Fundamentalsof StructuralEngineering
Jerome J. Connor · Susan Faraji
Second Edition
Fundamentals of Structural Engineering

Jerome J. Connor • Susan Faraji
Fundamentalsof StructuralEngineering
Second Edition
Jerome J. ConnorDepartment of Civil & EnvironmentalEngineering
Massachusetts Institute of TechnologyCambridge, MA, USA
Susan FarajiDepartment of Civil & Environmental EngineeringUniversity of Massachusetts-LowellLowell, MA, USA
ISBN 978-3-319-24329-0 ISBN 978-3-319-24331-3 (eBook)DOI 10.1007/978-3-319-24331-3
Library of Congress Control Number: 2015958840
Springer Cham Heidelberg New York Dordrecht London# Springer International Publishing Switzerland 2013, 2016This work is subject to copyright. All rights are reserved by the Publisher, whether the whole orpart of the material is concerned, specifically the rights of translation, reprinting, reuse ofillustrations, recitation, broadcasting, reproduction on microfilms or in any other physical way,and transmission or information storage and retrieval, electronic adaptation, computer software,or by similar or dissimilar methodology now known or hereafter developed.The use of general descriptive names, registered names, trademarks, service marks, etc. in thispublication does not imply, even in the absence of a specific statement, that such names areexempt from the relevant protective laws and regulations and therefore free for general use.The publisher, the authors and the editors are safe to assume that the advice and information inthis book are believed to be true and accurate at the date of publication. Neither the publisher northe authors or the editors give a warranty, express or implied, with respect to the materialcontained herein or for any errors or omissions that may have been made.
Printed on acid-free paper
Springer International Publishing AG Switzerland is part of Springer Science+Business Media(www.springer.com)
Preface
The first edition considered only linear elastic behavior of structures. This
assumption is reasonable for assessing the structural response in the early
stage of design where one is attempting to estimate design details. As a
design progresses, other critical behavioral issues need to be addressed.
The first issue concerns geometric nonlinearity which results when a
flexible member is subjected to axial compression loading as well as trans-
verse loading. This combination causes a loss in axial stiffness for the
member, which may result in a loss in stability for the structural system.
Euler buckling is an example of this type of nonlinear behavior.
The second issue is related to the behavior of the material used to fabricate
structural members. Steel and concrete are the most popular materials for
structural applications. These materials have a finite elastic range, i.e., they
behave elastically up to a certain stress level. Beyond this level, their stiffness
decreases dramatically and they experience significant deformation that
remains when the specimen is unloaded. This deformation is referred to as
“inelastic deformation.” The result of this type of member behavior is the fact
that the member has a finite load carrying capacity. From a structural system
perspective, it follows that the structure has a finite load capacity. Given the
experience with recent structural failures, structural engineers are now being
required to estimate the “limit” capacity of their design using inelastic
analysis procedures. Computer-based analysis is essential for this task.
We have addressed both issues in this edition. Geometric nonlinearity is
basically a displacement issue, so it is incorporated in Chap. 10. We derive
the nonlinear equations for a member; develop the general solution, special-
ize the solutions for various boundary conditions; and finally present the
generalized nonlinear “member” equations which are used in computer-
based analysis methods. Examples illustrating the effect of coupling between
compressive axial load and lateral displacement (P-delta effect) are included.
This treatment provides sufficient exposure to geometric nonlinearity that we
feel is necessary to prepare the student for professional practice.
Inelastic analysis is included in Part III which deals with professional
practice; we have added an additional chapter focused exclusively on inelas-
tic analysis. We start by reviewing the basic properties of structural steel and
concrete and then establish the expressions for the moment capacity of
beams. We use these results together with some simple analytical methods
v
to establish the limit loading for some simple beam and frames. For complex
structures, one needs to resort to computer-based procedures. We describe a
finite element-based method that allows one to treat the nonlinear load
displacement behavior and to estimate the limiting load. This approach is
referred to as a “pushover” analysis. Examples illustrating pushover analyses
of frames subjected to combined gravity and seismic loadings are included.
Just as for the geometric nonlinear case, our objective is to provide sufficient
exposure to the material so that the student is “informed” about the nonlinear
issues. One can gain a deeper background from more advanced specialized
references.
Aside from these two major additions, the overall organization of the
second edition is similar to the first edition. Some material that we feel is
obsolete has been deleted (e.g., conjugate beam), and other materials such as
force envelopes have been expanded. In general, we have tried to place more
emphasis on computer base approaches since professional practice is moving
in that direction. However, we still place the primary emphasis on developing
a fundamental understanding of structural behavior through analytical
solutions and computer-based computations.
Audience
The intended audience of this book is that of students majoring in civil
engineering or architecture who have been exposed to the basic concepts of
engineering mechanics and mechanics of materials. The book is sufficiently
comprehensive to be used for both undergraduate and higher level structures
subjects. In addition, it can serve students as a valuable resource as they study
for the engineering certification examination and as a reference later in their
careers. Practicing professionals will also find the book useful for self-study,
for review for the professional registration examination, and as a
reference book.
Motivation
The availability of inexpensive digital computers and user-friendly structural
engineering software has revolutionized the practice of structural engineer-
ing. Engineers now routinely employ computer-based procedures throughout
the various phases of the analysis and design detailing processes. As a result,
with these tools engineers can now deal with more complex structures than in
the past. Given that these tools are now essential in engineering practice, the
critical question facing faculty involved in the teaching of structural engi-
neering is “How the traditional teaching paradigm should be modified for the
computer age?” We believe that more exposure to computer-based analysis is
needed at an early stage in the course development. However, since the
phrase “garbage in garbage out” is especially relevant for computer-based
analysis, we also believe that the student needs to develop, through formal
vi Preface
training in analysis methodology, the ability to estimate qualitatively the
behavior of a structure subjected to a given loading and to confirm qualitative
estimates with some simple manual computations.
Based on a review of the current structural engineering academic litera-
ture, it appears that the current set of undergraduate textbooks are focused
mainly on either (1) teaching manual analysis methods and applying them to
simple idealized structures or (2) reformulating structural analysis methods
in terms of matrix notation. The first approach is based on the premise that
intuition about structural behavior is developed as one works through the
manual computations, which, at times, may seem exhaustive. The second
approach provides the basis for developing and understanding computer
software codes but does not contribute toward developing intuition about
structural behavior.
Clearly there is a need for a text that provides a balanced treatment of both
classical and modern computer-based analysis methods in a seamless way
and also stresses the development of an intuitive understanding of structural
behavior. Engineers reason about behavior using simple models and intuition
that they have acquired through problem-solving experience. The approach
adopted in this text is to develop this type of intuition through computer
simulation which allows one to rapidly explore how the structure responds to
changes in geometry and physical parameters. We believe this approach
better prepares the reader for the practice of structural engineering.
Objectives
Structural engineers have two major responsibilities during the design pro-
cess. First, they must synthesize the structural system, i.e., select the geome-
try and the type of structural members that make up the structure. Second,
they must size the members such that the structure can comfortably support
the design loading. Creating a structural concept requires a deep knowledge
of structural behavior. Sizing the members requires information about the
internal forces resulting from the loading. These data are acquired through
intelligent application of analysis methods, mainly computer-based methods.
With these responsibilities in mind, we have selected the following
objectives for this book:
• Develop the reader’s ability to analyze structures using manual computa-
tional procedures.
• Educate the reader about structural behavior. We believe that a strong
analytical background based on classical analysis methodology combined
with computer simulation facilitates the development of an understanding
of structural behavior.
• Provide the reader with an in-depth exposure to computer-based analysis
methods. Show how computer-based methods can be used to determine,
with minimal effort, how structures respond to loads and also how to
establish the extreme values of design variables required for design
detailing.
Preface vii
• Develop the reader’s ability to validate computer-based predictions of
structural response.• Provide the reader with idealization strategies for reducing complex
structures to simple structural models.
• Develop an appreciation for and an awareness of the limitations of usingsimple structural models to predict structural behavior through examples
which illustrate behavioral trends as structures become more complex.
Organization
We have organized this text into three parts. Parts I and II are intended to
provide the student with the necessary computational tools and also to
develop an understanding of structural behavior by covering analysis
methodologies, ranging from traditional classical methods through
computer-based methods, for skeletal-type structures, i.e., structures com-
posed of one-dimensional slender members. Part I deals with statically
determinate structures; statically indeterminate structures are covered in
Part II. Certain classical methods which we consider redundant have been
omitted. Some approximate methods which are useful for estimating the
response using hand computations have been included. Part III is devoted
to structural engineering issues for a range of structures frequently encoun-
tered in practice. Emphasis is placed on structural idealization, how one
identifies critical loading patterns, and how one generates the extreme values
of design variables corresponding to a combination of gravity, live, wind,
earthquake loading, and support settlement using computer software
systems.
Brief descriptions of the subject content for each part are presented below.
Part I discusses statically determinate structures. We start with an intro-
duction to structural engineering. Statically determinate structures are
introduced next. The treatment is limited to linear elastic behavior and static
loading. Separate chapters are devoted to different skeletal structural types
such as trusses, beams, frames, cables, curved members, footings, and
retaining walls. Each chapter is self-contained in that all the related analysis
issues for the particular structural type are discussed and illustrated. For
example, the chapter on beams deals with constructing shear and moment
diagrams, methods for computing the deflection due to bending, influence
lines, force envelopes, and symmetry properties. We find it convenient from
a pedagogical perspective to concentrate the related material in one location.
It is also convenient for the reader since now there is a single source point for
knowledge about each structural type rather than having the knowledge
distributed throughout the text. We start with trusses since they involve the
least amount of theory. The material on frames is based on beam theory, so it
is logical to present it directly after beam theory. Cables and curved members
are special structural types that generally receive a lower priority, due to time
constraints, when selecting a syllabus. We have included these topics here, as
viii Preface
well as a treatment of footings and retaining walls, because they are statically
determinate structures. We revisit these structures later in Part III.
Part II presents methods for analyzing statically indeterminate structuresand applies these methods to a broad range of structural types. Two classical
analysis methods are described, namely, the force (also referred to as the
flexibility) method and the displacement (or stiffness) method. We also
present some approximate analysis methods that are based on various types
of force and stiffness assumptions. These methods are useful for estimating
the structural response due to lateral loads using simple hand computations.
Lastly, we reformulate the traditional displacement method as a finite ele-
ment method using matrix notation. The finite element formulation (FEM) is
the basis of most existing structural analysis software packages. Our
objectives here are twofold: first, we want to enable the reader to be able to
use FEM methods in an intelligent way, and second, we want the reader to
develop an understanding of structural behavior by applying analysis
methods to a broad range of determinate and indeterminate skeletal
structures. We believe that using computer analysis software as a simulation
tool to explore structural behavior is a very effective way of building up aknowledge base of behavioral modes, especially for the types of structures
commonly employed in practice.
Part III discusses typical structural engineering problems. Our objectivehere is to expose the reader to a select set of activities that are now routinely
carried out by structural engineers using structural engineering software.
These activities are related to the approach followed to establish the “values”
for the design variables. Defining these values is the key step in the engi-
neering design process; once they are known, one can proceed to the design
detailing phase. Specific chapters deal with horizontal structures such as
multi-span girder, arch, and cable-stayed bridge systems, modeling of
three-dimensional vertical structures subjected to lateral loading, and vertical
structures such as low- and high-rise buildings subjected to gravity loading.
The topics cover constructing idealized structural models, establishing the
critical design loading patterns for a combination of gravity and live loading,
using analysis software to compute the corresponding design values for the
idealized structures, defining the lateral loading due to wind and earthquake
excitation for buildings, and estimating the three-dimensional response of
low-rise buildings subjected to seismic and wind loadings.
Course Suggestions
The following suggestions apply for students majoring in either civil engi-
neering or architecture. Depending on the time available, we suggest
organizing the material into either a two-semester or a three-semester
sequence of subjects.
Preface ix
Our recommendations for the three-semester sequence are as follows:
Structures I
The goal of this subject is to provide the skills for the analysis of statically
determinate trusses, beams, frames, and cables and to introduce some
computer-based analysis methods.
Chapters 1, 2, part of 3, part of 4, and the first part of 5
Structures II
The objectives of this subject are to present both classical and computer-
based analysis methods for statically indeterminate structures such as multi-
span beams, gable frames, arches, and cable-stayed structures subjected to
various loadings. The emphasis is on using analysis methods to develop an
understanding of the behavior of structures.
Chapters 9, 10, 11, 12, 6, and the last part of 5
Structures III
This subject is intended to serve as an introduction to the practice of
structural engineering. The material is presented as case studies for the two
most common types of structures, bridges, and buildings. Issues such as
geometrical configurations, idealized structural models, types and distribu-
tion of loadings, determination of the values of the design variables such as
the peak moment in a beam, force envelopes, and inelastic behavior are
discussed. Both the superstructure and the substructure components are
considered. Extensive use of computer software is made throughout the
subject. Recitation classes dealing with the design detailing of steel and
concrete elements can be taught in parallel with the lectures.
Chapters 13, 14, 15, 16, 7, and 8
The makeup of the two-semester sequence depends on how much back-
ground in mechanics and elementary structures the typical student has and
the goal of the undergraduate program. One possibility is to teach Structures I
and II described above. Another possible option is to combine Structures I
and II into a single subject offering together with Structures III. A suggested
combined subject is listed below.
Structures (Combined I + II)
Chapters 3, 4 (partial), 9 (partial), 10, 11, and 12
x Preface

Features of the Text
Organization by Structural Type
The chapters are organized such that an individual chapter contains all the
information pertaining to a particular structural type. We believe this organi-
zation facilitates access to information. Since the basic principles are generic,
it also reinforces these principles throughout the development of successive
chapters.
Classical Analysis Methods
In-depth coverage of classical analysis methods with numerous examples
helps students learn fundamental concepts and develop a “feel” and context
for structural behavior.
Analysis by Hand Computation
The book helps teach students to do simple hand computing, so that as they
move into doing more complex computational analysis, they can quickly
check that their computer-generated results make sense.
Gradual Introduction of Computer Analysis
The text provides students with a gradual transition from classical methods
to computational methods, with examples and homework problems designed
to bring students along by incorporating computational methods when
most appropriate to in-depth coverage of finite element methods for skeletal
structures.
Example Problems
Example problems in each chapter illustrate solutions to structural analysis
problems, including some problems illustrating computer analysis. Most of
the example problems are based on real scenarios that students will encounter
in professional practice.
Units
Both SI and customary US units are used in the examples and homework
problems.
Homework Problems that Build Students’ Skills
An extensive set of homework problems for each chapter provides students
with more exposure to the concepts and skills developed in the chapters. The
Preface xi

difficulty level is varied so that students can build confidence by starting with
simple problems and advancing toward more complex problems.
Comprehensive Breadth and Depth, Practical Topics
The comprehensive breadth and depth of this text means it may be used for
two or more courses, so it is useful to students for their courses and as a
professional reference. Special topics such as the simplifications associated
with symmetry and antisymmetry, arch-type structures, and cable-stayed
structures are topics that a practicing structural engineer needs to be
familiar with.
Cambridge, MA Jerome J. Connor
Lowell, MA Susan Faraji
xii Preface

Acknowledgments
We would like to thank our spouses Barbara Connor and Richard Hennessey
for their patience and moral support over the seemingly endless time required
to complete this text. We are most appreciative. We would also like to thank
our colleagues and students who provided us with many valuable suggestions
concerning the content and organization of the text. We are especially
indebted to Dr. Moneer Tewfik and Dr. Carlos Brebbia for their constructive
criticisms and enthusiastic support as the text was evolving into its final form.
xiii

Contents
Part I Statically Determinate Structures
1 Introduction to Structural Engineering . . . . . . . . . . . . . . . . 3
1.1 Types of Structures and Structural Components . . . . . . 4
1.1.1 Structural Components . . . . . . . . . . . . . . . . 4
1.1.2 Types of Structures . . . . . . . . . . . . . . . . . . . 4
1.2 Critical Concerns of Structural Engineering . . . . . . . . . 4
1.2.1 Reactions . . . . . . . . . . . . . . . . . . . . . . . . . . 5
1.2.2 Initial Stability . . . . . . . . . . . . . . . . . . . . . . 7
1.2.3 Loss of Stability Due to Material Failure . . . 11
1.2.4 Buckling Failure Mode . . . . . . . . . . . . . . . . 12
1.2.5 Priorities for Stability . . . . . . . . . . . . . . . . . 12
1.3 Types of Loads . . . . . . . . . . . . . . . . . . . . . . . . . . . . . 12
1.3.1 Source of Loads . . . . . . . . . . . . . . . . . . . . . 13
1.3.2 Properties of Loadings . . . . . . . . . . . . . . . . . 15
1.3.3 Gravity Live Loads . . . . . . . . . . . . . . . . . . . 16
1.3.4 Wind Loading . . . . . . . . . . . . . . . . . . . . . . . 17
1.3.5 Snow Loading . . . . . . . . . . . . . . . . . . . . . . . 22
1.3.6 Earthquake Loading . . . . . . . . . . . . . . . . . . 23
1.4 Structural Design Philosophy . . . . . . . . . . . . . . . . . . . 26
1.5 Basic Analytical Tools of Structural Analysis . . . . . . . 27
1.5.1 Concept of Equilibrium: Concurrent
Force System . . . . . . . . . . . . . . . . . . . . . . . 27
1.5.2 Concept of Equilibrium: Nonconcurrent
Force System . . . . . . . . . . . . . . . . . . . . . . . 28
1.5.3 Idealized Structure: Free Body Diagrams . . . 30
1.5.4 Internal Forces . . . . . . . . . . . . . . . . . . . . . . 30
1.5.5 Deformations and Displacements . . . . . . . . . 33
1.5.6 Structural Behavior: Structural Analysis . . . . 35
1.5.7 The Importance of Displacements . . . . . . . . 40
1.6 Summary . . . . . . . . . . . . . . . . . . . . . . . . . . . . . . . . . . 42
1.6.1 Objectives of the Chapter . . . . . . . . . . . . . . . 42
1.6.2 Key Issues and Concepts Introduced . . . . . . . 42
xv
2 Statically Determinate Truss Structures . . . . . . . . . . . . . . . 47
2.1 Introduction: Types of Truss Structures . . . . . . . . . . . . 47
2.1.1 Structural Idealization . . . . . . . . . . . . . . . . . 48
2.1.2 Historical Background . . . . . . . . . . . . . . . . . 50
2.2 Analysis of Planar Trusses . . . . . . . . . . . . . . . . . . . . . 55
2.2.1 Equilibrium Considerations . . . . . . . . . . . . . 56
2.2.2 Statically Determinate Planar Trusses . . . . . . 57
2.2.3 Stability Criterion . . . . . . . . . . . . . . . . . . . . 58
2.2.4 Method of Joints: Planar Trusses . . . . . . . . . 61
2.2.5 Method of Sections . . . . . . . . . . . . . . . . . . . 77
2.2.6 Complex Trusses . . . . . . . . . . . . . . . . . . . . . 86
2.3 Computation of Deflections . . . . . . . . . . . . . . . . . . . . 90
2.3.1 Introduction . . . . . . . . . . . . . . . . . . . . . . . . 90
2.3.2 Force–Deformation Relationship . . . . . . . . . 90
2.3.3 Deformation–Displacement Relations . . . . . . 91
2.3.4 Method of Virtual Forces . . . . . . . . . . . . . . . 93
2.4 Influence Lines . . . . . . . . . . . . . . . . . . . . . . . . . . . . . 105
2.5 Analysis of Three-Dimensional Trusses . . . . . . . . . . . . 114
2.5.1 Introduction . . . . . . . . . . . . . . . . . . . . . . . . 114
2.5.2 Restraining Rigid Body Motion . . . . . . . . . . 114
2.5.3 Static Determinacy . . . . . . . . . . . . . . . . . . . 118
2.5.4 Method of Joints for 3-D Trusses . . . . . . . . . 120
2.6 Matrix Formulation: Equilibrium Analysis
of Statically Determinate 3-D Trusses . . . . . . . . . . . . . 131
2.6.1 Notation . . . . . . . . . . . . . . . . . . . . . . . . . . . 131
2.6.2 Member–Node Incidence . . . . . . . . . . . . . . . 133
2.6.3 Force Equilibrium Equations . . . . . . . . . . . . 133
2.6.4 Stability . . . . . . . . . . . . . . . . . . . . . . . . . . . 135
2.6.5 Matrix Formulation: Computation
of Displacements . . . . . . . . . . . . . . . . . . . . . 135
2.7 Summary . . . . . . . . . . . . . . . . . . . . . . . . . . . . . . . . . . 141
2.7.1 Objectives of the Chapter . . . . . . . . . . . . . . . 141
2.7.2 Key Facts and Concepts . . . . . . . . . . . . . . . . 142
2.8 Problems . . . . . . . . . . . . . . . . . . . . . . . . . . . . . . . . . . 142
3 Statically Determinate Beams . . . . . . . . . . . . . . . . . . . . . . . 163
3.1 Definition of a Prismatic Beam . . . . . . . . . . . . . . . . . . 163
3.2 Stability and Determinacy of Beams:
Planar Bending . . . . . . . . . . . . . . . . . . . . . . . . . . . . . 165
3.2.1 Fixed Support: Planar Loading . . . . . . . . . . . 168
3.2.2 Hinged Support: Planar Loading . . . . . . . . . 168
3.2.3 Roller Support: Planar Loading . . . . . . . . . . 169
3.2.4 3-D Fixed Support . . . . . . . . . . . . . . . . . . . . 170
3.2.5 3-D Hinged Support . . . . . . . . . . . . . . . . . . 170
3.2.6 3-D Roller Support: Z Direction . . . . . . . . . . 170
3.2.7 Static Determinacy: Planar
Beam Systems . . . . . . . . . . . . . . . . . . . . . . . 171
xvi Contents
3.2.8 Unstable Support Arrangements . . . . . . . . . . 171
3.2.9 Beam with Multiple Supports . . . . . . . . . . . . 171
3.2.10 Beam with a Moment Release . . . . . . . . . . . 172
3.3 Reactions: Planar Loading . . . . . . . . . . . . . . . . . . . . . 173
3.4 Internal Forces: Planar Loading . . . . . . . . . . . . . . . . . 182
3.5 Differential Equations of Equilibrium:
Planar Loading . . . . . . . . . . . . . . . . . . . . . . . . . . . . . 190
3.6 Displacement and Deformation of Slender
Beams: Planar Loading . . . . . . . . . . . . . . . . . . . . . . . 210
3.6.1 Moment: Curvature Relationship . . . . . . . . . 212
3.6.2 Qualitative Reasoning About Deflected
Shapes . . . . . . . . . . . . . . . . . . . . . . . . . . . . 213
3.6.3 Moment Area Theorems . . . . . . . . . . . . . . . 218
3.6.4 Computing Displacements with the Method
of Virtual Forces . . . . . . . . . . . . . . . . . . . . . 231
3.6.5 Computing Displacements
for Non-prismatic Members . . . . . . . . . . . . . 241
3.7 Deformation–Displacement Relations
for Deep Beams: Planar Loading . . . . . . . . . . . . . . . . 244
3.8 Torsion of Prismatic Members . . . . . . . . . . . . . . . . . . 247
3.9 Symmetry and Anti-symmetry . . . . . . . . . . . . . . . . . . 250
3.9.1 Symmetry and Anti-symmetry:
Shear and Moment Diagrams . . . . . . . . . . . . 250
3.9.2 Symmetry and Anti-symmetry:
Deflected Shapes . . . . . . . . . . . . . . . . . . . . . 254
3.10 Influence Lines and Force Envelopes
for Statically Determinate Beams . . . . . . . . . . . . . . . . 258
3.10.1 The Engineering Process . . . . . . . . . . . . . . . 258
3.10.2 Influence Lines and Force Envelopes . . . . . . 259
3.11 Summary . . . . . . . . . . . . . . . . . . . . . . . . . . . . . . . . . . 285
3.11.1 Objectives of the Chapter . . . . . . . . . . . . . . . 285
3.11.2 Key Facts and Concepts . . . . . . . . . . . . . . . . 285
3.12 Problems . . . . . . . . . . . . . . . . . . . . . . . . . . . . . . . . . . 286
4 Statically Determinate Plane Frames . . . . . . . . . . . . . . . . . . 305
4.1 Definition of Plane Frames . . . . . . . . . . . . . . . . . . . . . 305
4.2 Statical Determinacy: Planar Loading . . . . . . . . . . . . . 306
4.3 Analysis of Statically Determinate Frames . . . . . . . . . 310
4.3.1 Behavior of Portal Frames:
Analytical Solution . . . . . . . . . . . . . . . . . . . 323
4.4 Pitched Roof Frames . . . . . . . . . . . . . . . . . . . . . . . . . 326
4.4.1 Member Loads . . . . . . . . . . . . . . . . . . . . . . 326
4.4.2 Analytical Solutions for Pitched
Roof Frames . . . . . . . . . . . . . . . . . . . . . . . . 330
4.5 A-Frames . . . . . . . . . . . . . . . . . . . . . . . . . . . . . . . . . 341
4.6 Deflection of Frames Using the Principle
of Virtual Forces . . . . . . . . . . . . . . . . . . . . . . . . . . . . 344
4.7 Deflection Profiles: Plane Frame Structures . . . . . . . . . 356
Contents xvii
4.8 Computer-Based Analysis: Plane Frames . . . . . . . . . . 358
4.9 Plane Frames: Out of Plane Loading . . . . . . . . . . . . . . 359
4.10 Summary . . . . . . . . . . . . . . . . . . . . . . . . . . . . . . . . . . 363
4.10.1 Objectives . . . . . . . . . . . . . . . . . . . . . . . . . . 363
4.10.2 Key Concepts . . . . . . . . . . . . . . . . . . . . . . . 363
4.11 Problems . . . . . . . . . . . . . . . . . . . . . . . . . . . . . . . . . . 363
5 Cable Structures . . . . . . . . . . . . . . . . . . . . . . . . . . . . . . . . . 383
5.1 Introduction . . . . . . . . . . . . . . . . . . . . . . . . . . . . . . . . 383
5.2 Cables Subjected to Concentrated Loads . . . . . . . . . . . 386
5.2.1 Horizontal Cables . . . . . . . . . . . . . . . . . . . . 386
5.2.2 Inclined Cables . . . . . . . . . . . . . . . . . . . . . . 393
5.3 Cables Subjected to Distributed Loading . . . . . . . . . . . 397
5.3.1 Horizontal Cable: Uniform Loading
per Horizontal Projection . . . . . . . . . . . . . . . 397
5.3.2 Inclined Cables . . . . . . . . . . . . . . . . . . . . . . 399
5.4 Advanced Topics . . . . . . . . . . . . . . . . . . . . . . . . . . . . 403
5.4.1 Arc Length . . . . . . . . . . . . . . . . . . . . . . . . . 403
5.4.2 Equivalent Axial Stiffness . . . . . . . . . . . . . . 407
5.4.3 Equivalent Axial Stiffness
for an Inclined Cable . . . . . . . . . . . . . . . . . . 409
5.4.4 Cable Shape Under Self Weight:
Catenary . . . . . . . . . . . . . . . . . . . . . . . . . . . 412
5.5 Summary . . . . . . . . . . . . . . . . . . . . . . . . . . . . . . . . . . 415
5.5.1 Objectives . . . . . . . . . . . . . . . . . . . . . . . . . . 415
5.5.2 Key Concepts . . . . . . . . . . . . . . . . . . . . . . . 416
5.6 Problems . . . . . . . . . . . . . . . . . . . . . . . . . . . . . . . . . . 416
6 Statically Determinate Curved Members . . . . . . . . . . . . . . . 423
6.1 A Brief History of Arch-Type Structures . . . . . . . . . . . 423
6.2 Modeling of Arch Structures . . . . . . . . . . . . . . . . . . . . 429
6.3 Internal Forces in Curved Members . . . . . . . . . . . . . . 431
6.4 Parabolic Geometry . . . . . . . . . . . . . . . . . . . . . . . . . . 435
6.5 Method of Virtual Forces for Curved Members . . . . . . 442
6.5.1 Non-shallow Slender Curved Members . . . . . 443
6.5.2 Shallow Slender Curved Members . . . . . . . . 443
6.5.3 Circular Curved Member . . . . . . . . . . . . . . . 447
6.6 Analysis of Three-Hinged Arches . . . . . . . . . . . . . . . . 450
6.7 Summary . . . . . . . . . . . . . . . . . . . . . . . . . . . . . . . . . . 463
6.7.1 Objectives . . . . . . . . . . . . . . . . . . . . . . . . . . 463
6.7.2 Key Factors and Concepts . . . . . . . . . . . . . . 463
6.8 Problems . . . . . . . . . . . . . . . . . . . . . . . . . . . . . . . . . . 464
7 Shallow Foundations . . . . . . . . . . . . . . . . . . . . . . . . . . . . . . 475
7.1 Introduction . . . . . . . . . . . . . . . . . . . . . . . . . . . . . . . . 475
7.1.1 Types of Foundations . . . . . . . . . . . . . . . . . 475
7.1.2 Types of Shallow Foundations . . . . . . . . . . . 476
7.1.3 Soil Pressure Distribution . . . . . . . . . . . . . . 477
xviii Contents
7.2 An Analytical Method for Evaluating the Soil Pressure
Distribution Under a Footing . . . . . . . . . . . . . . . . . . . 479
7.3 Dimensioning a Single Rectangular Footing . . . . . . . . 483
7.4 Dimensioning Combined Footings . . . . . . . . . . . . . . . 493
7.5 Dimensioning Strap Footings . . . . . . . . . . . . . . . . . . . 502
7.6 Summary . . . . . . . . . . . . . . . . . . . . . . . . . . . . . . . . . . 514
7.6.1 Objectives of the Chapter . . . . . . . . . . . . . . . 514
7.7 Problems . . . . . . . . . . . . . . . . . . . . . . . . . . . . . . . . . . 515
8 Vertical Retaining Wall Structures . . . . . . . . . . . . . . . . . . . 525
8.1 Introduction . . . . . . . . . . . . . . . . . . . . . . . . . . . . . . . . 525
8.1.1 Types of Retaining Walls . . . . . . . . . . . . . . . 525
8.1.2 Gravity Walls . . . . . . . . . . . . . . . . . . . . . . . 526
8.1.3 Cantilever Walls . . . . . . . . . . . . . . . . . . . . . 527
8.2 Force Due to the Backfill Material . . . . . . . . . . . . . . . 528
8.2.1 Different Types of Materials . . . . . . . . . . . . 528
8.2.2 Rankine Theory: Active Soil Pressure . . . . . . 530
8.3 Stability Analysis of Retaining Walls . . . . . . . . . . . . . 531
8.4 Pressure Distribution Under the Wall Footing . . . . . . . 533
8.5 Critical Sections for Design of Cantilever Walls . . . . . 548
8.6 Summary . . . . . . . . . . . . . . . . . . . . . . . . . . . . . . . . . . 552
8.6.1 Objectives of the Chapter . . . . . . . . . . . . . . . 552
8.6.2 Key Concepts and Facts . . . . . . . . . . . . . . . . 552
8.7 Problems . . . . . . . . . . . . . . . . . . . . . . . . . . . . . . . . . . 552
Part II Statically Indeterminate Structures
9 The Force Method . . . . . . . . . . . . . . . . . . . . . . . . . . . . . . . . 561
9.1 Introduction . . . . . . . . . . . . . . . . . . . . . . . . . . . . . . . . 561
9.2 Maxwell’s Law of Reciprocal Displacements . . . . . . . 569
9.3 Application of the Force Method to Beam-Type
Structures . . . . . . . . . . . . . . . . . . . . . . . . . . . . . . . . . 571
9.3.1 Beam with Yielding Supports . . . . . . . . . . . . 577
9.3.2 Fixed-Ended Beams . . . . . . . . . . . . . . . . . . . 588
9.3.3 Analytical Solutions for Multi-Span
Beams . . . . . . . . . . . . . . . . . . . . . . . . . . . . 596
9.4 Application to Arch-Type Structures . . . . . . . . . . . . . . 603
9.5 Application to Frame-Type Structures . . . . . . . . . . . . . 612
9.5.1 General Approach . . . . . . . . . . . . . . . . . . . . 612
9.5.2 Portal Frames . . . . . . . . . . . . . . . . . . . . . . . 613
9.5.3 Pitched Roof Frames . . . . . . . . . . . . . . . . . . 625
9.6 Indeterminate Trusses . . . . . . . . . . . . . . . . . . . . . . . . 629
9.7 Summary . . . . . . . . . . . . . . . . . . . . . . . . . . . . . . . . . . 636
9.7.1 Objectives . . . . . . . . . . . . . . . . . . . . . . . . . . 636
9.7.2 Key Factors and Concepts . . . . . . . . . . . . . . 637
9.8 Problems . . . . . . . . . . . . . . . . . . . . . . . . . . . . . . . . . . 637
10 The Displacement Method . . . . . . . . . . . . . . . . . . . . . . . . . . 649
10.1 Introduction . . . . . . . . . . . . . . . . . . . . . . . . . . . . . . . . 649
10.2 Displacement Method Applied to a Plane Truss . . . . . . 651
Contents xix
10.3 Member Equations for Frame-Type Structures . . . . . . . 653
10.4 The Displacement Method Applied
to Beam Structures . . . . . . . . . . . . . . . . . . . . . . . . . . . 658
10.4.1 Two-Span Beams . . . . . . . . . . . . . . . . . . . . 658
10.4.2 Multi-Span Beams . . . . . . . . . . . . . . . . . . . . 672
10.5 The Displacement Method Applied
to Rigid Frames . . . . . . . . . . . . . . . . . . . . . . . . . . . . . 685
10.5.1 Portal Frames: Symmetrical Loading . . . . . . 689
10.5.2 Portal Frames: Anti-symmetrical Loading . . . 690
10.6 The Moment Distribution Solution Procedure
for Multi-span Beams . . . . . . . . . . . . . . . . . . . . . . . . . 697
10.6.1 Introduction . . . . . . . . . . . . . . . . . . . . . . . . 697
10.6.2 Incorporation of Moment Releases
at Supports . . . . . . . . . . . . . . . . . . . . . . . . . 701
10.6.3 Moment Distribution for Multiple
Free Nodes . . . . . . . . . . . . . . . . . . . . . . . . . 703
10.7 Moment Distribution: Frame Structures . . . . . . . . . . . . 709
10.7.1 Frames: No Sideway . . . . . . . . . . . . . . . . . . 709
10.7.2 Frames with Sideway . . . . . . . . . . . . . . . . . . 718
10.8 Plane Frames: Out of Plane Loading . . . . . . . . . . . . . . 729
10.8.1 Slope-Deflection Equations: Out
of Plane Loading . . . . . . . . . . . . . . . . . . . . . 729
10.9 Nonlinear Member Equations for Frame-Type
Structures . . . . . . . . . . . . . . . . . . . . . . . . . . . . . . . . . 734
10.9.1 Geometric Nonlinearity . . . . . . . . . . . . . . . . 734
10.9.2 Geometric Equations Accounting
for Geometric Nonlinearity . . . . . . . . . . . . . 737
10.9.3 Solution for Compressive Axial Load . . . . . . 741
10.9.4 Nonlinear Member End Actions–End
Displacement Equations . . . . . . . . . . . . . . . . 744
10.10 Summary . . . . . . . . . . . . . . . . . . . . . . . . . . . . . . . . . . 751
10.10.1 Objectives . . . . . . . . . . . . . . . . . . . . . . . . . . 751
10.10.2 Key Factors and Concepts . . . . . . . . . . . . . . 751
10.11 Problems . . . . . . . . . . . . . . . . . . . . . . . . . . . . . . . . . . 752
11 Approximate Methods for Estimating Forces
in Statically Indeterminate Structures . . . . . . . . . . . . . . . . . 767
11.1 Introduction . . . . . . . . . . . . . . . . . . . . . . . . . . . . . . . . 767
11.2 Multi-span Beams: Gravity Loading . . . . . . . . . . . . . . 768
11.2.1 Basic Data-Moment Diagrams . . . . . . . . . . . 768
11.2.2 Quantitative Reasoning Based
on Relative Stiffness . . . . . . . . . . . . . . . . . . 769
11.3 Multistory Rigid Frames: Gravity Loading . . . . . . . . . 770
11.4 Multistory Rigid Frames: Lateral Loading . . . . . . . . . . 771
11.4.1 Portal Method . . . . . . . . . . . . . . . . . . . . . . . 772
11.4.2 Shear Stiffness Method: Low-Rise
Rigid Frames . . . . . . . . . . . . . . . . . . . . . . . 779
11.4.3 Low-Rise Rigid Frames with Bracing . . . . . . 785
xx Contents
11.5 High-Rise Rigid Frames: The Cantilever Method . . . . . 790
11.6 Summary . . . . . . . . . . . . . . . . . . . . . . . . . . . . . . . . . . 796
11.6.1 Objectives of the Chapter . . . . . . . . . . . . . . . 796
11.6.2 Key Concepts . . . . . . . . . . . . . . . . . . . . . . . 796
11.7 Problems . . . . . . . . . . . . . . . . . . . . . . . . . . . . . . . . . . 797
12 Finite Element Displacement Method for Framed
Structures . . . . . . . . . . . . . . . . . . . . . . . . . . . . . . . . . . . . . . 805
12.1 Introduction . . . . . . . . . . . . . . . . . . . . . . . . . . . . . . . . 805
12.2 Key Steps of the Finite Element Displacement
Method for Member Systems . . . . . . . . . . . . . . . . . . . 805
12.3 Matrix Formulation of the Member Equations:
Planar Behavior . . . . . . . . . . . . . . . . . . . . . . . . . . . . . 807
12.4 Local and Global Reference Frames . . . . . . . . . . . . . . 809
12.5 Nodal Force Equilibrium Equations . . . . . . . . . . . . . . 812
12.6 Introduction of Nodal Supports . . . . . . . . . . . . . . . . . . 818
12.6.1 Systematic Approach . . . . . . . . . . . . . . . . . . 819
12.7 Specialized Formulation for Beam and Truss
Structures . . . . . . . . . . . . . . . . . . . . . . . . . . . . . . . . . 834
12.7.1 The Steps Involved for Plane Truss
Structures . . . . . . . . . . . . . . . . . . . . . . . . . . 834
12.7.2 The Steps Involved for Beam Structures
with Transverse Loading—Planar
Behavior . . . . . . . . . . . . . . . . . . . . . . . . . . . 839
12.8 Three-Dimensional Formulation . . . . . . . . . . . . . . . . . 850
12.9 Summary . . . . . . . . . . . . . . . . . . . . . . . . . . . . . . . . . . 860
12.9.1 Objectives . . . . . . . . . . . . . . . . . . . . . . . . . . 860
12.10 Problems . . . . . . . . . . . . . . . . . . . . . . . . . . . . . . . . . . 860
Part III Practice of Structural Engineering
13 Multi-span Horizontal Structures . . . . . . . . . . . . . . . . . . . . 873
13.1 The Engineering Process for Girders . . . . . . . . . . . . . . 873
13.2 Influence Lines for Indeterminate Beams
Using Muller-Breslau’s Principle . . . . . . . . . . . . . . . . 875
13.3 Engineering Issues for Multi-span Girder
Bridges . . . . . . . . . . . . . . . . . . . . . . . . . . . . . . . . . . . 880
13.3.1 Geometric Configurations . . . . . . . . . . . . . . 880
13.3.2 Choice of Span Lengths . . . . . . . . . . . . . . . . 882
13.3.3 Live Loads for Multi-span Highway
Bridge Girders: Moment Envelopes . . . . . . . 885
13.3.4 Loading Due to Support Settlements . . . . . . . 890
13.4 Case Studies . . . . . . . . . . . . . . . . . . . . . . . . . . . . . . . 893
13.4.1 Case Study I: A Three-Span Continuous
Girder Bridge . . . . . . . . . . . . . . . . . . . . . . . 893
13.4.2 Case Study II: Two-Hinged Parabolic
Arch Response—Truck Loading . . . . . . . . . . 899
Contents xxi
13.4.3 Case Study III: Three-Span Parabolic
Arch Response—Truck Loading . . . . . . . . . . 902
13.4.4 Case Study IV: Cable-Stayed Bridge . . . . . . 903
13.5 Summary . . . . . . . . . . . . . . . . . . . . . . . . . . . . . . . . . . 907
13.5.1 Objectives . . . . . . . . . . . . . . . . . . . . . . . . . . 907
13.5.2 Key Facts and Concepts . . . . . . . . . . . . . . . . 907
13.6 Problems . . . . . . . . . . . . . . . . . . . . . . . . . . . . . . . . . . 908
14 Lateral Load Issues for Buildings . . . . . . . . . . . . . . . . . . . . 915
14.1 Types of Multistory Building Systems . . . . . . . . . . . . . 915
14.2 Treatment of Lateral Loading . . . . . . . . . . . . . . . . . . . 917
14.2.1 Wind Loading . . . . . . . . . . . . . . . . . . . . . . . 918
14.2.2 Earthquake Loading . . . . . . . . . . . . . . . . . . 920
14.3 Building Response Under Lateral Loads . . . . . . . . . . . 925
14.3.1 Center of Twist: One-Story Frame . . . . . . . . 926
14.3.2 Center of Mass: One-Story Frame . . . . . . . . 937
14.3.3 One-Story Frame: General Response . . . . . . 940
14.3.4 Multistory Response . . . . . . . . . . . . . . . . . . 943
14.3.5 Matrix Formulation: Shear Beam Model . . . . 946
14.4 Response of Symmetrical Buildings . . . . . . . . . . . . . . 949
14.5 Summary . . . . . . . . . . . . . . . . . . . . . . . . . . . . . . . . . . 964
14.5.1 Objectives . . . . . . . . . . . . . . . . . . . . . . . . . . 964
14.5.2 Key Facts and Concepts . . . . . . . . . . . . . . . . 965
14.6 Problems . . . . . . . . . . . . . . . . . . . . . . . . . . . . . . . . . . 965
15 Vertical Loads on Multistory Buildings . . . . . . . . . . . . . . . . 975
15.1 Loads on Frames . . . . . . . . . . . . . . . . . . . . . . . . . . . . 975
15.2 Treatment of Gravity Floor Loads . . . . . . . . . . . . . . . . 977
15.3 Live Load Patterns for Frame Structures . . . . . . . . . . . 980
15.4 A Case Study: Four-Story Building . . . . . . . . . . . . . . . 989
15.4.1 Building Details and Objectives . . . . . . . . . . 989
15.4.2 Case (1) Frames Are Braced in Both N–S
and E–W Directions: Computation
Details . . . . . . . . . . . . . . . . . . . . . . . . . . . . 991
15.4.3 Case (2) Frames Are Rigid in the N–S
Direction But Remain Braced
in the E–W Direction . . . . . . . . . . . . . . . . . . 997
15.4.4 Discussion . . . . . . . . . . . . . . . . . . . . . . . . . 1005
15.5 Summary . . . . . . . . . . . . . . . . . . . . . . . . . . . . . . . . . . 1006
15.5.1 Objectives . . . . . . . . . . . . . . . . . . . . . . . . . . 1006
15.5.2 Key Concepts . . . . . . . . . . . . . . . . . . . . . . . 1006
15.6 Problems . . . . . . . . . . . . . . . . . . . . . . . . . . . . . . . . . . 1006
16 Inelastic Response of Structures . . . . . . . . . . . . . . . . . . . . . . 1013
16.1 Stress–Strain Behavior of Structural Steels . . . . . . . . . 1013
16.2 Inelastic Moment–Curvature Relationships . . . . . . . . . 1015
16.3 Limit Analysis: A Simplified Approach . . . . . . . . . . . . 1018
xxii Contents

16.4 Nonlinear Analysis Scheme . . . . . . . . . . . . . . . . . . . . 1026
16.5 Summary . . . . . . . . . . . . . . . . . . . . . . . . . . . . . . . . . . 1031
16.5.1 Objectives . . . . . . . . . . . . . . . . . . . . . . . . . . 1031
16.6 Problems . . . . . . . . . . . . . . . . . . . . . . . . . . . . . . . . . . 1032
Index . . . . . . . . . . . . . . . . . . . . . . . . . . . . . . . . . . . . . . . . . . . . . . 1035
Contents xxiii


Photo Credits
Chapter 1
Fig. 1.1c Offshore Platform, Brazil. This image was produced by Agencia
Brasil, a public Brazilian news agency and published under a Creative
Commons Attribution License. It was accessed in February 2012 from
http://en.wikipedia.org/wiki/File:Oil_platform_P-51_(Brazil).jpg
Fig. 1.1a Skyscraper under construction in Kutuzovsky Prospekt, Moscow,
Russia. This image, created by Denghu, is licensed under a Creative
Commons Attribution 3.0 Unported License. The image was accessed in
April 2012 from http://commons.wikimedia.org/wiki/File:Skyscraper_
Kutuzovsky_Prospekt_Moscow.jpg
Fig. 1.8 Millau Viaduct, Author: Delphine DE ANDRIA Date: 18.11.2007,
from FreeMages. Accessed May 2012 from http://www.freemages.co.uk/
browse/photo-916-millau-viaduct.html. This work is licensed under a
Creative Commons Attribution 3.0 Unported License.
Chapter 2
Fig. 2.13 Three-dimensional truss of roof system. This image of the lead shot
tower in Melbourne, Australia, created by freeaussiestock.com, is licensed
under a Creative Commons Attribution 3.0 Unported License. The image
was accessed in February 2012 from http://freeaussiestock.com/free/Victo
ria/Melbourne/slides/shot_tower.htm
Chapter 5
Fig. 5.1 Clifton Suspension bridge, England. Picture taken by Adrian
Pingstone in October 2003 and placed in the public domain. Accessed in
February 2012 from http://commons.wikimedia.org/wiki/File:Clifton.bridge.
arp.750pix.jpg
xxv
Fig. 5.5Munich Olympic stadium, view from Olympic Tower. Picture taken
by Arad Mojtahedi in July 2008 and placed in the public domain. Accessed in
May 2012 from http://commons.wikimedia.org/wiki/File:Olympiastadion_
Muenchen.jpg
Fig. 5.21Millau Viaduct, Author: Delphine DE ANDRIA, Date: 18.11.2007,
from FreeMages. Accessed in May 2012 from http://www.freemages.co.uk/
browse/photo-916-millau-viaduct.html. This work is licensed under a
Creative Commons Attribution 3.0 Unported License.
Chapter 6
Fig. 6.5 Alcantara Toledo Bridge, Puente de Alcantara, Toledo, Spain.
This image was originally posted to Flickr on December 19, 2006 and
published under a Creative Commons Attribution License. It was accessed
in February 2012 from http://commons.wikimedia.org/wiki/File:Puente_
Alcantara_toledo.jpg
Fig. 6.7 Eads Bridge, USA. This image was originally posted to Flickr by
Kopper at http://flickr.com/photos/94086509@N00/2745897992. It was
reviewed on January 18, 2011 (2011-01-18) by the FlickreviewR robot and
confirmed to be licensed under the terms of the cc-by-2.0 (Creative
Commons Attribution 2.0). It was accessed in February 2012 from http://
commons.wikimedia.org/wiki/File:Eads_Bridge-1.jpg
Fig. 6.8 Salginatobel Bridge, Switzerland. Bild (Figure) 1.4-45 Ansicht der
Salginatobelbrucke. P. 81 in Mehlhorn, G. et al. “Bruckenbau auf dem Weg
vom Altertum zum modernen Bruckenbau,” in Handbuch Brucken. Gerhard
Mehlhorn (Ed). Berlin, Heidelberg. Springer-Verlag (2010)
Fig. 6.9a New Gorge Arch, West Virginia. This image was originally
posted to Flickr by nukeit1 at http://flickr.com/photos/88893304@N00/
244750516. It was reviewed on November 14, 2007 (2007-11-14) by the
FlickreviewR robot and confirmed to be licensed under the terms of the
cc-by-2.0 (Creative Commons Attribution 2.0). It was accessed in February
2012 from http://commons.wikimedia.org/wiki/File:New_River_Gorge_
Bridge_West_Virginia_244750516.jpg
Chapter 8
Fig. 8.4 Gravity retaining wall. Courtesy of HNTB Corporation, 31 St. James
Avenue, Suite 300 Boston, MA 02116, USA
Chapter 13
Fig. 13.1a Multi-span curved steel box girder bridge. Courtesy of HNTB
Corporation, 31 St. James Avenue, Suite 300, Boston, MA 02116, USA
xxvi Photo Credits

Fig. 13.1c The John James Audubon Bridge crossing the Mississippi River.
This image is credited to the Louisiana TIMED Managers and was accessed
in April 2012 from http://commons.wikimedia.org/wiki/File:Audubon_
Bridge2.jpg
Fig. 13.34 Typical cable-stayed scheme. This work has been released into the
public domain by its author, Kelly C. Cook. This applies worldwide. The
image was accessed in February 2012 from http://commons.wikimedia.org/
wiki/File:Sunshine_Skyway_from_Tampa_Bay.jpeg
Problem 13.9 Puente del Alamillo in Seville, Spain. This work has
been released into the public domain by its author, Consorcio Turismo
Sevilla. This applies worldwide. The image was accessed in March 2012
from http://en.wikipedia.org/wiki/File:Puente_del_Alamillo.jpg
Photo Credits xxvii
Part I
Statically Determinate Structures
A structure is an assemblage of components which are connected in such a way that the structure can
withstand the action of loads that are applied to it. These loads may be due to gravity, wind, ground
shaking, impact, temperature, or other environmental sources. Structures are everywhere in the built
environment. Buildings, bridges, tunnels, storage tanks, and transmission lines are examples of a
“structure.” Structural engineering is the discipline which is concerned with identifying the loads that
a structure may experience over its expected life, determining a suitable arrangement of structural
members, selecting the material and dimensions of the members, defining the assembly process, and
lastly monitoring the structure as it is being assembled and possibly also over its life.
In Part I, we first present an overview of structural engineering so that the reader can develop an
appreciation for the broad range of tasks that structural engineers carry out and the challenges that
they face in creating structures which perform satisfactorily under the loadings that they are subjected
to. We then discuss a particular subgroup of structures called statically determinate structures. This
subgroup is relatively easy to deal with analytically since only equilibrium concepts are involved.
Also, most structures belong to this category. Trusses, beams, frames, cables, curved members,
shallow foundations, and vertical retaining walls are described in separate chapters. The last two
topics are not normally covered in elementary texts, but we have included them here for
completeness.
In general, all structures can be classified as either statically determinate or statically indetermi-
nate. Part II describes techniques for dealing with statically indeterminate structures.
Part III describes how the methodologies presented in Parts I and II are applied to “engineer”
various types of bridges and buildings. This section is intended to identify the key issues involved in
structural engineering practice.
Introduction to Structural Engineering 1
Abstract
A structure is an assemblage of components which are connected in such a
way that the structure can withstand the action of loads that are applied to
it. These loads may be due to gravity, wind, ground shaking, impact,
temperature, or other environmental sources. Examples of structures
employed in civil infrastructure are buildings, bridges, dams, tunnels,
storage tanks, and transmission line towers. Non-civil applications include
aerospace structures such as airplane fuselages, missiles; naval structures
such as ships, offshore platforms; and automotive structures such as cars
and trucks. Structural engineering is the discipline which is concerned
with identifying the loads that a structure may experience over its
expected life, determining a suitable arrangement of structural members,
selecting the material and dimensions of the members, defining the
assembly process, and lastly monitoring the structure as it is being assem-
bled and possibly also over its life.
In this chapter, we describe first the various types of structures. Each
structure is categorized according to its particular function and the config-
uration of its components. We then discuss the critical issues that a
structural engineer needs to address when designing or assessing the
adequacy of a structure. The most important issue is preventing failure,
especially a sudden catastrophic failure. We describe various failure
modes: initial instability, material failure, and buckling of individual
structural components. In order to carry out a structural design, one
needs to specify the loading which is also a critical concern. Fortunately,
the technical literature contains considerable information about loadings.
We present here an overview of the nature of the different loads and
establish their relative importance for the most common civil structures.
Conventional structural design philosophy and the different approaches
for implementing this design strategy are described next. Lastly, we
briefly discuss some basic analytical methods of structural engineering
and describe how they are applied to analyze structures.
# Springer International Publishing Switzerland 2016
J.J. Connor, S. Faraji, Fundamentals of Structural Engineering,DOI 10.1007/978-3-319-24331-3_1
3
1.1 Types of Structures and Structural Components
Structures are everywhere in the built environment. Buildings, bridges, tunnels, storage tanks, and
transmission lines are examples of a “structure.” Structures differ in their makeup, i.e., the type and
configuration of the components, and also in their function. Our approach to describing a structure is
based on identifying a set of attributes which relate to these properties.
1.1.1 Structural Components
The components are the basic building blocks of a structure. We refer to them as structural elements.
Elements are classified into two categories according to their geometry [1]:
1. Line Elements—The geometry is essentially one-dimensional, i.e., one dimension is large with
respect to the other two dimensions. Examples are cables, beams, columns, and arches. Another
term for a line element is member.
2. Surface Elements—One dimension is small in comparison to the other two dimensions. The
elements are plate-like. Examples are flat plates, curved plates, and shells such as spherical,
cylindrical, and hyperbolic paraboloids.
1.1.2 Types of Structures
A structure is classified according to its function and the type of elements used to make up the
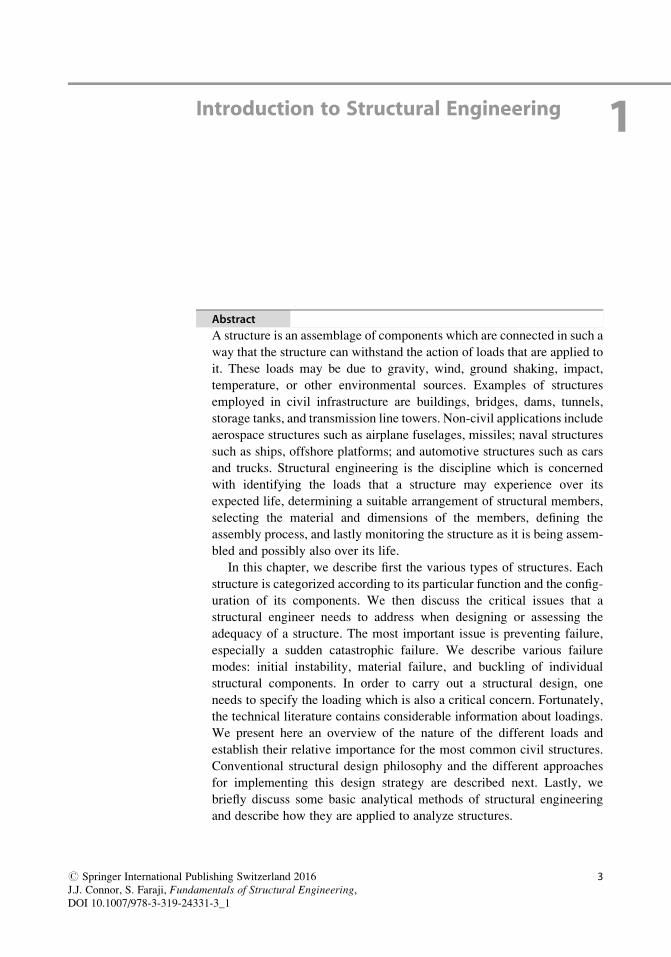
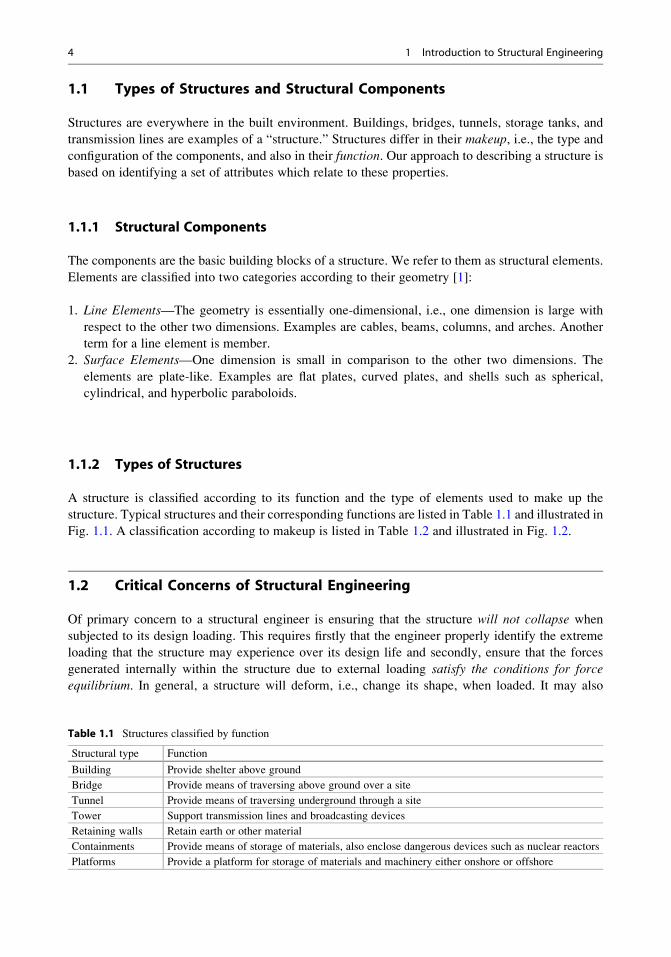
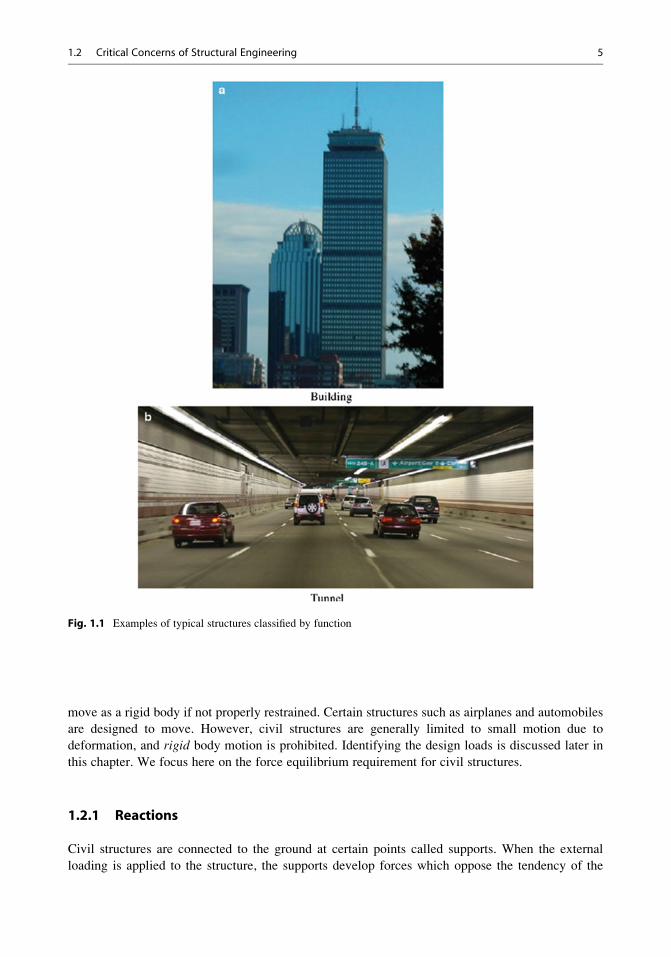
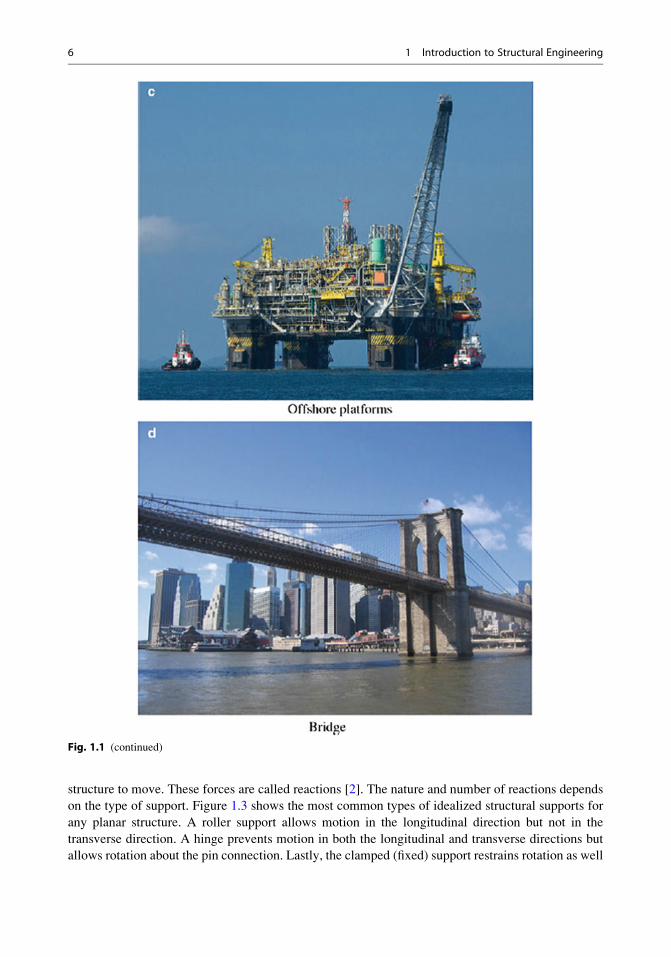
structure. Typical structures and their corresponding functions are listed in Table 1.1 and illustrated in
Fig. 1.1. A classification according to makeup is listed in Table 1.2 and illustrated in Fig. 1.2.
1.2 Critical Concerns of Structural Engineering
Of primary concern to a structural engineer is ensuring that the structure will not collapse when
subjected to its design loading. This requires firstly that the engineer properly identify the extreme
loading that the structure may experience over its design life and secondly, ensure that the forces
generated internally within the structure due to external loading satisfy the conditions for forceequilibrium. In general, a structure will deform, i.e., change its shape, when loaded. It may also
Table 1.1 Structures classified by function
Structural type Function
Building Provide shelter above ground
Bridge Provide means of traversing above ground over a site
Tunnel Provide means of traversing underground through a site
Tower Support transmission lines and broadcasting devices
Retaining walls Retain earth or other material
Containments Provide means of storage of materials, also enclose dangerous devices such as nuclear reactors
Platforms Provide a platform for storage of materials and machinery either onshore or offshore
4 1 Introduction to Structural Engineering
move as a rigid body if not properly restrained. Certain structures such as airplanes and automobiles
are designed to move. However, civil structures are generally limited to small motion due to
deformation, and rigid body motion is prohibited. Identifying the design loads is discussed later in
this chapter. We focus here on the force equilibrium requirement for civil structures.
1.2.1 Reactions
Civil structures are connected to the ground at certain points called supports. When the external
loading is applied to the structure, the supports develop forces which oppose the tendency of the
Fig. 1.1 Examples of typical structures classified by function
1.2 Critical Concerns of Structural Engineering 5
structure to move. These forces are called reactions [2]. The nature and number of reactions depends
on the type of support. Figure 1.3 shows the most common types of idealized structural supports for
any planar structure. A roller support allows motion in the longitudinal direction but not in the
transverse direction. A hinge prevents motion in both the longitudinal and transverse directions but
allows rotation about the pin connection. Lastly, the clamped (fixed) support restrains rotation as well
Fig. 1.1 (continued)
6 1 Introduction to Structural Engineering
as translation with two reaction forces and one moment. Three-dimensional supports are similar in
nature. There is an increase from 2 to 3 and from 3 to 6 in the number of reactions for the 3D hinge
and a clamped support.
1.2.2 Initial Stability
If either the number or nature of the reactions is insufficient to satisfy the equilibrium conditions, the
structure is said to be initially unstable. Figure 1.4a illustrates this case. The structure consists of a
triangular arrangement of members that are pinned at their ends. This combination of members forms
a rigid body. However, the arrangement is supported on two roller supports which offer no resistance
to horizontal motion, and consequently the structure is initially unstable. This situation can be
corrected by changing one of the roller supports to a hinge support, as shown in Fig. 1.4b. In general,
a rigid body is initially stable when translational and rotational motions are prevented in three
mutually orthogonal directions.
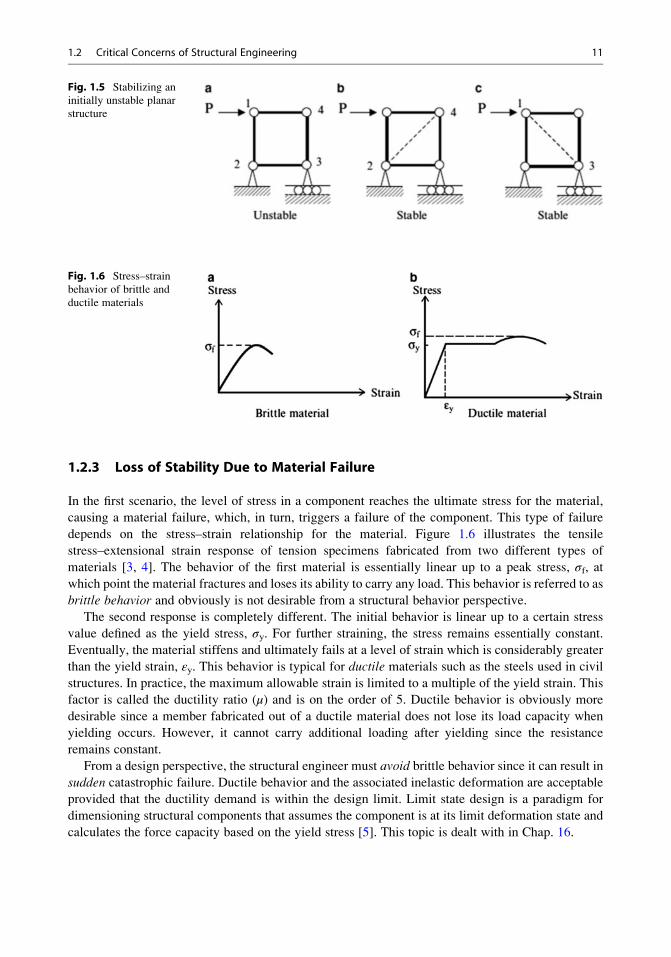
Even when the structure is adequately supported, it still may be initially unstable if the members
are not properly connected together to provide sufficient internal forces to resist the applied external
forces. Consider the four member pin-connected planar structure shown in Fig. 1.5a. The horizontal
force, P, cannot be transmitted to the support since the force in member 1-2 is vertical and therefore
cannot have a horizontal component. Adding a diagonal member, either 1-3 or 2-4, would make the
structure stable.
In summary, initial instability can occur either due to a lack of appropriate supports or to an
inadequate arrangement of members. The test for initial instability is whether there are sufficient
reactions and internal member forces to equilibrate the applied external loads. Assuming the structure
is initially stable, there still may be a problem if certain structural components fail under the action of
the extreme loading and cause the structure to lose its ability to carry load. In what follows, we discussvarious failure scenarios for structures which are loaded.
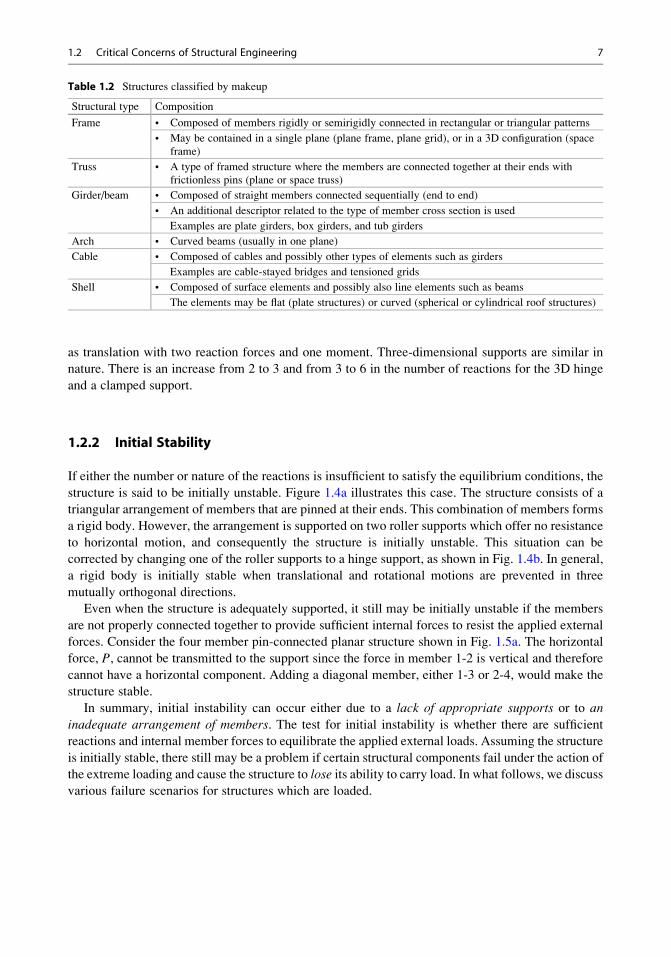
Table 1.2 Structures classified by makeup
Structural type Composition
Frame • Composed of members rigidly or semirigidly connected in rectangular or triangular patterns
• May be contained in a single plane (plane frame, plane grid), or in a 3D configuration (space
frame)
Truss • A type of framed structure where the members are connected together at their ends with
frictionless pins (plane or space truss)
Girder/beam • Composed of straight members connected sequentially (end to end)
• An additional descriptor related to the type of member cross section is used
Examples are plate girders, box girders, and tub girders
Arch • Curved beams (usually in one plane)
Cable • Composed of cables and possibly other types of elements such as girders
Examples are cable-stayed bridges and tensioned grids
Shell • Composed of surface elements and possibly also line elements such as beams
The elements may be flat (plate structures) or curved (spherical or cylindrical roof structures)
1.2 Critical Concerns of Structural Engineering 7
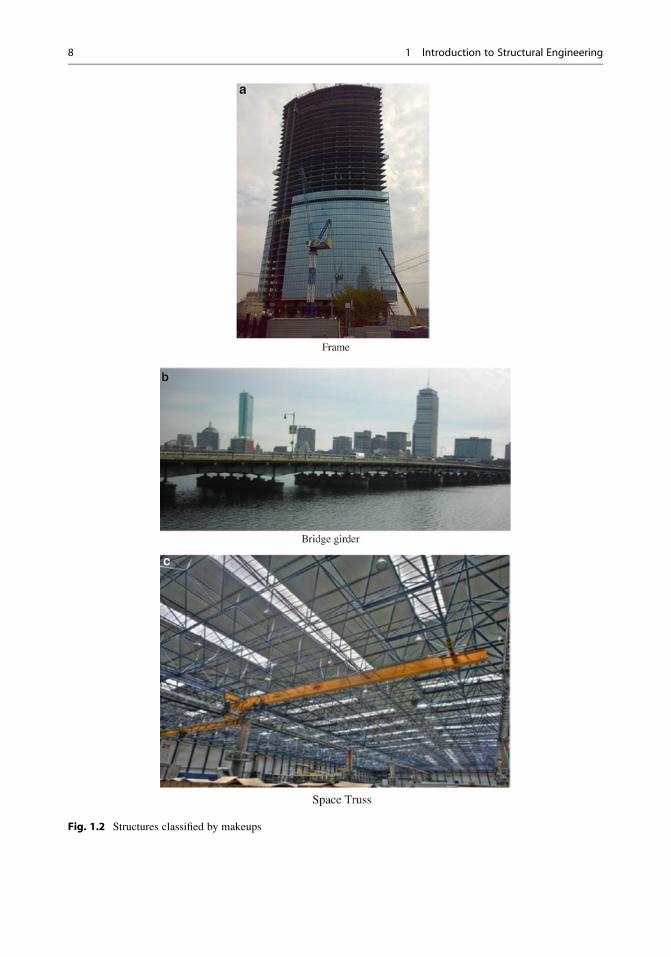
Fig. 1.2 Structures classified by makeups
8 1 Introduction to Structural Engineering
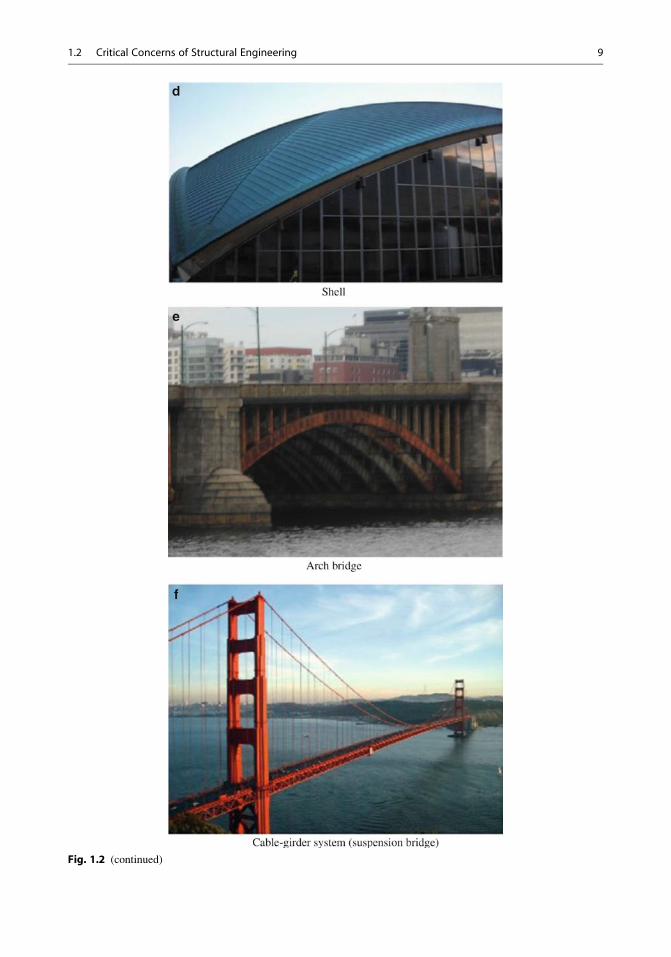
Fig. 1.2 (continued)
1.2 Critical Concerns of Structural Engineering 9
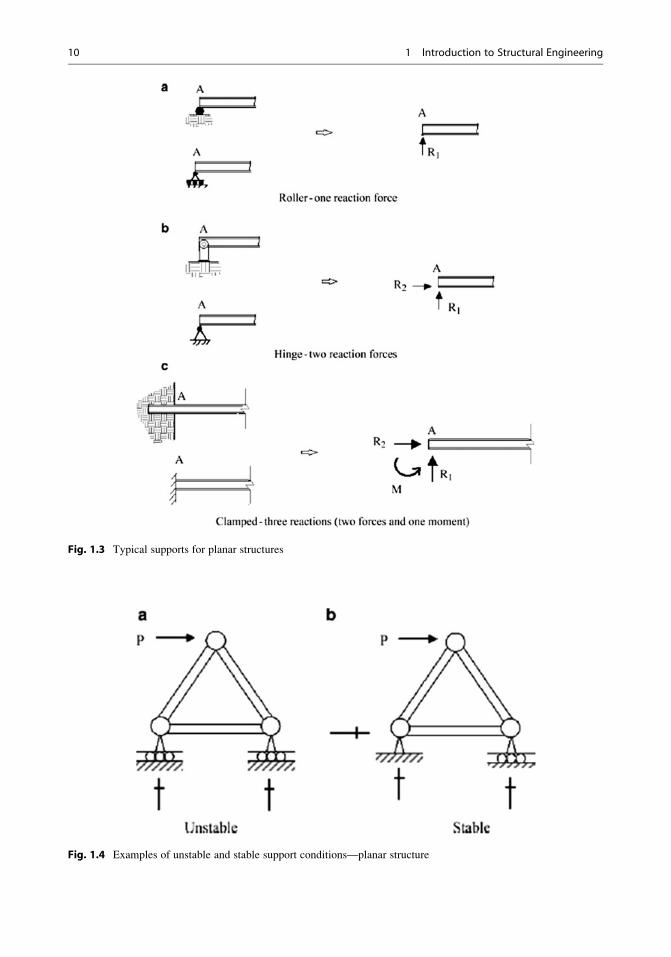
Fig. 1.3 Typical supports for planar structures
Fig. 1.4 Examples of unstable and stable support conditions—planar structure
10 1 Introduction to Structural Engineering
1.2.3 Loss of Stability Due to Material Failure
In the first scenario, the level of stress in a component reaches the ultimate stress for the material,
causing a material failure, which, in turn, triggers a failure of the component. This type of failure
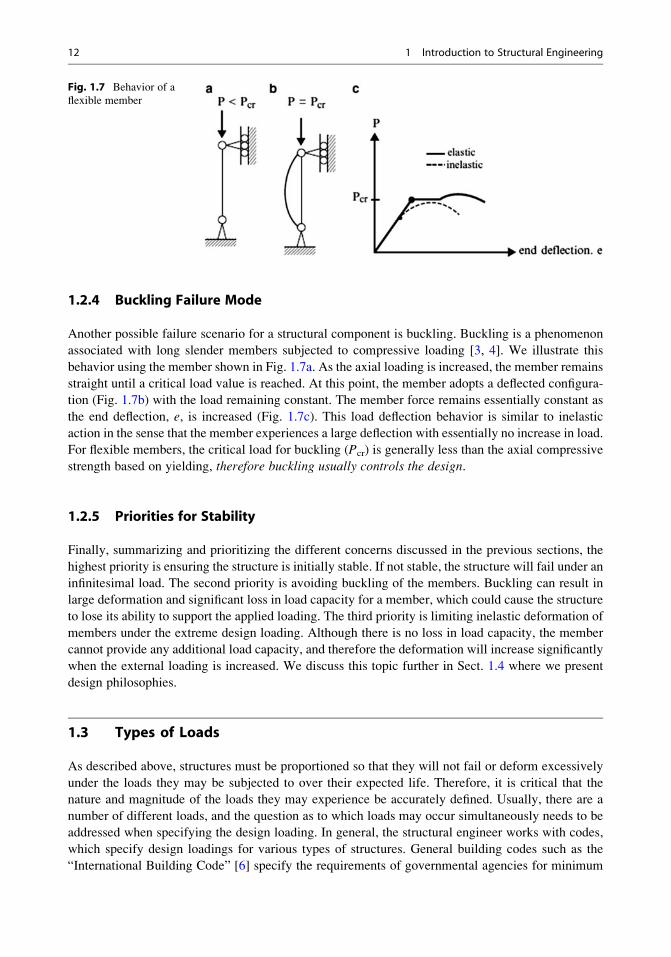
depends on the stress–strain relationship for the material. Figure 1.6 illustrates the tensile
stress–extensional strain response of tension specimens fabricated from two different types of
materials [3, 4]. The behavior of the first material is essentially linear up to a peak stress, σf, atwhich point the material fractures and loses its ability to carry any load. This behavior is referred to as
brittle behavior and obviously is not desirable from a structural behavior perspective.
The second response is completely different. The initial behavior is linear up to a certain stress
value defined as the yield stress, σy. For further straining, the stress remains essentially constant.
Eventually, the material stiffens and ultimately fails at a level of strain which is considerably greater
than the yield strain, εy. This behavior is typical for ductile materials such as the steels used in civil
structures. In practice, the maximum allowable strain is limited to a multiple of the yield strain. This
factor is called the ductility ratio (μ) and is on the order of 5. Ductile behavior is obviously more
desirable since a member fabricated out of a ductile material does not lose its load capacity when
yielding occurs. However, it cannot carry additional loading after yielding since the resistance
remains constant.
From a design perspective, the structural engineer must avoid brittle behavior since it can result in
sudden catastrophic failure. Ductile behavior and the associated inelastic deformation are acceptable
provided that the ductility demand is within the design limit. Limit state design is a paradigm for
dimensioning structural components that assumes the component is at its limit deformation state and
calculates the force capacity based on the yield stress [5]. This topic is dealt with in Chap. 16.
Fig. 1.5 Stabilizing an
initially unstable planar
structure
Fig. 1.6 Stress–strain
behavior of brittle and
ductile materials
1.2 Critical Concerns of Structural Engineering 11
1.2.4 Buckling Failure Mode
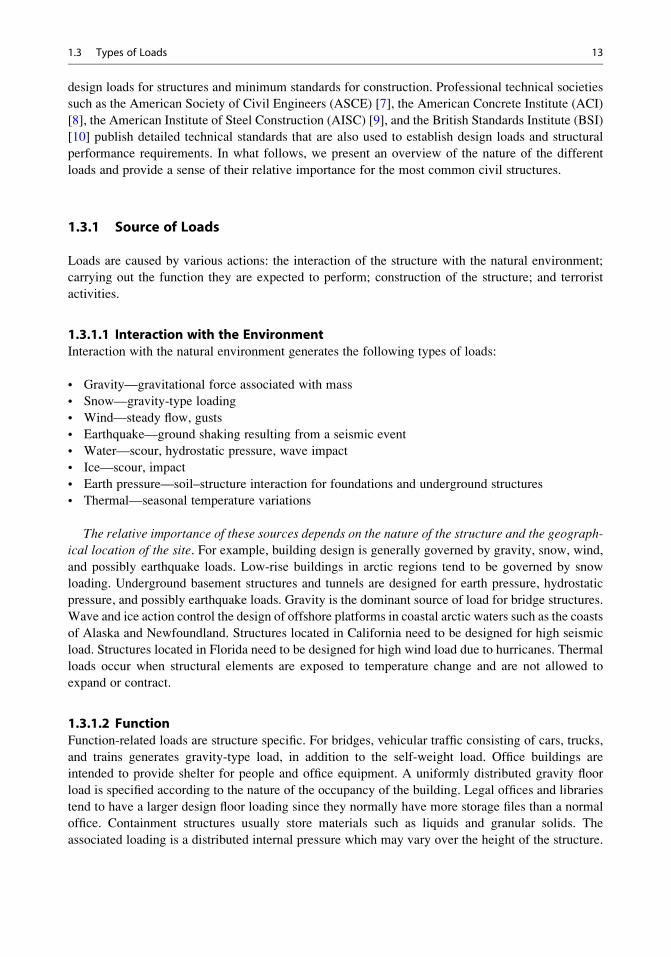
Another possible failure scenario for a structural component is buckling. Buckling is a phenomenon
associated with long slender members subjected to compressive loading [3, 4]. We illustrate this
behavior using the member shown in Fig. 1.7a. As the axial loading is increased, the member remains
straight until a critical load value is reached. At this point, the member adopts a deflected configura-
tion (Fig. 1.7b) with the load remaining constant. The member force remains essentially constant as
the end deflection, e, is increased (Fig. 1.7c). This load deflection behavior is similar to inelastic
action in the sense that the member experiences a large deflection with essentially no increase in load.
For flexible members, the critical load for buckling (Pcr) is generally less than the axial compressive
strength based on yielding, therefore buckling usually controls the design.
1.2.5 Priorities for Stability
Finally, summarizing and prioritizing the different concerns discussed in the previous sections, the
highest priority is ensuring the structure is initially stable. If not stable, the structure will fail under an
infinitesimal load. The second priority is avoiding buckling of the members. Buckling can result in
large deformation and significant loss in load capacity for a member, which could cause the structure
to lose its ability to support the applied loading. The third priority is limiting inelastic deformation of
members under the extreme design loading. Although there is no loss in load capacity, the member
cannot provide any additional load capacity, and therefore the deformation will increase significantly
when the external loading is increased. We discuss this topic further in Sect. 1.4 where we present
design philosophies.
1.3 Types of Loads
As described above, structures must be proportioned so that they will not fail or deform excessively
under the loads they may be subjected to over their expected life. Therefore, it is critical that the
nature and magnitude of the loads they may experience be accurately defined. Usually, there are a
number of different loads, and the question as to which loads may occur simultaneously needs to be
addressed when specifying the design loading. In general, the structural engineer works with codes,
which specify design loadings for various types of structures. General building codes such as the
“International Building Code” [6] specify the requirements of governmental agencies for minimum
Fig. 1.7 Behavior of a
flexible member
12 1 Introduction to Structural Engineering
design loads for structures and minimum standards for construction. Professional technical societies
such as the American Society of Civil Engineers (ASCE) [7], the American Concrete Institute (ACI)
[8], the American Institute of Steel Construction (AISC) [9], and the British Standards Institute (BSI)
[10] publish detailed technical standards that are also used to establish design loads and structural
performance requirements. In what follows, we present an overview of the nature of the different
loads and provide a sense of their relative importance for the most common civil structures.
1.3.1 Source of Loads
Loads are caused by various actions: the interaction of the structure with the natural environment;
carrying out the function they are expected to perform; construction of the structure; and terrorist
activities.
1.3.1.1 Interaction with the EnvironmentInteraction with the natural environment generates the following types of loads:
• Gravity—gravitational force associated with mass
• Snow—gravity-type loading
• Wind—steady flow, gusts
• Earthquake—ground shaking resulting from a seismic event
• Water—scour, hydrostatic pressure, wave impact
• Ice—scour, impact
• Earth pressure—soil–structure interaction for foundations and underground structures
• Thermal—seasonal temperature variations
The relative importance of these sources depends on the nature of the structure and the geograph-ical location of the site. For example, building design is generally governed by gravity, snow, wind,
and possibly earthquake loads. Low-rise buildings in arctic regions tend to be governed by snow
loading. Underground basement structures and tunnels are designed for earth pressure, hydrostatic
pressure, and possibly earthquake loads. Gravity is the dominant source of load for bridge structures.
Wave and ice action control the design of offshore platforms in coastal arctic waters such as the coasts
of Alaska and Newfoundland. Structures located in California need to be designed for high seismic
load. Structures located in Florida need to be designed for high wind load due to hurricanes. Thermal
loads occur when structural elements are exposed to temperature change and are not allowed to
expand or contract.
1.3.1.2 FunctionFunction-related loads are structure specific. For bridges, vehicular traffic consisting of cars, trucks,
and trains generates gravity-type load, in addition to the self-weight load. Office buildings are
intended to provide shelter for people and office equipment. A uniformly distributed gravity floor
load is specified according to the nature of the occupancy of the building. Legal offices and libraries
tend to have a larger design floor loading since they normally have more storage files than a normal
office. Containment structures usually store materials such as liquids and granular solids. The
associated loading is a distributed internal pressure which may vary over the height of the structure.
1.3 Types of Loads 13
1.3.1.3 ConstructionConstruction loading depends on the process followed to assemble the structure. Detailed force
analyses at various stages of the construction are required for complex structures such as segmented
long-span bridges for which the erection loading dominates the design. The structural engineer is
responsible for approving the construction loads when separate firms carry out engineering and
construction. A present trend is for a single organization to carry out both the engineering design
and construction (the design-build paradigm where engineering companies and construction
companies form a joint venture for the specific project). In this case, a team consisting of structural
engineers and construction engineers jointly carries out the design. An example of this type of
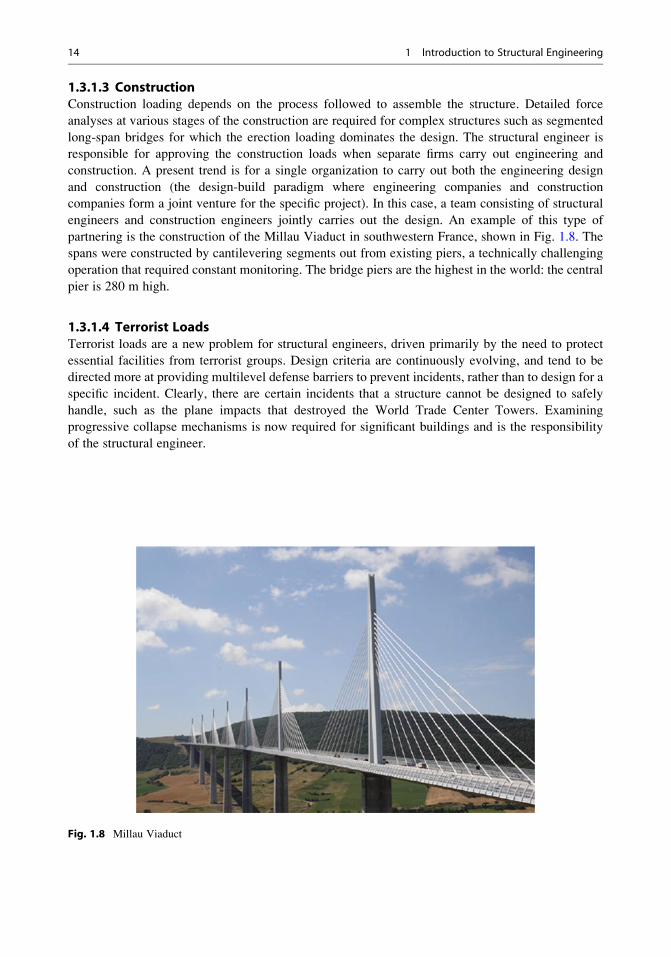
partnering is the construction of the Millau Viaduct in southwestern France, shown in Fig. 1.8. The
spans were constructed by cantilevering segments out from existing piers, a technically challenging
operation that required constant monitoring. The bridge piers are the highest in the world: the central
pier is 280 m high.
1.3.1.4 Terrorist LoadsTerrorist loads are a new problem for structural engineers, driven primarily by the need to protect
essential facilities from terrorist groups. Design criteria are continuously evolving, and tend to be
directed more at providing multilevel defense barriers to prevent incidents, rather than to design for a
specific incident. Clearly, there are certain incidents that a structure cannot be designed to safely
handle, such as the plane impacts that destroyed the World Trade Center Towers. Examining
progressive collapse mechanisms is now required for significant buildings and is the responsibility
of the structural engineer.
Fig. 1.8 Millau Viaduct
14 1 Introduction to Structural Engineering
1.3.2 Properties of Loadings
The previous discussion was focused on the source of loadings, i.e., environmental, functional,
construction, and terrorist activity. Loadings are also characterized by attributes, which relate to
properties of the loads. Table 1.3 lists the most relevant attributes and their possible values.
Duration relates to the time period over which the loading is applied. Long-term loads, such as
self-weight are referred to as dead loads. Loads whose magnitude or location changes are called
temporary loads. Examples of temporary loads are the weight of vehicles crossing a bridge, stored
items in buildings, wind and seismic loads, and construction loads.
Most loads are represented as being applied over a finite area. For example, a line of trucks is
represented with an equivalent uniformly distributed load. However, there are cases where the loaded
area is small, and it is more convenient to treat the load as being concentrated at a particular point. A
member partially supported by cables such as a cable-stayed girder is an example of concentrated
loading.
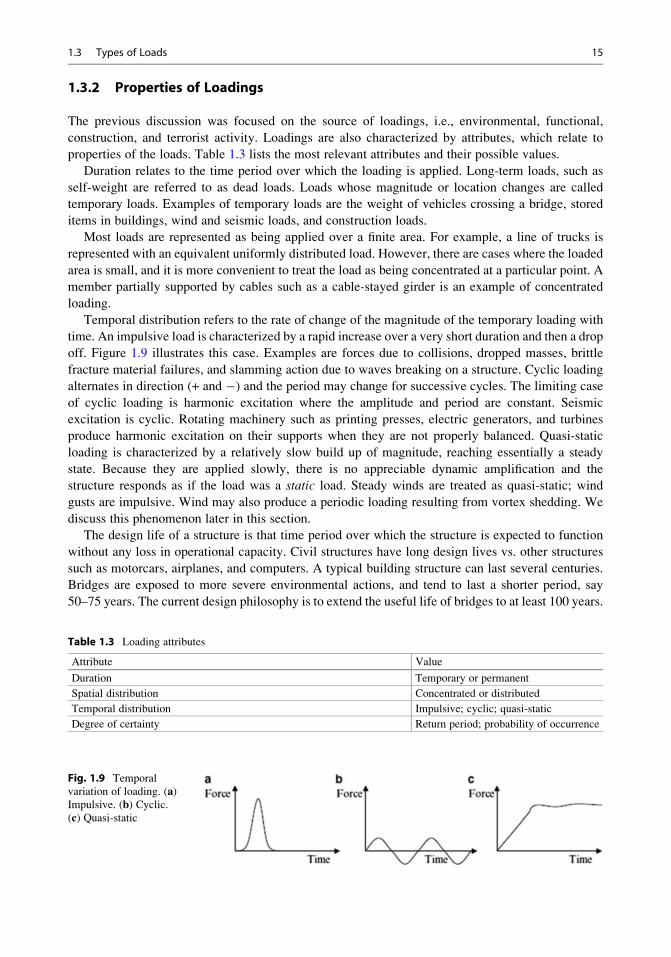
Temporal distribution refers to the rate of change of the magnitude of the temporary loading with
time. An impulsive load is characterized by a rapid increase over a very short duration and then a drop
off. Figure 1.9 illustrates this case. Examples are forces due to collisions, dropped masses, brittle
fracture material failures, and slamming action due to waves breaking on a structure. Cyclic loading
alternates in direction (+ and �) and the period may change for successive cycles. The limiting case
of cyclic loading is harmonic excitation where the amplitude and period are constant. Seismic
excitation is cyclic. Rotating machinery such as printing presses, electric generators, and turbines
produce harmonic excitation on their supports when they are not properly balanced. Quasi-static
loading is characterized by a relatively slow build up of magnitude, reaching essentially a steady
state. Because they are applied slowly, there is no appreciable dynamic amplification and the
structure responds as if the load was a static load. Steady winds are treated as quasi-static; wind
gusts are impulsive. Wind may also produce a periodic loading resulting from vortex shedding. We
discuss this phenomenon later in this section.
The design life of a structure is that time period over which the structure is expected to function
without any loss in operational capacity. Civil structures have long design lives vs. other structures
such as motorcars, airplanes, and computers. A typical building structure can last several centuries.
Bridges are exposed to more severe environmental actions, and tend to last a shorter period, say
50–75 years. The current design philosophy is to extend the useful life of bridges to at least 100 years.
Table 1.3 Loading attributes
Attribute Value
Duration Temporary or permanent
Spatial distribution Concentrated or distributed
Temporal distribution Impulsive; cyclic; quasi-static
Degree of certainty Return period; probability of occurrence
Fig. 1.9 Temporal
variation of loading. (a)Impulsive. (b) Cyclic.(c) Quasi-static
1.3 Types of Loads 15
The Millau viaduct shown in Fig. 1.8 is intended to function at its full design capacity for at least
125 years.
Given that the natural environment varies continuously, the structural engineer is faced with a
difficult problem: the most critical natural event, such as a windstorm or an earthquake that is likely to
occur during the design life of the structure located at a particular site needs to be identified. To
handle this problem, natural events are modeled as stochastic processes. The data for a particular
event, say wind velocity at location x, is arranged according to return period which can be interpreted
as the average time interval between occurrences of the event. One speaks of the 10-year wind, the
50-year wind, the 100-year wind, etc. Government agencies have compiled this data, which is
incorporated in design codes. Given the design life and the value of return period chosen for the
structure, the probability of the structure experiencing the chosen event is estimated as the ratio of the
design life to the return period. For example, a building with a 50-year design life has a 50 % chance
of experiencing the 100-year event during its lifetime. Typical design return periods are�50 years forwind loads and between 500 and 2500 years for severe seismic loads.
Specifying a loading having a higher return period reduces the probability of occurrence of that
load intensity over the design life. Another strategy for establishing design loads associated with
uncertain natural events is to increase the load magnitude according to the importance of the
structure. Importance is related to the nature of occupancy of the structure. In ASCE Standards
7-05 [7], four occupancy categories are defined using the potential hazard to human life in the event of
a failure as a basis. They are listed in Table 1.4 for reference.
The factor used to increase the loading is called the importance factor, and denoted by I. Table 1.5lists the values of I recommended by ASCE 7-05 [7] for each category and type of loading.
For example, one increases the earthquake loading by 50 % for an essential structure (category 4).
1.3.3 Gravity Live Loads
Gravitational loads are the dominant loads for bridges and low-rise buildings located in areas, where
the seismic activity is moderate. They act in the downward vertical direction and are generally a
combination of fixed (dead) and temporary (live) loads. The dead load is due to the weight of the
construction materials and permanently fixed equipment incorporated into the structure. As
Table 1.4 Occupancy categories
Category Description
I Structures that represent a low hazard to human life in the event of a failure
II All structures outside of categories I, III, and IV
III Structures that represent a substantial hazard to human life in the event of failure
IV Essential structures. Failure not allowed
Table 1.5 Values of I
Category
Wind
Snow EarthquakeNon-horizontal Horizontal
I 0.87 0.77 0.80 1.00
II 1.00 1.00 1.00 1.00
III 1.15 1.15 1.10 1.25
IV 1.15 1.15 1.20 1.50
16 1 Introduction to Structural Engineering
mentioned earlier, temporary live loads depend on the function of the structure. Typical values of live
loads for buildings are listed in Table 1.6. A reasonable estimate of live load for office/residential
facilities is �100 lbs/ft2 (4.8 kN/m2). Industrial facilities have higher live loadings, ranging up to
600 lbs/ft2 for foundries.
Live loading for bridges is specified in terms of standard truck loads. In the USA, bridge loads are
defined by the American Association of State Highway and Transportation Officials (AASHTO)
[11]. They consist of a combination of the Design truck or tandem, and Design lane load.
The design truck loading has a total weight of 72 kip (323 kN), with a variable axle spacing is
shown in Fig. 1.10. The design tandem shall consist of a pair of 25 kip (112 kN) axles spaced 4 ft
(1.2 m) apart. The transverse spacing of wheels shall be taken as 6 ft (1.83 m). The design lane load
shall consist of a load of 0.64 kip/ft2 (30.64 kN/m2) uniformly distributed in the longitudinal direction
and uniformly distributed over a 10 ft (3 m) width in the transverse direction.
1.3.4 Wind Loading
1.3.4.1 Wind Pressure DistributionThe effect of wind acting on a building is represented by a pressure loading distributed over the
exterior surface. This pressure loading depends on the geometry of the structure and the geographic
location of the site. Figure 1.11 illustrates the flow past a low-rise, single story, flat roof structure. The
sharp corners such as at point A causes flow separation, resulting in eddies forming and turbulence
zones on the flat roof, side faces, and leeward face. The sense of the pressure is positive (inward) on
the incident face and negative (outward) in the turbulence zones.
In general, the magnitude of the pressure varies over the faces, and depends on both the shape of
the structure and the design wind velocity at the site. The influence of shape is illustrated by Fig. 1.12,
which shows the effect of roof angle on the pressure distribution. When θ > 45�, there is a transitionfrom negative to positive pressure on face AB of the inclined roof. This shift is due to the flow
separation point moving from A to B for steeply inclined roofs.
1.3.4.2 Wind VelocityThe effect of the site is characterized firstly by the topography at the site, and secondly by the regional
wind environment. Exposure categories are defined to describe the local topography and to establish
the level of exposure to wind. ASCE 7-05 adopts the following definitions of exposure categories.
Table 1.6 Uniformly distributed live loads (ASCE 7-05)
Occupancy Magnitude lbs/ft2 (kN/m2)
Computer equipment 150 (7.18)
Dormitories 80 (3.83)
File room 125 (6.00)
Court rooms 50–100 (2.4–4.79)
Scientific laboratories 100 (4.79)
Public rooms 100 (4.79)
Rest rooms 60 (2.87)
Laundries 150 (7.18)
Foundries 600 (28.73)
Ice manufacturing 300 (14.36)
Transformer rooms 200 (9.58)
Storage, hay, or grain 300 (14.36)
1.3 Types of Loads 17
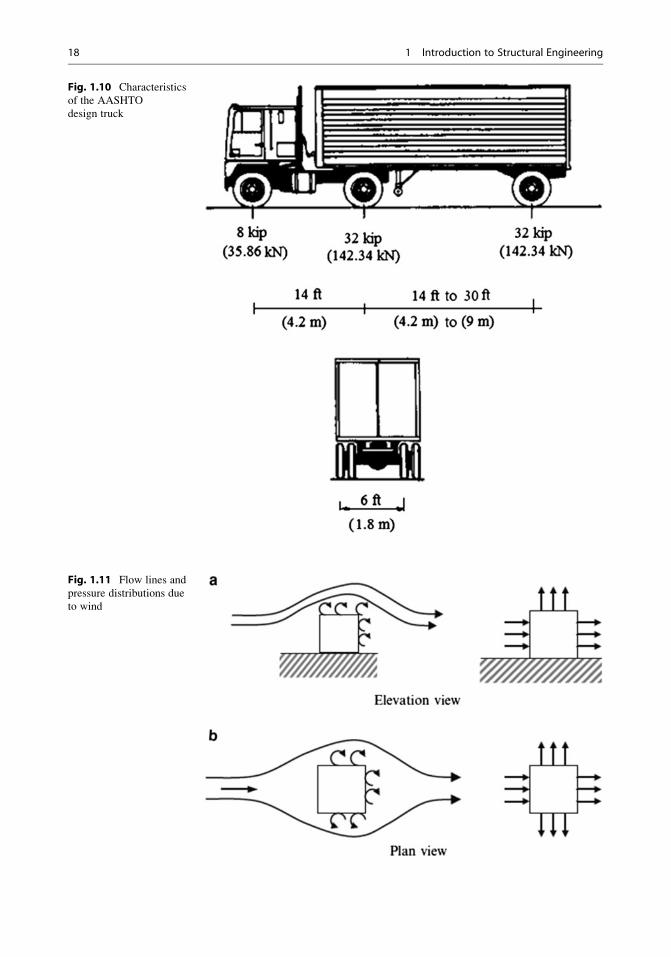
Fig. 1.10 Characteristics
of the AASHTO
design truck
Fig. 1.11 Flow lines and
pressure distributions due
to wind
18 1 Introduction to Structural Engineering
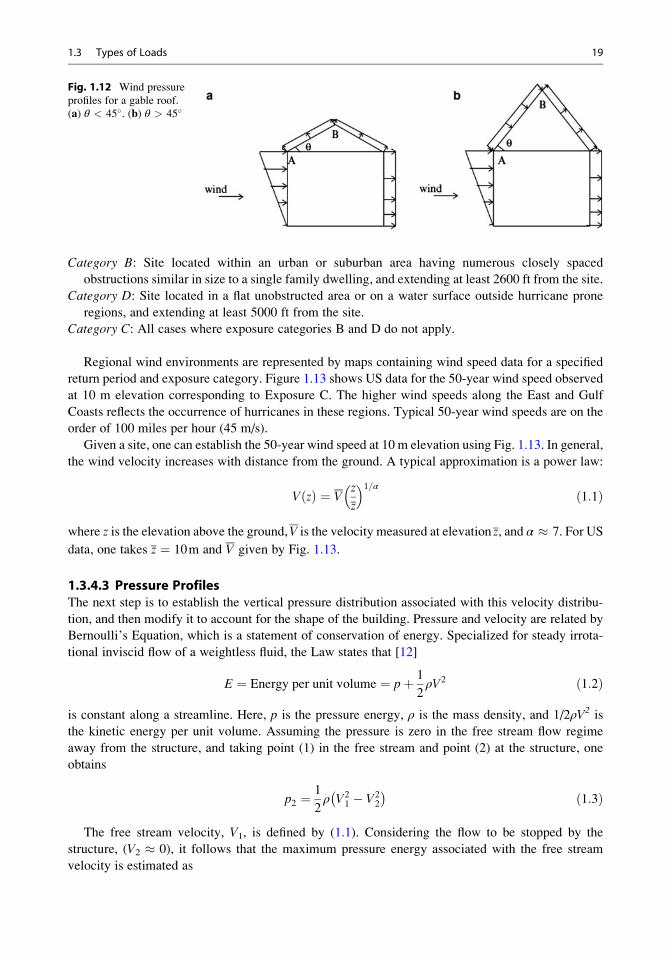
Category B: Site located within an urban or suburban area having numerous closely spaced
obstructions similar in size to a single family dwelling, and extending at least 2600 ft from the site.
Category D: Site located in a flat unobstructed area or on a water surface outside hurricane prone
regions, and extending at least 5000 ft from the site.
Category C: All cases where exposure categories B and D do not apply.
Regional wind environments are represented by maps containing wind speed data for a specified
return period and exposure category. Figure 1.13 shows US data for the 50-year wind speed observed
at 10 m elevation corresponding to Exposure C. The higher wind speeds along the East and Gulf
Coasts reflects the occurrence of hurricanes in these regions. Typical 50-year wind speeds are on the
order of 100 miles per hour (45 m/s).
Given a site, one can establish the 50-year wind speed at 10 m elevation using Fig. 1.13. In general,
the wind velocity increases with distance from the ground. A typical approximation is a power law:
V zð Þ ¼ Vz
z
� �1=αð1:1Þ
where z is the elevation above the ground,V is the velocity measured at elevation z, and α � 7. For US
data, one takes z ¼ 10m and V given by Fig. 1.13.
1.3.4.3 Pressure ProfilesThe next step is to establish the vertical pressure distribution associated with this velocity distribu-
tion, and then modify it to account for the shape of the building. Pressure and velocity are related by
Bernoulli’s Equation, which is a statement of conservation of energy. Specialized for steady irrota-
tional inviscid flow of a weightless fluid, the Law states that [12]
E ¼ Energy per unit volume ¼ pþ 1
2ρV2 ð1:2Þ
is constant along a streamline. Here, p is the pressure energy, ρ is the mass density, and 1/2ρV2 is
the kinetic energy per unit volume. Assuming the pressure is zero in the free stream flow regime
away from the structure, and taking point (1) in the free stream and point (2) at the structure, one
obtains
p2 ¼1
2ρ V2
1 � V22
� � ð1:3Þ
The free stream velocity, V1, is defined by (1.1). Considering the flow to be stopped by the
structure, (V2 � 0), it follows that the maximum pressure energy associated with the free stream
velocity is estimated as
Fig. 1.12 Wind pressure
profiles for a gable roof.
(a) θ < 45�. (b) θ > 45�
1.3 Types of Loads 19
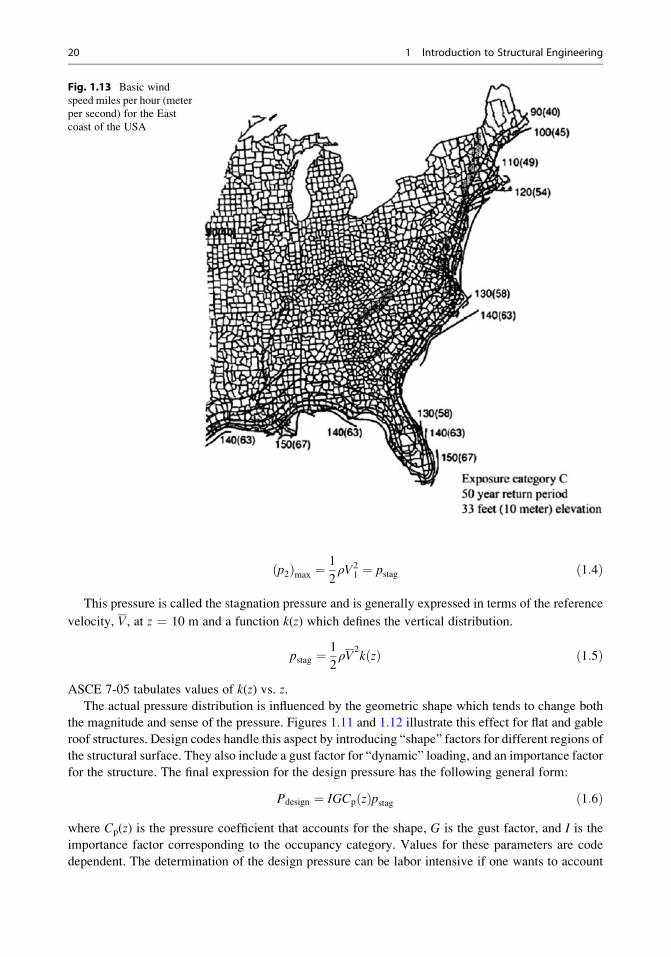
p2ð Þmax ¼1
2ρV2
1 ¼ pstag ð1:4Þ
This pressure is called the stagnation pressure and is generally expressed in terms of the reference
velocity, V, at z ¼ 10 m and a function k(z) which defines the vertical distribution.
pstag ¼1
2ρV
2k zð Þ ð1:5Þ
ASCE 7-05 tabulates values of k(z) vs. z.
The actual pressure distribution is influenced by the geometric shape which tends to change both
the magnitude and sense of the pressure. Figures 1.11 and 1.12 illustrate this effect for flat and gable
roof structures. Design codes handle this aspect by introducing “shape” factors for different regions of
the structural surface. They also include a gust factor for “dynamic” loading, and an importance factor
for the structure. The final expression for the design pressure has the following general form:
Pdesign ¼ IGCp zð Þpstag ð1:6Þ
where Cp(z) is the pressure coefficient that accounts for the shape, G is the gust factor, and I is the
importance factor corresponding to the occupancy category. Values for these parameters are code
dependent. The determination of the design pressure can be labor intensive if one wants to account
Fig. 1.13 Basic wind
speed miles per hour (meter
per second) for the East
coast of the USA
20 1 Introduction to Structural Engineering
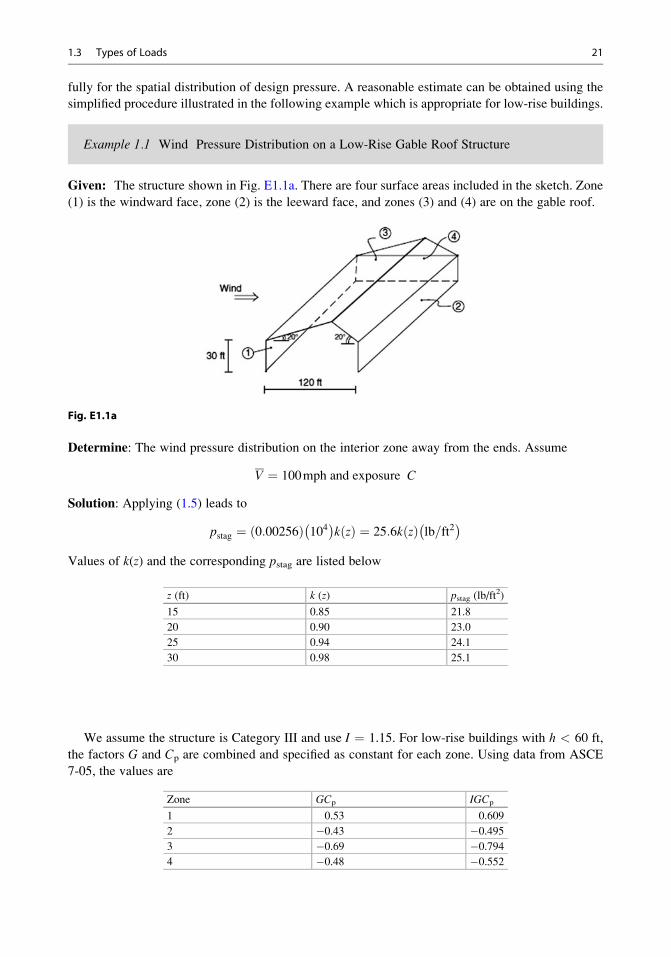
fully for the spatial distribution of design pressure. A reasonable estimate can be obtained using the
simplified procedure illustrated in the following example which is appropriate for low-rise buildings.
Example 1.1 Wind Pressure Distribution on a Low-Rise Gable Roof Structure
Given: The structure shown in Fig. E1.1a. There are four surface areas included in the sketch. Zone
(1) is the windward face, zone (2) is the leeward face, and zones (3) and (4) are on the gable roof.
Fig. E1.1a
Determine: The wind pressure distribution on the interior zone away from the ends. Assume
V ¼ 100mph and exposure C
Solution: Applying (1.5) leads to
pstag ¼ 0:00256ð Þ 104� �k zð Þ ¼ 25:6k zð Þ lb=ft2� �
Values of k(z) and the corresponding pstag are listed below
z (ft) k (z) pstag (lb/ft2)
15 0.85 21.8
20 0.90 23.0
25 0.94 24.1
30 0.98 25.1
We assume the structure is Category III and use I ¼ 1.15. For low-rise buildings with h < 60 ft,
the factors G and Cp are combined and specified as constant for each zone. Using data from ASCE
7-05, the values are
Zone GCp IGCp
1 0.53 0.609
2 �0.43 �0.4953 �0.69 �0.7944 �0.48 �0.552
1.3 Types of Loads 21
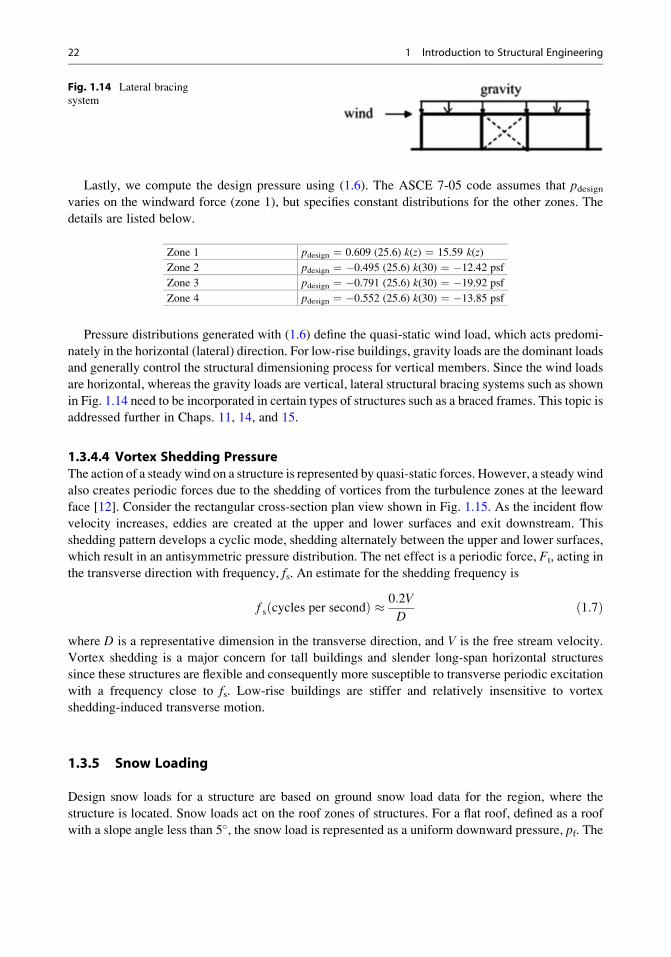
Lastly, we compute the design pressure using (1.6). The ASCE 7-05 code assumes that pdesignvaries on the windward force (zone 1), but specifies constant distributions for the other zones. The
details are listed below.
Zone 1 pdesign ¼ 0.609 (25.6) k(z) ¼ 15.59 k(z)
Zone 2 pdesign ¼ �0.495 (25.6) k(30) ¼ �12.42 psf
Zone 3 pdesign ¼ �0.791 (25.6) k(30) ¼ �19.92 psf
Zone 4 pdesign ¼ �0.552 (25.6) k(30) ¼ �13.85 psf
Pressure distributions generated with (1.6) define the quasi-static wind load, which acts predomi-
nately in the horizontal (lateral) direction. For low-rise buildings, gravity loads are the dominant loads
and generally control the structural dimensioning process for vertical members. Since the wind loads
are horizontal, whereas the gravity loads are vertical, lateral structural bracing systems such as shown
in Fig. 1.14 need to be incorporated in certain types of structures such as a braced frames. This topic is
addressed further in Chaps. 11, 14, and 15.
1.3.4.4 Vortex Shedding PressureThe action of a steady wind on a structure is represented by quasi-static forces. However, a steady wind
also creates periodic forces due to the shedding of vortices from the turbulence zones at the leeward
face [12]. Consider the rectangular cross-section plan view shown in Fig. 1.15. As the incident flow
velocity increases, eddies are created at the upper and lower surfaces and exit downstream. This
shedding pattern develops a cyclic mode, shedding alternately between the upper and lower surfaces,
which result in an antisymmetric pressure distribution. The net effect is a periodic force, Ft, acting in
the transverse direction with frequency, fs. An estimate for the shedding frequency is
f s cycles per secondð Þ � 0:2V
Dð1:7Þ
where D is a representative dimension in the transverse direction, and V is the free stream velocity.
Vortex shedding is a major concern for tall buildings and slender long-span horizontal structures
since these structures are flexible and consequently more susceptible to transverse periodic excitation
with a frequency close to fs. Low-rise buildings are stiffer and relatively insensitive to vortex
shedding-induced transverse motion.
1.3.5 Snow Loading
Design snow loads for a structure are based on ground snow load data for the region, where the
structure is located. Snow loads act on the roof zones of structures. For a flat roof, defined as a roof
with a slope angle less than 5�, the snow load is represented as a uniform downward pressure, pf. The
Fig. 1.14 Lateral bracing
system
22 1 Introduction to Structural Engineering
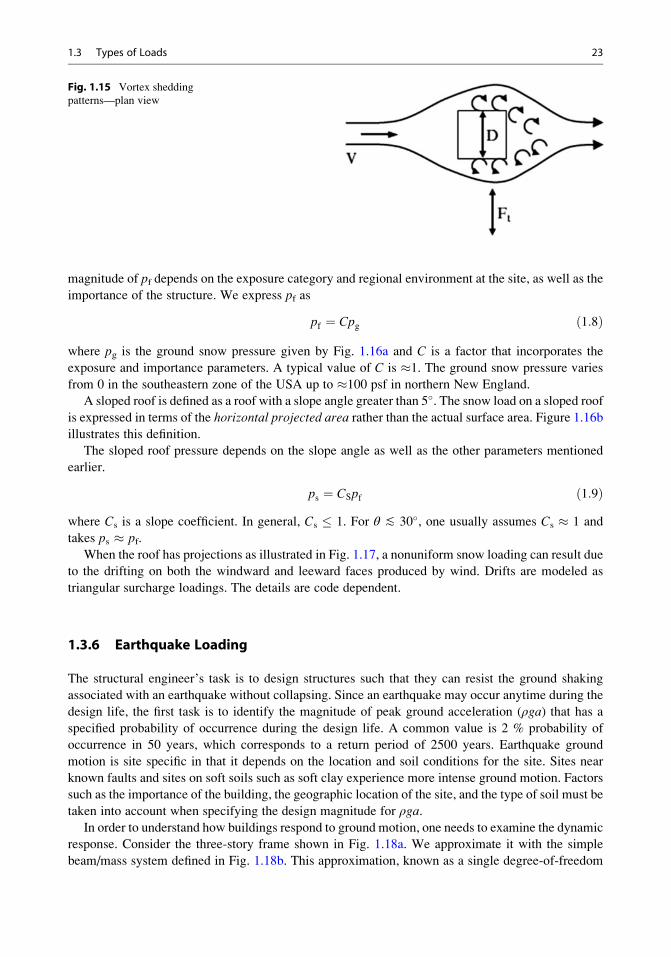
magnitude of pf depends on the exposure category and regional environment at the site, as well as the
importance of the structure. We express pf as
pf ¼ Cpg ð1:8Þ
where pg is the ground snow pressure given by Fig. 1.16a and C is a factor that incorporates the
exposure and importance parameters. A typical value of C is �1. The ground snow pressure varies
from 0 in the southeastern zone of the USA up to �100 psf in northern New England.
A sloped roof is defined as a roof with a slope angle greater than 5�. The snow load on a sloped roof
is expressed in terms of the horizontal projected area rather than the actual surface area. Figure 1.16b
illustrates this definition.
The sloped roof pressure depends on the slope angle as well as the other parameters mentioned
earlier.
ps ¼ CSpf ð1:9Þwhere Cs is a slope coefficient. In general, Cs � 1. For θ ≲ 30�, one usually assumes Cs � 1 and
takes ps � pf.
When the roof has projections as illustrated in Fig. 1.17, a nonuniform snow loading can result due
to the drifting on both the windward and leeward faces produced by wind. Drifts are modeled as
triangular surcharge loadings. The details are code dependent.
1.3.6 Earthquake Loading
The structural engineer’s task is to design structures such that they can resist the ground shaking
associated with an earthquake without collapsing. Since an earthquake may occur anytime during the
design life, the first task is to identify the magnitude of peak ground acceleration (ρga) that has aspecified probability of occurrence during the design life. A common value is 2 % probability of
occurrence in 50 years, which corresponds to a return period of 2500 years. Earthquake ground
motion is site specific in that it depends on the location and soil conditions for the site. Sites near
known faults and sites on soft soils such as soft clay experience more intense ground motion. Factors
such as the importance of the building, the geographic location of the site, and the type of soil must be
taken into account when specifying the design magnitude for ρga.In order to understand how buildings respond to ground motion, one needs to examine the dynamic
response. Consider the three-story frame shown in Fig. 1.18a. We approximate it with the simple
beam/mass system defined in Fig. 1.18b. This approximation, known as a single degree-of-freedom
Fig. 1.15 Vortex shedding
patterns—plan view
1.3 Types of Loads 23
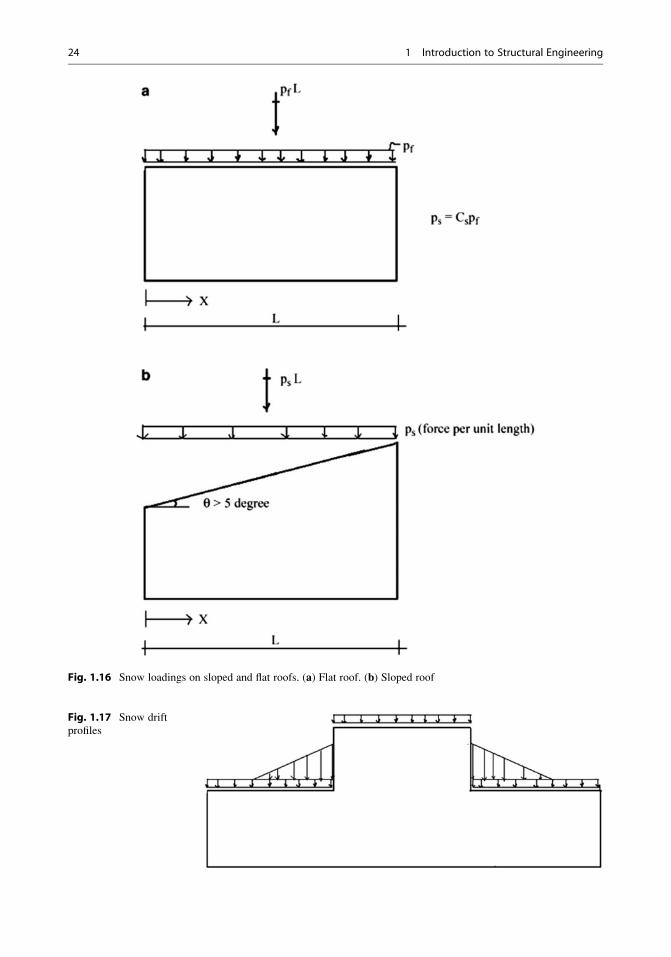
Fig. 1.16 Snow loadings on sloped and flat roofs. (a) Flat roof. (b) Sloped roof
Fig. 1.17 Snow drift
profiles
24 1 Introduction to Structural Engineering
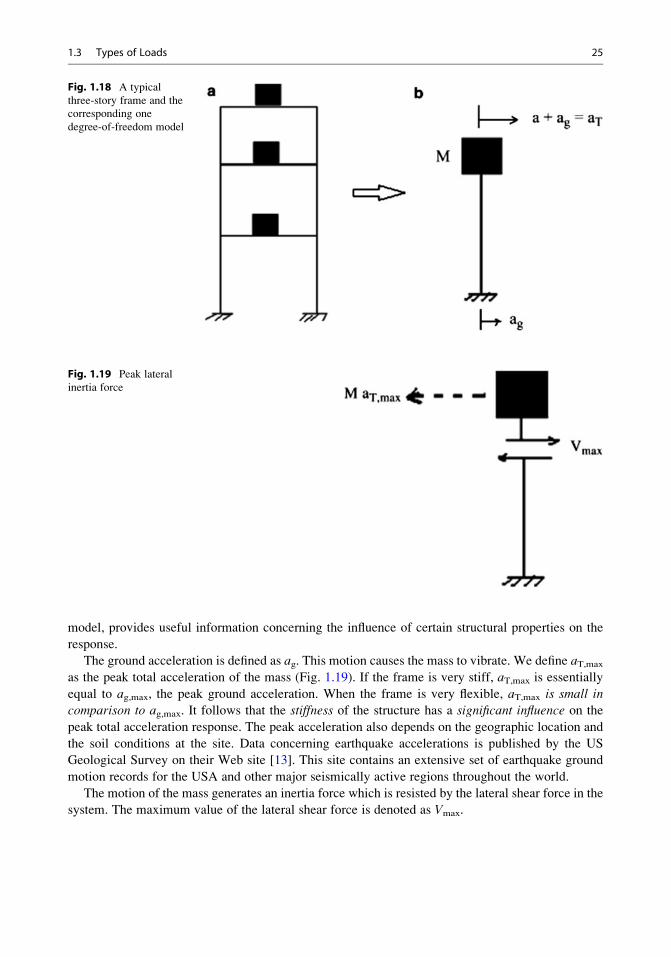
model, provides useful information concerning the influence of certain structural properties on the
response.
The ground acceleration is defined as ag. This motion causes the mass to vibrate. We define aT,max
as the peak total acceleration of the mass (Fig. 1.19). If the frame is very stiff, aT,max is essentially
equal to ag,max, the peak ground acceleration. When the frame is very flexible, aT,max is small incomparison to ag,max. It follows that the stiffness of the structure has a significant influence on the
peak total acceleration response. The peak acceleration also depends on the geographic location and
the soil conditions at the site. Data concerning earthquake accelerations is published by the US
Geological Survey on their Web site [13]. This site contains an extensive set of earthquake ground
motion records for the USA and other major seismically active regions throughout the world.
The motion of the mass generates an inertia force which is resisted by the lateral shear force in the
system. The maximum value of the lateral shear force is denoted as Vmax.
Fig. 1.18 A typical
three-story frame and the
corresponding one
degree-of-freedom model
Fig. 1.19 Peak lateral
inertia force
1.3 Types of Loads 25
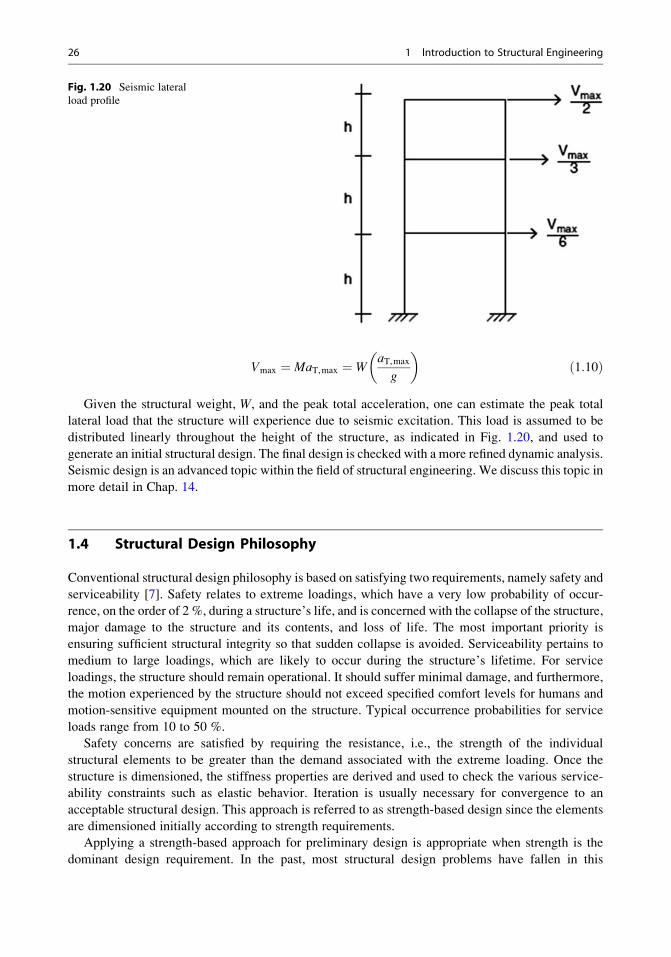
Vmax ¼ MaT,max ¼ WaT,max
g
� �ð1:10Þ
Given the structural weight, W, and the peak total acceleration, one can estimate the peak total
lateral load that the structure will experience due to seismic excitation. This load is assumed to be
distributed linearly throughout the height of the structure, as indicated in Fig. 1.20, and used to
generate an initial structural design. The final design is checked with a more refined dynamic analysis.
Seismic design is an advanced topic within the field of structural engineering. We discuss this topic in
more detail in Chap. 14.
1.4 Structural Design Philosophy
Conventional structural design philosophy is based on satisfying two requirements, namely safety and
serviceability [7]. Safety relates to extreme loadings, which have a very low probability of occur-
rence, on the order of 2 %, during a structure’s life, and is concerned with the collapse of the structure,
major damage to the structure and its contents, and loss of life. The most important priority is
ensuring sufficient structural integrity so that sudden collapse is avoided. Serviceability pertains to
medium to large loadings, which are likely to occur during the structure’s lifetime. For service
loadings, the structure should remain operational. It should suffer minimal damage, and furthermore,
the motion experienced by the structure should not exceed specified comfort levels for humans and
motion-sensitive equipment mounted on the structure. Typical occurrence probabilities for service
loads range from 10 to 50 %.
Safety concerns are satisfied by requiring the resistance, i.e., the strength of the individual
structural elements to be greater than the demand associated with the extreme loading. Once the
structure is dimensioned, the stiffness properties are derived and used to check the various service-
ability constraints such as elastic behavior. Iteration is usually necessary for convergence to an
acceptable structural design. This approach is referred to as strength-based design since the elements
are dimensioned initially according to strength requirements.
Applying a strength-based approach for preliminary design is appropriate when strength is the
dominant design requirement. In the past, most structural design problems have fallen in this
Fig. 1.20 Seismic lateral
load profile
26 1 Introduction to Structural Engineering
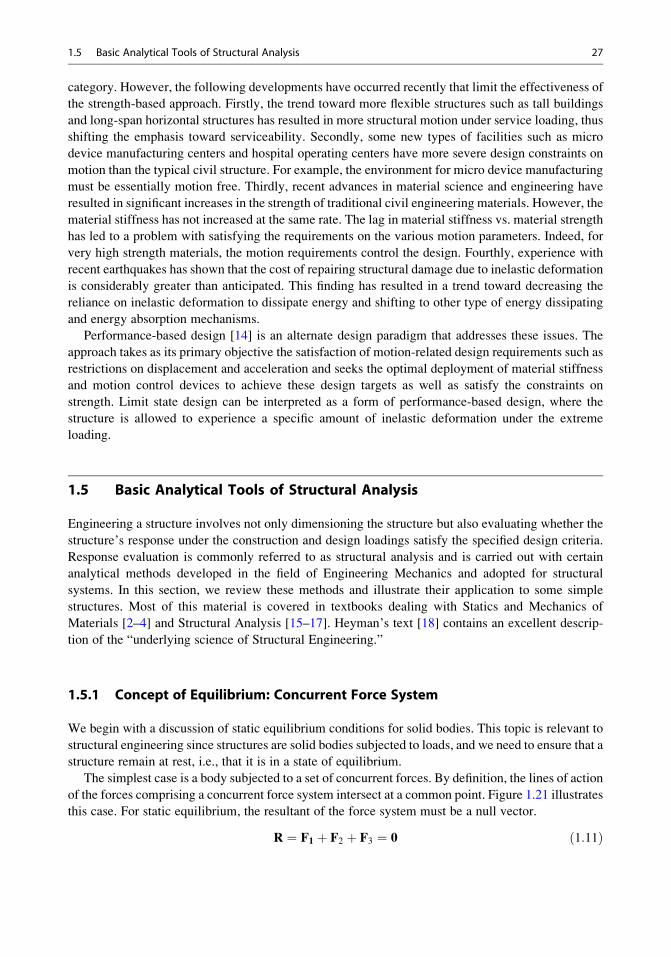
category. However, the following developments have occurred recently that limit the effectiveness of
the strength-based approach. Firstly, the trend toward more flexible structures such as tall buildings
and long-span horizontal structures has resulted in more structural motion under service loading, thus
shifting the emphasis toward serviceability. Secondly, some new types of facilities such as micro
device manufacturing centers and hospital operating centers have more severe design constraints on
motion than the typical civil structure. For example, the environment for micro device manufacturing
must be essentially motion free. Thirdly, recent advances in material science and engineering have
resulted in significant increases in the strength of traditional civil engineering materials. However, the
material stiffness has not increased at the same rate. The lag in material stiffness vs. material strength
has led to a problem with satisfying the requirements on the various motion parameters. Indeed, for
very high strength materials, the motion requirements control the design. Fourthly, experience with
recent earthquakes has shown that the cost of repairing structural damage due to inelastic deformation
is considerably greater than anticipated. This finding has resulted in a trend toward decreasing the
reliance on inelastic deformation to dissipate energy and shifting to other type of energy dissipating
and energy absorption mechanisms.
Performance-based design [14] is an alternate design paradigm that addresses these issues. The
approach takes as its primary objective the satisfaction of motion-related design requirements such as
restrictions on displacement and acceleration and seeks the optimal deployment of material stiffness
and motion control devices to achieve these design targets as well as satisfy the constraints on
strength. Limit state design can be interpreted as a form of performance-based design, where the
structure is allowed to experience a specific amount of inelastic deformation under the extreme
loading.
1.5 Basic Analytical Tools of Structural Analysis
Engineering a structure involves not only dimensioning the structure but also evaluating whether the
structure’s response under the construction and design loadings satisfy the specified design criteria.
Response evaluation is commonly referred to as structural analysis and is carried out with certain
analytical methods developed in the field of Engineering Mechanics and adopted for structural
systems. In this section, we review these methods and illustrate their application to some simple
structures. Most of this material is covered in textbooks dealing with Statics and Mechanics of
Materials [2–4] and Structural Analysis [15–17]. Heyman’s text [18] contains an excellent descrip-
tion of the “underlying science of Structural Engineering.”
1.5.1 Concept of Equilibrium: Concurrent Force System
We begin with a discussion of static equilibrium conditions for solid bodies. This topic is relevant to
structural engineering since structures are solid bodies subjected to loads, and we need to ensure that a
structure remain at rest, i.e., that it is in a state of equilibrium.
The simplest case is a body subjected to a set of concurrent forces. By definition, the lines of action
of the forces comprising a concurrent force system intersect at a common point. Figure 1.21 illustrates
this case. For static equilibrium, the resultant of the force system must be a null vector.
R ¼ F1 þ F2 þ F3 ¼ 0 ð1:11Þ
1.5 Basic Analytical Tools of Structural Analysis 27
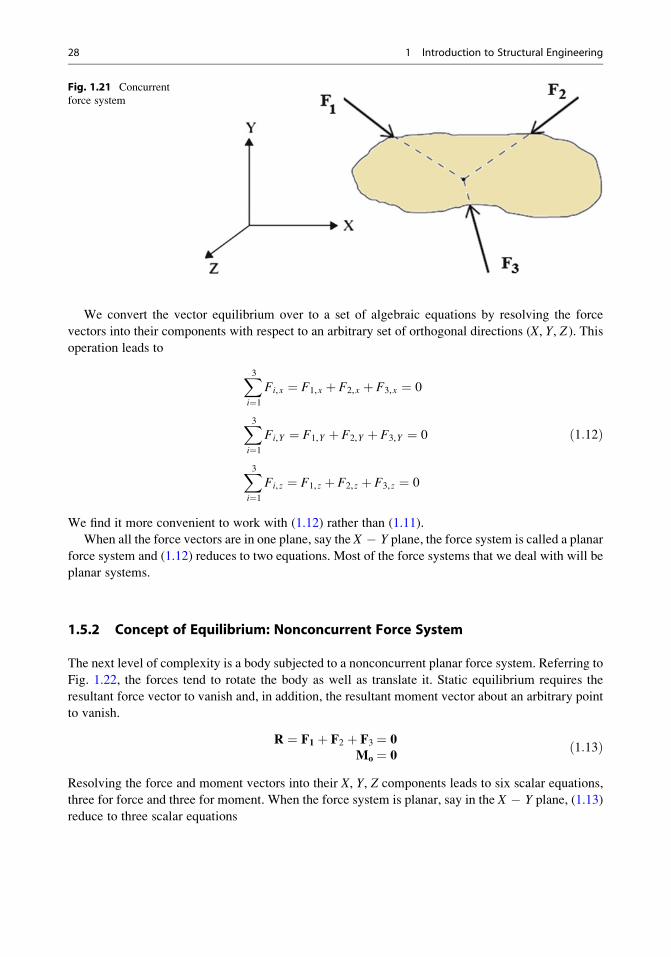
We convert the vector equilibrium over to a set of algebraic equations by resolving the force
vectors into their components with respect to an arbitrary set of orthogonal directions (X, Y, Z ). This
operation leads to
X3i¼1
Fi,x ¼ F1,x þ F2,x þ F3,x ¼ 0
X3i¼1
Fi,Y ¼ F1,Y þ F2,Y þ F3,Y ¼ 0
X3i¼1
Fi, z ¼ F1, z þ F2, z þ F3, z ¼ 0
ð1:12Þ
We find it more convenient to work with (1.12) rather than (1.11).
When all the force vectors are in one plane, say the X � Y plane, the force system is called a planar
force system and (1.12) reduces to two equations. Most of the force systems that we deal with will be
planar systems.
1.5.2 Concept of Equilibrium: Nonconcurrent Force System
The next level of complexity is a body subjected to a nonconcurrent planar force system. Referring to
Fig. 1.22, the forces tend to rotate the body as well as translate it. Static equilibrium requires the
resultant force vector to vanish and, in addition, the resultant moment vector about an arbitrary point
to vanish.
R ¼ F1 þ F2 þ F3 ¼ 0
Mo ¼ 0ð1:13Þ
Resolving the force and moment vectors into their X, Y, Z components leads to six scalar equations,
three for force and three for moment. When the force system is planar, say in the X � Y plane, (1.13)
reduce to three scalar equations
Fig. 1.21 Concurrent
force system
28 1 Introduction to Structural Engineering
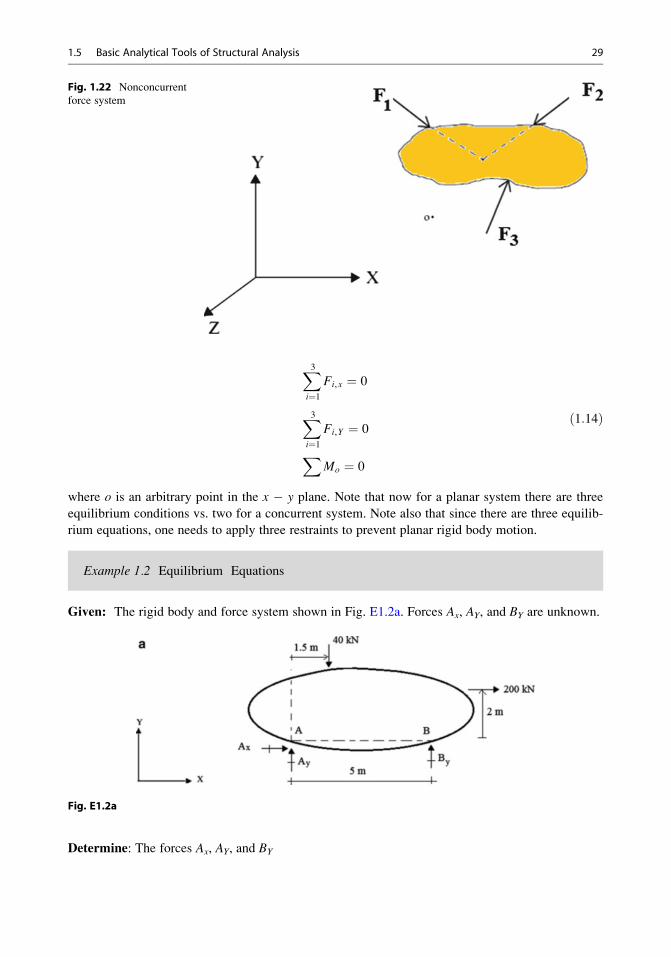
X3i¼1
Fi,x ¼ 0
X3i¼1
Fi,Y ¼ 0
XMo ¼ 0
ð1:14Þ
where o is an arbitrary point in the x � y plane. Note that now for a planar system there are three
equilibrium conditions vs. two for a concurrent system. Note also that since there are three equilib-
rium equations, one needs to apply three restraints to prevent planar rigid body motion.
Example 1.2 Equilibrium Equations
Given: The rigid body and force system shown in Fig. E1.2a. Forces Ax, AY, and BY are unknown.
Fig. E1.2a
Determine: The forces Ax, AY, and BY
Fig. 1.22 Nonconcurrent
force system
1.5 Basic Analytical Tools of Structural Analysis 29
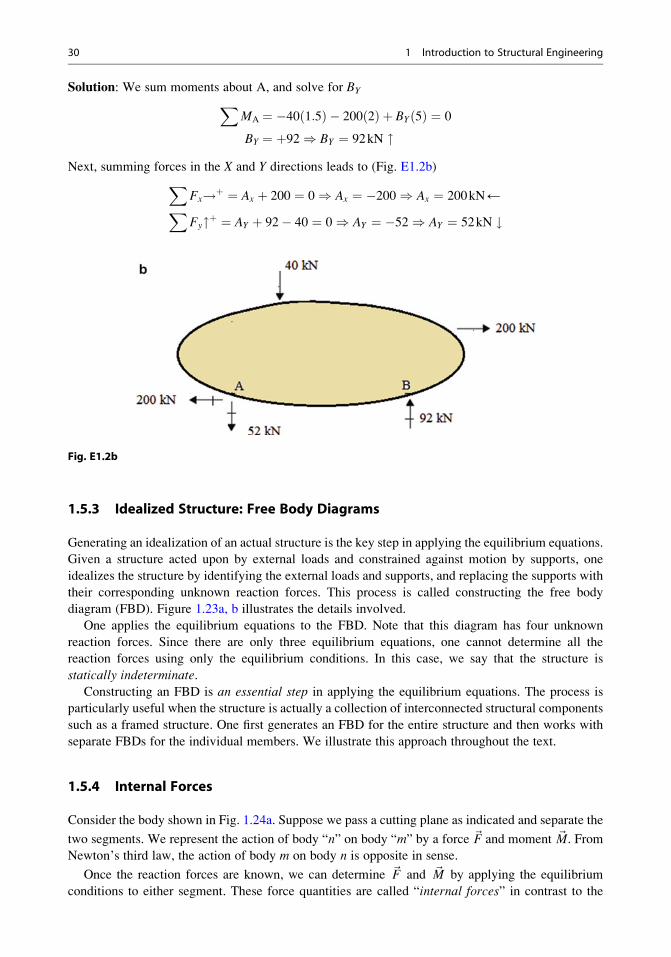
Solution: We sum moments about A, and solve for BYXMA ¼ �40 1:5ð Þ � 200 2ð Þ þ BY 5ð Þ ¼ 0
BY ¼ þ92) BY ¼ 92kN "Next, summing forces in the X and Y directions leads to (Fig. E1.2b)X
Fx!þ ¼ Ax þ 200 ¼ 0) Ax ¼ �200) Ax ¼ 200kN←XFy"þ ¼ AY þ 92� 40 ¼ 0) AY ¼ �52) AY ¼ 52kN #
Fig. E1.2b
1.5.3 Idealized Structure: Free Body Diagrams
Generating an idealization of an actual structure is the key step in applying the equilibrium equations.
Given a structure acted upon by external loads and constrained against motion by supports, one
idealizes the structure by identifying the external loads and supports, and replacing the supports with
their corresponding unknown reaction forces. This process is called constructing the free body
diagram (FBD). Figure 1.23a, b illustrates the details involved.
One applies the equilibrium equations to the FBD. Note that this diagram has four unknown
reaction forces. Since there are only three equilibrium equations, one cannot determine all the
reaction forces using only the equilibrium conditions. In this case, we say that the structure is
statically indeterminate.
Constructing an FBD is an essential step in applying the equilibrium equations. The process is
particularly useful when the structure is actually a collection of interconnected structural components
such as a framed structure. One first generates an FBD for the entire structure and then works with
separate FBDs for the individual members. We illustrate this approach throughout the text.
1.5.4 Internal Forces
Consider the body shown in Fig. 1.24a. Suppose we pass a cutting plane as indicated and separate the
two segments. We represent the action of body “n” on body “m” by a force ~F and moment ~M. From
Newton’s third law, the action of body m on body n is opposite in sense.
Once the reaction forces are known, we can determine ~F and ~M by applying the equilibrium
conditions to either segment. These force quantities are called “internal forces” in contrast to the
30 1 Introduction to Structural Engineering
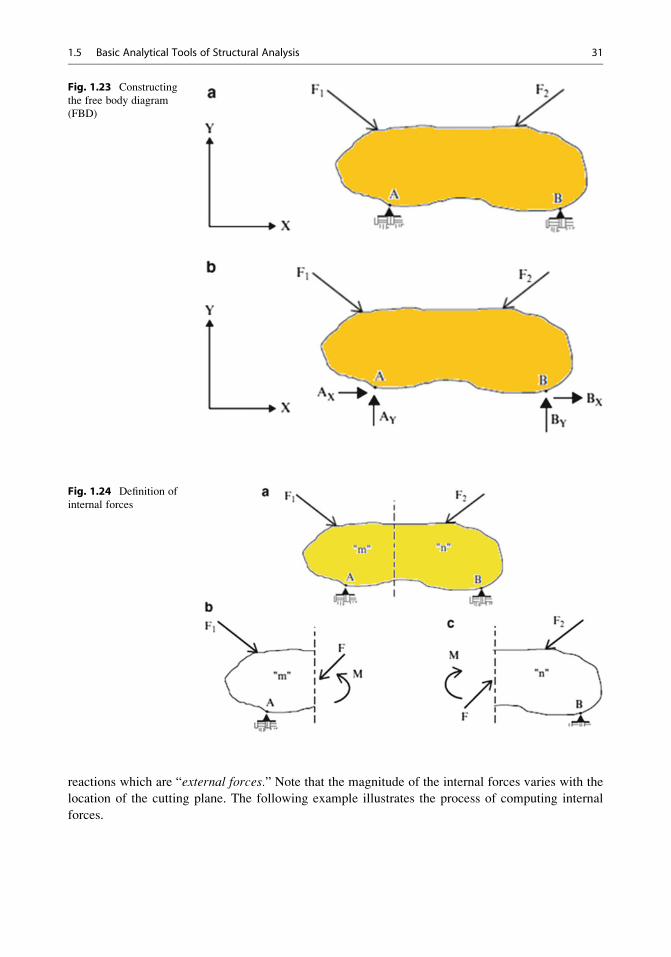
reactions which are “external forces.” Note that the magnitude of the internal forces varies with the
location of the cutting plane. The following example illustrates the process of computing internal
forces.
Fig. 1.23 Constructing
the free body diagram
(FBD)
Fig. 1.24 Definition of
internal forces
1.5 Basic Analytical Tools of Structural Analysis 31
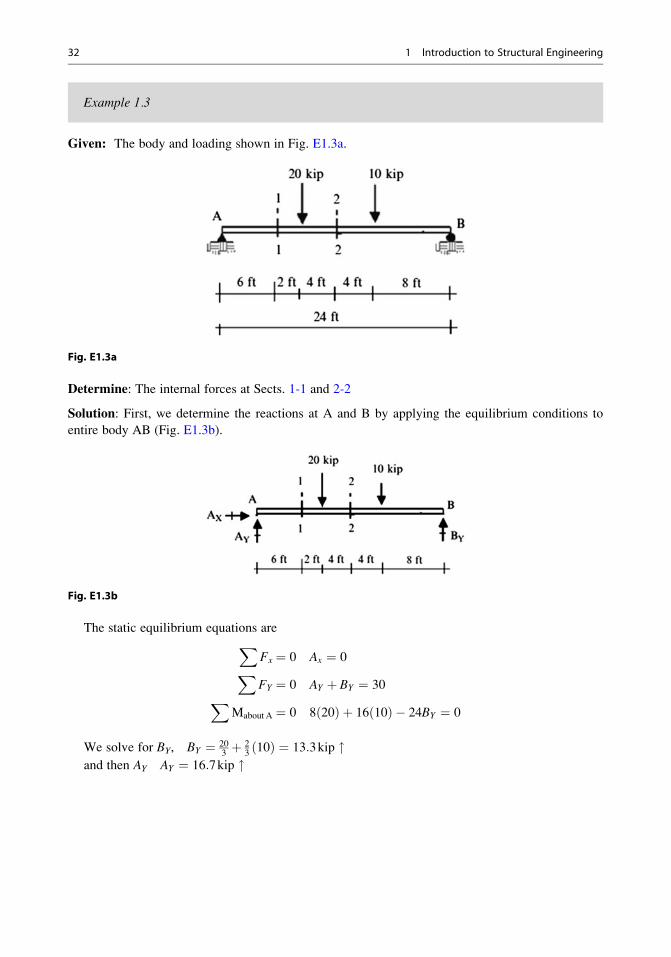
Example 1.3
Given: The body and loading shown in Fig. E1.3a.
Fig. E1.3a
Determine: The internal forces at Sects. 1-1 and 2-2
Solution: First, we determine the reactions at A and B by applying the equilibrium conditions to
entire body AB (Fig. E1.3b).
Fig. E1.3b
The static equilibrium equations areXFx ¼ 0 Ax ¼ 0XFY ¼ 0 AY þ BY ¼ 30X
Mabout A ¼ 0 8 20ð Þ þ 16 10ð Þ � 24BY ¼ 0
We solve for BY, BY ¼ 203þ 2
310ð Þ ¼ 13:3kip "
and then AY AY ¼ 16:7kip "
32 1 Introduction to Structural Engineering
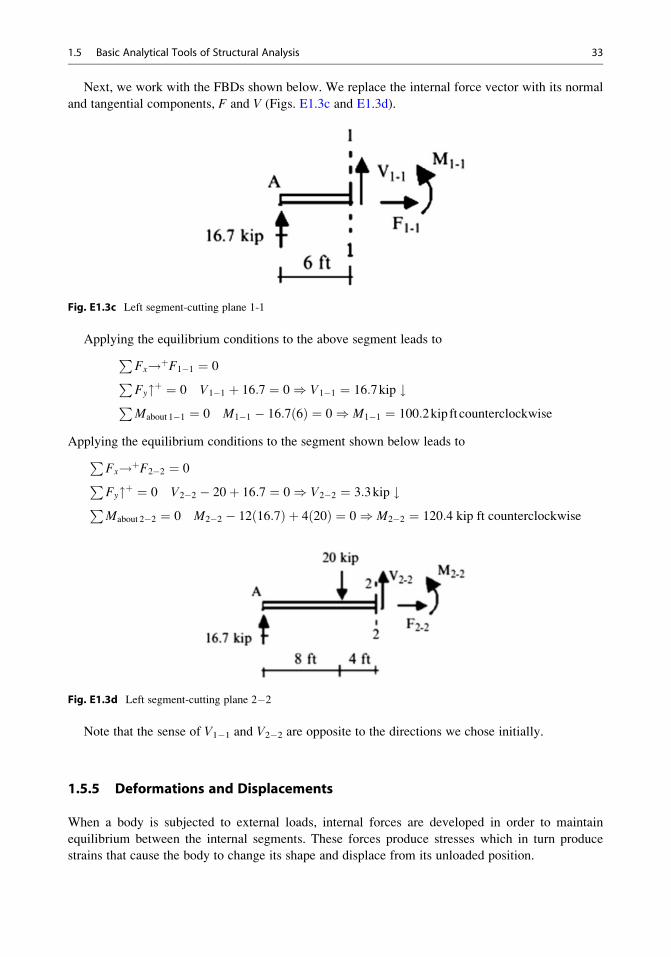
Next, we work with the FBDs shown below. We replace the internal force vector with its normal
and tangential components, F and V (Figs. E1.3c and E1.3d).
Fig. E1.3c Left segment-cutting plane 1-1
Applying the equilibrium conditions to the above segment leads toPFx!þF1�1 ¼ 0PFy"þ ¼ 0 V1�1 þ 16:7 ¼ 0) V1�1 ¼ 16:7kip #PMabout 1�1 ¼ 0 M1�1 � 16:7 6ð Þ ¼ 0) M1�1 ¼ 100:2kip ft counterclockwise
Applying the equilibrium conditions to the segment shown below leads toPFx!þF2�2 ¼ 0PFy"þ ¼ 0 V2�2 � 20þ 16:7 ¼ 0) V2�2 ¼ 3:3kip #PMabout 2�2 ¼ 0 M2�2 � 12 16:7ð Þ þ 4 20ð Þ ¼ 0) M2�2 ¼ 120:4 kip ft counterclockwise
Fig. E1.3d Left segment-cutting plane 2�2
Note that the sense of V1�1 and V2�2 are opposite to the directions we chose initially.
1.5.5 Deformations and Displacements
When a body is subjected to external loads, internal forces are developed in order to maintain
equilibrium between the internal segments. These forces produce stresses which in turn produce
strains that cause the body to change its shape and displace from its unloaded position.
1.5 Basic Analytical Tools of Structural Analysis 33
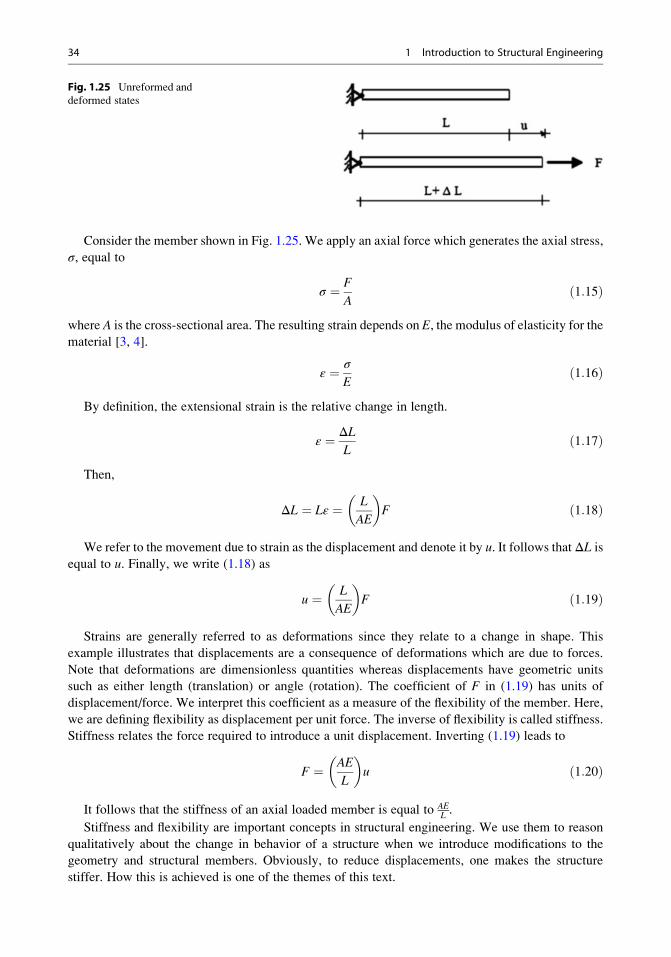
Consider the member shown in Fig. 1.25. We apply an axial force which generates the axial stress,
σ, equal to
σ ¼ F
Að1:15Þ
where A is the cross-sectional area. The resulting strain depends on E, the modulus of elasticity for the
material [3, 4].
ε ¼ σ
Eð1:16Þ
By definition, the extensional strain is the relative change in length.
ε ¼ ΔLL
ð1:17Þ
Then,
ΔL ¼ Lε ¼ L
AE
� �F ð1:18Þ
We refer to the movement due to strain as the displacement and denote it by u. It follows thatΔL is
equal to u. Finally, we write (1.18) as
u ¼ L
AE
� �F ð1:19Þ
Strains are generally referred to as deformations since they relate to a change in shape. This
example illustrates that displacements are a consequence of deformations which are due to forces.
Note that deformations are dimensionless quantities whereas displacements have geometric units
such as either length (translation) or angle (rotation). The coefficient of F in (1.19) has units of
displacement/force. We interpret this coefficient as a measure of the flexibility of the member. Here,
we are defining flexibility as displacement per unit force. The inverse of flexibility is called stiffness.
Stiffness relates the force required to introduce a unit displacement. Inverting (1.19) leads to
F ¼ AE
L
� �u ð1:20Þ
It follows that the stiffness of an axial loaded member is equal to AEL .
Stiffness and flexibility are important concepts in structural engineering. We use them to reason
qualitatively about the change in behavior of a structure when we introduce modifications to the
geometry and structural members. Obviously, to reduce displacements, one makes the structure
stiffer. How this is achieved is one of the themes of this text.
Fig. 1.25 Unreformed and
deformed states
34 1 Introduction to Structural Engineering
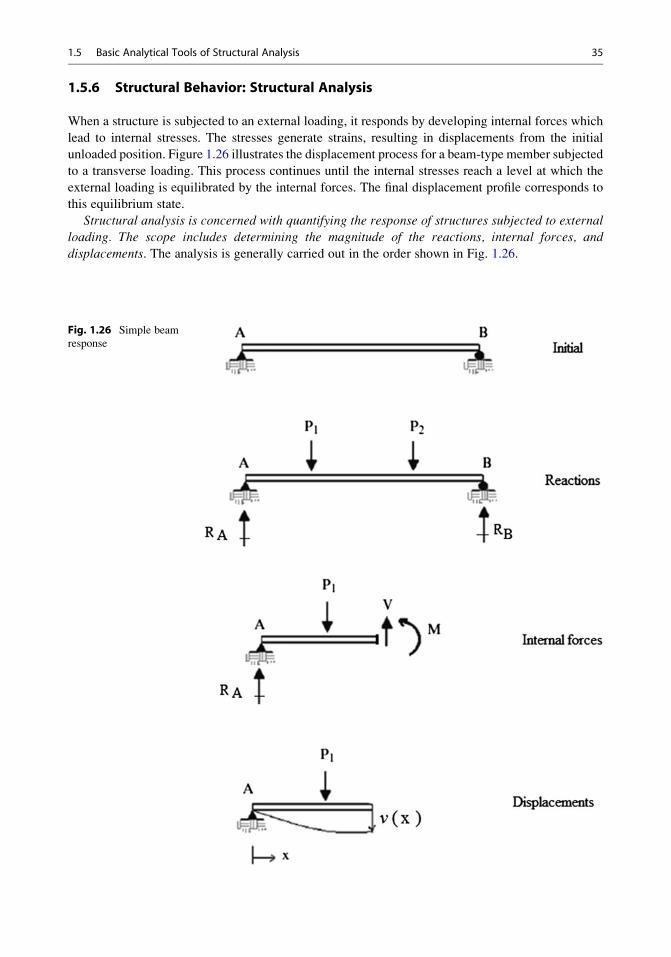
1.5.6 Structural Behavior: Structural Analysis
When a structure is subjected to an external loading, it responds by developing internal forces which
lead to internal stresses. The stresses generate strains, resulting in displacements from the initial
unloaded position. Figure 1.26 illustrates the displacement process for a beam-type member subjected
to a transverse loading. This process continues until the internal stresses reach a level at which the
external loading is equilibrated by the internal forces. The final displacement profile corresponds to
this equilibrium state.
Structural analysis is concerned with quantifying the response of structures subjected to externalloading. The scope includes determining the magnitude of the reactions, internal forces, and
displacements. The analysis is generally carried out in the order shown in Fig. 1.26.
Fig. 1.26 Simple beam
response
1.5 Basic Analytical Tools of Structural Analysis 35
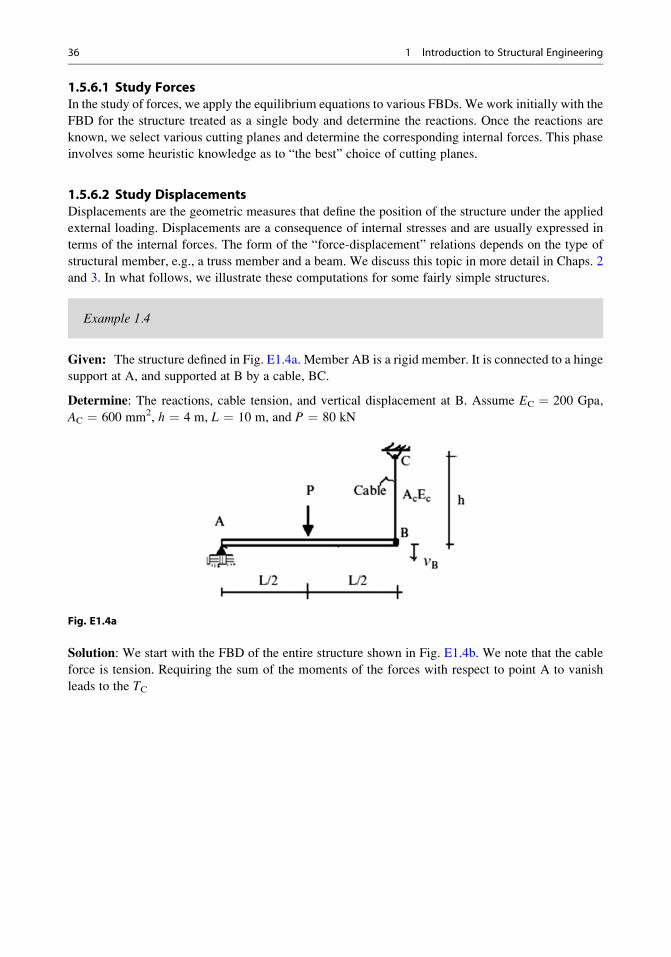
1.5.6.1 Study ForcesIn the study of forces, we apply the equilibrium equations to various FBDs. We work initially with the
FBD for the structure treated as a single body and determine the reactions. Once the reactions are
known, we select various cutting planes and determine the corresponding internal forces. This phase
involves some heuristic knowledge as to “the best” choice of cutting planes.
1.5.6.2 Study DisplacementsDisplacements are the geometric measures that define the position of the structure under the applied
external loading. Displacements are a consequence of internal stresses and are usually expressed in
terms of the internal forces. The form of the “force-displacement” relations depends on the type of
structural member, e.g., a truss member and a beam. We discuss this topic in more detail in Chaps. 2
and 3. In what follows, we illustrate these computations for some fairly simple structures.
Example 1.4
Given: The structure defined in Fig. E1.4a. Member AB is a rigid member. It is connected to a hinge
support at A, and supported at B by a cable, BC.
Determine: The reactions, cable tension, and vertical displacement at B. Assume EC ¼ 200 Gpa,
AC ¼ 600 mm2, h ¼ 4 m, L ¼ 10 m, and P ¼ 80 kN
Fig. E1.4a
Solution: We start with the FBD of the entire structure shown in Fig. E1.4b. We note that the cable
force is tension. Requiring the sum of the moments of the forces with respect to point A to vanish
leads to the TC
36 1 Introduction to Structural Engineering
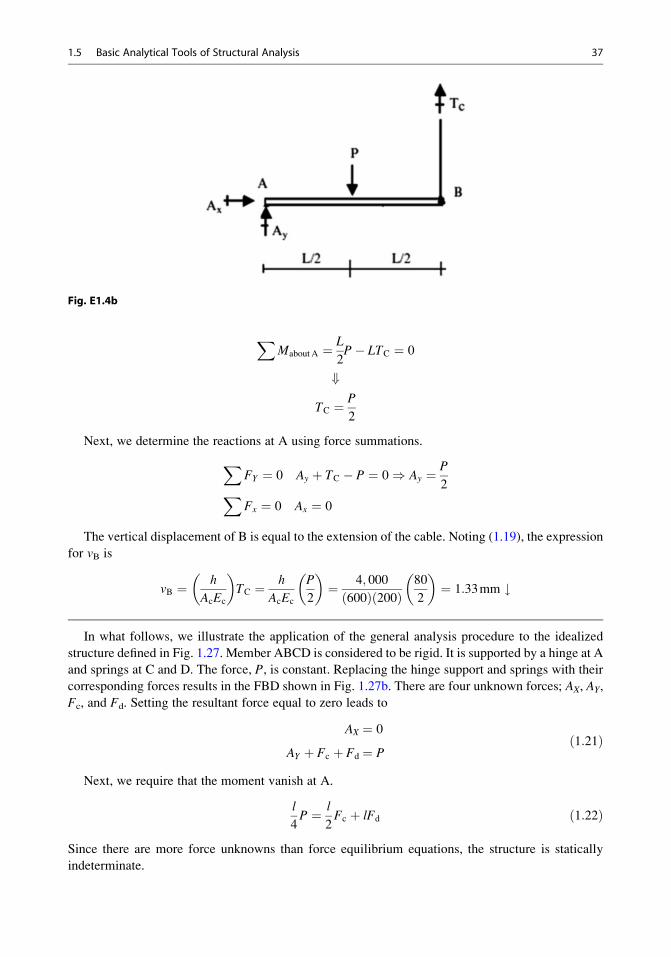
Fig. E1.4b
XMabout A ¼ L
2P� LTC ¼ 0
+
TC ¼ P
2
Next, we determine the reactions at A using force summations.
XFY ¼ 0 Ay þ TC � P ¼ 0) Ay ¼ P
2XFx ¼ 0 Ax ¼ 0
The vertical displacement of B is equal to the extension of the cable. Noting (1.19), the expression
for vB is
vB ¼ h
AcEc
� �TC ¼ h
AcEc
P
2
� �¼ 4; 000
600ð Þ 200ð Þ80
2
� �¼ 1:33mm #
In what follows, we illustrate the application of the general analysis procedure to the idealized
structure defined in Fig. 1.27. Member ABCD is considered to be rigid. It is supported by a hinge at A
and springs at C and D. The force, P, is constant. Replacing the hinge support and springs with their
corresponding forces results in the FBD shown in Fig. 1.27b. There are four unknown forces; AX, AY,
Fc, and Fd. Setting the resultant force equal to zero leads to
AX ¼ 0
AY þ Fc þ Fd ¼ Pð1:21Þ
Next, we require that the moment vanish at A.
l
4P ¼ l
2Fc þ lFd ð1:22Þ
Since there are more force unknowns than force equilibrium equations, the structure is statically
indeterminate.
1.5 Basic Analytical Tools of Structural Analysis 37
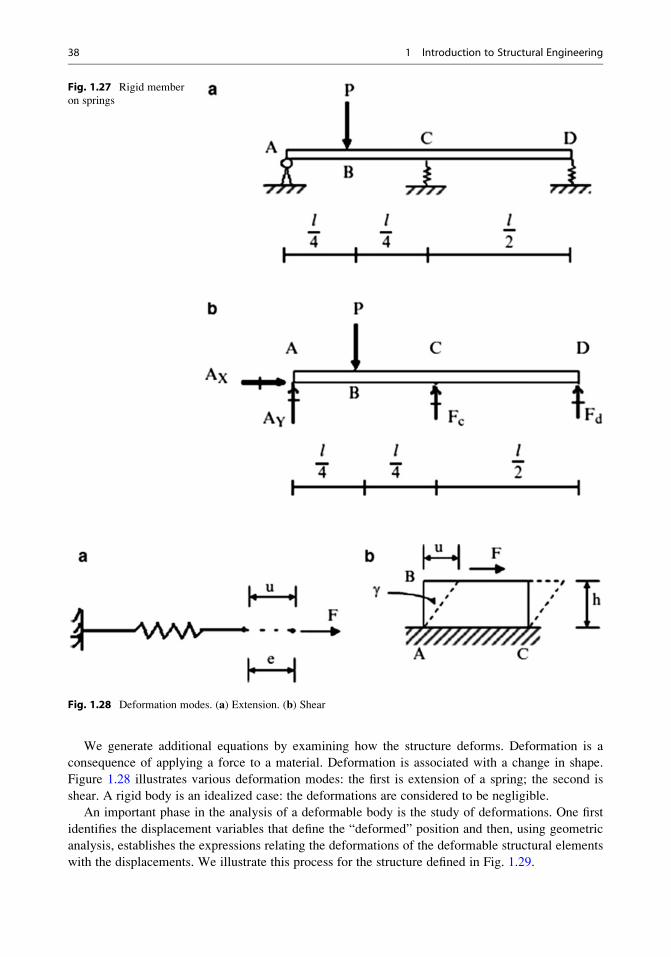
We generate additional equations by examining how the structure deforms. Deformation is a
consequence of applying a force to a material. Deformation is associated with a change in shape.
Figure 1.28 illustrates various deformation modes: the first is extension of a spring; the second is
shear. A rigid body is an idealized case: the deformations are considered to be negligible.
An important phase in the analysis of a deformable body is the study of deformations. One first
identifies the displacement variables that define the “deformed” position and then, using geometric
analysis, establishes the expressions relating the deformations of the deformable structural elements
with the displacements. We illustrate this process for the structure defined in Fig. 1.29.
Fig. 1.27 Rigid member
on springs
Fig. 1.28 Deformation modes. (a) Extension. (b) Shear
38 1 Introduction to Structural Engineering
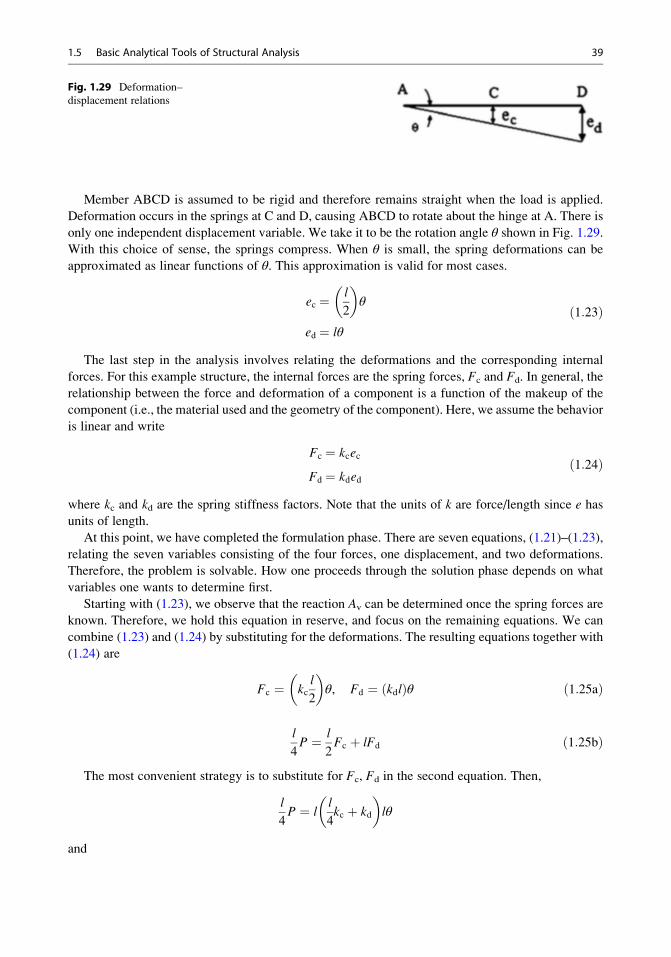
Member ABCD is assumed to be rigid and therefore remains straight when the load is applied.
Deformation occurs in the springs at C and D, causing ABCD to rotate about the hinge at A. There is
only one independent displacement variable. We take it to be the rotation angle θ shown in Fig. 1.29.With this choice of sense, the springs compress. When θ is small, the spring deformations can be
approximated as linear functions of θ. This approximation is valid for most cases.
ec ¼ l
2
� �θ
ed ¼ lθ
ð1:23Þ
The last step in the analysis involves relating the deformations and the corresponding internal
forces. For this example structure, the internal forces are the spring forces, Fc and Fd. In general, the
relationship between the force and deformation of a component is a function of the makeup of the
component (i.e., the material used and the geometry of the component). Here, we assume the behavior
is linear and write
Fc ¼ kcec
Fd ¼ kdedð1:24Þ
where kc and kd are the spring stiffness factors. Note that the units of k are force/length since e has
units of length.
At this point, we have completed the formulation phase. There are seven equations, (1.21)–(1.23),
relating the seven variables consisting of the four forces, one displacement, and two deformations.
Therefore, the problem is solvable. How one proceeds through the solution phase depends on what
variables one wants to determine first.
Starting with (1.23), we observe that the reaction Av can be determined once the spring forces are
known. Therefore, we hold this equation in reserve, and focus on the remaining equations. We can
combine (1.23) and (1.24) by substituting for the deformations. The resulting equations together with
(1.24) are
Fc ¼ kcl
2
� �θ, Fd ¼ kdlð Þθ ð1:25aÞ
l
4P ¼ l
2Fc þ lFd ð1:25bÞ
The most convenient strategy is to substitute for Fc, Fd in the second equation. Then,
l
4P ¼ l
l
4kc þ kd
� �lθ
and
Fig. 1.29 Deformation–
displacement relations
1.5 Basic Analytical Tools of Structural Analysis 39
θ ¼ P
4kd þ kcð Þl ð1:26Þ
Finally, the spring forces corresponding to this value of θ are
Fc ¼ kc2 4kd þ kcð Þ P
Fd ¼ kd4kd þ kcð Þ P
ð1:27Þ
An alternate strategy is to solve first for one of the spring forces. Suppose we take Fc as the primary
force variable. Using (1.25b), we solve for Fc.
Fc ¼ 1
2P� 2Fd ð1:28Þ
Another equation relating Fc and Fd is obtained by eliminating θ in (1.25a). The steps are
θ ¼ 1
kc l=2ð ÞFc ð1:29Þ
and
Fd ¼ 2kdkc
Fc ð1:30Þ
Equation (1.30) represents a constraint on the spring forces. The deformations of the springs are
not arbitrary; they must satisfy (1.23), which can be written as:
ed ¼ 2ec ð1:31ÞFinally, substituting for Fd in (1.28) and solving for Fc leads to
Fc ¼ 1=2
1þ 4kd=kc
� �P ð1:32Þ
The rotation angle is determined with (1.29) and Fc with (1.30).
We refer to the first solution procedure as the displacement or stiffness method. It is relatively
simple to execute since it involves only substitution. Most of the structural analysis computer
programs are based on this method. The second procedure is called the force or flexibility method.
Some manipulation of the equations is required when the structure is statically indeterminate and
consequently the method is somewhat more difficult to apply in this case. However, the Force Method
is more convenient to apply than the displacement method when the structure is statically determi-
nate, since the forces can be determined using only the equilibrium equations. The approach in part I
of the text is based on the Force Method. Later in part II, we discuss the Force and Displacement
methods in more detail.
1.5.7 The Importance of Displacements
Displacements are important for two reasons. Firstly, the serviceability requirement for structures is
usually specified as a limit on the magnitude of certain displacements. Secondly, for indeterminate
structures, one cannot determine the internal forces using only the equations of static equilibrium.
40 1 Introduction to Structural Engineering
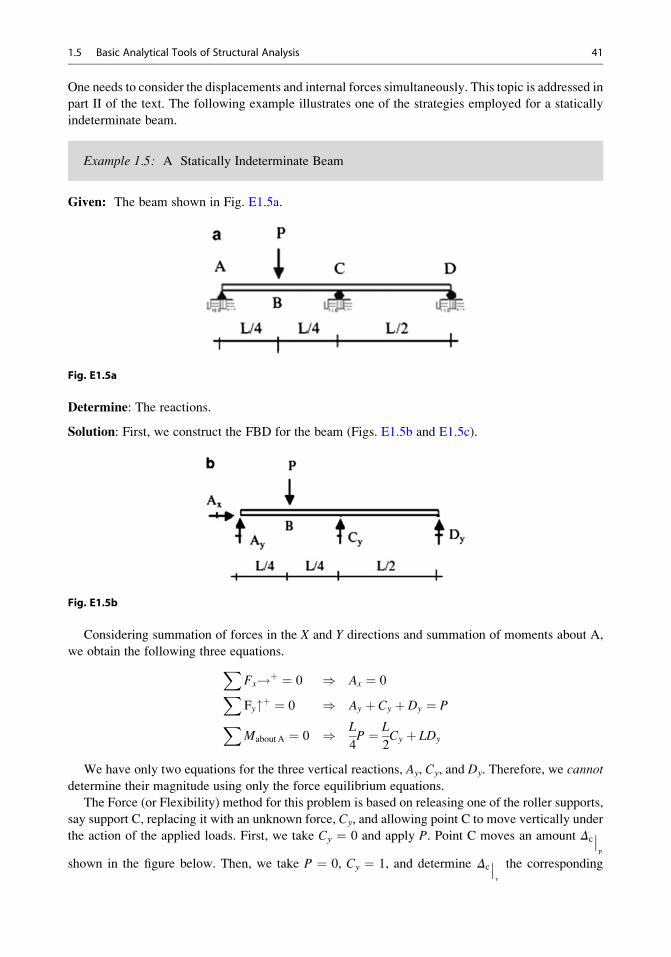
One needs to consider the displacements and internal forces simultaneously. This topic is addressed in
part II of the text. The following example illustrates one of the strategies employed for a statically
indeterminate beam.
Example 1.5: A Statically Indeterminate Beam
Given: The beam shown in Fig. E1.5a.
Fig. E1.5a
Determine: The reactions.
Solution: First, we construct the FBD for the beam (Figs. E1.5b and E1.5c).
Fig. E1.5b
Considering summation of forces in the X and Y directions and summation of moments about A,
we obtain the following three equations.XFx!þ ¼ 0 ) Ax ¼ 0XFy"þ ¼ 0 ) Ay þ Cy þ Dy ¼ PXMabout A ¼ 0 ) L
4P ¼ L
2Cy þ LDy
We have only two equations for the three vertical reactions, Ay, Cy, and Dy. Therefore, we cannot
determine their magnitude using only the force equilibrium equations.
The Force (or Flexibility) method for this problem is based on releasing one of the roller supports,
say support C, replacing it with an unknown force, Cy, and allowing point C to move vertically under
the action of the applied loads. First, we take Cy ¼ 0 and apply P. Point C moves an amount Δc��p
shown in the figure below. Then, we take P ¼ 0, Cy ¼ 1, and determine Δc��v
the corresponding
1.5 Basic Analytical Tools of Structural Analysis 41
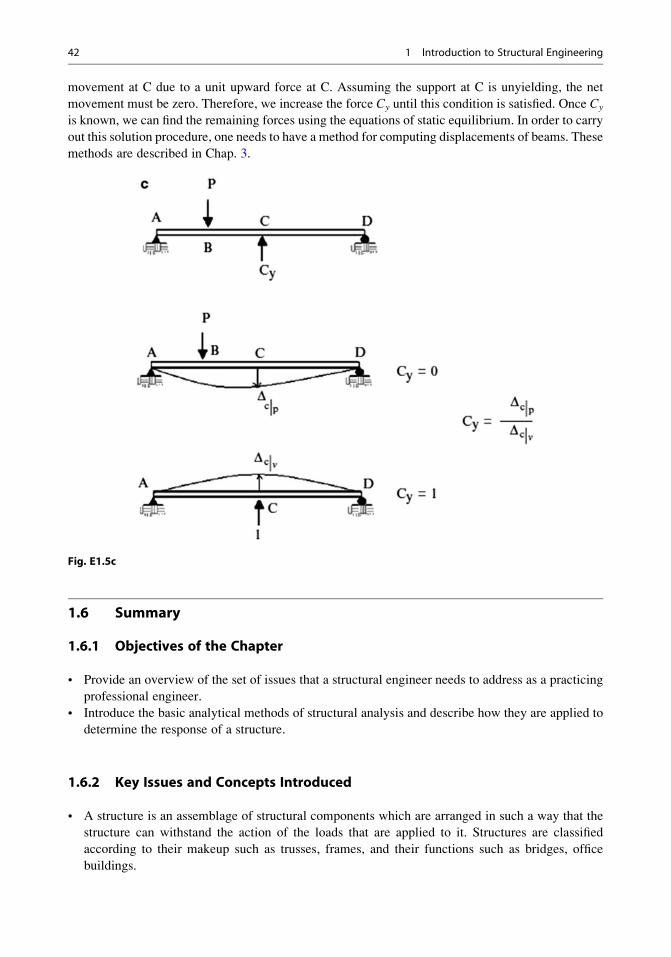
movement at C due to a unit upward force at C. Assuming the support at C is unyielding, the net
movement must be zero. Therefore, we increase the force Cy until this condition is satisfied. Once Cy
is known, we can find the remaining forces using the equations of static equilibrium. In order to carry
out this solution procedure, one needs to have a method for computing displacements of beams. These
methods are described in Chap. 3.
Fig. E1.5c
1.6 Summary
1.6.1 Objectives of the Chapter
• Provide an overview of the set of issues that a structural engineer needs to address as a practicing
professional engineer.
• Introduce the basic analytical methods of structural analysis and describe how they are applied to
determine the response of a structure.
1.6.2 Key Issues and Concepts Introduced
• A structure is an assemblage of structural components which are arranged in such a way that the
structure can withstand the action of the loads that are applied to it. Structures are classified
according to their makeup such as trusses, frames, and their functions such as bridges, office
buildings.
42 1 Introduction to Structural Engineering
• The primary concern of a structural engineer is to ensure that the structure will not collapse during
its expected lifetime. This requires firstly that the engineer properly identify the extreme loading
that the structure is likely to experience over its design life, and secondly, that the structure is
dimensioned so that it has adequate capacity to resist the extreme loading.
• Structures are restrained against rigid body motion by supports. When the structure is loaded,
reaction forces are developed by the supports. A minimum of three nonconcurrent reaction forces
are necessary to prevent rigid body motion for a planar structure.
• Initial instability occurs when the reactions are insufficient or the members are not properly
arranged to resist applied external forces. In this case, the structure will fail under an infinitesimal
load. This condition can be corrected by modifying the supports or including additional members.
• Loss of stability under loading can occur when a primary structural member loses its capacity to
carry load due to either elastic buckling or failure of the material. There are two modes of material
failure: “brittle” and “ductile.” Brittle failure occurs suddenly with a complete loss in load
capacity. One should avoid this mechanism. Ductile failure is evidenced by substantial inelastic
deformation and loss in stiffness. The limit state design procedure allows for a limited amount of
inelastic deformation.
• Loads applied to civil structures are categorized according to direction. Vertical loads are due to
gravitational forces and are defined in terms of the weight of objects. Lateral loads are produced by
natural events such as wind and earthquake. The relative importance of these loads depends on the
nature of the structure and the geographical location of the site.
• Loads are also generated during the construction of the structure. The design loading for certain
types of structures such as segmented concrete girders is controlled by the construction process.
Most structural failures occur during the construction process.
• Loads are also classified according to the time period over which the loads are applied. Long-term
loads, such as self-weight, are called “dead “loads. Loads whose magnitude or location changes
are called “live” loads. Typical live loads are produced by vehicles crossing bridges, and people
occupying buildings.
• Extreme loads such as wind and earthquakes are defined in terms of their return period, which is
interpreted as the average time interval between occurrences of the event. One speaks of the
50-year wind, the 50-year earthquake, etc. The magnitude of the load increases with increasing
return period.
• The design life of a structure is the time period over which the structure is expected to function
without any loss in functionality. Bridges are designed to last at least 100 years. Industrial
buildings are expected to have design lives usually greater than 100 years. The probability that a
structure will experience an extreme event over its design life is approximately equal to the ratio of
the design life to the return period.
• The effect of wind acting on a building is represented by a pressure loading distributed over the
external surfaces. The magnitude and spatial variation of the pressure depends on the shape of the
building and the local wind environment. Positive pressure is generated on windward vertical
forces and steeply inclined roofs. Turbulence zones occur on flat roof and leeward faces and result
in negative pressure.
• Design codes specify procedures for computing the spatial distribution of wind pressure given the
expected extreme wind velocity at the geographic location. The wind velocity tends to be larger in
coastal regions. A typical wind velocity for coastal regions of the USA is 100 miles per hour. The
corresponding wind pressure is approximately 20 psf.
• Snow loading is represented as a uniform download pressure acting on the roof zones of a
structure. Design snow pressure is based on ground snow data for the region where the structure
1.6 Summary 43
is located. Snow is an important loading for the northern part of the USA, Canada, and Eastern
Europe.
• Earthquakes produce sudden intense short-term ground motion which causes structures to vibrate.
The lateral floor loading is due to the inertia forces associated with the acceleration generated by
the ground shaking and is generally expressed as (Wf/g)amax, whereWf is the floor weight, and amax
is the peak value of floor acceleration. Seismic engineering is specialized technical area which is
beyond the scope of this textbook. However, the reader should be knowledgeable of the general
seismic design strategy.
• Conventional structural design philosophy is based on satisfying two requirements: safety and
serviceability. Safety relates to extreme loading and is concerned with preventing collapse and loss
of life. Safety is achieved by providing more resistance than is required for the extreme loading.
Serviceability relates to loading which occurs during the structure’s lifetime. One needs to ensure
that the structure remains operational and has no damage.
• Motion-Based Design, also called performance-based design, is an alternate design methodology
that takes as its primary objective the satisfaction of motion-related design requirements such as
displacement and acceleration. The goal here is to provide sufficient stiffness and energy dissipa-
tion mechanisms to limit the motion under extreme loading.
• Structural analysis is concerned with quantifying the response of a structure subjected to external
loading. This effort involves determining the reactions, internal forces, and displacement
profiles. One generally carries out the analysis in two steps: study of forces and study of
displacements. In the study of forces, one applies the force equilibrium equations to isolated
segments of the structure called FBDs. Selecting appropriate FBDs is a skill acquired through
practice. In the study of displacements, one first uses a geometric-based approach to express the
deformation measures in terms of displacement measures. The displacement measures are then
related to the internal forces by introducing certain material properties such as the elastic modulus.
These relations allow one to determine the displacements, given the internal forces. We apply this
approach throughout part II of the text. It provides the basis for the analysis of statically indeter-
minate structures.
References
1. Schodek DL, Bechthold M. Structures. Englewood Cliffs: Pearson/Prentice Hall; 2008.
2. Hibbeler RC. Engineering mechanics statics and dynamics. 11th ed. Englewood Cliffs: Pearson/Prentice Hall; 2007.
3. Hibbeler RC. Mechanics of materials. Upper Saddle River: Prentice Hall; 2008.
4. Gere JM. Mechanics of materials. 6th ed. Belmont: Brooks/Coll; 2004.
5. Segui WT. Steel design. 4th ed. Toronto: Thomson; 2007.
6. International Code Council (ICC). International building code. Washington: ICC; 2009.
7. Structural Engineering Institute (ASCE). ASCE/SEI 7-05. Minimum design loads for buildings and other structures.
New York: ASCE; 2006.
8. American Concrete Institute (ACI). Building code requirements for structural concrete (ACI 318-14). Farmington
Hills, MI: ACI; 2014.
9. American Institute of Steel Construction (AISC). AISC-ASD/LRFD steel construction manual. 14th ed. Chicago:
AISC; 2011.
10. Eurocode (1-9). British Standards Institute. London, UK; 2009.
11. American Association of State Highway and Transportation Officials (AASHTO). AASHTO LRFD bridge design
specifications. 7th ed. Washington, DC: AASHTO; 2015.
12. Streeter VL. Fluid mechanics. New York: McGraw-Hill; 1966.
44 1 Introduction to Structural Engineering

13. United States Geological Survey (USGS). National Earthquake Information Center (NEIC), Denver, Colorado.
14. Federal Emergency Management Agency FEMA445. Next generation performance-based design guidelines.
Washington; 2006.
15. Hibbeler RC. Structural analysis. 7th ed. Upper Saddle River: Pearson/Prentice Hall; 2009.
16. Leet KM, Uang CM. Fundamentals of structural analysis. 2nd ed. New York: McGraw-Hill; 2005.
17. McCormac JC. Structural analysis using classical and matrix methods. Hoboken: Wiley; 2007.
18. Heyman J. The science of structural engineering. London: Imperial College; 1999.
References 45
Statically Determinate Truss Structures 2
Abstract
We begin this chapter by reviewing the historical development of truss
structures. Trusses have played a key role in the expansion of the highway
and railroad systems during the past two centuries. From a mechanics
perspective, they are ideal structures for introducing the concepts of
equilibrium and displacement. We deal first with the issues of stability
and static determinacy, and then move on to describe manual and
computer-based techniques for determining the internal forces generated
by external loads. A computational scheme for determining the
displacements of truss structures is presented next. Given a structure,
one needs information concerning how the internal forces vary as the
external live load is repositioned on the structure for the design phase.
This type of information is provided by an influence line. We introduce
influence lines in the last section of this chapter and illustrate how they are
constructed for typical trusses. This chapter focuses on linear elastic
structural analysis. Nonlinear structural analysis is playing an increasingly
more important rule in structural design. However, we believe an
understanding of linear analysis is essential before discussing the topic
of nonlinear analysis.
2.1 Introduction: Types of Truss Structures
Simple two-dimensional (2-D) truss structures are formed by combining one-dimensional linear
members to create a triangular pattern. One starts with a triangular unit, and then adds a pair of
members to form an additional triangular unit. This process is repeated until the complete structure is
assembled. Figure 2.1 illustrates this process for the case where all the members are contained in a
single plane. Such .structures are called plane trusses; the nodes are also called “Joints.”Three members connected at their ends form a rigid structure in the sense that, when loaded, the
change in shape of the structure is due only to the deformation of the members. It follows that a
# Springer International Publishing Switzerland 2016
J.J. Connor, S. Faraji, Fundamentals of Structural Engineering,DOI 10.1007/978-3-319-24331-3_2
47
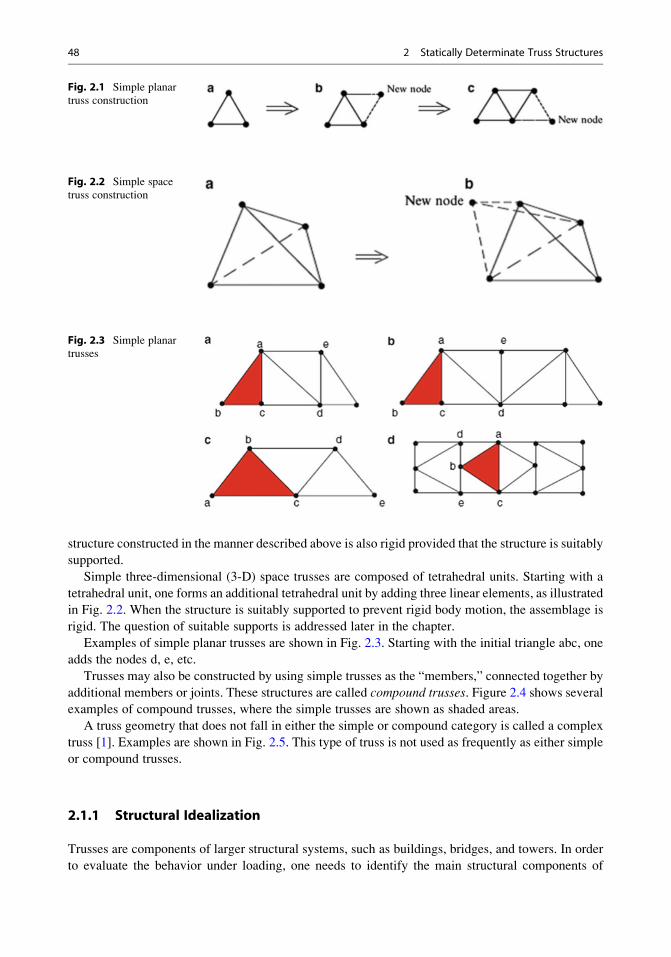
structure constructed in the manner described above is also rigid provided that the structure is suitably
supported.
Simple three-dimensional (3-D) space trusses are composed of tetrahedral units. Starting with a
tetrahedral unit, one forms an additional tetrahedral unit by adding three linear elements, as illustrated
in Fig. 2.2. When the structure is suitably supported to prevent rigid body motion, the assemblage is
rigid. The question of suitable supports is addressed later in the chapter.
Examples of simple planar trusses are shown in Fig. 2.3. Starting with the initial triangle abc, one
adds the nodes d, e, etc.
Trusses may also be constructed by using simple trusses as the “members,” connected together by
additional members or joints. These structures are called compound trusses. Figure 2.4 shows severalexamples of compound trusses, where the simple trusses are shown as shaded areas.
A truss geometry that does not fall in either the simple or compound category is called a complex
truss [1]. Examples are shown in Fig. 2.5. This type of truss is not used as frequently as either simple
or compound trusses.
2.1.1 Structural Idealization
Trusses are components of larger structural systems, such as buildings, bridges, and towers. In order
to evaluate the behavior under loading, one needs to identify the main structural components of
Fig. 2.1 Simple planar
truss construction
Fig. 2.2 Simple space
truss construction
Fig. 2.3 Simple planar
trusses
48 2 Statically Determinate Truss Structures
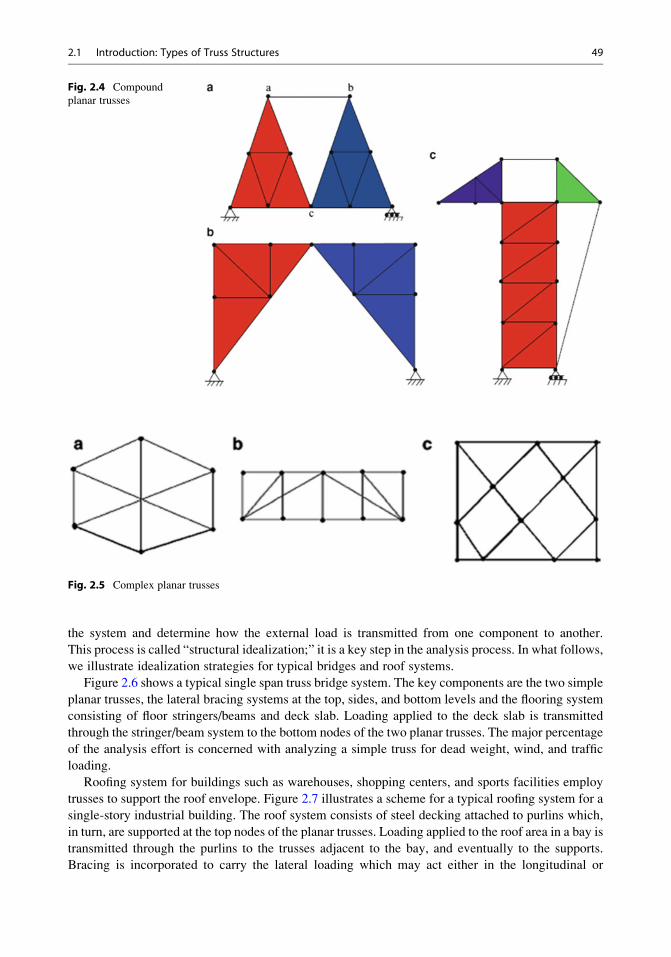
the system and determine how the external load is transmitted from one component to another.
This process is called “structural idealization;” it is a key step in the analysis process. In what follows,
we illustrate idealization strategies for typical bridges and roof systems.
Figure 2.6 shows a typical single span truss bridge system. The key components are the two simple
planar trusses, the lateral bracing systems at the top, sides, and bottom levels and the flooring system
consisting of floor stringers/beams and deck slab. Loading applied to the deck slab is transmitted
through the stringer/beam system to the bottom nodes of the two planar trusses. The major percentage
of the analysis effort is concerned with analyzing a simple truss for dead weight, wind, and traffic
loading.
Roofing system for buildings such as warehouses, shopping centers, and sports facilities employ
trusses to support the roof envelope. Figure 2.7 illustrates a scheme for a typical roofing system for a
single-story industrial building. The roof system consists of steel decking attached to purlins which,
in turn, are supported at the top nodes of the planar trusses. Loading applied to the roof area in a bay is
transmitted through the purlins to the trusses adjacent to the bay, and eventually to the supports.
Bracing is incorporated to carry the lateral loading which may act either in the longitudinal or
Fig. 2.4 Compound
planar trusses
Fig. 2.5 Complex planar trusses
2.1 Introduction: Types of Truss Structures 49
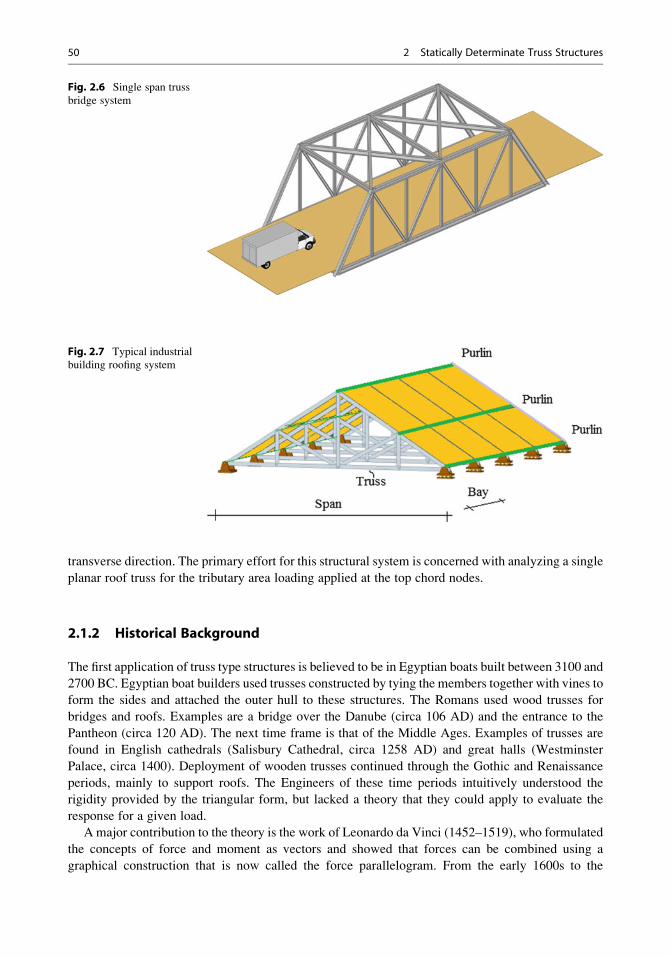
transverse direction. The primary effort for this structural system is concerned with analyzing a single
planar roof truss for the tributary area loading applied at the top chord nodes.
2.1.2 Historical Background
The first application of truss type structures is believed to be in Egyptian boats built between 3100 and
2700 BC. Egyptian boat builders used trusses constructed by tying the members together with vines to
form the sides and attached the outer hull to these structures. The Romans used wood trusses for
bridges and roofs. Examples are a bridge over the Danube (circa 106 AD) and the entrance to the
Pantheon (circa 120 AD). The next time frame is that of the Middle Ages. Examples of trusses are
found in English cathedrals (Salisbury Cathedral, circa 1258 AD) and great halls (Westminster
Palace, circa 1400). Deployment of wooden trusses continued through the Gothic and Renaissance
periods, mainly to support roofs. The Engineers of these time periods intuitively understood the
rigidity provided by the triangular form, but lacked a theory that they could apply to evaluate the
response for a given load.
A major contribution to the theory is the work of Leonardo da Vinci (1452–1519), who formulated
the concepts of force and moment as vectors and showed that forces can be combined using a
graphical construction that is now called the force parallelogram. From the early 1600s to the
Fig. 2.6 Single span truss
bridge system
Fig. 2.7 Typical industrial
building roofing system
50 2 Statically Determinate Truss Structures
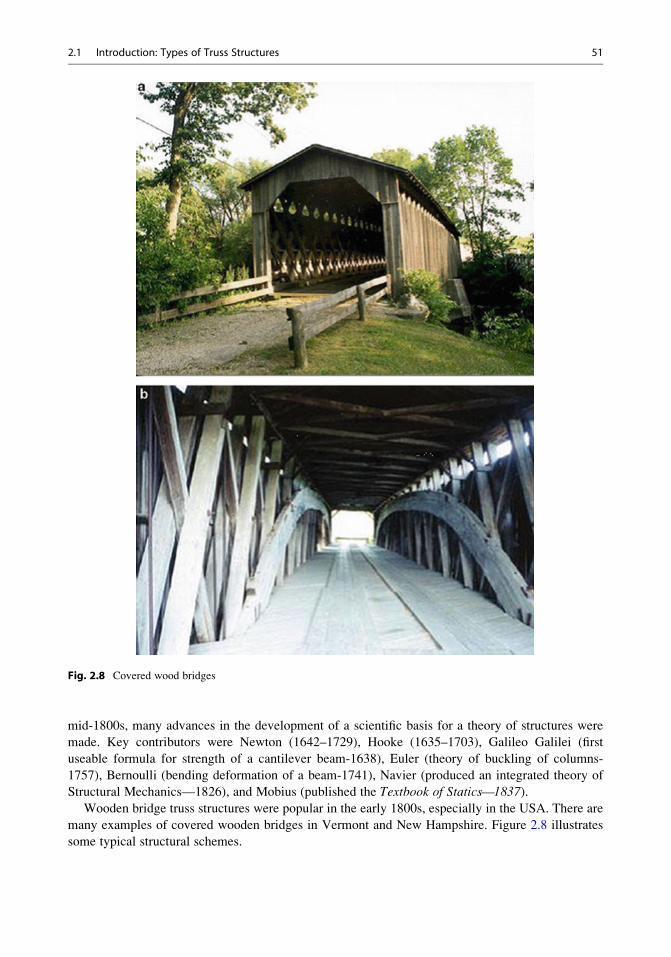
mid-1800s, many advances in the development of a scientific basis for a theory of structures were
made. Key contributors were Newton (1642–1729), Hooke (1635–1703), Galileo Galilei (first
useable formula for strength of a cantilever beam-1638), Euler (theory of buckling of columns-
1757), Bernoulli (bending deformation of a beam-1741), Navier (produced an integrated theory of
Structural Mechanics—1826), and Mobius (published the Textbook of Statics—1837).
Wooden bridge truss structures were popular in the early 1800s, especially in the USA. There are
many examples of covered wooden bridges in Vermont and New Hampshire. Figure 2.8 illustrates
some typical structural schemes.
Fig. 2.8 Covered wood bridges
2.1 Introduction: Types of Truss Structures 51
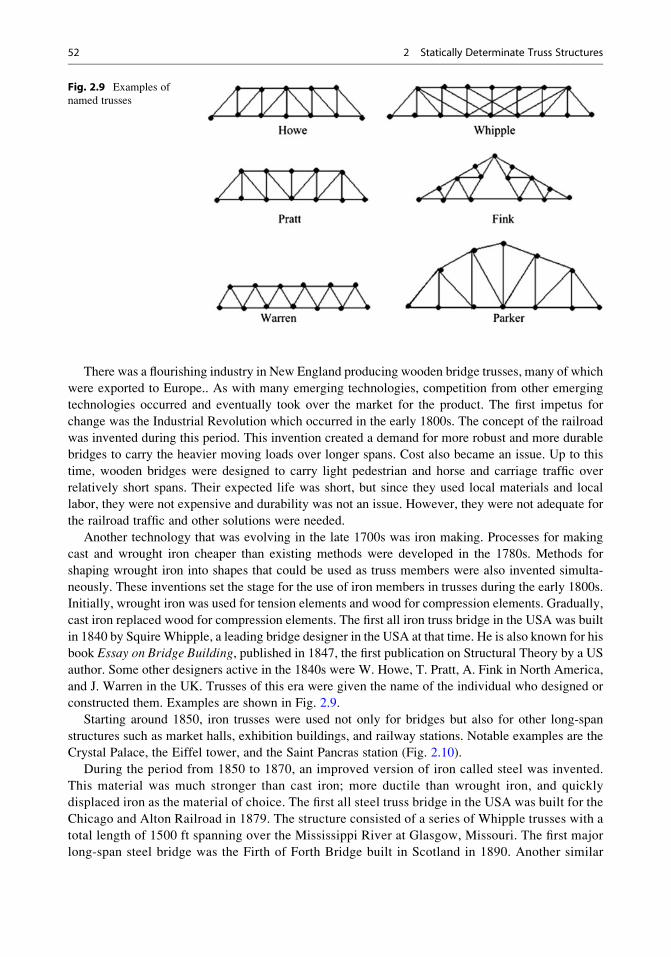
There was a flourishing industry in New England producing wooden bridge trusses, many of which
were exported to Europe.. As with many emerging technologies, competition from other emerging
technologies occurred and eventually took over the market for the product. The first impetus for
change was the Industrial Revolution which occurred in the early 1800s. The concept of the railroad
was invented during this period. This invention created a demand for more robust and more durable
bridges to carry the heavier moving loads over longer spans. Cost also became an issue. Up to this
time, wooden bridges were designed to carry light pedestrian and horse and carriage traffic over
relatively short spans. Their expected life was short, but since they used local materials and local
labor, they were not expensive and durability was not an issue. However, they were not adequate for
the railroad traffic and other solutions were needed.
Another technology that was evolving in the late 1700s was iron making. Processes for making
cast and wrought iron cheaper than existing methods were developed in the 1780s. Methods for
shaping wrought iron into shapes that could be used as truss members were also invented simulta-
neously. These inventions set the stage for the use of iron members in trusses during the early 1800s.
Initially, wrought iron was used for tension elements and wood for compression elements. Gradually,
cast iron replaced wood for compression elements. The first all iron truss bridge in the USA was built
in 1840 by Squire Whipple, a leading bridge designer in the USA at that time. He is also known for his
book Essay on Bridge Building, published in 1847, the first publication on Structural Theory by a US
author. Some other designers active in the 1840s were W. Howe, T. Pratt, A. Fink in North America,
and J. Warren in the UK. Trusses of this era were given the name of the individual who designed or
constructed them. Examples are shown in Fig. 2.9.
Starting around 1850, iron trusses were used not only for bridges but also for other long-span
structures such as market halls, exhibition buildings, and railway stations. Notable examples are the
Crystal Palace, the Eiffel tower, and the Saint Pancras station (Fig. 2.10).
During the period from 1850 to 1870, an improved version of iron called steel was invented.
This material was much stronger than cast iron; more ductile than wrought iron, and quickly
displaced iron as the material of choice. The first all steel truss bridge in the USA was built for the
Chicago and Alton Railroad in 1879. The structure consisted of a series of Whipple trusses with a
total length of 1500 ft spanning over the Mississippi River at Glasgow, Missouri. The first major
long-span steel bridge was the Firth of Forth Bridge built in Scotland in 1890. Another similar
Fig. 2.9 Examples of
named trusses
52 2 Statically Determinate Truss Structures
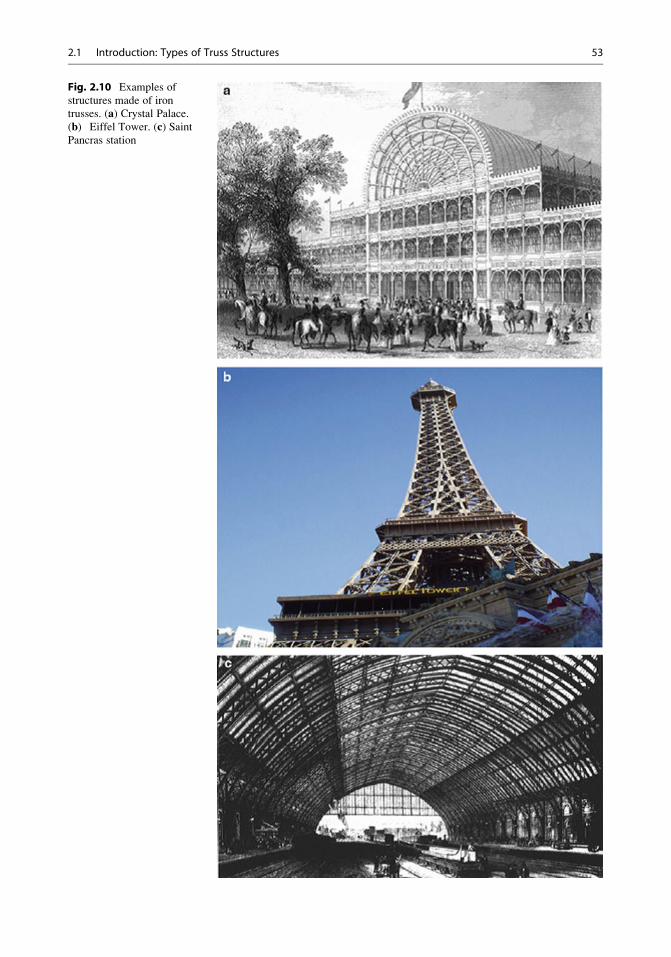
Fig. 2.10 Examples of
structures made of iron
trusses. (a) Crystal Palace.(b) Eiffel Tower. (c) SaintPancras station
2.1 Introduction: Types of Truss Structures 53
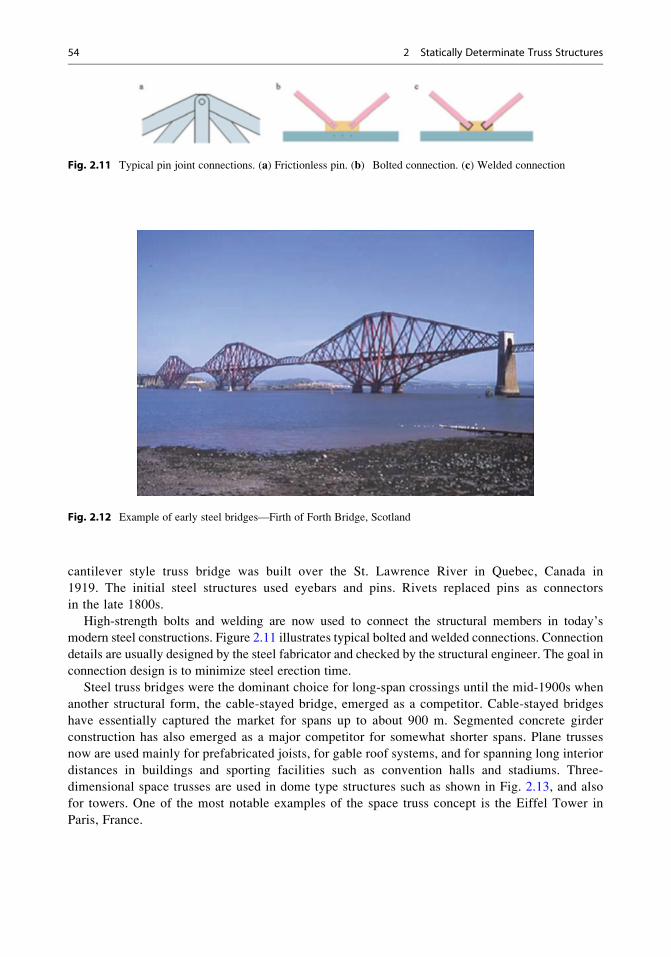
cantilever style truss bridge was built over the St. Lawrence River in Quebec, Canada in
1919. The initial steel structures used eyebars and pins. Rivets replaced pins as connectors
in the late 1800s.
High-strength bolts and welding are now used to connect the structural members in today’s
modern steel constructions. Figure 2.11 illustrates typical bolted and welded connections. Connection
details are usually designed by the steel fabricator and checked by the structural engineer. The goal in
connection design is to minimize steel erection time.
Steel truss bridges were the dominant choice for long-span crossings until the mid-1900s when
another structural form, the cable-stayed bridge, emerged as a competitor. Cable-stayed bridges
have essentially captured the market for spans up to about 900 m. Segmented concrete girder
construction has also emerged as a major competitor for somewhat shorter spans. Plane trusses
now are used mainly for prefabricated joists, for gable roof systems, and for spanning long interior
distances in buildings and sporting facilities such as convention halls and stadiums. Three-
dimensional space trusses are used in dome type structures such as shown in Fig. 2.13, and also
for towers. One of the most notable examples of the space truss concept is the Eiffel Tower in
Paris, France.
Fig. 2.11 Typical pin joint connections. (a) Frictionless pin. (b) Bolted connection. (c) Welded connection
Fig. 2.12 Example of early steel bridges—Firth of Forth Bridge, Scotland
54 2 Statically Determinate Truss Structures
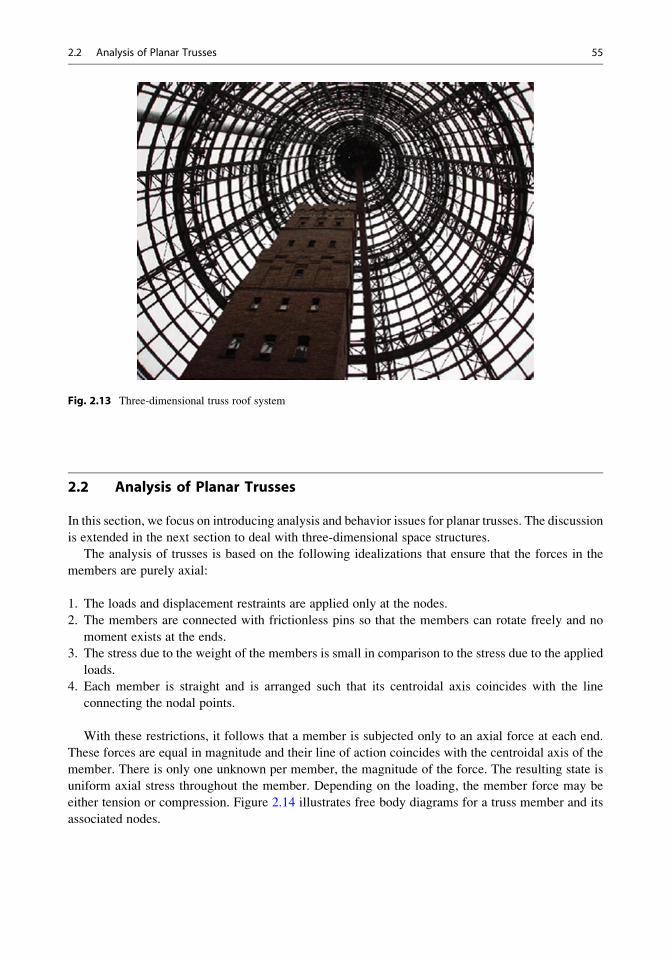
2.2 Analysis of Planar Trusses
In this section, we focus on introducing analysis and behavior issues for planar trusses. The discussion
is extended in the next section to deal with three-dimensional space structures.
The analysis of trusses is based on the following idealizations that ensure that the forces in the
members are purely axial:
1. The loads and displacement restraints are applied only at the nodes.
2. The members are connected with frictionless pins so that the members can rotate freely and no
moment exists at the ends.
3. The stress due to the weight of the members is small in comparison to the stress due to the applied
loads.
4. Each member is straight and is arranged such that its centroidal axis coincides with the line
connecting the nodal points.
With these restrictions, it follows that a member is subjected only to an axial force at each end.
These forces are equal in magnitude and their line of action coincides with the centroidal axis of the
member. There is only one unknown per member, the magnitude of the force. The resulting state is
uniform axial stress throughout the member. Depending on the loading, the member force may be
either tension or compression. Figure 2.14 illustrates free body diagrams for a truss member and its
associated nodes.
Fig. 2.13 Three-dimensional truss roof system
2.2 Analysis of Planar Trusses 55
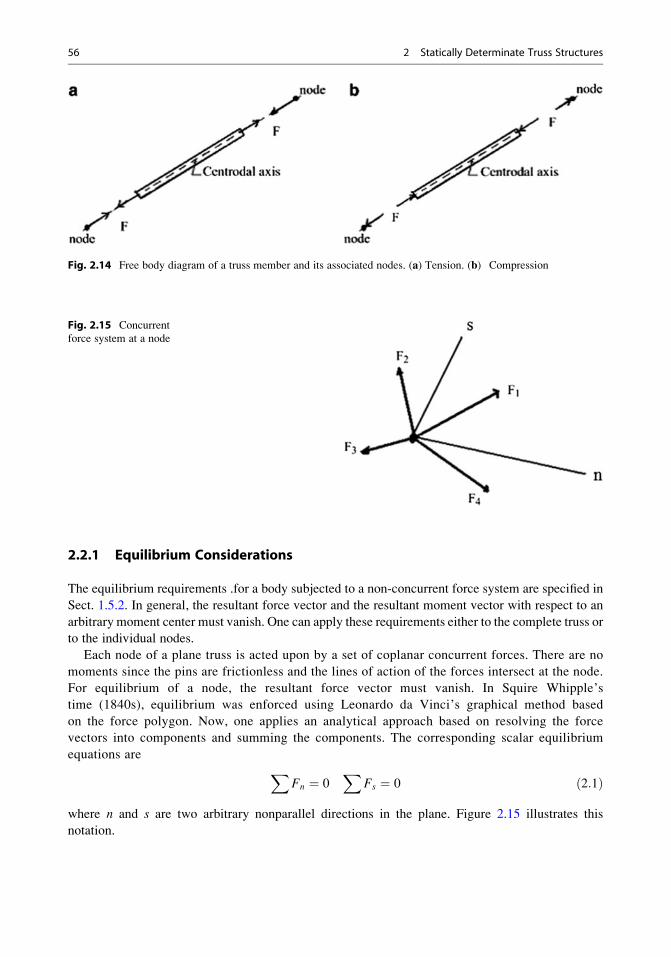
2.2.1 Equilibrium Considerations
The equilibrium requirements .for a body subjected to a non-concurrent force system are specified in
Sect. 1.5.2. In general, the resultant force vector and the resultant moment vector with respect to an
arbitrary moment center must vanish. One can apply these requirements either to the complete truss or
to the individual nodes.
Each node of a plane truss is acted upon by a set of coplanar concurrent forces. There are no
moments since the pins are frictionless and the lines of action of the forces intersect at the node.
For equilibrium of a node, the resultant force vector must vanish. In Squire Whipple’s
time (1840s), equilibrium was enforced using Leonardo da Vinci’s graphical method based
on the force polygon. Now, one applies an analytical approach based on resolving the force
vectors into components and summing the components. The corresponding scalar equilibrium
equations are XFn ¼ 0
XFs ¼ 0 ð2:1Þ
where n and s are two arbitrary nonparallel directions in the plane. Figure 2.15 illustrates this
notation.
Fig. 2.14 Free body diagram of a truss member and its associated nodes. (a) Tension. (b) Compression
Fig. 2.15 Concurrent
force system at a node
56 2 Statically Determinate Truss Structures
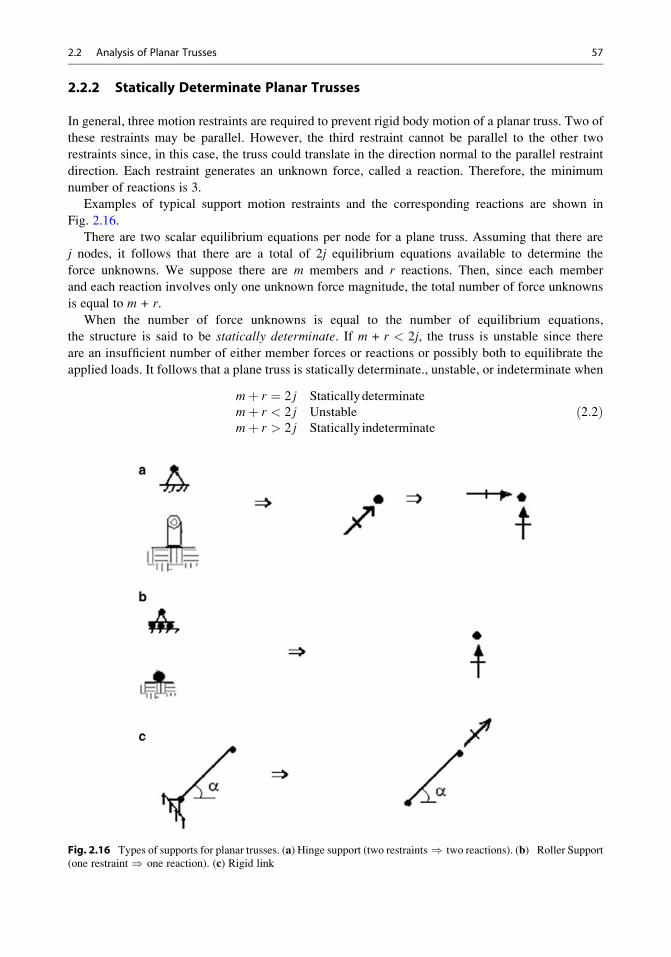
2.2.2 Statically Determinate Planar Trusses
In general, three motion restraints are required to prevent rigid body motion of a planar truss. Two of
these restraints may be parallel. However, the third restraint cannot be parallel to the other two
restraints since, in this case, the truss could translate in the direction normal to the parallel restraint
direction. Each restraint generates an unknown force, called a reaction. Therefore, the minimum
number of reactions is 3.
Examples of typical support motion restraints and the corresponding reactions are shown in
Fig. 2.16.
There are two scalar equilibrium equations per node for a plane truss. Assuming that there are
j nodes, it follows that there are a total of 2j equilibrium equations available to determine the
force unknowns. We suppose there are m members and r reactions. Then, since each member
and each reaction involves only one unknown force magnitude, the total number of force unknowns
is equal to m + r.
When the number of force unknowns is equal to the number of equilibrium equations,
the structure is said to be statically determinate. If m + r < 2j, the truss is unstable since there
are an insufficient number of either member forces or reactions or possibly both to equilibrate the
applied loads. It follows that a plane truss is statically determinate., unstable, or indeterminate when
mþ r ¼ 2 j Staticallydeterminate
mþ r < 2 j Unstable
mþ r > 2 j Statically indeterminate
ð2:2Þ
Fig. 2.16 Types of supports for planar trusses. (a) Hinge support (two restraints ) two reactions). (b) Roller Support
(one restraint ) one reaction). (c) Rigid link
2.2 Analysis of Planar Trusses 57
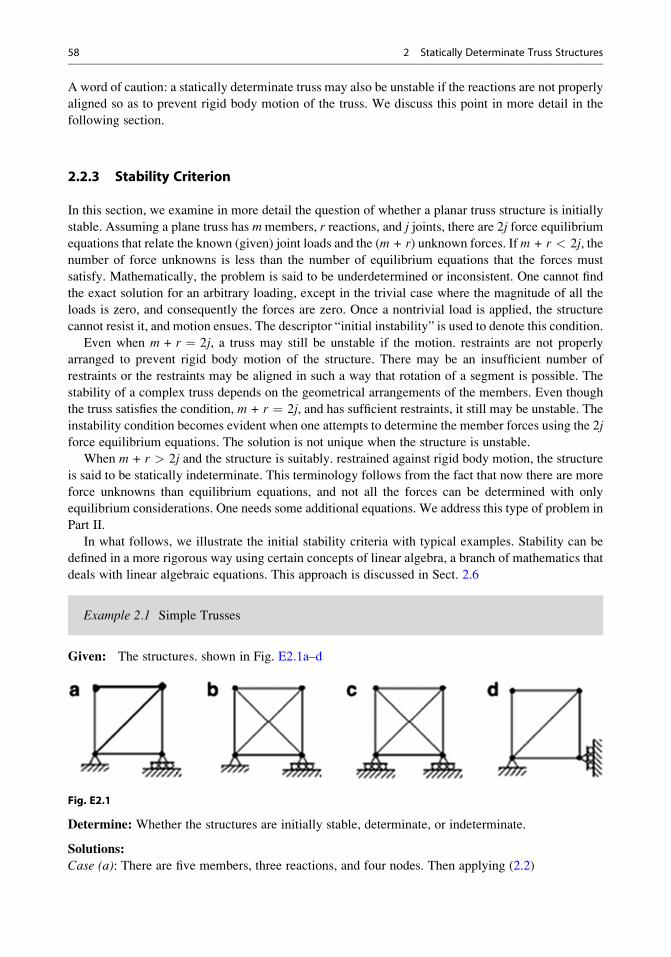
A word of caution: a statically determinate truss may also be unstable if the reactions are not properly
aligned so as to prevent rigid body motion of the truss. We discuss this point in more detail in the
following section.
2.2.3 Stability Criterion
In this section, we examine in more detail the question of whether a planar truss structure is initially
stable. Assuming a plane truss has mmembers, r reactions, and j joints, there are 2j force equilibrium
equations that relate the known (given) joint loads and the (m + r) unknown forces. Ifm + r < 2j, thenumber of force unknowns is less than the number of equilibrium equations that the forces must
satisfy. Mathematically, the problem is said to be underdetermined or inconsistent. One cannot find
the exact solution for an arbitrary loading, except in the trivial case where the magnitude of all the
loads is zero, and consequently the forces are zero. Once a nontrivial load is applied, the structure
cannot resist it, and motion ensues. The descriptor “initial instability” is used to denote this condition.
Even when m + r ¼ 2j, a truss may still be unstable if the motion. restraints are not properly
arranged to prevent rigid body motion of the structure. There may be an insufficient number of
restraints or the restraints may be aligned in such a way that rotation of a segment is possible. The
stability of a complex truss depends on the geometrical arrangements of the members. Even though
the truss satisfies the condition, m + r ¼ 2j, and has sufficient restraints, it still may be unstable. The
instability condition becomes evident when one attempts to determine the member forces using the 2j
force equilibrium equations. The solution is not unique when the structure is unstable.
When m + r > 2j and the structure is suitably. restrained against rigid body motion, the structure
is said to be statically indeterminate. This terminology follows from the fact that now there are more
force unknowns than equilibrium equations, and not all the forces can be determined with only
equilibrium considerations. One needs some additional equations. We address this type of problem in
Part II.
In what follows, we illustrate the initial stability criteria with typical examples. Stability can be
defined in a more rigorous way using certain concepts of linear algebra, a branch of mathematics that
deals with linear algebraic equations. This approach is discussed in Sect. 2.6
Example 2.1 Simple Trusses
Given: The structures. shown in Fig. E2.1a–d
Fig. E2.1
Determine: Whether the structures are initially stable, determinate, or indeterminate.
Solutions:
Case (a): There are five members, three reactions, and four nodes. Then applying (2.2)
58 2 Statically Determinate Truss Structures
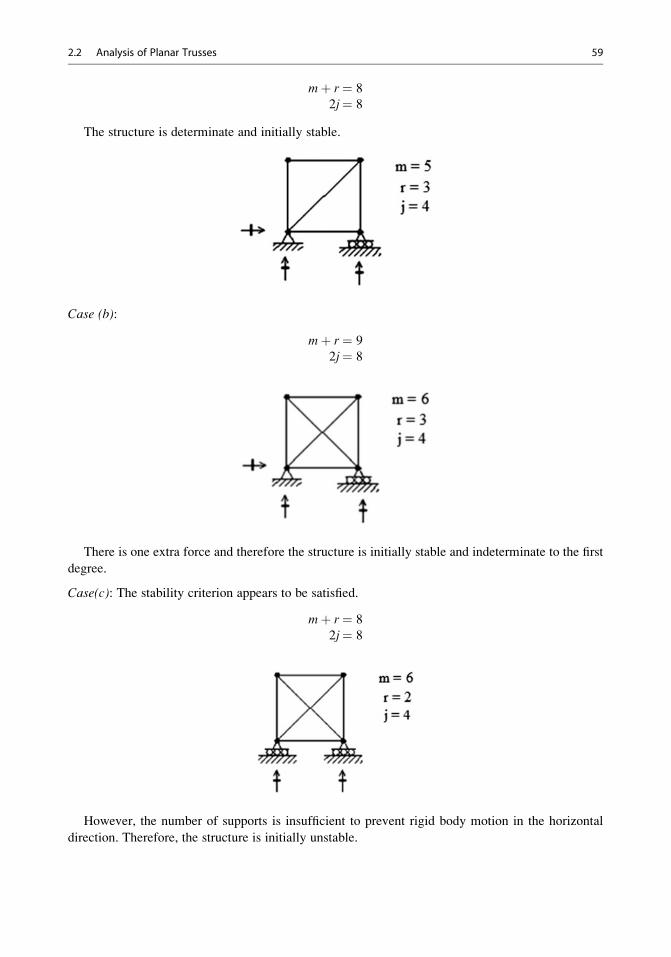
mþ r¼ 8
2j¼ 8
The structure is determinate and initially stable.
Case (b):
mþ r¼ 9
2j¼ 8
There is one extra force and therefore the structure is initially stable and indeterminate to the first
degree.
Case(c): The stability criterion appears to be satisfied.
mþ r¼ 8
2j¼ 8
However, the number of supports is insufficient to prevent rigid body motion in the horizontal
direction. Therefore, the structure is initially unstable.
2.2 Analysis of Planar Trusses 59
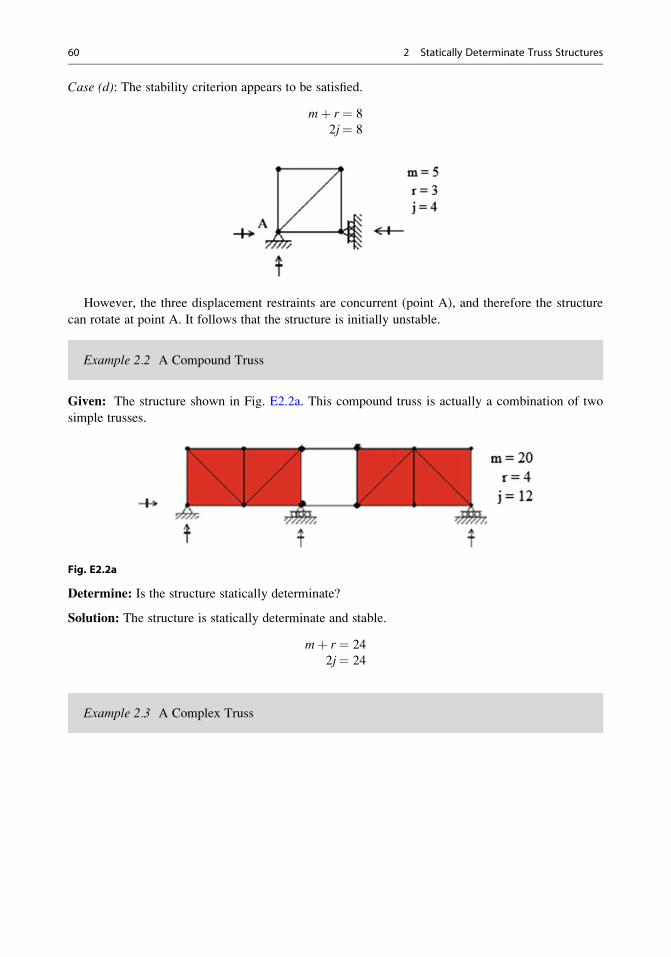
Case (d): The stability criterion appears to be satisfied.
mþ r¼ 8
2j¼ 8
However, the three displacement restraints are concurrent (point A), and therefore the structure
can rotate at point A. It follows that the structure is initially unstable.
Example 2.2 A Compound Truss
Given: The structure shown in Fig. E2.2a. This compound truss is actually a combination of two
simple trusses.
Fig. E2.2a
Determine: Is the structure statically determinate?
Solution: The structure is statically determinate and stable.
mþ r¼ 24
2j¼ 24
Example 2.3 A Complex Truss
60 2 Statically Determinate Truss Structures
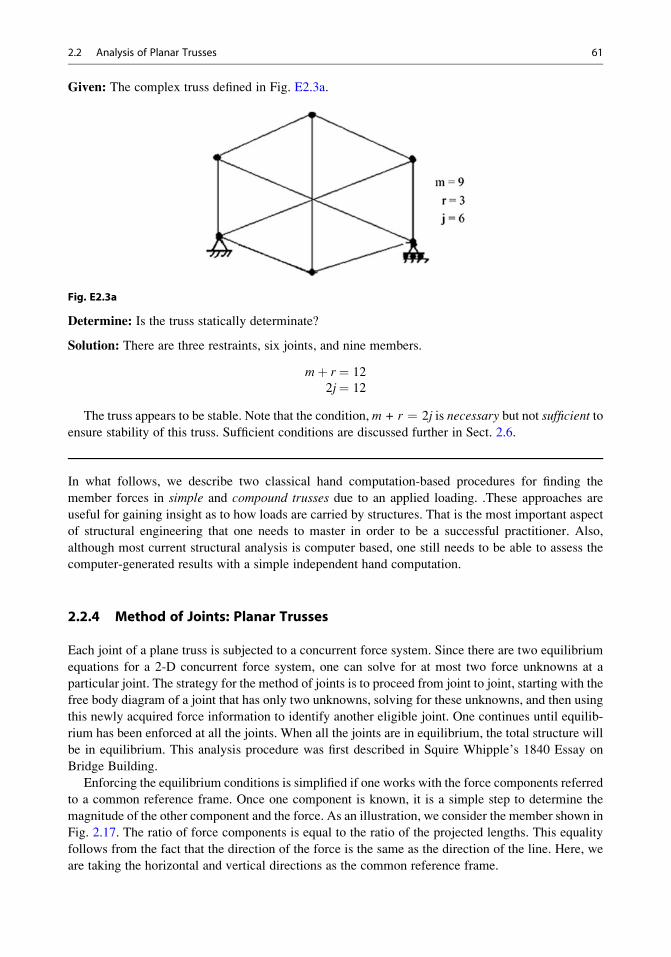
Given: The complex truss defined in Fig. E2.3a.
Fig. E2.3a
Determine: Is the truss statically determinate?
Solution: There are three restraints, six joints, and nine members.
mþ r¼ 12
2j¼ 12
The truss appears to be stable. Note that the condition, m + r ¼ 2j is necessary but not sufficient to
ensure stability of this truss. Sufficient conditions are discussed further in Sect. 2.6.
In what follows, we describe two classical hand computation-based procedures for finding the
member forces in simple and compound trusses due to an applied loading. .These approaches are
useful for gaining insight as to how loads are carried by structures. That is the most important aspect
of structural engineering that one needs to master in order to be a successful practitioner. Also,
although most current structural analysis is computer based, one still needs to be able to assess the
computer-generated results with a simple independent hand computation.
2.2.4 Method of Joints: Planar Trusses
Each joint of a plane truss is subjected to a concurrent force system. Since there are two equilibrium
equations for a 2-D concurrent force system, one can solve for at most two force unknowns at a
particular joint. The strategy for the method of joints is to proceed from joint to joint, starting with the
free body diagram of a joint that has only two unknowns, solving for these unknowns, and then using
this newly acquired force information to identify another eligible joint. One continues until equilib-
rium has been enforced at all the joints. When all the joints are in equilibrium, the total structure will
be in equilibrium. This analysis procedure was first described in Squire Whipple’s 1840 Essay on
Bridge Building.
Enforcing the equilibrium conditions is simplified if one works with the force components referred
to a common reference frame. Once one component is known, it is a simple step to determine the
magnitude of the other component and the force. As an illustration, we consider the member shown in
Fig. 2.17. The ratio of force components is equal to the ratio of the projected lengths. This equality
follows from the fact that the direction of the force is the same as the direction of the line. Here, we
are taking the horizontal and vertical directions as the common reference frame.
2.2 Analysis of Planar Trusses 61
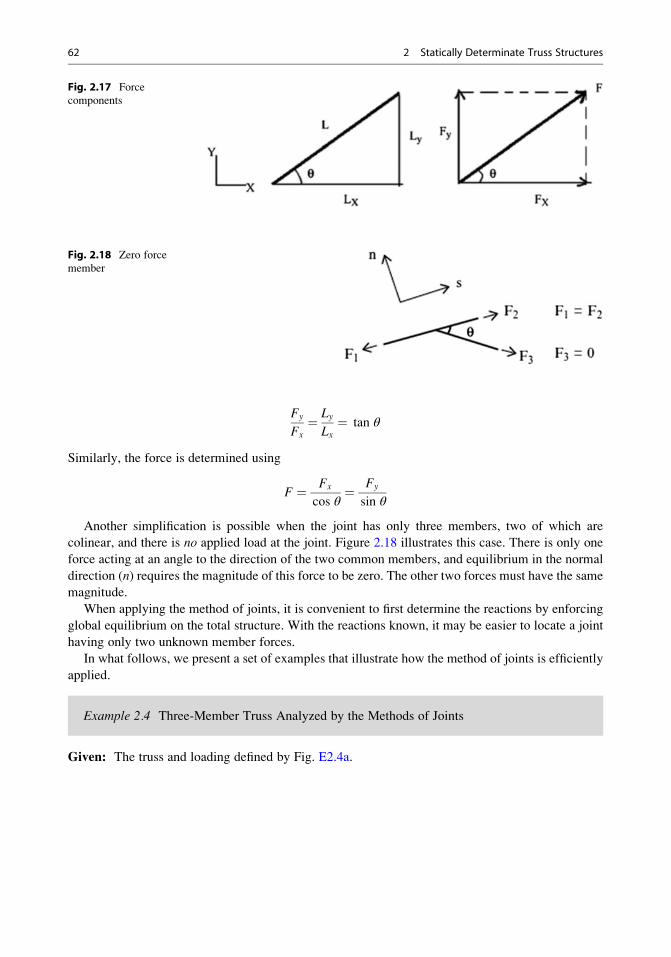
Fy
Fx¼ Ly
Lx¼ tan θ
Similarly, the force is determined using
F ¼ Fx
cos θ¼ Fy
sin θ
Another simplification is possible when the joint has only three members, two of which are
colinear, and there is no applied load at the joint. Figure 2.18 illustrates this case. There is only one
force acting at an angle to the direction of the two common members, and equilibrium in the normal
direction (n) requires the magnitude of this force to be zero. The other two forces must have the same
magnitude.
When applying the method of joints, it is convenient to first determine the reactions by enforcing
global equilibrium on the total structure. With the reactions known, it may be easier to locate a joint
having only two unknown member forces.
In what follows, we present a set of examples that illustrate how the method of joints is efficiently
applied.
Example 2.4 Three-Member Truss Analyzed by the Methods of Joints
Given: The truss and loading defined by Fig. E2.4a.
Fig. 2.17 Force
components
Fig. 2.18 Zero force
member
62 2 Statically Determinate Truss Structures
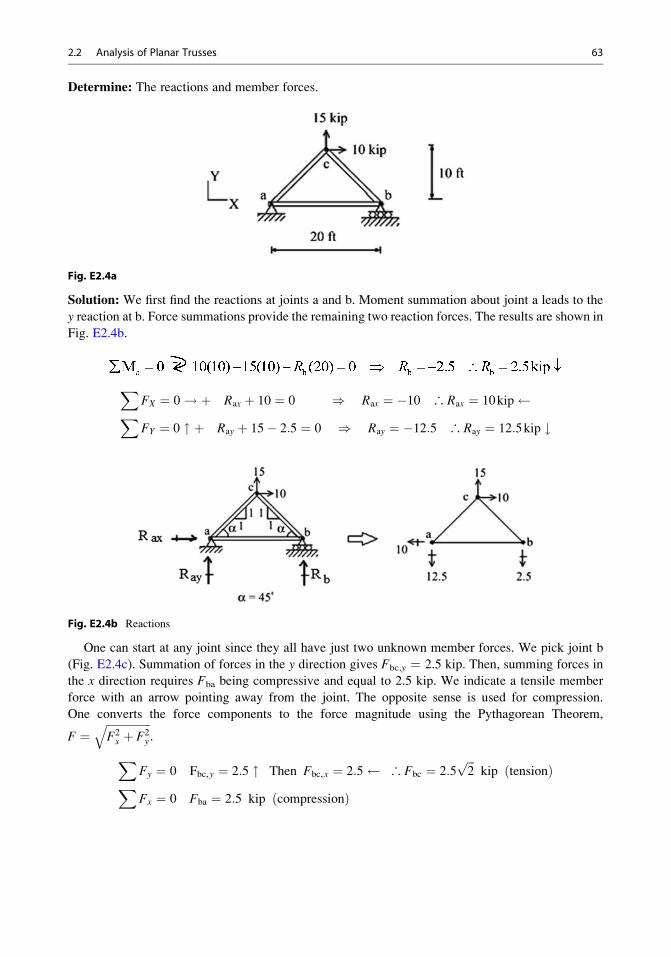
Determine: The reactions and member forces.
Fig. E2.4a
Solution: We first find the reactions at joints a and b. Moment summation about joint a leads to the
y reaction at b. Force summations provide the remaining two reaction forces. The results are shown in
Fig. E2.4b.
XFX ¼ 0! þ Rax þ 10 ¼ 0 ) Rax ¼ �10 ∴ Rax ¼ 10kip XFY ¼ 0 " þ Ray þ 15� 2:5 ¼ 0 ) Ray ¼ �12:5 ∴ Ray ¼ 12:5kip #
Fig. E2.4b Reactions
One can start at any joint since they all have just two unknown member forces. We pick joint b
(Fig. E2.4c). Summation of forces in the y direction gives Fbc,y ¼ 2.5 kip. Then, summing forces in
the x direction requires Fba being compressive and equal to 2.5 kip. We indicate a tensile member
force with an arrow pointing away from the joint. The opposite sense is used for compression.
One converts the force components to the force magnitude using the Pythagorean Theorem,
F ¼ffiffiffiffiffiffiffiffiffiffiffiffiffiffiffiffiF2x þ F2
y
q.
XFy ¼ 0 Fbc,y ¼ 2:5 " Then Fbc,x ¼ 2:5 ∴ Fbc ¼ 2:5
ffiffiffi2p
kip tensionð ÞXFx ¼ 0 Fba ¼ 2:5 kip compressionð Þ
2.2 Analysis of Planar Trusses 63

Fig. E2.4c Joint b
There is only one unknown member force left, Fca. One can work with either joint a or joint c. We
pick joint c. The free body diagram for joint c is shown in Fig. E2.4d. Equilibrium in the x directionrequires Fca,x ¼ 12.5 kip.X
Fx ¼ 0 Fca,x ¼ 12:5 ∴Fca ¼ 12:5ffiffiffi2p
kip tensionð Þ
Fig. E2.4d Joint C
Note that in this example we do not need to use the remaining equilibrium equations (one for joint
c and two for joint a) since we used instead three global equilibrium equations to calculate the
reactions. The total number of joint equilibrium equations is equal to six (two per joint � three
joints). If we use three equations for global equilibrium, there are only three independent equations
left to apply to the joints. The final results are shown on the sketch below. Tensile forces are denoted
with a + sign, and compressive forces with a � sign.
64 2 Statically Determinate Truss Structures
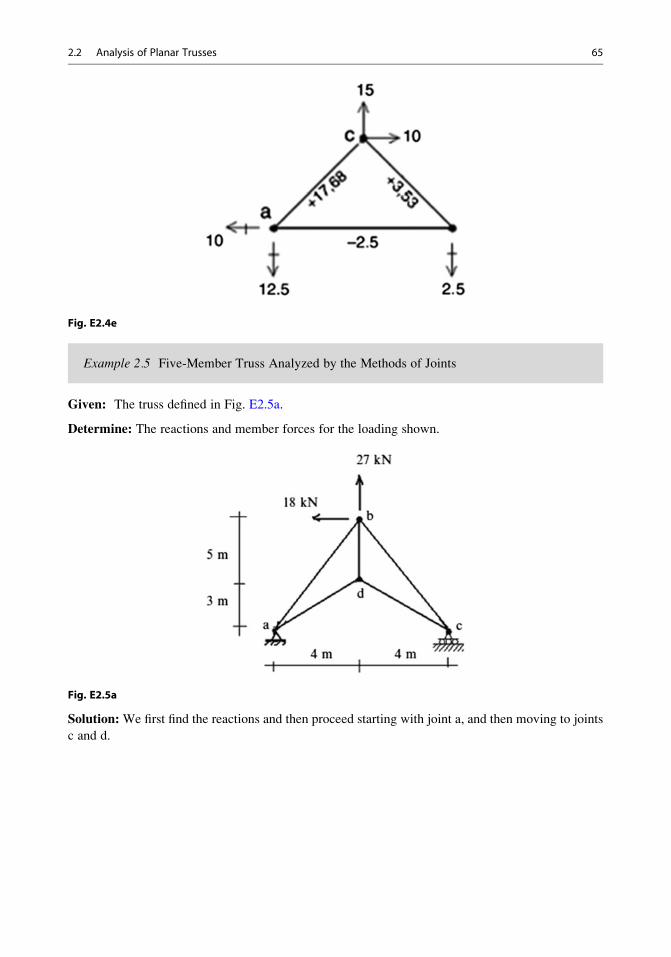
Fig. E2.4e
Example 2.5 Five-Member Truss Analyzed by the Methods of Joints
Given: The truss defined in Fig. E2.5a.
Determine: The reactions and member forces for the loading shown.
Fig. E2.5a
Solution:We first find the reactions and then proceed starting with joint a, and then moving to joints
c and d.
2.2 Analysis of Planar Trusses 65
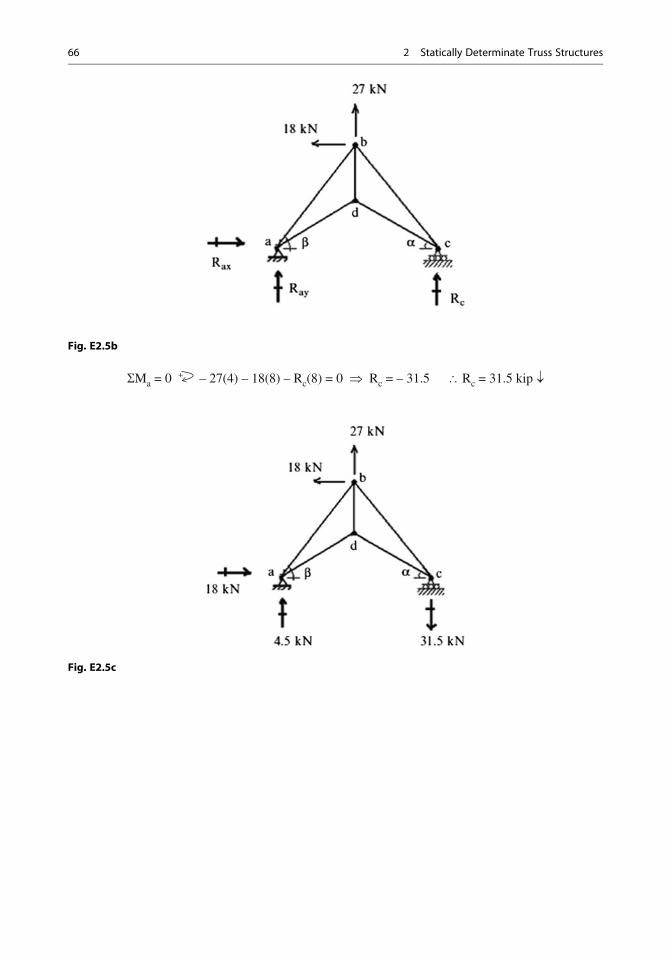
Fig. E2.5b
SMa = 0 + – 27(4) – 18(8) – Rc(8) = 0 Þ Rc = – 31.5 \ Rc = 31.5 kip ¯
Fig. E2.5c
66 2 Statically Determinate Truss Structures
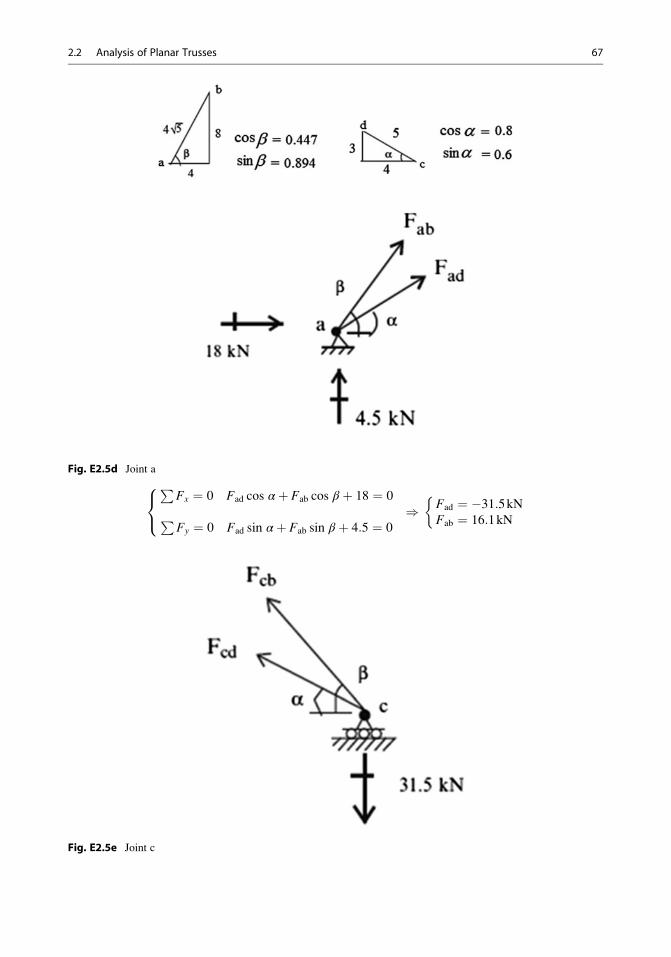
Fig. E2.5d Joint a PFx ¼ 0 Fad cos αþ Fab cos β þ 18 ¼ 0
PFy ¼ 0 Fad sin αþ Fab sin β þ 4:5 ¼ 0
8<: ) Fad ¼ �31:5kN
Fab ¼ 16:1kN
Fig. E2.5e Joint c
2.2 Analysis of Planar Trusses 67
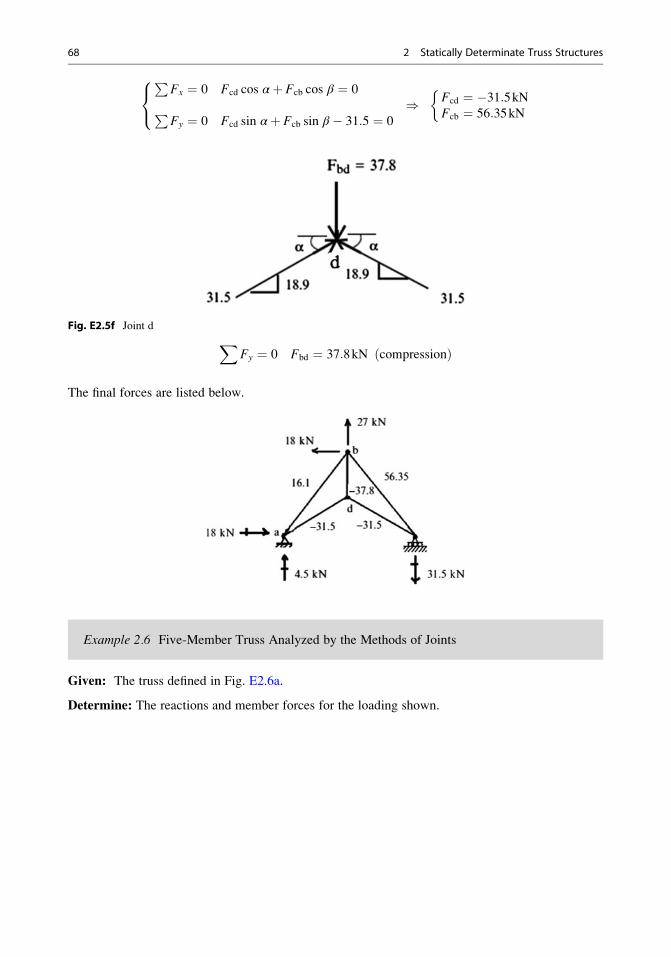
PFx ¼ 0 Fcd cos αþ Fcb cos β ¼ 0
PFy ¼ 0 Fcd sin αþ Fcb sin β � 31:5 ¼ 0
8<: ) Fcd ¼ �31:5kN
Fcb ¼ 56:35kN
Fig. E2.5f Joint d XFy ¼ 0 Fbd ¼ 37:8kN compressionð Þ
The final forces are listed below.
Example 2.6 Five-Member Truss Analyzed by the Methods of Joints
Given: The truss defined in Fig. E2.6a.
Determine: The reactions and member forces for the loading shown.
68 2 Statically Determinate Truss Structures
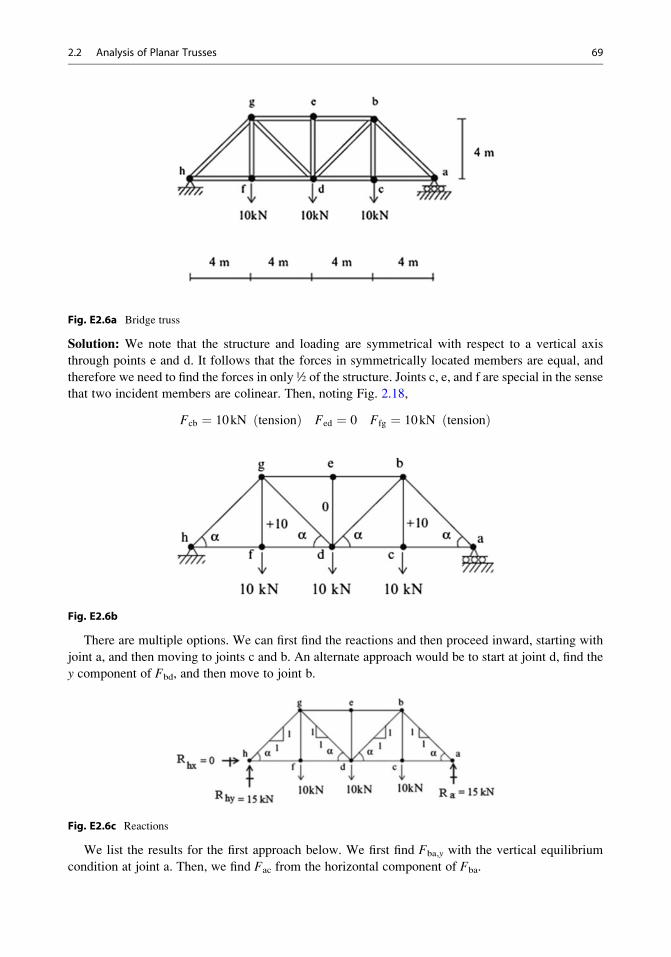
Fig. E2.6a Bridge truss
Solution: We note that the structure and loading are symmetrical with respect to a vertical axis
through points e and d. It follows that the forces in symmetrically located members are equal, and
therefore we need to find the forces in only ½ of the structure. Joints c, e, and f are special in the sense
that two incident members are colinear. Then, noting Fig. 2.18,
Fcb ¼ 10kN tensionð Þ Fed ¼ 0 Ffg ¼ 10kN tensionð Þ
Fig. E2.6b
There are multiple options. We can first find the reactions and then proceed inward, starting with
joint a, and then moving to joints c and b. An alternate approach would be to start at joint d, find the
y component of Fbd, and then move to joint b.
Fig. E2.6c Reactions
We list the results for the first approach below. We first find Fba,y with the vertical equilibrium
condition at joint a. Then, we find Fac from the horizontal component of Fba.
2.2 Analysis of Planar Trusses 69
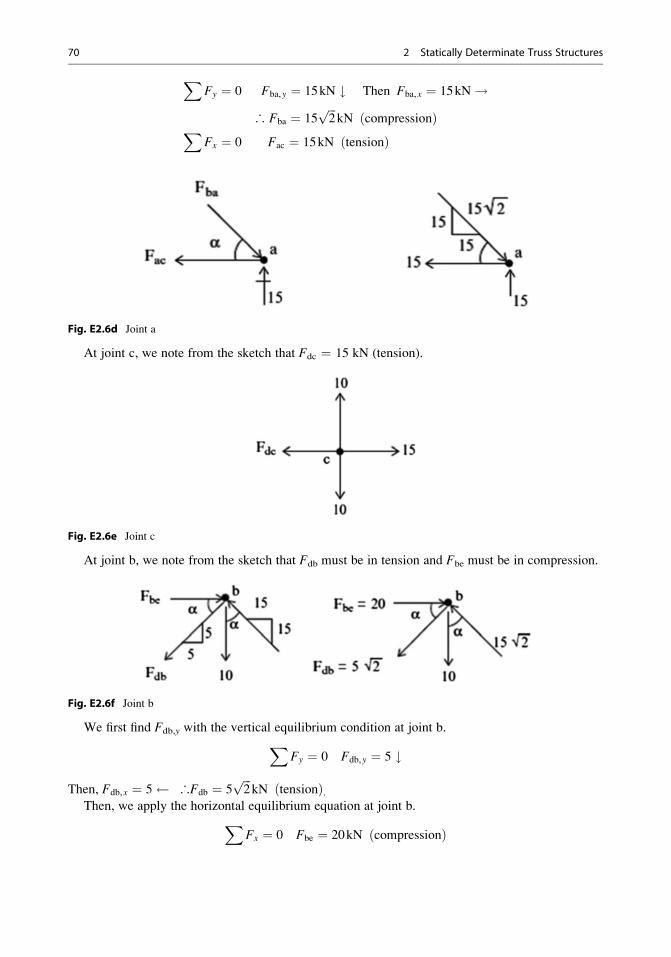
XFy ¼ 0 Fba,y ¼ 15kN # Then Fba,x ¼ 15kN!
∴ Fba ¼ 15ffiffiffi2p
kN compressionð ÞXFx ¼ 0 Fac ¼ 15kN tensionð Þ
Fig. E2.6d Joint a
At joint c, we note from the sketch that Fdc ¼ 15 kN (tension).
Fig. E2.6e Joint c
At joint b, we note from the sketch that Fdb must be in tension and Fbe must be in compression.
Fig. E2.6f Joint b
We first find Fdb,y with the vertical equilibrium condition at joint b.XFy ¼ 0 Fdb,y ¼ 5 #
Then, Fdb,x ¼ 5 ∴Fdb ¼ 5ffiffiffi2p
kN tensionð Þ.Then, we apply the horizontal equilibrium equation at joint b.X
Fx ¼ 0 Fbe ¼ 20kN compressionð Þ
70 2 Statically Determinate Truss Structures
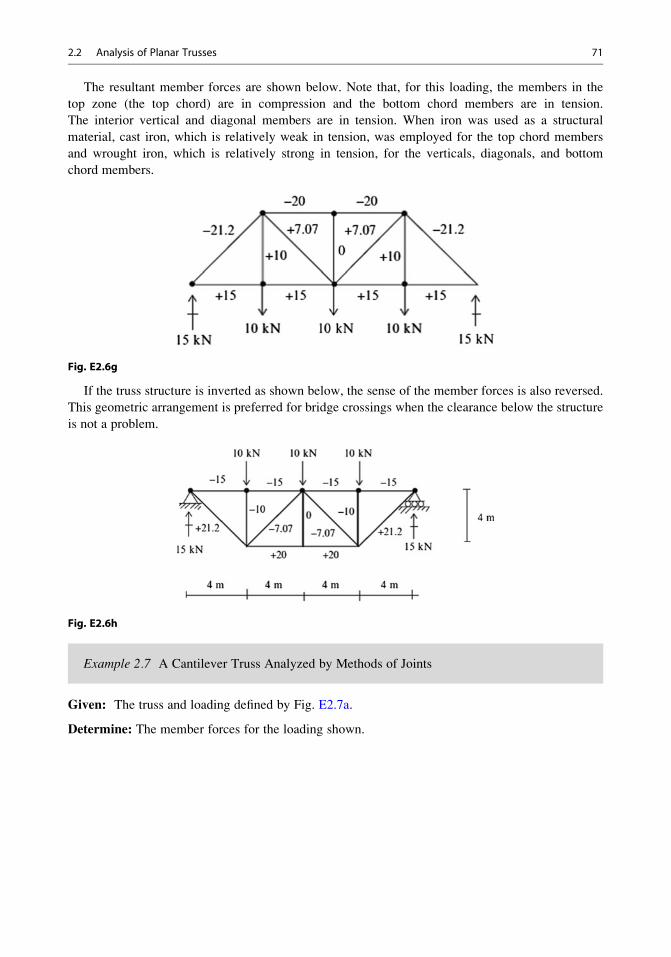
The resultant member forces are shown below. Note that, for this loading, the members in the
top zone (the top chord) are in compression and the bottom chord members are in tension.
The interior vertical and diagonal members are in tension. When iron was used as a structural
material, cast iron, which is relatively weak in tension, was employed for the top chord members
and wrought iron, which is relatively strong in tension, for the verticals, diagonals, and bottom
chord members.
Fig. E2.6g
If the truss structure is inverted as shown below, the sense of the member forces is also reversed.
This geometric arrangement is preferred for bridge crossings when the clearance below the structure
is not a problem.
Fig. E2.6h
Example 2.7 A Cantilever Truss Analyzed by Methods of Joints
Given: The truss and loading defined by Fig. E2.7a.
Determine: The member forces for the loading shown.
2.2 Analysis of Planar Trusses 71
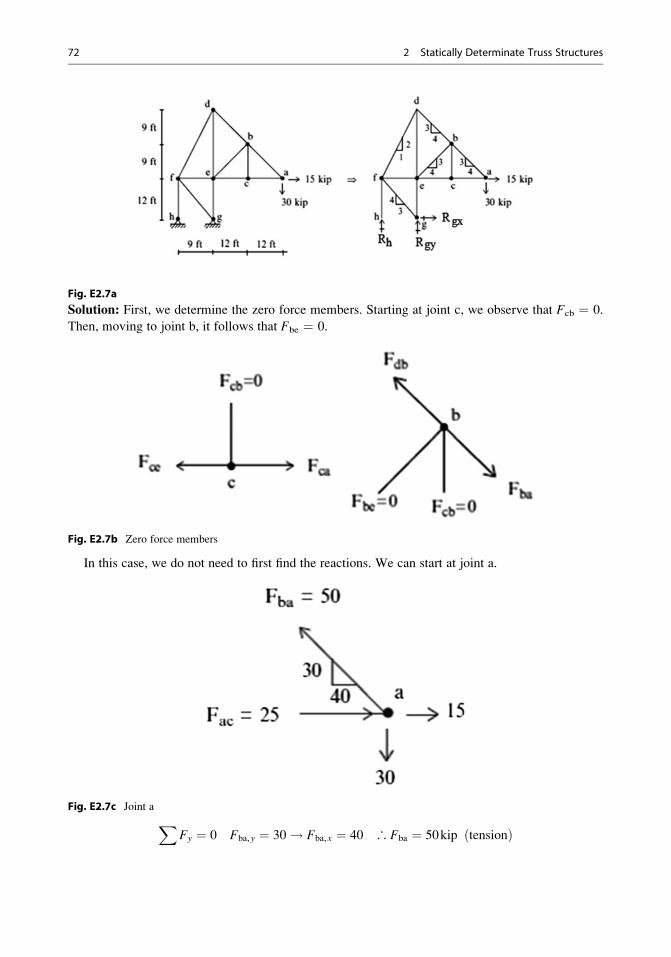
Fig. E2.7a
Solution: First, we determine the zero force members. Starting at joint c, we observe that Fcb ¼ 0.
Then, moving to joint b, it follows that Fbe ¼ 0.
Fig. E2.7b Zero force members
In this case, we do not need to first find the reactions. We can start at joint a.
Fig. E2.7c Joint a XFy ¼ 0 Fba,y ¼ 30! Fba,x ¼ 40 ∴ Fba ¼ 50kip tensionð Þ
72 2 Statically Determinate Truss Structures
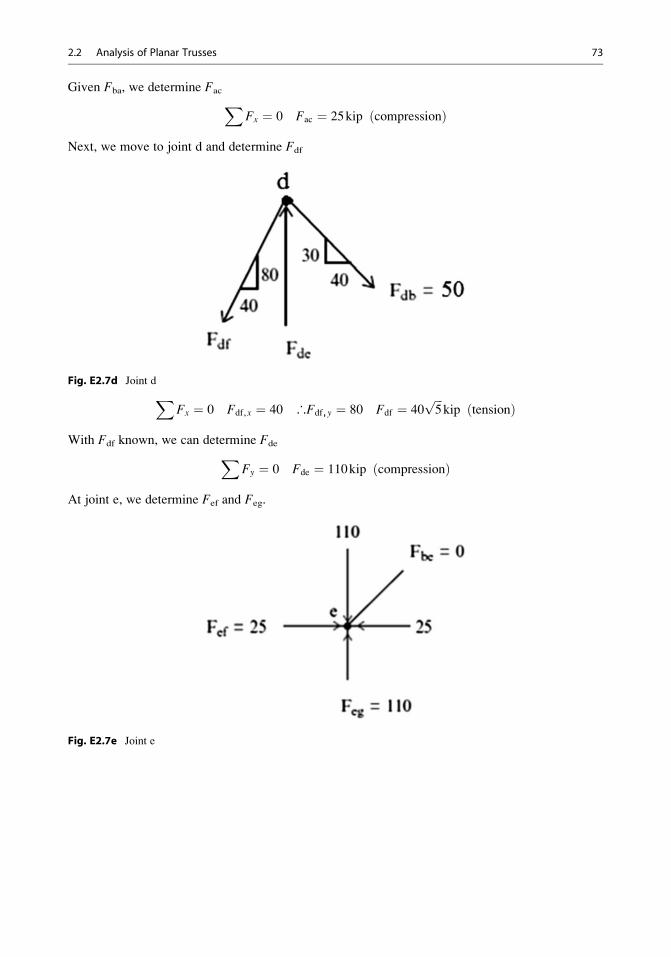
Given Fba, we determine FacXFx ¼ 0 Fac ¼ 25kip compressionð Þ
Next, we move to joint d and determine Fdf
Fig. E2.7d Joint dXFx ¼ 0 Fdf,x ¼ 40 ∴Fdf,y ¼ 80 Fdf ¼ 40
ffiffiffi5p
kip tensionð Þ
With Fdf known, we can determine FdeXFy ¼ 0 Fde ¼ 110kip compressionð Þ
At joint e, we determine Fef and Feg.
Fig. E2.7e Joint e
2.2 Analysis of Planar Trusses 73
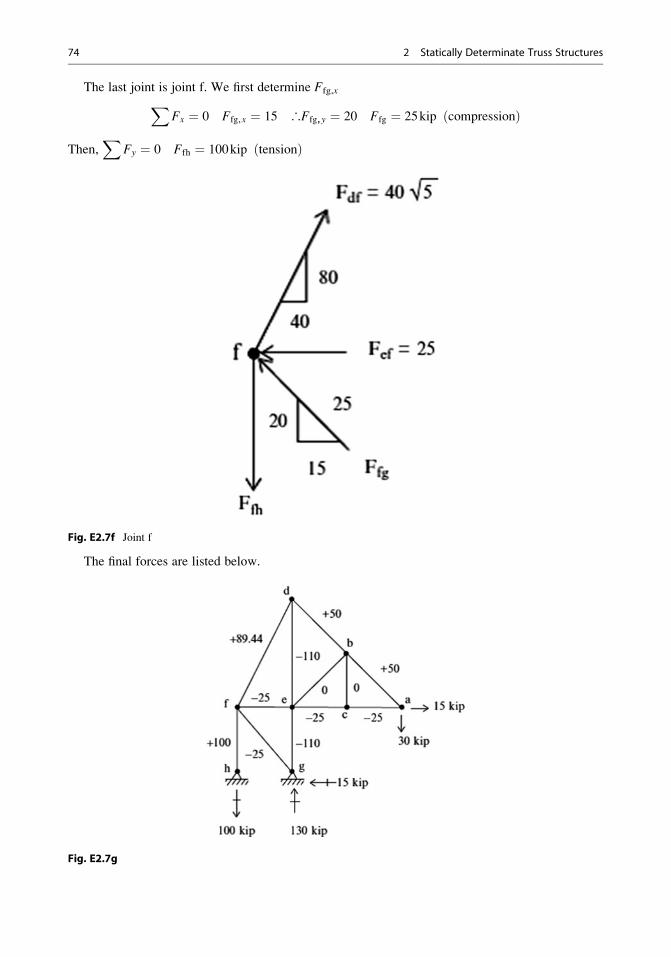
The last joint is joint f. We first determine Ffg,xXFx ¼ 0 Ffg,x ¼ 15 ∴Ffg,y ¼ 20 Ffg ¼ 25kip compressionð Þ
Then,X
Fy ¼ 0 Ffh ¼ 100kip tensionð Þ
Fig. E2.7f Joint f
The final forces are listed below.
Fig. E2.7g
74 2 Statically Determinate Truss Structures
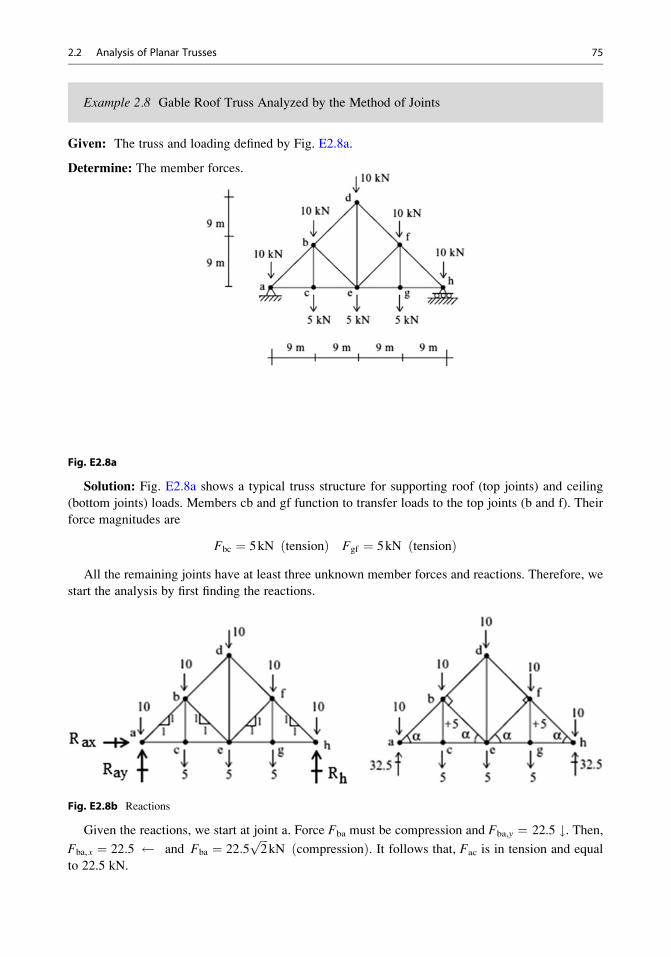
Example 2.8 Gable Roof Truss Analyzed by the Method of Joints
Given: The truss and loading defined by Fig. E2.8a.
Determine: The member forces.
Fig. E2.8a
Solution: Fig. E2.8a shows a typical truss structure for supporting roof (top joints) and ceiling
(bottom joints) loads. Members cb and gf function to transfer loads to the top joints (b and f). Their
force magnitudes are
Fbc ¼ 5kN tensionð Þ Fgf ¼ 5kN tensionð ÞAll the remaining joints have at least three unknown member forces and reactions. Therefore, we
start the analysis by first finding the reactions.
Fig. E2.8b Reactions
Given the reactions, we start at joint a. Force Fba must be compression and Fba,y ¼ 22.5 #. Then,Fba,x ¼ 22:5 and Fba ¼ 22:5
ffiffiffi2p
kN compressionð Þ. It follows that, Fac is in tension and equal
to 22.5 kN.
2.2 Analysis of Planar Trusses 75
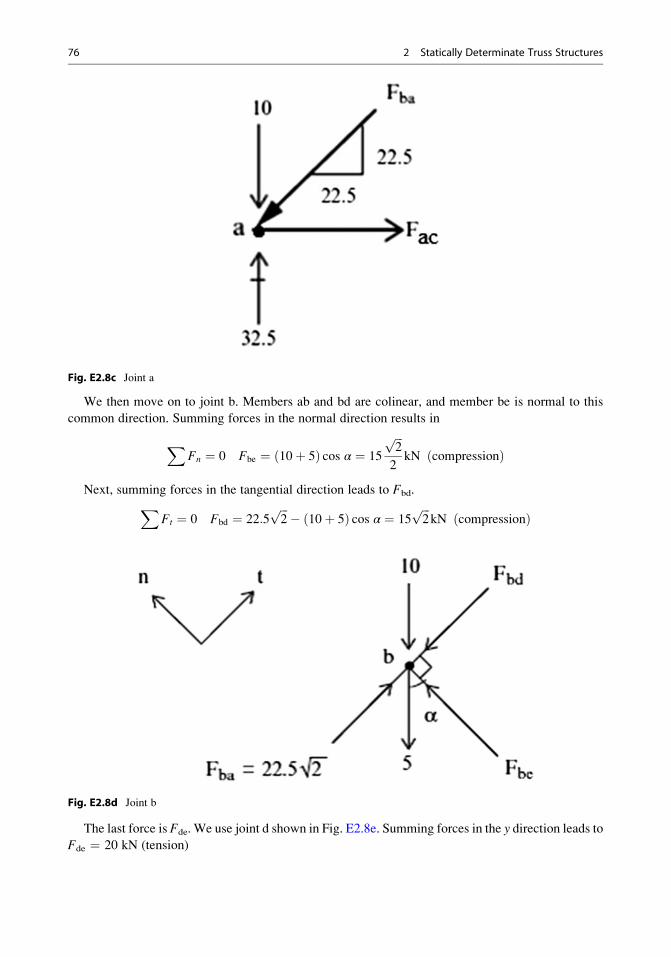
Fig. E2.8c Joint a
We then move on to joint b. Members ab and bd are colinear, and member be is normal to this
common direction. Summing forces in the normal direction results in
XFn ¼ 0 Fbe ¼ 10þ 5ð Þ cos α ¼ 15
ffiffiffi2p
2kN compressionð Þ
Next, summing forces in the tangential direction leads to Fbd.XFt ¼ 0 Fbd ¼ 22:5
ffiffiffi2p� 10þ 5ð Þ cos α ¼ 15
ffiffiffi2p
kN compressionð Þ
Fig. E2.8d Joint b
The last force is Fde. We use joint d shown in Fig. E2.8e. Summing forces in the y direction leads to
Fde ¼ 20 kN (tension)
76 2 Statically Determinate Truss Structures
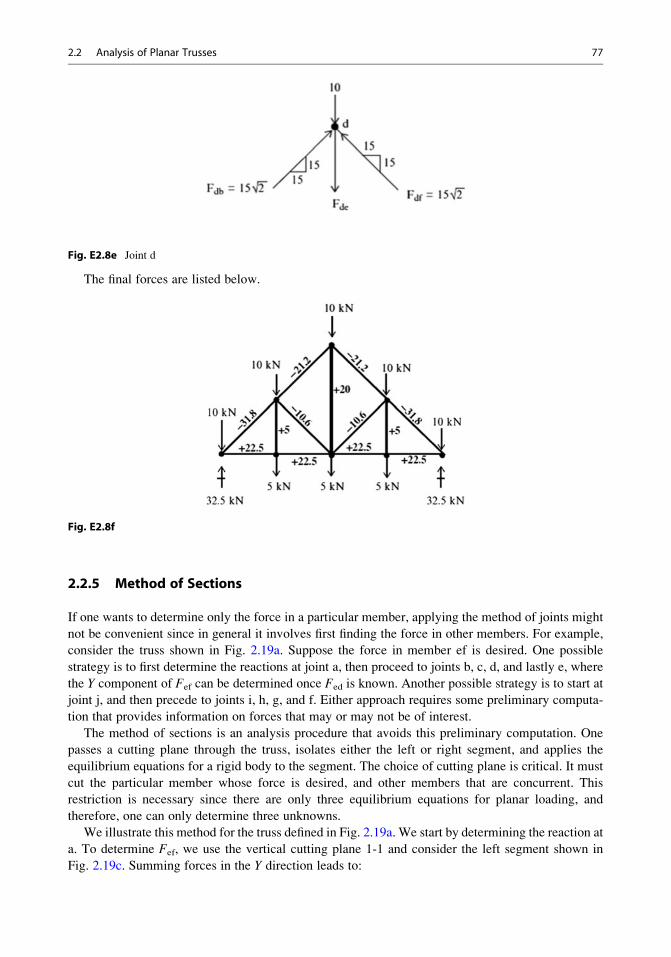
Fig. E2.8e Joint d
The final forces are listed below.
Fig. E2.8f
2.2.5 Method of Sections
If one wants to determine only the force in a particular member, applying the method of joints might
not be convenient since in general it involves first finding the force in other members. For example,
consider the truss shown in Fig. 2.19a. Suppose the force in member ef is desired. One possible
strategy is to first determine the reactions at joint a, then proceed to joints b, c, d, and lastly e, where
the Y component of Fef can be determined once Fed is known. Another possible strategy is to start at
joint j, and then precede to joints i, h, g, and f. Either approach requires some preliminary computa-
tion that provides information on forces that may or may not be of interest.
The method of sections is an analysis procedure that avoids this preliminary computation. One
passes a cutting plane through the truss, isolates either the left or right segment, and applies the
equilibrium equations for a rigid body to the segment. The choice of cutting plane is critical. It must
cut the particular member whose force is desired, and other members that are concurrent. This
restriction is necessary since there are only three equilibrium equations for planar loading, and
therefore, one can only determine three unknowns.
We illustrate this method for the truss defined in Fig. 2.19a. We start by determining the reaction at
a. To determine Fef, we use the vertical cutting plane 1-1 and consider the left segment shown in
Fig. 2.19c. Summing forces in the Y direction leads to:
2.2 Analysis of Planar Trusses 77
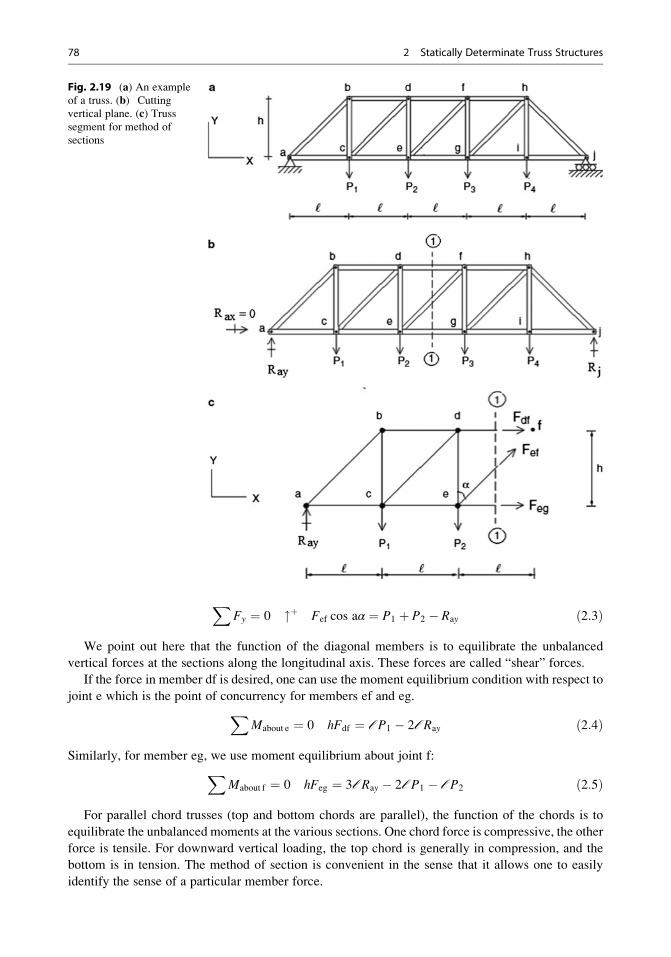
XFy ¼ 0 "þ Fef cos aα ¼ P1 þ P2 � Ray ð2:3Þ
We point out here that the function of the diagonal members is to equilibrate the unbalanced
vertical forces at the sections along the longitudinal axis. These forces are called “shear” forces.
If the force in member df is desired, one can use the moment equilibrium condition with respect to
joint e which is the point of concurrency for members ef and eg.XMabout e ¼ 0 hFdf ¼ ℓP1 � 2ℓRay ð2:4Þ
Similarly, for member eg, we use moment equilibrium about joint f:XMabout f ¼ 0 hFeg ¼ 3ℓRay � 2ℓP1 � ℓP2 ð2:5Þ
For parallel chord trusses (top and bottom chords are parallel), the function of the chords is to
equilibrate the unbalanced moments at the various sections. One chord force is compressive, the other
force is tensile. For downward vertical loading, the top chord is generally in compression, and the
bottom is in tension. The method of section is convenient in the sense that it allows one to easily
identify the sense of a particular member force.
Fig. 2.19 (a) An example
of a truss. (b) Cutting
vertical plane. (c) Trusssegment for method of
sections
78 2 Statically Determinate Truss Structures
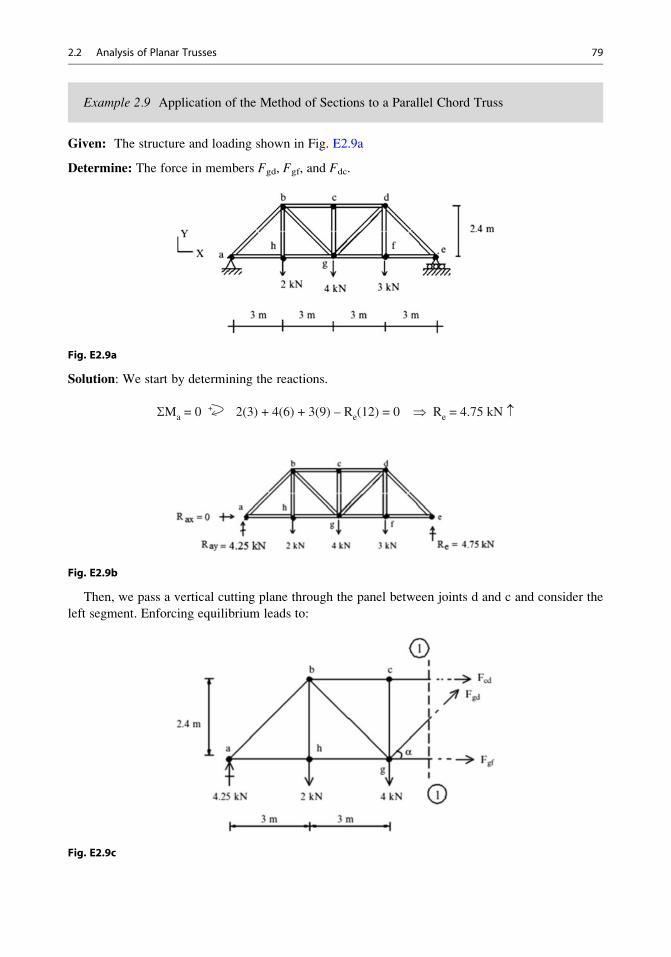
Example 2.9 Application of the Method of Sections to a Parallel Chord Truss
Given: The structure and loading shown in Fig. E2.9a
Determine: The force in members Fgd, Fgf, and Fdc.
Fig. E2.9a
Solution: We start by determining the reactions.
SMa = 0 + 2(3) + 4(6) + 3(9) – Re(12) = 0 Þ Re = 4.75 kN �
Fig. E2.9b
Then, we pass a vertical cutting plane through the panel between joints d and c and consider the
left segment. Enforcing equilibrium leads to:
Fig. E2.9c
2.2 Analysis of Planar Trusses 79
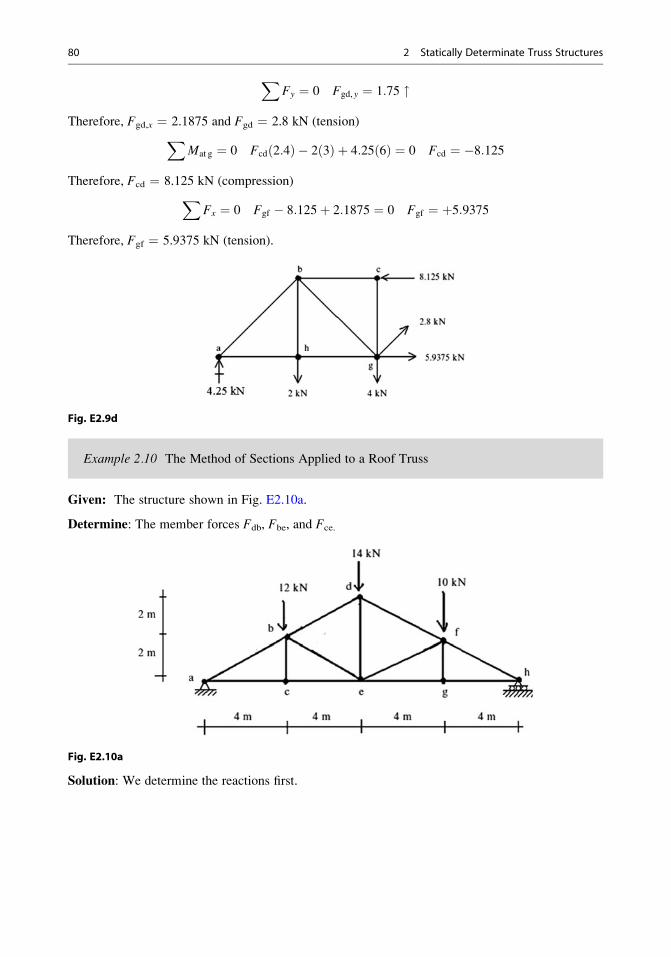
XFy ¼ 0 Fgd,y ¼ 1:75 "
Therefore, Fgd,x ¼ 2.1875 and Fgd ¼ 2.8 kN (tension)XMat g ¼ 0 Fcd 2:4ð Þ � 2 3ð Þ þ 4:25 6ð Þ ¼ 0 Fcd ¼ �8:125
Therefore, Fcd ¼ 8.125 kN (compression)XFx ¼ 0 Fgf � 8:125þ 2:1875 ¼ 0 Fgf ¼ þ5:9375
Therefore, Fgf ¼ 5.9375 kN (tension).
Fig. E2.9d
Example 2.10 The Method of Sections Applied to a Roof Truss
Given: The structure shown in Fig. E2.10a.
Determine: The member forces Fdb, Fbe, and Fce.
Fig. E2.10a
Solution: We determine the reactions first.
80 2 Statically Determinate Truss Structures
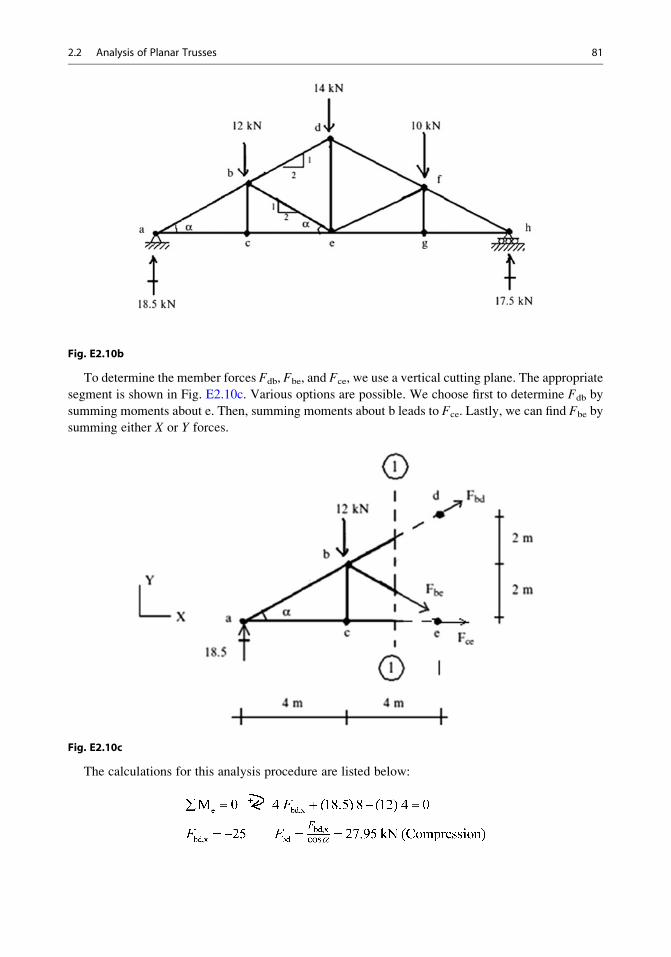
Fig. E2.10b
To determine the member forces Fdb, Fbe, and Fce, we use a vertical cutting plane. The appropriate
segment is shown in Fig. E2.10c. Various options are possible. We choose first to determine Fdb by
summing moments about e. Then, summing moments about b leads to Fce. Lastly, we can find Fbe by
summing either X or Y forces.
Fig. E2.10c
The calculations for this analysis procedure are listed below:
2.2 Analysis of Planar Trusses 81
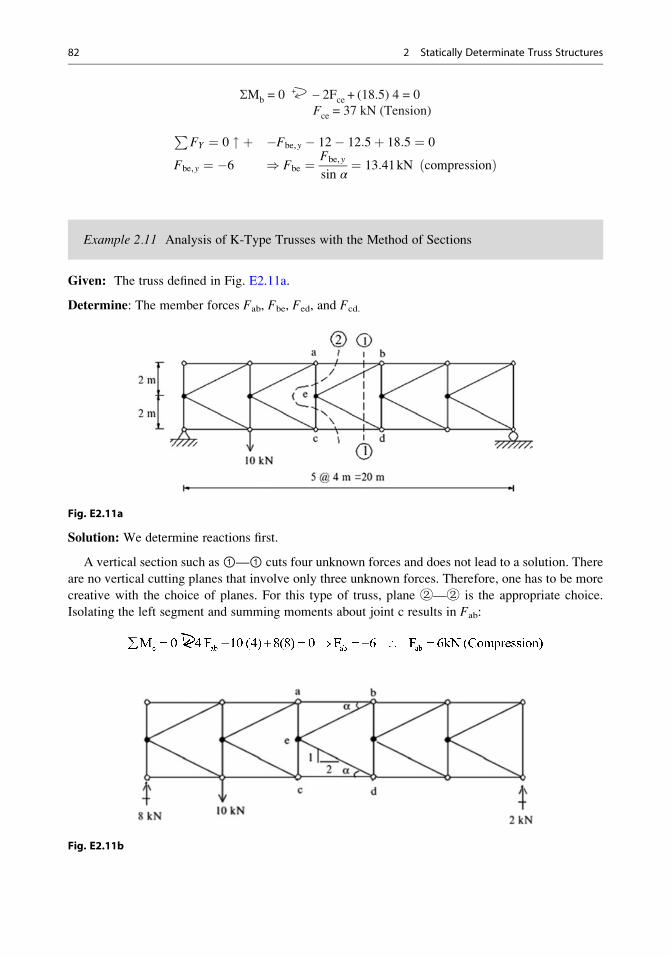
SMb = 0 + – 2Fce + (18.5) 4 = 0 Fce = 37 kN (Tension)
PFY ¼ 0 " þ �Fbe,y � 12� 12:5þ 18:5 ¼ 0
Fbe,y ¼ �6 ) Fbe ¼ Fbe,y
sin α¼ 13:41kN compressionð Þ
Example 2.11 Analysis of K-Type Trusses with the Method of Sections
Given: The truss defined in Fig. E2.11a.
Determine: The member forces Fab, Fbe, Fed, and Fcd.
Fig. E2.11a
Solution: We determine reactions first.
A vertical section such as①—① cuts four unknown forces and does not lead to a solution. There
are no vertical cutting planes that involve only three unknown forces. Therefore, one has to be more
creative with the choice of planes. For this type of truss, plane ②—② is the appropriate choice.
Isolating the left segment and summing moments about joint c results in Fab:
Fig. E2.11b
82 2 Statically Determinate Truss Structures
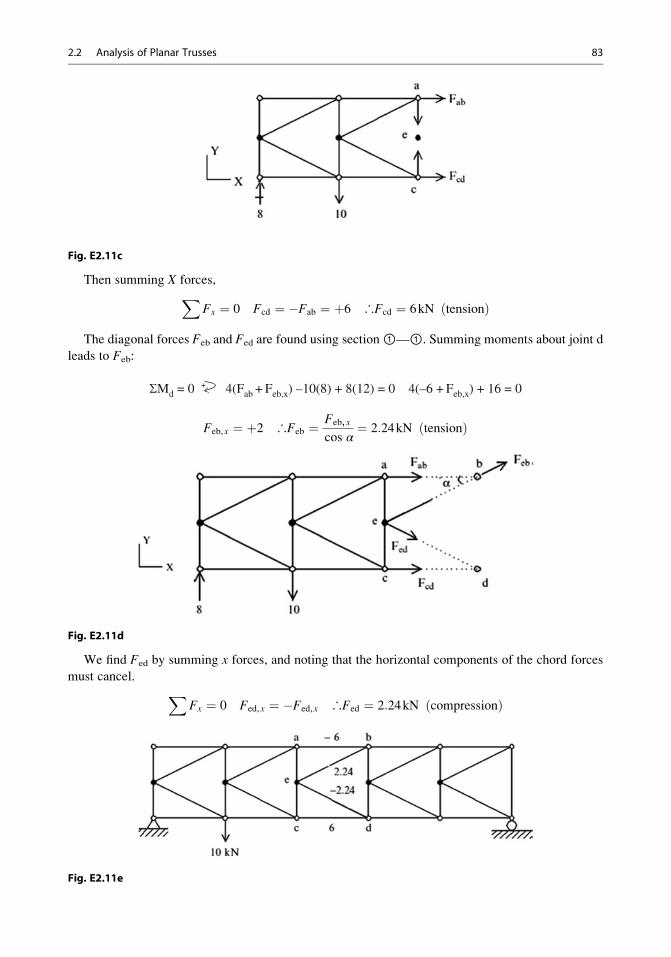
Fig. E2.11c
Then summing X forces,XFx ¼ 0 Fcd ¼ �Fab ¼ þ6 ∴Fcd ¼ 6kN tensionð Þ
The diagonal forces Feb and Fed are found using section①—①. Summing moments about joint d
leads to Feb:
SMd = 0 + 4(Fab + Feb,x) –10(8) + 8(12) = 0 4(–6 + Feb,x) + 16 = 0
Feb,x ¼ þ2 ∴Feb ¼ Feb,x
cos α¼ 2:24kN tensionð Þ
Fig. E2.11d
We find Fed by summing x forces, and noting that the horizontal components of the chord forces
must cancel. XFx ¼ 0 Fed,x ¼ �Fed,x ∴Fed ¼ 2:24kN compressionð Þ
Fig. E2.11e
2.2 Analysis of Planar Trusses 83
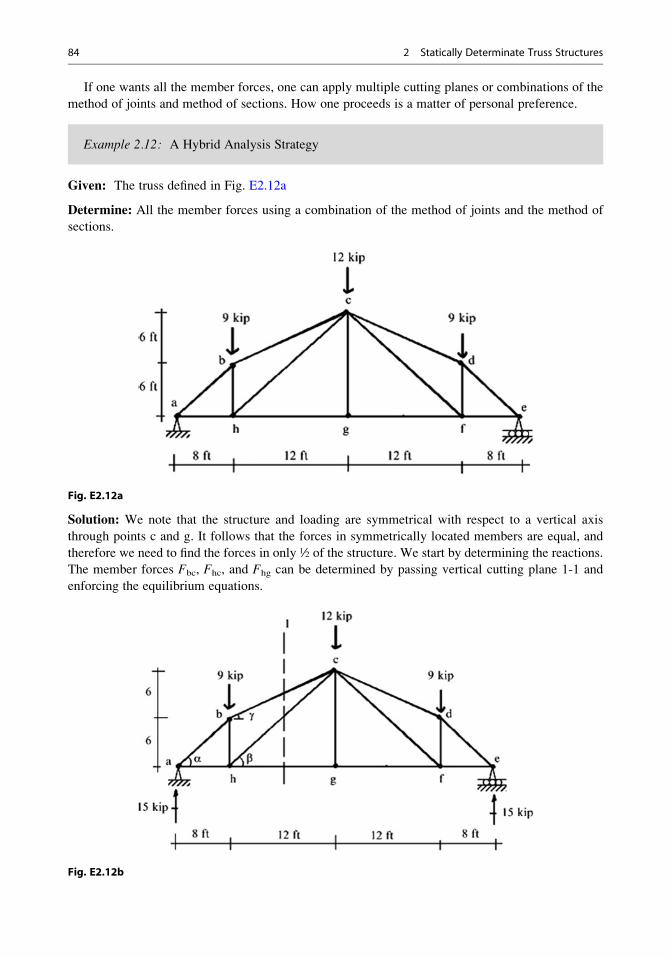
If one wants all the member forces, one can apply multiple cutting planes or combinations of the
method of joints and method of sections. How one proceeds is a matter of personal preference.
Example 2.12: A Hybrid Analysis Strategy
Given: The truss defined in Fig. E2.12a
Determine: All the member forces using a combination of the method of joints and the method of
sections.
Fig. E2.12a
Solution: We note that the structure and loading are symmetrical with respect to a vertical axis
through points c and g. It follows that the forces in symmetrically located members are equal, and
therefore we need to find the forces in only ½ of the structure. We start by determining the reactions.
The member forces Fbc, Fhc, and Fhg can be determined by passing vertical cutting plane 1-1 and
enforcing the equilibrium equations.
Fig. E2.12b
84 2 Statically Determinate Truss Structures
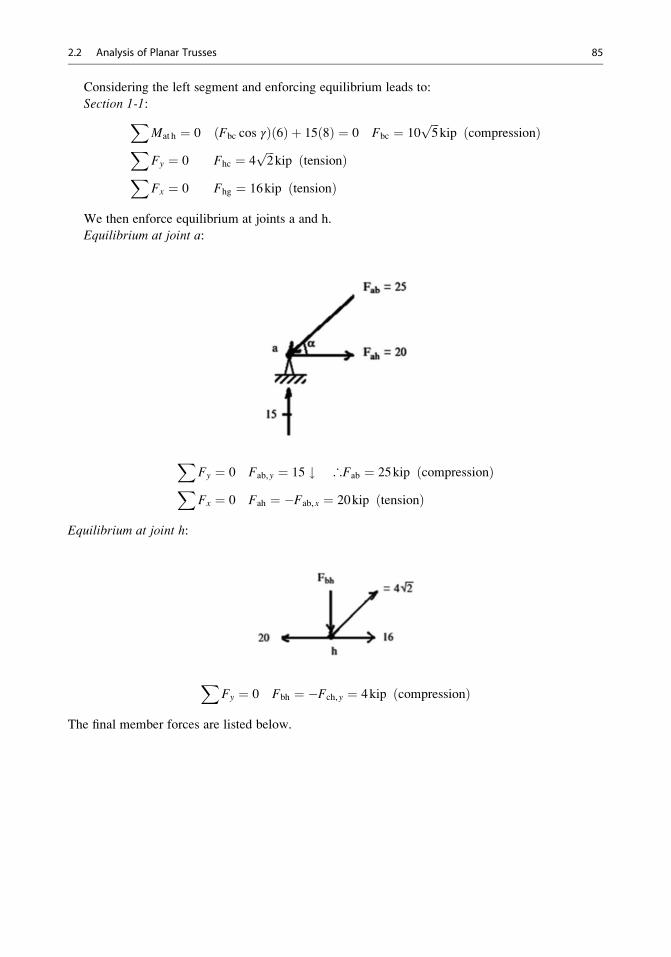
Considering the left segment and enforcing equilibrium leads to:
Section 1-1:XMat h ¼ 0 Fbc cos γð Þ 6ð Þ þ 15 8ð Þ ¼ 0 Fbc ¼ 10
ffiffiffi5p
kip compressionð ÞXFy ¼ 0 Fhc ¼ 4
ffiffiffi2p
kip tensionð ÞXFx ¼ 0 Fhg ¼ 16kip tensionð Þ
We then enforce equilibrium at joints a and h.
Equilibrium at joint a:
XFy ¼ 0 Fab,y ¼ 15 # ∴Fab ¼ 25kip compressionð ÞXFx ¼ 0 Fah ¼ �Fab,x ¼ 20kip tensionð Þ
Equilibrium at joint h:
XFy ¼ 0 Fbh ¼ �Fch,y ¼ 4kip compressionð Þ
The final member forces are listed below.
2.2 Analysis of Planar Trusses 85
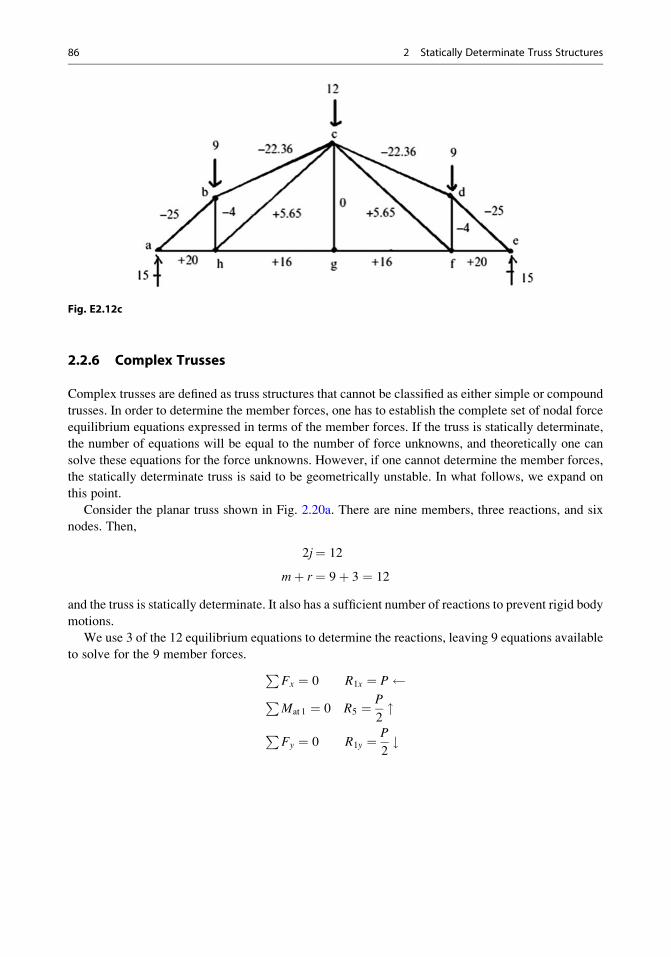
Fig. E2.12c
2.2.6 Complex Trusses
Complex trusses are defined as truss structures that cannot be classified as either simple or compound
trusses. In order to determine the member forces, one has to establish the complete set of nodal force
equilibrium equations expressed in terms of the member forces. If the truss is statically determinate,
the number of equations will be equal to the number of force unknowns, and theoretically one can
solve these equations for the force unknowns. However, if one cannot determine the member forces,
the statically determinate truss is said to be geometrically unstable. In what follows, we expand on
this point.
Consider the planar truss shown in Fig. 2.20a. There are nine members, three reactions, and six
nodes. Then,
2j¼ 12
mþ r¼ 9þ 3 ¼ 12
and the truss is statically determinate. It also has a sufficient number of reactions to prevent rigid body
motions.
We use 3 of the 12 equilibrium equations to determine the reactions, leaving 9 equations available
to solve for the 9 member forces. PFx ¼ 0 R1x ¼ P PMat 1 ¼ 0 R5 ¼ P
2"
PFy ¼ 0 R1y ¼ P
2#
86 2 Statically Determinate Truss Structures
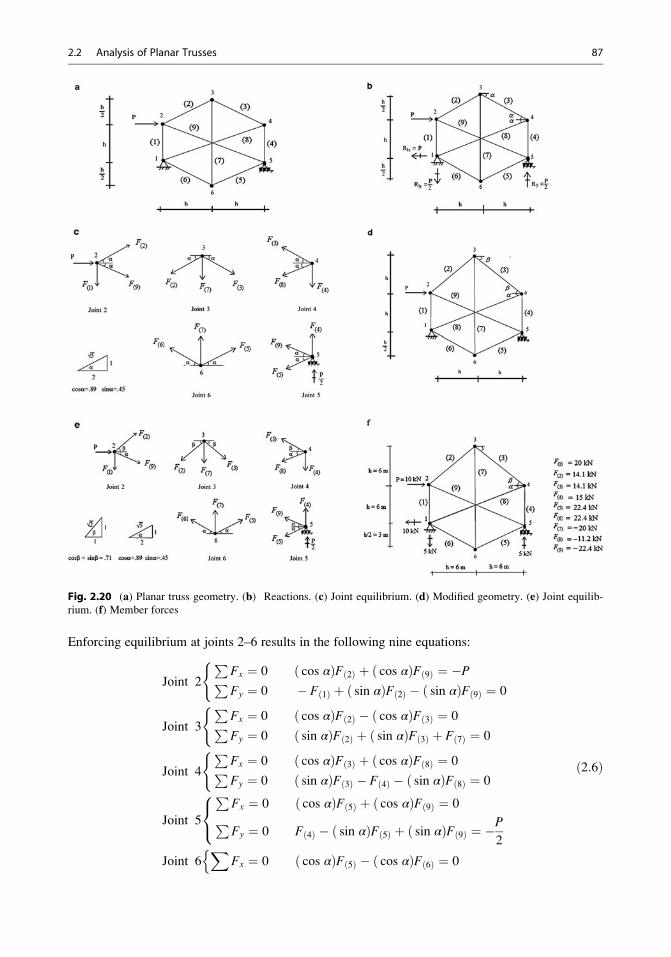
Enforcing equilibrium at joints 2–6 results in the following nine equations:
Joint 2
PFx ¼ 0 cos αð ÞF 2ð Þ þ cos αð ÞF 9ð Þ ¼ �PPFy ¼ 0 � F 1ð Þ þ sin αð ÞF 2ð Þ � sin αð ÞF 9ð Þ ¼ 0
(
Joint 3
PFx ¼ 0 cos αð ÞF 2ð Þ � cos αð ÞF 3ð Þ ¼ 0PFy ¼ 0 sin αð ÞF 2ð Þ þ sin αð ÞF 3ð Þ þ F 7ð Þ ¼ 0
(
Joint 4
PFx ¼ 0 cos αð ÞF 3ð Þ þ cos αð ÞF 8ð Þ ¼ 0PFy ¼ 0 sin αð ÞF 3ð Þ � F 4ð Þ � sin αð ÞF 8ð Þ ¼ 0
(
Joint 5
PFx ¼ 0 cos αð ÞF 5ð Þ þ cos αð ÞF 9ð Þ ¼ 0PFy ¼ 0 F 4ð Þ � sin αð ÞF 5ð Þ þ sin αð ÞF 9ð Þ ¼ �
P
2
8<:
Joint 6X
Fx ¼ 0 cos αð ÞF 5ð Þ � cos αð ÞF 6ð Þ ¼ 0n
ð2:6Þ
Fig. 2.20 (a) Planar truss geometry. (b) Reactions. (c) Joint equilibrium. (d) Modified geometry. (e) Joint equilib-rium. (f) Member forces
2.2 Analysis of Planar Trusses 87
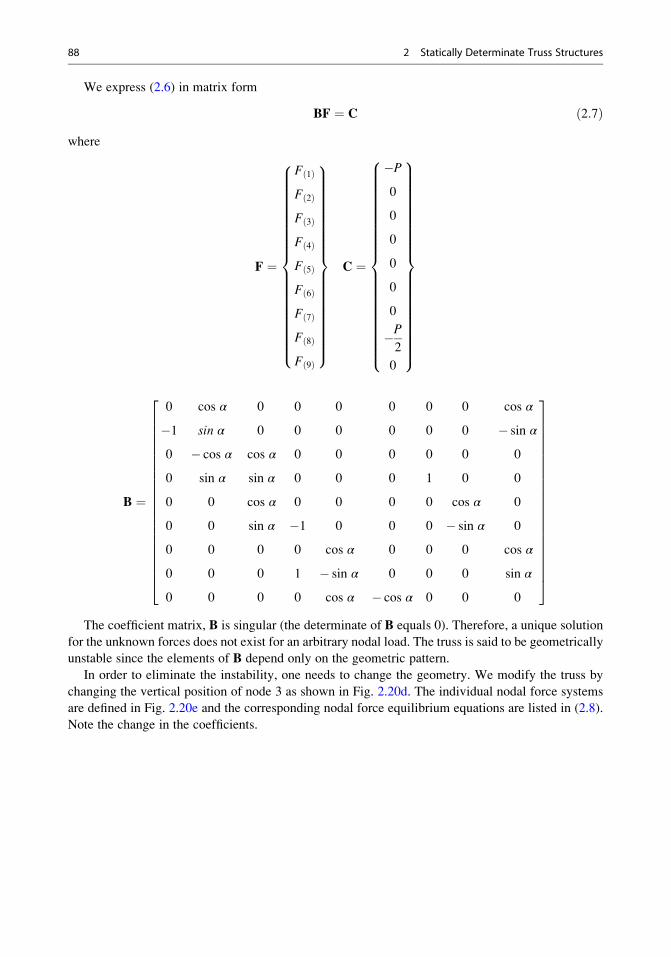
We express (2.6) in matrix form
BF ¼ C ð2:7Þwhere
F ¼
F 1ð Þ
F 2ð Þ
F 3ð Þ
F 4ð Þ
F 5ð Þ
F 6ð Þ
F 7ð Þ
F 8ð Þ
F 9ð Þ
8>>>>>>>>>>>>>>>>>>>><>>>>>>>>>>>>>>>>>>>>:
9>>>>>>>>>>>>>>>>>>>>=>>>>>>>>>>>>>>>>>>>>;
C ¼
�P0
0
0
0
0
0
�P2
0
8>>>>>>>>>>>>>>>>>>>>><>>>>>>>>>>>>>>>>>>>>>:
9>>>>>>>>>>>>>>>>>>>>>=>>>>>>>>>>>>>>>>>>>>>;
B ¼
0 cos α 0 0 0 0 0 0 cos α
�1 sin α 0 0 0 0 0 0 � sin α
0 � cos α cos α 0 0 0 0 0 0
0 sin α sin α 0 0 0 1 0 0
0 0 cos α 0 0 0 0 cos α 0
0 0 sin α �1 0 0 0 � sin α 0
0 0 0 0 cos α 0 0 0 cos α
0 0 0 1 � sin α 0 0 0 sin α
0 0 0 0 cos α � cos α 0 0 0
2666666666666666666664
3777777777777777777775
The coefficient matrix, B is singular (the determinate of B equals 0). Therefore, a unique solution
for the unknown forces does not exist for an arbitrary nodal load. The truss is said to be geometrically
unstable since the elements of B depend only on the geometric pattern.
In order to eliminate the instability, one needs to change the geometry. We modify the truss by
changing the vertical position of node 3 as shown in Fig. 2.20d. The individual nodal force systems
are defined in Fig. 2.20e and the corresponding nodal force equilibrium equations are listed in (2.8).
Note the change in the coefficients.
88 2 Statically Determinate Truss Structures
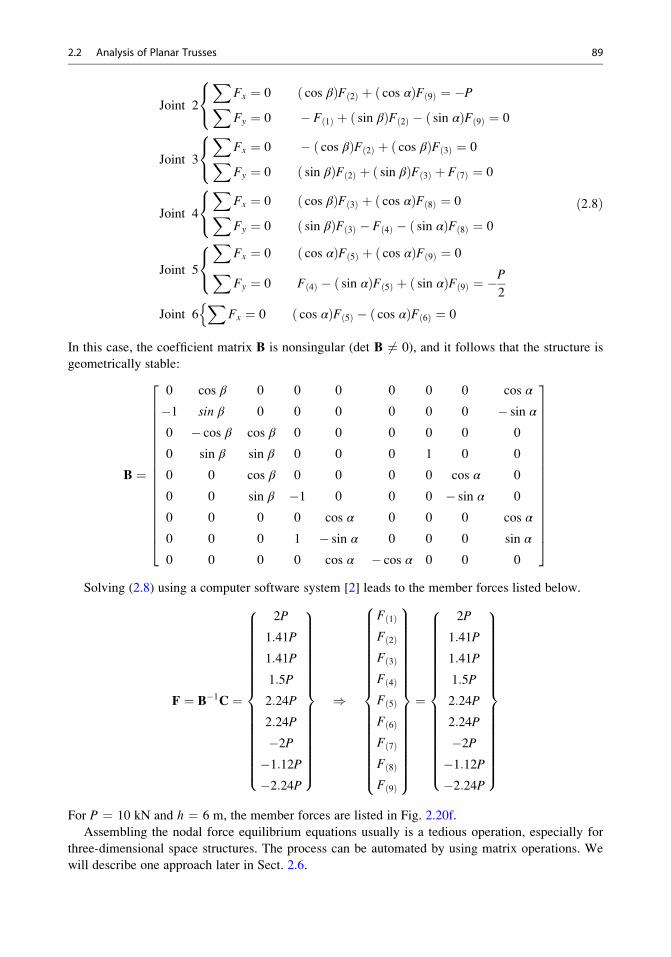
Joint 2
XFx ¼ 0 cos βð ÞF 2ð Þ þ cos αð ÞF 9ð Þ ¼ �PXFy ¼ 0 � F 1ð Þ þ sin βð ÞF 2ð Þ � sin αð ÞF 9ð Þ ¼ 0
8<:
Joint 3
XFx ¼ 0 � cos βð ÞF 2ð Þ þ cos βð ÞF 3ð Þ ¼ 0XFy ¼ 0 sin βð ÞF 2ð Þ þ sin βð ÞF 3ð Þ þ F 7ð Þ ¼ 0
8<:
Joint 4
XFx ¼ 0 cos βð ÞF 3ð Þ þ cos αð ÞF 8ð Þ ¼ 0XFy ¼ 0 sin βð ÞF 3ð Þ � F 4ð Þ � sin αð ÞF 8ð Þ ¼ 0
8<:
Joint 5
XFx ¼ 0 cos αð ÞF 5ð Þ þ cos αð ÞF 9ð Þ ¼ 0XFy ¼ 0 F 4ð Þ � sin αð ÞF 5ð Þ þ sin αð ÞF 9ð Þ ¼ �P
2
8<:
Joint 6X
Fx ¼ 0 cos αð ÞF 5ð Þ � cos αð ÞF 6ð Þ ¼ 0n
ð2:8Þ
In this case, the coefficient matrix B is nonsingular (det B 6¼ 0), and it follows that the structure is
geometrically stable:
B ¼
0 cos β 0 0 0 0 0 0 cos α
�1 sin β 0 0 0 0 0 0 � sin α
0 � cos β cos β 0 0 0 0 0 0
0 sin β sin β 0 0 0 1 0 0
0 0 cos β 0 0 0 0 cos α 0
0 0 sin β �1 0 0 0 � sin α 0
0 0 0 0 cos α 0 0 0 cos α
0 0 0 1 � sin α 0 0 0 sin α
0 0 0 0 cos α � cos α 0 0 0
2666666666666666664
3777777777777777775
Solving (2.8) using a computer software system [2] leads to the member forces listed below.
F ¼ B�1C ¼
2P
1:41P
1:41P
1:5P
2:24P
2:24P
�2P�1:12P�2:24P
8>>>>>>>>>>>>>>>>><>>>>>>>>>>>>>>>>>:
9>>>>>>>>>>>>>>>>>=>>>>>>>>>>>>>>>>>;
)
F 1ð ÞF 2ð ÞF 3ð ÞF 4ð ÞF 5ð ÞF 6ð ÞF 7ð ÞF 8ð ÞF 9ð Þ
8>>>>>>>>>>>>>>>>>><>>>>>>>>>>>>>>>>>>:
9>>>>>>>>>>>>>>>>>>=>>>>>>>>>>>>>>>>>>;
¼
2P
1:41P
1:41P
1:5P
2:24P
2:24P
�2P�1:12P�2:24P
8>>>>>>>>>>>>>>>>><>>>>>>>>>>>>>>>>>:
9>>>>>>>>>>>>>>>>>=>>>>>>>>>>>>>>>>>;
For P ¼ 10 kN and h ¼ 6 m, the member forces are listed in Fig. 2.20f.
Assembling the nodal force equilibrium equations usually is a tedious operation, especially for
three-dimensional space structures. The process can be automated by using matrix operations. We
will describe one approach later in Sect. 2.6.
2.2 Analysis of Planar Trusses 89
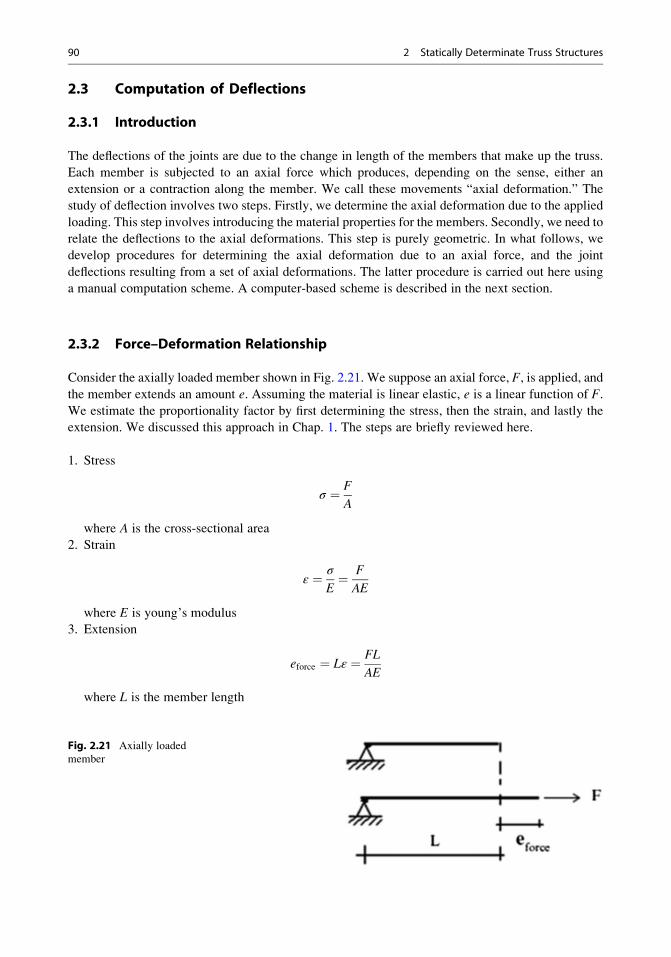
2.3 Computation of Deflections
2.3.1 Introduction
The deflections of the joints are due to the change in length of the members that make up the truss.
Each member is subjected to an axial force which produces, depending on the sense, either an
extension or a contraction along the member. We call these movements “axial deformation.” The
study of deflection involves two steps. Firstly, we determine the axial deformation due to the applied
loading. This step involves introducing the material properties for the members. Secondly, we need to
relate the deflections to the axial deformations. This step is purely geometric. In what follows, we
develop procedures for determining the axial deformation due to an axial force, and the joint
deflections resulting from a set of axial deformations. The latter procedure is carried out here using
a manual computation scheme. A computer-based scheme is described in the next section.
2.3.2 Force–Deformation Relationship
Consider the axially loaded member shown in Fig. 2.21. We suppose an axial force, F, is applied, and
the member extends an amount e. Assuming the material is linear elastic, e is a linear function of F.
We estimate the proportionality factor by first determining the stress, then the strain, and lastly the
extension. We discussed this approach in Chap. 1. The steps are briefly reviewed here.
1. Stress
σ ¼ F
A
where A is the cross-sectional area
2. Strain
ε ¼ σ
E¼ F
AE
where E is young’s modulus
3. Extension
eforce ¼ Lε ¼ FL
AE
where L is the member length
Fig. 2.21 Axially loaded
member
90 2 Statically Determinate Truss Structures
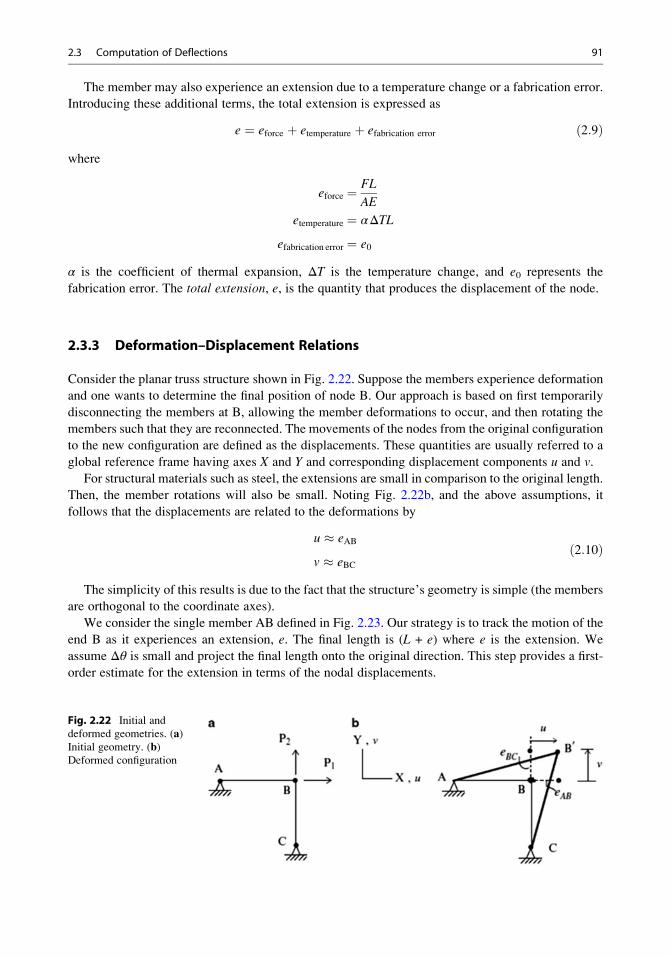
The member may also experience an extension due to a temperature change or a fabrication error.
Introducing these additional terms, the total extension is expressed as
e ¼ eforce þ etemperature þ efabrication error ð2:9Þwhere
eforce ¼ FL
AE
etemperature ¼ αΔTL
efabrication error ¼ e0
α is the coefficient of thermal expansion, ΔT is the temperature change, and e0 represents the
fabrication error. The total extension, e, is the quantity that produces the displacement of the node.
2.3.3 Deformation–Displacement Relations
Consider the planar truss structure shown in Fig. 2.22. Suppose the members experience deformation
and one wants to determine the final position of node B. Our approach is based on first temporarily
disconnecting the members at B, allowing the member deformations to occur, and then rotating the
members such that they are reconnected. The movements of the nodes from the original configuration
to the new configuration are defined as the displacements. These quantities are usually referred to a
global reference frame having axes X and Y and corresponding displacement components u and v.
For structural materials such as steel, the extensions are small in comparison to the original length.
Then, the member rotations will also be small. Noting Fig. 2.22b, and the above assumptions, it
follows that the displacements are related to the deformations by
u � eAB
v � eBCð2:10Þ
The simplicity of this results is due to the fact that the structure’s geometry is simple (the members
are orthogonal to the coordinate axes).
We consider the single member AB defined in Fig. 2.23. Our strategy is to track the motion of the
end B as it experiences an extension, e. The final length is (L + e) where e is the extension. We
assume Δθ is small and project the final length onto the original direction. This step provides a first-
order estimate for the extension in terms of the nodal displacements.
Fig. 2.22 Initial and
deformed geometries. (a)Initial geometry. (b)Deformed configuration
2.3 Computation of Deflections 91
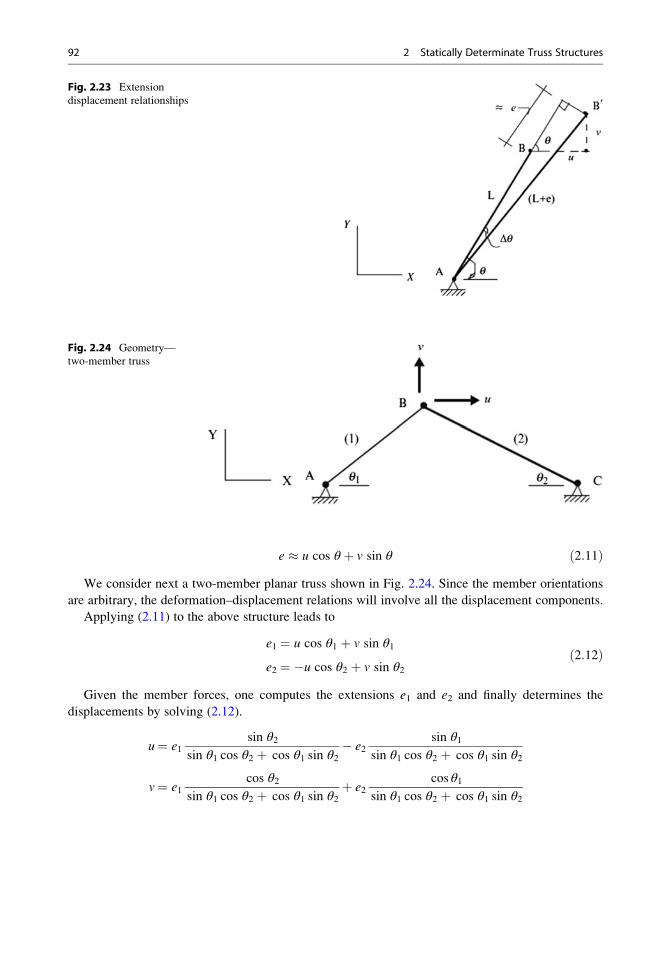
e � u cos θ þ v sin θ ð2:11ÞWe consider next a two-member planar truss shown in Fig. 2.24. Since the member orientations
are arbitrary, the deformation–displacement relations will involve all the displacement components.
Applying (2.11) to the above structure leads to
e1 ¼ u cos θ1 þ v sin θ1
e2 ¼ �u cos θ2 þ v sin θ2ð2:12Þ
Given the member forces, one computes the extensions e1 and e2 and finally determines the
displacements by solving (2.12).
u¼ e1sin θ2
sin θ1 cos θ2 þ cos θ1 sin θ2� e2
sin θ1sin θ1 cos θ2 þ cos θ1 sin θ2
v¼ e1cos θ2
sin θ1 cos θ2 þ cos θ1 sin θ2þ e2
cos θ1sin θ1 cos θ2 þ cos θ1 sin θ2
Fig. 2.24 Geometry—
two-member truss
Fig. 2.23 Extension
displacement relationships
92 2 Statically Determinate Truss Structures
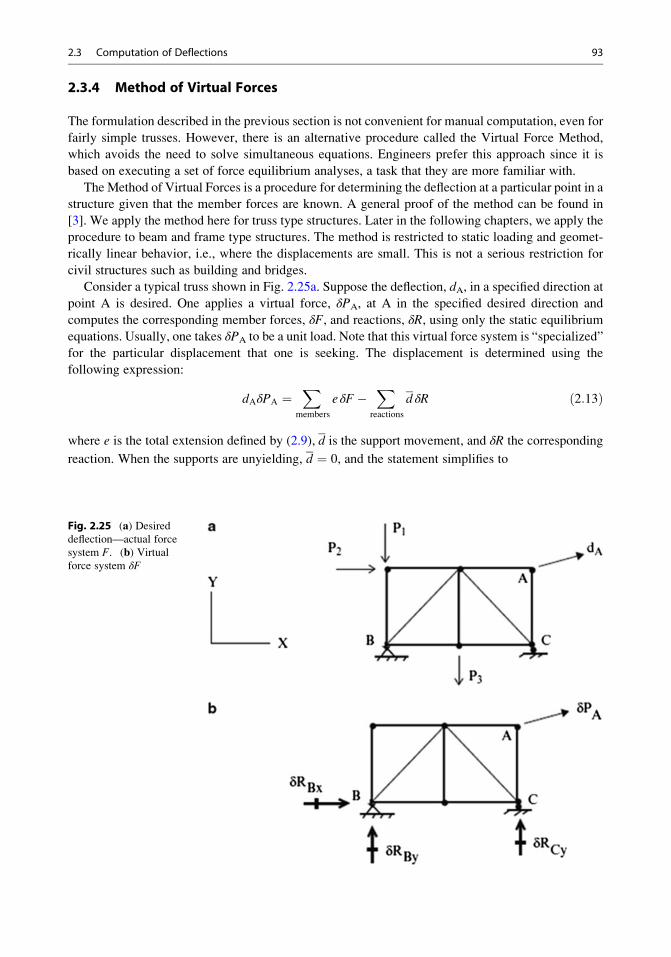
2.3.4 Method of Virtual Forces
The formulation described in the previous section is not convenient for manual computation, even for
fairly simple trusses. However, there is an alternative procedure called the Virtual Force Method,
which avoids the need to solve simultaneous equations. Engineers prefer this approach since it is
based on executing a set of force equilibrium analyses, a task that they are more familiar with.
The Method of Virtual Forces is a procedure for determining the deflection at a particular point in a
structure given that the member forces are known. A general proof of the method can be found in
[3]. We apply the method here for truss type structures. Later in the following chapters, we apply the
procedure to beam and frame type structures. The method is restricted to static loading and geomet-
rically linear behavior, i.e., where the displacements are small. This is not a serious restriction for
civil structures such as building and bridges.
Consider a typical truss shown in Fig. 2.25a. Suppose the deflection, dA, in a specified direction at
point A is desired. One applies a virtual force, δPA, at A in the specified desired direction and
computes the corresponding member forces, δF, and reactions, δR, using only the static equilibrium
equations. Usually, one takes δPA to be a unit load. Note that this virtual force system is “specialized”
for the particular displacement that one is seeking. The displacement is determined using the
following expression:
dAδPA ¼X
members
eδF�X
reactions
d δR ð2:13Þ
where e is the total extension defined by (2.9), d is the support movement, and δR the corresponding
reaction. When the supports are unyielding, d ¼ 0, and the statement simplifies to
Fig. 2.25 (a) Desireddeflection—actual force
system F. (b) Virtualforce system δF
2.3 Computation of Deflections 93

dAδPA ¼X
members
eδF ð2:14Þ
Given the actual forces, one evaluates e with (2.9), then determines the product, e δF, and lastly
sums over the members. Applying (2.13) is equivalent to solving the set of simultaneous equations
relating the deformations and the displacements. The following example illustrates this point.
Example 2.13 Computation of Deflection—Virtual Force Method
Given: The plane truss shown in Fig. E2.13a. Assume A ¼ 1300 mm2 and E ¼ 200 GPa for all
members.
Determine: The horizontal displacement at c (uc).
Fig. E2.13a Geometry and loading
Solution: Applying (2.14), the horizontal displacement at node c (uc) is determined with
ucδP ¼X
eforceδFu ¼X FL
AE
� �δFu
The actual and virtual forces are listed below.
Fig. E2.13b Actual forces, F
94 2 Statically Determinate Truss Structures

Fig. E2.13c Virtual forces, δF
Using this data, and assuming AE is constant, the computation proceeds as follows:
Member L F δFu eforce ¼ FL
AEe δFu
ab l �10 0 �10 l
AE0
bc l �40 0 �40 l
AE0
cd l �50 �1 �50 l
AE50
l
AE
da l 0 0 0 0
ac lffiffiffi2p
40ffiffiffi2p ffiffiffi
2p
80l
AE80
ffiffiffi2p l
AE
uc ¼X
eforceδFu ¼ l
AE80
ffiffiffi2pþ 50
� �The plus sign indicates the deflection is in the direction of the unit load. For A ¼ 1300 mm2,
E ¼ 200 GPa, and l ¼ 3 m, the displacement is
uc ¼3 103� �
1300 200ð Þ 80ffiffiffi2pþ 50
� �¼ 1:88mm!
We point out that the virtual force (δF) results identify which member deformations contribute to
the corresponding deflection. In this case, only two-member deformations contribute to the horizontal
displacement.
Example 2.14 Computation of Deflection—Virtual Force Method
Given: The plane truss shown in Fig. E2.14a. Assume E ¼ 200 GPa.
2.3 Computation of Deflections 95
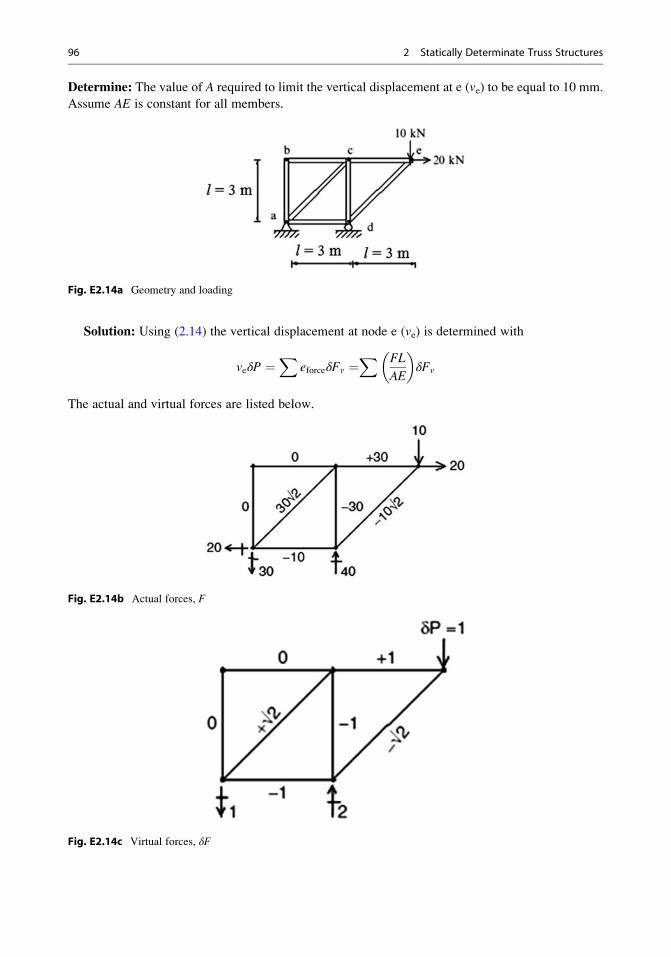
Determine: The value of A required to limit the vertical displacement at e (ve) to be equal to 10 mm.
Assume AE is constant for all members.
Fig. E2.14a Geometry and loading
Solution: Using (2.14) the vertical displacement at node e (ve) is determined with
veδP ¼X
eforceδFv ¼X FL
AE
� �δFv
The actual and virtual forces are listed below.
Fig. E2.14b Actual forces, F
Fig. E2.14c Virtual forces, δF
96 2 Statically Determinate Truss Structures
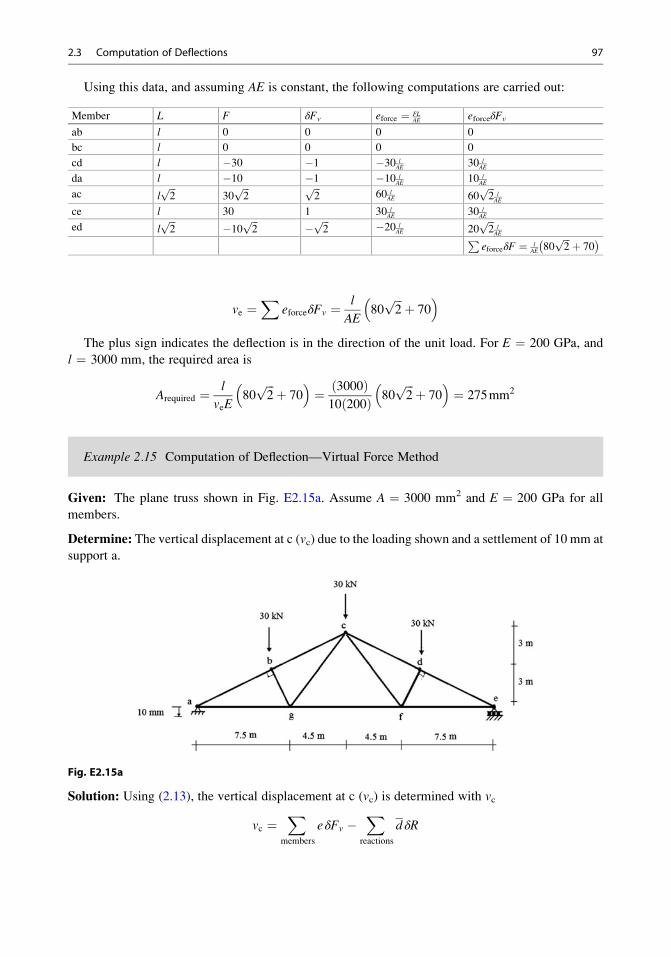
Using this data, and assuming AE is constant, the following computations are carried out:
Member L F δFv eforce ¼ FLAE eforceδFv
ab l 0 0 0 0
bc l 0 0 0 0
cd l �30 �1 �30 lAE 30 l
AE
da l �10 �1 �10 lAE 10 l
AE
ac lffiffiffi2p
30ffiffiffi2p ffiffiffi
2p
60 lAE 60
ffiffiffi2p
lAE
ce l 30 1 30 lAE 30 l
AE
ed lffiffiffi2p �10 ffiffiffi
2p � ffiffiffi
2p �20 l
AE 20ffiffiffi2p
lAEP
eforceδF ¼ lAE 80
ffiffiffi2p þ 70
� �
ve ¼X
eforceδFv ¼ l
AE80
ffiffiffi2pþ 70
� �The plus sign indicates the deflection is in the direction of the unit load. For E ¼ 200 GPa, and
l ¼ 3000 mm, the required area is
Arequired ¼ l
veE80
ffiffiffi2pþ 70
� �¼ 3000ð Þ
10 200ð Þ 80ffiffiffi2pþ 70
� �¼ 275mm2
Example 2.15 Computation of Deflection—Virtual Force Method
Given: The plane truss shown in Fig. E2.15a. Assume A ¼ 3000 mm2 and E ¼ 200 GPa for all
members.
Determine: The vertical displacement at c (vc) due to the loading shown and a settlement of 10 mm at
support a.
Fig. E2.15a
Solution: Using (2.13), the vertical displacement at c (vc) is determined with vc
vc ¼X
members
eδFv �X
reactions
d δR
2.3 Computation of Deflections 97
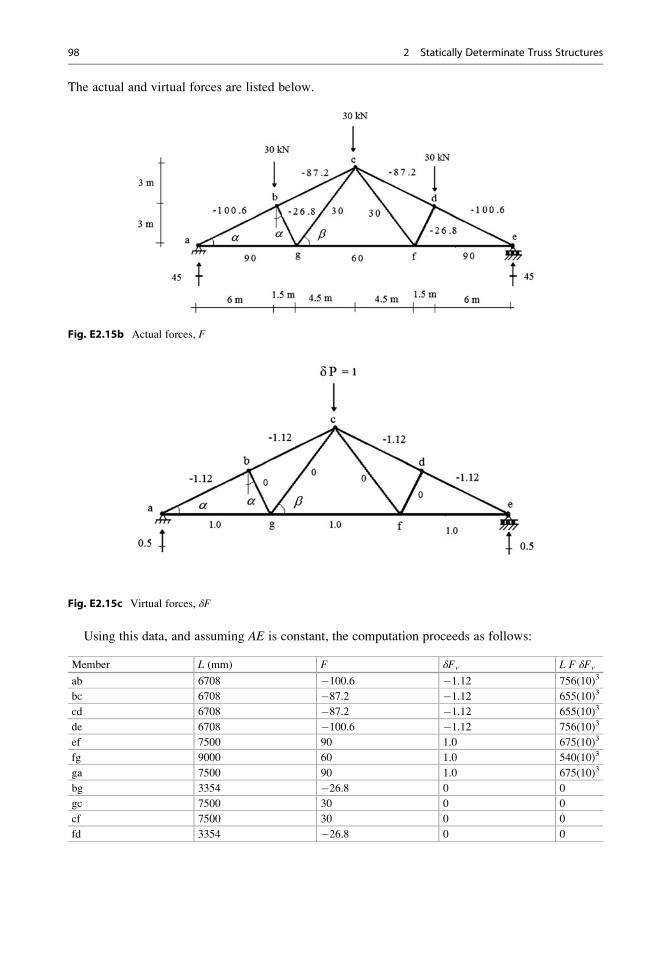
The actual and virtual forces are listed below.
Fig. E2.15b Actual forces, F
Fig. E2.15c Virtual forces, δF
Using this data, and assuming AE is constant, the computation proceeds as follows:
Member L (mm) F δFv L F δFv
ab 6708 �100.6 �1.12 756(10)3
bc 6708 �87.2 �1.12 655(10)3
cd 6708 �87.2 �1.12 655(10)3
de 6708 �100.6 �1.12 756(10)3
ef 7500 90 1.0 675(10)3
fg 9000 60 1.0 540(10)3
ga 7500 90 1.0 675(10)3
bg 3354 �26.8 0 0
gc 7500 30 0 0
cf 7500 30 0 0
fd 3354 �26.8 0 0
98 2 Statically Determinate Truss Structures
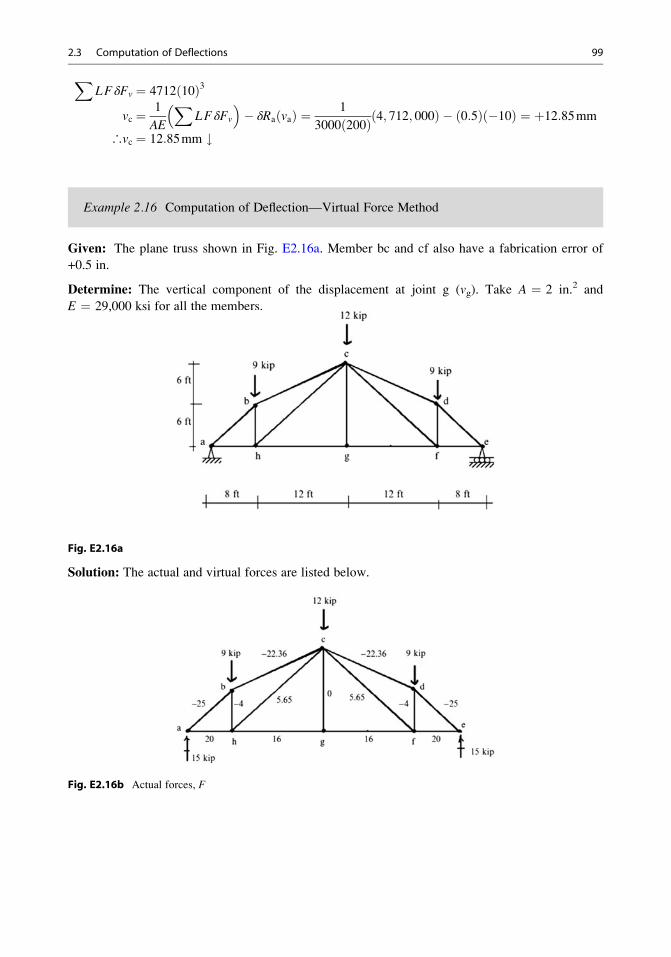
XLFδFv ¼ 4712 10ð Þ3
vc ¼ 1
AE
XLFδFv
� �� δRa vað Þ ¼ 1
3000 200ð Þ 4; 712; 000ð Þ � 0:5ð Þ �10ð Þ ¼ þ12:85mm
∴vc ¼ 12:85mm #
Example 2.16 Computation of Deflection—Virtual Force Method
Given: The plane truss shown in Fig. E2.16a. Member bc and cf also have a fabrication error of
+0.5 in.
Determine: The vertical component of the displacement at joint g (vg). Take A ¼ 2 in.2 and
E ¼ 29,000 ksi for all the members.
Fig. E2.16a
Solution: The actual and virtual forces are listed below.
Fig. E2.16b Actual forces, F
2.3 Computation of Deflections 99
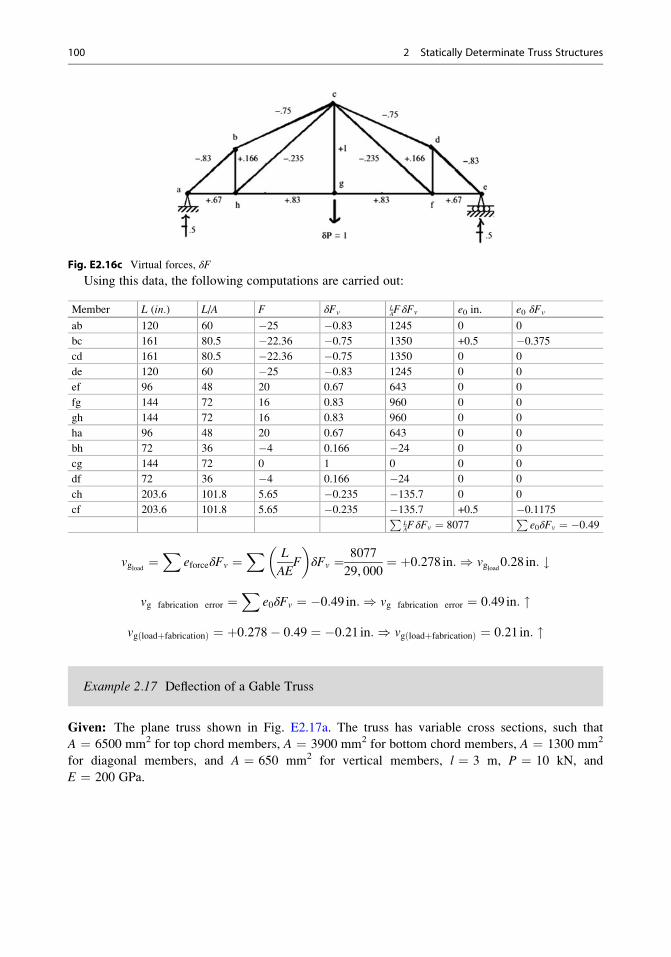
Fig. E2.16c Virtual forces, δF
Using this data, the following computations are carried out:
Member L (in.) L/A F δFvLAFδFv e0 in. e0 δFv
ab 120 60 �25 �0.83 1245 0 0
bc 161 80.5 �22.36 �0.75 1350 +0.5 �0.375cd 161 80.5 �22.36 �0.75 1350 0 0
de 120 60 �25 �0.83 1245 0 0
ef 96 48 20 0.67 643 0 0
fg 144 72 16 0.83 960 0 0
gh 144 72 16 0.83 960 0 0
ha 96 48 20 0.67 643 0 0
bh 72 36 �4 0.166 �24 0 0
cg 144 72 0 1 0 0 0
df 72 36 �4 0.166 �24 0 0
ch 203.6 101.8 5.65 �0.235 �135.7 0 0
cf 203.6 101.8 5.65 �0.235 �135.7 +0.5 �0.1175PLAFδFv ¼ 8077
Pe0δFv ¼ �0:49
vgload ¼X
eforceδFv ¼X L
AEF
� �δFv ¼ 8077
29, 000¼ þ0:278 in:) vgload0:28 in: #
vg fabrication error ¼X
e0δFv ¼ �0:49 in:) vg fabrication error ¼ 0:49 in: "
vg loadþfabricationð Þ ¼ þ0:278� 0:49 ¼ �0:21 in:) vg loadþfabricationð Þ ¼ 0:21 in: "
Example 2.17 Deflection of a Gable Truss
Given: The plane truss shown in Fig. E2.17a. The truss has variable cross sections, such that
A ¼ 6500 mm2 for top chord members, A ¼ 3900 mm2 for bottom chord members, A ¼ 1300 mm2
for diagonal members, and A ¼ 650 mm2 for vertical members, l ¼ 3 m, P ¼ 10 kN, and
E ¼ 200 GPa.
100 2 Statically Determinate Truss Structures
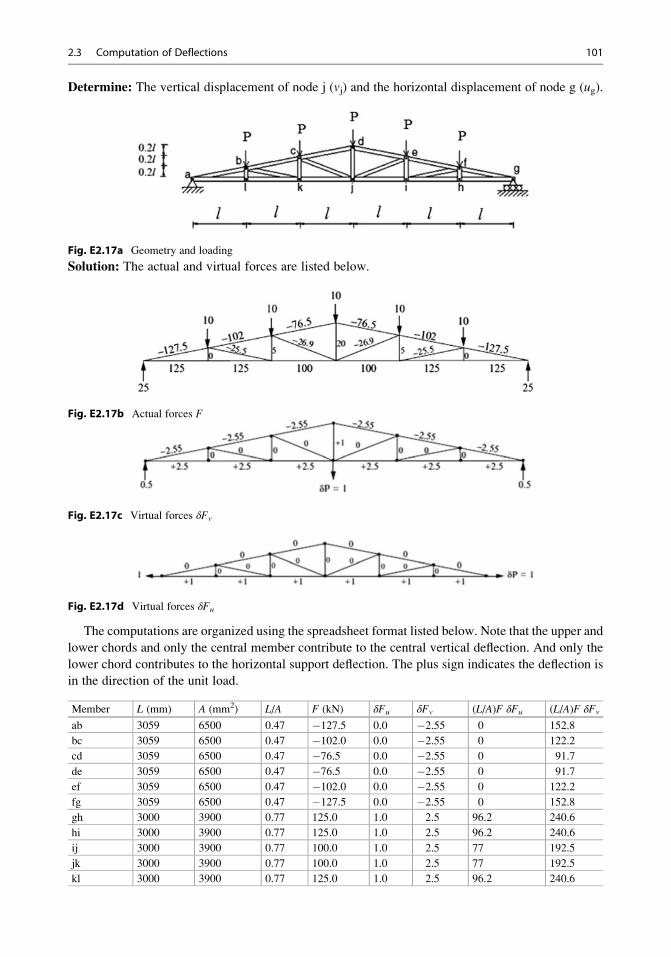
Determine: The vertical displacement of node j (vj) and the horizontal displacement of node g (ug).
Fig. E2.17a Geometry and loading
Solution: The actual and virtual forces are listed below.
Fig. E2.17b Actual forces F
Fig. E2.17c Virtual forces δFv
Fig. E2.17d Virtual forces δFu
The computations are organized using the spreadsheet format listed below. Note that the upper and
lower chords and only the central member contribute to the central vertical deflection. And only the
lower chord contributes to the horizontal support deflection. The plus sign indicates the deflection is
in the direction of the unit load.
Member L (mm) A (mm2) L/A F (kN) δFu δFv (L/A)F δFu (L/A)F δFv
ab 3059 6500 0.47 �127.5 0.0 �2.55 0 152.8
bc 3059 6500 0.47 �102.0 0.0 �2.55 0 122.2
cd 3059 6500 0.47 �76.5 0.0 �2.55 0 91.7
de 3059 6500 0.47 �76.5 0.0 �2.55 0 91.7
ef 3059 6500 0.47 �102.0 0.0 �2.55 0 122.2
fg 3059 6500 0.47 �127.5 0.0 �2.55 0 152.8
gh 3000 3900 0.77 125.0 1.0 2.5 96.2 240.6
hi 3000 3900 0.77 125.0 1.0 2.5 96.2 240.6
ij 3000 3900 0.77 100.0 1.0 2.5 77 192.5
jk 3000 3900 0.77 100.0 1.0 2.5 77 192.5
kl 3000 3900 0.77 125.0 1.0 2.5 96.2 240.6
2.3 Computation of Deflections 101
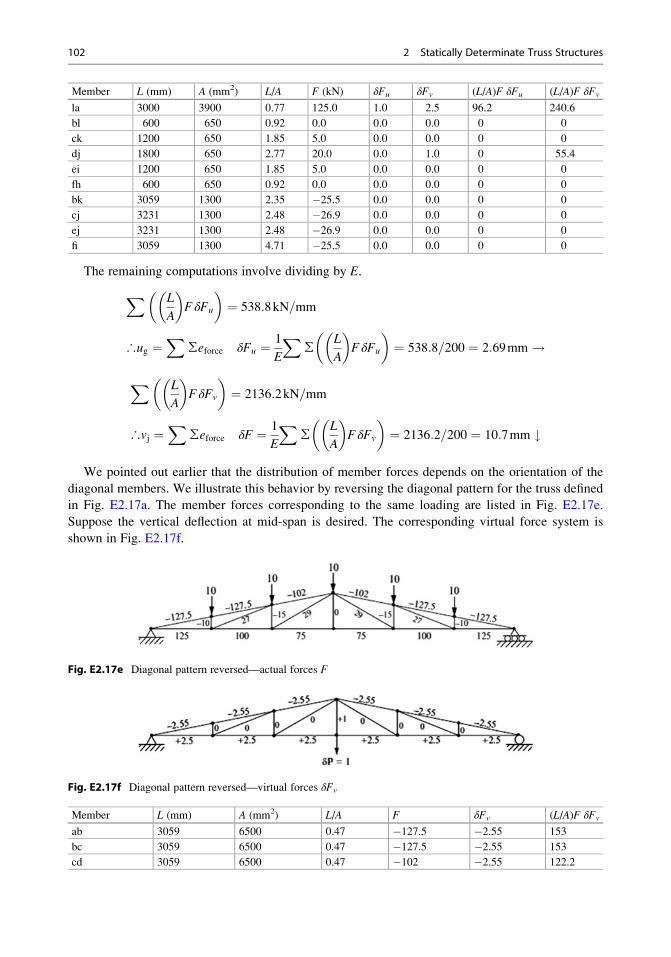
Member L (mm) A (mm2) L/A F (kN) δFu δFv (L/A)F δFu (L/A)F δFv
la 3000 3900 0.77 125.0 1.0 2.5 96.2 240.6
bl 600 650 0.92 0.0 0.0 0.0 0 0
ck 1200 650 1.85 5.0 0.0 0.0 0 0
dj 1800 650 2.77 20.0 0.0 1.0 0 55.4
ei 1200 650 1.85 5.0 0.0 0.0 0 0
fh 600 650 0.92 0.0 0.0 0.0 0 0
bk 3059 1300 2.35 �25.5 0.0 0.0 0 0
cj 3231 1300 2.48 �26.9 0.0 0.0 0 0
ej 3231 1300 2.48 �26.9 0.0 0.0 0 0
fi 3059 1300 4.71 �25.5 0.0 0.0 0 0
The remaining computations involve dividing by E.
X L
A
� �FδFu
� �¼ 538:8kN=mm
∴ug ¼X
∑eforce δFu ¼ 1
E
X∑
L
A
� �FδFu
� �¼ 538:8=200 ¼ 2:69mm!
X L
A
� �FδFv
� �¼ 2136:2kN=mm
∴vj ¼X
∑eforce δF ¼ 1
E
X∑
L
A
� �FδFv
� �¼ 2136:2=200 ¼ 10:7mm #
We pointed out earlier that the distribution of member forces depends on the orientation of the
diagonal members. We illustrate this behavior by reversing the diagonal pattern for the truss defined
in Fig. E2.17a. The member forces corresponding to the same loading are listed in Fig. E2.17e.
Suppose the vertical deflection at mid-span is desired. The corresponding virtual force system is
shown in Fig. E2.17f.
Fig. E2.17e Diagonal pattern reversed—actual forces F
Fig. E2.17f Diagonal pattern reversed—virtual forces δFv
Member L (mm) A (mm2) L/A F δFv (L/A)F δFv
ab 3059 6500 0.47 �127.5 �2.55 153
bc 3059 6500 0.47 �127.5 �2.55 153
cd 3059 6500 0.47 �102 �2.55 122.2
102 2 Statically Determinate Truss Structures
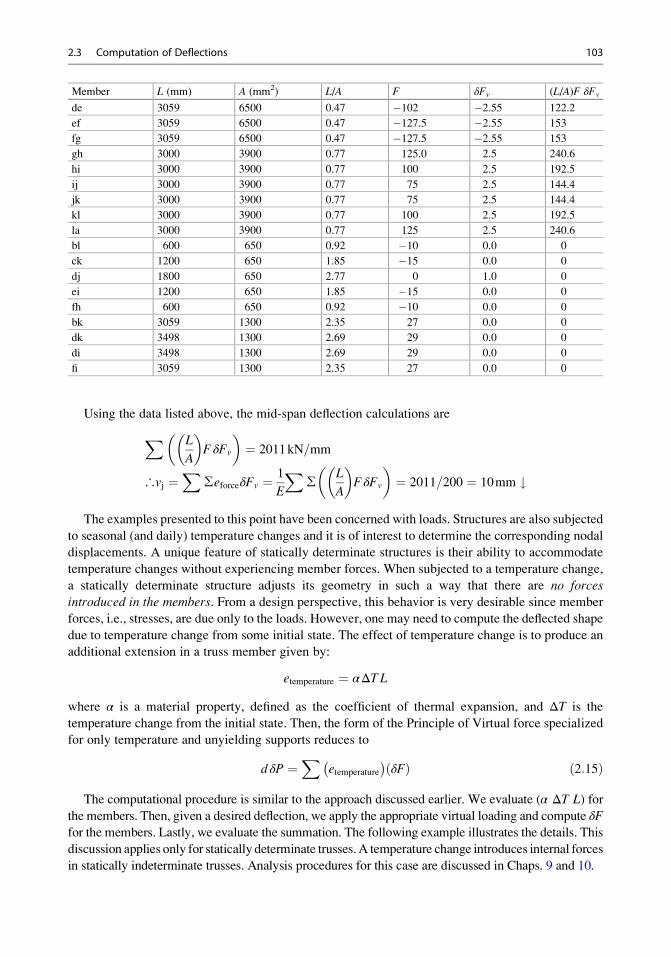
Member L (mm) A (mm2) L/A F δFv (L/A)F δFv
de 3059 6500 0.47 �102 �2.55 122.2
ef 3059 6500 0.47 �127.5 �2.55 153
fg 3059 6500 0.47 �127.5 �2.55 153
gh 3000 3900 0.77 125.0 2.5 240.6
hi 3000 3900 0.77 100 2.5 192.5
ij 3000 3900 0.77 75 2.5 144.4
jk 3000 3900 0.77 75 2.5 144.4
kl 3000 3900 0.77 100 2.5 192.5
la 3000 3900 0.77 125 2.5 240.6
bl 600 650 0.92 �10 0.0 0
ck 1200 650 1.85 �15 0.0 0
dj 1800 650 2.77 0 1.0 0
ei 1200 650 1.85 �15 0.0 0
fh 600 650 0.92 �10 0.0 0
bk 3059 1300 2.35 27 0.0 0
dk 3498 1300 2.69 29 0.0 0
di 3498 1300 2.69 29 0.0 0
fi 3059 1300 2.35 27 0.0 0
Using the data listed above, the mid-span deflection calculations are
X L
A
� �FδFv
� �¼ 2011kN=mm
∴vj ¼X
∑eforceδFv ¼ 1
E
X∑
L
A
� �FδFv
� �¼ 2011=200 ¼ 10mm #
The examples presented to this point have been concerned with loads. Structures are also subjected
to seasonal (and daily) temperature changes and it is of interest to determine the corresponding nodal
displacements. A unique feature of statically determinate structures is their ability to accommodate
temperature changes without experiencing member forces. When subjected to a temperature change,
a statically determinate structure adjusts its geometry in such a way that there are no forcesintroduced in the members. From a design perspective, this behavior is very desirable since member
forces, i.e., stresses, are due only to the loads. However, one may need to compute the deflected shape
due to temperature change from some initial state. The effect of temperature change is to produce an
additional extension in a truss member given by:
etemperature ¼ αΔT L
where α is a material property, defined as the coefficient of thermal expansion, and ΔT is the
temperature change from the initial state. Then, the form of the Principle of Virtual force specialized
for only temperature and unyielding supports reduces to
d δP ¼X
etemperature
� �δFð Þ ð2:15Þ
The computational procedure is similar to the approach discussed earlier. We evaluate (α ΔT L) for
the members. Then, given a desired deflection, we apply the appropriate virtual loading and compute δFfor the members. Lastly, we evaluate the summation. The following example illustrates the details. This
discussion applies only for statically determinate trusses.A temperature change introduces internal forces
in statically indeterminate trusses. Analysis procedures for this case are discussed in Chaps. 9 and 10.
2.3 Computation of Deflections 103
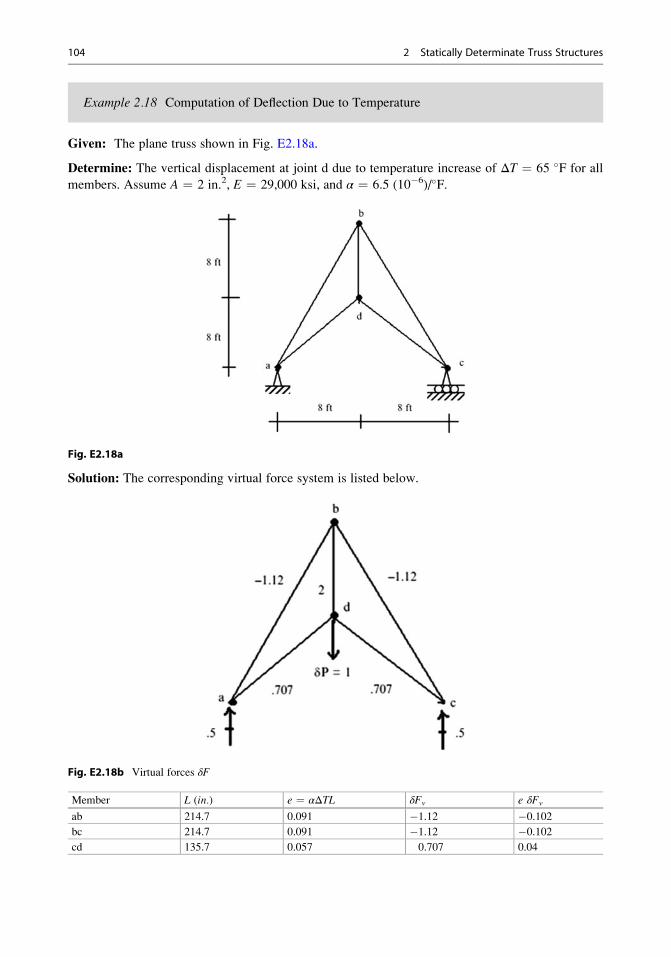
Example 2.18 Computation of Deflection Due to Temperature
Given: The plane truss shown in Fig. E2.18a.
Determine: The vertical displacement at joint d due to temperature increase of ΔT ¼ 65 �F for all
members. Assume A ¼ 2 in.2, E ¼ 29,000 ksi, and α ¼ 6.5 (10�6)/�F.
Fig. E2.18a
Solution: The corresponding virtual force system is listed below.
Fig. E2.18b Virtual forces δF
Member L (in.) e ¼ αΔTL δFv e δFv
ab 214.7 0.091 �1.12 �0.102bc 214.7 0.091 �1.12 �0.102cd 135.7 0.057 0.707 0.04
104 2 Statically Determinate Truss Structures
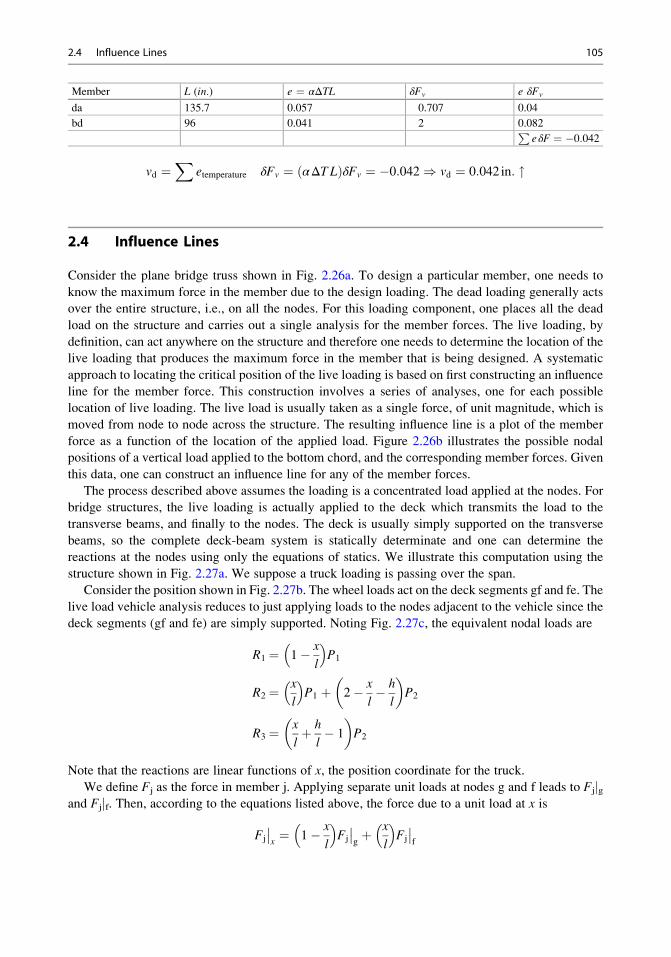
Member L (in.) e ¼ αΔTL δFv e δFv
da 135.7 0.057 0.707 0.04
bd 96 0.041 2 0.082PeδF ¼ �0:042
vd ¼X
etemperature δFv ¼ αΔT Lð ÞδFv ¼ �0:042) vd ¼ 0:042 in: "
2.4 Influence Lines
Consider the plane bridge truss shown in Fig. 2.26a. To design a particular member, one needs to
know the maximum force in the member due to the design loading. The dead loading generally acts
over the entire structure, i.e., on all the nodes. For this loading component, one places all the dead
load on the structure and carries out a single analysis for the member forces. The live loading, by
definition, can act anywhere on the structure and therefore one needs to determine the location of the
live loading that produces the maximum force in the member that is being designed. A systematic
approach to locating the critical position of the live loading is based on first constructing an influence
line for the member force. This construction involves a series of analyses, one for each possible
location of live loading. The live load is usually taken as a single force, of unit magnitude, which is
moved from node to node across the structure. The resulting influence line is a plot of the member
force as a function of the location of the applied load. Figure 2.26b illustrates the possible nodal
positions of a vertical load applied to the bottom chord, and the corresponding member forces. Given
this data, one can construct an influence line for any of the member forces.
The process described above assumes the loading is a concentrated load applied at the nodes. For
bridge structures, the live loading is actually applied to the deck which transmits the load to the
transverse beams, and finally to the nodes. The deck is usually simply supported on the transverse
beams, so the complete deck-beam system is statically determinate and one can determine the
reactions at the nodes using only the equations of statics. We illustrate this computation using the
structure shown in Fig. 2.27a. We suppose a truck loading is passing over the span.
Consider the position shown in Fig. 2.27b. The wheel loads act on the deck segments gf and fe. The
live load vehicle analysis reduces to just applying loads to the nodes adjacent to the vehicle since the
deck segments (gf and fe) are simply supported. Noting Fig. 2.27c, the equivalent nodal loads are
R1 ¼ 1� x
l
� �P1
R2 ¼ x
l
� �P1 þ 2� x
l� h
l
� �P2
R3 ¼ x
lþ h
l� 1
� �P2
Note that the reactions are linear functions of x, the position coordinate for the truck.
We define Fj as the force in member j. Applying separate unit loads at nodes g and f leads to Fjjgand Fjjf. Then, according to the equations listed above, the force due to a unit load at x is
Fj
��x¼ 1� x
l
� �Fj
��gþ x
l
� �Fj
��f
2.4 Influence Lines 105
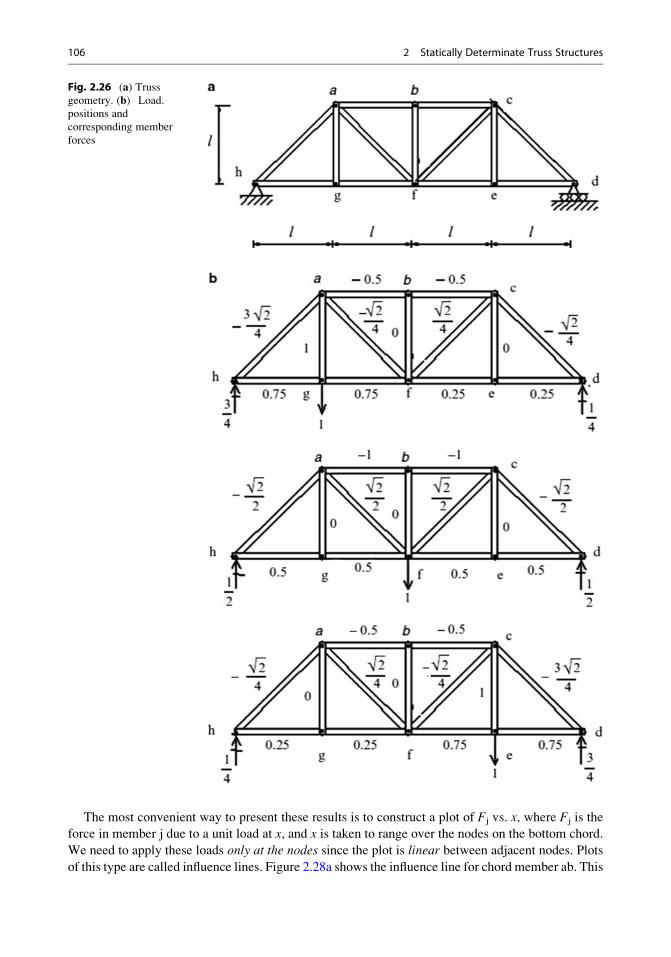
The most convenient way to present these results is to construct a plot of Fj vs. x, where Fj is the
force in member j due to a unit load at x, and x is taken to range over the nodes on the bottom chord.
We need to apply these loads only at the nodes since the plot is linear between adjacent nodes. Plots
of this type are called influence lines. Figure 2.28a shows the influence line for chord member ab. This
Fig. 2.26 (a) Trussgeometry. (b) Load.
positions and
corresponding member
forces
106 2 Statically Determinate Truss Structures
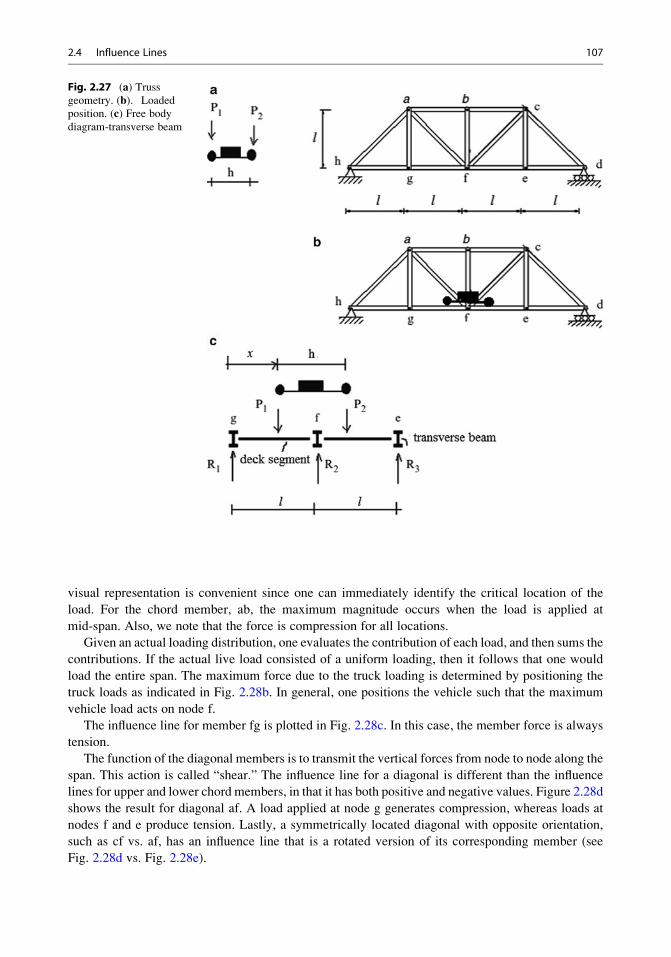
visual representation is convenient since one can immediately identify the critical location of the
load. For the chord member, ab, the maximum magnitude occurs when the load is applied at
mid-span. Also, we note that the force is compression for all locations.
Given an actual loading distribution, one evaluates the contribution of each load, and then sums the
contributions. If the actual live load consisted of a uniform loading, then it follows that one would
load the entire span. The maximum force due to the truck loading is determined by positioning the
truck loads as indicated in Fig. 2.28b. In general, one positions the vehicle such that the maximum
vehicle load acts on node f.
The influence line for member fg is plotted in Fig. 2.28c. In this case, the member force is always
tension.
The function of the diagonal members is to transmit the vertical forces from node to node along the
span. This action is called “shear.” The influence line for a diagonal is different than the influence
lines for upper and lower chord members, in that it has both positive and negative values. Figure 2.28d
shows the result for diagonal af. A load applied at node g generates compression, whereas loads at
nodes f and e produce tension. Lastly, a symmetrically located diagonal with opposite orientation,
such as cf vs. af, has an influence line that is a rotated version of its corresponding member (see
Fig. 2.28d vs. Fig. 2.28e).
Fig. 2.27 (a) Trussgeometry. (b). Loaded
position. (c) Free bodydiagram-transverse beam
2.4 Influence Lines 107
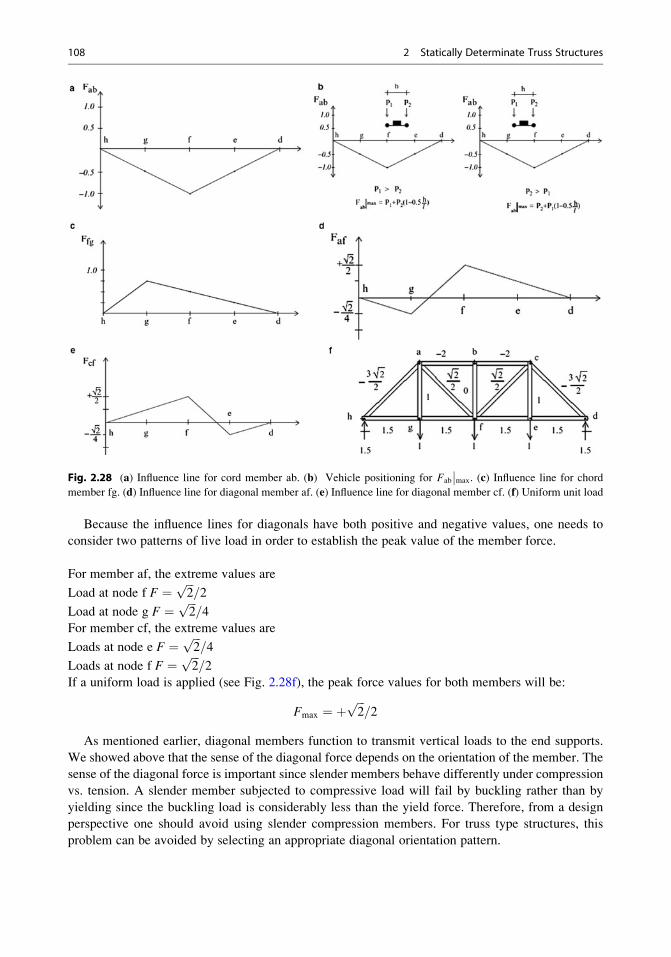
Because the influence lines for diagonals have both positive and negative values, one needs to
consider two patterns of live load in order to establish the peak value of the member force.
For member af, the extreme values are
Load at node f F ¼ ffiffiffi2p
=2
Load at node g F ¼ ffiffiffi2p
=4
For member cf, the extreme values are
Loads at node e F ¼ ffiffiffi2p
=4
Loads at node f F ¼ ffiffiffi2p
=2
If a uniform load is applied (see Fig. 2.28f), the peak force values for both members will be:
Fmax ¼ þffiffiffi2p
=2
As mentioned earlier, diagonal members function to transmit vertical loads to the end supports.
We showed above that the sense of the diagonal force depends on the orientation of the member. The
sense of the diagonal force is important since slender members behave differently under compression
vs. tension. A slender member subjected to compressive load will fail by buckling rather than by
yielding since the buckling load is considerably less than the yield force. Therefore, from a design
perspective one should avoid using slender compression members. For truss type structures, this
problem can be avoided by selecting an appropriate diagonal orientation pattern.
Fig. 2.28 (a) Influence line for cord member ab. (b) Vehicle positioning for Fab
��max. (c) Influence line for chord
member fg. (d) Influence line for diagonal member af. (e) Influence line for diagonal member cf. (f) Uniform unit load
108 2 Statically Determinate Truss Structures
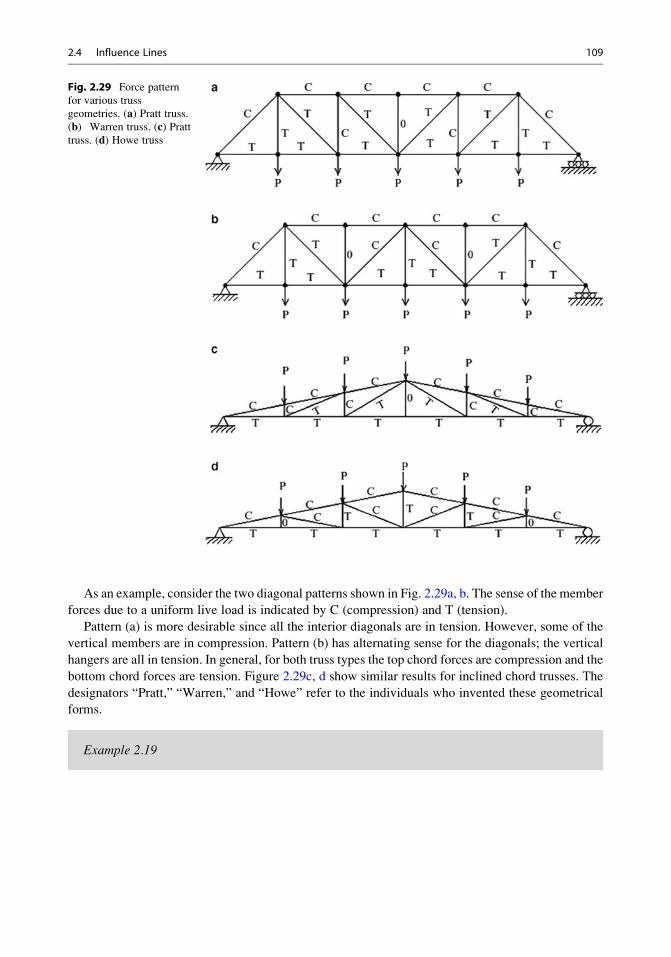
As an example, consider the two diagonal patterns shown in Fig. 2.29a, b. The sense of the member
forces due to a uniform live load is indicated by C (compression) and T (tension).
Pattern (a) is more desirable since all the interior diagonals are in tension. However, some of the
vertical members are in compression. Pattern (b) has alternating sense for the diagonals; the vertical
hangers are all in tension. In general, for both truss types the top chord forces are compression and the
bottom chord forces are tension. Figure 2.29c, d show similar results for inclined chord trusses. The
designators “Pratt,” “Warren,” and “Howe” refer to the individuals who invented these geometrical
forms.
Example 2.19
Fig. 2.29 Force pattern
for various truss
geometries. (a) Pratt truss.(b) Warren truss. (c) Pratttruss. (d) Howe truss
2.4 Influence Lines 109
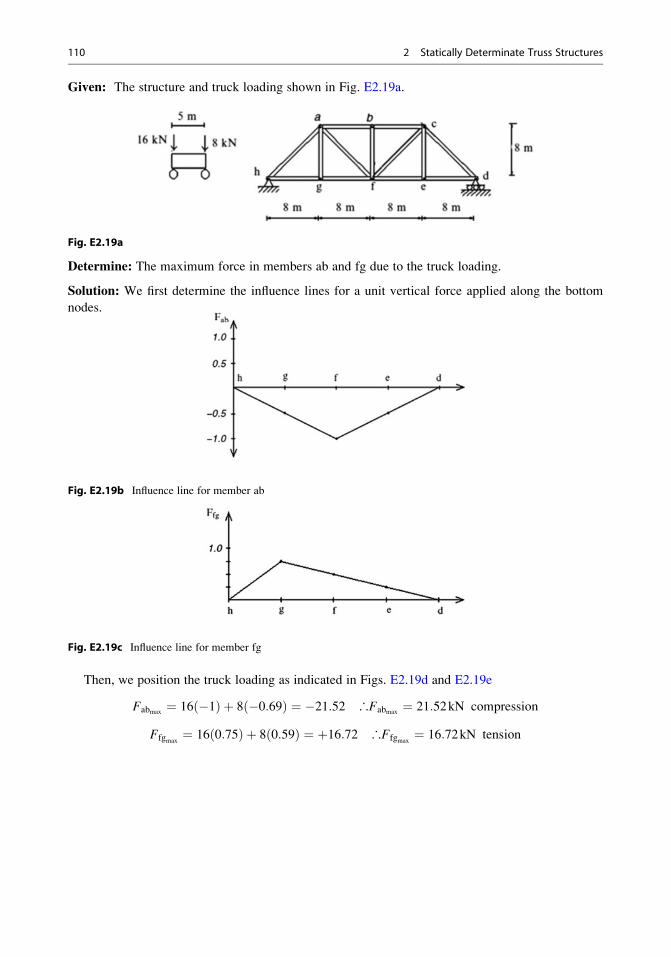
Given: The structure and truck loading shown in Fig. E2.19a.
Fig. E2.19a
Determine: The maximum force in members ab and fg due to the truck loading.
Solution: We first determine the influence lines for a unit vertical force applied along the bottom
nodes.
Fig. E2.19b Influence line for member ab
Fig. E2.19c Influence line for member fg
Then, we position the truck loading as indicated in Figs. E2.19d and E2.19e
Fabmax¼ 16 �1ð Þ þ 8 �0:69ð Þ ¼ �21:52 ∴Fabmax
¼ 21:52kN compression
Ffgmax¼ 16 0:75ð Þ þ 8 0:59ð Þ ¼ þ16:72 ∴Ffgmax
¼ 16:72kN tension
110 2 Statically Determinate Truss Structures
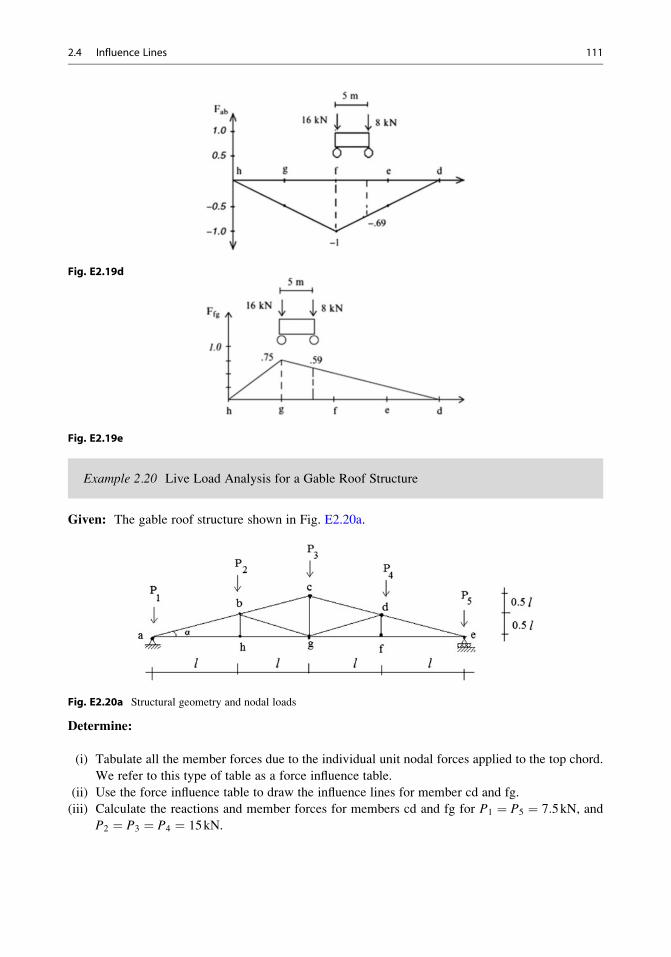
Fig. E2.19d
Fig. E2.19e
Example 2.20 Live Load Analysis for a Gable Roof Structure
Given: The gable roof structure shown in Fig. E2.20a.
Fig. E2.20a Structural geometry and nodal loads
Determine:
(i) Tabulate all the member forces due to the individual unit nodal forces applied to the top chord.
We refer to this type of table as a force influence table.
(ii) Use the force influence table to draw the influence lines for member cd and fg.
(iii) Calculate the reactions and member forces for members cd and fg for P1 ¼ P5 ¼ 7:5kN, and
P2 ¼ P3 ¼ P4 ¼ 15kN.
2.4 Influence Lines 111
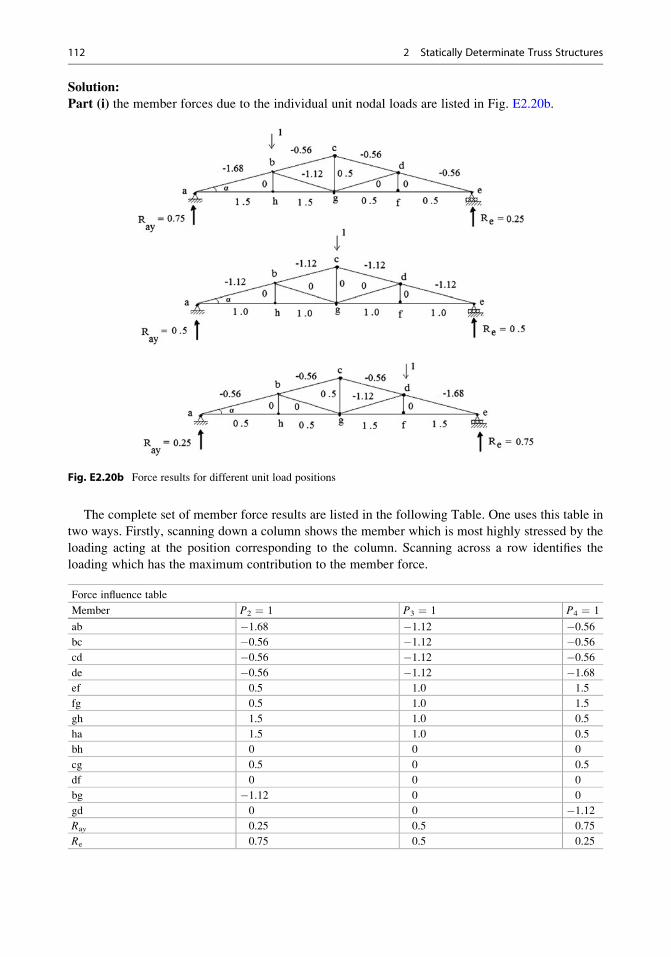
Solution:
Part (i) the member forces due to the individual unit nodal loads are listed in Fig. E2.20b.
Fig. E2.20b Force results for different unit load positions
The complete set of member force results are listed in the following Table. One uses this table in
two ways. Firstly, scanning down a column shows the member which is most highly stressed by the
loading acting at the position corresponding to the column. Scanning across a row identifies the
loading which has the maximum contribution to the member force.
Force influence table
Member P2 ¼ 1 P3 ¼ 1 P4 ¼ 1
ab �1.68 �1.12 �0.56bc �0.56 �1.12 �0.56cd �0.56 �1.12 �0.56de �0.56 �1.12 �1.68ef 0.5 1.0 1.5
fg 0.5 1.0 1.5
gh 1.5 1.0 0.5
ha 1.5 1.0 0.5
bh 0 0 0
cg 0.5 0 0.5
df 0 0 0
bg �1.12 0 0
gd 0 0 �1.12Ray 0.25 0.5 0.75
Re 0.75 0.5 0.25
112 2 Statically Determinate Truss Structures
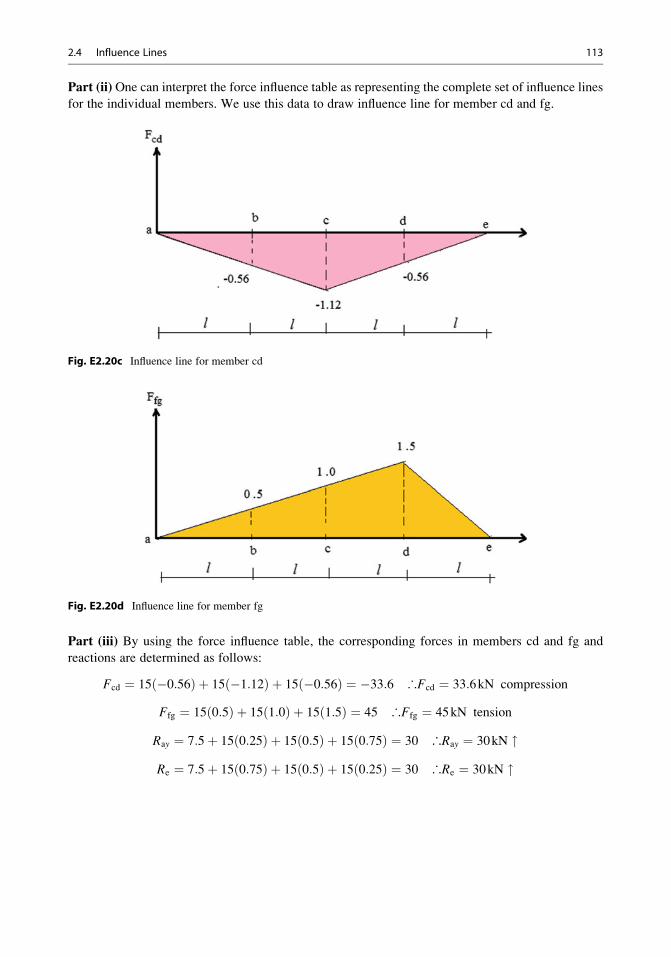
Part (ii) One can interpret the force influence table as representing the complete set of influence lines
for the individual members. We use this data to draw influence line for member cd and fg.
Fig. E2.20c Influence line for member cd
Fig. E2.20d Influence line for member fg
Part (iii) By using the force influence table, the corresponding forces in members cd and fg and
reactions are determined as follows:
Fcd ¼ 15 �0:56ð Þ þ 15 �1:12ð Þ þ 15 �0:56ð Þ ¼ �33:6 ∴Fcd ¼ 33:6kN compression
Ffg ¼ 15 0:5ð Þ þ 15 1:0ð Þ þ 15 1:5ð Þ ¼ 45 ∴Ffg ¼ 45kN tension
Ray ¼ 7:5þ 15 0:25ð Þ þ 15 0:5ð Þ þ 15 0:75ð Þ ¼ 30 ∴Ray ¼ 30kN "Re ¼ 7:5þ 15 0:75ð Þ þ 15 0:5ð Þ þ 15 0:25ð Þ ¼ 30 ∴Re ¼ 30kN "
2.4 Influence Lines 113
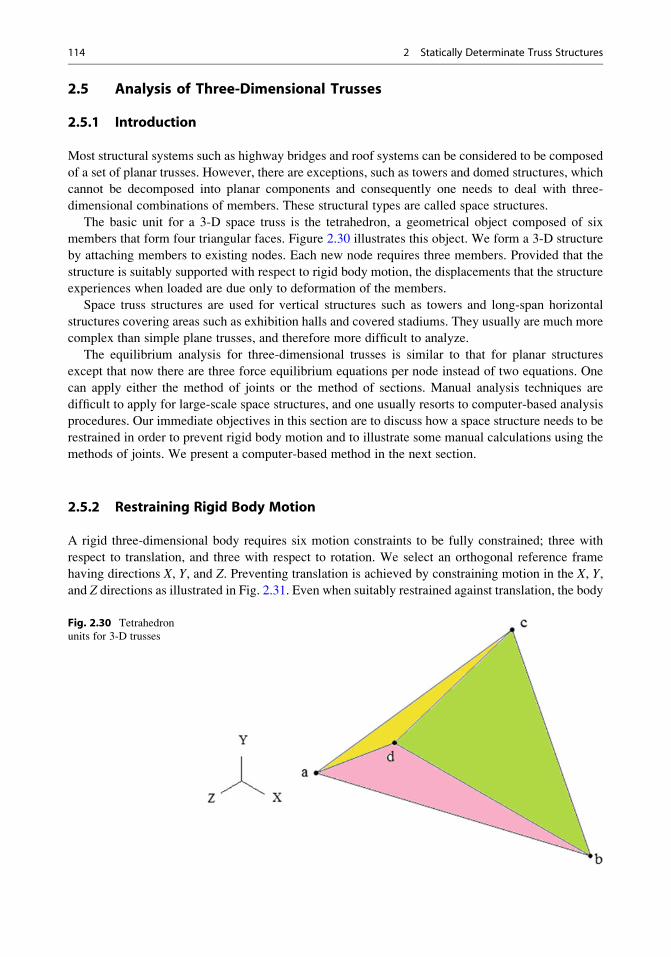
2.5 Analysis of Three-Dimensional Trusses
2.5.1 Introduction
Most structural systems such as highway bridges and roof systems can be considered to be composed
of a set of planar trusses. However, there are exceptions, such as towers and domed structures, which
cannot be decomposed into planar components and consequently one needs to deal with three-
dimensional combinations of members. These structural types are called space structures.
The basic unit for a 3-D space truss is the tetrahedron, a geometrical object composed of six
members that form four triangular faces. Figure 2.30 illustrates this object. We form a 3-D structure
by attaching members to existing nodes. Each new node requires three members. Provided that the
structure is suitably supported with respect to rigid body motion, the displacements that the structure
experiences when loaded are due only to deformation of the members.
Space truss structures are used for vertical structures such as towers and long-span horizontal
structures covering areas such as exhibition halls and covered stadiums. They usually are much more
complex than simple plane trusses, and therefore more difficult to analyze.
The equilibrium analysis for three-dimensional trusses is similar to that for planar structures
except that now there are three force equilibrium equations per node instead of two equations. One
can apply either the method of joints or the method of sections. Manual analysis techniques are
difficult to apply for large-scale space structures, and one usually resorts to computer-based analysis
procedures. Our immediate objectives in this section are to discuss how a space structure needs to be
restrained in order to prevent rigid body motion and to illustrate some manual calculations using the
methods of joints. We present a computer-based method in the next section.
2.5.2 Restraining Rigid Body Motion
A rigid three-dimensional body requires six motion constraints to be fully constrained; three with
respect to translation, and three with respect to rotation. We select an orthogonal reference frame
having directions X, Y, and Z. Preventing translation is achieved by constraining motion in the X, Y,
and Z directions as illustrated in Fig. 2.31. Even when suitably restrained against translation, the body
Fig. 2.30 Tetrahedron
units for 3-D trusses
114 2 Statically Determinate Truss Structures
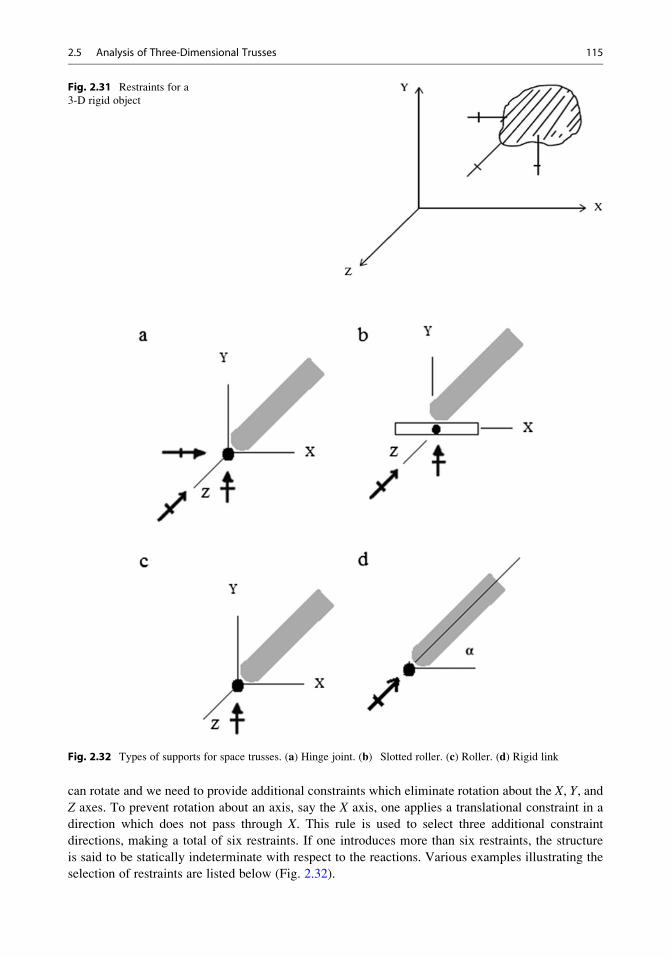
can rotate and we need to provide additional constraints which eliminate rotation about the X, Y, and
Z axes. To prevent rotation about an axis, say the X axis, one applies a translational constraint in a
direction which does not pass through X. This rule is used to select three additional constraint
directions, making a total of six restraints. If one introduces more than six restraints, the structure
is said to be statically indeterminate with respect to the reactions. Various examples illustrating the
selection of restraints are listed below (Fig. 2.32).
Fig. 2.31 Restraints for a
3-D rigid object
Fig. 2.32 Types of supports for space trusses. (a) Hinge joint. (b) Slotted roller. (c) Roller. (d) Rigid link
2.5 Analysis of Three-Dimensional Trusses 115
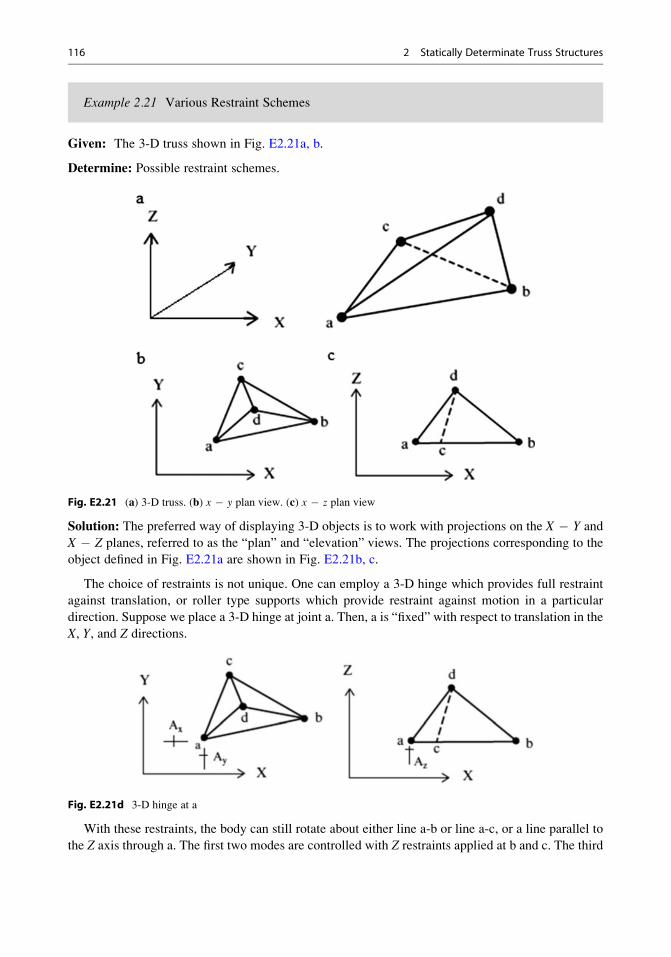
Example 2.21 Various Restraint Schemes
Given: The 3-D truss shown in Fig. E2.21a, b.
Determine: Possible restraint schemes.
Fig. E2.21 (a) 3-D truss. (b) x � y plan view. (c) x � z plan view
Solution: The preferred way of displaying 3-D objects is to work with projections on the X � Y and
X � Z planes, referred to as the “plan” and “elevation” views. The projections corresponding to the
object defined in Fig. E2.21a are shown in Fig. E2.21b, c.
The choice of restraints is not unique. One can employ a 3-D hinge which provides full restraint
against translation, or roller type supports which provide restraint against motion in a particular
direction. Suppose we place a 3-D hinge at joint a. Then, a is “fixed” with respect to translation in the
X, Y, and Z directions.
Fig. E2.21d 3-D hinge at a
With these restraints, the body can still rotate about either line a-b or line a-c, or a line parallel to
the Z axis through a. The first two modes are controlled with Z restraints applied at b and c. The third
116 2 Statically Determinate Truss Structures
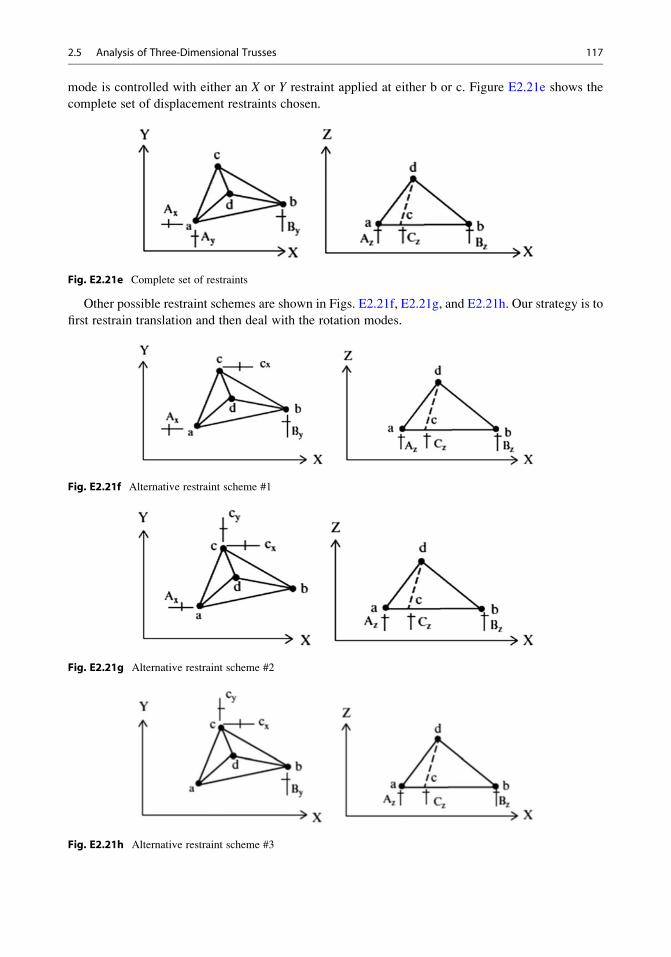
mode is controlled with either an X or Y restraint applied at either b or c. Figure E2.21e shows the
complete set of displacement restraints chosen.
Fig. E2.21e Complete set of restraints
Other possible restraint schemes are shown in Figs. E2.21f, E2.21g, and E2.21h. Our strategy is to
first restrain translation and then deal with the rotation modes.
Fig. E2.21f Alternative restraint scheme #1
Fig. E2.21g Alternative restraint scheme #2
Fig. E2.21h Alternative restraint scheme #3
2.5 Analysis of Three-Dimensional Trusses 117
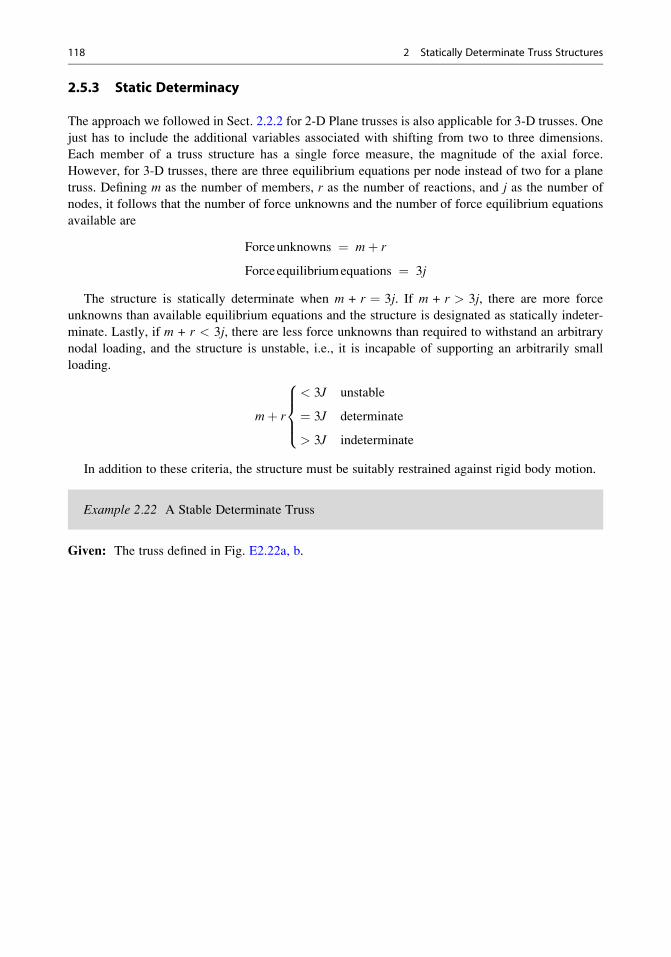
2.5.3 Static Determinacy
The approach we followed in Sect. 2.2.2 for 2-D Plane trusses is also applicable for 3-D trusses. One
just has to include the additional variables associated with shifting from two to three dimensions.
Each member of a truss structure has a single force measure, the magnitude of the axial force.
However, for 3-D trusses, there are three equilibrium equations per node instead of two for a plane
truss. Defining m as the number of members, r as the number of reactions, and j as the number of
nodes, it follows that the number of force unknowns and the number of force equilibrium equations
available are
Forceunknowns ¼ mþ r
Forceequilibriumequations ¼ 3j
The structure is statically determinate when m + r ¼ 3j. If m + r > 3j, there are more force
unknowns than available equilibrium equations and the structure is designated as statically indeter-
minate. Lastly, if m + r < 3j, there are less force unknowns than required to withstand an arbitrary
nodal loading, and the structure is unstable, i.e., it is incapable of supporting an arbitrarily small
loading.
mþ r
< 3J unstable
¼ 3J determinate
> 3J indeterminate
8>><>>:
In addition to these criteria, the structure must be suitably restrained against rigid body motion.
Example 2.22 A Stable Determinate Truss
Given: The truss defined in Fig. E2.22a, b.
118 2 Statically Determinate Truss Structures
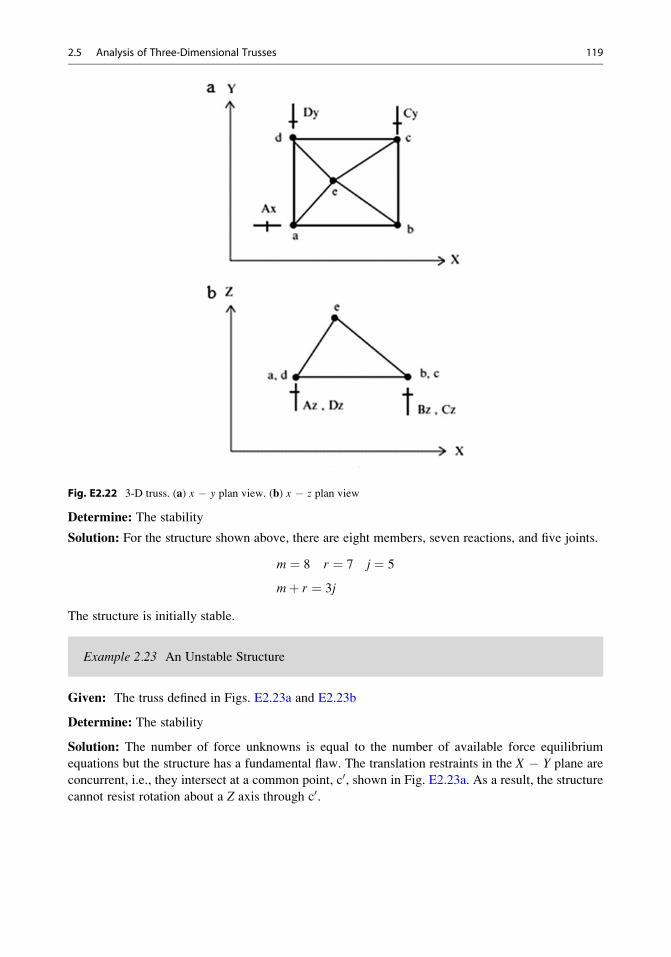
Fig. E2.22 3-D truss. (a) x � y plan view. (b) x � z plan view
Determine: The stability
Solution: For the structure shown above, there are eight members, seven reactions, and five joints.
m ¼ 8 r ¼ 7 j ¼ 5
mþ r ¼ 3j
The structure is initially stable.
Example 2.23 An Unstable Structure
Given: The truss defined in Figs. E2.23a and E2.23b
Determine: The stability
Solution: The number of force unknowns is equal to the number of available force equilibrium
equations but the structure has a fundamental flaw. The translation restraints in the X � Y plane are
concurrent, i.e., they intersect at a common point, c0, shown in Fig. E2.23a. As a result, the structure
cannot resist rotation about a Z axis through c0.
2.5 Analysis of Three-Dimensional Trusses 119
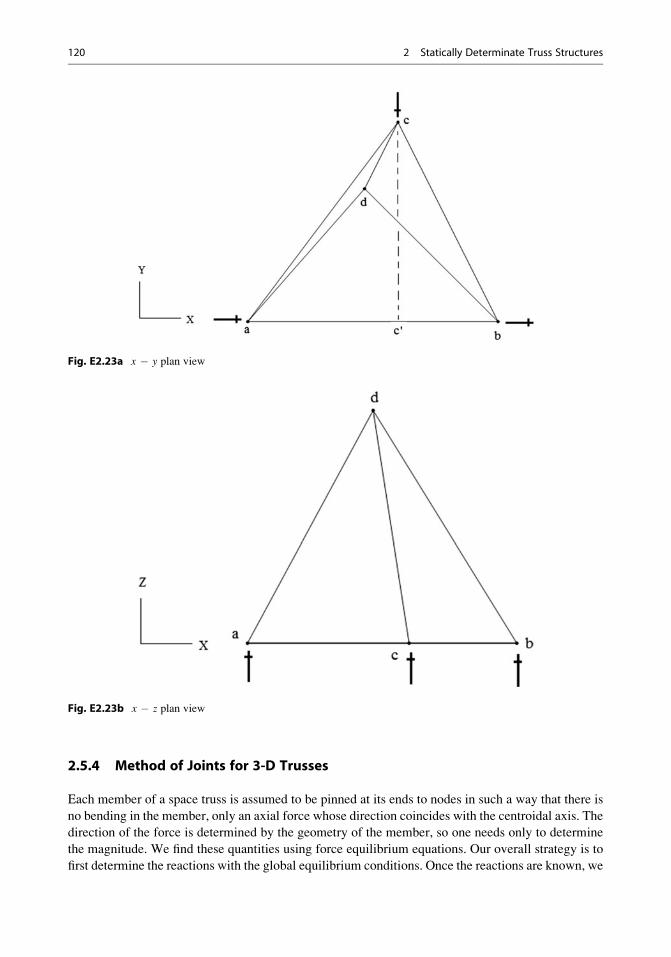
Fig. E2.23a x � y plan view
Fig. E2.23b x � z plan view
2.5.4 Method of Joints for 3-D Trusses
Each member of a space truss is assumed to be pinned at its ends to nodes in such a way that there is
no bending in the member, only an axial force whose direction coincides with the centroidal axis. The
direction of the force is determined by the geometry of the member, so one needs only to determine
the magnitude. We find these quantities using force equilibrium equations. Our overall strategy is to
first determine the reactions with the global equilibrium conditions. Once the reactions are known, we
120 2 Statically Determinate Truss Structures
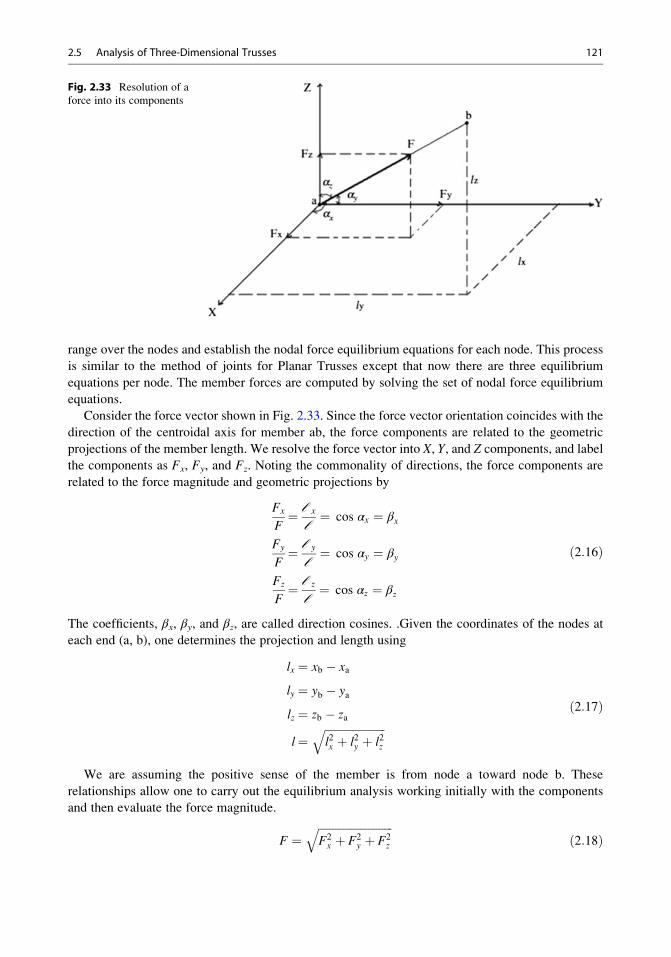
range over the nodes and establish the nodal force equilibrium equations for each node. This process
is similar to the method of joints for Planar Trusses except that now there are three equilibrium
equations per node. The member forces are computed by solving the set of nodal force equilibrium
equations.
Consider the force vector shown in Fig. 2.33. Since the force vector orientation coincides with the
direction of the centroidal axis for member ab, the force components are related to the geometric
projections of the member length. We resolve the force vector into X, Y, and Z components, and label
the components as Fx, Fy, and Fz. Noting the commonality of directions, the force components are
related to the force magnitude and geometric projections by
Fx
F¼ ℓx
ℓ¼ cos αx ¼ βx
Fy
F¼ ℓy
ℓ¼ cos αy ¼ βy
Fz
F¼ ℓz
ℓ¼ cos αz ¼ βz
ð2:16Þ
The coefficients, βx, βy, and βz, are called direction cosines. .Given the coordinates of the nodes at
each end (a, b), one determines the projection and length using
lx ¼ xb � xa
ly ¼ yb � ya
lz ¼ zb � za
l¼ffiffiffiffiffiffiffiffiffiffiffiffiffiffiffiffiffiffiffiffiffiffil2x þ l2y þ l2z
qð2:17Þ
We are assuming the positive sense of the member is from node a toward node b. These
relationships allow one to carry out the equilibrium analysis working initially with the components
and then evaluate the force magnitude.
F ¼ffiffiffiffiffiffiffiffiffiffiffiffiffiffiffiffiffiffiffiffiffiffiffiffiffiffiffiF2x þ F2
y þ F2z
qð2:18Þ
Fig. 2.33 Resolution of a
force into its components
2.5 Analysis of Three-Dimensional Trusses 121

We illustrate the analysis process with the following examples. There are many ways to carry out
the analysis. Our approach here is based primarily on trying to avoid solving sets of simultaneous
equations relating the force magnitudes. However, there are cases where this strategy is not possible.
Example 2.24 Analysis of a Tripod Structure
Given: The tripod structure shown in Fig. E2.24a, b. The supports at a, b, and c are fully restrained
against translation with 3-D hinges.
Determine: The force in each member.
Fig. E2.24 Tripod geometry and supports. (a) x � y plan view. (b) x � z plan view
122 2 Statically Determinate Truss Structures
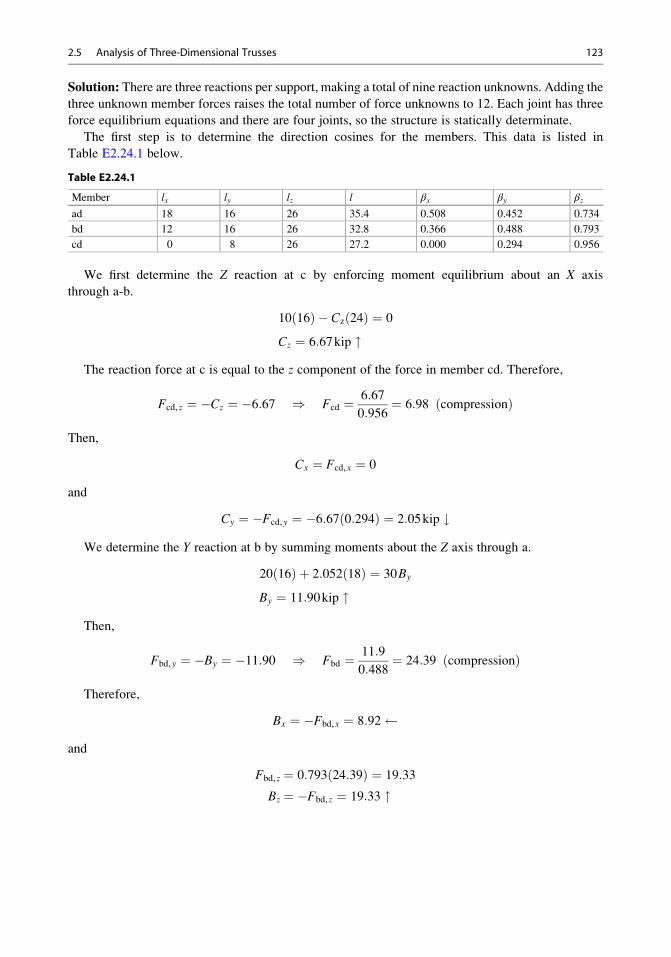
Solution: There are three reactions per support, making a total of nine reaction unknowns. Adding the
three unknown member forces raises the total number of force unknowns to 12. Each joint has three
force equilibrium equations and there are four joints, so the structure is statically determinate.
The first step is to determine the direction cosines for the members. This data is listed in
Table E2.24.1 below.
Table E2.24.1
Member lx ly lz l βx βy βzad 18 16 26 35.4 0.508 0.452 0.734
bd 12 16 26 32.8 0.366 0.488 0.793
cd 0 8 26 27.2 0.000 0.294 0.956
We first determine the Z reaction at c by enforcing moment equilibrium about an X axis
through a-b.
10 16ð Þ � Cz 24ð Þ ¼ 0
Cz ¼ 6:67kip "The reaction force at c is equal to the z component of the force in member cd. Therefore,
Fcd, z ¼ �Cz ¼ �6:67 ) Fcd ¼ 6:67
0:956¼ 6:98 compressionð Þ
Then,
Cx ¼ Fcd,x ¼ 0
and
Cy ¼ �Fcd,y ¼ �6:67 0:294ð Þ ¼ 2:05kip #We determine the Y reaction at b by summing moments about the Z axis through a.
20 16ð Þ þ 2:052 18ð Þ ¼ 30By
By ¼ 11:90kip "Then,
Fbd,y ¼ �By ¼ �11:90 ) Fbd ¼ 11:9
0:488¼ 24:39 compressionð Þ
Therefore,
Bx ¼ �Fbd,x ¼ 8:92 and
Fbd, z ¼ 0:793 24:39ð Þ ¼ 19:33
Bz ¼ �Fbd, z ¼ 19:33 "
2.5 Analysis of Three-Dimensional Trusses 123
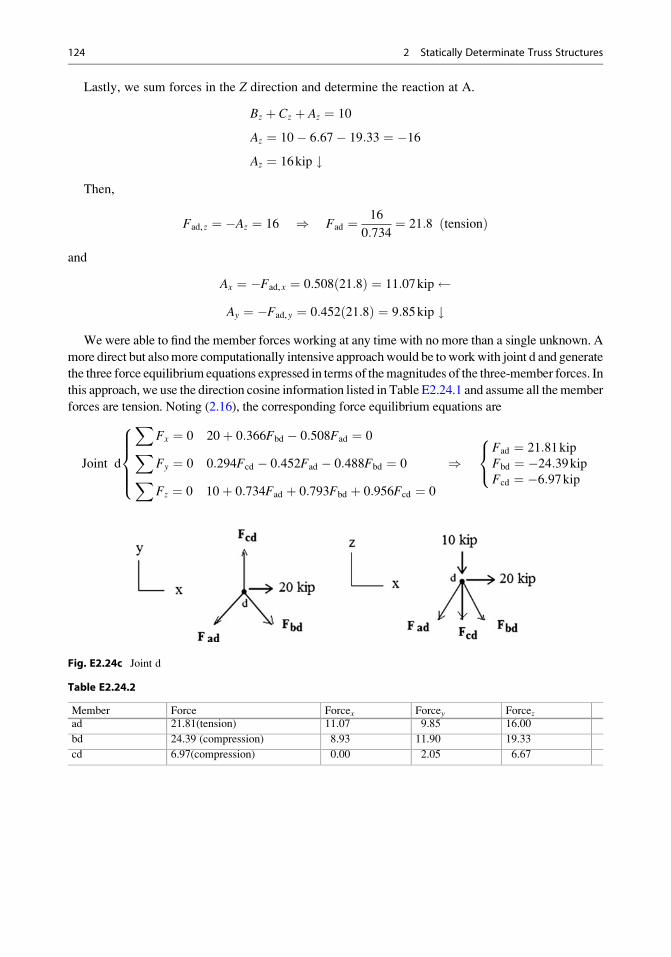
Lastly, we sum forces in the Z direction and determine the reaction at A.
Bz þ Cz þ Az ¼ 10
Az ¼ 10� 6:67� 19:33 ¼ �16Az ¼ 16kip #
Then,
Fad, z ¼ �Az ¼ 16 ) Fad ¼ 16
0:734¼ 21:8 tensionð Þ
and
Ax ¼ �Fad,x ¼ 0:508 21:8ð Þ ¼ 11:07kip Ay ¼ �Fad,y ¼ 0:452 21:8ð Þ ¼ 9:85kip #
Wewere able to find the member forces working at any time with no more than a single unknown. A
more direct but alsomore computationally intensive approachwould be toworkwith joint d and generate
the three force equilibrium equations expressed in terms of themagnitudes of the three-member forces. In
this approach, we use the direction cosine information listed in Table E2.24.1 and assume all themember
forces are tension. Noting (2.16), the corresponding force equilibrium equations are
Joint d
XFx ¼ 0 20þ 0:366Fbd � 0:508Fad ¼ 0XFy ¼ 0 0:294Fcd � 0:452Fad � 0:488Fbd ¼ 0XFz ¼ 0 10þ 0:734Fad þ 0:793Fbd þ 0:956Fcd ¼ 0
8>>><>>>:
)Fad ¼ 21:81kipFbd ¼ �24:39kipFcd ¼ �6:97kip
8<:
Fig. E2.24c Joint d
Table E2.24.2
Member Force Forcex Forcey Forcezad 21.81(tension) 11.07 9.85 16.00
bd 24.39 (compression) 8.93 11.90 19.33
cd 6.97(compression) 0.00 2.05 6.67
124 2 Statically Determinate Truss Structures
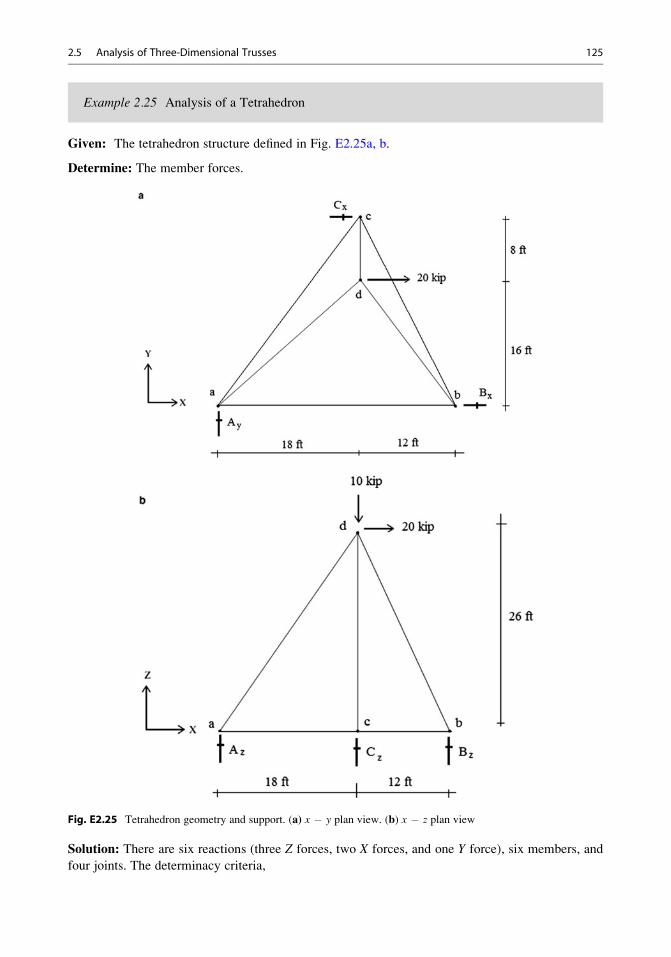
Example 2.25 Analysis of a Tetrahedron
Given: The tetrahedron structure defined in Fig. E2.25a, b.
Determine: The member forces.
Fig. E2.25 Tetrahedron geometry and support. (a) x � y plan view. (b) x � z plan view
Solution: There are six reactions (three Z forces, two X forces, and one Y force), six members, and
four joints. The determinacy criteria,
2.5 Analysis of Three-Dimensional Trusses 125
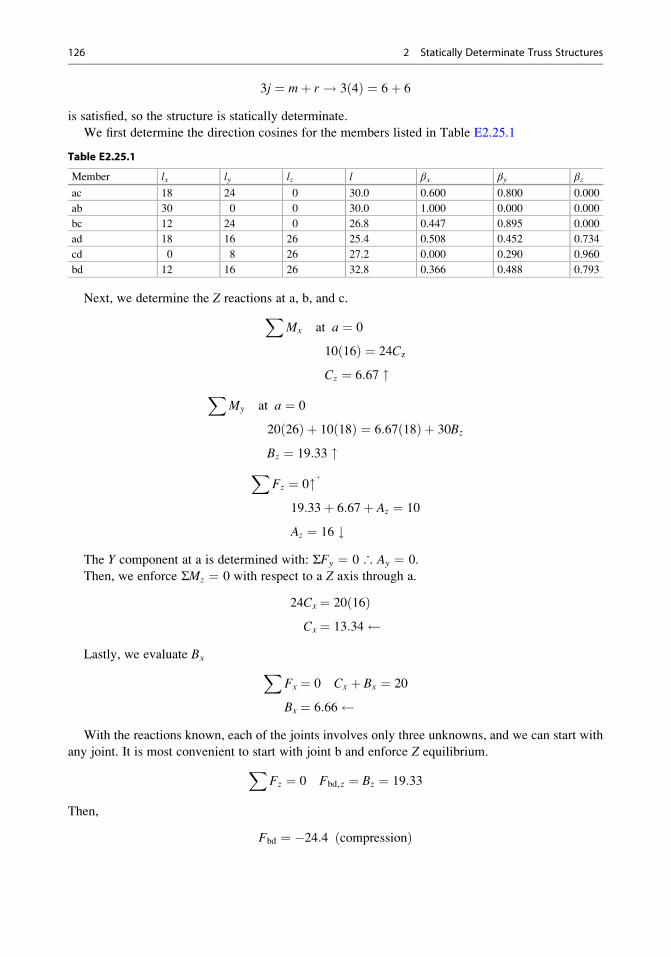
3j ¼ mþ r ! 3 4ð Þ ¼ 6þ 6
is satisfied, so the structure is statically determinate.
We first determine the direction cosines for the members listed in Table E2.25.1
Table E2.25.1
Member lx ly lz l βx βy βzac 18 24 0 30.0 0.600 0.800 0.000
ab 30 0 0 30.0 1.000 0.000 0.000
bc 12 24 0 26.8 0.447 0.895 0.000
ad 18 16 26 25.4 0.508 0.452 0.734
cd 0 8 26 27.2 0.000 0.290 0.960
bd 12 16 26 32.8 0.366 0.488 0.793
Next, we determine the Z reactions at a, b, and c.XMx at a ¼ 0
10 16ð Þ ¼ 24Cz
Cz ¼ 6:67 "XMy at a ¼ 0
20 26ð Þ þ 10 18ð Þ ¼ 6:67 18ð Þ þ 30Bz
Bz ¼ 19:33 "XFz ¼ 0"þ
19:33þ 6:67þ Az ¼ 10
Az ¼ 16 #The Y component at a is determined with: ΣFy ¼ 0 ∴ Ay ¼ 0.
Then, we enforce ΣMz ¼ 0 with respect to a Z axis through a.
24Cx ¼ 20 16ð ÞCx ¼ 13:34
Lastly, we evaluate Bx XFx ¼ 0 Cx þ Bx ¼ 20
Bx ¼ 6:66 With the reactions known, each of the joints involves only three unknowns, and we can start with
any joint. It is most convenient to start with joint b and enforce Z equilibrium.XFz ¼ 0 Fbd, z ¼ Bz ¼ 19:33
Then,
Fbd ¼ �24:4 compressionð Þ
126 2 Statically Determinate Truss Structures
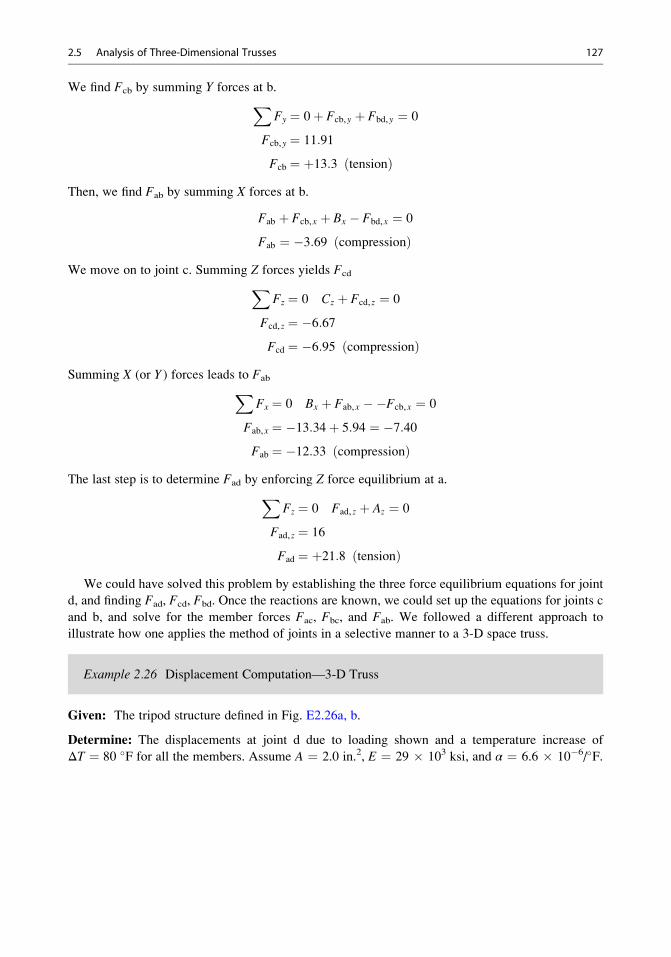
We find Fcb by summing Y forces at b.XFy ¼ 0þ Fcb,y þ Fbd,y ¼ 0
Fcb,y ¼ 11:91
Fcb ¼ þ13:3 tensionð ÞThen, we find Fab by summing X forces at b.
Fab þ Fcb,x þ Bx � Fbd,x ¼ 0
Fab ¼ �3:69 compressionð ÞWe move on to joint c. Summing Z forces yields FcdX
Fz ¼ 0 Cz þ Fcd, z ¼ 0
Fcd, z ¼ �6:67Fcd ¼ �6:95 compressionð Þ
Summing X (or Y ) forces leads to FabXFx ¼ 0 Bx þ Fab,x ��Fcb,x ¼ 0
Fab,x ¼ �13:34þ 5:94 ¼ �7:40Fab ¼ �12:33 compressionð Þ
The last step is to determine Fad by enforcing Z force equilibrium at a.XFz ¼ 0 Fad, z þ Az ¼ 0
Fad, z ¼ 16
Fad ¼ þ21:8 tensionð ÞWe could have solved this problem by establishing the three force equilibrium equations for joint
d, and finding Fad, Fcd, Fbd. Once the reactions are known, we could set up the equations for joints c
and b, and solve for the member forces Fac, Fbc, and Fab. We followed a different approach to
illustrate how one applies the method of joints in a selective manner to a 3-D space truss.
Example 2.26 Displacement Computation—3-D Truss
Given: The tripod structure defined in Fig. E2.26a, b.
Determine: The displacements at joint d due to loading shown and a temperature increase of
ΔT ¼ 80 �F for all the members. Assume A ¼ 2.0 in.2, E ¼ 29 � 103 ksi, and α ¼ 6.6 � 10�6/�F.
2.5 Analysis of Three-Dimensional Trusses 127
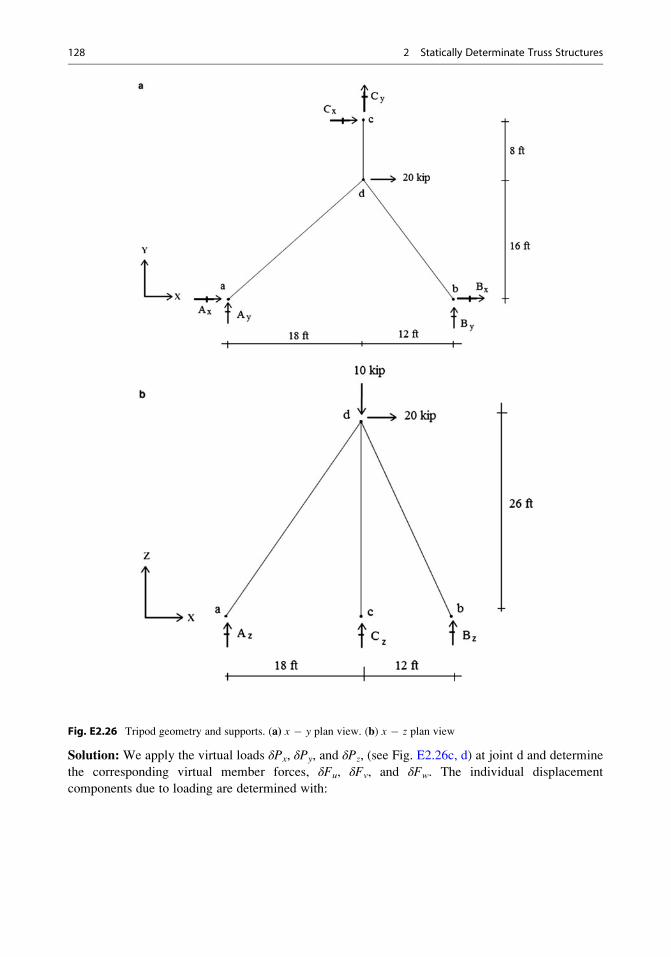
Fig. E2.26 Tripod geometry and supports. (a) x � y plan view. (b) x � z plan view
Solution: We apply the virtual loads δPx, δPy, and δPz, (see Fig. E2.26c, d) at joint d and determine
the corresponding virtual member forces, δFu, δFv, and δFw. The individual displacement
components due to loading are determined with:
128 2 Statically Determinate Truss Structures
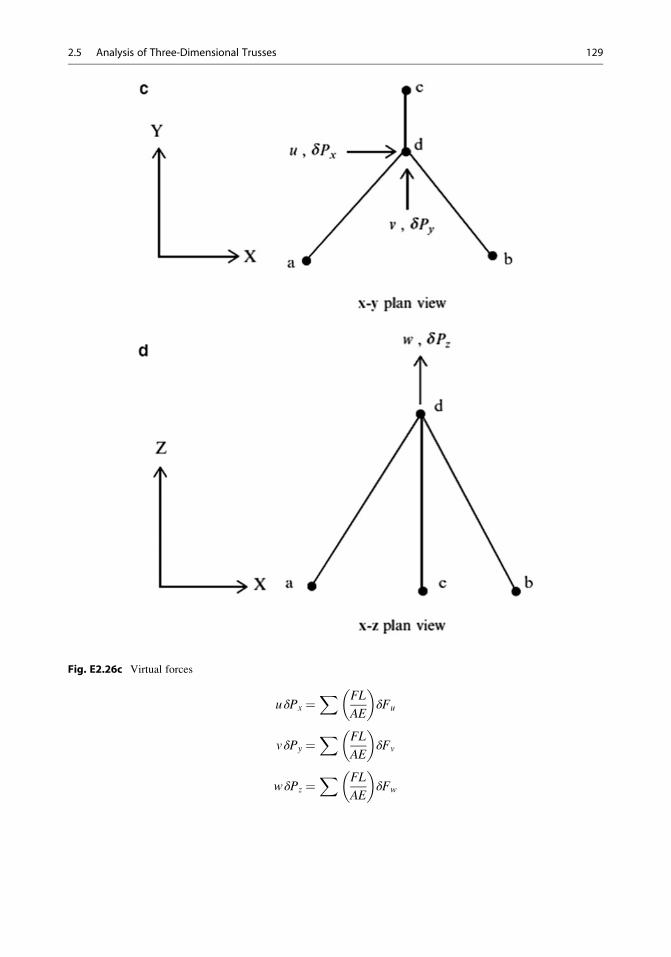
Fig. E2.26c Virtual forces
uδPx ¼X FL
AE
� �δFu
vδPy ¼X FL
AE
� �δFv
wδPz ¼X FL
AE
� �δFw
2.5 Analysis of Three-Dimensional Trusses 129
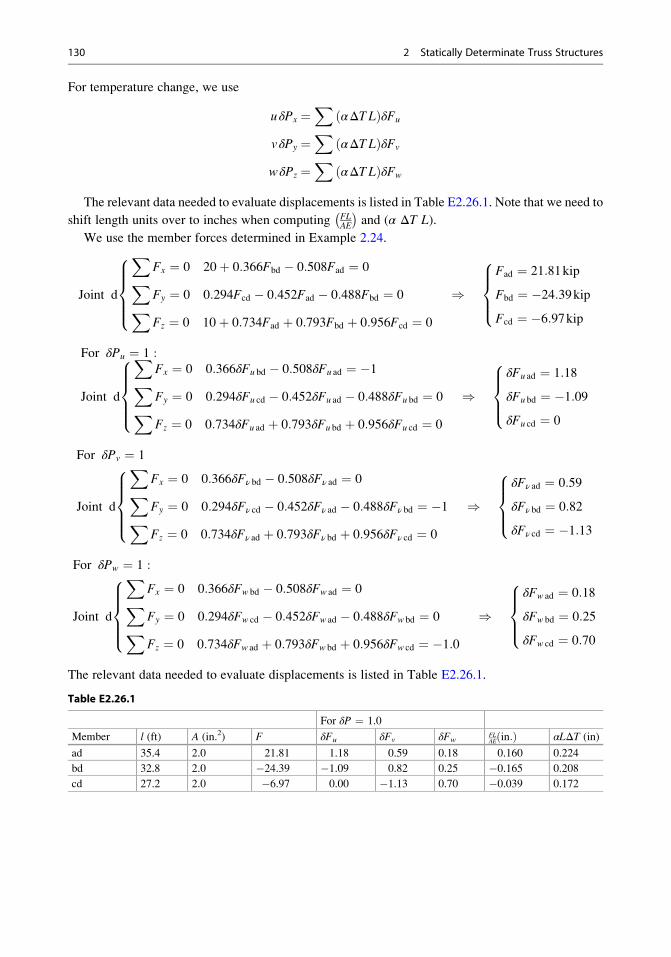
For temperature change, we use
uδPx ¼X
αΔT Lð ÞδFu
vδPy ¼X
αΔT Lð ÞδFv
wδPz ¼X
αΔT Lð ÞδFw
The relevant data needed to evaluate displacements is listed in Table E2.26.1. Note that we need to
shift length units over to inches when computing FLAE
� �and (α ΔT L).
We use the member forces determined in Example 2.24.
Joint d
XFx ¼ 0 20þ 0:366Fbd � 0:508Fad ¼ 0XFy ¼ 0 0:294Fcd � 0:452Fad � 0:488Fbd ¼ 0XFz ¼ 0 10þ 0:734Fad þ 0:793Fbd þ 0:956Fcd ¼ 0
8>>><>>>:
)Fad ¼ 21:81kip
Fbd ¼ �24:39kipFcd ¼ �6:97kip
8>><>>:
For δPu ¼ 1 :
Joint d
XFx ¼ 0 0:366δFu bd � 0:508δFu ad ¼ �1XFy ¼ 0 0:294δFu cd � 0:452δFu ad � 0:488δFu bd ¼ 0XFz ¼ 0 0:734δFu ad þ 0:793δFu bd þ 0:956δFu cd ¼ 0
8>>><>>>:
)δFu ad ¼ 1:18
δFu bd ¼ �1:09δFu cd ¼ 0
8>><>>:
For δPv ¼ 1
Joint d
XFx ¼ 0 0:366δFν bd � 0:508δFν ad ¼ 0XFy ¼ 0 0:294δFν cd � 0:452δFν ad � 0:488δFν bd ¼ �1XFz ¼ 0 0:734δFν ad þ 0:793δFν bd þ 0:956δFν cd ¼ 0
8>>><>>>:
)δFν ad ¼ 0:59
δFν bd ¼ 0:82
δFν cd ¼ �1:13
8>><>>:
For δPw ¼ 1 :
Joint d
XFx ¼ 0 0:366δFw bd � 0:508δFw ad ¼ 0XFy ¼ 0 0:294δFw cd � 0:452δFw ad � 0:488δFw bd ¼ 0XFz ¼ 0 0:734δFw ad þ 0:793δFw bd þ 0:956δFw cd ¼ �1:0
8>>><>>>:
)δFw ad ¼ 0:18
δFw bd ¼ 0:25
δFw cd ¼ 0:70
8>><>>:
The relevant data needed to evaluate displacements is listed in Table E2.26.1.
Table E2.26.1
For δP ¼ 1.0
Member l (ft) A (in.2) F δFu δFv δFwFLAE in:ð Þ αLΔT (in)
ad 35.4 2.0 21.81 1.18 0.59 0.18 0.160 0.224
bd 32.8 2.0 �24.39 �1.09 0.82 0.25 �0.165 0.208
cd 27.2 2.0 �6.97 0.00 �1.13 0.70 �0.039 0.172
130 2 Statically Determinate Truss Structures
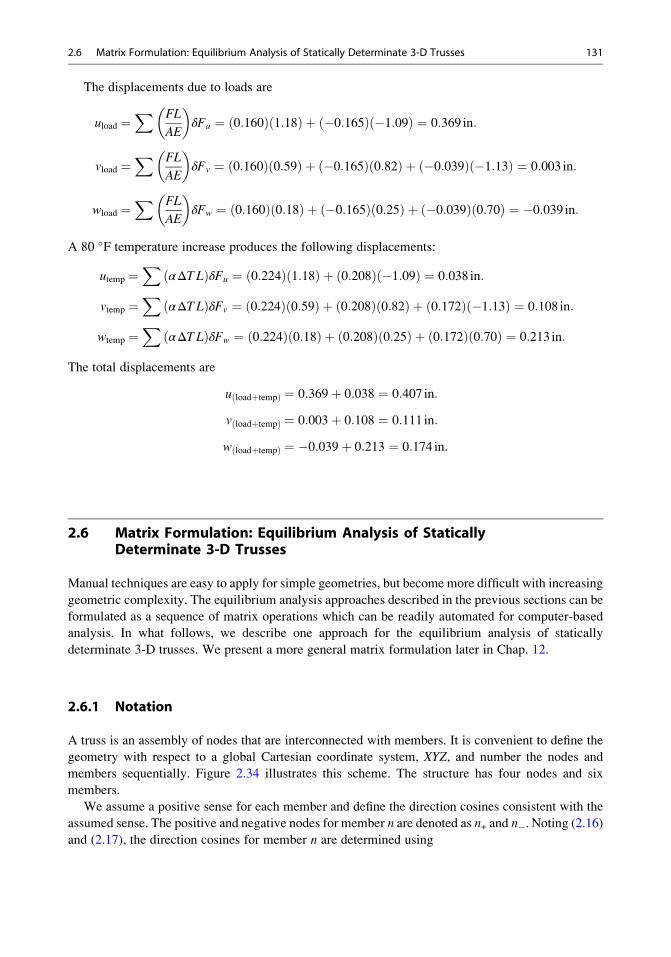
The displacements due to loads are
uload ¼X FL
AE
� �δFu ¼ 0:160ð Þ 1:18ð Þ þ �0:165ð Þ �1:09ð Þ ¼ 0:369 in:
vload ¼X FL
AE
� �δFv ¼ 0:160ð Þ 0:59ð Þ þ �0:165ð Þ 0:82ð Þ þ �0:039ð Þ �1:13ð Þ ¼ 0:003 in:
wload ¼X FL
AE
� �δFw ¼ 0:160ð Þ 0:18ð Þ þ �0:165ð Þ 0:25ð Þ þ �0:039ð Þ 0:70ð Þ ¼ �0:039 in:
A 80 �F temperature increase produces the following displacements:
utemp ¼X
αΔT Lð ÞδFu ¼ 0:224ð Þ 1:18ð Þ þ 0:208ð Þ �1:09ð Þ ¼ 0:038 in:
vtemp ¼X
αΔT Lð ÞδFv ¼ 0:224ð Þ 0:59ð Þ þ 0:208ð Þ 0:82ð Þ þ 0:172ð Þ �1:13ð Þ ¼ 0:108 in:
wtemp ¼X
αΔT Lð ÞδFw ¼ 0:224ð Þ 0:18ð Þ þ 0:208ð Þ 0:25ð Þ þ 0:172ð Þ 0:70ð Þ ¼ 0:213 in:
The total displacements are
u loadþtempð Þ ¼ 0:369þ 0:038 ¼ 0:407 in:
v loadþtempð Þ ¼ 0:003þ 0:108 ¼ 0:111 in:
w loadþtempð Þ ¼ �0:039þ 0:213 ¼ 0:174 in:
2.6 Matrix Formulation: Equilibrium Analysis of StaticallyDeterminate 3-D Trusses
Manual techniques are easy to apply for simple geometries, but become more difficult with increasing
geometric complexity. The equilibrium analysis approaches described in the previous sections can be
formulated as a sequence of matrix operations which can be readily automated for computer-based
analysis. In what follows, we describe one approach for the equilibrium analysis of statically
determinate 3-D trusses. We present a more general matrix formulation later in Chap. 12.
2.6.1 Notation
A truss is an assembly of nodes that are interconnected with members. It is convenient to define the
geometry with respect to a global Cartesian coordinate system, XYZ, and number the nodes and
members sequentially. Figure 2.34 illustrates this scheme. The structure has four nodes and six
members.
We assume a positive sense for each member and define the direction cosines consistent with the
assumed sense. The positive and negative nodes for member n are denoted as n+ and n�. Noting (2.16)and (2.17), the direction cosines for member n are determined using
2.6 Matrix Formulation: Equilibrium Analysis of Statically Determinate 3-D Trusses 131
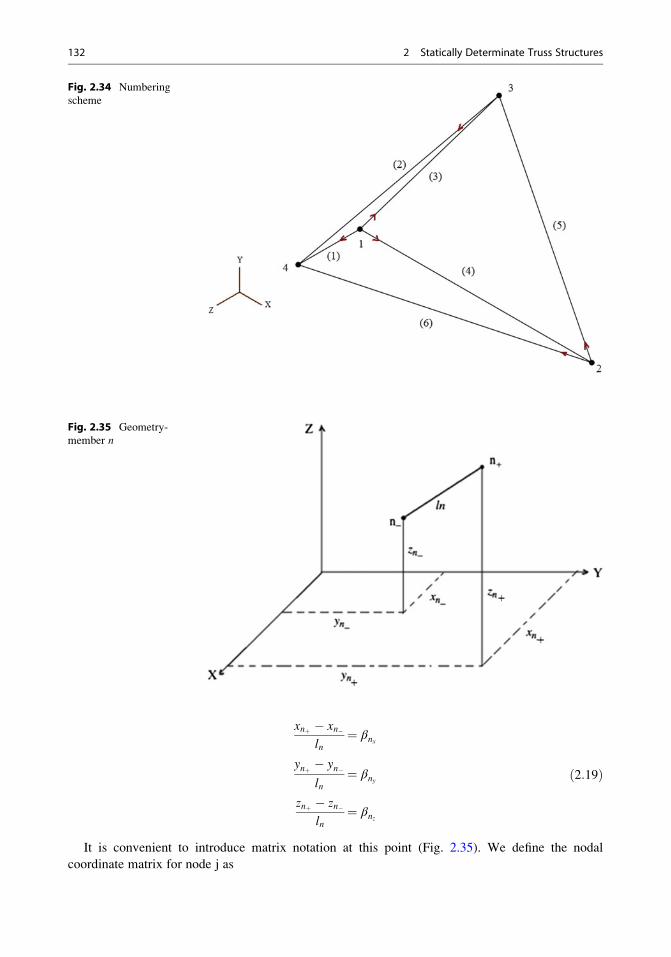
xnþ � xn�ln
¼ βnx
ynþ � yn�ln
¼ βny
znþ � zn�ln
¼ βnz
ð2:19Þ
It is convenient to introduce matrix notation at this point (Fig. 2.35). We define the nodal
coordinate matrix for node j as
Fig. 2.35 Geometry-
member n
Fig. 2.34 Numbering
scheme
132 2 Statically Determinate Truss Structures
xj ¼xjyjzj
8<:
9=; ð2:20Þ
and the direction cosine matrix for member n as
βn ¼βnxβnyβnz
8<:
9=; ð2:21Þ
With this notation, the matrix form of (2.19) is
βn ¼1
lnxnþ � xn�� � ð2:22Þ
where
l2n ¼ xnþ � xn�� �T
xnþ � xn�� �
2.6.2 Member–Node Incidence
The computation of the direction cosines can be automated using the topological data for the
members and nodes. This data is represented in tabular form. One lists, for each member, the node
numbers for the positive and negative ends of the member. It is commonly referred to as the
member–node incidence table. The table corresponding to the structure defined in Fig. 2.34 is listed
below. One loops over the members, extracts the nodal coordinates from the global coordinate vector,
executes the operation defined by (2.22), and obtains the member direction cosine matrix, β.
Member Negative node Positive node
(1) 1 4
(2) 3 4
(3) 1 3
(4) 1 2
(5) 2 3
(6) 2 4
2.6.3 Force Equilibrium Equations
The force vector for a member points in the positive direction of the member, i.e., from the negative
end toward the positive end. Noting (2.16), the set of Cartesian components for member n are listed in
the matrix, Pn, which is related to βnby
Pn ¼Fx
Fy
Fz
8<:
9=; ¼ Fnβn ð2:23Þ
The force components acting on the nodes at the ends of the member are equal to�Pn. Figure 2.36
illustrates this distribution.
2.6 Matrix Formulation: Equilibrium Analysis of Statically Determinate 3-D Trusses 133
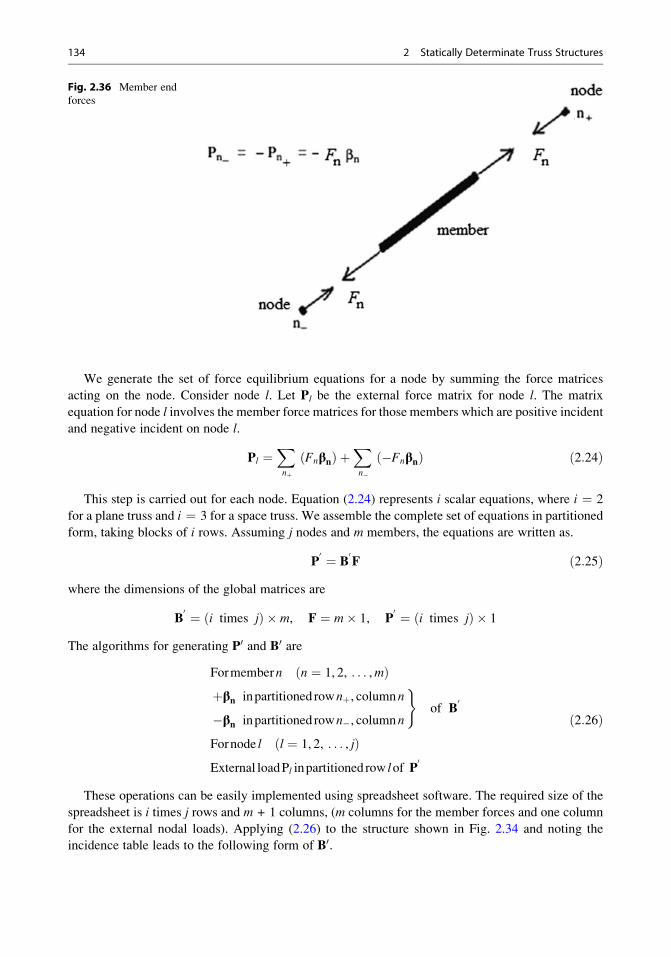
We generate the set of force equilibrium equations for a node by summing the force matrices
acting on the node. Consider node l. Let Pl be the external force matrix for node l. The matrix
equation for node l involves the member force matrices for those members which are positive incident
and negative incident on node l.
Pl ¼Xnþ
Fnβnð Þ þXn�
�Fnβnð Þ ð2:24Þ
This step is carried out for each node. Equation (2.24) represents i scalar equations, where i ¼ 2
for a plane truss and i ¼ 3 for a space truss. We assemble the complete set of equations in partitioned
form, taking blocks of i rows. Assuming j nodes and m members, the equations are written as.
P0 ¼ B
0F ð2:25Þ
where the dimensions of the global matrices are
B0 ¼ i times jð Þ � m, F ¼ m� 1, P
0 ¼ i times jð Þ � 1
The algorithms for generating P0 and B0 are
Formembern n ¼ 1, 2, . . . ,mð Þþβn inpartitioned rownþ, columnn
�βn inpartitioned rown�, columnn
)of B
0
Fornode l l ¼ 1, 2, . . . , jð ÞExternal loadPl inpartitioned row lof P
0
ð2:26Þ
These operations can be easily implemented using spreadsheet software. The required size of the
spreadsheet is i times j rows and m + 1 columns, (m columns for the member forces and one column
for the external nodal loads). Applying (2.26) to the structure shown in Fig. 2.34 and noting the
incidence table leads to the following form of B0.
Fig. 2.36 Member end
forces
134 2 Statically Determinate Truss Structures
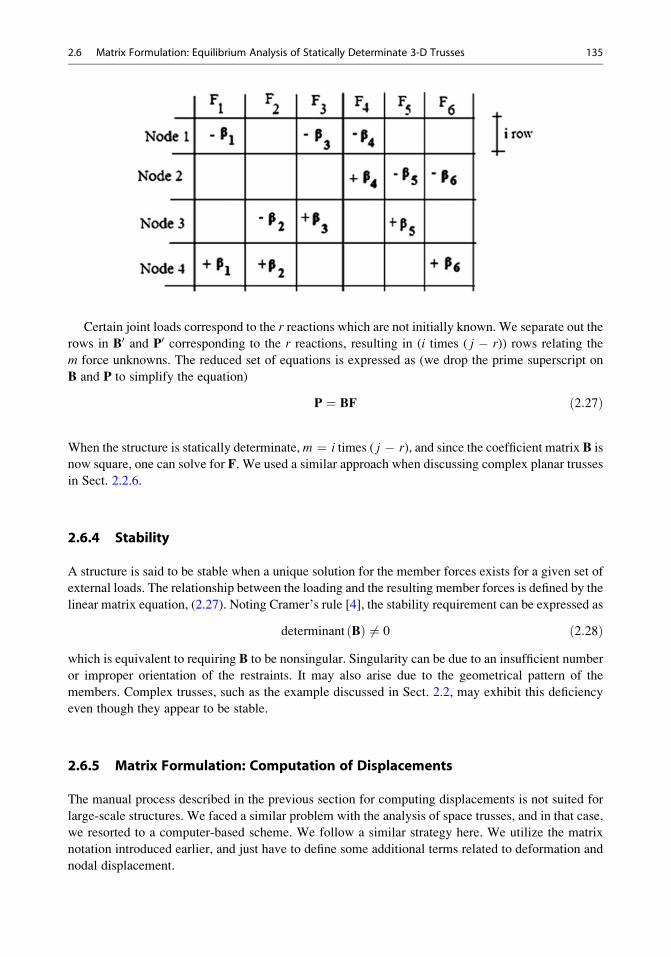
Certain joint loads correspond to the r reactions which are not initially known. We separate out the
rows in B0 and P0 corresponding to the r reactions, resulting in (i times ( j � r)) rows relating the
m force unknowns. The reduced set of equations is expressed as (we drop the prime superscript on
B and P to simplify the equation)
P ¼ BF ð2:27Þ
When the structure is statically determinate,m ¼ i times ( j � r), and since the coefficient matrix B is
now square, one can solve for F. We used a similar approach when discussing complex planar trusses
in Sect. 2.2.6.
2.6.4 Stability
A structure is said to be stable when a unique solution for the member forces exists for a given set of
external loads. The relationship between the loading and the resulting member forces is defined by the
linear matrix equation, (2.27). Noting Cramer’s rule [4], the stability requirement can be expressed as
determinant Bð Þ 6¼ 0 ð2:28Þwhich is equivalent to requiring B to be nonsingular. Singularity can be due to an insufficient number
or improper orientation of the restraints. It may also arise due to the geometrical pattern of the
members. Complex trusses, such as the example discussed in Sect. 2.2, may exhibit this deficiency
even though they appear to be stable.
2.6.5 Matrix Formulation: Computation of Displacements
The manual process described in the previous section for computing displacements is not suited for
large-scale structures. We faced a similar problem with the analysis of space trusses, and in that case,
we resorted to a computer-based scheme. We follow a similar strategy here. We utilize the matrix
notation introduced earlier, and just have to define some additional terms related to deformation and
nodal displacement.
2.6 Matrix Formulation: Equilibrium Analysis of Statically Determinate 3-D Trusses 135
Noting (2.11), we see that e involves the direction cosines for the member, and the nodal
displacements. Using the notation for the direction cosine matrix defined by (2.15) and also defining
u as the nodal displacement matrix,
β¼ βx; βy; βz� �
u¼ u; v;wf gð2:29Þ
we express the extension e as a matrix product.
e ¼ βTu ð2:30ÞWe generalize (2.30) for a member n connected to nodes n+ and n�
en ¼ βT
n unþ � un�� � ð2:31Þ
Note that this matrix expression applies to both 2-D and 3-D structures.
Following the strategy used to assemble the matrix force equilibrium equations, we assemble the
complete set of deformation–displacement relations for the structure. They have the following form
e ¼ B0
� �TU0 ð2:32Þ
where
U0 ¼ u1; u2; . . . ; uj
� �, e ¼ e1; e2; . . . ; emf g
and B0 is defined by (2.20). Note that B0 is the matrix associated with the matrix force equilibrium
equations (2.19). Some of the nodal displacements correspond to locations, where constraints are
applied and their magnitudes are known. When the structure is statically determinate, support
movement introduces no deformation, and we can delete these terms from U0. We also delete the
corresponding rows of B0. These operations lead to the modified equation
e ¼ BTU ð2:33ÞNote that the corresponding modified equilibrium equations have the form P ¼ BF.
The duality between these equations is called the “Static-Geometric” analogy.
Once F is known, one determines the extension of a member using
e ¼ L
AE
� �Fþ eI
where eI contains terms due to temperature and fabrication error. We express the set of deformations
in matrix form
e ¼ fFþ eI ð2:34Þwhere f is a diagonal matrix containing the flexibility coefficients for the members,
f ¼LAEð Þ1
LAEð Þ2
⋱LAEð Þm
2664
3775 ð2:35Þ
136 2 Statically Determinate Truss Structures
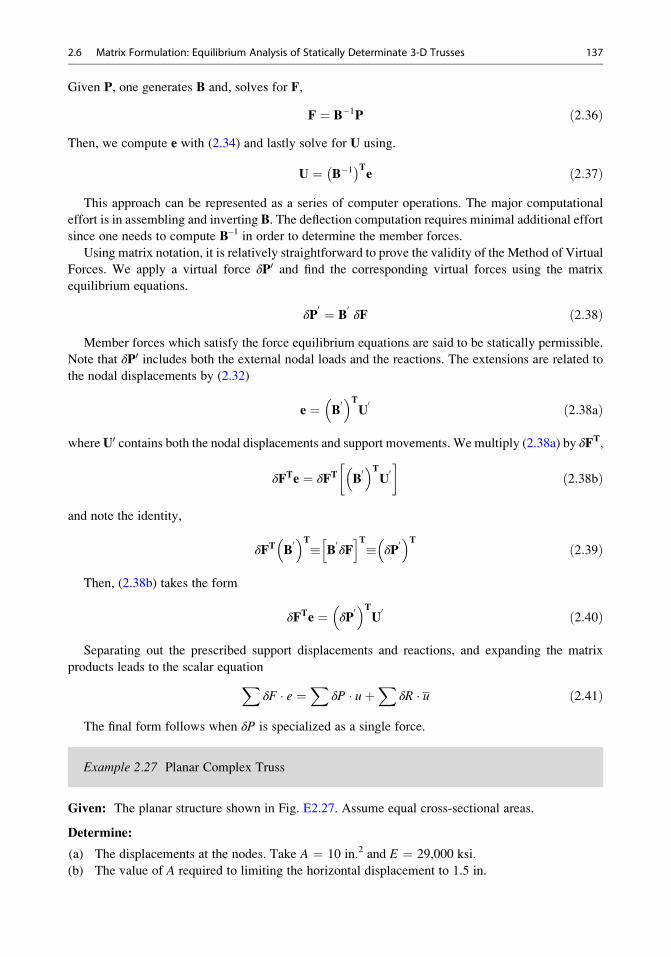
Given P, one generates B and, solves for F,
F ¼ B�1P ð2:36ÞThen, we compute e with (2.34) and lastly solve for U using.
U ¼ B�1� �T
e ð2:37Þ
This approach can be represented as a series of computer operations. The major computational
effort is in assembling and inverting B. The deflection computation requires minimal additional effort
since one needs to compute B–1 in order to determine the member forces.
Using matrix notation, it is relatively straightforward to prove the validity of the Method of Virtual
Forces. We apply a virtual force δP0 and find the corresponding virtual forces using the matrix
equilibrium equations.
δP0 ¼ B
0δF ð2:38Þ
Member forces which satisfy the force equilibrium equations are said to be statically permissible.
Note that δP0 includes both the external nodal loads and the reactions. The extensions are related to
the nodal displacements by (2.32)
e ¼ B0
� �TU0 ð2:38aÞ
whereU0 contains both the nodal displacements and support movements. We multiply (2.38a) by δFT,
δFTe ¼ δFT B0
� �TU0
�ð2:38bÞ
and note the identity,
δFT B0
� �T� B
0δF
h iT� δP
0� �T
ð2:39Þ
Then, (2.38b) takes the form
δFTe ¼ δP0
� �TU0 ð2:40Þ
Separating out the prescribed support displacements and reactions, and expanding the matrix
products leads to the scalar equationXδF e ¼
XδP uþ
XδR u ð2:41Þ
The final form follows when δP is specialized as a single force.
Example 2.27 Planar Complex Truss
Given: The planar structure shown in Fig. E2.27. Assume equal cross-sectional areas.
Determine:
(a) The displacements at the nodes. Take A ¼ 10 in.2 and E ¼ 29,000 ksi.
(b) The value of A required to limiting the horizontal displacement to 1.5 in.
2.6 Matrix Formulation: Equilibrium Analysis of Statically Determinate 3-D Trusses 137
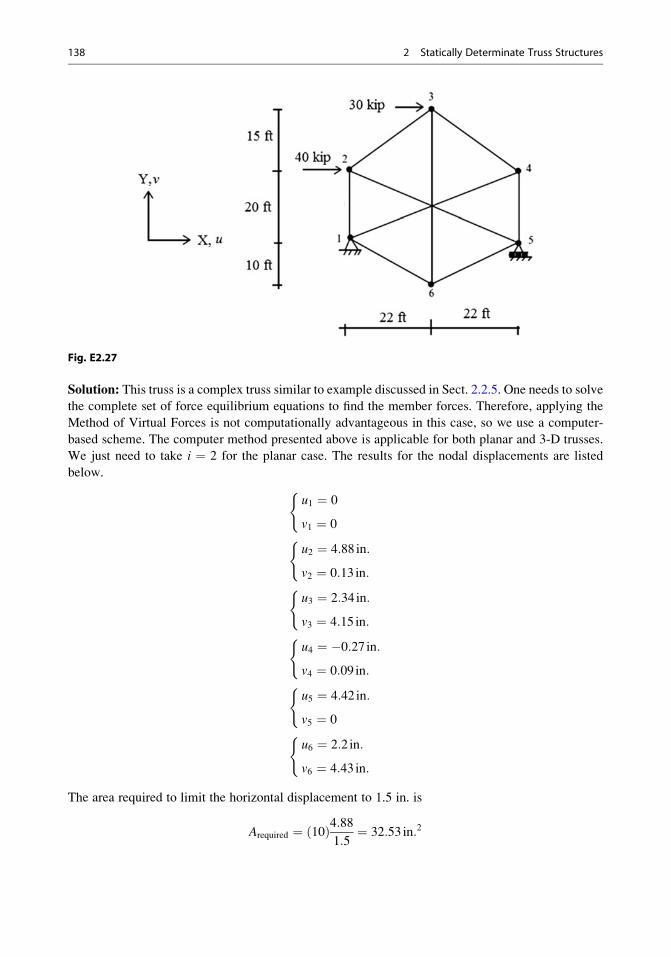
Fig. E2.27
Solution: This truss is a complex truss similar to example discussed in Sect. 2.2.5. One needs to solve
the complete set of force equilibrium equations to find the member forces. Therefore, applying the
Method of Virtual Forces is not computationally advantageous in this case, so we use a computer-
based scheme. The computer method presented above is applicable for both planar and 3-D trusses.
We just need to take i ¼ 2 for the planar case. The results for the nodal displacements are listed
below.
u1 ¼ 0
v1 ¼ 0
(
u2 ¼ 4:88 in:
v2 ¼ 0:13 in:
(
u3 ¼ 2:34 in:
v3 ¼ 4:15 in:
(
u4 ¼ �0:27 in:v4 ¼ 0:09 in:
(
u5 ¼ 4:42 in:
v5 ¼ 0
(
u6 ¼ 2:2 in:
v6 ¼ 4:43 in:
(
The area required to limit the horizontal displacement to 1.5 in. is
Arequired ¼ 10ð Þ4:881:5¼ 32:53 in:2
138 2 Statically Determinate Truss Structures
The revised nodal displacements for A ¼ 32.53 in.2 will be
u1 ¼ 0
v1 ¼ 0
(
u2 ¼ 1:5 in:
v2 ¼ 0:04 in:
(
u3 ¼ 0:72 in:
v3 ¼ 1:27 in:
(
u4 ¼ �0:08 in:v4 ¼ 0:03 in:
(
u5 ¼ 1:36 in:
v5 ¼ 0
(
u6 ¼ 0:68 in:
v6 ¼ 1:36 in:
(
Example 2.28 Space Truss
Given: The space structure shown in Fig. E2.28. Assume equal cross-sectional areas. Take A
¼ 1300 mm2 and E ¼ 200 GPa.
Determine: The member forces, the reactions, and the nodal displacements. Use computer-based
scheme.
2.6 Matrix Formulation: Equilibrium Analysis of Statically Determinate 3-D Trusses 139
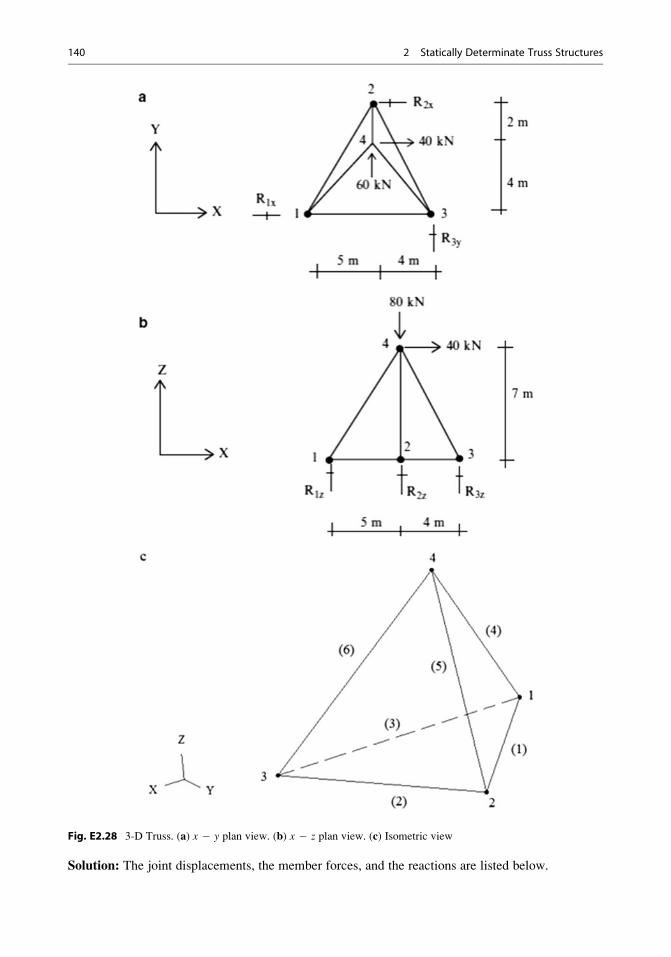
Fig. E2.28 3-D Truss. (a) x � y plan view. (b) x � z plan view. (c) Isometric view
Solution: The joint displacements, the member forces, and the reactions are listed below.
140 2 Statically Determinate Truss Structures
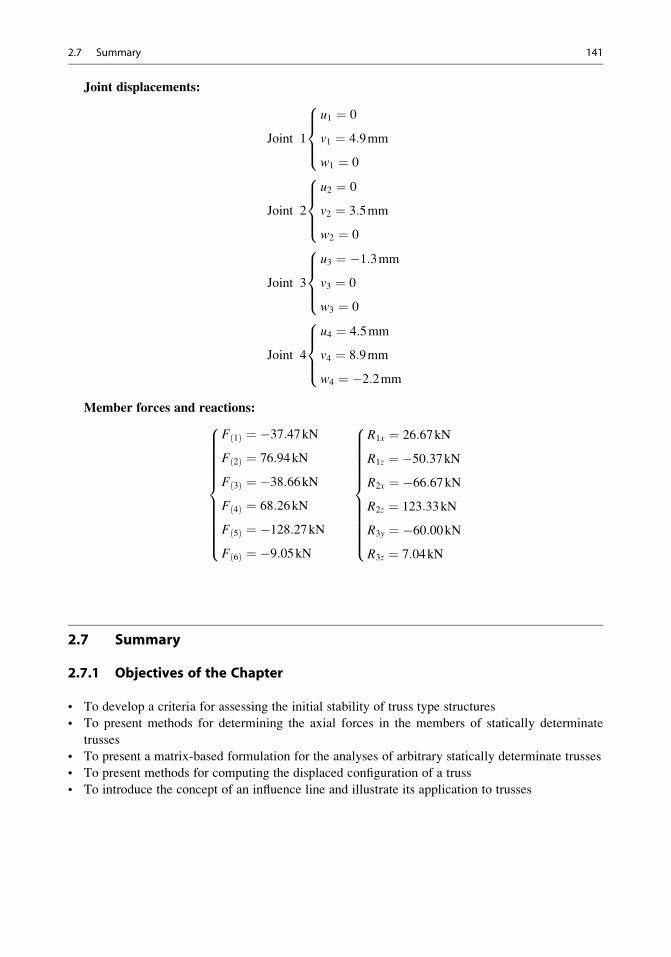
Joint displacements:
Joint 1
u1 ¼ 0
v1 ¼ 4:9mm
w1 ¼ 0
8>><>>:
Joint 2
u2 ¼ 0
v2 ¼ 3:5mm
w2 ¼ 0
8>><>>:
Joint 3
u3 ¼ �1:3mm
v3 ¼ 0
w3 ¼ 0
8>><>>:
Joint 4
u4 ¼ 4:5mm
v4 ¼ 8:9mm
w4 ¼ �2:2mm
8>><>>:
Member forces and reactions:
F 1ð Þ ¼ �37:47kNF 2ð Þ ¼ 76:94kN
F 3ð Þ ¼ �38:66kNF 4ð Þ ¼ 68:26kN
F 5ð Þ ¼ �128:27kNF 6ð Þ ¼ �9:05kN
8>>>>>>>>>>><>>>>>>>>>>>:
R1x ¼ 26:67kN
R1z ¼ �50:37kNR2x ¼ �66:67kNR2z ¼ 123:33kN
R3y ¼ �60:00kNR3z ¼ 7:04kN
8>>>>>>>>>>><>>>>>>>>>>>:
2.7 Summary
2.7.1 Objectives of the Chapter
• To develop a criteria for assessing the initial stability of truss type structures
• To present methods for determining the axial forces in the members of statically determinate
trusses
• To present a matrix-based formulation for the analyses of arbitrary statically determinate trusses
• To present methods for computing the displaced configuration of a truss
• To introduce the concept of an influence line and illustrate its application to trusses
2.7 Summary 141

2.7.2 Key Facts and Concepts
• The statical determinacy .of a plane truss is determined by comparing the number of unknown
forces vs. the number of available force equilibrium equations.
• The forces in the members of a statically determinate truss are independent of the member
properties such as area and material modulus and support movements.
• The two force analysis procedures are the method of joints and the method of sections. The method
of joints strategy proceeds from joint to joint, always working with a joint having a statically
determinate force system. This approach generates all the member forces. The method of sections
is designed to allow one to determine the force in a particular member. One passes a cutting plane
through the structure, selects either segment, and applies the equilibrium conditions. This method
requires less computation and generally is easier to apply.
• Given the external loads, one can determine the internal member forces using force equilibrium
equations when the truss is statically determinate. The displacements due to the loading can be
computed manually using the method of virtual forces. To determine the displacement at a point A
in a particular direction, da, one applies a virtual force δPa at point A in the same direction as the
desired displacement and computes, using static equilibrium equations, the internal forces δF, andreactions, δR, due to δPa. The displacement is given by
daδPa ¼X
members
eδF�X
reactions
d δR
where d is the prescribed support movement and e is the elongation of the member due to force,
temperature change, and initial fabrication error.
e ¼ FL
AE
� �þ αΔT Lð Þ þ e0
This method is restricted to static loading and small displacements. It is also applicable for
statically indeterminate trusses when the member forces are known.
• The concept of influence lines is very useful for dealing with the live loading which can act
anywhere on the structure. Given a particular member force and a particular type of live loading,
usually a unit vertical loading, the influence line displays graphically the magnitude of the force
for various locations of the load. By viewing the plot, one can immediately determine the position
of the load that produces the peak magnitude of the member force.
2.8 Problems
Classify each of the following plane trusses defined in Problems 2.1–2.4 as initially stable or unstable.
If stable, then classify them as statically determinate or indeterminate. For indeterminate trusses,
determine the degree of static indeterminacy.
142 2 Statically Determinate Truss Structures
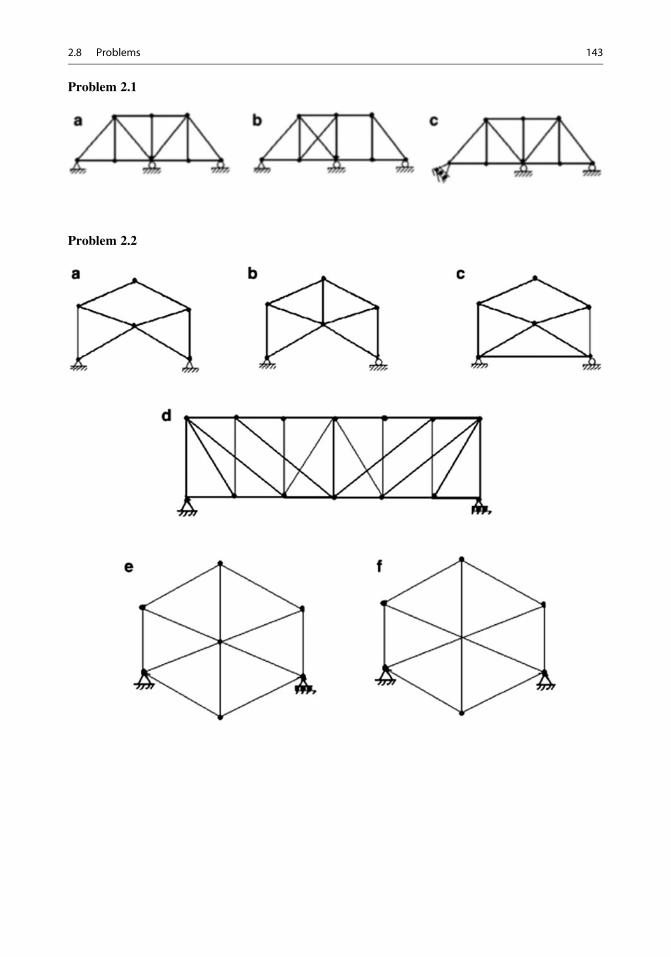
Problem 2.1
Problem 2.2
2.8 Problems 143
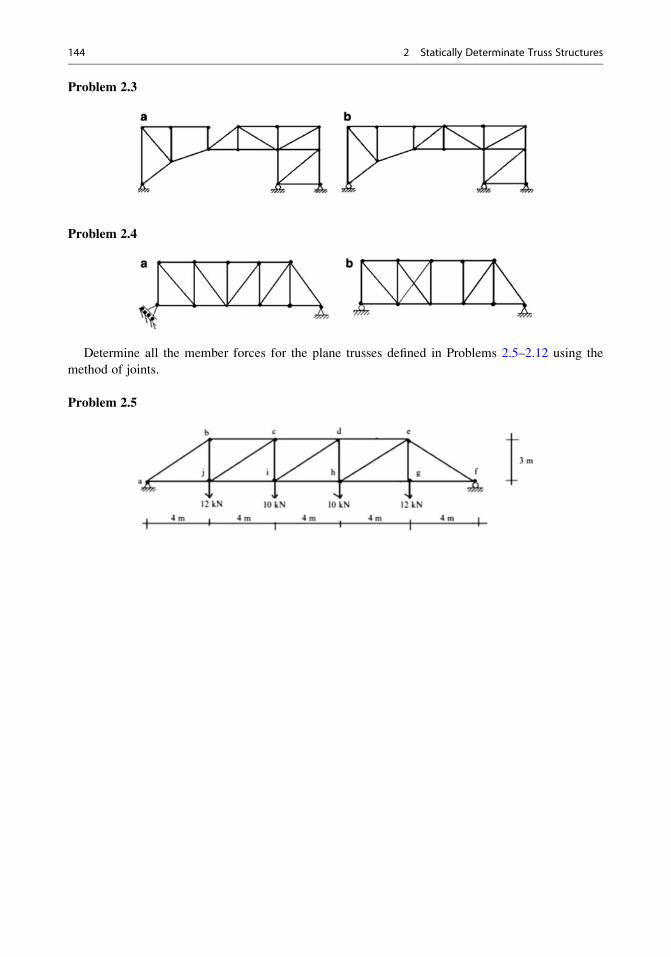
Problem 2.3
Problem 2.4
Determine all the member forces for the plane trusses defined in Problems 2.5–2.12 using the
method of joints.
Problem 2.5
144 2 Statically Determinate Truss Structures
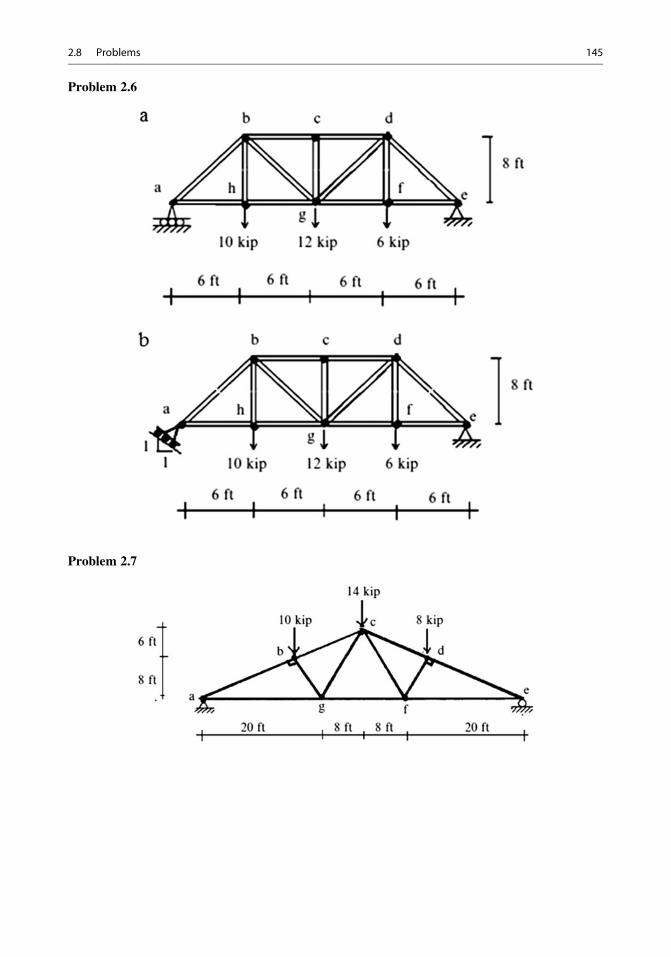
Problem 2.6
Problem 2.7
2.8 Problems 145
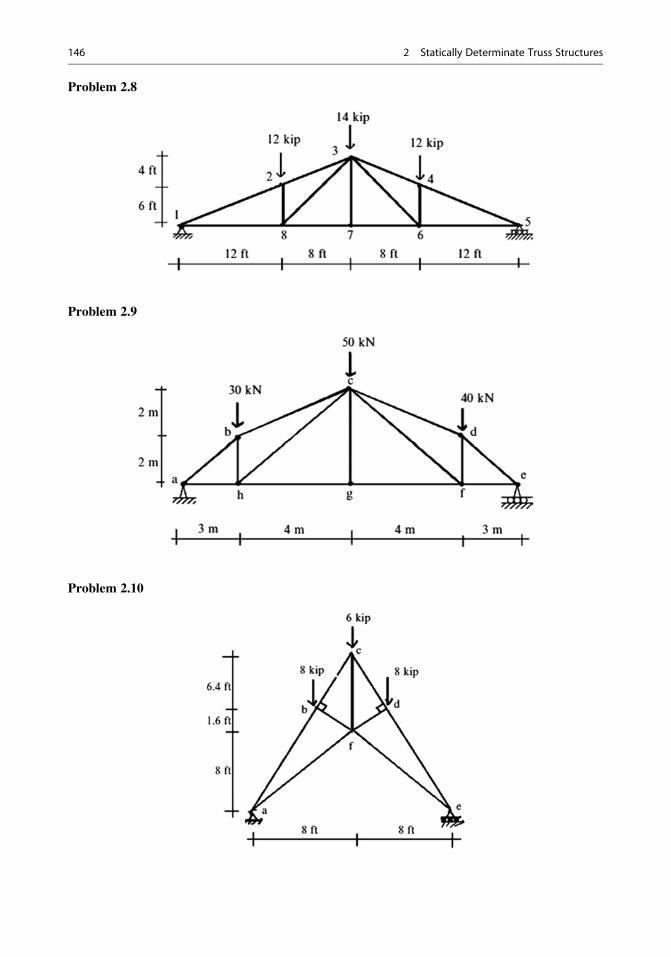
Problem 2.8
Problem 2.9
Problem 2.10
146 2 Statically Determinate Truss Structures
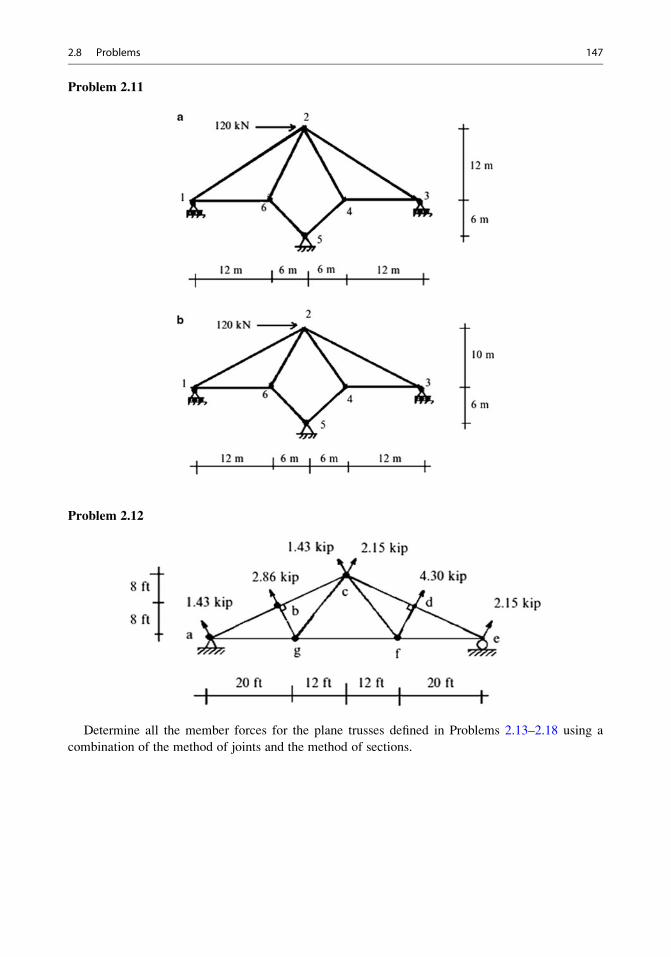
Problem 2.11
Problem 2.12
Determine all the member forces for the plane trusses defined in Problems 2.13–2.18 using a
combination of the method of joints and the method of sections.
2.8 Problems 147

Problem 2.13
Problem 2.14
Problem 2.15
148 2 Statically Determinate Truss Structures
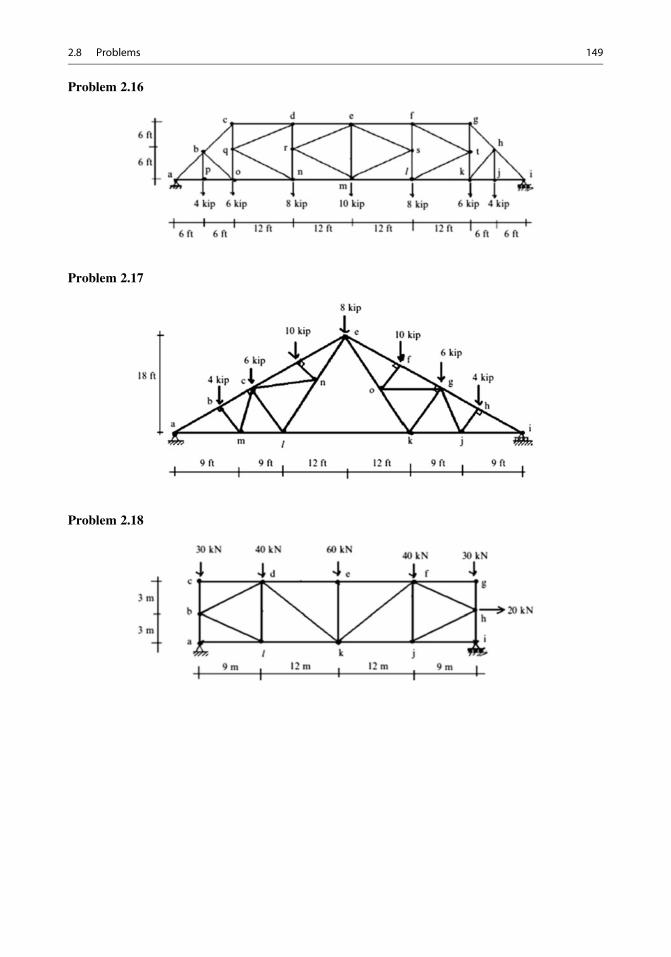
Problem 2.16
Problem 2.17
Problem 2.18
2.8 Problems 149
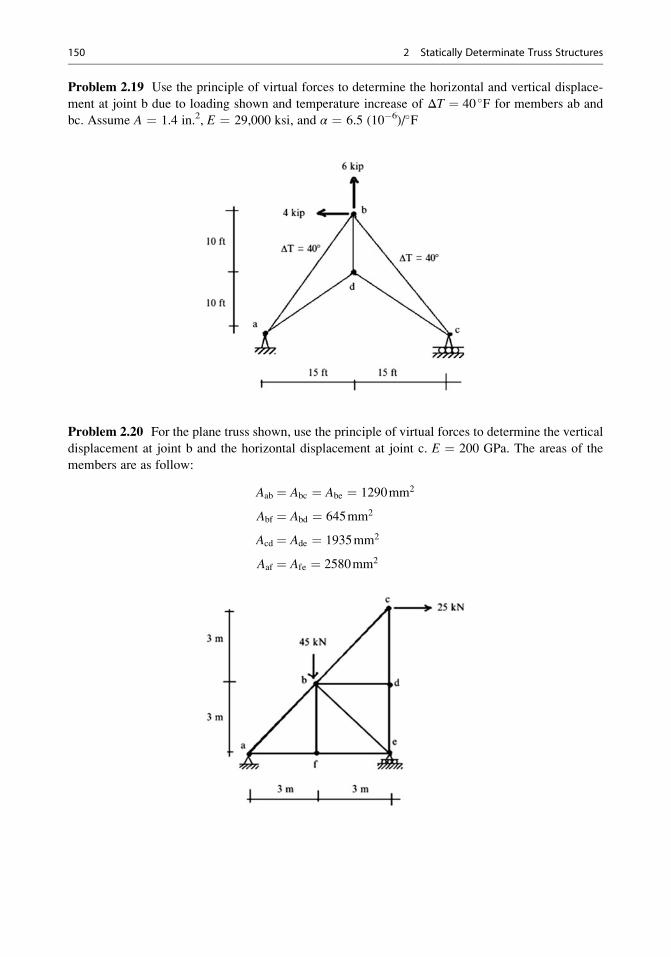
Problem 2.19 Use the principle of virtual forces to determine the horizontal and vertical displace-
ment at joint b due to loading shown and temperature increase of ΔT ¼ 40 �F for members ab and
bc. Assume A ¼ 1.4 in.2, E ¼ 29,000 ksi, and α ¼ 6.5 (10�6)/�F
Problem 2.20 For the plane truss shown, use the principle of virtual forces to determine the vertical
displacement at joint b and the horizontal displacement at joint c. E ¼ 200 GPa. The areas of the
members are as follow:
Aab ¼ Abc ¼ Abe ¼ 1290mm2
Abf ¼ Abd ¼ 645mm2
Acd ¼ Ade ¼ 1935mm2
Aaf ¼ Afe ¼ 2580mm2
150 2 Statically Determinate Truss Structures
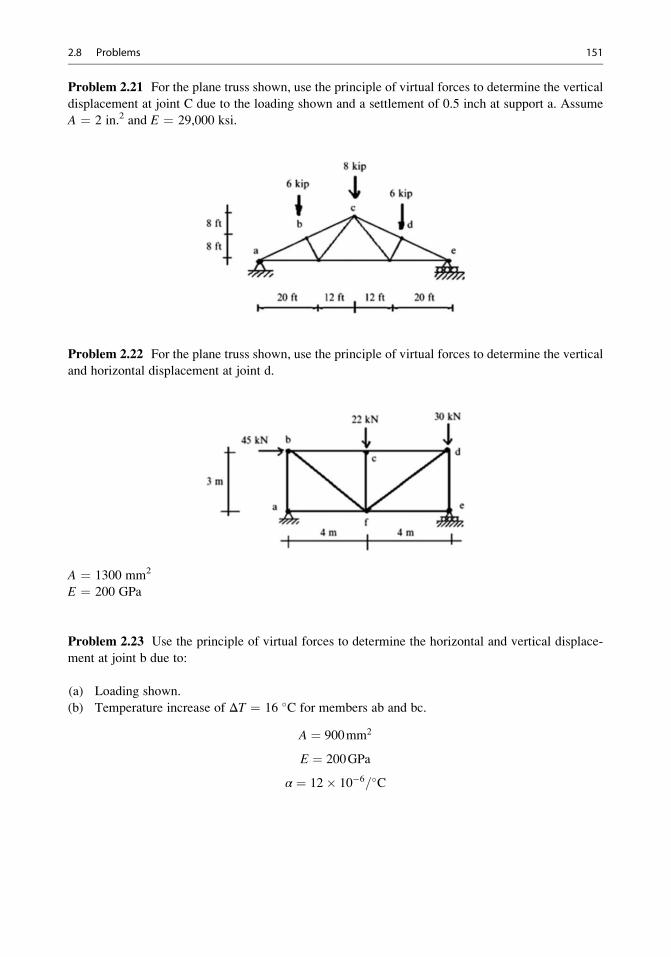
Problem 2.21 For the plane truss shown, use the principle of virtual forces to determine the vertical
displacement at joint C due to the loading shown and a settlement of 0.5 inch at support a. Assume
A ¼ 2 in.2 and E ¼ 29,000 ksi.
Problem 2.22 For the plane truss shown, use the principle of virtual forces to determine the vertical
and horizontal displacement at joint d.
A ¼ 1300 mm2
E ¼ 200 GPa
Problem 2.23 Use the principle of virtual forces to determine the horizontal and vertical displace-
ment at joint b due to:
(a) Loading shown.
(b) Temperature increase of ΔT ¼ 16 �C for members ab and bc.
A ¼ 900mm2
E ¼ 200GPa
α ¼ 12� 10�6=�C
2.8 Problems 151

Problem 2.24 Use the principle of virtual force method to determine the horizontal component of
the displacement at joint d. Assume A ¼ 0.5 in.2 and E ¼ 29,000 ksi.
(i) For the loading shown
(ii) For a fabrication error of �0.25 in. for members ac and df
(iii) For the summation of Case (i) and Case (ii) loadings.
Problem 2.25 Use the principle of virtual forces method to determine the horizontal component of
the displacement at joint b. Assume A ¼ 0.5 in.2, E ¼ 30,000 ksi, α ¼ 6.5 � 10�6/�F
(i) For the loading shown
(ii) For a temperature increase of ΔT ¼ 60 �F for all members
(iii) For the summation of Case (i) and Case (ii) loadings.
152 2 Statically Determinate Truss Structures
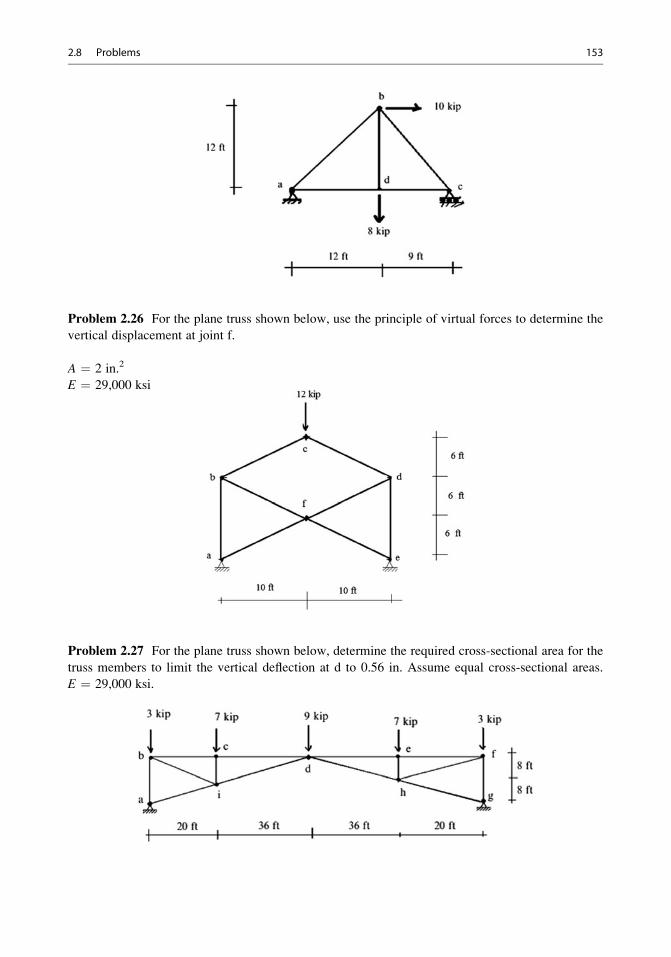
Problem 2.26 For the plane truss shown below, use the principle of virtual forces to determine the
vertical displacement at joint f.
A ¼ 2 in.2
E ¼ 29,000 ksi
Problem 2.27 For the plane truss shown below, determine the required cross-sectional area for the
truss members to limit the vertical deflection at d to 0.56 in. Assume equal cross-sectional areas.
E ¼ 29,000 ksi.
2.8 Problems 153
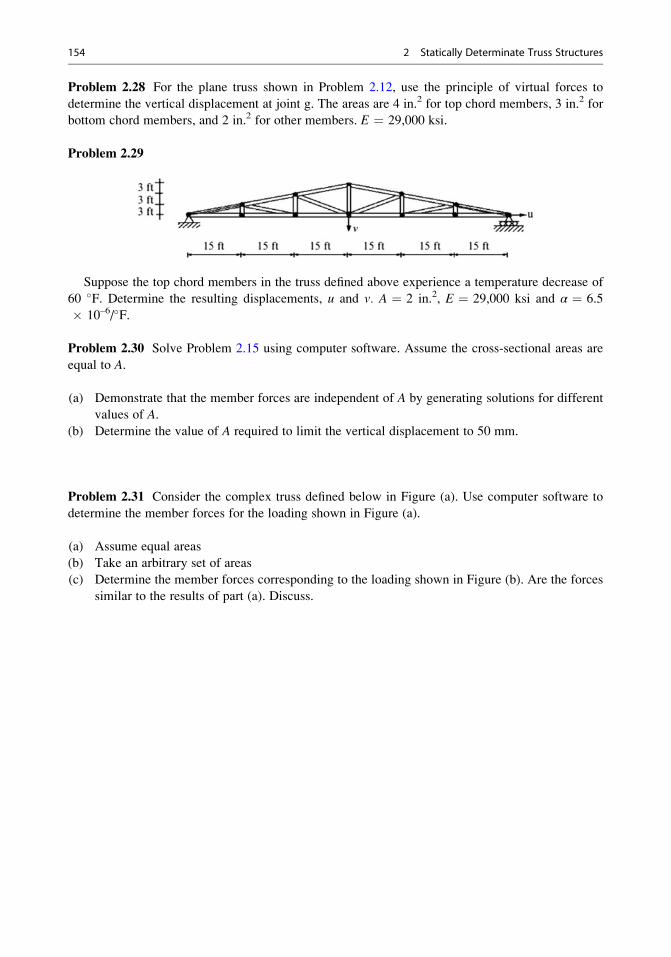
Problem 2.28 For the plane truss shown in Problem 2.12, use the principle of virtual forces to
determine the vertical displacement at joint g. The areas are 4 in.2 for top chord members, 3 in.2 for
bottom chord members, and 2 in.2 for other members. E ¼ 29,000 ksi.
Problem 2.29
Suppose the top chord members in the truss defined above experience a temperature decrease of
60 �F. Determine the resulting displacements, u and v. A ¼ 2 in.2, E ¼ 29,000 ksi and α ¼ 6.5
� 10–6/�F.
Problem 2.30 Solve Problem 2.15 using computer software. Assume the cross-sectional areas are
equal to A.
(a) Demonstrate that the member forces are independent of A by generating solutions for different
values of A.
(b) Determine the value of A required to limit the vertical displacement to 50 mm.
Problem 2.31 Consider the complex truss defined below in Figure (a). Use computer software to
determine the member forces for the loading shown in Figure (a).
(a) Assume equal areas
(b) Take an arbitrary set of areas
(c) Determine the member forces corresponding to the loading shown in Figure (b). Are the forces
similar to the results of part (a). Discuss.
154 2 Statically Determinate Truss Structures
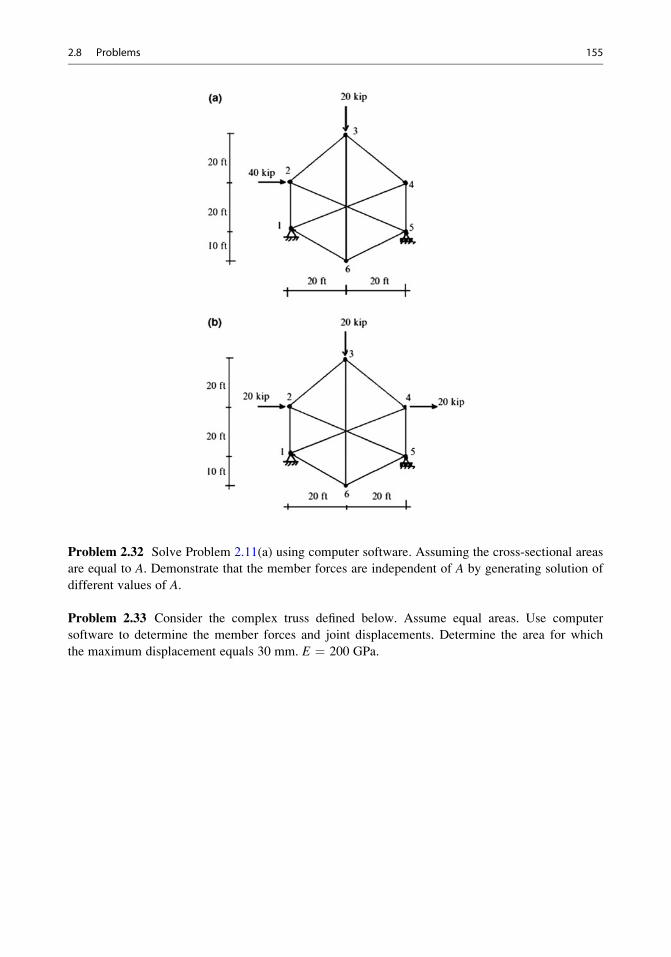
Problem 2.32 Solve Problem 2.11(a) using computer software. Assuming the cross-sectional areas
are equal to A. Demonstrate that the member forces are independent of A by generating solution of
different values of A.
Problem 2.33 Consider the complex truss defined below. Assume equal areas. Use computer
software to determine the member forces and joint displacements. Determine the area for which
the maximum displacement equals 30 mm. E ¼ 200 GPa.
2.8 Problems 155

Problem 2.34 For the truss and the loading shown:
(a) Tabulate all the member forces due to the individual unit vertical nodal forces applied to the top
chord (force influence table). Use computer software.
(b) Use the force influence table in part (a) to
(i) Draw influence lines for members 15, 4, and 20.
(ii) Calculate the member forces in members 3, 19, 10, and 14 for the following loading:
P2 ¼ 10 kN, P4 ¼ 6 kN, and P6 ¼ 8 kN.
Problem 2.35 For the truss and the loading shown:
156 2 Statically Determinate Truss Structures
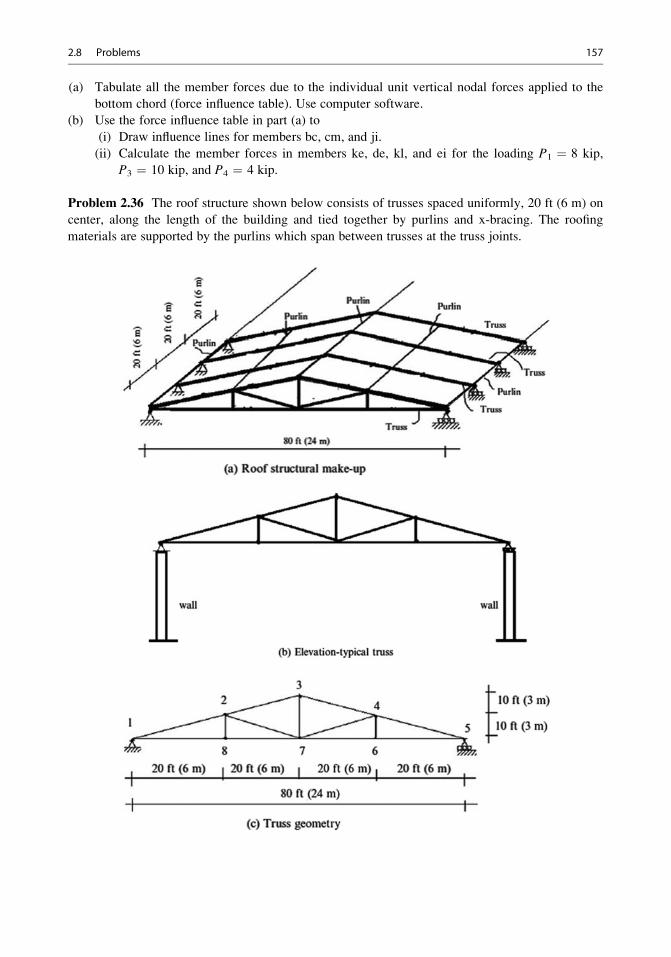
(a) Tabulate all the member forces due to the individual unit vertical nodal forces applied to the
bottom chord (force influence table). Use computer software.
(b) Use the force influence table in part (a) to
(i) Draw influence lines for members bc, cm, and ji.
(ii) Calculate the member forces in members ke, de, kl, and ei for the loading P1 ¼ 8 kip,
P3 ¼ 10 kip, and P4 ¼ 4 kip.
Problem 2.36 The roof structure shown below consists of trusses spaced uniformly, 20 ft (6 m) on
center, along the length of the building and tied together by purlins and x-bracing. The roofing
materials are supported by the purlins which span between trusses at the truss joints.
2.8 Problems 157
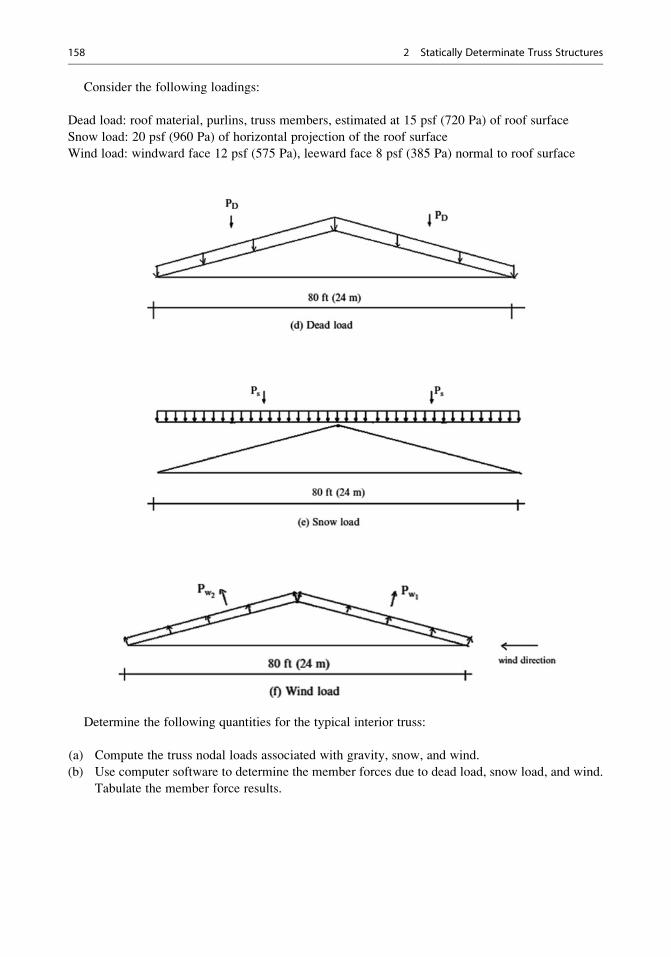
Consider the following loadings:
Dead load: roof material, purlins, truss members, estimated at 15 psf (720 Pa) of roof surface
Snow load: 20 psf (960 Pa) of horizontal projection of the roof surface
Wind load: windward face 12 psf (575 Pa), leeward face 8 psf (385 Pa) normal to roof surface
Determine the following quantities for the typical interior truss:
(a) Compute the truss nodal loads associated with gravity, snow, and wind.
(b) Use computer software to determine the member forces due to dead load, snow load, and wind.
Tabulate the member force results.
158 2 Statically Determinate Truss Structures
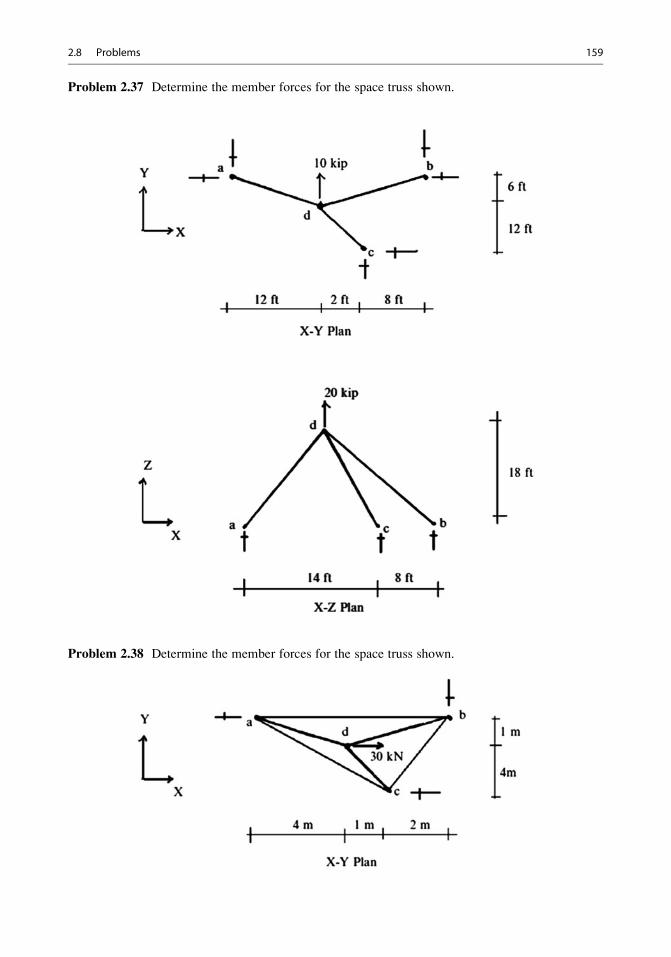
Problem 2.37 Determine the member forces for the space truss shown.
Problem 2.38 Determine the member forces for the space truss shown.
2.8 Problems 159
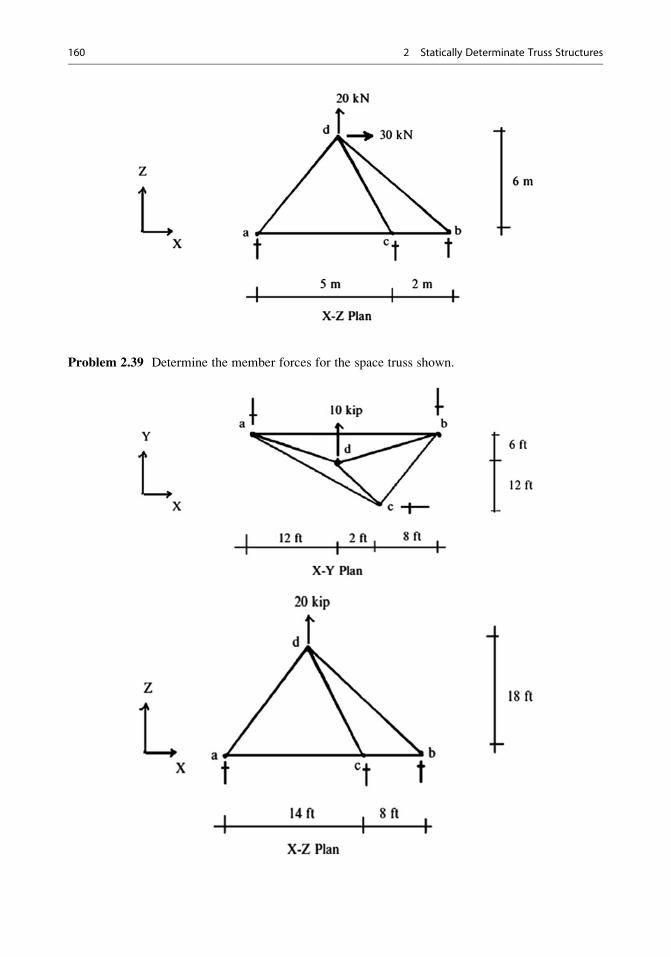
Problem 2.39 Determine the member forces for the space truss shown.
160 2 Statically Determinate Truss Structures
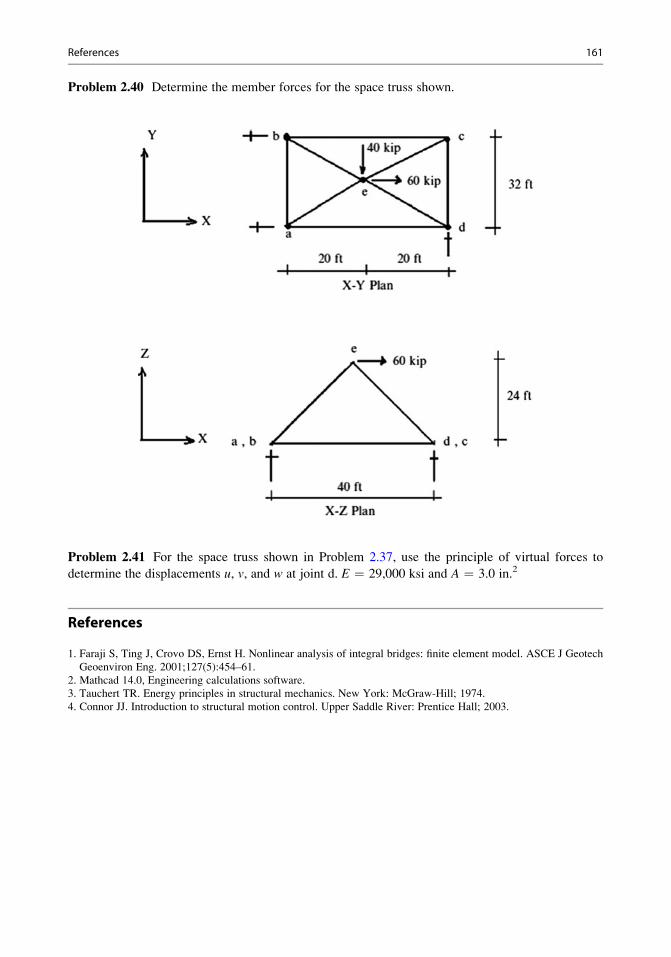
Problem 2.40 Determine the member forces for the space truss shown.
Problem 2.41 For the space truss shown in Problem 2.37, use the principle of virtual forces to
determine the displacements u, v, and w at joint d. E ¼ 29,000 ksi and A ¼ 3.0 in.2
References
1. Faraji S, Ting J, Crovo DS, Ernst H. Nonlinear analysis of integral bridges: finite element model. ASCE J Geotech
Geoenviron Eng. 2001;127(5):454–61.
2. Mathcad 14.0, Engineering calculations software.
3. Tauchert TR. Energy principles in structural mechanics. New York: McGraw-Hill; 1974.
4. Connor JJ. Introduction to structural motion control. Upper Saddle River: Prentice Hall; 2003.
References 161
Statically Determinate Beams 3
Abstract
Our focus in this chapter is on describing how beams behave under
transverse loading, i.e., when the loading acts normal to the longitudinal
axes. This problem is called the “beam bending” problem. The first step in
the analysis of a statically determinate beam is the determination of the
reactions. Given the reactions, one can establish the internal forces using
equilibrium-based procedures. These forces generate deformations that
cause the beam to displace. We discuss in detail the relationship between
the internal forces and the corresponding displacements and describe two
quantitative analysis procedures for establishing the displacements due to
a particular loading. The last section of the chapter presents some basic
analysis strategies employed in the design of beams such as influence lines
and global envelopes.
3.1 Definition of a Prismatic Beam
Beams are used extensively in structures, primarily in flooring systems for buildings and bridges.
They belong to the line element category, i.e., their longitudinal dimension is large in comparison to
their cross-sectional dimensions. Whereas truss members are loaded axially, beams are loaded normal
to the longitudinal direction, and carry the loading by bending and twisting action. This mode is
illustrated in Fig. 3.1. The transverse loading produces transverse deflection, which results in a
nonuniform distribution of stress throughout the body.
Most of the applications of beams in building structures involve straight beams with constant
cross-section. We refer to this subgroup as prismatic beams. Figure 3.2 defines the geometrical
parameters and notation used for prismatic beams. The longitudinal axis-X passes through the
centroid of the cross-section, and the Y, Z axes are taken as the principal inertia directions.
The relevant definition equations are
# Springer International Publishing Switzerland 2016
J.J. Connor, S. Faraji, Fundamentals of Structural Engineering,DOI 10.1007/978-3-319-24331-3_3
163
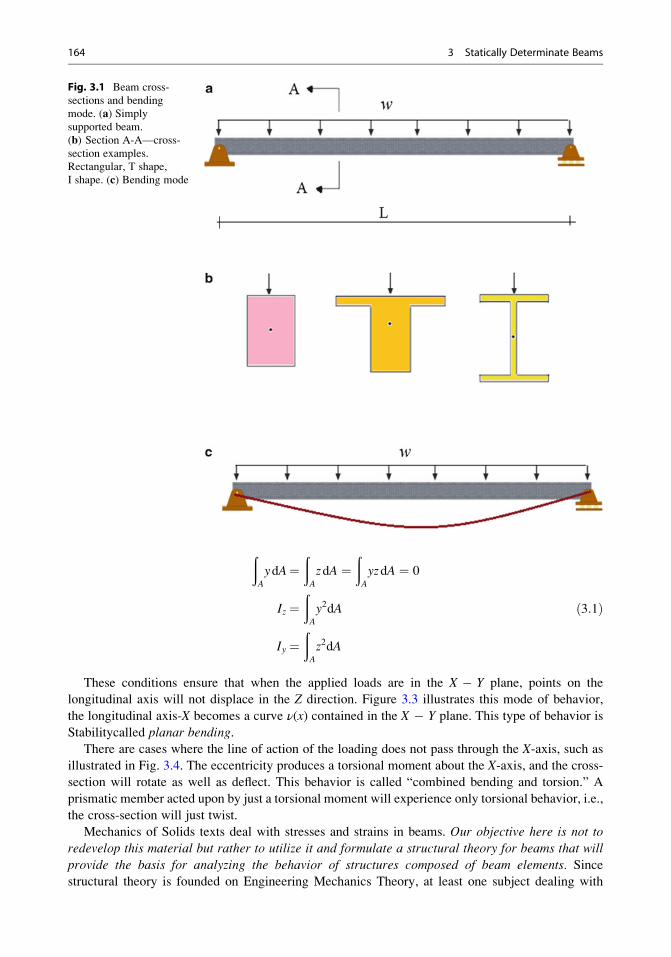
ðA
ydA¼ðA
zdA ¼ðA
yzdA ¼ 0
Iz ¼ðA
y2dA
Iy ¼ðA
z2dA
ð3:1Þ
These conditions ensure that when the applied loads are in the X � Y plane, points on the
longitudinal axis will not displace in the Z direction. Figure 3.3 illustrates this mode of behavior,
the longitudinal axis-X becomes a curve ν(x) contained in the X � Y plane. This type of behavior is
Stabilitycalled planar bending.There are cases where the line of action of the loading does not pass through the X-axis, such as
illustrated in Fig. 3.4. The eccentricity produces a torsional moment about the X-axis, and the cross-
section will rotate as well as deflect. This behavior is called “combined bending and torsion.” A
prismatic member acted upon by just a torsional moment will experience only torsional behavior, i.e.,
the cross-section will just twist.
Mechanics of Solids texts deal with stresses and strains in beams. Our objective here is not to
redevelop this material but rather to utilize it and formulate a structural theory for beams that will
provide the basis for analyzing the behavior of structures composed of beam elements. Sincestructural theory is founded on Engineering Mechanics Theory, at least one subject dealing with
Fig. 3.1 Beam cross-
sections and bending
mode. (a) Simply
supported beam.
(b) Section A-A—cross-
section examples.
Rectangular, T shape,
I shape. (c) Bending mode
164 3 Statically Determinate Beams
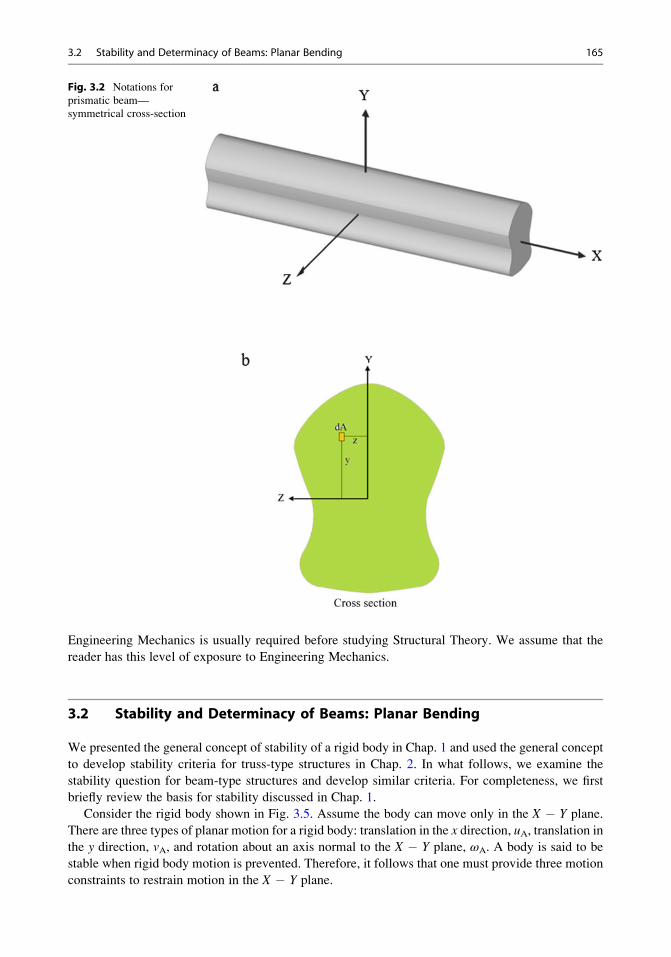
Engineering Mechanics is usually required before studying Structural Theory. We assume that the
reader has this level of exposure to Engineering Mechanics.
3.2 Stability and Determinacy of Beams: Planar Bending
We presented the general concept of stability of a rigid body in Chap. 1 and used the general concept
to develop stability criteria for truss-type structures in Chap. 2. In what follows, we examine the
stability question for beam-type structures and develop similar criteria. For completeness, we first
briefly review the basis for stability discussed in Chap. 1.
Consider the rigid body shown in Fig. 3.5. Assume the body can move only in the X � Y plane.
There are three types of planar motion for a rigid body: translation in the x direction, uA, translation inthe y direction, vA, and rotation about an axis normal to the X � Y plane, ωA. A body is said to be
stable when rigid body motion is prevented. Therefore, it follows that one must provide three motion
constraints to restrain motion in the X � Y plane.
Fig. 3.2 Notations for
prismatic beam—
symmetrical cross-section
3.2 Stability and Determinacy of Beams: Planar Bending 165
One needs to be careful in selecting the orientation of the three translation constraints. Consider
Fig. 3.6. We first choose two directions, “a” and “b” in the X � Y plane. They intersect at point o.
With these two constraints, the only possible rigid body motion is rotation about point o. If we take
the third direction as “c,” this rotation is not prevented. Therefore, it follows that the three directionsmust be nonconcurrent as well as coplanar, i.e., they cannot intersect at a common point. This implies
that they must not be parallel. Any other direction, such as “d0” is permissible.
Fig. 3.3 Planar
bending mode
Fig. 3.4 Combined bending and torsion
166 3 Statically Determinate Beams
When the loading is arbitrary, the body needs to be constrained against motion in any plane. This
requires six constraints, three with respect to translation and three with respect to rotation about the
X, Y, and Z direction. The strategy for selecting restraints is similar to the treatment of 3-D truss
structures. We point out that for pure rotational loading only one rotational restraint is required.
Fig. 3.5 Planar rigid body
motions
Fig. 3.6 Concurrent
displacement constraints
3.2 Stability and Determinacy of Beams: Planar Bending 167
Motion constraints produce reaction forces when the body is loaded. The nature of the reaction
forces depends on the constraints. Various types of supports for beams subjected to planar bending are
illustrated below.
3.2.1 Fixed Support: Planar Loading
The beam is embedded at point A in such a way that the end is prevented from translating or rotating.
We say the member is “fixed” at A. The reactions consist of two forces and one moment.
3.2.2 Hinged Support: Planar Loading
Suppose A is to be fully restrained against translation. This can be achieved by pinning the member.
Horizontal and vertical reactions are produced.
168 3 Statically Determinate Beams
3.2.3 Roller Support: Planar Loading
Suppose A is to be restrained against motion perpendicular to the surface of contact. We add a
restraint to A by inserting a device that allows motion parallel to the surface of contact but fully
restrains motion in the direction perpendicular to the surface. We refer to this device as a roller. This
restraint produces a reaction force perpendicular to the surface of contact.
When the loading is three dimensional, additional restraints are required. The supports described
above needs to be modified to deal with these additional restraints. Typical schemes are shown below.
3.2 Stability and Determinacy of Beams: Planar Bending 169
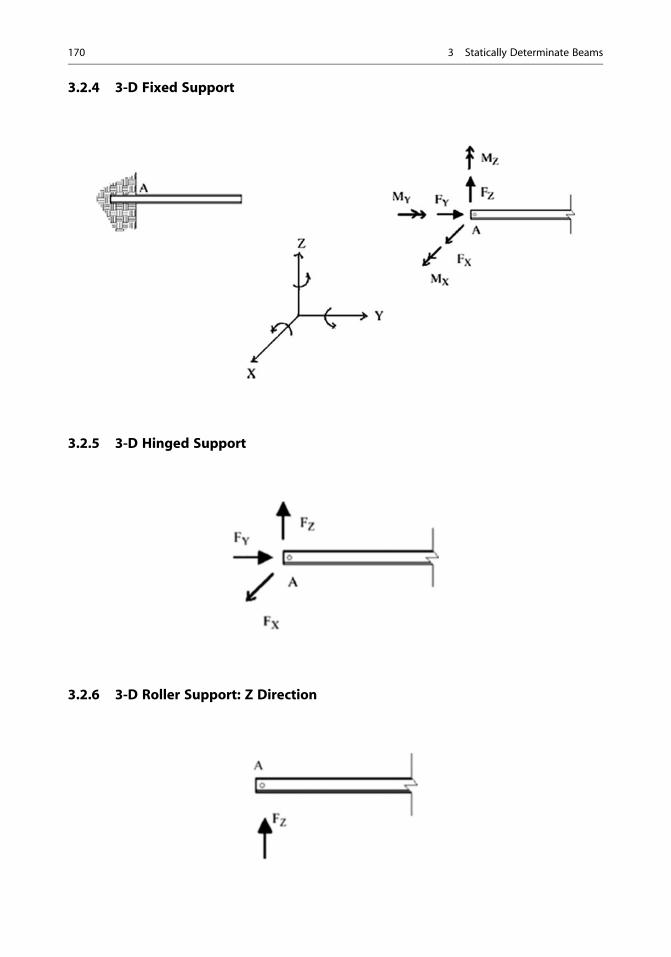
3.2.4 3-D Fixed Support
3.2.5 3-D Hinged Support
3.2.6 3-D Roller Support: Z Direction
170 3 Statically Determinate Beams
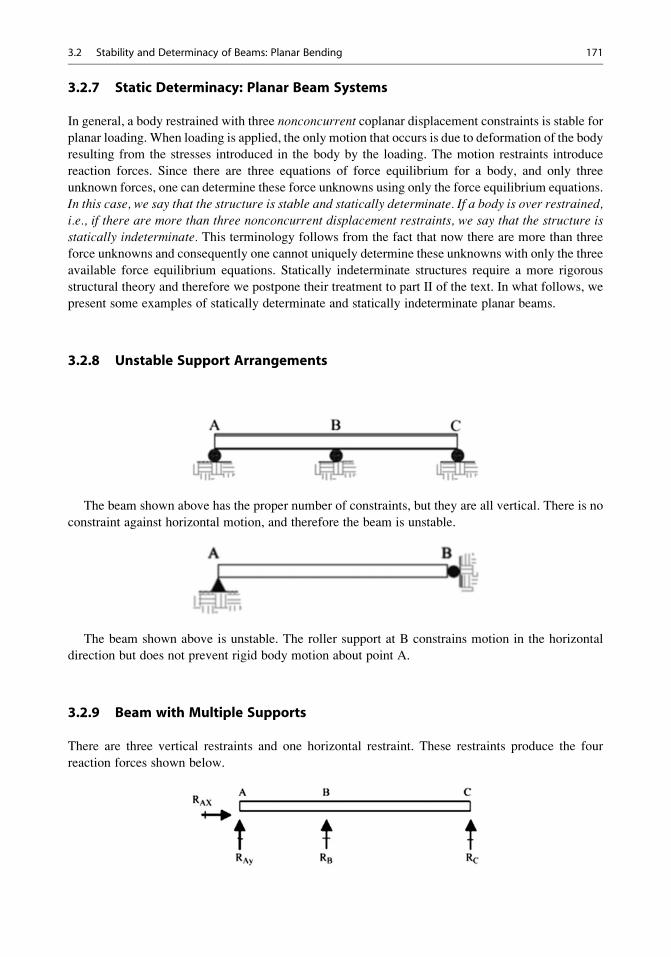
3.2.7 Static Determinacy: Planar Beam Systems
In general, a body restrained with three nonconcurrent coplanar displacement constraints is stable for
planar loading. When loading is applied, the only motion that occurs is due to deformation of the body
resulting from the stresses introduced in the body by the loading. The motion restraints introduce
reaction forces. Since there are three equations of force equilibrium for a body, and only three
unknown forces, one can determine these force unknowns using only the force equilibrium equations.
In this case, we say that the structure is stable and statically determinate. If a body is over restrained,
i.e., if there are more than three nonconcurrent displacement restraints, we say that the structure isstatically indeterminate. This terminology follows from the fact that now there are more than three
force unknowns and consequently one cannot uniquely determine these unknowns with only the three
available force equilibrium equations. Statically indeterminate structures require a more rigorous
structural theory and therefore we postpone their treatment to part II of the text. In what follows, we
present some examples of statically determinate and statically indeterminate planar beams.
3.2.8 Unstable Support Arrangements
The beam shown above has the proper number of constraints, but they are all vertical. There is no
constraint against horizontal motion, and therefore the beam is unstable.
The beam shown above is unstable. The roller support at B constrains motion in the horizontal
direction but does not prevent rigid body motion about point A.
3.2.9 Beam with Multiple Supports
There are three vertical restraints and one horizontal restraint. These restraints produce the four
reaction forces shown below.
3.2 Stability and Determinacy of Beams: Planar Bending 171
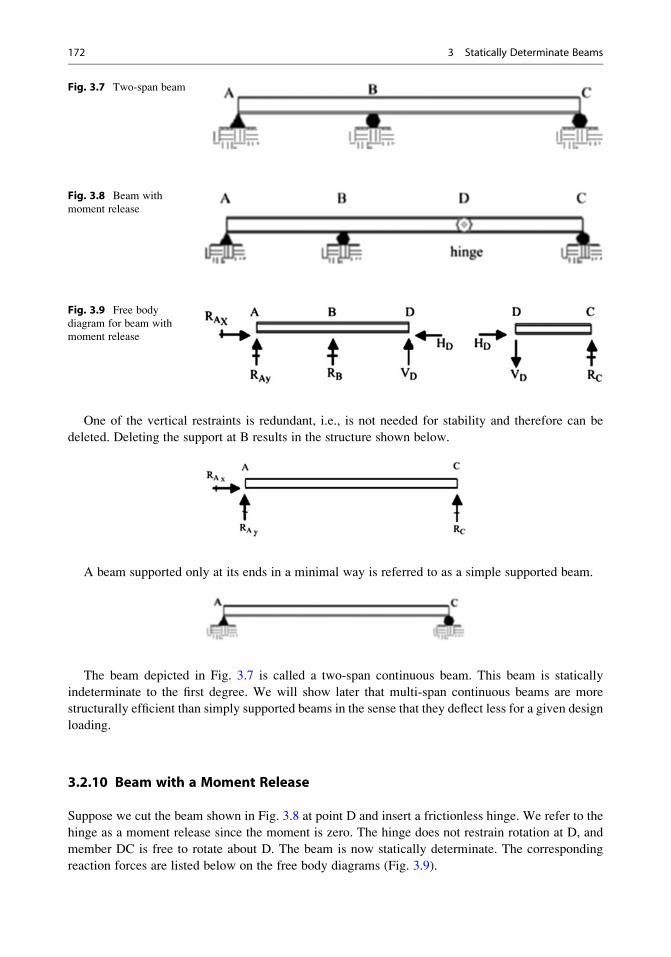
One of the vertical restraints is redundant, i.e., is not needed for stability and therefore can be
deleted. Deleting the support at B results in the structure shown below.
A beam supported only at its ends in a minimal way is referred to as a simple supported beam.
The beam depicted in Fig. 3.7 is called a two-span continuous beam. This beam is statically
indeterminate to the first degree. We will show later that multi-span continuous beams are more
structurally efficient than simply supported beams in the sense that they deflect less for a given design
loading.
3.2.10 Beam with a Moment Release
Suppose we cut the beam shown in Fig. 3.8 at point D and insert a frictionless hinge. We refer to the
hinge as a moment release since the moment is zero. The hinge does not restrain rotation at D, and
member DC is free to rotate about D. The beam is now statically determinate. The corresponding
reaction forces are listed below on the free body diagrams (Fig. 3.9).
Fig. 3.7 Two-span beam
Fig. 3.8 Beam with
moment release
Fig. 3.9 Free body
diagram for beam with
moment release
172 3 Statically Determinate Beams
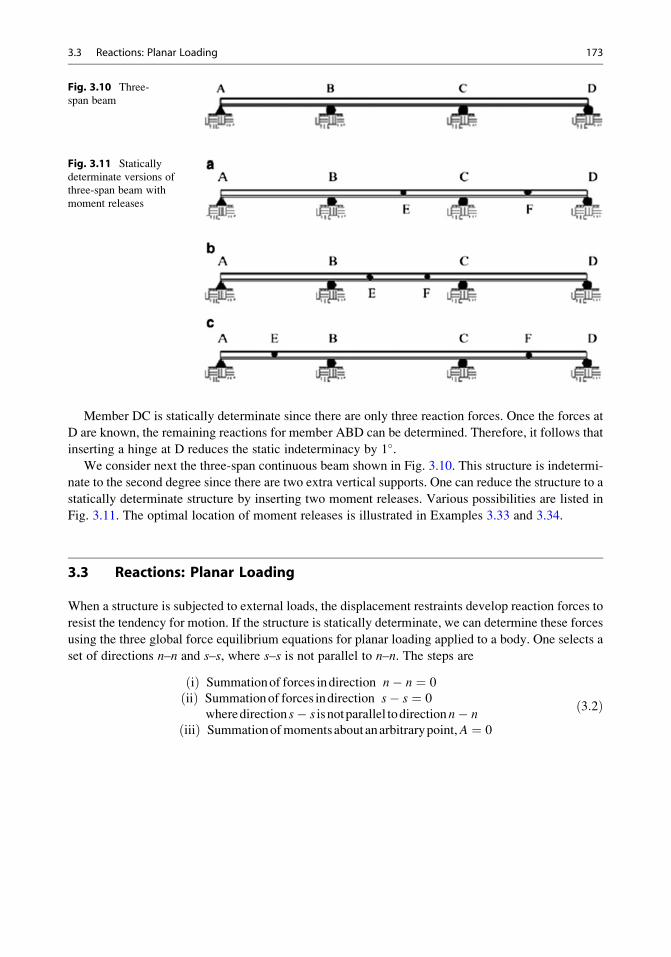
Member DC is statically determinate since there are only three reaction forces. Once the forces at
D are known, the remaining reactions for member ABD can be determined. Therefore, it follows that
inserting a hinge at D reduces the static indeterminacy by 1�.We consider next the three-span continuous beam shown in Fig. 3.10. This structure is indetermi-
nate to the second degree since there are two extra vertical supports. One can reduce the structure to a
statically determinate structure by inserting two moment releases. Various possibilities are listed in
Fig. 3.11. The optimal location of moment releases is illustrated in Examples 3.33 and 3.34.
3.3 Reactions: Planar Loading
When a structure is subjected to external loads, the displacement restraints develop reaction forces to
resist the tendency for motion. If the structure is statically determinate, we can determine these forces
using the three global force equilibrium equations for planar loading applied to a body. One selects a
set of directions n–n and s–s, where s–s is not parallel to n–n. The steps are
ið Þ Summationof forces indirection n� n ¼ 0
iið Þ Summationof forces indirection s� s ¼ 0
wheredirection s� s is notparallel todirectionn� niiið Þ Summationofmomentsaboutanarbitrarypoint,A ¼ 0
ð3:2Þ
Fig. 3.10 Three-
span beam
Fig. 3.11 Statically
determinate versions of
three-span beam with
moment releases
3.3 Reactions: Planar Loading 173
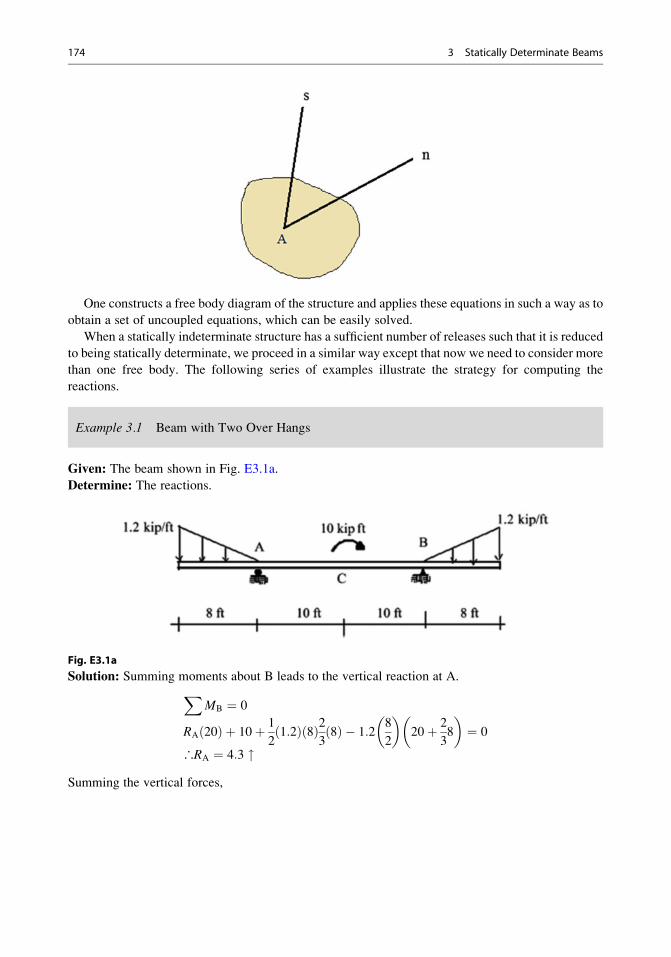
One constructs a free body diagram of the structure and applies these equations in such a way as to
obtain a set of uncoupled equations, which can be easily solved.
When a statically indeterminate structure has a sufficient number of releases such that it is reduced
to being statically determinate, we proceed in a similar way except that now we need to consider more
than one free body. The following series of examples illustrate the strategy for computing the
reactions.
Example 3.1 Beam with Two Over Hangs
Given: The beam shown in Fig. E3.1a.
Determine: The reactions.
Fig. E3.1a
Solution: Summing moments about B leads to the vertical reaction at A.XMB ¼ 0
RA 20ð Þ þ 10þ 1
21:2ð Þ 8ð Þ2
38ð Þ � 1:2
8
2
� �20þ 2
38
� �¼ 0
∴RA ¼ 4:3 "Summing the vertical forces,
174 3 Statically Determinate Beams
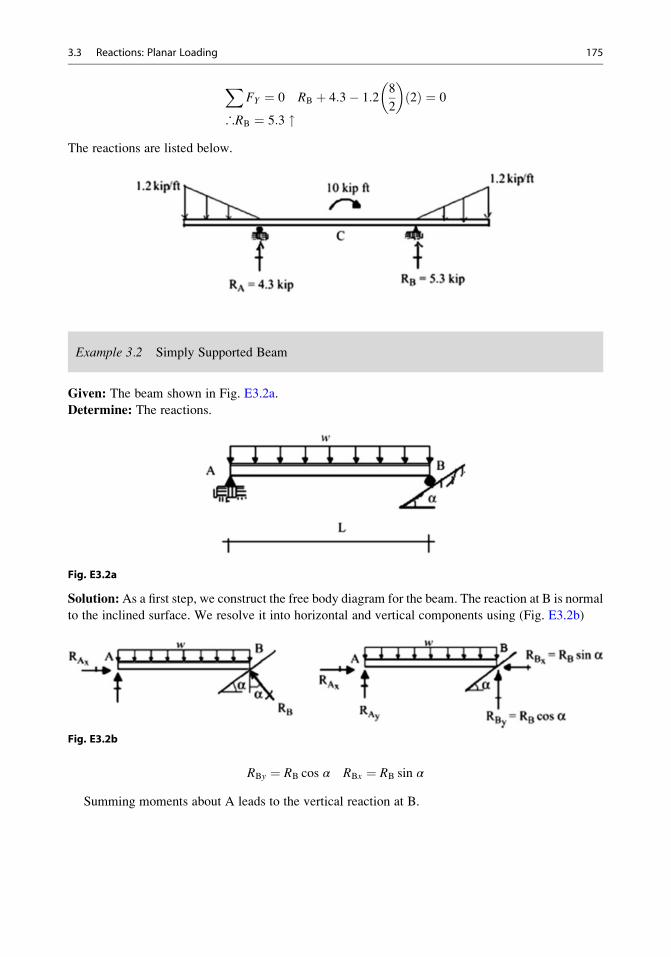
XFY ¼ 0 RB þ 4:3� 1:2
8
2
� �2ð Þ ¼ 0
∴RB ¼ 5:3 "The reactions are listed below.
Example 3.2 Simply Supported Beam
Given: The beam shown in Fig. E3.2a.
Determine: The reactions.
Fig. E3.2a
Solution:As a first step, we construct the free body diagram for the beam. The reaction at B is normal
to the inclined surface. We resolve it into horizontal and vertical components using (Fig. E3.2b)
Fig. E3.2b
RBy ¼ RB cos α RBx ¼ RB sin α
Summing moments about A leads to the vertical reaction at B.
3.3 Reactions: Planar Loading 175
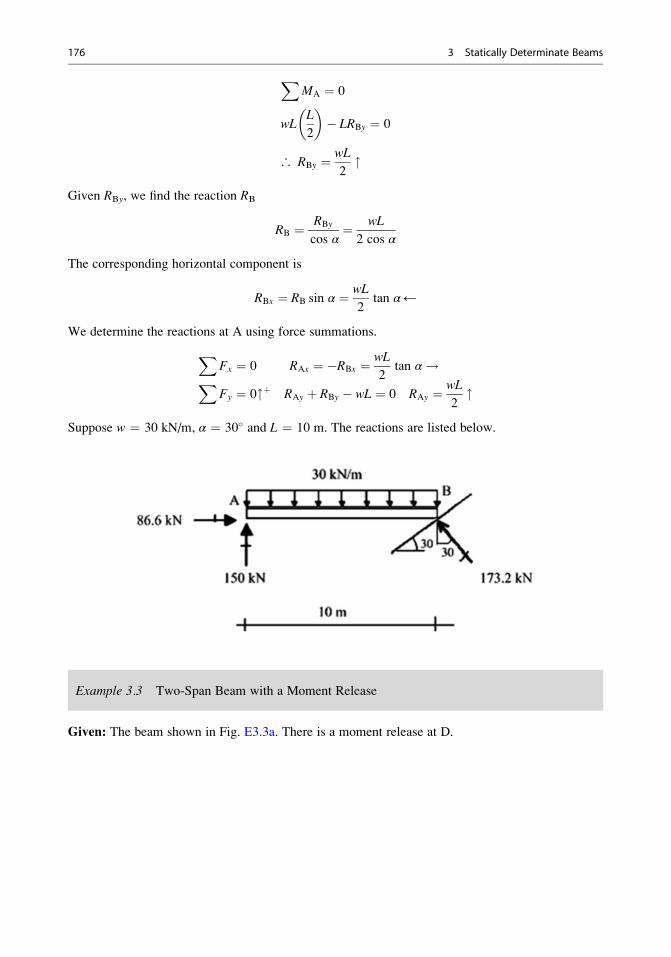
XMA ¼ 0
wLL
2
� �� LRBy ¼ 0
∴ RBy ¼ wL
2"
Given RBy, we find the reaction RB
RB ¼ RBy
cos α¼ wL
2 cos α
The corresponding horizontal component is
RBx ¼ RB sin α ¼ wL
2tan α←
We determine the reactions at A using force summations.
XFx ¼ 0 RAx ¼ �RBx ¼ wL
2tan α!X
Fy ¼ 0"þ RAy þ RBy � wL ¼ 0 RAy ¼ wL
2"
Suppose w ¼ 30 kN/m, α ¼ 30� and L ¼ 10 m. The reactions are listed below.
Example 3.3 Two-Span Beam with a Moment Release
Given: The beam shown in Fig. E3.3a. There is a moment release at D.
176 3 Statically Determinate Beams
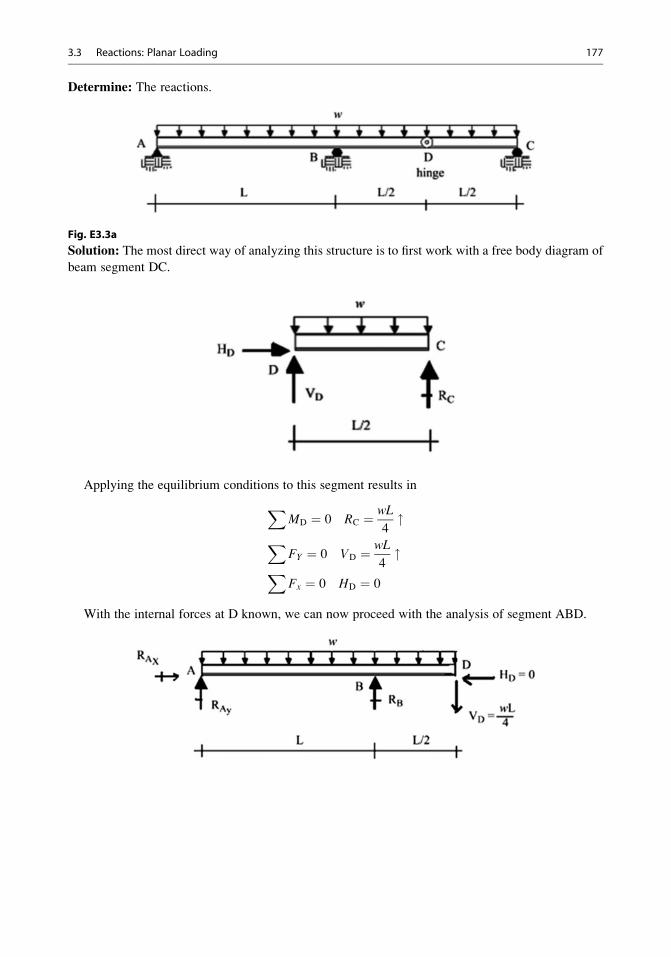
Determine: The reactions.
Fig. E3.3a
Solution: The most direct way of analyzing this structure is to first work with a free body diagram of
beam segment DC.
Applying the equilibrium conditions to this segment results in
XMD ¼ 0 RC ¼ wL
4"
XFY ¼ 0 VD ¼ wL
4"X
Fx ¼ 0 HD ¼ 0
With the internal forces at D known, we can now proceed with the analysis of segment ABD.
3.3 Reactions: Planar Loading 177
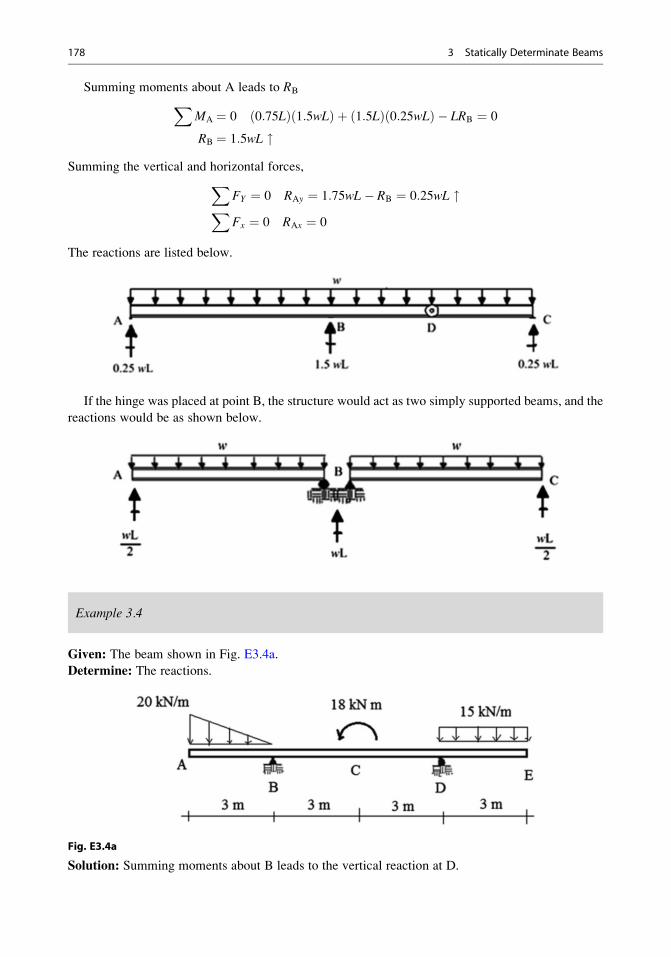
Summing moments about A leads to RBXMA ¼ 0 0:75Lð Þ 1:5wLð Þ þ 1:5Lð Þ 0:25wLð Þ � LRB ¼ 0
RB ¼ 1:5wL "Summing the vertical and horizontal forces,X
FY ¼ 0 RAy ¼ 1:75wL� RB ¼ 0:25wL "XFx ¼ 0 RAx ¼ 0
The reactions are listed below.
If the hinge was placed at point B, the structure would act as two simply supported beams, and the
reactions would be as shown below.
Example 3.4
Given: The beam shown in Fig. E3.4a.
Determine: The reactions.
Fig. E3.4a
Solution: Summing moments about B leads to the vertical reaction at D.
178 3 Statically Determinate Beams

XMB ¼ 0
RD 6ð Þ þ 203
2
� �2ð Þ þ 18� 15 3ð Þ 7:5ð Þ ¼ 0 ∴RD ¼ 43:25 "
Summing the vertical forces,
XFY ¼ 0 RB þ 43:25� 15 3ð Þ � 20
3
2
� �¼ 0
∴RB ¼ 31:75 "The reactions are listed below.
Example 3.5 Three-Span Beam with Two Moment Releases
Given: The beam shown in Fig. E3.5a.
Determine: The reactions.
Fig. E3.5a
3.3 Reactions: Planar Loading 179
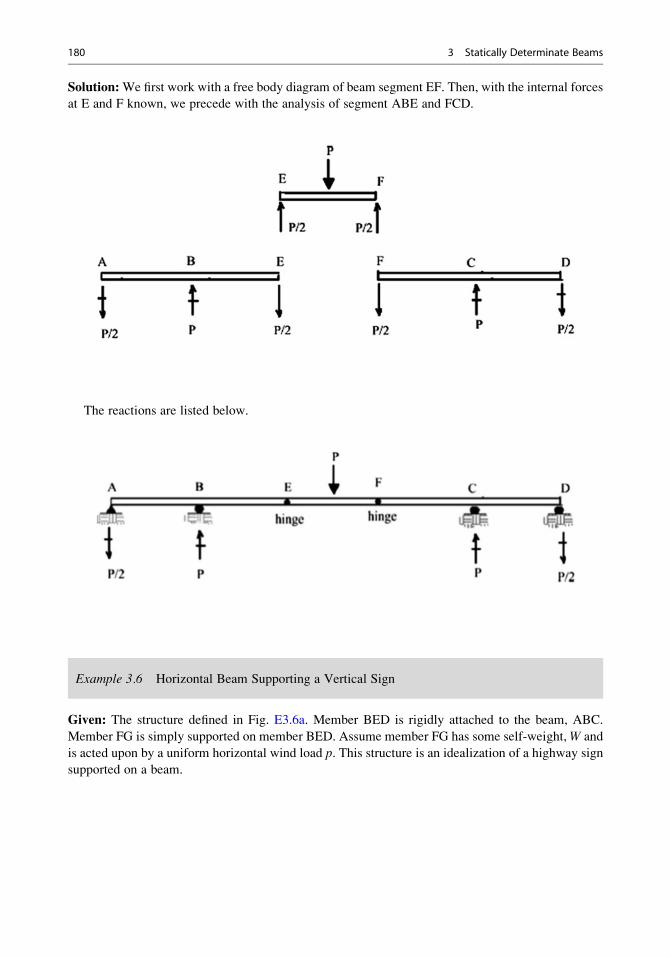
Solution:We first work with a free body diagram of beam segment EF. Then, with the internal forces
at E and F known, we precede with the analysis of segment ABE and FCD.
The reactions are listed below.
Example 3.6 Horizontal Beam Supporting a Vertical Sign
Given: The structure defined in Fig. E3.6a. Member BED is rigidly attached to the beam, ABC.
Member FG is simply supported on member BED. Assume member FG has some self-weight,W and
is acted upon by a uniform horizontal wind load p. This structure is an idealization of a highway signsupported on a beam.
180 3 Statically Determinate Beams
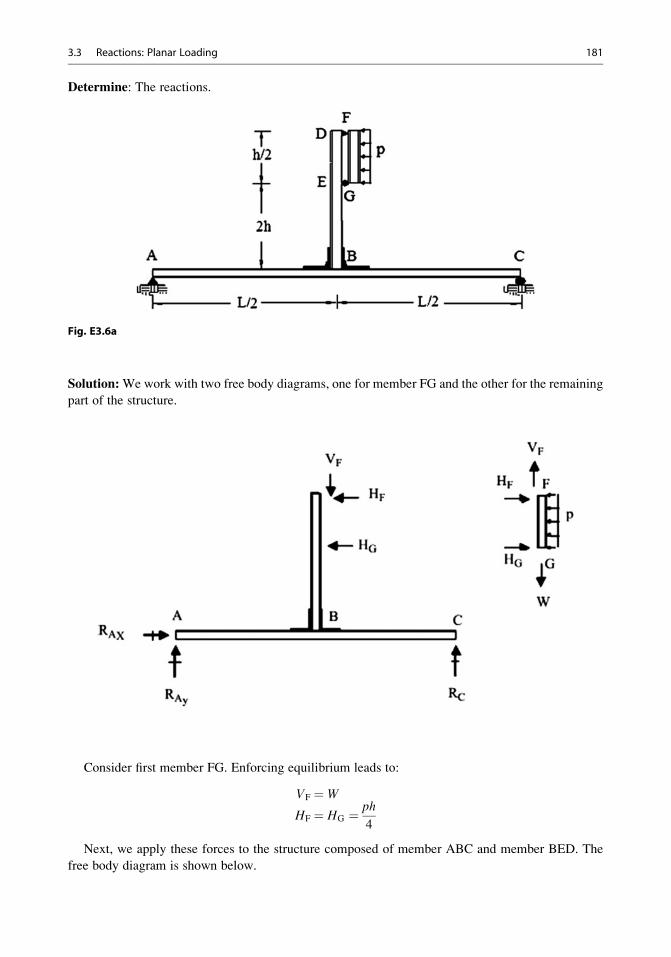
Determine: The reactions.
Fig. E3.6a
Solution:We work with two free body diagrams, one for member FG and the other for the remaining
part of the structure.
Consider first member FG. Enforcing equilibrium leads to:
VF ¼ W
HF ¼ HG ¼ ph
4
Next, we apply these forces to the structure composed of member ABC and member BED. The
free body diagram is shown below.
3.3 Reactions: Planar Loading 181
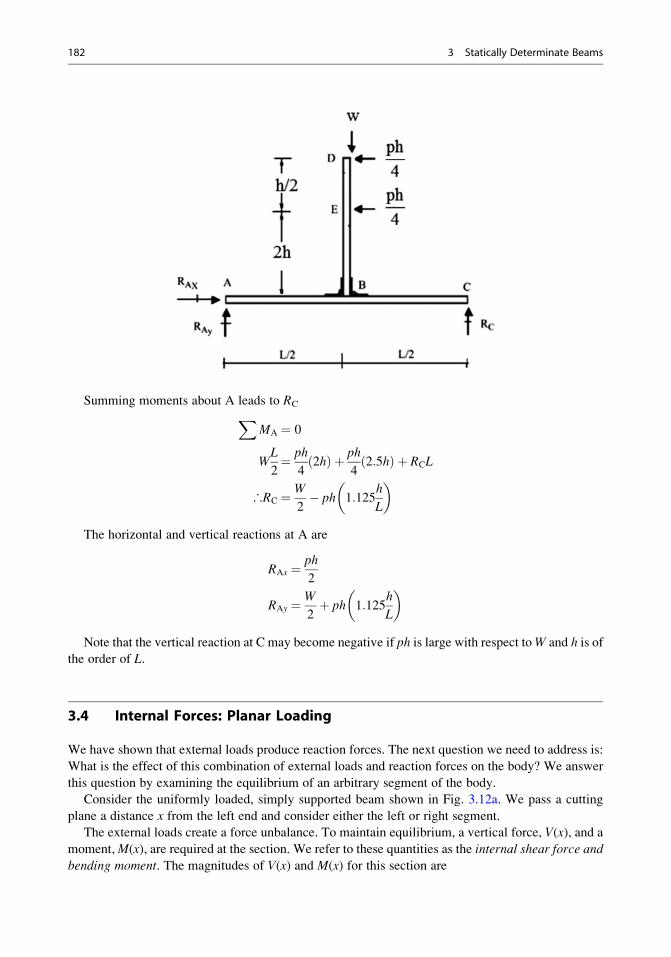
Summing moments about A leads to RCXMA ¼ 0
WL
2¼ ph
42hð Þ þ ph
42:5hð Þ þ RCL
∴RC ¼ W
2� ph 1:125
h
L
� �
The horizontal and vertical reactions at A are
RAx ¼ ph
2
RAy ¼ W
2þ ph 1:125
h
L
� �
Note that the vertical reaction at C may become negative if ph is large with respect toW and h is ofthe order of L.
3.4 Internal Forces: Planar Loading
We have shown that external loads produce reaction forces. The next question we need to address is:
What is the effect of this combination of external loads and reaction forces on the body? We answer
this question by examining the equilibrium of an arbitrary segment of the body.
Consider the uniformly loaded, simply supported beam shown in Fig. 3.12a. We pass a cutting
plane a distance x from the left end and consider either the left or right segment.
The external loads create a force unbalance. To maintain equilibrium, a vertical force, V(x), and a
moment,M(x), are required at the section. We refer to these quantities as the internal shear force and
bending moment. The magnitudes of V(x) and M(x) for this section are
182 3 Statically Determinate Beams
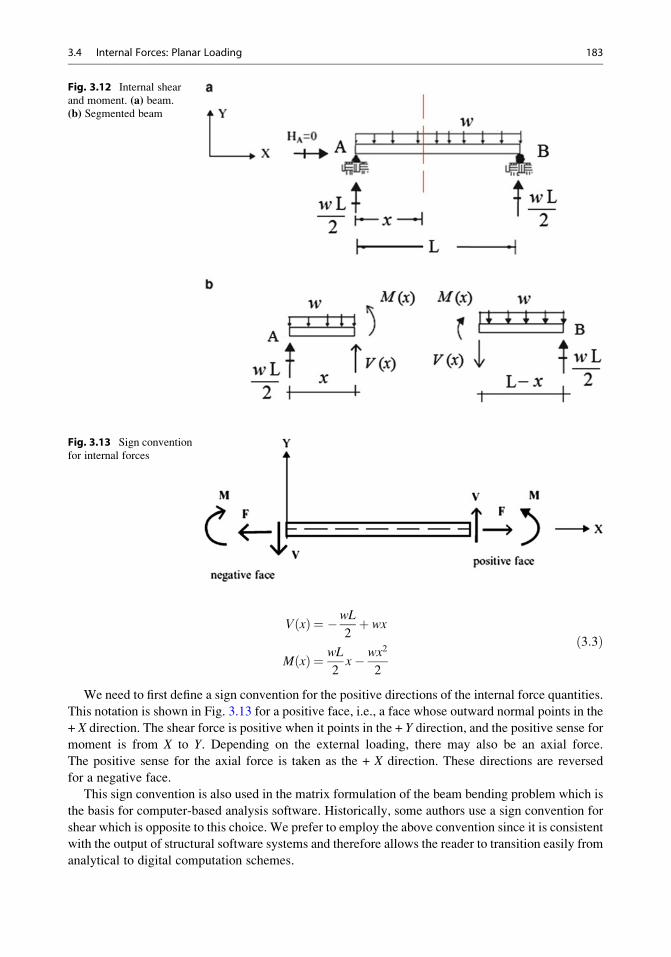
V xð Þ ¼ �wL
2þ wx
M xð Þ ¼ wL
2x� wx2
2
ð3:3Þ
We need to first define a sign convention for the positive directions of the internal force quantities.
This notation is shown in Fig. 3.13 for a positive face, i.e., a face whose outward normal points in the
+ X direction. The shear force is positive when it points in the + Y direction, and the positive sense for
moment is from X to Y. Depending on the external loading, there may also be an axial force.
The positive sense for the axial force is taken as the + X direction. These directions are reversed
for a negative face.
This sign convention is also used in the matrix formulation of the beam bending problem which is
the basis for computer-based analysis software. Historically, some authors use a sign convention for
shear which is opposite to this choice. We prefer to employ the above convention since it is consistent
with the output of structural software systems and therefore allows the reader to transition easily from
analytical to digital computation schemes.
Fig. 3.12 Internal shear
and moment. (a) beam.
(b) Segmented beam
Fig. 3.13 Sign convention
for internal forces
3.4 Internal Forces: Planar Loading 183
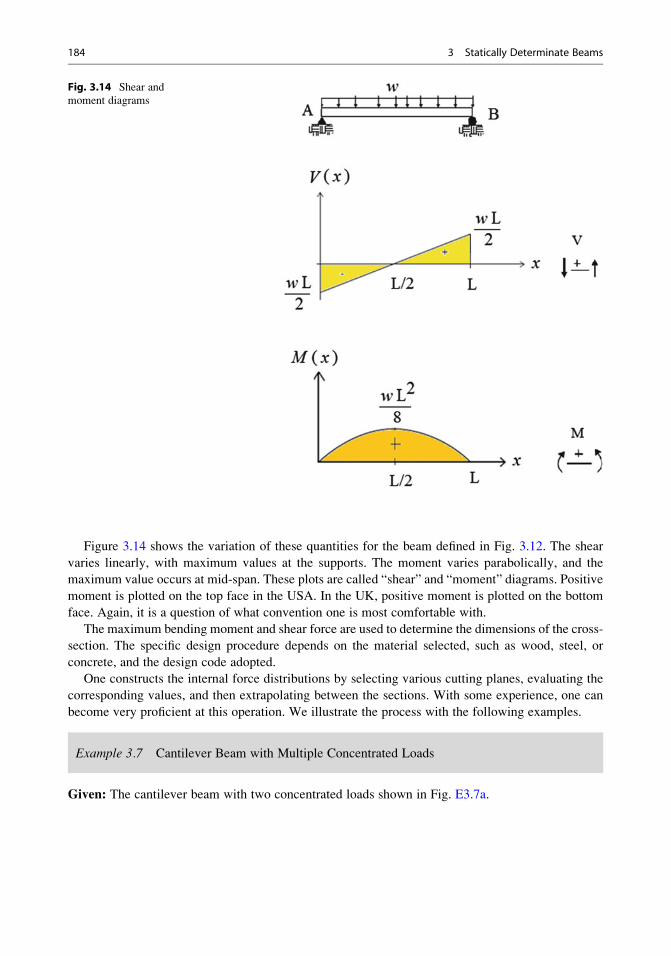
Figure 3.14 shows the variation of these quantities for the beam defined in Fig. 3.12. The shear
varies linearly, with maximum values at the supports. The moment varies parabolically, and the
maximum value occurs at mid-span. These plots are called “shear” and “moment” diagrams. Positive
moment is plotted on the top face in the USA. In the UK, positive moment is plotted on the bottom
face. Again, it is a question of what convention one is most comfortable with.
The maximum bending moment and shear force are used to determine the dimensions of the cross-
section. The specific design procedure depends on the material selected, such as wood, steel, or
concrete, and the design code adopted.
One constructs the internal force distributions by selecting various cutting planes, evaluating the
corresponding values, and then extrapolating between the sections. With some experience, one can
become very proficient at this operation. We illustrate the process with the following examples.
Example 3.7 Cantilever Beam with Multiple Concentrated Loads
Given: The cantilever beam with two concentrated loads shown in Fig. E3.7a.
Fig. 3.14 Shear and
moment diagrams
184 3 Statically Determinate Beams
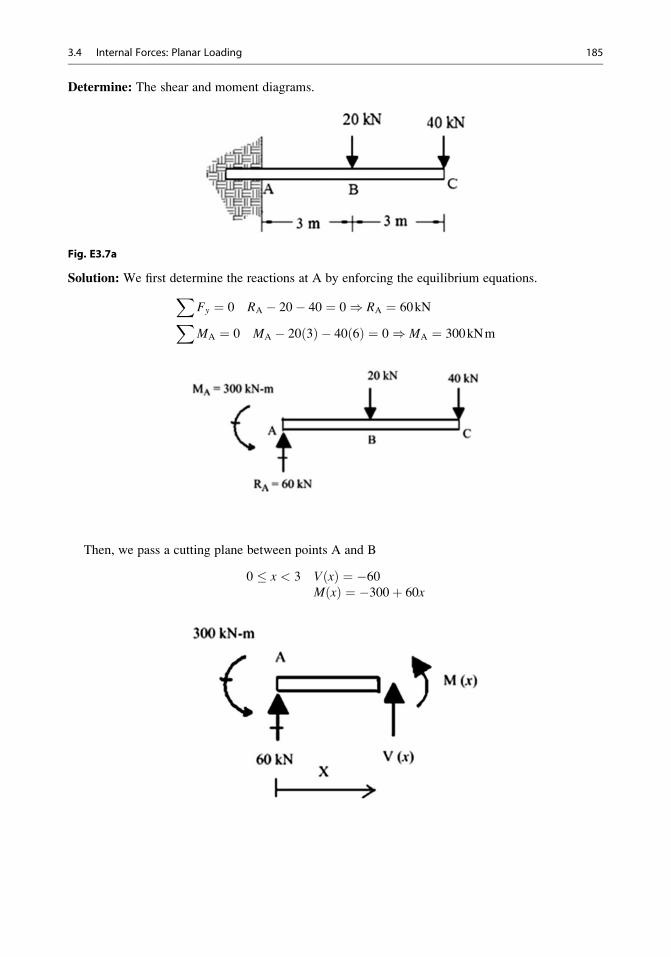
Determine: The shear and moment diagrams.
Fig. E3.7a
Solution: We first determine the reactions at A by enforcing the equilibrium equations.XFy ¼ 0 RA � 20� 40 ¼ 0) RA ¼ 60kNXMA ¼ 0 MA � 20 3ð Þ � 40 6ð Þ ¼ 0) MA ¼ 300kNm
Then, we pass a cutting plane between points A and B
0 � x < 3 V xð Þ ¼ �60M xð Þ ¼ �300þ 60x
3.4 Internal Forces: Planar Loading 185
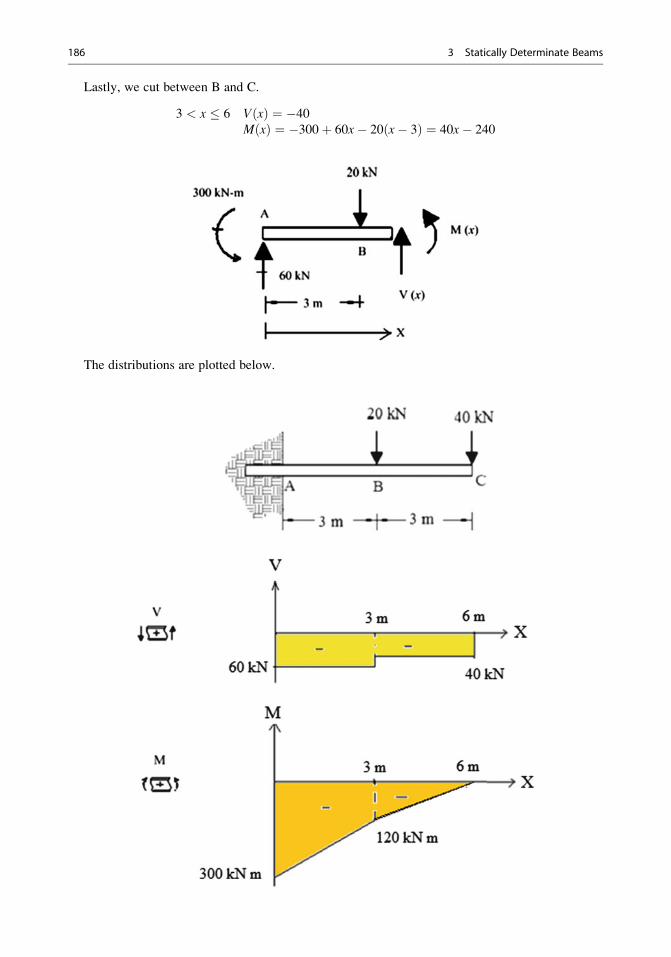
Lastly, we cut between B and C.
3 < x � 6 V xð Þ ¼ �40M xð Þ ¼ �300þ 60x� 20 x� 3ð Þ ¼ 40x� 240
The distributions are plotted below.
186 3 Statically Determinate Beams

There are some features that we want to point out. Firstly, a concentrated load produces a
discontinuity in the form of a “jump” in the shear force, such as at points B and C. Secondly, when
the loading consists only of concentrated loads, the shear diagram consists of segments having
constant values, and the moment diagram is composed of a set of straight-line segments. We have
demonstrated these features here. Later in the next section, we will establish a proof based on
equilibrium considerations. A thought question: When would the moment diagram have a jump in
the moment value? Hint: Consider Example 3.15.
Example 3.8 Cantilever Beam with Uniform Loading
Given: The uniformly loaded cantilever beam shown in Fig. E3.8a.
Determine: The shear and moment distributions.
Fig. E3.8a
Solution: We pass a cutting plane between points A and B. Then, we can consider either segment
shown below.
The shear and moment required for equilibrium are
0 � x � L V xð Þ ¼ �w L� xð ÞM xð Þ ¼ �w
2L� xð Þ2
These functions are plotted below. Note that the maximum moment varies as L2.
3.4 Internal Forces: Planar Loading 187
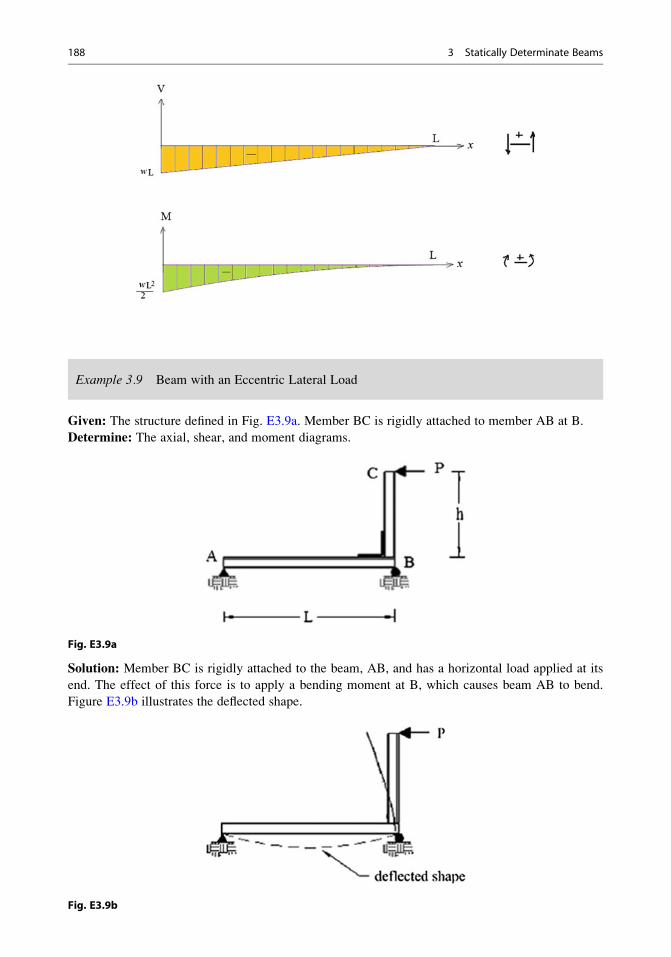
Example 3.9 Beam with an Eccentric Lateral Load
Given: The structure defined in Fig. E3.9a. Member BC is rigidly attached to member AB at B.
Determine: The axial, shear, and moment diagrams.
Fig. E3.9a
Solution: Member BC is rigidly attached to the beam, AB, and has a horizontal load applied at its
end. The effect of this force is to apply a bending moment at B, which causes beam AB to bend.
Figure E3.9b illustrates the deflected shape.
Fig. E3.9b
188 3 Statically Determinate Beams
We determine the reactions first. The free body diagram is shown below.
Moment summation about A leads toXMA ¼ 0
RBLþ Ph ¼ 0 ) RB ¼ �hLP ) RB ¼ h
LP #
The reactions at A required for equilibrium are
XFy ¼ 0 RAy ¼ �VB ¼ h
LP ) RAy ¼ h
LP "X
Fx ¼ 0 ) RAx ¼ P!
Next, we pass a cutting plane at D, isolate the left segment, and enforce equilibrium.
3.4 Internal Forces: Planar Loading 189
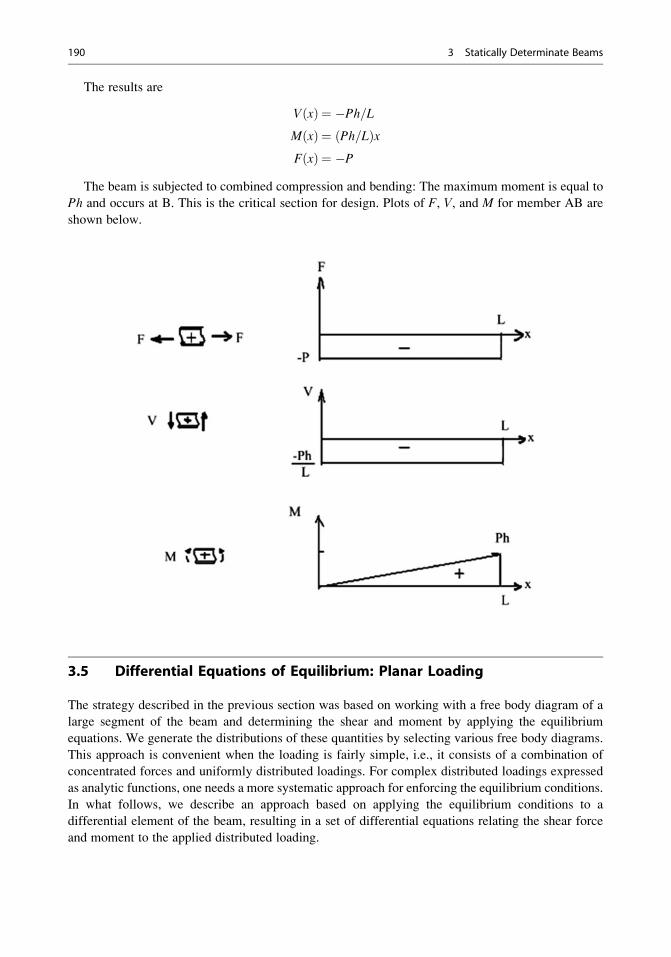
The results are
V xð Þ ¼ �Ph=LM xð Þ ¼ Ph=Lð ÞxF xð Þ ¼ �P
The beam is subjected to combined compression and bending: The maximum moment is equal to
Ph and occurs at B. This is the critical section for design. Plots of F, V, and M for member AB are
shown below.
3.5 Differential Equations of Equilibrium: Planar Loading
The strategy described in the previous section was based on working with a free body diagram of a
large segment of the beam and determining the shear and moment by applying the equilibrium
equations. We generate the distributions of these quantities by selecting various free body diagrams.
This approach is convenient when the loading is fairly simple, i.e., it consists of a combination of
concentrated forces and uniformly distributed loadings. For complex distributed loadings expressed
as analytic functions, one needs a more systematic approach for enforcing the equilibrium conditions.
In what follows, we describe an approach based on applying the equilibrium conditions to a
differential element of the beam, resulting in a set of differential equations relating the shear force
and moment to the applied distributed loading.
190 3 Statically Determinate Beams

Consider the beam and the differential element shown in Fig. 3.15. We use the same sign
convention for V and M as defined in Sect. 3.4. We take the positive sense of the distributed loading
to be “downward” since these loadings are generally associated with gravity. Considering V andM to
be functions of x, expanding these variables in terms of their differentials, and retaining up to first-
order terms results in the forces shown in Fig. 3.15b.
Summing forces in the Y direction,
V þ dV
dx
dx
2� V � dV
dx
dx
2
� �� wdx ¼ 0
and combining terms leads to
dV
dx� w
� �dx ¼ 0
Lastly, since this equation must be satisfied for arbitrary dx, it follows that
dV
dx¼ w ð3:4Þ
In words, “the rate of change of the shear force is equal to the applied distributed loading.”
Repeating this analysis for moment summation about point o, the steps are
Fig. 3.15 Beam with
arbitrary distributed
loading. (a) Beam. (b)Differential beam element
3.5 Differential Equations of Equilibrium: Planar Loading 191
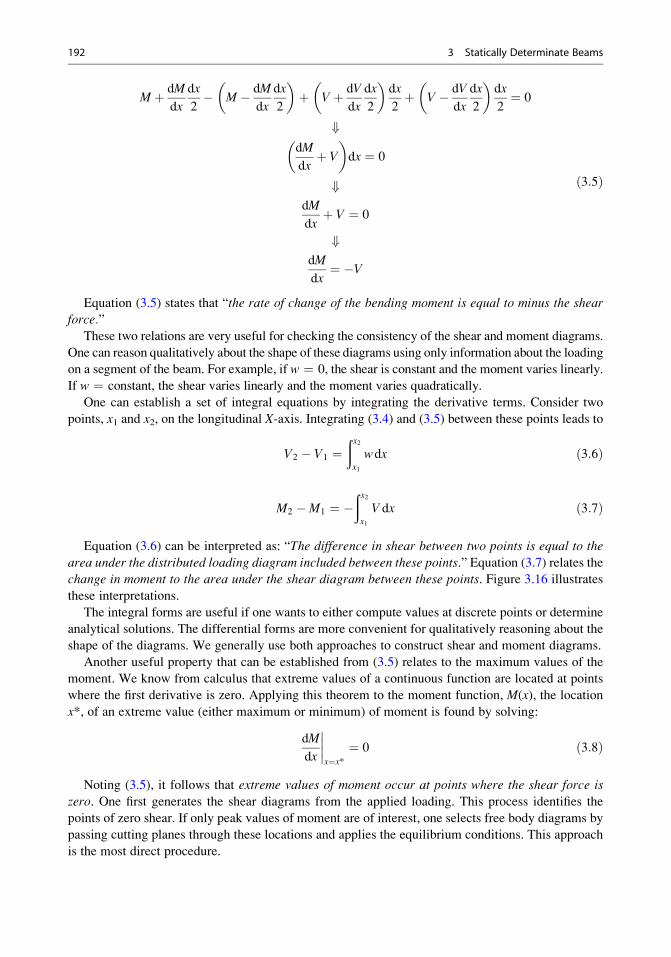
M þ dM
dx
dx
2� M � dM
dx
dx
2
� �þ V þ dV
dx
dx
2
� �dx
2þ V � dV
dx
dx
2
� �dx
2¼ 0
+dM
dxþ V
� �dx ¼ 0
+dM
dxþ V ¼ 0
+dM
dx¼ �V
ð3:5Þ
Equation (3.5) states that “the rate of change of the bending moment is equal to minus the shearforce.”
These two relations are very useful for checking the consistency of the shear and moment diagrams.
One can reason qualitatively about the shape of these diagrams using only information about the loading
on a segment of the beam. For example, if w ¼ 0, the shear is constant and the moment varies linearly.
If w ¼ constant, the shear varies linearly and the moment varies quadratically.
One can establish a set of integral equations by integrating the derivative terms. Consider two
points, x1 and x2, on the longitudinal X-axis. Integrating (3.4) and (3.5) between these points leads to
V2 � V1 ¼ðx2x1
wdx ð3:6Þ
M2 �M1 ¼ �ðx2x1
V dx ð3:7Þ
Equation (3.6) can be interpreted as: “The difference in shear between two points is equal to the
area under the distributed loading diagram included between these points.” Equation (3.7) relates thechange in moment to the area under the shear diagram between these points. Figure 3.16 illustrates
these interpretations.
The integral forms are useful if one wants to either compute values at discrete points or determine
analytical solutions. The differential forms are more convenient for qualitatively reasoning about the
shape of the diagrams. We generally use both approaches to construct shear and moment diagrams.
Another useful property that can be established from (3.5) relates to the maximum values of the
moment. We know from calculus that extreme values of a continuous function are located at points
where the first derivative is zero. Applying this theorem to the moment function, M(x), the location
x*, of an extreme value (either maximum or minimum) of moment is found by solving:
dM
dx
����x¼x*¼ 0 ð3:8Þ
Noting (3.5), it follows that extreme values of moment occur at points where the shear force is
zero. One first generates the shear diagrams from the applied loading. This process identifies the
points of zero shear. If only peak values of moment are of interest, one selects free body diagrams by
passing cutting planes through these locations and applies the equilibrium conditions. This approach
is the most direct procedure.
192 3 Statically Determinate Beams
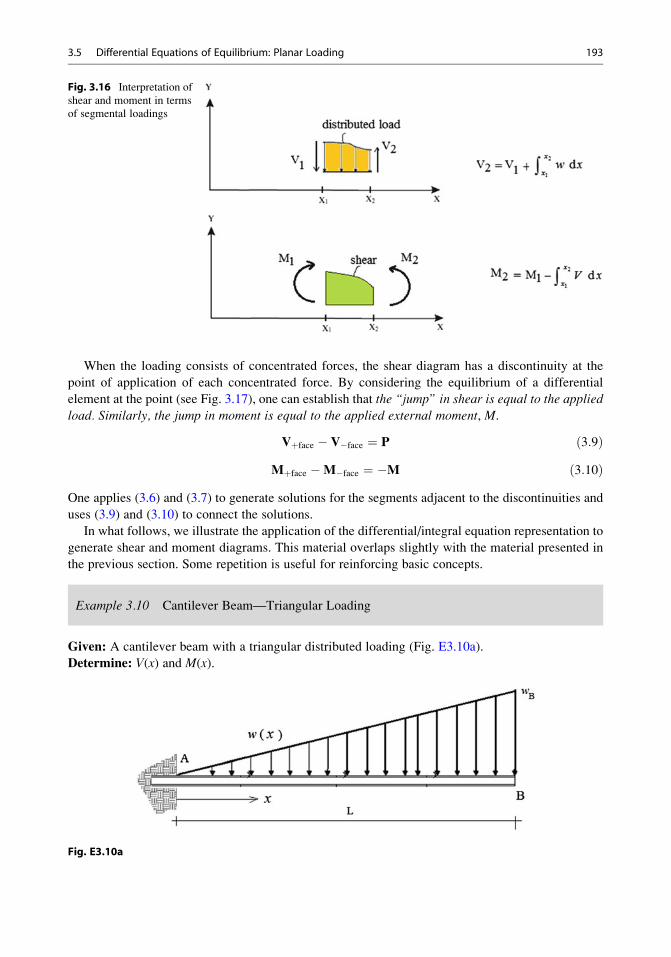
When the loading consists of concentrated forces, the shear diagram has a discontinuity at the
point of application of each concentrated force. By considering the equilibrium of a differential
element at the point (see Fig. 3.17), one can establish that the “jump” in shear is equal to the applied
load. Similarly, the jump in moment is equal to the applied external moment, M.
Vþface � V�face ¼ P ð3:9ÞMþface �M�face ¼ �M ð3:10Þ
One applies (3.6) and (3.7) to generate solutions for the segments adjacent to the discontinuities and
uses (3.9) and (3.10) to connect the solutions.
In what follows, we illustrate the application of the differential/integral equation representation to
generate shear and moment diagrams. This material overlaps slightly with the material presented in
the previous section. Some repetition is useful for reinforcing basic concepts.
Example 3.10 Cantilever Beam—Triangular Loading
Given: A cantilever beam with a triangular distributed loading (Fig. E3.10a).
Determine: V(x) and M(x).
Fig. E3.10a
Fig. 3.16 Interpretation of
shear and moment in terms
of segmental loadings
3.5 Differential Equations of Equilibrium: Planar Loading 193
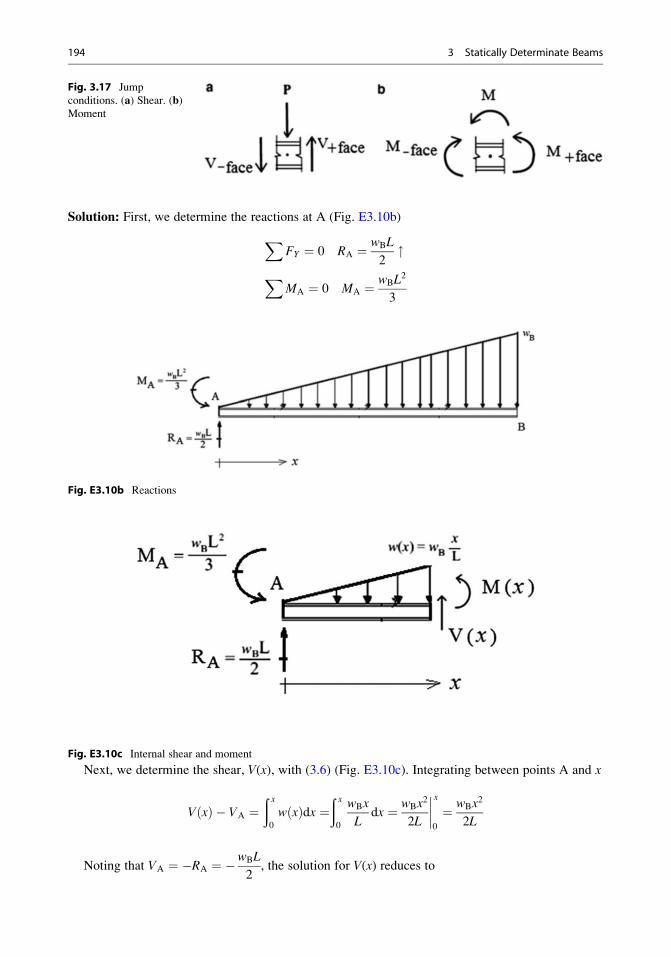
Solution: First, we determine the reactions at A (Fig. E3.10b)
XFY ¼ 0 RA ¼ wBL
2"
XMA ¼ 0 MA ¼ wBL
2
3
Fig. E3.10b Reactions
Fig. E3.10c Internal shear and moment
Next, we determine the shear, V(x), with (3.6) (Fig. E3.10c). Integrating between points A and x
V xð Þ � VA ¼ð x0
w xð Þdx ¼ð x0
wBx
Ldx ¼ wBx
2
2L
����x
0
¼ wBx2
2L
Noting that VA ¼ �RA ¼ �wBL
2, the solution for V(x) reduces to
Fig. 3.17 Jump
conditions. (a) Shear. (b)Moment
194 3 Statically Determinate Beams
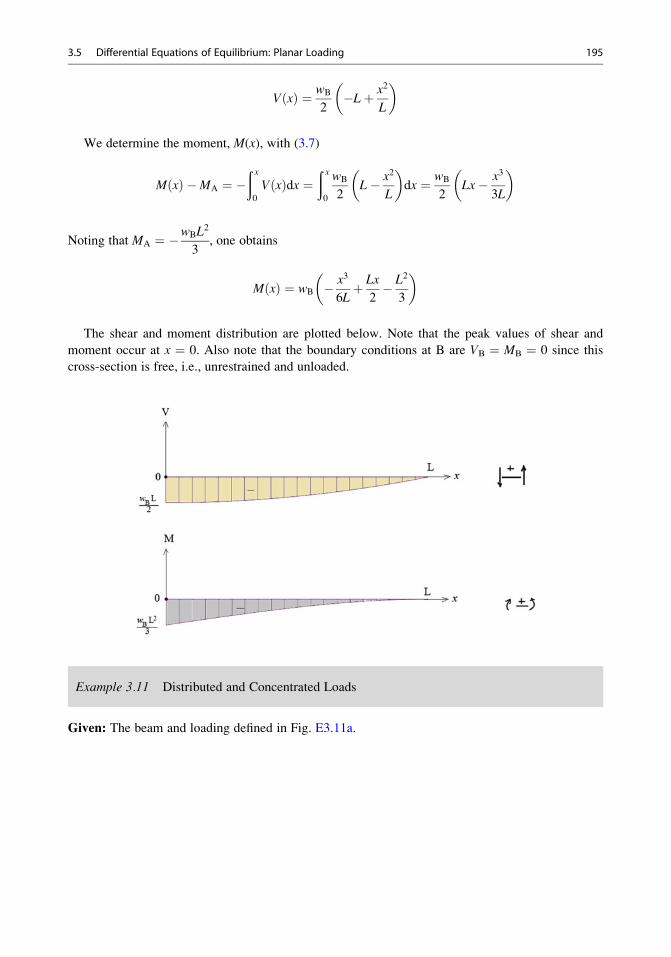
V xð Þ ¼ wB
2�Lþ x2
L
� �
We determine the moment, M(x), with (3.7)
M xð Þ �MA ¼ �ð x0
V xð Þdx ¼ð x0
wB
2L� x2
L
� �dx ¼ wB
2Lx� x3
3L
� �
Noting that MA ¼ �wBL2
3, one obtains
M xð Þ ¼ wB � x3
6Lþ Lx
2� L2
3
� �
The shear and moment distribution are plotted below. Note that the peak values of shear and
moment occur at x ¼ 0. Also note that the boundary conditions at B are VB ¼ MB ¼ 0 since this
cross-section is free, i.e., unrestrained and unloaded.
Example 3.11 Distributed and Concentrated Loads
Given: The beam and loading defined in Fig. E3.11a.
3.5 Differential Equations of Equilibrium: Planar Loading 195
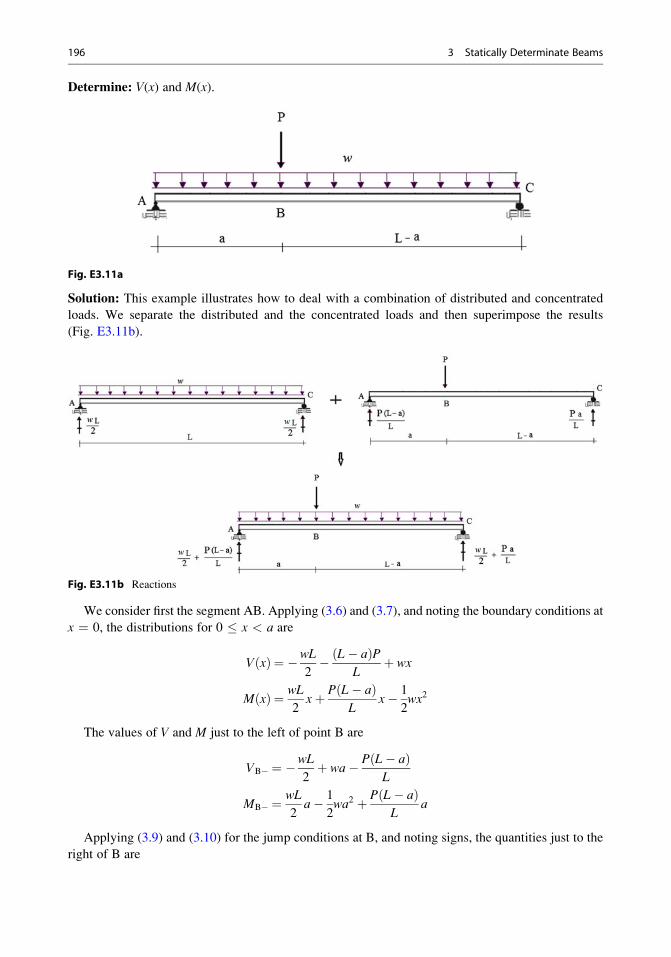
Determine: V(x) and M(x).
Fig. E3.11a
Solution: This example illustrates how to deal with a combination of distributed and concentrated
loads. We separate the distributed and the concentrated loads and then superimpose the results
(Fig. E3.11b).
Fig. E3.11b Reactions
We consider first the segment AB. Applying (3.6) and (3.7), and noting the boundary conditions at
x ¼ 0, the distributions for 0 � x < a are
V xð Þ ¼ �wL
2� L� að ÞP
Lþ wx
M xð Þ ¼ wL
2xþ P L� að Þ
Lx� 1
2wx2
The values of V and M just to the left of point B are
VB� ¼ �wL
2þ wa� P L� að Þ
L
MB� ¼ wL
2a� 1
2wa2 þ P L� að Þ
La
Applying (3.9) and (3.10) for the jump conditions at B, and noting signs, the quantities just to the
right of B are
196 3 Statically Determinate Beams
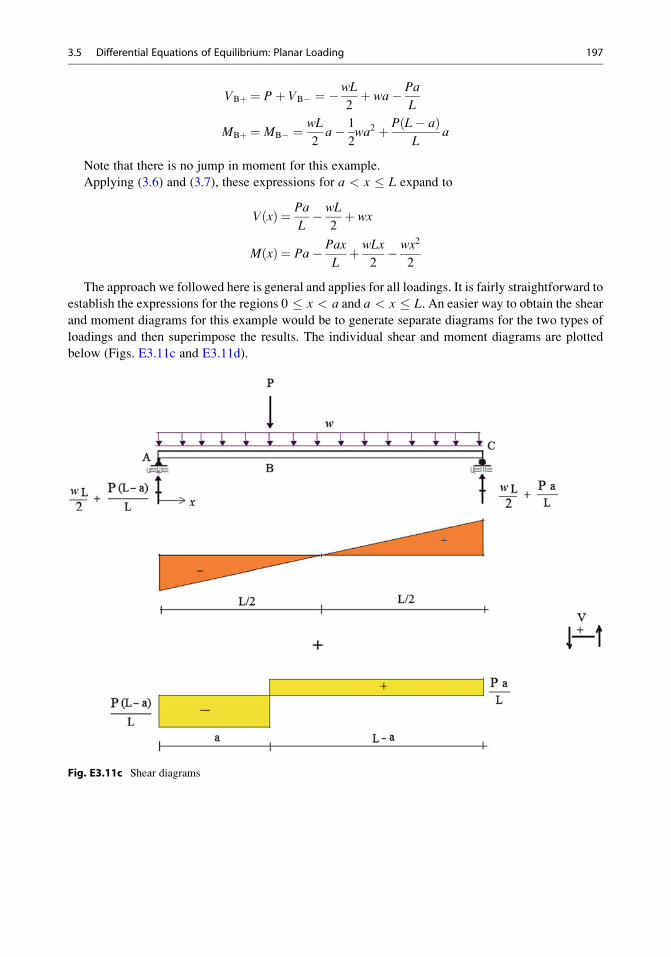
VBþ ¼ Pþ VB� ¼ �wL
2þ wa� Pa
L
MBþ ¼ MB� ¼ wL
2a� 1
2wa2 þ P L� að Þ
La
Note that there is no jump in moment for this example.
Applying (3.6) and (3.7), these expressions for a < x � L expand to
V xð Þ ¼ Pa
L� wL
2þ wx
M xð Þ ¼ Pa� Pax
Lþ wLx
2� wx2
2
The approach we followed here is general and applies for all loadings. It is fairly straightforward to
establish the expressions for the regions 0 � x < a and a < x � L. An easier way to obtain the shear
and moment diagrams for this example would be to generate separate diagrams for the two types of
loadings and then superimpose the results. The individual shear and moment diagrams are plotted
below (Figs. E3.11c and E3.11d).
Fig. E3.11c Shear diagrams
3.5 Differential Equations of Equilibrium: Planar Loading 197
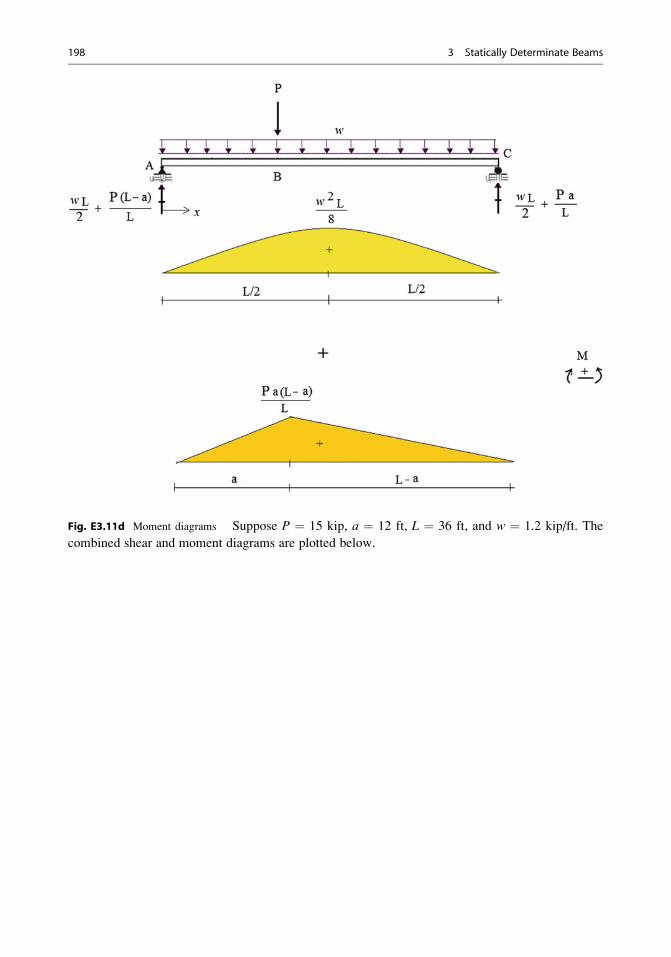
Fig. E3.11d Moment diagrams Suppose P ¼ 15 kip, a ¼ 12 ft, L ¼ 36 ft, and w ¼ 1.2 kip/ft. The
combined shear and moment diagrams are plotted below.
198 3 Statically Determinate Beams
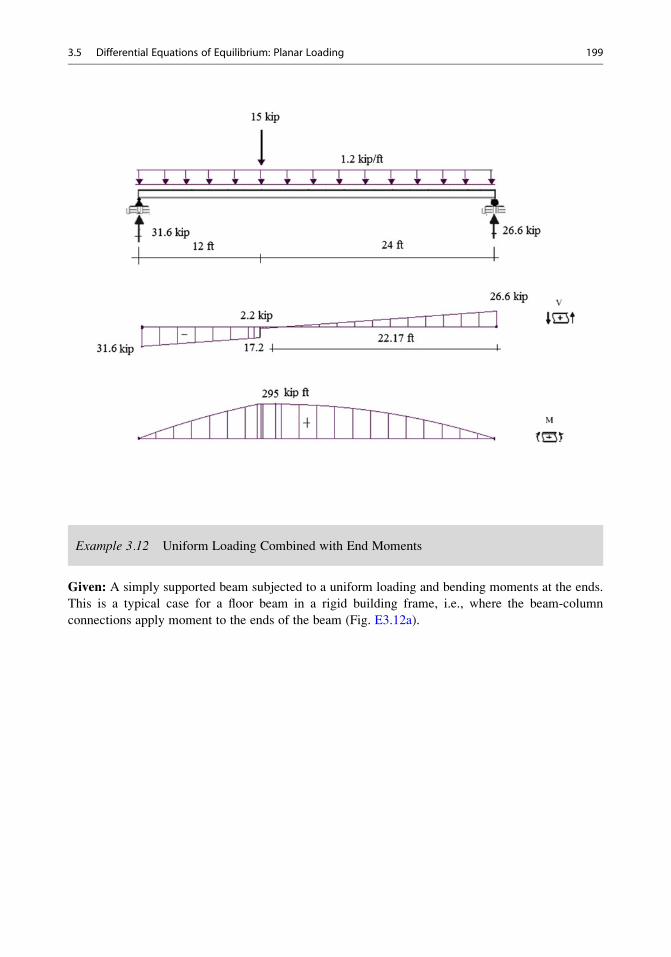
Example 3.12 Uniform Loading Combined with End Moments
Given: A simply supported beam subjected to a uniform loading and bending moments at the ends.
This is a typical case for a floor beam in a rigid building frame, i.e., where the beam-column
connections apply moment to the ends of the beam (Fig. E3.12a).
3.5 Differential Equations of Equilibrium: Planar Loading 199
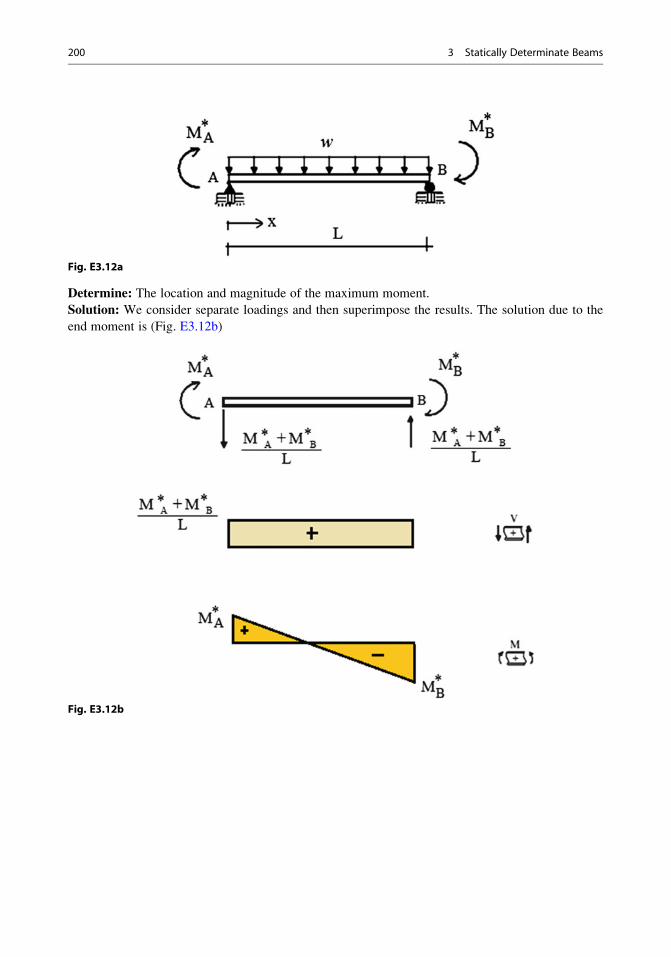
Fig. E3.12a
Determine: The location and magnitude of the maximum moment.
Solution: We consider separate loadings and then superimpose the results. The solution due to the
end moment is (Fig. E3.12b)
Fig. E3.12b
200 3 Statically Determinate Beams

The uniform loading provides the following distribution (Fig. E3.12c):
Fig. E3.12c
Combining these solutions leads to the analytical solution
V xð Þ ¼ �wL
2þ wxþM*
A þM*B
L
M xð Þ ¼ M*A �
M*A þM*
B
Lxþ wL
2x� wx2
2
3.5 Differential Equations of Equilibrium: Planar Loading 201
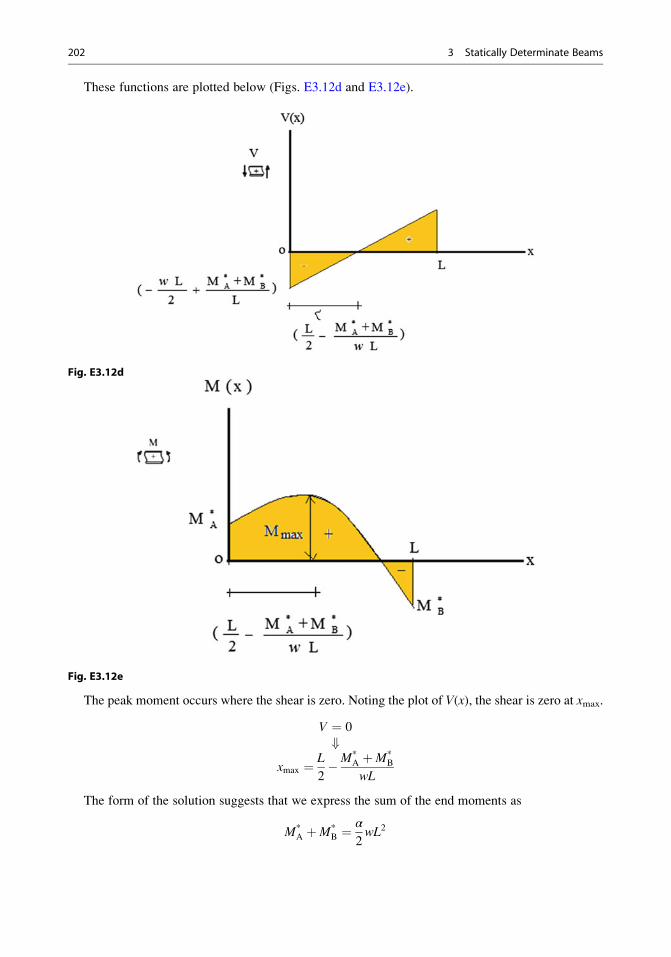
These functions are plotted below (Figs. E3.12d and E3.12e).
Fig. E3.12d
Fig. E3.12e
The peak moment occurs where the shear is zero. Noting the plot of V(x), the shear is zero at xmax.
V ¼ 0
+xmax ¼ L
2�M*
A þM*B
wL
The form of the solution suggests that we express the sum of the end moments as
M*A þM*
B ¼α
2wL2
202 3 Statically Determinate Beams
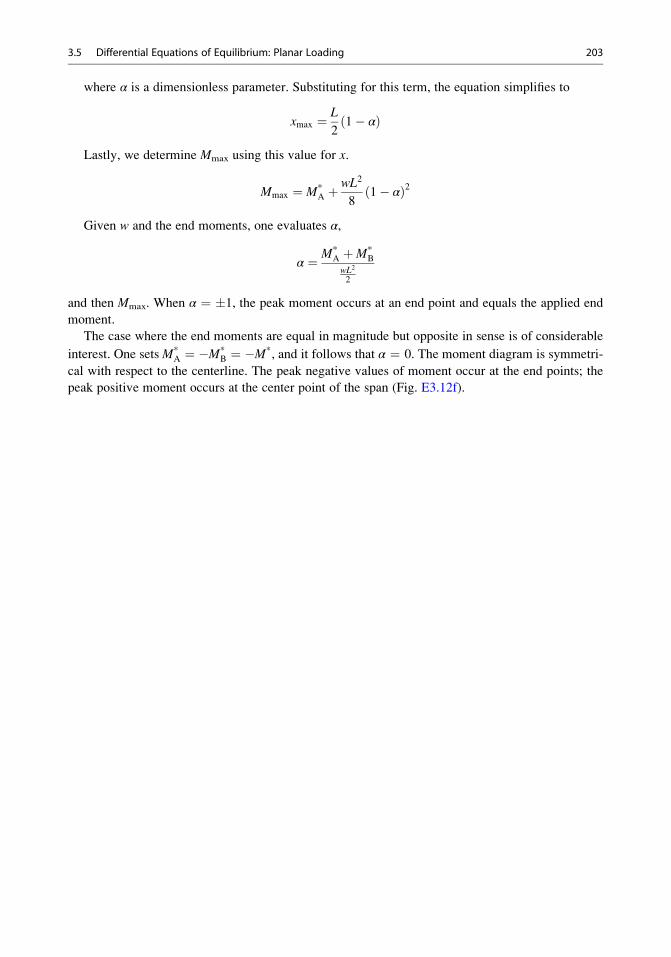
where α is a dimensionless parameter. Substituting for this term, the equation simplifies to
xmax ¼ L
21� αð Þ
Lastly, we determine Mmax using this value for x.
Mmax ¼ M*A þ
wL2
81� αð Þ2
Given w and the end moments, one evaluates α,
α ¼ M*A þM*
B
wL2
2
and then Mmax. When α ¼ �1, the peak moment occurs at an end point and equals the applied end
moment.
The case where the end moments are equal in magnitude but opposite in sense is of considerable
interest. One setsM*A ¼ �M*
B ¼ �M*, and it follows that α ¼ 0. The moment diagram is symmetri-
cal with respect to the centerline. The peak negative values of moment occur at the end points; the
peak positive moment occurs at the center point of the span (Fig. E3.12f).
3.5 Differential Equations of Equilibrium: Planar Loading 203
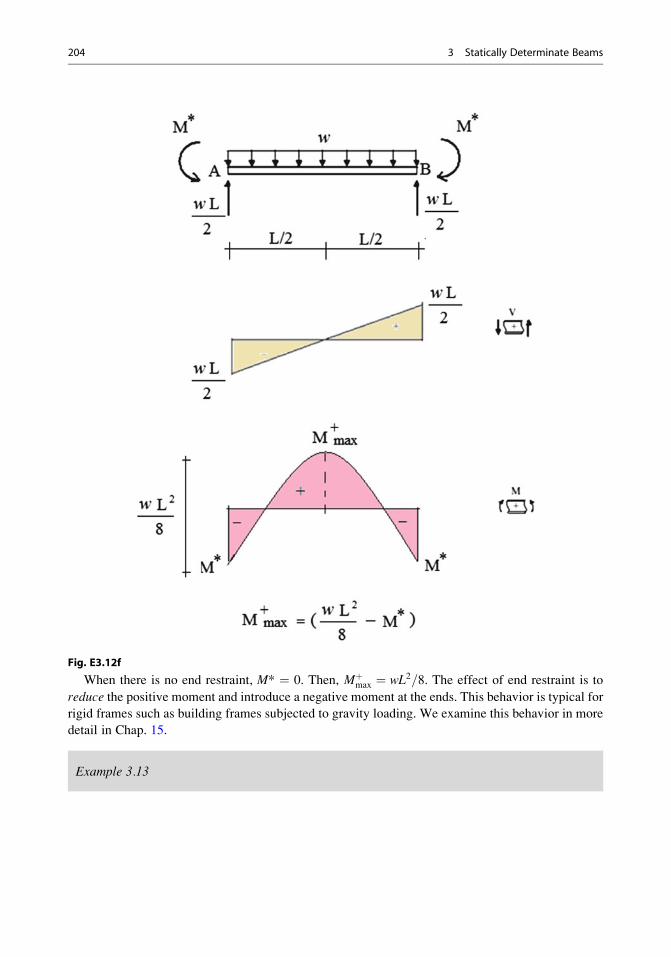
Fig. E3.12f
When there is no end restraint, M* ¼ 0. Then, Mþmax ¼ wL2=8. The effect of end restraint is to
reduce the positive moment and introduce a negative moment at the ends. This behavior is typical for
rigid frames such as building frames subjected to gravity loading. We examine this behavior in more
detail in Chap. 15.
Example 3.13
204 3 Statically Determinate Beams
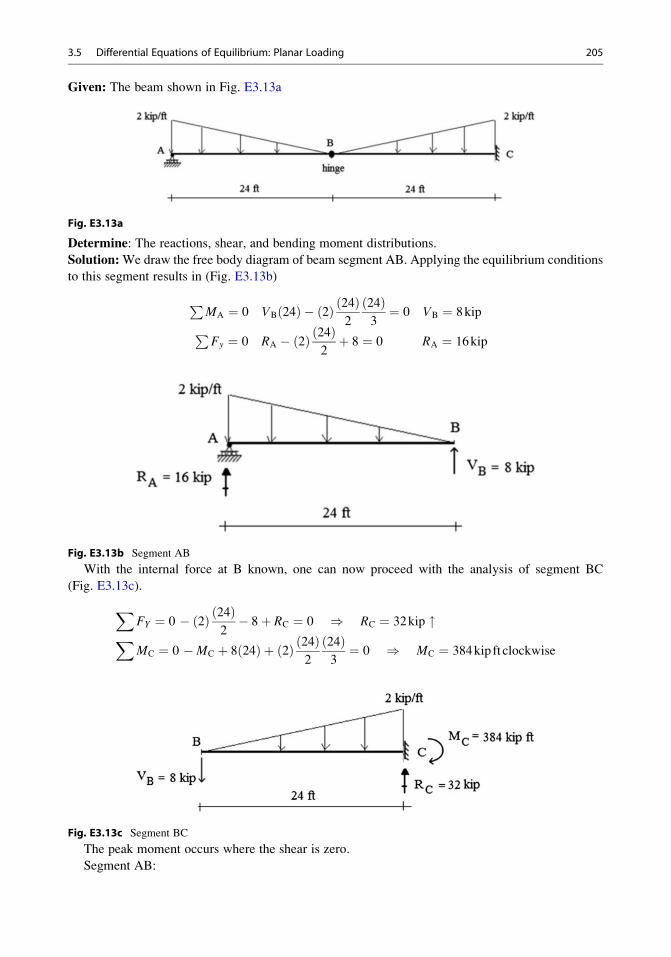
Given: The beam shown in Fig. E3.13a
Fig. E3.13a
Determine: The reactions, shear, and bending moment distributions.
Solution:We draw the free body diagram of beam segment AB. Applying the equilibrium conditions
to this segment results in (Fig. E3.13b)
PMA ¼ 0 VB 24ð Þ � 2ð Þ 24ð Þ
2
24ð Þ3¼ 0 VB ¼ 8kipP
Fy ¼ 0 RA � 2ð Þ 24ð Þ2þ 8 ¼ 0 RA ¼ 16kip
Fig. E3.13b Segment AB
With the internal force at B known, one can now proceed with the analysis of segment BC
(Fig. E3.13c).
XFY ¼ 0 � 2ð Þ 24ð Þ
2� 8þ RC ¼ 0 ) RC ¼ 32kip "X
MC ¼ 0 �MC þ 8 24ð Þ þ 2ð Þ 24ð Þ2
24ð Þ3¼ 0 ) MC ¼ 384kip ft clockwise
Fig. E3.13c Segment BC
The peak moment occurs where the shear is zero.
Segment AB:
3.5 Differential Equations of Equilibrium: Planar Loading 205
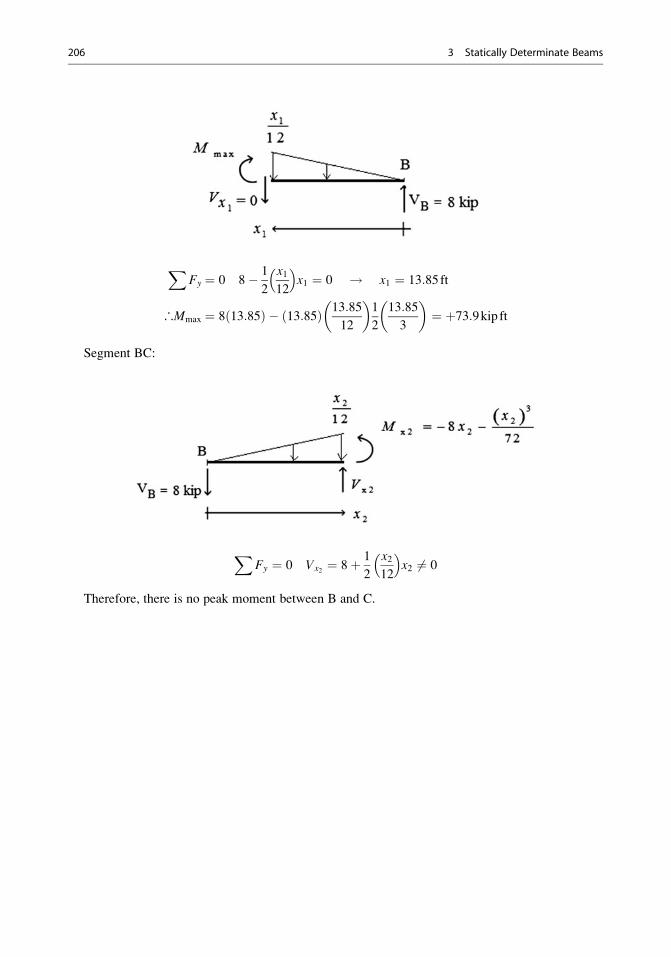
XFy ¼ 0 8� 1
2
x112
� �x1 ¼ 0 ! x1 ¼ 13:85ft
∴Mmax ¼ 8 13:85ð Þ � 13:85ð Þ 13:85
12
� �1
2
13:85
3
� �¼ þ73:9kip ft
Segment BC:
XFy ¼ 0 Vx2 ¼ 8þ 1
2
x212
� �x2 6¼ 0
Therefore, there is no peak moment between B and C.
206 3 Statically Determinate Beams
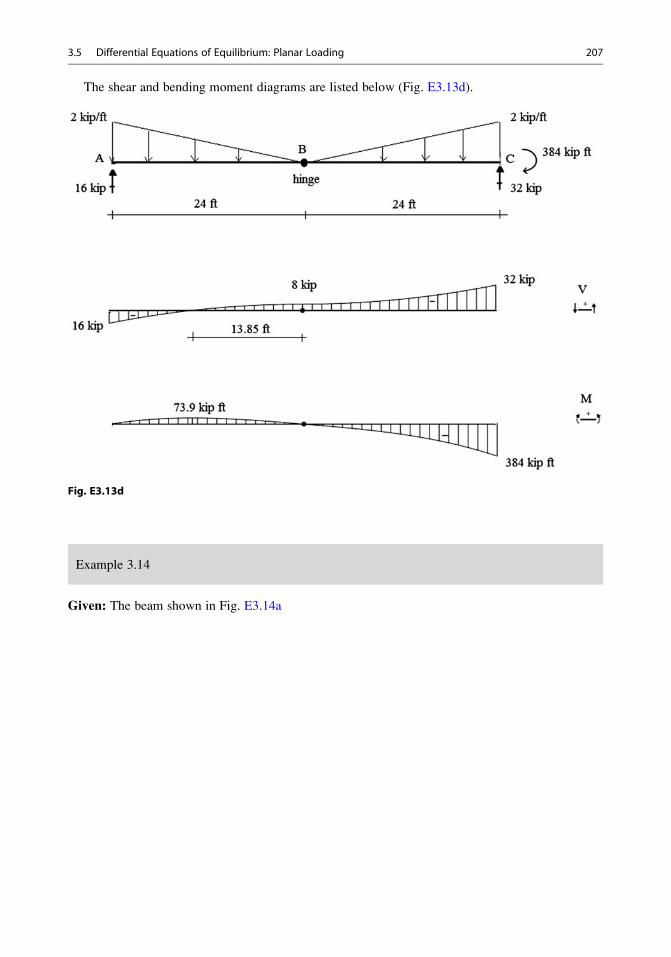
The shear and bending moment diagrams are listed below (Fig. E3.13d).
Fig. E3.13d
Example 3.14
Given: The beam shown in Fig. E3.14a
3.5 Differential Equations of Equilibrium: Planar Loading 207
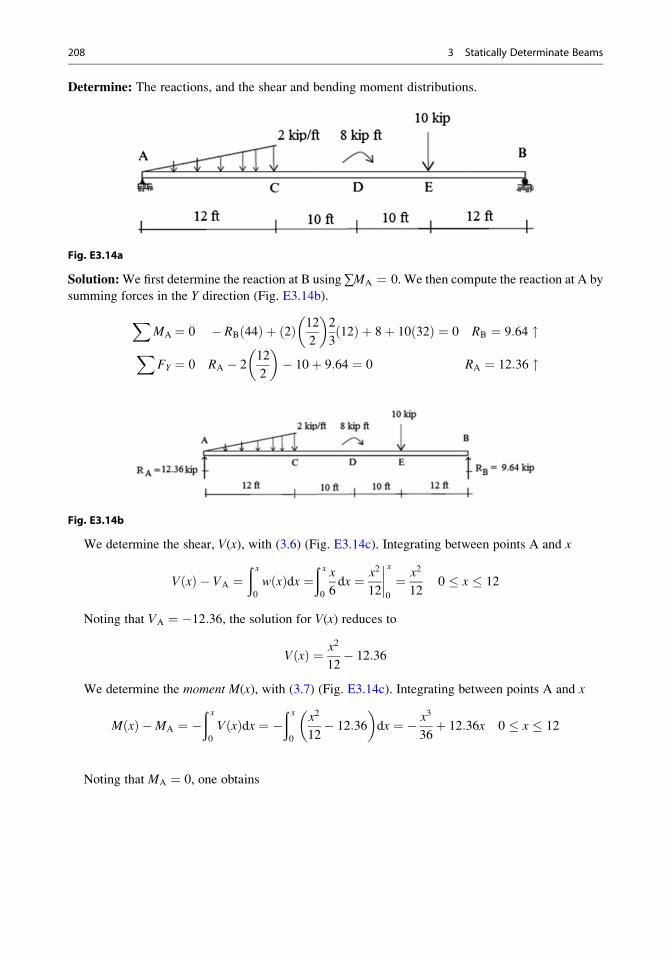
Determine: The reactions, and the shear and bending moment distributions.
Fig. E3.14a
Solution:We first determine the reaction at B using ∑MA ¼ 0. We then compute the reaction at A by
summing forces in the Y direction (Fig. E3.14b).
XMA ¼ 0 � RB 44ð Þ þ 2ð Þ 12
2
� �2
312ð Þ þ 8þ 10 32ð Þ ¼ 0 RB ¼ 9:64 "
XFY ¼ 0 RA � 2
12
2
� �� 10þ 9:64 ¼ 0 RA ¼ 12:36 "
Fig. E3.14b
We determine the shear, V(x), with (3.6) (Fig. E3.14c). Integrating between points A and x
V xð Þ � VA ¼ð x0
w xð Þdx ¼ð x0
x
6dx ¼ x2
12
����x
0
¼ x2
120 � x � 12
Noting that VA ¼ �12:36, the solution for V(x) reduces to
V xð Þ ¼ x2
12� 12:36
We determine the moment M(x), with (3.7) (Fig. E3.14c). Integrating between points A and x
M xð Þ �MA ¼ �ð x0
V xð Þdx ¼ �ð x0
x2
12� 12:36
� �dx ¼ � x3
36þ 12:36x 0 � x � 12
Noting that MA ¼ 0, one obtains
208 3 Statically Determinate Beams
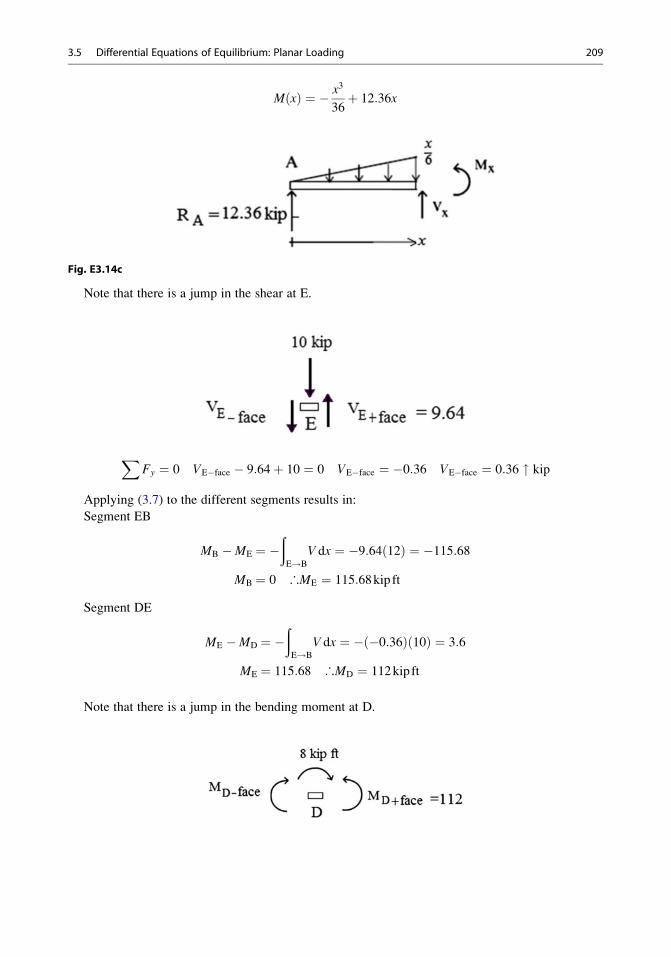
M xð Þ ¼ � x3
36þ 12:36x
Fig. E3.14c
Note that there is a jump in the shear at E.
XFy ¼ 0 VE�face � 9:64þ 10 ¼ 0 VE�face ¼ �0:36 VE�face ¼ 0:36 " kip
Applying (3.7) to the different segments results in:
Segment EB
MB �ME ¼ �ðE!B
V dx ¼ �9:64 12ð Þ ¼ �115:68
MB ¼ 0 ∴ME ¼ 115:68kip ft
Segment DE
ME �MD ¼ �ðE!B
V dx ¼ � �0:36ð Þ 10ð Þ ¼ 3:6
ME ¼ 115:68 ∴MD ¼ 112kip ft
Note that there is a jump in the bending moment at D.
3.5 Differential Equations of Equilibrium: Planar Loading 209
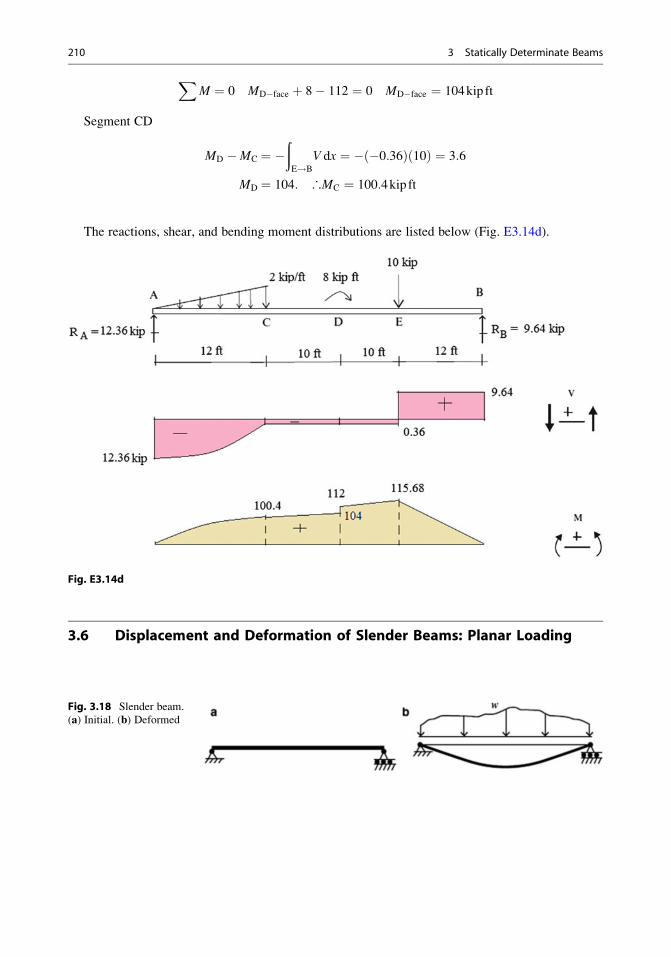
XM ¼ 0 MD�face þ 8� 112 ¼ 0 MD�face ¼ 104kip ft
Segment CD
MD �MC ¼ �ðE!B
V dx ¼ � �0:36ð Þ 10ð Þ ¼ 3:6
MD ¼ 104: ∴MC ¼ 100:4kip ft
The reactions, shear, and bending moment distributions are listed below (Fig. E3.14d).
Fig. E3.14d
3.6 Displacement and Deformation of Slender Beams: Planar Loading
Fig. 3.18 Slender beam.
(a) Initial. (b) Deformed
210 3 Statically Determinate Beams
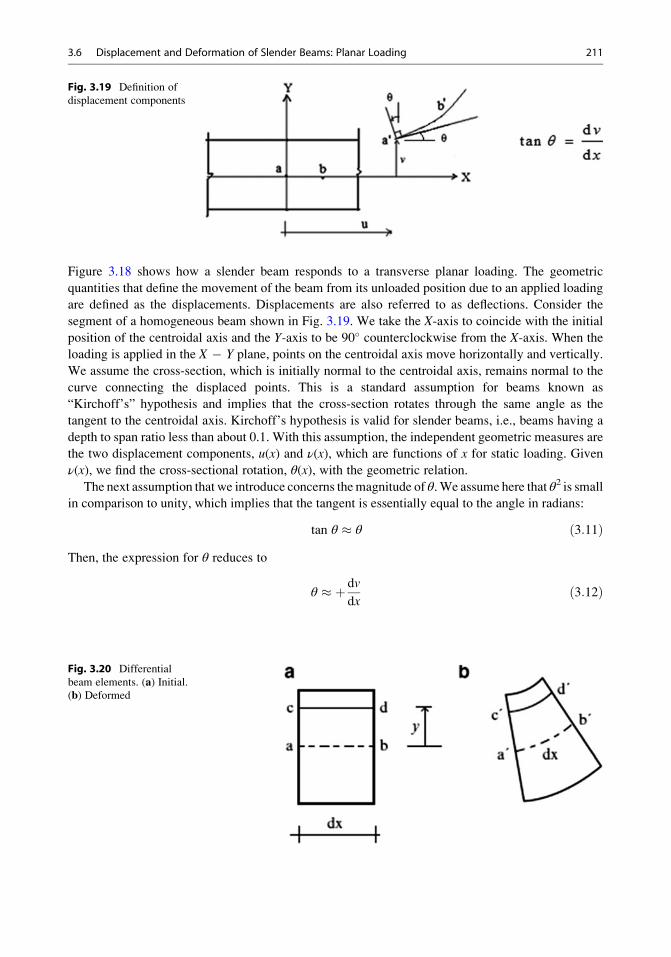
Figure 3.18 shows how a slender beam responds to a transverse planar loading. The geometric
quantities that define the movement of the beam from its unloaded position due to an applied loading
are defined as the displacements. Displacements are also referred to as deflections. Consider the
segment of a homogeneous beam shown in Fig. 3.19. We take the X-axis to coincide with the initial
position of the centroidal axis and the Y-axis to be 90� counterclockwise from the X-axis. When the
loading is applied in the X � Y plane, points on the centroidal axis move horizontally and vertically.
We assume the cross-section, which is initially normal to the centroidal axis, remains normal to the
curve connecting the displaced points. This is a standard assumption for beams known as
“Kirchoff’s” hypothesis and implies that the cross-section rotates through the same angle as the
tangent to the centroidal axis. Kirchoff’s hypothesis is valid for slender beams, i.e., beams having a
depth to span ratio less than about 0.1. With this assumption, the independent geometric measures are
the two displacement components, u(x) and ν(x), which are functions of x for static loading. Given
ν(x), we find the cross-sectional rotation, θ(x), with the geometric relation.
The next assumption that we introduce concerns themagnitude of θ.We assume here that θ2 is small
in comparison to unity, which implies that the tangent is essentially equal to the angle in radians:
tan θ � θ ð3:11ÞThen, the expression for θ reduces to
θ � þ dv
dxð3:12Þ
Fig. 3.19 Definition of
displacement components
Fig. 3.20 Differential
beam elements. (a) Initial.(b) Deformed
3.6 Displacement and Deformation of Slender Beams: Planar Loading 211

Deformations are dimensionless strain measures resulting from displacements. Consider the
differential elements shown in Fig. 3.20. The initial rectangular shape is transformed to a quadrilat-
eral shape with curved upper and lower edges. Adjacent cross-sections experience a relative rotation
equal to (dθ/dx)dx, which causes line elements parallel to the centroidal axis to either elongate or
contract. These changes in length produce extensional strains. A line element located y units above
the centroidal axis experiences a strain ε(y) equal to
ε yð Þ ¼ �y dθdx
ð3:13Þ
According to this model, the strain varies linearly over the cross-section and the peak strain values
occur at the upper and lower surfaces; the centroidal axis is not strained.
At this point, we introduce some standard notation for the derivative of the cross-section rotation
angle, θ.
χ ¼ curvature� dθ
dx� d2v
dx2unitsof radians=lengthð Þ
ρ¼ radiusof curvature ¼ 1
χunitsof lengthð Þ
ð3:14Þ
We prefer to work with the curvature and express the extensional strain as
ε ¼ �yχ ð3:15ÞGiven χ, one can establish qualitatively the shape of the curve defining the displaced centroidal axis.
An analytical solution for the displacement, v, can also be determined by integrating (3.14). We will
illustrate both procedures in later sections.
3.6.1 Moment: Curvature Relationship
We have demonstrated how to establish the bending moment distribution corresponding to a given
loading. We have also showed how the displacement field can be generated once the curvature is
known. To find the displacements due to a given loading, we need to relate the moment and the
corresponding curvature along the centroidal axis. Given this relationship, it is a fairly straightfor-
ward process to move from prescribed loading to the resulting displacement.
The positive sense of the bending moment on a positive cross-section is defined as counterclock-
wise. Then noting Fig. 3.21, the moment and normal stress are related by
Fig. 3.21 Definition of
normal stress and moment
212 3 Statically Determinate Beams
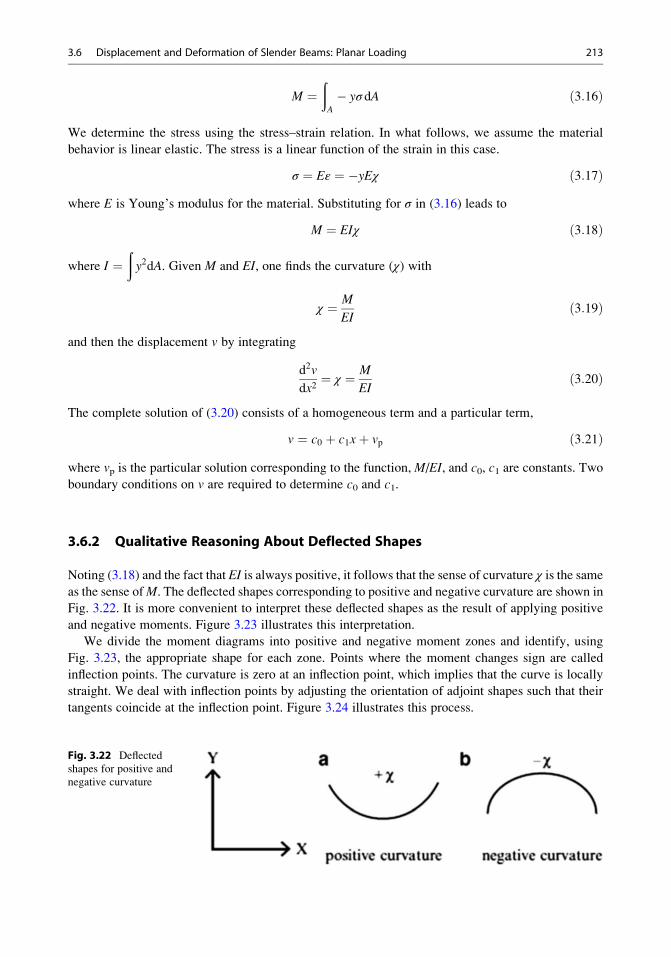
M ¼ðA
� yσ dA ð3:16Þ
We determine the stress using the stress–strain relation. In what follows, we assume the material
behavior is linear elastic. The stress is a linear function of the strain in this case.
σ ¼ Eε ¼ �yEχ ð3:17Þwhere E is Young’s modulus for the material. Substituting for σ in (3.16) leads to
M ¼ EIχ ð3:18Þ
where I ¼ðy2dA. Given M and EI, one finds the curvature (χ) with
χ ¼ M
EIð3:19Þ
and then the displacement v by integrating
d2v
dx2¼ χ ¼ M
EIð3:20Þ
The complete solution of (3.20) consists of a homogeneous term and a particular term,
v ¼ c0 þ c1xþ vp ð3:21Þwhere vp is the particular solution corresponding to the function, M/EI, and c0, c1 are constants. Two
boundary conditions on v are required to determine c0 and c1.
3.6.2 Qualitative Reasoning About Deflected Shapes
Noting (3.18) and the fact that EI is always positive, it follows that the sense of curvature χ is the same
as the sense ofM. The deflected shapes corresponding to positive and negative curvature are shown in
Fig. 3.22. It is more convenient to interpret these deflected shapes as the result of applying positive
and negative moments. Figure 3.23 illustrates this interpretation.
We divide the moment diagrams into positive and negative moment zones and identify, using
Fig. 3.23, the appropriate shape for each zone. Points where the moment changes sign are called
inflection points. The curvature is zero at an inflection point, which implies that the curve is locally
straight. We deal with inflection points by adjusting the orientation of adjoint shapes such that their
tangents coincide at the inflection point. Figure 3.24 illustrates this process.
Fig. 3.22 Deflected
shapes for positive and
negative curvature
3.6 Displacement and Deformation of Slender Beams: Planar Loading 213

The last step involves enforcing the displacement boundary conditions associated with end
conditions. Figure 3.25 shows four types of end conditions (full fixity, hinge, roller, and free) with
their corresponding displacement measures that are constrained by these conditions.
Fig. 3.23 Deflected shape
for positive and negative
moments
Fig. 3.24 Shape transition
at an inflection point
Fig. 3.25 Types of end conditions—displacement measures
214 3 Statically Determinate Beams
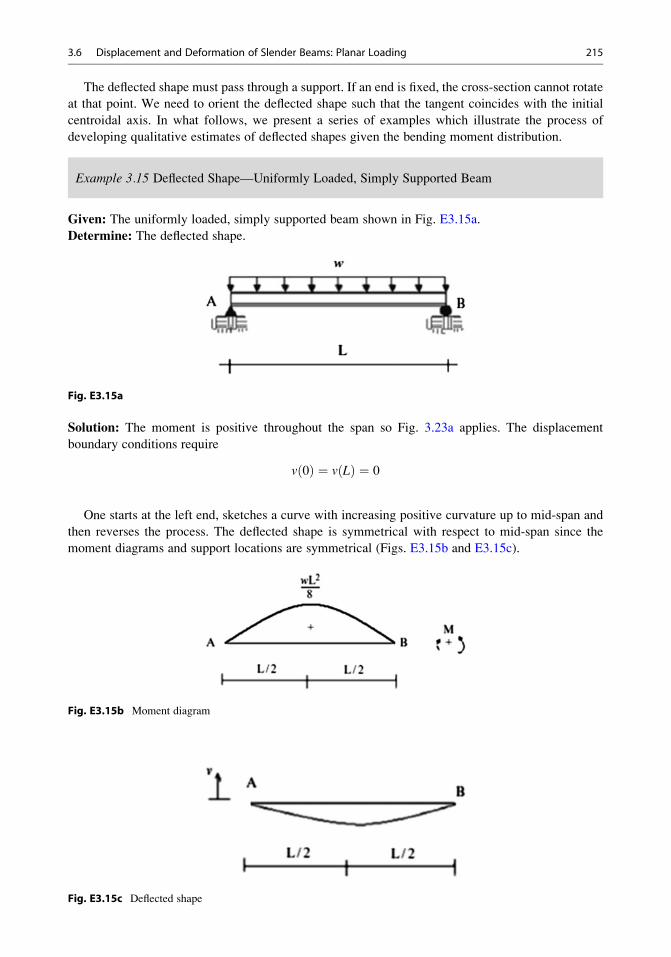
The deflected shape must pass through a support. If an end is fixed, the cross-section cannot rotate
at that point. We need to orient the deflected shape such that the tangent coincides with the initial
centroidal axis. In what follows, we present a series of examples which illustrate the process of
developing qualitative estimates of deflected shapes given the bending moment distribution.
Example 3.15 Deflected Shape—Uniformly Loaded, Simply Supported Beam
Given: The uniformly loaded, simply supported beam shown in Fig. E3.15a.
Determine: The deflected shape.
Fig. E3.15a
Solution: The moment is positive throughout the span so Fig. 3.23a applies. The displacement
boundary conditions require
v 0ð Þ ¼ v Lð Þ ¼ 0
One starts at the left end, sketches a curve with increasing positive curvature up to mid-span and
then reverses the process. The deflected shape is symmetrical with respect to mid-span since the
moment diagrams and support locations are symmetrical (Figs. E3.15b and E3.15c).
Fig. E3.15b Moment diagram
Fig. E3.15c Deflected shape
3.6 Displacement and Deformation of Slender Beams: Planar Loading 215
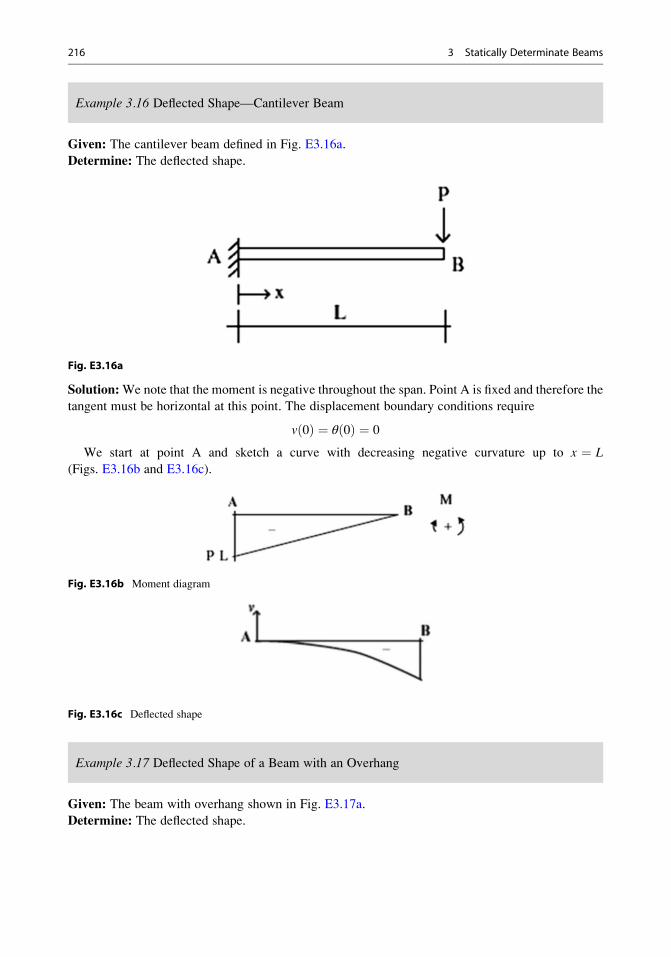
Example 3.16 Deflected Shape—Cantilever Beam
Given: The cantilever beam defined in Fig. E3.16a.
Determine: The deflected shape.
Fig. E3.16a
Solution:We note that the moment is negative throughout the span. Point A is fixed and therefore the
tangent must be horizontal at this point. The displacement boundary conditions require
v 0ð Þ ¼ θ 0ð Þ ¼ 0
We start at point A and sketch a curve with decreasing negative curvature up to x ¼ L
(Figs. E3.16b and E3.16c).
Fig. E3.16b Moment diagram
Fig. E3.16c Deflected shape
Example 3.17 Deflected Shape of a Beam with an Overhang
Given: The beam with overhang shown in Fig. E3.17a.
Determine: The deflected shape.
216 3 Statically Determinate Beams
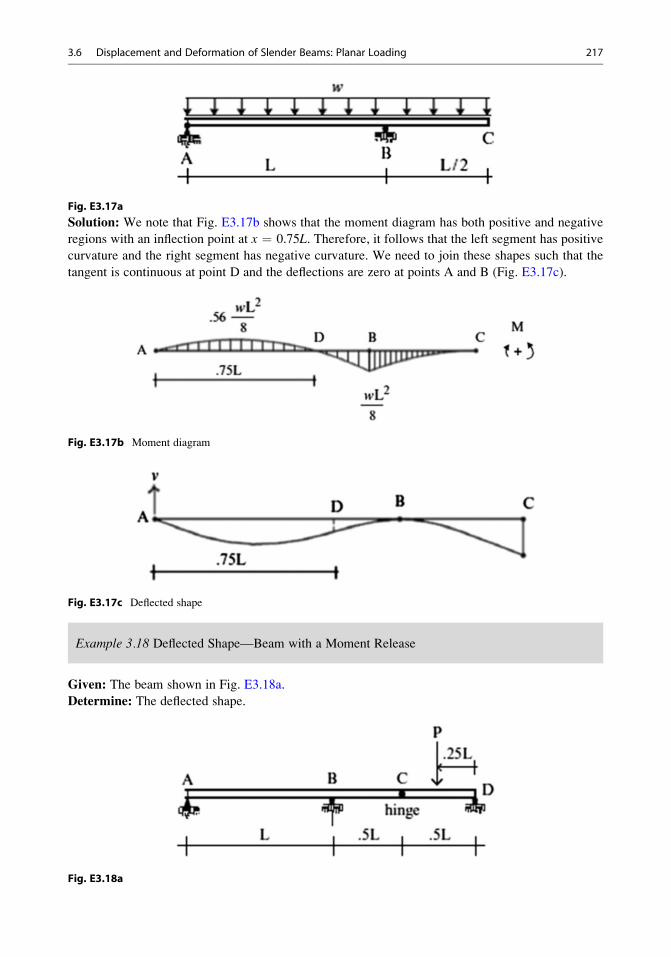
Fig. E3.17a
Solution: We note that Fig. E3.17b shows that the moment diagram has both positive and negative
regions with an inflection point at x ¼ 0.75L. Therefore, it follows that the left segment has positive
curvature and the right segment has negative curvature. We need to join these shapes such that the
tangent is continuous at point D and the deflections are zero at points A and B (Fig. E3.17c).
Fig. E3.17b Moment diagram
Fig. E3.17c Deflected shape
Example 3.18 Deflected Shape—Beam with a Moment Release
Given: The beam shown in Fig. E3.18a.
Determine: The deflected shape.
Fig. E3.18a
3.6 Displacement and Deformation of Slender Beams: Planar Loading 217
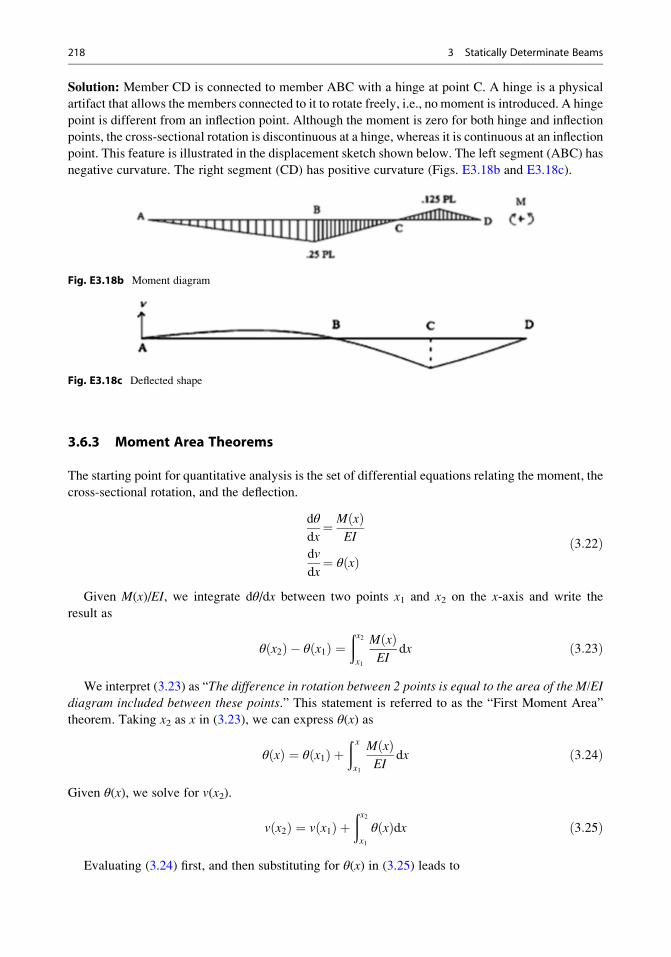
Solution: Member CD is connected to member ABC with a hinge at point C. A hinge is a physical
artifact that allows the members connected to it to rotate freely, i.e., no moment is introduced. A hinge
point is different from an inflection point. Although the moment is zero for both hinge and inflection
points, the cross-sectional rotation is discontinuous at a hinge, whereas it is continuous at an inflection
point. This feature is illustrated in the displacement sketch shown below. The left segment (ABC) has
negative curvature. The right segment (CD) has positive curvature (Figs. E3.18b and E3.18c).
Fig. E3.18b Moment diagram
Fig. E3.18c Deflected shape
3.6.3 Moment Area Theorems
The starting point for quantitative analysis is the set of differential equations relating the moment, the
cross-sectional rotation, and the deflection.
dθ
dx¼ M xð Þ
EI
dv
dx¼ θ xð Þ
ð3:22Þ
Given M(x)/EI, we integrate dθ/dx between two points x1 and x2 on the x-axis and write the
result as
θ x2ð Þ � θ x1ð Þ ¼ðx2x1
M xð ÞEI
dx ð3:23Þ
We interpret (3.23) as “The difference in rotation between 2 points is equal to the area of the M/EI
diagram included between these points.” This statement is referred to as the “First Moment Area”
theorem. Taking x2 as x in (3.23), we can express θ(x) as
θ xð Þ ¼ θ x1ð Þ þð xx1
M xð ÞEI
dx ð3:24Þ
Given θ(x), we solve for v(x2).
v x2ð Þ ¼ v x1ð Þ þðx2x1
θ xð Þdx ð3:25Þ
Evaluating (3.24) first, and then substituting for θ(x) in (3.25) leads to
218 3 Statically Determinate Beams
v x2ð Þ � v x1ð Þ ¼ x2 � x1ð Þθ x1ð Þ þðx2x1
ð xx1
M xð ÞEI
dx
�dx ð3:26Þ
The double integral in (3.26) can be evaluated using integration by parts. First, we note the
following identity,
d uvð Þ ¼ udvþ vdu ð3:27ÞIntegrating between x1 and x2, ðx2
x1
d uvð Þ ¼ðx2x1
udvþ vduð Þ ð3:28Þ
and rearranging terms leads to ðx2x1
udv ¼ uvjx2x1 �ðx2x1
vdu ð3:29Þ
We take
u¼ð xx1
M
EIdx
dv¼ dxð3:30Þ
in (3.26). Using (3.29), the double integral can be expressed asðx2x1
ð xx1
M xð ÞEI
dx
�dx¼ x
ð xx1
M xð ÞEI dx
�x2x1
�ðx2x1
xM xð ÞEI
dx
¼ðx2x1
x2 � xð ÞM xð ÞEI
dx
ð3:31Þ
Finally, an alternate form of (3.26) is
v x2ð Þ � v x1ð Þ ¼ x2 � x1ð Þθ x1ð Þ þðx2x1
x2 � xð ÞM xð ÞEI
dx ð3:32Þ
This form is referred to as the “Second Moment Area Theorem.” Figure 3.26 shows that the last term
can be interpreted as the moment of the M/EI diagram with respect to x2. It represents the deflection
from the tangent at point 1, as indicated in Fig. 3.27.
3.6 Displacement and Deformation of Slender Beams: Planar Loading 219
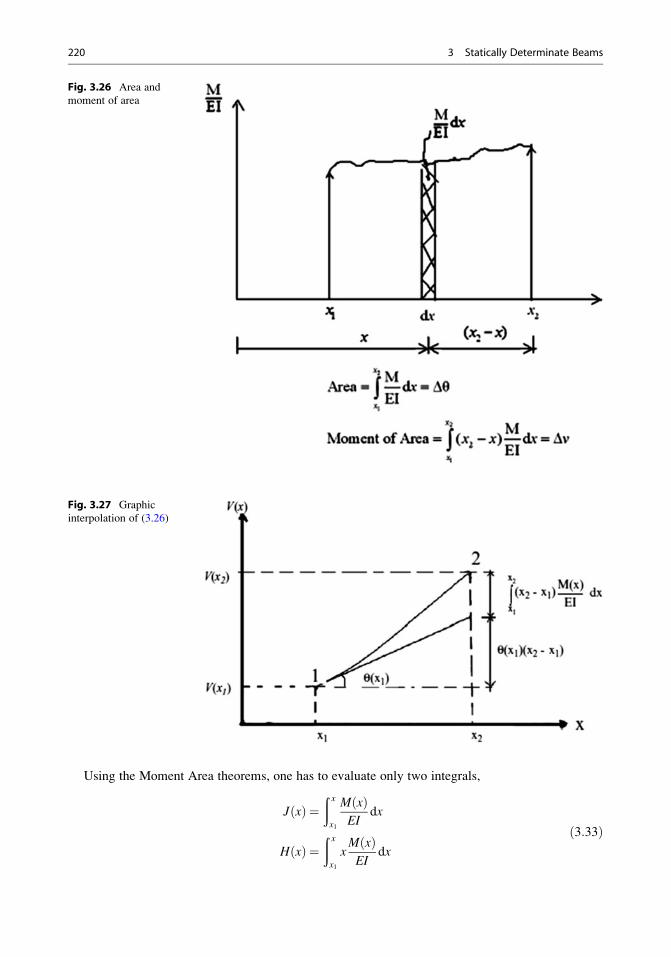
Using the Moment Area theorems, one has to evaluate only two integrals,
J xð Þ ¼ð xx1
M xð ÞEI
dx
H xð Þ ¼ð xx1
xM xð ÞEI
dx
ð3:33Þ
Fig. 3.26 Area and
moment of area
Fig. 3.27 Graphic
interpolation of (3.26)
220 3 Statically Determinate Beams
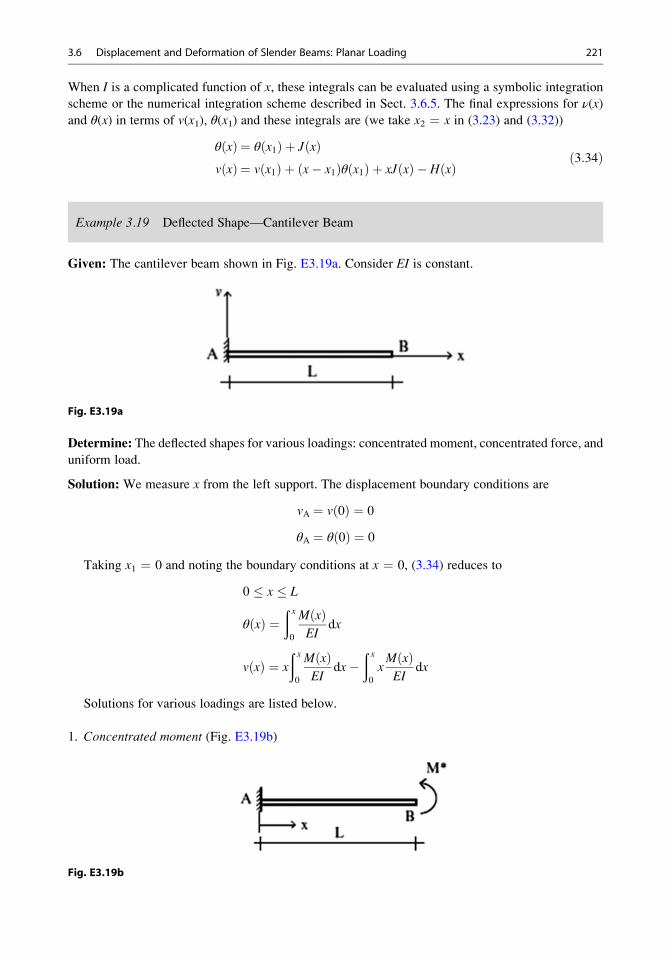
When I is a complicated function of x, these integrals can be evaluated using a symbolic integration
scheme or the numerical integration scheme described in Sect. 3.6.5. The final expressions for ν(x)and θ(x) in terms of v(x1), θ(x1) and these integrals are (we take x2 ¼ x in (3.23) and (3.32))
θ xð Þ ¼ θ x1ð Þ þ J xð Þv xð Þ ¼ v x1ð Þ þ x� x1ð Þθ x1ð Þ þ xJ xð Þ � H xð Þ ð3:34Þ
Example 3.19 Deflected Shape—Cantilever Beam
Given: The cantilever beam shown in Fig. E3.19a. Consider EI is constant.
Fig. E3.19a
Determine: The deflected shapes for various loadings: concentrated moment, concentrated force, and
uniform load.
Solution: We measure x from the left support. The displacement boundary conditions are
vA ¼ v 0ð Þ ¼ 0
θA ¼ θ 0ð Þ ¼ 0
Taking x1 ¼ 0 and noting the boundary conditions at x ¼ 0, (3.34) reduces to
0 � x � L
θ xð Þ ¼ð x0
M xð ÞEI
dx
v xð Þ ¼ x
ð x0
M xð ÞEI
dx�ð x0
xM xð ÞEI
dx
Solutions for various loadings are listed below.
1. Concentrated moment (Fig. E3.19b)
Fig. E3.19b
3.6 Displacement and Deformation of Slender Beams: Planar Loading 221

The expressions for M(x), θ(x), and v(x) for a concentrated moment are as follows:
M xð Þ ¼ M* 0 � x � L
θ xð Þ ¼ 1
EI
ð x0
M xð Þdx ¼ M*
EIx
v xð Þ ¼ x
EI
ð x0
M xð Þdx� 1
EI
ð x0
xM xð Þdx ¼ M*x2
EI�M*x2
2EI¼ þM*x2
2EI
Specific values are
θB ¼ M*L
EI
vB ¼ M*L2
2EI
2. Concentrated Force (Fig. E3.19c)
Fig. E3.19c
The expressions for M(x), θ(x), and v(x) for a concentrated load are as follows:
222 3 Statically Determinate Beams
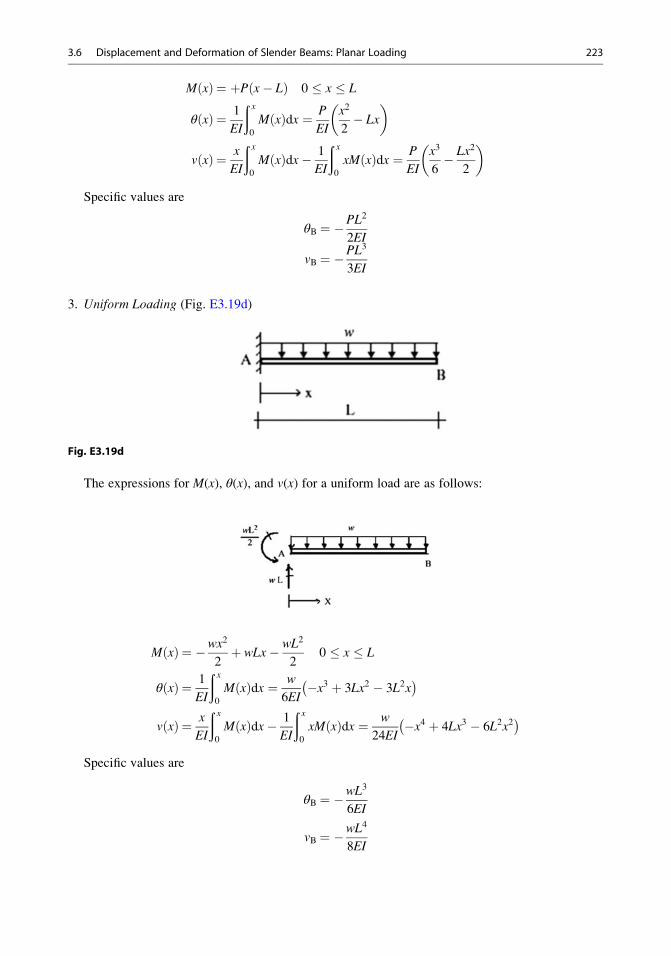
M xð Þ ¼ þP x� Lð Þ 0 � x � L
θ xð Þ ¼ 1
EI
ð x0
M xð Þdx ¼ P
EI
x2
2� Lx
� �
v xð Þ ¼ x
EI
ð x0
M xð Þdx� 1
EI
ð x0
xM xð Þdx ¼ P
EI
x3
6� Lx2
2
� �
Specific values are
θB ¼ �PL2
2EI
vB ¼ �PL3
3EI
3. Uniform Loading (Fig. E3.19d)
Fig. E3.19d
The expressions for M(x), θ(x), and v(x) for a uniform load are as follows:
M xð Þ ¼ �wx2
2þ wLx� wL2
20 � x � L
θ xð Þ ¼ 1
EI
ð x0
M xð Þdx ¼ w
6EI�x3 þ 3Lx2 � 3L2x� �
v xð Þ ¼ x
EI
ð x0
M xð Þdx� 1
EI
ð x0
xM xð Þdx ¼ w
24EI�x4 þ 4Lx3 � 6L2x2� �
Specific values are
θB ¼ �wL3
6EI
vB ¼ �wL4
8EI
3.6 Displacement and Deformation of Slender Beams: Planar Loading 223
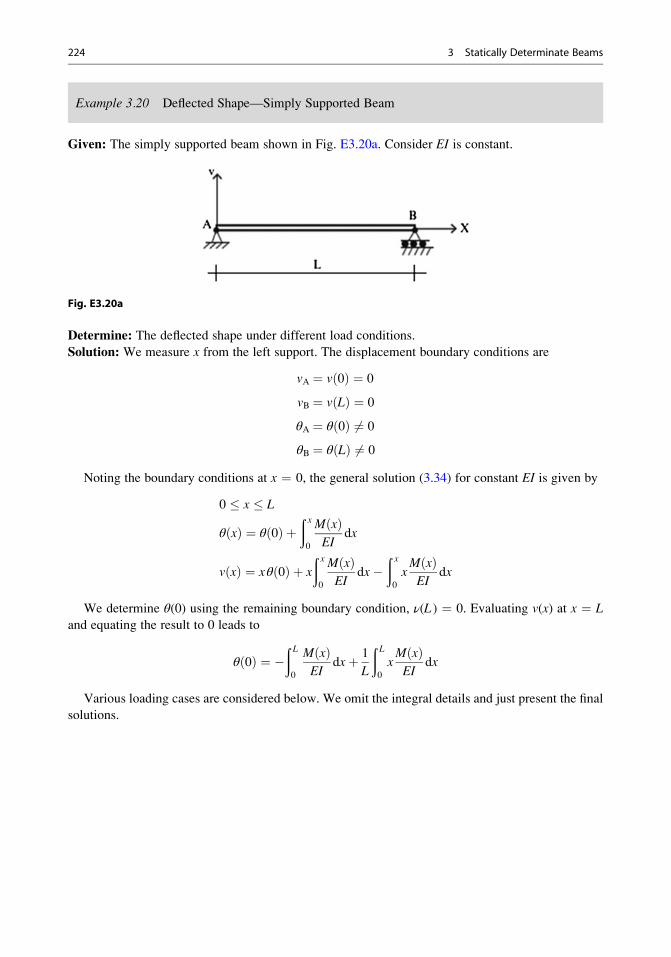
Example 3.20 Deflected Shape—Simply Supported Beam
Given: The simply supported beam shown in Fig. E3.20a. Consider EI is constant.
Fig. E3.20a
Determine: The deflected shape under different load conditions.
Solution: We measure x from the left support. The displacement boundary conditions are
vA ¼ v 0ð Þ ¼ 0
vB ¼ v Lð Þ ¼ 0
θA ¼ θ 0ð Þ 6¼ 0
θB ¼ θ Lð Þ 6¼ 0
Noting the boundary conditions at x ¼ 0, the general solution (3.34) for constant EI is given by
0 � x � L
θ xð Þ ¼ θ 0ð Þ þð x0
M xð ÞEI
dx
v xð Þ ¼ xθ 0ð Þ þ x
ð x0
M xð ÞEI
dx�ð x0
xM xð ÞEI
dx
We determine θ(0) using the remaining boundary condition, ν(L ) ¼ 0. Evaluating v(x) at x ¼ Land equating the result to 0 leads to
θ 0ð Þ ¼ �ð L0
M xð ÞEI
dxþ 1
L
ð L0
xM xð ÞEI
dx
Various loading cases are considered below. We omit the integral details and just present the final
solutions.
224 3 Statically Determinate Beams
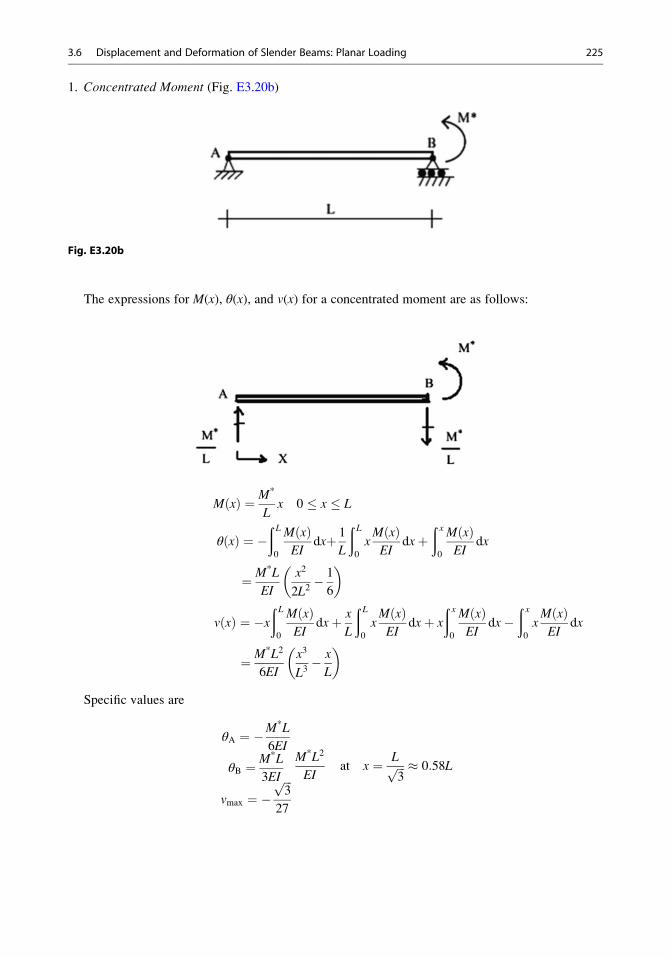
1. Concentrated Moment (Fig. E3.20b)
Fig. E3.20b
The expressions for M(x), θ(x), and v(x) for a concentrated moment are as follows:
M xð Þ ¼ M*
Lx 0 � x � L
θ xð Þ ¼ �ð L0
M xð ÞEI
dxþ 1
L
ð L0
xM xð ÞEI
dxþð x0
M xð ÞEI
dx
¼ M*L
EI
x2
2L2� 1
6
� �
v xð Þ ¼ �xð L0
M xð ÞEI
dxþ x
L
ð L0
xM xð ÞEI
dxþ x
ð x0
M xð ÞEI
dx�ð x0
xM xð ÞEI
dx
¼ M*L2
6EI
x3
L3� x
L
� �
Specific values are
θA ¼ �M*L
6EI
θB ¼ M*L
3EI
vmax ¼ �ffiffiffi3p
27
M*L2
EIat x ¼ Lffiffiffi
3p � 0:58L
3.6 Displacement and Deformation of Slender Beams: Planar Loading 225
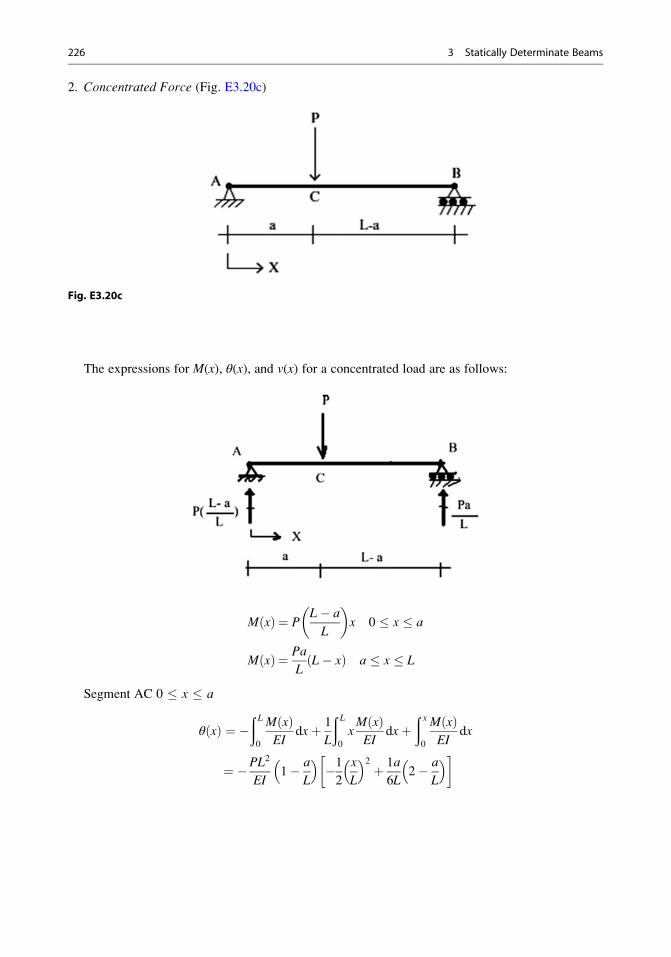
2. Concentrated Force (Fig. E3.20c)
Fig. E3.20c
The expressions for M(x), θ(x), and v(x) for a concentrated load are as follows:
M xð Þ ¼ PL� a
L
� �x 0 � x � a
M xð Þ ¼ Pa
LL� xð Þ a � x � L
Segment AC 0 � x � a
θ xð Þ ¼ �ð L0
M xð ÞEI
dxþ 1
L
ð L0
xM xð ÞEI
dxþð x0
M xð ÞEI
dx
¼ �PL2
EI1� a
L
� ��12
x
L
� �2þ 1
6
a
L2� a
L
� � �
226 3 Statically Determinate Beams
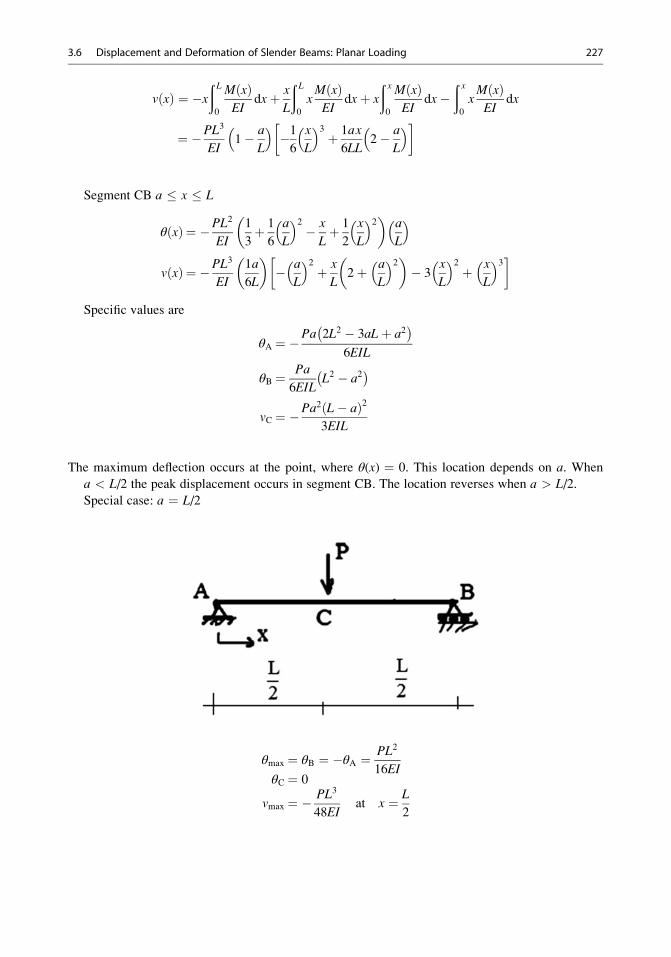
v xð Þ ¼ �xð L0
M xð ÞEI
dxþ x
L
ð L0
xM xð ÞEI
dxþ x
ð x0
M xð ÞEI
dx�ð x0
xM xð ÞEI
dx
¼ �PL3
EI1� a
L
� ��16
x
L
� �3þ 1
6
a
L
x
L2� a
L
� � �
Segment CB a � x � L
θ xð Þ ¼ �PL2
EI
1
3þ 1
6
a
L
� �2� x
Lþ 1
2
x
L
� �2� �a
L
� �
v xð Þ ¼ �PL3
EI
1
6
a
L
� �� a
L
� �2þ x
L2þ a
L
� �2� �� 3
x
L
� �2þ x
L
� �3 �
Specific values are
θA ¼ �Pa 2L2 � 3aLþ a2� �
6EIL
θB ¼ Pa
6EILL2 � a2� �
vC ¼ �Pa2 L� að Þ23EIL
The maximum deflection occurs at the point, where θ(x) ¼ 0. This location depends on a. When
a < L/2 the peak displacement occurs in segment CB. The location reverses when a > L/2.
Special case: a ¼ L/2
θmax ¼ θB ¼ �θA ¼ PL2
16EIθC ¼ 0
vmax ¼ � PL3
48EIat x ¼ L
2
3.6 Displacement and Deformation of Slender Beams: Planar Loading 227
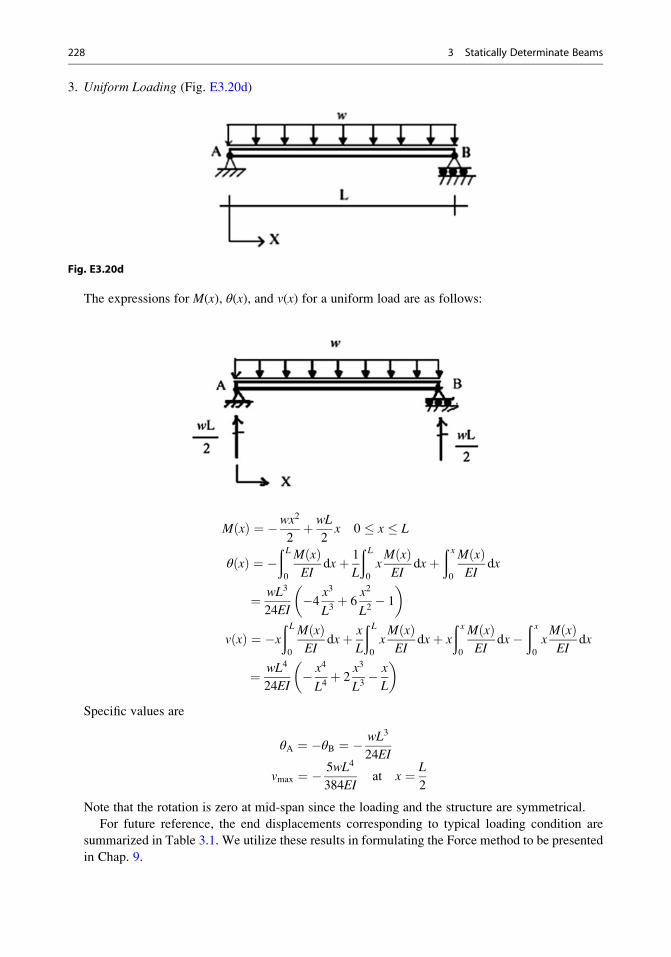
3. Uniform Loading (Fig. E3.20d)
Fig. E3.20d
The expressions for M(x), θ(x), and v(x) for a uniform load are as follows:
M xð Þ ¼ �wx2
2þ wL
2x 0 � x � L
θ xð Þ ¼ �ð L0
M xð ÞEI
dxþ 1
L
ð L0
xM xð ÞEI
dxþð x0
M xð ÞEI
dx
¼ wL3
24EI�4 x
3
L3þ 6
x2
L2� 1
� �
v xð Þ ¼ �xð L0
M xð ÞEI
dxþ x
L
ð L0
xM xð ÞEI
dxþ x
ð x0
M xð ÞEI
dx�ð x0
xM xð ÞEI
dx
¼ wL4
24EI� x4
L4þ 2
x3
L3� x
L
� �
Specific values are
θA ¼ �θB ¼ � wL3
24EI
vmax ¼ � 5wL4
384EIat x ¼ L
2
Note that the rotation is zero at mid-span since the loading and the structure are symmetrical.
For future reference, the end displacements corresponding to typical loading condition are
summarized in Table 3.1. We utilize these results in formulating the Force method to be presented
in Chap. 9.
228 3 Statically Determinate Beams
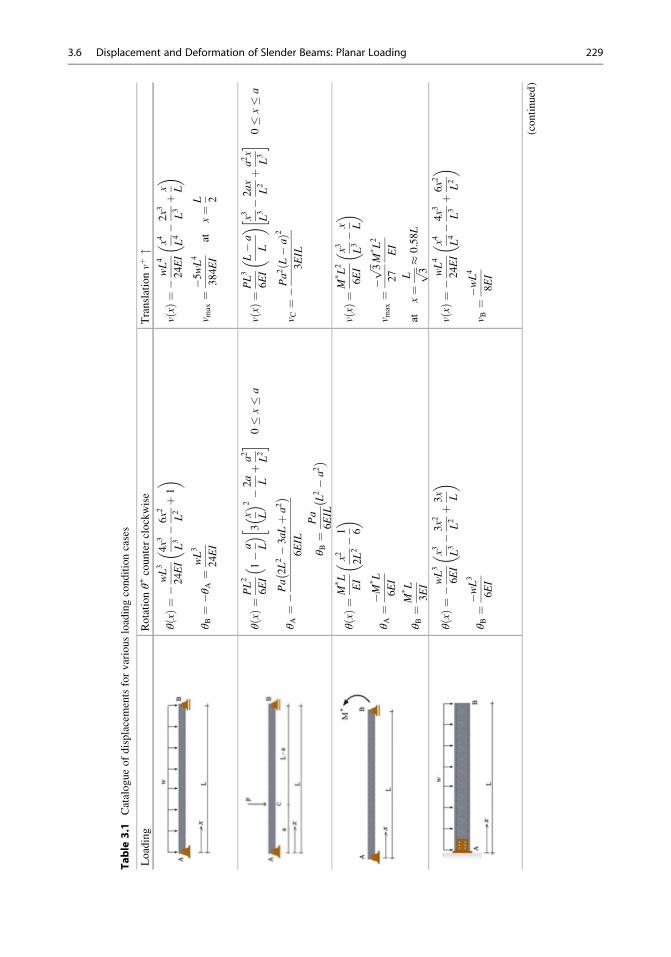
Table
3.1
Catalogueofdisplacementsforvariousloadingconditioncases
Loading
Rotationθ+
counterclockwise
Translationvþ"
θxðÞ¼�
wL3
24EI
4x3 L3�6x2 L2þ1
��
θ B¼�θ
A¼
wL3
24EI
vxðÞ¼�
wL4
24EI
x4 L4�2x3 L3þ
x L
��
v max¼�5
wL4
384EI
atx¼
L 2
θxðÞ¼
PL2
6EI
1�
a L
�� 3
x L��2
�2a Lþ
a2 L2
�
0�
x�
a
θ A¼�Pa2L2�3aLþa2
��
6EIL
θ B¼
Pa
6EIL
L2�a2
��
vxðÞ¼
PL3
6EI
L�a
L
�� x
3 L3�2ax L2þa2x
L3
�
0�
x�
a
v C¼�Pa2L�a
ðÞ2
3EIL
θxðÞ¼
M*L
EI
x2 2L2�1 6
��
θ A¼�M
*L
6EI
θ B¼
M*L
3EI
vxðÞ¼
M*L2
6EI
x3 L3�
x L
��
v max¼�
ffiffiffi 3p 27
M*L2
EI
atx¼
L ffiffiffi 3p�
0:58L
θxðÞ¼�wL3
6EI
x3 L3�3x2 L2þ3x L
��
θ B¼�w
L3
6EI
vxðÞ¼�
wL4
24EI
x4 L4�4x3 L3þ6x2 L2
��
v B¼�w
L4
8EI
(continued)
3.6 Displacement and Deformation of Slender Beams: Planar Loading 229

Table
3.1
(continued)
Loading
Rotationθ+
counterclockwise
Translationvþ"
θxðÞ¼
P EI
x2 2�Lx
��
θ B¼�P
L2
2EI
vxðÞ¼
P 6EIx3�3Lx2
��
v B¼�P
L3
3EI
θxðÞ¼
M*
EIxθ
B¼
M*L
EI
vxðÞ¼
M*x2
2EI
v B¼
M*L2
2EI
230 3 Statically Determinate Beams

3.6.4 Computing Displacements with the Method of Virtual Forces
The procedures described in the previous section are intended to generate analytical solutions for the
displacement and rotation. In many cases, one is interested only in the motion measures for a
particular point. Rather than generate the complete analytical solution and then evaluate it at the
point of interest, one can apply the Method of Virtual Forces. The Method of Virtual Forces
specialized for bending of slender beams is defined in [1]. We express the principle as
d δP ¼ðL
bendingdeformationð Þ δM xð Þð Þdx ð3:35Þ
where d is the desired displacement measure, δP is the virtual force in the direction of d, and δM(x) is
the virtual moment due to δP. The deformation due to transverse shear is not included since it is
negligible for slender beams. When the behavior is linear elastic, the bending deformation is related
to the moment by
bendingdeformation� dθ
dx¼ M xð Þ
EI
and (3.35) takes the form
d δP ¼ðL
M xð ÞEI
δM xð Þdx ð3:36Þ
The steps involved in applying the principle are as follows. We use as an example, the beam shown
in Fig. 3.28. To determine a desired vertical displacement or rotation such as vA or θB, one applies thecorresponding virtual force or virtual moment in the direction of the desired displacement or rotation,
determines the virtual moment δMv(x) or δMθ(x), and then evaluates the following integrals.
vA ¼ðL
M xð ÞEI
δMv xð Þdx
θB ¼ðL
M xð ÞEI
δMθ xð Þdx
Fig. 3.28 Actual and
virtual loads moments. (a)Actual load M(x). (b)Deflected shape. (c) Virtualload δMv for vA. (d) Virtualload δMθ(x) for θB
3.6 Displacement and Deformation of Slender Beams: Planar Loading 231
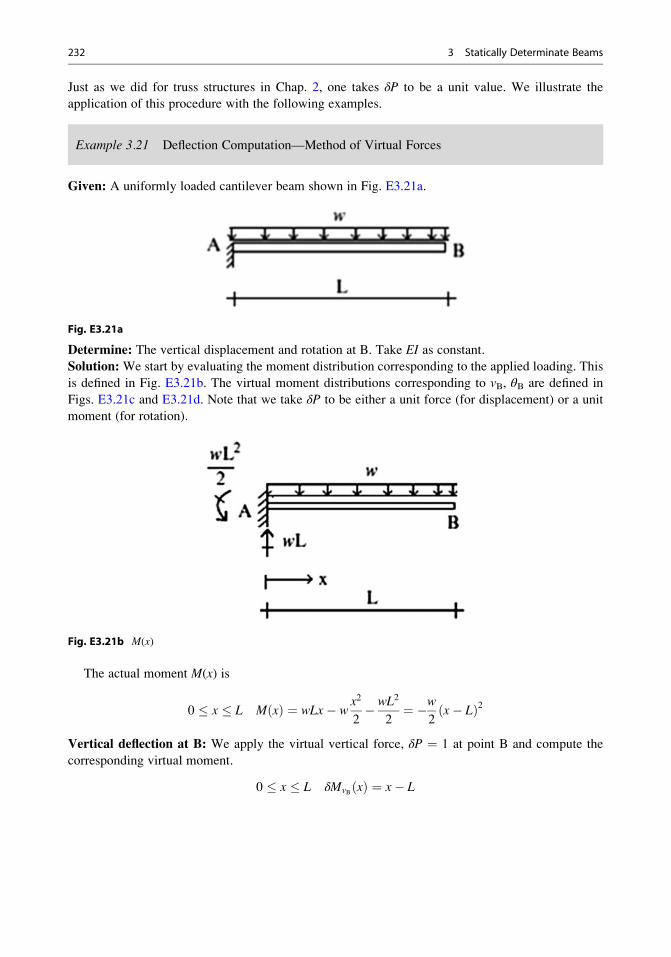
Just as we did for truss structures in Chap. 2, one takes δP to be a unit value. We illustrate the
application of this procedure with the following examples.
Example 3.21 Deflection Computation—Method of Virtual Forces
Given: A uniformly loaded cantilever beam shown in Fig. E3.21a.
Fig. E3.21a
Determine: The vertical displacement and rotation at B. Take EI as constant.Solution: We start by evaluating the moment distribution corresponding to the applied loading. This
is defined in Fig. E3.21b. The virtual moment distributions corresponding to vB, θB are defined in
Figs. E3.21c and E3.21d. Note that we take δP to be either a unit force (for displacement) or a unit
moment (for rotation).
Fig. E3.21b M(x)
The actual moment M(x) is
0 � x � L M xð Þ ¼ wLx� wx2
2� wL2
2¼ �w
2x� Lð Þ2
Vertical deflection at B: We apply the virtual vertical force, δP ¼ 1 at point B and compute the
corresponding virtual moment.
0 � x � L δMvB xð Þ ¼ x� L
232 3 Statically Determinate Beams
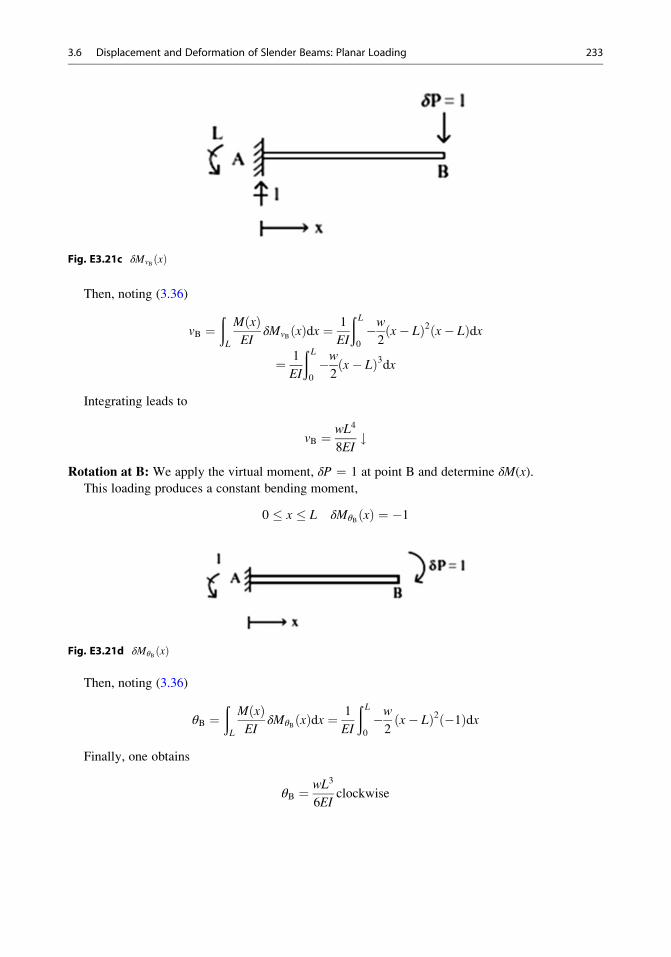
Fig. E3.21c δMvB xð Þ
Then, noting (3.36)
vB ¼ðL
M xð ÞEI
δMvB xð Þdx ¼ 1
EI
ð L0
�w2x� Lð Þ2 x� Lð Þdx
¼ 1
EI
ð L0
�w2x� Lð Þ3dx
Integrating leads to
vB ¼ wL4
8EI#
Rotation at B: We apply the virtual moment, δP ¼ 1 at point B and determine δM(x).
This loading produces a constant bending moment,
0 � x � L δMθB xð Þ ¼ �1
Fig. E3.21d δMθB xð Þ
Then, noting (3.36)
θB ¼ðL
M xð ÞEI
δMθB xð Þdx ¼ 1
EI
ð L0
�w2
x� Lð Þ2 �1ð Þdx
Finally, one obtains
θB ¼ wL3
6EIclockwise
3.6 Displacement and Deformation of Slender Beams: Planar Loading 233
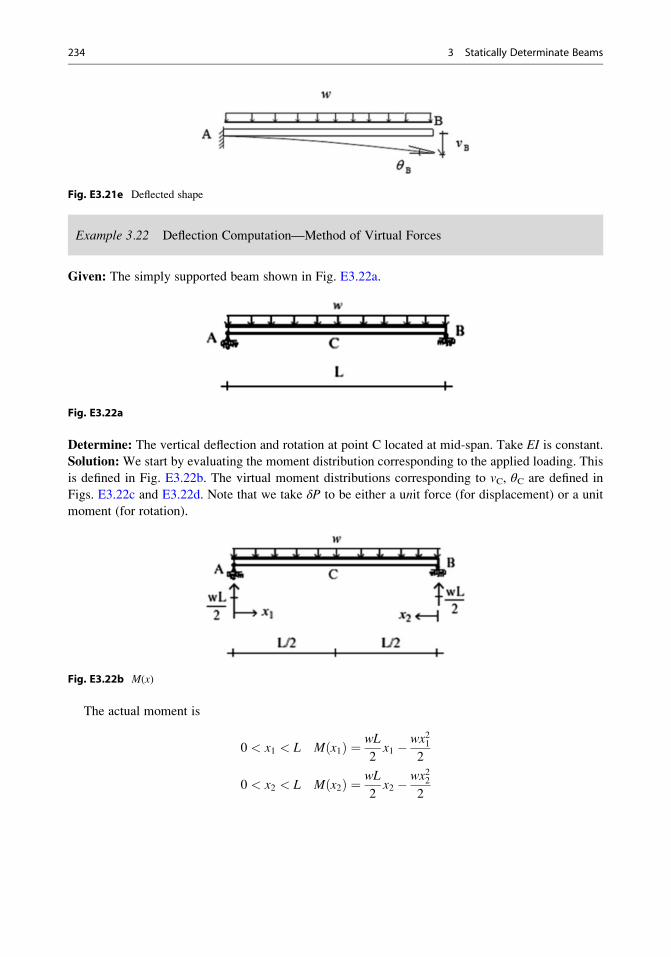
Fig. E3.21e Deflected shape
Example 3.22 Deflection Computation—Method of Virtual Forces
Given: The simply supported beam shown in Fig. E3.22a.
Fig. E3.22a
Determine: The vertical deflection and rotation at point C located at mid-span. Take EI is constant.Solution: We start by evaluating the moment distribution corresponding to the applied loading. This
is defined in Fig. E3.22b. The virtual moment distributions corresponding to vC, θC are defined in
Figs. E3.22c and E3.22d. Note that we take δP to be either a unit force (for displacement) or a unit
moment (for rotation).
Fig. E3.22b M(x)
The actual moment is
0 < x1 < L M x1ð Þ ¼ wL
2x1 � wx21
2
0 < x2 < L M x2ð Þ ¼ wL
2x2 � wx22
2
234 3 Statically Determinate Beams
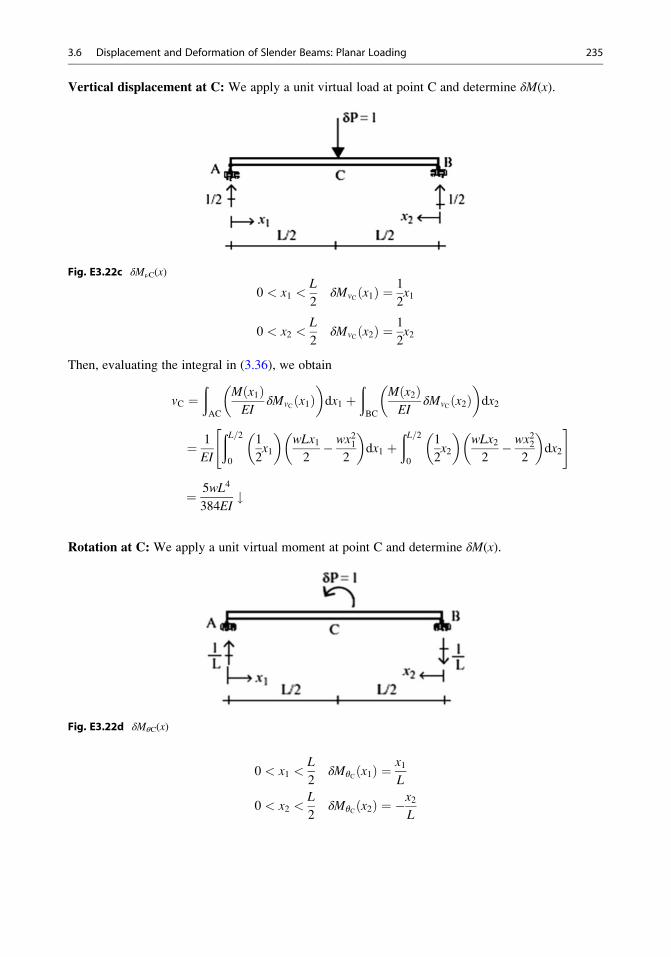
Vertical displacement at C: We apply a unit virtual load at point C and determine δM(x).
Fig. E3.22c δMνC(x)
0 < x1 <L
2δMvC x1ð Þ ¼ 1
2x1
0 < x2 <L
2δMvC x2ð Þ ¼ 1
2x2
Then, evaluating the integral in (3.36), we obtain
vC ¼ðAC
M x1ð ÞEI
δMvC x1ð Þ� �
dx1 þðBC
M x2ð ÞEI
δMvC x2ð Þ� �
dx2
¼ 1
EI
ðL=20
1
2x1
� �wLx12� wx21
2
� �dx1 þ
ðL=20
1
2x2
� �wLx22� wx22
2
� �dx2
" #
¼ 5wL4
384EI#
Rotation at C: We apply a unit virtual moment at point C and determine δM(x).
Fig. E3.22d δMθC(x)
0 < x1 <L
2δMθC x1ð Þ ¼ x1
L
0 < x2 <L
2δMθC x2ð Þ ¼ �x2
L
3.6 Displacement and Deformation of Slender Beams: Planar Loading 235
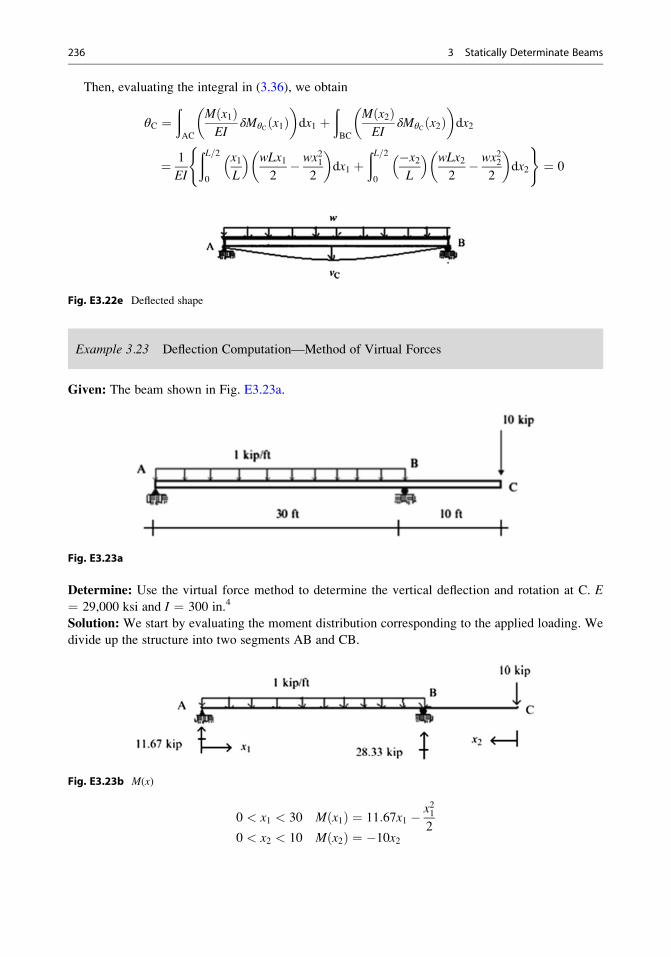
Then, evaluating the integral in (3.36), we obtain
θC ¼ðAC
M x1ð ÞEI
δMθC x1ð Þ� �
dx1 þðBC
M x2ð ÞEI
δMθC x2ð Þ� �
dx2
¼ 1
EI
ðL=20
x1L
� � wLx12� wx21
2
� �dx1 þ
ðL=20
�x2L
� � wLx22� wx22
2
� �dx2
( )¼ 0
Fig. E3.22e Deflected shape
Example 3.23 Deflection Computation—Method of Virtual Forces
Given: The beam shown in Fig. E3.23a.
Fig. E3.23a
Determine: Use the virtual force method to determine the vertical deflection and rotation at C. E
¼ 29,000 ksi and I ¼ 300 in.4
Solution: We start by evaluating the moment distribution corresponding to the applied loading. We
divide up the structure into two segments AB and CB.
Fig. E3.23b M(x)
0 < x1 < 30 M x1ð Þ ¼ 11:67x1 � x212
0 < x2 < 10 M x2ð Þ ¼ �10x2
236 3 Statically Determinate Beams
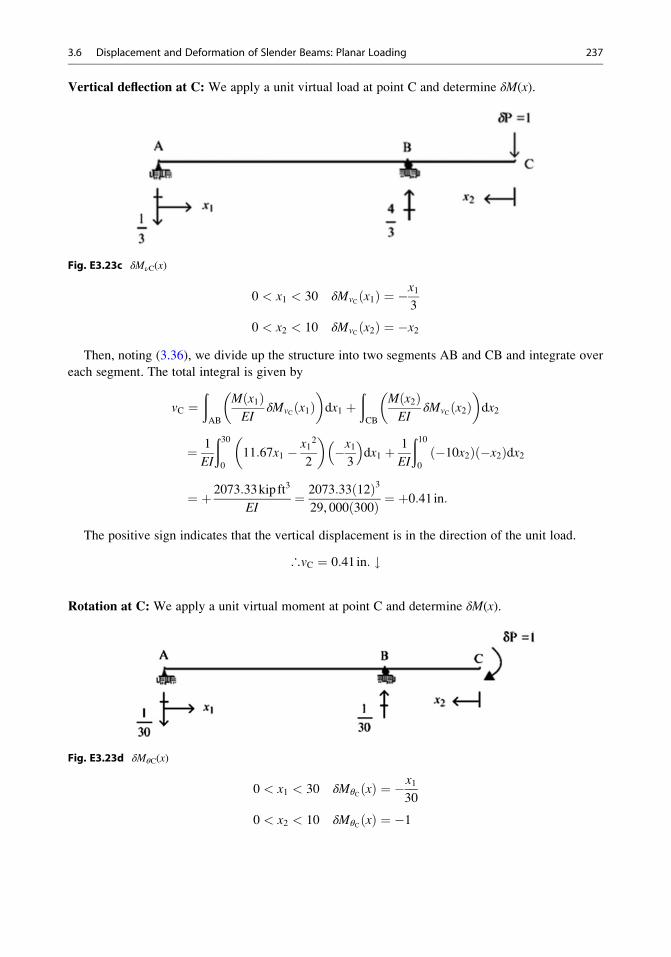
Vertical deflection at C: We apply a unit virtual load at point C and determine δM(x).
Fig. E3.23c δMνC(x)
0 < x1 < 30 δMvC x1ð Þ ¼ �x13
0 < x2 < 10 δMvC x2ð Þ ¼ �x2Then, noting (3.36), we divide up the structure into two segments AB and CB and integrate over
each segment. The total integral is given by
vC ¼ðAB
M x1ð ÞEI
δMvC x1ð Þ� �
dx1 þðCB
M x2ð ÞEI
δMvC x2ð Þ� �
dx2
¼ 1
EI
ð300
11:67x1 � x12
2
� ��x13
� �dx1 þ 1
EI
ð100
�10x2ð Þ �x2ð Þdx2
¼ þ 2073:33kip ft3
EI¼ 2073:33 12ð Þ3
29, 000 300ð Þ ¼ þ0:41 in:
The positive sign indicates that the vertical displacement is in the direction of the unit load.
∴vC ¼ 0:41 in: #
Rotation at C: We apply a unit virtual moment at point C and determine δM(x).
Fig. E3.23d δMθC(x)
0 < x1 < 30 δMθC xð Þ ¼ �x130
0 < x2 < 10 δMθC xð Þ ¼ �1
3.6 Displacement and Deformation of Slender Beams: Planar Loading 237
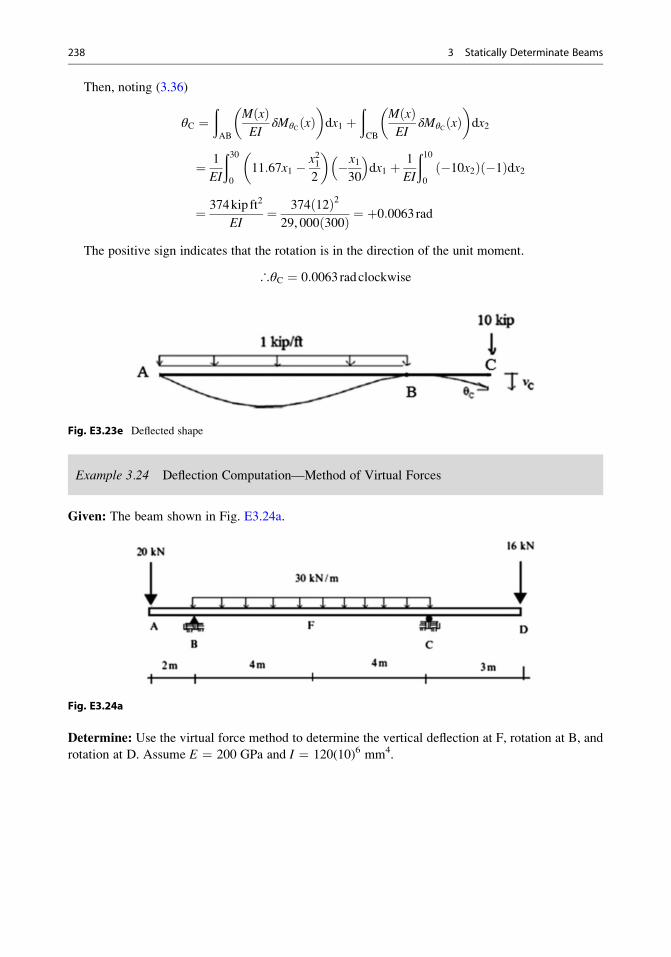
Then, noting (3.36)
θC ¼ðAB
M xð ÞEI
δMθC xð Þ� �
dx1 þðCB
M xð ÞEI
δMθC xð Þ� �
dx2
¼ 1
EI
ð300
11:67x1 � x212
� ��x130
� �dx1 þ 1
EI
ð100
�10x2ð Þ �1ð Þdx2
¼ 374kip ft2
EI¼ 374 12ð Þ2
29, 000 300ð Þ ¼ þ0:0063rad
The positive sign indicates that the rotation is in the direction of the unit moment.
∴θC ¼ 0:0063radclockwise
Fig. E3.23e Deflected shape
Example 3.24 Deflection Computation—Method of Virtual Forces
Given: The beam shown in Fig. E3.24a.
Fig. E3.24a
Determine: Use the virtual force method to determine the vertical deflection at F, rotation at B, and
rotation at D. Assume E ¼ 200 GPa and I ¼ 120(10)6 mm4.
238 3 Statically Determinate Beams
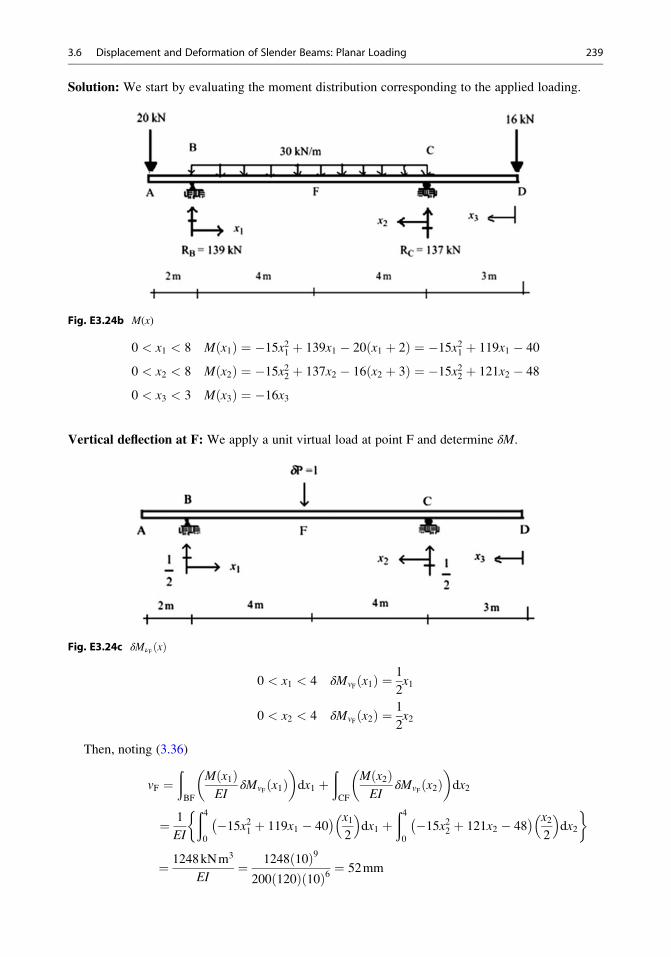
Solution: We start by evaluating the moment distribution corresponding to the applied loading.
Fig. E3.24b M(x)
0 < x1 < 8 M x1ð Þ ¼ �15x21 þ 139x1 � 20 x1 þ 2ð Þ ¼ �15x21 þ 119x1 � 40
0 < x2 < 8 M x2ð Þ ¼ �15x22 þ 137x2 � 16 x2 þ 3ð Þ ¼ �15x22 þ 121x2 � 48
0 < x3 < 3 M x3ð Þ ¼ �16x3
Vertical deflection at F: We apply a unit virtual load at point F and determine δM.
Fig. E3.24c δMνF xð Þ
0 < x1 < 4 δMvF x1ð Þ ¼ 1
2x1
0 < x2 < 4 δMvF x2ð Þ ¼ 1
2x2
Then, noting (3.36)
vF ¼ðBF
M x1ð ÞEI
δMvF x1ð Þ� �
dx1 þðCF
M x2ð ÞEI
δMvF x2ð Þ� �
dx2
¼ 1
EI
ð40
�15x21 þ 119x1 � 40� � x1
2
� �dx1 þ
ð40
�15x22 þ 121x2 � 48� � x2
2
� �dx2
�
¼ 1248kNm3
EI¼ 1248 10ð Þ9
200 120ð Þ 10ð Þ6 ¼ 52mm
3.6 Displacement and Deformation of Slender Beams: Planar Loading 239
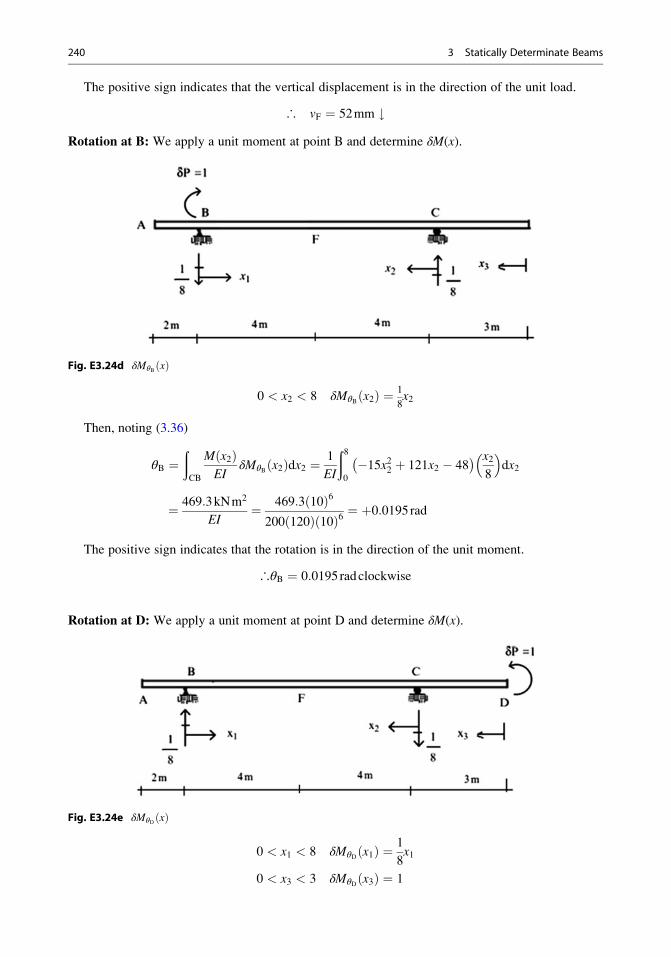
The positive sign indicates that the vertical displacement is in the direction of the unit load.
∴ vF ¼ 52mm #Rotation at B: We apply a unit moment at point B and determine δM(x).
Fig. E3.24d δMθB xð Þ
0 < x2 < 8 δMθB x2ð Þ ¼ 1
8x2
Then, noting (3.36)
θB ¼ðCB
M x2ð ÞEI
δMθB x2ð Þdx2 ¼ 1
EI
ð80
�15x22 þ 121x2 � 48� � x2
8
� �dx2
¼ 469:3kNm2
EI¼ 469:3 10ð Þ6
200 120ð Þ 10ð Þ6 ¼ þ0:0195rad
The positive sign indicates that the rotation is in the direction of the unit moment.
∴θB ¼ 0:0195radclockwise
Rotation at D: We apply a unit moment at point D and determine δM(x).
Fig. E3.24e δMθD xð Þ
0 < x1 < 8 δMθD x1ð Þ ¼ 1
8x1
0 < x3 < 3 δMθD x3ð Þ ¼ 1
240 3 Statically Determinate Beams
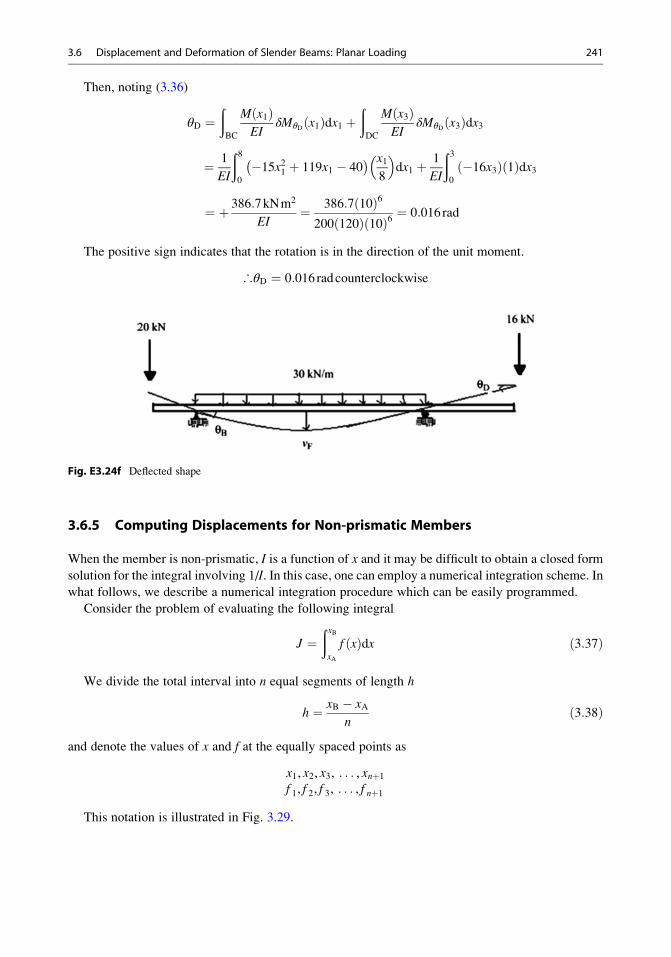
Then, noting (3.36)
θD ¼ðBC
M x1ð ÞEI
δMθD x1ð Þdx1 þðDC
M x3ð ÞEI
δMθD x3ð Þdx3
¼ 1
EI
ð80
�15x21 þ 119x1 � 40� � x1
8
� �dx1 þ 1
EI
ð30
�16x3ð Þ 1ð Þdx3
¼ þ 386:7kNm2
EI¼ 386:7 10ð Þ6
200 120ð Þ 10ð Þ6 ¼ 0:016rad
The positive sign indicates that the rotation is in the direction of the unit moment.
∴θD ¼ 0:016radcounterclockwise
Fig. E3.24f Deflected shape
3.6.5 Computing Displacements for Non-prismatic Members
When the member is non-prismatic, I is a function of x and it may be difficult to obtain a closed form
solution for the integral involving 1/I. In this case, one can employ a numerical integration scheme. In
what follows, we describe a numerical integration procedure which can be easily programmed.
Consider the problem of evaluating the following integral
J ¼ðxBxA
f xð Þdx ð3:37Þ
We divide the total interval into n equal segments of length h
h ¼ xB � xAn
ð3:38Þ
and denote the values of x and f at the equally spaced points as
x1, x2, x3, . . . , xnþ1f 1, f 2, f 3, . . . , f nþ1
This notation is illustrated in Fig. 3.29.
3.6 Displacement and Deformation of Slender Beams: Planar Loading 241
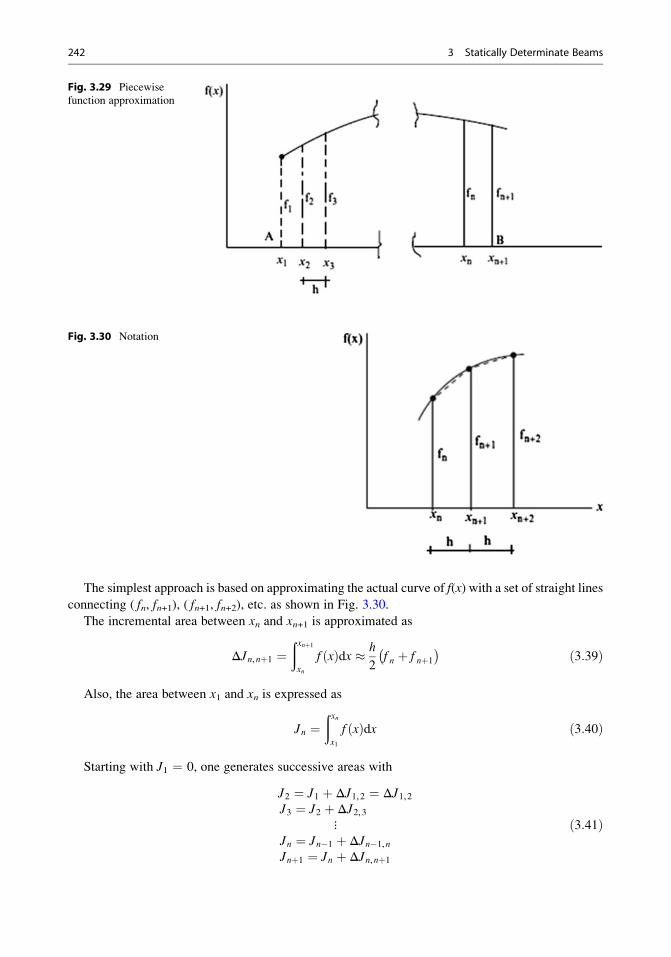
The simplest approach is based on approximating the actual curve of f(x) with a set of straight lines
connecting ( fn, fn+1), ( fn+1, fn+2), etc. as shown in Fig. 3.30.
The incremental area between xn and xn+1 is approximated as
ΔJn,nþ1 ¼ðxnþ1xn
f xð Þdx � h
2f n þ f nþ1� � ð3:39Þ
Also, the area between x1 and xn is expressed as
Jn ¼ðxnx1
f xð Þdx ð3:40Þ
Starting with J1 ¼ 0, one generates successive areas with
J2 ¼ J1 þ ΔJ1,2 ¼ ΔJ1,2J3 ¼ J2 þ ΔJ2,3
⋮Jn ¼ Jn�1 þ ΔJn�1,nJnþ1 ¼ Jn þ ΔJn,nþ1
ð3:41Þ
Fig. 3.29 Piecewise
function approximation
Fig. 3.30 Notation
242 3 Statically Determinate Beams
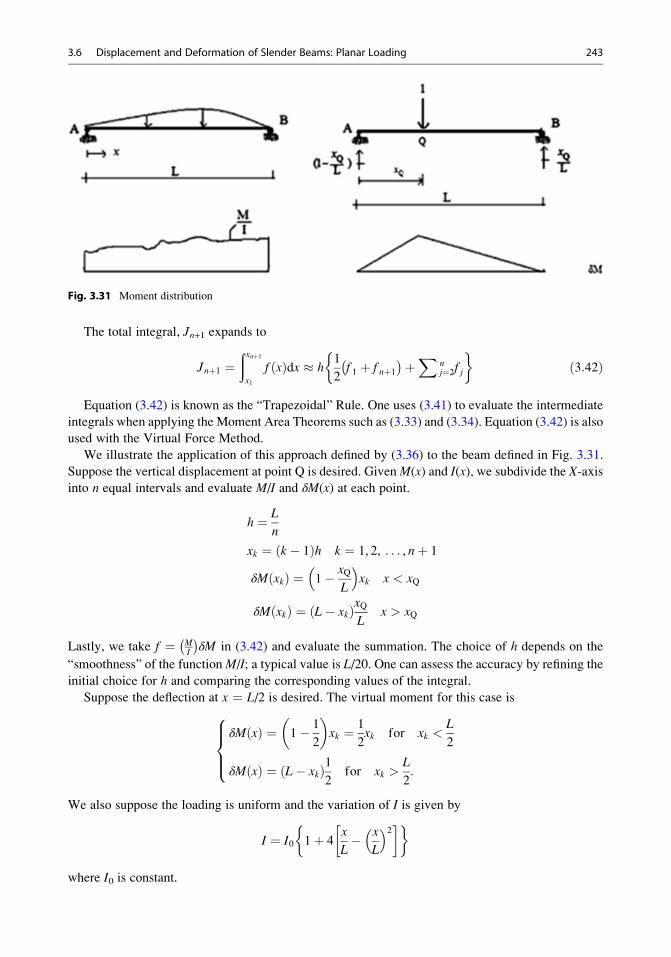
The total integral, Jn+1 expands to
Jnþ1 ¼ðxnþ1x1
f xð Þdx � h1
2f 1 þ f nþ1� �þX n
j¼2f j
�ð3:42Þ
Equation (3.42) is known as the “Trapezoidal” Rule. One uses (3.41) to evaluate the intermediate
integrals when applying the Moment Area Theorems such as (3.33) and (3.34). Equation (3.42) is also
used with the Virtual Force Method.
We illustrate the application of this approach defined by (3.36) to the beam defined in Fig. 3.31.
Suppose the vertical displacement at point Q is desired. GivenM(x) and I(x), we subdivide the X-axisinto n equal intervals and evaluate M/I and δM(x) at each point.
h ¼ L
n
xk ¼ k � 1ð Þh k ¼ 1, 2, . . . , nþ 1
δM xkð Þ ¼ 1� xQL
� �xk x < xQ
δM xkð Þ ¼ L� xkð ÞxQL
x > xQ
Lastly, we take f ¼ MI
� �δM in (3.42) and evaluate the summation. The choice of h depends on the
“smoothness” of the functionM/I; a typical value is L/20. One can assess the accuracy by refining the
initial choice for h and comparing the corresponding values of the integral.
Suppose the deflection at x ¼ L/2 is desired. The virtual moment for this case is
δM xð Þ ¼ 1� 1
2
� �xk ¼ 1
2xk for xk <
L
2
δM xð Þ ¼ L� xkð Þ12
for xk >L
2:
8>><>>:
We also suppose the loading is uniform and the variation of I is given by
I ¼ I0 1þ 4x
L� x
L
� �2 � �
where I0 is constant.
Fig. 3.31 Moment distribution
3.6 Displacement and Deformation of Slender Beams: Planar Loading 243

The corresponding moment is
M ¼ wL
2x� wx2
2¼ wL2
84
x
L� x
L
� �2 � �
Substituting for M, δM, and I, the virtual force expression for the displacement takes the form
v x ¼ L
2
� �¼ wL4
8EI0
ð10
4 xL� x
L
� �2h iδML
1þ 4 xL� x
L
� �2h i8<:
9=;d
x
L
� �¼ wL4
8EI0α
where α is a dimensionless coefficient that depends on the interval size.
We subdivide the interval 0–1 into n such intervals. Applying Equation (3.42) and taking a range
of values for n leads to
n ¼ 10 α ¼ 0:065n ¼ 20 α ¼ 0:0559n ¼ 30 α ¼ 0:0559
We note that taking n ¼ 20 is sufficiently accurate. We used MATLAB [2] to program the computa-
tion associated with Equation (3.42).
3.7 Deformation–Displacement Relations for Deep Beams: Planar Loading
When the depth to span ratio is greater than 0.1, the theory presented in Sect. 3.6, which is based on
Kirchhoff’s hypothesis, needs to be modified to include the transverse shear deformation. Figure 3.32
illustrates this case: the cross-section remains a plane but is no longer normal to the centroidal axis.
Defining β as the rotation of the cross-section, and γ as the transverse shear strain, it follows that
γ ¼ θ � β � dv
dx� β ð3:43Þ
The extensional strain now involves β rather than θ.
ε yð Þ ¼ �y dβdx
ð3:44Þ
Expressions for the internal force variables, V and M, in terms of the deformation measures are
derived in a similar way as followed in Sect. 3.6.1. We express them as:
244 3 Statically Determinate Beams
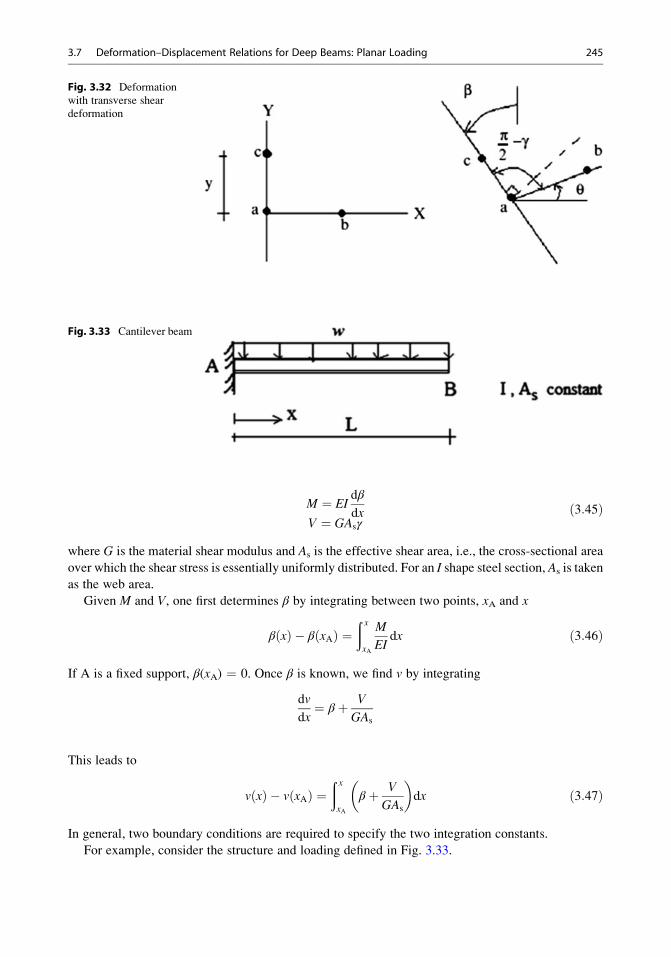
M ¼ EIdβ
dxV ¼ GAsγ
ð3:45Þ
where G is the material shear modulus and As is the effective shear area, i.e., the cross-sectional area
over which the shear stress is essentially uniformly distributed. For an I shape steel section, As is taken
as the web area.
Given M and V, one first determines β by integrating between two points, xA and x
β xð Þ � β xAð Þ ¼ð xxA
M
EIdx ð3:46Þ
If A is a fixed support, β(xA) ¼ 0. Once β is known, we find v by integrating
dv
dx¼ β þ V
GAs
This leads to
v xð Þ � v xAð Þ ¼ð xxA
β þ V
GAs
� �dx ð3:47Þ
In general, two boundary conditions are required to specify the two integration constants.
For example, consider the structure and loading defined in Fig. 3.33.
Fig. 3.32 Deformation
with transverse shear
deformation
Fig. 3.33 Cantilever beam
3.7 Deformation–Displacement Relations for Deep Beams: Planar Loading 245

The transverse shear force and moment expressions are
V xð Þ ¼ �w L� xð ÞM xð Þ ¼ �w
2L� xð Þ2
Point A is a fixed support. Then, β xAð Þ ¼ v xAð Þ ¼ 0. Noting (3.46),
β ¼ð x0
� w
2EIL� xð Þ2dx
+β ¼ w
6EIL� xð Þ3 � w
6EIL3
Substituting for β in (3.47) leads to
v xð Þ ¼ w2GAs
L� xð Þ2h i x
0þ � w
24EI L� xð Þ4 � w6EIL
3xh i x
0
¼ w
2GAs
L� xð Þ2 � L2� �
þ w
6EI�14L� xð Þ4 � L3xþ L4
4
� � ð3:48Þ
Specializing for x ¼ L, the end displacement is equal to
þ " v Lð Þ ¼ �wL4
8EI1þ 4EI
GAsL2
� �
The effect of shear deformation is to “increase” the displacement by a dimensionless factor which
is proportioned to the ratio EI/GAsL2. This factor is usually small with respect to 1 for a homogeneous
cross-section. It may be large for composite beams that have a “soft” core, i.e., where G E.
Rather than work with the deformation–displacement results, one can apply an extended form of
the Principle of Virtual Forces. We add the shear deformation term to the integral and also introduce
the virtual shear force δV. Then, (3.36) expands to
d δP ¼ðL
M xð ÞEI
δM xð Þ þ V xð ÞGAs
δV xð Þ� �
dx ð3:49Þ
The steps involved are the same as for slender beams. One now has to determine δV as well as δMfor a given δP. Revisiting the previous example defined in Fig. 3.33, we compute v(L). The details areas follows.
δV xð Þ ¼ �1δM xð Þ ¼ � L� xð Þ
246 3 Statically Determinate Beams
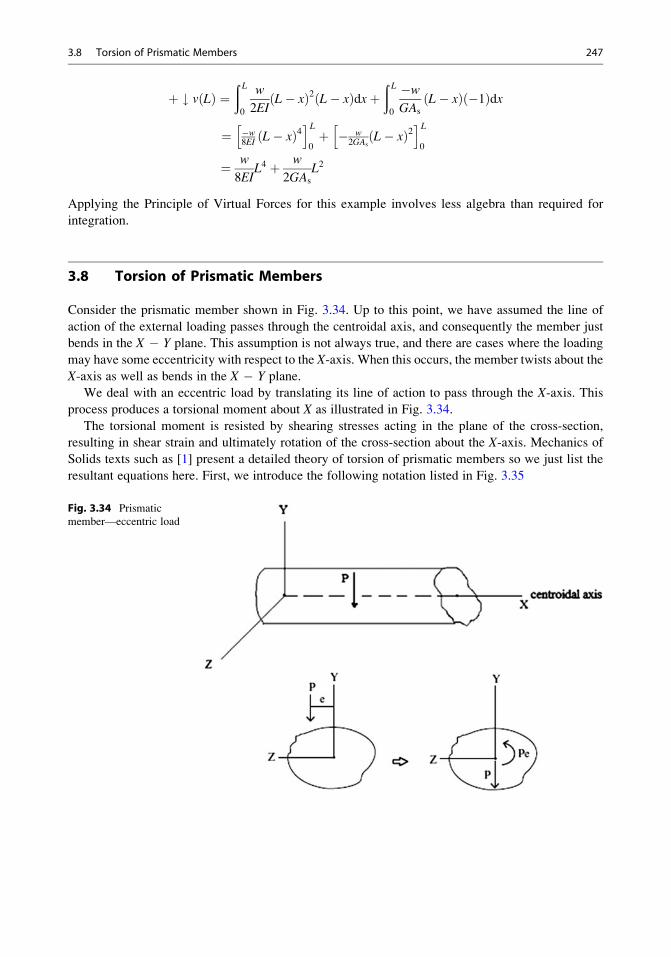
þ # v Lð Þ ¼ð L0
w
2EIL� xð Þ2 L� xð Þdxþ
ð L0
�wGAs
L� xð Þ �1ð Þdx
¼ �w8EI L� xð Þ4h iL
0þ � w
2GAsL� xð Þ2
h iL0
¼ w
8EIL4 þ w
2GAs
L2
Applying the Principle of Virtual Forces for this example involves less algebra than required for
integration.
3.8 Torsion of Prismatic Members
Consider the prismatic member shown in Fig. 3.34. Up to this point, we have assumed the line of
action of the external loading passes through the centroidal axis, and consequently the member just
bends in the X � Y plane. This assumption is not always true, and there are cases where the loading
may have some eccentricity with respect to the X-axis. When this occurs, the member twists about the
X-axis as well as bends in the X � Y plane.
We deal with an eccentric load by translating its line of action to pass through the X-axis. This
process produces a torsional moment about X as illustrated in Fig. 3.34.
The torsional moment is resisted by shearing stresses acting in the plane of the cross-section,
resulting in shear strain and ultimately rotation of the cross-section about the X-axis. Mechanics of
Solids texts such as [1] present a detailed theory of torsion of prismatic members so we just list the
resultant equations here. First, we introduce the following notation listed in Fig. 3.35
Fig. 3.34 Prismatic
member—eccentric load
3.8 Torsion of Prismatic Members 247
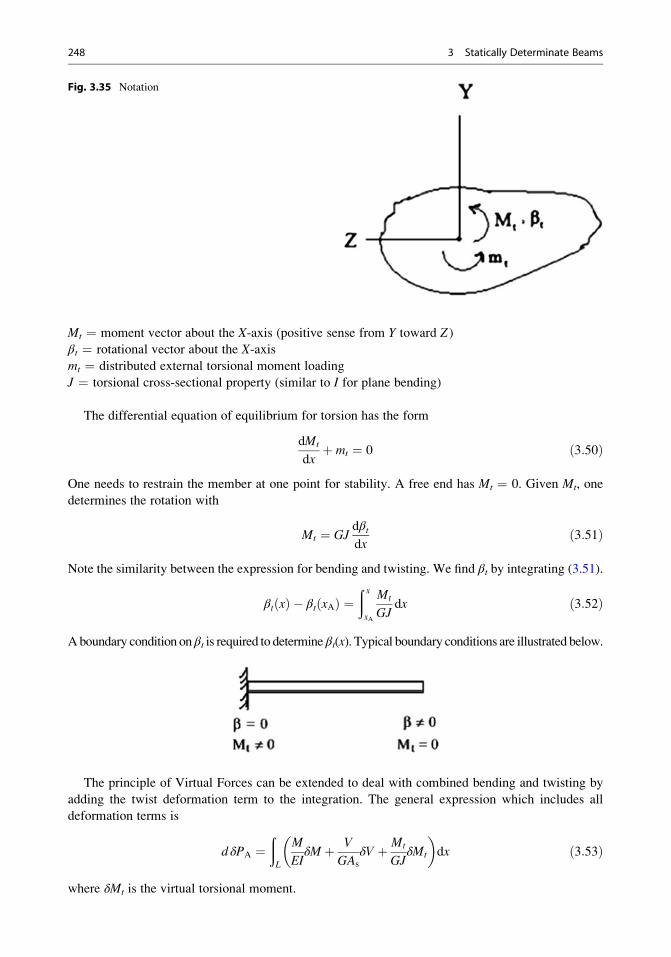
Mt ¼ moment vector about the X-axis (positive sense from Y toward Z )βt ¼ rotational vector about the X-axis
mt ¼ distributed external torsional moment loading
J ¼ torsional cross-sectional property (similar to I for plane bending)
The differential equation of equilibrium for torsion has the form
dMt
dxþ mt ¼ 0 ð3:50Þ
One needs to restrain the member at one point for stability. A free end has Mt ¼ 0. Given Mt, one
determines the rotation with
Mt ¼ GJdβtdx
ð3:51Þ
Note the similarity between the expression for bending and twisting. We find βt by integrating (3.51).
βt xð Þ � βt xAð Þ ¼ð xxA
Mt
GJdx ð3:52Þ
Aboundary condition on βt is required to determine βt(x). Typical boundary conditions are illustrated below.
The principle of Virtual Forces can be extended to deal with combined bending and twisting by
adding the twist deformation term to the integration. The general expression which includes all
deformation terms is
d δPA ¼ðL
M
EIδM þ V
GAs
δV þ Mt
GJδMt
� �dx ð3:53Þ
where δMt is the virtual torsional moment.
Fig. 3.35 Notation
248 3 Statically Determinate Beams
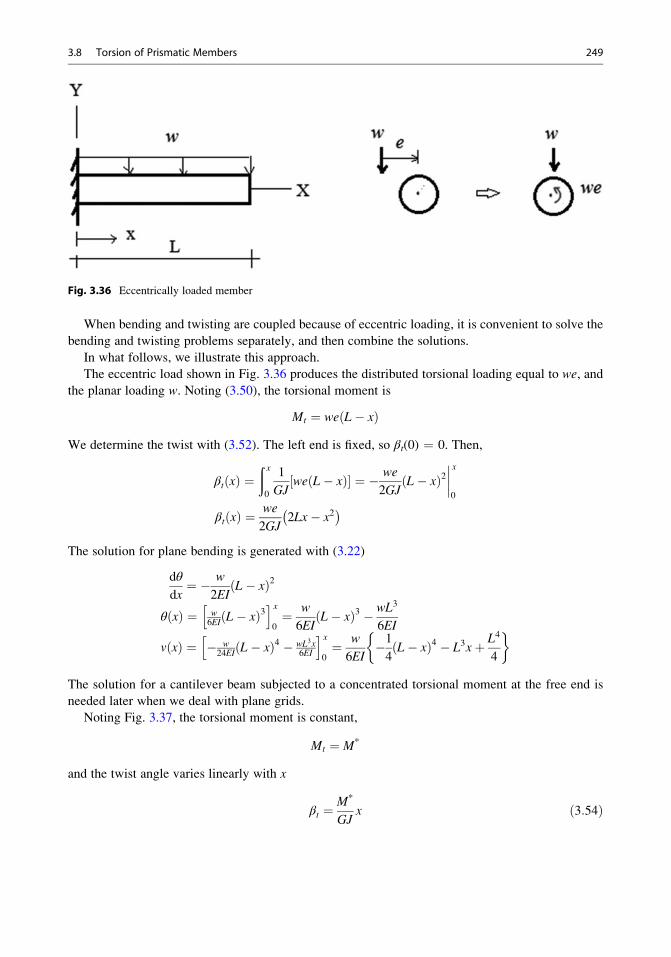
When bending and twisting are coupled because of eccentric loading, it is convenient to solve the
bending and twisting problems separately, and then combine the solutions.
In what follows, we illustrate this approach.
The eccentric load shown in Fig. 3.36 produces the distributed torsional loading equal to we, and
the planar loading w. Noting (3.50), the torsional moment is
Mt ¼ we L� xð ÞWe determine the twist with (3.52). The left end is fixed, so βt(0) ¼ 0. Then,
βt xð Þ ¼ð x0
1
GJwe L� xð Þ½ � ¼ � we
2GJL� xð Þ2
����x
0
βt xð Þ ¼we
2GJ2Lx� x2� �
The solution for plane bending is generated with (3.22)
dθ
dx¼ � w
2EIL� xð Þ2
θ xð Þ ¼ w6EI L� xð Þ3h i x
0¼ w
6EIL� xð Þ3 � wL3
6EI
v xð Þ ¼ � w24EI L� xð Þ4 � wL3x
6EI
h i x0¼ w
6EI�14L� xð Þ4 � L3xþ L4
4
�
The solution for a cantilever beam subjected to a concentrated torsional moment at the free end is
needed later when we deal with plane grids.
Noting Fig. 3.37, the torsional moment is constant,
Mt ¼ M*
and the twist angle varies linearly with x
βt ¼M*
GJx ð3:54Þ
Fig. 3.36 Eccentrically loaded member
3.8 Torsion of Prismatic Members 249
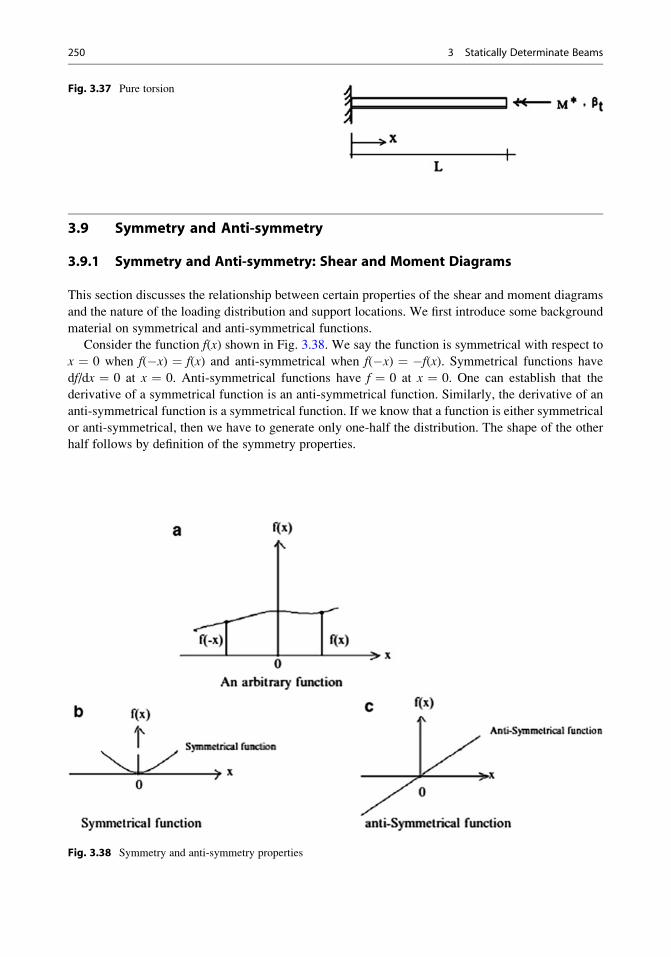
3.9 Symmetry and Anti-symmetry
3.9.1 Symmetry and Anti-symmetry: Shear and Moment Diagrams
This section discusses the relationship between certain properties of the shear and moment diagrams
and the nature of the loading distribution and support locations. We first introduce some background
material on symmetrical and anti-symmetrical functions.
Consider the function f(x) shown in Fig. 3.38. We say the function is symmetrical with respect to
x ¼ 0 when f(�x) ¼ f(x) and anti-symmetrical when f(�x) ¼ �f(x). Symmetrical functions have
df/dx ¼ 0 at x ¼ 0. Anti-symmetrical functions have f ¼ 0 at x ¼ 0. One can establish that the
derivative of a symmetrical function is an anti-symmetrical function. Similarly, the derivative of an
anti-symmetrical function is a symmetrical function. If we know that a function is either symmetrical
or anti-symmetrical, then we have to generate only one-half the distribution. The shape of the other
half follows by definition of the symmetry properties.
Fig. 3.38 Symmetry and anti-symmetry properties
Fig. 3.37 Pure torsion
250 3 Statically Determinate Beams
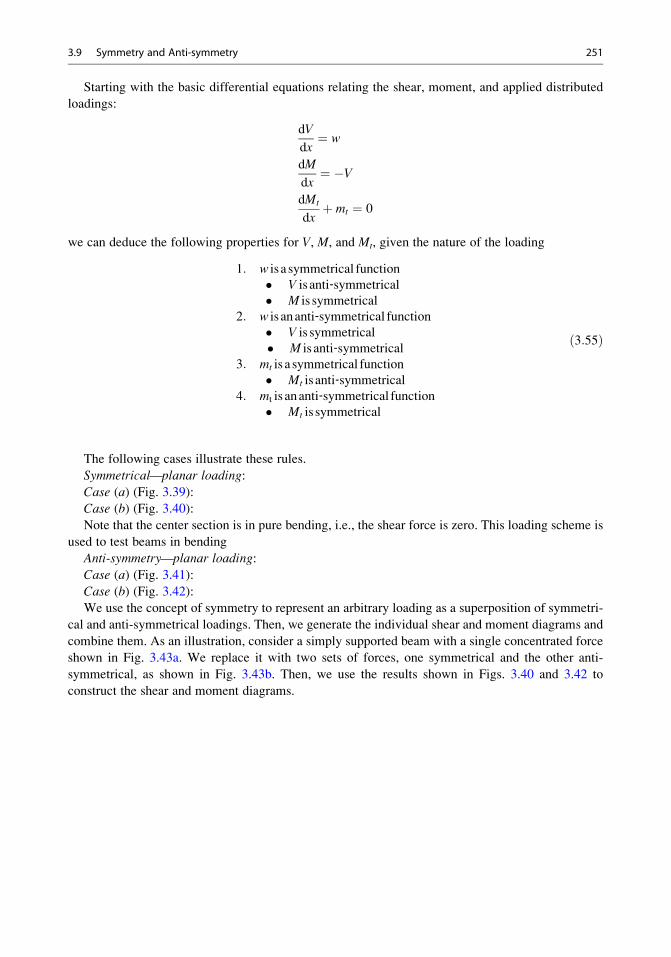
Starting with the basic differential equations relating the shear, moment, and applied distributed
loadings:
dV
dx¼ w
dM
dx¼ �V
dMt
dxþ mt ¼ 0
we can deduce the following properties for V, M, and Mt, given the nature of the loading
1: w is a symmetrical function
� V is anti‐symmetrical
� M is symmetrical
2: w is ananti‐symmetrical function
� V is symmetrical
� M is anti‐symmetrical
3: mt is a symmetrical function
� Mt is anti‐symmetrical
4: mt is ananti‐symmetrical function
� Mt is symmetrical
ð3:55Þ
The following cases illustrate these rules.
Symmetrical—planar loading:
Case (a) (Fig. 3.39):Case (b) (Fig. 3.40):
Note that the center section is in pure bending, i.e., the shear force is zero. This loading scheme is
used to test beams in bending
Anti-symmetry—planar loading:
Case (a) (Fig. 3.41):
Case (b) (Fig. 3.42):We use the concept of symmetry to represent an arbitrary loading as a superposition of symmetri-
cal and anti-symmetrical loadings. Then, we generate the individual shear and moment diagrams and
combine them. As an illustration, consider a simply supported beam with a single concentrated force
shown in Fig. 3.43a. We replace it with two sets of forces, one symmetrical and the other anti-
symmetrical, as shown in Fig. 3.43b. Then, we use the results shown in Figs. 3.40 and 3.42 to
construct the shear and moment diagrams.
3.9 Symmetry and Anti-symmetry 251
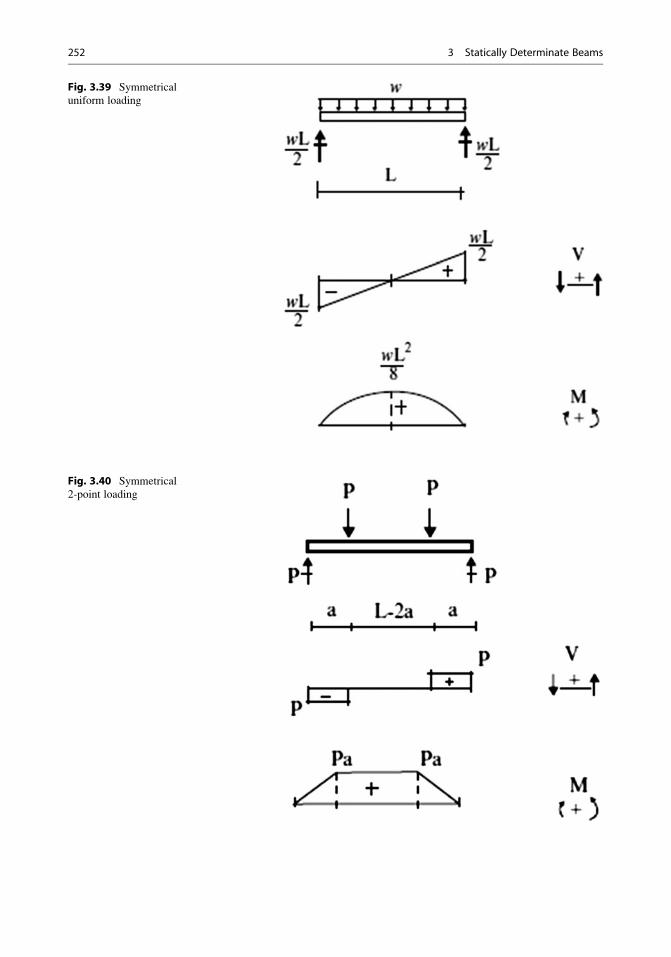
Fig. 3.40 Symmetrical
2-point loading
Fig. 3.39 Symmetrical
uniform loading
252 3 Statically Determinate Beams
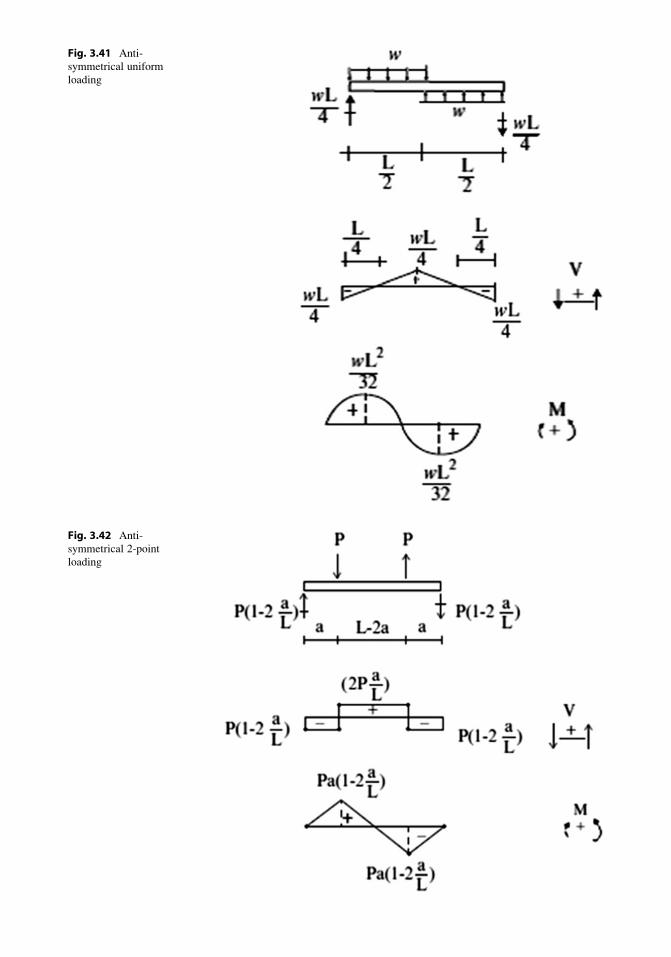
Fig. 3.41 Anti-
symmetrical uniform
loading
Fig. 3.42 Anti-
symmetrical 2-point
loading
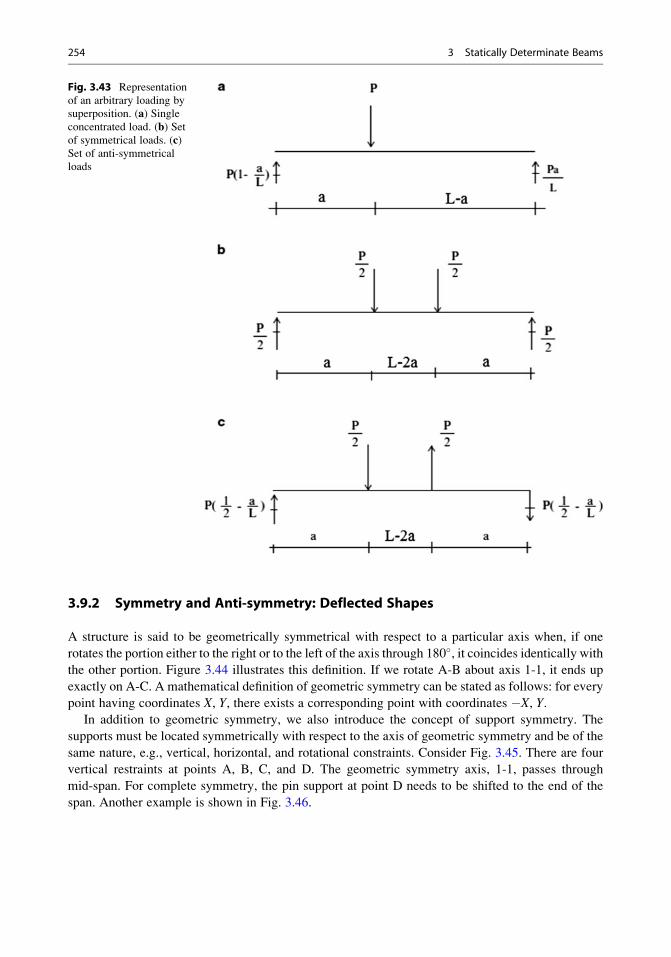
3.9.2 Symmetry and Anti-symmetry: Deflected Shapes
A structure is said to be geometrically symmetrical with respect to a particular axis when, if one
rotates the portion either to the right or to the left of the axis through 180�, it coincides identically withthe other portion. Figure 3.44 illustrates this definition. If we rotate A-B about axis 1-1, it ends up
exactly on A-C. A mathematical definition of geometric symmetry can be stated as follows: for every
point having coordinates X, Y, there exists a corresponding point with coordinates �X, Y.In addition to geometric symmetry, we also introduce the concept of support symmetry. The
supports must be located symmetrically with respect to the axis of geometric symmetry and be of the
same nature, e.g., vertical, horizontal, and rotational constraints. Consider Fig. 3.45. There are four
vertical restraints at points A, B, C, and D. The geometric symmetry axis, 1-1, passes through
mid-span. For complete symmetry, the pin support at point D needs to be shifted to the end of the
span. Another example is shown in Fig. 3.46.
Fig. 3.43 Representation
of an arbitrary loading by
superposition. (a) Singleconcentrated load. (b) Setof symmetrical loads. (c)Set of anti-symmetrical
loads
254 3 Statically Determinate Beams
Fig. 3.44 Geometric
symmetry
Fig. 3.45 Unsymmetrical
support
Fig. 3.46 Support
symmetry examples
We say a structure is symmetrical when it has both geometric and support symmetry. The
symmetry property is very useful since it leads to the following conclusions:
When a symmetrical structure is loaded symmetrically, the resulting deflected shape is alsosymmetrical. Similarly, a symmetrical structure loaded anti-symmetrically has an anti-symmetric
deflected shape.
These conclusions follow from the differential equations listed below and the properties of
symmetrical and anti-symmetrical functions:
dV
dx¼ w
dM
dx¼ �V
dMt
dxþ mt ¼ 0
dβ
dx¼ M
EIdV
dx¼ β þ V
GJdβtdx¼ Mt
GJ
ð3:56Þ
If f(x) is symmetrical, df/dx is anti-symmetrical; if f(x) is anti-symmetrical, df/dx is symmetrical.
Using these properties, we construct the following table relating the response variables to the
loading for a symmetrical structure (Table 3.2).
We have placed a lot of emphasis here on symmetry because it is useful for qualitative reasoning.
It also allows us to work with only one-half the structure provided that we introduce appropriate
boundary conditions on the axis of symmetry. The boundary conditions for the symmetrical case
follow from the fact that V, β, and Mt are anti-symmetric functions and therefore vanish at the
Table 3.2 Loading response relationships—
symmetrical structureLoading Response variables
w symmetrical V anti-symmetrical
M symmetrical
β anti-symmetrical
v symmetrical
w anti-symmetrical V symmetric
M anti-symmetrical
β symmetrical
v anti-symmetrical
mt symmetrical Mt anti-symmetrical
βt symmetrical
mt anti-symmetrical Mt symmetrical
βt anti-symmetrical
Fig. 3.47 Symmetrical
boundary conditions on a
symmetry axis
256 3 Statically Determinate Beams
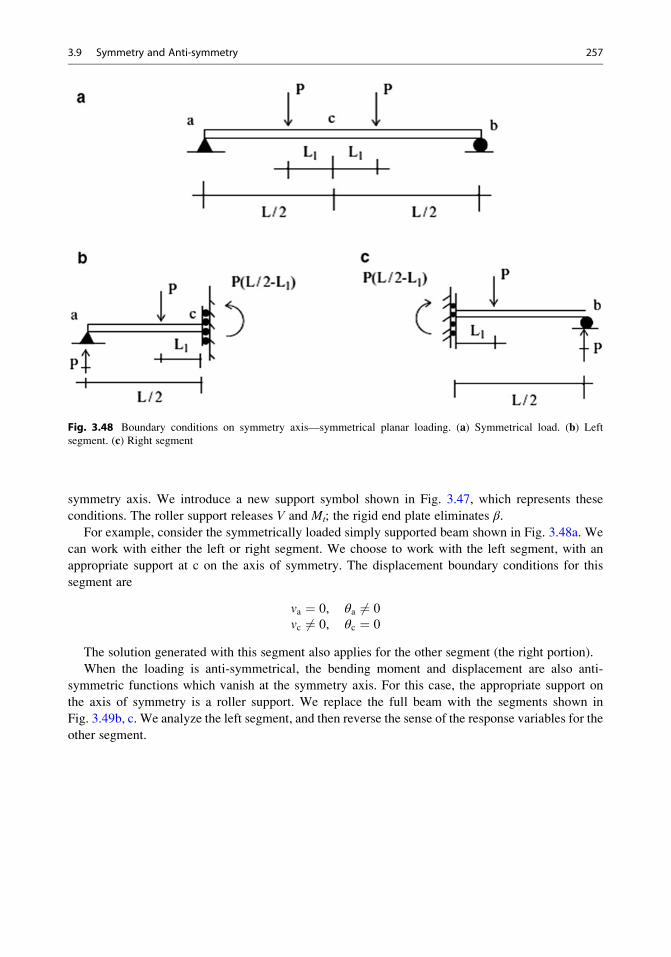
symmetry axis. We introduce a new support symbol shown in Fig. 3.47, which represents these
conditions. The roller support releases V and Mt; the rigid end plate eliminates β.For example, consider the symmetrically loaded simply supported beam shown in Fig. 3.48a. We
can work with either the left or right segment. We choose to work with the left segment, with an
appropriate support at c on the axis of symmetry. The displacement boundary conditions for this
segment are
va ¼ 0, θa 6¼ 0
vc 6¼ 0, θc ¼ 0
The solution generated with this segment also applies for the other segment (the right portion).
When the loading is anti-symmetrical, the bending moment and displacement are also anti-
symmetric functions which vanish at the symmetry axis. For this case, the appropriate support on
the axis of symmetry is a roller support. We replace the full beam with the segments shown in
Fig. 3.49b, c. We analyze the left segment, and then reverse the sense of the response variables for the
other segment.
Fig. 3.48 Boundary conditions on symmetry axis—symmetrical planar loading. (a) Symmetrical load. (b) Left
segment. (c) Right segment
3.9 Symmetry and Anti-symmetry 257
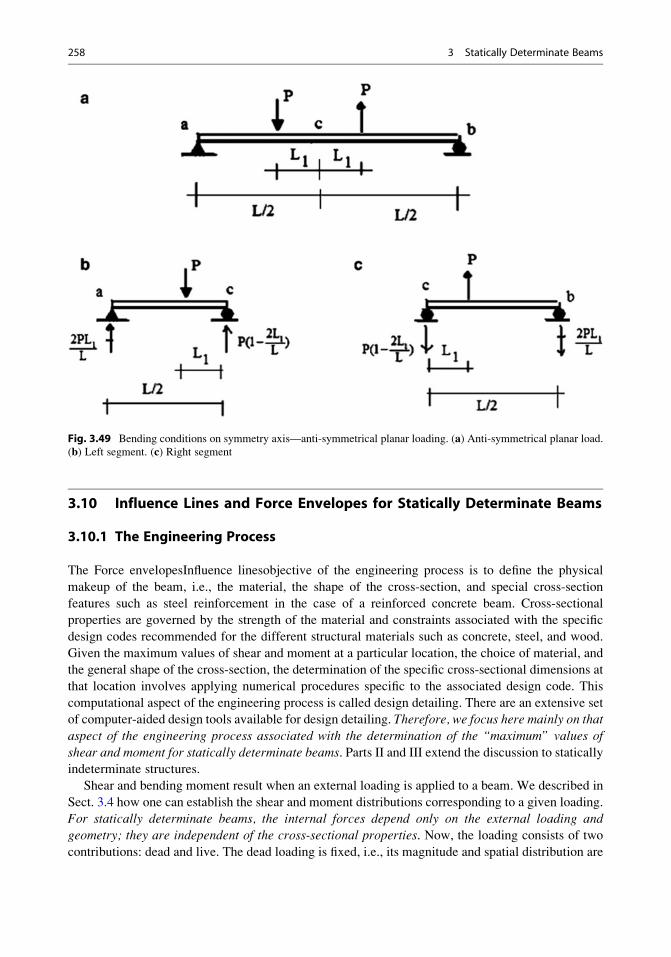
3.10 Influence Lines and Force Envelopes for Statically Determinate Beams
3.10.1 The Engineering Process
The Force envelopesInfluence linesobjective of the engineering process is to define the physical
makeup of the beam, i.e., the material, the shape of the cross-section, and special cross-section
features such as steel reinforcement in the case of a reinforced concrete beam. Cross-sectional
properties are governed by the strength of the material and constraints associated with the specific
design codes recommended for the different structural materials such as concrete, steel, and wood.
Given the maximum values of shear and moment at a particular location, the choice of material, and
the general shape of the cross-section, the determination of the specific cross-sectional dimensions at
that location involves applying numerical procedures specific to the associated design code. This
computational aspect of the engineering process is called design detailing. There are an extensive set
of computer-aided design tools available for design detailing. Therefore, we focus here mainly on that
aspect of the engineering process associated with the determination of the “maximum” values of
shear and moment for statically determinate beams. Parts II and III extend the discussion to staticallyindeterminate structures.
Shear and bending moment result when an external loading is applied to a beam. We described in
Sect. 3.4 how one can establish the shear and moment distributions corresponding to a given loading.
For statically determinate beams, the internal forces depend only on the external loading and
geometry; they are independent of the cross-sectional properties. Now, the loading consists of two
contributions: dead and live. The dead loading is fixed, i.e., its magnitude and spatial distribution are
Fig. 3.49 Bending conditions on symmetry axis—anti-symmetrical planar loading. (a) Anti-symmetrical planar load.
(b) Left segment. (c) Right segment
258 3 Statically Determinate Beams
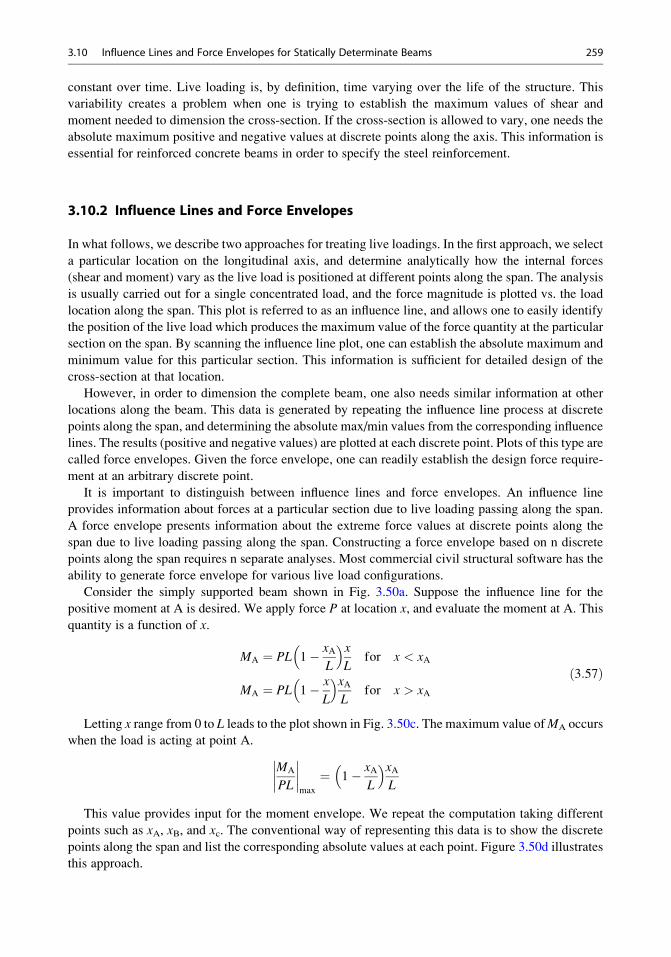
constant over time. Live loading is, by definition, time varying over the life of the structure. This
variability creates a problem when one is trying to establish the maximum values of shear and
moment needed to dimension the cross-section. If the cross-section is allowed to vary, one needs the
absolute maximum positive and negative values at discrete points along the axis. This information is
essential for reinforced concrete beams in order to specify the steel reinforcement.
3.10.2 Influence Lines and Force Envelopes
In what follows, we describe two approaches for treating live loadings. In the first approach, we select
a particular location on the longitudinal axis, and determine analytically how the internal forces
(shear and moment) vary as the live load is positioned at different points along the span. The analysis
is usually carried out for a single concentrated load, and the force magnitude is plotted vs. the load
location along the span. This plot is referred to as an influence line, and allows one to easily identify
the position of the live load which produces the maximum value of the force quantity at the particular
section on the span. By scanning the influence line plot, one can establish the absolute maximum and
minimum value for this particular section. This information is sufficient for detailed design of the
cross-section at that location.
However, in order to dimension the complete beam, one also needs similar information at other
locations along the beam. This data is generated by repeating the influence line process at discrete
points along the span, and determining the absolute max/min values from the corresponding influence
lines. The results (positive and negative values) are plotted at each discrete point. Plots of this type are
called force envelopes. Given the force envelope, one can readily establish the design force require-
ment at an arbitrary discrete point.
It is important to distinguish between influence lines and force envelopes. An influence line
provides information about forces at a particular section due to live loading passing along the span.
A force envelope presents information about the extreme force values at discrete points along the
span due to live loading passing along the span. Constructing a force envelope based on n discrete
points along the span requires n separate analyses. Most commercial civil structural software has the
ability to generate force envelope for various live load configurations.
Consider the simply supported beam shown in Fig. 3.50a. Suppose the influence line for the
positive moment at A is desired. We apply force P at location x, and evaluate the moment at A. This
quantity is a function of x.
MA ¼ PL 1� xAL
� �xL
for x < xA
MA ¼ PL 1� x
L
� �xAL
for x > xA
ð3:57Þ
Letting x range from 0 to L leads to the plot shown in Fig. 3.50c. The maximum value ofMA occurs
when the load is acting at point A.
MA
PL
��������max
¼ 1� xAL
� �xAL
This value provides input for the moment envelope. We repeat the computation taking different
points such as xA, xB, and xc. The conventional way of representing this data is to show the discrete
points along the span and list the corresponding absolute values at each point. Figure 3.50d illustrates
this approach.
3.10 Influence Lines and Force Envelopes for Statically Determinate Beams 259
Fig. 3.50 (a) Beam. (b) Loading patterns – Concentrated load P at x < xA and x > xA. (c) Moment diagram.
(d) Different load patterns. (e) Moment diagram. (f) Shear diagrams for concentrated load P at x < xA and x > xA.(g) Influence line for shear at location xA. (h) Maximum and minimum shear. (i) Shear force envelope
260 3 Statically Determinate Beams
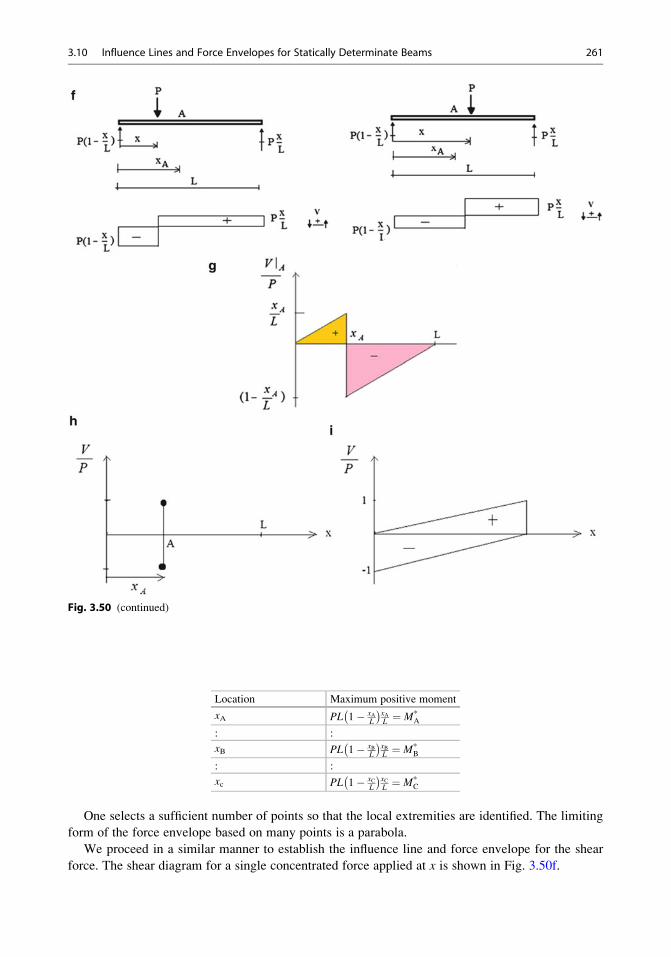
Location Maximum positive moment
xA PL 1� xAL
� �xAL ¼ M*
A
: :
xB PL 1� xBL
� �xBL ¼ M*
B
: :
xc PL 1� xCL
� �xCL ¼ M*
C
One selects a sufficient number of points so that the local extremities are identified. The limiting
form of the force envelope based on many points is a parabola.
We proceed in a similar manner to establish the influence line and force envelope for the shear
force. The shear diagram for a single concentrated force applied at x is shown in Fig. 3.50f.
Fig. 3.50 (continued)
3.10 Influence Lines and Force Envelopes for Statically Determinate Beams 261
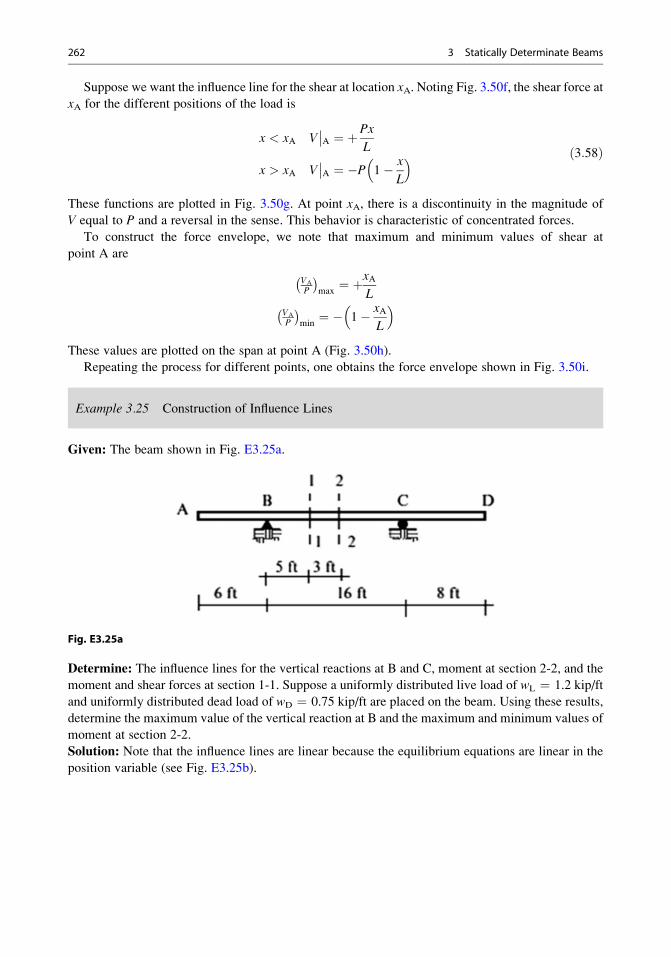
Suppose we want the influence line for the shear at location xA. Noting Fig. 3.50f, the shear force atxA for the different positions of the load is
x < xA V��A ¼ þPx
L
x > xA V��A ¼ �P 1� x
L
� � ð3:58Þ
These functions are plotted in Fig. 3.50g. At point xA, there is a discontinuity in the magnitude of
V equal to P and a reversal in the sense. This behavior is characteristic of concentrated forces.
To construct the force envelope, we note that maximum and minimum values of shear at
point A are
VA
P
� �max¼ þxA
L
VA
P
� �min¼ � 1� xA
L
� �These values are plotted on the span at point A (Fig. 3.50h).
Repeating the process for different points, one obtains the force envelope shown in Fig. 3.50i.
Example 3.25 Construction of Influence Lines
Given: The beam shown in Fig. E3.25a.
Fig. E3.25a
Determine: The influence lines for the vertical reactions at B and C, moment at section 2-2, and the
moment and shear forces at section 1-1. Suppose a uniformly distributed live load of wL ¼ 1.2 kip/ft
and uniformly distributed dead load of wD ¼ 0.75 kip/ft are placed on the beam. Using these results,
determine the maximum value of the vertical reaction at B and the maximum and minimum values of
moment at section 2-2.
Solution: Note that the influence lines are linear because the equilibrium equations are linear in the
position variable (see Fig. E3.25b).
262 3 Statically Determinate Beams
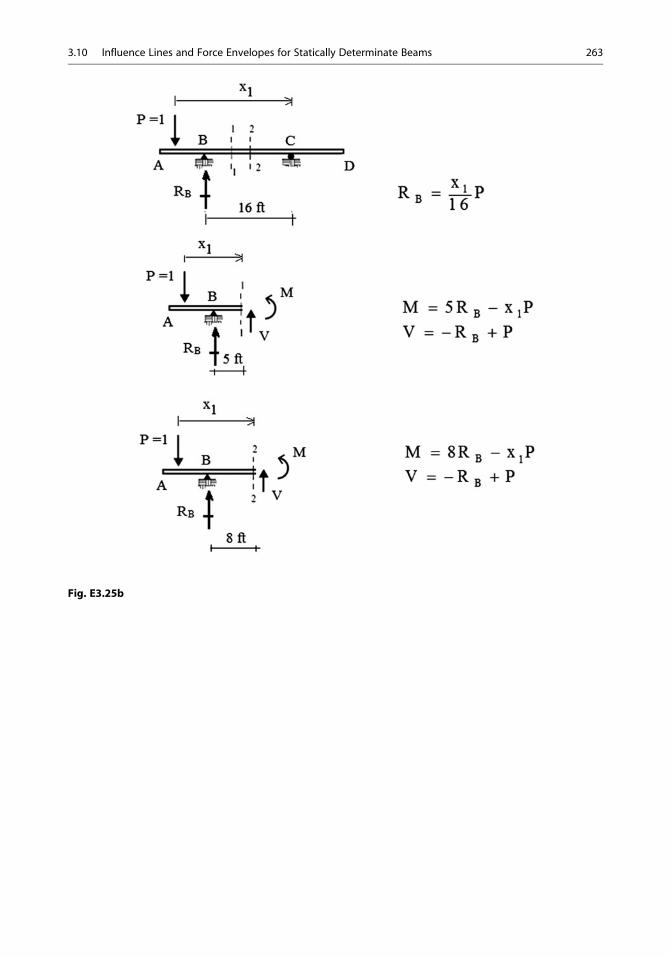
Fig. E3.25b
3.10 Influence Lines and Force Envelopes for Statically Determinate Beams 263
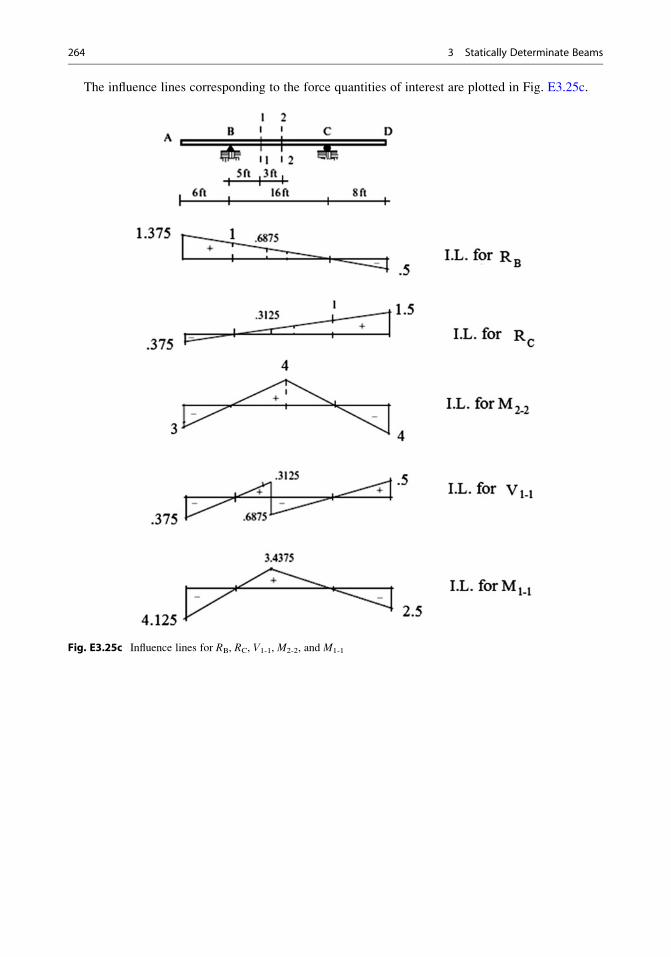
The influence lines corresponding to the force quantities of interest are plotted in Fig. E3.25c.
Fig. E3.25c Influence lines for RB, RC, V1-1, M2-2, and M1-1
264 3 Statically Determinate Beams
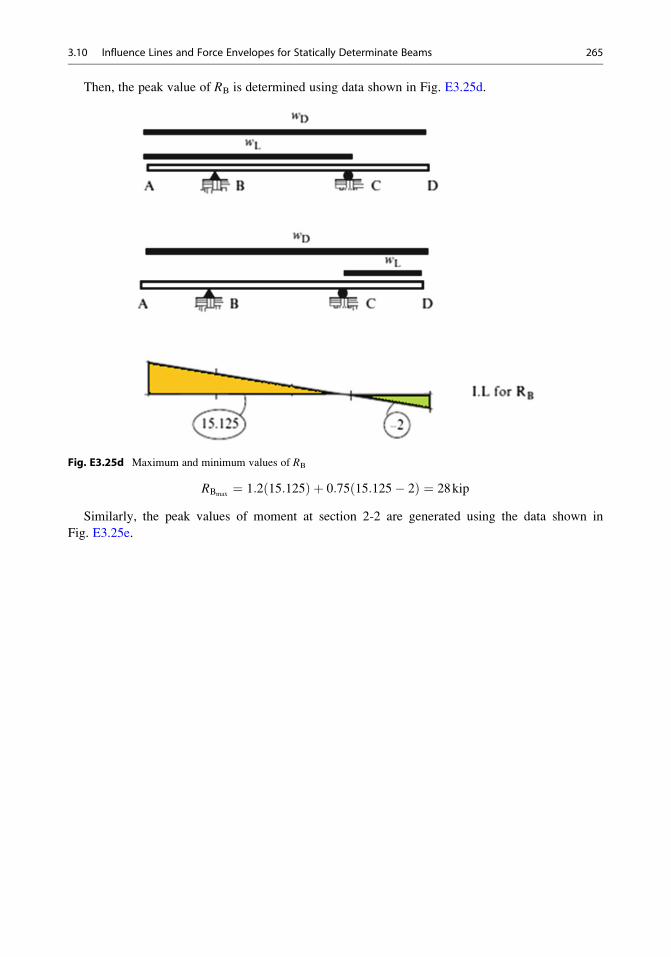
Then, the peak value of RB is determined using data shown in Fig. E3.25d.
Fig. E3.25d Maximum and minimum values of RB
RBmax¼ 1:2 15:125ð Þ þ 0:75 15:125� 2ð Þ ¼ 28kip
Similarly, the peak values of moment at section 2-2 are generated using the data shown in
Fig. E3.25e.
3.10 Influence Lines and Force Envelopes for Statically Determinate Beams 265
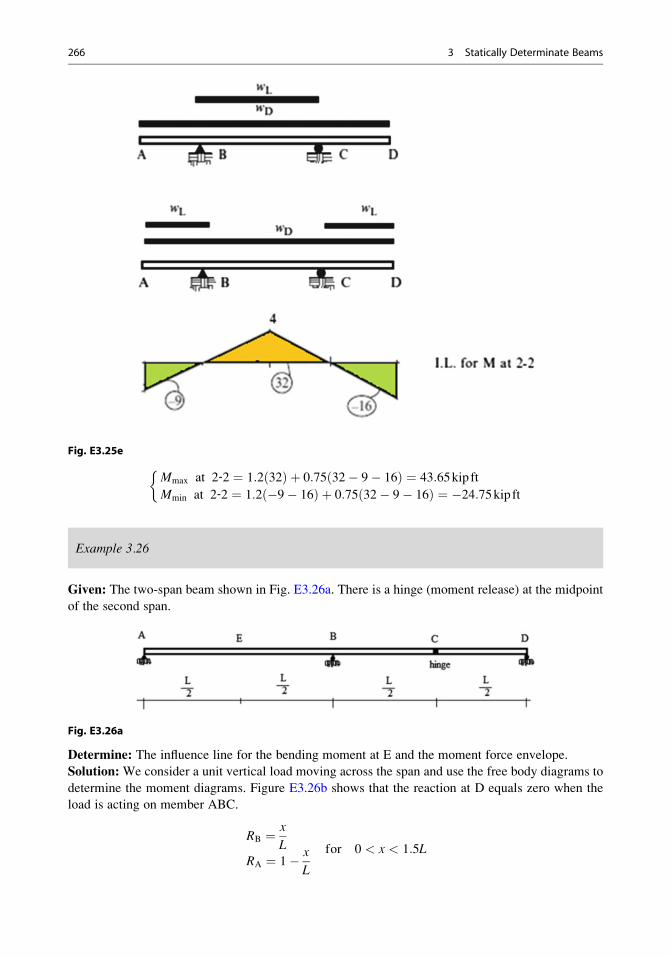
Fig. E3.25e
Mmax at 2‐2 ¼ 1:2 32ð Þ þ 0:75 32� 9� 16ð Þ ¼ 43:65kip ft
Mmin at 2‐2 ¼ 1:2 �9� 16ð Þ þ 0:75 32� 9� 16ð Þ ¼ �24:75kip ft
Example 3.26
Given: The two-span beam shown in Fig. E3.26a. There is a hinge (moment release) at the midpoint
of the second span.
Fig. E3.26a
Determine: The influence line for the bending moment at E and the moment force envelope.
Solution: We consider a unit vertical load moving across the span and use the free body diagrams to
determine the moment diagrams. Figure E3.26b shows that the reaction at D equals zero when the
load is acting on member ABC.
RB ¼ x
LRA ¼ 1� x
L
for 0 < x < 1:5L
266 3 Statically Determinate Beams
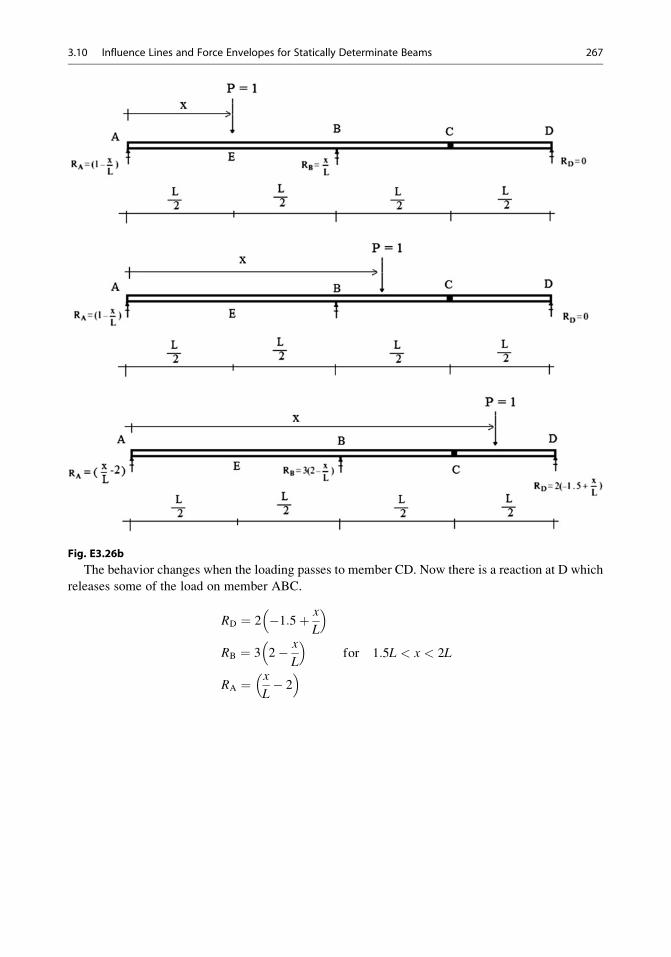
Fig. E3.26b
The behavior changes when the loading passes to member CD. Now there is a reaction at D which
releases some of the load on member ABC.
RD ¼ 2 �1:5þ x
L
� �RB ¼ 3 2� x
L
� �RA ¼ x
L� 2
� � for 1:5L < x < 2L
3.10 Influence Lines and Force Envelopes for Statically Determinate Beams 267
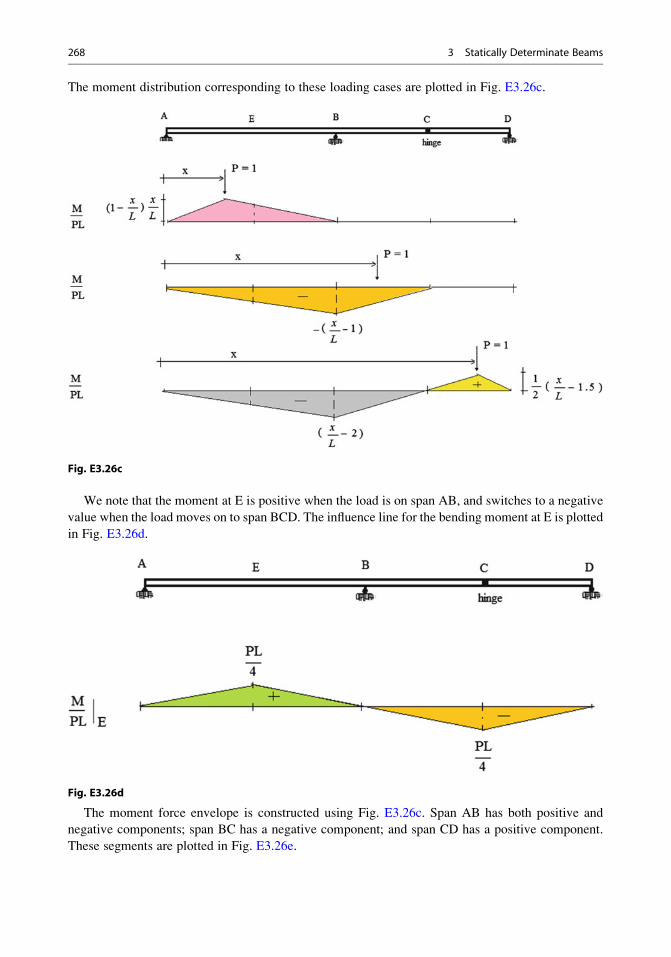
The moment distribution corresponding to these loading cases are plotted in Fig. E3.26c.
Fig. E3.26c
We note that the moment at E is positive when the load is on span AB, and switches to a negative
value when the load moves on to span BCD. The influence line for the bending moment at E is plotted
in Fig. E3.26d.
Fig. E3.26d
The moment force envelope is constructed using Fig. E3.26c. Span AB has both positive and
negative components; span BC has a negative component; and span CD has a positive component.
These segments are plotted in Fig. E3.26e.
268 3 Statically Determinate Beams
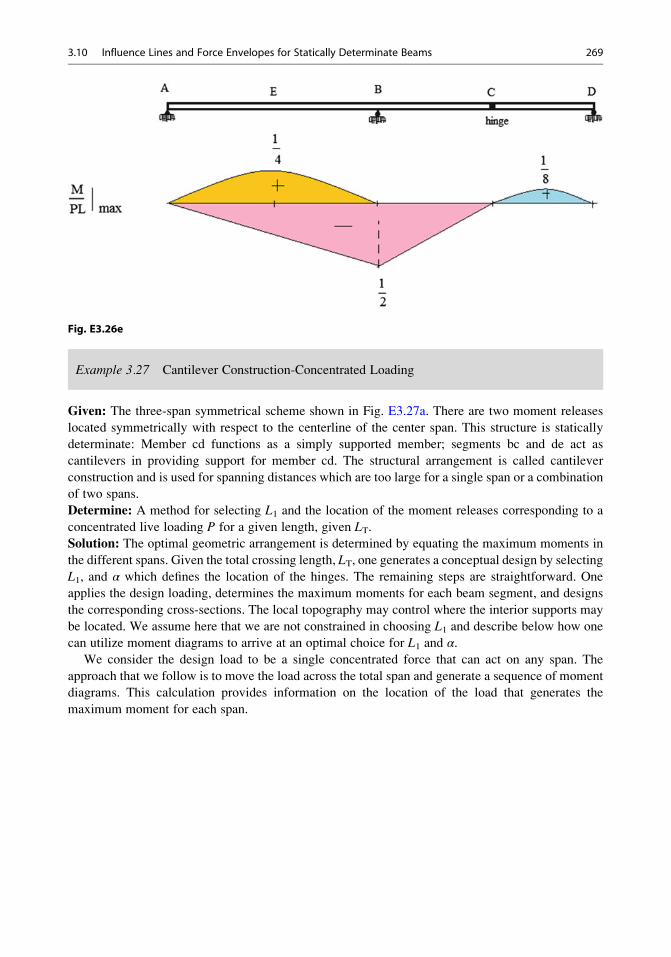
Fig. E3.26e
Example 3.27 Cantilever Construction-Concentrated Loading
Given: The three-span symmetrical scheme shown in Fig. E3.27a. There are two moment releases
located symmetrically with respect to the centerline of the center span. This structure is statically
determinate: Member cd functions as a simply supported member; segments bc and de act as
cantilevers in providing support for member cd. The structural arrangement is called cantilever
construction and is used for spanning distances which are too large for a single span or a combination
of two spans.
Determine: A method for selecting L1 and the location of the moment releases corresponding to a
concentrated live loading P for a given length, given LT.Solution: The optimal geometric arrangement is determined by equating the maximum moments in
the different spans. Given the total crossing length, LT, one generates a conceptual design by selecting
L1, and α which defines the location of the hinges. The remaining steps are straightforward. One
applies the design loading, determines the maximum moments for each beam segment, and designs
the corresponding cross-sections. The local topography may control where the interior supports may
be located. We assume here that we are not constrained in choosing L1 and describe below how one
can utilize moment diagrams to arrive at an optimal choice for L1 and α.We consider the design load to be a single concentrated force that can act on any span. The
approach that we follow is to move the load across the total span and generate a sequence of moment
diagrams. This calculation provides information on the location of the load that generates the
maximum moment for each span.
3.10 Influence Lines and Force Envelopes for Statically Determinate Beams 269
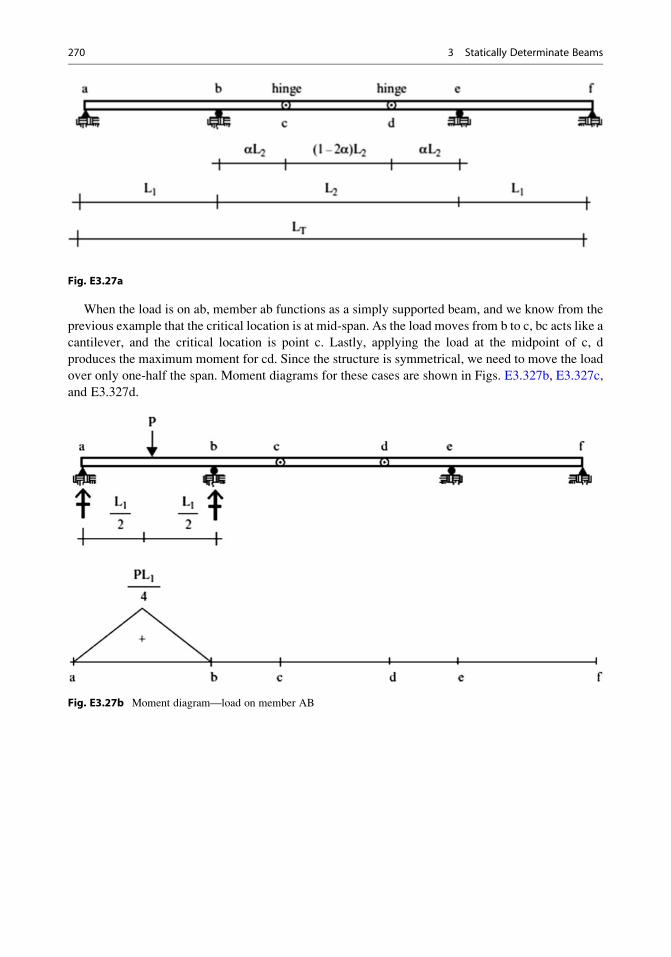
Fig. E3.27a
When the load is on ab, member ab functions as a simply supported beam, and we know from the
previous example that the critical location is at mid-span. As the load moves from b to c, bc acts like a
cantilever, and the critical location is point c. Lastly, applying the load at the midpoint of c, d
produces the maximum moment for cd. Since the structure is symmetrical, we need to move the load
over only one-half the span. Moment diagrams for these cases are shown in Figs. E3.327b, E3.327c,
and E3.327d.
Fig. E3.27b Moment diagram—load on member AB
270 3 Statically Determinate Beams
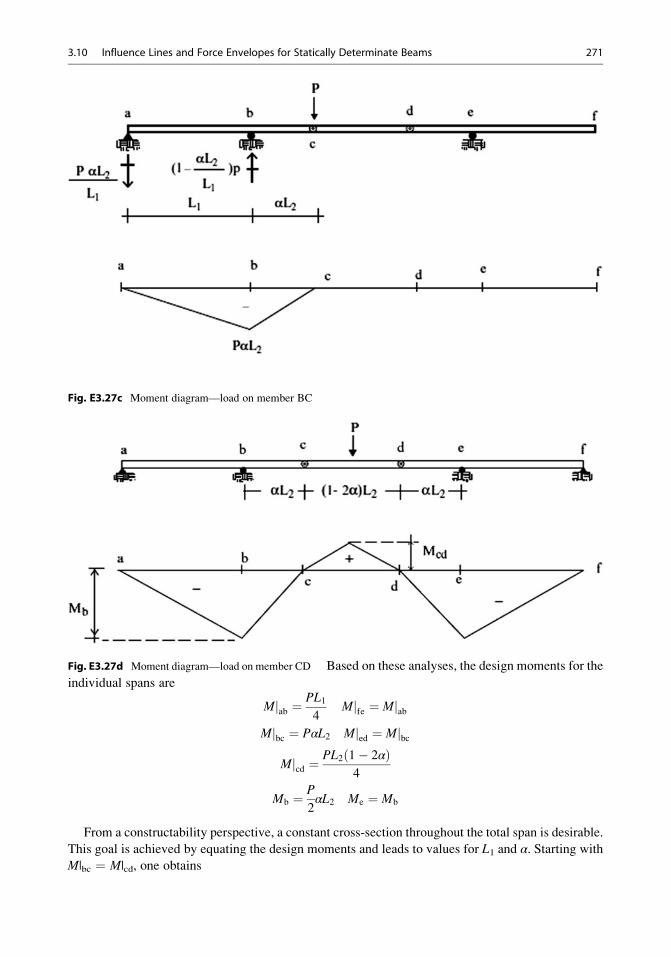
Fig. E3.27c Moment diagram—load on member BC
Fig. E3.27d Moment diagram—load on member CD Based on these analyses, the design moments for the
individual spans are
Mjab ¼PL14
Mjfe ¼ MjabMjbc ¼ PαL2 Mjed ¼ Mjbc
Mjcd ¼PL2 1� 2αð Þ
4
Mb ¼ P
2αL2 Me ¼ Mb
From a constructability perspective, a constant cross-section throughout the total span is desirable.
This goal is achieved by equating the design moments and leads to values for L1 and α. Starting withM|bc ¼ M|cd, one obtains
3.10 Influence Lines and Force Envelopes for Statically Determinate Beams 271

PαL2 ¼ PL2 1� 2αð Þ4+
α ¼ 1� 2αð Þ4
+ α ¼ 1
6
Next, we equate M|ab and M|bc, resulting in
PL14¼ PαL2+
L1 ¼ 2
3L2
The “optimal” center span is
2L1 þ L2 ¼ LT+
L2 ¼ 3
7LT ¼ 0:429LT
If the interior supports can be located such that these span lengths can be realized, the design is
optimal for this particular design loading. We want to emphasize here that analysis is useful for
gaining insight about behavior, which provides the basis for rational design. One could have solved
this problem by iterating through various geometries, i.e., assuming values for α and L1, but the
strategy described above is a better structural engineering approach.
Example 3.28 Cantilever Construction—Uniform Design Loading
Given: The three-span symmetrical structure shown in Fig. E3.28a.
Fig. E3.28a
Determine: The optimal values of L1 and α corresponding to a uniform live loading w.Solution: Using the results of the previous example, first, we establish the influence lines for the
moment at mid-span of ab (M1-1), at point b (Mb), and at mid-span of member cd (M2-2). They are
plotted in Fig. E3.28b.
272 3 Statically Determinate Beams

Fig. E3.28b Influence lines
We suppose that the uniformly distributed loading can be applied on an arbitrary segment of a
span. We start with the side span, ab. Based on the influence line, we load span ab (Fig. E3.28c).
Next, we load the center span. Loading the segment bcd produces the maximum values forMb and
Mcd (Fig. E3.28d). The third option is to load the center span (Fig. E3.28e).
The peak values for these loading schemes are
Mab ¼ wL218
Mcd ¼ wL228
1� 2αð Þ2
Mbc ¼ wL222
α2 þ α 1� 2αð Þ� �
3.10 Influence Lines and Force Envelopes for Statically Determinate Beams 273
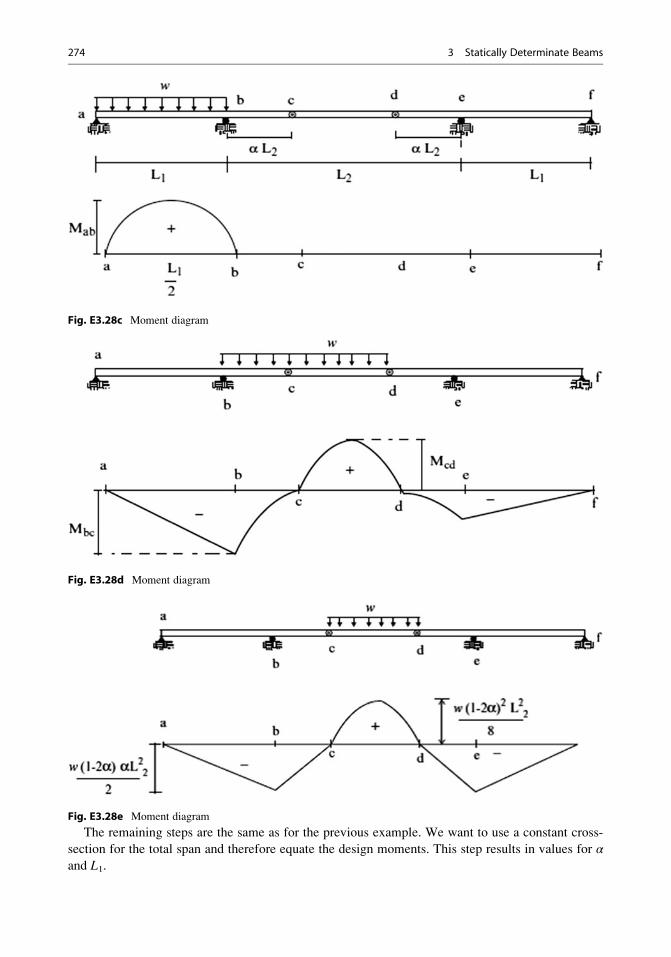
Fig. E3.28c Moment diagram
Fig. E3.28d Moment diagram
Fig. E3.28e Moment diagram
The remaining steps are the same as for the previous example. We want to use a constant cross-
section for the total span and therefore equate the design moments. This step results in values for αand L1.
274 3 Statically Determinate Beams
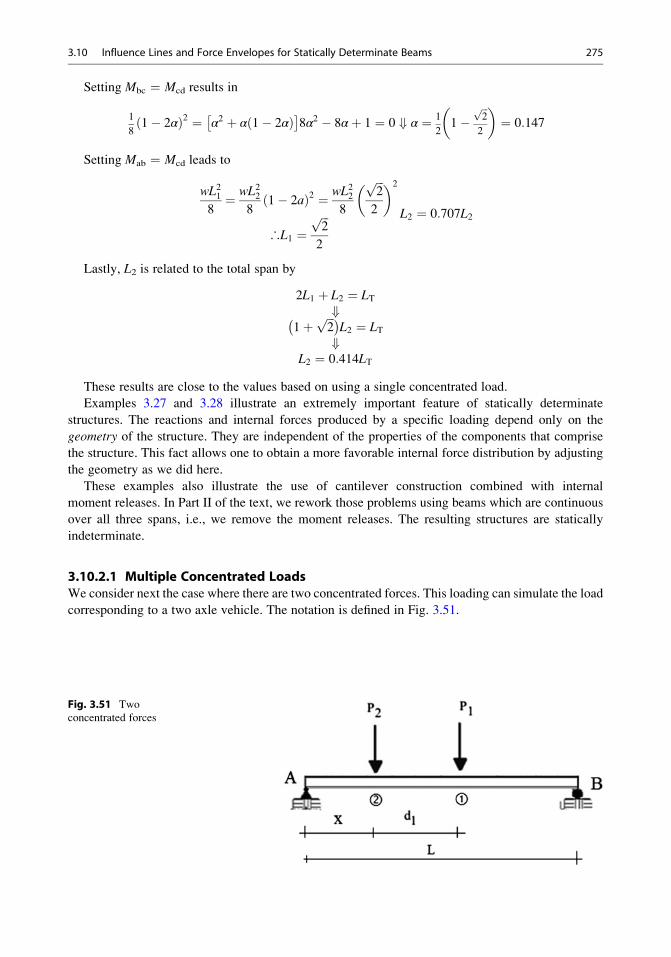
Setting Mbc ¼ Mcd results in
1
81� 2αð Þ2 ¼ α2 þ α 1� 2αð Þ� �
8α2 � 8αþ 1 ¼ 0 + α ¼ 1
21�
ffiffiffi2p
2
� �¼ 0:147
Setting Mab ¼ Mcd leads to
wL218¼ wL22
81� 2að Þ2 ¼ wL22
8
ffiffiffi2p
2
� �2
∴L1 ¼ffiffiffi2p
2
L2 ¼ 0:707L2
Lastly, L2 is related to the total span by
2L1 þ L2 ¼ LT+
1þ ffiffiffi2p� �
L2 ¼ LT+
L2 ¼ 0:414LT
These results are close to the values based on using a single concentrated load.
Examples 3.27 and 3.28 illustrate an extremely important feature of statically determinate
structures. The reactions and internal forces produced by a specific loading depend only on the
geometry of the structure. They are independent of the properties of the components that comprise
the structure. This fact allows one to obtain a more favorable internal force distribution by adjusting
the geometry as we did here.
These examples also illustrate the use of cantilever construction combined with internal
moment releases. In Part II of the text, we rework those problems using beams which are continuous
over all three spans, i.e., we remove the moment releases. The resulting structures are statically
indeterminate.
3.10.2.1 Multiple Concentrated LoadsWe consider next the case where there are two concentrated forces. This loading can simulate the load
corresponding to a two axle vehicle. The notation is defined in Fig. 3.51.
Fig. 3.51 Two
concentrated forces
3.10 Influence Lines and Force Envelopes for Statically Determinate Beams 275
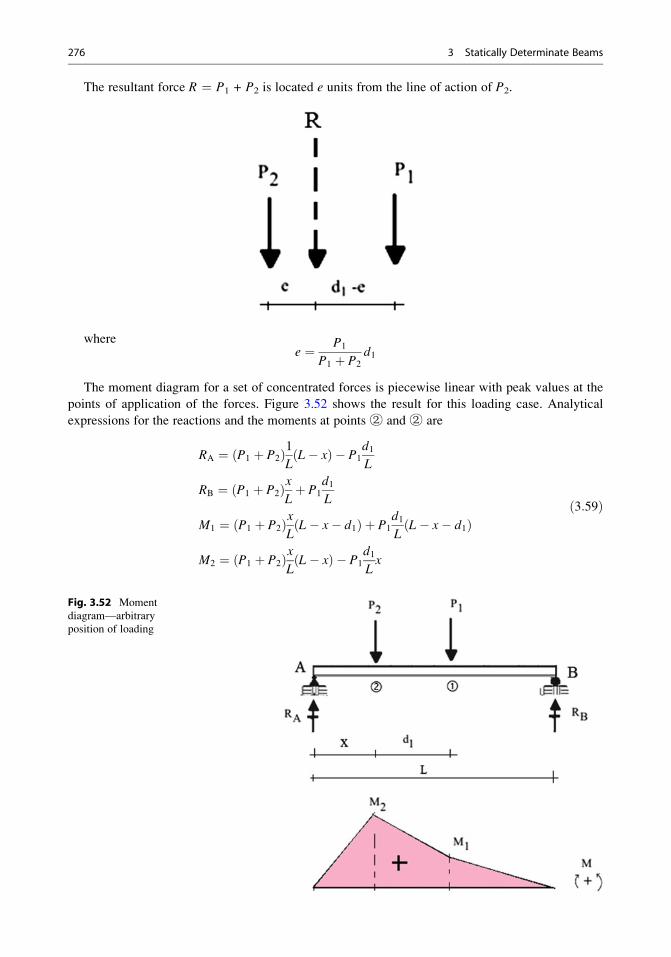
The resultant force R ¼ P1 + P2 is located e units from the line of action of P2.
wheree ¼ P1
P1 þ P2
d1
The moment diagram for a set of concentrated forces is piecewise linear with peak values at the
points of application of the forces. Figure 3.52 shows the result for this loading case. Analytical
expressions for the reactions and the moments at points ② and ② are
RA ¼ P1 þ P2ð Þ1LL� xð Þ � P1
d1L
RB ¼ P1 þ P2ð ÞxLþ P1
d1L
M1 ¼ P1 þ P2ð ÞxLL� x� d1ð Þ þ P1
d1L
L� x� d1ð Þ
M2 ¼ P1 þ P2ð ÞxLL� xð Þ � P1
d1Lx
ð3:59Þ
Fig. 3.52 Moment
diagram—arbitrary
position of loading
276 3 Statically Determinate Beams
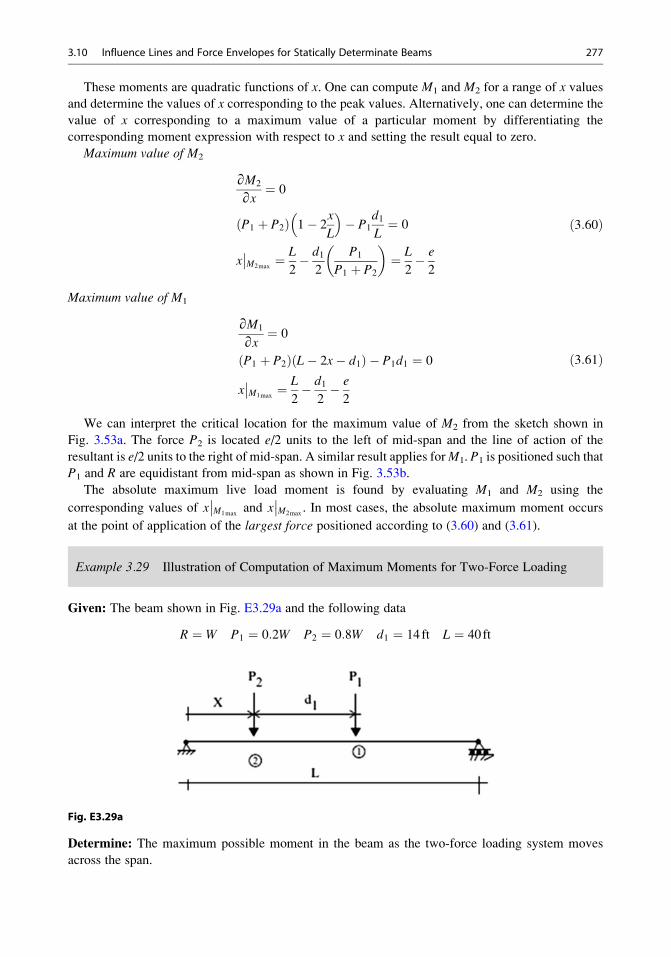
These moments are quadratic functions of x. One can compute M1 and M2 for a range of x valuesand determine the values of x corresponding to the peak values. Alternatively, one can determine the
value of x corresponding to a maximum value of a particular moment by differentiating the
corresponding moment expression with respect to x and setting the result equal to zero.
Maximum value of M2
∂M2
∂x¼ 0
P1 þ P2ð Þ 1� 2x
L
� �� P1
d1L¼ 0
x��M2max
¼ L
2� d1
2
P1
P1 þ P2
� �¼ L
2� e
2
ð3:60Þ
Maximum value of M1
∂M1
∂x¼ 0
P1 þ P2ð Þ L� 2x� d1ð Þ � P1d1 ¼ 0
x��M1max
¼ L
2� d1
2� e
2
ð3:61Þ
We can interpret the critical location for the maximum value of M2 from the sketch shown in
Fig. 3.53a. The force P2 is located e/2 units to the left of mid-span and the line of action of the
resultant is e/2 units to the right of mid-span. A similar result applies forM1. P1 is positioned such that
P1 and R are equidistant from mid-span as shown in Fig. 3.53b.
The absolute maximum live load moment is found by evaluating M1 and M2 using the
corresponding values of x��M1max
and x��M2max
. In most cases, the absolute maximum moment occurs
at the point of application of the largest force positioned according to (3.60) and (3.61).
Example 3.29 Illustration of Computation of Maximum Moments for Two-Force Loading
Given: The beam shown in Fig. E3.29a and the following data
R ¼ W P1 ¼ 0:2W P2 ¼ 0:8W d1 ¼ 14 ft L ¼ 40ft
Fig. E3.29a
Determine: The maximum possible moment in the beam as the two-force loading system moves
across the span.
3.10 Influence Lines and Force Envelopes for Statically Determinate Beams 277
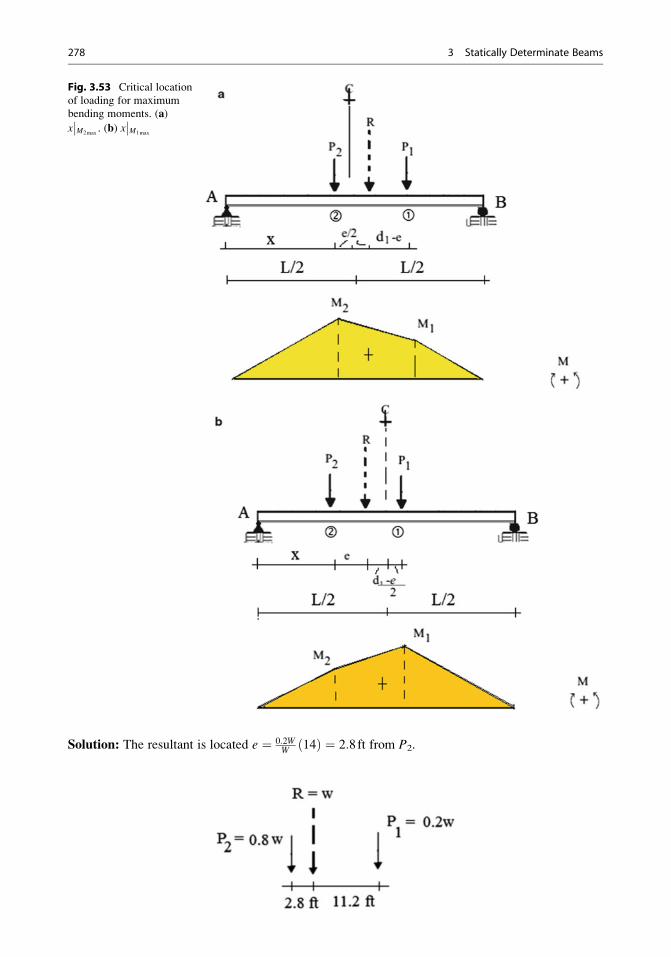
Solution: The resultant is located e ¼ 0:2WW 14ð Þ ¼ 2:8ft from P2.
Fig. 3.53 Critical location
of loading for maximum
bending moments. (a)
x��M2max
. (b) x��M1max
278 3 Statically Determinate Beams
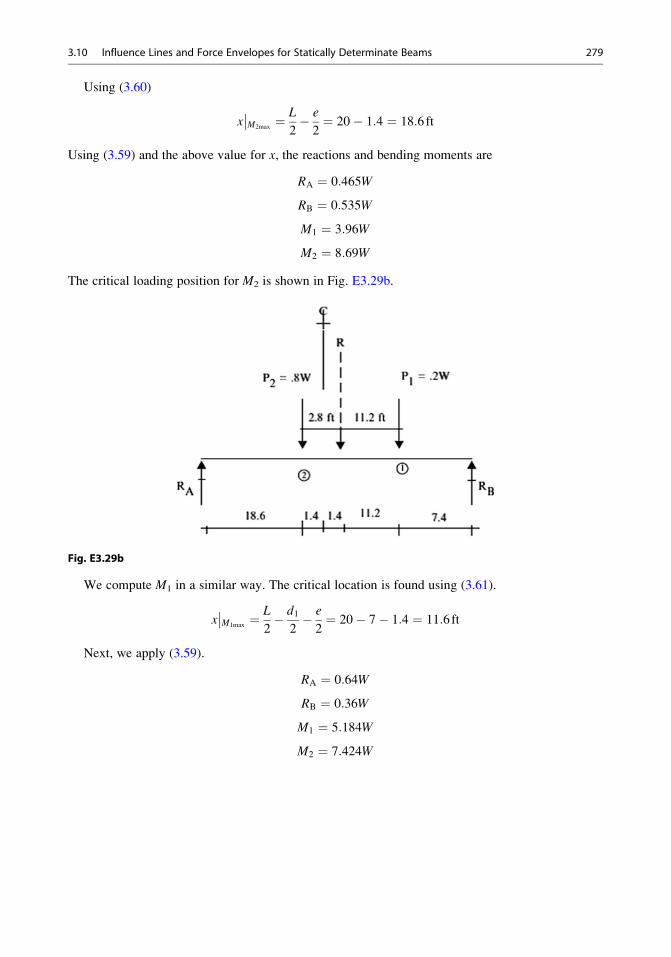
Using (3.60)
x��M2max
¼ L
2� e
2¼ 20� 1:4 ¼ 18:6ft
Using (3.59) and the above value for x, the reactions and bending moments are
RA ¼ 0:465W
RB ¼ 0:535W
M1 ¼ 3:96W
M2 ¼ 8:69W
The critical loading position for M2 is shown in Fig. E3.29b.
Fig. E3.29b
We compute M1 in a similar way. The critical location is found using (3.61).
x��M1max
¼ L
2� d1
2� e
2¼ 20� 7� 1:4 ¼ 11:6ft
Next, we apply (3.59).
RA ¼ 0:64W
RB ¼ 0:36W
M1 ¼ 5:184W
M2 ¼ 7:424W
3.10 Influence Lines and Force Envelopes for Statically Determinate Beams 279
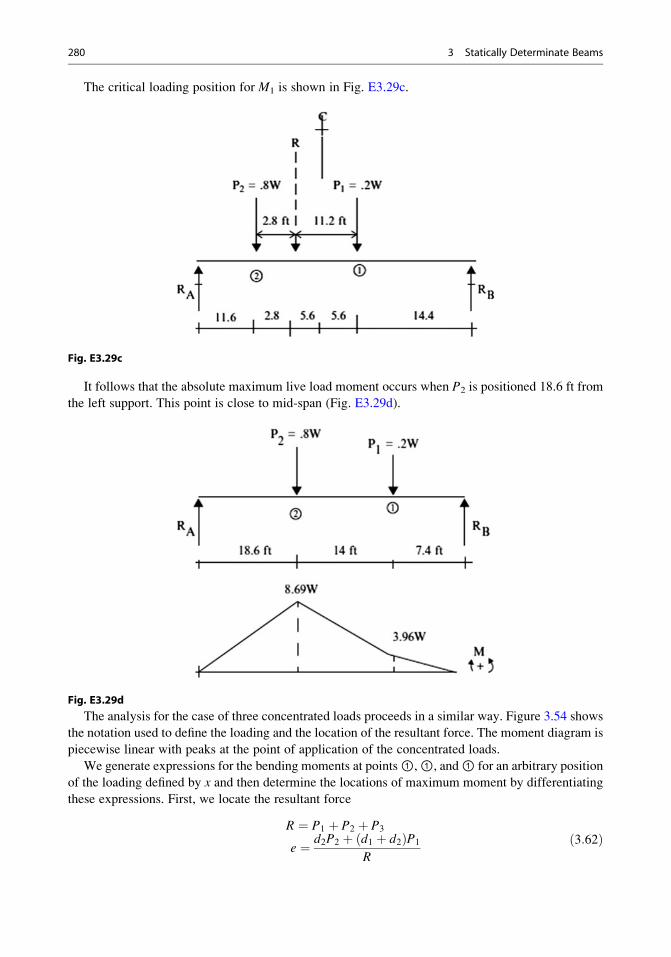
The critical loading position for M1 is shown in Fig. E3.29c.
Fig. E3.29c
It follows that the absolute maximum live load moment occurs when P2 is positioned 18.6 ft from
the left support. This point is close to mid-span (Fig. E3.29d).
Fig. E3.29d
The analysis for the case of three concentrated loads proceeds in a similar way. Figure 3.54 shows
the notation used to define the loading and the location of the resultant force. The moment diagram is
piecewise linear with peaks at the point of application of the concentrated loads.
We generate expressions for the bending moments at points①,①, and① for an arbitrary position
of the loading defined by x and then determine the locations of maximum moment by differentiating
these expressions. First, we locate the resultant force
R ¼ P1 þ P2 þ P3
e ¼ d2P2 þ d1 þ d2ð ÞP1
R
ð3:62Þ
280 3 Statically Determinate Beams
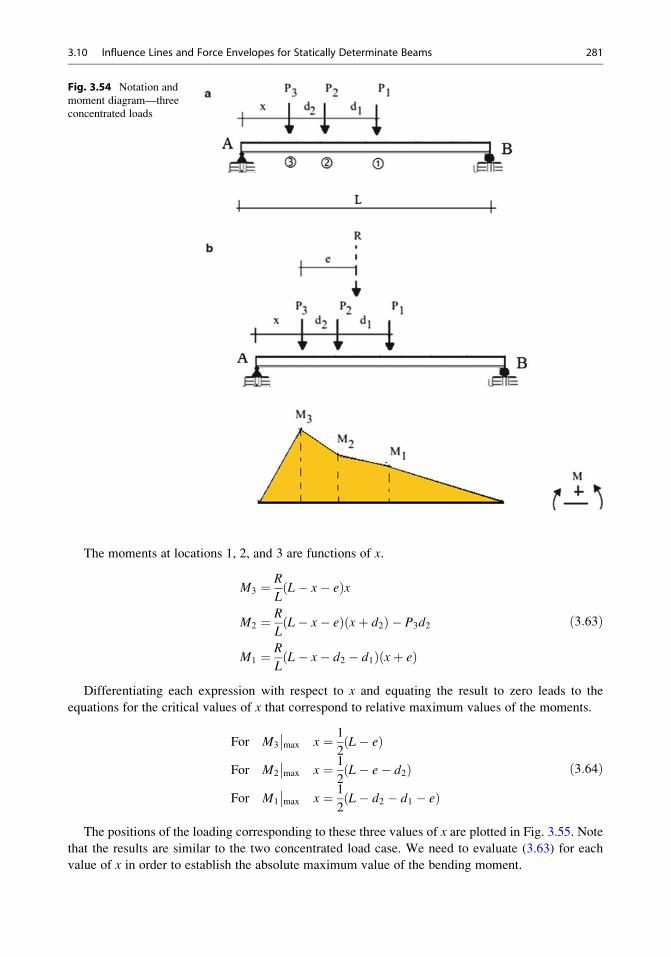
The moments at locations 1, 2, and 3 are functions of x.
M3 ¼ R
LL� x� eð Þx
M2 ¼ R
LL� x� eð Þ xþ d2ð Þ � P3d2
M1 ¼ R
LL� x� d2 � d1ð Þ xþ eð Þ
ð3:63Þ
Differentiating each expression with respect to x and equating the result to zero leads to the
equations for the critical values of x that correspond to relative maximum values of the moments.
For M3
��max x ¼ 1
2L� eð Þ
For M2
��max x ¼ 1
2L� e� d2ð Þ
For M1
��max x ¼ 1
2L� d2 � d1 � eð Þ
ð3:64Þ
The positions of the loading corresponding to these three values of x are plotted in Fig. 3.55. Note
that the results are similar to the two concentrated load case. We need to evaluate (3.63) for each
value of x in order to establish the absolute maximum value of the bending moment.
Fig. 3.54 Notation and
moment diagram—three
concentrated loads
3.10 Influence Lines and Force Envelopes for Statically Determinate Beams 281
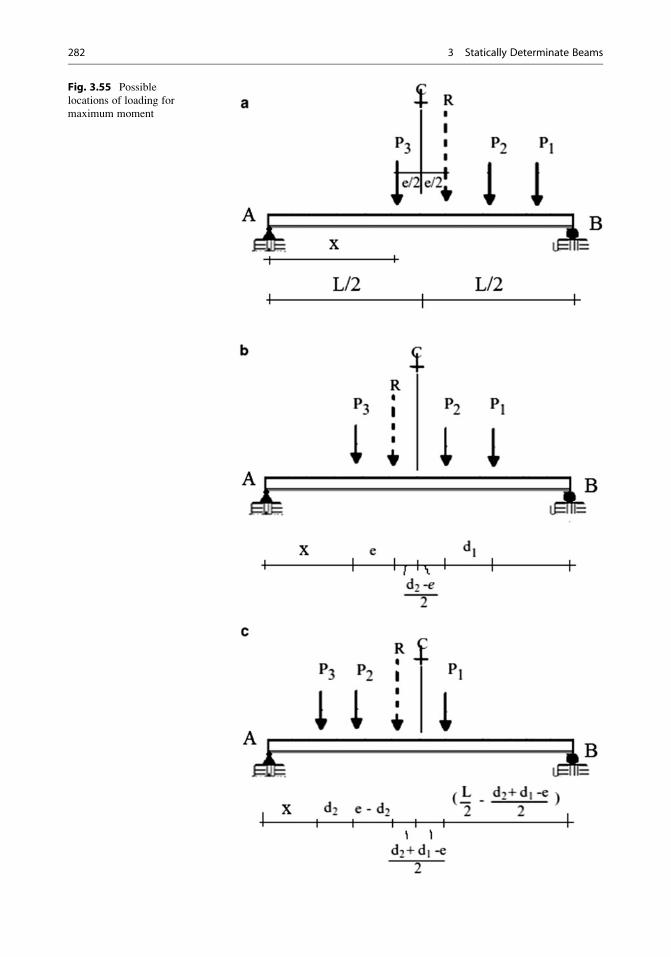
Fig. 3.55 Possible
locations of loading for
maximum moment
282 3 Statically Determinate Beams
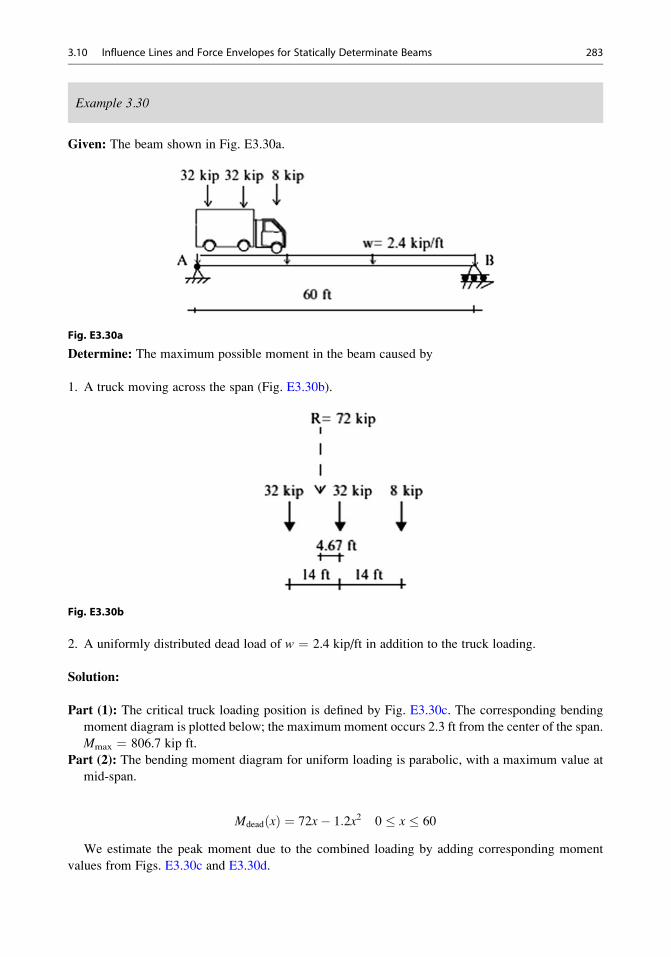
Example 3.30
Given: The beam shown in Fig. E3.30a.
Fig. E3.30a
Determine: The maximum possible moment in the beam caused by
1. A truck moving across the span (Fig. E3.30b).
Fig. E3.30b
2. A uniformly distributed dead load of w ¼ 2.4 kip/ft in addition to the truck loading.
Solution:
Part (1): The critical truck loading position is defined by Fig. E3.30c. The corresponding bending
moment diagram is plotted below; the maximum moment occurs 2.3 ft from the center of the span.
Mmax ¼ 806.7 kip ft.
Part (2): The bending moment diagram for uniform loading is parabolic, with a maximum value at
mid-span.
Mdead xð Þ ¼ 72x� 1:2x2 0 � x � 60
We estimate the peak moment due to the combined loading by adding corresponding moment
values from Figs. E3.30c and E3.30d.
3.10 Influence Lines and Force Envelopes for Statically Determinate Beams 283
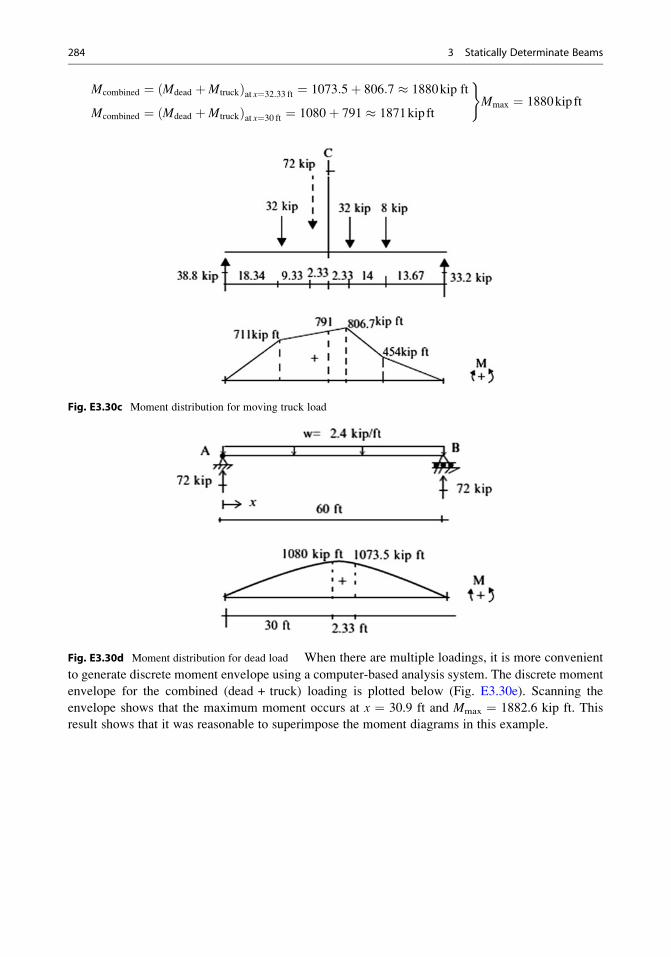
Mcombined ¼ Mdead þMtruckð Þat x¼32:33 ft ¼ 1073:5þ 806:7 � 1880kip ft
Mcombined ¼ Mdead þMtruckð Þat x¼30 ft ¼ 1080þ 791 � 1871kip ft
)Mmax ¼ 1880kip ft
Fig. E3.30c Moment distribution for moving truck load
Fig. E3.30d Moment distribution for dead load When there are multiple loadings, it is more convenient
to generate discrete moment envelope using a computer-based analysis system. The discrete moment
envelope for the combined (dead + truck) loading is plotted below (Fig. E3.30e). Scanning the
envelope shows that the maximum moment occurs at x ¼ 30.9 ft and Mmax ¼ 1882.6 kip ft. This
result shows that it was reasonable to superimpose the moment diagrams in this example.
284 3 Statically Determinate Beams
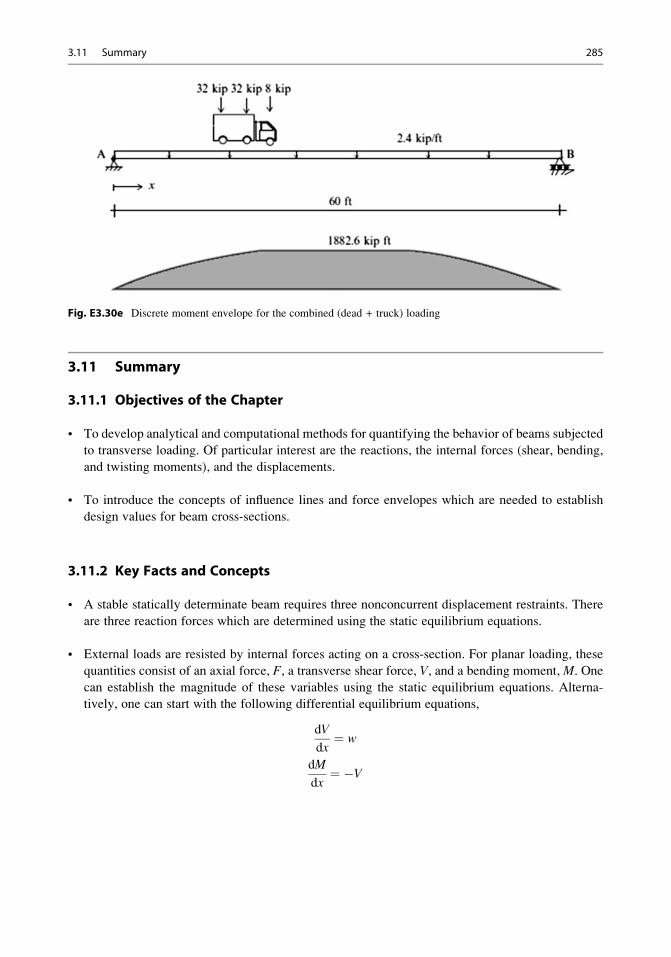
Fig. E3.30e Discrete moment envelope for the combined (dead + truck) loading
3.11 Summary
3.11.1 Objectives of the Chapter
• To develop analytical and computational methods for quantifying the behavior of beams subjected
to transverse loading. Of particular interest are the reactions, the internal forces (shear, bending,
and twisting moments), and the displacements.
• To introduce the concepts of influence lines and force envelopes which are needed to establish
design values for beam cross-sections.
3.11.2 Key Facts and Concepts
• A stable statically determinate beam requires three nonconcurrent displacement restraints. There
are three reaction forces which are determined using the static equilibrium equations.
• External loads are resisted by internal forces acting on a cross-section. For planar loading, these
quantities consist of an axial force, F, a transverse shear force, V, and a bending moment, M. One
can establish the magnitude of these variables using the static equilibrium equations. Alterna-
tively, one can start with the following differential equilibrium equations,
dV
dx¼ w
dM
dx¼ �V
3.11 Summary 285
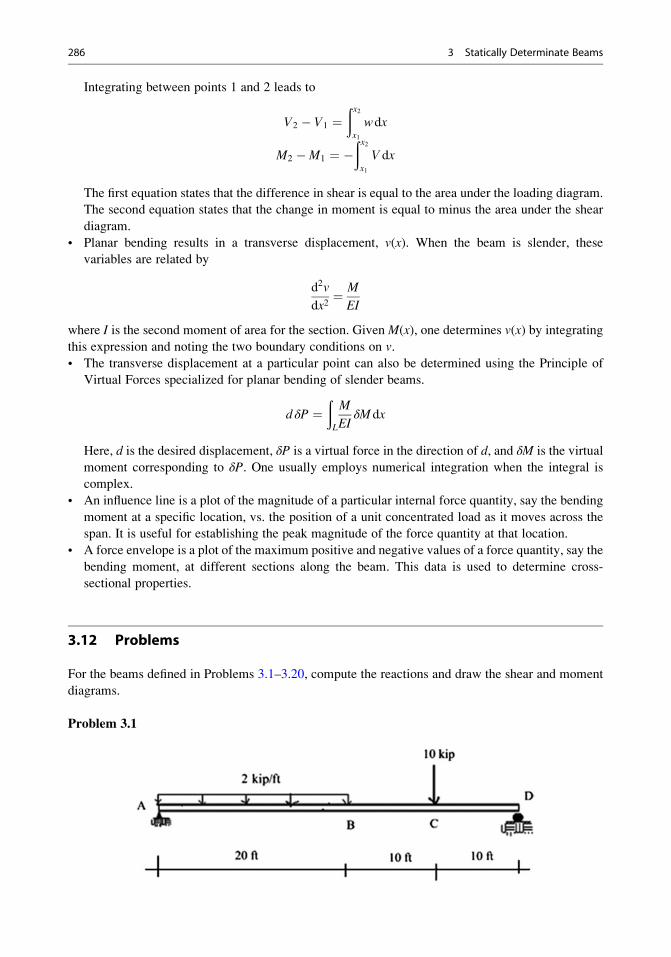
Integrating between points 1 and 2 leads to
V2 � V1 ¼ðx2x1
wdx
M2 �M1 ¼ �ðx2x1
V dx
The first equation states that the difference in shear is equal to the area under the loading diagram.
The second equation states that the change in moment is equal to minus the area under the shear
diagram.
• Planar bending results in a transverse displacement, v(x). When the beam is slender, these
variables are related by
d2v
dx2¼ M
EI
where I is the second moment of area for the section. Given M(x), one determines v(x) by integrating
this expression and noting the two boundary conditions on v.
• The transverse displacement at a particular point can also be determined using the Principle of
Virtual Forces specialized for planar bending of slender beams.
d δP ¼ðL
M
EIδMdx
Here, d is the desired displacement, δP is a virtual force in the direction of d, and δM is the virtual
moment corresponding to δP. One usually employs numerical integration when the integral is
complex.
• An influence line is a plot of the magnitude of a particular internal force quantity, say the bending
moment at a specific location, vs. the position of a unit concentrated load as it moves across the
span. It is useful for establishing the peak magnitude of the force quantity at that location.
• A force envelope is a plot of the maximum positive and negative values of a force quantity, say the
bending moment, at different sections along the beam. This data is used to determine cross-
sectional properties.
3.12 Problems
For the beams defined in Problems 3.1–3.20, compute the reactions and draw the shear and moment
diagrams.
Problem 3.1
286 3 Statically Determinate Beams
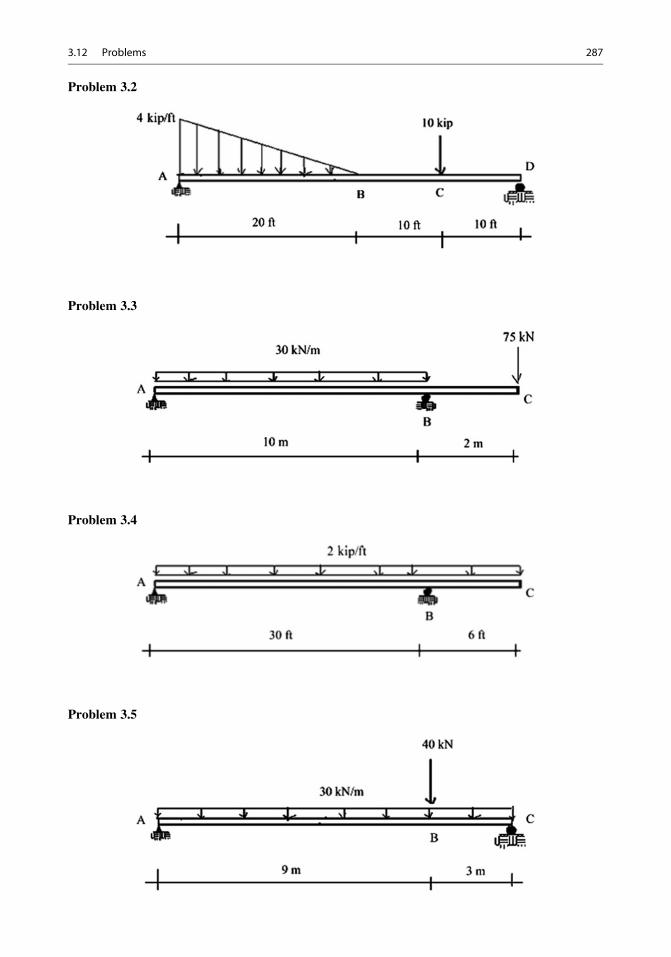
Problem 3.2
Problem 3.3
Problem 3.4
Problem 3.5
3.12 Problems 287
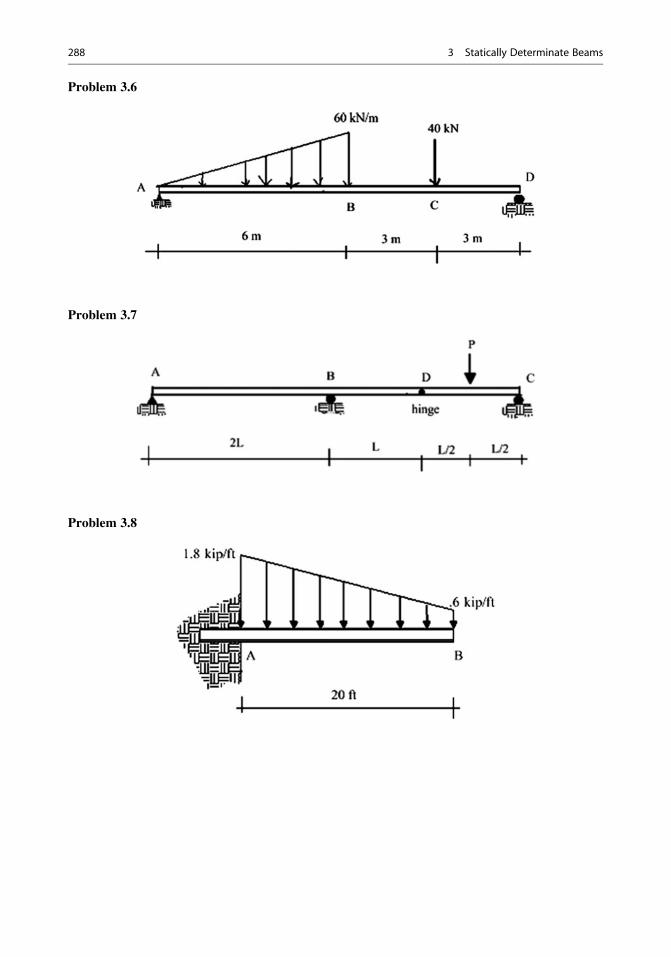
Problem 3.6
Problem 3.7
Problem 3.8
288 3 Statically Determinate Beams
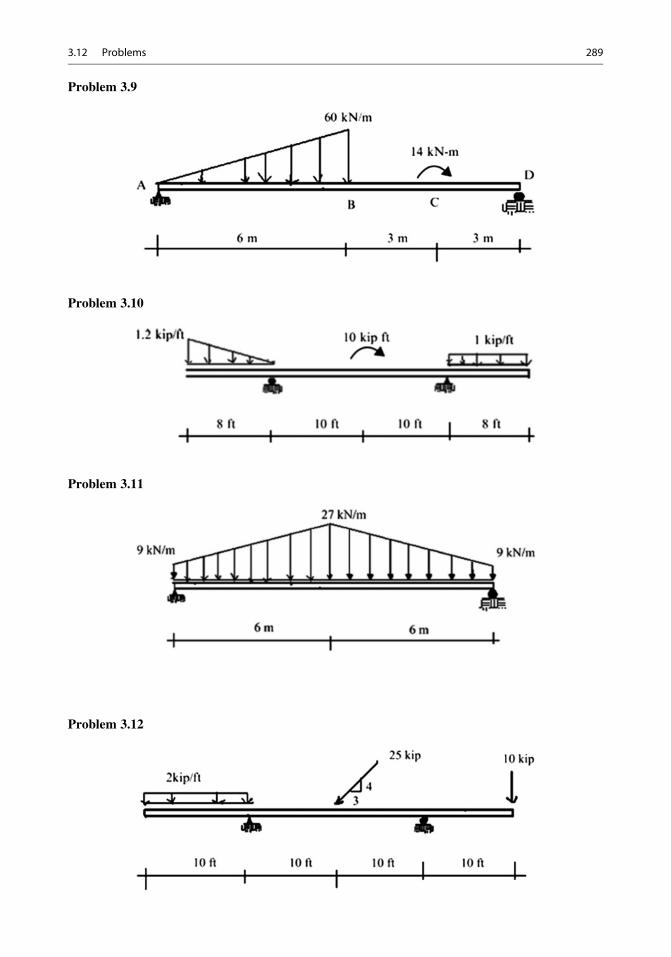
Problem 3.9
Problem 3.10
Problem 3.11
Problem 3.12
3.12 Problems 289
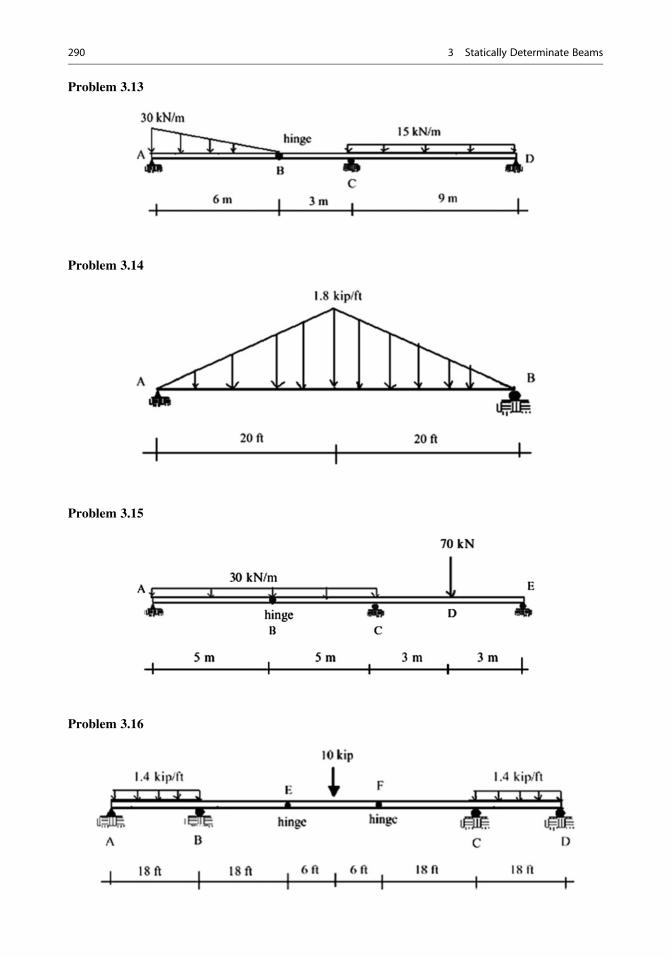
Problem 3.13
Problem 3.14
Problem 3.15
Problem 3.16
290 3 Statically Determinate Beams
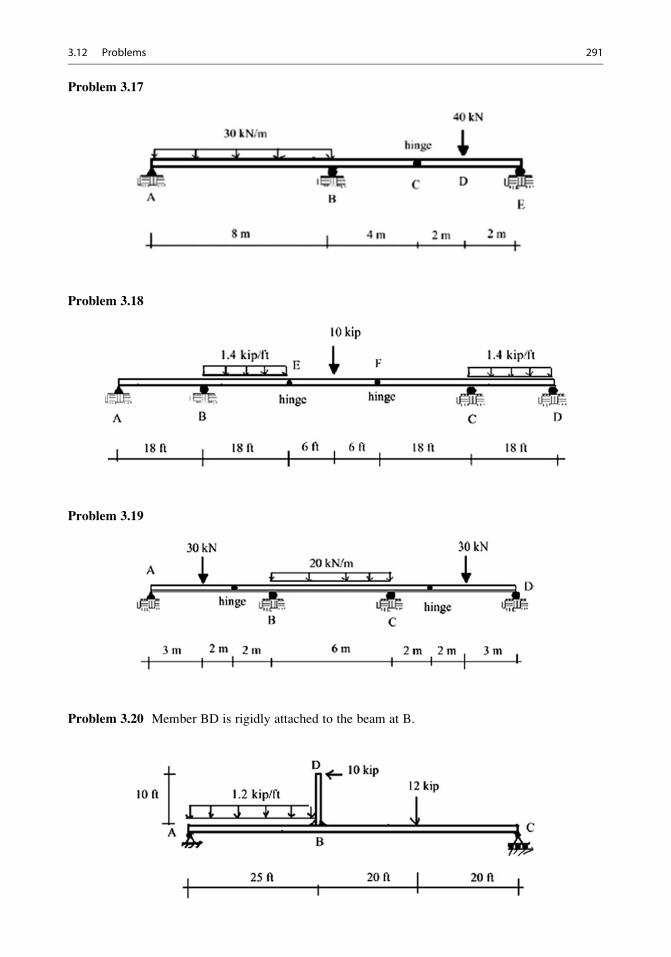
Problem 3.17
Problem 3.18
Problem 3.19
Problem 3.20 Member BD is rigidly attached to the beam at B.
3.12 Problems 291
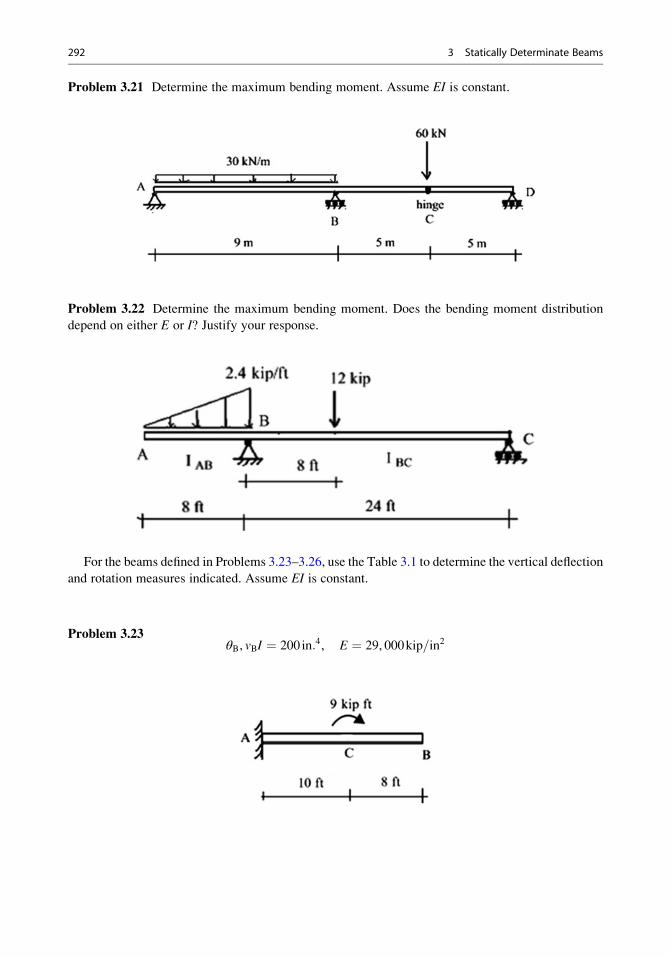
Problem 3.21 Determine the maximum bending moment. Assume EI is constant.
Problem 3.22 Determine the maximum bending moment. Does the bending moment distribution
depend on either E or I? Justify your response.
For the beams defined in Problems 3.23–3.26, use the Table 3.1 to determine the vertical deflection
and rotation measures indicated. Assume EI is constant.
Problem 3.23θB, vBI ¼ 200 in:4, E ¼ 29, 000kip=in2
292 3 Statically Determinate Beams
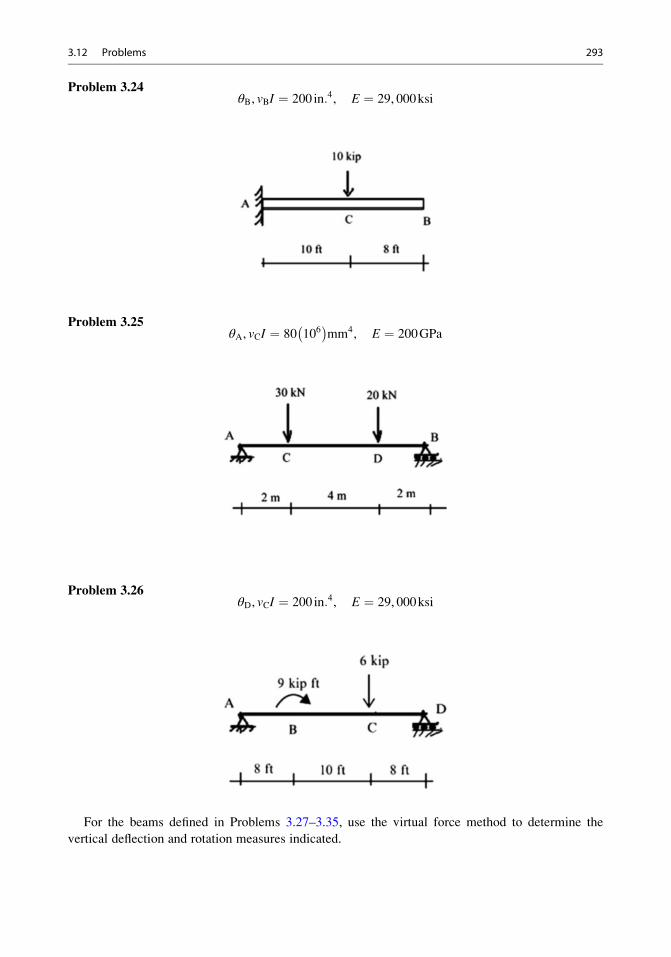
Problem 3.24θB, vBI ¼ 200 in:4, E ¼ 29, 000ksi
Problem 3.25θA, vCI ¼ 80 106
� �mm4, E ¼ 200GPa
Problem 3.26θD, vCI ¼ 200 in:4, E ¼ 29, 000ksi
For the beams defined in Problems 3.27–3.35, use the virtual force method to determine the
vertical deflection and rotation measures indicated.
3.12 Problems 293
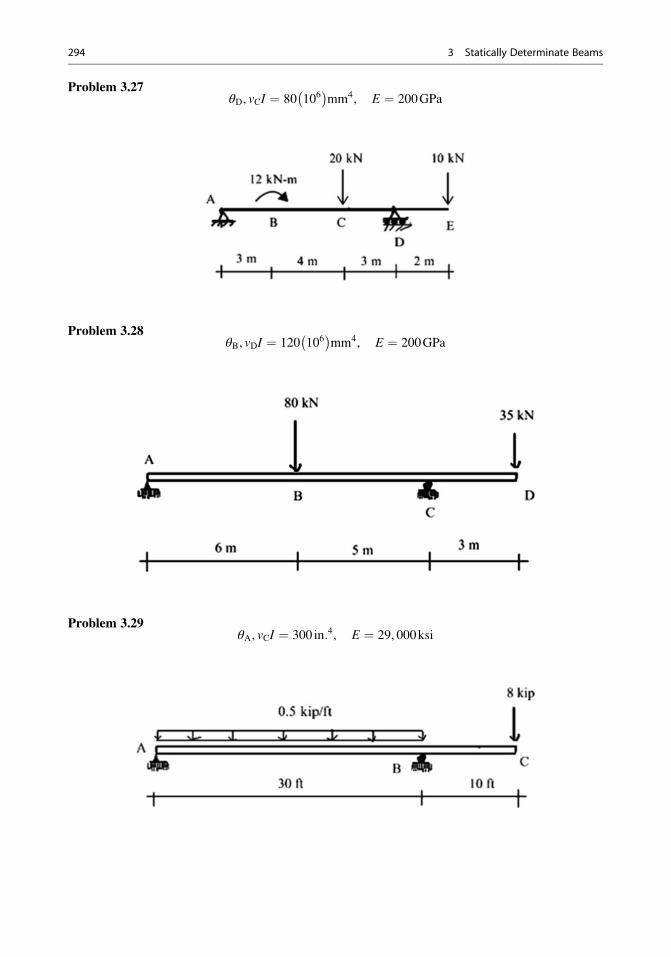
Problem 3.27θD, vCI ¼ 80 106
� �mm4, E ¼ 200GPa
Problem 3.28θB, vDI ¼ 120 106
� �mm4, E ¼ 200GPa
Problem 3.29θA, vCI ¼ 300 in:4, E ¼ 29, 000ksi
294 3 Statically Determinate Beams
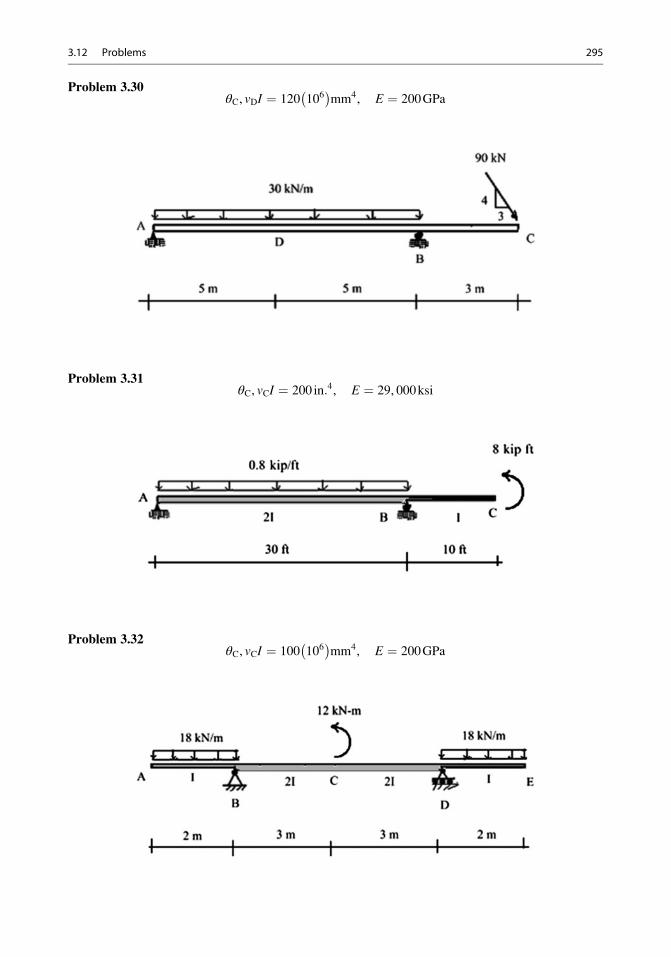
Problem 3.30θC, vDI ¼ 120 106
� �mm4, E ¼ 200GPa
Problem 3.31θC, vCI ¼ 200 in:4, E ¼ 29, 000ksi
Problem 3.32θC, vCI ¼ 100 106
� �mm4, E ¼ 200GPa
3.12 Problems 295
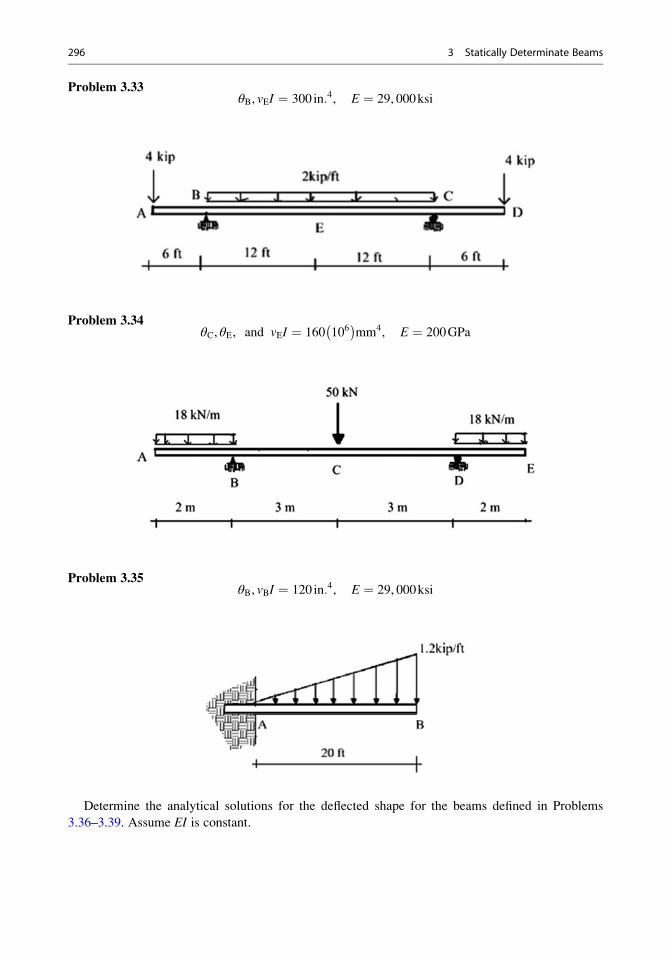
Problem 3.33θB, vEI ¼ 300 in:4, E ¼ 29, 000ksi
Problem 3.34θC, θE, and vEI ¼ 160 106
� �mm4, E ¼ 200GPa
Problem 3.35θB, vBI ¼ 120 in:4, E ¼ 29, 000ksi
Determine the analytical solutions for the deflected shape for the beams defined in Problems
3.36–3.39. Assume EI is constant.
296 3 Statically Determinate Beams
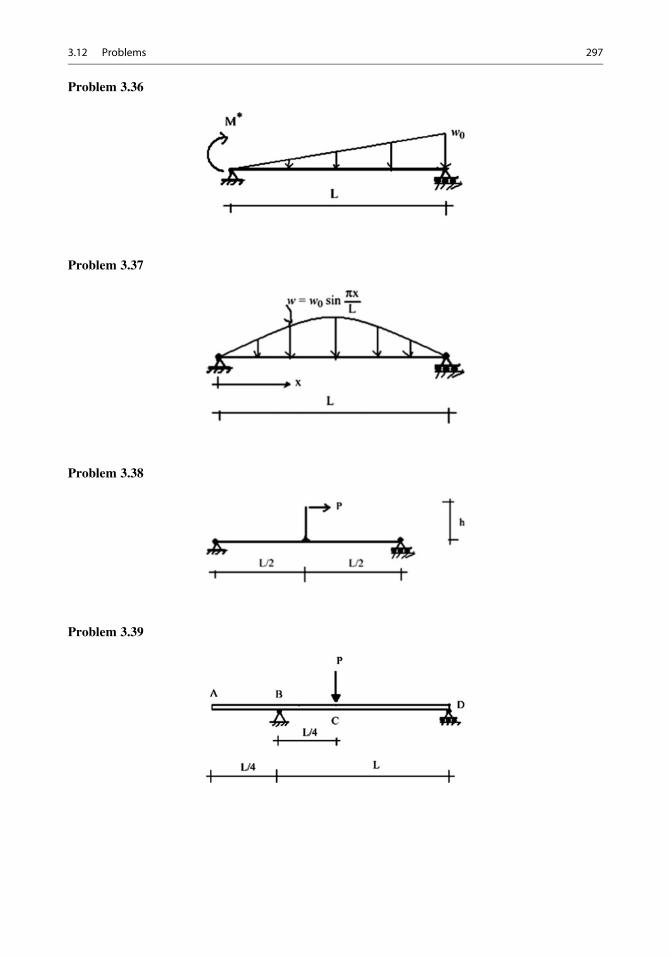
Problem 3.36
Problem 3.37
Problem 3.38
Problem 3.39
3.12 Problems 297
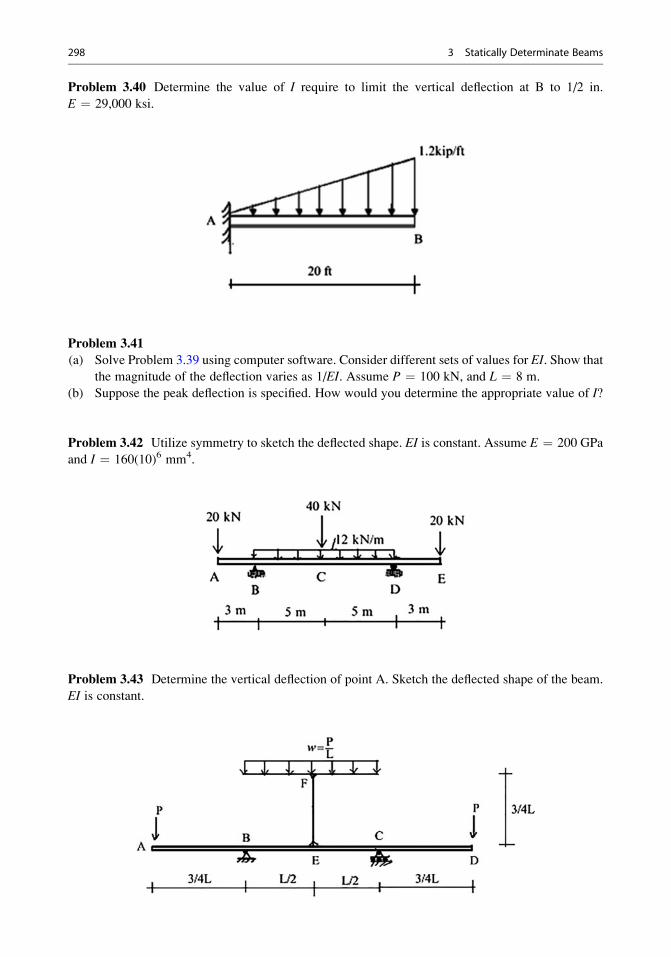
Problem 3.40 Determine the value of I require to limit the vertical deflection at B to 1/2 in.
E ¼ 29,000 ksi.
Problem 3.41
(a) Solve Problem 3.39 using computer software. Consider different sets of values for EI. Show that
the magnitude of the deflection varies as 1/EI. Assume P ¼ 100 kN, and L ¼ 8 m.
(b) Suppose the peak deflection is specified. How would you determine the appropriate value of I?
Problem 3.42 Utilize symmetry to sketch the deflected shape. EI is constant. Assume E ¼ 200 GPa
and I ¼ 160(10)6 mm4.
Problem 3.43 Determine the vertical deflection of point A. Sketch the deflected shape of the beam.
EI is constant.
298 3 Statically Determinate Beams

Problem 3.44 Determine the vertical deflection of point A. Sketch the deflected shape of the beam.
EI is constant.
Problem 3.45 Determine the vertical deflection of point A. Sketch the deflected shape. EI is
constant.
Problem 3.46 Consider the cantilever beam shown below. Determine the displacement at B due to
the loading. Use the principle of Virtual Forces and evaluate the corresponding integral with the
trapezoidal rule.
Take w0 ¼ 10kip=ft, L ¼ 20ft, I0 ¼ 1000 in:4,E ¼ 29, 000ksi, I ¼ I0 1þ cosπx
2L
� �:
3.12 Problems 299
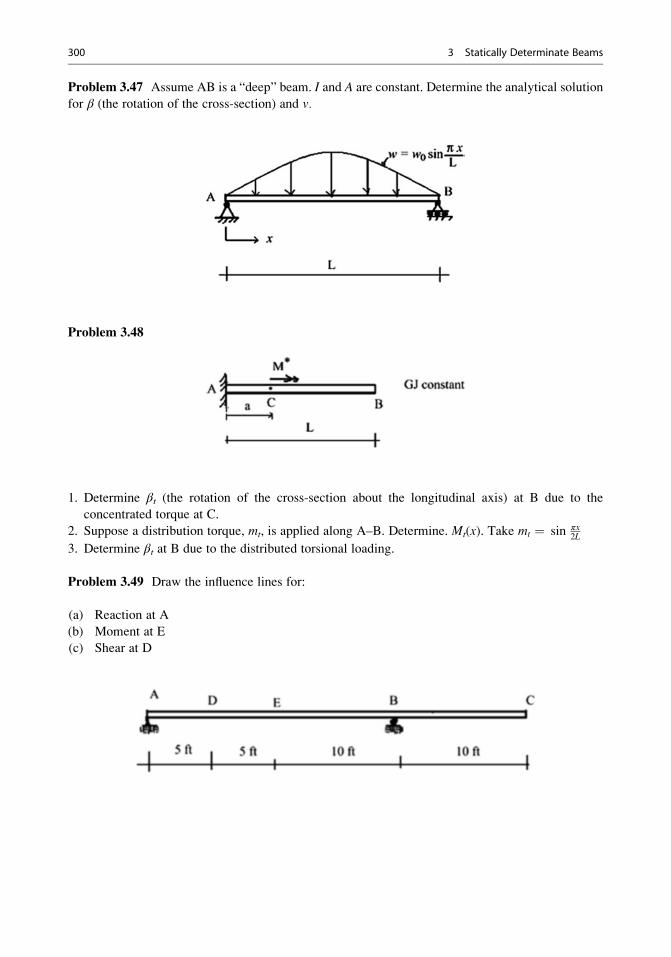
Problem 3.47 Assume AB is a “deep” beam. I and A are constant. Determine the analytical solution
for β (the rotation of the cross-section) and v.
Problem 3.48
1. Determine βt (the rotation of the cross-section about the longitudinal axis) at B due to the
concentrated torque at C.
2. Suppose a distribution torque, mt, is applied along A–B. Determine. Mt(x). Take mt ¼ sin πx2L
3. Determine βt at B due to the distributed torsional loading.
Problem 3.49 Draw the influence lines for:
(a) Reaction at A
(b) Moment at E
(c) Shear at D
300 3 Statically Determinate Beams
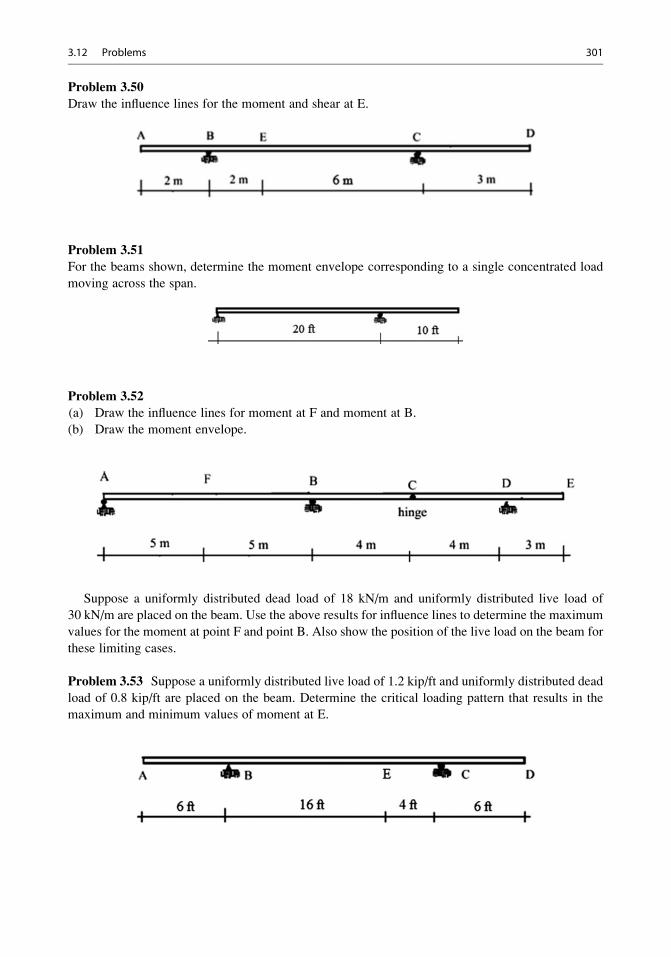
Problem 3.50
Draw the influence lines for the moment and shear at E.
Problem 3.51
For the beams shown, determine the moment envelope corresponding to a single concentrated load
moving across the span.
Problem 3.52
(a) Draw the influence lines for moment at F and moment at B.
(b) Draw the moment envelope.
Suppose a uniformly distributed dead load of 18 kN/m and uniformly distributed live load of
30 kN/m are placed on the beam. Use the above results for influence lines to determine the maximum
values for the moment at point F and point B. Also show the position of the live load on the beam for
these limiting cases.
Problem 3.53 Suppose a uniformly distributed live load of 1.2 kip/ft and uniformly distributed dead
load of 0.8 kip/ft are placed on the beam. Determine the critical loading pattern that results in the
maximum and minimum values of moment at E.
3.12 Problems 301
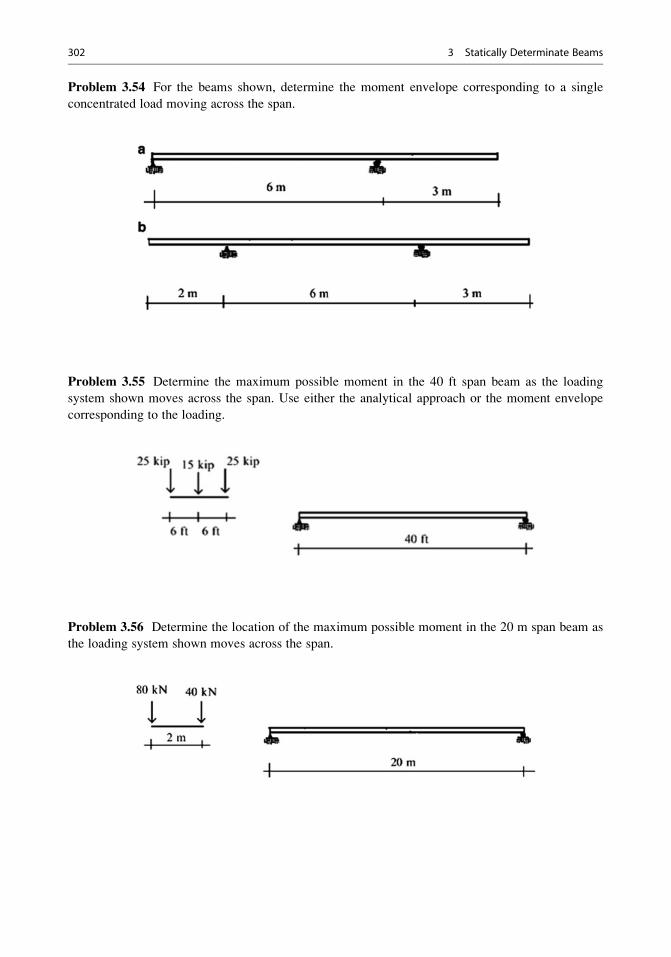
Problem 3.54 For the beams shown, determine the moment envelope corresponding to a single
concentrated load moving across the span.
Problem 3.55 Determine the maximum possible moment in the 40 ft span beam as the loading
system shown moves across the span. Use either the analytical approach or the moment envelope
corresponding to the loading.
Problem 3.56 Determine the location of the maximum possible moment in the 20 m span beam as
the loading system shown moves across the span.
302 3 Statically Determinate Beams
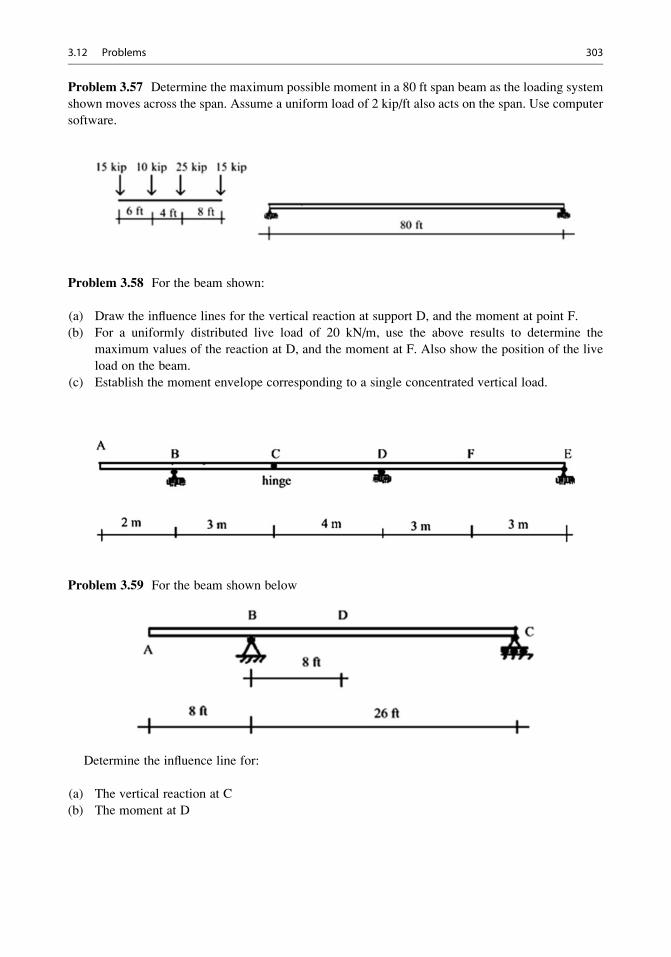
Problem 3.57 Determine the maximum possible moment in a 80 ft span beam as the loading system
shown moves across the span. Assume a uniform load of 2 kip/ft also acts on the span. Use computer
software.
Problem 3.58 For the beam shown:
(a) Draw the influence lines for the vertical reaction at support D, and the moment at point F.
(b) For a uniformly distributed live load of 20 kN/m, use the above results to determine the
maximum values of the reaction at D, and the moment at F. Also show the position of the live
load on the beam.
(c) Establish the moment envelope corresponding to a single concentrated vertical load.
Problem 3.59 For the beam shown below
Determine the influence line for:
(a) The vertical reaction at C
(b) The moment at D
3.12 Problems 303
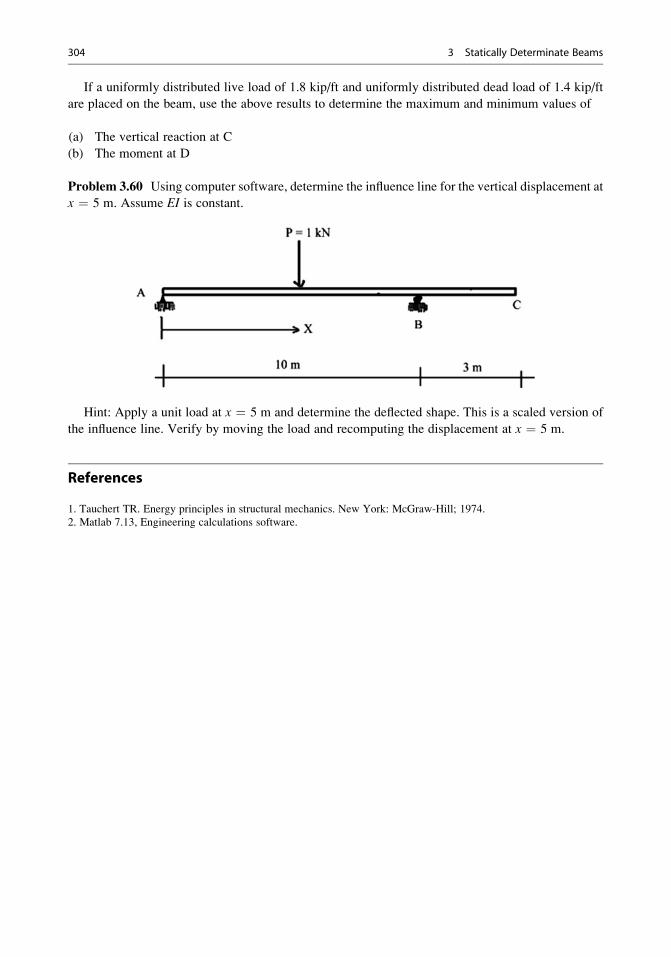
If a uniformly distributed live load of 1.8 kip/ft and uniformly distributed dead load of 1.4 kip/ft
are placed on the beam, use the above results to determine the maximum and minimum values of
(a) The vertical reaction at C
(b) The moment at D
Problem 3.60 Using computer software, determine the influence line for the vertical displacement at
x ¼ 5 m. Assume EI is constant.
Hint: Apply a unit load at x ¼ 5 m and determine the deflected shape. This is a scaled version of
the influence line. Verify by moving the load and recomputing the displacement at x ¼ 5 m.
References
1. Tauchert TR. Energy principles in structural mechanics. New York: McGraw-Hill; 1974.
2. Matlab 7.13, Engineering calculations software.
304 3 Statically Determinate Beams
Statically Determinate Plane Frames 4
Abstract
Plane frame structures are composed of structural members which lie in a
single plane. When loaded in this plane, they are subjected to both
bending and axial action. Of particular interest are the shear and moment
distributions for the members due to gravity and lateral loadings. We
describe in this chapter analysis strategies for typical statically determi-
nate single-story frames. Numerous examples illustrating the response are
presented to provide the reader with insight as to the behavior of these
structural types. We also describe how the Method of Virtual Forces can
be applied to compute displacements of frames. The theory for frame
structures is based on the theory of beams presented in Chap. 3. Later in
Chaps. 9, 10, and 15, we extend the discussion to deal with statically
indeterminate frames and space frames.
4.1 Definition of Plane Frames
The two dominant planar structural systems are plane trusses and plane frames. Plane trusses were
discussed in detail in Chap. 2. Both structural systems are formed by connecting structural members
at their ends such that they are in a single plane. The systems differ in the way the individual members
are connected and loaded. Loads are applied at nodes (joints) for truss structures. Consequently, the
member forces are purely axial. Frame structures behave in a completely different way. The loading
is applied directly to the members, resulting in internal shear and moment as well as axial force in the
members. Depending on the geometric configuration, a set of members may experience predomi-
nately bending action; these members are called “beams.” Another set may experience predominately
axial action. They are called “columns.” The typical building frame is composed of a combination of
beams and columns.
Frames are categorized partly by their geometry and partly by the nature of the member/member
connection, i.e., pinned vs. rigid connection. Figure 4.1 illustrates some typical rigid plane frames
used mainly for light manufacturing factories, warehouses, and office buildings. We generate three-
dimensional frames by suitably combining plane frames.
# Springer International Publishing Switzerland 2016
J.J. Connor, S. Faraji, Fundamentals of Structural Engineering,DOI 10.1007/978-3-319-24331-3_4
305
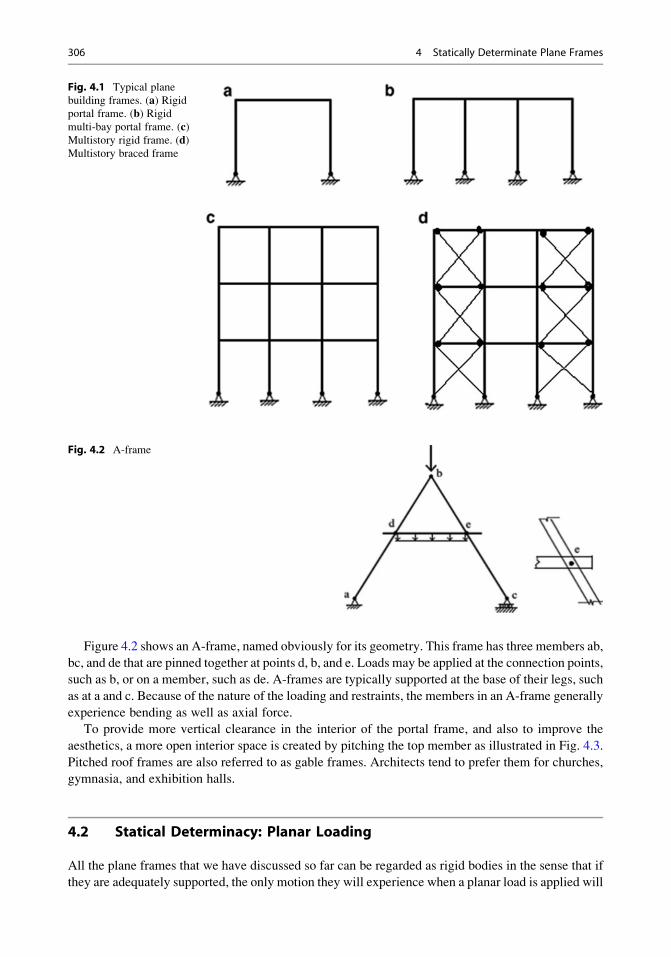
Figure 4.2 shows an A-frame, named obviously for its geometry. This frame has three members ab,
bc, and de that are pinned together at points d, b, and e. Loads may be applied at the connection points,
such as b, or on a member, such as de. A-frames are typically supported at the base of their legs, such
as at a and c. Because of the nature of the loading and restraints, the members in an A-frame generally
experience bending as well as axial force.
To provide more vertical clearance in the interior of the portal frame, and also to improve the
aesthetics, a more open interior space is created by pitching the top member as illustrated in Fig. 4.3.
Pitched roof frames are also referred to as gable frames. Architects tend to prefer them for churches,
gymnasia, and exhibition halls.
4.2 Statical Determinacy: Planar Loading
All the plane frames that we have discussed so far can be regarded as rigid bodies in the sense that if
they are adequately supported, the only motion they will experience when a planar load is applied will
Fig. 4.1 Typical plane
building frames. (a) Rigidportal frame. (b) Rigidmulti-bay portal frame. (c)Multistory rigid frame. (d)Multistory braced frame
Fig. 4.2 A-frame
306 4 Statically Determinate Plane Frames
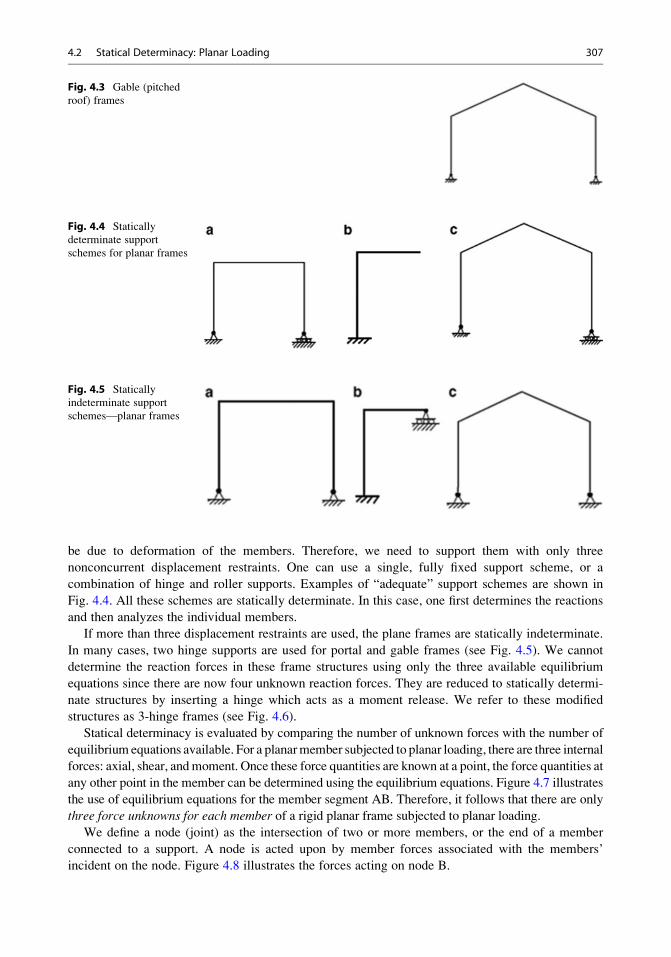
be due to deformation of the members. Therefore, we need to support them with only three
nonconcurrent displacement restraints. One can use a single, fully fixed support scheme, or a
combination of hinge and roller supports. Examples of “adequate” support schemes are shown in
Fig. 4.4. All these schemes are statically determinate. In this case, one first determines the reactions
and then analyzes the individual members.
If more than three displacement restraints are used, the plane frames are statically indeterminate.
In many cases, two hinge supports are used for portal and gable frames (see Fig. 4.5). We cannot
determine the reaction forces in these frame structures using only the three available equilibrium
equations since there are now four unknown reaction forces. They are reduced to statically determi-
nate structures by inserting a hinge which acts as a moment release. We refer to these modified
structures as 3-hinge frames (see Fig. 4.6).
Statical determinacy is evaluated by comparing the number of unknown forces with the number of
equilibrium equations available. For a planarmember subjected to planar loading, there are three internal
forces: axial, shear, andmoment. Once these force quantities are known at a point, the force quantities at
any other point in the member can be determined using the equilibrium equations. Figure 4.7 illustrates
the use of equilibrium equations for the member segment AB. Therefore, it follows that there are only
three force unknowns for each member of a rigid planar frame subjected to planar loading.
We define a node (joint) as the intersection of two or more members, or the end of a member
connected to a support. A node is acted upon by member forces associated with the members’
incident on the node. Figure 4.8 illustrates the forces acting on node B.
Fig. 4.3 Gable (pitched
roof) frames
Fig. 4.4 Statically
determinate support
schemes for planar frames
Fig. 4.5 Statically
indeterminate support
schemes—planar frames
4.2 Statical Determinacy: Planar Loading 307
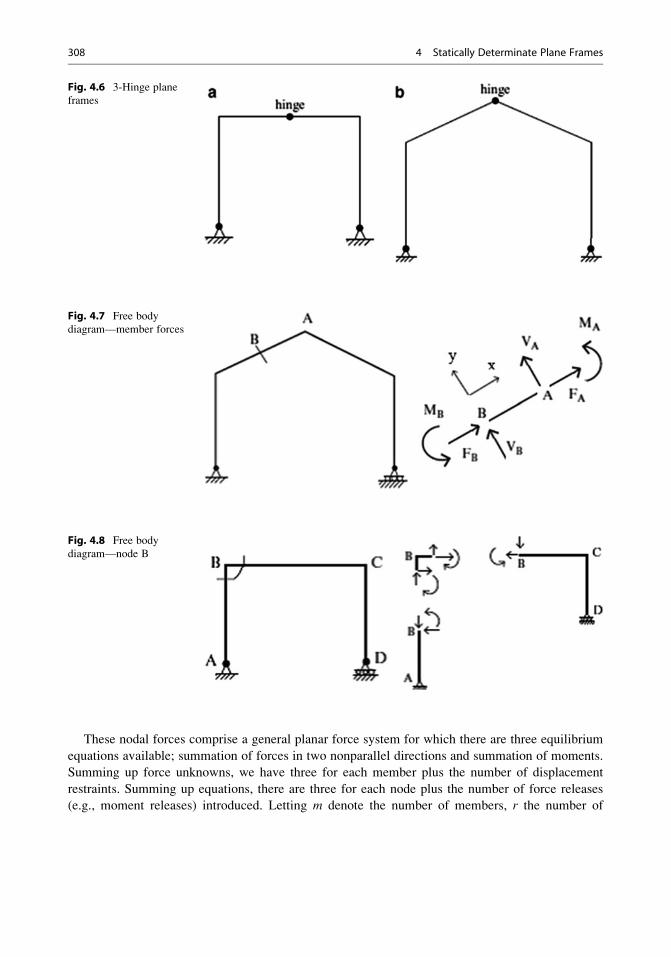
These nodal forces comprise a general planar force system for which there are three equilibrium
equations available; summation of forces in two nonparallel directions and summation of moments.
Summing up force unknowns, we have three for each member plus the number of displacement
restraints. Summing up equations, there are three for each node plus the number of force releases
(e.g., moment releases) introduced. Letting m denote the number of members, r the number of
Fig. 4.6 3-Hinge plane
frames
Fig. 4.7 Free body
diagram—member forces
Fig. 4.8 Free body
diagram—node B
308 4 Statically Determinate Plane Frames
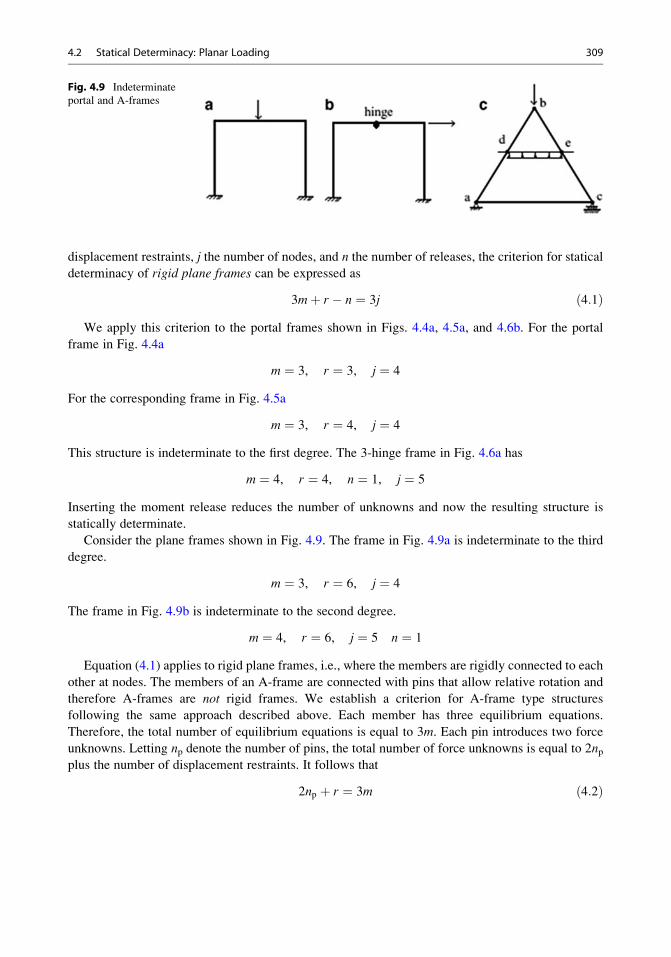
displacement restraints, j the number of nodes, and n the number of releases, the criterion for statical
determinacy of rigid plane frames can be expressed as
3mþ r � n ¼ 3j ð4:1ÞWe apply this criterion to the portal frames shown in Figs. 4.4a, 4.5a, and 4.6b. For the portal
frame in Fig. 4.4a
m ¼ 3, r ¼ 3, j ¼ 4
For the corresponding frame in Fig. 4.5a
m ¼ 3, r ¼ 4, j ¼ 4
This structure is indeterminate to the first degree. The 3-hinge frame in Fig. 4.6a has
m ¼ 4, r ¼ 4, n ¼ 1, j ¼ 5
Inserting the moment release reduces the number of unknowns and now the resulting structure is
statically determinate.
Consider the plane frames shown in Fig. 4.9. The frame in Fig. 4.9a is indeterminate to the third
degree.
m ¼ 3, r ¼ 6, j ¼ 4
The frame in Fig. 4.9b is indeterminate to the second degree.
m ¼ 4, r ¼ 6, j ¼ 5 n ¼ 1
Equation (4.1) applies to rigid plane frames, i.e., where the members are rigidly connected to each
other at nodes. The members of an A-frame are connected with pins that allow relative rotation and
therefore A-frames are not rigid frames. We establish a criterion for A-frame type structures
following the same approach described above. Each member has three equilibrium equations.
Therefore, the total number of equilibrium equations is equal to 3m. Each pin introduces two force
unknowns. Letting np denote the number of pins, the total number of force unknowns is equal to 2npplus the number of displacement restraints. It follows that
2np þ r ¼ 3m ð4:2Þ
Fig. 4.9 Indeterminate
portal and A-frames
4.2 Statical Determinacy: Planar Loading 309
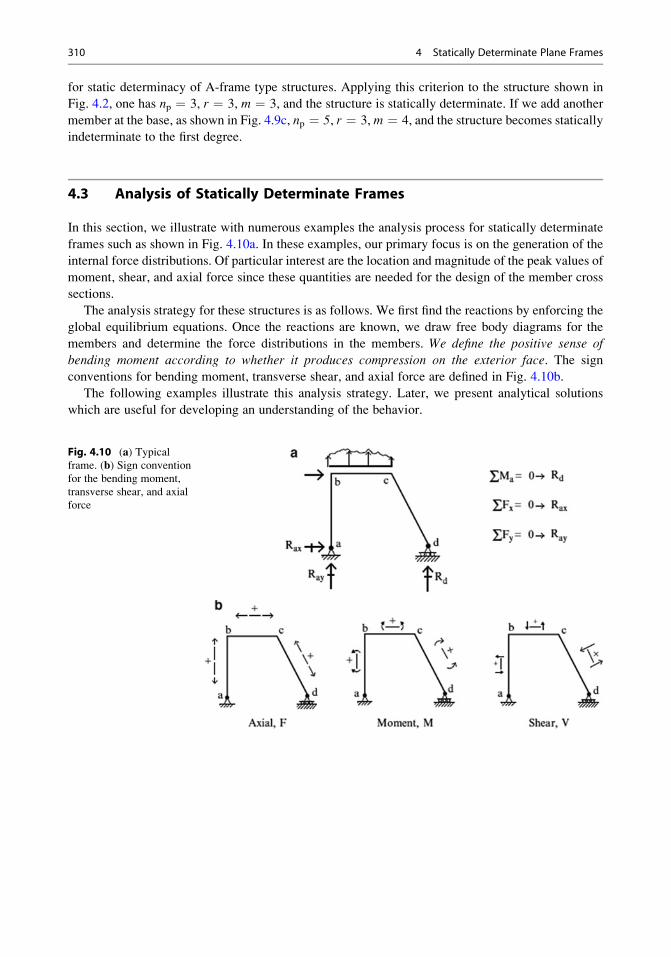
for static determinacy of A-frame type structures. Applying this criterion to the structure shown in
Fig. 4.2, one has np ¼ 3, r ¼ 3, m ¼ 3, and the structure is statically determinate. If we add another
member at the base, as shown in Fig. 4.9c, np ¼ 5, r ¼ 3, m ¼ 4, and the structure becomes statically
indeterminate to the first degree.
4.3 Analysis of Statically Determinate Frames
In this section, we illustrate with numerous examples the analysis process for statically determinate
frames such as shown in Fig. 4.10a. In these examples, our primary focus is on the generation of the
internal force distributions. Of particular interest are the location and magnitude of the peak values of
moment, shear, and axial force since these quantities are needed for the design of the member cross
sections.
The analysis strategy for these structures is as follows. We first find the reactions by enforcing the
global equilibrium equations. Once the reactions are known, we draw free body diagrams for the
members and determine the force distributions in the members. We define the positive sense of
bending moment according to whether it produces compression on the exterior face. The sign
conventions for bending moment, transverse shear, and axial force are defined in Fig. 4.10b.
The following examples illustrate this analysis strategy. Later, we present analytical solutions
which are useful for developing an understanding of the behavior.
Fig. 4.10 (a) Typicalframe. (b) Sign convention
for the bending moment,
transverse shear, and axial
force
310 4 Statically Determinate Plane Frames
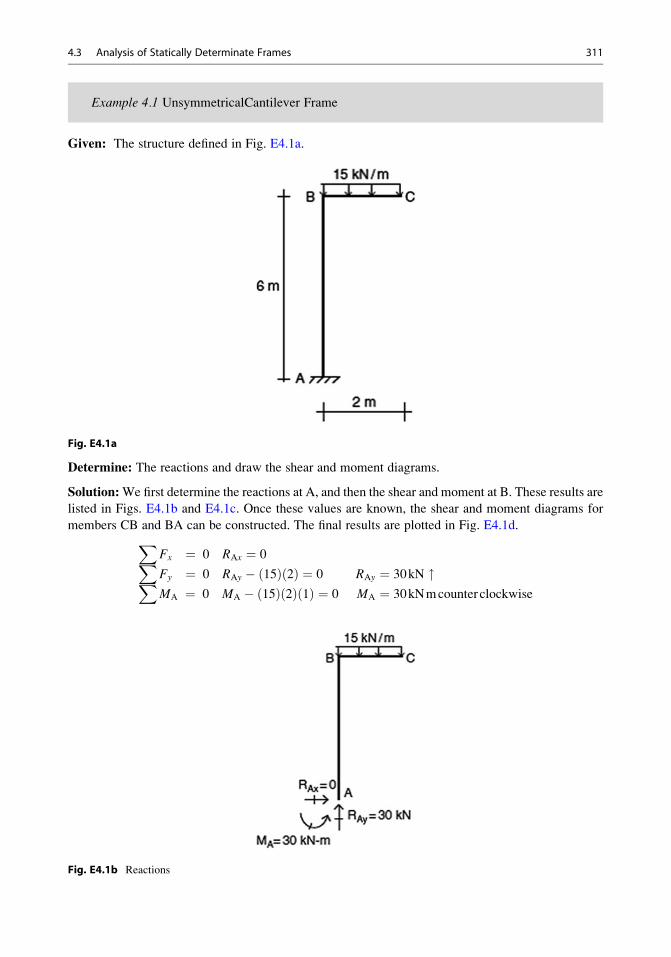
Example 4.1 UnsymmetricalCantilever Frame
Given: The structure defined in Fig. E4.1a.
Fig. E4.1a
Determine: The reactions and draw the shear and moment diagrams.
Solution:We first determine the reactions at A, and then the shear and moment at B. These results are
listed in Figs. E4.1b and E4.1c. Once these values are known, the shear and moment diagrams for
members CB and BA can be constructed. The final results are plotted in Fig. E4.1d.XFx ¼ 0 RAx ¼ 0XFy ¼ 0 RAy � 15ð Þ 2ð Þ ¼ 0 RAy ¼ 30kN "XMA ¼ 0 MA � 15ð Þ 2ð Þ 1ð Þ ¼ 0 MA ¼ 30kNmcounter clockwise
Fig. E4.1b Reactions
4.3 Analysis of Statically Determinate Frames 311
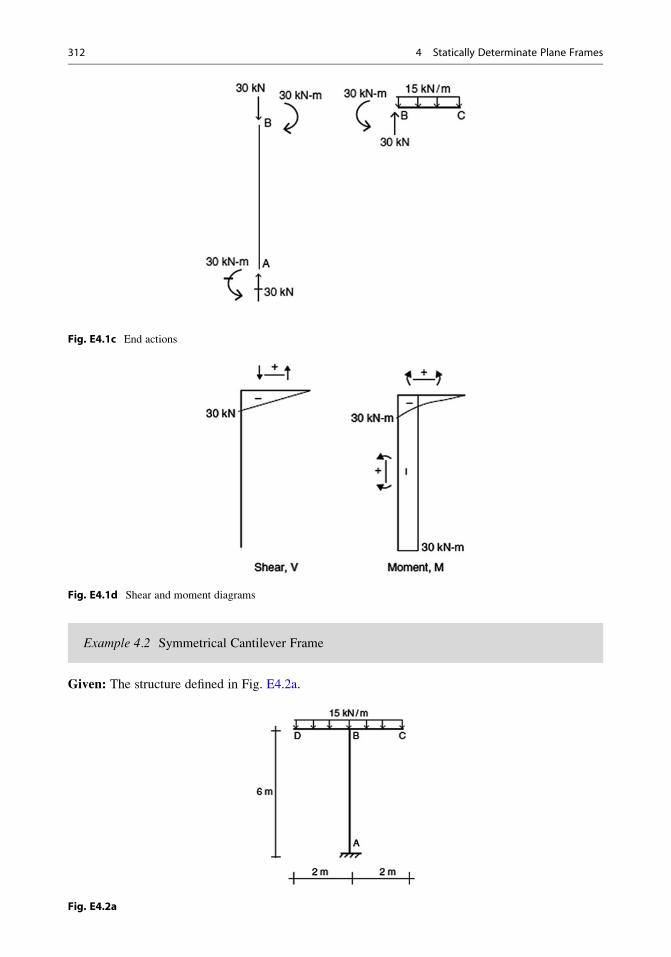
Fig. E4.1c End actions
Fig. E4.1d Shear and moment diagrams
Example 4.2 Symmetrical Cantilever Frame
Given: The structure defined in Fig. E4.2a.
Fig. E4.2a
312 4 Statically Determinate Plane Frames

Determine: The reactions and draw the shear and moment diagrams.
Solution: We determine the reactions at A and shear and moment at B. The results are shown in
Figs. E4.2b and E4.2c.XFx ¼ 0 RAx ¼ 0XFy ¼ 0 RAy � 15ð Þ 4ð Þ ¼ 0 RAy ¼ 60kN "XMA ¼ 0 MA � 15ð Þ 2ð Þ 1ð Þ þ 15ð Þ 2ð Þ 1ð Þ ¼ 0 MA ¼ 0
Fig. E4.2b Reactions
Fig. E4.2c End actions
4.3 Analysis of Statically Determinate Frames 313
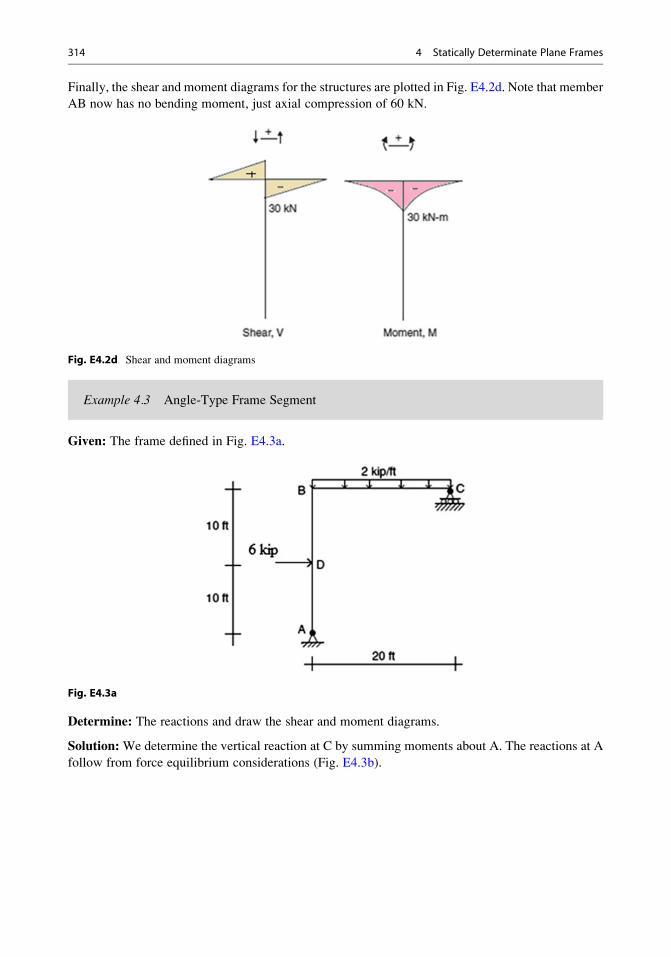
Finally, the shear and moment diagrams for the structures are plotted in Fig. E4.2d. Note that member
AB now has no bending moment, just axial compression of 60 kN.
Fig. E4.2d Shear and moment diagrams
Example 4.3 Angle-Type Frame Segment
Given: The frame defined in Fig. E4.3a.
Fig. E4.3a
Determine: The reactions and draw the shear and moment diagrams.
Solution:We determine the vertical reaction at C by summing moments about A. The reactions at A
follow from force equilibrium considerations (Fig. E4.3b).
314 4 Statically Determinate Plane Frames
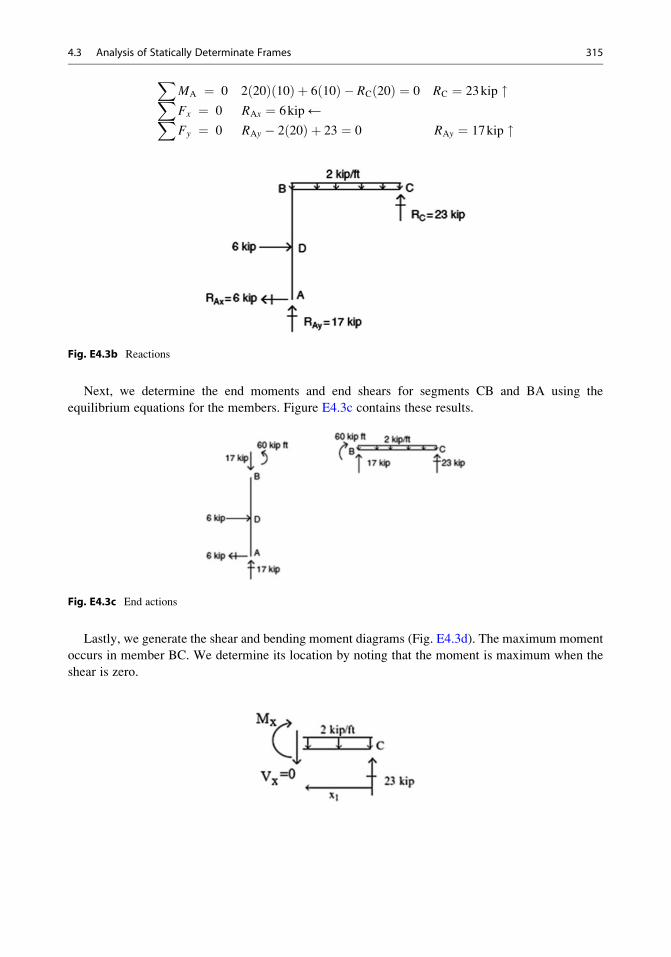
XMA ¼ 0 2 20ð Þ 10ð Þ þ 6 10ð Þ � RC 20ð Þ ¼ 0 RC ¼ 23kip "XFx ¼ 0 RAx ¼ 6kip←XFy ¼ 0 RAy � 2 20ð Þ þ 23 ¼ 0 RAy ¼ 17kip "
Fig. E4.3b Reactions
Next, we determine the end moments and end shears for segments CB and BA using the
equilibrium equations for the members. Figure E4.3c contains these results.
Fig. E4.3c End actions
Lastly, we generate the shear and bending moment diagrams (Fig. E4.3d). The maximum moment
occurs in member BC. We determine its location by noting that the moment is maximum when the
shear is zero.
4.3 Analysis of Statically Determinate Frames 315
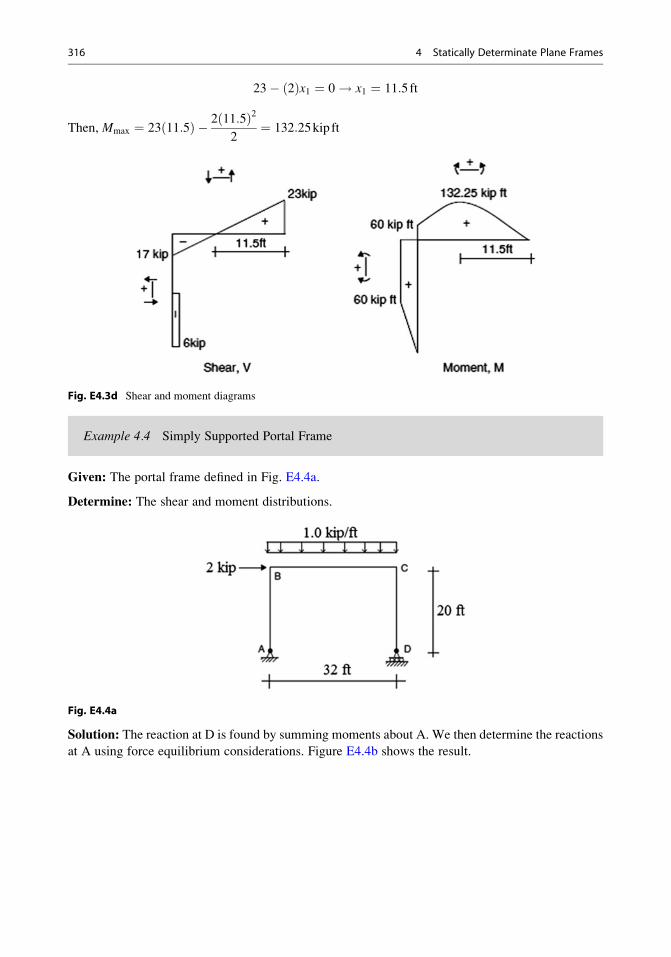
23� 2ð Þx1 ¼ 0! x1 ¼ 11:5ft
Then, Mmax ¼ 23 11:5ð Þ � 2 11:5ð Þ22
¼ 132:25kip ft
Fig. E4.3d Shear and moment diagrams
Example 4.4 Simply Supported Portal Frame
Given: The portal frame defined in Fig. E4.4a.
Determine: The shear and moment distributions.
Fig. E4.4a
Solution: The reaction at D is found by summing moments about A. We then determine the reactions
at A using force equilibrium considerations. Figure E4.4b shows the result.
316 4 Statically Determinate Plane Frames
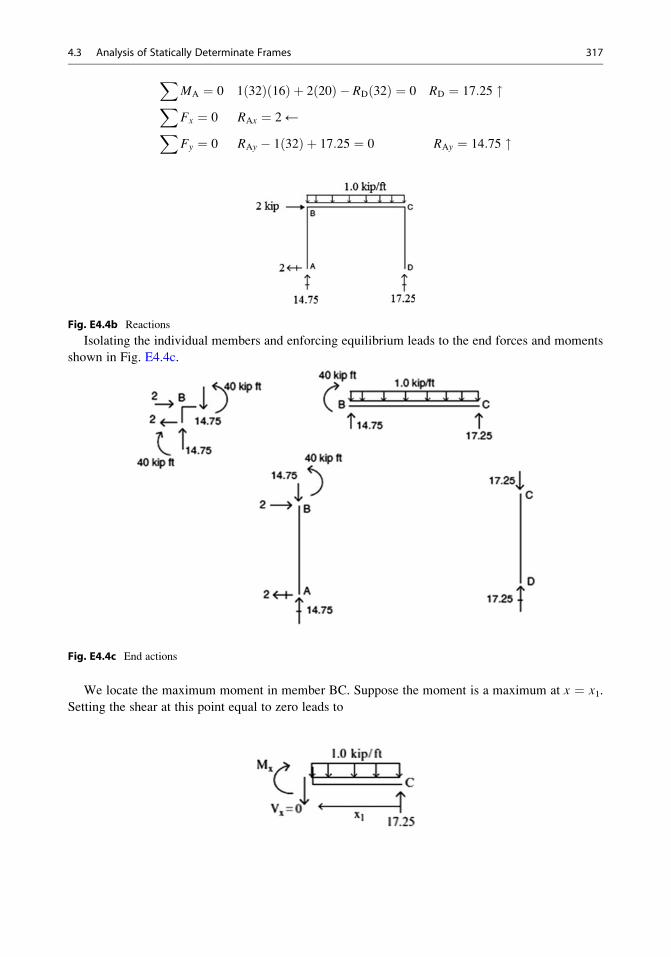
XMA ¼ 0 1 32ð Þ 16ð Þ þ 2 20ð Þ � RD 32ð Þ ¼ 0 RD ¼ 17:25 "XFx ¼ 0 RAx ¼ 2 ←XFy ¼ 0 RAy � 1 32ð Þ þ 17:25 ¼ 0 RAy ¼ 14:75 "
Fig. E4.4b Reactions
Isolating the individual members and enforcing equilibrium leads to the end forces and moments
shown in Fig. E4.4c.
Fig. E4.4c End actions
We locate the maximum moment in member BC. Suppose the moment is a maximum at x ¼ x1.
Setting the shear at this point equal to zero leads to
4.3 Analysis of Statically Determinate Frames 317
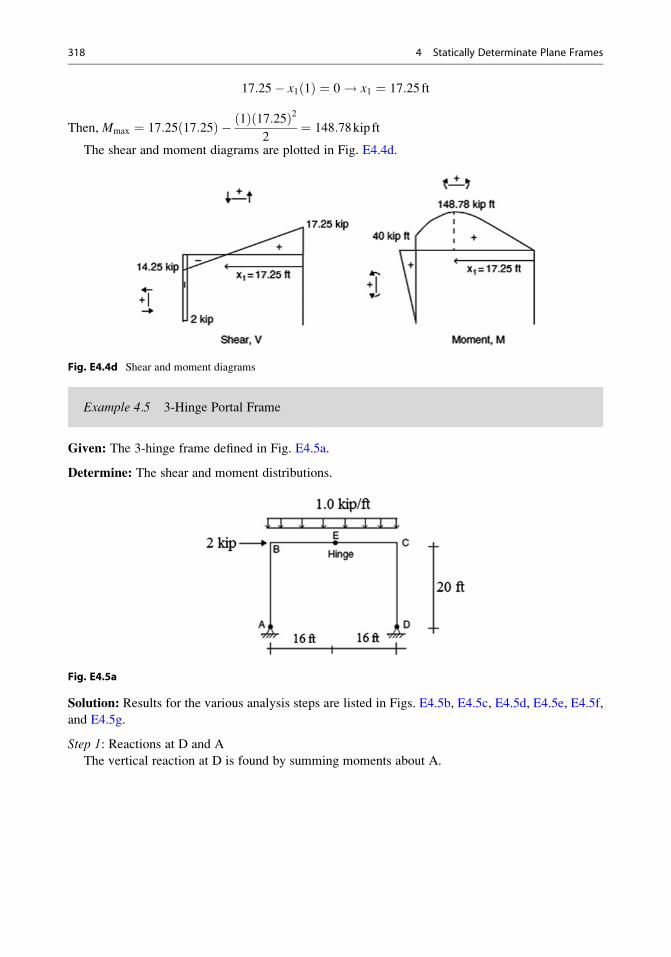
17:25� x1 1ð Þ ¼ 0! x1 ¼ 17:25 ft
Then, Mmax ¼ 17:25 17:25ð Þ � 1ð Þ 17:25ð Þ22
¼ 148:78kip ft
The shear and moment diagrams are plotted in Fig. E4.4d.
Fig. E4.4d Shear and moment diagrams
Example 4.5 3-Hinge Portal Frame
Given: The 3-hinge frame defined in Fig. E4.5a.
Determine: The shear and moment distributions.
Fig. E4.5a
Solution: Results for the various analysis steps are listed in Figs. E4.5b, E4.5c, E4.5d, E4.5e, E4.5f,
and E4.5g.
Step 1: Reactions at D and A
The vertical reaction at D is found by summing moments about A.
318 4 Statically Determinate Plane Frames
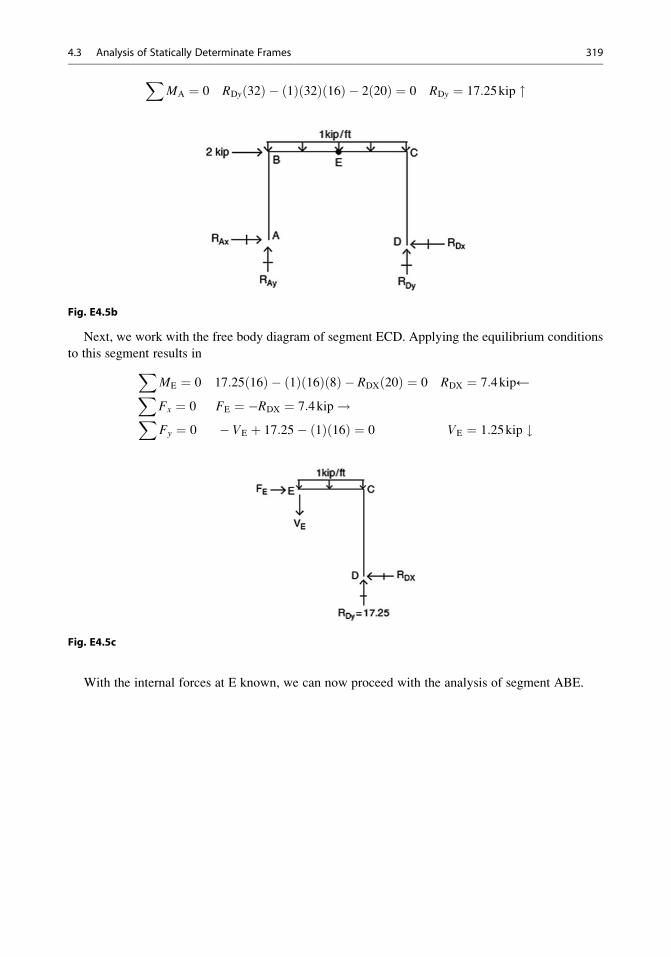
XMA ¼ 0 RDy 32ð Þ � 1ð Þ 32ð Þ 16ð Þ � 2 20ð Þ ¼ 0 RDy ¼ 17:25kip "
Fig. E4.5b
Next, we work with the free body diagram of segment ECD. Applying the equilibrium conditions
to this segment results inXME ¼ 0 17:25 16ð Þ � 1ð Þ 16ð Þ 8ð Þ � RDX 20ð Þ ¼ 0 RDX ¼ 7:4kip←XFx ¼ 0 FE ¼ �RDX ¼ 7:4kip!XFy ¼ 0 � VE þ 17:25� 1ð Þ 16ð Þ ¼ 0 VE ¼ 1:25kip #
Fig. E4.5c
With the internal forces at E known, we can now proceed with the analysis of segment ABE.
4.3 Analysis of Statically Determinate Frames 319
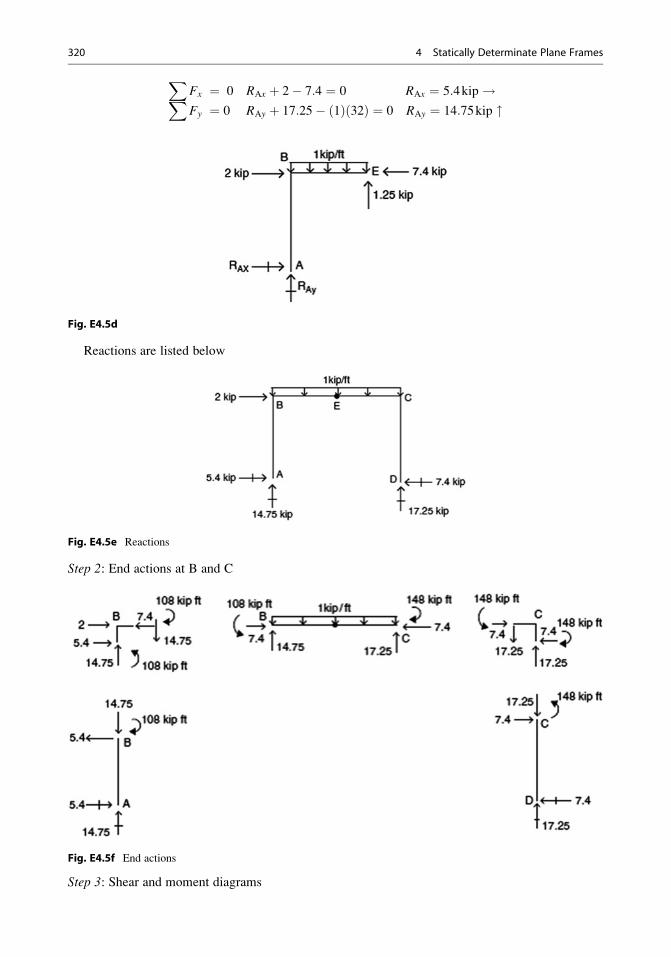
XFx ¼ 0 RAx þ 2� 7:4 ¼ 0 RAx ¼ 5:4kip!XFy ¼ 0 RAy þ 17:25� 1ð Þ 32ð Þ ¼ 0 RAy ¼ 14:75kip "
Fig. E4.5d
Reactions are listed below
Fig. E4.5e Reactions
Step 2: End actions at B and C
Fig. E4.5f End actions
Step 3: Shear and moment diagrams
320 4 Statically Determinate Plane Frames
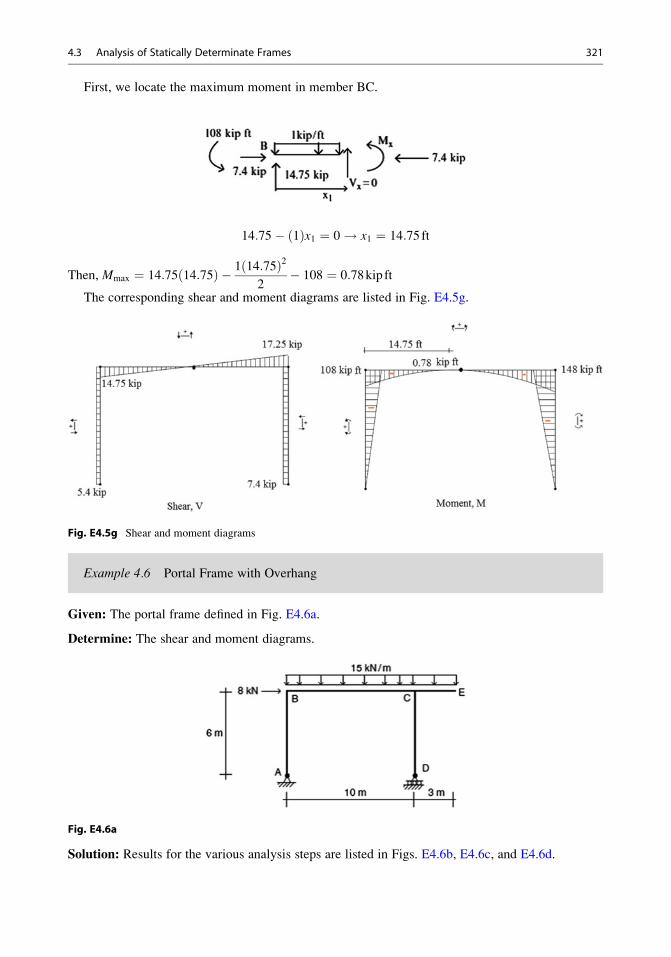
First, we locate the maximum moment in member BC.
14:75� 1ð Þx1 ¼ 0! x1 ¼ 14:75 ft
Then, Mmax ¼ 14:75 14:75ð Þ � 1 14:75ð Þ22
� 108 ¼ 0:78kip ft
The corresponding shear and moment diagrams are listed in Fig. E4.5g.
Fig. E4.5g Shear and moment diagrams
Example 4.6 Portal Frame with Overhang
Given: The portal frame defined in Fig. E4.6a.
Determine: The shear and moment diagrams.
Fig. E4.6a
Solution: Results for the various analysis steps are listed in Figs. E4.6b, E4.6c, and E4.6d.
4.3 Analysis of Statically Determinate Frames 321
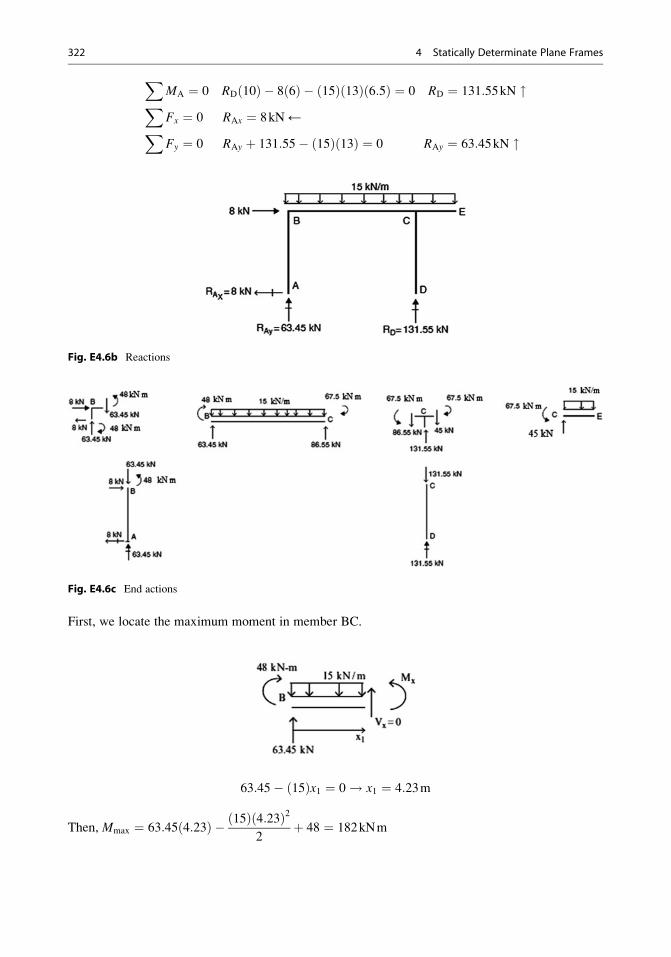
XMA ¼ 0 RD 10ð Þ � 8 6ð Þ � 15ð Þ 13ð Þ 6:5ð Þ ¼ 0 RD ¼ 131:55kN "XFx ¼ 0 RAx ¼ 8kN ←XFy ¼ 0 RAy þ 131:55� 15ð Þ 13ð Þ ¼ 0 RAy ¼ 63:45kN "
Fig. E4.6b Reactions
Fig. E4.6c End actions
First, we locate the maximum moment in member BC.
63:45� 15ð Þx1 ¼ 0! x1 ¼ 4:23m
Then, Mmax ¼ 63:45 4:23ð Þ � 15ð Þ 4:23ð Þ22
þ 48 ¼ 182kNm
322 4 Statically Determinate Plane Frames
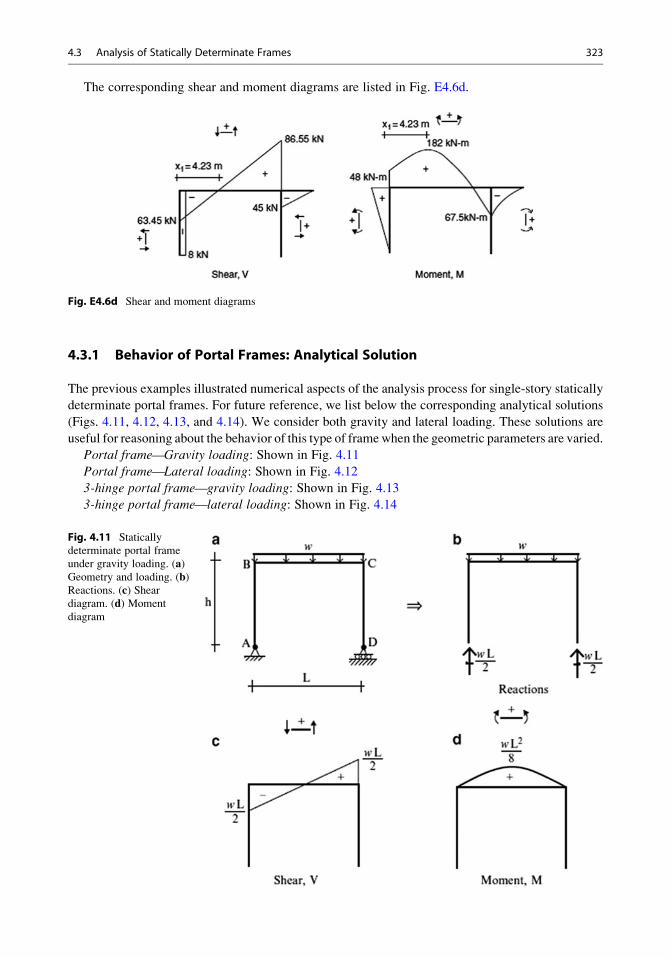
The corresponding shear and moment diagrams are listed in Fig. E4.6d.
Fig. E4.6d Shear and moment diagrams
4.3.1 Behavior of Portal Frames: Analytical Solution
The previous examples illustrated numerical aspects of the analysis process for single-story statically
determinate portal frames. For future reference, we list below the corresponding analytical solutions
(Figs. 4.11, 4.12, 4.13, and 4.14). We consider both gravity and lateral loading. These solutions are
useful for reasoning about the behavior of this type of framewhen the geometric parameters are varied.
Portal frame—Gravity loading: Shown in Fig. 4.11
Portal frame—Lateral loading: Shown in Fig. 4.12
3-hinge portal frame—gravity loading: Shown in Fig. 4.13
3-hinge portal frame—lateral loading: Shown in Fig. 4.14
Fig. 4.11 Statically
determinate portal frame
under gravity loading. (a)Geometry and loading. (b)Reactions. (c) Sheardiagram. (d) Moment
diagram
4.3 Analysis of Statically Determinate Frames 323
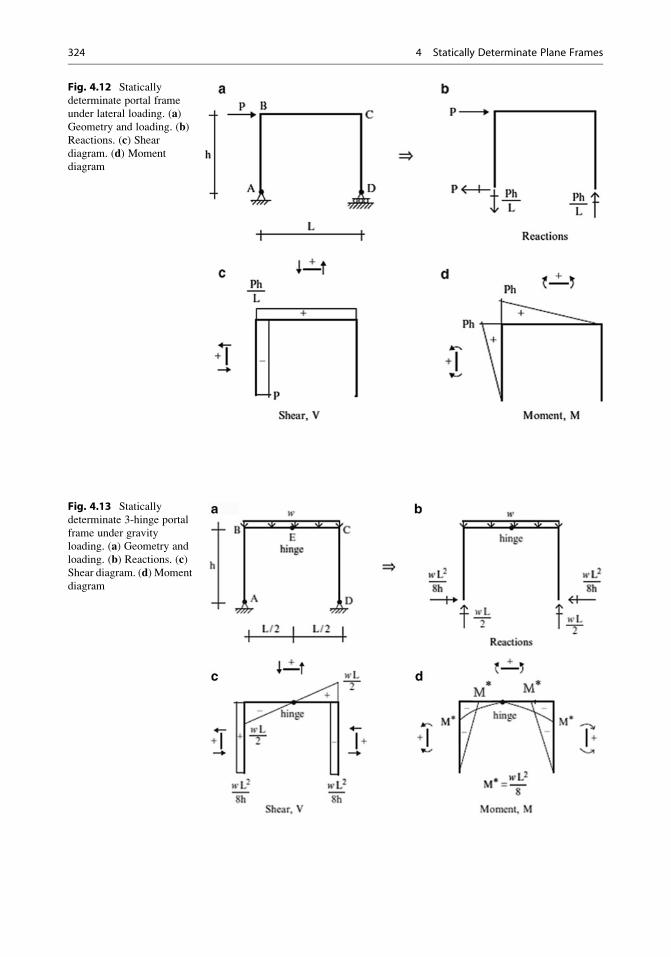
Fig. 4.13 Statically
determinate 3-hinge portal
frame under gravity
loading. (a) Geometry and
loading. (b) Reactions. (c)Shear diagram. (d) Moment
diagram
Fig. 4.12 Statically
determinate portal frame
under lateral loading. (a)Geometry and loading. (b)Reactions. (c) Sheardiagram. (d) Moment
diagram
324 4 Statically Determinate Plane Frames
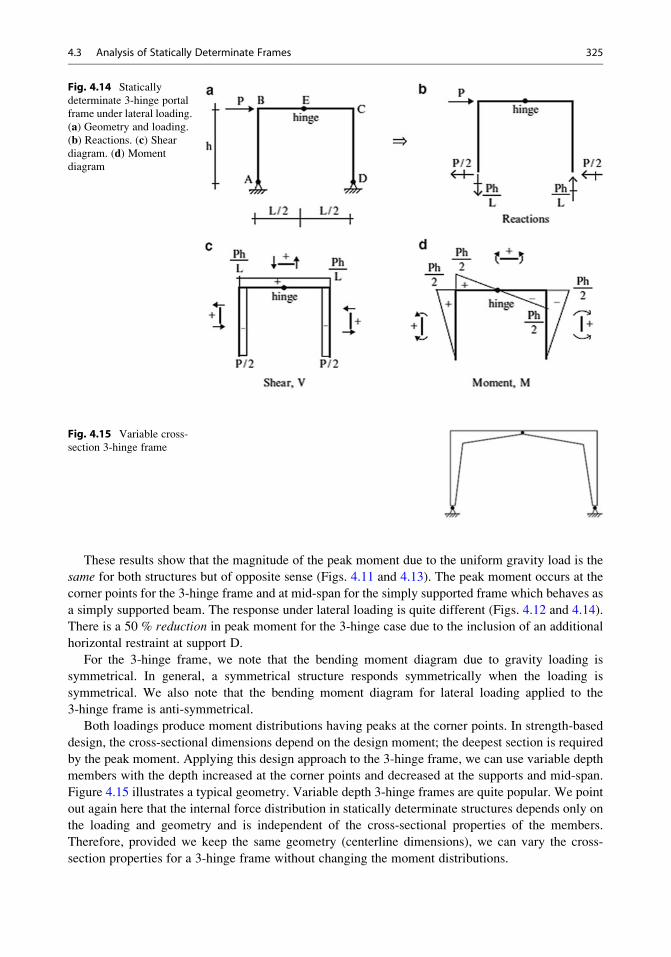
These results show that the magnitude of the peak moment due to the uniform gravity load is the
same for both structures but of opposite sense (Figs. 4.11 and 4.13). The peak moment occurs at the
corner points for the 3-hinge frame and at mid-span for the simply supported frame which behaves as
a simply supported beam. The response under lateral loading is quite different (Figs. 4.12 and 4.14).
There is a 50 % reduction in peak moment for the 3-hinge case due to the inclusion of an additional
horizontal restraint at support D.
For the 3-hinge frame, we note that the bending moment diagram due to gravity loading is
symmetrical. In general, a symmetrical structure responds symmetrically when the loading is
symmetrical. We also note that the bending moment diagram for lateral loading applied to the
3-hinge frame is anti-symmetrical.
Both loadings produce moment distributions having peaks at the corner points. In strength-based
design, the cross-sectional dimensions depend on the design moment; the deepest section is required
by the peak moment. Applying this design approach to the 3-hinge frame, we can use variable depth
members with the depth increased at the corner points and decreased at the supports and mid-span.
Figure 4.15 illustrates a typical geometry. Variable depth 3-hinge frames are quite popular. We point
out again here that the internal force distribution in statically determinate structures depends only on
the loading and geometry and is independent of the cross-sectional properties of the members.
Therefore, provided we keep the same geometry (centerline dimensions), we can vary the cross-
section properties for a 3-hinge frame without changing the moment distributions.
Fig. 4.14 Statically
determinate 3-hinge portal
frame under lateral loading.
(a) Geometry and loading.
(b) Reactions. (c) Sheardiagram. (d) Moment
diagram
Fig. 4.15 Variable cross-
section 3-hinge frame
4.3 Analysis of Statically Determinate Frames 325
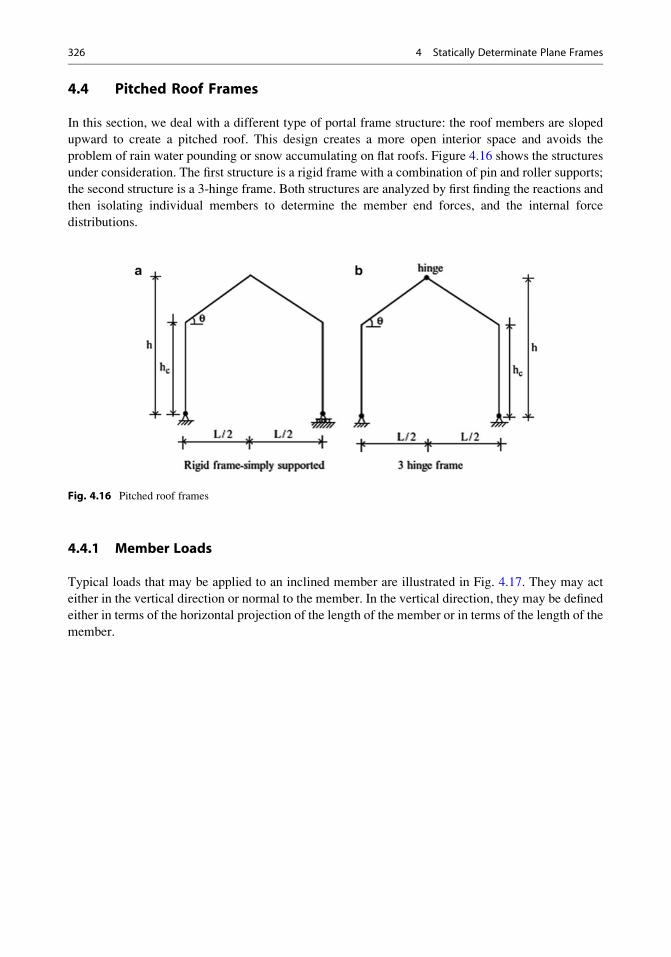
4.4 Pitched Roof Frames
In this section, we deal with a different type of portal frame structure: the roof members are sloped
upward to create a pitched roof. This design creates a more open interior space and avoids the
problem of rain water pounding or snow accumulating on flat roofs. Figure 4.16 shows the structures
under consideration. The first structure is a rigid frame with a combination of pin and roller supports;
the second structure is a 3-hinge frame. Both structures are analyzed by first finding the reactions and
then isolating individual members to determine the member end forces, and the internal force
distributions.
4.4.1 Member Loads
Typical loads that may be applied to an inclined member are illustrated in Fig. 4.17. They may act
either in the vertical direction or normal to the member. In the vertical direction, they may be defined
either in terms of the horizontal projection of the length of the member or in terms of the length of the
member.
Fig. 4.16 Pitched roof frames
326 4 Statically Determinate Plane Frames
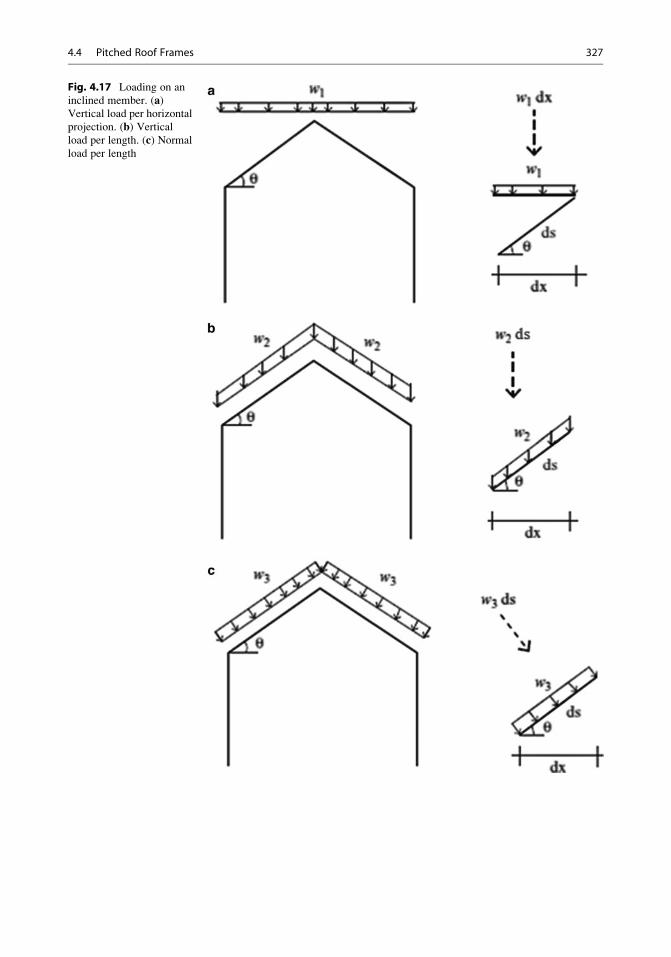
Fig. 4.17 Loading on an
inclined member. (a)Vertical load per horizontal
projection. (b) Verticalload per length. (c) Normal
load per length
4.4 Pitched Roof Frames 327
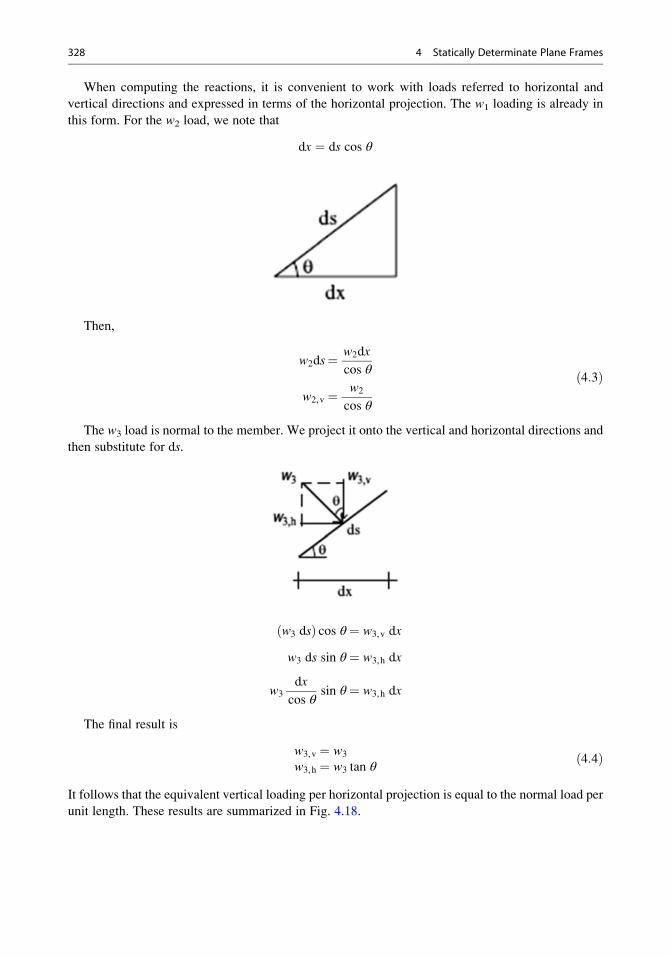
When computing the reactions, it is convenient to work with loads referred to horizontal and
vertical directions and expressed in terms of the horizontal projection. The w1 loading is already in
this form. For the w2 load, we note that
dx ¼ ds cos θ
Then,
w2ds¼ w2dx
cos θ
w2,v ¼ w2
cos θ
ð4:3Þ
The w3 load is normal to the member. We project it onto the vertical and horizontal directions and
then substitute for ds.
w3 dsð Þ cos θ¼ w3,v dx
w3 ds sin θ¼ w3,h dx
w3
dx
cos θsin θ¼ w3,h dx
The final result is
w3,v ¼ w3
w3,h ¼ w3 tan θð4:4Þ
It follows that the equivalent vertical loading per horizontal projection is equal to the normal load per
unit length. These results are summarized in Fig. 4.18.
328 4 Statically Determinate Plane Frames
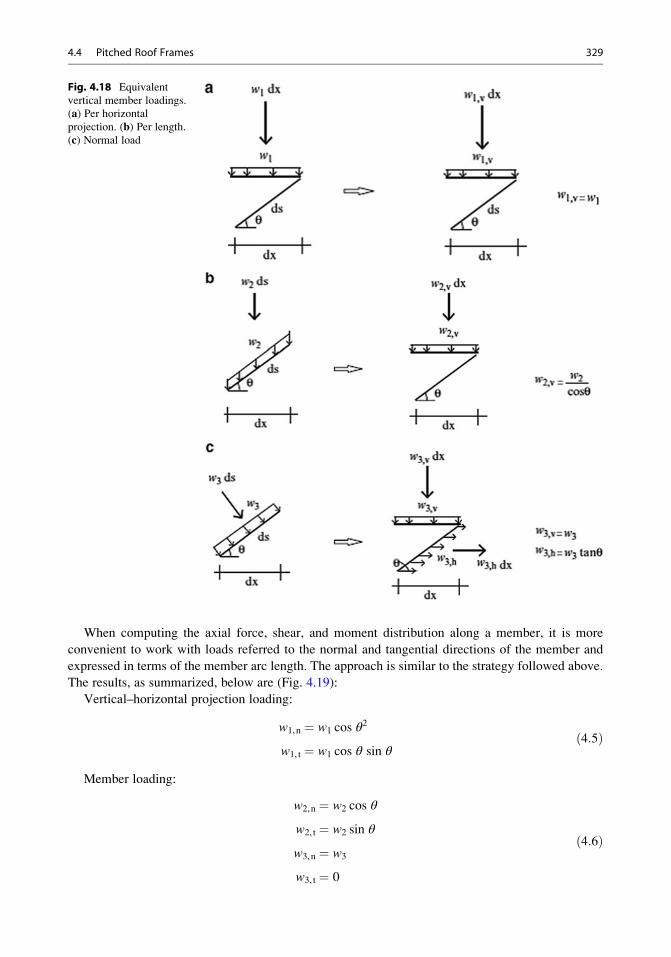
When computing the axial force, shear, and moment distribution along a member, it is more
convenient to work with loads referred to the normal and tangential directions of the member and
expressed in terms of the member arc length. The approach is similar to the strategy followed above.
The results, as summarized, below are (Fig. 4.19):
Vertical–horizontal projection loading:
w1,n ¼ w1 cos θ2
w1, t ¼ w1 cos θ sin θð4:5Þ
Member loading:
w2,n ¼ w2 cos θ
w2, t ¼ w2 sin θ
w3,n ¼ w3
w3, t ¼ 0
ð4:6Þ
Fig. 4.18 Equivalent
vertical member loadings.
(a) Per horizontalprojection. (b) Per length.(c) Normal load
4.4 Pitched Roof Frames 329
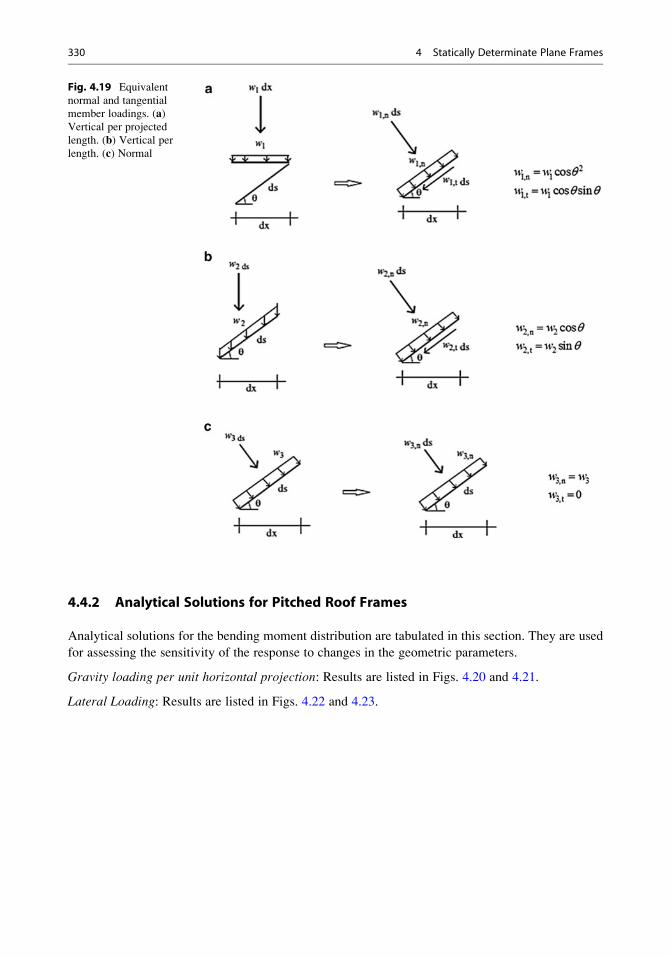
4.4.2 Analytical Solutions for Pitched Roof Frames
Analytical solutions for the bending moment distribution are tabulated in this section. They are used
for assessing the sensitivity of the response to changes in the geometric parameters.
Gravity loading per unit horizontal projection: Results are listed in Figs. 4.20 and 4.21.
Lateral Loading: Results are listed in Figs. 4.22 and 4.23.
Fig. 4.19 Equivalent
normal and tangential
member loadings. (a)Vertical per projected
length. (b) Vertical perlength. (c) Normal
330 4 Statically Determinate Plane Frames
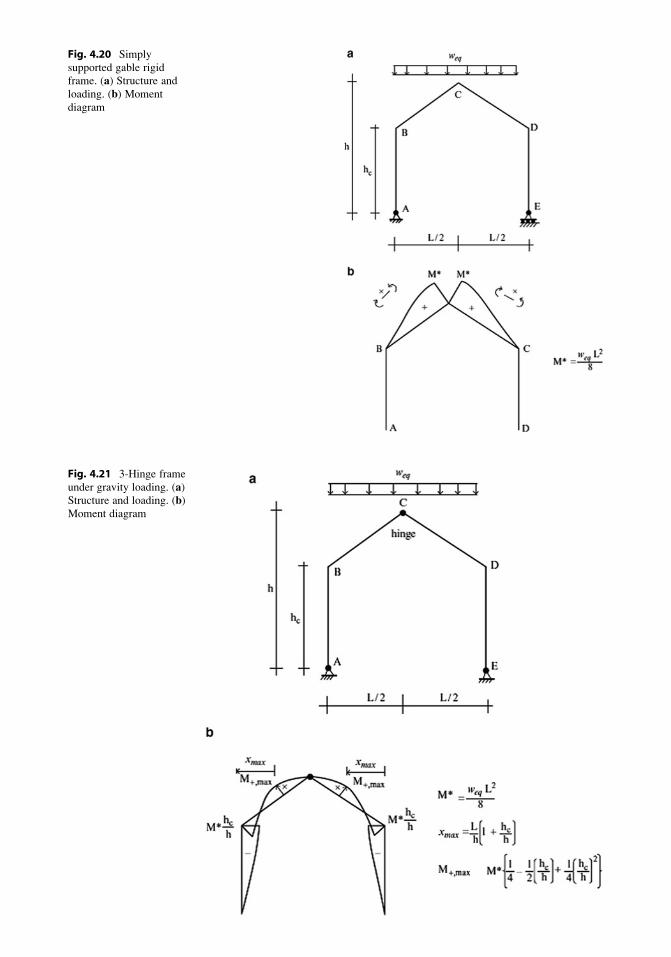
Fig. 4.20 Simply
supported gable rigid
frame. (a) Structure andloading. (b) Moment
diagram
Fig. 4.21 3-Hinge frame
under gravity loading. (a)Structure and loading. (b)Moment diagram
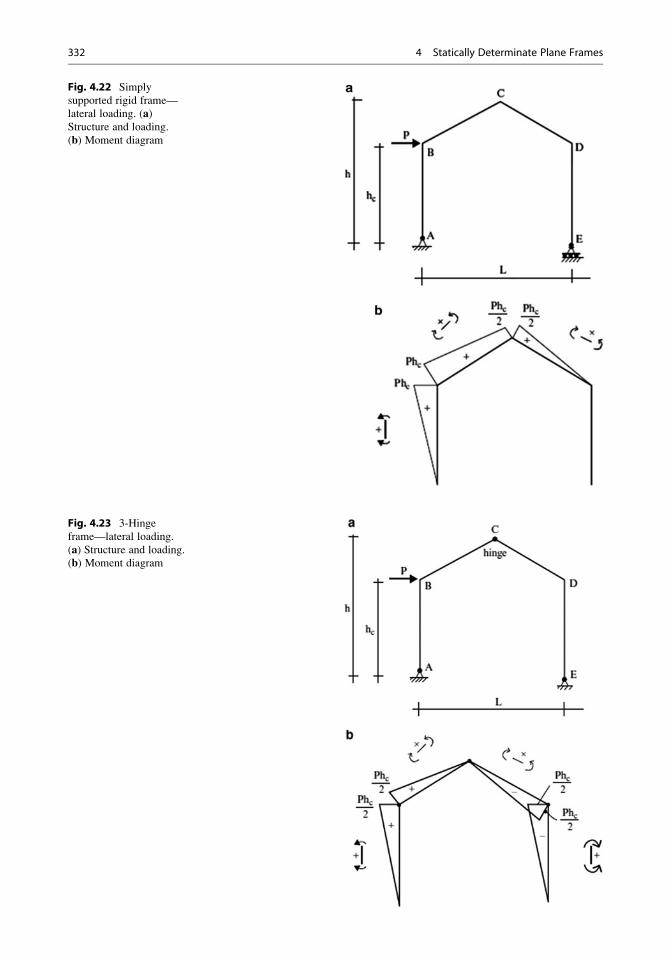
Fig. 4.22 Simply
supported rigid frame—
lateral loading. (a)Structure and loading.
(b) Moment diagram
Fig. 4.23 3-Hinge
frame—lateral loading.
(a) Structure and loading.
(b) Moment diagram
332 4 Statically Determinate Plane Frames
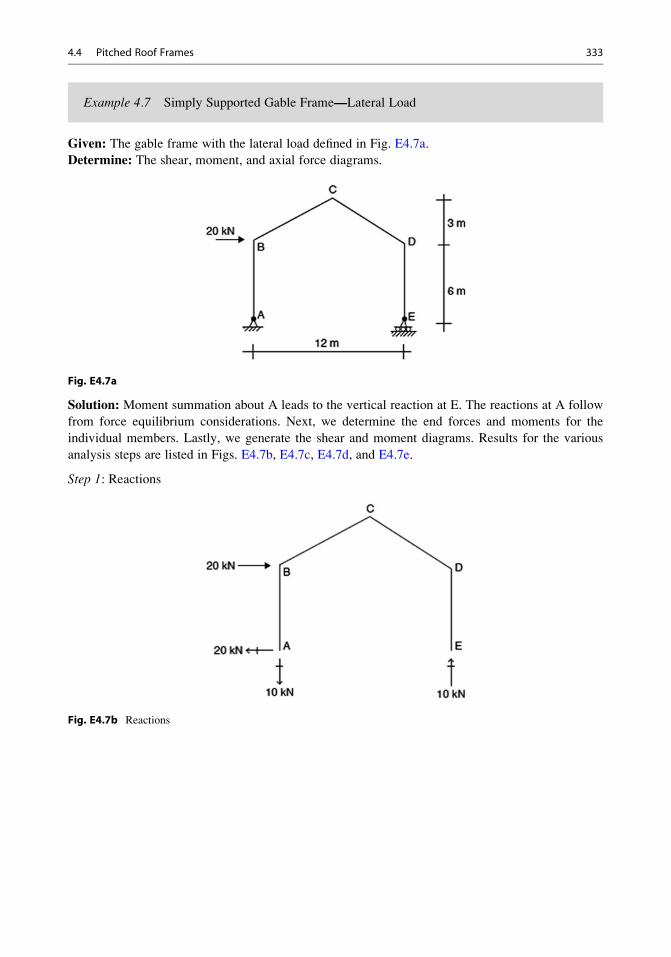
Example 4.7 Simply Supported Gable Frame—Lateral Load
Given: The gable frame with the lateral load defined in Fig. E4.7a.
Determine: The shear, moment, and axial force diagrams.
Fig. E4.7a
Solution: Moment summation about A leads to the vertical reaction at E. The reactions at A follow
from force equilibrium considerations. Next, we determine the end forces and moments for the
individual members. Lastly, we generate the shear and moment diagrams. Results for the various
analysis steps are listed in Figs. E4.7b, E4.7c, E4.7d, and E4.7e.
Step 1: Reactions
Fig. E4.7b Reactions
4.4 Pitched Roof Frames 333
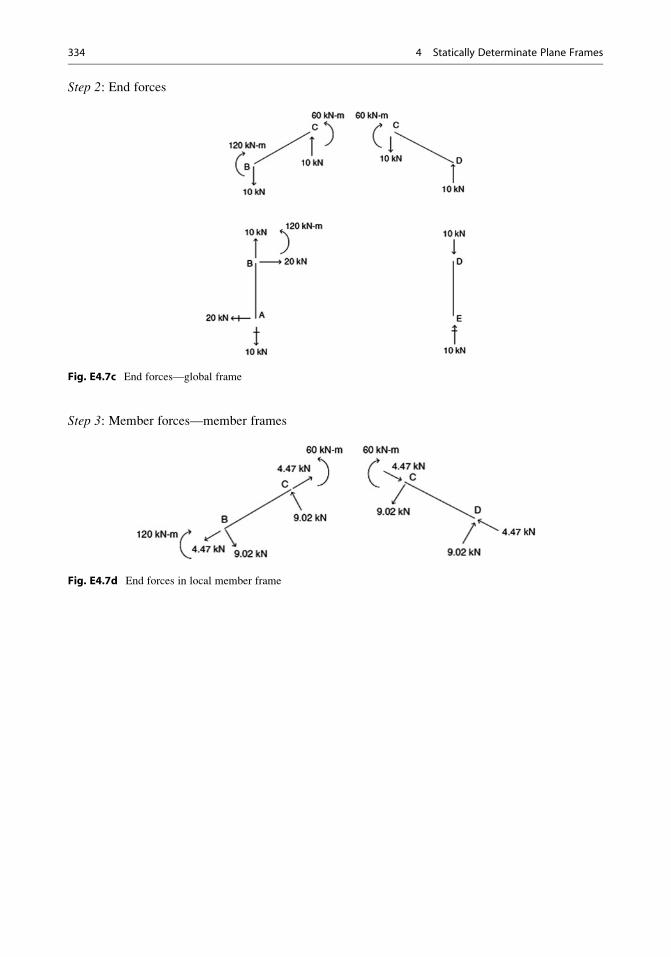
Step 2: End forces
Fig. E4.7c End forces—global frame
Step 3: Member forces—member frames
Fig. E4.7d End forces in local member frame
334 4 Statically Determinate Plane Frames
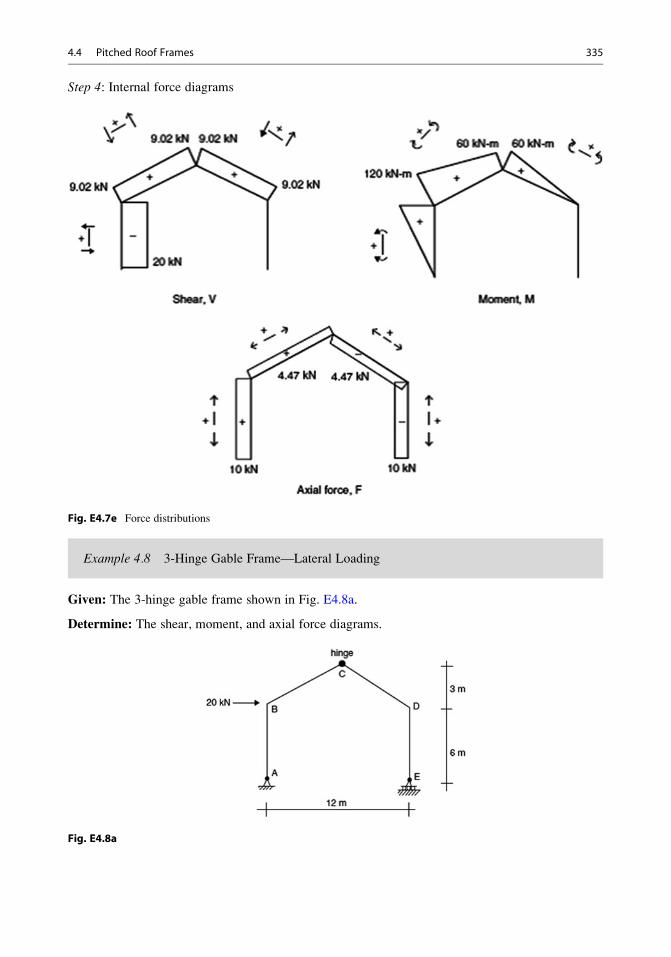
Step 4: Internal force diagrams
Fig. E4.7e Force distributions
Example 4.8 3-Hinge Gable Frame—Lateral Loading
Given: The 3-hinge gable frame shown in Fig. E4.8a.
Determine: The shear, moment, and axial force diagrams.
Fig. E4.8a
4.4 Pitched Roof Frames 335
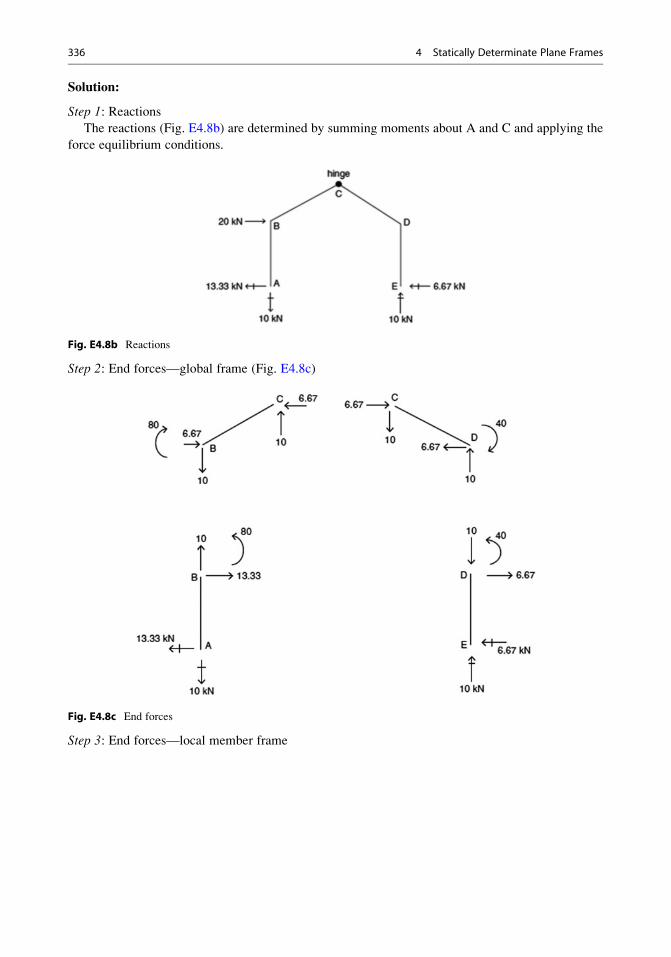
Solution:
Step 1: ReactionsThe reactions (Fig. E4.8b) are determined by summing moments about A and C and applying the
force equilibrium conditions.
Fig. E4.8b Reactions
Step 2: End forces—global frame (Fig. E4.8c)
Fig. E4.8c End forces
Step 3: End forces—local member frame
336 4 Statically Determinate Plane Frames
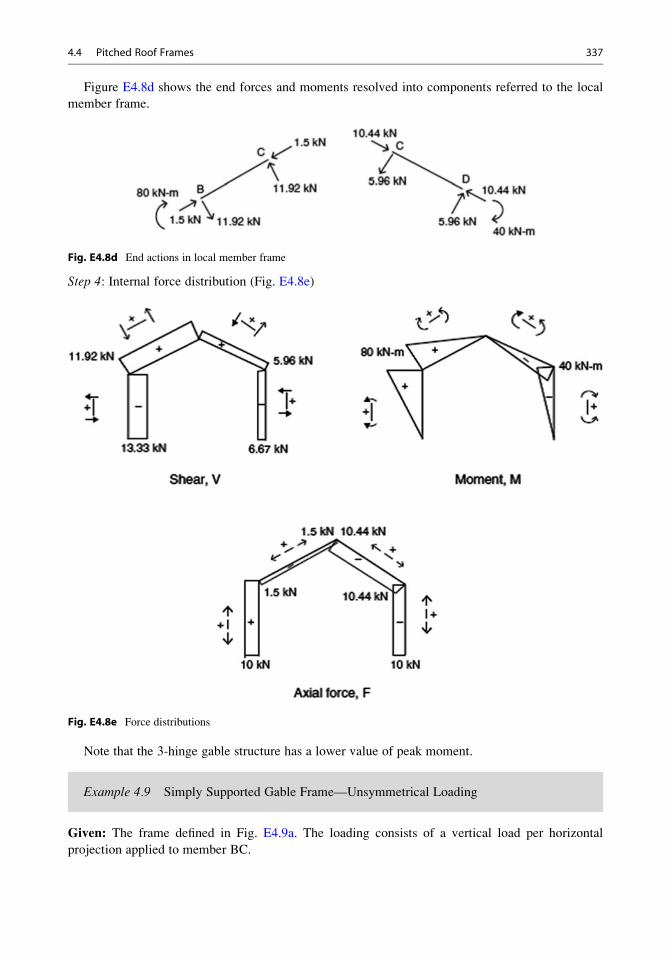
Figure E4.8d shows the end forces and moments resolved into components referred to the local
member frame.
Fig. E4.8d End actions in local member frame
Step 4: Internal force distribution (Fig. E4.8e)
Fig. E4.8e Force distributions
Note that the 3-hinge gable structure has a lower value of peak moment.
Example 4.9 Simply Supported Gable Frame—Unsymmetrical Loading
Given: The frame defined in Fig. E4.9a. The loading consists of a vertical load per horizontal
projection applied to member BC.
4.4 Pitched Roof Frames 337
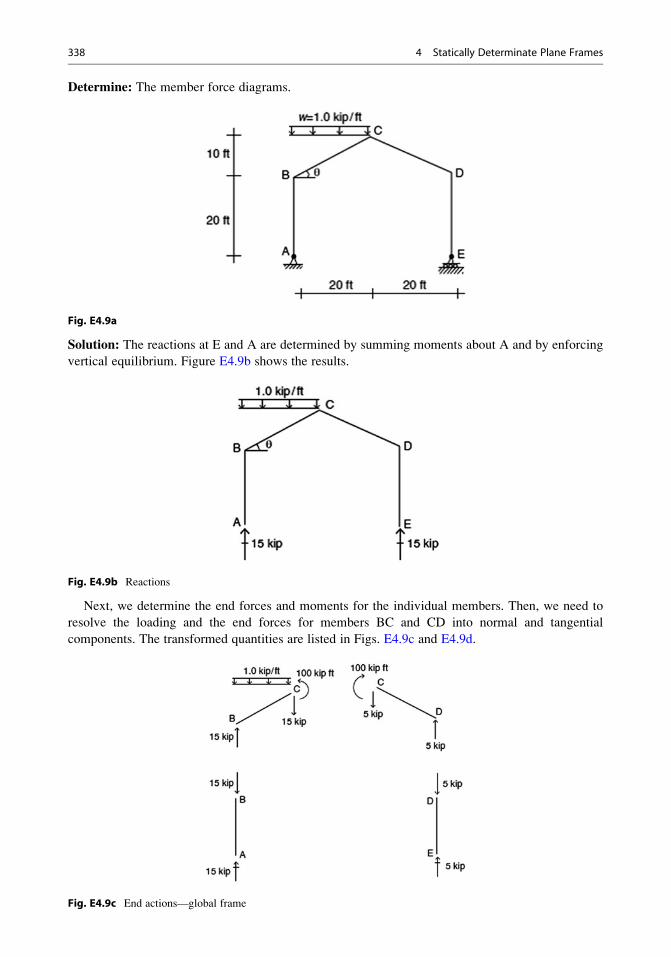
Determine: The member force diagrams.
Fig. E4.9a
Solution: The reactions at E and A are determined by summing moments about A and by enforcing
vertical equilibrium. Figure E4.9b shows the results.
Fig. E4.9b Reactions
Next, we determine the end forces and moments for the individual members. Then, we need to
resolve the loading and the end forces for members BC and CD into normal and tangential
components. The transformed quantities are listed in Figs. E4.9c and E4.9d.
Fig. E4.9c End actions—global frame
338 4 Statically Determinate Plane Frames
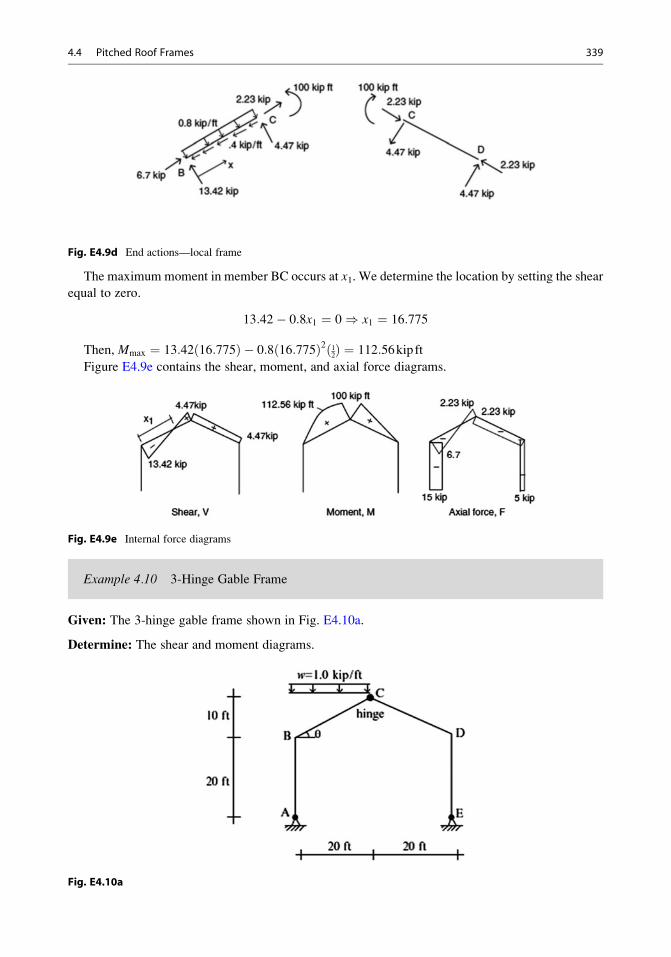
Fig. E4.9d End actions—local frame
The maximum moment in member BC occurs at x1. We determine the location by setting the shear
equal to zero.
13:42� 0:8x1 ¼ 0) x1 ¼ 16:775
Then, Mmax ¼ 13:42 16:775ð Þ � 0:8 16:775ð Þ2 12ð Þ ¼ 112:56kip ft
Figure E4.9e contains the shear, moment, and axial force diagrams.
Fig. E4.9e Internal force diagrams
Example 4.10 3-Hinge Gable Frame
Given: The 3-hinge gable frame shown in Fig. E4.10a.
Determine: The shear and moment diagrams.
Fig. E4.10a
4.4 Pitched Roof Frames 339
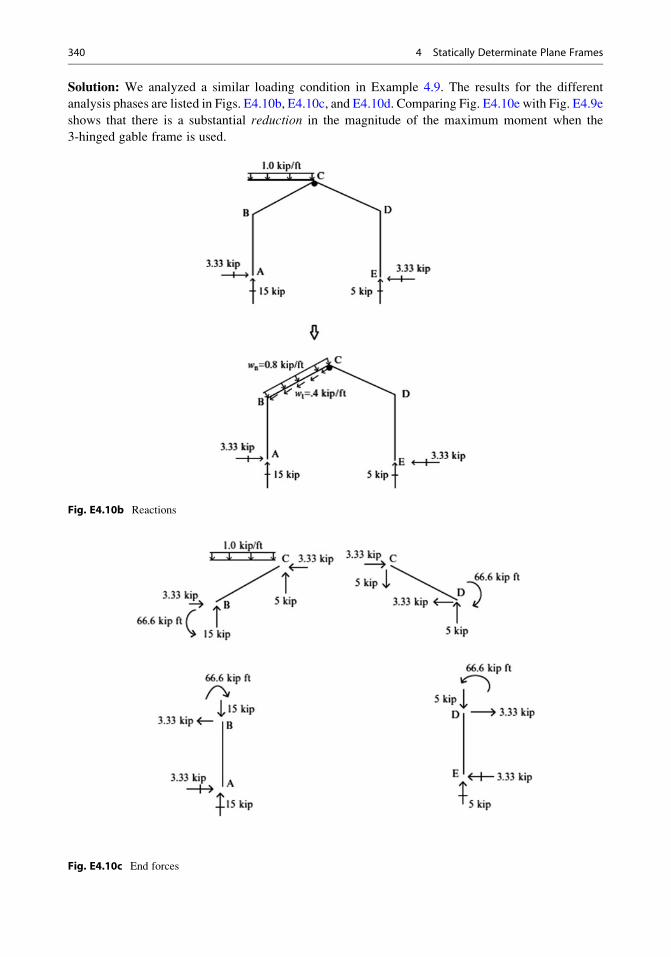
Solution: We analyzed a similar loading condition in Example 4.9. The results for the different
analysis phases are listed in Figs. E4.10b, E4.10c, and E4.10d. Comparing Fig. E4.10e with Fig. E4.9e
shows that there is a substantial reduction in the magnitude of the maximum moment when the
3-hinged gable frame is used.
Fig. E4.10b Reactions
Fig. E4.10c End forces
340 4 Statically Determinate Plane Frames
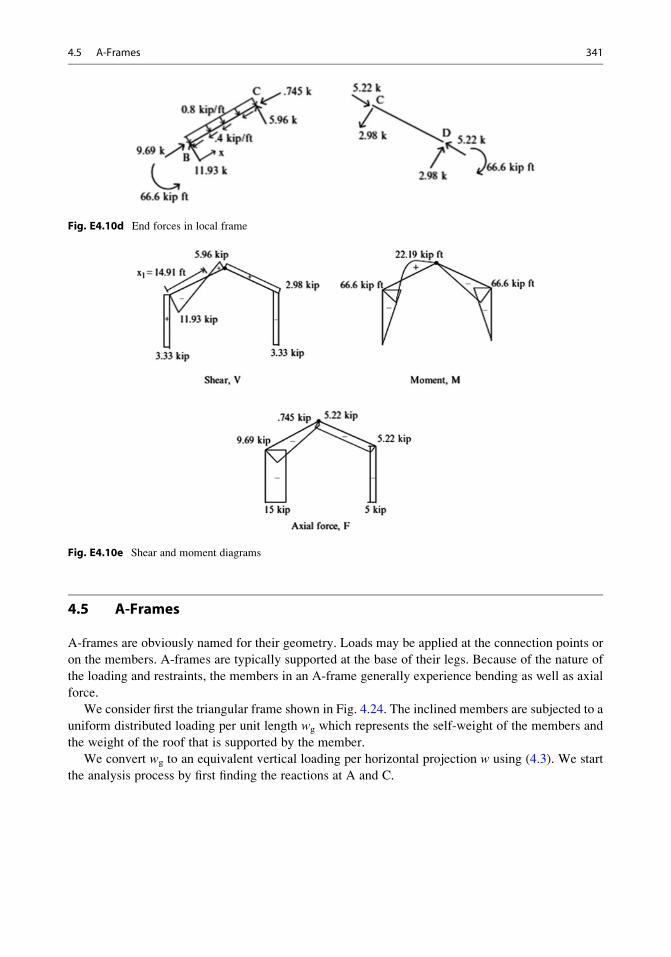
Fig. E4.10d End forces in local frame
Fig. E4.10e Shear and moment diagrams
4.5 A-Frames
A-frames are obviously named for their geometry. Loads may be applied at the connection points or
on the members. A-frames are typically supported at the base of their legs. Because of the nature of
the loading and restraints, the members in an A-frame generally experience bending as well as axial
force.
We consider first the triangular frame shown in Fig. 4.24. The inclined members are subjected to a
uniform distributed loading per unit length wg which represents the self-weight of the members and
the weight of the roof that is supported by the member.
We convert wg to an equivalent vertical loading per horizontal projection w using (4.3). We start
the analysis process by first finding the reactions at A and C.
4.5 A-Frames 341

Fig. 4.24 (a) Geometry
and loading. (b) A-frame
loading and reactions. (c)Free body diagrams. (d)Moment diagram
342 4 Statically Determinate Plane Frames
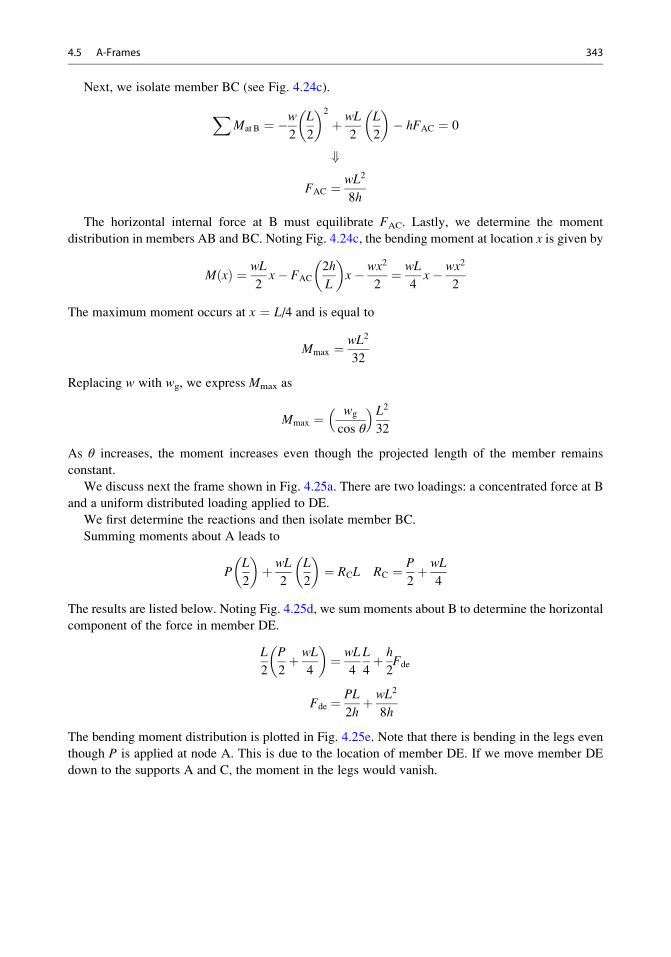
Next, we isolate member BC (see Fig. 4.24c).
XMat B ¼ �w
2
L
2
� �2
þ wL
2
L
2
� �� hFAC ¼ 0
+
FAC ¼ wL2
8h
The horizontal internal force at B must equilibrate FAC. Lastly, we determine the moment
distribution in members AB and BC. Noting Fig. 4.24c, the bending moment at location x is given by
M xð Þ ¼ wL
2x� FAC
2h
L
� �x� wx2
2¼ wL
4x� wx2
2
The maximum moment occurs at x ¼ L/4 and is equal to
Mmax ¼ wL2
32
Replacing w with wg, we express Mmax as
Mmax ¼ wg
cos θ
� � L232
As θ increases, the moment increases even though the projected length of the member remains
constant.
We discuss next the frame shown in Fig. 4.25a. There are two loadings: a concentrated force at B
and a uniform distributed loading applied to DE.
We first determine the reactions and then isolate member BC.
Summing moments about A leads to
PL
2
� �þ wL
2
L
2
� �¼ RCL RC ¼ P
2þ wL
4
The results are listed below. Noting Fig. 4.25d, we sum moments about B to determine the horizontal
component of the force in member DE.
L
2
P
2þ wL
4
� �¼ wL
4
L
4þ h
2Fde
Fde ¼ PL
2hþ wL2
8h
The bending moment distribution is plotted in Fig. 4.25e. Note that there is bending in the legs even
though P is applied at node A. This is due to the location of member DE. If we move member DE
down to the supports A and C, the moment in the legs would vanish.
4.5 A-Frames 343
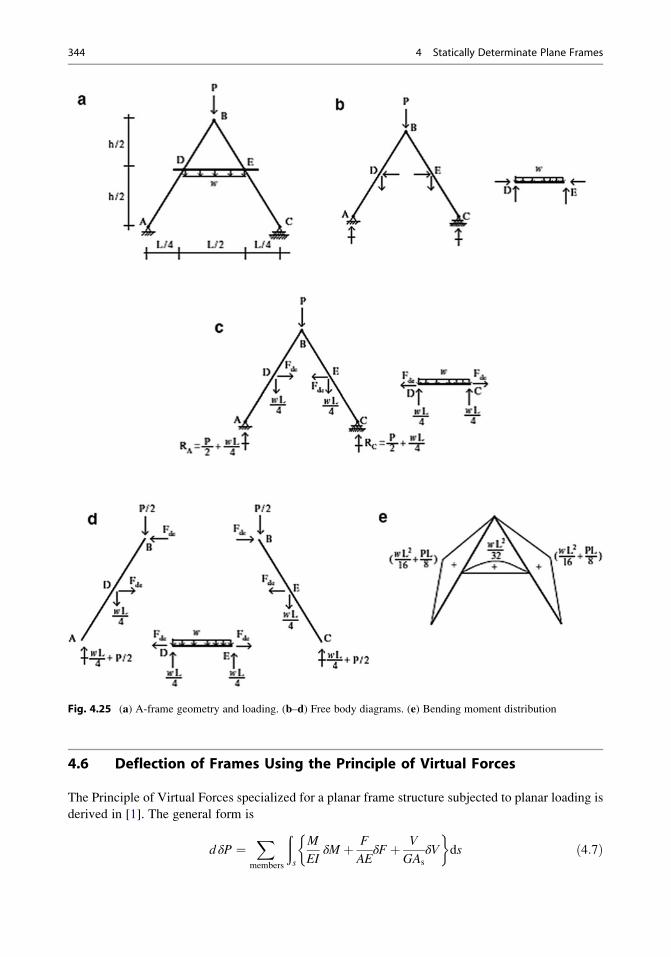
4.6 Deflection of Frames Using the Principle of Virtual Forces
The Principle of Virtual Forces specialized for a planar frame structure subjected to planar loading is
derived in [1]. The general form is
d δP ¼X
members
ðs
M
EIδM þ F
AEδFþ V
GAs
δV
�ds ð4:7Þ
Fig. 4.25 (a) A-frame geometry and loading. (b–d) Free body diagrams. (e) Bending moment distribution
344 4 Statically Determinate Plane Frames
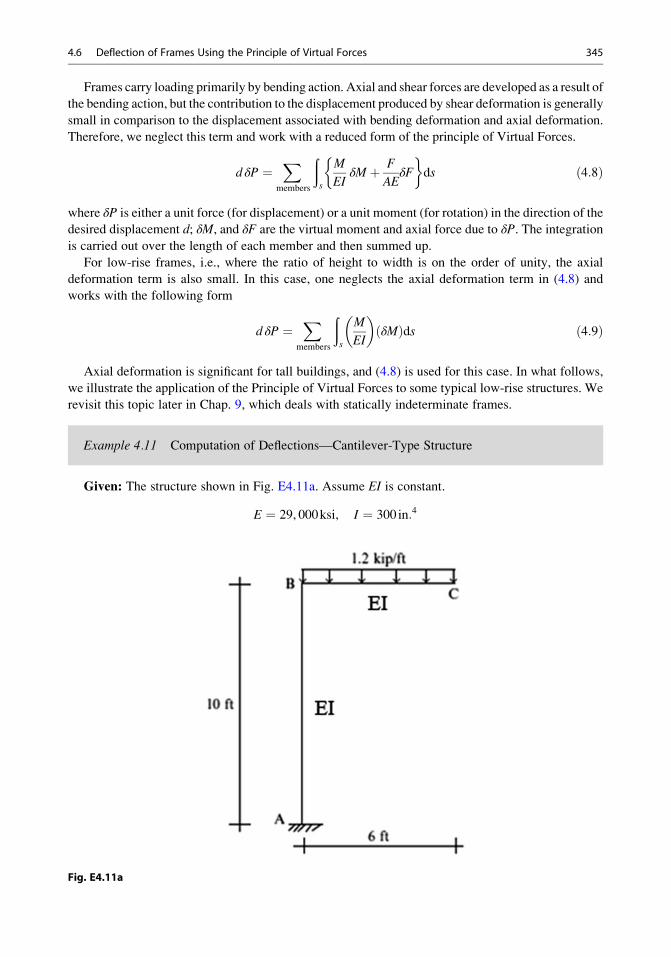
Frames carry loading primarily by bending action. Axial and shear forces are developed as a result of
the bending action, but the contribution to the displacement produced by shear deformation is generally
small in comparison to the displacement associated with bending deformation and axial deformation.
Therefore, we neglect this term and work with a reduced form of the principle of Virtual Forces.
d δP ¼X
members
ðs
M
EIδM þ F
AEδF
�ds ð4:8Þ
where δP is either a unit force (for displacement) or a unit moment (for rotation) in the direction of the
desired displacement d; δM, and δF are the virtual moment and axial force due to δP. The integrationis carried out over the length of each member and then summed up.
For low-rise frames, i.e., where the ratio of height to width is on the order of unity, the axial
deformation term is also small. In this case, one neglects the axial deformation term in (4.8) and
works with the following form
d δP ¼X
members
ðs
M
EI
� �δMð Þds ð4:9Þ
Axial deformation is significant for tall buildings, and (4.8) is used for this case. In what follows,
we illustrate the application of the Principle of Virtual Forces to some typical low-rise structures. We
revisit this topic later in Chap. 9, which deals with statically indeterminate frames.
Example 4.11 Computation of Deflections—Cantilever-Type Structure
Given: The structure shown in Fig. E4.11a. Assume EI is constant.
E ¼ 29, 000ksi, I ¼ 300 in:4
Fig. E4.11a
4.6 Deflection of Frames Using the Principle of Virtual Forces 345
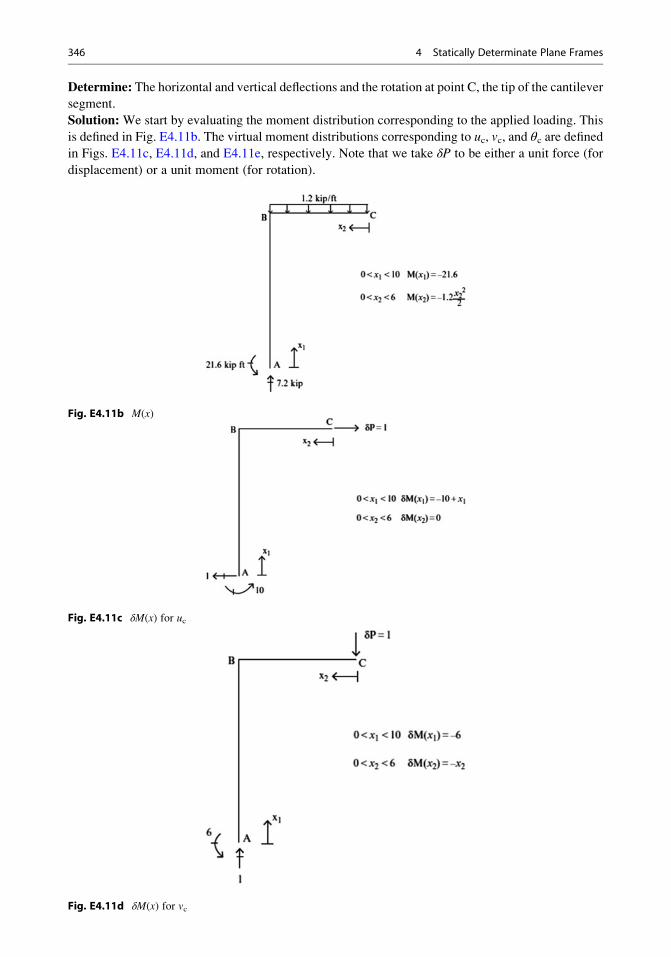
Determine: The horizontal and vertical deflections and the rotation at point C, the tip of the cantilever
segment.
Solution: We start by evaluating the moment distribution corresponding to the applied loading. This
is defined in Fig. E4.11b. The virtual moment distributions corresponding to uc, vc, and θc are definedin Figs. E4.11c, E4.11d, and E4.11e, respectively. Note that we take δP to be either a unit force (for
displacement) or a unit moment (for rotation).
Fig. E4.11b M(x)
Fig. E4.11c δM(x) for uc
Fig. E4.11d δM(x) for vc
346 4 Statically Determinate Plane Frames
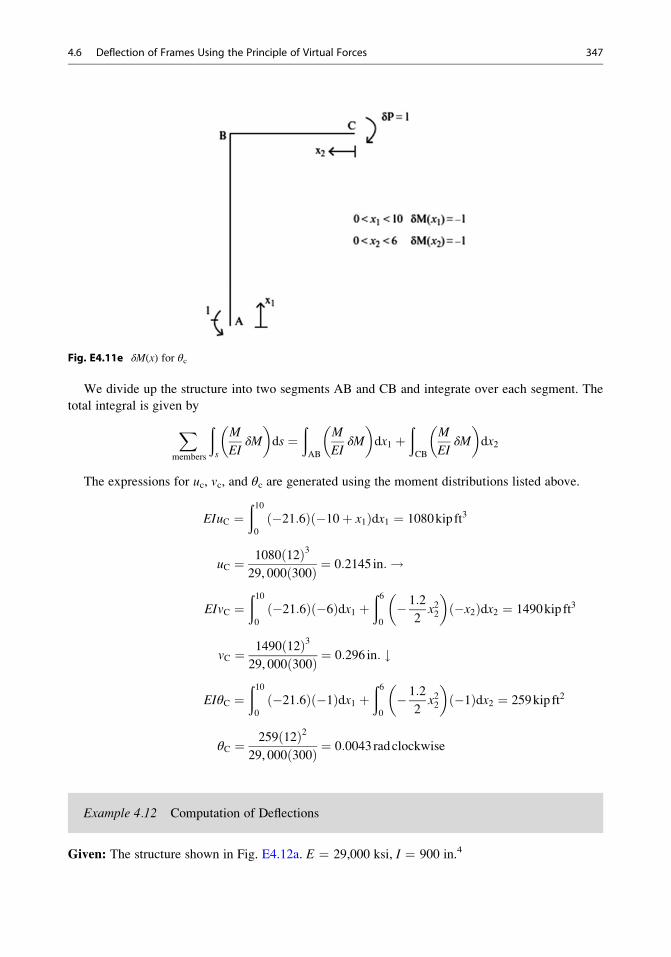
Fig. E4.11e δM(x) for θc
We divide up the structure into two segments AB and CB and integrate over each segment. The
total integral is given by
Xmembers
ðs
M
EIδM
� �ds ¼
ðAB
M
EIδM
� �dx1 þ
ðCB
M
EIδM
� �dx2
The expressions for uc, vc, and θc are generated using the moment distributions listed above.
EIuC ¼ð100
�21:6ð Þ �10þ x1ð Þdx1 ¼ 1080kip ft3
uC ¼ 1080 12ð Þ329, 000 300ð Þ ¼ 0:2145 in:!
EIvC ¼ð100
�21:6ð Þ �6ð Þdx1 þð60
� 1:2
2x22
� ��x2ð Þdx2 ¼ 1490kip ft3
vC ¼ 1490 12ð Þ329, 000 300ð Þ ¼ 0:296 in: #
EIθC ¼ð100
�21:6ð Þ �1ð Þdx1 þð60
� 1:2
2x22
� ��1ð Þdx2 ¼ 259kip ft2
θC ¼ 259 12ð Þ229, 000 300ð Þ ¼ 0:0043radclockwise
Example 4.12 Computation of Deflections
Given: The structure shown in Fig. E4.12a. E ¼ 29,000 ksi, I ¼ 900 in.4
4.6 Deflection of Frames Using the Principle of Virtual Forces 347
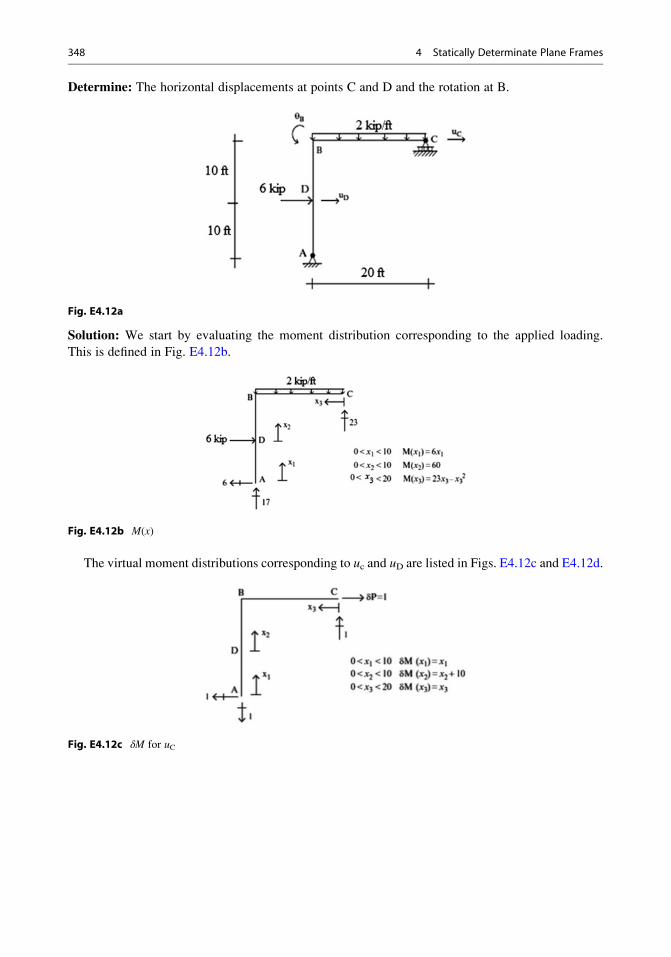
Determine: The horizontal displacements at points C and D and the rotation at B.
Fig. E4.12a
Solution: We start by evaluating the moment distribution corresponding to the applied loading.
This is defined in Fig. E4.12b.
Fig. E4.12b M(x)
The virtual moment distributions corresponding to uc and uD are listed in Figs. E4.12c and E4.12d.
Fig. E4.12c δM for uC
348 4 Statically Determinate Plane Frames
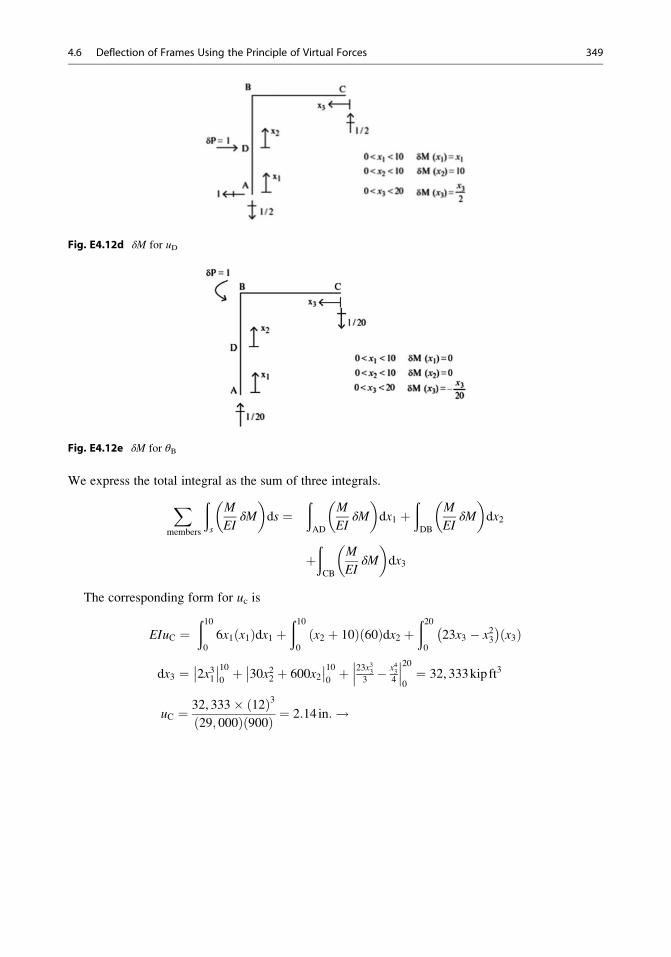
Fig. E4.12d δM for uD
Fig. E4.12e δM for θB
We express the total integral as the sum of three integrals.
Xmembers
ðs
M
EIδM
� �ds ¼
ðAD
M
EIδM
� �dx1 þ
ðDB
M
EIδM
� �dx2
þðCB
M
EIδM
� �dx3
The corresponding form for uc is
EIuC ¼ð100
6x1 x1ð Þdx1 þð100
x2 þ 10ð Þ 60ð Þdx2 þð200
23x3 � x23� �
x3ð Þ
dx3 ¼ 2x31�� ��10
0þ 30x22 þ 600x2�� ��10
0þ 23x3
3
3� x4
3
4
��� ���200¼ 32, 333kip ft3
uC ¼ 32, 333� 12ð Þ329; 000ð Þ 900ð Þ ¼ 2:14 in:!
4.6 Deflection of Frames Using the Principle of Virtual Forces 349
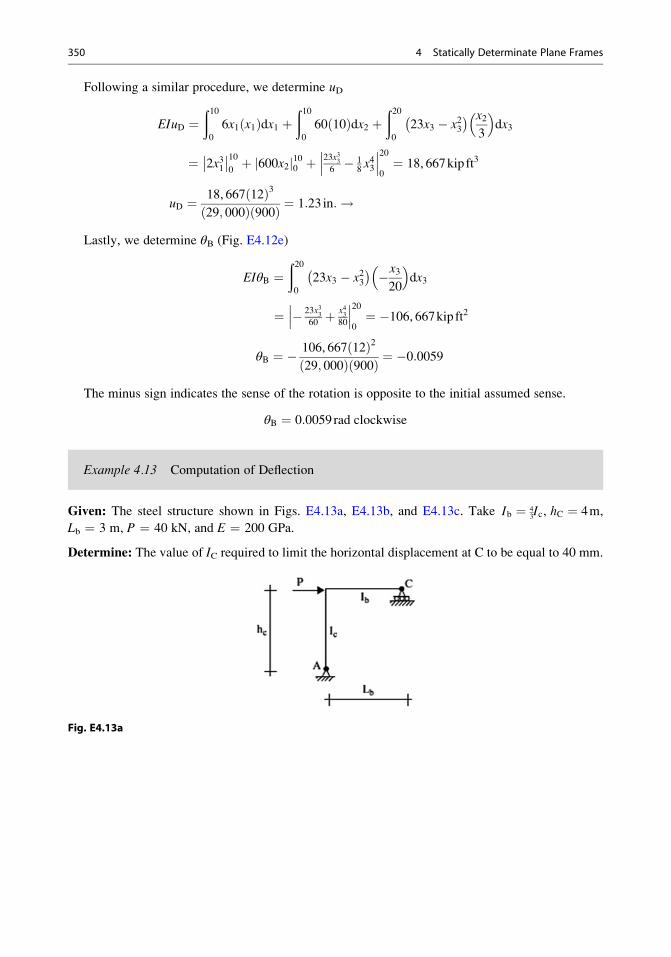
Following a similar procedure, we determine uD
EIuD ¼ð100
6x1 x1ð Þdx1 þð100
60 10ð Þdx2 þð200
23x3 � x23� � x2
3
� �dx3
¼ 2x31�� ��10
0þ 600x2j j100 þ 23x3
3
6� 1
8x43
��� ���200¼ 18, 667kip ft3
uD ¼ 18, 667 12ð Þ329; 000ð Þ 900ð Þ ¼ 1:23 in:!
Lastly, we determine θB (Fig. E4.12e)
EIθB ¼ð200
�23x3 � x23
� �x320
� �dx3
¼ � 23x33
60þ x4
3
80
��� ���200¼ �106, 667kip ft2
θB ¼ � 106, 667 12ð Þ229; 000ð Þ 900ð Þ ¼ �0:0059
The minus sign indicates the sense of the rotation is opposite to the initial assumed sense.
θB ¼ 0:0059rad clockwise
Example 4.13 Computation of Deflection
Given: The steel structure shown in Figs. E4.13a, E4.13b, and E4.13c. Take Ib ¼ 43Ic, hC ¼ 4m,
Lb ¼ 3 m, P ¼ 40 kN, and E ¼ 200 GPa.
Determine: The value of IC required to limit the horizontal displacement at C to be equal to 40 mm.
Fig. E4.13a
350 4 Statically Determinate Plane Frames
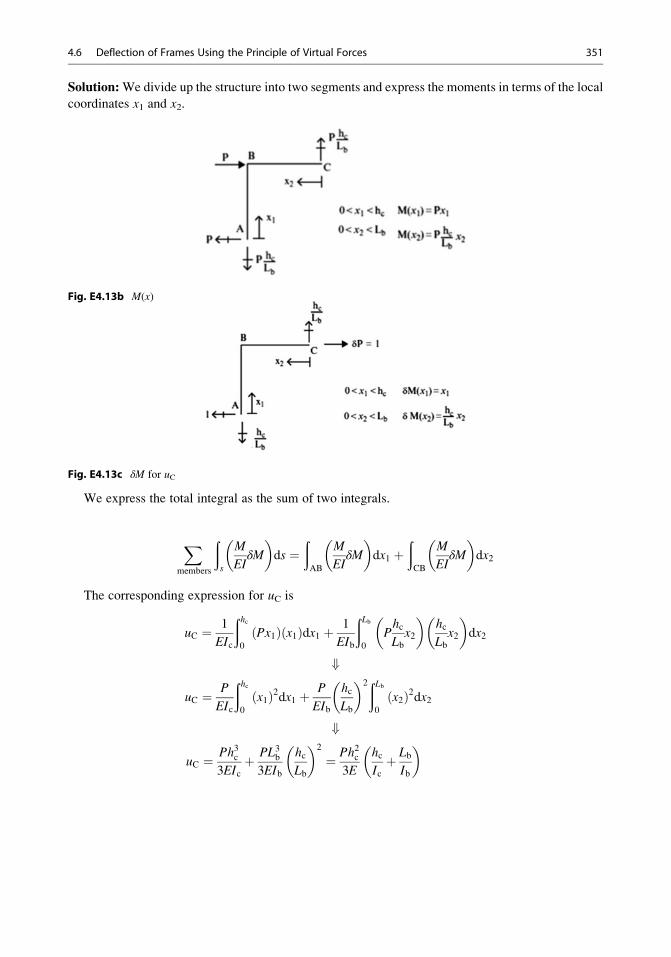
Solution:We divide up the structure into two segments and express the moments in terms of the local
coordinates x1 and x2.
Fig. E4.13b M(x)
Fig. E4.13c δM for uC
We express the total integral as the sum of two integrals.
Xmembers
ðs
M
EIδM
� �ds ¼
ðAB
M
EIδM
� �dx1 þ
ðCB
M
EIδM
� �dx2
The corresponding expression for uC is
uC ¼ 1
EIc
ðhc0
Px1ð Þ x1ð Þdx1 þ 1
EIb
ðLb0
PhcLbx2
� �hcLbx2
� �dx2
+
uC ¼ P
EIc
ðhc0
x1ð Þ2dx1 þ P
EIb
hcLb
� �2ðLb0
x2ð Þ2dx2
+
uC ¼ Ph3c3EIc
þ PL3b3EIb
hcLb
� �2
¼ Ph2c3E
hcIcþ Lb
Ib
� �
4.6 Deflection of Frames Using the Principle of Virtual Forces 351
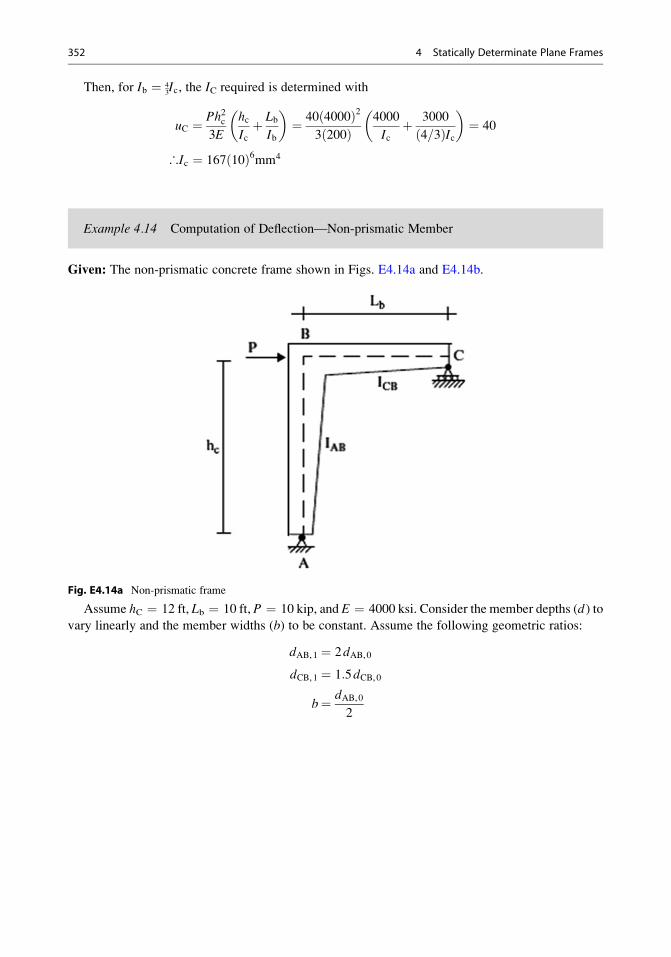
Then, for Ib ¼ 43Ic, the IC required is determined with
uC ¼ Ph2c3E
hcIcþ Lb
Ib
� �¼ 40 4000ð Þ2
3 200ð Þ4000
Icþ 3000
4=3ð ÞIc
� �¼ 40
∴Ic ¼ 167 10ð Þ6mm4
Example 4.14 Computation of Deflection—Non-prismatic Member
Given: The non-prismatic concrete frame shown in Figs. E4.14a and E4.14b.
Fig. E4.14a Non-prismatic frame
Assume hC ¼ 12 ft, Lb ¼ 10 ft, P ¼ 10 kip, and E ¼ 4000 ksi. Consider the member depths (d ) to
vary linearly and the member widths (b) to be constant. Assume the following geometric ratios:
dAB,1 ¼ 2dAB,0
dCB,1 ¼ 1:5dCB,0
b¼ dAB,02
352 4 Statically Determinate Plane Frames
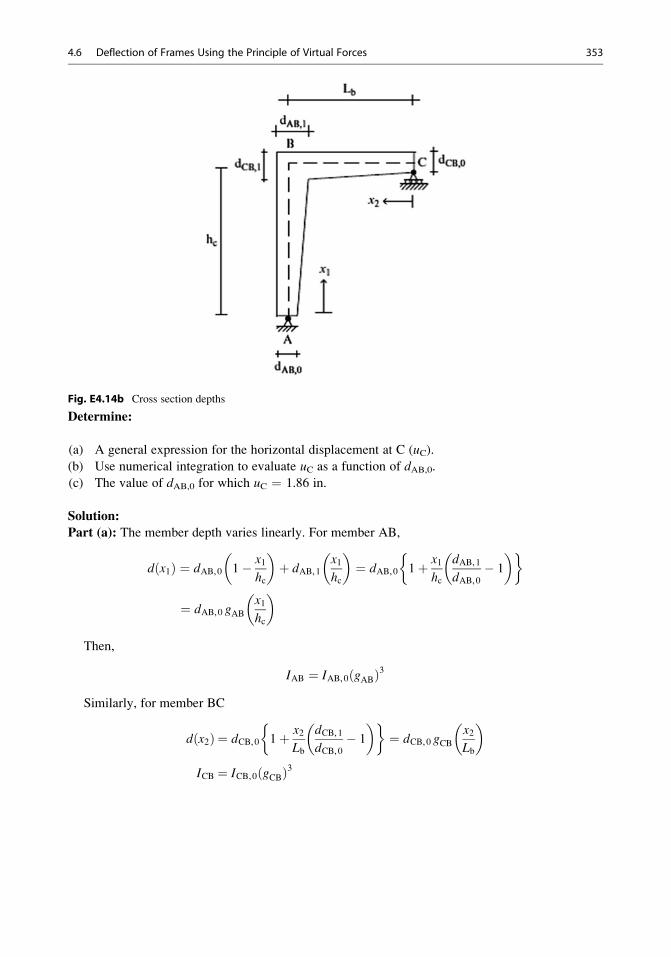
Fig. E4.14b Cross section depths
Determine:
(a) A general expression for the horizontal displacement at C (uC).
(b) Use numerical integration to evaluate uC as a function of dAB,0.
(c) The value of dAB,0 for which uC ¼ 1.86 in.
Solution:
Part (a): The member depth varies linearly. For member AB,
d x1ð Þ ¼ dAB,0 1� x1hc
� �þ dAB,1
x1hc
� �¼ dAB,0 1þ x1
hc
dAB,1dAB,0
� 1
� � �
¼ dAB,0 gABx1hc
� �
Then,
IAB ¼ IAB,0 gABð Þ3
Similarly, for member BC
d x2ð Þ ¼ dCB,0 1þ x2Lb
dCB,1dCB,0
� 1
� � �¼ dCB,0 gCB
x2Lb
� �
ICB ¼ ICB,0 gCBð Þ3
4.6 Deflection of Frames Using the Principle of Virtual Forces 353
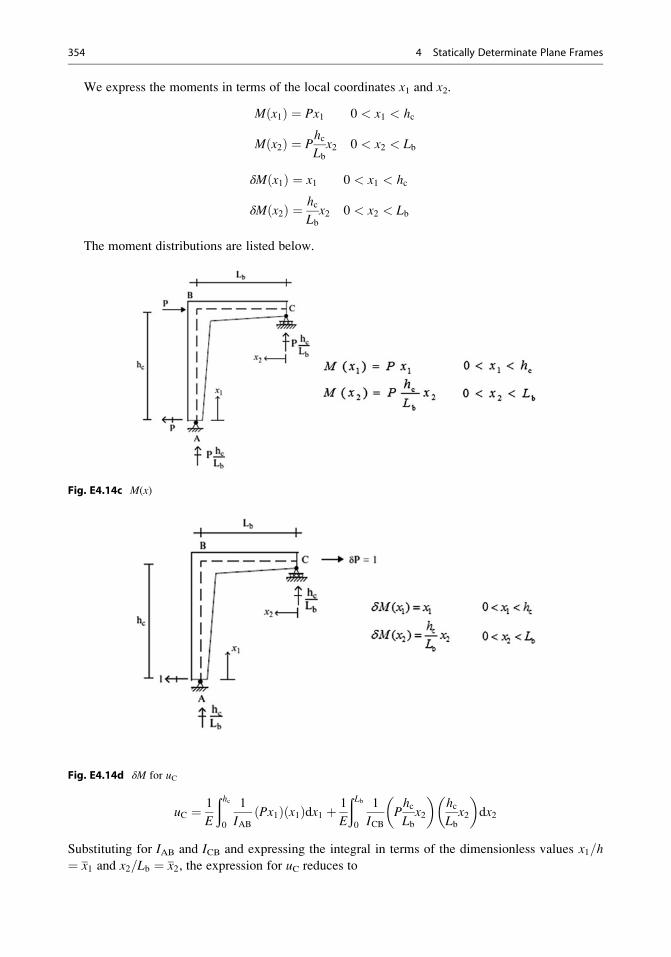
We express the moments in terms of the local coordinates x1 and x2.
M x1ð Þ ¼ Px1 0 < x1 < hc
M x2ð Þ ¼ PhcLbx2 0 < x2 < Lb
δM x1ð Þ ¼ x1 0 < x1 < hc
δM x2ð Þ ¼ hcLbx2 0 < x2 < Lb
The moment distributions are listed below.
Fig. E4.14c M(x)
Fig. E4.14d δM for uC
uC ¼ 1
E
ðhc0
1
IABPx1ð Þ x1ð Þdx1 þ 1
E
ðLb0
1
ICBPhcLbx2
� �hcLbx2
� �dx2
Substituting for IAB and ICB and expressing the integral in terms of the dimensionless values x1=h
¼ x1 and x2=Lb ¼ x2, the expression for uC reduces to
354 4 Statically Determinate Plane Frames
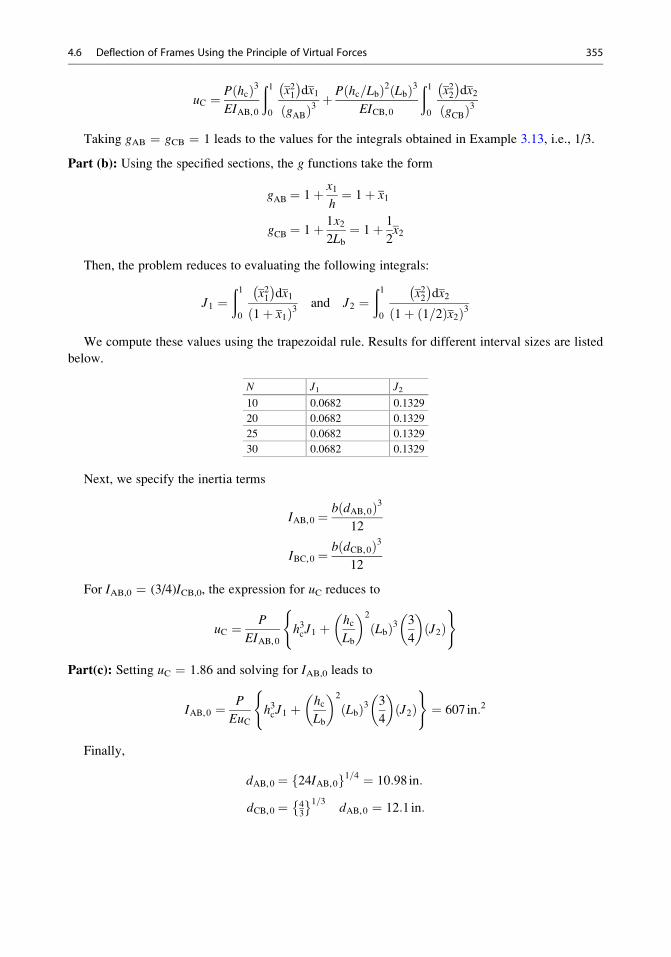
uC ¼ P hcð Þ3EIAB,0
ð10
x21� �
dx1
gABð Þ3 þP hc=Lbð Þ2 Lbð Þ3
EICB,0
ð10
x22� �
dx2
gCBð Þ3
Taking gAB ¼ gCB ¼ 1 leads to the values for the integrals obtained in Example 3.13, i.e., 1/3.
Part (b): Using the specified sections, the g functions take the form
gAB ¼ 1þ x1h¼ 1þ x1
gCB ¼ 1þ 1
2
x2Lb¼ 1þ 1
2x2
Then, the problem reduces to evaluating the following integrals:
J1 ¼ð10
x21� �
dx1
1þ x1ð Þ3 and J2 ¼ð10
x22� �
dx2
1þ 1=2ð Þx2ð Þ3
We compute these values using the trapezoidal rule. Results for different interval sizes are listed
below.
N J1 J2
10 0.0682 0.1329
20 0.0682 0.1329
25 0.0682 0.1329
30 0.0682 0.1329
Next, we specify the inertia terms
IAB,0 ¼ b dAB,0ð Þ312
IBC,0 ¼ b dCB,0ð Þ312
For IAB,0 ¼ (3/4)ICB,0, the expression for uC reduces to
uC ¼ P
EIAB,0h3cJ1 þ
hcLb
� �2
Lbð Þ3 3
4
� �J2ð Þ
( )
Part(c): Setting uC ¼ 1.86 and solving for IAB,0 leads to
IAB,0 ¼ P
EuCh3cJ1 þ
hcLb
� �2
Lbð Þ3 3
4
� �J2ð Þ
( )¼ 607 in:2
Finally,
dAB,0 ¼ 24IAB,0f g1=4 ¼ 10:98 in:
dCB,0 ¼ 43
� �1=3dAB,0 ¼ 12:1 in:
4.6 Deflection of Frames Using the Principle of Virtual Forces 355
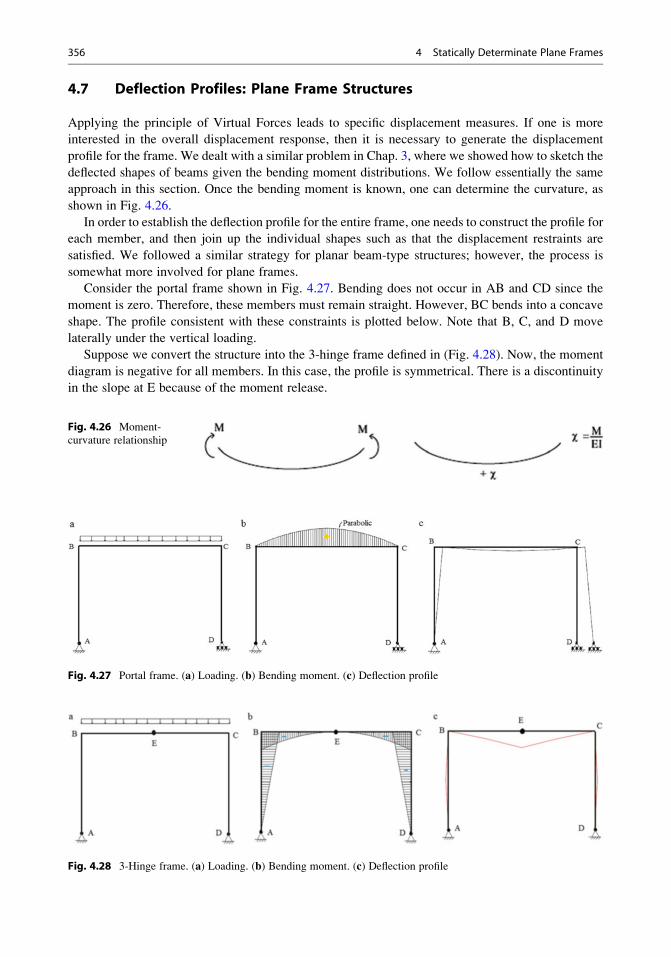
4.7 Deflection Profiles: Plane Frame Structures
Applying the principle of Virtual Forces leads to specific displacement measures. If one is more
interested in the overall displacement response, then it is necessary to generate the displacement
profile for the frame. We dealt with a similar problem in Chap. 3, where we showed how to sketch the
deflected shapes of beams given the bending moment distributions. We follow essentially the same
approach in this section. Once the bending moment is known, one can determine the curvature, as
shown in Fig. 4.26.
In order to establish the deflection profile for the entire frame, one needs to construct the profile for
each member, and then join up the individual shapes such as that the displacement restraints are
satisfied. We followed a similar strategy for planar beam-type structures; however, the process is
somewhat more involved for plane frames.
Consider the portal frame shown in Fig. 4.27. Bending does not occur in AB and CD since the
moment is zero. Therefore, these members must remain straight. However, BC bends into a concave
shape. The profile consistent with these constraints is plotted below. Note that B, C, and D move
laterally under the vertical loading.
Suppose we convert the structure into the 3-hinge frame defined in (Fig. 4.28). Now, the moment
diagram is negative for all members. In this case, the profile is symmetrical. There is a discontinuity
in the slope at E because of the moment release.
Fig. 4.26 Moment-
curvature relationship
Fig. 4.27 Portal frame. (a) Loading. (b) Bending moment. (c) Deflection profile
Fig. 4.28 3-Hinge frame. (a) Loading. (b) Bending moment. (c) Deflection profile
356 4 Statically Determinate Plane Frames
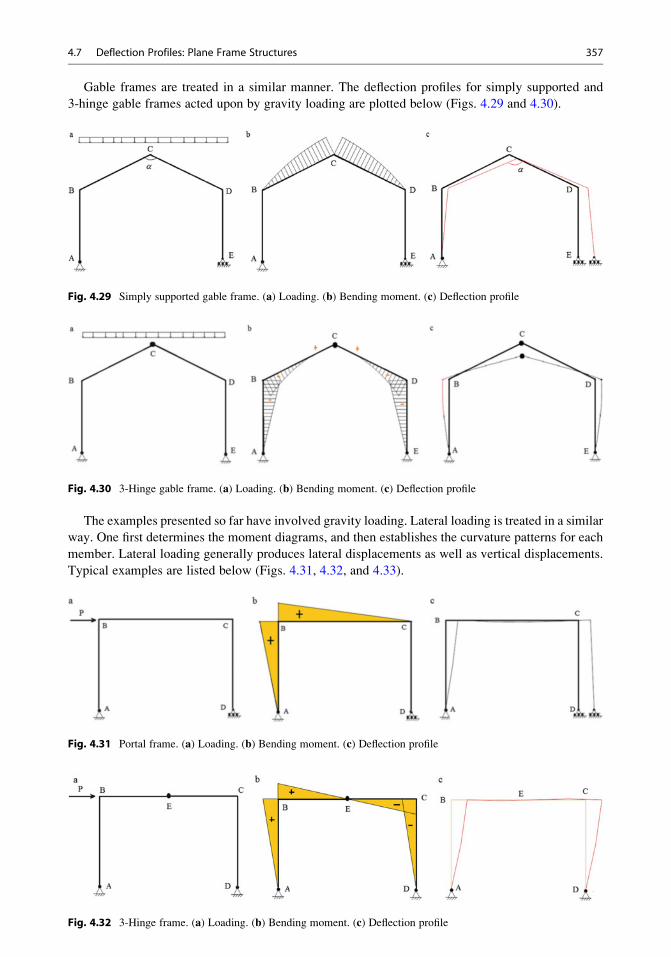
Gable frames are treated in a similar manner. The deflection profiles for simply supported and
3-hinge gable frames acted upon by gravity loading are plotted below (Figs. 4.29 and 4.30).
The examples presented so far have involved gravity loading. Lateral loading is treated in a similar
way. One first determines the moment diagrams, and then establishes the curvature patterns for each
member. Lateral loading generally produces lateral displacements as well as vertical displacements.
Typical examples are listed below (Figs. 4.31, 4.32, and 4.33).
Fig. 4.29 Simply supported gable frame. (a) Loading. (b) Bending moment. (c) Deflection profile
Fig. 4.30 3-Hinge gable frame. (a) Loading. (b) Bending moment. (c) Deflection profile
Fig. 4.31 Portal frame. (a) Loading. (b) Bending moment. (c) Deflection profile
Fig. 4.32 3-Hinge frame. (a) Loading. (b) Bending moment. (c) Deflection profile
4.7 Deflection Profiles: Plane Frame Structures 357
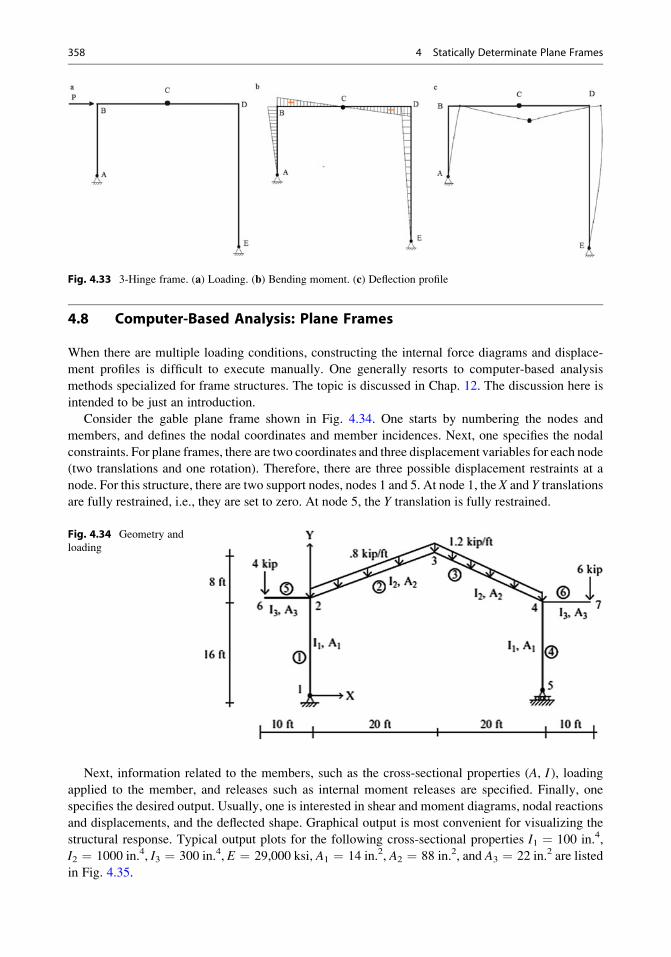
4.8 Computer-Based Analysis: Plane Frames
When there are multiple loading conditions, constructing the internal force diagrams and displace-
ment profiles is difficult to execute manually. One generally resorts to computer-based analysis
methods specialized for frame structures. The topic is discussed in Chap. 12. The discussion here is
intended to be just an introduction.
Consider the gable plane frame shown in Fig. 4.34. One starts by numbering the nodes and
members, and defines the nodal coordinates and member incidences. Next, one specifies the nodal
constraints. For plane frames, there are two coordinates and three displacement variables for each node
(two translations and one rotation). Therefore, there are three possible displacement restraints at a
node. For this structure, there are two support nodes, nodes 1 and 5. At node 1, the X and Y translations
are fully restrained, i.e., they are set to zero. At node 5, the Y translation is fully restrained.
Next, information related to the members, such as the cross-sectional properties (A, I), loading
applied to the member, and releases such as internal moment releases are specified. Finally, one
specifies the desired output. Usually, one is interested in shear and moment diagrams, nodal reactions
and displacements, and the deflected shape. Graphical output is most convenient for visualizing the
structural response. Typical output plots for the following cross-sectional properties I1 ¼ 100 in.4,
I2 ¼ 1000 in.4, I3 ¼ 300 in.4, E ¼ 29,000 ksi, A1 ¼ 14 in.2, A2 ¼ 88 in.2, and A3 ¼ 22 in.2 are listed
in Fig. 4.35.
Fig. 4.33 3-Hinge frame. (a) Loading. (b) Bending moment. (c) Deflection profile
Fig. 4.34 Geometry and
loading
358 4 Statically Determinate Plane Frames
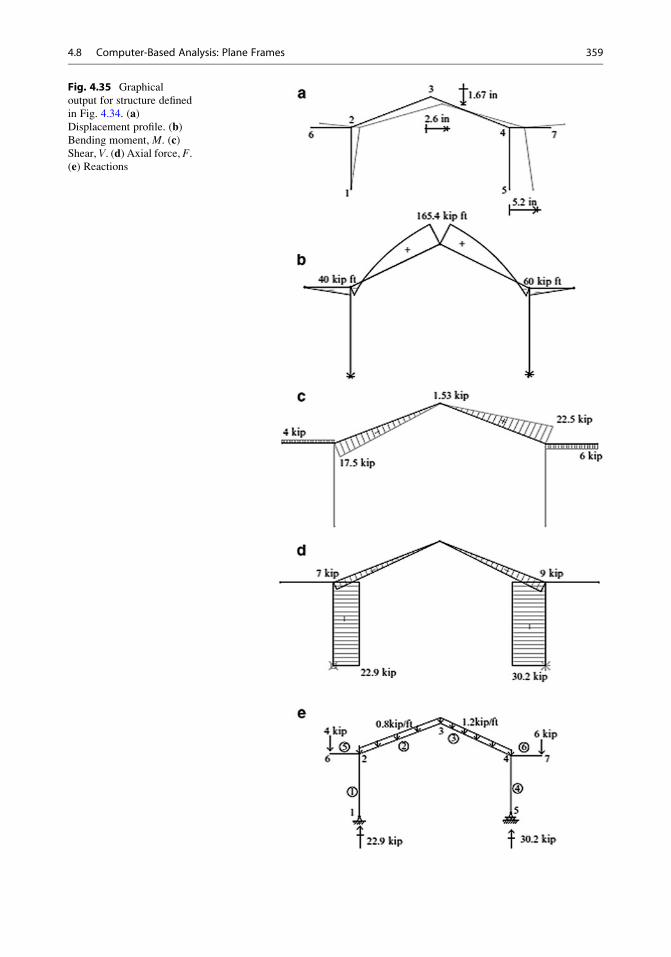
Fig. 4.35 Graphical
output for structure defined
in Fig. 4.34. (a)Displacement profile. (b)Bending moment, M. (c)Shear, V. (d) Axial force, F.(e) Reactions
4.8 Computer-Based Analysis: Plane Frames 359
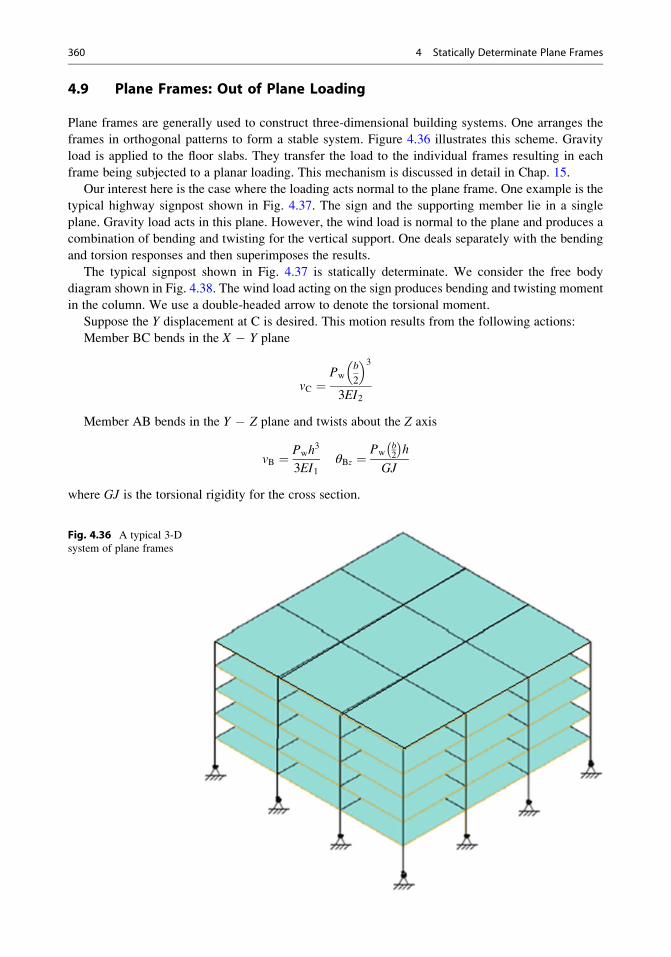
4.9 Plane Frames: Out of Plane Loading
Plane frames are generally used to construct three-dimensional building systems. One arranges the
frames in orthogonal patterns to form a stable system. Figure 4.36 illustrates this scheme. Gravity
load is applied to the floor slabs. They transfer the load to the individual frames resulting in each
frame being subjected to a planar loading. This mechanism is discussed in detail in Chap. 15.
Our interest here is the case where the loading acts normal to the plane frame. One example is the
typical highway signpost shown in Fig. 4.37. The sign and the supporting member lie in a single
plane. Gravity load acts in this plane. However, the wind load is normal to the plane and produces a
combination of bending and twisting for the vertical support. One deals separately with the bending
and torsion responses and then superimposes the results.
The typical signpost shown in Fig. 4.37 is statically determinate. We consider the free body
diagram shown in Fig. 4.38. The wind load acting on the sign produces bending and twisting moment
in the column. We use a double-headed arrow to denote the torsional moment.
Suppose the Y displacement at C is desired. This motion results from the following actions:
Member BC bends in the X � Y plane
vC ¼Pw
b
2
� �33EI2
Member AB bends in the Y � Z plane and twists about the Z axis
vB ¼ Pwh3
3EI1θBz ¼
Pwb2
� �h
GJ
where GJ is the torsional rigidity for the cross section.
Fig. 4.36 A typical 3-D
system of plane frames
360 4 Statically Determinate Plane Frames
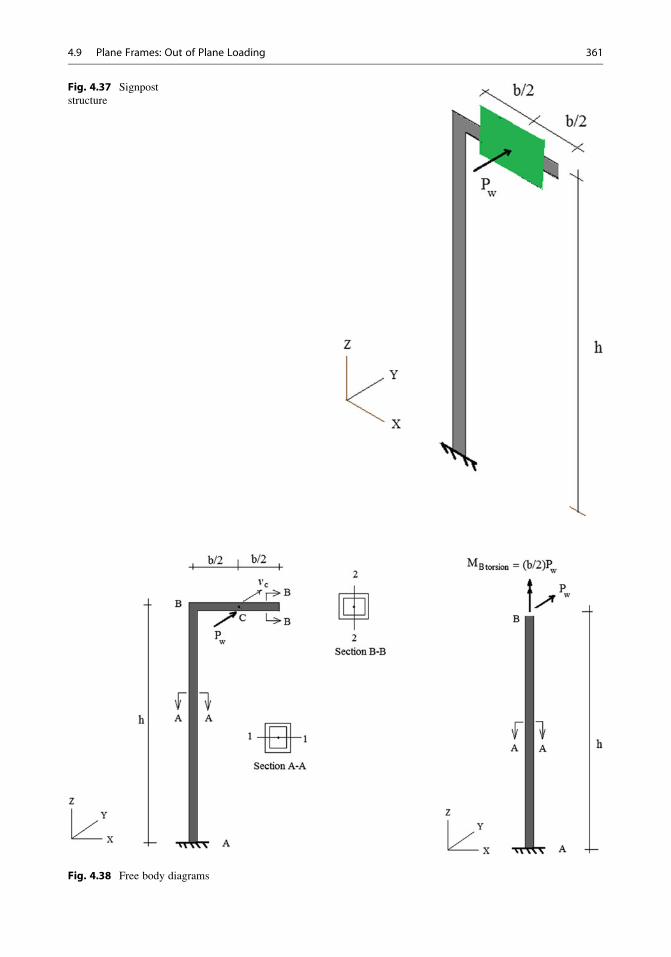
Fig. 4.37 Signpost
structure
Fig. 4.38 Free body diagrams
4.9 Plane Frames: Out of Plane Loading 361
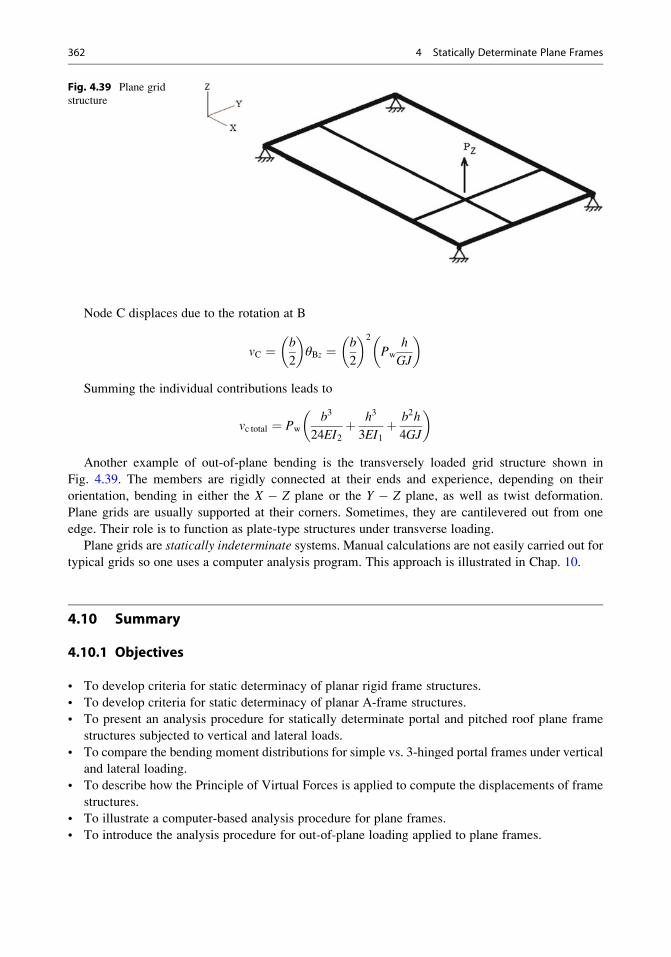
Node C displaces due to the rotation at B
vC ¼ b
2
� �θBz ¼ b
2
� �2
Pw
h
GJ
� �
Summing the individual contributions leads to
vc total ¼ Pw
b3
24EI2þ h3
3EI1þ b2h
4GJ
� �
Another example of out-of-plane bending is the transversely loaded grid structure shown in
Fig. 4.39. The members are rigidly connected at their ends and experience, depending on their
orientation, bending in either the X � Z plane or the Y � Z plane, as well as twist deformation.
Plane grids are usually supported at their corners. Sometimes, they are cantilevered out from one
edge. Their role is to function as plate-type structures under transverse loading.
Plane grids are statically indeterminate systems. Manual calculations are not easily carried out for
typical grids so one uses a computer analysis program. This approach is illustrated in Chap. 10.
4.10 Summary
4.10.1 Objectives
• To develop criteria for static determinacy of planar rigid frame structures.
• To develop criteria for static determinacy of planar A-frame structures.
• To present an analysis procedure for statically determinate portal and pitched roof plane frame
structures subjected to vertical and lateral loads.
• To compare the bending moment distributions for simple vs. 3-hinged portal frames under vertical
and lateral loading.
• To describe how the Principle of Virtual Forces is applied to compute the displacements of frame
structures.
• To illustrate a computer-based analysis procedure for plane frames.
• To introduce the analysis procedure for out-of-plane loading applied to plane frames.
Fig. 4.39 Plane grid
structure
362 4 Statically Determinate Plane Frames
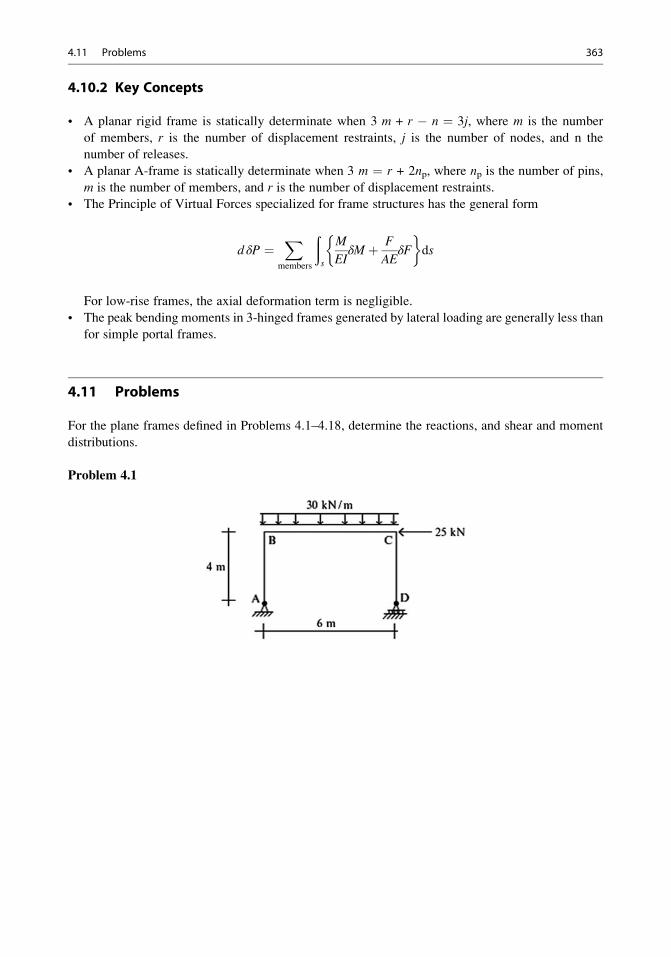
4.10.2 Key Concepts
• A planar rigid frame is statically determinate when 3 m + r � n ¼ 3j, where m is the number
of members, r is the number of displacement restraints, j is the number of nodes, and n the
number of releases.
• A planar A-frame is statically determinate when 3 m ¼ r + 2np, where np is the number of pins,
m is the number of members, and r is the number of displacement restraints.
• The Principle of Virtual Forces specialized for frame structures has the general form
d δP ¼X
members
ðs
M
EIδM þ F
AEδF
�ds
For low-rise frames, the axial deformation term is negligible.
• The peak bending moments in 3-hinged frames generated by lateral loading are generally less than
for simple portal frames.
4.11 Problems
For the plane frames defined in Problems 4.1–4.18, determine the reactions, and shear and moment
distributions.
Problem 4.1
4.11 Problems 363

Problem 4.2
Problem 4.3
364 4 Statically Determinate Plane Frames
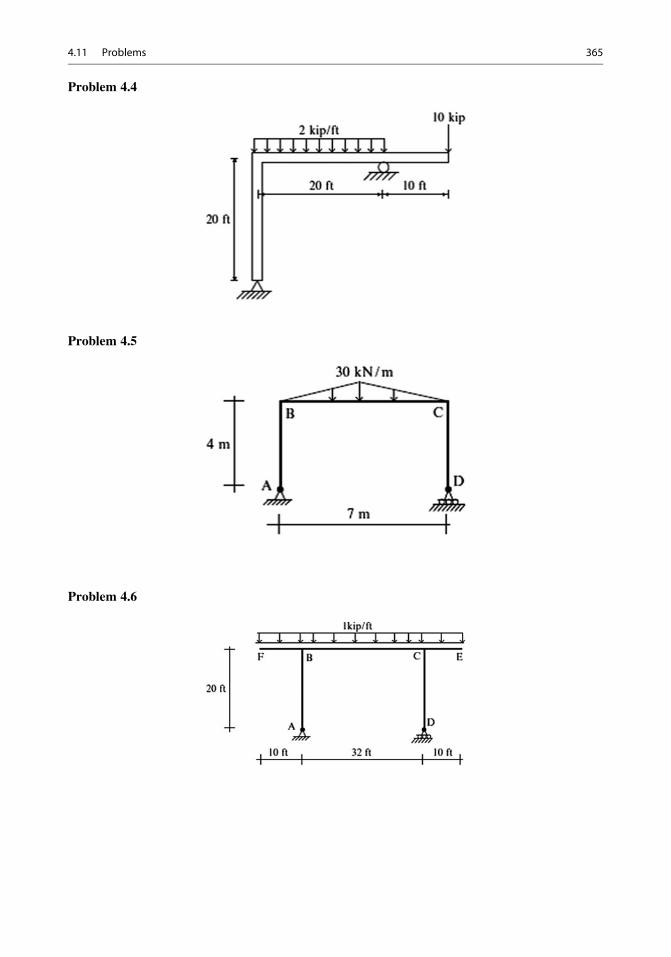
Problem 4.4
Problem 4.5
Problem 4.6
4.11 Problems 365
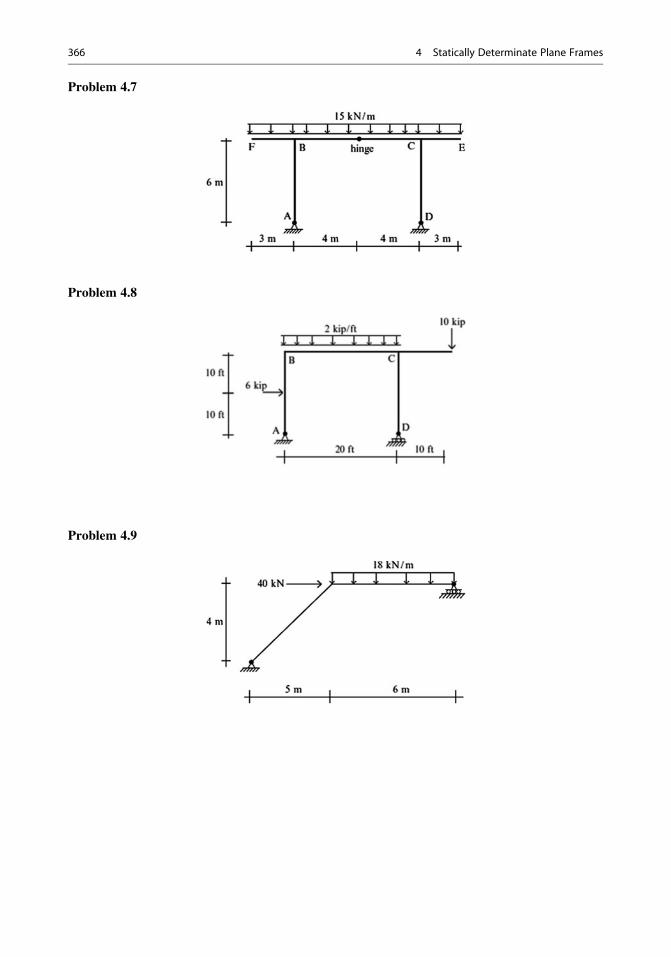
Problem 4.7
Problem 4.8
Problem 4.9
366 4 Statically Determinate Plane Frames
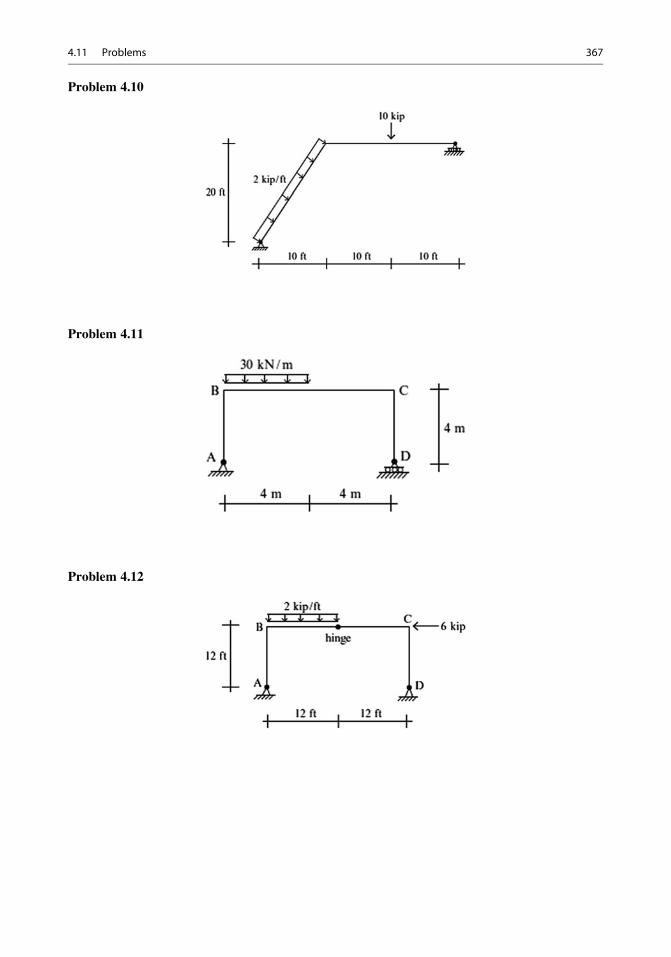
Problem 4.10
Problem 4.11
Problem 4.12
4.11 Problems 367
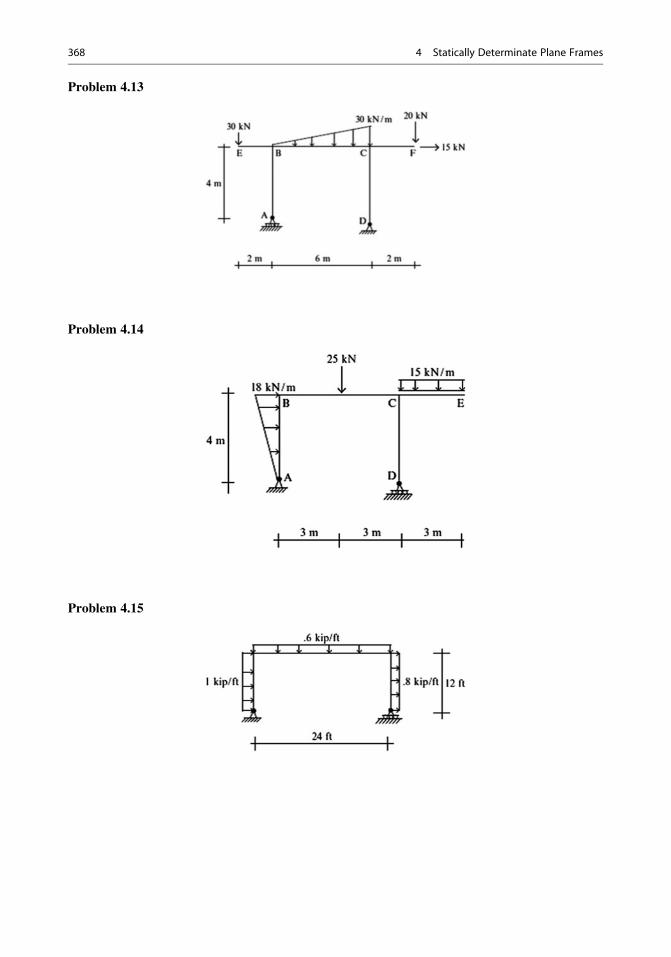
Problem 4.13
Problem 4.14
Problem 4.15
368 4 Statically Determinate Plane Frames
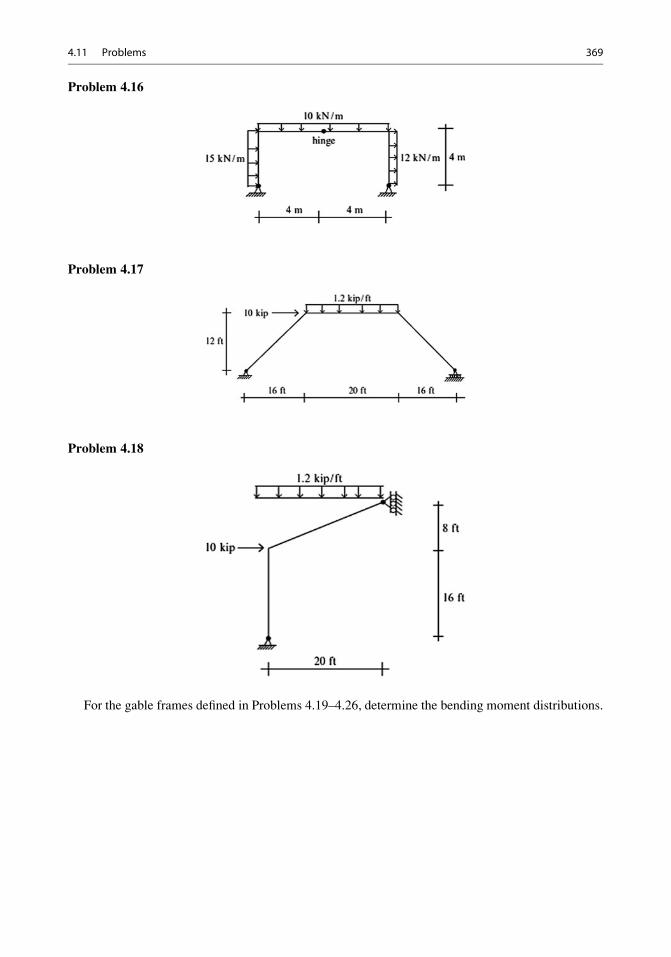
Problem 4.16
Problem 4.17
Problem 4.18
For the gable frames defined in Problems 4.19–4.26, determine the bending moment distributions.
4.11 Problems 369
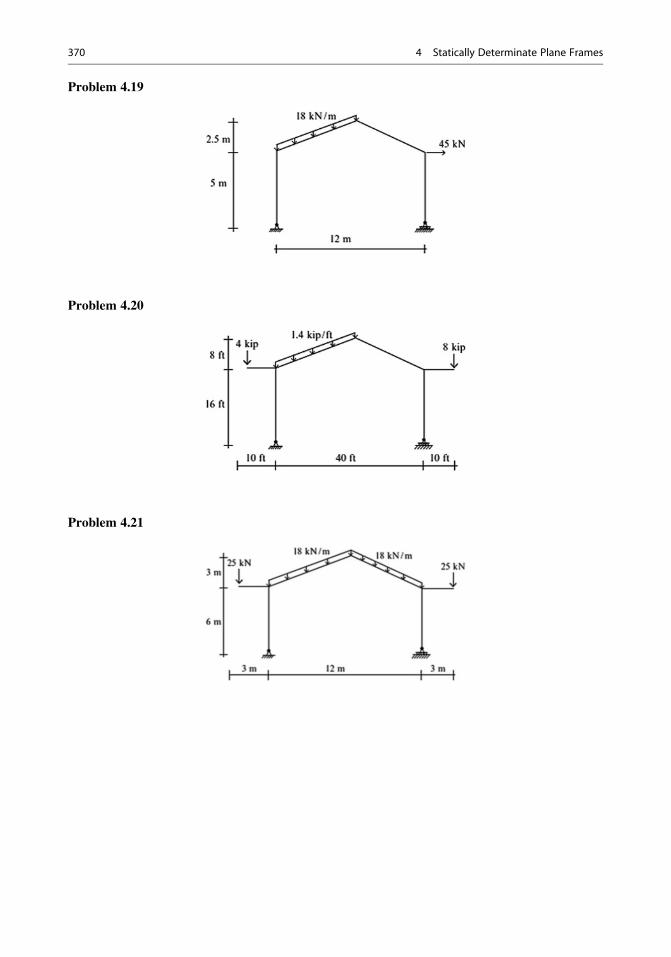
Problem 4.19
Problem 4.20
Problem 4.21
370 4 Statically Determinate Plane Frames
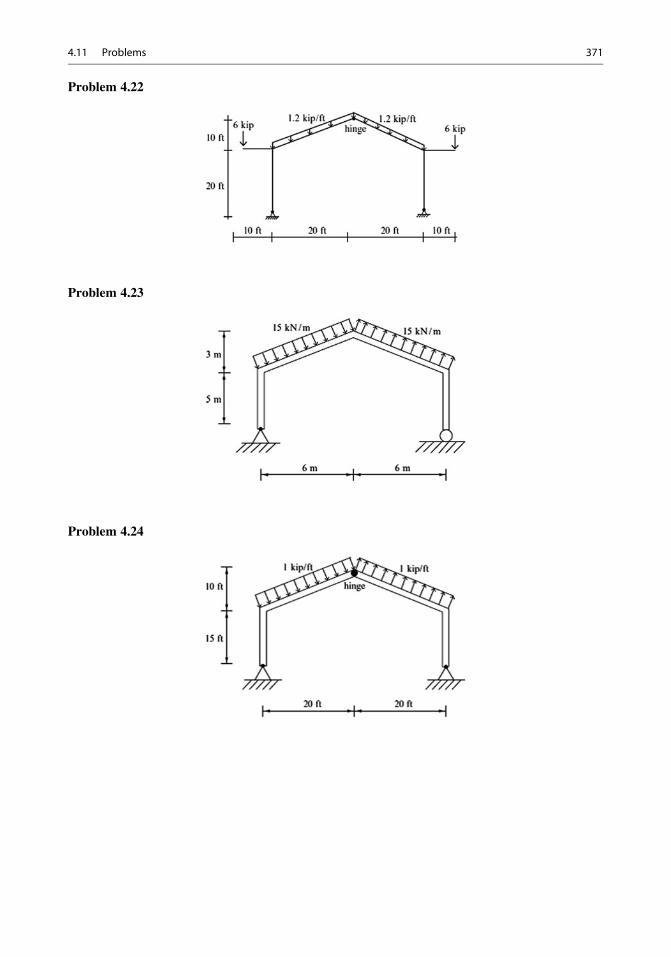
Problem 4.22
Problem 4.23
Problem 4.24
4.11 Problems 371
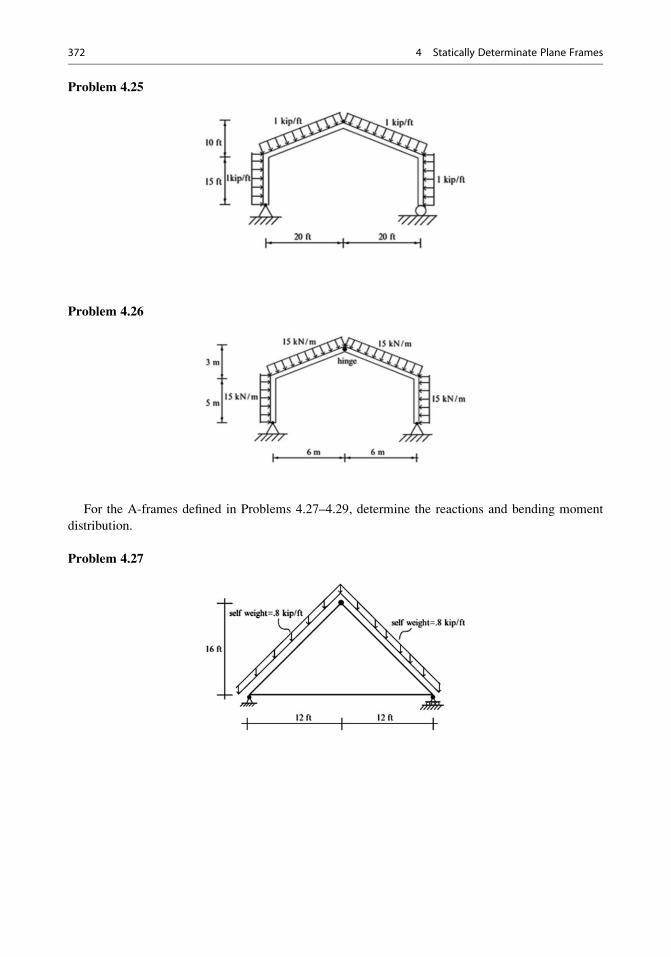
Problem 4.25
Problem 4.26
For the A-frames defined in Problems 4.27–4.29, determine the reactions and bending moment
distribution.
Problem 4.27
372 4 Statically Determinate Plane Frames
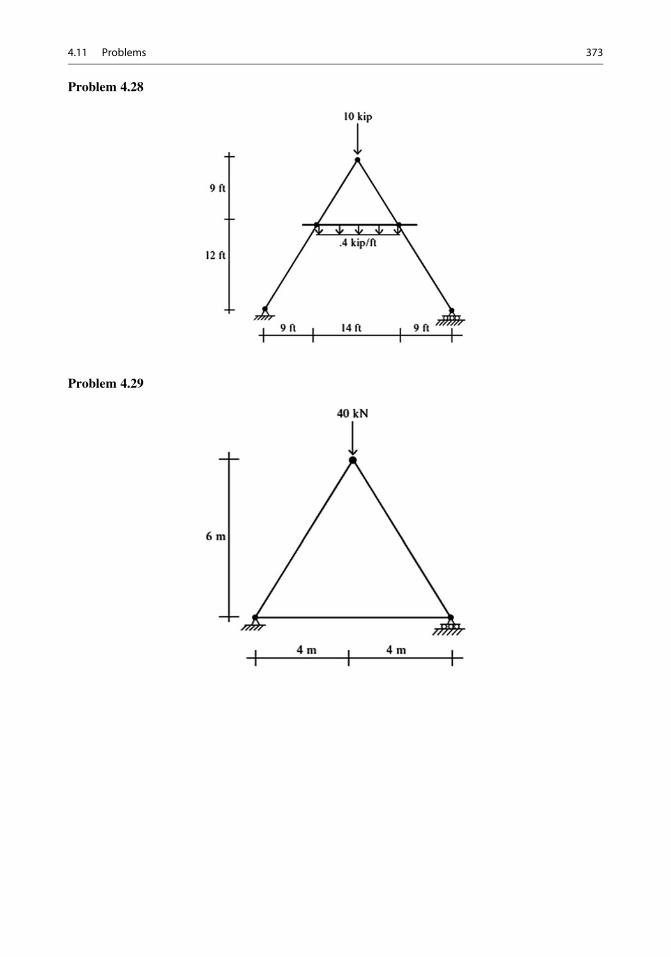
Problem 4.28
Problem 4.29
4.11 Problems 373
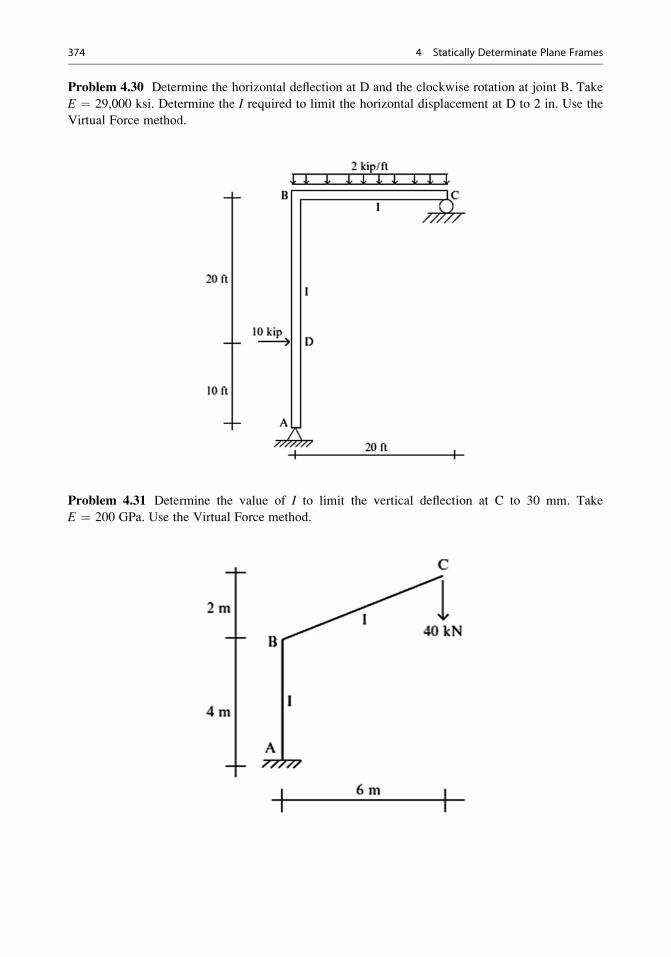
Problem 4.30 Determine the horizontal deflection at D and the clockwise rotation at joint B. Take
E ¼ 29,000 ksi. Determine the I required to limit the horizontal displacement at D to 2 in. Use the
Virtual Force method.
Problem 4.31 Determine the value of I to limit the vertical deflection at C to 30 mm. Take
E ¼ 200 GPa. Use the Virtual Force method.
374 4 Statically Determinate Plane Frames
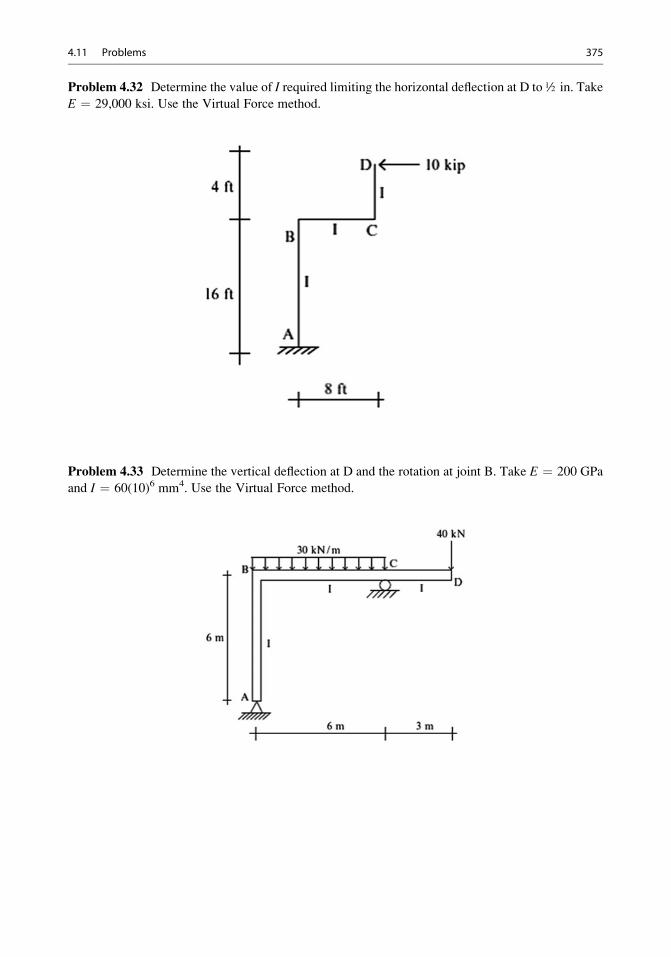
Problem 4.32 Determine the value of I required limiting the horizontal deflection at D to ½ in. Take
E ¼ 29,000 ksi. Use the Virtual Force method.
Problem 4.33 Determine the vertical deflection at D and the rotation at joint B. Take E ¼ 200 GPa
and I ¼ 60(10)6 mm4. Use the Virtual Force method.
4.11 Problems 375
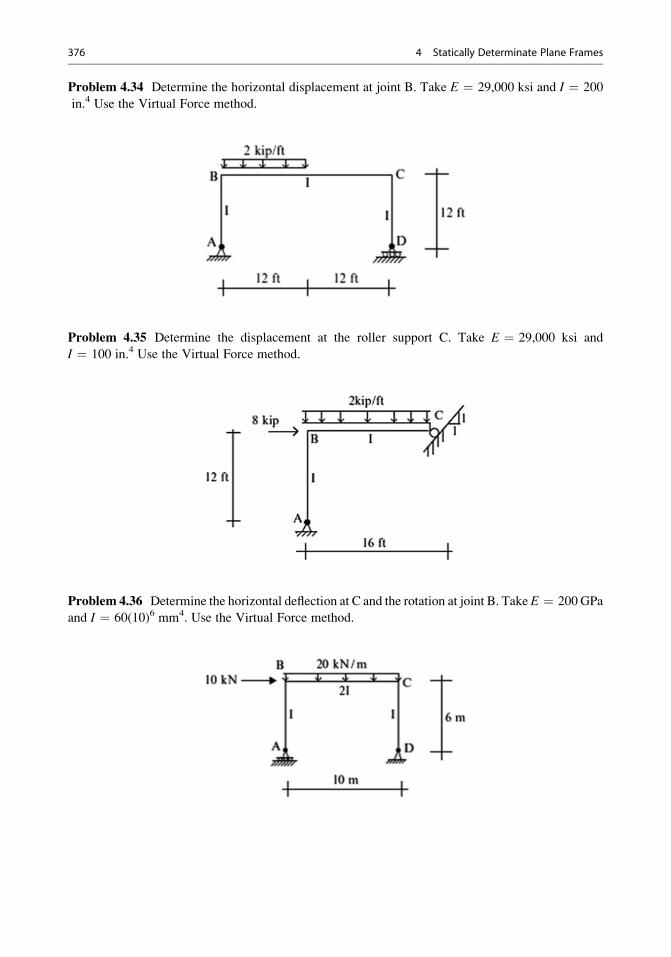
Problem 4.34 Determine the horizontal displacement at joint B. Take E ¼ 29,000 ksi and I ¼ 200
in.4 Use the Virtual Force method.
Problem 4.35 Determine the displacement at the roller support C. Take E ¼ 29,000 ksi and
I ¼ 100 in.4 Use the Virtual Force method.
Problem 4.36 Determine the horizontal deflection at C and the rotation at joint B. Take E ¼ 200 GPa
and I ¼ 60(10)6 mm4. Use the Virtual Force method.
376 4 Statically Determinate Plane Frames
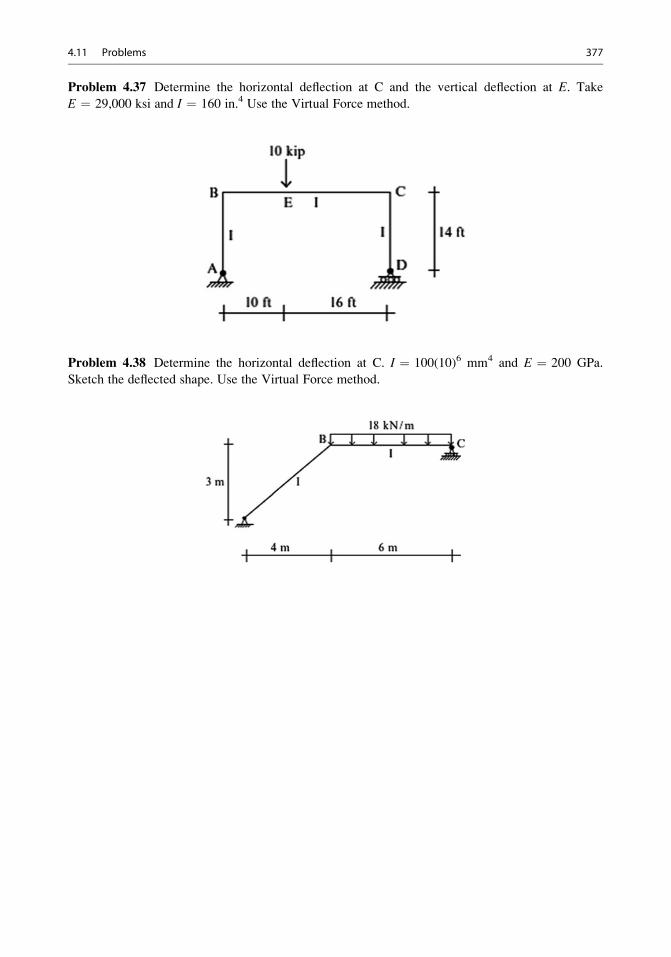
Problem 4.37 Determine the horizontal deflection at C and the vertical deflection at E. Take
E ¼ 29,000 ksi and I ¼ 160 in.4 Use the Virtual Force method.
Problem 4.38 Determine the horizontal deflection at C. I ¼ 100(10)6 mm4 and E ¼ 200 GPa.
Sketch the deflected shape. Use the Virtual Force method.
4.11 Problems 377
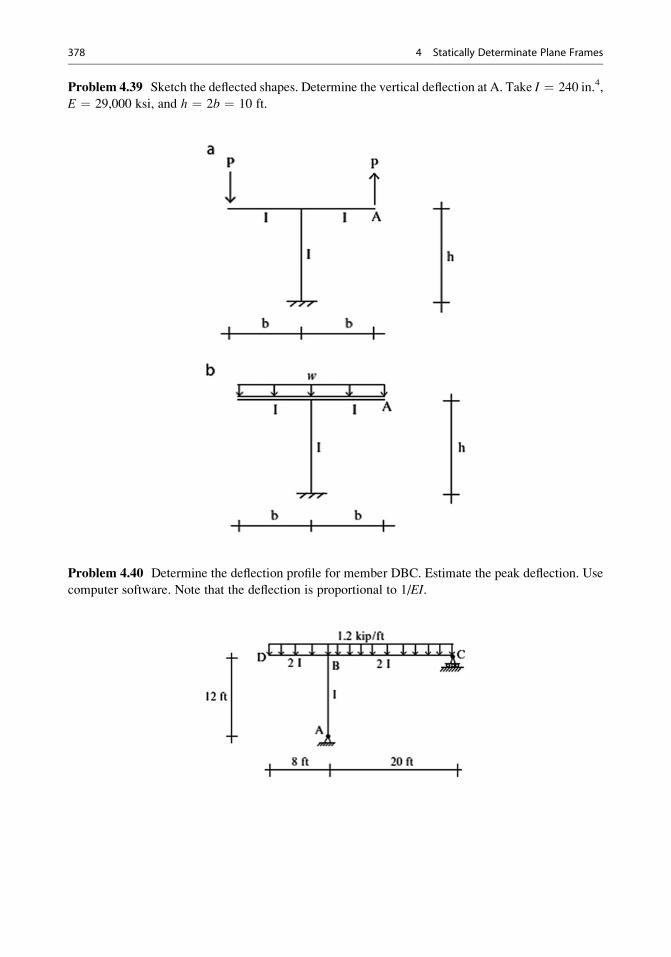
Problem 4.39 Sketch the deflected shapes. Determine the vertical deflection at A. Take I ¼ 240 in.4,
E ¼ 29,000 ksi, and h ¼ 2b ¼ 10 ft.
Problem 4.40 Determine the deflection profile for member DBC. Estimate the peak deflection. Use
computer software. Note that the deflection is proportional to 1/EI.
378 4 Statically Determinate Plane Frames
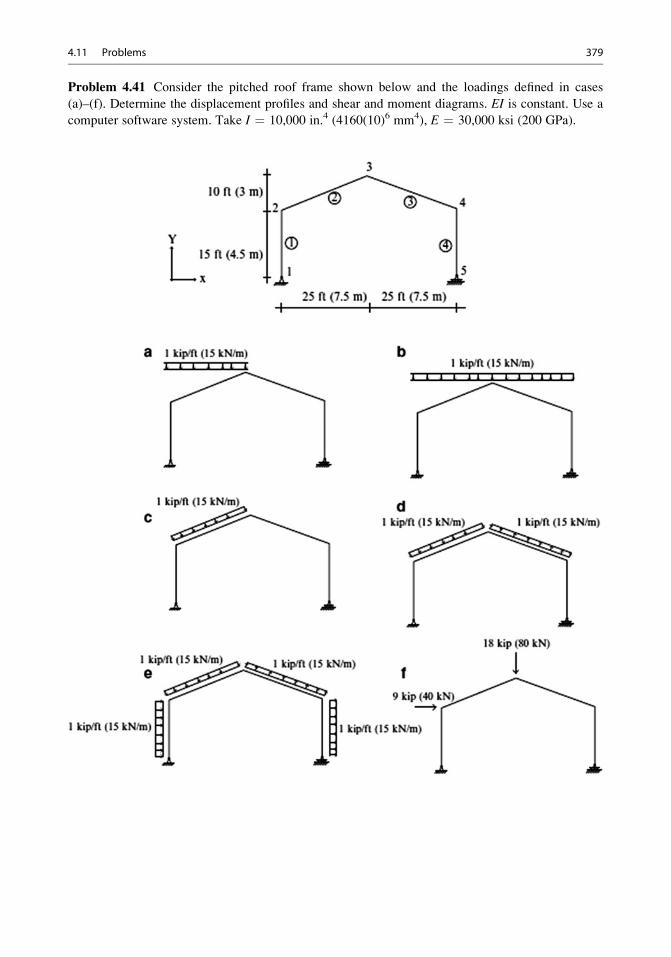
Problem 4.41 Consider the pitched roof frame shown below and the loadings defined in cases
(a)–(f). Determine the displacement profiles and shear and moment diagrams. EI is constant. Use a
computer software system. Take I ¼ 10,000 in.4 (4160(10)6 mm4), E ¼ 30,000 ksi (200 GPa).
4.11 Problems 379
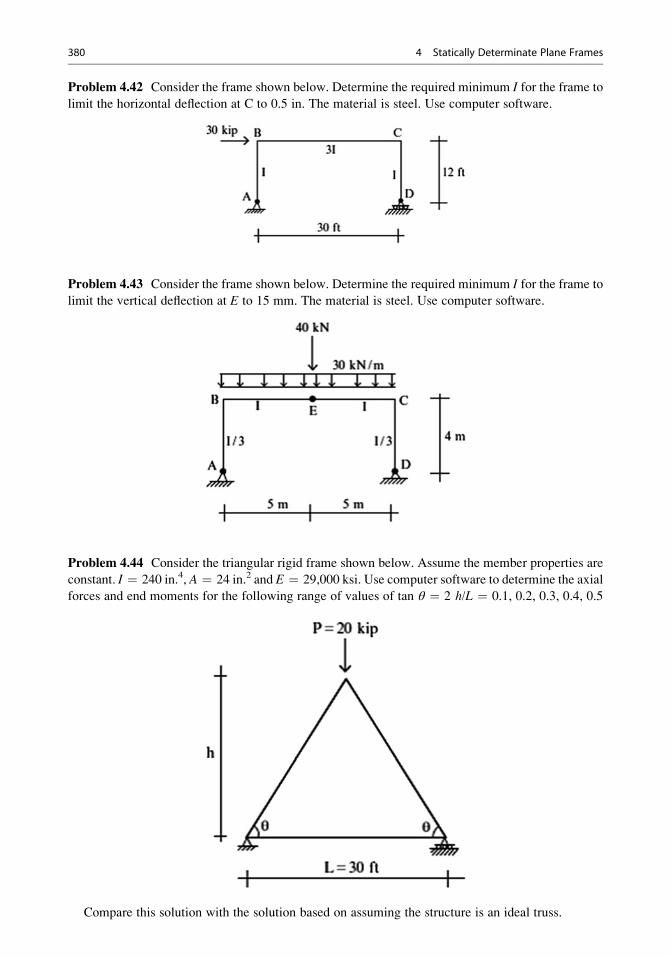
Problem 4.42 Consider the frame shown below. Determine the required minimum I for the frame to
limit the horizontal deflection at C to 0.5 in. The material is steel. Use computer software.
Problem 4.43 Consider the frame shown below. Determine the required minimum I for the frame to
limit the vertical deflection at E to 15 mm. The material is steel. Use computer software.
Problem 4.44 Consider the triangular rigid frame shown below. Assume the member properties are
constant. I ¼ 240 in.4, A ¼ 24 in.2 and E ¼ 29,000 ksi. Use computer software to determine the axial
forces and end moments for the following range of values of tan θ ¼ 2 h/L ¼ 0.1, 0.2, 0.3, 0.4, 0.5
Compare this solution with the solution based on assuming the structure is an ideal truss.
380 4 Statically Determinate Plane Frames
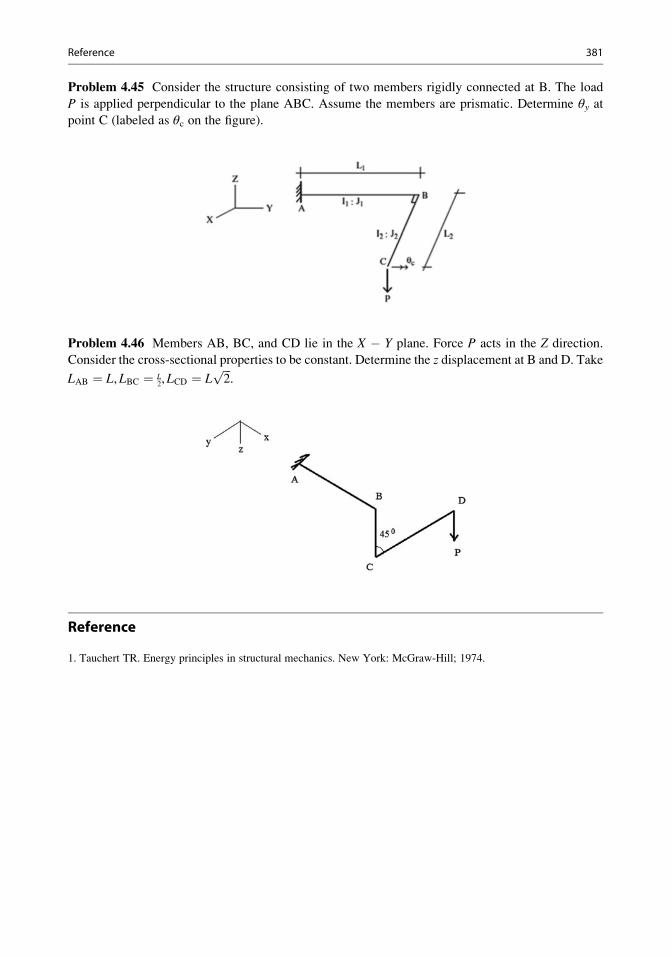
Problem 4.45 Consider the structure consisting of two members rigidly connected at B. The load
P is applied perpendicular to the plane ABC. Assume the members are prismatic. Determine θy atpoint C (labeled as θc on the figure).
Problem 4.46 Members AB, BC, and CD lie in the X � Y plane. Force P acts in the Z direction.
Consider the cross-sectional properties to be constant. Determine the z displacement at B and D. Take
LAB ¼ L, LBC ¼ L2,LCD ¼ L
ffiffiffi2p
.
Reference
1. Tauchert TR. Energy principles in structural mechanics. New York: McGraw-Hill; 1974.
Reference 381
Cable Structures 5
Abstract
Historically, cables have been used as structural components in bridge
structures. In this chapter, we first examine how the geometry of a cable is
related to the loading that is applied to it. We treat concentrated loadings
first and then incorporate distributed loadings leading up to a theory for
continuously loaded inclined cables. We also analyze the effect of tem-
perature on the cable geometry. Lastly, we develop an approximate
formula for estimating the stiffness of a cable modeled as an equivalent
straight member. This modeling strategy is used when analyzing cable-
stayed structures.
5.1 Introduction
A cable is a flexible structural component that offers no resistance when compressed or bent into a
curved shape. Technically, we say a cable has zero bending rigidity. It can support only tensile
loading. The first cables were made by twisting vines to form a rope-like member. There are many
examples of early cable suspension bridges dating back several thousand years. With the introduction
of iron as a structural material, cables were fabricated by connecting wrought iron links. Figure 5.1
shows an example of an iron link suspension bridge, the Clifton Suspension Bridge near Bristol,
England built in 1836–1864 and designed by Isambard Brunel.
When high-strength steel wires became available, steel replaced wrought iron as the material of
choice for cables. Modern cables are composed of multiple wires (up to 150 wires) clustered in a
circular cross-section and arranged in a parallel pattern, as illustrated in Fig. 5.2. This arrangement is
used for cable-stayed bridges and suspension bridges. The cable is normally coated with a protective
substance such as grease and wrapped or inserted in a plastic sheathing.
One of the most notable early applications of steel cables was the Brooklyn Bridge built in
1870–1883 and designed by John Roebling and Wilhelm Hildebrandt. John Roebling also invented
and perfected the manufacture of steel wire cable which was used for the bridge. At the time of
completion, the total length of the Brooklyn Bridge was 50 % greater than any existing suspension
bridge, an extraordinary advancement in bridge engineering (Fig. 5.3).
# Springer International Publishing Switzerland 2016
J.J. Connor, S. Faraji, Fundamentals of Structural Engineering,DOI 10.1007/978-3-319-24331-3_5
383
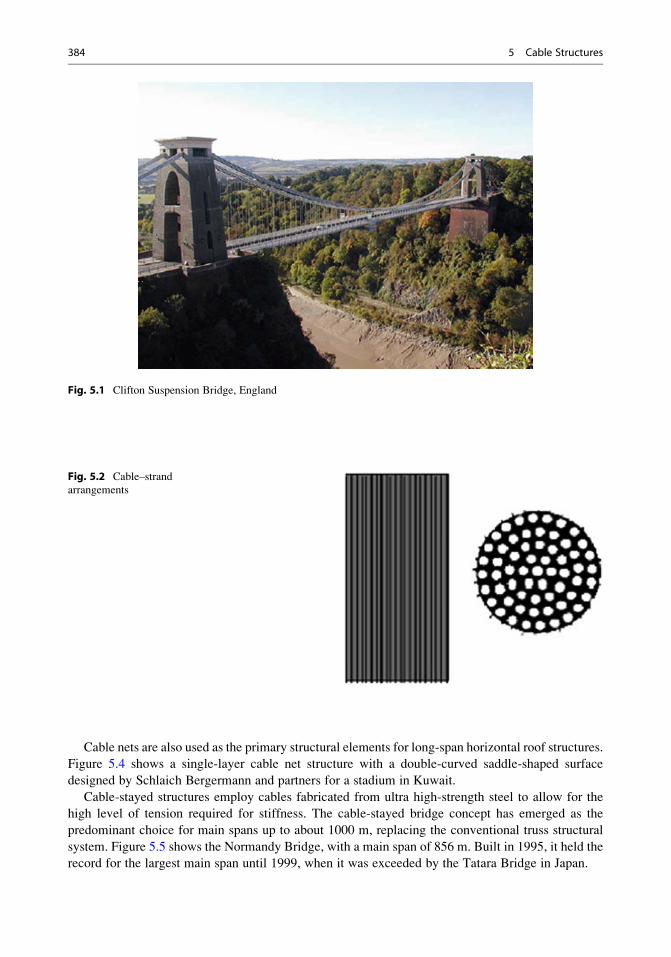
Cable nets are also used as the primary structural elements for long-span horizontal roof structures.
Figure 5.4 shows a single-layer cable net structure with a double-curved saddle-shaped surface
designed by Schlaich Bergermann and partners for a stadium in Kuwait.
Cable-stayed structures employ cables fabricated from ultra high-strength steel to allow for the
high level of tension required for stiffness. The cable-stayed bridge concept has emerged as the
predominant choice for main spans up to about 1000 m, replacing the conventional truss structural
system. Figure 5.5 shows the Normandy Bridge, with a main span of 856 m. Built in 1995, it held the
record for the largest main span until 1999, when it was exceeded by the Tatara Bridge in Japan.
Fig. 5.1 Clifton Suspension Bridge, England
Fig. 5.2 Cable–strand
arrangements
384 5 Cable Structures
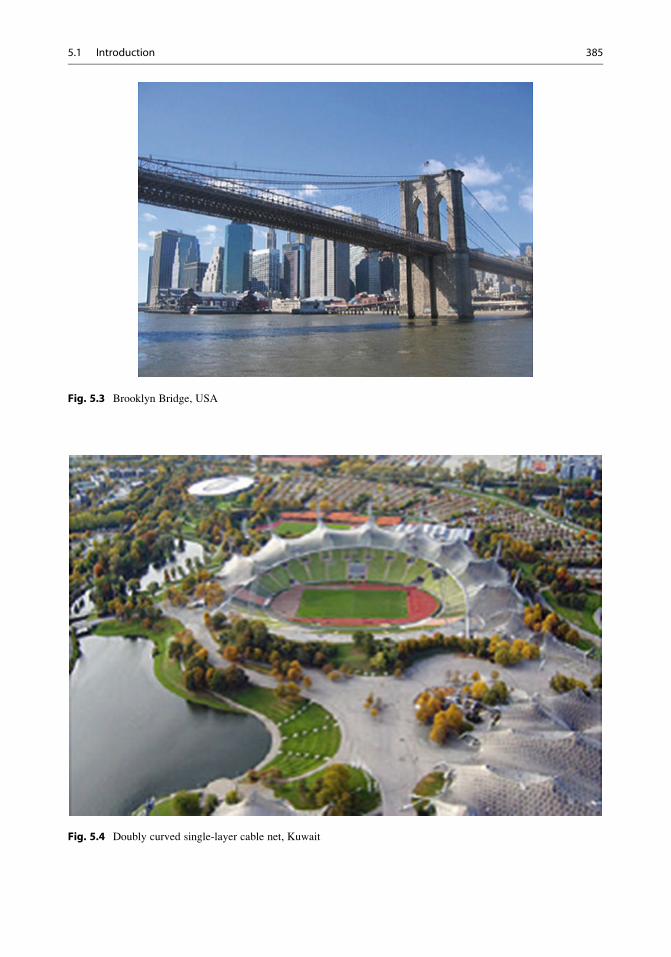
Fig. 5.3 Brooklyn Bridge, USA
Fig. 5.4 Doubly curved single-layer cable net, Kuwait
5.1 Introduction 385
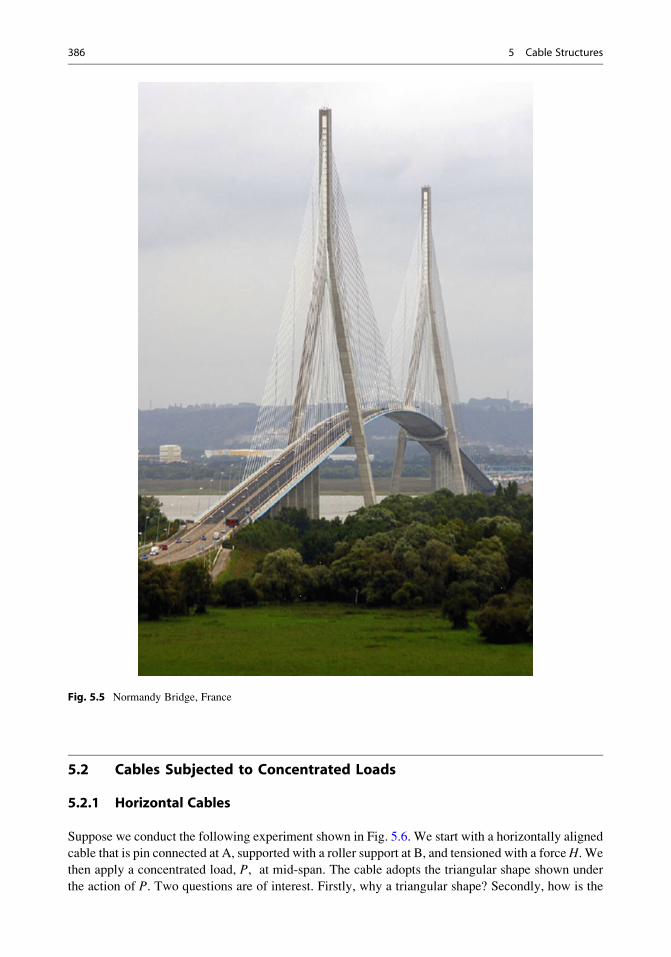
5.2 Cables Subjected to Concentrated Loads
5.2.1 Horizontal Cables
Suppose we conduct the following experiment shown in Fig. 5.6. We start with a horizontally aligned
cable that is pin connected at A, supported with a roller support at B, and tensioned with a forceH. We
then apply a concentrated load, P, at mid-span. The cable adopts the triangular shape shown under
the action of P. Two questions are of interest. Firstly, why a triangular shape? Secondly, how is the
Fig. 5.5 Normandy Bridge, France
386 5 Cable Structures
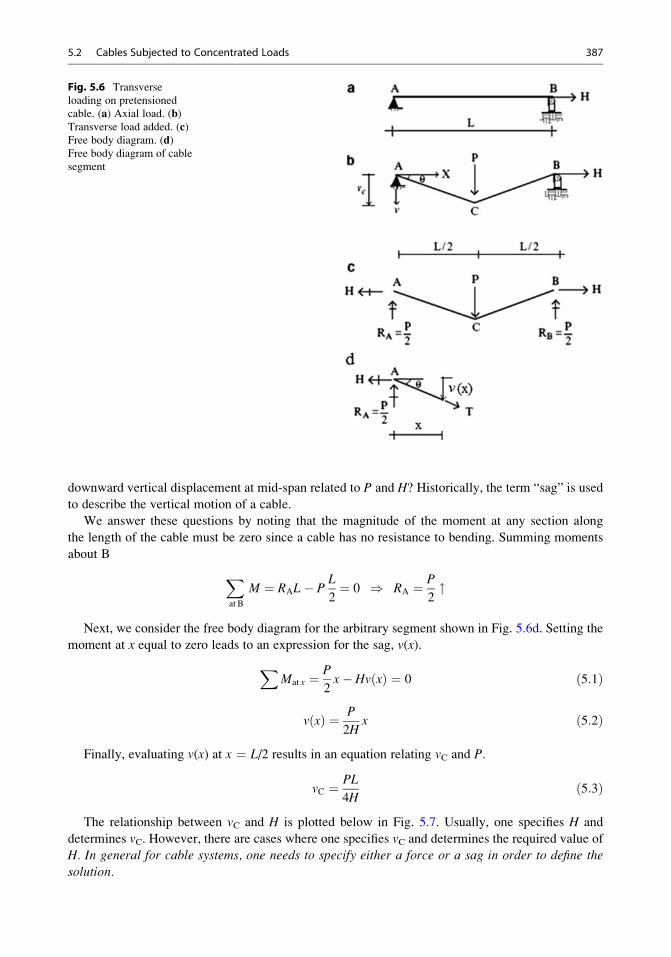
downward vertical displacement at mid-span related to P and H? Historically, the term “sag” is used
to describe the vertical motion of a cable.
We answer these questions by noting that the magnitude of the moment at any section along
the length of the cable must be zero since a cable has no resistance to bending. Summing moments
about B
Xat B
M ¼ RAL� PL
2¼ 0 ) RA ¼ P
2"
Next, we consider the free body diagram for the arbitrary segment shown in Fig. 5.6d. Setting the
moment at x equal to zero leads to an expression for the sag, v(x).
XMat x ¼ P
2x� Hv xð Þ ¼ 0 ð5:1Þ
v xð Þ ¼ P
2Hx ð5:2Þ
Finally, evaluating v(x) at x ¼ L/2 results in an equation relating vC and P.
vC ¼ PL
4Hð5:3Þ
The relationship between vC and H is plotted below in Fig. 5.7. Usually, one specifies H and
determines vC. However, there are cases where one specifies vC and determines the required value of
H. In general for cable systems, one needs to specify either a force or a sag in order to define the
solution.
Fig. 5.6 Transverse
loading on pretensioned
cable. (a) Axial load. (b)Transverse load added. (c)Free body diagram. (d)Free body diagram of cable
segment
5.2 Cables Subjected to Concentrated Loads 387
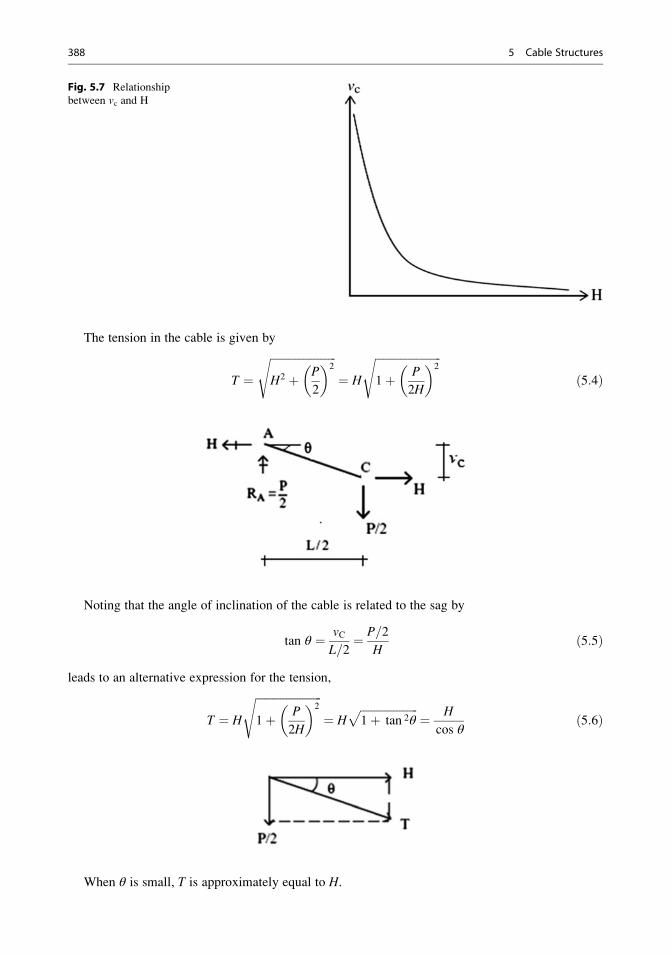
The tension in the cable is given by
T ¼ffiffiffiffiffiffiffiffiffiffiffiffiffiffiffiffiffiffiffiffiffiffiffiffiH2 þ P
2
� �2s
¼ H
ffiffiffiffiffiffiffiffiffiffiffiffiffiffiffiffiffiffiffiffiffiffiffiffi1þ P
2H
� �2s
ð5:4Þ
Noting that the angle of inclination of the cable is related to the sag by
tan θ ¼ vCL=2¼ P=2
Hð5:5Þ
leads to an alternative expression for the tension,
T ¼ H
ffiffiffiffiffiffiffiffiffiffiffiffiffiffiffiffiffiffiffiffiffiffiffiffi1þ P
2H
� �2s
¼ Hffiffiffiffiffiffiffiffiffiffiffiffiffiffiffiffiffiffiffiffiffi1þ tan 2θ
p¼ H
cos θð5:6Þ
When θ is small, T is approximately equal to H.
Fig. 5.7 Relationship
between vc and H
388 5 Cable Structures
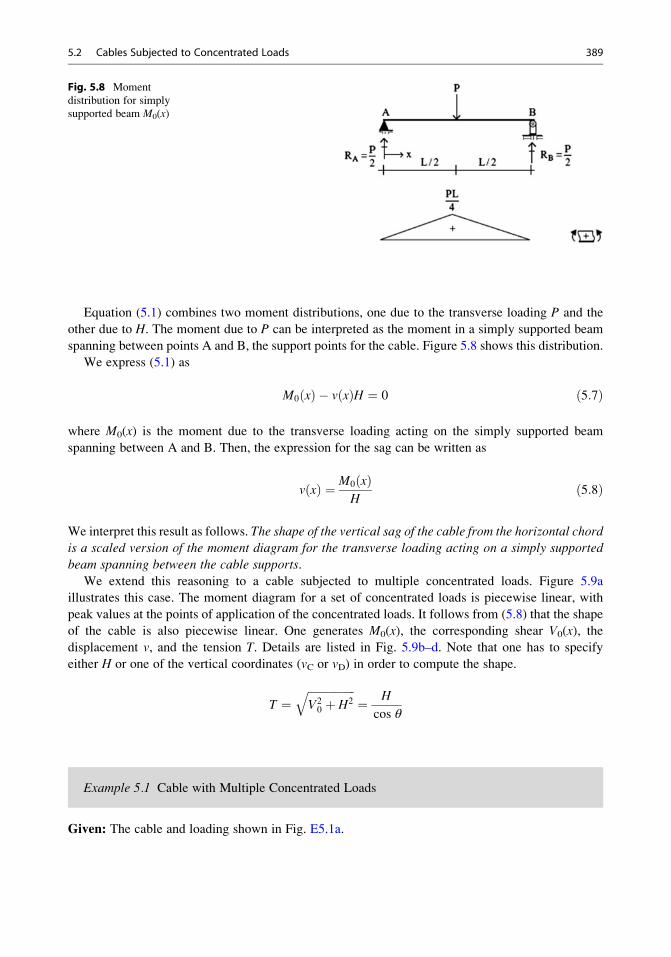
Equation (5.1) combines two moment distributions, one due to the transverse loading P and the
other due to H. The moment due to P can be interpreted as the moment in a simply supported beam
spanning between points A and B, the support points for the cable. Figure 5.8 shows this distribution.
We express (5.1) as
M0 xð Þ � v xð ÞH ¼ 0 ð5:7Þ
where M0(x) is the moment due to the transverse loading acting on the simply supported beam
spanning between A and B. Then, the expression for the sag can be written as
v xð Þ ¼ M0 xð ÞH
ð5:8Þ
We interpret this result as follows. The shape of the vertical sag of the cable from the horizontal chordis a scaled version of the moment diagram for the transverse loading acting on a simply supported
beam spanning between the cable supports.
We extend this reasoning to a cable subjected to multiple concentrated loads. Figure 5.9a
illustrates this case. The moment diagram for a set of concentrated loads is piecewise linear, with
peak values at the points of application of the concentrated loads. It follows from (5.8) that the shape
of the cable is also piecewise linear. One generates M0(x), the corresponding shear V0(x), thedisplacement v, and the tension T. Details are listed in Fig. 5.9b–d. Note that one has to specify
either H or one of the vertical coordinates (vC or vD) in order to compute the shape.
T ¼ffiffiffiffiffiffiffiffiffiffiffiffiffiffiffiffiffiV20 þ H2
q¼ H
cos θ
Example 5.1 Cable with Multiple Concentrated Loads
Given: The cable and loading shown in Fig. E5.1a.
Fig. 5.8 Moment
distribution for simply
supported beam M0(x)
5.2 Cables Subjected to Concentrated Loads 389
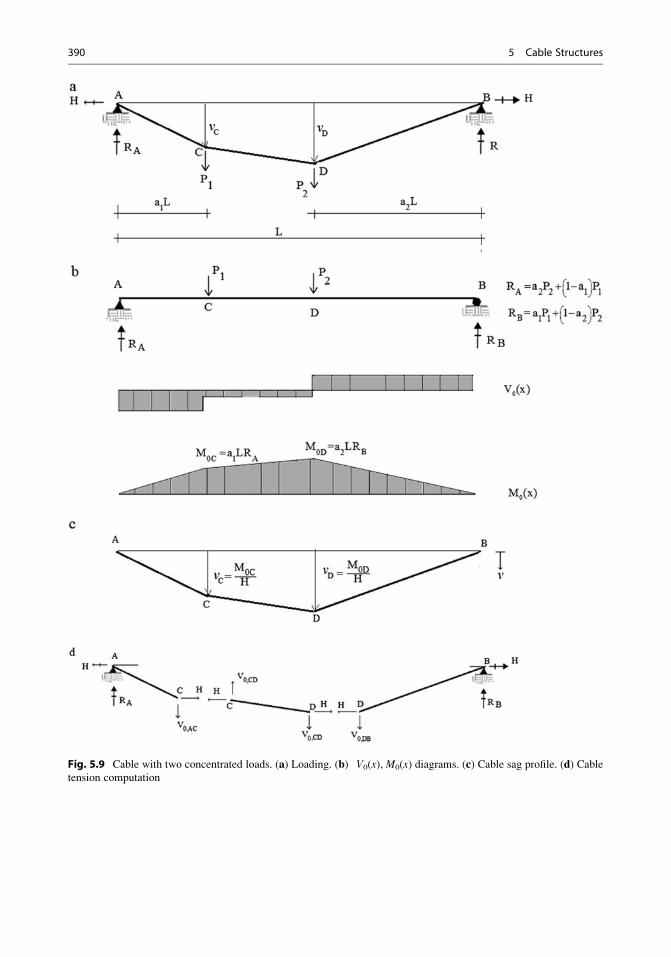
Fig. 5.9 Cable with two concentrated loads. (a) Loading. (b) V0(x), M0(x) diagrams. (c) Cable sag profile. (d) Cabletension computation
390 5 Cable Structures
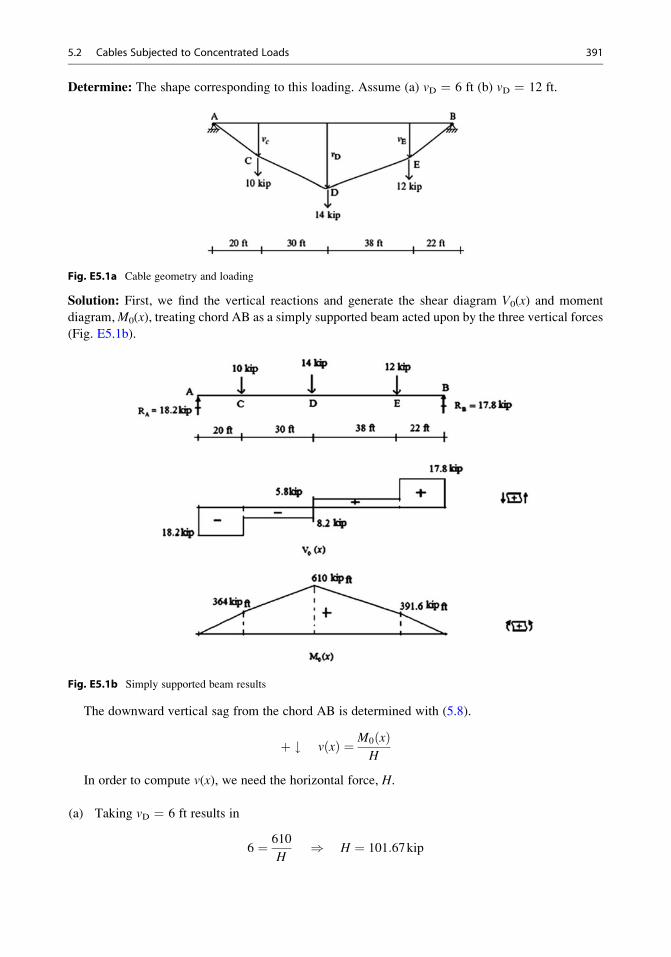
Determine: The shape corresponding to this loading. Assume (a) vD ¼ 6 ft (b) vD ¼ 12 ft.
Fig. E5.1a Cable geometry and loading
Solution: First, we find the vertical reactions and generate the shear diagram V0(x) and moment
diagram,M0(x), treating chord AB as a simply supported beam acted upon by the three vertical forces
(Fig. E5.1b).
Fig. E5.1b Simply supported beam results
The downward vertical sag from the chord AB is determined with (5.8).
þ # v xð Þ ¼ M0 xð ÞH
In order to compute v(x), we need the horizontal force, H.
(a) Taking vD ¼ 6 ft results in
6 ¼ 610
H) H ¼ 101:67kip
5.2 Cables Subjected to Concentrated Loads 391
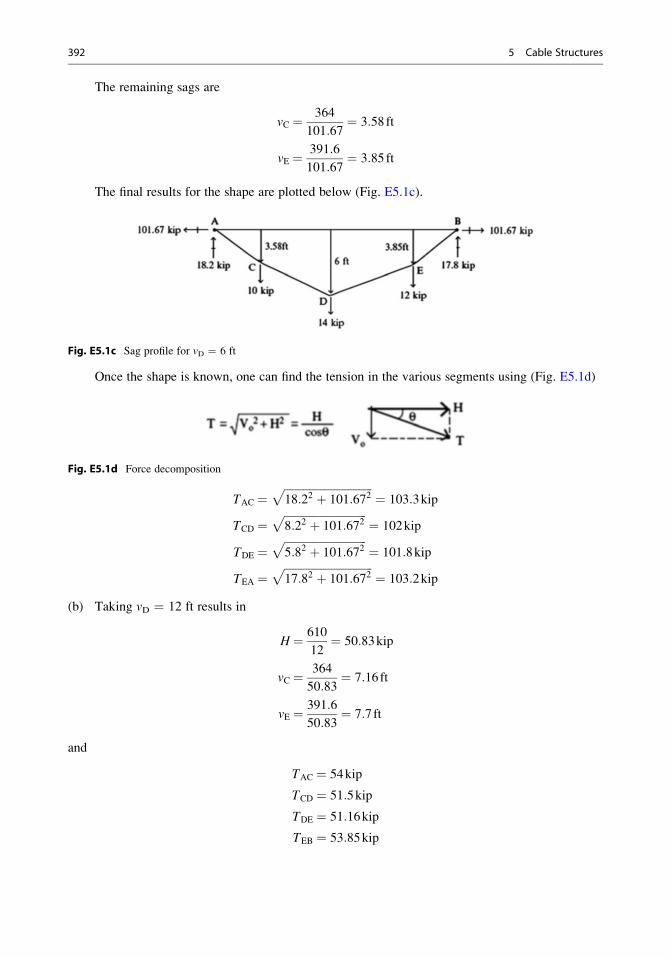
The remaining sags are
vC ¼ 364
101:67¼ 3:58ft
vE ¼ 391:6
101:67¼ 3:85ft
The final results for the shape are plotted below (Fig. E5.1c).
Fig. E5.1c Sag profile for vD ¼ 6 ft
Once the shape is known, one can find the tension in the various segments using (Fig. E5.1d)
Fig. E5.1d Force decomposition
TAC ¼ffiffiffiffiffiffiffiffiffiffiffiffiffiffiffiffiffiffiffiffiffiffiffiffiffiffiffiffiffiffiffiffi18:22 þ 101:672
p¼ 103:3kip
TCD ¼ffiffiffiffiffiffiffiffiffiffiffiffiffiffiffiffiffiffiffiffiffiffiffiffiffiffiffiffiffiffi8:22 þ 101:672
p¼ 102kip
TDE ¼ffiffiffiffiffiffiffiffiffiffiffiffiffiffiffiffiffiffiffiffiffiffiffiffiffiffiffiffiffiffi5:82 þ 101:672
p¼ 101:8kip
TEA ¼ffiffiffiffiffiffiffiffiffiffiffiffiffiffiffiffiffiffiffiffiffiffiffiffiffiffiffiffiffiffiffiffi17:82 þ 101:672
p¼ 103:2kip
(b) Taking vD ¼ 12 ft results in
H ¼ 610
12¼ 50:83kip
vC ¼ 364
50:83¼ 7:16ft
vE ¼ 391:6
50:83¼ 7:7ft
and
TAC ¼ 54kip
TCD ¼ 51:5kip
TDE ¼ 51:16kip
TEB ¼ 53:85kip
392 5 Cable Structures
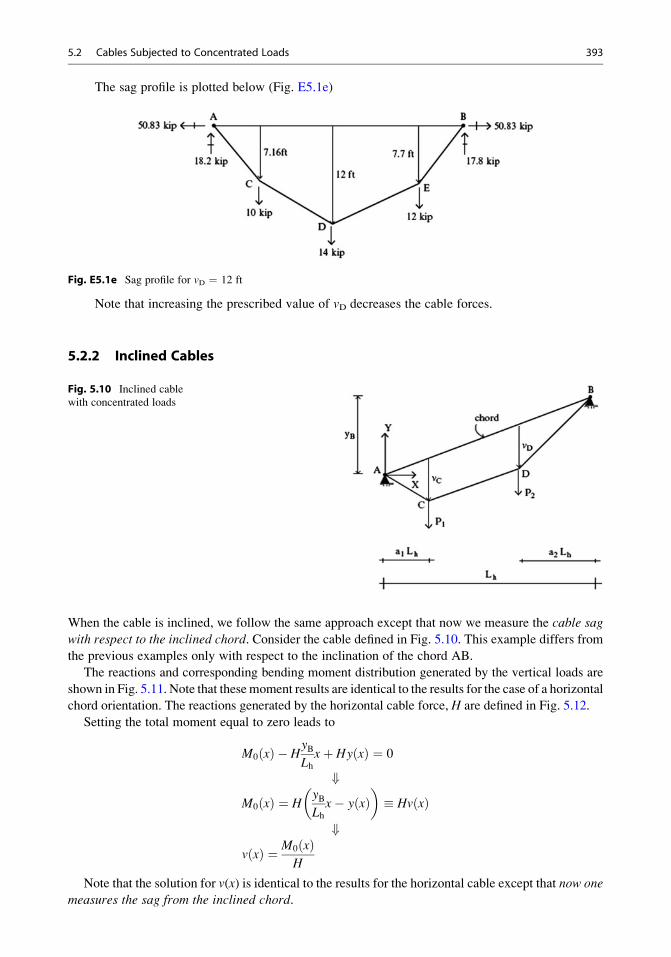
The sag profile is plotted below (Fig. E5.1e)
Fig. E5.1e Sag profile for vD ¼ 12 ft
Note that increasing the prescribed value of vD decreases the cable forces.
5.2.2 Inclined Cables
When the cable is inclined, we follow the same approach except that now we measure the cable sag
with respect to the inclined chord. Consider the cable defined in Fig. 5.10. This example differs from
the previous examples only with respect to the inclination of the chord AB.
The reactions and corresponding bending moment distribution generated by the vertical loads are
shown in Fig. 5.11. Note that thesemoment results are identical to the results for the case of a horizontal
chord orientation. The reactions generated by the horizontal cable force, H are defined in Fig. 5.12.
Setting the total moment equal to zero leads to
M0 xð Þ � HyBLhxþ Hy xð Þ ¼ 0
+M0 xð Þ ¼ H
yBLhx� y xð Þ
� �� Hv xð Þ
+v xð Þ ¼ M0 xð Þ
H
Note that the solution for v(x) is identical to the results for the horizontal cable except that now onemeasures the sag from the inclined chord.
Fig. 5.10 Inclined cable
with concentrated loads
5.2 Cables Subjected to Concentrated Loads 393
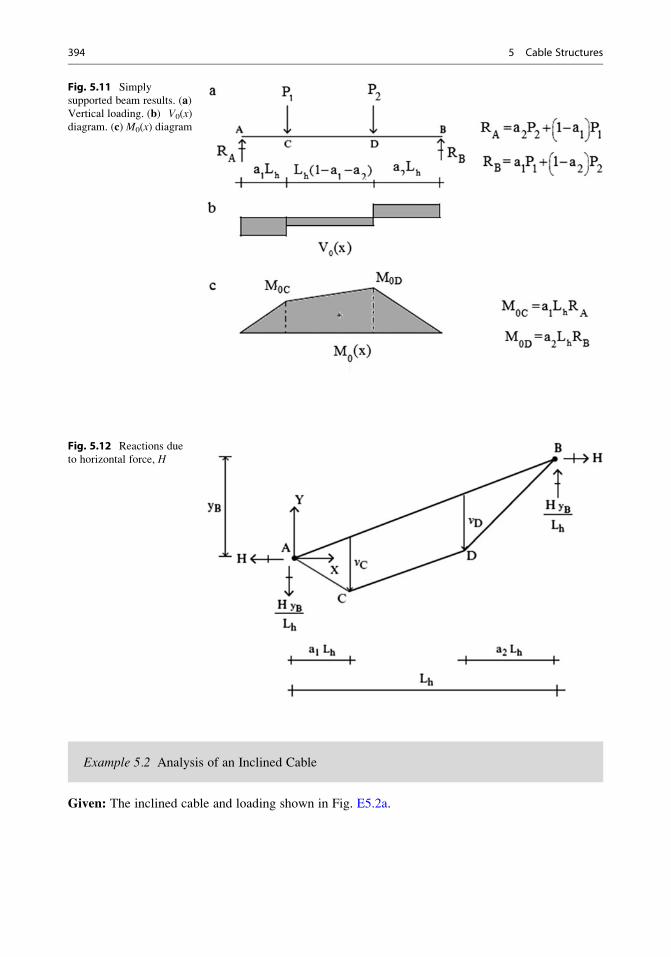
Example 5.2 Analysis of an Inclined Cable
Given: The inclined cable and loading shown in Fig. E5.2a.
Fig. 5.11 Simply
supported beam results. (a)Vertical loading. (b) V0(x)diagram. (c) M0(x) diagram
Fig. 5.12 Reactions due
to horizontal force, H
394 5 Cable Structures
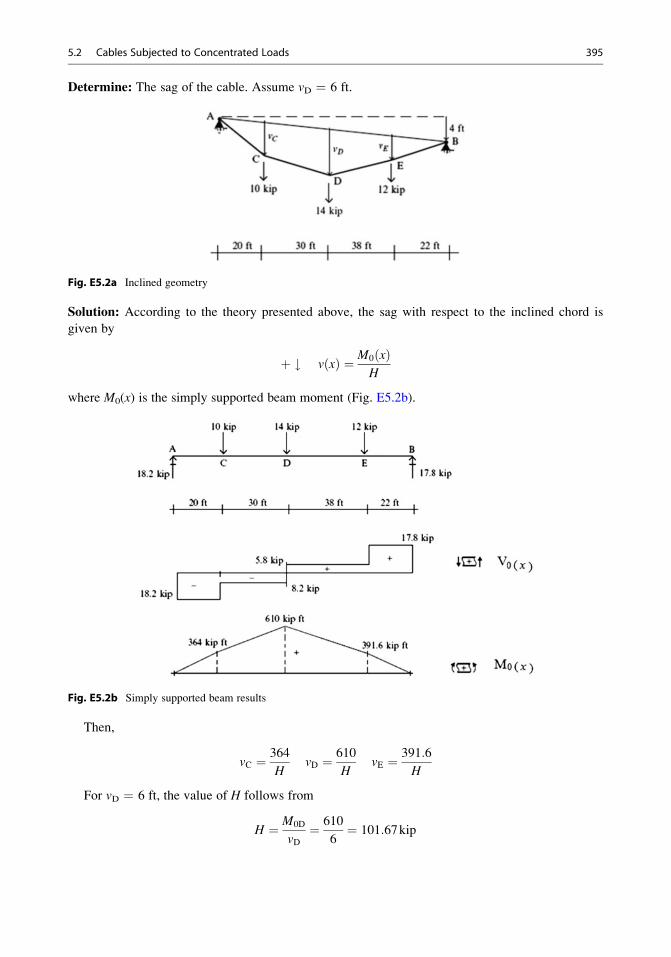
Determine: The sag of the cable. Assume vD ¼ 6 ft.
Fig. E5.2a Inclined geometry
Solution: According to the theory presented above, the sag with respect to the inclined chord is
given by
þ # v xð Þ ¼ M0 xð ÞH
where M0(x) is the simply supported beam moment (Fig. E5.2b).
Fig. E5.2b Simply supported beam results
Then,
vC ¼ 364
HvD ¼ 610
HvE ¼ 391:6
H
For vD ¼ 6 ft, the value of H follows from
H ¼ M0D
vD¼ 610
6¼ 101:67kip
5.2 Cables Subjected to Concentrated Loads 395
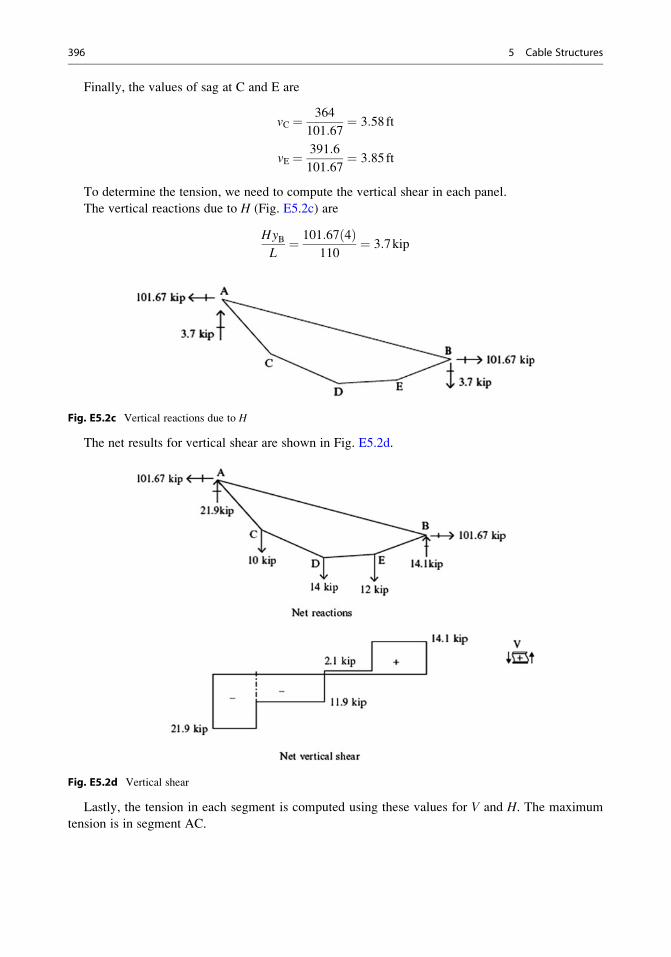
Finally, the values of sag at C and E are
vC ¼ 364
101:67¼ 3:58ft
vE ¼ 391:6
101:67¼ 3:85ft
To determine the tension, we need to compute the vertical shear in each panel.
The vertical reactions due to H (Fig. E5.2c) are
HyBL¼ 101:67 4ð Þ
110¼ 3:7kip
Fig. E5.2c Vertical reactions due to H
The net results for vertical shear are shown in Fig. E5.2d.
Fig. E5.2d Vertical shear
Lastly, the tension in each segment is computed using these values for V and H. The maximum
tension is in segment AC.
396 5 Cable Structures
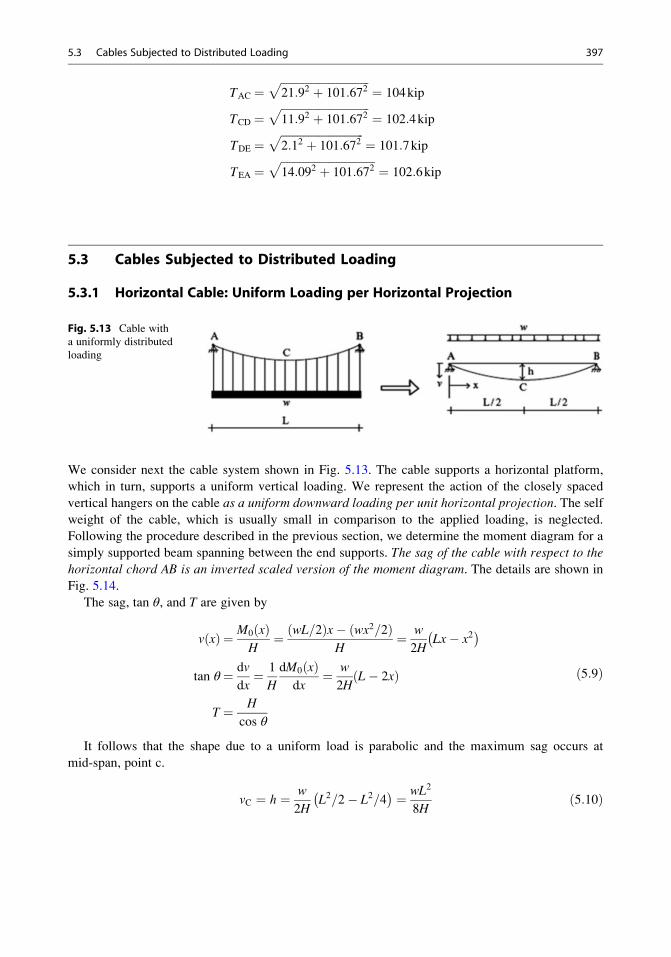
TAC ¼ffiffiffiffiffiffiffiffiffiffiffiffiffiffiffiffiffiffiffiffiffiffiffiffiffiffiffiffiffiffiffiffi21:92 þ 101:672
p¼ 104kip
TCD ¼ffiffiffiffiffiffiffiffiffiffiffiffiffiffiffiffiffiffiffiffiffiffiffiffiffiffiffiffiffiffiffiffi11:92 þ 101:672
p¼ 102:4kip
TDE ¼ffiffiffiffiffiffiffiffiffiffiffiffiffiffiffiffiffiffiffiffiffiffiffiffiffiffiffiffiffiffi2:12 þ 101:672
p¼ 101:7kip
TEA ¼ffiffiffiffiffiffiffiffiffiffiffiffiffiffiffiffiffiffiffiffiffiffiffiffiffiffiffiffiffiffiffiffiffiffi14:092 þ 101:672
p¼ 102:6kip
5.3 Cables Subjected to Distributed Loading
5.3.1 Horizontal Cable: Uniform Loading per Horizontal Projection
We consider next the cable system shown in Fig. 5.13. The cable supports a horizontal platform,
which in turn, supports a uniform vertical loading. We represent the action of the closely spaced
vertical hangers on the cable as a uniform downward loading per unit horizontal projection. The self
weight of the cable, which is usually small in comparison to the applied loading, is neglected.
Following the procedure described in the previous section, we determine the moment diagram for a
simply supported beam spanning between the end supports. The sag of the cable with respect to the
horizontal chord AB is an inverted scaled version of the moment diagram. The details are shown in
Fig. 5.14.
The sag, tan θ, and T are given by
v xð Þ ¼ M0 xð ÞH¼ wL=2ð Þx� wx2=2ð Þ
H¼ w
2HLx� x2� �
tan θ¼ dv
dx¼ 1
H
dM0 xð Þdx
¼ w
2HL� 2xð Þ
T ¼ H
cos θ
ð5:9Þ
It follows that the shape due to a uniform load is parabolic and the maximum sag occurs at
mid-span, point c.
vC ¼ h ¼ w
2HL2=2� L2=4� � ¼ wL2
8Hð5:10Þ
Fig. 5.13 Cable with
a uniformly distributed
loading
5.3 Cables Subjected to Distributed Loading 397
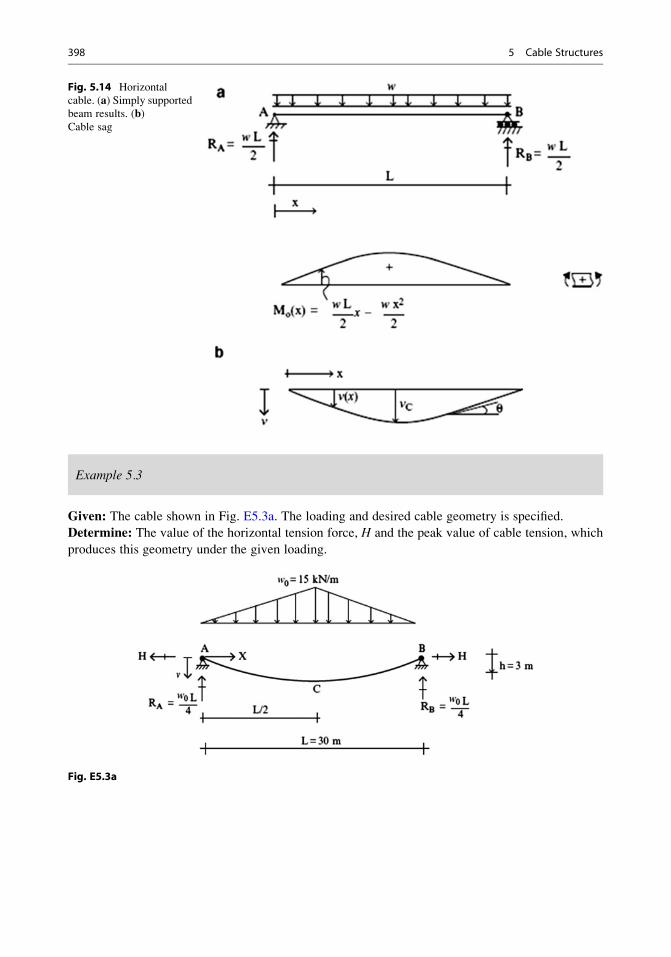
Example 5.3
Given: The cable shown in Fig. E5.3a. The loading and desired cable geometry is specified.
Determine: The value of the horizontal tension force, H and the peak value of cable tension, which
produces this geometry under the given loading.
Fig. E5.3a
Fig. 5.14 Horizontal
cable. (a) Simply supported
beam results. (b)Cable sag
398 5 Cable Structures

Solution: We note that the maximum value of ν occurs at x ¼ L/2. Then, specializing (5.9) for this
value of x leads to the value of H:
M0 xð Þ ¼ w0L
4x� w0
3Lx3 0 � x � L
2
tan θ¼ 1
H
dM0 xð Þdx
¼ 1
H
w0L
4� w0
Lx2
� �
H ¼ M0 x ¼ L=2ð ÞvC
¼ w0L2
12
1
vC¼ 15ð Þ 30ð Þ2
12 3ð Þ ¼ 375kN
The tension is related to H by:
T ¼ H
cos θ
The peak values of θ occur at x ¼ 0 and x ¼ L.
tan θat x¼0 ¼ 1
H
w0L
4
� �¼ 15ð Þ 30ð Þ
375ð Þ 4ð Þ ¼ 0:3
θat x¼0 ¼ 16:7�
It follows that
θmax ¼ �16:7�
Tmax ¼ H
cos θ¼ 391:5kN
5.3.2 Inclined Cables
Suppose the cable is inclined and subjected to an arbitrary loading. We define the shape by the
function y(x). Figure 5.15 defines this notation.
Since the cable has no bending rigidity, the shape of the cable must adjust itself so that the resultant
moment due to the vertical load and H vanishes at all points along the cable. Then, setting the total
moment at x equal to zero leads to
XMat x ¼ M0 xð Þ þ Hy xð Þ � HyB
Lhx ¼ 0
+
y xð Þ ¼ yBLhx�M0 xð Þ
H
ð5:11Þ
5.3 Cables Subjected to Distributed Loading 399
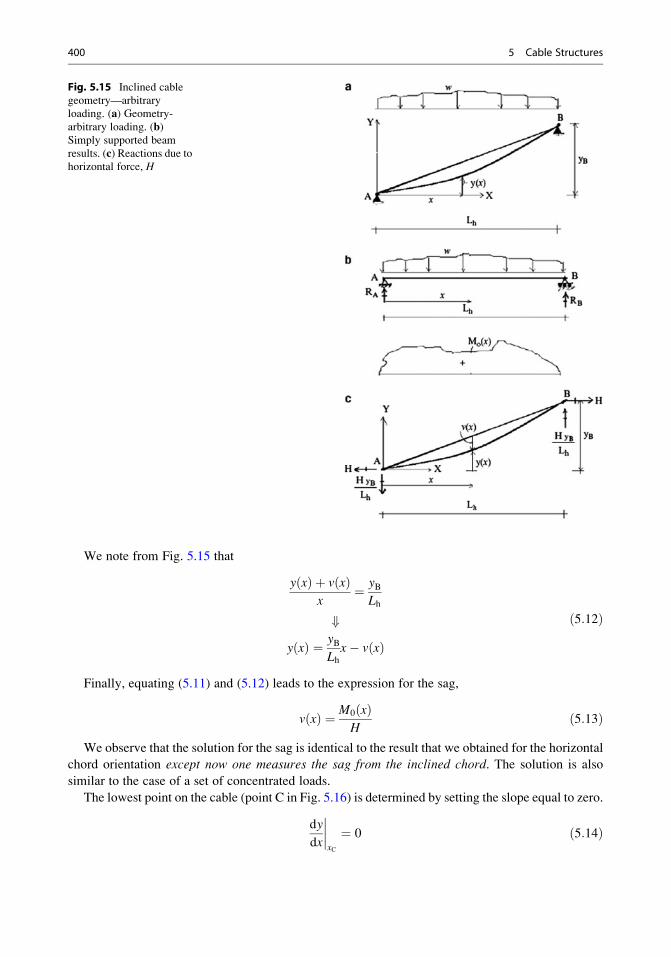
We note from Fig. 5.15 that
y xð Þ þ v xð Þx
¼ yBLh
+y xð Þ ¼ yB
Lhx� v xð Þ
ð5:12Þ
Finally, equating (5.11) and (5.12) leads to the expression for the sag,
v xð Þ ¼ M0 xð ÞH
ð5:13Þ
We observe that the solution for the sag is identical to the result that we obtained for the horizontal
chord orientation except now one measures the sag from the inclined chord. The solution is also
similar to the case of a set of concentrated loads.
The lowest point on the cable (point C in Fig. 5.16) is determined by setting the slope equal to zero.
dy
dx
����xC
¼ 0 ð5:14Þ
Fig. 5.15 Inclined cable
geometry—arbitrary
loading. (a) Geometry-
arbitrary loading. (b)Simply supported beam
results. (c) Reactions due tohorizontal force, H
400 5 Cable Structures
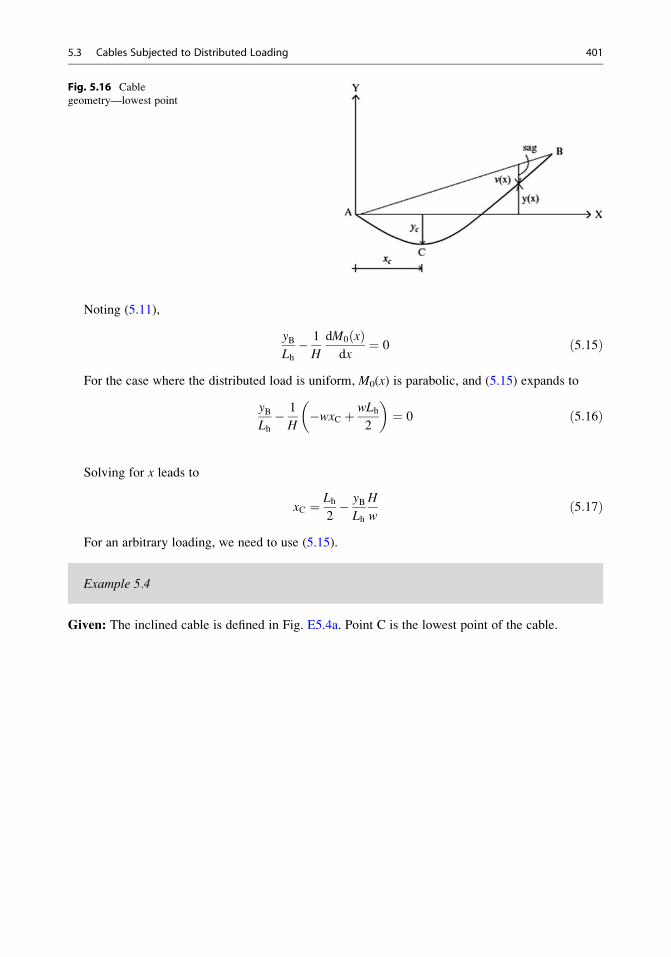
Noting (5.11),
yBLh� 1
H
dM0 xð Þdx
¼ 0 ð5:15Þ
For the case where the distributed load is uniform, M0(x) is parabolic, and (5.15) expands to
yBLh� 1
H�wxC þ wLh
2
� �¼ 0 ð5:16Þ
Solving for x leads to
xC ¼ Lh2� yB
Lh
H
wð5:17Þ
For an arbitrary loading, we need to use (5.15).
Example 5.4
Given: The inclined cable is defined in Fig. E5.4a. Point C is the lowest point of the cable.
Fig. 5.16 Cable
geometry—lowest point
5.3 Cables Subjected to Distributed Loading 401
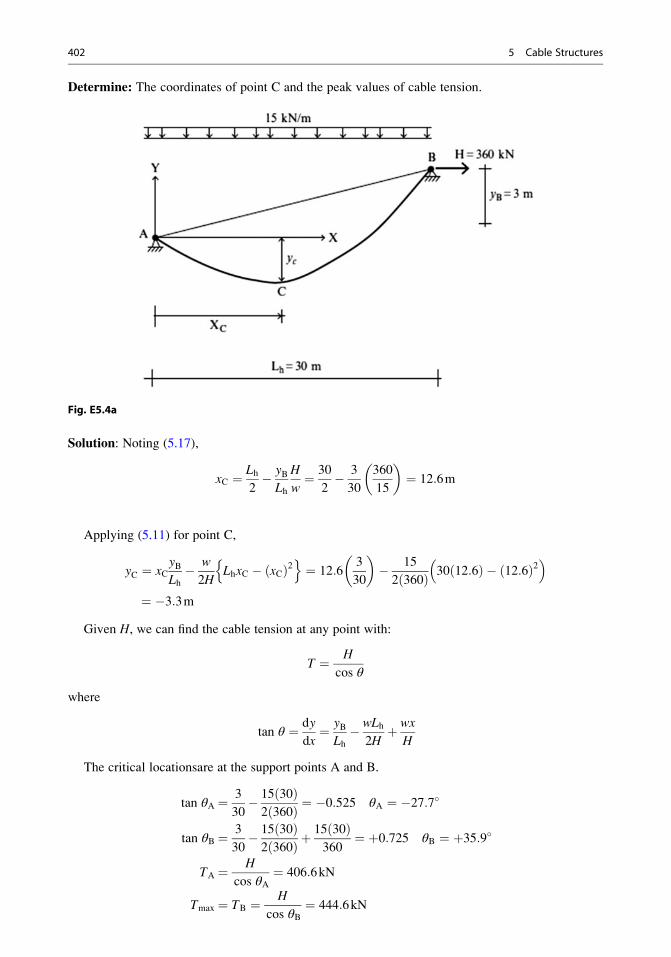
Determine: The coordinates of point C and the peak values of cable tension.
Fig. E5.4a
Solution: Noting (5.17),
xC ¼ Lh2� yB
Lh
H
w¼ 30
2� 3
30
360
15
� �¼ 12:6m
Applying (5.11) for point C,
yC ¼ xCyBLh� w
2HLhxC � xCð Þ2n o
¼ 12:63
30
� �� 15
2 360ð Þ 30 12:6ð Þ � 12:6ð Þ2� �
¼ �3:3mGiven H, we can find the cable tension at any point with:
T ¼ H
cos θ
where
tan θ ¼ dy
dx¼ yB
Lh� wLh
2Hþ wx
H
The critical locationsare at the support points A and B.
tan θA ¼ 3
30� 15 30ð Þ2 360ð Þ ¼ �0:525 θA ¼ �27:7�
tan θB ¼ 3
30� 15 30ð Þ2 360ð Þ þ
15 30ð Þ360
¼ þ0:725 θB ¼ þ35:9�
TA ¼ H
cos θA¼ 406:6kN
Tmax ¼ TB ¼ H
cos θB¼ 444:6kN
402 5 Cable Structures
5.4 Advanced Topics
This section deals with the calculation of arch length, the axial stiffness, and the effect of temperature.
We also discuss a modeling strategy for cable-stayed structures such as guyed towers and cable-
stayed bridges.
5.4.1 Arc Length
We consider first the uniformly loaded horizontal cable shown in Fig. 5.17. We have shown that the
sag profile due to a uniform load is parabolic,
v xð Þ ¼ wL
2Hx� wx2
2H
and the maximum sag occurs at mid-span,
vmax � h ¼ wL2
8H
Given H and L, of interest is the total arc length of the cable. We need this quantity in order to
determine the effect on the cable geometry of a temperature increase in the cable. Figure 5.17 shows
the initial and loaded shapes of the cable. Note that the deformed length is greater than L. We denote
this quantity as L + Δ.The differential arc length, ds, is related to its horizontal and vertical projections by
ds ¼ffiffiffiffiffiffiffiffiffiffiffiffiffiffiffiffiffiffiffiffidx2 þ dy2
p¼ dx
ffiffiffiffiffiffiffiffiffiffiffiffiffiffiffiffiffiffiffiffiffiffi1þ dy
dx
� �2s
ð5:18Þ
Fig. 5.17 Cable
geometry. (a) Initialunloaded. (b) Loaded
shape
5.4 Advanced Topics 403
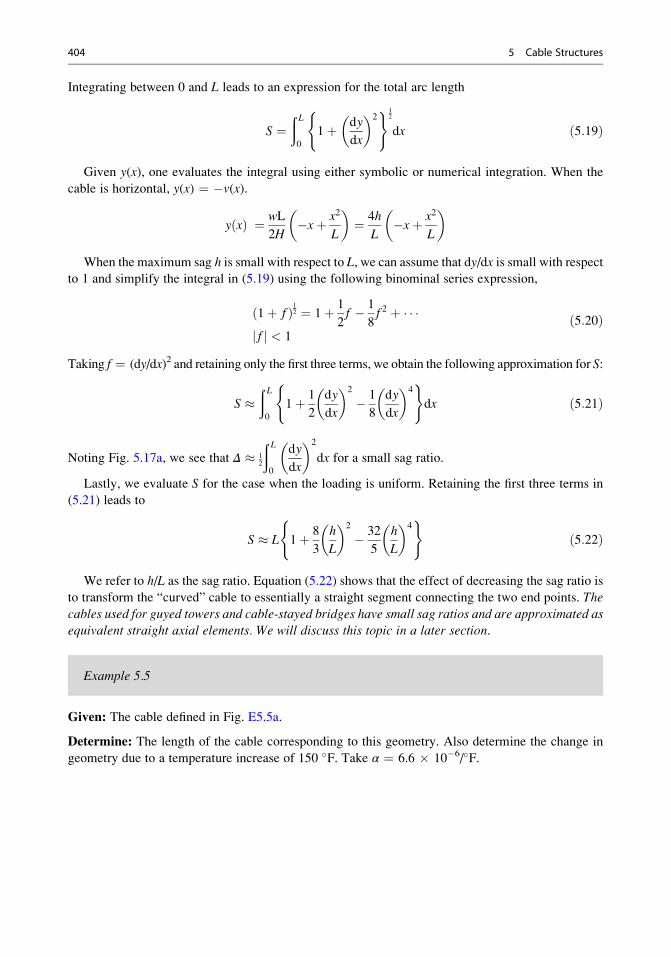
Integrating between 0 and L leads to an expression for the total arc length
S ¼ð L0
1þ dy
dx
� �2( )1
2
dx ð5:19Þ
Given y(x), one evaluates the integral using either symbolic or numerical integration. When the
cable is horizontal, y(x) ¼ �v(x).
y xð Þ ¼ wL
2H�xþ x2
L
� �¼ 4h
L�xþ x2
L
� �
When the maximum sag h is small with respect to L, we can assume that dy/dx is small with respect
to 1 and simplify the integral in (5.19) using the following binominal series expression,
1þ fð Þ12 ¼ 1þ 1
2f � 1
8f 2 þ
fj j < 1
ð5:20Þ
Taking f ¼ (dy/dx)2 and retaining only the first three terms, we obtain the following approximation for S:
S �ð L0
1þ 1
2
dy
dx
� �2
� 1
8
dy
dx
� �4( )
dx ð5:21Þ
Noting Fig. 5.17a, we see that Δ � 12
ð L0
dy
dx
� �2
dx for a small sag ratio.
Lastly, we evaluate S for the case when the loading is uniform. Retaining the first three terms in
(5.21) leads to
S � L 1þ 8
3
h
L
� �2
� 32
5
h
L
� �4( )
ð5:22Þ
We refer to h/L as the sag ratio. Equation (5.22) shows that the effect of decreasing the sag ratio is
to transform the “curved” cable to essentially a straight segment connecting the two end points. The
cables used for guyed towers and cable-stayed bridges have small sag ratios and are approximated asequivalent straight axial elements. We will discuss this topic in a later section.
Example 5.5
Given: The cable defined in Fig. E5.5a.
Determine: The length of the cable corresponding to this geometry. Also determine the change in
geometry due to a temperature increase of 150 �F. Take α ¼ 6.6 � 10�6/�F.
404 5 Cable Structures
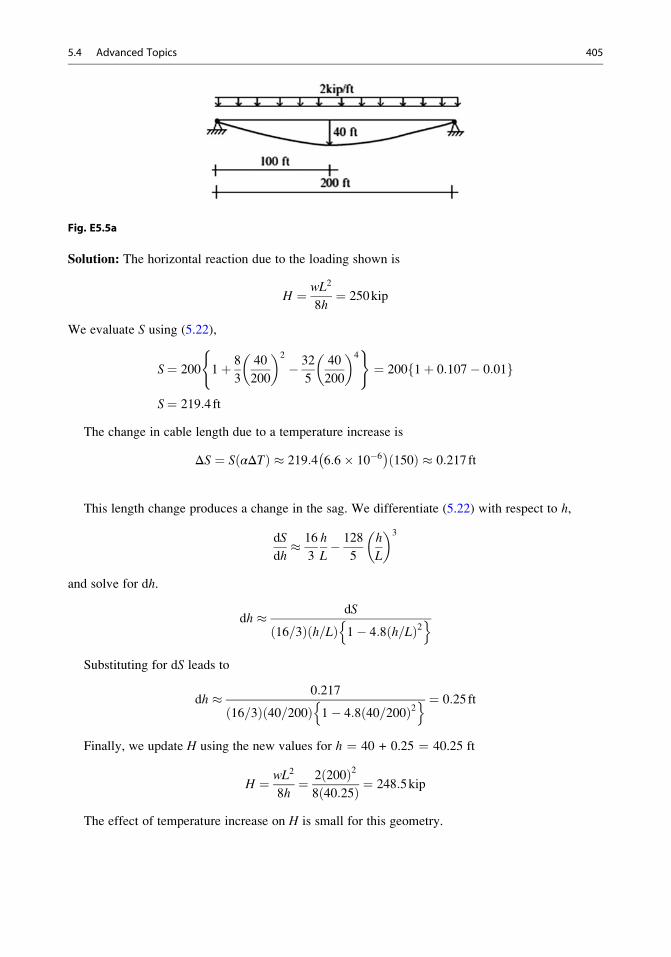
Fig. E5.5a
Solution: The horizontal reaction due to the loading shown is
H ¼ wL2
8h¼ 250kip
We evaluate S using (5.22),
S¼ 200 1þ 8
3
40
200
� �2
� 32
5
40
200
� �4( )
¼ 200 1þ 0:107� 0:01f g
S¼ 219:4ft
The change in cable length due to a temperature increase is
ΔS ¼ S αΔTð Þ � 219:4 6:6� 10�6� �
150ð Þ � 0:217ft
This length change produces a change in the sag. We differentiate (5.22) with respect to h,
dS
dh� 16
3
h
L� 128
5
h
L
� �3
and solve for dh.
dh � dS
16=3ð Þ h=Lð Þ 1� 4:8 h=Lð Þ2n o
Substituting for dS leads to
dh � 0:217
16=3ð Þ 40=200ð Þ 1� 4:8 40=200ð Þ2n o ¼ 0:25ft
Finally, we update H using the new values for h ¼ 40 + 0.25 ¼ 40.25 ft
H ¼ wL2
8h¼ 2 200ð Þ2
8 40:25ð Þ ¼ 248:5kip
The effect of temperature increase on H is small for this geometry.
5.4 Advanced Topics 405
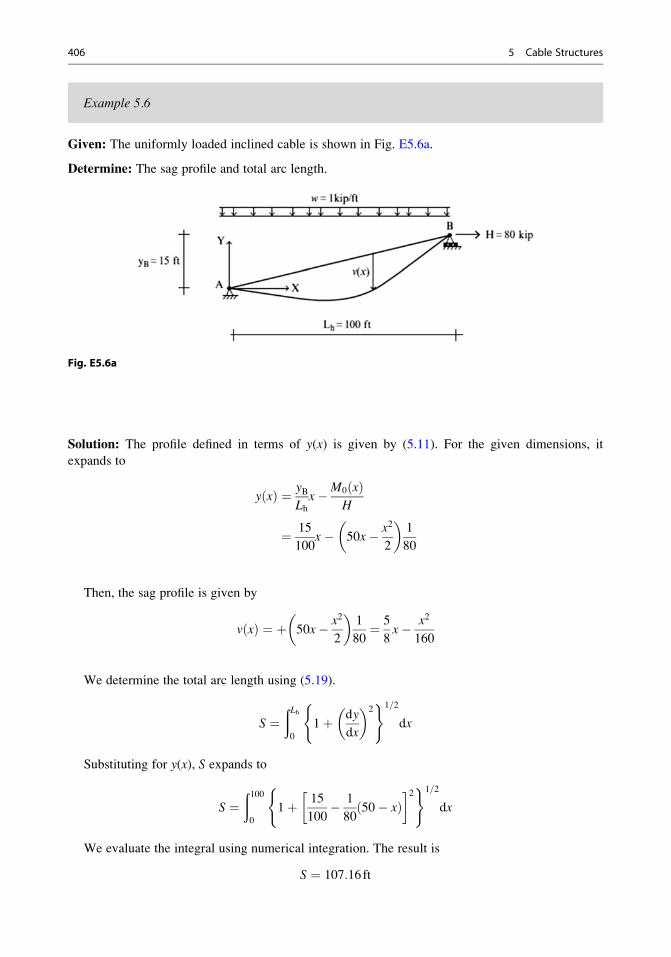
Example 5.6
Given: The uniformly loaded inclined cable is shown in Fig. E5.6a.
Determine: The sag profile and total arc length.
Fig. E5.6a
Solution: The profile defined in terms of y(x) is given by (5.11). For the given dimensions, it
expands to
y xð Þ ¼ yBLhx�M0 xð Þ
H
¼ 15
100x� 50x� x2
2
� �1
80
Then, the sag profile is given by
v xð Þ ¼ þ 50x� x2
2
� �1
80¼ 5
8x� x2
160
We determine the total arc length using (5.19).
S ¼ðLh0
1þ dy
dx
� �2( )1=2
dx
Substituting for y(x), S expands to
S ¼ð1000
1þ 15
100� 1
8050� xð Þ
�2( )1=2
dx
We evaluate the integral using numerical integration. The result is
S ¼ 107:16ft
406 5 Cable Structures
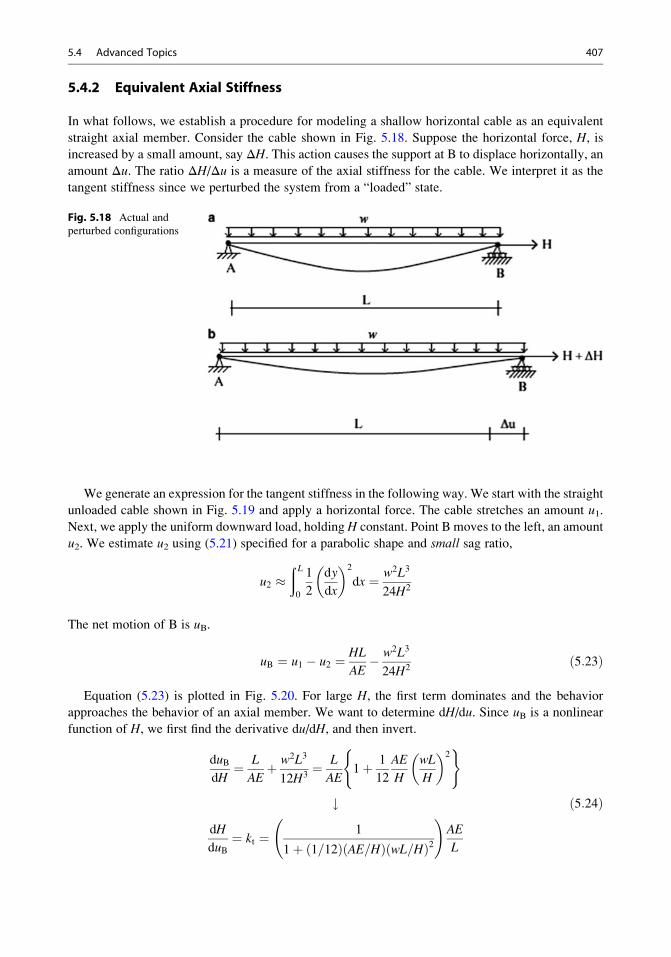
5.4.2 Equivalent Axial Stiffness
In what follows, we establish a procedure for modeling a shallow horizontal cable as an equivalent
straight axial member. Consider the cable shown in Fig. 5.18. Suppose the horizontal force, H, isincreased by a small amount, say ΔH. This action causes the support at B to displace horizontally, an
amount Δu. The ratio ΔH/Δu is a measure of the axial stiffness for the cable. We interpret it as the
tangent stiffness since we perturbed the system from a “loaded” state.
We generate an expression for the tangent stiffness in the following way. We start with the straight
unloaded cable shown in Fig. 5.19 and apply a horizontal force. The cable stretches an amount u1.
Next, we apply the uniform downward load, holding H constant. Point B moves to the left, an amount
u2. We estimate u2 using (5.21) specified for a parabolic shape and small sag ratio,
u2 �ð L0
1
2
dy
dx
� �2
dx ¼ w2L3
24H2
The net motion of B is uB.
uB ¼ u1 � u2 ¼ HL
AE� w2L3
24H2ð5:23Þ
Equation (5.23) is plotted in Fig. 5.20. For large H, the first term dominates and the behavior
approaches the behavior of an axial member. We want to determine dH/du. Since uB is a nonlinear
function of H, we first find the derivative du/dH, and then invert.
duBdH¼ L
AEþ w2L3
12H3¼ L
AE1þ 1
12
AE
H
wL
H
� �2( )
#dH
duB¼ kt ¼ 1
1þ 1=12ð Þ AE=Hð Þ wL=Hð Þ2 !
AE
L
ð5:24Þ
Fig. 5.18 Actual and
perturbed configurations
5.4 Advanced Topics 407
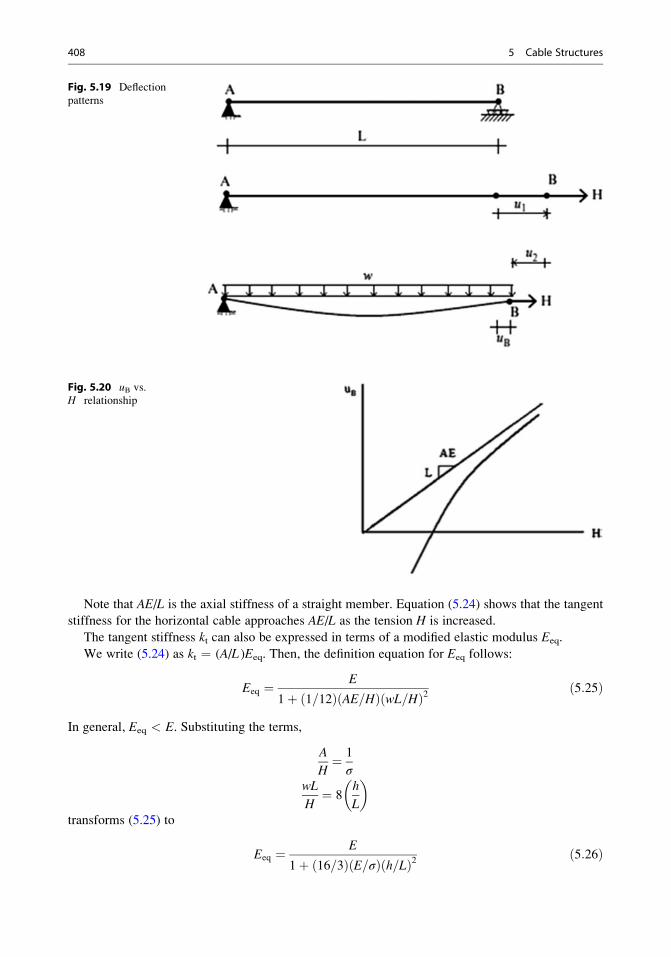
Note that AE/L is the axial stiffness of a straight member. Equation (5.24) shows that the tangent
stiffness for the horizontal cable approaches AE/L as the tension H is increased.
The tangent stiffness kt can also be expressed in terms of a modified elastic modulus Eeq.
We write (5.24) as kt ¼ (A/L )Eeq. Then, the definition equation for Eeq follows:
Eeq ¼ E
1þ 1=12ð Þ AE=Hð Þ wL=Hð Þ2 ð5:25Þ
In general, Eeq < E. Substituting the terms,
A
H¼ 1
σwL
H¼ 8
h
L
� �transforms (5.25) to
Eeq ¼ E
1þ 16=3ð Þ E=σð Þ h=Lð Þ2 ð5:26Þ
Fig. 5.20 uB vs.
H relationship
Fig. 5.19 Deflection
patterns
408 5 Cable Structures
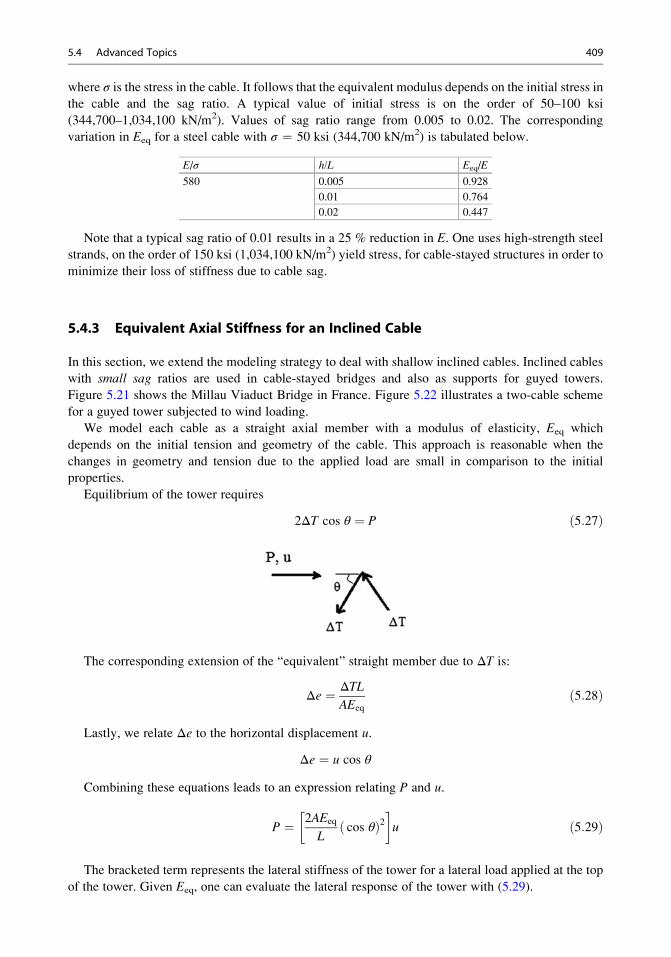
where σ is the stress in the cable. It follows that the equivalent modulus depends on the initial stress in
the cable and the sag ratio. A typical value of initial stress is on the order of 50–100 ksi
(344,700–1,034,100 kN/m2). Values of sag ratio range from 0.005 to 0.02. The corresponding
variation in Eeq for a steel cable with σ ¼ 50 ksi (344,700 kN/m2) is tabulated below.
E/σ h/L Eeq/E
580 0.005 0.928
0.01 0.764
0.02 0.447
Note that a typical sag ratio of 0.01 results in a 25 % reduction in E. One uses high-strength steel
strands, on the order of 150 ksi (1,034,100 kN/m2) yield stress, for cable-stayed structures in order to
minimize their loss of stiffness due to cable sag.
5.4.3 Equivalent Axial Stiffness for an Inclined Cable
In this section, we extend the modeling strategy to deal with shallow inclined cables. Inclined cables
with small sag ratios are used in cable-stayed bridges and also as supports for guyed towers.
Figure 5.21 shows the Millau Viaduct Bridge in France. Figure 5.22 illustrates a two-cable scheme
for a guyed tower subjected to wind loading.
We model each cable as a straight axial member with a modulus of elasticity, Eeq which
depends on the initial tension and geometry of the cable. This approach is reasonable when the
changes in geometry and tension due to the applied load are small in comparison to the initial
properties.
Equilibrium of the tower requires
2ΔT cos θ ¼ P ð5:27Þ
The corresponding extension of the “equivalent” straight member due to ΔT is:
Δe ¼ ΔTLAEeq
ð5:28Þ
Lastly, we relate Δe to the horizontal displacement u.
Δe ¼ u cos θ
Combining these equations leads to an expression relating P and u.
P ¼ 2AEeq
Lcos θð Þ2
�u ð5:29Þ
The bracketed term represents the lateral stiffness of the tower for a lateral load applied at the top
of the tower. Given Eeq, one can evaluate the lateral response of the tower with (5.29).
5.4 Advanced Topics 409
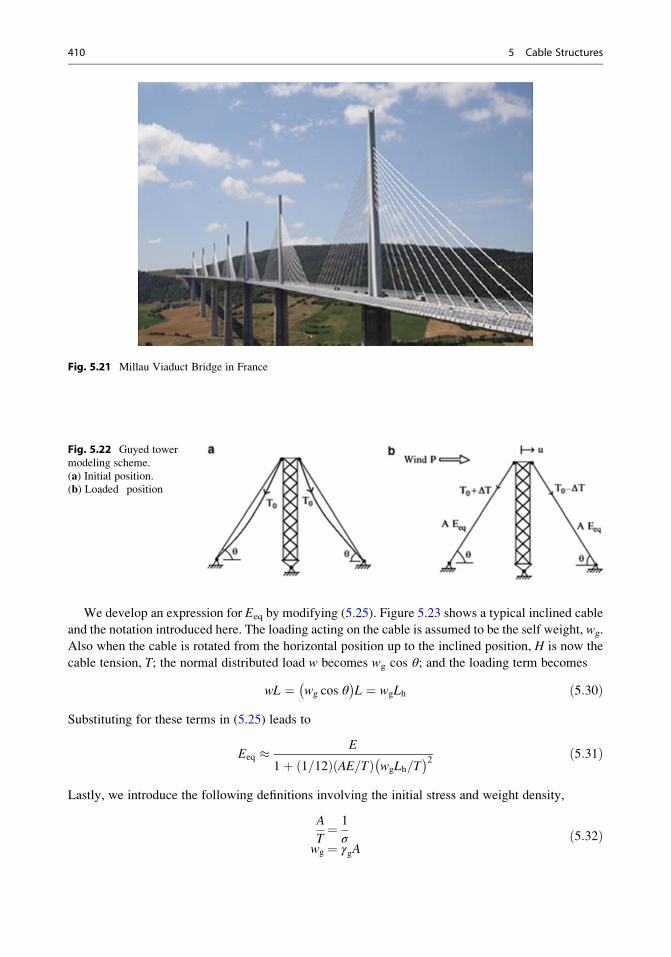
We develop an expression for Eeq by modifying (5.25). Figure 5.23 shows a typical inclined cable
and the notation introduced here. The loading acting on the cable is assumed to be the self weight, wg.
Also when the cable is rotated from the horizontal position up to the inclined position, H is now the
cable tension, T; the normal distributed load w becomes wg cos θ; and the loading term becomes
wL ¼ wg cos θ� �
L ¼ wgLh ð5:30Þ
Substituting for these terms in (5.25) leads to
Eeq � E
1þ 1=12ð Þ AE=Tð Þ wgLh=T� �2 ð5:31Þ
Lastly, we introduce the following definitions involving the initial stress and weight density,
A
T¼ 1
σwg ¼ γgA
ð5:32Þ
Fig. 5.21 Millau Viaduct Bridge in France
Fig. 5.22 Guyed tower
modeling scheme.
(a) Initial position.(b) Loaded position
410 5 Cable Structures
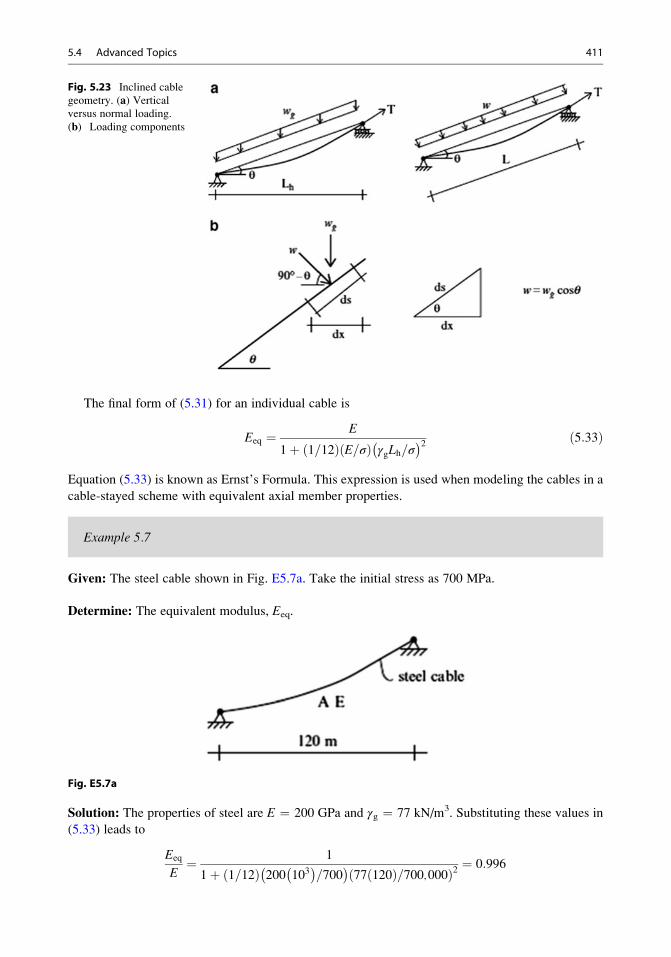
The final form of (5.31) for an individual cable is
Eeq ¼ E
1þ 1=12ð Þ E=σð Þ γgLh=σ� �2 ð5:33Þ
Equation (5.33) is known as Ernst’s Formula. This expression is used when modeling the cables in a
cable-stayed scheme with equivalent axial member properties.
Example 5.7
Given: The steel cable shown in Fig. E5.7a. Take the initial stress as 700 MPa.
Determine: The equivalent modulus, Eeq.
Fig. E5.7a
Solution: The properties of steel are E ¼ 200 GPa and γg ¼ 77 kN/m3. Substituting these values in
(5.33) leads to
Eeq
E¼ 1
1þ 1=12ð Þ 200 103� �
=700� �
77 120ð Þ=700,000ð Þ2 ¼ 0:996
Fig. 5.23 Inclined cable
geometry. (a) Verticalversus normal loading.
(b) Loading components
5.4 Advanced Topics 411

One uses Eeq when specifying the properties of the “equivalent” straight axial member.
5.4.4 Cable Shape Under Self Weight: Catenary
There are cases where the loading on a cable is due only to self weight. Electrical transmission lines
are one example. The previous analyses have assumed the loading is defined in terms of the horizontal
projection (dx). This assumption is reasonable when the slope of the cable is small. In order to
investigate the case when the slope is not small, we need to work with the exact equilibrium equation.
Consider the segment shown in Fig. 5.24b. Enforcing equilibrium and noting that the loading is
vertical leads to following equations:
XFy ¼ 0
d
dxT sin θð Þdx ¼ wgds
XFx ¼ 0
d
dxT cos θð Þ ¼ 0) T cos θ ¼ Constant ¼ H
ð5:34Þ
Substituting for T
T ¼ H
cos θ) T sin θ ¼ H tan θ ¼ H
dy
dx
in the first equation in (5.34) leads to
Hd2y
dx2¼ wg
ds
dx¼ wg 1þ dy
dx
� �2( )1
2
ð5:35Þ
The general solution of (5.35) is
y ¼ H
wg
coshwg
Hxþ c1
� �þ c2 ð5:36Þ
where c1 and c2 are integration constants which are determined using the coordinates of the support
points. For the unsymmetrical case, we locate the origin at the left support (Fig. 5.24a). When the
cable is symmetrical, it is more convenient to locate the origin at the lowest point.
We consider the symmetrical case shown in Fig. 5.25. We locate the origin at the lowest point.
Then for this choice,
c1 ¼ 0
c2 ¼ �H
wg
412 5 Cable Structures
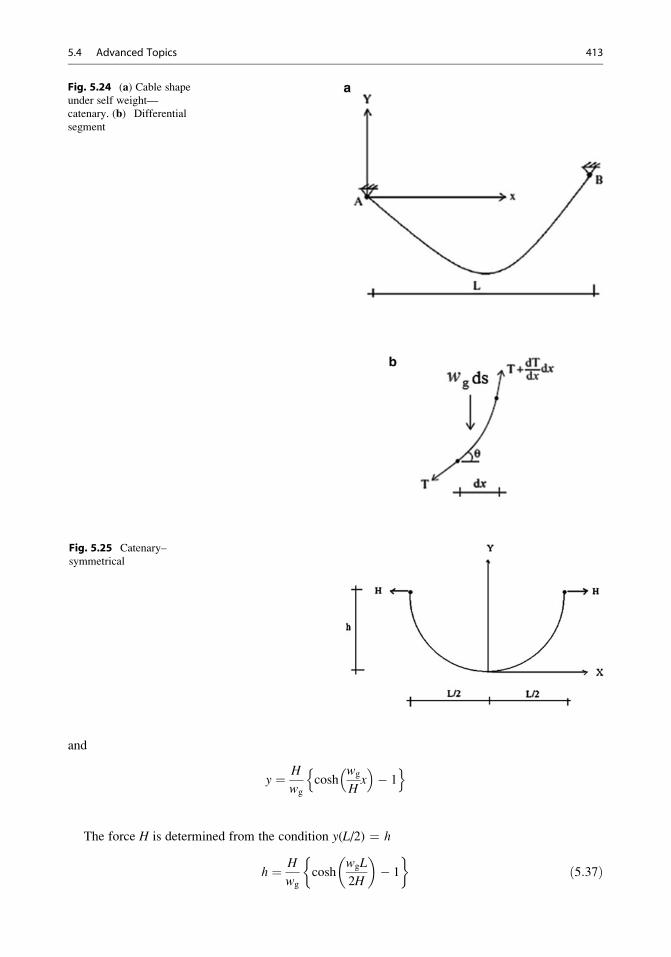
and
y ¼ H
wg
coshwg
Hx
� �� 1
n o
The force H is determined from the condition y(L/2) ¼ h
h ¼ H
wg
coshwgL
2H
� �� 1
�ð5:37Þ
Fig. 5.24 (a) Cable shapeunder self weight—
catenary. (b) Differential
segment
Fig. 5.25 Catenary–
symmetrical
5.4 Advanced Topics 413
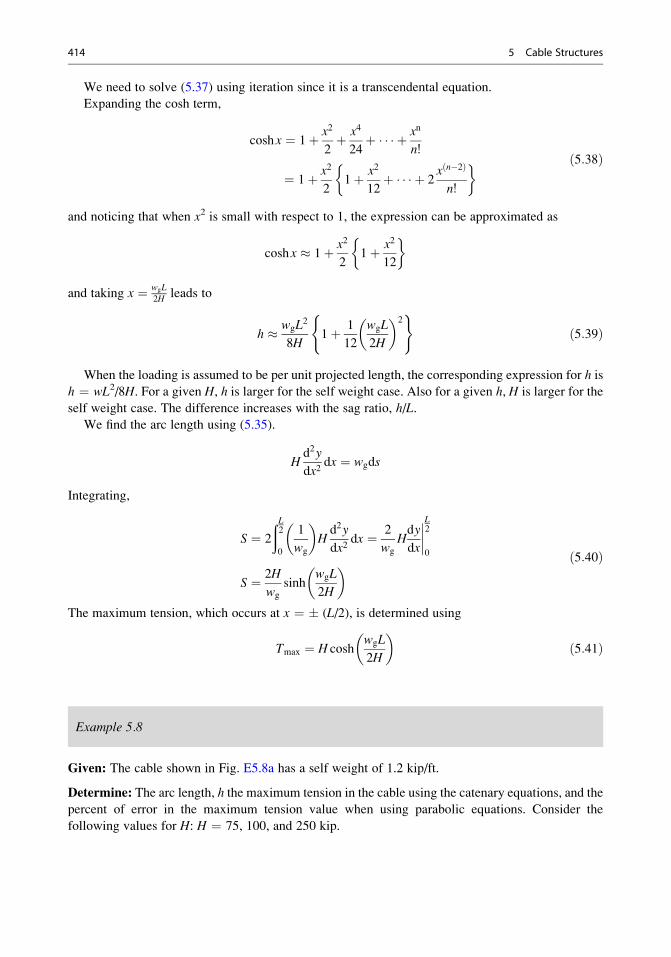
We need to solve (5.37) using iteration since it is a transcendental equation.
Expanding the cosh term,
coshx ¼ 1þ x2
2þ x4
24þ þ xn
n!
¼ 1þ x2
21þ x2
12þ þ 2
x n�2ð Þ
n!
� ð5:38Þ
and noticing that when x2 is small with respect to 1, the expression can be approximated as
coshx � 1þ x2
21þ x2
12
�
and taking x ¼ wgL2H leads to
h � wgL2
8H1þ 1
12
wgL
2H
� �2( )
ð5:39Þ
When the loading is assumed to be per unit projected length, the corresponding expression for h is
h ¼ wL2/8H. For a given H, h is larger for the self weight case. Also for a given h, H is larger for the
self weight case. The difference increases with the sag ratio, h/L.We find the arc length using (5.35).
Hd2y
dx2dx ¼ wgds
Integrating,
S ¼ 2
ðL2
0
1
wg
� �Hd2y
dx2dx ¼ 2
wg
Hdy
dx
����L2
0
S ¼ 2H
wg
sinhwgL
2H
� � ð5:40Þ
The maximum tension, which occurs at x ¼ � (L/2), is determined using
Tmax ¼ H coshwgL
2H
� �ð5:41Þ
Example 5.8
Given: The cable shown in Fig. E5.8a has a self weight of 1.2 kip/ft.
Determine: The arc length, h the maximum tension in the cable using the catenary equations, and the
percent of error in the maximum tension value when using parabolic equations. Consider the
following values for H: H ¼ 75, 100, and 250 kip.
414 5 Cable Structures
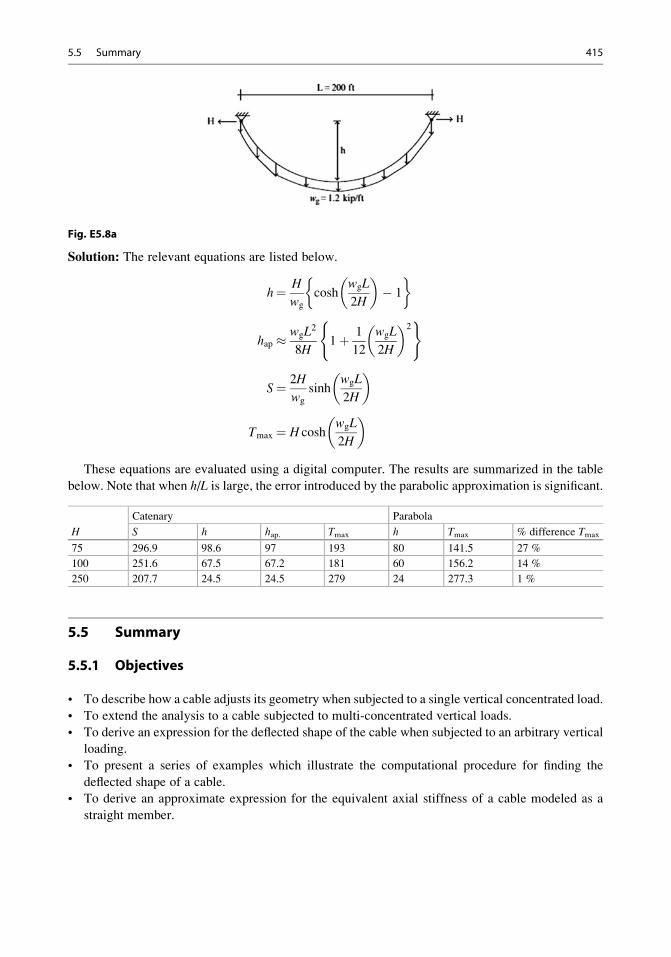
Fig. E5.8a
Solution: The relevant equations are listed below.
h¼ H
wg
coshwgL
2H
� �� 1
�
hap � wgL2
8H1þ 1
12
wgL
2H
� �2( )
S¼ 2H
wg
sinhwgL
2H
� �
Tmax ¼ H coshwgL
2H
� �
These equations are evaluated using a digital computer. The results are summarized in the table
below. Note that when h/L is large, the error introduced by the parabolic approximation is significant.
H
Catenary Parabola
S h hap. Tmax h Tmax % difference Tmax
75 296.9 98.6 97 193 80 141.5 27 %
100 251.6 67.5 67.2 181 60 156.2 14 %
250 207.7 24.5 24.5 279 24 277.3 1 %
5.5 Summary
5.5.1 Objectives
• To describe how a cable adjusts its geometry when subjected to a single vertical concentrated load.
• To extend the analysis to a cable subjected to multi-concentrated vertical loads.
• To derive an expression for the deflected shape of the cable when subjected to an arbitrary vertical
loading.
• To present a series of examples which illustrate the computational procedure for finding the
deflected shape of a cable.
• To derive an approximate expression for the equivalent axial stiffness of a cable modeled as a
straight member.
5.5 Summary 415
5.5.2 Key Concepts
• Given a cable supported at two points, A and B, and subjected to a vertical loading. The vertical
deflection from the chord connecting points A and B is proportional to the bending momentM in a
simply supported beam spanning between A and B. One finds the bending moment diagram using
a simple equilibrium analysis. The deflection of the cable with respect to the chord AB is an
inverted scaled version of the moment diagram.
• Under vertical loading, the horizontal component of the cable force is constant.
• The length of the cable is determined by integrating
S ¼ð L0
ds ¼ð L0
ffiffiffiffiffiffiffiffiffiffiffiffiffiffiffiffiffiffiffiffiffiffi1þ dy
dx
� �2s
dx
where
y ¼ �M0 xð ÞHþ yB
Lhx
One usually approximates the integrand with ds � 1 + (1/2) (dy/dx)2 when (dy/dx)2 is small in
comparison to 1.
5.6 Problems
For Problems 5.1–5.8, determine the reactions at the supports, and the tension in each segment of the cable.
Problem 5.1
Problem 5.2
416 5 Cable Structures
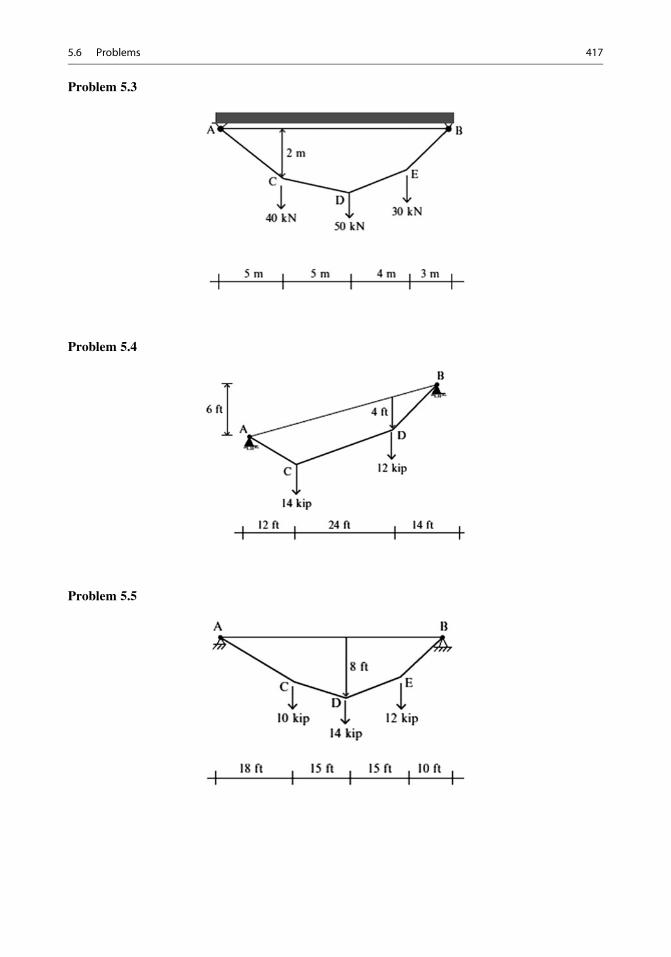
Problem 5.3
Problem 5.4
Problem 5.5
5.6 Problems 417
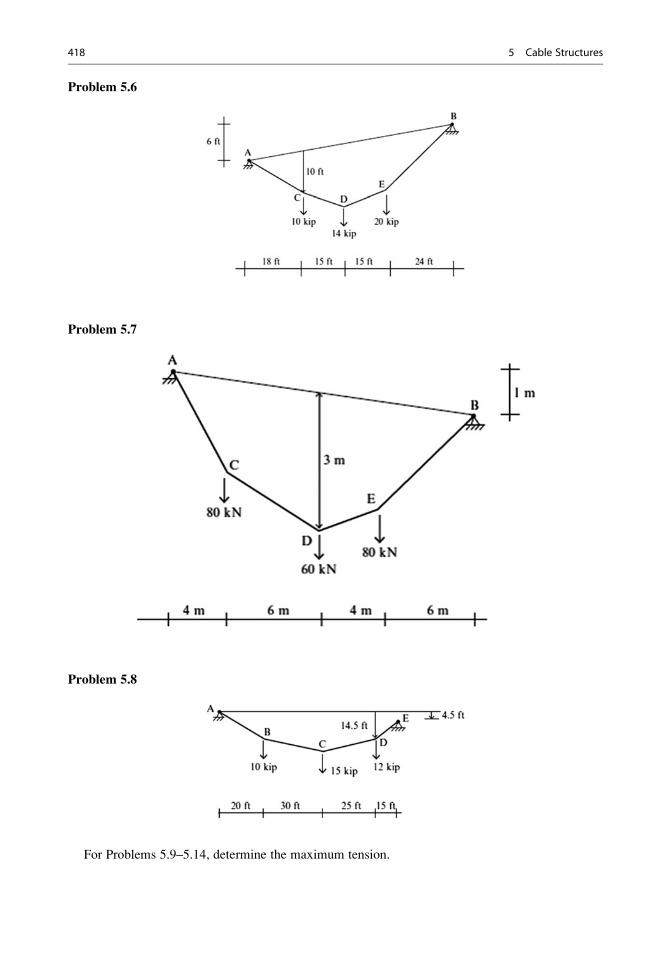
Problem 5.6
Problem 5.7
Problem 5.8
For Problems 5.9–5.14, determine the maximum tension.
418 5 Cable Structures
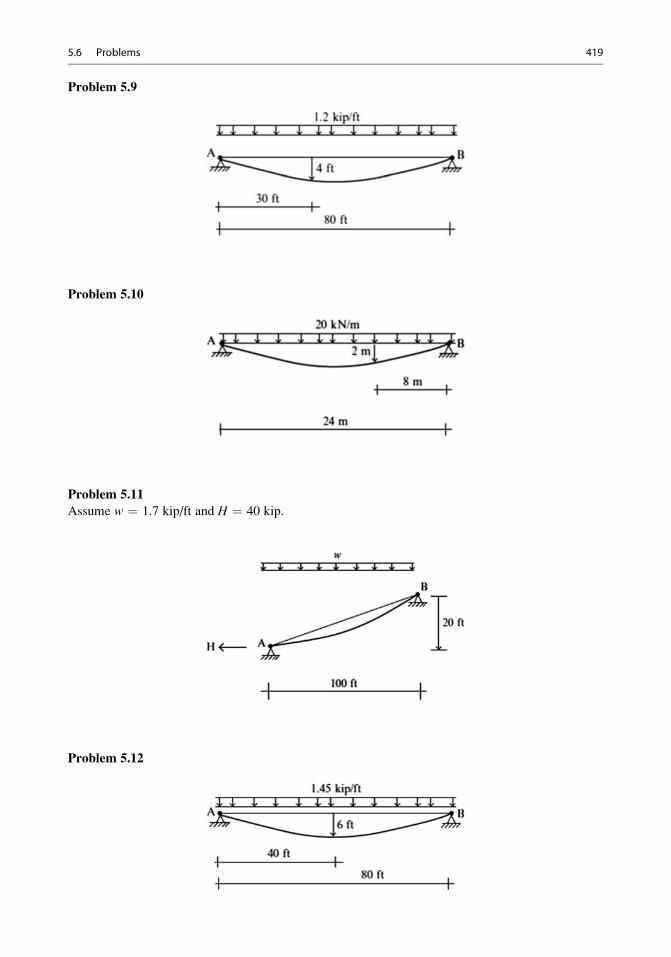
Problem 5.9
Problem 5.10
Problem 5.11
Assume w ¼ 1.7 kip/ft and H ¼ 40 kip.
Problem 5.12
5.6 Problems 419
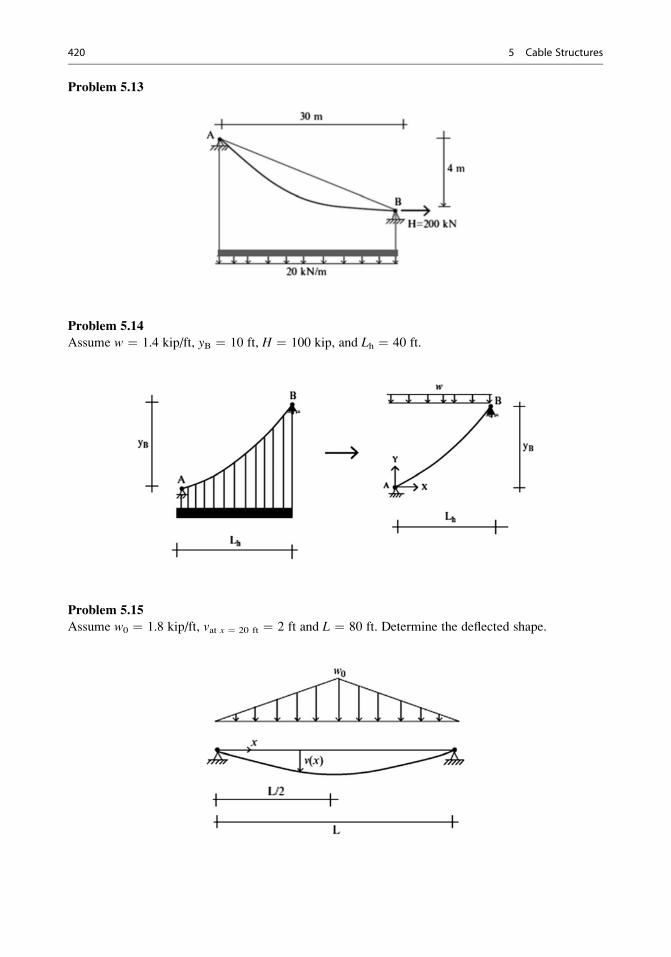
Problem 5.13
Problem 5.14
Assume w ¼ 1.4 kip/ft, yB ¼ 10 ft, H ¼ 100 kip, and Lh ¼ 40 ft.
Problem 5.15
Assume w0 ¼ 1.8 kip/ft, vat x ¼ 20 ft ¼ 2 ft and L ¼ 80 ft. Determine the deflected shape.
420 5 Cable Structures
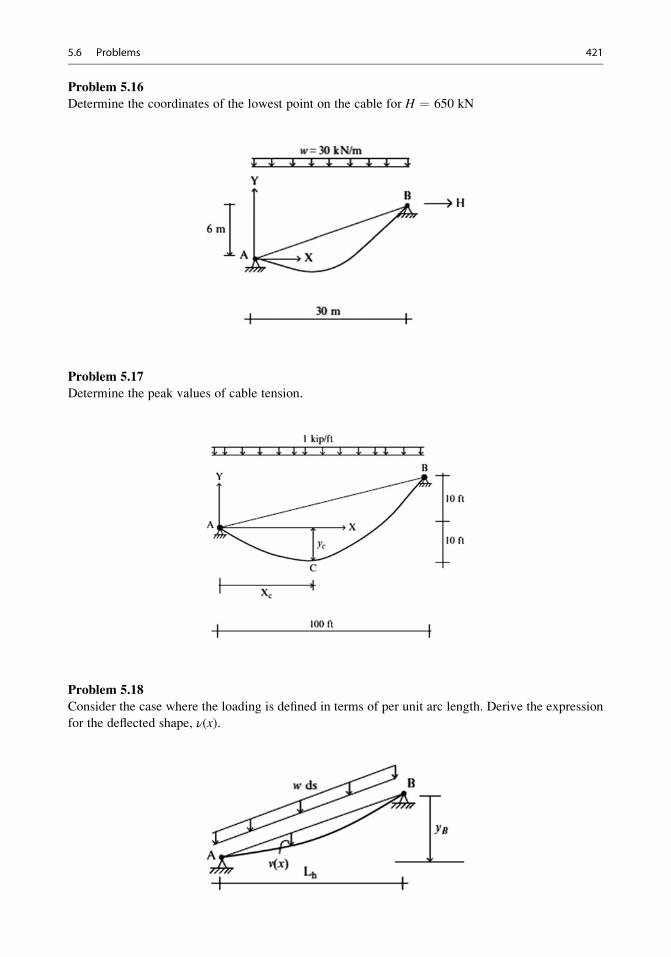
Problem 5.16
Determine the coordinates of the lowest point on the cable for H ¼ 650 kN
Problem 5.17
Determine the peak values of cable tension.
Problem 5.18
Consider the case where the loading is defined in terms of per unit arc length. Derive the expression
for the deflected shape, ν(x).
5.6 Problems 421
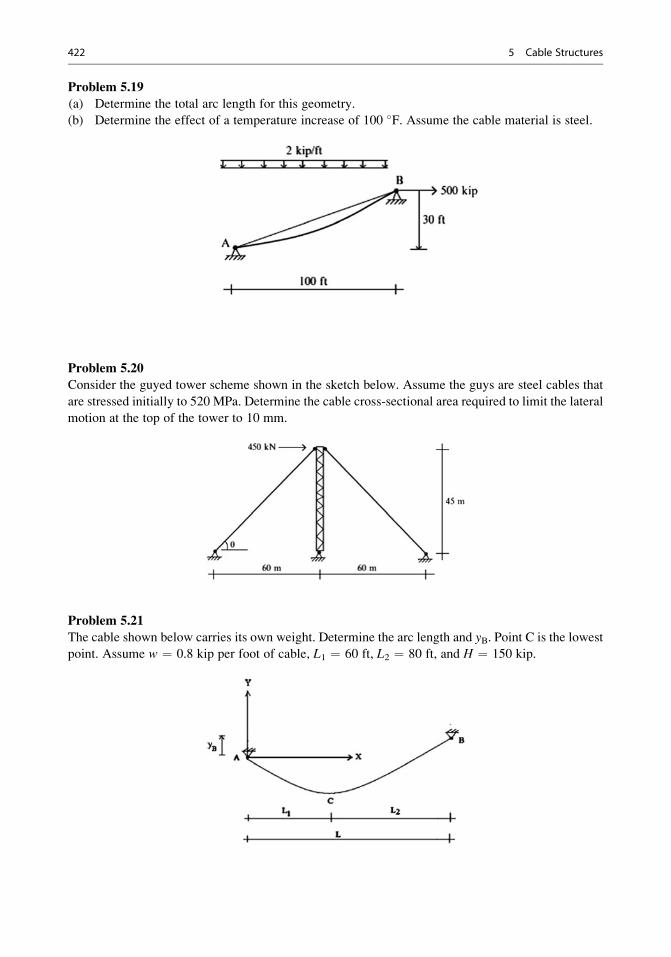
Problem 5.19
(a) Determine the total arc length for this geometry.
(b) Determine the effect of a temperature increase of 100 �F. Assume the cable material is steel.
Problem 5.20
Consider the guyed tower scheme shown in the sketch below. Assume the guys are steel cables that
are stressed initially to 520 MPa. Determine the cable cross-sectional area required to limit the lateral
motion at the top of the tower to 10 mm.
Problem 5.21
The cable shown below carries its own weight. Determine the arc length and yB. Point C is the lowest
point. Assume w ¼ 0.8 kip per foot of cable, L1 ¼ 60 ft, L2 ¼ 80 ft, and H ¼ 150 kip.
422 5 Cable Structures
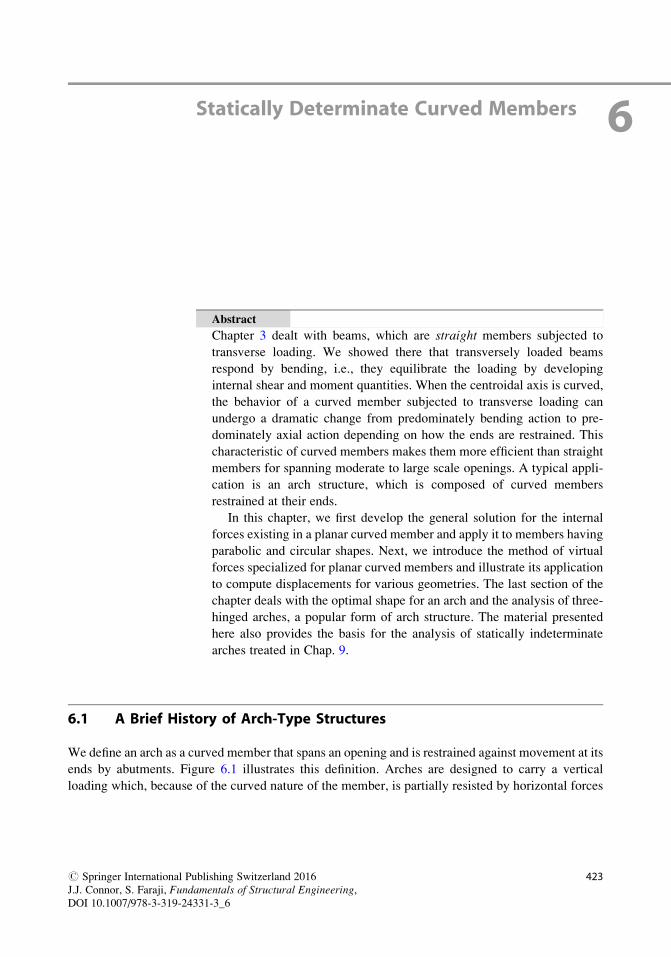
Statically Determinate Curved Members 6
Abstract
Chapter 3 dealt with beams, which are straight members subjected to
transverse loading. We showed there that transversely loaded beams
respond by bending, i.e., they equilibrate the loading by developing
internal shear and moment quantities. When the centroidal axis is curved,
the behavior of a curved member subjected to transverse loading can
undergo a dramatic change from predominately bending action to pre-
dominately axial action depending on how the ends are restrained. This
characteristic of curved members makes them more efficient than straight
members for spanning moderate to large scale openings. A typical appli-
cation is an arch structure, which is composed of curved members
restrained at their ends.
In this chapter, we first develop the general solution for the internal
forces existing in a planar curved member and apply it to members having
parabolic and circular shapes. Next, we introduce the method of virtual
forces specialized for planar curved members and illustrate its application
to compute displacements for various geometries. The last section of the
chapter deals with the optimal shape for an arch and the analysis of three-
hinged arches, a popular form of arch structure. The material presented
here also provides the basis for the analysis of statically indeterminate
arches treated in Chap. 9.
6.1 A Brief History of Arch-Type Structures
We define an arch as a curved member that spans an opening and is restrained against movement at its
ends by abutments. Figure 6.1 illustrates this definition. Arches are designed to carry a vertical
loading which, because of the curved nature of the member, is partially resisted by horizontal forces
# Springer International Publishing Switzerland 2016
J.J. Connor, S. Faraji, Fundamentals of Structural Engineering,DOI 10.1007/978-3-319-24331-3_6
423
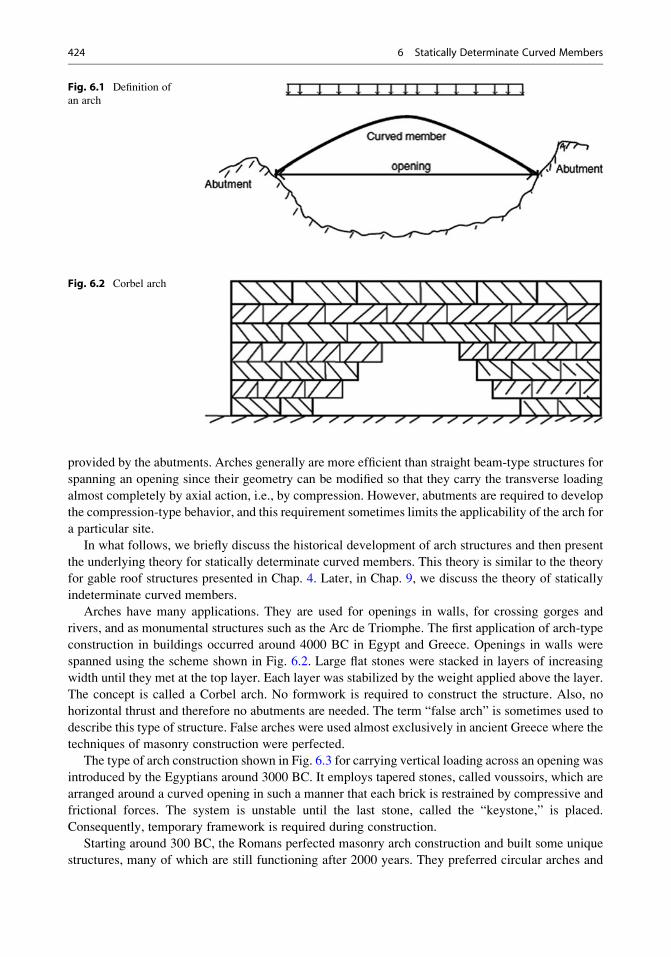
provided by the abutments. Arches generally are more efficient than straight beam-type structures for
spanning an opening since their geometry can be modified so that they carry the transverse loading
almost completely by axial action, i.e., by compression. However, abutments are required to develop
the compression-type behavior, and this requirement sometimes limits the applicability of the arch for
a particular site.
In what follows, we briefly discuss the historical development of arch structures and then present
the underlying theory for statically determinate curved members. This theory is similar to the theory
for gable roof structures presented in Chap. 4. Later, in Chap. 9, we discuss the theory of statically
indeterminate curved members.
Arches have many applications. They are used for openings in walls, for crossing gorges and
rivers, and as monumental structures such as the Arc de Triomphe. The first application of arch-type
construction in buildings occurred around 4000 BC in Egypt and Greece. Openings in walls were
spanned using the scheme shown in Fig. 6.2. Large flat stones were stacked in layers of increasing
width until they met at the top layer. Each layer was stabilized by the weight applied above the layer.
The concept is called a Corbel arch. No formwork is required to construct the structure. Also, no
horizontal thrust and therefore no abutments are needed. The term “false arch” is sometimes used to
describe this type of structure. False arches were used almost exclusively in ancient Greece where the
techniques of masonry construction were perfected.
The type of arch construction shown in Fig. 6.3 for carrying vertical loading across an opening was
introduced by the Egyptians around 3000 BC. It employs tapered stones, called voussoirs, which are
arranged around a curved opening in such a manner that each brick is restrained by compressive and
frictional forces. The system is unstable until the last stone, called the “keystone,” is placed.
Consequently, temporary framework is required during construction.
Starting around 300 BC, the Romans perfected masonry arch construction and built some unique
structures, many of which are still functioning after 2000 years. They preferred circular arches and
Fig. 6.1 Definition of
an arch
Fig. 6.2 Corbel arch
424 6 Statically Determinate Curved Members
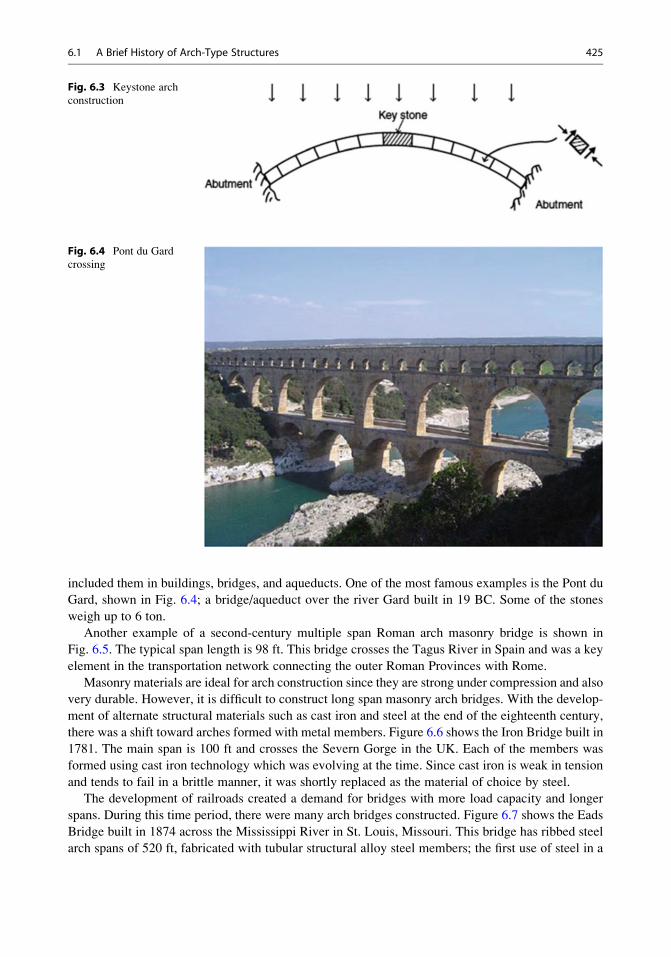
included them in buildings, bridges, and aqueducts. One of the most famous examples is the Pont du
Gard, shown in Fig. 6.4; a bridge/aqueduct over the river Gard built in 19 BC. Some of the stones
weigh up to 6 ton.
Another example of a second-century multiple span Roman arch masonry bridge is shown in
Fig. 6.5. The typical span length is 98 ft. This bridge crosses the Tagus River in Spain and was a key
element in the transportation network connecting the outer Roman Provinces with Rome.
Masonry materials are ideal for arch construction since they are strong under compression and also
very durable. However, it is difficult to construct long span masonry arch bridges. With the develop-
ment of alternate structural materials such as cast iron and steel at the end of the eighteenth century,
there was a shift toward arches formed with metal members. Figure 6.6 shows the Iron Bridge built in
1781. The main span is 100 ft and crosses the Severn Gorge in the UK. Each of the members was
formed using cast iron technology which was evolving at the time. Since cast iron is weak in tension
and tends to fail in a brittle manner, it was shortly replaced as the material of choice by steel.
The development of railroads created a demand for bridges with more load capacity and longer
spans. During this time period, there were many arch bridges constructed. Figure 6.7 shows the Eads
Bridge built in 1874 across the Mississippi River in St. Louis, Missouri. This bridge has ribbed steel
arch spans of 520 ft, fabricated with tubular structural alloy steel members; the first use of steel in a
Fig. 6.3 Keystone arch
construction
Fig. 6.4 Pont du Gard
crossing
6.1 A Brief History of Arch-Type Structures 425
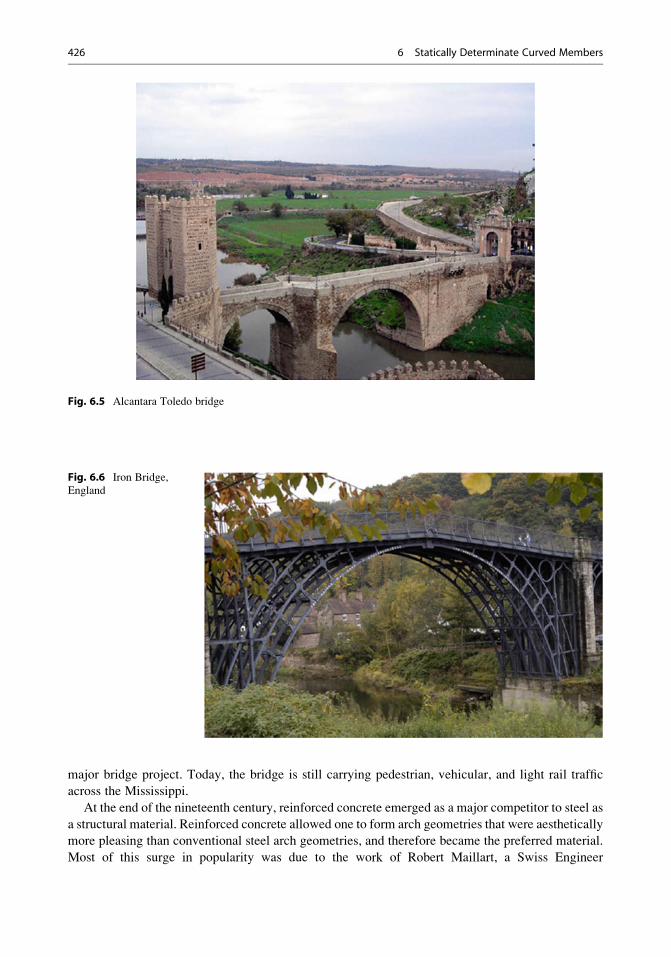
major bridge project. Today, the bridge is still carrying pedestrian, vehicular, and light rail traffic
across the Mississippi.
At the end of the nineteenth century, reinforced concrete emerged as a major competitor to steel as
a structural material. Reinforced concrete allowed one to form arch geometries that were aesthetically
more pleasing than conventional steel arch geometries, and therefore became the preferred material.
Most of this surge in popularity was due to the work of Robert Maillart, a Swiss Engineer
Fig. 6.5 Alcantara Toledo bridge
Fig. 6.6 Iron Bridge,
England
426 6 Statically Determinate Curved Members
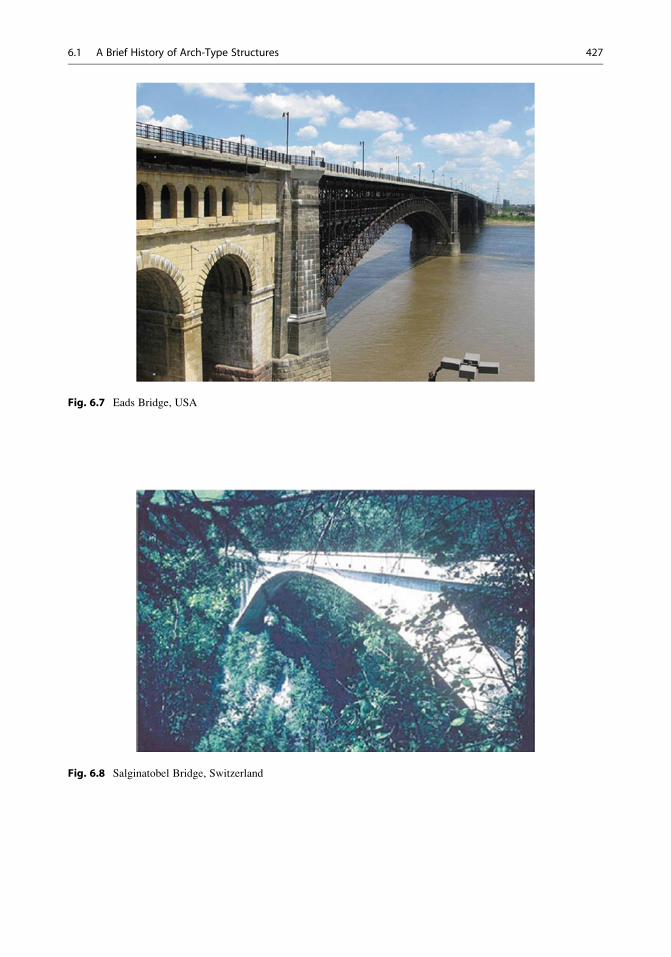
Fig. 6.7 Eads Bridge, USA
Fig. 6.8 Salginatobel Bridge, Switzerland
6.1 A Brief History of Arch-Type Structures 427
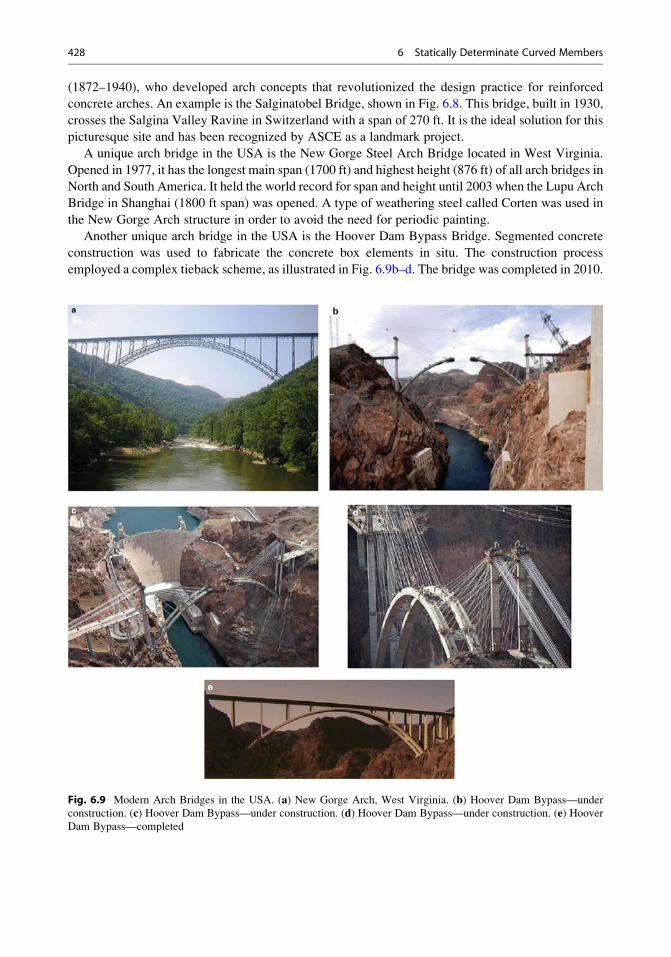
(1872–1940), who developed arch concepts that revolutionized the design practice for reinforced
concrete arches. An example is the Salginatobel Bridge, shown in Fig. 6.8. This bridge, built in 1930,
crosses the Salgina Valley Ravine in Switzerland with a span of 270 ft. It is the ideal solution for this
picturesque site and has been recognized by ASCE as a landmark project.
A unique arch bridge in the USA is the New Gorge Steel Arch Bridge located in West Virginia.
Opened in 1977, it has the longest main span (1700 ft) and highest height (876 ft) of all arch bridges in
North and South America. It held the world record for span and height until 2003 when the Lupu Arch
Bridge in Shanghai (1800 ft span) was opened. A type of weathering steel called Corten was used in
the New Gorge Arch structure in order to avoid the need for periodic painting.
Another unique arch bridge in the USA is the Hoover Dam Bypass Bridge. Segmented concrete
construction was used to fabricate the concrete box elements in situ. The construction process
employed a complex tieback scheme, as illustrated in Fig. 6.9b–d. The bridge was completed in 2010.
Fig. 6.9 Modern Arch Bridges in the USA. (a) New Gorge Arch, West Virginia. (b) Hoover Dam Bypass—under
construction. (c) Hoover Dam Bypass—under construction. (d) Hoover Dam Bypass—under construction. (e) HooverDam Bypass—completed
428 6 Statically Determinate Curved Members
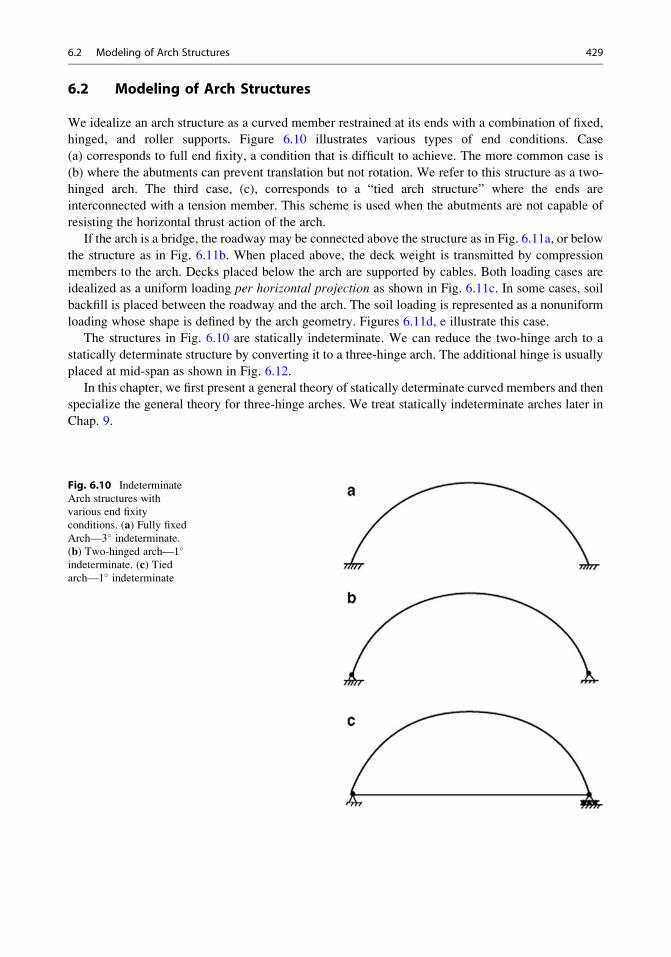
6.2 Modeling of Arch Structures
We idealize an arch structure as a curved member restrained at its ends with a combination of fixed,
hinged, and roller supports. Figure 6.10 illustrates various types of end conditions. Case
(a) corresponds to full end fixity, a condition that is difficult to achieve. The more common case is
(b) where the abutments can prevent translation but not rotation. We refer to this structure as a two-
hinged arch. The third case, (c), corresponds to a “tied arch structure” where the ends are
interconnected with a tension member. This scheme is used when the abutments are not capable of
resisting the horizontal thrust action of the arch.
If the arch is a bridge, the roadway may be connected above the structure as in Fig. 6.11a, or below
the structure as in Fig. 6.11b. When placed above, the deck weight is transmitted by compression
members to the arch. Decks placed below the arch are supported by cables. Both loading cases are
idealized as a uniform loading per horizontal projection as shown in Fig. 6.11c. In some cases, soil
backfill is placed between the roadway and the arch. The soil loading is represented as a nonuniform
loading whose shape is defined by the arch geometry. Figures 6.11d, e illustrate this case.
The structures in Fig. 6.10 are statically indeterminate. We can reduce the two-hinge arch to a
statically determinate structure by converting it to a three-hinge arch. The additional hinge is usually
placed at mid-span as shown in Fig. 6.12.
In this chapter, we first present a general theory of statically determinate curved members and then
specialize the general theory for three-hinge arches. We treat statically indeterminate arches later in
Chap. 9.
Fig. 6.10 Indeterminate
Arch structures with
various end fixity
conditions. (a) Fully fixed
Arch—3� indeterminate.
(b) Two-hinged arch—1�
indeterminate. (c) Tiedarch—1� indeterminate
6.2 Modeling of Arch Structures 429
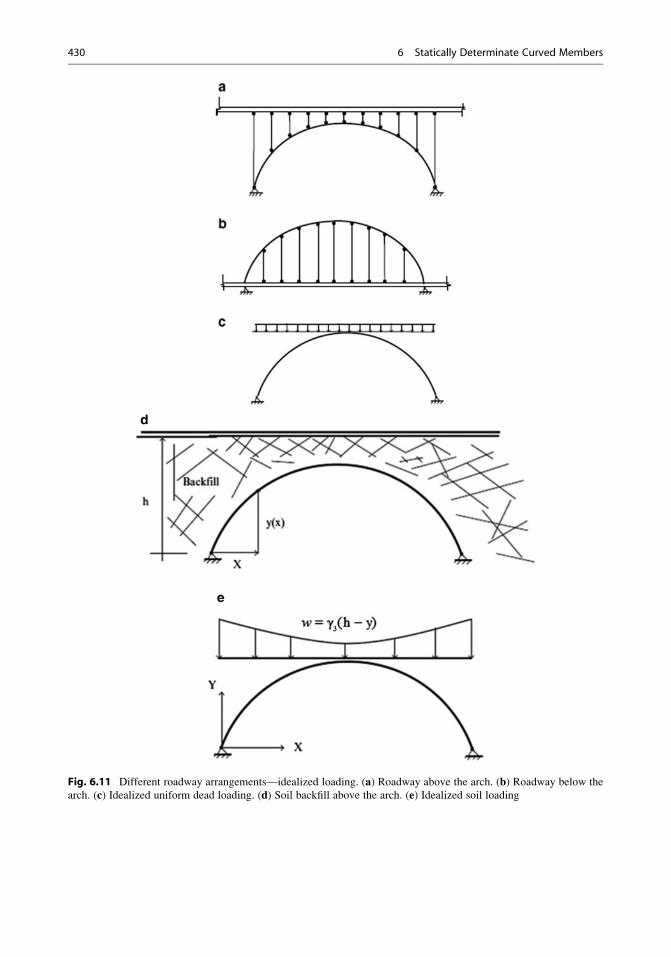
Fig. 6.11 Different roadway arrangements—idealized loading. (a) Roadway above the arch. (b) Roadway below the
arch. (c) Idealized uniform dead loading. (d) Soil backfill above the arch. (e) Idealized soil loading
430 6 Statically Determinate Curved Members
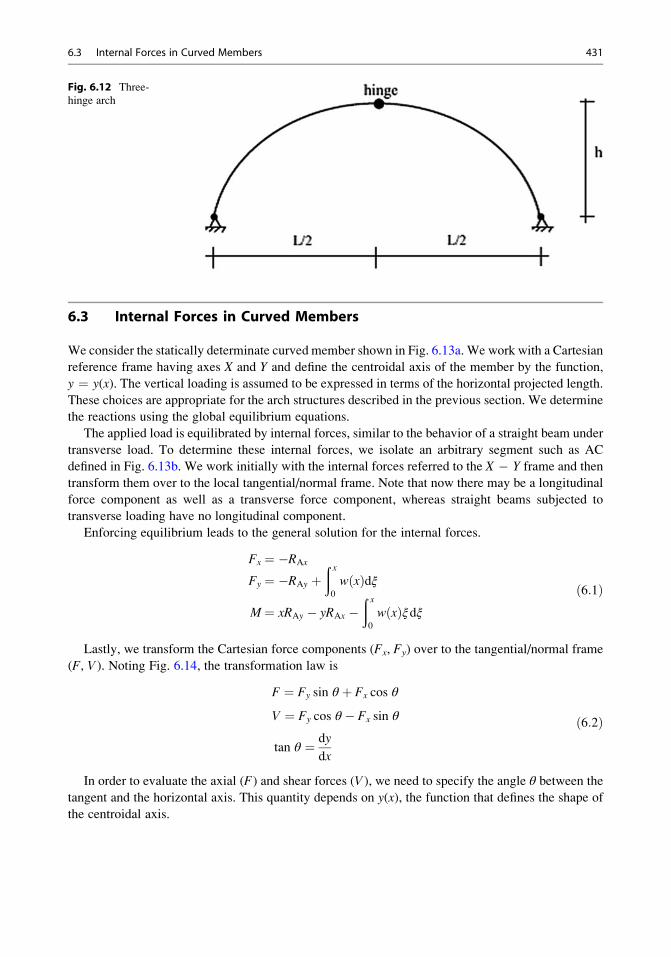
6.3 Internal Forces in Curved Members
We consider the statically determinate curved member shown in Fig. 6.13a. We work with a Cartesian
reference frame having axes X and Y and define the centroidal axis of the member by the function,
y ¼ y(x). The vertical loading is assumed to be expressed in terms of the horizontal projected length.
These choices are appropriate for the arch structures described in the previous section. We determine
the reactions using the global equilibrium equations.
The applied load is equilibrated by internal forces, similar to the behavior of a straight beam under
transverse load. To determine these internal forces, we isolate an arbitrary segment such as AC
defined in Fig. 6.13b. We work initially with the internal forces referred to the X � Y frame and then
transform them over to the local tangential/normal frame. Note that now there may be a longitudinal
force component as well as a transverse force component, whereas straight beams subjected to
transverse loading have no longitudinal component.
Enforcing equilibrium leads to the general solution for the internal forces.
Fx ¼ �RAx
Fy ¼ �RAy þð x0
w xð Þdξ
M¼ xRAy � yRAx �ð x0
w xð Þξdξð6:1Þ
Lastly, we transform the Cartesian force components (Fx, Fy) over to the tangential/normal frame
(F, V ). Noting Fig. 6.14, the transformation law is
F ¼ Fy sin θ þ Fx cos θ
V ¼ Fy cos θ � Fx sin θ
tan θ ¼ dy
dx
ð6:2Þ
In order to evaluate the axial (F) and shear forces (V ), we need to specify the angle θ between the
tangent and the horizontal axis. This quantity depends on y(x), the function that defines the shape of
the centroidal axis.
Fig. 6.12 Three-
hinge arch
6.3 Internal Forces in Curved Members 431
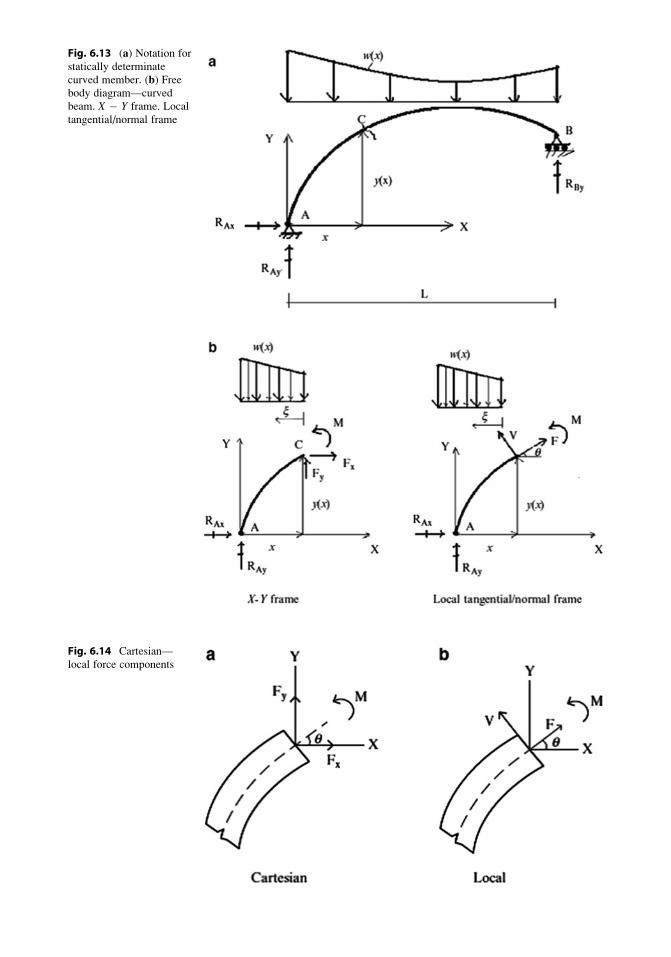
Fig. 6.13 (a) Notation for
statically determinate
curved member. (b) Freebody diagram—curved
beam. X � Y frame. Local
tangential/normal frame
Fig. 6.14 Cartesian—
local force components
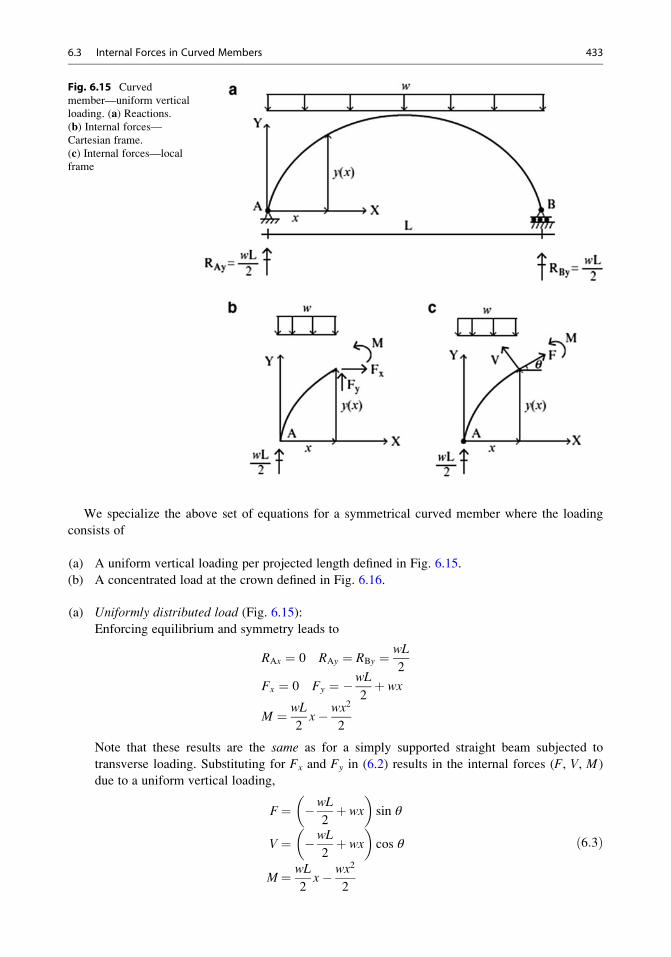
We specialize the above set of equations for a symmetrical curved member where the loading
consists of
(a) A uniform vertical loading per projected length defined in Fig. 6.15.
(b) A concentrated load at the crown defined in Fig. 6.16.
(a) Uniformly distributed load (Fig. 6.15):
Enforcing equilibrium and symmetry leads to
RAx ¼ 0 RAy ¼ RBy ¼ wL
2
Fx ¼ 0 Fy ¼ �wL
2þ wx
M ¼ wL
2x� wx2
2
Note that these results are the same as for a simply supported straight beam subjected to
transverse loading. Substituting for Fx and Fy in (6.2) results in the internal forces (F, V, M )
due to a uniform vertical loading,
F¼ �wL
2þ wx
� �sin θ
V ¼ �wL
2þ wx
� �cos θ
M¼ wL
2x� wx2
2
ð6:3Þ
Fig. 6.15 Curved
member—uniform vertical
loading. (a) Reactions.(b) Internal forces—Cartesian frame.
(c) Internal forces—local
frame
6.3 Internal Forces in Curved Members 433
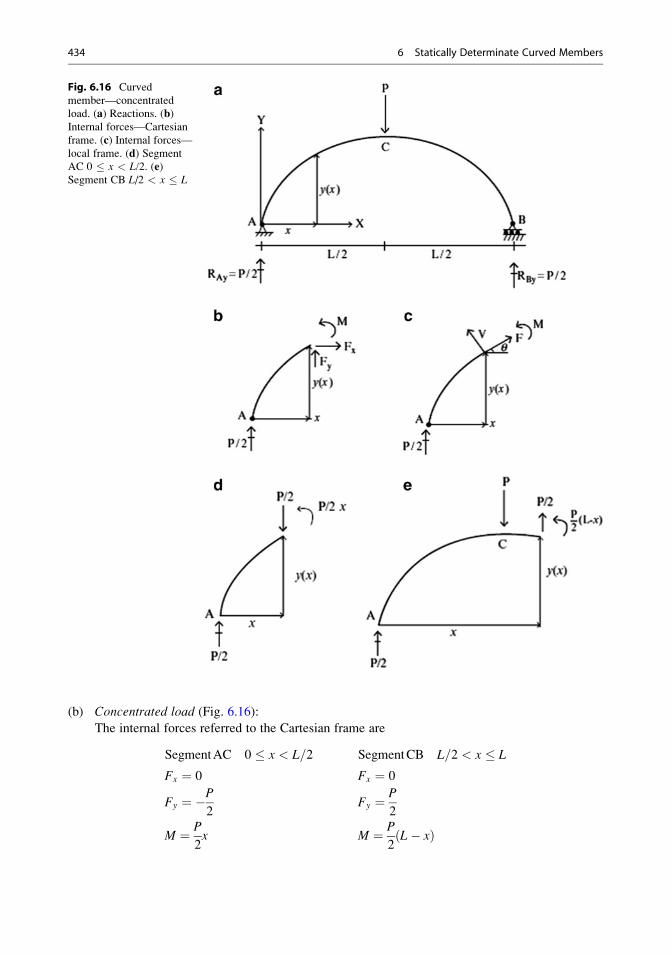
(b) Concentrated load (Fig. 6.16):
The internal forces referred to the Cartesian frame are
SegmentAC 0 � x < L=2 SegmentCB L=2 < x � L
Fx ¼ 0 Fx ¼ 0
Fy ¼ �P2
Fy ¼ P
2
M ¼ P
2x M ¼ P
2L� xð Þ
Fig. 6.16 Curved
member—concentrated
load. (a) Reactions. (b)Internal forces—Cartesian
frame. (c) Internal forces—local frame. (d) Segment
AC 0 � x < L/2. (e)Segment CB L/2 < x � L
434 6 Statically Determinate Curved Members
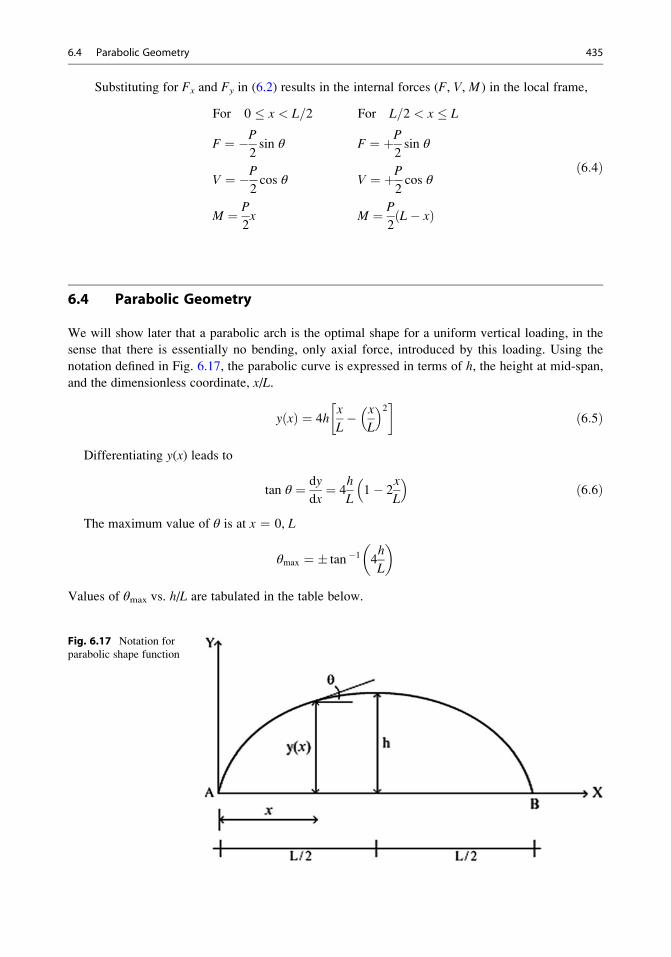
Substituting for Fx and Fy in (6.2) results in the internal forces (F, V, M ) in the local frame,
For 0 � x < L=2 For L=2 < x � L
F ¼ �P2sin θ F ¼ þP
2sin θ
V ¼ �P2cos θ V ¼ þP
2cos θ
M ¼ P
2x M ¼ P
2L� xð Þ
ð6:4Þ
6.4 Parabolic Geometry
We will show later that a parabolic arch is the optimal shape for a uniform vertical loading, in the
sense that there is essentially no bending, only axial force, introduced by this loading. Using the
notation defined in Fig. 6.17, the parabolic curve is expressed in terms of h, the height at mid-span,
and the dimensionless coordinate, x/L.
y xð Þ ¼ 4hx
L� x
L
� �2 �ð6:5Þ
Differentiating y(x) leads to
tan θ ¼ dy
dx¼ 4
h
L1� 2
x
L
� �ð6:6Þ
The maximum value of θ is at x ¼ 0, L
θmax ¼ � tan �1 4h
L
� �
Values of θmax vs. h/L are tabulated in the table below.
Fig. 6.17 Notation for
parabolic shape function
6.4 Parabolic Geometry 435

hL θmax(
�) tan θmax cos θmax sin θmax
0 0 0 1 0
0.01 2.3 0.04 0.999 0.04
0.025 5.7 0.1 0.995 0.099
0.05 11.3 0.2 0.98 0.196
0.1 21.8 0.4 0.93 0.37
0.15 30.9 0.6 0.86 0.51
0.2 38.6 0.8 0.78 0.62
0.25 45 1 0.7 0.7
0.3 50.2 1.2 0.64 0.77
0.35 54.4 1.4 0.58 81
0.4 58 1.6 0.53 0.85
0.45 60.9 1.8 0.48 0.87
0.5 63.4 2 0.45 0.89
The parameter h/L is a measure of the steepness of the curved member. Deep curved members
have h/L �0.25. A curved member is said to be shallow when h/L is small with respect to unity, on
the order of 0.1. The trigonometric measures for a shallow curved member are approximated by
shallowparaboliccurve
tan θ ¼ dy
dx� θ radð Þ
cos θ ¼ 1ffiffiffiffiffiffiffiffiffiffiffiffiffiffiffiffiffiffiffiffiffi1þ tan θ2
p � 1
sin θ ¼ tan θffiffiffiffiffiffiffiffiffiffiffiffiffiffiffiffiffiffiffiffiffi1þ tan θ2
p � tan θ � θ radð Þ
8>>>>>><>>>>>>:
ð6:7Þ
Example 6.1 Shallow vs. Deep Parabolic Curved Members
Given: The parabolic curved beam defined in Fig. E6.1a.
Determine: The axial, shear, and moment distributions for (a) h/L ¼ 0.1, (b) h/L ¼ 0.5.
Fig. E6.1a Parabolic geometry
436 6 Statically Determinate Curved Members
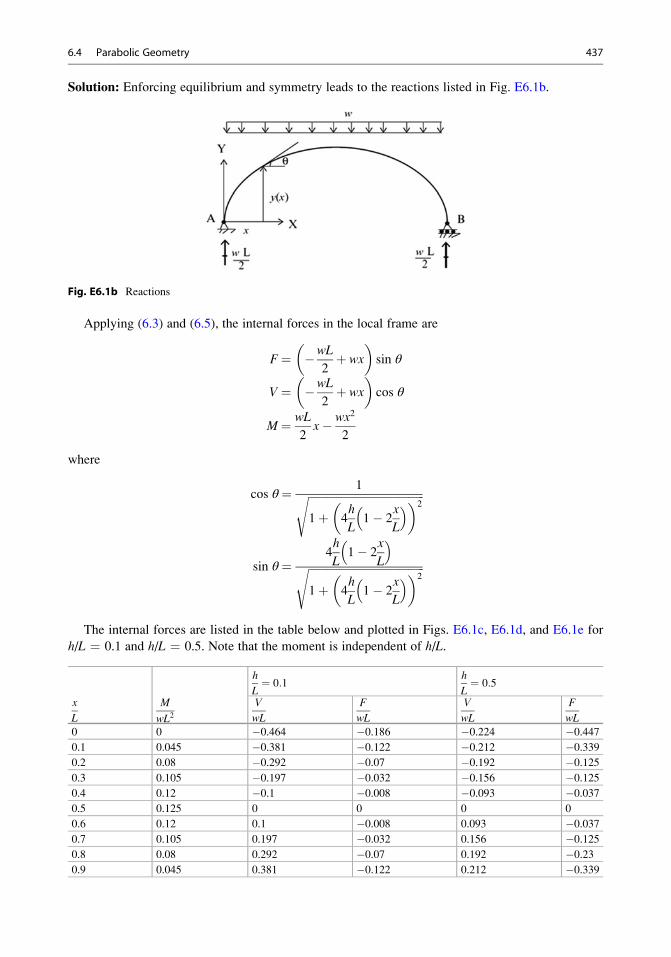
Solution: Enforcing equilibrium and symmetry leads to the reactions listed in Fig. E6.1b.
Fig. E6.1b Reactions
Applying (6.3) and (6.5), the internal forces in the local frame are
F¼ �wL
2þ wx
� �sin θ
V ¼ �wL
2þ wx
� �cos θ
M¼ wL
2x� wx2
2
where
cos θ¼ 1ffiffiffiffiffiffiffiffiffiffiffiffiffiffiffiffiffiffiffiffiffiffiffiffiffiffiffiffiffiffiffiffiffiffiffiffiffiffiffiffiffiffi1þ 4
h
L1� 2
x
L
� �� �2s
sin θ¼4h
L1� 2
x
L
� �ffiffiffiffiffiffiffiffiffiffiffiffiffiffiffiffiffiffiffiffiffiffiffiffiffiffiffiffiffiffiffiffiffiffiffiffiffiffiffiffiffiffi1þ 4
h
L1� 2
x
L
� �� �2s
The internal forces are listed in the table below and plotted in Figs. E6.1c, E6.1d, and E6.1e for
h/L ¼ 0.1 and h/L ¼ 0.5. Note that the moment is independent of h/L.
x
L
M
wL2
h
L¼ 0:1
h
L¼ 0:5
V
wL
F
wL
V
wL
F
wL0 0 �0.464 �0.186 �0.224 �0.4470.1 0.045 �0.381 �0.122 �0.212 �0.3390.2 0.08 �0.292 �0.07 �0.192 �0.1250.3 0.105 �0.197 �0.032 �0.156 �0.1250.4 0.12 �0.1 �0.008 �0.093 �0.0370.5 0.125 0 0 0 0
0.6 0.12 0.1 �0.008 0.093 �0.0370.7 0.105 0.197 �0.032 0.156 �0.1250.8 0.08 0.292 �0.07 0.192 �0.230.9 0.045 0.381 �0.122 0.212 �0.339
6.4 Parabolic Geometry 437
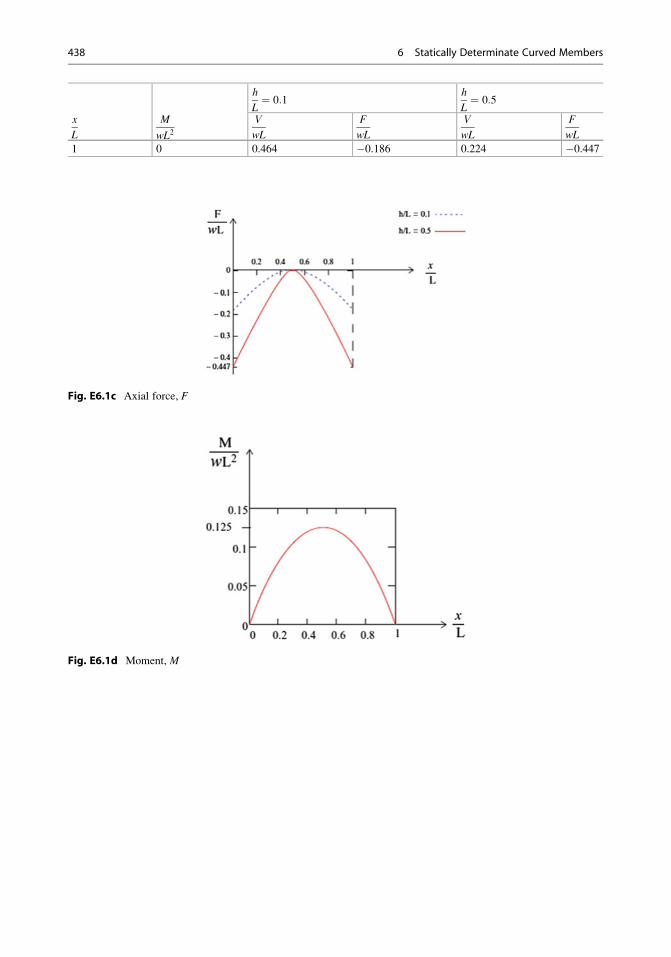
x
L
M
wL2
h
L¼ 0:1
h
L¼ 0:5
V
wL
F
wL
V
wL
F
wL1 0 0.464 �0.186 0.224 �0.447
Fig. E6.1c Axial force, F
Fig. E6.1d Moment, M
438 6 Statically Determinate Curved Members
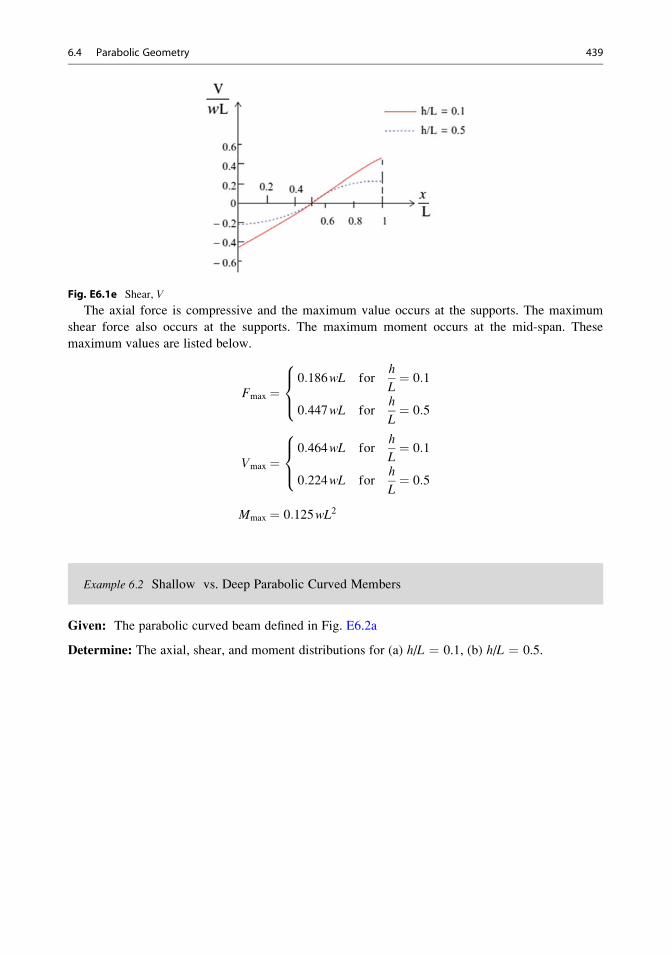
Fig. E6.1e Shear, V
The axial force is compressive and the maximum value occurs at the supports. The maximum
shear force also occurs at the supports. The maximum moment occurs at the mid-span. These
maximum values are listed below.
Fmax ¼0:186wL for
h
L¼ 0:1
0:447wL forh
L¼ 0:5
8><>:
Vmax ¼0:464wL for
h
L¼ 0:1
0:224wL forh
L¼ 0:5
8><>:
Mmax ¼ 0:125wL2
Example 6.2 Shallow vs. Deep Parabolic Curved Members
Given: The parabolic curved beam defined in Fig. E6.2a
Determine: The axial, shear, and moment distributions for (a) h/L ¼ 0.1, (b) h/L ¼ 0.5.
6.4 Parabolic Geometry 439
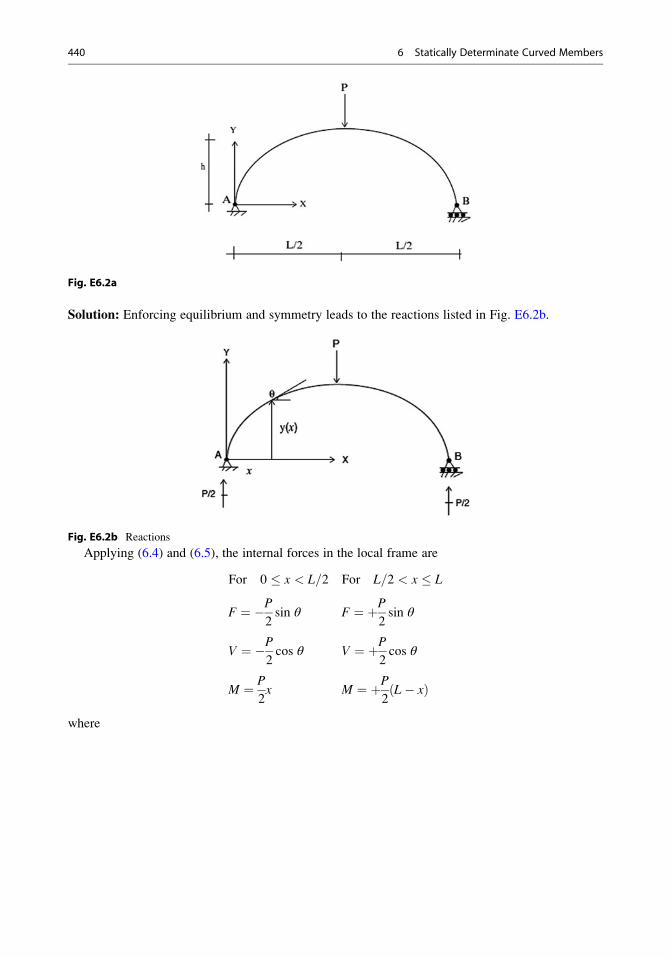
Fig. E6.2a
Solution: Enforcing equilibrium and symmetry leads to the reactions listed in Fig. E6.2b.
Fig. E6.2b Reactions
Applying (6.4) and (6.5), the internal forces in the local frame are
For 0 � x < L=2 For L=2 < x � L
F ¼ �P2sin θ F ¼ þP
2sin θ
V ¼ �P2cos θ V ¼ þP
2cos θ
M ¼ P
2x M ¼ þP
2L� xð Þ
where
440 6 Statically Determinate Curved Members
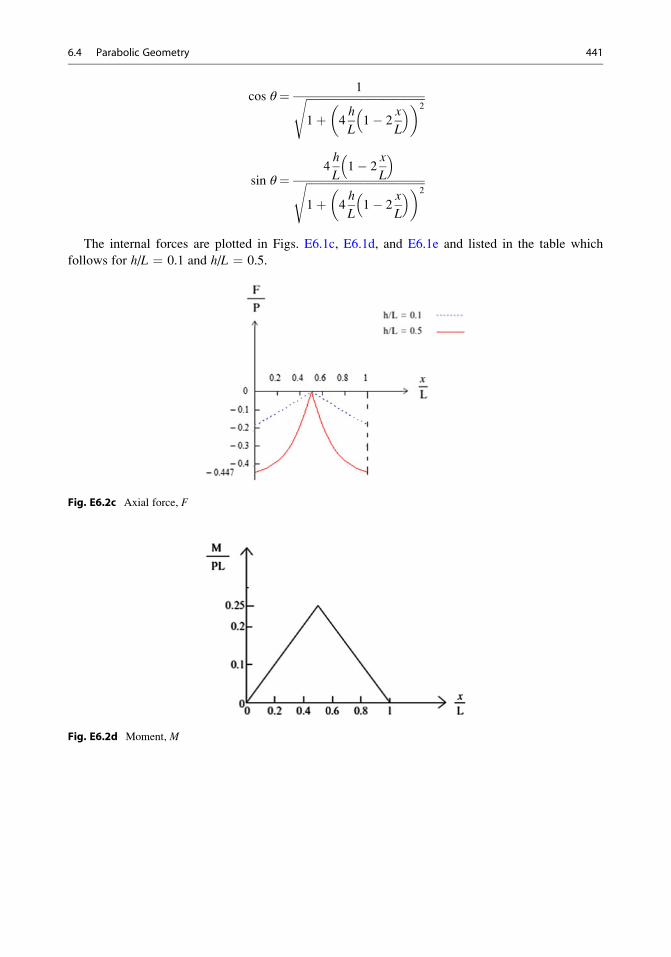
cos θ¼ 1ffiffiffiffiffiffiffiffiffiffiffiffiffiffiffiffiffiffiffiffiffiffiffiffiffiffiffiffiffiffiffiffiffiffiffiffiffiffiffiffiffiffiffi1þ 4
h
L1� 2
x
L
� �� �2s
sin θ¼4h
L1� 2
x
L
� �ffiffiffiffiffiffiffiffiffiffiffiffiffiffiffiffiffiffiffiffiffiffiffiffiffiffiffiffiffiffiffiffiffiffiffiffiffiffiffiffiffiffiffi1þ 4
h
L1� 2
x
L
� �� �2s
The internal forces are plotted in Figs. E6.1c, E6.1d, and E6.1e and listed in the table which
follows for h/L ¼ 0.1 and h/L ¼ 0.5.
Fig. E6.2c Axial force, F
Fig. E6.2d Moment, M
6.4 Parabolic Geometry 441
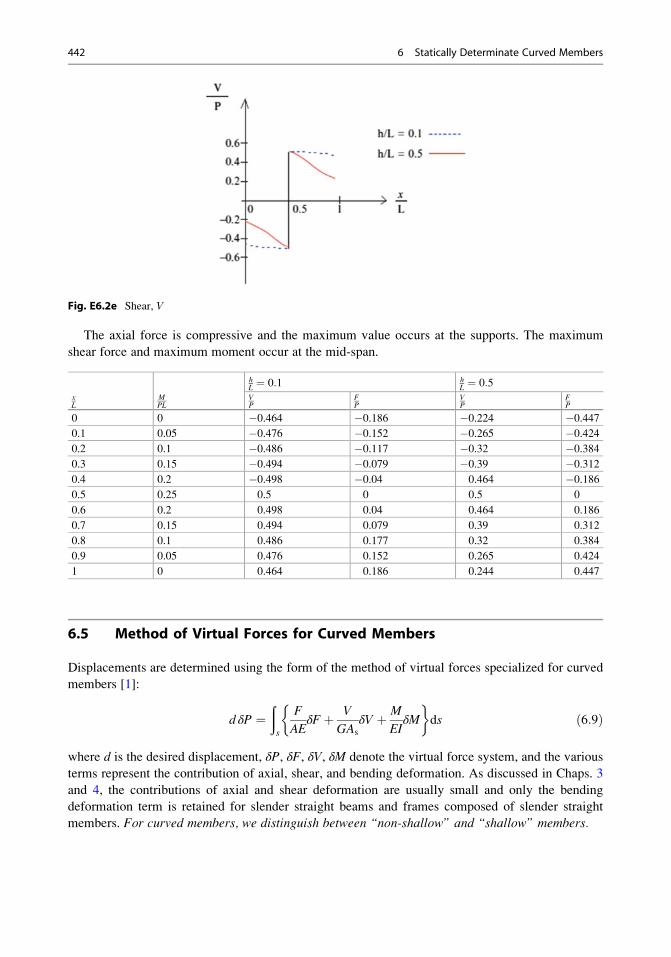
Fig. E6.2e Shear, V
The axial force is compressive and the maximum value occurs at the supports. The maximum
shear force and maximum moment occur at the mid-span.
xL
MPL
hL ¼ 0:1 h
L ¼ 0:5VP
FP
VP
FP
0 0 �0.464 �0.186 �0.224 �0.4470.1 0.05 �0.476 �0.152 �0.265 �0.4240.2 0.1 �0.486 �0.117 �0.32 �0.3840.3 0.15 �0.494 �0.079 �0.39 �0.3120.4 0.2 �0.498 �0.04 0.464 �0.1860.5 0.25 0.5 0 0.5 0
0.6 0.2 0.498 0.04 0.464 0.186
0.7 0.15 0.494 0.079 0.39 0.312
0.8 0.1 0.486 0.177 0.32 0.384
0.9 0.05 0.476 0.152 0.265 0.424
1 0 0.464 0.186 0.244 0.447
6.5 Method of Virtual Forces for Curved Members
Displacements are determined using the form of the method of virtual forces specialized for curved
members [1]:
d δP ¼ðs
F
AEδFþ V
GAs
δV þ M
EIδM
�ds ð6:9Þ
where d is the desired displacement, δP, δF, δV, δM denote the virtual force system, and the various
terms represent the contribution of axial, shear, and bending deformation. As discussed in Chaps. 3
and 4, the contributions of axial and shear deformation are usually small and only the bending
deformation term is retained for slender straight beams and frames composed of slender straight
members. For curved members, we distinguish between “non-shallow” and “shallow” members.
442 6 Statically Determinate Curved Members
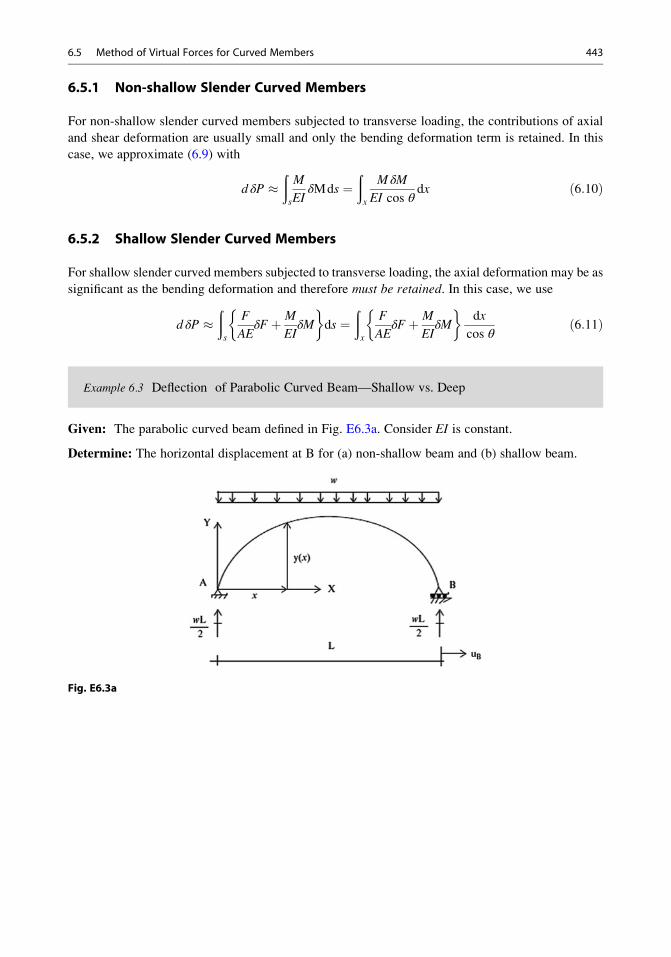
6.5.1 Non-shallow Slender Curved Members
For non-shallow slender curved members subjected to transverse loading, the contributions of axial
and shear deformation are usually small and only the bending deformation term is retained. In this
case, we approximate (6.9) with
d δP �ðs
M
EIδMds ¼
ðx
M δM
EI cos θdx ð6:10Þ
6.5.2 Shallow Slender Curved Members
For shallow slender curved members subjected to transverse loading, the axial deformation may be as
significant as the bending deformation and therefore must be retained. In this case, we use
d δP �ðs
F
AEδFþ M
EIδM
�ds ¼
ðx
F
AEδFþ M
EIδM
�dx
cos θð6:11Þ
Example 6.3 Deflection of Parabolic Curved Beam—Shallow vs. Deep
Given: The parabolic curved beam defined in Fig. E6.3a. Consider EI is constant.
Determine: The horizontal displacement at B for (a) non-shallow beam and (b) shallow beam.
Fig. E6.3a
6.5 Method of Virtual Forces for Curved Members 443
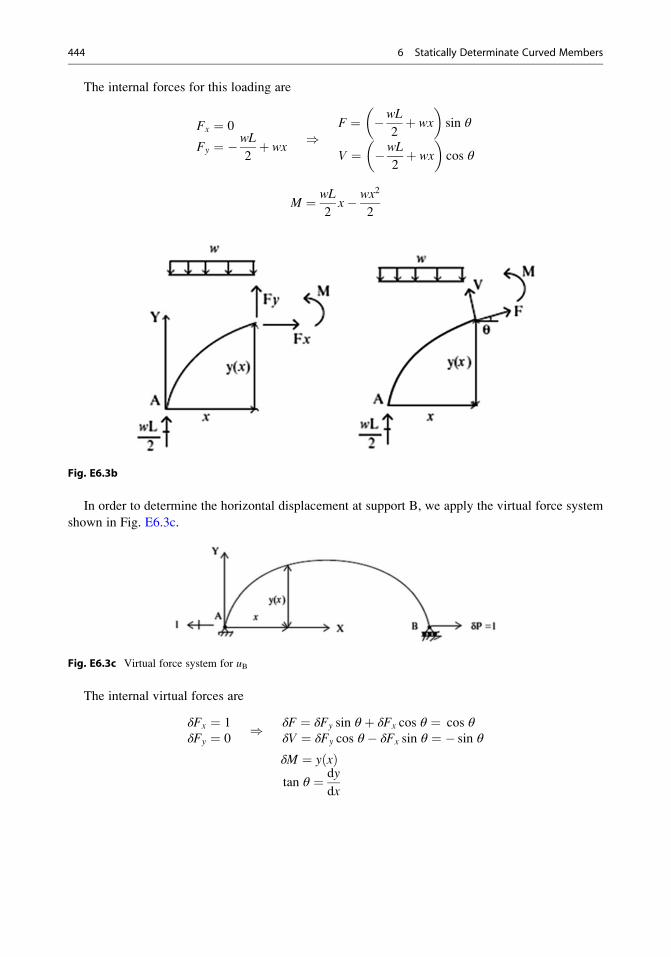
The internal forces for this loading are
Fx ¼ 0
Fy ¼ �wL
2þ wx
)F ¼ �wL
2þ wx
� �sin θ
V ¼ �wL
2þ wx
� �cos θ
M ¼ wL
2x� wx2
2
Fig. E6.3b
In order to determine the horizontal displacement at support B, we apply the virtual force system
shown in Fig. E6.3c.
Fig. E6.3c Virtual force system for uB
The internal virtual forces are
δFx ¼ 1
δFy ¼ 0) δF ¼ δFy sin θ þ δFx cos θ ¼ cos θ
δV ¼ δFy cos θ � δFx sin θ ¼ � sin θ
δM ¼ y xð Þtan θ ¼ dy
dx
444 6 Statically Determinate Curved Members
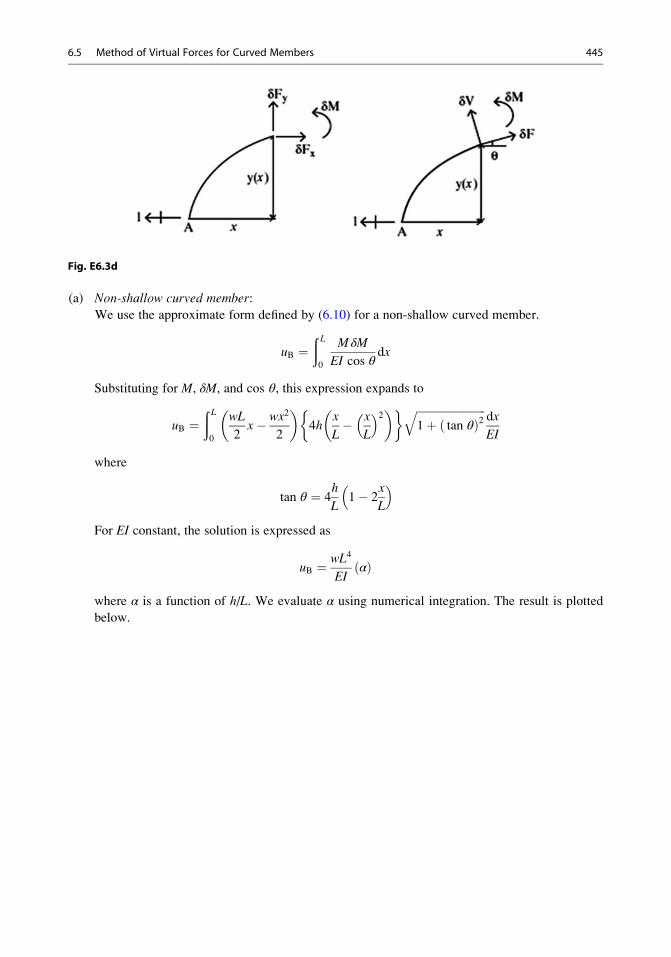
Fig. E6.3d
(a) Non-shallow curved member:
We use the approximate form defined by (6.10) for a non-shallow curved member.
uB ¼ð L0
M δM
EI cos θdx
Substituting for M, δM, and cos θ, this expression expands to
uB ¼ð L0
wL
2x� wx2
2
� �4h
x
L� x
L
� �2� � � ffiffiffiffiffiffiffiffiffiffiffiffiffiffiffiffiffiffiffiffiffiffiffiffiffi1þ tan θð Þ2
qdx
EI
where
tan θ ¼ 4h
L1� 2
x
L
� �For EI constant, the solution is expressed as
uB ¼ wL4
EIαð Þ
where α is a function of h/L. We evaluate α using numerical integration. The result is plotted
below.
6.5 Method of Virtual Forces for Curved Members 445
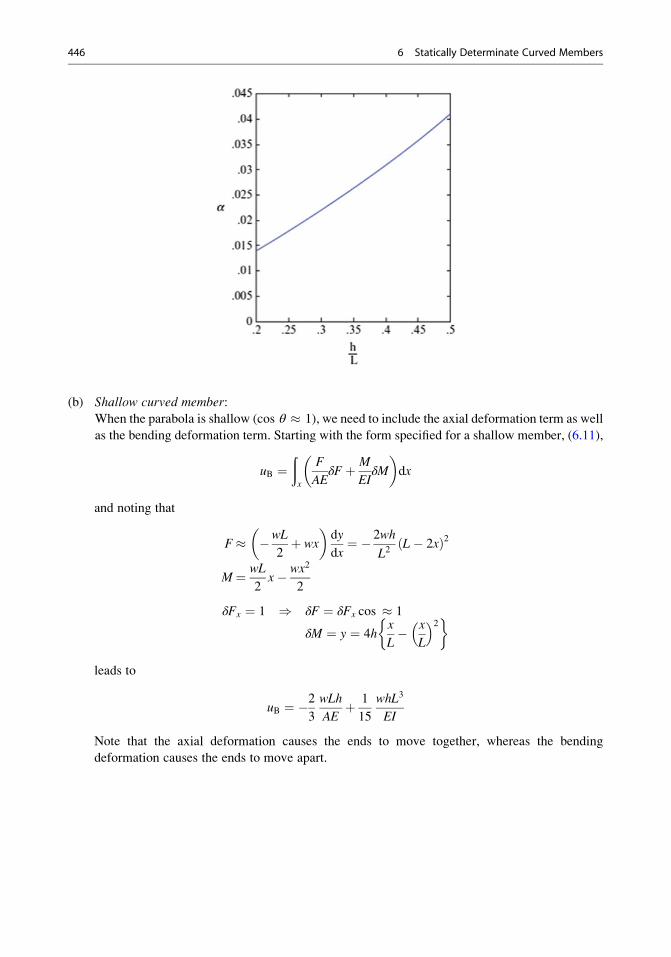
(b) Shallow curved member:
When the parabola is shallow (cos θ � 1), we need to include the axial deformation term as well
as the bending deformation term. Starting with the form specified for a shallow member, (6.11),
uB ¼ðx
F
AEδFþ M
EIδM
� �dx
and noting that
F� �wL
2þ wx
� �dy
dx¼ � 2wh
L2L� 2xð Þ2
M¼ wL
2x� wx2
2
δFx ¼ 1 ) δF ¼ δFx cos � 1
δM ¼ y ¼ 4hx
L� x
L
� �2 �
leads to
uB ¼ �23
wLh
AEþ 1
15
whL3
EI
Note that the axial deformation causes the ends to move together, whereas the bending
deformation causes the ends to move apart.
446 6 Statically Determinate Curved Members
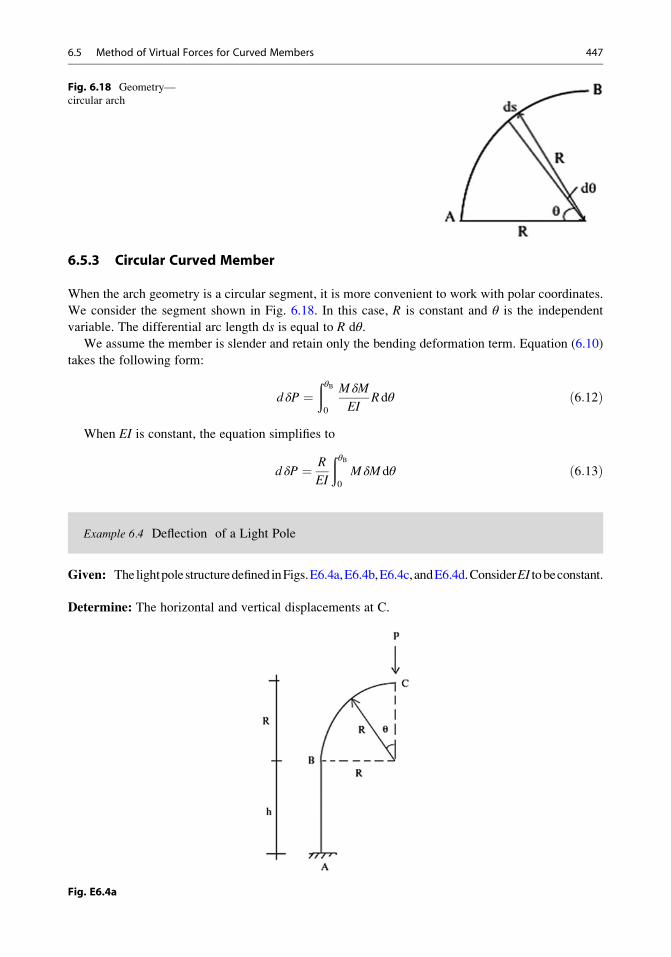
6.5.3 Circular Curved Member
When the arch geometry is a circular segment, it is more convenient to work with polar coordinates.
We consider the segment shown in Fig. 6.18. In this case, R is constant and θ is the independent
variable. The differential arc length ds is equal to R dθ.We assume the member is slender and retain only the bending deformation term. Equation (6.10)
takes the following form:
d δP ¼ðθB0
M δM
EIRdθ ð6:12Þ
When EI is constant, the equation simplifies to
d δP ¼ R
EI
ðθB0
M δMdθ ð6:13Þ
Example 6.4 Deflection of a Light Pole
Given: ThelightpolestructuredefinedinFigs.E6.4a,E6.4b,E6.4c,andE6.4d.ConsiderEI tobeconstant.
Determine: The horizontal and vertical displacements at C.
Fig. E6.4a
Fig. 6.18 Geometry—
circular arch
6.5 Method of Virtual Forces for Curved Members 447
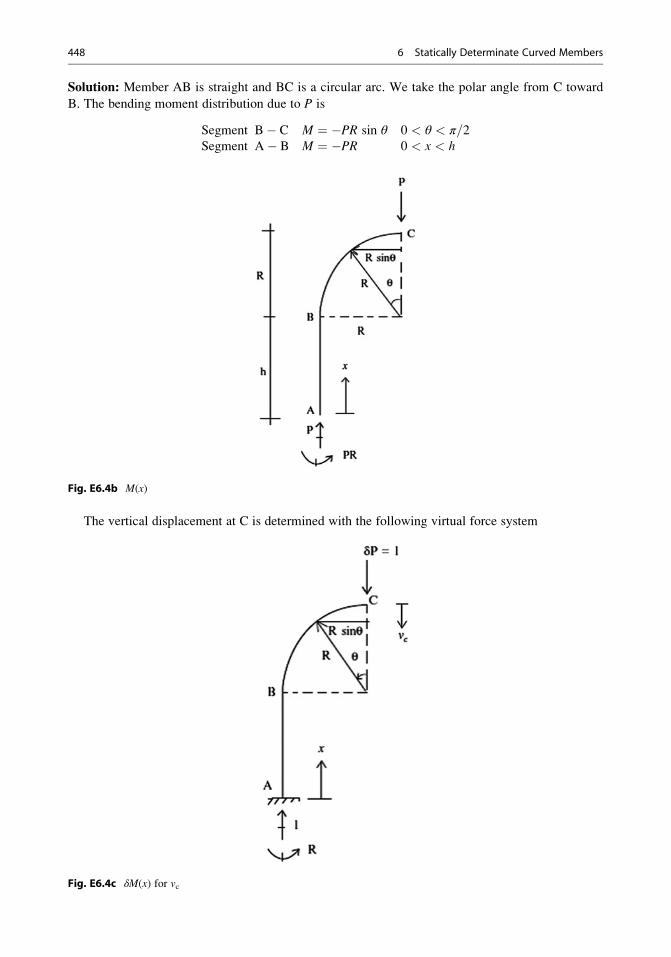
Solution: Member AB is straight and BC is a circular arc. We take the polar angle from C toward
B. The bending moment distribution due to P is
Segment B� C M ¼ �PR sin θ 0 < θ < π=2Segment A� B M ¼ �PR 0 < x < h
Fig. E6.4b M(x)
The vertical displacement at C is determined with the following virtual force system
Fig. E6.4c δM(x) for vc
448 6 Statically Determinate Curved Members
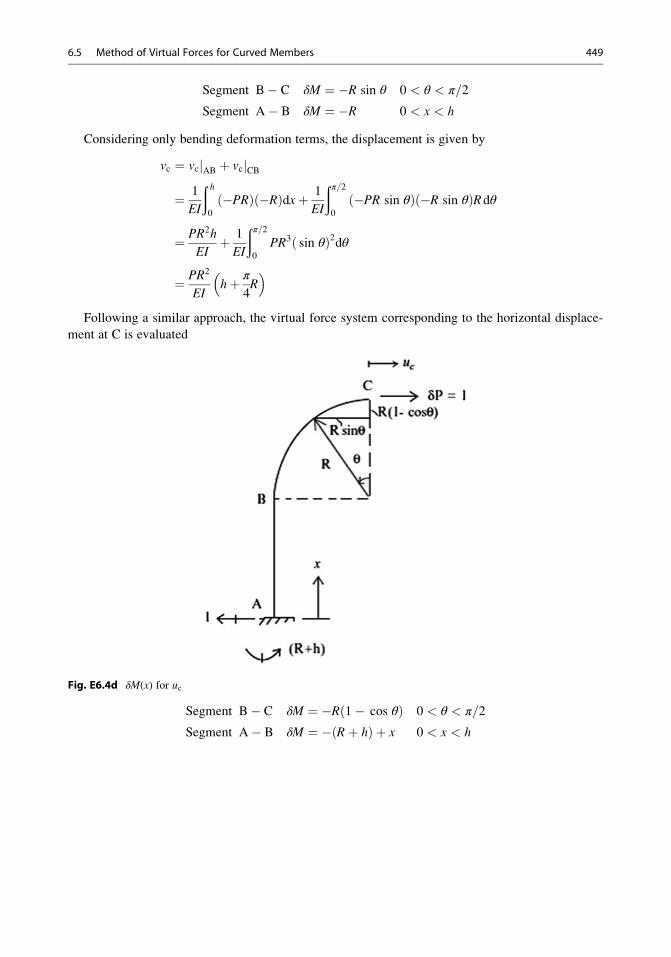
Segment B� C δM ¼ �R sin θ 0 < θ < π=2
Segment A� B δM ¼ �R 0 < x < h
Considering only bending deformation terms, the displacement is given by
vc ¼ vcjAB þ vcjCB
¼ 1
EI
ð h0
�PRð Þ �Rð Þdxþ 1
EI
ðπ=20
�PR sin θð Þ �R sin θð ÞRdθ
¼ PR2h
EIþ 1
EI
ðπ=20
PR3 sin θð Þ2dθ
¼ PR2
EIhþ π
4R
� �Following a similar approach, the virtual force system corresponding to the horizontal displace-
ment at C is evaluated
Fig. E6.4d δM(x) for uc
Segment B� C δM ¼ �R 1� cos θð Þ 0 < θ < π=2
Segment A� B δM ¼ � Rþ hð Þ þ x 0 < x < h
6.5 Method of Virtual Forces for Curved Members 449
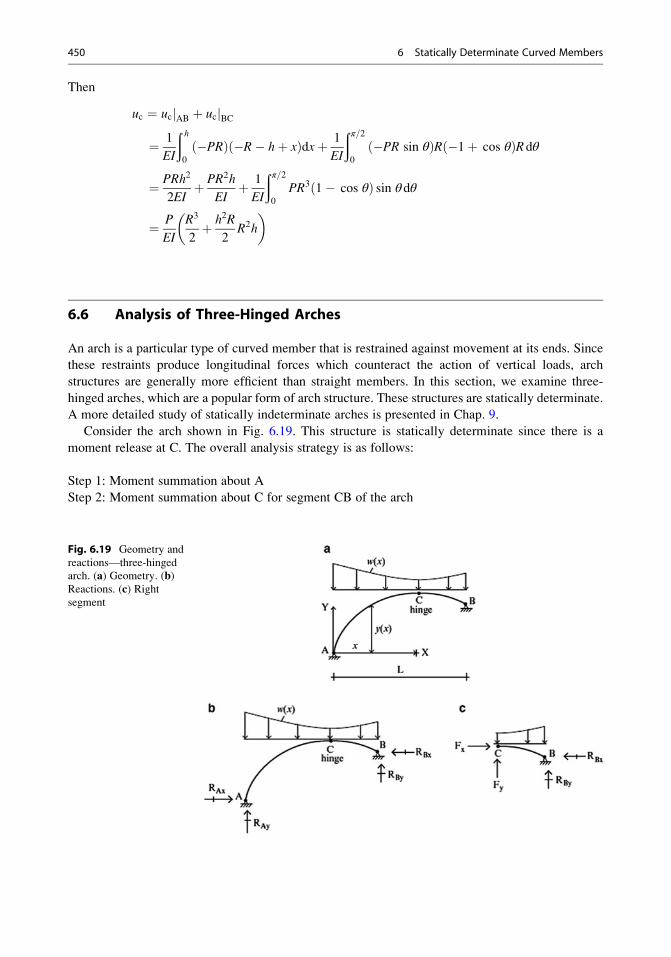
Then
uc ¼ ucjAB þ ucjBC
¼ 1
EI
ð h0
�PRð Þ �R� hþ xð Þdxþ 1
EI
ðπ=20
�PR sin θð ÞR �1þ cos θð ÞRdθ
¼ PRh2
2EIþ PR2h
EIþ 1
EI
ðπ=20
PR3 1� cos θð Þ sin θdθ
¼ P
EI
R3
2þ h2R
2R2h
� �
6.6 Analysis of Three-Hinged Arches
An arch is a particular type of curved member that is restrained against movement at its ends. Since
these restraints produce longitudinal forces which counteract the action of vertical loads, arch
structures are generally more efficient than straight members. In this section, we examine three-
hinged arches, which are a popular form of arch structure. These structures are statically determinate.
A more detailed study of statically indeterminate arches is presented in Chap. 9.
Consider the arch shown in Fig. 6.19. This structure is statically determinate since there is a
moment release at C. The overall analysis strategy is as follows:
Step 1: Moment summation about A
Step 2: Moment summation about C for segment CB of the arch
Fig. 6.19 Geometry and
reactions—three-hinged
arch. (a) Geometry. (b)Reactions. (c) Rightsegment
450 6 Statically Determinate Curved Members
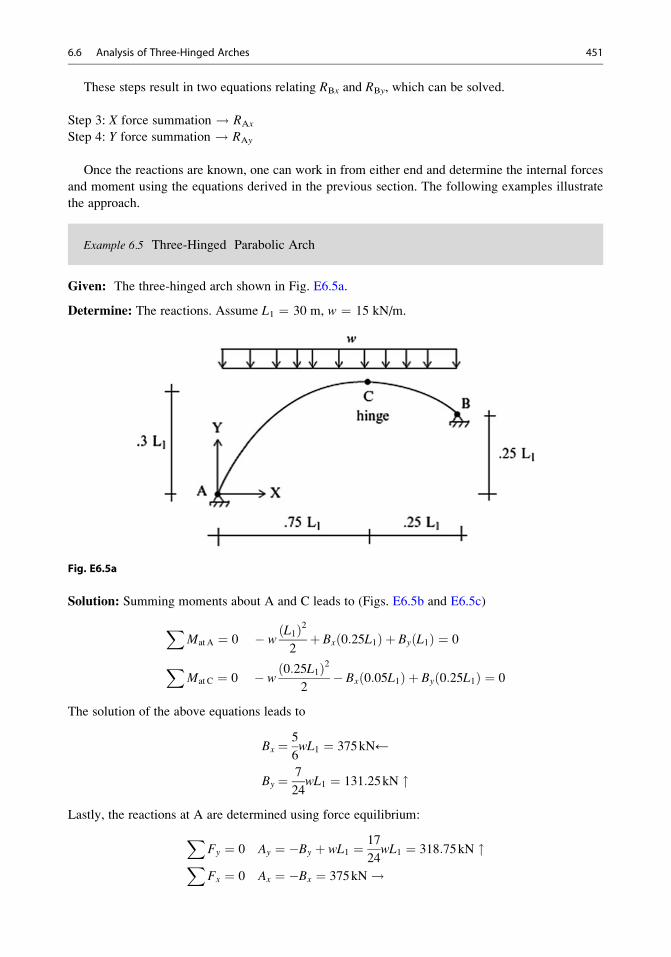
These steps result in two equations relating RBx and RBy, which can be solved.
Step 3: X force summation ! RAx
Step 4: Y force summation ! RAy
Once the reactions are known, one can work in from either end and determine the internal forces
and moment using the equations derived in the previous section. The following examples illustrate
the approach.
Example 6.5 Three-Hinged Parabolic Arch
Given: The three-hinged arch shown in Fig. E6.5a.
Determine: The reactions. Assume L1 ¼ 30 m, w ¼ 15 kN/m.
Fig. E6.5a
Solution: Summing moments about A and C leads to (Figs. E6.5b and E6.5c)
XMat A ¼ 0 � w
L1ð Þ22þ Bx 0:25L1ð Þ þ By L1ð Þ ¼ 0
XMat C ¼ 0 � w
0:25L1ð Þ22
� Bx 0:05L1ð Þ þ By 0:25L1ð Þ ¼ 0
The solution of the above equations leads to
Bx ¼ 5
6wL1 ¼ 375kN←
By ¼ 7
24wL1 ¼ 131:25kN "
Lastly, the reactions at A are determined using force equilibrium:
XFy ¼ 0 Ay ¼ �By þ wL1 ¼ 17
24wL1 ¼ 318:75kN "X
Fx ¼ 0 Ax ¼ �Bx ¼ 375kN!
6.6 Analysis of Three-Hinged Arches 451
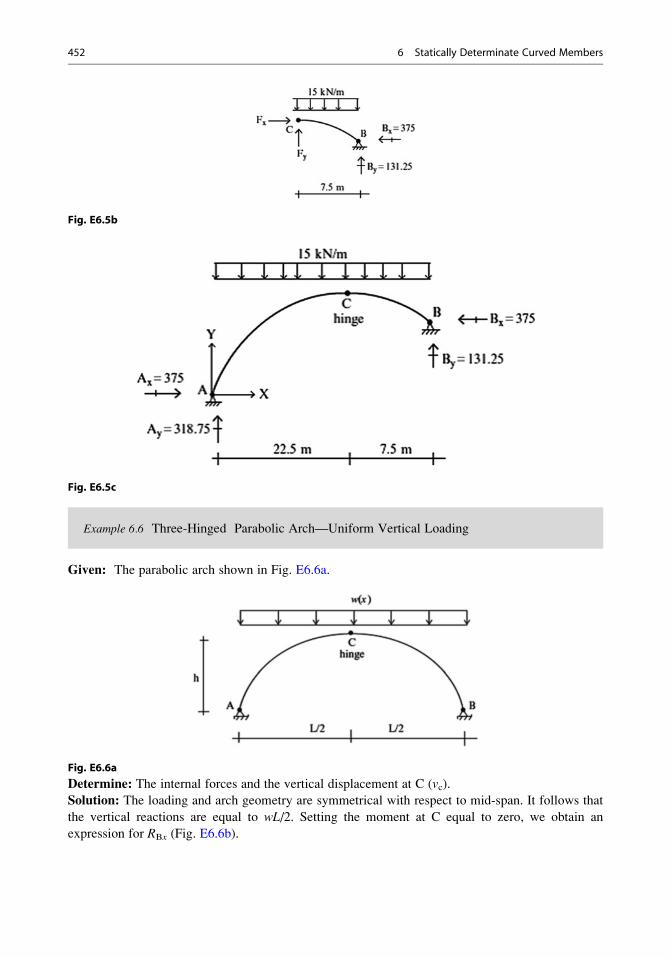
Fig. E6.5b
Fig. E6.5c
Example 6.6 Three-Hinged Parabolic Arch—Uniform Vertical Loading
Given: The parabolic arch shown in Fig. E6.6a.
Fig. E6.6a
Determine: The internal forces and the vertical displacement at C (vc).Solution: The loading and arch geometry are symmetrical with respect to mid-span. It follows that
the vertical reactions are equal to wL/2. Setting the moment at C equal to zero, we obtain an
expression for RBx (Fig. E6.6b).
452 6 Statically Determinate Curved Members
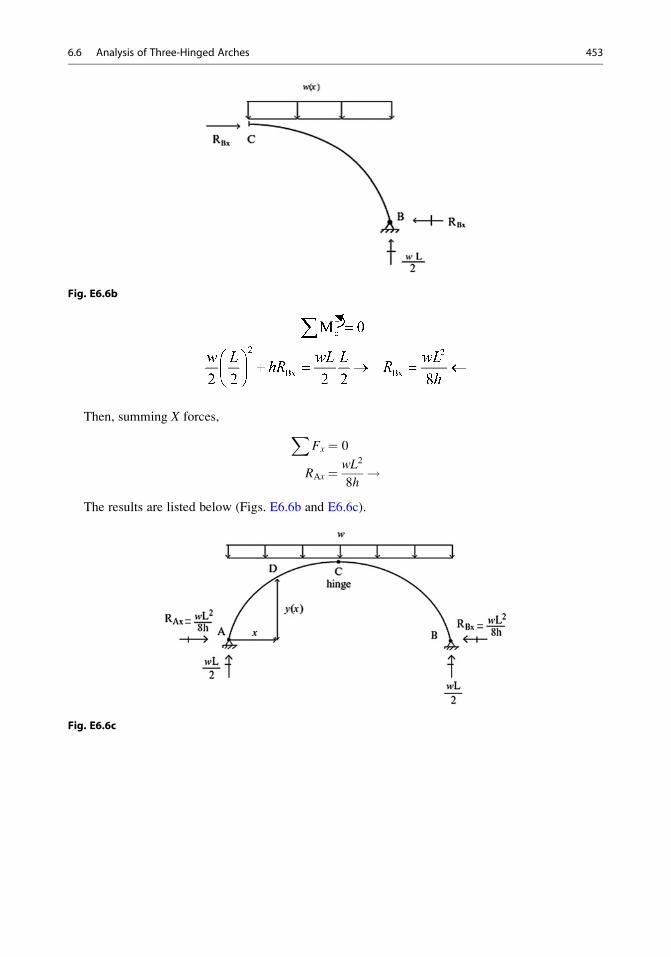
Fig. E6.6b
Then, summing X forces, XFx ¼ 0
RAx ¼ wL2
8h!
The results are listed below (Figs. E6.6b and E6.6c).
Fig. E6.6c
6.6 Analysis of Three-Hinged Arches 453
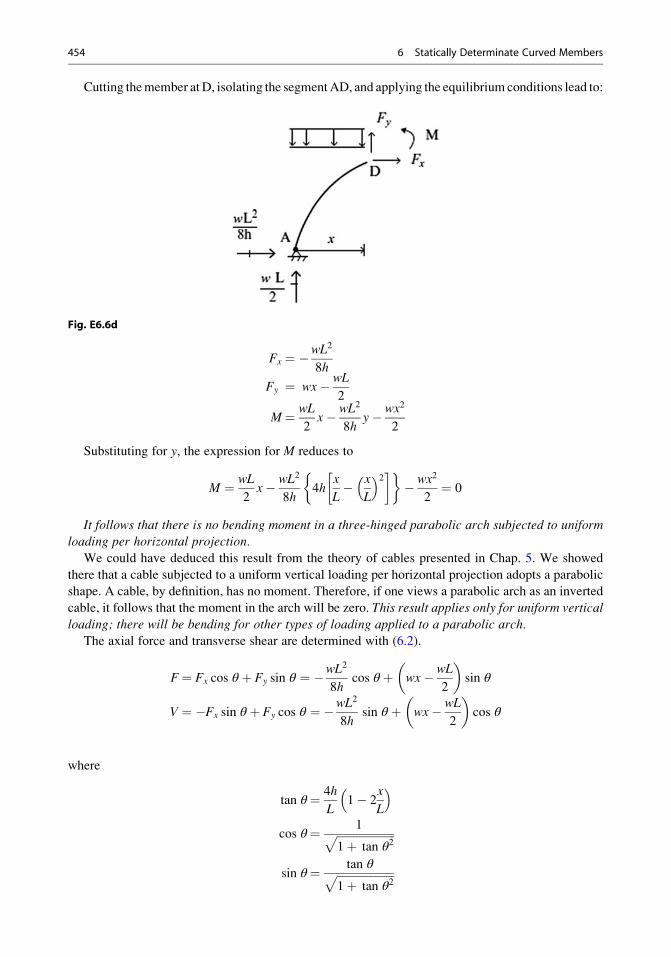
Cutting themember atD, isolating the segmentAD, and applying the equilibrium conditions lead to:
Fig. E6.6d
Fx ¼ �wL2
8h
Fy ¼ wx� wL
2
M¼ wL
2x� wL2
8hy� wx2
2
Substituting for y, the expression for M reduces to
M ¼ wL
2x� wL2
8h4h
x
L� x
L
� �2 � �� wx2
2¼ 0
It follows that there is no bending moment in a three-hinged parabolic arch subjected to uniformloading per horizontal projection.
We could have deduced this result from the theory of cables presented in Chap. 5. We showed
there that a cable subjected to a uniform vertical loading per horizontal projection adopts a parabolic
shape. A cable, by definition, has no moment. Therefore, if one views a parabolic arch as an inverted
cable, it follows that the moment in the arch will be zero. This result applies only for uniform vertical
loading; there will be bending for other types of loading applied to a parabolic arch.The axial force and transverse shear are determined with (6.2).
F¼ Fx cos θ þ Fy sin θ ¼ �wL2
8hcos θ þ wx� wL
2
� �sin θ
V ¼ �Fx sin θ þ Fy cos θ ¼ �wL2
8hsin θ þ wx� wL
2
� �cos θ
where
tan θ¼ 4h
L1� 2
x
L
� �cos θ¼ 1ffiffiffiffiffiffiffiffiffiffiffiffiffiffiffiffiffiffiffiffiffi
1þ tan θ2p
sin θ¼ tan θffiffiffiffiffiffiffiffiffiffiffiffiffiffiffiffiffiffiffiffiffi1þ tan θ2
p
454 6 Statically Determinate Curved Members
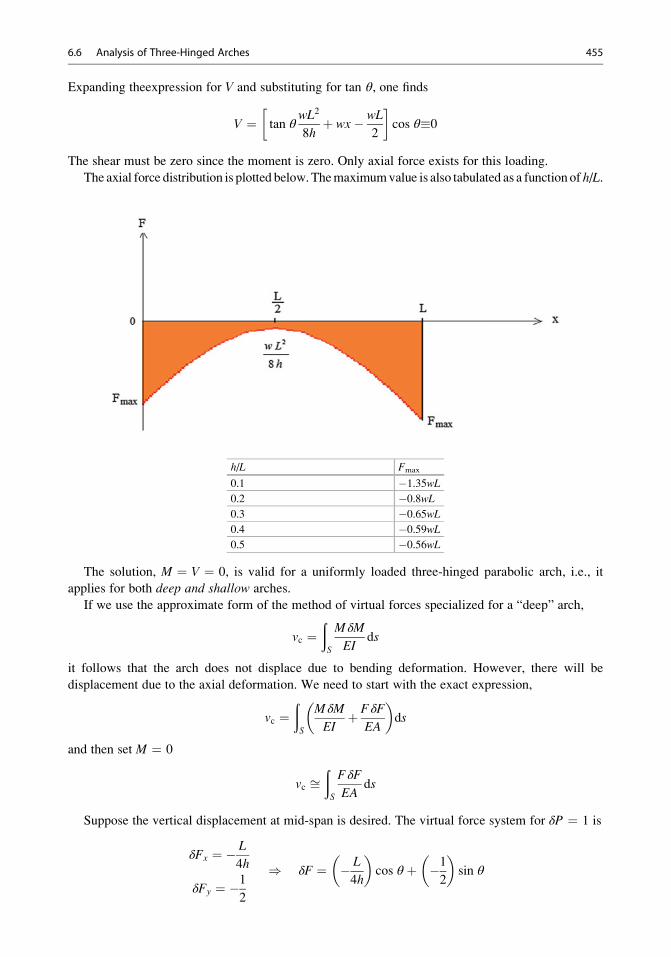
Expanding theexpression for V and substituting for tan θ, one finds
V ¼ tan θwL2
8hþ wx� wL
2
�cos θ�0
The shear must be zero since the moment is zero. Only axial force exists for this loading.
The axial force distribution is plotted below.Themaximumvalue is also tabulated as a function of h/L.
h/L Fmax
0.1 �1.35wL0.2 �0.8wL0.3 �0.65wL0.4 �0.59wL0.5 �0.56wL
The solution, M ¼ V ¼ 0, is valid for a uniformly loaded three-hinged parabolic arch, i.e., it
applies for both deep and shallow arches.
If we use the approximate form of the method of virtual forces specialized for a “deep” arch,
vc ¼ðS
M δM
EIds
it follows that the arch does not displace due to bending deformation. However, there will be
displacement due to the axial deformation. We need to start with the exact expression,
vc ¼ðS
M δM
EIþ FδF
EA
� �ds
and then set M ¼ 0
vc ffiðS
FδF
EAds
Suppose the vertical displacement at mid-span is desired. The virtual force system for δP ¼ 1 is
δFx ¼ � L
4h
δFy ¼ �12
) δF ¼ � L
4h
� �cos θ þ �1
2
� �sin θ
6.6 Analysis of Three-Hinged Arches 455
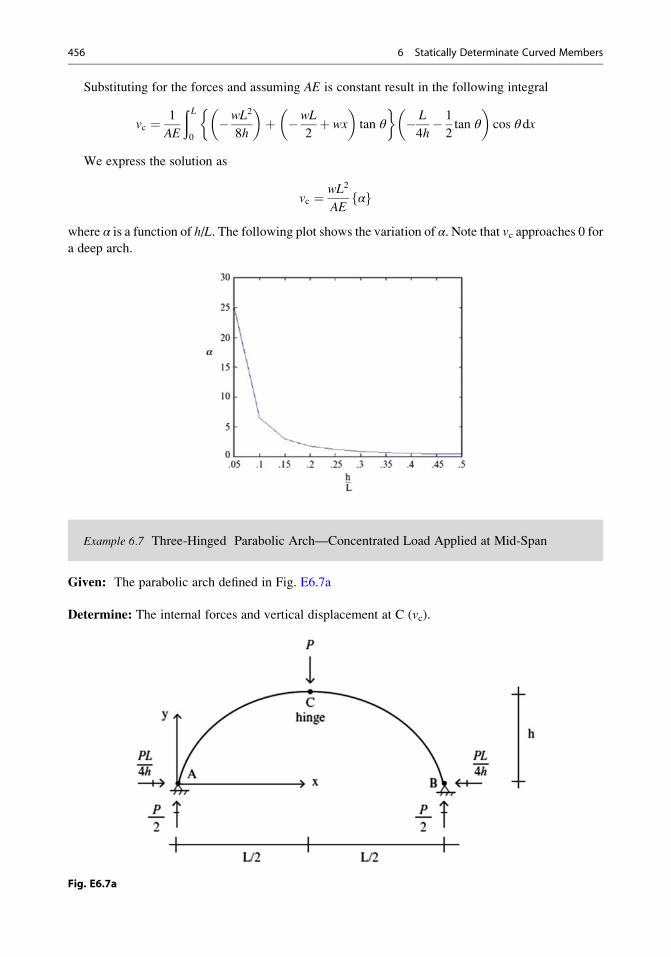
Substituting for the forces and assuming AE is constant result in the following integral
vc ¼ 1
AE
ð L0
�wL2
8h
� �þ �wL
2þ wx
� �tan θ
�� L
4h� 1
2tan θ
� �cos θdx
We express the solution as
vc ¼ wL2
AEαf g
where α is a function of h/L. The following plot shows the variation of α. Note that vc approaches 0 fora deep arch.
Example 6.7 Three-Hinged Parabolic Arch—Concentrated Load Applied at Mid-Span
Given: The parabolic arch defined in Fig. E6.7a
Determine: The internal forces and vertical displacement at C (vc).
Fig. E6.7a
456 6 Statically Determinate Curved Members
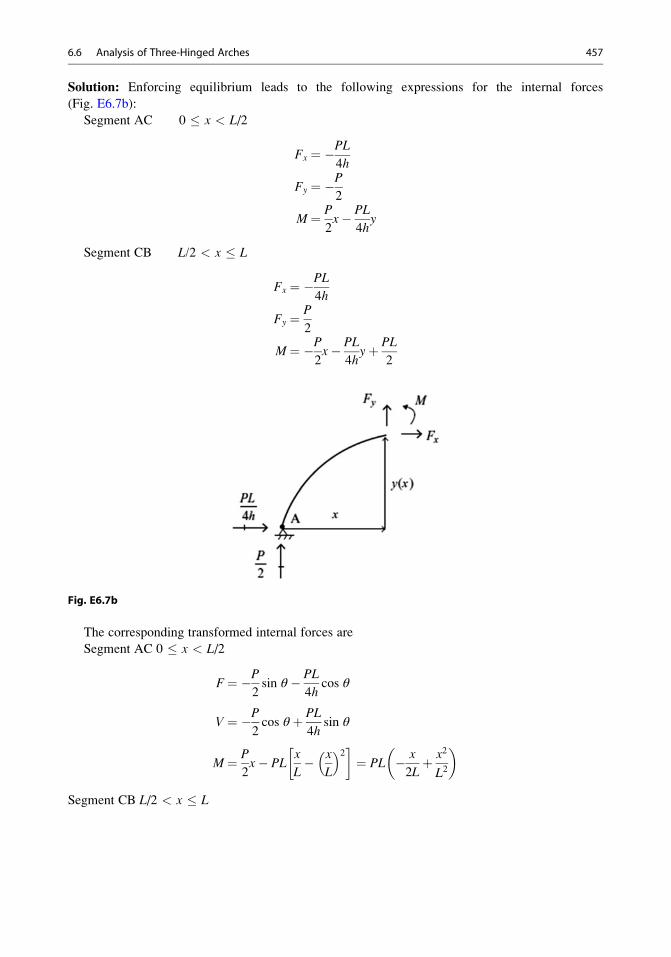
Solution: Enforcing equilibrium leads to the following expressions for the internal forces
(Fig. E6.7b):
Segment AC 0 � x < L/2
Fx ¼ �PL4h
Fy ¼ �P2
M¼ P
2x� PL
4hy
Segment CB L/2 < x � L
Fx ¼ �PL4h
Fy ¼ P
2
M¼ �P2x� PL
4hyþ PL
2
Fig. E6.7b
The corresponding transformed internal forces are
Segment AC 0 � x < L/2
F¼ �P2sin θ � PL
4hcos θ
V ¼ �P2cos θ þ PL
4hsin θ
M¼ P
2x� PL
x
L� x
L
� �2 �¼ PL � x
2Lþ x2
L2
� �
Segment CB L/2 < x � L
6.6 Analysis of Three-Hinged Arches 457
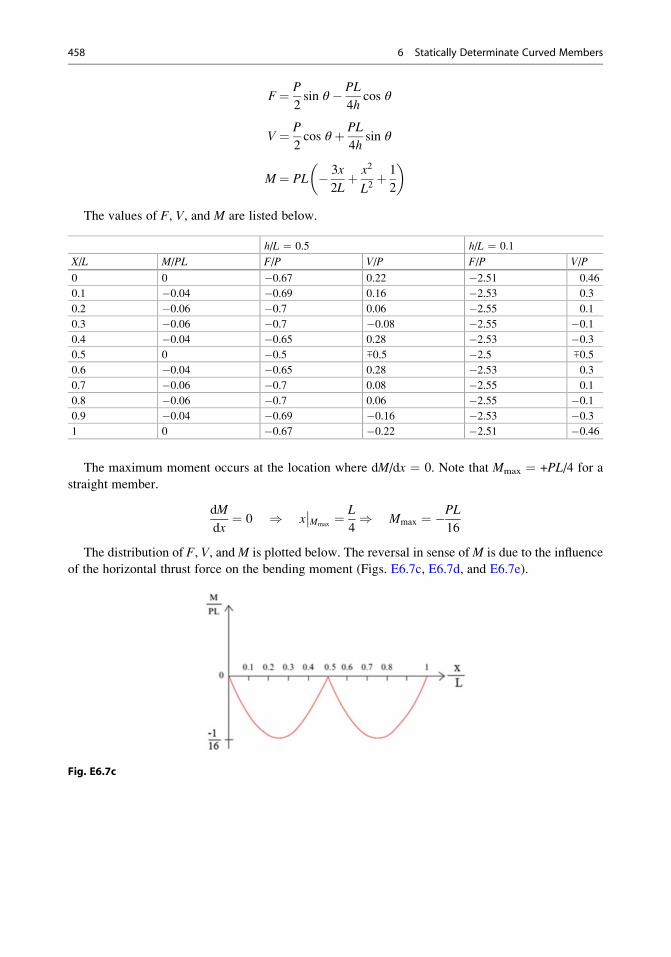
F¼ P
2sin θ � PL
4hcos θ
V ¼ P
2cos θ þ PL
4hsin θ
M¼ PL � 3x
2Lþ x2
L2þ 1
2
� �
The values of F, V, and M are listed below.
h/L ¼ 0.5 h/L ¼ 0.1
X/L M/PL F/P V/P F/P V/P
0 0 �0.67 0.22 �2.51 0.46
0.1 �0.04 �0.69 0.16 �2.53 0.3
0.2 �0.06 �0.7 0.06 �2.55 0.1
0.3 �0.06 �0.7 �0.08 �2.55 �0.10.4 �0.04 �0.65 0.28 �2.53 �0.30.5 0 �0.5 ∓0.5 �2.5 ∓0.50.6 �0.04 �0.65 0.28 �2.53 0.3
0.7 �0.06 �0.7 0.08 �2.55 0.1
0.8 �0.06 �0.7 0.06 �2.55 �0.10.9 �0.04 �0.69 �0.16 �2.53 �0.31 0 �0.67 �0.22 �2.51 �0.46
The maximum moment occurs at the location where dM/dx ¼ 0. Note that Mmax ¼ +PL/4 for a
straight member.
dM
dx¼ 0 ) x
��Mmax¼ L
4) Mmax ¼ �PL
16
The distribution of F, V, andM is plotted below. The reversal in sense ofM is due to the influence
of the horizontal thrust force on the bending moment (Figs. E6.7c, E6.7d, and E6.7e).
Fig. E6.7c
458 6 Statically Determinate Curved Members
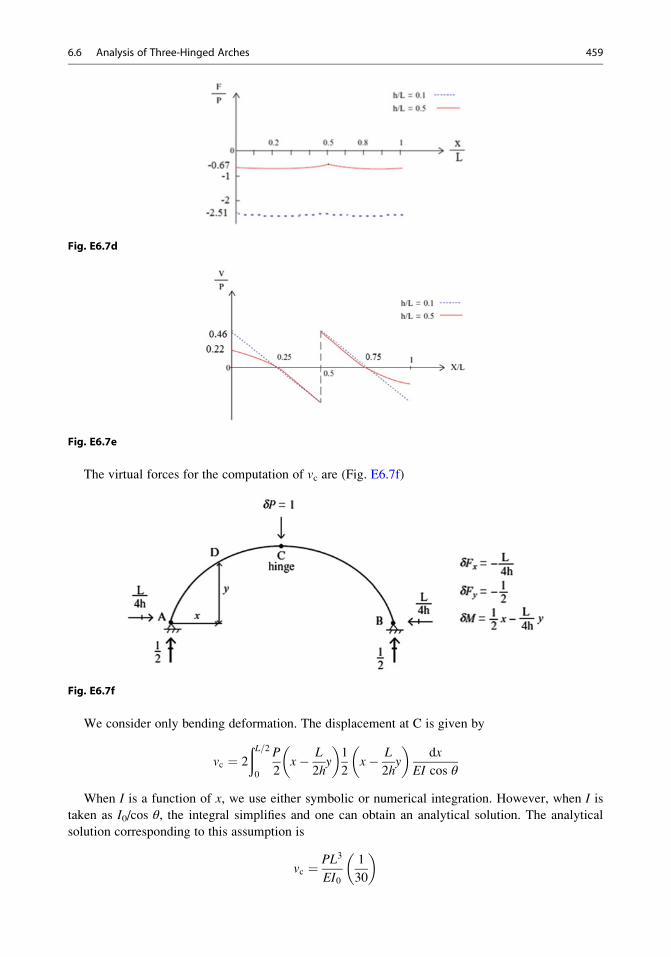
Fig. E6.7d
Fig. E6.7e
The virtual forces for the computation of vc are (Fig. E6.7f)
Fig. E6.7f
We consider only bending deformation. The displacement at C is given by
vc ¼ 2
ðL=20
P
2x� L
2hy
� �1
2x� L
2hy
� �dx
EI cos θ
When I is a function of x, we use either symbolic or numerical integration. However, when I istaken as I0/cos θ, the integral simplifies and one can obtain an analytical solution. The analytical
solution corresponding to this assumption is
vc ¼ PL3
EI0
1
30
� �
6.6 Analysis of Three-Hinged Arches 459
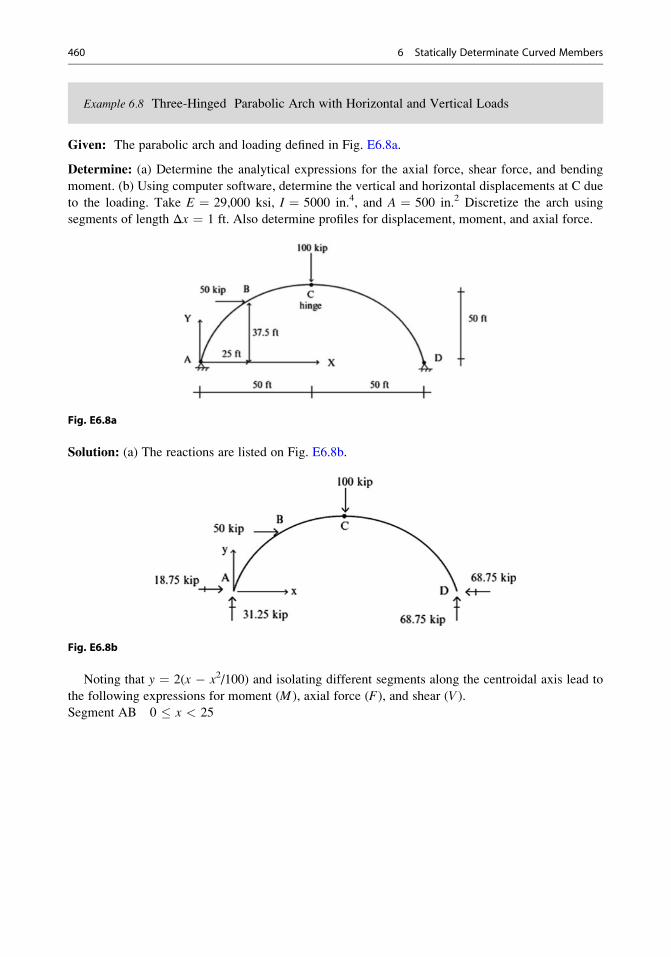
Example 6.8 Three-Hinged Parabolic Arch with Horizontal and Vertical Loads
Given: The parabolic arch and loading defined in Fig. E6.8a.
Determine: (a) Determine the analytical expressions for the axial force, shear force, and bending
moment. (b) Using computer software, determine the vertical and horizontal displacements at C due
to the loading. Take E ¼ 29,000 ksi, I ¼ 5000 in.4, and A ¼ 500 in.2 Discretize the arch using
segments of length Δx ¼ 1 ft. Also determine profiles for displacement, moment, and axial force.
Fig. E6.8a
Solution: (a) The reactions are listed on Fig. E6.8b.
Fig. E6.8b
Noting that y ¼ 2(x � x2/100) and isolating different segments along the centroidal axis lead to
the following expressions for moment (M ), axial force (F), and shear (V ).Segment AB 0 � x < 25
460 6 Statically Determinate Curved Members
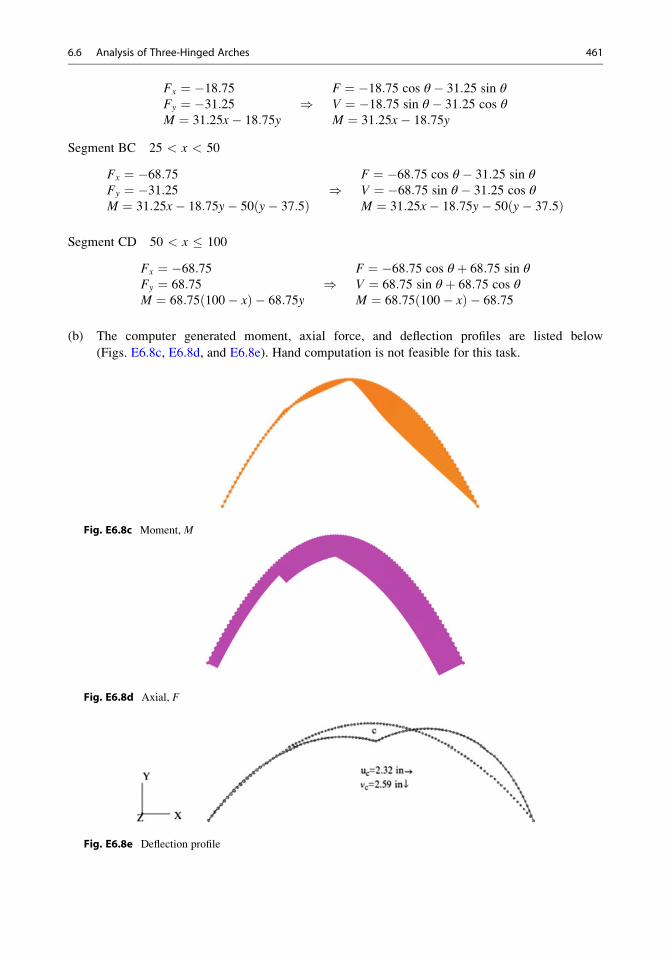
Fx ¼ �18:75Fy ¼ �31:25M ¼ 31:25x� 18:75y
)F ¼ �18:75 cos θ � 31:25 sin θV ¼ �18:75 sin θ � 31:25 cos θM ¼ 31:25x� 18:75y
Segment BC 25 < x < 50
Fx ¼ �68:75Fy ¼ �31:25M ¼ 31:25x� 18:75y� 50 y� 37:5ð Þ
)F ¼ �68:75 cos θ � 31:25 sin θV ¼ �68:75 sin θ � 31:25 cos θM ¼ 31:25x� 18:75y� 50 y� 37:5ð Þ
Segment CD 50 < x � 100
Fx ¼ �68:75Fy ¼ 68:75M ¼ 68:75 100� xð Þ � 68:75y
)F ¼ �68:75 cos θ þ 68:75 sin θV ¼ 68:75 sin θ þ 68:75 cos θM ¼ 68:75 100� xð Þ � 68:75
(b) The computer generated moment, axial force, and deflection profiles are listed below
(Figs. E6.8c, E6.8d, and E6.8e). Hand computation is not feasible for this task.
Fig. E6.8c Moment, M
Fig. E6.8d Axial, F
Fig. E6.8e Deflection profile
6.6 Analysis of Three-Hinged Arches 461
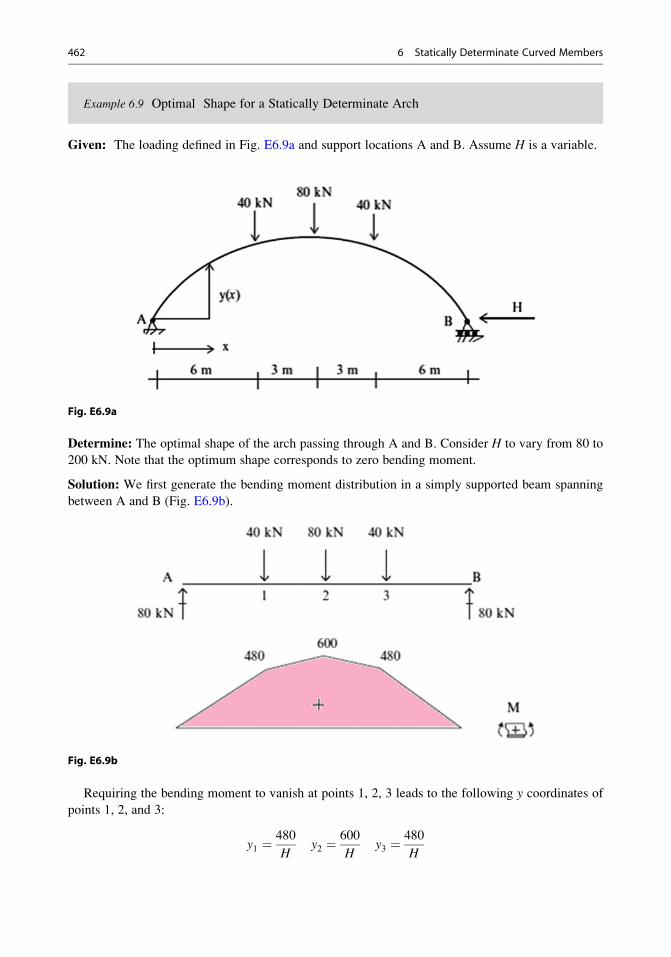
Example 6.9 Optimal Shape for a Statically Determinate Arch
Given: The loading defined in Fig. E6.9a and support locations A and B. Assume H is a variable.
Fig. E6.9a
Determine: The optimal shape of the arch passing through A and B. Consider H to vary from 80 to
200 kN. Note that the optimum shape corresponds to zero bending moment.
Solution: We first generate the bending moment distribution in a simply supported beam spanning
between A and B (Fig. E6.9b).
Fig. E6.9b
Requiring the bending moment to vanish at points 1, 2, 3 leads to the following y coordinates of
points 1, 2, and 3:
y1 ¼480
Hy2 ¼
600
Hy3 ¼
480
H
462 6 Statically Determinate Curved Members
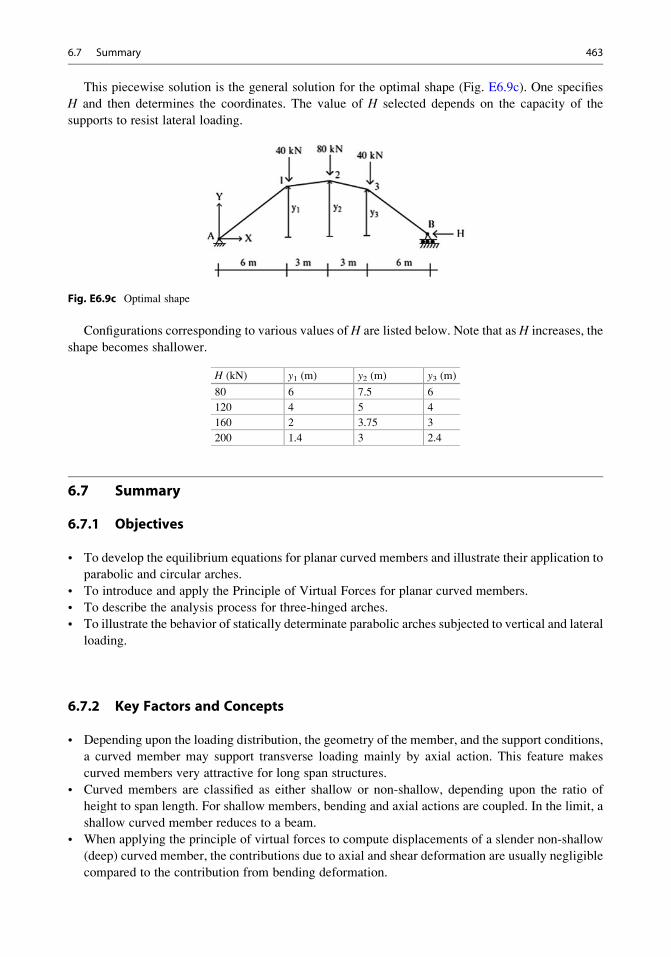
This piecewise solution is the general solution for the optimal shape (Fig. E6.9c). One specifies
H and then determines the coordinates. The value of H selected depends on the capacity of the
supports to resist lateral loading.
Fig. E6.9c Optimal shape
Configurations corresponding to various values of H are listed below. Note that as H increases, the
shape becomes shallower.
H (kN) y1 (m) y2 (m) y3 (m)
80 6 7.5 6
120 4 5 4
160 2 3.75 3
200 1.4 3 2.4
6.7 Summary
6.7.1 Objectives
• To develop the equilibrium equations for planar curved members and illustrate their application to
parabolic and circular arches.
• To introduce and apply the Principle of Virtual Forces for planar curved members.
• To describe the analysis process for three-hinged arches.
• To illustrate the behavior of statically determinate parabolic arches subjected to vertical and lateral
loading.
6.7.2 Key Factors and Concepts
• Depending upon the loading distribution, the geometry of the member, and the support conditions,
a curved member may support transverse loading mainly by axial action. This feature makes
curved members very attractive for long span structures.
• Curved members are classified as either shallow or non-shallow, depending upon the ratio of
height to span length. For shallow members, bending and axial actions are coupled. In the limit, a
shallow curved member reduces to a beam.
• When applying the principle of virtual forces to compute displacements of a slender non-shallow
(deep) curved member, the contributions due to axial and shear deformation are usually negligible
compared to the contribution from bending deformation.
6.7 Summary 463
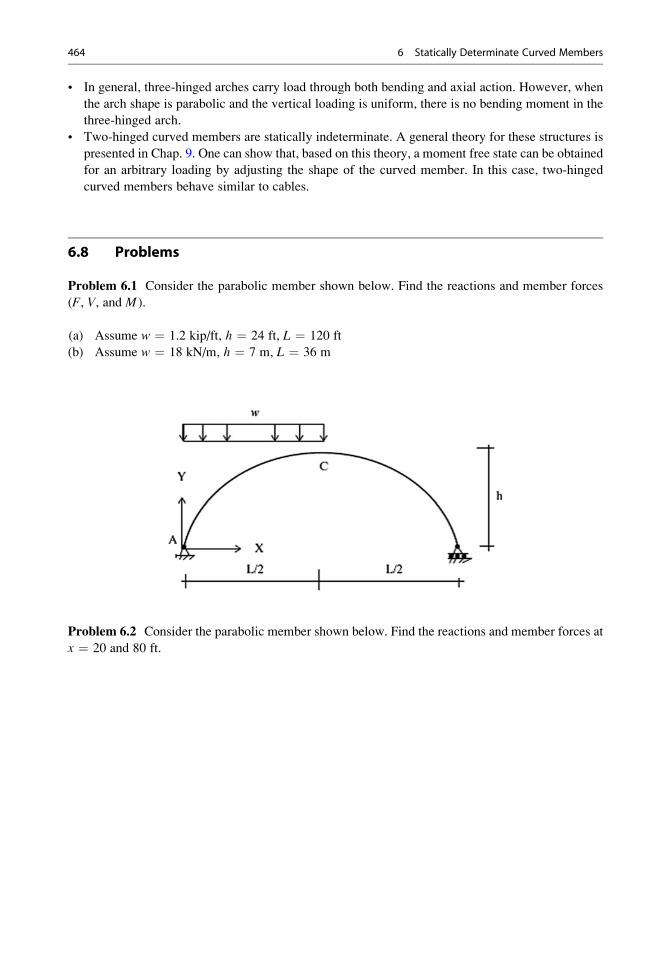
• In general, three-hinged arches carry load through both bending and axial action. However, when
the arch shape is parabolic and the vertical loading is uniform, there is no bending moment in the
three-hinged arch.
• Two-hinged curved members are statically indeterminate. A general theory for these structures is
presented in Chap. 9. One can show that, based on this theory, a moment free state can be obtained
for an arbitrary loading by adjusting the shape of the curved member. In this case, two-hinged
curved members behave similar to cables.
6.8 Problems
Problem 6.1 Consider the parabolic member shown below. Find the reactions and member forces
(F, V, and M ).
(a) Assume w ¼ 1.2 kip/ft, h ¼ 24 ft, L ¼ 120 ft
(b) Assume w ¼ 18 kN/m, h ¼ 7 m, L ¼ 36 m
Problem 6.2 Consider the parabolic member shown below. Find the reactions and member forces at
x ¼ 20 and 80 ft.
464 6 Statically Determinate Curved Members
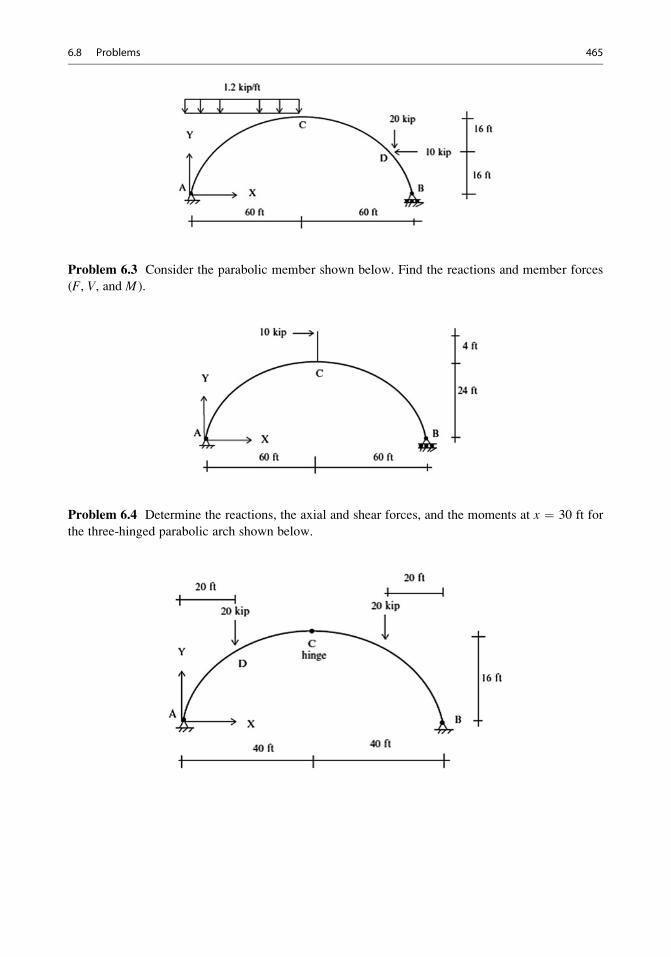
Problem 6.3 Consider the parabolic member shown below. Find the reactions and member forces
(F, V, and M ).
Problem 6.4 Determine the reactions, the axial and shear forces, and the moments at x ¼ 30 ft for
the three-hinged parabolic arch shown below.
6.8 Problems 465
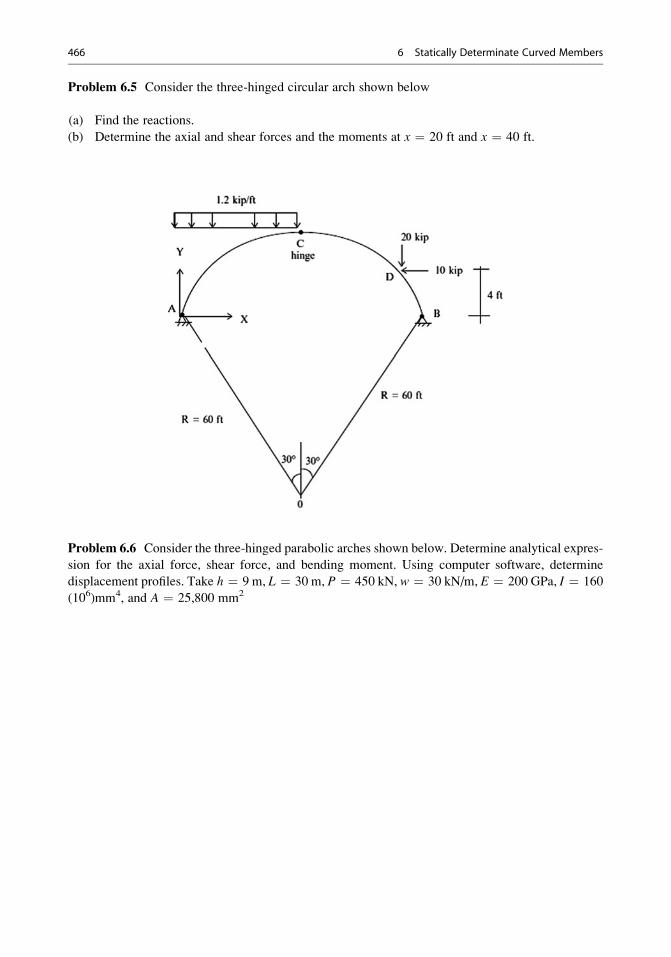
Problem 6.5 Consider the three-hinged circular arch shown below
(a) Find the reactions.
(b) Determine the axial and shear forces and the moments at x ¼ 20 ft and x ¼ 40 ft.
Problem 6.6 Consider the three-hinged parabolic arches shown below. Determine analytical expres-
sion for the axial force, shear force, and bending moment. Using computer software, determine
displacement profiles. Take h ¼ 9 m, L ¼ 30 m, P ¼ 450 kN, w ¼ 30 kN/m, E ¼ 200 GPa, I ¼ 160
(106)mm4, and A ¼ 25,800 mm2
466 6 Statically Determinate Curved Members
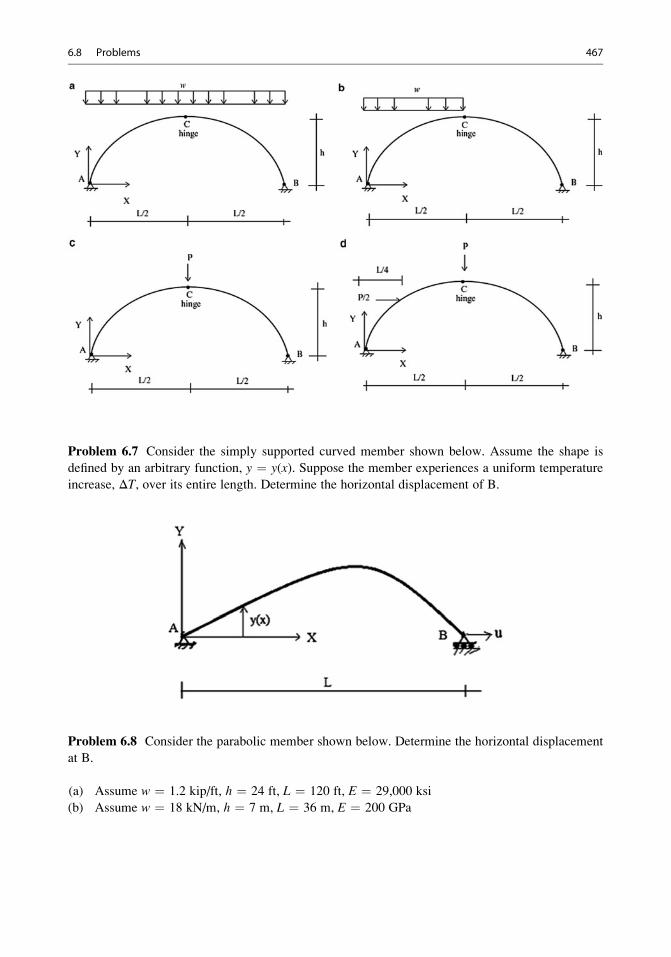
Problem 6.7 Consider the simply supported curved member shown below. Assume the shape is
defined by an arbitrary function, y ¼ y(x). Suppose the member experiences a uniform temperature
increase, ΔT, over its entire length. Determine the horizontal displacement of B.
Problem 6.8 Consider the parabolic member shown below. Determine the horizontal displacement
at B.
(a) Assume w ¼ 1.2 kip/ft, h ¼ 24 ft, L ¼ 120 ft, E ¼ 29,000 ksi
(b) Assume w ¼ 18 kN/m, h ¼ 7 m, L ¼ 36 m, E ¼ 200 GPa
6.8 Problems 467
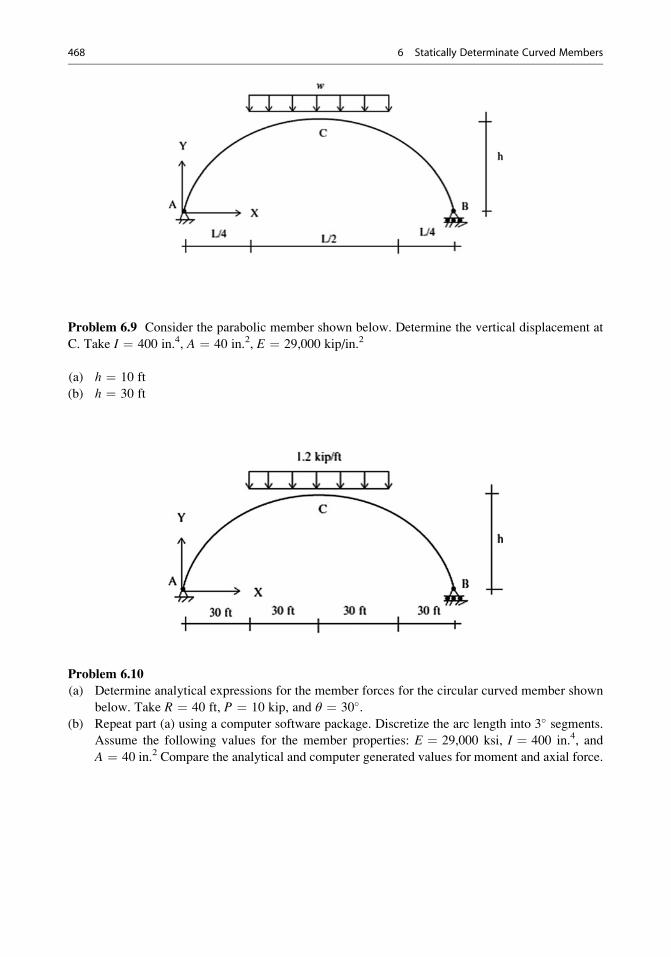
Problem 6.9 Consider the parabolic member shown below. Determine the vertical displacement at
C. Take I ¼ 400 in.4, A ¼ 40 in.2, E ¼ 29,000 kip/in.2
(a) h ¼ 10 ft
(b) h ¼ 30 ft
Problem 6.10
(a) Determine analytical expressions for the member forces for the circular curved member shown
below. Take R ¼ 40 ft, P ¼ 10 kip, and θ ¼ 30�.(b) Repeat part (a) using a computer software package. Discretize the arc length into 3� segments.
Assume the following values for the member properties: E ¼ 29,000 ksi, I ¼ 400 in.4, and
A ¼ 40 in.2 Compare the analytical and computer generated values for moment and axial force.
468 6 Statically Determinate Curved Members
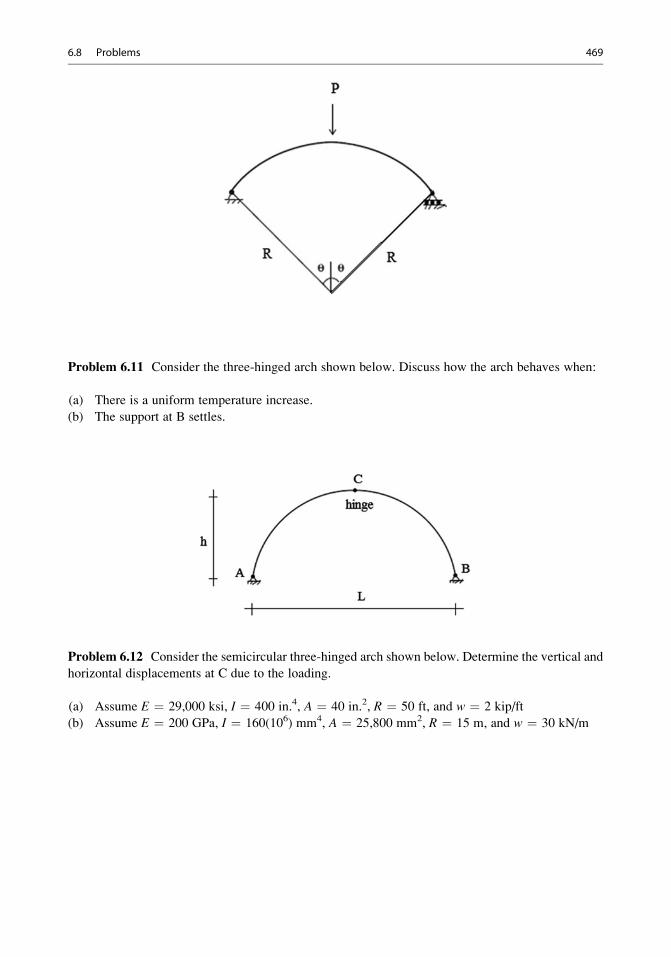
Problem 6.11 Consider the three-hinged arch shown below. Discuss how the arch behaves when:
(a) There is a uniform temperature increase.
(b) The support at B settles.
Problem 6.12 Consider the semicircular three-hinged arch shown below. Determine the vertical and
horizontal displacements at C due to the loading.
(a) Assume E ¼ 29,000 ksi, I ¼ 400 in.4, A ¼ 40 in.2, R ¼ 50 ft, and w ¼ 2 kip/ft
(b) Assume E ¼ 200 GPa, I ¼ 160(106) mm4, A ¼ 25,800 mm2, R ¼ 15 m, and w ¼ 30 kN/m
6.8 Problems 469
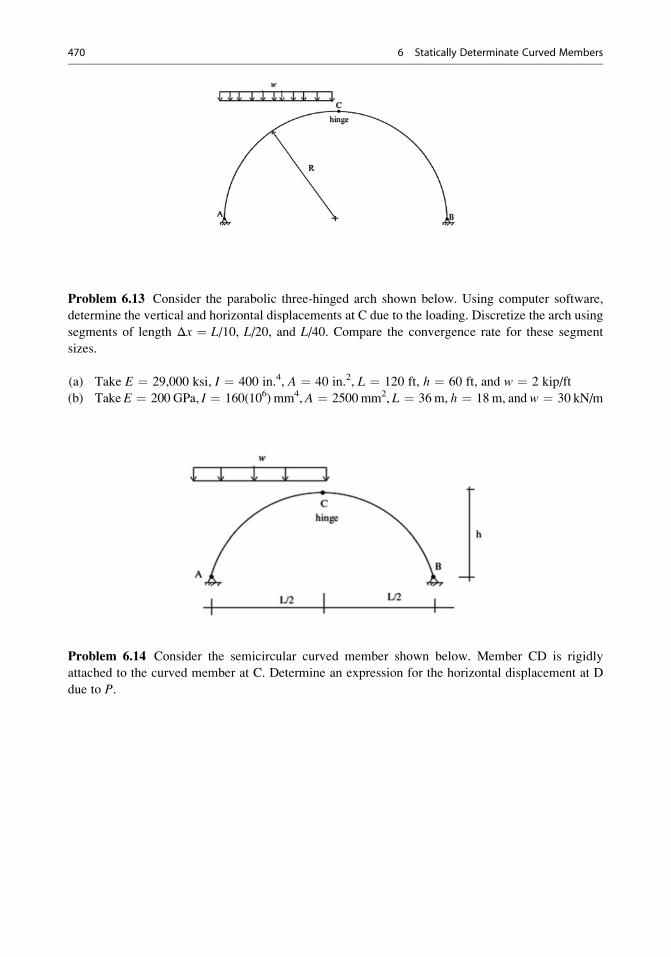
Problem 6.13 Consider the parabolic three-hinged arch shown below. Using computer software,
determine the vertical and horizontal displacements at C due to the loading. Discretize the arch using
segments of length Δx ¼ L/10, L/20, and L/40. Compare the convergence rate for these segment
sizes.
(a) Take E ¼ 29,000 ksi, I ¼ 400 in.4, A ¼ 40 in.2, L ¼ 120 ft, h ¼ 60 ft, and w ¼ 2 kip/ft
(b) Take E ¼ 200 GPa, I ¼ 160(106) mm4, A ¼ 2500 mm2, L ¼ 36 m, h ¼ 18 m, and w ¼ 30 kN/m
Problem 6.14 Consider the semicircular curved member shown below. Member CD is rigidly
attached to the curved member at C. Determine an expression for the horizontal displacement at D
due to P.
470 6 Statically Determinate Curved Members
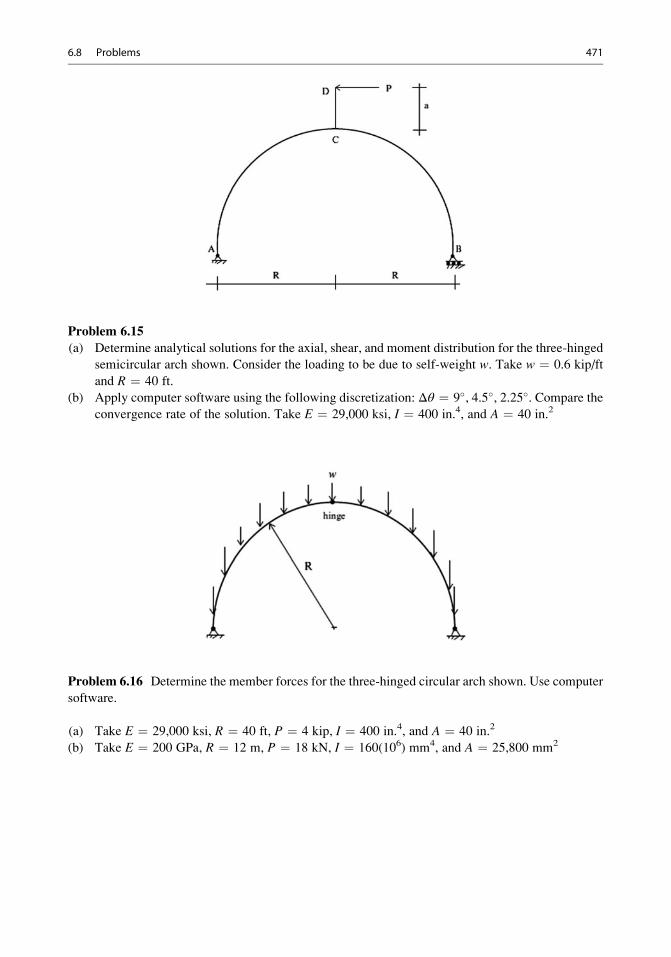
Problem 6.15
(a) Determine analytical solutions for the axial, shear, and moment distribution for the three-hinged
semicircular arch shown. Consider the loading to be due to self-weight w. Take w ¼ 0.6 kip/ft
and R ¼ 40 ft.
(b) Apply computer software using the following discretization: Δθ ¼ 9�, 4.5�, 2.25�. Compare the
convergence rate of the solution. Take E ¼ 29,000 ksi, I ¼ 400 in.4, and A ¼ 40 in.2
Problem 6.16 Determine the member forces for the three-hinged circular arch shown. Use computer
software.
(a) Take E ¼ 29,000 ksi, R ¼ 40 ft, P ¼ 4 kip, I ¼ 400 in.4, and A ¼ 40 in.2
(b) Take E ¼ 200 GPa, R ¼ 12 m, P ¼ 18 kN, I ¼ 160(106) mm4, and A ¼ 25,800 mm2
6.8 Problems 471
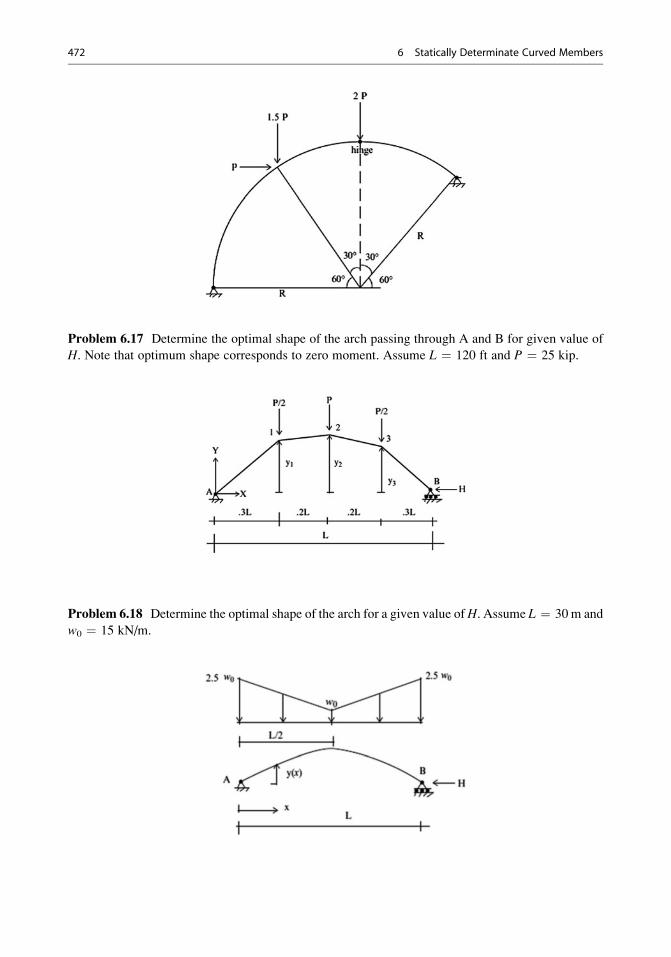
Problem 6.17 Determine the optimal shape of the arch passing through A and B for given value of
H. Note that optimum shape corresponds to zero moment. Assume L ¼ 120 ft and P ¼ 25 kip.
Problem 6.18 Determine the optimal shape of the arch for a given value ofH. Assume L ¼ 30 m and
w0 ¼ 15 kN/m.
472 6 Statically Determinate Curved Members

Problem 6.19 Consider the three-hinged arch shown below. Determine the reactions and the
internal forces.
Reference
1. Tauchert TR. Energy principles in structural mechanics. New York: McGraw-Hill; 1974.
Reference 473
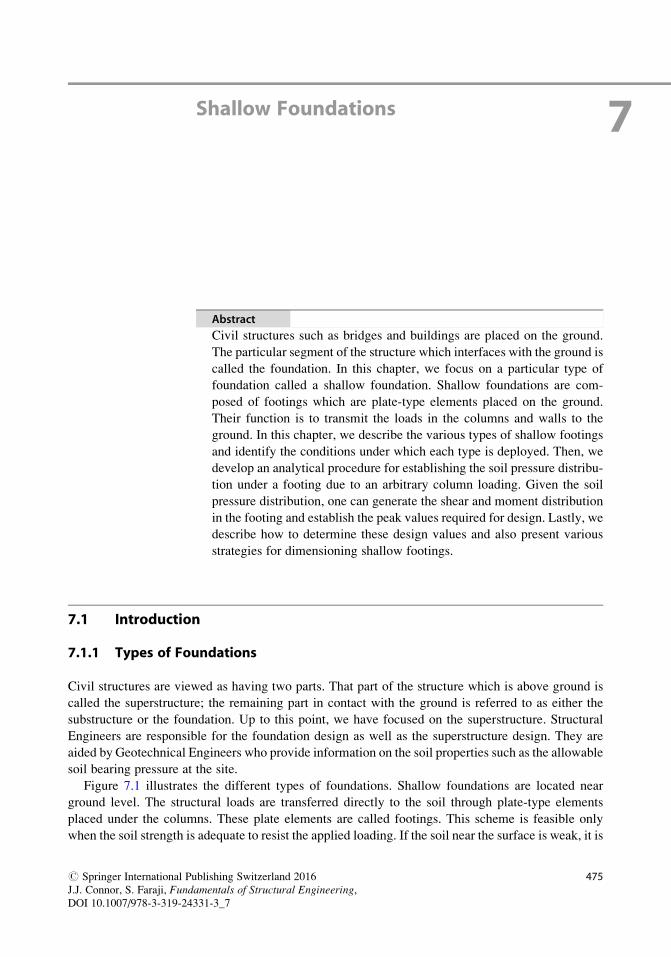
Shallow Foundations 7
Abstract
Civil structures such as bridges and buildings are placed on the ground.
The particular segment of the structure which interfaces with the ground is
called the foundation. In this chapter, we focus on a particular type of
foundation called a shallow foundation. Shallow foundations are com-
posed of footings which are plate-type elements placed on the ground.
Their function is to transmit the loads in the columns and walls to the
ground. In this chapter, we describe the various types of shallow footings
and identify the conditions under which each type is deployed. Then, we
develop an analytical procedure for establishing the soil pressure distribu-
tion under a footing due to an arbitrary column loading. Given the soil
pressure distribution, one can generate the shear and moment distribution
in the footing and establish the peak values required for design. Lastly, we
describe how to determine these design values and also present various
strategies for dimensioning shallow footings.
7.1 Introduction
7.1.1 Types of Foundations
Civil structures are viewed as having two parts. That part of the structure which is above ground is
called the superstructure; the remaining part in contact with the ground is referred to as either the
substructure or the foundation. Up to this point, we have focused on the superstructure. Structural
Engineers are responsible for the foundation design as well as the superstructure design. They are
aided by Geotechnical Engineers who provide information on the soil properties such as the allowable
soil bearing pressure at the site.
Figure 7.1 illustrates the different types of foundations. Shallow foundations are located near
ground level. The structural loads are transferred directly to the soil through plate-type elements
placed under the columns. These plate elements are called footings. This scheme is feasible only
when the soil strength is adequate to resist the applied loading. If the soil near the surface is weak, it is
# Springer International Publishing Switzerland 2016
J.J. Connor, S. Faraji, Fundamentals of Structural Engineering,DOI 10.1007/978-3-319-24331-3_7
475
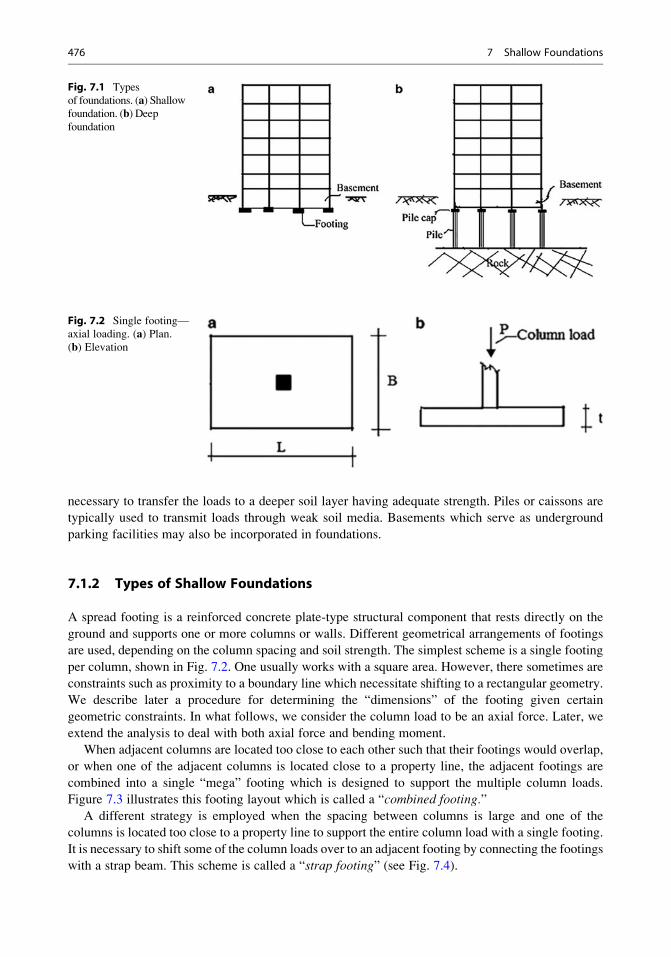
necessary to transfer the loads to a deeper soil layer having adequate strength. Piles or caissons are
typically used to transmit loads through weak soil media. Basements which serve as underground
parking facilities may also be incorporated in foundations.
7.1.2 Types of Shallow Foundations
A spread footing is a reinforced concrete plate-type structural component that rests directly on the
ground and supports one or more columns or walls. Different geometrical arrangements of footings
are used, depending on the column spacing and soil strength. The simplest scheme is a single footing
per column, shown in Fig. 7.2. One usually works with a square area. However, there sometimes are
constraints such as proximity to a boundary line which necessitate shifting to a rectangular geometry.
We describe later a procedure for determining the “dimensions” of the footing given certain
geometric constraints. In what follows, we consider the column load to be an axial force. Later, we
extend the analysis to deal with both axial force and bending moment.
When adjacent columns are located too close to each other such that their footings would overlap,
or when one of the adjacent columns is located close to a property line, the adjacent footings are
combined into a single “mega” footing which is designed to support the multiple column loads.
Figure 7.3 illustrates this footing layout which is called a “combined footing.”
A different strategy is employed when the spacing between columns is large and one of the
columns is located too close to a property line to support the entire column load with a single footing.
It is necessary to shift some of the column loads over to an adjacent footing by connecting the footings
with a strap beam. This scheme is called a “strap footing” (see Fig. 7.4).
Fig. 7.1 Types
of foundations. (a) Shallowfoundation. (b) Deepfoundation
Fig. 7.2 Single footing—
axial loading. (a) Plan.(b) Elevation
476 7 Shallow Foundations
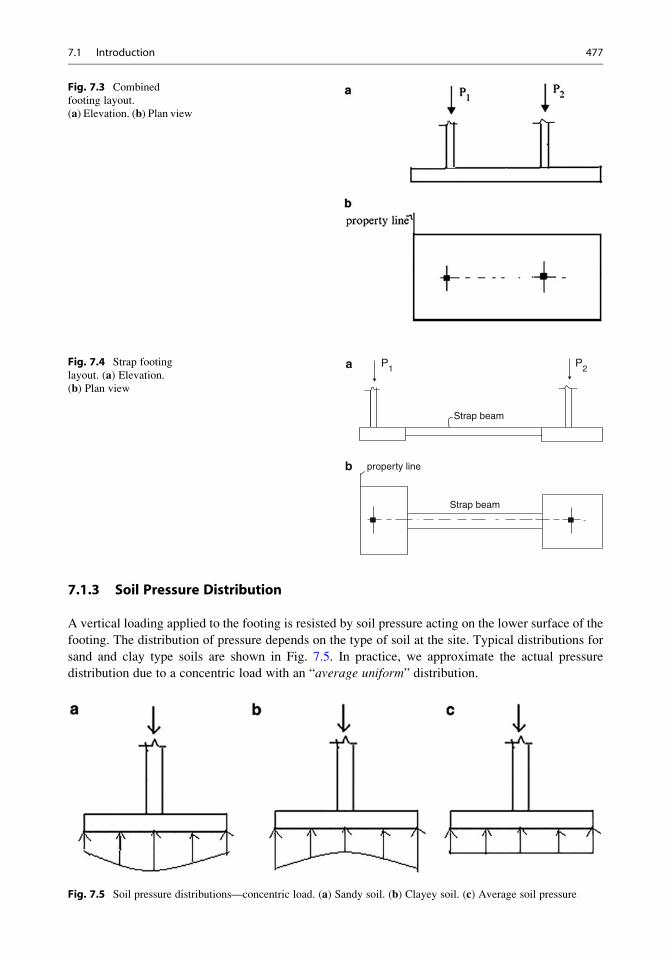
7.1.3 Soil Pressure Distribution
A vertical loading applied to the footing is resisted by soil pressure acting on the lower surface of the
footing. The distribution of pressure depends on the type of soil at the site. Typical distributions for
sand and clay type soils are shown in Fig. 7.5. In practice, we approximate the actual pressure
distribution due to a concentric load with an “average uniform” distribution.
Fig. 7.3 Combined
footing layout.
(a) Elevation. (b) Plan view
a
b
P1 P2
property line
Strap beam
Strap beam
Fig. 7.4 Strap footing
layout. (a) Elevation.(b) Plan view
Fig. 7.5 Soil pressure distributions—concentric load. (a) Sandy soil. (b) Clayey soil. (c) Average soil pressure
7.1 Introduction 477
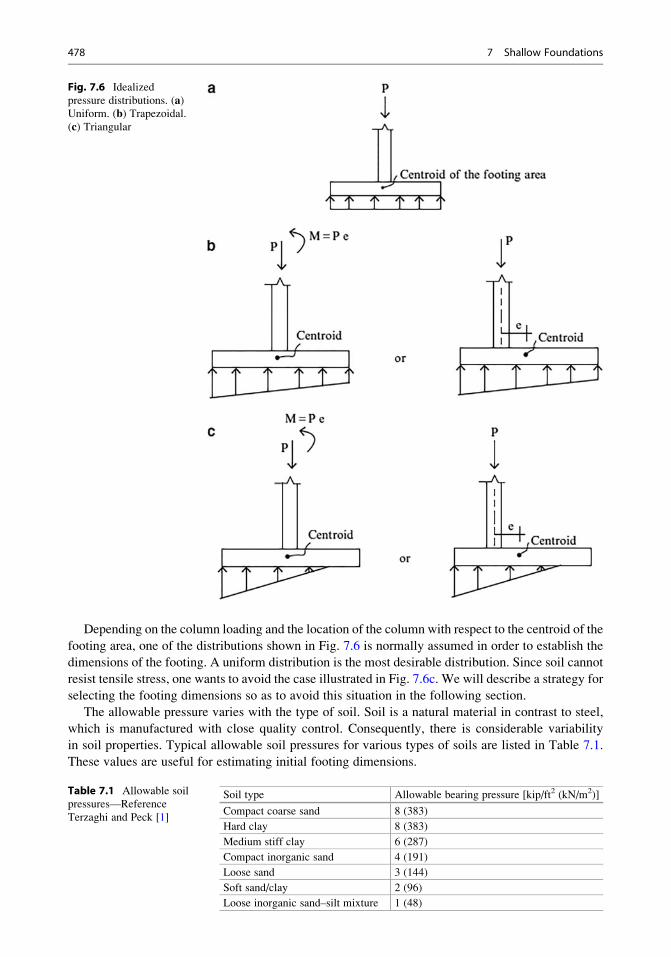
Depending on the column loading and the location of the column with respect to the centroid of the
footing area, one of the distributions shown in Fig. 7.6 is normally assumed in order to establish the
dimensions of the footing. A uniform distribution is the most desirable distribution. Since soil cannot
resist tensile stress, one wants to avoid the case illustrated in Fig. 7.6c. We will describe a strategy for
selecting the footing dimensions so as to avoid this situation in the following section.
The allowable pressure varies with the type of soil. Soil is a natural material in contrast to steel,
which is manufactured with close quality control. Consequently, there is considerable variability
in soil properties. Typical allowable soil pressures for various types of soils are listed in Table 7.1.
These values are useful for estimating initial footing dimensions.
Fig. 7.6 Idealized
pressure distributions. (a)Uniform. (b) Trapezoidal.(c) Triangular
Table 7.1 Allowable soil
pressures—Reference
Terzaghi and Peck [1]
Soil type Allowable bearing pressure [kip/ft2 (kN/m2)]
Compact coarse sand 8 (383)
Hard clay 8 (383)
Medium stiff clay 6 (287)
Compact inorganic sand 4 (191)
Loose sand 3 (144)
Soft sand/clay 2 (96)
Loose inorganic sand–silt mixture 1 (48)
478 7 Shallow Foundations
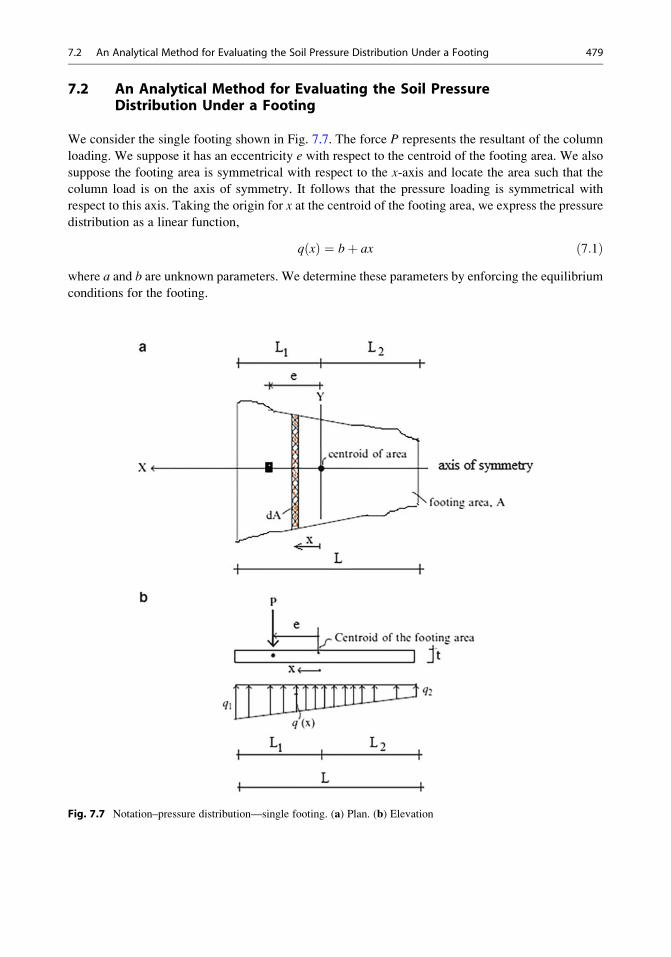
7.2 An Analytical Method for Evaluating the Soil PressureDistribution Under a Footing
We consider the single footing shown in Fig. 7.7. The force P represents the resultant of the column
loading. We suppose it has an eccentricity e with respect to the centroid of the footing area. We also
suppose the footing area is symmetrical with respect to the x-axis and locate the area such that the
column load is on the axis of symmetry. It follows that the pressure loading is symmetrical with
respect to this axis. Taking the origin for x at the centroid of the footing area, we express the pressure
distribution as a linear function,
q xð Þ ¼ bþ ax ð7:1Þwhere a and b are unknown parameters. We determine these parameters by enforcing the equilibrium
conditions for the footing.
Fig. 7.7 Notation–pressure distribution—single footing. (a) Plan. (b) Elevation
7.2 An Analytical Method for Evaluating the Soil Pressure Distribution Under a Footing 479
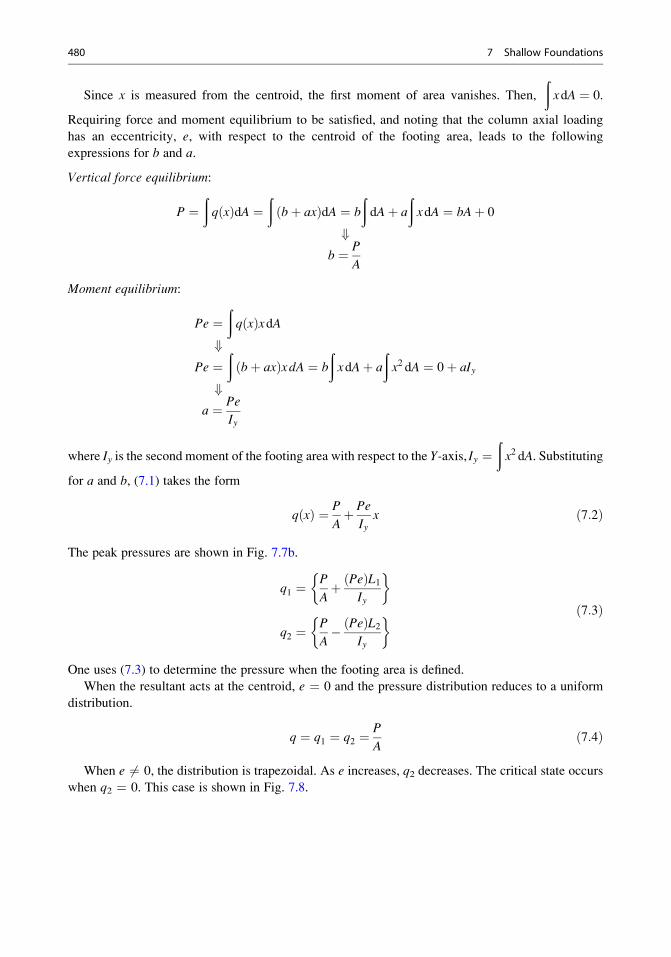
Since x is measured from the centroid, the first moment of area vanishes. Then,
ðxdA ¼ 0.
Requiring force and moment equilibrium to be satisfied, and noting that the column axial loading
has an eccentricity, e, with respect to the centroid of the footing area, leads to the following
expressions for b and a.
Vertical force equilibrium:
P ¼ðq xð ÞdA ¼
ðbþ axð ÞdA ¼ b
ðdAþ a
ðxdA ¼ bAþ 0
+b ¼ P
A
Moment equilibrium:
Pe ¼ðq xð ÞxdA
+Pe ¼
ðbþ axð ÞxdA ¼ b
ðxdAþ a
ðx2 dA ¼ 0þ aIy
+a ¼ Pe
Iy
where Iy is the second moment of the footing area with respect to the Y-axis, Iy ¼ðx2 dA. Substituting
for a and b, (7.1) takes the form
q xð Þ ¼ P
Aþ Pe
Iyx ð7:2Þ
The peak pressures are shown in Fig. 7.7b.
q1 ¼P
Aþ Peð ÞL1
Iy
�
q2 ¼P
A� Peð ÞL2
Iy
� ð7:3Þ
One uses (7.3) to determine the pressure when the footing area is defined.
When the resultant acts at the centroid, e ¼ 0 and the pressure distribution reduces to a uniform
distribution.
q ¼ q1 ¼ q2 ¼P
Að7:4Þ
When e 6¼ 0, the distribution is trapezoidal. As e increases, q2 decreases. The critical state occurs
when q2 ¼ 0. This case is shown in Fig. 7.8.
480 7 Shallow Foundations
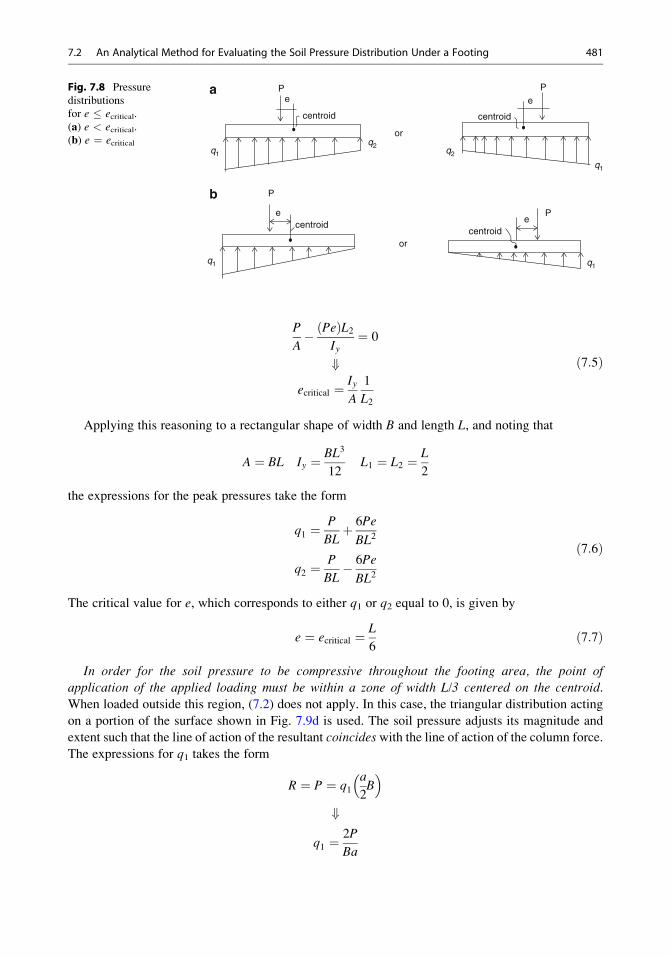
P
A� Peð ÞL2
Iy¼ 0
+ecritical ¼ Iy
A
1
L2
ð7:5Þ
Applying this reasoning to a rectangular shape of width B and length L, and noting that
A ¼ BL Iy ¼ BL3
12L1 ¼ L2 ¼ L
2
the expressions for the peak pressures take the form
q1 ¼P
BLþ 6Pe
BL2
q2 ¼P
BL� 6Pe
BL2
ð7:6Þ
The critical value for e, which corresponds to either q1 or q2 equal to 0, is given by
e ¼ ecritical ¼ L
6ð7:7Þ
In order for the soil pressure to be compressive throughout the footing area, the point ofapplication of the applied loading must be within a zone of width L/3 centered on the centroid.
When loaded outside this region, (7.2) does not apply. In this case, the triangular distribution acting
on a portion of the surface shown in Fig. 7.9d is used. The soil pressure adjusts its magnitude and
extent such that the line of action of the resultant coincides with the line of action of the column force.
The expressions for q1 takes the form
R ¼ P ¼ q1a
2B
� �+
q1 ¼2P
Ba
centroid
centroidcentroid
centroid
P
P
P
P
e
e
e
e
or
or
q1
q1
q1q1
q2q2
a
b
Fig. 7.8 Pressure
distributions
for e � ecritical.(a) e < ecritical.(b) e ¼ ecritical
7.2 An Analytical Method for Evaluating the Soil Pressure Distribution Under a Footing 481
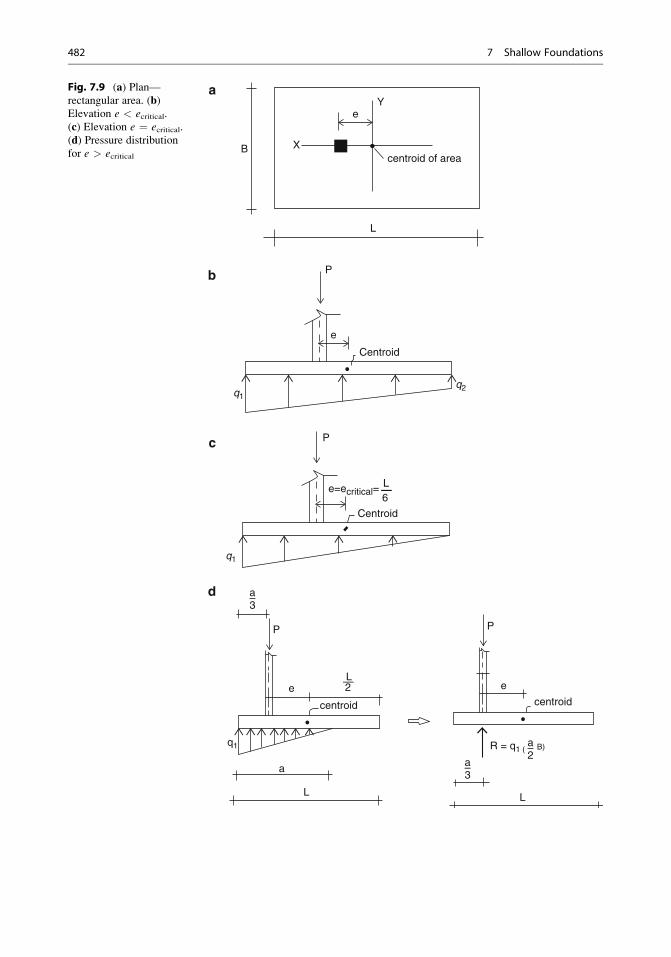
centroid of areaX
Ye
e
e e
B
L
P
P
P P
Centroid
Centroid
q1
q1
q2
e=ecritical=L—6
centroid centroid
q1
a
L L
L—2
a–3
a–2
a–3
R = q1 ( B)
a
b
c
d
Fig. 7.9 (a) Plan—rectangular area. (b)Elevation e < ecritical.(c) Elevation e ¼ ecritical.(d) Pressure distributionfor e > ecritical
482 7 Shallow Foundations
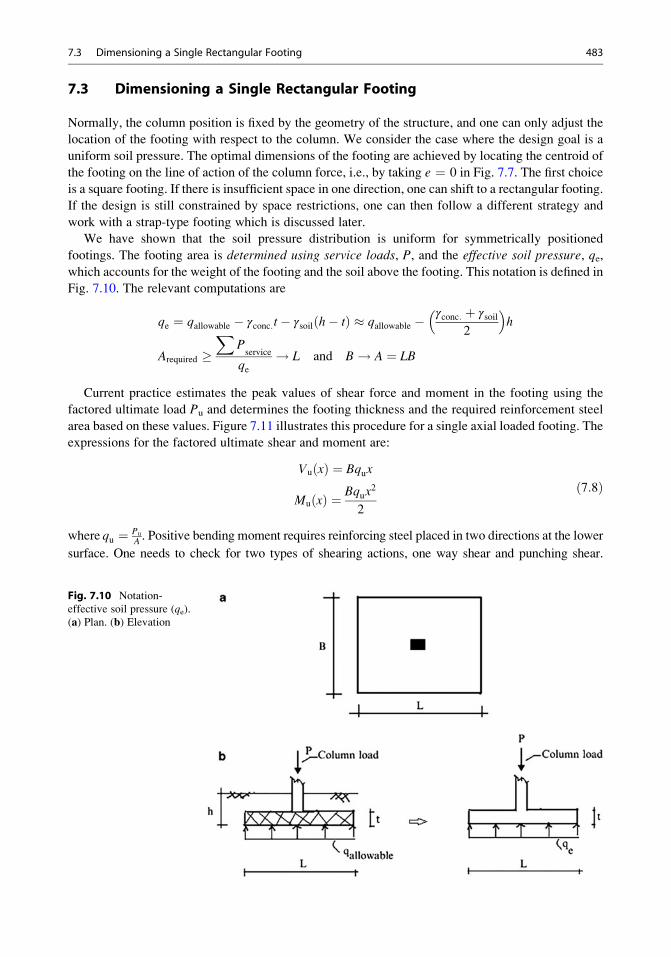
7.3 Dimensioning a Single Rectangular Footing
Normally, the column position is fixed by the geometry of the structure, and one can only adjust the
location of the footing with respect to the column. We consider the case where the design goal is a
uniform soil pressure. The optimal dimensions of the footing are achieved by locating the centroid of
the footing on the line of action of the column force, i.e., by taking e ¼ 0 in Fig. 7.7. The first choice
is a square footing. If there is insufficient space in one direction, one can shift to a rectangular footing.
If the design is still constrained by space restrictions, one can then follow a different strategy and
work with a strap-type footing which is discussed later.
We have shown that the soil pressure distribution is uniform for symmetrically positioned
footings. The footing area is determined using service loads, P, and the effective soil pressure, qe,
which accounts for the weight of the footing and the soil above the footing. This notation is defined in
Fig. 7.10. The relevant computations are
qe ¼ qallowable � γconc:t� γsoil h� tð Þ � qallowable �γconc: þ γsoil
2
� �h
Arequired X
Pservice
qe! L and B! A ¼ LB
Current practice estimates the peak values of shear force and moment in the footing using the
factored ultimate load Pu and determines the footing thickness and the required reinforcement steel
area based on these values. Figure 7.11 illustrates this procedure for a single axial loaded footing. The
expressions for the factored ultimate shear and moment are:
Vu xð Þ ¼ Bqux
Mu xð Þ ¼ Bqux2
2
ð7:8Þ
where qu ¼ Pu
A . Positive bending moment requires reinforcing steel placed in two directions at the lower
surface. One needs to check for two types of shearing actions, one way shear and punching shear.
Fig. 7.10 Notation-
effective soil pressure (qe).(a) Plan. (b) Elevation
7.3 Dimensioning a Single Rectangular Footing 483
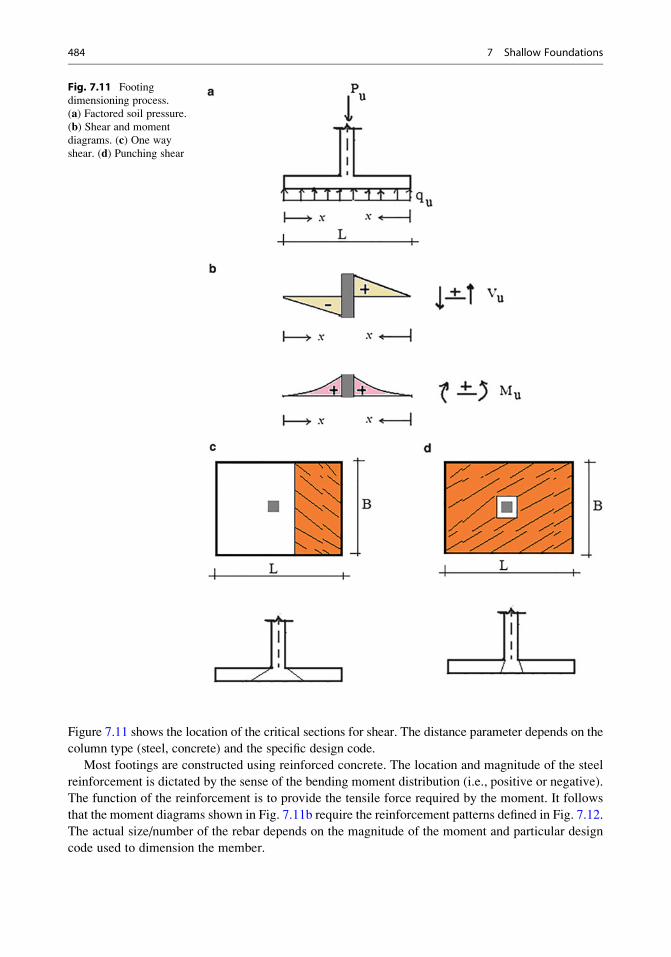
Figure 7.11 shows the location of the critical sections for shear. The distance parameter depends on the
column type (steel, concrete) and the specific design code.
Most footings are constructed using reinforced concrete. The location and magnitude of the steel
reinforcement is dictated by the sense of the bending moment distribution (i.e., positive or negative).
The function of the reinforcement is to provide the tensile force required by the moment. It follows
that the moment diagrams shown in Fig. 7.11b require the reinforcement patterns defined in Fig. 7.12.
The actual size/number of the rebar depends on the magnitude of the moment and particular design
code used to dimension the member.
Fig. 7.11 Footing
dimensioning process.
(a) Factored soil pressure.
(b) Shear and moment
diagrams. (c) One wayshear. (d) Punching shear
484 7 Shallow Foundations
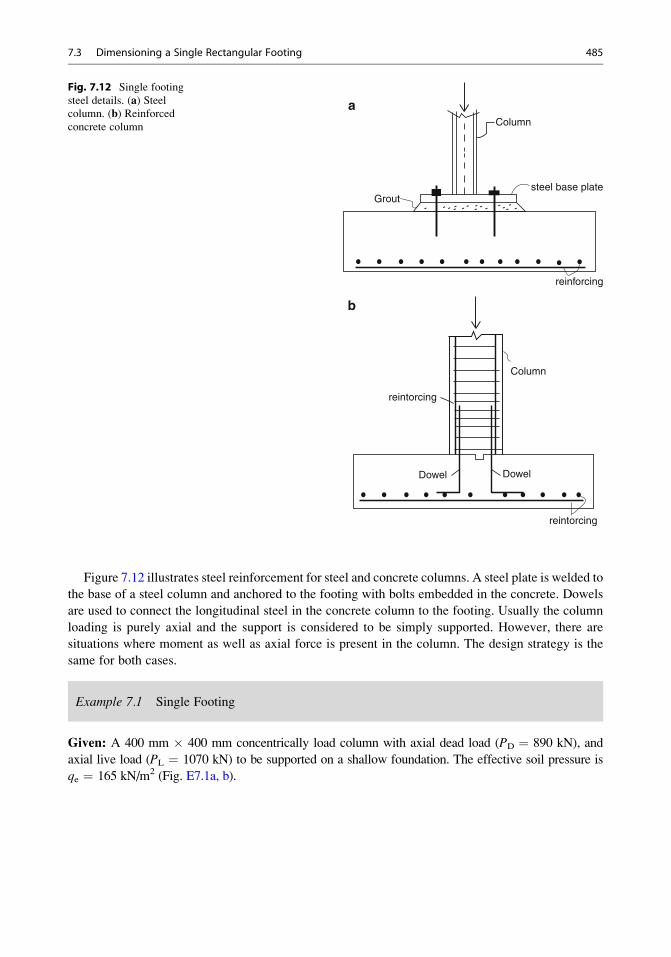
Figure 7.12 illustrates steel reinforcement for steel and concrete columns. A steel plate is welded to
the base of a steel column and anchored to the footing with bolts embedded in the concrete. Dowels
are used to connect the longitudinal steel in the concrete column to the footing. Usually the column
loading is purely axial and the support is considered to be simply supported. However, there are
situations where moment as well as axial force is present in the column. The design strategy is the
same for both cases.
Example 7.1 Single Footing
Given: A 400 mm � 400 mm concentrically load column with axial dead load (PD ¼ 890 kN), and
axial live load (PL ¼ 1070 kN) to be supported on a shallow foundation. The effective soil pressure is
qe ¼ 165 kN/m2 (Fig. E7.1a, b).
Column
reinforcing
reintorcing
reintorcing
Grout
Column
steel base plate
DowelDowel
a
b
Fig. 7.12 Single footing
steel details. (a) Steelcolumn. (b) Reinforcedconcrete column
7.3 Dimensioning a Single Rectangular Footing 485
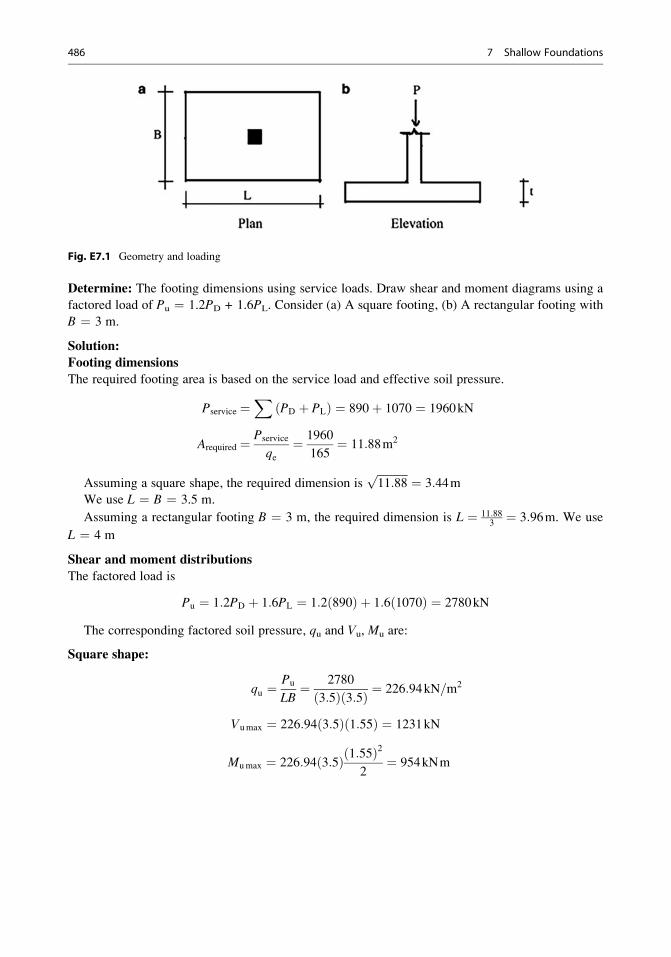
Fig. E7.1 Geometry and loading
Determine: The footing dimensions using service loads. Draw shear and moment diagrams using a
factored load of Pu ¼ 1.2PD + 1.6PL. Consider (a) A square footing, (b) A rectangular footing with
B ¼ 3 m.
Solution:
Footing dimensions
The required footing area is based on the service load and effective soil pressure.
Pservice ¼X
PD þ PLð Þ ¼ 890þ 1070 ¼ 1960kN
Arequired ¼ Pservice
qe¼ 1960
165¼ 11:88m2
Assuming a square shape, the required dimension isffiffiffiffiffiffiffiffiffiffiffi11:88p ¼ 3:44m
We use L ¼ B ¼ 3.5 m.
Assuming a rectangular footing B ¼ 3 m, the required dimension is L ¼ 11:883¼ 3:96m. We use
L ¼ 4 m
Shear and moment distributions
The factored load is
Pu ¼ 1:2PD þ 1:6PL ¼ 1:2 890ð Þ þ 1:6 1070ð Þ ¼ 2780kN
The corresponding factored soil pressure, qu and Vu, Mu are:
Square shape:
qu ¼Pu
LB¼ 2780
3:5ð Þ 3:5ð Þ ¼ 226:94kN=m2
Vumax ¼ 226:94 3:5ð Þ 1:55ð Þ ¼ 1231kN
Mumax ¼ 226:94 3:5ð Þ 1:55ð Þ22
¼ 954kNm
486 7 Shallow Foundations
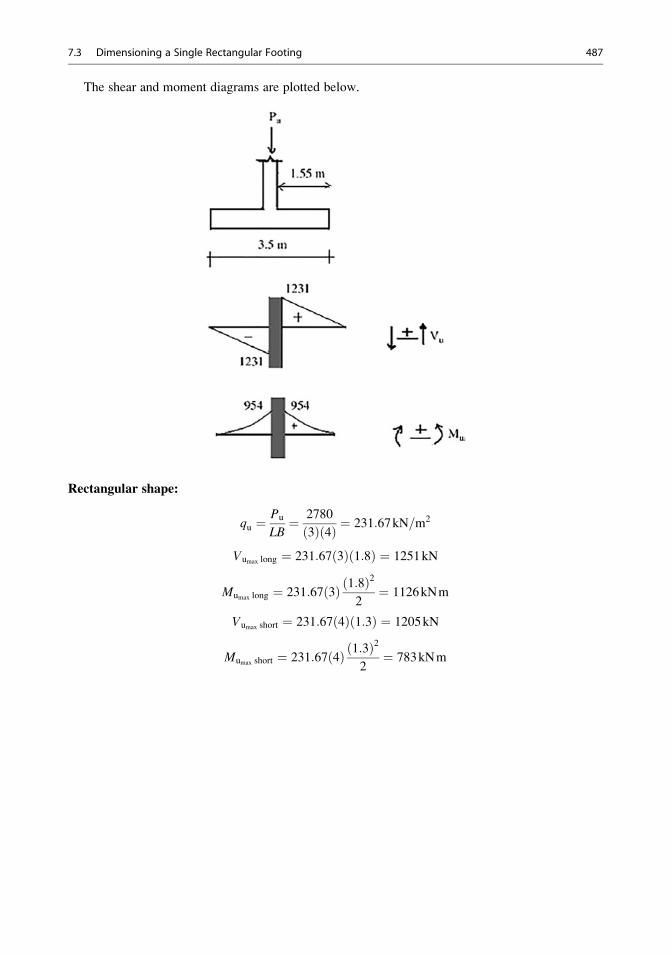
The shear and moment diagrams are plotted below.
Rectangular shape:
qu ¼Pu
LB¼ 2780
3ð Þ 4ð Þ ¼ 231:67kN=m2
Vumax long ¼ 231:67 3ð Þ 1:8ð Þ ¼ 1251kN
Mumax long ¼ 231:67 3ð Þ 1:8ð Þ22¼ 1126kNm
Vumax short ¼ 231:67 4ð Þ 1:3ð Þ ¼ 1205kN
Mumax short ¼ 231:67 4ð Þ 1:3ð Þ22¼ 783kNm
7.3 Dimensioning a Single Rectangular Footing 487
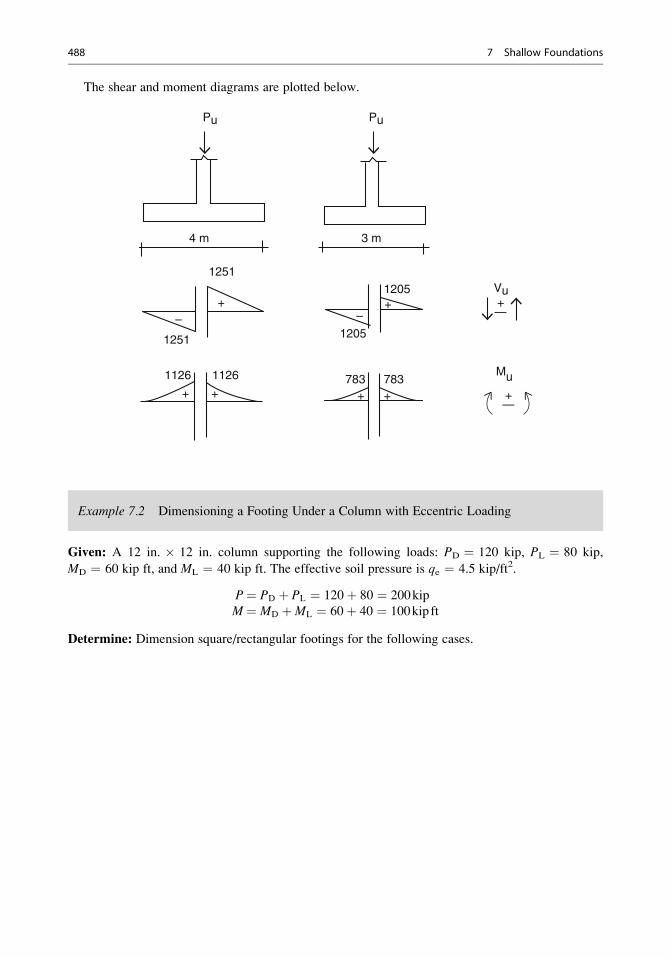
The shear and moment diagrams are plotted below.
Pu Pu
4 m
1251
1251 1205
1205
3 m
11261126 783 783
++
++++
––
+—
+—
Vu
Mu
Example 7.2 Dimensioning a Footing Under a Column with Eccentric Loading
Given: A 12 in. � 12 in. column supporting the following loads: PD ¼ 120 kip, PL ¼ 80 kip,
MD ¼ 60 kip ft, and ML ¼ 40 kip ft. The effective soil pressure is qe ¼ 4.5 kip/ft2.
P¼ PD þ PL ¼ 120þ 80 ¼ 200kip
M¼ MD þML ¼ 60þ 40 ¼ 100kip ft
Determine: Dimension square/rectangular footings for the following cases.
488 7 Shallow Foundations
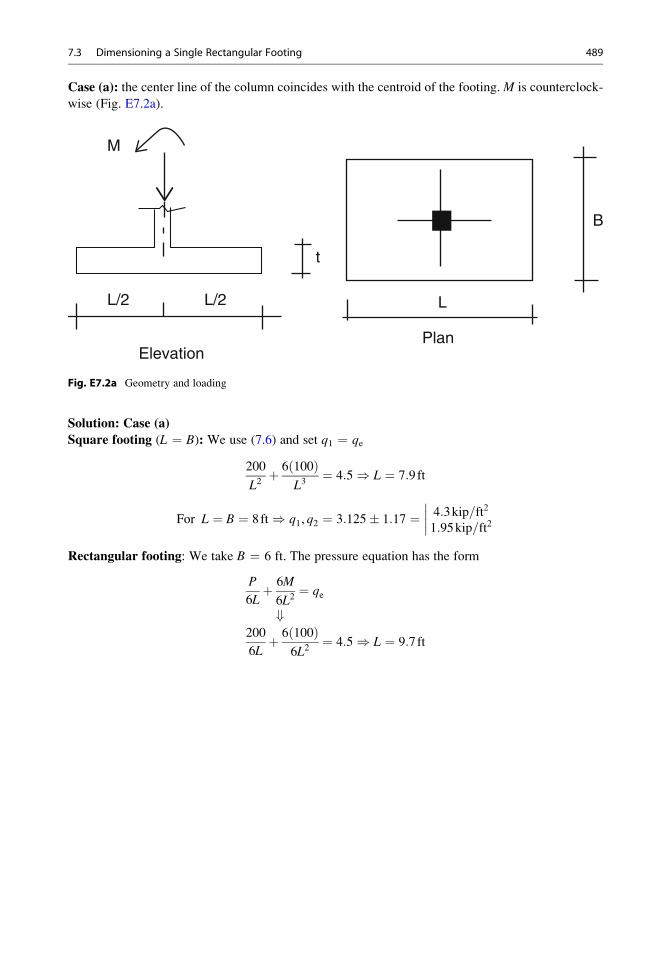
Case (a): the center line of the column coincides with the centroid of the footing.M is counterclock-
wise (Fig. E7.2a).
PlanElevation
L/2
M
B
L/2
t
L
Fig. E7.2a Geometry and loading
Solution: Case (a)
Square footing (L ¼ B): We use (7.6) and set q1 ¼ qe
200
L2þ 6 100ð Þ
L3¼ 4:5) L ¼ 7:9ft
For L ¼ B ¼ 8ft) q1, q2 ¼ 3:125� 1:17 ¼ 4:3kip=ft2
1:95kip=ft2
����Rectangular footing: We take B ¼ 6 ft. The pressure equation has the form
P
6Lþ 6M
6L2¼ qe
+200
6Lþ 6 100ð Þ
6L2¼ 4:5) L ¼ 9:7ft
7.3 Dimensioning a Single Rectangular Footing 489

For L ¼ 10ft and B ¼ 6ft) q1, q2 ¼ 3:33� 1:0 ¼ 4:33kip=ft2
2:33kip=ft2
����
Case (b): the center line of the column is 3 ft from the property line. M is clockwise (Fig. E7.2b).
P
M
property line
3 ft
Elevation
L
t
e 3 ft e
L
B
Plan
L/2
Fig. E7.2b Geometry and loading
Solution: Case (b) We position the centroid of the footing so that it is on the line of action of the
resultant force. The location of the resultant is
490 7 Shallow Foundations
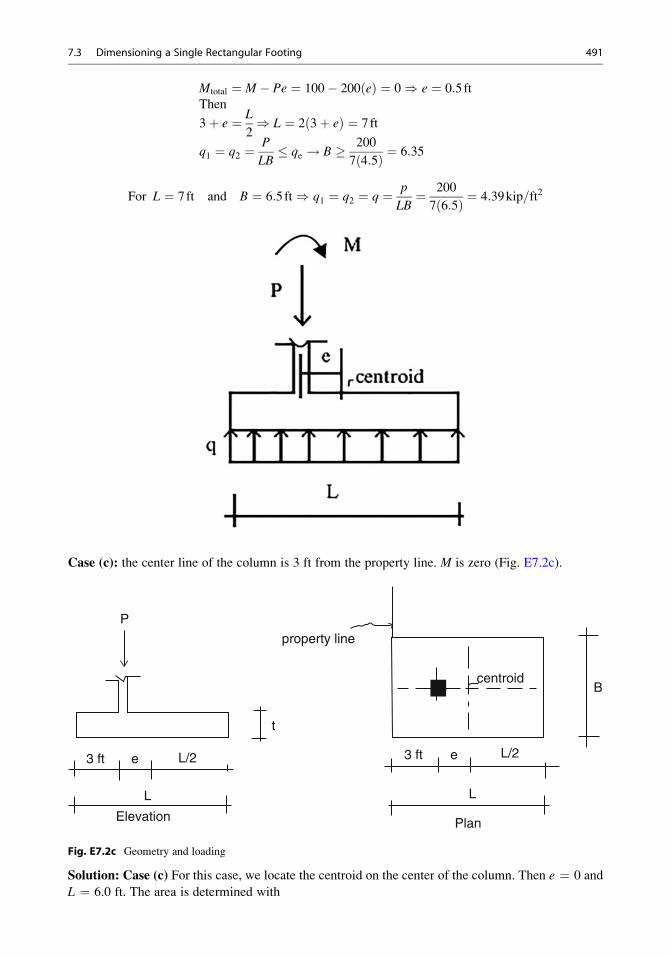
Mtotal ¼ M � Pe ¼ 100� 200 eð Þ ¼ 0) e ¼ 0:5ftThen
3þ e ¼ L
2) L ¼ 2 3þ eð Þ ¼ 7ft
q1 ¼ q2 ¼P
LB� qe ! B 200
7 4:5ð Þ ¼ 6:35
For L ¼ 7ft and B ¼ 6:5ft) q1 ¼ q2 ¼ q ¼ p
LB¼ 200
7 6:5ð Þ ¼ 4:39kip=ft2
Case (c): the center line of the column is 3 ft from the property line. M is zero (Fig. E7.2c).
P
property line
centroid
3 ft
Elevation
L
L/2
t
e 3 ft e
L
B
Plan
L/2
Fig. E7.2c Geometry and loading
Solution: Case (c) For this case, we locate the centroid on the center of the column. Then e ¼ 0 and
L ¼ 6.0 ft. The area is determined with
7.3 Dimensioning a Single Rectangular Footing 491
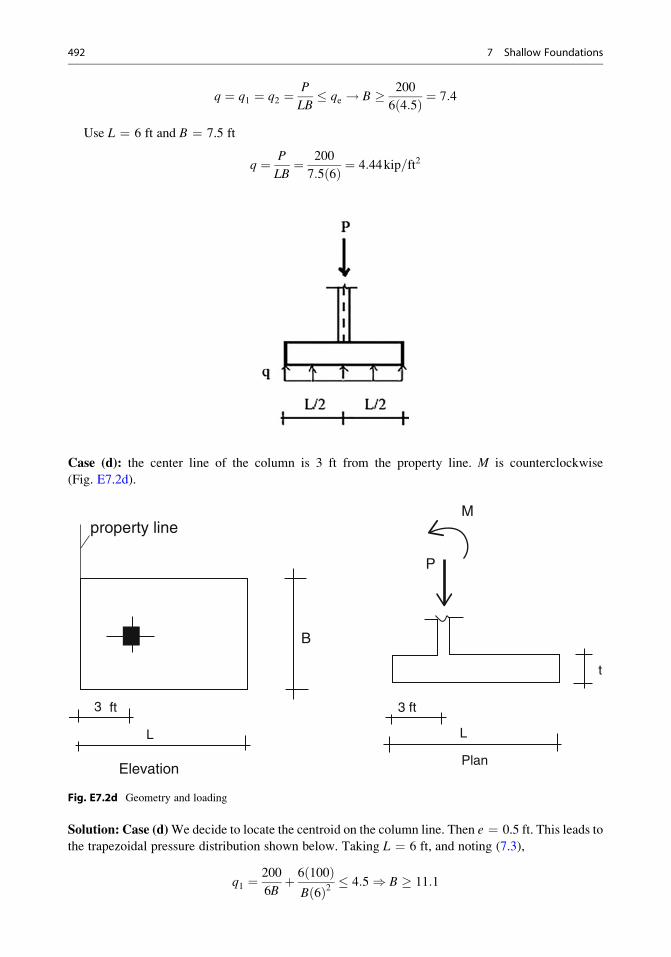
q ¼ q1 ¼ q2 ¼P
LB� qe ! B 200
6 4:5ð Þ ¼ 7:4
Use L ¼ 6 ft and B ¼ 7.5 ft
q ¼ P
LB¼ 200
7:5 6ð Þ ¼ 4:44kip=ft2
Case (d): the center line of the column is 3 ft from the property line. M is counterclockwise
(Fig. E7.2d).
property line
3
Elevation
L
B
P
M
3 ft
t
L
Plan
ft
Fig. E7.2d Geometry and loading
Solution: Case (d)We decide to locate the centroid on the column line. Then e ¼ 0.5 ft. This leads to
the trapezoidal pressure distribution shown below. Taking L ¼ 6 ft, and noting (7.3),
q1 ¼200
6Bþ 6 100ð Þ
B 6ð Þ2 � 4:5) B 11:1
492 7 Shallow Foundations
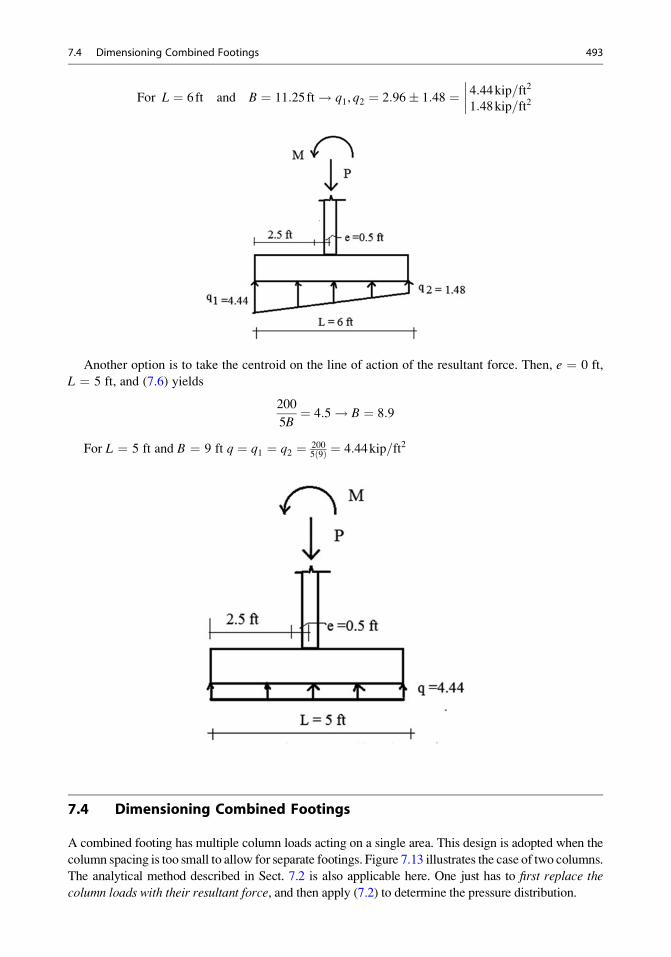
For L ¼ 6ft and B ¼ 11:25ft! q1, q2 ¼ 2:96� 1:48 ¼ 4:44kip=ft2
1:48kip=ft2
����
Another option is to take the centroid on the line of action of the resultant force. Then, e ¼ 0 ft,
L ¼ 5 ft, and (7.6) yields
200
5B¼ 4:5! B ¼ 8:9
For L ¼ 5 ft and B ¼ 9 ft q ¼ q1 ¼ q2 ¼ 2005 9ð Þ ¼ 4:44kip=ft2
7.4 Dimensioning Combined Footings
A combined footing has multiple column loads acting on a single area. This design is adopted when the
column spacing is too small to allow for separate footings. Figure 7.13 illustrates the case of two columns.
The analytical method described in Sect. 7.2 is also applicable here. One just has to first replace the
column loads with their resultant force, and then apply (7.2) to determine the pressure distribution.
7.4 Dimensioning Combined Footings 493
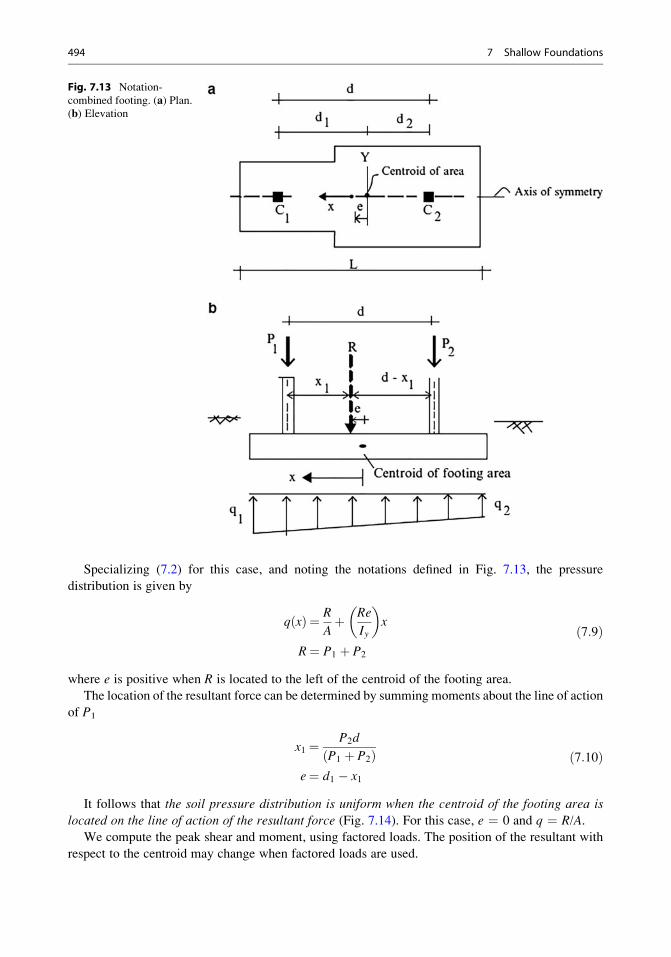
Specializing (7.2) for this case, and noting the notations defined in Fig. 7.13, the pressure
distribution is given by
q xð Þ ¼ R
Aþ Re
Iy
� �x
R¼ P1 þ P2
ð7:9Þ
where e is positive when R is located to the left of the centroid of the footing area.
The location of the resultant force can be determined by summing moments about the line of action
of P1
x1 ¼ P2d
P1 þ P2ð Þe¼ d1 � x1
ð7:10Þ
It follows that the soil pressure distribution is uniform when the centroid of the footing area is
located on the line of action of the resultant force (Fig. 7.14). For this case, e ¼ 0 and q ¼ R/A.We compute the peak shear and moment, using factored loads. The position of the resultant with
respect to the centroid may change when factored loads are used.
Fig. 7.13 Notation-
combined footing. (a) Plan.(b) Elevation
494 7 Shallow Foundations
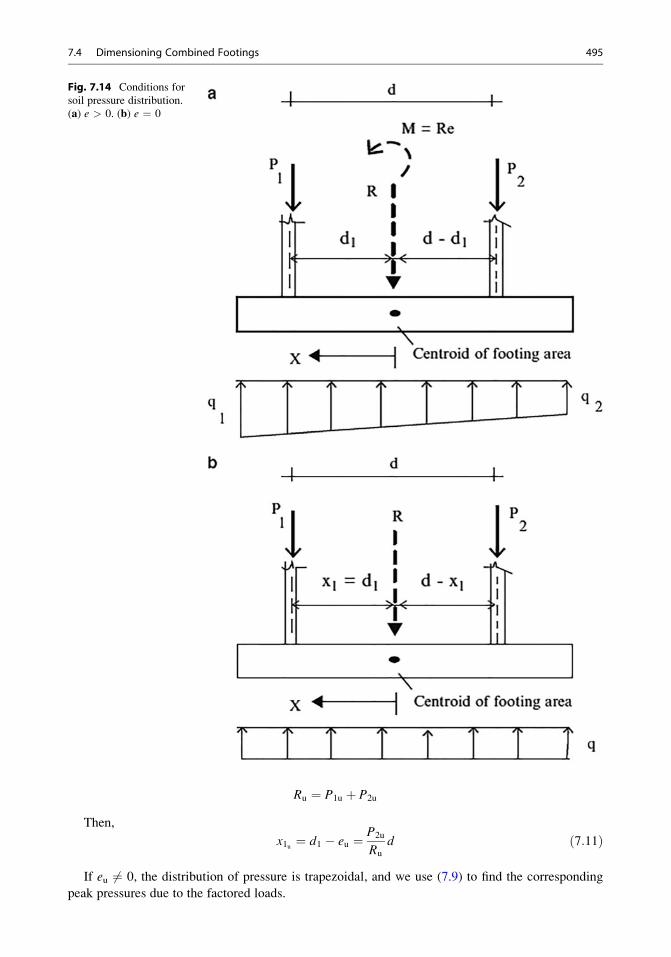
Ru ¼ P1u þ P2u
Then,
x1u ¼ d1 � eu ¼ P2u
Ru
d ð7:11Þ
If eu 6¼ 0, the distribution of pressure is trapezoidal, and we use (7.9) to find the corresponding
peak pressures due to the factored loads.
Fig. 7.14 Conditions for
soil pressure distribution.
(a) e > 0. (b) e ¼ 0
7.4 Dimensioning Combined Footings 495
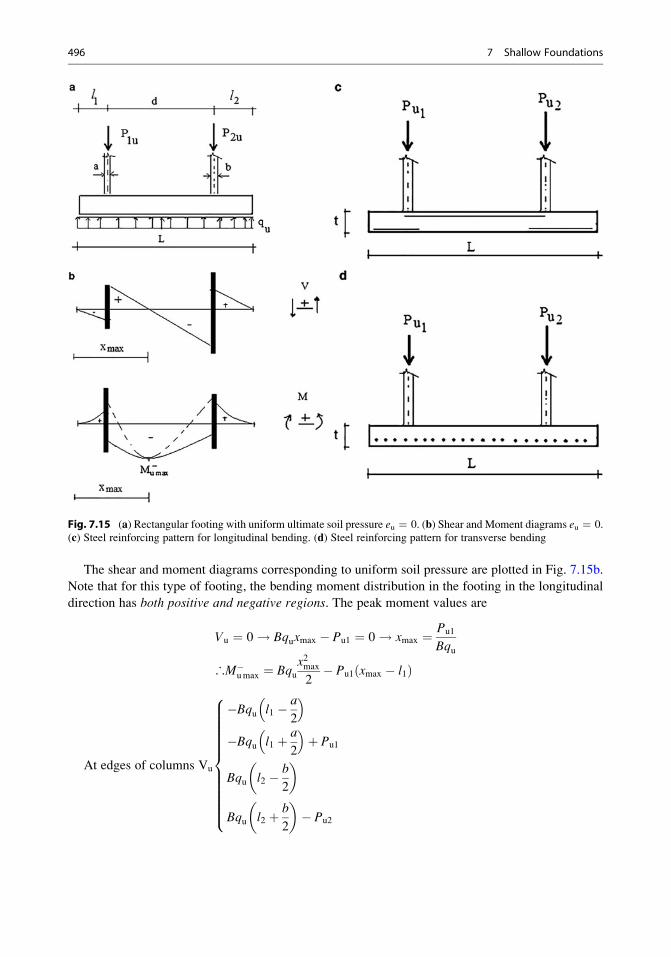
The shear and moment diagrams corresponding to uniform soil pressure are plotted in Fig. 7.15b.
Note that for this type of footing, the bending moment distribution in the footing in the longitudinal
direction has both positive and negative regions. The peak moment values are
Vu ¼ 0! Bquxmax � Pu1 ¼ 0! xmax ¼ Pu1
Bqu
∴M�umax ¼ Bqux2max
2� Pu1 xmax � l1ð Þ
At edges of columns Vu
�Bqu l1 � a
2
� ��Bqu l1 þ a
2
� �þ Pu1
Bqu l2 � b
2
� �
Bqu l2 þ b
2
� �� Pu2
8>>>>>>>>>>><>>>>>>>>>>>:
Fig. 7.15 (a) Rectangular footing with uniform ultimate soil pressure eu ¼ 0. (b) Shear and Moment diagrams eu ¼ 0.
(c) Steel reinforcing pattern for longitudinal bending. (d) Steel reinforcing pattern for transverse bending
496 7 Shallow Foundations
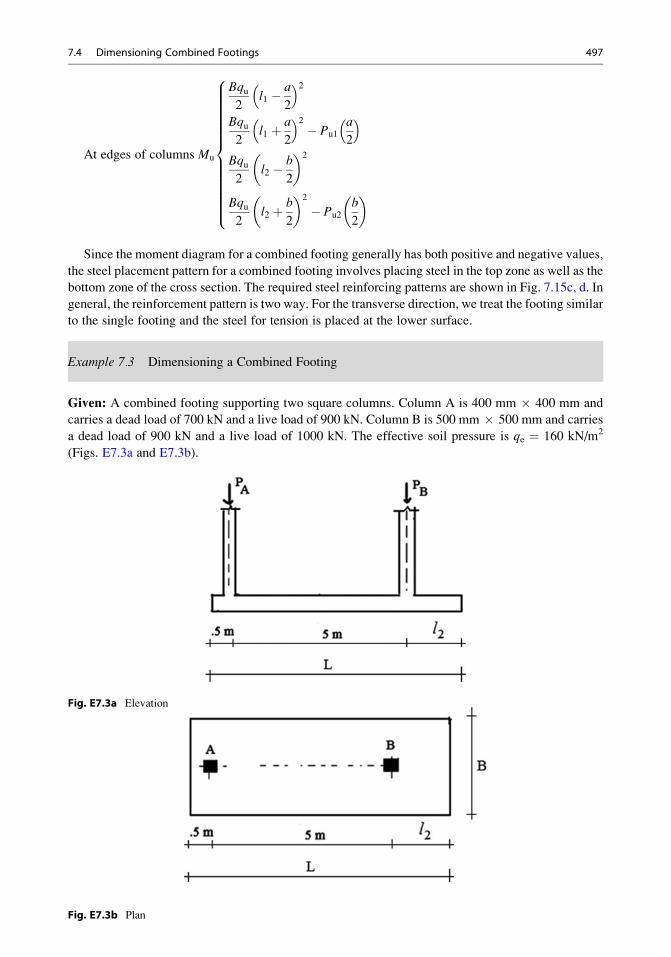
At edges of columns Mu
Bqu2
l1 � a
2
� �2Bqu2
l1 þ a
2
� �2� Pu1
a
2
� �Bqu2
l2 � b
2
� �2
Bqu2
l2 þ b
2
� �2
� Pu2
b
2
� �
8>>>>>>>>>>>>><>>>>>>>>>>>>>:
Since the moment diagram for a combined footing generally has both positive and negative values,
the steel placement pattern for a combined footing involves placing steel in the top zone as well as the
bottom zone of the cross section. The required steel reinforcing patterns are shown in Fig. 7.15c, d. In
general, the reinforcement pattern is two way. For the transverse direction, we treat the footing similar
to the single footing and the steel for tension is placed at the lower surface.
Example 7.3 Dimensioning a Combined Footing
Given: A combined footing supporting two square columns. Column A is 400 mm � 400 mm and
carries a dead load of 700 kN and a live load of 900 kN. Column B is 500 mm � 500 mm and carries
a dead load of 900 kN and a live load of 1000 kN. The effective soil pressure is qe ¼ 160 kN/m2
(Figs. E7.3a and E7.3b).
Fig. E7.3a Elevation
Fig. E7.3b Plan
7.4 Dimensioning Combined Footings 497
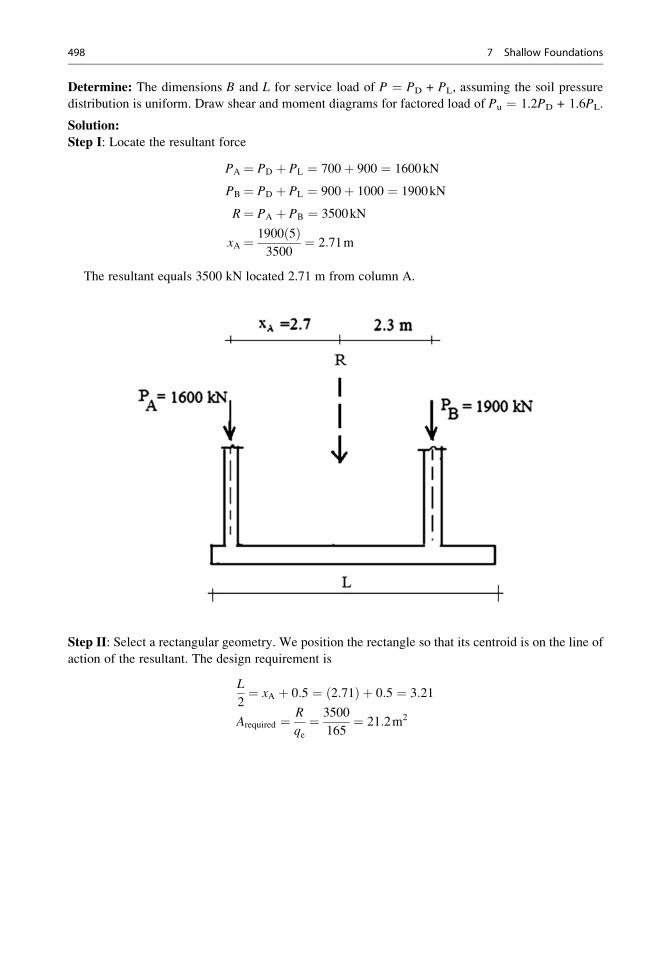
Determine: The dimensions B and L for service load of P ¼ PD + PL, assuming the soil pressure
distribution is uniform. Draw shear and moment diagrams for factored load of Pu ¼ 1.2PD + 1.6PL.
Solution:
Step I: Locate the resultant force
PA ¼ PD þ PL ¼ 700þ 900 ¼ 1600kN
PB ¼ PD þ PL ¼ 900þ 1000 ¼ 1900kN
R¼ PA þ PB ¼ 3500kN
xA ¼ 1900 5ð Þ3500
¼ 2:71m
The resultant equals 3500 kN located 2.71 m from column A.
Step II: Select a rectangular geometry. We position the rectangle so that its centroid is on the line of
action of the resultant. The design requirement is
L
2¼ xA þ 0:5 ¼ 2:71ð Þ þ 0:5 ¼ 3:21
Arequired ¼ R
qe¼ 3500
165¼ 21:2m2
498 7 Shallow Foundations
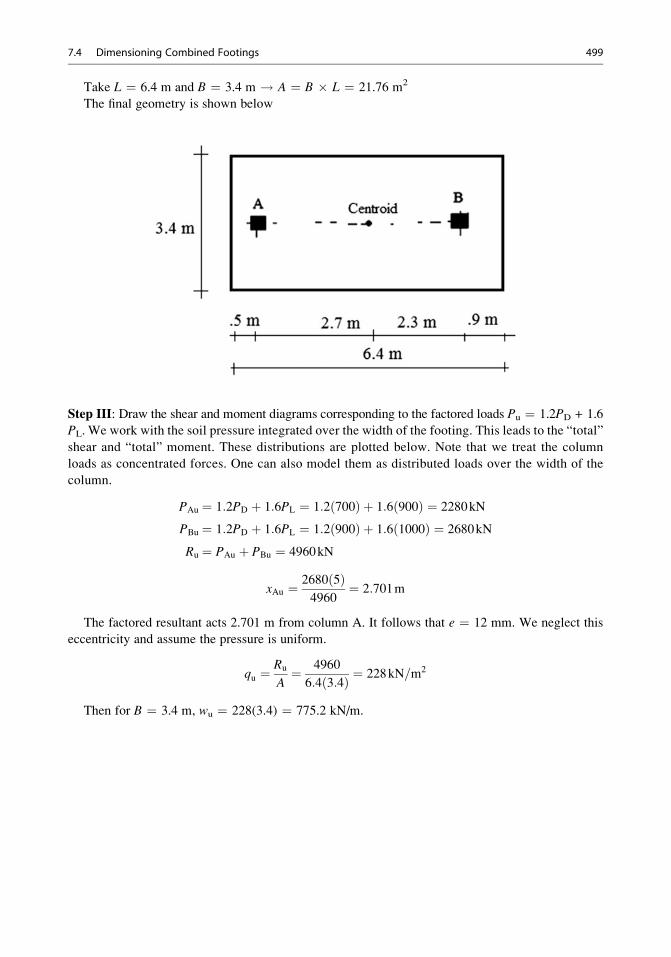
Take L ¼ 6.4 m and B ¼ 3.4 m ! A ¼ B � L ¼ 21.76 m2
The final geometry is shown below
Step III: Draw the shear and moment diagrams corresponding to the factored loads Pu ¼ 1.2PD + 1.6
PL. We work with the soil pressure integrated over the width of the footing. This leads to the “total”
shear and “total” moment. These distributions are plotted below. Note that we treat the column
loads as concentrated forces. One can also model them as distributed loads over the width of the
column.
PAu ¼ 1:2PD þ 1:6PL ¼ 1:2 700ð Þ þ 1:6 900ð Þ ¼ 2280kN
PBu ¼ 1:2PD þ 1:6PL ¼ 1:2 900ð Þ þ 1:6 1000ð Þ ¼ 2680kN
Ru ¼ PAu þ PBu ¼ 4960kN
xAu ¼ 2680 5ð Þ4960
¼ 2:701m
The factored resultant acts 2.701 m from column A. It follows that e ¼ 12 mm. We neglect this
eccentricity and assume the pressure is uniform.
qu ¼Ru
A¼ 4960
6:4 3:4ð Þ ¼ 228kN=m2
Then for B ¼ 3.4 m, wu ¼ 228(3.4) ¼ 775.2 kN/m.
7.4 Dimensioning Combined Footings 499
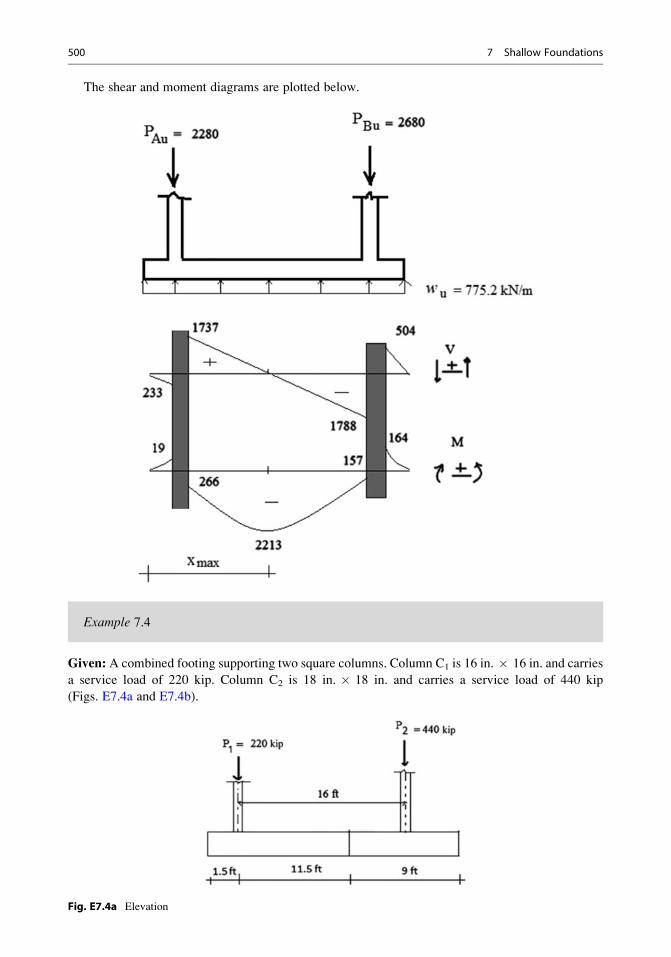
The shear and moment diagrams are plotted below.
Example 7.4
Given: A combined footing supporting two square columns. Column C1 is 16 in. � 16 in. and carries
a service load of 220 kip. Column C2 is 18 in. � 18 in. and carries a service load of 440 kip
(Figs. E7.4a and E7.4b).
Fig. E7.4a Elevation
500 7 Shallow Foundations
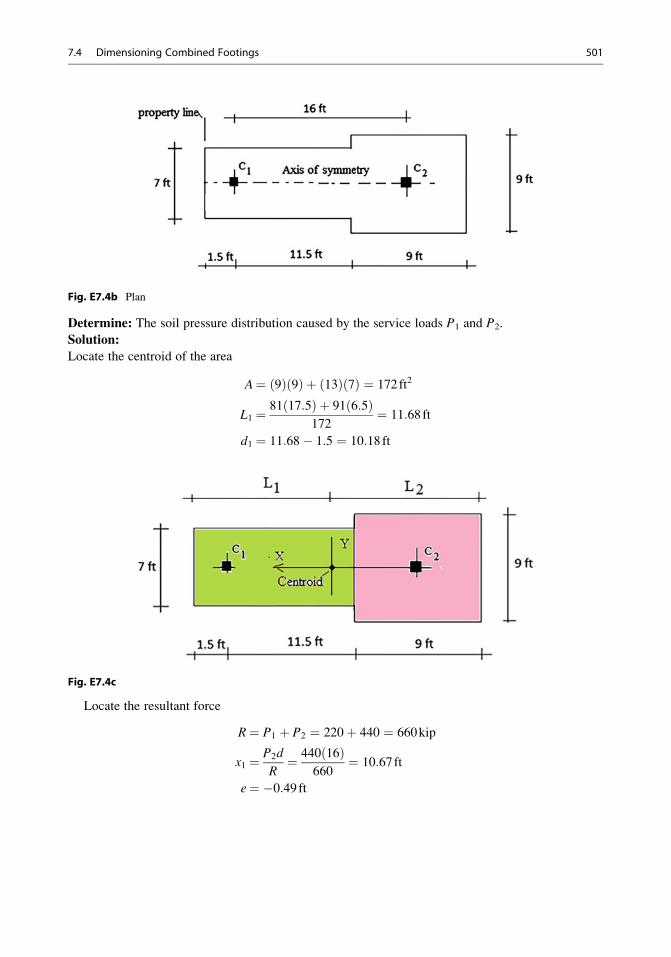
Fig. E7.4b Plan
Determine: The soil pressure distribution caused by the service loads P1 and P2.
Solution:
Locate the centroid of the area
A¼ 9ð Þ 9ð Þ þ 13ð Þ 7ð Þ ¼ 172ft2
L1 ¼ 81 17:5ð Þ þ 91 6:5ð Þ172
¼ 11:68ft
d1 ¼ 11:68� 1:5 ¼ 10:18 ft
Fig. E7.4c
Locate the resultant force
R¼ P1 þ P2 ¼ 220þ 440 ¼ 660kip
x1 ¼ P2d
R¼ 440 16ð Þ
660¼ 10:67ft
e¼ �0:49ft
7.4 Dimensioning Combined Footings 501
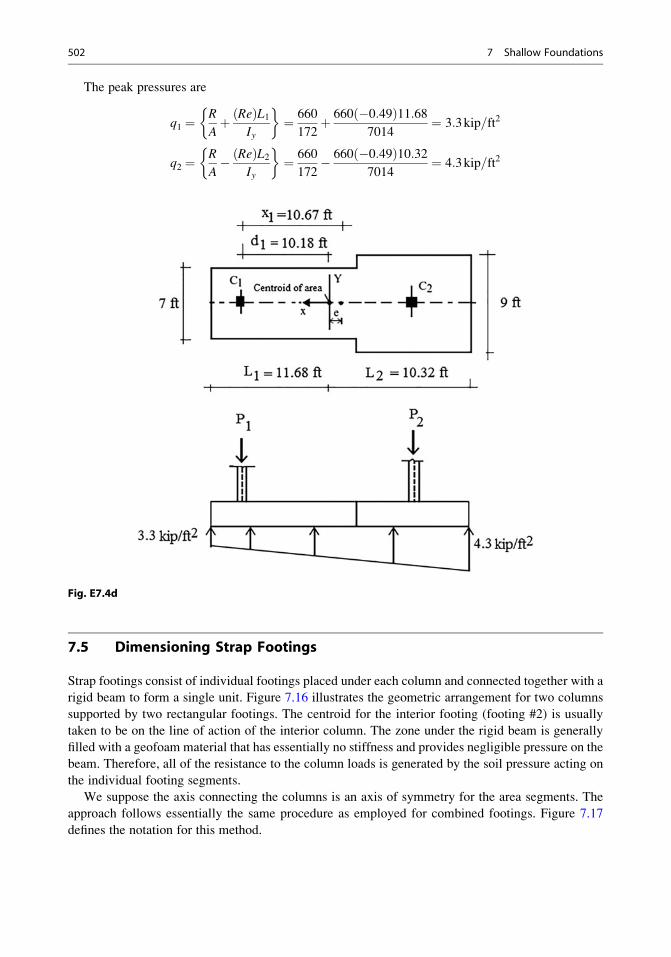
The peak pressures are
q1 ¼R
Aþ Reð ÞL1
Iy
�¼ 660
172þ 660 �0:49ð Þ11:68
7014¼ 3:3kip=ft2
q2 ¼R
A� Reð ÞL2
Iy
�¼ 660
172� 660 �0:49ð Þ10:32
7014¼ 4:3kip=ft2
Fig. E7.4d
7.5 Dimensioning Strap Footings
Strap footings consist of individual footings placed under each column and connected together with a
rigid beam to form a single unit. Figure 7.16 illustrates the geometric arrangement for two columns
supported by two rectangular footings. The centroid for the interior footing (footing #2) is usually
taken to be on the line of action of the interior column. The zone under the rigid beam is generally
filled with a geofoam material that has essentially no stiffness and provides negligible pressure on the
beam. Therefore, all of the resistance to the column loads is generated by the soil pressure acting on
the individual footing segments.
We suppose the axis connecting the columns is an axis of symmetry for the area segments. The
approach follows essentially the same procedure as employed for combined footings. Figure 7.17
defines the notation for this method.
502 7 Shallow Foundations
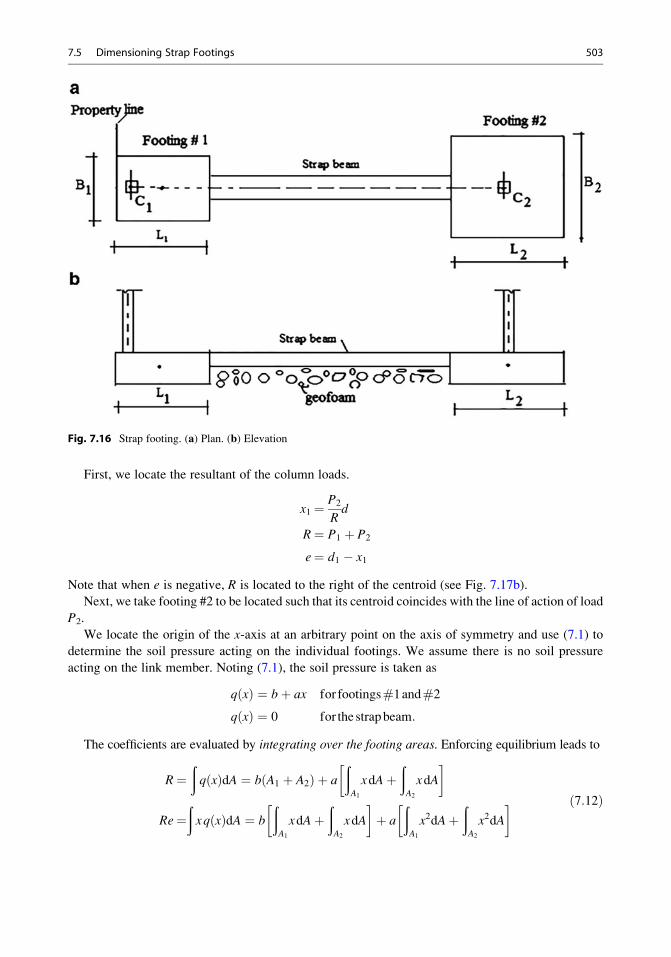
First, we locate the resultant of the column loads.
x1 ¼ P2
Rd
R¼ P1 þ P2
e¼ d1 � x1
Note that when e is negative, R is located to the right of the centroid (see Fig. 7.17b).
Next, we take footing #2 to be located such that its centroid coincides with the line of action of load
P2.
We locate the origin of the x-axis at an arbitrary point on the axis of symmetry and use (7.1) to
determine the soil pressure acting on the individual footings. We assume there is no soil pressure
acting on the link member. Noting (7.1), the soil pressure is taken as
q xð Þ ¼ bþ ax for footings#1and#2
q xð Þ ¼ 0 for the strapbeam:
The coefficients are evaluated by integrating over the footing areas. Enforcing equilibrium leads to
R¼ðq xð ÞdA ¼ b A1 þ A2ð Þ þ a
ðA1
xdAþðA2
xdA
�
Re¼ðxq xð ÞdA ¼ b
ðA1
xdAþðA2
xdA
�þ a
ðA1
x2dAþðA2
x2dA
� ð7:12Þ
Fig. 7.16 Strap footing. (a) Plan. (b) Elevation
7.5 Dimensioning Strap Footings 503
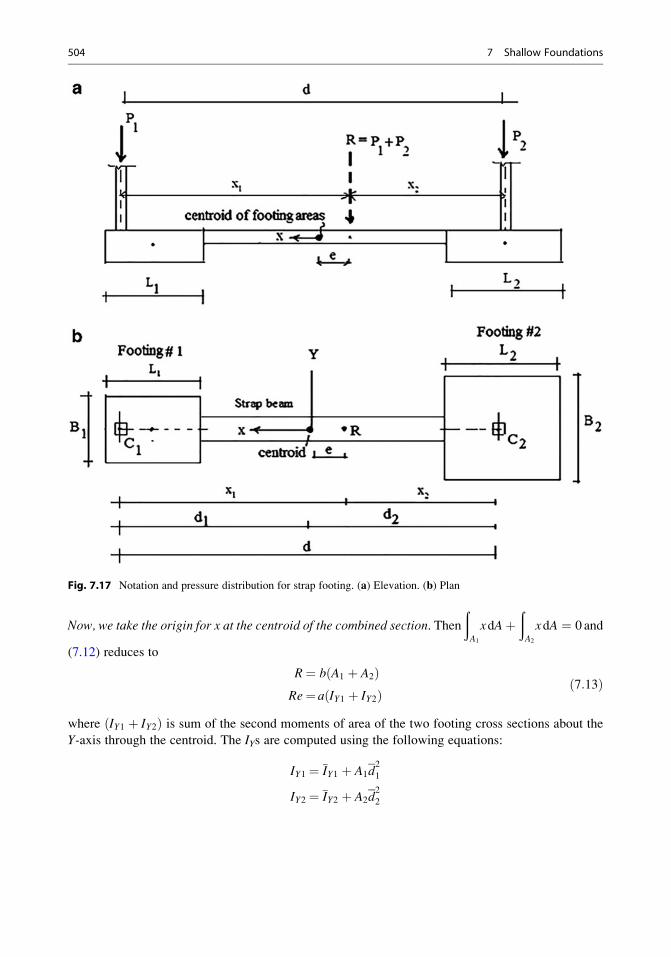
Now, we take the origin for x at the centroid of the combined section. Then
ðA1
xdAþðA2
xdA ¼ 0 and
(7.12) reduces to
R¼ b A1 þ A2ð ÞRe¼ a IY1 þ IY2ð Þ ð7:13Þ
where IY1 þ IY2ð Þ is sum of the second moments of area of the two footing cross sections about the
Y-axis through the centroid. The IYs are computed using the following equations:
IY1 ¼ IY1 þ A1d2
1
IY2 ¼ IY2 þ A2d2
2
Fig. 7.17 Notation and pressure distribution for strap footing. (a) Elevation. (b) Plan
504 7 Shallow Foundations
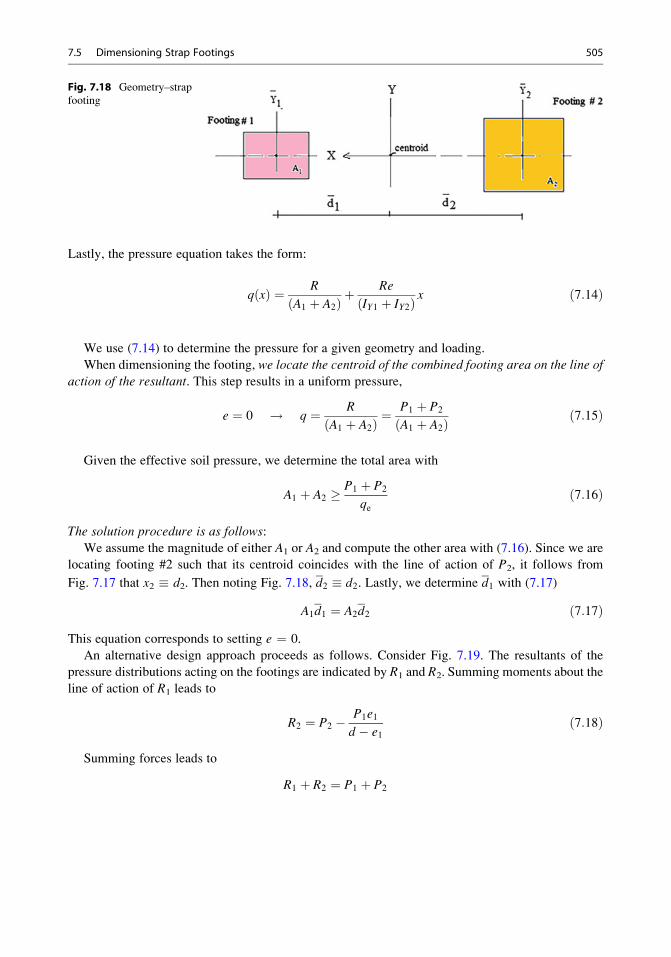
Lastly, the pressure equation takes the form:
q xð Þ ¼ R
A1 þ A2ð Þ þRe
IY1 þ IY2ð Þ x ð7:14Þ
We use (7.14) to determine the pressure for a given geometry and loading.
When dimensioning the footing, we locate the centroid of the combined footing area on the line of
action of the resultant. This step results in a uniform pressure,
e ¼ 0 ! q ¼ R
A1 þ A2ð Þ ¼P1 þ P2
A1 þ A2ð Þ ð7:15Þ
Given the effective soil pressure, we determine the total area with
A1 þ A2 P1 þ P2
qeð7:16Þ
The solution procedure is as follows:
We assume the magnitude of either A1 or A2 and compute the other area with (7.16). Since we are
locating footing #2 such that its centroid coincides with the line of action of P2, it follows from
Fig. 7.17 that x2 � d2. Then noting Fig. 7.18, d2 � d2. Lastly, we determine d1 with (7.17)
A1d1 ¼ A2d2 ð7:17ÞThis equation corresponds to setting e ¼ 0.
An alternative design approach proceeds as follows. Consider Fig. 7.19. The resultants of the
pressure distributions acting on the footings are indicated by R1 and R2. Summing moments about the
line of action of R1 leads to
R2 ¼ P2 � P1e1d � e1
ð7:18Þ
Summing forces leads to
R1 þ R2 ¼ P1 þ P2
Fig. 7.18 Geometry–strap
footing
7.5 Dimensioning Strap Footings 505
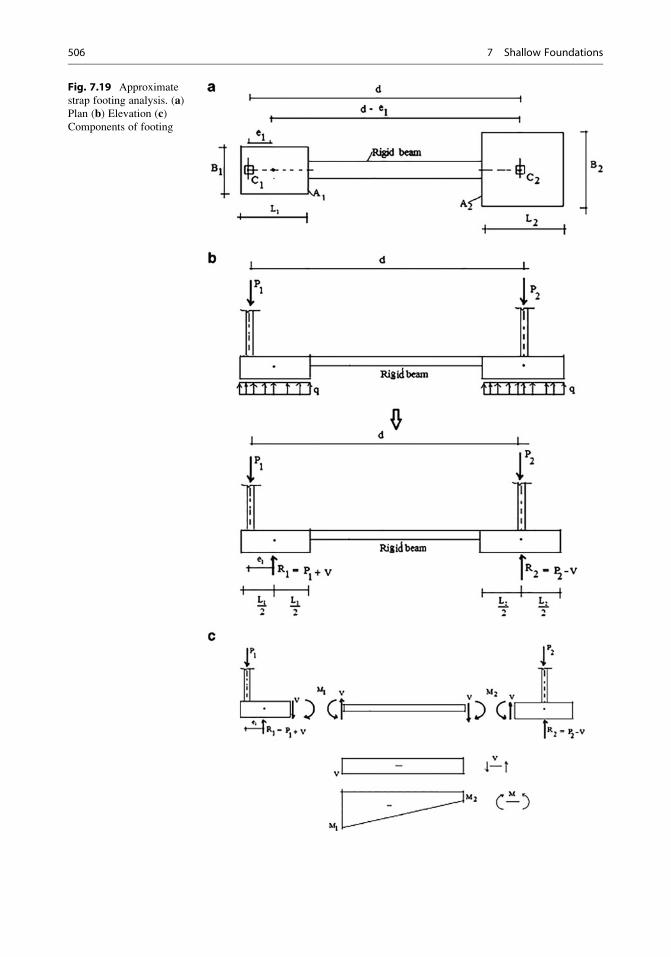
Fig. 7.19 Approximate
strap footing analysis. (a)Plan (b) Elevation (c)Components of footing
506 7 Shallow Foundations
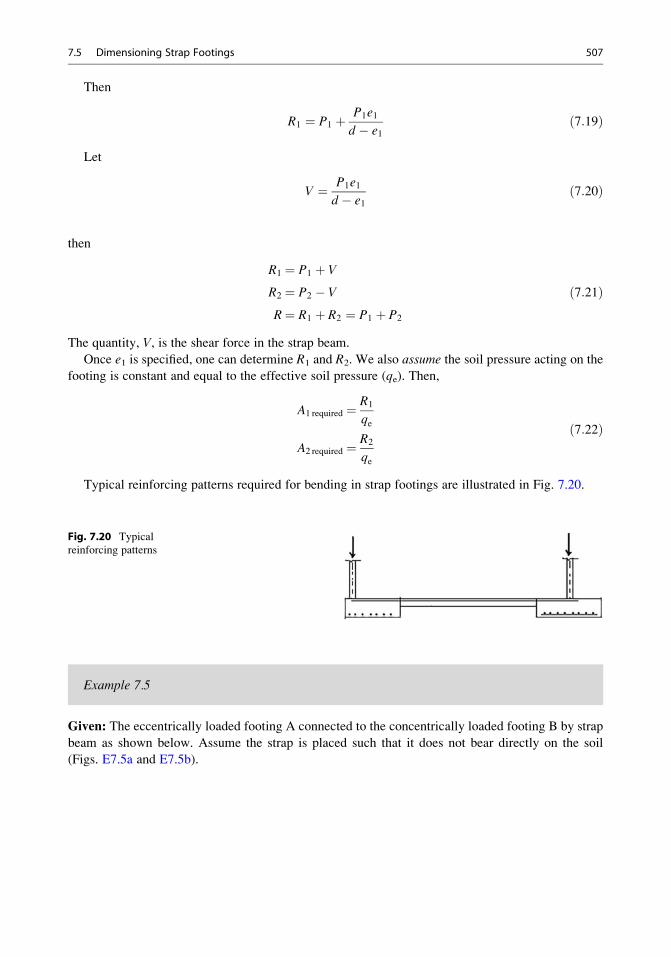
Then
R1 ¼ P1 þ P1e1d � e1
ð7:19Þ
Let
V ¼ P1e1d � e1
ð7:20Þ
then
R1 ¼ P1 þ V
R2 ¼ P2 � V
R¼ R1 þ R2 ¼ P1 þ P2
ð7:21Þ
The quantity, V, is the shear force in the strap beam.
Once e1 is specified, one can determine R1 and R2. We also assume the soil pressure acting on the
footing is constant and equal to the effective soil pressure (qe). Then,
A1 required ¼ R1
qe
A2 required ¼ R2
qe
ð7:22Þ
Typical reinforcing patterns required for bending in strap footings are illustrated in Fig. 7.20.
Example 7.5
Given: The eccentrically loaded footing A connected to the concentrically loaded footing B by strap
beam as shown below. Assume the strap is placed such that it does not bear directly on the soil
(Figs. E7.5a and E7.5b).
Fig. 7.20 Typical
reinforcing patterns
7.5 Dimensioning Strap Footings 507
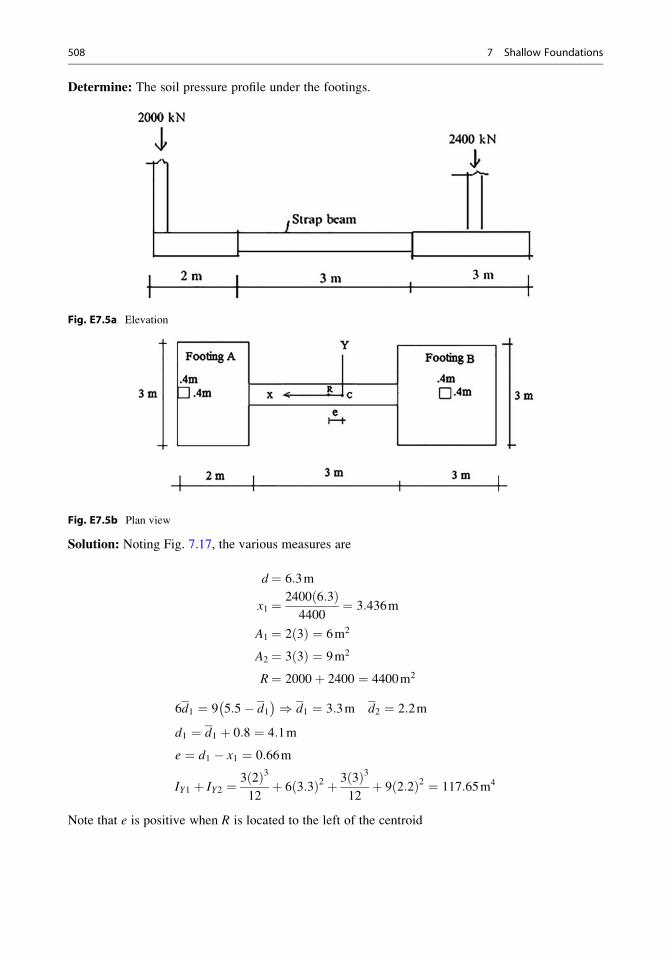
Determine: The soil pressure profile under the footings.
Fig. E7.5a Elevation
Fig. E7.5b Plan view
Solution: Noting Fig. 7.17, the various measures are
d¼ 6:3m
x1 ¼ 2400 6:3ð Þ4400
¼ 3:436m
A1 ¼ 2 3ð Þ ¼ 6m2
A2 ¼ 3 3ð Þ ¼ 9m2
R¼ 2000þ 2400 ¼ 4400m2
6d1 ¼ 9 5:5� d1� �) d1 ¼ 3:3m d2 ¼ 2:2m
d1 ¼ d1 þ 0:8 ¼ 4:1m
e ¼ d1 � x1 ¼ 0:66m
IY1 þ IY2 ¼ 3 2ð Þ312þ 6 3:3ð Þ2 þ 3 3ð Þ3
12þ 9 2:2ð Þ2 ¼ 117:65m4
Note that e is positive when R is located to the left of the centroid
508 7 Shallow Foundations
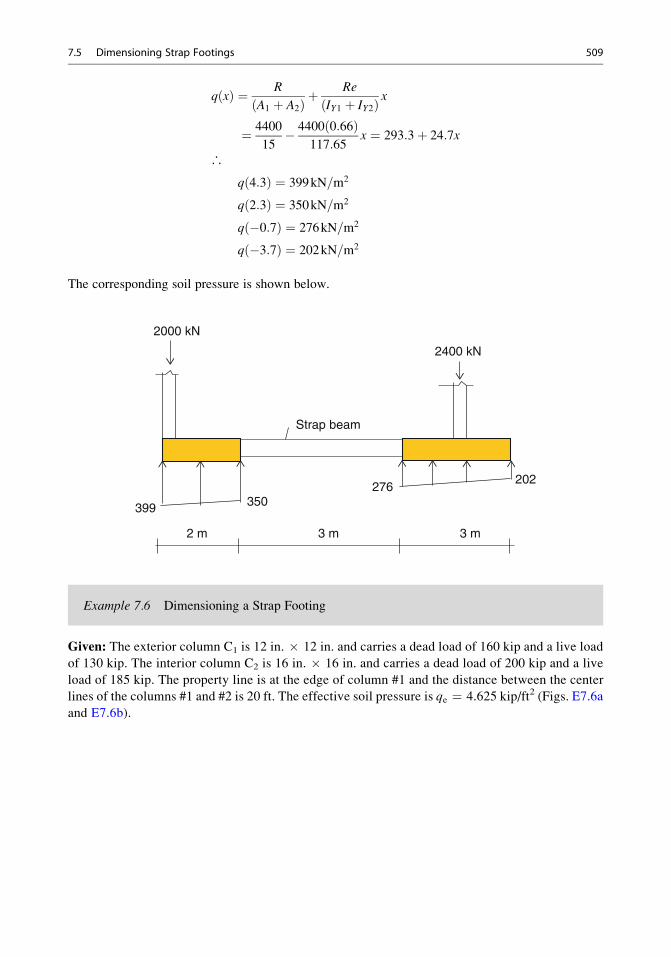
q xð Þ ¼ R
A1 þ A2ð Þ þRe
IY1 þ IY2ð Þ x
¼ 4400
15� 4400 0:66ð Þ
117:65x ¼ 293:3þ 24:7x
∴
q 4:3ð Þ ¼ 399kN=m2
q 2:3ð Þ ¼ 350kN=m2
q �0:7ð Þ ¼ 276kN=m2
q �3:7ð Þ ¼ 202kN=m2
The corresponding soil pressure is shown below.
2000 kN
2400 kN
Strap beam
399 350276
202
2 m 3 m 3 m
Example 7.6 Dimensioning a Strap Footing
Given: The exterior column C1 is 12 in. � 12 in. and carries a dead load of 160 kip and a live load
of 130 kip. The interior column C2 is 16 in. � 16 in. and carries a dead load of 200 kip and a live
load of 185 kip. The property line is at the edge of column #1 and the distance between the center
lines of the columns #1 and #2 is 20 ft. The effective soil pressure is qe ¼ 4.625 kip/ft2 (Figs. E7.6a
and E7.6b).
7.5 Dimensioning Strap Footings 509
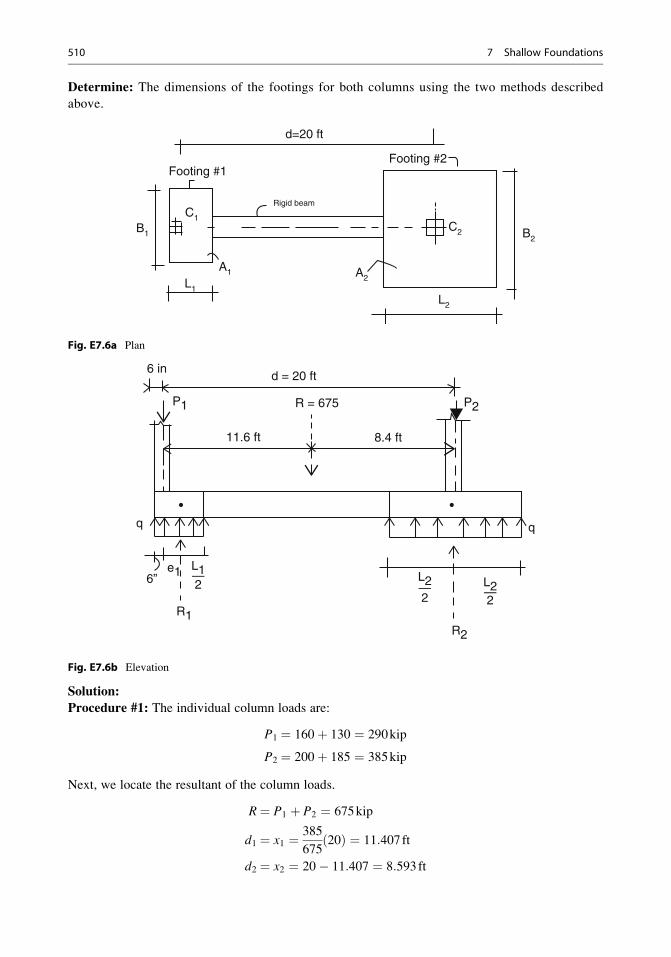
Determine: The dimensions of the footings for both columns using the two methods described
above.
d=20 ft
Footing #1Footing #2
C1
A1 A2
C2
L2
B2
L1
B1
Rigid beam
Fig. E7.6a Plan
6 ind = 20 ft
P1 P2
11.6 ft
R = 675
8.4 ft
q q
6”e1 L1 L2 L2
—— —
22 2
R1R2
Fig. E7.6b Elevation
Solution:
Procedure #1: The individual column loads are:
P1 ¼ 160þ 130 ¼ 290kip
P2 ¼ 200þ 185 ¼ 385kip
Next, we locate the resultant of the column loads.
R¼ P1 þ P2 ¼ 675kip
d1 ¼ x1 ¼ 385
67520ð Þ ¼ 11:407ft
d2 ¼ x2 ¼ 20� 11:407 ¼ 8:593ft
510 7 Shallow Foundations
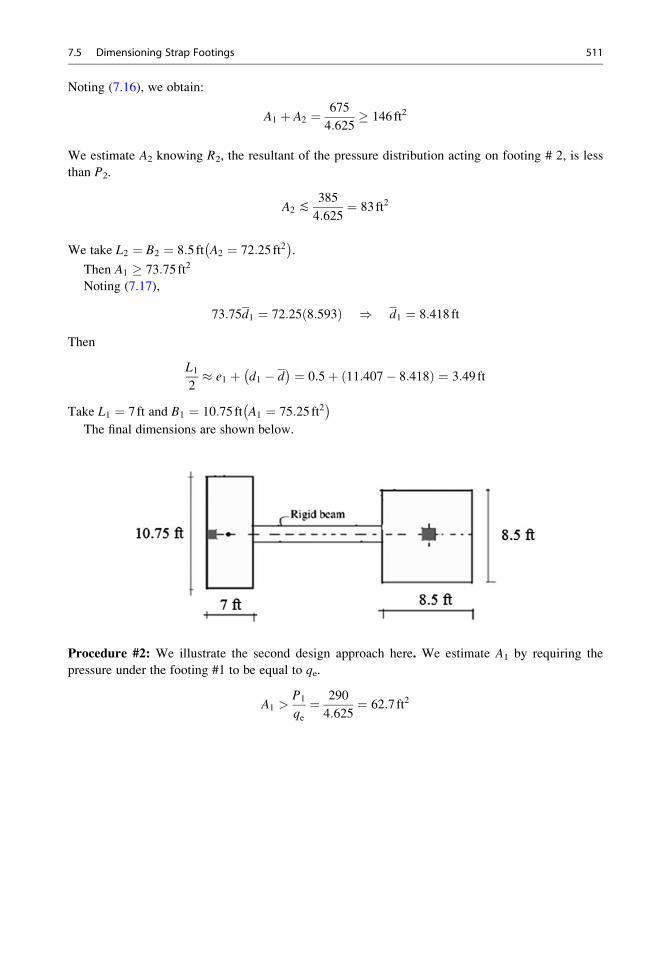
Noting (7.16), we obtain:
A1 þ A2 ¼ 675
4:625 146ft2
We estimate A2 knowing R2, the resultant of the pressure distribution acting on footing # 2, is less
than P2.
A2 ≲385
4:625¼ 83ft2
We take L2 ¼ B2 ¼ 8:5ft A2 ¼ 72:25ft2� �
.
Then A1 73:75ft2
Noting (7.17),
73:75d1 ¼ 72:25 8:593ð Þ ) d1 ¼ 8:418 ft
Then
L12� e1 þ d1 � d
� � ¼ 0:5þ 11:407� 8:418ð Þ ¼ 3:49ft
Take L1 ¼ 7ft and B1 ¼ 10:75ft A1 ¼ 75:25 ft2� �
The final dimensions are shown below.
Procedure #2: We illustrate the second design approach here. We estimate A1 by requiring the
pressure under the footing #1 to be equal to qe.
A1 >P1
qe¼ 290
4:625¼ 62:7ft2
7.5 Dimensioning Strap Footings 511
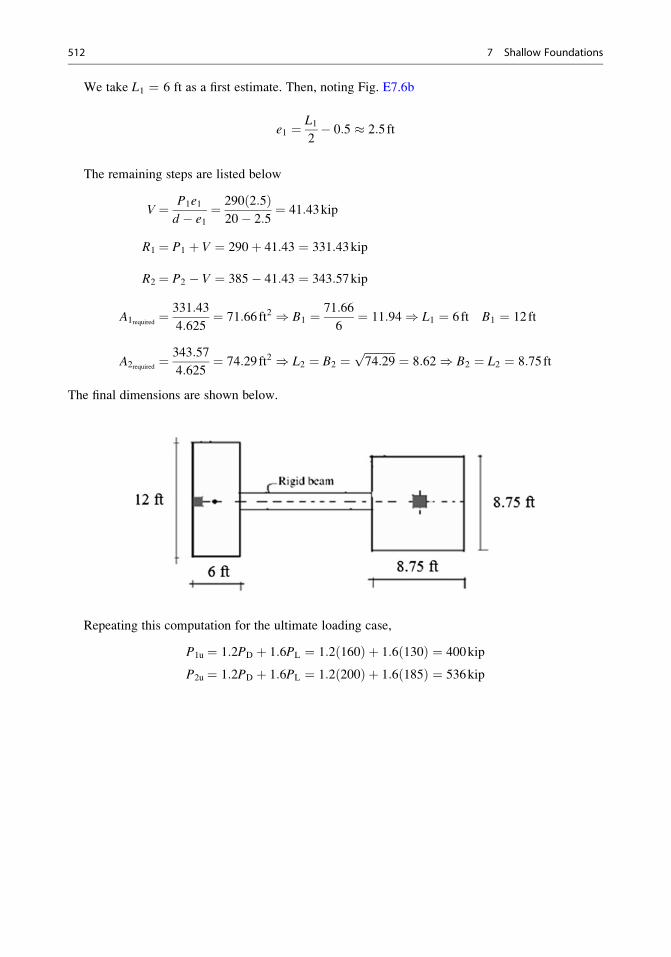
We take L1 ¼ 6 ft as a first estimate. Then, noting Fig. E7.6b
e1 ¼ L12� 0:5 � 2:5ft
The remaining steps are listed below
V ¼ P1e1d � e1
¼ 290 2:5ð Þ20� 2:5
¼ 41:43kip
R1 ¼ P1 þ V ¼ 290þ 41:43 ¼ 331:43kip
R2 ¼ P2 � V ¼ 385� 41:43 ¼ 343:57kip
A1required ¼331:43
4:625¼ 71:66ft2 ) B1 ¼ 71:66
6¼ 11:94) L1 ¼ 6ft B1 ¼ 12ft
A2required ¼343:57
4:625¼ 74:29ft2 ) L2 ¼ B2 ¼
ffiffiffiffiffiffiffiffiffiffiffi74:29p
¼ 8:62) B2 ¼ L2 ¼ 8:75ft
The final dimensions are shown below.
Repeating this computation for the ultimate loading case,
P1u ¼ 1:2PD þ 1:6PL ¼ 1:2 160ð Þ þ 1:6 130ð Þ ¼ 400kip
P2u ¼ 1:2PD þ 1:6PL ¼ 1:2 200ð Þ þ 1:6 185ð Þ ¼ 536kip
512 7 Shallow Foundations
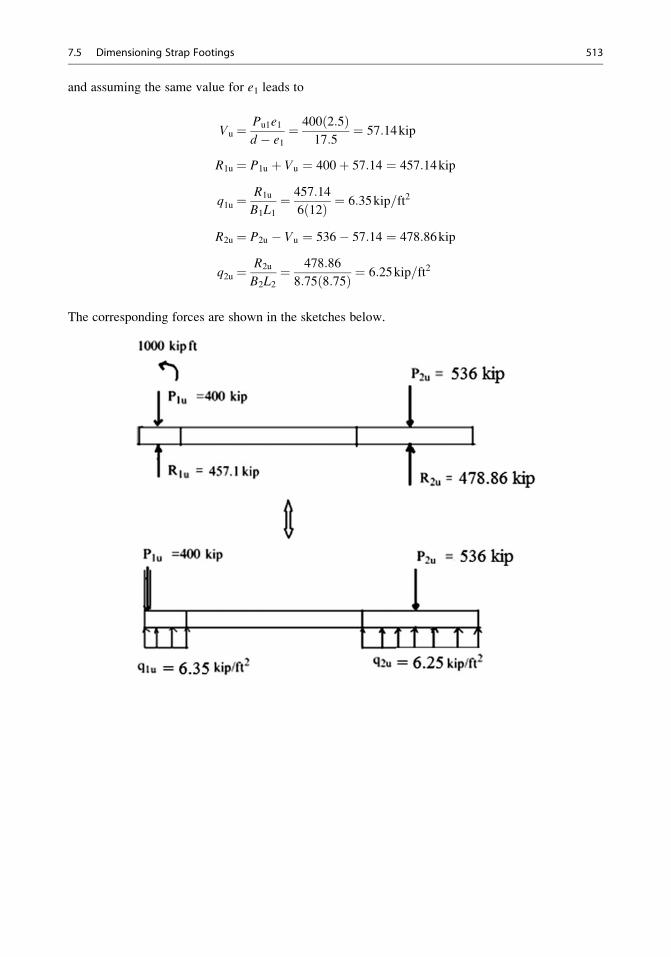
and assuming the same value for e1 leads to
Vu ¼ Pu1e1d � e1
¼ 400 2:5ð Þ17:5
¼ 57:14kip
R1u ¼ P1u þ Vu ¼ 400þ 57:14 ¼ 457:14kip
q1u ¼R1u
B1L1¼ 457:14
6 12ð Þ ¼ 6:35kip=ft2
R2u ¼ P2u � Vu ¼ 536� 57:14 ¼ 478:86kip
q2u ¼R2u
B2L2¼ 478:86
8:75 8:75ð Þ ¼ 6:25kip=ft2
The corresponding forces are shown in the sketches below.
7.5 Dimensioning Strap Footings 513
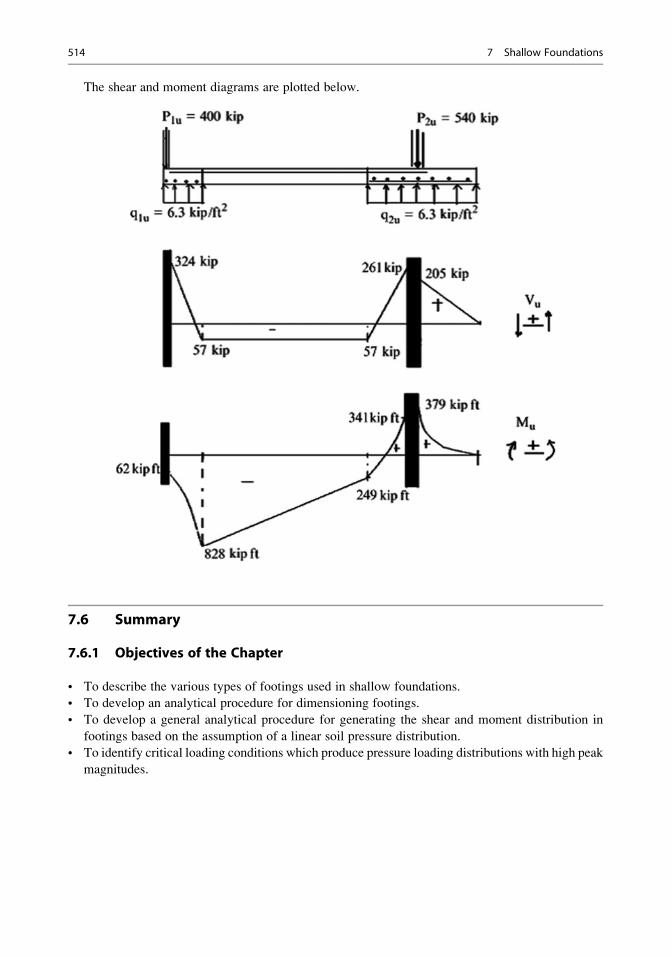
The shear and moment diagrams are plotted below.
7.6 Summary
7.6.1 Objectives of the Chapter
• To describe the various types of footings used in shallow foundations.
• To develop an analytical procedure for dimensioning footings.
• To develop a general analytical procedure for generating the shear and moment distribution in
footings based on the assumption of a linear soil pressure distribution.
• To identify critical loading conditions which produce pressure loading distributions with high peak
magnitudes.
514 7 Shallow Foundations
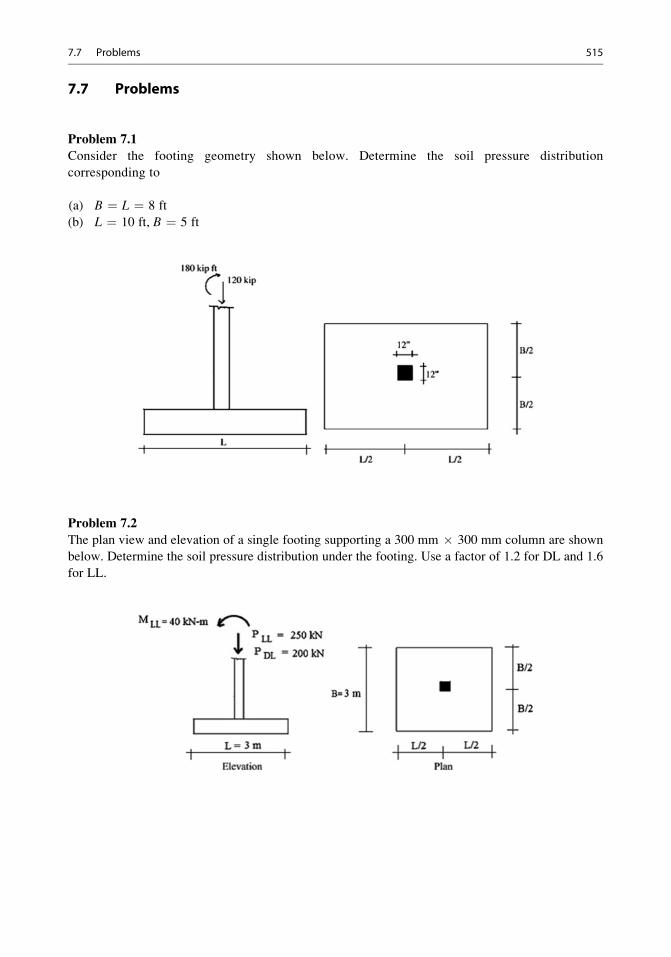
7.7 Problems
Problem 7.1
Consider the footing geometry shown below. Determine the soil pressure distribution
corresponding to
(a) B ¼ L ¼ 8 ft
(b) L ¼ 10 ft, B ¼ 5 ft
Problem 7.2
The plan view and elevation of a single footing supporting a 300 mm � 300 mm column are shown
below. Determine the soil pressure distribution under the footing. Use a factor of 1.2 for DL and 1.6
for LL.
7.7 Problems 515
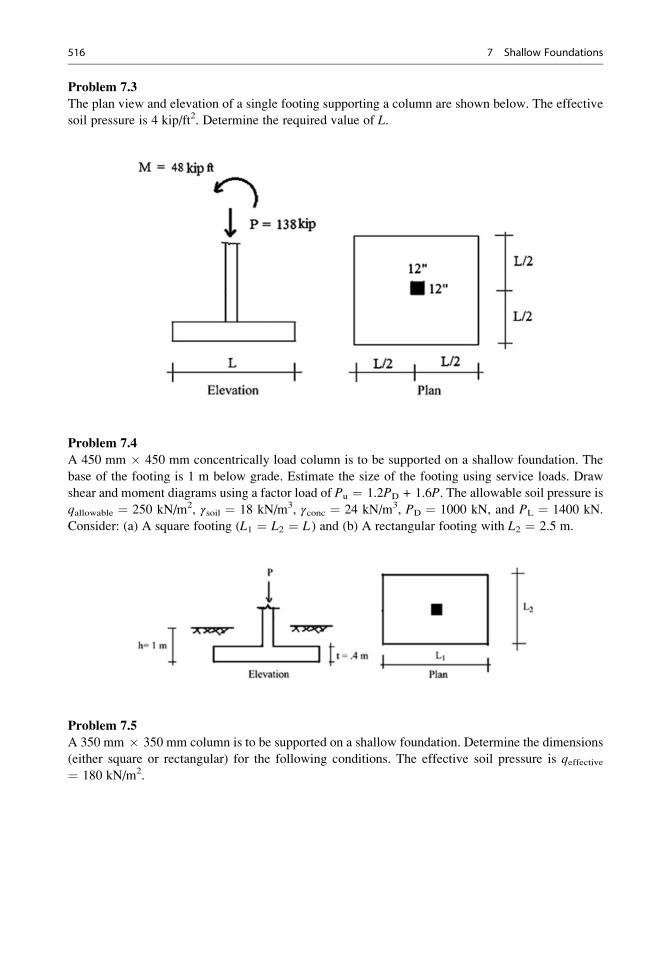
Problem 7.3
The plan view and elevation of a single footing supporting a column are shown below. The effective
soil pressure is 4 kip/ft2. Determine the required value of L.
Problem 7.4
A 450 mm � 450 mm concentrically load column is to be supported on a shallow foundation. The
base of the footing is 1 m below grade. Estimate the size of the footing using service loads. Draw
shear and moment diagrams using a factor load of Pu ¼ 1.2PD + 1.6P. The allowable soil pressure is
qallowable ¼ 250 kN/m2, γsoil ¼ 18 kN/m3, γconc ¼ 24 kN/m3, PD ¼ 1000 kN, and PL ¼ 1400 kN.
Consider: (a) A square footing (L1 ¼ L2 ¼ L ) and (b) A rectangular footing with L2 ¼ 2.5 m.
Problem 7.5
A 350 mm � 350 mm column is to be supported on a shallow foundation. Determine the dimensions
(either square or rectangular) for the following conditions. The effective soil pressure is qeffective¼ 180 kN/m2.
516 7 Shallow Foundations
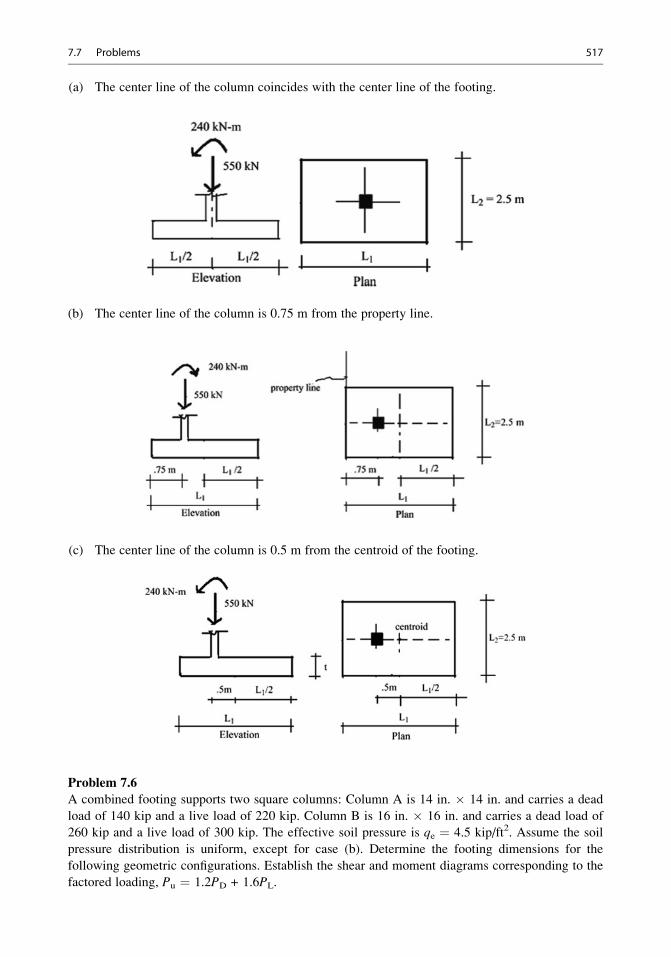
(a) The center line of the column coincides with the center line of the footing.
(b) The center line of the column is 0.75 m from the property line.
(c) The center line of the column is 0.5 m from the centroid of the footing.
Problem 7.6
A combined footing supports two square columns: Column A is 14 in. � 14 in. and carries a dead
load of 140 kip and a live load of 220 kip. Column B is 16 in. � 16 in. and carries a dead load of
260 kip and a live load of 300 kip. The effective soil pressure is qe ¼ 4.5 kip/ft2. Assume the soil
pressure distribution is uniform, except for case (b). Determine the footing dimensions for the
following geometric configurations. Establish the shear and moment diagrams corresponding to the
factored loading, Pu ¼ 1.2PD + 1.6PL.
7.7 Problems 517
Case (a):
Column A
2 ft 14 ft
L
Elevation
Axis of symmrty A
2 ft 14 ft
L
Plan
B
B
Column B
Plan
L
16 n
Axis of symmetry BA
Elevation
L
16 ft
Column A
Case (b):
Column B
B
518 7 Shallow Foundations
Case (c):
Column A Column B
a 10 ft
L
Elevation
Axis of symmetryB =10.25 ft
a 10 ft b
L
Plan
BA
b
Case (d):
Column AColumn B
Elevation
16 ft1.5 ft
B/2
BAxis of symmetry
A
B
L
16 ft1.5 ft
L
Plan
7.7 Problems 519
Case (e):
Column AColumn B
t
16 ft1.5 ft
B/2BAxis of symmetry
A
B
L
16 ft1.5 ft
L
Problem 7.7
Column A is 350 mm � 350 mm and carries a dead load of 1300 kN and a live load of 450 kN.
Column B is 450 mm � 450 mm and carries a dead load of 1400 kN and a live load of 800 kN. The
combined footing shown below is used to support these columns. Determine the soil pressure
distribution and the shear and bending moment distributions along the longitudinal direction
corresponding to the factored loading, Pu ¼ 1.2PD + 1.6PL.
520 7 Shallow Foundations
PA PB
1.5 m 3.5 m 1 m
Elevation
3 m
6 m
Plan
A B Axis of symmetry
Problem 7.8
Dimension a strap footing for the situation shown. The exterior column A is 14 in. � 14 in. and
carries a dead load of 160 kip and a live load of 130 kip; the interior column B is 18 in. � 18 in. and
carries a dead load of 200 kip and a live load of 187.5 kip; the distance between the center lines of the
columns is 18 ft. Assume the strap is placed such that it does not bear directly on the soil. Take the
effective soil pressure as qe ¼ 4.5 kip/ft2. Draw shear and moment diagrams using a factored load of
Pu ¼ 1.2PD + 1.6PL.
7.7 Problems 521
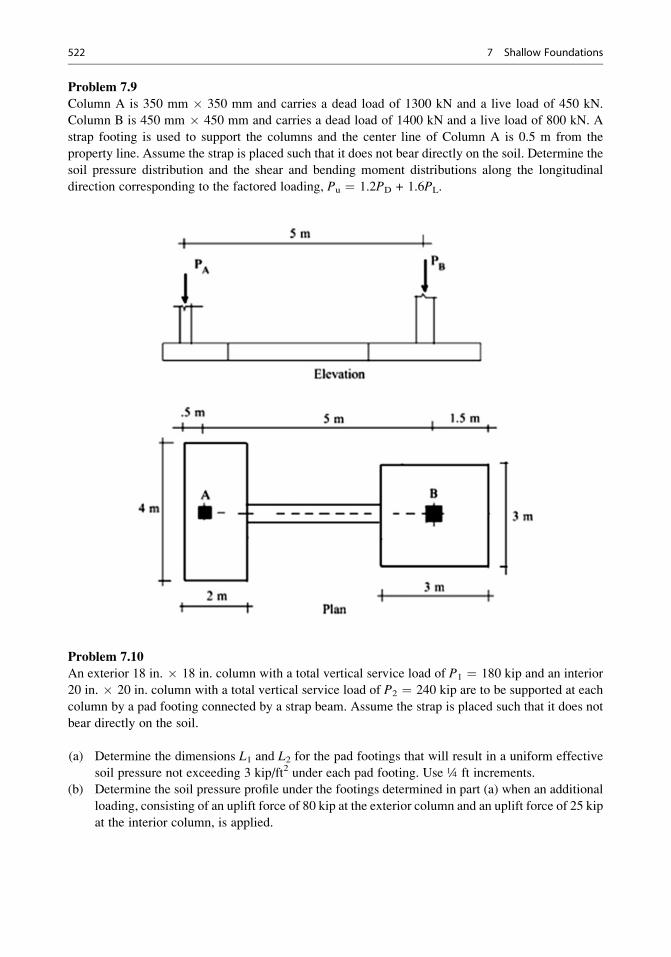
Problem 7.9
Column A is 350 mm � 350 mm and carries a dead load of 1300 kN and a live load of 450 kN.
Column B is 450 mm � 450 mm and carries a dead load of 1400 kN and a live load of 800 kN. A
strap footing is used to support the columns and the center line of Column A is 0.5 m from the
property line. Assume the strap is placed such that it does not bear directly on the soil. Determine the
soil pressure distribution and the shear and bending moment distributions along the longitudinal
direction corresponding to the factored loading, Pu ¼ 1.2PD + 1.6PL.
Problem 7.10
An exterior 18 in. � 18 in. column with a total vertical service load of P1 ¼ 180 kip and an interior
20 in. � 20 in. column with a total vertical service load of P2 ¼ 240 kip are to be supported at each
column by a pad footing connected by a strap beam. Assume the strap is placed such that it does not
bear directly on the soil.
(a) Determine the dimensions L1 and L2 for the pad footings that will result in a uniform effective
soil pressure not exceeding 3 kip/ft2 under each pad footing. Use ¼ ft increments.
(b) Determine the soil pressure profile under the footings determined in part (a) when an additional
loading, consisting of an uplift force of 80 kip at the exterior column and an uplift force of 25 kip
at the interior column, is applied.
522 7 Shallow Foundations
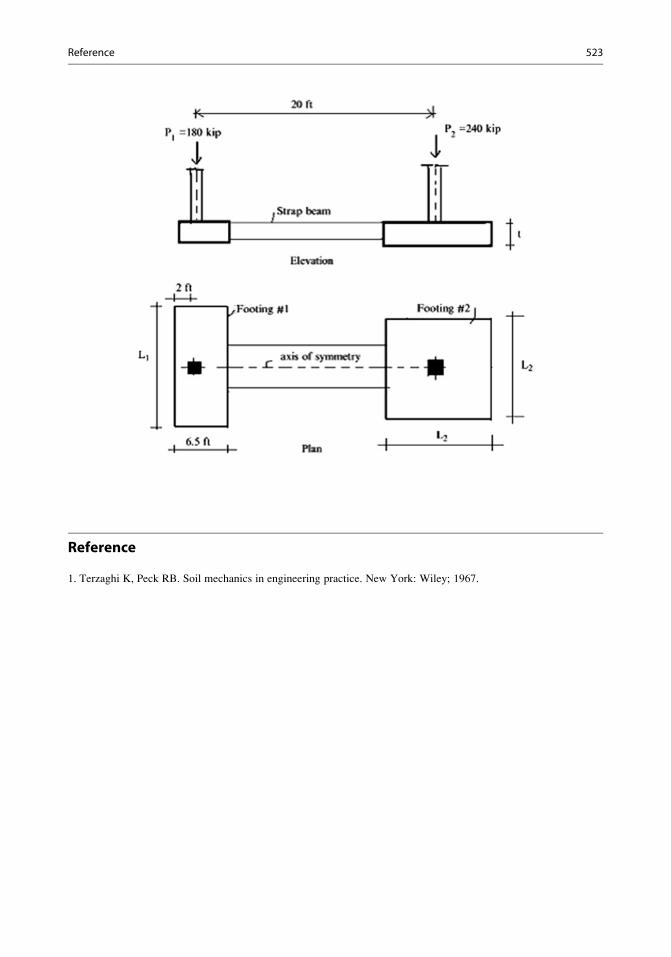
Reference
1. Terzaghi K, Peck RB. Soil mechanics in engineering practice. New York: Wiley; 1967.
Reference 523
Vertical Retaining Wall Structures 8
Abstract
Vertical wall type structures function as barriers whose purpose is to
prevent a material from entering a certain space. Typical applications
are embankment walls, bridge abutments, and underground basement
walls. Structural Engineers are responsible for the design of these
structures. The loading acting on a retaining wall is generally due to the
soil that is confined behind the wall. Various theories have been proposed
in the literature, and it appears that all the theories predict similar loading
results. In this chapter, we describe the Rankine theory which is fairly
simple to apply. We present the governing equations for various design
scenarios and illustrate their application to typical retaining structures.
The most critical concerns for retaining walls are ensuring stability with
respect to sliding and overturning, and identifying the regions of positiveand negative moment in the wall segments. Some of the material
developed in Chap. 7 is also applicable for retaining wall structures.
8.1 Introduction
8.1.1 Types of Retaining Walls
Vertical retaining wall structures are used to form a vertical barrier that retains a fluid or other
material such as soil. Figure 8.1 illustrates different types of vertical retaining wall structures. They
are constructed using unreinforced concrete for gravity walls and reinforced concrete for cantilever
walls and bridge abutments. The base of the wall/footing is placed below the frost level. The material
behind the wall is called backfill and is composed of granular material such as sand.
8.1.2 Gravity Walls
A free body diagram of a gravity structure is shown in Fig. 8.2. The force acting on the structure due
to the backfill material is represented by P; the forces provided by the soil at the base are represented
# Springer International Publishing Switzerland 2016
J.J. Connor, S. Faraji, Fundamentals of Structural Engineering,DOI 10.1007/978-3-319-24331-3_8
525
by the friction force F and the normal force N; lastly, the weight of the structure is represented byW.
The end points of the base are called the “toe” and the “heel.” We observe that P tends to overturn the
wall about its toe and also to slide the structure in the horizontal direction. The overturning tendency
is resisted by the gravity force W which has a counterbalancing moment about the toe. Sliding is
resisted by the friction which is proportional to the normal force. Therefore, since both resisting
mechanisms are due to gravity, this type of structure is called a “Gravity” structure.
Of critical concern are the sliding and overturning failure modes. The key design parameter is the
length of the base. We need to select this parameter such that the factors of safety for sliding and
overturning are sufficient to ensure global stability of the structure.
Fig. 8.1 Vertical retaining wall structures. (a) Gravity dam. (b) Cantilever retaining wall. (c) Bridge abutment.
(d) Underground basement
Fig. 8.2 Free body diagram—gravity structure
526 8 Vertical Retaining Wall Structures
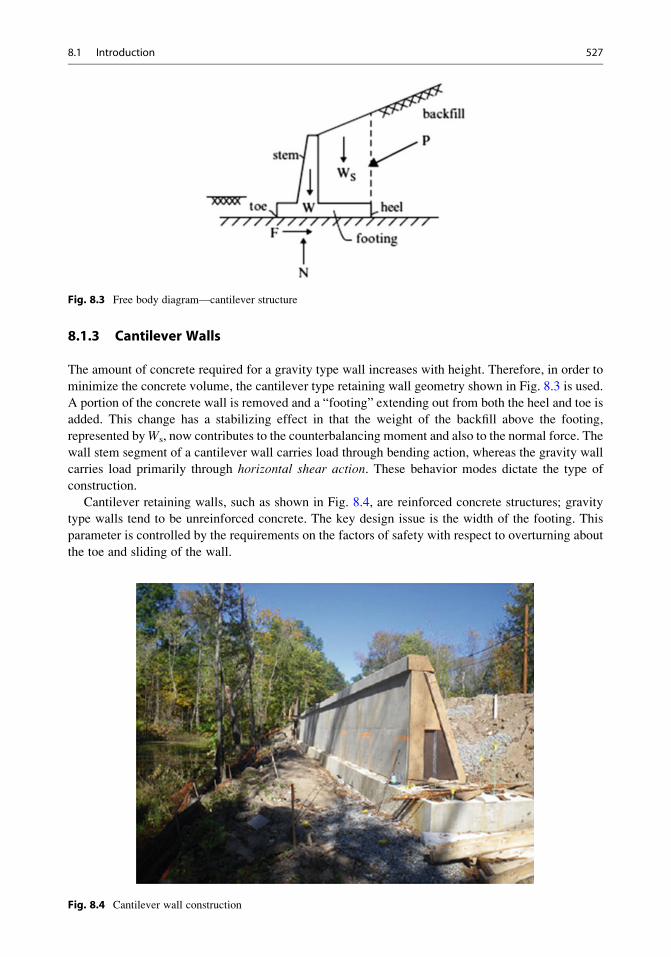
8.1.3 Cantilever Walls
The amount of concrete required for a gravity type wall increases with height. Therefore, in order to
minimize the concrete volume, the cantilever type retaining wall geometry shown in Fig. 8.3 is used.
A portion of the concrete wall is removed and a “footing” extending out from both the heel and toe is
added. This change has a stabilizing effect in that the weight of the backfill above the footing,
represented byWs, now contributes to the counterbalancing moment and also to the normal force. The
wall stem segment of a cantilever wall carries load through bending action, whereas the gravity wall
carries load primarily through horizontal shear action. These behavior modes dictate the type of
construction.
Cantilever retaining walls, such as shown in Fig. 8.4, are reinforced concrete structures; gravity
type walls tend to be unreinforced concrete. The key design issue is the width of the footing. This
parameter is controlled by the requirements on the factors of safety with respect to overturning about
the toe and sliding of the wall.
Fig. 8.3 Free body diagram—cantilever structure
Fig. 8.4 Cantilever wall construction
8.1 Introduction 527
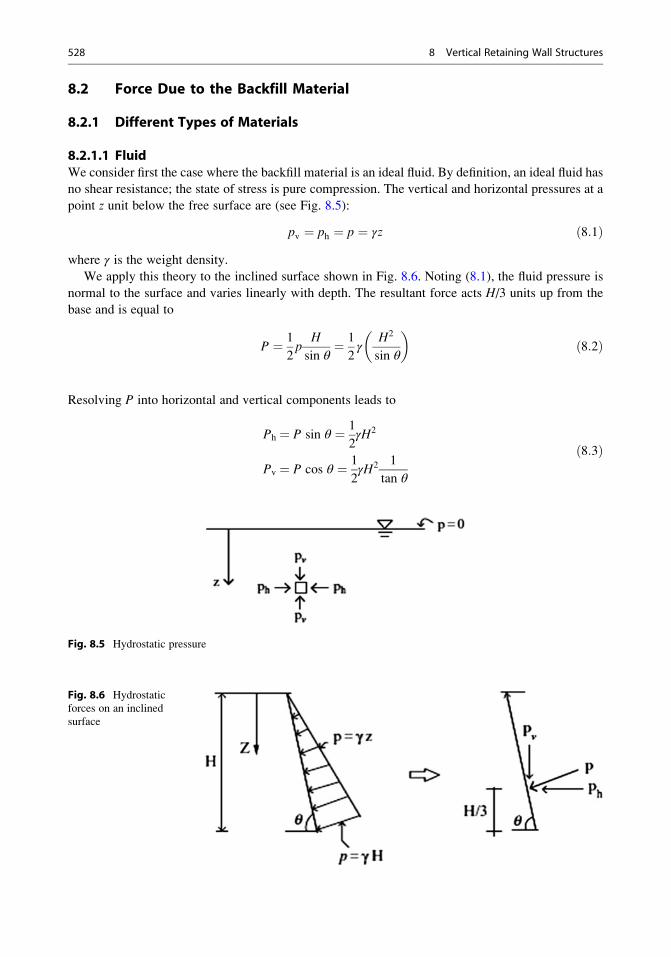
8.2 Force Due to the Backfill Material
8.2.1 Different Types of Materials
8.2.1.1 FluidWe consider first the case where the backfill material is an ideal fluid. By definition, an ideal fluid has
no shear resistance; the state of stress is pure compression. The vertical and horizontal pressures at a
point z unit below the free surface are (see Fig. 8.5):
pv ¼ ph ¼ p ¼ γz ð8:1Þwhere γ is the weight density.
We apply this theory to the inclined surface shown in Fig. 8.6. Noting (8.1), the fluid pressure is
normal to the surface and varies linearly with depth. The resultant force acts H/3 units up from the
base and is equal to
P ¼ 1
2p
H
sin θ¼ 1
2γ
H2
sin θ
� �ð8:2Þ
Resolving P into horizontal and vertical components leads to
Ph ¼ P sin θ ¼ 1
2γH2
Pv ¼ P cos θ ¼ 1
2γH2 1
tan θ
ð8:3Þ
Fig. 8.5 Hydrostatic pressure
Fig. 8.6 Hydrostatic
forces on an inclined
surface
528 8 Vertical Retaining Wall Structures
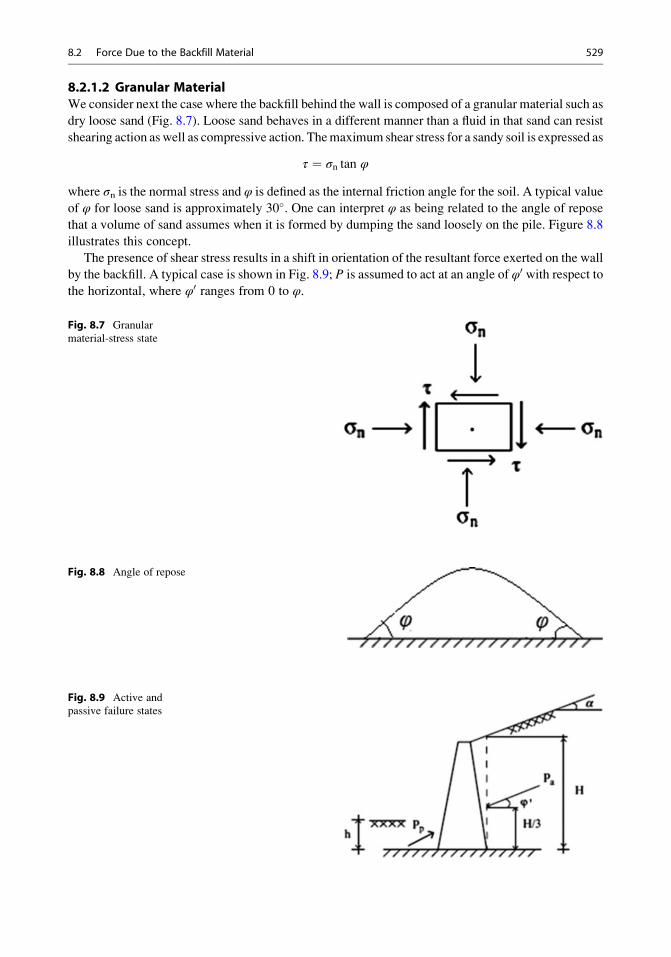
8.2.1.2 Granular MaterialWe consider next the case where the backfill behind the wall is composed of a granular material such as
dry loose sand (Fig. 8.7). Loose sand behaves in a different manner than a fluid in that sand can resist
shearing action aswell as compressive action. Themaximum shear stress for a sandy soil is expressed as
τ ¼ σn tan φ
where σn is the normal stress and φ is defined as the internal friction angle for the soil. A typical value
of φ for loose sand is approximately 30�. One can interpret φ as being related to the angle of repose
that a volume of sand assumes when it is formed by dumping the sand loosely on the pile. Figure 8.8
illustrates this concept.
The presence of shear stress results in a shift in orientation of the resultant force exerted on the wall
by the backfill. A typical case is shown in Fig. 8.9; P is assumed to act at an angle of φ0 with respect tothe horizontal, where φ0 ranges from 0 to φ.
Fig. 8.7 Granular
material-stress state
Fig. 8.8 Angle of repose
Fig. 8.9 Active and
passive failure states
8.2 Force Due to the Backfill Material 529
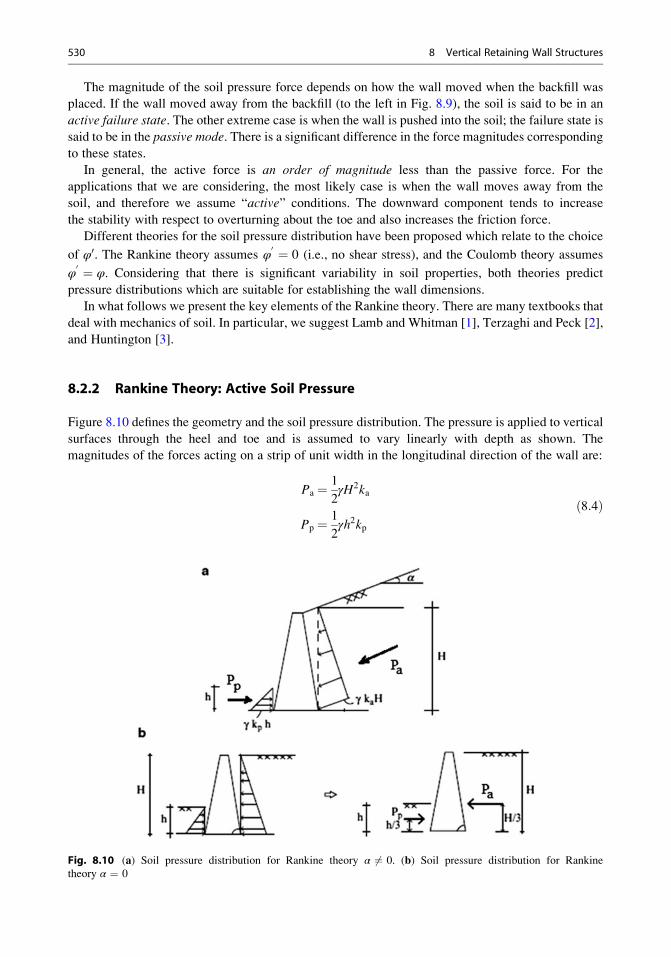
The magnitude of the soil pressure force depends on how the wall moved when the backfill was
placed. If the wall moved away from the backfill (to the left in Fig. 8.9), the soil is said to be in an
active failure state. The other extreme case is when the wall is pushed into the soil; the failure state is
said to be in the passive mode. There is a significant difference in the force magnitudes corresponding
to these states.
In general, the active force is an order of magnitude less than the passive force. For the
applications that we are considering, the most likely case is when the wall moves away from the
soil, and therefore we assume “active” conditions. The downward component tends to increase
the stability with respect to overturning about the toe and also increases the friction force.
Different theories for the soil pressure distribution have been proposed which relate to the choice
of φ0. The Rankine theory assumes φ0 ¼ 0 (i.e., no shear stress), and the Coulomb theory assumes
φ0 ¼ φ. Considering that there is significant variability in soil properties, both theories predict
pressure distributions which are suitable for establishing the wall dimensions.
In what follows we present the key elements of the Rankine theory. There are many textbooks that
deal with mechanics of soil. In particular, we suggest Lamb and Whitman [1], Terzaghi and Peck [2],
and Huntington [3].
8.2.2 Rankine Theory: Active Soil Pressure
Figure 8.10 defines the geometry and the soil pressure distribution. The pressure is applied to vertical
surfaces through the heel and toe and is assumed to vary linearly with depth as shown. The
magnitudes of the forces acting on a strip of unit width in the longitudinal direction of the wall are:
Pa ¼ 1
2γH2ka
Pp ¼ 1
2γh2kp
ð8:4Þ
Fig. 8.10 (a) Soil pressure distribution for Rankine theory α 6¼ 0. (b) Soil pressure distribution for Rankine
theory α ¼ 0
530 8 Vertical Retaining Wall Structures
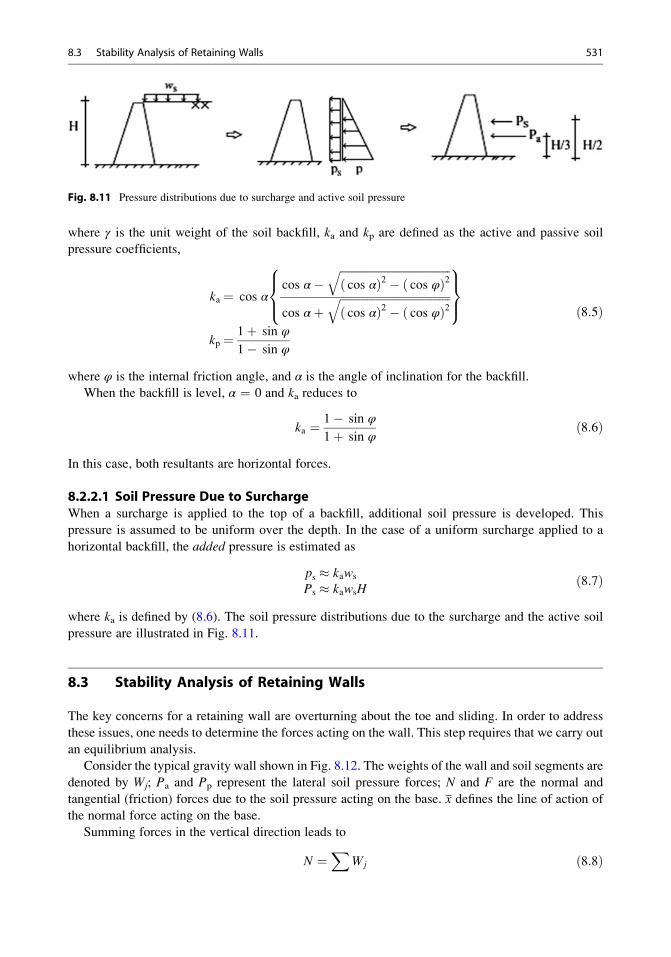
where γ is the unit weight of the soil backfill, ka and kp are defined as the active and passive soil
pressure coefficients,
ka ¼ cos αcos α�
ffiffiffiffiffiffiffiffiffiffiffiffiffiffiffiffiffiffiffiffiffiffiffiffiffiffiffiffiffiffiffiffiffiffiffiffiffiffiffifficos αð Þ2 � cos φð Þ2
qcos αþ
ffiffiffiffiffiffiffiffiffiffiffiffiffiffiffiffiffiffiffiffiffiffiffiffiffiffiffiffiffiffiffiffiffiffiffiffiffiffiffifficos αð Þ2 � cos φð Þ2
q8><>:
9>=>;
kp ¼ 1þ sin φ
1� sin φ
ð8:5Þ
where φ is the internal friction angle, and α is the angle of inclination for the backfill.
When the backfill is level, α ¼ 0 and ka reduces to
ka ¼ 1� sin φ
1þ sin φð8:6Þ
In this case, both resultants are horizontal forces.
8.2.2.1 Soil Pressure Due to SurchargeWhen a surcharge is applied to the top of a backfill, additional soil pressure is developed. This
pressure is assumed to be uniform over the depth. In the case of a uniform surcharge applied to a
horizontal backfill, the added pressure is estimated as
ps � kaws
Ps � kawsHð8:7Þ
where ka is defined by (8.6). The soil pressure distributions due to the surcharge and the active soil
pressure are illustrated in Fig. 8.11.
8.3 Stability Analysis of Retaining Walls
The key concerns for a retaining wall are overturning about the toe and sliding. In order to address
these issues, one needs to determine the forces acting on the wall. This step requires that we carry out
an equilibrium analysis.
Consider the typical gravity wall shown in Fig. 8.12. The weights of the wall and soil segments are
denoted by Wj; Pa and Pp represent the lateral soil pressure forces; N and F are the normal and
tangential (friction) forces due to the soil pressure acting on the base. x defines the line of action of
the normal force acting on the base.
Summing forces in the vertical direction leads to
N ¼X
Wj ð8:8Þ
Fig. 8.11 Pressure distributions due to surcharge and active soil pressure
8.3 Stability Analysis of Retaining Walls 531
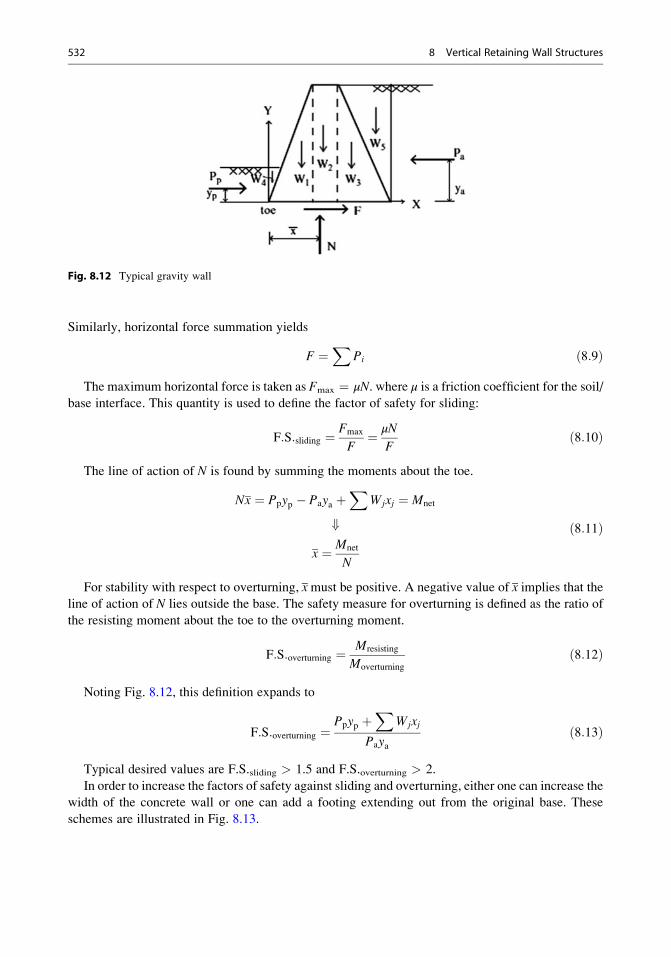
Similarly, horizontal force summation yields
F ¼X
Pi ð8:9Þ
The maximum horizontal force is taken as Fmax ¼ μN. where μ is a friction coefficient for the soil/base interface. This quantity is used to define the factor of safety for sliding:
F:S:sliding ¼ Fmax
F¼ μN
Fð8:10Þ
The line of action of N is found by summing the moments about the toe.
Nx ¼ Ppyp � Paya þX
Wjxj ¼ Mnet
+
x ¼ Mnet
N
ð8:11Þ
For stability with respect to overturning, xmust be positive. A negative value of x implies that the
line of action of N lies outside the base. The safety measure for overturning is defined as the ratio of
the resisting moment about the toe to the overturning moment.
F:S:overturning ¼ Mresisting
Moverturning
ð8:12Þ
Noting Fig. 8.12, this definition expands to
F:S:overturning ¼Ppyp þ
XWjxj
Payað8:13Þ
Typical desired values are F.S.sliding > 1.5 and F.S.overturning > 2.
In order to increase the factors of safety against sliding and overturning, either one can increase the
width of the concrete wall or one can add a footing extending out from the original base. These
schemes are illustrated in Fig. 8.13.
Fig. 8.12 Typical gravity wall
532 8 Vertical Retaining Wall Structures
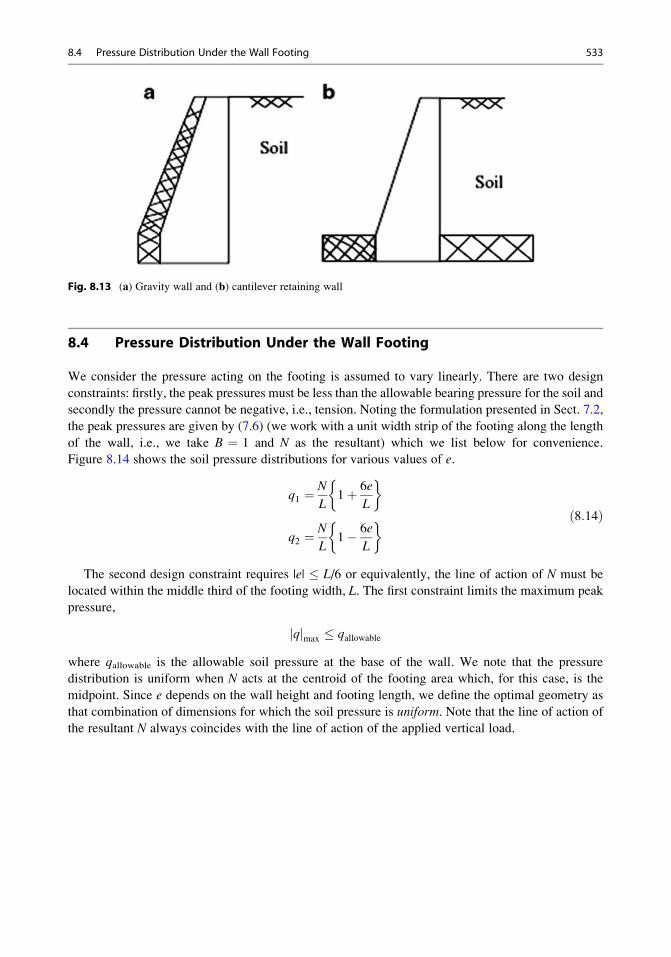
8.4 Pressure Distribution Under the Wall Footing
We consider the pressure acting on the footing is assumed to vary linearly. There are two design
constraints: firstly, the peak pressures must be less than the allowable bearing pressure for the soil and
secondly the pressure cannot be negative, i.e., tension. Noting the formulation presented in Sect. 7.2,
the peak pressures are given by (7.6) (we work with a unit width strip of the footing along the length
of the wall, i.e., we take B ¼ 1 and N as the resultant) which we list below for convenience.
Figure 8.14 shows the soil pressure distributions for various values of e.
q1 ¼N
L1þ 6e
L
�
q2 ¼N
L1� 6e
L
� ð8:14Þ
The second design constraint requires |e| � L/6 or equivalently, the line of action of N must be
located within the middle third of the footing width, L. The first constraint limits the maximum peak
pressure,
qj jmax � qallowable
where qallowable is the allowable soil pressure at the base of the wall. We note that the pressure
distribution is uniform when N acts at the centroid of the footing area which, for this case, is the
midpoint. Since e depends on the wall height and footing length, we define the optimal geometry as
that combination of dimensions for which the soil pressure is uniform. Note that the line of action of
the resultant N always coincides with the line of action of the applied vertical load.
Fig. 8.13 (a) Gravity wall and (b) cantilever retaining wall
8.4 Pressure Distribution Under the Wall Footing 533
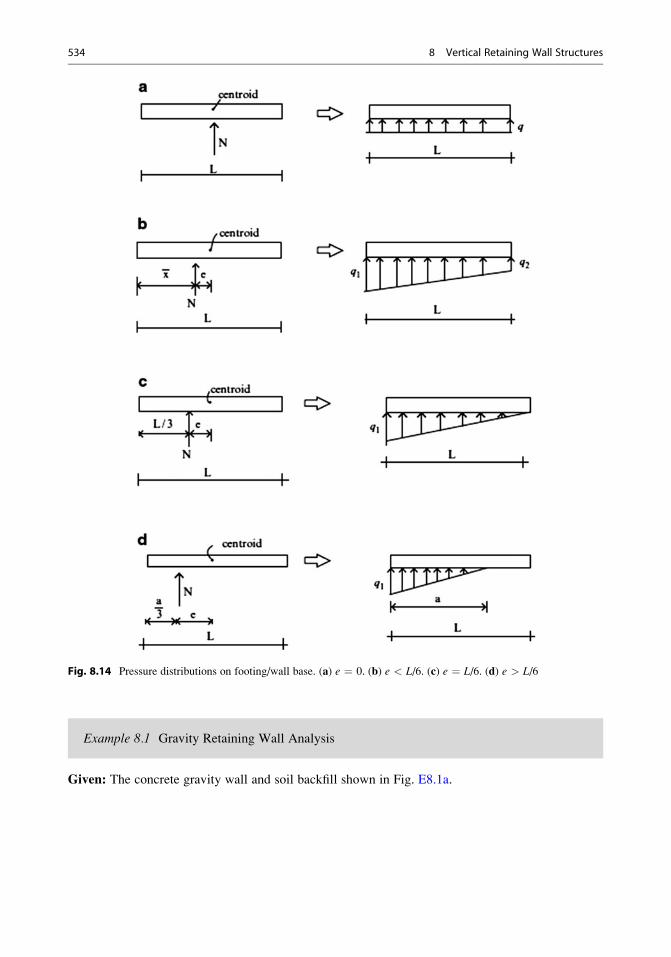
Example 8.1 Gravity Retaining Wall Analysis
Given: The concrete gravity wall and soil backfill shown in Fig. E8.1a.
Fig. 8.14 Pressure distributions on footing/wall base. (a) e ¼ 0. (b) e < L/6. (c) e ¼ L/6. (d) e > L/6
534 8 Vertical Retaining Wall Structures
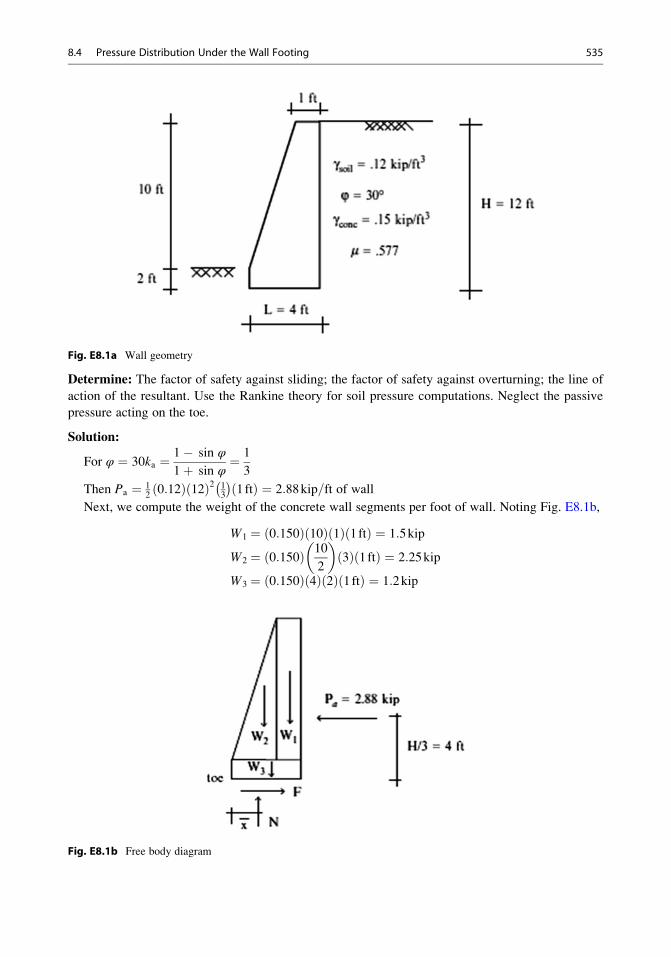
Fig. E8.1a Wall geometry
Determine: The factor of safety against sliding; the factor of safety against overturning; the line of
action of the resultant. Use the Rankine theory for soil pressure computations. Neglect the passive
pressure acting on the toe.
Solution:
For φ ¼ 30ka ¼ 1� sin φ
1þ sin φ¼ 1
3
Then Pa ¼ 120:12ð Þ 12ð Þ2 1
3
� �1ftð Þ ¼ 2:88kip=ft of wall
Next, we compute the weight of the concrete wall segments per foot of wall. Noting Fig. E8.1b,
W1 ¼ 0:150ð Þ 10ð Þ 1ð Þ 1ftð Þ ¼ 1:5kip
W2 ¼ 0:150ð Þ 10
2
� �3ð Þ 1ftð Þ ¼ 2:25kip
W3 ¼ 0:150ð Þ 4ð Þ 2ð Þ 1ftð Þ ¼ 1:2kip
Fig. E8.1b Free body diagram
8.4 Pressure Distribution Under the Wall Footing 535
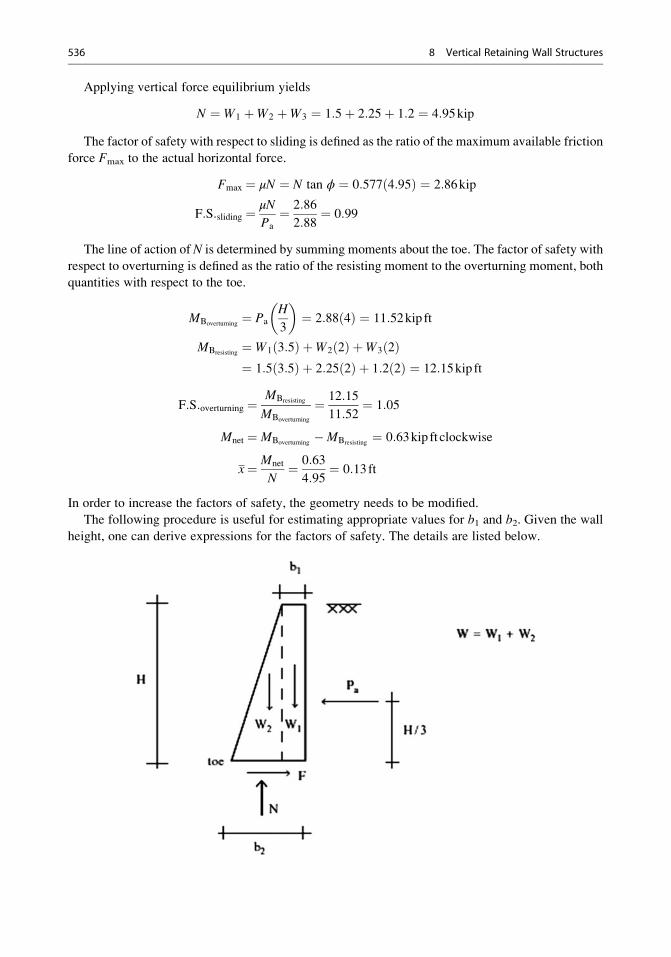
Applying vertical force equilibrium yields
N ¼ W1 þW2 þW3 ¼ 1:5þ 2:25þ 1:2 ¼ 4:95kip
The factor of safety with respect to sliding is defined as the ratio of the maximum available friction
force Fmax to the actual horizontal force.
Fmax ¼ μN ¼ N tan ϕ ¼ 0:577 4:95ð Þ ¼ 2:86kip
F:S:sliding ¼ μN
Pa
¼ 2:86
2:88¼ 0:99
The line of action of N is determined by summing moments about the toe. The factor of safety with
respect to overturning is defined as the ratio of the resisting moment to the overturning moment, both
quantities with respect to the toe.
MBoverturning¼ Pa
H
3
� �¼ 2:88 4ð Þ ¼ 11:52kip ft
MBresisting¼ W1 3:5ð Þ þW2 2ð Þ þW3 2ð Þ¼ 1:5 3:5ð Þ þ 2:25 2ð Þ þ 1:2 2ð Þ ¼ 12:15kip ft
F:S:overturning ¼MBresisting
MBoverturning
¼ 12:15
11:52¼ 1:05
Mnet ¼ MBoverturning�MBresisting
¼ 0:63kip ft clockwise
x¼ Mnet
N¼ 0:63
4:95¼ 0:13ft
In order to increase the factors of safety, the geometry needs to be modified.
The following procedure is useful for estimating appropriate values for b1 and b2. Given the wall
height, one can derive expressions for the factors of safety. The details are listed below.
536 8 Vertical Retaining Wall Structures
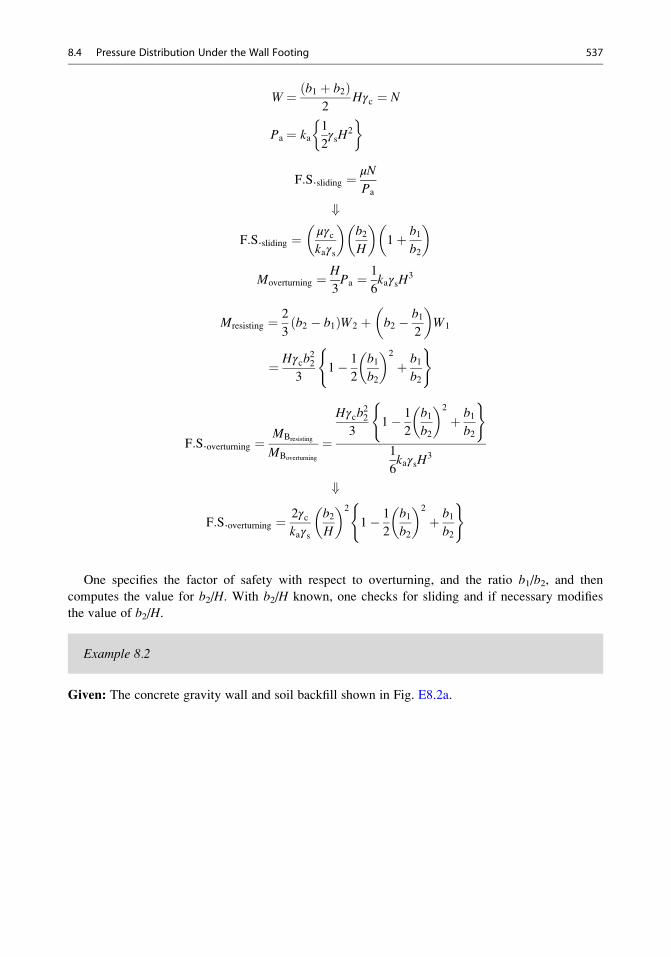
W ¼ b1 þ b2ð Þ2
Hγc ¼ N
Pa ¼ ka1
2γsH
2
�
F:S:sliding ¼ μN
Pa
+
F:S:sliding ¼ μγckaγs
� �b2H
� �1þ b1
b2
� �
Moverturning ¼ H
3Pa ¼ 1
6kaγsH
3
Mresisting ¼ 2
3b2 � b1ð ÞW2 þ b2 � b1
2
� �W1
¼ Hγcb22
31� 1
2
b1b2
� �2
þ b1b2
( )
F:S:overturning ¼MBresisting
MBoverturning
¼
Hγcb22
31� 1
2
b1b2
� �2
þ b1b2
( )
1
6kaγsH
3
+
F:S:overturning ¼ 2γckaγs
b2H
� �2
1� 1
2
b1b2
� �2
þ b1b2
( )
One specifies the factor of safety with respect to overturning, and the ratio b1/b2, and then
computes the value for b2/H. With b2/H known, one checks for sliding and if necessary modifies
the value of b2/H.
Example 8.2
Given: The concrete gravity wall and soil backfill shown in Fig. E8.2a.
8.4 Pressure Distribution Under the Wall Footing 537
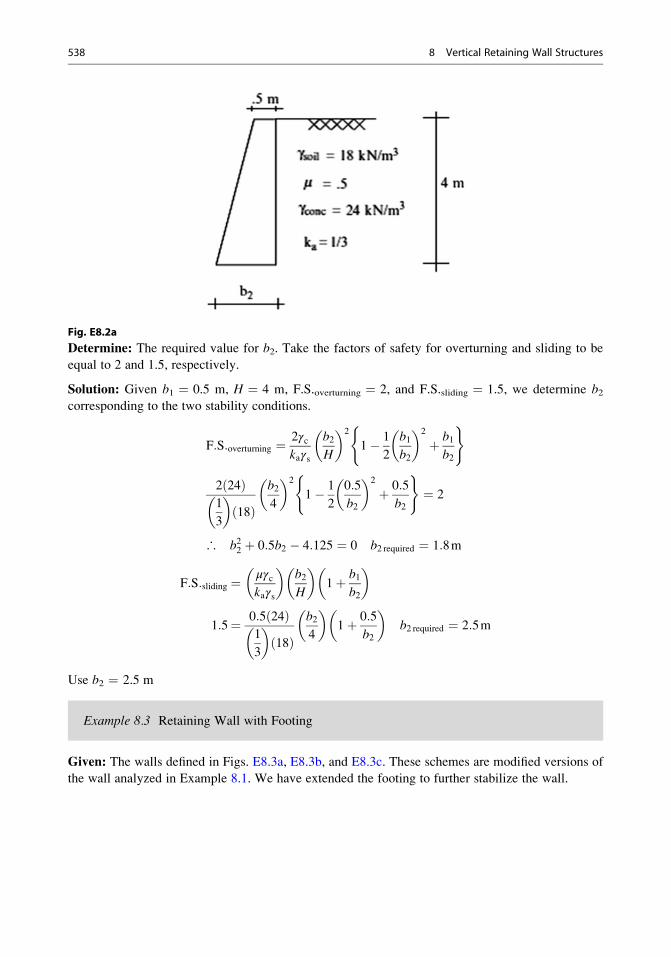
Fig. E8.2a
Determine: The required value for b2. Take the factors of safety for overturning and sliding to be
equal to 2 and 1.5, respectively.
Solution: Given b1 ¼ 0.5 m, H ¼ 4 m, F.S.overturning ¼ 2, and F.S.sliding ¼ 1.5, we determine b2corresponding to the two stability conditions.
F:S:overturning ¼ 2γckaγs
b2H
� �2
1� 1
2
b1b2
� �2
þ b1b2
( )
2 24ð Þ1
3
� �18ð Þ
b24
� �2
1� 1
2
0:5
b2
� �2
þ 0:5
b2
( )¼ 2
∴ b22 þ 0:5b2 � 4:125 ¼ 0 b2 required ¼ 1:8m
F:S:sliding ¼ μγckaγs
� �b2H
� �1þ b1
b2
� �
1:5¼ 0:5 24ð Þ1
3
� �18ð Þ
b24
� �1þ 0:5
b2
� �b2 required ¼ 2:5m
Use b2 ¼ 2.5 m
Example 8.3 Retaining Wall with Footing
Given: The walls defined in Figs. E8.3a, E8.3b, and E8.3c. These schemes are modified versions of
the wall analyzed in Example 8.1. We have extended the footing to further stabilize the wall.
538 8 Vertical Retaining Wall Structures
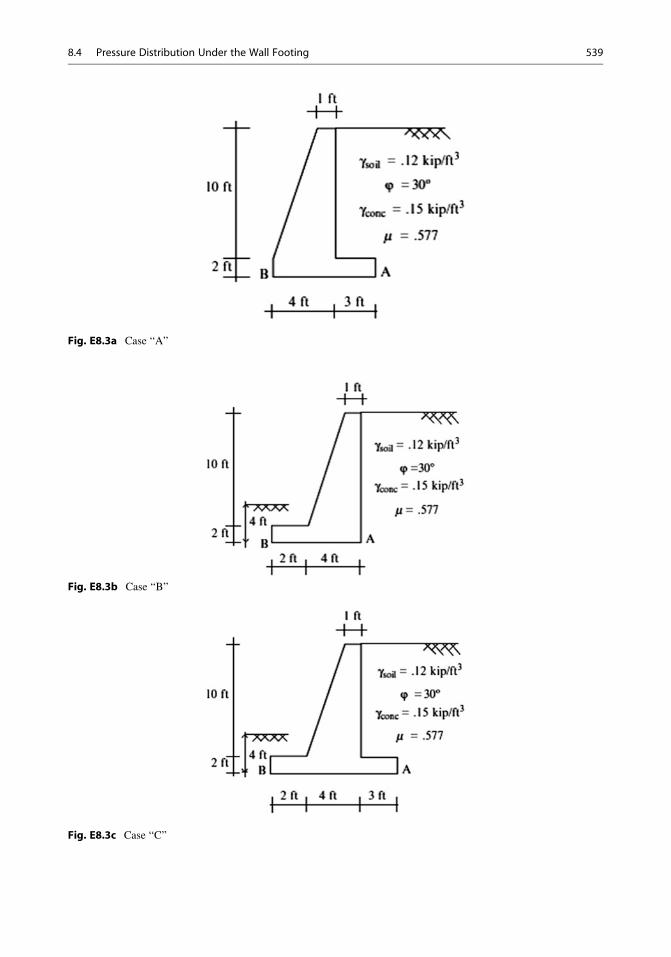
Fig. E8.3a Case “A”
Fig. E8.3b Case “B”
Fig. E8.3c Case “C”
8.4 Pressure Distribution Under the Wall Footing 539
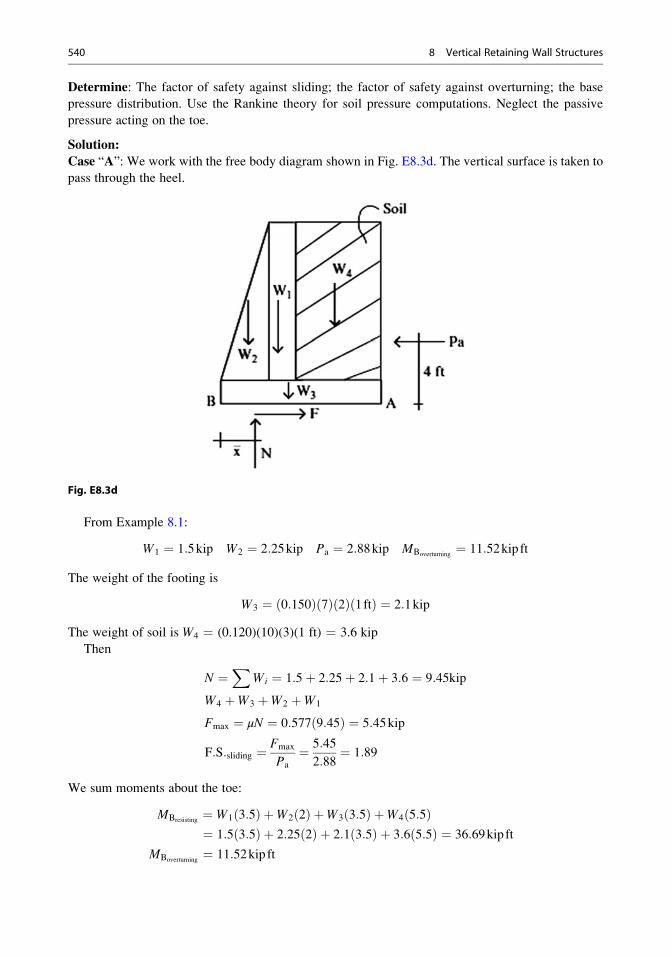
Determine: The factor of safety against sliding; the factor of safety against overturning; the base
pressure distribution. Use the Rankine theory for soil pressure computations. Neglect the passive
pressure acting on the toe.
Solution:
Case “A”: We work with the free body diagram shown in Fig. E8.3d. The vertical surface is taken to
pass through the heel.
Fig. E8.3d
From Example 8.1:
W1 ¼ 1:5kip W2 ¼ 2:25kip Pa ¼ 2:88kip MBoverturning¼ 11:52kip ft
The weight of the footing is
W3 ¼ 0:150ð Þ 7ð Þ 2ð Þ 1ftð Þ ¼ 2:1kip
The weight of soil is W4 ¼ (0.120)(10)(3)(1 ft) ¼ 3.6 kip
Then
N ¼X
Wi ¼ 1:5þ 2:25þ 2:1þ 3:6 ¼ 9:45kip
W4 þW3 þW2 þW1
Fmax ¼ μN ¼ 0:577 9:45ð Þ ¼ 5:45kip
F:S:sliding ¼ Fmax
Pa
¼ 5:45
2:88¼ 1:89
We sum moments about the toe:
MBresisting¼ W1 3:5ð Þ þW2 2ð Þ þW3 3:5ð Þ þW4 5:5ð Þ¼ 1:5 3:5ð Þ þ 2:25 2ð Þ þ 2:1 3:5ð Þ þ 3:6 5:5ð Þ ¼ 36:69kip ft
MBoverturning¼ 11:52kip ft
540 8 Vertical Retaining Wall Structures
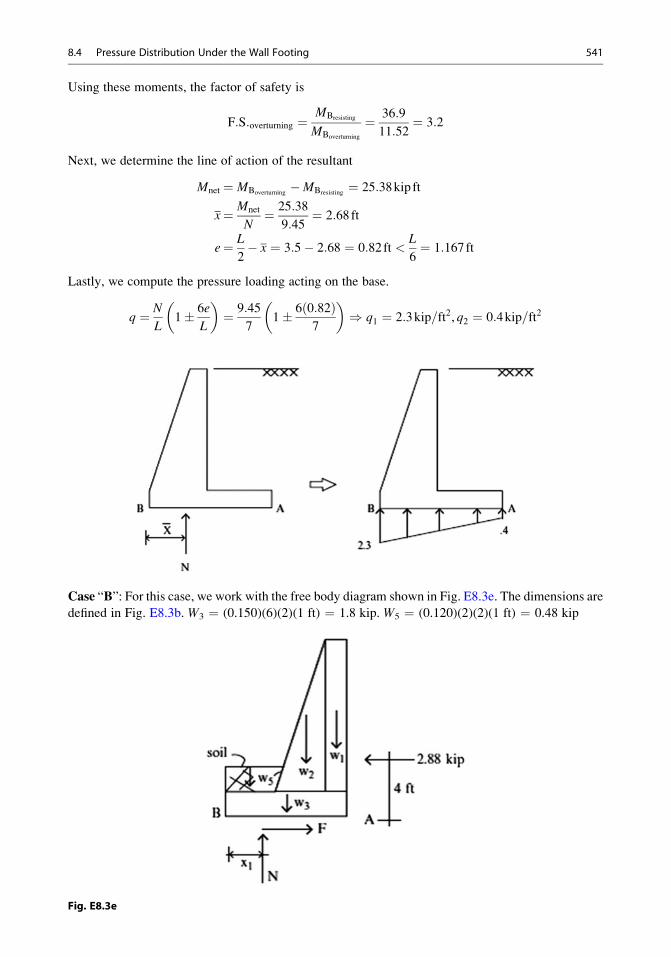
Using these moments, the factor of safety is
F:S:overturning ¼MBresisting
MBoverturning
¼ 36:9
11:52¼ 3:2
Next, we determine the line of action of the resultant
Mnet ¼ MBoverturning�MBresisting
¼ 25:38kip ft
x¼ Mnet
N¼ 25:38
9:45¼ 2:68ft
e¼ L
2� x ¼ 3:5� 2:68 ¼ 0:82ft <
L
6¼ 1:167ft
Lastly, we compute the pressure loading acting on the base.
q ¼ N
L1� 6e
L
� �¼ 9:45
71� 6 0:82ð Þ
7
� �) q1 ¼ 2:3kip=ft2, q2 ¼ 0:4kip=ft2
Case “B”: For this case, we work with the free body diagram shown in Fig. E8.3e. The dimensions are
defined in Fig. E8.3b. W3 ¼ (0.150)(6)(2)(1 ft) ¼ 1.8 kip. W5 ¼ (0.120)(2)(2)(1 ft) ¼ 0.48 kip
Fig. E8.3e
8.4 Pressure Distribution Under the Wall Footing 541
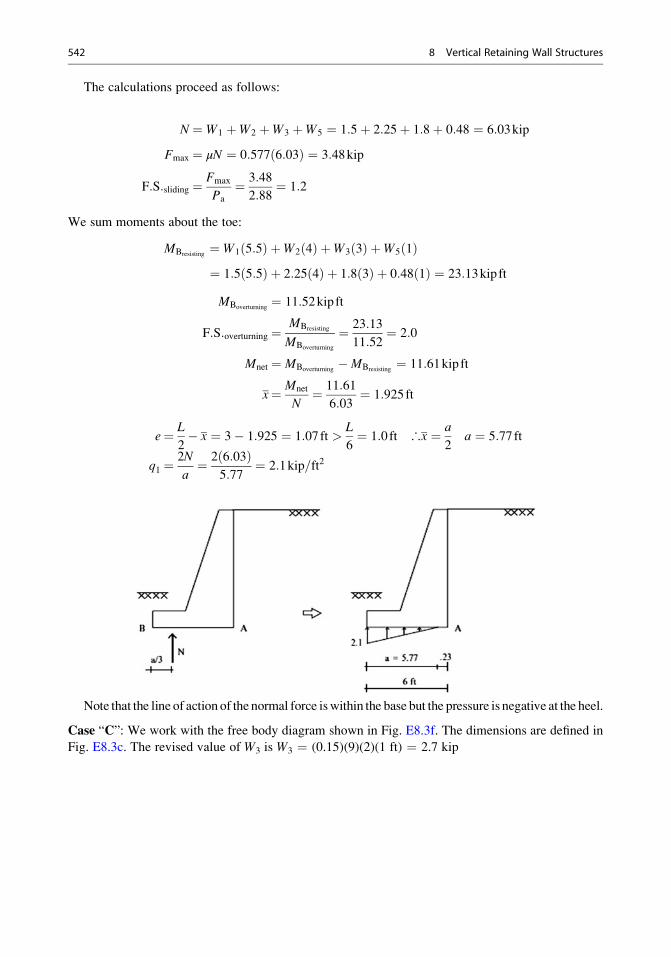
The calculations proceed as follows:
N ¼ W1 þW2 þW3 þW5 ¼ 1:5þ 2:25þ 1:8þ 0:48 ¼ 6:03kip
Fmax ¼ μN ¼ 0:577 6:03ð Þ ¼ 3:48kip
F:S:sliding ¼ Fmax
Pa
¼ 3:48
2:88¼ 1:2
We sum moments about the toe:
MBresisting¼ W1 5:5ð Þ þW2 4ð Þ þW3 3ð Þ þW5 1ð Þ¼ 1:5 5:5ð Þ þ 2:25 4ð Þ þ 1:8 3ð Þ þ 0:48 1ð Þ ¼ 23:13kip ft
MBoverturning¼ 11:52kip ft
F:S:overturning ¼MBresisting
MBoverturning
¼ 23:13
11:52¼ 2:0
Mnet ¼ MBoverturning�MBresisting
¼ 11:61kip ft
x¼ Mnet
N¼ 11:61
6:03¼ 1:925ft
e¼ L
2� x ¼ 3� 1:925 ¼ 1:07ft >
L
6¼ 1:0ft ∴x ¼ a
2a ¼ 5:77ft
q1 ¼2N
a¼ 2 6:03ð Þ
5:77¼ 2:1kip=ft2
Note that the line of action of the normal force iswithin the base but the pressure is negative at the heel.
Case “C”: We work with the free body diagram shown in Fig. E8.3f. The dimensions are defined in
Fig. E8.3c. The revised value of W3 is W3 ¼ (0.15)(9)(2)(1 ft) ¼ 2.7 kip
542 8 Vertical Retaining Wall Structures
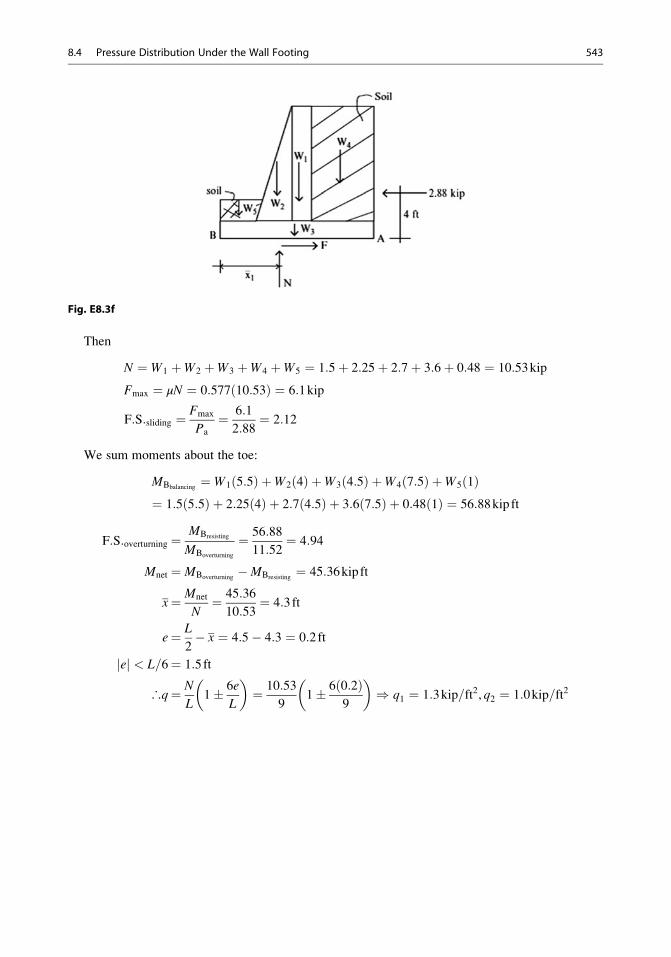
Fig. E8.3f
Then
N ¼ W1 þW2 þW3 þW4 þW5 ¼ 1:5þ 2:25þ 2:7þ 3:6þ 0:48 ¼ 10:53kip
Fmax ¼ μN ¼ 0:577 10:53ð Þ ¼ 6:1kip
F:S:sliding ¼ Fmax
Pa
¼ 6:1
2:88¼ 2:12
We sum moments about the toe:
MBbalancing¼ W1 5:5ð Þ þW2 4ð Þ þW3 4:5ð Þ þW4 7:5ð Þ þW5 1ð Þ
¼ 1:5 5:5ð Þ þ 2:25 4ð Þ þ 2:7 4:5ð Þ þ 3:6 7:5ð Þ þ 0:48 1ð Þ ¼ 56:88kip ft
F:S:overturning ¼MBresisting
MBoverturning
¼ 56:88
11:52¼ 4:94
Mnet ¼ MBoverturning�MBresisting
¼ 45:36kip ft
x¼ Mnet
N¼ 45:36
10:53¼ 4:3ft
e¼ L
2� x ¼ 4:5� 4:3 ¼ 0:2ft
ej j < L=6¼ 1:5ft
∴q¼ N
L1� 6e
L
� �¼ 10:53
91� 6 0:2ð Þ
9
� �) q1 ¼ 1:3kip=ft2, q2 ¼ 1:0kip=ft2
8.4 Pressure Distribution Under the Wall Footing 543
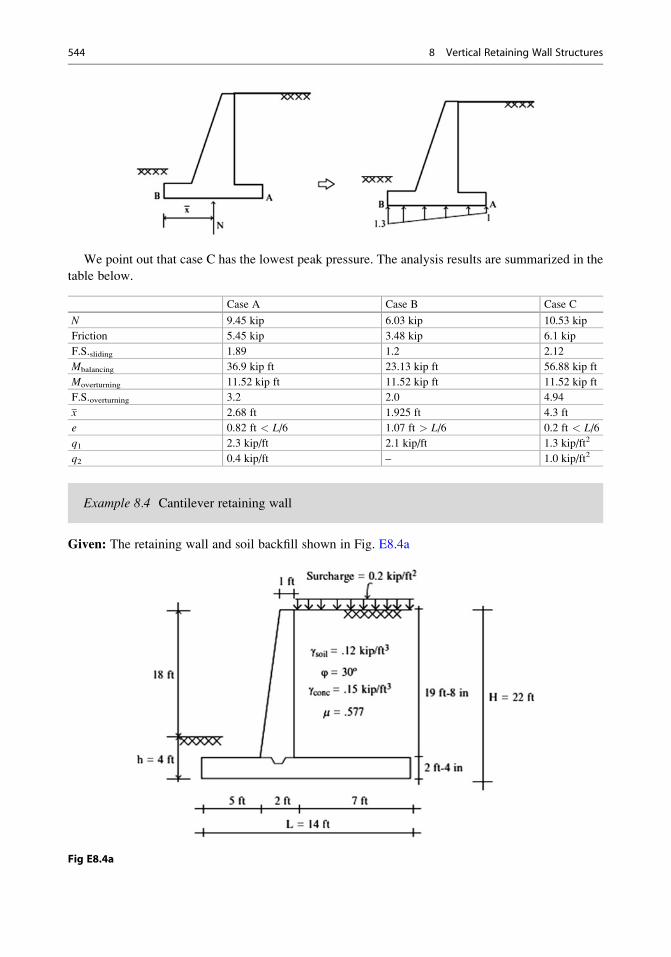
We point out that case C has the lowest peak pressure. The analysis results are summarized in the
table below.
Case A Case B Case C
N 9.45 kip 6.03 kip 10.53 kip
Friction 5.45 kip 3.48 kip 6.1 kip
F.S.sliding 1.89 1.2 2.12
Mbalancing 36.9 kip ft 23.13 kip ft 56.88 kip ft
Moverturning 11.52 kip ft 11.52 kip ft 11.52 kip ft
F.S.overturning 3.2 2.0 4.94
x 2.68 ft 1.925 ft 4.3 ft
e 0.82 ft < L/6 1.07 ft > L/6 0.2 ft < L/6
q1 2.3 kip/ft 2.1 kip/ft 1.3 kip/ft2
q2 0.4 kip/ft – 1.0 kip/ft2
Example 8.4 Cantilever retaining wall
Given: The retaining wall and soil backfill shown in Fig. E8.4a
Fig E8.4a
544 8 Vertical Retaining Wall Structures
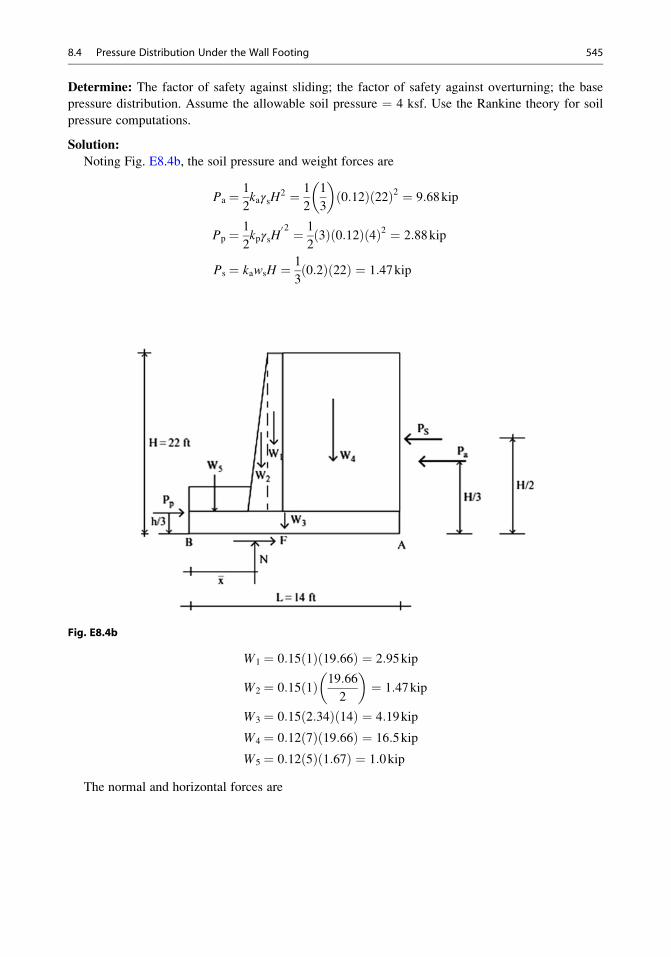
Determine: The factor of safety against sliding; the factor of safety against overturning; the base
pressure distribution. Assume the allowable soil pressure ¼ 4 ksf. Use the Rankine theory for soil
pressure computations.
Solution:
Noting Fig. E8.4b, the soil pressure and weight forces are
Pa ¼ 1
2kaγsH
2 ¼ 1
2
1
3
� �0:12ð Þ 22ð Þ2 ¼ 9:68kip
Pp ¼ 1
2kpγsH
02 ¼ 1
23ð Þ 0:12ð Þ 4ð Þ2 ¼ 2:88kip
Ps ¼ kawsH ¼ 1
30:2ð Þ 22ð Þ ¼ 1:47kip
Fig. E8.4b
W1 ¼ 0:15 1ð Þ 19:66ð Þ ¼ 2:95kip
W2 ¼ 0:15 1ð Þ 19:66
2
� �¼ 1:47kip
W3 ¼ 0:15 2:34ð Þ 14ð Þ ¼ 4:19kip
W4 ¼ 0:12 7ð Þ 19:66ð Þ ¼ 16:5kip
W5 ¼ 0:12 5ð Þ 1:67ð Þ ¼ 1:0kip
The normal and horizontal forces are
8.4 Pressure Distribution Under the Wall Footing 545
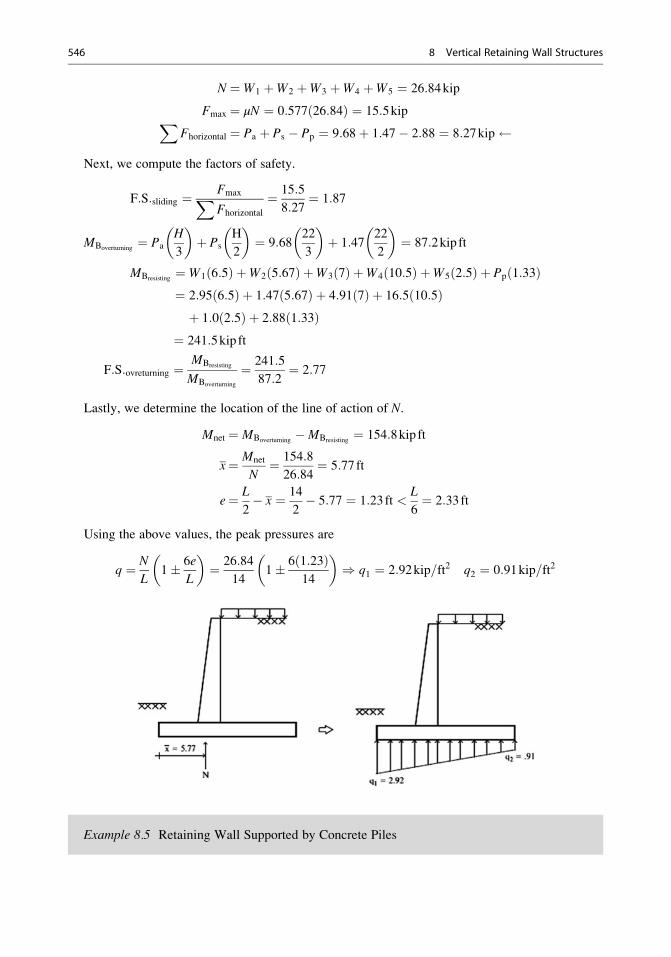
N ¼ W1 þW2 þW3 þW4 þW5 ¼ 26:84kip
Fmax ¼ μN ¼ 0:577 26:84ð Þ ¼ 15:5kipXFhorizontal ¼ Pa þ Ps � Pp ¼ 9:68þ 1:47� 2:88 ¼ 8:27kip
Next, we compute the factors of safety.
F:S:sliding ¼ FmaxXFhorizontal
¼ 15:5
8:27¼ 1:87
MBoverturning¼ Pa
H
3
� �þ Ps
H
2
� �¼ 9:68
22
3
� �þ 1:47
22
2
� �¼ 87:2kip ft
MBresisting¼ W1 6:5ð Þ þW2 5:67ð Þ þW3 7ð Þ þW4 10:5ð Þ þW5 2:5ð Þ þ Pp 1:33ð Þ¼ 2:95 6:5ð Þ þ 1:47 5:67ð Þ þ 4:91 7ð Þ þ 16:5 10:5ð Þþ 1:0 2:5ð Þ þ 2:88 1:33ð Þ
¼ 241:5kip ft
F:S:ovreturning ¼MBresisting
MBoverturning
¼ 241:5
87:2¼ 2:77
Lastly, we determine the location of the line of action of N.
Mnet ¼ MBoverturning�MBresisting
¼ 154:8kip ft
x¼ Mnet
N¼ 154:8
26:84¼ 5:77 ft
e¼ L
2� x ¼ 14
2� 5:77 ¼ 1:23ft <
L
6¼ 2:33ft
Using the above values, the peak pressures are
q ¼ N
L1� 6e
L
� �¼ 26:84
141� 6 1:23ð Þ
14
� �) q1 ¼ 2:92kip=ft2 q2 ¼ 0:91kip=ft2
Example 8.5 Retaining Wall Supported by Concrete Piles
546 8 Vertical Retaining Wall Structures
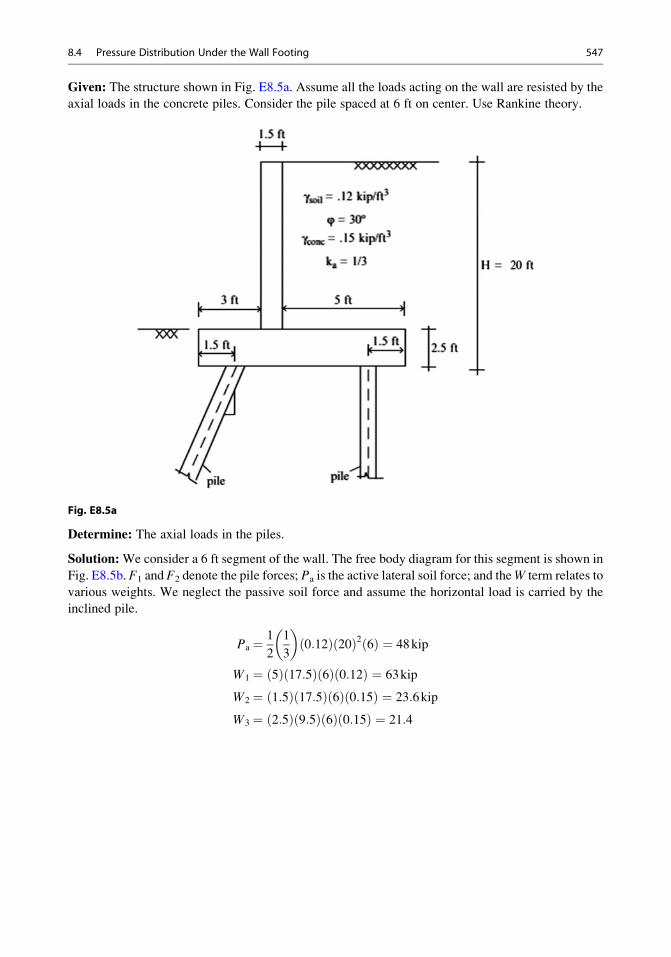
Given: The structure shown in Fig. E8.5a. Assume all the loads acting on the wall are resisted by the
axial loads in the concrete piles. Consider the pile spaced at 6 ft on center. Use Rankine theory.
Fig. E8.5a
Determine: The axial loads in the piles.
Solution:We consider a 6 ft segment of the wall. The free body diagram for this segment is shown in
Fig. E8.5b. F1 and F2 denote the pile forces; Pa is the active lateral soil force; and theW term relates to
various weights. We neglect the passive soil force and assume the horizontal load is carried by the
inclined pile.
Pa ¼ 1
2
1
3
� �0:12ð Þ 20ð Þ2 6ð Þ ¼ 48kip
W1 ¼ 5ð Þ 17:5ð Þ 6ð Þ 0:12ð Þ ¼ 63kip
W2 ¼ 1:5ð Þ 17:5ð Þ 6ð Þ 0:15ð Þ ¼ 23:6kip
W3 ¼ 2:5ð Þ 9:5ð Þ 6ð Þ 0:15ð Þ ¼ 21:4
8.4 Pressure Distribution Under the Wall Footing 547
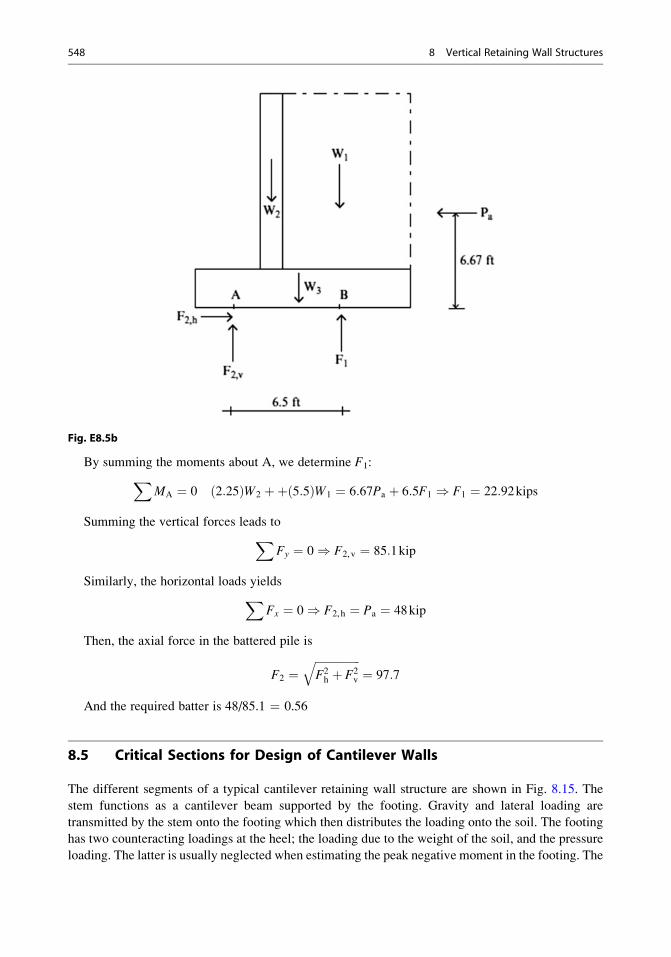
Fig. E8.5b
By summing the moments about A, we determine F1:XMA ¼ 0 2:25ð ÞW2 þþ 5:5ð ÞW1 ¼ 6:67Pa þ 6:5F1 ) F1 ¼ 22:92kips
Summing the vertical forces leads toXFy ¼ 0) F2,v ¼ 85:1kip
Similarly, the horizontal loads yieldsXFx ¼ 0) F2,h ¼ Pa ¼ 48kip
Then, the axial force in the battered pile is
F2 ¼ffiffiffiffiffiffiffiffiffiffiffiffiffiffiffiffiF2h þ F2
v
q¼ 97:7
And the required batter is 48/85.1 ¼ 0.56
8.5 Critical Sections for Design of Cantilever Walls
The different segments of a typical cantilever retaining wall structure are shown in Fig. 8.15. The
stem functions as a cantilever beam supported by the footing. Gravity and lateral loading are
transmitted by the stem onto the footing which then distributes the loading onto the soil. The footing
has two counteracting loadings at the heel; the loading due to the weight of the soil, and the pressure
loading. The latter is usually neglected when estimating the peak negative moment in the footing. The
548 8 Vertical Retaining Wall Structures
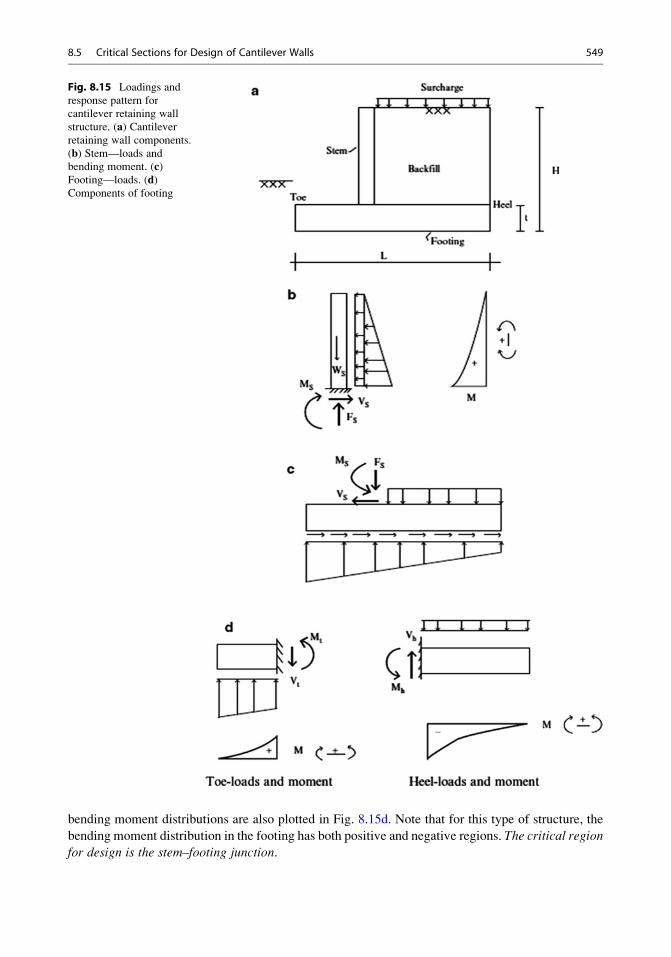
bending moment distributions are also plotted in Fig. 8.15d. Note that for this type of structure, the
bending moment distribution in the footing has both positive and negative regions. The critical region
for design is the stem–footing junction.
Fig. 8.15 Loadings and
response pattern for
cantilever retaining wall
structure. (a) Cantileverretaining wall components.
(b) Stem—loads and
bending moment. (c)Footing—loads. (d)Components of footing
8.5 Critical Sections for Design of Cantilever Walls 549
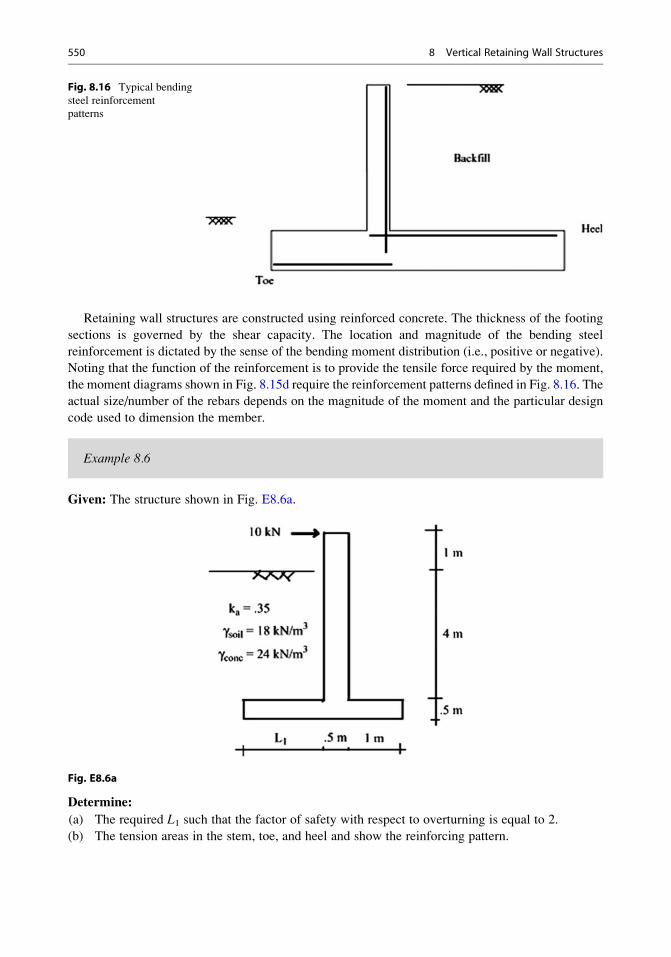
Retaining wall structures are constructed using reinforced concrete. The thickness of the footing
sections is governed by the shear capacity. The location and magnitude of the bending steel
reinforcement is dictated by the sense of the bending moment distribution (i.e., positive or negative).
Noting that the function of the reinforcement is to provide the tensile force required by the moment,
the moment diagrams shown in Fig. 8.15d require the reinforcement patterns defined in Fig. 8.16. The
actual size/number of the rebars depends on the magnitude of the moment and the particular design
code used to dimension the member.
Example 8.6
Given: The structure shown in Fig. E8.6a.
Fig. E8.6a
Determine:
(a) The required L1 such that the factor of safety with respect to overturning is equal to 2.
(b) The tension areas in the stem, toe, and heel and show the reinforcing pattern.
Fig. 8.16 Typical bending
steel reinforcement
patterns
550 8 Vertical Retaining Wall Structures
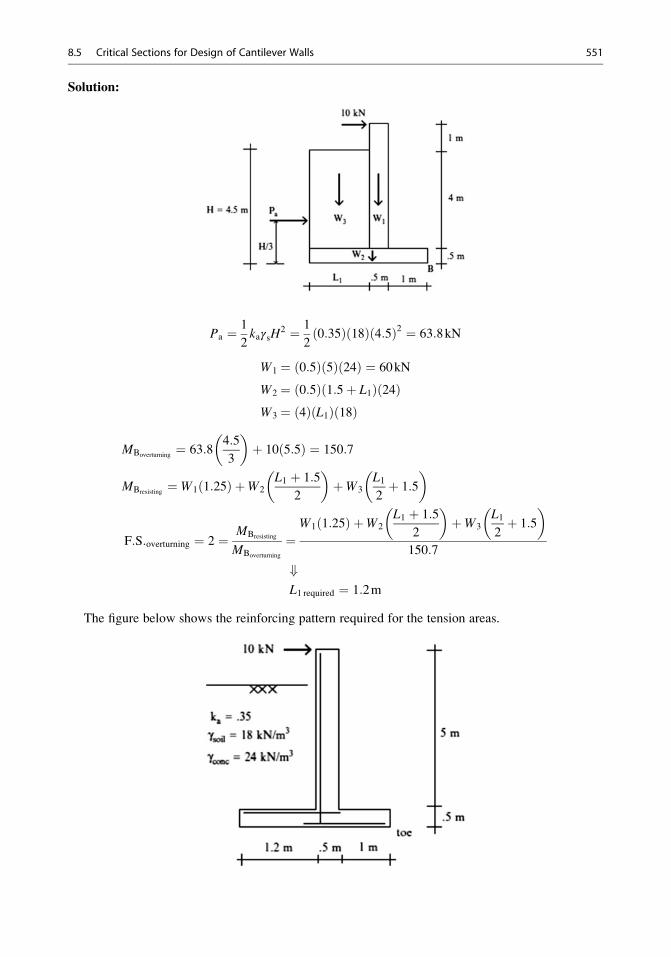
Solution:
Pa ¼ 1
2kaγsH
2 ¼ 1
20:35ð Þ 18ð Þ 4:5ð Þ2 ¼ 63:8kN
W1 ¼ 0:5ð Þ 5ð Þ 24ð Þ ¼ 60kN
W2 ¼ 0:5ð Þ 1:5þ L1ð Þ 24ð ÞW3 ¼ 4ð Þ L1ð Þ 18ð Þ
MBoverturning¼ 63:8
4:5
3
� �þ 10 5:5ð Þ ¼ 150:7
MBresisting¼ W1 1:25ð Þ þW2
L1 þ 1:5
2
� �þW3
L12þ 1:5
� �
F:S:overturning ¼ 2 ¼ MBresisting
MBoverturning
¼W1 1:25ð Þ þW2
L1 þ 1:5
2
� �þW3
L12þ 1:5
� �150:7
+L1 required ¼ 1:2m
The figure below shows the reinforcing pattern required for the tension areas.
8.5 Critical Sections for Design of Cantilever Walls 551
8.6 Summary
8.6.1 Objectives of the Chapter
• To introduce the topic of vertical retaining wall structures used for embankments, abutments, and
underground structures.
• To present a theory for establishing the lateral loading exerted by soil backfill on vertical walls.
• To develop a methodology for evaluating the stability of cantilever retaining walls when subjected
to lateral loading due to backfill and surcharges.
8.6.2 Key Concepts and Facts
• The Rankine theory predicts a linear distribution of soil pressure which acts normal to a vertical
face and increases with depth. The resultant force is given by
Pa ¼ 1
2γH2ka
where H is the vertical wall height, γ is the soil density, and ka is a dimensionless coefficient that
depends on the soil type and nature of the relative motion between the wall and the backfill. For
active conditions,
ka ¼ 1� sin φ
1þ sin φ
where φ is the soil friction angle, typically � 30�.• Stability is addressed from two perspectives: Sliding and overturning. The factor of safety with
respect to sliding is defined as the ratio of the peak available horizontal friction force to the actual
friction force. The factor of safety with respect to overturning about the toe is taken as the ratio of
the restoring moment to the unbalancing moment.
• One selects the dimensions of the footing, such that these factors of safety are greater than one and
the resultant force due to the structural weight and the soil loads acts within the middle third of the
footing width.
8.7 Problems
Problem 8.1 For the concrete retaining wall shown, determine the factors of safety against sliding
and overturning and the base pressure distribution. Use the Rankine theory for soil pressure
computations.
552 8 Vertical Retaining Wall Structures
Problem 8.2 For the concrete retaining wall shown, determine the factors of safety against sliding
and overturning and the base pressure distribution. Use the Rankine theory for soil pressure
computations.
Problem 8.3 For the concrete retaining wall shown, determine the factors of safety against sliding
and overturning and the base pressure distribution. Use the Rankine theory for soil pressure
computations
8.7 Problems 553
Problem 8.4 For the concrete retaining wall shown, determine the required value for b2. Take the
factors of safety for overturning and sliding to be equal to 1.75 and 1.25, respectively. Use the
Rankine theory for soil pressure computations.
Problem 8.5 For the retaining wall shown, determine
(a) The soil pressure acting on the wall
(b) The factor of safety for overturning
(c) The factor of safety for sliding
(d) The soil pressure distribution under the footing
Assume: μ ¼ 0.5, γsoil ¼ 0.12 kip/ft3, ka ¼ 1/3, γconcrete ¼ 0.15 kip/ft3, μ ¼ 0.5, and Φ ¼ 30�.
554 8 Vertical Retaining Wall Structures
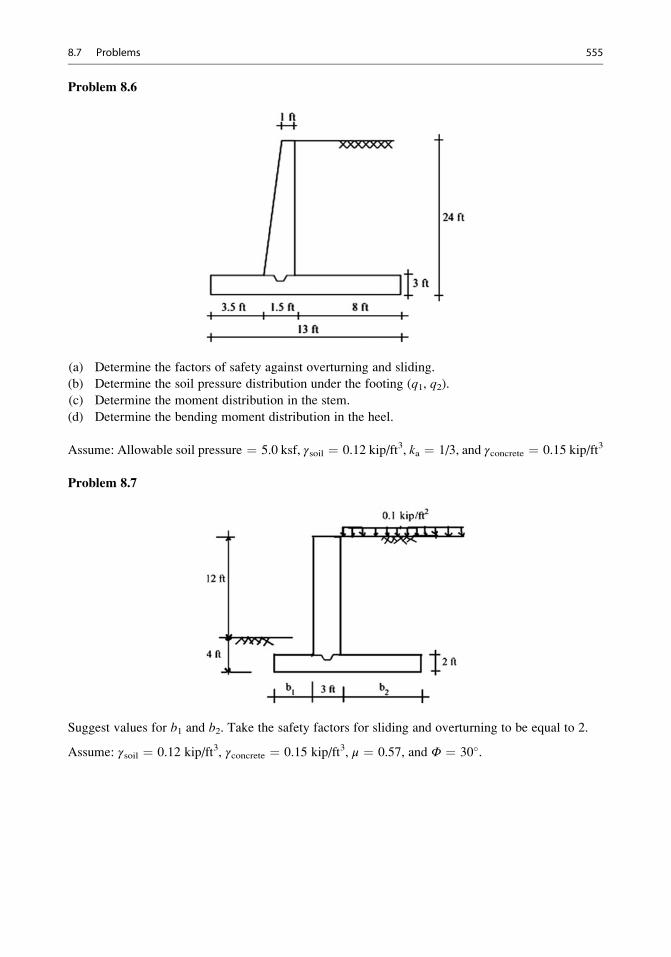
Problem 8.6
(a) Determine the factors of safety against overturning and sliding.
(b) Determine the soil pressure distribution under the footing (q1, q2).
(c) Determine the moment distribution in the stem.
(d) Determine the bending moment distribution in the heel.
Assume: Allowable soil pressure ¼ 5.0 ksf, γsoil ¼ 0.12 kip/ft3, ka ¼ 1/3, and γconcrete ¼ 0.15 kip/ft3
Problem 8.7
Suggest values for b1 and b2. Take the safety factors for sliding and overturning to be equal to 2.
Assume: γsoil ¼ 0.12 kip/ft3, γconcrete ¼ 0.15 kip/ft3, μ ¼ 0.57, and Φ ¼ 30�.
8.7 Problems 555
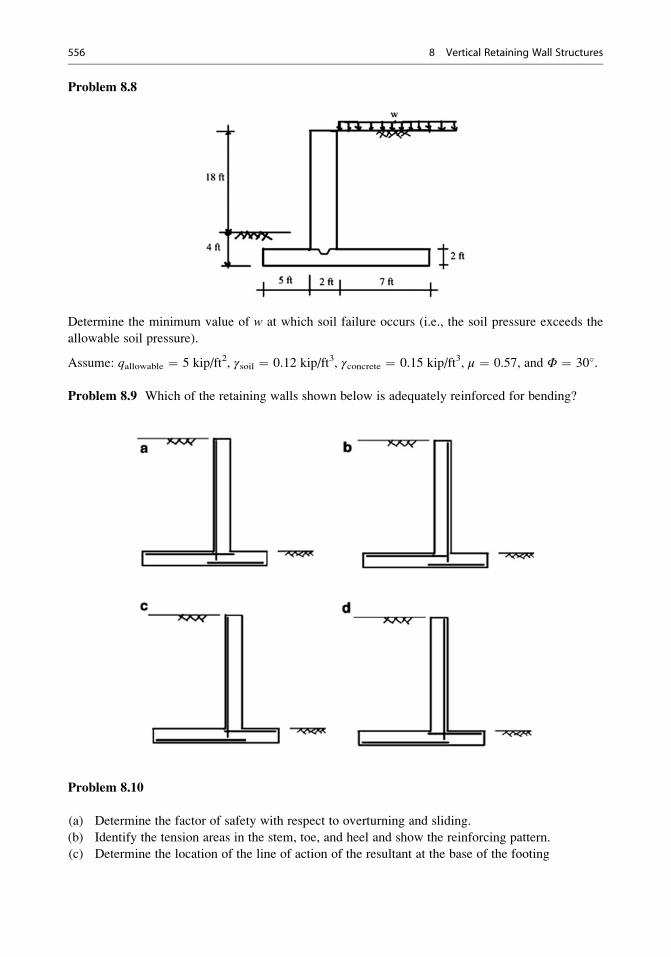
Problem 8.8
Determine the minimum value of w at which soil failure occurs (i.e., the soil pressure exceeds the
allowable soil pressure).
Assume: qallowable ¼ 5 kip/ft2, γsoil ¼ 0.12 kip/ft3, γconcrete ¼ 0.15 kip/ft3, μ ¼ 0.57, and Φ ¼ 30�.
Problem 8.9 Which of the retaining walls shown below is adequately reinforced for bending?
Problem 8.10
(a) Determine the factor of safety with respect to overturning and sliding.
(b) Identify the tension areas in the stem, toe, and heel and show the reinforcing pattern.
(c) Determine the location of the line of action of the resultant at the base of the footing
556 8 Vertical Retaining Wall Structures
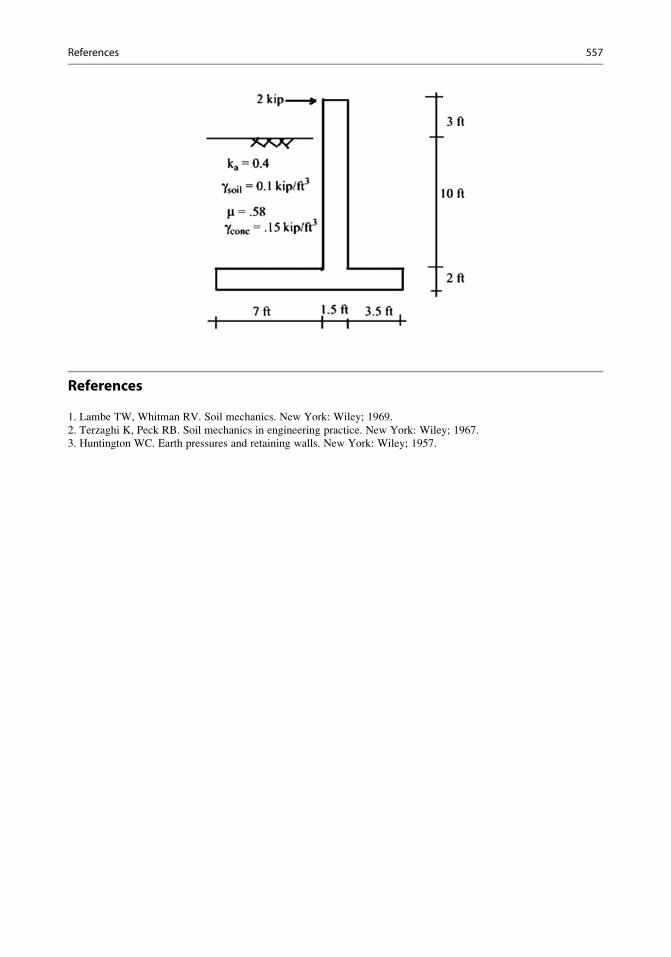
References
1. Lambe TW, Whitman RV. Soil mechanics. New York: Wiley; 1969.
2. Terzaghi K, Peck RB. Soil mechanics in engineering practice. New York: Wiley; 1967.
3. Huntington WC. Earth pressures and retaining walls. New York: Wiley; 1957.
References 557
Part II
Statically Indeterminate Structures
Statically indeterminate structures are over-restrained in the sense that there are more force unknowns
than available equilibrium equations. This situation arises when there are more supports than needed
to prevent rigid body motion. Multi-span continuous beams and two-hinged frames are examples of
this case. Indeterminacy may also result when there is an excess of members, such as a truss with
multiple diagonals. Two dominant methods of analysis are used for indeterminate structures.
The traditional approach for analyzing statically indeterminate structures is based on the assump-
tion that the structure behaves in a linear elastic manner, and therefore displacement patterns
corresponding to different systems of forces can be superimposed to achieve a desired displacement
pattern. One replaces the displacement constraints with unknown forces, determines the deflected
shapes for each unit force, and then combines and scales these shapes to obtain a final deflected shape
that satisfies the constraints. Since one works with force unknowns, this approach is called the “Force
Method.” It is also called the “Flexibility Method.” Engineers find the method appealing since the
process of superimposing the different deflected shapes can be easily visualized and the computa-
tional details, which are suited for hand computation, provide insight into the deflection behavior.
A second method is based on solving a set of equilibrium equations expressed in terms of certain
displacement measures that define the loaded configuration. It views the structure as an assemblage of
members and uses a set of member end force–end displacement relations called the slope deflection
equations. In general, the number of displacement unknowns is larger than the number of force
unknowns, but the method is readily programmed and numerous software packages now exist. We
refer to this approach as the “Displacement Method.” It is also called the “Stiffness Method” since the
equations involve stiffness coefficients.
In what follows, we discuss both methods. We also describe some approximate hand calculation-
based methods that are suitable for rapidly estimating the response due to gravity and lateral loads.
Finally, we describe the underlying theory for the Displacement Method and illustrate how to apply
the method using computer software.
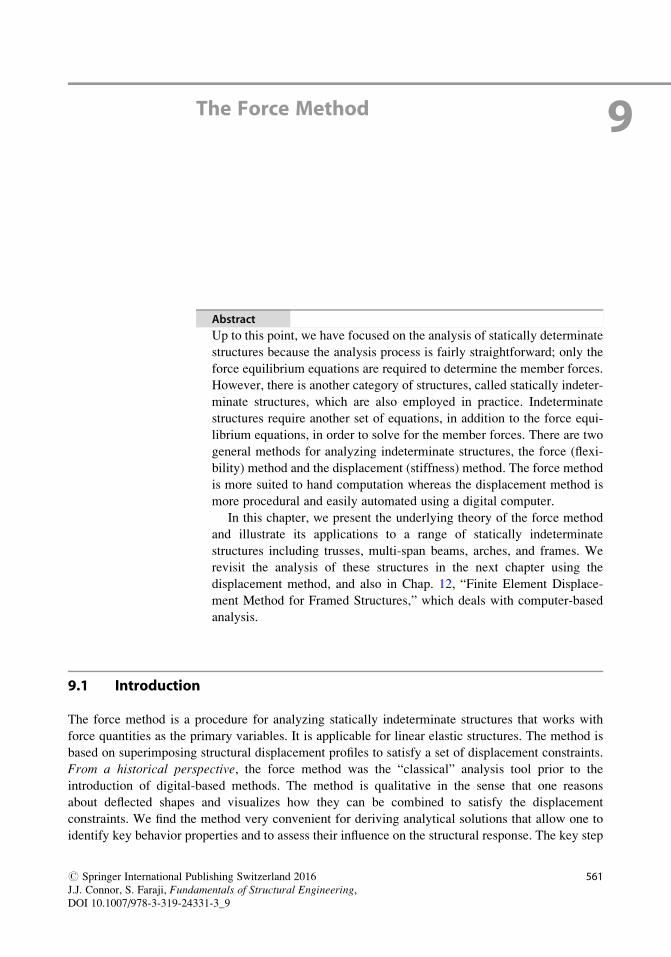
The Force Method 9
Abstract
Up to this point, we have focused on the analysis of statically determinate
structures because the analysis process is fairly straightforward; only the
force equilibrium equations are required to determine the member forces.
However, there is another category of structures, called statically indeter-
minate structures, which are also employed in practice. Indeterminate
structures require another set of equations, in addition to the force equi-
librium equations, in order to solve for the member forces. There are two
general methods for analyzing indeterminate structures, the force (flexi-
bility) method and the displacement (stiffness) method. The force method
is more suited to hand computation whereas the displacement method is
more procedural and easily automated using a digital computer.
In this chapter, we present the underlying theory of the force method
and illustrate its applications to a range of statically indeterminate
structures including trusses, multi-span beams, arches, and frames. We
revisit the analysis of these structures in the next chapter using the
displacement method, and also in Chap. 12, “Finite Element Displace-
ment Method for Framed Structures,” which deals with computer-based
analysis.
9.1 Introduction
The force method is a procedure for analyzing statically indeterminate structures that works with
force quantities as the primary variables. It is applicable for linear elastic structures. The method is
based on superimposing structural displacement profiles to satisfy a set of displacement constraints.
From a historical perspective, the force method was the “classical” analysis tool prior to the
introduction of digital-based methods. The method is qualitative in the sense that one reasons
about deflected shapes and visualizes how they can be combined to satisfy the displacement
constraints. We find the method very convenient for deriving analytical solutions that allow one to
identify key behavior properties and to assess their influence on the structural response. The key step
# Springer International Publishing Switzerland 2016
J.J. Connor, S. Faraji, Fundamentals of Structural Engineering,DOI 10.1007/978-3-319-24331-3_9
561
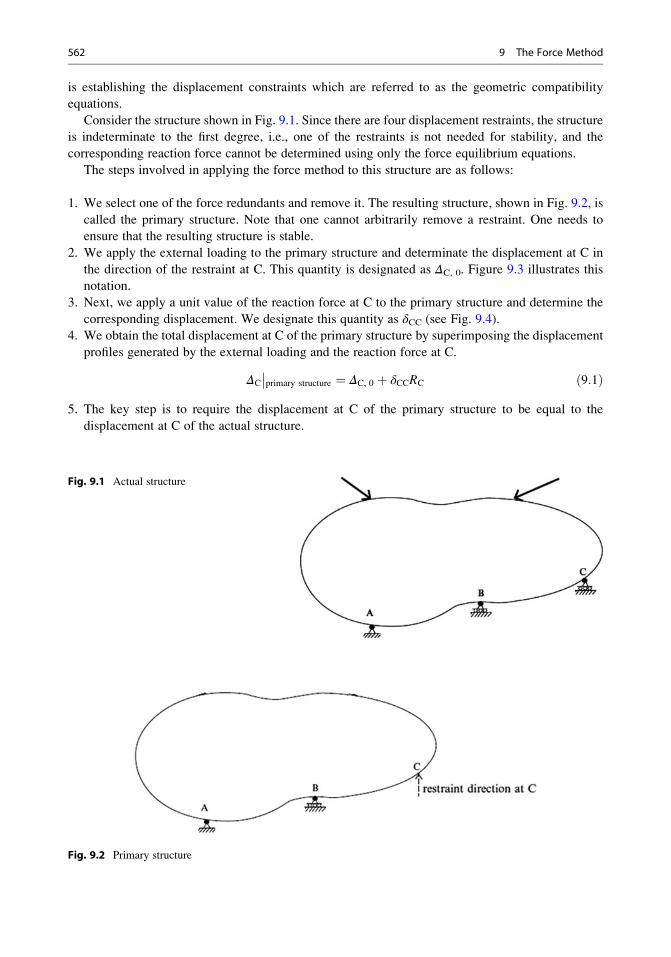
is establishing the displacement constraints which are referred to as the geometric compatibility
equations.
Consider the structure shown in Fig. 9.1. Since there are four displacement restraints, the structure
is indeterminate to the first degree, i.e., one of the restraints is not needed for stability, and the
corresponding reaction force cannot be determined using only the force equilibrium equations.
The steps involved in applying the force method to this structure are as follows:
1. We select one of the force redundants and remove it. The resulting structure, shown in Fig. 9.2, is
called the primary structure. Note that one cannot arbitrarily remove a restraint. One needs to
ensure that the resulting structure is stable.
2. We apply the external loading to the primary structure and determinate the displacement at C in
the direction of the restraint at C. This quantity is designated as ΔC, 0. Figure 9.3 illustrates this
notation.
3. Next, we apply a unit value of the reaction force at C to the primary structure and determine the
corresponding displacement. We designate this quantity as δCC (see Fig. 9.4).
4. We obtain the total displacement at C of the primary structure by superimposing the displacement
profiles generated by the external loading and the reaction force at C.
ΔC
��primary structure ¼ ΔC, 0 þ δCCRC ð9:1Þ
5. The key step is to require the displacement at C of the primary structure to be equal to the
displacement at C of the actual structure.
Fig. 9.1 Actual structure
Fig. 9.2 Primary structure
562 9 The Force Method
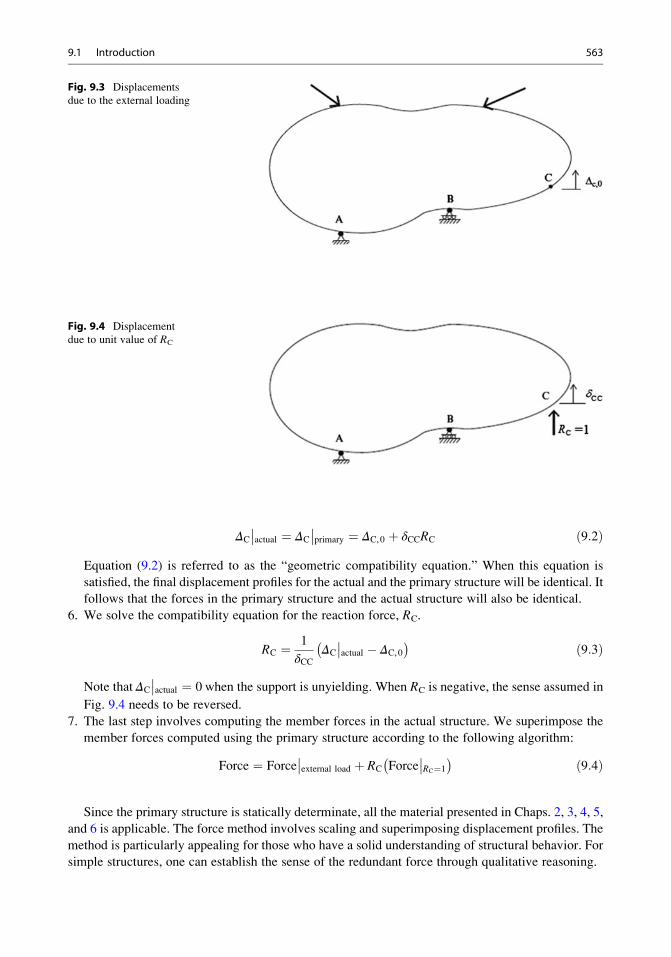
ΔC
��actual ¼ ΔC
��primary ¼ ΔC,0 þ δCCRC ð9:2Þ
Equation (9.2) is referred to as the “geometric compatibility equation.” When this equation is
satisfied, the final displacement profiles for the actual and the primary structure will be identical. It
follows that the forces in the primary structure and the actual structure will also be identical.
6. We solve the compatibility equation for the reaction force, RC.
RC ¼ 1
δCCΔC
��actual � ΔC,0
� � ð9:3Þ
Note that ΔC
��actual ¼ 0 when the support is unyielding. When RC is negative, the sense assumed in
Fig. 9.4 needs to be reversed.
7. The last step involves computing the member forces in the actual structure. We superimpose the
member forces computed using the primary structure according to the following algorithm:
Force ¼ Force��external load þ RC Force
��RC¼1
� � ð9:4Þ
Since the primary structure is statically determinate, all the material presented in Chaps. 2, 3, 4, 5,
and 6 is applicable. The force method involves scaling and superimposing displacement profiles. The
method is particularly appealing for those who have a solid understanding of structural behavior. For
simple structures, one can establish the sense of the redundant force through qualitative reasoning.
Fig. 9.3 Displacements
due to the external loading
Fig. 9.4 Displacement
due to unit value of RC
9.1 Introduction 563
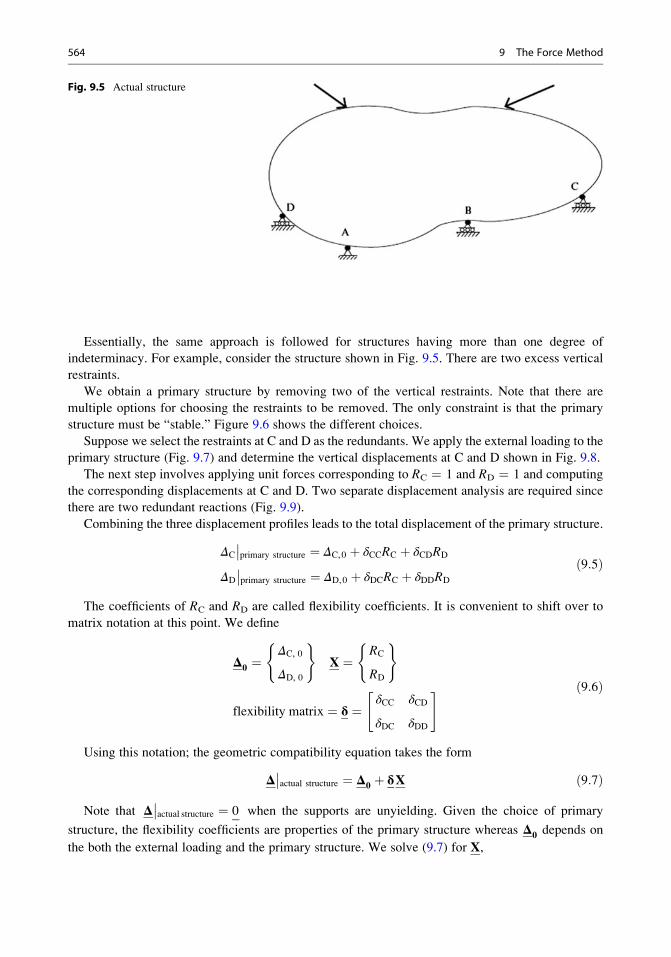
Essentially, the same approach is followed for structures having more than one degree of
indeterminacy. For example, consider the structure shown in Fig. 9.5. There are two excess vertical
restraints.
We obtain a primary structure by removing two of the vertical restraints. Note that there are
multiple options for choosing the restraints to be removed. The only constraint is that the primary
structure must be “stable.” Figure 9.6 shows the different choices.
Suppose we select the restraints at C and D as the redundants. We apply the external loading to the
primary structure (Fig. 9.7) and determine the vertical displacements at C and D shown in Fig. 9.8.
The next step involves applying unit forces corresponding to RC ¼ 1 and RD ¼ 1 and computing
the corresponding displacements at C and D. Two separate displacement analysis are required since
there are two redundant reactions (Fig. 9.9).
Combining the three displacement profiles leads to the total displacement of the primary structure.
ΔC
��primary structure ¼ ΔC,0 þ δCCRC þ δCDRD
ΔD
��primary structure ¼ ΔD,0 þ δDCRC þ δDDRD
ð9:5Þ
The coefficients of RC and RD are called flexibility coefficients. It is convenient to shift over to
matrix notation at this point. We define
Δ0 ¼ΔC, 0
ΔD, 0
( )X ¼
RC
RD
( )
flexibility matrix ¼ δ ¼δCC δCD
δDC δDD
" # ð9:6Þ
Using this notation; the geometric compatibility equation takes the form
Δ��actual structure ¼ Δ0 þ δX ð9:7Þ
Note that Δ��actual structure ¼ 0 when the supports are unyielding. Given the choice of primary
structure, the flexibility coefficients are properties of the primary structure whereas Δ0 depends on
the both the external loading and the primary structure. We solve (9.7) for X,
Fig. 9.5 Actual structure
564 9 The Force Method
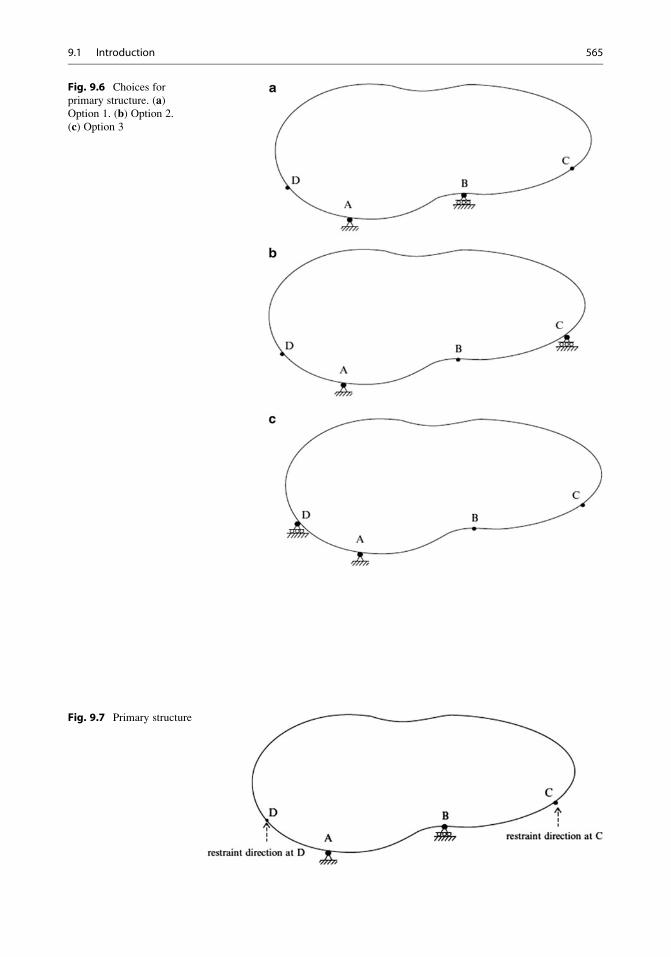
Fig. 9.6 Choices for
primary structure. (a)Option 1. (b) Option 2.
(c) Option 3
Fig. 9.7 Primary structure
9.1 Introduction 565
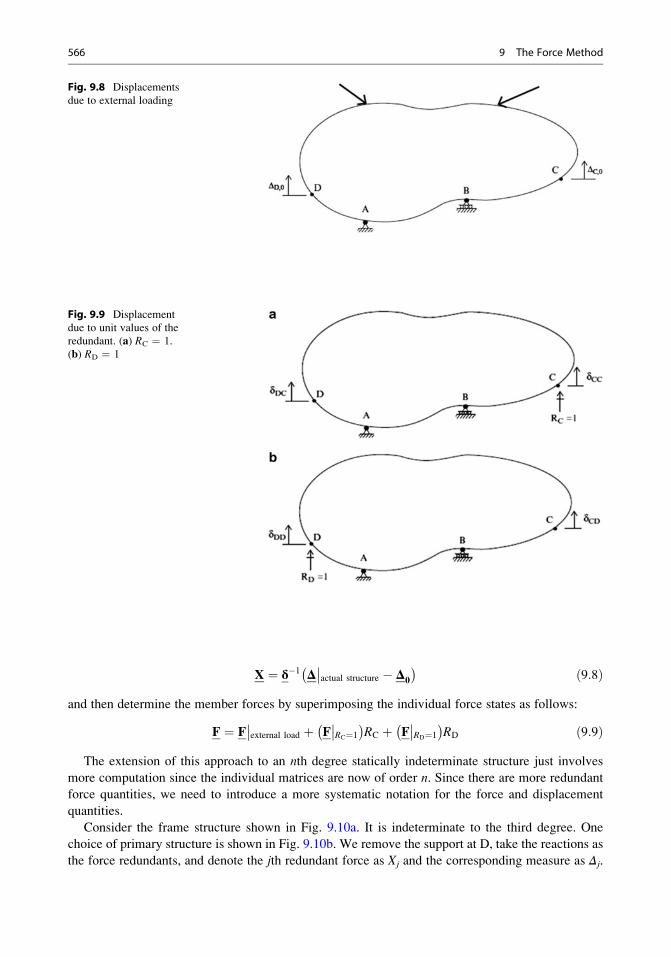
X ¼ δ�1 Δ��actual structure � Δ0
� � ð9:8Þ
and then determine the member forces by superimposing the individual force states as follows:
F ¼ F��external load þ F
��RC¼1
� �RC þ F
��RD¼1
� �RD ð9:9Þ
The extension of this approach to an nth degree statically indeterminate structure just involves
more computation since the individual matrices are now of order n. Since there are more redundant
force quantities, we need to introduce a more systematic notation for the force and displacement
quantities.
Consider the frame structure shown in Fig. 9.10a. It is indeterminate to the third degree. One
choice of primary structure is shown in Fig. 9.10b. We remove the support at D, take the reactions as
the force redundants, and denote the jth redundant force as Xj and the corresponding measure as Δj.
Fig. 9.8 Displacements
due to external loading
Fig. 9.9 Displacement
due to unit values of the
redundant. (a) RC ¼ 1.
(b) RD ¼ 1
566 9 The Force Method

The resulting displacements of the primary structure due to the external loading and the three force
redundants are expressed as
Δ1
��primary structure ¼ Δ1, 0 þ δ11X1 þ δ12X2 þ δ13X3
Δ2
��primary structure ¼ Δ2, 0 þ δ21X1 þ δ22X2 þ δ23X3
Δ3
��primary structure ¼ Δ3, 0 þ δ31X1 þ δ32X2 þ δ33X3
ð9:10Þ
The matrix form of (9.10) is
Δ��primary structure ¼ Δ0 þ δX ð9:11Þ
where
δ ¼δ11 δ12 δ13δ21 δ22 δ23δ31 δ32 δ33
24
35 Δ0 ¼
Δ1, 0
Δ2, 0
Δ3, 0
8<:
9=; X ¼
X1
X2
X3
8<:
9=;
Note that the displacement measures may be either a translation or a rotation. A major portion of
the computational effort is involved with computing the flexibility coefficients using the Principle of
Virtual Forces. The matrix form of the geometric compatibility equation (9.7) is generic, i.e., it is
applicable for all structures. One just has to establish the appropriate form for Δ0 and δ.Other possible choices of primary structures are shown in Fig. 9.11. We can retain the two fixed
supports, but cut the structure at an arbitrary interior point (Fig. 9.11a). The redundants are taken as
the internal forces (axial, shear, and moment) at the point. The flexibility coefficients are now
interpreted as the relative displacements of the adjacent cross sections (e.g., spreading, sliding,
relative rotation). Another choice involves removing excess reactions as in Fig. 9.11b.
For multi-bay multistory frames, one needs to work with internal force redundants since removing
fixed supports is not sufficient to reduce the structure to a statically determinate structure. Figure 9.12
illustrates this case.
Multi-span beam-type structures are handled in a similar way when choosing a primary structure.
Consider Fig. 9.13. One can either select certain excess reactions or work with bending moments at
interior points. We prefer the latter choice since the computation of the corresponding flexibility
coefficients is simpler due to the fact that the deflection profiles associated with the redundant
moments are confined to adjacent spans.
For truss-type structures, various cases arise. The truss may have more supports than needed, such
as shown in Fig. 9.14a. One choice would be to remove sufficient supports such that the resulting
structure is statically determinate (Fig. 9.14b).
We can also keep the original restraints, and remove some members, as indicated in Fig. 9.14c.
Another example is shown in Fig. 9.15a. The truss has too many members and therefore the only
option is to remove some of the diagonals. Figure 9.15b illustrates one choice of redundants.
Fig. 9.10 (a) Actualstructure. (b) Primary
structure—redundant
reactions
9.1 Introduction 567
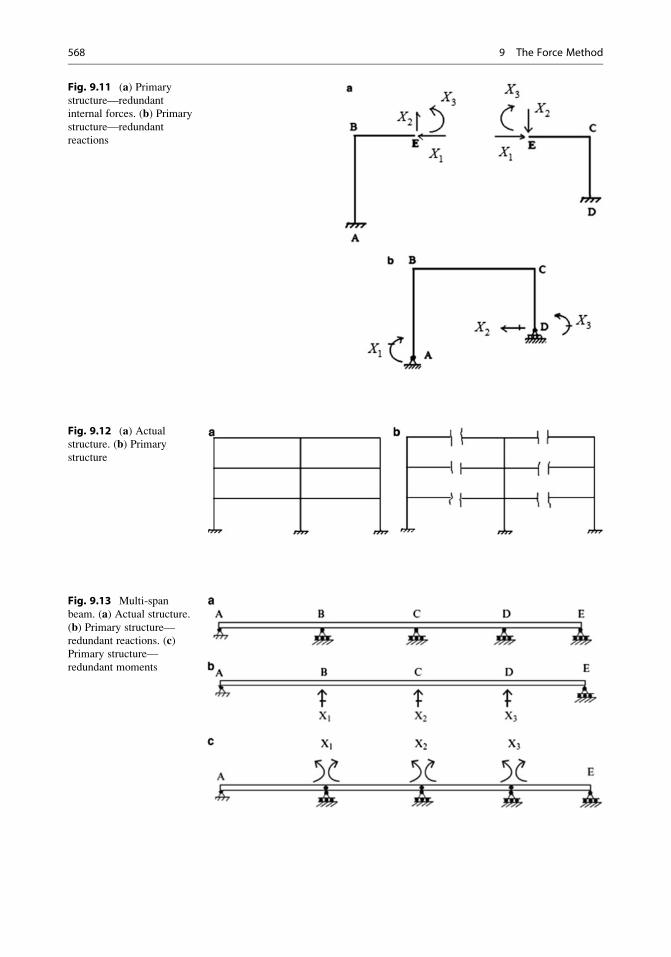
Fig. 9.12 (a) Actualstructure. (b) Primary
structure
Fig. 9.11 (a) Primary
structure—redundant
internal forces. (b) Primary
structure—redundant
reactions
Fig. 9.13 Multi-span
beam. (a) Actual structure.(b) Primary structure—
redundant reactions. (c)Primary structure—
redundant moments
568 9 The Force Method
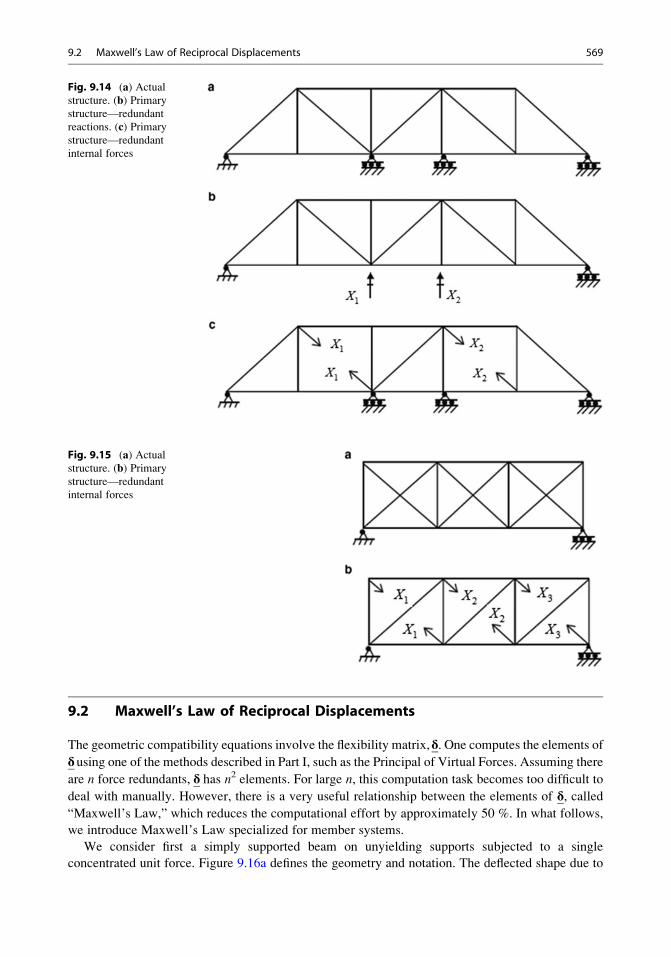
9.2 Maxwell’s Law of Reciprocal Displacements
The geometric compatibility equations involve the flexibility matrix,δ. One computes the elements of
δusing one of the methods described in Part I, such as the Principal of Virtual Forces. Assuming there
are n force redundants, δ has n2 elements. For large n, this computation task becomes too difficult to
deal with manually. However, there is a very useful relationship between the elements of δ, called“Maxwell’s Law,” which reduces the computational effort by approximately 50 %. In what follows,
we introduce Maxwell’s Law specialized for member systems.
We consider first a simply supported beam on unyielding supports subjected to a single
concentrated unit force. Figure 9.16a defines the geometry and notation. The deflected shape due to
Fig. 9.14 (a) Actualstructure. (b) Primary
structure—redundant
reactions. (c) Primary
structure—redundant
internal forces
Fig. 9.15 (a) Actualstructure. (b) Primary
structure—redundant
internal forces
9.2 Maxwell’s Law of Reciprocal Displacements 569
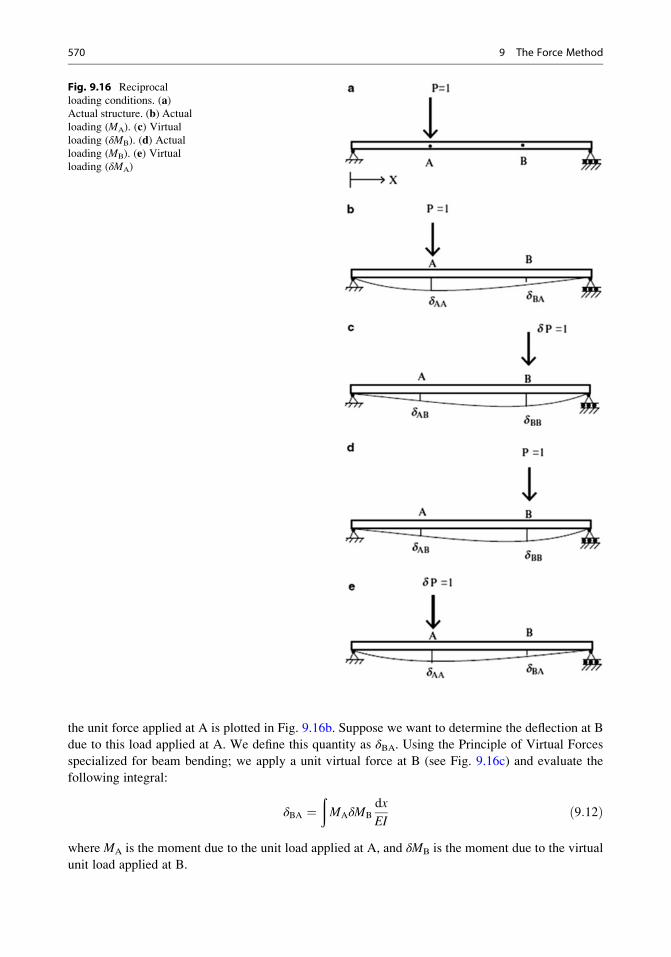
the unit force applied at A is plotted in Fig. 9.16b. Suppose we want to determine the deflection at B
due to this load applied at A. We define this quantity as δBA. Using the Principle of Virtual Forces
specialized for beam bending; we apply a unit virtual force at B (see Fig. 9.16c) and evaluate the
following integral:
δBA ¼ðMAδMB
dx
EIð9:12Þ
where MA is the moment due to the unit load applied at A, and δMB is the moment due to the virtual
unit load applied at B.
Fig. 9.16 Reciprocal
loading conditions. (a)Actual structure. (b) Actualloading (MA). (c) Virtualloading (δMB). (d) Actualloading (MB). (e) Virtualloading (δMA)
570 9 The Force Method
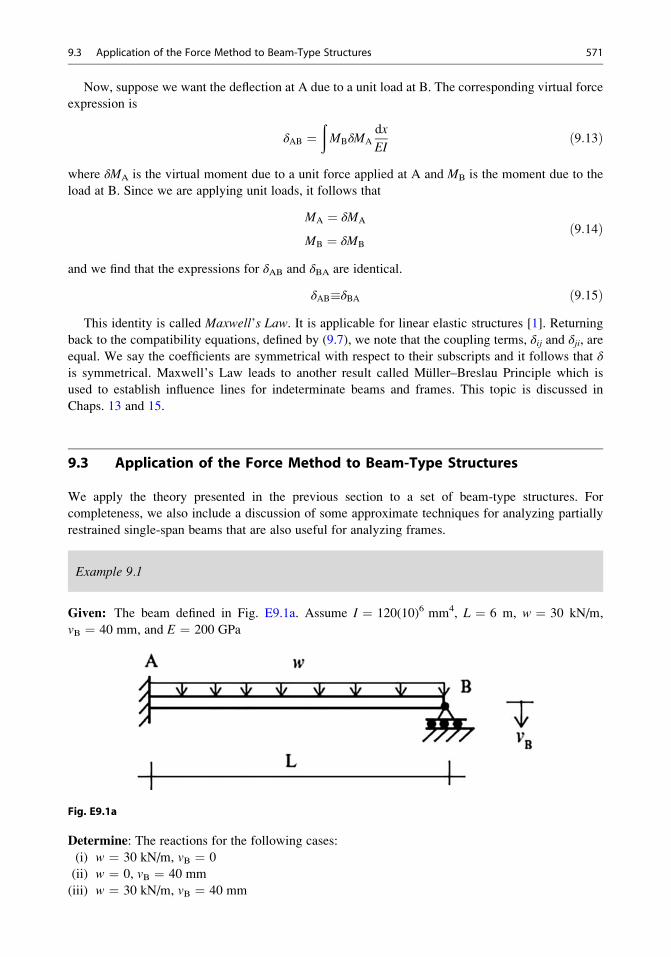
Now, suppose we want the deflection at A due to a unit load at B. The corresponding virtual force
expression is
δAB ¼ðMBδMA
dx
EIð9:13Þ
where δMA is the virtual moment due to a unit force applied at A and MB is the moment due to the
load at B. Since we are applying unit loads, it follows that
MA ¼ δMA
MB ¼ δMB
ð9:14Þ
and we find that the expressions for δAB and δBA are identical.
δAB�δBA ð9:15ÞThis identity is called Maxwell’s Law. It is applicable for linear elastic structures [1]. Returning
back to the compatibility equations, defined by (9.7), we note that the coupling terms, δij and δji, areequal. We say the coefficients are symmetrical with respect to their subscripts and it follows that δis symmetrical. Maxwell’s Law leads to another result called Muller–Breslau Principle which is
used to establish influence lines for indeterminate beams and frames. This topic is discussed in
Chaps. 13 and 15.
9.3 Application of the Force Method to Beam-Type Structures
We apply the theory presented in the previous section to a set of beam-type structures. For
completeness, we also include a discussion of some approximate techniques for analyzing partially
restrained single-span beams that are also useful for analyzing frames.
Example 9.1
Given: The beam defined in Fig. E9.1a. Assume I ¼ 120(10)6 mm4, L ¼ 6 m, w ¼ 30 kN/m,
vB ¼ 40 mm, and E ¼ 200 GPa
Fig. E9.1a
Determine: The reactions for the following cases:
(i) w ¼ 30 kN/m, vB ¼ 0
(ii) w ¼ 0, vB ¼ 40 mm
(iii) w ¼ 30 kN/m, vB ¼ 40 mm
9.3 Application of the Force Method to Beam-Type Structures 571
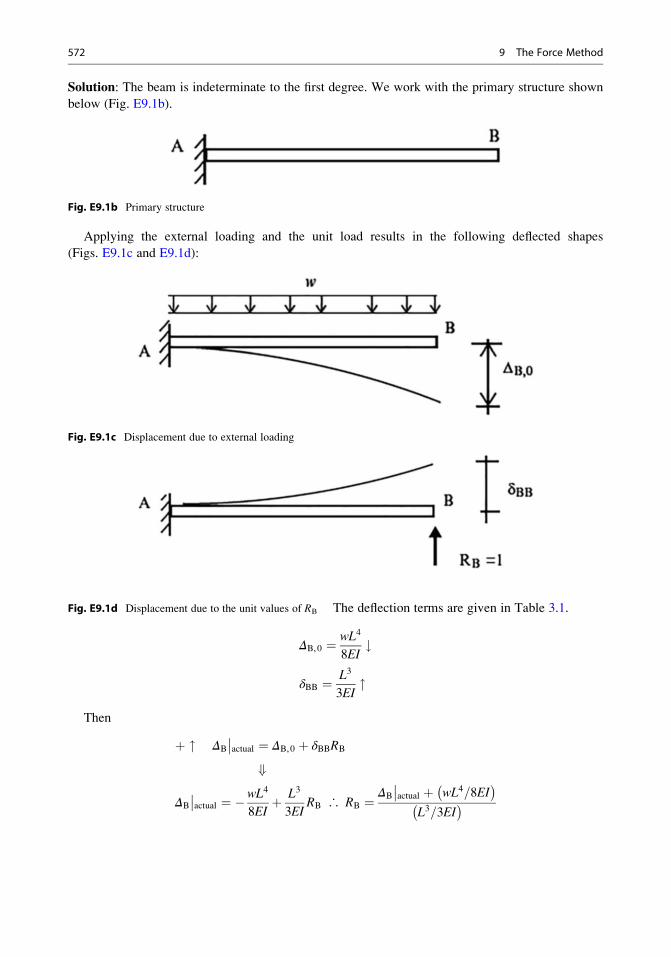
Solution: The beam is indeterminate to the first degree. We work with the primary structure shown
below (Fig. E9.1b).
Fig. E9.1b Primary structure
Applying the external loading and the unit load results in the following deflected shapes
(Figs. E9.1c and E9.1d):
Fig. E9.1c Displacement due to external loading
Fig. E9.1d Displacement due to the unit values of RB The deflection terms are given in Table 3.1.
ΔB,0 ¼ wL4
8EI#
δBB ¼ L3
3EI"
Then
þ " ΔB
��actual ¼ ΔB,0 þ δBBRB
+
ΔB
��actual ¼ �wL4
8EIþ L3
3EIRB ∴ RB ¼
ΔB
��actual þ wL4=8EI
� �L3=3EI� �
572 9 The Force Method
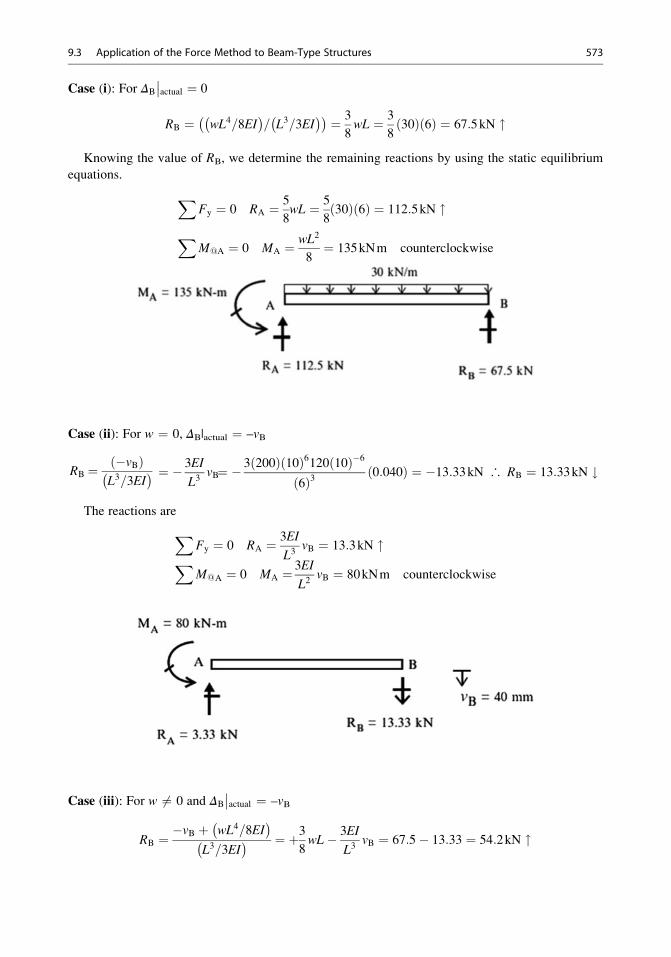
Case (i): For ΔB
��actual ¼ 0
RB ¼ wL4=8EI� �
= L3=3EI� �� � ¼ 3
8wL ¼ 3
830ð Þ 6ð Þ ¼ 67:5kN "
Knowing the value of RB, we determine the remaining reactions by using the static equilibrium
equations.
XFy ¼ 0 RA ¼ 5
8wL ¼ 5
830ð Þ 6ð Þ ¼ 112:5kN "
XM@A ¼ 0 MA ¼ wL2
8¼ 135kNm counterclockwise
Case (ii): For w ¼ 0, ΔB|actual ¼ –vB
RB ¼ �vBð ÞL3=3EI� � ¼ � 3EI
L3vB¼ � 3 200ð Þ 10ð Þ6120 10ð Þ�6
6ð Þ3 0:040ð Þ ¼ �13:33kN ∴ RB ¼ 13:33kN #
The reactions are
XFy ¼ 0 RA ¼ 3EI
L3vB ¼ 13:3kN "X
M@A ¼ 0 MA ¼ 3EI
L2vB ¼ 80kNm counterclockwise
Case (iii): For w 6¼ 0 and ΔB
��actual ¼ –vB
RB ¼�vB þ wL4=8EI
� �L3=3EI� � ¼ þ3
8wL� 3EI
L3vB ¼ 67:5� 13:33 ¼ 54:2kN "
9.3 Application of the Force Method to Beam-Type Structures 573
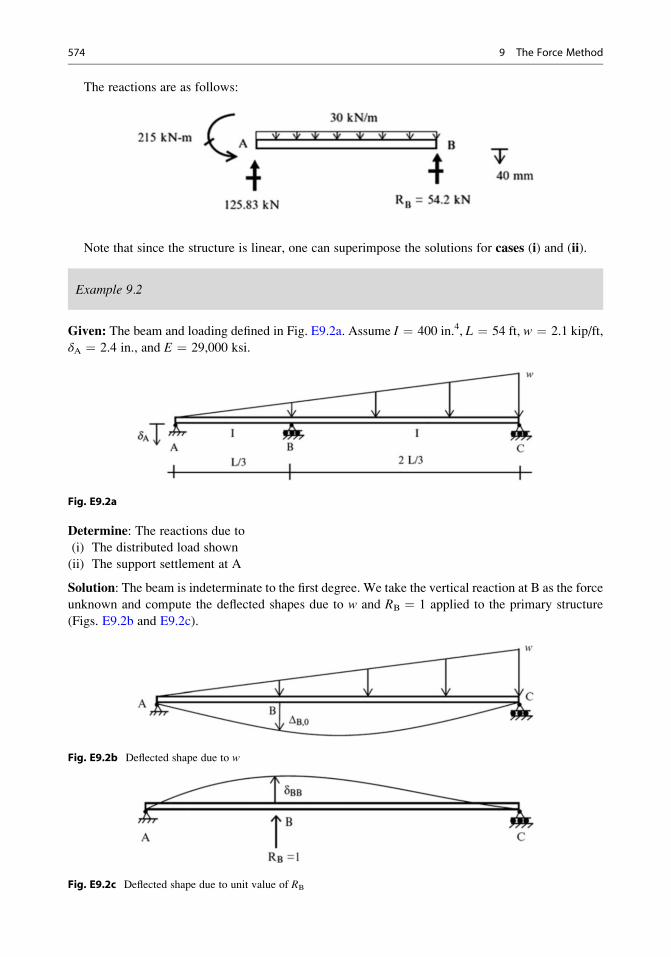
The reactions are as follows:
Note that since the structure is linear, one can superimpose the solutions for cases (i) and (ii).
Example 9.2
Given: The beam and loading defined in Fig. E9.2a. Assume I ¼ 400 in.4, L ¼ 54 ft, w ¼ 2.1 kip/ft,
δA ¼ 2.4 in., and E ¼ 29,000 ksi.
Fig. E9.2a
Determine: The reactions due to
(i) The distributed load shown
(ii) The support settlement at A
Solution: The beam is indeterminate to the first degree. We take the vertical reaction at B as the force
unknown and compute the deflected shapes due to w and RB ¼ 1 applied to the primary structure
(Figs. E9.2b and E9.2c).
Fig. E9.2b Deflected shape due to w
Fig. E9.2c Deflected shape due to unit value of RB
574 9 The Force Method
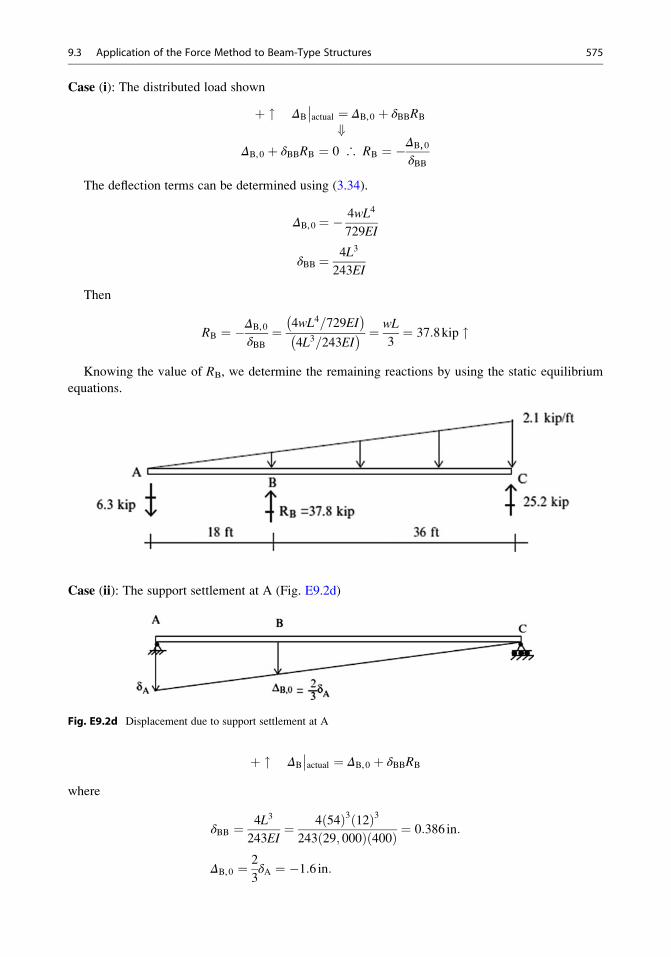
Case (i): The distributed load shown
þ " ΔB
��actual ¼ ΔB,0 þ δBBRB
+ΔB,0 þ δBBRB ¼ 0 ∴ RB ¼ �ΔB,0
δBB
The deflection terms can be determined using (3.34).
ΔB,0 ¼ � 4wL4
729EI
δBB ¼ 4L3
243EI
Then
RB ¼ �ΔB,0
δBB¼ 4wL4=729EI� �4L3=243EI� � ¼ wL
3¼ 37:8kip "
Knowing the value of RB, we determine the remaining reactions by using the static equilibrium
equations.
Case (ii): The support settlement at A (Fig. E9.2d)
Fig. E9.2d Displacement due to support settlement at A
þ " ΔB
��actual ¼ ΔB,0 þ δBBRB
where
δBB ¼ 4L3
243EI¼ 4 54ð Þ3 12ð Þ3
243 29; 000ð Þ 400ð Þ ¼ 0:386 in:
ΔB,0 ¼ 2
3δA ¼ �1:6 in:
9.3 Application of the Force Method to Beam-Type Structures 575
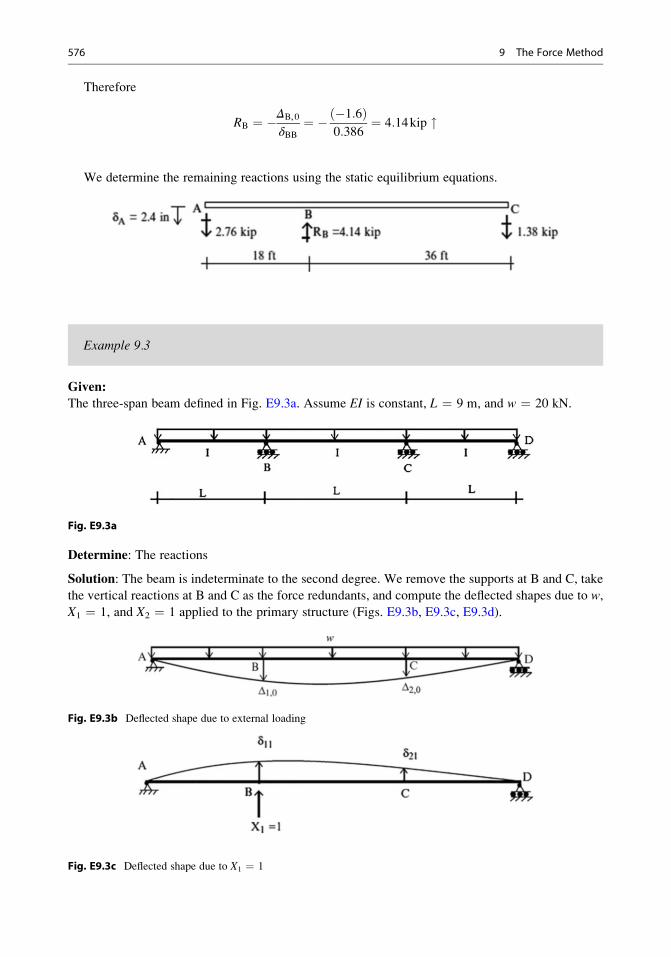
Therefore
RB ¼ �ΔB,0
δBB¼ � �1:6ð Þ
0:386¼ 4:14kip "
We determine the remaining reactions using the static equilibrium equations.
Example 9.3
Given:
The three-span beam defined in Fig. E9.3a. Assume EI is constant, L ¼ 9 m, and w ¼ 20 kN.
Fig. E9.3a
Determine: The reactions
Solution: The beam is indeterminate to the second degree. We remove the supports at B and C, take
the vertical reactions at B and C as the force redundants, and compute the deflected shapes due to w,
X1 ¼ 1, and X2 ¼ 1 applied to the primary structure (Figs. E9.3b, E9.3c, E9.3d).
Fig. E9.3b Deflected shape due to external loading
Fig. E9.3c Deflected shape due to X1 ¼ 1
576 9 The Force Method
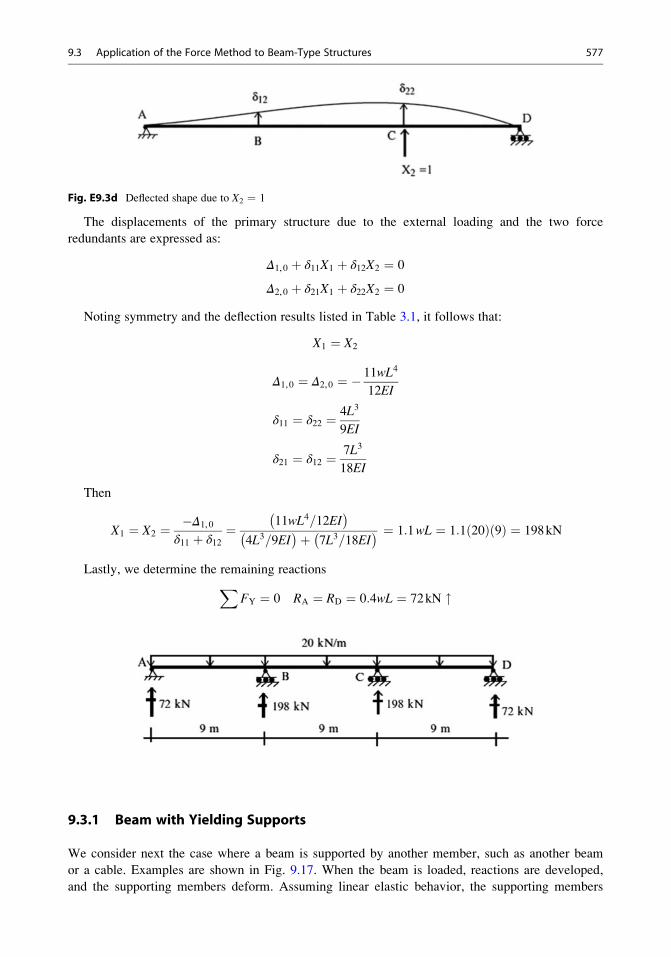
Fig. E9.3d Deflected shape due to X2 ¼ 1
The displacements of the primary structure due to the external loading and the two force
redundants are expressed as:
Δ1,0 þ δ11X1 þ δ12X2 ¼ 0
Δ2,0 þ δ21X1 þ δ22X2 ¼ 0
Noting symmetry and the deflection results listed in Table 3.1, it follows that:
X1 ¼ X2
Δ1,0 ¼ Δ2,0 ¼ � 11wL4
12EI
δ11 ¼ δ22 ¼ 4L3
9EI
δ21 ¼ δ12 ¼ 7L3
18EI
Then
X1 ¼ X2 ¼ �Δ1,0
δ11 þ δ12¼ 11wL4=12EI
� �4L3=9EI� �þ 7L3=18EI
� � ¼ 1:1wL ¼ 1:1 20ð Þ 9ð Þ ¼ 198kN
Lastly, we determine the remaining reactionsXFY ¼ 0 RA ¼ RD ¼ 0:4wL ¼ 72kN "
9.3.1 Beam with Yielding Supports
We consider next the case where a beam is supported by another member, such as another beam
or a cable. Examples are shown in Fig. 9.17. When the beam is loaded, reactions are developed,
and the supporting members deform. Assuming linear elastic behavior, the supporting members
9.3 Application of the Force Method to Beam-Type Structures 577
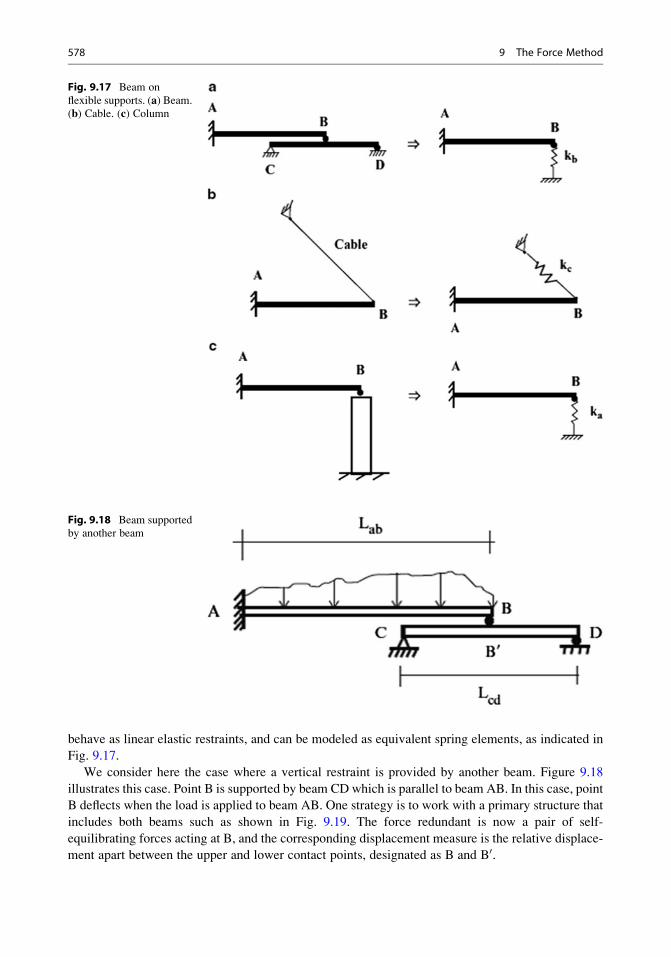
behave as linear elastic restraints, and can be modeled as equivalent spring elements, as indicated in
Fig. 9.17.
We consider here the case where a vertical restraint is provided by another beam. Figure 9.18
illustrates this case. Point B is supported by beam CD which is parallel to beam AB. In this case, point
B deflects when the load is applied to beam AB. One strategy is to work with a primary structure that
includes both beams such as shown in Fig. 9.19. The force redundant is now a pair of self-
equilibrating forces acting at B, and the corresponding displacement measure is the relative displace-
ment apart between the upper and lower contact points, designated as B and B0.
Fig. 9.17 Beam on
flexible supports. (a) Beam.
(b) Cable. (c) Column
Fig. 9.18 Beam supported
by another beam
578 9 The Force Method
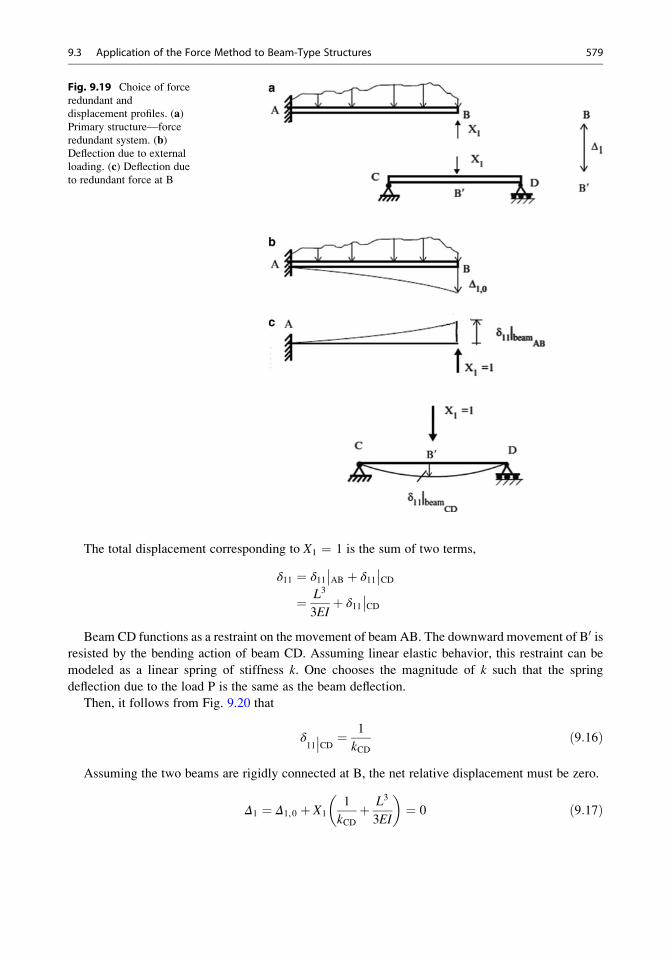
The total displacement corresponding to X1 ¼ 1 is the sum of two terms,
δ11 ¼ δ11��AB þ δ11
��CD
¼ L3
3EIþ δ11
��CD
Beam CD functions as a restraint on the movement of beam AB. The downward movement of B0 isresisted by the bending action of beam CD. Assuming linear elastic behavior, this restraint can be
modeled as a linear spring of stiffness k. One chooses the magnitude of k such that the spring
deflection due to the load P is the same as the beam deflection.
Then, it follows from Fig. 9.20 that
δ11
��CD ¼ 1
kCDð9:16Þ
Assuming the two beams are rigidly connected at B, the net relative displacement must be zero.
Δ1 ¼ Δ1,0 þ X1
1
kCDþ L3
3EI
� �¼ 0 ð9:17Þ
Fig. 9.19 Choice of force
redundant and
displacement profiles. (a)Primary structure—force
redundant system. (b)Deflection due to external
loading. (c) Deflection due
to redundant force at B
9.3 Application of the Force Method to Beam-Type Structures 579
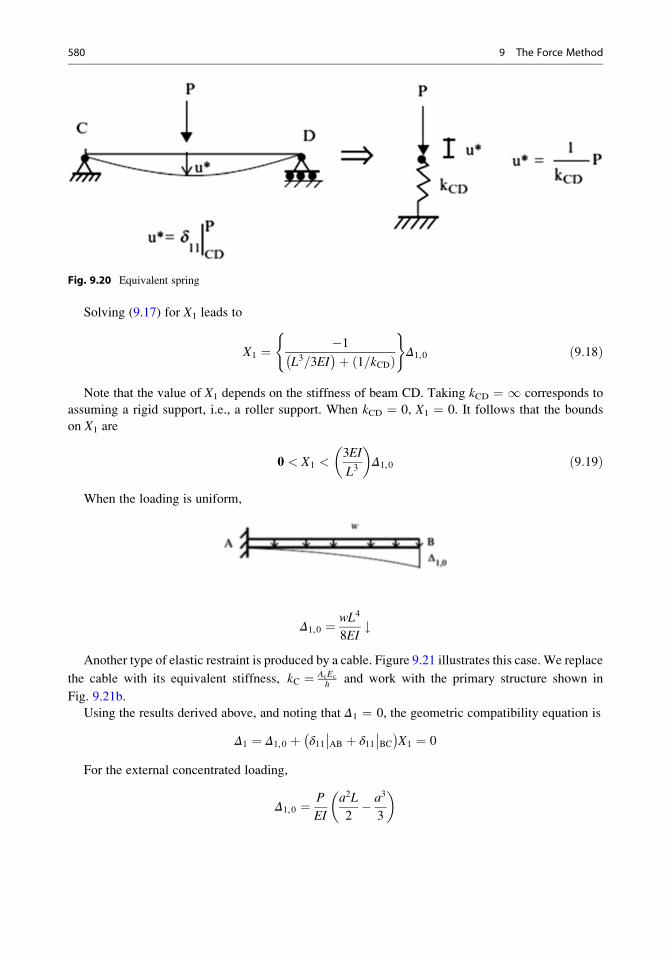
Solving (9.17) for X1 leads to
X1 ¼ �1L3=3EI� �þ 1=kCDð Þ
( )Δ1,0 ð9:18Þ
Note that the value of X1 depends on the stiffness of beam CD. Taking kCD ¼ 1 corresponds to
assuming a rigid support, i.e., a roller support. When kCD ¼ 0, X1 ¼ 0. It follows that the bounds
on X1 are
0 < X1 <3EI
L3
� �Δ1,0 ð9:19Þ
When the loading is uniform,
Δ1,0 ¼ wL4
8EI#
Another type of elastic restraint is produced by a cable. Figure 9.21 illustrates this case. We replace
the cable with its equivalent stiffness, kC ¼ AcEc
h and work with the primary structure shown in
Fig. 9.21b.
Using the results derived above, and noting that Δ1 ¼ 0, the geometric compatibility equation is
Δ1 ¼ Δ1,0 þ δ11��AB þ δ11
��BC
� �X1 ¼ 0
For the external concentrated loading,
Δ1,0 ¼ P
EI
a2L
2� a3
3
� �
Fig. 9.20 Equivalent spring
580 9 The Force Method
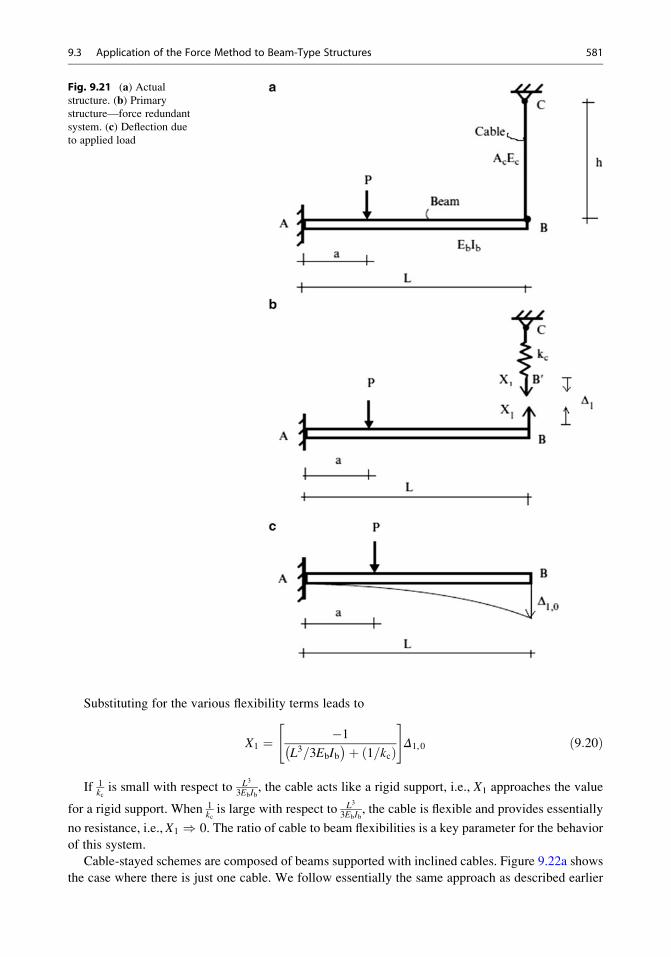
Substituting for the various flexibility terms leads to
X1 ¼ �1L3=3EbIb� �þ 1=kcð Þ
" #Δ1,0 ð9:20Þ
If 1kcis small with respect to L3
3EbIb, the cable acts like a rigid support, i.e., X1 approaches the value
for a rigid support. When 1kcis large with respect to L3
3EbIb, the cable is flexible and provides essentially
no resistance, i.e., X1 ) 0. The ratio of cable to beam flexibilities is a key parameter for the behavior
of this system.
Cable-stayed schemes are composed of beams supported with inclined cables. Figure 9.22a shows
the case where there is just one cable. We follow essentially the same approach as described earlier
Fig. 9.21 (a) Actualstructure. (b) Primary
structure—force redundant
system. (c) Deflection due
to applied load
9.3 Application of the Force Method to Beam-Type Structures 581
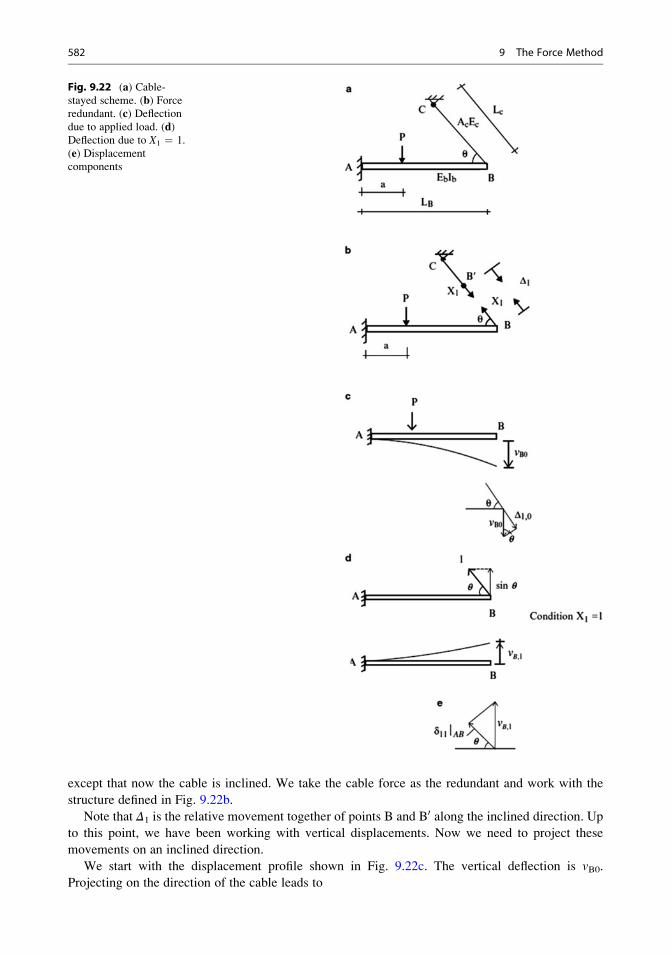
except that now the cable is inclined. We take the cable force as the redundant and work with the
structure defined in Fig. 9.22b.
Note that Δ1 is the relative movement together of points B and B0 along the inclined direction. Up
to this point, we have been working with vertical displacements. Now we need to project these
movements on an inclined direction.
We start with the displacement profile shown in Fig. 9.22c. The vertical deflection is vB0.Projecting on the direction of the cable leads to
Fig. 9.22 (a) Cable-stayed scheme. (b) Forceredundant. (c) Deflectiondue to applied load. (d)Deflection due to X1 ¼ 1.
(e) Displacement
components
582 9 The Force Method
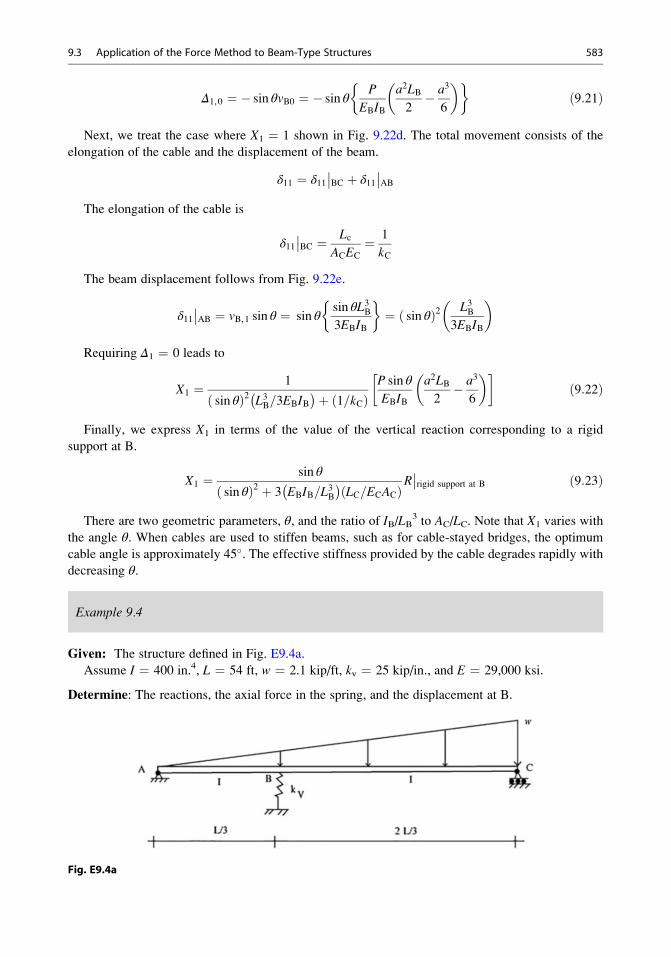
Δ1,0 ¼ � sin θvB0 ¼ � sin θP
EBIB
a2LB2� a3
6
� � �ð9:21Þ
Next, we treat the case where X1 ¼ 1 shown in Fig. 9.22d. The total movement consists of the
elongation of the cable and the displacement of the beam.
δ11 ¼ δ11��BC þ δ11
��AB
The elongation of the cable is
δ11��BC ¼ Lc
ACEC
¼ 1
kC
The beam displacement follows from Fig. 9.22e.
δ11��AB ¼ vB,1 sin θ ¼ sin θ
sin θL3B3EBIB
�¼ sin θð Þ2 L3B
3EBIB
� �
Requiring Δ1 ¼ 0 leads to
X1 ¼ 1
sin θð Þ2 L3B=3EBIB� �þ 1=kCð Þ
P sin θ
EBIB
a2LB2� a3
6
� � �ð9:22Þ
Finally, we express X1 in terms of the value of the vertical reaction corresponding to a rigid
support at B.
X1 ¼ sin θ
sin θð Þ2 þ 3 EBIB=L3B
� �LC=ECACð ÞR
��rigid support at B ð9:23Þ
There are two geometric parameters, θ, and the ratio of IB/LB3 to AC/LC. Note that X1 varies with
the angle θ. When cables are used to stiffen beams, such as for cable-stayed bridges, the optimum
cable angle is approximately 45�. The effective stiffness provided by the cable degrades rapidly withdecreasing θ.
Example 9.4
Given: The structure defined in Fig. E9.4a.
Assume I ¼ 400 in.4, L ¼ 54 ft, w ¼ 2.1 kip/ft, kv ¼ 25 kip/in., and E ¼ 29,000 ksi.
Determine: The reactions, the axial force in the spring, and the displacement at B.
Fig. E9.4a
9.3 Application of the Force Method to Beam-Type Structures 583
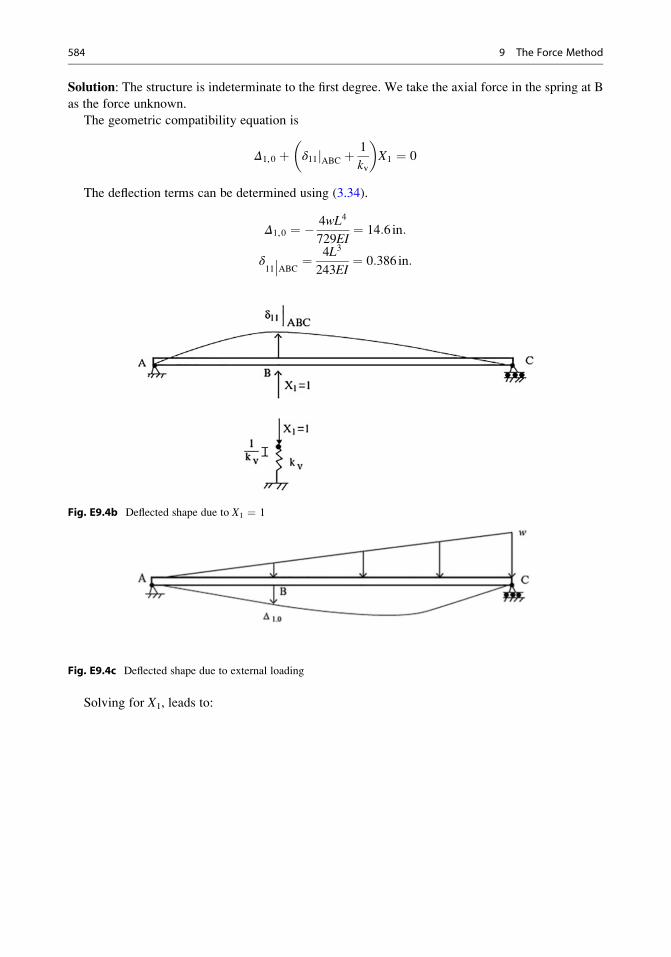
Solution: The structure is indeterminate to the first degree. We take the axial force in the spring at B
as the force unknown.
The geometric compatibility equation is
Δ1,0 þ δ11jABC þ1
kv
� �X1 ¼ 0
The deflection terms can be determined using (3.34).
Δ1,0 ¼ � 4wL4
729EI¼ 14:6 in:
δ11
��ABC ¼ 4L3
243EI¼ 0:386 in:
Fig. E9.4b Deflected shape due to X1 ¼ 1
Fig. E9.4c Deflected shape due to external loading
Solving for X1, leads to:
584 9 The Force Method
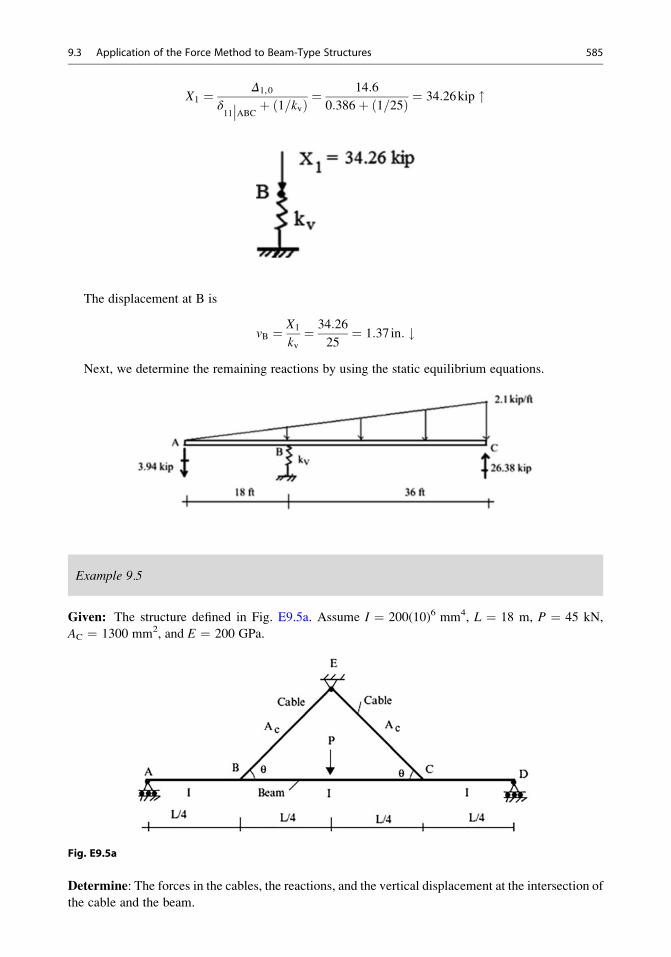
X1 ¼ Δ1,0
δ11
��ABC þ 1=kvð Þ ¼14:6
0:386þ 1=25ð Þ ¼ 34:26kip "
The displacement at B is
vB ¼ X1
kv¼ 34:26
25¼ 1:37 in: #
Next, we determine the remaining reactions by using the static equilibrium equations.
Example 9.5
Given: The structure defined in Fig. E9.5a. Assume I ¼ 200(10)6 mm4, L ¼ 18 m, P ¼ 45 kN,
AC ¼ 1300 mm2, and E ¼ 200 GPa.
Fig. E9.5a
Determine: The forces in the cables, the reactions, and the vertical displacement at the intersection of
the cable and the beam.
9.3 Application of the Force Method to Beam-Type Structures 585
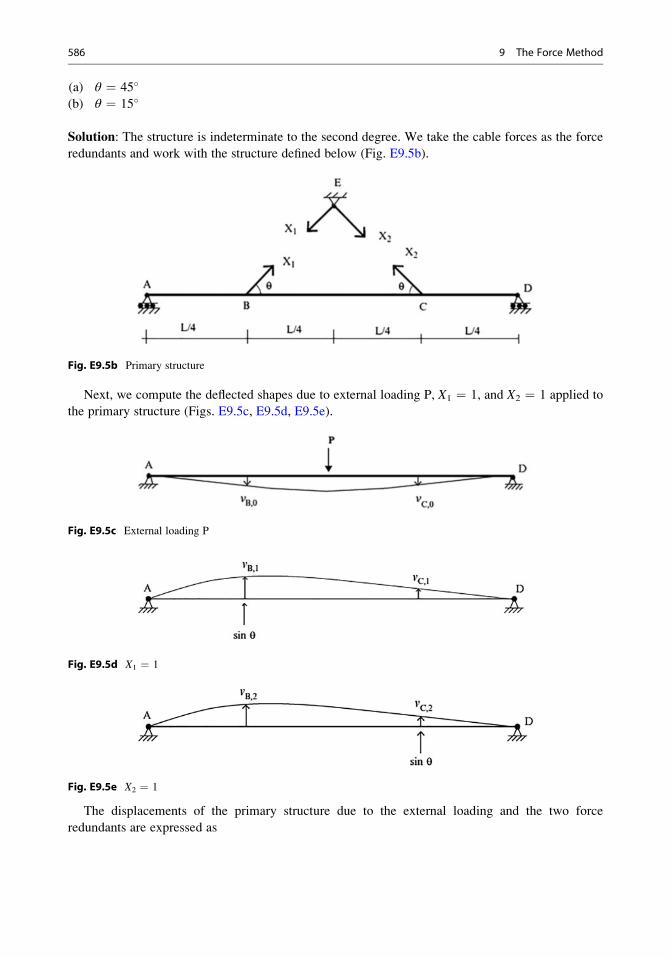
(a) θ ¼ 45�
(b) θ ¼ 15�
Solution: The structure is indeterminate to the second degree. We take the cable forces as the force
redundants and work with the structure defined below (Fig. E9.5b).
Fig. E9.5b Primary structure
Next, we compute the deflected shapes due to external loading P, X1 ¼ 1, and X2 ¼ 1 applied to
the primary structure (Figs. E9.5c, E9.5d, E9.5e).
Fig. E9.5c External loading P
Fig. E9.5d X1 ¼ 1
Fig. E9.5e X2 ¼ 1
The displacements of the primary structure due to the external loading and the two force
redundants are expressed as
586 9 The Force Method
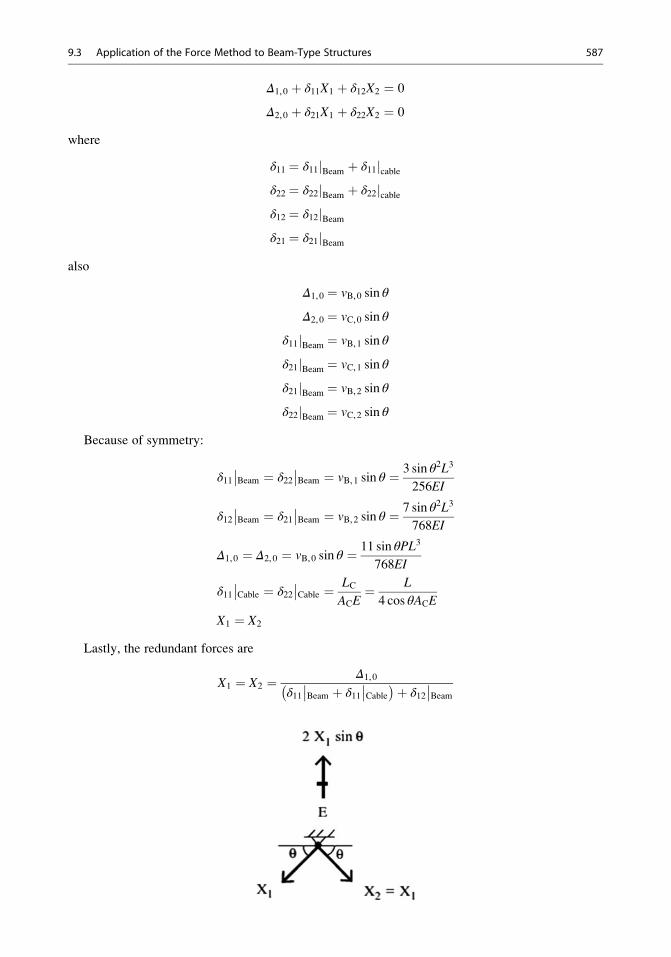
Δ1,0 þ δ11X1 þ δ12X2 ¼ 0
Δ2,0 þ δ21X1 þ δ22X2 ¼ 0
where
δ11 ¼ δ11jBeam þ δ11jcableδ22 ¼ δ22jBeam þ δ22jcableδ12 ¼ δ12jBeamδ21 ¼ δ21jBeam
also
Δ1,0 ¼ vB,0 sin θ
Δ2,0 ¼ vC,0 sin θ
δ11jBeam ¼ vB,1 sin θ
δ21jBeam ¼ vC,1 sin θ
δ21jBeam ¼ vB,2 sin θ
δ22jBeam ¼ vC,2 sin θ
Because of symmetry:
δ11��Beam ¼ δ22
��Beam ¼ vB,1 sin θ ¼ 3 sin θ2L3
256EI
δ12��Beam ¼ δ21
��Beam ¼ vB,2 sin θ ¼ 7 sin θ2L3
768EI
Δ1,0 ¼ Δ2,0 ¼ vB,0 sin θ ¼ 11 sin θPL3
768EI
δ11��Cable ¼ δ22
��Cable ¼ LC
ACE¼ L
4 cos θACE
X1 ¼ X2
Lastly, the redundant forces are
X1 ¼ X2 ¼ Δ1,0
δ11��Beam þ δ11
��Cable
� �þ δ12��Beam
9.3 Application of the Force Method to Beam-Type Structures 587
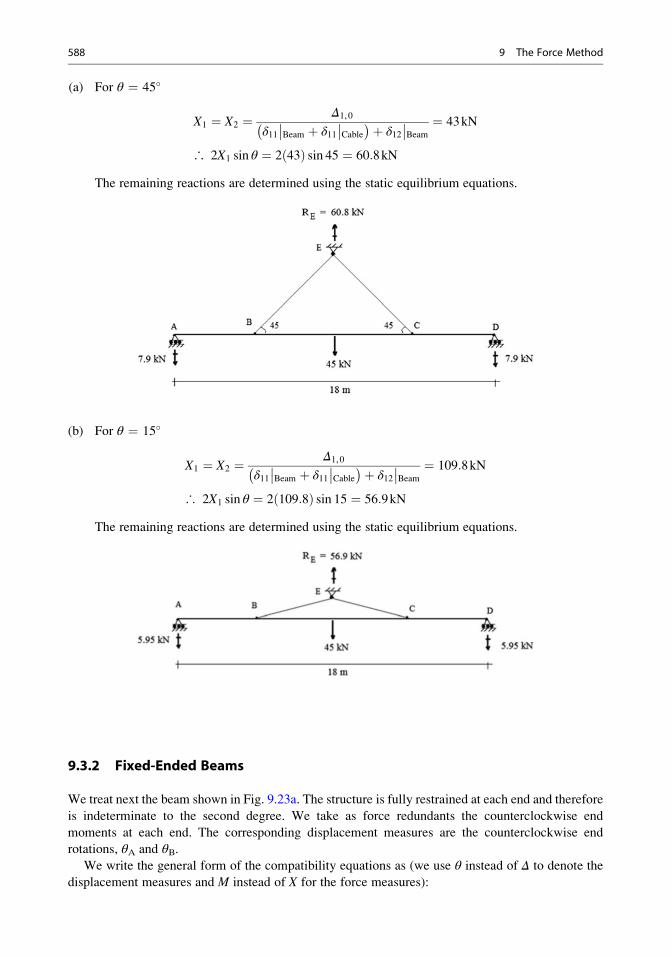
(a) For θ ¼ 45�
X1 ¼ X2 ¼ Δ1,0
δ11��Beam þ δ11
��Cable
� �þ δ12��Beam
¼ 43kN
∴ 2X1 sin θ ¼ 2 43ð Þ sin 45 ¼ 60:8kN
The remaining reactions are determined using the static equilibrium equations.
(b) For θ ¼ 15�
X1 ¼ X2 ¼ Δ1,0
δ11��Beam þ δ11
��Cable
� �þ δ12��Beam
¼ 109:8kN
∴ 2X1 sin θ ¼ 2 109:8ð Þ sin 15 ¼ 56:9kN
The remaining reactions are determined using the static equilibrium equations.
9.3.2 Fixed-Ended Beams
We treat next the beam shown in Fig. 9.23a. The structure is fully restrained at each end and therefore
is indeterminate to the second degree. We take as force redundants the counterclockwise end
moments at each end. The corresponding displacement measures are the counterclockwise end
rotations, θA and θB.We write the general form of the compatibility equations as (we use θ instead of Δ to denote the
displacement measures and M instead of X for the force measures):
588 9 The Force Method
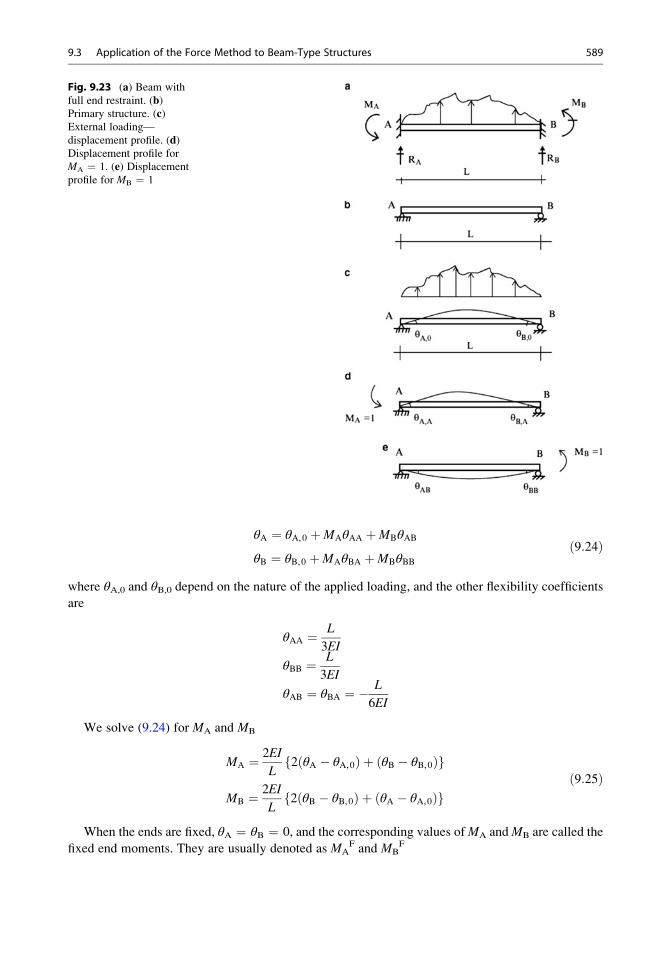
θA ¼ θA,0 þMAθAA þMBθAB
θB ¼ θB,0 þMAθBA þMBθBBð9:24Þ
where θA,0 and θB,0 depend on the nature of the applied loading, and the other flexibility coefficients
are
θAA ¼ L
3EI
θBB ¼ L
3EI
θAB ¼ θBA ¼ � L
6EI
We solve (9.24) for MA and MB
MA ¼ 2EI
L2 θA � θA,0ð Þ þ θB � θB,0ð Þf g
MB ¼ 2EI
L2 θB � θB,0ð Þ þ θA � θA,0ð Þf g
ð9:25Þ
When the ends are fixed, θA ¼ θB ¼ 0, and the corresponding values ofMA andMB are called the
fixed end moments. They are usually denoted as MAF and MB
F
Fig. 9.23 (a) Beam with
full end restraint. (b)Primary structure. (c)External loading—
displacement profile. (d)Displacement profile for
MA ¼ 1. (e) Displacement
profile for MB ¼ 1
9.3 Application of the Force Method to Beam-Type Structures 589
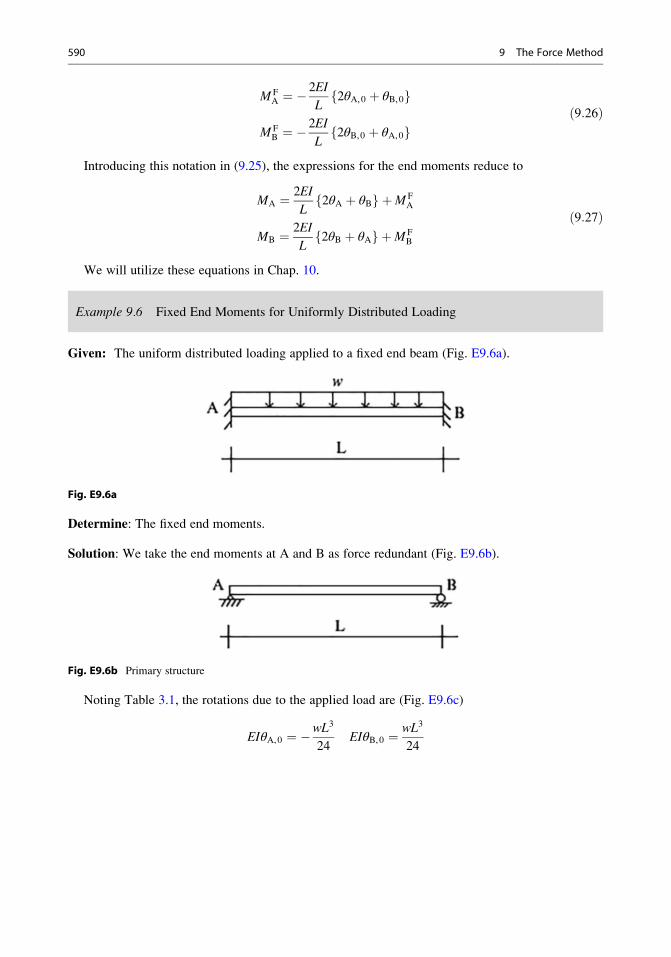
M FA ¼ �
2EI
L2θA,0 þ θB,0f g
M FB ¼ �
2EI
L2θB,0 þ θA,0f g
ð9:26Þ
Introducing this notation in (9.25), the expressions for the end moments reduce to
MA ¼ 2EI
L2θA þ θBf g þM F
A
MB ¼ 2EI
L2θB þ θAf g þM F
B
ð9:27Þ
We will utilize these equations in Chap. 10.
Example 9.6 Fixed End Moments for Uniformly Distributed Loading
Given: The uniform distributed loading applied to a fixed end beam (Fig. E9.6a).
Fig. E9.6a
Determine: The fixed end moments.
Solution: We take the end moments at A and B as force redundant (Fig. E9.6b).
Fig. E9.6b Primary structure
Noting Table 3.1, the rotations due to the applied load are (Fig. E9.6c)
EIθA,0 ¼ �wL3
24EIθB,0 ¼ wL3
24
590 9 The Force Method

Fig. E9.6c Deformation of primary structure due to applied load
Substituting their values in (9.26) leads to
M FA ¼ �
2EI
L2θA,0 þ θB,0f g ¼ wL2
6� wL2
12¼ wL2
12
M FB ¼ �
2EI
L2θB,0 þ θA,0f g ¼ �wL2
6þ wL2
12¼ �wL2
12
2FA
2FB
wLM
12wL
M12
=
=
The shear and moment diagrams are plotted in Fig. E9.6d.
Fig. E9.6d
Note that the peak positive moment for the simply supported case is +(wL2/8). Points of inflectionare located symmetrically at
9.3 Application of the Force Method to Beam-Type Structures 591
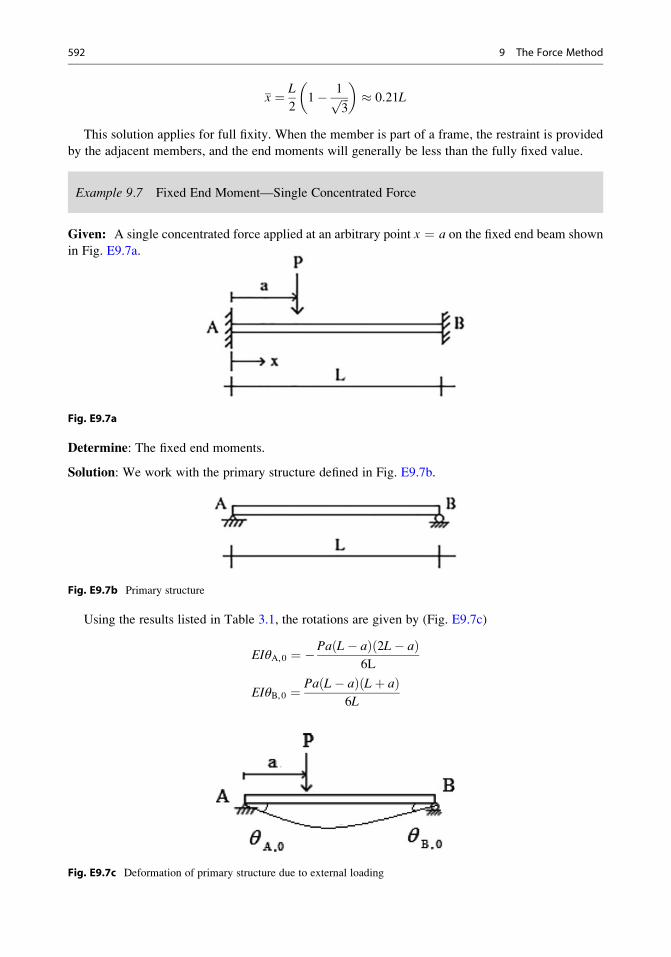
x ¼ L
21� 1ffiffiffi
3p
� �� 0:21L
This solution applies for full fixity. When the member is part of a frame, the restraint is provided
by the adjacent members, and the end moments will generally be less than the fully fixed value.
Example 9.7 Fixed End Moment—Single Concentrated Force
Given: A single concentrated force applied at an arbitrary point x ¼ a on the fixed end beam shown
in Fig. E9.7a.
Fig. E9.7a
Determine: The fixed end moments.
Solution: We work with the primary structure defined in Fig. E9.7b.
Fig. E9.7b Primary structure
Using the results listed in Table 3.1, the rotations are given by (Fig. E9.7c)
EIθA,0 ¼ �Pa L� að Þ 2L� að Þ6L
EIθB,0 ¼ Pa L� að Þ Lþ að Þ6L
Fig. E9.7c Deformation of primary structure due to external loading
592 9 The Force Method
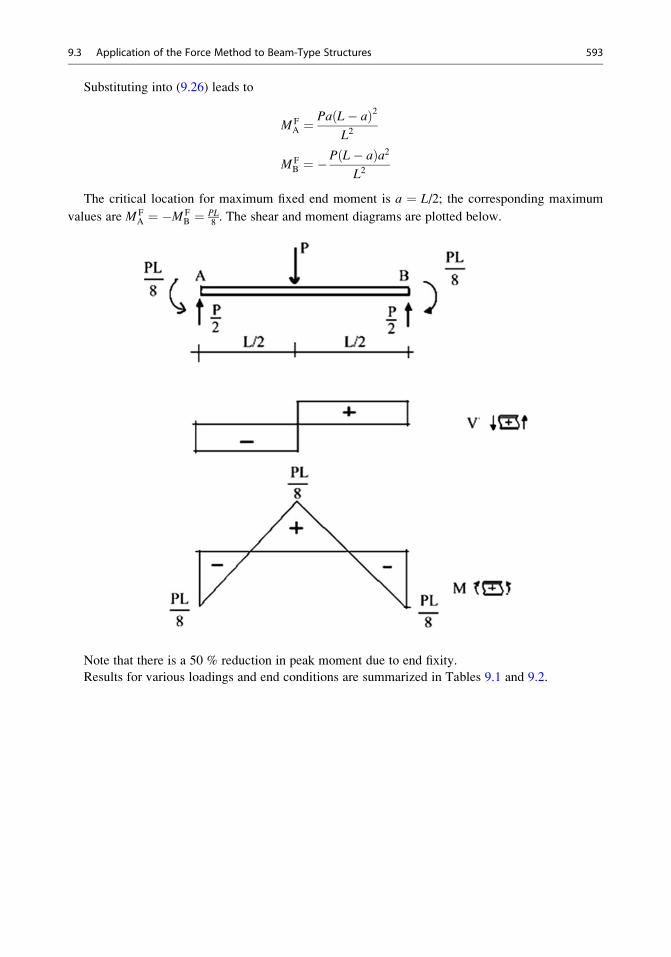
Substituting into (9.26) leads to
M FA ¼
Pa L� að Þ2L2
M FB ¼ �
P L� að Þa2L2
The critical location for maximum fixed end moment is a ¼ L/2; the corresponding maximum
values are M FA ¼ �M F
B ¼ PL8. The shear and moment diagrams are plotted below.
Note that there is a 50 % reduction in peak moment due to end fixity.
Results for various loadings and end conditions are summarized in Tables 9.1 and 9.2.
9.3 Application of the Force Method to Beam-Type Structures 593
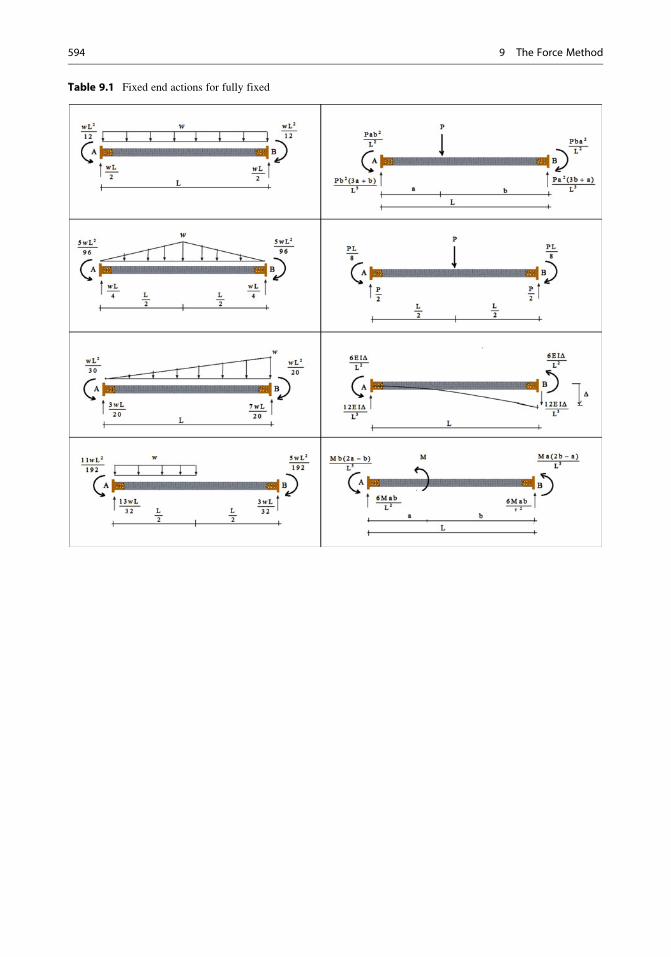
Table 9.1 Fixed end actions for fully fixed
594 9 The Force Method
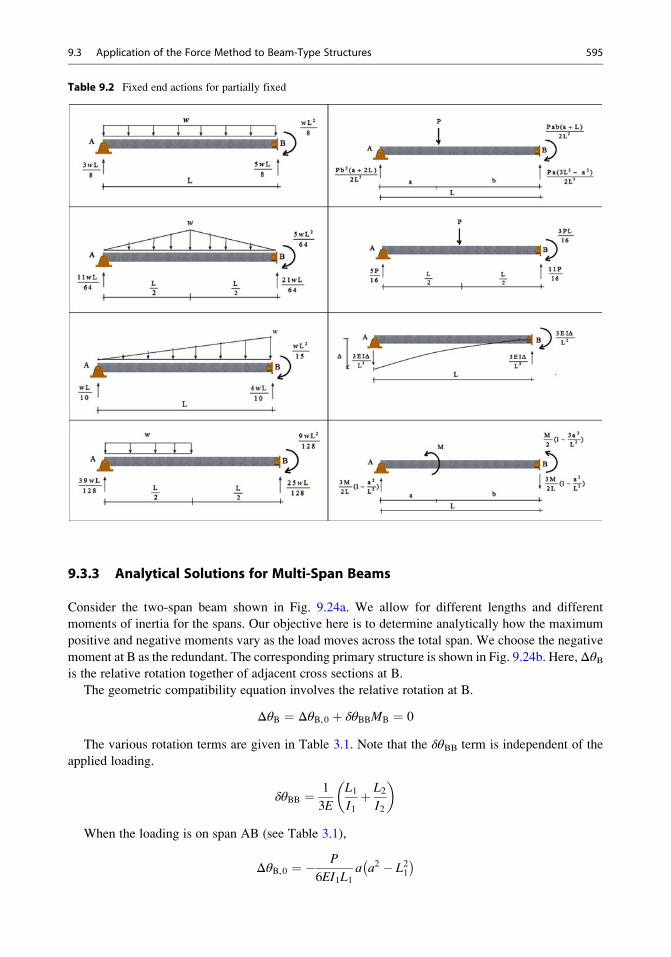
9.3.3 Analytical Solutions for Multi-Span Beams
Consider the two-span beam shown in Fig. 9.24a. We allow for different lengths and different
moments of inertia for the spans. Our objective here is to determine analytically how the maximum
positive and negative moments vary as the load moves across the total span. We choose the negative
moment at B as the redundant. The corresponding primary structure is shown in Fig. 9.24b. Here,ΔθBis the relative rotation together of adjacent cross sections at B.
The geometric compatibility equation involves the relative rotation at B.
ΔθB ¼ ΔθB,0 þ δθBBMB ¼ 0
The various rotation terms are given in Table 3.1. Note that the δθBB term is independent of the
applied loading.
δθBB ¼ 1
3E
L1I1þ L2
I2
� �
When the loading is on span AB (see Table 3.1),
ΔθB,0 ¼ � P
6EI1L1a a2 � L21� �
Table 9.2 Fixed end actions for partially fixed
9.3 Application of the Force Method to Beam-Type Structures 595
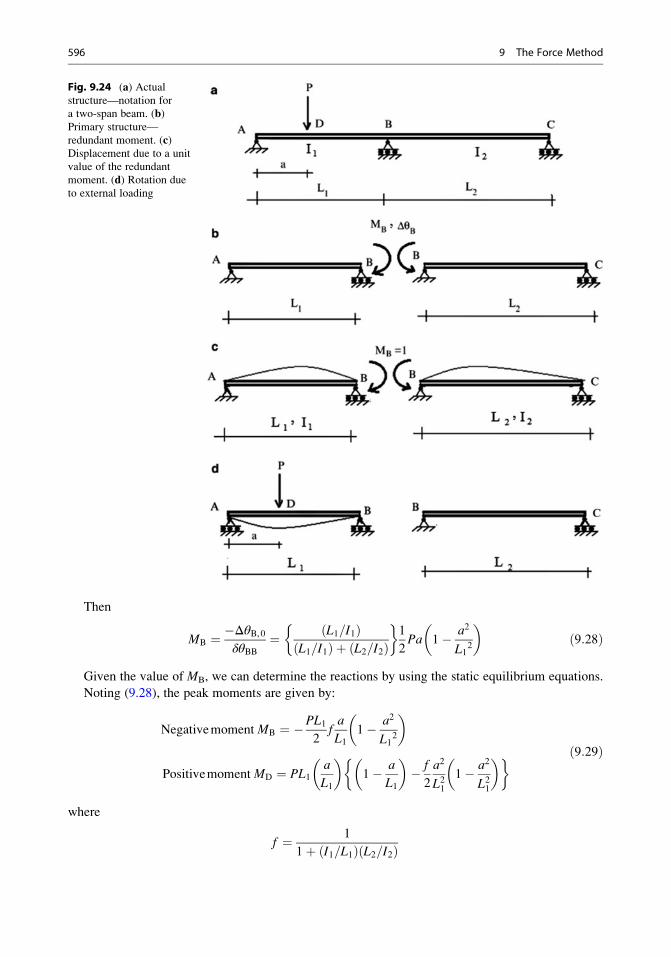
Then
MB ¼ �ΔθB,0δθBB
¼ L1=I1ð ÞL1=I1ð Þ þ L2=I2ð Þ
�1
2Pa 1� a2
L12
� �ð9:28Þ
Given the value of MB, we can determine the reactions by using the static equilibrium equations.
Noting (9.28), the peak moments are given by:
Negativemoment MB ¼ �PL12
fa
L11� a2
L12
� �
Positivemoment MD ¼ PL1a
L1
� �1� a
L1
� �� f
2
a2
L211� a2
L21
� � � ð9:29Þ
where
f ¼ 1
1þ I1=L1ð Þ L2=I2ð Þ
Fig. 9.24 (a) Actualstructure—notation for
a two-span beam. (b)Primary structure—
redundant moment. (c)Displacement due to a unit
value of the redundant
moment. (d) Rotation due
to external loading
596 9 The Force Method
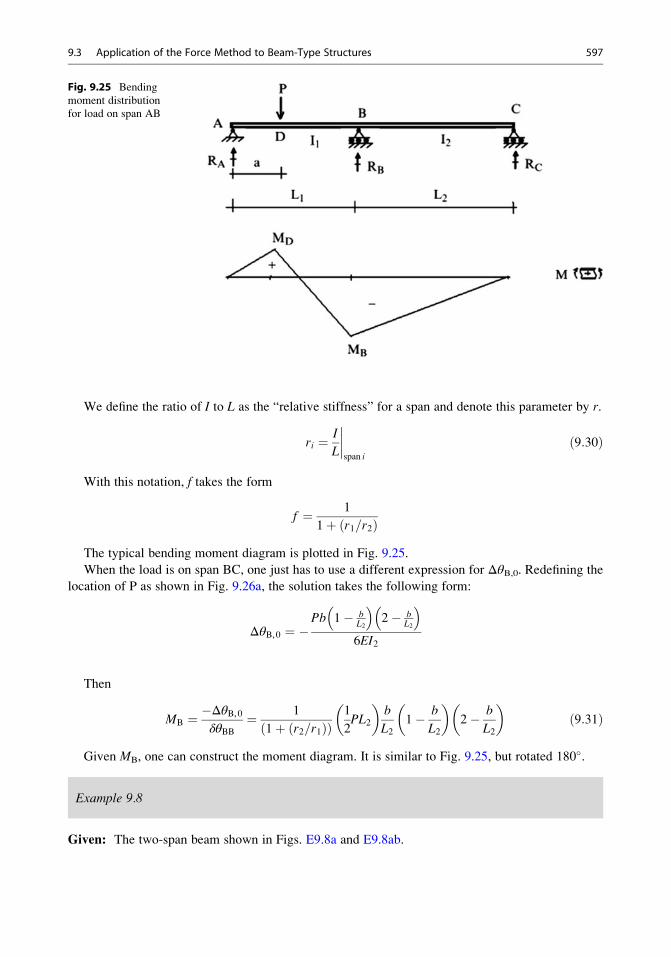
We define the ratio of I to L as the “relative stiffness” for a span and denote this parameter by r.
ri ¼ I
L
����span i
ð9:30Þ
With this notation, f takes the form
f ¼ 1
1þ r1=r2ð ÞThe typical bending moment diagram is plotted in Fig. 9.25.
When the load is on span BC, one just has to use a different expression for ΔθB,0. Redefining the
location of P as shown in Fig. 9.26a, the solution takes the following form:
ΔθB,0 ¼ �Pb 1� b
L2
� �2� b
L2
� �6EI2
Then
MB ¼ �ΔθB,0δθBB
¼ 1
1þ r2=r1ð Þð Þ1
2PL2
� �b
L21� b
L2
� �2� b
L2
� �ð9:31Þ
Given MB, one can construct the moment diagram. It is similar to Fig. 9.25, but rotated 180�.
Example 9.8
Given: The two-span beam shown in Figs. E9.8a and E9.8ab.
Fig. 9.25 Bending
moment distribution
for load on span AB
9.3 Application of the Force Method to Beam-Type Structures 597
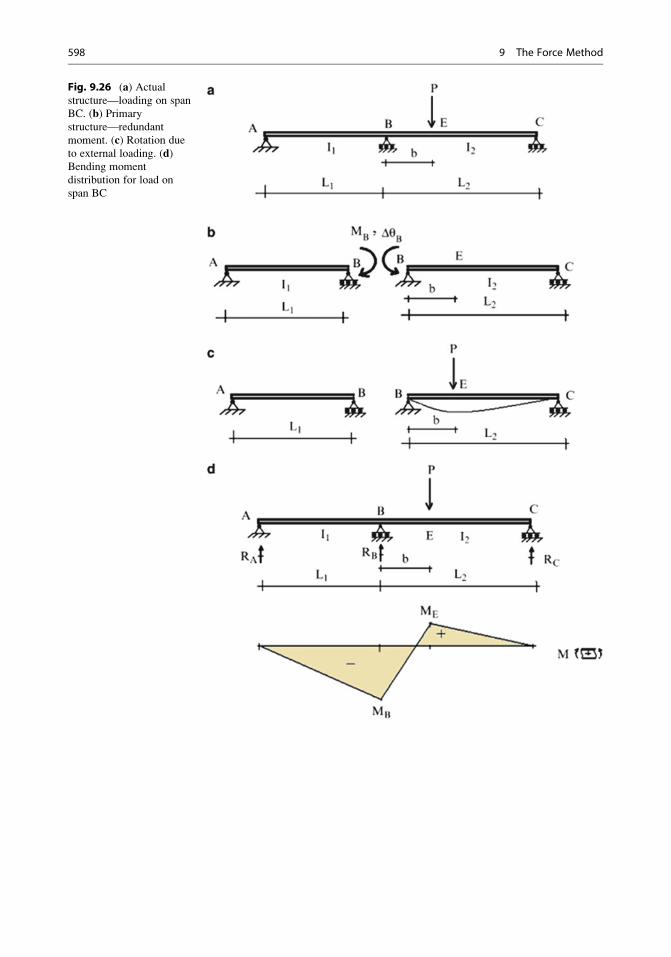
Fig. 9.26 (a) Actualstructure—loading on span
BC. (b) Primary
structure—redundant
moment. (c) Rotation due
to external loading. (d)Bending moment
distribution for load on
span BC
598 9 The Force Method
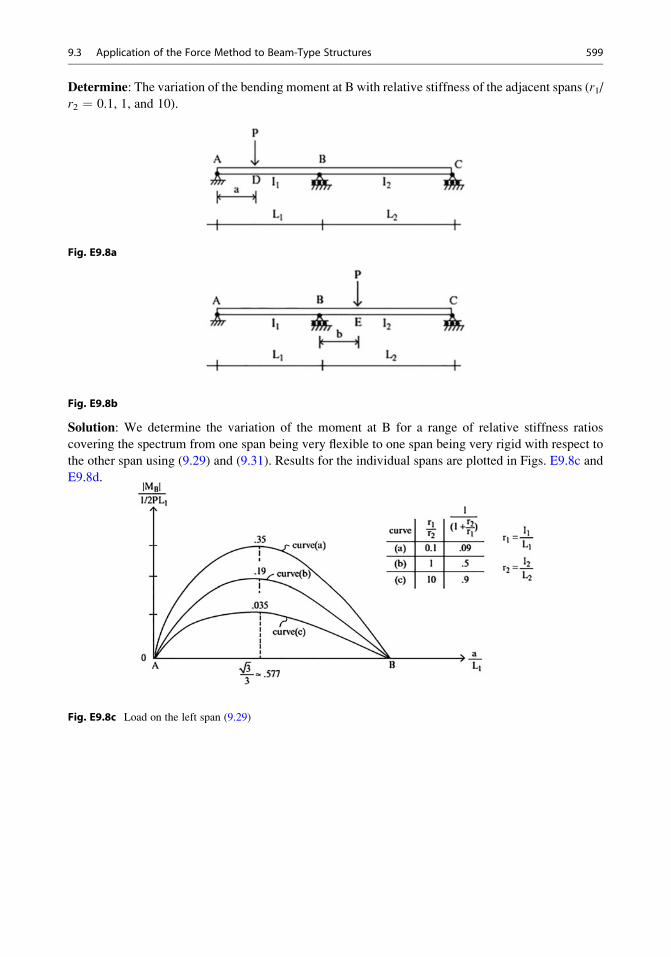
Determine: The variation of the bending moment at B with relative stiffness of the adjacent spans (r1/
r2 ¼ 0.1, 1, and 10).
Fig. E9.8a
Fig. E9.8b
Solution: We determine the variation of the moment at B for a range of relative stiffness ratios
covering the spectrum from one span being very flexible to one span being very rigid with respect to
the other span using (9.29) and (9.31). Results for the individual spans are plotted in Figs. E9.8c and
E9.8d.
Fig. E9.8c Load on the left span (9.29)
9.3 Application of the Force Method to Beam-Type Structures 599
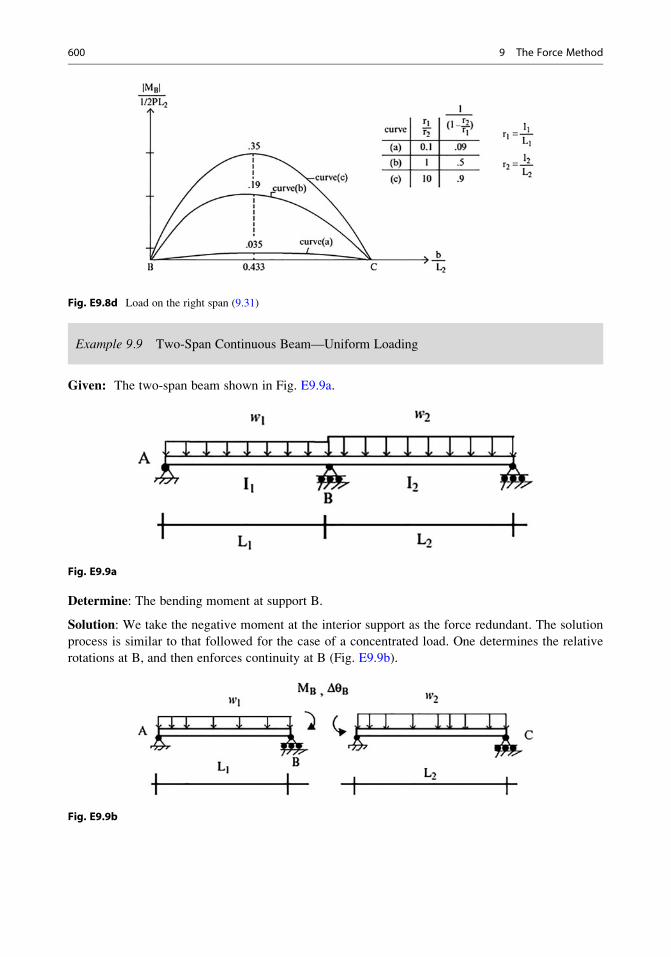
Fig. E9.8d Load on the right span (9.31)
Example 9.9 Two-Span Continuous Beam—Uniform Loading
Given: The two-span beam shown in Fig. E9.9a.
Fig. E9.9a
Determine: The bending moment at support B.
Solution: We take the negative moment at the interior support as the force redundant. The solution
process is similar to that followed for the case of a concentrated load. One determines the relative
rotations at B, and then enforces continuity at B (Fig. E9.9b).
Fig. E9.9b
600 9 The Force Method
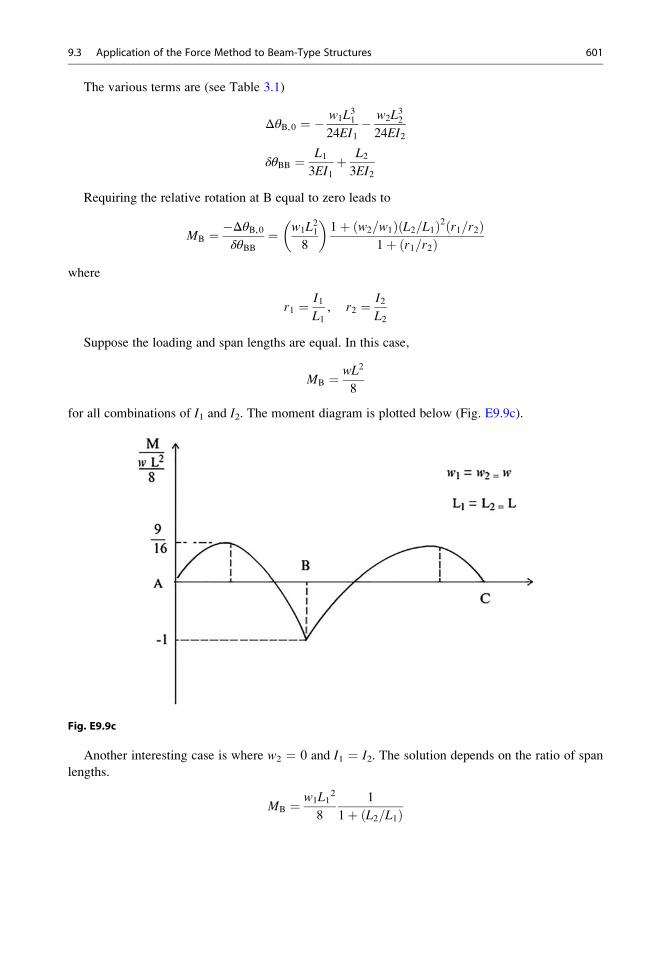
The various terms are (see Table 3.1)
ΔθB,0 ¼ � w1L31
24EI1� w2L
32
24EI2
δθBB ¼ L13EI1
þ L23EI2
Requiring the relative rotation at B equal to zero leads to
MB ¼ �ΔθB,0δθBB
¼ w1L21
8
� �1þ w2=w1ð Þ L2=L1ð Þ2 r1=r2ð Þ
1þ r1=r2ð Þwhere
r1 ¼ I1L1
, r2 ¼ I2L2
Suppose the loading and span lengths are equal. In this case,
MB ¼ wL2
8
for all combinations of I1 and I2. The moment diagram is plotted below (Fig. E9.9c).
Fig. E9.9c
Another interesting case is where w2 ¼ 0 and I1 ¼ I2. The solution depends on the ratio of span
lengths.
MB ¼ w1L12
8
1
1þ L2=L1ð Þ
9.3 Application of the Force Method to Beam-Type Structures 601
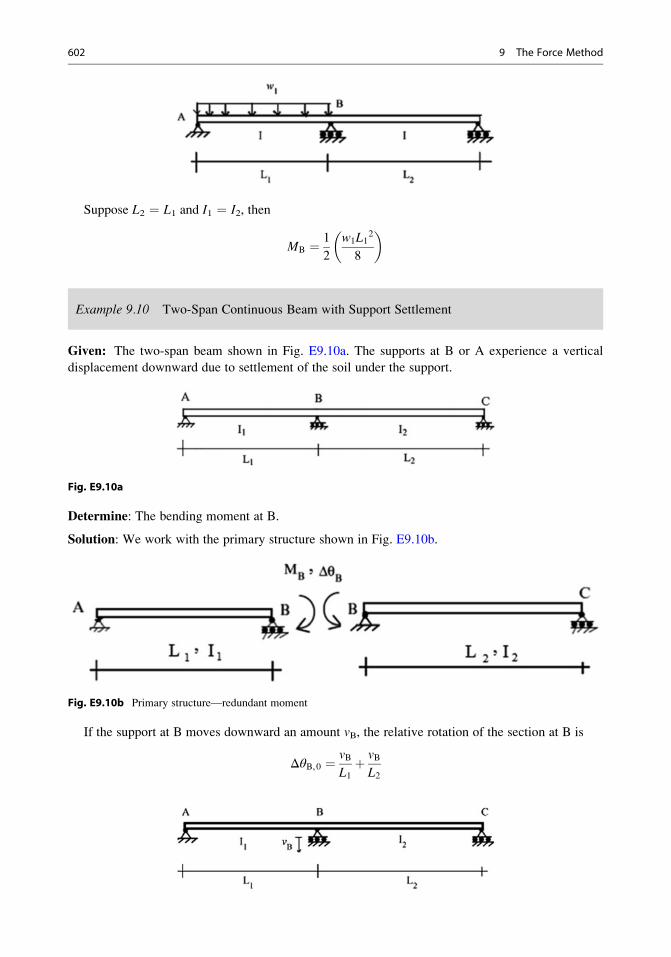
Suppose L2 ¼ L1 and I1 ¼ I2, then
MB ¼ 1
2
w1L12
8
� �
Example 9.10 Two-Span Continuous Beam with Support Settlement
Given: The two-span beam shown in Fig. E9.10a. The supports at B or A experience a vertical
displacement downward due to settlement of the soil under the support.
Fig. E9.10a
Determine: The bending moment at B.
Solution: We work with the primary structure shown in Fig. E9.10b.
Fig. E9.10b Primary structure—redundant moment
If the support at B moves downward an amount vB, the relative rotation of the section at B is
ΔθB,0 ¼ vBL1þ vB
L2
602 9 The Force Method
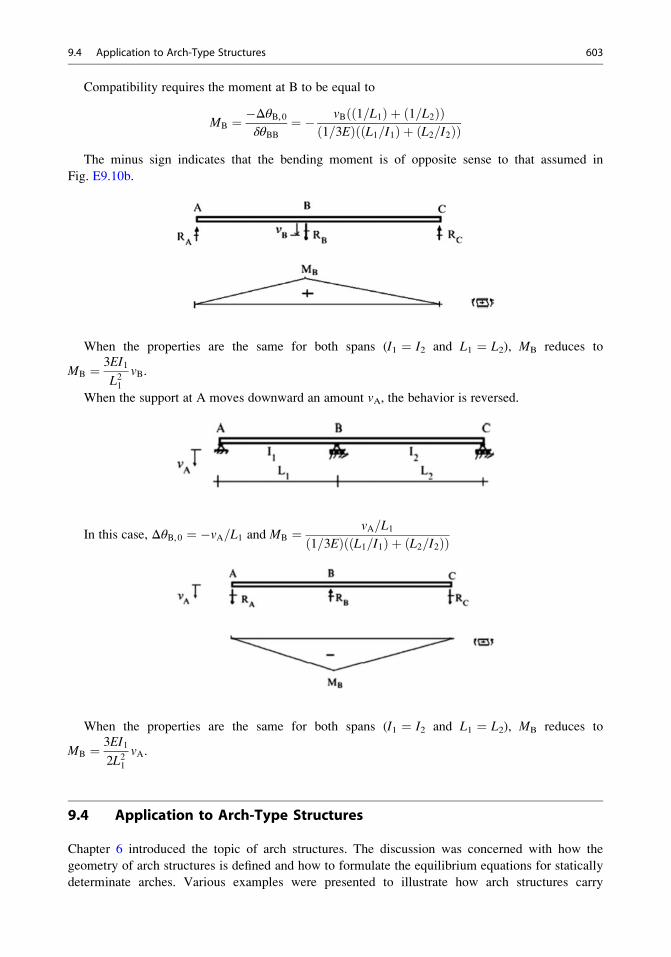
Compatibility requires the moment at B to be equal to
MB ¼ �ΔθB,0δθBB
¼ � vB 1=L1ð Þ þ 1=L2ð Þð Þ1=3Eð Þ L1=I1ð Þ þ L2=I2ð Þð Þ
The minus sign indicates that the bending moment is of opposite sense to that assumed in
Fig. E9.10b.
When the properties are the same for both spans (I1 ¼ I2 and L1 ¼ L2), MB reduces to
MB ¼ 3EI1
L21vB.
When the support at A moves downward an amount vA, the behavior is reversed.
In this case, ΔθB,0 ¼ �vA=L1 and MB ¼ vA=L11=3Eð Þ L1=I1ð Þ þ L2=I2ð Þð Þ
When the properties are the same for both spans (I1 ¼ I2 and L1 ¼ L2), MB reduces to
MB ¼ 3EI1
2L21vA.
9.4 Application to Arch-Type Structures
Chapter 6 introduced the topic of arch structures. The discussion was concerned with how the
geometry of arch structures is defined and how to formulate the equilibrium equations for statically
determinate arches. Various examples were presented to illustrate how arch structures carry
9.4 Application to Arch-Type Structures 603
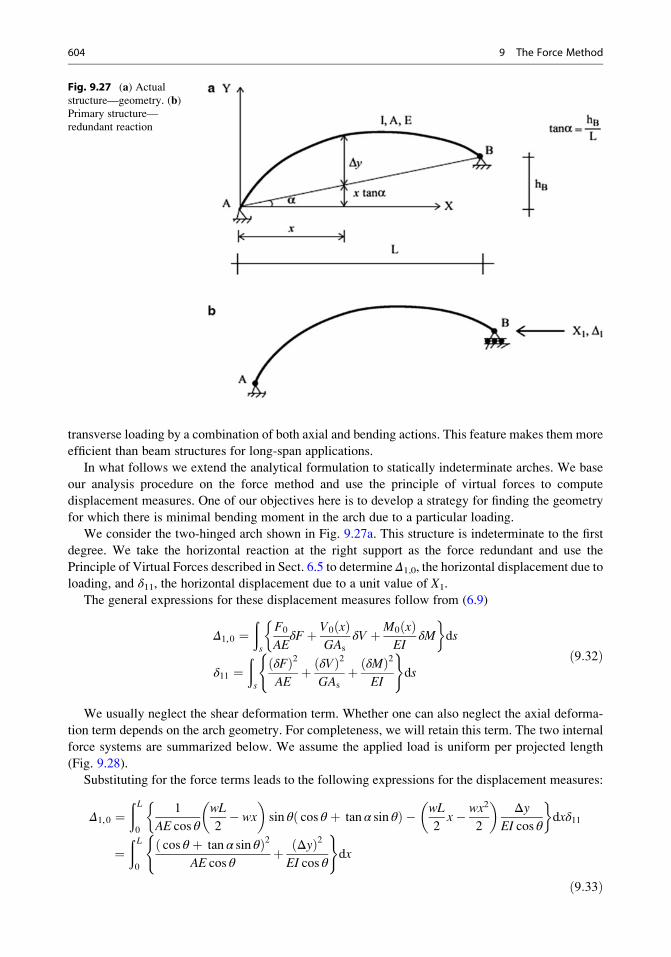
transverse loading by a combination of both axial and bending actions. This feature makes them more
efficient than beam structures for long-span applications.
In what follows we extend the analytical formulation to statically indeterminate arches. We base
our analysis procedure on the force method and use the principle of virtual forces to compute
displacement measures. One of our objectives here is to develop a strategy for finding the geometry
for which there is minimal bending moment in the arch due to a particular loading.
We consider the two-hinged arch shown in Fig. 9.27a. This structure is indeterminate to the first
degree. We take the horizontal reaction at the right support as the force redundant and use the
Principle of Virtual Forces described in Sect. 6.5 to determine Δ1,0, the horizontal displacement due to
loading, and δ11, the horizontal displacement due to a unit value of X1.
The general expressions for these displacement measures follow from (6.9)
Δ1,0 ¼ðs
F0
AEδFþ V0 xð Þ
GAs
δV þM0 xð ÞEI
δM
�ds
δ11 ¼ðs
δFð Þ2AEþ δVð Þ2
GAs
þ δMð Þ2EI
( )ds
ð9:32Þ
We usually neglect the shear deformation term. Whether one can also neglect the axial deforma-
tion term depends on the arch geometry. For completeness, we will retain this term. The two internal
force systems are summarized below. We assume the applied load is uniform per projected length
(Fig. 9.28).
Substituting for the force terms leads to the following expressions for the displacement measures:
Δ1,0 ¼ð L0
1
AE cos θ
wL
2� wx
� �sin θ cos θ þ tan α sin θð Þ � wL
2x� wx2
2
� �Δy
EI cos θ
�dxδ11
¼ð L0
cos θ þ tan α sin θð Þ2AE cos θ
þ Δyð Þ2EI cos θ
( )dx
ð9:33Þ
Fig. 9.27 (a) Actualstructure—geometry. (b)Primary structure—
redundant reaction
604 9 The Force Method
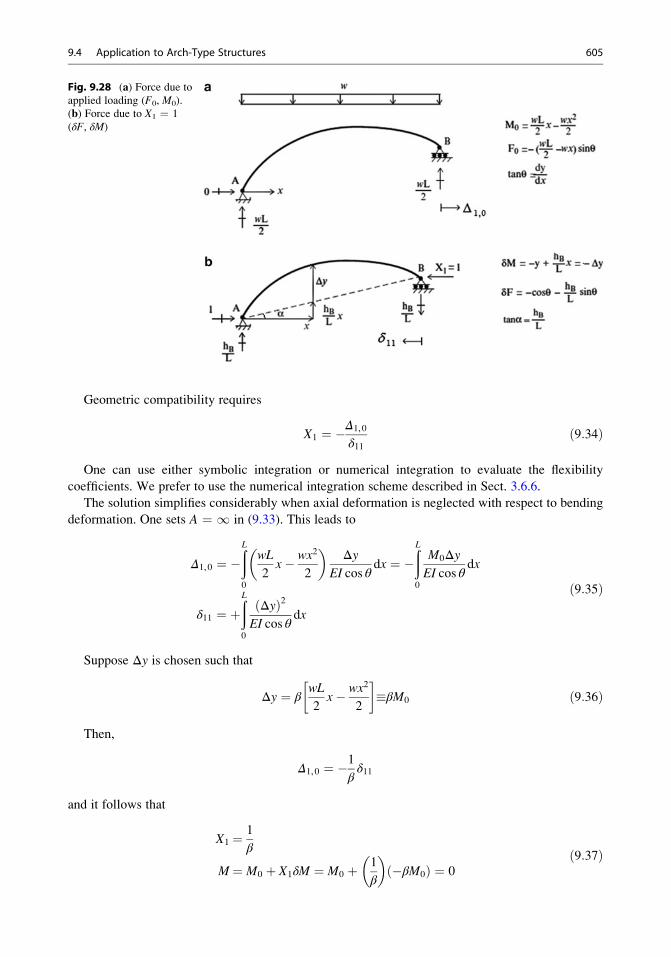
Geometric compatibility requires
X1 ¼ �Δ1,0
δ11ð9:34Þ
One can use either symbolic integration or numerical integration to evaluate the flexibility
coefficients. We prefer to use the numerical integration scheme described in Sect. 3.6.6.
The solution simplifies considerably when axial deformation is neglected with respect to bending
deformation. One sets A ¼ 1 in (9.33). This leads to
Δ1,0 ¼ �ðL0
wL
2x� wx2
2
� �Δy
EI cos θdx ¼ �
ðL0
M0ΔyEI cos θ
dx
δ11 ¼ þðL0
Δyð Þ2EI cos θ
dx
ð9:35Þ
Suppose Δy is chosen such that
Δy ¼ βwL
2x� wx2
2
��βM0 ð9:36Þ
Then,
Δ1,0 ¼ �1βδ11
and it follows that
X1 ¼ 1
β
M¼ M0 þ X1δM ¼ M0 þ 1
β
� ��βM0ð Þ ¼ 0
ð9:37Þ
Fig. 9.28 (a) Force due toapplied loading (F0, M0).
(b) Force due to X1 ¼ 1
(δF, δM)
9.4 Application to Arch-Type Structures 605
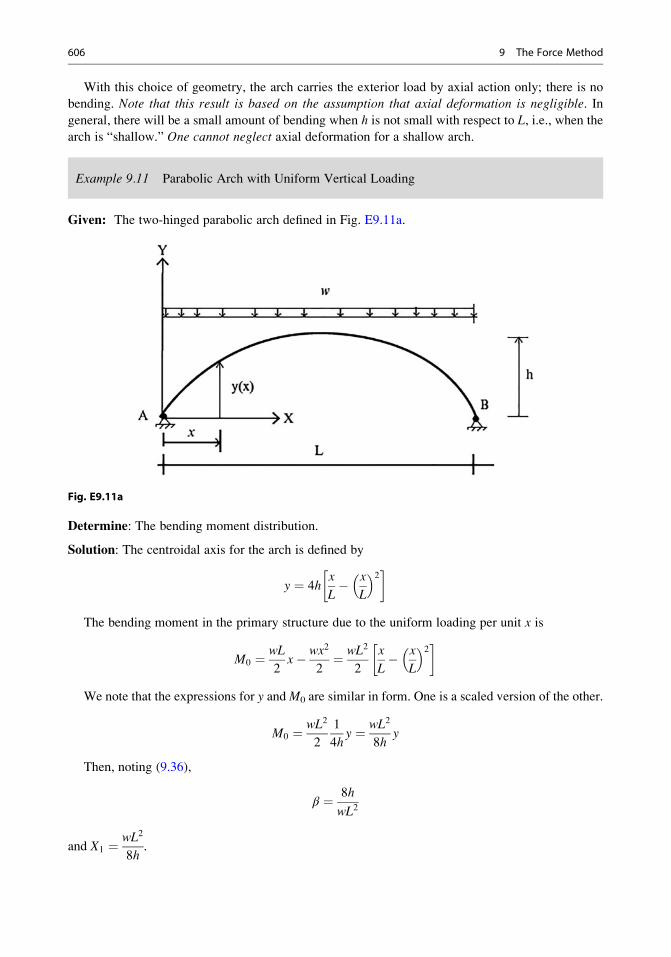
With this choice of geometry, the arch carries the exterior load by axial action only; there is no
bending. Note that this result is based on the assumption that axial deformation is negligible. In
general, there will be a small amount of bending when h is not small with respect to L, i.e., when the
arch is “shallow.” One cannot neglect axial deformation for a shallow arch.
Example 9.11 Parabolic Arch with Uniform Vertical Loading
Given: The two-hinged parabolic arch defined in Fig. E9.11a.
Fig. E9.11a
Determine: The bending moment distribution.
Solution: The centroidal axis for the arch is defined by
y ¼ 4hx
L� x
L
� �2 �
The bending moment in the primary structure due to the uniform loading per unit x is
M0 ¼ wL
2x� wx2
2¼ wL2
2
x
L� x
L
� �2 �
We note that the expressions for y andM0 are similar in form. One is a scaled version of the other.
M0 ¼ wL2
2
1
4hy ¼ wL2
8hy
Then, noting (9.36),
β ¼ 8h
wL2
and X1 ¼ wL2
8h.
606 9 The Force Method
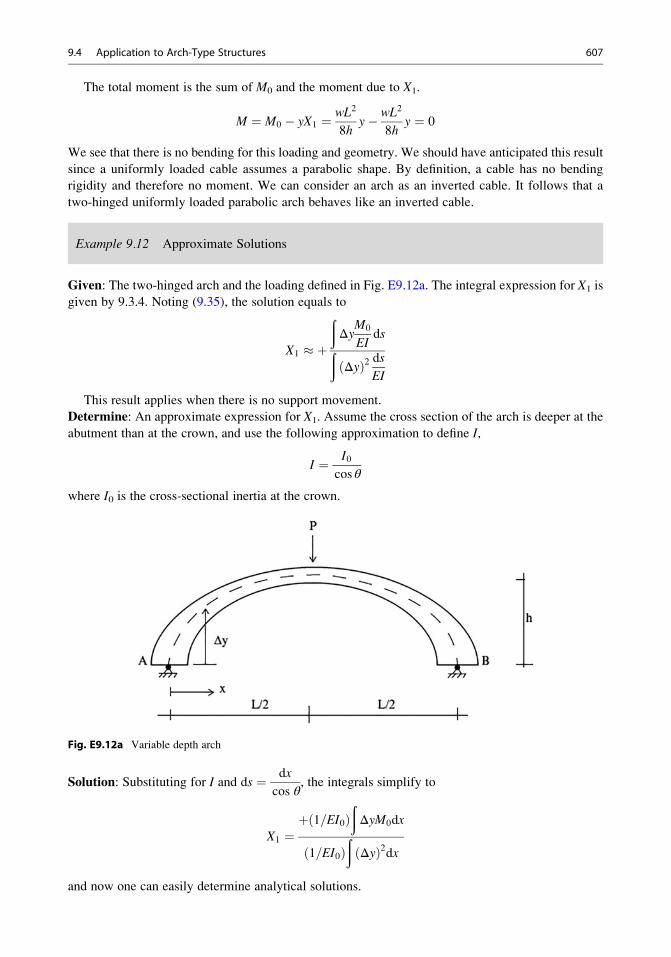
The total moment is the sum of M0 and the moment due to X1.
M ¼ M0 � yX1 ¼ wL2
8hy� wL2
8hy ¼ 0
We see that there is no bending for this loading and geometry. We should have anticipated this result
since a uniformly loaded cable assumes a parabolic shape. By definition, a cable has no bending
rigidity and therefore no moment. We can consider an arch as an inverted cable. It follows that a
two-hinged uniformly loaded parabolic arch behaves like an inverted cable.
Example 9.12 Approximate Solutions
Given: The two-hinged arch and the loading defined in Fig. E9.12a. The integral expression for X1 is
given by 9.3.4. Noting (9.35), the solution equals to
X1 � þ
ðΔy
M0
EIdsð
Δyð Þ2 dsEI
This result applies when there is no support movement.
Determine: An approximate expression for X1. Assume the cross section of the arch is deeper at the
abutment than at the crown, and use the following approximation to define I,
I ¼ I0cos θ
where I0 is the cross-sectional inertia at the crown.
Fig. E9.12a Variable depth arch
Solution: Substituting for I and ds ¼ dx
cos θ, the integrals simplify to
X1 ¼þ 1=EI0ð Þ
ðΔyM0dx
1=EI0ð Þð
Δyð Þ2dx
and now one can easily determine analytical solutions.
9.4 Application to Arch-Type Structures 607
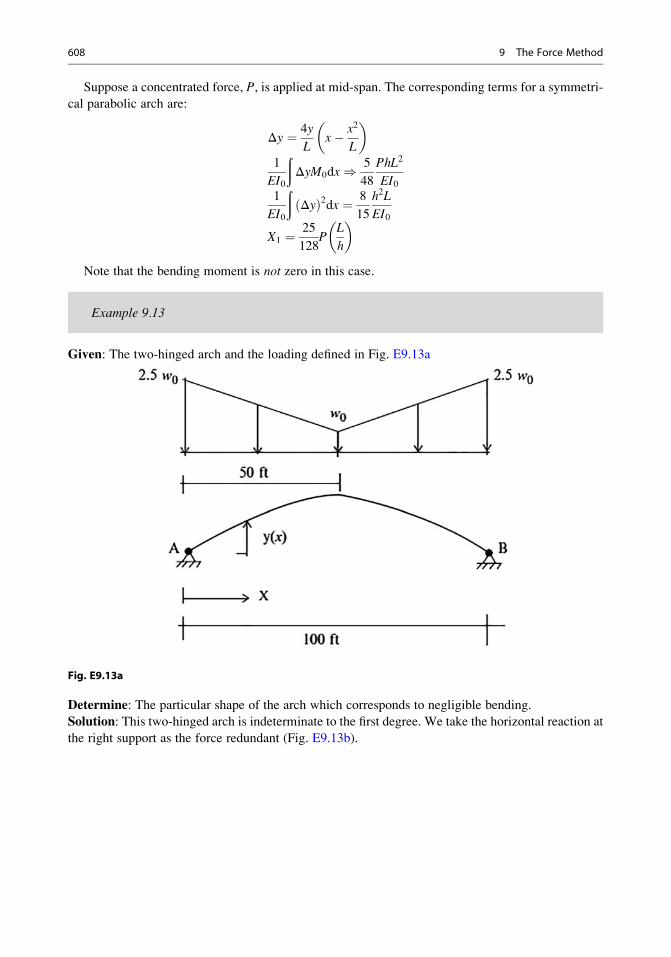
Suppose a concentrated force, P, is applied at mid-span. The corresponding terms for a symmetri-
cal parabolic arch are:
Δy ¼ 4y
Lx� x2
L
� �1
EI0
ðΔyM0dx) 5
48
PhL2
EI01
EI0
ðΔyð Þ2dx ¼ 8
15
h2L
EI0
X1 ¼ 25
128P
L
h
� �
Note that the bending moment is not zero in this case.
Example 9.13
Given: The two-hinged arch and the loading defined in Fig. E9.13a
Fig. E9.13a
Determine: The particular shape of the arch which corresponds to negligible bending.
Solution: This two-hinged arch is indeterminate to the first degree. We take the horizontal reaction at
the right support as the force redundant (Fig. E9.13b).
608 9 The Force Method
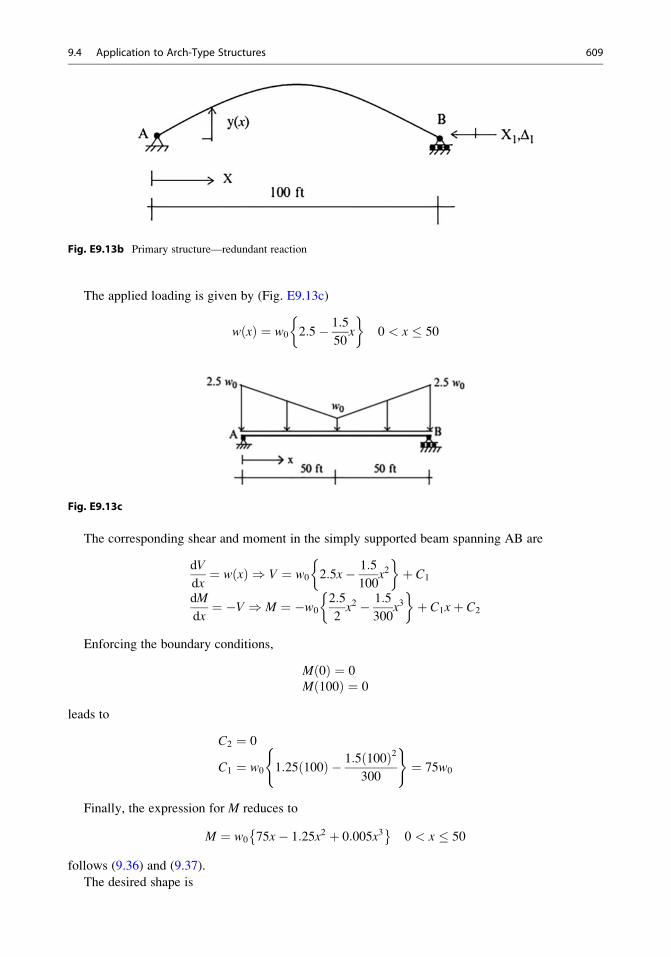
Fig. E9.13b Primary structure—redundant reaction
The applied loading is given by (Fig. E9.13c)
w xð Þ ¼ w0 2:5� 1:5
50x
�0 < x � 50
Fig. E9.13c
The corresponding shear and moment in the simply supported beam spanning AB are
dV
dx¼ w xð Þ ) V ¼ w0 2:5x� 1:5
100x2
�þ C1
dM
dx¼ �V ) M ¼ �w0
2:5
2x2 � 1:5
300x3
�þ C1xþ C2
Enforcing the boundary conditions,
M 0ð Þ ¼ 0
M 100ð Þ ¼ 0
leads to
C2 ¼ 0
C1 ¼ w0 1:25 100ð Þ � 1:5 100ð Þ2300
( )¼ 75w0
Finally, the expression for M reduces to
M ¼ w0 75x� 1:25x2 þ 0:005x3� �
0 < x � 50
follows (9.36) and (9.37).
The desired shape is
9.4 Application to Arch-Type Structures 609
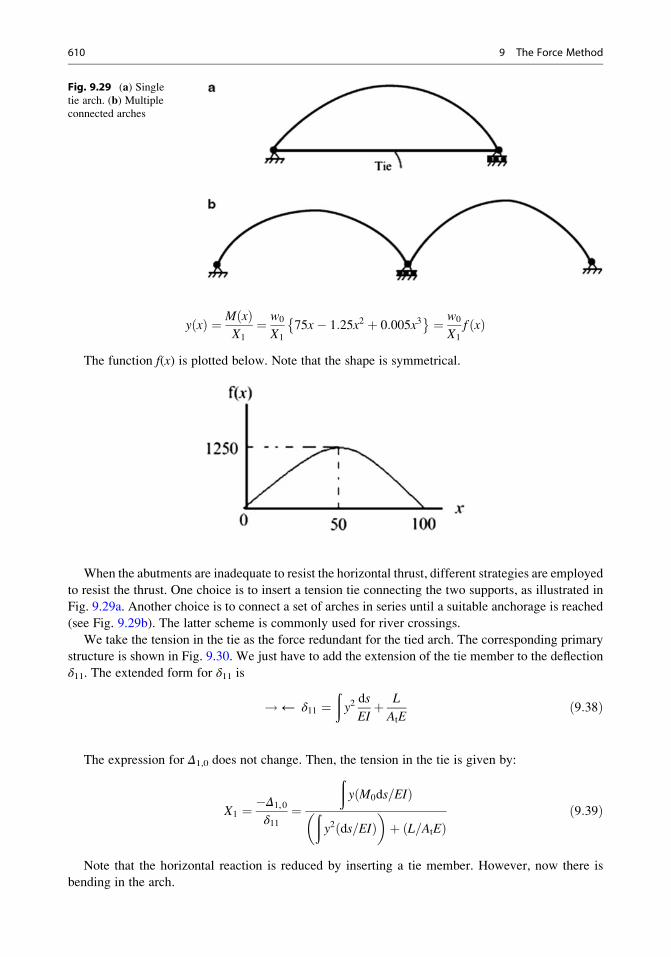
y xð Þ ¼ M xð ÞX1
¼ w0
X1
75x� 1:25x2 þ 0:005x3� � ¼ w0
X1
f xð Þ
The function f(x) is plotted below. Note that the shape is symmetrical.
When the abutments are inadequate to resist the horizontal thrust, different strategies are employed
to resist the thrust. One choice is to insert a tension tie connecting the two supports, as illustrated in
Fig. 9.29a. Another choice is to connect a set of arches in series until a suitable anchorage is reached
(see Fig. 9.29b). The latter scheme is commonly used for river crossings.
We take the tension in the tie as the force redundant for the tied arch. The corresponding primary
structure is shown in Fig. 9.30. We just have to add the extension of the tie member to the deflection
δ11. The extended form for δ11 is
!← δ11 ¼ðy2
ds
EIþ L
AtEð9:38Þ
The expression for Δ1,0 does not change. Then, the tension in the tie is given by:
X1 ¼ �Δ1,0
δ11¼
ðy M0ds=EIð Þð
y2 ds=EIð Þ� �
þ L=AtEð Þð9:39Þ
Note that the horizontal reaction is reduced by inserting a tie member. However, now there is
bending in the arch.
Fig. 9.29 (a) Singletie arch. (b) Multiple
connected arches
610 9 The Force Method
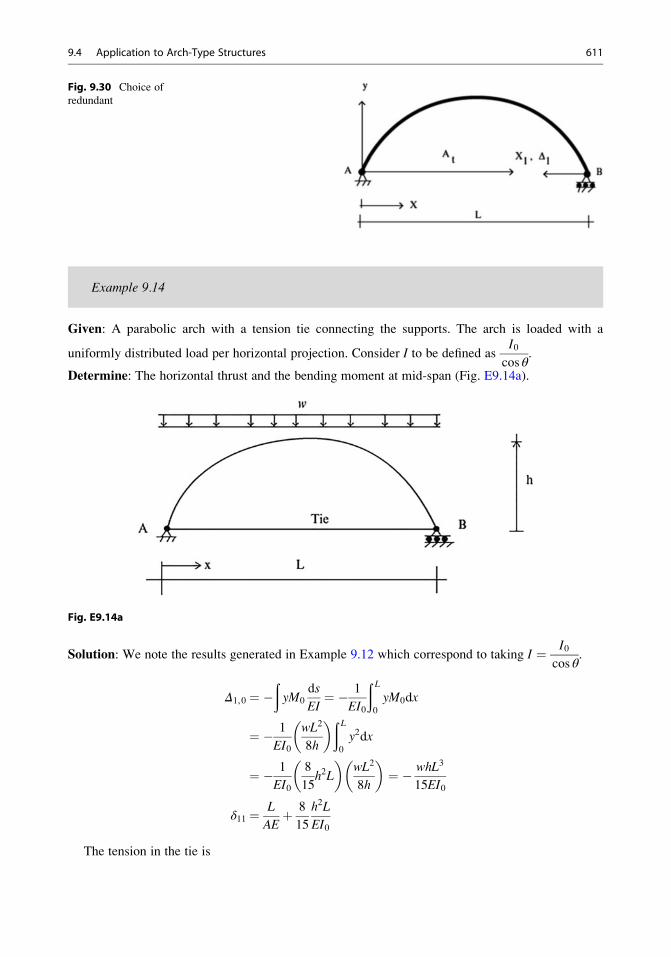
Example 9.14
Given: A parabolic arch with a tension tie connecting the supports. The arch is loaded with a
uniformly distributed load per horizontal projection. Consider I to be defined asI0
cos θ.
Determine: The horizontal thrust and the bending moment at mid-span (Fig. E9.14a).
Fig. E9.14a
Solution: We note the results generated in Example 9.12 which correspond to taking I ¼ I0cos θ
.
Δ1,0 ¼ �ðyM0
ds
EI¼ � 1
EI0
ð L0
yM0dx
¼ � 1
EI0
wL2
8h
� �ð L0
y2dx
¼ � 1
EI0
8
15h2L
� �wL2
8h
� �¼ � whL3
15EI0
δ11 ¼ L
AEþ 8
15
h2L
EI0
The tension in the tie is
Fig. 9.30 Choice of
redundant
9.4 Application to Arch-Type Structures 611
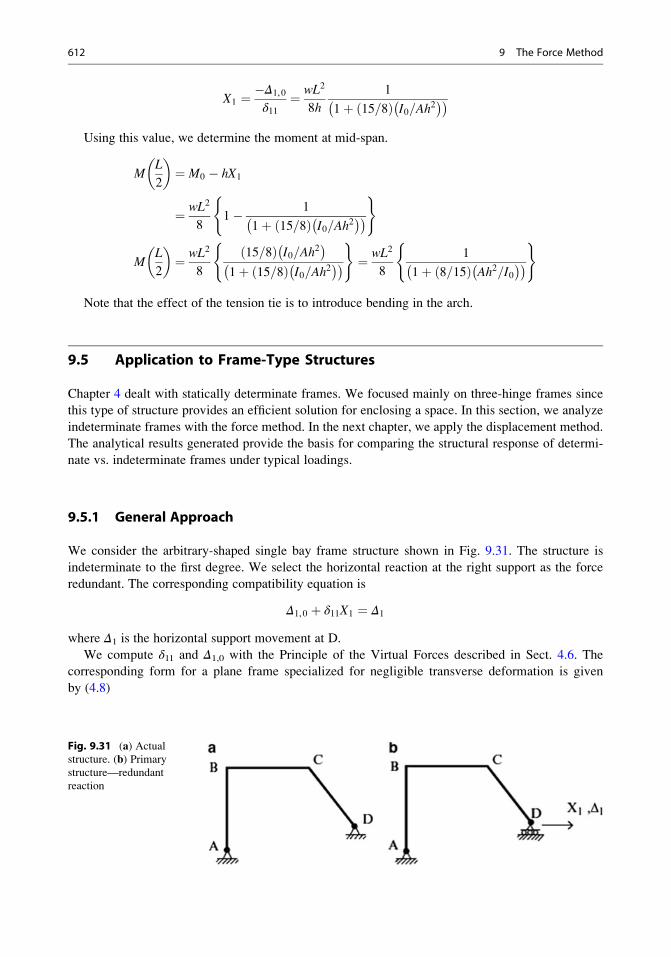
X1 ¼ �Δ1,0
δ11¼ wL2
8h
1
1þ 15=8ð Þ I0=Ah2� �� �
Using this value, we determine the moment at mid-span.
ML
2
� �¼ M0 � hX1
¼ wL2
81� 1
1þ 15=8ð Þ I0=Ah2� �� �
( )
ML
2
� �¼ wL2
8
15=8ð Þ I0=Ah2� �
1þ 15=8ð Þ I0=Ah2� �� �
( )¼ wL2
8
1
1þ 8=15ð Þ Ah2=I0� �� �
( )
Note that the effect of the tension tie is to introduce bending in the arch.
9.5 Application to Frame-Type Structures
Chapter 4 dealt with statically determinate frames. We focused mainly on three-hinge frames since
this type of structure provides an efficient solution for enclosing a space. In this section, we analyze
indeterminate frames with the force method. In the next chapter, we apply the displacement method.
The analytical results generated provide the basis for comparing the structural response of determi-
nate vs. indeterminate frames under typical loadings.
9.5.1 General Approach
We consider the arbitrary-shaped single bay frame structure shown in Fig. 9.31. The structure is
indeterminate to the first degree. We select the horizontal reaction at the right support as the force
redundant. The corresponding compatibility equation is
Δ1,0 þ δ11X1 ¼ Δ1
where Δ1 is the horizontal support movement at D.
We compute δ11 and Δ1,0 with the Principle of the Virtual Forces described in Sect. 4.6. The
corresponding form for a plane frame specialized for negligible transverse deformation is given
by (4.8)
Fig. 9.31 (a) Actualstructure. (b) Primary
structure—redundant
reaction
612 9 The Force Method
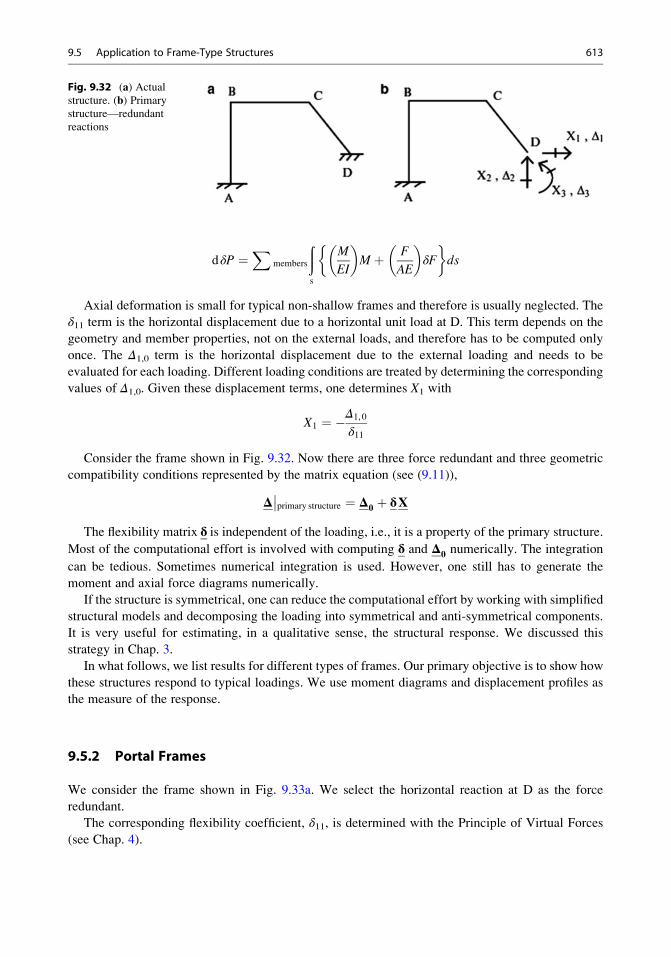
dδP ¼X
members
ðs
M
EI
� �M þ F
AE
� �δF
�ds
Axial deformation is small for typical non-shallow frames and therefore is usually neglected. The
δ11 term is the horizontal displacement due to a horizontal unit load at D. This term depends on the
geometry and member properties, not on the external loads, and therefore has to be computed only
once. The Δ1,0 term is the horizontal displacement due to the external loading and needs to be
evaluated for each loading. Different loading conditions are treated by determining the corresponding
values of Δ1,0. Given these displacement terms, one determines X1 with
X1 ¼ �Δ1,0
δ11
Consider the frame shown in Fig. 9.32. Now there are three force redundant and three geometric
compatibility conditions represented by the matrix equation (see (9.11)),
Δ��primary structure ¼ Δ0 þ δX
The flexibility matrix δ is independent of the loading, i.e., it is a property of the primary structure.
Most of the computational effort is involved with computing δ and Δ0 numerically. The integration
can be tedious. Sometimes numerical integration is used. However, one still has to generate the
moment and axial force diagrams numerically.
If the structure is symmetrical, one can reduce the computational effort by working with simplified
structural models and decomposing the loading into symmetrical and anti-symmetrical components.
It is very useful for estimating, in a qualitative sense, the structural response. We discussed this
strategy in Chap. 3.
In what follows, we list results for different types of frames. Our primary objective is to show how
these structures respond to typical loadings. We use moment diagrams and displacement profiles as
the measure of the response.
9.5.2 Portal Frames
We consider the frame shown in Fig. 9.33a. We select the horizontal reaction at D as the force
redundant.
The corresponding flexibility coefficient, δ11, is determined with the Principle of Virtual Forces
(see Chap. 4).
Fig. 9.32 (a) Actualstructure. (b) Primary
structure—redundant
reactions
9.5 Application to Frame-Type Structures 613
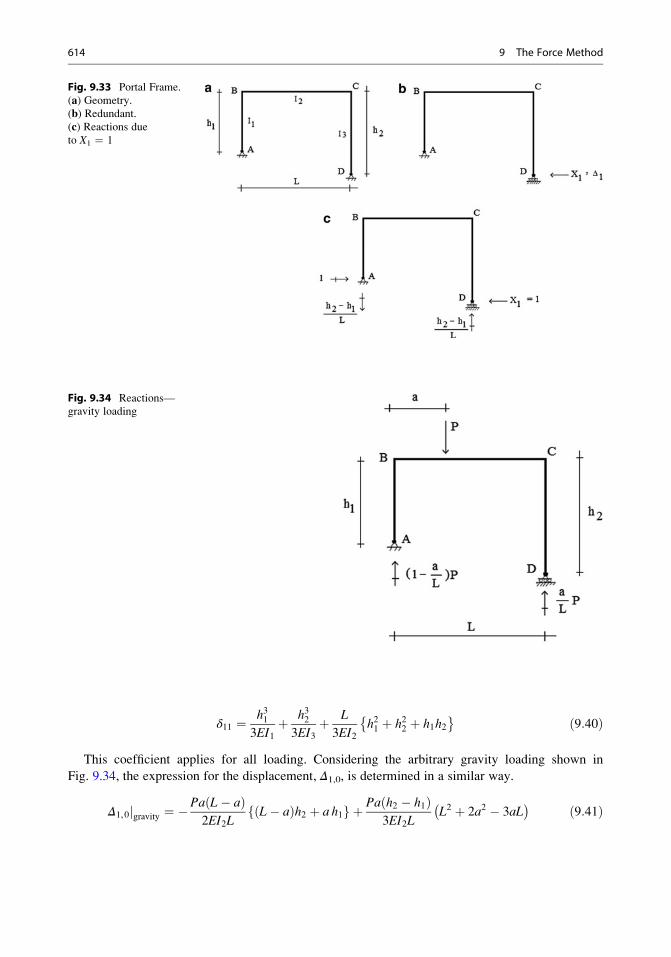
δ11 ¼ h313EI1
þ h323EI3
þ L
3EI2h21 þ h22 þ h1h2� � ð9:40Þ
This coefficient applies for all loading. Considering the arbitrary gravity loading shown in
Fig. 9.34, the expression for the displacement, Δ1,0, is determined in a similar way.
Δ1,0jgravity ¼ �Pa L� að Þ2EI2L
L� að Þh2 þ a h1f g þ Pa h2 � h1ð Þ3EI2L
L2 þ 2a2 � 3aL� � ð9:41Þ
Fig. 9.33 Portal Frame.
(a) Geometry.
(b) Redundant.(c) Reactions dueto X1 ¼ 1
Fig. 9.34 Reactions—
gravity loading
614 9 The Force Method
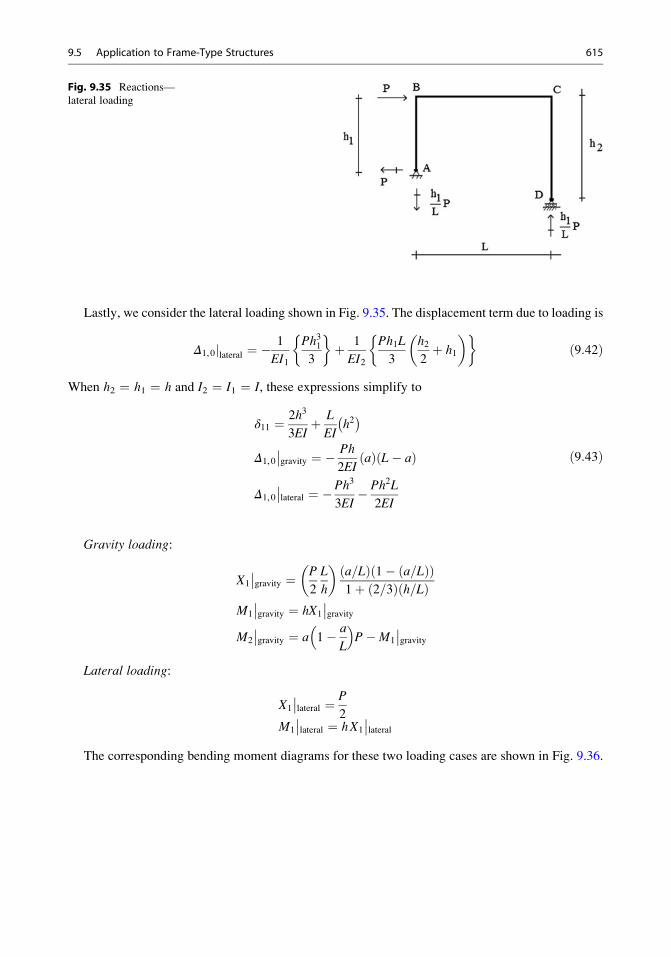
Lastly, we consider the lateral loading shown in Fig. 9.35. The displacement term due to loading is
Δ1,0jlateral ¼ �1
EI1
Ph313
�þ 1
EI2
Ph1L
3
h22þ h1
� � �ð9:42Þ
When h2 ¼ h1 ¼ h and I2 ¼ I1 ¼ I, these expressions simplify to
δ11 ¼ 2h3
3EIþ L
EIh2� �
Δ1,0
��gravity ¼ � Ph
2EIað Þ L� að Þ
Δ1,0
��lateral ¼ �Ph3
3EI� Ph2L
2EI
ð9:43Þ
Gravity loading:
X1
��gravity ¼ P
2
L
h
� �a=Lð Þ 1� a=Lð Þð Þ1þ 2=3ð Þ h=Lð Þ
M1
��gravity ¼ hX1
��gravity
M2
��gravity ¼ a 1� a
L
� �P�M1
��gravity
Lateral loading:
X1
��lateral ¼ P
2M1
��lateral ¼ hX1
��lateral
The corresponding bending moment diagrams for these two loading cases are shown in Fig. 9.36.
Fig. 9.35 Reactions—
lateral loading
9.5 Application to Frame-Type Structures 615
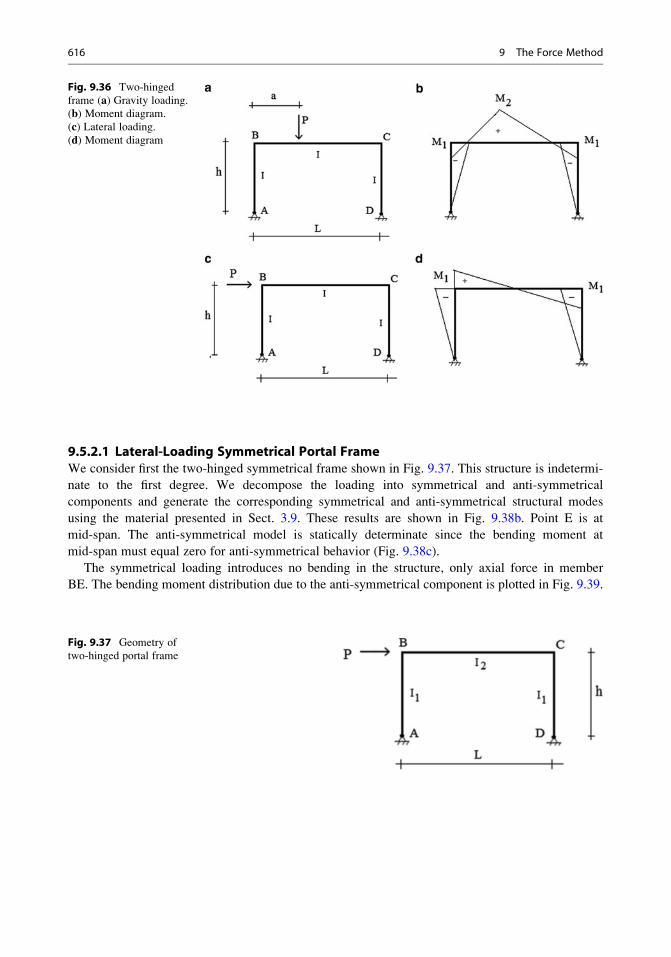
9.5.2.1 Lateral-Loading Symmetrical Portal FrameWe consider first the two-hinged symmetrical frame shown in Fig. 9.37. This structure is indetermi-
nate to the first degree. We decompose the loading into symmetrical and anti-symmetrical
components and generate the corresponding symmetrical and anti-symmetrical structural modes
using the material presented in Sect. 3.9. These results are shown in Fig. 9.38b. Point E is at
mid-span. The anti-symmetrical model is statically determinate since the bending moment at
mid-span must equal zero for anti-symmetrical behavior (Fig. 9.38c).
The symmetrical loading introduces no bending in the structure, only axial force in member
BE. The bending moment distribution due to the anti-symmetrical component is plotted in Fig. 9.39.
Fig. 9.37 Geometry of
two-hinged portal frame
Fig. 9.36 Two-hinged
frame (a) Gravity loading.
(b) Moment diagram.
(c) Lateral loading.(d) Moment diagram
616 9 The Force Method
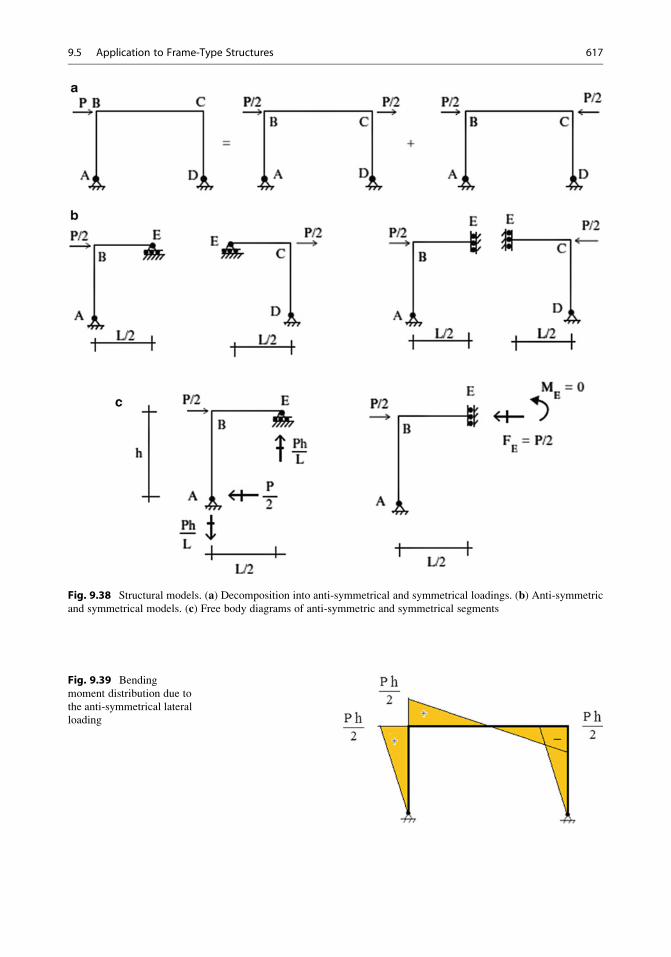
Fig. 9.38 Structural models. (a) Decomposition into anti-symmetrical and symmetrical loadings. (b) Anti-symmetric
and symmetrical models. (c) Free body diagrams of anti-symmetric and symmetrical segments
Fig. 9.39 Bending
moment distribution due to
the anti-symmetrical lateral
loading
9.5 Application to Frame-Type Structures 617
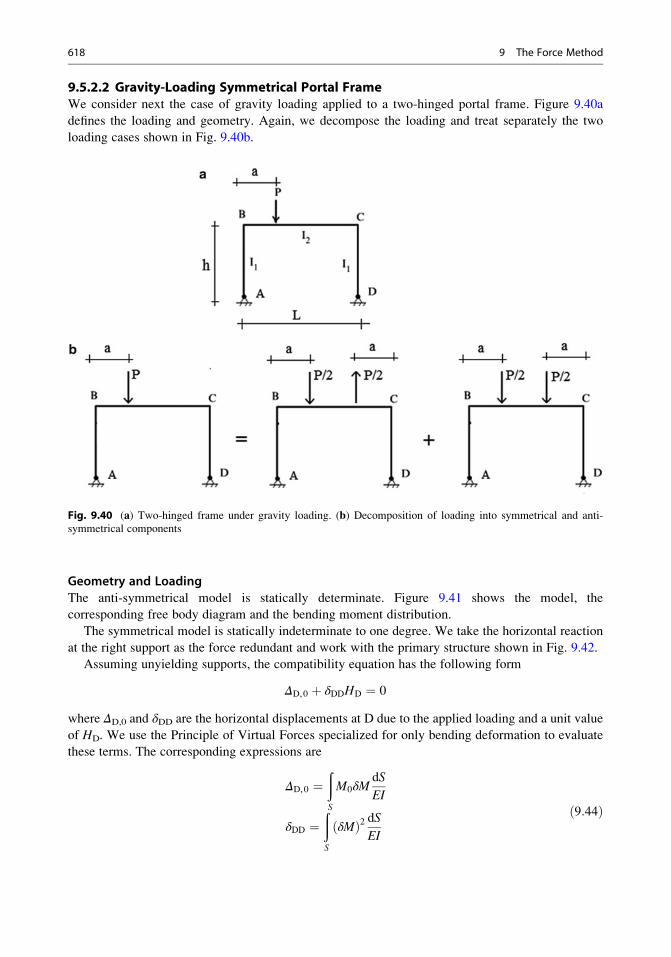
9.5.2.2 Gravity-Loading Symmetrical Portal FrameWe consider next the case of gravity loading applied to a two-hinged portal frame. Figure 9.40a
defines the loading and geometry. Again, we decompose the loading and treat separately the two
loading cases shown in Fig. 9.40b.
Geometry and Loading
The anti-symmetrical model is statically determinate. Figure 9.41 shows the model, the
corresponding free body diagram and the bending moment distribution.
The symmetrical model is statically indeterminate to one degree. We take the horizontal reaction
at the right support as the force redundant and work with the primary structure shown in Fig. 9.42.
Assuming unyielding supports, the compatibility equation has the following form
ΔD,0 þ δDDHD ¼ 0
where ΔD,0 and δDD are the horizontal displacements at D due to the applied loading and a unit value
of HD. We use the Principle of Virtual Forces specialized for only bending deformation to evaluate
these terms. The corresponding expressions are
ΔD,0 ¼ðS
M0δMdS
EI
δDD ¼ðS
δMð Þ2 dSEI
ð9:44Þ
Fig. 9.40 (a) Two-hinged frame under gravity loading. (b) Decomposition of loading into symmetrical and anti-
symmetrical components
618 9 The Force Method
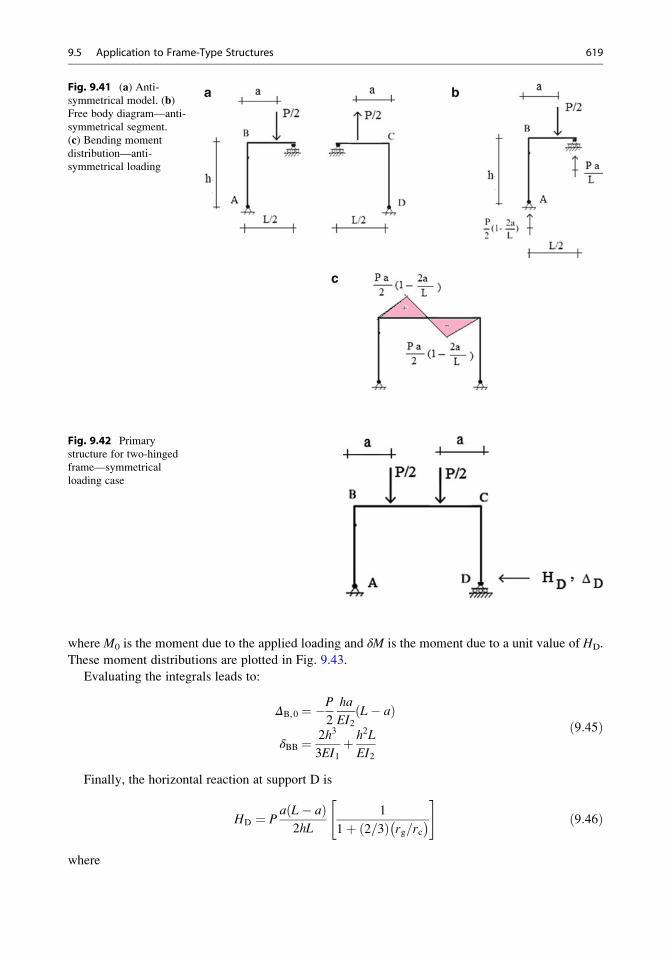
where M0 is the moment due to the applied loading and δM is the moment due to a unit value of HD.
These moment distributions are plotted in Fig. 9.43.
Evaluating the integrals leads to:
ΔB,0 ¼ �P2
ha
EI2L� að Þ
δBB ¼ 2h3
3EI1þ h2L
EI2
ð9:45Þ
Finally, the horizontal reaction at support D is
HD ¼ Pa L� að Þ2hL
1
1þ 2=3ð Þ rg=rc� �
" #ð9:46Þ
where
Fig. 9.42 Primary
structure for two-hinged
frame—symmetrical
loading case
Fig. 9.41 (a) Anti-symmetrical model. (b)Free body diagram—anti-
symmetrical segment.
(c) Bending moment
distribution—anti-
symmetrical loading
9.5 Application to Frame-Type Structures 619
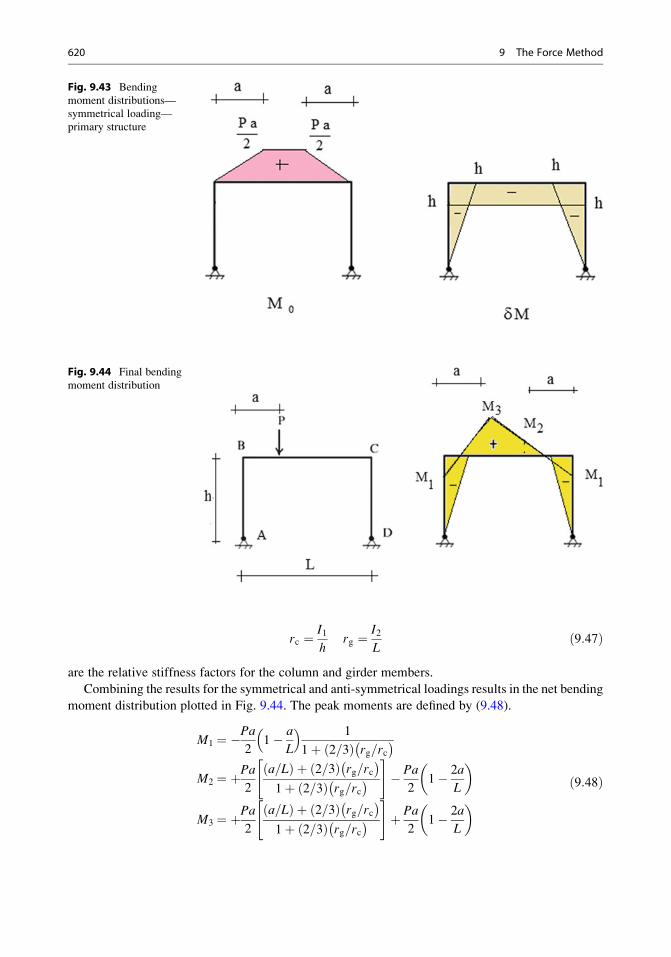
rc ¼ I1h
rg ¼ I2L
ð9:47Þ
are the relative stiffness factors for the column and girder members.
Combining the results for the symmetrical and anti-symmetrical loadings results in the net bending
moment distribution plotted in Fig. 9.44. The peak moments are defined by (9.48).
M1 ¼ �Pa2
1� a
L
� � 1
1þ 2=3ð Þ rg=rc� �
M2 ¼ þPa2
a=Lð Þ þ 2=3ð Þ rg=rc� �
1þ 2=3ð Þ rg=rc� �
" #� Pa
21� 2a
L
� �
M3 ¼ þPa2
a=Lð Þ þ 2=3ð Þ rg=rc� �
1þ 2=3ð Þ rg=rc� �
" #þ Pa
21� 2a
L
� � ð9:48Þ
Fig. 9.44 Final bending
moment distribution
Fig. 9.43 Bending
moment distributions—
symmetrical loading—
primary structure
620 9 The Force Method
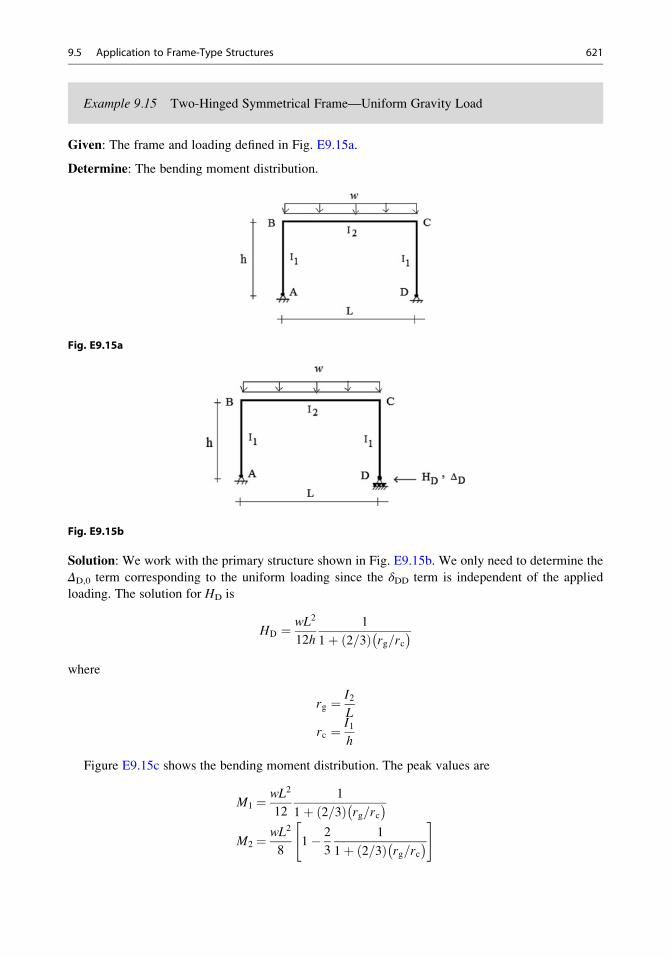
Example 9.15 Two-Hinged Symmetrical Frame—Uniform Gravity Load
Given: The frame and loading defined in Fig. E9.15a.
Determine: The bending moment distribution.
Fig. E9.15a
Fig. E9.15b
Solution: We work with the primary structure shown in Fig. E9.15b. We only need to determine the
ΔD,0 term corresponding to the uniform loading since the δDD term is independent of the applied
loading. The solution for HD is
HD ¼ wL2
12h
1
1þ 2=3ð Þ rg=rc� �
where
rg ¼ I2L
rc ¼ I1h
Figure E9.15c shows the bending moment distribution. The peak values are
M1 ¼ wL2
12
1
1þ 2=3ð Þ rg=rc� �
M2 ¼ wL2
81� 2
3
1
1þ 2=3ð Þ rg=rc� �
" #
9.5 Application to Frame-Type Structures 621
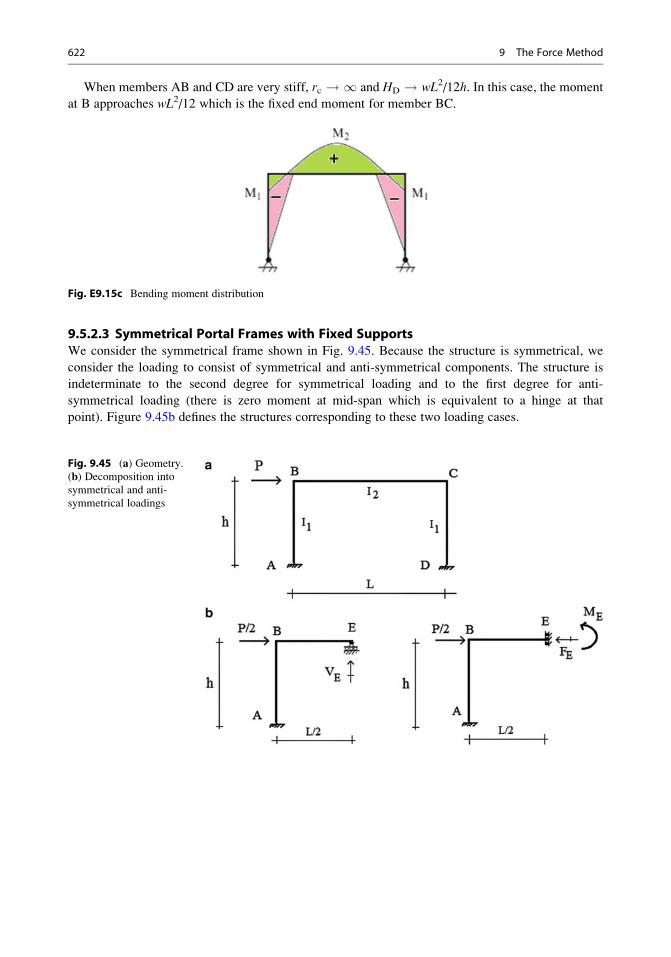
When members AB and CD are very stiff, rc ! 1 and HD ! wL2/12h. In this case, the moment
at B approaches wL2/12 which is the fixed end moment for member BC.
Fig. E9.15c Bending moment distribution
9.5.2.3 Symmetrical Portal Frames with Fixed SupportsWe consider the symmetrical frame shown in Fig. 9.45. Because the structure is symmetrical, we
consider the loading to consist of symmetrical and anti-symmetrical components. The structure is
indeterminate to the second degree for symmetrical loading and to the first degree for anti-
symmetrical loading (there is zero moment at mid-span which is equivalent to a hinge at that
point). Figure 9.45b defines the structures corresponding to these two loading cases.
Fig. 9.45 (a) Geometry.
(b) Decomposition into
symmetrical and anti-
symmetrical loadings
622 9 The Force Method
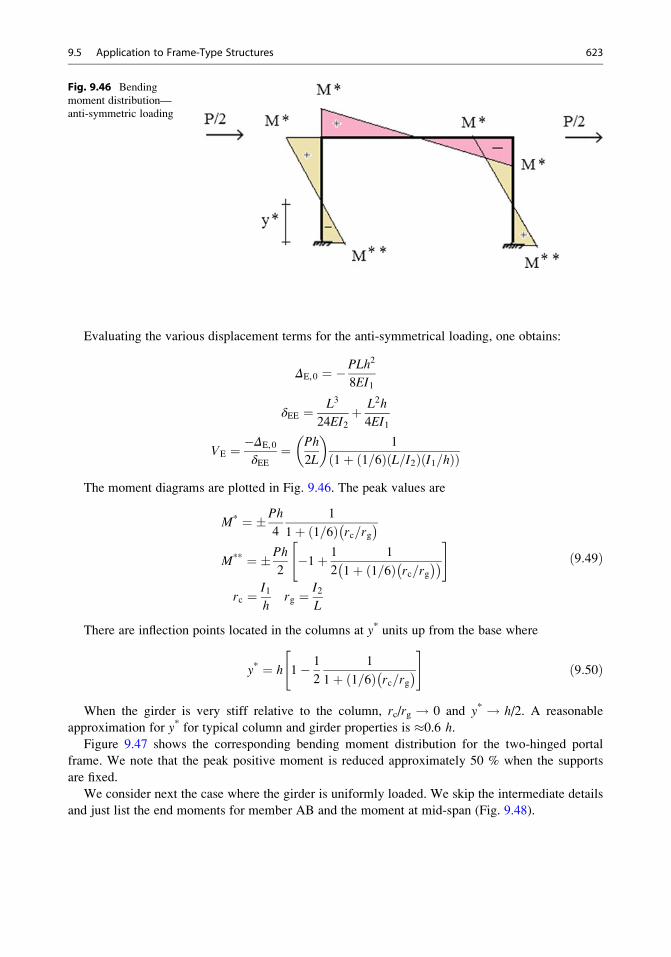
Evaluating the various displacement terms for the anti-symmetrical loading, one obtains:
ΔE,0 ¼ �PLh2
8EI1
δEE ¼ L3
24EI2þ L2h
4EI1
VE ¼ �ΔE,0
δEE¼ Ph
2L
� �1
1þ 1=6ð Þ L=I2ð Þ I1=hð Þð ÞThe moment diagrams are plotted in Fig. 9.46. The peak values are
M* ¼ �Ph
4
1
1þ 1=6ð Þ rc=rg� �
M** ¼ �Ph
2�1þ 1
2
1
1þ 1=6ð Þ rc=rg� �� �
" #
rc ¼ I1h
rg ¼ I2L
ð9:49Þ
There are inflection points located in the columns at y* units up from the base where
y* ¼ h 1� 1
2
1
1þ 1=6ð Þ rc=rg� �
" #ð9:50Þ
When the girder is very stiff relative to the column, rc/rg ! 0 and y* ! h/2. A reasonable
approximation for y* for typical column and girder properties is �0.6 h.
Figure 9.47 shows the corresponding bending moment distribution for the two-hinged portal
frame. We note that the peak positive moment is reduced approximately 50 % when the supports
are fixed.
We consider next the case where the girder is uniformly loaded. We skip the intermediate details
and just list the end moments for member AB and the moment at mid-span (Fig. 9.48).
Fig. 9.46 Bending
moment distribution—
anti-symmetric loading
9.5 Application to Frame-Type Structures 623
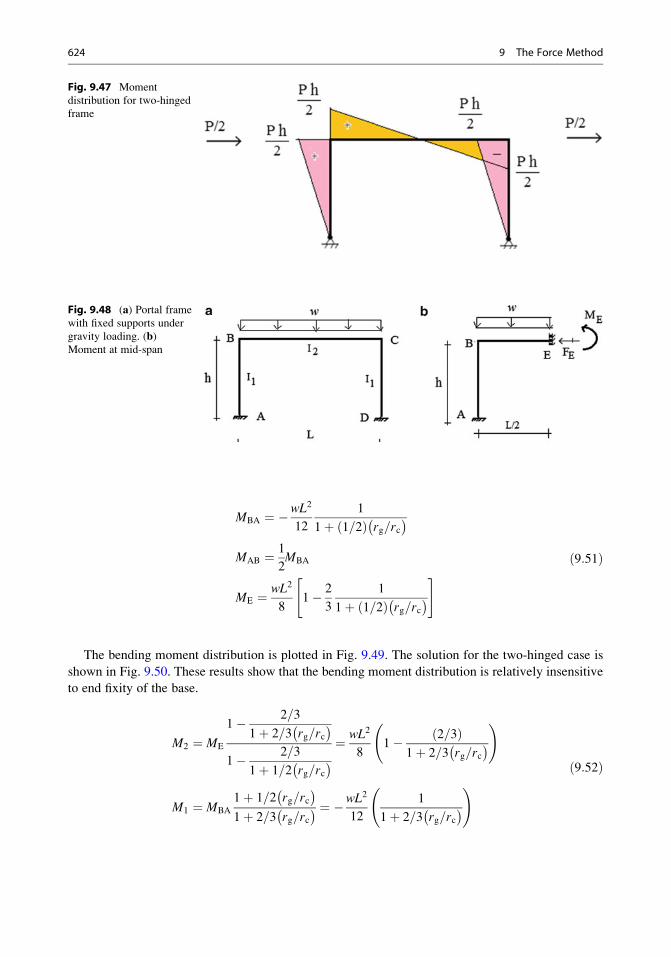
MBA ¼ �wL2
12
1
1þ 1=2ð Þ rg=rc� �
MAB ¼ 1
2MBA
ME ¼ wL2
81� 2
3
1
1þ 1=2ð Þ rg=rc� �
" # ð9:51Þ
The bending moment distribution is plotted in Fig. 9.49. The solution for the two-hinged case is
shown in Fig. 9.50. These results show that the bending moment distribution is relatively insensitive
to end fixity of the base.
M2 ¼ ME
1� 2=3
1þ 2=3 rg=rc� �
1� 2=3
1þ 1=2 rg=rc� � ¼
wL2
81� 2=3ð Þ
1þ 2=3 rg=rc� �
!
M1 ¼ MBA
1þ 1=2 rg=rc� �
1þ 2=3 rg=rc� � ¼ �wL2
12
1
1þ 2=3 rg=rc� �
! ð9:52Þ
Fig. 9.47 Moment
distribution for two-hinged
frame
Fig. 9.48 (a) Portal frame
with fixed supports under
gravity loading. (b)Moment at mid-span
624 9 The Force Method
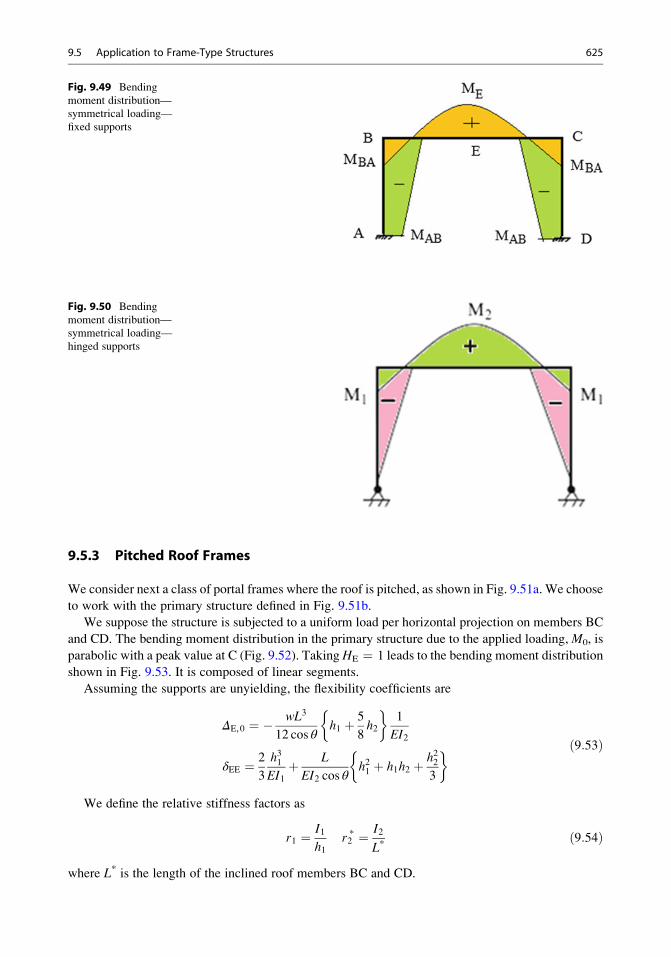
9.5.3 Pitched Roof Frames
We consider next a class of portal frames where the roof is pitched, as shown in Fig. 9.51a. We choose
to work with the primary structure defined in Fig. 9.51b.
We suppose the structure is subjected to a uniform load per horizontal projection on members BC
and CD. The bending moment distribution in the primary structure due to the applied loading, M0, is
parabolic with a peak value at C (Fig. 9.52). Taking HE ¼ 1 leads to the bending moment distribution
shown in Fig. 9.53. It is composed of linear segments.
Assuming the supports are unyielding, the flexibility coefficients are
ΔE,0 ¼ � wL3
12 cos θh1 þ 5
8h2
�1
EI2
δEE ¼ 2
3
h31EI1þ L
EI2 cos θh21 þ h1h2 þ h22
3
� ð9:53Þ
We define the relative stiffness factors as
r1 ¼ I1h1
r2* ¼ I2
L*ð9:54Þ
where L* is the length of the inclined roof members BC and CD.
Fig. 9.50 Bending
moment distribution—
symmetrical loading—
hinged supports
Fig. 9.49 Bending
moment distribution—
symmetrical loading—
fixed supports
9.5 Application to Frame-Type Structures 625
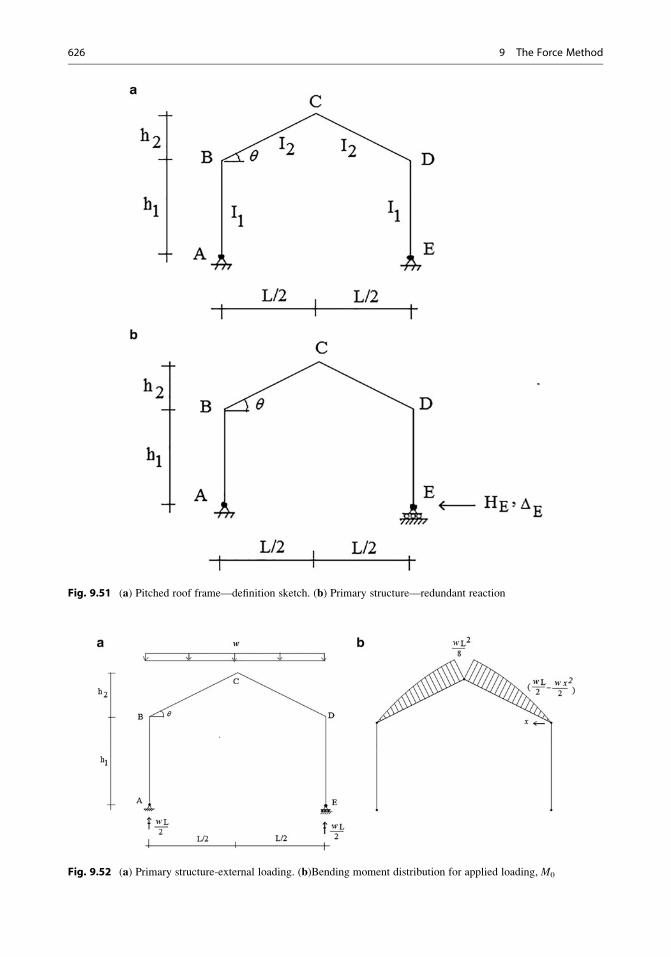
Fig. 9.52 (a) Primary structure-external loading. (b)Bending moment distribution for applied loading, M0
Fig. 9.51 (a) Pitched roof frame—definition sketch. (b) Primary structure—redundant reaction
626 9 The Force Method
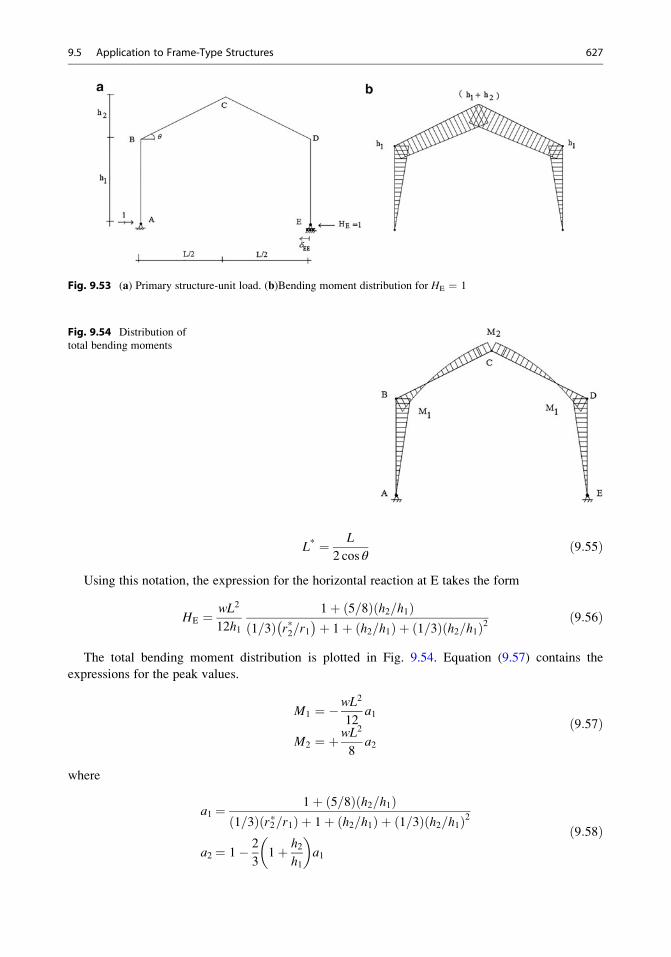
L* ¼ L
2 cos θð9:55Þ
Using this notation, the expression for the horizontal reaction at E takes the form
HE ¼ wL2
12h1
1þ 5=8ð Þ h2=h1ð Þ1=3ð Þ r*2=r1
� �þ 1þ h2=h1ð Þ þ 1=3ð Þ h2=h1ð Þ2 ð9:56Þ
The total bending moment distribution is plotted in Fig. 9.54. Equation (9.57) contains the
expressions for the peak values.
M1 ¼ �wL2
12a1
M2 ¼ þwL2
8a2
ð9:57Þ
where
a1 ¼ 1þ 5=8ð Þ h2=h1ð Þ1=3ð Þ r2*=r1ð Þ þ 1þ h2=h1ð Þ þ 1=3ð Þ h2=h1ð Þ2
a2 ¼ 1� 2
31þ h2
h1
� �a1
ð9:58Þ
Fig. 9.54 Distribution of
total bending moments
Fig. 9.53 (a) Primary structure-unit load. (b)Bending moment distribution for HE ¼ 1
9.5 Application to Frame-Type Structures 627
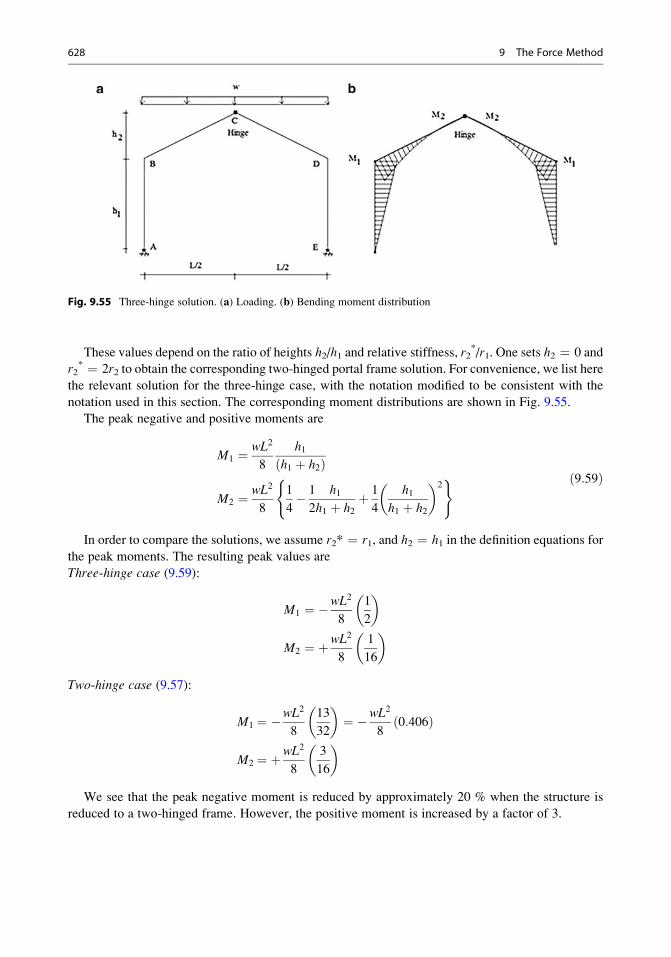
These values depend on the ratio of heights h2/h1 and relative stiffness, r2*/r1. One sets h2 ¼ 0 and
r2* ¼ 2r2 to obtain the corresponding two-hinged portal frame solution. For convenience, we list here
the relevant solution for the three-hinge case, with the notation modified to be consistent with the
notation used in this section. The corresponding moment distributions are shown in Fig. 9.55.
The peak negative and positive moments are
M1 ¼ wL2
8
h1h1 þ h2ð Þ
M2 ¼ wL2
8
1
4� 1
2
h1h1 þ h2
þ 1
4
h1h1 þ h2
� �2( ) ð9:59Þ
In order to compare the solutions, we assume r2* ¼ r1, and h2 ¼ h1 in the definition equations for
the peak moments. The resulting peak values are
Three-hinge case (9.59):
M1 ¼ �wL2
8
1
2
� �
M2 ¼ þwL2
8
1
16
� �
Two-hinge case (9.57):
M1 ¼ �wL2
8
13
32
� �¼ �wL2
80:406ð Þ
M2 ¼ þwL2
8
3
16
� �
We see that the peak negative moment is reduced by approximately 20 % when the structure is
reduced to a two-hinged frame. However, the positive moment is increased by a factor of 3.
Fig. 9.55 Three-hinge solution. (a) Loading. (b) Bending moment distribution
628 9 The Force Method
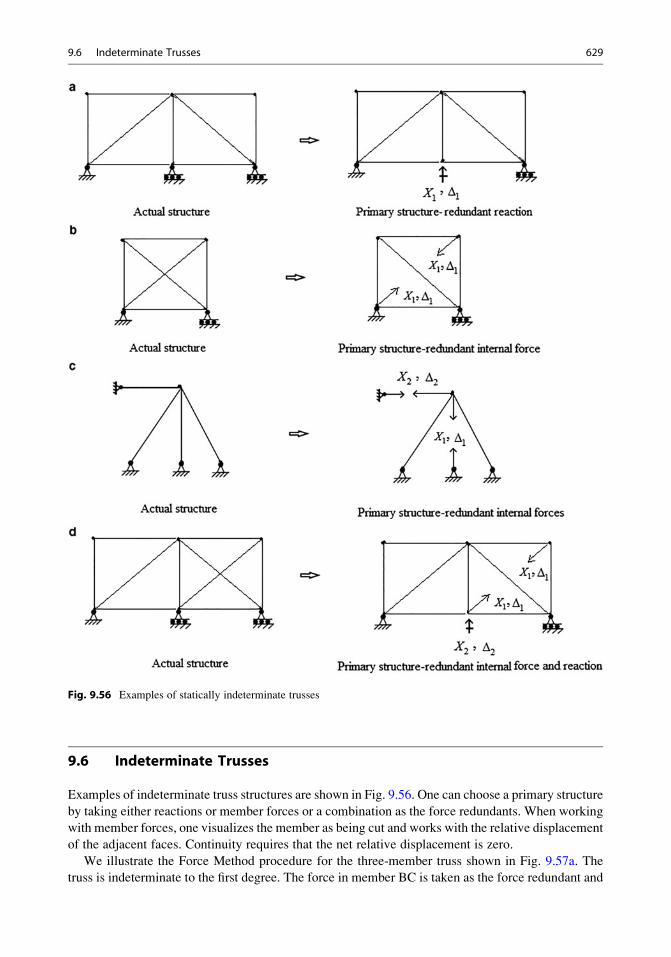
9.6 Indeterminate Trusses
Examples of indeterminate truss structures are shown in Fig. 9.56. One can choose a primary structure
by taking either reactions or member forces or a combination as the force redundants. When working
with member forces, one visualizes the member as being cut and works with the relative displacement
of the adjacent faces. Continuity requires that the net relative displacement is zero.
We illustrate the Force Method procedure for the three-member truss shown in Fig. 9.57a. The
truss is indeterminate to the first degree. The force in member BC is taken as the force redundant and
Fig. 9.56 Examples of statically indeterminate trusses
9.6 Indeterminate Trusses 629
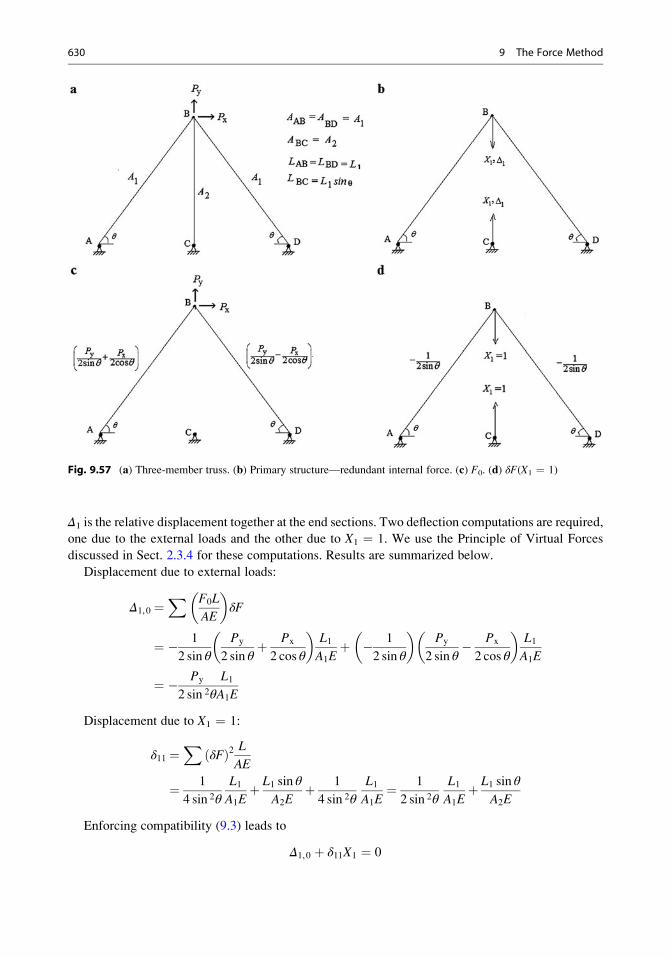
Δ1 is the relative displacement together at the end sections. Two deflection computations are required,
one due to the external loads and the other due to X1 ¼ 1. We use the Principle of Virtual Forces
discussed in Sect. 2.3.4 for these computations. Results are summarized below.
Displacement due to external loads:
Δ1,0 ¼X F0L
AE
� �δF
¼ � 1
2 sin θ
Py
2 sin θþ Px
2 cos θ
� �L1A1Eþ � 1
2 sin θ
� �Py
2 sin θ� Px
2 cos θ
� �L1A1E
¼ � Py
2 sin 2θ
L1A1E
Displacement due to X1 ¼ 1:
δ11 ¼X
δFð Þ2 L
AE
¼ 1
4 sin 2θ
L1A1Eþ L1 sin θ
A2Eþ 1
4 sin 2θ
L1A1E¼ 1
2 sin 2θ
L1A1Eþ L1 sin θ
A2E
Enforcing compatibility (9.3) leads to
Δ1,0 þ δ11X1 ¼ 0
Fig. 9.57 (a) Three-member truss. (b) Primary structure—redundant internal force. (c) F0. (d) δF(X1 ¼ 1)
630 9 The Force Method

FBC ¼ X1 ¼ �Δ1,0
δ11¼ Py=2 sin
2θ� �
L1=A1Eð Þ1=2 sin 2θð Þ L1=A1Eð Þ þ L1 sin θ=A2Eð Þ
¼ Py
A2= sin θð ÞA2= sin θð Þ þ 2A1 sin 2θ
ð9:60Þ
Lastly, the remaining forces are determined by superimposing the individual solutions.
F ¼ F0 þ δFX1
FAB ¼ Px
2 cos θþ Py
A1 sin θ
A2= sin θð Þ þ 2A1 sin 2θ
�
FDB ¼ � Px
2 cos θþ Py
A1 sin θ
A2= sin θð Þ þ 2A1 sin 2θ
� ð9:61Þ
As expected for indeterminate structures, the internal force distribution depends on the relative
stiffness of the members. When A2 is very large in comparison to A1, Py is essentially carried by
member BC. Conversely, if A2 is small in comparison to A1, member BC carries essentially none
of Py.
Example 9.16
Given: The indeterminate truss shown in Fig. E9.16a. Assume AE is constant, A ¼ 2 in.2, and
E ¼ 29,000 ksi.
Fig. E9.16a
Determine: The member forces.
9.6 Indeterminate Trusses 631
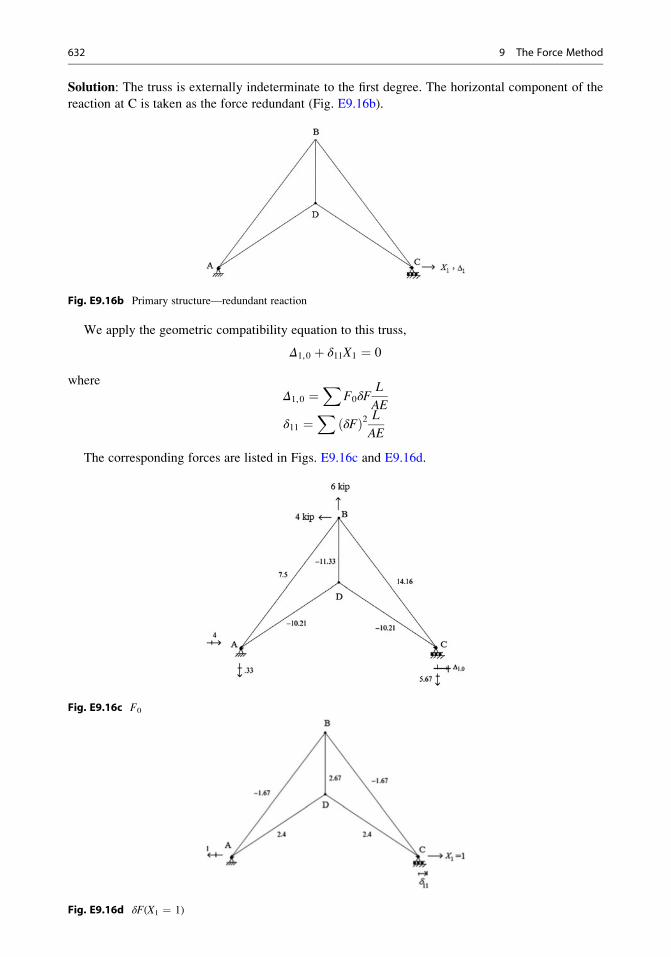
Solution: The truss is externally indeterminate to the first degree. The horizontal component of the
reaction at C is taken as the force redundant (Fig. E9.16b).
Fig. E9.16b Primary structure—redundant reaction
We apply the geometric compatibility equation to this truss,
Δ1,0 þ δ11X1 ¼ 0
where
Δ1,0 ¼X
F0δFL
AE
δ11 ¼X
δFð Þ2 L
AE
The corresponding forces are listed in Figs. E9.16c and E9.16d.
Fig. E9.16c F0
Fig. E9.16d δF(X1 ¼ 1)
632 9 The Force Method

Member L (in.) A (in.2)
L
A F0 δF
2(dF )L
AE 0
LF dF
AEAB 300 2 150 7.5 �1.67 418.3/E �1878.7/EBC 300 2 150 14.16 �1.67 418.3/E �3547/ECD 216.3 2 108.2 �10.21 2.4 625.1/E 2656/E
DA 216.3 2 108.2 �10.21 2.4 625.1/E 2656/E
BD 120 2 60 �11.33 2.67 422.7/E �1815/EΣ 2509.5/E �12,552.7/E
Inserting this data in the compatibility equation leads to
X1 ¼ �Δ1,0
δ11¼ 12552:7
2509:5¼ 5
Then, the forces are determined by superimposing the individual solutions
F ¼ F0 þ δFX1
The final member forces and the reactions are listed below:
Member F0 δFX1 F
AB 7.5 �8.35 �0.85BC 14.16 �8.35 5.81
CD �10.21 12.0 1.8
DA �10.21 12.0 1.8
BD �11.33 13.35 2
Rax 4.0 �5.0 �1.0Ray �0.33 0 �0.33Rex 0.0 +5.0 +5.0
Rey �5.67 0 �5.67
9.6 Indeterminate Trusses 633

Example 9.17
Given: The indeterminate truss shown in Fig. E9.17a.
Determine: The member forces. Assume AE is constant, A ¼ 200 mm2, and E ¼ 200 GPa.
Fig. E9.17a
Solution: The truss is internally indeterminate to the first degree. The force in member BD is taken as
the force redundant (Fig. E9.17b).
Fig. E9.17b Primary structure—internal force redundant
We apply the geometric compatibility equation to this truss,
Δ1,0 þ δ11X1 ¼ 0
where
Δ1,0 ¼X
F0δFL
AE
δ11 ¼X
δFð Þ2 L
AE
634 9 The Force Method
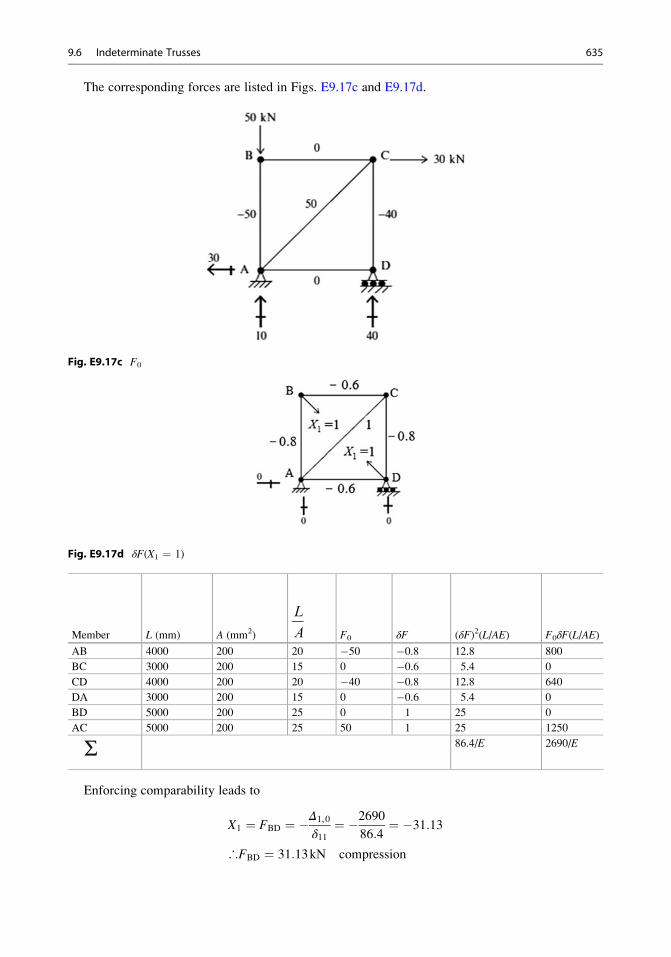
The corresponding forces are listed in Figs. E9.17c and E9.17d.
Fig. E9.17c F0
Fig. E9.17d δF(X1 ¼ 1)
Member L (mm) A (mm2)
L
A F0 δF (δF)2(L/AE) F0δF(L/AE)
AB 4000 200 20 �50 �0.8 12.8 800
BC 3000 200 15 0 �0.6 5.4 0
CD 4000 200 20 �40 �0.8 12.8 640
DA 3000 200 15 0 �0.6 5.4 0
BD 5000 200 25 0 1 25 0
AC 5000 200 25 50 1 25 1250
Σ 86.4/E 2690/E
Enforcing comparability leads to
X1 ¼ FBD ¼ �Δ1,0
δ11¼ �2690
86:4¼ �31:13
∴FBD ¼ 31:13kN compression
9.6 Indeterminate Trusses 635
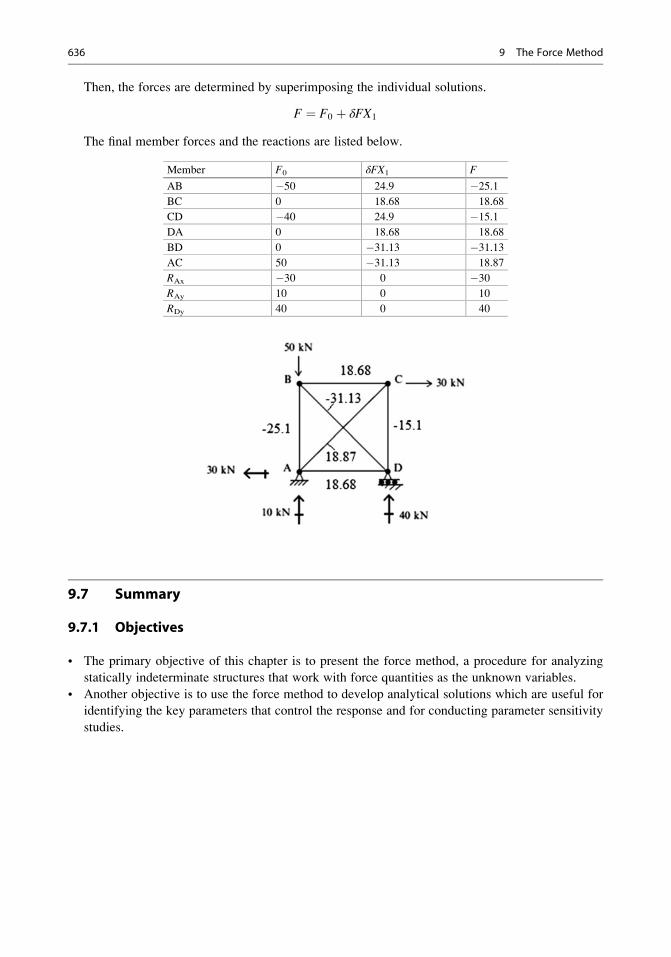
Then, the forces are determined by superimposing the individual solutions.
F ¼ F0 þ δFX1
The final member forces and the reactions are listed below.
Member F0 δFX1 F
AB �50 24.9 �25.1BC 0 18.68 18.68
CD �40 24.9 �15.1DA 0 18.68 18.68
BD 0 �31.13 �31.13AC 50 �31.13 18.87
RAx �30 0 �30RAy 10 0 10
RDy 40 0 40
9.7 Summary
9.7.1 Objectives
• The primary objective of this chapter is to present the force method, a procedure for analyzing
statically indeterminate structures that work with force quantities as the unknown variables.
• Another objective is to use the force method to develop analytical solutions which are useful for
identifying the key parameters that control the response and for conducting parameter sensitivity
studies.
636 9 The Force Method
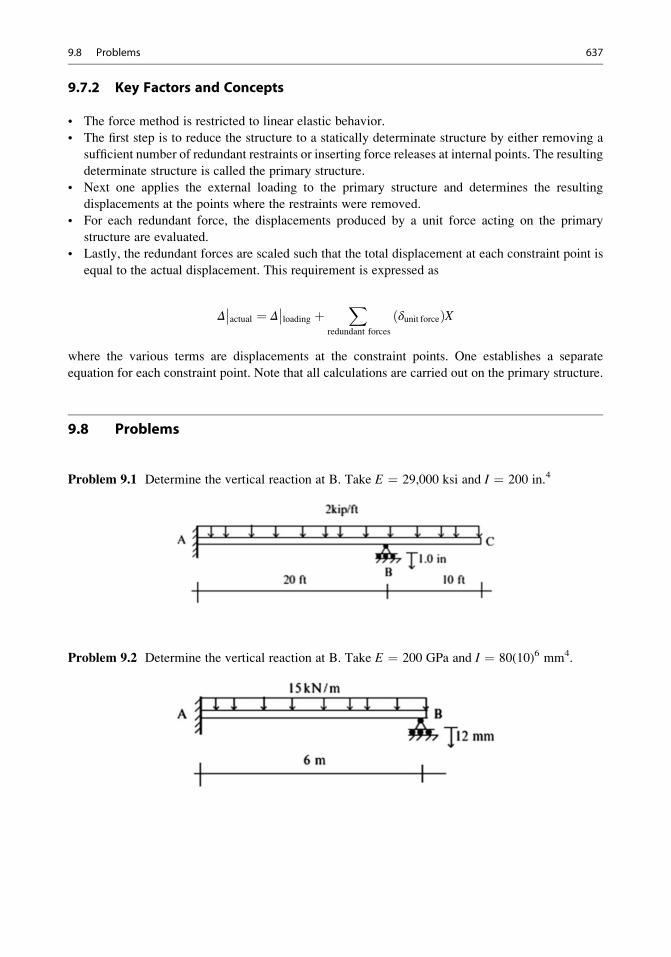
9.7.2 Key Factors and Concepts
• The force method is restricted to linear elastic behavior.
• The first step is to reduce the structure to a statically determinate structure by either removing a
sufficient number of redundant restraints or inserting force releases at internal points. The resulting
determinate structure is called the primary structure.
• Next one applies the external loading to the primary structure and determines the resulting
displacements at the points where the restraints were removed.
• For each redundant force, the displacements produced by a unit force acting on the primary
structure are evaluated.
• Lastly, the redundant forces are scaled such that the total displacement at each constraint point is
equal to the actual displacement. This requirement is expressed as
Δ��actual ¼ Δ
��loading þ
Xredundant forces
δunit forceð ÞX
where the various terms are displacements at the constraint points. One establishes a separate
equation for each constraint point. Note that all calculations are carried out on the primary structure.
9.8 Problems
Problem 9.1 Determine the vertical reaction at B. Take E ¼ 29,000 ksi and I ¼ 200 in.4
Problem 9.2 Determine the vertical reaction at B. Take E ¼ 200 GPa and I ¼ 80(10)6 mm4.
9.8 Problems 637
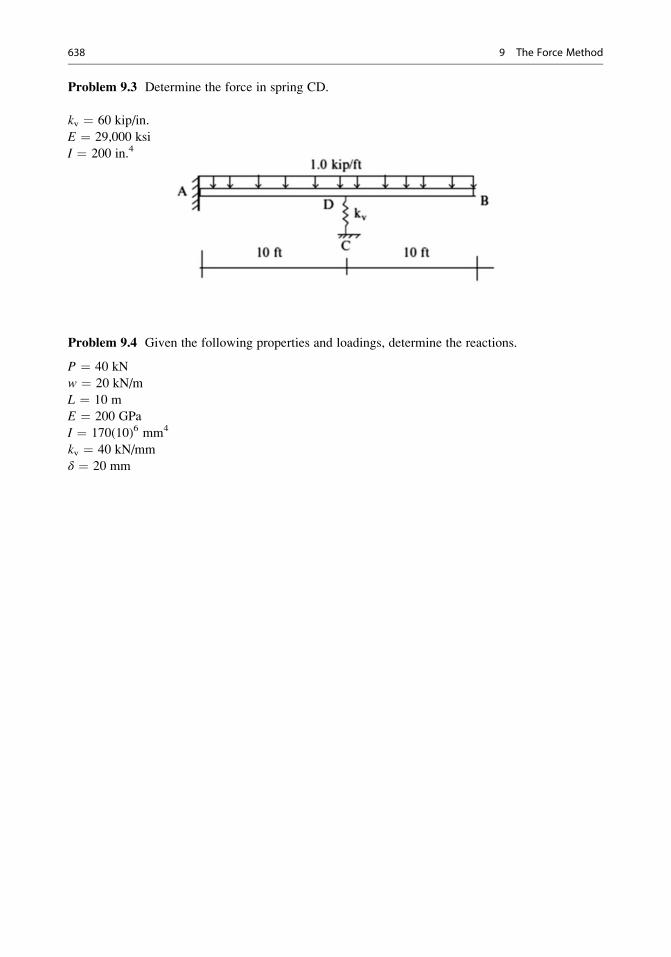
Problem 9.3 Determine the force in spring CD.
kv ¼ 60 kip/in.
E ¼ 29,000 ksi
I ¼ 200 in.4
Problem 9.4 Given the following properties and loadings, determine the reactions.
P ¼ 40 kN
w ¼ 20 kN/m
L ¼ 10 m
E ¼ 200 GPa
I ¼ 170(10)6 mm4
kv ¼ 40 kN/mm
δ ¼ 20 mm
638 9 The Force Method
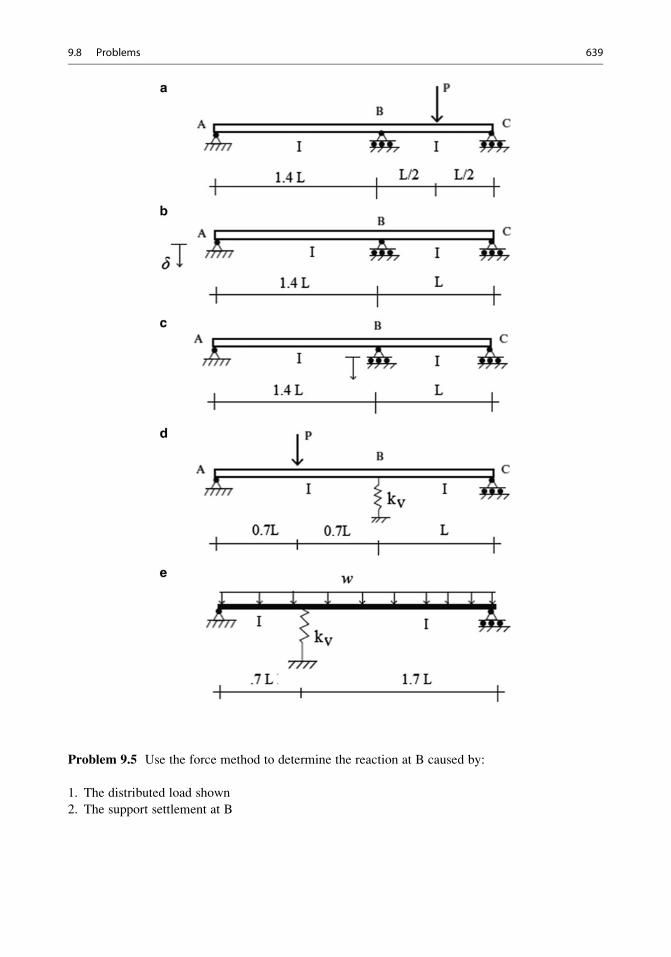
Problem 9.5 Use the force method to determine the reaction at B caused by:
1. The distributed load shown
2. The support settlement at B
9.8 Problems 639
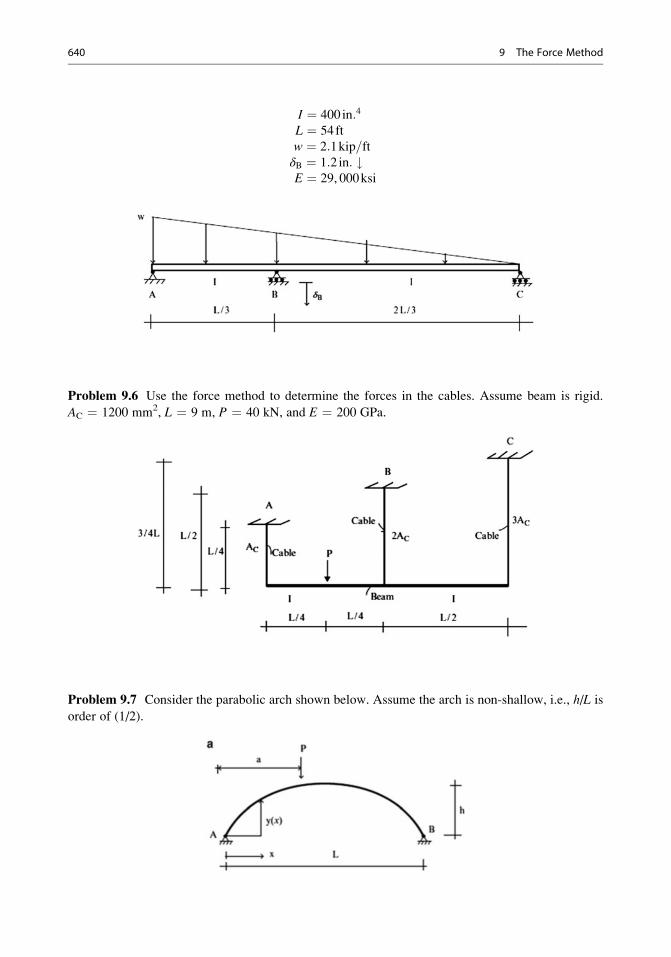
I ¼ 400 in:4
L ¼ 54ft
w ¼ 2:1kip=ftδB ¼ 1:2 in: #E ¼ 29, 000ksi
Problem 9.6 Use the force method to determine the forces in the cables. Assume beam is rigid.
AC ¼ 1200 mm2, L ¼ 9 m, P ¼ 40 kN, and E ¼ 200 GPa.
Problem 9.7 Consider the parabolic arch shown below. Assume the arch is non-shallow, i.e., h/L is
order of (1/2).
640 9 The Force Method
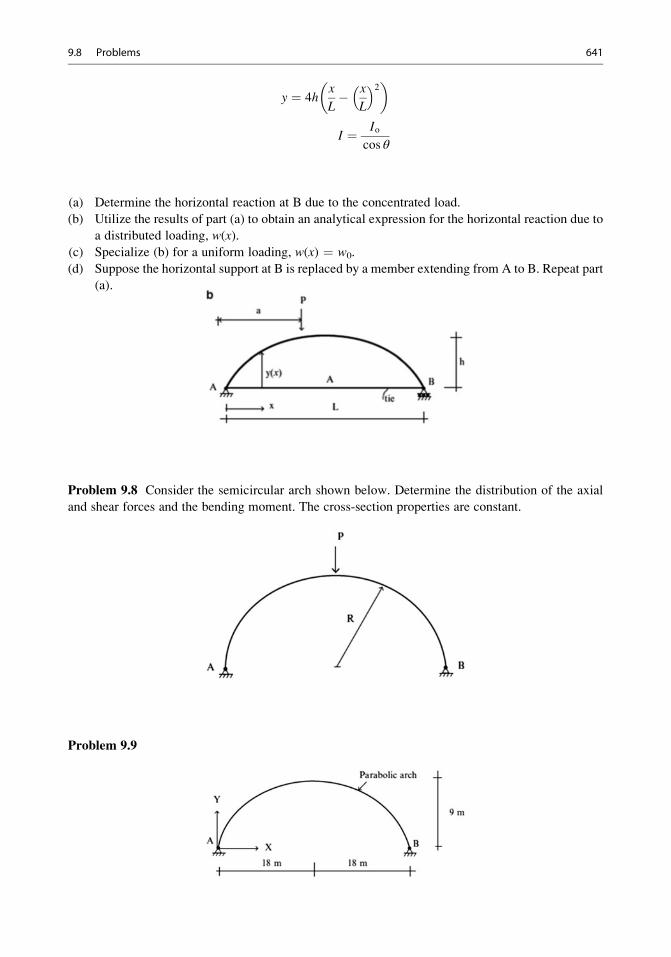
y ¼ 4hx
L� x
L
� �2� �
I ¼ Iocos θ
(a) Determine the horizontal reaction at B due to the concentrated load.
(b) Utilize the results of part (a) to obtain an analytical expression for the horizontal reaction due to
a distributed loading, w(x).
(c) Specialize (b) for a uniform loading, w(x) ¼ w0.
(d) Suppose the horizontal support at B is replaced by a member extending from A to B. Repeat part
(a).
Problem 9.8 Consider the semicircular arch shown below. Determine the distribution of the axial
and shear forces and the bending moment. The cross-section properties are constant.
Problem 9.9
9.8 Problems 641
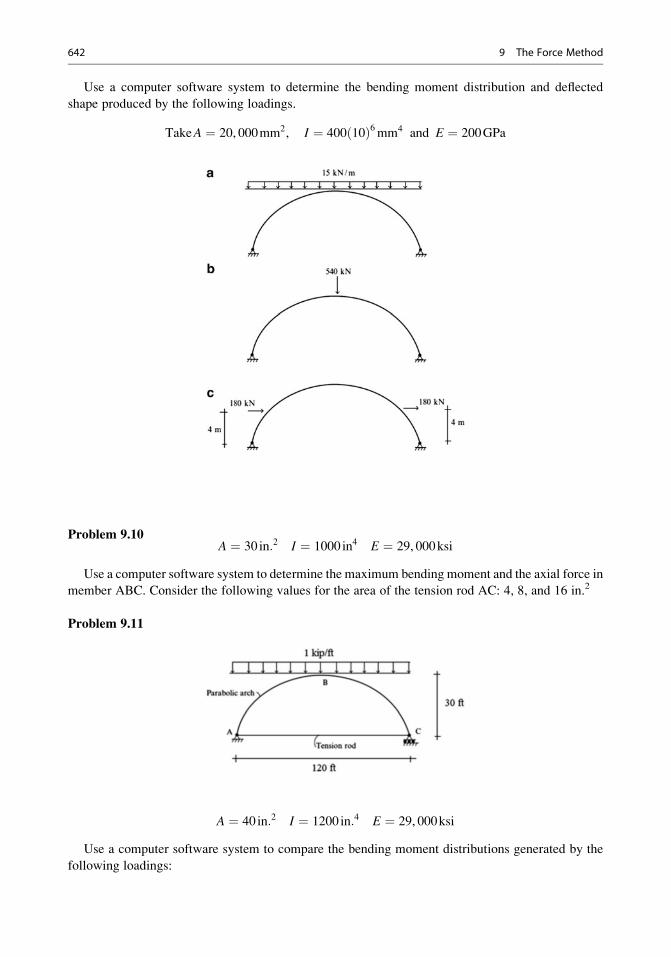
Use a computer software system to determine the bending moment distribution and deflected
shape produced by the following loadings.
TakeA ¼ 20, 000mm2, I ¼ 400 10ð Þ6mm4 and E ¼ 200GPa
Problem 9.10A ¼ 30 in:2 I ¼ 1000 in4 E ¼ 29, 000ksi
Use a computer software system to determine the maximum bending moment and the axial force in
member ABC. Consider the following values for the area of the tension rod AC: 4, 8, and 16 in.2
Problem 9.11
A ¼ 40 in:2 I ¼ 1200 in:4 E ¼ 29, 000ksi
Use a computer software system to compare the bending moment distributions generated by the
following loadings:
642 9 The Force Method
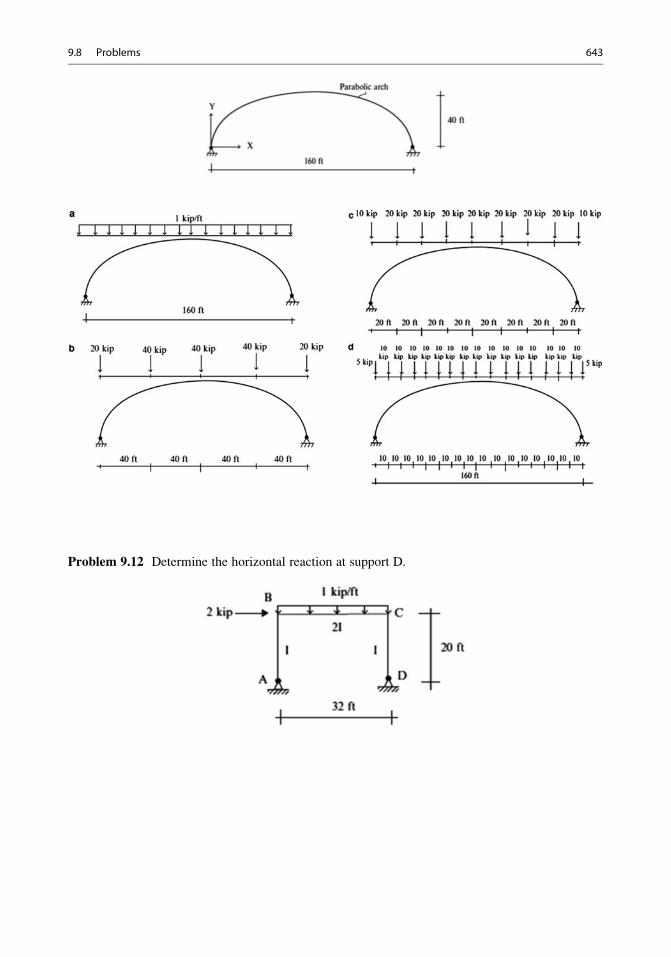
Problem 9.12 Determine the horizontal reaction at support D.
9.8 Problems 643
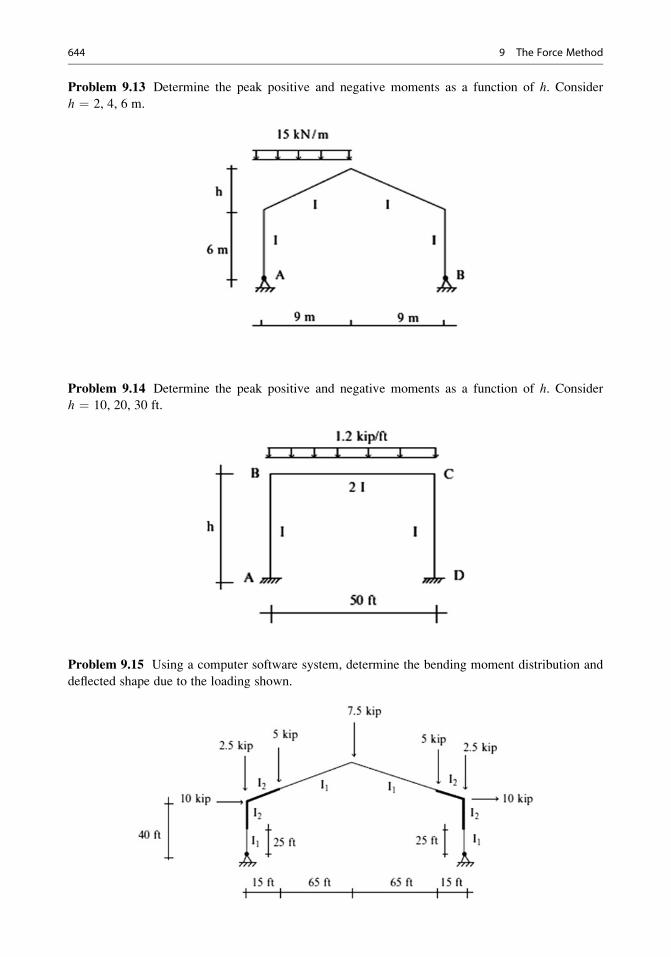
Problem 9.13 Determine the peak positive and negative moments as a function of h. Consider
h ¼ 2, 4, 6 m.
Problem 9.14 Determine the peak positive and negative moments as a function of h. Considerh ¼ 10, 20, 30 ft.
Problem 9.15 Using a computer software system, determine the bending moment distribution and
deflected shape due to the loading shown.
644 9 The Force Method
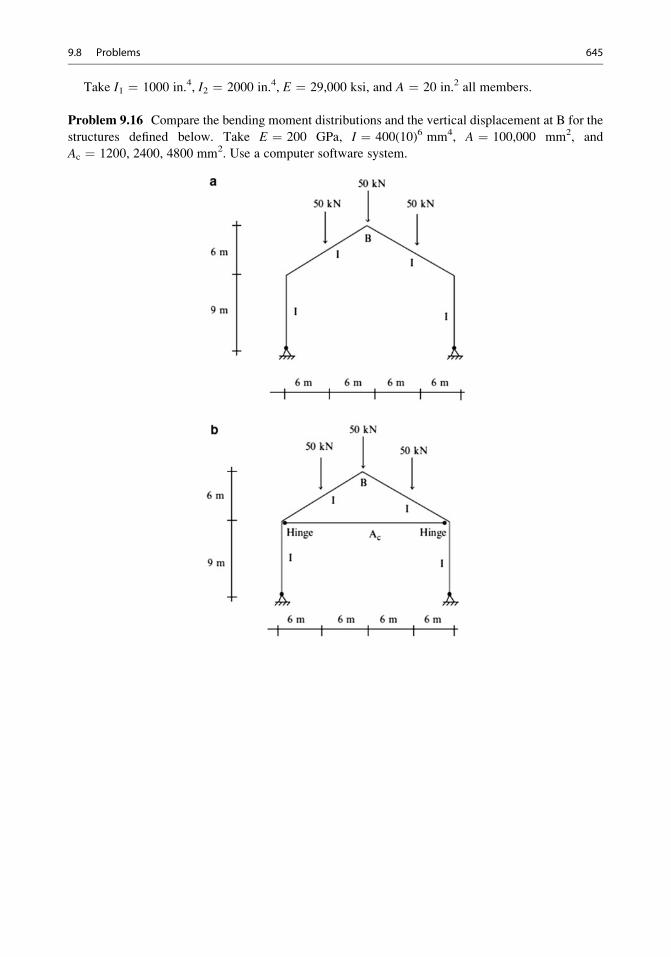
Take I1 ¼ 1000 in.4, I2 ¼ 2000 in.4, E ¼ 29,000 ksi, and A ¼ 20 in.2 all members.
Problem 9.16 Compare the bending moment distributions and the vertical displacement at B for the
structures defined below. Take E ¼ 200 GPa, I ¼ 400(10)6 mm4, A ¼ 100,000 mm2, and
Ac ¼ 1200, 2400, 4800 mm2. Use a computer software system.
9.8 Problems 645
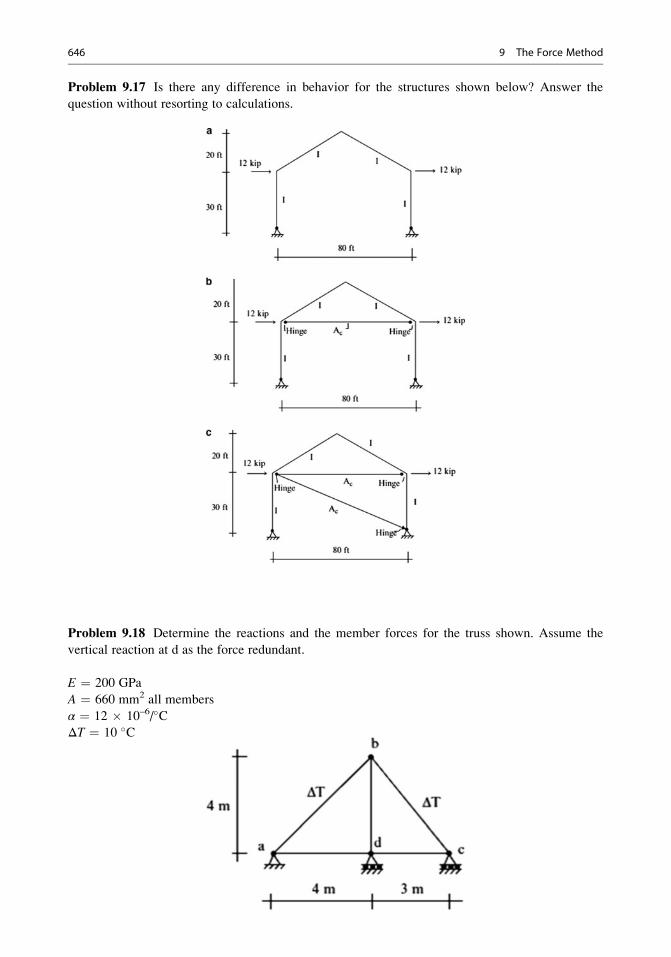
Problem 9.17 Is there any difference in behavior for the structures shown below? Answer the
question without resorting to calculations.
Problem 9.18 Determine the reactions and the member forces for the truss shown. Assume the
vertical reaction at d as the force redundant.
E ¼ 200 GPa
A ¼ 660 mm2 all members
α ¼ 12 � 10–6/�CΔT ¼ 10 �C
646 9 The Force Method
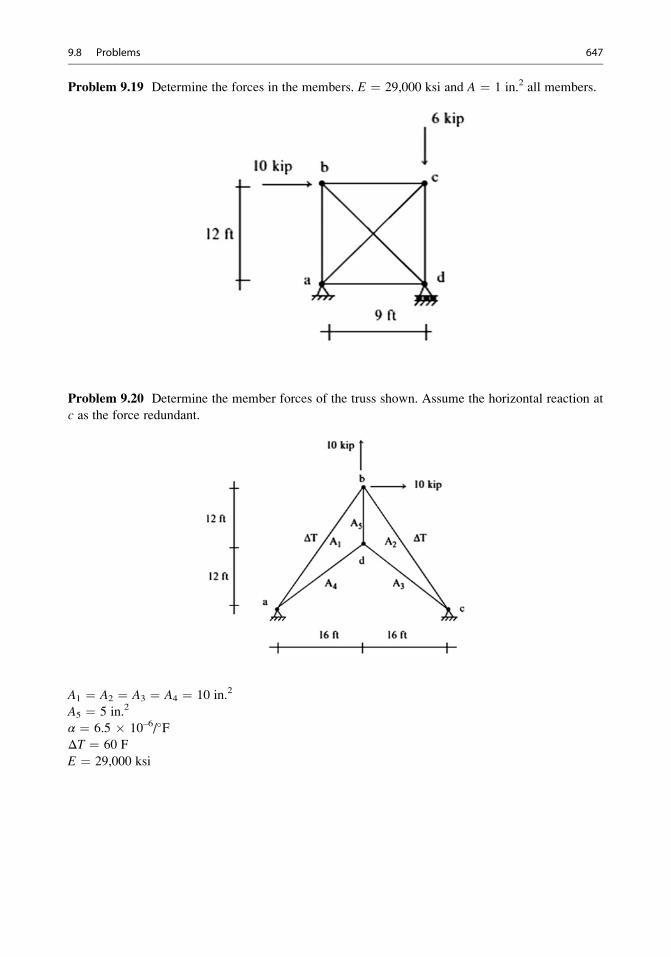
Problem 9.19 Determine the forces in the members. E ¼ 29,000 ksi and A ¼ 1 in.2 all members.
Problem 9.20 Determine the member forces of the truss shown. Assume the horizontal reaction at
c as the force redundant.
A1 ¼ A2 ¼ A3 ¼ A4 ¼ 10 in.2
A5 ¼ 5 in.2
α ¼ 6.5 � 10–6/�FΔT ¼ 60 F
E ¼ 29,000 ksi
9.8 Problems 647
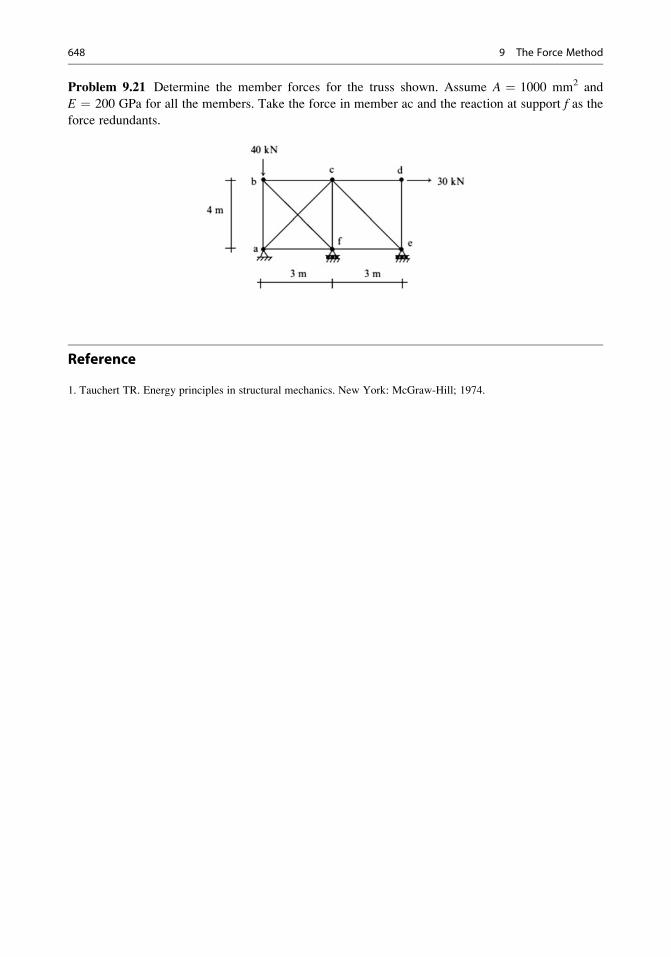
Problem 9.21 Determine the member forces for the truss shown. Assume A ¼ 1000 mm2 and
E ¼ 200 GPa for all the members. Take the force in member ac and the reaction at support f as theforce redundants.
Reference
1. Tauchert TR. Energy principles in structural mechanics. New York: McGraw-Hill; 1974.
648 9 The Force Method
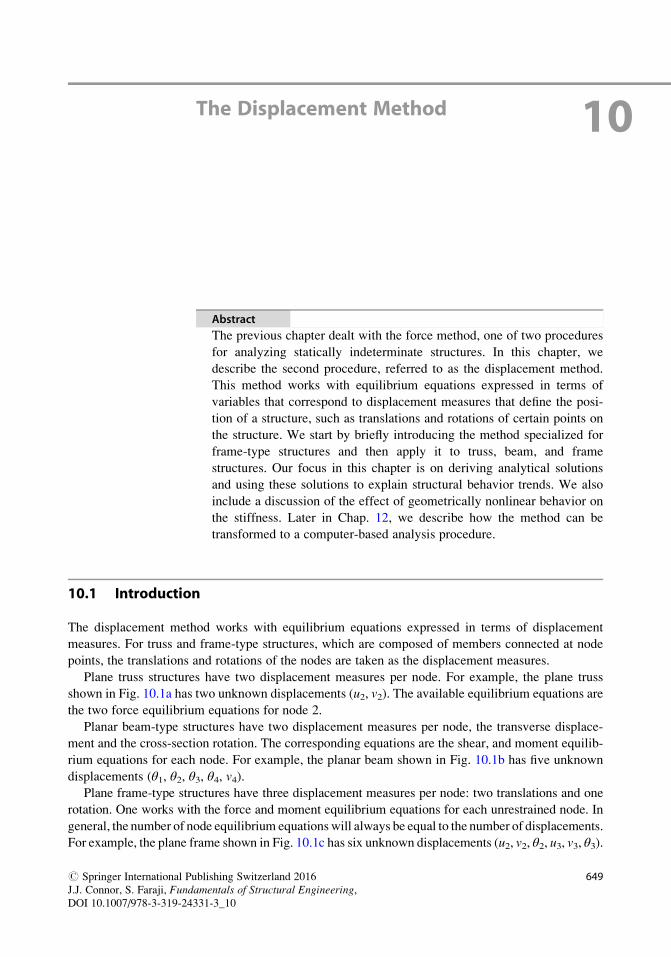
The Displacement Method 10
Abstract
The previous chapter dealt with the force method, one of two procedures
for analyzing statically indeterminate structures. In this chapter, we
describe the second procedure, referred to as the displacement method.
This method works with equilibrium equations expressed in terms of
variables that correspond to displacement measures that define the posi-
tion of a structure, such as translations and rotations of certain points on
the structure. We start by briefly introducing the method specialized for
frame-type structures and then apply it to truss, beam, and frame
structures. Our focus in this chapter is on deriving analytical solutions
and using these solutions to explain structural behavior trends. We also
include a discussion of the effect of geometrically nonlinear behavior on
the stiffness. Later in Chap. 12, we describe how the method can be
transformed to a computer-based analysis procedure.
10.1 Introduction
The displacement method works with equilibrium equations expressed in terms of displacement
measures. For truss and frame-type structures, which are composed of members connected at node
points, the translations and rotations of the nodes are taken as the displacement measures.
Plane truss structures have two displacement measures per node. For example, the plane truss
shown in Fig. 10.1a has two unknown displacements (u2, v2). The available equilibrium equations are
the two force equilibrium equations for node 2.
Planar beam-type structures have two displacement measures per node, the transverse displace-
ment and the cross-section rotation. The corresponding equations are the shear, and moment equilib-
rium equations for each node. For example, the planar beam shown in Fig. 10.1b has five unknown
displacements (θ1, θ2, θ3, θ4, v4).Plane frame-type structures have three displacement measures per node: two translations and one
rotation. One works with the force and moment equilibrium equations for each unrestrained node. In
general, the number of node equilibrium equationswill always be equal to the number of displacements.
For example, the plane frame shown in Fig. 10.1c has six unknown displacements (u2, v2, θ2, u3, v3, θ3).
# Springer International Publishing Switzerland 2016
J.J. Connor, S. Faraji, Fundamentals of Structural Engineering,DOI 10.1007/978-3-319-24331-3_10
649
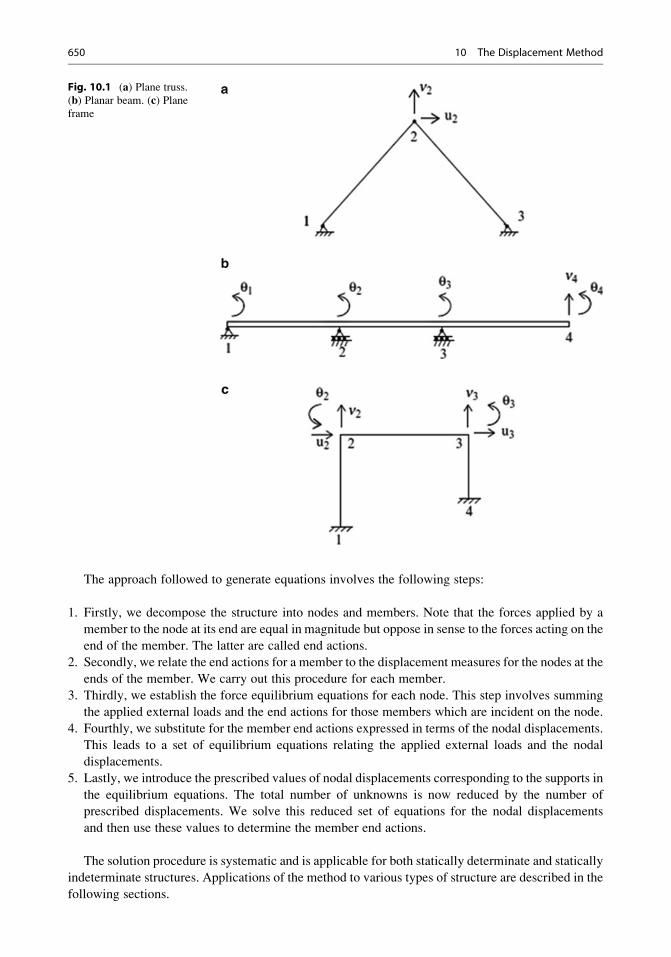
The approach followed to generate equations involves the following steps:
1. Firstly, we decompose the structure into nodes and members. Note that the forces applied by a
member to the node at its end are equal in magnitude but oppose in sense to the forces acting on the
end of the member. The latter are called end actions.
2. Secondly, we relate the end actions for a member to the displacement measures for the nodes at the
ends of the member. We carry out this procedure for each member.
3. Thirdly, we establish the force equilibrium equations for each node. This step involves summing
the applied external loads and the end actions for those members which are incident on the node.
4. Fourthly, we substitute for the member end actions expressed in terms of the nodal displacements.
This leads to a set of equilibrium equations relating the applied external loads and the nodal
displacements.
5. Lastly, we introduce the prescribed values of nodal displacements corresponding to the supports in
the equilibrium equations. The total number of unknowns is now reduced by the number of
prescribed displacements. We solve this reduced set of equations for the nodal displacements
and then use these values to determine the member end actions.
The solution procedure is systematic and is applicable for both statically determinate and statically
indeterminate structures. Applications of the method to various types of structure are described in the
following sections.
Fig. 10.1 (a) Plane truss.(b) Planar beam. (c) Planeframe
650 10 The Displacement Method
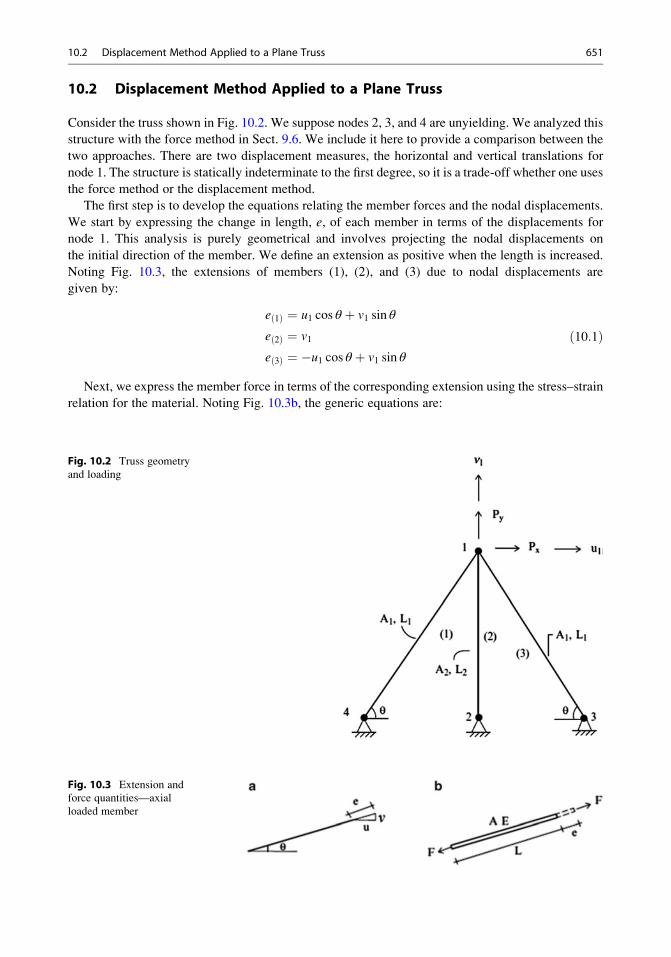
10.2 Displacement Method Applied to a Plane Truss
Consider the truss shown in Fig. 10.2. We suppose nodes 2, 3, and 4 are unyielding. We analyzed this
structure with the force method in Sect. 9.6. We include it here to provide a comparison between the
two approaches. There are two displacement measures, the horizontal and vertical translations for
node 1. The structure is statically indeterminate to the first degree, so it is a trade-off whether one uses
the force method or the displacement method.
The first step is to develop the equations relating the member forces and the nodal displacements.
We start by expressing the change in length, e, of each member in terms of the displacements for
node 1. This analysis is purely geometrical and involves projecting the nodal displacements on
the initial direction of the member. We define an extension as positive when the length is increased.
Noting Fig. 10.3, the extensions of members (1), (2), and (3) due to nodal displacements are
given by:
e 1ð Þ ¼ u1 cos θ þ v1 sin θ
e 2ð Þ ¼ v1
e 3ð Þ ¼ �u1 cos θ þ v1 sin θ
ð10:1Þ
Next, we express the member force in terms of the corresponding extension using the stress–strain
relation for the material. Noting Fig. 10.3b, the generic equations are:
Fig. 10.2 Truss geometry
and loading
Fig. 10.3 Extension and
force quantities—axial
loaded member
10.2 Displacement Method Applied to a Plane Truss 651
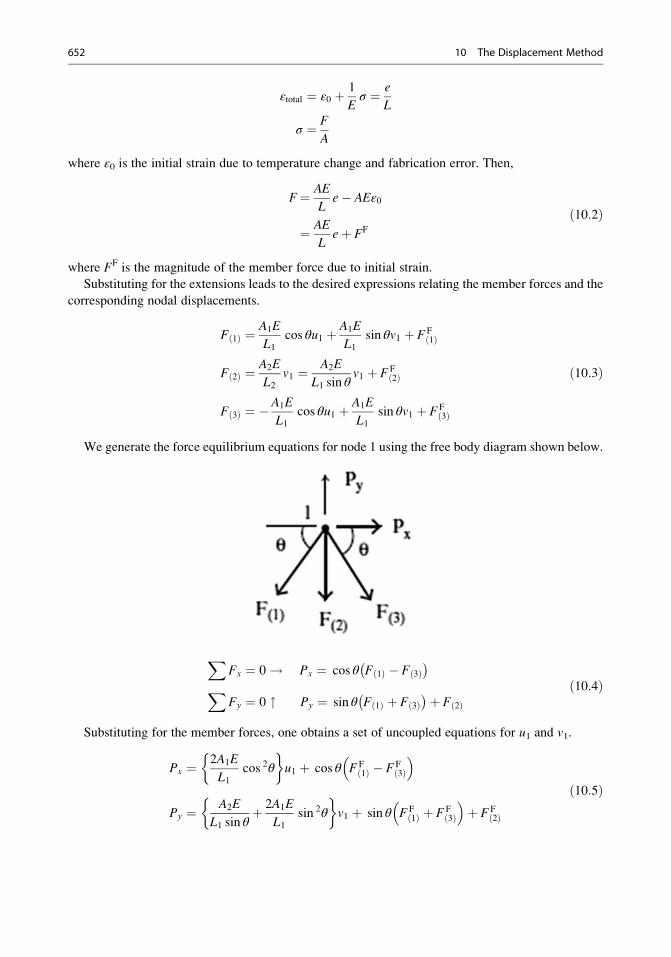
εtotal ¼ ε0 þ 1
Eσ ¼ e
L
σ ¼ F
A
where ε0 is the initial strain due to temperature change and fabrication error. Then,
F¼ AE
Le� AEε0
¼ AE
Leþ FF
ð10:2Þ
where FF is the magnitude of the member force due to initial strain.
Substituting for the extensions leads to the desired expressions relating the member forces and the
corresponding nodal displacements.
F 1ð Þ ¼ A1E
L1cos θu1 þ A1E
L1sin θv1 þ FF
1ð Þ
F 2ð Þ ¼ A2E
L2v1 ¼ A2E
L1 sin θv1 þ FF
2ð Þ
F 3ð Þ ¼ �A1E
L1cos θu1 þ A1E
L1sin θv1 þ FF
3ð Þ
ð10:3Þ
We generate the force equilibrium equations for node 1 using the free body diagram shown below.
XFx ¼ 0! Px ¼ cos θ F 1ð Þ � F 3ð Þ
� �X
Fy ¼ 0 " Py ¼ sin θ F 1ð Þ þ F 3ð Þ� �þ F 2ð Þ
ð10:4Þ
Substituting for the member forces, one obtains a set of uncoupled equations for u1 and v1.
Px ¼ 2A1E
L1cos 2θ
�u1 þ cos θ FF
1ð Þ � FF3ð Þ
� �
Py ¼ A2E
L1 sin θþ 2A1E
L1sin 2θ
�v1 þ sin θ FF
1ð Þ þ FF3ð Þ
� �þ FF
2ð Þ
ð10:5Þ
652 10 The Displacement Method
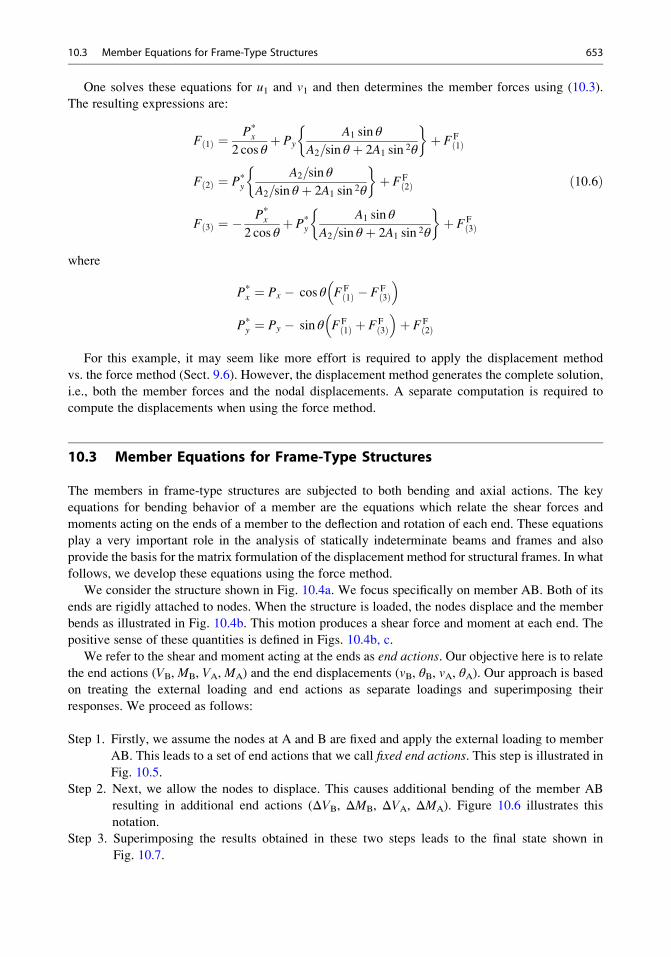
One solves these equations for u1 and v1 and then determines the member forces using (10.3).
The resulting expressions are:
F 1ð Þ ¼ P*x
2 cos θþ Py
A1 sin θ
A2=sin θ þ 2A1 sin 2θ
�þ FF
1ð Þ
F 2ð Þ ¼ P*y
A2=sin θ
A2=sin θ þ 2A1 sin 2θ
�þ FF
2ð Þ
F 3ð Þ ¼ � P*x
2 cos θþ P*
y
A1 sin θ
A2=sin θ þ 2A1 sin 2θ
�þ FF
3ð Þ
ð10:6Þ
where
P*x ¼ Px � cos θ FF
1ð Þ � FF3ð Þ
� �P*y ¼ Py � sin θ FF
1ð Þ þ FF3ð Þ
� �þ FF
2ð Þ
For this example, it may seem like more effort is required to apply the displacement method
vs. the force method (Sect. 9.6). However, the displacement method generates the complete solution,
i.e., both the member forces and the nodal displacements. A separate computation is required to
compute the displacements when using the force method.
10.3 Member Equations for Frame-Type Structures
The members in frame-type structures are subjected to both bending and axial actions. The key
equations for bending behavior of a member are the equations which relate the shear forces and
moments acting on the ends of a member to the deflection and rotation of each end. These equations
play a very important role in the analysis of statically indeterminate beams and frames and also
provide the basis for the matrix formulation of the displacement method for structural frames. In what
follows, we develop these equations using the force method.
We consider the structure shown in Fig. 10.4a. We focus specifically on member AB. Both of its
ends are rigidly attached to nodes. When the structure is loaded, the nodes displace and the member
bends as illustrated in Fig. 10.4b. This motion produces a shear force and moment at each end. The
positive sense of these quantities is defined in Figs. 10.4b, c.
We refer to the shear and moment acting at the ends as end actions. Our objective here is to relate
the end actions (VB, MB, VA, MA) and the end displacements (vB, θB, vA, θA). Our approach is based
on treating the external loading and end actions as separate loadings and superimposing their
responses. We proceed as follows:
Step 1. Firstly, we assume the nodes at A and B are fixed and apply the external loading to member
AB. This leads to a set of end actions that we call fixed end actions. This step is illustrated in
Fig. 10.5.
Step 2. Next, we allow the nodes to displace. This causes additional bending of the member AB
resulting in additional end actions (ΔVB, ΔMB, ΔVA, ΔMA). Figure 10.6 illustrates this
notation.
Step 3. Superimposing the results obtained in these two steps leads to the final state shown in
Fig. 10.7.
10.3 Member Equations for Frame-Type Structures 653
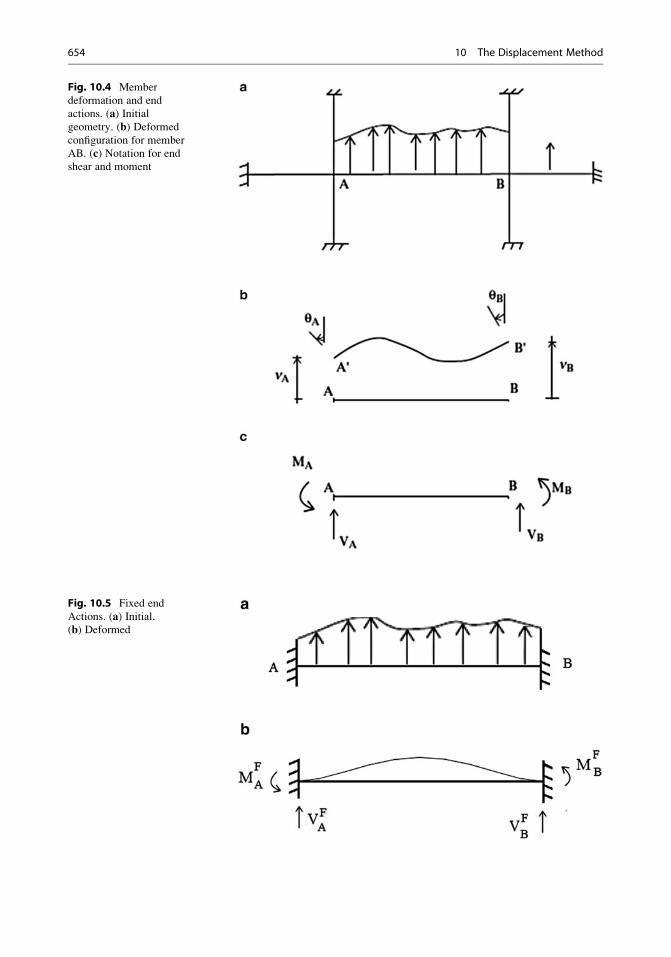
Fig. 10.4 Member
deformation and end
actions. (a) Initialgeometry. (b) Deformed
configuration for member
AB. (c) Notation for end
shear and moment
Fig. 10.5 Fixed end
Actions. (a) Initial.(b) Deformed
654 10 The Displacement Method
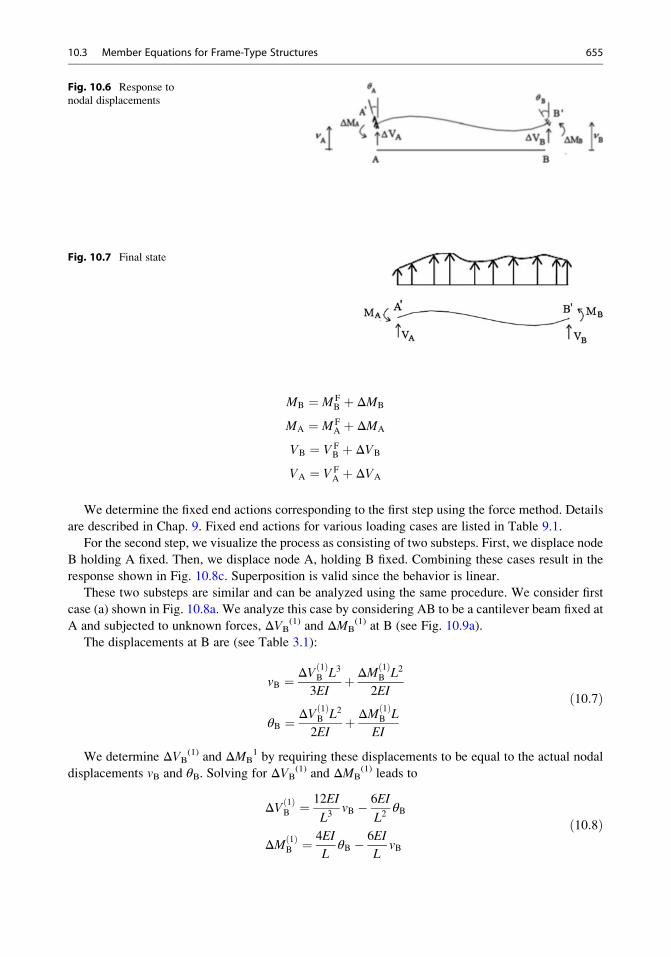
MB ¼ M FB þ ΔMB
MA ¼ M FA þ ΔMA
VB ¼ V FB þ ΔVB
VA ¼ V FA þ ΔVA
We determine the fixed end actions corresponding to the first step using the force method. Details
are described in Chap. 9. Fixed end actions for various loading cases are listed in Table 9.1.
For the second step, we visualize the process as consisting of two substeps. First, we displace node
B holding A fixed. Then, we displace node A, holding B fixed. Combining these cases result in the
response shown in Fig. 10.8c. Superposition is valid since the behavior is linear.
These two substeps are similar and can be analyzed using the same procedure. We consider first
case (a) shown in Fig. 10.8a. We analyze this case by considering AB to be a cantilever beam fixed at
A and subjected to unknown forces, ΔVB(1) and ΔMB
(1) at B (see Fig. 10.9a).
The displacements at B are (see Table 3.1):
vB ¼ ΔV 1ð ÞB L3
3EIþ ΔM 1ð Þ
B L2
2EI
θB ¼ ΔV 1ð ÞB L2
2EIþ ΔM 1ð Þ
B L
EI
ð10:7Þ
We determine ΔVB(1) and ΔMB
1 by requiring these displacements to be equal to the actual nodal
displacements vB and θB. Solving for ΔVB(1) and ΔMB
(1) leads to
ΔV 1ð ÞB ¼
12EI
L3vB � 6EI
L2θB
ΔM 1ð ÞB ¼
4EI
LθB � 6EI
LvB
ð10:8Þ
Fig. 10.6 Response to
nodal displacements
Fig. 10.7 Final state
10.3 Member Equations for Frame-Type Structures 655
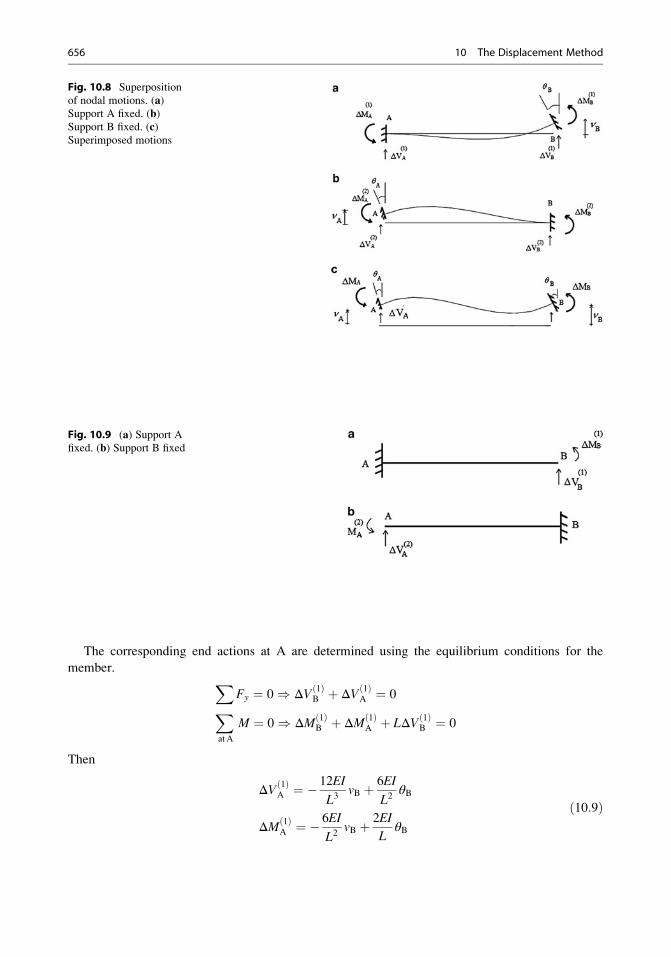
The corresponding end actions at A are determined using the equilibrium conditions for the
member. XFy ¼ 0) ΔV 1ð Þ
B þ ΔV 1ð ÞA ¼ 0X
at A
M ¼ 0) ΔM 1ð ÞB þ ΔM 1ð Þ
A þ LΔV 1ð ÞB ¼ 0
Then
ΔV 1ð ÞA ¼ �
12EI
L3vB þ 6EI
L2θB
ΔM 1ð ÞA ¼ �
6EI
L2vB þ 2EI
LθB
ð10:9Þ
Fig. 10.8 Superposition
of nodal motions. (a)Support A fixed. (b)Support B fixed. (c)Superimposed motions
Fig. 10.9 (a) Support Afixed. (b) Support B fixed
656 10 The Displacement Method
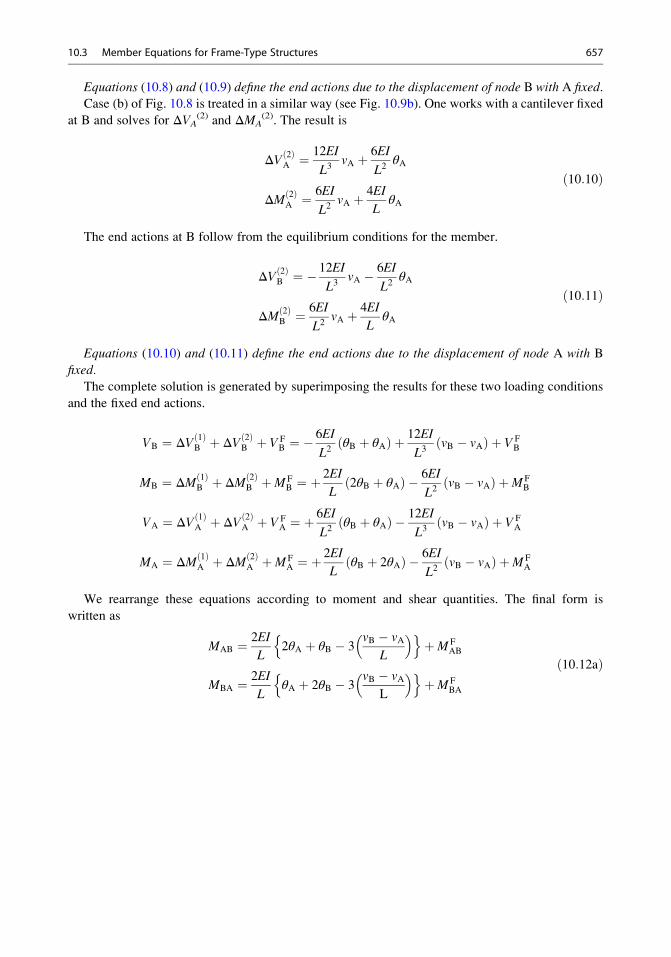
Equations (10.8) and (10.9) define the end actions due to the displacement of node B with A fixed.Case (b) of Fig. 10.8 is treated in a similar way (see Fig. 10.9b). One works with a cantilever fixed
at B and solves for ΔVA(2) and ΔMA
(2). The result is
ΔV 2ð ÞA ¼
12EI
L3vA þ 6EI
L2θA
ΔM 2ð ÞA ¼
6EI
L2vA þ 4EI
LθA
ð10:10Þ
The end actions at B follow from the equilibrium conditions for the member.
ΔV 2ð ÞB ¼ �
12EI
L3vA � 6EI
L2θA
ΔM 2ð ÞB ¼
6EI
L2vA þ 4EI
LθA
ð10:11Þ
Equations (10.10) and (10.11) define the end actions due to the displacement of node A with B
fixed.The complete solution is generated by superimposing the results for these two loading conditions
and the fixed end actions.
VB ¼ ΔV 1ð ÞB þ ΔV 2ð Þ
B þ V FB ¼ �
6EI
L2θB þ θAð Þ þ 12EI
L3vB � vAð Þ þ V F
B
MB ¼ ΔM 1ð ÞB þ ΔM 2ð Þ
B þM FB ¼ þ
2EI
L2θB þ θAð Þ � 6EI
L2vB � vAð Þ þM F
B
VA ¼ ΔV 1ð ÞA þ ΔV 2ð Þ
A þ V FA ¼ þ
6EI
L2θB þ θAð Þ � 12EI
L3vB � vAð Þ þ V F
A
MA ¼ ΔM 1ð ÞA þ ΔM 2ð Þ
A þM FA ¼ þ
2EI
LθB þ 2θAð Þ � 6EI
L2vB � vAð Þ þM F
A
We rearrange these equations according to moment and shear quantities. The final form is
written as
MAB ¼ 2EI
L2θA þ θB � 3
vB � vAL
� �n oþM F
AB
MBA ¼ 2EI
LθA þ 2θB � 3
vB � vAL
� �n oþM F
BA
ð10:12aÞ
10.3 Member Equations for Frame-Type Structures 657
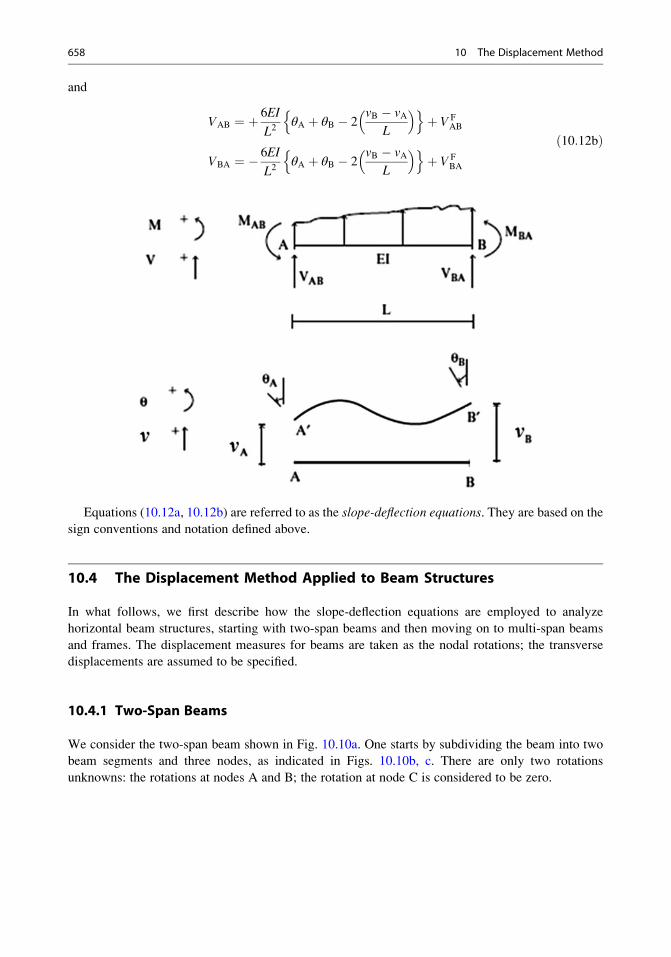
and
VAB ¼ þ 6EI
L2θA þ θB � 2
vB � vAL
� �n oþ V F
AB
VBA ¼ � 6EI
L2θA þ θB � 2
vB � vAL
� �n oþ V F
BA
ð10:12bÞ
Equations (10.12a, 10.12b) are referred to as the slope-deflection equations. They are based on the
sign conventions and notation defined above.
10.4 The Displacement Method Applied to Beam Structures
In what follows, we first describe how the slope-deflection equations are employed to analyze
horizontal beam structures, starting with two-span beams and then moving on to multi-span beams
and frames. The displacement measures for beams are taken as the nodal rotations; the transverse
displacements are assumed to be specified.
10.4.1 Two-Span Beams
We consider the two-span beam shown in Fig. 10.10a. One starts by subdividing the beam into two
beam segments and three nodes, as indicated in Figs. 10.10b, c. There are only two rotations
unknowns: the rotations at nodes A and B; the rotation at node C is considered to be zero.
658 10 The Displacement Method
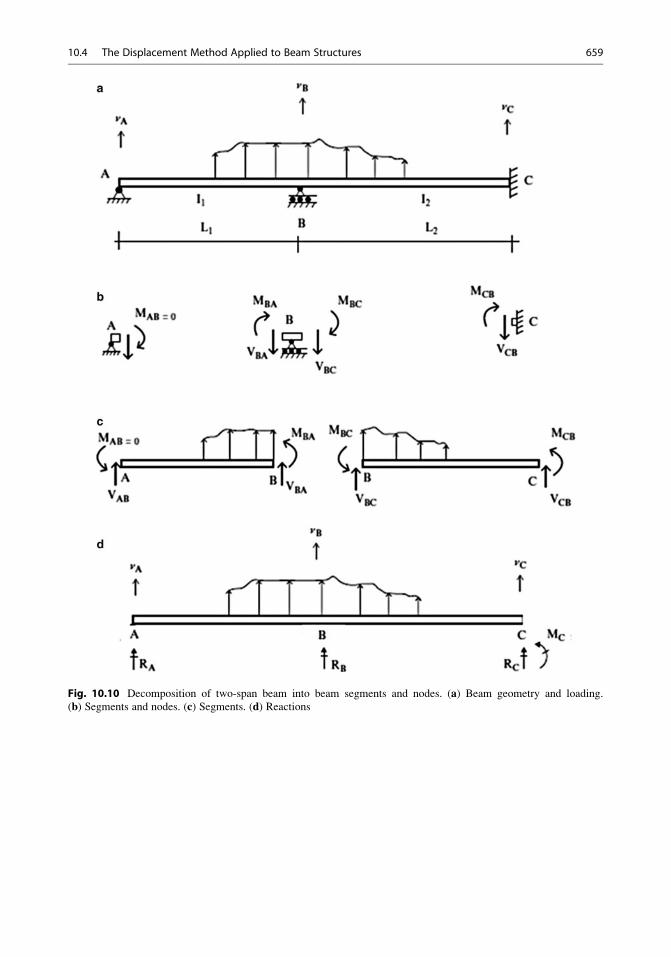
Fig. 10.10 Decomposition of two-span beam into beam segments and nodes. (a) Beam geometry and loading.
(b) Segments and nodes. (c) Segments. (d) Reactions
10.4 The Displacement Method Applied to Beam Structures 659
Next we apply the slope-deflection equations (10.12a) to members AB and BC.
MAB ¼ 2EI1L
2θA þ θB � 3vB � vA
L1
� � �þM F
AB
MBA ¼ 2EI1L1
2θB þ θA � 3vB � vA
L1
� � �þM F
BA
MBC ¼ 2EI2L2
2θB � 3vC � vB
L2
� � �þM F
BC
MCB ¼ 2EI2L2
θB � 3vC � vB
L2
� � �þM F
CB
ð10:13Þ
Then, we enforce moment equilibrium at the nodes. The corresponding equations are:
MAB ¼ 0
MBA þMBC ¼ 0ð10:14Þ
Substituting for the end moments in the nodal moment equilibrium equations yields
4EI1L1
θA þ 2EI1L1
θB ¼ 6EI1L1
vB � vAL1
� ��M F
AB
2EI1L1
θA þ 4EI1L1þ 4EI2
L2
� �θB ¼ 6EI1
L1
vB � vAL1
� �þ 6EI2
L2
vC � vBL2
� �� M F
BA þM FBC
� � ð10:15Þ
Once the loading, support motion, and member properties are specified, one can solve for θB and
θA. Substituting for the θs in (10.13) leads to the end moments. Lastly, we calculate the end shears.
Since the end moments are known, we can determine the end shear forces using either the static
equilibrium equations for the members AB and BC or by using (10.12b).
VAB ¼ 6EI1
L21θA þ θBð Þ � 12EI1
L21
vB � vAL1
� �þ V F
AB
VBA ¼ � 6EI1
L21θB þ θAð Þ þ 12EI1
L21
vB � vAL1
� �þ V F
BA
VBC ¼ 6EI2
L22θBð Þ � 12EI2
L22
vC � vBL2
� �þ V F
BC
VBC ¼ � 6EI2
L22θBð Þ þ 12EI2
L22
vC � vBL2
� �þ V F
BC
ð10:16Þ
The reactions are related to the end actions by (see Fig. 10.10d)
RA ¼ VAB
MA ¼ MAB ¼ 0
RB ¼ VBA þ VBC
RC ¼ VCB
MC ¼ MCB
660 10 The Displacement Method
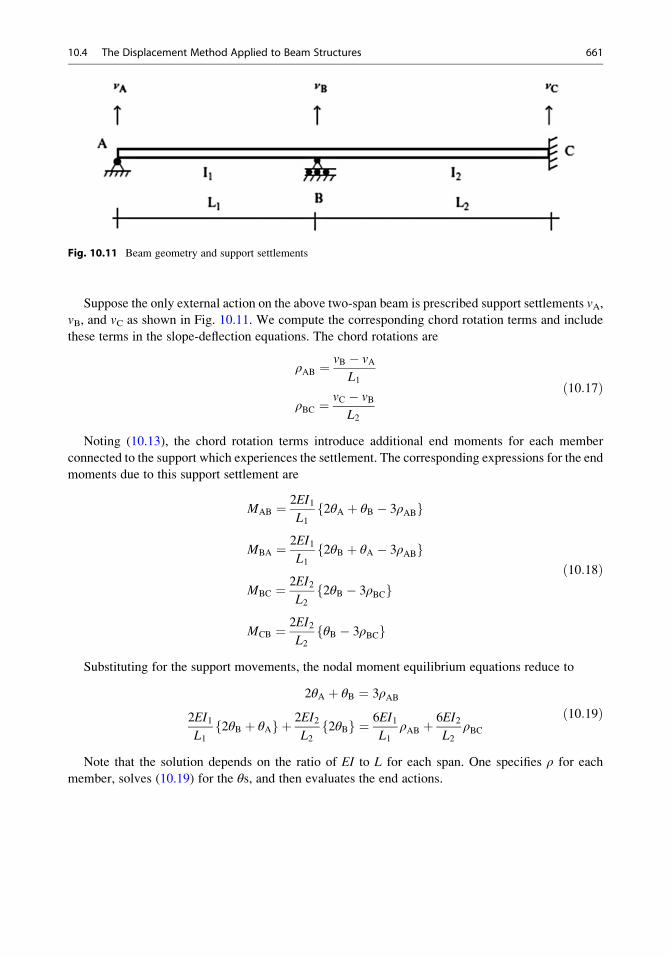
Suppose the only external action on the above two-span beam is prescribed support settlements vA,vB, and vC as shown in Fig. 10.11. We compute the corresponding chord rotation terms and include
these terms in the slope-deflection equations. The chord rotations are
ρAB ¼vB � vA
L1
ρBC ¼vC � vB
L2
ð10:17Þ
Noting (10.13), the chord rotation terms introduce additional end moments for each member
connected to the support which experiences the settlement. The corresponding expressions for the end
moments due to this support settlement are
MAB ¼ 2EI1L1
2θA þ θB � 3ρABf g
MBA ¼ 2EI1L1
2θB þ θA � 3ρABf g
MBC ¼ 2EI2L2
2θB � 3ρBCf g
MCB ¼ 2EI2L2
θB � 3ρBCf g
ð10:18Þ
Substituting for the support movements, the nodal moment equilibrium equations reduce to
2θA þ θB ¼ 3ρAB
2EI1L1
2θB þ θAf g þ 2EI2L2
2θBf g ¼ 6EI1L1
ρAB þ6EI2L2
ρBCð10:19Þ
Note that the solution depends on the ratio of EI to L for each span. One specifies ρ for each
member, solves (10.19) for the θs, and then evaluates the end actions.
Fig. 10.11 Beam geometry and support settlements
10.4 The Displacement Method Applied to Beam Structures 661
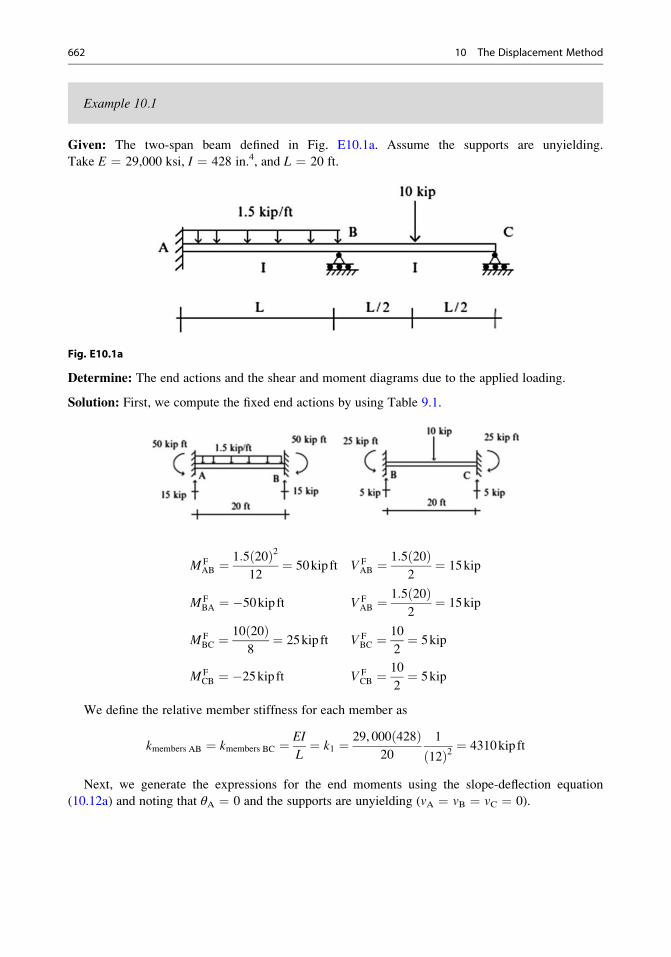
Example 10.1
Given: The two-span beam defined in Fig. E10.1a. Assume the supports are unyielding.
Take E ¼ 29,000 ksi, I ¼ 428 in.4, and L ¼ 20 ft.
Fig. E10.1a
Determine: The end actions and the shear and moment diagrams due to the applied loading.
Solution: First, we compute the fixed end actions by using Table 9.1.
M FAB ¼
1:5 20ð Þ212
¼ 50kip ft V FAB ¼
1:5 20ð Þ2
¼ 15kip
M FBA ¼ �50kip ft V F
AB ¼1:5 20ð Þ
2¼ 15kip
M FBC ¼
10 20ð Þ8¼ 25kip ft V F
BC ¼10
2¼ 5kip
M FCB ¼ �25kip ft V F
CB ¼10
2¼ 5kip
We define the relative member stiffness for each member as
kmembers AB ¼ kmembers BC ¼EI
L¼ k1 ¼ 29, 000 428ð Þ
20
1
12ð Þ2 ¼ 4310kip ft
Next, we generate the expressions for the end moments using the slope-deflection equation
(10.12a) and noting that θA ¼ 0 and the supports are unyielding (vA ¼ vB ¼ vC ¼ 0).
662 10 The Displacement Method
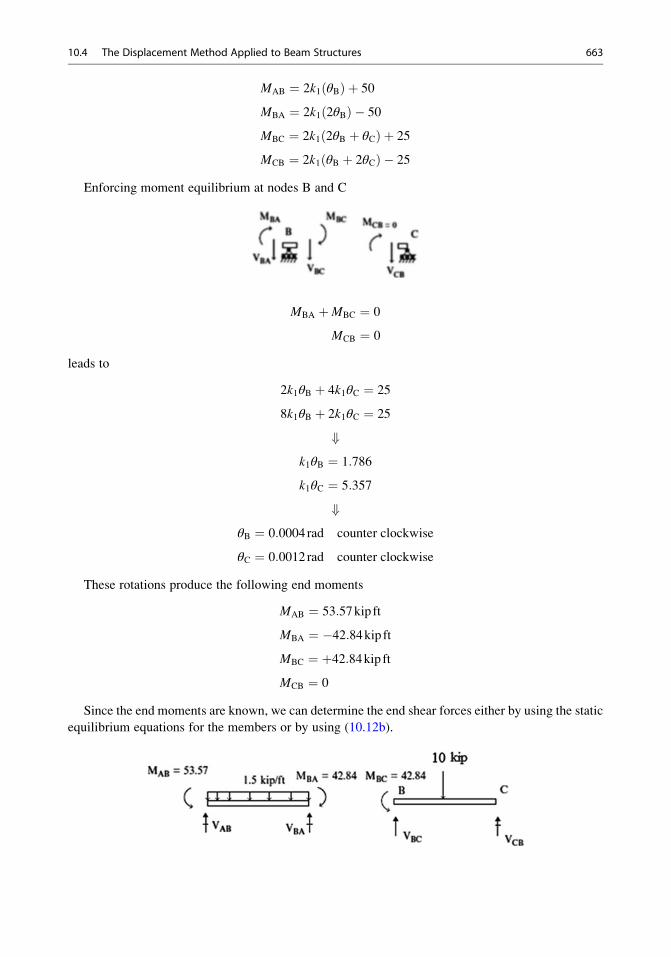
MAB ¼ 2k1 θBð Þ þ 50
MBA ¼ 2k1 2θBð Þ � 50
MBC ¼ 2k1 2θB þ θCð Þ þ 25
MCB ¼ 2k1 θB þ 2θCð Þ � 25
Enforcing moment equilibrium at nodes B and C
MBA þMBC ¼ 0
MCB ¼ 0
leads to
2k1θB þ 4k1θC ¼ 25
8k1θB þ 2k1θC ¼ 25
+k1θB ¼ 1:786
k1θC ¼ 5:357
+θB ¼ 0:0004rad counter clockwise
θC ¼ 0:0012rad counter clockwise
These rotations produce the following end moments
MAB ¼ 53:57kip ft
MBA ¼ �42:84kip ftMBC ¼ þ42:84kip ftMCB ¼ 0
Since the end moments are known, we can determine the end shear forces either by using the static
equilibrium equations for the members or by using (10.12b).
10.4 The Displacement Method Applied to Beam Structures 663
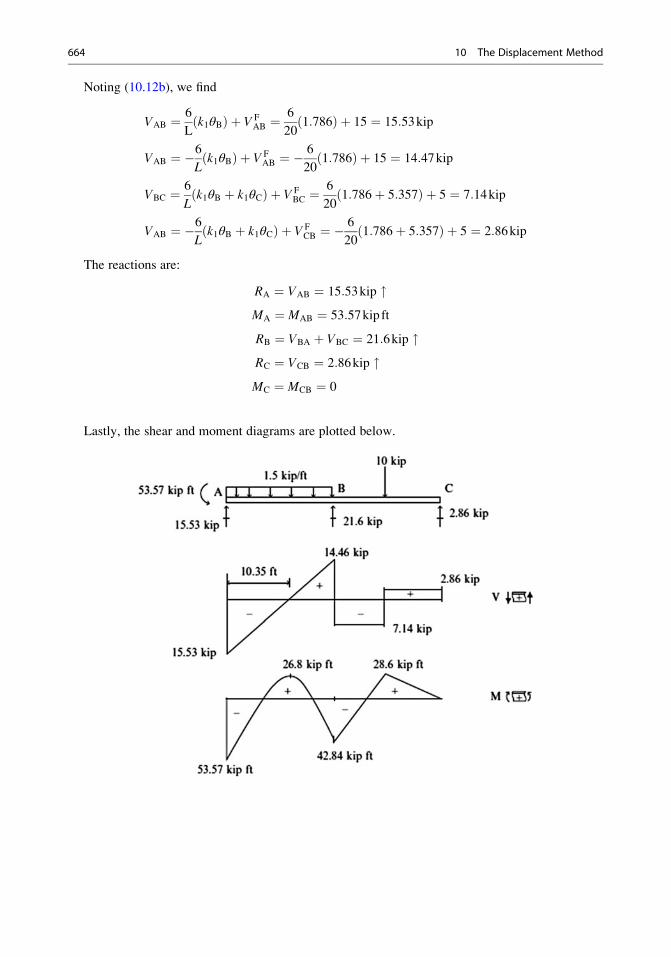
Noting (10.12b), we find
VAB ¼ 6
Lk1θBð Þ þ V F
AB ¼6
201:786ð Þ þ 15 ¼ 15:53kip
VAB ¼ �6Lk1θBð Þ þ V F
AB ¼ �6
201:786ð Þ þ 15 ¼ 14:47kip
VBC ¼ 6
Lk1θB þ k1θCð Þ þ V F
BC ¼6
201:786þ 5:357ð Þ þ 5 ¼ 7:14kip
VAB ¼ �6Lk1θB þ k1θCð Þ þ V F
CB ¼ �6
201:786þ 5:357ð Þ þ 5 ¼ 2:86kip
The reactions are:
RA ¼ VAB ¼ 15:53kip "MA ¼ MAB ¼ 53:57kip ft
RB ¼ VBA þ VBC ¼ 21:6kip "RC ¼ VCB ¼ 2:86kip "MC ¼ MCB ¼ 0
Lastly, the shear and moment diagrams are plotted below.
664 10 The Displacement Method
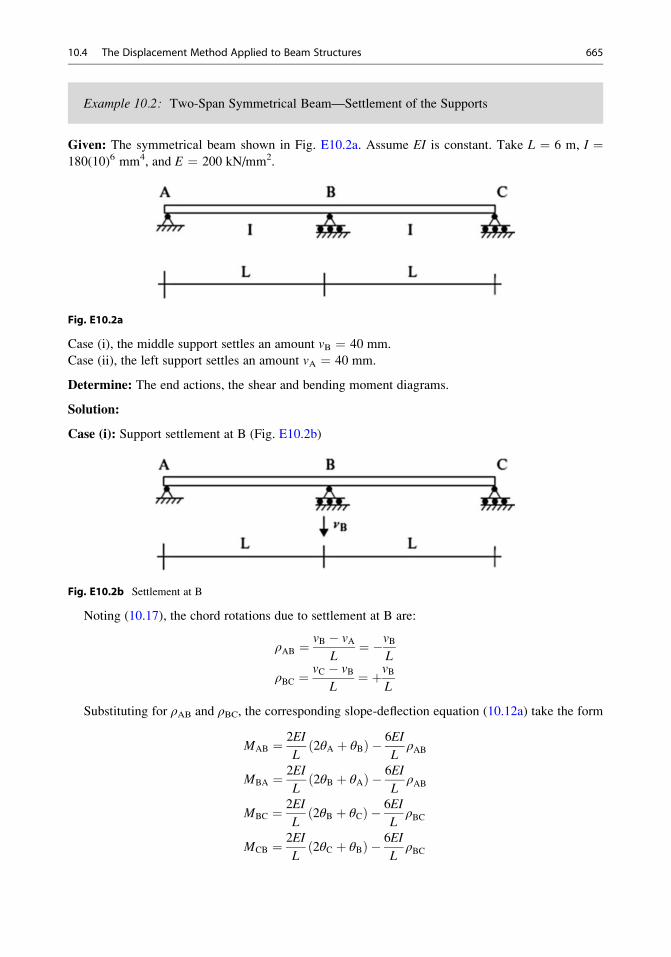
Example 10.2: Two-Span Symmetrical Beam—Settlement of the Supports
Given: The symmetrical beam shown in Fig. E10.2a. Assume EI is constant. Take L ¼ 6 m, I ¼180(10)6 mm4, and E ¼ 200 kN/mm2.
Fig. E10.2a
Case (i), the middle support settles an amount vB ¼ 40 mm.
Case (ii), the left support settles an amount vA ¼ 40 mm.
Determine: The end actions, the shear and bending moment diagrams.
Solution:
Case (i): Support settlement at B (Fig. E10.2b)
Fig. E10.2b Settlement at B
Noting (10.17), the chord rotations due to settlement at B are:
ρAB ¼vB � vA
L¼ �vB
L
ρBC ¼vC � vB
L¼ þvB
L
Substituting for ρAB and ρBC, the corresponding slope-deflection equation (10.12a) take the form
MAB ¼ 2EI
L2θA þ θBð Þ � 6EI
LρAB
MBA ¼ 2EI
L2θB þ θAð Þ � 6EI
LρAB
MBC ¼ 2EI
L2θB þ θCð Þ � 6EI
LρBC
MCB ¼ 2EI
L2θC þ θBð Þ � 6EI
LρBC
10.4 The Displacement Method Applied to Beam Structures 665
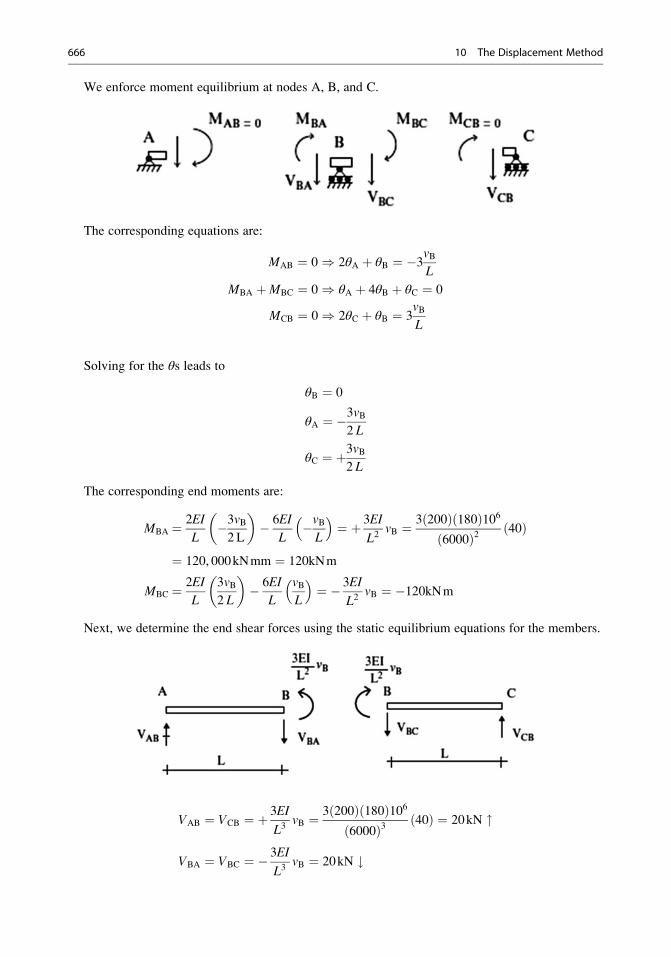
We enforce moment equilibrium at nodes A, B, and C.
The corresponding equations are:
MAB ¼ 0) 2θA þ θB ¼ �3vBL
MBA þMBC ¼ 0) θA þ 4θB þ θC ¼ 0
MCB ¼ 0) 2θC þ θB ¼ 3vBL
Solving for the θs leads to
θB ¼ 0
θA ¼ �32
vBL
θC ¼ þ32
vBL
The corresponding end moments are:
MBA ¼ 2EI
L�32
vBL
� �� 6EI
L�vBL
� �¼ þ 3EI
L2vB ¼ 3 200ð Þ 180ð Þ106
6000ð Þ2 40ð Þ
¼ 120, 000kNmm ¼ 120kNm
MBC ¼ 2EI
L
3
2
vBL
� �� 6EI
L
vBL
� �¼ � 3EI
L2vB ¼ �120kNm
Next, we determine the end shear forces using the static equilibrium equations for the members.
VAB ¼ VCB ¼ þ 3EI
L3vB ¼ 3 200ð Þ 180ð Þ106
6000ð Þ3 40ð Þ ¼ 20kN "
VBA ¼ VBC ¼ � 3EI
L3vB ¼ 20kN #
666 10 The Displacement Method
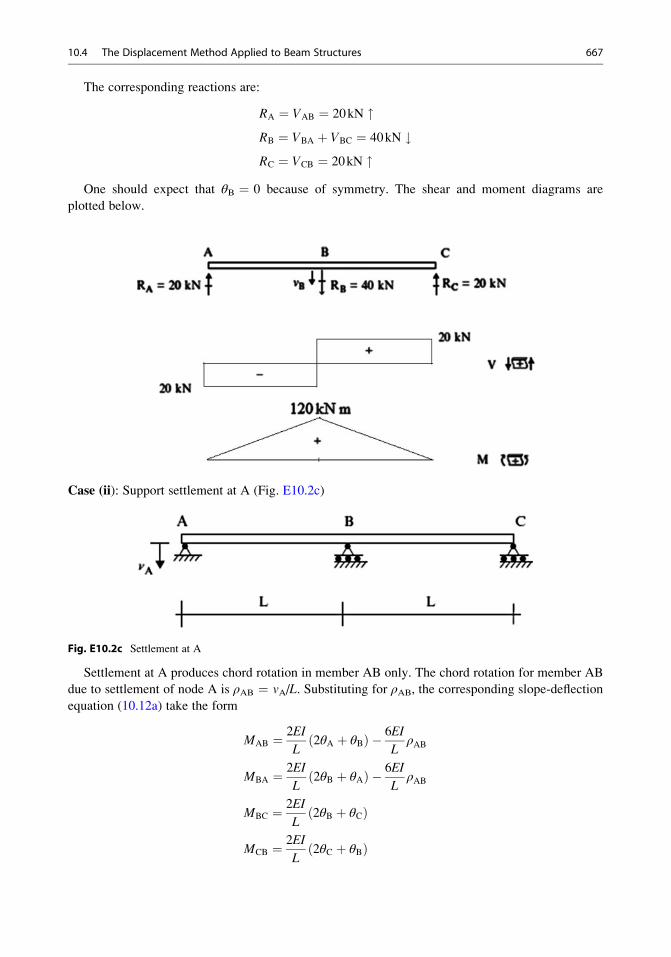
The corresponding reactions are:
RA ¼ VAB ¼ 20kN "RB ¼ VBA þ VBC ¼ 40kN #RC ¼ VCB ¼ 20kN "
One should expect that θB ¼ 0 because of symmetry. The shear and moment diagrams are
plotted below.
Case (ii): Support settlement at A (Fig. E10.2c)
Fig. E10.2c Settlement at A
Settlement at A produces chord rotation in member AB only. The chord rotation for member AB
due to settlement of node A is ρAB ¼ vA/L. Substituting for ρAB, the corresponding slope-deflection
equation (10.12a) take the form
MAB ¼ 2EI
L2θA þ θBð Þ � 6EI
LρAB
MBA ¼ 2EI
L2θB þ θAð Þ � 6EI
LρAB
MBC ¼ 2EI
L2θB þ θCð Þ
MCB ¼ 2EI
L2θC þ θBð Þ
10.4 The Displacement Method Applied to Beam Structures 667

Setting MAB ¼ MCB ¼ 0 and MBA þ MBC ¼ 0 leads to
2θA þ θB ¼ 3ρAB
2θC þ θB ¼ 0
4θB þ θA þ θC ¼ 3ρAB
Solving for the θs leads to
θA ¼ 5
4ρAB
θB ¼ 1
2ρAB
θC ¼ �14ρAB
Finally, the bending moment at B due to support settlement at A is:
MBA ¼ 2EI
L
vALþ 5
4
vAL
� �� 6EIvA
L2¼ � 1:5EI
L2vA ¼ 1:5 200ð Þ 180ð Þ106
6000ð Þ2 40ð Þ
¼ �60, 000kNmm ¼ �60kNm
MBC ¼ �MBA ¼ 60kNm counterclockwise
Next, we determine the end shear forces using the static equilibrium equations for the members.
Then,
RA ¼ RC ¼ � 1:5EI
L3vA ¼ � 1:5 200ð Þ 180ð Þ106
6000ð Þ3 40ð Þ ¼ �10kN
RB ¼ 1:5EI
L3vA þ 1:5EI
L3vA ¼ þ20N
668 10 The Displacement Method
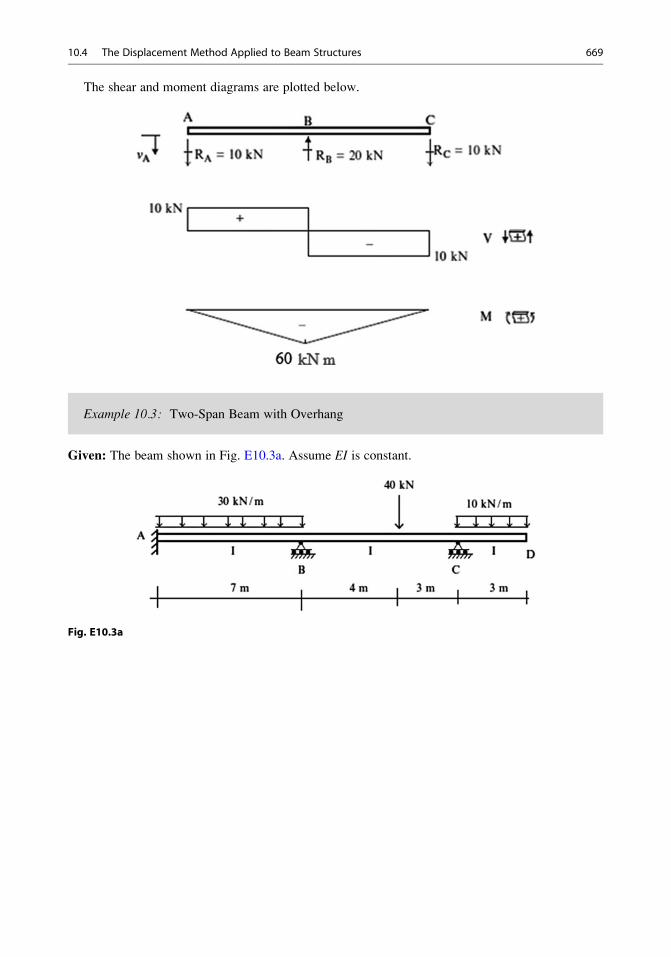
The shear and moment diagrams are plotted below.
Example 10.3: Two-Span Beam with Overhang
Given: The beam shown in Fig. E10.3a. Assume EI is constant.
Fig. E10.3a
10.4 The Displacement Method Applied to Beam Structures 669
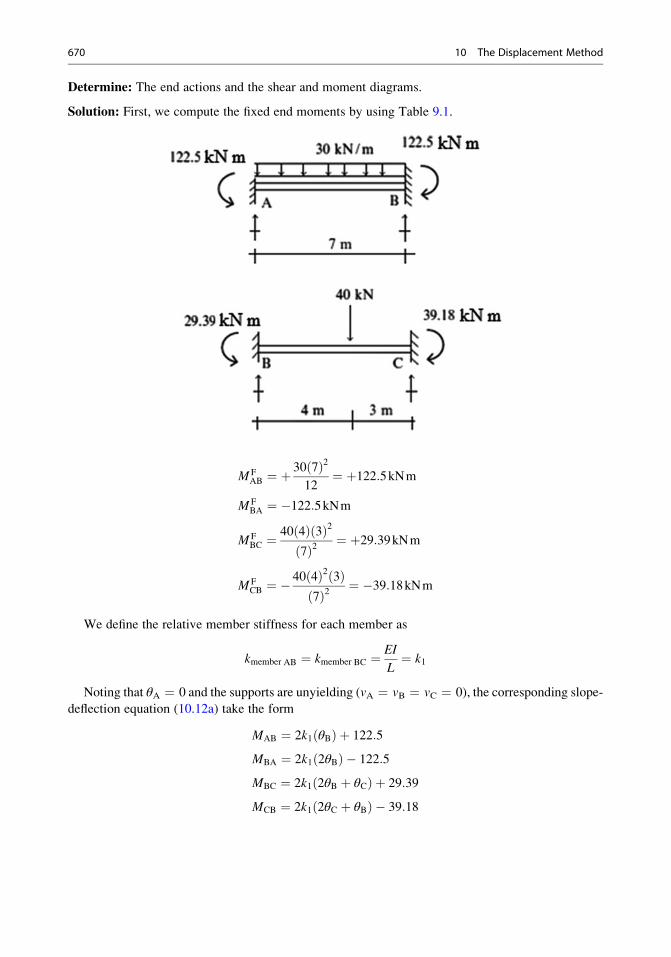
Determine: The end actions and the shear and moment diagrams.
Solution: First, we compute the fixed end moments by using Table 9.1.
M FAB ¼ þ
30 7ð Þ212
¼ þ122:5kNm
M FBA ¼ �122:5kNm
M FBC ¼
40 4ð Þ 3ð Þ27ð Þ2 ¼ þ29:39kNm
M FCB ¼ �
40 4ð Þ2 3ð Þ7ð Þ2 ¼ �39:18kNm
We define the relative member stiffness for each member as
kmember AB ¼ kmember BC ¼EI
L¼ k1
Noting that θA ¼ 0 and the supports are unyielding (vA ¼ vB ¼ vC ¼ 0), the corresponding slope-
deflection equation (10.12a) take the form
MAB ¼ 2k1 θBð Þ þ 122:5
MBA ¼ 2k1 2θBð Þ � 122:5
MBC ¼ 2k1 2θB þ θCð Þ þ 29:39
MCB ¼ 2k1 2θC þ θBð Þ � 39:18
670 10 The Displacement Method
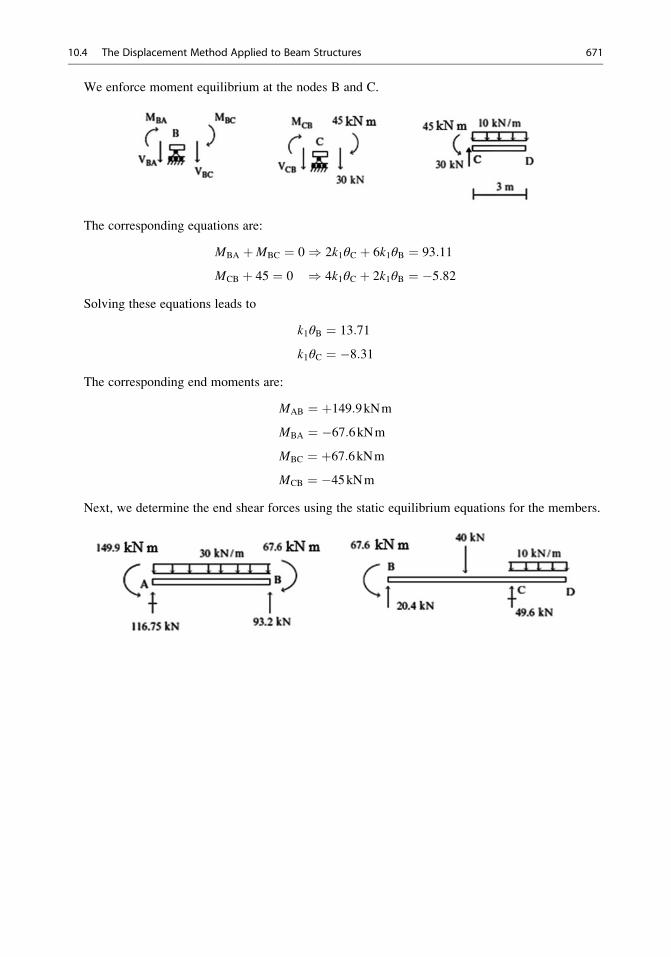
We enforce moment equilibrium at the nodes B and C.
The corresponding equations are:
MBA þMBC ¼ 0) 2k1θC þ 6k1θB ¼ 93:11
MCB þ 45 ¼ 0 ) 4k1θC þ 2k1θB ¼ �5:82Solving these equations leads to
k1θB ¼ 13:71
k1θC ¼ �8:31The corresponding end moments are:
MAB ¼ þ149:9kNm
MBA ¼ �67:6kNm
MBC ¼ þ67:6kNm
MCB ¼ �45kNm
Next, we determine the end shear forces using the static equilibrium equations for the members.
10.4 The Displacement Method Applied to Beam Structures 671
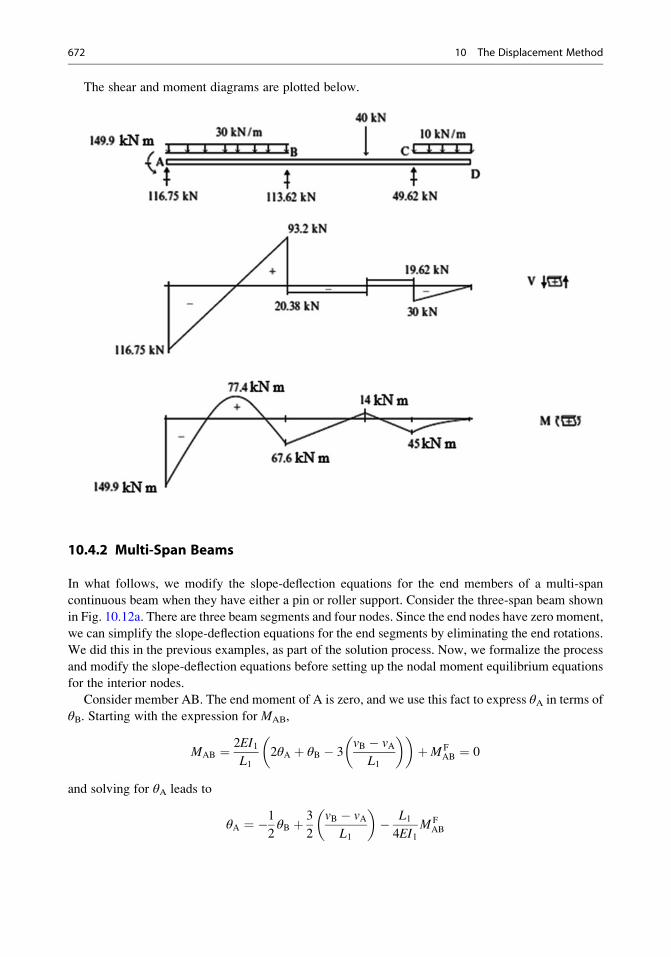
The shear and moment diagrams are plotted below.
10.4.2 Multi-Span Beams
In what follows, we modify the slope-deflection equations for the end members of a multi-span
continuous beam when they have either a pin or roller support. Consider the three-span beam shown
in Fig. 10.12a. There are three beam segments and four nodes. Since the end nodes have zero moment,
we can simplify the slope-deflection equations for the end segments by eliminating the end rotations.
We did this in the previous examples, as part of the solution process. Now, we formalize the process
and modify the slope-deflection equations before setting up the nodal moment equilibrium equations
for the interior nodes.
Consider member AB. The end moment of A is zero, and we use this fact to express θA in terms of
θB. Starting with the expression for MAB,
MAB ¼ 2EI1L1
2θA þ θB � 3vB � vA
L1
� �� �þM F
AB ¼ 0
and solving for θA leads to
θA ¼ �12θB þ 3
2
vB � vAL1
� �� L14EI1
M FAB
672 10 The Displacement Method
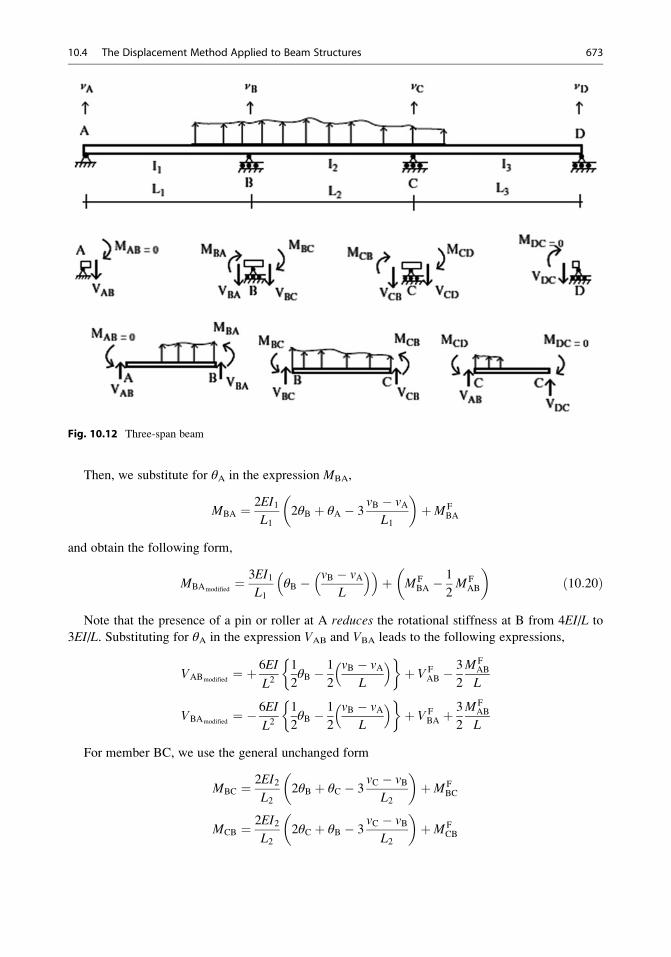
Then, we substitute for θA in the expression MBA,
MBA ¼ 2EI1L1
2θB þ θA � 3vB � vA
L1
� �þM F
BA
and obtain the following form,
MBAmodified¼ 3EI1
L1θB � vB � vA
L
� �� �þ M F
BA �1
2M F
AB
� �ð10:20Þ
Note that the presence of a pin or roller at A reduces the rotational stiffness at B from 4EI/L to
3EI/L. Substituting for θA in the expression VAB and VBA leads to the following expressions,
VABmodified¼ þ 6EI
L21
2θB � 1
2
vB � vAL
� � �þ V F
AB �3
2
M FAB
L
VBAmodified¼ � 6EI
L21
2θB � 1
2
vB � vAL
� � �þ V F
BA þ3
2
M FAB
L
For member BC, we use the general unchanged form
MBC ¼ 2EI2L2
2θB þ θC � 3vC � vB
L2
� �þM F
BC
MCB ¼ 2EI2L2
2θC þ θB � 3vC � vB
L2
� �þM F
CB
Fig. 10.12 Three-span beam
10.4 The Displacement Method Applied to Beam Structures 673
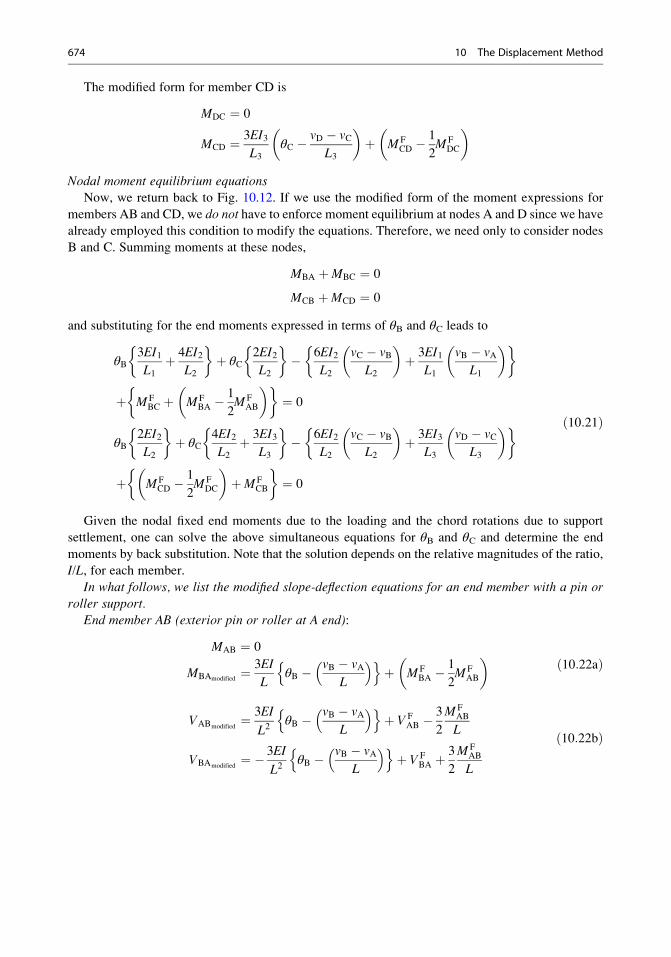
The modified form for member CD is
MDC ¼ 0
MCD ¼ 3EI3L3
θC � vD � vCL3
� �þ M F
CD �1
2M F
DC
� �
Nodal moment equilibrium equationsNow, we return back to Fig. 10.12. If we use the modified form of the moment expressions for
members AB and CD, we do not have to enforce moment equilibrium at nodes A and D since we have
already employed this condition to modify the equations. Therefore, we need only to consider nodes
B and C. Summing moments at these nodes,
MBA þMBC ¼ 0
MCB þMCD ¼ 0
and substituting for the end moments expressed in terms of θB and θC leads to
θB3EI1L1þ 4EI2
L2
�þ θC
2EI2L2
�� 6EI2
L2
vC � vBL2
� �þ 3EI1
L1
vB � vAL1
� � �
þ M FBC þ M F
BA �1
2M F
AB
� � �¼ 0
θB2EI2L2
�þ θC
4EI2L2þ 3EI3
L3
�� 6EI2
L2
vC � vBL2
� �þ 3EI3
L3
vD � vCL3
� � �
þ M FCD �
1
2M F
DC
� �þM F
CB
�¼ 0
ð10:21Þ
Given the nodal fixed end moments due to the loading and the chord rotations due to support
settlement, one can solve the above simultaneous equations for θB and θC and determine the end
moments by back substitution. Note that the solution depends on the relative magnitudes of the ratio,
I/L, for each member.
In what follows, we list the modified slope-deflection equations for an end member with a pin or
roller support.End member AB (exterior pin or roller at A end):
MAB ¼ 0
MBAmodified¼ 3EI
LθB � vB � vA
L
� �n oþ M F
BA �1
2M F
AB
� � ð10:22aÞ
VABmodified¼ 3EI
L2θB � vB � vA
L
� �n oþ V F
AB �3
2
M FAB
L
VBAmodified¼ � 3EI
L2θB � vB � vA
L
� �n oþ V F
BA þ3
2
M FAB
L
ð10:22bÞ
674 10 The Displacement Method
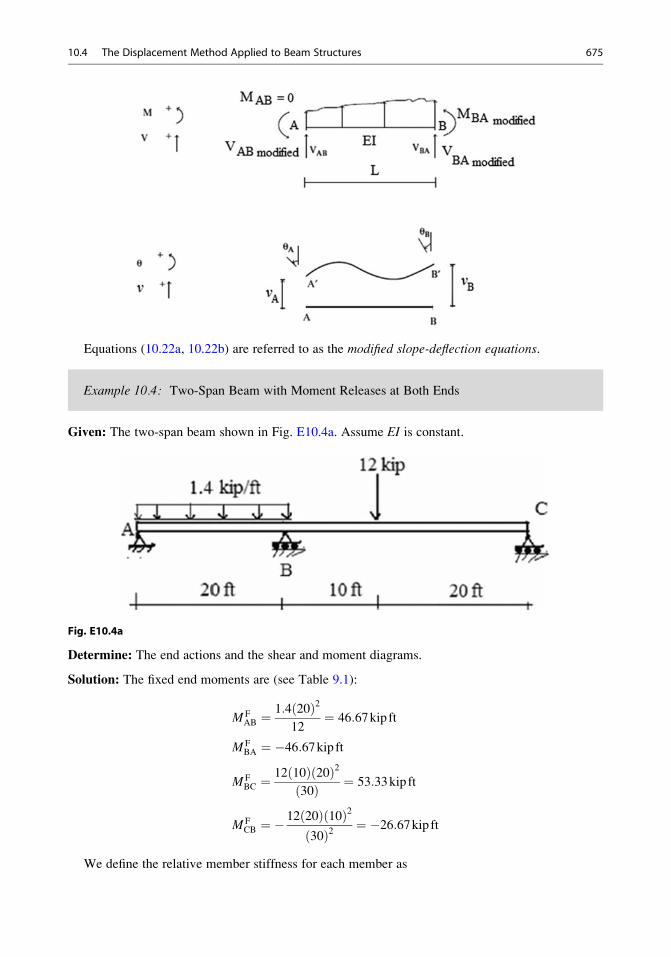
Equations (10.22a, 10.22b) are referred to as the modified slope-deflection equations.
Example 10.4: Two-Span Beam with Moment Releases at Both Ends
Given: The two-span beam shown in Fig. E10.4a. Assume EI is constant.
Fig. E10.4a
Determine: The end actions and the shear and moment diagrams.
Solution: The fixed end moments are (see Table 9.1):
M FAB ¼
1:4 20ð Þ212
¼ 46:67kip ft
M FBA ¼ �46:67kip ft
M FBC ¼
12 10ð Þ 20ð Þ230ð Þ ¼ 53:33kip ft
M FCB ¼ �
12 20ð Þ 10ð Þ230ð Þ2 ¼ �26:67kip ft
We define the relative member stiffness for each member as
10.4 The Displacement Method Applied to Beam Structures 675
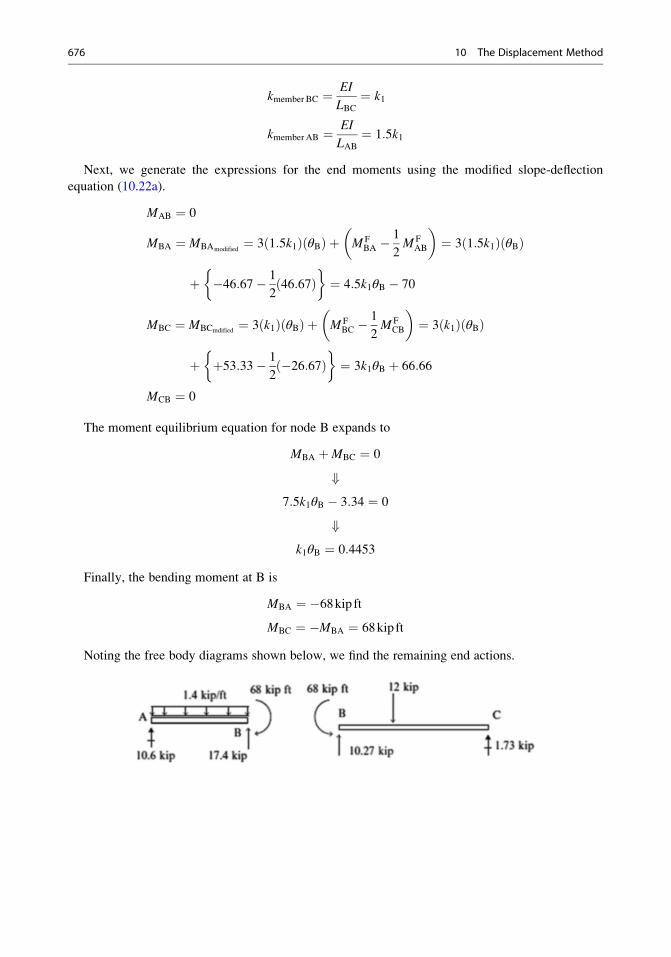
kmember BC ¼ EI
LBC¼ k1
kmemberAB ¼ EI
LAB¼ 1:5k1
Next, we generate the expressions for the end moments using the modified slope-deflection
equation (10.22a).
MAB ¼ 0
MBA ¼ MBAmodified¼ 3 1:5k1ð Þ θBð Þ þ M F
BA �1
2M F
AB
� �¼ 3 1:5k1ð Þ θBð Þ
þ �46:67� 1
246:67ð Þ
�¼ 4:5k1θB � 70
MBC ¼ MBCmdified¼ 3 k1ð Þ θBð Þ þ M F
BC �1
2M F
CB
� �¼ 3 k1ð Þ θBð Þ
þ þ53:33� 1
2�26:67ð Þ
�¼ 3k1θB þ 66:66
MCB ¼ 0
The moment equilibrium equation for node B expands to
MBA þMBC ¼ 0
+7:5k1θB � 3:34 ¼ 0
+k1θB ¼ 0:4453
Finally, the bending moment at B is
MBA ¼ �68kip ftMBC ¼ �MBA ¼ 68kip ft
Noting the free body diagrams shown below, we find the remaining end actions.
676 10 The Displacement Method
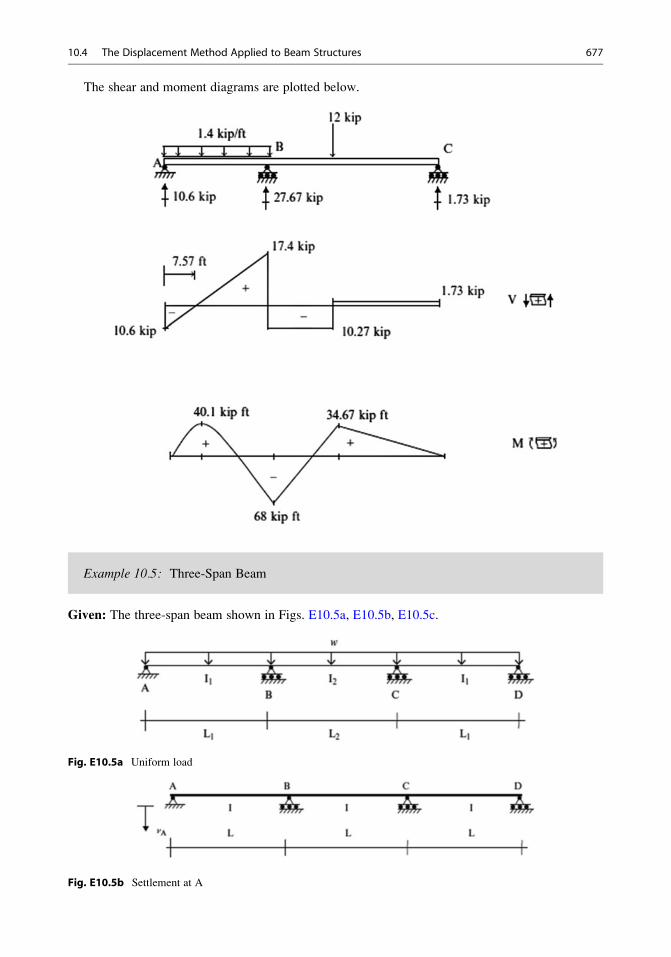
The shear and moment diagrams are plotted below.
Example 10.5: Three-Span Beam
Given: The three-span beam shown in Figs. E10.5a, E10.5b, E10.5c.
Fig. E10.5a Uniform load
Fig. E10.5b Settlement at A
10.4 The Displacement Method Applied to Beam Structures 677
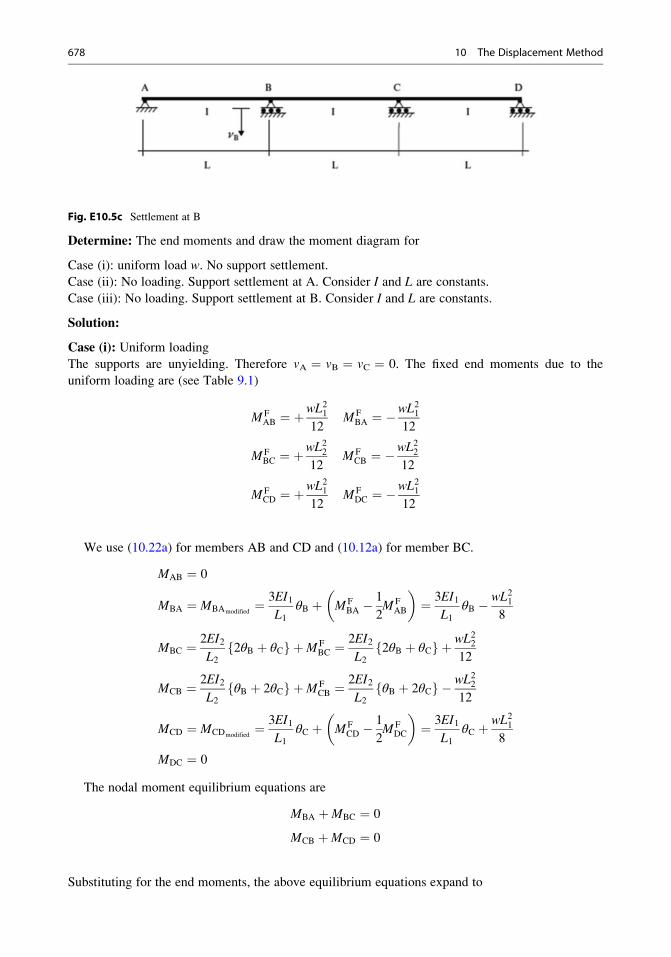
Fig. E10.5c Settlement at B
Determine: The end moments and draw the moment diagram for
Case (i): uniform load w. No support settlement.
Case (ii): No loading. Support settlement at A. Consider I and L are constants.
Case (iii): No loading. Support settlement at B. Consider I and L are constants.
Solution:
Case (i): Uniform loading
The supports are unyielding. Therefore vA ¼ vB ¼ vC ¼ 0. The fixed end moments due to the
uniform loading are (see Table 9.1)
M FAB ¼ þ
wL2112
M FBA ¼ �
wL2112
M FBC ¼ þ
wL2212
M FCB ¼ �
wL2212
M FCD ¼ þ
wL2112
M FDC ¼ �
wL2112
We use (10.22a) for members AB and CD and (10.12a) for member BC.
MAB ¼ 0
MBA ¼ MBAmodified¼ 3EI1
L1θB þ M F
BA �1
2M F
AB
� �¼ 3EI1
L1θB � wL21
8
MBC ¼ 2EI2L2
2θB þ θCf g þM FBC ¼
2EI2L2
2θB þ θCf g þ wL2212
MCB ¼ 2EI2L2
θB þ 2θCf g þM FCB ¼
2EI2L2
θB þ 2θCf g � wL2212
MCD ¼ MCDmodified¼ 3EI1
L1θC þ M F
CD �1
2M F
DC
� �¼ 3EI1
L1θC þ wL21
8
MDC ¼ 0
The nodal moment equilibrium equations are
MBA þMBC ¼ 0
MCB þMCD ¼ 0
Substituting for the end moments, the above equilibrium equations expand to
678 10 The Displacement Method
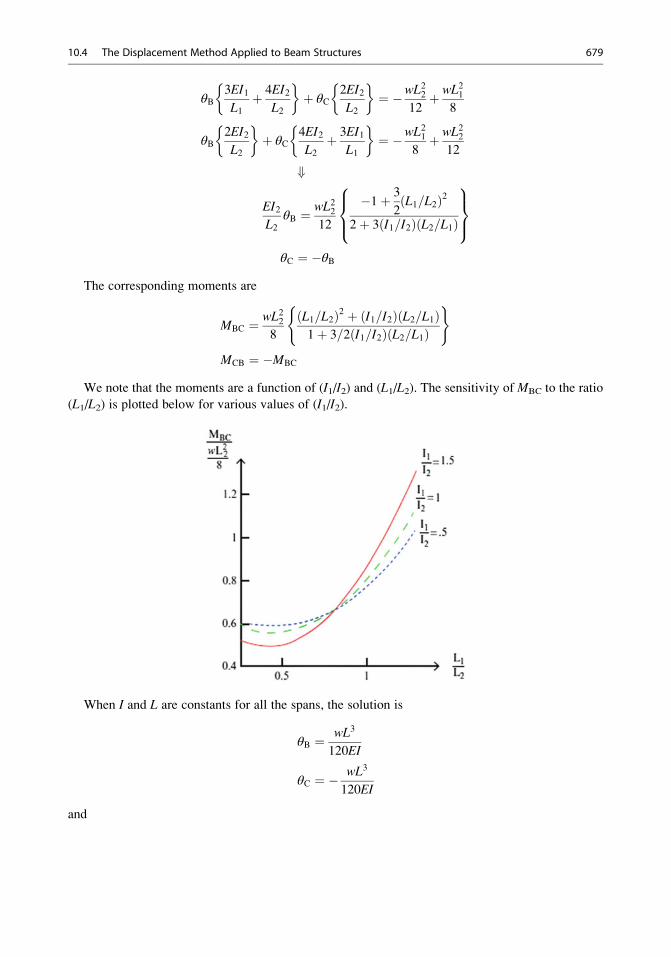
θB3EI1L1þ 4EI2
L2
�þ θC
2EI2L2
�¼ �wL22
12þ wL21
8
θB2EI2L2
�þ θC
4EI2L2þ 3EI1
L1
�¼ �wL21
8þ wL22
12
+
EI2L2
θB ¼ wL2212
�1þ 3
2L1=L2ð Þ2
2þ 3 I1=I2ð Þ L2=L1ð Þ
8><>:
9>=>;
θC ¼ �θBThe corresponding moments are
MBC ¼ wL228
L1=L2ð Þ2 þ I1=I2ð Þ L2=L1ð Þ1þ 3=2 I1=I2ð Þ L2=L1ð Þ
( )
MCB ¼ �MBC
We note that the moments are a function of (I1/I2) and (L1/L2). The sensitivity of MBC to the ratio
(L1/L2) is plotted below for various values of (I1/I2).
When I and L are constants for all the spans, the solution is
θB ¼ wL3
120EI
θC ¼ � wL3
120EI
and
10.4 The Displacement Method Applied to Beam Structures 679
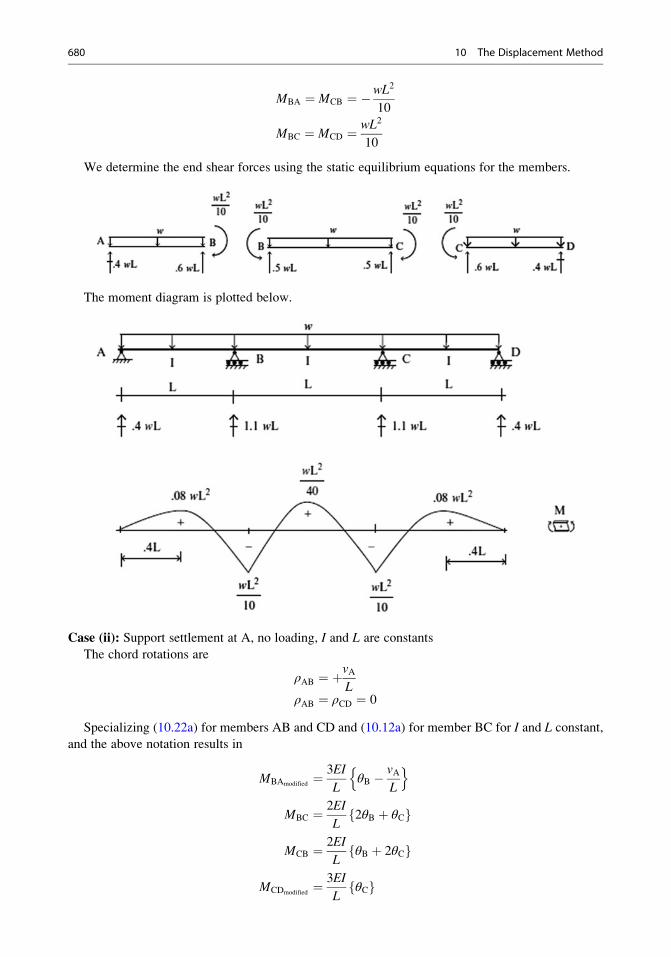
MBA ¼ MCB ¼ �wL2
10
MBC ¼ MCD ¼ wL2
10
We determine the end shear forces using the static equilibrium equations for the members.
The moment diagram is plotted below.
Case (ii): Support settlement at A, no loading, I and L are constants
The chord rotations are
ρAB ¼ þvAL
ρAB ¼ ρCD ¼ 0
Specializing (10.22a) for members AB and CD and (10.12a) for member BC for I and L constant,
and the above notation results in
MBAmodified¼ 3EI
LθB � vA
L
n o
MBC ¼ 2EI
L2θB þ θCf g
MCB ¼ 2EI
LθB þ 2θCf g
MCDmodified¼ 3EI
LθCf g
680 10 The Displacement Method
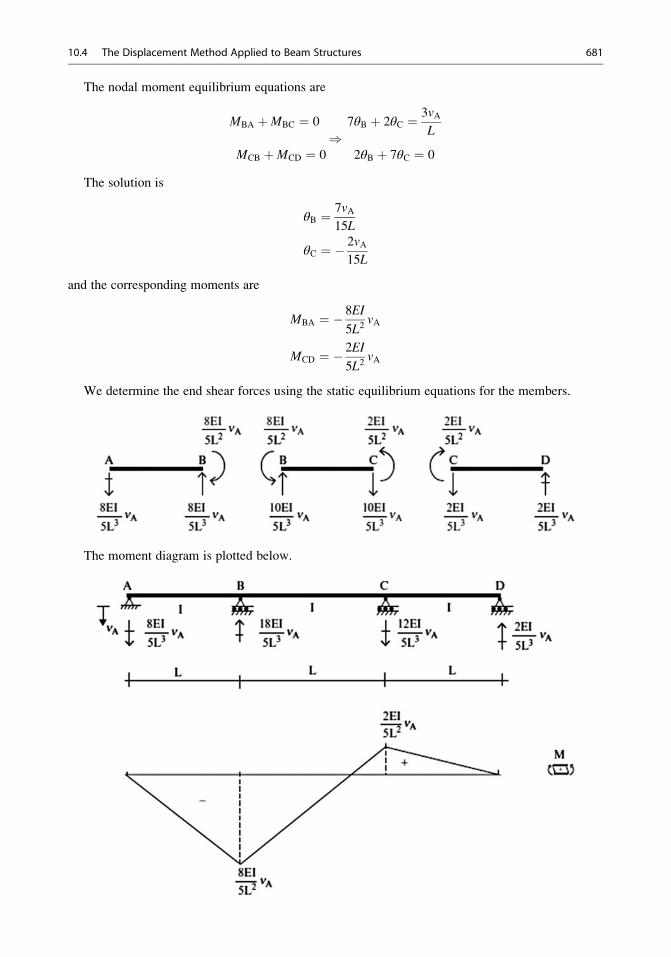
The nodal moment equilibrium equations are
MBA þMBC ¼ 0 7θB þ 2θC ¼ 3vAL)
MCB þMCD ¼ 0 2θB þ 7θC ¼ 0
The solution is
θB ¼ 7vA15L
θC ¼ � 2vA15L
and the corresponding moments are
MBA ¼ � 8EI
5L2vA
MCD ¼ � 2EI
5L2vA
We determine the end shear forces using the static equilibrium equations for the members.
The moment diagram is plotted below.
10.4 The Displacement Method Applied to Beam Structures 681
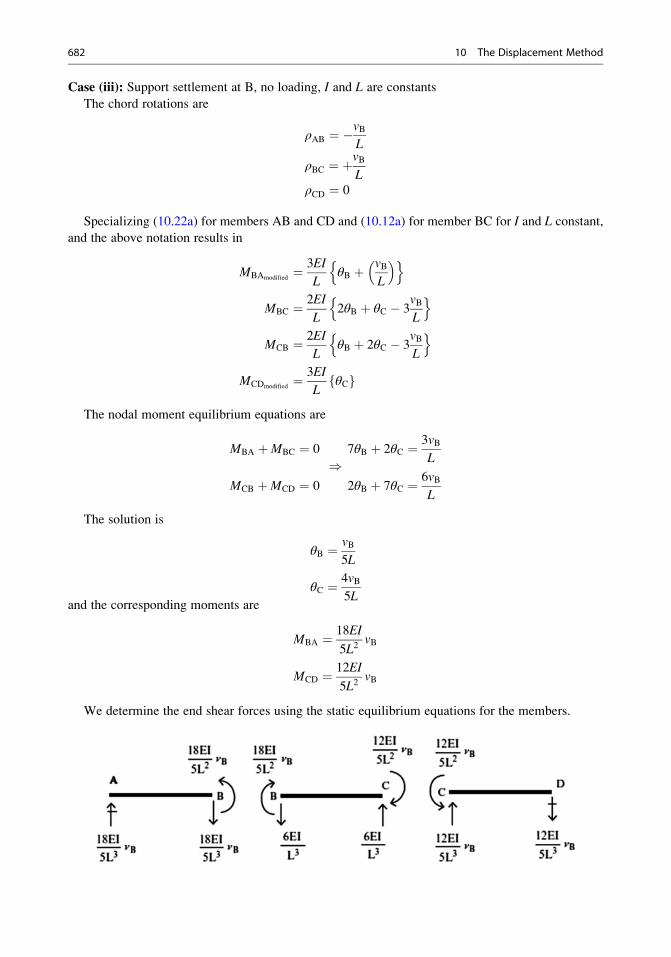
Case (iii): Support settlement at B, no loading, I and L are constants
The chord rotations are
ρAB ¼ �vBL
ρBC ¼ þvBL
ρCD ¼ 0
Specializing (10.22a) for members AB and CD and (10.12a) for member BC for I and L constant,
and the above notation results in
MBAmodified¼ 3EI
LθB þ vB
L
� �n o
MBC ¼ 2EI
L2θB þ θC � 3
vBL
n o
MCB ¼ 2EI
LθB þ 2θC � 3
vBL
n o
MCDmodified¼ 3EI
LθCf g
The nodal moment equilibrium equations are
MBA þMBC ¼ 0 7θB þ 2θC ¼ 3vBL)
MCB þMCD ¼ 0 2θB þ 7θC ¼ 6vBL
The solution is
θB ¼ vB5L
θC ¼ 4vB5L
and the corresponding moments are
MBA ¼ 18EI
5L2vB
MCD ¼ 12EI
5L2vB
We determine the end shear forces using the static equilibrium equations for the members.
682 10 The Displacement Method
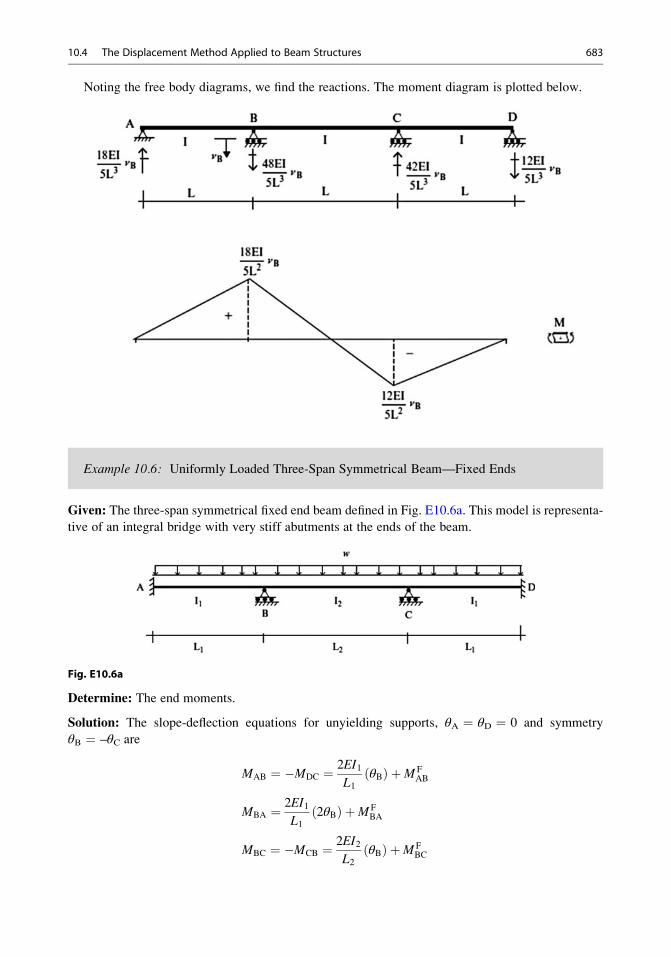
Noting the free body diagrams, we find the reactions. The moment diagram is plotted below.
Example 10.6: Uniformly Loaded Three-Span Symmetrical Beam—Fixed Ends
Given: The three-span symmetrical fixed end beam defined in Fig. E10.6a. This model is representa-
tive of an integral bridge with very stiff abutments at the ends of the beam.
Fig. E10.6a
Determine: The end moments.
Solution: The slope-deflection equations for unyielding supports, θA ¼ θD ¼ 0 and symmetry
θB ¼ –θC are
MAB ¼ �MDC ¼ 2EI1L1
θBð Þ þM FAB
MBA ¼ 2EI1L1
2θBð Þ þM FBA
MBC ¼ �MCB ¼ 2EI2L2
θBð Þ þM FBC
10.4 The Displacement Method Applied to Beam Structures 683
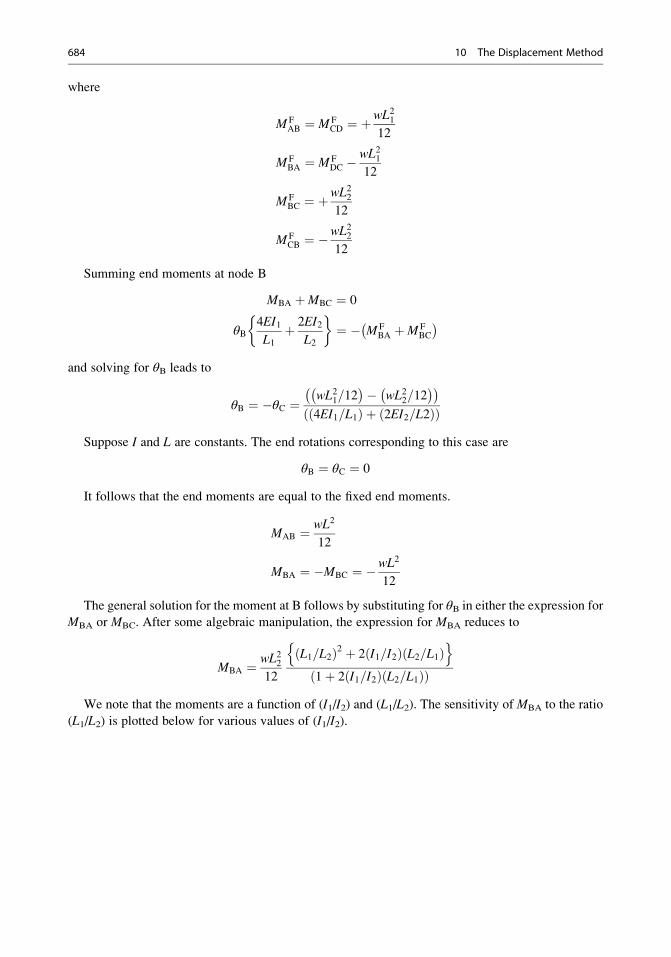
where
M FAB ¼ M F
CD ¼ þwL2112
M FBA ¼ M F
DC �wL2112
M FBC ¼ þ
wL2212
M FCB ¼ �
wL2212
Summing end moments at node B
MBA þMBC ¼ 0
θB4EI1L1þ 2EI2
L2
�¼ � M F
BA þM FBC
� �and solving for θB leads to
θB ¼ �θC ¼wL21=12� �� wL22=12
� �� �4EI1=L1ð Þ þ 2EI2=L2ð Þð Þ
Suppose I and L are constants. The end rotations corresponding to this case are
θB ¼ θC ¼ 0
It follows that the end moments are equal to the fixed end moments.
MAB ¼ wL2
12
MBA ¼ �MBC ¼ �wL2
12
The general solution for the moment at B follows by substituting for θB in either the expression forMBA or MBC. After some algebraic manipulation, the expression for MBA reduces to
MBA ¼ wL2212
L1=L2ð Þ2 þ 2 I1=I2ð Þ L2=L1ð Þn o
1þ 2 I1=I2ð Þ L2=L1ð Þð ÞWe note that the moments are a function of (I1/I2) and (L1/L2). The sensitivity of MBA to the ratio
(L1/L2) is plotted below for various values of (I1/I2).
684 10 The Displacement Method
10.5 The Displacement Method Applied to Rigid Frames
The essential difference between the analysis of beams and frames is the choice of the nodal
displacements. The nodal variables for a beam are taken as the rotations. When there is support
movement, we prescribe the nodal translation and compute the corresponding fixed end moments. In
this way, the equilibrium equations always involve only rotation variables. Rigid frames are consid-
ered to be an assemblage of members rigidly connected at nodes. Since frame structures are formed
by joining members at an arbitrary angle, the members rotate as well as bend. When this occurs, we
need to include the chord rotation terms in the slope-deflection equations, and work with both
translation and rotation variables. Using these relations, we generate a set of equations relating the
nodal translations and rotations by enforcing equilibrium for the nodes. The approach is relatively
straightforward when there are not many displacement variables. However, for complex structures
involving many displacement unknowns, one would usually employ a computer program which
automates the generation and solution of the equilibrium equations.
The term “sideway” is used to denote the case where some of the members in a structure
experience chord rotation resulting in “sway” of the structure. Whether sideway occurs depends on
how the members are arranged and also depends on the loading applied. For example, consider the
frame shown in Fig. 10.13a. Sideway is not possible because of the horizontal restraint. The frame
shown in Fig. 10.13b is symmetrical and also loaded symmetrically. Because of symmetry, there will
be no sway. The frame shown in Fig. 10.13c will experience sideway. The symmetrical frame shown
in Fig. 10.13d will experience sideway because of the unsymmetrical loading. All three members will
experience chord rotation for the frame shown in Fig. 10.13e.
When starting an analysis, one first determines whether sideway will occur in order to identify the
nature of the displacement variables. The remaining steps are relatively straightforward. One
establishes the free body diagram for each node and enforces the equilibrium equations. The essential
difference is that now one needs to consider force equilibrium as well as moment equilibrium. We
illustrate the analysis process with the following example.
Consider the frame shown in Fig. 10.14. Under the action of the applied loading, nodes B and C
will displace horizontally an amount Δ. Both members AB and CD will have chord rotation. There are
10.5 The Displacement Method Applied to Rigid Frames 685
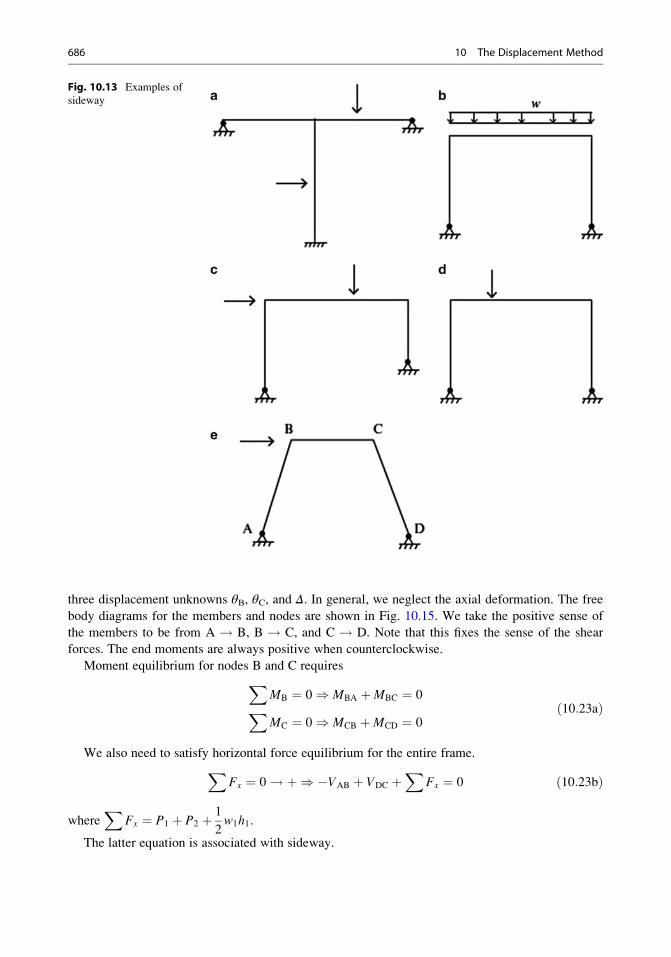
three displacement unknowns θB, θC, and Δ. In general, we neglect the axial deformation. The free
body diagrams for the members and nodes are shown in Fig. 10.15. We take the positive sense of
the members to be from A ! B, B ! C, and C ! D. Note that this fixes the sense of the shear
forces. The end moments are always positive when counterclockwise.
Moment equilibrium for nodes B and C requiresXMB ¼ 0) MBA þMBC ¼ 0XMC ¼ 0) MCB þMCD ¼ 0
ð10:23aÞ
We also need to satisfy horizontal force equilibrium for the entire frame.XFx ¼ 0! þ) �VAB þ VDC þ
XFx ¼ 0 ð10:23bÞ
whereX
Fx ¼ P1 þ P2 þ 1
2w1h1.
The latter equation is associated with sideway.
Fig. 10.13 Examples of
sideway
686 10 The Displacement Method

Noting that θA ¼ θD ¼ 0, vA ¼ vD ¼ 0, vB ¼ –Δ, and vC ¼ +Δ, the slope-deflection equations
(10.12a, 10.12b) simplify to
MAB ¼ 2EI1h1
θB � 3�Δh1
� � �þM F
AB
MBA ¼ 2EI1h1
2θB � 3�Δh1
� � �þM F
BA
MBC ¼ 2EI3L
2θB þ θCf g þM FBC
MCB ¼ 2EI3L
2θC þ θBf g þM FCB
MCD ¼ 2EI2h2
2θC � 3�Δh2
� � �þM F
CD
MDC ¼ 2EI2h2
θC � 3�Δh2
� � �þM F
DC
VAB ¼ 6EI1
h21θB þ 2
Δ
h1
�þ V F
AB
VDC ¼ � 6EI2
h22θC þ 2
Δ
h2
�þ V F
DC
ð10:24Þ
Fig. 10.14 (a) Loading.(b) Deflected shape
10.5 The Displacement Method Applied to Rigid Frames 687
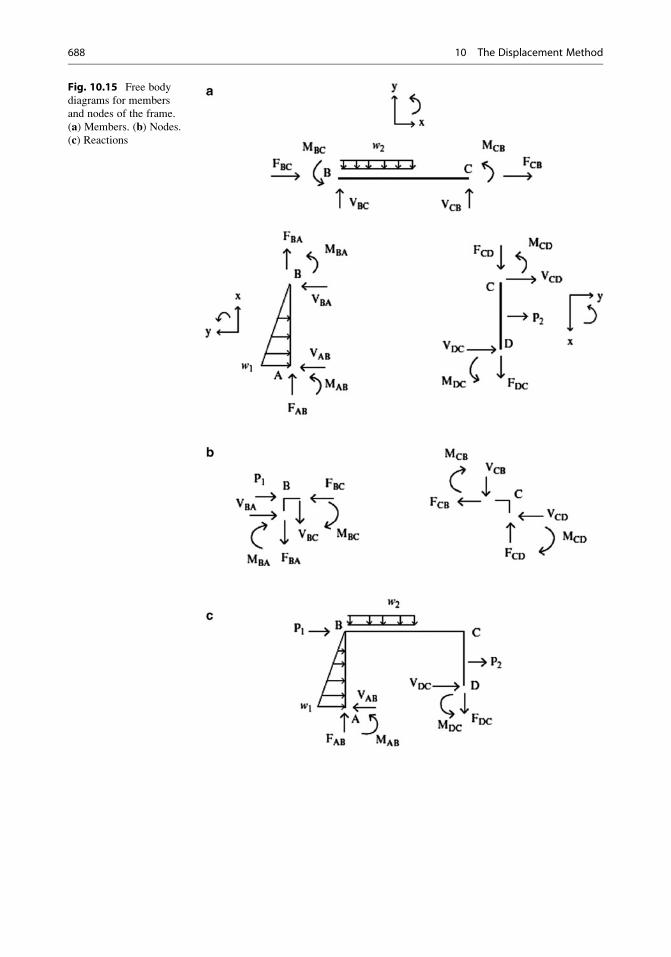
Fig. 10.15 Free body
diagrams for members
and nodes of the frame.
(a) Members. (b) Nodes.(c) Reactions
688 10 The Displacement Method
Substituting for the end moments and shear forces in (10.23a, 10.23b) leads to
4EI1h1þ 4EI3
L
� �θB þ 2EI3
LθC þ 6EI1
h1
Δ
h1
� �þ M F
BC þM FBA
� � ¼ 0
2EI3L
θB þ 4EI3Lþ 4EI2
h2
� �θC þ 6EI2
h2
Δ
h2
� �þ M F
CD þM FCB
� � ¼ 0
� 6EI1
h21θB � 6EI2
h32θC þ � 12EI1
h31� 12EI2
h32
!Δ� V F
AB þ V FDC þ
XFx ¼ 0
ð10:25Þ
Once the loading and properties are specified, one can solve (10.25) for θB, θC, and Δ. The end
actions are then evaluated with (10.24).
10.5.1 Portal Frames: Symmetrical Loading
Consider the symmetrical frame defined in Fig. 10.16. When the loading is also symmetrical, nodes B
and C do not displace laterally, and therefore there is no chord rotation for members AB and
CD. Also, the rotations at B and C are equal in magnitude but opposite in sense (θB ¼ –θC). With
these simplifications, the expressions for the end moments reduce to
Fig. 10.16 Portal frame—
symmetrical loading. (a)Loading. (b) Deflectedshape. (c) Moment diagram
10.5 The Displacement Method Applied to Rigid Frames 689
MBC ¼ 2EI2L
θBð Þ þM FBC
MBA ¼ 2EI1h
2θBð Þ
MAB ¼ 1
2MBA
ð10:26Þ
Moment equilibrium for node B requires
MBC þMBA ¼ 0 ð10:27ÞSubstituting for the moments, the equilibrium equation expands to
2EθB 2I1hþ I2
L
�¼ �M F
BC
We solve for θB and then evaluate the end moments.
MBA ¼ 2MAB ¼ �MBC ¼ �11þ I2=Lð Þ=2 I1=hð ÞM
FBC ð10:28Þ
The bending moment diagram is plotted in Fig. 10.16c.
10.5.2 Portal Frames: Anti-symmetrical Loading
Lateral loading produces anti-symmetrical behavior, as indicated in Fig. 10.17, and chord rotation for
members AB and CD. In this case, the nodal rotations at B and C are equal in both magnitude and
sense (θB ¼ θC). The chord rotation is related to the lateral displacement of B by
ρAB ¼ �vBh
ð10:29Þ
Note that the chord rotation sign convention for the slope-deflection equations (10.12a, 10.12b) is
positive when counterclockwise. Therefore for this choice of the sense of vB, the chord rotation for
AB is negative. The corresponding expressions for the end moments are
MBC ¼ 2EI2L
3θBð Þ
MBA ¼ 2EI1h
2θB þ 3vBh
� �
MAB ¼ 2EI1h
θB þ 3vBh
� � ð10:30Þ
Equilibrium requires
MBC þMBA ¼ 0
� VAB þ P
2¼ 0
ð10:31Þ
690 10 The Displacement Method
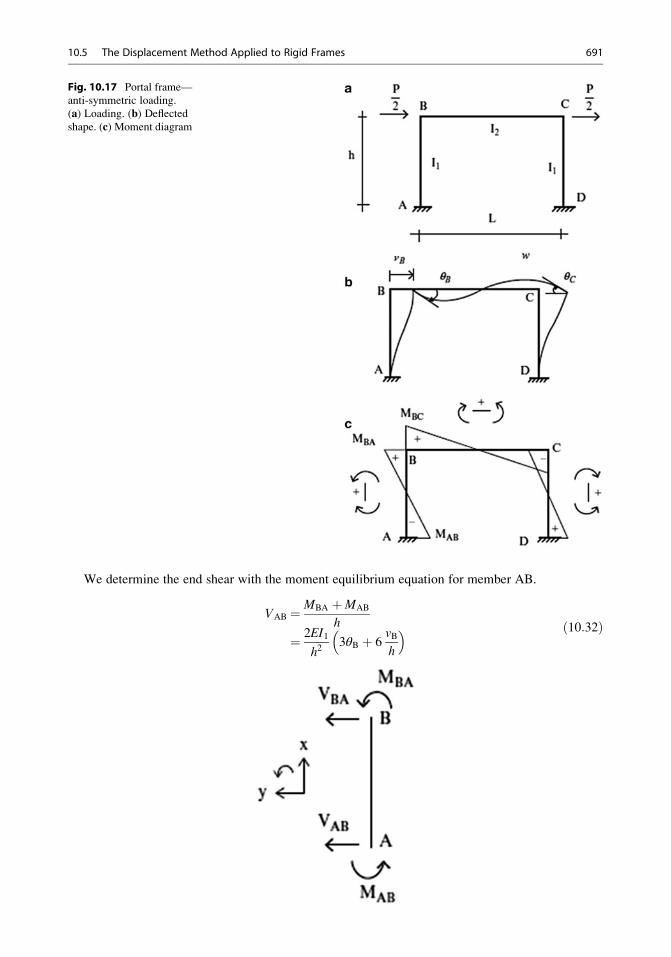
We determine the end shear with the moment equilibrium equation for member AB.
VAB ¼ MBA þMAB
h
¼ 2EI1
h23θB þ 6
vBh
� � ð10:32Þ
Fig. 10.17 Portal frame—
anti-symmetric loading.
(a) Loading. (b) Deflectedshape. (c) Moment diagram
10.5 The Displacement Method Applied to Rigid Frames 691
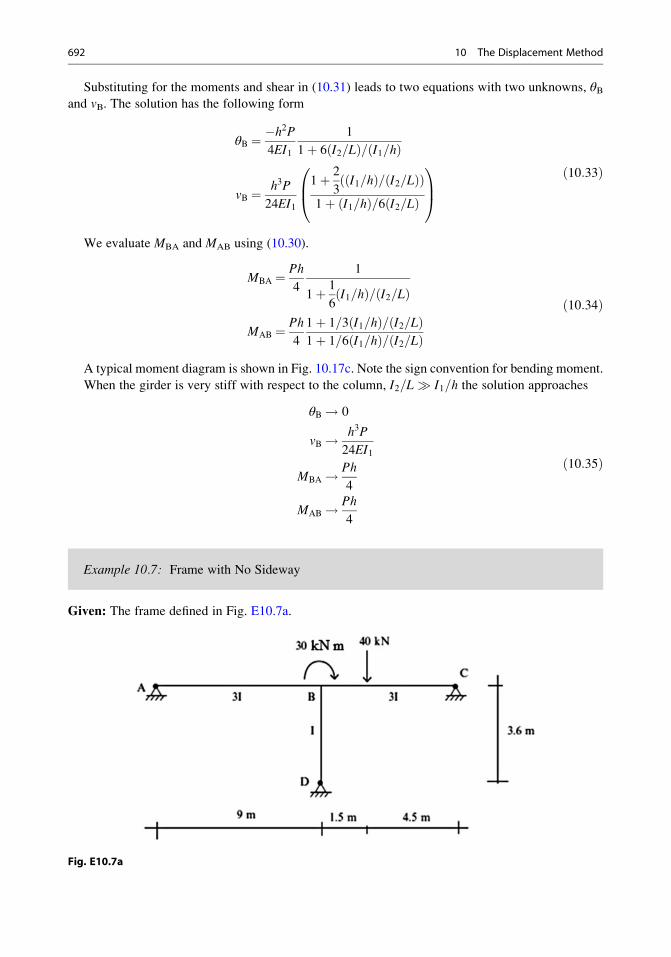
Substituting for the moments and shear in (10.31) leads to two equations with two unknowns, θBand vB. The solution has the following form
θB ¼ �h2P
4EI1
1
1þ 6 I2=Lð Þ= I1=hð Þ
vB ¼ h3P
24EI1
1þ 2
3I1=hð Þ= I2=Lð Þð Þ
1þ I1=hð Þ=6 I2=Lð Þ
0B@
1CA
ð10:33Þ
We evaluate MBA and MAB using (10.30).
MBA ¼ Ph
4
1
1þ 1
6I1=hð Þ= I2=Lð Þ
MAB ¼ Ph
4
1þ 1=3 I1=hð Þ= I2=Lð Þ1þ 1=6 I1=hð Þ= I2=Lð Þ
ð10:34Þ
A typical moment diagram is shown in Fig. 10.17c. Note the sign convention for bending moment.
When the girder is very stiff with respect to the column, I2=L� I1=h the solution approaches
θB! 0
vB! h3P
24EI1
MBA! Ph
4
MAB! Ph
4
ð10:35Þ
Example 10.7: Frame with No Sideway
Given: The frame defined in Fig. E10.7a.
Fig. E10.7a
692 10 The Displacement Method
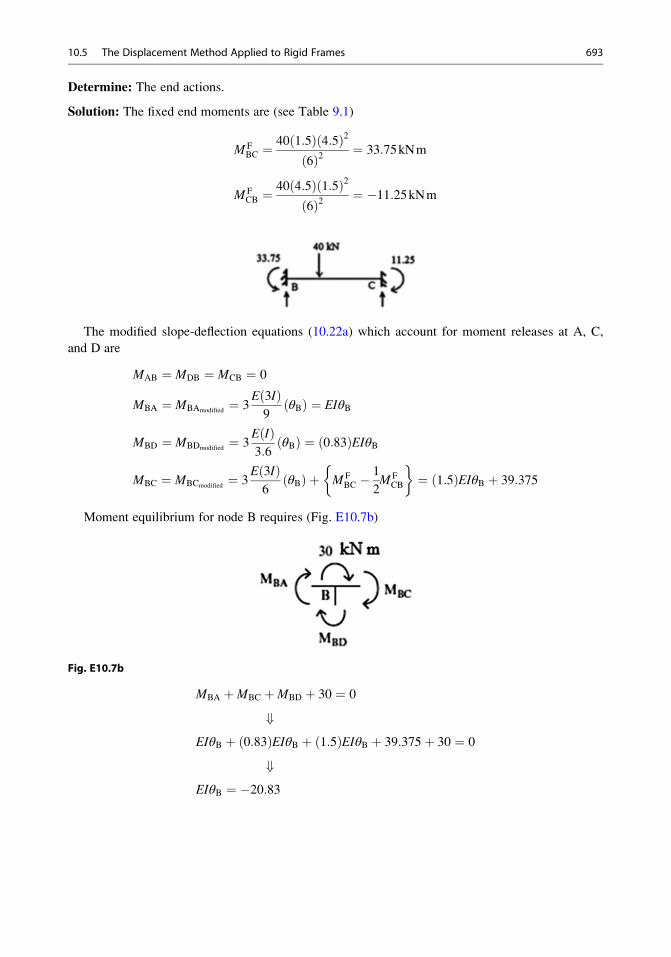
Determine: The end actions.
Solution: The fixed end moments are (see Table 9.1)
M FBC ¼
40 1:5ð Þ 4:5ð Þ26ð Þ2 ¼ 33:75kNm
M FCB ¼
40 4:5ð Þ 1:5ð Þ26ð Þ2 ¼ �11:25kNm
The modified slope-deflection equations (10.22a) which account for moment releases at A, C,
and D are
MAB ¼ MDB ¼ MCB ¼ 0
MBA ¼ MBAmodified¼ 3
E 3Ið Þ9
θBð Þ ¼ EIθB
MBD ¼ MBDmodified¼ 3
E Ið Þ3:6
θBð Þ ¼ 0:83ð ÞEIθB
MBC ¼ MBCmodified¼ 3
E 3Ið Þ6
θBð Þ þ M FBC �
1
2M F
CB
�¼ 1:5ð ÞEIθB þ 39:375
Moment equilibrium for node B requires (Fig. E10.7b)
Fig. E10.7b
MBA þMBC þMBD þ 30 ¼ 0
+EIθB þ 0:83ð ÞEIθB þ 1:5ð ÞEIθB þ 39:375þ 30 ¼ 0
+EIθB ¼ �20:83
10.5 The Displacement Method Applied to Rigid Frames 693
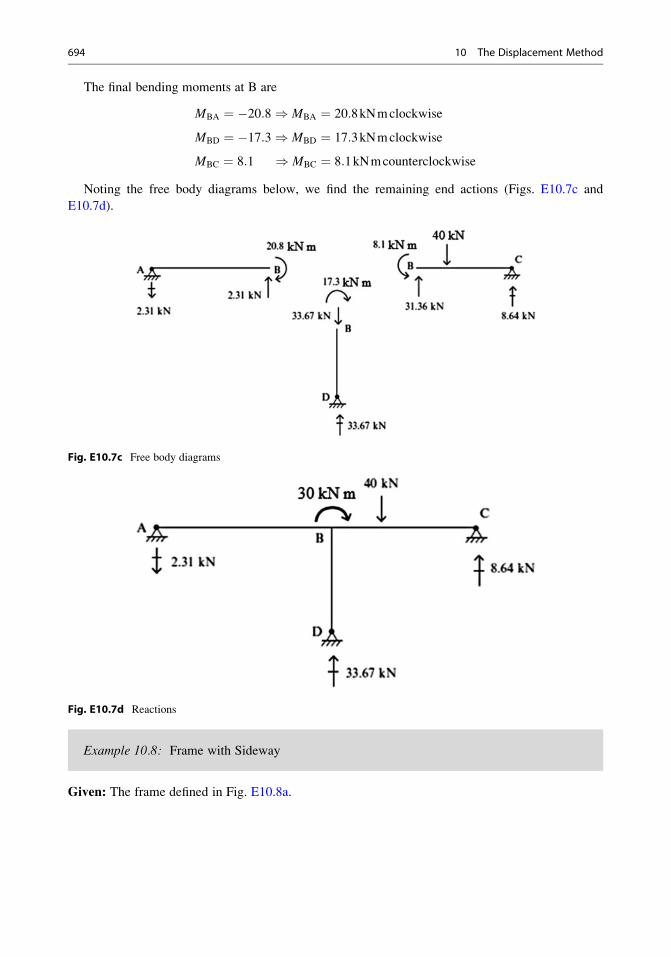
The final bending moments at B are
MBA ¼ �20:8) MBA ¼ 20:8kNmclockwise
MBD ¼ �17:3) MBD ¼ 17:3kNmclockwise
MBC ¼ 8:1 ) MBC ¼ 8:1kNmcounterclockwise
Noting the free body diagrams below, we find the remaining end actions (Figs. E10.7c and
E10.7d).
Fig. E10.7c Free body diagrams
Fig. E10.7d Reactions
Example 10.8: Frame with Sideway
Given: The frame defined in Fig. E10.8a.
694 10 The Displacement Method
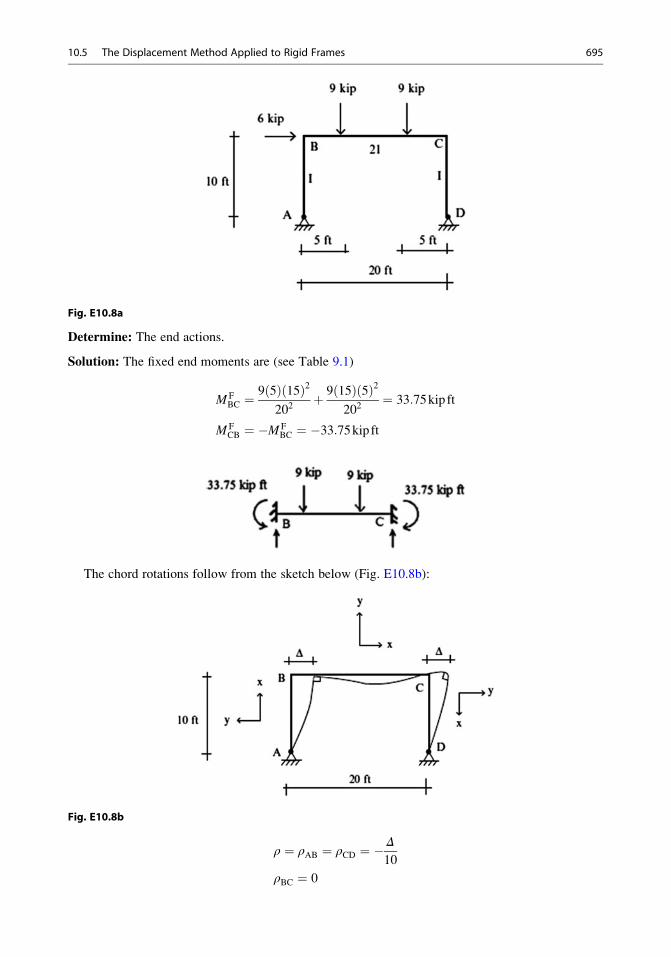
Fig. E10.8a
Determine: The end actions.
Solution: The fixed end moments are (see Table 9.1)
M FBC ¼
9 5ð Þ 15ð Þ2202
þ 9 15ð Þ 5ð Þ2202
¼ 33:75kip ft
M FCB ¼ �M F
BC ¼ �33:75kip ft
The chord rotations follow from the sketch below (Fig. E10.8b):
Fig. E10.8b
ρ ¼ ρAB ¼ ρCD ¼ �Δ
10
ρBC ¼ 0
10.5 The Displacement Method Applied to Rigid Frames 695
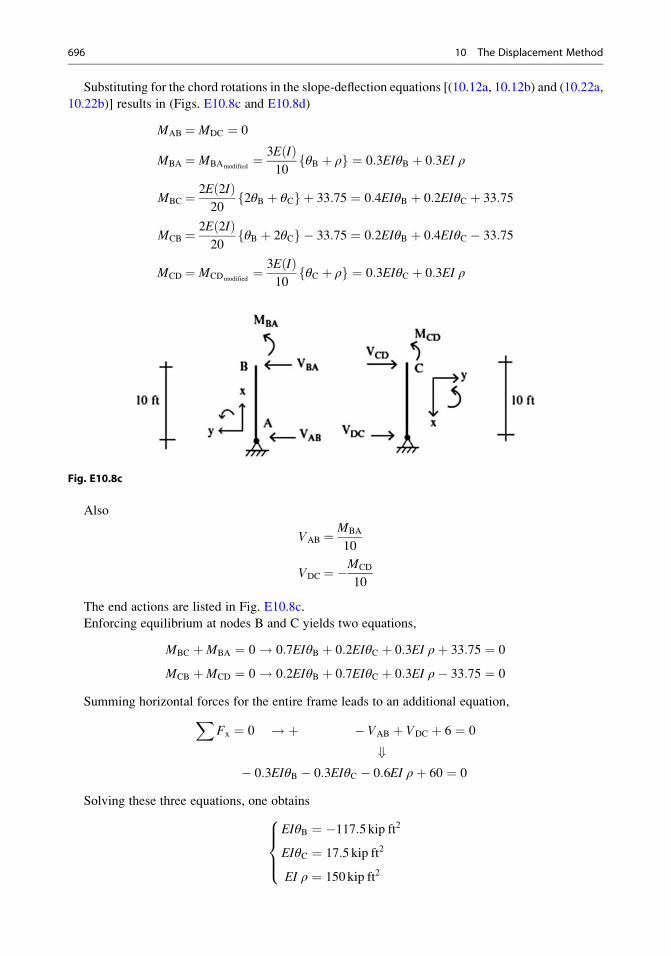
Substituting for the chord rotations in the slope-deflection equations [(10.12a, 10.12b) and (10.22a,
10.22b)] results in (Figs. E10.8c and E10.8d)
MAB ¼ MDC ¼ 0
MBA ¼ MBAmodified¼ 3E Ið Þ
10θB þ ρf g ¼ 0:3EIθB þ 0:3EI ρ
MBC ¼ 2E 2Ið Þ20
2θB þ θCf g þ 33:75 ¼ 0:4EIθB þ 0:2EIθC þ 33:75
MCB ¼ 2E 2Ið Þ20
θB þ 2θCf g � 33:75 ¼ 0:2EIθB þ 0:4EIθC � 33:75
MCD ¼ MCDmodified¼ 3E Ið Þ
10θC þ ρf g ¼ 0:3EIθC þ 0:3EI ρ
Fig. E10.8c
Also
VAB ¼ MBA
10
VDC ¼ �MCD
10
The end actions are listed in Fig. E10.8c.
Enforcing equilibrium at nodes B and C yields two equations,
MBC þMBA ¼ 0! 0:7EIθB þ 0:2EIθC þ 0:3EI ρþ 33:75 ¼ 0
MCB þMCD ¼ 0! 0:2EIθB þ 0:7EIθC þ 0:3EI ρ� 33:75 ¼ 0
Summing horizontal forces for the entire frame leads to an additional equation,XFx ¼ 0 ! þ � VAB þ VDC þ 6 ¼ 0
+� 0:3EIθB � 0:3EIθC � 0:6EI ρþ 60 ¼ 0
Solving these three equations, one obtains
EIθB ¼ �117:5kip ft2
EIθC ¼ 17:5 kip ft2
EI ρ ¼ 150 kip ft2
8>><>>:
696 10 The Displacement Method
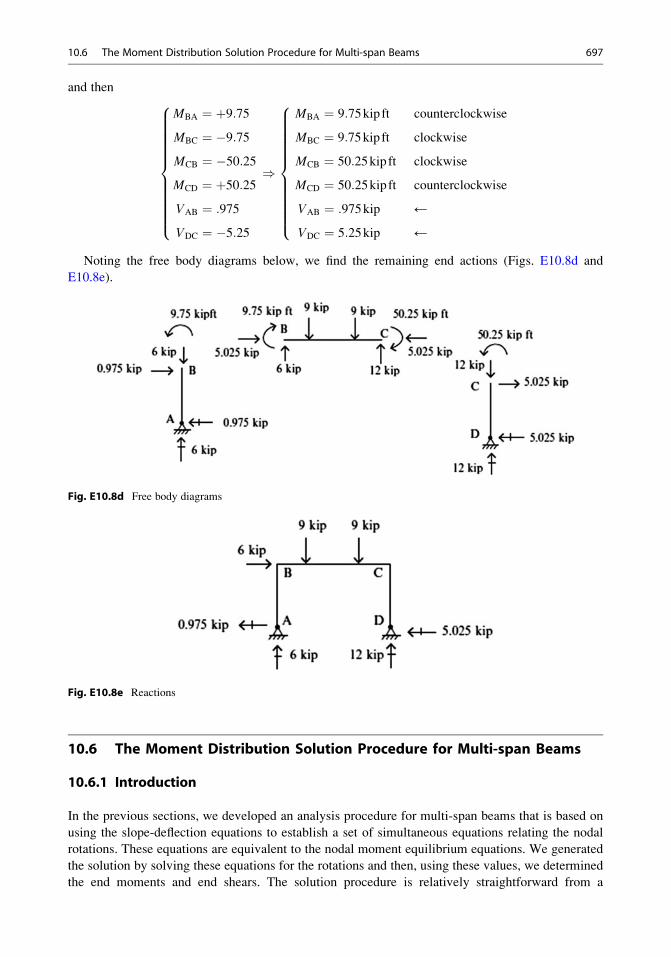
and then
MBA ¼ þ9:75MBC ¼ �9:75MCB ¼ �50:25MCD ¼ þ50:25VAB ¼ :975
VDC ¼ �5:25
8>>>>>>>>>>><>>>>>>>>>>>:
)
MBA ¼ 9:75kip ft
MBC ¼ 9:75kip ft
MCB ¼ 50:25kip ft
MCD ¼ 50:25kip ft
VAB ¼ :975kip
VDC ¼ 5:25kip
counterclockwise
clockwise
clockwise
counterclockwise
←
←
8>>>>>>>>>>><>>>>>>>>>>>:
Noting the free body diagrams below, we find the remaining end actions (Figs. E10.8d and
E10.8e).
Fig. E10.8d Free body diagrams
Fig. E10.8e Reactions
10.6 The Moment Distribution Solution Procedure for Multi-span Beams
10.6.1 Introduction
In the previous sections, we developed an analysis procedure for multi-span beams that is based on
using the slope-deflection equations to establish a set of simultaneous equations relating the nodal
rotations. These equations are equivalent to the nodal moment equilibrium equations. We generated
the solution by solving these equations for the rotations and then, using these values, we determined
the end moments and end shears. The solution procedure is relatively straightforward from a
10.6 The Moment Distribution Solution Procedure for Multi-span Beams 697

mathematical perspective, but it is difficult to gain some physical insight as to how the structure is
responding during the solution process. This is typical of mathematical procedures which involve
mainly number crunching and are ideally suited for computer-based solution schemes.
The Moment Distribution Method is a solution procedure developed by Structural Engineers to
solve the nodal moment equilibrium equations. The method was originally introduced by Cross [1]
and has proven to be an efficient hand-based computational scheme for beam- and frame-type
structures. Its primary appeal is its computational simplicity.
The solution is generated in an iterative manner. Each iteration cycle involves only two simple
computations. Another attractive feature is the fact that one does not have to formulate the nodal
equilibrium equations expressed in terms of the nodal displacements. The method works directly with
the end moments. This feature allows one to assess convergence by comparing successive values of
the moments as the iteration progresses. In what follows, we illustrate the method with a series of
beam-type examples. Later, we extend the method to frame-type structures.
Consider the two-span beam shown in Fig. 10.18. Supports A and C are fixed, and we assume that
there is no settlement at B.
We assume initially that there is no rotation at B. Noting Fig. 10.19, the net unbalanced
clockwise nodal moment at B is equal to the sum of the fixed end moments for the members incident
on node B.
ð10:36Þ
This unbalanced moment will cause node B to rotate until equilibrium is restored. Using the slope-
deflection equations, we note that the increment in the end moment for a member which is incident on
B due to a counterclockwise rotation at B is proportional to the relative stiffness I/L for the member.
The moments acting on the node are of opposite sense, i.e., clockwise, from Newton’s law. The
equilibrium state for the node is shown in Fig. 10.20.
Fig. 10.18 Two-span
beam with fixed ends
Fig. 10.19 Nodal
moments
Fig. 10.20 Moment
equilibrium for node B
698 10 The Displacement Method
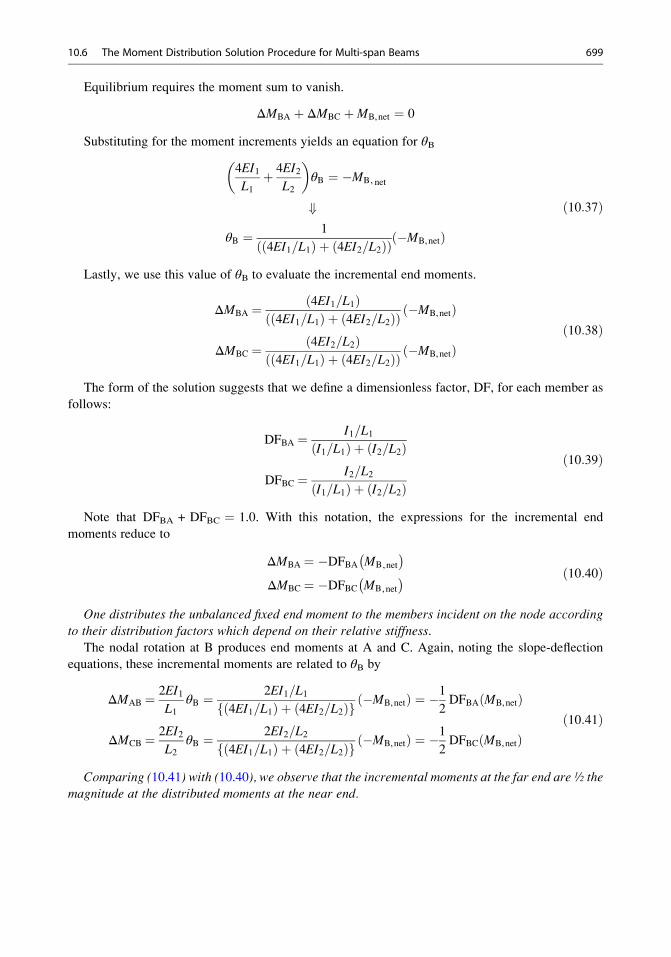
Equilibrium requires the moment sum to vanish.
ΔMBA þ ΔMBC þMB,net ¼ 0
Substituting for the moment increments yields an equation for θB
4EI1L1þ 4EI2
L2
� �θB ¼ �MB, net
+
θB ¼ 1
4EI1=L1ð Þ þ 4EI2=L2ð Þð Þ �MB,netð Þ
ð10:37Þ
Lastly, we use this value of θB to evaluate the incremental end moments.
ΔMBA ¼ 4EI1=L1ð Þ4EI1=L1ð Þ þ 4EI2=L2ð Þð Þ �MB,netð Þ
ΔMBC ¼ 4EI2=L2ð Þ4EI1=L1ð Þ þ 4EI2=L2ð Þð Þ �MB,netð Þ
ð10:38Þ
The form of the solution suggests that we define a dimensionless factor, DF, for each member as
follows:
DFBA ¼ I1=L1I1=L1ð Þ þ I2=L2ð Þ
DFBC ¼ I2=L2I1=L1ð Þ þ I2=L2ð Þ
ð10:39Þ
Note that DFBA + DFBC ¼ 1.0. With this notation, the expressions for the incremental end
moments reduce to
ΔMBA ¼ �DFBA MB,net
� �ΔMBC ¼ �DFBC MB,net
� � ð10:40Þ
One distributes the unbalanced fixed end moment to the members incident on the node according
to their distribution factors which depend on their relative stiffness.
The nodal rotation at B produces end moments at A and C. Again, noting the slope-deflection
equations, these incremental moments are related to θB by
ΔMAB ¼ 2EI1L1
θB ¼ 2EI1=L14EI1=L1ð Þ þ 4EI2=L2ð Þf g �MB,netð Þ ¼ �1
2DFBA MB,netð Þ
ΔMCB ¼ 2EI2L2
θB ¼ 2EI2=L24EI1=L1ð Þ þ 4EI2=L2ð Þf g �MB,netð Þ ¼ �1
2DFBC MB,netð Þ
ð10:41Þ
Comparing (10.41) with (10.40), we observe that the incremental moments at the far end are ½ themagnitude at the distributed moments at the near end.
10.6 The Moment Distribution Solution Procedure for Multi-span Beams 699
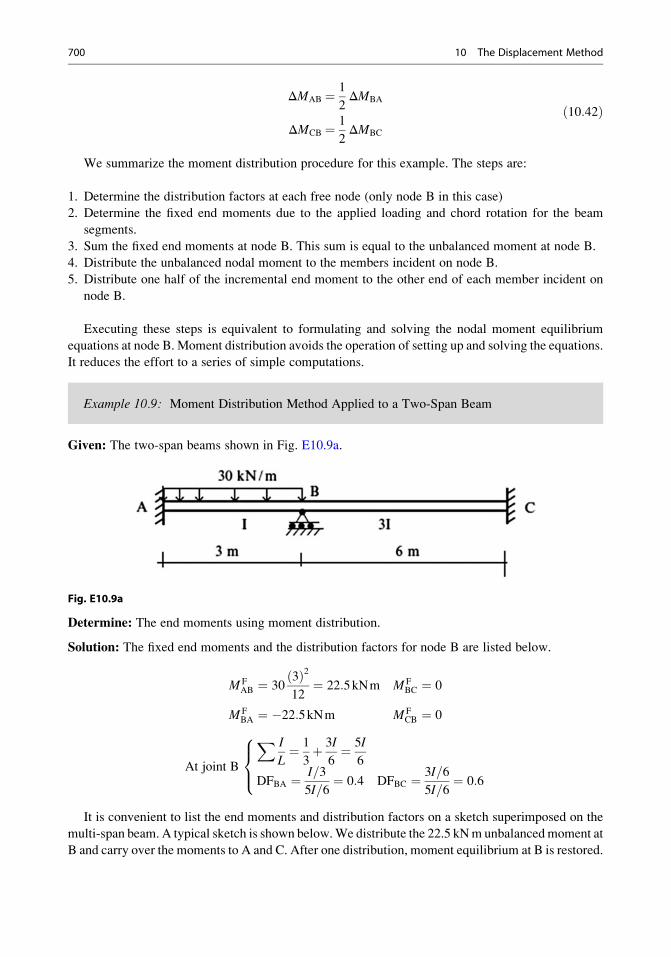
ΔMAB ¼ 1
2ΔMBA
ΔMCB ¼ 1
2ΔMBC
ð10:42Þ
We summarize the moment distribution procedure for this example. The steps are:
1. Determine the distribution factors at each free node (only node B in this case)
2. Determine the fixed end moments due to the applied loading and chord rotation for the beam
segments.
3. Sum the fixed end moments at node B. This sum is equal to the unbalanced moment at node B.
4. Distribute the unbalanced nodal moment to the members incident on node B.
5. Distribute one half of the incremental end moment to the other end of each member incident on
node B.
Executing these steps is equivalent to formulating and solving the nodal moment equilibrium
equations at node B. Moment distribution avoids the operation of setting up and solving the equations.
It reduces the effort to a series of simple computations.
Example 10.9: Moment Distribution Method Applied to a Two-Span Beam
Given: The two-span beams shown in Fig. E10.9a.
Fig. E10.9a
Determine: The end moments using moment distribution.
Solution: The fixed end moments and the distribution factors for node B are listed below.
M FAB ¼ 30
3ð Þ212¼ 22:5kNm M F
BC ¼ 0
M FBA ¼ �22:5kNm M F
CB ¼ 0
At joint B
X I
L¼ 1
3þ 3I
6¼ 5I
6
DFBA ¼ I=3
5I=6¼ 0:4 DFBC ¼ 3I=6
5I=6¼ 0:6
8><>:
It is convenient to list the end moments and distribution factors on a sketch superimposed on the
multi-span beam. A typical sketch is shown below.We distribute the 22.5 kNm unbalancedmoment at
B and carry over the moments to A and C. After one distribution, moment equilibrium at B is restored.
700 10 The Displacement Method
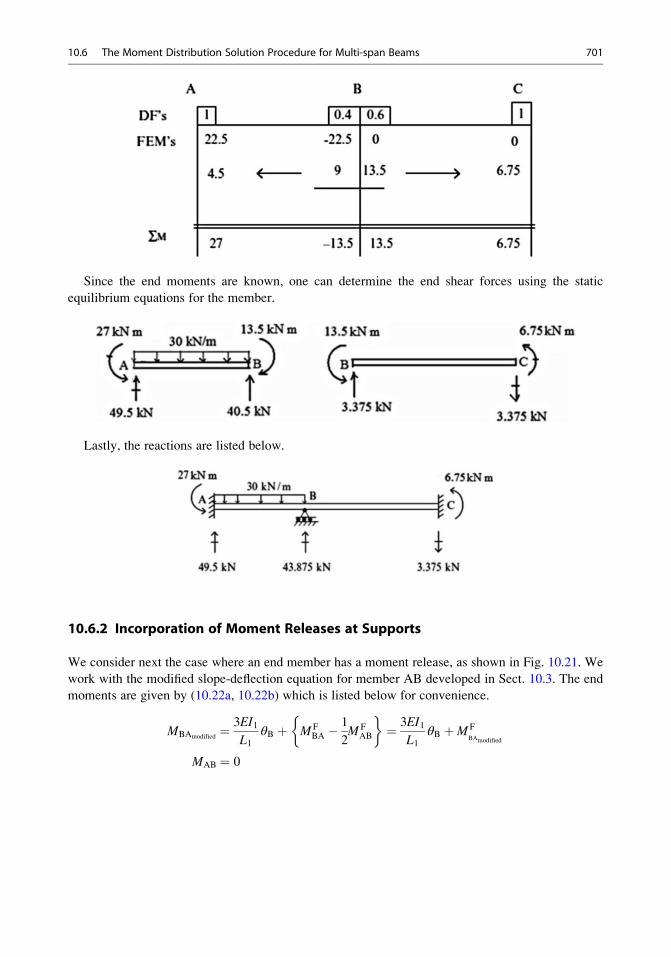
Since the end moments are known, one can determine the end shear forces using the static
equilibrium equations for the member.
Lastly, the reactions are listed below.
10.6.2 Incorporation of Moment Releases at Supports
We consider next the case where an end member has a moment release, as shown in Fig. 10.21. We
work with the modified slope-deflection equation for member AB developed in Sect. 10.3. The end
moments are given by (10.22a, 10.22b) which is listed below for convenience.
MBAmodified¼ 3EI1
L1θB þ M F
BA �1
2M F
AB
�¼ 3EI1
L1θB þM F
BAmodified
MAB ¼ 0
10.6 The Moment Distribution Solution Procedure for Multi-span Beams 701
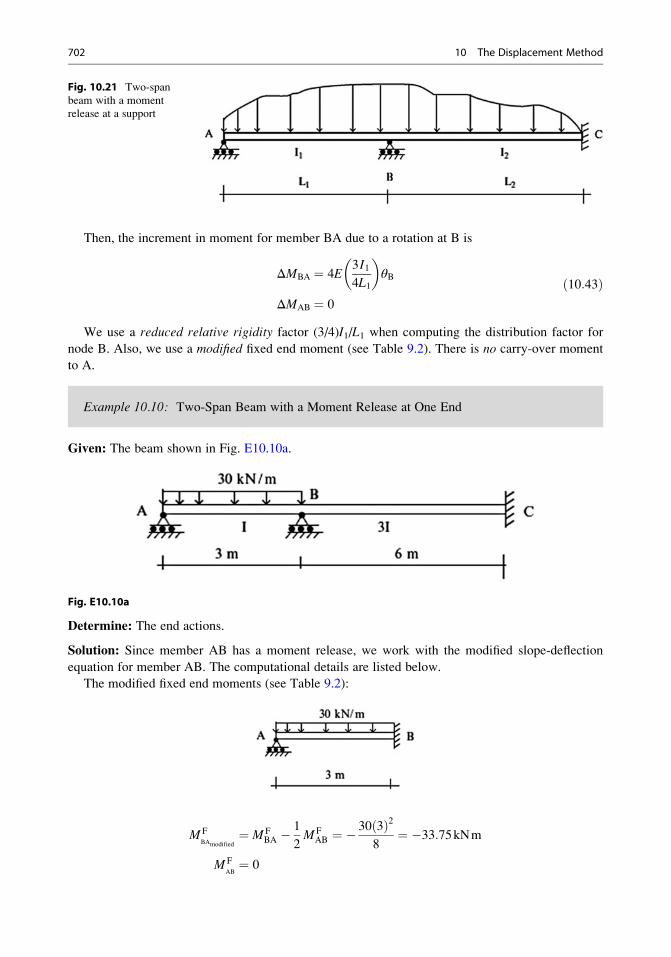
Then, the increment in moment for member BA due to a rotation at B is
ΔMBA ¼ 4E3
4
I1L1
� �θB
ΔMAB ¼ 0
ð10:43Þ
We use a reduced relative rigidity factor (3/4)I1/L1 when computing the distribution factor for
node B. Also, we use a modified fixed end moment (see Table 9.2). There is no carry-over moment
to A.
Example 10.10: Two-Span Beam with a Moment Release at One End
Given: The beam shown in Fig. E10.10a.
Fig. E10.10a
Determine: The end actions.
Solution: Since member AB has a moment release, we work with the modified slope-deflection
equation for member AB. The computational details are listed below.
The modified fixed end moments (see Table 9.2):
M FBAmodified
¼ M FBA �
1
2M F
AB ¼ �30 3ð Þ2
8¼ �33:75kNm
M FAB¼ 0
Fig. 10.21 Two-span
beam with a moment
release at a support
702 10 The Displacement Method
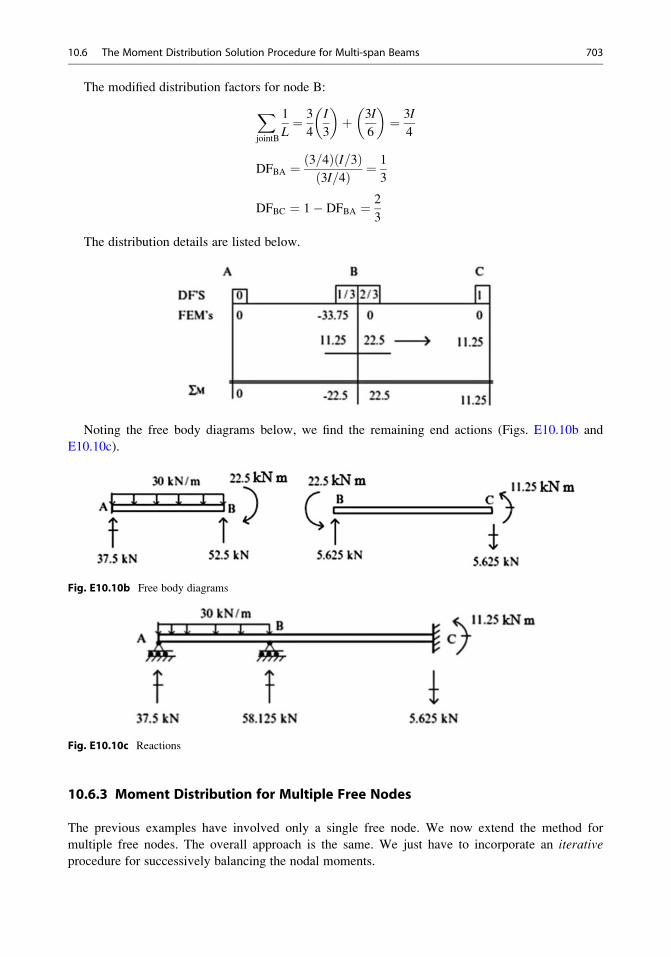
The modified distribution factors for node B:
XjointB
1
L¼ 3
4
I
3
� �þ 3I
6
� �¼ 3I
4
DFBA ¼ 3=4ð Þ I=3ð Þ3I=4ð Þ ¼ 1
3
DFBC ¼ 1� DFBA ¼ 2
3
The distribution details are listed below.
Noting the free body diagrams below, we find the remaining end actions (Figs. E10.10b and
E10.10c).
Fig. E10.10b Free body diagrams
Fig. E10.10c Reactions
10.6.3 Moment Distribution for Multiple Free Nodes
The previous examples have involved only a single free node. We now extend the method for
multiple free nodes. The overall approach is the same. We just have to incorporate an iterative
procedure for successively balancing the nodal moments.
10.6 The Moment Distribution Solution Procedure for Multi-span Beams 703
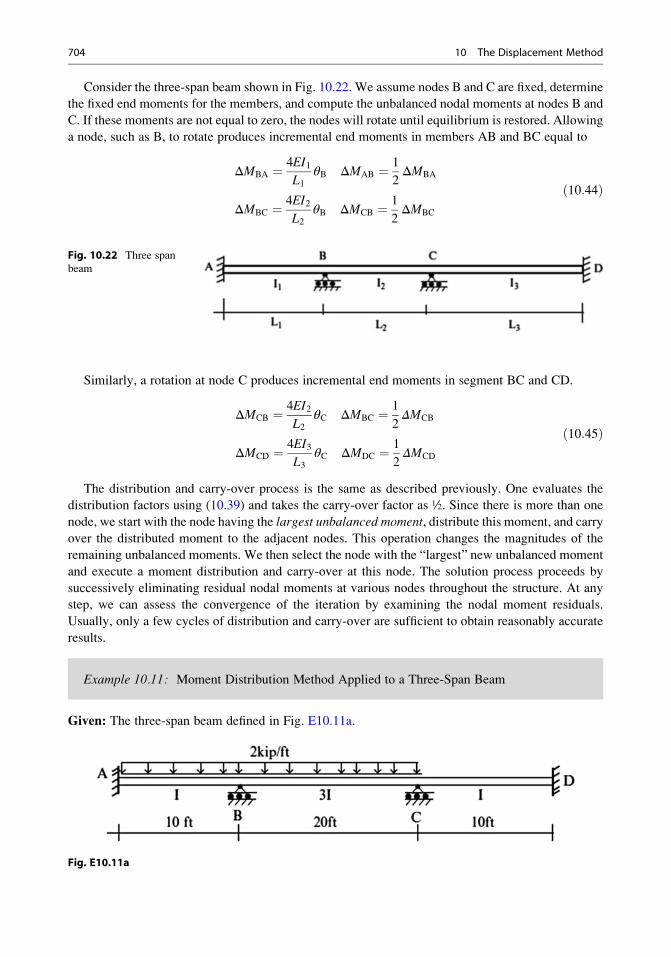
Consider the three-span beam shown in Fig. 10.22. We assume nodes B and C are fixed, determine
the fixed end moments for the members, and compute the unbalanced nodal moments at nodes B and
C. If these moments are not equal to zero, the nodes will rotate until equilibrium is restored. Allowing
a node, such as B, to rotate produces incremental end moments in members AB and BC equal to
ΔMBA ¼ 4EI1L1
θB ΔMAB ¼ 1
2ΔMBA
ΔMBC ¼ 4EI2L2
θB ΔMCB ¼ 1
2ΔMBC
ð10:44Þ
Similarly, a rotation at node C produces incremental end moments in segment BC and CD.
ΔMCB ¼ 4EI2L2
θC ΔMBC ¼ 1
2ΔMCB
ΔMCD ¼ 4EI3L3
θC ΔMDC ¼ 1
2ΔMCD
ð10:45Þ
The distribution and carry-over process is the same as described previously. One evaluates the
distribution factors using (10.39) and takes the carry-over factor as ½. Since there is more than one
node, we start with the node having the largest unbalanced moment, distribute this moment, and carry
over the distributed moment to the adjacent nodes. This operation changes the magnitudes of the
remaining unbalanced moments. We then select the node with the “largest” new unbalanced moment
and execute a moment distribution and carry-over at this node. The solution process proceeds by
successively eliminating residual nodal moments at various nodes throughout the structure. At any
step, we can assess the convergence of the iteration by examining the nodal moment residuals.
Usually, only a few cycles of distribution and carry-over are sufficient to obtain reasonably accurate
results.
Example 10.11: Moment Distribution Method Applied to a Three-Span Beam
Given: The three-span beam defined in Fig. E10.11a.
Fig. E10.11a
Fig. 10.22 Three span
beam
704 10 The Displacement Method
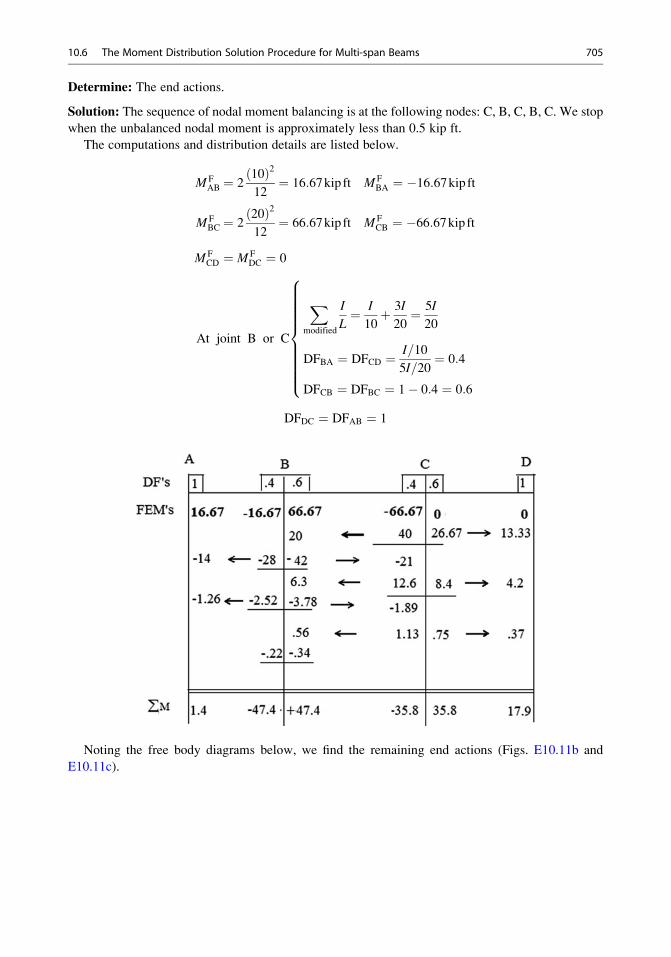
Determine: The end actions.
Solution: The sequence of nodal moment balancing is at the following nodes: C, B, C, B, C. We stop
when the unbalanced nodal moment is approximately less than 0.5 kip ft.
The computations and distribution details are listed below.
M FAB ¼ 2
10ð Þ212¼ 16:67kip ft M F
BA ¼ �16:67kip ft
M FBC ¼ 2
20ð Þ212¼ 66:67kip ft M F
CB ¼ �66:67kip ft
M FCD ¼ M F
DC ¼ 0
At joint B or C
Xmodified
I
L¼ I
10þ 3I
20¼ 5I
20
DFBA ¼ DFCD ¼ I=10
5I=20¼ 0:4
DFCB ¼ DFBC ¼ 1� 0:4 ¼ 0:6
8>>>>>>>>><>>>>>>>>>:DFDC ¼ DFAB ¼ 1
Noting the free body diagrams below, we find the remaining end actions (Figs. E10.11b and
E10.11c).
10.6 The Moment Distribution Solution Procedure for Multi-span Beams 705
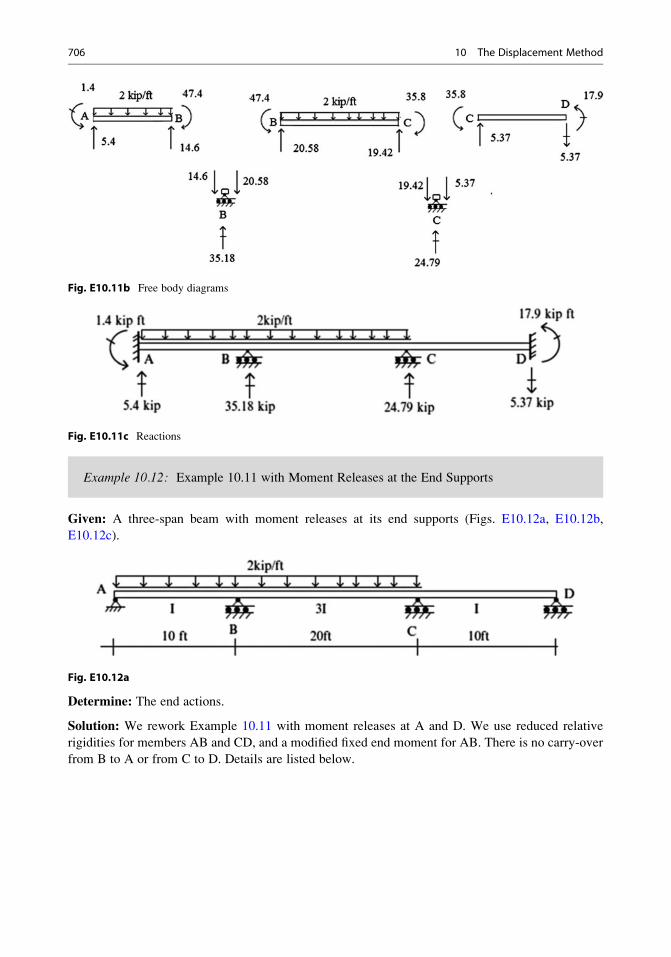
Fig. E10.11b Free body diagrams
Fig. E10.11c Reactions
Example 10.12: Example 10.11 with Moment Releases at the End Supports
Given: A three-span beam with moment releases at its end supports (Figs. E10.12a, E10.12b,
E10.12c).
Fig. E10.12a
Determine: The end actions.
Solution: We rework Example 10.11 with moment releases at A and D. We use reduced relative
rigidities for members AB and CD, and a modified fixed end moment for AB. There is no carry-over
from B to A or from C to D. Details are listed below.
706 10 The Displacement Method
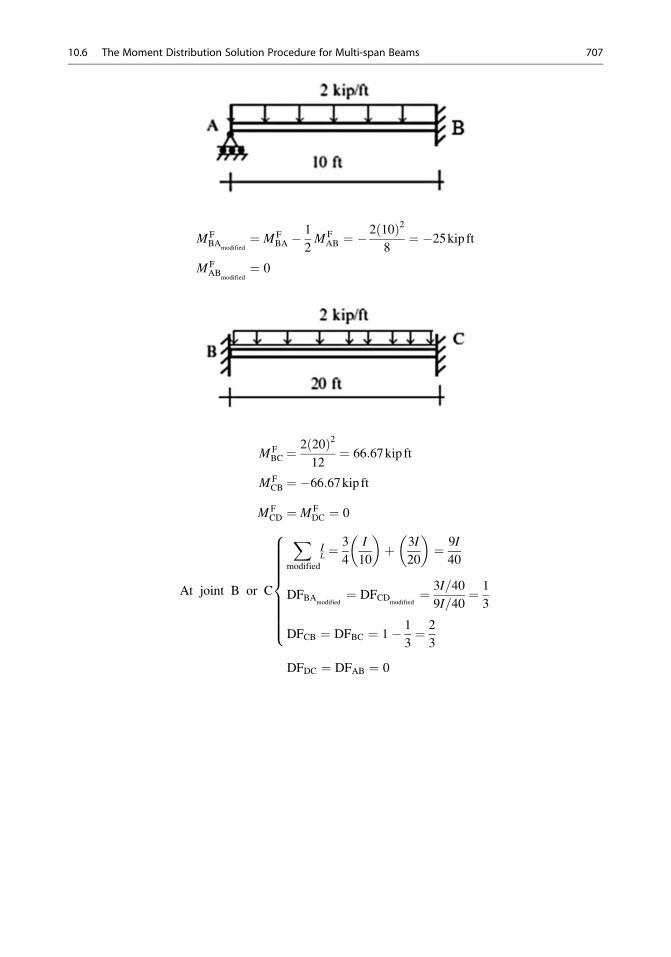
M FBA
modified¼ M F
BA �1
2M F
AB ¼ �2 10ð Þ2
8¼ �25kip ft
M FAB
modified¼ 0
M FBC ¼
2 20ð Þ212
¼ 66:67kip ft
M FCB ¼ �66:67kip ft
M FCD ¼ M F
DC ¼ 0
At joint B or C
Xmodified
IL ¼
3
4
I
10
� �þ 3I
20
� �¼ 9I
40
DFBAmodified
¼ DFCDmodified
¼ 3I=40
9I=40¼ 1
3
DFCB ¼ DFBC ¼ 1� 1
3¼ 2
3
8>>>>>>>><>>>>>>>>:
DFDC ¼ DFAB ¼ 0
10.6 The Moment Distribution Solution Procedure for Multi-span Beams 707
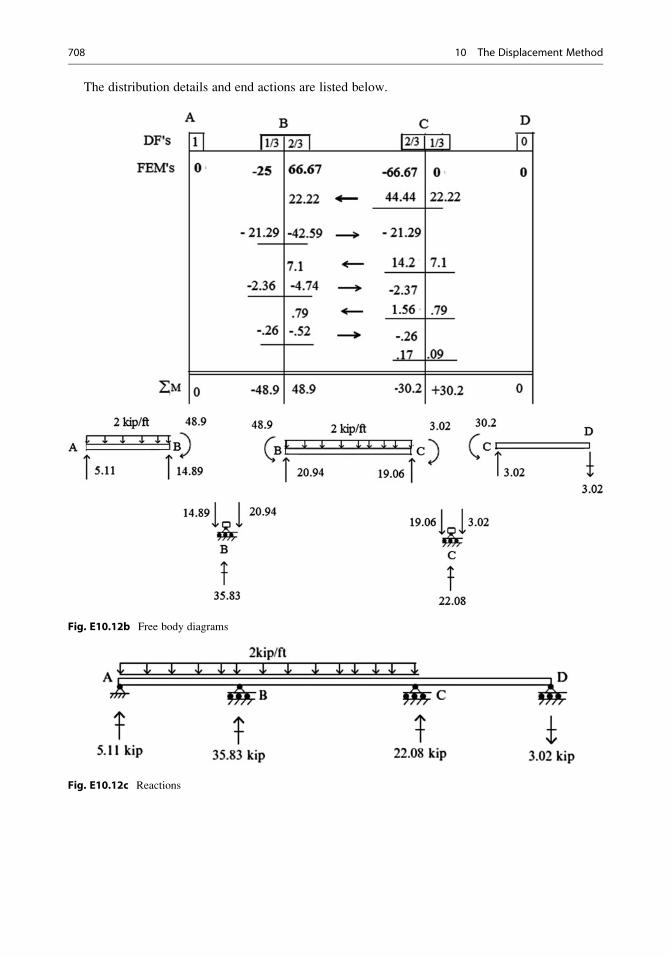
The distribution details and end actions are listed below.
Fig. E10.12b Free body diagrams
Fig. E10.12c Reactions
708 10 The Displacement Method
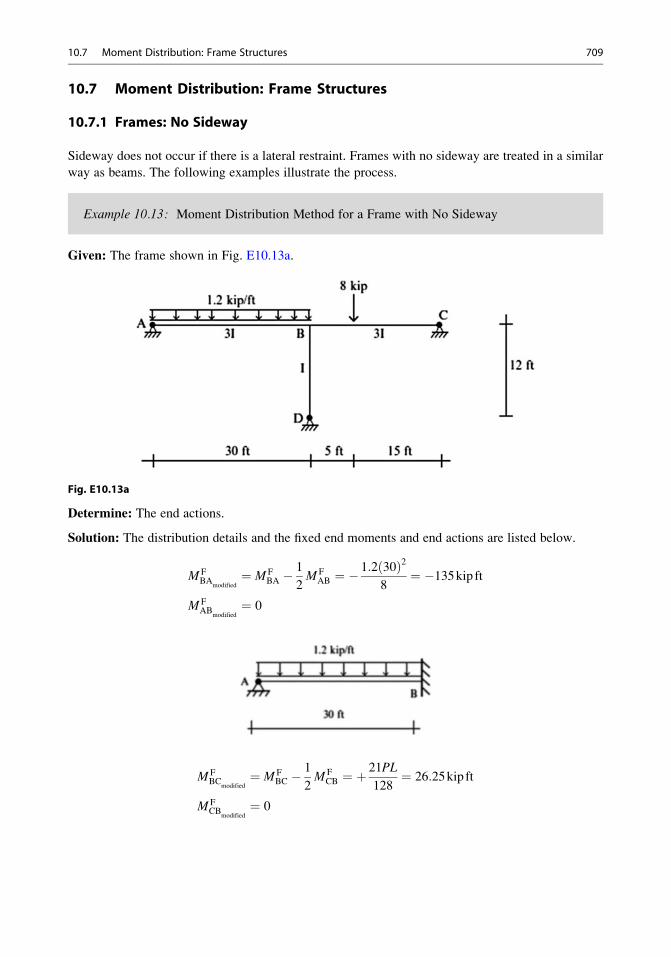
10.7 Moment Distribution: Frame Structures
10.7.1 Frames: No Sideway
Sideway does not occur if there is a lateral restraint. Frames with no sideway are treated in a similar
way as beams. The following examples illustrate the process.
Example 10.13: Moment Distribution Method for a Frame with No Sideway
Given: The frame shown in Fig. E10.13a.
Fig. E10.13a
Determine: The end actions.
Solution: The distribution details and the fixed end moments and end actions are listed below.
M FBA
modified¼ M F
BA �1
2M F
AB ¼ �1:2 30ð Þ2
8¼ �135kip ft
M FAB
modified¼ 0
M FBC
modified¼ M F
BC �1
2M F
CB ¼ þ21PL
128¼ 26:25kip ft
M FCB
modified¼ 0
10.7 Moment Distribution: Frame Structures 709
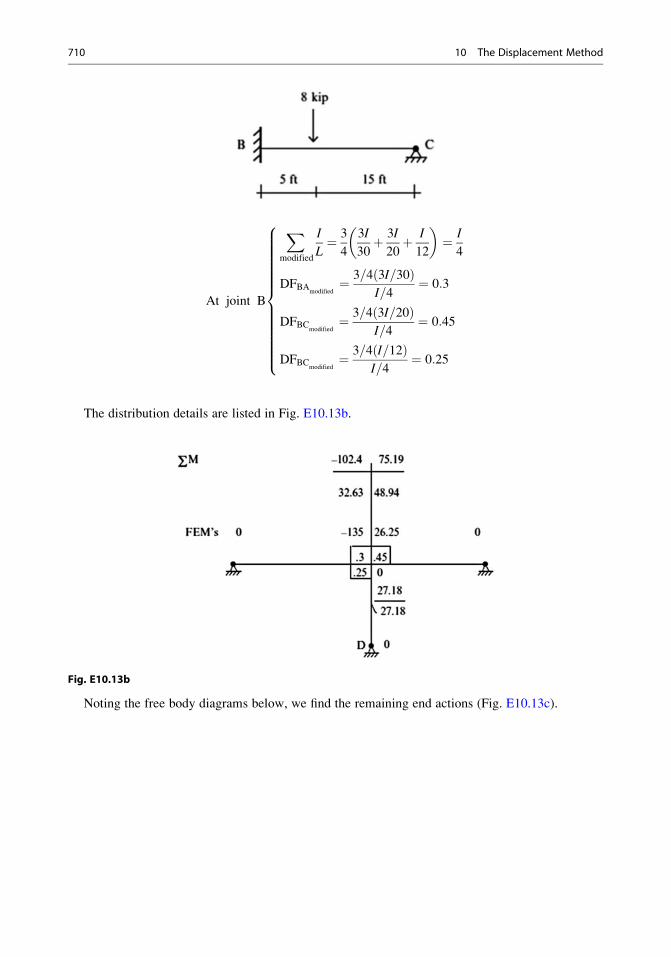
At joint B
Xmodified
I
L¼ 3
4
3I
30þ 3I
20þ I
12
� �¼ I
4
DFBAmodified
¼ 3=4 3I=30ð ÞI=4
¼ 0:3
DFBCmodified
¼ 3=4 3I=20ð ÞI=4
¼ 0:45
DFBCmodified
¼ 3=4 I=12ð ÞI=4
¼ 0:25
8>>>>>>>>>>>>><>>>>>>>>>>>>>:
The distribution details are listed in Fig. E10.13b.
Fig. E10.13b
Noting the free body diagrams below, we find the remaining end actions (Fig. E10.13c).
710 10 The Displacement Method
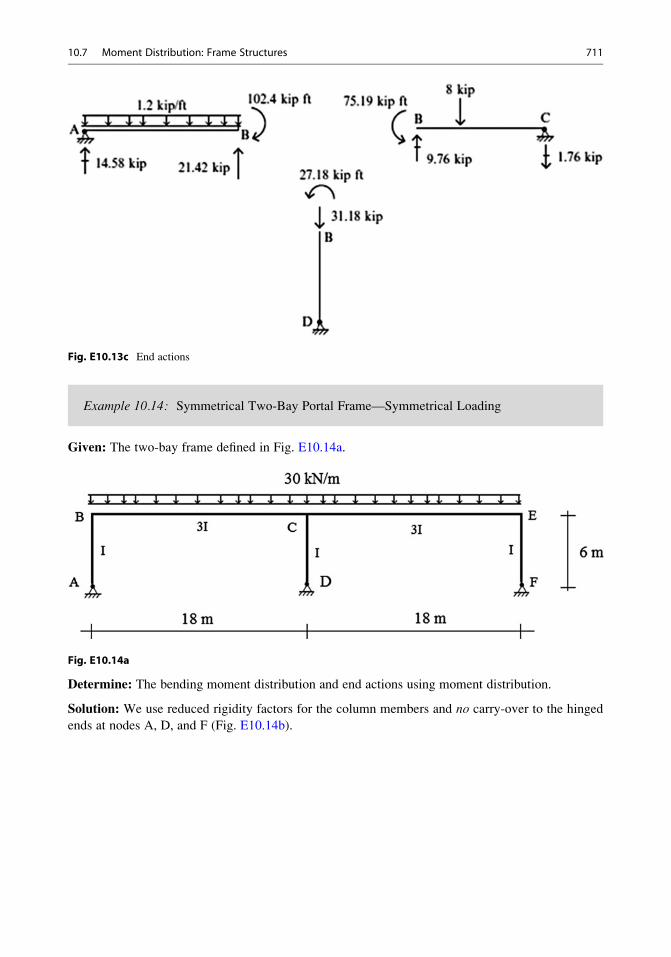
Fig. E10.13c End actions
Example 10.14: Symmetrical Two-Bay Portal Frame—Symmetrical Loading
Given: The two-bay frame defined in Fig. E10.14a.
Fig. E10.14a
Determine: The bending moment distribution and end actions using moment distribution.
Solution: We use reduced rigidity factors for the column members and no carry-over to the hinged
ends at nodes A, D, and F (Fig. E10.14b).
10.7 Moment Distribution: Frame Structures 711

At node B or E
X I
L¼ I
6
� �3
4þ 3I
18
� �
DFBAmodified¼ DFEFmodified
¼ I=6ð Þ3=4I=6ð Þ3=4þ 3I=18ð Þ ¼
3
7
DFBC ¼ DFEC ¼ 1� 3
7¼ 4
7
8>>>>>>>><>>>>>>>>:
At node C
X I
L¼ I
6
� �3
4þ 3I
18þ 3I
18¼ 11
24I
DFCDmodified¼ I=6ð Þ3=4
11=24ð ÞI ¼3
11
DFCB ¼ DFCE ¼ 1
21� 3
11
� �¼ 4
11
8>>>>>>>><>>>>>>>>:
The fixed end moments are
M FBC ¼ �M F
CB ¼ M FCE ¼ �M F
EC ¼ þ30 18ð Þ2
12¼ þ810kNm
Fig. E10.14b Distribution factors
The moment distribution sequence is listed in Fig. E10.14c. Note that there is never any redistri-
bution at node C because of symmetry (Fig. E10.14d).
Fig. E10.14c
712 10 The Displacement Method
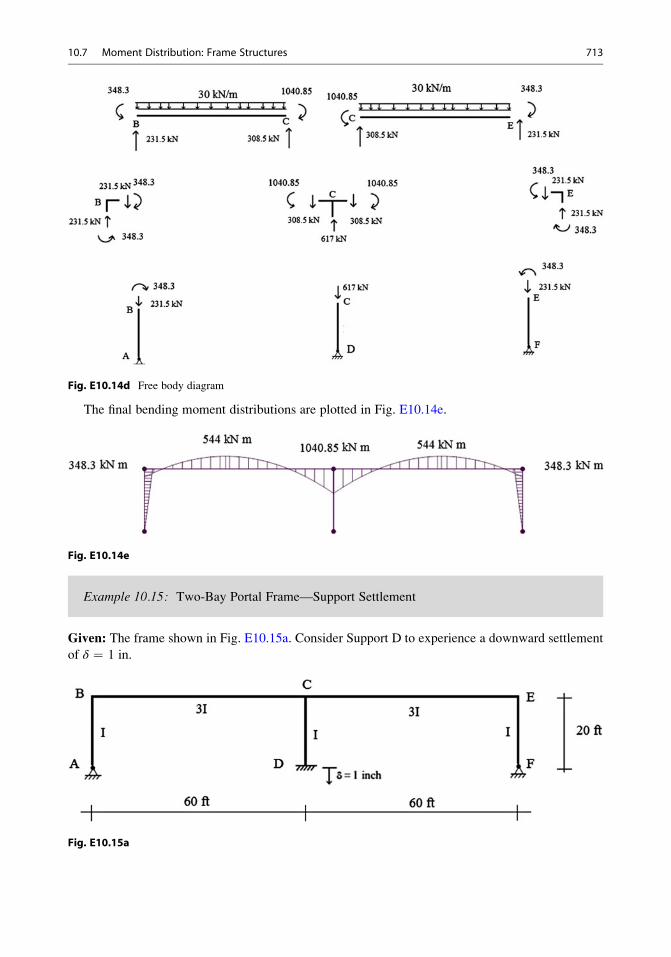
Fig. E10.14d Free body diagram
The final bending moment distributions are plotted in Fig. E10.14e.
Fig. E10.14e
Example 10.15: Two-Bay Portal Frame—Support Settlement
Given: The frame shown in Fig. E10.15a. Consider Support D to experience a downward settlement
of δ ¼ 1 in.
Fig. E10.15a
10.7 Moment Distribution: Frame Structures 713
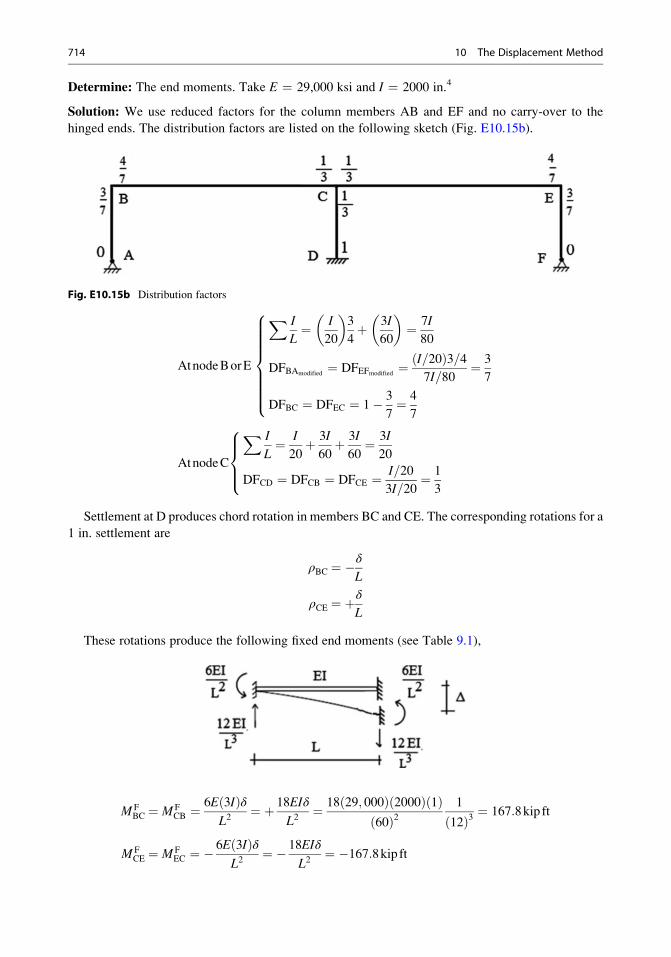
Determine: The end moments. Take E ¼ 29,000 ksi and I ¼ 2000 in.4
Solution: We use reduced factors for the column members AB and EF and no carry-over to the
hinged ends. The distribution factors are listed on the following sketch (Fig. E10.15b).
Fig. E10.15b Distribution factors
AtnodeBorE
X I
L¼ I
20
� �3
4þ 3I
60
� �¼ 7I
80
DFBAmodified¼ DFEFmodified
¼ I=20ð Þ3=47I=80
¼ 3
7
DFBC ¼ DFEC ¼ 1� 3
7¼ 4
7
8>>>>>>><>>>>>>>:
AtnodeC
X I
L¼ I
20þ 3I
60þ 3I
60¼ 3I
20
DFCD ¼ DFCB ¼ DFCE ¼ I=20
3I=20¼ 1
3
8>><>>:
Settlement at D produces chord rotation in members BC and CE. The corresponding rotations for a
1 in. settlement are
ρBC ¼ �δ
L
ρCE ¼ þδ
L
These rotations produce the following fixed end moments (see Table 9.1),
M FBC ¼ M F
CB ¼6E 3Ið Þδ
L2¼ þ 18EIδ
L2¼ 18 29; 000ð Þ 2000ð Þ 1ð Þ
60ð Þ21
12ð Þ3 ¼ 167:8kip ft
M FCE ¼ M F
EC ¼ �6E 3Ið Þδ
L2¼ � 18EIδ
L2¼ �167:8kip ft
714 10 The Displacement Method

These moments are distributed at nodes B and E. Note that no unbalanced moment occurs at node
C (Fig. E10.15c).
Fig. E10.15c
The final bending moment distributions are plotted in Fig. E10.15d.
Fig. E10.15d
Example 10.16: Two-Bay Portal Frame—Temperature Increase
Given: The frame shown in Fig. E10.16a. Consider members BC and CE to experience a temperature
increase of ΔT.
Fig. E10.16a
Determine: The end moments.
10.7 Moment Distribution: Frame Structures 715
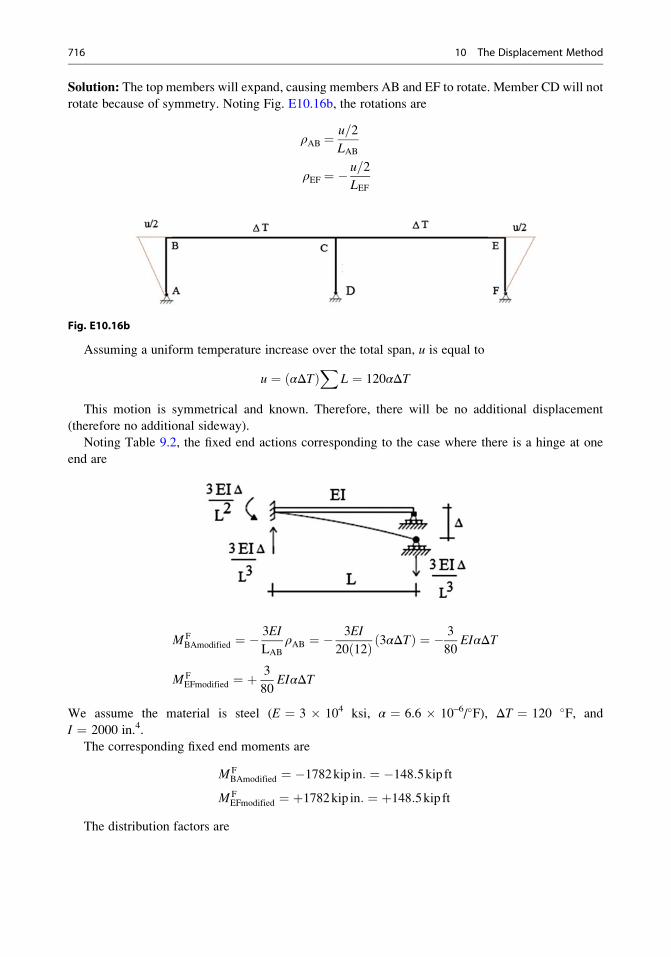
Solution: The top members will expand, causing members AB and EF to rotate. Member CD will not
rotate because of symmetry. Noting Fig. E10.16b, the rotations are
ρAB ¼u=2
LAB
ρEF ¼ �u=2
LEF
Fig. E10.16b
Assuming a uniform temperature increase over the total span, u is equal to
u ¼ αΔTð ÞX
L ¼ 120αΔT
This motion is symmetrical and known. Therefore, there will be no additional displacement
(therefore no additional sideway).
Noting Table 9.2, the fixed end actions corresponding to the case where there is a hinge at one
end are
M FBAmodified ¼ �
3EI
LAB
ρAB ¼ �3EI
20 12ð Þ 3αΔTð Þ ¼ � 3
80EIαΔT
M FEFmodified ¼ þ
3
80EIαΔT
We assume the material is steel (E ¼ 3 � 104 ksi, α ¼ 6.6 � 10–6/�F), ΔT ¼ 120 �F, and
I ¼ 2000 in.4.
The corresponding fixed end moments are
M FBAmodified ¼ �1782kip in: ¼ �148:5kip ft
M FEFmodified ¼ þ1782kip in: ¼ þ148:5kip ft
The distribution factors are
716 10 The Displacement Method
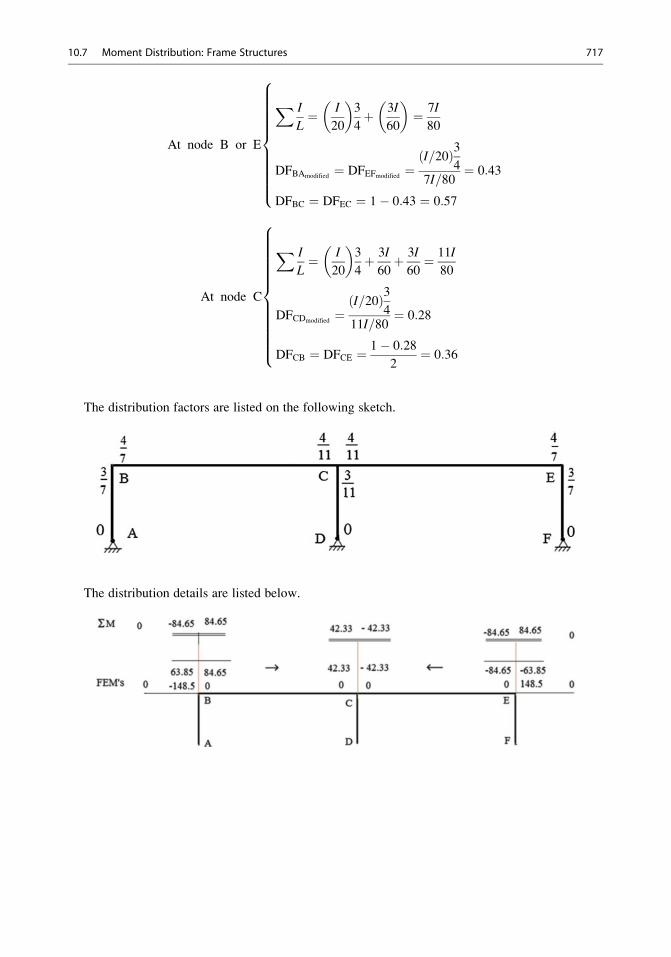
At node B or E
X I
L¼ I
20
� �3
4þ 3I
60
� �¼ 7I
80
DFBAmodified¼ DFEFmodified
¼I=20ð Þ3
47I=80
¼ 0:43
DFBC ¼ DFEC ¼ 1� 0:43 ¼ 0:57
8>>>>>>>>>><>>>>>>>>>>:
At node C
X I
L¼ I
20
� �3
4þ 3I
60þ 3I
60¼ 11I
80
DFCDmodified¼
I=20ð Þ34
11I=80¼ 0:28
DFCB ¼ DFCE ¼ 1� 0:28
2¼ 0:36
8>>>>>>>>>>>><>>>>>>>>>>>>:
The distribution factors are listed on the following sketch.
The distribution details are listed below.
10.7 Moment Distribution: Frame Structures 717
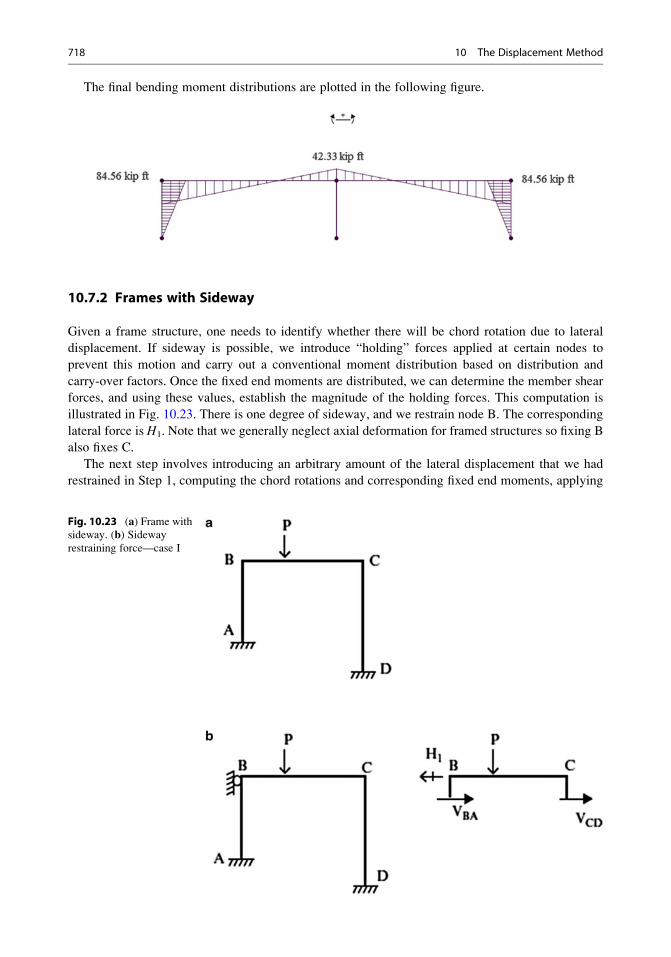
The final bending moment distributions are plotted in the following figure.
10.7.2 Frames with Sideway
Given a frame structure, one needs to identify whether there will be chord rotation due to lateral
displacement. If sideway is possible, we introduce “holding” forces applied at certain nodes to
prevent this motion and carry out a conventional moment distribution based on distribution and
carry-over factors. Once the fixed end moments are distributed, we can determine the member shear
forces, and using these values, establish the magnitude of the holding forces. This computation is
illustrated in Fig. 10.23. There is one degree of sideway, and we restrain node B. The corresponding
lateral force is H1. Note that we generally neglect axial deformation for framed structures so fixing B
also fixes C.
The next step involves introducing an arbitrary amount of the lateral displacement that we had
restrained in Step 1, computing the chord rotations and corresponding fixed end moments, applying
Fig. 10.23 (a) Frame with
sideway. (b) Sidewayrestraining force—case I
718 10 The Displacement Method
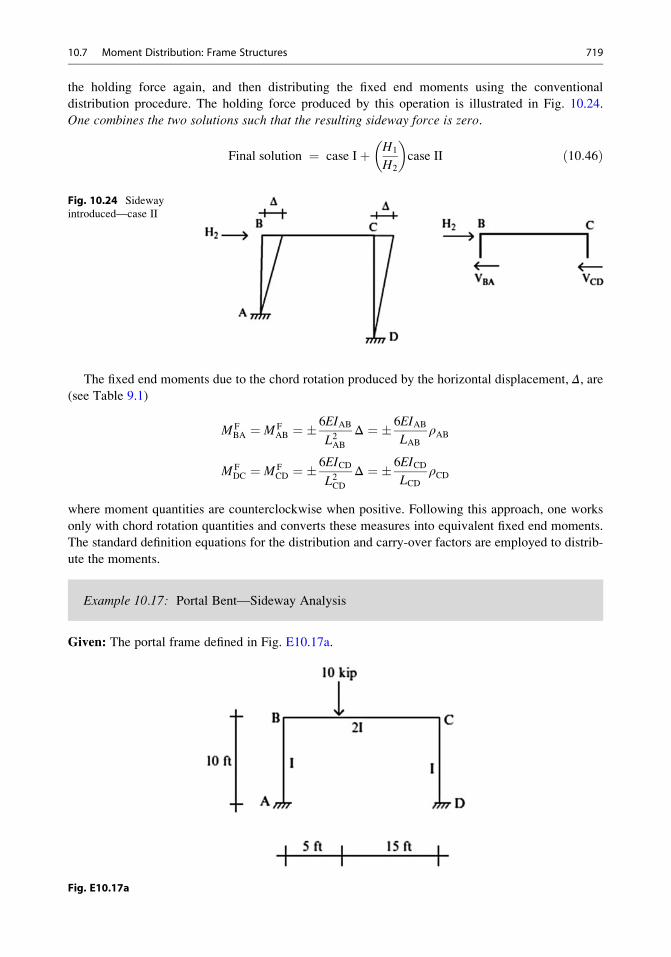
the holding force again, and then distributing the fixed end moments using the conventional
distribution procedure. The holding force produced by this operation is illustrated in Fig. 10.24.
One combines the two solutions such that the resulting sideway force is zero.
Final solution ¼ case Iþ H1
H2
� �case II ð10:46Þ
The fixed end moments due to the chord rotation produced by the horizontal displacement, Δ, are(see Table 9.1)
M FBA ¼ M F
AB ¼ �6EIAB
L2ABΔ ¼ � 6EIAB
LABρAB
M FDC ¼ M F
CD ¼ �6EICD
L2CDΔ ¼ � 6EICD
LCDρCD
where moment quantities are counterclockwise when positive. Following this approach, one works
only with chord rotation quantities and converts these measures into equivalent fixed end moments.
The standard definition equations for the distribution and carry-over factors are employed to distrib-
ute the moments.
Example 10.17: Portal Bent—Sideway Analysis
Given: The portal frame defined in Fig. E10.17a.
Fig. E10.17a
Fig. 10.24 Sideway
introduced—case II
10.7 Moment Distribution: Frame Structures 719
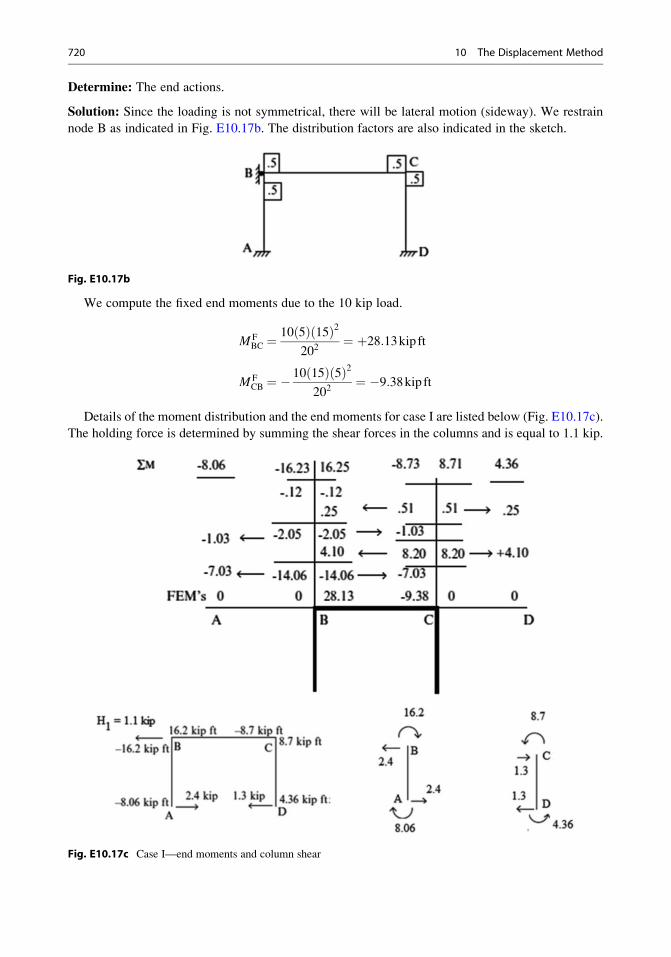
Determine: The end actions.
Solution: Since the loading is not symmetrical, there will be lateral motion (sideway). We restrain
node B as indicated in Fig. E10.17b. The distribution factors are also indicated in the sketch.
Fig. E10.17b
We compute the fixed end moments due to the 10 kip load.
M FBC ¼
10 5ð Þ 15ð Þ2202
¼ þ28:13kip ft
M FCB ¼ �
10 15ð Þ 5ð Þ2202
¼ �9:38kip ft
Details of the moment distribution and the end moments for case I are listed below (Fig. E10.17c).
The holding force is determined by summing the shear forces in the columns and is equal to 1.1 kip.
Fig. E10.17c Case I—end moments and column shear
720 10 The Displacement Method
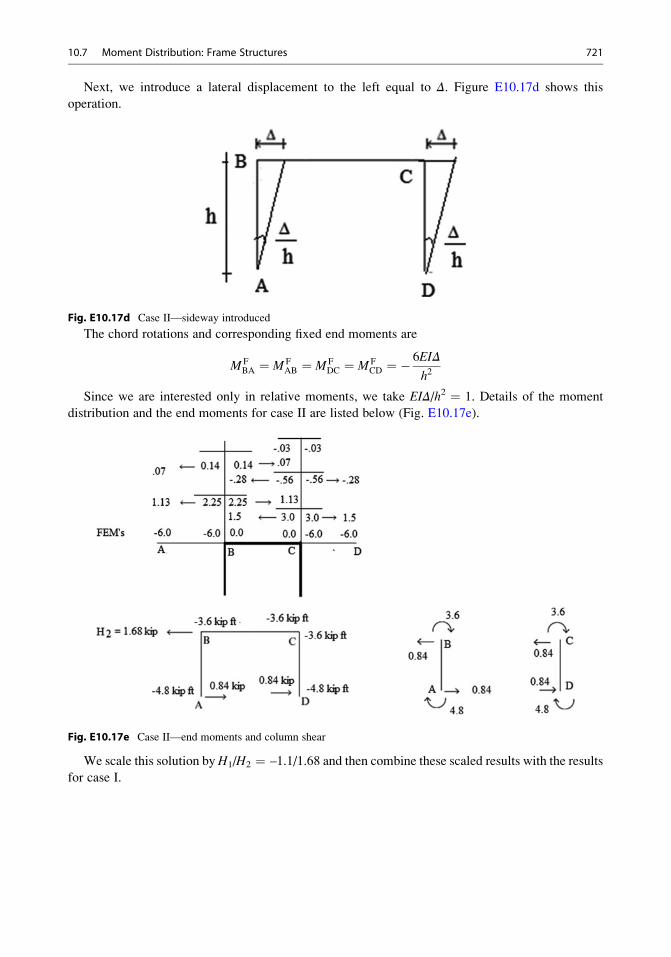
Next, we introduce a lateral displacement to the left equal to Δ. Figure E10.17d shows this
operation.
Fig. E10.17d Case II—sideway introduced
The chord rotations and corresponding fixed end moments are
M FBA ¼ M F
AB ¼ M FDC ¼ M F
CD ¼ �6EIΔ
h2
Since we are interested only in relative moments, we take EIΔ/h2 ¼ 1. Details of the moment
distribution and the end moments for case II are listed below (Fig. E10.17e).
Fig. E10.17e Case II—end moments and column shear
We scale this solution byH1/H2 ¼ –1.1/1.68 and then combine these scaled results with the results
for case I.
10.7 Moment Distribution: Frame Structures 721
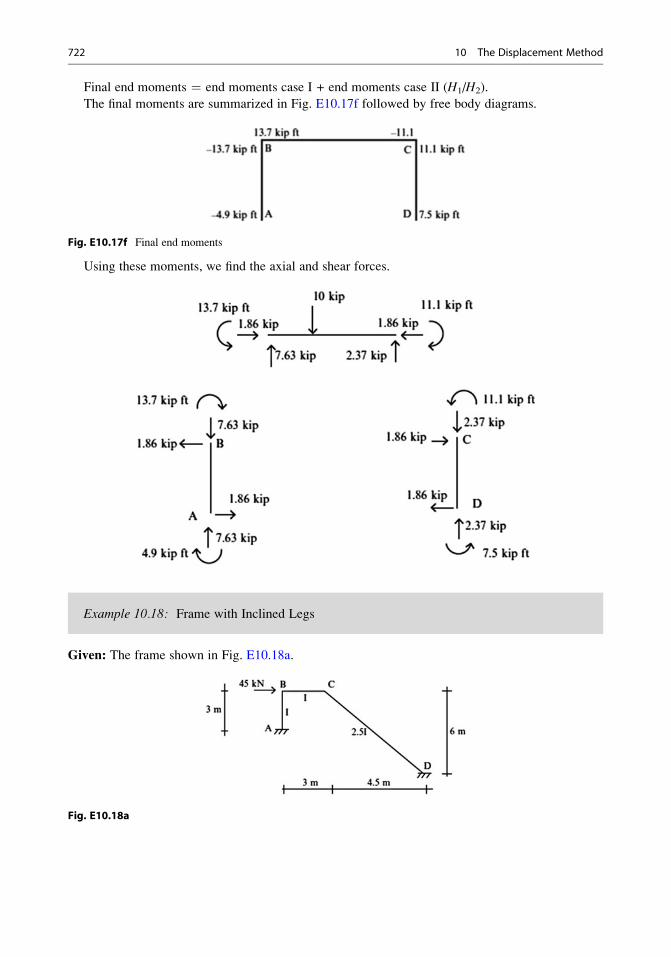
Final end moments ¼ end moments case I + end moments case II (H1/H2).
The final moments are summarized in Fig. E10.17f followed by free body diagrams.
Fig. E10.17f Final end moments
Using these moments, we find the axial and shear forces.
Example 10.18: Frame with Inclined Legs
Given: The frame shown in Fig. E10.18a.
Fig. E10.18a
722 10 The Displacement Method
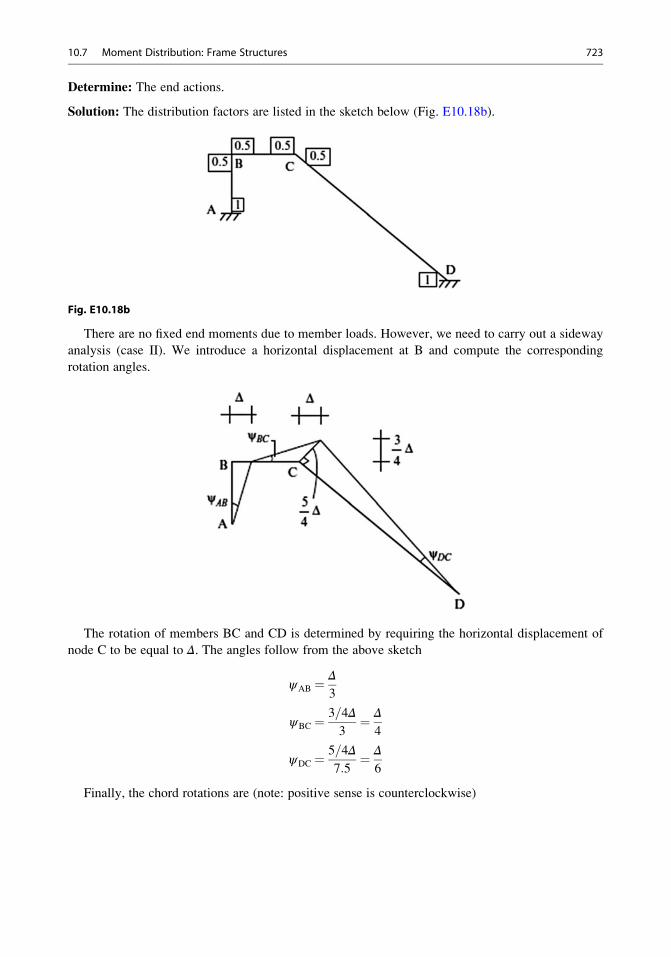
Determine: The end actions.
Solution: The distribution factors are listed in the sketch below (Fig. E10.18b).
Fig. E10.18b
There are no fixed end moments due to member loads. However, we need to carry out a sideway
analysis (case II). We introduce a horizontal displacement at B and compute the corresponding
rotation angles.
The rotation of members BC and CD is determined by requiring the horizontal displacement of
node C to be equal to Δ. The angles follow from the above sketch
ψAB ¼Δ
3
ψBC ¼3=4Δ
3¼ Δ
4
ψDC ¼5=4Δ
7:5¼ Δ
6
Finally, the chord rotations are (note: positive sense is counterclockwise)
10.7 Moment Distribution: Frame Structures 723
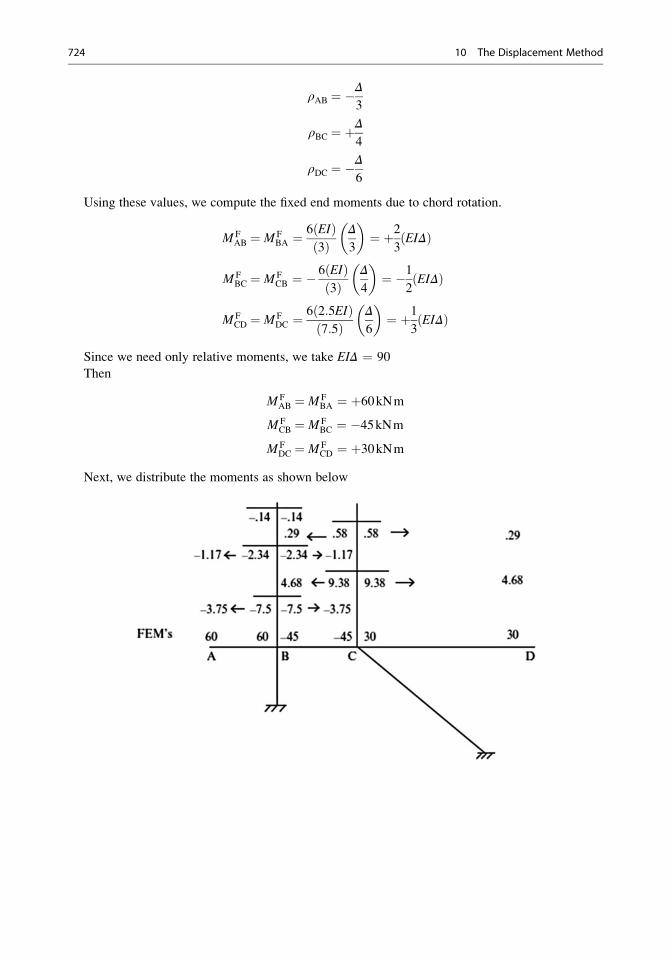
ρAB ¼ �Δ
3
ρBC ¼ þΔ
4
ρDC ¼ �Δ
6
Using these values, we compute the fixed end moments due to chord rotation.
M FAB ¼ M F
BA ¼6 EIð Þ3ð Þ
Δ
3
� �¼ þ2
3EIΔð Þ
M FBC ¼ M F
CB ¼ �6 EIð Þ3ð Þ
Δ
4
� �¼ �1
2EIΔð Þ
M FCD ¼ M F
DC ¼6 2:5EIð Þ
7:5ð ÞΔ
6
� �¼ þ1
3EIΔð Þ
Since we need only relative moments, we take EIΔ ¼ 90
Then
M FAB ¼ M F
BA ¼ þ60kNm
M FCB ¼ M F
BC ¼ �45kNm
M FDC ¼ M F
CD ¼ þ30kNm
Next, we distribute the moments as shown below
724 10 The Displacement Method
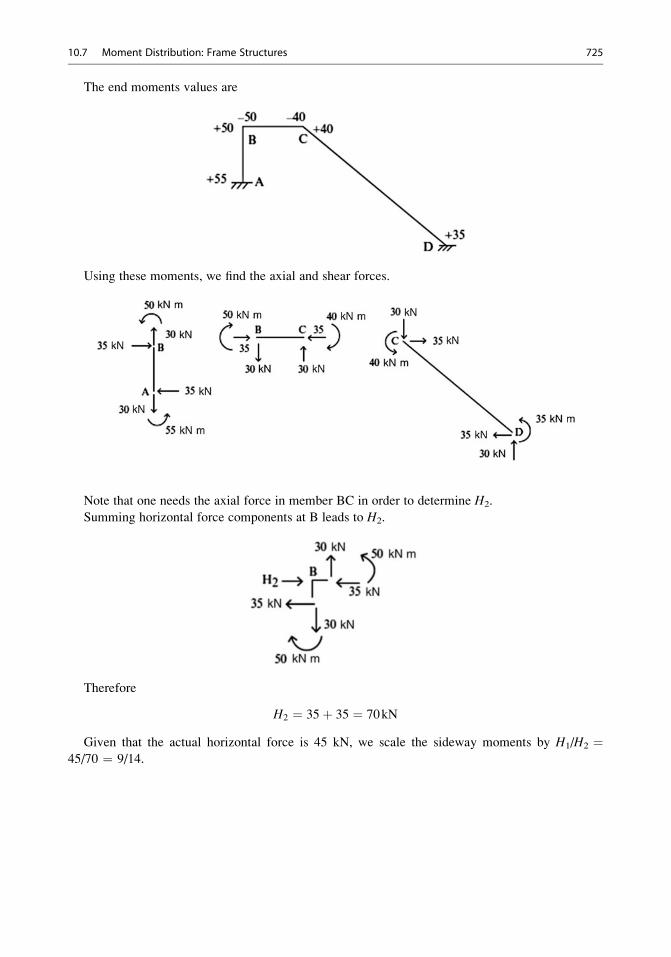
The end moments values are
Using these moments, we find the axial and shear forces.
Note that one needs the axial force in member BC in order to determine H2.
Summing horizontal force components at B leads to H2.
Therefore
H2 ¼ 35þ 35 ¼ 70kN
Given that the actual horizontal force is 45 kN, we scale the sideway moments by H1/H2 ¼45/70 ¼ 9/14.
10.7 Moment Distribution: Frame Structures 725
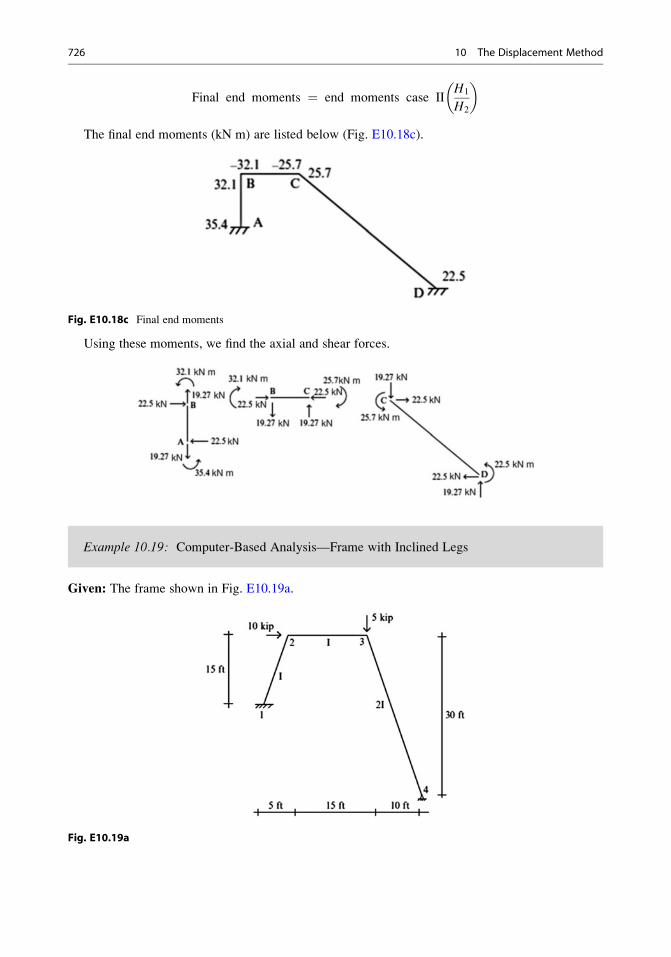
Final end moments ¼ end moments case IIH1
H2
� �
The final end moments (kN m) are listed below (Fig. E10.18c).
Fig. E10.18c Final end moments
Using these moments, we find the axial and shear forces.
Example 10.19: Computer-Based Analysis—Frame with Inclined Legs
Given: The frame shown in Fig. E10.19a.
Fig. E10.19a
726 10 The Displacement Method
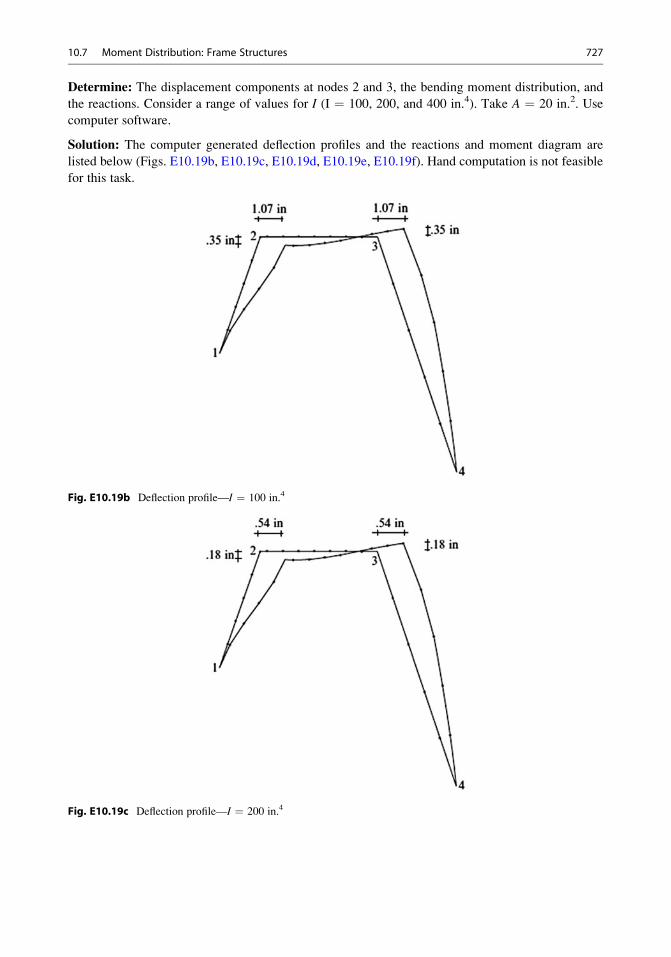
Determine: The displacement components at nodes 2 and 3, the bending moment distribution, and
the reactions. Consider a range of values for I (I ¼ 100, 200, and 400 in.4). Take A ¼ 20 in.2. Use
computer software.
Solution: The computer generated deflection profiles and the reactions and moment diagram are
listed below (Figs. E10.19b, E10.19c, E10.19d, E10.19e, E10.19f). Hand computation is not feasible
for this task.
Fig. E10.19b Deflection profile—I ¼ 100 in.4
Fig. E10.19c Deflection profile—I ¼ 200 in.4
10.7 Moment Distribution: Frame Structures 727
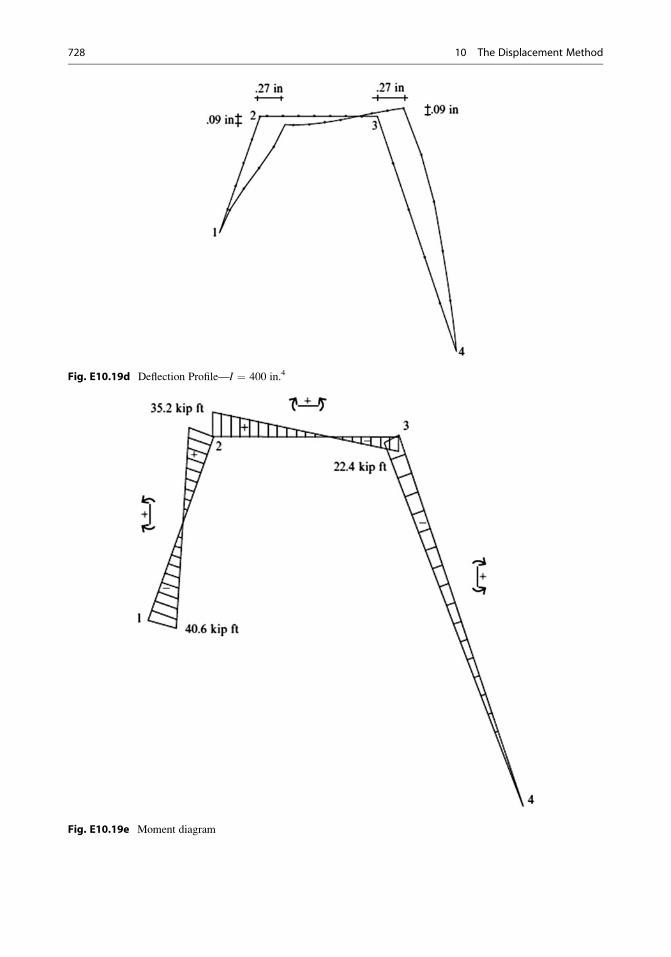
Fig. E10.19d Deflection Profile—I ¼ 400 in.4
Fig. E10.19e Moment diagram
728 10 The Displacement Method
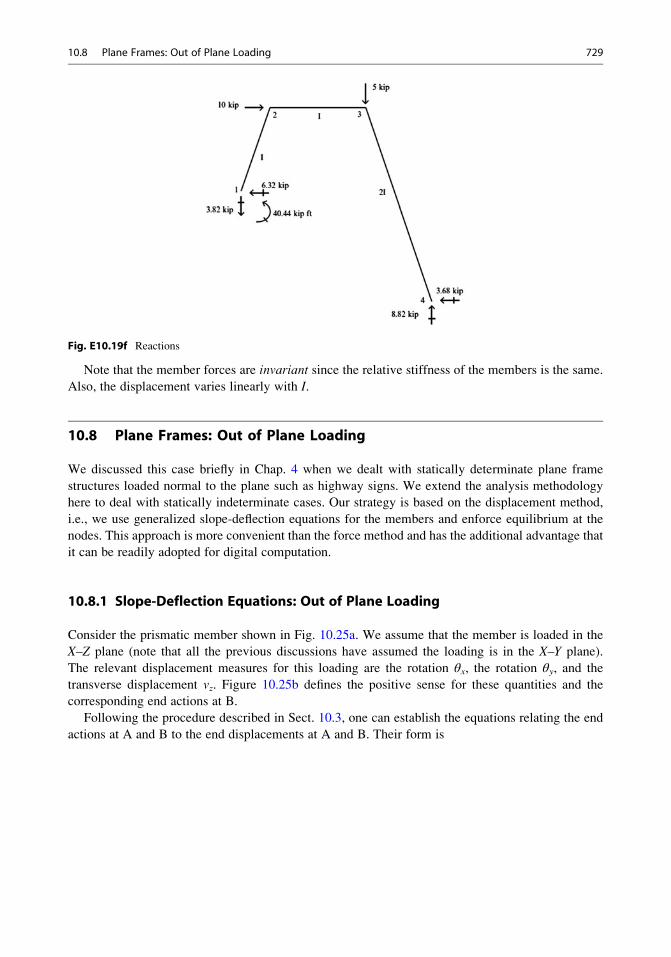
Fig. E10.19f Reactions
Note that the member forces are invariant since the relative stiffness of the members is the same.
Also, the displacement varies linearly with I.
10.8 Plane Frames: Out of Plane Loading
We discussed this case briefly in Chap. 4 when we dealt with statically determinate plane frame
structures loaded normal to the plane such as highway signs. We extend the analysis methodology
here to deal with statically indeterminate cases. Our strategy is based on the displacement method,
i.e., we use generalized slope-deflection equations for the members and enforce equilibrium at the
nodes. This approach is more convenient than the force method and has the additional advantage that
it can be readily adopted for digital computation.
10.8.1 Slope-Deflection Equations: Out of Plane Loading
Consider the prismatic member shown in Fig. 10.25a. We assume that the member is loaded in the
X–Z plane (note that all the previous discussions have assumed the loading is in the X–Y plane).
The relevant displacement measures for this loading are the rotation θx, the rotation θy, and the
transverse displacement vz. Figure 10.25b defines the positive sense for these quantities and the
corresponding end actions at B.
Following the procedure described in Sect. 10.3, one can establish the equations relating the end
actions at A and B to the end displacements at A and B. Their form is
10.8 Plane Frames: Out of Plane Loading 729
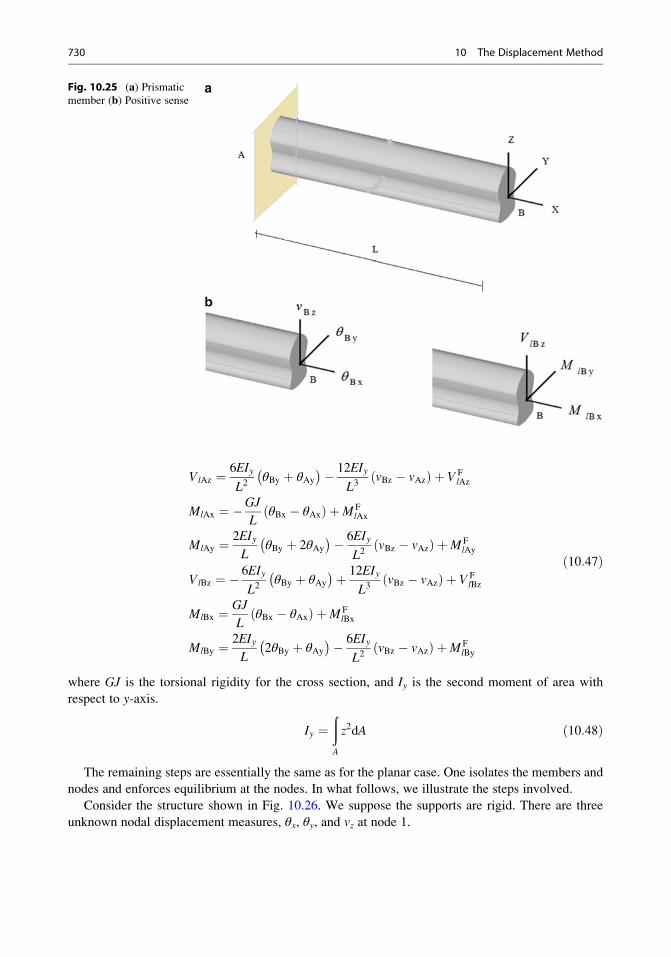
VlAz ¼ 6EIy
L2θBy þ θAy� �� 12EIy
L3vBz � vAzð Þ þ V F
lAz
MlAx ¼ �GJ
LθBx � θAxð Þ þM F
lAx
MlAy ¼ 2EIyL
θBy þ 2θAy� �� 6EIy
L2vBz � vAzð Þ þM F
lAy
VlBz ¼ � 6EIy
L2θBy þ θAy� �þ 12EIy
L3vBz � vAzð Þ þ V F
lBz
MlBx ¼ GJ
LθBx � θAxð Þ þM F
lBx
MlBy ¼ 2EIyL
2θBy þ θAy� �� 6EIy
L2vBz � vAzð Þ þM F
lBy
ð10:47Þ
where GJ is the torsional rigidity for the cross section, and Iy is the second moment of area with
respect to y-axis.
Iy ¼ðA
z2dA ð10:48Þ
The remaining steps are essentially the same as for the planar case. One isolates the members and
nodes and enforces equilibrium at the nodes. In what follows, we illustrate the steps involved.
Consider the structure shown in Fig. 10.26. We suppose the supports are rigid. There are three
unknown nodal displacement measures, θx, θy, and vz at node 1.
Fig. 10.25 (a) Prismatic
member (b) Positive sense
730 10 The Displacement Method
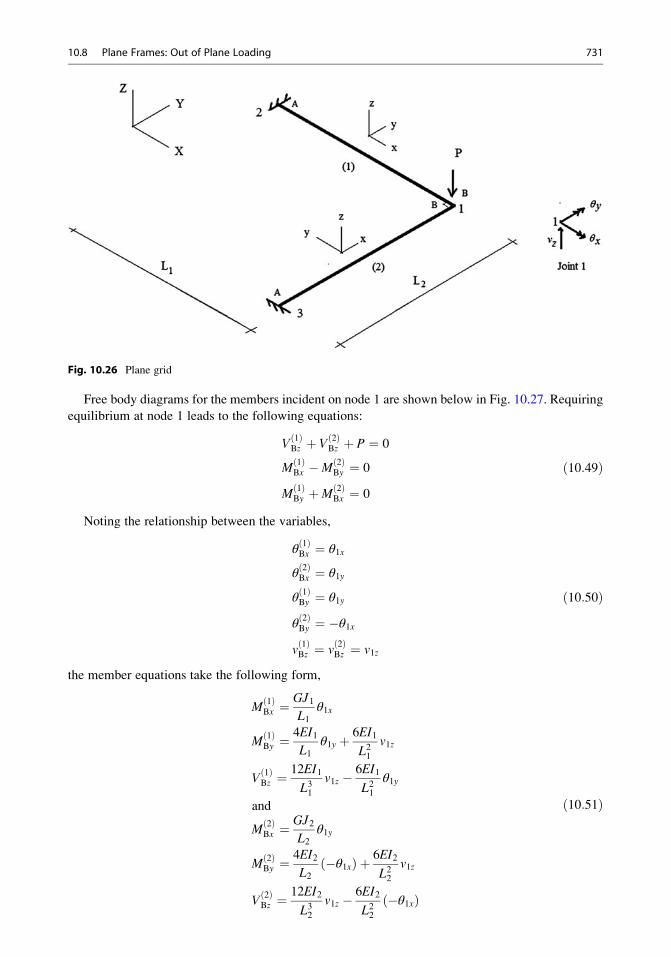
Free body diagrams for the members incident on node 1 are shown below in Fig. 10.27. Requiring
equilibrium at node 1 leads to the following equations:
V1ð ÞBz þ V
2ð ÞBz þ P ¼ 0
M1ð ÞBx �M
2ð ÞBy ¼ 0
M1ð ÞBy þM
2ð ÞBx ¼ 0
ð10:49Þ
Noting the relationship between the variables,
θ 1ð ÞBx ¼ θ1x
θ 2ð ÞBx ¼ θ1y
θ 1ð ÞBy ¼ θ1y
θ 2ð ÞBy ¼ �θ1x
v1ð ÞBz ¼ v
2ð ÞBz ¼ v1z
ð10:50Þ
the member equations take the following form,
M1ð ÞBx ¼
GJ1L1
θ1x
M1ð ÞBy ¼
4EI1L1
θ1y þ 6EI1
L21v1z
V1ð ÞBz ¼
12EI1
L31v1z � 6EI1
L21θ1y
and
M2ð ÞBx ¼
GJ2L2
θ1y
M2ð ÞBy ¼
4EI2L2�θ1xð Þ þ 6EI2
L22v1z
V2ð ÞBz ¼
12EI2
L32v1z � 6EI2
L22�θ1xð Þ
ð10:51Þ
Fig. 10.26 Plane grid
10.8 Plane Frames: Out of Plane Loading 731
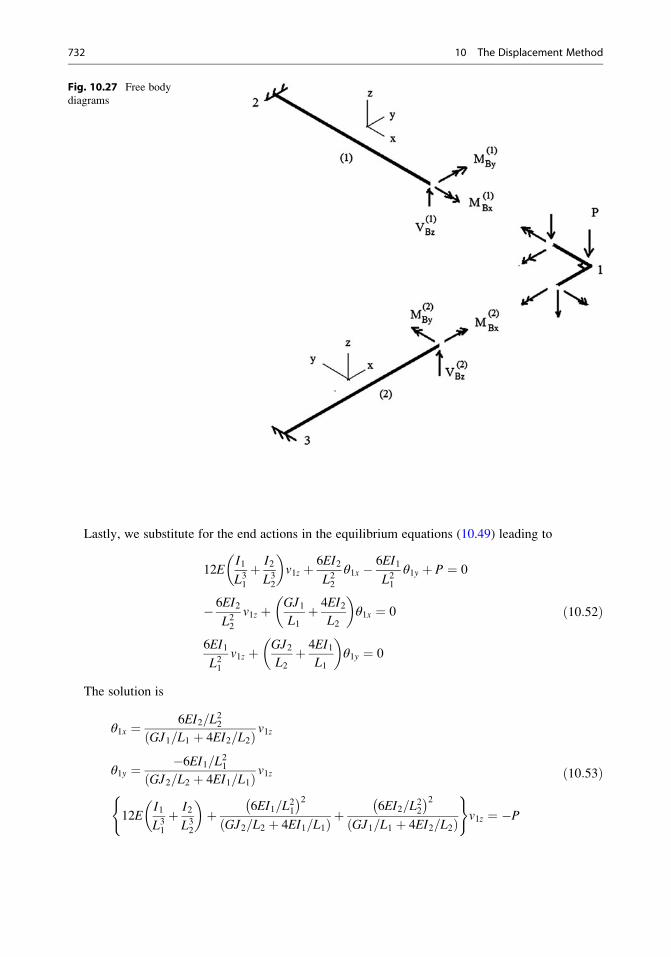
Lastly, we substitute for the end actions in the equilibrium equations (10.49) leading to
12EI1
L31þ I2
L32
� �v1z þ 6EI2
L22θ1x � 6EI1
L21θ1y þ P ¼ 0
� 6EI2
L22v1z þ GJ1
L1þ 4EI2
L2
� �θ1x ¼ 0
6EI1
L21v1z þ GJ2
L2þ 4EI1
L1
� �θ1y ¼ 0
ð10:52Þ
The solution is
θ1x ¼ 6EI2=L22
GJ1=L1 þ 4EI2=L2ð Þ v1z
θ1y ¼ �6EI1=L21GJ2=L2 þ 4EI1=L1ð Þ v1z
12EI1
L31þ I2
L32
� �þ 6EI1=L
21
� �2GJ2=L2 þ 4EI1=L1ð Þ þ
6EI2=L22
� �2GJ1=L1 þ 4EI2=L2ð Þ
( )v1z ¼ �P
ð10:53Þ
Fig. 10.27 Free body
diagrams
732 10 The Displacement Method
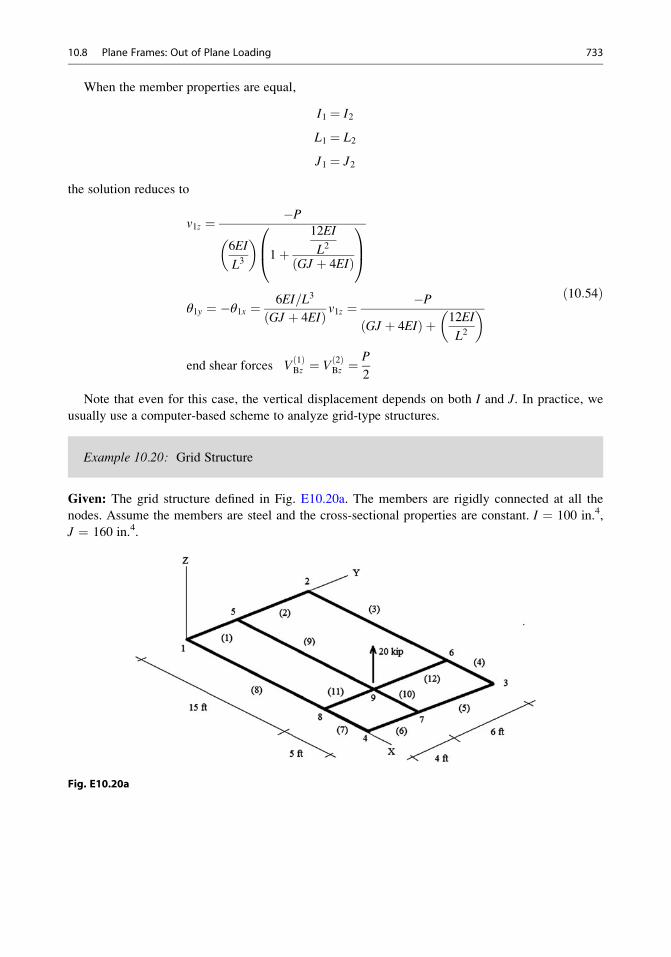
When the member properties are equal,
I1 ¼ I2
L1 ¼ L2
J1 ¼ J2
the solution reduces to
v1z ¼ �P
6EI
L3
� �1þ
12EI
L2
GJ þ 4EIð Þ
0B@
1CA
θ1y ¼ �θ1x ¼ 6EI=L3
GJ þ 4EIð Þ v1z ¼�P
GJ þ 4EIð Þ þ 12EI
L2
� �
end shear forces V1ð ÞBz ¼ V
2ð ÞBz ¼
P
2
ð10:54Þ
Note that even for this case, the vertical displacement depends on both I and J. In practice, we
usually use a computer-based scheme to analyze grid-type structures.
Example 10.20: Grid Structure
Given: The grid structure defined in Fig. E10.20a. The members are rigidly connected at all the
nodes. Assume the members are steel and the cross-sectional properties are constant. I ¼ 100 in.4,
J ¼ 160 in.4.
Fig. E10.20a
10.8 Plane Frames: Out of Plane Loading 733
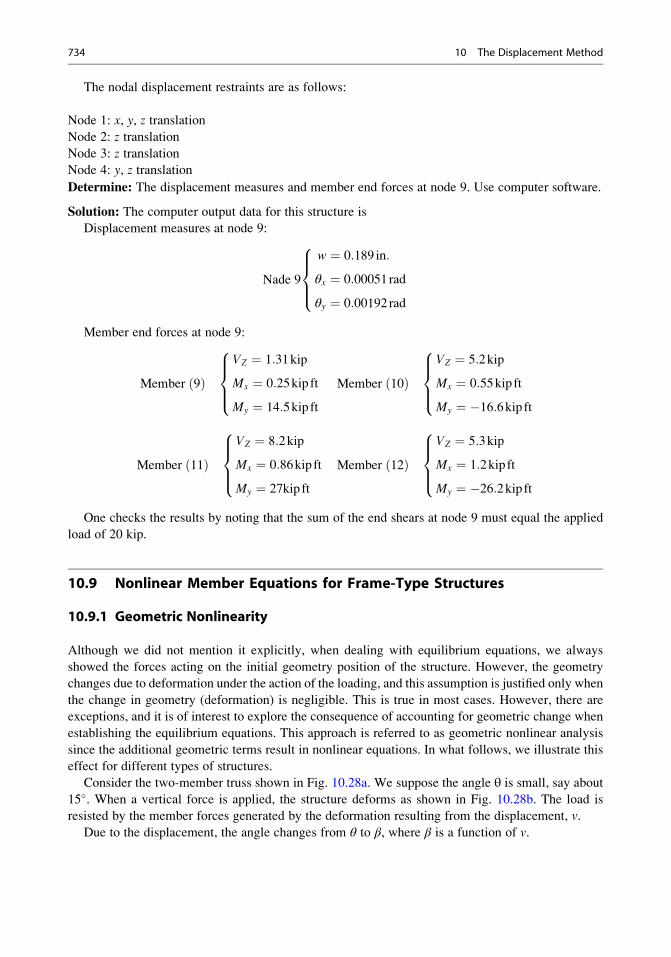
The nodal displacement restraints are as follows:
Node 1: x, y, z translation
Node 2: z translation
Node 3: z translationNode 4: y, z translation
Determine: The displacement measures and member end forces at node 9. Use computer software.
Solution: The computer output data for this structure is
Displacement measures at node 9:
Nade 9
w ¼ 0:189 in:
θx ¼ 0:00051rad
θy ¼ 0:00192rad
8>><>>:
Member end forces at node 9:
Member 9ð ÞVZ ¼ 1:31kip
Mx ¼ 0:25kip ft
My ¼ 14:5kip ft
8>><>>: Member 10ð Þ
VZ ¼ 5:2kip
Mx ¼ 0:55kip ft
My ¼ �16:6kip ft
8>><>>:
Member 11ð ÞVZ ¼ 8:2kip
Mx ¼ 0:86kip ft
My ¼ 27kip ft
8>><>>: Member 12ð Þ
VZ ¼ 5:3kip
Mx ¼ 1:2kip ft
My ¼ �26:2kip ft
8>><>>:
One checks the results by noting that the sum of the end shears at node 9 must equal the applied
load of 20 kip.
10.9 Nonlinear Member Equations for Frame-Type Structures
10.9.1 Geometric Nonlinearity
Although we did not mention it explicitly, when dealing with equilibrium equations, we always
showed the forces acting on the initial geometry position of the structure. However, the geometry
changes due to deformation under the action of the loading, and this assumption is justified only when
the change in geometry (deformation) is negligible. This is true in most cases. However, there are
exceptions, and it is of interest to explore the consequence of accounting for geometric change when
establishing the equilibrium equations. This approach is referred to as geometric nonlinear analysis
since the additional geometric terms result in nonlinear equations. In what follows, we illustrate this
effect for different types of structures.
Consider the two-member truss shown in Fig. 10.28a. We suppose the angle θ is small, say about
15�. When a vertical force is applied, the structure deforms as shown in Fig. 10.28b. The load is
resisted by the member forces generated by the deformation resulting from the displacement, v.
Due to the displacement, the angle changes from θ to β, where β is a function of v.
734 10 The Displacement Method
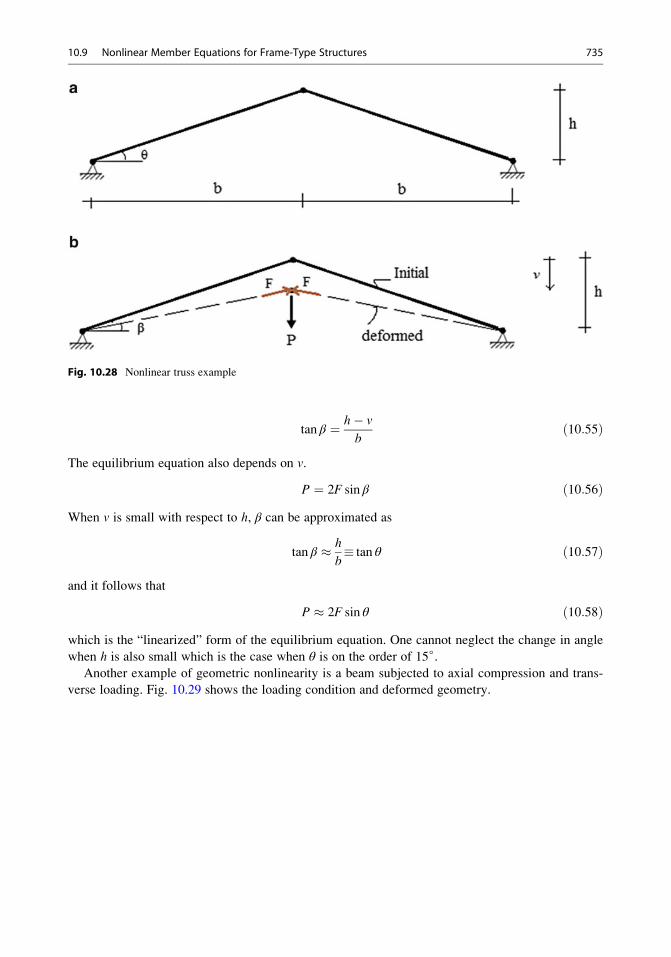
tan β ¼ h� v
bð10:55Þ
The equilibrium equation also depends on v.
P ¼ 2F sin β ð10:56ÞWhen v is small with respect to h, β can be approximated as
tan β � h
b� tan θ ð10:57Þ
and it follows that
P � 2F sin θ ð10:58Þwhich is the “linearized” form of the equilibrium equation. One cannot neglect the change in angle
when h is also small which is the case when θ is on the order of 15∘.
Another example of geometric nonlinearity is a beam subjected to axial compression and trans-
verse loading. Fig. 10.29 shows the loading condition and deformed geometry.
Fig. 10.28 Nonlinear truss example
10.9 Nonlinear Member Equations for Frame-Type Structures 735
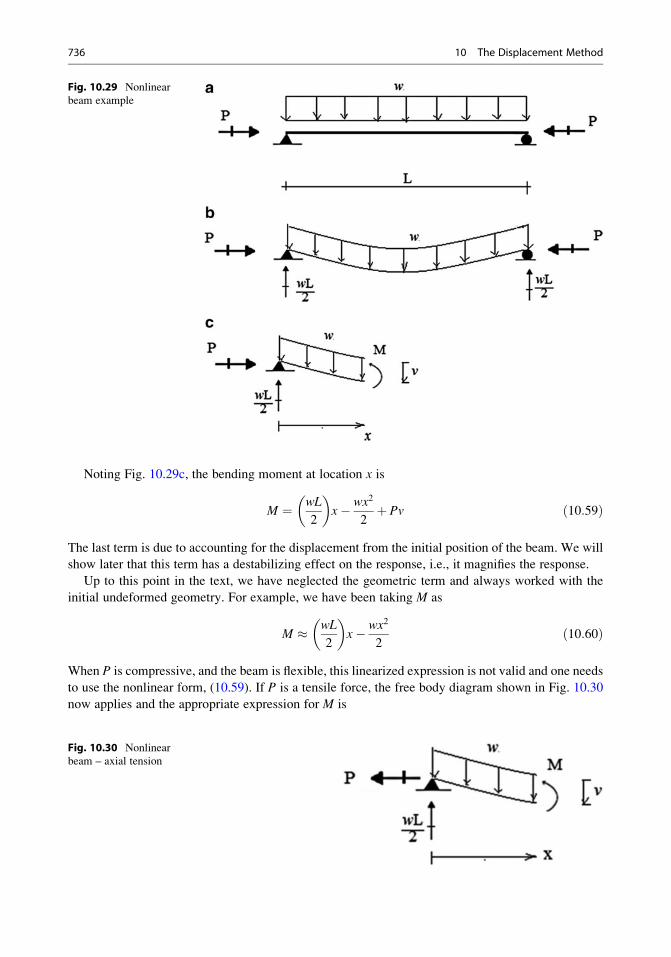
Noting Fig. 10.29c, the bending moment at location x is
M ¼ wL
2
� �x� wx2
2þ Pv ð10:59Þ
The last term is due to accounting for the displacement from the initial position of the beam. We will
show later that this term has a destabilizing effect on the response, i.e., it magnifies the response.
Up to this point in the text, we have neglected the geometric term and always worked with the
initial undeformed geometry. For example, we have been taking M as
M � wL
2
� �x� wx2
2ð10:60Þ
When P is compressive, and the beam is flexible, this linearized expression is not valid and one needs
to use the nonlinear form, (10.59). If P is a tensile force, the free body diagram shown in Fig. 10.30
now applies and the appropriate expression for M is
Fig. 10.30 Nonlinear
beam – axial tension
Fig. 10.29 Nonlinear
beam example
736 10 The Displacement Method
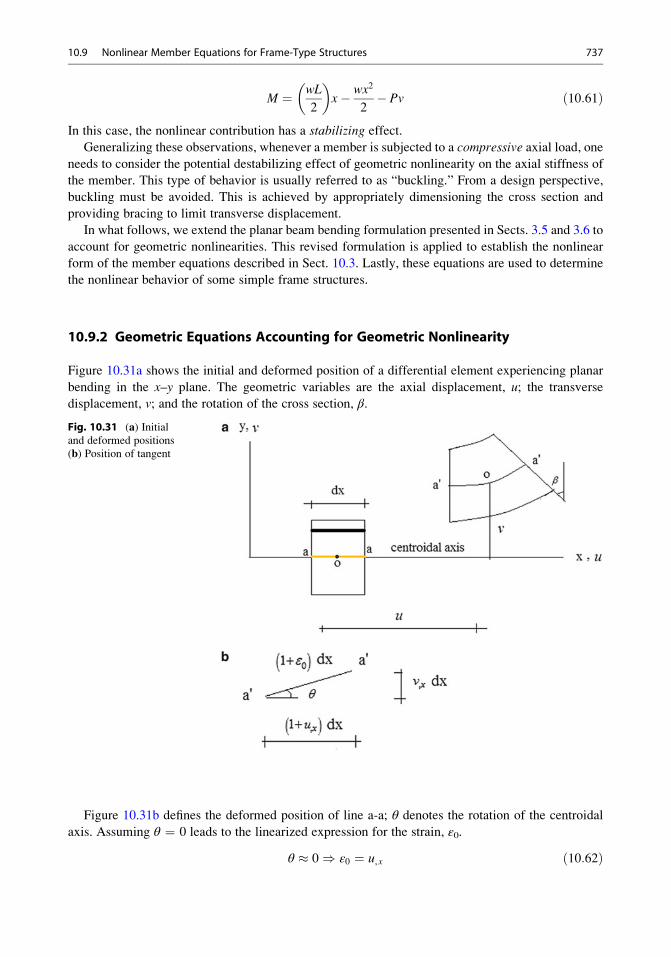
M ¼ wL
2
� �x� wx2
2� Pv ð10:61Þ
In this case, the nonlinear contribution has a stabilizing effect.
Generalizing these observations, whenever a member is subjected to a compressive axial load, one
needs to consider the potential destabilizing effect of geometric nonlinearity on the axial stiffness of
the member. This type of behavior is usually referred to as “buckling.” From a design perspective,
buckling must be avoided. This is achieved by appropriately dimensioning the cross section and
providing bracing to limit transverse displacement.
In what follows, we extend the planar beam bending formulation presented in Sects. 3.5 and 3.6 to
account for geometric nonlinearities. This revised formulation is applied to establish the nonlinear
form of the member equations described in Sect. 10.3. Lastly, these equations are used to determine
the nonlinear behavior of some simple frame structures.
10.9.2 Geometric Equations Accounting for Geometric Nonlinearity
Figure 10.31a shows the initial and deformed position of a differential element experiencing planar
bending in the x–y plane. The geometric variables are the axial displacement, u; the transverse
displacement, v; and the rotation of the cross section, β.
Figure 10.31b defines the deformed position of line a-a; θ denotes the rotation of the centroidal
axis. Assuming θ ¼ 0 leads to the linearized expression for the strain, ε0.
θ � 0) ε0 ¼ u,x ð10:62Þ
Fig. 10.31 (a) Initialand deformed positions
(b) Position of tangent
10.9 Nonlinear Member Equations for Frame-Type Structures 737
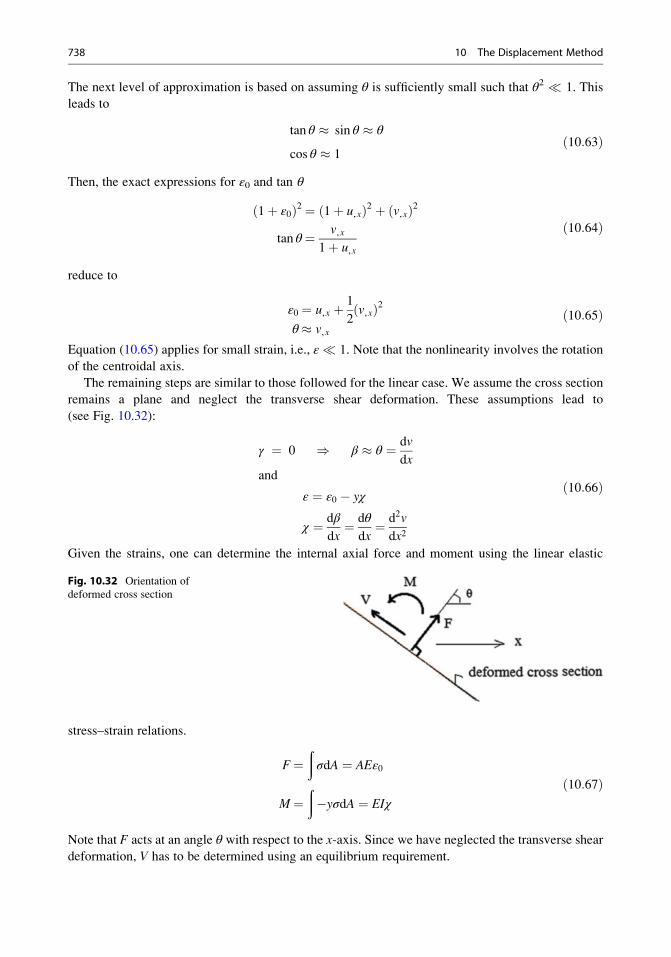
The next level of approximation is based on assuming θ is sufficiently small such that θ2 1. This
leads to
tan θ � sin θ � θ
cos θ � 1ð10:63Þ
Then, the exact expressions for ε0 and tan θ
1þ ε0ð Þ2 ¼ 1þ u,xð Þ2 þ v,xð Þ2
tan θ¼ v,x1þ u,x
ð10:64Þ
reduce to
ε0 ¼ u,x þ 1
2v,xð Þ2
θ� v,xð10:65Þ
Equation (10.65) applies for small strain, i.e., ε 1. Note that the nonlinearity involves the rotation
of the centroidal axis.
The remaining steps are similar to those followed for the linear case. We assume the cross section
remains a plane and neglect the transverse shear deformation. These assumptions lead to
(see Fig. 10.32):
γ ¼ 0 ) β � θ ¼ dv
dxand
ε ¼ ε0 � yχ
χ ¼ dβ
dx¼ dθ
dx¼ d2v
dx2
ð10:66Þ
Given the strains, one can determine the internal axial force and moment using the linear elastic
stress–strain relations.
F¼ðσdA ¼ AEε0
M¼ð�yσdA ¼ EIχ
ð10:67Þ
Note that F acts at an angle θ with respect to the x-axis. Since we have neglected the transverse sheardeformation, V has to be determined using an equilibrium requirement.
Fig. 10.32 Orientation of
deformed cross section
738 10 The Displacement Method
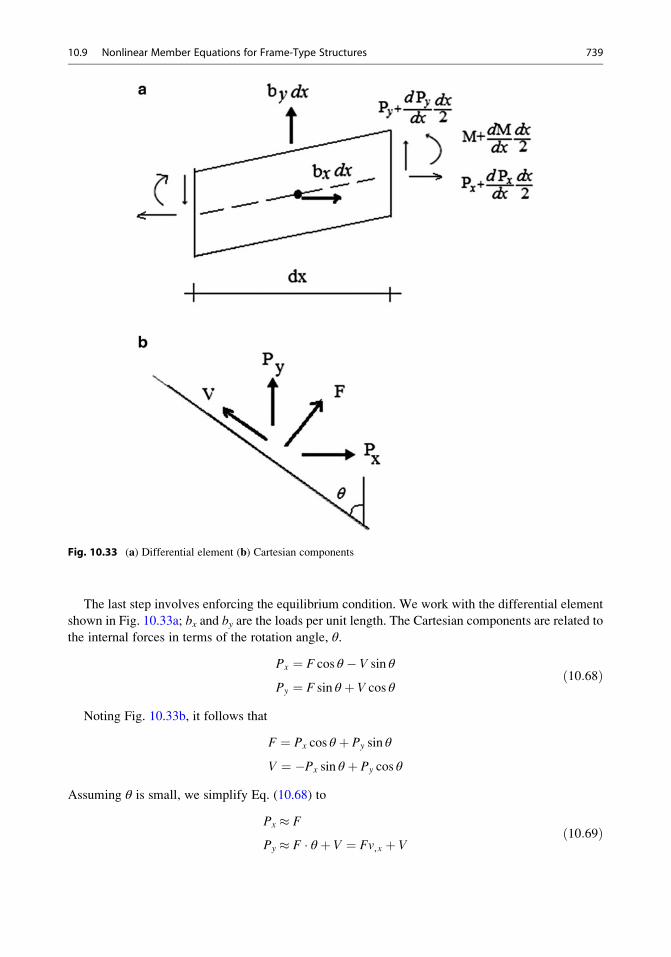
The last step involves enforcing the equilibrium condition. We work with the differential element
shown in Fig. 10.33a; bx and by are the loads per unit length. The Cartesian components are related to
the internal forces in terms of the rotation angle, θ.
Px ¼ F cos θ � V sin θ
Py ¼ F sin θ þ V cos θð10:68Þ
Noting Fig. 10.33b, it follows that
F ¼ Px cos θ þ Py sin θ
V ¼ �Px sin θ þ Py cos θ
Assuming θ is small, we simplify Eq. (10.68) to
Px � F
Py � F θ þ V ¼ Fv,x þ Vð10:69Þ
Fig. 10.33 (a) Differential element (b) Cartesian components
10.9 Nonlinear Member Equations for Frame-Type Structures 739
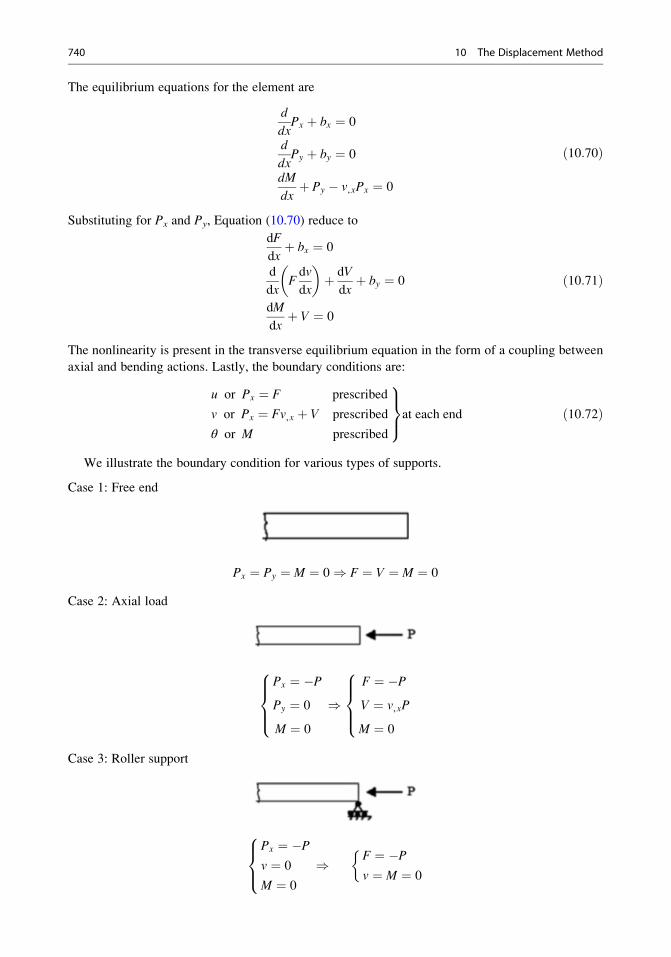
The equilibrium equations for the element are
d
dxPx þ bx ¼ 0
d
dxPy þ by ¼ 0
dM
dxþ Py � v,xPx ¼ 0
ð10:70Þ
Substituting for Px and Py, Equation (10.70) reduce to
dF
dxþ bx ¼ 0
d
dxFdv
dx
� �þ dV
dxþ by ¼ 0
dM
dxþ V ¼ 0
ð10:71Þ
The nonlinearity is present in the transverse equilibrium equation in the form of a coupling between
axial and bending actions. Lastly, the boundary conditions are:
u or Px ¼ F prescribed
v or Px ¼ Fv,x þ V prescribed
θ or M prescribed
9>=>;at each end ð10:72Þ
We illustrate the boundary condition for various types of supports.
Case 1: Free end
Px ¼ Py ¼ M ¼ 0) F ¼ V ¼ M ¼ 0
Case 2: Axial load
Px ¼ �PPy ¼ 0
M ¼ 0
8>><>>: )
F ¼ �PV ¼ v,xP
M ¼ 0
8>><>>:
Case 3: Roller support
Px ¼ �Pv ¼ 0
M ¼ 0
8><>: ) F ¼ �P
v ¼ M ¼ 0
740 10 The Displacement Method
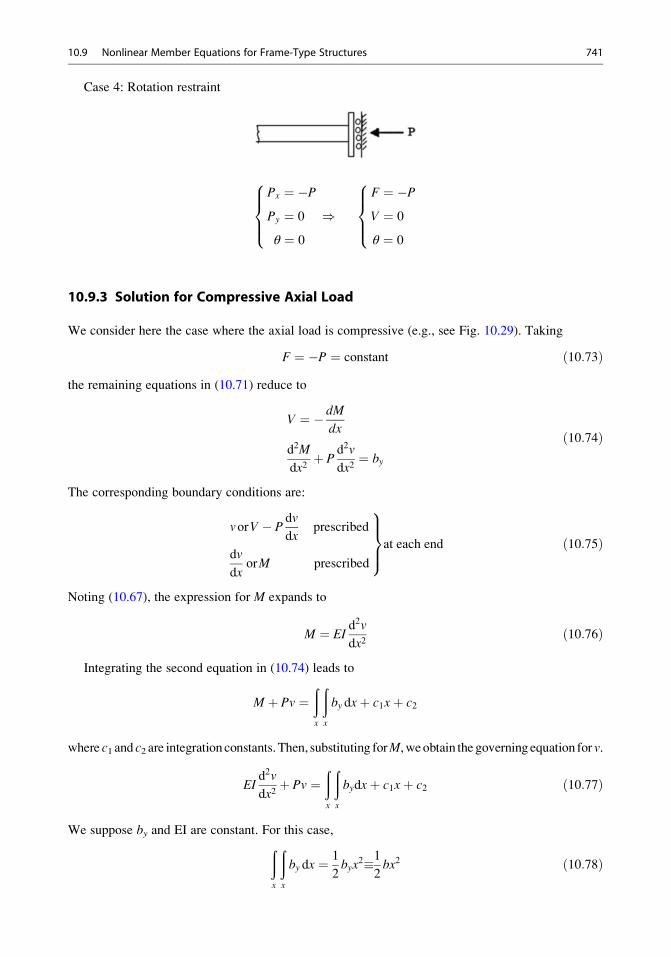
Case 4: Rotation restraint
Px ¼ �PPy ¼ 0
θ ¼ 0
8>><>>: )
F ¼ �PV ¼ 0
θ ¼ 0
8>><>>:
10.9.3 Solution for Compressive Axial Load
We consider here the case where the axial load is compressive (e.g., see Fig. 10.29). Taking
F ¼ �P ¼ constant ð10:73Þthe remaining equations in (10.71) reduce to
V ¼ � dM
dx
d2M
dx2þ P
d2v
dx2¼ by
ð10:74Þ
The corresponding boundary conditions are:
vorV � Pdv
dxprescribed
dv
dxorM prescribed
9>>=>>;at each end ð10:75Þ
Noting (10.67), the expression for M expands to
M ¼ EId2v
dx2ð10:76Þ
Integrating the second equation in (10.74) leads to
M þ Pv ¼ðx
ðx
by dxþ c1xþ c2
where c1 and c2 are integration constants.Then, substituting forM,weobtain the governing equation for v.
EId2v
dx2þ Pv ¼
ðx
ðx
bydxþ c1xþ c2 ð10:77Þ
We suppose by and EI are constant. For this case,ðx
ðx
by dx ¼ 1
2byx
2�12bx2 ð10:78Þ
10.9 Nonlinear Member Equations for Frame-Type Structures 741
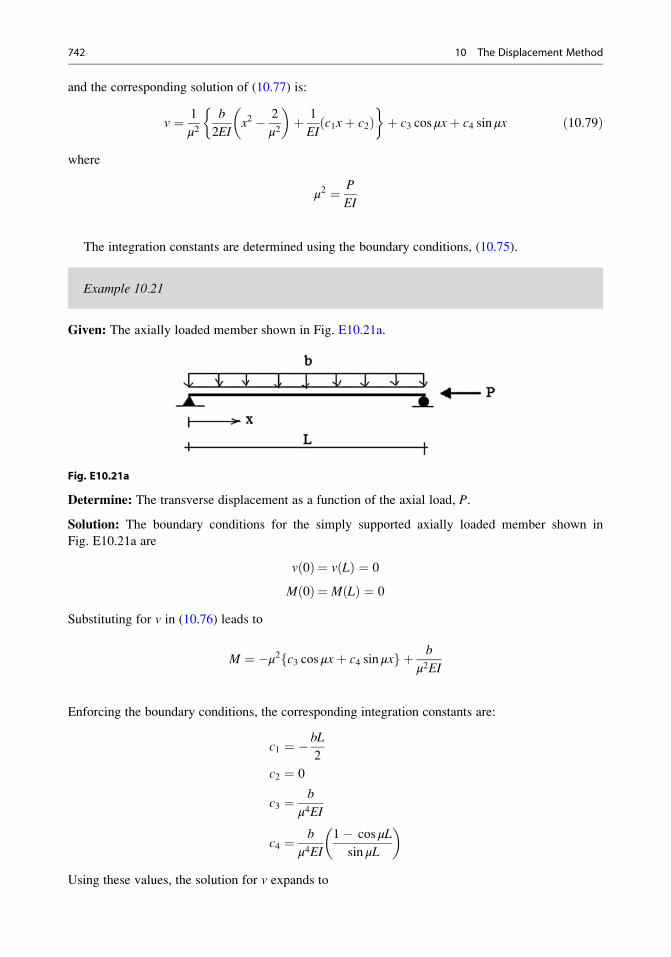
and the corresponding solution of (10.77) is:
v ¼ 1
μ2b
2EIx2 � 2
μ2
� �þ 1
EIc1xþ c2ð Þ
�þ c3 cos μxþ c4 sin μx ð10:79Þ
where
μ2 ¼ P
EI
The integration constants are determined using the boundary conditions, (10.75).
Example 10.21
Given: The axially loaded member shown in Fig. E10.21a.
Fig. E10.21a
Determine: The transverse displacement as a function of the axial load, P.
Solution: The boundary conditions for the simply supported axially loaded member shown in
Fig. E10.21a are
v 0ð Þ ¼ v Lð Þ ¼ 0
M 0ð Þ ¼ M Lð Þ ¼ 0
Substituting for v in (10.76) leads to
M ¼ �μ2 c3 cos μxþ c4 sin μxf g þ b
μ2EI
Enforcing the boundary conditions, the corresponding integration constants are:
c1 ¼ � bL
2
c2 ¼ 0
c3 ¼ b
μ4EI
c4 ¼ b
μ4EI
1� cos μL
sin μL
� �
Using these values, the solution for v expands to
742 10 The Displacement Method
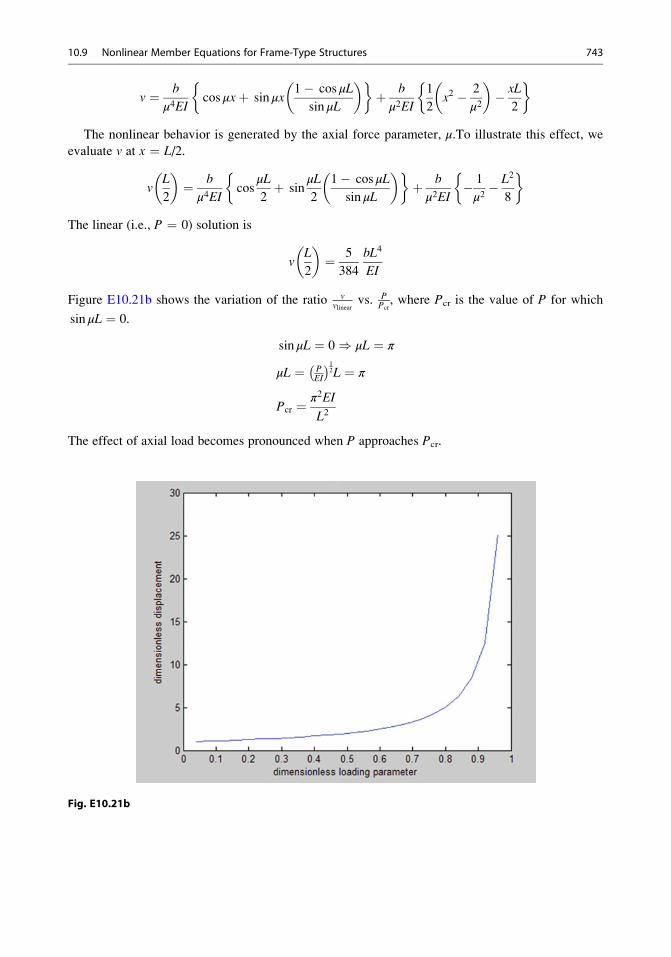
v ¼ b
μ4EIcos μxþ sin μx
1� cos μL
sin μL
� � �þ b
μ2EI
1
2x2 � 2
μ2
� �� xL
2
�
The nonlinear behavior is generated by the axial force parameter, μ.To illustrate this effect, we
evaluate v at x ¼ L/2.
vL
2
� �¼ b
μ4EIcos
μL
2þ sin
μL
2
1� cos μL
sin μL
� � �þ b
μ2EI� 1
μ2� L2
8
�
The linear (i.e., P ¼ 0) solution is
vL
2
� �¼ 5
384
bL4
EI
Figure E10.21b shows the variation of the ratio vvlinear
vs. PPcr, where Pcr is the value of P for which
sin μL ¼ 0.
sin μL ¼ 0) μL ¼ π
μL ¼ PEI
� �12L ¼ π
Pcr ¼ π2EI
L2
The effect of axial load becomes pronounced when P approaches Pcr.
Fig. E10.21b
10.9 Nonlinear Member Equations for Frame-Type Structures 743
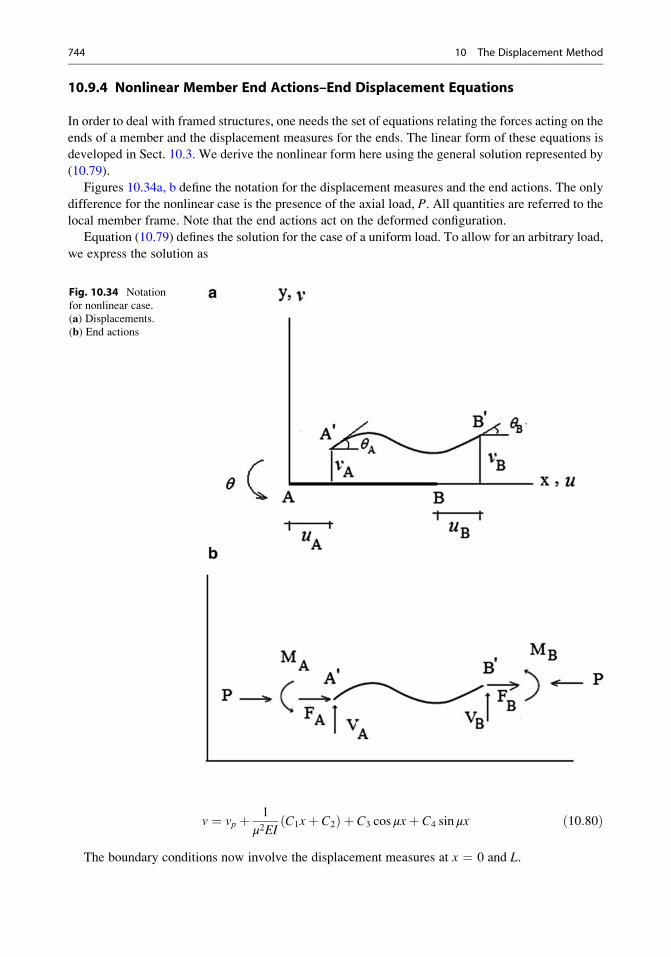
10.9.4 Nonlinear Member End Actions–End Displacement Equations
In order to deal with framed structures, one needs the set of equations relating the forces acting on the
ends of a member and the displacement measures for the ends. The linear form of these equations is
developed in Sect. 10.3. We derive the nonlinear form here using the general solution represented by
(10.79).
Figures 10.34a, b define the notation for the displacement measures and the end actions. The only
difference for the nonlinear case is the presence of the axial load, P. All quantities are referred to the
local member frame. Note that the end actions act on the deformed configuration.
Equation (10.79) defines the solution for the case of a uniform load. To allow for an arbitrary load,
we express the solution as
v ¼ vp þ 1
μ2EIC1xþ C2ð Þ þ C3 cos μxþ C4 sin μx ð10:80Þ
The boundary conditions now involve the displacement measures at x ¼ 0 and L.
Fig. 10.34 Notation
for nonlinear case.
(a) Displacements.
(b) End actions
744 10 The Displacement Method
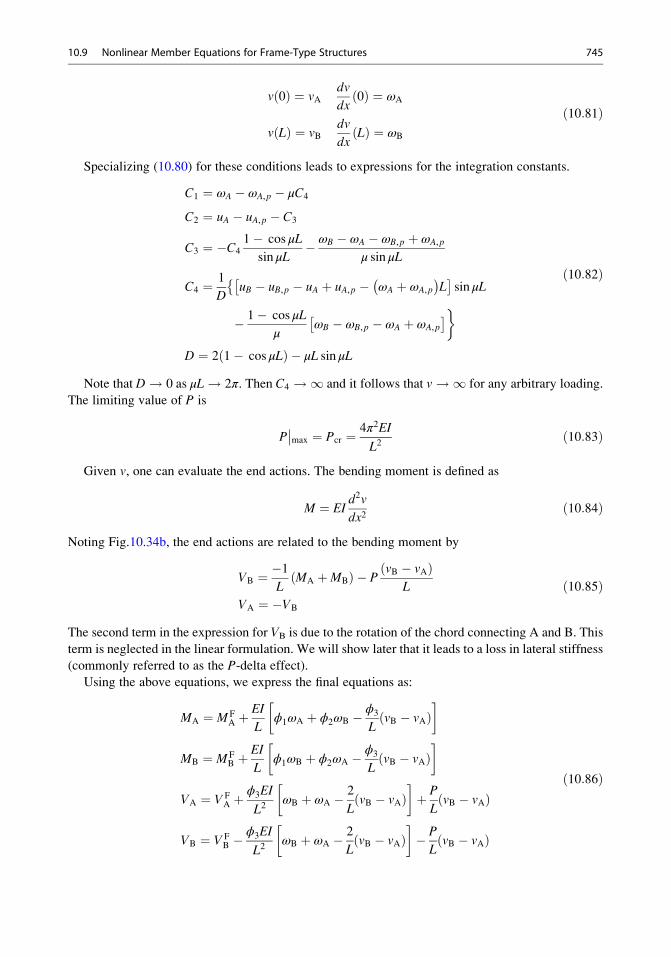
v 0ð Þ ¼ vAdv
dx0ð Þ ¼ ωA
v Lð Þ ¼ vBdv
dxLð Þ ¼ ωB
ð10:81Þ
Specializing (10.80) for these conditions leads to expressions for the integration constants.
C1 ¼ ωA � ωA,p � μC4
C2 ¼ uA � uA,p � C3
C3 ¼ �C4
1� cos μL
sin μL� ωB � ωA � ωB,p þ ωA,p
μ sin μL
C4 ¼ 1
DuB � uB,p � uA þ uA,p � ωA þ ωA,p
� �L
� �sin μL
�� 1� cos μL
μωB � ωB,p � ωA þ ωA,p
� ��
D ¼ 2 1� cos μLð Þ � μL sin μL
ð10:82Þ
Note that D! 0 as μL! 2π. Then C4 !1 and it follows that v!1 for any arbitrary loading.
The limiting value of P is
P��max ¼ Pcr ¼ 4π2EI
L2ð10:83Þ
Given v, one can evaluate the end actions. The bending moment is defined as
M ¼ EId2v
dx2ð10:84Þ
Noting Fig.10.34b, the end actions are related to the bending moment by
VB ¼ �1L
MA þMBð Þ � PvB � vAð Þ
L
VA ¼ �VB
ð10:85Þ
The second term in the expression for VB is due to the rotation of the chord connecting A and B. This
term is neglected in the linear formulation. We will show later that it leads to a loss in lateral stiffness
(commonly referred to as the P-delta effect).Using the above equations, we express the final equations as:
MA ¼ M FA þ
EI
Lϕ1ωA þ ϕ2ωB � ϕ3
LvB � vAð Þ
�
MB ¼ M FB þ
EI
Lϕ1ωB þ ϕ2ωA � ϕ3
LvB � vAð Þ
�
VA ¼ V FA þ
ϕ3EI
L2ωB þ ωA � 2
LvB � vAð Þ
�þ P
LvB � vAð Þ
VB ¼ V FB �
ϕ3EI
L2ωB þ ωA � 2
LvB � vAð Þ
�� P
LvB � vAð Þ
ð10:86Þ
10.9 Nonlinear Member Equations for Frame-Type Structures 745
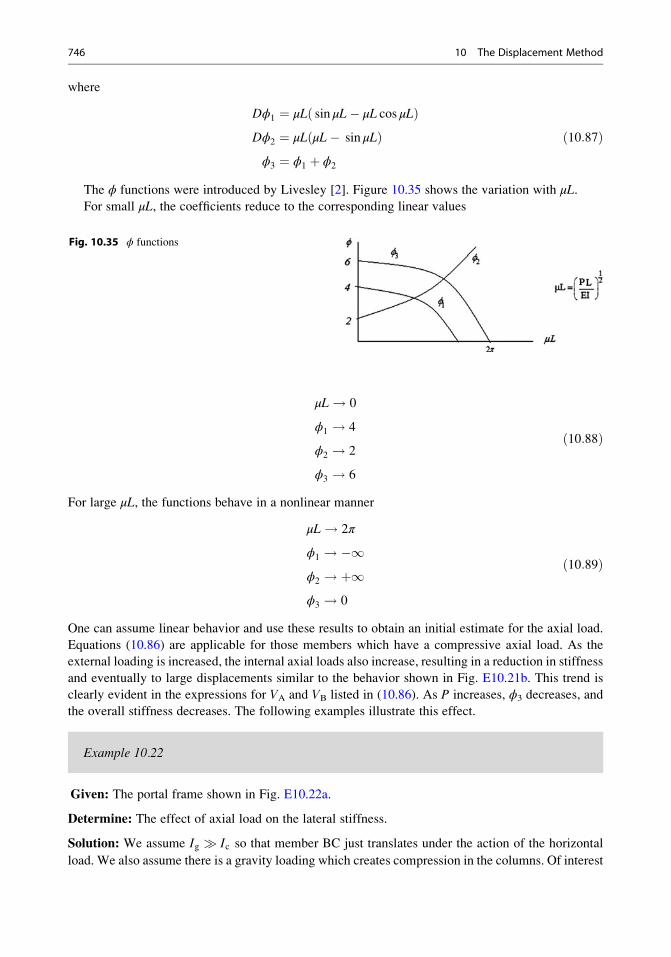
where
Dϕ1 ¼ μL sin μL� μL cos μLð ÞDϕ2 ¼ μL μL� sin μLð Þϕ3 ¼ ϕ1 þ ϕ2
ð10:87Þ
The ϕ functions were introduced by Livesley [2]. Figure 10.35 shows the variation with μL.For small μL, the coefficients reduce to the corresponding linear values
μL! 0
ϕ1 ! 4
ϕ2 ! 2
ϕ3 ! 6
ð10:88Þ
For large μL, the functions behave in a nonlinear manner
μL! 2π
ϕ1 ! �1ϕ2 ! þ1ϕ3 ! 0
ð10:89Þ
One can assume linear behavior and use these results to obtain an initial estimate for the axial load.
Equations (10.86) are applicable for those members which have a compressive axial load. As the
external loading is increased, the internal axial loads also increase, resulting in a reduction in stiffness
and eventually to large displacements similar to the behavior shown in Fig. E10.21b. This trend is
clearly evident in the expressions for VA and VB listed in (10.86). As P increases, ϕ3 decreases, and
the overall stiffness decreases. The following examples illustrate this effect.
Example 10.22
Given: The portal frame shown in Fig. E10.22a.
Determine: The effect of axial load on the lateral stiffness.
Solution: We assume Ig � Ic so that member BC just translates under the action of the horizontal
load. We also assume there is a gravity loading which creates compression in the columns. Of interest
Fig. 10.35 ϕ functions
746 10 The Displacement Method
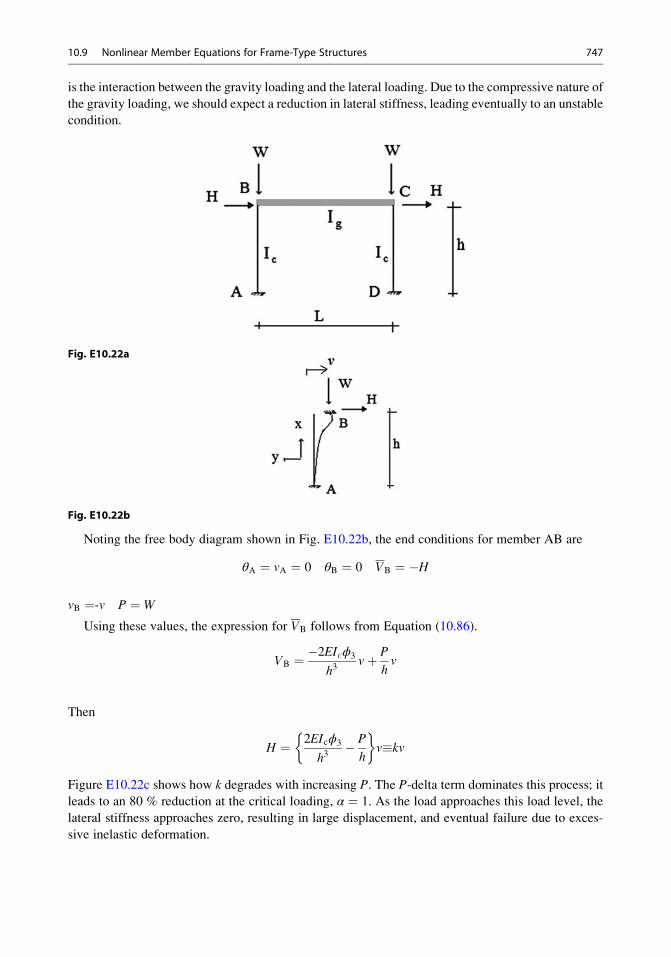
is the interaction between the gravity loading and the lateral loading. Due to the compressive nature of
the gravity loading, we should expect a reduction in lateral stiffness, leading eventually to an unstable
condition.
Fig. E10.22a
Fig. E10.22b
Noting the free body diagram shown in Fig. E10.22b, the end conditions for member AB are
θA ¼ vA ¼ 0 θB ¼ 0 VB ¼ �H
vB ¼-v P ¼ W
Using these values, the expression for VB follows from Equation (10.86).
VB ¼ �2EIcϕ3
h3vþ P
hv
Then
H ¼ 2EIcϕ3
h3� P
h
�v�kv
Figure E10.22c shows how k degrades with increasing P. The P-delta term dominates this process; it
leads to an 80 % reduction at the critical loading, α ¼ 1. As the load approaches this load level, the
lateral stiffness approaches zero, resulting in large displacement, and eventual failure due to exces-
sive inelastic deformation.
10.9 Nonlinear Member Equations for Frame-Type Structures 747
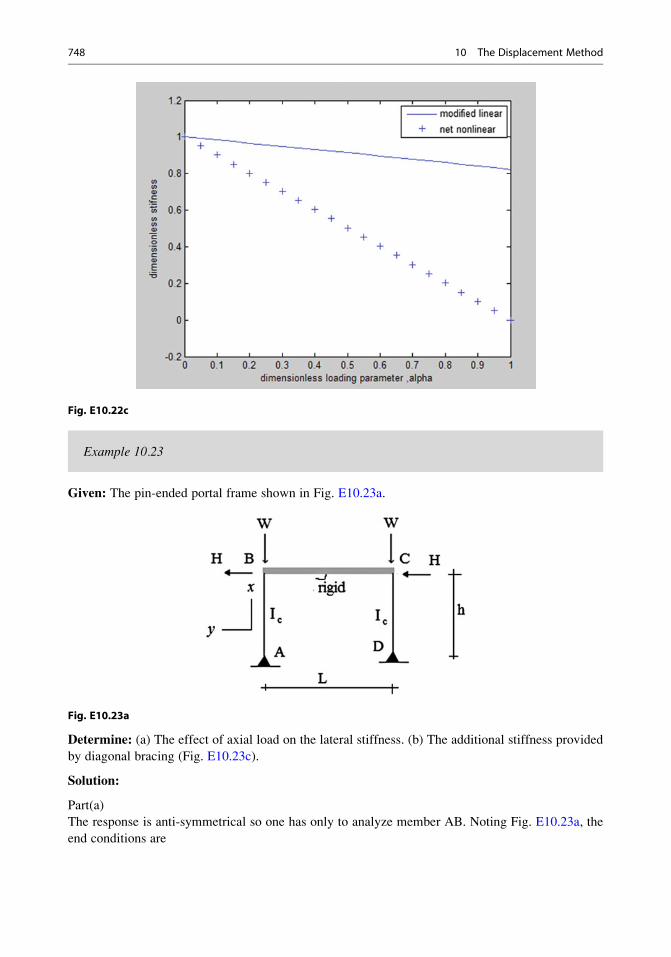
Fig. E10.22c
Example 10.23
Given: The pin-ended portal frame shown in Fig. E10.23a.
Fig. E10.23a
Determine: (a) The effect of axial load on the lateral stiffness. (b) The additional stiffness provided
by diagonal bracing (Fig. E10.23c).
Solution:
Part(a)
The response is anti-symmetrical so one has only to analyze member AB. Noting Fig. E10.23a, the
end conditions are
748 10 The Displacement Method
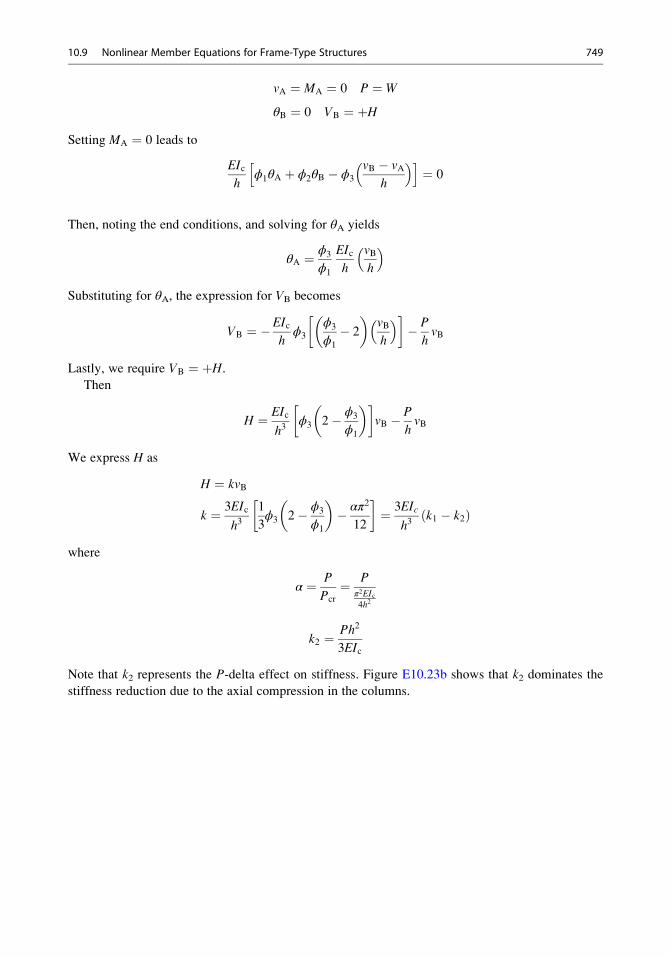
vA ¼ MA ¼ 0 P ¼ W
θB ¼ 0 VB ¼ þHSetting MA ¼ 0 leads to
EIch
ϕ1θA þ ϕ2θB � ϕ3
vB � vAh
� �h i¼ 0
Then, noting the end conditions, and solving for θA yields
θA ¼ ϕ3
ϕ1
EIch
vBh
� �
Substituting for θA, the expression for VB becomes
VB ¼ �EIch
ϕ3
ϕ3
ϕ1
� 2
� �vBh
� � �� P
hvB
Lastly, we require VB ¼ þH.
Then
H ¼ EIc
h3ϕ3 2� ϕ3
ϕ1
� � �vB � P
hvB
We express H as
H ¼ kvB
k ¼ 3EIc
h31
3ϕ3 2� ϕ3
ϕ1
� �� απ2
12
�¼ 3EIc
h3k1 � k2ð Þ
where
α ¼ P
Pcr
¼ Pπ2EIc4h2
k2 ¼ Ph2
3EIc
Note that k2 represents the P-delta effect on stiffness. Figure E10.23b shows that k2 dominates the
stiffness reduction due to the axial compression in the columns.
10.9 Nonlinear Member Equations for Frame-Type Structures 749
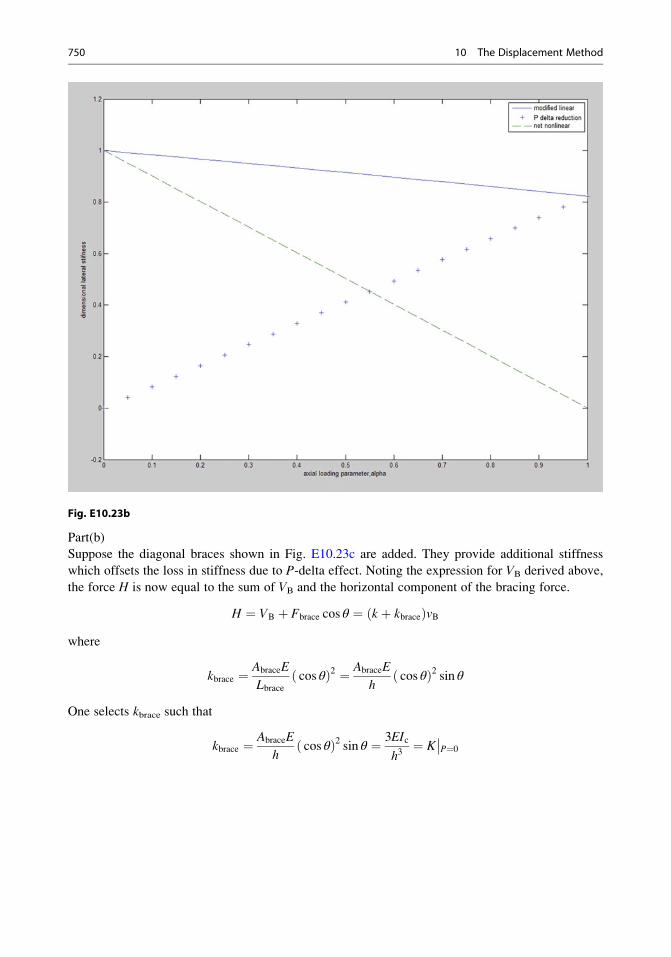
Fig. E10.23b
Part(b)
Suppose the diagonal braces shown in Fig. E10.23c are added. They provide additional stiffness
which offsets the loss in stiffness due to P-delta effect. Noting the expression for VB derived above,
the force H is now equal to the sum of VB and the horizontal component of the bracing force.
H ¼ VB þ Fbrace cos θ ¼ k þ kbraceð ÞvBwhere
kbrace ¼ AbraceE
Lbracecos θð Þ2 ¼ AbraceE
hcos θð Þ2 sin θ
One selects kbrace such that
kbrace ¼ AbraceE
hcos θð Þ2 sin θ ¼ 3EIc
h3¼ K
��P¼0
750 10 The Displacement Method
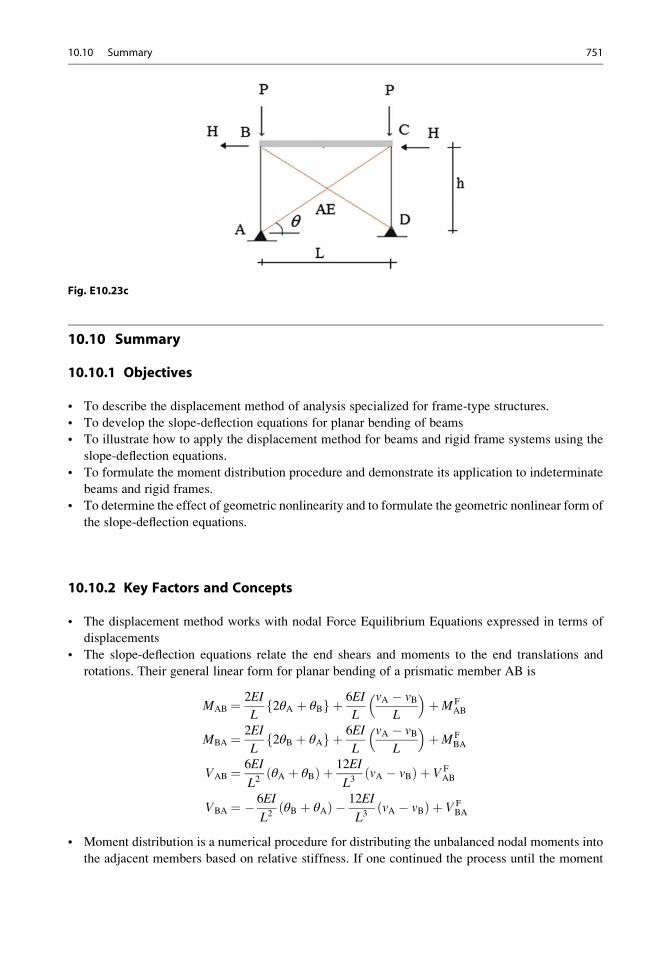
Fig. E10.23c
10.10 Summary
10.10.1 Objectives
• To describe the displacement method of analysis specialized for frame-type structures.
• To develop the slope-deflection equations for planar bending of beams
• To illustrate how to apply the displacement method for beams and rigid frame systems using the
slope-deflection equations.
• To formulate the moment distribution procedure and demonstrate its application to indeterminate
beams and rigid frames.
• To determine the effect of geometric nonlinearity and to formulate the geometric nonlinear form of
the slope-deflection equations.
10.10.2 Key Factors and Concepts
• The displacement method works with nodal Force Equilibrium Equations expressed in terms of
displacements
• The slope-deflection equations relate the end shears and moments to the end translations and
rotations. Their general linear form for planar bending of a prismatic member AB is
MAB ¼ 2EI
L2θA þ θBf g þ 6EI
L
vA � vBL
� �þM F
AB
MBA ¼ 2EI
L2θB þ θAf g þ 6EI
L
vA � vBL
� �þM F
BA
VAB ¼ 6EI
L2θA þ θBð Þ þ 12EI
L3vA � vBð Þ þ V F
AB
VBA ¼ � 6EI
L2θB þ θAð Þ � 12EI
L3vA � vBð Þ þ V F
BA
• Moment distribution is a numerical procedure for distributing the unbalanced nodal moments into
the adjacent members based on relative stiffness. If one continued the process until the moment
10.10 Summary 751
residuals are reduced to zero, one would obtain the exact solution. Normally, the process is
terminated when the residuals are relatively small.
• The slope-deflection equations provide the basis for the computer-based analysis procedure
described in Chap. 12.
• Geometric nonlinear behavior is due to the coupling between compressive axial load and trans-
verse displacement. It results in a loss of stiffness and leads to unstable behavior.
10.11 Problems
Problem 10.1 Determine the displacements and member forces for the truss shown. Consider the
following values for the areas:
(a) A1 ¼ 12A
(b) A1 ¼ 2A(c) Check your results with computer-based analysis.
Take E ¼ 200 GPa and A ¼ 2000 mm2
Problem 10.2 For the truss shown below, determine the member forces for:
(a) The loading shown
(b) Support #1 moves as follows: u ¼ 18
in:! and v ¼ 12
in: "
Take A ¼ 0.1 in.2, A1 ¼ 0.4 in.2, and E ¼ 29,000 ksi.
752 10 The Displacement Method
For the following beams and frames defined in Problems 10.3–10.18, determine the member end
moments using the slope-deflection equations.
Problem 10.3 Assume E ¼ 29,000 ksi, I ¼ 200 in.4, L ¼ 30 ft, vC ¼ 0.6 in. #, and w ¼ 1.2 kip/ft.
Problem 10.4
(a) I1 ¼ I2 and L1 ¼ L2(b) I1 ¼ 2I2 and L1 ¼ L2(c) I1 ¼ 2I2 and L1 ¼ 2 L2
10.11 Problems 753
Assume E ¼ 200 GPa, I2 ¼ 80(10)6 mm4, and L2 ¼ 6 m.
Problem 10.5
E ¼ 29,000 ksi and I ¼ 300 in.4
Problem 10.6 Assume E ¼ 200 GPa, I ¼ 80(10)6 mm4, P ¼ 45 kN, h ¼ 3 m, and L ¼ 9 m.
Problem 10.7 Assume E ¼ 29,000 ksi, I ¼ 200 in.4, L ¼ 18 ft, and w ¼ 1.2 kip/ft.
754 10 The Displacement Method
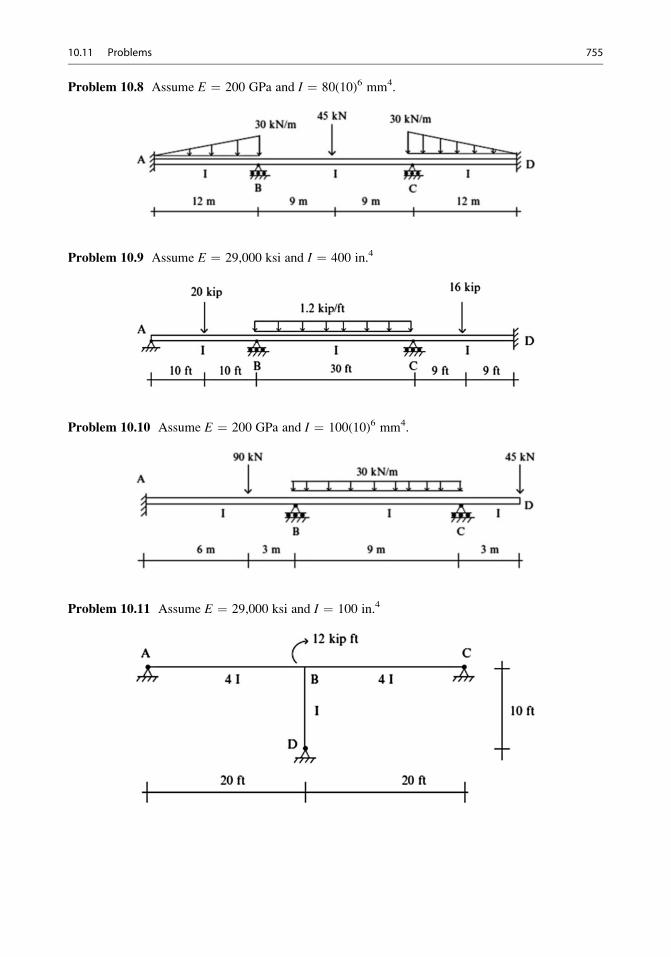
Problem 10.8 Assume E ¼ 200 GPa and I ¼ 80(10)6 mm4.
Problem 10.9 Assume E ¼ 29,000 ksi and I ¼ 400 in.4
Problem 10.10 Assume E ¼ 200 GPa and I ¼ 100(10)6 mm4.
Problem 10.11 Assume E ¼ 29,000 ksi and I ¼ 100 in.4
10.11 Problems 755
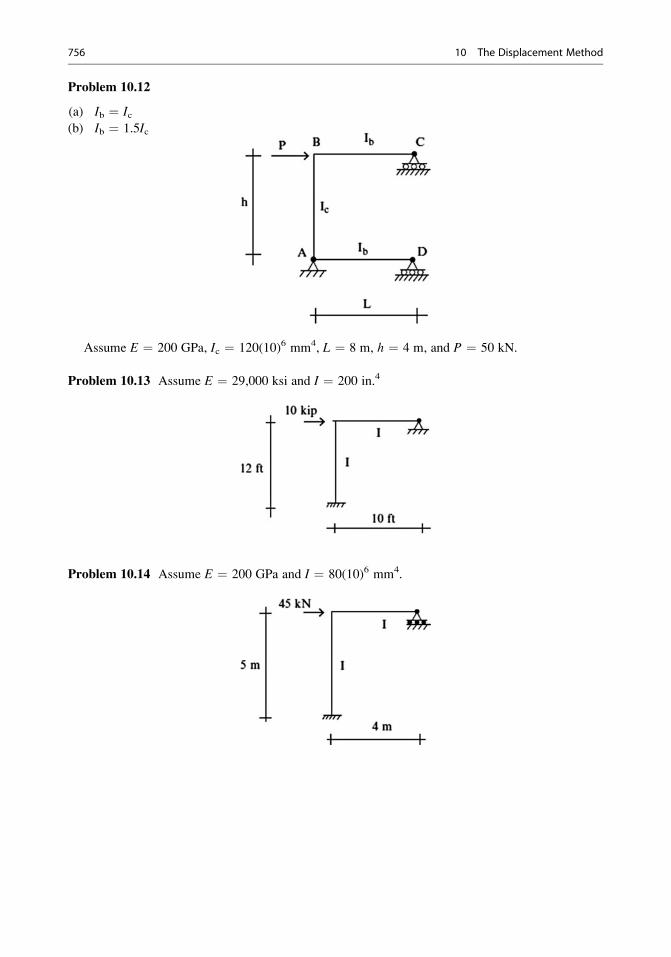
Problem 10.12
(a) Ib ¼ Ic(b) Ib ¼ 1.5Ic
Assume E ¼ 200 GPa, Ic ¼ 120(10)6 mm4, L ¼ 8 m, h ¼ 4 m, and P ¼ 50 kN.
Problem 10.13 Assume E ¼ 29,000 ksi and I ¼ 200 in.4
Problem 10.14 Assume E ¼ 200 GPa and I ¼ 80(10)6 mm4.
756 10 The Displacement Method
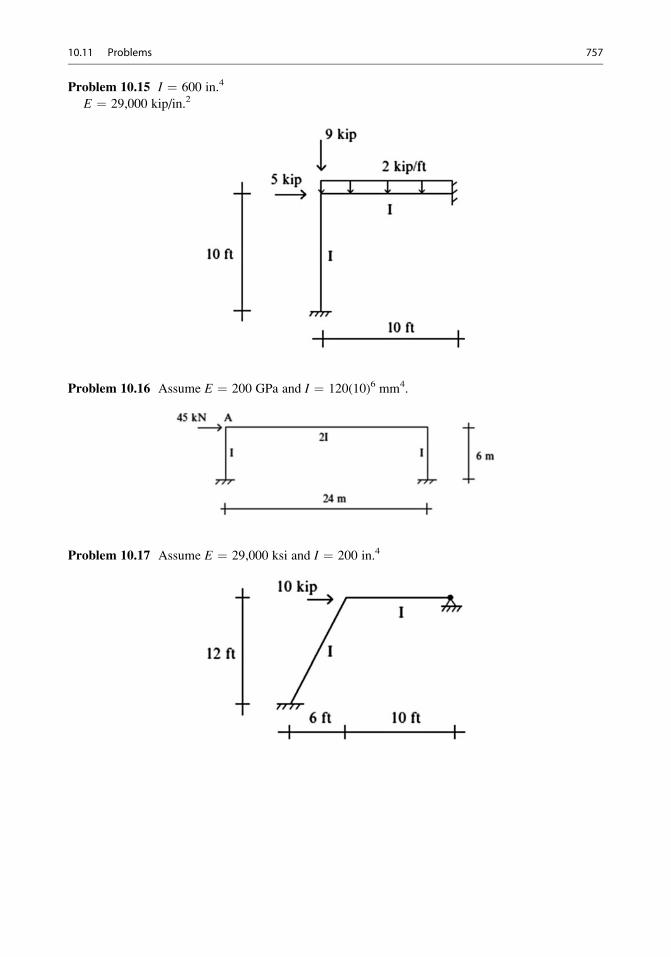
Problem 10.15 I ¼ 600 in.4
E ¼ 29,000 kip/in.2
Problem 10.16 Assume E ¼ 200 GPa and I ¼ 120(10)6 mm4.
Problem 10.17 Assume E ¼ 29,000 ksi and I ¼ 200 in.4
10.11 Problems 757
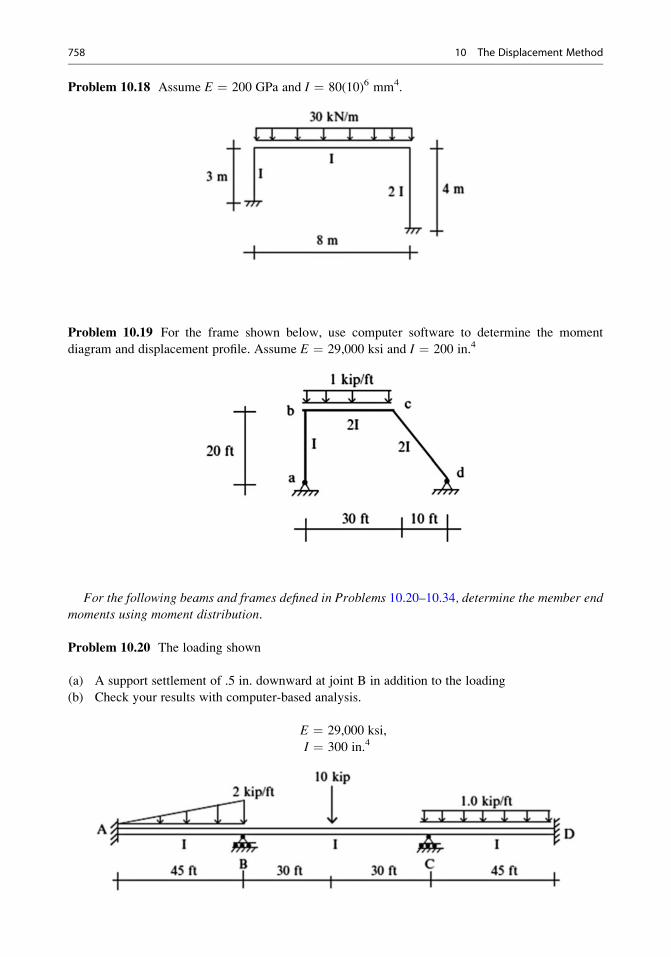
Problem 10.18 Assume E ¼ 200 GPa and I ¼ 80(10)6 mm4.
Problem 10.19 For the frame shown below, use computer software to determine the moment
diagram and displacement profile. Assume E ¼ 29,000 ksi and I ¼ 200 in.4
For the following beams and frames defined in Problems 10.20–10.34, determine the member endmoments using moment distribution.
Problem 10.20 The loading shown
(a) A support settlement of .5 in. downward at joint B in addition to the loading
(b) Check your results with computer-based analysis.
E ¼ 29,000 ksi,
I ¼ 300 in.4
758 10 The Displacement Method
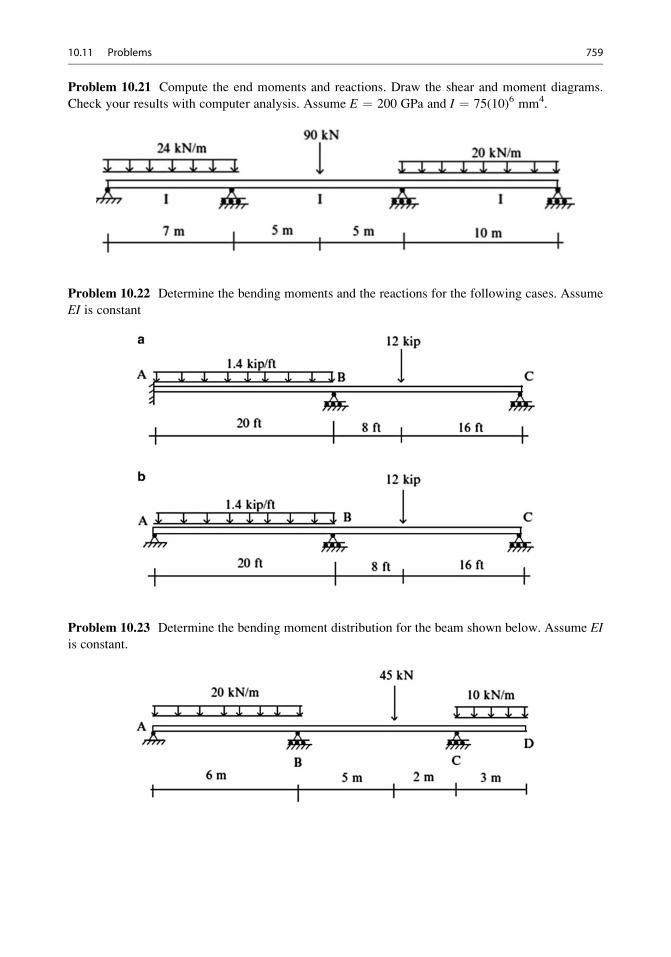
Problem 10.21 Compute the end moments and reactions. Draw the shear and moment diagrams.
Check your results with computer analysis. Assume E ¼ 200 GPa and I ¼ 75(10)6 mm4.
Problem 10.22 Determine the bending moments and the reactions for the following cases. Assume
EI is constant
Problem 10.23 Determine the bending moment distribution for the beam shown below. Assume EIis constant.
10.11 Problems 759
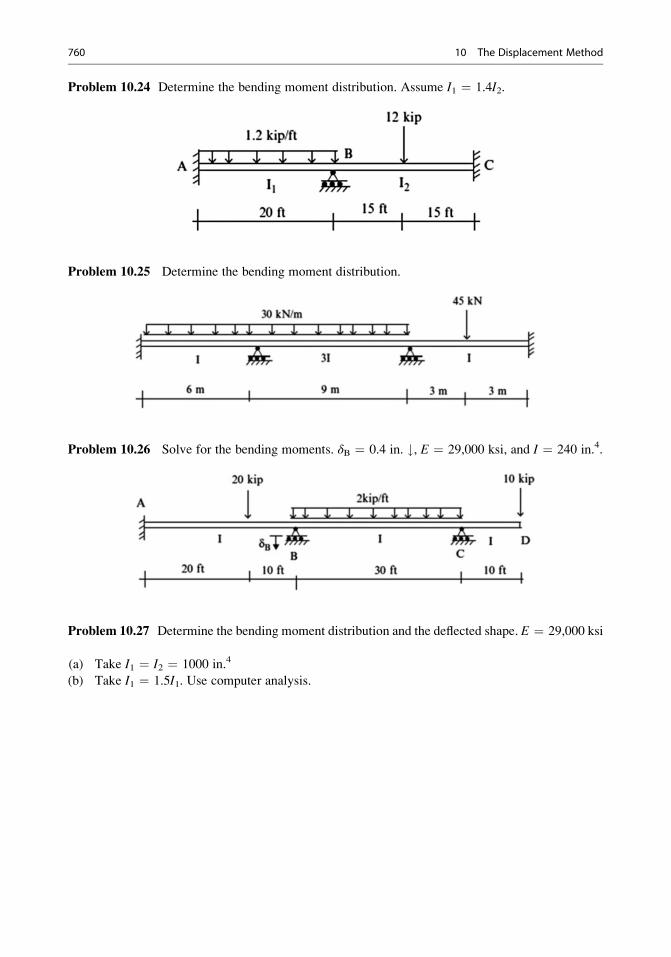
Problem 10.24 Determine the bending moment distribution. Assume I1 ¼ 1.4I2.
Problem 10.25 Determine the bending moment distribution.
Problem 10.26 Solve for the bending moments. δB ¼ 0.4 in. #, E ¼ 29,000 ksi, and I ¼ 240 in.4.
Problem 10.27 Determine the bending moment distribution and the deflected shape. E ¼ 29,000 ksi
(a) Take I1 ¼ I2 ¼ 1000 in.4
(b) Take I1 ¼ 1.5I1. Use computer analysis.
760 10 The Displacement Method
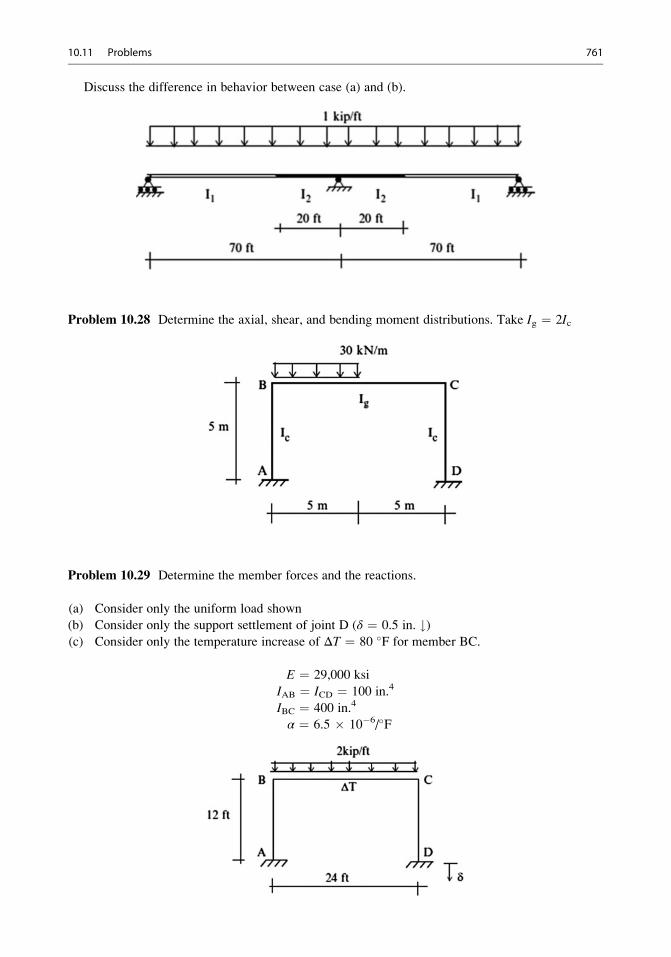
Discuss the difference in behavior between case (a) and (b).
Problem 10.28 Determine the axial, shear, and bending moment distributions. Take Ig ¼ 2Ic
Problem 10.29 Determine the member forces and the reactions.
(a) Consider only the uniform load shown
(b) Consider only the support settlement of joint D (δ ¼ 0.5 in. #)(c) Consider only the temperature increase of ΔT ¼ 80 �F for member BC.
E ¼ 29,000 ksi
IAB ¼ ICD ¼ 100 in.4
IBC ¼ 400 in.4
α ¼ 6.5 � 10�6/�F
10.11 Problems 761
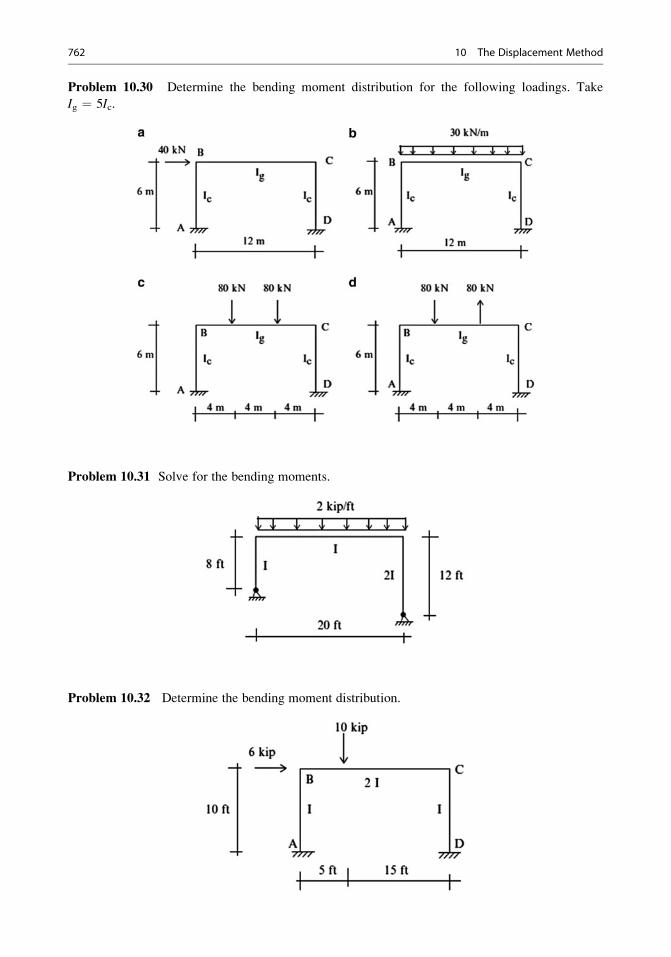
Problem 10.30 Determine the bending moment distribution for the following loadings. Take
Ig ¼ 5Ic.
Problem 10.31 Solve for the bending moments.
Problem 10.32 Determine the bending moment distribution.
762 10 The Displacement Method
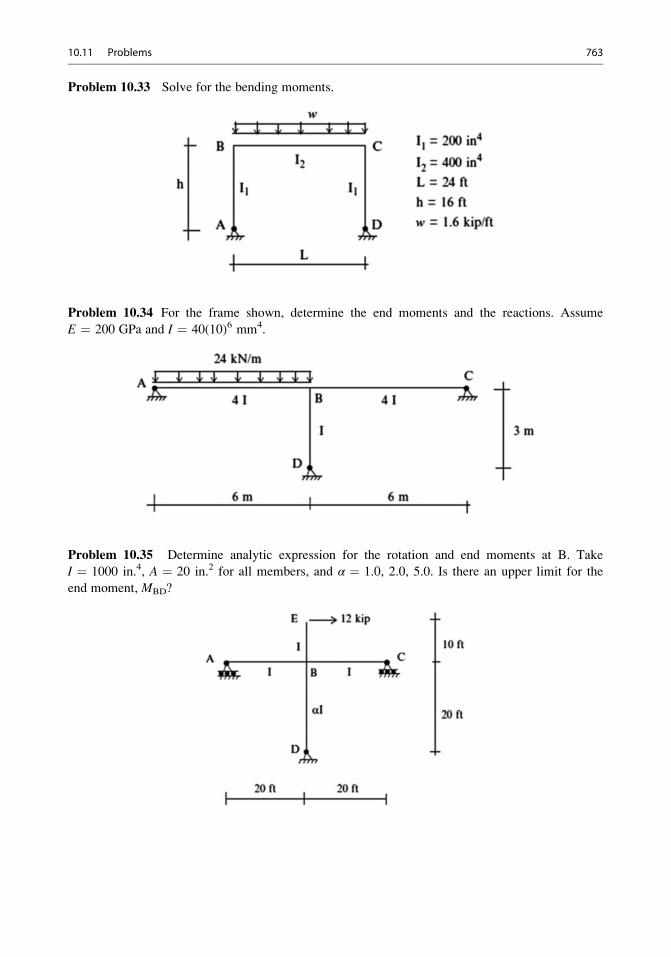
Problem 10.33 Solve for the bending moments.
Problem 10.34 For the frame shown, determine the end moments and the reactions. Assume
E ¼ 200 GPa and I ¼ 40(10)6 mm4.
Problem 10.35 Determine analytic expression for the rotation and end moments at B. Take
I ¼ 1000 in.4, A ¼ 20 in.2 for all members, and α ¼ 1.0, 2.0, 5.0. Is there an upper limit for the
end moment, MBD?
10.11 Problems 763
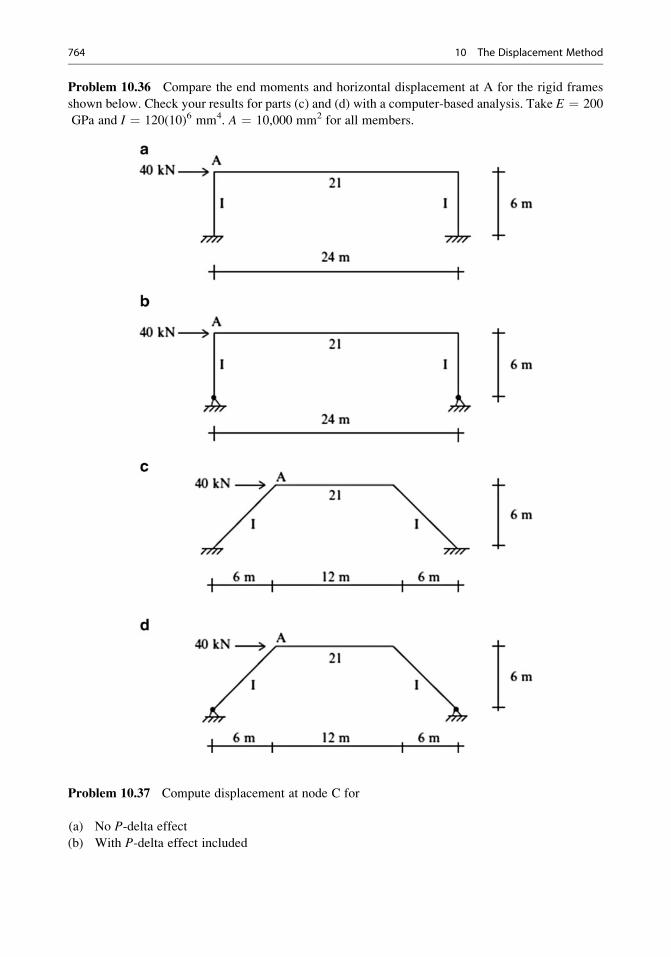
Problem 10.36 Compare the end moments and horizontal displacement at A for the rigid frames
shown below. Check your results for parts (c) and (d) with a computer-based analysis. Take E ¼ 200
GPa and I ¼ 120(10)6 mm4. A ¼ 10,000 mm2 for all members.
Problem 10.37 Compute displacement at node C for
(a) No P-delta effect
(b) With P-delta effect included
764 10 The Displacement Method
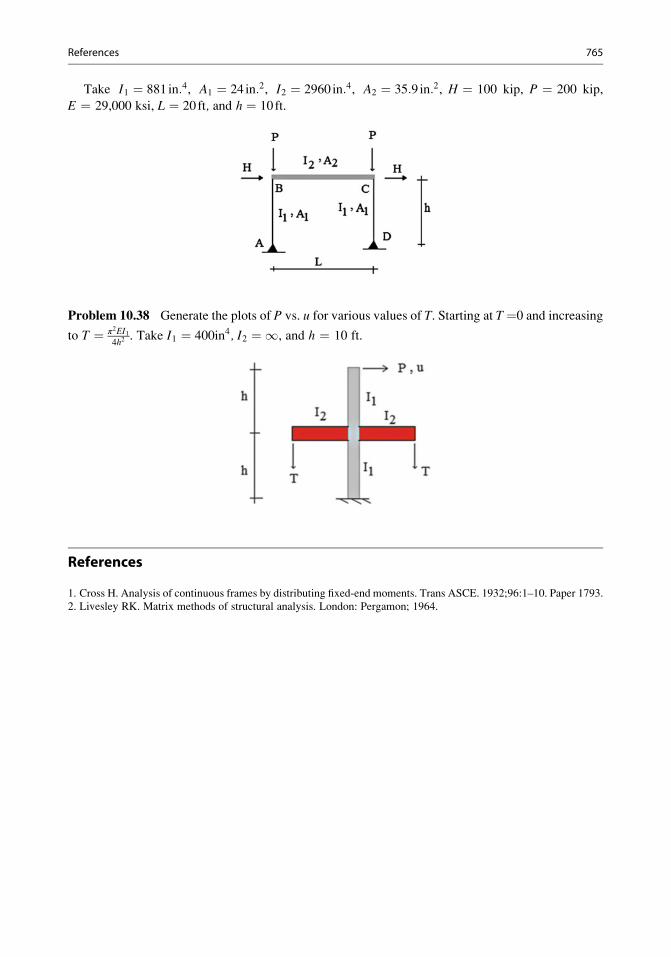
Take I1 ¼ 881 in:4, A1 ¼ 24 in:2, I2 ¼ 2960 in:4, A2 ¼ 35:9 in:2, H ¼ 100 kip, P ¼ 200 kip,
E ¼ 29,000 ksi, L ¼ 20ft, and h ¼ 10ft.
Problem 10.38 Generate the plots of P vs. u for various values of T. Starting at T¼0 and increasingto T ¼ π2EI1
4h2. Take I1 ¼ 400in4, I2 ¼ 1, and h ¼ 10 ft.
References
1. Cross H. Analysis of continuous frames by distributing fixed-end moments. Trans ASCE. 1932;96:1–10. Paper 1793.
2. Livesley RK. Matrix methods of structural analysis. London: Pergamon; 1964.
References 765
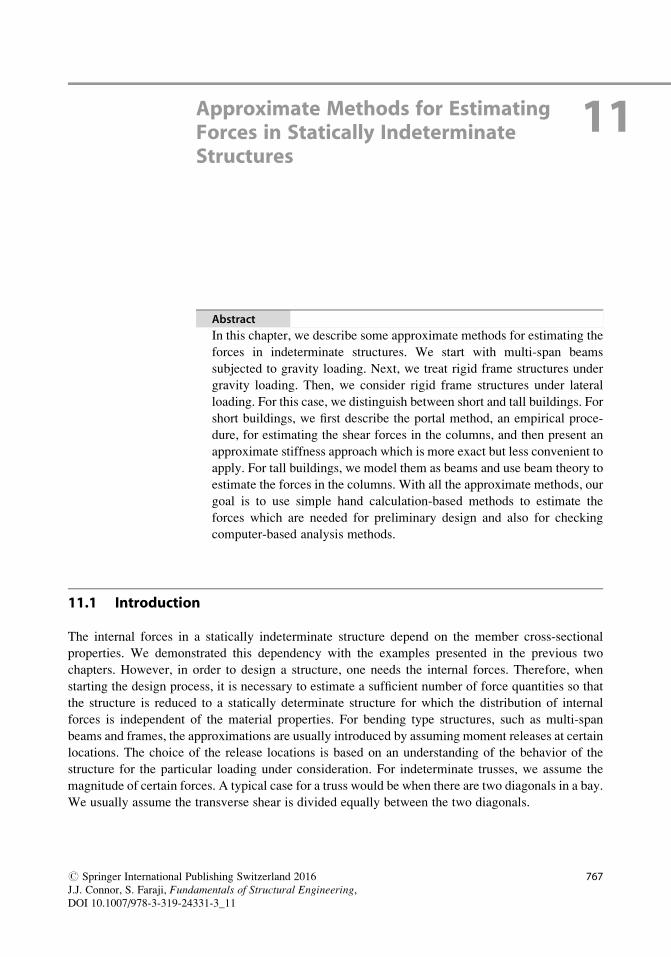
Approximate Methods for EstimatingForces in Statically IndeterminateStructures
11
Abstract
In this chapter, we describe some approximate methods for estimating the
forces in indeterminate structures. We start with multi-span beams
subjected to gravity loading. Next, we treat rigid frame structures under
gravity loading. Then, we consider rigid frame structures under lateral
loading. For this case, we distinguish between short and tall buildings. For
short buildings, we first describe the portal method, an empirical proce-
dure, for estimating the shear forces in the columns, and then present an
approximate stiffness approach which is more exact but less convenient to
apply. For tall buildings, we model them as beams and use beam theory to
estimate the forces in the columns. With all the approximate methods, our
goal is to use simple hand calculation-based methods to estimate the
forces which are needed for preliminary design and also for checking
computer-based analysis methods.
11.1 Introduction
The internal forces in a statically indeterminate structure depend on the member cross-sectional
properties. We demonstrated this dependency with the examples presented in the previous two
chapters. However, in order to design a structure, one needs the internal forces. Therefore, when
starting the design process, it is necessary to estimate a sufficient number of force quantities so that
the structure is reduced to a statically determinate structure for which the distribution of internal
forces is independent of the material properties. For bending type structures, such as multi-span
beams and frames, the approximations are usually introduced by assuming moment releases at certain
locations. The choice of the release locations is based on an understanding of the behavior of the
structure for the particular loading under consideration. For indeterminate trusses, we assume the
magnitude of certain forces. A typical case for a truss would be when there are two diagonals in a bay.
We usually assume the transverse shear is divided equally between the two diagonals.
# Springer International Publishing Switzerland 2016
J.J. Connor, S. Faraji, Fundamentals of Structural Engineering,DOI 10.1007/978-3-319-24331-3_11
767
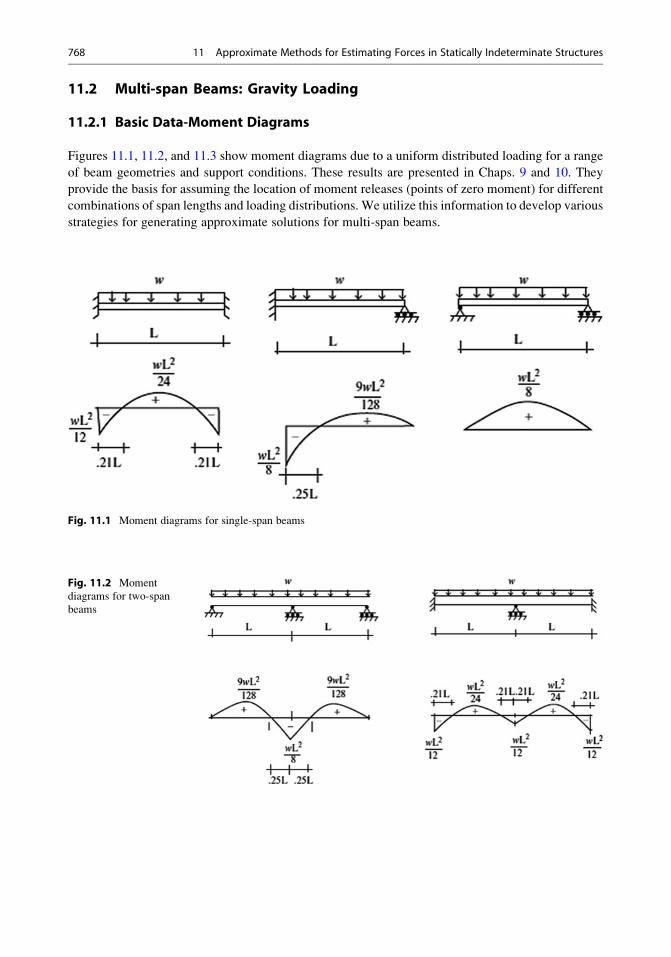
11.2 Multi-span Beams: Gravity Loading
11.2.1 Basic Data-Moment Diagrams
Figures 11.1, 11.2, and 11.3 show moment diagrams due to a uniform distributed loading for a range
of beam geometries and support conditions. These results are presented in Chaps. 9 and 10. They
provide the basis for assuming the location of moment releases (points of zero moment) for different
combinations of span lengths and loading distributions. We utilize this information to develop various
strategies for generating approximate solutions for multi-span beams.
Fig. 11.1 Moment diagrams for single-span beams
Fig. 11.2 Moment
diagrams for two-span
beams
768 11 Approximate Methods for Estimating Forces in Statically Indeterminate Structures
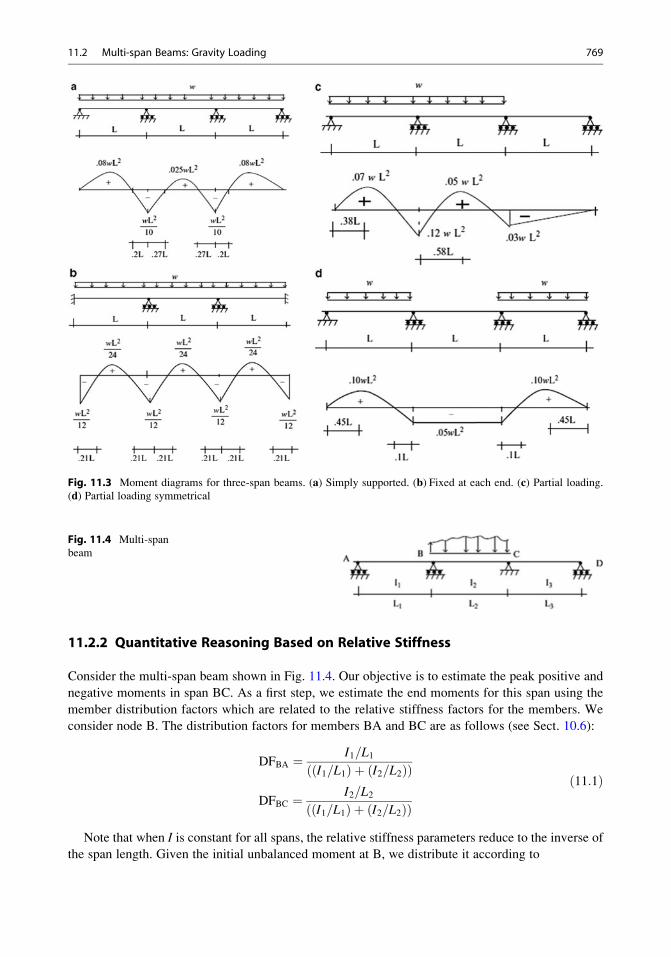
11.2.2 Quantitative Reasoning Based on Relative Stiffness
Consider the multi-span beam shown in Fig. 11.4. Our objective is to estimate the peak positive and
negative moments in span BC. As a first step, we estimate the end moments for this span using the
member distribution factors which are related to the relative stiffness factors for the members. We
consider node B. The distribution factors for members BA and BC are as follows (see Sect. 10.6):
DFBA ¼ I1=L1I1=L1ð Þ þ I2=L2ð Þð Þ
DFBC ¼ I2=L2I1=L1ð Þ þ I2=L2ð Þð Þ
ð11:1Þ
Note that when I is constant for all spans, the relative stiffness parameters reduce to the inverse of
the span length. Given the initial unbalanced moment at B, we distribute it according to
Fig. 11.3 Moment diagrams for three-span beams. (a) Simply supported. (b) Fixed at each end. (c) Partial loading.(d) Partial loading symmetrical
Fig. 11.4 Multi-span
beam
11.2 Multi-span Beams: Gravity Loading 769
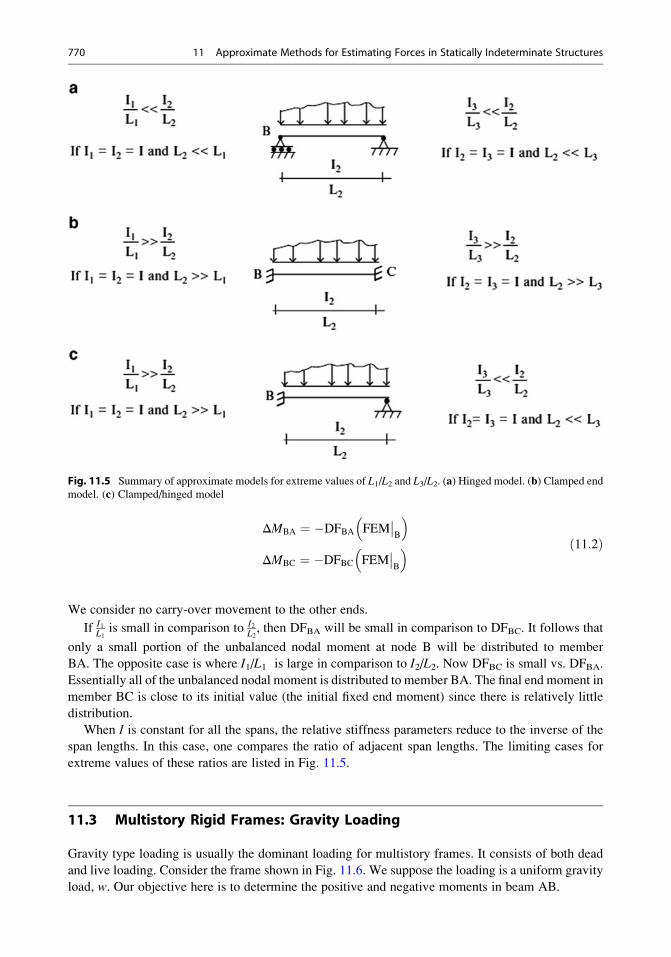
ΔMBA ¼ �DFBA FEM��B
� �ΔMBC ¼ �DFBC FEM
��B
� � ð11:2Þ
We consider no carry-over movement to the other ends.
If I1L1is small in comparison to I2
L2, then DFBA will be small in comparison to DFBC. It follows that
only a small portion of the unbalanced nodal moment at node B will be distributed to member
BA. The opposite case is where I1/L1 is large in comparison to I2/L2. Now DFBC is small vs. DFBA.
Essentially all of the unbalanced nodal moment is distributed to member BA. The final end moment in
member BC is close to its initial value (the initial fixed end moment) since there is relatively little
distribution.
When I is constant for all the spans, the relative stiffness parameters reduce to the inverse of the
span lengths. In this case, one compares the ratio of adjacent span lengths. The limiting cases for
extreme values of these ratios are listed in Fig. 11.5.
11.3 Multistory Rigid Frames: Gravity Loading
Gravity type loading is usually the dominant loading for multistory frames. It consists of both dead
and live loading. Consider the frame shown in Fig. 11.6. We suppose the loading is a uniform gravity
load, w. Our objective here is to determine the positive and negative moments in beam AB.
Fig. 11.5 Summary of approximate models for extreme values of L1/L2 and L3/L2. (a) Hinged model. (b) Clamped end
model. (c) Clamped/hinged model
770 11 Approximate Methods for Estimating Forces in Statically Indeterminate Structures
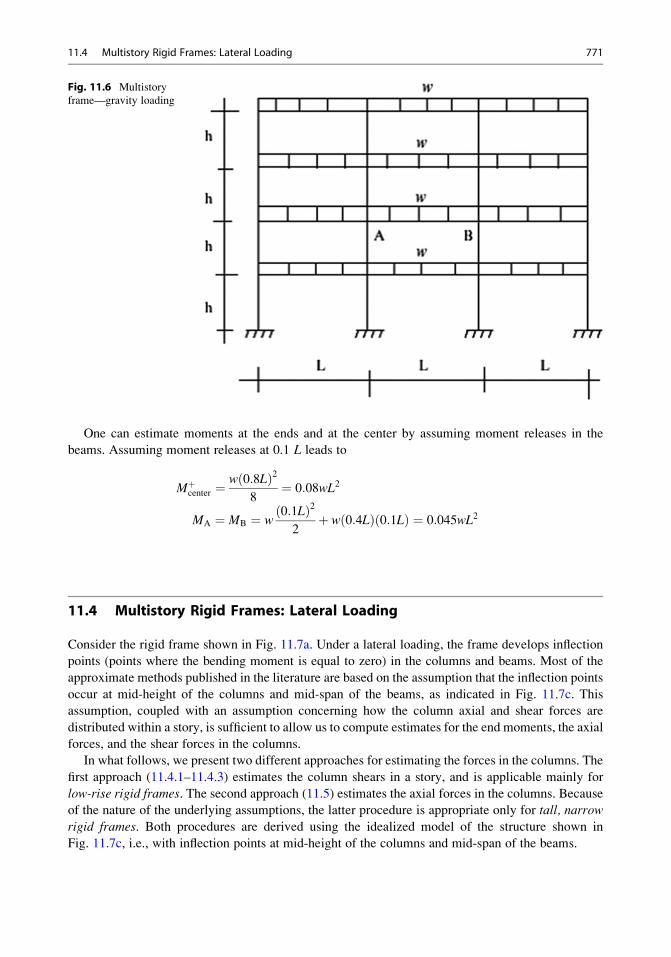
One can estimate moments at the ends and at the center by assuming moment releases in the
beams. Assuming moment releases at 0.1 L leads to
Mþcenter ¼w 0:8Lð Þ2
8¼ 0:08wL2
MA ¼ MB ¼ w0:1Lð Þ22þ w 0:4Lð Þ 0:1Lð Þ ¼ 0:045wL2
11.4 Multistory Rigid Frames: Lateral Loading
Consider the rigid frame shown in Fig. 11.7a. Under a lateral loading, the frame develops inflection
points (points where the bending moment is equal to zero) in the columns and beams. Most of the
approximate methods published in the literature are based on the assumption that the inflection points
occur at mid-height of the columns and mid-span of the beams, as indicated in Fig. 11.7c. This
assumption, coupled with an assumption concerning how the column axial and shear forces are
distributed within a story, is sufficient to allow us to compute estimates for the end moments, the axial
forces, and the shear forces in the columns.
In what follows, we present two different approaches for estimating the forces in the columns. The
first approach (11.4.1–11.4.3) estimates the column shears in a story, and is applicable mainly for
low-rise rigid frames. The second approach (11.5) estimates the axial forces in the columns. Because
of the nature of the underlying assumptions, the latter procedure is appropriate only for tall, narrow
rigid frames. Both procedures are derived using the idealized model of the structure shown in
Fig. 11.7c, i.e., with inflection points at mid-height of the columns and mid-span of the beams.
Fig. 11.6 Multistory
frame—gravity loading
11.4 Multistory Rigid Frames: Lateral Loading 771
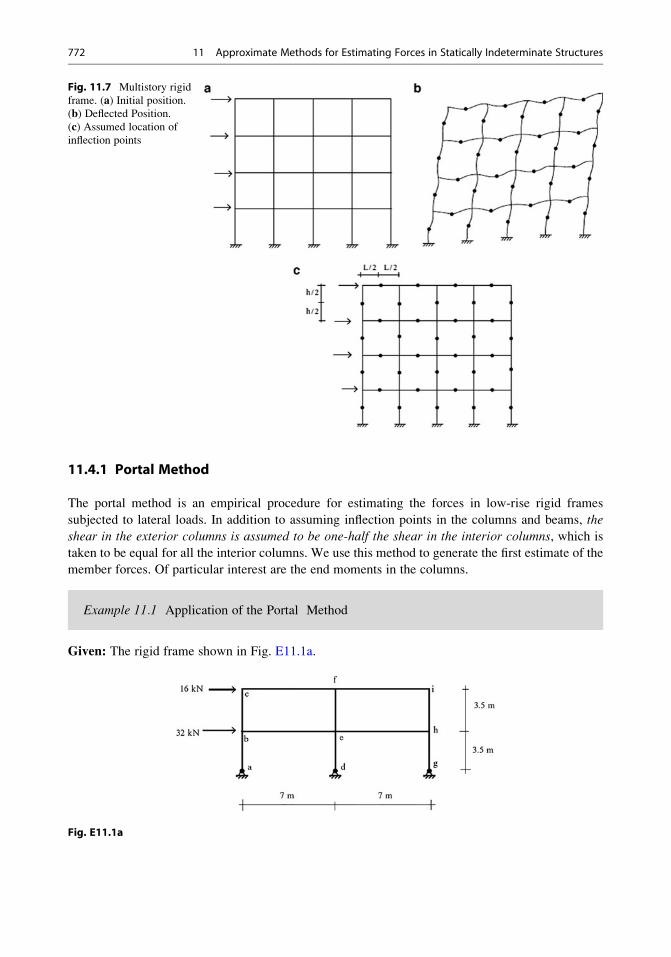
11.4.1 Portal Method
The portal method is an empirical procedure for estimating the forces in low-rise rigid frames
subjected to lateral loads. In addition to assuming inflection points in the columns and beams, the
shear in the exterior columns is assumed to be one-half the shear in the interior columns, which is
taken to be equal for all the interior columns. We use this method to generate the first estimate of the
member forces. Of particular interest are the end moments in the columns.
Example 11.1 Application of the Portal Method
Given: The rigid frame shown in Fig. E11.1a.
Fig. E11.1a
Fig. 11.7 Multistory rigid
frame. (a) Initial position.(b) Deflected Position.
(c) Assumed location of
inflection points
772 11 Approximate Methods for Estimating Forces in Statically Indeterminate Structures
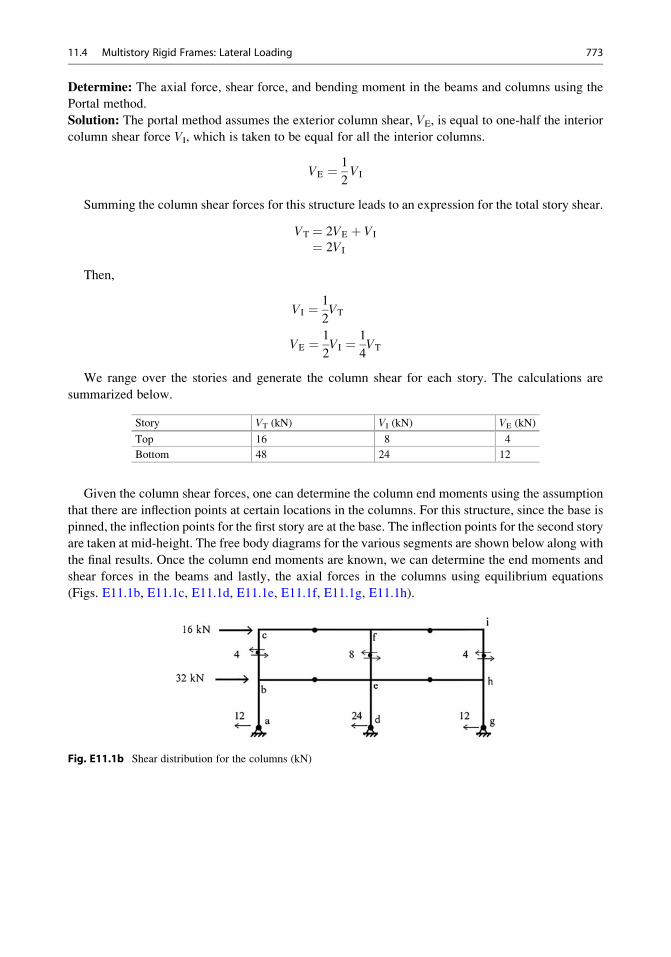
Determine: The axial force, shear force, and bending moment in the beams and columns using the
Portal method.
Solution: The portal method assumes the exterior column shear, VE, is equal to one-half the interior
column shear force VI, which is taken to be equal for all the interior columns.
VE ¼ 1
2VI
Summing the column shear forces for this structure leads to an expression for the total story shear.
VT ¼ 2VE þ VI
¼ 2VI
Then,
VI ¼ 1
2VT
VE ¼ 1
2VI ¼ 1
4VT
We range over the stories and generate the column shear for each story. The calculations are
summarized below.
Story VT (kN) VI (kN) VE (kN)
Top 16 8 4
Bottom 48 24 12
Given the column shear forces, one can determine the column end moments using the assumption
that there are inflection points at certain locations in the columns. For this structure, since the base is
pinned, the inflection points for the first story are at the base. The inflection points for the second story
are taken at mid-height. The free body diagrams for the various segments are shown below along with
the final results. Once the column end moments are known, we can determine the end moments and
shear forces in the beams and lastly, the axial forces in the columns using equilibrium equations
(Figs. E11.1b, E11.1c, E11.1d, E11.1e, E11.1f, E11.1g, E11.1h).
Fig. E11.1b Shear distribution for the columns (kN)
11.4 Multistory Rigid Frames: Lateral Loading 773
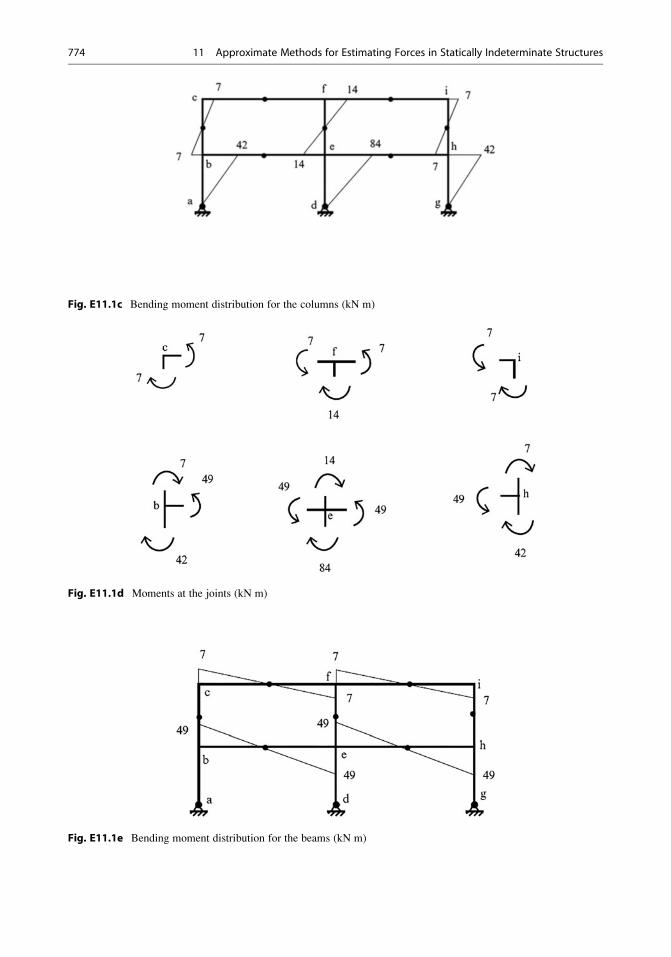
Fig. E11.1c Bending moment distribution for the columns (kN m)
Fig. E11.1d Moments at the joints (kN m)
Fig. E11.1e Bending moment distribution for the beams (kN m)
774 11 Approximate Methods for Estimating Forces in Statically Indeterminate Structures
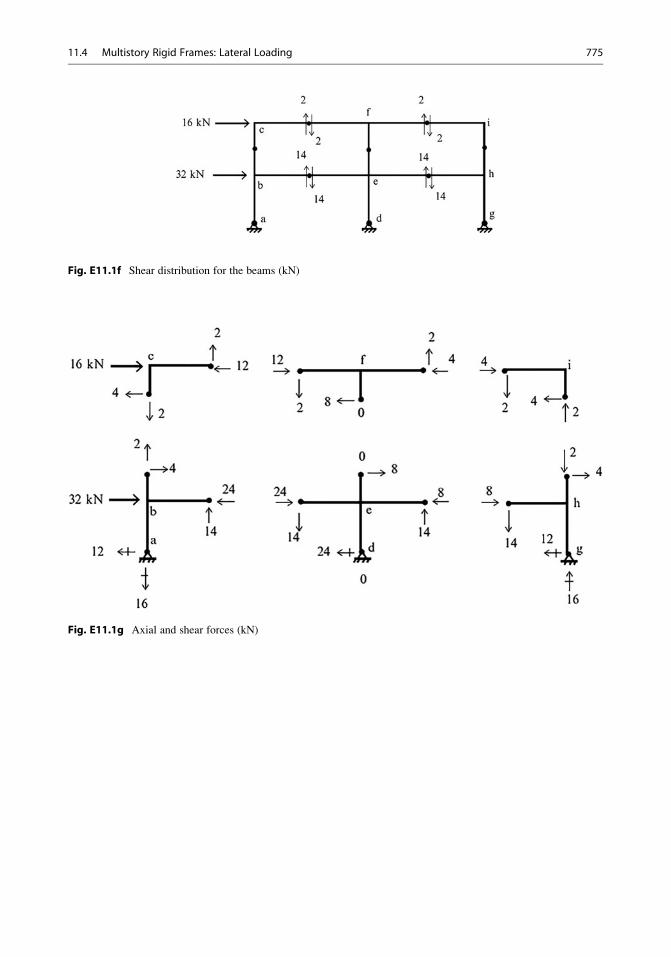
Fig. E11.1f Shear distribution for the beams (kN)
Fig. E11.1g Axial and shear forces (kN)
11.4 Multistory Rigid Frames: Lateral Loading 775
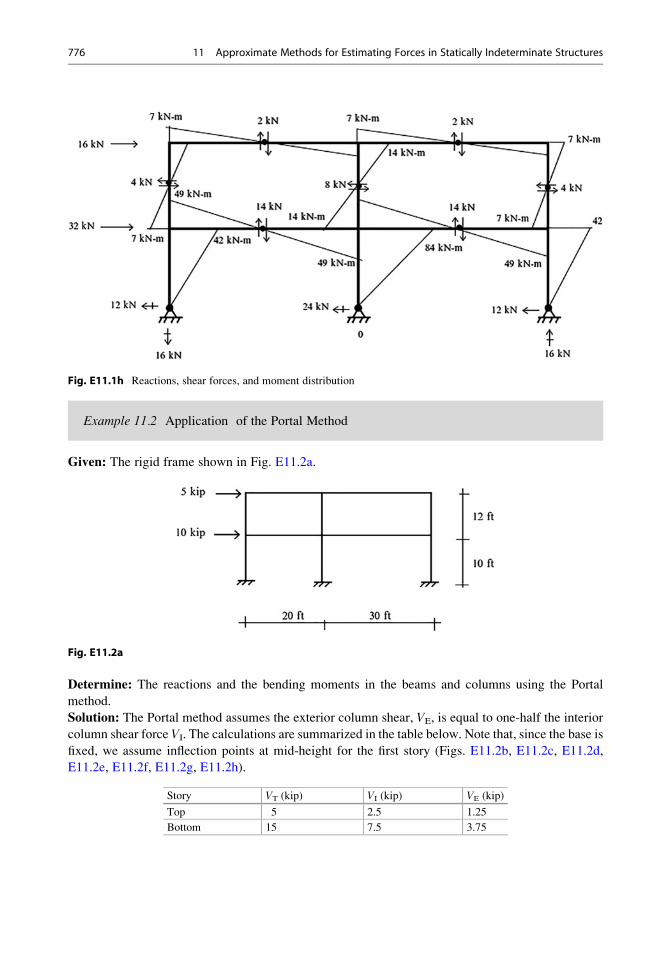
Fig. E11.1h Reactions, shear forces, and moment distribution
Example 11.2 Application of the Portal Method
Given: The rigid frame shown in Fig. E11.2a.
Fig. E11.2a
Determine: The reactions and the bending moments in the beams and columns using the Portal
method.
Solution: The Portal method assumes the exterior column shear, VE, is equal to one-half the interior
column shear force VI. The calculations are summarized in the table below. Note that, since the base is
fixed, we assume inflection points at mid-height for the first story (Figs. E11.2b, E11.2c, E11.2d,
E11.2e, E11.2f, E11.2g, E11.2h).
Story VT (kip) VI (kip) VE (kip)
Top 5 2.5 1.25
Bottom 15 7.5 3.75
776 11 Approximate Methods for Estimating Forces in Statically Indeterminate Structures
Fig. E11.2b Shear distribution for the columns (kip)
Fig. E11.2c Bending moment distribution for the columns (kip ft)
Fig. E11.2d Moments at the joints (kip ft)
11.4 Multistory Rigid Frames: Lateral Loading 777
Fig. E11.2e Bending moment distribution for the beams (kip ft)
Fig. E11.2f Shear distribution for the beams (kip)
Fig. E11.2g Axial and shear forces (kip)
Fig. E11.2h Reactions, shear forces and moment distribution
11.4.2 Shear Stiffness Method: Low-Rise Rigid Frames
In this approach, we model a frame as a set of substructures, which resist the lateral shear in the stories
through shearing action. First, we idealize the frame as a rigid frame with moment releases at the
midpoints of the columns and beams such as shown in Fig. 11.8. We consider a segment bounded by
floor i + 1 and floor i. For convenience, we assume Ib and L are constant in a story. We allow for
different values of I for the exterior and interior columns. We define VT as the sum of the lateral loads
acting on floor i + 1, and all the floors above floor i + 1. This quantity represents the :total transverse
shear for the story. Next, we define Δu as the differential lateral displacement between floor i andfloor i + 1.We assume the floor beams are rigidwith respect to axial deformation so that all points on
a floor experience the same lateral displacement. Lastly, we assume the floors do not move in
the vertical direction, and insert lines as indicated in Fig. 11.9. Our objective in this section is to
establish an expression for the column shear forces in a story as a function of the total transverse shear
for the story.
11.4 Multistory Rigid Frames: Lateral Loading 779
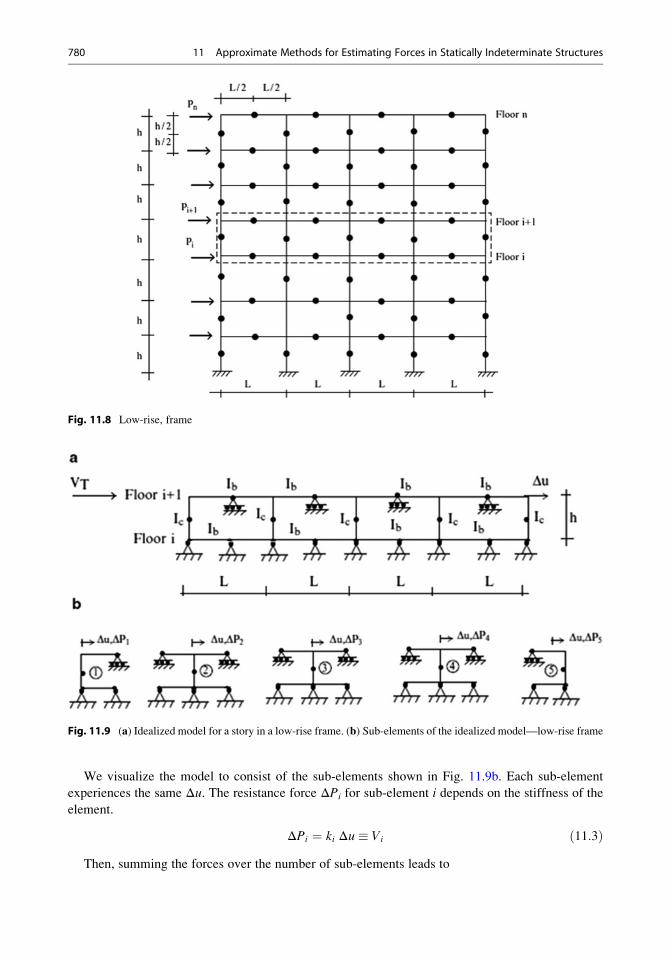
We visualize the model to consist of the sub-elements shown in Fig. 11.9b. Each sub-element
experiences the same Δu. The resistance force ΔPi for sub-element i depends on the stiffness of the
element.
ΔPi ¼ ki Δu � Vi ð11:3ÞThen, summing the forces over the number of sub-elements leads to
Fig. 11.8 Low-rise, frame
Fig. 11.9 (a) Idealized model for a story in a low-rise frame. (b) Sub-elements of the idealized model—low-rise frame
780 11 Approximate Methods for Estimating Forces in Statically Indeterminate Structures
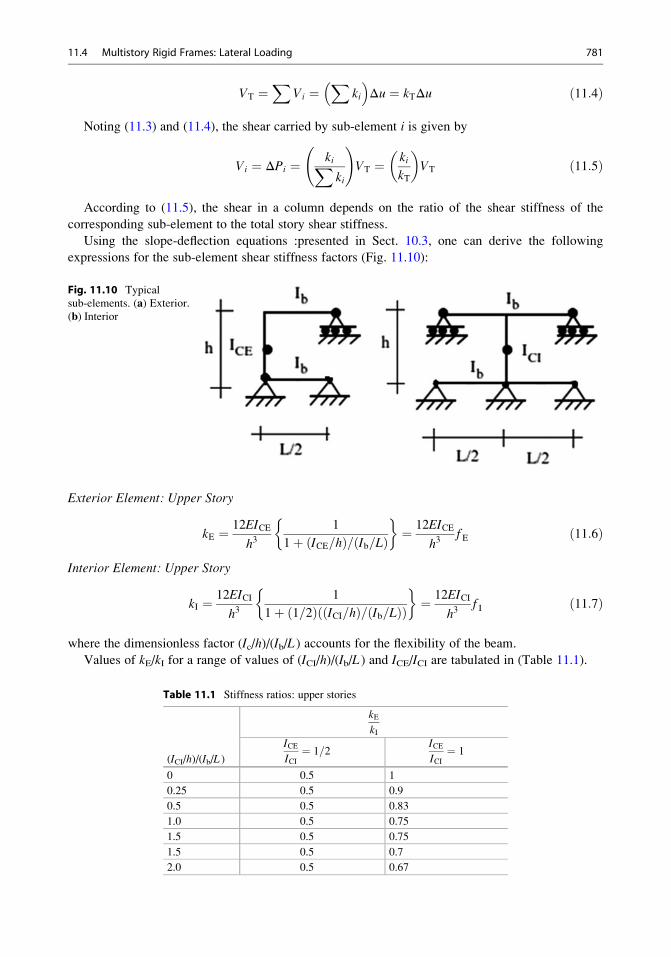
VT ¼X
Vi ¼X
ki
� �Δu ¼ kTΔu ð11:4Þ
Noting (11.3) and (11.4), the shear carried by sub-element i is given by
Vi ¼ ΔPi ¼ kiXki
!VT ¼ ki
kT
� �VT ð11:5Þ
According to (11.5), the shear in a column depends on the ratio of the shear stiffness of the
corresponding sub-element to the total story shear stiffness.
Using the slope-deflection equations :presented in Sect. 10.3, one can derive the following
expressions for the sub-element shear stiffness factors (Fig. 11.10):
Exterior Element: Upper Story
kE ¼ 12EICE
h31
1þ ICE=hð Þ= Ib=Lð Þ �
¼ 12EICE
h3f E ð11:6Þ
Interior Element: Upper Story
kI ¼ 12EICI
h31
1þ 1=2ð Þ ICI=hð Þ= Ib=Lð Þð Þ �
¼ 12EICI
h3f I ð11:7Þ
where the dimensionless factor (Ic/h)/(Ib/L) accounts for the flexibility of the beam.
Values of kE/kI for a range of values of (ICI/h)/(Ib/L ) and ICE/ICI are tabulated in (Table 11.1).
Fig. 11.10 Typical
sub-elements. (a) Exterior.(b) Interior
Table 11.1 Stiffness ratios: upper stories
(ICI/h)/(Ib/L )
kEkI
ICEICI¼ 1=2
ICEICI¼ 1
0 0.5 1
0.25 0.5 0.9
0.5 0.5 0.83
1.0 0.5 0.75
1.5 0.5 0.75
1.5 0.5 0.7
2.0 0.5 0.67
11.4 Multistory Rigid Frames: Lateral Loading 781
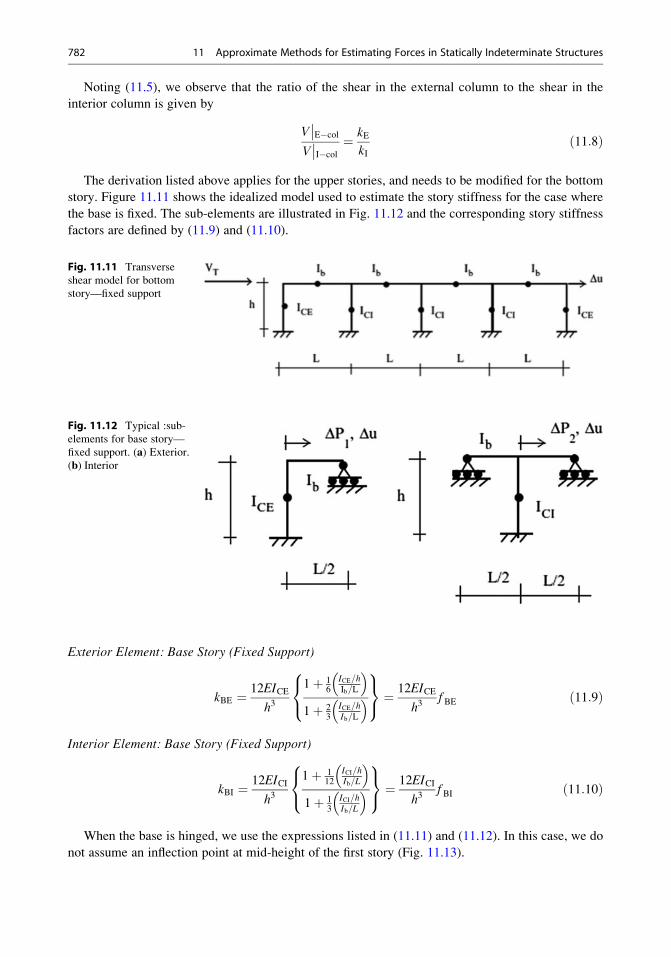
Noting (11.5), we observe that the ratio of the shear in the external column to the shear in the
interior column is given by
V��E�col
V��I�col
¼ kEkI
ð11:8Þ
The derivation listed above applies for the upper stories, and needs to be modified for the bottom
story. Figure 11.11 shows the idealized model used to estimate the story stiffness for the case where
the base is fixed. The sub-elements are illustrated in Fig. 11.12 and the corresponding story stiffness
factors are defined by (11.9) and (11.10).
Exterior Element: Base Story (Fixed Support)
kBE ¼ 12EICE
h3
1þ 16
ICE=hIb=L
� �1þ 2
3ICE=hIb=L
� �8<:
9=; ¼ 12EICE
h3f BE ð11:9Þ
Interior Element: Base Story (Fixed Support)
kBI ¼ 12EICI
h3
1þ 112
ICI=hIb=L
� �1þ 1
3ICI=hIb=L
� �8<:
9=; ¼ 12EICI
h3f BI ð11:10Þ
When the base is hinged, we use the expressions listed in (11.11) and (11.12). In this case, we do
not assume an inflection point at mid-height of the first story (Fig. 11.13).
Fig. 11.11 Transverse
shear model for bottom
story—fixed support
Fig. 11.12 Typical :sub-
elements for base story—
fixed support. (a) Exterior.(b) Interior
782 11 Approximate Methods for Estimating Forces in Statically Indeterminate Structures
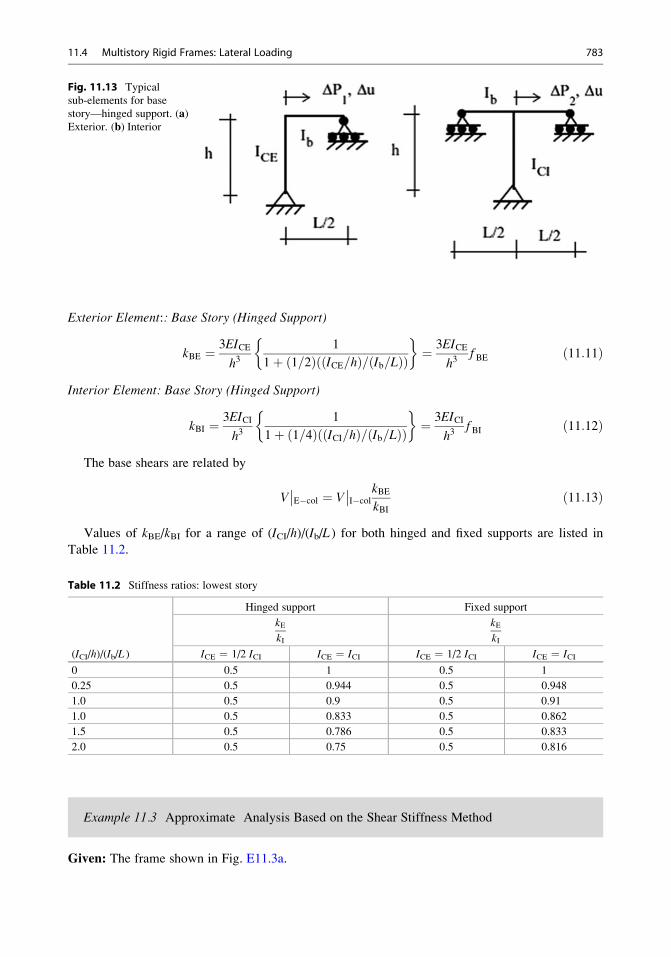
Exterior Element:: Base Story (Hinged Support)
kBE ¼ 3EICE
h31
1þ 1=2ð Þ ICE=hð Þ= Ib=Lð Þð Þ �
¼ 3EICE
h3f BE ð11:11Þ
Interior Element: Base Story (Hinged Support)
kBI ¼ 3EICI
h31
1þ 1=4ð Þ ICI=hð Þ= Ib=Lð Þð Þ �
¼ 3EICI
h3f BI ð11:12Þ
The base shears are related by
V��E�col ¼ V
��I�col
kBEkBI
ð11:13Þ
Values of kBE/kBI for a range of (ICI/h)/(Ib/L ) for both hinged and fixed supports are listed in
Table 11.2.
Example 11.3 Approximate Analysis Based on the Shear Stiffness Method
Given: The frame shown in Fig. E11.3a.
Fig. 11.13 Typical
sub-elements for base
story—hinged support. (a)Exterior. (b) Interior
Table 11.2 Stiffness ratios: lowest story
(ICI/h)/(Ib/L )
Hinged support Fixed support
kEkI
kEkI
ICE ¼ 1/2 ICI ICE ¼ ICI ICE ¼ 1/2 ICI ICE ¼ ICI
0 0.5 1 0.5 1
0.25 0.5 0.944 0.5 0.948
1.0 0.5 0.9 0.5 0.91
1.0 0.5 0.833 0.5 0.862
1.5 0.5 0.786 0.5 0.833
2.0 0.5 0.75 0.5 0.816
11.4 Multistory Rigid Frames: Lateral Loading 783
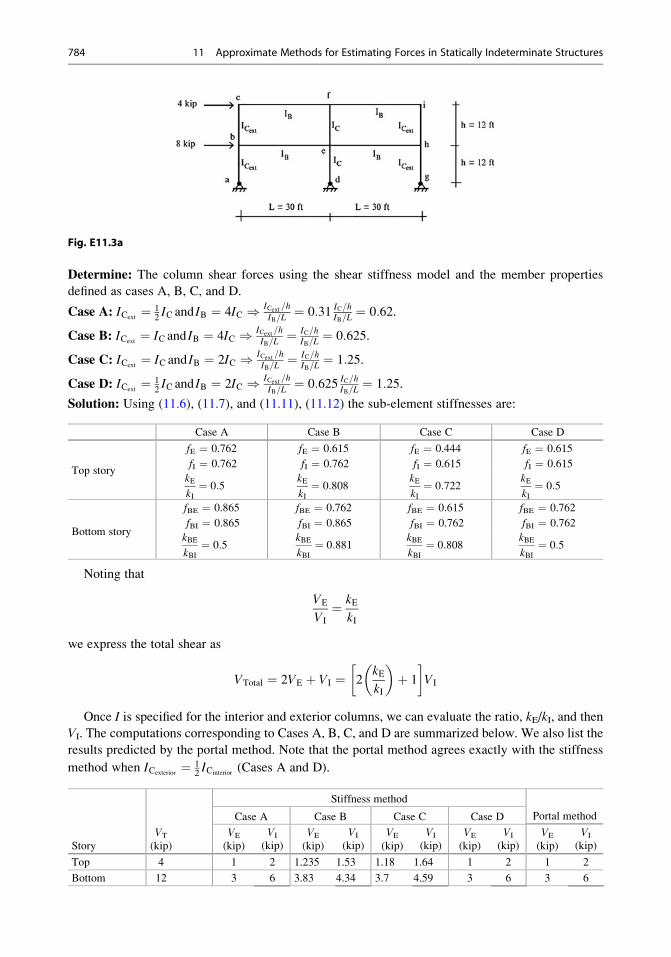
Fig. E11.3a
Determine: The column shear forces using the shear stiffness model and the member properties
defined as cases A, B, C, and D.
Case A: ICext¼ 1
2IC and IB ¼ 4IC ) ICext=h
IB=L¼ 0:31 IC=h
IB=L¼ 0:62.
Case B: ICext¼ IC and IB ¼ 4IC ) ICext=h
IB=L¼ IC=h
IB=L¼ 0:625.
Case C: ICext¼ IC and IB ¼ 2IC ) ICext=h
IB=L¼ IC=h
IB=L¼ 1:25.
Case D: ICext¼ 1
2IC and IB ¼ 2IC ) ICext=h
IB=L¼ 0:625 IC=h
IB=L¼ 1:25.
Solution: Using (11.6), (11.7), and (11.11), (11.12) the sub-element stiffnesses are:
Case A Case B Case C Case D
Top story
fE ¼ 0.762 fE ¼ 0.615 fE ¼ 0.444 fE ¼ 0.615
fI ¼ 0.762 fI ¼ 0.762 fI ¼ 0.615 fI ¼ 0.615
kEkI¼ 0:5
kEkI¼ 0:808
kEkI¼ 0:722
kEkI¼ 0:5
Bottom story
fBE ¼ 0.865 fBE ¼ 0.762 fBE ¼ 0.615 fBE ¼ 0.762
fBI ¼ 0.865 fBI ¼ 0.865 fBI ¼ 0.762 fBI ¼ 0.762
kBEkBI¼ 0:5
kBEkBI¼ 0:881
kBEkBI¼ 0:808
kBEkBI¼ 0:5
Noting that
VE
VI
¼ kEkI
we express the total shear as
VTotal ¼ 2VE þ VI ¼ 2kEkI
� �þ 1
�VI
Once I is specified for the interior and exterior columns, we can evaluate the ratio, kE/kI, and then
VI. The computations corresponding to Cases A, B, C, and D are summarized below. We also list the
results predicted by the portal method. Note that the portal method agrees exactly with the stiffness
method when ICexterior¼ 1
2ICinterior
(Cases A and D).
Story
VT
(kip)
Stiffness method
Portal methodCase A Case B Case C Case D
VE
(kip)
VI
(kip)VE
(kip)
VI
(kip)VE
(kip)
VI
(kip)VE
(kip)
VI
(kip)VE
(kip)
VI
(kip)
Top 4 1 2 1.235 1.53 1.18 1.64 1 2 1 2
Bottom 12 3 6 3.83 4.34 3.7 4.59 3 6 3 6
784 11 Approximate Methods for Estimating Forces in Statically Indeterminate Structures
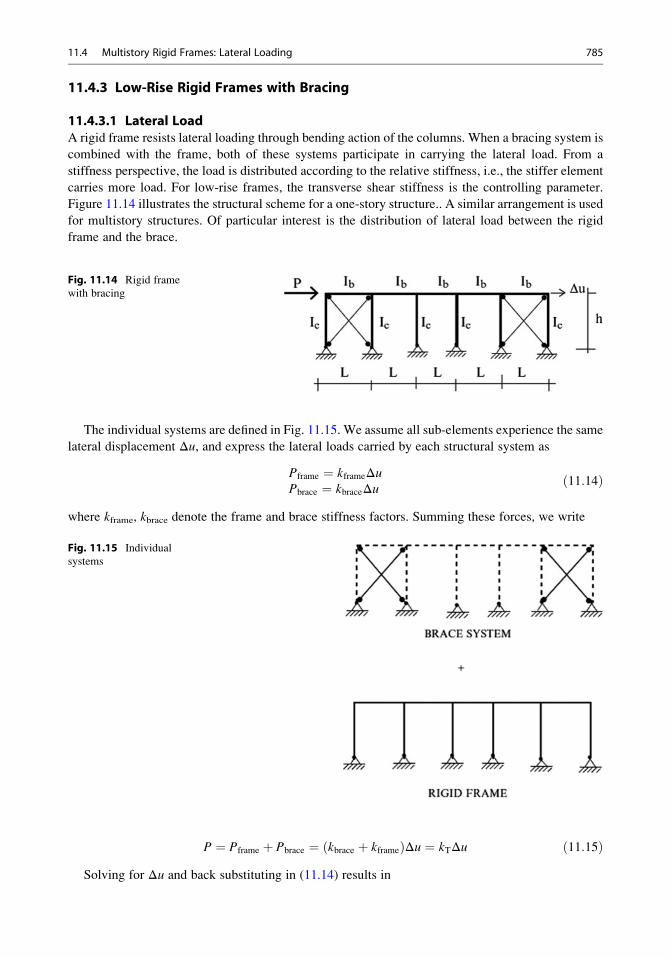
11.4.3 Low-Rise Rigid Frames with Bracing
11.4.3.1 Lateral LoadA rigid frame resists lateral loading through bending action of the columns. When a bracing system is
combined with the frame, both of these systems participate in carrying the lateral load. From a
stiffness perspective, the load is distributed according to the relative stiffness, i.e., the stiffer element
carries more load. For low-rise frames, the transverse shear stiffness is the controlling parameter.
Figure 11.14 illustrates the structural scheme for a one-story structure.. A similar arrangement is used
for multistory structures. Of particular interest is the distribution of lateral load between the rigid
frame and the brace.
The individual systems are defined in Fig. 11.15. We assume all sub-elements experience the same
lateral displacement Δu, and express the lateral loads carried by each structural system as
Pframe ¼ kframeΔuPbrace ¼ kbraceΔu
ð11:14Þ
where kframe, kbrace denote the frame and brace stiffness factors. Summing these forces, we write
P ¼ Pframe þ Pbrace ¼ kbrace þ kframeð ÞΔu ¼ kTΔu ð11:15ÞSolving for Δu and back substituting in (11.14) results in
Fig. 11.14 Rigid frame
with bracing
Fig. 11.15 Individual
systems
11.4 Multistory Rigid Frames: Lateral Loading 785
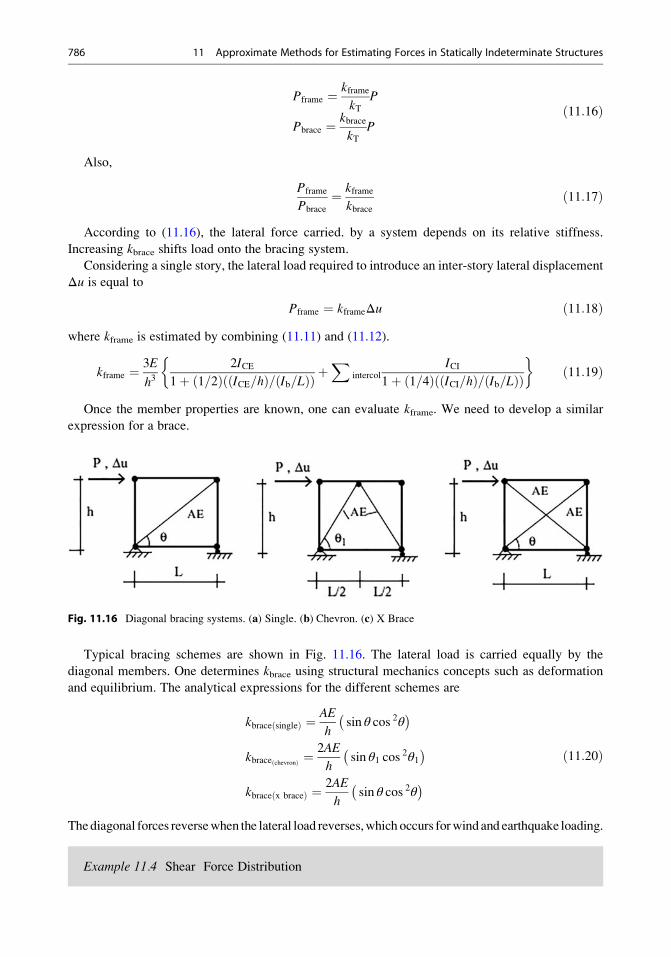
Pframe ¼ kframe
kTP
Pbrace ¼ kbracekT
Pð11:16Þ
Also,
Pframe
Pbrace
¼ kframe
kbraceð11:17Þ
According to (11.16), the lateral force carried. by a system depends on its relative stiffness.
Increasing kbrace shifts load onto the bracing system.
Considering a single story, the lateral load required to introduce an inter-story lateral displacement
Δu is equal to
Pframe ¼ kframeΔu ð11:18Þwhere kframe is estimated by combining (11.11) and (11.12).
kframe ¼ 3E
h32ICE
1þ 1=2ð Þ ICE=hð Þ= Ib=Lð Þð Þ þX
intercol
ICI1þ 1=4ð Þ ICI=hð Þ= Ib=Lð Þð Þ
�ð11:19Þ
Once the member properties are known, one can evaluate kframe. We need to develop a similar
expression for a brace.
Typical bracing schemes are shown in Fig. 11.16. The lateral load is carried equally by the
diagonal members. One determines kbrace using structural mechanics concepts such as deformation
and equilibrium. The analytical expressions for the different schemes are
kbrace singleð Þ ¼ AE
hsin θ cos 2θ� �
kbrace chevronð Þ ¼2AE
hsin θ1 cos
2θ1� �
kbrace x braceð Þ ¼ 2AE
hsin θ cos 2θ� �
ð11:20Þ
Thediagonal forces reversewhen the lateral load reverses,which occurs forwindand earthquake loading.
Example 11.4 Shear Force Distribution
Fig. 11.16 Diagonal bracing systems. (a) Single. (b) Chevron. (c) X Brace
786 11 Approximate Methods for Estimating Forces in Statically Indeterminate Structures
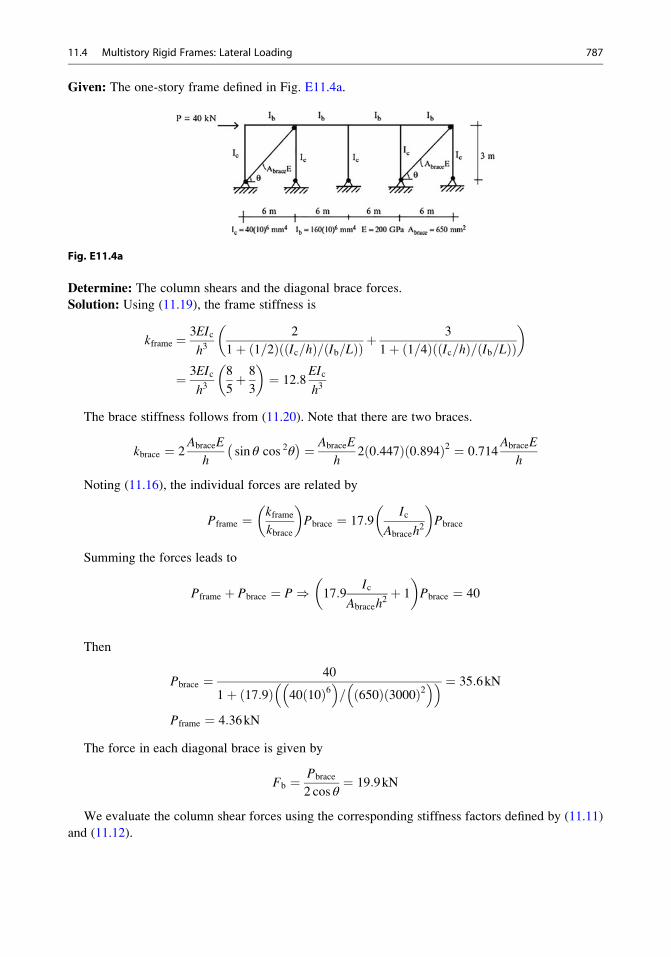
Given: The one-story frame defined in Fig. E11.4a.
Fig. E11.4a
Determine: The column shears and the diagonal brace forces.
Solution: Using (11.19), the frame stiffness is
kframe ¼ 3EIc
h32
1þ 1=2ð Þ Ic=hð Þ= Ib=Lð Þð Þ þ3
1þ 1=4ð Þ Ic=hð Þ= Ib=Lð Þð Þ� �
¼ 3EIc
h38
5þ 8
3
� �¼ 12:8
EIc
h3
The brace stiffness follows from (11.20). Note that there are two braces.
kbrace ¼ 2AbraceE
hsin θ cos 2θ� � ¼ AbraceE
h2 0:447ð Þ 0:894ð Þ2 ¼ 0:714
AbraceE
h
Noting (11.16), the individual forces are related by
Pframe ¼ kframe
kbrace
� �Pbrace ¼ 17:9
Ic
Abraceh2
� �Pbrace
Summing the forces leads to
Pframe þ Pbrace ¼ P) 17:9Ic
Abraceh2þ 1
� �Pbrace ¼ 40
Then
Pbrace ¼ 40
1þ 17:9ð Þ 40 10ð Þ6� �
= 650ð Þ 3000ð Þ2� �� � ¼ 35:6kN
Pframe ¼ 4:36kN
The force in each diagonal brace is given by
Fb ¼ Pbrace
2 cos θ¼ 19:9kN
We evaluate the column shear forces using the corresponding stiffness factors defined by (11.11)
and (11.12).
11.4 Multistory Rigid Frames: Lateral Loading 787
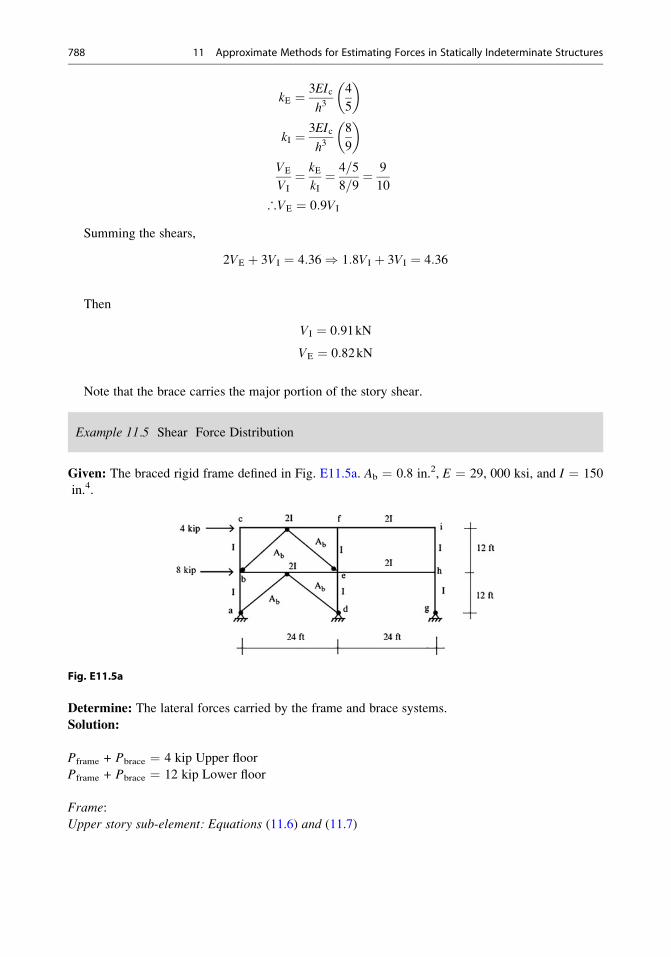
kE ¼ 3EIc
h34
5
� �
kI ¼ 3EIc
h38
9
� �VE
VI
¼ kEkI¼ 4=5
8=9¼ 9
10
∴VE ¼ 0:9VI
Summing the shears,
2VE þ 3VI ¼ 4:36) 1:8VI þ 3VI ¼ 4:36
Then
VI ¼ 0:91kN
VE ¼ 0:82kN
Note that the brace carries the major portion of the story shear.
Example 11.5 Shear Force Distribution
Given: The braced rigid frame defined in Fig. E11.5a. Ab ¼ 0.8 in.2, E ¼ 29, 000 ksi, and I ¼ 150
in.4.
Fig. E11.5a
Determine: The lateral forces carried by the frame and brace systems.
Solution:
Pframe + Pbrace ¼ 4 kip Upper floor
Pframe + Pbrace ¼ 12 kip Lower floor
Frame:
Upper story sub-element: Equations (11.6) and (11.7)
788 11 Approximate Methods for Estimating Forces in Statically Indeterminate Structures

kE ¼ 6EIc
h3
kI ¼ 8EIc
h3
) kframe ¼ EIc
h32 6ð Þ þ 8ð Þ ¼ 20EIc
h3¼ 20 29; 000ð Þ150
12� 12ð Þ3 ¼ 29:14kip=in:
Base story sub-element: Equations (11.11) and (11.12)
kE ¼ 2EIc
h3
kI ¼ 2:4EIc
h3
) kframe ¼ EIc
h32 2ð Þ þ 2:4ð Þ ¼ 6:4EIc
h3¼ 9:32kip=in:
Brace:
kbrace ¼ 2EAb
hsin θ1 cos θ1ð Þ2 ¼ 0:707
EAb
h¼ 0:707 0:8ð Þ 29; 000ð Þ
12 12ð Þ ¼ 113:9kip=in:
Shear distributions
Pframe ¼ kframe
kbrace
� �Pbrace )
Pframe ¼ 29:14
113:9
� �Pbrace ¼ 0:256Pbrace Upper floor
Pframe ¼ 9:32
113:9
� �Pbrace ¼ 0:082Pbrace Lower floor
Then
0:256þ 1ð ÞPbrace ¼ 4kip) Pbrace ¼ 3:18kip Upper floor
0:082þ 1ð ÞPbrace ¼ 12kip) Pbrace ¼ 11:09kip Lower floor
Therefore
Pframe ¼ 0:256Pbrace ¼ 0:81kip Upper floor
Pframe ¼ 0:082Pbrace ¼ 0:91kip Lower floor
Example 11.6 Shear Force Distribution
Given: The braced frame defined in Fig. E11.6a.
11.4 Multistory Rigid Frames: Lateral Loading 789
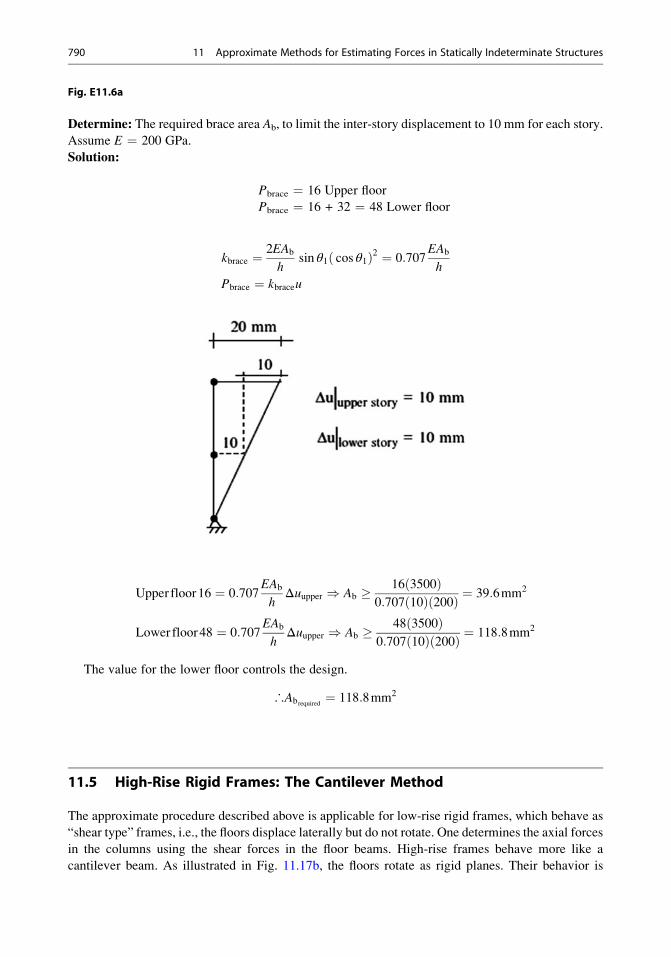
Fig. E11.6a
Determine: The required brace area Ab, to limit the inter-story displacement to 10 mm for each story.
Assume E ¼ 200 GPa.
Solution:
Pbrace ¼ 16 Upper floor
Pbrace ¼ 16 + 32 ¼ 48 Lower floor
kbrace ¼ 2EAb
hsin θ1 cos θ1ð Þ2 ¼ 0:707
EAb
h
Pbrace ¼ kbraceu
Upper floor16 ¼ 0:707EAb
hΔuupper ) Ab 16 3500ð Þ
0:707 10ð Þ 200ð Þ ¼ 39:6mm2
Lower floor48 ¼ 0:707EAb
hΔuupper ) Ab 48 3500ð Þ
0:707 10ð Þ 200ð Þ ¼ 118:8mm2
The value for the lower floor controls the design.
∴Abrequired ¼ 118:8mm2
11.5 High-Rise Rigid Frames: The Cantilever Method
The approximate procedure described above is applicable for low-rise rigid frames, which behave as
“shear type” frames, i.e., the floors displace laterally but do not rotate. One determines the axial forces
in the columns using the shear forces in the floor beams. High-rise frames behave more like a
cantilever beam. As illustrated in Fig. 11.17b, the floors rotate as rigid planes. Their behavior is
790 11 Approximate Methods for Estimating Forces in Statically Indeterminate Structures
similar to what is assumed for the cross section of a beam in the formulation of the bending theory of
beams; the floors experience both a translation and a rotation. Just as for beams, the rotational
component produces axial strain in the columns. The column shears and moments are found from
equilibrium considerations, given the axial forces in the columns. In what follows, we describe an
idealized structural model that is used to establish the distribution of column axial forces in a story.
This approach is called the “Cantilever Method.”
Fig. 11.17 Tall building
model—lateral deflections
11.5 High-Rise Rigid Frames: The Cantilever Method 791
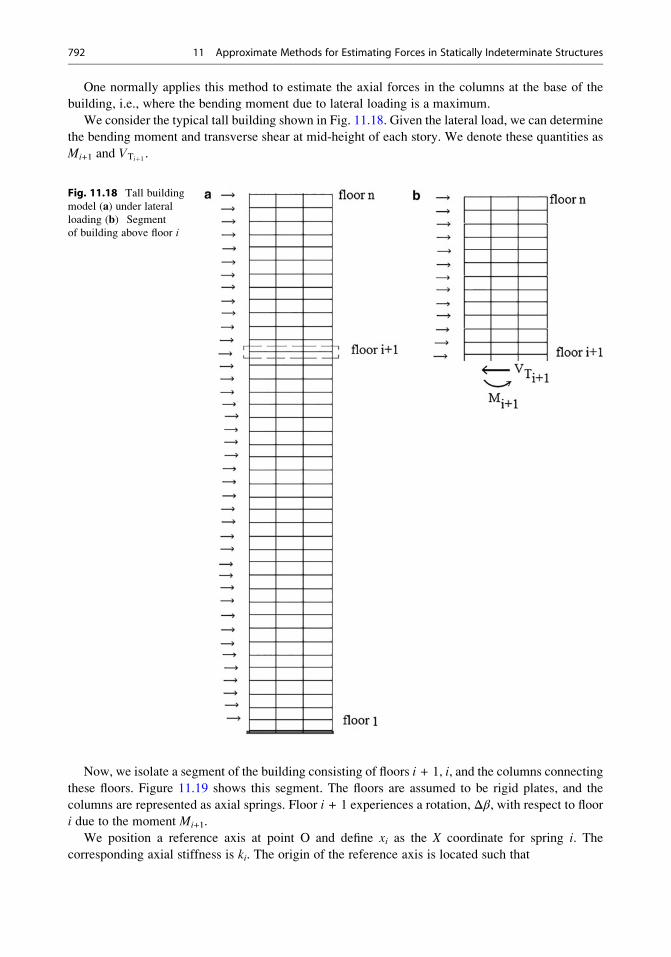
One normally applies this method to estimate the axial forces in the columns at the base of the
building, i.e., where the bending moment due to lateral loading is a maximum.
We consider the typical tall building shown in Fig. 11.18. Given the lateral load, we can determine
the bending moment and transverse shear at mid-height of each story. We denote these quantities as
Mi+1 and VTiþ1 .
Now, we isolate a segment of the building consisting of floors i + 1, i, and the columns connecting
these floors. Figure 11.19 shows this segment. The floors are assumed to be rigid plates, and the
columns are represented as axial springs. Floor i + 1 experiences a rotation, Δβ, with respect to floori due to the moment Mi+1.
We position a reference axis at point O and define xi as the X coordinate for spring i. The
corresponding axial stiffness is ki. The origin of the reference axis is located such that
Fig. 11.18 Tall building
model (a) under lateralloading (b) Segment
of building above floor i
792 11 Approximate Methods for Estimating Forces in Statically Indeterminate Structures
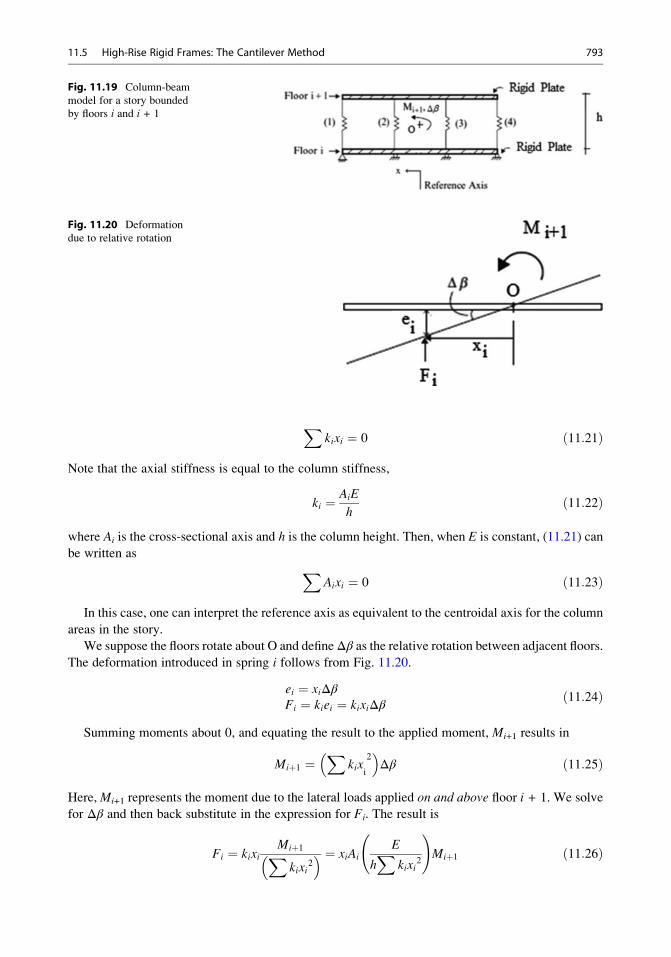
Xkixi ¼ 0 ð11:21Þ
Note that the axial stiffness is equal to the column stiffness,
ki ¼ AiE
hð11:22Þ
where Ai is the cross-sectional axis and h is the column height. Then, when E is constant, (11.21) can
be written as XAixi ¼ 0 ð11:23Þ
In this case, one can interpret the reference axis as equivalent to the centroidal axis for the column
areas in the story.
We suppose the floors rotate about O and defineΔβ as the relative rotation between adjacent floors.The deformation introduced in spring i follows from Fig. 11.20.
ei ¼ xiΔβFi ¼ kiei ¼ kixiΔβ
ð11:24Þ
Summing moments about 0, and equating the result to the applied moment, Mi+1 results in
Miþ1 ¼X
kixi
2� �
Δβ ð11:25Þ
Here,Mi+1 represents the moment due to the lateral loads applied on and above floor i + 1. We solve
for Δβ and then back substitute in the expression for Fi. The result is
Fi ¼ kixiMiþ1Xkixi
2� � ¼ xiAi
E
hX
kixi2
!Miþ1 ð11:26Þ
Fig. 11.19 Column-beam
model for a story bounded
by floors i and i + 1
Fig. 11.20 Deformation
due to relative rotation
11.5 High-Rise Rigid Frames: The Cantilever Method 793
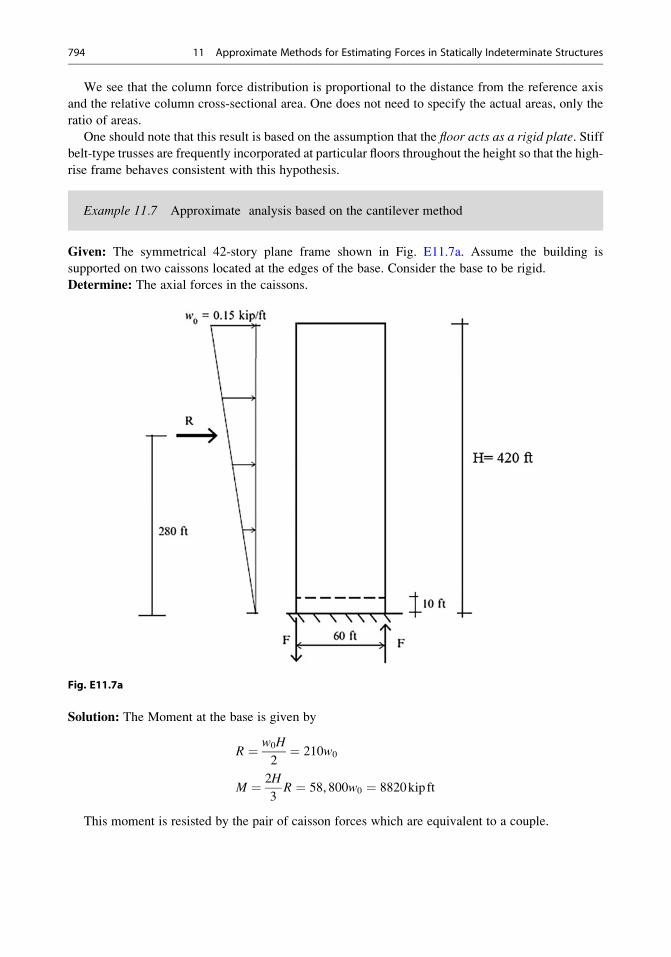
We see that the column force distribution is proportional to the distance from the reference axis
and the relative column cross-sectional area. One does not need to specify the actual areas, only the
ratio of areas.
One should note that this result is based on the assumption that the floor acts as a rigid plate. Stiff
belt-type trusses are frequently incorporated at particular floors throughout the height so that the high-
rise frame behaves consistent with this hypothesis.
Example 11.7 Approximate analysis based on the cantilever method
Given: The symmetrical 42-story plane frame shown in Fig. E11.7a. Assume the building is
supported on two caissons located at the edges of the base. Consider the base to be rigid.
Determine: The axial forces in the caissons.
Fig. E11.7a
Solution: The Moment at the base is given by
R ¼ w0H
2¼ 210w0
M ¼ 2H
3R ¼ 58, 800w0 ¼ 8820kip ft
This moment is resisted by the pair of caisson forces which are equivalent to a couple.
794 11 Approximate Methods for Estimating Forces in Statically Indeterminate Structures
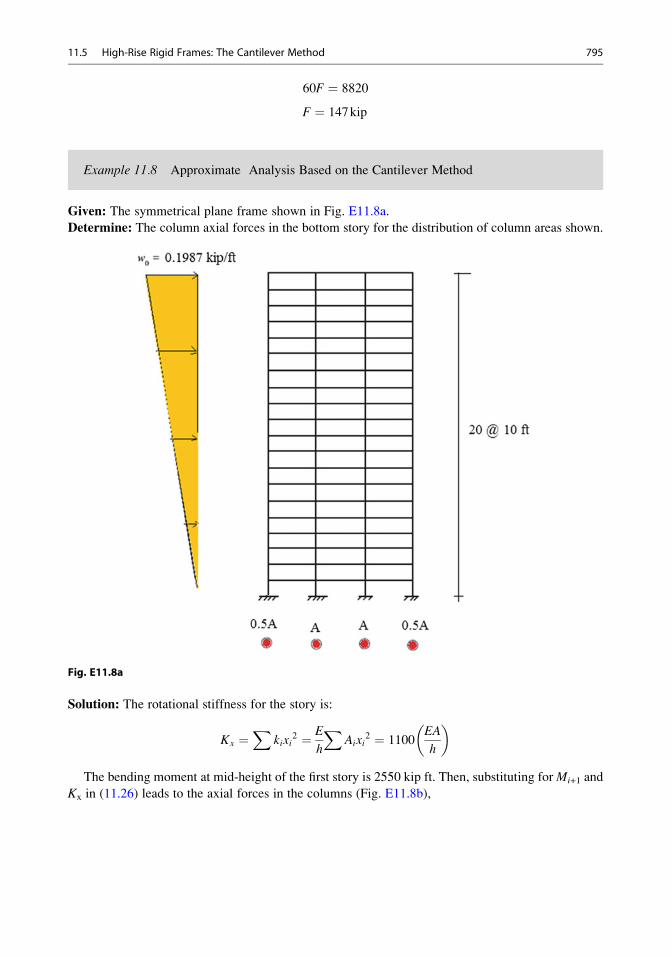
60F ¼ 8820
F ¼ 147kip
Example 11.8 Approximate Analysis Based on the Cantilever Method
Given: The symmetrical plane frame shown in Fig. E11.8a.
Determine: The column axial forces in the bottom story for the distribution of column areas shown.
Fig. E11.8a
Solution: The rotational stiffness for the story is:
Kx ¼X
kixi2 ¼ E
h
XAixi
2 ¼ 1100EA
h
� �
The bending moment at mid-height of the first story is 2550 kip ft. Then, substituting forMi+1 and
Kx in (11.26) leads to the axial forces in the columns (Fig. E11.8b),
11.5 High-Rise Rigid Frames: The Cantilever Method 795
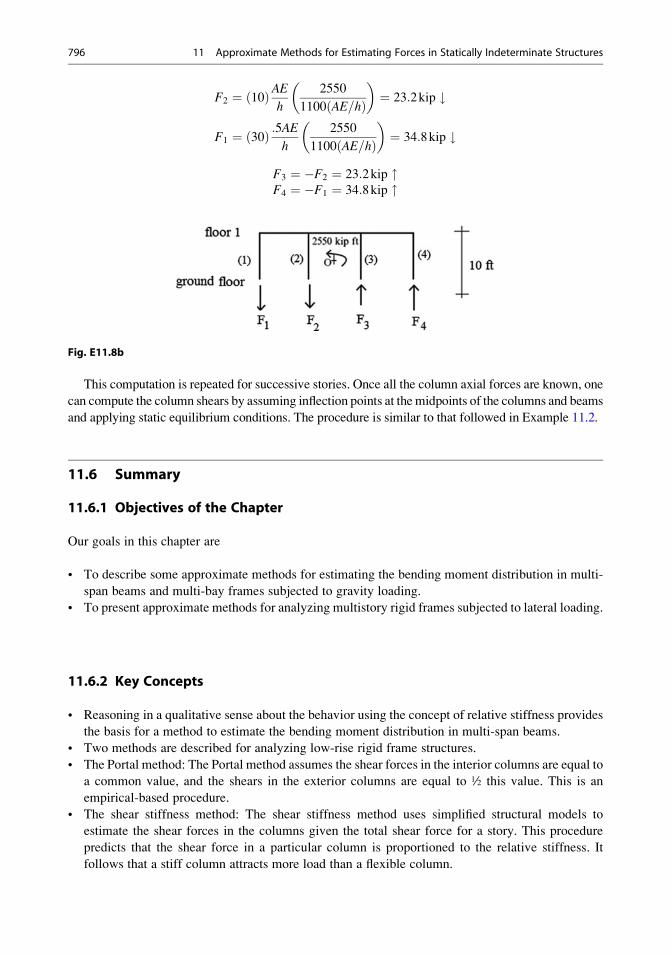
F2 ¼ 10ð ÞAEh
2550
1100 AE=hð Þ� �
¼ 23:2kip #
F1 ¼ 30ð Þ :5AEh
2550
1100 AE=hð Þ� �
¼ 34:8kip #
F3 ¼ �F2 ¼ 23:2kip "F4 ¼ �F1 ¼ 34:8kip "
Fig. E11.8b
This computation is repeated for successive stories. Once all the column axial forces are known, one
can compute the column shears by assuming inflection points at the midpoints of the columns and beams
and applying static equilibrium conditions. The procedure is similar to that followed in Example 11.2.
11.6 Summary
11.6.1 Objectives of the Chapter
Our goals in this chapter are
• To describe some approximate methods for estimating the bending moment distribution in multi-
span beams and multi-bay frames subjected to gravity loading.
• To present approximate methods for analyzing multistory rigid frames subjected to lateral loading.
11.6.2 Key Concepts
• Reasoning in a qualitative sense about the behavior using the concept of relative stiffness provides
the basis for a method to estimate the bending moment distribution in multi-span beams.
• Two methods are described for analyzing low-rise rigid frame structures.
• The Portal method: The Portal method assumes the shear forces in the interior columns are equal to
a common value, and the shears in the exterior columns are equal to ½ this value. This is an
empirical-based procedure.
• The shear stiffness method: The shear stiffness method uses simplified structural models to
estimate the shear forces in the columns given the total shear force for a story. This procedure
predicts that the shear force in a particular column is proportioned to the relative stiffness. It
follows that a stiff column attracts more load than a flexible column.
796 11 Approximate Methods for Estimating Forces in Statically Indeterminate Structures

• High-rise rigid frames are modeled as equivalent cantilever beams. The floor slabs are considered
rigid and the bending rigidity is generated through the axial action of the columns. One starts with
the bending moment at the midpoint between a set of floors and determines the axial forces in the
columns. According to this method, the axial force depends on the axial rigidity of the column and
the distance from the centroidal axis.
11.7 Problems
Problem 11.1. Estimate the bending .moment distribution for the cases listed below.. Use qualitative
reasoning based on relative stiffness. Assume I as constant.
Problem 11.2. Estimate the bending moment distribution. Use qualitative reasoning based on
relative stiffness. Assume I as constant.
Problem 11.3. Solve Problem 11.1 cases (a) and (b) using moment distribution. Compare the
approximate and exact results.
11.7 Problems 797
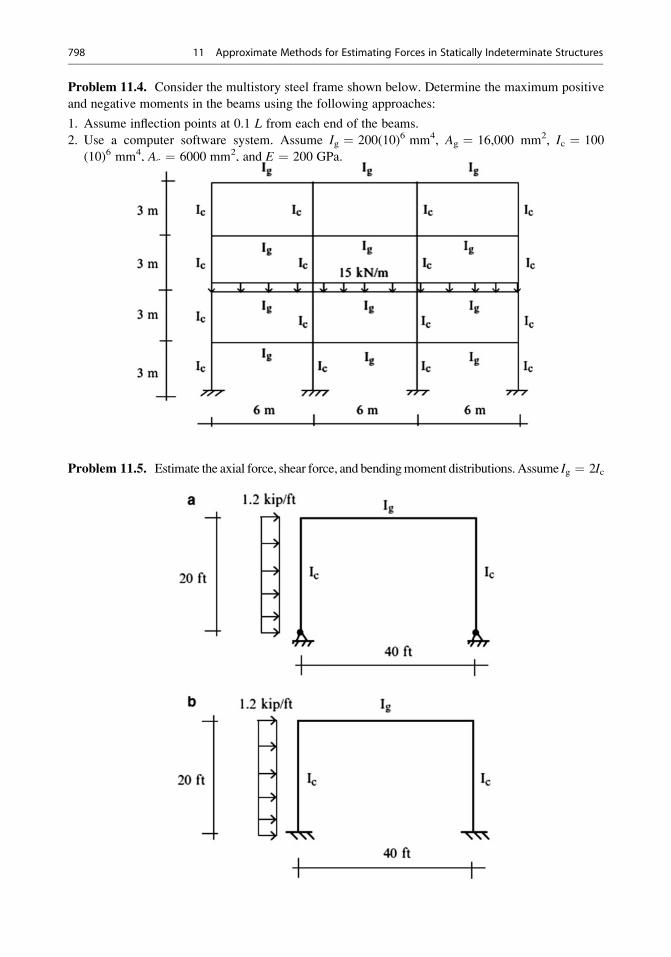
Problem 11.4. Consider the multistory steel frame shown below. Determine the maximum positive
and negative moments in the beams using the following approaches:
1. Assume inflection points at 0.1 L from each end of the beams.
2. Use a computer software system. Assume Ig ¼ 200(10)6 mm4, Ag ¼ 16,000 mm2, Ic ¼ 100
(10)6 mm4, Ac ¼ 6000 mm2, and E ¼ 200 GPa.
Problem 11.5. Estimate the axial force, shear force, and bendingmoment distributions. Assume Ig ¼ 2Ic
798 11 Approximate Methods for Estimating Forces in Statically Indeterminate Structures
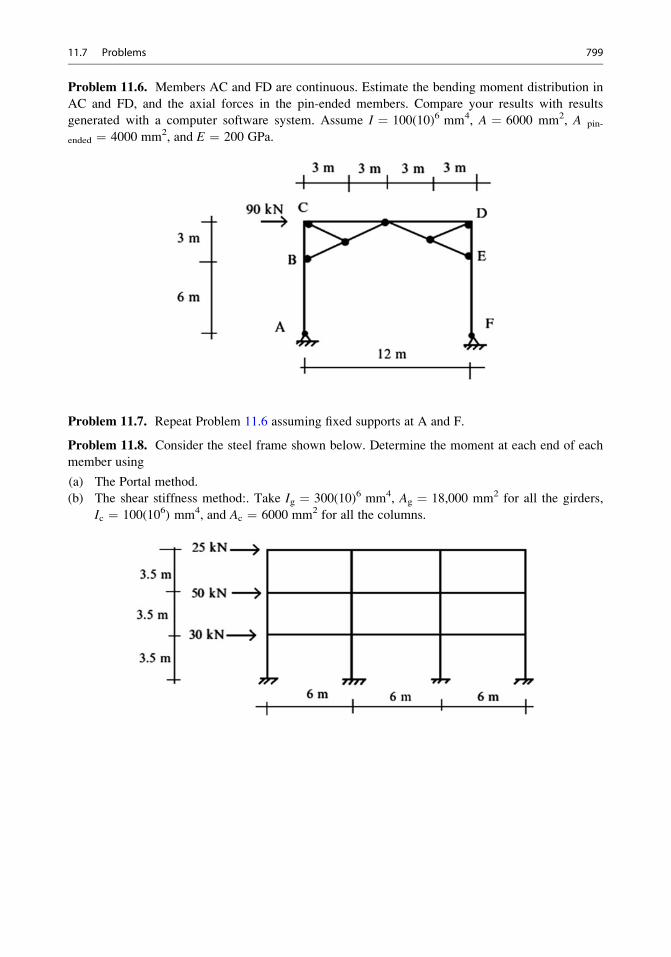
Problem 11.6. Members AC and FD are continuous. Estimate the bending moment distribution in
AC and FD, and the axial forces in the pin-ended members. Compare your results with results
generated with a computer software system. Assume I ¼ 100(10)6 mm4, A ¼ 6000 mm2, A pin-
ended ¼ 4000 mm2, and E ¼ 200 GPa.
Problem 11.7. Repeat Problem 11.6 assuming fixed supports at A and F.
Problem 11.8. Consider the steel frame shown below. Determine the moment at each end of each
member using
(a) The Portal method.
(b) The shear stiffness method:. Take Ig ¼ 300(10)6 mm4, Ag ¼ 18,000 mm2 for all the girders,
Ic ¼ 100(106) mm4, and Ac ¼ 6000 mm2 for all the columns.
11.7 Problems 799

Problem 11.9. For the steel frames shown, estimate the axial force, shear force, and moments for all
of the members using the Portal method. Compare your results with results generated with a computer
software system. Take Ic ¼ 480 in.4, Ac ¼ 40 in.2 for all the columns and Ib ¼ 600 in.4, Ab ¼ 60 in.2
for all the beams.
800 11 Approximate Methods for Estimating Forces in Statically Indeterminate Structures
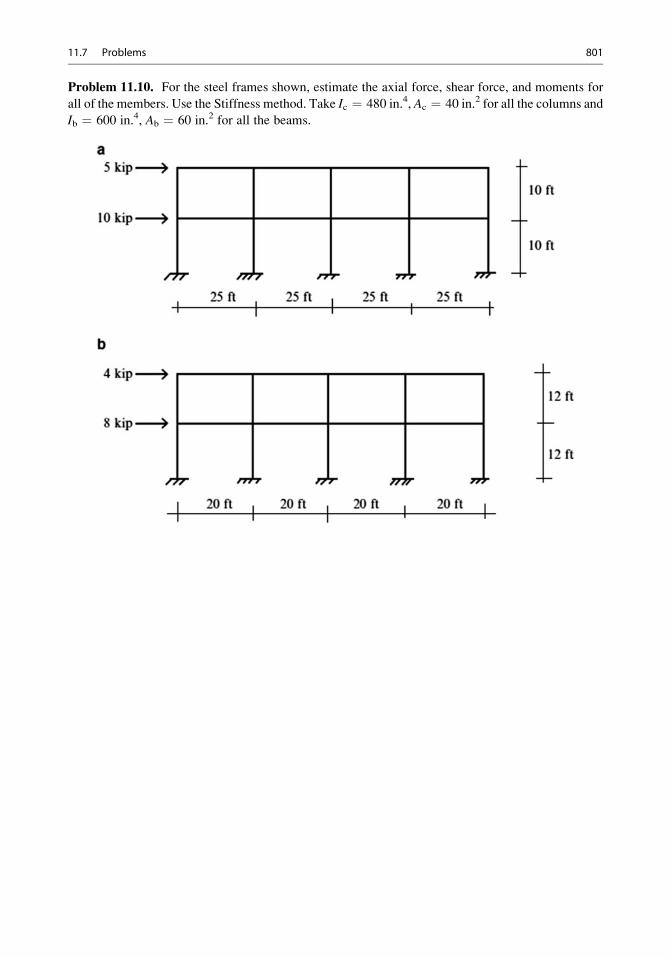
Problem 11.10. For the steel frames shown, estimate the axial force, shear force, and moments for
all of the members. Use the Stiffness method. Take Ic ¼ 480 in.4, Ac ¼ 40 in.2 for all the columns and
Ib ¼ 600 in.4, Ab ¼ 60 in.2 for all the beams.
11.7 Problems 801
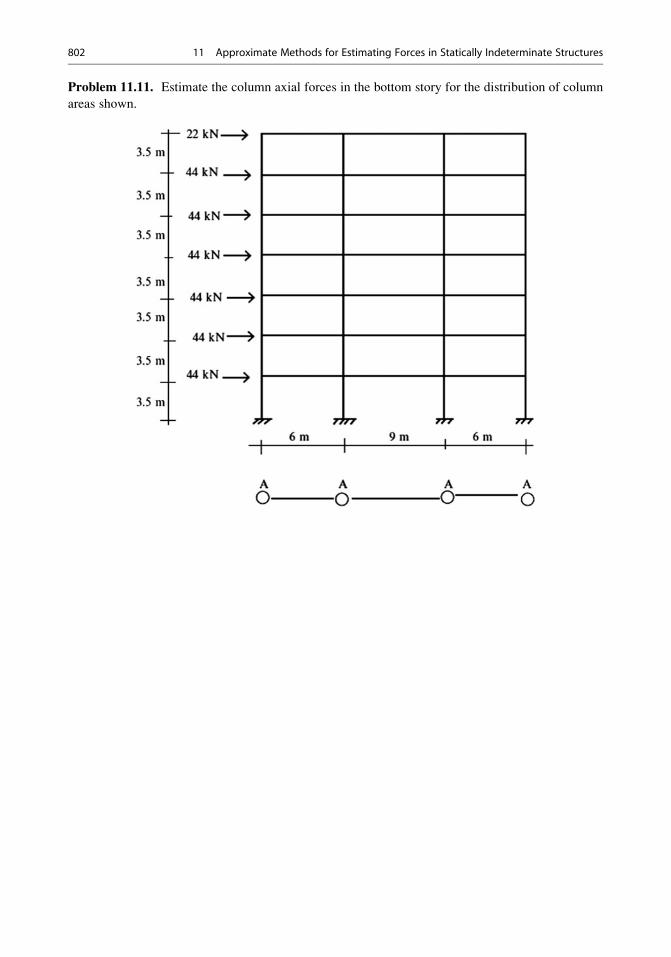
Problem 11.11. Estimate the column axial forces in the bottom story for the distribution of column
areas shown.
802 11 Approximate Methods for Estimating Forces in Statically Indeterminate Structures
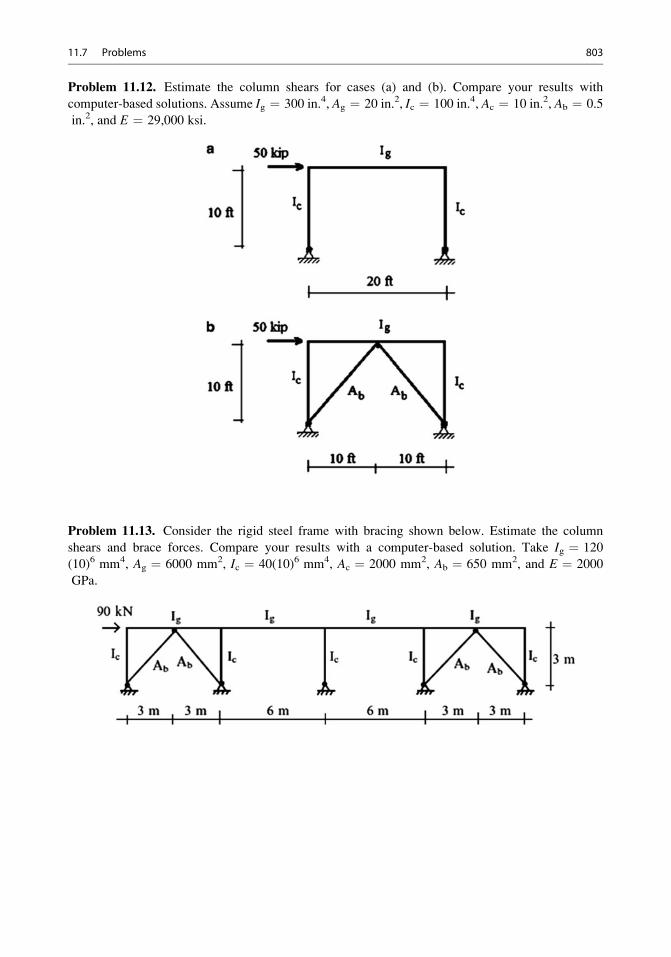
Problem 11.12. Estimate the column shears for cases (a) and (b). Compare your results with
computer-based solutions. Assume Ig ¼ 300 in.4, Ag ¼ 20 in.2, Ic ¼ 100 in.4, Ac ¼ 10 in.2, Ab ¼ 0.5
in.2, and E ¼ 29,000 ksi.
Problem 11.13. Consider the rigid steel frame with bracing shown below. Estimate the column
shears and brace forces. Compare your results with a computer-based solution. Take Ig ¼ 120
(10)6 mm4, Ag ¼ 6000 mm2, Ic ¼ 40(10)6 mm4, Ac ¼ 2000 mm2, Ab ¼ 650 mm2, and E ¼ 2000
GPa.
11.7 Problems 803
Finite Element Displacement Methodfor Framed Structures 12
Abstract
In this chapter, we revisit the Displacement Method for structures such as
trusses, beams, and frames which are composed of member type elements.
Our objective is to identify the basic steps involved in applying theDisplacement Method that can be represented as computer procedures.
We utilize matrix notation since it is the natural language of computation,
and systematically reformulate the different steps as a sequence of matrix
operations. This reformulation is referred to as the Finite Element Dis-
placement Method. It is relatively straightforward to convert these matrix
operations into computer code once one selects a computer language.
12.1 Introduction
In Chaps. 9 and 10, we described two methods for analyzing indeterminate structures, namely the
Force and Displacement Methods. The examples that we presented were deliberately kept simple to
minimize the computational effort since our objective was to demonstrate “how” the methods are
applied rather than the computational details. However, one can appreciate that as a structure
becomes more complex, the computational effort becomes the limiting issue for hand computation.
Therefore, it is necessary to resort to computer-based procedures in order to execute the various
phases of the analysis process. One needs to be familiar with commercial computer-based analysis
codes since the extensive use of digital computers in structural analysis and design has revolutionized
the practice of structural engineering over the past 40 years.
12.2 Key Steps of the Finite Element Displacement Methodfor Member Systems
Chapter 10 discussed the methodology of the Displacement Method and presented examples of beam
and frame structures analyzed by this method. We summarize here the key steps involved in applying
# Springer International Publishing Switzerland 2016
J.J. Connor, S. Faraji, Fundamentals of Structural Engineering,DOI 10.1007/978-3-319-24331-3_12
805
the Displacement Method to member type structures. In later sections, we reexamine each step and
represent the set of actions as a set of matrix operations.
Step #1. Formulate the member end force–end displacement equations
Using beam theory, we express the forces acting on the ends of a member in terms of the
displacement measures for the ends. These equations are referred to as member end
action–end displacement equations. Their derivation is contained in Sect. 10.2. A subset
of these equations are called the slope-deflection equations. In the derivation, the force and
displacement quantities are referred to a local reference frame associated with the orienta-
tion of the member.
Step #2. Select a global reference frame and transform member variables
We select a common reference frame and refer both the nodal and member force and
displacement quantities to this common frame. This step involves shifting back and forth
from member frames to the global frame and allows one to deal with structures having
arbitrary geometries.
Step #3. Establish the nodal force equilibrium equations
We enforce force equilibrium at each node. This step involves summing the end actions for
those members which are incident on the node. Then, using the member equations, we
substitute for the end actions in terms of the nodal displacements that correspond to the end
displacements for the member. This operation leads to a set of linear algebraic equations
which relate the external forces applied to the nodes and the nodal displacements. The
coefficient matrix for this set is called the “System Stiffness Matrix.”
Step #4. Introduce displacement constraints
Supports at nodes introduce constraints on certain nodal displacements. For example, if a
node is fully fixed, all the displacement measures associated with the node are equal to zero.
Introducing displacement constraints reduces the total number of displacement variables,
and one works with a “reduced” set of equilibrium equations. Depending on the structure, a
certain number of supports are required to prevent initial instability.
Step #5. Solve the nodal equilibrium equations
We solve the nodal force equilibrium equations for the nodal displacements. When the
number of unknown displacements is large, this step is not feasible without a digital
computer.
Step #6. Determine member end actionsWe substitute the values of the nodal displacements obtained from the solution of the nodal
equilibrium equations into the member force–displacement relations and solve for the
member end forces.
Step #7. Check on nodal force equilibrium
The last step involves substituting for the member end forces in the nodal force equilibrium
equations to check that the external nodal forces are equilibrated by the member forces. This
step provides information on the reactions; it also provides a check on statics. Static
discrepancy is generally related to the computational accuracy associated with solving the
nodal equilibrium equations. Most computers now use double precision representation and
numerical accuracy is usually not a problem.
806 12 Finite Element Displacement Method for Framed Structures
12.3 Matrix Formulation of the Member Equations: Planar Behavior
In what follows, we present the member equations for the two-dimensional case where bending
occurs in the x–y plane. Figure 12.1 shows the end actions and end displacements referred to the local
member frame. We use a subscript l to denote quantities referred to the local frame. The x-axis
coincides with the centroidal axis for the member, and the y and z axes are the principal inertia
directions for the cross section. Subscripts B and A denote the positive and negative ends of the
member. It is convenient to represent the set of end forces and end displacements as matrices defined
as follows:
• End Displacements
UℓB ¼uℓB
vℓB
θB
8><>:
9>=>; UℓA ¼
uℓA
vℓA
θA
8><>:
9>=>; ð12:1Þ
• End Forces
PℓB ¼FℓB
VℓB
MB
8><>:
9>=>; PℓA ¼
FℓA
VℓA
MA
8><>:
9>=>; ð12:2Þ
Note that the positive sense for moment and rotation is taken as counterclockwise, i.e., from
X toward Y.We derived the complete set of equations relating the end forces and end displacements in
Chap. 10 and used a subset of these equations (10.12) to analyze bending of beams and frames.
That analysis was approximate in the sense that the axial deformation of the members was neglected.
Consequently, the axial forces had to be determined from the force equilibrium conditions. In what
follows, we remove this assumption. The resulting analysis is now applicable for both truss and frame
type structures. The formulation is now more involved since there are now more unknowns, but this is
Fig. 12.1 End forces and
displacements—local
member frame—planar
behavior
12.3 Matrix Formulation of the Member Equations: Planar Behavior 807
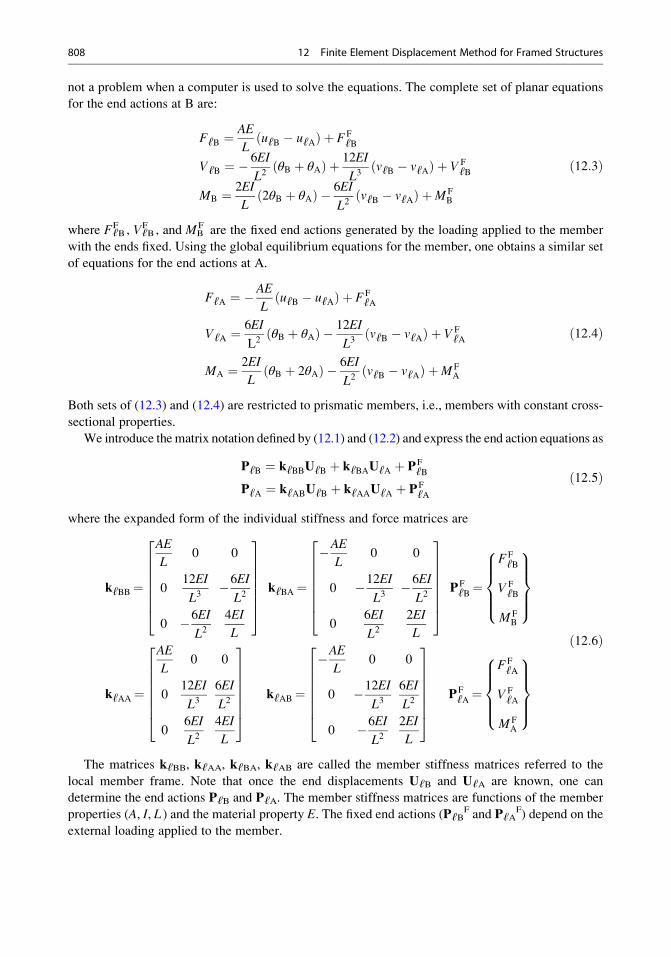
not a problem when a computer is used to solve the equations. The complete set of planar equations
for the end actions at B are:
FℓB ¼AE
LuℓB � uℓAð Þ þ FF
ℓB
VℓB ¼ �6EI
L2θB þ θAð Þ þ 12EI
L3vℓB � vℓAð Þ þ V F
ℓB
MB ¼ 2EI
L2θB þ θAð Þ � 6EI
L2vℓB � vℓAð Þ þM F
B
ð12:3Þ
where FℓBF , VℓB
F , and MBF are the fixed end actions generated by the loading applied to the member
with the ends fixed. Using the global equilibrium equations for the member, one obtains a similar set
of equations for the end actions at A.
FℓA ¼ �AE
LuℓB � uℓAð Þ þ FF
ℓA
VℓA ¼6EI
L2θB þ θAð Þ � 12EI
L3vℓB � vℓAð Þ þ V F
ℓA
MA ¼ 2EI
LθB þ 2θAð Þ � 6EI
L2vℓB � vℓAð Þ þM F
A
ð12:4Þ
Both sets of (12.3) and (12.4) are restricted to prismatic members, i.e., members with constant cross-
sectional properties.
We introduce the matrix notation defined by (12.1) and (12.2) and express the end action equations as
PℓB ¼ kℓBBUℓB þ kℓBAUℓA þ PFℓB
PℓA ¼ kℓABUℓB þ kℓAAUℓA þ PFℓA
ð12:5Þ
where the expanded form of the individual stiffness and force matrices are
kℓBB¼
AE
L0 0
012EI
L3�6EI
L2
0 �6EIL2
4EI
L
26666664
37777775
kℓBA¼
�AE
L0 0
0 �12EI
L3�6EI
L2
06EI
L22EI
L
26666664
37777775
PFℓB¼
FFℓB
V FℓB
M FB
8>>><>>>:
9>>>=>>>;
kℓAA¼
AE
L0 0
012EI
L36EI
L2
06EI
L24EI
L
26666664
37777775
kℓAB¼
�AEL
0 0
0 �12EI
L36EI
L2
0 �6EI
L22EI
L
26666664
37777775
PFℓA¼
FFℓA
V FℓA
M FA
8>>><>>>:
9>>>=>>>;
ð12:6Þ
The matrices kℓBB, kℓAA, kℓBA, kℓAB are called the member stiffness matrices referred to the
local member frame. Note that once the end displacements UℓB and UℓA are known, one can
determine the end actions PℓB and PℓA. The member stiffness matrices are functions of the member
properties (A, I, L ) and the material property E. The fixed end actions (PℓBF and PℓA
F) depend on the
external loading applied to the member.
808 12 Finite Element Displacement Method for Framed Structures
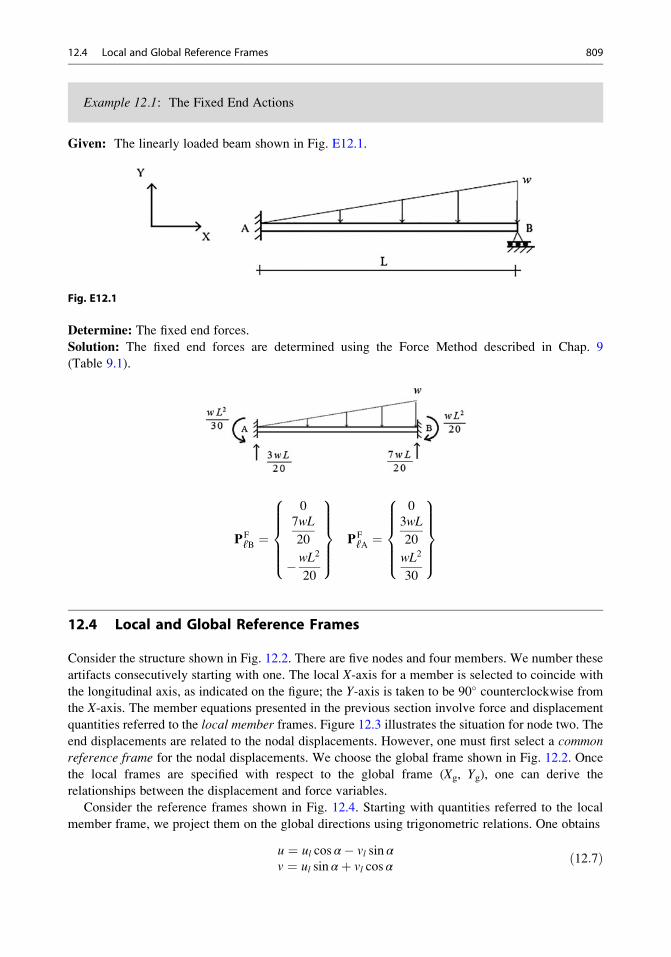
Example 12.1: The Fixed End Actions
Given: The linearly loaded beam shown in Fig. E12.1.
Fig. E12.1
Determine: The fixed end forces.
Solution: The fixed end forces are determined using the Force Method described in Chap. 9
(Table 9.1).
PFℓB ¼
07wL
20
�wL2
20
8>>>><>>>>:
9>>>>=>>>>;
PFℓA ¼
0
3wL
20
wL2
30
8>>>><>>>>:
9>>>>=>>>>;
12.4 Local and Global Reference Frames
Consider the structure shown in Fig. 12.2. There are five nodes and four members. We number these
artifacts consecutively starting with one. The local X-axis for a member is selected to coincide with
the longitudinal axis, as indicated on the figure; the Y-axis is taken to be 90� counterclockwise fromthe X-axis. The member equations presented in the previous section involve force and displacement
quantities referred to the local member frames. Figure 12.3 illustrates the situation for node two. The
end displacements are related to the nodal displacements. However, one must first select a commonreference frame for the nodal displacements. We choose the global frame shown in Fig. 12.2. Once
the local frames are specified with respect to the global frame (Xg, Yg), one can derive the
relationships between the displacement and force variables.
Consider the reference frames shown in Fig. 12.4. Starting with quantities referred to the local
member frame, we project them on the global directions using trigonometric relations. One obtains
u ¼ ul cos α� vl sin αv ¼ ul sin αþ vl cos α
ð12:7Þ
12.4 Local and Global Reference Frames 809
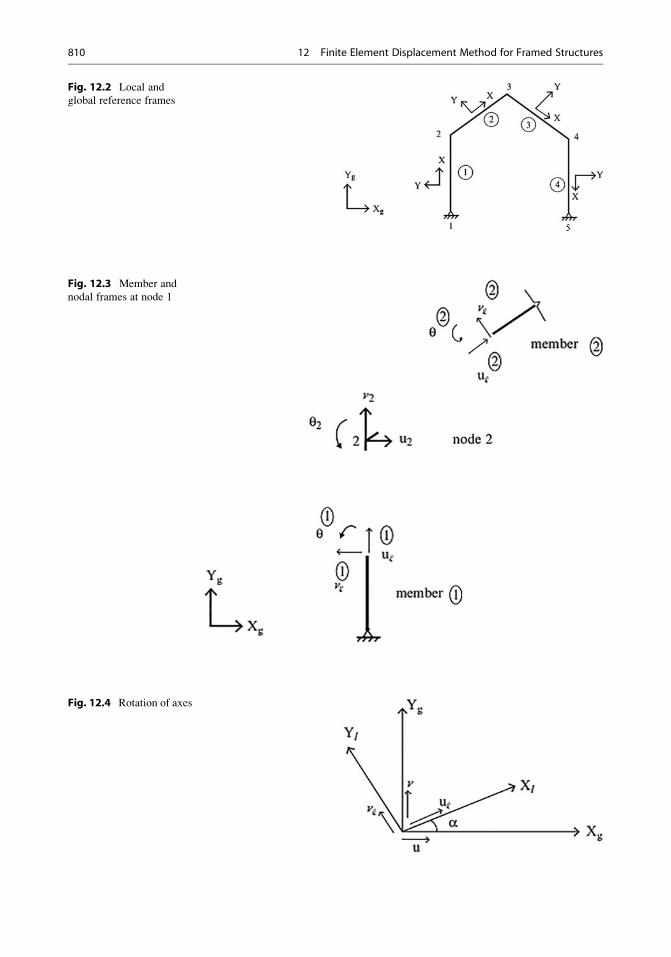
Fig. 12.2 Local and
global reference frames
Fig. 12.3 Member and
nodal frames at node 1
Fig. 12.4 Rotation of axes
810 12 Finite Element Displacement Method for Framed Structures
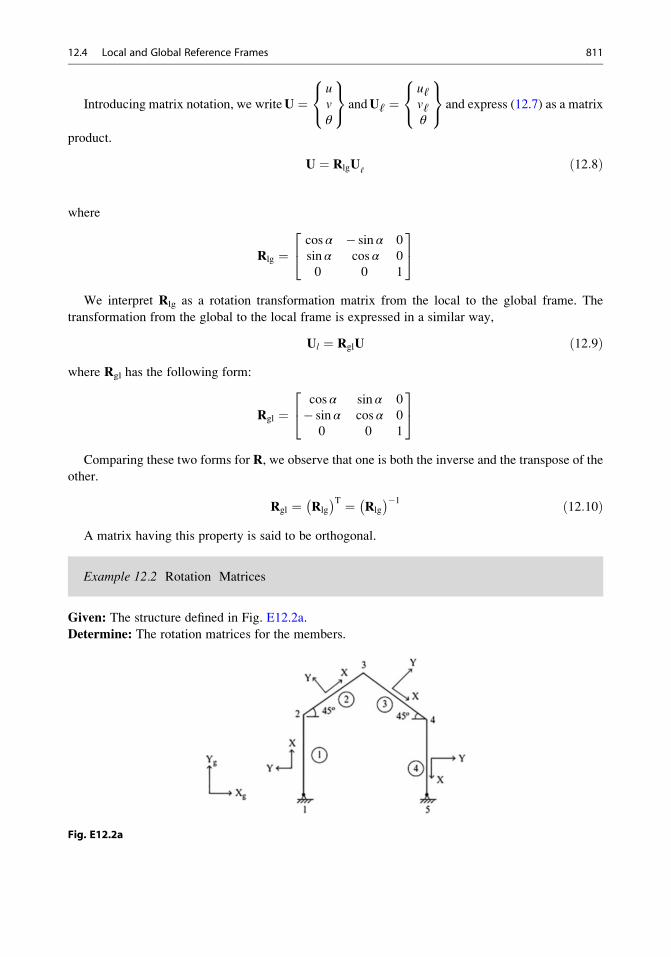
Introducing matrix notation, we writeU ¼uvθ
8<:
9=; andUℓ ¼
uℓvℓθ
8<:
9=; and express (12.7) as a matrix
product.
U ¼ RlgUℓð12:8Þ
where
Rlg ¼cos α � sin α 0
sin α cos α 0
0 0 1
24
35
We interpret Rlg as a rotation transformation matrix from the local to the global frame. The
transformation from the global to the local frame is expressed in a similar way,
Ul ¼ RglU ð12:9Þwhere Rgl has the following form:
Rgl ¼cos α sin α 0
� sin α cos α 0
0 0 1
24
35
Comparing these two forms for R, we observe that one is both the inverse and the transpose of the
other.
Rgl ¼ Rlg
� �T ¼ Rlg
� ��1 ð12:10Þ
A matrix having this property is said to be orthogonal.
Example 12.2 Rotation Matrices
Given: The structure defined in Fig. E12.2a.
Determine: The rotation matrices for the members.
Fig. E12.2a
12.4 Local and Global Reference Frames 811
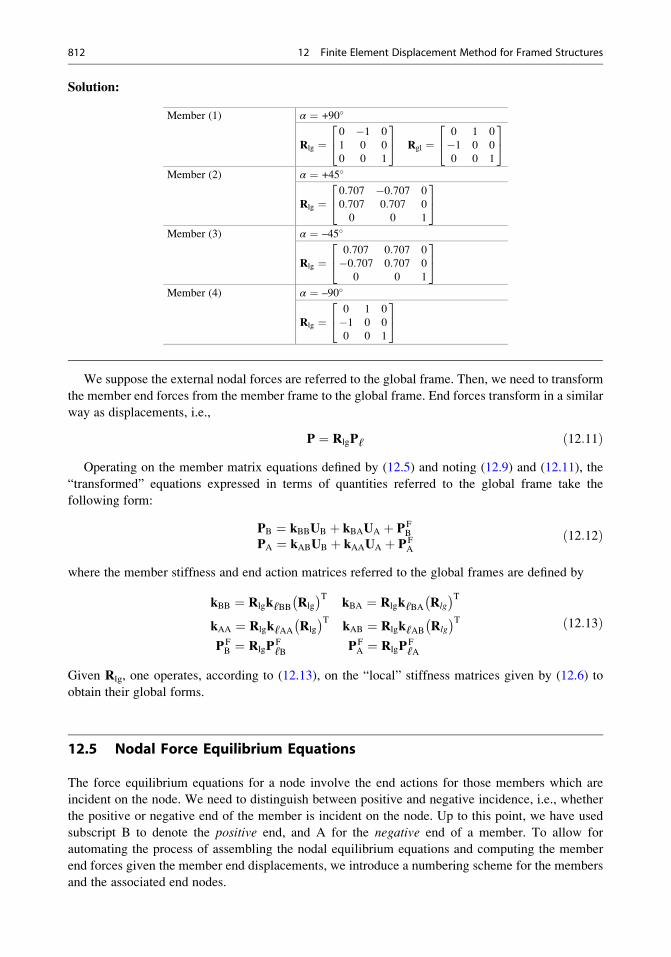
Solution:
Member (1) α ¼ +90�
Rlg ¼0 �1 0
1 0 0
0 0 1
24
35 Rgl ¼
0 1 0
�1 0 0
0 0 1
24
35
Member (2) α ¼ +45�
Rlg ¼0:707 �0:707 0
0:707 0:707 0
0 0 1
24
35
Member (3) α ¼ –45�
Rlg ¼0:707 0:707 0
�0:707 0:707 0
0 0 1
24
35
Member (4) α ¼ –90�
Rlg ¼0 1 0
�1 0 0
0 0 1
24
35
We suppose the external nodal forces are referred to the global frame. Then, we need to transform
the member end forces from the member frame to the global frame. End forces transform in a similar
way as displacements, i.e.,
P ¼ RlgPℓ ð12:11ÞOperating on the member matrix equations defined by (12.5) and noting (12.9) and (12.11), the
“transformed” equations expressed in terms of quantities referred to the global frame take the
following form:
PB ¼ kBBUB þ kBAUA þ PFB
PA ¼ kABUB þ kAAUA þ PFA
ð12:12Þ
where the member stiffness and end action matrices referred to the global frames are defined by
kBB ¼ RlgkℓBB Rlg
� �TkBA ¼ RlgkℓBA Rlg
� �TkAA ¼ RlgkℓAA Rlg
� �TkAB ¼ RlgkℓAB Rlg
� �TPFB ¼ RlgP
FℓB PF
A ¼ RlgPFℓA
ð12:13Þ
Given Rlg, one operates, according to (12.13), on the “local” stiffness matrices given by (12.6) to
obtain their global forms.
12.5 Nodal Force Equilibrium Equations
The force equilibrium equations for a node involve the end actions for those members which are
incident on the node. We need to distinguish between positive and negative incidence, i.e., whether
the positive or negative end of the member is incident on the node. Up to this point, we have used
subscript B to denote the positive end, and A for the negative end of a member. To allow for
automating the process of assembling the nodal equilibrium equations and computing the member
end forces given the member end displacements, we introduce a numbering scheme for the members
and the associated end nodes.
812 12 Finite Element Displacement Method for Framed Structures
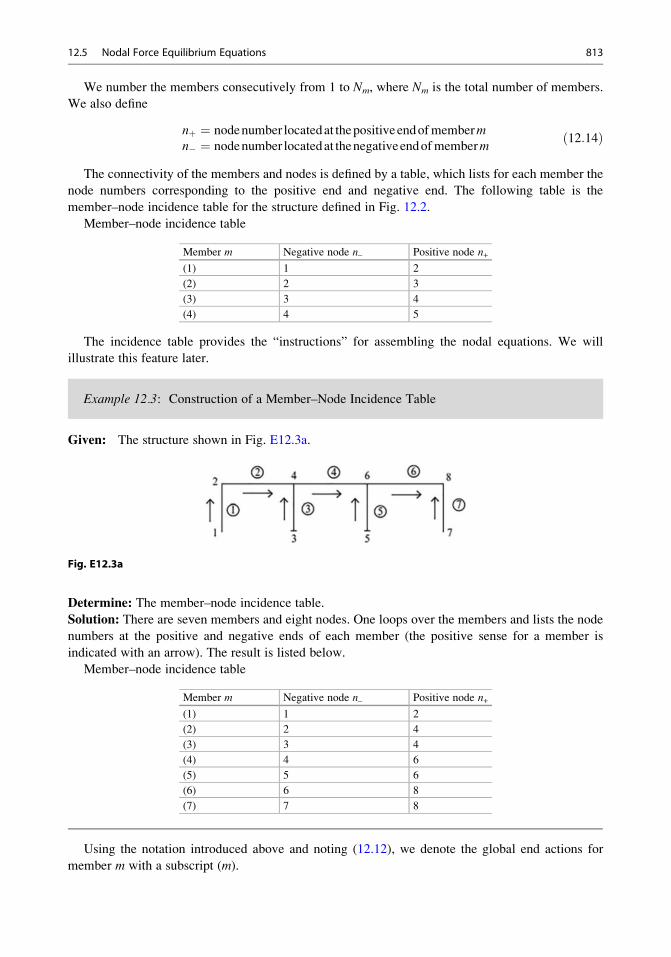
We number the members consecutively from 1 to Nm, where Nm is the total number of members.
We also define
nþ ¼ nodenumber locatedat thepositiveendofmembermn� ¼ nodenumber locatedat thenegativeendofmemberm
ð12:14Þ
The connectivity of the members and nodes is defined by a table, which lists for each member the
node numbers corresponding to the positive end and negative end. The following table is the
member–node incidence table for the structure defined in Fig. 12.2.
Member–node incidence table
Member m Negative node n– Positive node n+
(1) 1 2
(2) 2 3
(3) 3 4
(4) 4 5
The incidence table provides the “instructions” for assembling the nodal equations. We will
illustrate this feature later.
Example 12.3: Construction of a Member–Node Incidence Table
Given: The structure shown in Fig. E12.3a.
Fig. E12.3a
Determine: The member–node incidence table.
Solution: There are seven members and eight nodes. One loops over the members and lists the node
numbers at the positive and negative ends of each member (the positive sense for a member is
indicated with an arrow). The result is listed below.
Member–node incidence table
Member m Negative node n– Positive node n+
(1) 1 2
(2) 2 4
(3) 3 4
(4) 4 6
(5) 5 6
(6) 6 8
(7) 7 8
Using the notation introduced above and noting (12.12), we denote the global end actions for
member m with a subscript (m).
12.5 Nodal Force Equilibrium Equations 813
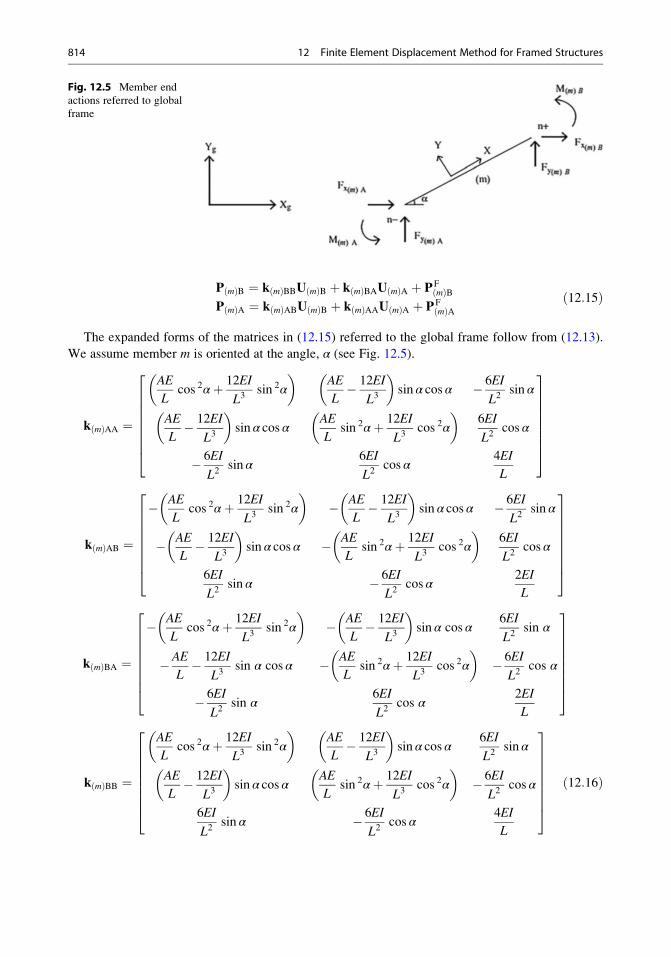
P mð ÞB ¼ k mð ÞBBU mð ÞB þ k mð ÞBAU mð ÞA þ PFmð ÞB
P mð ÞA ¼ k mð ÞABU mð ÞB þ k mð ÞAAU mð ÞA þ PFmð ÞA
ð12:15Þ
The expanded forms of the matrices in (12.15) referred to the global frame follow from (12.13).
We assume member m is oriented at the angle, α (see Fig. 12.5).
k mð ÞAA ¼
AE
Lcos 2αþ 12EI
L3sin 2α
� �AE
L� 12EI
L3
� �sin α cos α � 6EI
L2sin α
AE
L� 12EI
L3
� �sin α cos α
AE
Lsin 2αþ 12EI
L3cos 2α
� �6EI
L2cos α
� 6EI
L2sin α
6EI
L2cos α
4EI
L
266666664
377777775
k mð ÞAB ¼
� AE
Lcos 2αþ 12EI
L3sin 2α
� �� AE
L� 12EI
L3
� �sin α cos α � 6EI
L2sin α
� AE
L� 12EI
L3
� �sin α cos α � AE
Lsin 2αþ 12EI
L3cos 2α
� �6EI
L2cos α
6EI
L2sin α � 6EI
L2cos α
2EI
L
266666664
377777775
k mð ÞBA ¼
� AE
Lcos 2αþ 12EI
L3sin 2α
� �� AE
L� 12EI
L3
� �sin α cos α
6EI
L2sin α
�AE
L� 12EI
L3sin α cos α � AE
Lsin 2αþ 12EI
L3cos 2α
� �� 6EI
L2cos α
� 6EI
L2sin α
6EI
L2cos α
2EI
L
266666664
377777775
k mð ÞBB ¼
AE
Lcos 2αþ 12EI
L3sin 2α
� �AE
L� 12EI
L3
� �sin α cos α
6EI
L2sin α
AE
L� 12EI
L3
� �sin α cos α
AE
Lsin 2αþ 12EI
L3cos 2α
� �� 6EI
L2cos α
6EI
L2sin α � 6EI
L2cos α
4EI
L
266666664
377777775ð12:16Þ
Fig. 12.5 Member end
actions referred to global
frame
814 12 Finite Element Displacement Method for Framed Structures
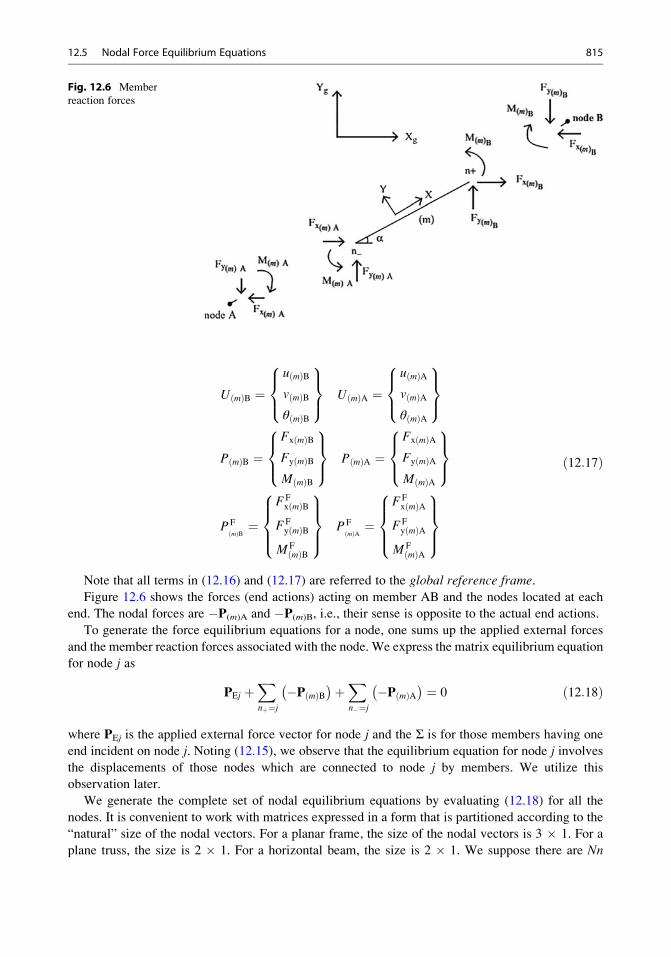
U mð ÞB ¼u mð ÞBv mð ÞBθ mð ÞB
8><>:
9>=>; U mð ÞA ¼
u mð ÞAv mð ÞAθ mð ÞA
8><>:
9>=>;
P mð ÞB ¼Fx mð ÞBFy mð ÞBM mð ÞB
8><>:
9>=>; P mð ÞA ¼
Fx mð ÞAFy mð ÞAM mð ÞA
8><>:
9>=>;
PFmð ÞB ¼
FFx mð ÞB
FFy mð ÞB
M Fmð ÞB
8>><>>:
9>>=>>; PF
mð ÞA ¼FFx mð ÞA
FFy mð ÞA
M Fmð ÞA
8>><>>:
9>>=>>;
ð12:17Þ
Note that all terms in (12.16) and (12.17) are referred to the global reference frame.
Figure 12.6 shows the forces (end actions) acting on member AB and the nodes located at each
end. The nodal forces are �P(m)A and �P(m)B, i.e., their sense is opposite to the actual end actions.
To generate the force equilibrium equations for a node, one sums up the applied external forces
and the member reaction forces associated with the node. We express the matrix equilibrium equation
for node j as
PEj þXnþ¼j
�P mð ÞB� �þX
n�¼j�P mð ÞA� � ¼ 0 ð12:18Þ
where PEj is the applied external force vector for node j and the Σ is for those members having one
end incident on node j. Noting (12.15), we observe that the equilibrium equation for node j involves
the displacements of those nodes which are connected to node j by members. We utilize this
observation later.
We generate the complete set of nodal equilibrium equations by evaluating (12.18) for all the
nodes. It is convenient to work with matrices expressed in a form that is partitioned according to the
“natural” size of the nodal vectors. For a planar frame, the size of the nodal vectors is 3 � 1. For a
plane truss, the size is 2 � 1. For a horizontal beam, the size is 2 � 1. We suppose there are Nn
Fig. 12.6 Member
reaction forces
12.5 Nodal Force Equilibrium Equations 815
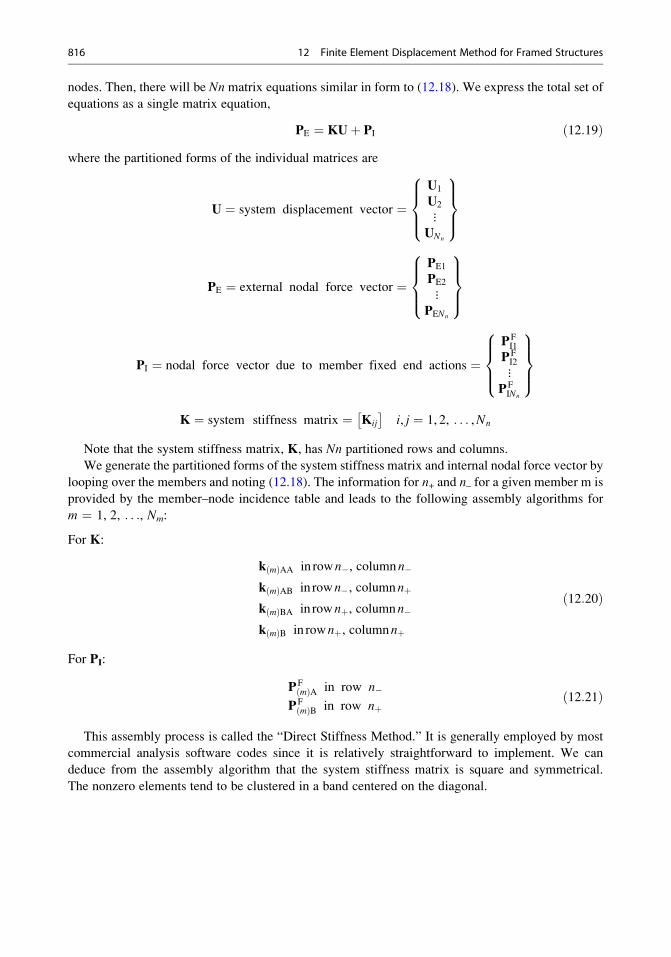
nodes. Then, there will be Nn matrix equations similar in form to (12.18). We express the total set of
equations as a single matrix equation,
PE ¼ KUþ PI ð12:19Þwhere the partitioned forms of the individual matrices are
U ¼ system displacement vector ¼U1
U2
⋮UNn
8>><>>:
9>>=>>;
PE ¼ external nodal force vector ¼PE1
PE2
⋮PENn
8>><>>:
9>>=>>;
PI ¼ nodal force vector due to member fixed end actions ¼PFI1
PFI2
⋮PFINn
8>><>>:
9>>=>>;
K ¼ system stiffness matrix ¼ Kij
� �i, j ¼ 1, 2, . . . ,Nn
Note that the system stiffness matrix, K, has Nn partitioned rows and columns.
We generate the partitioned forms of the system stiffness matrix and internal nodal force vector by
looping over the members and noting (12.18). The information for n+ and n– for a given member m is
provided by the member–node incidence table and leads to the following assembly algorithms for
m ¼ 1, 2, . . ., Nm:
For K:
k mð ÞAA in rown�, columnn�k mð ÞAB in rown�, columnnþk mð ÞBA in rownþ, columnn�k mð ÞB in rownþ, columnnþ
ð12:20Þ
For PI:
PFmð ÞA in row n�
PFmð ÞB in row nþ
ð12:21Þ
This assembly process is called the “Direct Stiffness Method.” It is generally employed by most
commercial analysis software codes since it is relatively straightforward to implement. We can
deduce from the assembly algorithm that the system stiffness matrix is square and symmetrical.
The nonzero elements tend to be clustered in a band centered on the diagonal.
816 12 Finite Element Displacement Method for Framed Structures
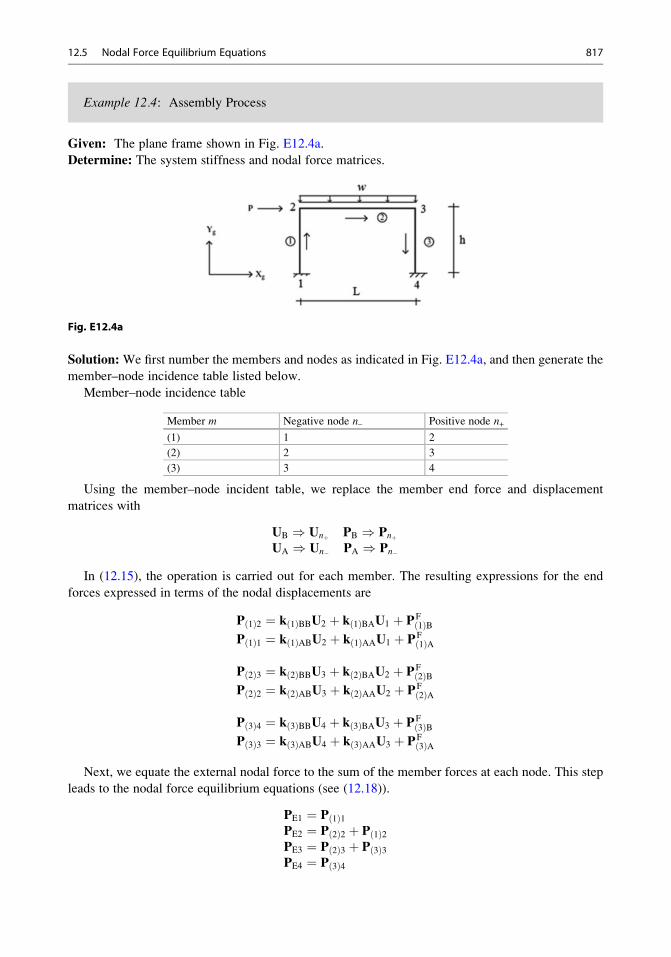
Example 12.4: Assembly Process
Given: The plane frame shown in Fig. E12.4a.
Determine: The system stiffness and nodal force matrices.
Fig. E12.4a
Solution: We first number the members and nodes as indicated in Fig. E12.4a, and then generate the
member–node incidence table listed below.
Member–node incidence table
Member m Negative node n– Positive node n+
(1) 1 2
(2) 2 3
(3) 3 4
Using the member–node incident table, we replace the member end force and displacement
matrices with
UB ) Unþ PB ) PnþUA ) Un� PA ) Pn�
In (12.15), the operation is carried out for each member. The resulting expressions for the end
forces expressed in terms of the nodal displacements are
P 1ð Þ2 ¼ k 1ð ÞBBU2 þ k 1ð ÞBAU1 þ PF1ð ÞB
P 1ð Þ1 ¼ k 1ð ÞABU2 þ k 1ð ÞAAU1 þ PF1ð ÞA
P 2ð Þ3 ¼ k 2ð ÞBBU3 þ k 2ð ÞBAU2 þ PF2ð ÞB
P 2ð Þ2 ¼ k 2ð ÞABU3 þ k 2ð ÞAAU2 þ PF2ð ÞA
P 3ð Þ4 ¼ k 3ð ÞBBU4 þ k 3ð ÞBAU3 þ PF3ð ÞB
P 3ð Þ3 ¼ k 3ð ÞABU4 þ k 3ð ÞAAU3 þ PF3ð ÞA
Next, we equate the external nodal force to the sum of the member forces at each node. This step
leads to the nodal force equilibrium equations (see (12.18)).
PE1 ¼ P 1ð Þ1PE2 ¼ P 2ð Þ2 þ P 1ð Þ2PE3 ¼ P 2ð Þ3 þ P 3ð Þ3PE4 ¼ P 3ð Þ4
12.5 Nodal Force Equilibrium Equations 817
Substituting for the end forces expressed in terms of the nodal displacements, these equations
expand to
PE1 ¼ k 1ð ÞAAU1 þ k 1ð ÞABU2 þ PF1ð ÞA
PE2 ¼ k 1ð ÞBAU1 þ k 1ð ÞBB þ k 2ð ÞAA� �
U2 þ k 2ð ÞABU3 þ PF2ð ÞA þ PF
1ð ÞB
PE3 ¼ k 2ð ÞBAU2 þ k 2ð ÞBB þ k 3ð ÞAA� �
U3 þ k 3ð ÞABU4 þ PF3ð ÞA þ PF
2ð ÞB
PE4 ¼ k 3ð ÞBAU3 þ k 3ð ÞBBU4 þ PF3ð ÞB
Lastly, we write these equations as a single equation in terms of “system” matrices [see (12.19)].
The forms of the system matrices are listed below.
U ¼
U1
U2
U3
U4
8>>><>>>:
9>>>=>>>;
PE ¼
PE1
PE2
PE3
PE4
8>>><>>>:
9>>>=>>>;
PI ¼
PF1ð ÞA
PF1ð ÞB þ PF
2ð ÞA� �PF
2ð ÞB þ PF3ð ÞA
� �PF
3ð ÞB
8>>>>>><>>>>>>:
9>>>>>>=>>>>>>;
K ¼
k 1ð ÞAA k 1ð ÞAB 0 0
k 1ð ÞBA k 1ð ÞBB þ k 2ð ÞAA� �
k 2ð ÞAB 0
0 k 2ð ÞBA k 2ð ÞBB þ k 3ð ÞAA� �
k 3ð ÞAB0 0 k 3ð ÞBA k 3ð ÞBB
26664
37775
There are four nodes in this example, so the partitioned form of K is 4 � 4. The expanded size of
K for this two-dimensional plane frame will be 12 � 12 since there are three variables per node.
In this example, we chose to list all the equations first and then combine them in a single “system”
equation. Normally, one would apply the algorithms defined by (12.20) and (12.21) and directly
assemble the system matrices.
12.6 Introduction of Nodal Supports
Introducing a support at a node corresponds to prescribing the value of certain nodal displacements.
For example, a hinge prevents translation in two orthogonal directions. Full fixity eliminates both
translation and rotation at a node. When supports are introduced, the number of displacement
unknowns is decreased by the number of displacement restraints. However, each displacement
constraint produces an unknown reaction so that the “total” number of unknowns (nodal
displacements and nodal reaction forces) remains constant. In order to determine the unknown
displacements, we work with a reduced set of equilibrium equations. We illustrate this process
with the following example.
Example 12.5: Example of Fully Fixed Supports
Given: The structure defined in Fig. E12.5a. Suppose nodes one and four are fully fixed.
818 12 Finite Element Displacement Method for Framed Structures
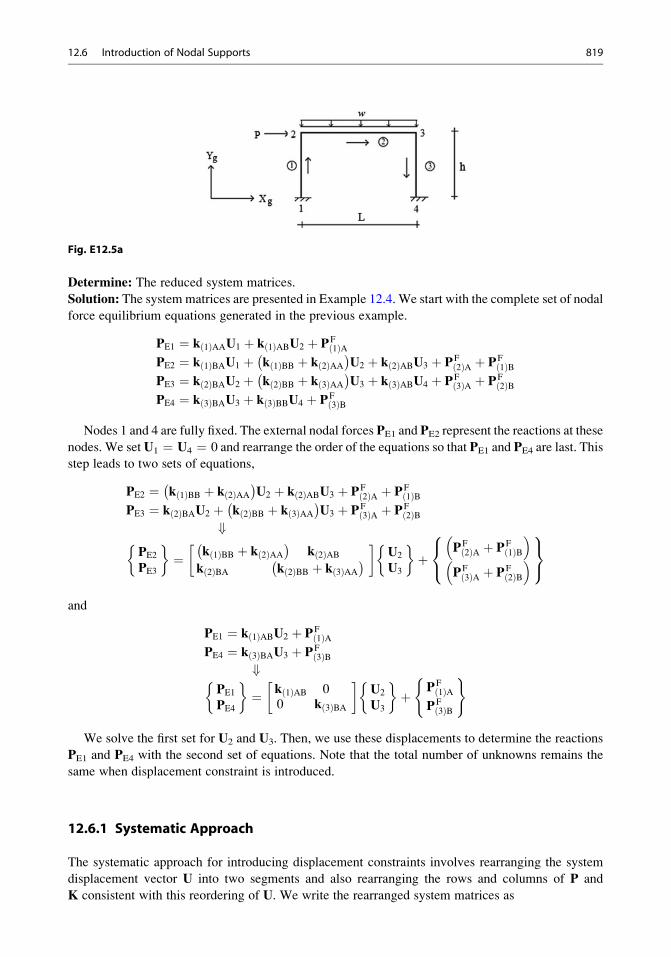
Fig. E12.5a
Determine: The reduced system matrices.
Solution: The system matrices are presented in Example 12.4. We start with the complete set of nodal
force equilibrium equations generated in the previous example.
PE1 ¼ k 1ð ÞAAU1 þ k 1ð ÞABU2 þ PF1ð ÞA
PE2 ¼ k 1ð ÞBAU1 þ k 1ð ÞBB þ k 2ð ÞAA� �
U2 þ k 2ð ÞABU3 þ PF2ð ÞA þ PF
1ð ÞBPE3 ¼ k 2ð ÞBAU2 þ k 2ð ÞBB þ k 3ð ÞAA
� �U3 þ k 3ð ÞABU4 þ PF
3ð ÞA þ PF2ð ÞB
PE4 ¼ k 3ð ÞBAU3 þ k 3ð ÞBBU4 þ PF3ð ÞB
Nodes 1 and 4 are fully fixed. The external nodal forces PE1 and PE2 represent the reactions at these
nodes. We setU1 ¼ U4 ¼ 0 and rearrange the order of the equations so that PE1 and PE4 are last. This
step leads to two sets of equations,
PE2 ¼ k 1ð ÞBB þ k 2ð ÞAA� �
U2 þ k 2ð ÞABU3 þ PF2ð ÞA þ PF
1ð ÞBPE3 ¼ k 2ð ÞBAU2 þ k 2ð ÞBB þ k 3ð ÞAA
� �U3 þ PF
3ð ÞA þ PF2ð ÞB
+PE2
PE3
�¼ k 1ð ÞBB þ k 2ð ÞAA
� �k 2ð ÞAB
k 2ð ÞBA k 2ð ÞBB þ k 3ð ÞAA� � �
U2
U3
�þ
PF2ð ÞA þ PF
1ð ÞB� �PF
3ð ÞA þ PF2ð ÞB
� �8<:
9=;
and
PE1 ¼ k 1ð ÞABU2 þ PF1ð ÞA
PE4 ¼ k 3ð ÞBAU3 þ PF3ð ÞB
+PE1
PE4
�¼ k 1ð ÞAB 0
0 k 3ð ÞBA
�U2
U3
�þ PF
1ð ÞAPF
3ð ÞB
( )
We solve the first set for U2 and U3. Then, we use these displacements to determine the reactions
PE1 and PE4 with the second set of equations. Note that the total number of unknowns remains the
same when displacement constraint is introduced.
12.6.1 Systematic Approach
The systematic approach for introducing displacement constraints involves rearranging the system
displacement vector U into two segments and also rearranging the rows and columns of P and
K consistent with this reordering of U. We write the rearranged system matrices as
12.6 Introduction of Nodal Supports 819
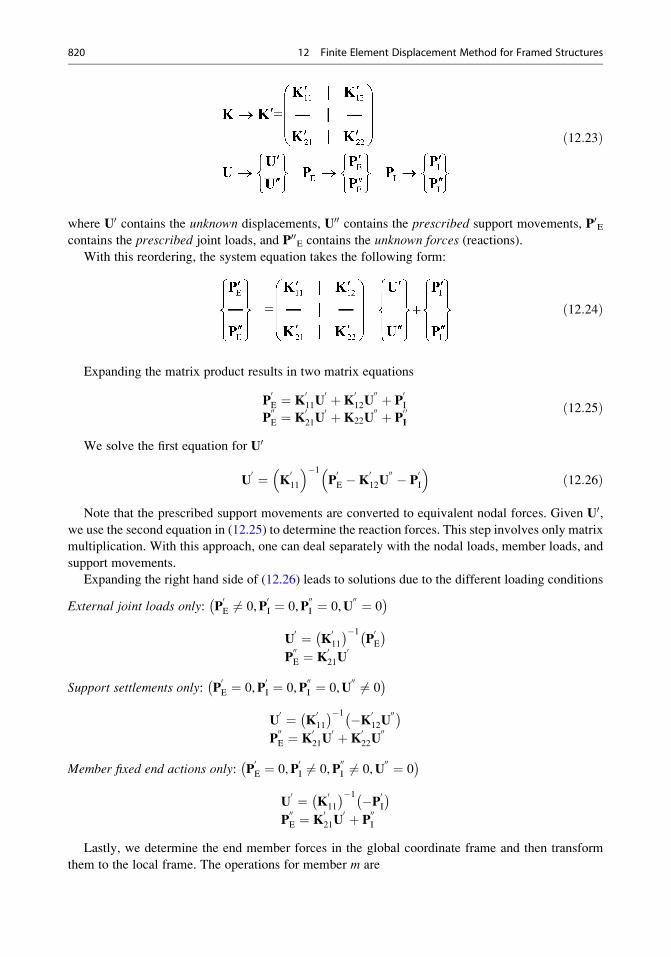
ð12:23Þ
where U0 contains the unknown displacements, U00 contains the prescribed support movements, P0Econtains the prescribed joint loads, and P00E contains the unknown forces (reactions).
With this reordering, the system equation takes the following form:
ð12:24Þ
Expanding the matrix product results in two matrix equations
P0E ¼ K
011U
0 þK012U
00 þ P0I
P00E ¼ K
021U
0 þK22U00 þ P
0 0I
ð12:25Þ
We solve the first equation for U0
U0 ¼ K
011
� ��1P0E �K
012U
00 � P0I
� �ð12:26Þ
Note that the prescribed support movements are converted to equivalent nodal forces. Given U0,we use the second equation in (12.25) to determine the reaction forces. This step involves only matrix
multiplication. With this approach, one can deal separately with the nodal loads, member loads, and
support movements.
Expanding the right hand side of (12.26) leads to solutions due to the different loading conditions
External joint loads only: P0E 6¼ 0,P
0I ¼ 0,P
00I ¼ 0,U
00 ¼ 0� �
U0 ¼ K
011
� ��1P0E
� �P00E ¼ K
021U
0
Support settlements only: P0E ¼ 0,P
0I ¼ 0,P
00I ¼ 0,U
00 6¼ 0� �
U0 ¼ K
011
� ��1 �K012U
00� �P00E ¼ K
021U
0 þK022U
00
Member fixed end actions only: P0E ¼ 0,P
0I 6¼ 0,P
00I 6¼ 0,U
00 ¼ 0� �
U0 ¼ K
011
� ��1 �P0I� �P00E ¼ K
021U
0 þ P00I
Lastly, we determine the end member forces in the global coordinate frame and then transform
them to the local frame. The operations for member m are
820 12 Finite Element Displacement Method for Framed Structures
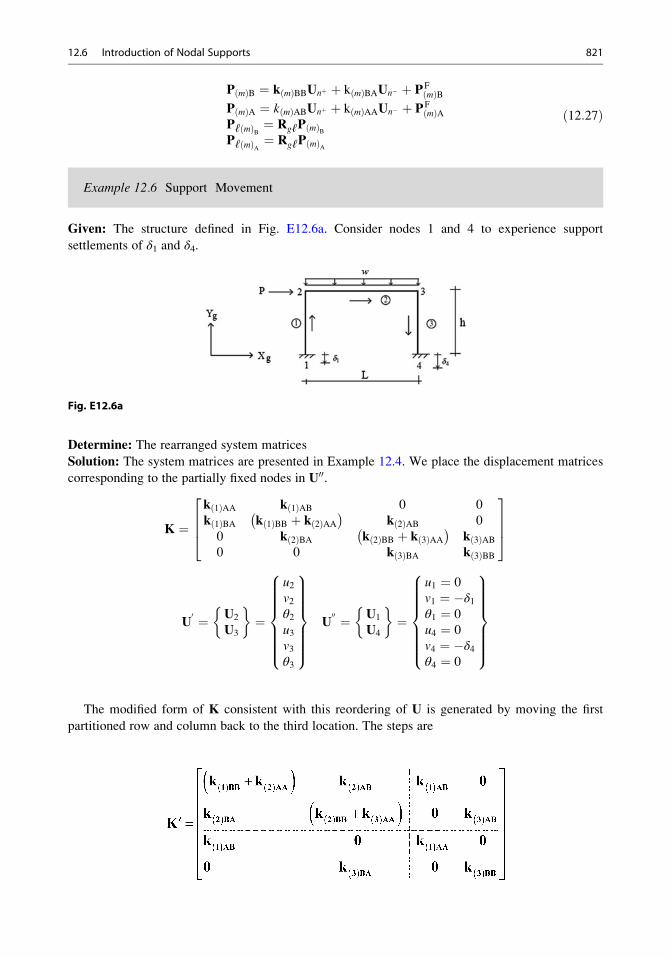
P mð ÞB ¼ k mð ÞBBUnþ þ k mð ÞBAUn� þ PFmð ÞB
P mð ÞA ¼ k mð ÞABUnþ þ k mð ÞAAUn� þ PFmð ÞA
Pℓ mð ÞB ¼ RgℓP mð ÞBPℓ mð ÞA ¼ RgℓP mð ÞA
ð12:27Þ
Example 12.6 Support Movement
Given: The structure defined in Fig. E12.6a. Consider nodes 1 and 4 to experience support
settlements of δ1 and δ4.
Fig. E12.6a
Determine: The rearranged system matrices
Solution: The system matrices are presented in Example 12.4. We place the displacement matrices
corresponding to the partially fixed nodes in U00.
K ¼k 1ð ÞAA k 1ð ÞAB 0 0
k 1ð ÞBA k 1ð ÞBB þ k 2ð ÞAA� �
k 2ð ÞAB 0
0 k 2ð ÞBA k 2ð ÞBB þ k 3ð ÞAA� �
k 3ð ÞAB0 0 k 3ð ÞBA k 3ð ÞBB
2664
3775
U0 ¼ U2
U3
�¼
u2v2θ2u3v3θ3
8>>>>>><>>>>>>:
9>>>>>>=>>>>>>;
U00 ¼ U1
U4
�¼
u1 ¼ 0
v1 ¼ �δ1θ1 ¼ 0
u4 ¼ 0
v4 ¼ �δ4θ4 ¼ 0
8>>>>>><>>>>>>:
9>>>>>>=>>>>>>;
The modified form of K consistent with this reordering of U is generated by moving the first
partitioned row and column back to the third location. The steps are
12.6 Introduction of Nodal Supports 821
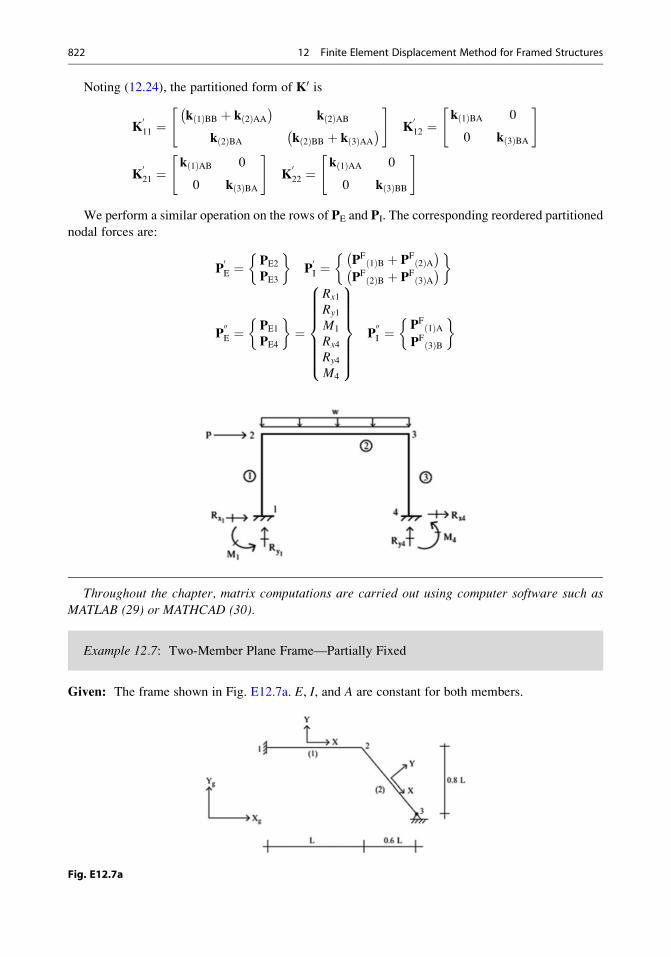
Noting (12.24), the partitioned form of K0 is
K011 ¼
k 1ð ÞBB þ k 2ð ÞAA� �
k 2ð ÞAB
k 2ð ÞBA k 2ð ÞBB þ k 3ð ÞAA� �
" #K012 ¼
k 1ð ÞBA 0
0 k 3ð ÞBA
" #
K021 ¼
k 1ð ÞAB 0
0 k 3ð ÞBA
" #K022 ¼
k 1ð ÞAA 0
0 k 3ð ÞBB
" #
We perform a similar operation on the rows of PE and PI. The corresponding reordered partitioned
nodal forces are:
P0E ¼
PE2
PE3
�P0I ¼
PF1ð ÞB þ PF
2ð ÞA� �PF
2ð ÞB þ PF3ð ÞA
� � �
P00E ¼
PE1
PE4
�¼
Rx1
Ry1
M1
Rx4
Ry4
M4
8>>>>>><>>>>>>:
9>>>>>>=>>>>>>;
P00I ¼
PF1ð ÞA
PF3ð ÞB
�
Throughout the chapter, matrix computations are carried out using computer software such as
MATLAB (29) or MATHCAD (30).
Example 12.7: Two-Member Plane Frame—Partially Fixed
Given: The frame shown in Fig. E12.7a. E, I, and A are constant for both members.
Fig. E12.7a
822 12 Finite Element Displacement Method for Framed Structures
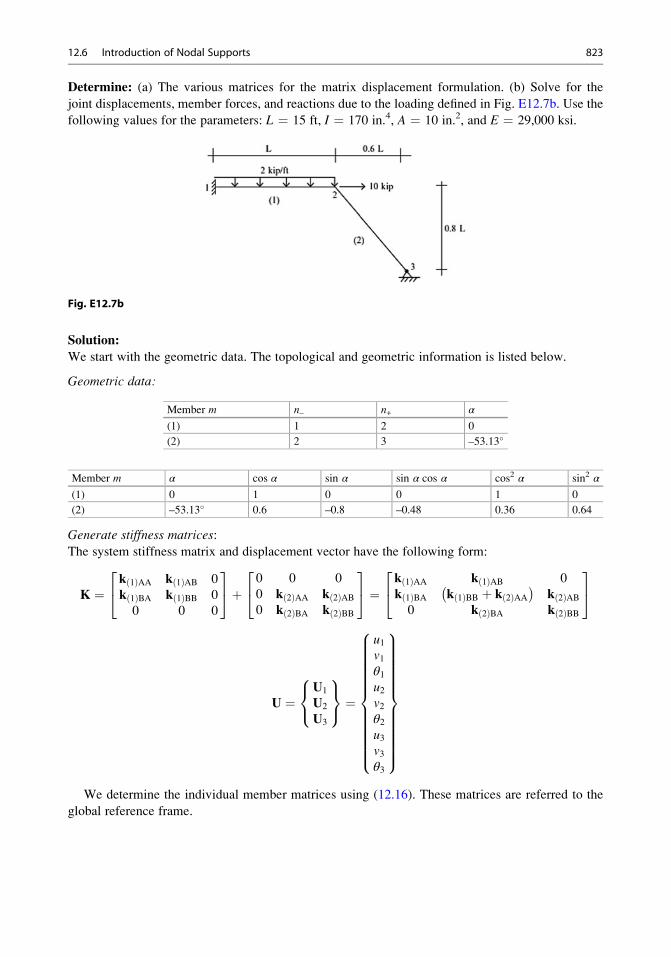
Determine: (a) The various matrices for the matrix displacement formulation. (b) Solve for the
joint displacements, member forces, and reactions due to the loading defined in Fig. E12.7b. Use the
following values for the parameters: L ¼ 15 ft, I ¼ 170 in.4, A ¼ 10 in.2, and E ¼ 29,000 ksi.
Fig. E12.7b
Solution:
We start with the geometric data. The topological and geometric information is listed below.
Geometric data:
Member m n– n+ α
(1) 1 2 0
(2) 2 3 –53.13�
Member m α cos α sin α sin α cos α cos2 α sin2 α
(1) 0 1 0 0 1 0
(2) –53.13� 0.6 –0.8 –0.48 0.36 0.64
Generate stiffness matrices:
The system stiffness matrix and displacement vector have the following form:
K ¼k 1ð ÞAA k 1ð ÞAB 0
k 1ð ÞBA k 1ð ÞBB 0
0 0 0
24
35þ 0 0 0
0 k 2ð ÞAA k 2ð ÞAB0 k 2ð ÞBA k 2ð ÞBB
24
35 ¼ k 1ð ÞAA k 1ð ÞAB 0
k 1ð ÞBA k 1ð ÞBB þ k 2ð ÞAA� �
k 2ð ÞAB0 k 2ð ÞBA k 2ð ÞBB
24
35
U ¼U1
U2
U3
8<:
9=; ¼
u1v1θ1u2v2θ2u3v3θ3
8>>>>>>>>>>>><>>>>>>>>>>>>:
9>>>>>>>>>>>>=>>>>>>>>>>>>;
We determine the individual member matrices using (12.16). These matrices are referred to the
global reference frame.
12.6 Introduction of Nodal Supports 823
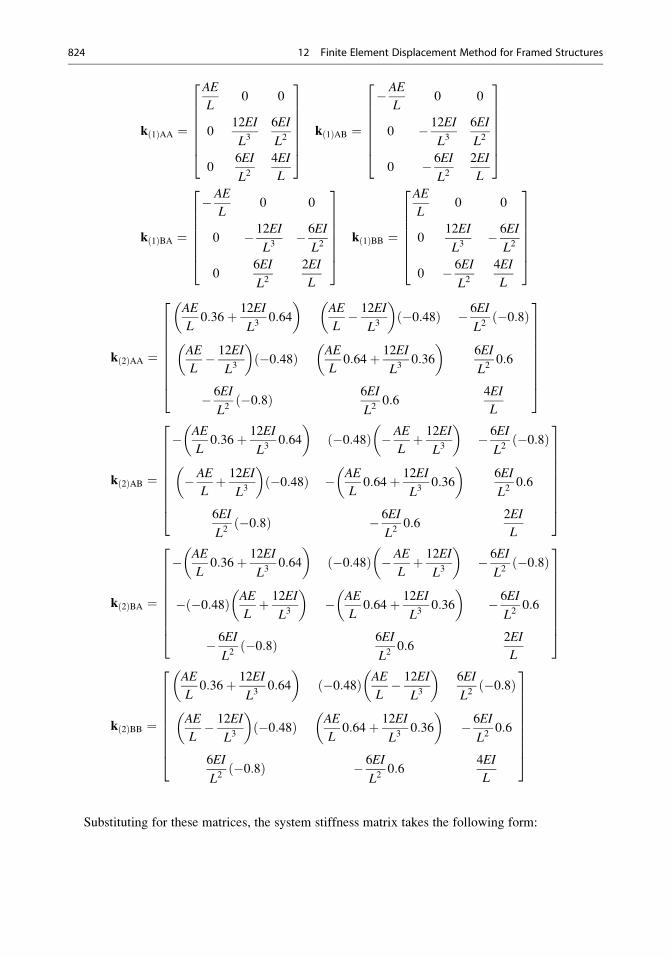
k 1ð ÞAA ¼
AE
L0 0
012EI
L36EI
L2
06EI
L24EI
L
26666664
37777775
k 1ð ÞAB ¼
�AE
L0 0
0 � 12EI
L36EI
L2
0 � 6EI
L22EI
L
26666664
37777775
k 1ð ÞBA ¼
�AE
L0 0
0 � 12EI
L3� 6EI
L2
06EI
L22EI
L
26666664
37777775
k 1ð ÞBB ¼
AE
L0 0
012EI
L3� 6EI
L2
0 � 6EI
L24EI
L
26666664
37777775
k 2ð ÞAA ¼
AE
L0:36þ 12EI
L30:64
� �AE
L� 12EI
L3
� ��0:48ð Þ � 6EI
L2�0:8ð Þ
AE
L� 12EI
L3
� ��0:48ð Þ AE
L0:64þ 12EI
L30:36
� �6EI
L20:6
� 6EI
L2�0:8ð Þ 6EI
L20:6
4EI
L
2666666664
3777777775
k 2ð ÞAB ¼
� AE
L0:36þ 12EI
L30:64
� ��0:48ð Þ �AE
Lþ 12EI
L3
� �� 6EI
L2�0:8ð Þ
�AE
Lþ 12EI
L3
� ��0:48ð Þ � AE
L0:64þ 12EI
L30:36
� �6EI
L20:6
6EI
L2�0:8ð Þ � 6EI
L20:6
2EI
L
2666666664
3777777775
k 2ð ÞBA ¼
� AE
L0:36þ 12EI
L30:64
� ��0:48ð Þ �AE
Lþ 12EI
L3
� �� 6EI
L2�0:8ð Þ
� �0:48ð Þ AE
Lþ 12EI
L3
� �� AE
L0:64þ 12EI
L30:36
� �� 6EI
L20:6
� 6EI
L2�0:8ð Þ 6EI
L20:6
2EI
L
2666666664
3777777775
k 2ð ÞBB ¼
AE
L0:36þ 12EI
L30:64
� ��0:48ð Þ AE
L� 12EI
L3
� �6EI
L2�0:8ð Þ
AE
L� 12EI
L3
� ��0:48ð Þ AE
L0:64þ 12EI
L30:36
� �� 6EI
L20:6
6EI
L2�0:8ð Þ � 6EI
L20:6
4EI
L
2666666664
3777777775
Substituting for these matrices, the system stiffness matrix takes the following form:
824 12 Finite Element Displacement Method for Framed Structures
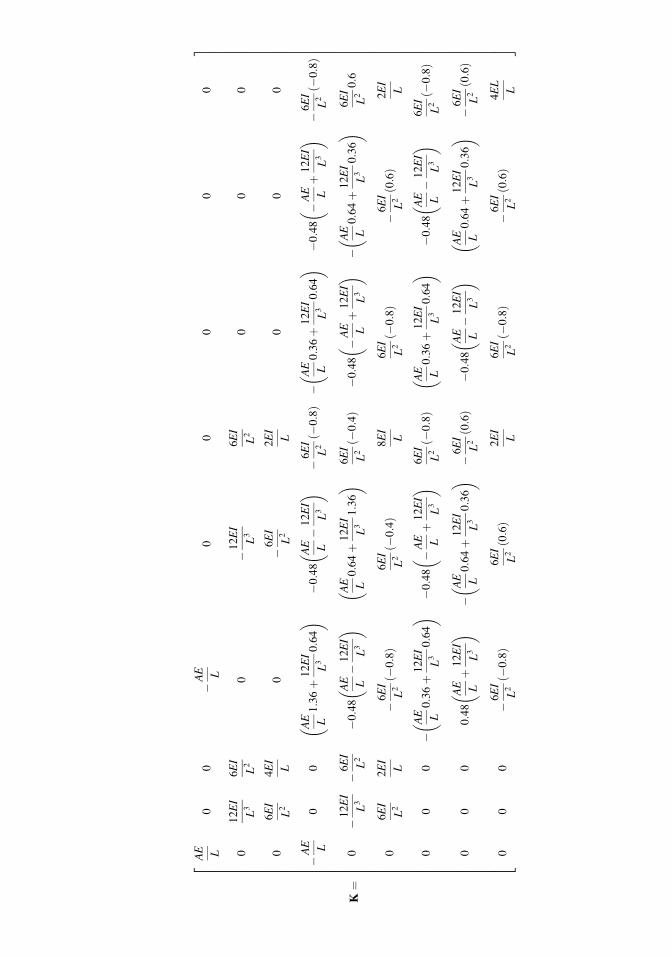
K¼
AE L
00
�AE L
00
00
0
012EI
L3
6EI
L2
0�12EI
L3
6EI
L2
00
0
06EI
L2
4EI
L0
�6EI
L2
2EI
L0
00
�AE L
00
AE L1:36þ12EI
L3
0:64
��
�0:48
AE L�12EI
L3
��
�6EI
L2�0
:8ð
Þ�
AE L0:36þ12EI
L3
0:64
��
�0:48�AE Lþ12EI
L3
��
�6EI
L2�0
:8ð
Þ
0�12EI
L3�6EI
L2
�0:48
AE L�12EI
L3
��
AE L0:64þ12EI
L3
1:36
��
6EI
L2�0
:4ð
Þ�0
:48�AE Lþ12EI
L3
��
�AE L0:64þ12EI
L3
0:36
��
6EI
L20:6
06EI
L2
2EI
L�6EI
L2�0
:8ð
Þ6EI
L2�0
:4ð
Þ8EI
L
6EI
L2�0
:8ð
Þ�6EI
L2
0:6ðÞ
2EI
L
00
0�
AE L0:36þ12EI
L3
0:64
��
�0:48�AE Lþ12EI
L3
��
6EI
L2�0
:8ð
ÞAE L0:36þ12EI
L3
0:64
��
�0:48
AE L�12EI
L3
��
6EI
L2�0
:8ð
Þ
00
00:48
AE Lþ12EI
L3
��
�AE L0:64þ12EI
L3
0:36
��
�6EI
L2
0:6ðÞ
�0:48
AE L�12EI
L3
��
AE L0:64þ12EI
L3
0:36
��
�6EI
L2
0:6ðÞ
00
0�6EI
L2�0
:8ð
Þ6EI
L2
0:6ðÞ
2EI
L
6EI
L2�0
:8ð
Þ�6EI
L2
0:6ðÞ
4EL
L
2 6 6 6 6 6 6 6 6 6 6 6 6 6 6 6 6 6 6 6 6 6 6 6 6 6 6 6 6 6 6 6 6 6 6 6 6 6 6 6 6 4
3 7 7 7 7 7 7 7 7 7 7 7 7 7 7 7 7 7 7 7 7 7 7 7 7 7 7 7 7 7 7 7 7 7 7 7 7 7 7 7 7 5
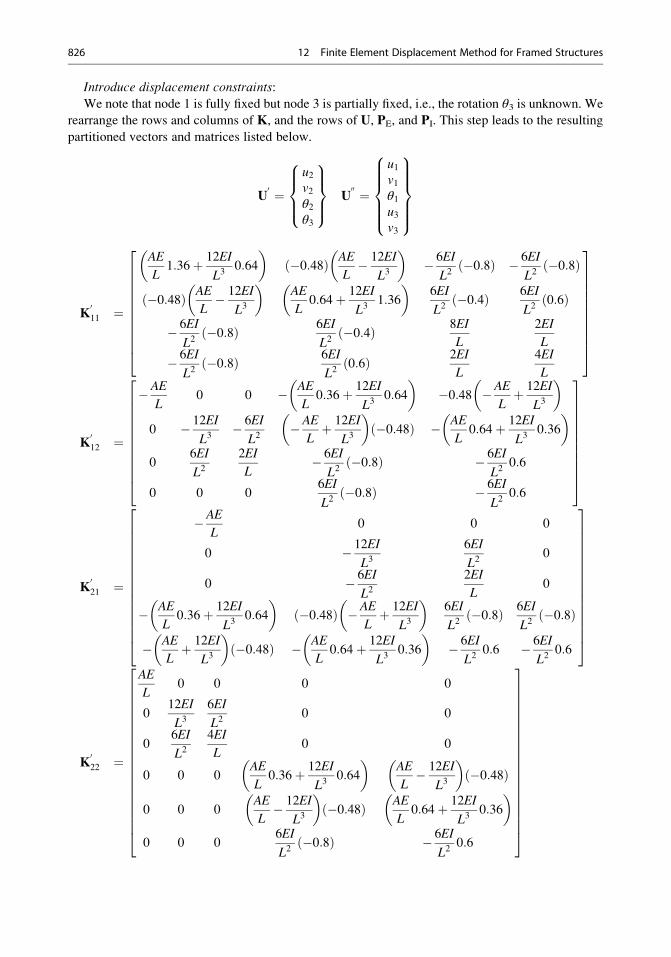
Introduce displacement constraints:
We note that node 1 is fully fixed but node 3 is partially fixed, i.e., the rotation θ3 is unknown. We
rearrange the rows and columns of K, and the rows of U, PE, and PI. This step leads to the resulting
partitioned vectors and matrices listed below.
U0 ¼
u2v2θ2θ3
8>><>>:
9>>=>>; U
00 ¼
u1v1θ1u3v3
8>>>><>>>>:
9>>>>=>>>>;
K011 ¼
AE
L1:36þ 12EI
L30:64
� ��0:48ð Þ AE
L� 12EI
L3
� �� 6EI
L2�0:8ð Þ � 6EI
L2�0:8ð Þ
�0:48ð Þ AE
L� 12EI
L3
� �AE
L0:64þ 12EI
L31:36
� �6EI
L2�0:4ð Þ 6EI
L20:6ð Þ
� 6EI
L2�0:8ð Þ 6EI
L2�0:4ð Þ 8EI
L
2EI
L
� 6EI
L2�0:8ð Þ 6EI
L20:6ð Þ 2EI
L
4EI
L
266666666664
377777777775
K012 ¼
�AE
L0 0 � AE
L0:36þ 12EI
L30:64
� ��0:48 �AE
Lþ 12EI
L3
� �
0 � 12EI
L3� 6EI
L2�AE
Lþ 12EI
L3
� ��0:48ð Þ � AE
L0:64þ 12EI
L30:36
� �
06EI
L22EI
L� 6EI
L2�0:8ð Þ � 6EI
L20:6
0 0 06EI
L2�0:8ð Þ � 6EI
L20:6
266666666664
377777777775
K021 ¼
�AE
L0 0 0
0 � 12EI
L36EI
L20
0 � 6EI
L22EI
L0
� AE
L0:36þ 12EI
L30:64
� ��0:48ð Þ �AE
Lþ 12EI
L3
� �6EI
L2�0:8ð Þ 6EI
L2�0:8ð Þ
� AE
Lþ 12EI
L3
� ��0:48ð Þ � AE
L0:64þ 12EI
L30:36
� �� 6EI
L20:6 � 6EI
L20:6
2666666666666664
3777777777777775
K022 ¼
AE
L0 0 0 0
012EI
L36EI
L20 0
06EI
L24EI
L0 0
0 0 0AE
L0:36þ 12EI
L30:64
� �AE
L� 12EI
L3
� ��0:48ð Þ
0 0 0AE
L� 12EI
L3
� ��0:48ð Þ AE
L0:64þ 12EI
L30:36
� �
0 0 06EI
L2�0:8ð Þ � 6EI
L20:6
26666666666666666664
37777777777777777775
826 12 Finite Element Displacement Method for Framed Structures
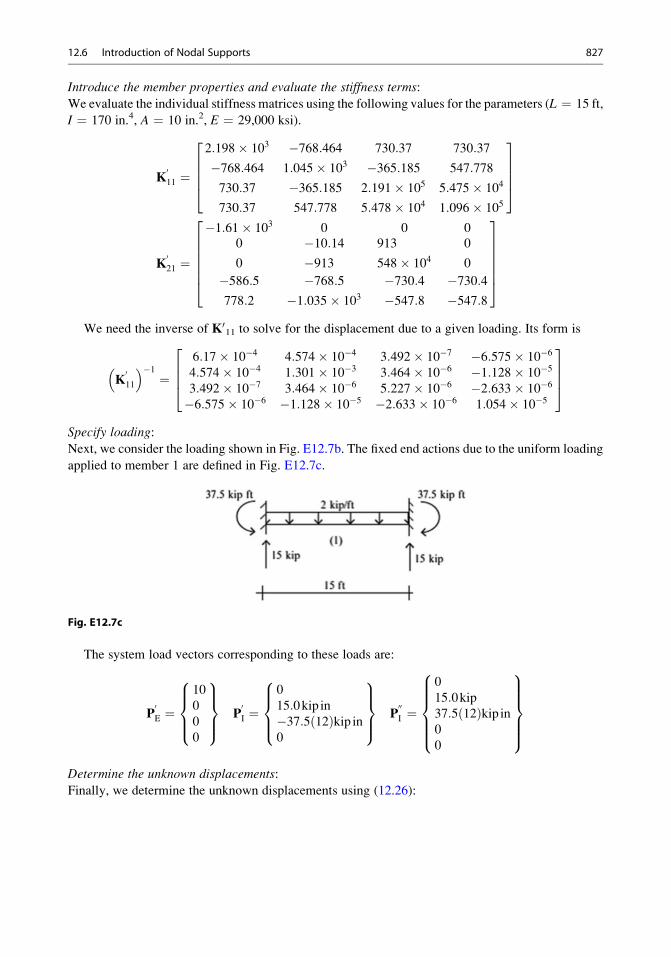
Introduce the member properties and evaluate the stiffness terms:
We evaluate the individual stiffness matrices using the following values for the parameters (L ¼ 15 ft,
I ¼ 170 in.4, A ¼ 10 in.2, E ¼ 29,000 ksi).
K011 ¼
2:198� 103 �768:464 730:37 730:37
�768:464 1:045� 103 �365:185 547:778
730:37 �365:185 2:191� 105 5:475� 104
730:37 547:778 5:478� 104 1:096� 105
26664
37775
K021 ¼
�1:61� 103 0 0 00
0
�10:14�913
913
548� 1040
0
�586:5 �768:5 �730:4 �730:4778:2 �1:035� 103 �547:8 �547:8
2666664
3777775
We need the inverse of K011 to solve for the displacement due to a given loading. Its form is
K011
� ��1¼
6:17� 10�4 4:574� 10�4 3:492� 10�7 �6:575� 10�6
4:574� 10�4 1:301� 10�3 3:464� 10�6 �1:128� 10�5
3:492� 10�7 3:464� 10�6 5:227� 10�6 �2:633� 10�6
�6:575� 10�6 �1:128� 10�5 �2:633� 10�6 1:054� 10�5
2664
3775
Specify loading:
Next, we consider the loading shown in Fig. E12.7b. The fixed end actions due to the uniform loading
applied to member 1 are defined in Fig. E12.7c.
Fig. E12.7c
The system load vectors corresponding to these loads are:
P0E ¼
10
0
0
0
8>><>>:
9>>=>>; P
0I ¼
0
15:0kip in�37:5 12ð Þkip in0
8>><>>:
9>>=>>; P
00I ¼
0
15:0kip37:5 12ð Þkip in0
0
8>>>><>>>>:
9>>>>=>>>>;
Determine the unknown displacements:
Finally, we determine the unknown displacements using (12.26):
12.6 Introduction of Nodal Supports 827
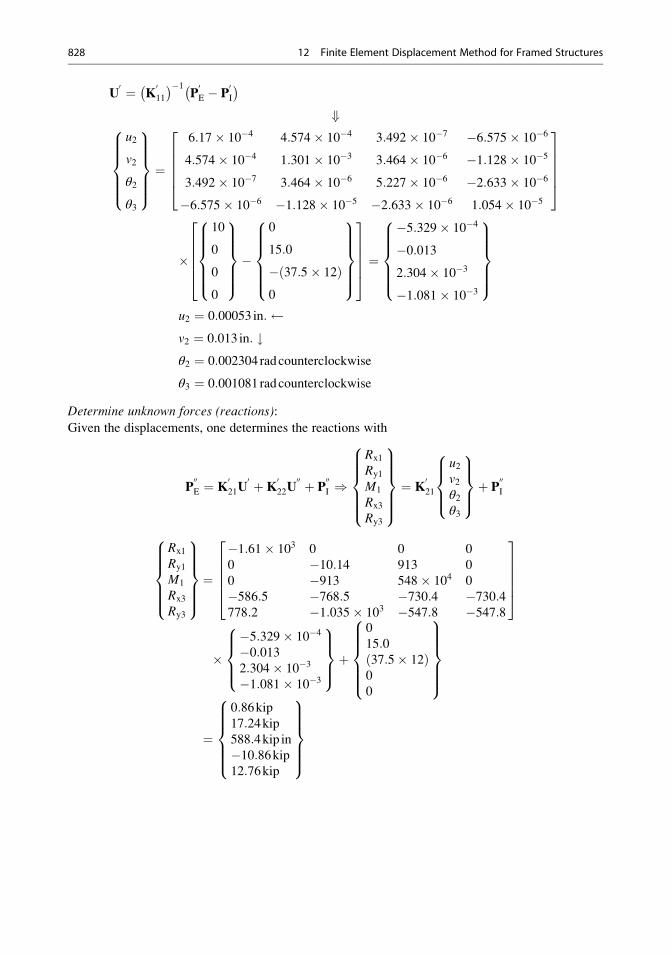
U0 ¼ K
011
� ��1P0E � P
0I
� �+
u2
v2
θ2
θ3
8>>>><>>>>:
9>>>>=>>>>;¼
6:17� 10�4 4:574� 10�4 3:492� 10�7 �6:575� 10�6
4:574� 10�4 1:301� 10�3 3:464� 10�6 �1:128� 10�5
3:492� 10�7 3:464� 10�6 5:227� 10�6 �2:633� 10�6
�6:575� 10�6 �1:128� 10�5 �2:633� 10�6 1:054� 10�5
266664
377775
�
10
0
0
0
8>>>><>>>>:
9>>>>=>>>>;�
0
15:0
� 37:5� 12ð Þ0
8>>>><>>>>:
9>>>>=>>>>;
266664
377775 ¼
�5:329� 10�4
�0:0132:304� 10�3
�1:081� 10�3
8>>>><>>>>:
9>>>>=>>>>;
u2 ¼ 0:00053 in: v2 ¼ 0:013 in: #θ2 ¼ 0:002304radcounterclockwise
θ3 ¼ 0:001081radcounterclockwise
Determine unknown forces (reactions):
Given the displacements, one determines the reactions with
P00E ¼ K
021U
0 þK022U
00 þ P00I )
Rx1
Ry1
M1
Rx3
Ry3
8>>>><>>>>:
9>>>>=>>>>;¼ K
021
u2v2θ2θ3
8>><>>:
9>>=>>;þ P
00I
Rx1
Ry1
M1
Rx3
Ry3
8>>>><>>>>:
9>>>>=>>>>;¼
�1:61� 103 0 0 0
0 �10:14 913 0
0 �913 548� 104 0
�586:5 �768:5 �730:4 �730:4778:2 �1:035� 103 �547:8 �547:8
266664
377775
��5:329� 10�4
�0:0132:304� 10�3
�1:081� 10�3
8>><>>:
9>>=>>;þ
0
15:037:5� 12ð Þ0
0
8>>>><>>>>:
9>>>>=>>>>;
¼
0:86kip17:24kip588:4kip in�10:86kip12:76kip
8>>>><>>>>:
9>>>>=>>>>;
828 12 Finite Element Displacement Method for Framed Structures
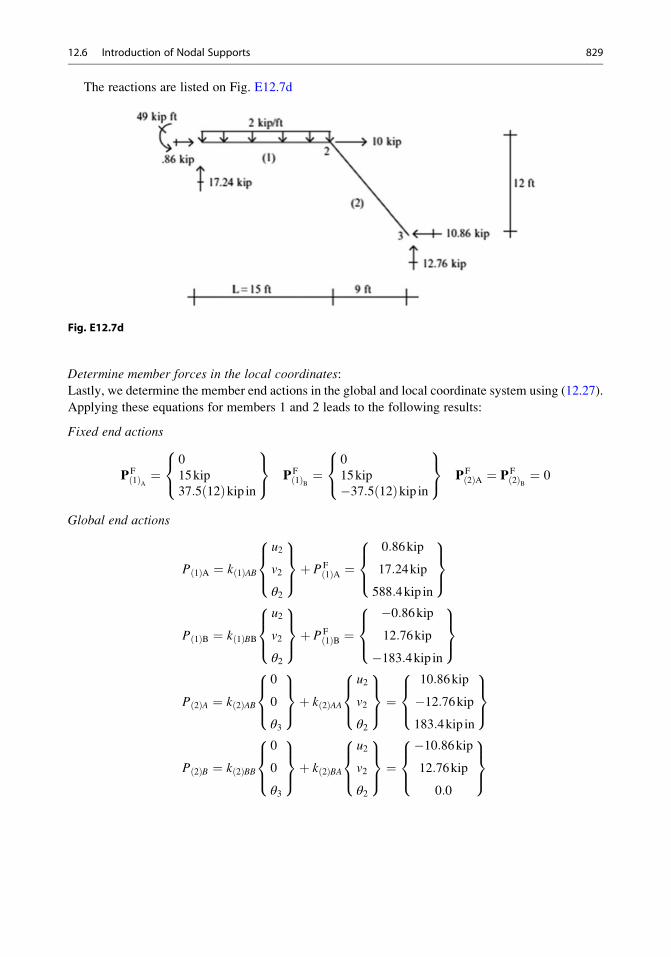
The reactions are listed on Fig. E12.7d
Fig. E12.7d
Determine member forces in the local coordinates:
Lastly, we determine the member end actions in the global and local coordinate system using (12.27).
Applying these equations for members 1 and 2 leads to the following results:
Fixed end actions
PF1ð ÞA ¼
0
15kip
37:5 12ð Þkip in
8<:
9=; PF
1ð ÞB ¼0
15kip
�37:5 12ð Þkip in
8<:
9=; PF
2ð ÞA ¼ PF2ð ÞB ¼ 0
Global end actions
P 1ð ÞA ¼ k 1ð ÞAB
u2
v2
θ2
8><>:
9>=>;þ PF
1ð ÞA ¼0:86kip
17:24kip
588:4kip in
8><>:
9>=>;
P 1ð ÞB ¼ k 1ð ÞBB
u2
v2
θ2
8><>:
9>=>;þ PF
1ð ÞB ¼�0:86kip12:76kip
�183:4kip in
8><>:
9>=>;
P 2ð ÞA ¼ k 2ð ÞAB
0
0
θ3
8><>:
9>=>;þ k 2ð ÞAA
u2
v2
θ2
8><>:
9>=>; ¼
10:86kip
�12:76kip183:4kip in
8><>:
9>=>;
P 2ð ÞB ¼ k 2ð ÞBB
0
0
θ3
8><>:
9>=>;þ k 2ð ÞBA
u2
v2
θ2
8><>:
9>=>; ¼
�10:86kip12:76kip
0:0
8><>:
9>=>;
12.6 Introduction of Nodal Supports 829
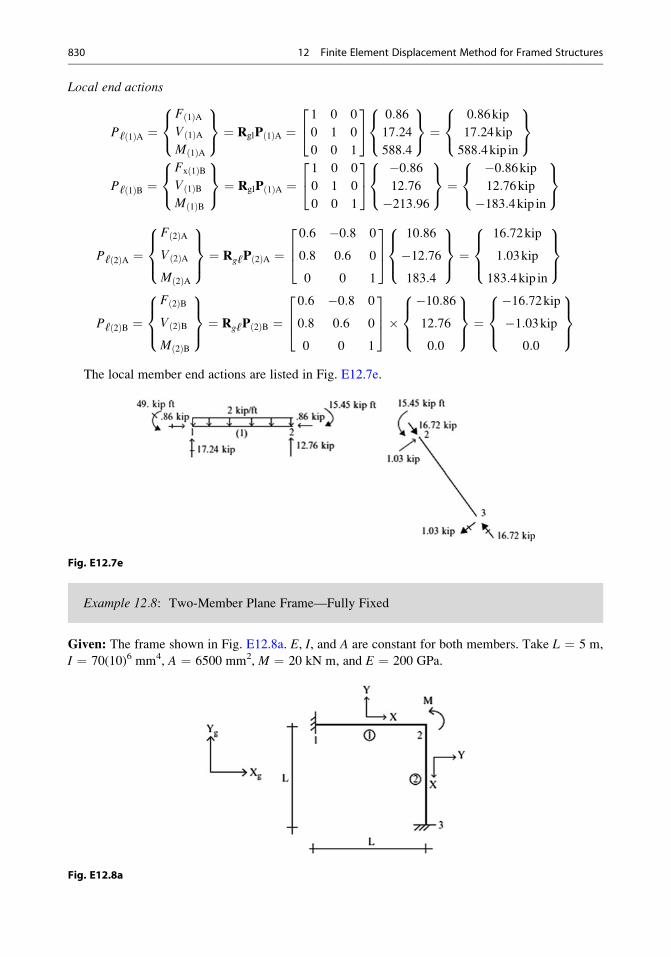
Local end actions
Pℓ 1ð ÞA ¼F 1ð ÞAV 1ð ÞAM 1ð ÞA
8<:
9=; ¼ RglP 1ð ÞA ¼
1 0 0
0 1 0
0 0 1
24
35 0:86
17:24
588:4
8<:
9=; ¼
0:86kip
17:24kip
588:4kip in
8<:
9=;
Pℓ 1ð ÞB ¼Fx 1ð ÞBV 1ð ÞBM 1ð ÞB
8<:
9=; ¼ RglP 1ð ÞA ¼
1 0 0
0 1 0
0 0 1
24
35 �0:86
12:76
�213:96
8<:
9=; ¼
�0:86kip12:76kip
�183:4kip in
8<:
9=;
Pℓ 2ð ÞA ¼F 2ð ÞA
V 2ð ÞA
M 2ð ÞA
8><>:
9>=>; ¼ RgℓP 2ð ÞA ¼
0:6 �0:8 0
0:8 0:6 0
0 0 1
264
375
10:86
�12:76183:4
8><>:
9>=>; ¼
16:72kip
1:03kip
183:4kip in
8><>:
9>=>;
Pℓ 2ð ÞB ¼F 2ð ÞB
V 2ð ÞB
M 2ð ÞB
8><>:
9>=>; ¼ RgℓP 2ð ÞB ¼
0:6 �0:8 0
0:8 0:6 0
0 0 1
264
375�
�10:8612:76
0:0
8><>:
9>=>; ¼
�16:72kip�1:03kip
0:0
8><>:
9>=>;
The local member end actions are listed in Fig. E12.7e.
Fig. E12.7e
Example 12.8: Two-Member Plane Frame—Fully Fixed
Given: The frame shown in Fig. E12.8a. E, I, and A are constant for both members. Take L ¼ 5 m,
I ¼ 70(10)6 mm4, A ¼ 6500 mm2, M ¼ 20 kN m, and E ¼ 200 GPa.
Fig. E12.8a
830 12 Finite Element Displacement Method for Framed Structures
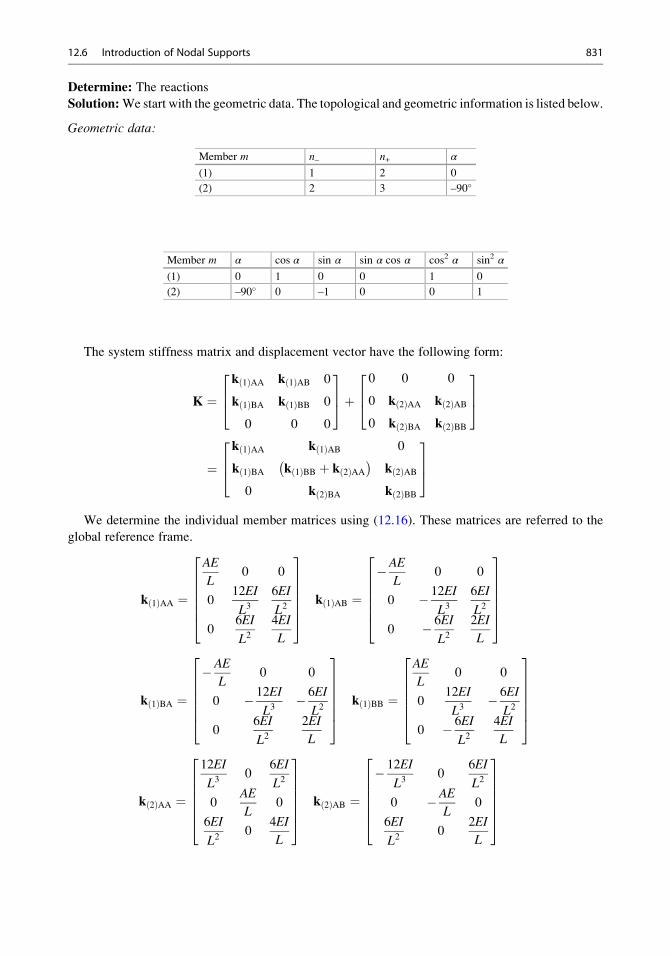
Determine: The reactions
Solution:We start with the geometric data. The topological and geometric information is listed below.
Geometric data:
Member m n– n+ α
(1) 1 2 0
(2) 2 3 –90�
Member m α cos α sin α sin α cos α cos2 α sin2 α
(1) 0 1 0 0 1 0
(2) –90� 0 –1 0 0 1
The system stiffness matrix and displacement vector have the following form:
K ¼k 1ð ÞAA k 1ð ÞAB 0
k 1ð ÞBA k 1ð ÞBB 0
0 0 0
264
375þ
0 0 0
0 k 2ð ÞAA k 2ð ÞAB
0 k 2ð ÞBA k 2ð ÞBB
264
375
¼k 1ð ÞAA k 1ð ÞAB 0
k 1ð ÞBA k 1ð ÞBB þ k 2ð ÞAA� �
k 2ð ÞAB
0 k 2ð ÞBA k 2ð ÞBB
264
375
We determine the individual member matrices using (12.16). These matrices are referred to the
global reference frame.
k 1ð ÞAA ¼
AE
L0 0
012EI
L36EI
L2
06EI
L24EI
L
2666664
3777775 k 1ð ÞAB ¼
�AE
L0 0
0 � 12EI
L36EI
L2
0 � 6EI
L22EI
L
2666664
3777775
k 1ð ÞBA ¼�AE
L0 0
0 � 12EI
L3� 6EI
L2
06EI
L22EI
L
2666664
3777775 k 1ð ÞBB ¼
AE
L0 0
012EI
L3� 6EI
L2
0 � 6EI
L24EI
L
2666664
3777775
k 2ð ÞAA ¼
12EI
L30
6EI
L2
0AE
L0
6EI
L20
4EI
L
2666664
3777775 k 2ð ÞAB ¼
� 12EI
L30
6EI
L2
0 �AE
L0
6EI
L20
2EI
L
2666664
3777775
12.6 Introduction of Nodal Supports 831
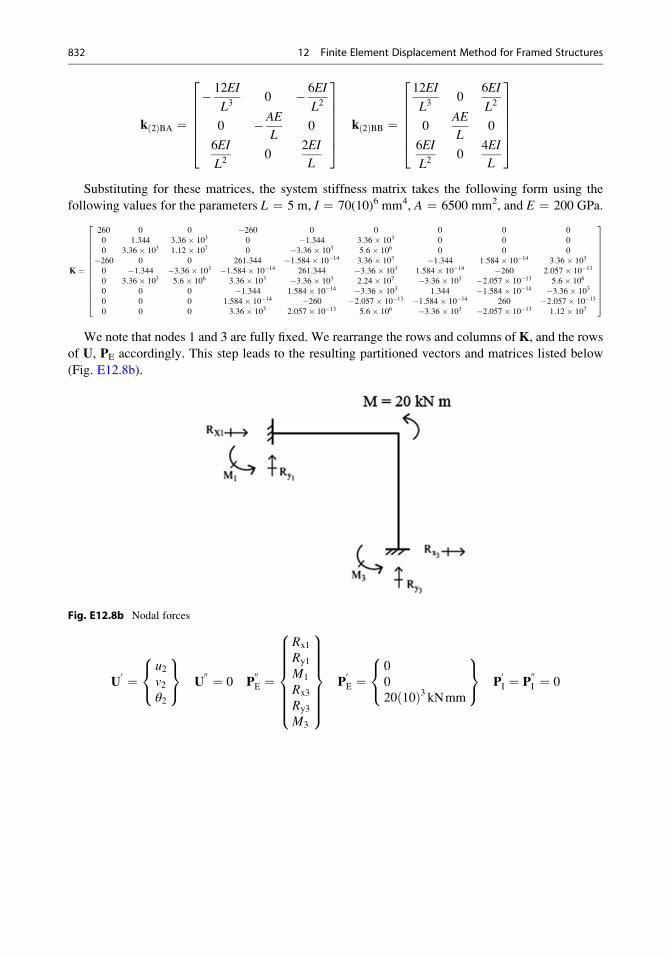
k 2ð ÞBA ¼� 12EI
L30 � 6EI
L2
0 �AE
L0
6EI
L20
2EI
L
2666664
3777775 k 2ð ÞBB ¼
12EI
L30
6EI
L2
0AE
L0
6EI
L20
4EI
L
2666664
3777775
Substituting for these matrices, the system stiffness matrix takes the following form using the
following values for the parameters L ¼ 5 m, I ¼ 70(10)6 mm4, A ¼ 6500 mm2, and E ¼ 200 GPa.
K ¼
260 0 0 �260 0 0 0 0 0
0 1:344 3:36� 103 0 �1:344 3:36� 103 0 0 0
0 3:36� 103 1:12� 107 0 �3:36� 103 5:6� 106 0 0 0
�260 0 0 261:344 �1:584� 10�14 3:36� 103 �1:344 1:584� 10�14 3:36� 103
0 �1:344 �3:36� 103 �1:584� 10�14 261:344 �3:36� 103 1:584� 10�14 �260 2:057� 10�13
0 3:36� 103 5:6� 106 3:36� 103 �3:36� 103 2:24� 107 �3:36� 103 �2:057� 10�13 5:6� 106
0 0 0 �1:344 1:584� 10�14 �3:36� 103 1:344 �1:584� 10�14 �3:36� 103
0 0 0 1:584� 10�14 �260 �2:057� 10�13 �1:584� 10�14 260 �2:057� 10�13
0 0 0 3:36� 103 2:057� 10�13 5:6� 106 �3:36� 103 �2:057� 10�13 1:12� 107
26666666666664
37777777777775
We note that nodes 1 and 3 are fully fixed. We rearrange the rows and columns of K, and the rows
of U, PE accordingly. This step leads to the resulting partitioned vectors and matrices listed below
(Fig. E12.8b).
Fig. E12.8b Nodal forces
U0 ¼
u2v2θ2
8<:
9=; U
00 ¼ 0 P00E ¼
Rx1
Ry1
M1
Rx3
Ry3
M3
8>>>>>><>>>>>>:
9>>>>>>=>>>>>>;
P0E ¼
0
0
20 10ð Þ3 kNmm
8<:
9=; P
0I ¼ P
00I ¼ 0
832 12 Finite Element Displacement Method for Framed Structures
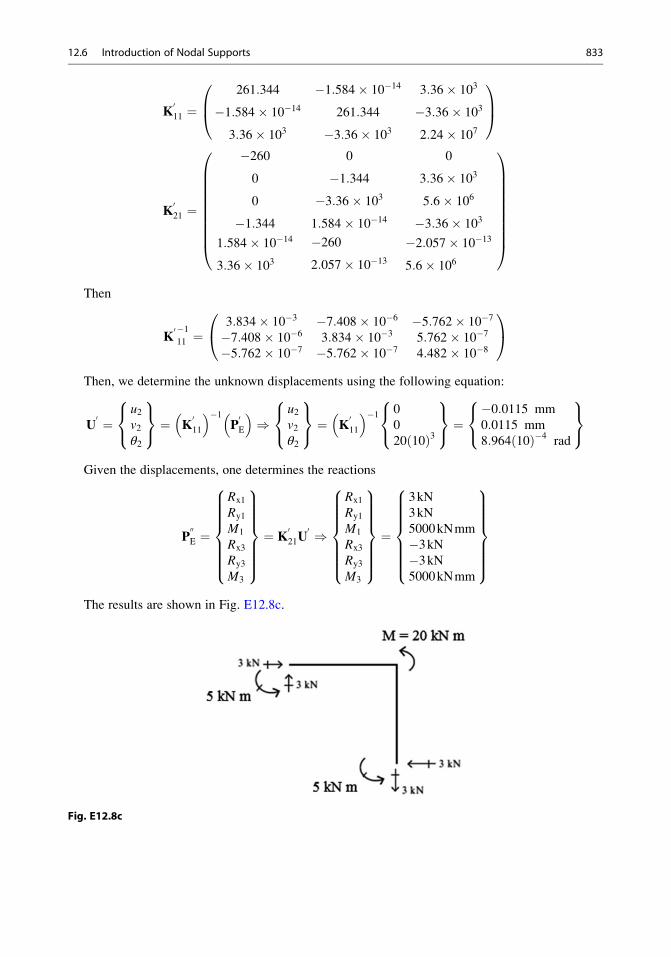
K011 ¼
261:344 �1:584� 10�14 3:36� 103
�1:584� 10�14 261:344 �3:36� 103
3:36� 103 �3:36� 103 2:24� 107
0B@
1CA
K021 ¼
�260 0 0
0 �1:344 3:36� 103
0 �3:36� 103 5:6� 106
�1:344 1:584� 10�14 �3:36� 103
1:584� 10�14
3:36� 103
�2602:057� 10�13
�2:057� 10�13
5:6� 106
0BBBBBBBBB@
1CCCCCCCCCA
Then
K0 �111 ¼
3:834� 10�3 �7:408� 10�6 �5:762� 10�7
�7:408� 10�6 3:834� 10�3 5:762� 10�7
�5:762� 10�7 �5:762� 10�7 4:482� 10�8
0@
1A
Then, we determine the unknown displacements using the following equation:
U0 ¼
u2v2θ2
8<:
9=; ¼ K
011
� ��1P0E
� �)
u2v2θ2
8<:
9=; ¼ K
011
� ��1 0
0
20 10ð Þ3
8<:
9=; ¼
�0:0115 mm
0:0115 mm
8:964 10ð Þ�4 rad
8<:
9=;
Given the displacements, one determines the reactions
P00E ¼
Rx1
Ry1
M1
Rx3
Ry3
M3
8>>>>>><>>>>>>:
9>>>>>>=>>>>>>;¼ K
021U
0 )
Rx1
Ry1
M1
Rx3
Ry3
M3
8>>>>>><>>>>>>:
9>>>>>>=>>>>>>;¼
3kN
3kN
5000kNmm
�3kN�3kN5000kNmm
8>>>>>><>>>>>>:
9>>>>>>=>>>>>>;
The results are shown in Fig. E12.8c.
Fig. E12.8c
12.6 Introduction of Nodal Supports 833
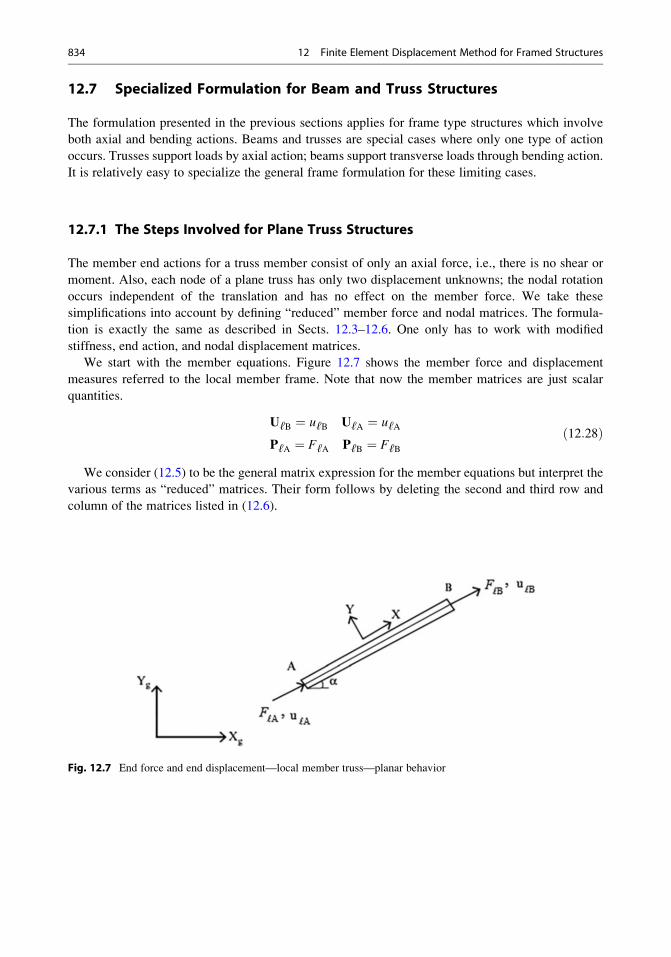
12.7 Specialized Formulation for Beam and Truss Structures
The formulation presented in the previous sections applies for frame type structures which involve
both axial and bending actions. Beams and trusses are special cases where only one type of action
occurs. Trusses support loads by axial action; beams support transverse loads through bending action.
It is relatively easy to specialize the general frame formulation for these limiting cases.
12.7.1 The Steps Involved for Plane Truss Structures
The member end actions for a truss member consist of only an axial force, i.e., there is no shear or
moment. Also, each node of a plane truss has only two displacement unknowns; the nodal rotation
occurs independent of the translation and has no effect on the member force. We take these
simplifications into account by defining “reduced” member force and nodal matrices. The formula-
tion is exactly the same as described in Sects. 12.3–12.6. One only has to work with modified
stiffness, end action, and nodal displacement matrices.
We start with the member equations. Figure 12.7 shows the member force and displacement
measures referred to the local member frame. Note that now the member matrices are just scalar
quantities.
UℓB ¼ uℓB UℓA ¼ uℓA
PℓA ¼ FℓA PℓB ¼ FℓB
ð12:28Þ
We consider (12.5) to be the general matrix expression for the member equations but interpret the
various terms as “reduced” matrices. Their form follows by deleting the second and third row and
column of the matrices listed in (12.6).
Fig. 12.7 End force and end displacement—local member truss—planar behavior
834 12 Finite Element Displacement Method for Framed Structures
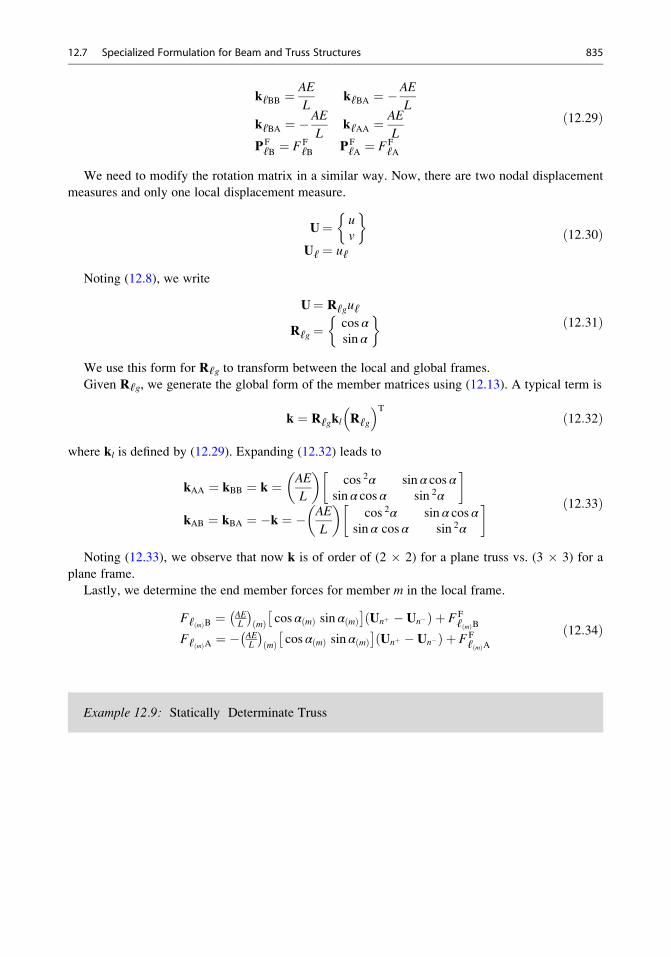
kℓBB ¼AE
LkℓBA ¼ �
AE
L
kℓBA ¼ �AE
LkℓAA ¼
AE
LPFℓB ¼ FF
ℓB PFℓA ¼ FF
ℓA
ð12:29Þ
We need to modify the rotation matrix in a similar way. Now, there are two nodal displacement
measures and only one local displacement measure.
U¼ uv
�Uℓ ¼ uℓ
ð12:30Þ
Noting (12.8), we write
U¼ Rℓguℓ
Rℓg ¼ cos αsin α
� ð12:31Þ
We use this form for Rℓg to transform between the local and global frames.
Given Rℓg, we generate the global form of the member matrices using (12.13). A typical term is
k ¼ Rℓgkl Rℓg
� �Tð12:32Þ
where kl is defined by (12.29). Expanding (12.32) leads to
kAA ¼ kBB ¼ k ¼ AE
L
� �cos 2α sin α cos α
sin α cos α sin 2α
�
kAB ¼ kBA ¼ �k ¼ � AE
L
� �cos 2α sin α cos α
sin α cos α sin 2α
� ð12:33Þ
Noting (12.33), we observe that now k is of order of (2 � 2) for a plane truss vs. (3 � 3) for a
plane frame.
Lastly, we determine the end member forces for member m in the local frame.
Fℓ mð ÞB ¼ AEL
� �mð Þ cos α mð Þ sin α mð Þ� �
Unþ � Un�ð Þ þ FFℓ mð ÞB
Fℓ mð ÞA ¼ � AEL
� �mð Þ cos α mð Þ sin α mð Þ� �
Unþ � Un�ð Þ þ FFℓ mð ÞA
ð12:34Þ
Example 12.9: Statically Determinate Truss
12.7 Specialized Formulation for Beam and Truss Structures 835
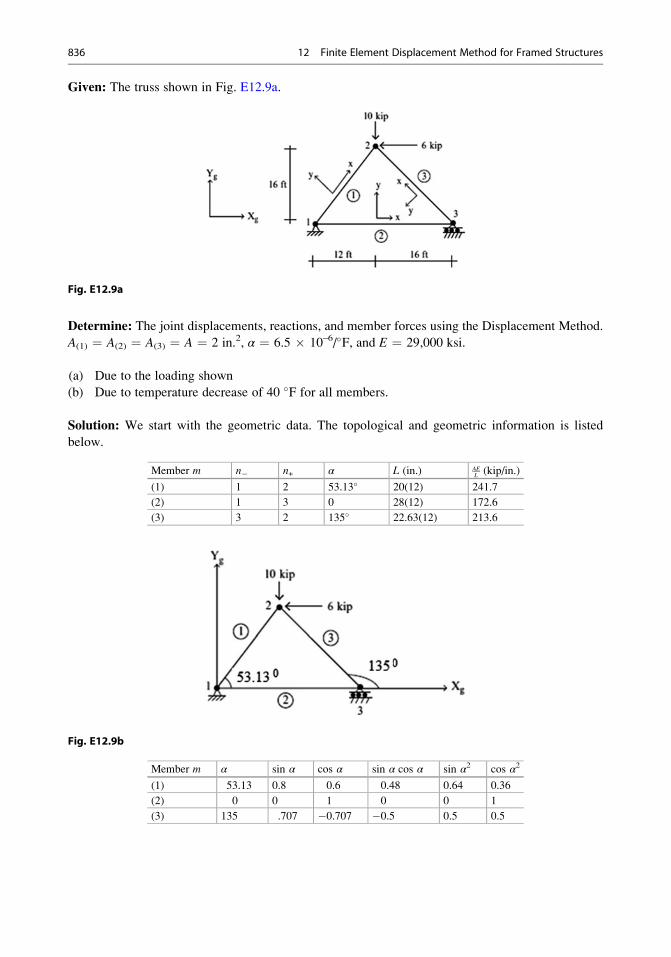
Given: The truss shown in Fig. E12.9a.
Fig. E12.9a
Determine: The joint displacements, reactions, and member forces using the Displacement Method.
A(1) ¼ A(2) ¼ A(3) ¼ A ¼ 2 in.2, α ¼ 6.5 � 10–6/�F, and E ¼ 29,000 ksi.
(a) Due to the loading shown
(b) Due to temperature decrease of 40 �F for all members.
Solution: We start with the geometric data. The topological and geometric information is listed
below.
Member m n� n+ α L (in.) AEL (kip/in.)
(1) 1 2 53.13� 20(12) 241.7
(2) 1 3 0 28(12) 172.6
(3) 3 2 135� 22.63(12) 213.6
Fig. E12.9b
Member m α sin α cos α sin α cos α sin α2 cos α2
(1) 53.13 0.8 0.6 0.48 0.64 0.36
(2) 0 0 1 0 0 1
(3) 135 .707 �0.707 �0.5 0.5 0.5
836 12 Finite Element Displacement Method for Framed Structures
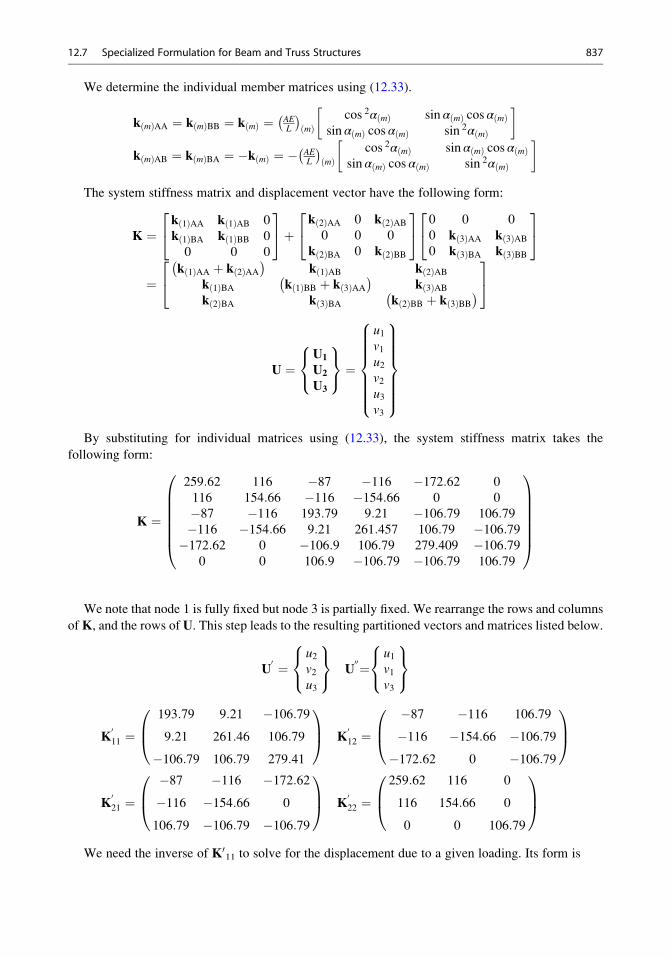
We determine the individual member matrices using (12.33).
k mð ÞAA ¼ k mð ÞBB ¼ k mð Þ ¼ AEL
� �mð Þ
cos 2α mð Þ sin α mð Þ cos α mð Þsin α mð Þ cos α mð Þ sin 2α mð Þ
�
k mð ÞAB ¼ k mð ÞBA ¼ �k mð Þ ¼ � AEL
� �mð Þ
cos 2α mð Þ sin α mð Þ cos α mð Þsin α mð Þ cos α mð Þ sin 2α mð Þ
�
The system stiffness matrix and displacement vector have the following form:
K ¼k 1ð ÞAA k 1ð ÞAB 0
k 1ð ÞBA k 1ð ÞBB 0
0 0 0
24
35þ k 2ð ÞAA 0 k 2ð ÞAB
0 0 0
k 2ð ÞBA 0 k 2ð ÞBB
24
35 0 0 0
0 k 3ð ÞAA k 3ð ÞAB0 k 3ð ÞBA k 3ð ÞBB
24
35
¼k 1ð ÞAA þ k 2ð ÞAA� �
k 1ð ÞAB k 2ð ÞABk 1ð ÞBA k 1ð ÞBB þ k 3ð ÞAA
� �k 3ð ÞAB
k 2ð ÞBA k 3ð ÞBA k 2ð ÞBB þ k 3ð ÞBB� �
24
35
U ¼U1
U2
U3
8<:
9=; ¼
u1v1u2v2u3v3
8>>>>>><>>>>>>:
9>>>>>>=>>>>>>;
By substituting for individual matrices using (12.33), the system stiffness matrix takes the
following form:
K ¼
259:62 116 �87 �116 �172:62 0
116 154:66 �116 �154:66 0 0
�87 �116 193:79 9:21 �106:79 106:79�116 �154:66 9:21 261:457 106:79 �106:79�172:62 0 �106:9 106:79 279:409 �106:79
0 0 106:9 �106:79 �106:79 106:79
0BBBBBB@
1CCCCCCA
We note that node 1 is fully fixed but node 3 is partially fixed. We rearrange the rows and columns
ofK, and the rows of U. This step leads to the resulting partitioned vectors and matrices listed below.
U0 ¼
u2v2u3
8<:
9=; U
00¼u1v1v3
8<:
9=;
K011 ¼
193:79 9:21 �106:799:21 261:46 106:79
�106:79 106:79 279:41
0B@
1CA K
012 ¼
�87 �116 106:79
�116 �154:66 �106:79�172:62 0 �106:79
0B@
1CA
K021 ¼
�87 �116 �172:62�116 �154:66 0
106:79 �106:79 �106:79
0B@
1CA K
022 ¼
259:62 116 0
116 154:66 0
0 0 106:79
0B@
1CA
We need the inverse of K011 to solve for the displacement due to a given loading. Its form is
12.7 Specialized Formulation for Beam and Truss Structures 837
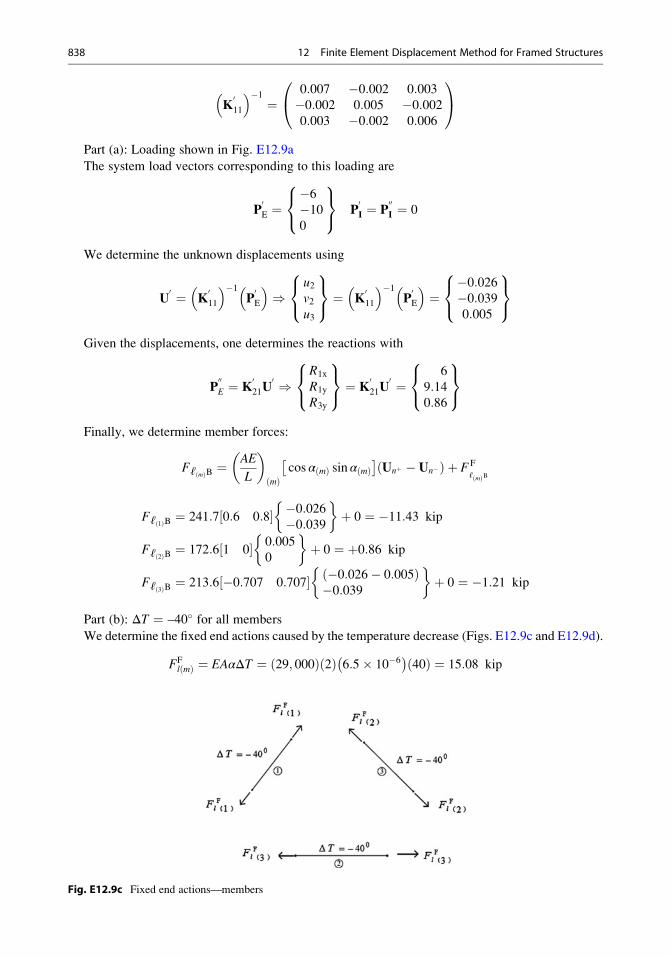
K011
� ��1¼
0:007 �0:002 0:003�0:002 0:005 �0:0020:003 �0:002 0:006
0@
1A
Part (a): Loading shown in Fig. E12.9a
The system load vectors corresponding to this loading are
P0E ¼
�6�100
8<:
9=; P
0I ¼ P
00I ¼ 0
We determine the unknown displacements using
U0 ¼ K
011
� ��1P0E
� �)
u2v2u3
8<:
9=; ¼ K
011
� ��1P0E
� �¼
�0:026�0:0390:005
8<:
9=;
Given the displacements, one determines the reactions with
P00E ¼ K
021U
0 )R1x
R1y
R3y
8<:
9=; ¼ K
021U
0 ¼6
9:140:86
8<:
9=;
Finally, we determine member forces:
Fℓ mð ÞB ¼AE
L
� �mð Þ
cos α mð Þ sin α mð Þ� �
Unþ � Un�ð Þ þ FF
ℓ mð ÞB
Fℓ 1ð ÞB ¼ 241:7 0:6 0:8½ � �0:026�0:039 �
þ 0 ¼ �11:43 kip
Fℓ 2ð ÞB ¼ 172:6 1 0½ � 0:0050
�þ 0 ¼ þ0:86 kip
Fℓ 3ð ÞB ¼ 213:6 �0:707 0:707½ � �0:026� 0:005ð Þ�0:039
�þ 0 ¼ �1:21 kip
Part (b): ΔT ¼ –40� for all members
We determine the fixed end actions caused by the temperature decrease (Figs. E12.9c and E12.9d).
FFlðmÞ ¼ EAαΔT ¼ 29; 000ð Þ 2ð Þ 6:5� 10�6
� �40ð Þ ¼ 15:08 kip
Fig. E12.9c Fixed end actions—members
838 12 Finite Element Displacement Method for Framed Structures
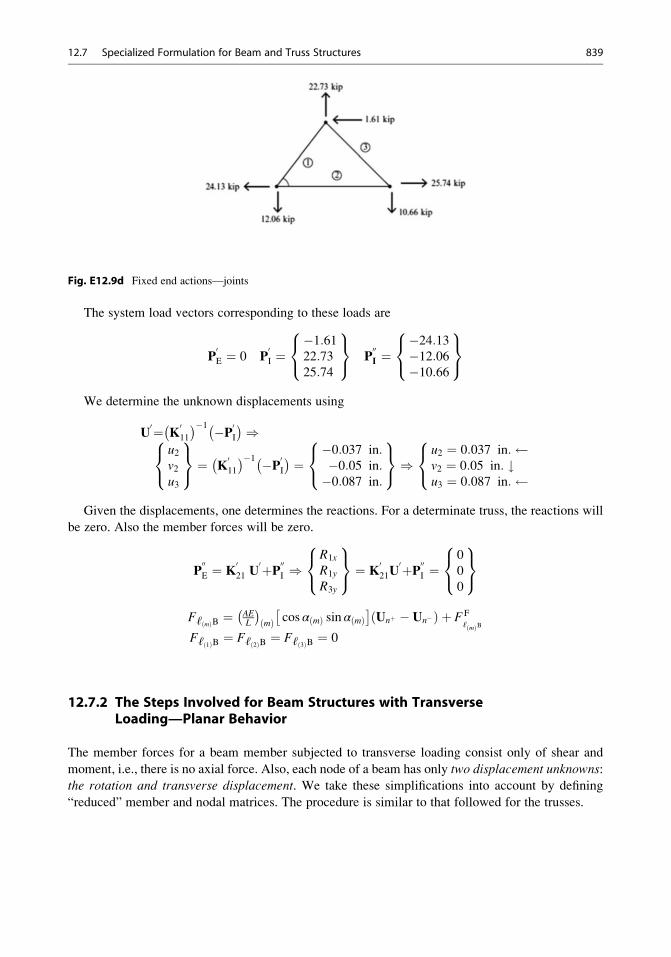
Fig. E12.9d Fixed end actions—joints
The system load vectors corresponding to these loads are
P0E ¼ 0 P
0I ¼
�1:6122:7325:74
8<:
9=; P
00I ¼
�24:13�12:06�10:66
8<:
9=;
We determine the unknown displacements using
U0¼ K
011
� ��1 �P0I� �)u2v2u3
8<:
9=; ¼ K
011
� ��1 �P0I� � ¼ �0:037 in:�0:05 in:�0:087 in:
8<:
9=;)
u2 ¼ 0:037 in: v2 ¼ 0:05 in: #u3 ¼ 0:087 in:
8<:
Given the displacements, one determines the reactions. For a determinate truss, the reactions will
be zero. Also the member forces will be zero.
P00E ¼ K
021 U
0þP00I )R1x
R1y
R3y
8<:
9=; ¼ K
021U
0þP00I ¼0
0
0
8<:
9=;
Fℓ mð ÞB ¼ AEL
� �mð Þ cos α mð Þ sin α mð Þ� �
Unþ � Un�ð Þ þ FF
ℓ mð ÞB
Fℓ 1ð ÞB ¼ Fℓ 2ð ÞB ¼ Fℓ 3ð ÞB ¼ 0
12.7.2 The Steps Involved for Beam Structures with TransverseLoading—Planar Behavior
The member forces for a beam member subjected to transverse loading consist only of shear and
moment, i.e., there is no axial force. Also, each node of a beam has only two displacement unknowns:the rotation and transverse displacement. We take these simplifications into account by defining
“reduced” member and nodal matrices. The procedure is similar to that followed for the trusses.
12.7 Specialized Formulation for Beam and Truss Structures 839
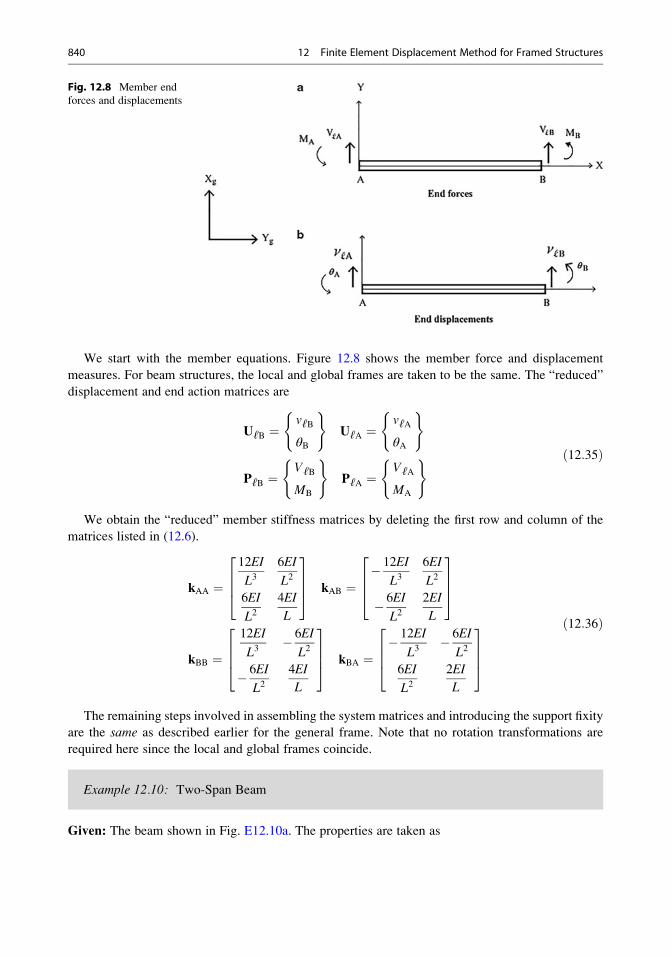
We start with the member equations. Figure 12.8 shows the member force and displacement
measures. For beam structures, the local and global frames are taken to be the same. The “reduced”
displacement and end action matrices are
UℓB ¼vℓB
θB
( )UℓA ¼
vℓA
θA
( )
PℓB ¼VℓB
MB
( )PℓA ¼
VℓA
MA
( ) ð12:35Þ
We obtain the “reduced” member stiffness matrices by deleting the first row and column of the
matrices listed in (12.6).
kAA ¼12EI
L36EI
L2
6EI
L24EI
L
2664
3775 kAB ¼
� 12EI
L36EI
L2
� 6EI
L22EI
L
2664
3775
kBB ¼12EI
L3� 6EI
L2
� 6EI
L24EI
L
2664
3775 kBA ¼
� 12EI
L3� 6EI
L2
6EI
L22EI
L
2664
3775
ð12:36Þ
The remaining steps involved in assembling the system matrices and introducing the support fixity
are the same as described earlier for the general frame. Note that no rotation transformations are
required here since the local and global frames coincide.
Example 12.10: Two-Span Beam
Given: The beam shown in Fig. E12.10a. The properties are taken as
Fig. 12.8 Member end
forces and displacements
840 12 Finite Element Displacement Method for Framed Structures
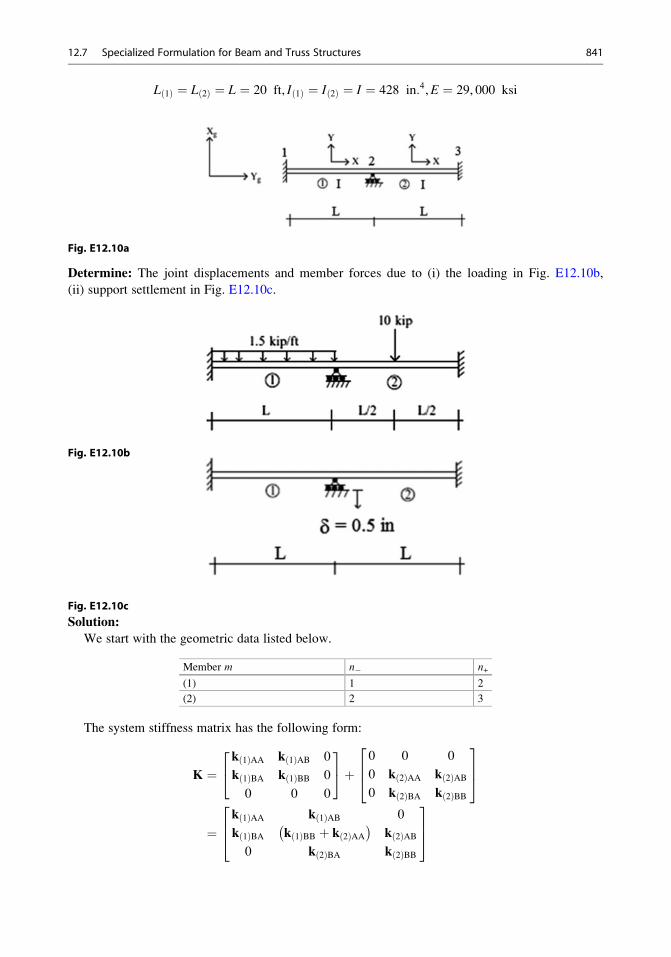
L 1ð Þ ¼ L 2ð Þ ¼ L ¼ 20 ft, I 1ð Þ ¼ I 2ð Þ ¼ I ¼ 428 in:4,E ¼ 29, 000 ksi
Fig. E12.10a
Determine: The joint displacements and member forces due to (i) the loading in Fig. E12.10b,
(ii) support settlement in Fig. E12.10c.
Fig. E12.10b
Fig. E12.10c
Solution:
We start with the geometric data listed below.
Member m n� n+
(1) 1 2
(2) 2 3
The system stiffness matrix has the following form:
K ¼k 1ð ÞAA k 1ð ÞAB 0
k 1ð ÞBA k 1ð ÞBB 0
0 0 0
24
35þ 0 0 0
0 k 2ð ÞAA k 2ð ÞAB0 k 2ð ÞBA k 2ð ÞBB
264
375
¼k 1ð ÞAA k 1ð ÞAB 0
k 1ð ÞBA k 1ð ÞBB þ k 2ð ÞAA� �
k 2ð ÞAB0 k 2ð ÞBA k 2ð ÞBB
264
375
12.7 Specialized Formulation for Beam and Truss Structures 841

The member stiffness matrices follow from Equation (12.36). Since the lengths and cross-sectional
properties are equal, the corresponding matrices are equal.
k 1ð ÞAA ¼ k 2ð ÞAA ¼12EI
L36EI
L2
6EI
L24EI
L
264
375 k 1ð ÞAB ¼ k 2ð ÞAB ¼
� 12EI
L3� 6EI
L2
� 6EI
L22EI
L
264
375
k 1ð ÞBA ¼ k 2ð ÞBA ¼� 12EI
L3� 6EI
L2
6EI
L22EI
L
264
375 k 1ð ÞBB ¼ k 2ð ÞBB ¼
12EI
L3� 6EI
L2
� 6EI
L24EI
L
264
375
Substituting for the member matrices, the system matrix expands to:
K ¼
12EI
L36EI
L2� 12EI
L3� 6EI
L20 0
6EI
L24EI
L� 6EI
L22EI
L0 0
� 12EI
L3� 6EI
L224EI
L30 � 12EI
L36EI
L26EI
L22EI
L0
8EI
L� 6EI
L22EI
L
0 0 � 12EI
L3� 6EI
L212EI
L3� 6EI
L2
0 06EI
L22EI
L� 6EI
L24EI
L
0BBBBBBBBBBBBBBBB@
1CCCCCCCCCCCCCCCCA
The system nodal displacement and nodal load terms follow from (12.19).
U ¼
v1θ1v2θ2v3θ3
8>>>>>><>>>>>>:
9>>>>>>=>>>>>>;
PE ¼
Ry1
M1
Ry2
M2
Ry3
M3
8>>>>>><>>>>>>:
9>>>>>>=>>>>>>;
PI ¼
V F1ð ÞA
M F1ð ÞA
V F1ð ÞB þ V F
2ð ÞA� �M F
1ð ÞB þM F2ð ÞA
� �V F
2ð ÞBM F
2ð ÞB
8>>>>>>>>>><>>>>>>>>>>:
9>>>>>>>>>>=>>>>>>>>>>;
Nodes 1 and 3 are fully fixed and node 2 is partially fixed. The only unknown displacement is θ2.We rearrange the rows and columns according to the systematic approach described in Sect. 12.6.1.
Noting (12.23) and (12.24), the rearranged terms are
U0 ¼ θ2f g U
00¼
v1θ1v2v3θ3
8>>>><>>>>:
9>>>>=>>>>;
and
842 12 Finite Element Displacement Method for Framed Structures
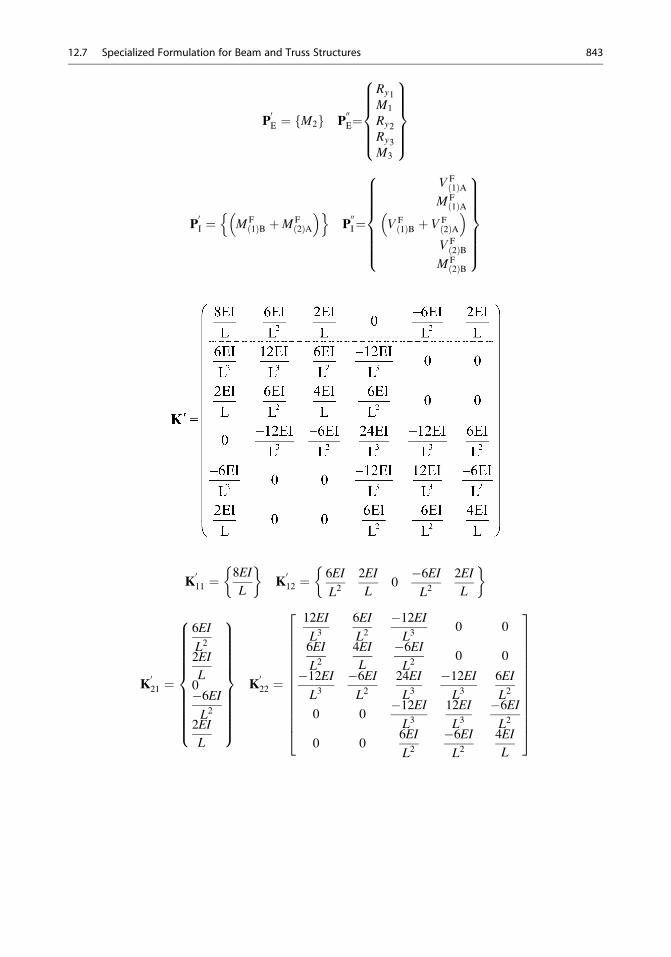
P0E ¼ M2f g P
00E¼
Ry1M1
Ry2Ry3M3
8>>>><>>>>:
9>>>>=>>>>;
P0I ¼ M F
1ð ÞB þM F2ð ÞA
� �n oP00I¼
V F1ð ÞA
M F1ð ÞA
V F1ð ÞB þ V F
2ð ÞA� �
V F2ð ÞB
M F2ð ÞB
8>>>>>><>>>>>>:
9>>>>>>=>>>>>>;
K011 ¼
8EI
L
�K012 ¼
6EI
L22EI
L0�6EIL2
2EI
L
�
K021 ¼
6EI
L22EI
L0�6EIL2
2EI
L
8>>>>>>>>>><>>>>>>>>>>:
9>>>>>>>>>>=>>>>>>>>>>;
K022 ¼
12EI
L36EI
L2�12EIL3
0 0
6EI
L24EI
L
�6EIL2
0 0
�12EIL3
�6EIL2
24EI
L3�12EIL3
6EI
L2
0 0�12EIL3
12EI
L3�6EIL2
0 06EI
L2�6EIL2
4EI
L
26666666666664
37777777777775
12.7 Specialized Formulation for Beam and Truss Structures 843
The inverse of K011 is
K011
� ��1¼ L
8EI¼ 20 12ð Þ
8 29; 000ð Þ 428ð Þ ¼ 2:417 10�6� �
(i) Loading:We consider the loading shown in Fig. E12.10b. The fixed end actions due to the loading applied to
members 1 and 2 are defined in Fig. E12.10d.
Fig. E12.10d
Substituting for the fixed end actions, the various nodal displacement and load terms reduce to
U0¼ θ2f g U
00 ¼ 0 (No support movement)
P0E ¼ 0f g P
0I ¼ �50þ 25ð Þf g ¼ �25 kip ftf g P
00I ¼
15:0 kip
50:0 kip ft
15:0þ 5:0ð Þ kip
5:0 kip
�25:0 kip ft
8>>>><>>>>:
9>>>>=>>>>;
The unknown displacement is determined with (12.26) specialized for this example
U0¼ K
011
� ��1P0E �K
012U
00 � P0I
� �+
U0¼ K
011
� ��1 �P0I� �+
θ2 ¼ L
8EI
� �25:0kip ftð Þ ¼ 3:125L
EI¼ 3:125 20ð Þ 12ð Þ2
29, 000 428ð Þ ¼ 0:000725rad
Given the displacement, one determines the reactions with the second equation in (12.25):
P00E¼K
021U
0 þK022U
00 þ P00I
+P00E¼K
021U
0 þ P00I
+
Ry1
M1
Ry2
Ry3
M3
8>>>><>>>>:
9>>>>=>>>>;¼
6EI
L22EI
L0
� 6EI
L22EI
L
8>>>>>>>>>><>>>>>>>>>>:
9>>>>>>>>>>=>>>>>>>>>>;
3:125L
EI
� �þ
15
50
20
5
�25
8>>>><>>>>:
9>>>>=>>>>;¼
15:94 kip
56:25 kip ft
20:0 kip
4:06 kip
�18:75 kip ft
8>>>><>>>>:
9>>>>=>>>>;
844 12 Finite Element Displacement Method for Framed Structures
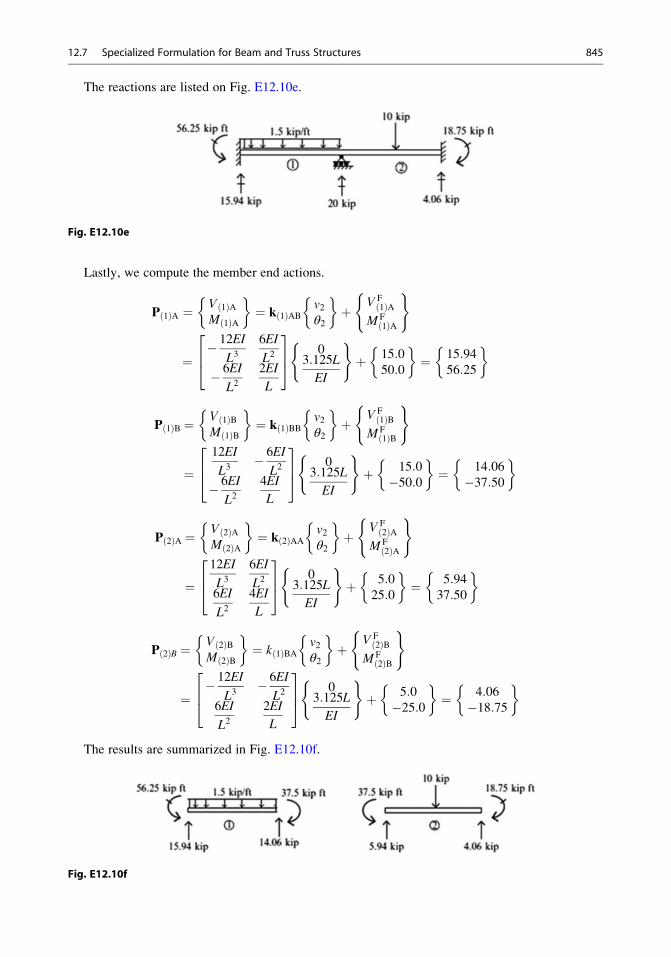
The reactions are listed on Fig. E12.10e.
Fig. E12.10e
Lastly, we compute the member end actions.
P 1ð ÞA ¼ V 1ð ÞAM 1ð ÞA
�¼ k 1ð ÞAB
v2θ2
�þ V F
1ð ÞAM F
1ð ÞA
( )
¼� 12EI
L36EI
L2
� 6EI
L22EI
L
264
375 0
3:125L
EI
( )þ 15:0
50:0
�¼ 15:94
56:25
�
P 1ð ÞB ¼ V 1ð ÞBM 1ð ÞB
�¼ k 1ð ÞBB
v2θ2
�þ V F
1ð ÞBM F
1ð ÞB
( )
¼12EI
L3� 6EI
L2
� 6EI
L24EI
L
264
375 0
3:125L
EI
( )þ 15:0�50:0
�¼ 14:06�37:50
�
P 2ð ÞA ¼ V 2ð ÞAM 2ð ÞA
�¼ k 2ð ÞAA
v2θ2
�þ V F
2ð ÞAM F
2ð ÞA
( )
¼12EI
L36EI
L26EI
L24EI
L
264
375 0
3:125L
EI
( )þ 5:0
25:0
�¼ 5:94
37:50
�
P 2ð ÞB ¼ V 2ð ÞBM 2ð ÞB
�¼ k 1ð ÞBA
v2θ2
�þ V F
2ð ÞBM F
2ð ÞB
( )
¼� 12EI
L3� 6EI
L26EI
L22EI
L
264
375 0
3:125L
EI
( )þ 5:0�25:0
�¼ 4:06�18:75
�
The results are summarized in Fig. E12.10f.
Fig. E12.10f
12.7 Specialized Formulation for Beam and Truss Structures 845
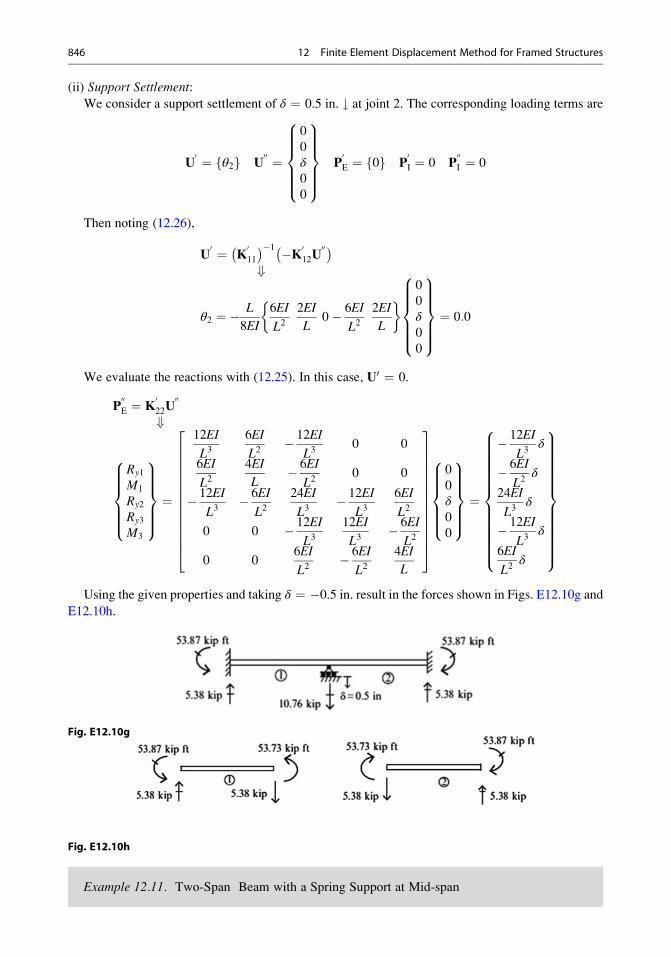
(ii) Support Settlement:We consider a support settlement of δ ¼ 0.5 in. # at joint 2. The corresponding loading terms are
U0 ¼ θ2f g U
00 ¼
0
0
δ0
0
8>>>><>>>>:
9>>>>=>>>>;
P0E ¼ 0f g P
0I ¼ 0 P
00I ¼ 0
Then noting (12.26),
U0 ¼ K
011
� ��1 �K012U
00� �+
θ2 ¼ � L
8EI
6EI
L22EI
L0� 6EI
L22EI
L
� 0
0
δ0
0
8>>>><>>>>:
9>>>>=>>>>;¼ 0:0
We evaluate the reactions with (12.25). In this case, U0 ¼ 0.
P00E ¼ K
022U
00
+
Ry1
M1
Ry2
Ry3
M3
8>>>><>>>>:
9>>>>=>>>>;¼
12EI
L36EI
L2� 12EI
L30 0
6EI
L24EI
L� 6EI
L20 0
� 12EI
L3� 6EI
L224EI
L3� 12EI
L36EI
L2
0 0 � 12EI
L312EI
L3� 6EI
L2
0 06EI
L2� 6EI
L24EI
L
26666666666664
37777777777775
0
0
δ0
0
8>>>><>>>>:
9>>>>=>>>>;¼
� 12EI
L3δ
� 6EI
L2δ
24EI
L3δ
� 12EI
L3δ
6EI
L2δ
8>>>>>>>>>>>><>>>>>>>>>>>>:
9>>>>>>>>>>>>=>>>>>>>>>>>>;
Using the given properties and taking δ ¼ �0.5 in. result in the forces shown in Figs. E12.10g andE12.10h.
Fig. E12.10g
Fig. E12.10h
Example 12.11. Two-Span Beam with a Spring Support at Mid-span
846 12 Finite Element Displacement Method for Framed Structures
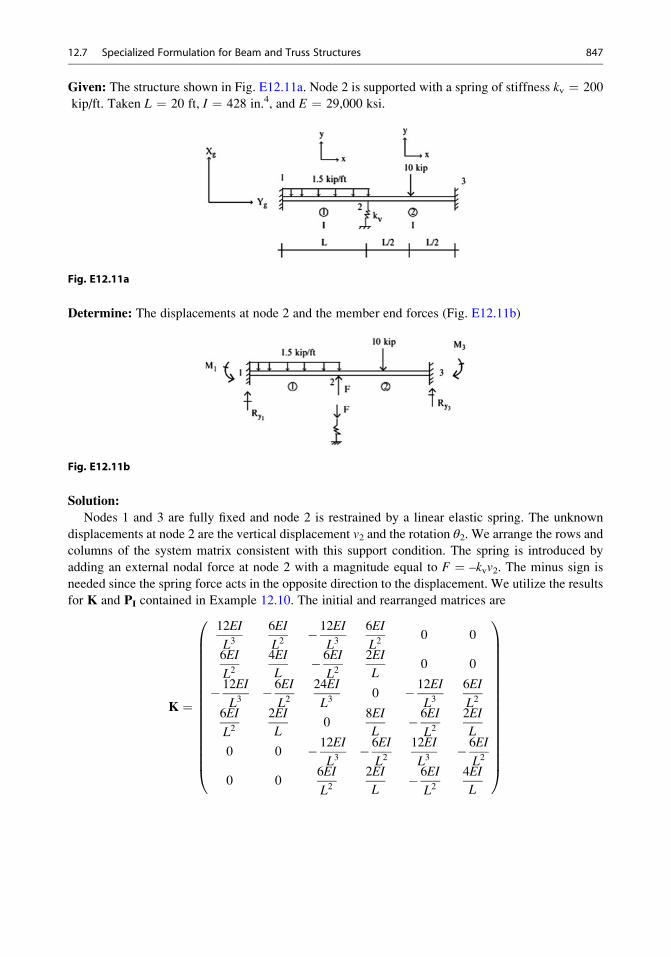
Given: The structure shown in Fig. E12.11a. Node 2 is supported with a spring of stiffness kv ¼ 200
kip/ft. Taken L ¼ 20 ft, I ¼ 428 in.4, and E ¼ 29,000 ksi.
Fig. E12.11a
Determine: The displacements at node 2 and the member end forces (Fig. E12.11b)
Fig. E12.11b
Solution:
Nodes 1 and 3 are fully fixed and node 2 is restrained by a linear elastic spring. The unknown
displacements at node 2 are the vertical displacement v2 and the rotation θ2. We arrange the rows and
columns of the system matrix consistent with this support condition. The spring is introduced by
adding an external nodal force at node 2 with a magnitude equal to F ¼ –kvv2. The minus sign is
needed since the spring force acts in the opposite direction to the displacement. We utilize the results
for K and PI contained in Example 12.10. The initial and rearranged matrices are
K ¼
12EI
L36EI
L2� 12EI
L36EI
L20 0
6EI
L24EI
L� 6EI
L22EI
L0 0
� 12EI
L3� 6EI
L224EI
L30 � 12EI
L36EI
L26EI
L22EI
L0
8EI
L� 6EI
L22EI
L
0 0 � 12EI
L3� 6EI
L212EI
L3� 6EI
L2
0 06EI
L22EI
L� 6EI
L24EI
L
0BBBBBBBBBBBBBBBB@
1CCCCCCCCCCCCCCCCA
12.7 Specialized Formulation for Beam and Truss Structures 847
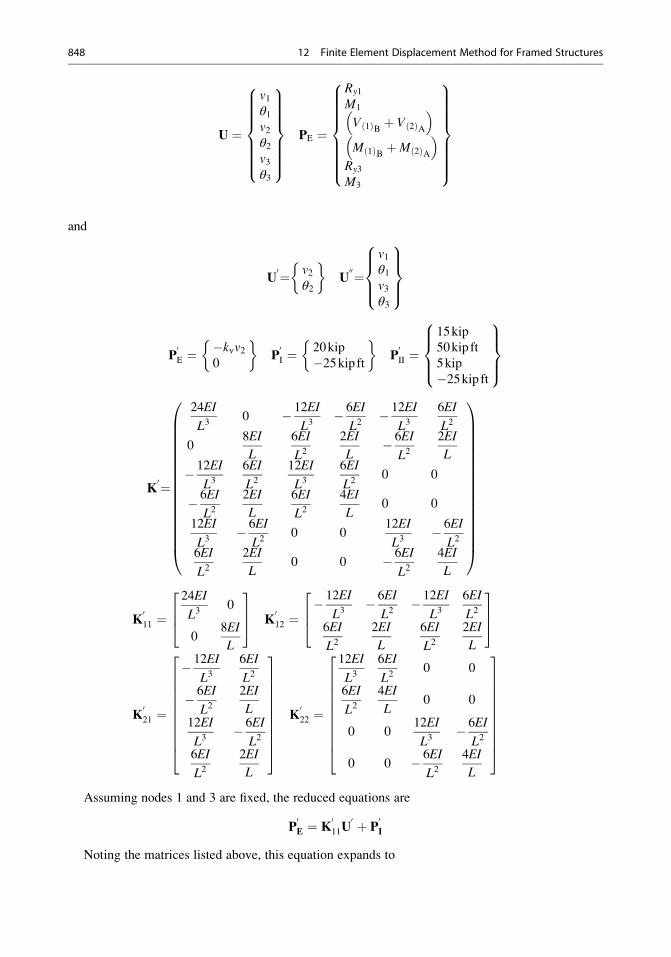
U ¼
v1θ1v2θ2v3θ3
8>>>>>><>>>>>>:
9>>>>>>=>>>>>>;
PE ¼
Ry1
M1
V 1ð ÞB þ V 2ð ÞA� �M 1ð ÞB þM 2ð ÞA� �Ry3
M3
8>>>>>>><>>>>>>>:
9>>>>>>>=>>>>>>>;
and
U0¼ v2
θ2
�U00¼
v1θ1v3θ3
8>><>>:
9>>=>>;
P0E ¼
�kvv20
�P0I ¼
20kip
�25kip ft �
P0II ¼
15kip
50kip ft
5kip
�25kip ft
8>><>>:
9>>=>>;
K0¼
24EI
L30 � 12EI
L3� 6EI
L2� 12EI
L36EI
L2
08EI
L
6EI
L22EI
L� 6EI
L22EI
L
� 12EI
L36EI
L212EI
L36EI
L20 0
� 6EI
L22EI
L
6EI
L24EI
L0 0
12EI
L3� 6EI
L20 0
12EI
L3� 6EI
L26EI
L22EI
L0 0 � 6EI
L24EI
L
0BBBBBBBBBBBBBBBB@
1CCCCCCCCCCCCCCCCA
K011 ¼
24EI
L30
08EI
L
264
375 K
012 ¼
� 12EI
L3� 6EI
L2� 12EI
L36EI
L2
6EI
L22EI
L
6EI
L22EI
L
264
375
K021 ¼
� 12EI
L36EI
L2
� 6EI
L22EI
L12EI
L3� 6EI
L2
6EI
L22EI
L
26666666664
37777777775
K022 ¼
12EI
L36EI
L20 0
6EI
L24EI
L0 0
0 012EI
L3� 6EI
L2
0 0 � 6EI
L24EI
L
26666666664
37777777775
Assuming nodes 1 and 3 are fixed, the reduced equations are
P0E ¼ K
011U
0 þ P0I
Noting the matrices listed above, this equation expands to
848 12 Finite Element Displacement Method for Framed Structures
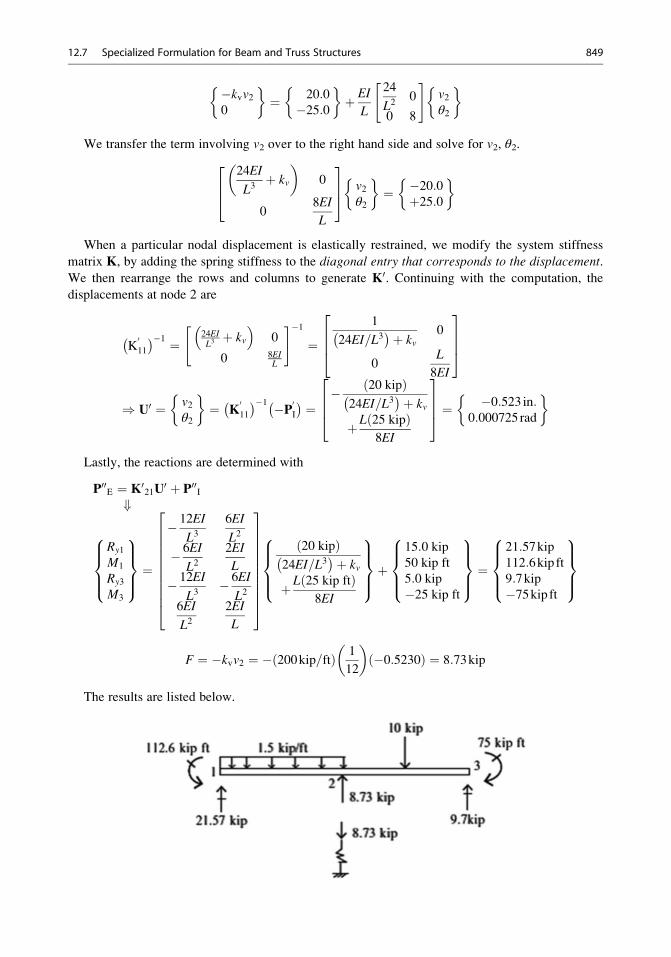
�kvv20
�¼ 20:0�25:0
�þ EI
L
24
L20
0 8
" #v2θ2
�
We transfer the term involving v2 over to the right hand side and solve for v2, θ2.
24EI
L3þ kv
� �0
08EI
L
264
375 v2
θ2
�¼ �20:0þ25:0
�
When a particular nodal displacement is elastically restrained, we modify the system stiffness
matrix K, by adding the spring stiffness to the diagonal entry that corresponds to the displacement.
We then rearrange the rows and columns to generate K0. Continuing with the computation, the
displacements at node 2 are
K011
� ��1 ¼ 24EIL3þ kv
� �0
0 8EIL
" #�1¼
1
24EI=L3� �þ kv
0
0L
8EI
2664
3775
) U0 ¼ v2θ2
�¼ K
011
� ��1 �P0I� � ¼ � ð20 kipÞ24EI=L3� �þ kv
þ Lð25 kipÞ8EI
2664
3775 ¼ �0:523 in:
0:000725rad
�
Lastly, the reactions are determined with
P00E ¼ K021U0 þ P00I+
Ry1
M1
Ry3
M3
8>><>>:
9>>=>>; ¼
� 12EI
L36EI
L2
� 6EI
L22EI
L
� 12EI
L3� 6EI
L26EI
L22EI
L
26666666664
37777777775
ð20 kipÞ24EI=L3� �þ kv
þ Lð25 kip ftÞ8EI
8>><>>:
9>>=>>;þ
15:0 kip
50 kip ft
5:0 kip
�25 kip ft
8>><>>:
9>>=>>; ¼
21:57kip112:6kip ft9:7kip�75kip ft
8>><>>:
9>>=>>;
F ¼ �kvv2 ¼ � 200kip=ftð Þ 1
12
� ��0:5230ð Þ ¼ 8:73kip
The results are listed below.
12.7 Specialized Formulation for Beam and Truss Structures 849
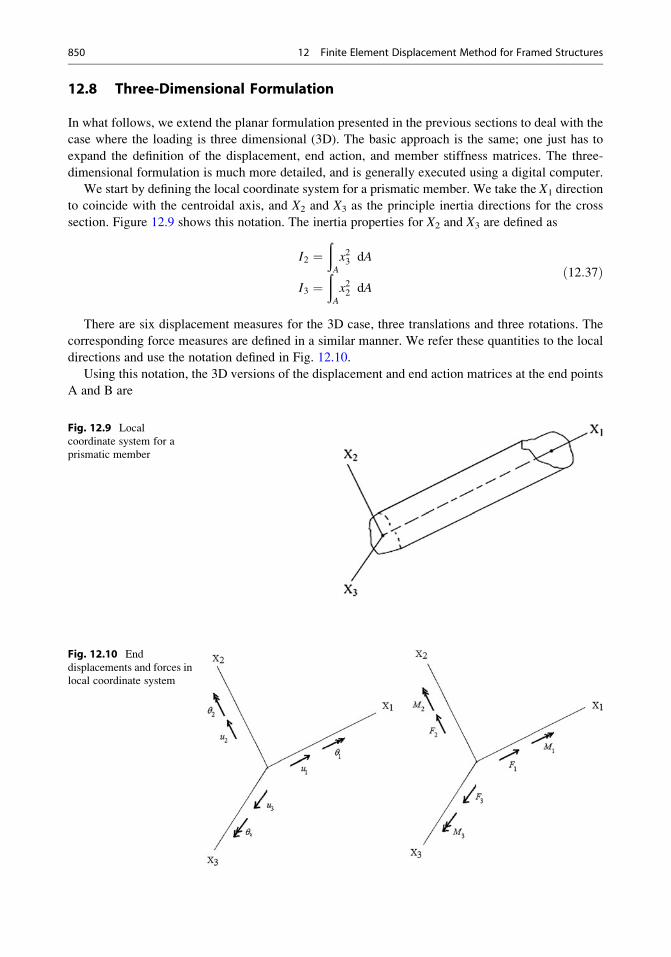
12.8 Three-Dimensional Formulation
In what follows, we extend the planar formulation presented in the previous sections to deal with the
case where the loading is three dimensional (3D). The basic approach is the same; one just has to
expand the definition of the displacement, end action, and member stiffness matrices. The three-
dimensional formulation is much more detailed, and is generally executed using a digital computer.
We start by defining the local coordinate system for a prismatic member. We take the X1 direction
to coincide with the centroidal axis, and X2 and X3 as the principle inertia directions for the cross
section. Figure 12.9 shows this notation. The inertia properties for X2 and X3 are defined as
I2 ¼ðA
x23 dA
I3 ¼ðA
x22 dAð12:37Þ
There are six displacement measures for the 3D case, three translations and three rotations. The
corresponding force measures are defined in a similar manner. We refer these quantities to the local
directions and use the notation defined in Fig. 12.10.
Using this notation, the 3D versions of the displacement and end action matrices at the end points
A and B are
Fig. 12.9 Local
coordinate system for a
prismatic member
Fig. 12.10 End
displacements and forces in
local coordinate system
850 12 Finite Element Displacement Method for Framed Structures
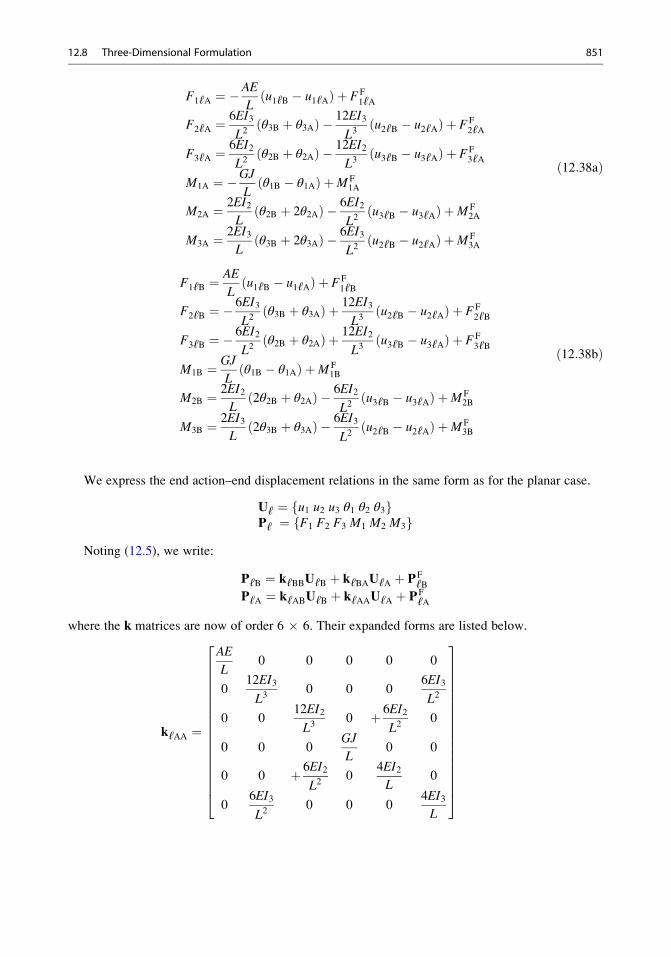
F1ℓA ¼ �AE
Lu1ℓB � u1ℓAð Þ þ FF
1ℓA
F2ℓA ¼6EI3
L2θ3B þ θ3Að Þ � 12EI3
L3u2ℓB � u2ℓAð Þ þ FF
2ℓA
F3ℓA ¼6EI2
L2θ2B þ θ2Að Þ � 12EI2
L3u3ℓB � u3ℓAð Þ þ FF
3ℓA
M1A ¼ �GJ
Lθ1B � θ1Að Þ þM F
1A
M2A ¼ 2EI2L
θ2B þ 2θ2Að Þ � 6EI2
L2u3ℓB � u3ℓAð Þ þM F
2A
M3A ¼ 2EI3L
θ3B þ 2θ3Að Þ � 6EI3
L2u2ℓB � u2ℓAð Þ þM F
3A
ð12:38aÞ
F1ℓB ¼AE
Lu1ℓB � u1ℓAð Þ þ FF
1ℓB
F2ℓB ¼ �6EI3
L2θ3B þ θ3Að Þ þ 12EI3
L3u2ℓB � u2ℓAð Þ þ FF
2ℓB
F3ℓB ¼ �6EI2
L2θ2B þ θ2Að Þ þ 12EI2
L3u3ℓB � u3ℓAð Þ þ FF
3ℓB
M1B ¼ GJ
Lθ1B � θ1Að Þ þM F
1B
M2B ¼ 2EI2L
2θ2B þ θ2Að Þ � 6EI2
L2u3ℓB � u3ℓAð Þ þM F
2B
M3B ¼ 2EI3L
2θ3B þ θ3Að Þ � 6EI3
L2u2ℓB � u2ℓAð Þ þM F
3B
ð12:38bÞ
We express the end action–end displacement relations in the same form as for the planar case.
Uℓ ¼ u1 u2 u3 θ1 θ2 θ3f gPℓ ¼ F1 F2 F3 M1 M2 M3f g
Noting (12.5), we write:
PℓB ¼ kℓBBUℓB þ kℓBAUℓA þ PFℓB
PℓA ¼ kℓABUℓB þ kℓAAUℓA þ PFℓA
where the k matrices are now of order 6 � 6. Their expanded forms are listed below.
kℓAA ¼
AE
L0 0 0 0 0
012EI3
L30 0 0
6EI3
L2
0 012EI2
L30 þ 6EI2
L20
0 0 0GJ
L0 0
0 0 þ 6EI2
L20
4EI2L
0
06EI3
L20 0 0
4EI3L
266666666666666664
377777777777777775
12.8 Three-Dimensional Formulation 851
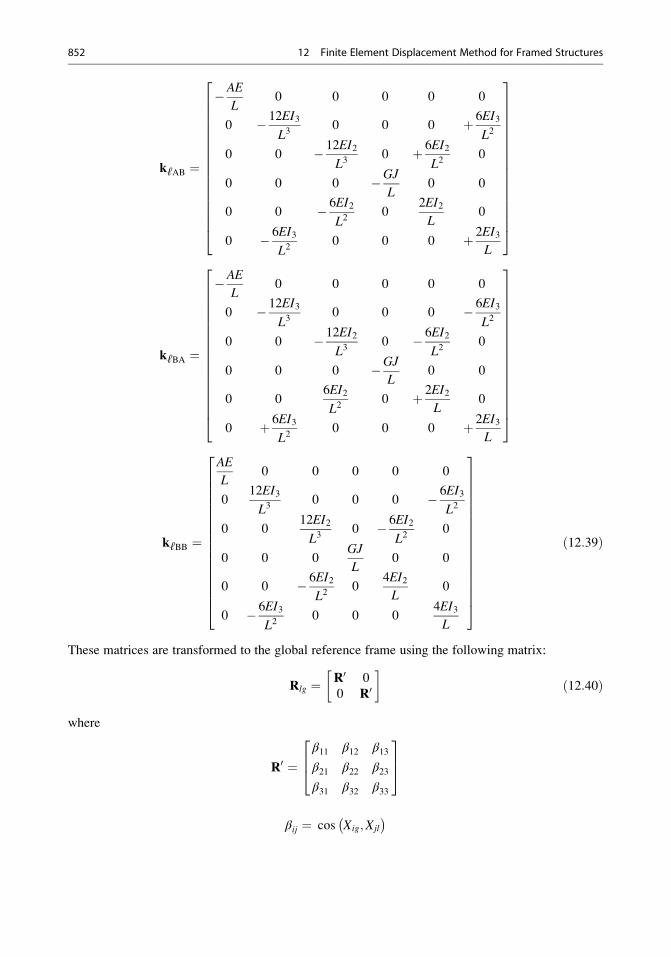
kℓAB ¼
�AE
L0 0 0 0 0
0 � 12EI3
L30 0 0 þ 6EI3
L2
0 0 � 12EI2
L30 þ 6EI2
L20
0 0 0 �GJ
L0 0
0 0 � 6EI2
L20
2EI2L
0
0 � 6EI3
L20 0 0 þ 2EI3
L
266666666666666664
377777777777777775
kℓBA ¼
�AE
L0 0 0 0 0
0 � 12EI3
L30 0 0 � 6EI3
L2
0 0 � 12EI2
L30 � 6EI2
L20
0 0 0 �GJ
L0 0
0 06EI2
L20 þ 2EI2
L0
0 þ 6EI3
L20 0 0 þ 2EI3
L
266666666666666664
377777777777777775
kℓBB ¼
AE
L0 0 0 0 0
012EI3
L30 0 0 � 6EI3
L2
0 012EI2
L30 � 6EI2
L20
0 0 0GJ
L0 0
0 0 � 6EI2
L20
4EI2L
0
0 � 6EI3
L20 0 0
4EI3L
266666666666666664
377777777777777775
ð12:39Þ
These matrices are transformed to the global reference frame using the following matrix:
Rlg ¼ R0 0
0 R0
�ð12:40Þ
where
R0 ¼β11 β12 β13β21 β22 β23β31 β32 β33
264
375
βij ¼ cos Xig;Xjl
� �
852 12 Finite Element Displacement Method for Framed Structures
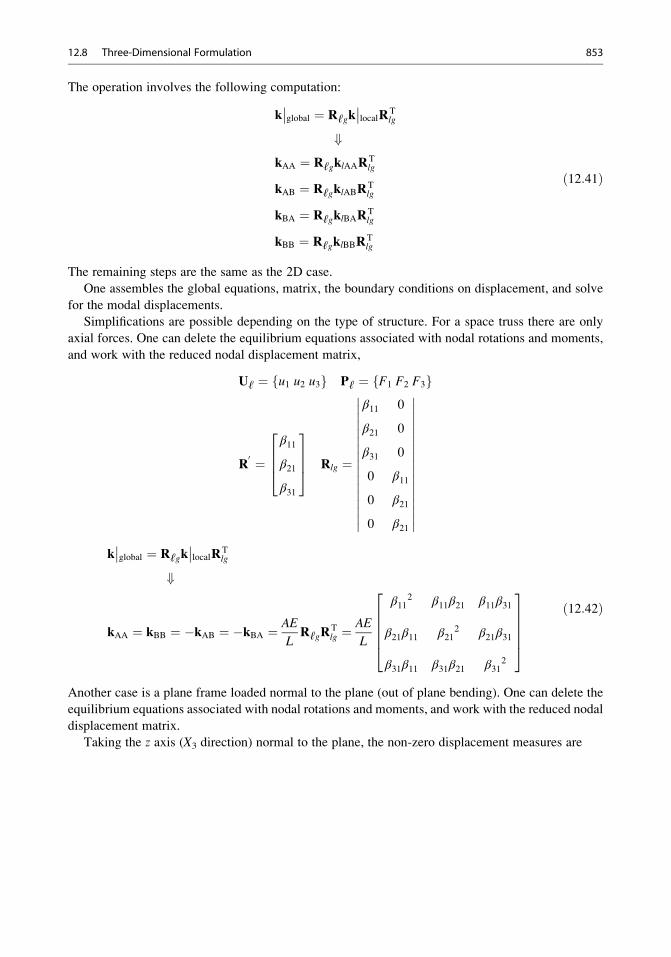
The operation involves the following computation:
k��global ¼ Rℓgk
��localR
Tlg
+kAA ¼ RℓgklAAR
Tlg
kAB ¼ RℓgklABRTlg
kBA ¼ RℓgklBARTlg
kBB ¼ RℓgklBBRTlg
ð12:41Þ
The remaining steps are the same as the 2D case.
One assembles the global equations, matrix, the boundary conditions on displacement, and solve
for the modal displacements.
Simplifications are possible depending on the type of structure. For a space truss there are only
axial forces. One can delete the equilibrium equations associated with nodal rotations and moments,
and work with the reduced nodal displacement matrix,
Uℓ ¼ u1 u2 u3f g Pℓ ¼ F1 F2 F3f g
R0 ¼
β11
β21
β31
2664
3775 Rlg ¼
β11 0
β21 0
β31 0
0 β11
0 β21
0 β21
�����������������
�����������������k��global ¼ Rℓgk
��localR
Tlg
+
kAA ¼ kBB ¼ �kAB ¼ �kBA ¼ AE
LRℓgR
Tlg ¼
AE
L
β112 β11β21 β11β31
β21β11 β212 β21β31
β31β11 β31β21 β312
266664
377775
ð12:42Þ
Another case is a plane frame loaded normal to the plane (out of plane bending). One can delete the
equilibrium equations associated with nodal rotations and moments, and work with the reduced nodal
displacement matrix.
Taking the z axis (X3 direction) normal to the plane, the non-zero displacement measures are
12.8 Three-Dimensional Formulation 853
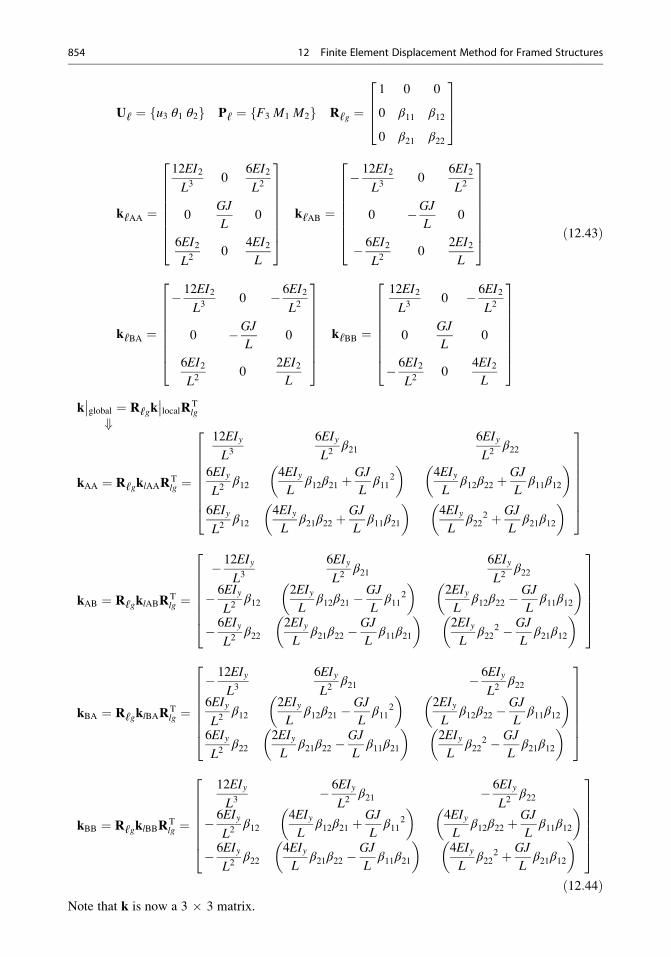
Uℓ ¼ u3 θ1 θ2f g Pℓ ¼ F3 M1 M2f g Rℓg ¼1 0 0
0 β11 β12
0 β21 β22
2664
3775
kℓAA ¼
12EI2
L30
6EI2
L2
0GJ
L0
6EI2
L20
4EI2L
266666664
377777775
kℓAB ¼
� 12EI2
L30
6EI2
L2
0 �GJ
L0
� 6EI2
L20
2EI2L
266666664
377777775
kℓBA ¼
� 12EI2
L30 � 6EI2
L2
0 �GJ
L0
6EI2
L20
2EI2L
266666664
377777775
kℓBB ¼
12EI2
L30 � 6EI2
L2
0GJ
L0
� 6EI2
L20
4EI2L
266666664
377777775
ð12:43Þ
k��global ¼ Rℓgk
��localR
Tlg
+
kAA ¼ RℓgklAARTlg ¼
12EIy
L36EIy
L2β21
6EIy
L2β22
6EIy
L2β12
4EIyL
β12β21 þGJ
Lβ11
2
� �4EIyL
β12β22 þGJ
Lβ11β12
� �6EIy
L2β12
4EIyL
β21β22 þGJ
Lβ11β21
� �4EIyL
β222 þ GJ
Lβ21β12
� �
266666664
377777775
kAB ¼ RℓgklABRTlg ¼
� 12EIy
L36EIy
L2β21
6EIy
L2β22
� 6EIy
L2β12
2EIyL
β12β21 �GJ
Lβ11
2
� �2EIyL
β12β22 �GJ
Lβ11β12
� �
� 6EIy
L2β22
2EIyL
β21β22 �GJ
Lβ11β21
� �2EIyL
β222 � GJ
Lβ21β12
� �
26666664
37777775
kBA ¼ RℓgklBARTlg ¼
� 12EIy
L36EIy
L2β21 � 6EIy
L2β22
6EIy
L2β12
2EIyL
β12β21 �GJ
Lβ11
2
� �2EIyL
β12β22 �GJ
Lβ11β12
� �6EIy
L2β22
2EIyL
β21β22 �GJ
Lβ11β21
� �2EIyL
β222 � GJ
Lβ21β12
� �
26666664
37777775
kBB ¼ RℓgklBBRTlg ¼
12EIy
L3� 6EIy
L2β21 � 6EIy
L2β22
� 6EIy
L2β12
4EIyL
β12β21 þGJ
Lβ11
2
� �4EIyL
β12β22 þGJ
Lβ11β12
� �
� 6EIy
L2β22
4EIyL
β21β22 �GJ
Lβ11β21
� �4EIyL
β222 þ GJ
Lβ21β12
� �
26666664
37777775
ð12:44ÞNote that k is now a 3 � 3 matrix.
854 12 Finite Element Displacement Method for Framed Structures
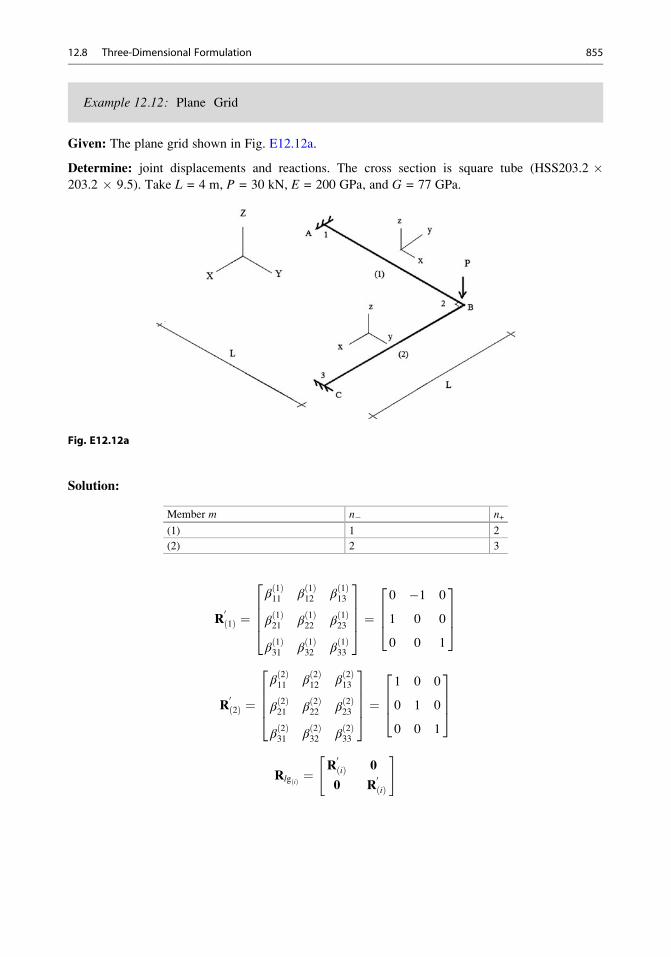
Example 12.12: Plane Grid
Given: The plane grid shown in Fig. E12.12a.
Determine: joint displacements and reactions. The cross section is square tube (HSS203.2 �203.2 � 9.5). Take L = 4 m, P = 30 kN, E = 200 GPa, and G = 77 GPa.
Fig. E12.12a
Solution:
Member m n� n+
(1) 1 2
(2) 2 3
R01ð Þ ¼
β 1ð Þ11 β 1ð Þ
12 β 1ð Þ13
β 1ð Þ21 β 1ð Þ
22 β 1ð Þ23
β 1ð Þ31 β 1ð Þ
32 β 1ð Þ33
26664
37775 ¼
0 �1 0
1 0 0
0 0 1
2664
3775
R02ð Þ ¼
β 2ð Þ11 β 2ð Þ
12 β 2ð Þ13
β 2ð Þ21 β 2ð Þ
22 β 2ð Þ23
β 2ð Þ31 β 2ð Þ
32 β 2ð Þ33
26664
37775 ¼
1 0 0
0 1 0
0 0 1
2664
3775
Rlg ið Þ ¼R0ið Þ 0
0 R0ið Þ
" #
12.8 Three-Dimensional Formulation 855
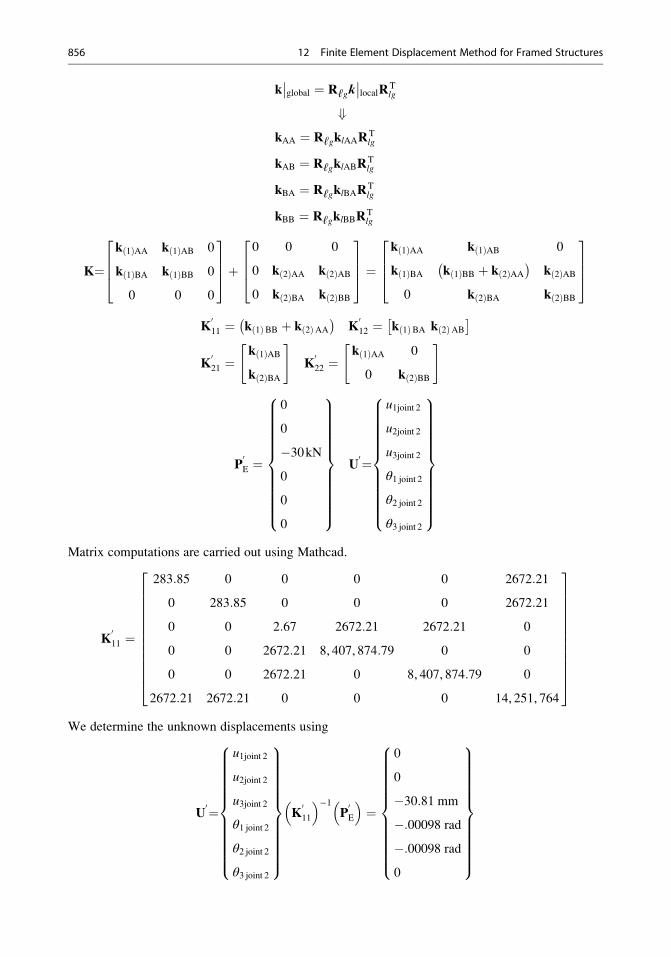
k��global ¼ Rℓgk
��localR
Tlg
+kAA ¼ RℓgklAAR
Tlg
kAB ¼ RℓgklABRTlg
kBA ¼ RℓgklBARTlg
kBB ¼ RℓgklBBRTlg
K¼k 1ð ÞAA k 1ð ÞAB 0
k 1ð ÞBA k 1ð ÞBB 0
0 0 0
2664
3775þ
0 0 0
0 k 2ð ÞAA k 2ð ÞAB
0 k 2ð ÞBA k 2ð ÞBB
2664
3775 ¼
k 1ð ÞAA k 1ð ÞAB 0
k 1ð ÞBA k 1ð ÞBB þ k 2ð ÞAA� �
k 2ð ÞAB
0 k 2ð ÞBA k 2ð ÞBB
2664
3775
K011 ¼ k 1ð ÞBB þ k 2ð ÞAA
� �K012 ¼ k 1ð ÞBA k 2ð ÞAB
� �K021 ¼
k 1ð ÞAB
k 2ð ÞBA
" #K022 ¼
k 1ð ÞAA 0
0 k 2ð ÞBB
" #
P0E ¼
0
0
�30kN0
0
0
8>>>>>>>>>>><>>>>>>>>>>>:
9>>>>>>>>>>>=>>>>>>>>>>>;
U0¼
u1joint 2
u2joint 2
u3joint 2
θ1 joint 2
θ2 joint 2
θ3 joint 2
8>>>>>>>>>>><>>>>>>>>>>>:
9>>>>>>>>>>>=>>>>>>>>>>>;
Matrix computations are carried out using Mathcad.
K011 ¼
283:85 0 0 0 0 2672:21
0 283:85 0 0 0 2672:21
0 0 2:67 2672:21 2672:21 0
0 0 2672:21 8, 407, 874:79 0 0
0 0 2672:21 0 8, 407, 874:79 0
2672:21 2672:21 0 0 0 14, 251, 764
2666666666664
3777777777775
We determine the unknown displacements using
U0¼
u1joint 2
u2joint 2
u3joint 2
θ1 joint 2
θ2 joint 2
θ3 joint 2
8>>>>>>>>>>><>>>>>>>>>>>:
9>>>>>>>>>>>=>>>>>>>>>>>;
K011
� ��1P0E
� �¼
0
0
�30:81 mm
�:00098 rad
�:00098 rad
0
8>>>>>>>>>>><>>>>>>>>>>>:
9>>>>>>>>>>>=>>>>>>>>>>>;
856 12 Finite Element Displacement Method for Framed Structures
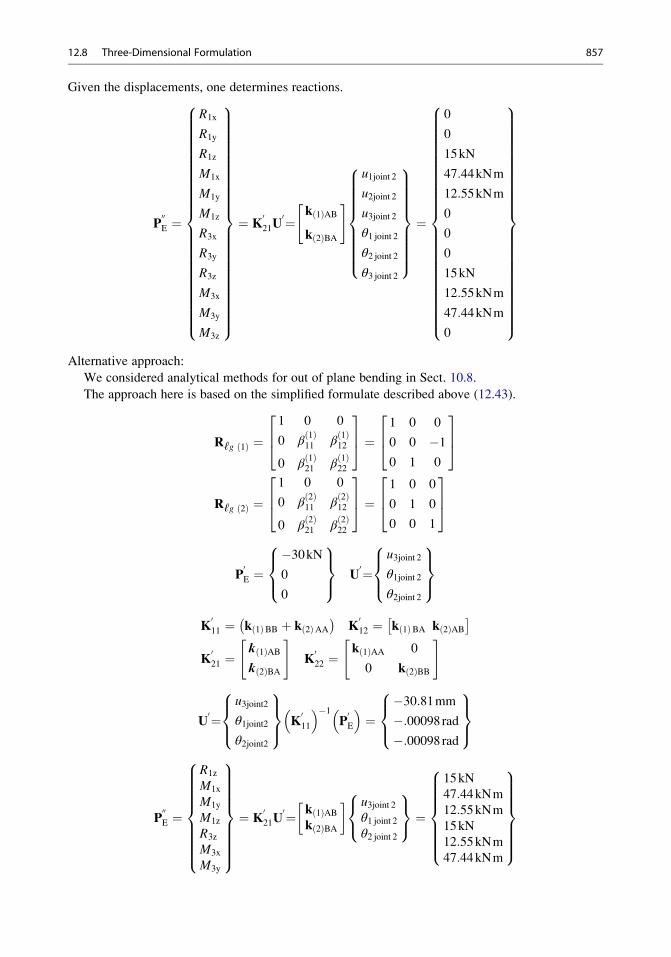
Given the displacements, one determines reactions.
P00E ¼
R1x
R1y
R1z
M1x
M1y
M1z
R3x
R3y
R3z
M3x
M3y
M3z
8>>>>>>>>>>>>>>>>>>>>>>>><>>>>>>>>>>>>>>>>>>>>>>>>:
9>>>>>>>>>>>>>>>>>>>>>>>>=>>>>>>>>>>>>>>>>>>>>>>>>;
¼ K021U
0¼k 1ð ÞAB
k 2ð ÞBA
" #u1joint 2
u2joint 2
u3joint 2
θ1 joint 2
θ2 joint 2
θ3 joint 2
8>>>>>>>><>>>>>>>>:
9>>>>>>>>=>>>>>>>>;¼
0
0
15kN
47:44kNm
12:55kNm
0
0
0
15kN
12:55kNm
47:44kNm
0
8>>>>>>>>>>>>>>>>>>>>>>>><>>>>>>>>>>>>>>>>>>>>>>>>:
9>>>>>>>>>>>>>>>>>>>>>>>>=>>>>>>>>>>>>>>>>>>>>>>>>;
Alternative approach:
We considered analytical methods for out of plane bending in Sect. 10.8.
The approach here is based on the simplified formulate described above (12.43).
Rℓg 1ð Þ ¼1 0 0
0 β 1ð Þ11 β 1ð Þ
12
0 β 1ð Þ21 β 1ð Þ
22
264
375 ¼
1 0 0
0 0 �10 1 0
264
375
Rℓg 2ð Þ ¼1 0 0
0 β 2ð Þ11 β 2ð Þ
12
0 β 2ð Þ21 β 2ð Þ
22
264
375 ¼
1 0 0
0 1 0
0 0 1
264
375
P0E ¼
�30kN0
0
8><>:
9>=>; U
0¼u3joint 2
θ1joint 2
θ2joint 2
8><>:
9>=>;
K011 ¼ k 1ð ÞBB þ k 2ð ÞAA
� �K012 ¼ k 1ð ÞBA k 2ð ÞAB
� �K021 ¼
k 1ð ÞABk 2ð ÞBA
" #K022 ¼
k 1ð ÞAA 0
0 k 2ð ÞBB
" #
U0¼
u3joint2
θ1joint2
θ2joint2
8><>:
9>=>; K
011
� ��1P0E
� �¼
�30:81mm
�:00098rad�:00098rad
8><>:
9>=>;
P00E ¼
R1z
M1x
M1y
M1z
R3z
M3x
M3y
8>>>>>>>><>>>>>>>>:
9>>>>>>>>=>>>>>>>>;¼ K
021U
0¼ k 1ð ÞABk 2ð ÞBA
� u3joint 2θ1 joint 2θ2 joint 2
8<:
9=; ¼
15kN
47:44kNm
12:55kNm
15kN
12:55kNm
47:44kNm
8>>>>>><>>>>>>:
9>>>>>>=>>>>>>;
12.8 Three-Dimensional Formulation 857
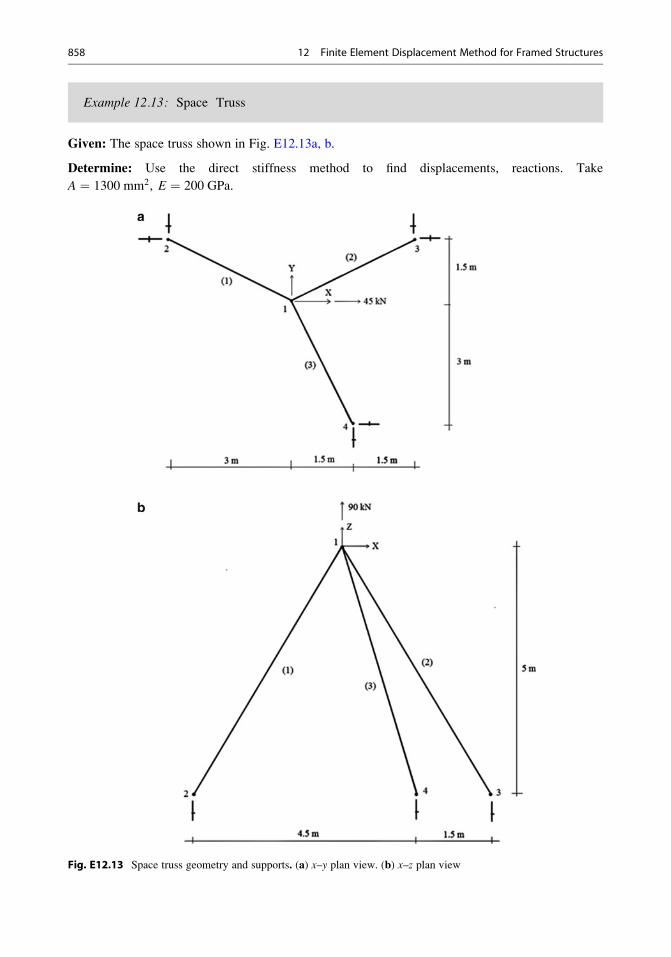
Example 12.13: Space Truss
Given: The space truss shown in Fig. E12.13a, b.
Determine: Use the direct stiffness method to find displacements, reactions. Take
A ¼ 1300 mm2, E ¼ 200 GPa.
Fig. E12.13 Space truss geometry and supports. (a) x–y plan view. (b) x–z plan view
858 12 Finite Element Displacement Method for Framed Structures
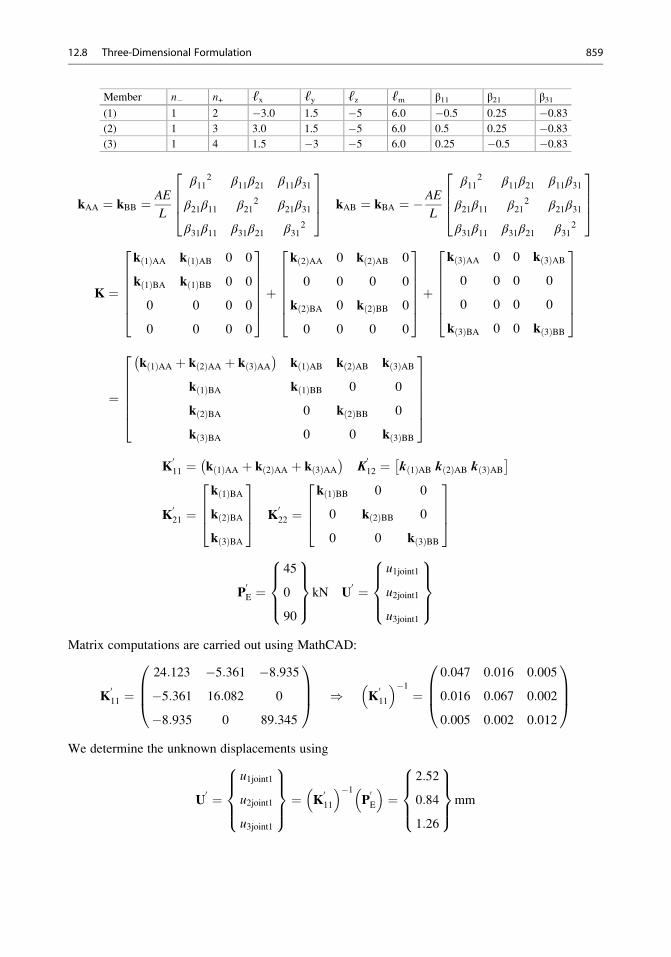
Member n� n+ ℓx ℓy ℓz ℓm β11 β21 β31(1) 1 2 �3.0 1.5 �5 6.0 �0.5 0.25 �0.83(2) 1 3 3.0 1.5 �5 6.0 0.5 0.25 �0.83(3) 1 4 1.5 �3 �5 6.0 0.25 �0.5 �0.83
kAA ¼ kBB ¼ AE
L
β112 β11β21 β11β31
β21β11 β212 β21β31
β31β11 β31β21 β312
2664
3775 kAB ¼ kBA ¼ �AE
L
β112 β11β21 β11β31
β21β11 β212 β21β31
β31β11 β31β21 β312
2664
3775
K ¼
k 1ð ÞAA k 1ð ÞAB 0 0
k 1ð ÞBA k 1ð ÞBB 0 0
0 0 0 0
0 0 0 0
2666664
3777775þ
k 2ð ÞAA 0 k 2ð ÞAB 0
0 0 0 0
k 2ð ÞBA 0 k 2ð ÞBB 0
0 0 0 0
2666664
3777775þ
k 3ð ÞAA 0 0 k 3ð ÞAB
0 0 0 0
0 0 0 0
k 3ð ÞBA 0 0 k 3ð ÞBB
2666664
3777775
¼
k 1ð ÞAA þ k 2ð ÞAA þ k 3ð ÞAA� �
k 1ð ÞAB k 2ð ÞAB k 3ð ÞAB
k 1ð ÞBA k 1ð ÞBB 0 0
k 2ð ÞBA 0 k 2ð ÞBB 0
k 3ð ÞBA 0 0 k 3ð ÞBB
2666664
3777775
K011 ¼ k 1ð ÞAA þ k 2ð ÞAA þ k 3ð ÞAA
� �K012 ¼ k 1ð ÞAB k 2ð ÞAB k 3ð ÞAB
� �
K021 ¼
k 1ð ÞBA
k 2ð ÞBA
k 3ð ÞBA
2664
3775 K
022 ¼
k 1ð ÞBB 0 0
0 k 2ð ÞBB 0
0 0 k 3ð ÞBB
2664
3775
P0E ¼
45
0
90
8>><>>:
9>>=>>;kN U
0 ¼u1joint1
u2joint1
u3joint1
8>><>>:
9>>=>>;
Matrix computations are carried out using MathCAD:
K011 ¼
24:123 �5:361 �8:935�5:361 16:082 0
�8:935 0 89:345
0BB@
1CCA ) K
011
� ��1¼
0:047 0:016 0:005
0:016 0:067 0:002
0:005 0:002 0:012
0BB@
1CCA
We determine the unknown displacements using
U0 ¼
u1joint1
u2joint1
u3joint1
8>><>>:
9>>=>>; ¼ K
011
� ��1P0E
� �¼
2:52
0:84
1:26
8>><>>:
9>>=>>;mm
12.8 Three-Dimensional Formulation 859
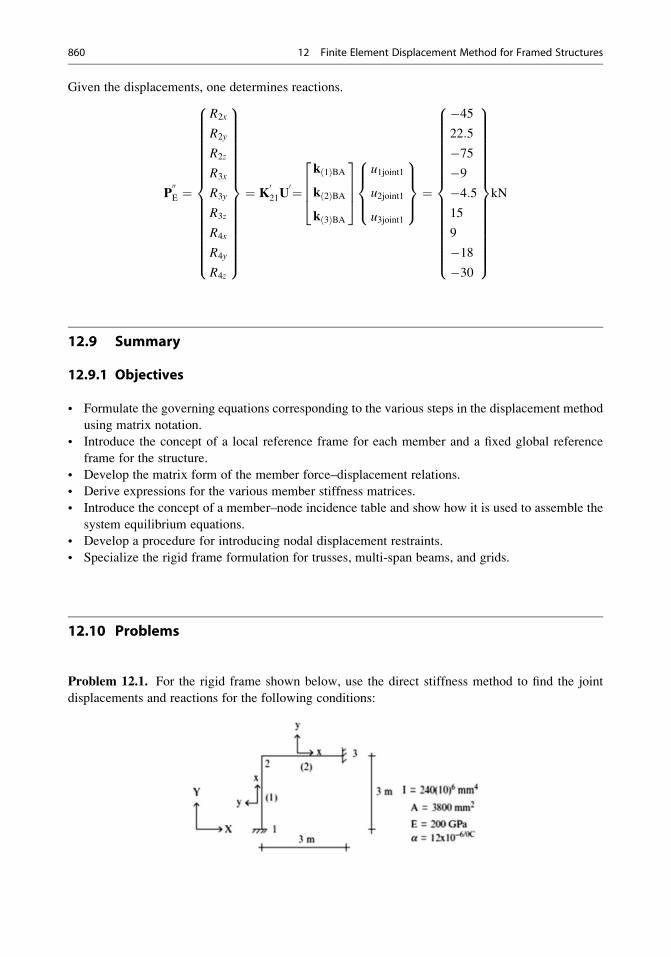
Given the displacements, one determines reactions.
P00E ¼
R2x
R2y
R2z
R3x
R3y
R3z
R4x
R4y
R4z
8>>>>>>>>>>>>>>>><>>>>>>>>>>>>>>>>:
9>>>>>>>>>>>>>>>>=>>>>>>>>>>>>>>>>;
¼ K021U
0¼k 1ð ÞBA
k 2ð ÞBA
k 3ð ÞBA
2664
3775
u1joint1
u2joint1
u3joint1
8>><>>:
9>>=>>; ¼
�4522:5
�75�9�4:515
9
�18�30
8>>>>>>>>>>>>>>>><>>>>>>>>>>>>>>>>:
9>>>>>>>>>>>>>>>>=>>>>>>>>>>>>>>>>;
kN
12.9 Summary
12.9.1 Objectives
• Formulate the governing equations corresponding to the various steps in the displacement method
using matrix notation.
• Introduce the concept of a local reference frame for each member and a fixed global reference
frame for the structure.
• Develop the matrix form of the member force–displacement relations.
• Derive expressions for the various member stiffness matrices.
• Introduce the concept of a member–node incidence table and show how it is used to assemble the
system equilibrium equations.
• Develop a procedure for introducing nodal displacement restraints.
• Specialize the rigid frame formulation for trusses, multi-span beams, and grids.
12.10 Problems
Problem 12.1. For the rigid frame shown below, use the direct stiffness method to find the joint
displacements and reactions for the following conditions:
860 12 Finite Element Displacement Method for Framed Structures
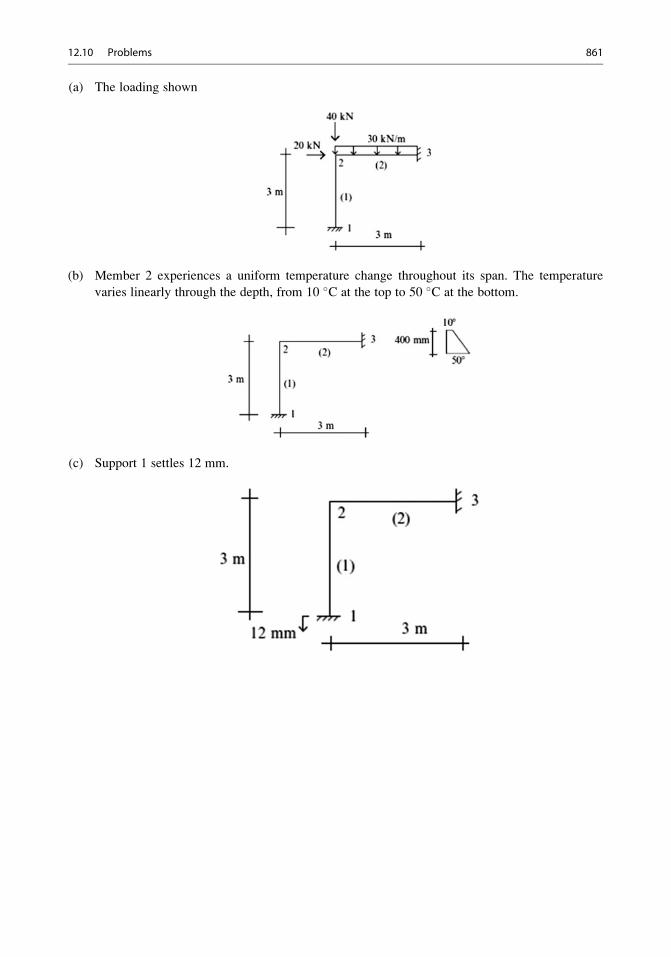
(a) The loading shown
(b) Member 2 experiences a uniform temperature change throughout its span. The temperature
varies linearly through the depth, from 10 �C at the top to 50 �C at the bottom.
(c) Support 1 settles 12 mm.
12.10 Problems 861
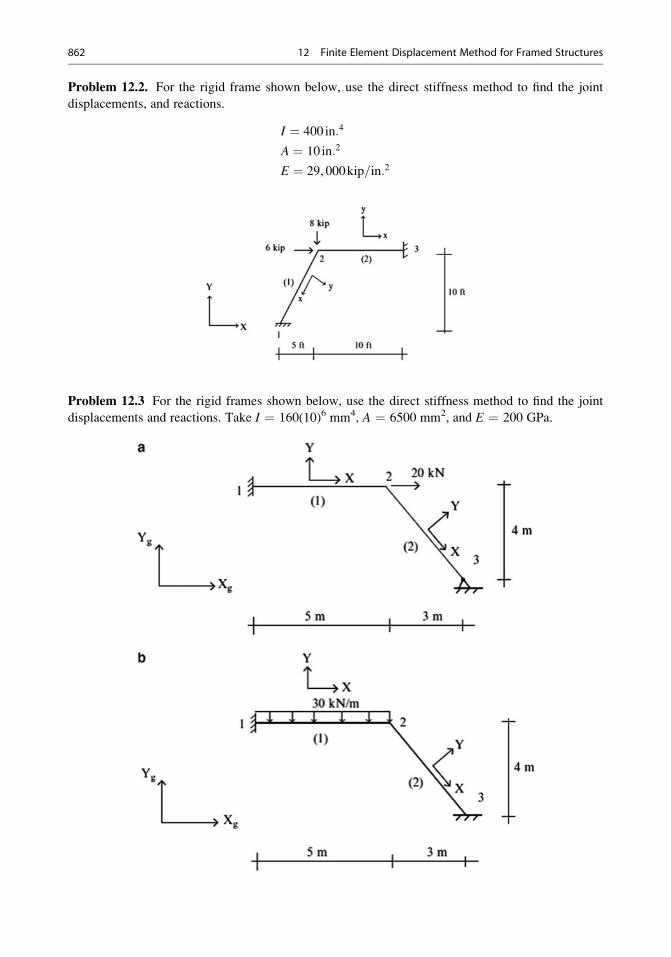
Problem 12.2. For the rigid frame shown below, use the direct stiffness method to find the joint
displacements, and reactions.
I ¼ 400 in:4
A ¼ 10 in:2
E ¼ 29, 000kip=in:2
Problem 12.3 For the rigid frames shown below, use the direct stiffness method to find the joint
displacements and reactions. Take I ¼ 160(10)6 mm4, A ¼ 6500 mm2, and E ¼ 200 GPa.
862 12 Finite Element Displacement Method for Framed Structures
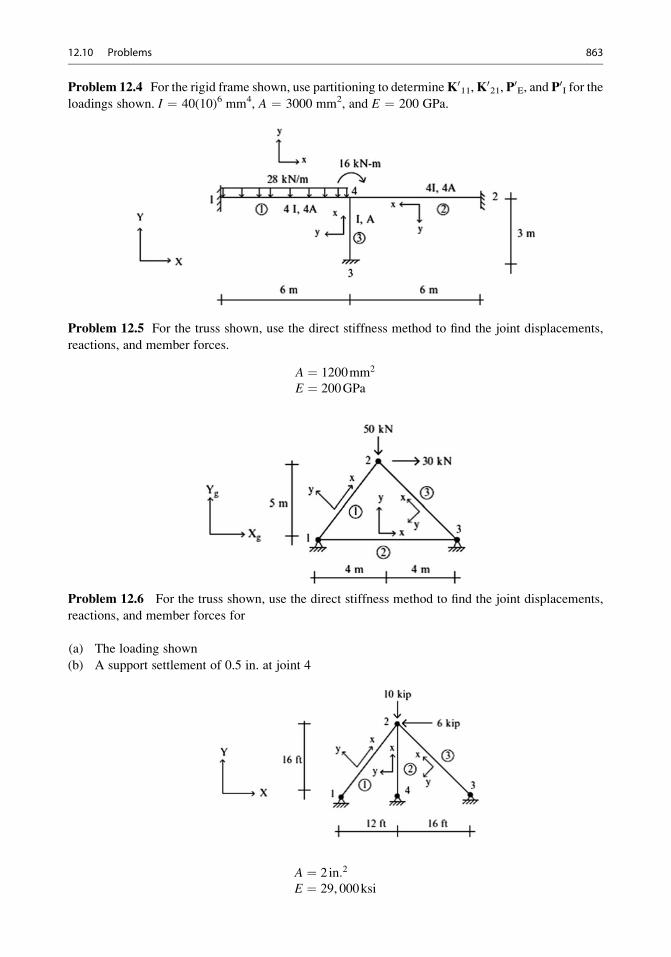
Problem 12.4 For the rigid frame shown, use partitioning to determineK011,K021, P0E, and P0I for theloadings shown. I ¼ 40(10)6 mm4, A ¼ 3000 mm2, and E ¼ 200 GPa.
Problem 12.5 For the truss shown, use the direct stiffness method to find the joint displacements,
reactions, and member forces.
A ¼ 1200mm2
E ¼ 200GPa
Problem 12.6 For the truss shown, use the direct stiffness method to find the joint displacements,
reactions, and member forces for
(a) The loading shown
(b) A support settlement of 0.5 in. at joint 4
A ¼ 2 in:2
E ¼ 29, 000ksi
12.10 Problems 863
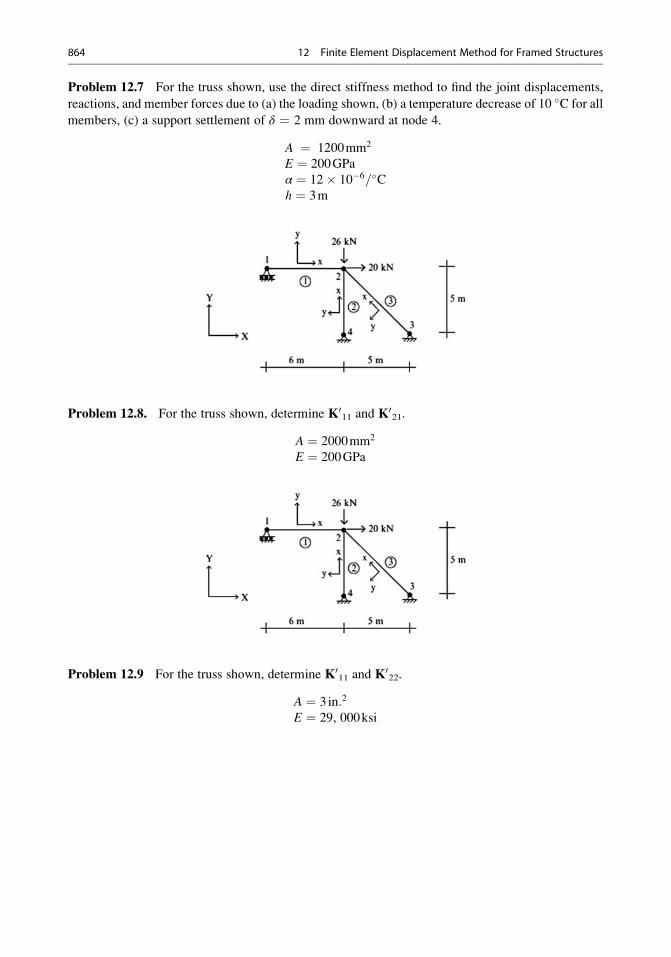
Problem 12.7 For the truss shown, use the direct stiffness method to find the joint displacements,
reactions, and member forces due to (a) the loading shown, (b) a temperature decrease of 10 �C for all
members, (c) a support settlement of δ ¼ 2 mm downward at node 4.
A ¼ 1200mm2
E ¼ 200GPa
α ¼ 12� 10�6=�Ch ¼ 3m
Problem 12.8. For the truss shown, determine K011 and K021.
A ¼ 2000mm2
E ¼ 200GPa
Problem 12.9 For the truss shown, determine K011 and K022.
A ¼ 3 in:2
E ¼ 29, 000ksi
864 12 Finite Element Displacement Method for Framed Structures
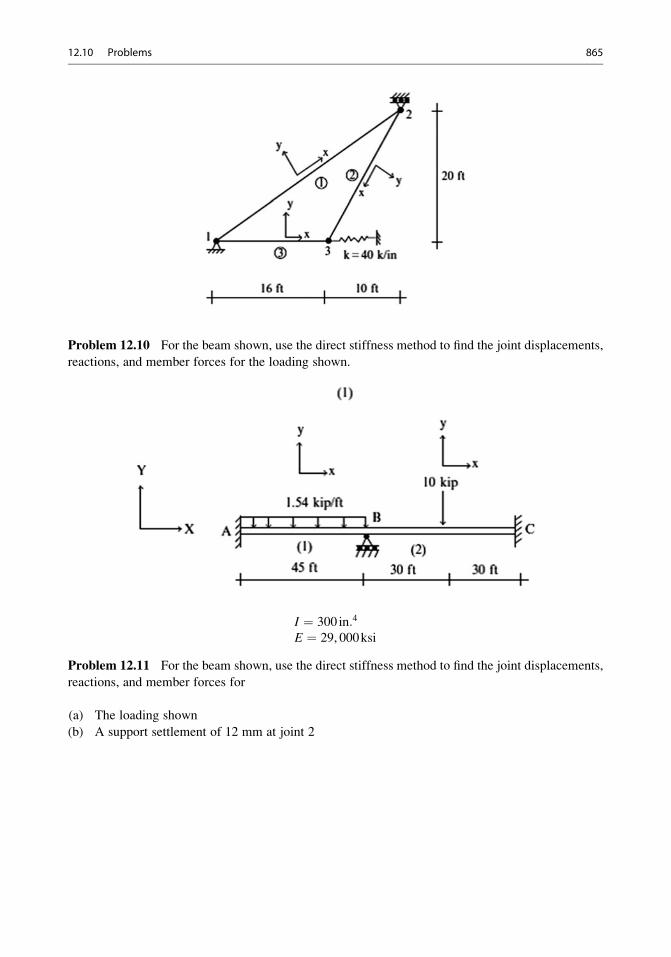
Problem 12.10 For the beam shown, use the direct stiffness method to find the joint displacements,
reactions, and member forces for the loading shown.
I ¼ 300 in:4
E ¼ 29, 000ksi
Problem 12.11 For the beam shown, use the direct stiffness method to find the joint displacements,
reactions, and member forces for
(a) The loading shown
(b) A support settlement of 12 mm at joint 2
12.10 Problems 865

I ¼ 120 10ð Þ6 mm4
E ¼ 200GPa
Problem 12.12 For the beam shown, use partitioning to determine K011, K021, U00, PI
0, PI
00, PE
0and
PE
00for the loading and displacement constraint shown. L ¼ 30 ft, I ¼ 300 in.4, and E ¼ 29,000 ksi.
Problem 12.13 Investigate the effect of varying the spring stiffness on the behavior (moment and
deflected profile) of the structure shown below. Consider a range of values of kv.
I ¼ 120 10ð Þ6mm4,E ¼ 200GPa and kv ¼18kN=mm
36kN=mm
90kN=mm
8<:
866 12 Finite Element Displacement Method for Framed Structures
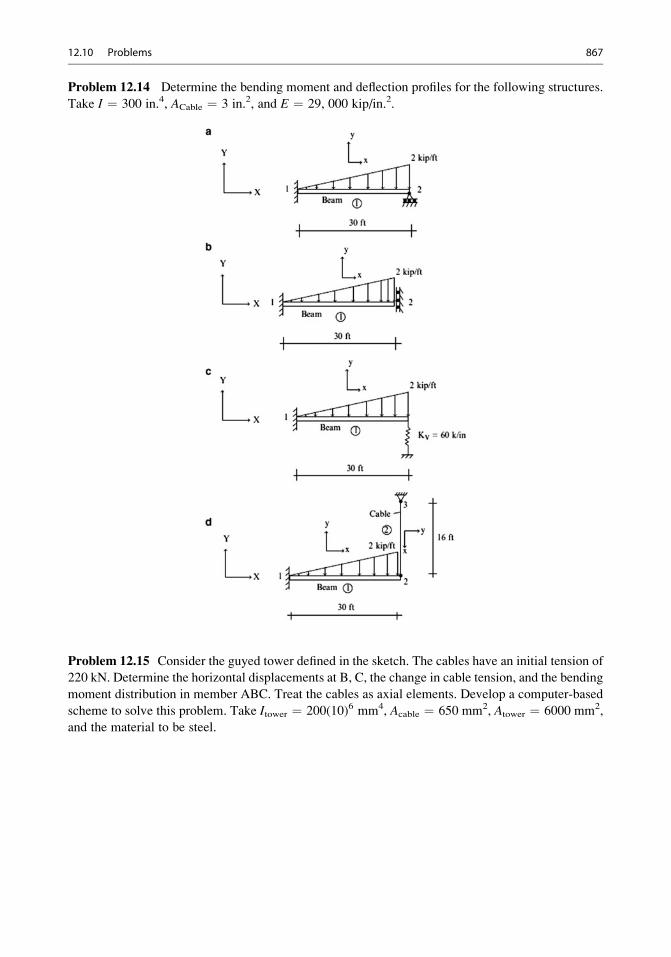
Problem 12.14 Determine the bending moment and deflection profiles for the following structures.
Take I ¼ 300 in.4, ACable ¼ 3 in.2, and E ¼ 29, 000 kip/in.2.
Problem 12.15 Consider the guyed tower defined in the sketch. The cables have an initial tension of
220 kN. Determine the horizontal displacements at B, C, the change in cable tension, and the bending
moment distribution in member ABC. Treat the cables as axial elements. Develop a computer-based
scheme to solve this problem. Take Itower ¼ 200(10)6 mm4, Acable ¼ 650 mm2, Atower ¼ 6000 mm2,
and the material to be steel.
12.10 Problems 867
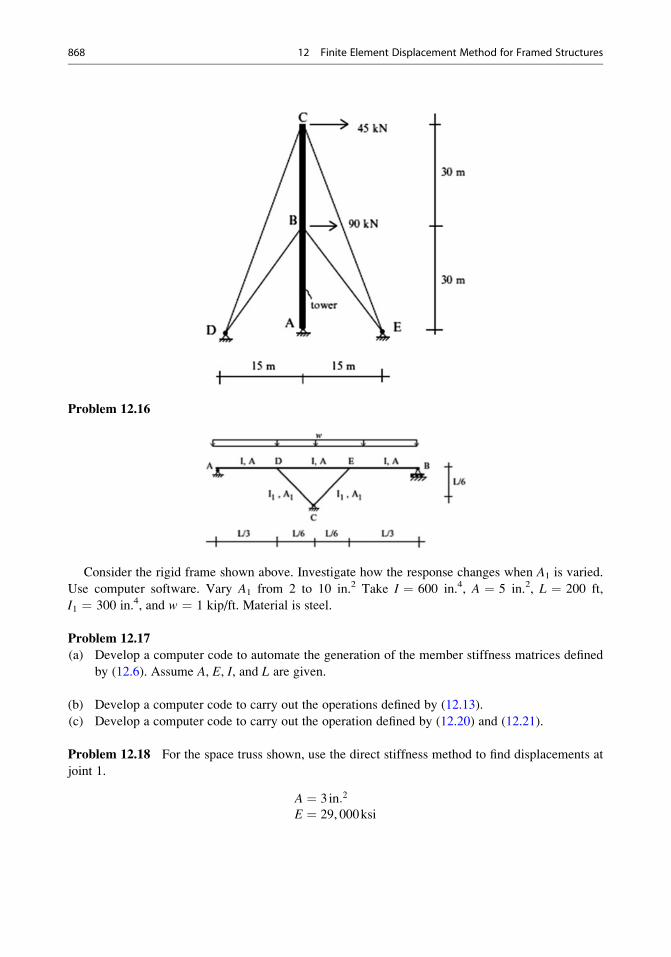
Problem 12.16
Consider the rigid frame shown above. Investigate how the response changes when A1 is varied.
Use computer software. Vary A1 from 2 to 10 in.2 Take I ¼ 600 in.4, A ¼ 5 in.2, L ¼ 200 ft,
I1 ¼ 300 in.4, and w ¼ 1 kip/ft. Material is steel.
Problem 12.17
(a) Develop a computer code to automate the generation of the member stiffness matrices defined
by (12.6). Assume A, E, I, and L are given.
(b) Develop a computer code to carry out the operations defined by (12.13).
(c) Develop a computer code to carry out the operation defined by (12.20) and (12.21).
Problem 12.18 For the space truss shown, use the direct stiffness method to find displacements at
joint 1.
A ¼ 3 in:2
E ¼ 29, 000ksi
868 12 Finite Element Displacement Method for Framed Structures
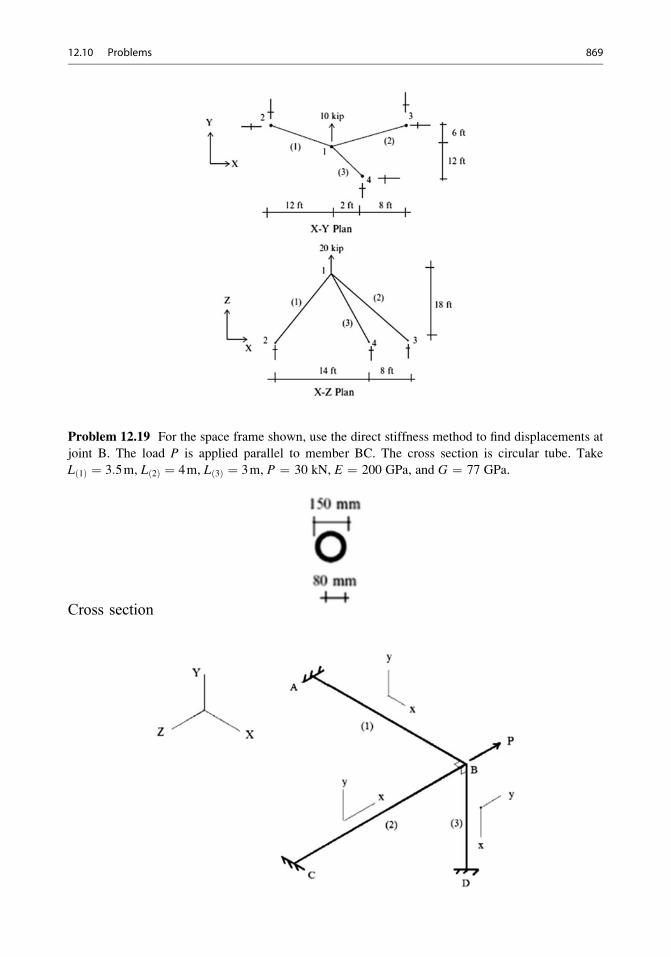
Problem 12.19 For the space frame shown, use the direct stiffness method to find displacements at
joint B. The load P is applied parallel to member BC. The cross section is circular tube. Take
L 1ð Þ ¼ 3:5m, L 2ð Þ ¼ 4m, L 3ð Þ ¼ 3m, P ¼ 30 kN, E ¼ 200 GPa, and G ¼ 77 GPa.
Cross section
12.10 Problems 869
Part III
Practice of Structural Engineering
The practice of structural engineering involves identifying possible loading patterns, conceptualizing
candidate structural systems, developing idealized physical models, applying the possible loading
patterns to these idealized models, using analysis methods to determine the peak values of the
response variables needed for design detailing, and selecting the design details using an appropriate
design code. In this section, we focus on selecting loading patterns, idealizing three-dimensional
frame structures, and establishing the peak values of the response variables needed for design
detailing. Computer-based analysis is used extensively for this phase.
Multi-span horizontal structures are discussed in the next chapter. The topics range from girder
bridges to arch bridges to cable-stayed bridges. The following chapter presents a strategy for
modeling three-dimensional low-rise rigid frame structures subjected to varying loads. Then, the
succeeding chapter describes in detail the process followed to establish the critical loading patterns
for multistory frames. Finally, the last chapter covers the inelastic response of structures.
Multi-span Horizontal Structures 13
Abstract
In this chapter, we discuss the role of analysis in the structural engineering
process for multi-span horizontal structures such as bridges. Typical
examples of a girder bridge, an arch bridge, and a cable-stayed bridge
are shown in Fig. 13.1. Multi-span girders are actually variable depth
horizontal beams. They are used extensively in medium span highway
bridge systems. Arch and cable-stayed structures are efficient for spans
ranging up to 1000 m.
Chapters 9 and 10 dealt with analysis methods for indeterminate
structures. Some of the analytical results presented in those chapters are
utilized here to estimate critical loading patterns. Most of the analysis
effort required in the engineering process is related to determining the
maximum values of bending moment, axial force, and shear
corresponding to the typical bridge loadings. Establishing these values
for indeterminate structures requires a considerable amount of computa-
tional effort. In what follows, we illustrate this computational process for
different types of bridges such as continuous girder, arch, and cable-
stayed schemes using a commercial structural analysis software system.
13.1 The Engineering Process for Girders
The objective of the structural engineering process for a beam is to define the physical makeup, i.e.,
the location of supports, the material, the shape and dimensions of the cross section, and special cross-
section features such as steel reinforcement in the case of a reinforced concrete beam. Given the
absolute maximum values of shear and moment at a particular location, the choice of material, and the
general shape of the cross section, one determines the specific cross-sectional dimensions by applying
numerical procedures specified by a design code. This phase of the engineering process is called
design detailing.We focus here on that aspect of the process associated with the determination of the
“maximum” values of shear and moment.
# Springer International Publishing Switzerland 2016
J.J. Connor, S. Faraji, Fundamentals of Structural Engineering,DOI 10.1007/978-3-319-24331-3_13
873
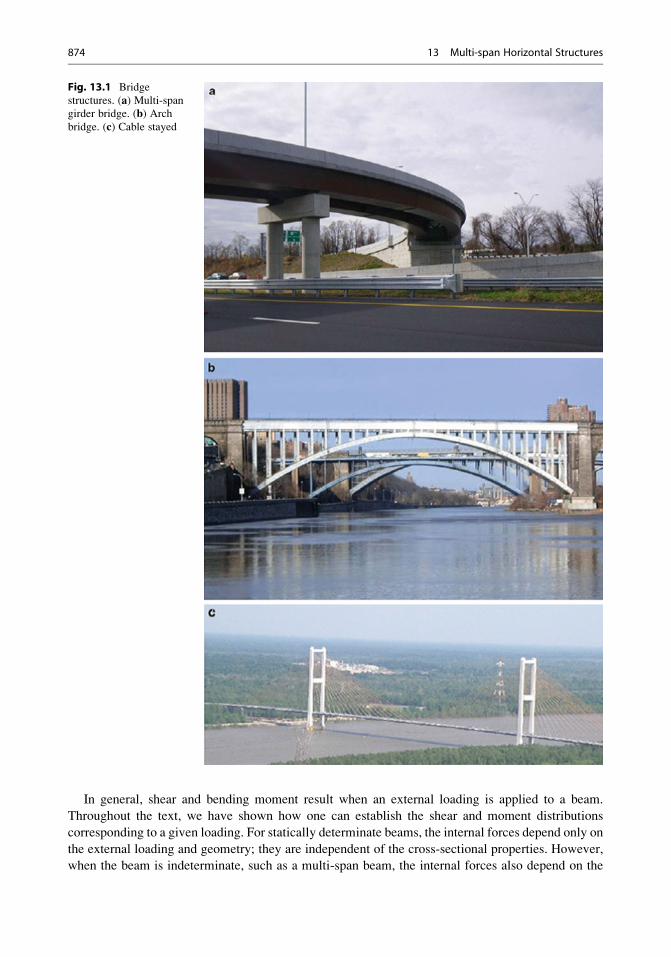
In general, shear and bending moment result when an external loading is applied to a beam.
Throughout the text, we have shown how one can establish the shear and moment distributions
corresponding to a given loading. For statically determinate beams, the internal forces depend only on
the external loading and geometry; they are independent of the cross-sectional properties. However,
when the beam is indeterminate, such as a multi-span beam, the internal forces also depend on the
Fig. 13.1 Bridge
structures. (a) Multi-span
girder bridge. (b) Archbridge. (c) Cable stayed
874 13 Multi-span Horizontal Structures
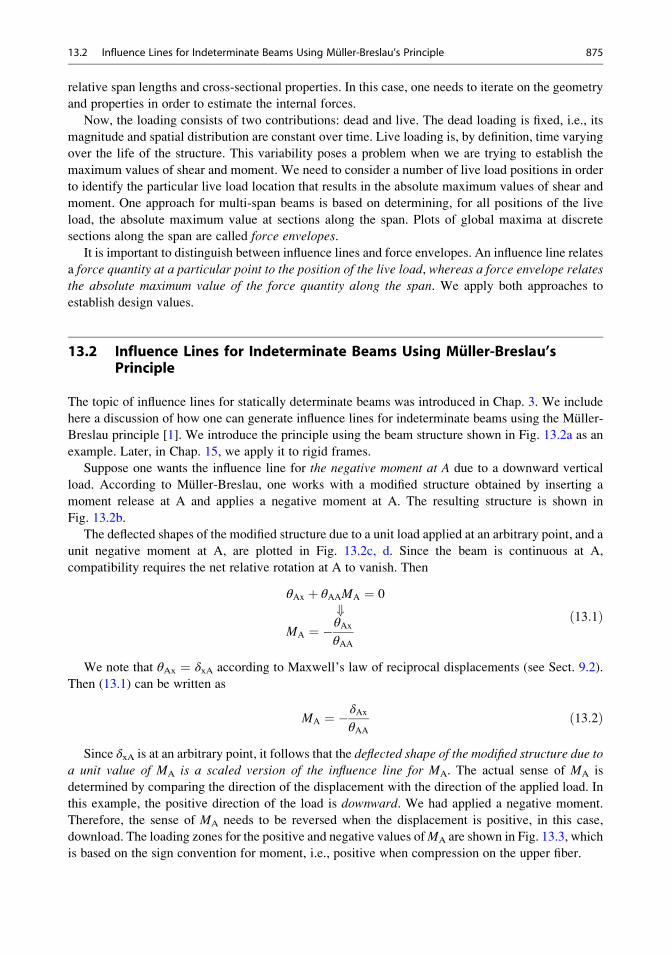
relative span lengths and cross-sectional properties. In this case, one needs to iterate on the geometry
and properties in order to estimate the internal forces.
Now, the loading consists of two contributions: dead and live. The dead loading is fixed, i.e., its
magnitude and spatial distribution are constant over time. Live loading is, by definition, time varying
over the life of the structure. This variability poses a problem when we are trying to establish the
maximum values of shear and moment. We need to consider a number of live load positions in order
to identify the particular live load location that results in the absolute maximum values of shear and
moment. One approach for multi-span beams is based on determining, for all positions of the live
load, the absolute maximum value at sections along the span. Plots of global maxima at discrete
sections along the span are called force envelopes.
It is important to distinguish between influence lines and force envelopes. An influence line relates
a force quantity at a particular point to the position of the live load, whereas a force envelope relatesthe absolute maximum value of the force quantity along the span. We apply both approaches to
establish design values.
13.2 Influence Lines for Indeterminate Beams Using Muller-Breslau’sPrinciple
The topic of influence lines for statically determinate beams was introduced in Chap. 3. We include
here a discussion of how one can generate influence lines for indeterminate beams using the Muller-
Breslau principle [1]. We introduce the principle using the beam structure shown in Fig. 13.2a as an
example. Later, in Chap. 15, we apply it to rigid frames.
Suppose one wants the influence line for the negative moment at A due to a downward vertical
load. According to Muller-Breslau, one works with a modified structure obtained by inserting a
moment release at A and applies a negative moment at A. The resulting structure is shown in
Fig. 13.2b.
The deflected shapes of the modified structure due to a unit load applied at an arbitrary point, and a
unit negative moment at A, are plotted in Fig. 13.2c, d. Since the beam is continuous at A,
compatibility requires the net relative rotation at A to vanish. Then
θAx þ θAAMA ¼ 0
+MA ¼ �θAx
θAA
ð13:1Þ
We note that θAx ¼ δxA according to Maxwell’s law of reciprocal displacements (see Sect. 9.2).
Then (13.1) can be written as
MA ¼ �δAxθAA
ð13:2Þ
Since δxA is at an arbitrary point, it follows that the deflected shape of the modified structure due to
a unit value of MA is a scaled version of the influence line for MA. The actual sense of MA is
determined by comparing the direction of the displacement with the direction of the applied load. In
this example, the positive direction of the load is downward. We had applied a negative moment.
Therefore, the sense of MA needs to be reversed when the displacement is positive, in this case,
download. The loading zones for the positive and negative values ofMA are shown in Fig. 13.3, which
is based on the sign convention for moment, i.e., positive when compression on the upper fiber.
13.2 Influence Lines for Indeterminate Beams Using Muller-Breslau’s Principle 875
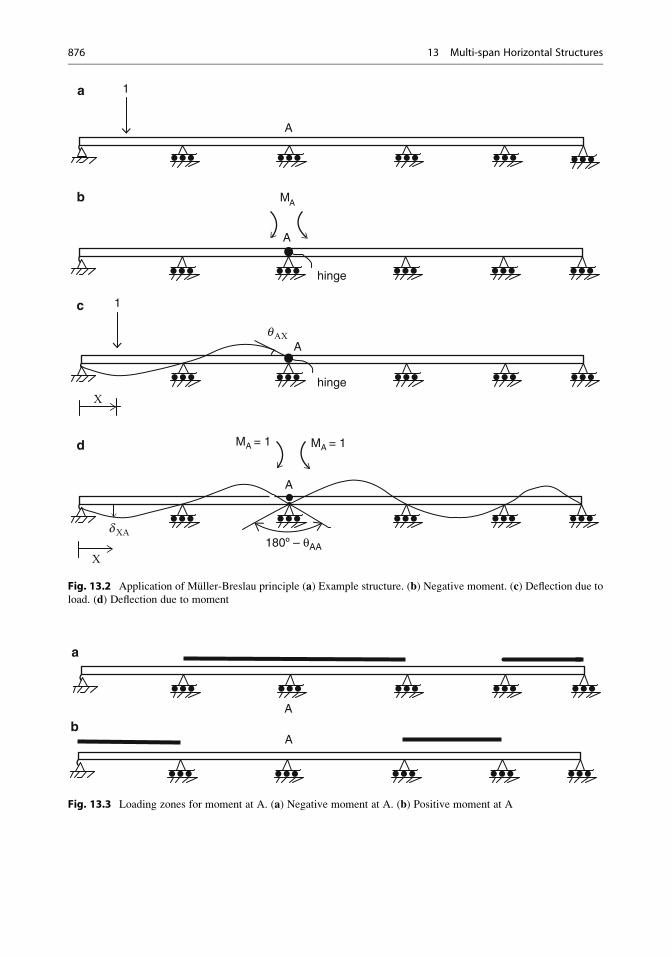
A
A
a
b
Fig. 13.3 Loading zones for moment at A. (a) Negative moment at A. (b) Positive moment at A
1
1
A
A
A
A
180º – θAA
hinge
hinge
q
AM
ΑΧ
MA = 1 MA = 1
Χ
Χ
d ΧΑ
a
b
c
d
Fig. 13.2 Application of Muller-Breslau principle (a) Example structure. (b) Negative moment. (c) Deflection due to
load. (d) Deflection due to moment
876 13 Multi-span Horizontal Structures
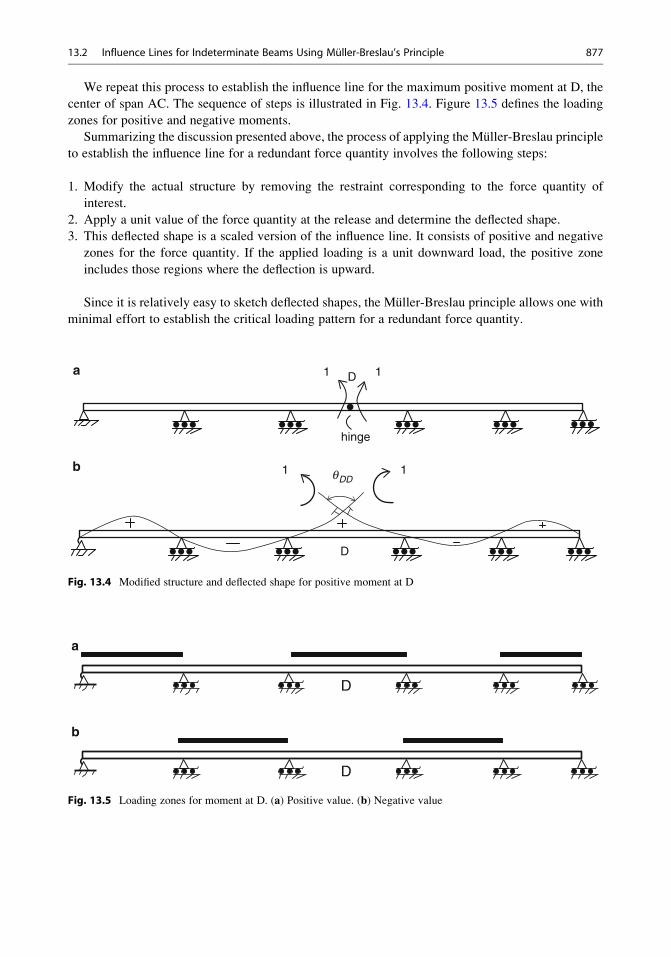
We repeat this process to establish the influence line for the maximum positive moment at D, the
center of span AC. The sequence of steps is illustrated in Fig. 13.4. Figure 13.5 defines the loading
zones for positive and negative moments.
Summarizing the discussion presented above, the process of applying the Muller-Breslau principle
to establish the influence line for a redundant force quantity involves the following steps:
1. Modify the actual structure by removing the restraint corresponding to the force quantity of
interest.
2. Apply a unit value of the force quantity at the release and determine the deflected shape.
3. This deflected shape is a scaled version of the influence line. It consists of positive and negative
zones for the force quantity. If the applied loading is a unit downward load, the positive zone
includes those regions where the deflection is upward.
Since it is relatively easy to sketch deflected shapes, the Muller-Breslau principle allows one with
minimal effort to establish the critical loading pattern for a redundant force quantity.
1
1 1
1
hinge
DD
D
D
q
a
b
Fig. 13.4 Modified structure and deflected shape for positive moment at D
D
D
a
b
Fig. 13.5 Loading zones for moment at D. (a) Positive value. (b) Negative value
13.2 Influence Lines for Indeterminate Beams Using Muller-Breslau’s Principle 877
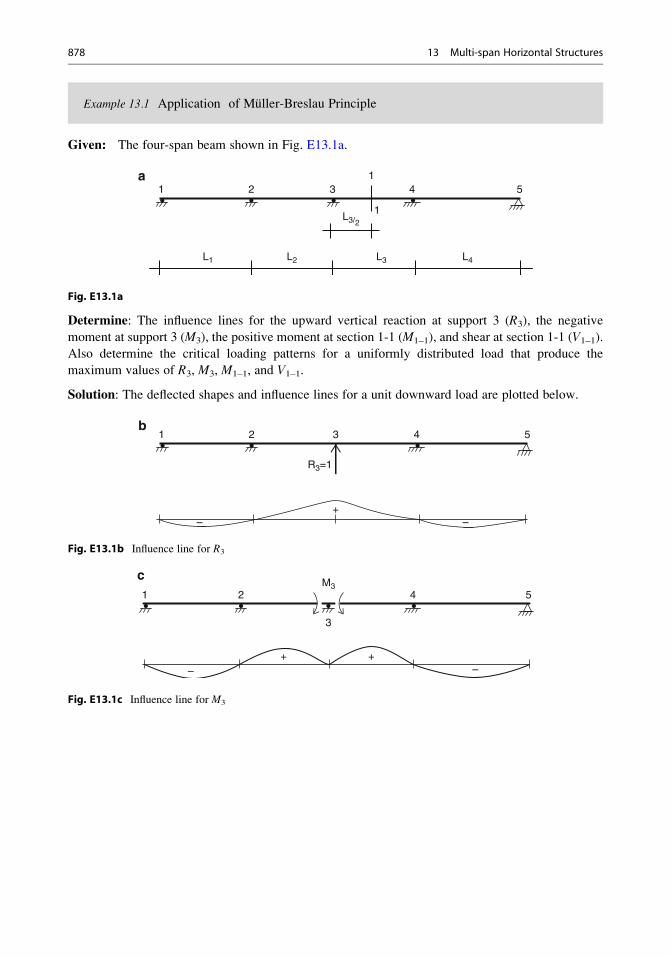
Example 13.1 Application of Muller-Breslau Principle
Given: The four-span beam shown in Fig. E13.1a.
11
1
L1 L3 L4L2
L3/2
2 3 4 5a
Fig. E13.1a
Determine: The influence lines for the upward vertical reaction at support 3 (R3), the negative
moment at support 3 (M3), the positive moment at section 1-1 (M1–1), and shear at section 1-1 (V1–1).
Also determine the critical loading patterns for a uniformly distributed load that produce the
maximum values of R3, M3, M1–1, and V1–1.
Solution: The deflected shapes and influence lines for a unit downward load are plotted below.
1
R3=1
2
– –+
3 4 5b
Fig. E13.1b Influence line for R3
1M3
2
– –+ +
4 5
c
3
Fig. E13.1c Influence line for M3
878 13 Multi-span Horizontal Structures
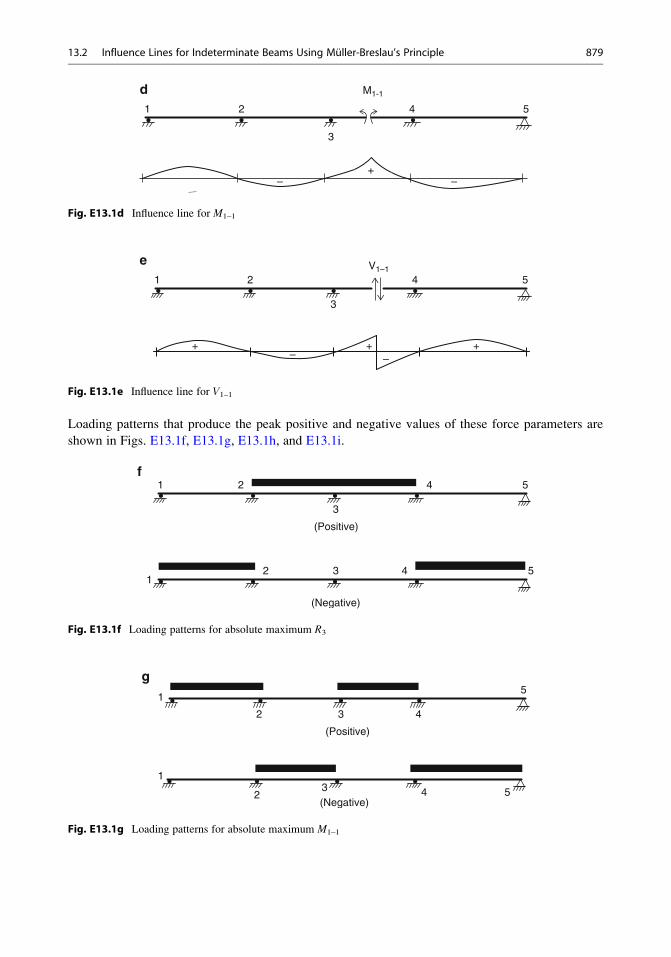
1
M1-1
2 4 5
d
3
– –+
Fig. E13.1d Influence line for M1–1
1 2
e4 5
3
V1–1
– –+ ++
Fig. E13.1e Influence line for V1–1
Loading patterns that produce the peak positive and negative values of these force parameters are
shown in Figs. E13.1f, E13.1g, E13.1h, and E13.1i.
1 2 4 5
3
(Positive)
f
12 4 53
(Negative)
Fig. E13.1f Loading patterns for absolute maximum R3
1
2
5
3 4
(Positive)
g
1
2 43 5(Negative)
Fig. E13.1g Loading patterns for absolute maximum M1–1
13.2 Influence Lines for Indeterminate Beams Using Muller-Breslau’s Principle 879
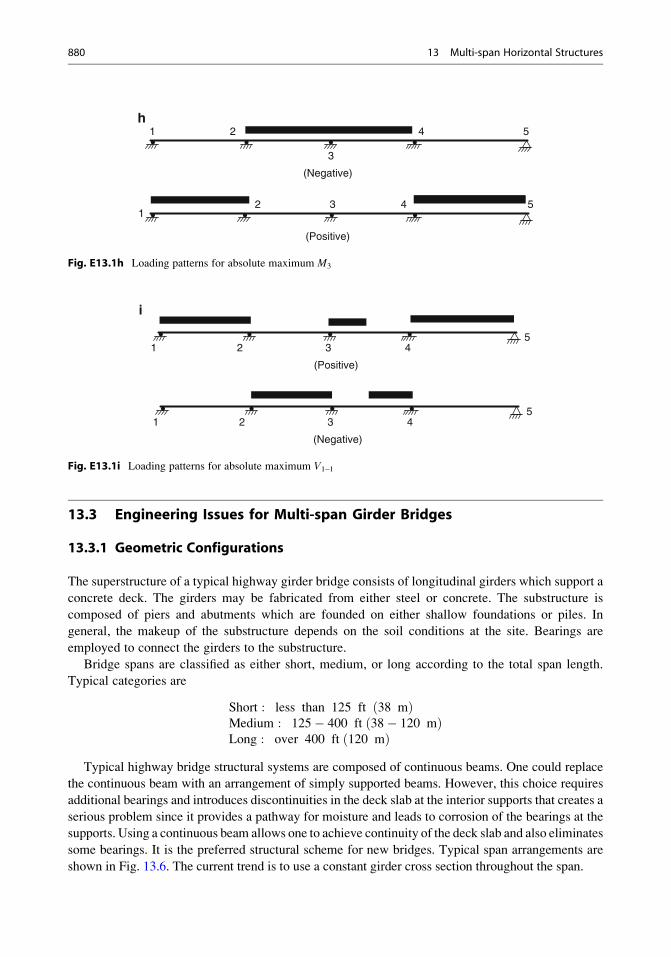
1 2 4 5
3
(Negative)
h
12 4 53
(Positive)
Fig. E13.1h Loading patterns for absolute maximum M3
1 25
3 4
(Positive)
i
1 25
3 4
(Negative)
Fig. E13.1i Loading patterns for absolute maximum V1–1
13.3 Engineering Issues for Multi-span Girder Bridges
13.3.1 Geometric Configurations
The superstructure of a typical highway girder bridge consists of longitudinal girders which support a
concrete deck. The girders may be fabricated from either steel or concrete. The substructure is
composed of piers and abutments which are founded on either shallow foundations or piles. In
general, the makeup of the substructure depends on the soil conditions at the site. Bearings are
employed to connect the girders to the substructure.
Bridge spans are classified as either short, medium, or long according to the total span length.
Typical categories are
Short : less than 125 ft 38 mð ÞMedium : 125� 400 ft 38� 120 mð ÞLong : over 400 ft 120 mð Þ
Typical highway bridge structural systems are composed of continuous beams. One could replace
the continuous beam with an arrangement of simply supported beams. However, this choice requires
additional bearings and introduces discontinuities in the deck slab at the interior supports that creates a
serious problem since it provides a pathway for moisture and leads to corrosion of the bearings at the
supports. Using a continuous beam allows one to achieve continuity of the deck slab and also eliminates
some bearings. It is the preferred structural scheme for new bridges. Typical span arrangements are
shown in Fig. 13.6. The current trend is to use a constant girder cross section throughout the span.
880 13 Multi-span Horizontal Structures
Historically, girder bridges were configured as a collection of single spans. This scheme is
illustrated in Fig. 13.7a. In order to deal with longer interior spans, the cantilever scheme shown in
Fig. 13.7b was introduced. Both schemes involve discontinuities in the girder/deck which provide
pathways for moisture and lead to deterioration. To eliminate the interior discontinuities, the obvious
option is to use a continuous girder as shown in Fig. 13.7c. We demonstrated in Chap. 9 that
continuous beams are more efficient structurally, i.e., the peak internal forces are less than the
corresponding forces for the simply supported case. Therefore, the required cross section tends to
be lighter.
Even when a continuous girder is used, there still remains the problem of the discontinuities at the
end supports (abutments). The problem is solved by using the scheme shown in Fig. 13.8. The
abutments walls are supported on flexible piles that are rigidly connected to the deck/girder system.
This concept is called an “integral abutment bridge.” Since the abutment is rigidly attached to the
deck/girder, a temperature change of the deck produces a longitudinal displacement of the abutment
wall. In order to minimize the effect of the resulting lateral force, the abutments are supported on
flexible piles and loose granular backfill is placed behind the wall. The longitudinal displacement due
to temperature varies linearly with the span length, and consequently, the maximum span length is
limited by the seasonal temperature change.
We generate an idealized model by replacing the action of the soil and piles with equivalent
springs [2]. Figure 13.9a illustrates this approach. An estimate of the effect of support stiffness is
obtained using the model shown in Fig. 13.9b.
Fig. 13.6 Span
arrangements for multi-
span beams. (a) Two spans
continuous. (b) Two spans
simply supported. (c) Threespans continuous. (d) Threespans simply supported
13.3 Engineering Issues for Multi-span Girder Bridges 881
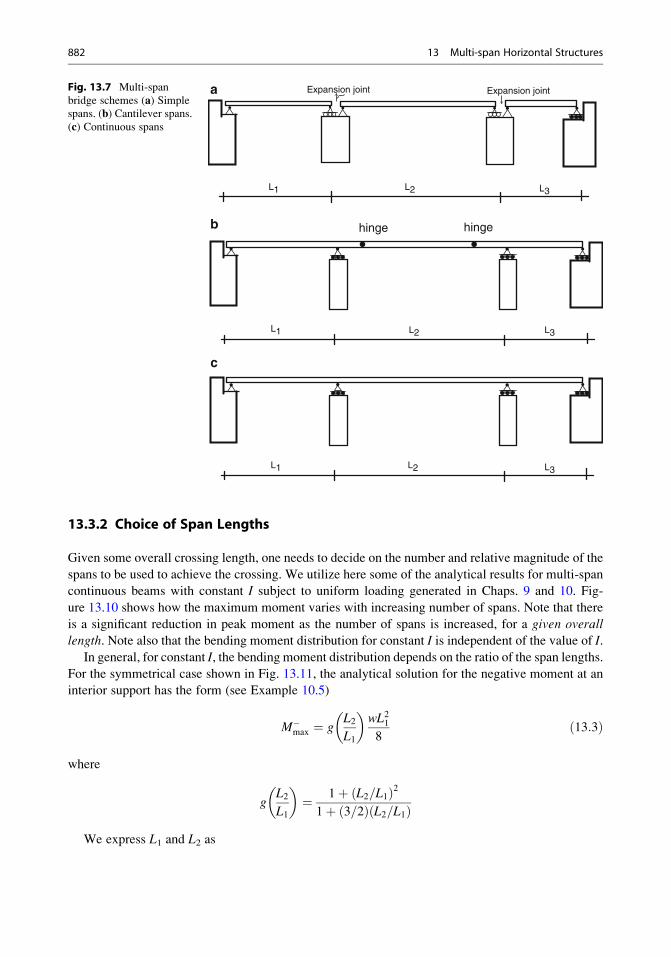
13.3.2 Choice of Span Lengths
Given some overall crossing length, one needs to decide on the number and relative magnitude of the
spans to be used to achieve the crossing. We utilize here some of the analytical results for multi-span
continuous beams with constant I subject to uniform loading generated in Chaps. 9 and 10. Fig-
ure 13.10 shows how the maximum moment varies with increasing number of spans. Note that there
is a significant reduction in peak moment as the number of spans is increased, for a given overalllength. Note also that the bending moment distribution for constant I is independent of the value of I.
In general, for constant I, the bending moment distribution depends on the ratio of the span lengths.
For the symmetrical case shown in Fig. 13.11, the analytical solution for the negative moment at an
interior support has the form (see Example 10.5)
M�max ¼ gL2L1
� �wL218
ð13:3Þ
where
gL2L1
� �¼ 1þ L2=L1ð Þ2
1þ 3=2ð Þ L2=L1ð ÞWe express L1 and L2 as
a
b
c
Expansion joint Expansion joint
L1
L1
L1
L2
L2
L3
L3
L2 L3
hinge hinge
Fig. 13.7 Multi-span
bridge schemes (a) Simple
spans. (b) Cantilever spans.(c) Continuous spans
882 13 Multi-span Horizontal Structures
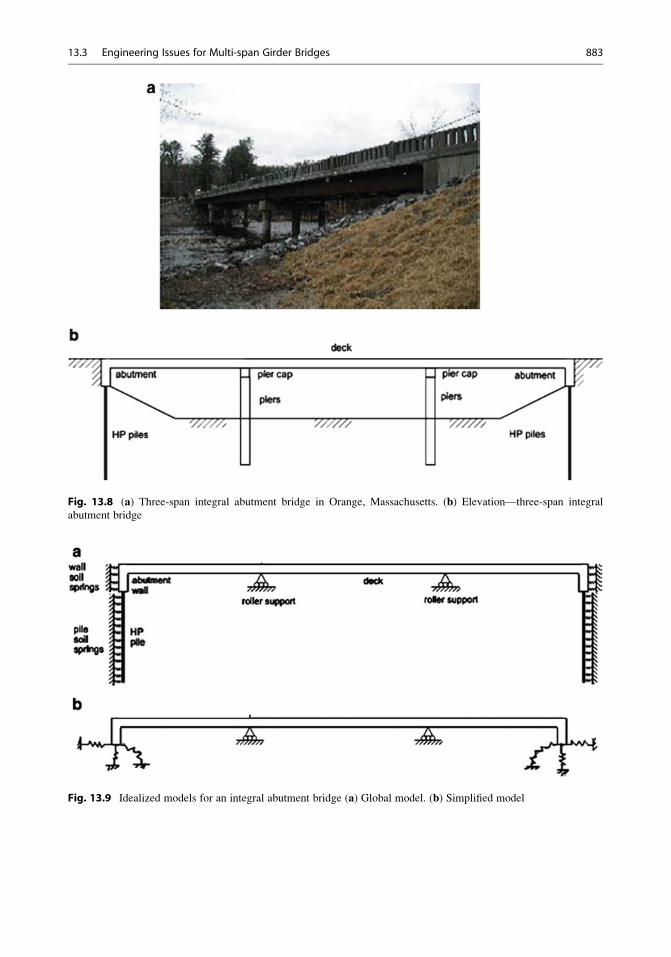
Fig. 13.8 (a) Three-span integral abutment bridge in Orange, Massachusetts. (b) Elevation—three-span integral
abutment bridge
Fig. 13.9 Idealized models for an integral abutment bridge (a) Global model. (b) Simplified model
13.3 Engineering Issues for Multi-span Girder Bridges 883
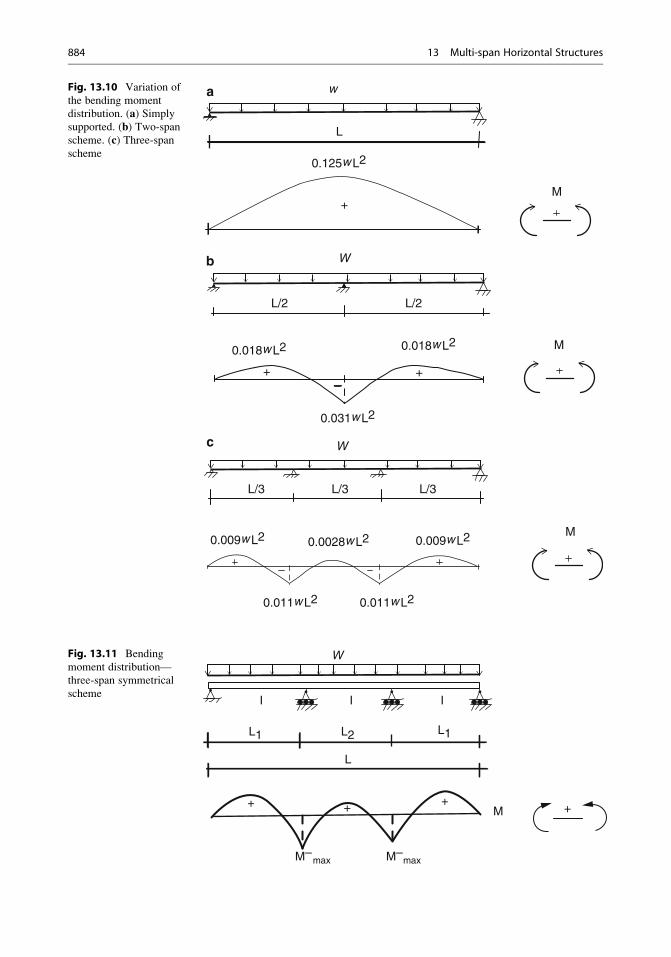
a
b
c
w
L
+
W
W
0.125w L2
L/2 L/2
L/3 L/3 L/3
0.018w L2 0.018w L2
0.031w L2
0.009w L2
0.011w L2 0.011w L2
0.0028w L2 0.009w L2
M
M
M
+ +
Fig. 13.10 Variation of
the bending moment
distribution. (a) Simply
supported. (b) Two-spanscheme. (c) Three-spanscheme
W
++ ++
I I I
L1L2
L
M
M–M–
L1
maxmax
Fig. 13.11 Bending
moment distribution—
three-span symmetrical
scheme
884 13 Multi-span Horizontal Structures
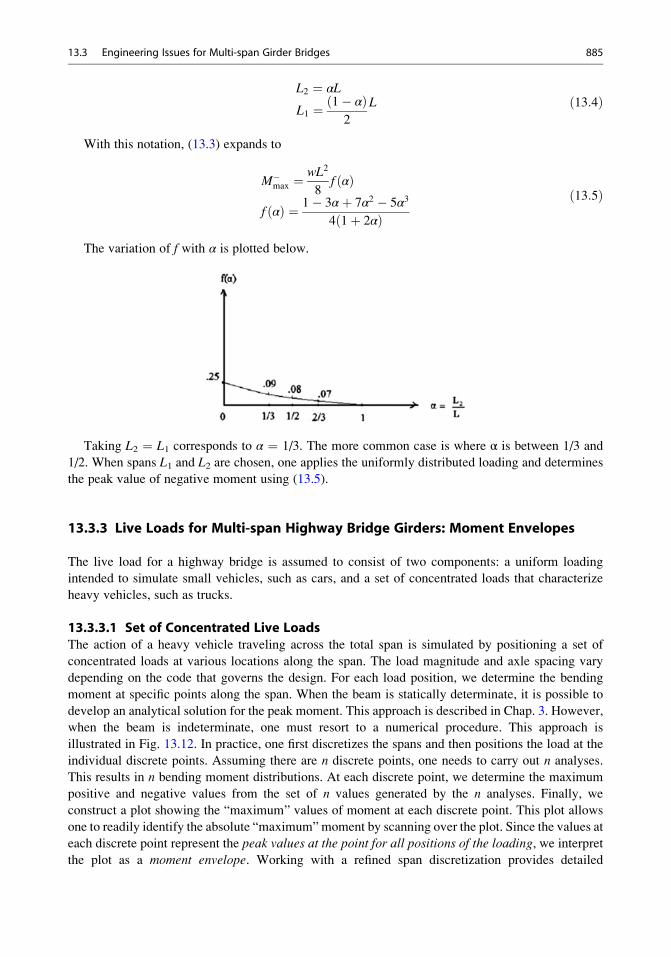
L2 ¼ αL
L1 ¼ 1� αð Þ2
L ð13:4Þ
With this notation, (13.3) expands to
M�max ¼wL2
8f αð Þ
f αð Þ ¼ 1� 3αþ 7α2 � 5α3
4 1þ 2αð Þð13:5Þ
The variation of f with α is plotted below.
Taking L2 ¼ L1 corresponds to α ¼ 1/3. The more common case is where α is between 1/3 and
1/2. When spans L1 and L2 are chosen, one applies the uniformly distributed loading and determines
the peak value of negative moment using (13.5).
13.3.3 Live Loads for Multi-span Highway Bridge Girders: Moment Envelopes
The live load for a highway bridge is assumed to consist of two components: a uniform loading
intended to simulate small vehicles, such as cars, and a set of concentrated loads that characterize
heavy vehicles, such as trucks.
13.3.3.1 Set of Concentrated Live LoadsThe action of a heavy vehicle traveling across the total span is simulated by positioning a set of
concentrated loads at various locations along the span. The load magnitude and axle spacing vary
depending on the code that governs the design. For each load position, we determine the bending
moment at specific points along the span. When the beam is statically determinate, it is possible to
develop an analytical solution for the peak moment. This approach is described in Chap. 3. However,
when the beam is indeterminate, one must resort to a numerical procedure. This approach is
illustrated in Fig. 13.12. In practice, one first discretizes the spans and then positions the load at the
individual discrete points. Assuming there are n discrete points, one needs to carry out n analyses.
This results in n bending moment distributions. At each discrete point, we determine the maximum
positive and negative values from the set of n values generated by the n analyses. Finally, we
construct a plot showing the “maximum” values of moment at each discrete point. This plot allows
one to readily identify the absolute “maximum” moment by scanning over the plot. Since the values at
each discrete point represent the peak values at the point for all positions of the loading, we interpret
the plot as a moment envelope. Working with a refined span discretization provides detailed
13.3 Engineering Issues for Multi-span Girder Bridges 885
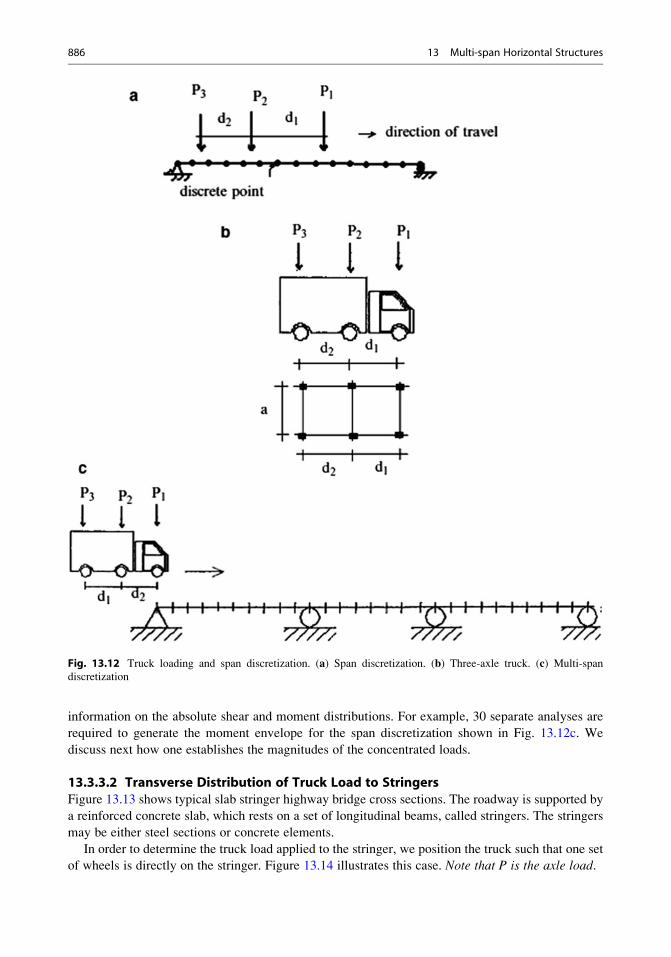
information on the absolute shear and moment distributions. For example, 30 separate analyses are
required to generate the moment envelope for the span discretization shown in Fig. 13.12c. We
discuss next how one establishes the magnitudes of the concentrated loads.
13.3.3.2 Transverse Distribution of Truck Load to StringersFigure 13.13 shows typical slab stringer highway bridge cross sections. The roadway is supported by
a reinforced concrete slab, which rests on a set of longitudinal beams, called stringers. The stringers
may be either steel sections or concrete elements.
In order to determine the truck load applied to the stringer, we position the truck such that one set
of wheels is directly on the stringer. Figure 13.14 illustrates this case. Note that P is the axle load.
Fig. 13.12 Truck loading and span discretization. (a) Span discretization. (b) Three-axle truck. (c) Multi-span
discretization
886 13 Multi-span Horizontal Structures
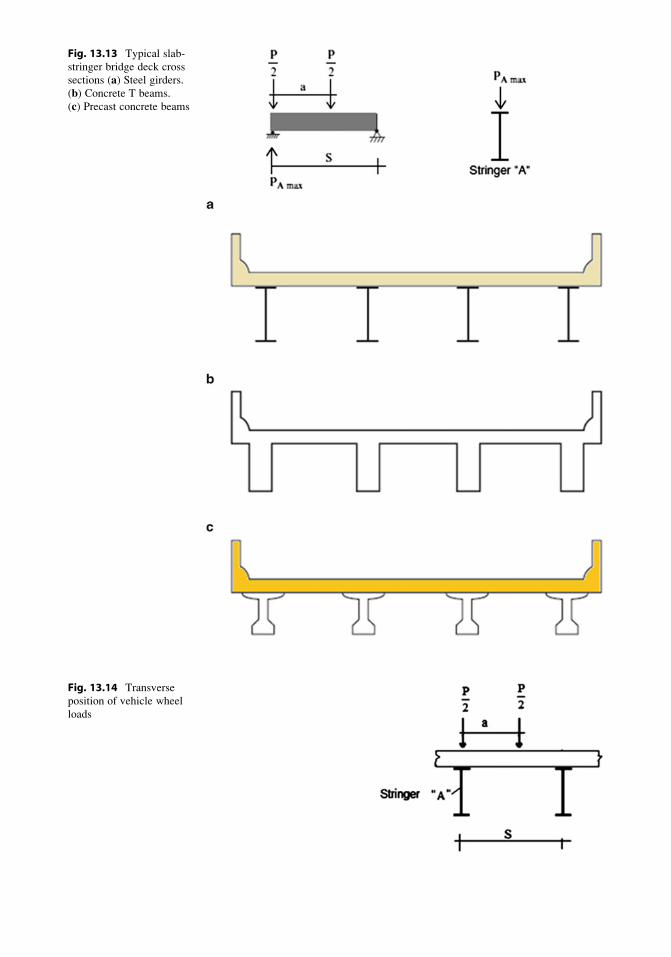
Fig. 13.13 Typical slab-
stringer bridge deck cross
sections (a) Steel girders.(b) Concrete T beams.
(c) Precast concrete beams
Fig. 13.14 Transverse
position of vehicle wheel
loads
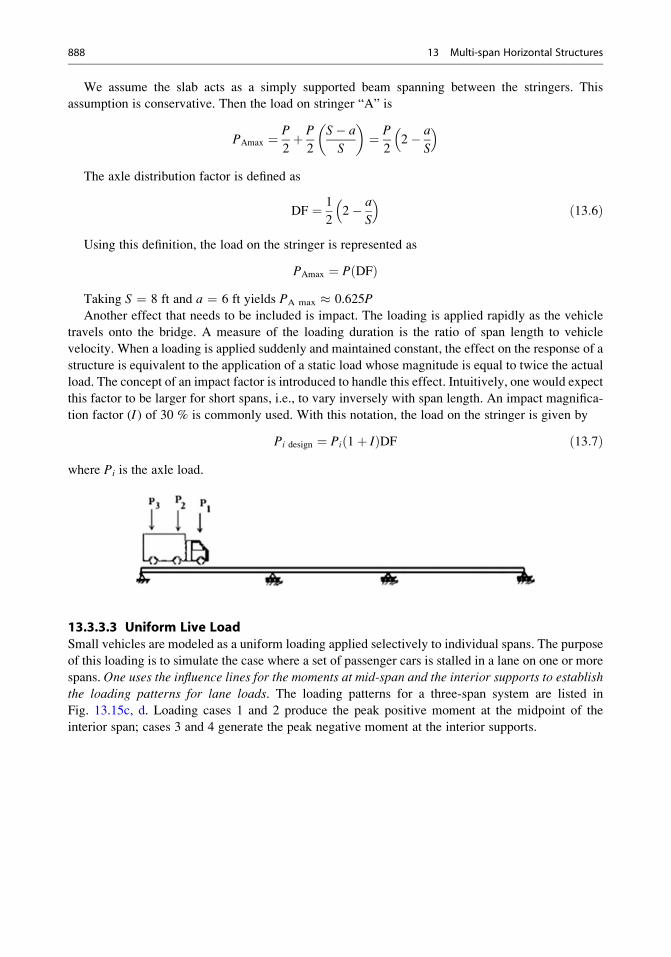
We assume the slab acts as a simply supported beam spanning between the stringers. This
assumption is conservative. Then the load on stringer “A” is
PAmax ¼ P
2þ P
2
S� a
S
� �¼ P
22� a
S
� �
The axle distribution factor is defined as
DF ¼ 1
22� a
S
� �ð13:6Þ
Using this definition, the load on the stringer is represented as
PAmax ¼ P DFð ÞTaking S ¼ 8 ft and a ¼ 6 ft yields PA max � 0.625P
Another effect that needs to be included is impact. The loading is applied rapidly as the vehicle
travels onto the bridge. A measure of the loading duration is the ratio of span length to vehicle
velocity. When a loading is applied suddenly and maintained constant, the effect on the response of a
structure is equivalent to the application of a static load whose magnitude is equal to twice the actual
load. The concept of an impact factor is introduced to handle this effect. Intuitively, one would expect
this factor to be larger for short spans, i.e., to vary inversely with span length. An impact magnifica-
tion factor (I) of 30 % is commonly used. With this notation, the load on the stringer is given by
Pi design ¼ Pi 1þ Ið ÞDF ð13:7Þwhere Pi is the axle load.
13.3.3.3 Uniform Live LoadSmall vehicles are modeled as a uniform loading applied selectively to individual spans. The purpose
of this loading is to simulate the case where a set of passenger cars is stalled in a lane on one or more
spans. One uses the influence lines for the moments at mid-span and the interior supports to establish
the loading patterns for lane loads. The loading patterns for a three-span system are listed in
Fig. 13.15c, d. Loading cases 1 and 2 produce the peak positive moment at the midpoint of the
interior span; cases 3 and 4 generate the peak negative moment at the interior supports.
888 13 Multi-span Horizontal Structures
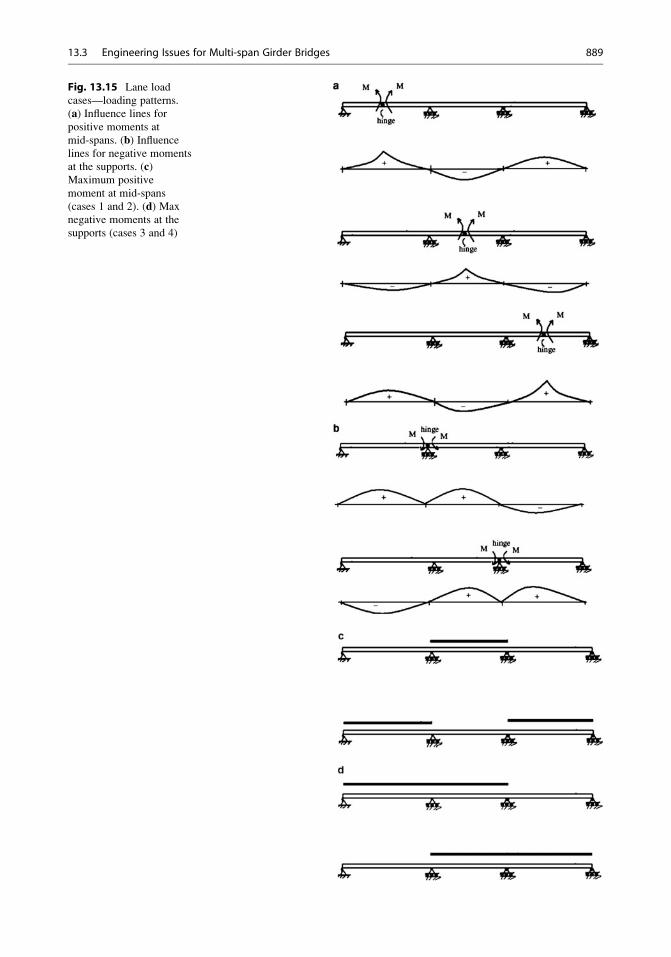
Fig. 13.15 Lane load
cases—loading patterns.
(a) Influence lines forpositive moments at
mid-spans. (b) Influencelines for negative moments
at the supports. (c)Maximum positive
moment at mid-spans
(cases 1 and 2). (d) Max
negative moments at the
supports (cases 3 and 4)
13.3 Engineering Issues for Multi-span Girder Bridges 889
Given the loading patterns, one generates the bending moment distribution for each loading
condition and then establishes the maximum values of the positive and negative moments at the
same discrete locations selected for the truck loading. These results define the discrete moment
envelope for the structure. Four separate analyses (cases 1–4) are required to construct the discrete
moment envelope corresponding to the lane loading for this three-span example.
13.3.4 Loading Due to Support Settlements
In addition to the gravity loading associated with the weight of the beam and vehicles, one also needs
to consider the moments induced in the structure due to support settlement. This calculation is
relatively straightforward. The analytical solutions for two- and three-span symmetrical beams are
generated in Examples 10.2 and 10.5. We list those results in Fig. 13.16 for convenience. Note that
the peak moments are linear functions of EI. Note that the peak moment varies as 1/L2. Therefore
support settlement is more significant for short spans vs. long spans.
890 13 Multi-span Horizontal Structures
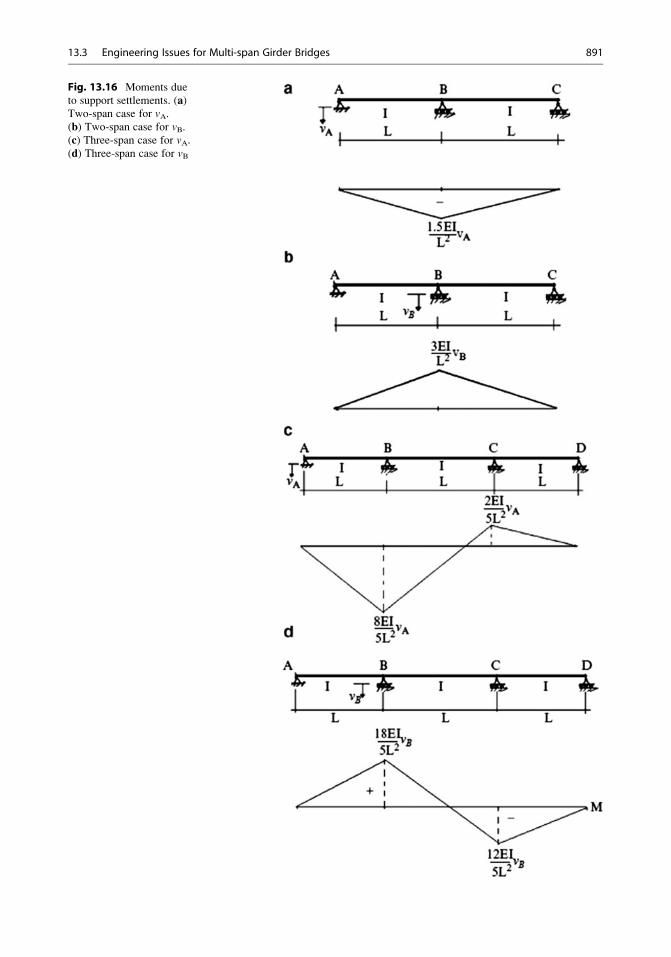
Fig. 13.16 Moments due
to support settlements. (a)Two-span case for vA.(b) Two-span case for vB.(c) Three-span case for vA.(d) Three-span case for vB
13.3 Engineering Issues for Multi-span Girder Bridges 891
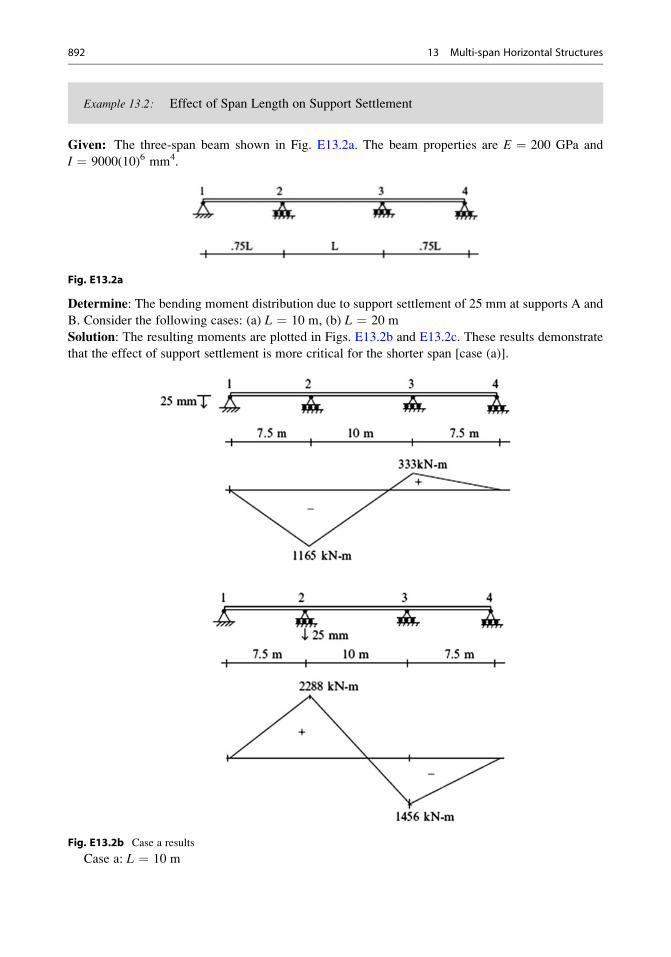
Example 13.2: Effect of Span Length on Support Settlement
Given: The three-span beam shown in Fig. E13.2a. The beam properties are E ¼ 200 GPa and
I ¼ 9000(10)6 mm4.
Fig. E13.2a
Determine: The bending moment distribution due to support settlement of 25 mm at supports A and
B. Consider the following cases: (a) L ¼ 10 m, (b) L ¼ 20 m
Solution: The resulting moments are plotted in Figs. E13.2b and E13.2c. These results demonstrate
that the effect of support settlement is more critical for the shorter span [case (a)].
Fig. E13.2b Case a results
Case a: L ¼ 10 m
892 13 Multi-span Horizontal Structures
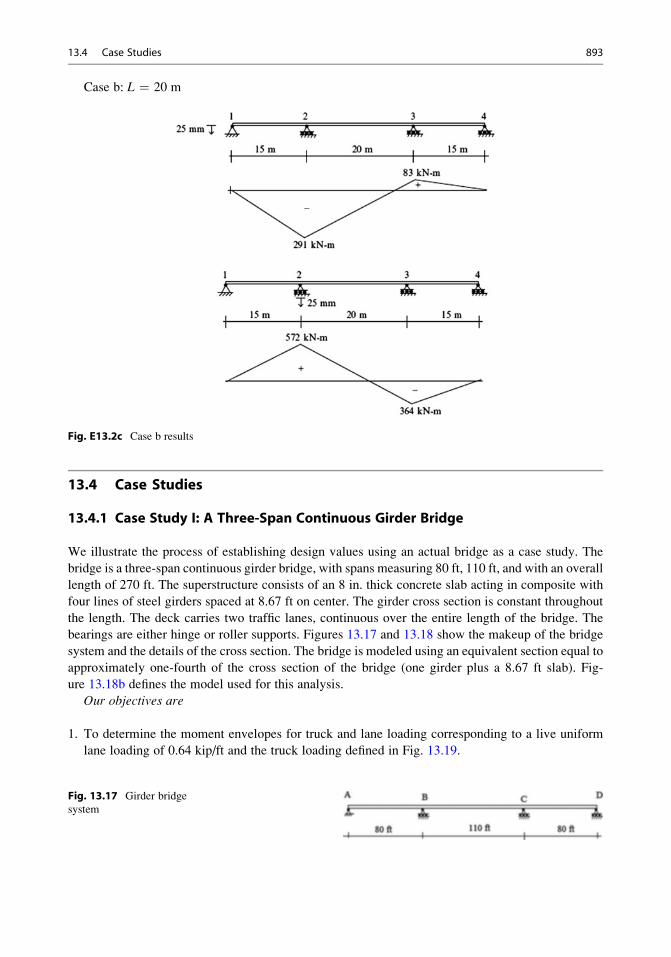
Case b: L ¼ 20 m
Fig. E13.2c Case b results
13.4 Case Studies
13.4.1 Case Study I: A Three-Span Continuous Girder Bridge
We illustrate the process of establishing design values using an actual bridge as a case study. The
bridge is a three-span continuous girder bridge, with spans measuring 80 ft, 110 ft, and with an overall
length of 270 ft. The superstructure consists of an 8 in. thick concrete slab acting in composite with
four lines of steel girders spaced at 8.67 ft on center. The girder cross section is constant throughout
the length. The deck carries two traffic lanes, continuous over the entire length of the bridge. The
bearings are either hinge or roller supports. Figures 13.17 and 13.18 show the makeup of the bridge
system and the details of the cross section. The bridge is modeled using an equivalent section equal to
approximately one-fourth of the cross section of the bridge (one girder plus a 8.67 ft slab). Fig-
ure 13.18b defines the model used for this analysis.
Our objectives are
1. To determine the moment envelopes for truck and lane loading corresponding to a live uniform
lane loading of 0.64 kip/ft and the truck loading defined in Fig. 13.19.
Fig. 13.17 Girder bridge
system
13.4 Case Studies 893
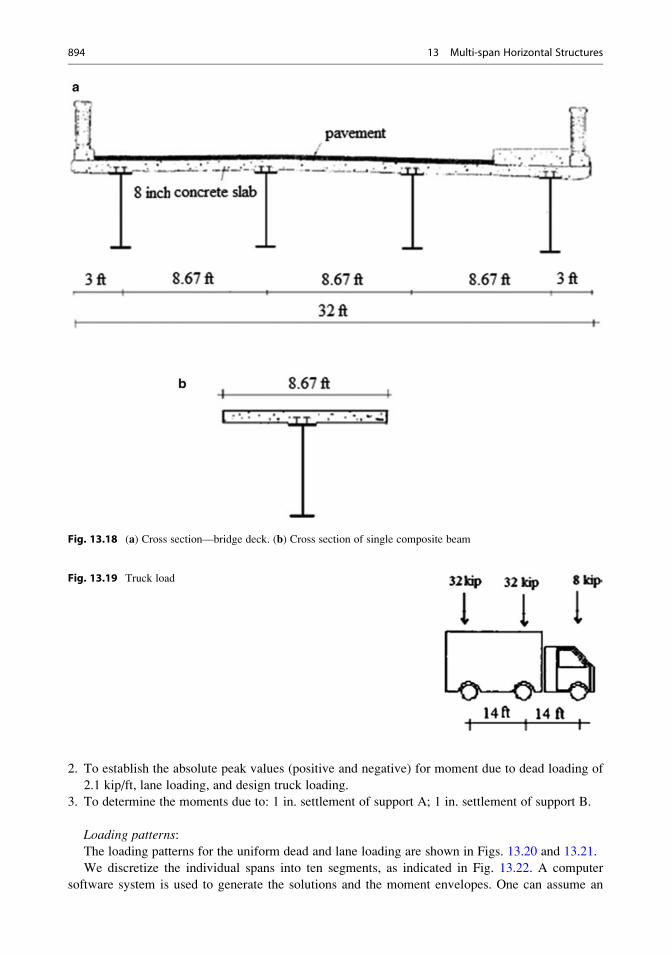
2. To establish the absolute peak values (positive and negative) for moment due to dead loading of
2.1 kip/ft, lane loading, and design truck loading.
3. To determine the moments due to: 1 in. settlement of support A; 1 in. settlement of support B.
Loading patterns:The loading patterns for the uniform dead and lane loading are shown in Figs. 13.20 and 13.21.
We discretize the individual spans into ten segments, as indicated in Fig. 13.22. A computer
software system is used to generate the solutions and the moment envelopes. One can assume an
Fig. 13.18 (a) Cross section—bridge deck. (b) Cross section of single composite beam
Fig. 13.19 Truck load
894 13 Multi-span Horizontal Structures

arbitrary value for I since the moment results are independent of I. Computer-based analysis is ideally
suited for envelopes. Certain software packages have incorporated special features that automate the
process of moving the load across the span and compiling the peak positive and negative moment
values at each discrete section. Both the positive and negative moment envelopes are required in
order to dimension the beam cross section.
Dead load:The envelopes for dead load coincide with the actual moment and shear distribution shown below
(Fig. 13.23). The peak values of shear, moment, and deflection are listed below.
M�DLmax ¼ 1975kip ft
MþDLmax ¼ 1202kip ft
VDLmax ¼ 115:5kip
δDLmax ¼ 1:1 in: span II
δDLmax ¼ 1:26 in: span Ior III
8>>>>>>>><>>>>>>>>:
13.4.1.1 Uniform Lane LoadThe uniform load patterns defined in Fig. 13.21 are analyzed separately; based on this data, the
following envelopes are generated (Fig. 13.24).
2.1 kip/ftFig. 13.20 Uniform dead
load pattern
.64 kip/ft .64 kip/ft
.64 kip/ft
.64 kip/ft
.64 kip/ft
.64 kip/ft
Fig. 13.21 Uniform lane
load patterns for positive
and negative moments
13.4 Case Studies 895
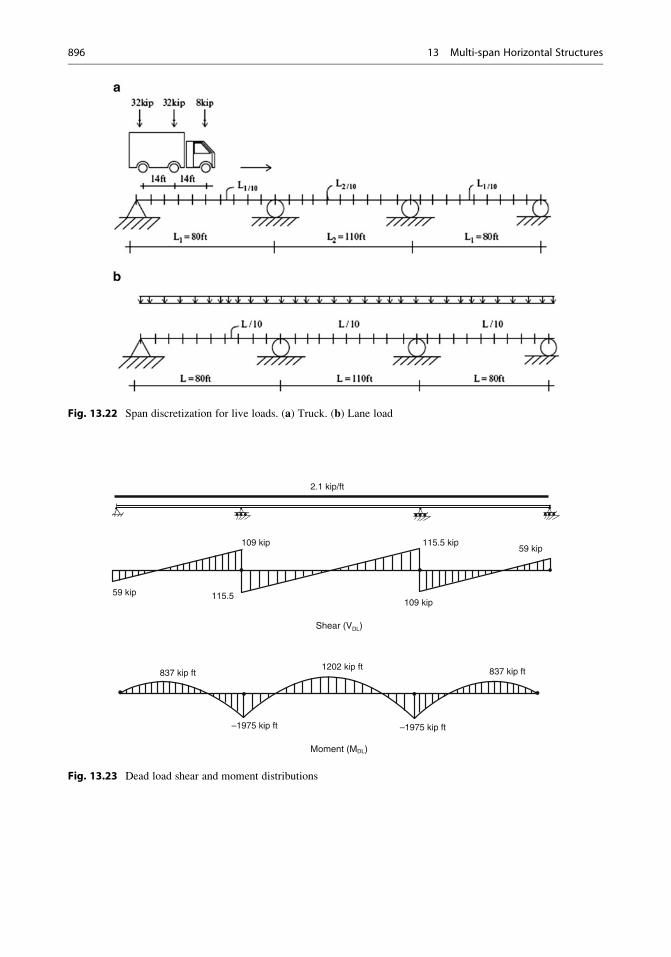
Fig. 13.22 Span discretization for live loads. (a) Truck. (b) Lane load
2.1 kip/ft
109 kip
59 kip 115.5
115.5 kip
109 kip
1202 kip ft 837 kip ft837 kip ft
–1975 kip ft –1975 kip ft
Moment (MDL)
Shear (VDL)
59 kip
Fig. 13.23 Dead load shear and moment distributions
896 13 Multi-span Horizontal Structures
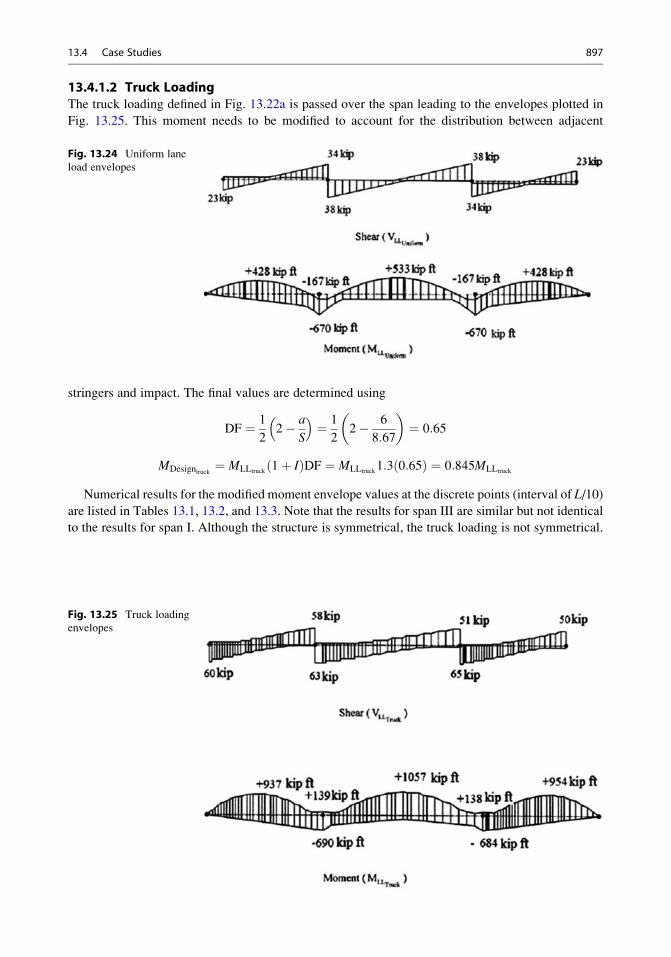
13.4.1.2 Truck LoadingThe truck loading defined in Fig. 13.22a is passed over the span leading to the envelopes plotted in
Fig. 13.25. This moment needs to be modified to account for the distribution between adjacent
stringers and impact. The final values are determined using
DF ¼ 1
22� a
S
� �¼ 1
22� 6
8:67
� �¼ 0:65
MDesigntruck ¼ MLLtruck1þ Ið ÞDF ¼ MLLtruck
1:3 0:65ð Þ ¼ 0:845MLLtruck
Numerical results for the modified moment envelope values at the discrete points (interval of L/10)
are listed in Tables 13.1, 13.2, and 13.3. Note that the results for span III are similar but not identical
to the results for span I. Although the structure is symmetrical, the truck loading is not symmetrical.
Fig. 13.24 Uniform lane
load envelopes
Fig. 13.25 Truck loading
envelopes
13.4 Case Studies 897
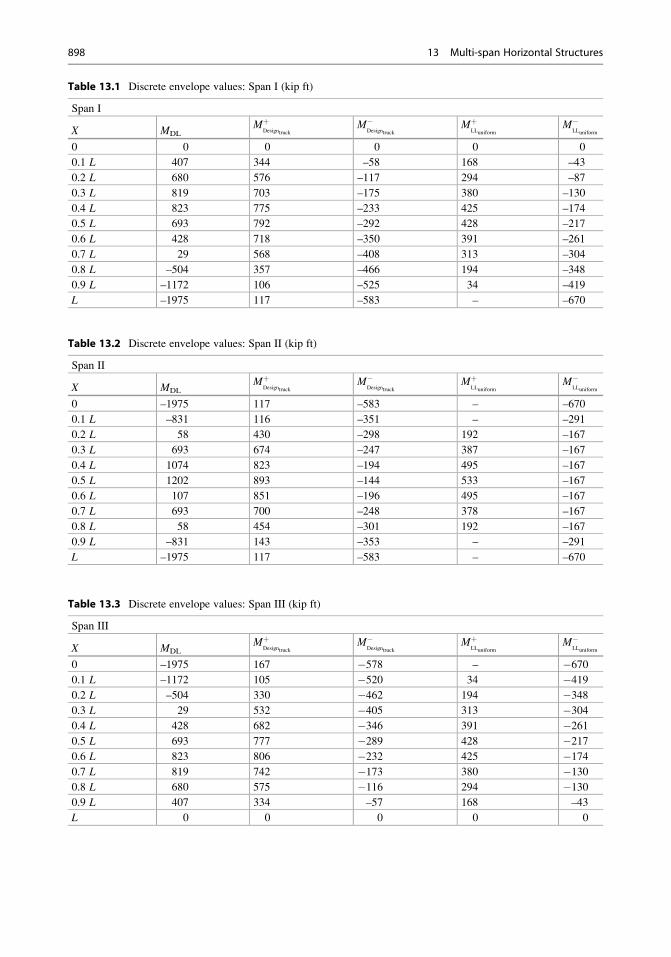
Table 13.1 Discrete envelope values: Span I (kip ft)
Span I
X MDLMþ
DesigntruckM�
DesigntruckMþ
LLuniformM�
LLuniform
0 0 0 0 0 0
0.1 L 407 344 –58 168 –43
0.2 L 680 576 –117 294 –87
0.3 L 819 703 –175 380 –130
0.4 L 823 775 –233 425 –174
0.5 L 693 792 –292 428 –217
0.6 L 428 718 –350 391 –261
0.7 L 29 568 –408 313 –304
0.8 L –504 357 –466 194 –348
0.9 L –1172 106 –525 34 –419
L –1975 117 –583 – –670
Table 13.2 Discrete envelope values: Span II (kip ft)
Span II
X MDLMþ
DesigntruckM�
DesigntruckMþ
LLuniformM�
LLuniform
0 –1975 117 –583 – –670
0.1 L –831 116 –351 – –291
0.2 L 58 430 –298 192 –167
0.3 L 693 674 –247 387 –167
0.4 L 1074 823 –194 495 –167
0.5 L 1202 893 –144 533 –167
0.6 L 107 851 –196 495 –167
0.7 L 693 700 –248 378 –167
0.8 L 58 454 –301 192 –167
0.9 L –831 143 –353 – –291
L –1975 117 –583 – –670
Table 13.3 Discrete envelope values: Span III (kip ft)
Span III
X MDLMþ
DesigntruckM�
DesigntruckMþ
LLuniformM�
LLuniform
0 –1975 167 �578 – �6700.1 L –1172 105 �520 34 �4190.2 L –504 330 �462 194 �3480.3 L 29 532 �405 313 �3040.4 L 428 682 �346 391 �2610.5 L 693 777 �289 428 �2170.6 L 823 806 �232 425 �1740.7 L 819 742 �173 380 �1300.8 L 680 575 �116 294 �1300.9 L 407 334 –57 168 –43
L 0 0 0 0 0
898 13 Multi-span Horizontal Structures
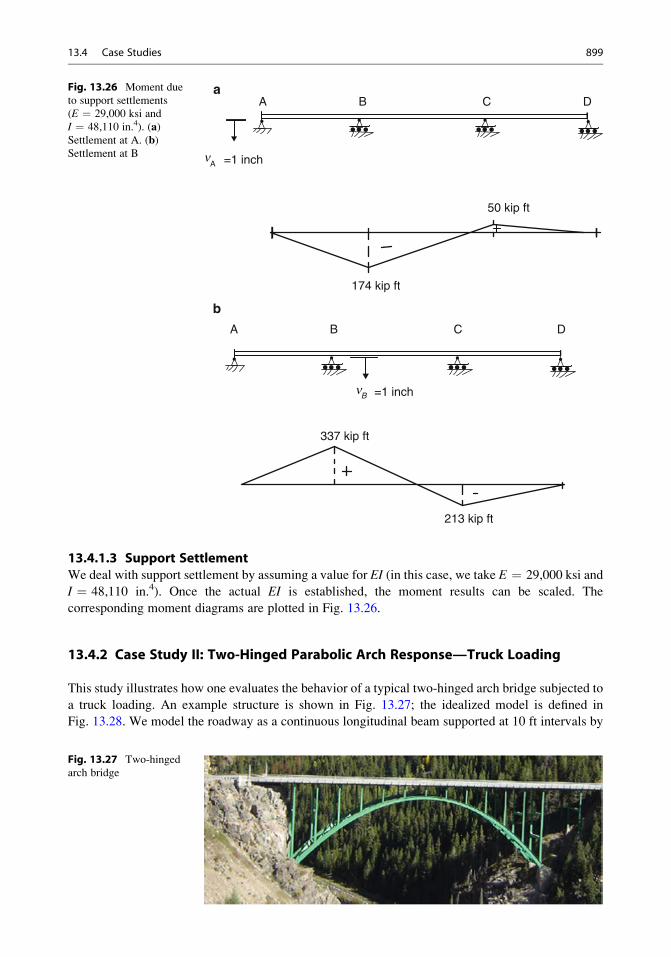
13.4.1.3 Support SettlementWe deal with support settlement by assuming a value for EI (in this case, we take E ¼ 29,000 ksi and
I ¼ 48,110 in.4). Once the actual EI is established, the moment results can be scaled. The
corresponding moment diagrams are plotted in Fig. 13.26.
13.4.2 Case Study II: Two-Hinged Parabolic Arch Response—Truck Loading
This study illustrates how one evaluates the behavior of a typical two-hinged arch bridge subjected to
a truck loading. An example structure is shown in Fig. 13.27; the idealized model is defined in
Fig. 13.28. We model the roadway as a continuous longitudinal beam supported at 10 ft intervals by
A B C D
A B C D
A
B
=1 inch
=1 inch
50 kip ft
174 kip ft
337 kip ft
213 kip ft
a
b
n
n
Fig. 13.26 Moment due
to support settlements
(E ¼ 29,000 ksi and
I ¼ 48,110 in.4). (a)Settlement at A. (b)Settlement at B
Fig. 13.27 Two-hinged
arch bridge
13.4 Case Studies 899
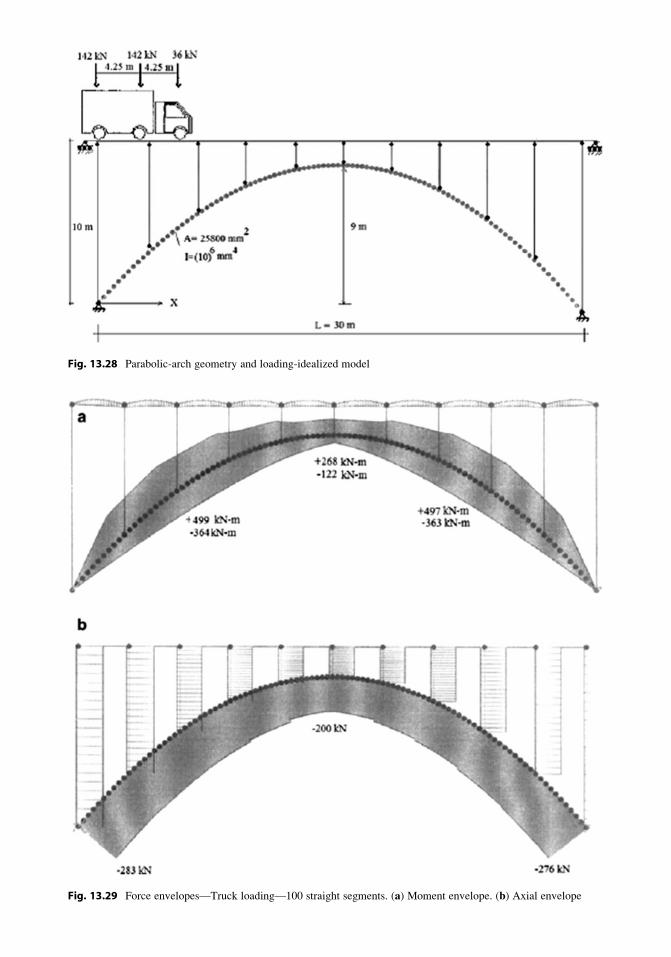
Fig. 13.28 Parabolic-arch geometry and loading-idealized model
Fig. 13.29 Force envelopes—Truck loading—100 straight segments. (a) Moment envelope. (b) Axial envelope
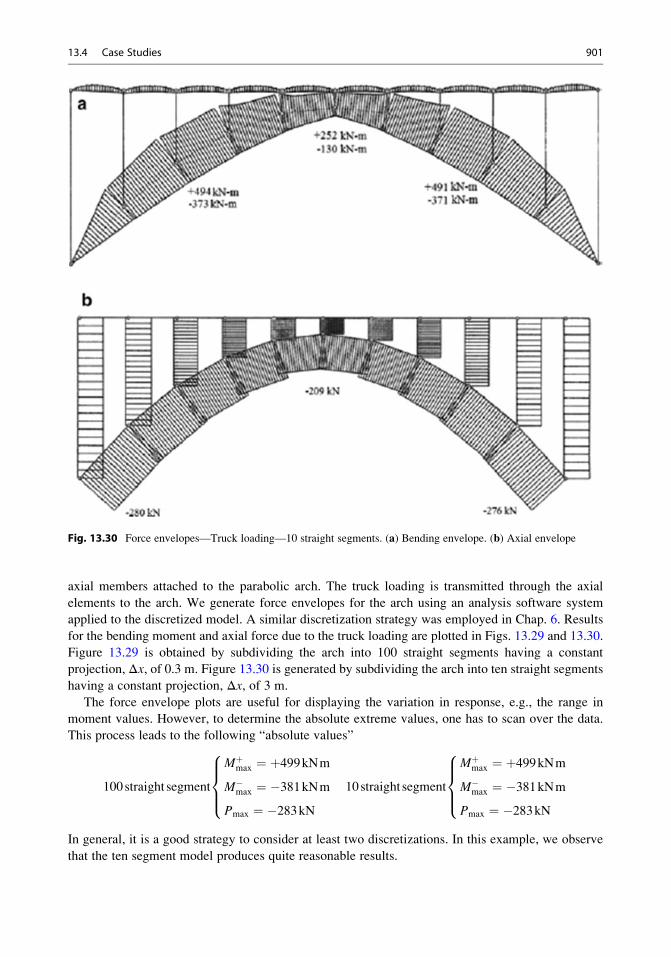
axial members attached to the parabolic arch. The truck loading is transmitted through the axial
elements to the arch. We generate force envelopes for the arch using an analysis software system
applied to the discretized model. A similar discretization strategy was employed in Chap. 6. Results
for the bending moment and axial force due to the truck loading are plotted in Figs. 13.29 and 13.30.
Figure 13.29 is obtained by subdividing the arch into 100 straight segments having a constant
projection, Δx, of 0.3 m. Figure 13.30 is generated by subdividing the arch into ten straight segments
having a constant projection, Δx, of 3 m.
The force envelope plots are useful for displaying the variation in response, e.g., the range in
moment values. However, to determine the absolute extreme values, one has to scan over the data.
This process leads to the following “absolute values”
100straight segment
Mþmax ¼ þ499kNm
M�max ¼ �381kNm
Pmax ¼ �283kN
8>><>>: 10straight segment
Mþmax ¼ þ499kNm
M�max ¼ �381kNm
Pmax ¼ �283kN
8>><>>:
In general, it is a good strategy to consider at least two discretizations. In this example, we observe
that the ten segment model produces quite reasonable results.
Fig. 13.30 Force envelopes—Truck loading—10 straight segments. (a) Bending envelope. (b) Axial envelope
13.4 Case Studies 901
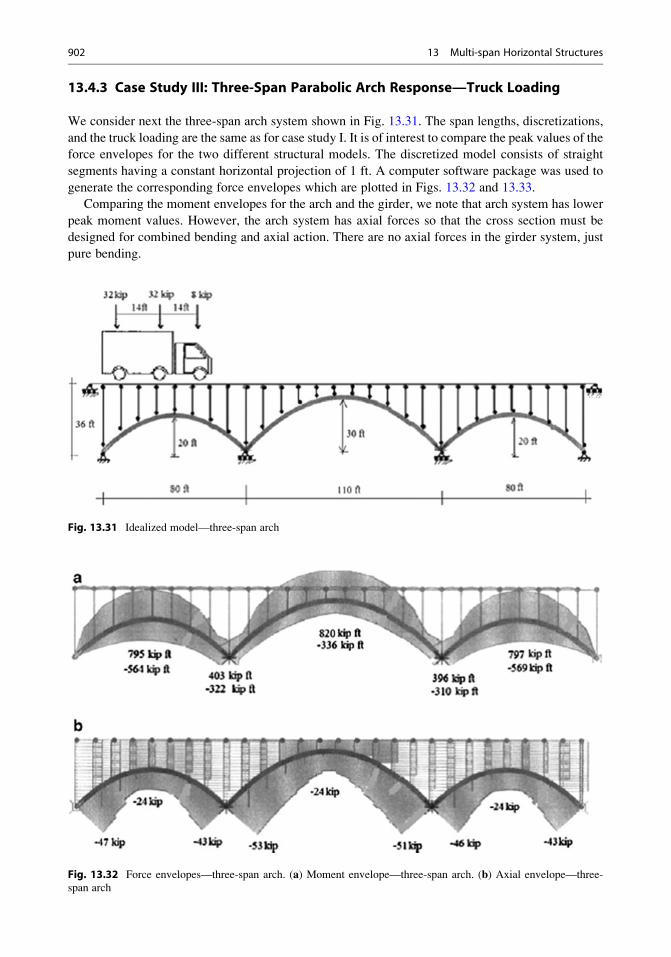
13.4.3 Case Study III: Three-Span Parabolic Arch Response—Truck Loading
We consider next the three-span arch system shown in Fig. 13.31. The span lengths, discretizations,
and the truck loading are the same as for case study I. It is of interest to compare the peak values of the
force envelopes for the two different structural models. The discretized model consists of straight
segments having a constant horizontal projection of 1 ft. A computer software package was used to
generate the corresponding force envelopes which are plotted in Figs. 13.32 and 13.33.
Comparing the moment envelopes for the arch and the girder, we note that arch system has lower
peak moment values. However, the arch system has axial forces so that the cross section must be
designed for combined bending and axial action. There are no axial forces in the girder system, just
pure bending.
Fig. 13.31 Idealized model—three-span arch
Fig. 13.32 Force envelopes—three-span arch. (a) Moment envelope—three-span arch. (b) Axial envelope—three-
span arch
902 13 Multi-span Horizontal Structures
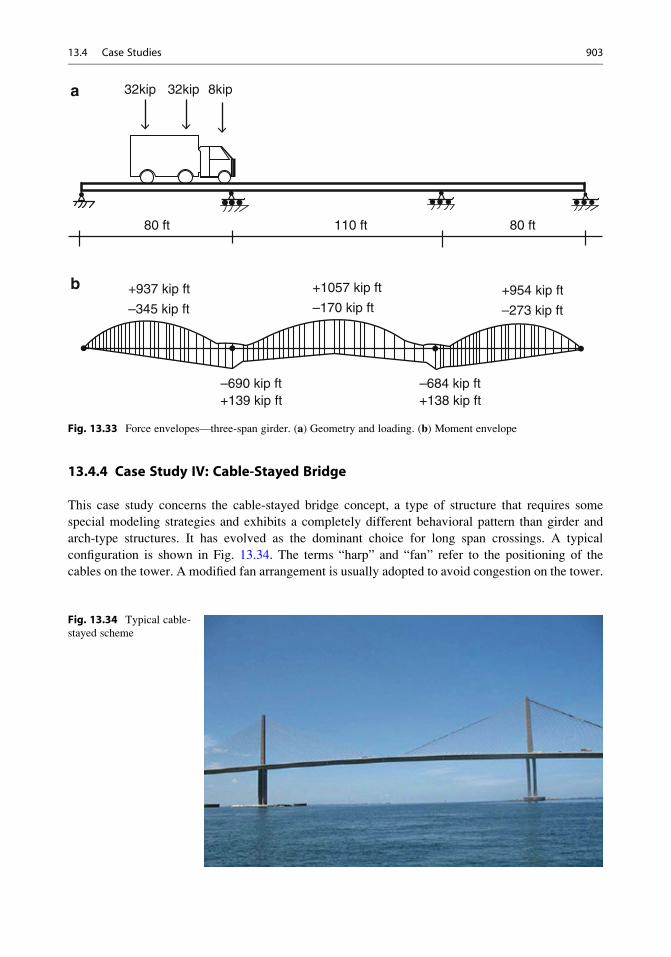
13.4.4 Case Study IV: Cable-Stayed Bridge
This case study concerns the cable-stayed bridge concept, a type of structure that requires some
special modeling strategies and exhibits a completely different behavioral pattern than girder and
arch-type structures. It has evolved as the dominant choice for long span crossings. A typical
configuration is shown in Fig. 13.34. The terms “harp” and “fan” refer to the positioning of the
cables on the tower. A modified fan arrangement is usually adopted to avoid congestion on the tower.
32kip 32kip 8kip
80 ft 80 ft110 ft
+937 kip ft
+139 kip ft
–345 kip ft
+1057 kip ft
–170 kip ft
–690 kip ft+138 kip ft–684 kip ft
+954 kip ft
–273 kip ft
a
b
Fig. 13.33 Force envelopes—three-span girder. (a) Geometry and loading. (b) Moment envelope
Fig. 13.34 Typical cable-
stayed scheme
13.4 Case Studies 903

Of particular interest is the load path for vertical loading applied to the girder. Without the cables,
the girder carries the load by bending action throughout the total span. Since the maximum moment
varies as to the square of the span length, this structural concept is not feasible for long spans. The
effect of the cables is to provide a set of vertical supports to the girder, thus reducing the moment in
the girder. In what follows, we illustrate this effect using the idealized structure shown in Fig. 13.35.
We suppose the girder is continuous, and the cable layout is symmetrical (equally spaced on the
longitudinal axis). There are seven pairs of symmetrical cables. Each cable has a different cross-
sectional area. The girder is hinged at the tower, but free to expand at the two end supports. We model
the cables as straight members that are hinged at their ends to the tower and the girder. In this way,
they function as axial elements and transmit the gravity loading applied to the girder up to the tower.
The net effect is to reduce the bending moment in the girder.
Starting with nodes at the supports and the cable–girder intersection points, one may also
discretize the girder between the cable nodes to obtain more refined displacement and moment
profiles. Since the structure is indeterminate, we need to specify member properties in order to
execute an analysis. We estimate the cable areas by assuming an individual cable carries the tributary
loading on a segment adjacent to the cable. This estimate is based on strength.
AC ¼ T
σall¼ wΔL
σall sin θ
where σall is some fraction of the yield stress andΔL is the cable spacing. This equation shows that the
required area increases with decreasing θ. Therefore, one must increase the cable area as the distance
from the tower increases. A lower limit on θ is usually taken as 15� (Fig. 13.36).Taking w ¼ 10 kN/m, ΔL ¼ 30 m, and σall ¼ 0.687 kN/mm2 leads to the estimated cable areas
listed below.
Cable θ � 1sin θ Acable (mm2)
C1 19.6 3 1305
C2 22.6 2.3 1130
C3 26.5 2.2 957
C4 32 1.9 827
C5 39.8 1.6 696
C6 51.3 1.3 566
C7 68.2 1.1 480
Fig. 13.35 Idealized cable-stayed scheme
904 13 Multi-span Horizontal Structures
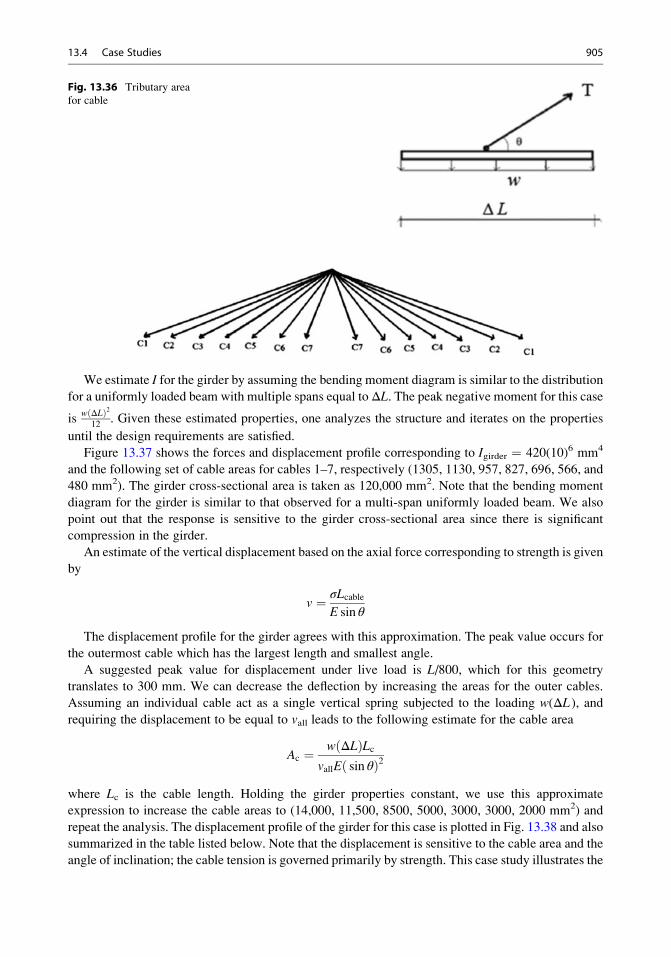
We estimate I for the girder by assuming the bending moment diagram is similar to the distribution
for a uniformly loaded beam with multiple spans equal toΔL. The peak negative moment for this case
isw ΔLð Þ2
12. Given these estimated properties, one analyzes the structure and iterates on the properties
until the design requirements are satisfied.
Figure 13.37 shows the forces and displacement profile corresponding to Igirder ¼ 420(10)6 mm4
and the following set of cable areas for cables 1–7, respectively (1305, 1130, 957, 827, 696, 566, and
480 mm2). The girder cross-sectional area is taken as 120,000 mm2. Note that the bending moment
diagram for the girder is similar to that observed for a multi-span uniformly loaded beam. We also
point out that the response is sensitive to the girder cross-sectional area since there is significant
compression in the girder.
An estimate of the vertical displacement based on the axial force corresponding to strength is given
by
v ¼ σLcableE sin θ
The displacement profile for the girder agrees with this approximation. The peak value occurs for
the outermost cable which has the largest length and smallest angle.
A suggested peak value for displacement under live load is L/800, which for this geometry
translates to 300 mm. We can decrease the deflection by increasing the areas for the outer cables.
Assuming an individual cable act as a single vertical spring subjected to the loading w(ΔL), andrequiring the displacement to be equal to vall leads to the following estimate for the cable area
Ac ¼ w ΔLð ÞLcvallE sin θð Þ2
where Lc is the cable length. Holding the girder properties constant, we use this approximate
expression to increase the cable areas to (14,000, 11,500, 8500, 5000, 3000, 3000, 2000 mm2) and
repeat the analysis. The displacement profile of the girder for this case is plotted in Fig. 13.38 and also
summarized in the table listed below. Note that the displacement is sensitive to the cable area and the
angle of inclination; the cable tension is governed primarily by strength. This case study illustrates the
Fig. 13.36 Tributary area
for cable
13.4 Case Studies 905
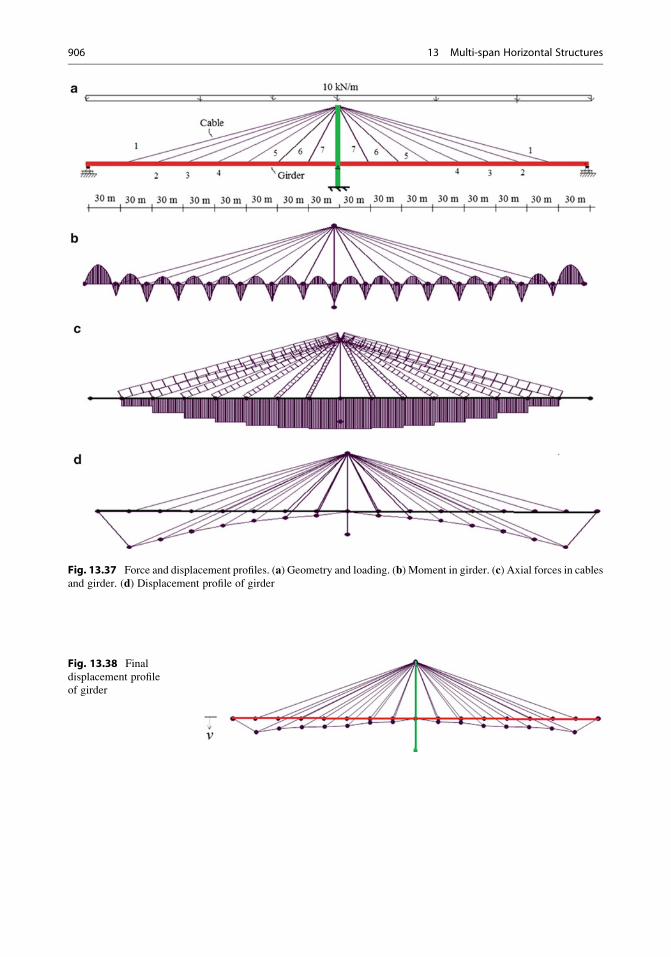
Fig. 13.37 Force and displacement profiles. (a) Geometry and loading. (b) Moment in girder. (c) Axial forces in cablesand girder. (d) Displacement profile of girder
Fig. 13.38 Final
displacement profile
of girder
906 13 Multi-span Horizontal Structures
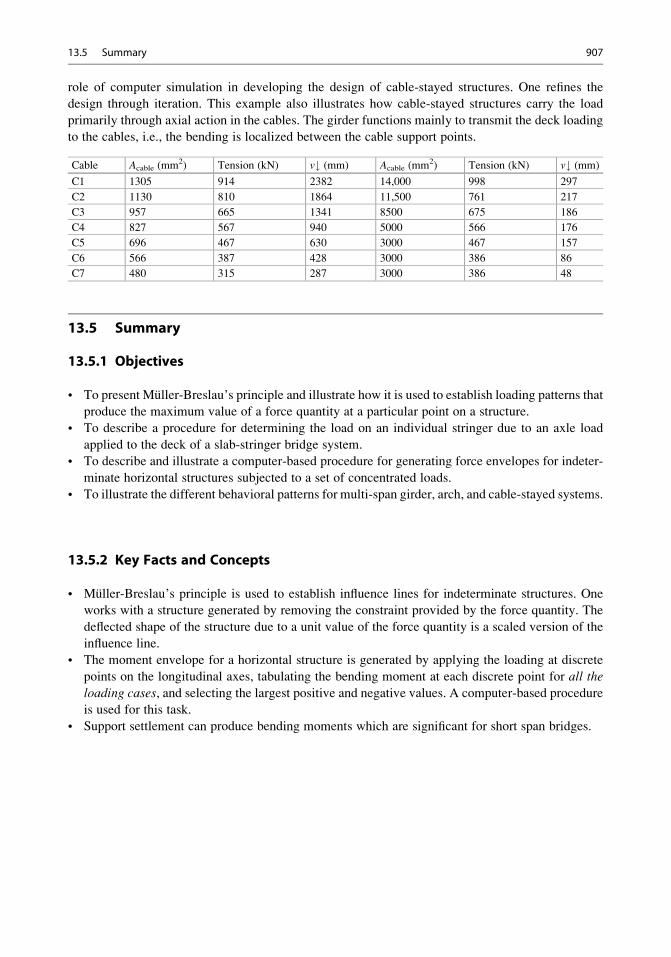
role of computer simulation in developing the design of cable-stayed structures. One refines the
design through iteration. This example also illustrates how cable-stayed structures carry the load
primarily through axial action in the cables. The girder functions mainly to transmit the deck loading
to the cables, i.e., the bending is localized between the cable support points.
Cable Acable (mm2) Tension (kN) v# (mm) Acable (mm2) Tension (kN) v# (mm)
C1 1305 914 2382 14,000 998 297
C2 1130 810 1864 11,500 761 217
C3 957 665 1341 8500 675 186
C4 827 567 940 5000 566 176
C5 696 467 630 3000 467 157
C6 566 387 428 3000 386 86
C7 480 315 287 3000 386 48
13.5 Summary
13.5.1 Objectives
• To present Muller-Breslau’s principle and illustrate how it is used to establish loading patterns that
produce the maximum value of a force quantity at a particular point on a structure.
• To describe a procedure for determining the load on an individual stringer due to an axle load
applied to the deck of a slab-stringer bridge system.
• To describe and illustrate a computer-based procedure for generating force envelopes for indeter-
minate horizontal structures subjected to a set of concentrated loads.
• To illustrate the different behavioral patterns for multi-span girder, arch, and cable-stayed systems.
13.5.2 Key Facts and Concepts
• Muller-Breslau’s principle is used to establish influence lines for indeterminate structures. One
works with a structure generated by removing the constraint provided by the force quantity. The
deflected shape of the structure due to a unit value of the force quantity is a scaled version of the
influence line.
• The moment envelope for a horizontal structure is generated by applying the loading at discrete
points on the longitudinal axes, tabulating the bending moment at each discrete point for all the
loading cases, and selecting the largest positive and negative values. A computer-based procedure
is used for this task.
• Support settlement can produce bending moments which are significant for short span bridges.
13.5 Summary 907
13.6 Problems
Problem 13.1
1
1
1
2 3 4 5
I I I I
10 ft
40 ft 40 ft 30 ft30 ft
(a) Using Muller-Breslau principle, sketch the influence lines for the vertical upward reaction at
support 3 (R3), the negative moment at support 2 (M2), and the negative moment at section 1-1
(M1–1)
(b) Use a software package to determine:
(i) The maximum values of R3, M2, and M1–1 cause by a uniformly distributed dead load of
2 kip/ft.
(ii) The maximum value of M2 caused by a uniformly distributed live load of 1 kip/ft.
Problem 13.2 Consider the single span bridge shown below. Using the analytical procedure
described in Sect. 3.10.2.1, determine the absolute maximum value of moment developed as the
truck loading defined below passes over the span. Repeat the analysis using computer software.
Problem 13.3 Consider the two-span bridges shown below. Use computer software to determine
global moment envelopes for both the lane and truck loadings defined below.
Lane load: w ¼ 10 kN/m uniform
Truck load:
(a) L1 ¼ L2 ¼ 30 m, EI is constant
908 13 Multi-span Horizontal Structures
(b) L1 ¼ 15 m, L2 ¼ 30 m, EI is constant
(c) L1 ¼ L2 ¼ 30 m, EI is constant
(d) Compare the global moment envelopes for the structure shown below with the envelopes
generated in part (a). Is there any effect of varying I?
Problem 13.4 Consider the multi-span bridge shown below. Suppose the bridge is expected to
experience a temperature change ofΔT over its entire length. Where would you place a hinge support:
at A or at B? Determine the end movement corresponding to your choice of support location.
13.6 Problems 909
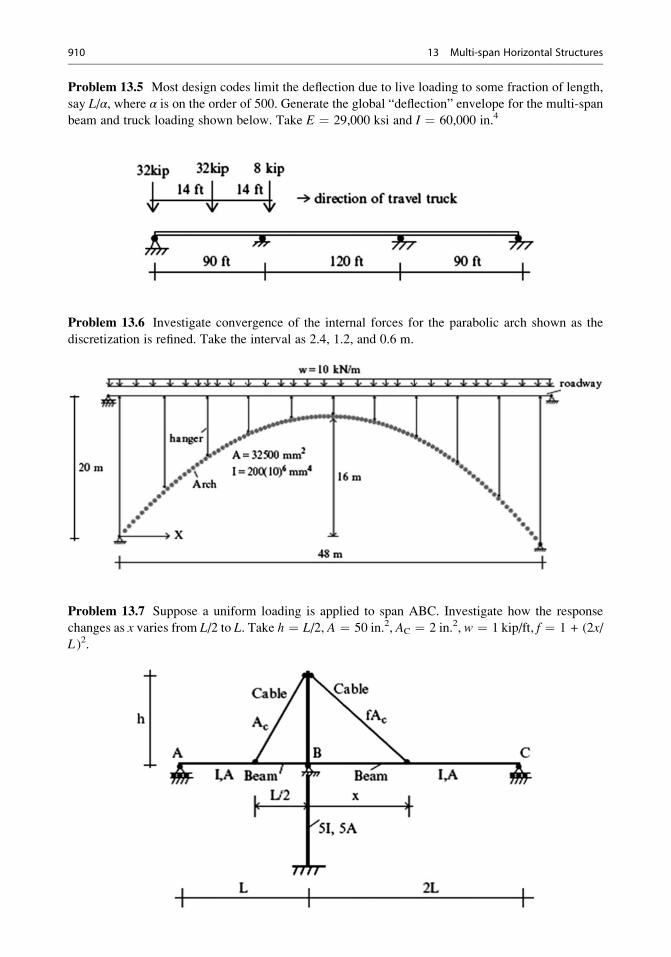
Problem 13.5 Most design codes limit the deflection due to live loading to some fraction of length,
say L/α, where α is on the order of 500. Generate the global “deflection” envelope for the multi-span
beam and truck loading shown below. Take E ¼ 29,000 ksi and I ¼ 60,000 in.4
Problem 13.6 Investigate convergence of the internal forces for the parabolic arch shown as the
discretization is refined. Take the interval as 2.4, 1.2, and 0.6 m.
Problem 13.7 Suppose a uniform loading is applied to span ABC. Investigate how the response
changes as x varies from L/2 to L. Take h ¼ L/2, A ¼ 50 in.2, AC ¼ 2 in.2, w ¼ 1 kip/ft, f ¼ 1 + (2x/
L )2.
910 13 Multi-span Horizontal Structures
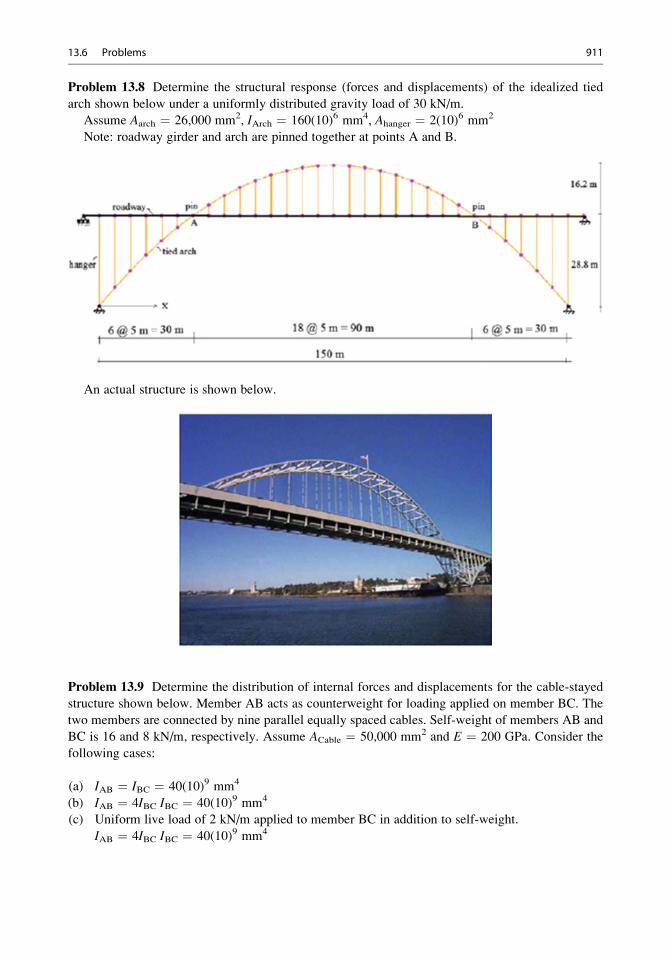
Problem 13.8 Determine the structural response (forces and displacements) of the idealized tied
arch shown below under a uniformly distributed gravity load of 30 kN/m.
Assume Aarch ¼ 26,000 mm2, IArch ¼ 160(10)6 mm4, Ahanger ¼ 2(10)6 mm2
Note: roadway girder and arch are pinned together at points A and B.
An actual structure is shown below.
Problem 13.9 Determine the distribution of internal forces and displacements for the cable-stayed
structure shown below. Member AB acts as counterweight for loading applied on member BC. The
two members are connected by nine parallel equally spaced cables. Self-weight of members AB and
BC is 16 and 8 kN/m, respectively. Assume ACable ¼ 50,000 mm2 and E ¼ 200 GPa. Consider the
following cases:
(a) IAB ¼ IBC ¼ 40(10)9 mm4
(b) IAB ¼ 4IBC IBC ¼ 40(10)9 mm4
(c) Uniform live load of 2 kN/m applied to member BC in addition to self-weight.
IAB ¼ 4IBC IBC ¼ 40(10)9 mm4
13.6 Problems 911
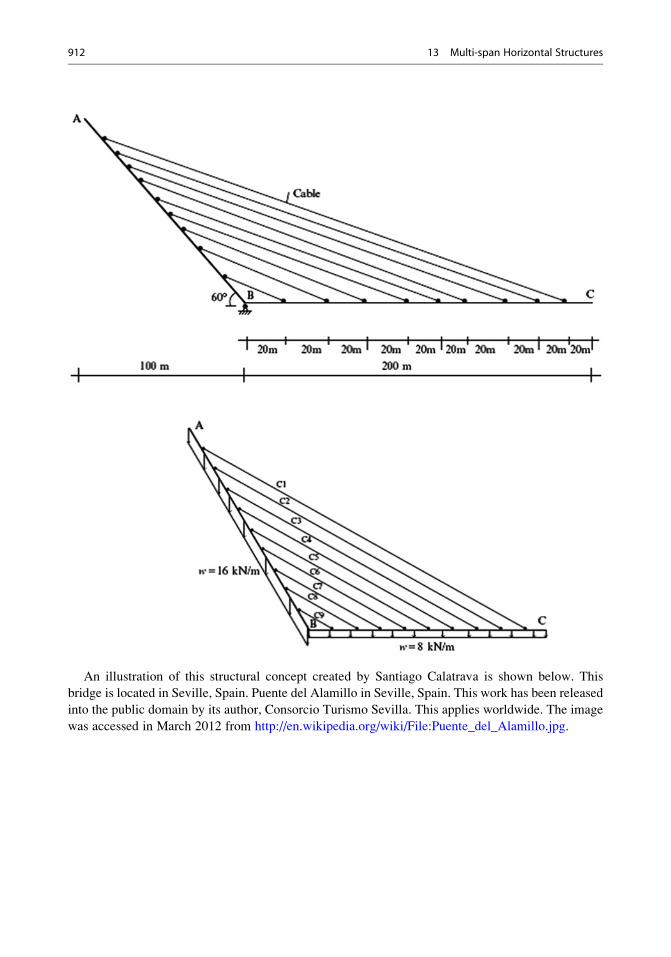
An illustration of this structural concept created by Santiago Calatrava is shown below. This
bridge is located in Seville, Spain. Puente del Alamillo in Seville, Spain. This work has been released
into the public domain by its author, Consorcio Turismo Sevilla. This applies worldwide. The image
was accessed in March 2012 from http://en.wikipedia.org/wiki/File:Puente_del_Alamillo.jpg.
912 13 Multi-span Horizontal Structures
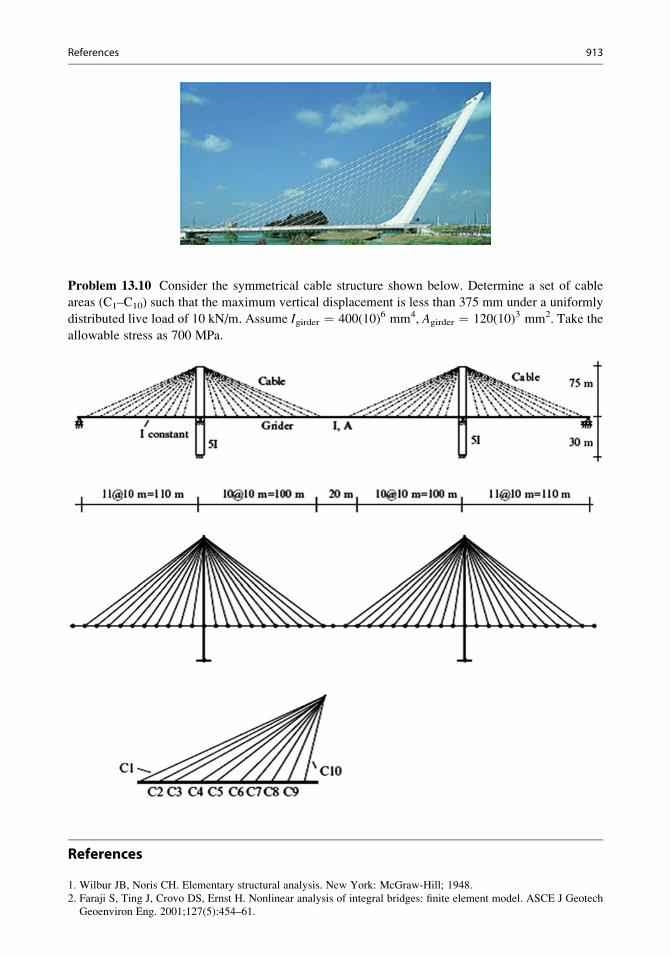
Problem 13.10 Consider the symmetrical cable structure shown below. Determine a set of cable
areas (C1–C10) such that the maximum vertical displacement is less than 375 mm under a uniformly
distributed live load of 10 kN/m. Assume Igirder ¼ 400(10)6 mm4, Agirder ¼ 120(10)3 mm2. Take the
allowable stress as 700 MPa.
References
1. Wilbur JB, Noris CH. Elementary structural analysis. New York: McGraw-Hill; 1948.
2. Faraji S, Ting J, Crovo DS, Ernst H. Nonlinear analysis of integral bridges: finite element model. ASCE J Geotech
Geoenviron Eng. 2001;127(5):454–61.
References 913
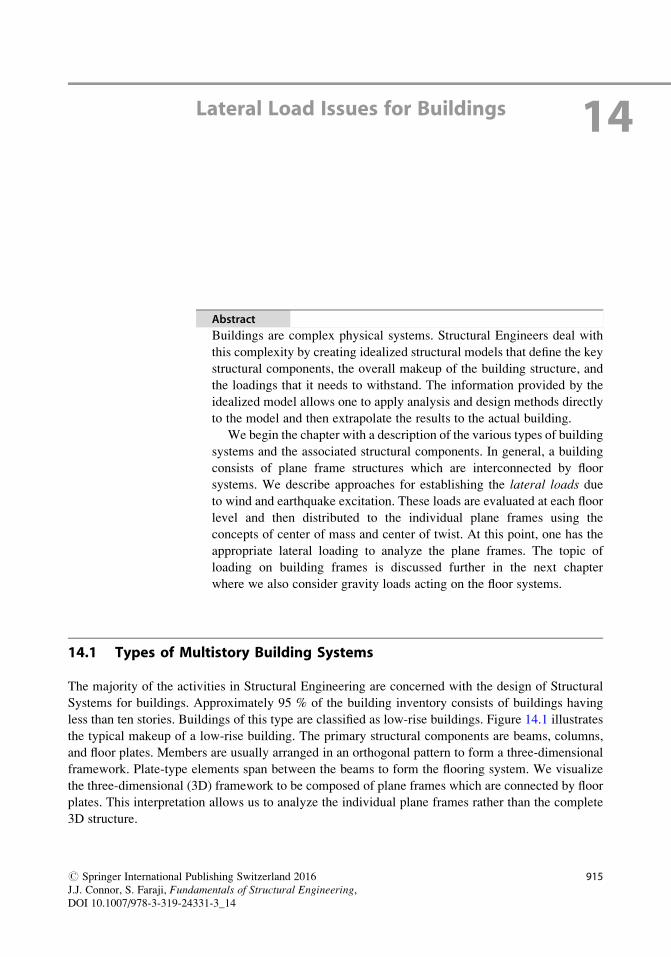
Lateral Load Issues for Buildings 14
Abstract
Buildings are complex physical systems. Structural Engineers deal with
this complexity by creating idealized structural models that define the key
structural components, the overall makeup of the building structure, and
the loadings that it needs to withstand. The information provided by the
idealized model allows one to apply analysis and design methods directly
to the model and then extrapolate the results to the actual building.
We begin the chapter with a description of the various types of building
systems and the associated structural components. In general, a building
consists of plane frame structures which are interconnected by floor
systems. We describe approaches for establishing the lateral loads due
to wind and earthquake excitation. These loads are evaluated at each floor
level and then distributed to the individual plane frames using the
concepts of center of mass and center of twist. At this point, one has the
appropriate lateral loading to analyze the plane frames. The topic of
loading on building frames is discussed further in the next chapter
where we also consider gravity loads acting on the floor systems.
14.1 Types of Multistory Building Systems
The majority of the activities in Structural Engineering are concerned with the design of Structural
Systems for buildings. Approximately 95 % of the building inventory consists of buildings having
less than ten stories. Buildings of this type are classified as low-rise buildings. Figure 14.1 illustrates
the typical makeup of a low-rise building. The primary structural components are beams, columns,
and floor plates. Members are usually arranged in an orthogonal pattern to form a three-dimensional
framework. Plate-type elements span between the beams to form the flooring system. We visualize
the three-dimensional (3D) framework to be composed of plane frames which are connected by floor
plates. This interpretation allows us to analyze the individual plane frames rather than the complete
3D structure.
# Springer International Publishing Switzerland 2016
J.J. Connor, S. Faraji, Fundamentals of Structural Engineering,DOI 10.1007/978-3-319-24331-3_14
915
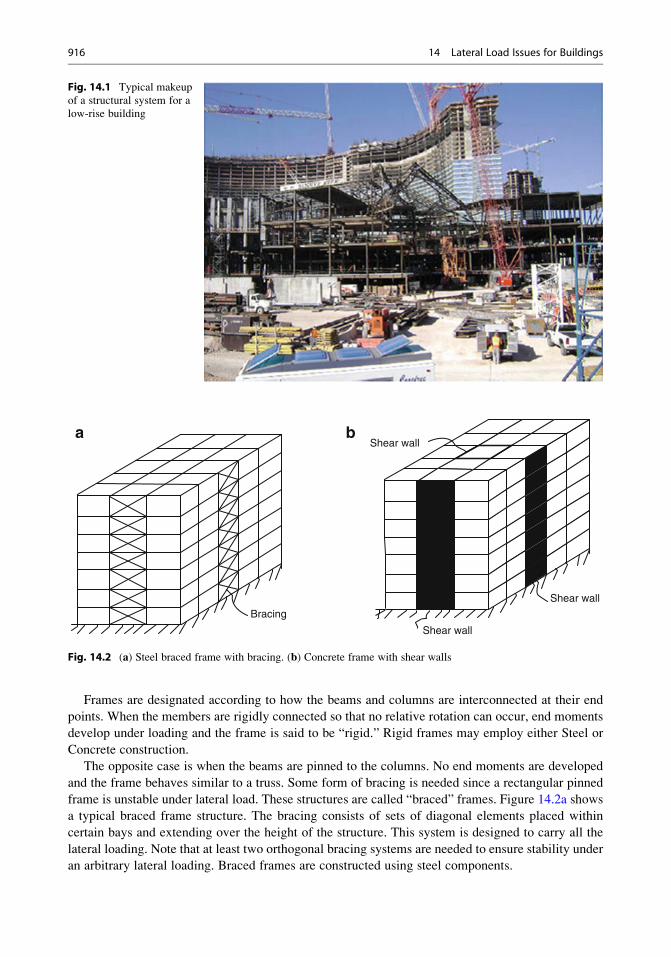
Frames are designated according to how the beams and columns are interconnected at their end
points. When the members are rigidly connected so that no relative rotation can occur, end moments
develop under loading and the frame is said to be “rigid.” Rigid frames may employ either Steel or
Concrete construction.
The opposite case is when the beams are pinned to the columns. No end moments are developed
and the frame behaves similar to a truss. Some form of bracing is needed since a rectangular pinned
frame is unstable under lateral load. These structures are called “braced” frames. Figure 14.2a shows
a typical braced frame structure. The bracing consists of sets of diagonal elements placed within
certain bays and extending over the height of the structure. This system is designed to carry all the
lateral loading. Note that at least two orthogonal bracing systems are needed to ensure stability under
an arbitrary lateral loading. Braced frames are constructed using steel components.
Fig. 14.1 Typical makeup
of a structural system for a
low-rise building
a bShear wall
Shear wall
Shear wall
Bracing
Fig. 14.2 (a) Steel braced frame with bracing. (b) Concrete frame with shear walls
916 14 Lateral Load Issues for Buildings
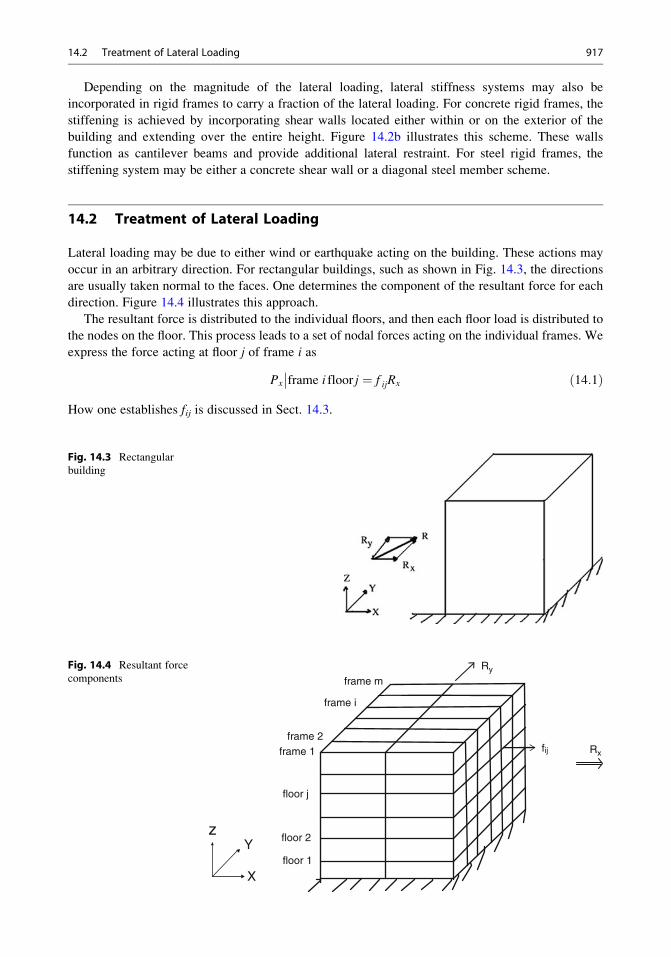
Depending on the magnitude of the lateral loading, lateral stiffness systems may also be
incorporated in rigid frames to carry a fraction of the lateral loading. For concrete rigid frames, the
stiffening is achieved by incorporating shear walls located either within or on the exterior of the
building and extending over the entire height. Figure 14.2b illustrates this scheme. These walls
function as cantilever beams and provide additional lateral restraint. For steel rigid frames, the
stiffening system may be either a concrete shear wall or a diagonal steel member scheme.
14.2 Treatment of Lateral Loading
Lateral loading may be due to either wind or earthquake acting on the building. These actions may
occur in an arbitrary direction. For rectangular buildings, such as shown in Fig. 14.3, the directions
are usually taken normal to the faces. One determines the component of the resultant force for each
direction. Figure 14.4 illustrates this approach.
The resultant force is distributed to the individual floors, and then each floor load is distributed to
the nodes on the floor. This process leads to a set of nodal forces acting on the individual frames. We
express the force acting at floor j of frame i as
Px
��frame i floor j ¼ f ijRx ð14:1Þ
How one establishes fij is discussed in Sect. 14.3.
Fig. 14.3 Rectangular
building
floor 1
floor 2
floor j
frame 1frame 2
frame i
frame m
zY
X
fij Rx
RyFig. 14.4 Resultant force
components
14.2 Treatment of Lateral Loading 917

14.2.1 Wind Loading
We suppose the wind acts in the x direction, as shown in Fig. 14.5a. The normal pressure varies in
the vertical direction according to a power law (e.g., p ~ z1/7). We approximate the distribution with a
set of step functions centered at the floor levels and generate the resultant force for each floor by
integrating over the tributary area associated with the floor. This process is illustrated in Fig. 14.5b, c.
The individual floor forces are given by
Pi ¼ p zið Þ ziþ1 � zi2
þ zi � zi�12
h iB ¼ p zið Þ ziþ1 � zi�1
2
h iB
i ¼ 1, 2, . . . , nð14:2Þ
z
zb
B
a
n
n–1
i
n
n–1
i
3
2
1
3
2
1
Y
Wind
zY
X
X
zi
Pi
Fig. 14.5 Lateral floor forces due to wind pressure. (a) Wind in X direction. (b) Wind on Y–Z face. (c) Floor loads dueto wind load on Y–Z face
918 14 Lateral Load Issues for Buildings
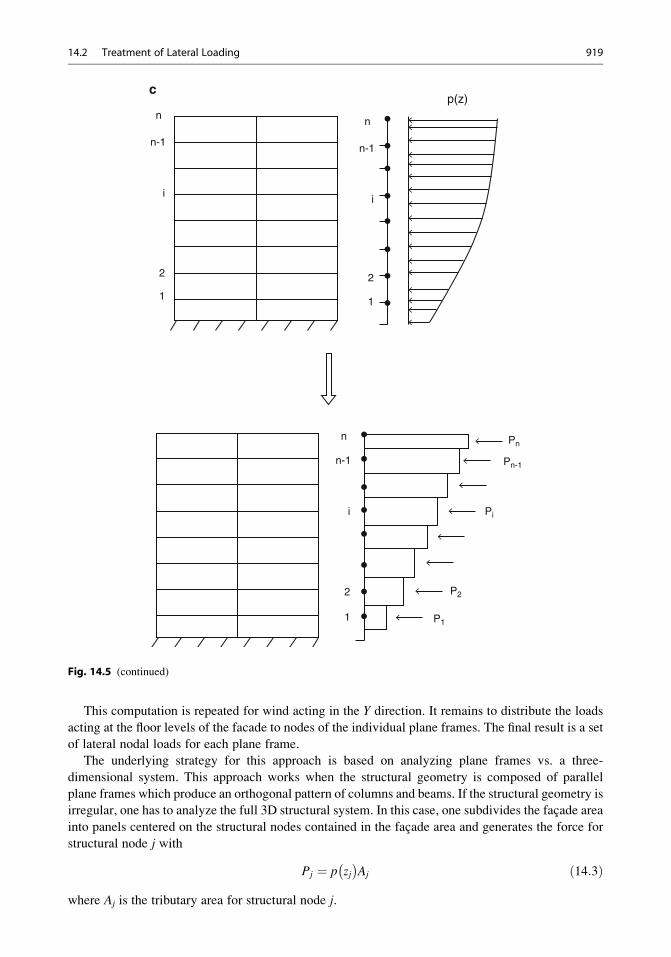
This computation is repeated for wind acting in the Y direction. It remains to distribute the loads
acting at the floor levels of the facade to nodes of the individual plane frames. The final result is a set
of lateral nodal loads for each plane frame.
The underlying strategy for this approach is based on analyzing plane frames vs. a three-
dimensional system. This approach works when the structural geometry is composed of parallel
plane frames which produce an orthogonal pattern of columns and beams. If the structural geometry is
irregular, one has to analyze the full 3D structural system. In this case, one subdivides the facade area
into panels centered on the structural nodes contained in the facade area and generates the force for
structural node j with
Pj ¼ p zj� �
Aj ð14:3Þ
where Aj is the tributary area for structural node j.
n
n-1
2
1
i
n
n-1
2
1
i
n
p(z)
n-1
2
1
i
Pn
Pn-1
Pi
P2
P1
c
Fig. 14.5 (continued)
14.2 Treatment of Lateral Loading 919
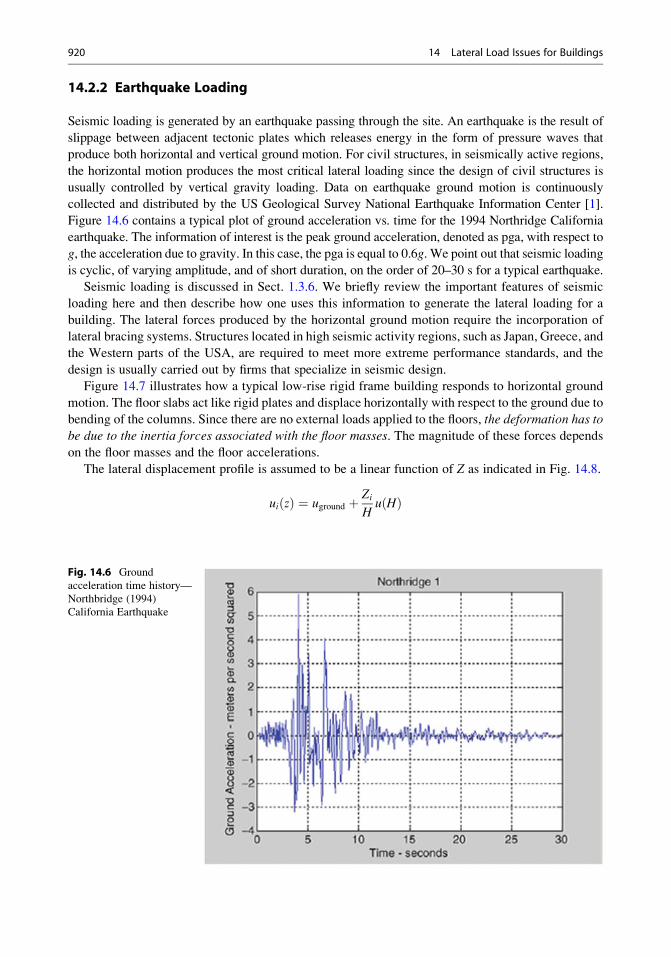
14.2.2 Earthquake Loading
Seismic loading is generated by an earthquake passing through the site. An earthquake is the result of
slippage between adjacent tectonic plates which releases energy in the form of pressure waves that
produce both horizontal and vertical ground motion. For civil structures, in seismically active regions,
the horizontal motion produces the most critical lateral loading since the design of civil structures is
usually controlled by vertical gravity loading. Data on earthquake ground motion is continuously
collected and distributed by the US Geological Survey National Earthquake Information Center [1].
Figure 14.6 contains a typical plot of ground acceleration vs. time for the 1994 Northridge California
earthquake. The information of interest is the peak ground acceleration, denoted as pga, with respect to
g, the acceleration due to gravity. In this case, the pga is equal to 0.6g. We point out that seismic loading
is cyclic, of varying amplitude, and of short duration, on the order of 20–30 s for a typical earthquake.
Seismic loading is discussed in Sect. 1.3.6. We briefly review the important features of seismic
loading here and then describe how one uses this information to generate the lateral loading for a
building. The lateral forces produced by the horizontal ground motion require the incorporation of
lateral bracing systems. Structures located in high seismic activity regions, such as Japan, Greece, and
the Western parts of the USA, are required to meet more extreme performance standards, and the
design is usually carried out by firms that specialize in seismic design.
Figure 14.7 illustrates how a typical low-rise rigid frame building responds to horizontal ground
motion. The floor slabs act like rigid plates and displace horizontally with respect to the ground due to
bending of the columns. Since there are no external loads applied to the floors, the deformation has tobe due to the inertia forces associated with the floor masses. The magnitude of these forces depends
on the floor masses and the floor accelerations.
The lateral displacement profile is assumed to be a linear function of Z as indicated in Fig. 14.8.
ui zð Þ ¼ uground þ Zi
Hu Hð Þ
Fig. 14.6 Ground
acceleration time history—
Northbridge (1994)
California Earthquake
920 14 Lateral Load Issues for Buildings
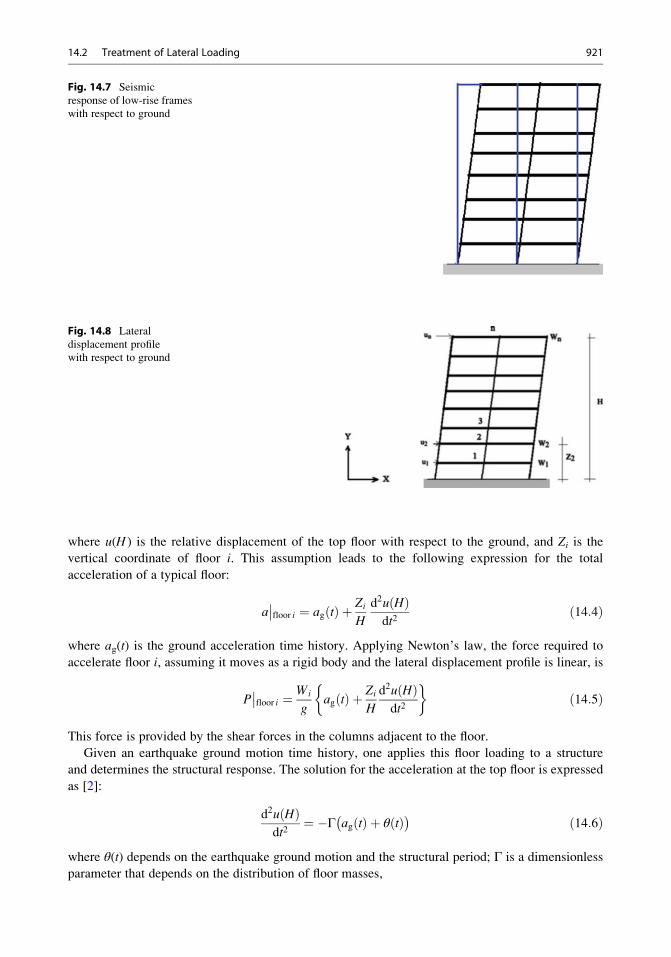
where u(H ) is the relative displacement of the top floor with respect to the ground, and Zi is the
vertical coordinate of floor i. This assumption leads to the following expression for the total
acceleration of a typical floor:
a��floor i ¼ ag tð Þ þ Zi
H
d2u Hð Þdt2
ð14:4Þ
where ag(t) is the ground acceleration time history. Applying Newton’s law, the force required to
accelerate floor i, assuming it moves as a rigid body and the lateral displacement profile is linear, is
P��floor i ¼ Wi
gag tð Þ þ Zi
H
d2u Hð Þdt2
�ð14:5Þ
This force is provided by the shear forces in the columns adjacent to the floor.
Given an earthquake ground motion time history, one applies this floor loading to a structure
and determines the structural response. The solution for the acceleration at the top floor is expressed
as [2]:
d2u Hð Þdt2
¼ �Γ ag tð Þ þ θ tð Þ� � ð14:6Þ
where θ(t) depends on the earthquake ground motion and the structural period; Γ is a dimensionless
parameter that depends on the distribution of floor masses,
Fig. 14.7 Seismic
response of low-rise frames
with respect to ground
Fig. 14.8 Lateral
displacement profile
with respect to ground
14.2 Treatment of Lateral Loading 921
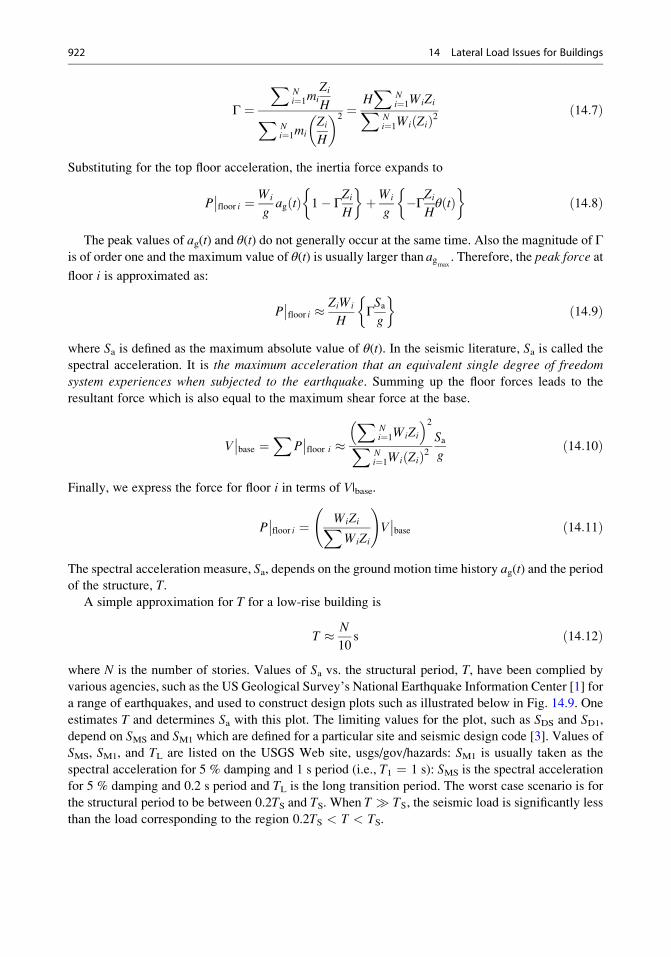
Γ ¼X
Ni¼1mi
Zi
HXNi¼1mi
Zi
H
� �2¼ H
XNi¼1WiZiX
Ni¼1Wi Zið Þ2
ð14:7Þ
Substituting for the top floor acceleration, the inertia force expands to
P��floor i ¼ Wi
gag tð Þ 1� Γ
Zi
H
�þWi
g�ΓZi
Hθ tð Þ
�ð14:8Þ
The peak values of ag(t) and θ(t) do not generally occur at the same time. Also the magnitude of Γis of order one and the maximum value of θ(t) is usually larger than ag
max. Therefore, the peak force at
floor i is approximated as:
P��floor i � ZiWi
HΓSag
�ð14:9Þ
where Sa is defined as the maximum absolute value of θ(t). In the seismic literature, Sa is called the
spectral acceleration. It is the maximum acceleration that an equivalent single degree of freedom
system experiences when subjected to the earthquake. Summing up the floor forces leads to the
resultant force which is also equal to the maximum shear force at the base.
V��base ¼
XP��floor i �
XNi¼1WiZi
� �2X
Ni¼1Wi Zið Þ2
Sag
ð14:10Þ
Finally, we express the force for floor i in terms of V|base.
P��floor i ¼ WiZiX
WiZi
!V��base ð14:11Þ
The spectral acceleration measure, Sa, depends on the ground motion time history ag(t) and the periodof the structure, T.
A simple approximation for T for a low-rise building is
T � N
10s ð14:12Þ
where N is the number of stories. Values of Sa vs. the structural period, T, have been complied by
various agencies, such as the US Geological Survey’s National Earthquake Information Center [1] for
a range of earthquakes, and used to construct design plots such as illustrated below in Fig. 14.9. One
estimates T and determines Sa with this plot. The limiting values for the plot, such as SDS and SD1,depend on SMS and SM1 which are defined for a particular site and seismic design code [3]. Values of
SMS, SM1, and TL are listed on the USGS Web site, usgs/gov/hazards: SM1 is usually taken as the
spectral acceleration for 5 % damping and 1 s period (i.e., T1 ¼ 1 s): SMS is the spectral acceleration
for 5 % damping and 0.2 s period and TL is the long transition period. The worst case scenario is for
the structural period to be between 0.2TS and TS. When T � TS, the seismic load is significantly less
than the load corresponding to the region 0.2TS < T < TS.
922 14 Lateral Load Issues for Buildings
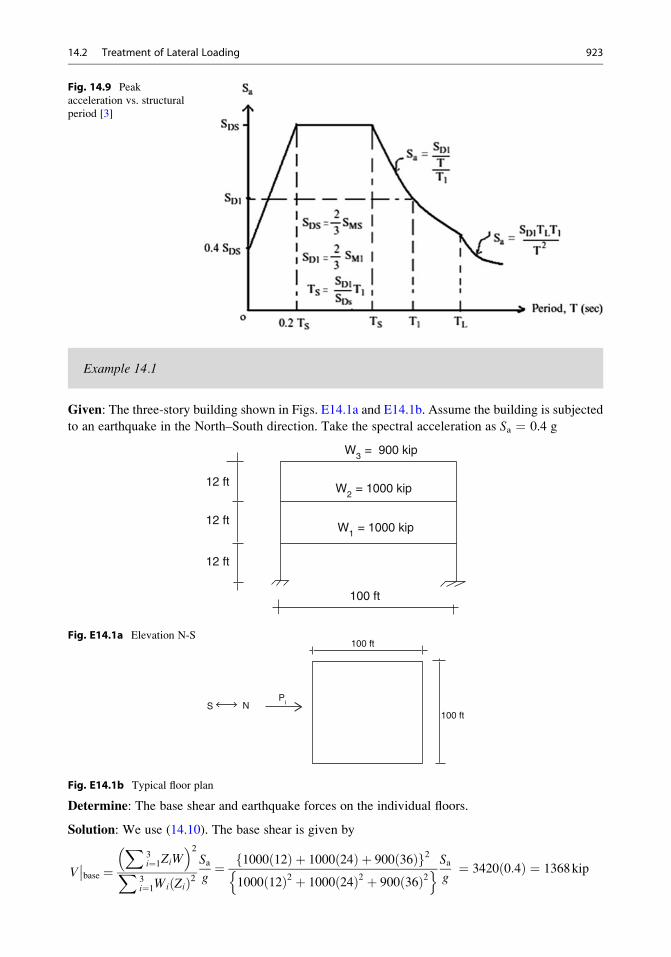
Example 14.1
Given: The three-story building shown in Figs. E14.1a and E14.1b. Assume the building is subjected
to an earthquake in the North–South direction. Take the spectral acceleration as Sa ¼ 0.4 g
12 ft
12 ft
12 ft
100 ft
W3 = 900 kip
W2 = 1000 kip
W1 = 1000 kip
Fig. E14.1a Elevation N-S100 ft
100 ftS N
Pi
Fig. E14.1b Typical floor plan
Determine: The base shear and earthquake forces on the individual floors.
Solution: We use (14.10). The base shear is given by
V��base ¼
X3i¼1ZiW
� �2X
3i¼1Wi Zið Þ2
Sag¼ 1000 12ð Þ þ 1000 24ð Þ þ 900 36ð Þf g2
1000 12ð Þ2 þ 1000 24ð Þ2 þ 900 36ð Þ2n o Sa
g¼ 3420 0:4ð Þ ¼ 1368kip
Fig. 14.9 Peak
acceleration vs. structural
period [3]
14.2 Treatment of Lateral Loading 923
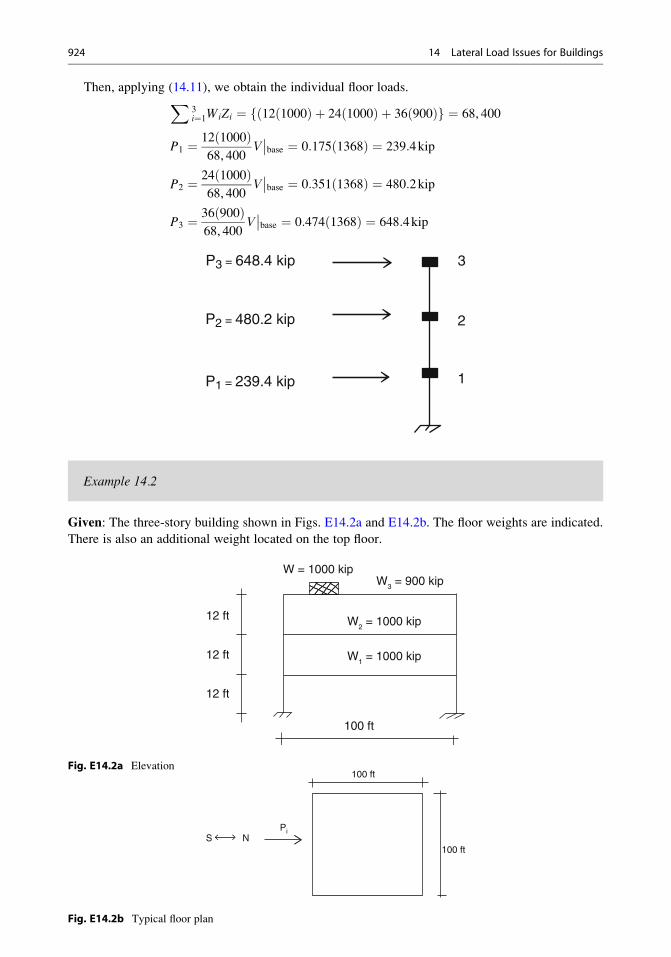
Then, applying (14.11), we obtain the individual floor loads.X3i¼1WiZi ¼ 12 1000ð Þ þ 24 1000ð Þ þ 36 900ð Þðf g ¼ 68, 400
P1 ¼ 12 1000ð Þ68, 400
V��base ¼ 0:175 1368ð Þ ¼ 239:4kip
P2 ¼ 24 1000ð Þ68, 400
V��base ¼ 0:351 1368ð Þ ¼ 480:2kip
P3 ¼ 36 900ð Þ68, 400
V��base ¼ 0:474 1368ð Þ ¼ 648:4kip
P3 = 648.4 kip
P2 = 480.2 kip
P1 = 239.4 kip
3
2
1
Example 14.2
Given: The three-story building shown in Figs. E14.2a and E14.2b. The floor weights are indicated.
There is also an additional weight located on the top floor.
12 ft
12 ft
100 ft
12 ft
W = 1000 kipW3 = 900 kip
W2 = 1000 kip
W1 = 1000 kip
Fig. E14.2a Elevation100 ft
100 ftS N
Pi
Fig. E14.2b Typical floor plan
924 14 Lateral Load Issues for Buildings
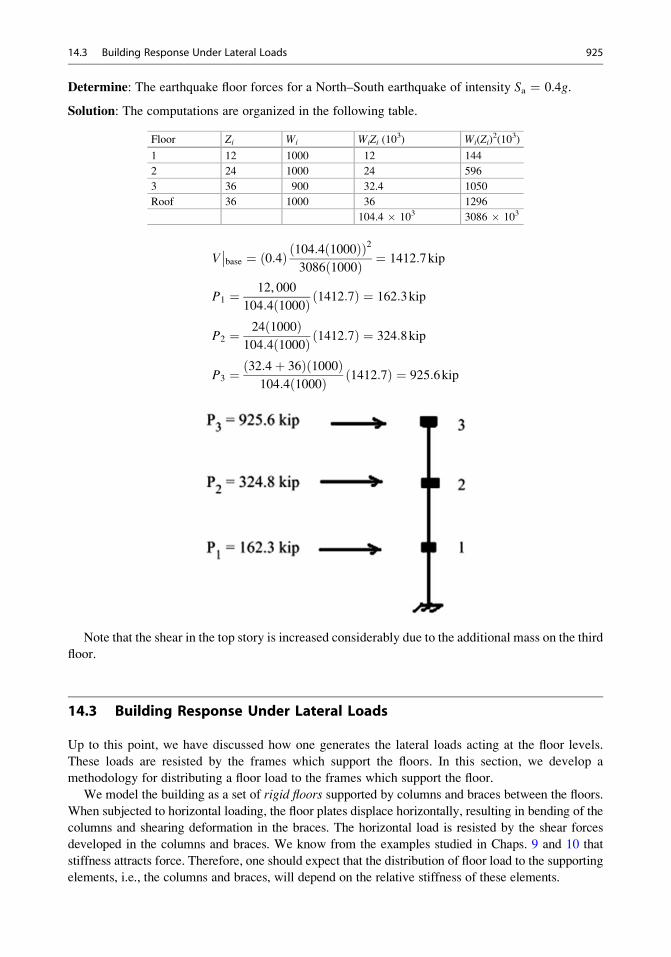
Determine: The earthquake floor forces for a North–South earthquake of intensity Sa ¼ 0.4g.
Solution: The computations are organized in the following table.
Floor Zi Wi WiZi (103) Wi(Zi)
2(103)
1 12 1000 12 144
2 24 1000 24 596
3 36 900 32.4 1050
Roof 36 1000 36 1296
104.4 � 103 3086 � 103
V��base ¼ 0:4ð Þ 104:4 1000ð Þð Þ2
3086 1000ð Þ ¼ 1412:7kip
P1 ¼ 12, 000
104:4 1000ð Þ 1412:7ð Þ ¼ 162:3kip
P2 ¼ 24 1000ð Þ104:4 1000ð Þ 1412:7ð Þ ¼ 324:8kip
P3 ¼ 32:4þ 36ð Þ 1000ð Þ104:4 1000ð Þ 1412:7ð Þ ¼ 925:6kip
Note that the shear in the top story is increased considerably due to the additional mass on the third
floor.
14.3 Building Response Under Lateral Loads
Up to this point, we have discussed how one generates the lateral loads acting at the floor levels.
These loads are resisted by the frames which support the floors. In this section, we develop a
methodology for distributing a floor load to the frames which support the floor.
We model the building as a set of rigid floors supported by columns and braces between the floors.
When subjected to horizontal loading, the floor plates displace horizontally, resulting in bending of the
columns and shearing deformation in the braces. The horizontal load is resisted by the shear forces
developed in the columns and braces. We know from the examples studied in Chaps. 9 and 10 that
stiffness attracts force. Therefore, one should expect that the distribution of floor load to the supporting
elements, i.e., the columns and braces, will depend on the relative stiffness of these elements.
14.3 Building Response Under Lateral Loads 925
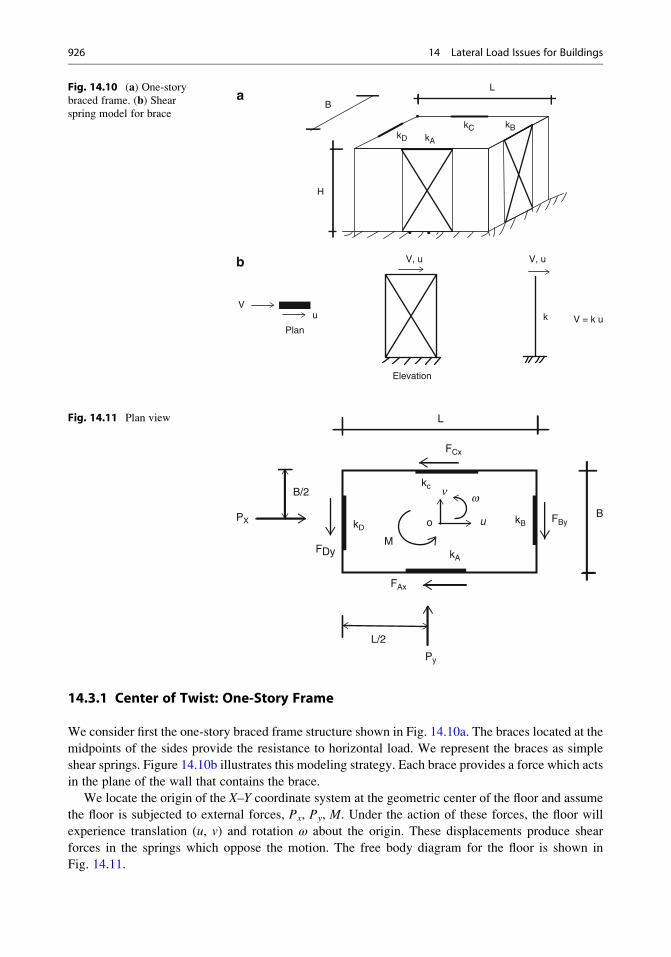
14.3.1 Center of Twist: One-Story Frame
We consider first the one-story braced frame structure shown in Fig. 14.10a. The braces located at the
midpoints of the sides provide the resistance to horizontal load. We represent the braces as simple
shear springs. Figure 14.10b illustrates this modeling strategy. Each brace provides a force which acts
in the plane of the wall that contains the brace.
We locate the origin of the X–Y coordinate system at the geometric center of the floor and assume
the floor is subjected to external forces, Px, Py, M. Under the action of these forces, the floor will
experience translation (u, v) and rotation ω about the origin. These displacements produce shear
forces in the springs which oppose the motion. The free body diagram for the floor is shown in
Fig. 14.11.
L
kBkCkA
kD
H
B
Vu
Plan
Elevation
V, u V, ub
a
k V = k u
Fig. 14.10 (a) One-storybraced frame. (b) Shearspring model for brace
L
BFBy
FAx
FDy
kD
kA
kB
kc n w
M
B/2
PX
L/2
Py
FCx
uo
Fig. 14.11 Plan view
926 14 Lateral Load Issues for Buildings
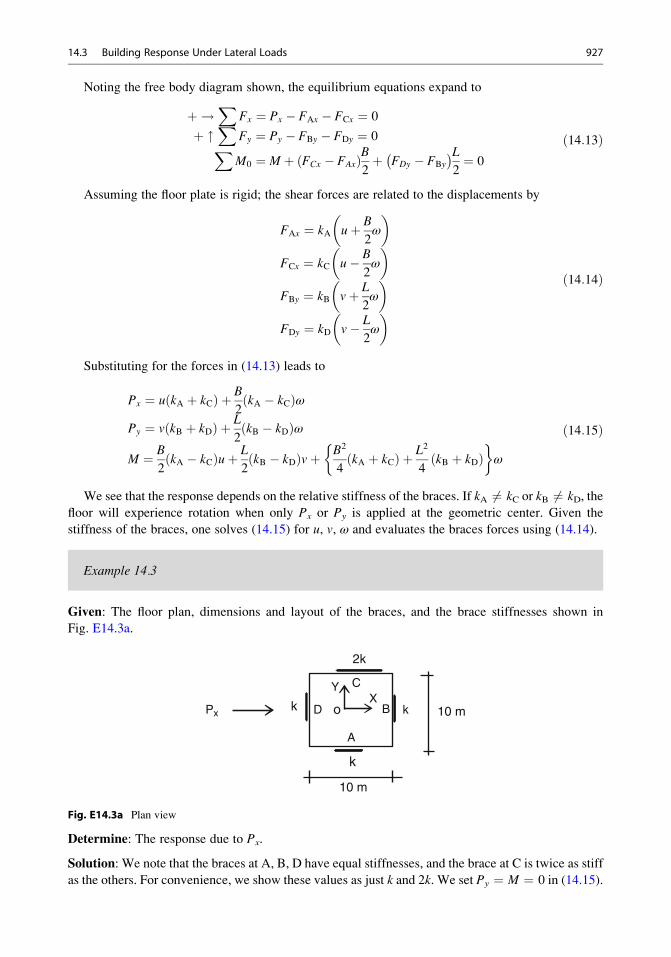
Noting the free body diagram shown, the equilibrium equations expand to
þ !X
Fx ¼ Px � FAx � FCx ¼ 0
þ "X
Fy ¼ Py � FBy � FDy ¼ 0XM0 ¼ M þ FCx � FAxð ÞB
2þ FDy � FBy
� �L2¼ 0
ð14:13Þ
Assuming the floor plate is rigid; the shear forces are related to the displacements by
FAx ¼ kA uþ B
2ω
� �
FCx ¼ kC u� B
2ω
� �
FBy ¼ kB vþ L
2ω
� �
FDy ¼ kD v� L
2ω
� �ð14:14Þ
Substituting for the forces in (14.13) leads to
Px ¼ u kA þ kCð Þ þ B
2kA � kCð Þω
Py ¼ v kB þ kDð Þ þ L
2kB � kDð Þω
M ¼ B
2kA � kCð Þuþ L
2kB � kDð Þvþ B2
4kA þ kCð Þ þ L2
4kB þ kDð Þ
�ω
ð14:15Þ
We see that the response depends on the relative stiffness of the braces. If kA 6¼ kC or kB 6¼ kD, the
floor will experience rotation when only Px or Py is applied at the geometric center. Given the
stiffness of the braces, one solves (14.15) for u, v, ω and evaluates the braces forces using (14.14).
Example 14.3
Given: The floor plan, dimensions and layout of the braces, and the brace stiffnesses shown in
Fig. E14.3a.
10 m
10 m
2k
kk
k
Px D
A
B
CX
Y
o
Fig. E14.3a Plan view
Determine: The response due to Px.
Solution: We note that the braces at A, B, D have equal stiffnesses, and the brace at C is twice as stiff
as the others. For convenience, we show these values as just k and 2k. We set Py ¼ M ¼ 0 in (14.15).
14.3 Building Response Under Lateral Loads 927
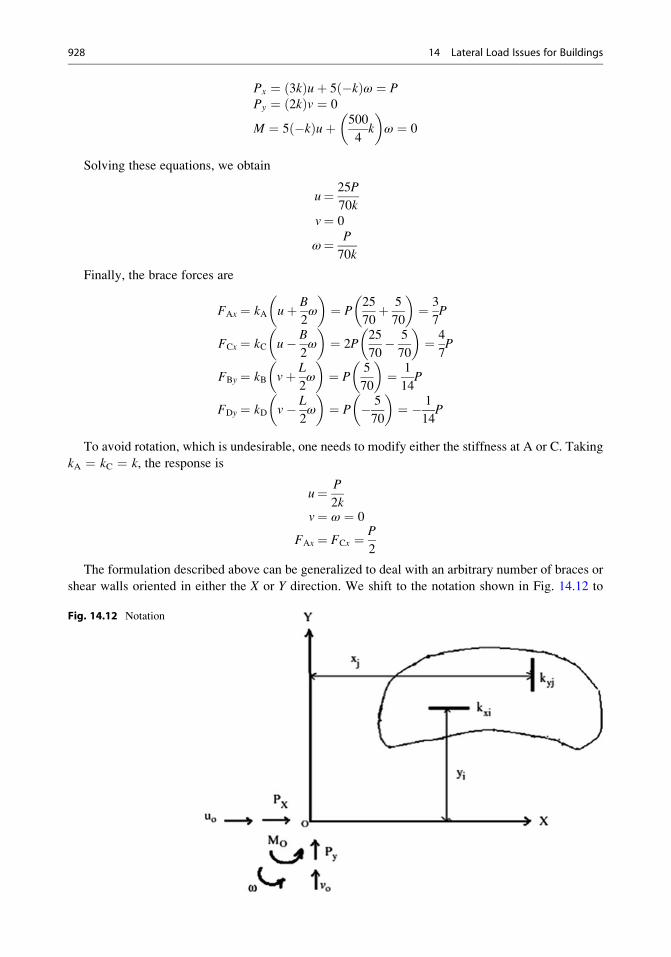
Px ¼ 3kð Þuþ 5 �kð Þω ¼ PPy ¼ 2kð Þv ¼ 0
M ¼ 5 �kð Þuþ 500
4k
� �ω ¼ 0
Solving these equations, we obtain
u¼ 25P
70kv¼ 0
ω¼ P
70k
Finally, the brace forces are
FAx ¼ kA uþ B
2ω
� �¼ P
25
70þ 5
70
� �¼ 3
7P
FCx ¼ kC u� B
2ω
� �¼ 2P
25
70� 5
70
� �¼ 4
7P
FBy ¼ kB vþ L
2ω
� �¼ P
5
70
� �¼ 1
14P
FDy ¼ kD v� L
2ω
� �¼ P � 5
70
� �¼ � 1
14P
To avoid rotation, which is undesirable, one needs to modify either the stiffness at A or C. Taking
kA ¼ kC ¼ k, the response is
u¼ P
2kv¼ ω ¼ 0
FAx ¼ FCx ¼ P
2
The formulation described above can be generalized to deal with an arbitrary number of braces or
shear walls oriented in either the X or Y direction. We shift to the notation shown in Fig. 14.12 to
Fig. 14.12 Notation
928 14 Lateral Load Issues for Buildings
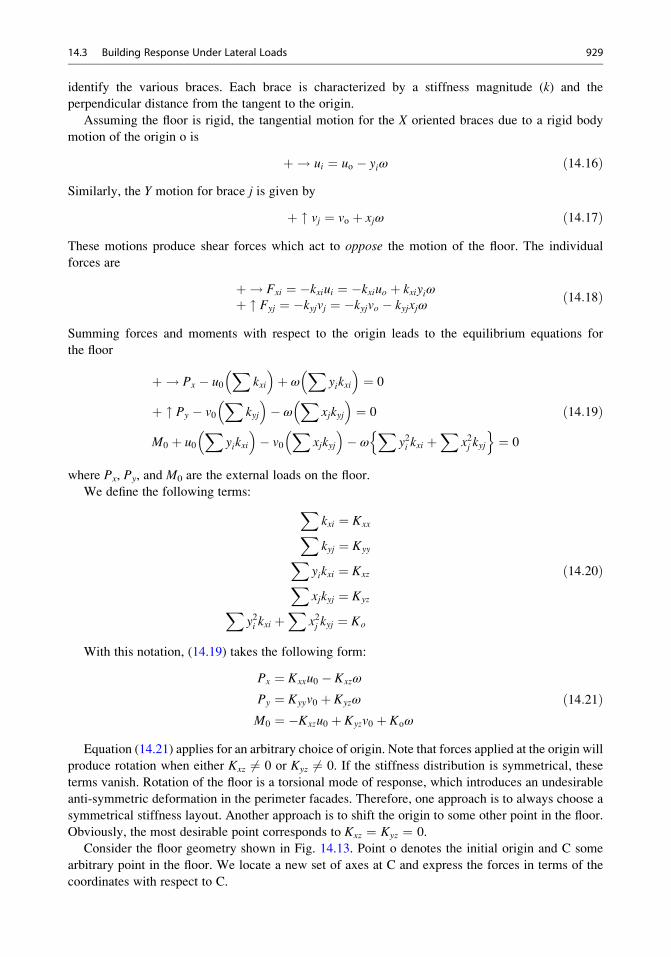
identify the various braces. Each brace is characterized by a stiffness magnitude (k) and the
perpendicular distance from the tangent to the origin.
Assuming the floor is rigid, the tangential motion for the X oriented braces due to a rigid body
motion of the origin o is
þ ! ui ¼ uo � yiω ð14:16ÞSimilarly, the Y motion for brace j is given by
þ " vj ¼ vo þ xjω ð14:17ÞThese motions produce shear forces which act to oppose the motion of the floor. The individual
forces are
þ ! Fxi ¼ �kxiui ¼ �kxiuo þ kxiyiωþ " Fyj ¼ �kyjvj ¼ �kyjvo � kyjxjω
ð14:18Þ
Summing forces and moments with respect to the origin leads to the equilibrium equations for
the floor
þ ! Px � u0X
kxi
� �þ ω
Xyikxi
� �¼ 0
þ " Py � v0X
kyj
� �� ω
Xxjkyj
� �¼ 0
M0 þ u0X
yikxi
� �� v0
Xxjkyj
� �� ω
Xy2i kxi þ
Xx2j kyj
n o¼ 0
ð14:19Þ
where Px, Py, and M0 are the external loads on the floor.
We define the following terms: Xkxi ¼ KxxXkyj ¼ KyyX
yikxi ¼ KxzXxjkyj ¼ KyzX
y2i kxi þX
x2j kyj ¼ Ko
ð14:20Þ
With this notation, (14.19) takes the following form:
Px ¼ Kxxu0 � Kxzω
Py ¼ Kyyv0 þ Kyzω
M0 ¼ �Kxzu0 þ Kyzv0 þ Koω
ð14:21Þ
Equation (14.21) applies for an arbitrary choice of origin. Note that forces applied at the origin will
produce rotation when either Kxz 6¼ 0 or Kyz 6¼ 0. If the stiffness distribution is symmetrical, these
terms vanish. Rotation of the floor is a torsional mode of response, which introduces an undesirable
anti-symmetric deformation in the perimeter facades. Therefore, one approach is to always choose a
symmetrical stiffness layout. Another approach is to shift the origin to some other point in the floor.
Obviously, the most desirable point corresponds to Kxz ¼ Kyz ¼ 0.
Consider the floor geometry shown in Fig. 14.13. Point o denotes the initial origin and C some
arbitrary point in the floor. We locate a new set of axes at C and express the forces in terms of the
coordinates with respect to C.
14.3 Building Response Under Lateral Loads 929
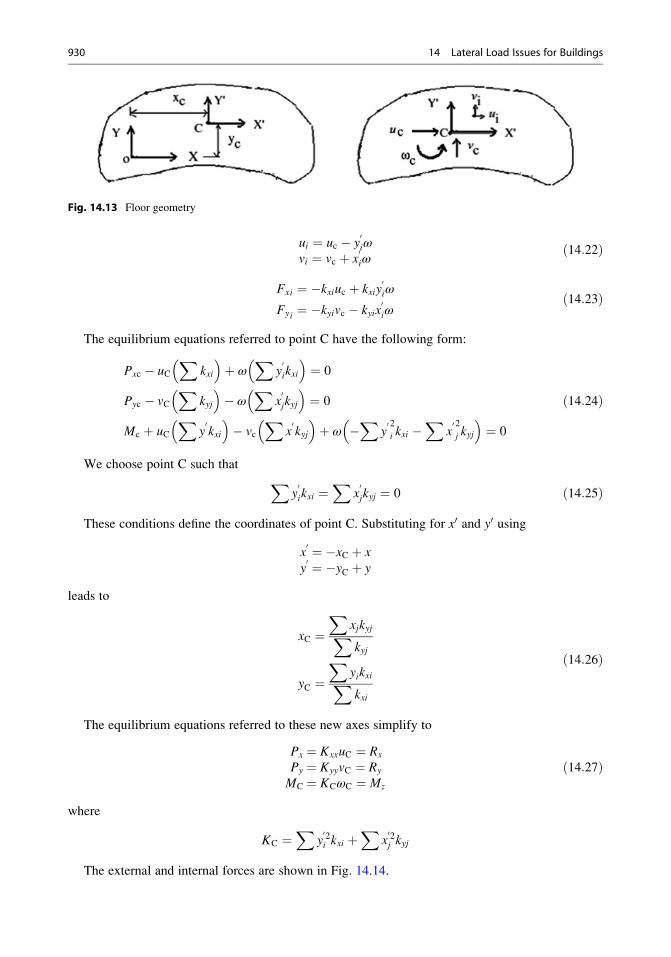
ui ¼ uc � y0iω
vi ¼ vc þ x0iω
ð14:22Þ
Fxi ¼ �kxiuc þ kxiy0iω
Fyi ¼ �kyivc � kyix0iω
ð14:23Þ
The equilibrium equations referred to point C have the following form:
Pxc � uCX
kxi
� �þ ω
Xy0ikxi
� �¼ 0
Pyc � vCX
kyj
� �� ω
Xx0jkyj
� �¼ 0
Mc þ uCX
y0kxi
� �� vc
Xx0kyj
� �þ ω �
Xy02i kxi �
Xx02j kyj
� �¼ 0
ð14:24Þ
We choose point C such that Xy0ikxi ¼
Xx0jkyj ¼ 0 ð14:25Þ
These conditions define the coordinates of point C. Substituting for x0 and y0 using
x0 ¼ �xC þ xy0 ¼ �yC þ y
leads to
xC ¼X
xjkyjXkyj
yC ¼X
yikxiXkxi
ð14:26Þ
The equilibrium equations referred to these new axes simplify to
Px ¼ KxxuC ¼ Rx
Py ¼ KyyvC ¼ Ry
MC ¼ KCωC ¼ Mz
ð14:27Þ
where
KC ¼X
y02i kxi þ
Xx02j kyj
The external and internal forces are shown in Fig. 14.14.
Fig. 14.13 Floor geometry
930 14 Lateral Load Issues for Buildings
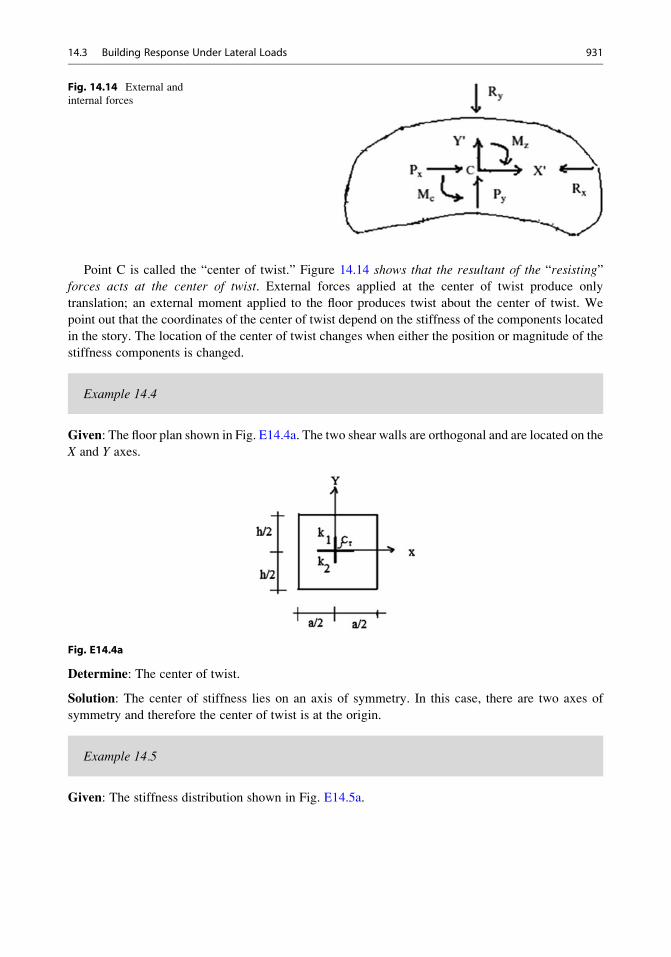
Point C is called the “center of twist.” Figure 14.14 shows that the resultant of the “resisting”forces acts at the center of twist. External forces applied at the center of twist produce only
translation; an external moment applied to the floor produces twist about the center of twist. We
point out that the coordinates of the center of twist depend on the stiffness of the components located
in the story. The location of the center of twist changes when either the position or magnitude of the
stiffness components is changed.
Example 14.4
Given: The floor plan shown in Fig. E14.4a. The two shear walls are orthogonal and are located on the
X and Y axes.
Fig. E14.4a
Determine: The center of twist.
Solution: The center of stiffness lies on an axis of symmetry. In this case, there are two axes of
symmetry and therefore the center of twist is at the origin.
Example 14.5
Given: The stiffness distribution shown in Fig. E14.5a.
Fig. 14.14 External and
internal forces
14.3 Building Response Under Lateral Loads 931
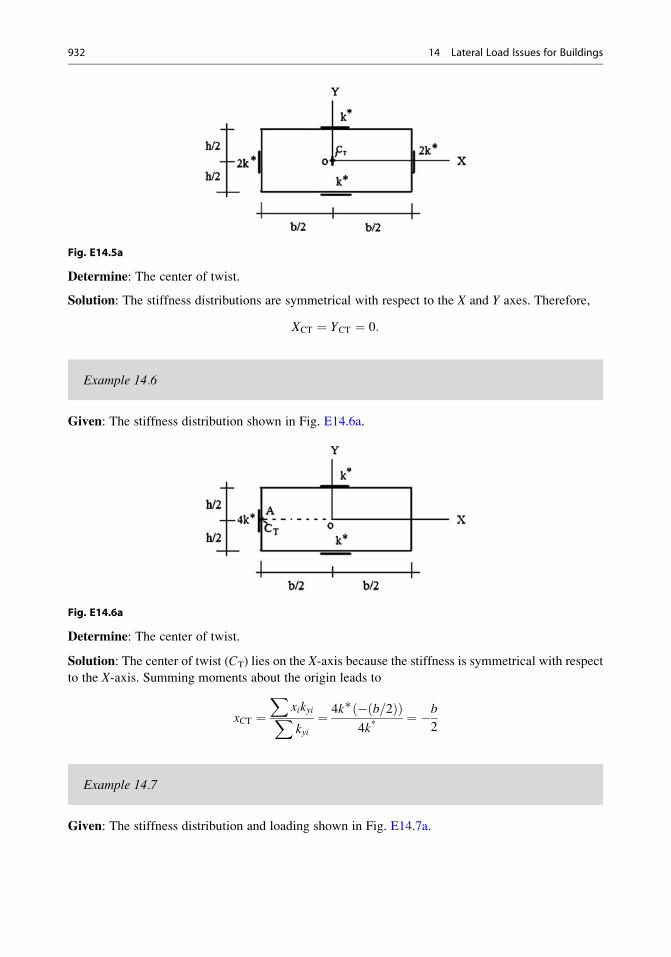
Fig. E14.5a
Determine: The center of twist.
Solution: The stiffness distributions are symmetrical with respect to the X and Y axes. Therefore,
XCT ¼ YCT ¼ 0:
Example 14.6
Given: The stiffness distribution shown in Fig. E14.6a.
Fig. E14.6a
Determine: The center of twist.
Solution: The center of twist (CT) lies on the X-axis because the stiffness is symmetrical with respect
to the X-axis. Summing moments about the origin leads to
xCT ¼X
xikyiXkyi¼ 4k∗ � b=2ð Þð Þ
4k*¼ �b
2
Example 14.7
Given: The stiffness distribution and loading shown in Fig. E14.7a.
932 14 Lateral Load Issues for Buildings

Fig. E14.7a
Determine: The rigid body motion.
Solution: Thefloorwill experience rotation aswell as translation since there is a netmomentwith respect
to the center of twist. We determine the motion measures using (14.27). The stiffness measures are
Kxx ¼X
kxi ¼ 2k*
Kyy ¼X
kyj ¼ 4k*
KC ¼X
y2i kxi þX
x2j kyj ¼ 2 h2
� �2k*
n o¼ h
2
2k*
Then,
u ¼ Px
Kxx¼ Px
2k*
v ¼ Py
Kyy¼ Py
4k*
ω ¼ Pyb2ð Þ
KC
¼ Py
b
2h2
2k*¼ Py
k*b
h2
The deformed configuration of the floor is shown in Fig. E14.7b.
Fig. E14.7b
14.3 Building Response Under Lateral Loads 933
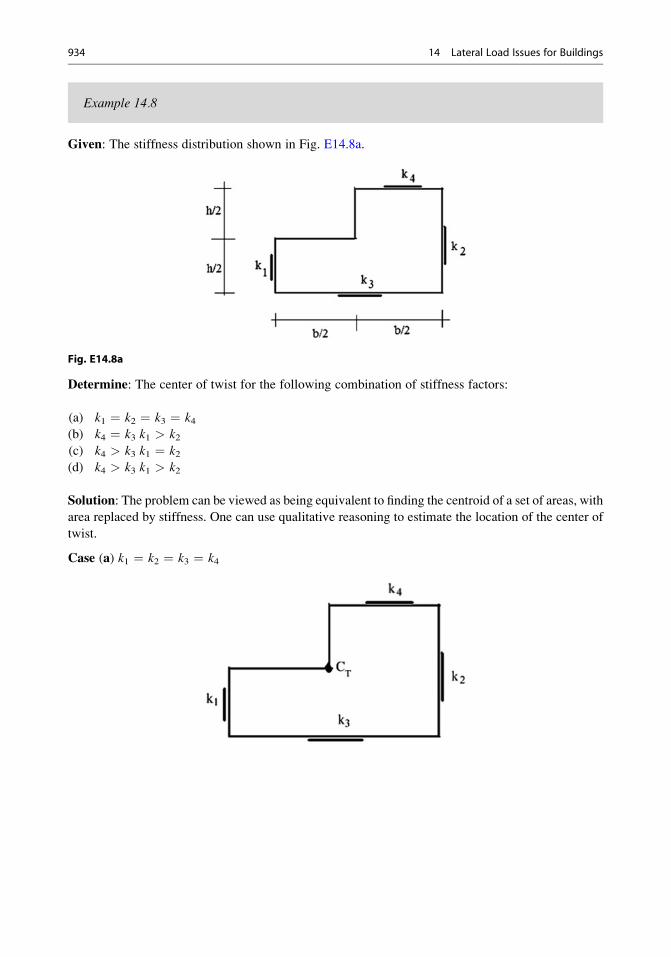
Example 14.8
Given: The stiffness distribution shown in Fig. E14.8a.
Fig. E14.8a
Determine: The center of twist for the following combination of stiffness factors:
(a) k1 ¼ k2 ¼ k3 ¼ k4(b) k4 ¼ k3 k1 > k2(c) k4 > k3 k1 ¼ k2(d) k4 > k3 k1 > k2
Solution: The problem can be viewed as being equivalent to finding the centroid of a set of areas, with
area replaced by stiffness. One can use qualitative reasoning to estimate the location of the center of
twist.
Case (a) k1 ¼ k2 ¼ k3 ¼ k4
934 14 Lateral Load Issues for Buildings
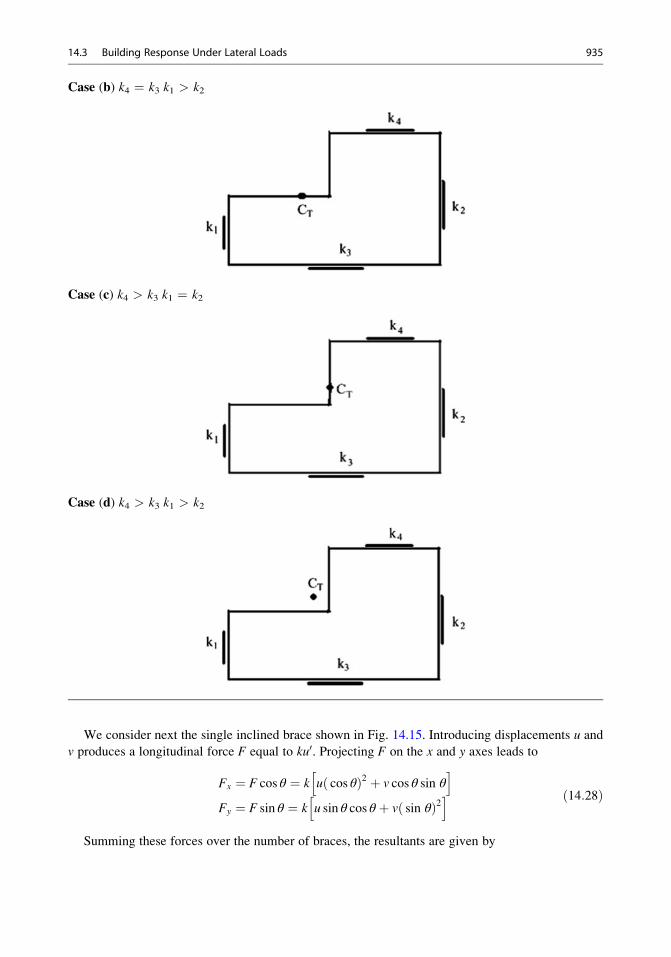
Case (b) k4 ¼ k3 k1 > k2
Case (c) k4 > k3 k1 ¼ k2
Case (d) k4 > k3 k1 > k2
We consider next the single inclined brace shown in Fig. 14.15. Introducing displacements u and
v produces a longitudinal force F equal to ku0. Projecting F on the x and y axes leads to
Fx ¼ F cos θ ¼ k u cos θð Þ2 þ v cos θ sin θh i
Fy ¼ F sin θ ¼ k u sin θ cos θ þ v sin θð Þ2h i ð14:28Þ
Summing these forces over the number of braces, the resultants are given by
14.3 Building Response Under Lateral Loads 935
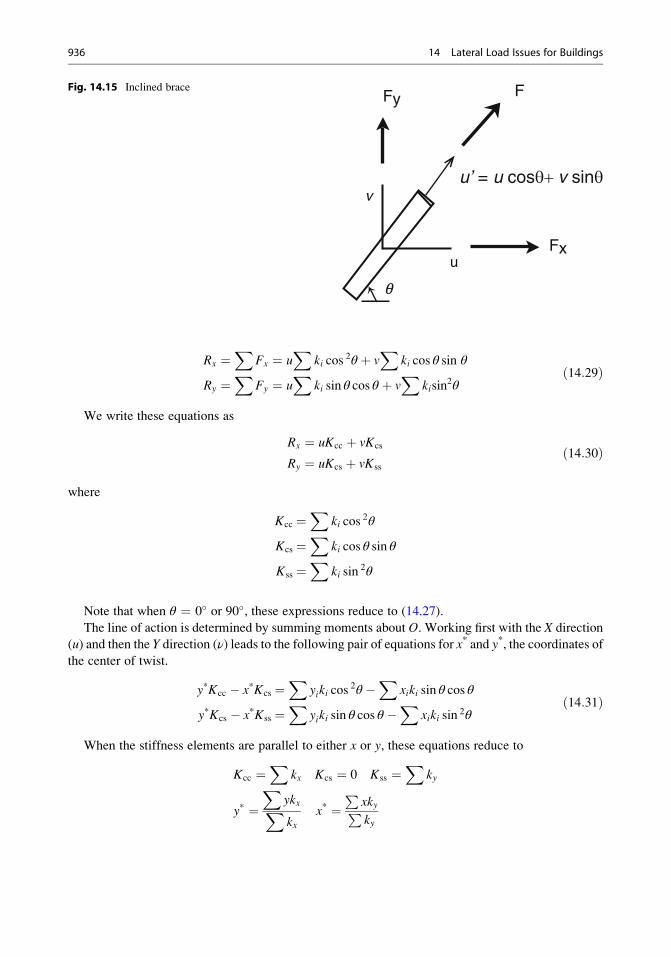
Rx ¼X
Fx ¼ uX
ki cos2θ þ v
Xki cos θ sin θ
Ry ¼X
Fy ¼ uX
ki sin θ cos θ þ vX
kisin2θ
ð14:29Þ
We write these equations as
Rx ¼ uKcc þ vKcs
Ry ¼ uKcs þ vKss
ð14:30Þ
where
Kcc ¼X
ki cos2θ
Kcs ¼X
ki cos θ sin θ
Kss ¼X
ki sin2θ
Note that when θ ¼ 0� or 90�, these expressions reduce to (14.27).
The line of action is determined by summing moments about O. Working first with the X direction
(u) and then the Y direction (ν) leads to the following pair of equations for x* and y*, the coordinates ofthe center of twist.
y*Kcc � x*Kcs ¼X
yiki cos2θ �
Xxiki sin θ cos θ
y*Kcs � x*Kss ¼X
yiki sin θ cos θ �X
xiki sin2θ
ð14:31Þ
When the stiffness elements are parallel to either x or y, these equations reduce to
Kcc ¼X
kx Kcs ¼ 0 Kss ¼X
ky
y* ¼X
ykxXkx
x* ¼P
xkyPky
FFy
Fx
u’ = u cosθ+ v sinθv
q
u
Fig. 14.15 Inclined brace
936 14 Lateral Load Issues for Buildings
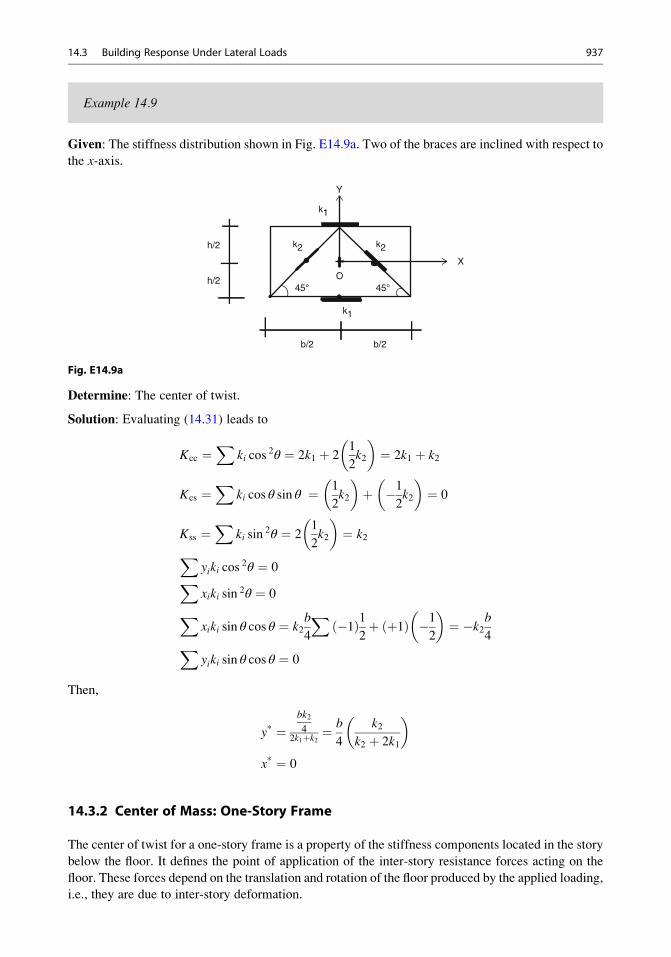
Example 14.9
Given: The stiffness distribution shown in Fig. E14.9a. Two of the braces are inclined with respect to
the x-axis.
Y
k1
k1
b/2 b/2
k2k2
O
X
45°45°
h/2
h/2
Fig. E14.9a
Determine: The center of twist.
Solution: Evaluating (14.31) leads to
Kcc ¼X
ki cos2θ ¼ 2k1 þ 2
1
2k2
� �¼ 2k1 þ k2
Kcs ¼X
ki cos θ sin θ ¼ 1
2k2
� �þ �1
2k2
� �¼ 0
Kss ¼X
ki sin2θ ¼ 2
1
2k2
� �¼ k2X
yiki cos2θ ¼ 0X
xiki sin2θ ¼ 0
Xxiki sin θ cos θ ¼ k2
b
4
X�1ð Þ1
2þ þ1ð Þ �1
2
� �¼ �k2b
4Xyiki sin θ cos θ ¼ 0
Then,
y* ¼bk24
2k1þk2 ¼b
4
k2k2 þ 2k1
� �
x* ¼ 0
14.3.2 Center of Mass: One-Story Frame
The center of twist for a one-story frame is a property of the stiffness components located in the story
below the floor. It defines the point of application of the inter-story resistance forces acting on the
floor. These forces depend on the translation and rotation of the floor produced by the applied loading,
i.e., they are due to inter-story deformation.
14.3 Building Response Under Lateral Loads 937
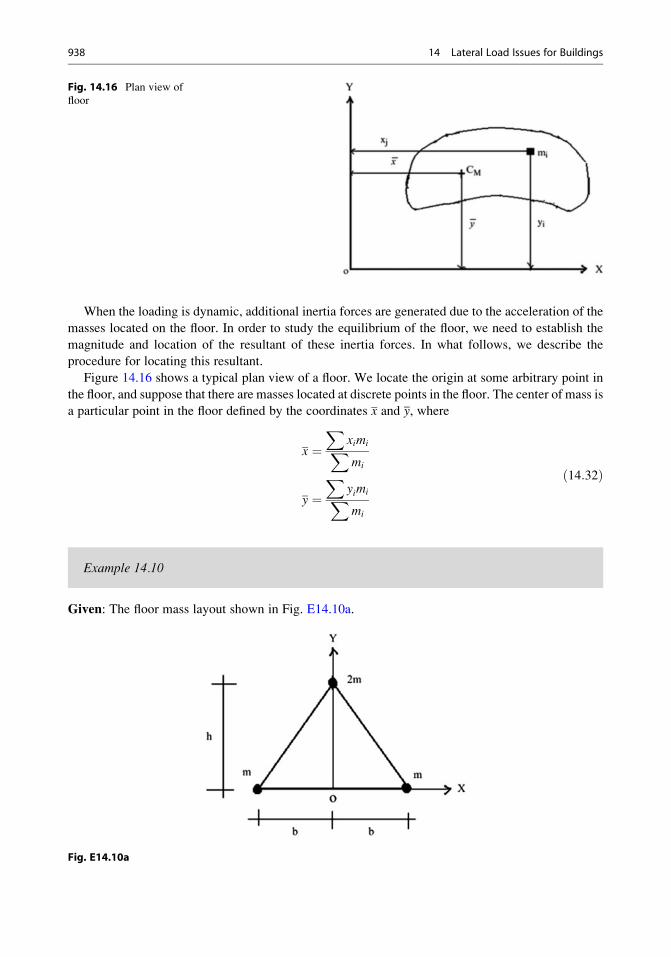
When the loading is dynamic, additional inertia forces are generated due to the acceleration of the
masses located on the floor. In order to study the equilibrium of the floor, we need to establish the
magnitude and location of the resultant of these inertia forces. In what follows, we describe the
procedure for locating this resultant.
Figure 14.16 shows a typical plan view of a floor. We locate the origin at some arbitrary point in
the floor, and suppose that there are masses located at discrete points in the floor. The center of mass is
a particular point in the floor defined by the coordinates x and y, where
x ¼X
ximiXmi
y ¼X
yimiXmi
ð14:32Þ
Example 14.10
Given: The floor mass layout shown in Fig. E14.10a.
Fig. E14.10a
Fig. 14.16 Plan view of
floor
938 14 Lateral Load Issues for Buildings
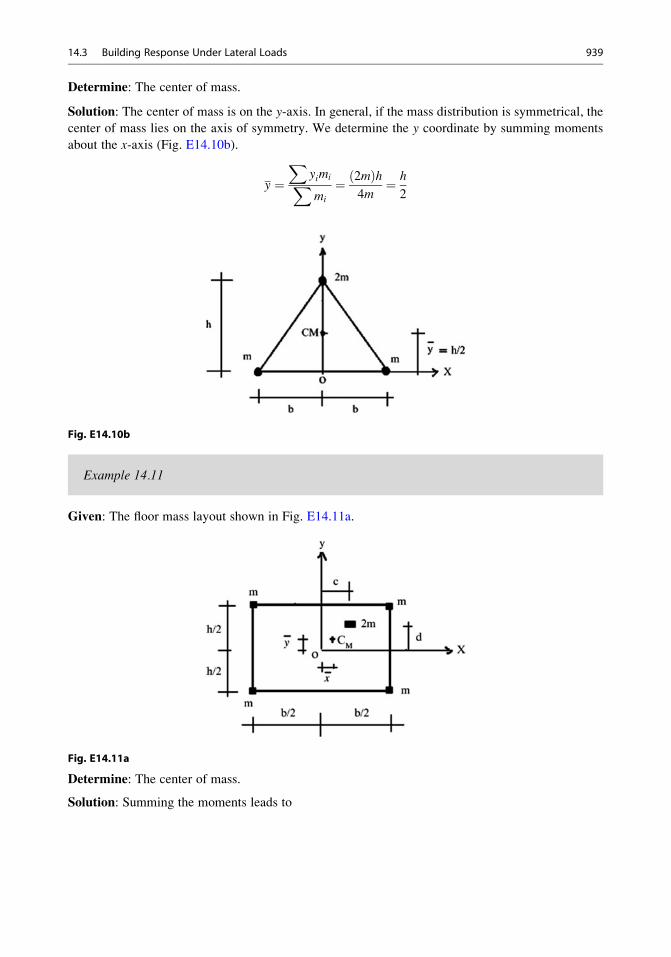
Determine: The center of mass.
Solution: The center of mass is on the y-axis. In general, if the mass distribution is symmetrical, the
center of mass lies on the axis of symmetry. We determine the y coordinate by summing moments
about the x-axis (Fig. E14.10b).
y ¼X
yimiXmi
¼ 2mð Þh4m
¼ h
2
Fig. E14.10b
Example 14.11
Given: The floor mass layout shown in Fig. E14.11a.
Fig. E14.11a
Determine: The center of mass.
Solution: Summing the moments leads to
14.3 Building Response Under Lateral Loads 939
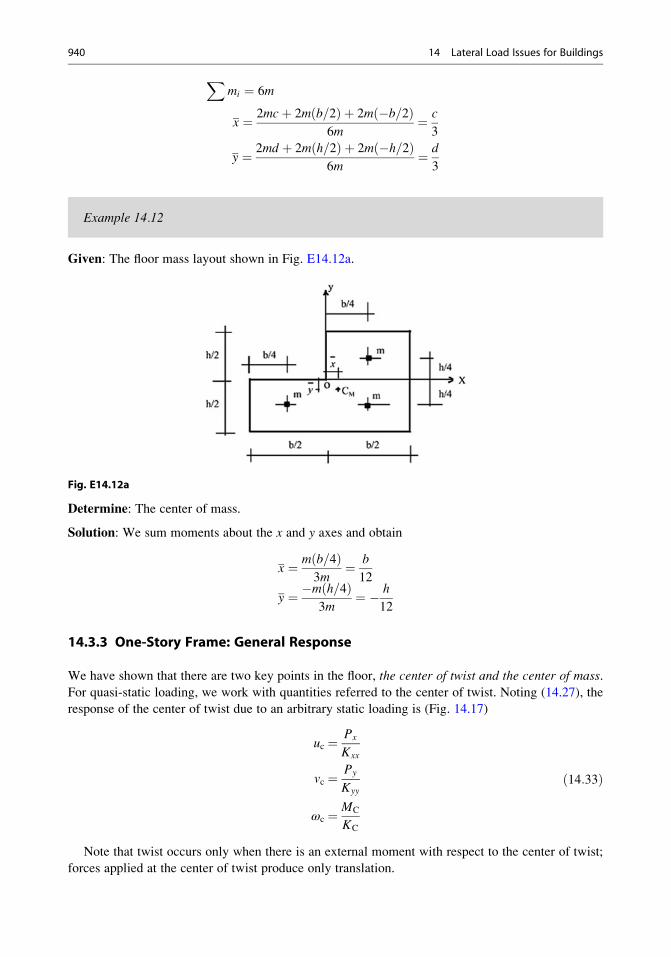
Xmi ¼ 6m
x ¼ 2mcþ 2m b=2ð Þ þ 2m �b=2ð Þ6m
¼ c
3
y ¼ 2md þ 2m h=2ð Þ þ 2m �h=2ð Þ6m
¼ d
3
Example 14.12
Given: The floor mass layout shown in Fig. E14.12a.
Fig. E14.12a
Determine: The center of mass.
Solution: We sum moments about the x and y axes and obtain
x ¼ m b=4ð Þ3m
¼ b
12
y ¼ �m h=4ð Þ3m
¼ � h
12
14.3.3 One-Story Frame: General Response
We have shown that there are two key points in the floor, the center of twist and the center of mass.
For quasi-static loading, we work with quantities referred to the center of twist. Noting (14.27), the
response of the center of twist due to an arbitrary static loading is (Fig. 14.17)
uc ¼ Px
Kxx
vc ¼ Py
Kyy
ωc ¼ MC
KC
ð14:33Þ
Note that twist occurs only when there is an external moment with respect to the center of twist;
forces applied at the center of twist produce only translation.
940 14 Lateral Load Issues for Buildings
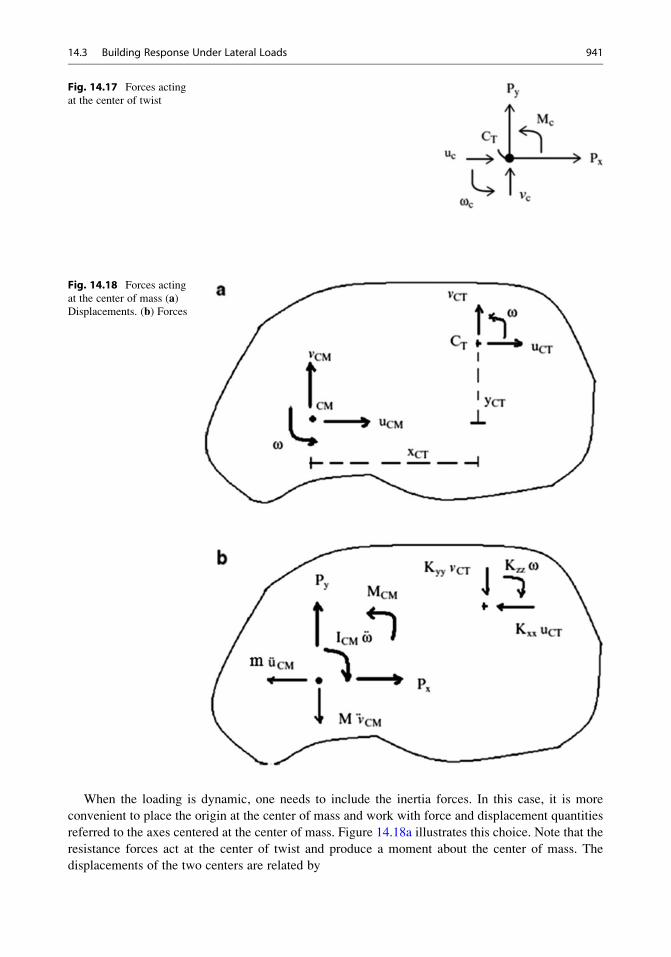
When the loading is dynamic, one needs to include the inertia forces. In this case, it is more
convenient to place the origin at the center of mass and work with force and displacement quantities
referred to the axes centered at the center of mass. Figure 14.18a illustrates this choice. Note that the
resistance forces act at the center of twist and produce a moment about the center of mass. The
displacements of the two centers are related by
Fig. 14.18 Forces acting
at the center of mass (a)Displacements. (b) Forces
Fig. 14.17 Forces acting
at the center of twist
14.3 Building Response Under Lateral Loads 941
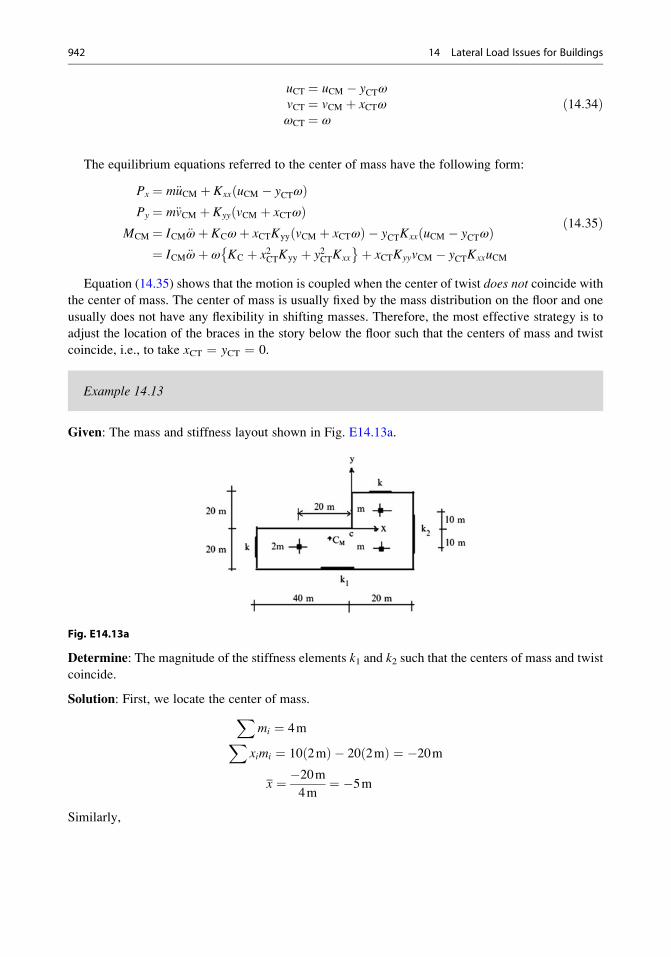
uCT ¼ uCM � yCTωvCT ¼ vCM þ xCTωωCT ¼ ω
ð14:34Þ
The equilibrium equations referred to the center of mass have the following form:
Px ¼ m€uCM þ Kxx uCM � yCTωð ÞPy ¼ m€vCM þ Kyy vCM þ xCTωð Þ
MCM ¼ ICM€ωþ KCωþ xCTKyy vCM þ xCTωð Þ � yCTKxx uCM � yCTωð Þ¼ ICM€ωþ ω KC þ x2CTKyy þ y2CTKxx
� �þ xCTKyyvCM � yCTKxxuCM
ð14:35Þ
Equation (14.35) shows that the motion is coupled when the center of twist does not coincide withthe center of mass. The center of mass is usually fixed by the mass distribution on the floor and one
usually does not have any flexibility in shifting masses. Therefore, the most effective strategy is to
adjust the location of the braces in the story below the floor such that the centers of mass and twist
coincide, i.e., to take xCT ¼ yCT ¼ 0.
Example 14.13
Given: The mass and stiffness layout shown in Fig. E14.13a.
Fig. E14.13a
Determine: The magnitude of the stiffness elements k1 and k2 such that the centers of mass and twist
coincide.
Solution: First, we locate the center of mass.Xmi ¼ 4mX
ximi ¼ 10 2mð Þ � 20 2mð Þ ¼ �20m
x ¼ �20m4m
¼ �5m
Similarly,
942 14 Lateral Load Issues for Buildings
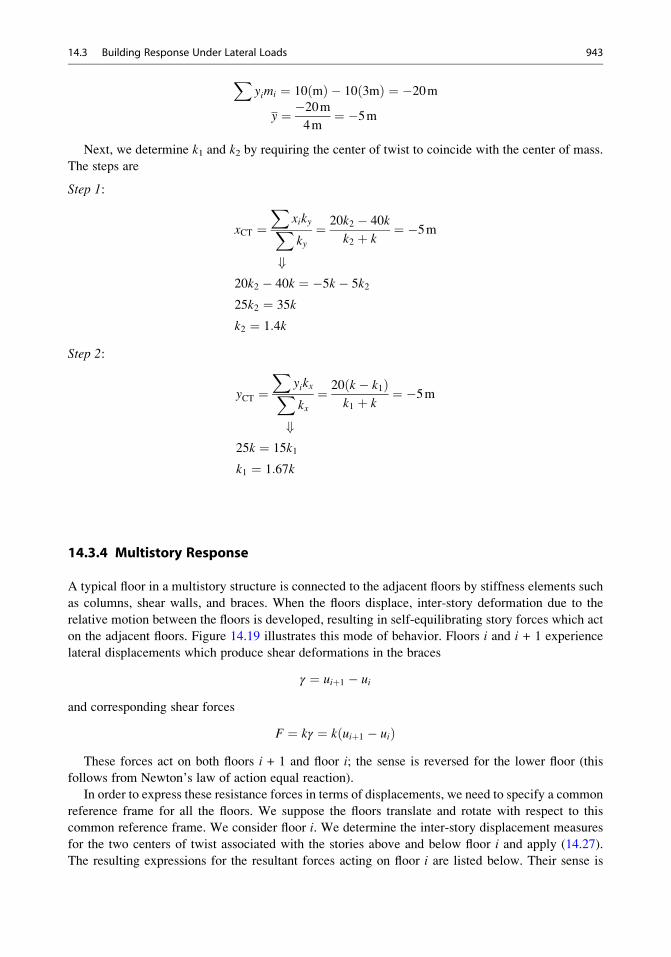
Xyimi ¼ 10 mð Þ � 10 3mð Þ ¼ �20m
y ¼ �20m4m
¼ �5m
Next, we determine k1 and k2 by requiring the center of twist to coincide with the center of mass.
The steps are
Step 1:
xCT ¼X
xikyXky¼ 20k2 � 40k
k2 þ k¼ �5m
+20k2 � 40k ¼ �5k � 5k2
25k2 ¼ 35k
k2 ¼ 1:4k
Step 2:
yCT ¼X
yikxXkx¼ 20 k � k1ð Þ
k1 þ k¼ �5m
+25k ¼ 15k1
k1 ¼ 1:67k
14.3.4 Multistory Response
A typical floor in a multistory structure is connected to the adjacent floors by stiffness elements such
as columns, shear walls, and braces. When the floors displace, inter-story deformation due to the
relative motion between the floors is developed, resulting in self-equilibrating story forces which act
on the adjacent floors. Figure 14.19 illustrates this mode of behavior. Floors i and i + 1 experience
lateral displacements which produce shear deformations in the braces
γ ¼ uiþ1 � ui
and corresponding shear forces
F ¼ kγ ¼ k uiþ1 � uið ÞThese forces act on both floors i + 1 and floor i; the sense is reversed for the lower floor (this
follows from Newton’s law of action equal reaction).
In order to express these resistance forces in terms of displacements, we need to specify a common
reference frame for all the floors. We suppose the floors translate and rotate with respect to this
common reference frame. We consider floor i. We determine the inter-story displacement measures
for the two centers of twist associated with the stories above and below floor i and apply (14.27).
The resulting expressions for the resultant forces acting on floor i are listed below. Their sense is
14.3 Building Response Under Lateral Loads 943
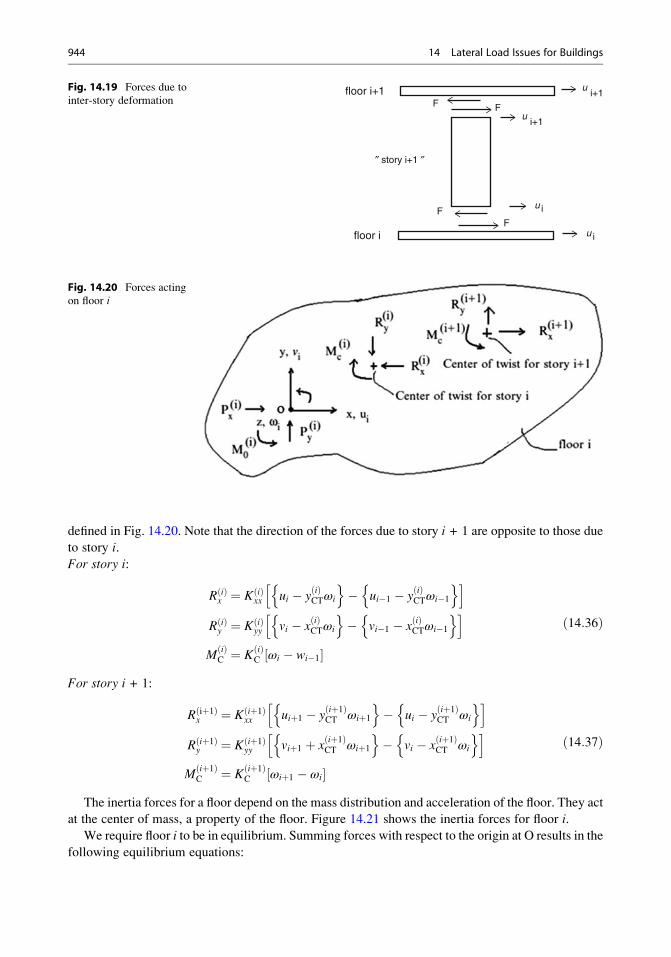
defined in Fig. 14.20. Note that the direction of the forces due to story i + 1 are opposite to those due
to story i.
For story i:
R ið Þx ¼ K ið Þ
xx ui � yið ÞCTωi
n o� ui�1 � y
ið ÞCTωi�1
n oh iR ið Þy ¼ K ið Þ
yy vi � xið ÞCTωi
n o� vi�1 � x
ið ÞCTωi�1
n oh iM
ið ÞC ¼ K
ið ÞC ωi � wi�1½ �
ð14:36Þ
For story i + 1:
R iþ1ð Þx ¼ K iþ1ð Þ
xx uiþ1 � yiþ1ð ÞCT ωiþ1
n o� ui � y
iþ1ð ÞCT ωi
n oh iR iþ1ð Þy ¼ K iþ1ð Þ
yy viþ1 þ xiþ1ð ÞCT ωiþ1
n o� vi � x
iþ1ð ÞCT ωi
n oh iM
iþ1ð ÞC ¼ K
iþ1ð ÞC ωiþ1 � ωi½ �
ð14:37Þ
The inertia forces for a floor depend on the mass distribution and acceleration of the floor. They act
at the center of mass, a property of the floor. Figure 14.21 shows the inertia forces for floor i.
We require floor i to be in equilibrium. Summing forces with respect to the origin at O results in the
following equilibrium equations:
ui+1
u
u i
u i
i+1
F F
FF
″ story i+1 ″
floor i
floor i+1Fig. 14.19 Forces due to
inter-story deformation
Fig. 14.20 Forces acting
on floor i
944 14 Lateral Load Issues for Buildings
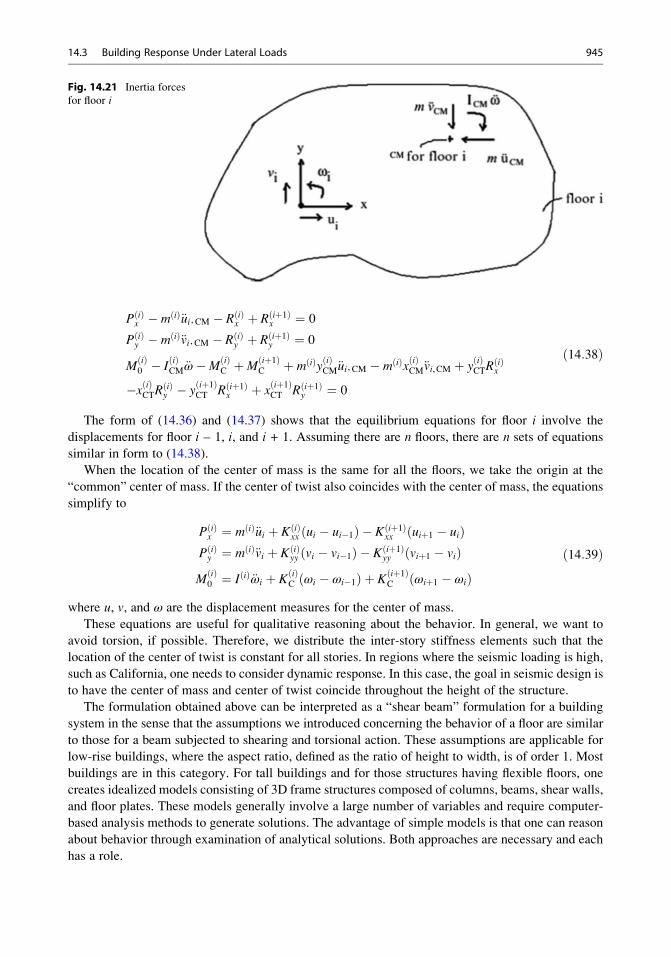
P ið Þx � m ið Þ€ui, CM � R ið Þ
x þ R iþ1ð Þx ¼ 0
P ið Þy � m ið Þ€vi, CM � R ið Þ
y þ R iþ1ð Þy ¼ 0
Mið Þ0 � I
ið ÞCM€ω�M
ið ÞC þM
iþ1ð ÞC þ m ið Þy ið Þ
CM€ui, CM � m ið Þx ið ÞCM€vi,CM þ y
ið ÞCTR
ið Þx
�x ið ÞCTR
ið Þy � y
iþ1ð ÞCT R iþ1ð Þ
x þ xiþ1ð ÞCT R iþ1ð Þ
y ¼ 0
ð14:38Þ
The form of (14.36) and (14.37) shows that the equilibrium equations for floor i involve the
displacements for floor i – 1, i, and i + 1. Assuming there are n floors, there are n sets of equations
similar in form to (14.38).
When the location of the center of mass is the same for all the floors, we take the origin at the
“common” center of mass. If the center of twist also coincides with the center of mass, the equations
simplify to
P ið Þx ¼ m ið Þ€ui þ K ið Þ
xx ui � ui�1ð Þ � K iþ1ð Þxx uiþ1 � uið Þ
P ið Þy ¼ m ið Þ€vi þ K ið Þ
yy vi � vi�1ð Þ � K iþ1ð Þyy viþ1 � við Þ
Mið Þ0 ¼ I ið Þ€ωi þ K
ið ÞC ωi � ωi�1ð Þ þ K
iþ1ð ÞC ωiþ1 � ωið Þ
ð14:39Þ
where u, v, and ω are the displacement measures for the center of mass.
These equations are useful for qualitative reasoning about the behavior. In general, we want to
avoid torsion, if possible. Therefore, we distribute the inter-story stiffness elements such that the
location of the center of twist is constant for all stories. In regions where the seismic loading is high,
such as California, one needs to consider dynamic response. In this case, the goal in seismic design is
to have the center of mass and center of twist coincide throughout the height of the structure.
The formulation obtained above can be interpreted as a “shear beam” formulation for a building
system in the sense that the assumptions we introduced concerning the behavior of a floor are similar
to those for a beam subjected to shearing and torsional action. These assumptions are applicable for
low-rise buildings, where the aspect ratio, defined as the ratio of height to width, is of order 1. Most
buildings are in this category. For tall buildings and for those structures having flexible floors, one
creates idealized models consisting of 3D frame structures composed of columns, beams, shear walls,
and floor plates. These models generally involve a large number of variables and require computer-
based analysis methods to generate solutions. The advantage of simple models is that one can reason
about behavior through examination of analytical solutions. Both approaches are necessary and each
has a role.
Fig. 14.21 Inertia forces
for floor i
14.3 Building Response Under Lateral Loads 945
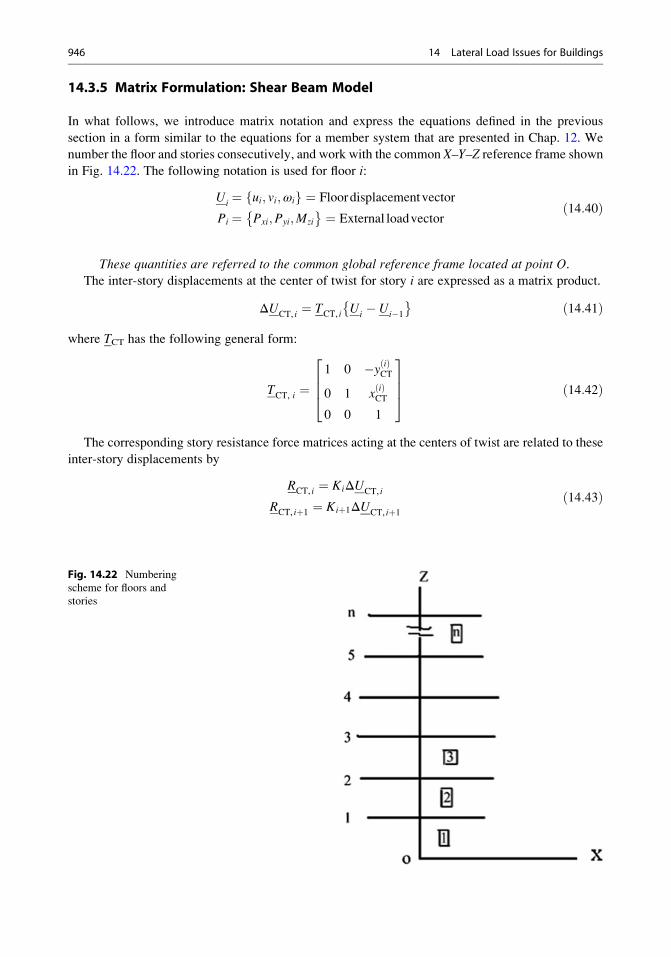
14.3.5 Matrix Formulation: Shear Beam Model
In what follows, we introduce matrix notation and express the equations defined in the previous
section in a form similar to the equations for a member system that are presented in Chap. 12. We
number the floor and stories consecutively, and work with the common X–Y–Z reference frame shown
in Fig. 14.22. The following notation is used for floor i:
Ui ¼ ui; vi;ωif g ¼ Floordisplacementvector
Pi ¼ Pxi;Pyi;Mzi
� � ¼ External loadvectorð14:40Þ
These quantities are referred to the common global reference frame located at point O.The inter-story displacements at the center of twist for story i are expressed as a matrix product.
ΔUCT, i ¼ TCT, i Ui � Ui�1
� � ð14:41Þ
where TCT has the following general form:
TCT, i ¼1 0 �y ið Þ
CT
0 1 xið ÞCT
0 0 1
2664
3775 ð14:42Þ
The corresponding story resistance force matrices acting at the centers of twist are related to these
inter-story displacements by
RCT, i ¼ KiΔUCT, i
RCT, iþ1 ¼ Kiþ1ΔUCT, iþ1ð14:43Þ
Fig. 14.22 Numbering
scheme for floors and
stories
946 14 Lateral Load Issues for Buildings
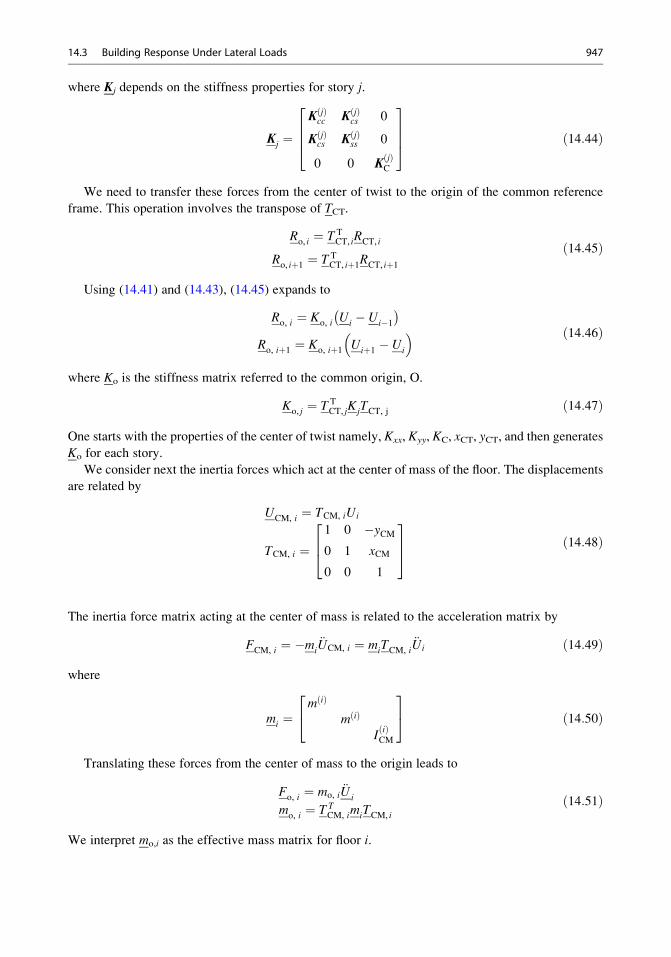
where Kj depends on the stiffness properties for story j.
Kj ¼K jð Þ
cc K jð Þcs 0
K jð Þcs K jð Þ
ss 0
0 0 Kjð ÞC
2664
3775 ð14:44Þ
We need to transfer these forces from the center of twist to the origin of the common reference
frame. This operation involves the transpose of TCT.
Ro, i ¼ T TCT, iRCT, i
Ro, iþ1 ¼ T TCT, iþ1RCT, iþ1
ð14:45Þ
Using (14.41) and (14.43), (14.45) expands to
Ro, i ¼ Ko, i Ui � Ui�1� �
Ro, iþ1 ¼ Ko, iþ1 Uiþ1 � Ui
� � ð14:46Þ
where Ko is the stiffness matrix referred to the common origin, O.
Ko, j ¼ T TCT, jKjTCT, j ð14:47Þ
One starts with the properties of the center of twist namely, Kxx, Kyy, KC, xCT, yCT, and then generates
Ko for each story.
We consider next the inertia forces which act at the center of mass of the floor. The displacements
are related by
UCM, i ¼ TCM, iUi
TCM, i ¼1 0 �yCM0 1 xCM
0 0 1
264
375 ð14:48Þ
The inertia force matrix acting at the center of mass is related to the acceleration matrix by
FCM, i ¼ �mi€UCM, i ¼ miTCM, i
€Ui ð14:49Þ
where
mi ¼m ið Þ
m ið Þ
Iið ÞCM
24
35 ð14:50Þ
Translating these forces from the center of mass to the origin leads to
Fo, i ¼ mo, i€Ui
mo, i ¼ T T
CM, imiTCM, i
ð14:51Þ
We interpret mo,i as the effective mass matrix for floor i.
14.3 Building Response Under Lateral Loads 947
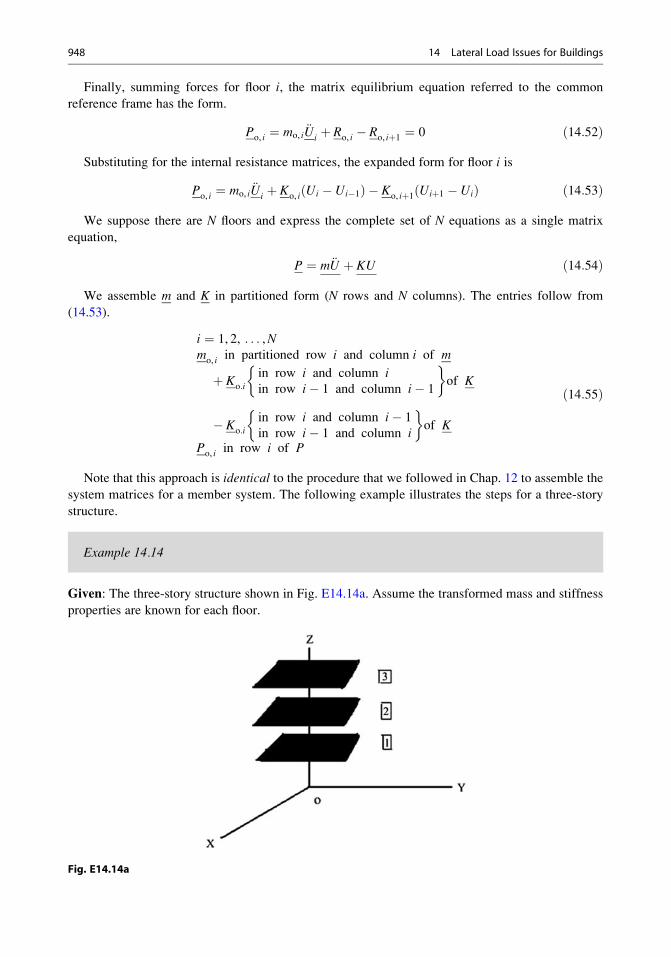
Finally, summing forces for floor i, the matrix equilibrium equation referred to the common
reference frame has the form.
Po, i ¼ mo, i€Ui þ Ro, i � Ro, iþ1 ¼ 0 ð14:52Þ
Substituting for the internal resistance matrices, the expanded form for floor i is
Po, i ¼ mo, i€Ui þ Ko, i Ui � Ui�1ð Þ � Ko, iþ1 Uiþ1 � Uið Þ ð14:53Þ
We suppose there are N floors and express the complete set of N equations as a single matrix
equation,
P ¼ m€U þ KU ð14:54Þ
We assemble m and K in partitioned form (N rows and N columns). The entries follow from
(14.53).
i ¼ 1, 2, . . . ,Nm
o, i in partitioned row i and column i of m
þ Ko:i
in row i and column iin row i� 1 and column i� 1
�of K
� Ko:i
in row i and column i� 1
in row i� 1 and column i
�of K
Po, i in row i of P
ð14:55Þ
Note that this approach is identical to the procedure that we followed in Chap. 12 to assemble the
system matrices for a member system. The following example illustrates the steps for a three-story
structure.
Example 14.14
Given: The three-story structure shown in Fig. E14.14a. Assume the transformed mass and stiffness
properties are known for each floor.
Fig. E14.14a
948 14 Lateral Load Issues for Buildings
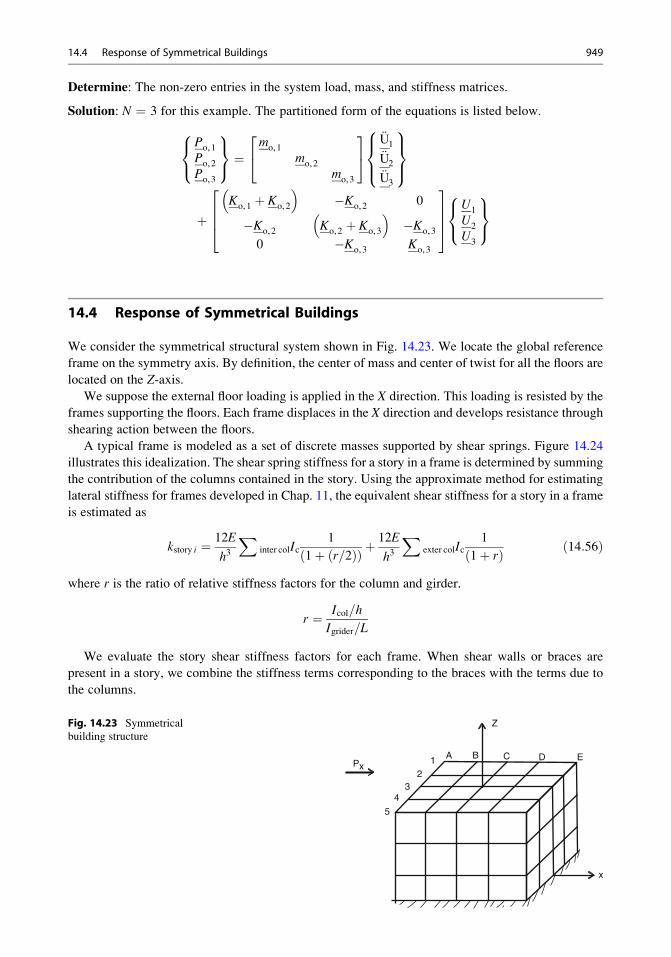
Determine: The non-zero entries in the system load, mass, and stiffness matrices.
Solution: N ¼ 3 for this example. The partitioned form of the equations is listed below.
Po,1
Po,2
Po,3
8<:
9=; ¼
mo,1mo,2
mo,3
24
35 €U1
€U2
€U3
8><>:
9>=>;
þKo,1 þ Ko,2
� ��Ko,2 0
�Ko,2 Ko,2 þ Ko,3
� ��Ko,3
0 �Ko,3 Ko,3
2664
3775
U1
U2
U3
8<:
9=;
14.4 Response of Symmetrical Buildings
We consider the symmetrical structural system shown in Fig. 14.23. We locate the global reference
frame on the symmetry axis. By definition, the center of mass and center of twist for all the floors are
located on the Z-axis.
We suppose the external floor loading is applied in the X direction. This loading is resisted by the
frames supporting the floors. Each frame displaces in the X direction and develops resistance through
shearing action between the floors.
A typical frame is modeled as a set of discrete masses supported by shear springs. Figure 14.24
illustrates this idealization. The shear spring stiffness for a story in a frame is determined by summing
the contribution of the columns contained in the story. Using the approximate method for estimating
lateral stiffness for frames developed in Chap. 11, the equivalent shear stiffness for a story in a frame
is estimated as
kstory i ¼ 12E
h3
Xinter colIc
1
1þ r=2ð Þð Þ þ12E
h3
Xexter colIc
1
1þ rð Þ ð14:56Þ
where r is the ratio of relative stiffness factors for the column and girder.
r ¼ Icol=h
Igrider=L
We evaluate the story shear stiffness factors for each frame. When shear walls or braces are
present in a story, we combine the stiffness terms corresponding to the braces with the terms due to
the columns.
x
Z
A12
34
5
PxB C D E
Fig. 14.23 Symmetrical
building structure
14.4 Response of Symmetrical Buildings 949
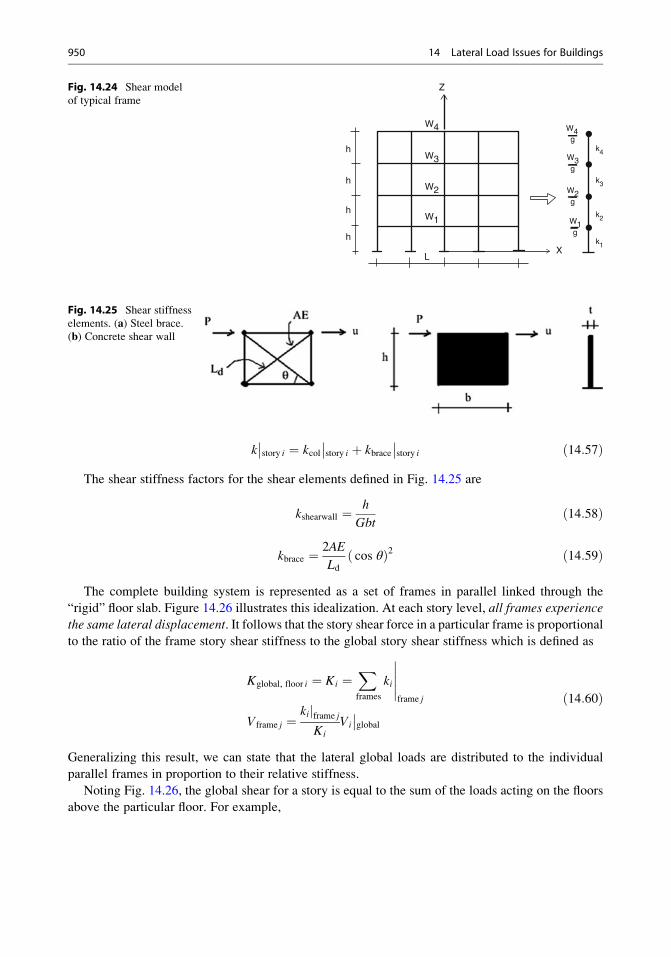
k story i
�� ¼ kcol��story i þ kbrace
��story i ð14:57Þ
The shear stiffness factors for the shear elements defined in Fig. 14.25 are
kshearwall ¼ h
Gbtð14:58Þ
kbrace ¼ 2AE
Ldcos θð Þ2 ð14:59Þ
The complete building system is represented as a set of frames in parallel linked through the
“rigid” floor slab. Figure 14.26 illustrates this idealization. At each story level, all frames experience
the same lateral displacement. It follows that the story shear force in a particular frame is proportional
to the ratio of the frame story shear stiffness to the global story shear stiffness which is defined as
Kglobal, floor i ¼ Ki ¼Xframes
ki
�����frame j
Vframe j ¼kijframe j
KiVi
��global
ð14:60Þ
Generalizing this result, we can state that the lateral global loads are distributed to the individual
parallel frames in proportion to their relative stiffness.
Noting Fig. 14.26, the global shear for a story is equal to the sum of the loads acting on the floors
above the particular floor. For example,
h
Z
X
g
g
g
g
W4 W4
k4
k3
k2
k1
W3
W2
W1
W3
W2
W1
h
h
h
L
Fig. 14.24 Shear model
of typical frame
Fig. 14.25 Shear stiffness
elements. (a) Steel brace.(b) Concrete shear wall
950 14 Lateral Load Issues for Buildings
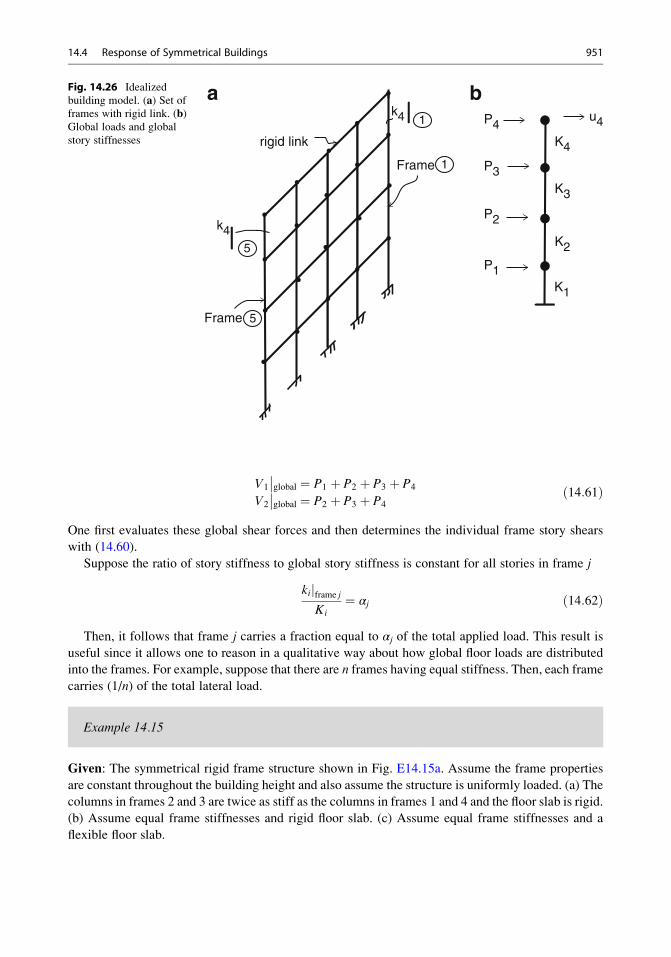
V1
��global ¼ P1 þ P2 þ P3 þ P4
V2
��global ¼ P2 þ P3 þ P4
ð14:61Þ
One first evaluates these global shear forces and then determines the individual frame story shears
with (14.60).
Suppose the ratio of story stiffness to global story stiffness is constant for all stories in frame j
kijframe j
Ki¼ αj ð14:62Þ
Then, it follows that frame j carries a fraction equal to αj of the total applied load. This result is
useful since it allows one to reason in a qualitative way about how global floor loads are distributed
into the frames. For example, suppose that there are n frames having equal stiffness. Then, each frame
carries (1/n) of the total lateral load.
Example 14.15
Given: The symmetrical rigid frame structure shown in Fig. E14.15a. Assume the frame properties
are constant throughout the building height and also assume the structure is uniformly loaded. (a) The
columns in frames 2 and 3 are twice as stiff as the columns in frames 1 and 4 and the floor slab is rigid.
(b) Assume equal frame stiffnesses and rigid floor slab. (c) Assume equal frame stiffnesses and a
flexible floor slab.
Frame
k4
k4
K4
u4
K3
K2
K1
P4
P3
P2
P1
Frame
rigid link
5
5
1
1
a bFig. 14.26 Idealized
building model. (a) Set offrames with rigid link. (b)Global loads and global
story stiffnesses
14.4 Response of Symmetrical Buildings 951
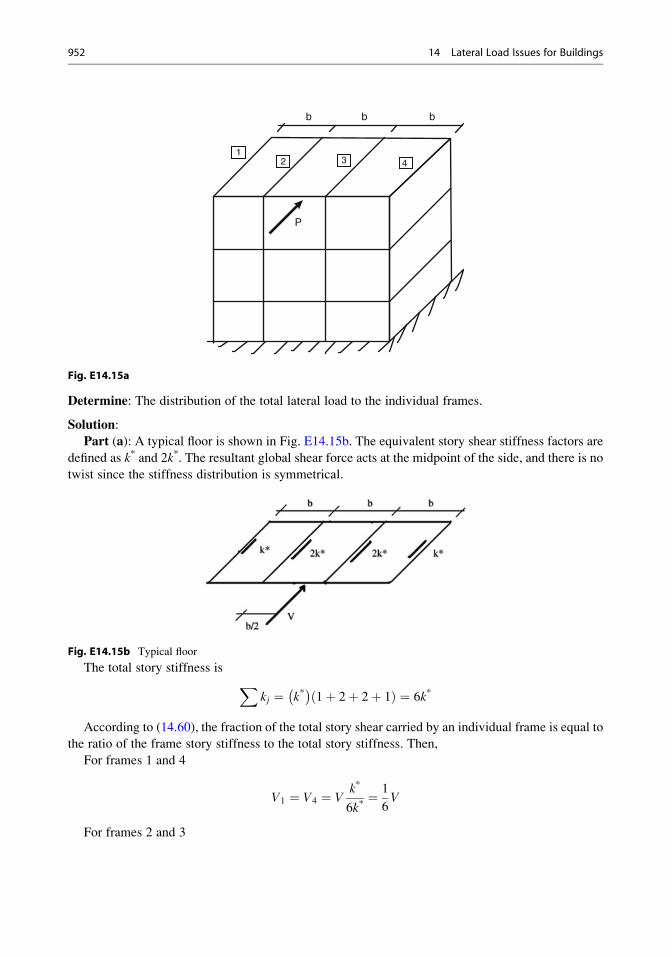
321
4
P
b b b
Fig. E14.15a
Determine: The distribution of the total lateral load to the individual frames.
Solution:
Part (a): A typical floor is shown in Fig. E14.15b. The equivalent story shear stiffness factors are
defined as k* and 2k*. The resultant global shear force acts at the midpoint of the side, and there is no
twist since the stiffness distribution is symmetrical.
Fig. E14.15b Typical floor
The total story stiffness is Xkj ¼ k*
� �1þ 2þ 2þ 1ð Þ ¼ 6k*
According to (14.60), the fraction of the total story shear carried by an individual frame is equal to
the ratio of the frame story stiffness to the total story stiffness. Then,
For frames 1 and 4
V1 ¼ V4 ¼ Vk*
6k*¼ 1
6V
For frames 2 and 3
952 14 Lateral Load Issues for Buildings
V2 ¼ V3 ¼ V2k*
6k*¼ 1
3V
In this case, the interior frames carry twice as much load as the exterior frames.
Part (b): If the floor slab is rigid and equal frame stiffnesses are used, the frame load distribution
shown in Fig. E14.15c is now applicable; the shear is assigned uniformly to the frames.
Fig. E14.15c Typical floor
Part (c): Suppose one generates an estimate for the global loading on an individual frame using the
tributary areas for the frames. Consider the structure shown in Fig. E14.15a. We divide the facade
area into area segments and associate these segmental areas with the frames adjacent to the areas as
illustrated in Fig. E14.15d.
Fig. E14.15d
14.4 Response of Symmetrical Buildings 953
We note that the width for the segmental areas 1 and 4 is ½ the width for the interior tributary
areas. Therefore, assuming the external loading is constant over the width, it follows that the
magnitude of the loads for frames 1 and 4 is ½ the load for the interior frames. This breakdown is
shown in Fig. E14.15e. This distribution is based on the assumption that the frames act independently,
i.e., the floor slabs are flexible.
Fig. E14.15e
Example 14.16
Given: The five-story symmetrical rigid frame building shown in Figs. E14.16a and E14.16b.
Assume the building can be subjected to an earthquake in either the North–South or East–West
directions. Take the spectral acceleration as Sa ¼ 0.15g. Consider all the beams to be the same size
and all the columns to be the same size. Assume IB ¼ 4IC.
Fig. E14.16a Elevation
954 14 Lateral Load Issues for Buildings
Fig. E14.16b Typical floor plan
Determine: The maximum moments in the columns (a) for rigid floors and (b) for flexible floors.
Solution: We use (14.10). The base shear is given by
Vjbase ¼X
5i¼1ZiW
� �2X
5i¼1Wi Zið Þ2
Sag¼ 2000 3ð Þ þ 2000 6ð Þ þ 2000 9ð Þ þ 2000 12ð Þ þ 2000 15ð Þð Þ2
2000 3ð Þ2 þ 2000 6ð Þ2 þ 2000 9ð Þ2 þ 2000 12ð Þ2 þ 2000 15ð Þ2 0:15ð Þ
¼ 1227kN
Then, applying (14.11), we obtain the individual floor loads (Fig. E14.16c).
Pjfloor i ¼WiZiXWiZi
!Vjbase
X5i¼1WiZi ¼ 2000 3ð Þ þ 2000 6ð Þ þ 2000 9ð Þ þ 2000 12ð Þ þ 2000 15ð Þ¼ 90, 000kN=m
Pjfloor 1 ¼3 2000ð Þ90, 000
1227ð Þ ¼ 81:8kN
Pjfloor 2 ¼6 2000ð Þ90, 000
1227ð Þ ¼ 163:6kN
Pjfloor 3 ¼9 2000ð Þ90, 000
1227ð Þ ¼ 245:4kN
Pjfloor 4 ¼12 2000ð Þ90, 000
1227ð Þ ¼ 327:2kN
Pjfloor 5 ¼15 2000ð Þ90, 000
1227ð Þ ¼ 409kN
14.4 Response of Symmetrical Buildings 955
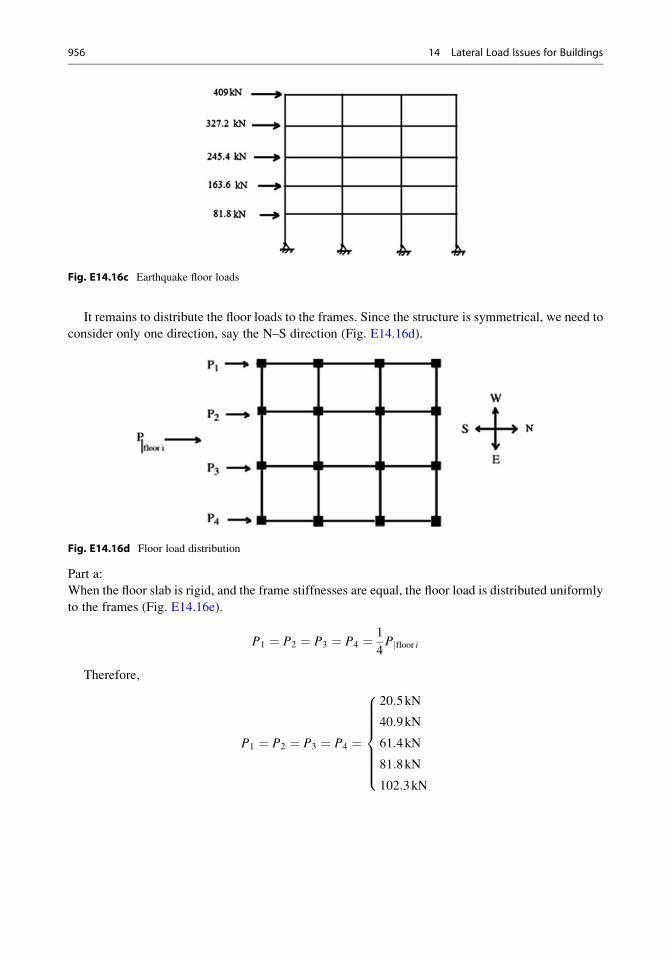
Fig. E14.16c Earthquake floor loads
It remains to distribute the floor loads to the frames. Since the structure is symmetrical, we need to
consider only one direction, say the N–S direction (Fig. E14.16d).
Fig. E14.16d Floor load distribution
Part a:
When the floor slab is rigid, and the frame stiffnesses are equal, the floor load is distributed uniformly
to the frames (Fig. E14.16e).
P1 ¼ P2 ¼ P3 ¼ P4 ¼ 1
4P floor ij
Therefore,
P1 ¼ P2 ¼ P3 ¼ P4 ¼
20:5kN
40:9kN
61:4kN
81:8kN
102:3kN
8>>>>>><>>>>>>:
956 14 Lateral Load Issues for Buildings
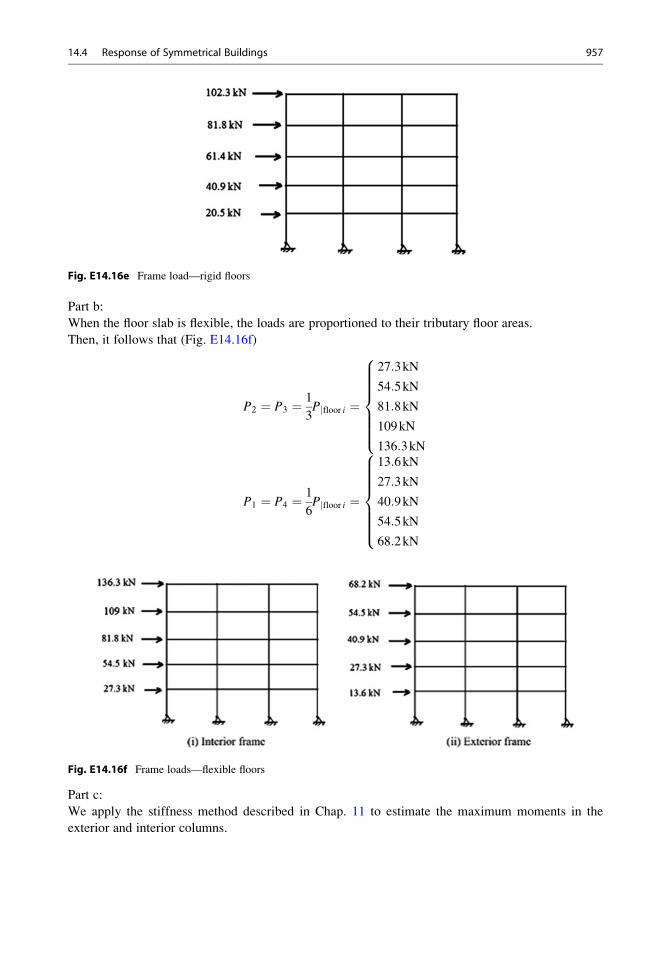
Fig. E14.16e Frame load—rigid floors
Part b:
When the floor slab is flexible, the loads are proportioned to their tributary floor areas.
Then, it follows that (Fig. E14.16f)
P2 ¼ P3 ¼ 1
3P floor ij ¼
27:3kN
54:5kN
81:8kN
109kN
136:3kN
8>>>>>><>>>>>>:
P1 ¼ P4 ¼ 1
6P floor ij ¼
13:6kN
27:3kN
40:9kN
54:5kN
68:2kN
8>>>>>><>>>>>>:
Fig. E14.16f Frame loads—flexible floors
Part c:
We apply the stiffness method described in Chap. 11 to estimate the maximum moments in the
exterior and interior columns.
14.4 Response of Symmetrical Buildings 957
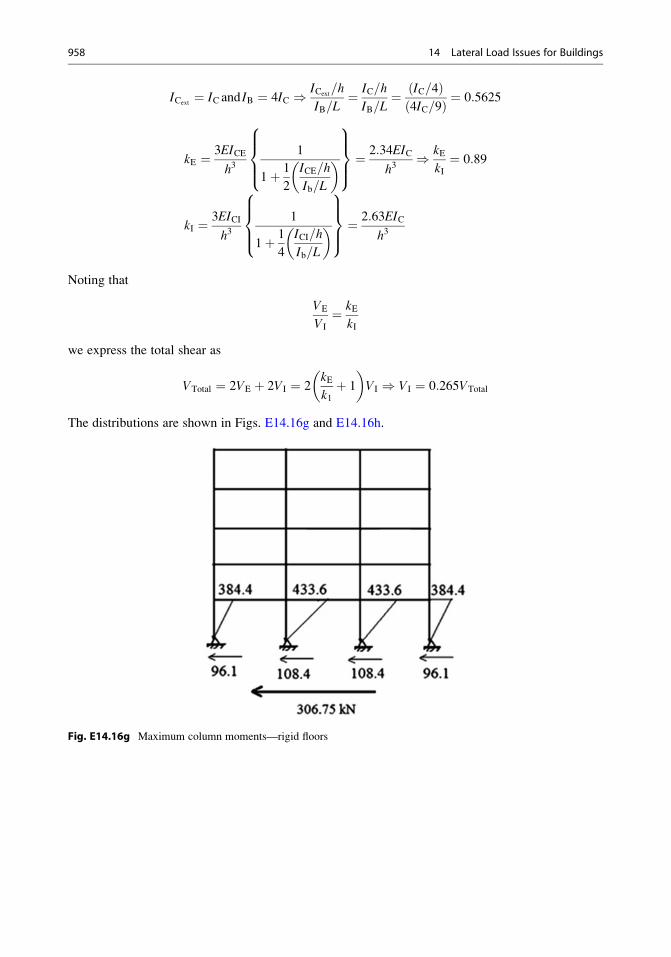
ICext¼ IC and IB ¼ 4IC ) ICext
=h
IB=L¼ IC=h
IB=L¼ IC=4ð Þ
4IC=9ð Þ ¼ 0:5625
kE ¼ 3EICE
h31
1þ 1
2
ICE=h
Ib=L
� �8>><>>:
9>>=>>; ¼
2:34EIC
h3) kE
kI¼ 0:89
kI ¼ 3EICI
h31
1þ 1
4
ICI=h
Ib=L
� �8>><>>:
9>>=>>; ¼
2:63EIC
h3
Noting that
VE
VI
¼ kEkI
we express the total shear as
VTotal ¼ 2VE þ 2VI ¼ 2kEk1þ 1
� �VI ) VI ¼ 0:265VTotal
The distributions are shown in Figs. E14.16g and E14.16h.
Fig. E14.16g Maximum column moments—rigid floors
958 14 Lateral Load Issues for Buildings

Fig. E14.16h Maximum column moments—flexible floors
Example 14.17
Given: The one-story frame shown in Figs. E14.17a, E14.17b, E14.17c. Assume the cross sections
are equal.
Fig. E14.17a Plan
14.4 Response of Symmetrical Buildings 959
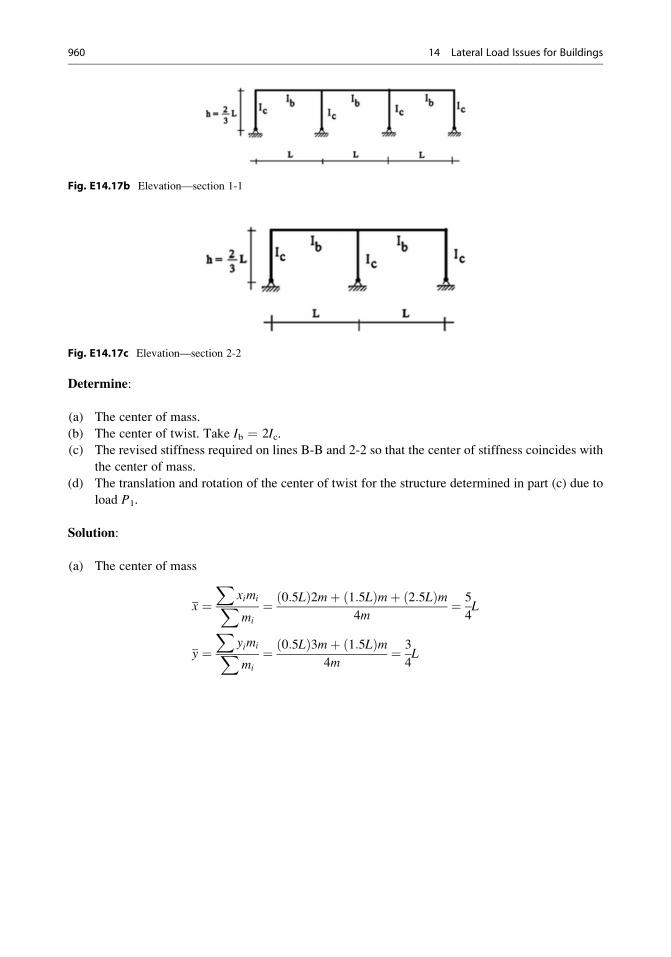
Fig. E14.17b Elevation—section 1-1
Fig. E14.17c Elevation—section 2-2
Determine:
(a) The center of mass.
(b) The center of twist. Take Ib ¼ 2Ic.(c) The revised stiffness required on lines B-B and 2-2 so that the center of stiffness coincides with
the center of mass.
(d) The translation and rotation of the center of twist for the structure determined in part (c) due to
load P1.
Solution:
(a) The center of mass
x ¼X
ximiXmi
¼ 0:5Lð Þ2mþ 1:5Lð Þmþ 2:5Lð Þm4m
¼ 5
4L
y ¼X
yimiXmi
¼ 0:5Lð Þ3mþ 1:5Lð Þm4m
¼ 3
4L
960 14 Lateral Load Issues for Buildings

(b) The center of twist
ICE ¼ ICI ¼ Ic
Ib ¼ 2IcICI=h
Ib=L
� �¼ ICE=h
Ib=L
� �¼ 3Ic=2L
2Ic=L
� �¼ 0:75
Using the shear stiffness equations (11.11) and (11.12), the relevant stiffness factors are
f BE ¼1
1þ 1
2
ICE=h
Ib=L
� �8>><>>:
9>>=>>; ¼ 0:73
f BI ¼1
1þ 1
4
ICE=h
Ib=L
� �8>><>>:
9>>=>>; ¼ 0:84
Let (EIc/h3) ¼ k. Then,
kBE ¼ 3EICE
h31
1þ 1
2
ICE=h
Ib=L
� �8>><>>:
9>>=>>; ¼
3EICE
h3f BE ¼ 2:19k
kBI ¼ 3EICI
h31
1þ 1
4
ICI=h
Ib=L
� �8>><>>:
9>>=>>; ¼
3EICI
h3f BI ¼ 2:52k
14.4 Response of Symmetrical Buildings 961
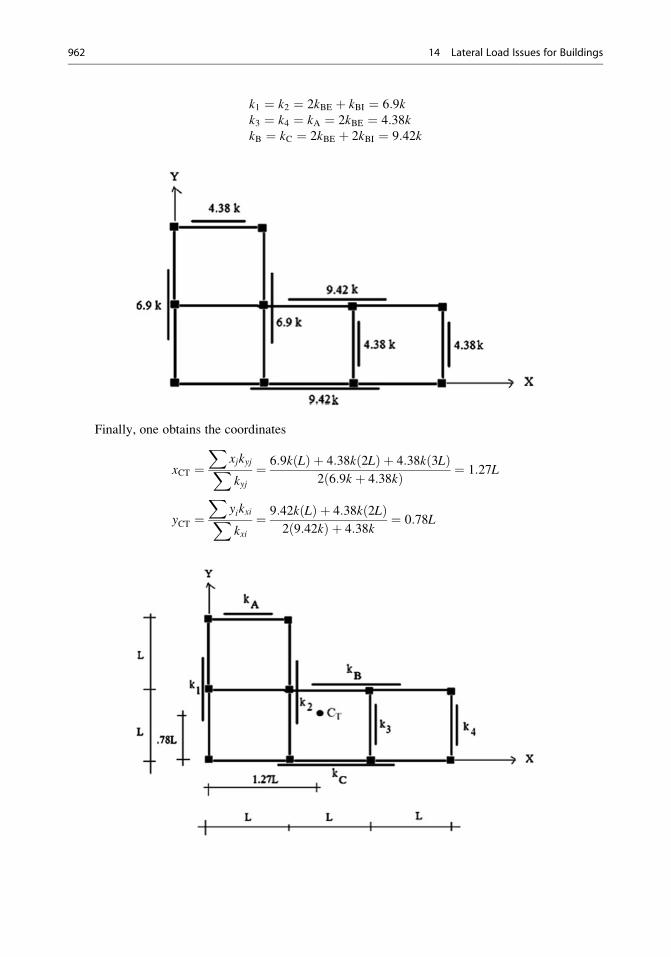
k1 ¼ k2 ¼ 2kBE þ kBI ¼ 6:9kk3 ¼ k4 ¼ kA ¼ 2kBE ¼ 4:38kkB ¼ kC ¼ 2kBE þ 2kBI ¼ 9:42k
Finally, one obtains the coordinates
xCT ¼X
xjkyjXkyj¼ 6:9k Lð Þ þ 4:38k 2Lð Þ þ 4:38k 3Lð Þ
2 6:9k þ 4:38kð Þ ¼ 1:27L
yCT ¼X
yikxiXkxi¼ 9:42k Lð Þ þ 4:38k 2Lð Þ
2 9:42kð Þ þ 4:38k¼ 0:78L
962 14 Lateral Load Issues for Buildings
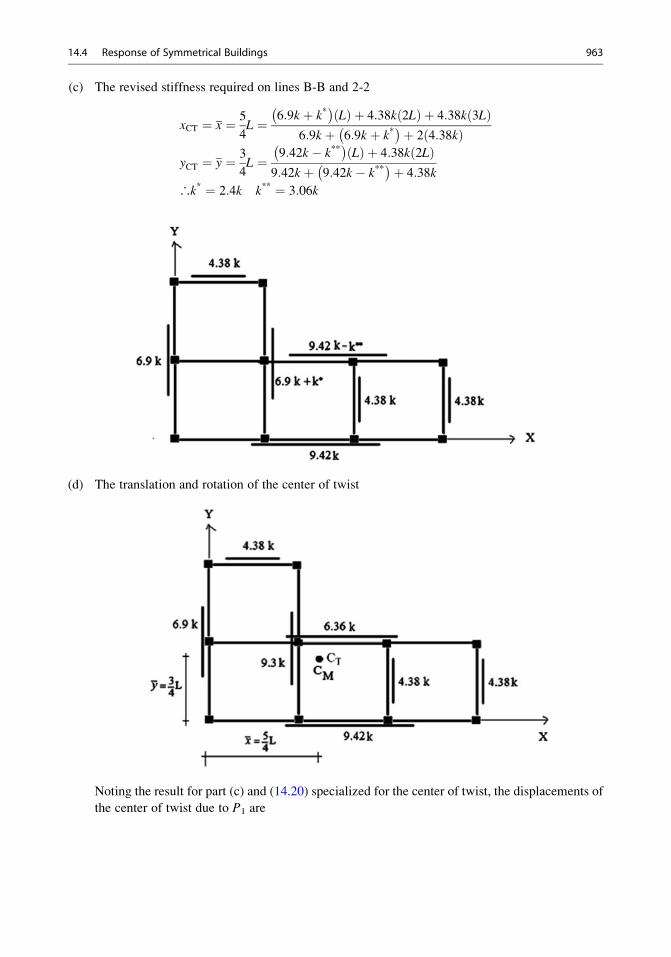
(c) The revised stiffness required on lines B-B and 2-2
xCT ¼ x ¼ 5
4L ¼ 6:9k þ k*
� �Lð Þ þ 4:38k 2Lð Þ þ 4:38k 3Lð Þ
6:9k þ 6:9k þ k*� �þ 2 4:38kð Þ
yCT ¼ y ¼ 3
4L ¼ 9:42k � k**
� �Lð Þ þ 4:38k 2Lð Þ
9:42k þ 9:42k � k**� �þ 4:38k
∴k* ¼ 2:4k k** ¼ 3:06k
(d) The translation and rotation of the center of twist
Noting the result for part (c) and (14.20) specialized for the center of twist, the displacements of
the center of twist due to P1 are
14.4 Response of Symmetrical Buildings 963
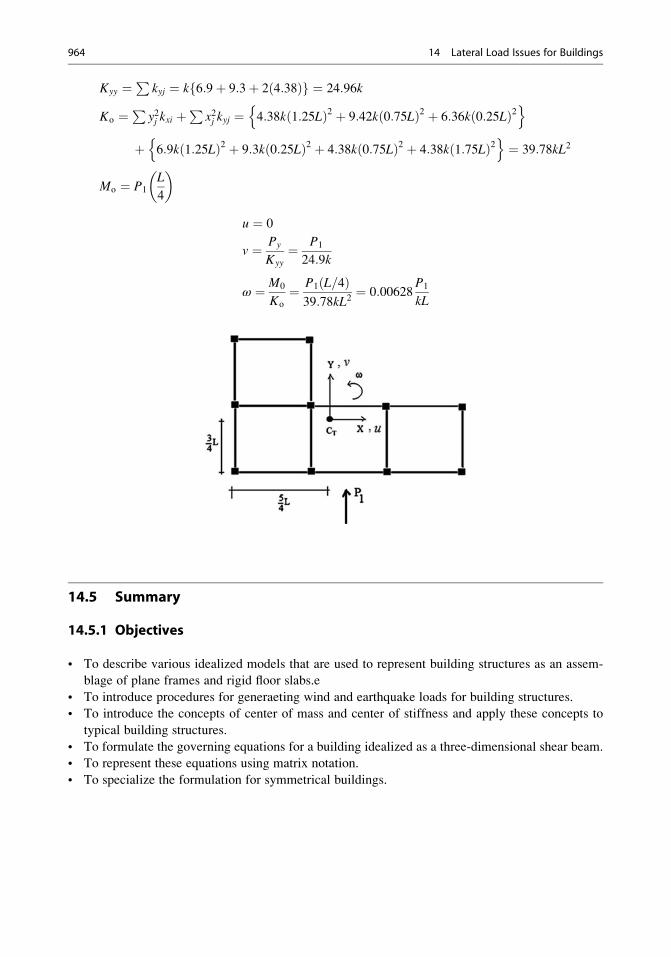
Kyy ¼P
kyj ¼ k 6:9þ 9:3þ 2 4:38ð Þf g ¼ 24:96k
Ko ¼P
y2j kxi þP
x2j kyj ¼ 4:38k 1:25Lð Þ2 þ 9:42k 0:75Lð Þ2 þ 6:36k 0:25Lð Þ2n o
þ 6:9k 1:25Lð Þ2 þ 9:3k 0:25Lð Þ2 þ 4:38k 0:75Lð Þ2 þ 4:38k 1:75Lð Þ2n o
¼ 39:78kL2
Mo ¼ P1
L
4
� �
u ¼ 0
v ¼ Py
Kyy¼ P1
24:9k
ω ¼ M0
Ko
¼ P1 L=4ð Þ39:78kL2
¼ 0:00628P1
kL
14.5 Summary
14.5.1 Objectives
• To describe various idealized models that are used to represent building structures as an assem-
blage of plane frames and rigid floor slabs.e
• To introduce procedures for generaeting wind and earthquake loads for building structures.
• To introduce the concepts of center of mass and center of stiffness and apply these concepts to
typical building structures.
• To formulate the governing equations for a building idealized as a three-dimensional shear beam.
• To represent these equations using matrix notation.
• To specialize the formulation for symmetrical buildings.
964 14 Lateral Load Issues for Buildings
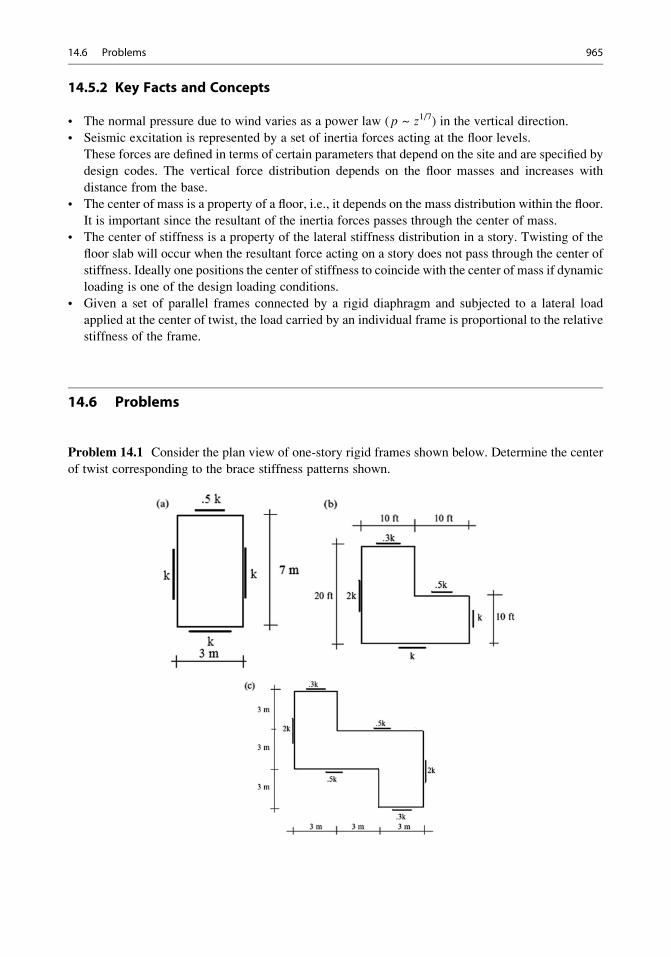
14.5.2 Key Facts and Concepts
• The normal pressure due to wind varies as a power law ( p ~ z1/7) in the vertical direction.
• Seismic excitation is represented by a set of inertia forces acting at the floor levels.
These forces are defined in terms of certain parameters that depend on the site and are specified by
design codes. The vertical force distribution depends on the floor masses and increases with
distance from the base.
• The center of mass is a property of a floor, i.e., it depends on the mass distribution within the floor.
It is important since the resultant of the inertia forces passes through the center of mass.
• The center of stiffness is a property of the lateral stiffness distribution in a story. Twisting of the
floor slab will occur when the resultant force acting on a story does not pass through the center of
stiffness. Ideally one positions the center of stiffness to coincide with the center of mass if dynamic
loading is one of the design loading conditions.
• Given a set of parallel frames connected by a rigid diaphragm and subjected to a lateral load
applied at the center of twist, the load carried by an individual frame is proportional to the relative
stiffness of the frame.
14.6 Problems
Problem 14.1 Consider the plan view of one-story rigid frames shown below. Determine the center
of twist corresponding to the brace stiffness patterns shown.
14.6 Problems 965
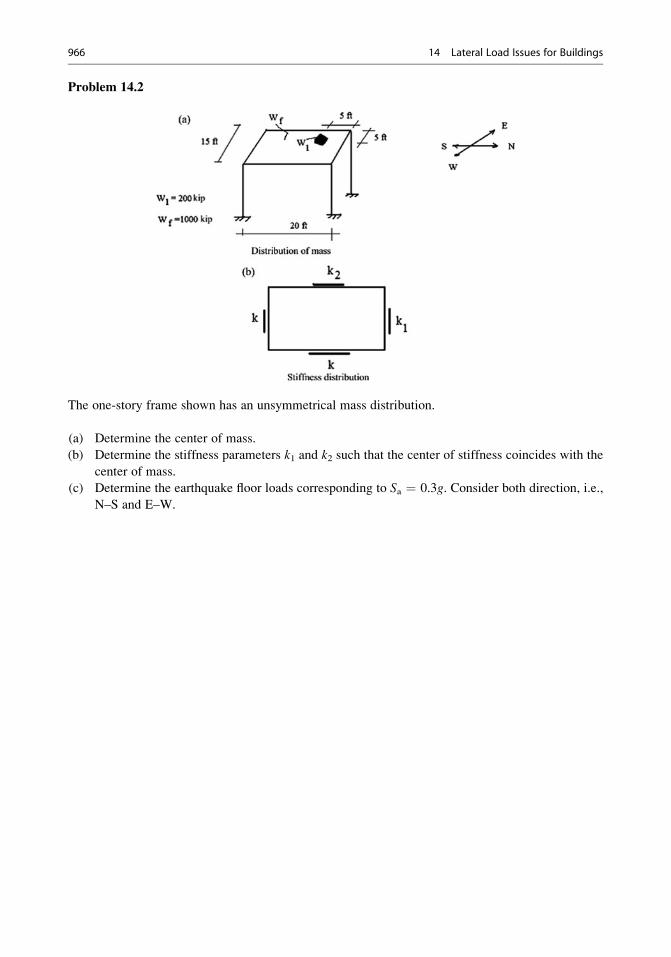
Problem 14.2
The one-story frame shown has an unsymmetrical mass distribution.
(a) Determine the center of mass.
(b) Determine the stiffness parameters k1 and k2 such that the center of stiffness coincides with the
center of mass.
(c) Determine the earthquake floor loads corresponding to Sa ¼ 0.3g. Consider both direction, i.e.,
N–S and E–W.
966 14 Lateral Load Issues for Buildings
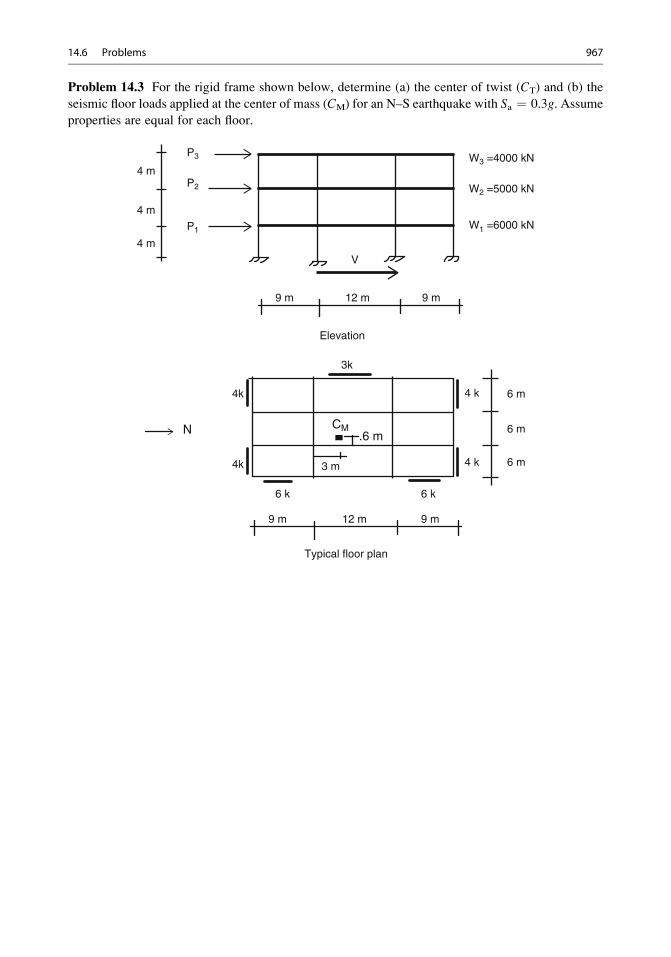
Problem 14.3 For the rigid frame shown below, determine (a) the center of twist (CT) and (b) the
seismic floor loads applied at the center of mass (CM) for an N–S earthquake with Sa ¼ 0.3g. Assume
properties are equal for each floor.
V
4 m
4 m
4 m
P3
P2
P1
9 m 12 m
3k
9 m
Elevation
W3 =4000 kN
W2 =5000 kN
W1 =6000 kN
6 m
6 m
6 m
4 k4k
4k 3 m
6 k 6 k
9 m 12 m
Typical floor plan
9 m
CMN .6 m
4 k
14.6 Problems 967
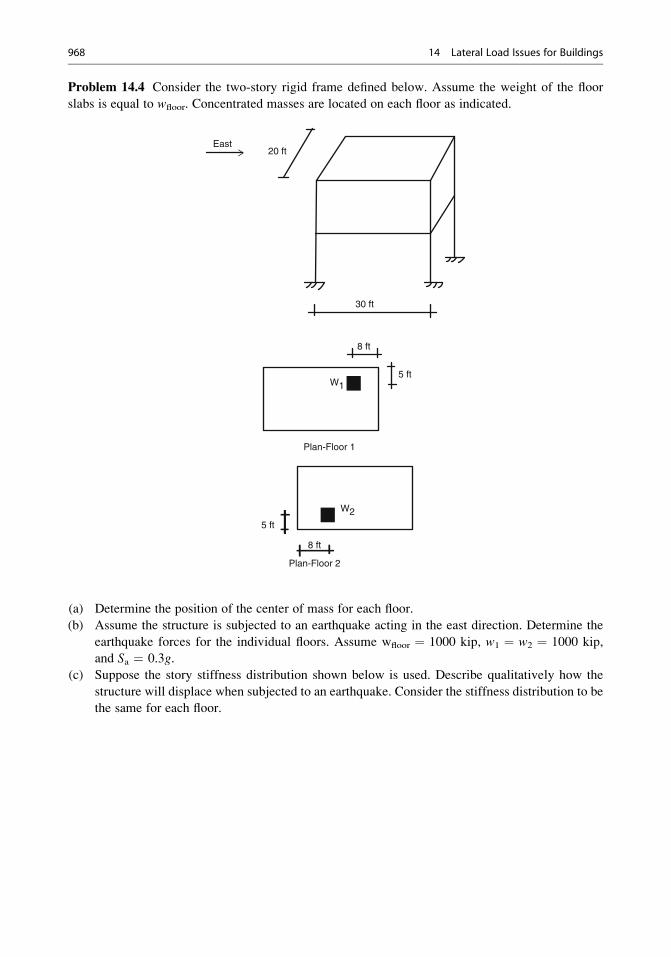
Problem 14.4 Consider the two-story rigid frame defined below. Assume the weight of the floor
slabs is equal to wfloor. Concentrated masses are located on each floor as indicated.
W1
W2
East20 ft
30 ft
8 ft
8 ft
5 ft
5 ft
Plan-Floor 1
Plan-Floor 2
(a) Determine the position of the center of mass for each floor.
(b) Assume the structure is subjected to an earthquake acting in the east direction. Determine the
earthquake forces for the individual floors. Assume wfloor ¼ 1000 kip, w1 ¼ w2 ¼ 1000 kip,
and Sa ¼ 0.3g.
(c) Suppose the story stiffness distribution shown below is used. Describe qualitatively how the
structure will displace when subjected to an earthquake. Consider the stiffness distribution to be
the same for each floor.
968 14 Lateral Load Issues for Buildings
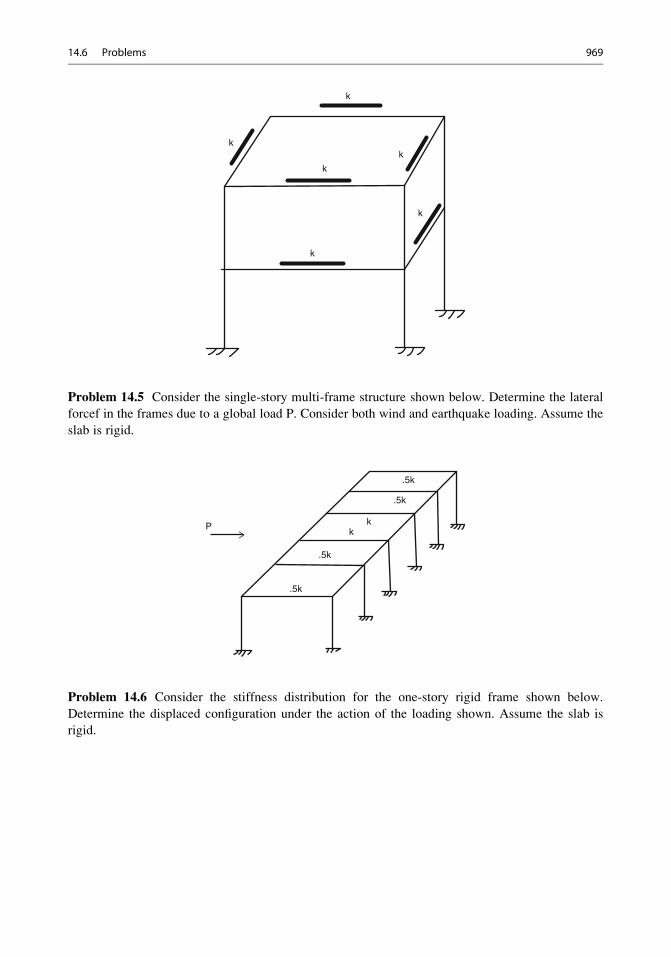
k
k
k
k
k
k
Problem 14.5 Consider the single-story multi-frame structure shown below. Determine the lateral
forcef in the frames due to a global load P. Consider both wind and earthquake loading. Assume the
slab is rigid.
.5k
.5k
kk
.5k
.5k
P
Problem 14.6 Consider the stiffness distribution for the one-story rigid frame shown below.
Determine the displaced configuration under the action of the loading shown. Assume the slab is
rigid.
14.6 Problems 969
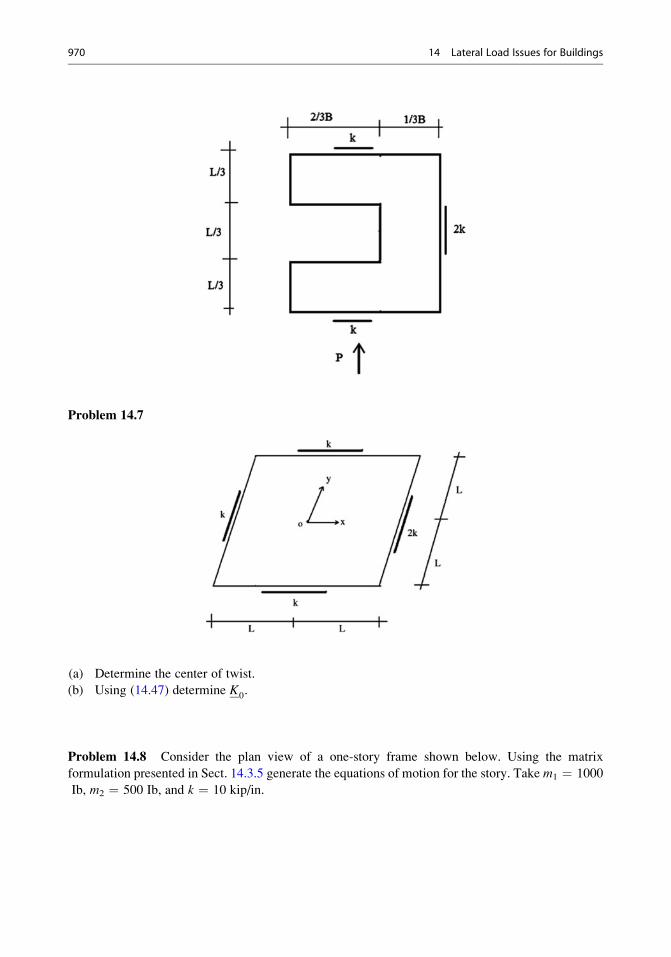
Problem 14.7
(a) Determine the center of twist.
(b) Using (14.47) determine K0.
Problem 14.8 Consider the plan view of a one-story frame shown below. Using the matrix
formulation presented in Sect. 14.3.5 generate the equations of motion for the story. Take m1 ¼ 1000
Ib, m2 ¼ 500 Ib, and k ¼ 10 kip/in.
970 14 Lateral Load Issues for Buildings
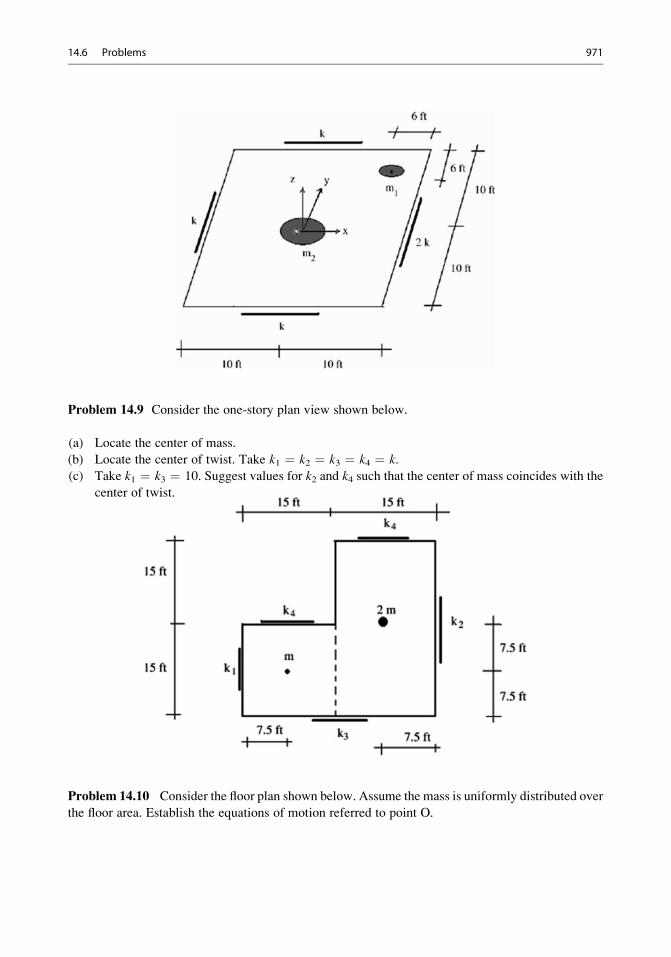
Problem 14.9 Consider the one-story plan view shown below.
(a) Locate the center of mass.
(b) Locate the center of twist. Take k1 ¼ k2 ¼ k3 ¼ k4 ¼ k.(c) Take k1 ¼ k3 ¼ 10. Suggest values for k2 and k4 such that the center of mass coincides with the
center of twist.
Problem 14.10 Consider the floor plan shown below. Assume the mass is uniformly distributed over
the floor area. Establish the equations of motion referred to point O.
14.6 Problems 971
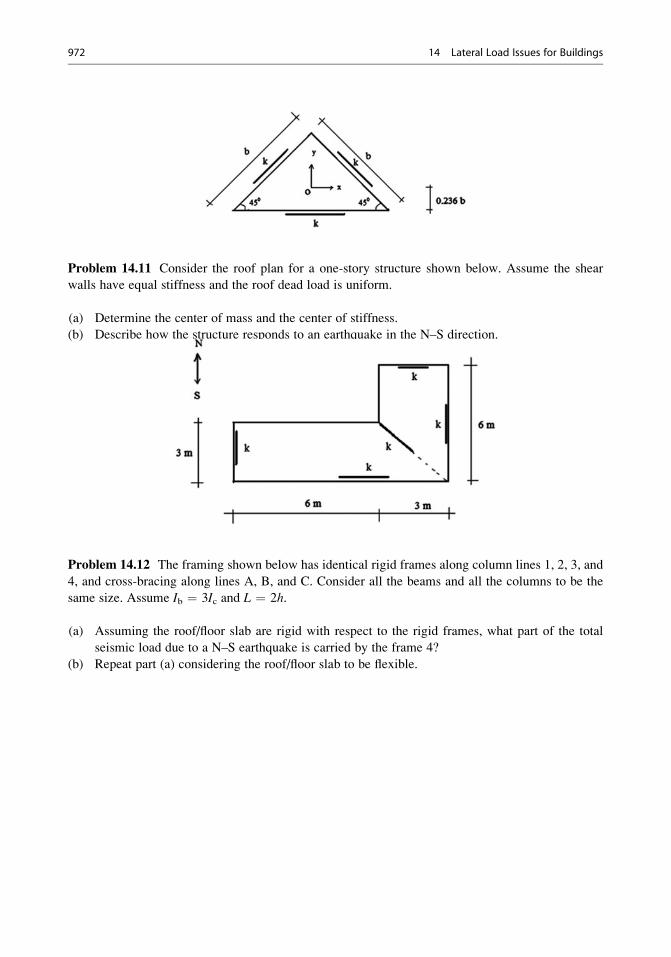
Problem 14.11 Consider the roof plan for a one-story structure shown below. Assume the shear
walls have equal stiffness and the roof dead load is uniform.
(a) Determine the center of mass and the center of stiffness.
(b) Describe how the structure responds to an earthquake in the N–S direction.
Problem 14.12 The framing shown below has identical rigid frames along column lines 1, 2, 3, and
4, and cross-bracing along lines A, B, and C. Consider all the beams and all the columns to be the
same size. Assume Ib ¼ 3Ic and L ¼ 2h.
(a) Assuming the roof/floor slab are rigid with respect to the rigid frames, what part of the total
seismic load due to a N–S earthquake is carried by the frame 4?
(b) Repeat part (a) considering the roof/floor slab to be flexible.
972 14 Lateral Load Issues for Buildings
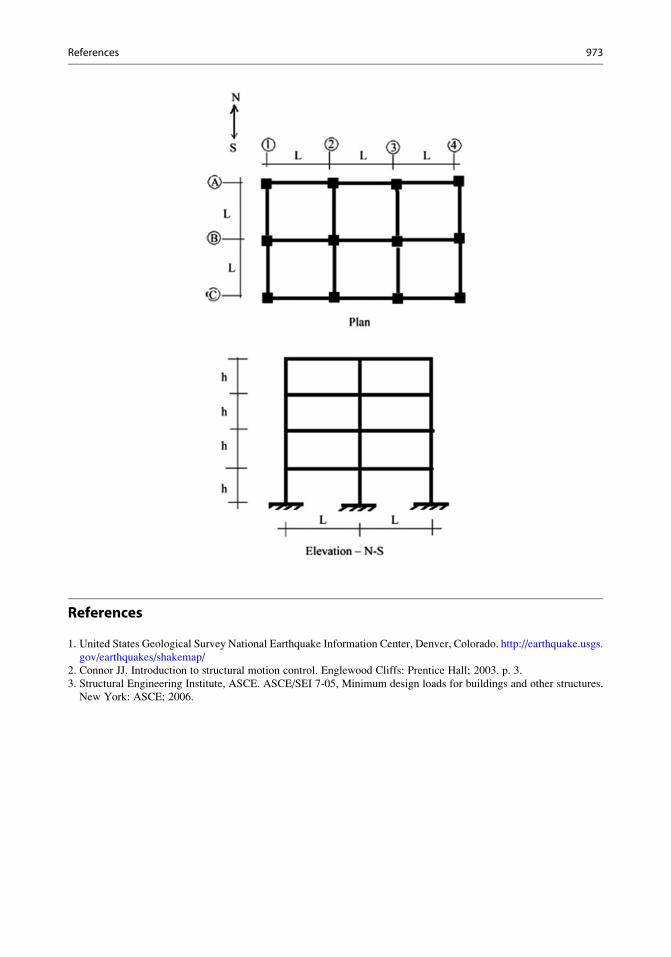
References
1. United States Geological Survey National Earthquake Information Center, Denver, Colorado. http://earthquake.usgs.
gov/earthquakes/shakemap/
2. Connor JJ. Introduction to structural motion control. Englewood Cliffs: Prentice Hall; 2003. p. 3.
3. Structural Engineering Institute, ASCE. ASCE/SEI 7-05, Minimum design loads for buildings and other structures.
New York: ASCE; 2006.
References 973
Vertical Loads on Multistory Buildings 15
Abstract
The previous chapter dealt with issues related to the lateral loadings on
building systems. In that chapter, we described how one can represent the
global lateral loading as loads acting on the individual frames contained in
the building system. We focus in this chapter on how one treats vertical
loads such as gravity loads. Gravity loads applied to a floor slab are
converted to distributed loads acting on the beams which support the
slab. Since the floor slab loads involve both dead and live loads, one
needs to investigate various floor slab loading patterns in order to establish
the maximum values of the design parameters such as bending moment.
We apply Muller-Breslau principle for this task. The last section of the
chapter contains a case study which illustrates the process of combining
lateral and vertical loading, and demonstrates the sensitivity of the struc-
tural design to the type of structural system.
15.1 Loads on Frames
Figure 15.1 shows a multistory building system and Figure 15.2 shows a typical makeup of a
rectangular building; the structural system is composed of floor slabs that are supported by frames
arranged in an orthogonal pattern. The action of wind and earthquake is represented by concentrated
lateral loads applied to the nodes. Gravity loads acting on the floor slabs or roof are transferred to the
beams and then to the columns. The nature of these beam loads (uniform, concentrated, triangular,
trapezoidal) depends on the makeup of the flooring system. In this chapter, we examine first the
mechanism by which the floor loads are transferred to the beams and then describe how to establish
the critical loading pattern that produces the peak values of moment in an individual beam. Given the
peak moments, one can select appropriate beam cross sections.
# Springer International Publishing Switzerland 2016
J.J. Connor, S. Faraji, Fundamentals of Structural Engineering,DOI 10.1007/978-3-319-24331-3_15
975
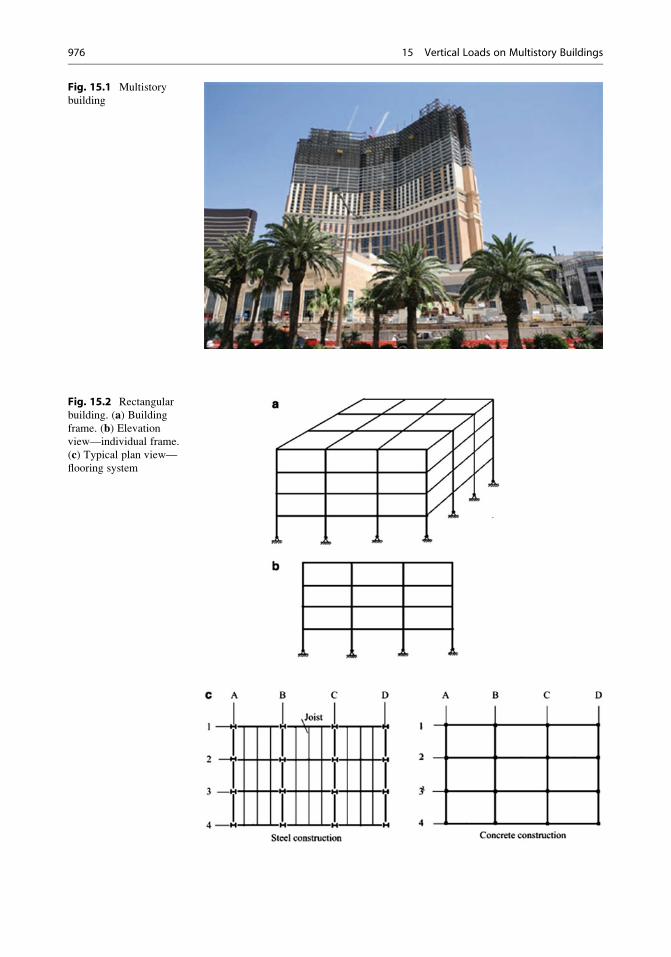
Fig. 15.1 Multistory
building
Fig. 15.2 Rectangular
building. (a) Buildingframe. (b) Elevationview—individual frame.
(c) Typical plan view—
flooring system
976 15 Vertical Loads on Multistory Buildings
15.2 Treatment of Gravity Floor Loads
Figure 15.3 shows a rectangular segment of the floor (abcd) bounded by columns at its corners and
beams along its sides. In typical concrete construction, the floor slab and beams are framed simulta-
neously. The floor slab–beam system functions as a rectangular plate supported on all its sides. If the
load is transmitted to all the sides, we refer to this behavior as two-way action. When the load tends to
be transmitted primarily in one direction, this behavior is called one-way action.
Whether one-way or two-way action occurs depends on the dimensions and makeup of the floor
slab. The most common approach is to work with the tributary areas defined in Fig. 15.4. One
constructs 45� lines and computes individual areas. The loading on an area is assigned to the adjacent
beam. When the members are located in the interior, these areas are doubled to account for the
adjacent panels. In general, the areas are either triangular or trapezoidal.
Fig. 15.3 Slab–beam
framing scheme—two-way
action
Fig. 15.4 Tributary areas
for floor panel abcd
15.2 Treatment of Gravity Floor Loads 977
The floor loading is represented as a uniform load q (Ib/ft2 or N/m2) applied to the floor slab. Using
the concept of tributary areas, we convert this loading to a line loading w (Ib/ft or N/m) on the
perimeter floor beams. The loading patterns for the beams supporting panel abcd and adjacent panels
shown in Fig. 15.5 are listed below.
w1 ¼ qB1
2
� �
w2 ¼ qB1
2þ B2
2
� �
w3 ¼ qB1
2
� �w4 ¼ qB1
8>>>>>>>>>><>>>>>>>>>>:
When steel members are used, the usual approach is to form the floor by first installing joists, then
overlaying steel decking, and lastly casting a thin layer of concrete. Loading applied to the floor is
transferred through the decking to the joists and ultimately to the beams supporting the joists. For the
geometry shown in Fig. 15.6, beams ab and cd carry essentially all the loads applied to the floor panel
abcd. The loads on beams ad and bc are associated with the small tributary areas between them and
the adjacent joists. Depending on the joist spacing, the beam loads are represented either as
concentrated loads or as a uniformly distributed load. The loading patterns are shown in Fig. 15.7
are listed below.
P1 ¼ q a1B1
2
� �
P2 ¼ q a1B1
2þ B2
2
� �
w1 ¼ qB1
2
� �
w2 ¼ qB1
2þ B2
2
� �
8>>>>>>>>>>>>><>>>>>>>>>>>>>:
Fig. 15.5 Two-way action
perimeter beam loadings
for uniform floor loading—
panel abcd
978 15 Vertical Loads on Multistory Buildings
a
b
P1 P1 P1
a b
a b
L1
w1
P2 P2 P2
d c
L1
L1
d c
w2
L1
Fig. 15.7 One-way action
beam loading for uniform
floor loading q. (a) Largejoist spacing. (b) Small
joist spacing
Fig. 15.6 Steel joist/beam
framing scheme
15.2 Treatment of Gravity Floor Loads 979
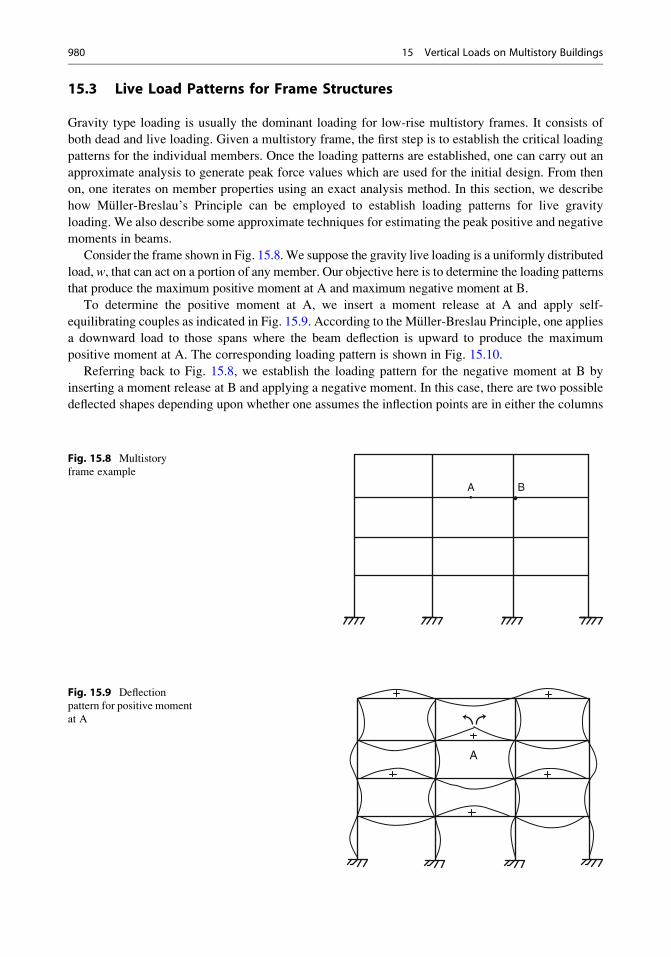
15.3 Live Load Patterns for Frame Structures
Gravity type loading is usually the dominant loading for low-rise multistory frames. It consists of
both dead and live loading. Given a multistory frame, the first step is to establish the critical loading
patterns for the individual members. Once the loading patterns are established, one can carry out an
approximate analysis to generate peak force values which are used for the initial design. From then
on, one iterates on member properties using an exact analysis method. In this section, we describe
how Muller-Breslau’s Principle can be employed to establish loading patterns for live gravity
loading. We also describe some approximate techniques for estimating the peak positive and negative
moments in beams.
Consider the frame shown in Fig. 15.8.We suppose the gravity live loading is a uniformly distributed
load, w, that can act on a portion of any member. Our objective here is to determine the loading patterns
that produce the maximum positive moment at A and maximum negative moment at B.
To determine the positive moment at A, we insert a moment release at A and apply self-
equilibrating couples as indicated in Fig. 15.9. According to the Muller-Breslau Principle, one applies
a downward load to those spans where the beam deflection is upward to produce the maximum
positive moment at A. The corresponding loading pattern is shown in Fig. 15.10.
Referring back to Fig. 15.8, we establish the loading pattern for the negative moment at B by
inserting a moment release at B and applying a negative moment. In this case, there are two possible
deflected shapes depending upon whether one assumes the inflection points are in either the columns
A B
Fig. 15.8 Multistory
frame example
A
Fig. 15.9 Deflection
pattern for positive moment
at A
980 15 Vertical Loads on Multistory Buildings
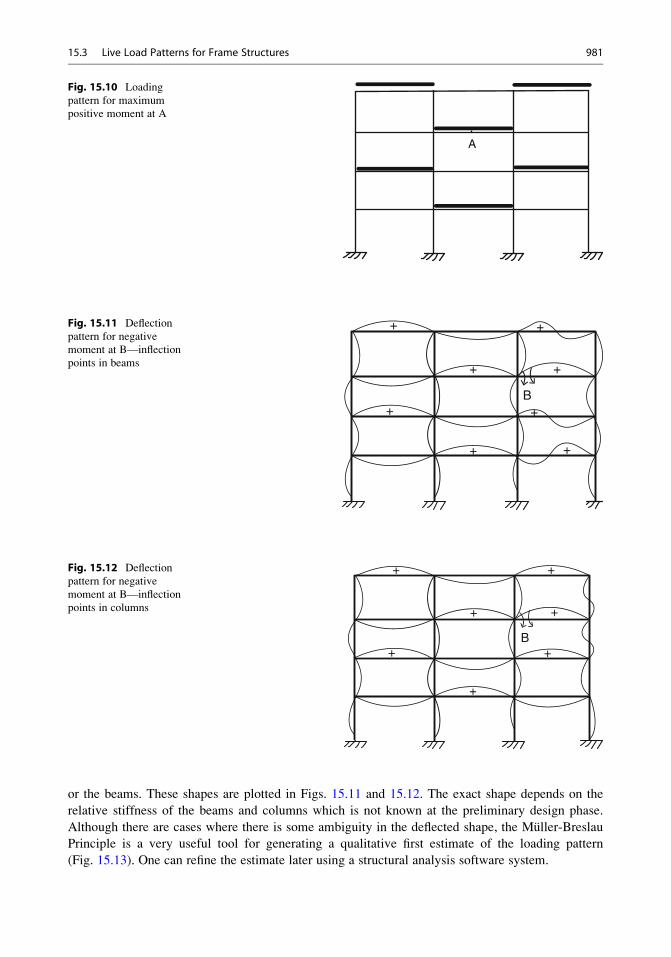
or the beams. These shapes are plotted in Figs. 15.11 and 15.12. The exact shape depends on the
relative stiffness of the beams and columns which is not known at the preliminary design phase.
Although there are cases where there is some ambiguity in the deflected shape, the Muller-Breslau
Principle is a very useful tool for generating a qualitative first estimate of the loading pattern
(Fig. 15.13). One can refine the estimate later using a structural analysis software system.
A
Fig. 15.10 Loading
pattern for maximum
positive moment at A
+
+ +
+
+
+
B
+
+Fig. 15.11 Deflection
pattern for negative
moment at B—inflection
points in beams
+
+ +
+
+
+
B
+Fig. 15.12 Deflection
pattern for negative
moment at B—inflection
points in columns
15.3 Live Load Patterns for Frame Structures 981
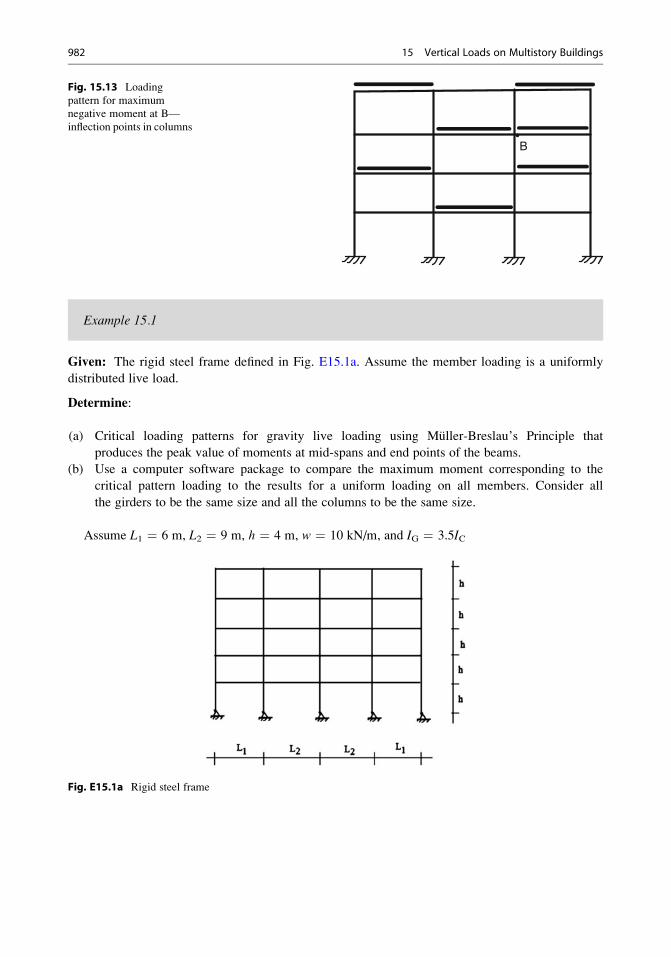
Example 15.1
Given: The rigid steel frame defined in Fig. E15.1a. Assume the member loading is a uniformly
distributed live load.
Determine:
(a) Critical loading patterns for gravity live loading using Muller-Breslau’s Principle that
produces the peak value of moments at mid-spans and end points of the beams.
(b) Use a computer software package to compare the maximum moment corresponding to the
critical pattern loading to the results for a uniform loading on all members. Consider all
the girders to be the same size and all the columns to be the same size.
Assume L1 ¼ 6 m, L2 ¼ 9 m, h ¼ 4 m, w ¼ 10 kN/m, and IG ¼ 3.5IC
Fig. E15.1a Rigid steel frame
B
Fig. 15.13 Loading
pattern for maximum
negative moment at B—
inflection points in columns
982 15 Vertical Loads on Multistory Buildings
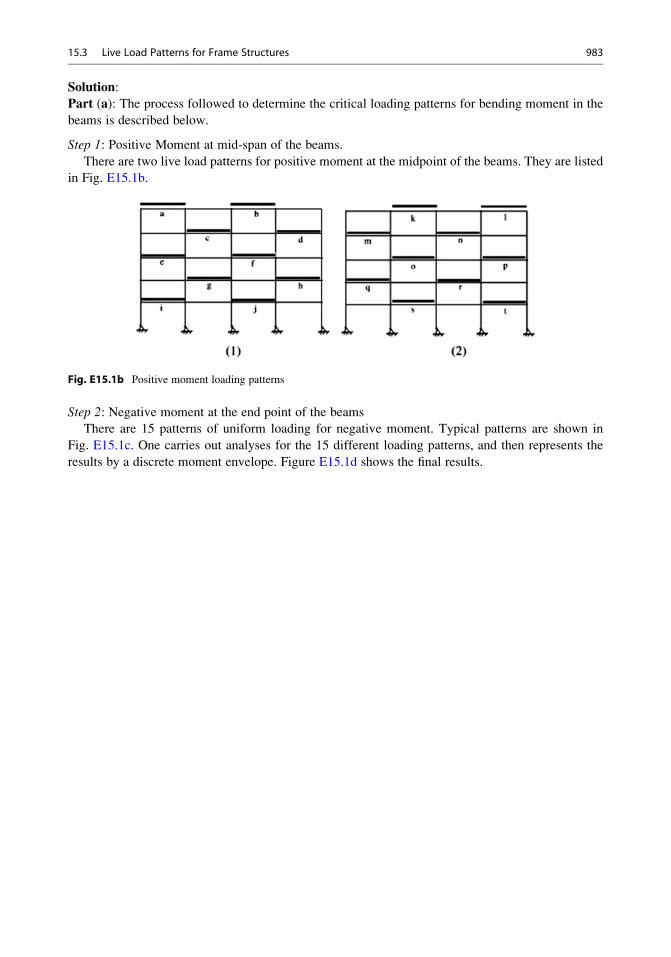
Solution:
Part (a): The process followed to determine the critical loading patterns for bending moment in the
beams is described below.
Step 1: Positive Moment at mid-span of the beams.
There are two live load patterns for positive moment at the midpoint of the beams. They are listed
in Fig. E15.1b.
Fig. E15.1b Positive moment loading patterns
Step 2: Negative moment at the end point of the beams
There are 15 patterns of uniform loading for negative moment. Typical patterns are shown in
Fig. E15.1c. One carries out analyses for the 15 different loading patterns, and then represents the
results by a discrete moment envelope. Figure E15.1d shows the final results.
15.3 Live Load Patterns for Frame Structures 983
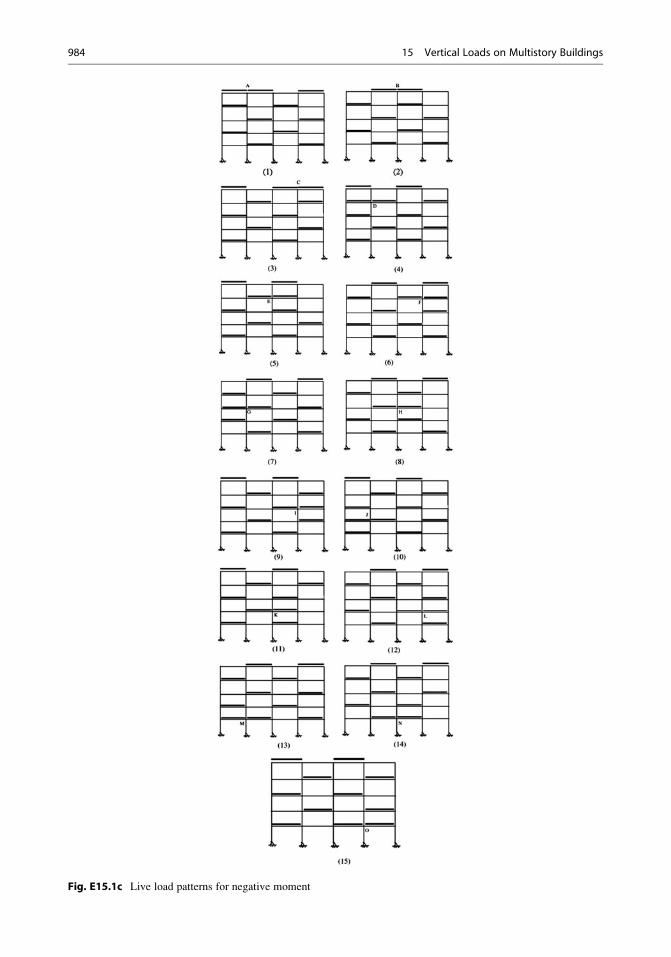
Fig. E15.1c Live load patterns for negative moment
984 15 Vertical Loads on Multistory Buildings
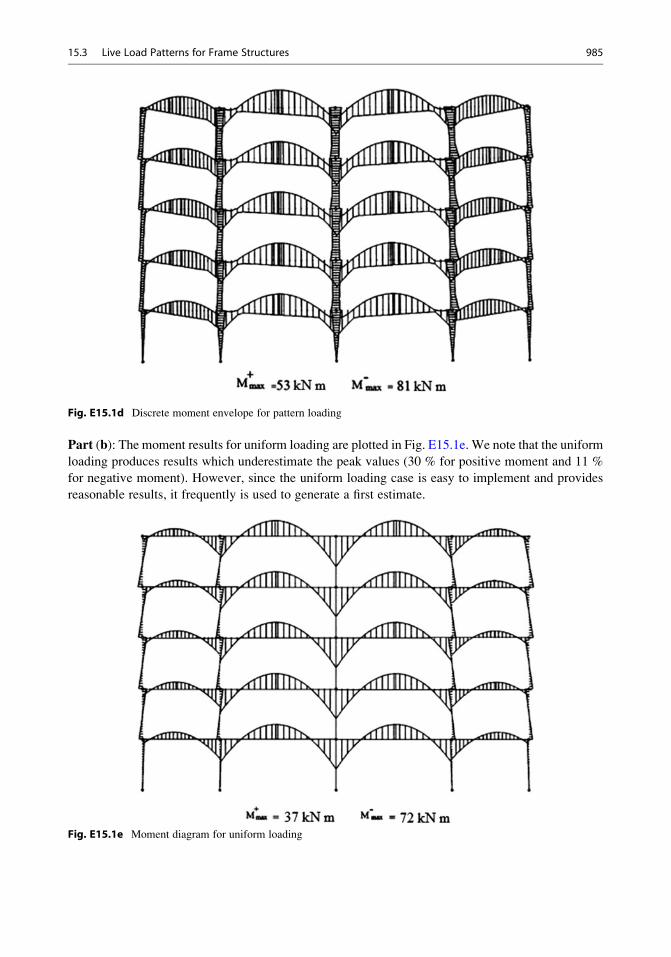
Fig. E15.1d Discrete moment envelope for pattern loading
Part (b): The moment results for uniform loading are plotted in Fig. E15.1e. We note that the uniform
loading produces results which underestimate the peak values (30 % for positive moment and 11 %
for negative moment). However, since the uniform loading case is easy to implement and provides
reasonable results, it frequently is used to generate a first estimate.
Fig. E15.1e Moment diagram for uniform loading
15.3 Live Load Patterns for Frame Structures 985
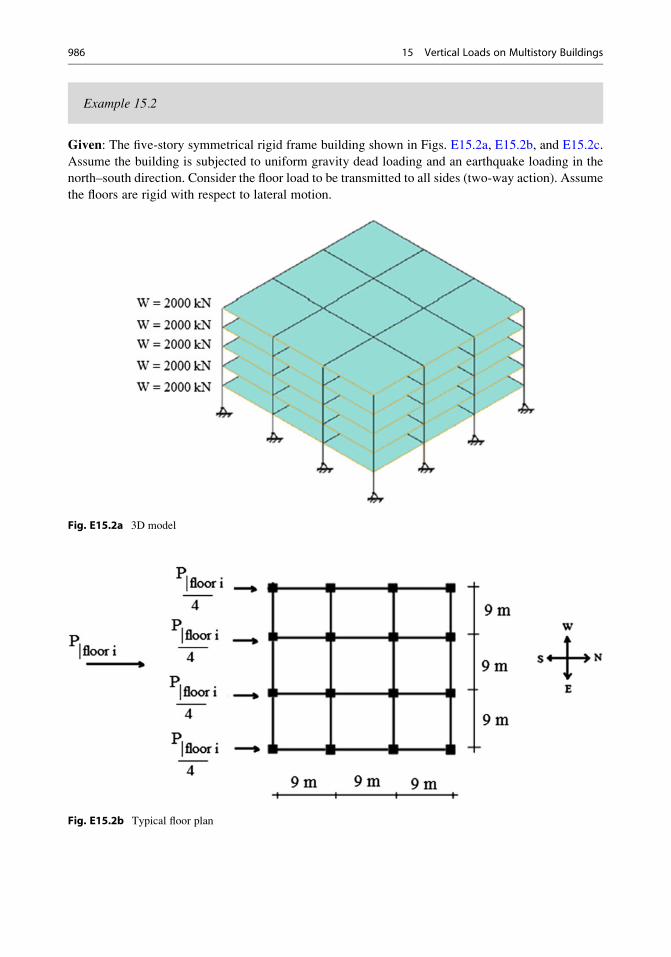
Example 15.2
Given: The five-story symmetrical rigid frame building shown in Figs. E15.2a, E15.2b, and E15.2c.
Assume the building is subjected to uniform gravity dead loading and an earthquake loading in the
north–south direction. Consider the floor load to be transmitted to all sides (two-way action). Assume
the floors are rigid with respect to lateral motion.
Fig. E15.2a 3D model
Fig. E15.2b Typical floor plan
986 15 Vertical Loads on Multistory Buildings
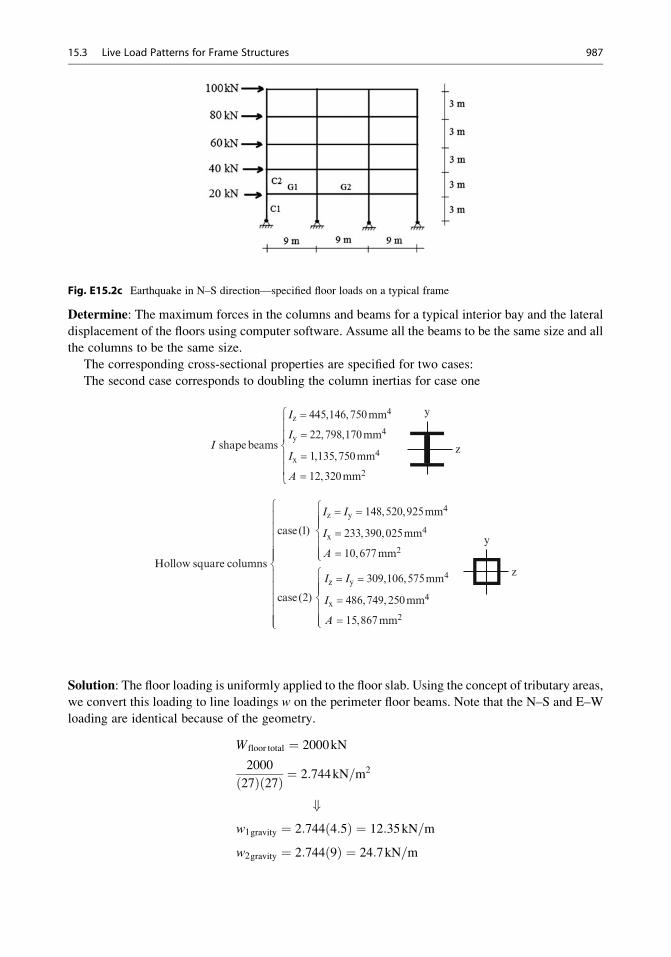
Fig. E15.2c Earthquake in N–S direction—specified floor loads on a typical frame
Determine: The maximum forces in the columns and beams for a typical interior bay and the lateral
displacement of the floors using computer software. Assume all the beams to be the same size and all
the columns to be the same size.
The corresponding cross-sectional properties are specified for two cases:
The second case corresponds to doubling the column inertias for case one
I shapebeams
Iz = 445,146,750mm4
Iy = 22,798,170mm4
Ix = 1,135,750mm4
A = 12,320mm2
y
z
case (1)
Hollow square columns
case (2)
Iz = Iy = 148,520,925mm4
Ix = 233,390,025mm4
A = 10,677mm2
Iz = Iy = 309,106,575mm4
Ix = 486,749,250mm4
A = 15,867mm2
y
z
Solution: The floor loading is uniformly applied to the floor slab. Using the concept of tributary areas,
we convert this loading to line loadings w on the perimeter floor beams. Note that the N–S and E–W
loading are identical because of the geometry.
Wfloor total ¼ 2000kN
2000
27ð Þ 27ð Þ ¼ 2:744kN=m2
+w1gravity ¼ 2:744 4:5ð Þ ¼ 12:35kN=m
w2gravity ¼ 2:744 9ð Þ ¼ 24:7kN=m
15.3 Live Load Patterns for Frame Structures 987
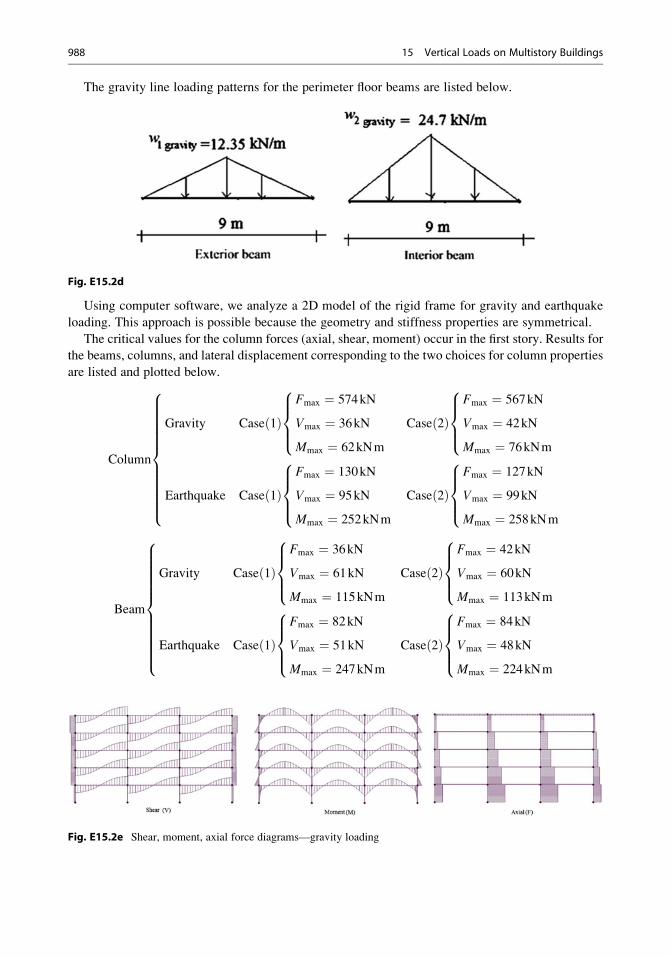
The gravity line loading patterns for the perimeter floor beams are listed below.
Fig. E15.2d
Using computer software, we analyze a 2D model of the rigid frame for gravity and earthquake
loading. This approach is possible because the geometry and stiffness properties are symmetrical.
The critical values for the column forces (axial, shear, moment) occur in the first story. Results for
the beams, columns, and lateral displacement corresponding to the two choices for column properties
are listed and plotted below.
Column
Gravity Case 1ð ÞFmax ¼ 574kN
Vmax ¼ 36kN
Mmax ¼ 62kNm
8>><>>: Case 2ð Þ
Fmax ¼ 567kN
Vmax ¼ 42kN
Mmax ¼ 76kNm
8>><>>:
Earthquake Case 1ð ÞFmax ¼ 130kN
Vmax ¼ 95kN
Mmax ¼ 252kNm
8>><>>: Case 2ð Þ
Fmax ¼ 127kN
Vmax ¼ 99kN
Mmax ¼ 258kNm
8>><>>:
8>>>>>>>>>>><>>>>>>>>>>>:
Beam
Gravity Case 1ð ÞFmax ¼ 36kN
Vmax ¼ 61kN
Mmax ¼ 115kNm
8>><>>: Case 2ð Þ
Fmax ¼ 42kN
Vmax ¼ 60kN
Mmax ¼ 113kNm
8>><>>:
Earthquake Case 1ð ÞFmax ¼ 82kN
Vmax ¼ 51kN
Mmax ¼ 247kNm
8>><>>: Case 2ð Þ
Fmax ¼ 84kN
Vmax ¼ 48kN
Mmax ¼ 224kNm
8>><>>:
8>>>>>>>>>>><>>>>>>>>>>>:
Fig. E15.2e Shear, moment, axial force diagrams—gravity loading
988 15 Vertical Loads on Multistory Buildings
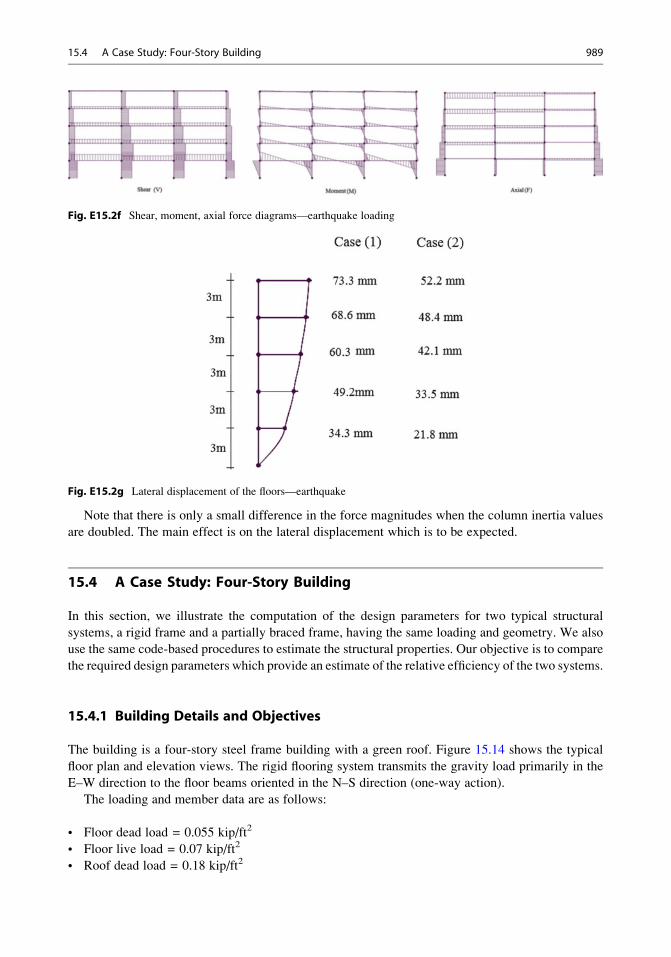
Fig. E15.2f Shear, moment, axial force diagrams—earthquake loading
Fig. E15.2g Lateral displacement of the floors—earthquake
Note that there is only a small difference in the force magnitudes when the column inertia values
are doubled. The main effect is on the lateral displacement which is to be expected.
15.4 A Case Study: Four-Story Building
In this section, we illustrate the computation of the design parameters for two typical structural
systems, a rigid frame and a partially braced frame, having the same loading and geometry. We also
use the same code-based procedures to estimate the structural properties. Our objective is to compare
the required design parameters which provide an estimate of the relative efficiency of the two systems.
15.4.1 Building Details and Objectives
The building is a four-story steel frame building with a green roof. Figure 15.14 shows the typical
floor plan and elevation views. The rigid flooring system transmits the gravity load primarily in the
E–W direction to the floor beams oriented in the N–S direction (one-way action).
The loading and member data are as follows:
• Floor dead load = 0.055 kip/ft2
• Floor live load = 0.07 kip/ft2
• Roof dead load = 0.18 kip/ft2
15.4 A Case Study: Four-Story Building 989
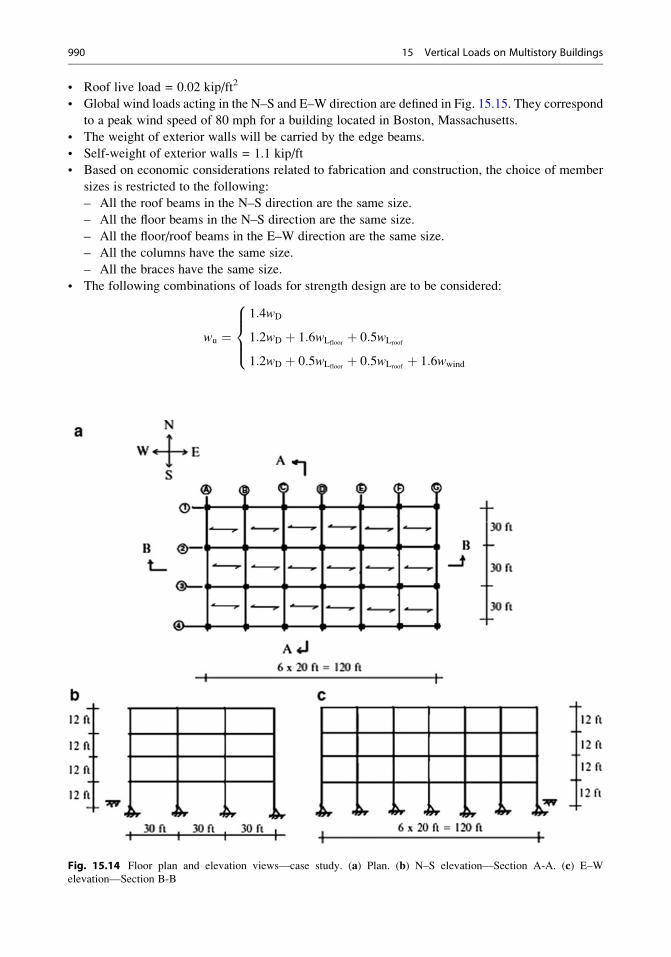
• Roof live load = 0.02 kip/ft2
• Global wind loads acting in the N–S and E–W direction are defined in Fig. 15.15. They correspond
to a peak wind speed of 80 mph for a building located in Boston, Massachusetts.
• The weight of exterior walls will be carried by the edge beams.
• Self-weight of exterior walls = 1.1 kip/ft
• Based on economic considerations related to fabrication and construction, the choice of member
sizes is restricted to the following:
– All the roof beams in the N–S direction are the same size.
– All the floor beams in the N–S direction are the same size.
– All the floor/roof beams in the E–W direction are the same size.
– All the columns have the same size.
– All the braces have the same size.
• The following combinations of loads for strength design are to be considered:
wu ¼1:4wD
1:2wD þ 1:6wLfloorþ 0:5wLroof
1:2wD þ 0:5wLfloorþ 0:5wLroof
þ 1:6wwind
8>><>>:
Fig. 15.14 Floor plan and elevation views—case study. (a) Plan. (b) N–S elevation—Section A-A. (c) E–W
elevation—Section B-B
990 15 Vertical Loads on Multistory Buildings
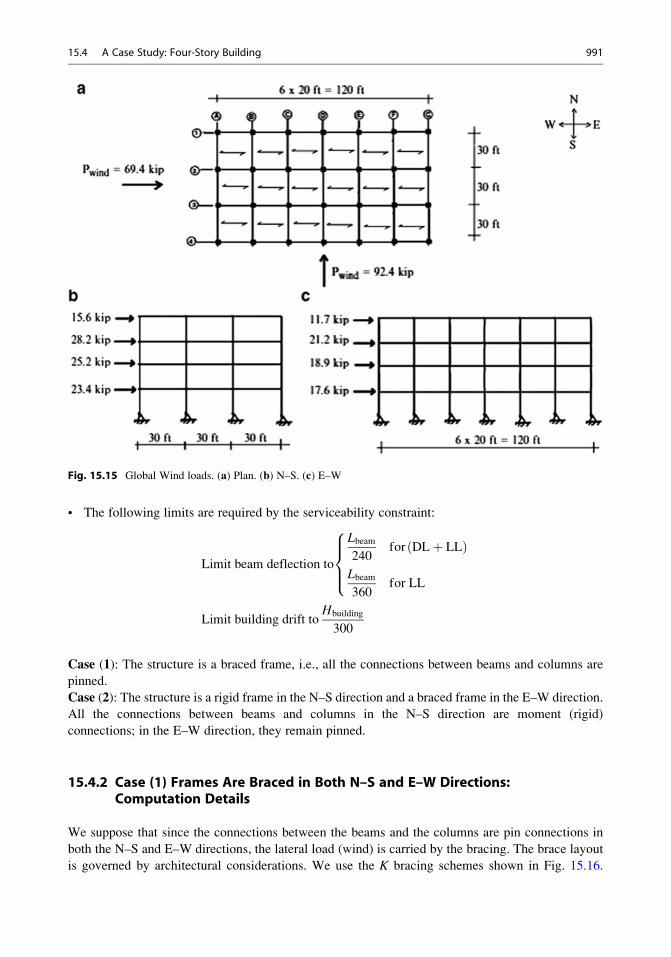
• The following limits are required by the serviceability constraint:
Limit beam deflection to
Lbeam240
for DLþ LLð ÞLbeam360
for LL
8>><>>:
Limit building drift toHbuilding
300
Case (1): The structure is a braced frame, i.e., all the connections between beams and columns are
pinned.
Case (2): The structure is a rigid frame in the N–S direction and a braced frame in the E–W direction.
All the connections between beams and columns in the N–S direction are moment (rigid)
connections; in the E–W direction, they remain pinned.
15.4.2 Case (1) Frames Are Braced in Both N–S and E–W Directions:Computation Details
We suppose that since the connections between the beams and the columns are pin connections in
both the N–S and E–W directions, the lateral load (wind) is carried by the bracing. The brace layout
is governed by architectural considerations. We use the K bracing schemes shown in Fig. 15.16.
Fig. 15.15 Global Wind loads. (a) Plan. (b) N–S. (c) E–W
15.4 A Case Study: Four-Story Building 991

The braces have equal stiffnesses and the floors are rigid. Therefore the global wind load will be
distributed equally between braces (see Chap. 14). The column load is purely axial since the members
are pinned. We establish the column load per floor working with the tributary floor area associated
with the column. The beams are simply supported, and the beam loading is based on one-way action
(uniformly loaded).
Since all the members are pinned, the total lateral wind load on a floor is carried by the bracing
systems. The axial forces in a typical brace are shown on the sketch below. We assume the shear is
equally distributed between the diagonals.
Fig. 15.16 Braced frame
configuration. (a) Plan—braced in both directions.
(b) N–S elevation—braced
frames A-A, D-D, G-G. (c)E–W elevation braced
frames 1-1, 4-4
992 15 Vertical Loads on Multistory Buildings
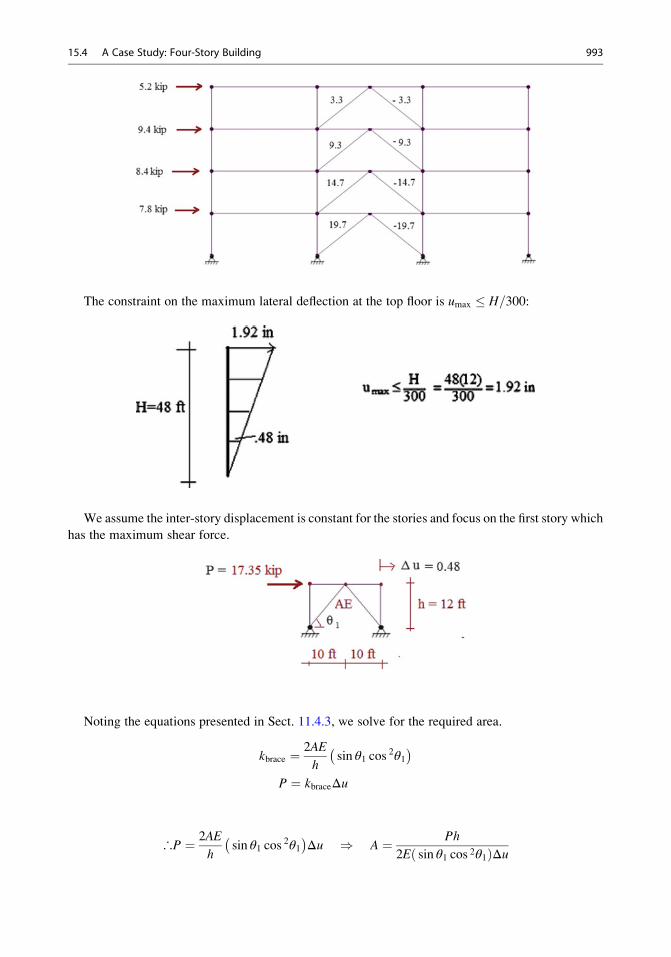
The constraint on the maximum lateral deflection at the top floor is umax � H=300:
We assume the inter-story displacement is constant for the stories and focus on the first story which
has the maximum shear force.
Noting the equations presented in Sect. 11.4.3, we solve for the required area.
kbrace ¼ 2AE
hsin θ1 cos
2θ1� �
P ¼ kbraceΔu
∴P ¼ 2AE
hsin θ1 cos
2θ1� �
Δu ) A ¼ Ph
2E sin θ1 cos 2θ1ð ÞΔu
15.4 A Case Study: Four-Story Building 993
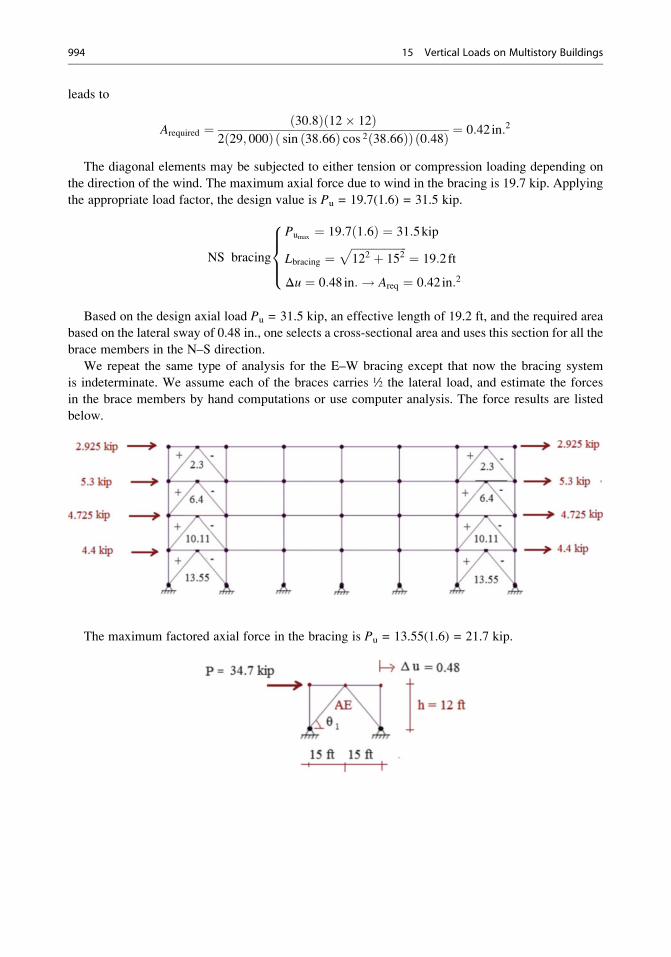
leads to
Arequired ¼ 30:8ð Þ 12� 12ð Þ2 29; 000ð Þ sin 38:66ð Þ cos 2 38:66ð Þð Þ 0:48ð Þ ¼ 0:42 in:2
The diagonal elements may be subjected to either tension or compression loading depending on
the direction of the wind. The maximum axial force due to wind in the bracing is 19.7 kip. Applying
the appropriate load factor, the design value is Pu = 19.7(1.6) = 31.5 kip.
NS bracing
Pumax¼ 19:7 1:6ð Þ ¼ 31:5kip
Lbracing ¼ffiffiffiffiffiffiffiffiffiffiffiffiffiffiffiffiffiffiffiffi122 þ 152
p¼ 19:2ft
Δu ¼ 0:48 in:! Areq ¼ 0:42 in:2
8>><>>:
Based on the design axial load Pu = 31.5 kip, an effective length of 19.2 ft, and the required area
based on the lateral sway of 0.48 in., one selects a cross-sectional area and uses this section for all the
brace members in the N–S direction.
We repeat the same type of analysis for the E–W bracing except that now the bracing system
is indeterminate. We assume each of the braces carries ½ the lateral load, and estimate the forces
in the brace members by hand computations or use computer analysis. The force results are listed
below.
The maximum factored axial force in the bracing is Pu = 13.55(1.6) = 21.7 kip.
994 15 Vertical Loads on Multistory Buildings

We compute the required brace area following the same approach used for the N–S bracing
system. The required area is given by
Arequired ¼ 17:35ð Þ 12� 12ð Þ2 29; 000ð Þ sin 50:19ð Þ cos 2 50:19ð Þð Þ 0:48ð Þ ¼ 0:285 in:2
15.4.2.1 Interior ColumnsThe column load is purely axial since the members are pinned. We establish the column load per floor
working with the tributary floor areas for dead and live loads, and the brace forces due to wind. The
column on the first floor has the maximum axial force.
The loads in an interior column located in the first story are
PD ¼ 20 30ð Þ 0:18þ :055 3ð Þf g ¼ 207kip
PL roof ¼ 20 30ð Þ 0:02f g ¼ 12kip
PL floor ¼ 20 30ð Þ 0:07 3ð Þf g ¼ 126kip
PN�SWind ¼ 29:4kip
Evaluating the following load combinations
Pu ¼1:4PD ¼ 290kip
1:2PD þ 1:6PL þ 0:5PLr¼ 456kip
1:2PD þ 0:5PL þ 0:5PLrþ 1:6PWind ¼ 364kip
8>><>>:
leads to the design value of Pu = 456 kip. One selects a cross section based on Pu = 456 kip and an
effective length of 12 ft.
15.4.2.2 Interior BeamsInterior Floor Beams (30 ft span):
wDfloor¼ 0:055 20ð Þ ¼ 1:1kip=ft ) MDfloor
¼ wDL2
8¼ 1:1 30ð Þ2
8¼ 124kip ft
wLfloor¼ 0:07 20ð Þ ¼ 1:4kip=ft ) MLfloor
¼ wLL2
8¼ 1:4 30ð Þ2
8¼ 157:5kip ft
wu ¼1:4wD ¼ 1:54kip=ft
1:2wD þ 1:6wL ¼ 3:56kip=ft
8<:
Mu ¼ wuL2
8¼ 3:56 30ð Þ2
8¼ 400:5kip ft
Vu ¼ wuL
2¼ 3:56 30ð Þ
2¼ 53:4kip
15.4 A Case Study: Four-Story Building 995
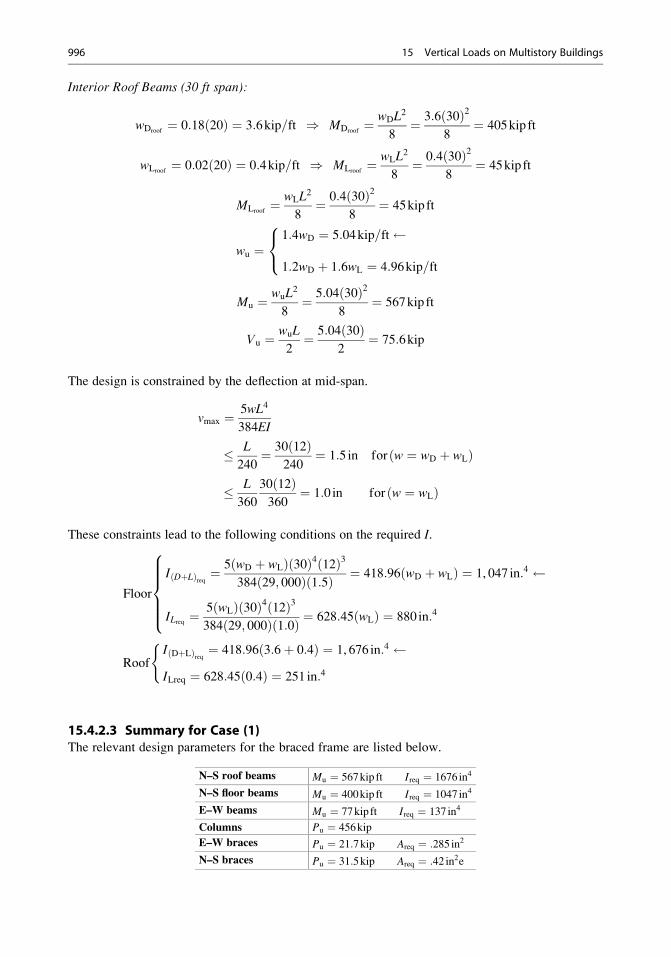
Interior Roof Beams (30 ft span):
wDroof¼ 0:18 20ð Þ ¼ 3:6kip=ft ) MDroof
¼ wDL2
8¼ 3:6 30ð Þ2
8¼ 405kip ft
wLroof¼ 0:02 20ð Þ ¼ 0:4kip=ft ) MLroof
¼ wLL2
8¼ 0:4 30ð Þ2
8¼ 45kip ft
MLroof¼ wLL
2
8¼ 0:4 30ð Þ2
8¼ 45kip ft
wu ¼1:4wD ¼ 5:04kip=ft
1:2wD þ 1:6wL ¼ 4:96kip=ft
8<:
Mu ¼ wuL2
8¼ 5:04 30ð Þ2
8¼ 567kip ft
Vu ¼ wuL
2¼ 5:04 30ð Þ
2¼ 75:6kip
The design is constrained by the deflection at mid-span.
vmax ¼ 5wL4
384EI
� L
240¼ 30 12ð Þ
240¼ 1:5 in for w ¼ wD þ wLð Þ
� L
360
30 12ð Þ360
¼ 1:0 in for w ¼ wLð Þ
These constraints lead to the following conditions on the required I.
Floor
I DþLð Þreq ¼5 wD þ wLð Þ 30ð Þ4 12ð Þ3384 29; 000ð Þ 1:5ð Þ ¼ 418:96 wD þ wLð Þ ¼ 1, 047 in:4
ILreq ¼5 wLð Þ 30ð Þ4 12ð Þ3384 29; 000ð Þ 1:0ð Þ ¼ 628:45 wLð Þ ¼ 880 in:4
8>>>><>>>>:
RoofI DþLð Þreq ¼ 418:96 3:6þ 0:4ð Þ ¼ 1, 676 in:4 ILreq ¼ 628:45 0:4ð Þ ¼ 251 in:4
(
15.4.2.3 Summary for Case (1)The relevant design parameters for the braced frame are listed below.
N–S roof beams Mu ¼ 567kip ft Ireq ¼ 1676 in4
N–S floor beams Mu ¼ 400kip ft Ireq ¼ 1047 in4
E–W beams Mu ¼ 77kip ft Ireq ¼ 137 in4
Columns Pu ¼ 456kip
E–W braces Pu ¼ 21:7kip Areq ¼ :285 in2
N–S braces Pu ¼ 31:5kip Areq ¼ :42 in2e
996 15 Vertical Loads on Multistory Buildings
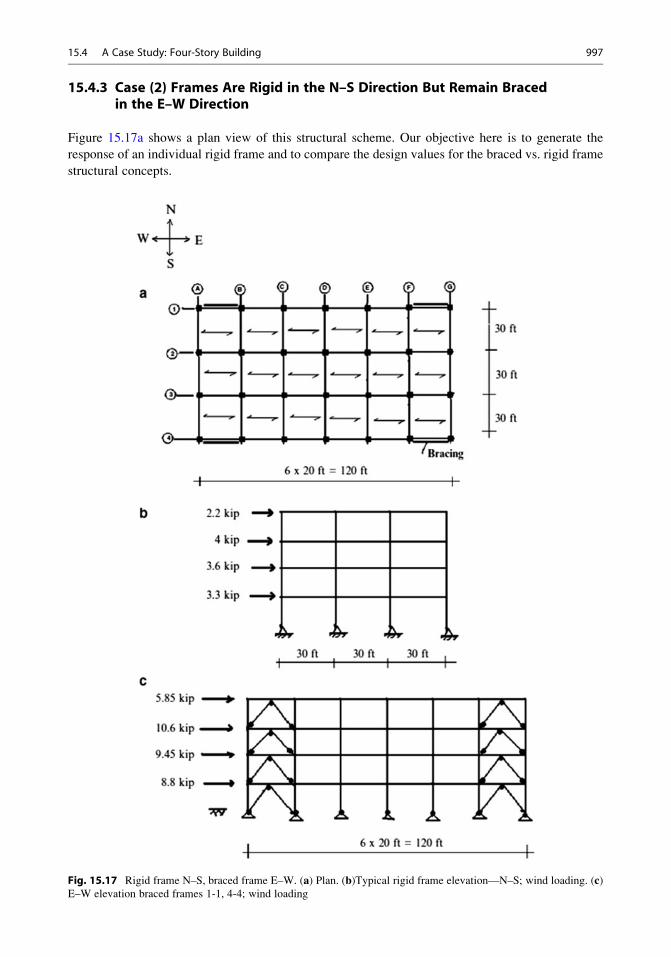
15.4.3 Case (2) Frames Are Rigid in the N–S Direction But Remain Bracedin the E–W Direction
Figure 15.17a shows a plan view of this structural scheme. Our objective here is to generate the
response of an individual rigid frame and to compare the design values for the braced vs. rigid frame
structural concepts.
Fig. 15.17 Rigid frame N–S, braced frame E–W. (a) Plan. (b)Typical rigid frame elevation—N–S; wind loading. (c)E–W elevation braced frames 1-1, 4-4; wind loading
15.4 A Case Study: Four-Story Building 997
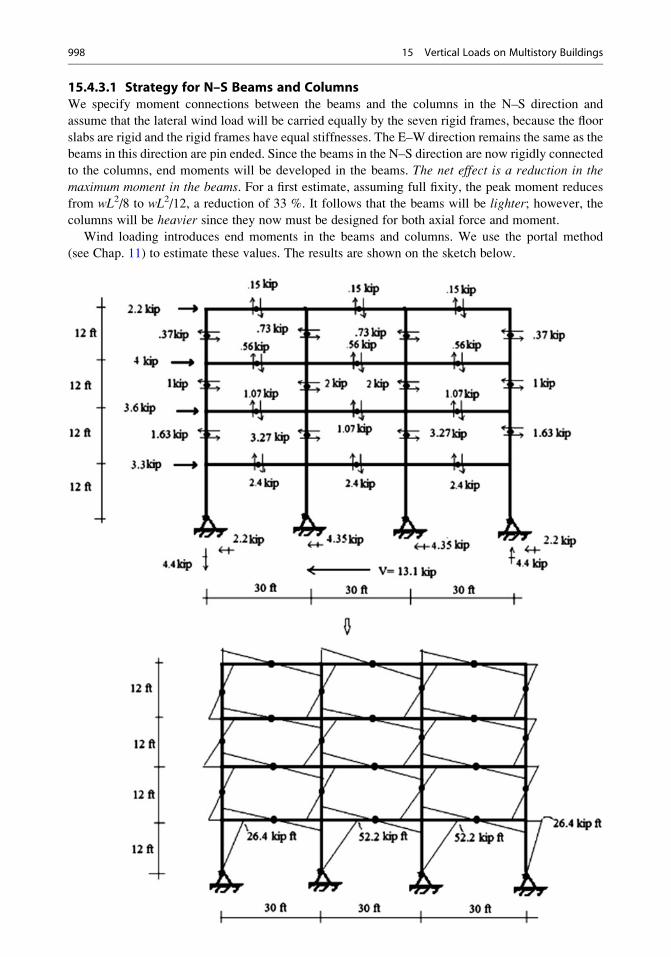
15.4.3.1 Strategy for N–S Beams and ColumnsWe specify moment connections between the beams and the columns in the N–S direction and
assume that the lateral wind load will be carried equally by the seven rigid frames, because the floor
slabs are rigid and the rigid frames have equal stiffnesses. The E–W direction remains the same as the
beams in this direction are pin ended. Since the beams in the N–S direction are now rigidly connected
to the columns, end moments will be developed in the beams. The net effect is a reduction in the
maximum moment in the beams. For a first estimate, assuming full fixity, the peak moment reduces
from wL2/8 to wL2/12, a reduction of 33 %. It follows that the beams will be lighter; however, the
columns will be heavier since they now must be designed for both axial force and moment.
Wind loading introduces end moments in the beams and columns. We use the portal method
(see Chap. 11) to estimate these values. The results are shown on the sketch below.
998 15 Vertical Loads on Multistory Buildings
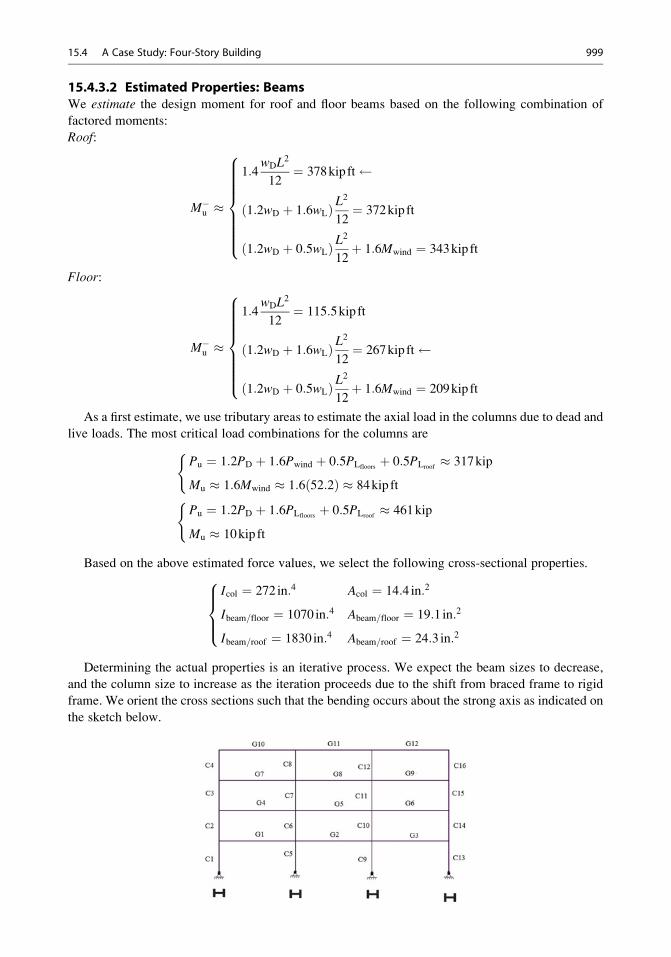
15.4.3.2 Estimated Properties: BeamsWe estimate the design moment for roof and floor beams based on the following combination of
factored moments:
Roof:
M�u �
1:4wDL
2
12¼ 378kip ft
1:2wD þ 1:6wLð Þ L2
12¼ 372kip ft
1:2wD þ 0:5wLð Þ L2
12þ 1:6Mwind ¼ 343kip ft
8>>>>>>><>>>>>>>:
Floor:
M�u �
1:4wDL
2
12¼ 115:5kip ft
1:2wD þ 1:6wLð Þ L2
12¼ 267kip ft
1:2wD þ 0:5wLð Þ L2
12þ 1:6Mwind ¼ 209kip ft
8>>>>>>><>>>>>>>:
As a first estimate, we use tributary areas to estimate the axial load in the columns due to dead and
live loads. The most critical load combinations for the columns are
Pu ¼ 1:2PD þ 1:6Pwind þ 0:5PLfloorsþ 0:5PLroof
� 317kip
Mu � 1:6Mwind � 1:6 52:2ð Þ � 84kip ft
(
Pu ¼ 1:2PD þ 1:6PLfloorsþ 0:5PLroof
� 461kip
Mu � 10kip ft
(
Based on the above estimated force values, we select the following cross-sectional properties.
Icol ¼ 272 in:4 Acol ¼ 14:4 in:2
Ibeam=floor ¼ 1070 in:4 Abeam=floor ¼ 19:1 in:2
Ibeam=roof ¼ 1830 in:4 Abeam=roof ¼ 24:3 in:2
8>><>>:
Determining the actual properties is an iterative process. We expect the beam sizes to decrease,
and the column size to increase as the iteration proceeds due to the shift from braced frame to rigid
frame. We orient the cross sections such that the bending occurs about the strong axis as indicated on
the sketch below.
15.4 A Case Study: Four-Story Building 999
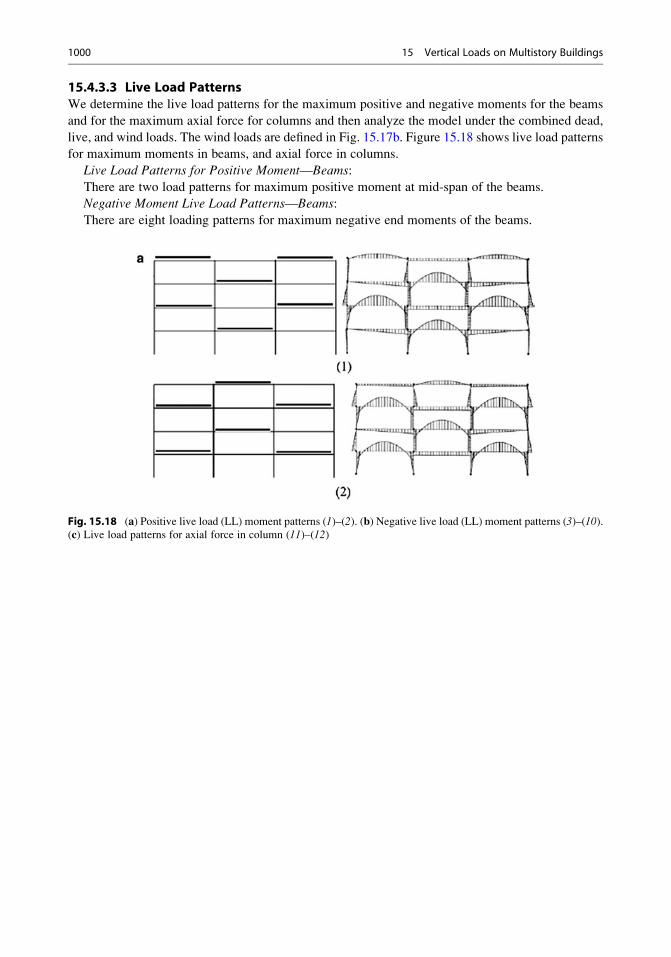
15.4.3.3 Live Load PatternsWe determine the live load patterns for the maximum positive and negative moments for the beams
and for the maximum axial force for columns and then analyze the model under the combined dead,
live, and wind loads. The wind loads are defined in Fig. 15.17b. Figure 15.18 shows live load patterns
for maximum moments in beams, and axial force in columns.
Live Load Patterns for Positive Moment—Beams:
There are two load patterns for maximum positive moment at mid-span of the beams.
Negative Moment Live Load Patterns—Beams:
There are eight loading patterns for maximum negative end moments of the beams.
Fig. 15.18 (a) Positive live load (LL) moment patterns (1)–(2). (b) Negative live load (LL) moment patterns (3)–(10).(c) Live load patterns for axial force in column (11)–(12)
1000 15 Vertical Loads on Multistory Buildings
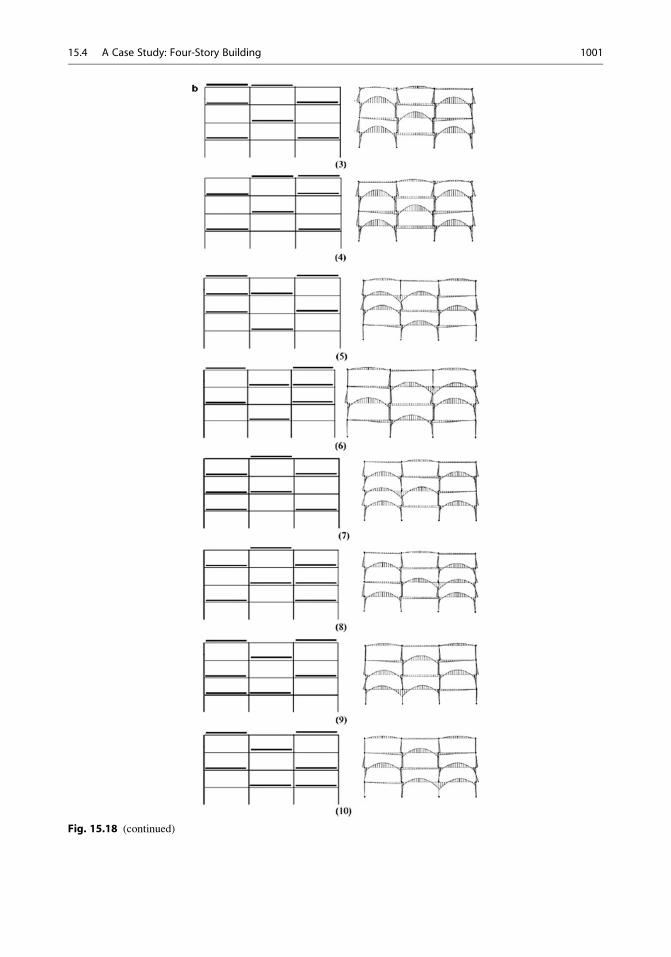
Fig. 15.18 (continued)
15.4 A Case Study: Four-Story Building 1001
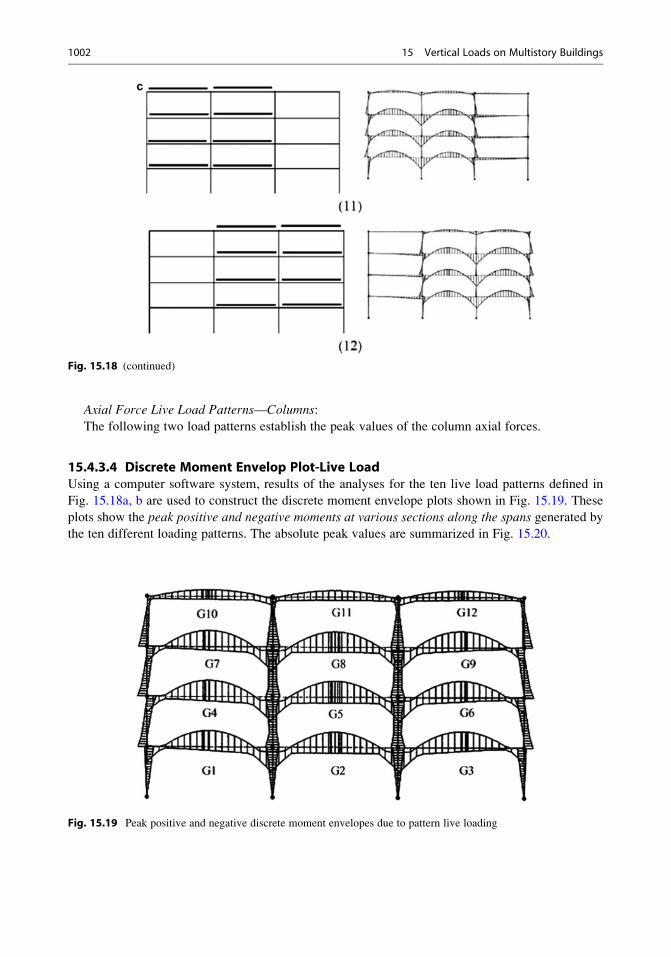
Axial Force Live Load Patterns—Columns:
The following two load patterns establish the peak values of the column axial forces.
15.4.3.4 Discrete Moment Envelop Plot-Live LoadUsing a computer software system, results of the analyses for the ten live load patterns defined in
Fig. 15.18a, b are used to construct the discrete moment envelope plots shown in Fig. 15.19. These
plots show the peak positive and negative moments at various sections along the spans generated by
the ten different loading patterns. The absolute peak values are summarized in Fig. 15.20.
Fig. 15.18 (continued)
Fig. 15.19 Peak positive and negative discrete moment envelopes due to pattern live loading
1002 15 Vertical Loads on Multistory Buildings
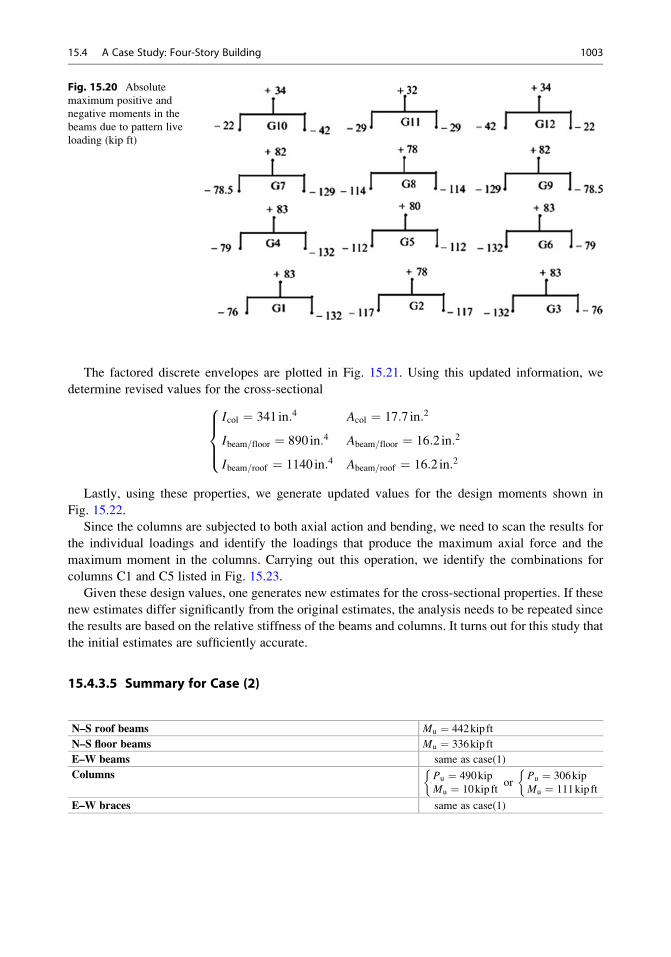
The factored discrete envelopes are plotted in Fig. 15.21. Using this updated information, we
determine revised values for the cross-sectional
Icol ¼ 341 in:4 Acol ¼ 17:7 in:2
Ibeam=floor ¼ 890 in:4 Abeam=floor ¼ 16:2 in:2
Ibeam=roof ¼ 1140 in:4 Abeam=roof ¼ 16:2 in:2
8>><>>:
Lastly, using these properties, we generate updated values for the design moments shown in
Fig. 15.22.
Since the columns are subjected to both axial action and bending, we need to scan the results for
the individual loadings and identify the loadings that produce the maximum axial force and the
maximum moment in the columns. Carrying out this operation, we identify the combinations for
columns C1 and C5 listed in Fig. 15.23.
Given these design values, one generates new estimates for the cross-sectional properties. If these
new estimates differ significantly from the original estimates, the analysis needs to be repeated since
the results are based on the relative stiffness of the beams and columns. It turns out for this study that
the initial estimates are sufficiently accurate.
15.4.3.5 Summary for Case (2)
N–S roof beams Mu ¼ 442kip ft
N–S floor beams Mu ¼ 336kip ft
E–W beams same as case(1)
Columns Pu ¼ 490kip
Mu ¼ 10kip ft
or
Pu ¼ 306kip
Mu ¼ 111kip ft
E–W braces same as case(1)
Fig. 15.20 Absolute
maximum positive and
negative moments in the
beams due to pattern live
loading (kip ft)
15.4 A Case Study: Four-Story Building 1003
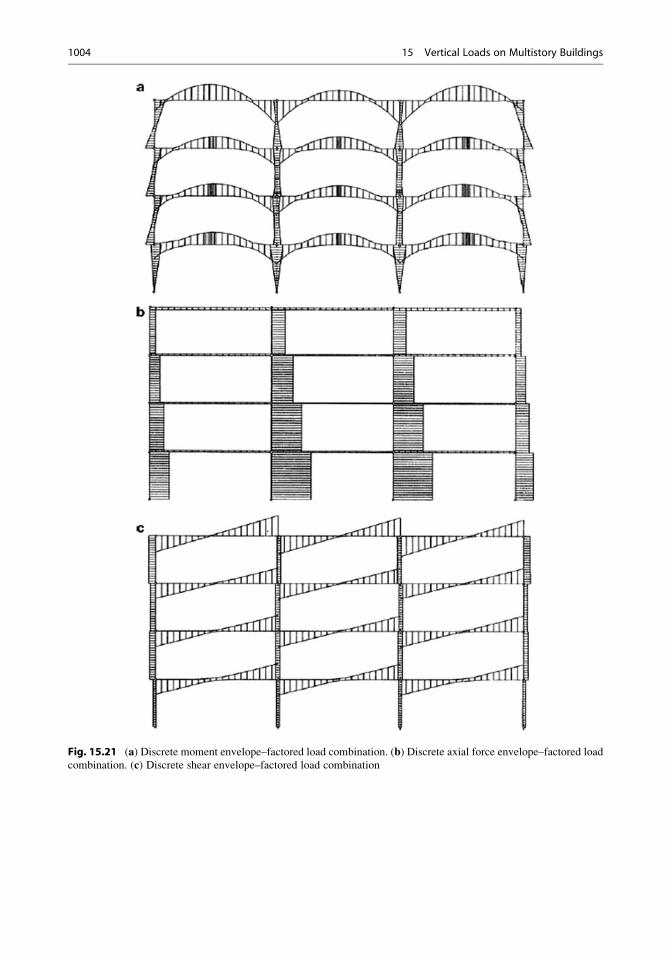
Fig. 15.21 (a) Discrete moment envelope–factored load combination. (b) Discrete axial force envelope–factored loadcombination. (c) Discrete shear envelope–factored load combination
1004 15 Vertical Loads on Multistory Buildings
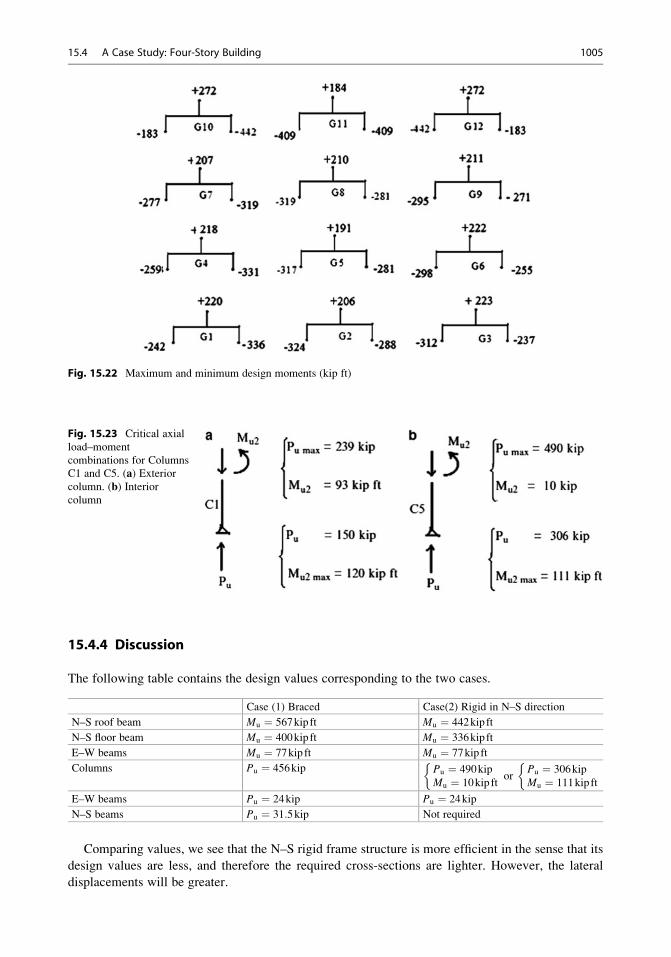
15.4.4 Discussion
The following table contains the design values corresponding to the two cases.
Case (1) Braced Case(2) Rigid in N–S direction
N–S roof beam Mu ¼ 567kip ft Mu ¼ 442kip ft
N–S floor beam Mu ¼ 400kip ft Mu ¼ 336kip ft
E–W beams Mu ¼ 77kip ft Mu ¼ 77kip ft
Columns Pu ¼ 456kip Pu ¼ 490kip
Mu ¼ 10kip ft
or
Pu ¼ 306kip
Mu ¼ 111kip ft
E–W beams Pu ¼ 24kip Pu ¼ 24kip
N–S beams Pu ¼ 31:5kip Not required
Comparing values, we see that the N–S rigid frame structure is more efficient in the sense that its
design values are less, and therefore the required cross-sections are lighter. However, the lateral
displacements will be greater.
Fig. 15.22 Maximum and minimum design moments (kip ft)
Fig. 15.23 Critical axial
load–moment
combinations for Columns
C1 and C5. (a) Exteriorcolumn. (b) Interiorcolumn
15.4 A Case Study: Four-Story Building 1005
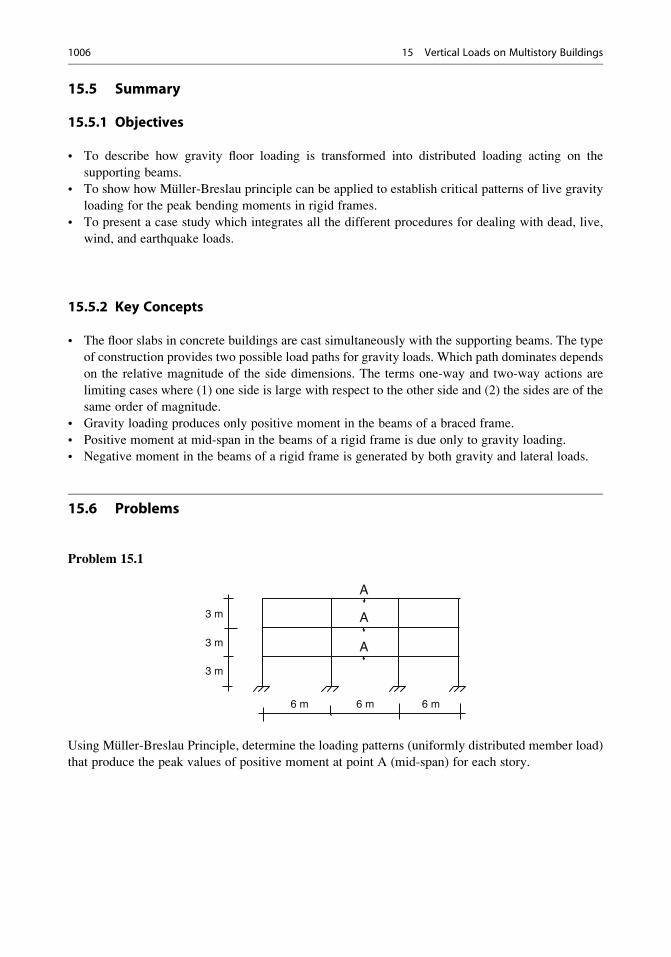
15.5 Summary
15.5.1 Objectives
• To describe how gravity floor loading is transformed into distributed loading acting on the
supporting beams.
• To show how Muller-Breslau principle can be applied to establish critical patterns of live gravity
loading for the peak bending moments in rigid frames.
• To present a case study which integrates all the different procedures for dealing with dead, live,
wind, and earthquake loads.
15.5.2 Key Concepts
• The floor slabs in concrete buildings are cast simultaneously with the supporting beams. The type
of construction provides two possible load paths for gravity loads. Which path dominates depends
on the relative magnitude of the side dimensions. The terms one-way and two-way actions are
limiting cases where (1) one side is large with respect to the other side and (2) the sides are of the
same order of magnitude.
• Gravity loading produces only positive moment in the beams of a braced frame.
• Positive moment at mid-span in the beams of a rigid frame is due only to gravity loading.
• Negative moment in the beams of a rigid frame is generated by both gravity and lateral loads.
15.6 Problems
Problem 15.1
3 m
3 m
3 m
6 m 6 m 6 m
A
A
A
Using Muller-Breslau Principle, determine the loading patterns (uniformly distributed member load)
that produce the peak values of positive moment at point A (mid-span) for each story.
1006 15 Vertical Loads on Multistory Buildings
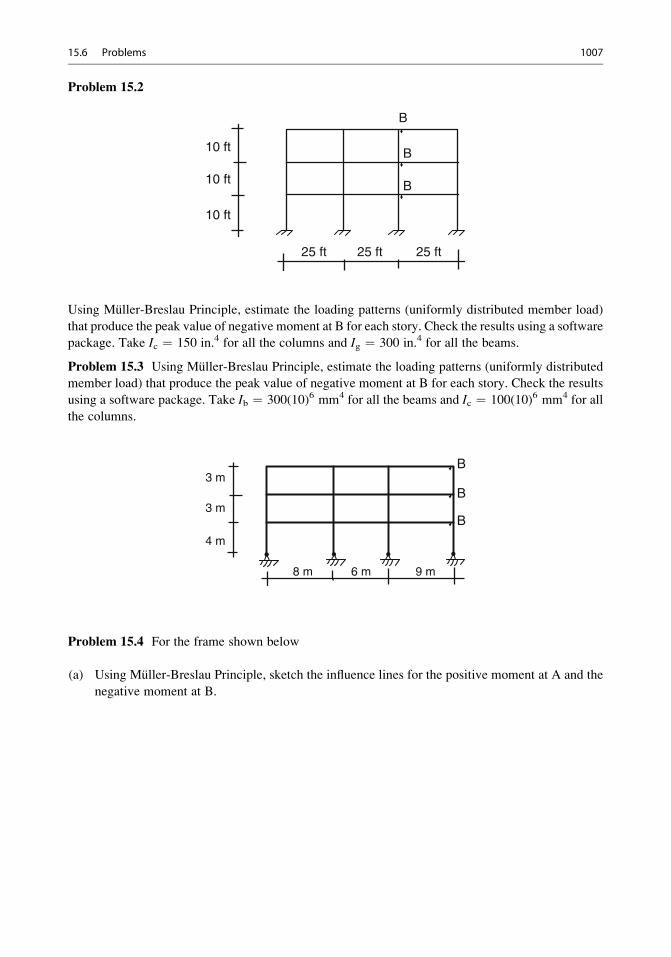
Problem 15.2
10 ft
10 ft
10 ft
25 ft 25 ft 25 ft
B
B
B
Using Muller-Breslau Principle, estimate the loading patterns (uniformly distributed member load)
that produce the peak value of negative moment at B for each story. Check the results using a software
package. Take Ic ¼ 150 in.4 for all the columns and Ig ¼ 300 in.4 for all the beams.
Problem 15.3 Using Muller-Breslau Principle, estimate the loading patterns (uniformly distributed
member load) that produce the peak value of negative moment at B for each story. Check the results
using a software package. Take Ib ¼ 300(10)6 mm4 for all the beams and Ic ¼ 100(10)6 mm4 for all
the columns.
B
B
B
8 m
3 m
3 m
4 m
6 m 9 m
Problem 15.4 For the frame shown below
(a) Using Muller-Breslau Principle, sketch the influence lines for the positive moment at A and the
negative moment at B.
15.6 Problems 1007
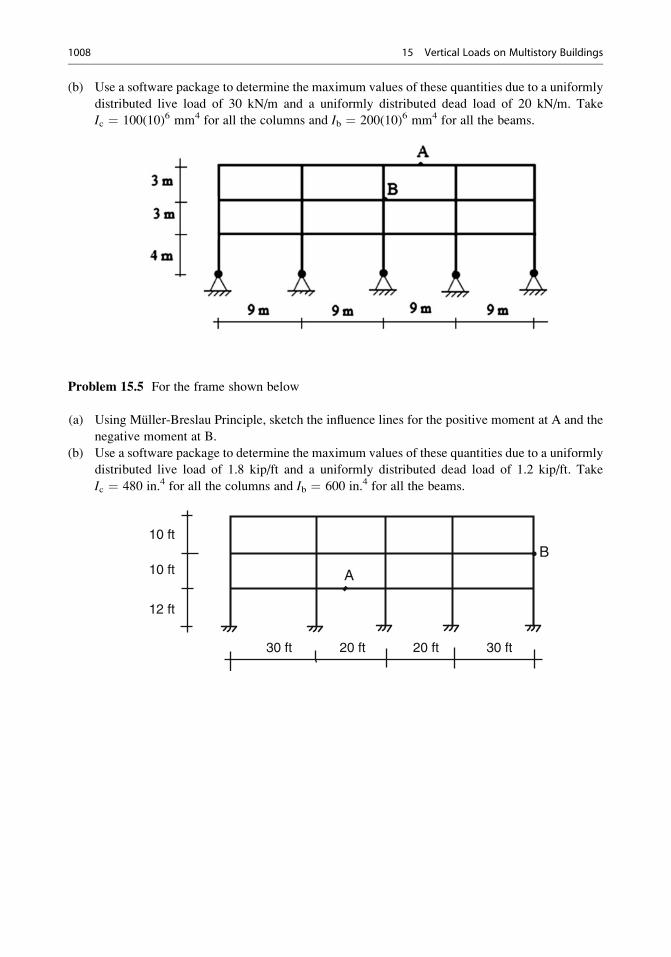
(b) Use a software package to determine the maximum values of these quantities due to a uniformly
distributed live load of 30 kN/m and a uniformly distributed dead load of 20 kN/m. Take
Ic ¼ 100(10)6 mm4 for all the columns and Ib ¼ 200(10)6 mm4 for all the beams.
Problem 15.5 For the frame shown below
(a) Using Muller-Breslau Principle, sketch the influence lines for the positive moment at A and the
negative moment at B.
(b) Use a software package to determine the maximum values of these quantities due to a uniformly
distributed live load of 1.8 kip/ft and a uniformly distributed dead load of 1.2 kip/ft. Take
Ic ¼ 480 in.4 for all the columns and Ib ¼ 600 in.4 for all the beams.
B
A
10 ft
30 ft 30 ft20 ft20 ft
10 ft
12 ft
1008 15 Vertical Loads on Multistory Buildings
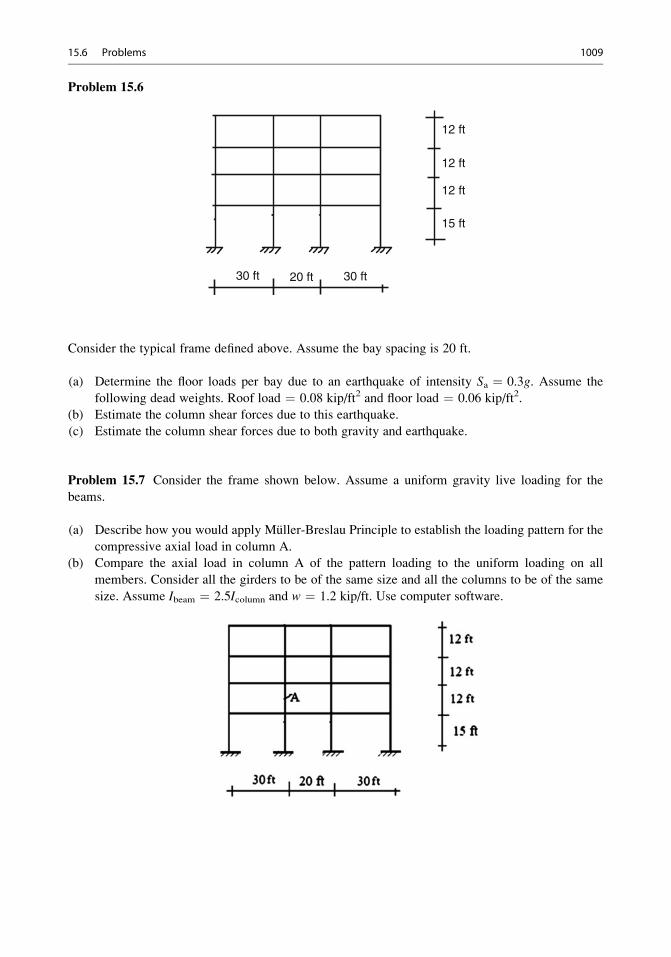
Problem 15.6
30 ft 30 ft
12 ft
12 ft
12 ft
15 ft
20 ft
Consider the typical frame defined above. Assume the bay spacing is 20 ft.
(a) Determine the floor loads per bay due to an earthquake of intensity Sa ¼ 0.3g. Assume the
following dead weights. Roof load ¼ 0.08 kip/ft2 and floor load ¼ 0.06 kip/ft2.
(b) Estimate the column shear forces due to this earthquake.
(c) Estimate the column shear forces due to both gravity and earthquake.
Problem 15.7 Consider the frame shown below. Assume a uniform gravity live loading for the
beams.
(a) Describe how you would apply Muller-Breslau Principle to establish the loading pattern for the
compressive axial load in column A.
(b) Compare the axial load in column A of the pattern loading to the uniform loading on all
members. Consider all the girders to be of the same size and all the columns to be of the same
size. Assume Ibeam ¼ 2.5Icolumn and w ¼ 1.2 kip/ft. Use computer software.
15.6 Problems 1009
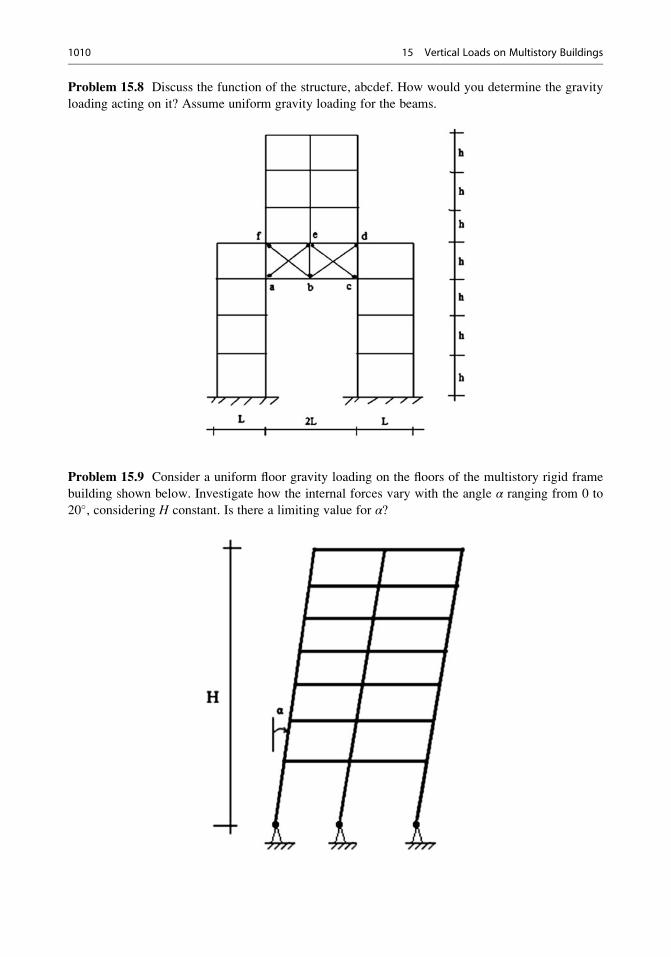
Problem 15.8 Discuss the function of the structure, abcdef. How would you determine the gravity
loading acting on it? Assume uniform gravity loading for the beams.
Problem 15.9 Consider a uniform floor gravity loading on the floors of the multistory rigid frame
building shown below. Investigate how the internal forces vary with the angle α ranging from 0 to
20�, considering H constant. Is there a limiting value for α?
1010 15 Vertical Loads on Multistory Buildings
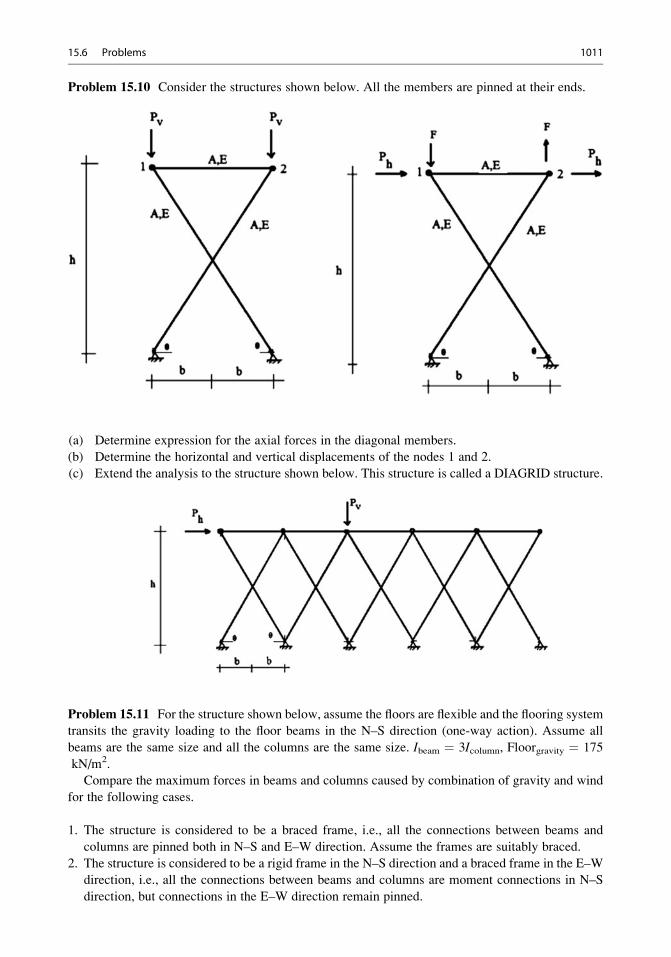
Problem 15.10 Consider the structures shown below. All the members are pinned at their ends.
(a) Determine expression for the axial forces in the diagonal members.
(b) Determine the horizontal and vertical displacements of the nodes 1 and 2.
(c) Extend the analysis to the structure shown below. This structure is called a DIAGRID structure.
Problem 15.11 For the structure shown below, assume the floors are flexible and the flooring system
transits the gravity loading to the floor beams in the N–S direction (one-way action). Assume all
beams are the same size and all the columns are the same size. Ibeam ¼ 3Icolumn, Floorgravity ¼ 175
kN/m2.
Compare the maximum forces in beams and columns caused by combination of gravity and wind
for the following cases.
1. The structure is considered to be a braced frame, i.e., all the connections between beams and
columns are pinned both in N–S and E–W direction. Assume the frames are suitably braced.
2. The structure is considered to be a rigid frame in the N–S direction and a braced frame in the E–W
direction, i.e., all the connections between beams and columns are moment connections in N–S
direction, but connections in the E–W direction remain pinned.
15.6 Problems 1011
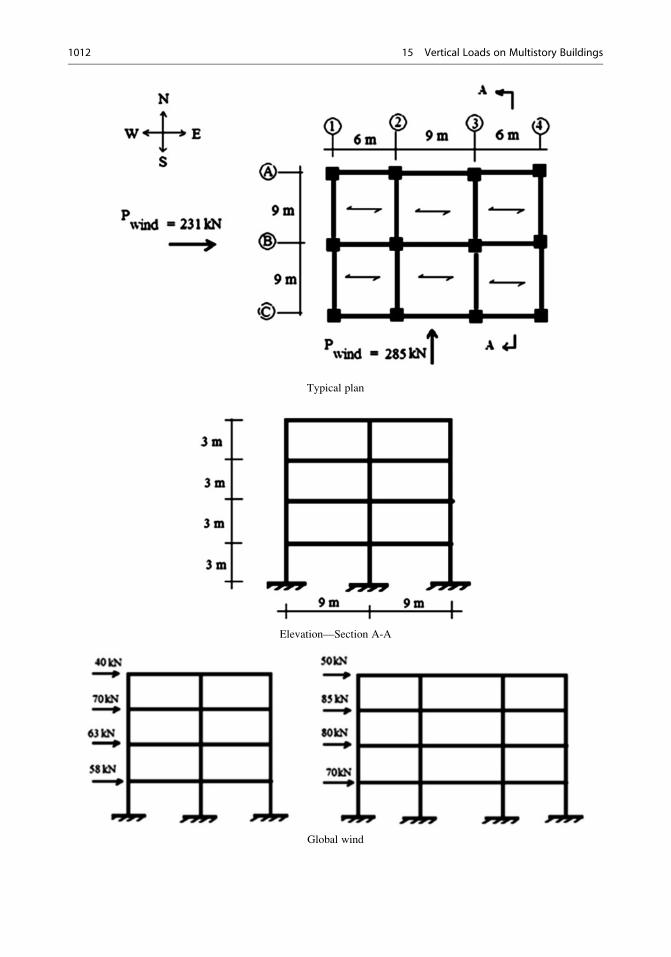
Typical plan
Elevation—Section A-A
Global wind
1012 15 Vertical Loads on Multistory Buildings
Inelastic Response of Structures 16
Abstract
The conventional design approach works with factored loads and reduced
material capacities such as strength. When subjected to service loads, the
structure is detailed such that it behaves elastically. For extreme loadings,
the structure is allowed to experience a limited amount of deformation
beyond the elastic limit. This deformation is called “inelastic” since in
contrast to elastic deformation, when the loading is removed, the structure
does not return to its original position. Up to this point in the text, we have
assumed the behavior to be elastic. In Chap. 10, we included geometric
nonlinear effects but still assumed elastic behavior. Here, we introduce an
additional effect, inelastic behavior. We start with an in-depth discussion
of the stress–strain behavior of structural steels and concrete, apply these
ideas to beams subjected to inelastic bending, and then develop an analy-
sis procedure to determine the inelastic response of frame-type structures.
This approach allows one to estimate the “maximum” loading that a
structure can support, i.e., the “limit load.” Examples illustrating the
influence of inelastic behavior on the ultimate capacity are included.
16.1 Stress–Strain Behavior of Structural Steels
Steel and concrete are the two most popular construction materials. Steels with low carbon content are
usually referred to as “structural” steels since they are used primarily to fabricate structural elements
such as W, T, and I shapes. Structural steels have desirable properties such as strength, uniformity,
weldablity, and ductility. The latter property is related to the ability of structural steels to experience
significant deformation prior to fracture.
Figure 16.1 shows a typical stress–strain plot for a mild (low carbon) steel. There are four distinct
deformation zones: elastic; yielding; strain hardening; and necking. The stress remains constant as the
specimen yields until the strain, εy0, is reached. Beyond this level, strain hardening occurs with the
stress increasing to its “ultimate” value and then decreasing to the value at which rupture occurs. The
yield zone for mild steel is relatively large, on the order of 20 times the yield strain εy. Another
# Springer International Publishing Switzerland 2016
J.J. Connor, S. Faraji, Fundamentals of Structural Engineering,DOI 10.1007/978-3-319-24331-3_16
1013
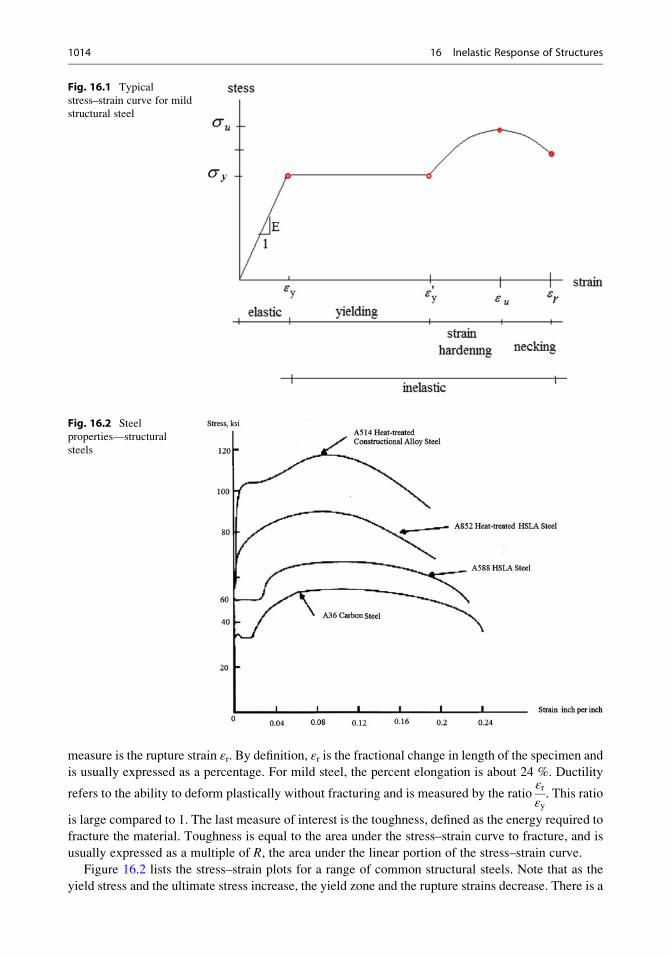
measure is the rupture strain εr. By definition, εr is the fractional change in length of the specimen and
is usually expressed as a percentage. For mild steel, the percent elongation is about 24 %. Ductility
refers to the ability to deform plastically without fracturing and is measured by the ratioεrεy. This ratio
is large compared to 1. The last measure of interest is the toughness, defined as the energy required to
fracture the material. Toughness is equal to the area under the stress–strain curve to fracture, and is
usually expressed as a multiple of R, the area under the linear portion of the stress–strain curve.
Figure 16.2 lists the stress–strain plots for a range of common structural steels. Note that as the
yield stress and the ultimate stress increase, the yield zone and the rupture strains decrease. There is a
Fig. 16.1 Typical
stress–strain curve for mild
structural steel
Fig. 16.2 Steel
properties—structural
steels
1014 16 Inelastic Response of Structures

trade-off between ductility and strength. The yield zones for the two lower strength steels are
essentially equalε0y
εy� 13
� �whereas the higher strength steels shift directly from elastic behavior
into strain hardening.
16.2 Inelastic Moment–Curvature Relationships
The fact that structural steels can experience significant deformation before rupturing is the basis for
developing an analysis procedure for tracking the response as the structure passes from the elastic
range through the yielding zone up to rupture. The starting point for the analysis is establishing the
moment capacity of a beam subjected to inelastic bending.
Assuming a cross section remains a plane, the extensional strain varies linearly with distance from
the centroidal axis.
ε ¼ yχ ð16:1Þwhere χ is the curvature of the centroidal axis. Given χ, one computes ε and then determines the stress
using a nonlinear stress–strain relation such as shown in Fig. 16.1.
ε! σ ¼ f εð Þ ! σ ¼ f χð Þ ð16:2ÞThe moment is defined by the following integral,
M ¼ðA
�yð ÞσdA ¼ M χð Þ ð16:3Þ
This integral is usually evaluated numerically; one ranges over χ and constructs a plot ofM vs. χ. Theexact form depends upon the assumed stress–strain relationship and the shape of the cross section.
In order to obtain an analytical solution, the stress–strain curve is usually approximated with a
linear model. The simplest model for steel is based on the assumption of elastic perfectly plastic
fracture behavior; the increase in stress due to strain hardening is neglected. Figure 16.3 illustrates
this behavior.
Fig. 16.3 Elastic perfectly
plastic fracture (EPPF)
model
16.2 Inelastic Moment–Curvature Relationships 1015
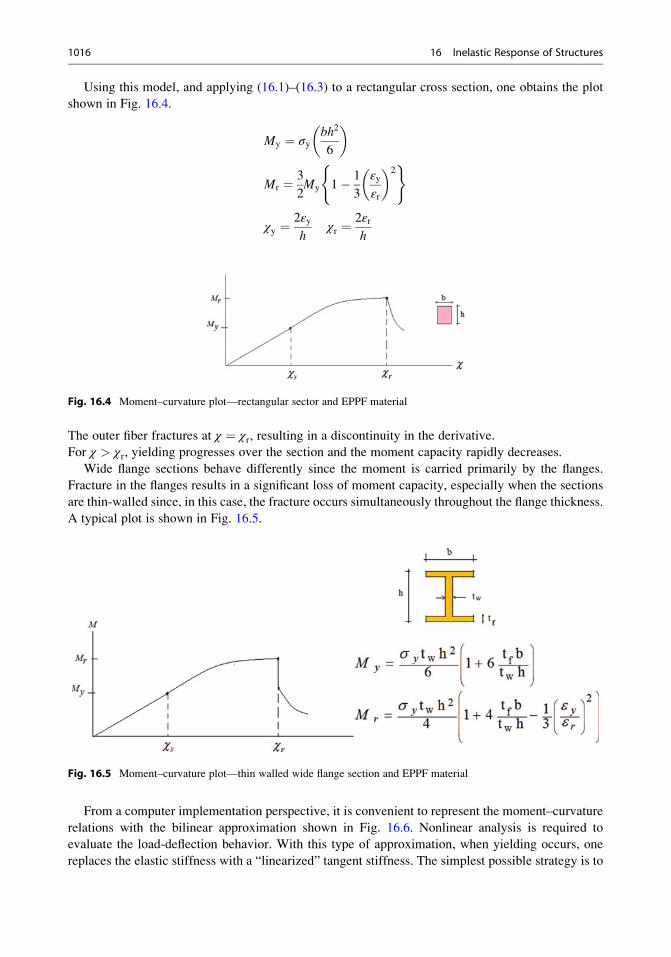
Using this model, and applying (16.1)–(16.3) to a rectangular cross section, one obtains the plot
shown in Fig. 16.4.
My ¼ σybh2
6
� �
Mr ¼ 3
2My 1� 1
3
εyεr
� �2( )
χy ¼2εyh
χr ¼2εrh
The outer fiber fractures at χ ¼ χr, resulting in a discontinuity in the derivative.
For χ > χr, yielding progresses over the section and the moment capacity rapidly decreases.
Wide flange sections behave differently since the moment is carried primarily by the flanges.
Fracture in the flanges results in a significant loss of moment capacity, especially when the sections
are thin-walled since, in this case, the fracture occurs simultaneously throughout the flange thickness.
A typical plot is shown in Fig. 16.5.
From a computer implementation perspective, it is convenient to represent the moment–curvature
relations with the bilinear approximation shown in Fig. 16.6. Nonlinear analysis is required to
evaluate the load-deflection behavior. With this type of approximation, when yielding occurs, one
replaces the elastic stiffness with a “linearized” tangent stiffness. The simplest possible strategy is to
Fig. 16.4 Moment–curvature plot—rectangular sector and EPPF material
Fig. 16.5 Moment–curvature plot—thin walled wide flange section and EPPF material
1016 16 Inelastic Response of Structures
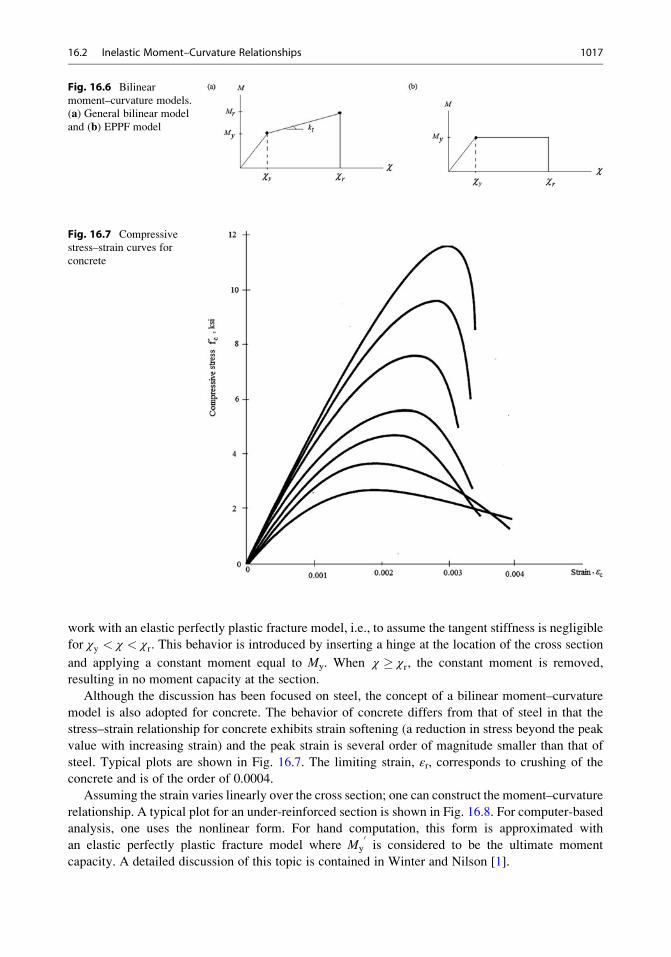
work with an elastic perfectly plastic fracture model, i.e., to assume the tangent stiffness is negligible
for χy < χ < χr. This behavior is introduced by inserting a hinge at the location of the cross section
and applying a constant moment equal to My. When χ χr, the constant moment is removed,
resulting in no moment capacity at the section.
Although the discussion has been focused on steel, the concept of a bilinear moment–curvature
model is also adopted for concrete. The behavior of concrete differs from that of steel in that the
stress–strain relationship for concrete exhibits strain softening (a reduction in stress beyond the peak
value with increasing strain) and the peak strain is several order of magnitude smaller than that of
steel. Typical plots are shown in Fig. 16.7. The limiting strain, εr, corresponds to crushing of the
concrete and is of the order of 0.0004.
Assuming the strain varies linearly over the cross section; one can construct the moment–curvature
relationship. A typical plot for an under-reinforced section is shown in Fig. 16.8. For computer-based
analysis, one uses the nonlinear form. For hand computation, this form is approximated with
an elastic perfectly plastic fracture model where My
0is considered to be the ultimate moment
capacity. A detailed discussion of this topic is contained in Winter and Nilson [1].
Fig. 16.6 Bilinear
moment–curvature models.
(a) General bilinear model
and (b) EPPF model
Fig. 16.7 Compressive
stress–strain curves for
concrete
16.2 Inelastic Moment–Curvature Relationships 1017
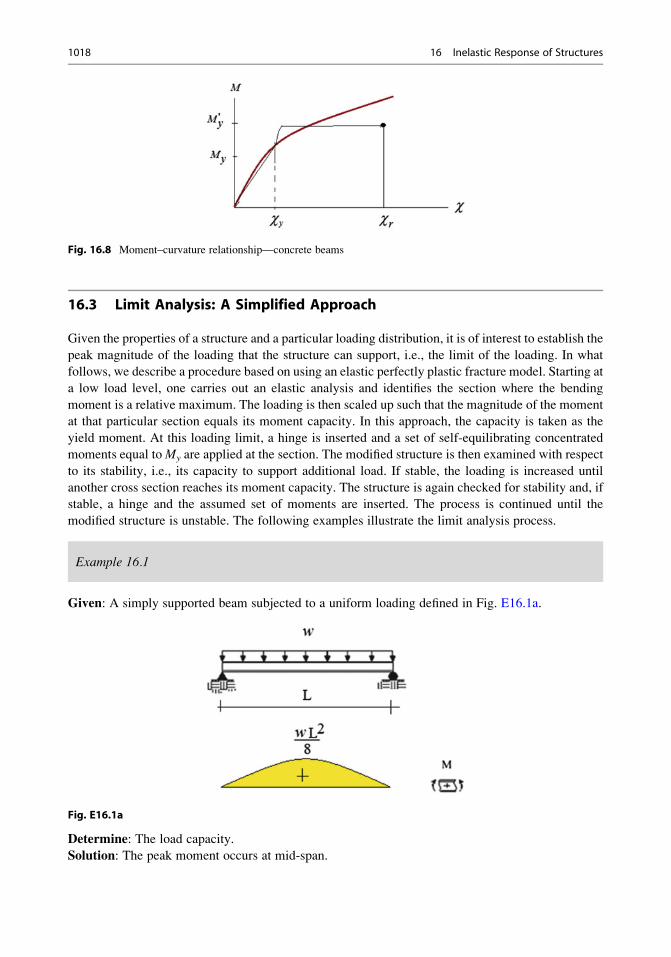
16.3 Limit Analysis: A Simplified Approach
Given the properties of a structure and a particular loading distribution, it is of interest to establish the
peak magnitude of the loading that the structure can support, i.e., the limit of the loading. In what
follows, we describe a procedure based on using an elastic perfectly plastic fracture model. Starting at
a low load level, one carries out an elastic analysis and identifies the section where the bending
moment is a relative maximum. The loading is then scaled up such that the magnitude of the moment
at that particular section equals its moment capacity. In this approach, the capacity is taken as the
yield moment. At this loading limit, a hinge is inserted and a set of self-equilibrating concentrated
moments equal toMy are applied at the section. The modified structure is then examined with respect
to its stability, i.e., its capacity to support additional load. If stable, the loading is increased until
another cross section reaches its moment capacity. The structure is again checked for stability and, if
stable, a hinge and the assumed set of moments are inserted. The process is continued until the
modified structure is unstable. The following examples illustrate the limit analysis process.
Example 16.1
Given: A simply supported beam subjected to a uniform loading defined in Fig. E16.1a.
Fig. E16.1a
Determine: The load capacity.
Solution: The peak moment occurs at mid-span.
Fig. 16.8 Moment–curvature relationship—concrete beams
1018 16 Inelastic Response of Structures
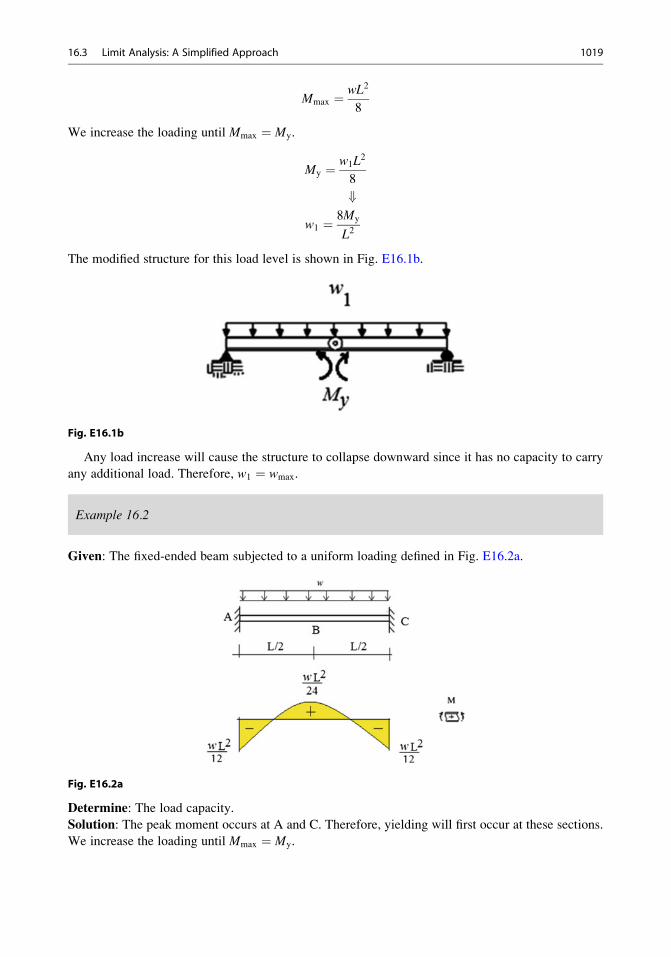
Mmax ¼ wL2
8
We increase the loading until Mmax ¼ My.
My ¼ w1L2
8
+w1 ¼ 8My
L2
The modified structure for this load level is shown in Fig. E16.1b.
Fig. E16.1b
Any load increase will cause the structure to collapse downward since it has no capacity to carry
any additional load. Therefore, w1 ¼ wmax.
Example 16.2
Given: The fixed-ended beam subjected to a uniform loading defined in Fig. E16.2a.
Fig. E16.2a
Determine: The load capacity.
Solution: The peak moment occurs at A and C. Therefore, yielding will first occur at these sections.
We increase the loading until Mmax ¼ My.
16.3 Limit Analysis: A Simplified Approach 1019
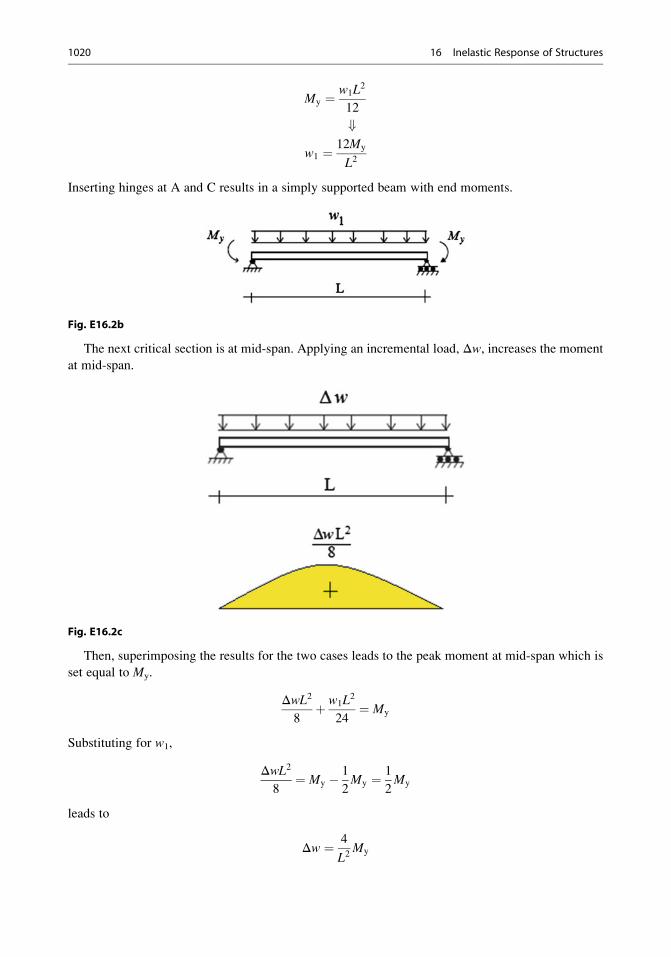
My ¼ w1L2
12
+w1 ¼ 12My
L2
Inserting hinges at A and C results in a simply supported beam with end moments.
Fig. E16.2b
The next critical section is at mid-span. Applying an incremental load, Δw, increases the moment
at mid-span.
Fig. E16.2c
Then, superimposing the results for the two cases leads to the peak moment at mid-span which is
set equal to My.
ΔwL2
8þ w1L
2
24¼ My
Substituting for w1,
ΔwL2
8¼ My � 1
2My ¼ 1
2My
leads to
Δw ¼ 4
L2My
1020 16 Inelastic Response of Structures

Lastly,
wmax ¼ w1 þ Δw ¼ 16
L2My
The final “limit state” is shown in Fig. E16.2d. This structure is unstable for any additional transverse
loading.
Fig. E16.2d
Example 16.3
Given: The two-span beam shown in Fig. E16.3a. Assume EI is constant.
Fig. E16.3a
Determine: The limit state.
Solution: The moments at section B and C are relative maxima; the value at B is the largest, so
yielding will occur first at this section.
MB ¼ 13
64PL
MC ¼ � 6
64PL
Load level 1:
We set MB equal to My and insert a hinge at B.
13
64P1L ¼ My
+P1 ¼ 64
13LMy
16.3 Limit Analysis: A Simplified Approach 1021
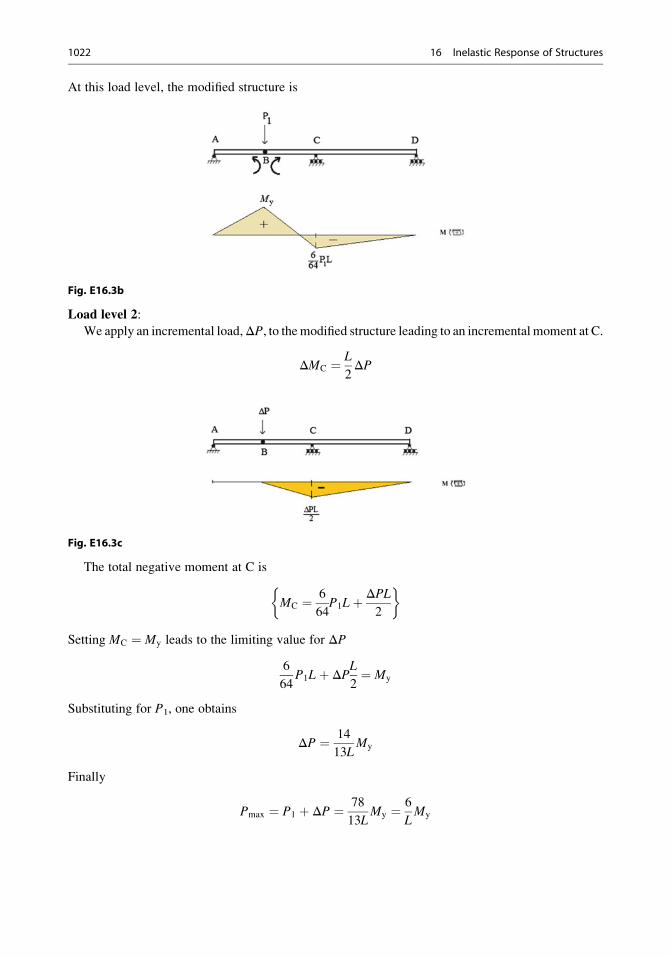
At this load level, the modified structure is
Fig. E16.3b
Load level 2:
We apply an incremental load,ΔP, to themodified structure leading to an incremental moment at C.
ΔMC ¼ L
2ΔP
Fig. E16.3c
The total negative moment at C is
MC ¼ 6
64P1Lþ ΔPL
2
�
Setting MC ¼ My leads to the limiting value for ΔP
6
64P1Lþ ΔP
L
2¼ My
Substituting for P1, one obtains
ΔP ¼ 14
13LMy
Finally
Pmax ¼ P1 þ ΔP ¼ 78
13LMy ¼ 6
LMy
1022 16 Inelastic Response of Structures
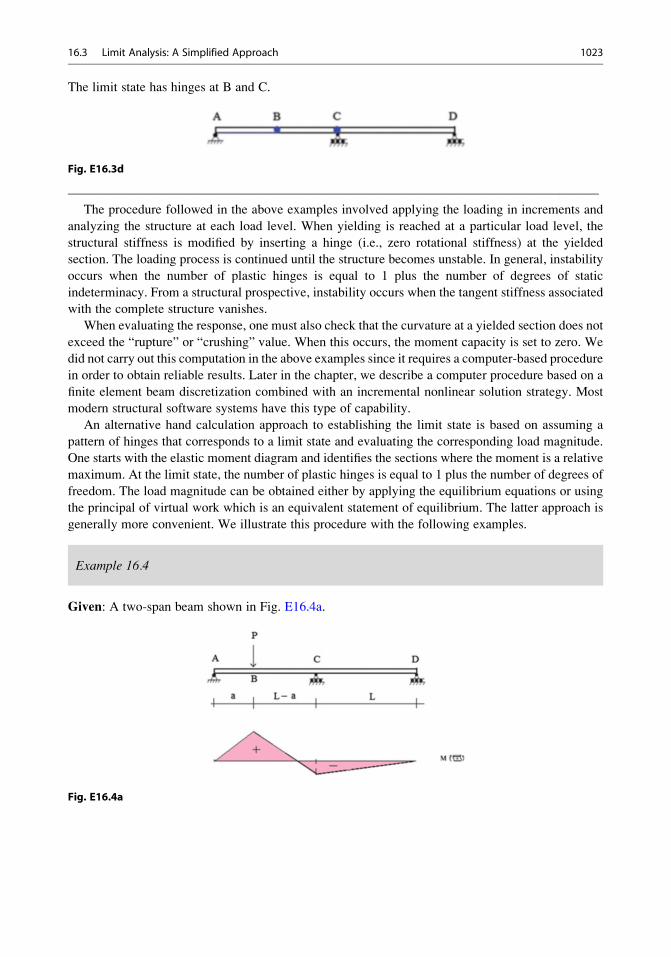
The limit state has hinges at B and C.
Fig. E16.3d
————————————————————————————————————————
The procedure followed in the above examples involved applying the loading in increments and
analyzing the structure at each load level. When yielding is reached at a particular load level, the
structural stiffness is modified by inserting a hinge (i.e., zero rotational stiffness) at the yielded
section. The loading process is continued until the structure becomes unstable. In general, instability
occurs when the number of plastic hinges is equal to 1 plus the number of degrees of static
indeterminacy. From a structural prospective, instability occurs when the tangent stiffness associated
with the complete structure vanishes.
When evaluating the response, one must also check that the curvature at a yielded section does not
exceed the “rupture” or “crushing” value. When this occurs, the moment capacity is set to zero. We
did not carry out this computation in the above examples since it requires a computer-based procedure
in order to obtain reliable results. Later in the chapter, we describe a computer procedure based on a
finite element beam discretization combined with an incremental nonlinear solution strategy. Most
modern structural software systems have this type of capability.
An alternative hand calculation approach to establishing the limit state is based on assuming a
pattern of hinges that corresponds to a limit state and evaluating the corresponding load magnitude.
One starts with the elastic moment diagram and identifies the sections where the moment is a relative
maximum. At the limit state, the number of plastic hinges is equal to 1 plus the number of degrees of
freedom. The load magnitude can be obtained either by applying the equilibrium equations or using
the principal of virtual work which is an equivalent statement of equilibrium. The latter approach is
generally more convenient. We illustrate this procedure with the following examples.
Example 16.4
Given: A two-span beam shown in Fig. E16.4a.
Fig. E16.4a
16.3 Limit Analysis: A Simplified Approach 1023
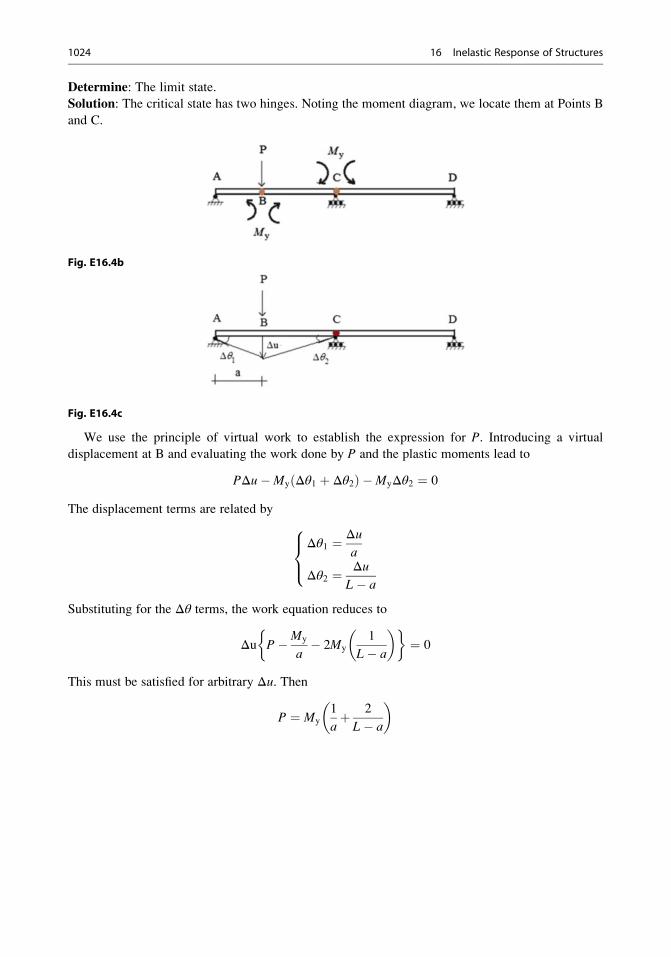
Determine: The limit state.
Solution: The critical state has two hinges. Noting the moment diagram, we locate them at Points B
and C.
Fig. E16.4b
Fig. E16.4c
We use the principle of virtual work to establish the expression for P. Introducing a virtual
displacement at B and evaluating the work done by P and the plastic moments lead to
PΔu�My Δθ1 þ Δθ2ð Þ �MyΔθ2 ¼ 0
The displacement terms are related by
Δθ1 ¼ Δua
Δθ2 ¼ ΔuL� a
8><>:
Substituting for the Δθ terms, the work equation reduces to
Δu P�My
a� 2My
1
L� a
� � �¼ 0
This must be satisfied for arbitrary Δu. Then
P ¼ My
1
aþ 2
L� a
� �
1024 16 Inelastic Response of Structures
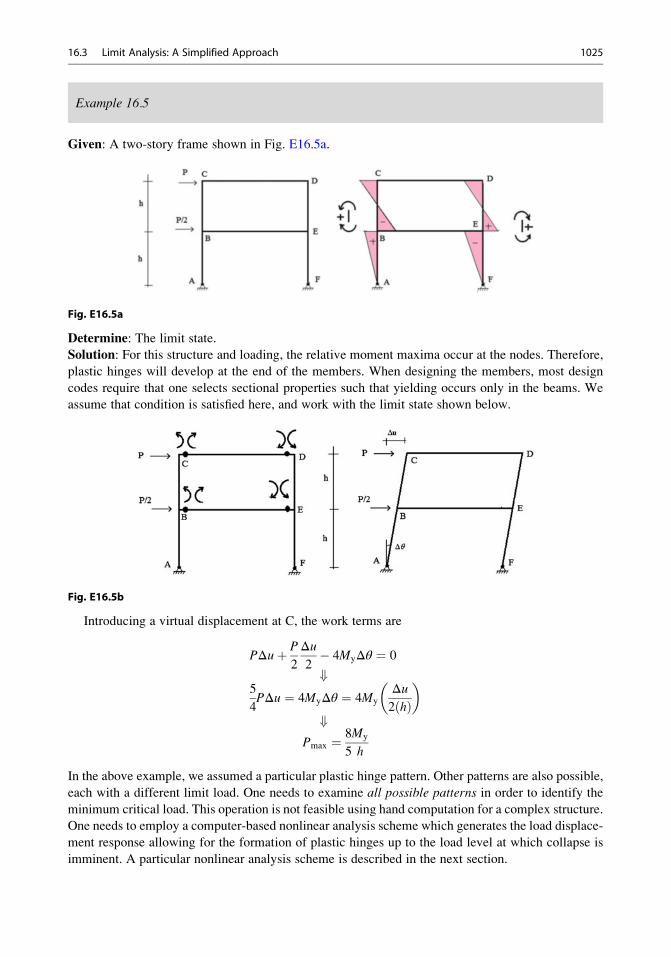
Example 16.5
Given: A two-story frame shown in Fig. E16.5a.
Fig. E16.5a
Determine: The limit state.
Solution: For this structure and loading, the relative moment maxima occur at the nodes. Therefore,
plastic hinges will develop at the end of the members. When designing the members, most design
codes require that one selects sectional properties such that yielding occurs only in the beams. We
assume that condition is satisfied here, and work with the limit state shown below.
Fig. E16.5b
Introducing a virtual displacement at C, the work terms are
PΔuþ P
2
Δu2� 4MyΔθ ¼ 0
+5
4PΔu ¼ 4MyΔθ ¼ 4My
Δu2 hð Þ� �
+Pmax ¼ 8
5
My
h
In the above example, we assumed a particular plastic hinge pattern. Other patterns are also possible,
each with a different limit load. One needs to examine all possible patterns in order to identify the
minimum critical load. This operation is not feasible using hand computation for a complex structure.
One needs to employ a computer-based nonlinear analysis scheme which generates the load displace-
ment response allowing for the formation of plastic hinges up to the load level at which collapse is
imminent. A particular nonlinear analysis scheme is described in the next section.
16.3 Limit Analysis: A Simplified Approach 1025
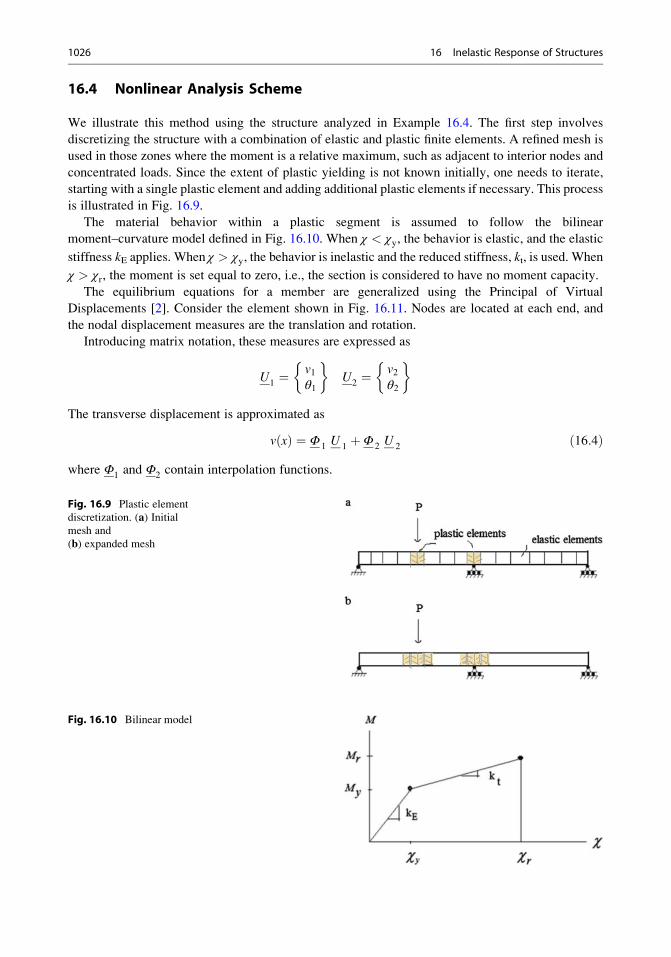
16.4 Nonlinear Analysis Scheme
We illustrate this method using the structure analyzed in Example 16.4. The first step involves
discretizing the structure with a combination of elastic and plastic finite elements. A refined mesh is
used in those zones where the moment is a relative maximum, such as adjacent to interior nodes and
concentrated loads. Since the extent of plastic yielding is not known initially, one needs to iterate,
starting with a single plastic element and adding additional plastic elements if necessary. This process
is illustrated in Fig. 16.9.
The material behavior within a plastic segment is assumed to follow the bilinear
moment–curvature model defined in Fig. 16.10. When χ < χy, the behavior is elastic, and the elastic
stiffness kE applies. When χ > χy, the behavior is inelastic and the reduced stiffness, kt, is used. When
χ > χr, the moment is set equal to zero, i.e., the section is considered to have no moment capacity.
The equilibrium equations for a member are generalized using the Principal of Virtual
Displacements [2]. Consider the element shown in Fig. 16.11. Nodes are located at each end, and
the nodal displacement measures are the translation and rotation.
Introducing matrix notation, these measures are expressed as
U1¼ v1
θ1
�U
2¼ v2
θ2
�
The transverse displacement is approximated as
v xð Þ ¼ Φ 1 U 1þΦ 2 U 2
ð16:4Þ
where Φ1 and Φ2 contain interpolation functions.
Fig. 16.9 Plastic element
discretization. (a) Initialmesh and
(b) expanded mesh
Fig. 16.10 Bilinear model
1026 16 Inelastic Response of Structures
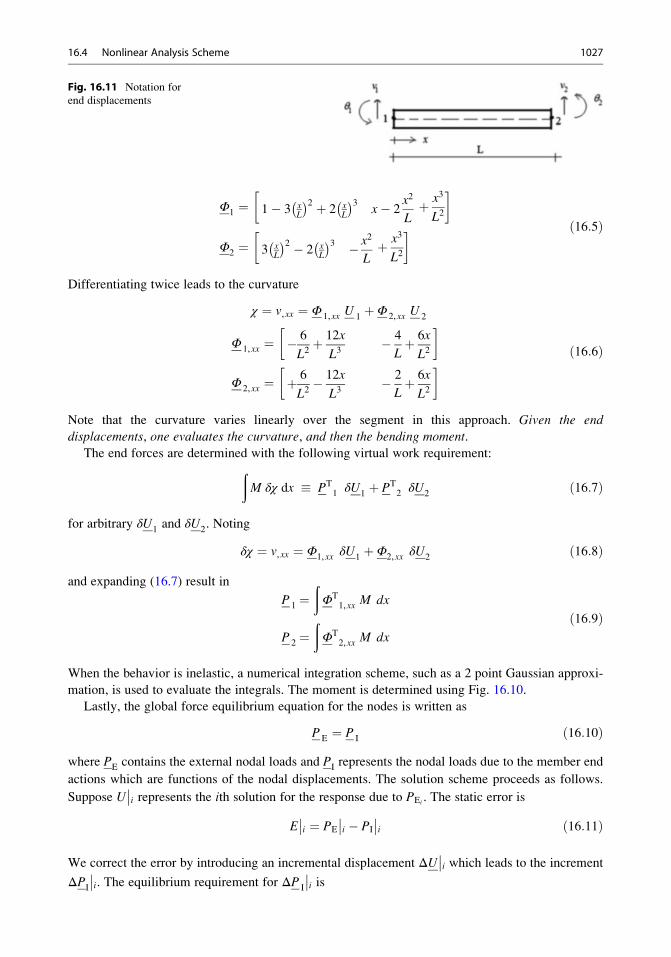
Φ1 ¼ 1� 3 xL
� �2 þ 2 xL
� �3x� 2
x2
Lþ x3
L2
�
Φ2 ¼ 3 xL
� �2 � 2 xL
� �3 � x2
Lþ x3
L2
� ð16:5Þ
Differentiating twice leads to the curvature
χ ¼ v,xx ¼ Φ 1,xx U 1þ Φ 2,xx U 2
Φ 1,xx ¼ � 6
L2þ 12x
L3� 4
Lþ 6x
L2
�
Φ 2,xx ¼ þ 6
L2� 12x
L3� 2
Lþ 6x
L2
� ð16:6Þ
Note that the curvature varies linearly over the segment in this approach. Given the end
displacements, one evaluates the curvature, and then the bending moment.
The end forces are determined with the following virtual work requirement:ðM δχ dx � PT
1 δU1þ PT
2 δU2
ð16:7Þ
for arbitrary δU1and δU
2. Noting
δχ ¼ v,xx ¼ Φ1,xx δU1þ Φ2,xx δU
2ð16:8Þ
and expanding (16.7) result in
P 1 ¼ðΦT
1,xx M dx
P 2 ¼ðΦT
2,xx M dx
ð16:9Þ
When the behavior is inelastic, a numerical integration scheme, such as a 2 point Gaussian approxi-
mation, is used to evaluate the integrals. The moment is determined using Fig. 16.10.
Lastly, the global force equilibrium equation for the nodes is written as
PE ¼ P I ð16:10Þ
where PE contains the external nodal loads and PI represents the nodal loads due to the member end
actions which are functions of the nodal displacements. The solution scheme proceeds as follows.
Suppose U��i represents the ith solution for the response due to PEi
. The static error is
E��i ¼ PE
��i � PI
��i ð16:11Þ
We correct the error by introducing an incremental displacement ΔU��i which leads to the increment
ΔPI
��i. The equilibrium requirement for ΔP I
��i is
Fig. 16.11 Notation for
end displacements
16.4 Nonlinear Analysis Scheme 1027
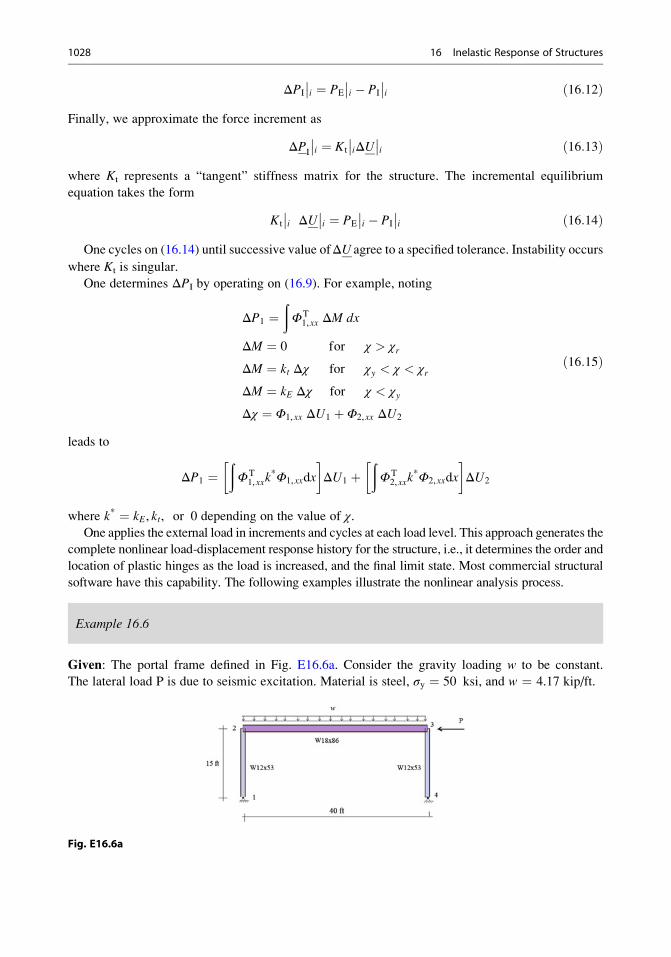
ΔPI
��i ¼ PE
��i � PI
��i ð16:12Þ
Finally, we approximate the force increment as
ΔPI
��i ¼ Kt
��iΔU
��i ð16:13Þ
where Kt represents a “tangent” stiffness matrix for the structure. The incremental equilibrium
equation takes the form
Kt
��i ΔU
��i ¼ PE
��i � PI
��i ð16:14Þ
One cycles on (16.14) until successive value ofΔU agree to a specified tolerance. Instability occurs
where Kt is singular.
One determines ΔPI by operating on (16.9). For example, noting
ΔP1 ¼ðΦT
1,xx ΔM dx
ΔM ¼ 0 for χ > χr
ΔM ¼ kt Δχ for χy < χ < χr
ΔM ¼ kE Δχ for χ < χy
Δχ ¼ Φ1,xx ΔU1 þ Φ2,xx ΔU2
ð16:15Þ
leads to
ΔP1 ¼ðΦT
1,xxk*Φ1,xxdx
�ΔU1 þ
ðΦT
2,xxk*Φ2,xxdx
�ΔU2
where k* ¼ kE, kt, or 0 depending on the value of χ.One applies the external load in increments and cycles at each load level. This approach generates the
complete nonlinear load-displacement response history for the structure, i.e., it determines the order and
location of plastic hinges as the load is increased, and the final limit state. Most commercial structural
software have this capability. The following examples illustrate the nonlinear analysis process.
Example 16.6
Given: The portal frame defined in Fig. E16.6a. Consider the gravity loading w to be constant.
The lateral load P is due to seismic excitation. Material is steel, σy ¼ 50 ksi, and w ¼ 4.17 kip/ft.
Fig. E16.6a
1028 16 Inelastic Response of Structures
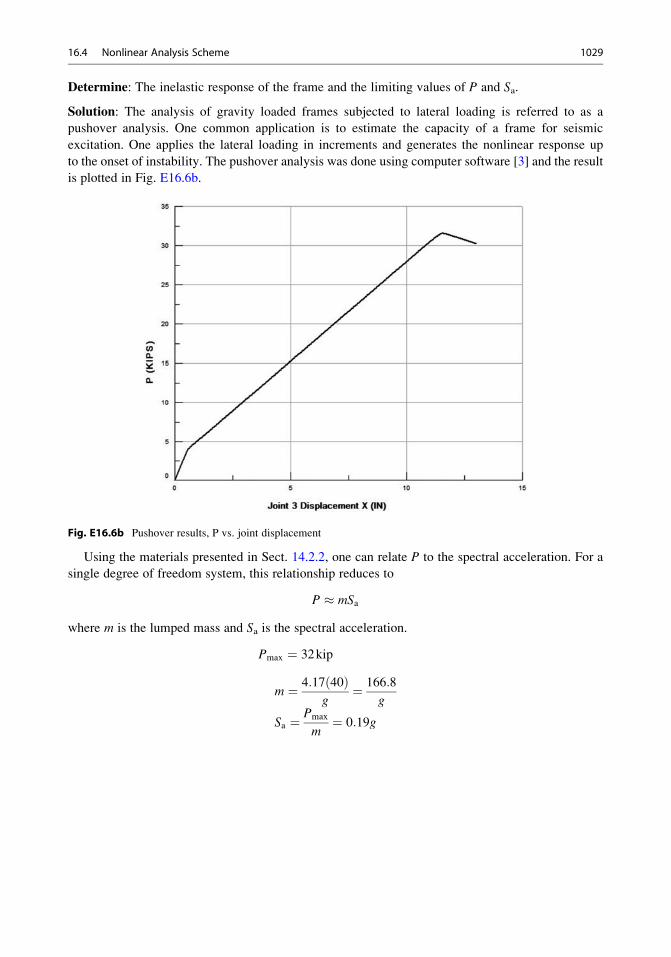
Determine: The inelastic response of the frame and the limiting values of P and Sa.
Solution: The analysis of gravity loaded frames subjected to lateral loading is referred to as a
pushover analysis. One common application is to estimate the capacity of a frame for seismic
excitation. One applies the lateral loading in increments and generates the nonlinear response up
to the onset of instability. The pushover analysis was done using computer software [3] and the result
is plotted in Fig. E16.6b.
Fig. E16.6b Pushover results, P vs. joint displacement
Using the materials presented in Sect. 14.2.2, one can relate P to the spectral acceleration. For a
single degree of freedom system, this relationship reduces to
P � mSa
where m is the lumped mass and Sa is the spectral acceleration.
Pmax ¼ 32kip
m ¼ 4:17 40ð Þg
¼ 166:8
g
Sa ¼ Pmax
m¼ 0:19g
16.4 Nonlinear Analysis Scheme 1029
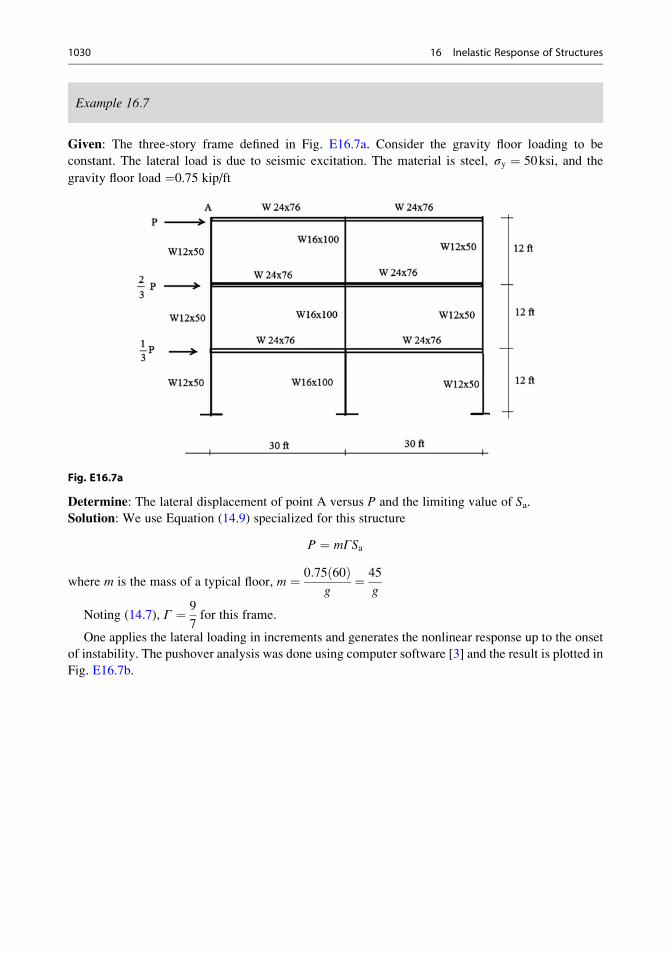
Example 16.7
Given: The three-story frame defined in Fig. E16.7a. Consider the gravity floor loading to be
constant. The lateral load is due to seismic excitation. The material is steel, σy ¼ 50ksi, and the
gravity floor load ¼0.75 kip/ft
Fig. E16.7a
Determine: The lateral displacement of point A versus P and the limiting value of Sa.Solution: We use Equation (14.9) specialized for this structure
P ¼ mΓSa
where m is the mass of a typical floor, m ¼ 0:75 60ð Þg
¼ 45
g
Noting (14.7), Γ ¼ 9
7for this frame.
One applies the lateral loading in increments and generates the nonlinear response up to the onset
of instability. The pushover analysis was done using computer software [3] and the result is plotted in
Fig. E16.7b.
1030 16 Inelastic Response of Structures

Fig. E16.7b Pushover results, P vs. joint displacement
Then
Sa ¼ Pmax
mΓ¼ 115
45g
� �97
� � ¼ 1:98g
16.5 Summary
16.5.1 Objectives
• Describe the different regions of the stress–strain behavior of structural steels and concrete:
elastic; inelastic.
• Extend the moment–curvature relationships to the inelastic range and estimate the moment
capacity of a beam subjected to inelastic bending.
• Present analysis procedures for determining the maximum external load that a structure can
support using: (a) hand calculation methods and (b) finite element computation-based methods.
This general topic is called “Limit Analysis.”
• Include some examples which illustrate how analysis is applied to simple rigid frames.
16.5 Summary 1031
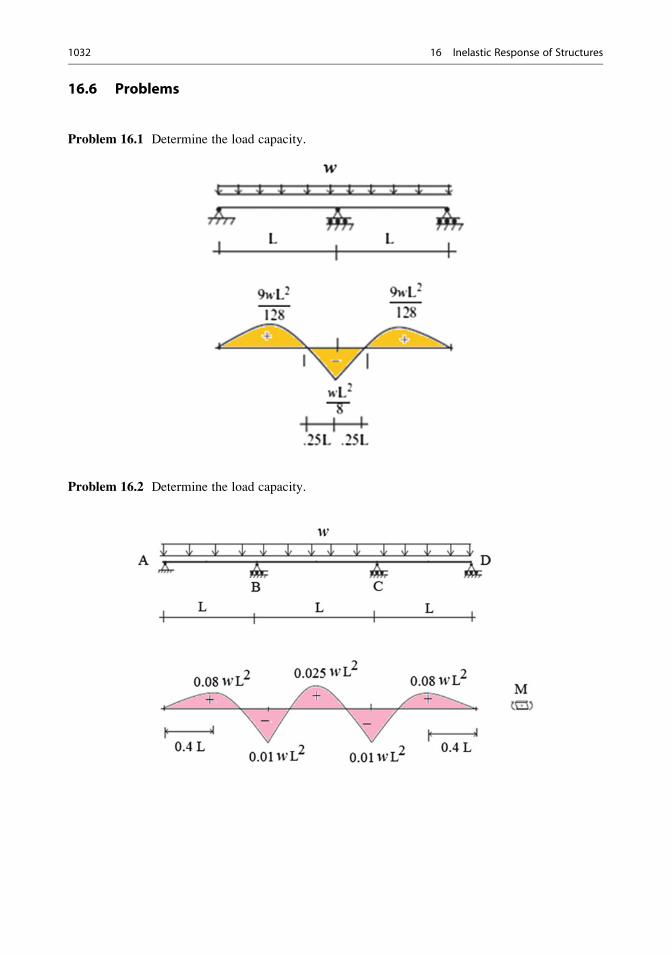
16.6 Problems
Problem 16.1 Determine the load capacity.
Problem 16.2 Determine the load capacity.
1032 16 Inelastic Response of Structures

Problem 16.3 Determine wmax as a function of α.
Problem 16.4 Determine an expression for Pmax.
Problem 16.5 Generate the plot of P vs. u for the frame shown. Consider w as a dead loading.
Assume α ¼ 1.2.
16.6 Problems 1033
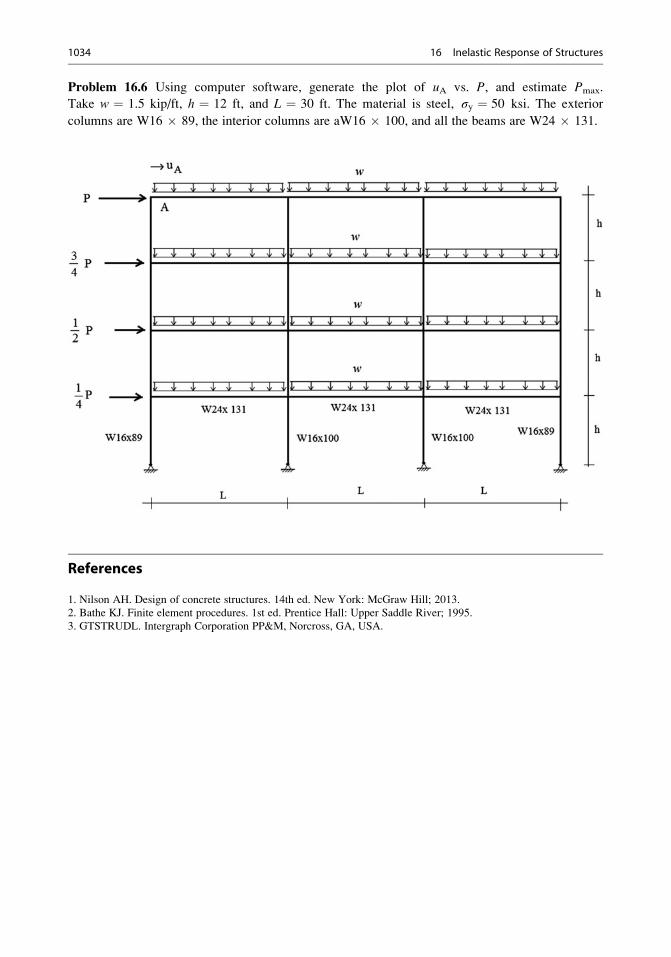
Problem 16.6 Using computer software, generate the plot of uA vs. P, and estimate Pmax.
Take w ¼ 1.5 kip/ft, h ¼ 12 ft, and L ¼ 30 ft. The material is steel, σy ¼ 50 ksi. The exterior
columns are W16 � 89, the interior columns are aW16 � 100, and all the beams are W24 � 131.
References
1. Nilson AH. Design of concrete structures. 14th ed. New York: McGraw Hill; 2013.
2. Bathe KJ. Finite element procedures. 1st ed. Prentice Hall: Upper Saddle River; 1995.
3. GTSTRUDL. Intergraph Corporation PP&M, Norcross, GA, USA.
1034 16 Inelastic Response of Structures

Index
AActive failure mode, 530
A-frame
description, 306
indeterminate, 309
loading, reactions and free body, 341–343
moment distribution, 342, 343
reactions and bending moment distribution, 372
Allowable soil pressure, 477, 479
American Association of State Highway and
Transportation Officials (AASHTO), 17, 18
Analysis
statically determinate plane frames
angle-type frame segment, 314–316
cantilever frame, 311–314
moment, shear and axial force, 310
sign convention, 310
Analytical solutions, multi span beams
Bending moment distribution, 597
compatibility equation, 595, 596
lengths and moments, 596
loading, 597, 598
peak moments, 596
static equilibrium equations, 596
support settlement, continuous, 602–603
uniform loading, continuous, 600–602
variation, bending moment, 599–600
Analytical tools, structural analysis
beam response, 35
concept of equilibrium, 27–30
deformations and displacements, 33–34
description, 27
displacements
deformation modes, 38
description, 36
reactions, cable tension and vertical displacement,
36–37
rigid member, springs, 37, 38
spring forces, 3, 9–40
statically indeterminate beam, 40–42
FBD, 30, 31
internal forces, 30–33
study of forces, 36
Anti-symmetry
deflected shapes, 254–257
shear and moment diagrams, 250–254
Approximate methods
bending moment distribution
approximate and exact results, 797
axial force, shear force, 798
qualitative reasoning, relative stiffness, 797
bending type structures, 767
column axial forces, 802, 803
column shears, 803
multi-span beams (gravity loading), 768–770
multistory rigid frames
gravity loading, 770–771
lateral loading, 771–790
positive and negative moments, multistory steel
frame, 798
rigid steel frame, bracing, 803
statically indeterminate structure, 767
steel frame
axial force, shear force and moments, 800–802
portal and shear stiffness method, 799–802
Arc length
differential and total, 403, 404
initial and loaded shapes, cable, 403
maximum tension, determination, 414, 422
sag profile and total arc length, 406
sag ratio, 404
temperature effect, 404, 405, 422
Arch bridge
structure, 874
two-hinged, 899
Arch structures
historical development, 424
models, 429–431
Arches
“false arch”, 424
force method
applied load, 605
axial deformation, 604
description, 604
expressions, horizontal displacement, 604
integral expression, 607–608
# Springer International Publishing Switzerland 2016
J.J. Connor, S. Faraji, Fundamentals of Structural Engineering,DOI 10.1007/978-3-319-24331-3
1035

Arches (cont.)parabolic, 606–607
structure, 603, 604
tension tie, 611–612
two-hinged arch and loading, 607–608
ASCE 7-05, 16, 17, 20, 21
Assuming the supports are unyielding, the flexibility
coefficients, 625
Axial force
compressive and maximum value, 442
gable frame
3-hinge, 335–337
simply supported, 369
graphical output, 358, 360
shallow vs. deep parabolic curved members, 436–439
sign convention, 310
and transverse shear, 454, 455
triangular rigid frame, 380
Axial stress, 34, 55
Axle load, 886, 888
BBackfill material
fluid
definition, 527
horizontal and vertical components, 529
hydrostatic forces, inclined surface, 529
granular
active and passive failure states, 530
angle of repose, 530
dry loose, 529
shear stress, 529
theories, soil pressure distribution, 530
Base shear, 783, 923, 955
Beam formulation
loading, 827, 844
member end forces and displacements, 840
nodes, 842
spring support, 846–849
stiffness matrices, 842
support settlement, 846
two-span beam, 840
Beams
deep beams, deformation and displacement relations,
244–247
differential equations, equilibrium, 190–210
displacement process, 35
external loads, 285
force method
single-span beams, analyzing frames, 571–577
Yielding Supports, 577–588
forced envelope, 286
influence line, 286
internal force, 258
mass system, 25
objectives, 285
planar bending, 286, 287
prismatic beams, 163
problems
computer software, 303–304
deflected shape, 296–297
influence lines, 300–301
loading system, span, 302
rotation, cross-section, 300
shear and moment diagrams, 286–292
single concentrated load, 301
trapezoidal rule, 299
vertical deflection, 298–299
virtual force method, 293–296
statically indeterminate, 40–42
symmetry and anti-symmetry
deflected shapes, 253–258
shear and moment diagrams, 250–254
torsion, prismatic members, 247–250
transverse displacement, 286
two span beams, displacement method
chord rotations, 661
decomposition, 658, 659
end actions, shear and moment, 662–664
end shears, 660
geometry and support settlements, 661
moment releases, 675–677
nodal moment equilibrium, 660
overhang, modified slope-deflection equations,
670–672
symmetrical beam, supports settlement, 665–669
three span beam, 677–683
uniformly loaded three span symmetrical beam,
683–685
Behavior
brittle, 11
combined bending and torsion, 164
ductile, 11
portal frames
-hinge, 3, 312–314, 324, 325
gravity loading, 323, 324
lateral loading, 323, 324
Bending moment
distribution
approximate and exact results, 797
axial force, shear force, 798, 799
beams and columns, portal method, 772–779
lateral loading, 792
multi-span beams and multi-bay frames, 796
qualitative reasoning, relative stiffness, 796
transverse shear, 792
horizontal thrust force, 458, 459
reactions and shear distributions, 204–206
uniform loading, parabolic, 283
Bilinear moment–curvature model, 1026
Braced frames
definition, 789–790
multistory, 305, 306
Braced rigid frame
analytical expressions, schemes, 786
column shear forces, 787
1036 Index

definition, one-story, 787
individual systems defined, 785
one-story structure, 785
shear force distribution
base story sub-element, 789
brace stiffness, 787
column shear forces, 787
frame stiffness, 787
inter-story displacement, 790
lateral forces, 788
one-story, 787
upper story sub-element, 788
value, lower floor controls, 790
Bridge
gravity live loads, 17
segmented long-span, 14
structure
geometric arrangement, 71
and gravity, 13
iron truss bridge, USA, 52
plane bridge truss, 105, 106
steel truss bridges, 54
wooden bridge truss, 51
Brittle, 11, 12, 15, 43
Buckling, 12, 43
Building
design, 13
effect, wind, 17
gravity live loads, 17
ground motion, 23
low-rise, 21
vortex shedding, 22
Building codes, 13
Building systems
“shear beam” formulation, 945
CCable, 4, 7, 15, 36–37
Cable length, 387, 404–406, 416
Cable stayed
bridges, 383, 404, 409
beam displacement, 583
composition, 581, 582
configuration, 903
displacement profile of girder, 906
elongation, 582, 583
estimated areas, 904
force and displacement profiles, 905, 906
idealized scheme, 904
stiffen beams, 583
tributary area, 905
vertical displacement, cable and beam,
585–588
Cable structures
Brooklyn Bridge, USA, 383, 385
cable-strand arrangements, 383, 384
Clifton Suspension Bridge, England, 383, 384
coordinates, lowest point, 421
deflected shape, 420, 421
doubly curved single-layer cable net, 384, 385
guyed tower, 422
maximum tension, 418–420
Normandy Bridge, France, 384, 386
peak values, cable tension, 421
reactions and tension, 416–418
Cantilever frame
symmetrical, 312–314
unsymmetrical, 337–339
Cantilever method
applied moment, 793
bending moment, axial forces, columns, 795
column-beam model, 793
deformation, relative rotation, 793
description, 790
lateral deflections, 790
reference axis, 792
stiff belt type trusses, 794
symmetrical -story plane frame, 42, 794
symmetrical plane frame, 795
tall building model, 792
Catenary shape
arc length and tension, 414
equilibrium and vertical loading, 412, 413
horizontal projection, 412
iteration and sag ratio, 414
symmetrical case, 412, 414
Center of mass
description, 937
floor
mass layout, 938–940
plan view, 938
Center of twist
braces, 935–937
external and internal forces, 930
floor
configuration, 933
geometry, 929
free body diagram, floor, 926
rigid body motion, 929
shear spring model, 926
stiffness
braces, 927
distribution, 931
symmetry axes, 931
Centroid
dimension square/rectangular footings, 488
single footing, 479–481
structure, 477, 478
Centroidal axis, 1015
Chord
horizontal, 389, 393, 397
inclined, 393, 394, 400
Circular curved members
deflection, light pole, 447, 449
geometry-circular arch, 447
slender and retain, 447
Clamped end model, 770
Clamped/hinged model, 770
Index 1037
Clay soil
allowable soil pressure, 477, 479
pressure distributions, 477, 478
Combined footings
description, 493
factored loads, 496
peak moment values, 496
shear and moment, 494
soil pressure distribution, 494, 495
square columns, 497–499
Complex trusses
corresponding nodal force equilibrium equations, 88
definition, 48, 86
equilibrium at joints, 87
geometrically stable, 89
individual nodal force systems, 88
matrix form, 88
planar, 137
planar truss, 87
Compound trusses, 48, 60, 61, 86
Compression, 310, 314
Computation of displacements
and deformation relations, 136
matrix equilibrium equations, 137
nodal displacement, 135, 137
planar complex truss, 137
scalar equation, 137
space truss, 139
static-geometric analogy, 136
Computer based analysis
displacement method
bending moment distribution, 760, 761
frame structures, 728–729
and member forces, truss, 752
nonlinear form, 1017, 1025
plane frames
gable, 358
graphical output, 358, 360
Concentrated load
horizontal cables
free body diagram, segment, 387
moment distributions, 389
moments and sag, 387
multiple concentrated loads, 389, 391–393
tension, 388, 389
transverse loading, pretensioned cable, 386, 387
inclined cables
description, 393–397
reactions and horizontal force, 393, 394
sag determination, 395, 396
Concept of equilibrium
non-concurrent force system, 28–30
Construction loading, 14
Containments, 4, 14
Corbel arch, 424
Critical loading
plan, rectangular area, 481, 482
pressure distributions, 481
Critical sections for design, cantilever walls, 549, 552
Cross section
beam, 164
combined bending and torsion, 164
properties, 258
Cross, H., 698
Curvature
positive and negative, deflected shapes, 213
relationship, 212–213
DDeck
and beam system, 105
segments, 105
slab, 49
Deep beams, deformation and displacement relations
symmetry and anti-symmetry, 254–258
Deep curved members, 464
Deflection(s)
computation
deformation–displacement relations, 91–92
description, 90
force–deformation relationship, 90–91
Deflection profiles
curvature, 356
gable frames, 357, 358
lateral loading, 357
peak deflection, estimation, 377
portal and -hinge frame, 3, 357
Deformations
and displacements, 33–34
inelastic, 12, 27
modes, 38
Design codes, 16, 21, 43
Design philosophy, 26–27
Design strategies, N-S beams and columns, 998–999
Differential equations of equilibrium, planar loading
arbitrary distributed loading, differential
element, 190
cantilever beam triangular loading, 193–196
distributed and concentrated loads, 196–200
extreme value, moment, 192
integral forms, 19
jump conditions, 194
moment summation, 191
reactions, shear, and bending moment distributions,
204–212
shear and moment, interpretation, 193
uniform loading, end moments, 199
Dimensions
design code, 551
optimal geometry, 535
pressure distributions, 530
wall footing, 553
Direct stiffness method, 860–865, 868, 869
Displacement method
description, 649
displacements and member forces, truss, 752
frame structures
member equations, 653–658
1038 Index
member end moments
moment distribution, 753–760
slope-deflection equations, 753–758
member forces, truss, 752
end moments and horizontal displacement, 764
planar
beam-type structures, 649, 650
frame-type structure, 649, 650
truss, 649, 650
plane truss
axial loaded member, 651
force-equilibrium equations, 651
horizontal and vertical translations, 651
nodal displacements and member forces, 651
rotation and end moments, analytic expression, 763
Distributed load
horizontal cable
description, 397, 398
tension determination, 398, 399
inclined cables
arbitrary loading, 399, 400
sag expression and lowest point, 400
tension determination, 401, 402
total moment, 399
uniform load, 400, 402
Ductile, 11, 43
Ductility, 11, 1013–1015
EEarthquake loading
base shear, 923
elevation, 954
floor forces, 925
ground acceleration time history, 920
ground motion, 23
lateral displacement profile, 921
low-rise rigid frame, 921
peak acceleration vs. structural period, 923peak lateral inertia force, 25
seismic lateral load profile, 26
seismic loading, 920
single degree-of-freedom model, 25
Elastic moment diagram, 1022
Engineering process
bridge structures, 874
loading, 874
objective, 873
Equivalent axial stiffness
horizontal cable
actual and perturbed configurations, 407
deflection patterns, 407, 408
modified elastic modulus, 408
net motion, 408
sag ratio, 409
inclined cable
Ernst’s formula, 411
guyed tower modeling, 409, 410
Millau Viaduct Bridge, France, 409
modified elastic modulus, 411
steel cable, 411, 412
Equivalent single degree of freedom system, 922
Extensional strain, 11, 34
External loading
creation, 182
displacements, 562, 563
primary structure, 563, 565
produce reaction forces, 182
shear and bending moment, beams, 258
structure, 173
and three force redundants, 567
and unit load results, 572
FFactor of safety
defined, 533
requirements, 527
vs. sliding and overturning, 533
Factored soil pressure, 484, 486
Failure mode, buckling, 12
Finite element method
beam structures, 839–849
bending moment and deflection profiles, 867
description, 805
direct stiffness method, 860–865, 868, 869
horizontal displacements, 867
local and global reference frames, 809–812
matrix formulation for rigid frames, 807–809
nodal supports
displacement constraints, 819–820, 826
end member forces, 820
fixed and global end actions, 829
fully fixed supports, 818
geometric data, 823
loading conditions, 820, 827
local end actions, 830
matrix displacement formulation, 823
member forces, local coordinates, 829
member plane frame, 830
movement, 821
rearranged system matrices, 821–822
reduced system matrices, 819
stiffness matrices, 823–825, 827
system stiffness matrix, 831
unknown force and displacements, 827–829
spring stiffness, 866
steps, 805–806
three dimensional (3D) formulation, 850–860
truss structures, 834–839
Fixed support
planar loading, 168
three dimensional, 170
Fixed-end beams
compatibility equations, 588
fully fixed, 594
partially fixed, 595
single concentrated force, 592–593
structure, 588
uniformly distributed loading, 590–592
Fixed-ended beam
inelastic response, limit analysis process, 1019–1021
Index 1039

Flexibility coefficients
description, 564
pitched roof frames, 625
plane frame, 612
Principle of Virtual Forces, 567
symbolic/numerical integration, 605
Flexibility method, 41
Floor loads, wind load, 918
Force envelopes
axial, 1003, 1004
definition, 258
two-hinged arches, 899
Force method
axial, shear forces and bending moment, 641
behavioral differences, 646
computer software system, use, 641–643, 645
description, 561–562
forces, cables, 640
horizontal reaction, 643
parabolic arch, 640
peak positive and negative moments, 643–644
properties and loadings, 637–639
reactions and member forces, 647–648
structure and steps
actual, 562
choices, primary, 563, 565
external loading, displacements,
561–564
flexibility coefficients, 564
force redundants, 566
“geometric compatibility equation”, 563
internal forces, 567
matrix form, 567
multi-bay multistory frame, 567
multi-span beam-type, 567
primary, 562
reaction force, displacements, 562
redundant reactions, 563, 567
truss-type, 567
vertical reaction, 637
Fracture, 11, 15, 1014–1018
Frame(s)
braced, 22
force method
arbitrary-shaped single bay frame
structure, 612
axial deformation, 613
compatibility equation, 612
description, 612
flexibility matrix, 613
matrix equations, 613
three-story, 25
Frame type structures, member equations
deformation and end actions, 654
description, 653
equilibrium conditions, 657
fixed end actions, 654, 655
moment and shear quantities, 657–658
nodal displacement, 655
slope-deflection equations, 658
superposition, 655, 656
Free body diagram (FBD)
beam
construction, 174, 175
statically indeterminate, 41
statically determinate plane frames
A-frames, 341, 342
forces acting, node B, 307, 308
member forces, 307, 308
structural analysis, 30, 31
Fully fixed arch, 429
GGable frame
3-hinge
lateral load, 335–337
shear and moment, 339–342
bending moment distributions, 369
deflection profiles, 356, 357
simply supported
lateral load, 369
unsymmetrical loading, 337–339
Geometric compatibility
description, 563
flexibility coefficients, 564
flexibility matrix, 569
matrix equations, 613
member forces, 631, 634
Geometric nonlinear analysis, 734
Geometric nonlinearity, 734–741
Girder, 7, 15, 43
Girder bridge system, 893
Global force equilibrium equations, planar loading, 173
Global reference frame
quantities, 946
symmetry axis, 949
Granular material, 525, 529, 530
Gravity floor loads
floor slab-beam system, 977
loading patterns, 977–978
one-way action beam loading, 979
steel joist/beam framing, 979
tributary areas, 977
Gravity load, 13, 17, 22
Gravity walls
concrete and soil backfill, 535
description, 526
retaining analysis, 534–536
Grid structures, 733
Guyed tower(s), 403, 404, 409, 410, 422
HHeyman, J., 27
High-strength steel, 383, 384, 409
Hinged model, 770
Hinged support
3-D, 170
planar loading, 169
portal
gravity loading, 323
lateral loading, 323
variable cross-section, 325
1040 Index

Horizontal cables
distributed load
description, 397, 398
tension determination, 398
equivalent axial stiffness
actual and perturbed configurations, 407
deflection patterns, 407, 408
modified elastic modulus, 408
net motion, 407
sag ratio, 409
Horizontal projection
catenary shape, 412
distributed loading, 397–399
Huntington, W.C., 530
IIdealized dead loading, 430
Idealized model
defined, 899
integral abutment bridge, 883
loading-idealized model, 900
story stiffness, 781
sub-elements, 780
three-span arch, 902
Idealized models
integral abutment bridge, 883
Impact magnification factor, 888
Inclined cable, 394
concentrated load, description, 394
Inclined cables
cable-stayed schemes, 581
concentrated load
description, 394
reactions and horizontal force, 393
sag determination, 396, 397
equivalent axial stiffness
Ernst’s formula, 411
guyed tower modeling, 409, 410
Millau Viaduct Bridge in France, 409
modified elastic modulus, 411
steel cable, 411
Incremental load, 1022
Indeterminate, 574, 582, 584, 586, 604, 618, 622, 626,
629–636
arches, 604, 610
beams
first degree, 572, 584
second degree, 576, 586, 588
frames
first degree, 604, 616
second degree, 622
plane truss, 57
portal frames, 616, 618
trusses
internal force distribution, 631
member forces, determination, 631–634
principle of virtual forces, 630
structures, 629
three member truss, 629, 630
Inelastic analysis, 1013–1034
Inelastic behavior, 1026, 1027
Inelastic bending, 1015
Inelastic deformation, 11, 12, 27, 747
Inelastic response
computer software, 1034
dead loading, 1033
limit analysis process
fixed-ended beam, 1019–1021
loading, 1018
plastic fracture model, 1018
simply supported beam, 1018–1019
two-span beam, 1021–1025
two-story frame, 1025–1026
load capacity determination, 1032
moment capacity, 1018
moment–curvature relations, 1015–1018
nonlinear analysis scheme
bilinear moment–curvature model, 1026
end forces, 1027
equilibrium equations, 1026
force increment, 1028
global force equilibrium equation, 1027
matrix notation, 1026
2 point Gaussian approximation, 1027
portal frame, 1028–1029
refined mesh, 1026
three-story frame, 1030–1031
transverse displacement, 1026
structural steels, stress–strain behavior of, 1013–1015
Influence lines, 261, 262, 264, 272
actual loading distribution, 107
chord forces, 109
deck-beam system, 105
diagonal members, function, 107
force parameters, 879
live load analysis, gable roof structure, 111–113
load positions and corresponding member
forces, 105, 106
loading, 105
loading zones, 875, 876
Muller-Breslau principle application, 875, 878
peak value, member force, 108
shear, 107
slender members, compression vs. tension, 108span beam, 878
structure and truck loading, 110
truss geometry, 105, 106
virtual work, principle
cantilever construction-concentrated
loading, 266
construction, 262–266
equilibrium equations, 285
uniform design loading-cantilever
construction, 272
Integral abutment bridges
elevation—three-span, 881, 883
idealized model, 881, 883
Internal bending moment, 182
Index 1041
Internal forces
free body diagram, 205
planar loading
beam and eccentric lateral load, 188
cantilever beam and multiple concentrated
loads, 184
internal shear and moment, 194
maximum bending moment and shear force, 184
shear and moment diagrams, 184
sign convention, 183
uniform loading and cantilever beam, 187
structural analysis, 30–33
JJoints
3-D trusses
analysis process, 122
direction cosines, 121
displacement computation, 127
force equilibrium equations, 119
resolution, force, 121
tetrahedron, analysis, 125–127
tripod structure, analysis, 122–124
definition, 47
deflections, 90
pin joint connections, 54
KKeystone arch construction, 422, 423
Kirchoff’s hypothesis, 211
K-type truss, 82
LLambe, T.W., 530
Lane load, 17
Lateral loading
3-hinge gable frame, 335–337
building response
center of mass, 937–940
description, 925
forces acting, center of mass, 941
multistory response, 943–945
portal frames, 323–325
stiffness elements, 942, 943, 945
center of mass, 968
center of twist, 970, 971
center of twist and seismic floor loads, 967
deflection profiles, 356
displaced configuration, 969
frames, 972
pitched roof frames, 330–338
story rigid frames, 965–966
treatment
earthquake loading, 920–925
rectangular buildings, 917
wind loading, 918–919
Lateral stiffness, 409, 745–748, 917, 949
Limit analysis, 1018–1025
Limit load, 1025
Limit state, 11, 27, 1021, 1023–1025, 1028
Line elements, 4, 7, 212Live load gravity, 16–17
Live load patterns
deflection pattern
beams, negative moment, 980, 981
columns, negative moment, 980, 981
positive moment, 980, 1000
earthquake analysis, 986–988
gravity type loading, 980
loading pattern
columns, maximum negative moment, 980, 982
maximum positive moment, 980, 1000
multistory frame, 980
uniformly distributed live load, 982–985
Live loads, bridges
truck loading and span discretization, 885, 886
uniform live load, 888–890
Load magnitude, 1023
Loading(s)
codes and technical societies, 13
gravity live loads, 16–17
properties
importance factor, values, 16
occupancy categories, 16
quasi-static loading, 15
temporal variation, 15
snow, 22–24
source
construction, 14
function, 13
interaction, environment, 30–33
terrorist loads, 14
Loading pattern
computer-based analysis, 895
dead load, 894–895
span discretization, 893, 896
Loading zones, 875–877
Local reference frame
member and nodes, 809, 810
nodal forces, 812
rotation matrices, 811
rotation of axes, 809, 810
structure, 809, 810
Low-rise rigid frames
bracing, 785–790
shear stiffness method, 779–784
MMass, 13, 15, 19, 25, 26
Matrix formulation, 807–809
displacements, computation, 135–141
floors and stories, 946
force equilibrium equations, 133–135
inertia forces, 947
manual techniques, 131
member–node incidence, 133
notation, 131–133
rigid frames
1042 Index

end forces and displacements, 807
fixed end forces, 809
linearly loaded beam, 809
member stiffness matrices, 807–808
stability, 135
story structure, 948
system load, mass and stiffness matrices, 949
Maxwell’s law
compatibility equations, 571
definition, 569
reciprocal loading conditions, 569–571
Method of joints
cantilever truss analysis, 71–74
five member truss, 65–71
gable roof truss analysis, 75–77
plane truss, 61
three member truss analysis, 62–65
zero force members, 72
Method of sections
chord trusses, 78
design, 142
equilibrium equations, 77
hybrid analysis strategy, 84–86
joints, 77
K-type trusses, analysis, 82–84
parallel chord truss, 79–80
roof truss, 80–82
shear forces, 78
Method of virtual forces
arches, 447
beams, 231
bending, slender beams, 231
deflection computation, 232
displacement, roller support, 376
frames, 344
horizontal deflection determination, 374, 378
horizontal displacement, 376
trusses, 78
vertical deflection determination, 374, 375, 378
M1 , M2, and M3, maximum value, 277, 878, 908
Modern cables, 383
Modern structural software systems, 1023
Modulus of elasticity, 34, 44
Moment area theorems, slender beams
cantilever beam, 220
cross-sectional rotation and deflection, 218
double integral, 219
First Moment Area theorem, 218
integration, x1 and x2, 219Second Moment Area Theorem, 219
simply supported beam, 224–230
Moment capacity, 1015–1018, 1023, 1026
Moment distribution
multi-span beams
dimensionless factor (DF), 699
incremental moments, 699
iteration cycle, 698
method, 698
moment equilibrium, 699
moment release, two span beam, 702–703
multiple free nodes, 703–704
reduced relative rigidity factor, 702
solution procedure, 698
three span beam, 704–706
two span beam, 700–704
unbalanced clockwise nodal moment, 698
Multi-bay
multistory frames, 567
portal frame, 306
Multiple concentrated loads
force envelopes
absolute maximum moment, 277
computation, maximum moments, 277–282
critical truck loading position, 283
dead + truck loading, 284
forces, 275
M1 and M2, maximum value, 277
maximum bending moments, 278
moment diagram-arbitrary position, loading, 276
truck moving across, span, 283
internal forces, cantilever beam, 184, 188
Multi-span beams (gravity loading)
data-moment diagrams
quantitative reasoning, relative stiffness, 769–770
single-span, 768
three-span, 768, 769
two-span, 768
Multi-span beams force method
structures, 567
Multi-span bridges, 878
geometric configurations
elevation—three-span, 881, 883
idealized model, 881, 883
integral abutment bridge, 883
sintegral abutment bridge, 882
span arrangements, 880, 881
span lengths
bending moment distribution, 882, 884
symmetrical scheme, 882, 884
Multi-span horizontal structures
cable-stayed
bridge, 903–907
structure, 911
engineering process, girders, 873–875
global deflection, 910
idealized tied arch, 911
influence lines, 875–880, 908
single span bridge, 908
span lengths, 908
symmetrical cable structure, 913
three-span parabolic arch response, 902–903
Two-Hinged Parabolic Arch Response, 899–901
multistory building systems
multistory building systems, 915–917
Multistory buildings
braced frames, N-S and E-W directions
beam properties E-W direction, 989
configuration, 992
deflection, 996
floor loading, 1006
Index 1043

Multistory buildings (cont.)interior columns, 982
result, 998
four-story building
floor plan and elevation structure, 989
global wind loads, 990
loading and member data, 989
load paths, 1006
loading patterns estimation, Muller–Breslau principle,
1006–1009
loads, frames
rectangular building, 975, 976
structure, 975, 976
system, 975
rigid frames, N-S and E-W direction
beams, N-S, 998
braced vs. rigid frame, 997
columns, N-S, 998
connection, N-S beams and columns, 998
dead load, 1008
design values, 1005
live load patterns, 980–989
moment diagrams, 1024
result, 1006
uniform live load, 888–889
wind load N-S, 990–992, 997, 998
systems
braced frame structure, 916
lateral stiffness systems, 917
low-rise building, 916, 917
Multistory response
forces
floor, 943
inertia, 944
interstory deformation, 943
shear beam, 945
Multistory rigid and braced frame, 306
Multistory rigid frames
gravity loading, 771
lateral loading
approaches, estimation, 771
inflection points, 771
low-rise, bracing, 785–790
shear stiffness method, 779–784
NNodal equilibrium equations
direct stiffness method, 816
equilibrium equations, 815
member end actions, 814
member node incidence, 812–813
member reaction forces, 815
positive/negative end, 812
system matrices, 818
Nodes
and member incidence, 133
concurrent force system, 56
description, 47
horizontal displacement, 94–99
member af and cf, extreme values, 108
plane trusses, 118
positive and negative, member n, 131scalar equilibrium equations, 57
Non prismatic members, 241–244
Nonlinear analysis
bilinear moment–curvature model, 1026
end forces, 1027
equilibrium equations, 1026
force increment, 1028
global force equilibrium equation, 1027
matrix notation, 1026
2 point Gaussian approximation, 1027
portal frame, 1028–1029
refined mesh, 1026
three-story frame, 1030–1031
transverse displacement, 1026
Nonlinear equations, 734
Nonlinear stress–strain relation, 1015
OOptimal shape
parabolic arch, 435
statically determinate arch, 462–463
Out of plane loading
end actions, 729
equilibrium equations, 731
free body diagrams, 686, 688
grid structure, 733–734
plane frames
3-D system, 359, 361
displacement and rotation, 358
gravity load, 359
highway signpost, 359
transversely loaded grid structure, 362
prismatic member, 729
Overturning
base pressure distribution, 553
defined, 533
stability, 553
toe and sliding, 532
vs. safety, 545
PParabolic geometry
notation, parabolic shape function, 435
shallow vs. deep parabolic curved members, 436–442
Passive soil pressure, 531
Pattern loading
three-span system, 888–889
uniform dead and lane, 894
P-delta effect, 745, 749, 750, 764Peak acceleration, 23, 25, 26
Peak pressure, 480, 481, 502
Peck, R.B., 479, 530
Piles/caissons, 476, 547–549
Pitched roof frames
analytical solutions
gravity loading, 330, 331
1044 Index

displacement profiles, shear and moment
diagrams, 379
expression, horizontal reaction, 627
member loads
equivalent vertical loading, 328
inclined member, 326, 327
normal and tangential directions, 329
reactions, 326–320
peak negative and positive moments, 628
primary structure, 625
relative stiffness factors, 625–626
structures, 326
three-hinge solution, 628
total bending moment distribution, 627
two vs. three-hinge solution, 628Planar beam systems, 171
Planar bending, 164
definition, 164
stability and determinacy, beams see Stabilitytransverse displacement, 286
Planar trusses
analysis
axial force, 90
equilibrium considerations, 56
statically determinate, 57–58
bottom and top nodes, 49
complex and compound, 49
simple planar truss construction, 48
structure, 91
two member, 91
Plane frames
transverse deformation, 612
Plane trusses
2-D, 118
definition, 47
node, 56
statical determinacy, 142
plastic fracture model, 1018
plastic hinges, 1023, 1025
Platforms, 4, 13
Portal framesanti-symmetrical loading, displacement
method
chord rotation, 690
frame with no sideway, 692–694
frame with sideway, 694–697
moments and shear, 692
slope-deflection equations, 690
bending moment distribution, 621–622
expression, displacement, 614
gravity-loading
anti-symmetrical model, 618
bending moment distributions, 619
compatibility equation, 618
decomposition, loading, 617
horizontal reaction, 619
net bending moment distribution, 620
peak moments, 620
symmetrical model, 618, 619
two-hinged, 618
lateral loading symmetrical
two-hinged, 616
overhang, 321–323
reaction, gravity loading, 613, 614
simply supported, 316–318
structure, 613, 614
symmetrical
anti-symmetrical loading, 622
bending moment distribution, two-hinged frame,
623, 624
displacement, 622
hinged and fixed supports, bending moment
distribution, 624, 625
structures, 622
symmetrical loading, displacement method
description, 689–690
moment equilibrium, 690
Portal method
axial and shear forces, 773, 775, 776, 778
bending moment distribution
beams, 773, 775, 776, 778
columns, 773, 776, 777
description, 772, 796
moments, joints, 772, 773, 777
reactions, shear forces and moment distribution, 773,
775, 776, 778
rigid frame, 771–772, 776
steel frame, 799
Positive sense, bending, 310
Primary structure
description, 562
displacement, 564, 577
fixed end moments, 590
flexibility
coefficients, 564
matrix, 613
force redundants, 566, 568
geometric compatibility equation, 563
multi-span beam, 568
pitched roof frames, 625–629
redundant moment, 568
vertical restraints, 564
Principle of virtual forces
axial and shear forces, 345
deflections, computation
cantilever-type structure, 345–347
horizontal displacements and rotation, 348–350
non-prismatic member, 352–355
steel structure, 350–353
low-rise frames, 345
planar frame structure, 344–345
Prismatic beams
combined bending and torsion, 164, 166
cross-sections and bending mode, 163, 164, 166
geometrical parameters and notation, 163
Mechanics Theory, 164
planar bending, 164, 286
Index 1045
QQualitative reasoning, deflected shapes
beam and moment release, 217–218
cantilever beam, 216
moments, positive and negative, 213, 215
overhang and beam, 216
positive and negative curvature, 213
shape transition at inflection point, 214
supports-displacement measures, types, 213, 214
uniformly loaded and simply supported beam, 215
RRankine theory
defined, magnitude per unit wide strip, 531
distribution, soil pressure, 530
horizontal forces, 531
soil pressure, surcharge, 532
Reactions
planar loading
beam and two over hangs, 174–175
beam free body diagram, construction, 175
horizontal beam supports, vertical sign, 180–182
simply supported beam, 175–176
statically determinate and indeterminate structure,
173
three-span beam and two moment releases,
179–180
two-span beam and moment release, 176–179
structural engineering
forces, 30
statically indeterminate beam, 41–42
supports, planar structures, 7, 10
Rectangular footing, loading, 483, 496
Redundant
cable force, 582
displacements, primary structure, 586
external loading, 586
force
expression, primary structure, 567
reaction, 563, 567
steps, 562
internal force, 567
matrix equations, 613
tension, tie, 610
three-span beam, 576
Refined mesh, 1026
Relative stiffness
bending moment distribution, 597
clamped/hinged model, 770
end moments estimation, 771
flexibility coefficients, 625
hinged and clamped end model, 770
internal force distribution, 631
multi-span beam, 768, 769
qualitative reason, 797
two-span beam, 597
Resultant
centroid, 480
force, 479
pressure distributions, 505
Resultant
combined footings, 493
factored loads, 494
line of action, 481, 493
Rigid body motion
prevent
arranged, 58
insufficient, 59
order, 114
reactions, 87
required, 57
respect, 114
supported, 48
Rigid frame
displacement method
anti-symmetrical loading, portal frames, 690–697
description, 685
free body diagrams, members and nodes, 686, 688
moment equilibrium, 686, 690
sideway, 686
slope-deflection equations, 658
symmetrical loading, portal frames, 689–690
five story symmetrical rigid frame building, 986
lateral loading, 330, 332
multistory, 306
pitched roof frames, 326
simply supported gable, 330–335
triangular, 380
Roller support, 169–170
Rotation, 309, 345–346, 348, 350, 358, 359, 375, 376
Rupture strain, 1014
SSag
arc length, 403–406
concentrated loads, horizontal cables
angle of inclination, relationship, 388
downward vertical, 391
expression, 387, 389
profile, 392
distributed loading, 395–397
equivalent axial stiffness, 409
inclined cables and concentrated loading, 393–397
Sandy soil
allowable pressures, 477, 479
pressure distributions, 477, 478
Sections
cantilever walls design, 549–552
Service loads, 26, 483, 486, 498, 500, 501, 516
Shallow curved members
non-shallow curved member, 445–446
trigonometric measures, 436
vs. deep, 436Shallow foundations
allowable soil pressure, 516
combined footing, 520
dimensions, square/rectangular, 517
pad footing, 522
service loads, 516
square columns, 517
1046 Index
strap footing, 521
types
combined footing, 477
footings, 476
single footing, 476
strap footing, 476
structure, 475, 476
superstructure, 475
Shear force, 184, 246, 262–266
influence line
construction, 262–266
maximum bending moment, 184
transverse, 246
maximum moment occurs at mid-span, 442
Shear stiffness method
approximate analysis, 783–784, 794–796
bottom story-fixed support, transverse shear
model, 782
description, 796–797
elements, 950
exterior and interior element—upper story, 781
factors, 949
low-rise frame, 780
parameter, 785
ratios
lowest story, 783
upper stories, 781
slope-deflection equations, 781
steel frame, 799
sub-elements, base story
fixed support, 782
hinged support, 783
total transverse shear, 779
Shear walls, concrete frame, 916
Shell, 4, 7
Sideway
with sideway, frame’s moment distribution, 694–697
computer-based analysis, frame with inclined legs,
726–729
fixed end moments, 718
frame with inclined legs, 722–726
“holding” forces, 718
portal bent, 719–722
without sideway, frame’s moment distribution
end actions, 723–726
support settlement, two-bay portal frame,
713–715
symmetrical loading, two-bay portal frame,
711–713
temperature increase, two-bay portal frame,
715–718
Sign convention
matrix formulation, beam bending problem, 183
positive directions, 183
Simple planar truss, 48, 49
Simple space truss, 48
Single footings
column position, 483
dowels use, 485
effective soil pressure, 483
procedure, 484
service loads, 486–489
shear and moment, 484, 485
shear, location, 484, 485
square/rectangular, 488–493
steel reinforcement, 485
Slender beams
centroidal axis, strain, 211
cross section rotation angle, 212
curvature relationship, moment, 212–213
differential elements, 211, 212
express and curvature, extensional strain, 212
homogeneous beam, 211, 213
Kirchoff’s hypothesis, 211
moment area theorems, 218–230
non prismatic members, 241–244
qualitative reasoning, deflected shapes see Qualitativereasoning, deflected shapes
virtual forces method, 231–232
Sliding
defined, 532, 536
stability, 553
vs. safety, 533Snow load
drift profiles, 24
flat and sloped roof, 23, 24
Soil friction angle, 553
Soil pressure distributions
allowable pressures, 477, 479
analytical method
equilibrium, 480
line of action, 481
peak pressure, 480, 481
plan, rectangular area, 482
single footing, 479
trapezoidal, 481
concentric load, 477, 478
description, 477
determination, 515
dimensions, footing, 477–479
footing/wall base, 539
Rankine theory, 531–532
Spectral acceleration, 922, 923
Stability
3-D trusses, equilibrium analysis
Cramer’s rule, 135
requirement, 135
and determinacy, beams
concurrent displacement constraints, 166, 167
fixed and hinged support, 168
3-D fixed support, 170
3-D hinged support, 170
moment release, 172–173
multiple supports, 171, 172
planar rigid body motions, 165, 167
3-D roller support, 170
roller support, 169
static determinacy, 171
Index 1047

Stability (cont.)unstable support arrangements, 171
X–Y plane, 165
planar truss
complex truss, 61
compound truss, 60, 61
equilibrium equations, 58
plane truss, 57, 58
simple and compound trusses, 61
simple trusses, 58
suitably restrain, 58
unstable, motion restraints, 58
structural engineering
initial, 7–11
loss and material failure, 11–12
priorities, 12
Stabilizing effect, 527
Static determinacy
2-D plane trusses, 118
stable determinate structure, 118
structure, 118
unstable structure, 119–120
Statically determinate beams
engineering process, 258–259
force envelopes, 259–262
influence lines, 259–262
Statically determinate curved members
arch-type structures, 423–428
factors and concepts, 463–464
internal forces, 431–435
models, arch structures, 429–431
objectives, 463
parabolic geometry, 435–436, 439, 443, 451, 454
problems, parabolic member, 464–473
three-hinged arches, analysis, 450–463
virtual forces
circular, 447–450
displacements, 442
non-shallow slender, 443
shallow slender, 443–447
Statically determinate plane frames
axial forces and end moments, 380
beams and columns, 305
bending moment distributions, 369
computer-based analysis, 358
displacement determination, 381
planar loading
adequate support schemes, 307
indeterminate portal and A-frames, 309
indeterminate support schemes, 307
nodal forces and rigid plane frames, 309
three-hinge plane frames, 306–310
reactions, shear and moment distributions, 363
rigid plane frames, 305, 309
steel material, 380
virtual force
method, 374–378
Steel base plate, 485
Stiffness
definition, 34
material, 27
method, 40
Stiffness factor, 39
Straight members
“equivalent”, 409
slender, 442
Strain hardening, 1013, 1015
Strands, 384, 409
Strap footings
description, 504
design approach, 505, 511
equilibrium, 503
notation and pressure distribution, 504, 505
reinforcing patterns, 507
soil pressure profile, 509
summing moments, 505
Stress-strain, 11, 213, 651, 738, 1013–1015, 1017
Structural components, 4, 11, 12, 30, 42
Structural engineering
components and types, 4, 5
design
loading, 4, 7
philosophy, 26–27
reactions, 7, 11
stability
initial, 7–11
loss and material failure, 11–12
priorities, 12
Structural idealization, 48, 50
Structural steels, 1013–1015
Structural types
function, 4, 5
makeup, 4, 7
Superposition, 655, 656
Support constraints, 806
Support settlement
moments, 891
resulting moments, 891
three-span beam, 890
Surcharge, soil pressure, 532, 553
Surface elements, 4, 7
Symmetrical buildings
earthquake floor loads, 956
flexible floors, 955
floor load distribution, 956
frame load-rigid, 957
idealized building model, 945
maximum column moments-rigid and flexible
floors, 955
one story frame, 960
rigid frame building, 954
rigid frame structure, 951
segmental areas, 953
shear stiffness factors, 952
structure, 949
total story stiffness, 952
1048 Index
typical floor, 952
typical frame, 949
Symmetry and anti-symmetry
deflected shapes, 254–258
shear and moment diagrams, 250–252
TTall building
lateral deflections, 791, 792
quantities, Mi+ and VTi+, 1, 792
segment, 792
Tandem, 17
“Tangent” stiffness matrix, 1028
Temperature change
effect, 103
total extension, 91
Tension
cable-stayed structures, 384
concentrated loads
horizontal cables, 386, 389
determination
catenary equations, 414
maximum tension, 418
peak values, 421
segment, cable, 413, 414, 416
distributed loading
horizontal cables, 398, 408
inclined cable, 399, 401
equivalent axial stiffness, 407–409
Terrorist loads, 14
Terzaghi, K., 479, 530
Thermal loading, 13
Three-dimensional (D) formulation, 3
displacement measures, 850–851
notation, 850
Three-dimensional (D) trusses, 3
equilibrium analysis, 114
joints, 120–131
restraining rigid body motion, 114–117
restraints, rigid object, 115
space truss structures, 114
static determinacy, 118–120
tetrahedron units, -D trusses, 3, 114
Three-hinged arches
and geometry and reactions, 450
1� indeterminate, 429
optimal shape, statically determinate arch, 462, 463
parabolic arch
concentrated load, mid-span, 456–459
force equilibrium, 451
horizontal and vertical loads, 460, 461
uniform vertical loading, 452–456
Three-Hinge frames
deflection profiles, 356–358
description, 309
gable
lateral loading, 335–337
gravity loading, 330, 331
lateral loading, 330, 332
portal
shear and moment distributions, 363
shear and moment, 339–341
3-D Hinged support, 170
Three-span arch study
discrete force envelopes, 895, 897
idealized model, 902, 904
Three-span continuous girder bridge
axle loading, 888
cross-section, 895
loading patterns, 894, 895
support settlement, 899
truck loading, 896, 897
uniform load patterns, 895
Three-span parabolic arch response, 902–903
Thrust, 610, 611
Tied arches, 610
Torsional response
floor rotation, 929
shearing, 945
Toughness, 1014
Tower, 4, 14
Transverse distribution, truck loading
axle distribution factor, 888
loading, 888
slab-stringer bridge deck cross-sections, 887, 888
vehicle wheel loads, 887
Trapezoidal rule, 299
Truck load, 17
Truss
defined, 7
formulation
fixed end actions—members and joints, 838
force and displacement, 834
load vectors, 838
local and global frames, 835
stiffness matrix and displacement vector, 837
topological and geometric information, 823
unknown displacements, 838
Truss structures
facts and concepts, 142
matrix formulation
displacements, computation, 135–141
force equilibrium equations, 133–135
manual techniques, 131
member–node incidence, 133
notation, 131–133
stability, 135
objectives, 141
planar trusses, analysis
3-D space structures, 55
complex trusses, 86–89
equilibrium considerations, 56
joints, method, 61–77
sections, method, 77–86
stability criterion, 58–61
statically determinate planar trusses, 57–58
problems
plane trusses, classification, 142, 161
Index 1049

Truss structures (cont.)types
complex planar, 49
compound planar, 49
compression elements, 52
covered wood bridges, 51
Egyptian boat built, 50
flourishing industry, New England, 52
force parallelogram, 50
high-strength bolts and welding, 54
iron trusses, 52, 53
pin joint connections, 54
plane and joints, 47
simple planar and space, construction, 48
single span truss bridge system, 50
steel, 52
structural systems, 49
three-dimensional truss roof system, 55
wooden bridge truss structures, 52
Two-hinged arch
and 1� indeterminate, 429
structure, 429
Two-hinged parabolic arch response
discrete force envelopes—truck loading, 890, 894,
897
idealized model, 902, 904
3-D Hinged support, 170
Type of foundations
footings
description, 475
single, 476
strap, 476, 477
structure, 475, 476
superstructure, 475
UUnstable
initially, 59
structure, 119
VVertical retaining wall structures
cantilever, 527, 544
concrete piles, 547
design, cantilever walls, 549–551
gravity, 526–527
gravity wall, 533, 534
peak pressure, 534
stability analysis
cantilever and gravity, 533
concrete gravity wall and soil backfill, 535
defined, safety for sliding, 533
equilibrium, 532
force summation, 533
gravity wall, 532
overturning, 533
types, 525
with footing, 539, 544
Virtual forces method
and actual force, 101
application, 141
curved members
circular, 447–450
displacements, 442
non-shallow slender, 443
shallow slender, 443–447
definition, 93
deflection, computation, 95–97
diagonal pattern reversed, 102
matrix equations, 137
procedure, 93
truss applications, 103
WWhitman, R.V., 530
Wind load
pressure
distribution, 17–19
profiles, 19–22
vortex shedding, 22
velocity distribution, 19, 20
Wind pressure
distribution, 17–19
profiles
Bernoulli’s equation, 19
stagnation and design pressure, 20
vortex shedding, 22
Wind speed, 19, 20
Wind velocity, 19
YYielding
bending envelopes, 901
concrete, 1013
elastic limit, 1015
factor loads, 516
necking, 1013
steel, 1013, 1014
yield strain, 11, 1013
Yielding support, beam
axial force, 583–584
deflection, 578–579
external concentrated loading, 580
force redundant and displacement profiles, 577, 579
force redundant system, primary structure, 580
linear elastic behavior, 579
supporting members, 577
vertical restraint, 578
1050 Index
Recommended


