
ARI Contractor Report 96-65
Operating Procedures Manual CTC Archive Data Entry Documentation
William S. Hutton PRC, Inc.
Dana Giellerup, John Mulshine, Julie Murphy, Jeff Stevision, and William Walsh
BDM Federal, Inc.
19960924 117 fee QUALITY
This report is published to meet legal and contractual requirements and may not meet ARI's scientific or professional standards for publication.
August 1996
United States Army Research Institute for the Behavioral and Social Sciences
Approved for public release; distribution is unlimited

U.S. ARMY RESEARCH INSTITUTE FOR THE BEHAVIORAL AND SOCIAL SCIENCES
A Field Operating Agency Under the Jurisdiction of the Deputy Chief of Staff for Personnel
EDGAR M. JOHNSON Director
NOTICES
DISTRIBUTION: This report has been cleared for release to the Defense Technical Information Center (DTTC) to comply with regulatory requirements. It has been given no primary distribution other than to DTIC and will be available only through DTIC or the National Technical Information Service (NTIS).
FINAL DISPOSITION: This report may be destroyed when it is no longer needed. Please do not return it to the U.S. Army Research Institute for the Behavioral and Social Sciences.
NOTE: The views, opinions and findings in this report are those of the author(s) and should not be construed as an official Department of the Army position, policy, or decision, unless so designated by other authorized documents.

REPORT DOCUMENTATION PAGE Form Approved OMB No. 0704-0188
Public reporting burden for this collection of information is estimated to average 1 hour per response, including the time for reviewing instructions, searching existing data sources, gathering and maintaining the data needed, and completing and reviewing the collection of information. Send comments regarding this burden estimate or any other aspect of this collection of information, including suggestions for reducing this burden, to Washington Headquarters Services, Directorate for Information Operations and Reports, 1215 Jefferson Davis Highway, Suite 1204, Arlington, VA 22202-4302, and to the Office of Management and Budget, Paperwork Reduction Project (0704-0188), Washington DC 20503.
1. AGENCY USE ONLY (Leave blank) 2. REPORT DATE August 1996
3. REPORT TYPE AND DATES COVERED Interim Report 06/02/94 - 10/30/94
4. TITLE AND SUBTITLE Operating Procedures Manual CTC Archive Data Entry Documentation
6. AUTHOR(S) William S. Hutton, Dana Giellerup, John Mulshine, Julie Murphy, Jeff Stevison, William Walsh
5. FUNDING NUMBERS MDA903-92-D-0075-002S 2131 R02 MIPR from TRADOC
7. PERFORMING ORGANIZATION NAME(S) AND ADDRESS(ES) BDM FEDERAL INC.
DOD CENTER MONTEREY BAY 400 GIGLING ROAD SEASIDE, CA 93955
8. PERFORMING ORGANIZATION REPORT NUMBER
9. SPONSORING/MONITORING AGENCY NAME(S) AND ADDRESS(ES) U.S. ARMY RESEARCH INSTITUTE FOR THE
BEHAVIORAL AND SOCIAL SCIENCES 5001 EISENHOWER AVENUE ALEXANDRIA, VA 22333-5600
10. SPONSORING/MONITORING AGENCY REPORT NUMBER
Contractor Report 96-65
11. SUPPLEMENTARY NOTES The COR is Michael R. McCluskey. This report is published to meet legal and contractual requirements and may not meet ARl's scientific or professional standards for publication.
12a. DISTRIBUTION/AVAILABILITY STATEMENT APPROVED FOR PUBLIC RELEASE; DISTRIBUTION IS UNLIMITED.
12b. DISTRIBUTION CODE
13. ABSTRACT (Maximum 200 words) The purpose of the Archive Operating Procedures Manual is to provide detailed
documentation of the data processing procedures that are used to maintain the Combat Training Centers (CTC) data sources and digital databases. This manual covers the processing of data sources and the entry of data into the AFG, BDA Database, Graphics Database, Mission Database and THP Database.
The Combat Training Centers send training data to the CTC Archive after each rotation. The Archive data sources include the following materials: Take Home Packages (THP), After Action Review (AAR) videocassettes, communication tapes, digital data and other paper data products.
The CTC Archive receives these data sources from three centers: The Combat Maneuver Training Center, Hohenfels, Germany, the Joint Readiness Training Center, Fort Polk, Louisiana, and the National Training Center, Fort Irwin, California.
14. SUBJECT TERMS Take Home Packages, After Action Review, Battle Damage Assessment (BDA) , Mission Training Plan (MTP), Operations Other Than War (OOTW), Automated Finders Guide (AFG)
15. NUMBER OF PAGES
16. PRICE CODE
17. SECURITY CLASSIFICATION OF REPORT UNCLASSIFIED
18. SECURITY CLASSIFICATION OF THIS PAGE UNCLASSIFIED
19. SECURITY CLASSIFICATION OF ABSTRACT UNCLASSIFIED
20. LIMITATION OF ABSTRACT
UNLIMITED
NSN 7540-01-280-5500 Standard Form 298 (Rev. 2-89) Prescribed by ANSI ad 239-18 298-102

THIS DOCUMENT IS BEST
QUALITY AVAILABLE. THE
COPY FURNISHED TO DTIC
CONTAINED A SIGNIFICANT
NUMBER OF PAGES WHICH DO
NOT REPRODUCE LEGIBLY.

CONTRACT #: MDA 903-92-D-0075 DELIVERABLE #: 0028-0028AJ
OCTOBER 28, 1994
OPERATING PROCEDURES MANUAL
CTC ARCHIVE DATA ENTRY DOCUMENTATION
William S. Hutton PRC, Inc.
Dana Giellerup John Mulshine Julie Murphy Jeff Stevison
William Walsh BDM Federal
Submitted by: Mr. Michael R. McCluskey, Acting Chief Unit-Collective Training Research Unit
and Jack Hiller, Director Training Research Laboratory
Mr. Michael R. McCluskey, Contracting Officer's Representative
November 1, 1994
U.S. Army Research Institute

Operating Procedures Manual CTC Archive Data Entry Documentation
Page
CHAPTER 1 - OPERATING PROCEDURES MANUAL
I. Introduction 1 A. Background 1 B. Purpose 1 C. Overview 1
CHAPTER 2 - DATA SOURCES
I. Data Source Information Documentation 2 A. List of Data Sources 2
1. After Action Review (AAR) Hardcopy/Slides (transparencies) 2 2. After Action Review (AAR) Videocassettes 3 3. Battle Damage Assessment (BDA) Diskette 3 4. Communications Tapes 3 5. Instrumented Data 3 6. Mission Training Plan (MTP) (Green Book) Hardcopy/Diskette 4 7. Orders (FRAGOs, OPORDs, WARNOs) Hardcopy 4 8. Scenario Development and Exercise Control Documents 4 9. Take Home Package (THP) Hardcopy/Diskette 5
Enclosure 1 - List of CTC Rotations 6
CHAPTER 3 - AUTOMATED FINDERS GUIDE (Data Synthesis & Loading of Rotation & Mission Summary)
I. Overview 11
II. Data Sources 11 A. Combat Maneuver Training Center (CMTC) 11 B. Joint Readiness Training Center (JRTC) 12 C. National Training Center (NTC) 12
III. Coordinating Instructions 13
IV. Combat Maneuver Training Center (CMTC) 14 A. General 14

Page
B. Processing Steps 14
V. Joint Readiness Training Center (JRTC) 17 A. General 17 B. Processing Steps 17
VI. National Training Center (NTC) 21 A. General 21 B. Processing Steps 21
VII. Data Entry Procedures 25 A. General 25 B. Processing Steps (Rotation Data Entry) 25 C. Processing Steps (Mission Data Entry) 26 D. Processing Steps (Rotation - View) 28 E. Processing Steps (Rotation - Modify) 29 F. Processing Steps (Rotation - Append) 30 G. Processing Steps (Rotation - Delete) 30 H. Processing Steps (Mission - Append) 31 I. Processing Steps (Mission - View) 31 J. Processing Steps (Mission - Modify) 31 K. Processing Steps (Mission - Delete) 31
XIII. Quality Control Procedures 31 A. General 31 B. Data Synthesis Quality Control 32 C. Data Entry Quality Control 32
Enclosure 1 - Automated Finders Guide (Part One) 34 Enclosure 1 - Automated Finders Guide (Part Two) 37 Enclosure 1 - Automated Finders Guide (Part Three) 40 Enclosure 2 - AFG Rotation & Mission Summary Information (Blank Data Entry Form) . 44 Enclosure 3 - AFG Rotation & Mission Summary Information (Completed Data Entry Form45
Diagram A 48 Diagram B 49 Diagram C 50
CHAPTER 3 - AUTOMATED FINDERS GUIDE (AAR Videocassette & Communications Tapes Catalog)
I. Data Sources 51
u

Page
A. Combat Maneuver Training Center (CMTC) 51 B. Joint Readiness Training Center (JRTC) 51 C. National Training Center (NTC) 51
II. Coordinating Instructions 52 A. Hardware & Software Requirement 52
1. Hardware 52 2. Software 52
III. AAR Videocassette Catalog Data Entry Procedures 52
IV. Communications Tape Catalog Data Entry Procedures 54
Enclosure 1 - AAR Videocassettes Catalog Codes 57 Enclosure 2 - Communication Tapes Catalog Codes 61
CHAPTER 4 - BATTLE DAMAGE ASSESSMENT DATABASE
I. Data Sources 62 A. General Information 62 B. Combat Maneuver Training Center (CMTC) 62 C. Joint Readiness Training Center (JRTC) 62 D. National Training Center (NTC) 62
II. Coordinating Instructions 63
III. Data Entry Procedures 63
IV. Quality Control (QC) Procedures 69
V. Transferring Temporary BDA Files to Main Database 70
Enclosure la - CMTC BDA Tables 72 Enclosure lb - CMTC Fratricide Tables 74 Enclosure lc - JRTC BDA Tables 76 Enclosure Id - NTC BDA Tables 80 Enclosure le - NTC BDA Tables 82 Enclosure 2a - Fully Edited CMTC BDA Tables 90 Enclosure 2b - Fully Edited JRTC BDA Tables 94 Enclosure 2c - Fully Edited NTC BDA Tables 98 Enclosure 3 - BLUFOR and OPFOR Target & Weapons Codes & Categories 106
m

Page
Enclosure 4 - Target & Weapon Types, THP to FoxPro 121 Enclosure 5 - Target & Weapon Types, FoxPro to THP 133
Diagram A 143
CHAPTER 5 - GRAPHICS DATABASE
I. Data Sources 144 A. Combat Maneuver Training Center (CMTC) 144
1. Operations Orders (OPORDs) 144 2. Execution Matrix 144 3. Operations Overlays 144 4. Situation Templates 145
B. Joint Readiness Training Center (JRTC) 145 1. Operations Orders (OPORDs) 145 2. Execution Matrix 145 3. Operations Overlay 145 4. Situation Template - 145
C. National Training Center (NTC) 146 1. Operations Orders (OPORDs) 146 2. Execution Matrix 146 3. Operations Overlay 146 4. Situation Template 146
II. Data Coordinating Instructions 147 A. Hardware & Software Requirement 147
1. Computer hardware & software 147 2. Scanner hardware & software 147 3. Camera hardware & software 147
III. Data Entry Procedures 147
Enclosure 1 - File Naming 157
Diagram A 158
CHAPTER 6 - MISSION DATABASE
I. Data Sources 159 A. Combat Maneuver Training Center (CMTC) 159 B. Joint Readiness Training Center (JRTC) 159 C. National Training Center 159
IV

Page
II. Coordinating Instructions 159 A. Conventions Used in This Document 159 B. Mission Database Building Worksheet 160 C. Sample Mission Database Worksheet 160 D. Mission Identification Code 160 E. Computer Hardware & Software Requirements 160 F. Phase I - Pre-Process Data 160 G. Phase II - Build Databases 161
III. Data Entry Procedures 161 A. Phase I - Pre-Process Data 161 B. Phase II - Build Databases 172
IV. Quality Control Procedures 175
Enclosure 1 - Mission Database Building Worksheet (Blank) 176 Enclosure 2 - Mission Database Building Worksheet (Complete) 177 Enclosure 3a 180 Enclosure 3b 182 Enclosure 4 - Mission Identification Codes 184
CHAPTER 7 - TAKE HOME PACKAGE DATABASE
I. Combat Maneuver Training Center (CMTC) 188 A. Type of Data Sources Received 188 B. Coordinating Instructions 188 C. Detailed Conversion Procedures 188
II. Joint Readiness Training Center (JRTC) 188 A. Type of Data Sources Received 188 B. Coordinating Instructions 188 C. Detailed Conversion Procedures 189
III. National Training Center (NTC) 195 A. Type of Data Sources Received 195 B. Coordinating Instructions 195 C. Detailed Conversion Procedures 195

Page
Enclosure 1 - Breakout of JRTC THP Content (for Rotations 90-1 through 94-4) 200 Enclosure 2 - JRTC THP Original File Naming Convention 205 Enclosure 3 - THP DB Filenaming Convention - JRTC Rotations 90-1 through 93-3 ... 210 Enclosure 4 - THP DB Filenaming Convention - JRTC Rotations 93-4 through present . 212 Enclosure 4.1 - JRTC File Type Equations (to File Designator) 214 Enclosure 5 - NTC THP Original File Naming Convention (Rotations 90-01 through
93-03) 221 Enclosure 6 - NTC THP DB File Naming Convention (Rotations 90-01 through 93-03) . 224 Enclosure 7 - NTC THP Original File Naming Convention (Rotations 93-03 Light 93-04 through
94-07) 227 Enclosure 8 - NTC THP DB File Naming Convention (Rotations 93-03 (light)/93-04 through
94-07) 230 Enclosure 9 - NTC THP Original File Naming Convention (Rotations 94-08 through
94-09) 233
Diagram A 235 Diagram B 236 Diagram C 237
VI

CHAPTER 1
OPERATING PROCEDURES MANUAL
I. INTRODUCTION
A. Background
The Combat Training Centers (CTCs) send training data to the CTC Archive after each rotation. The Archive data sources include the following materials: Take Home Packages (THP), After Action Review (AAR) videocassettes, communications tapes, digital data and other paper data products.
The Archive operating procedures involve the processing of all materials received from the CTCs in order to provide ready access to all of the training data. After receiving CTC data, Archive personnel log in, catalog and shelve the data sources for later processing and use. Archive processing includes the extraction of data from the sources, the conversion of data from source formats into formats compatible with Archive databases, and the entry of data into several digital databases. The digital databases that are maintained in the CTC Archive include the following: Automated Finders Guide (AFG), Battle Damage Assessment (BDA) Database, Graphics Database, Mission Database and THP Database.
B. Purpose
The purpose of the Archive Operating Procedures Manual is to provide detailed documentation of the data processing procedures that are used to maintain the CTC data sources and digital databases. This manual covers the processing of data sources and the entry of data into the AFG, BDA Database, Graphics Database, Mission Database and THP Database.
C. Overview
There are seven chapters in this manual. Chapter One provides the background information and purpose for this document. In Chapter Two we have identified, by CTC, the data sources and rotations which make up the Active Archive. The procedures used to maintain the AFG mission summaries and catalog information are described in Chapter Three. Chapter Four provides the instructions for loading the target start/lost values and the number of kills by specific weapon system into the BDA Database. The scanning and loading procedures for the Graphics Database are described in Chapter Five. Chapter Six prescribes the processes for preparing mission building worksheets and entering data into the Mission Database. The data conversion and loading procedures for the THP Database are defined in Chapter Seven.

CHAPTER 2
DATA SOURCES
I. DATA SOURCE INFORMATION DOCUMENTATION
Active Army, Army Reserve, and National Guard units deploy to combat training centers periodically to train in the most realistic conditions short of actual combat. Following each training cycle or rotation, data concerning the training units and their missions are sent to the Combat Training Center (CTC) Archive.
The CTC Archive receives these data sources from three centers: The Combat Maneuver Training Center, Hohenfels, Germany, the Joint Readiness Training Center, Fort Polk, Louisiana, and the National Training Center, Fort Irwin, California.
Attached as enclosure 1 is a list of CTC rotations which makes up the Active Archive. Among other things, this list indicates which rotations were canceled or special in nature, e.g., Peacekeeping Operations (PKO), Operations other than War (OOTW), etc.. When rotations are indicated within the data sources, such as 90-01 through 91-02, please refer to the enclosure for rotational status (you will note that rotations 90-12, 90-14, plus 91-01 were canceled).
The data are sent to the CTC Archive in a variety of formats. These formats include: digital data tapes, videocassettes, audiotapes, paper and electronic versions of Take Home Packages (THP), etc..
Included below is a listing of the data sources received and stored in the Active Archive:
A. List of Data Sources
1. After Action Review (AAR) Hardcopy/Slides (transparencies):
CMTC: The CTC Archive normally receives hardcopy (paper reproductions of transparencies) of AARs as part of the Take Home Package (THP). AAR slides have been provided, but sporadically.
JRTC: The CTC Archive receives hardcopy (paper reproductions of transparencies) of AARs.
NTC: The CTC Archive started receiving hardcopy (paper reproductions of transiencies) of AARs with rotation 94-09, Forward Support Battalion (FSB).

2. After Action Review (AAR) Videocassettes:
CMTC: The CTC Archive has received AARs for rotations 90-01 through 94-02, 94-08, and 94-11. All videocassettes are VHS format.
JRTC: The CTC Archive has received AARs for rotations 90-01 through 93-03. All videocassettes are VHS format. The JRTC stopped producing tapes for the CTC Archive because of the expense; however, the Center for Army Lesson Learned (CALL) indicates the JRTC will resume in providing copies of AARs starting with rotation 93-04.
NTC: The CTC Archive has received AARs for rotations 90-01 through 91-06 and 91-08 through 94-08. Videocassettes for rotations 90-01 through 92-03 are 3/4" U-Matic format, for all later rotations, the videocassettes are VHS format.
3. Battle Damage Assessment (BDA) Diskette:
CMTC: BDA data is not provided on diskette. (BDA can be found in the THP).
JRTC: The CTC Archive has received BDA data on diskette for rotations 90-01 through 90-08, 91-01 through 93-06, 93-08 through 94-02, 94-04, and 94-05.
NTC: BDA data is provided on diskette as part of the THP.
4. Communications Tapes:
CMTC: The CTC Archive has received Communications Tapes for rotations 90-03 through 92-01, and 93-02 through 93-09. The CMTC stopped producing tapes for the Archive because of the expense; CALL was notified and as of this report, no further information is available. Tapes are believed to be 40 track recording tapes. The CMTC has not provided the Archive with Signal Operating Instructions (SOIs) or track assignments.
JRTC: The CTC Archive does not receive Communications Tapes.
NTC: The CTC Archive has received Communications Tapes for rotations 90-01 through 94-08. Tapes are 40 track recording tapes. SOIs and track assignments are available for most rotations.
Note: These tapes are used with a Dictaphone 5500, Veritrac Recorder, from Pitney Bowes Company.
5. Instrumented Data:
CMTC: No instrumented data are presently provided to the CTC Archive.
JRTC: No instrumented data are presently provided to the CTC Archive.
NTC: The CTC Archive has received instrumented data in two forms; rotations 90-01

through 90-07,90-09, and 90-10 were sent on twelve inch computer tape reels, and rotations 90- 13, 91-08, plus 91-10 through 94-09 were sent on digital data cartridges. Additional information is provided in the form of hardcopy printouts or hardcopy forms:
Hardcopy printouts: a) Exercise Backups-ATPs Deleted Prior to End of Rotations (6150), b) Start of rotation element definition file (EDF) snapshot, c) End of rotation element definition file (EDF) snapshot, and d) Tracking Quality List (TQList).
Hardcopy forms: Micro-B Change sheets.
6. Mission Training Plan (MTP) (Green Book) Hardcopy/Diskette:
CMTC: The CTC Archive has received MTP data in hardcopy format but sporadically. The data is unit generated (not evaluated by O/Cs) and most of the data cannot be identified to a specific Task Force. MTP data is not provided on diskette.
JRTC: MTP data has not been provided in hardcopy format since rotation 91-06. The CTC Archive has received MTP data on diskette for rotations 90-01 through 93-06, 93-08 through 94-02, 94-04, and 94-05 and in hardcopy for rotations 90-01 through 91-06.
NTC: MTP data is not provided in hardcopy or diskette format.
7. Orders (FRAGOs, OPORDs, WARNOs) Hardcopy:
Individuals interested in this type of data should be familiar with the provisions of Chapter 7, FM 101-5. One should keep in mine that each CTC provides Orders for different levels of commands, i.e. NTC generally provides Orders for division, brigade, task force, and some slice units, JRTC provides task force orders, and the CMTC has provided Orders sporadically for all levels of commands. Also, provided as additional information is the fact that the CTCs play fictional division units, e.g. 52d Inf Div, Force on Force missions and the 54th Inf Div, Live Fire missions.
CMTC: The CTC Archive has received Orders for rotations 90-01 through 94-02, 94-08, and 94-11. The Orders are normally sent as part of the THP and may not be complete, i.e., missing Annexes, Overlays, etc.. In some of the early rotations, FY90, Orders were sent separately and these are stored in the Graphics Storage Cabinets (overlays) and the Rotational Paper Data Storage Boxes.
JRTC: The CTC Archive has received Orders for rotations 90-03 through 90-07, 91-01 through 91-04, 91-07 and 91-08, 92-01 through 92-09, 93-02 through 93-04, and 94-01 through 94-07. The Archive normally receives Orders for only one of the two or three Task Forces that participated in the rotation.
NTC: The CTC Archive has received Orders for rotations 90-01 through 91-06 and 91-08 through 94-09.

8. Scenario Development and Exercise Control Documents:
CMTC: No Scenario Development Documents are provided to the Archive. Exercise Control Documents provided are received in the form of Rules of Engagement (ROE).
JRTC: Scenario Development Documents provided are LANTCOM OPLANs, JTF Concept w/Overlays, JTF OPLANs, JTF INTSUMs, Terrprost Evemts, Target Intel Package, Embassy Country Plans, Division OPORDs/FRAGOs, etc.. Exercise Control Documents provided are received in the form of Exercise Rules of Engagement (EXROE).
NTC: No Scenario Development Documents are provided to the Archive. Exercise Control Documents provided are received in the form of Rules of Engagement (ROE), Rotational Unit Worksheets (this document indicate training dates, units, equipment, key personnel, key dates, OPFOR Augmentation, etc.), Rotational Summary Document (this document provides the user with formation about the missions to be preformed on which training days/dates and overlays of the play areas, etc.).
9. Take Home Package (THP) Hardcopy/Diskette:
CMTC: The CTC Archive has received hardcopy of THPs for rotations 90-01 through 94-02, 94-08, and 94-11. THPs are not provide on diskette. The THP normally consists of the Brigade/Regiment, Field Artillery (FA), Forward Support Battalion (FEB), and Task Forces of Armor forces, Cavalry forces, Light Infantry forces (Air Assault/Airborne), and/or Mechanized Infantry forces.
JRTC: The CTC Archive has received hardcopy of THPs for rotations 90-01 through 92- 09, 93-02, and 93-04 through 94-05. The Archive also receives the THP on diskette; rotations received are 90-01 through 91-01, 91-03 through 91-08, and 92-04 through 94-04. The THP sometimes consists of part or all of the following: Special Operations Forces (SOF), Brigade Task Force Operations, Battalion Task Force 1, 2, and 3 Operations (Light Infantry forces, Airborne/Airmobile forces, Ranger forces), and Air/Naval Gunfire Liaison Company.
NTC: The CTC Archive has received hardcopy and diskettes of THPs for rotations 90-01 through 94-09. The THP normally consists of the Brigade/Regiment, Aviation (Avn), Fire Support (FS), Logistics (FSB), Task Forces of Armor forces, Cavalry forces (both ground and air), Air Assault/Airborne/Light Infantry forces, Mechanized Infantry forces, and/or Motorized Infantry forces. In some of the later rotations (93-04 through 94-08) an O&I (Operations and Intelligence (GS Fire Support - 155mm/8inch)) battalion/section was added to the THP.
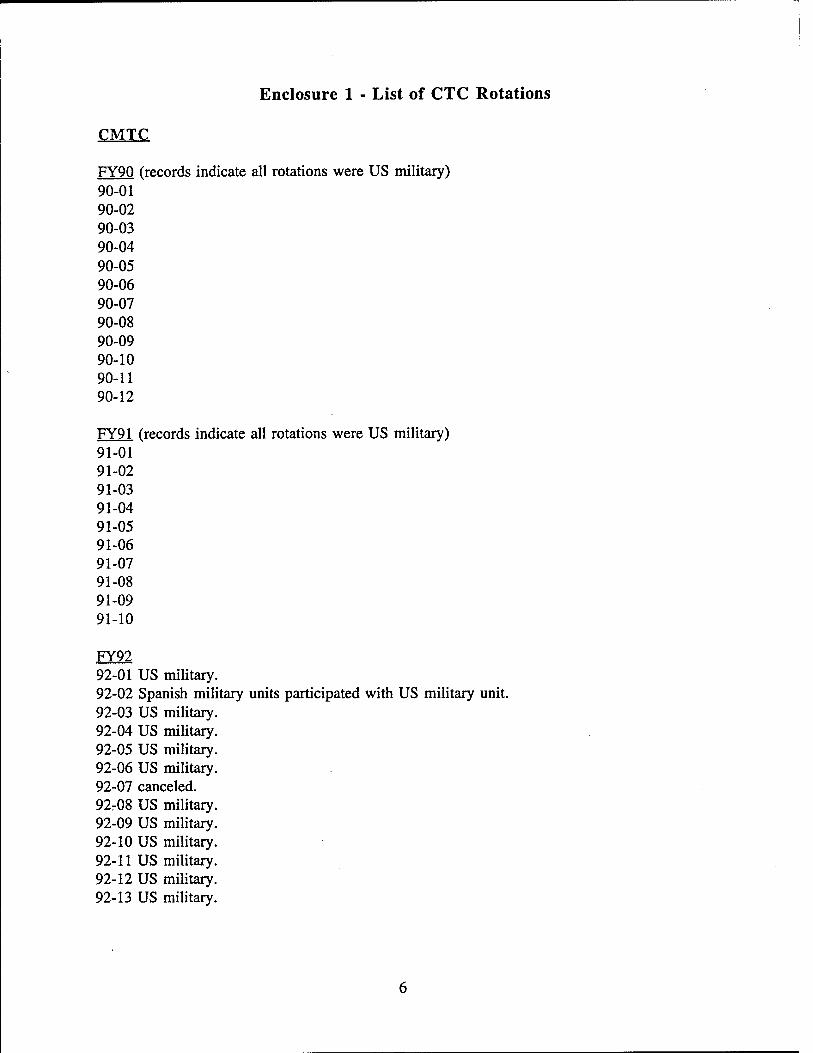
Enclosure 1 - List of CTC Rotations
CMTC
FY90 (records indicate all rotations were US military) 90-01 90-02 90-03 90-04 90-05 90-06 90-07 90-08 90-09 90-10 90-11 90-12
FY91 (records indicate all rotations were US military) 91-01 91-02 91-03 91-04 91-05 91-06 91-07 91-08 91-09 91-10
FY92 92-01 US military. 92-02 Spanish military units participated with US military unit. 92-03 US military. 92-04 US military. 92-05 US military. 92-06 US military. 92-07 canceled. 92r08 US military. 92-09 US military. 92-10 US military. 92-11 US military. 92-12 US military. 92-13 US military.

FY93 93-01 US military. 93-02 US military. 93-03 US military. 93-04 US military. 93-05 PKO - US military. 93-06 PKO - US military. 93-07 Dutch military. 93-08 French military. 93-09 PKO - US military. 93-10 Dutch military. 93-11 PKO - US military. 93-12 PKO - US military.
FY94 94-01 OOTW - US military. 94-02 OOTW - US military. 94-03 (status unknown) 94-04 (status unknown) 94-05 (status unknown) 94-06 (status unknown) 94-07 (status unknown) 94-08 OOTW - US military. 94-09 (status unknown) 94-10 (status unknown) 94rll OOTW - US military.
JRTC
FY90 90-01 90-02 90-03 90-04 90-05 90-06 90-07 90-08 90-09 canceled.
FY91 91-01 91-02 91-03 91-04 91-05

91-06 91-07 91-08 91-09
FY92 92-01 92-02 92-03 92-04 92-05 92-06 92-07 92-08 92-09
FY93 93-01 93-02 93-03 93-04 93-05 93-06 93-07 Special Operations Forces rotation. 93-08. 93-09 canceled.
FY94 94-01 94-02 94-03 94-04 94-05 94-06 94-07 94-08 94-09 94-10
NTC
FY90 90-01 90-02 90-03

90-04 90-05 90-06 90-07 90-08 90-09 90-10 90-11 90-12 canceled. 90-13 90-14 canceled.
FY91 91-01 canceled. 91-02 91-03 canceled. 91-04 canceled. 91-05 *NTC rotation number 91-48 91-06 *NTC rotation number 91-155 91-07 *NTC rotation number 91-40 91-08 *NTC rotation number 91-XX 91-09 canceled. 91-10 91-11 * Aviation Brigade w/OPFOR Armor playing BLUEFOR Armor. 91-12 91-13 canceled. * Special rotations conducted during Operations Desert Shield/Desert Storm.
FY92 92-01 92-02 92-03 92-04 92-05 92-06 92-07 92-08 92-09 92-10 92-11 92-12
FY93 93-01 93-02 93-03 93-04

93-05 93-06 93-07 93-08 93-09 93-10 93-11 93-12
FY94 94-01 94-02 94-03 94-04 94-05 94-06 94-07 94-08 94-09 94-10 canceled.
10

CHAPTER 3
AUTOMATED FINDERS GUIDE
Database Entry Documentation for the Data Synthesis and Database Loading of Rotation and Mission Summary Information
I. OVERVIEW
The Automated Finders Guide (AFG) is the "card catalog" of the CTC Archive. It consists of a set of Foxpro for Windows, (version 2.6) custom applications. The AFG comprises a suite of software tools designed to facilitate data entry, retrieval, cataloging, and database management for the AFG Database. This database contains entries for all of the task force combat missions for the three tactical CTCs from rotation 90-01 to the present. These entries (each tagged with a Mission Identification Code (Mission ID)) permit all of the data which pertains to a particular mission to be easily located. This enables the researcher to select a set of candidate missions for further study and to easily determine which and how much data is available for each task force mission of interest. This document discusses the preparation of CTC rotation and mission data for entry into the AFG as well as the data entry process itself. In addition, it covers quality control of the entered data, and describes how to correct some data entry errors or omissions.
The "key" to the AFG is that, for each set of "CTC", "Rotation", and "Force Type", for example, C(MTC), (Rotation) 94-04, Armor((ed) Task Force Number) 1, i.e., "C944A1", there is a unique "key". Once you enter the "key" elements into the AFG Rotation Data Entry window, and click on "Rotation - View", you will be able to view all the other data elements in the rotation table which are associated with the "key", as well as all missions associated with the "key".
II. DATA SOURCES
A. Combat Maneuver Training Center (CMTC)
The CMTC forwards data for rotation and mission summary in the paper copy of the CMTC Take Home Package (THP). This data is relatively easy to use, since the CMTC THP is divided into sections by task force mission, and marked with tabs. Owing in part to the geographical constraints of the training area, even when a particular time period has been reserved for a maneuver brigade, only one task force plays at a time. Occasionally there is a slight overlap in training dates, as one task force arrives before the other has finished its cycle.
11

The training dates for the task force in question are usually to be found on the cover letter to the THP or on the title page. To date almost all rotations have been straight "Heavy" due to the character of the forces deployed in Europe. At CMTC, in addition to U. S. forces, the training complex is used by Canadian, Dutch, and Spanish forces, at least. Sometimes the Archive receives materials relating to these non - U. S. forces. None of these data (concerning foreign troops) are processed at the Archive. Without exception, the U. S. forces rotating through the CMTC have come from the Active component.
B. Joint Readiness Training Center (JRTC)
The JRTC rotational training data is sometimes contained in the paper THP as well as in the Task Force After Action Review (AAR) Slides and videocassettes. Here the data is not as easily synthesized into the required rotation and mission summary sets. At various times in the past, it has been relatively easy to identify the individual missions; however, at the present, there is little information related to any specific mission in the THP. At the JRTC, it is now possible for two or three battalion task forces to take part in exercises at the same time. The training dates for each task force and for the brigade are usually found on the title page of the respective THP. To date almost all rotations at the JRTC have been "Light" rotations, although occasionally one of the task forces has a small "Heavy" component. Some of the smaller units at the JRTC have come from the Reserve component, but the battalion task forces themselves have all been Active Army or National Guard component units.
C. National Training Center (NTC)
Until recently (Rotation 94-08/May 94), the NTC forwarded to the Archive a THP which contained detailed rotation and mission data. The mission data were relatively easy to use. The THP chapters contained either all the Task Force mission comments broken down by Battlefield Operating System (BOS), or all the comments for a BOS, broken down by task force mission. Since the change to the new THP format, some of the Task Force sections contain only rotational comments and no mission-specific remarks. Thus, it is now necessary to review not only the THP, but also the NTC-provided pre-rotation briefing slides and sometimes even the After Action Review (AAR) videocassettes to obtain most or all of the mission data. Rotations at the NTC have been designated "Heavy", "Heavy/Light", or "Light/Heavy". As many as three battalion task forces maneuver at the same time, owing to the size of the NTC complex, and the multitude of exercise areas. The training dates for a particular task force may be deduced from the THP mission entries, read from the slides, or deduced from the dates on the AAR videos. (Generally, there are 14 training days in an NTC rotation; thus, if the calendar date and number of any training day is known, it is possible to extrapolate the other dates) Task forces and units have been seen training at the NTC from the Active and National Guard components.
12

m. COORDINATING INSTRUCTIONS
1. See attached block diagram for an overview of the database loading process. (Diagram A - Automated Finders Guide (AFG) Loading Procedures)
2. The list of Rotation and Mission Summary Codes is contained in Enclosure 1.
3. For the AFG Rotation and Mission Summary Information Data Entry Form itself (AFG Form 1 (dated 16 Sep 94), see attached Enclosure 2.
4. A filled-out rotational set of AFG Form 1 can be found at Diagram B.
5. An explanation of the derivation and meaning of Mission Identification Codes (Mission ID) is contained in Enclosure 1, Part Three.
6. A snapshot of the AFG Data Entry initial input screen (AFG Rotation Data Entry window) can be found at Diagram C.
7. A snapshot of the "AFG Mission Data Entry" window is at Diagram D
8. Computer Hardware/Software Requirements:
Hardware: IBM- Compatible PC (486 suggested) with at least 4MB RAM (Super-VGA monitor and video card recommended)
Software: Microsoft Foxpro for Windows (version 2.5)
Custom AFG Data Entry Applications
NOTE: In the rotations after 93-05, especially at the CMTC, a number of special missions have been conducted. These missions, generally described as Peacekeeping Operations (PKO) and/or Operations Other Than War (OOTW), because of their distinct nature, cannot be entered into the Automated Finders Guide or any of the other Archive databases without special attention being given to how they differ from conventional CTC missions. The CTC Archive personnel have sought guidance from the Center for Army Lessons Learned in archiving the data from these missions, but, as of the publication of this document, no final determination has been made. Thus, no attempt is made herein to describe the processing of data from these special missions.
13

ROTATION AND MISSION SUMMARY FORM Data Synthesis and completion of Data Entry Form
IV. COMBAT MANEUVER TRAINING CENTER (CMTC)
A. General
As mentioned above, data synthesis for CMTC is fairly straightforward. All of the needed information is normally contained in the THP. Since the THP is usually broken down into tabbed sections by task force mission, each mission's data is normally already separated out for the data technician.
B. Processing Steps
STEP 1: Fill in as much of the rotational information at the top of the data entry form as possible from an initial perusal of the THP. The number of pages of Rotation and Mission Summary Data Entry Form used will vary from rotation to rotation. A separate sheet will be used for each Maneuver Battalion Task Force. If desired, (an) additional sheet(s) can be used to enter the overall brigade missions for the brigade task force(s). This will allow data which is specific to a brigade-level mission to be linked to a Mission ID Code.
STEP la: Select the acronym for the CTC, and enter the CTC and rotation number in their respective blocks on the form. The CTC and rotation number are generally noted in several places in each THP: the title page, the cover, the Senior O/C Comment Sheets, and the individual tabs. The "CTC" must be selected from the list of possible entries in Field 1, Page 1, Enclosure 1 (Part One). By reviewing all of the data which have arrived from a particular time period or rotation, one can ascertain whether the rotation number has been incorrectly entered anywhere in the THP. Be careful to use the correct rotation number. In the event an inconsistent entry is found, use the one supported by the preponderance of evidence, or consult a Military Subject Matter Expert (SME), the Archivist or Database Administrator for assistance.
Example: CTC: CMTC Rotation: 93-05
STEP lb: Enter the rotation start and end dates in their respective places on the form. These dates are generally found on the title page, on the SENIOR O/C COMMENT SHEETs, or in the body of the cover letter. As indicated on the form, the dates are entered in numerals only, in "day/month/year" order. For CMTC rotations, these dates cover the entire period from the first training day of the first task force through the last training day of the last task force to complete its missions.
Example: Start Date: 24/03/93
14

End Date: 11/04/93
STEP lc: Select the rotation type which applies to the entire rotational period. "Rotation type" for CMTC will always be entered as "Heavy", unless specific mention is made of participation by a "Light Infantry" or "Airborne/Air Assault" unit or similar units. "Rotation type" is limited to the items in Field 8, Page 2, Enclosure 1 (Part One). If in doubt as to which rotation type to use, consult an SME.
Example: Rotation Type: Heavy
STEP Id: Enter the unit designation on the line below "Rotation Number". (Use the format found in the entries for Field 4, Page 1, Enclosure 1 (Part One)) The "Unit designation" consists of the battalion designation of the battalion-level command element, followed by the number of the parent brigade or regiment, and finally, the Divisional affiliation. These bits of information can often be gleaned from the THP cover letter. If in doubt as to how to complete this or any of the succeeding parts of the form, see a Military SME.
Example: Unit Designation: l-15th Inf/1/3 ID
STEP le: Enter the "Task force designation", which can be obtained from one of the Mission Statements in the THP, from the THP title page, from an AAR video label, or from the first page of the After Action Review (AAR) Slides, which are at the end of each mission section in the THP. (Use the format found in the entries for Field 5, Page 1, Enclosure 1 (Part One))
Example: Task Force Designation: TF 1-15 Mech
STEP If: For "Force Type", select from one of the choices in Field 6, pages 1 or 2 of Enclosure 1 (Part One). If in doubt as to which one to use, see an SME. The ordinal number at the end of some of the Force Types merely serves to distinguish one task force of a particular type from another of the same type taking part in the same rotation. The first armored task force to maneuver, or to take part, or merely to show up at the CTC in a rotation is arbitrarily called "Armor 1", the second, "Armor 2", etc.
Example: Force Type: Mech 1
STEP lg: "Component" for the CMTC will always be "Active Army" unless a specific mention is made of the participation of a unit from the Reserve or National Guard component. Valid "Component" choices are found in Field 7, Page 2, Enclosure 1 (Part One).
Example: Component: Active Army
STEP lh: The "Equipment" field should contain a list, separated by slashes (/), of all the major equipment types used by the particular unit. (See available choices in Field 9, Page 2, Enclosure 1 (Part One)) This information can be obtained by perusing the Battle Damage
15

Assessment (BDA) pages of the AAR Slides in the THP. If in doubt as to which equipment types to list or the order in which to list them, consult an SME. The various equipment types are listed in order of their importance to the task force/brigade being described on the form.
Example: Equipment: M2
This concludes the rotational information entries. Step 2 will explain the synthesis of mission information.
STEP 2: Fill in the information for each individual mission (for the task force or brigade named at the top of the form) on the respective mission line below. The "Mission Sequence Numbers" (1 - 9) are already filled in on the form. The missions are entered on the form in the order in which they took place at the CTC. All of the information for each mission is entered on a single line going across the page. Each individual task force- or brigade-level mission to which a section is dedicated in the THP, or which is covered by an After Action Review (paper or video) is counted as a mission in this sense, and it is entered on a separate line on the form. Each mission is entered only once from the perspective of the unit/task force named at the top of the form.
STEP 2a: The "mission date" entry refers to the calendar day during which the majority of the mission execution took place. This will usually coincide with the date of the mission as listed on the mission divider tab, but not always. If in doubt as to which date to use, consult an SME. The mission date is entered in digits, two for the day, two for the month, and two for the year, separated by slashes.
Example: Mission Date: 25/03/93
STEP 2b: The "type of exercise" is selected from the choices in Field 7, Page 3, Enclosure 1 (Part Two). Consult an SME if in doubt as to which type to use.
Example: Type of Exercise: DFF
STEP 2c: The "type of mission" is selected from the choices in Field 8, Pages 3 & 4, Enclosure 1 (Part Two). It will often coincide with the type of mission mentioned in the Task Force Mission Statement in the Task Force Operations Order, and/or the mission type given for that particular section of the CMTC THP, but not always. Consult an SME if in doubt as to which mission type to use.
Example: Type of Mission: DATK
STEP 2d: "Echelon" is specified by looking at the choices in Field 9, at the bottom of Page 4, Enclosure 1 (Part Two), and selecting the one which best reflects the mission facts as found upon close examination. The "Echelon" of the respective mission can be determined by looking
16

at whether the unit in question is normally in the chain of command of the controlling brigade headquarters. If it is, then the mission will normally be designated a "Brigade" mission; otherwise, the mission will usually be considered "Task Force" level. If in doubt as to which to put, consult an SME.
Example: Echelon: Bde
STEP 2e: This field, "Mission ID Code", is the most important one on the form. For, once this mission ID is built and assigned to a particular mission, all of the individual pieces of the data for this mission may be linked to this Mission ID. (See Enclosure 1, Part Three, for an explanation of how the Mission ID is built). The Mission ID Code is an eight element alphanumeric indicator which reflects the CTC, Rotation, Force Type, and calendar date of the mission. This allows the Archivist to uniquely describe any mission (task force-level and above) which takes place at one of the CTCs, and to link data elements to the set of data pertaining to the specific mission.
Example: Mission ID Code: C935M125
V. JOINT READINESS TRAINING CENTER (JRTC)
A. General
Mission data synthesis for JRTC is neither straightforward nor can it always be accomplished, given the data provided by the CTC alone. On occasion, some of the basic mission data for one or more missions is unavailable because it was not included in the data sent to the Archive. For example, the "type of mission" was not recorded for the 2nd mission of three performed at the JRTC, 1st Air Assault Task Force, Rotation 94-05. Similarly, for the 2nd Ay- Assault Task Force, same rotation, no "type of mission" was recorded for the first and third missions which took place. Assemble as much information as possible from the data sent to the Archive; consult an SME if this is not sufficient to allow you to complete the form. When present, mission data are most easily found in the AAR Slides, paper copies of the visuals used during the AAR. Additional data can be obtained by reviewing the AAR videocassettes, when these are provided by the JRTC. Some basic details can be gleaned from the THPs.
B. Processing Steps
STEP 1: Secure the AAR Slides, where available, for all missions which took place during the rotation. Fill in as much of the rotational information at the top of the data entry form as possible from an initial perusal of the AAR Slides. The number of pages of Rotation and Mission Summary Data Entry Form used will vary from rotation to rotation. A separate sheet
17

will be used for each Maneuver Battalion Task Force. If desired, (an) additional sheet(s) can be used to enter the overall brigade missions for the brigade task force(s). This will allow data which is specific to a brigade-level mission to be linked to a Mission ED Code.
STEP la: Select the acronym for the CTC, and enter the CTC and rotation number in their respective blocks on the form. The CTC and rotation number are generally noted in several places in each THP: the title page, the cover, and/or the Executive Summary. The "CTC" must be selected from the list of possible entries in Field 1, Page 1, Enclosure 1 (Part One). By reviewing all of the data which have arrived from a particular time period or rotation, one can ascertain whether the rotation number has been incorrectly entered anywhere in the THP. Be careful to use the correct rotation number. In the event an inconsistent entry is found, use the one supported by the preponderance of evidence, or consult a Military Subject Matter Expert (SME), the Archivist or Database Administrator for assistance.
Example: CTC: JRTC Rotation: 94-04
STEP lb: Enter the rotation start and end dates in their respective places on the form. These dates are generally found on the cover of the THP or in the body of the cover letter. As indicated on the form, the dates are entered in numerals only, in "day/month/year" order. For JRTC rotations, these dates cover the entire period from the first training day of the first task force through the last training day of the last task force to complete its missions.
Example: Start Date: 17/02/94 End Date: 28/02/94
STEP lc: Select the rotation type which applies to the entire rotational period. "Rotation type" for JRTC will always be entered as "Light", unless specific mention is made of participation by an Armored or Mechanized Infantry unit. "Rotation type" is limited to the items in Field 8, Page 2, Enclosure 1 (Part One). If in doubt as to which rotation type to use, consult an SME.
Example: Rotation Type: Light
STEP Id: Enter the unit designation on the line below "Rotation Number". (Use the format found in the entries for Field 4, Page 1, Enclosure 1 (Part One)) The "Unit designation" consists of the battalion designation of the battalion-level command element, followed by the number of the parent brigade or regiment, and finally, the Divisional affiliation. These bits of information can often be gleaned from the THP cover letter. If in doubt as to how to complete this or any of the succeeding parts of the form, see a Military SME.
Example: Unit Designation: 1-504th PIR/l/82d Abn Div
STEP le: Enter the "Task force designation", which can be obtained from one of the Mission
18

Statements in the AAR Slides, from the THP title page or cover, or from an AAR video label. (Use the format found in the entries for Field 5, Page 1, Enclosure 1 (Part One))
Example: Task Force Designation: TF 1-504 ABN
STEP If: For "Force Type", select from one of the choices in Field 6, pages 1 or 2 of Enclosure 1 (Part One). If in doubt as to which one to use, see an SME. The ordinal number at the end of some of the Force Types merely serves to distinguish one task force of a particular type from another of the same type taking part in the same rotation. The first Air Assault task force to maneuver, or to take part at the CTC in a rotation is called "Air Assault 1", the second, "Air Assault 2", etc.
Example: Force Type: AIRASLT 1
STEP lg: "Component" for the JRTC will always be "Active Army" unless a specific mention is made of the participation of a unit from the Reserve or National Guard component. Valid "Component" choices are found in Field 7, Page 2, Enclosure 1 (Part One).
Example: Component: Active Army
STEP lh: The "Equipment" field should contain a list, separated by slashes (/), of all the major equipment types used by the particular unit. (See available choices in Field 9, Page 2, Enclosure 1 (Part One)) This information can be obtained by perusing the Battle Damage Assessment (BDA) pages of the AAR Slides. If in doubt as to which equipment types to list or the order in which to list them, consult an SME. The various equipment types are listed in order of their importance to the task force/brigade being described on the form.
Example: Equipment: M47/M224
This concludes the rotational information entries. Step 2 will explain the synthesis of mission information.
STEP 2: Fill in the information for each individual mission (for the task force or brigade named at the top of the form) on the respective mission line below. The "Mission Sequence Numbers" (1 - 9) are already filled in on the form. The missions are entered on the form in the order in which they took place at the CTC. All of the information for each mission is entered on a single line going across the page. Each individual task force- or brigade-level mission which is covered by an After Action Review (paper or video) is counted as a mission in this sense, and it is entered on a separate line of the form. Each mission is entered only once from the perspective of the unit/task force named at the top of the form.
STEP 2a: The "mission date" entry refers to the calendar day during which the majority of the mission execution took place. This will usually coincide with the date of the mission as listed on the mission divider tab, but not always. If in doubt as to which date to use, consult an
19

SME. The mission date is entered in digits, two for the day, two for the month, and two for the year, separated by slashes.
Example: Mission Date: 17/02/94
STEP 2b: The "type of exercise" is selected from the choices in Field 7, Page 3, Enclosure 1 (Part Two). Consult an SME if in doubt as to which type to use.
Example: Type of Exercise: FOF
STEP 2c: The "type of mission" is selected from the choices in Field 8, Pages 3 & 4, Enclosure 1 (Part Two). It will often coincide with the type of mission mentioned in the Task Force Mission Statement in the Task Force Operations Order, but not always. Consult an SME if in doubt as to which mission type to use.
Example: Type of Mission: ATK
STEP 2d: "Echelon" is specified by looking at the choices in Field 9, at the bottom of Page 4, Enclosure 1 (Part Two), and selecting the one which best reflects the mission facts as found after close examination. The "Echelon" of the respective mission can be determined by looking at whether the unit in question is normally in the chain of command of the controlling brigade headquarters. If it is, then the mission will normally be a "Brigade" mission; otherwise, the mission will usually be considered "Task Force" level. If in doubt as to which to put, consult an SME.
Example: Echelon: Bde
STEP 2e: This field, "Mission ID Code", is the most important one on the form. For, once this mission ID is built and assigned to a particular mission, all of the individual pieces of the data for this mission may be linked to this Mission ID. (See Enclosure 1, Part Three, for an explanation of how the Mission ID is built). The Mission ID Code is an eight element alphanumeric indicator which reflects the CTC, Rotation, Force Type, and calendar date of the mission. This allows the Archivist to uniquely describe any mission (task force-level and above) which takes place at one of the CTCs, and to link data elements to the set of data pertaining to the specific mission. (In the unlikely event that two missions for the same task force have the same mission date, see Part 3, Step 2e below).
Example: Mission ID Code: J944T117
20

VI. NATIONAL TRAINING CENTER (NTC)
A. General
Rotation and mission analysis for the NTC will depend on the particular task force for which the information is needed. Some of the task forces provide sufficient data in the Take Home Package. For others, a detailed study of the pre-rotation briefing slides will be necessary.
B. Processing Steps
STEP 1: Fill in as much of the rotational information at the top of the data entry form as possible from an initial perusal of the THP. The number of pages of Rotation and Mission Summary Data Entry Form used will vary from rotation to rotation. A separate sheet will be used for each Maneuver Battalion Task Force. If desired, (an) additional sheet(s) can be used to enter the overall brigade missions for the brigade task force(s). This will allow data which is specific to a brigade-level mission to be linked to its Mission ID Code.
STEP la: Select the acronym for the CTC, and enter the CTC and rotation number in their respective blocks on the form. The CTC and rotation number are generally noted in several places in each THP: the title page, the cover, and the Executive Summary section. The "CTC" must be selected from the list of possible entries in Field 1, Page 1, Enclosure 1 (Part One). By reviewing all of the data which have arrived from a particular time period or rotation, one can ascertain whether the rotation number has been incorrectly entered anywhere in the THP. Be careful to use the correct rotation number. In the event an inconsistent entry is found, use the one supported by the preponderance of evidence, or consult a Military Subject Matter Expert (SME), the Archivist or Database Administrator for assistance.
Example: CTC: NTC Rotation: 94-09
STEP lb: Enter the rotation start and end dates in their respective places on the form. These dates are generally found in the pre-rotational briefing slides. As indicated on the form, the dates are entered in numerals only, in "day/month/year" order. For NTC rotations, these dates cover the period from the first training day through the last training day of the last task force to complete its missions.
Example: Start Date: 05/06/94 End Date: 18/06/94
STEP lc: Select the rotation type which applies to the entire rotational period. "Rotation type" for NTC may be entered as "Heavy", "Heavy/Light", or "Light/Heavy". "Rotation type"
21

is limited to the items in Field 8, Page 2, Enclosure 1 (Part One). If in doubt as to which rotation type to use, consult an SME.
Example: Rotation Type: Light/Heavy
STEP Id: Enter the unit designation on the line below "Rotation Number". (Use the format found in the entries for Field 4, Page 1, Enclosure 1 (Part One)) The "Unit designation" consists of the battalion designation of the battalion-level command element, followed by the number of the parent brigade or regiment, and finally, the Divisional affiliation. These bits of information can often be gleaned from the pre-rotational briefing slides. If in doubt as to how to complete this or any of the succeeding parts of the form, see a Military SME.
Example: Unit Designation: 2-187th INF/3/101 AA DIV
STEP le: Enter the "Task force designation", which can be obtained from one of the Mission Statements in the THP, from the THP title page, or from an AAR video label. (Use the format found in the entries for Field 5, Page 1, Enclosure 1 (Part One))
Example: Task Force Designation: TF 2-187 AA
STEP If: For "Force Type", select from one of the choices in Field 6, pages 1 or 2 of Enclosure 1 (Part One). If in doubt as to which one to use, see an SME. The ordinal number at the end of some of the Force Types merely serves to distinguish one task force of a particular type from another of the same type taking part in the same rotation. The first Armor task force to maneuver, or to take part, or merely to show up at the CTC in a rotation is called "Armor 1", the second, "Armor 2", etc.
Example: Force Type: AIRASLT 1
STEP lg: "Component" for the NTC will always be "Active Army" unless a specific mention is made of the participation of a unit from the Reserve or National Guard component. Valid "Component" choices are found in Field 7, Page 2, Enclosure 1 (Part One).
Example: Component: Active Army
STEP lh: The "Equipment" field should contain a list, separated by slashes (/), of all the major equipment types used by the particular unit. (See available choices in Field 9, Page 2, Enclosure 1 (Part One)) This information can be obtained by perusing the Battle Damage Assessment (BDA) pages of the THP, when available. If in doubt as to which equipment types to list or the order in which to list them, consult an SME. The various equipment types are listed in order of their importance to the task force/brigade being described on the form.
Example: Equipment: M47/M224
22

This concludes the rotational information. Step 2 will explain the synthesis of mission information.
STEP 2: Fill in the information for each individual mission (for the task force or brigade named at the top of the form) on the respective mission line below. The "Mission Sequence Numbers" (1 - 9) are already filled in on the form. The missions are entered on the form in the order in which they took place at the CTC. All of the information for each mission is entered on a single line going across the page. Each individual task force- or brigade-level mission to which a section is dedicated in the THP, or which is covered by an After Action Review (paper or video) is counted as a mission in this sense, and it is entered on a separate line of the form. Each mission is entered only once from the perspective of the unit/task force named at the top of the form.
STEP 2a: The "mission date" entry refers to the calendar day during which the majority of the mission execution took place. This will usually coincide with the date of the mission as listed on the mission divider tab, but not always. If in doubt as to which date to use, consult an SME. The mission date is entered in digits, two for the day, two for the month, and two for the year, separated by slashes.
Example: Mission Date: 05/06/94
STEP 2b: The "type of exercise" is selected from the choices in Field 7, Page 3, Enclosure 1 (Part Two). Consult an SME if in doubt as to which type to use.
Example: Type of Exercise: DFF
STEP 2c: The "type of mission" is selected from the choices in Field 8, Pages 3 & 4, Enclosure 1 (Part Two). It will often coincide with the type of mission mentioned in the Task Force Mission Statement in the Task Force Operations Order, and/or the mission type given for that particular section of the NTC THP, but not always. Consult an SME if in doubt as to which mission type to use.
Example: Type of Mission: HATK
STEP 2d: "Echelon" is specified by looking at the choices in Field 9, at the bottom of Page 4, Enclosure 1 (Part Two), and selecting the one which best reflects the mission facts as found upon close examination. The "Echelon" of the respective mission can be determined by looking at whether the unit in question is normally in the chain of command of the controlling brigade headquarters. If it is, then the mission will normally be a "Brigade" mission; otherwise, the mission will usually be considered "Task Force" level. If in doubt as to which to put, consult an SME.
Example: Echelon: Bde
23

STEP 2e: This field, "Mission ID Code", is the most important one on the form. For, once this mission ID is built and assigned to a particular mission, all of the individual pieces of the data for this mission may be linked to it. (See Enclosure 1, Part Three, for an explanation of how the Mission ID is built). The Mission ID Code is an eight element alphanumeric indicator which reflects the CTC, Rotation, Force Type, and calendar date of the mission. (See Example Nr. 1 below) This allows the Archivist to uniquely describe any mission (task force-level and above) which takes place at any one of the CTCs, and to link specific data elements to the set of data pertaining to the specific mission described by the Mission ID Code. For live fire missions at the NTC, in particular, it is possible to have two missions from the same task force on the same day. In this case, the sixth element of the code changes, e.g., from "1" to "A", or from "2" to "B", to indicate the second mission (chronologically) only. This allows the system to distinguish between these two missions. (See Example Nr. 2 below)
Example Nr. 1: Mission ID Code: N949T105
Example Nr. 2: Mission ID Code (first mission): N949T105 Mission ID Code (second mission): N949TA05
24

VE. DATA ENTRY PROCEDURES
A. General
Following the completion of the AFG Rotation and Mission Summary Information Data Entry Form(s) for a "rotation",e.g., CMTC, 94-04 (all force types), the data for each rotation's force types are ready to be entered into the Automated Finders Guide Database. This part of the documentation will describe the data entry process from the time the AFG Form(s) 1 has (have) been completed through the process of completing the entry of the rotational information and all the mission information which pertains to each rotation. For this procedure, you will need the completed AFG Form(s) 1.
B. Processing Steps (Rotation Data Entry)
STEP 1: art the Automated Finders Guide Data Entry Application by double-clicking on the "AFG Entry" icon in the "CTC Archive Access" Program Group. (See Diagram D) If necessary center the "AFG Rotational Data Entry" window in the field of view by touching the bar at the top of the window with the mouse cursor, holding the left button down, and dragging the window to the center of the screen (towards the top half), releasing the left mouse button when the window is where you want it.
STEP 2: Select a CTC by clicking on the list box arrow (down arrow) at the right edge of the CTC Selection Box and releasing the left mouse button. A list box will appear. Select the appropriate CTC by highlighting it, and then clicking anywhere outside the list box.
STEP 3: Enter the rotation number by typing it into the "Rotation #" box as a four-digit number (without the dash). (As soon as you fill the box, the cursor will move to the next data entry field).
STEP 4: Enter the rotation "Start Date" and "End Date" by typing them into their respective boxes (without the slashes), each as a six-digit number.
STEP 5: Enter the "Unit Designation" in the box provided, exactly as written on the form. (If you fill the box, the cursor will move to the next box. If not, use the "Tab" or "Enter" keys to execute the entry and move the cursor to the next box).
STEP 6: Enter the "Task Force Designation" in the box provided, exactly as written on the form. (If you fill the box, the cursor will move to the next box. If not, use the "Tab" or "Enter" keys to execute the entry and move the cursor to the next box).
STEP 7: Select a "Force Type" from the respective list box. "Enter" or "Tab" will execute this
25
entry and move your cursor to the next field.
STEP 8: Select a "Component" from the Component list box. "Enter" or "Tab" will execute this entry and move your cursor to the next field.
STEP 9: Select a "Rotation Type" from the list box to the right of the Component list box. "Enter" or "Tab" will execute this entry and move your cursor to the next field.
STEP 10: Select "Equipment" entries from the Equipment list box. If more than one equipment type is noted, special attention must be paid to the data entry process. Pay attention to the order in which the Equipment types appear on the form, and select the different values in the same order. To select multiple equipment types, after highlighting the first one, hold down the "Shift" key and select the others in the order in which you want them to appear. When you are finished with your equipment type selections, click somewhere outside the list box to activate the choices. At this point, the rotation has been entered into the Database. To append missions to this rotation, proceed to section "B" below.
NOTE: If you accidentally select a "wrong" equipment type, you have three options. You can finish entering the rest of the rotation, "append" the rotation to the table "as is", and then use the "modify" feature to correct the entry. Or, you can cancel out of the rotation entry screen altogether, come back in, via the "append" selection (upper left corner of "rotation data entry" screen, and re-enter all of the rotation data. A third option is to enter the equipment type as the first entry when appending a rotation. This allows you to back out of the process early if the equipment type selection process goes awry.
C. Processing Steps (Mission Data Entry)
STEP 1: While the rotational information is still displayed on the screen (in the "AFG Rotation Data Entry" window), go to the "Rotation" pull down menu (at the upper left corner of the window) and select "append". This will do two things:
a. If the key does not already exist in the "Rotation" table, the rotational data will be appended to the "Rotation" table, and an AFG Mission Data Entry window will open. This will allow you to begin appending missions to the rotation entry displayed in the window above.
b. If the key matches one which appears in the "Rotation" table, a system feedback message, e.g., "Duplicate key. Record not appended" should appear. The data which is in each of the "non-key" fields will be replaced by whatever is associated (if anything) with the original key for that field. In addition, the AFG Mission Data Entry window will open. At this point, before you enter any missions, you should "cancel" out of the AFG Mission Data Entry window, and use "Rotation - View" from the pull down menu to review the rotation information, and any mission data which is associated with the rotation key which is already in the system. Look to
26

see if the rotation data already entered is correct. If it is all correct, you can go back to "Rotation - Append" to append missions, if necessary. If any of it is incorrect or incomplete, you should use "Rotation - Modify" to update the information in the AFG Rotation Data Entry window as well as the AFG Mission Data Entry window.
NOTE: It is appropriate at this time to mention that the AFG Mission Data Entry window will contain some information which flows from the AFG Rotation Data Entry window. The "key" information, i.e., CTC, Rotation, and (Task) Force Type, will be filled in on the AFG Mission Data Entry window by the system. This will, in turn, cause the first six elements of the "Mission Id" field to be filled in in the window to the right of the "key" elements.
STEP 2: Enter the preprinted "Mission Sequence Number" from the first column of the AFG Rotation and Mission Summary Information Data Entry Form in the "Sequence" field on the data entry screen. "Enter" or "Tab" will execute this entry and move your cursor to the next field.
STEP 3: Type the "Mission Date" from the next column into the space ("Date" field) on the data entry screen, just as you did the Rotation Start and End Dates above. "Enter" or "Tab" will execute this entry and move your cursor to the next field.
NOTE: As soon as you finish entering the "Mission Date", you will notice that the "Mission ID Code" has been completed on the screen. (For two or more missions with the same "Mission Date", see Step 8 below)
STEP 4: Select the Type of Exercise from the pull-down list ("Exercise" field) to correspond with the entry on the data entry form. "Enter" or "Tab" will execute this entry and move your cursor to the next field.
STEP 5: Select the Type of Mission from the next pull-down list ("Mission Type" field). For multiple mission types (a maximum of two can be selected), select the first one which appears in the block on the data entry form; then, select the second mission type by holding down the "Shift" key while selecting with the left mouse button pressed down. Once you've completed your selections, click the left mouse button outside the selection box to activate your choices.
NOTE: If you don't get the mission types you tried to enter on the first try, you have two choices. You can finish entering the rest of the mission, "add" the mission to the table "as is", and then use the "modify" feature to correct the entry. Or, you can cancel out of the mission entry screen altogether, come back in, via the "append" selection (upper left corner of "rotation data entry" screen, and re-enter all of the mission data. One other option is to enter the mission type as the first entry when appending a mission. This allows you to back out of the "mission-append" function early if the "mission type1' entry process goes awry.
27

STEP 6: Select the Echelon from the list box labelled as such. "Enter" or "Tab" will execute this entry and move your cursor to the next field.
STEP 7: Review the "Mission Id" in the box at the upper right hand corner of the mission data entry screen. If the data have been entered correctly and the "Mission ID Code" has been assembled correctly on the AFG Rotation and Mission Summary Information Data Entry Form, the two should match exactly, unless there are two or more missions which have the same "Mission Date". (See Step 8 below) If there is a mismatch, review the data entered in the rotation and mission data entry screens, the data on the AFG Rotation and Mission Summary Information Data Entry Form, and the Mission ID Code on the form. If you still cannot uncover the reason for the mismatch, see step 8 below, consult the Archivist, the Database Administrator, or an SME.
STEP 8: As mentioned above in step 7, there will be a mismatch if two or more missions have the same "Mission Date". In this case, once you try to append the mission by clicking on the "Add" button below, you will get a system message saying "Duplicate Mission Id. Override Mission ID xxxxxxxx", where "xxxxxxxx" is the calculated mission id. At this time you will also notice that the cursor has jumped to the "Mission Id" box. Using the information on the form, or other info from Enclosure 1, type in the character(s) needed to obtain the correct (unique) Mission ID. When you are satisfied that the proper Mission Id has been entered, use the "Tab" key (or the mouse cursor) to move back to the bottom of the data entry screen. Then, when you now click on the "Add" button, the mission will be appended. Once you have obtained a match between the form and the screen information, click on the "Add" button at the bottom of the AFG Mission Data Entry window. This will append the mission to the corresponding table.
STEP 9: Complete Steps 2 through 8 for each of the remaining missions, adding each of them to the table.
D. Processing Steps (Rotation - View)
STEP 1: Start the Automated Finders Guide Data Entry Application by double-clicking on the "AFG Entry" icon in the "CTC Archive Access" Program Group. (See Diagram D) If necessary, center the "AFG Rotational Data Entry" window in the field of view by touching the bar at the top of the window with the mouse cursor, holding the left button down, and dragging the window to the center of the screen (towards the top half), releasing the left mouse button when the window is where you want it.
STEP 2: Select a CTC by clicking on the list box arrow (down arrow) at the right edge of the CTC Selection Box and releasing the left mouse button. A list box will appear. Select the appropriate CTC by highlighting it, and then clicking anywhere outside the list box. In addition, "Enter" or "Tab" will execute this entry and move the cursor to the next box.
28

STEP 3: Enter the rotation number by typing it into the "Rotation #" box as a four-digit number (without the dash). (As soon as you fill the box, the cursor will move to the next data entry field).
STEP 4: Select the "force type". At this point you can use the "Rotation" pull-down menu to select the "view" option. This will allow you to view the contents of all the non-key fields for the rotation, as well as all the missions which have been appended to the rotation and force type in question. When you are finished "viewing" the missions, click on "Done" at the bottom of the mission screen. You are now ready to perform another function for the rotation selected, or to pick another rotation, or click on "Exit" to leave the application altogether.
NOTE: In "rotation - view" mode you can only view the contents. All fields will be read-only.
E. Processing Steps (Rotation - Modify)
STEP 1: Start the Automated Finders Guide Data Entry Application by double-clicking on the "AFG Entry" icon in the "CTC Archive Access" Program Group. (See Diagram D) If necessary, center the "AFG Rotational Data Entry" window in the field of view by touching the bar at the top of the window with the mouse cursor, holding the left button down, and dragging the window to the center of the screen (towards the top half), releasing the left mouse button when the window is where you want it.
STEP 2: Select a CTC by clicking on the list box arrow (down arrow) at the right edge of the CTC Selection Box and releasing the left mouse button. A list box will appear. Select the appropriate CTC by highlighting it, and then clicking anywhere outside the list box. In addition, "Enter" or "Tab" will execute this entry and move the cursor to the next box.
STEP 3: Enter the rotation number by typing it into the "Rotation #" box as a four-digit number (without the dash). (As soon as you fill the box, the cursor will move to the next data entry field).
STEP 4: Select the "force type". At this point you can use the "Rotation" pull-down menu to select the "modify" option. This will allow you to view and modify, if necessary, the contents of all non-key fields in the rotation screen, and to view and modify any and all non-key fields in the mission screens for all attached missions. If you modify any information in the rotation screen, click on "rotation - modify" to execute the changes. If you modify any information in the mission screen(s), use the "replace" button to effect the change(s). When making changes to selected fields in the "mission" or "rotation" screen(s) it is best to enter all fields and re-select all entries. This will ensure that all information which is to remain does not change due to some previously selected choices. After using the "rotation - modify" or "mission - modify" options, use the respective "view" option to check to be sure that the changes took. When you are finished making changes to all missions, click on the "done" button to return to the rotation
29

screen.
F. Processing Steps (Rotation - Append)
STEP 1: Start the Automated Finders Guide Data Entry Application by double-clicking on the "AFG Entry" icon in the "CTC Archive Access" Program Group. (See Diagram D) If necessary, center the "AFG Rotational Data Entry" window in the field of view by touching the bar at the top of the window with the mouse cursor, holding the left button down, and dragging the window to the center of the screen (towards the top half), releasing the left mouse button when the window is where you want it.
STEP 2: Select a CTC by clicking on the list box arrow (down arrow) at the right edge of the CTC Selection Box and releasing the left mouse button. A list box will appear. Select the appropriate CTC by highlighting it, and then clicking anywhere outside the list box. In addition, "Enter" or "Tab" will execute this entry and move the cursor to the next box.
STEP 3: Enter the rotation number by typing it into the "Rotation #" box as a four-digit number (without the dash). (As soon as you fill the box, the cursor will move to the next data entry field).
STEP 4: Select the "force type". At this point you can use the "Rotation" pull-down menu to select the "append" option. (The "append" option is fully described in Section IV. A. above)
G. Processing Steps (Rotation - Delete)
STEP 1: Start the Automated Finders Guide Data Entry Application by double-clicking on the "AFG Entry" icon in the "CTC Archive Access" Program Group. (See Diagram D) If necessary, center the "AFG Rotational Data Entry" window in the field of view by touching the bar at the top of the window with the mouse cursor, holding the left button down, and dragging the window to the center of the screen (towards the top half), releasing the left mouse button when the window is where you want it.
STEP 2: Select a CTC by clicking on the list box arrow (down arrow) at the right edge of the CTC Selection Box and releasing the left mouse button. A list box will appear. Select the appropriate CTC by highlighting it, and then clicking anywhere outside the list box. In addition, "Enter" or "Tab" will execute this entry and move the cursor to the next box.
STEP 3: Enter the rotation number by typing it into the "Rotation #" box as a four-digit number (without the dash). (As soon as you fill the box, the cursor will move to the next data entry field).
STEP 4: Select the "force type". At this point you can use the "Rotation" pull-down menu to
30

select the "delete" option. This will cause the "non-key" fields to be filled in. In addition, the "AFG Delete Mission Window" will open. In order to delete a rotation entry, first you must delete all missions attached to it. In order to do this, you must delete the first mission (showing), then call up each new mission in turn, with the "Next" button, "delete" them, and, when you have deleted all missions, and you click on "Done", the rotation record will be deleted, and the system will tell you that.
H. Processing Steps (Mission - Append)
The "mission - append" function is described under Section VII. F. above.
I. Processing Steps (Mission - View)
The "mission - view" function is described under Section VII. D. above.
J. Processing Steps (Mission - Modify)
The "mission - modify" function is described under Section VII. E. above.
K. Processing Steps (Mission - Delete)
The "mission - delete" function is described under Section IV. G. above.
Xm. QUALITY CONTROL PROCEDURES
A. General
This section will discuss two types of quality control (Q/C): data synthesis Q/C and data entry Q/C. Data synthesis Q/C involves checking all of the information entered on the pages of AFG Form 1 (prior to the data entry process) to ensure that it is an accurate reflection of the data which are present at the Archive. Data entry Q/C is the procedure (usually undertaken after the data entry is complete) which ensures that the information contained on the data entry forms is entered accurately into the AFG Database. The Automated Finders Guide data synthesis and data entry procedures were designed to eliminate some common errors. Some of the measures undertaken to accomplish this include the design of "lists of valid choices", "list boxes", etc.
31

B. Data Synthesis Quality Control
As mentioned above, data synthesis quality control involves checking the information entered on the various pages of the data entry form. This process is undertaken to ensure that all information in the data entry fields on the AFG Form lis accurate and complete. This is done by making sure that the filled out data entry form meets the following standards:
1. All critical fields are filled in.
2. As many total fields as possible are filled out.
3. In each filled-out field, there is correct information.
4. In each filled-out field, if there is a list of valid choices provided, the selection entered on the form is one of the valid choices.
Critical Fields for the rotational header of the AFG Form 1 are: CTC, Rotation Number, and Force Type. Mission Date is the only critical mission-level field on the form. A mission date should be provided for each mission entered, at the least.
An effort should be made to fill out as many as possible of the data fields on the form. This will greatly assist the researcher in determining which rotations/missions are of interest to him/her.
To determine the correctness of the information entered in the various fields of the data entry form, consult an SME.
C. Data Entry Quality Control
Data entry Q/C is the procedure (usually undertaken after the data entry is complete) which ensures that the information contained on the data entry forms is entered accurately into the AFG Database. This process involves the use of the "Rotation - View" option in the AFG Rotation and Mission Data Entry Application. Once the critical rotational data (CTC/Rotation/Force Type) has been entered on the AFG Rotation Data Entry screen, clicking on the pull down menu entitled "Rotation" and selecting "View" from the options present will present the entered data for quality control.
These are the quality control standards for this procedure:
1. For rotational data: all rotations entered.
2. For mission data: all missions entered.
32

3. For fields with list boxes: correct choice selected.
4. For fields without list boxes: correct information entered.
33

Enclosure 1 - Automated Finders Guide Part One
Database Structure for Mission Summary Information
FIELD
1
FIELD NAME TYPE
CTC Character BCTP - Battle Command Training Command CMTC - Combat Maneuver Training Center JRTC - Joint Readiness Training Center NTC - National Training Center
Rotation Number Numeric 8901 - 89-01 9112-91-12
Training Dates Date Start 10/09/94 - DD/MM/YY End 23/09/94 - DD/MM/YY
Unit Designation Character 10th Mtn Div (L) 1st Bde, 24th InfDiv(M) 3d Bde, 82d Abn Div 48th Bde-Georgia NG 218th Inf Bde (Mech)(Sep) 9th Inf Regt (L) 160th Special Forces Gp l-64th Arm/2/24 ID l-5th Cav (Mech)/2/l CD 3-7th Inf (Mech)/1/1 ID 1-505 Inf (Abn)/3/82 AB 1-502 Inf (AA)/2/101 AA
Task Force Designation Character TF 1-505 AA (Air Assault) TF 1-107 ABN (Airborne) TF 1-64 ARM (Armor) TF 1-12 CAV (Armor) TF 1-3 CAV (Cavalry)
WIDTH
4
8
8
25
13
34

FIELD FIELD NAME TYPE WIDTH
Task Force Designation (Cont.) TF 1-87 LIGHT (Light) TF 1-5 CAV (Mechanized) TF 1-171 MECH (Mechanized) TF 1-118 MZ (Motorized)
6 Force Type Character 9 CORPS - Corps DIV 1, DIV 2, DIV 3 - Division BDE 1, BDE 2 - Brigade REGT 1, REGT 2 - Regiment
Task Force Elements AIRASLT1, AIRASLT2, AIRASLT3 - AirAssault (Infantry)
AIRASLT1, AIRASLT2, AIRASLT3 - Airborne (Infantry) AIRASLT1, AIRASLT2, AIRASLT3 - Airmobile (Infantry) AIRCAV 1, AIRCAV 2 - Air Cavalry (Aviation) ARM 1, ARM 2, ARM 3 - Armor CAV 1, CAV 2, CAV 3 - Cavalry (Regt/Div Cav) INF 1, INF 2 - Infantry (Straight Leg Inf) LIGHT 1, LIGHT 2, LIGHT 3 - Light Infantry MECH 1, MECH 2 - Mechanized Infantry MOTOR 1, MOTOR 2 - Motorized Infantry RANGER 1, RANGER 2 - Ranger
Combat Support/Combat Service Support Elements AVN 1, AVN 2 - Aviation FSB 1, FSB 2 - Forward Support Battalion FS 1, FS 2, FS 3 - Fire Support (Artillery) O&I 1, O&I 2 - Operation and Intelligence
Special Operations Elements SOF ALL - Special Operations Forces (SOF) SOF AVN - SOF Aviation SOF CA - SOF Civil Affairs SOF SF - SOF Special Forces PSYOPS - SOF Psychological Operations
35

FIELD FIELD NAME TYPE WIDTH
7 Component Character 14 Active Army National Guard Army Reserve
8 Type of Rotation Character 11 Heavy Heavy/Light Light/Heavy Light
9 Equipment (JRTC and NTC only) Character 30 Ml - Tank, Abrams Ml Al - Tank, Abrams M1A2 - Tank, Abrams Ml06 - Mortars Platoon Ml 13 -APC M2 - Bradley, IFV M2A2 -Bradley, IFV M3 - Bradley, CFV M3A2 -Bradley, CFV M60A3-Tank M901 -ITV HMMWV
Example: M1A2/M2A2/M3A2/M901/M106/HMMWV
36

Enclosure 1 Automated Finders Guide Part Two
FIELD FIELD NAME TYPE WIDTH
1 2 3 4
CTC Rotation Number Force Type Mission Identification Code
Note: Fields 1, 2, and 3 are automatically filled-in when the Rotation Summary Information is complete. Field 4 is partially filled-in from Rotation Summary Information and is completed when the Mission Date field is filled-in. Listed below is a description of the Mission Identification Code.
Mission Sequence Number 1 - First Mission the TF performed
10 - Tenth Mission the TF performed
Mission Date 14/09/94 - DD/MM/YY
Numeric
Date
Type of Exercise FOF - Force on Force DFF - Day Force on Force NFF - Night Force on Force LF - Live Fire DLF - Day Live Fire NLF - Night Live Fire NA - Not Applicable
Type of Mission ADC - Advance Cover ADG - Advance Guard AIRA - Air Assault AIRD - Air Drop AIRI - Airborne Insertion AMM - Airmobile Maneuver ASLT - Assault ATK - Attack BRCH - Breaching CAK - Counterattack CAFF - Civil Affairs CAR - Combined Arms Reserve
Character
Character
37

FIELD FIELD NAME TYPE WIDTH
CF - Counter Fire CR - Counter Recon DEFC - Defend Cover DEF - Defend, Defense DIS - Defend in Sector DLY -Delay DATK - Deliberate Attack
Type Mission (Cont.) DDEF - Deliberate Defend DPA - Deep Attack ESTL - Establish Lodgement FGRD - Flank Guard FPOL - Forward Passage of Lines GRD - Guard HDEF - Hasty Defend HATK - Hasty Attack JAAT - Joint Army Aviation Team LIC - Low Intensity Conflict LUP - Link-up MET - Meeting Engagement MOUT - Military Operations on Urbanized
Terrain (MOUT) MVUT - Move Out MTC - Movement to Contact MNUV - Maneuver OFF - Offense OFFC - Offense Cover OOTW - Operations Other Than War OWM - Onward Movement PKO - Peacekeeping Operations/Missions PSY -PSYOPS RAID - Raid REC - Reconnaissance RDM - Road March RIP - Relief in Place ROM - Refuel on the Move (March) RPOL - Rearward Passage of Lines SCR - Screen SRH - Search SEC - Security TRM - Tactical Road March
38

FIELD FIELD NAME TYPE WIDTH
UNC - Unconventional XXX - Not Applicable ZRE - Zone Recon
Examples: MTC/LUP, DATK, or SCR/GRD
9 Echelon Character 3 Bde - Brigade Cor - Corps Div - Division Rgt - Regiment TF - Task Force
39

Enclosure 1 - Automated Finders Guide Part Three
Mission Identification Codes
Mission Identification Codes. The key source for identifying any information in the CTC Archive is the Mission Identification Code (Mission ID). The Mission ID is an eight character code, e.g. C902_M19, J916T110, and N92BAA02, constructed as follows:
Position 1:
Positions 2 & 3:
Position 4:
Positions 5 & 6:
Combat Training Centers:
BCTP-B CMTC - C JRTC-J NTC -N
Rotation Fiscal Year Number:
FY90 - 90 FY92 - 92 FY93 - 93
Rotation Sequence Number (hexadecimal):
01 - 1 08 -8 10-A 11 -B 12-C
Command Level and Mission Identification:
Corps - Ql/QA, normal.
Division (DIV) - DI/DA, D2/DB, normal.
Regiment/Brigade - Bl/BA, B2/BB, B3/BC, normal. (REGT/BDE)
Air Assault (AIRASLT) - T_, _T, Tl/TA, T2/TB, T3/TC, normal. (Airborne) I_, _L, N_ are exceptions. (Airmobile) (The exceptions are J929I_, J932I_,
J933I_, N893_L, N898_L, N927_L,
40

N92A_L, N92B_L, N93B_L, J929N_, J933NJ
Air Cavalry (AIRCAV) - Vl/VA, V2/VB, V3/VC, normal.
Armor (ARM) - A_, _A, Al/AA, A2/AB, A3/AC, normal _R, C_, Cl, C2 are exceptions. (The exceptions are N89D_R, N935_R N89BC_, N901C_, C911C1, C911C2)
Aviation (AVN) - Wl/WA, W2AVB, W3AVC, normal.
Cavalry - C_, _V, Cl/CA, C2/CB, C3/CC, normal. (For exceptions see Armor/Mech)
Forward Support - Fl/FA, F2/FB, F3/FC, normal. Battalion (FSB) (Logistics)
Fire Support (FS) - Gl/GA, G2/GB, G3/GC normal.
Infantry (INF) - HI/HA, H2/HB, H3/HC, normal. (At the present time there are no Infantry (leg units) missions identified)
Light Infantry (LIGHT) - L_, _L, Ll/LA, L2/LB, L3/LC, normal. _G, I_, N_ are exceptions. (The exceptions are N901_G, J907I_, J928I_, J928NJ
Mechanized (MECH) - M_, _M, Ml/MA, M2/MB, M3/MC, normal. _C, Cl, C2, E_, _V are exceptions. (The exceptions are N93A_C, C905C1, C905C2, C928C1, N906E_, N89B_V)
Motorized Infantry - Il/IA, I2/IB, I3/IC, normal. (MOTOR) A_, I_, _I, _N are exceptions.
(The exceptions are N922A_, N905I_, N897_I, N922J, N905_N, N922_N)
Operations & - Ol/OA, 02/0B, normal. Intelligence (O&I) Section/Battalion (NTC only)
41

Ranger - Rl/RA, R2/RB, R3/RC, normal. T_ is an exception. (The exceptions are J895T_, J926TJ
Special Ops Forces - YZ (SOF ALL)
Special Ops Forces Aviation (SOF AVN) - YY
Special Ops Forces Civil Affairs (SOF CA) - YF
Special Ops Forces Special Forces (SOF SF) - YS
Special Ops Forces Psychological Ops - YP (PSYOPS)
Position 7 & 8: Day of Month on which the majority of the mission execution took place:
01 - 1st day in month 10 - 10th day in month 31 - 31st day in month
Example 1: C941M119 19 - 19th calendar day Ml - Mechanized TF
941 - Rotation 94-01 C - CMTC (Combat Maneuver Training Center)
Example 2: C941MA19 19 - 19th calendar day MA - Mechanized TF conducted a second mission on the same
calendar day 941 - Rotation 94-01
C - CMTC
42

Example 3: J941T205 05 - 5th calendar day T2 - Second Air Assault TF
941 - Rotation 94-01 J - JRTC (Joint Readiness Training Center)
Example 4: J941TB05 05 - 5th calendar day TB - Second Air Assault TF conducted
a second mission on the same calendar day
941 - Rotation 94-01 J-JRTC
Example 5: N941A131 31 - 31st calendar day
Al - Armor TF 941 - Rotation 94-01 N - NTC (National Training Center)
Example 6: N941A231 31 - 31st calendar day A2 - Second Armor TF
941 - Rotation 94-01 N-NTC
43

Enclosure 2 - AFG Rotation & Mission Summary Information
Data Entry Form (Blank)

AFG Rotation & Mission Summary Information Data Entry Form Page . .of.
(All entries to be made in pencil)
CTC: Rotation Number:
Unit Designation«^:
Task Force Designation«»):
Component«^:
Equipment»)»:
Start Date:
End Date:
Force Type««:
(dd/mm/yy)
Rotation Type: Heavy Heavy/Light Light/Heavy Light
(circle one)
Mission Sequence Number
Mission Date (dd/mm/yy)
Type of Exercise
Type of Mission Echelon
Mission ID Code
(1) (8) (3) (9) (3) (8)
Data Sources Used:
Data Form Corrected:
Remarks:
Data Form Corrected:
Remarks:
Data Form Corrected:
Remarks:
Form Filled In By:
AFG Corrected:
AFG Corrected:
AFG Corrected:
1
2
3
4
5
6
7
8
9
Data Entered into AFG
(date & initials)
Q/C Performed (date & initials)
Q/C Performed
Q/C Performed
Q/C Performed
Q/C Performed
AFG Form 1 (16Sep94) 44

Enclosure 3 - AFG Rotation & Mission Summary Information
Data Entry Form (Completed)

AFG Rotation & Mission Summary Information Data Entry Form (AH entries to be made in pencil)
P«f«.
CTC: NTTL Rotation Number: T^ - SO-L
: IX S^e/lOls-r- Aft h\\f Unit Designation»«
Task Force Designations):
Start Date:
End Date:
Force Typew:
OS* I PCs I 94~ (dd/mm/yy)
Ift / PC / <rf-
6beL
Component(U):
Equipment»«»:
f\c1~i Ve ry WJ Rotation Type: He*ry Heiry/Light (Light/Heavy) Light
(circle one)
Mission Sequence Number
Mission Date (dd/mm/yy)
Type of Exercise
Type of Mission Echelon
Mission ID Code
(.» (8) (3) (9) (3) (8)
1 * os/oc/^4 .kFF MTT. ßbe NJWSiOS t
2 oijocj^ kFP ■ £T^ £kr M<?4?6io7
3 iojod^ hL^ rn< 6be WfBiio
' 4 11 oc/^4- bLP bxs 6ke 10W6NZ
5 \^ oCJ?f ULF bxs 6>be UW&I2
6 \3Joc/*i4 hi_F AT< ßlc NWEH3
7 bP-~ iM-rr Bbc. MHi e(j ■»
8 1?/ o&fVr- bc^ KIT <2v f K]^S)i 3
9
Data Entered into AFG
(date & initials)
Q/C Performed (date & initials)
. . -
Data Sources Used: Form Filled In By: 5W_ QUO? °+0/C Performed
Data Form Corrected:
Remarks:
AFG Corrected: Q/C Performed
Data Form Corrected:
Remarks:
AFG Corrected: Q/C Performed
Data Form Corrected:
Remarks:
AFG Corrected: Q/C Performed
AFG Form 1 (16 Sep 94) 45

AFG Rotation & Mission Summary Information Data Entry Form (AH entries to be made in pencil)
Page .2_or3_
CTC: Q5~ / Q£ / 14- (dd/mra/yy) M~T£- Rotation Number: ^4" - Of Start Date:
End Date:
Unit Designations: ?-'l &7 IMFUUOJ 4A M\/
Task Force Designationu»: Tp l~l 8 ~? M Force Type<»:
P CT>,V6 "^-^V Rotation Type: Heary Heary/Light (Light/HeaTjf^ Light
13 / 04 /%-
ftlRftSLT 1
Component<i4):
Equipments): h£i h??4- (circle one)
Mission Sequence Number
Mission Date (dd/mm/yy)
Type of Exercise
Type of Mission Echelon
Mission ID Code
(i) (8) (3) (9) (3) (8)
l S$\OL\% bFf frfVTK B^E M^^iOS-
2 n 1 o (, «H- *>FF krs ei? NJ141TL37
3 \0|'=G <\i- fc>L= bA'TK €b- iW^T'HO
4 l^'j 0<= /'<?4- tLr ^rVTR 6bE WWTIU
5 l(*|o(, ^ b^F nouT £b<r WVT\)(,
6 i$ j06.[^ L-^1 HC'J- E.br ^yii^
7
8
9
Data Entered into AFG
(date & initials)
Q/C Performed (date & initials)
-
Data Sources Used:
Data Form Corrected:
Remarks:
Form Filled In By: ^L
AFG Corrected:
Cyffe-O/C Performed
Q/C Performed
Data Form Corrected:
Remarks:
AFG Corrected: Q/C Performed
Data Form Corrected:
Remarks:
AFG Corrected: Q/C Performed
46
AFG Form 1 (16 Sep 94)

AFG Rotation & Mission Summary Information Data Entry Form (All entries to be made m pencil)
Patt JL-3.
CTC: N)"T£- Rotation Number: ^4- • 0^
Z-C14L flRnUh+rb Unit Designationcz»:
Task Force Designations: TF "L~ G*i t£LL
f\cT\vg PXMV
SUrt Date:
End Date:
Force Type«:
Q 5 / Ob / "f (dd/mm/yy)
PtflM.
Components
Equipment): HIM / M2- M?I niQ'
Rotation Type: Heary Hea»y/Lijht( Light/HeaYyJ Light
(circle ooe)
Mission Sequence Number
Mission Date (dd/mmfyy)
Type of Exercise
Type of Mission Echelon
Mission ID Code
(1) (8) (3) (9) (3) (8)
1 OsfoJ^ bf=F MTr, £beF NWrVlor
2 ol (0^4- LFF txs £LE NJWrVl07
3 lojoc^f £>IF rVTK ae m.¥; fv \| o
4 5Zl 0&/^ bu- kX5 <Sbc M<T4-<?£!!1
5 11 ofi/^4 WUF krs ßhE NiW^AU
6 \3 DC \aX &LF bE ~F NWftll*
7 \fcfoc|l^r £>PF hX-f-ü.^ £te N^fMl^
8 IQ oc/^f bFf ^*T< £E*= MWAII8
9
Data Entered into AFG
(date & initials)
Q/C Performed (date & initials)
6^-p ^7n
Data Sources Used
Data Form Corrected:
Remarks:
-rj? TV.' f^'JibQ. Form Filled In By: ^ bUOlflt-Q/C Performed
Q/C Performed AFG Corrected:
Data Form Corrected:
Remarks:
AFG Corrected: Q/C Performed
Data Form Corrected:
Remarks:
AFG Corrected: Q/C Performed
47
AFG Form 1 <16Sep94)

DIAGRAM A Section I - ROT/MSN Summary Data
INPUT PROCESS
-THP (paper) -AAR Videos
-Guide to AFG mission IDs -Pre-Rotation briefing slides
Synthesize Rotation Data (once for each task force)
Synthesize Mission Data (once for each
task force mission)
OUTPUT
Fill out ROT & MSN summary data entry form
Distribute copies of ROT /MSN summary info data entry form(s) to all data entry Personnel
Enter rotation data into the AFG
Enter mission data into the AFG
Perform quality control on entered data / correct
Report data entry complete
48
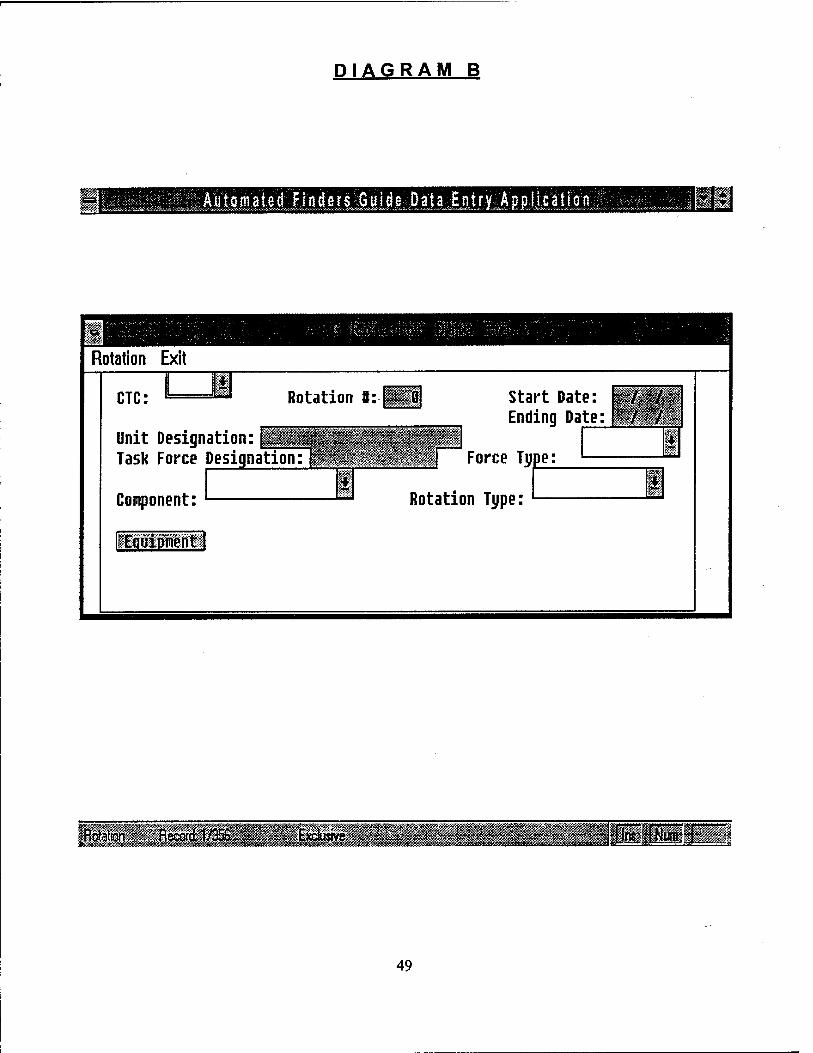
DIAGRAM B
iaksSää^ÄAS 'S%iii&.£i&s&&ik&iiia&i3@lii ' Automatid,finders Guide. ÖaUjjtjyiÄpiJLc^yoj^ Hi
Rotation Exit
CTC: Rotation B: | ft
Unit Designation: Task Force Designation:
Component:
Eouipnent
Start Date: Ending Date:
Force Type:
Rotation Type:
«Rotation • Record: 1/3K>! Exclusive J-|Ins [Nun j
49

DIAGRAM C
Rotation Exit
CTC: NTC bJ Rotation ft: 9ii09
Unit Designation: ||| Task Force Designation: H
Component:
Start Date: Ending Date:
Force Type: AIRASLT1
Rotation Type:
It Equipment I
Duplicate key. Record not appended.
A JF-G-.'M is s i o n D at a: Entry
Sequence: |j_0] Date:
CTC:NTC Rotation :9iiQ9 Force Type: HlRflSLTI Mission Id: |N949T1
/ / I Exercise:
I Mission Tune Echelon:
Add: Previous Hext Cancel :
fflotefoft'LV j&^jcCTd^^^Ja^E^2^;E»ifawe^^ »•>•;****..•. ^hüoiM I fins fNÜm" T
50

CHAPTER 3
AUTOMATED FINDERS GUIDE
Database Entry Documentation for the After Action Review (AAR) Videocassettes Catalog and Communications Tapes Catalog
I. DATA SOURCES
A. Combat Maneuver Training Center (CMTC)
1. AAR Videocassettes: The amount of videocassettes provided to the CTC Archive varies from rotation to rotation, but approximately seventy-five to one hundred videos are received, (see Data Source Documentation for further information).
2. Communications Tapes: The amount of tapes provided to the CTC Archive varies from rotation to rotation, as few as ten tapes to as many as forty tapes are received, (see Data Source Documentation for further information).
B. Joint Readiness Training Center (JRTC)
1. AAR Videocassettes: The amount of videocassettes provided to the CTC Archive varies from rotation to rotation, but approximately seventy-five to one hundred videos are received, (see Data Source Documentation for further information).
2. Communications Tapes: No communications tapes are sent to the CTC Archive.
C. National Training Center (NTC)
1. AAR Videocassettes: The amount of videocassettes provided to the CTC Archive varies from rotation to rotation, but approximately ninety to one hundred twenty videos are received, (see Data Source Documentation for further information).
2. Communications Tapes:The amount of tapes provided to the CTC Archive varies from 4 to 6 tapes for some of the more current rotations and ten to twenty tapes in some of the older rotations, (see Data Source Documentation for further information).
51

SfiW-PUBLICRTIDNS :D:703-617-lo30 0CT 1?.96 5:31 NO_Q01 p_Q3
II. COORDINATING INSTRUCTIONS
• A list of AAR Videocassettes Catalog Codes is contained at Enclosure 1.
• A list of Communications Tapes Catalog Codes is contained at Enclosure 2.
A. Computer Hardware/Software Requirements
1. Hardware:
«■JSL""*'^ PC Wi'h * to" 4m" RAM • •*« ™A monitor and video card
2. Software:
III. AAR VIDEOCASSETTE CATALOG DATA ENTRY PROCEDURES
STEP 1: Organize AAR Videocassettes in preparation for numbering.
•ZSJLSZS; a^dOTC AARavideConeiVWl "T"^ ™TC AAR videos are no,
system. Pan of organizing ihe videos'i« ™tl„ I8"- \ Y 0,sreear<1«" numbering videoc.se,« and the *J££Z££'aZZ"" ",f°n,""i0" C°"'ai"«1« ** «*
BOSs. BrigL J££?J£ SÄ™' SyS"!mS (BOSS)' c-6- Brigade. Brigade TF supporting uni.s an2r BOSs K„!r / > ^T """ CTOS attached »«•». TF BOSs. antvorBOSs. Finally, segregate the videos left, by unit and/or BOS.
STEP 2: Numbenilg AAR videocassettes in preparation fo, cataloging.
below for marking labels. ^ ( f *" ,nch) Pieces) Use the examples
52

EXAMPLES
STEP 3: Cataloging AAR Videocassettes.
STEP 3A: Initialize computer. Make sure the custom "AAR Entry" application is available.
STEP 3B: Point the mouse arrow to the AAR Entry icon within the "CTC Archive Access" window and double click the left mouse button. This will open the AAR Entry database window.
STEP 3C: Point the mouse arrow to the "Add" button at the bottom of the database window and click the left mouse bottom. This will open a new record.
STEP 3D: Using the information contained at enclosure 1 and on the video-cassette labels, fill-in the data fields. Please note that when a data field is completely filled-in the next data field will be "highlighted", otherwise use the "enter" key or "down arrow" key to move to the next field.
STEP 3E: Prior to saving this record, STOP and "QC" for correctness, if the information in the record is correct, point the mouse arrow to the "Save" button and click left mouse button. This will add (save) the record to the "AAR Catalog". Return to STEP 3C to continue adding AAR Videocassettes to the catalog, or
STEP 3F: If information in the record is NOT complete or is INCORRECT, use the "up arrow" key to return to the incorrect data field. Corrections can be made by reentering the correct data. When the record is correct, point the mouse arrow to the "Save" button, click left mouse button to save (add) this record.
STEP 4: Printing Hardcopy of AAR Videocassette Catalogues.
STEP 4A: There are two types of catalogs that can be printed; one, a complete catalog of all AAR Videocassettes, and two, a catalog listing one rotation. As a database entry person, your interest is in the rotation catalog.
STEP 4B: The "Print" button located at the bottom of the database window is not presently programmed. Printing a hardcopy of the rotation catalog can be accomplished by using the "AFG" users database, (see the Users Guide to AFG.)
53

STINFO-PUBLICRTIONS ID :703-517-0030 OCT 17'96 5:31 No.001 P.04
STEP 5: Quality Control (QQ Check of a Rotation Catalog.
needed, the videocassettes can be shelved. hardc°py. If there are no corrections
STEP 6: Posting Corrections to the AAR Videoeasseite Catalog.
STEP 6A: When corrections are needed the AAR P„*„, the "I***- button to open a. ^^£%?%^£** "f **"
von no» jrr:is^:ropcn a menu'now •aJ-°^-
posted, perform a QC, if «he reeord is now «^S^S.",^? **
eo"««o„Co; y?u ^rn I^T" yW "" m°Ve '° "" "«' ■»- —•-
STEP 7= When all videocassettes are correctly cataloged, they can be shelved.
IV. COMMUNICATIONS TAPE CATALOG DATA ENTRY PROCEDURES
STEP ,: Organ,* Communications Tapes in preparation for numbering.
>■££ uh;egC^her„„X^Ul",i0n TaPCS *? "0* ""** P-^bered. b„, if times. A «me may have Zm *„^ T are/re-,n"rk«> «*■> dates and start and end
end times in^X^ m^s by d"t" Z^l^Z ?» ~ « - - - ntafcng sure th. information contained o„L„ £££Z ^^1^ "
STEP 2= Numbering Communications Tapes in preparation for cataloging.
nm™ x^z^z^^-^tiiTr^ ih°foi,owios **»— consecutive sequence number mf.fT' f des'e™"°n. rotation number; and a
54

Number OlA; the next sequence might be 15 Jul, Start 1605, 16 Jul, End 0437, and this date/time sequence would be Tape Number OIB, etc.. Use file labels and the examples below for marking labels.
EXAMPLES
N9401 N9401 N9401
OlA OIB OIC OlD
02A 02B 02C
03A
STEP 3: Cataloging Communications Tapes.
STEP 3A: Initialize computer. Make sure the custom "COMMO Entry" application is available.
STEP 3B: Point the mouse arrow to the COMMO Entry icon within the "CTC Archive Access" window and double click the left mouse button. This will open the COMMO Entry database window.
STEP 3C: Point the mouse arrow to the "Add" button at the bottom of the database window and click the left mouse bottom. This will open a new record.
STEP 3D: Using the information contain in enclosure 1 and on the tape labels, fill-in the data fields. Please note that when a data field is completely filled-in, the next data field will be "highlighted", otherwise use the "enter" key or "down arrow" key on the keyboard to move to the next field.
STEP 3E: Prior to saving this record, STOP and "QC" for correctness, if the information in the record is correct, point the mouse arrow to the "Save" button and click left mouse button. This will add (save) this record to the "COMMO Catalog". Return to STEP 3C to continue adding Communications Tapes to the catalog, or
STEP 3F: If information in the record is NOT complete or is INCORRECT, use the "up arrow" key to return to the incorrect data field. Corrections can be made by reentering the correction data. When the record is correct, point the mouse arrow to the "Save" button, click left mouse button to save (add) the record to the 'COMMO Catalog".
STEP 4: Printing Hardcopy of Communications Tapes Catalogues.
55

STINFO-PUBLICß'TfONS ID: 703-617-0030 """ nc7~17'95 5:32 MQ.001 P.05
iTrLlA: -^ 1? tW° typeS °f Cata,0^s lhal can bc P™'e* one, a complete catalog of tlTT m ^^ tW°' a cata,°* ,isti"S onc rota^n. As a databai enTry person, your interest is in the rotation catalog. ««woasc eniry
DSro?rLme:d ^p"^" ^T l0Cated at the boltom of the diabase window is not presently
W^/T*6 \ ^°Py °f tbC r°tali0n Cata,°S can bc ^omplished by usfng *e AFG users database, (see the Users Guide to AFG.) g
STEP 5: Quality Control (QQ Check of a Rotation Communications Tapes Catalog.
har^D^rin^6" nr '^T' W°rth °f Co™™™«™ Tapes has been cataloged and a nardcopy pruned a QC must be performed. This QC must be performed by someone oLr
information contamed on the tape labels must be compared against the hardcoov Ii«in«
ZZZ£" ^ P0StCd l° thC hardC0Py" If *"» " "^o^■e£ÄÄ« STEP 6: Posting Corrections to the Communications Tapes Catalog.
™JA; Wh,f" com*tions are needed, the COMMO Entry program must be ooened Select the Locate" button to open the locate window. Use the scroll Z Jl find^firc record requxnng correction, drag the mouse across the record soTh*tt hÄ Id Usin*
•CIo^USevCl,Ck °\the bUtt°n in thC ,Cft h3nd C0rncr« *** ^ OP- Ä5^M
Close . You now have access to the record(s) needing correction
the ^ kev^o hf h £ ^T ^ ^ ^ y°U l° make co^™ to record, madeTL record 2" 'nn*? ?,dS needlng C°rrCCti°n When a» cor^ions are made to the record, perform a QC, ,f the information is now correct, "Save" this record.
STEP «C: By clicking on the "Next" button you can move to the next record needing correction or you may want to return to STEP 6A. needing
STEP 7: When all tapes are correctly cataloged, they can be shelved.
Use
56

Enclosure 1 - AAR Videocassettes Catalog Codes
Database Structure, Codes and Information for Cataloging AAR Videocassettes
FIELD
1
FIELD NAME TYPE WIDTH
CTC Character 1 B - BCTP-
C - CMTC-
Battle Command Training Program Combat Maneuver Training Center
J - JRTC - Joint Readiness Training Center
N- NTC - National Training Center
Rotation Num ber Numeric 4 8901 - 89-01 9112-91-12
Tape Number 1 - 1 10- 10
Numeric 4
100 - 100
AAR Date Date 8 14/09/94 - DD/MM/YY
TF/Unit Designation m Corps 1st AD (Armored Division) 1st CD (Cavalry Division) 1st ED (Infantry Division) DIVARTY (Division Artillery) Bde/lst AD (Brigade) 3d Bde/lst ID
Character 25
2d Arm Regt 3d Cav Regt TF 1-64 Arm
(Armored Regiment)
TF 1-5 Mech (Mechanized) TF 3-325 Inf (Abn) (Infantry) 1-101 Avn (Aviation) 2-1 Atk Hel (Aviation)
57

ST INFO-PUBLICATIONS ~ID : 703-517-0030 0CT 17 '96 5:32 N'o.OOl P. 05
9-227 ASB (Aviation Support Battalion)
2-3 FA (Field Artillery) 501st FSB (Forward Support
Battalion) CoA/TF 1-32 Arm (Company) BtryD/2-3 FA (Battery) TmB/TP 1-5 Mech (Team) TmTk/TF 1-32 Arm (TeamTank) TpG/TF 1-1 Cav (Troop) IPlt/CoA/TF 1-64 Mech (Platoon) 3Plt/Btry/2-3 FA Seal Tm2/EPli/ASqd (Squad)
Type of Mission Character 15
N&XEi More than one Type of Mission and/or Type ofAAR can be used in this field. Also if a mlssion/AAR is designated as "Live Fire", then LF mil precede the Type of Mission(s) or Type of AAR(s e.g. LF DIS, LF DATK/EOM. The designation EOM (End of Mission) mil not be used by its self. J
ADC - Advance Cover ADG - Advance Guard AIRA - Air Assault AIRD -Air Drop AIRI - Airborne Insertion AMM - Airmobile Maneuver ASLT - Assault ATK -Attack BRCH -Breaching CAK - Counterattack CAFF - Civil Affairs CF - Counter Fire CR - Counter Rccon DEFC - Defend Cover DEF - Defend, Defense DIS - Defend in Sector DLY -Delay DATK - Deliberate Attack DDEF - Deliberate Defend ESTL - Establish Lodgement FGRD - Flank Guard FPOL - Forward Passage of Lines
58

GRD - Guard HDEF - Hasty Defend HATK - Hasty Attack JAAT - Joint Army Aviation Team LIC - Low Intensity Conflict LUP - Link-up MET - Meeting Engagement MOUT - Military Operations on Urbanized
Terrain (MOUT) MVUT - Move Out MTC - Movement to Contact MNUV - Maneuver OFF - Offense OFFC - Offense Cover OOTW - Operations Other Than War PKO - Peacekeeping Operations/
Missions PSY - PSYOPS RAID - Raid REC - Reconnaissance REF - Reinforcement RDM - Road March RIP - Relief in Place ROM - Refuel on the Move (March) RPOL - Rearward Passage of Lines SCR - Screen SRH - Search SEC - Security TRM - Tactical Road March UNC - Unconventional XXX - Not Applicable ZRE - Zone Recon
AND/OR
Type of AAR AD -Air Defense ADA -Air Defense Artillery ASB -Aviation Support Battalion AVN -Aviation BAYONET 2 -Type of Live Fire Mission BULLET -Type of Live Fire Mission CC -Command and Control COMD -Command
Character 15
59

STINFO-PUBLICPfIONS 7.0:703-517-0030 OCT 17'96 5:33 No.001 P.07
CS -Combat Service CSM -Command Sergeant's Major
Briefing CSS -Combat Service Support CHUCKWALLA
-Type of Live Fire Mission -Division Command Post -Engineer -End of Mission -Field Artillery -Final -Final Vertical -Fire Support -Forward Support Battalion -Intelligence -Joint Task Force -Logistics -Maneuver
-Mobility/Counrermobility/Survjvability -Medical -Mid-Rotation -Ministry -Mortars -Nuclear, Biological, Chemical -Noncommissioned Officer's Briefing -Type of Live Fire Mission -POW Exchange -Regiment (Armored or Cavalry) -Scouts -Staff -Unit Ministry Team
DIVCP ENG EOM FA FINAL FINV FS FSB INTEL JTF LOG MAN MCS MED MID MIN MORTARS NBC NCO ORGE POWEX REGT SCOUTS STAFF UMT
60

Enclosure 2 - Communication Tapes Catalog Codes
Database Structure , Codes and Information for Cataloging Communications Tape
FIELD
1
FIELD NAME TYPE WIDTH
CTC Character 1 B - BCTP -Battle Command Training
Program C - CMTC -Combat Maneuver Training
Center J - JRTC -Joint Readiness Training
Center N - NTC -National Training Center
Rotation Number Numeric 4 8901 - 89-01 9112-91-12
Tape Number 01A - Tape Number 01A 01B - Tape Number 01B 01Z - Tape Number 01Z 45A - Tape Number 45A
Start Date 14/09/94 - DD/MM/YY
Numeric
Date
Start Time 0001 - 00:01 am
Numeric
End Date 15/09/94 - DD/MM/YY
Date
End Time 2359- 11:59 pm
Numeric
61

STINFO-PUBLICPTIONS " ID: 703-6I7-0030 0CT7?'95 5:33 Mo . 001 P. 08
CHAPTER 4
BATTLE DAMAGE ASSESSMENT DATABASE (BDA db)
Database Entry Documentation
I. DATA SOURCES
A. General Information
There are two data components to the BDA. The first is the Initial Strength/Lost table
fhe BDA^r ^ T Start/l0Sl VaIUeS" " iS USUa"y l0Cated in ** fir* lwo columni of rfiT/k -?C SeC°nd comP°ncnt is lhe BDA >tsclf which describes the number of kills obtained by specific weapon systems. Weapon types are listed horizontally across the top of the table; target values are listed vertically in the column beneath. Currently. Task Force level BDA s the only level of BDA entered into the BDAdb. (Note: in this documentation, "Task Force"
refers to Armor, Cavalry, Mechanized, Infanrry or Light Infantry.)
B. Combat Maneuver Training Center (CMTC)
BDA for the CMTC is obtained from the hardcopy of the Take Home Package (see enclosures la and lb). The BDA is generally included in the AAR slides, which are part of Misston Summary information in the THP. While Personnel Initial Strength/Lost and BDA has been entered, data for KIA, WIA, DOW and RTD have not been entered because the databa* did not support weapon types at the time that data was entered. Fratricide BDA is derived from ^separate table (enclosure lb) if included, otherwise fratricides are extracted from thtSn BDA
C. Joint Readiness Training Center (JRTC)
nn Ai^A,f0T the,JRTC ;svobtained from printing-out the BDA from the SPSS files provided
ml BDA?ha t 77 lC)u u the diSkCtteS haVC nüt been rcccived«or "* ™* be Z, *en Derail 1L PT Wf tAAR S,ideS CEn bC USed- ™e BDAdb f« *e JRTC has only WoTds*<£5w No^r f ""f °r W°Unded " Acti°n (KIA' ™* "> number W of wounds (DOW). No other weapon/target types have been entered for JRTC.
D. National Training Center (NTC)
62

BDA from the NTC is derived from the Take Home Package, which arrives either in hardcopy or diskette form. The BDA is generally found after the Mission Summary information Enclosure Id is an example of BDA taken from a 1992 THP. Enclosure le is an example of BDA taken from a 1994 THP. The BDA may be marked as "Battle Statistics", although it may simply appear in tabular form without much identifying information. BDA for "Live Fire" missions is normally not included, therefore no data entry is required.
II. COORDINATING INSTRUCTIONS
• Enclosures la-le are examples of BDA tables directly taken from the THP or SPSS files.
• Enclosures 2a - 2c are examples of edited BDA tables that are ready to be entered into the BDAdb.
• Enclosure 3 is a flowchart of the data entry steps.
• Enclosure 4 is a list of BLUEFOR and OPFOR Target and Weapon categories with corresponding database codes. "Categories" in this document pertain to the Target and Weapon names used in the BDAdb program. "Database codes" pertain to the numeric codes in the BDAdb program that correspond to the THP target/weapon categories.
• Enclosure 5 and 6 are lists of Target and Weapon Types. "Target/Weapon Types" refer to those target/weapon names in the original BDA source that may or may not have been entered under a slightly different BDAdb category. Enclosure 5 lists their corresponding BDAdb equivalent or "roll-up". Enclosure 6 lists the breakdown by BDAdb roll-ups into the original THP target/weapon types. These two enclosures cover rotations prior to 94-01 and is provided as background information on how the BDA was previously entered. Step 3 below describes in detail the nature of these Target/Weapon Type "roll-ups".
• Computer software requirements are: FoxPro for Windows v.2.5, BDA/Initial Strength Database Program v. 1.3.
III. DATA ENTRY PROCEDURES
STEP 1: Assemble BDA Data.. Retrieve BDA from the data source for the rotation being entered and make working copies of all missions. On each page, write down the Task Force designator for each group of missions if the designator is not printed with the BDA table. Also write down the date of each mission on each page so that you will be able to assign Mission IDs to the correct tables.
STEP 2: Assign Mission IDs.. Obtain Mission ID's for the BDA by locating the correct Mission Summary Sheet. Make sure this sheet is current. If you have questions about Mission
63

STINFD-PUBLICRTIONS ID: 703-617-0030 OCT 17'96 5:34 No.001 P.09
IDs check with the Archivist. Write the Mission IDs on the corresponding BDA data copies (It will help the data entry process if the Mission IDs are printed on each page.)
STEP 3: Preparation of BDA for data entry. In the earlier stages of BDA data entry, similar target and weapon types were represented separately in the THP, but were "rolled-up" into encompassing target or weapon categories. (For example, the BLUEFOR target types "61 mm" and "81mm" were listed separately, but both targets are mortars. Therefore, the values were rolled up for both targets and entered under the target category "Mortar". Similarly, a current
BDA target type from the THP is listed as "Stinger", but is entered under the target category Manpack Stinger" in the BDAdb.) This system was used extensively prior to rotation 94-01
Enclosure 4 lists BLUEFOR and OPFOR target and weapon codes and categories and indicates the few roll-ups that are currently used. The current BDAdb is configured in FoxPro for Windows and the data is entered almost exactly as it appears in the data source, starting with rotation 94-01 (some JRTC rotations in FY93 have been entered under the new system). Provided as enclosures 5 and 6 are lists of target and weapon types as they appeared in the data source and as they were "rolled-up" and entered into the BDAdb at that time.
STEP 3A: Editing the BDA for data entry. Some editing is still necessary for data entry to proceed efficiently and accurately. First, go through each mission and read the target and weapon types and assign each one its corresponding database code number. Use Enclosure 4 for this purpose. This will save time when actually doing the data entry because the target/weapon codes can be directly entered into the database by using the keypad without the need to read through the target/weapon codes that appear on the monitor. Enclosures 2a, 2b, and 2c are examples of fully edited BDA tables from CMTC, JRTC. and NTC respectively. Note that data is not entered from the AT CMTC" column from CMTC BDA, the "Replacements" column from JRTC BDA and the "Total Avail At COM" column from NTC BDA.
STEP3A1: Using Table la. (BLUFOR TARGETS) in Enclosure 3, systematically find all the corresponding BDAdb target codes that match the BLUFOR target types for all the missions in the rotation. Write these code numbers next to each BLUFOR target Don't forget to combine the few categories that are still "rolled up". (For example, "MICUC" values are combined with and entered under the "AVLB" target type.) Note that Blufor Target types arc listed in the first column. y
STEP 3A2: Using Table 2a. (OPFOR TARGETS) in Enclosure 3, systematically find all the corresponding BDAdb target codes that match the OPFOR target types for all the missions in the rotation. Write these code numbers next to each OPFOR target Don't forget to combine the few categories that are still "rolled up". (For example, "AT-5 DISMOUNT" values are combined with and entered under the "AT-5" target type.) Note that Opfor Target types are also listed in the first column of the table, following the Blufor Target types.
STEP3A3: Using Table lb. (BLUFOR WEAPONS) in Enclosure 3, systematically find a! the corresponding weapon codes that match the BLUFOR weapons for all the missions in the rotation. Write these code numbers next to each BLUFOR weapon. Note that Blufor Weapons
64

are listed in the first row. Using Table 3. (O/C WEAPONS) in Enclosure 3, go back through each mission's weapon side and enter the corresponding Observer/Controller codes. These codes represent quasi "weapons" such as MILES, Maintenance Malfunction, and Fratricides and are thus not technically the opposite side's weapons. Observer/Controller weapon types also appear in the same row as OPFOR Weapon types. Don't forget to combine the few categories that are still "rolled up".
STEP 3A4: Using Table 2b. (OPFOR WEAPONS) in Enclosure 3, systematically find all the corresponding weapon codes that match the OPFOR weapons for all the missions in the database. Note that OPFOR weapons are listed in the first row, following BLUFOR weapons. Write these code numbers next to each OPFOR weapon. Don't forget to combine the few categories that are still "rolled up". (For example, "LAV" values are combined with and entered under the "AT-5 (BMP)" weapon type.)
STEP 3B: Check to see if the number of targets lost in the Initial Strength/Lost column of each table equals the total number of targets lost in the corresponding BDA columns of each table. Often, the numbers will NOT correspond, which generally means that data entry errors were made during the creation of the THP BDA file(s). Because there is no way to tell where the mistake originated, nothing can be done to correct it. Make a note of these errors, input the data as it appears.
STEP 4: Enter Initial Strength/Lost.
STEP 4A: Starting the BDA/Initial Strength data entry program.
STEP 4A1: Click on the "BDA Entry" icon in Program Manager, located in the "Applications" program group. This will begin the BDA database program within FoxPro for Windows.
STEP 4A2: You are now at the main menu of the BDA data entry program. Choose "2" for "Initial Strength/Lost data entry".
STEP 4A3: Choose the corresponding number of the CTC that you are working on.
STEP 4A4: Input the rotation number. For example, type "90-01" for rotation 90-1.
STEP 4A5: Choose "1" for "ADD Records" from the menu. Input the last four digits of the Mission ID. The program will retain the first four digits from the CTC and the rotational information already given.
STEP 4B: Adding Initial Strength/Lost data.
STEP 4B1: Following the directions on the screen, choose "1" to enter Blufor Initial Strength/Lost first. An index will appear in the lower half of the screen that gives the BDAdb
65

STiNFÖ-p.JBLICflTIONS ID: 703-517-0030 OC-17'96 5 :34 No .001 P. 10
code number for each target type. Because you have already entered the corresponding code number on the hardcopy of the BDA, you probably won't need to refer to this list very often.
w tu S1!EP 4B
L2: L
Enter thc corrcsP°ndinfi code number for the target type and press "enter" If the code number has more than three digits, thc cursor will automatically advance to the nexi
field. Enter thest^lott values on the next two lines. Press "enter" when through and then choose ether "Y" for Yes or "N" for No. NOTE: thc program has been designed so that one "P SCrt a"d dataentry with one hand on the keypad. Therefore, you may enter
1 for Yes and 2 for "No" throughout the program.
rw STEr 4B3: uAl^ b°tt0m °f thC SCrCCn' prcss "enler"t0 *et a fresh da* entry screen. Continue entering all Blufor Iniüal Strength/Lost. NOTE: If you have made an incorrect entry and you are in the middle of the record, keep pressing return until you get a fresh screen.
»r- « A*? 4B4: 0p
Jfor
rdata entr*- Wben jt's «me to enter Opfor data, remember to specify
2 as the Target instead of "1". Proceed as with Blufor data entry.
hrt»rtmSJiP 4B5: Wh!" aU data mry f0r a 8ivcn Mission ro is complete, choose "S" at the
bottom of the screen and you will return to the main menu where you will choose "1" "ADD records and enter the next Mission ID.
STEP 5: Print Initial Strength/Lost,
* 2Ü!P 5tV Wheu aH **Initial Strength/Lost Data for both Blufor and Opfor are entered for a given rotation, choose 15] "PRINT Report".
prinTterP 5B: A dia,0g b°X Wil1 aPPCar- Ch0°SC "°K" if y°U Want t0 *end the reP°rt t0 *•
a/LEAqrn(?iraTAV0iLyou want t0 print thc data "> a ™* and then view or edit the data
as an ASCII file, select "SETUP" from the dialog box. Then choose "Specific Printer" and Generic / Text only on FILE." . Choose "OK" and then type in the name/p^th of the ne" file
,»S^5D-! .y^™01 d0 no1 altemPt to switch to other applications or exit out of FoxPro until the pnnt job is completed as you may lose your print job
STEP 6: Enter BDA.
coZlUAou^ernr?ntCr fjf f*' ** mu* quk *< M™ *™*M" ™de and get
of2 nroLam 117 * ^ ^^ ManagCn Y°U wil1 need to ba<* completely out of the program each time you switch from working with either Initial Strength/Lost or BDA.
STEP «B: Click on the "BDA Entry" icon to re-activate the BDA data entry program.
66

STEP 6C: To enter BDA data, simply choose [1] from the initial menu and proceed in exactly the same way as with Initial Strength/Lost entry, except that you must now supply the weapon side and type as well as the target side, type, and number lost. If you make an error before you finish the record, you cannot press enter until a fresh screen appears. You must enter a number in each field. Just enter any number until you get to the end of the record, and press "N" so that the record is not saved. A fresh screen will appear. NOTE: For N94-08 Mechanized only Initial Strength/Lost data was present in the THP.
STEP 7: Print BDA. Print out a copy of the BDA data following the above instructions for Initial Strength/Lost data. (See Step 5.)
STEP 8: Q/C Initial Strength/Lost and BDA data.
STEP 8A: Compare your data entry closely with the THP copy. Highlight the Mission IDs on the printout to ensure their accuracy. Mark corrections clearly.
STEP 8B: If you come across any target/weapon types not represented by a roll up or BDAdb category, consult with a Subject Matter Expert to determine if the target/weapon should be rolled up into an existing category, or if an entirely new category should be created.
STEP 9: Correct Initial Strength/Lost and BDA data.
STEP 9A: Correcting Initial Strength/Lost. Go into the BDA program and select Initial Strength/Lost. Proceed to input the CTC type and Rotation. When you reach the Main menu, choose "2" for "EDIT Mode".
STEP 9B: Locating the record to be edited.
STEP 9B1: The edit sub-menu will present you with several choices. You may search for records to edit by: 1) mission ID, 2) mission ID and target side, or 3) mission ID and target type. Searching by Mission ID only will bring up ALL start/lost entries for a given Mission ID. Be sure to type the ID exactly as was previously entered. Blufor values will be followed by Opfor values. However, you must page through each entry by typing "N" for "Next" to get to the one that you want. Use this option only if you have corrections that need to be made for both sides, and for different target types. NOTE: entries cannot be deleted in Edit mode. Also, you can only back-track by one record. If you need to backtrack farther, you must select "Q" for "Quit" and begin the record selection process again.
STEP 9B2: If you only have corrections for one target side but have to correct several target types, select "2" "mission ID and weapon side" and then type a "1" for Blufor or "2" for Opfor, depending on the side containing the error.
STEP 9B3: To select a specific target side and type and further narrow down the records retrieved, choose "3" "Mission ID and target type". In this case you will enter "1" or "2" for the
67
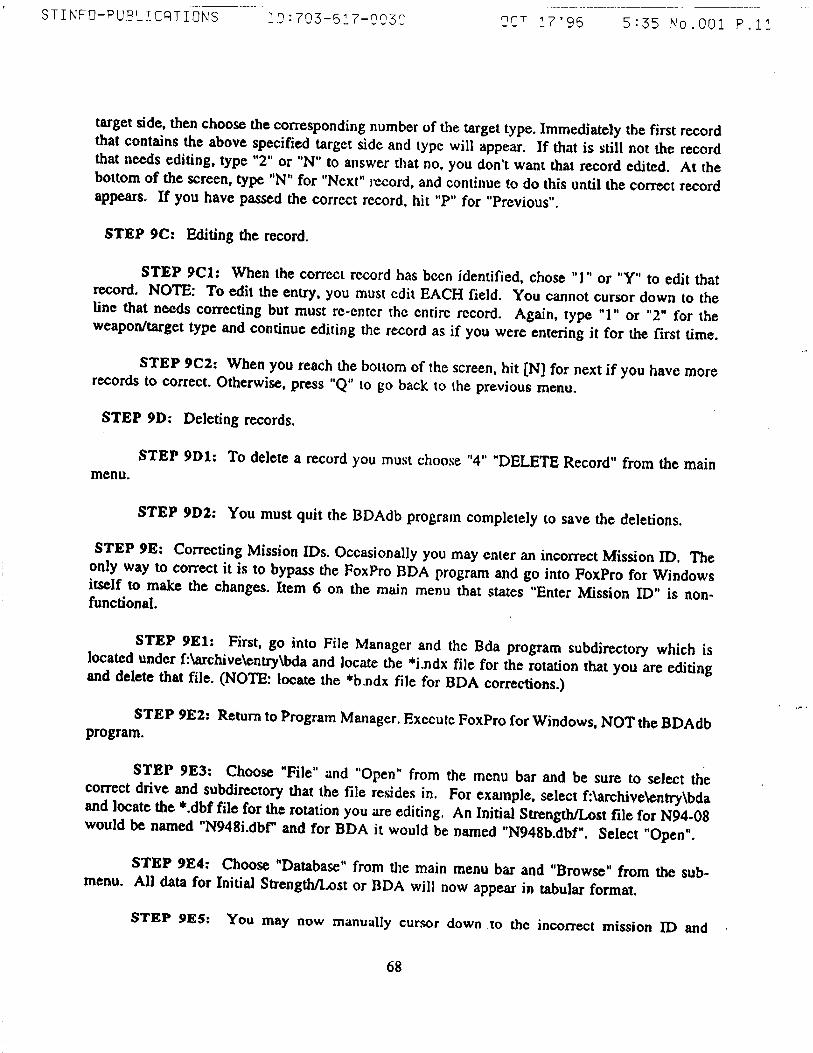
STINFO-PUBLICRTIÖNS ~~13:703-617-0030 "~~ 0CT 17'9S 5:35 No.001 P.11
target side, then choose the corresponding number of the target type. Immediately the first record that contains the above specified target side and type will appear. If that is still not the record that needs editing, type "2" or "N" to answer that no, you don't want that record edited At the bottom of the screen, type "N" for "Next" record, and continue to do this until the correct record appears. If you have passed the correct record, hit "P" for "Previous".
STEP 9C: Editing the record.
STEP 9C1: When the correct record has been identified, chose "J" or "Y" to edit that record. NOTE: To edit the entry, you must edit EACH field. You cannot cursor down to the line that needs correcting but must re-enter the entire record. Again, type "1" or "2" for the weapon/target type and continue editing the record as if you were entering it for the first time.
STEP 9C2: When you reach the bottom of the screen, hit [N] for next if you have more records to correct. Otherwise, press "Q" 10 go back 10 the previous menu.
STEP 9D: Deleting records.
STEP 9D1: To delete a record you must choose "4" "DELETE Record" from the main menu
STEP 9D2: You must quit the BDAdb program completely to save the deletions.
STEP 9E: Correcting Mission IDs. Occasionally you may enter an incorrect Mission ID. The only way to correct it is to bypass the FoxPro BDA program and go into FoxPro for Windows itself to make the changes. Item 6 on the main menu that states "Enter Mission ID" is non- functional.
STEP 9E1: First, go into File Manager and the Bda program subdirectory which is located under f:\archive\entry\bda and locate the *i.ndx file for the rotation that you are editing and delete that file. (NOTE: locate the *b.ndx file for BDA corrections.)
STEP 9E2: Return to Program Manager. Execute FoxPro for Windows, NOT the BDAdb program.
STEP 9E3: Choose "File" and "Open" from the menu bar and be sure to select the correct drive and subdirectory that the file resides in. For example, select f:\archive\entry\bda and locate the *.dbf file for the rotation you are editing. An Initial Strength/Lost file for N94-08 would be named "N948i.dbf and for BDA it would be named "N948b.dbf". Select "Open".
STEP 9E4: Choose "Database" from the main menu bar and "Browse" from the sub- menu. All data for Initial Strength/Ust or BDA will now appear in tabular format.
STEP 9E5: You may now manually cursor down to the incorrect mission ID and
68

manually correct it. However, you can also change the entire group of incorrect Mission IDs by using FoxPro's search and replace utility (see Step 9E7). When you have completed all changes to the database, select "Database" from the main menu bar and "Pack" from the sub-menu to make the changes permanent.
STEP 9E6: You can also use the "Search and Replace" command in FoxPro to automatically replace all instances of an incorrect Mission ID with the correct version.
STEP 9E6a: If you are still in the BDAdb program, quit to the Program Manager and enter FoxPro for Windows.
STEP 9E6b: Select "File" and "Open" and select the *.dbf file that you were working on. Then choose "Database" from the main menu bar and "Browse" from the sub-menu. The BDA table should appear with all missions for the rotation in question. Position the cursor at the top of the table.
STEP 9E6c: Select "Record" from the main menu bar and "Replace" from the sub-menu.
STEP 9E6d: Make sure that "Mission ID" is highlighted in the dialog box. Select "Scope" and then "All", then click on "OK".
STEP 9E6e: Select "For". Double click on "missionID" in the dialog box. It should appear in the blank box below "FOR Clause". Then type "=" and then the incorrect Mission ID, IN QUOTES. (For example, the box should read: N946b.missionid="N946A102" if you were changing N946A103 in the BDA database for N946. Note that you should type the mission ID exactly as it appears in the database. )
STEP 9E7f: Select "OK" and return to the initial Search and Replace Dialog box. In the blank space to the right of the "With" button, type, IN QUOTES, the correct Mission ID and select "Replace" to effect the correction. Make sure you save the file before exiting FoxPro (the program will prompt you to do so when you quit).
STEP 9F: Correcting the BDA. The BDA is edited in exactly the same way as the Initial Strength/Lost. You must exit completely out of the BDAdb program and re-enter it via the BDA data entry mode. However, there are six instead of three choices at the edit sub-menu: l)Edit by Mission ID, 2) Edit by Mission ID and Weapon Side, 3) Edit by Mission ID and Weapon Type, 4) Edit by Mission ID and Target Side, 5) Edit by Mission ID and Target Type, and 6) Edit by all fields.
STEP 10: Final Printout.
STEP 10A: Print out the corrected version of Initial Strength/Lost and BDA and highlight the Mission IDs for easy reference. Double check against the marked up copy to make sure that all
69

STINFO-PUBLICRTIONS 10 : 703-617-0030 0CT 17'96 5:36 Mo.001 P.12
your errors have been corrected.
STEP 10B: Take the first, marked up copy and file in a binder with the original THP data copies for your own reference.
STEP 10C: Take the final printout and give it and the BDA from the THP to the person in charge of Quality Control.
STEP 11: Provide Archivist with all BDA data for Q/C.
IV. QUALITY CONTROL (QC) PROCEDURES
STEP 12: Check the printout against the THP/AAR slide/SPSS version of the BDA.
STEP 12A: With both printout and The originul source in hand, go through all Initial Strength/Lost and then BDA and do a cell by cell check for accuracy of data.
STEP 12B: Keep in mind which cells have been "rolled up" and values combined. Note any inconsistencies in data.
STEP 12C: Return corrected printoui to data entry person for final corrections.
STEP 13: Final Corrections to BDA database.
STEP 13A: Make required changes to the Initial Strength/ BDA.
STEP 13B: Print out a final copy of the data.
STEP 13C: Retain a clean copy of the BDA printout as these copies can be used for quick, overall BDA reference by researchers.
V. TRANSFERRING TEMPORARY BDA FILES TO MAIN DATABASE
STEP 14: Transferring BDA into main BDA database. The Initial Strength/BDA files just entered have been kept in a temporary work area. After the final Q/C, these files need to be transferred to the main BDA database, where the data can be accessed by users. While the main menu within the data entry program has a choice (#7) for exporting or uploading the BDA data files from the BDA data entry program to the main database, this utility is non-functional. The correct procedure follows:
STEP 14A: Initial Strength/Lost must be loaded separately from BDA into the main FoxPro BDA database. To activate the uploading program, click on the main Foxpro for Windows icon.
70

STEP 14B: Select File and Open and select the subdirectory F:\archive\entry\bda. Check the list of files to the left and note the rotation number that you will upload.
STEP 14C: In the dialog box marked "List Files by Type" select "Program" to get a list of program files. Click on the file named "i_s_upld.prg" and click on "Open".
STEP 14D: A window will appear that contains the text of the initial strength/lost uploading program. On the line that begins with "from f:archive\entry \bda\ ", delete the text that follows "\bda\" and type in the name of the *.dbf file that you want to upload. For example, to upload the initial strength data for J93-08, type "j938i.dbf; ".
STEP 14E: Select "Program" from the main menu bar. On the last line of the sub-menu will be the command "DO *i_s_upld.prg". Click on this command and the file will be uploaded automatically. The bar at the bottom of the FoxPro screen will flash the number of records transferred.
STEP 14F: To upload bda data files, follow Steps 14A-E but select the program "bda_upld.prg" from the "Program" sub-menu and proceed as above.
STEP 14G: Once files have been uploaded, care must be taken not to upload them again as this would cause duplicate records to exist in the database. To ensure that this does not happen, delete the uploaded *.dbf files from the f:\archive\entry\bda subdirectory and/or move the files to a floppy disk to provide a personal backup of the data.
STEP 14H: To view the records that you've just uploaded, go into FoxPro for Windows and select the f:\archive\bda subdirectory and select the file "init_str.dbf" or "bda.dbf". Select "Database" and "Browse" from the menu bar and all uploaded records appear in an immense table. The records added recently appear at the very bottom of this table.
71

CO UI
CO <
Ü cr O u. Q. o
DC Ul X
5 *r
CO LU _l 2
CM T-
Z < 2
lO
CO UJ z 2
T~ ** CM
2 < Ü CO < u.
IT) IO CM CM
cc <
CO T—
1- <
CM
< u o CO T-
~;
1 r^ to
2 s in CM
CO CO
z <
CM CM CM CO T- T- '
to O
to CM
o CO IO CO CM CM CO CO
CO
1-
< T- co 5 o> I««- CM o CO o *f CO T- o
IO
2 UJ
>- CO
o CO
Q. s CD
IO 2 O DC m
CM
1- s
CO CM
CO N
CO
< CO
> EC O <
Q Z x
X UJ >
z UJ
Q O 5
u. Z
72

Enclosure lb: CMTC Fratricide Tables

>
CO z co5 Oo o_J
CD
CO
>
DC o o a.
eg co > oc o o CL
Sä <
co CO o oc Ü
C5 z
Ü <
CO UJ o o or
g < Ü o
o T— CO T—
o > Ö
o CO m h- o > Ö
CO O) in o in o > Ö
CO CO CO
CN o
Ö
CO o CO
o o > O
< DC LL
>■
Q 111
OC LU
OC <
Q _J LU Li. LU
CO
LU O
CO CM Ü
CO LU -J O X UJ
CO LL m
m
in LU o
o CO Q
co CM CO T-
o
CM
CM T- Ü
CM <* co CM
co
74
LU T- CO
CO LL 2 ZZ CM O Z <M^ r« 2
SscoOttOO OOOXHXX o m co o CM
CO
CM Ü
m o CM O
m

*9 Zh << JZ "-5 CCDC
>. oo x oo 5 Q.O
CO
öS
z o < Ü
CO CM <o o> CO
Si o _J
> Ü.
OCF
RA
T (C
ON
■ •
>- CD
UJ U. Q -J
LU ««J
-J or * <
CO CO 111 ^"
-J H-i- o CM g X T-S 111 Oui > XX
CO
LÜ o 2 CM
H O
(D
75

Enclosure 1c: JRTC BDA Tables
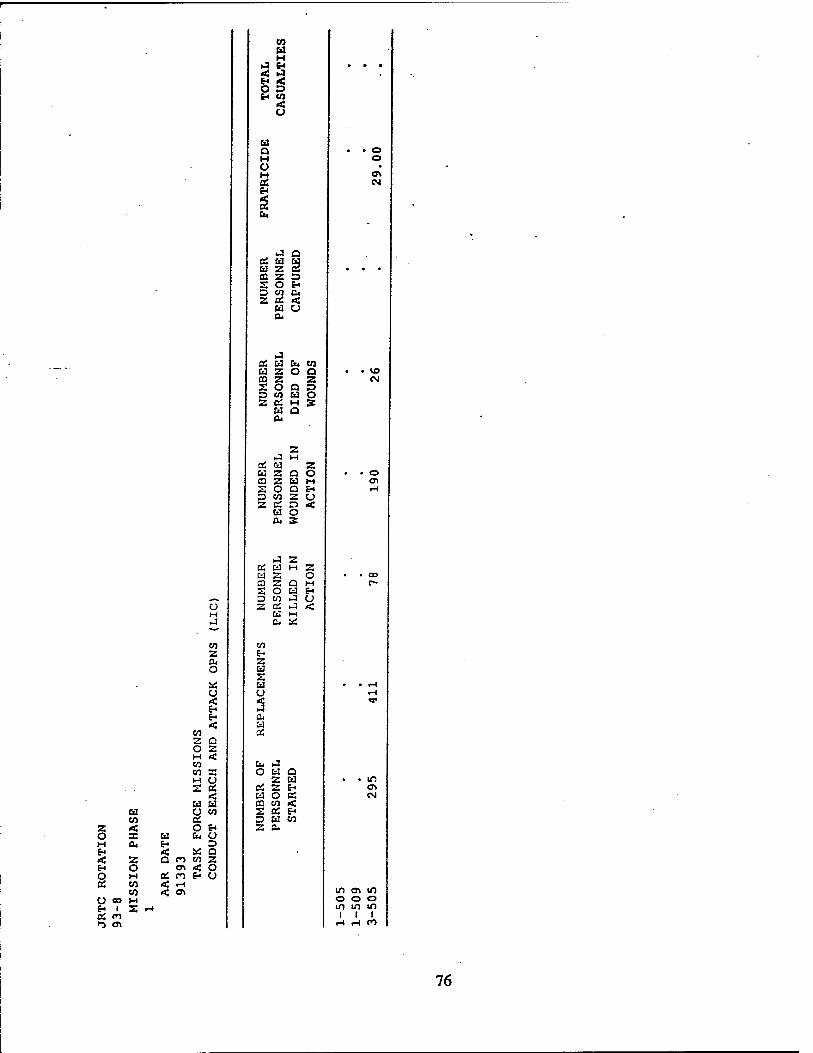
O w J
CO 2 04 o X o < fri 6* <
CO 2 Q O 2 H < CO CO X M CJ S OS < B Cd
a Ü CO CO OS
2 < O E« O X Cd a O H cu En D E* < *S Q < z Q CO co 2 Z* o o\ < O O H as co 6- O CC CO 2 i-t
co o\ o CO M E- 1 a ^ a n >-i a\
CO a M
H3 *• 4 iJ H < O D E-i co <
U
a Q
o M OS
■J Q es a a M 2 2 CQ 2 D S O E-> D CO Oi 2 OS <
a u 04
J os a fc. en B 2 O Q
i§o 2 a to a O 2 OS M 36
a a 04
2 ►3 M
öS a 2 B 2 Q O a 2 a l-i a o a £-• D CO 2 O 2 CS D <
a o 04 S
i4 2 as a M 2 a 2 O ca 2 Q 1-4 a o a E-< D W J O 2 OS iJ <
a M 04 aä
CO E-> 2 a a a o 3 04 a OS
a »4 o a o
2 a OS 2 E-> a o os CQ CO < a os E-> D a co 2 04
© o
o en
lO ON CM
U1 CT> 10 o o o lO lO lO
I I I p-i f-i n
76

u M J
EC £H M CO
•J < O H n W a: o < Eu
CO O 2 o w M CO CO 2 co m M Eu s a
Q Ed
a O < co £ z o g Ed
O EH Cu o
M cu EH s EH «C Sd Q < 2 D CO CO 2 6-> O en < o o H CO co EH O OS V] 3 rH
CO oi O 00 M &4 1 2 -i a. CO •^ a\
CO a H
•J EH < H> EH < O D EH CO <
Ed Q M O H B: EH
►3 Q OS Ed Ed Ed 2 OS OZ3 2 O EH D to & Z OS «c
u o cu
OS Ed Cu CO Cd 2 O a CO 2 2 S O Q D D CO Cd O 2 OS M s
cd a Oi
2 iJ M
OS Ed 2 Cd 2 Q O £0 Z Cd M 2 o a EH 3 CO 2 CJ 2 OS D <
Cd O CU S
•4 2 OS Cd M 2 Cd 2 O OZQ M 2 O Cd EH DM J O Z CS J <
Cd M a, td
CO EH 2 Cd 2 Cd O 3 Cu Cd OS
Eu iJ O Cd Q
2 Cd OS 2 EH Ed O OS CO CO < 2 Cu EH D Cd CO 2 CU
<3"
co
lO CT> U"> O O O m m m
i i i r-i i-H CO
77

CO Ed M
iJf o • ■■ < ^ in t* < » O D E-i CO <
O
a Q o • © w © © o H f-4 to a:
Cu •
►J Q - 05 Ed Ed Ed Z S . . . § O f S CO Oi Z OS <C
Ed O 04
o 1-1
ENTS NUMBER NUMBER NUMBER
PERSONNEL PERSONNEL PERSONNEL
KILLED IN WOUNDED IN DIED OF
ACTION ACTION WOUNDS
143 307
85 276 26
< E* E- <
Ed O
04
409
Ed Ed CO i* a:
O 2 M Ed en CQ Eu iJ CO M O Ed Q H iJ Z Ed m • c—
Q Ci Z |j ta t— Ed O OS VD CM
Ed CO CO < Ed O < 2 e. e-> CO Eli D Ed CO
z < oh Z 04 O X Ed Cu O M 04 6" ,5 s* < * S < Z Q en co Z f-, O ' W < P O M 0J CD f O
* OT "5 2 co «5 en in a\ m © © o
O eo H m m m £-. 1 S CM t i ■ 02 co f-H .-4 CO IO C\
78

o
EH
o
fa o
X a, Z O
Cd
a a\
a: m to «eo co «en
ü oo M EH i 2 <n OS <n rs «
O Cd t-i co «o 2 co Cd H fa 2 Cd
O Cd
els* O EH fa a as
CO CO < EH
O O
CO u H
►3 EH <o < *» « E* < N O D EH CO
< CJ
Cd a O H o o • M CO a t*
►4 a cs u Cd Ed Z OS o z s 2 o EH D co CU z a <
Cd Ü Oi
■J os cd fa CO Cd Z O Q m z 5 2 O a 5 D co Cd o Z £ 1-4 B
Cd a &
z J M
OS Cd z Cd Z a o m z Cd M 2 O a EH D co z O Z OS 5 <
Cd O a< s
j z CS Cd M z Cd Z o 03 z a M z o Cd £H p CO iJ C> z cs J <
Cd l-H Oi ^
CO 6* Z Cd 2 Cd O
3 Ü4 Cd OS
fa iJ O Cd Q
Z Cd os z EH Cd O OS en co < 2 OS EH D Cd CO Z 04
o o vo
in
10 r- CM
en o
m o\ in o o o m m in I I I
rH rH CO
79

Enclosure Id: NTC BDA Tables

TANKS IFV UNIT START LOST START LOST
TM A (MECH) 4 3 7/6 2/2
TM G (MECH) 3 3 3/10 2/0
SCOUTS -- -- 6/2 5/0
TF CONTROL -- -- 0/6 0/0
c. WEAPON SYSTEMS THAT CAUSED OPFOR CASUALTIES
DRAGON SYSTEM START LOST TANK TOW 25mm VIPER CAS/AH ARTY OTHER
T-72 22 6 3 1 — " *2
BMP 68 31 16 2 3-- 3/0 5 **2
BRDM 17 7 1 2 -- 1 ***3
BRDM AT-5 6 2 2 -- -- - —"
MT12 4 2 2
ZSU 23-4 4 0
2S1 6 0
HIND 2 0
VISMOD 10 0 -- -- --
INFANTRY 277 71 29 36 -- .... 6 --
RED AIR 10 7 -- -- -- -- " -- ****7
* FRATRICIDES ** 1 FRATRICIDE/1 OC KILL *** 2 FRATRICIDE/1 OC KILL "k'k'jcJt AJDA
80
j ■,.-■.
This document contains information exempt from mandatory disclosure FOIA. Exemption 5 applies.
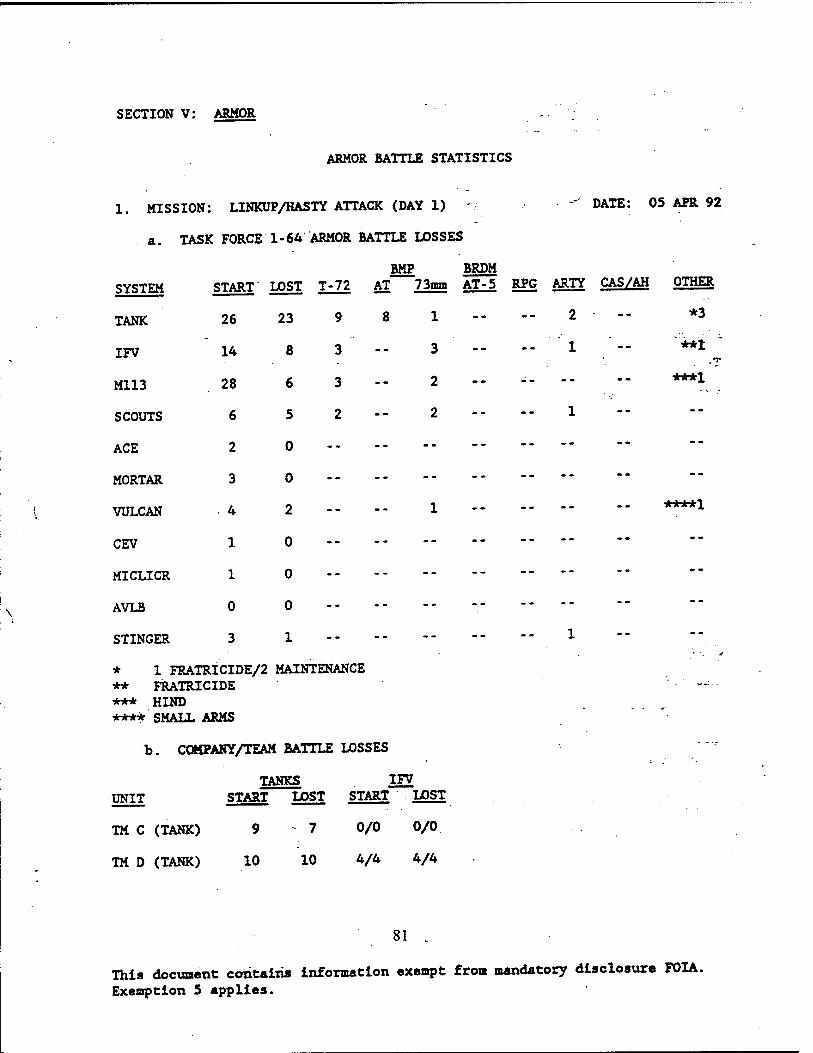
SECTION V: ARMOR
ARMOR BATTLE STATISTICS
1. MISSION: LINKUP/HASTY ATTACK (DAY 1) ' DATE: 05 APR 92
a. TASK FORCE 1-64 ARMOR BATTLE LOSSES
BMP BRDM SYSTEM START LOST T-72 AT 73mm AT-5 RPG ARTY CAS/AH OTHER
TANK 26 23 9 8 1 - - 2 - *3
IFV 14 8 3 -- 3 -- -- 1 -- *** _
M113 28 6 3 2 ***!
SCOUTS 6 5 2 -- 2 -- -- 1
ACE 2 0
MORTAR 3 0
VULCAN 4 2 -- -- 1 -" ****1
CEV 1 0
MICLICR 1 0
AVLB 0 0
STINGER 3 1 !
* 1 FRATRICIDE/2 MAINTENANCE ** FRATRICIDE *** HIND jrirkfe SMAUL ARMS
b. COMPANY/TEAM BATTLE LOSSES
TANKS IFV UNIT START LOST START LOST
TM C (TANK) 9 7 0/0 0/0
TM D (TANK) 10 10 A/4 4/4
81 k
This document contains information exempt from mandatory disclosure FOIA. Exemption S applies.

Enclosure le: NTC BDA Tables

BATTLE STATISTICS
BLUFOR COMBAT SYSTEM MISSION CAPABLE ATLD
DESTROYED/ LOST
TOTAL AVAIL AT COM
T-MMAIN T-72 BMP TIMM
BMP ATJ
BMP AT-*
BRDM AT-«
AT-* OISMN
SCTBMMWV » ■ •
SCOLTSQD
M1/A1/A2 43 42 1 14 1 2 to
M2(IFV) 14 14 0 5 I 1
M3(CTV)
M113 2! < 13 «
DRAGON
AT-«
»SQUAD 7 7
rrv 2 2 0 2
B CO-CIV - -
TOWHMMWV
TOW DISMOUNTED
nsTv « 2 4 2
•OLT
.isrr roc 3 i
107MM MORTAR 6 6
SIMM MORTAR
«MM MORTAR
AH-**
AH-1
EH-M
OB-JS3
OH-4SC
UH-4»
UH-1
CH-47 ■
VVLCAN-SP
VULCAN-TOWKD
STINGER
This document contains information exempt from mandatory disclosure FOIA. Exemption 5 applies.
82

BLUTOK COMBAT 5YITXM 1 MUMONCAPABLB 1 ATLD
TOTAL AVAIL AT COM
T-MMA1N CUN
T-n BMF TIMM
BMP AT»
BMP AT-«
BBDM AT-«
AT» DUMM LOST
Htrnnca. 1 4 3 t
CEV
AVLB
AVLM t 1
MICLIC 3 3
BULLDOZE*.
BUCKET LOADEK
ACS 7 7
III
EN SQUAD < «
MltnSMKCEN
rox
MM
M577CF * 4B>
PERSONNEL
This document contains information exempt from mandatory disclosure FOIA. Exemption 5 applies.
83

II
TO» COMBAT IY8TBM KT-OAT CUN
XTC-l« ROOT AVIATION
HWD-D AT-1 JSU&4 ■A4 j&* fUNI» »0*
£AS £4 FA9CAM I
»CTHMMWV
SCOUT SQD
M1/A1/A2
M2(!JV)
MJICTV)
MU3
DRAGON
AT-4
IN SQUAD
rrv
t CO-CIV
TOWHMMWV .
TOW DISMOUNTED
nSTV
COLT
M5TT roc
IJ7MM MORTAR
MMORTAX
<M MOKTAX
AH-M
AH-t
BH-M
OH-SD
OH-4SC
VH-U
UH-l
cn-rr
VULCAN - SP
VULCAN - TOWED
STOICS«
M2STINCKR
CSV ,
AVL»
This document contains information exempt from mandatory disclosure FOIA. Exemption 5 applies.
84

SLUTOR COMBAT SYSTEM MT43AT «IN
KPG-U FRONT AVIATION
HIMM> AT<4 WM üä SA-» «NP-P
Sfi* CAS ZA £A£AM
AVLM
MKXIC
BULLDOZER
BUCKET LOADER
ACC
SEX
IN SQUAD
MM» SMK CEN
rox
MSI
Miner
PERSONNEL
SLUTOR COMBAT SYSTEM MINES SMALL ARMS
NBC PERSISTENT
NBC NONTERSISTENT
MAINT MILES INOP FRAT K2A WIA DOW OTHER 1
SCTHMMWV
SCOUT SQO
M1/AI/A2 1
Msnrvi 2
M3(CTV)
M1U
D HA CON
AT-4
W SQUAD
rrv
ECO-CTY
TOW HMMWV
TOW DISMOUNTED
fISTV .
COLT
This document contains information exempt from mandatory disclosure FOIA. Exemption 5 applies.
85

F—-—aJ-=nsu—i
«OK COMSAT IYITSM tama ■MALL AMU
me fttSISTENT
NBC NONHRSIITKNT
MAINT MILHINOr nur K1A WIA DOW OTHXR
M577IDC
WMMMOCTAX
tlMMMOKTAX
«MM MORTAR
AH-M
AB-1
KfW»
<HMB>
OB4K
L1M»
VH-1 -
C1W7
V«LC*N-sr
YULCAJ*-TOWED
3KR
MZSTIXGEX
CBV
AVIS
AVLM
MICLIC
IL1UXKK
BUCKET LOADER
ACS
SEC
IN »QUAD
M1M9SMXCBN
rox
This document contains information exempt from mandatory disclosure FOIA. Exemption 5 applies.
86

BLUTO* COMBAT SYSTEM MINES SMALL AIMS
NBC PERSISTENT
NBC NONPSBSISTENT
MABTT MILBBINOP nur E2A «U BOW
""
MM
MST7CT
PERSONNEL
OrrOR COMBAT SYSTEMS MISSION CAPABLE AT LD
DESTROYED/ LOST
TOTAL AVAILABLE
AT COM
MI/A1/A2 MAIN GUN
M20 MAIN CUN
MM TOW
rrv BBLL roti
AB-M AH-l TOW
T-S»
T-n U I 1
BMP. ATS 47 12 5 t
BMP. AT-«
BRDM. AT-«
AT-5DISMOUNT « 1 -
BRDM t« 3
MT-U. AT CUN
D18 INFANTRY
St. FA
ACRV
1
HESD-O. M1-J4
FRONT AVIATION
MTLS
D» KNCLNEERS
SA-*
SA-» m
zsu
ADO
PERSONNEL . ...
This document contains information exempt from mandatory disclosure FOIA. Exemption 5 applies.
87

orroK COMBAT | BYBTBMS
TOW HMMWV
TOW DISMOUNTS»
BBACON CAB BMAJU. AIMS
FA tABCAM MKBB .NBC NBC 1 NONrUSIBTINT |
TB»
T-n
»MT. AT-J 5
BMP. AT-*
1 RDM. ATM
AT-5DISMXT 1
»RDM t
MT-tt. AT CUM
DISINTA.VntY
an. FA I ACRV 1 HMW>. MI-M
ROW AVIATION "
MTLB
DIB BNCICTIXS
»A4
J
ADC2
KRSONNSL
OrrOR COMBAT SY3TSM3 rRATWCmi MILIStMOr MAWTXNA.NCT OTHBS
T-*
T-Tl
IMP. AT-3
•Mr. AT-»
»RDM. AT-«
AT-4DISMNT
BRDM
MT-1X AT CVS
DU WTAWTRY
This document contains information exempt from mandatory disclosure FOIA. Exemption 5 applies.
88

1 ortos COMSAT mrsMs | numcs» BULB »or MAINRKANCS eras 1
WUtA
toy
HINM.MUM
ROM* AVIATION
KTU
DIS XXCtNBRS
IA-«
•A4
ZJV
ADCI
ma«««.
f. GRAPHICS (ENCLOSED)
This document contain« information exempt from mandatory disclosure FOIA. Exemption 5 applies.
89

Enclosure 2a: Fully Edited CMTC BDA Tables

7v
ä
■*r
4> 1 IU\i SS '^ 2
CM -
IO
/ co '"* UJ N
5^ T- ** CM
(f) u.
io in CM CM
■aJKV
I?2
< to
CM
< r° ü V o - in
CO
1« r*- CO
o 11- Q. o
il CO CO
|5 CM T-
CM CM CO T" T-
J*( O) O
to CM
o CO IO CO CM CM CO CO
CO
fcäi < CO CO T-
o> !"- CM o CO o *" CO T" o to
2
6 CO
Q. 2 m
to S Q DC 09
CM
1- s
co|
CO N
< CO
1 DC O < i
UJ > O Z Ul
cs o o s
u.
90

' 1 1
1? '. ä - —
V
CO UJ CO CO o(
cc
o CXi
Uli;
_1* m5
EC
o
IS 5
•
82
CC^ T- T- T-l
eoc T- to v
2^1
CN CO
< T CO
r-
in .-*
Si 1—
I* ^ T- c M CN CM CM
gC to *- *"
8 fe OJ T- C si CM o CM CO to to to CO
CO CM
CM CO
CO to
0:2 -, <co O »-SE *T CO
T- h- C T- T-
9 *r m
CM T to r- CO
*
CO
H<:^C> c I <S ~HL -N. "£*''
SY
STE
MS
M1
t3
/>
? i M r- 5 SSI
cc o s
•
cc CO O
>
CO
C UJ O 2
CO
TV •A
UJ Ü <
■ ■ CO CC UJ C-
CO <
<
2
<
-A
f
v _ ^> _^i
1
■
<>
\ Ä ^
SQ
91

^ ■^
^
*) *
-K
*2
1^
\c* *
I
^f3
*1 "^1
-J
coS Oü cc< O-J
g < O o
CD
> a V
1 ."^» >- m Q LU -J
"V ^ <» ̂ -v
r^v
GQ CO >
a: o o Q.
O CD lO
Ö
DC
CO LÜ -J Ü
IÜ
LU
lO
m CM
Ü £2 Q CO CM CO
>-
£9 CO >
DC O o Q.
CO O) in o m
Ö
< i
^5
CM
Ü CM *f CO CM
Op £
CO CO CO
CM
£ ^«2
LU O
£
< H CO CO o DC Ü
CO o CO
a z 5 <
CO CM Ü
LU CO
r T- CO
r-4
LL. 2 i CM T^ CO '
^ CO CM O) _
uf2 LO r^rCO co iCwODCÖÖ ÜOÜXHXX
in co
H o CM o
CM Ü
LO
o CM
CM CO
92
to

>- X 5
*2 Zh << JZ
CCDC oo oo
O
ü o
CD
Q LU
CO CM CO O) CO G> > Q.
>- CC
\-s -J
<
CO LU
O X LU >
HI
co
si GUI XX CO
o CM o
<o 93

Enclosure 2b: Fully Edited JRTC BDA Tables

o
a E*
< ü
u
z o w
< E*
§
OS o
z o en eo
o u M CO CO Z CO U M Eu 2 Ed Q
U
2« o 6* Eu U D
« Q
Ed E->
Q m co Z o» < o
Ei O cS n 2 <T>
x -<
CO u M
iJ n < >J E* < O 3
6
a H
V
J Q Ed U
OS
EH
Ö
o
o
co
z Cd S u o
a. w a:
EH J O Ed a
z w BS Z E- Cd O OS 03 CO < 2 OS EH D Cd CO Z Oi
1
{- CO
U3 CO
ui <n m o o o mm m
t i i rH rH n
<5>
*
*
^
94

V
o H 2
o <
< a
co
o 2 M w CO CO
H ►H Cd Q
Z o M EH < EH O OS
Ü eo EH I a* ro •o en
eo
2 O H CO CO IH 2 CM
g o Cd fa
*! « Q n co
CM < a: eo EH
2 en
CO u HI
< J EH < o s EH CO
u Q
O • y ^> EH^
Cu
►4 Qi Cd Ed Z 01 z 2 O
(V
Eu coC Z^
CO Cd O
ss
z cä cd 2? Cd Z Q qs m z cd MN 2 O Q EA_ D CO Z CJ z as 3 <
Cd O 0. 3
J aä oi Cd Z ffl z 2 O P CO z e:
Cd &
CO £H Z Cd 2 Cd O
M Z
Q w-i Cd Enpv
a, Cd
o m
o • o o o
tH en
CM
c- o <n
10 r» CM
m 00
en o
m r» r» CM
tr> en to o o o m m ui
i i t rH rH C1
\
3^ IS I
>
I«
95

*i^
96

•I
Z o H
< o a
a CO A S
Z O H CO CO
U SO M e* i s <-> oS en
< Q CO
en öJ en
2 o\
to 2 O CO CO
as! o CM
O M
CO z Du o
< a z < X o < Ed CO
s* u D Q Z o u
CO a H
►3 f« < iJ t< < O D t* CO
<<
63 a M
1-1 '
61 N. s
o o en CM
1"* ^! ^
<A a OS 63 Ed 63 Z 2 OZ3 s o fr D CO Cu Z OS «t!
63 O
es td Cu 63 Z O m z s o a D CO 63 Z CS M
63 a a.
z o 1-1 El Ü <
co
z 63 2 6] o
a, 63 as
Eu O
as 63 _ 03 CO 2 a:
a 63
as < fr*
63 CO
CM
O en
m CM
til $
«>>
1
97

Enclosure 2c: Fully Edited NTC BDA Tables

(noKfrvs&tonib i'U-'O
BATTLE STATISTICS ITATISTICS, <MML^tUrf \ Opfer ufetfpcmS CftA }
BLUFOR COMBAT SY3TKM
(
MISSION CATABLI ATLD
1
DESTROYED/ LOST
TOTAL AVAIL AT COM
T-MMAIN T-n »MM ATJ AT-«
■RDM AT-* OHMN
SCT HMMWV (if»/ 4 • \
SCOUT SOJD
MUA1/A2 (3d"J 43 42 • 1 14 1 2 10
vcarv) (^9) 14 14 0 5 1 1
MJ(CTV) A
MID ft/£") 21 t \
13 '• <
DKACON %
AT-«
INSQUAD £(H1-) 7 7
rrv A"/> 2 •* 0 2
KCO-CTV -
TOW HMMWV
i TOW D!3MOL'Vr2D
TT?TV ($ft)) i 2 4 2
-0L7
1577 roc 1<\I») 3 3 1 —
IS7MM MORTAR /£*' ' 4 « \
SIMM MORTAR (<% ? )
«MM MORTAR ( %"% / ■>
j AH-*»
AH-1
IH-M
OK-4S3 '
OH-4*C
LH-W
LH-l
CH-«7
VLXCAN - SP
VULCA.N - TOWKD
3TINGBR
This document contains information exempt Exemption 5 applies.
from mandatorv disclosure FOIA.
98

/'«n /'•'■>■"
tZ*****) <%£r*
This document contains information exempt from mandatory disclosure FOLA. Exemption 5 applies.
99
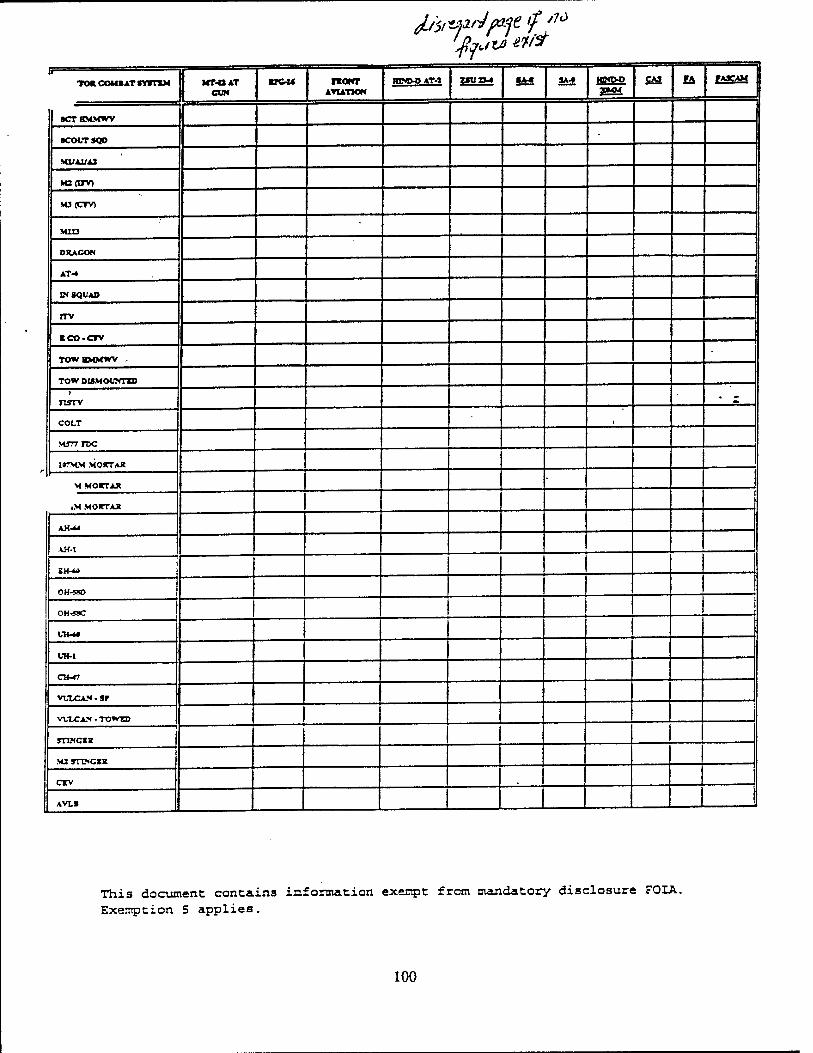
Jti$iVftrJf*jt'/ J70
'fatläW* ll
TO» COM1 AT fVTTTM KT-OAT cat
WKAt ROOT AVIATION
HPflVO AT-1 ZIUZM 1A-1 SA-» HPWVO
S5H £i2 ja r**Mi
»CTHMSCWV
•COCTSQO
M1/AI/A2
»caro
M3(CTV)
M113
DRACO«
AT-4
IN SQUAD
«TV
Eco-crv
TOWHMMWV .
TOW DISMOUNTS)
nsTV * X
COLT r
M577 TOC
1»TMM MOKTAÄ
M MOKTAK
»M MOST A»
AH-**
AH-I
ZH-*a
OH-3D
OH-48C
UH-W
UH-l
CH-C?
VTXCAJ» - SF
WLCA.N • TOWZD
STtNCK
M3 STINGSX
CSV
AVLS
This document contains information exempt from mandatory disclosure FOIA. Exemption 5 applies.
100

(ß&.fm±
■LUV«« COMSAT «WIM MT-SAT CVN
UC4« nONT AVIATION
HIND-D AT-1 ZSUZM l&S l*d HPffVP CAS. £5 £AS£AM
AVLM -
...
MICLIC
ILTLDOZK
IUCXTTLOADEK .
ACS
SIS
EJ» SQUAD
MX«» SMr CSN
rox
MS •
MS7TCT
KKSONNSL
i OpftrU»pan& (BOA )
J— ' ' '' u L-~_ ,JLiJ*q An (ÜB* ILLTOR COMBAT SYSTEM MINES SMALL
ARMS SBC
rSRSlSTSMT MC
NOf*TgR3ISTS.vr MAINT MILSS INOr RAT EIA WIA DOW OTHJK
( „-=7 r
SCOUT SQO
Ml/Al/Al ßlZ ) I f
Y^ r M2(IJY> /tfC) I yizd
M3 fCTV)
MXU
DRACON
AT-«
i IN SQUAD
rrv
SCO-CTV
TOW HMMWV
TOW DISMOUNTED
flSTV _
\ COLT
This document contains information exempt from mandatory disclosure FOIA. Exemption 5 applies.
101

*r!ßt»**- ft JUU1 1_J 4__1
•Ok COMSAT SYfTKM MMt •HALL AIMS
NSC roc MABfT MLB WOP RAT DA wu »aw OTVXZ 1
woMTCMuri tm
Mirrnc
lffTMM MOCTAX
CMMMOTTAK
MMM MOKTAX
AB-«
AH-t
>H-M
OB-J8>
OEHK
UB-M
L-H-l
cH-r 1
vtxCA?« - »r
VliXCA.N-TOWB>
;ix
M2STC«CK
CSV
AVL*
AVXM .
MJCIIC
»CUJXHM
IUCX3T LOAD»
ACS
SEX
EV5QUAD
MI» IMI C»
rox
This document contains information exempt from mandatory disclosure FOIA. Exemption 5 applies.
102

(/!0M /r7/&'ov/ö/u/r)
BLUTO* COMBAT SYITBM
M57TCP
macnnKL
MKH toe Rusmr
NBC NO*rSMI«TBNT
tuon lauamoe nur «u
OpktCSfwtSrfUsf) gAufir tLkafenS QiM )
' > • r r~
OrrOR COMBAT SYSTXMS MISSION CATABLB AT U>
DtSTROYXD/ LOST
%
M1/A1/A3 MAINCVN
M20 MAIN GUN TOW
trv HSU. mi
AS44 AB4 TOW
/ " \ M») 13 1 V I
BMF.AT4 fill)) 47 12 A 5 t
■MT. AT.«
■RDM. AT-* / \ AT-* DISMOUNT CMC/ ) « 1 i ) -
»RDM /77!>) 14 I \ i
MT-Ii. AT CUN
\ \ \
D1S IXFA.NTRY \
31. FA A ACRV
\ \
HIND-O. MI-24 ■' \
rao.vr AVIATION
MTLS \
DIS K>CI.VEERS \ / SA-* V SA-* _
ZSU \
ADCZ / \ ^ PKRSONML
This document contains information exempt from mandatory disclosure FOIA. Exemption 5 applies.
103

t^r f ^c^k/7i^rc^ö^t)
/b
<
orrox COMBAT TOW BMMWV
TOW DISMOUNT»
DEACON CAS ■MAIX ASMS
FA rAJCAM M»B -NBC -TT-1 SYBTOU ruawrsNT
T-M
T-n
BHT. AT-J /7?£ ' 5
BM*. AT-«
BKOM. AT-«
AT-fDISMXT^V?"' ) 1
■>OM <V7?; 1
MT-I2. AT Cl»
DU IKTANTSCY
m.fA
ACIV
BIND-D. MM*
rXONT AVIATION
MTLB
0U «J«CC«SIt3
«A-C
J
ADO
rsasoNNSL
> ' -L OPTO« COMSAT JY3TIMS rXATUODB VdLISIMOr MAINTXXA.NCX OTHXX
T-»
T-«
BMP. ATJ
•Mr. AT-«
BXSM. AT-«
AT-« DBMNT
BXSM
KT-U. AT Cl»
DtSBWANTXY
This document contains information exempt from mandatory disclosure FOIA. Exemption 5 applies.
104

*xüxt»*-. 1 onoK COMBAT mms 1 ™ MLBimr MADOIKAICS «n ».FA
ACTtV
HBO». MM«'
RONT AVIATION
I MTU _ .
DISEMCINKSS •
•A-i
■A-»
ZMX
ADO
| KXSOW4ZL
f. GRAPHICS (ENCLOSED)
This document contains information exempt from mandatory disclosure FOIA. Exemption 5 applies.
105

Enclosure 3 - BLUFOR and OPFOR Target and Weapons Codes and Categories
The left hand column designates the code numbers represented in the BDAdb and the Target Category is listed to the right. BOLD categories denote the occasional target/weapon category synonyms, or "roll-up", e.g. category 138 AVLB = MICLIC means that any entry in the THP for MICLIC is entered under the BDAdb code for AVLB.
Table 1a - BLUFOR Targets
BDAdb CODE
BLUFOR TARGET CATEGORY
86 107mm Mortar
88 60mm Mortar
87 81mm Mortar
120 A10
137 ACE
55 ADC2
111 AH-1S
AH-1 -use AH-1S
110 AH-64
APCs-useM113(APC)
105 Artillery
AT-4 - use MANPACK AT-4
71 ATGM
117 Attack Helicopter
145 Avenger
138 AVLB
139 AVLM
122 Bomber
BUCKET LOADER - use Misc/Other
BULLDOZER - use BULLDOZER/SEE
146 Bulldozer/SEE
106

BDAdb CODE
BLUFOR TARGET CATEGORY
125 CAS
136 CEV
116 CH-47
132 Collector
DOZER - use BULLDOZER/Use
DRAGON - use MANPACK DRAGON
DSMT INF - use Infantry
45 E Co - CFV
EH60 - use Misc/Other
EN M113-useM113 APC
EN SQUAD - use Misc/Other
ENG/SQD - use Misc/Other
FDC - use Mortar
121 Fighter
123 Fighter Bomber
80 FISTV
148 FOX
134 HMMWV
143 HMMWV (TOW)
HOWITZER - use Artillery
IFV - use M2 (IFV)
IN SQD - use IN SQUAD
142 IN SQUAD
144 Infantry
ITV - use M901-AT-APC
131 Jammer
M1025 - use SCT HMMWV
M106 - use M106-SP-Mortar
107

BDAdb CODE
BLUFOR TARGET CATEGORY
147 M1059 Smoke Gen
91 M106-SP-Mortar
102 M107-SP-Gun-Howitzer
100 M108-SP-Howitzer
101 M109-SP-Howitzer
103 M110-SP-Howitzer
42 M113APC
43 M113 WITH TOW
90 M125-SP-Mortar
M1 - use M1 Tank
32 M1A1 Tank
M1/A1/A2 - use M1A1 Tank
31 M1 Tank
M113-useM113(APC)
M2 - use M2 (IFV)
54 M2 Stinger
82 M224 Mortar
40 M2 (IFV)
M3 - use M3 (CFV)
41 M3 (CFV)
33 M551 TK
46 M577
M577 CP - use M577
M577 FDC - use M577
30 M60 Tank
149 M88
44 M901-AT-APC
60 Manpack
108

BDAdb CODE
BLUFOR TARGET CATEGORY
70 Manpack AT-4
66 Manpack Dragon
61 Manpack M-16
64 Manpack M =203
63 Manpack M249
62 Manpack M60
68 Manpack Mark 19
51 Manpack Stinger
65 Manpack TOW
67 Manpack Viper-Law
MICLIC - use AVLB
20 Misc/Other
89 Mortar
104 MRLS
OH-58C - use OH-58
115 OH-58D
112 OH-58
PERSONNEL - use Infantry
130 Radar
124 Recon
140 Set HMMWV
141 Set Squad
SCT113-useM113(APC)
Scouts - use Set Squad
See - use BULLDOZER/SEE
52 SP Chapparral
50 SP Vulcan
STGR - use MANPACK STINGER
109

BDAdb CODE
BLUFOR TARGET CATEGORY
STINGER - use MANPACK STINGER
TOW DISMOUNTED - use MANPACK TOW
TOW HMMWV - use HMMWV (TOW)
133 Truck
135 Truck-HMMWV-Mark-19
113 UH-1
UNK - use Other/Misc
UNKNOWN - use Other/Misc
VOLCANO - use ADA
VULCAN - use Vulcan, Towed
VULCAN-SP - use SP-VULCAN
110

Table 1b - BLUFOR Weapons
BDAdb CODE
BLUFOR WEAPON CATEGORY
20 105mm
30 105mm Tank Main Gun
12 107mm
31 120mm Tank Main Gun
32 152mm Tank Main Gun
21 155mm
22 175mm
83 2.75 Inch Rocket
81 20mm Airborne
70 20mm Vulcan
24 227mm Rocket
25mm - use 25mm M2/3 Main Gun
40 25mm M2/3 Main Gun
80 30mm Airborne
55 40mm Grenade
50 50 cal Machine Gun
10 60mm
11 81mm
23 8 inch
73 ADA
AH-1 TOW - use TOW AH-1
25 Artillery
ARTY - use Artillery
67 AT-4
69 ATGM
87 Attack Helicopter
AVGR - use Stinger
111

BDAdb CODE
BLUFOR WEAPON CATEGORY
CAS/AH - Single figure goes under CAS; X/Y where X = CAS and Y = AH
86 CAS
71 Chaparral
52 COAX
97 DOW
61 Dragon
90 FA
91 FASCAM
74 Hawk
82 Hellfire
1FV - use 25mm M2/3 MAIN GUN
95 KIA
M1/A1 - 120mm Tank MAIN GUN
M1/A1/A2 - use 120mm Tank MAIN GUN
54 M16 Rifle
M2/3 TOW - use TOW M2/3
M2/3 MAIN GUN - use 25mm M2/3 MAIN GUN
M2/M3 - use 25mm M2/3 MAIN GUN
53 M249 Machine Gun
51 Mark 19 Grenade
84 Maverick
92 Mines
13 Mortar
94 NBC (Non Pers)
93 NBC (Pers)
85 Rockeye
SCOUT - use Small Arms
112

BDAdb CODE
BLUFOR WEAPON CATEGORY
63 Shillegh Missile
57 Sm Arms
72 Stinger
60 Tow
65 Tow AH-1
TOW DISMOUNTED - use TOW
66 Tow HMMWV
64 Tow ITV
68 Tow M2/3
62 Viper Law
96 WIA
113

Table 2a - OPFOR Targets
BDAdb CODE
OPFOR TARGET CATEGORY
210 122-SP-Howitzer
212 152-SP-Gun-Howitzer
211 152-SP-Howitzer
213 203-SP-Gun-Howitzer
256 - use Artillery
2S1 - use Artillery
2S1, FA - use Artillery
2S6 - use Artillery
218 ACRV
187 AD C2
AIR - use Front Aviation
217 Artillery
AT-3 - use BMP-1
AT-4 - use Infantry
AT-5 - use BMP-2
196 AT-5
AT-5 DISMT - use AT-5
197 ATGM
214 BM21-MRL
215 BM27-MRL
172 BMP
170 BMP-1
171 BMP-2
231 Bomber
173 BRDM
BRDM AT-5 - use BRDM2-AT5
181 BRDM2-AD
114

BDAdb CODE
OPFOR TARGET CATEGORY
174 BRDM2-AT5
175 BRDM AT-3
176 BTR
BTR-80 - use BTR
241 Collector
250 DIS Engineer
DIS INFANTRY - use Infantry
230 Fighter
232 Fighter-Bomber
216 Frog
234 Front Aviation
Front Aviation - BDA - use Front Aviation
Front Aviation - TF - use Front Aviation
220 HIND-D
HIND-D, MI-24 - use HIND-D
221 HIND-E
198 Infantry
240 Jammer
201 M160 Mortar
200 M1943 Mortar
202 M240 Mortar
190 Manpack
191 Manpack AKM
193 Manpack AT3
194 Manpack AT4
192 Manpack PKT
195 Manpack RPG
183 Manpack SA14
115

BDAdb CODE
OPFOR TARGET CATEGORY
204 Mortar
219 MT-12
MT-12, AT GUN - use MT-12
182 MTLB
223 OH-HOPLITE
245 Other/Misc
PERSONNEL - use Infantry
244 Radar
233 Recon
RED AIR - use Front Aviation
184 SA8
185 SA9
SA-14 - use SAM
186 SAM
T-12-use MT-12
160 T-72 Tank
161 T-80 Tank
242 Truck
222 UH HP
243 VISMOD
ZS6 - use ZSU
180 ZSU
ZSU 23-4 - use ZSU
ZSU-23-24 - use ZSU
ZSU/SA-14 - use ZSU
116

Table 2b - OPFOR Weapons
BDAdb CODE
OPFOR WEAPON CATEGORY
190 12.7mm Airborne MG
160 12.7mm Machine Gun
110 120mm
120 122mm Howitzer
124 122mm Rocket
140 125mm T-72 Main Gun
141 125mm T-80 Main Gun
168 14.5mm BTR
122 152mm Gun Howitzer
121 152mm Howitzer
111 160mm
123 203mm Gun Howitzer
125 220mm Rocket
180 23mm ZSU
112 240mm
30mm - use 30mm HIND
151 30mm BMP Main Gun
191 30mm Gun
196 30mm HIND
192 57mm Rocket
73mm - use 73mm BMP Main Gun
73mm MG - use 73mm BMP Main Gun
150 73mm BMP Main Gun
186 ADA
167 AGS-17
162 AKM
127 Artillery
117

BDAdb CODE
OPFOR WEAPON CATEGORY
195 AT-6 HIND
AT-3 - use AT3 (BMP)
170 AT3 (BMP)
171 AT4
AT-5 - use AT5 (BMP)
172 AT5 (BMP) = LAV
174 AT5 (BRDM)
AT-5 DISMN - use AT5 DISMOUNT
175 AT5 DISMOUNT
173 AT6
BMP - use AT3 (BMP)
BMP 73mm - use 73mm BMP Main Gun
BMP AT-3 - use AT3 (BMP)
BMP AT-5 - use AT5 (BMP)
197 CAS
207 DOW
FA - use Artillery
202 FASCAM
126 FROG
193 Frontal Aviation
HIND - use HIND-D MI-24
HIND-D 20mm - use HIND-D MI-24
HIND-D AT-2 - use HIND-D MI-24
194 HIND-D MI-24
HIND M-24 - use HIND-D MI-24
205 KIA
LAV - use AT5 (BMP)
MINEFIELD - use MINES
118

BDAdb CODE
OPFOR WEAPON CATEGORY
200 MINES
113 Mortar
164 MT-12 AT Gun
201 NBC
161 PKT
163 RPG
165 RPG-16
182 SA-13
183 SA-14
184 SA-8
181 SA-9
185 SAM
SILENT - use Other/Misc
SILENT KILL - use Other/Misc
166 Small Arms
SU-25 - use Other/Misc
T-72 - use T-72 MAIN GUN
T-72/80 - use Other/Misc
206 WIA
ZSU-23-24 - use ZSU
119

Table 3 - 0/C Weapons
BDAdb CODE
CONTROLLER GUN WEAPON CATEGORY
ADMIN - use Controller Gun
CNTRLR - use Controller Gun
4 Controller Gun
DIRECT FIRE - use Fratricide
1 EVP 105MM Ballistic
2 EVP 120MM Ballistic
0 EVP Null Weapon
FRAT - use Fratricide
5 Fratricide
INDIRECT FIRE - use Fratricide
MAINT - use Maintenance Down
7 Maintenance Down
MILES - use MILES Malfunction
6 MILES Malfunction
O/C - use Controller Gun
8 Other
SAFETY - use MILES Malfunction
SAFETY INOP MILES - use MILES Malfunction
TAF - use Controller Gun
3 Weapon Undefined
120
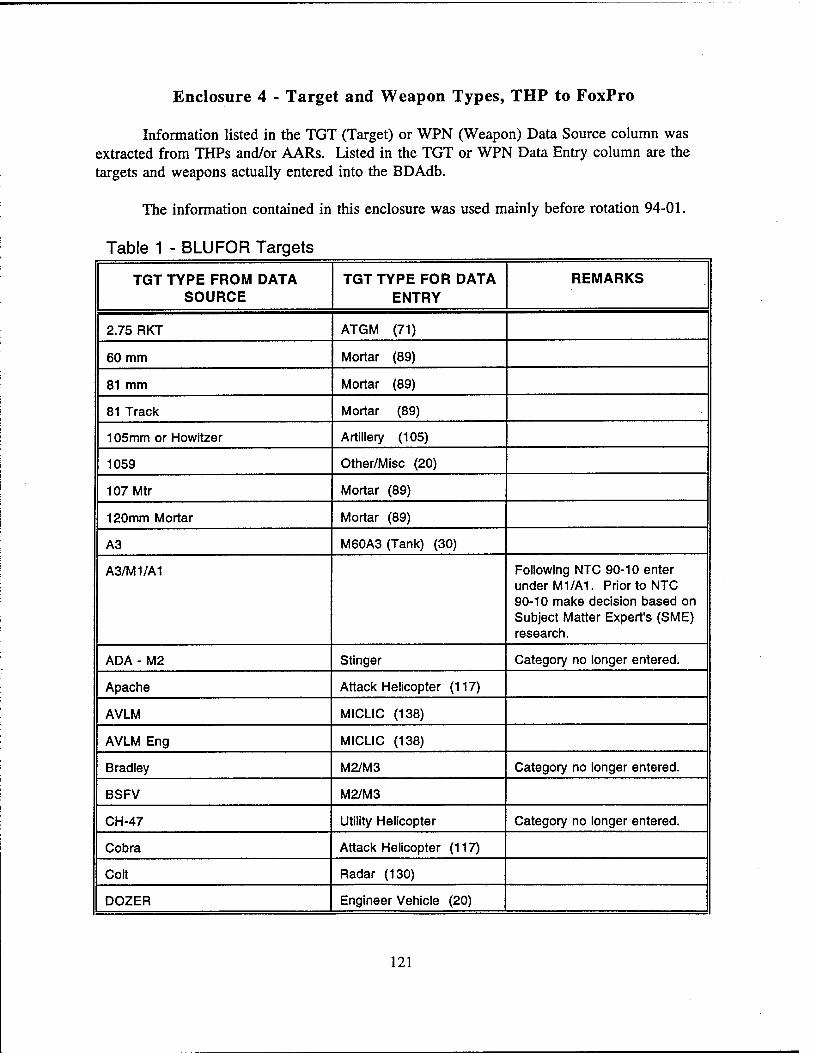
Enclosure 4 - Target and Weapon Types, THP to FoxPro
Information listed in the TGT (Target) or WPN (Weapon) Data Source column was extracted from THPs and/or AARs. Listed in the TGT or WPN Data Entry column are the targets and weapons actually entered into the BDAdb.
The information contained in this enclosure was used mainly before rotation 94-01.
Table 1 - BLUFOR Targets
TGT TYPE FROM DATA SOURCE
TGT TYPE FOR DATA ENTRY
REMARKS
2.75 RKT ATGM (71)
60 mm Mortar (89)
81 mm Mortar (89)
81 Track Mortar (89)
105mm or Howitzer Artillery (105)
1059 Other/Misc (20)
107 Mtr Mortar (89)
120mm Mortar Mortar (89)
A3 M60A3(Tank) (30)
A3/M1/A1 Following NTC 90-10 enter under M1/A1. Prior to NTC 90-10 make decision based on Subject Matter Expert's (SME) research.
ADA - M2 Stinger Category no longer entered.
Apache Attack Helicopter (117)
AVLM MICLIC (138)
AVLM Eng MICLIC (138)
Bradley M2/M3 Category no longer entered.
BSFV M2/M3
CH-47 Utility Helicopter Category no longer entered.
Cobra Attack Helicopter (117)
Colt Radar (130)
DOZER Engineer Vehicle (20)
121

TGT TYPE FROM DATA SOURCE
TGT TYPE FOR DATA ENTRY
REMARKS
DRAGON ATGM (71)
EH 60 Other/Misc (20)
Eng Sqd Other/Misc (20)
FDC Mortar (89)
FOX + DOZER Engineer Vehicle (20)
FSV FISTV (80) Typo.
FUCHS Other/Misc (20) This is a BTR.
GSR Radar (130)
IFV M2/M3 Category no longer entered.
Inf Sqd Infantry (144)
M1/A1 Tank Category no longer entered.
M109 Artillery (105)
M113/M2/M3 SeeA3/M1/A1.
M113(ENG)orEng/M113 Engineer Vehicle (20)
Main M113 Other/Misc (20)
M2 M2/M3 Category no longer entered.
M2INF M2/M3 Category no longer entered.
M2/3 M2/M3 Category no longer entered.
M2 HMMWV HMMWV (134)
M3 M2/M3 Category no longer entered.
M25 Other/Misc (20)
M35 Other/Misc (20)
M548 Other/Misc (20) This is a 2 1/2 ton truck.
M88 Other/Misc (20)
M901 TOW
M981 Other/Misc (20)
M996 (SCT) TOW Category no longer entered.
M996 (TOW) TOW Category no longer entered.
MF Minefield Category no longer entered
122

TGT TYPE FROM DATA SOURCE
TGT TYPE FOR DATA ENTRY
REMARKS
Mired Other/Misc (20)
MK-19 HMMWV (134)
Mortar If this value is displayed in "start/lost" as a fraction - go with the figure on the right of the / for the actual number of mortars.
OH 58 Scout Helicopter Category no longer entered.
Other Hmmwv HMMWV (134)
Out of Fuel Other/Misc (20)
PERSONNEL Infantry (144)
SAW Small Arms Category no longer entered.
Scouts Infantry (144)
Set M1025 HMMWV (134)
Set M998 HMMWV (134)
Set Hmmwv HMMWV (134)
Scouts/M3 M2/M3 Category no longer entered.
SEE Engineer Vehicle (20)
Sheridan M551 (46)
Squad Infantry (144)
Stuck in mud Other/Misc (20)
TLAT TOW Category no longer entered.
Tow Hmmwv TOW Category no longer entered.
Tow M966 TOW Category no longer entered.
Tow Scouts TOW Category no longer entered.
Truck Other/Misc (20)
UH1 Utility Helicopter Category no longer entered.
Viper/AT-4 ATGM (71)
WPN HMMWV HMMWV (134)
123

Table 2 - BLUFOR Weapons
WPN TYPE FROM DATA SOURCE
WPN TYPE FOR DATA ENTRY
REMARKS
105mm Artillery (25) Howitzer
2.5 Rocket Attack Helicopter (87)
40 mm See SME.
.50 or .50 cal Small Arms (57)
.50 Machine Gun Small Arms (57)
50 m rules Controller Gun (4)
60mm Mortar Mortar (13)
81mm Mortar Mortar (13)
105mm Howitzer Artillery (25)
155mm Howitzer Artillery (25)
AT-4 ATGM (69)
AT-4/Viper ATGM (69)
A-10, AVN A10 CAS (86)
ADA/M2 ADA undefined (73)
ADMIN Other/Misc (8)
AH Attack Helicopter (87)
Apache Attack Helicopter (87)
ARTY/MORTAR Artillery (25)
AVLB MICLIC Category no longer entered.
AVLM MICLIC Category no longer entered.
Backblast Fratricide (5)
BOGUS Other/Misc (8)
Bradley 25mm (40)
CAS/AH x/y where x is under CAS and y is under AH; if only one value then it goes under CAS
CAS/AH/MILES INOPERABLE Other/Misc (8)
CAS/AH/MIN/FRATRI Cl DE/ MILES INOPERABLE
Other/Misc (8)
124

WPN TYPE FROM DATA SOURCE
WPN TYPE FOR DATA ENTRY
REMARKS
CAS/AH/FRATRICIDE/NBC Other/Misc (8)
CAS/AH/2 MINE Other/Misc (8)
CFV 25 mm (40) Cavalry Fighting Vehicle
CHAP CHAPARRAL (1)
CHEM or CHEM DOWNWIND NBC Category no longer entered.
COAX Small Arms (57)
Cobra Attack Helicopter (87)
Code 00 Controller Gun (4)
Copperhead Artillery (25)
Crew Killed Other/Misc (8)
Depop Other/Misc (8)
Dragon ATGM (69)
Dragon (DGN) ATGM (69)
Dragon/Viper ATGM (69)
FAS CAS (86) Typo.
FASCAM Bluefor FASCAM (91) Unless entry specifies RED FASCAM, enter under Bluefor FASCAM.
FIST-V Small Arms (57)
GEMMS Mines (92)
HIND MI-14 HIND (30mm) Category no longer entered.
How or How Btr Artillery (25) Howitzer
IFV 25mm (40)
IFV/APC See SME.
INF or Inf Sqd (as weapon) Small Arms (57)
INF as RTD (Returned to Duty) Do not enter.
INT Infantry Typo. Category no longer entered.
ITV Improved Tow Vehicle (64)
Machine Gun Small Arms (57)
125

WPN TYPE FROM DATA SOURCE
WPN TYPE FOR DATA ENTRY
REMARKS
M1 Tank Category no longer entered.
M106 Mortar (13)
M109 Artillery (25)
M901 ITV Category no longer entered.
M981 ?
M2 25mm (40)
M21 M2/M3 Typo. Category no longer entered
M202 TOW (60) Typo, for M220.
M3 25 mm (40) CFV/Bradley
M551 (Sheridan) Tank Category no longer entered.
M60MG Small Arms (57) M60 Machine Gun
M60TK Tank M60 A3. Category no longer entered.
M996 TOW (60)
Mines inop or Bfor Mines Mines (92)
Mine Plow Engineer Vehicle Category no longer entered.
Mine Roller Engineer Vehicle Category no longer entered.
MK19, MK19/M2, Scouts (MK19)
MK19 Category no longer entered.
No matching KC Other/Misc (8)
NBC Mines NBC Category no longer entered.
OC Kill Controller Gun (4) Observer/Controller Kill
Overrun Other/Misc (8)
SAFAD Small Arms (57)
Safety Controller Gun (4)
Safety/Miles Inop Controller Gun (4)
SBDA Other/Misc (8)
SIM Other/Misc (8)
Scout/APC Small Arms (57) Same as APC/M113
Scouts/M3 25 mm (40)
126

WPN TYPE FROM DATA SOURCE
WPN TYPE FOR DATA ENTRY
REMARKS
Scouts/CFV 25 mm (40)
Scouts Hmmwv Small Arms (57)
Scouts Infantry Category no longer entered.
SEE Engineer Vehicle Category no longer entered.
SM ARMS VUL FRAT Fratricide (5)
Stinger/Vulcan ADA (73)
TAF Controller Gun (4)
TOW TOW (60)
TOW HMMWV TOW (60)
Unconfirmed Fratricide Fratricide (5)
Unknown Other/Misc (8)
UK Other/Misc (8)
Viper ATGM (69)
VOLC Other/Misc (8)
XSMALL ARMS Small Arms (57)
127

Table 3 - OPFOR Targets
TGT TYPE FROM DATA SOURCE
TGT TYPE FOR DATA ENTRY
REMARKS
16/18 ATGM (197) RPG
2S1 Artillery (217) 122mm Howitzer
82mm Mortar Mortar (204)
102mm Mortar Mortar (204)
122mm Howitzer Artillery (217)
A!), AVN A-10 CAS Category no longer entered.
AGS-17 Infantry (198)
AT5 Arms AT-5 (106)
Aviation, AVN CAS Category no longer entered.
AVLM Small Arms Category no longer entered.
BMP/73 73mm Category no longer entered.
BMP/ATGM ATGM (197) AT-3
BUILDING KILLER Other/Misc (245)
Bunker Other/Misc (245)
Direct Fire Frat Fratricide (5)
DSMT MACHINE GUN Small Arms Category no longer entered.
ENG BRDM BRDM (173)
Eng Veh Other/Misc (8)
EW BRDM BRDM (173)
FAS CAS Typo. Category no longer entered.
Frontal Aviation CAS Category no longer entered.
GEMSS Mines Category no longer entered.
GRAIL SAM (186) SA-7
GSR Radar Category no longer entered.
HIND MI-24 Hind (30mm) Category no longer entered.
HIP Utility Helicopter Category no longer entered.
How Artillery (217) SP122 Howitzer
M16 Small Arms Category no longer entered.
128

TGT TYPE FROM DATA SOURCE
TGT TYPE FOR DATA ENTRY
REMARKS
MTLB and MTLB/VIS/M113 MTLB (182)
Red Air CAS Category no longer entered.
SA-7 SAM (186)
SA7/13 SAM (186)
SA8/9 SAM (186)
SA8 SAM (186)
SA9 SAM (186)
SA13 SAM (186)
SA14 SAM (186)
SA 16 SAM (186)
Scouts Infantry (198)
SP122 Howitzer Artillery (217)
T-12 MT-12 (219)
Tank T-72/T-80 Tank Category no longer entered.
Thrown Truck Other/Misc (8)
TF DESTROYER Other/Misc (8)
Truck Other/Misc (8)
VISMOD(MOD) BMP (172)
129

Table 4 - OPFOR Weapons
WPN TYPE FROM DATA SOURCE
WPN TYPE FOR DATA ENTRY
REMARKS
2S2 Artillery (127)
2S3 Artillery (127)
2S12 Artillery (127)
120mm Artillery (127)
122mm Howitzer Artillery (127)
152 mm Artillery (127)
73mm MG 73mm (150)
A/C (BAI) CAS Category no longer used.
ADJACENT UNIT Controller Gun (4)
AGS-17 Small Arms (166)
AH HIND AT-6 (195)
ARM CARR M1025 Do not enter.
AT-3 (BMP W/SAGGER) ATGM Category no longer used.
ATGL ATGM Category no longer used.
Aviation, AVN CAS Category no longer used.
BMPw/ATGM ATGM Category no longer used.
BRDM 14.5 BRDM (173)
COPS BMP Combat Output. Category no longer used.
Frontal Aviation CAS Category no longer used.
GRETA Other/Misc (8)
HIND HIND AT-6 (195)
HIND MI-24 HIND (30mm) (196)
Machine Gun Small Arms (166)
MAINT DURING BATTLE Maintenance (7)
M109 Mortars (113)
M2S1 Artillery (127)
M3583 (Truck) Do not enter.
M88 (Tank Recovery Vehicle) Do not enter.
130

WPN TYPE FROM DATA SOURCE
WPN TYPE FOR DATA ENTRY
REMARKS
MK2 Engineer Vehicle Category no longer used.
MRLB Artillery (127) Typo, for MRLS
MRLS Artillery (127)
MT-12 ATGM Category no longer used.
MTK-1 Engineer Vehicle Category no longer used.
MTK-2 Engineer Vehicle Category no longer used.
MTLB Small Arms (166)
MTLB/M113 Small Arms (166)
MTLB/VIS/M113 Small Arms (166)
NBC Mines NBC Category no longer used.
Nonbattle Controller Gun (4) OC Kill
NOT CARR M1038/M948 Do not enter.
Obst Other/Misc (8)
OSV Other/Misc (8)
Other: ammo Other/Misc (8)
Other: no miles Other/Misc (8)
Other: depop Other/Misc (8)
Other: out of fuel Other/Misc (8)
Other: no crew Other/Misc (8)
Other: MT MT-12 (164)
PER Infantry Category no longer used.
PK GMPG Small Arms (166)
PKM Small Arms (166)
RED ADA ZSU-23-4 Category no longer used.
RED FASCAM Opfor FASCAM (202)
RKH MTLB Category no longer used.
ROE Other/Misc (8) Rules of Engagement (ROE)
RPK LMG Small Arms (166)
RP SQUAD Inf Squad Category no longer used.
131

RPG ATGM Category no longer used.
WPN TYPE FROM DATA SOURCE
WPN TYPE FOR DATA ENTRY
REMARKS
RPG-9 ATGM Category no longer used.
RPG-16 ATGM Category no longer used.
RPG-18 ATGM Category no longer used.
RPK ATGM Typo, for RPG. Category no longer used
SA Small Arms (166)
SA 7/13 SAM (185)
SA8/9 SAM (185)
SA8 SAM (185)
SA8 TRTG SAM (185)
SA9 SAM (185)
SA13 SAM (185)
SA 13/14 SAM (185)
SA14 SAM (185)
SA16 SAM (185)
Safety/Miles Inop Controller Gun (4)
SIM Other/Misc (8)
SBDA Other/Misc (8)
SP122 Artillery (127) 122mm Howitzer
SPG-9 73mm (BMP) (150)
TAF Controller Gun (4)
Tank (T-80) Tank Category no longer used.
TRKS * =
Other/Misc (8)
132

Enclosure 5 - Target and Weapon Types, FoxPro to THP
Listed in the TGT or WPN Data Entry column are the targets and weapons actually entered into the BDAdbinformation listed in the TGT (Target) or WPN (Weapon) Data Source column was extracted from THPs and/or AARs.
The information contained in this enclosure was used mainly before rotation 94-01.
Table 1 - BLUFOR Targets
TGT TYPE FOR DATA ENTRY TGT TYPE FROM DATA SOURCE
Artillery (105) 105 mm Howitzer
ATGM (71) Dragon DragonA/iper Viper
Attack Helicopter (117) Apache Cobra
Engineer Vehicle (20) SEE
HMMWV (134) M2 HMMWV MK-19 Other Hmmwv WPHN HMMWV
Infantry (144) Inf Sqd INT Personnel Scouts
M2/M3 (Category no longer entered) Bradley BFV or Bradley Fighting Vehicle CFV or Cavalry Fighting Vehicle IFV or Infantry Fighting Vehicle M2 M3 Scouts/M3 M113/M2/M3 (following NTC 90-10 only)
M551 (33) Sheridan
M60A3 (30) A3 (Tank)
Mortar (89) 60mm 81mm 107mm
Radar (130) GSR
133

TGT TYPE FOR DATA ENTRY TGT TYPE FROM DATA SOURCE
Scout Helicopter (Category no longer entered)
OH OH-58
Tank (Category no longer entered.) M1/A1 A3/M1/A1 (following NTC 90-10 only)
TOW (Category no longer entered.) TLAT Tow Hmmwv
Utility Helicopter (Category no longer entered.)
UH-1
134
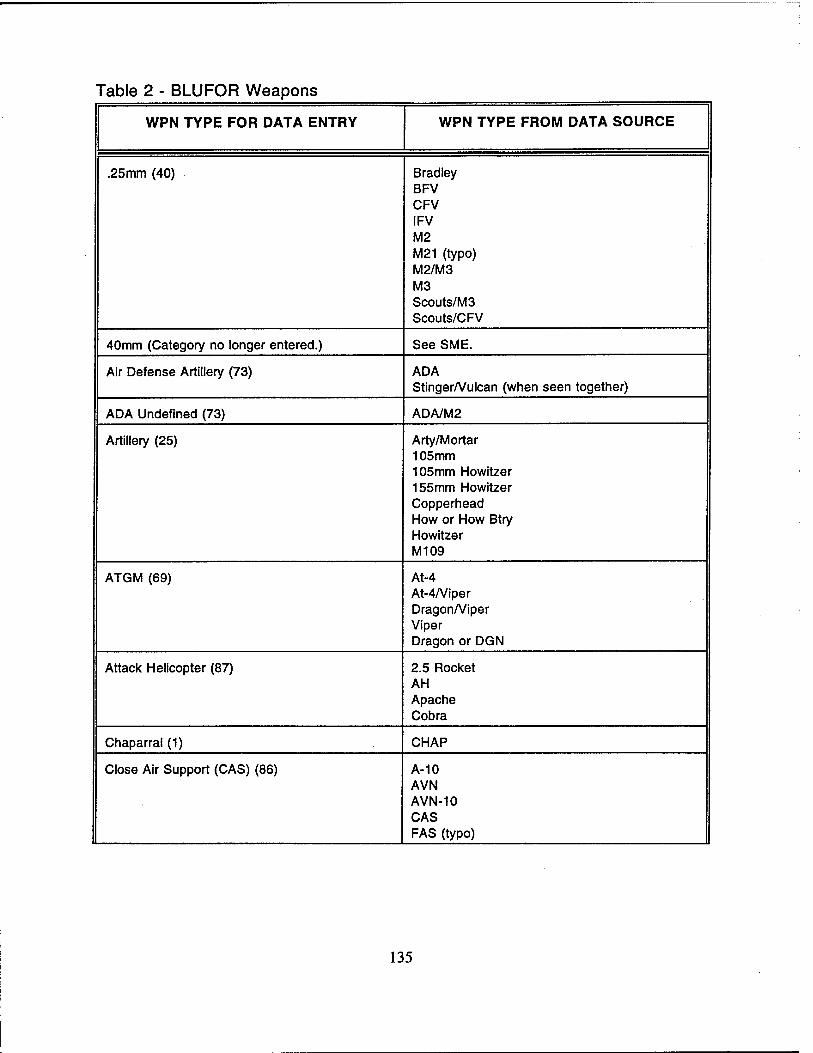
Table 2 - BLUFOR Weapons
WPN TYPE FOR DATA ENTRY WPN TYPE FROM DATA SOURCE
.25mm (40) Bradley BFV CFV IFV M2 M21 (typo) M2/M3 M3 Scouts/M3 Scouts/CFV
40mm (Category no longer entered.) See SME.
Air Defense Artillery (73) ADA Stinger/Vulcan (when seen together)
ADA Undefined (73) ADA/M2
Artillery (25) Arty/Mortar 105 mm 105mm Howitzer 155mm Howitzer Copperhead How or How Btry Howitzer M109
ATGM (69) At-4 At-4/Viper Dragon/Viper Viper Dragon or DGN
Attack Helicopter (87) 2.5 Rocket AH Apache Cobra
Chaparral (1) CHAP
Close Air Support (CAS) (86) A-10 AVN AVN-10 CAS FAS (typo)
135

Combat Engineer Vehicle (Category no longer entered.)
CEV
WPN TYPE FOR DATA ENTRY WPN TYPE FROM DATA SOURCE
Controller Gun (4) Code 00 OC Kill Observer/Controller Kill Out of Sector Safety Safety/MILES Inop. TAF 50 m rules
Engineer Vehicle (Category no longer entered.) SEE Mine Plow Mine Roller
FASCAM (91) Bluefor FASCAM unless it specifically says RED FASCAM
Fratricide (5) Backblast FRAT Self-Kill SM ARMS VUL FRAT any general fratricide Unconfirmed Frat
IFV/APC (Category no longer entered.) See Subject Matter Expert to research.
Improved Tow Vehicle (64) ITV M901
Infantry (Category no longer used) Personnel INF INT (typo) RTD Scouts
M113 (Category no longer used) IFV/APC (research to determine if under M113 or IFV)
MICLIC (Category no longer used) AVLB AVLM
Mines (92) GEMSS NBC Mines Mines Inop Bfor Mines
MK19 (Category no longer used.) MK19/M2 Scouts (MK19) Small Arms
136

Mortar (13) 60mm Mortar 81mm Mortar M106
NBC (Category no longer used.) CHEM CHEM DOWNWIND
WPN TYPE FOR DATA ENTRY WPN TYPE FROM DATA SOURCE
Other/Misc (8) ADMIN Bogus CAS/AH/2 Mine CAS/AH/MILES INOP CAS/AH/MINE/Fratricide CAS/AH/FRAT/NBC Caties Crew killed Depop Overrun No matching KC ROE Rules of Engagement Unknown UK VOLC
Small Arms* (57) .50 or .50 cal .50 Machine Gun COAX FIST-V INF (as a weapon) Infantry Squad INT (typo) MK-19 M60MG Machine Gun Personnel Scouts Scout/APC Scout/Hmmwv SAFAD XSMALL ARMS
Tank (Category no longer entered.) A-14 Depop M1/A1 M1 M551 (Sheridan) M60TK M60A3
TOW (60) M996 M202 (typo for M220) TOW HMMWV
* Small Arms = Infantry if used as a target.
137

Table 4 - OPFOR Target
TGT TYPE FOR DATA ENTRY TGT TYPE FROM DATA SOURCE
73mm (Category no longer entered.) 73mm (BMP) BMP/73
Artillery (217) 120mm Howitzer 2S1 Howitzer SP122 Howitzer
AT-5 (196) AT-5 Arms
BMP (172) BMP/ATGM MOD VISMOD
BRDM (173) ENG BRDM EW BRDM
Close Air Support (Category no longer entered.) A10 AVN AVN A-10 Aviation CAS FAS (typo) Frontal Aviation Red Air
Fratricide (5) Direct Fire Frat
HIND (30mm) (Category no longer entered.) HIND-24
Infantry (198) AGS-17 DIS PK Squad Scouts
MILES (6) No MILES
Mines (Category no longer entered) GEMSS
Mortar (204) 82mm Mortar 102mm Mortar
MT-12(219) MT T-12 VISB
138

MTLB (182) MTLB/VIS/M113
TGT TYPE FOR DATA ENTRY TGT TYPE FROM DATA SOURCE
Other/Misc (8) 14/16 Ammo Building Killer Bunker Depop Eng Veh No Crew Obst Out of Fuel TF Destroyer Thrown Truck Truck
Radar (244) GSR
RPG (Category no longer entered.) 16/18 RPG T-12
SAM (186) SA7 SA7/13 SA8 SA8/9 SA 8 TRTG SA9 SA 13 SA 13/14 SA14 SA 16 GRAIL
Small Arms* (Category no longer entered.) Infantry AGS-17 AVLM DSMT MACHINE GUN M16
Utility Helicopter (Category no longer entered.) HIP
ZSU-23-4 (180) Red ADA
Small Arms = Infantry if used as a target.
139

Table 5 - OPFOR Weapons
WPN TYPE FOR DATA ENTRY WPN TYPE FROM DATA SOURCE
.73mm (150) 73mm MG 73mm (BMP) BMP/73 SPG-9
Artillery (217) 120mm 122mm Howitzer 152mm 2S1 2S2 2S3 2S12 How Howitzer M2S1 MRLB (typo) MRLS SP122 Howitzer ZS1
AT-6HIND (195) Attack Helicopter HIND
AT-3 (170) BMP/ATGM BMP w/ SAGGER
BMP (Category no longer entered.) COPS (Combat Output)
BRDM (174) BRDM 14.5
Close Air Support (Category no longer entered.) A/C (BAI) CAS Frontal Aviation Red Air
Controller Gun (4) Adjacent Unit Nonbattle OC Kill TAF Safety/MILES Inop
Eng Veh (Category no longer entered.) Eng 113 MK2 MTK-1 MTK-2 Other/Misc
140

FASCAM (OPFOR) (202) RED FASCAM
WPN TYPE FOR DATA ENTRY WPN TYPE FROM DATA SOURCE
Fratricide (5) Direct Fire Frat Frat
Hind (30mm) (196) HIND MI-24
Infantry* (Category no longer entered.)
* Infantry = Small Arms if used as a weapon.
AGS-17 Inf Sqd PER Personnel PK Squad
Maint (7) Maint during battle
MILES (6) No miles
Mortar (113) 82mm Mortar 102mm Mortar M109
MT-12 (164) MT
MTLB (Category no longer entered.) MTLB/VIS/M113 RKH Small Arms
NBC (201) Crew NBC NBC mines
Other/Misc (8) Ammo Crew (esp. if alone under "Other") Depop GRETA No crew Obst OS OSV Out of Fuel ROE Rules of Engagement SBDA SIM TRKS
141

RPG (63) RPG-9 RPG-16 RPG-18
WPN TYPE FOR DATA ENTRY WPN TYPE FROM DATA SOURCE
SAM (185) SA-7 SA7/13 SA8 SA 8 TRTG SA 8/9 SA9 SA13 SA 13/14 SA14 SA 16 GRAIL
Small Arms (166) Machine gun MTLB MTLB/M113 MTLB/VIS/M113 PK GPMG PKM PK Squad RKH RPK LMG RPK-74 Machine Gun RP Squad SA S/A
Tank (Category no longer entered.) T-72 T-80 T-72/T-80
ZSU-23-4 (Category no longer entered.) Red ADA
142

DIAGRAM A
BDAFlow Chart
STEP1
Assemble BDA Data
V STEP 2
Assign Mission Ids
Y STEP 3
Preparation of BDA for Data Entry
Y STEP 4
Enter Initial Strength Data
V STEP 5
Print Initial Strength Data
STEP 6
Enter BDA Data
V STEP 7
Print BDA Data
V. STEP 8
Q/C Initial Strength and BDA Data
Y STEP 9
Correct Initial Strength and BDA Data
Y STEP 10
Provide Archivist with all BDA Data for Q/C
143

CHAPTER 5
GRAPHICS DATABASE Database Entry Documentation
I. DATA SOURCES
A. Combat Maneuver Training Center (CMTC)
NOTE: All data required for the graphics database should be included in the rotations data package sent by the CTC. Due to reasons beyond the control of the CTC archive, quite often these materials are either illegible or not available. No live fire or brigade missions are included in the graphics database procedures, only Task Force, force on force missions.
1. Operations Orders (OPORDs):
All of the required data for the Graphics Database: OPORDs, EXECUTION MATRIX, OPERATION OVERLAYS, and SITUATION TEMPLATES derive from the Operation Orders. The OPORDs are located in the Take Home Package. Listed below are the five basic paragraphs of the Operations Order that are required for the Graphics Database.
1. Situation 2. Mission 3. Execution 4. Coordinating instructions 5. Command and Signal
2. Execution Matrix:
The execution matrix should be located within the Operations Order in the Take Home Package.
3. Operations Overlays:
Operations overlays are available in a full size acetate, They are logged in by the Archivist and made available to the data technician for processing. There is also a reduced size overlay available on paper located in the Take Home Package. After the overlays are processed and entered into the database, the full size graphics are marked and stored in the Archive graphics storage cabinets.
144

4. Situation Templates:
Situation templates are also available in the full size acetate, they are logged in by the Archivist and made available to the data technician for processing. There is also a reduced size overlay available on paper in the Take Home Package. After the overlays are processed and entered into the graphics database, the full size graphics are marked and stored in the Archive graphics storage cabinets.
NOTE: Locations of graphics stored in the Archive graphics storage cabinets are listed in the CMTC ARCHIVE DATA CHECK LIST.
B. Joint Readiness Training Center (JRTC)
NOTE: All data required for the graphics database should be included in the rotations data package, sent by the CTC. Due to reasons beyond the control of the CTC archive quite often these materials are either illegible or not available. No live fire or brigade missions are included in the graphics database procedures, only Task Force, force on force missions.
1. Operations Orders (OPORDs):
All of the data required for the Graphics database: OPERATION ORDERS, EXECUTION TEMPLATES OPERATIONS OVERLAYS, AND SITUATION TEMPLATES derive from the Operations order. The Operation Orders are located in the Rotational Paper Data Boxes. Listed below are the five basic paragraphs of the Operations Order required for the Graphics Database.
1. Situation 2. Mission 3. Execution 4. Coordinating Instructions 5. Command and Signal
2. Execution Matrix:
The Execution Matrix should be located within the Operations Order.
3. Operations Overlay:
The Operations Overlays are located in the JRTC Rotational Paper Data Boxes. No full size graphics are available.
145
4. Situation Template:
Situation Templates are located in the JRTC Rotational Paper Data Boxes. No full size graphics are available.
C. National Training Center (NTC):
NOTE: All data required for the graphics database should be included in the rotations data package, sent by the CTC. Due to reasons beyond the control of the CTC archive quite often these materials are either illegible or not available. No live fire or brigade missions are included in the graphics database procedures, only Task Force, force on force missions.
1. Operations Orders (OPORDs):
All of the Data required for the graphics Database: OPERATION ORDERS, EXECUTION MATRIX, OPERATIONS OVERLAYS, AND SITUATION TEMPLATES derive from the Operations Order. Operations Orders are located in the NTC Rotational Paper Data Boxes. In these Boxes there are mission folders that indicates: Mission date, task force, and mission type. Listed below are the five basic paragraphs of the Operations Order that are required for the Graphics Database.
1. Situation 2. Mission 3. execution 4. Coordinating Instructions 5. Command and Signal
2. Execution Matrix:
The Execution Matrix for NTC should be located within the Operations Order.
3. Operations Overlay:
Operations Overlays for NTC are logged in by the archivist and then made available to the data technician for processing. Graphics for NTC come in a full size acetate and or a full size paper copy of the original. Rotations 90-01 to 93-12 can be located in the Rotational Paper Data Boxes and the Graphics Storage Cabinets. Graphics beyond rotation 93-12 are located in the Graphics Storage Cabinets only, and any current rotations that are processed are marked and stored in the storage cabinets.
146

4. Situation Template:
Situation Templates are made available to the data technician, then they are processed with the operations overlay and stored along with the operations overlay rotations, rotations 90-01 to 93-12 can be located in the Rotational Paper Data Boxes and the Graphics Storage Cabinets. Graphics beyond rotation 93-12 are located in the Graphics Storage Cabinets only, and any current rotations that are processed are marked and stored in the graphics storage cabinets.
NOTE: Locations of graphics stored in the Archive graphics storage cabinets are listed in the NTC ARCHIVE DATA CHECK LIST.
H. DATA COORDINATING INSTRUCTIONS
• See attached block diagram for an overview of the data entry.
A. Hardware and Software Requirement
1. Computer hardware and software:
• A 486 or 386 computer is needed
• MICROSOFT WINDOWS VERSION 3.1
• Lan Workplace/Serving FTP
• Graphics Workshop
2. Scanner hardware and software:
• The CTC Archive currently uses the Howtek scanner
• Howtek scan-it version 3.1 software
3. Camera hardware and software:
• VHS adjustable zoom camera
• VIDEO BLASTER/VIDEO BLASTER Software
147

m. DATA ENTRY PROCEDURES
STEP 1: After locating the data material using the DATA SOURCES in section I, the data material must be separated by date of mission and mission type using the rotation's Mission Summary Forms.
STEP 2: A determination must be made to which data material is suitable for processing. This determination is based on the quality of the data material and whether the data is properly marked. If the data material is not properly marked and can not be identified to a mission by the data technician, a Subject Matter Expert (SME) should be consulted.
STEP 3: The operations overlays physical appearance will vary between the three CTCs. NTC and some CMTC graphics come in a full size acetate overlay which is too large to be scanned, so it must be either reduced in size to allow the entire graphic to be scanned, or divided into several frames using the VIDEO BLASTER PROGRAM, which will be explained later in this documentation. Most CMTC and JRTC graphics come in a size that can be scanned along with the operations orders which exists of a normal 8.5" x 11" paper form. Now decide which task force to process first and starting with the task forces first mission of the rotation take the data material that you have selected to scan and refer to STEP 4 for further instructions.
STEP 4: Scanning Process
STEP 4a: At prompt: cd scanner2 {ENTER}
STEP 4b: At prompt: scan {ENTER} (the menu as shown below will appear)
148

FIGURE 1 [MAIN MENU)
figure 2 «-*
^
*r 5 SUM. SHSJl ÜgPgTT
1.41 X M. IE «1. W. ». «Ml <. S*. t. *n
figure 2a W=f=j TW?
T-TT *'■
j LL ;f■ III.L 8Cg5ML:VZj t«si«s(i »tea * I
eaXS&Jfil£™-4
i ► ii i Mü> iron »oral
' il S2SB!Oi wräaSSiiiüi!
figure 2c figure 2b
figure 3
KOWTEH sca.Hir; vi.üo j
]!a» •.« X51.D1 <E.0B.!.4n,.ci«.PLt<7! ISMS* 323 K It! a».H.C<W.3!Y1
r~j—"t—|i—"p ] , SC »WEH ;
■--• <•-
A3 SH 14«
».SiCSl
figure 3a
•j |: ■■ >i»BFuirw?Mntti»-:
5 ^
*,v*e.9«=££M.
figure 3b
STEP 4c: At Main menu (FIGURE 1) using the left button of your mouse, click on the figure 3 icon, Sub-menu figure 3a will appear, choose the A3 option (figure 3b).
STEP 4d: Next, using the right button on your mouse return to the main menu. At the Main Menu (FIGURE 1) click l--(SPELLING CAPITALIZATION ERROR.)-I ont the figure 2 icon. Sub-menu figure 2a will appear, choose the FILL MONITOR AREA option (figure 2b).
STEP 4e: Place data material on the scanner bed so it is setting parallel with the left edge of the bed. Line the top and bottom up with the 11" marks, and the left edge of the page is lined up with the default line, and the right side is lined with the 81/2" mark on the bottom of the scanner bed. Using the left button on your mouse click on the GO icon (figure
149
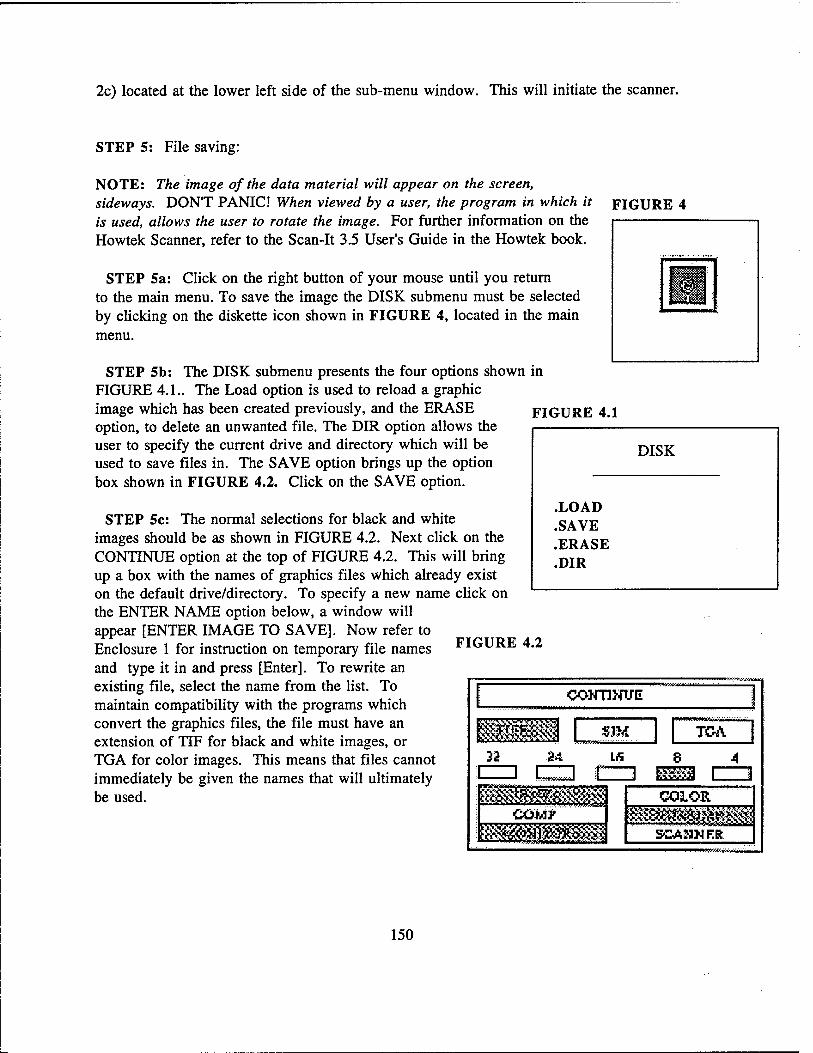
2c) located at the lower left side of the sub-menu window. This will initiate the scanner.
STEP 5: File saving:
NOTE: The image of the data material will appear on the screen, sideways. DON'T PANIC! When viewed by a user, the program in which it is used, allows the user to rotate the image. For further information on the Howtek Scanner, refer to the Scan-It 3.5 User's Guide in the Howtek book.
STEP 5a: Click on the right button of your mouse until you return to the main menu. To save the image the DISK submenu must be selected by clicking on the diskette icon shown in FIGURE 4, located in the main menu.
STEP 5b: The DISK submenu presents the four options shown in FIGURE 4.1.. The Load option is used to reload a graphic image which has been created previously, and the ERASE FIGURE 4.1 option, to delete an unwanted file. The DIR option allows the user to specify the current drive and directory which will be used to save files in. The SAVE option brings up the option box shown in FIGURE 4.2. Click on the SAVE option.
FIGURE 4
■ H:
FIGURE 4.2
STEP 5c: The normal selections for black and white images should be as shown in FIGURE 4.2. Next click on the CONTINUE option at the top of FIGURE 4.2. This will bring up a box with the names of graphics files which already exist on the default drive/directory. To specify a new name click on the ENTER NAME option below, a window will appear [ENTER IMAGE TO SAVE]. Now refer to Enclosure 1 for instruction on temporary file names and type it in and press [Enter]. To rewrite an existing file, select the name from the list. To maintain compatibility with the programs which convert the graphics files, the file must have an extension of TIF for black and white images, or TGA for color images. This means that files cannot immediately be given the names that will ultimately be used.
DISK
.LOAD
.SAVE
.ERASE
.DIR
CONTtfTUE
150

STEP 6: File Transferring : The scanned files must now be transferred via FTP (File transfer protocol) from the scanner computer to the ARCHIVE 3 computer where they will be sent into the Graphics Workshop program.
STEP 6a: To initiate FTP click on the right button of the mouse until you get back to the main menu. Next click on the DOS icon located at the bottom right corner of the submenu. A window will open that reads EXIT? YES/NO, choose YES.
STEP 6b: Next go to the ARCHIVE 3 computer and go to the Lan Workplace window and choose the Serving FTP icon. A minimized version of this option will appear at the bottom of the screen reading; Serving FTP Idle. If you double click on this a window will appear displaying FTP operations.
STEP 6c: Return to the scanner computer and follow the DOS instructions listed below:
(1) c:\SCANNER2> FTP {ENTER}
(2) ftp> OPEN 194.100.100.089 {ENTER}
(3) Username: Corf {ENTER} (230 User corf logged in) will appear
(4) ftp> binary {ENTER} (200 Type set to I) will appear
(5) ftp> led c:\scanner2 {ENTER} (local directory now C:\SCANNER2) will appear
(6) ftp> cd c:\gws {ENTER} (200 CWD command okay.) will appear
(7) ftp> input {ENTER}
* Files: will appear
STEP 6d: Now list the files that you want to FTP. You can either list each file separately or ENTER *.tif, to have the computer list each file name for you. A list of options will be offered with each file name; (Yes/No/All/Quit), choose accordingly.
STEP 7: File format conversion: When the FTP> prompt appears after Transfer complete, the files chosen have been successfully transferred into the Graphics Workshop. Type in BYE and [enter], this will close the FTP program. Now return to windows and go to the applications window and choose the Graphics Workshop.
STEP 7a: A list of directories will come up. Choose the directory that the files were sent to, in this case they were sent to GWS (Graphics Work Station), double click on [GWS].
151

STEP 7b: Now you have a window with the TIF files and a menu of options above. To convert these Tif files to GIF files single click on each file number so it is highlighted (if you double click the file will come up on the screen).
STEP 7c: Once you have all the files highlighted, go to the option menu and click on the CONVERT option. A submenu with a variety of file formats will appear, choose the GIF format.
STEP 7d: After the files have all been converted to the GIF format, the TTF files remain in the directory. Next go through the directory and check the GIF files for quality. If the files are satisfactory you may delete the TIF files from the directory by clicking on the TIF files, then using the DELETE option above.
STEP 7e: Close the Graphics Workshop.
STEP 8: Video Blaster Process: Go to the Video Blaster window and double click on the Video Kit icon.
STEP 8a: The Video Kit window opens with four options along the top, DISPLAY, CONFIGURE, ACCESSORIES and HELP. Choose the DISPLAY option. A submenu will appear, go down and click on the SHOW option, this will give you two choices, SIZE and POSITION. Click on SIZE.
STEP 8b: You now have a size indicator at the top left corner of the window that looks like this: (320x238). Now you must adjust the window size to (640x480). To adjust the window size take the mouse arrow to the edge of the window until the resize curser appears, hold the left button of your mouse down and drag the edge of the window out until the size indicator reads: (640x480).
STEP 9: Video camera/Video blaster: Next turn your VHS video camera on, you should now have the camera image on the computer screen.
STEP 9a: Take the graphic overlay that you wish to process and place it on a white smooth surface, point the camera at the overlay and either zoom in or zoom out so that the whole graphic is visible in the Video Kit window.
STEP 9b: Creating Graphics files: Go to the DISPLAY option at top of the window and choose SAVE in the submenu, this will automatically freeze the image on the screen.
STEP 9c: The SAVE IMAGE window will appear on the screen. At the lower left side of the window there is a box: {List Files of Type:}, there is an arrow pointing down, this arrow brings down a menu of file types. Using the up or down arrows go down to the {GIF (8-bit)} file format and click on it. At the upper left corner of the window
152

there is a {FILE NAME:} box inside it should read: *.gif, go into the box and delete the asterisk. You are now ready to enter your temporary Mission ID number.
STEP 9d: The image That is in the VIDEO KIT window is a full scale view of the graphic, the full scale graphic segment number is zero,as shown in EXAMPLE 1 below. Now type in the temporary mission Identification number and click on the OK button. (Refer to step 6 for temporary mission identification number instructions)
EXAMPLE 1 EXAMPLE 2
segment 0
(full scale graphic overlay) segment 1 segment 2
segment 3 segment 4
STEP 10: You should now have a file containing the full scale graphic overlay. Now with the VHS video camera zoom in on the upper left corner of the graphic and look at the screen, zoom in until you have a clear, readable section of the graphic and repeat step 10c. The frame sequence goes as shown in EXAMPLE 2 above, although it may take more than four segments to define the details of the graphic. Below are some examples of Temporary mission Id numbers matched to segment numbers, (segment numbers will be bold)
Segment 0 n48al0t0
Segment 1 n48al0tl
Segment 2 n48al0t2
Segment 3 n48al0t3
Segment 4 n48al0t4
153

STEP 11: Quality control of graphic overlay files: Once you have completed all of the graphic overlays and they are in one of the Video Blaster directories, exit the program.
STEP 11a: Go to the MAIN window of your program manager and choose the FILE MANAGER program. You will see two columns, on the left are the directories, on the right are the files they contain. Using the search arrows go down until you find the {vblaster} directory. There will be two sub-directories {windows} and {mmplay}, choose the directory that you used in the Video blaster program. The files that you saved should appear in the right column.
STEP lib: Next go to the file column and check the files by double clicking on them, they will then appear on the screen in the WINGIF program. Once you have checked the files exit the File Manager.
NOTE: If you find a graphic overlay file that is of poor quality, you must retrieve the graphic of which it derived from and make the necessary corrections.
STEP 12: Renaming graphics files: Now you are ready to give your temporary file names their permanent name, which they will keep throughout their lives as a graphics database file. Exit windows into DOS, and follow the dos commands below.
STEP 12a: c:\windows> (get to root directory) ed.. [enter]
STEP 12b: c:\> (go to vblaster directory) cd c:\vblaster [enter] (if a sub-directory was use c:\vblaster\window or \mmplay)
STEP 12c: c:\vblaster> (list all files in directory) dir/w [enter]
NOTE: You now have a list of the graphic overlay files. The difference between a temporary file name and a permanent file name is:
* The number 9 is added to indicate the decade in which the rotation occurred:
EXAMPLE: Temporary-n48al0t0.gif Permanent - n948all0.tf0
* A number is put between the task force type and the mission date to indicate if there was more than one of the same type of task force. If there was one armored task force, the number would be one, if there were two armored task forces the number would be two, ect.
EXAMPLE: Temporary - n48al0t0.gif Permanent - n948all0.tf0
154

* The T in the temporary file name indicates what data type the file name pertains to. In the permanent file name the GIF extension is replaced with the data type abbreviation and the segment number.
EXAMPLE: Temporary-n48al0t0.gif Permanent - n948all0.tf0
NOTE: Before you begin renaming the files, listed below are the correct data type abbreviations:
* Operations orders -.op example: n948all0.opl (this is the first page of an operations order)
* Execution matrix -.ex example: n948all0.ex3 (this is the third page of a execution matrix)
* Operations overlay -.tf example: n948all0.tfl (this is the first segment of an operations overlay)
* Situation template -.st example: n948all0.st0 (this is the full scale view of a situation template)
STEP 12d: Below are examples of the proper dos commands for renaming files to their permanent form.
Example: c:\vblaster> ren n48al0t0.gif n948all0.tf0 [enter]
Example: c:\vblaster> ren n48al0tl.gif n948all0.tfl [enter]
Example: c:\vblaster> ren n48al0t2.gif n948all0.tf2 [enter]
NOTE: Continue this until every mission file name is renamed to the new format. An easy and faster way to do this is by using your curser arrows to repeat the file that was just entered, you can then simply replace the segment number instead of retyping the whole line. Once you have renamed all the files in the vblaster directory, repeat step 13 for the gws directory, then return to windows. Please refer to the AFG MISSION SUMMARY DATA INFORMATION FORM for further information on mission ID numbers.
STEP 13: Return to the program manager and go to the LAN Workplace window and choose the Rapid Filer program.
STEP 13a: A window will appear [Open a Remote File System], follow these commands:
155

* Remote Host Name: Pom3 [Tab]
* User Name: corf [Tab]
* Password: Download [enter]
STEP 13b: This will reveal two directory windows: c:\windows on top, and pom3.pom.gov:/u/corf on the bottom. TO enter the new graphics files go into the u/corf directory window and double click on Newfiles. You now have a blank U/Corf/Newfiles window.
STEP 13c: Now go to the c:\windows directory window above, single click on the c of the c:\windows, this will bring up a [change directory] window. In the Change directory window you will see Path: and below there is a box with c:\ in it. place the curser right after the (\) and type in gws or vblaster then press enter.
STEP 13d: The directory you have chosen should now reveal all of the files it contains. Now Identify the files you wish to transfer, click on the first file, hold down on the shift key, then click on the last file. This will highlight the files. On the left side of your screen there is a menu of options: INFO, PRINT, RENAME, COPY, DELETE, and CLOSE. Choose COPY, the program will send the files into the U/Corf/Newfiles directory. This will conclude the graphics database data entry procedure.
156

Enclosure 1 - File Naming
Below is an example of a proper temporary mission identification number, and an explanation of each character.
N48A10P1.TIF
W The first character indicates which CTC the mission number pertains to, N for NTC, C
for CMTC, and J for JRTC.
4 O This number tells you which rotation the mission number pertains to. For example;
48 would stand for 94-08, if the rotation was 91-02 the mission ID abbreviation would be 12. When the rotation number gets to the double digits such as; 93-10, 93-11 or 93-12, a letter is used to replace them, A =10, B =11, c =12 etc.
A This letter indicates what type of task force the mission ID number pertains to; A =
armor, m = mech, c = cavalry....ect. {Please refer to the AFG MISSION SUMMARY DATA INFORMATION FORM for other task force abbreviations).
10 * Mission date.
X This character indicates what type of data material is being processed. These are the
temporary abbreviations for the data materials: T = TASK FORCE OPERATIONS OVERLAY, S = SITUATION TEMPLATE, P = OPERATIONS ORDER, E = EXECUTION MATRDC
X Each Graphic segment and operations order page is a separate file, where they are put
into numeric sequence, graphics overlay segment numbers start with zero and go up to how ever many frames (files) it takes to retain the maximum amount of information in a readable form. Operations order and execution matrix sequence numbers start with one for the first page, and goes up depending on how many pages (files) are scanned.
• JL JL JD This is an industry-standard graphics format. It is used in this application solely
for the means to convert black and white images from this format to the GIF format which is the format used for the database.
157

DIAGRAM A
Graphics Database Data Entry Overview
Locate and Identify Graphics Material
Separate Graphics Materials by Mission type and date.
Scan OPORDS and Execution Matrix.
Use Video Camera and Video Blaster to process operation overlays and
situation templates
1. Assign temporary File ID
2. FTP files
3. Convert files from TIF Format to GIF
Assign temporary file ID
Using DOS, rename files to permanent form. Upload the
files to the file server
158

CHAPTER 6
MISSION DATABASE (MSN db)
Database Entry Documentation
I. DATA SOURCES
A. Combat Maneuver Training Center (CMTC)
Presently no Instrumentation System data are received from this CTC.
B. Joint Readiness Training Center (JRTC)
Presently no Instrumentation System data are received from this CTC.
C. National Training Center (NTC)
Following the completion of each rotation, the NTC sends binary data (on a set of 4-6 digital data cartridges), collected from the NTC Instrumentation System, to the CTC Archive. There, the tape cartridges, each of which can hold up to 150 MB of data, are written to an optical laser disk to be accessed through a Sun Workstation.
Ü. COORDINATING INSTRUCTIONS
A. Conventions Used in this Documentation
Symbol/Text Meaning
Anything - a screen prompt or output screen text (bold)
anything - a keyboard entered command (italics)
<anything> - a variable to be determined by command context and entered by the operator
159

J - Press the Enter key
J> - an explanatory remark relevant to the step in the process in which it appears
B. Mission Database Building Worksheet
(See Enclosure 1) The data coordinator will provide you with a copy of this worksheet for each rotation to be processed. It will supply you with the following information for each mission:
a. the History (A-M) (Task Force (TF) type (e.g., Armor, Mech, Brigade, etc.)) b. the Mission Type (e.g., MTC, DATK, etc.) c. the Mission Identification Code (ID) d. the start and end dates/times e. the Segment Type (e.g., Recon, Movement, Maneuver, etc.) f. the Ground PL rate
Information will be collected during processing that will be recorded on this worksheet by the data entry personnel. (This will be explained further in Section III - Data Entry.)
C. Sample Mission Database Worksheet
(See Enclosure 2) With two phase file listings (one directory listing of phase files from optical platter containing actual raw data sent by NTC; and one listing from screen output of the builddb program used in processing the files for the Mission Database generated from the master table sent with the data from the NTC, Enclosures 2a and 2b, respectively).
D. Mission Identification Code
(See Enclosure 3) This is provided for information, and quality control purposes. This enclosure explains how the Mission IDs are derived and how they break down into their individual elements.
E. Computer Hardware and Software Requirements
F. Phase I - Pre-process Data
• Hardware Platform - A Sun Workstation (330 SPARCstation running SunOS
160

Release 4.1) (Herein designated as ARIl)
• Peripherals - Perceptics optical platter (WORM: Write Once Read Many) drive
• Software - Sun OS (Unix BSD); Sunview builddb (custom 'C software)
G. Phase II - Build Databases
• Hardware Platform - Intel 486 running SCO Unix (Herein designated as POM4)
• Software - Santa Cruz Operations (SCO) (Unix system V) INGRES database makedb (SQL script) appenddb (SQL script)
m. DATA ENTRY PROCEDURES
A. Phase I - Pre-process Data
Before you begin, obtain from the archivist, data coordinator, and/or database programming staff, the following items:
• Mission Database Building Worksheet
• Complete listing of phase files produced at the NTC during the rotation (the list of phase files displayed during the execution of the builddb program; re: Step 3a)
• Listing of phase files actually received by the CTC Archive (the output of a directory listing on the Sun workstation; re: Step 3a)
STEP 1: Log on to the Sun workstation on which you will be pre-processing your databases. There are two ways to access the Sun Workstation, direct access and remote access. The pre- processing may be done remotely; however, direct access to the Sun workstation will be required if the data is to be entered into INGRES. If you are accessing the workstation remotely, speak with your Systems Administrator for instructions on how to gain access to the Sun Workstation.
J> - The Sun workstation is herein referred to as "ARH". Your node may be named differently. See your systems administrator for the name of the node that you will be using and the appropriate login (< login_name >) and password (< password >).
161

J> - The key board configuration of the Sun workstation will disable the backspace key (l<-); in order to back over something entered at the command line, use the delete key.
When you look at your workstation monitor screen, the first thing you will see is the Login: prompt. At this prompt, type:
< login_name >J
The system will then prompt you to enter a password; at the Password: prompt, type:
< password >J
you are now logged onto the system.
J> - If you are accessing the Sun Workstation remotely, after entering the password the command line will read:
Type dec - vt220 unknown TERM = (unknown)
press enter (J ) to continue, the machine will then give you the first command line prompt.
STEP 2: At the 1 root@aril# prompt type cd / J, this is to ensure that you are now in the root directory. To check your path, enter pwd J, this should display a forward slash /, indicating that you are at the root directory.
J> - If you are accessing the Sun Workstation remotely, you will not be able to utilize the Sunview graphic user interface (GUI); therefore, disregard Steps 2a thru 2c and go directly to Step 2d.
J> - Forward slashes ( / ) in paths are a UNIX syntax convention, in contrast to the back- slash ( \ ) in MS-DOS.
i> - Notice that the number at the beginning of the prompt is incremented each time that you enter a command. If you type the word history at the prompt, it will list approximately the last 25 commands that were entered. Each number in front of the commands listed may be used to reenter the same command at the command line by typing in !< number >. For more information on the History command, enter man history and if you are unfamiliar with the man (the UNIX online manual) command, type manJ.
162

STEP 2a: Open the Sunview graphic user interface system by typing sunview J. In the upper left hand corner of your screen you will see a narrow window, referred to by the system authors as a "bounding box"; at the top of this window, you will see a black band with the word «CONSOLE» displayed on it.
STEP 2b: Using the mouse, move the mouse arrow to the bottom of the window frame so that it touches the frame, turns the frame white, and the arrow becomes a small circle. Then press your right mouse button and hold it down. This will display a small menu and bring back the arrow for use on this menu. Continuing to hold down the right mouse button, move the arrow down to the word resize on your menu, and when it is highlighted, release the mouse button. An information box will appear with the following instructions and remain on the screen until you either - Press and hold the middle mouse button near the side or corner you want to resize and hold the button down while adjusting the bounding box (window) to the shape and size you want; then release the mouse button - or, you push the Cancel button. It is best that you size this window as far down vertically as possible, and horizontally as wide as it will go, without covering the clock icon to the right of the window.
J> - If the frame is black when you press the mouse button, a menu, different from the menu called to resize the window, will appear. If this occurs, continue to hold the mouse button down and move the arrow to the top the small menu, and release the mouse button. Move the arrow back to the frame until the frame becomes white, press and hold down the left mouse button again.
STEP 2c: Now, move the mouse arrow into the window and double click the left mouse button. This will turn on the cursor at the command line, allowing you to access the UNIX system prompt from within Sunview, similar to accessing MS-DOS through Windows.
J> - When the display buffer (data storage area) for this window is full, you will be unable to enter any more characters at the command line until you scroll down the window. To scroll this window, first locate the scroll bar on the left side of the window frame. Be aware that the scrolling on this system is very fast, so you may wish to test it out a bit when you first start using the Sunview interface. Place the mouse arrow anywhere within the scroll bar, when the arrow changes shape to fit within the scroll bar, press and hold the left mouse button to scroll up or the right mouse button to scroll down.
You are now ready to start preprocessing data.
STEP 2d: Next, type:
cd usr/builddbJ
163

this will place you in your working directory. Then type:
pwd «J
to verify path.
STEP 3: Now refer to your Mission Database Building Worksheet. Find the first mission that you will be processing. The database for each mission is built from one, to as many as twenty phase files. First, you need to ascertain what phase files apply to your mission, and collect the data that will be used to determine the PL (Position/Location) logging rate at which they will be built.
The raw data sent from the NTC will be interpreted into the phase and sub-phase files, you will use for making the database, by the builddb program.
J> - Sub-phase files will be treated in exactly the same manner as the phase files, so at this point the term 'phase', for our purposes, will be interpreted to include sub-phases.
The original phase files (see Step 3a) are comprised of data collected during a period of time, recording the movement and status of instrumented players (personnel, vehicles, and weapons) during force on force missions at the NTC. The PL rate will be the rate at which the builddb program will write data into the database from each phase file. This rate is determined by the data entry technician, data coordinator, or archivist; it is based primarily on the size, and chronological occupance of the phase file as it relates to the stages of the mission.
This data is recorded in a steady 'stream'; approximately every second, data for all instrumented players are read into this 'stream data'; including: player ID, position/location information, fires & hits, and losses of both equipment & personnel.
For each reading of data sent by MILES (Multi Integrated Laser Engagement System) equipped players into the NTC Instrumentation System, a kind of data 'snapshot' is produced; accounting for the position, location, and status of all players on the field at the moment the data for the 'snapshot' was collected. The stream data is the flow of these 'snapshots' into the system. As the stream comes into the system, it is collected and processed into phase files; this is the raw data received by the CTC Archive to be processed into the Mission Database.
Since data is almost continuously recorded, the total amount of data is too great to store in database form, and allot of it contains 'dead time', long periods of inactivity that are irrelevant to researchers and cost valuable data storage space. To limit the amount of data converted into the Mission Database, and to make locating relevant data easier for the user, only phase files recorded during the actual execution of missions are utilized.
Each time the file is read by the builddb program, the data read is equal to one
164

'snapshot', (the data recorded for all the players for one moment on the field during the phase) The PL rate will determine the number of 'snapshots' to be read into the processed phase file. The more snapshots, the more data is copied into the database. The lower the PL rate, the greater the number of times the file is read, the greater the total amount of data ('snapshots') that are copied into the database. The importance of the PL rate is critical as it determines the amount of data that will be written into INGRES. INGRES is limited as to how much data it will accept per phase; therefore it is crucial that close attention be paid to determining the appropriate PL rates.
The actual process of determining PL rates is discussed in STEP 4.
STEP 3a: Determine the phase files to be used to construct the first mission to be entered, by first ascertaining the missions beginning and ending dates and times, and then, referring to a listing of the phase files actually received from the NTC, attached to the Mission Database Building Work Sheet (see listing a., attached to enclosure #3; and example below), find the phase files that fall between these two dates/times.
In the event that you are not provided with this listing, issue the following Unix directory file listing command:
Is -I /od/ds_archiveJiles/YY_##/SD. *
The first argument is the actual Unix directory file listing command; the second is an option of this command, determining the type of file information the Is command will display. (For more information on the Is command, type man Is at the command line) The following argument is the path.
J> - YY = yearfunderscoreW = rotation number
As an example, if we were to have the raw data for rotation 93-02 loaded onto the optical disc drive, we would enter the following:
Is -I /od/ds_archiveJiles/93_02/SD.*
The output of this command would be a directory listing similar to the following partial listing for rotation 93-02 (for the full listing, see attachment 3a):
■rw-r-r» 1 ntc_ice 3872472 Aug 16 14:36 /usr2/ds_archive_fiIes/93_02/SD.110592_04:05 -rw-r--r~ 1 ntc_ice 1745532 Aug 16 14:37 /usr2/ds_archive_fiIes/93_02/SD.110792_01:05 .rw.r..r.. i ntc_ice 4811460 Aug 16 14:39 /usr2/ds_archive_files/93_02/SD.110792_04:41 ■rw-r-r-- 1 ntc_ice 3116580 Aug 16 14:41 /usr2/ds_archive_fiIes/93_02/SD.110792_16:49
165

-rw-r—r— -rw-r—r— -rw-r—r— -rw-r—r— ■rw-r-r- -rw-r—r— -rw-r—r— -rw-r—r— -rw-r—r— ■rw-r-r-
ntc_ice 2587660 Aug 16 14:42 /usr2/ds_archive_files/93_02/SD.110792_20:44 ntc_ice 2619108 Aug 16 14:43 /usr2/ds_archive_files/93_02/SD.110892_01:13 ntc_ice 4828440 Aug 16 14:45 /usr2/ds_archive_fiIes/93_02/SD.110892_05:59 ntc_ice 5889888 Aug 16 14:47 /usr2/ds_archive_fiIes/93_02/SD.110892_ll:25 ntc_ice 2900624 Aug 16 14:49 /usr2/ds_archive_fiIes/93_02/SD.110892_17:05 ntc_ice 5125792 Aug 16 14:51 /usr2/ds_archive_fiIes/93_02/SD.110892_21:09 ntc_ice 5143960 Aug 16 14:53 /usr2/ds_archive_fiIes/93_02/SD.110992_06:05 ntc_ice 4243464 Aug 16 14:53 /usr2/ds_archive_files/93_02/SD.110992_14:04 ntc_ice 976700 Aug 16 14:53 /usr2/ds_archive_fiIes/93_02/SD.110992_18:45 ntc_ice 3184912 Aug 16 14:53 /usr2/ds_archive_fiIes/93_02/SD.110992_20:59
From left to right, the lines contain the following file information:
• the file type (first character) • the read, write, & execute access permissions • the number of lines to the file • the owner of the file / the size of the phase file in bytes • the date & time the file was created or last modified / the path/file name (SD.*)
J> - The / indicates the data relevant to determining the phase files to be used.
The file name indicates the file type (relative to the mission database building program specifications), and the start date (MMDDYY) & time (HH:MM) of the phase of the mission.
If we were to look at the Mission Database Building Worksheet for rotation 93_02, we would see that the entry for mission N932_M09, is a Defend In Sector (DIS), beginning at 071700 (7th day of month, 5:00 p.m.) and ending at 091000 (9th day of month, 10:00 a.m.). Since the mission starts at 17:00 (5:00 p.m.) on the 7th of the month (November) the first file containing data for this mission will have to begin at or before 110792_17:00. The ending time will be the 9th at 10:00, so the last phases start time will have to be before 091000, and the phase following the last phase for the mission will start after 110992_10:00. Comparing these times with the times encoded in the file names in our directory listing, we see that the that at least part of 8 of these files fall within this time frame.
STEP 3b: The size of the original phase files sent from the NTC is much too large to be processed into INGRES, which has a ceiling as to how many bytes it can accept per phase entry. A set of files is produced from the original phase files by the builddb program for each phase file. (Subphases are synonymous with the term 'phases' for the purpose of this writing.) This will eventually be used to help determine the PL rates. This is done by
166

processing the phase files using the builddb command with a dummy mission ID, and then displaying a list of the files produced by processing the phase file through the builddb program.
You will need to first find the size of the gplt.dat file produced by the builddb program for each phase of the mission. The size of this file will be the primary factor in determining the appropriate PL rate to run the phase.
To use the builddb program to determine the PL rate that will be best for entering the phase into INGRES, you will type a command similar to the following example command on the command line:
builddb 93_02 300 TESTITJ
The first command line argument is the builddb command that initializes the database building program. The second is the rotation designator, 93 indicating the year, the 02 indicating the specific rotation; these are joined by an underscore to form a single argument. The third is the PL rate, in this case, for testing purposes only, we have used 300. The final argument is the name of the database being built, which will be the same as the Mission ID (See enclosure 2).
builddb <yy_##> <PL#> N#######J
For the purpose of determining the appropriate PL rate to use, and testing the data for any potential difficulties, use the actual rotation designation, a test PL rate of 300 (the rate that allows the greatest amount of data to be written into the database building table files), and a "dummy" Mission ID of eight or less alphanumeric characters (e.g., testit).
J> Be sure to test all phases for a given mission at the same PL rate. This will ensure that the sizes of the resultant database files will be in same proportion to each other as were the phases from which they were generated.
If we were to run the database program 'builddb 93_02 300 TESTIT', we would see the following list of phases (see sample listing, attachment 3b, for the full listing output by this command):
bytes read in from phase file...: 1139 1 phase: test start time: 30-Oct-1992 14:35:00 2 sub C_0_ROAD_MARCH 3 sub C_0_ROAD_MARCH_II 4 sub C_0_PREP_MTC 5 phase: C_0_P_MTC_1 start time: 31-Oct-1992 20:38:31 6 sub C_1_MTC 7 sub T 1 MTC
167
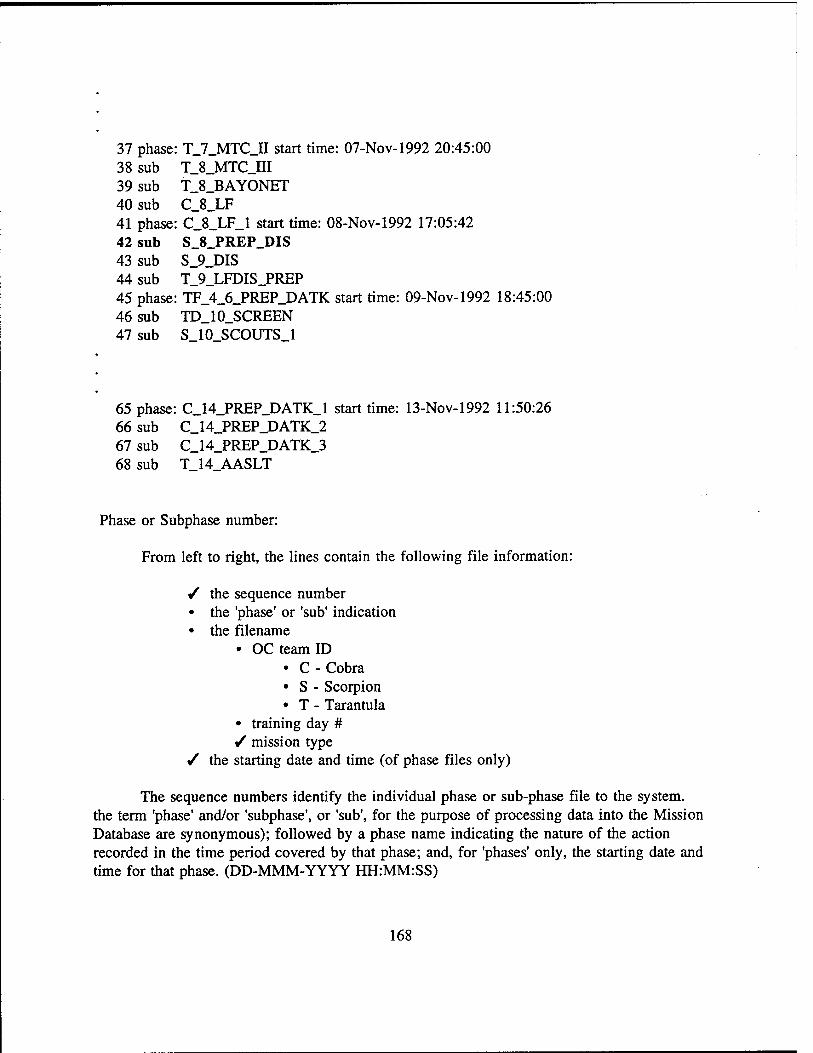
37 phase: T_7_MTC_II start time: 07-Nov-1992 20:45:00 38 sub T_8_MTC_m 39 sub T_8_BAYONET 40 sub C_8 JLF 41 phase: C_8_LF_1 start time: 08-Nov-1992 17:05:42 42 sub S_8_PREP_DIS 43 sub S_9_DIS 44 sub T_9_LFDIS_PREP 45 phase: TF_4_6_PREP_DATK start time: 09-Nov-1992 18:45:00 46 sub TD_10_SCREEN 47 sub S 10 SCOUTS 1
65 phase: C_14_PREP_DATK_1 start time: 13-Nov-1992 11:50:26 66 sub C_14_PREP_DATK_2 67 sub C_14_PREP_DATK_3 68 sub T 14 AASLT
Phase or Subphase number:
From left to right, the lines contain the following file information:
/ the sequence number • the 'phase' or 'sub' indication • the filename
• OC team ID • C - Cobra • S - Scorpion • T - Tarantula
• training day # /" mission type
/ the starting date and time (of phase files only)
The sequence numbers identify the individual phase or sub-phase file to the system, the term 'phase' and/or 'subphase', or 'sub', for the purpose of processing data into the Mission Database are synonymous); followed by a phase name indicating the nature of the action recorded in the time period covered by that phase; and, for 'phases' only, the starting date and time for that phase. (DD-MMM-YYYY HH:MM:SS)
168

Although we have eight phase files that may contain data for the mission database N932_M09 (see Step 3a), only two of these phases, 42 and 43 (see listing above), are phases for a DIS (Defend In Sector). Therefore, these two phases are the ones that will be used to create the single database, N932_M09.
When you have correctly entered the builddb command, you will be prompted to enter the number of the phase you are going to process, (the example shows we will enter phase number forty-two) Select the phase number from the screen out-put list displayed by the builddb program that corresponds with the mission start time from the Mission DB Building Worksheet. Type in the phase number at the prompt at the bottom of the listing, and press enter (J ).
Process all of the phases for each mission in chronological order (lowest to highest numerically). It will take anywhere from 5 to 15 minutes to run each phase; the larger the file, the longer it will take to process. If there is a problem with the machine finding the data, or opening the file, it will return an error message within a minute or two.
There are several problems you will encounter when using the builddb program. These problems commonly occur, which is one of the reasons why pre-processing all of the phases for a mission before attempting to make the final database is so important. After you have entered the phase number, you should see, after approximately 8-12 minutes, the output of the builddb program. The following is an example of what this output should look like:
/usr2/cs_archive_fiIes/93_02/phase_nies/S_8_PREP_DIS.phase_def
/usr2/ds_archive_fiIes/93_02/SNI.110892_21:09 SNI buffer start time: 08-Nov-1992 21:09:07 SNI buffer end time: 09-Nov-1992 06:02:16 SNI bytes read: 312 SDI buffer start time: 08-Nov-1992 21:09:07 SDI buffer end time: 09-Nov-1992 06:02:16 SDI bytes read: 126 SN start time: 08-Nov-1992 21:09:07 SN end time: 09-Nov-1992 06:02:16 SD start time: 08-Nov-1992 21:09:07 SD end time: 09-Nov-1992 06:02:16 SD bytes read: 2
It is from this output that you will derive the specific start and end dates and times for each phase. If you receive output other than that resembling the above example, or an error message of any sort, consult with the database programming staff immediately.
STEP 3c: When the phase has been built, type the following command:
169
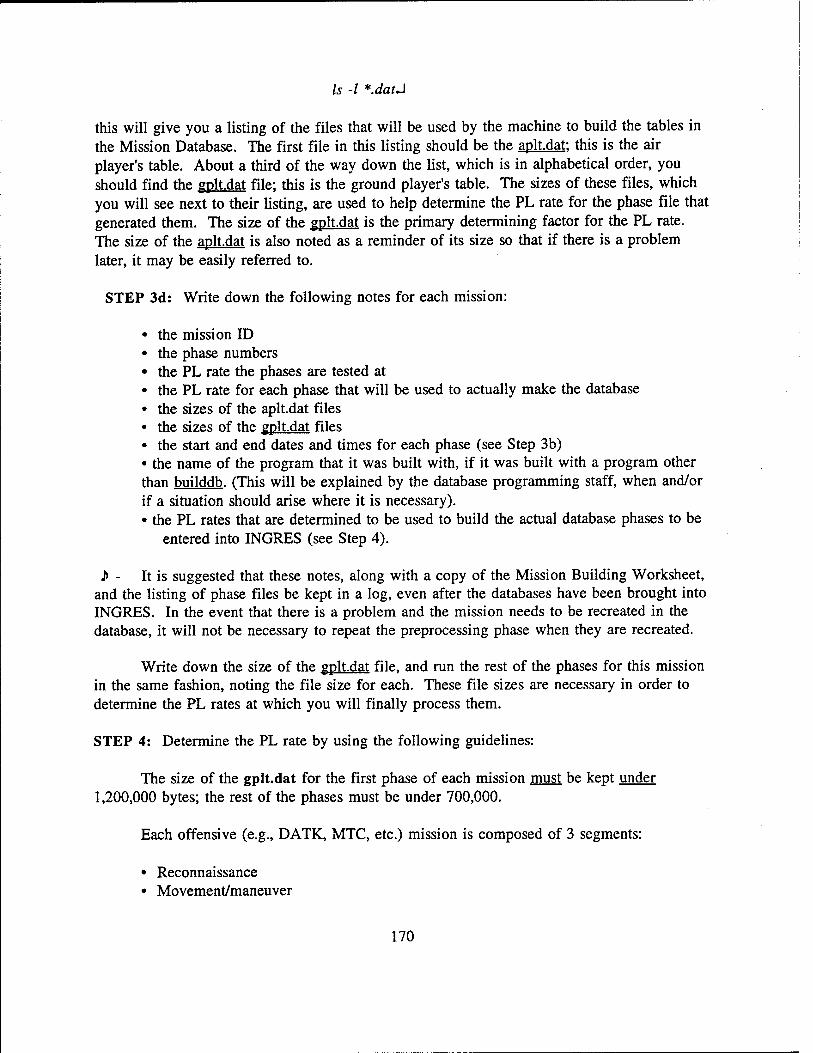
Is -I *.datJ
this will give you a listing of the files that will be used by the machine to build the tables in the Mission Database. The first file in this listing should be the aplt.dat: this is the air player's table. About a third of the way down the list, which is in alphabetical order, you should find the gplt.dat file; this is the ground player's table. The sizes of these files, which you will see next to their listing, are used to help determine the PL rate for the phase file that generated them. The size of the gplt.dat is the primary determining factor for the PL rate. The size of the aplt.dat is also noted as a reminder of its size so that if there is a problem later, it may be easily referred to.
STEP 3d: Write down the following notes for each mission:
• the mission ID • the phase numbers • the PL rate the phases are tested at • the PL rate for each phase that will be used to actually make the database • the sizes of the aplt.dat files • the sizes of the gplt.dat files • the start and end dates and times for each phase (see Step 3b) • the name of the program that it was built with, if it was built with a program other than builddb. (This will be explained by the database programming staff, when and/or if a situation should arise where it is necessary). • the PL rates that are determined to be used to build the actual database phases to be
entered into INGRES (see Step 4).
J> - It is suggested that these notes, along with a copy of the Mission Building Worksheet, and the listing of phase files be kept in a log, even after the databases have been brought into INGRES. In the event that there is a problem and the mission needs to be recreated in the database, it will not be necessary to repeat the preprocessing phase when they are recreated.
Write down the size of the gplt.dat file, and run the rest of the phases for this mission in the same fashion, noting the file size for each. These file sizes are necessary in order to determine the PL rates at which you will finally process them.
STEP 4: Determine the PL rate by using the following guidelines:
The size of the gplt.dat for the first phase of each mission must be kept under 1,200,000 bytes; the rest of the phases must be under 700,000.
Each offensive (e.g., DATK, MTC, etc.) mission is composed of 3 segments:
• Reconnaissance • Movement/maneuver
170

• Main Battle
Each defensive (e.g., DIS, DEF, etc.) mission has only 2 segments:
• Counter Reconnaissance • Main Battle
Recon and Counter Recon phases may be run at higher rates (600, 900, etc.), as the data, though relevant, is sparse and not as valuable as that of the movement and main battles.
Movement phase can be guessed by a sharp increase in the size of the aplt.dat (air players table). This should be run at a lower rate, as this data is of great importance to researchers.
The main battle can often be discerned by comparing ground player (gplt.dat) table sizes. There will be a strong increase in the size of this file when the main battle is fought.
Run the phases for the main battle at the lowest PL rate (300), as this data is the most valuable.
Having built all of the test phases using a PL rate of 300, we have created test phase files for our database that are comprised of 'snapshots' taken for every 5 minutes of data collected.
This is calculated using the following formula:
5 min. x 60 sec. = 300 PL rate (60 seconds represents approximate number of 'snapshots' or records the builddb
program will be sorting through)
So, if the gplt.dat file for the first phase you have for this mission is 1,376,352 bytes, which is too big for INGRES, you would need to run it at a 'higher' rate, 600, which will mean less 'snapshots' - data - will be sent to the database.
For the Mission Database, we use increments of 5 minutes to calculate PL rates. So, if a rate of 300 (every 5 minutes) generated too much data, we would use the next increment of 5 minutes, which would be 10, so:
10 min. x 60 sec. = 600 PL rate
In the example, because the first time period, 42, falls into the movement phase of the mission, we specify a PL logging rate of 600 (once every ten minutes). For phase 43, we will specify a logging rate of 300, because the main battle takes place during this phase.
171

J> - Not all missions will be divided into segments on the Mission Database Worksheet and some guesswork will have to be done to determine where the movement and main battle segments fall in the time line. Referring to the actual take home package for the subject rotation may be the only way to ascertain this information.
J> - Keep clear and accurate notes on the file sizes used to determine the PL rates; you may be required to show these to the data coordinator or a member of the database programming staff prior to entering the data into the INGRES database. In any case, it is best to show all of your pre-processing notes to the data-coordinator or archivist to verify the phases and their PL rates in order to ensure that the necessary data is recorded into the Mission Database. It also is a good idea to consult with the programming staff to ensure that INGRES is not overloaded.
J> - Repeat these steps for each of the phases for the mission being built; and for each of the missions for the rotation to be entered.
When all of the phases have been run, their data having been found valid: and their PL rates, and the order in which the phases will be run determined, they will be ready to process into the INGRES database.
> - If you are accessing the Sun Workstation Remotely: Having accessed the system through the LAN, using Windows, log off the Sun Workstation by typing:
Alt-F x
This will log you off both the workstation and the Host Presenter and bring you back to the Window's Program Manager.
B. Phase II - Build Databases
Ji - If you are using a different system: see your system administrator for information on what system, log-on name, and password you will be using. If you are using a different system or procedure, skip Step 5, and use the appropriate procedures as explained by your systems administrator or database programming staff member.
STEP 5: Log on to POM4 to access the INGRES database.
When you look at the screen, the first thing you will see is the login: prompt. At this prompt, type:
<login>J
172

The system will then prompt you to enter a password; at the Password: prompt, type:
<password>J
you are now logged onto the system.
STEP 6: If you are not logged onto the Sun Workstation already, do so now, making sure that your path reads /usr/builddb (See Step 2). Remember, that if you are using Sunview, the system will re-place you into the root directory, at the time of initializing Sunview, so you must change directories from within Sunview before proceeding.
J> - The Sun workstation is herein referred to as "ARI1". Your workstation may be named differently, and/or your login and password may be different. See your systems administrator for the name of the workstation that you will be using and the appropriate login and password.
On your notes, find the mission that you are going to process, and the number of the first phase to be built for that mission.
STEP 6a: Build the first phase of the mission on the Sun Workstation, using the PL rate determined during the pre-processing phase, and the actual Mission ID, as it is written on the Mission Database Building Worksheet. (See Step 3b).
builddb YYJHt PLr <MISSION_ID>J
J> - IMPORTANT!!! UNDC is case sensitive, enter the Mission ID in all capital letters when using builddb to build the final databases.
Do: builddb 93_02 300 N932_M09J
Don't: builddb 93_02 300 n932_m09J
STEP 6b: For the first phase of the mission, after the builddb command has completed executing on aril, you will process the data files produced from the builddb command into the INGRES database on the POM4 machine.
The database is entered into the INGRES database system by processing the phase file through the makedb program.
To use the makedb program you will type a command similar to the following example on the POM4 command line:
makedb aril n.932 m09.J
173

The first command line argument is the makedb command that initializes the database input program. The second argument names the data source (in this case aril) indicating the Sun Workstation (See notation above). The third and final argument is the name of the database being entered, which will be the same as the Mission ID; this needs to be entered in all lowercase, as in the above example.
J> - IMPORTANT!!! UNIX is case sensitive, enter the Mission ID in all lowercase letters when using makedb to enter the databases into INGRES.
Do: makedb aril n932_m09J
Don't: makedb aril N932_M09J
Observe the monitor during the processing and notify the database programming staff of any error messages or anything that seems to be out of the ordinary.
J> - Most of the missions use multiple phase files. Use makedb only on the first phase for each mission.
STEP 6c: For all phases after the first, you will use appenddb. This, quite literally, appends the phases onto the database that has already been made on the POM4 machine by the makedb program.
To use the appenddb program you will type a command similar to the following example on the command line:
appenddb aril n932_m09J
The first command line argument is the appenddb command that initializes the database input program. The second argument names the data source (in this case aril) indicating the Sun Workstation (See notation above). The third and final argument is the name of the database being entered, which will be the same as the Mission ID; this needs to be entered in all lowercase, as in the above example.
Repeat Steps 6a through 6c for each consecutive phase file, until all of the phases for the mission have been processed.
STEP 7: When you have completed entering all of the missions, it will be time to log off the systems.
STEP 7a: Log off POM4. To do this, simply enter the following string :
exit*!
174
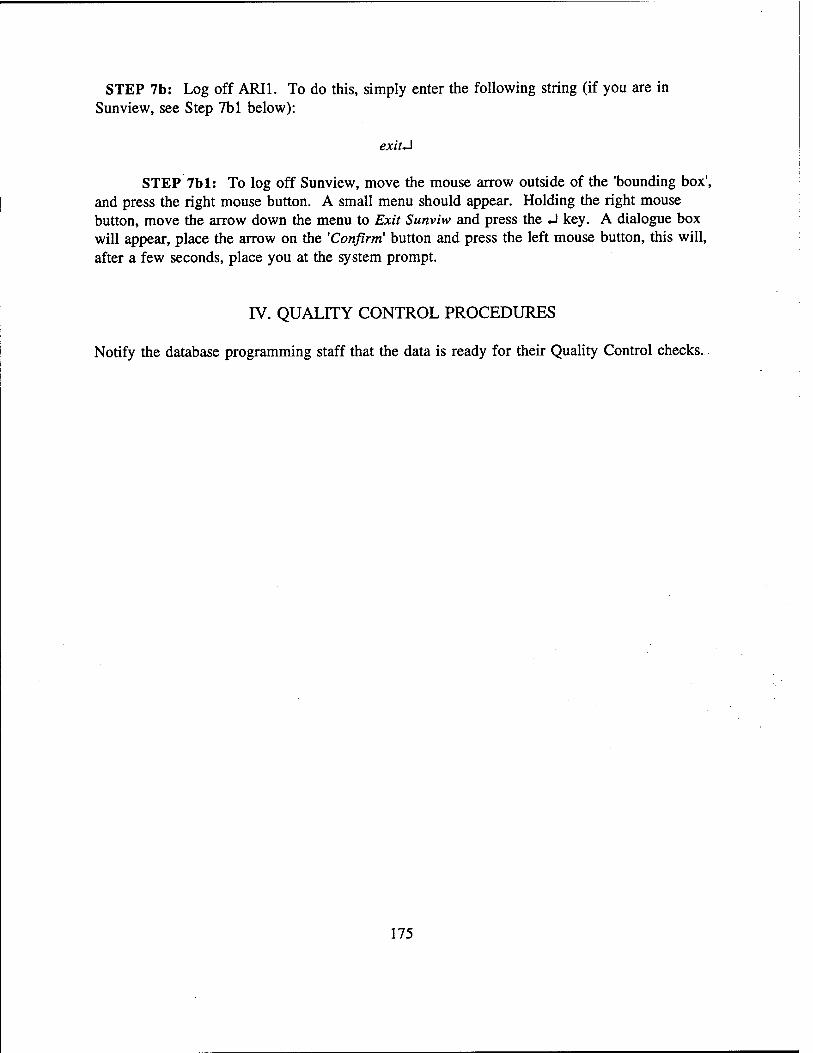
STEP 7b: Log off ARIL To do this, simply enter the following string (if you are in Sunview, see Step 7b 1 below):
exit-J
STEP 7b 1: To log off Sunview, move the mouse arrow outside of the 'bounding box', and press the right mouse button. A small menu should appear. Holding the right mouse button, move the arrow down the menu to Exit Sunviw and press the J key. A dialogue box will appear, place the arrow on the 'Confirm' button and press the left mouse button, this will, after a few seconds, place you at the system prompt.
rV. QUALITY CONTROL PROCEDURES
Notify the database programming staff that the data is ready for their Quality Control checks.
175

Enclosure 1 - Mission Database Building Worksheet (Blank)

MISSION DATABASE BUILDING WORKSHEET
History CA.-M)
Mission Tjpe:
Mission ID \ ■. . /•■_
- .-. i .
1 Start date/öme . — .
End dareftimc • - ._ *.:7'.
Segment type
Air PL rat»
Ground PL rate . ..
2 EnddaieAnne -. :
Segment type - « ——
AirPLrate - ■'
Ground PL rate
3 Enddais/ume
Segment type - •
Air PL rate
Ground PL raxe
4 End daie/äme
Segment type
Air PL rate ■
GroandPLraie - - —
Build T3 AT file: Yes No Yes No Yes No Yes No Yes No Yes No
Build GNATTfUe: Yes No Yes No Yes No Yes No Yes No Yes No
Date completed: ■
Segment type: Recon/Ctr-recon; Morexoent/MaaenTer; Mam Battle
Please make comma ts on jererse side et ans form.
Logged in by:
Msnbuilcby:
Date:
Date:
176

Enclosure 2 - Mission Database Building Worksheet (Complete)

MISSION DATABASEBUILDING WORKSHEET
History (A. -M)
Mission Type: (Arc r>\* "DAT*. "DAT1C •DA-Tfcft^ /*IT<£
Mask» ID /I^IA-Ol AlW-A-CS AHVLA-O5 iWLA-ft WZA^I«* fäi.noi
1 Start datcAnnc ZPLT,\00 OU03Ö Oirj\S" flt.l'SO \3YgOO Qio fza End date/time OIOloo 0 30feOö OS"OS"30 /*>e»uc»0 HO Too OiOfe>M<2>
Segment type &tco*J £R <£COvO £tcoo £.££0.0 <£COO
Air PL ate ,
Ground PL rate -Zo lO 2.0 ■ZJO If .-5"
2 End date/time OICT7 1S* os\oi>c> c?ro"7oo l**ÖTSO /<r0*OO 0T01X0
Segment type f\0\>l. A\^ vnov?_ v^ove. l*VWt W|0^£
Air PL täte >
Ground PL rate *• /o ?■
5" /O 'Ä. ' .O 10
3 Enddats/dme 010^30 oTolJlS" /3/iso WlCbV OTOVsO
Segment type vn?> M^> /^S t*\S WE
Air PL rate
Ground PL rare *- -■ r r <-
-
4 Enddaie/cime
Segment type
Air PL rate
Ground PL rate
Build TB AT file: Yes No Yes No Yes No Yes No Yes No Yes No
B did GNATT file: Yes No Yes No Yes No Yes No Yes No Yes - No
Date completed: J Segment type: Recon/Ctr-reeon; Monnneai/ManenTer; Main Eittk
Please make comments on rrrerse sde of tius form.
Logged in by:
Msa built by:
/J, U M. ^- - tv>-y^ w-.v Date WTyUW**
Date
177
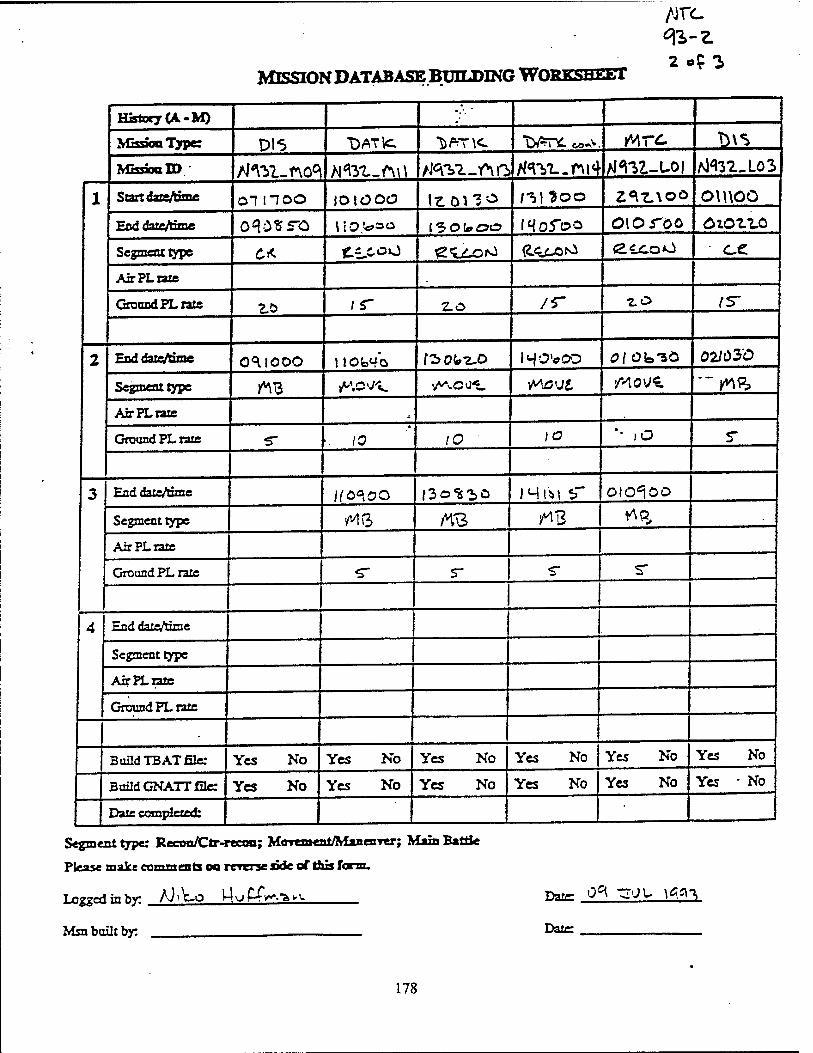
MISSION DATABASE BUILDING WORKSHEET
History CA.-M) -.'. -
MmxmTjpe D15 "DATtc "fc*T\C "D^nTC co^v wr£ T>^
MisänID ' WVbl-fVfl H^yi-fw) /JW-All /ft"VL. f\l«t AWil-LOl Atf32-U>3
1 St3rtdatr/rimft oinoo IOIOOO ^0)1^ rtlJoo 2<\Z.\Oö o\\\oo EnddateAüne O^öS ro TiO>s»o I30I» co IHofoo oioroo öic^i.o
Segment type c< ££.COO ^«LilONi ß&AA^ e«xoO cc
Air PL tau .
Ground PL rate 2.Ö ;r Z.O /r Z.O /S"
2 pnri Mt*ft5m*. O^IOOO ltOttfO f2>0fcz-O l<-fO'cOO tf/Öfc^ö 02/t)3'O
Segment type ttB AW1. •A\C0«_ Alfltfi /vtOV<c *~^
AirPLiaie .
Ground PL rate S" 10 /O \o '• IO r
3 End date/time /fö^OO f3o%2>0 miM «r OIOROO
Segment type fA\h A13 AiB tfp,
Air PL rate
Ground PL rate 5" s- s* r
4 End date/tznie
Segment type
Air PL rate
Ground PL rate
.
Build TBATSe: Yes No Yes No Yes No Yes No Yes No Yes No
Build GNATT de: Yes No Yes No Yes No Yes No Yes No Yes - No
Date completed:
Segment type: Recoa/Ctr-recan; MoT*n»*nt/ManenTer; Main Battle
Please make comments oa rererse side of tins form.
Logged in by: AJ'CO H^ £■£»*•-"^»v-
Msn built by: ,
Date: 0^ ~'JU \^-\
Date
178

MISSION DATABASE BUILDING WORKSHEET 3 ^ %
History CA-M)
Mission Type: *PfcT\«- DATKL T>AT*_
Mission ID AWL-LOS jm^-Li-b //13?_L)4
1 Start dateAäne oqorcc i*z.o\ro nZ^OÖ - •
Enddate/ome oMiyox 17.n*»>£> fMo-LOO
Segment type ££C^>3 *eu>o <tCoAJ
Air PL rare
Ground PL rare -z.^ -2^3 /O
2 End dateAxmc OM*L\OO a^-ir wor^ö Segment type *\o\/i. flo-vi y*\oV«L
Air PL taw
GroandPLrate ro IO *. /o
3 End dais/time DS~0%oo !310<AS~ Ncoir Segment type WV> *^n> i^B
AirPLiaie
Ground PL rate c «r r
4 EnddaK/dine
Segment type |
Air PL rate
Ground PL rare
Baud TB AT file: Yes No Yes No Yes No Yes No Yes No Yes No
Build GNATT de: Yes No Yes No Yes No Yes No Yes No Yes No
1 Date completed: I Segment type: Recon/Ctr-recon; Merrcmeni/ManeixTer: Main BatHe
Please make comments on reverse side of this form.
Logged in by: MVo HvffU'»^
Msn buil: by:
Date JÜLJEHhJfÜÜ
Date
179

Enclosure 3A

read in from phase file...: 1133 phase: test start time: 30-0ct-1992 14:35:00 sub C_0_R0AD_MARCH sub C_0_R0AD_MARCH_II sub ' C 0~PREP MTC phase: C_0_P_MTC_1 start time: 31-0ct-1992 20:38:31 sub C_1J1TC sub T_1_MTC sub C_1~PREP_DIS sub a' phase: C_1_PREP_DIS_1 start time: Ol-Nov-1992 21:10:27 sub C~1_PREPJ)IS_2 sub 7 sub S_LF_MTC sub S_LF_MTC_2 phase: T 3_PREP_DIS start time: 02-Nov-1992 16:08:IS sub cf3_PREP_DIS sub T_3_PREP_DIS_II sub C_3_DIS phase: C_3_DIS_I start time: 03-Nov-1992 04:15:36 sub cl3_DIsl2 sub AGES TEST_3_N0V sub C_3_PREP_DATK phase: C_3lPREP_DATK_l start time: 03-Nov-1992 21:43:25 sub C 4~PREP_DATK~ sub C~4_PREP_DATK_1 sub cf4_PREP_DATK_2 phase: C_4_PREP_DATK_3 start time: 04-Nov-1992 17:40:35 sub S_LF_NDIS sub T_4_DATK sub cT4~DATK phase: C_5~D7K start time: 05-Nov-1992 04:05:11 sub C~filDATK sub 3_S_MTC_PREP sub 3_S_MTC_PREP_2 phase: T~6_MTC_I start time: 0&-Nov-1992 20:05:00 sub SIF'REP_MTC_1 sub S_7_MTC_1 sub • T_7_MTC_I phase: T_7_MTC_II start time: 07-Nov-1992 20:45:00 sub T_S_MTC_III sub T_3_BAYDNET sub C_8_LF phase: C_8_LF_1 start time: 08-Nov-1992 17:05:42 sub S_S_PREP_DIS sub S_9_DIS sub T 9_LFDIS_PREP phase: TF_4_6_PREP_DATK start time: 09-Nov-1992 18:45:00 sub TD_lö_SCREEN sub S_10 SC0UTS_1 sub T_10~LFDIS phase: T_10_LFDIS_II start time: lö-Nov-1932 11:46:00 sub T_10J_FDIS_III sub T_10_LFNDEF sub S_10_PREP_DATK phase: S_l1~PREPDATK start time: ll-Nov-1392 02:30:00 sub S_ICDATK sub S_ll ROAD MARCH sub C_HIPREP_DATK phase: C 11 PREP_DATK_1 start time: 1l-Nov-1932 23:14:34 sub cIl2~PREP_DATK~ sub C_12_PREP_DATK_1 sub C~12~PREP~DATK 2
bytes 1 2 3 4 5 6 7 8 9 9 10 11 12 13 13 14 15 16 17 18 19 '20 21
24 25 26 27 28 23 30 31
34 35 oo ,37 33 33 40 41
44 45 46 47 48 43 50 51 cr -. Ji
JO
54 55 56 57 58 59 SO
180

61 phase: C_12_PREP_DATK_3 start time: 12-Nov-1992 18:52:42 62 sub (TI2IPREPIDATK~4 63 sub C~13_PREP_DATK 64 sub C_13_DATK 1 65 phase: C 14_PREP_DATK_1 start time: 13-Nov-1992 11:50:26 66 sub cIl4_PREP_DATK_2 67 sub C_14 PREP_DATK_3 68 sub T 14 AASLT
181

Enclosure 3B

— r w—r — fc aivw * -«. it
-rw-r- —r— L ntc^ice 3244840 Jan 3 1994 SD. 103192 06:04 -rw-r- —r— L ntc_ic* 6177616 Jan 3 1994 SD. 103192_10»55
-rw-r- —r— I ntc_ic« 28S7000 Jan 3 1994 SD. 103192_16:21
—rw—r- —r— I ntc_ic* 293608 Jan 3 1994 SD. 103192_20s38
—rw—r- —r— I ntc_ice 691304 Jan 3 1994 SD. 110192_03:58
-rw-r- -r— L ntc_ice 6093840 Jan 4 1994 SD. 110192_05:07
—rw—r- -r — I ntc_ice 2425356 Jan 3 1994 SD. 110192_17:23
—rw—r- -r— L ntc_ic* 2544712 Jan 3 1994 SD. 110192_21:10
-rw-r- -r — L ntc_ice 1877648 Jan 1994 SD. 110292_01:38
-rw-r- -r — I ntc_ice 3567456 Jan 4 1994 SD. 110292_05:19
-ru-r- -r — '. ntc_ic* 5345172 Jan 4 1994 SD. 110292_09:59
'. ntc_ice Jan 1994 SD. U0292~16:08
-rw-r- _r — I ntc_ic* 2650768 Jan 1994 SD. 110292_20:32
—rw—r— -r — L ntc_ice 1995984 Jan 1994 SD. 110392~00:49
-rw—r- -r — L ntc_ice 4379028 Jan 4 1994 SD. U0392_04:15 -rw-r- -r — I ntc_ic* 5970540 Jan 4 1994 SD. 110392 07:28 -rw-r- -r — L ntc_ic* 3248084 Jan 1994 SD. 110392_13:15 —rw—r— -l t ntc_ic* 2110092 Jan 1994 SD. 110392_17:49 -rw-r- -r — I ntc_ice 1560560 Jan 3 1994 SD. 110392_21:48 —rw—r— -r — L ntc_ice 3082932 Jan *-> 1994 SD. 110492_01:41 -ru-r- -r — . ntc_ice 4931168 Jan 1994 SD. 110492_08:25
-rw—r- -r — L ntc_ice 1398488 Jan 1994 SD. 110492_15:29 —rw—r— -r — L ntc_ice 45056 Jan 4 1994 SD. 110492_17:40 —rw—r- -r— : . ntc_ic* 45056 Jan 4 1994 SD. 110492_1B:54
-rw-r- -r — L ntc_ice 45056 Jan 4 1994 SD. 110492120:29
-rw-'r- -r — L ntc_ic* 2190780 Jan 3 1994 SD. 110492123:38 —rw—r— -r — . ntc_ice 45056 Jan 4 1994 SD. 110592_04:05 —rw—r— -r— J L ntc_ic* 2172508 Dec 30 1993 SD. 110592~08:37 —rw—r— —r — L ntc_ice 3911796 Jan 1994 SD. 110692_05:09 —rw—r— -r— J L ntc_ice 3008208 Jan 3 1994 SD. 110692_13:49 -rw-r- _r— 1 . ntc_ice 2429340 Dec 30 1993 SD. 110692120:05 —rw—r— -r — L ntc_ice 1745532 Dec 30 1993 SD. 110792_01:05 —rw—r— -r— I L ntc_ice 4811460 Dec 30 1993 SD. U0792_04:41 —rw—r— -r — L ntc_ice 3116580 Dec 30 1993 SD. 110792~16:49 -rw-r— -r — L n t c _ i c * 2587660 Dec 30 1993 SD. 110792.20:44 -ru-r- -r — L ntc_ice 2619108 Dec 30 1993 SD. 110S92_01:13 —rw-r— -r — n t •; _ i c e 482S440 Dec 30 1993 SD. 110892_05:59 —rw—r— -r— ] . ntc_ic* 5839883 Dec 30 1993 SD. 110S92_11:25 —rw—r— -r— 1 . ntc_ic* 2900524 Dec 30 1993 SD. 110892_17:05 —rw—r— -r— 1 . ntc^ice 5125792 Dec 30 1993 SD. 110892121:09 —r w-r — -r— ] . ntc_i.ce 5143960 Dec 30 1993 SD. 110992_06:05 -rw-r- -r— 1 ntc_ice 4243454 Dec 30 1993 SD. 110992_14:04 —rw—r— -r— 1 . ntc_ic* 976700 Dec 30 1993 SD. 110992_18:45 —rw—r— -r— 1 ntc_i.ce 3184912 Dec 30 1993 SD. 110992_20:59 —rw-r— -r — . ntc_ice 3534788 Dec 30 1993 SD. 111092_03:24 -rw—r— -r— 1 ntc_ice 2755036 Dec 30 1993 SD. 111092_08:48 -rw-r- -r— 1 . ntc_ice 3596344 Dec 30 1993 SD. 111092_11:45 —rw—r— -r— 1 ntc_ice 650372 Dec 30 1993 SD. 111092_17:40 -rw-r- -r— ] ntc_ic* 1824668 Dec 30 1993 SD. 111092_18:46 -rw-r— -r— 1 ntc_ic* 2824700 Dec 30 1993 SD. 111092_21:50 —rw—r— -r— 1 ntc_ice 1570904 Dec 30 1993 SD. 11U92_02:30 -r'y-r- -r— 1 ntc_ice 2972232 Dec 30 1993 SD. 111192_05:09 —rw—r— -r— 1 ntc_ic* 4347564 Dec 30 1993 SD. 111192_13:05 —rw-r- -r— 1 ntc_ice 2514264 Dec 30 1993 SD. 111192_19:06
n t •: _ i c * 1267836 Dec 30 1993 SD. 111192_23:14 —rw—r— -r— i ntc_ice 3774960 Dec 30 1993 SD. 111292_01:24 —rw—r— -i 1 n t c _ i c e 6543072 Dec 30 1993 SD. 111292_06:13
—rw—r- -r— 1 ntc^ice 4620148 Dec 30 1993 3 w • 111292_13:43 -rw-r— -i 1 n t c _ i c e 3724624 Dec 30 1993 SD. 111292_18:52 —rw—r— -r— 1 n t c _ i c e 3013956 Dec 30 1993 SD. 111292_23:24 —rw-r— -r— 3 n t c _ i c e 2025648 Dec- 30 1993 SD. 1 11392_03:05 -ru-r- -r— 1 ntc_ice 8558756 Dec 30 1993 SD. 1 11392_05:42 -ru-r- -r— 1 t 1 t c _ i c £ 4 184192 Dec 30 1993 SD. 111292_11:50
-rw-r- -l 1 n t c i •: =• 237-02- Dec 30 ', •}■"»:? S~. i : i :?•}-? 1=.:-?1
182
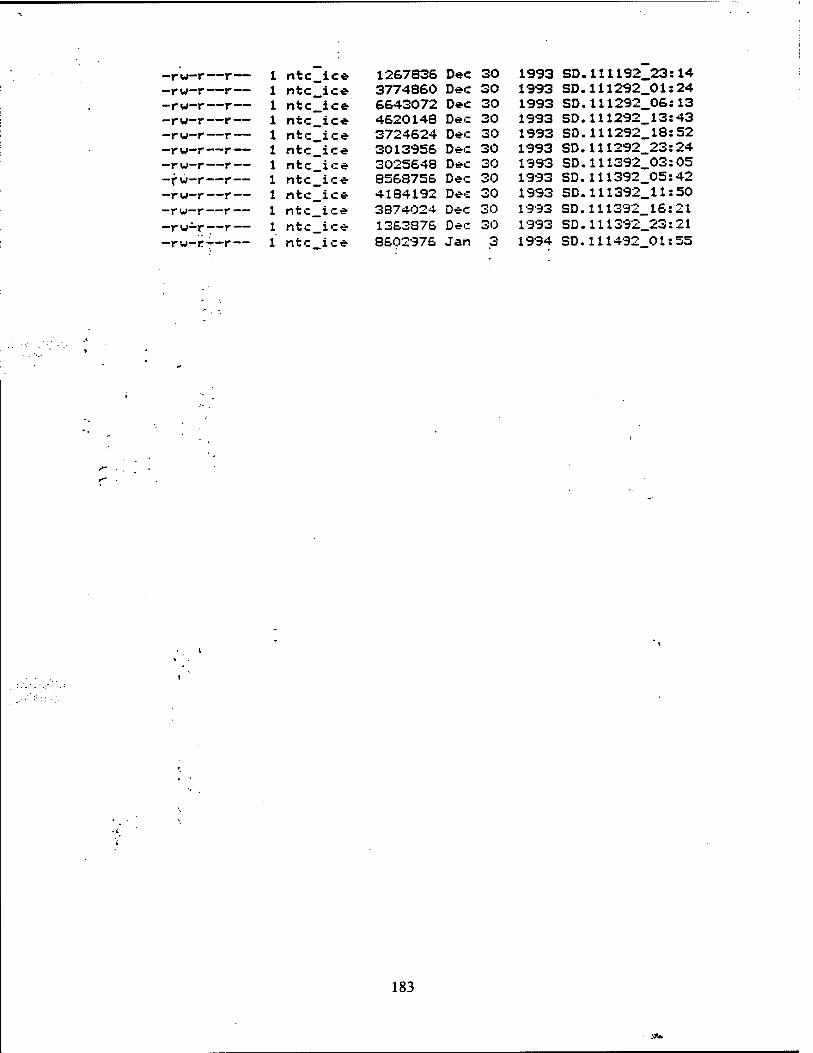
rw—r—i 1 ntc ice 1267S3& Dec ^u rw-r—i 1 ntc ice 3774850 Dec 30 rw-i r— 1 ntc_ice 6643072 Dec 30 rw-r—r— 1 ntc_ice 4620148 Dec 30 rw-r—r— 1 ntc ice 3724624 Dec 30 rw—r—r— 1 ntc ice 3013956 Dec 30 rw-r r— 1 ntc ice 3025648 Dec 30 rw—r—r— 1 ntc ice 8568756 Dei- 30 rw-r—r— 1 ntc ice 4184192 Dec 30 rw—r—r— 1 ntc ice 3874024 Dec 30 rw-r—r— 1 ntc ice 1JDOO/D Dec 30 ru-r-^-r — 1. ntc ice 8602976 Jan 3
1993 SD.111292_01:24 1993 SD.111292_06:13 1993 SD.111292_13:43 1993 SD.111292_18:52 1993 SD.111292_23:24 1993 SD.111392_03:05 1993 SD.111392_05:42 1993 SD.111392_11:50 1993 SD.111392_16:21 1993 SD.111392_23:21 1994 SD.111492_01:55
183

Enclosure 4 - Mission Identification Codes
Mission Identification. The key source for identifying any information in the CTC Archive is the Mission Identification Code (Mission ID). The Mission ID is an eight character code, e.g. C902_M19, J916T110, and N92BAA02, constructed as follows:
Position 1: Combat Training Centers:
BCTP-B CMTC - C JRTC-J NTC -N
Positions 2 & 3: Rotation Fiscal Year Number:
FY90 - 90 FY92 - 92 FY93 - 93
Position 4: Rotation Sequence Number (hexadecimal):
01 - 1 08- 8 10-A 11 -B 12-C
Positions 5 & 6: Command Level and Mission Identification:
Corps - Ql/QA, normal.
Division (DIV) - DI/DA, D2/DB, normal.
Regiment/Brigade - Bl/BA, B2/BB, B3/BC, normal. (REGT/BDE)
Air Assault (AIRASLT) - T_, _T, Tl/TA, T2/TB, T3/TC, normal. (Airborne) I_, _L, N_ are exceptions. (Airmobile) (The exceptions are J929I_, J932I_,
J933I_, N893_L, N898_L, N927_L, N92A_L, N92B_L, N93B_L, J929N_, J933NJ
184

Air Cavalry (AIRCAV) - Vl/VA, V2/VB, V3/VC, normal.
Armor (ARM) - A_, _A, Al/AA, A2/AB, A3/AC, normal _R, C_, Cl, C2 are exceptions. (The exceptions are N89D_R, N935_R N89BC_, N901C_, C911C1, C911C2)
Aviation (AVN) - Wl/WA, W2AVB, W3/WC, normal.
Cavalry - C_, _V, Cl/CA, C2/CB, C3/CC, normal. (For exceptions see Armor/Mech)
Forward Support - Fl/FA, F2/FB, F3/FC, normal. Battalion (FSB) (Logistics)
Fire Support (FS) - Gl/GA, G2/GB, G3/GC normal.
Infantry (INF) - HI/HA, H2/HB, H3/HC, normal. (At the present time there are no Infantry (leg units) missions identified)
Light Infantry (LIGHT) - L_, _L, Ll/LA, L2/LB, L3/LC, normal. _G, I_, N_ are exceptions. (The exceptions are N901_G, J907I_, J928I_, J928NJ
Mechanized (MECH) - M_, _M, Ml/MA, M2/MB, M3/MC, normal. _C, Cl, C2, E_, _V are exceptions. (The exceptions are N93A_C, C905C1, C905C2, C928C1, N906E_, N89B_V)
Motorized Infantry - Il/IA, I2/IB, I3/IC, normal. (MOTOR) A_, I_, _I, _N are exceptions.
(The exceptions are N922A_, N905I_, N897_I, N922_I, N905_N, N922_N)
Operations & - Ol/OA, 02/OB, normal. Intelligence (O&I) Section/Battalion (NTC only)
185

Ranger - Rl/RA, R2/RB, R3/RC, normal. T_ is an exception. (The exceptions are J895T_, J926TJ
Special Ops Forces - YZ (SOF ALL)
Special Ops Forces Aviation (SOF AVN) - YY
Special Ops Forces Civil Affairs (SOF CA) - YF
Special Ops Forces Special Forces (SOF SF) - YS
Special Ops Forces Psychological Ops - YP (PSYOPS)
Position 7 & 8: Day of Month on which the majority of the mission execution took place:
01 - 1st day in month 10 - 10th day in month 31 - 31st day in month
Example 1: C941M119 19 - 19th calendar day Ml - Mechanized TF
941 - Rotation 94-01 C - CMTC (Combat Maneuver Training Center)
Example 2: C941MA19 19 - 19th calendar day MA - Mechanized TF conducted a 2nd mission on the same day 941 - Rotation 94-01
C - CMTC
186

Example 3: J941T205 05 - 5th calendar day T2 - Second Air Assault TF 941 - Rotation 94-01 J - JRTC (Joint Readiness Training Center)
Example 4: J941TB05 05 - 5th calendar day TB - Second Air Assault TF conducted
a second mission on the same calendar day
941 - Rotation 94-01 J-JRTC
Example 5: N941A131 31 - 31st calendar day
Al - Armor TF 941 - Rotation 94-01
N - NTC (National Training Center)
Example 6: N941A231 31 - 31st calendar day A2 - Second Armor TF
941 - Rotation 94-01 N-NTC
187

CHAPTER 7
TAKE HOME PACKAGE DATABASE (THP db)
Database Entry Documentation
I. COMBAT MANEUVER TRAINING CENTER (CMTC)
A. Type of Data Sources Received
The CMTC forwards the Take Home Package (THP) to the Combat Training Center (CTC) Archive in hard copy only. Thus, none of the CMTC THP information is readily available for inclusion into the THP DB.
B. Coordinating Instructions
Not Applicable.
C. Detailed Conversion Procedures
Not Applicable.
H. JOINT READINESS TRAINING CENTER (JRTC)
A. Type of Data Sources Received
The JRTC has, since its first rotation, 88-1A, October 1987, forwarded the THP to the CTC Archive in two forms, hard copy and digital file(s), i.e., files on diskette in "wordprocessor" format. Originally, the THP was provided to the Archive in the Wordstar format; later, the JRTC switched to WordPerfect format. JRTC THP files from rotation 90-1 through the present ( rotation 94-4) are contained in the CTC Archive THP Database.
B. Coordinating Instructions
188

a. See attached block diagram (Diagram 1 - THP DB Loading Procedures - JRTC (all rotations)). b. Filename convention (see individual subsection below). c. Computer software requirements. The process detailed herein requires, for the
Wordstar files, a file conversion program such as WordPort, the WordPerfect conversion utility, or a similar tool. For the WordPerfect files, all that is needed is a copy of WordPerfect, version 5.1 or later. In addition, the quality control process requires a good ASCII editor, such as MicroEMACS, Qedit, etc., to ensure that the resultant files are suitable for the THP Viewer.
C. Detailed Conversion Procedures
General: Since the JRTC THP is a living document and changes over time, in format and content, there have been several major changes to the conversion procedures. (See Enclosure 1, Breakout of JRTC THP Content for rotations 90-1 through 94-4). After each major change, there is a period of stability, during which the conversion procedures remain relatively constant and file format for various THP files is similar across several rotations. The rotations from 90-1 to 93-3 form the first set of similar files.
Part 1 - JRTC Rotations 90-1 through 91-8 (Wordstar format) and Rotations 92-4 through 93-3 (Wordperfect format)
NOTE: The JRTC THP for rotations 91-9 through 92-3 (inclusive) were in an abbreviated format (similar to briefing slides) and no diskette version was provided to the Archive. Therefore, these rotations are missing from the THP DB.
PROCESSING STEPS:
STEP 1: Make sure that the write protect feature on the original disk(s) is on, so that you don't accidentally overwrite the original file(s). Copy the files from the original disk(s) to the hard drive. Pay attention to the filenaming utilized at JRTC so that you have the same set of files on the hard drive as you did on the floppy diskette(s).
NOTE: Occasionally two sets of files have the same name(s), and are merely placed in different subdirectories on the same floppy disk.
STEP 2: Convert the individual file(s) to ASCII text, using one of the programs referenced in II-2.C. above. Be sure that the program output has no more than 75 characters and spaces (total) per line, so that the text doesn't wrap when viewed in the THP Viewer, or when imported to another program. Pay particular attention to any data in tables or separated by tabs, e.g., Task Organization or Battle Damage Assessment data. If necessary, realign these items by comparing them with the hard copy of the THP. Finally, view the output file, so that you can ascertain that the result is readable and properly spaced. In the case of the JRTC THP, the individual files have characteristic filenames and
189

are generally prepared for the THP DB by dividing the original file into several parts. Using the key provided in Enclosure 2, JRTC THP Original File Naming Convention, determine the probable content of each original file. For example, the JRTC file named "THP.901" contains the whole text of the THP for JRTC rotation 90-1. However, the file named "anx-a.924" only contains the full text of Annex A, Unit Summaries, of the Brigade THP for rotation 92-4.
STEP 3: Print or XEROX a copy of the Take Home Package Table(s) of Contents. This will allow you to see what subjects are covered in the individual files, and to equate each part to an appropriate filename.
STEP 4: Review each Table of Contents, assigning to each section and/or subsection a filename which reflects its content. (See Enclosure 3 - THP Filenaming Convention - JRTC Rotations 90-1 through 93-3 as well as Enclosure 4.1 - File Type Equations (to File Designator))
For example, part of the Table of Contents for rotation 91-1 is reproduced as Figure 1:
TABLE OF CONTENTS
PART I - BRIGADE TASK FORCE OPERATIONS
Annex A: Brigade Task Force Trends A-1 1. Command, Control, and Communications A-3 2. Intelligence A-9 A. Intelligence System A-9 B. Military Intelligence Company Team A-13 C Long Range Surveillance Detachment A-19 3. Air Defense A-25 4. Mobility/Countermobility/Survivability A-29 5. Nuclear, Biological, and Chemical A-33
Annex B: Fire Support Trends B-1 1. Fire Support B-3 2. Field Artillery Battalion Tactical Operations Center/Fire Direction Center B-9 3. Field Artillery Battalion Logistics Operations and Headquarters and Service Battery B-15
Annex C: Aviation Trends C-1 1. Aviation Task Force C-3 2. Assault Helicopter Operations C-6
Annex D: Combat Service Support and Combat Support Trends D-1 1. Brigade Rear Command Post/S1 and S4 D-3
Figure 1
Refer to Figure 1 and Enclosure 2. THP Annex A, pages A-1 through A-33, at least, could be placed in a single file with the filename "J911BT0.THP", equating to JRTC rotation 91-1, Brigade Trends, All. However, it might assist the user more if each section of Annex A were placed in its own file and descriptively named. Thus, Section 1 of Annex A would comprise a file with the filename "J911BT7.THP", JRTC rotation 91-1, Brigade Trends, Command and Control; Section 2 (A, B, and C) would then have the name "J911BT1.THP" JRTC rotation 91-1, Brigade Trends, Intelligence, etc. Similarly, the whole of Annex B could be named "J911FT0.THP", and the whole of Annex C, "J911VT0.THP". The part of Annex D which remains would be the beginning of "J911LT0.THP", etc. (See Figure la (below) - "ANNOTATED TABLE OF CONTENTS", which has
190

been included as an example of the file splitting and naming process)
STEP 5: Divide the THP into its individual sections, assigning the appropriate filename to each. Wherever two or more sections have been assigned the same filename, append each successive section to the first one, putting them all together in one file under the single filename.
STEP 6: Using an ASCII text editor such as the ones mentioned in II-2.C above, perform quality control on the resultant files. Pay attention to the match between the content of each file and its filename. Ensure that all of the lines are 75 or less characters/spaces long, and that there are no superfluous blank lines or extraneous characters.
STEP 7: Make a backup copy of the resultant ASCII files, upload them to the appropriate file server or disk drive, and go on to the next rotational set.
191

ANNOTATED TABLE OF CONTENTS (J911)
PART I - BRIGADE TASK FORCE OPERATIONS
Annex A: Brigade Task Force Trends A-1
1. Command, Control, and Communications A-3 (t> I I)
2. Intelligence A-9 (BT1)
A. Intelligence System A-9(BT1)
B. Military Intelligence Company Team A-13 (tJ I I )
C. Long Range Surveillance Detachment A-19 (t5 I 1)
3. Air Defense A-25 (BT4)
4. Mobility/Countermobility/Survivability A-29 (BT5)
5. Nuclear, Biological, and Chemical A-33 (BT8)
Annex B: Fire Support Trends B-1 (BT3)
1. Fire Support B-3 (BT3)
2. Field Artillery Battalion Tactical Operations Center/Fire Direction Center B-9 (BT3)
3. Field Artillery Battalion Logistics Operations and Headquarters and Service Battery B-15 (B I o)
Annex C: Aviation Trends C-1 (VT0)
1. Aviation Task Force C-3 (VTO)
2. Assault Helicopter Operations C-6 (VTO)
Annex D: Combat Service Support and Combat Support Trends D-1 (L I 0)
1. Brigade Rear Command Post/S1 and S4 D-3 (LTO)
Figure 1a
Part 2 - JRTC Rotations 93-4 through 94-4 (WordPerfect format)
PROCESSING STEPS:
STEP 1: Make sure that the write protect feature on the original disk(s) is on, so that you don't accidentally overwrite the original file(s). Copy the files from the original disk(s) to the hard drive. Pay attention to the filenaming utilized at JRTC so that you have the same set of files on the hard drive as you did on the floppy diskette(s). (NOTE: Occasionally two sets of files have the same name(s), and are merely placed in different subdirectories on the same disk)
STEP 2: Convert the individual file(s) to ASCII text, using one of the programs referenced in II-2.C above. Be sure that the program output has no more than 75 characters and spaces per line, so that the text doesn't wrap when viewed in the THP Viewer, or when exported to another wordprocessor file format. Pay particular attention to any data in tables or separated by tabs, e.g., Task Organization or Battle Damage Assessment data. If necessary, realign these items by comparing them with the hard copy of the THP. Finally, view the output file, so that you can ascertain that the result is readable and properly spaced. As above, the individual THP files have characteristic filenames and are generally prepared for the THP DB by dividing the original file into several parts. Using the key
192

provided in Enclosure 2, JRTC THP Original File Naming Convention, determine the probable content of each original file. For example, the JRTC file named "bntf 1.941" contains the full text (minus title page and table of contents) of the Battalion Task Force THP for Task Force #1, rotation 94-1. Likewise, the file named "sof.941" contains the full text of the THP for the Special Operations Forces from 94-1.
STEP 3: Print or XEROX a copy of the Take Home Package Table(s) of Contents. This will allow you to see what subjects are supposed to be discussed in the individual files, and to equate each to an appropriate filename.
STEP 4: Review each Table of Contents, assigning to each section or subsection a filename which reflects its content. Note that the filenaming convention for these later files differs somewhat from the one used previously . (See Enclosure 4 - THP Filenaming Convention - JRTC Rotations 93-4 through present, and Enclosure 4.1 - File Type Equations (to File Designator))
For example, part of the Table of Contents for rotation 94-1 is reproduced in Figure 2:
TABLE OF CONTENTS
Annex A: Unit Summaries A-1 1. Brigade Mission Summary A-2 2. Battalion Task Force Summaries A-4 3. Brigade Aviation Summary A-10 4. Brigade Intelligence System Summary A-11 5. Fire Support Summary A-13 6. Air Defense Summary A-14 7. Engineer Summary A-15 8. Nuclear, Biological, and Chemical Summary A-16 9. Combat Service Support Summary A-17 10. Special Operations Forces Summary A-21 11. Live-Fire Summary A-23 12. Safety A-26
Annex B: Brigade Task Force Observations B-1 1. Command, Control, and Communications B-2 2. Signal B-7 3. Battery B, Air Defense Artillery B-11 4. Mobility/Survrvability B-16 5. Engineer Company B-21
Figure 2
See Figure 2 and Enclosure 3. In this example, the first section of Annex A, "Brigade Mission Summary" would be given the filename of "J941B1S0.THP", that is, JRTC rotation 94-1, Brigade, BOS LL, All. Likewise, the information in Section 4 of Annex A would be indicated by the filename "J941B1S1.THP", since this information is similar to that in the first section in every aspect but its focus on the Intelligence BOS. As another example, Sections 4 & 5 of Annex B above would be put together and given the filename "J941B1T5.THP", since the focus is on Brigade Observations (Trends), but only those which deal with mobility/countermobility/survivability, BOS number 5.
193

NOTE: One of the changes to be careful of is that in the naming of the later THP files, "Company/Team Lessons Learned" is treated as a file type, and placed under the parent unit's echelon rather than the previous method of treating it as an organization type. This change was necessitated by the appearance of the additional battalion task force and brigade Company Team Observations. (See Figure 2a (below) - "ANNOTATED TABLE OF CONTENTS", which has been included as an example of the file splitting and naming process)
STEP 5: Divide the THP into its individual sections, assigning the appropriate filename to each. Wherever two or more sections have been assigned the same filename, append each successive section to the first one, putting them all together in one file under the single filename.
STEP 6: Using an ASCII text editor such as the ones mentioned in II-2.C above, perform quality control on the resultant files. Pay attention to the match between the content of each file and its filename. Ensure that all of the lines are 75 or less characters/spaces long, and that there are no superfluous blank lines or extraneous characters.
STEP 7: Make a backup copy of the resultant ASCII files, upload them to the appropriate file server or disk drive, and go on to the next rotational set.
ANNOTATED TABLE OF CONTENTS (J941)
Annex A: Unit Summaries
1. Brigade Mission Summary
2. Battalion Task Force Summaries
3. Brigade Aviation Summary
4. Brigade Intelligence System Summary
5. Fire Support Summary
6. Air Defense Summary
7. Engineer Summary
8. Nuclear, Biological, and Chemical Summary
9. Combat Service Support Summary
10. Special Operations Forces Summary
11. Live-Fire Summary
12. SafetyA-26(B1T9)
Annex B: Brigade Task Force Observations
1. Command, Control, and Communications
2. Signal
3. Battery B, Air Defense Artillery
4. Mobility/Survivabirrty
5. Engineer Company
A-1
A-2(B1S0) A-4(L1S0/L2S0)
A-IO(W1TO)
A-II(B1T1)
A-i3(B1S3) A-14(B1S4) A-IS(B1S5)
A-16(B1S8) A-i7(B1S6) A-21 (YZTO) A-23(B1X0)
B-1
Figure 2a
B-2(B1T1) B-7(B1T9)
B-II(B1T4)
B-ie(B1T5) B-2I(B1T5)
194

HI. NATIONAL TRAINING CENTER (NTC)
A. Type of Data Sources Received
The NTC has, since at least October 1986 (rotation 87-01), forwarded the THP to the CTC Archive in two forms, hard copy and digital file(s). Originally, the THP was provided to the Archive in the DisplayWrite format; later, the NTC switched to WordPerfect format. Starting with rotation 94-08, the NTC switched again, this time to an abbreviated THP, in the Microsoft PowerPoint (version 4.0) format. NTC THPs from rotation 90-01 through rotation 94-07 inclusive are contained in the CTC Archive THP Database.
NOTE: Since the 94-08 NTC THP is the first to arrive in the new format, and the software necessary to process it has just arrived, no detailed processing information can be provided at this time.
B. Coordinating Instructions
a. See attached block diagrams. (Diagram 2 - THP DB Loading Procedures - NTC, (Rotations 90-01 through 93-03) or Diagram 3 - THP DB Loading Procedures - NTC ( Rotations 93-04 through 94-07)).
b. Filename convention (see individual subsection below). c. Computer software requirements: The process detailed herein requires, for the
DisplayWrite files, a file conversion program such as WordPort, the WordPerfect conversion utility, or a similar tool. For the WordPerfect files, all that is needed is a copy of WordPerfect, version 5.1 or later. In addition, the quality control process requires a good ASCII editor, such as MicroEMACS, Qedit, etc., to ensure that the resultant files do not contain special characters which might cause problems in the viewing process.
C. Detailed Conversion Procedures
General: Since the NTC THP is a living document and changes over time, in format and content, there have been several major changes to the conversion procedures. After each major change, there is a period of stability, during which the conversion procedures remain relatively constant, with files being similar, one to the other, across several rotations. The rotations from 90-1 to 93-3 form the first of these sets of similar files.
195

Part 1 -NTC Rotations 90-1 through 92-10 (DisplayWrite format) and Rotations 92-11 through 93-03 (WordPerfect format)
NOTE: During this period the NTC THP Battlefield Operating Systems (BOS) Lessons Learned (the majority of the information provided in the THP) section was divided into chapters by BOS, and then further subdivided within each chapter by mission. The Force-on-Force missions were covered in one subsection of each chapter, with the Live Fire missions grouped together in each chapter's annex. The processing steps below reflect this structure.
PROCESSING STEPS:
STEP 1: (AH files) Make sure that the write protect feature on the original disk(s) is on, so that you don't accidentally overwrite the original file(s). Copy the files from the original disk(s) to the hard drive. Pay attention to the filenaming utilized at NTC so that you have the same set of files on the hard drive as you did on the floppy diskette(s).
STEP 2: (DisplayWrite files only) Convert the individual file (s) to ASCII text, using one of the programs referenced in III-2.C. above. Be sure that the program output has no more than 75 characters and spaces per line, so that the text doesn't wrap when viewed in the THP Viewer, or when exported to another wordprocessor file format. In addition, check the tables (Battle Damage Assessment, Task Organization, and others) against the hardcopy to ensure that the columns and rows remain lined up. Finally, view the entire output file, so that you can ascertain that the result is readable and properly spaced.
STEP 2a: (WordPerfect files only) Using WordPerfect, split the Lessons Learned files into sections by Battlefield Operating System.
STEP 3: (DisplayWrite files only) Using WordPerfect, or a similar program, split the Lessons Learned files into sections by Battlefield Operating System.
STEP 3a: (WordPerfect files only) Convert the individual file (s) to ASCII text, using WordPerfect. Be sure that the program output has no more than 75 characters and spaces per line, so that the text doesn't wrap when viewed in the THP Viewer, or when exported to another wordprocessor file format. In addition, check the tables (Battle Damage Assessment, Task Organization, and others) against the hardcopy to ensure that the columns and rows remain lined up. Finally, view each output file, so that you can ascertain that the result is readable and properly spaced.
STEP 4: (All files) Using the key provided in Enclosure 4, NTC THP Original File Naming Convention (rotations 90-01 through 93-03, except 93-03 Light Infantry Files), determine the probable content of each original file. For example, the NTC file named "N901S.AS" contains the Armor, Battlefield Operating Systems (BOS) Lessons Learned for the NTC rotation 90-01. The file named "N908D.MS" contains the Battle Statistics/Data for the Mechanized Task Force (actually whichever Task Force was observed/controlled by the Scorpion (Mech) Observer/Controllers) for NTC rotation 90-08. Using Enclosure 5, NTC THP DB File Naming Convention, rename each file to correspond
196

with its contents. For example, the file mentioned above, "N908D.MS" would be renamed "N908MD0.THP", i.e., NTC, rotation 90-08, Mech Task Force (#1) Battle Statistics, All.
STEP 5: (All files) Using an ASCII text editor such as the ones mentioned in III-2.C above, perform quality control on the resultant files. Pay attention to the match between the content of each file and its filename. Ensure that all of the lines are 75 or less characters/spaces long, and that there are no superfluous blank lines.
STEP 6: (All files) Make a backup copy of the resultant ASCII files, upload them to the appropriate file server or disk drive, and go on to the next rotational set.
Part 2 -NTC Rotations 93-04 through 94-07 (WordPerfect format)
NOTE: During this period the NTC THP was divided into chapters by mission, and then further subdivided within each chapter by BOS. The processing steps below reflect this structure.
PROCESSING STEPS:
STEP 1: Make sure that the write protect feature on the original disk(s) is on, so that you don't accidentally overwrite the original file(s). Copy the files from the original disk(s) to the hard drive. Pay attention to the filenaming utilized at NTC so that you have the same set of files on the hard drive as you did on the floppy diskette(s).
STEP 2: Convert the individual file (s) to ASCII text, using WordPerfect. Be sure that the program output has no more than 75 characters and spaces per line, so that the text doesn't wrap when viewed in the THP Viewer, or when exported to another wordprocessor file format. In addition, check the tables (Battle Damage Assessment, Task Organization, and others) against the hardcopy to ensure that the columns and rows remain lined up. Finally, view the entire output file, so that you can ascertain that the result is readable and properly spaced.
STEP 3: (Rotations 94-01 forward only) Obtain the appropriate Mission Identification Codes (ID) for the rotation and task force(s) in question from the Archivist. Enter the Mission ID(s) corresponding to each file's mission counterpart(s) near the top of the file, immediately below the words "Mission Summary". Separate the Mission ID(s) from the surrounding text with double parentheses. Note: Particularly with mission chapters which pertain to "Live Fire" missions, it is possible for one file to pertain to more than one mission.
STEP 4: (All files) The individual files have characteristic filenames and are generally prepared for uploading to the THP DB by renaming the entire file. Using the key provided in Enclosure 7, NTC THP Original File Naming Convention (rotations 93-03 Light/93-04 through 94-07), determine the probable content of each original file. For example, the NTC file named "9305CP1AS" contains the Armor, Battlefield Operating Systems (BOS) Lessons Learned for Chapter 1 of the THP for NTC rotation 93-05. This does not tell you to which missions it pertains, but it will generally be the first mission or the first and second missions (in the case of live fire day and night missions). The file
197

named "9401CP2.MS" contains the Chapter Two text for the Mechanized Task Force (actually whichever Task Force was observed/controlled by the Scorpion (Mech) Observer/Controllers) for NTC rotation 94-01. Using Enclosure 8, NTC THP DB File Naming Convention (rotations 93-03 Light/93- 04 through 94-07), rename each file to correspond with its contents. For example, the file mentioned above, "9401CP2.MS" would be renamed "N941M12X.THP", i.e., NTC, rotation 94-01, Mech Task Force (#1), Chapter 2 Text, All. Likewise, "9305CP1AS" above would be renamed nN935AllX.THP".
STEP 5: (AH Files) Using an ASCII text editor such as the ones mentioned in III-2.C above, perform quality control on the resultant files. Pay attention to the match between the content of each file and its filename. Ensure that all of the lines are 75 or less characters/spaces long, and that there are no superfluous blank lines.
STEP 6: (All Files) Make a backup copy of the resultant ASCII files, upload them to the appropriate file server or disk drive, and go on to the next rotational set.
Part 3 - NTC Rotations 94-08 forward (PowerPoint format)
General: A major change took place with the NTC 94-08 THP. The THP was sent, hard copy and diskette copy, to the Archive. The hard copy was a much abbreviated package, similar to a set of briefing slides, and slightly to vastly different from Task Force piece to Task Force piece from the previous document. The digital file on diskette was found to be created in Microsoft PowerPoint, version 4.0, a graphics presentation program. In addition to the above, the filenaming convention had, once again, changed. See Enclosure 9, NTC THP Original File Naming Convention (Rotations 94-08 through 94-09). In order for the title and body text from these files to be converted for loading into the THP DB as it currently exists, some loading procedure development work must be done. At the present time, the original PowerPoint files have been renamed to agree with the filenaming convention contained in Enclosure 8. These files can be viewed by any user with Windows 3.1 by downloading and/or installing the PowerPoint Viewer on the local machine, and then downloading the file in question. According to the manufacturer, the PowerPoint Viewer can be freely distributed to anyone who needs it.
Since this was the first THP in this format, and it arrived in June 1994, no further information is available at this time.
List of Enclosures and Diagrams
Enclosures:
Enclosure 1, Breakout of JRTC THP Content for rotations 90-1 through 94-4. Enclosure 2, JRTC THP Original File Naming Convention Enclosure 3, THP Filenaming Convention (JRTC Rotations 90-1 through 93-3) Enclosure 4, THP Filenaming Convention (JRTC Rotations 93-4 through present)
198

Enclosure 4.1, JRTC File Type Equations (to File Designator) Enclosure 5, NTC THP Original File Naming Convention (Rotations 90-01 through 93-03, except 93- 03 Light Infantry Files) Enclosure 6, NTC THP DB File Naming Convention (Rotations 90-01 through 93-03) Enclosure 7, NTC THP DB File Naming Convention (Rotations 93-03 Light/93-04 through 94-07) Enclosure 8, NTC THP Original File Naming Convention (Rotations 93-03 Light/93-04 through 94- 07) Enclosure 9, NTC THP Original File Naming Convention (Rotations 94-08 through 94-09)
Diagrams:
Diagram A - THP DB Loading Procedures - JRTC (all rotations). Diagram B - THP DB Loading Procedures - NTC (Rotations 90-01 through 93-03) Diagram C - THP DB Loading Procedures - NTC ( Rotations 93-04 through 94-07)
199

Ol ■
O "^ Z. Ü ÜJ -J -J LU Q 1 1 1 I
Ol
00 < 1
o X X X X X X X X X X X Z
N. « « < 1
o O)
X X X X X X X X X X X Z
c o
to 1
o en
X X X X X X X X X X X < z
c o .o
cc « to < la o o X X X X X X X X X X X z o CC o>
«*-
c o
■* ^ o
1
o X X X X X X X X z o<* O)
Q. 4 JL O)
H£ co <
JRT
C
hro
ug
l
o en
X X X X X X X X X X z
■4-1
It O
f 0-
1 CVJ i
o X X X X X X X X X X < z
i o> o (0 V T- < 1_
CQ
T—
t o X X X X X X X X X X z
0) v. 3 V) o o
"Tn XJ C
5 CD CO
CO T3 c
CD CO
CO
'2 © >
-0 c CD k.
CO XJ c CD k.
c CD c c CD CO CO O H c tn
Ml t*
E E 3
o CO CD
co CD c
<D CO ■£ w O Ü 0 "k-
CO
a E E
CO
c
2 "° CX CD CO
O U.
k. O u_
0
CO
XJ O
X i—
3 CO
CD Ü
o CO
CO X> 5f XI
c CO
X» CO c
CO c
0_
CD
cs m
CO
c
ü i- cc
c o tn
.J2
o
CO OS
CO
is u. H c o
"co *-» *-•
CD k»
h- UL
c o
ffl
CO XJ c CD k»
it C O. CD 3
CD k. H ■c O
c CD k. H CD
0
CO V. CD Q.
0 ♦-• CO k_ CD Q.
CD
E CD
co
c 0
CO is <D
X» «c CD
H CD
X3 CD
.CO
CO o tn
CO
c o
"co mba
t S
mba
t S Q.
Q. 3
CO CD
U c CD
.5? "5
O
"cö 'O CD
O
"co
CD
c CO O-
E
CO c 0
"cö CO
Q_ 0 > CO 0.
*k» 'L. <a CO *> 0 0 k_ Q. Q. 0 CQ m CO m CO < ü ü u. c CO CO ü|
2 II «
200

CO c o CO
o DC
c o *■»
c o
X o> H JC ü ^ H CC
3 O
O i- I
CO Ü
ffl
V >- 3 (0 o o c
LU
* o{J O)
Oi
00 <
OS X X X X X X X X X X X Z
r«. * « < T— O)
X X X X X X X X X X X z
co <
c
X X X X X X X X X X X z
o ^* CO to < o
DC OJ X X X X X X X X X X X z
"«t <
s X X X X X z
CO <
a> X X X X X X X X X X z
CVJ < ,— z O)
Y- < X X X X X X X X X X X z
T3 5 CO c CD CO CD CO z
CD > o
TJ CO
c
CO T3 c CD CO
CO CO
c CD ft—
"O c CD ft-
c ©
o £- 1- E E 3
o CO CD
co CD c
c CO
<D 03 U_ ■£ « P y o ft- CO a.
E E
CO c
2 "° a. CD
O LL
o LL
o CO
TJ Ü
i- CO CD Ü
o CO
■a c^H TJ c
CO TJ
CO c
CO c
Q.
"ft^ CD +■* *-» CO
CO "5. c CO D.
E
(0
C
ü H CC ~3
c o «0 <o
<D ■a CO
O u_
CO co h- <D TJ CO
CO
li- t- er o
CD ft» 1- U- 1- c o «
CO o w "5
CO TJ c CD ft- h- c o "5 m
bat
Ser
vice
m
bat
Sup
port CD ft—
H- ■c o Q. Q. =3
CO CD
c 2 H- CD Ü C CD at
"55
o
ea ft— CD Q.
O 15 o CD
o "5 ft— CD ex o Ö 'o CD
CD
E ©
<4ft-*
CO c o
"w CO ft— CO CO > o o ft— Q. Q. o
m m CD CO CO < ü ü u. c CO CO Ü is
TJ CD > CD
8 £
S 'S 8 .5 I » O X) Z <
II II * »a
201

OJ I
CM OJ
< Z
00 I
OJ X Z
OJ
W c o
o
c d) c o
0.4 I o>
Ü ?
-3 JZ
O T- I
T °
to 0)
c o CO *-* o
cc
CO
o k. 3 (0 o u E
LU
CO
OJ OJ
to I
OJ O)
OJ o>
4fe
CO I
OJ O)
4t o8 OJ i
OJ en
OJ o>
< Z
X XX
c o o CD
CO 0. X H- Ü K- CC ~3
CO
E E 3
CO c o (0 (0
CD "O 08
.OJ "^ CO
CO
c CD
LL.
CD O
co a t- CD
TO CO o>
CQ
CO
CO
E E 3
CO c o CO CO
LL.
>■
c o
"co CO
CQ
CO TO c CD
C o
15 *—• "co CD
co
.2
CO
co TO c CD
c o
"co
TO C CO
CO CO o o D. O. 3
CO CD o
CD
CO *-» CO
JQ
E o Ü
CO TO c CD
o Q. O.
CO a E o Ü
CO TO c CD
tr o Q. Q. 3
CO CD
CO TO C CD
CD O c CD
.CO
©
c
5 CD
E CD > o CO CD 2 o
LL.
CO c o CO l_
CD Q.
O "5 'o CD Q.
co
co T3 C CD
CO T3 C CD
LL. CO en a. c o "^ *-» CD CO
CD Q.
CO CQ
Ü c rn CO
n ü CD E Q. o
CO Ü
< z
< z
co T». TO Ü »■^ CO *■*
e CD
E CD
CO
CO c .o "53 co
TO CD > CD O n CD
CC CO CD TO ♦^ CD CD CO
CO > a o JQ z < ii II * 00
202

1—
O) < ■ CO X X X X X X X X X X X 2?
CO < 1
CO o>
X X X X X X X X X X X Z
r«. < ■ CO 03
X X X X X X X X X X X z
0) c o
CO 1
CO O)
X X X X X X X X X X X < z
CO 1
CO CD
*•* co o
DC
c .g 75 ** o
c .2 'S
^m o to 1 X X X X X X X X X X X X c
O £E CO o>
XJ
c *I 4~* CO CD
C o
E 1—
1 X X X X X X X X X X X X o
o* CO en
ft- CD
0.4 "iZ CO CD
H£ O
JRT
C
hro
ug
CO i
CO en
X X X X X X X X X X X X *-•
Ü CO XI
H- ** c CD
5 o T- 1
CM i X X X X X X X X X X X X
X o CO O) c
CD
CO «. (j> T— < CO
m ■
CO O)
X X X X X X X X X X X z c o
Z£5
■ 1 CO ^-» o v T-
0) CD 1_ 5
CD
CO 3 (0 o Ü
To" TJ c CO
CD Xj
CO TJ C
to
1? CO
CO CD >
TJ c CD ft»
CO TJ c CD k.
c CD
ft- o •*-
c c © CO CO o H **
CO
,>. UJ
o fc> ft- 1- E
E 3
CO c
o CO CD
co CD c 75
u CD
CO 0.
CO
E E
£ m 2 "^ 8- c C CD CO
TJ c CD ft— J- ■c o Q. Q. 3
CO CO
o u.
o o o "5
TJ Ü
'■5 CO
X H- Ü H tr
3 CO c o
'co CO
'5 CD
TJ <0
CO
o u. CO (0 1- co
TJ CO
o CO CO
h- c o "5 +•* 4-*
CO TO c CD ft- 1- U. h- c .o 75 *+* *-*
CO
.12 co
CO TJ c CD ft- \- C o «5
5H
&l C Q. CD 3 co cp "5 to X> £1
E E
CO TJ c CD ft_ 1- CD o c CD
75
CO c o *-* CO ft— CD CL
O 75 '5 CO
CO c o To k. CD Q.
O 75 o CO
a.
CO
7a m "5. c CO Q.
E
CO
c CD
E CD
CO
CO c o
"co CO
XJ CD D) C CO x: ü
To E ft- o
UL *C *i— CO CO > o o ft- +-* Q. Q. o II m CQ CD m CO < ü Ü Ü. c CO CO ü Ü
^5 0s
203

C o +3 CO *-< o
EC
C o c o
I CD
Ü s?
3 O
(0 0
m
0) i_ 3 V) o u c
UJ
o
c o
-1—1
«0 *■*
o DC
4 X X X X X X X X X X X < z
CO < i
o X X X X X X X X X X X
Z
CM ■ X X X X X X X X X X X
< Z
< 1 X X X X X X X X X X X z
73 5 CO c - CD CO CD CO
CD > o CO CD
T3 CO
c _o o ^
CO ■o c CO CO
E £ 3
CO c
CO CO o
C CD t-
1- co CD
■o c <D
1- C
c © c
w 0} (0 LL "£ «o o P o k.
CO a.
E E
2 "o 9- c £L CD
o LL
o LL
o O
1- Ü
cc -3
3 CO
c o
'eo to
Ü ©
CO
© o k. o
LL
CO CO
H- a>
■a CO CJ>
'co CO
is LL H c g
5
CO ■D c a) i—
1- LL H- c o
"55
CO o
Ih. to
CO ■o c CD i_
V- c q
%■*
CO mba
t S
ervi
ce S
u m
bat
Sup
port
Tr T3
c CD i_
h- r o Q. O. 3
CO
CD
CO •a c CD i—
1- CD Ü C CD a>
"©
CO C o *^ CO t_ CD Q.
O 15 'o CD
CO c o CO 1» CD D.
o "co 'o CD
CL
©
CO CO
c © Q. E
co c © E © co
CO c p 'co © <r) CO > o o i_ Q. Q. o
CO CO CD CO CO < ü ü LL c CO CO O *z
204

Enclosure 2 - JRTC THP Original File Naming Convention
General: The JRTC THP files received at the Archive are, for the most part, named in a common-sense fashion. For example, the JRTC file named "THP.901" contains the whole text of the THP for JRTC rotation 90-1. However, the file named "anx-a.924" only contains the full text of Annex A, Unit Summaries, of the Brigade THP for rotation 92-4. This guide will not attempt to exhaustively list and equate all filenames to subject, but will merely report on a brief survey of the filenames used in the first JRTC rotation from Fiscal Years 90, 91, 92, 93, and 94.
Filename Meaning Remarks
THP.901 JRTC THP, rotation 90-1 Entire Text
THP911.WS JRTC THP, rotation 91-1 Entire Text
ANX-A.924 JRTC BDE THP, rotation 92-4
Annex A Text
ANX-B.924 JRTC BDE THP, rotation 92-4
Annex B Text
ANX-C.924 JRTC BDE THP, rotation 92-4
Annex C Text
ANX-D.924 JRTC BDE THP, rotation 92-4
Annex D Text
ANX-E.924 JRTC BDE THP, rotation 92-4
Annex E Text
ANX-F.924 JRTC BDE THP, rotation 92-4
Annex F Text
ANX-G.924 JRTC BDE THP, rotation 92-4
Annex G Text
ANX-H.924 JRTC BDE THP, rotation 92-4
Annex H Text
PART. JRTC BDE THP, rotation 92-4
Table of Contents, Part 1, Bde TF Opns, Annex A
through F
PART II JRTC BDE THP, rotation 92-4
Table of Contents, Part 2, Bn TF Opns, Annexes G
&H
205
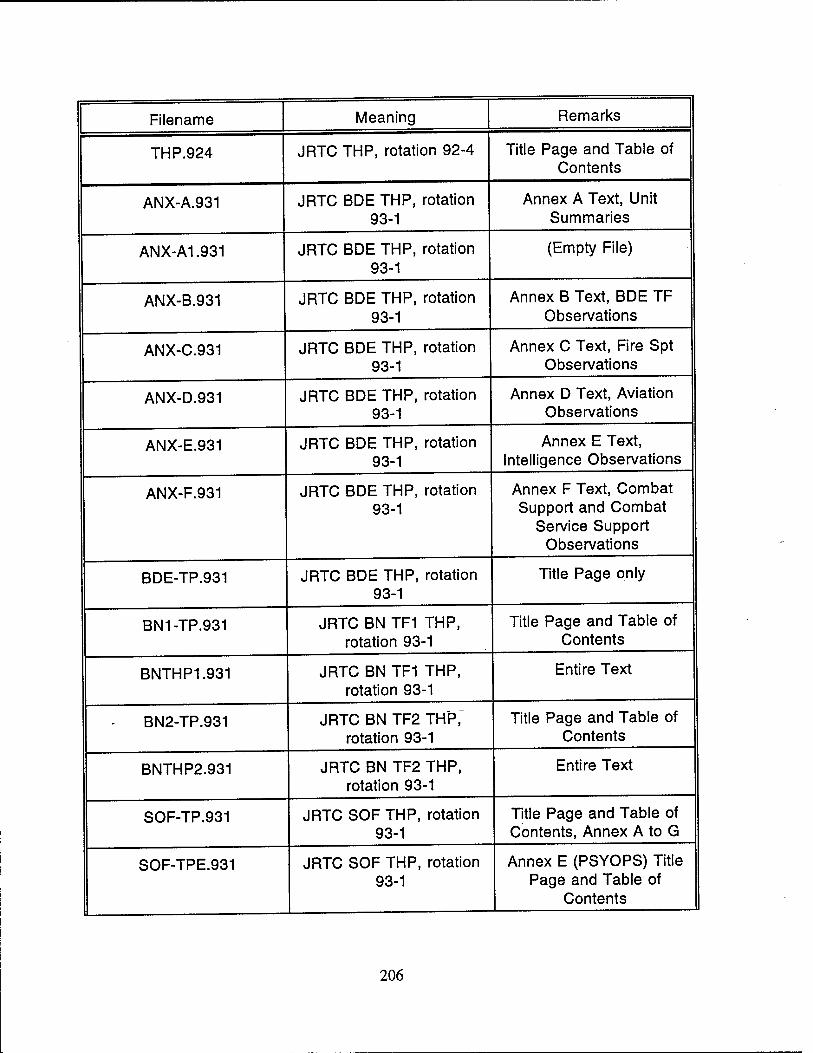
Filename
THP.924
ANX-A.931
ANX-A1.931
ANX-B.931
ANX-C.931
ANX-D.931
ANX-E.931
ANX-F.931
BDE-TP.931
BN1-TP.931
BNTHP1.931
BN2-TP.931
BNTHP2.931
SOF-TP.931
SOF-TPE.931
Meaning Remarks
JRTC THP, rotation 92-4
JRTC BDE THP, rotation 93-1
JRTC BDE THP, rotation 93-1
JRTC BDE THP, rotation 93-1
JRTC BDE THP, rotation 93-1
JRTC BDE THP, rotation 93-1
JRTC BDE THP, rotation 93-1
JRTC BDE THP, rotation 93-1
Title Page and Table of Contents
Annex A Text, Unit Summaries
(Empty File)
Annex B Text, BDE TF Observations
Annex C Text, Fire Spt Observations
Annex D Text, Aviation Observations
Annex E Text, Intelligence Observations
JRTC BDE THP, rotation 93-1
JRTC BN TF1 THP, rotation 93-1
JRTC BN TF1 THP, rotation 93-1
JRTC BN TF2 THP, rotation 93-1
JRTC BN TF2 THP, rotation 93-1
Annex F Text, Combat Support and Combat
Service Support Observations
Title Page only
Title Page and Table of Contents
Entire Text
Title Page and Table of Contents
Entire Text
JRTC SOF THP, rotation 93-1
JRTC SOF THP, rotation 93-1
Title Page and Table of Contents, Annex A to G
Annex E (PSYOPS) Title Page and Table of
Contents
206

Filename Meaning Remarks
SOF-TPF.931 JRTC SOF THP, rotation 93-1
Annex F (Civil Affairs/Civil-Military
Operations) Title Page and Table of Contents
SOF-TPG.931 JRTC SOF THP, rotation 93-1
Annex G (Special Operations Aviation) Title
Page and Table of Contents
ANX-A.931 (SOF) JRTC SOF THP, rotation 93-1
Annex A Text
ANX-B.931 (SOF) JRTC SOF THP, rotation 93-1
Annex B Text
ANX-C.931 (SOF) JRTC SOF THP, rotation 93-1
Annex C Text
ANX-D.931 (SOF) JRTC SOF THP, rotation 93-1
Annex D Text
ANX-E.931 (SOF) JRTC SOF THP, rotation 93-1
Annex E Text
ANX-F.931 (SOF) JRTC SOF THP, rotation 93-1
Annex F Text
ANX-G.931 (SOF) JRTC SOF THP, rotation 93-1
Annex G Text
BNTF1.941 JRTC TF 1 THP, rotation 94-1
Entire Text
BNTF2.941 JRTC TF 2 THP, rotation 94-1
Entire Text
BNTF3.941 JRTC TF 3 THP, rotation 94-1
Entire Text
ANX-A.941 JRTC BDE THP, rotation 94-1
Annex A Text, Unit Summaries
ANX-B.941 JRTC BDE THP, rotation 94-1
Annex B Text, Bde TF Observations
ANX-C.941 JRTC BDE THP, rotation 94-1
Annex C Text, Fire Spt Observations
207

Filename Meaning Remarks
ANX-D.941 JRTC BDE THP, rotation 94-1
Annex D Text, Aviation Observations
ANX-E.941 JRTC BDE THP, rotation 94-1
Annex E Text, Intelligence Observations
ANX-F.941 JRTC BDE THP, rotation 94-1
Annex F Text, Combat Support and Combat
Service Support Observations
SOF.941 JRTC SOF THP, rotation 94-1
Entire Text
ANGLI.941 JRTC ANGLICO THP, rotation 94-1
Entire Text
BN1LFX.941 JRTC BN TF1 THP, rotation 94-1
Annex A, Live Fire Exercises
BN2LFX.941 JRTC BN TF2 THP, rotation 94-1
Annex A, Live Fire Exercises
FSLFX.941 JRTC THP, rotation 94-1 Appendix 1, Live Fire Exercises, Fire Spt Bn
ANGLI.944 JRTC ANGLICO THP, rotation 94-4
Entire Text
ANGLITP.944 JRTC ANGLICO THP, rotation 94-4
Title Page only
BN1LFX.944 JRTC BN TF1 THP, rotation 94-4
Annex A Text, Live Fire Exercises
BNTF1.944 JRTC BN TF1 THP/ rotation 94-4
Entire Text
BN2LFX.944 JRTC BN TF2 THP, rotation 94-4
Annex A Text, Live Fire Exercises
BNTF2.944 JRTC BN TF2 THP, rotation 94-4
Entire Text
BNTF3.944 JRTC BN TF3 THP, rotation 94-4
Entire Text
ANX-A.944 JRTC BDE THP, rotation 94-4
Annex A Text, Unit Summaries
208

Filename Meaning Remarks
ANX-B.944 JRTC BDE THP, rotation 94-4
Annex B Text, BDE TF Observations
ANX-C.944 JRTC BDE THP, rotation 94-4
Annex C Text, Fire Support Observations
ANX-D.944 JRTC BDE THP, rotation 94-4
Annex D Text, Aviation Observations
ANX-E.944 JRTC BDE THP, rotation 94-4
Annex E Text, Intelligence Observations
ANX-F.944 JRTC BDE THP, rotation 94-4
Annex F Text, Combat Service Support
Observations
ANX-G.944 JRTC BDE THP, rotation 94-4
Annex G Text, Civil Affairs Operations
ANX-H.944 JRTC BDE THP, rotation 94-4
Annex H Text, Psychological Operations
FSLFX.944 JRTC FIRE SPT BN THP, rotation 94-4
Entire Text
209

Enclosure 3 THP DB Filenaming Convention through 93-3
JRTC Rotations 90-1
General: The JRTC THP files in the THP Database for early JRTC rotations, 90-1 through 93-3, have a seven-element filename with a standard file extension of "THP". The first element is always a "J" representing "JRTC". The next two elements represent the Fiscal Year during which the rotation occurred, e.g., "90", "91", "92", or "93". Following these, the fourth element is the rotation number itself, "1" through "9". Thus, a filename for a file from JRTC rotation 91-1 would begin "J911...", and one from rotation 92-3 would begin "J923...". The next three elements (Elements 5, 6, and 7) denote, within a rotational set, the subject to which the information pertains. Element 5, the Organization Code, represents the Organization/Echelon to which the information pertains. Element 6, the File Type, denotes the type of information being reported, whether Lessons Learned, Trends, Statistics, etc. Finally, the last element, element 7, indicates which Battlefield Operating System or Systems (BOS) the file addresses.
Element 5: Organization Code: For these rotations, element 5 indicates the organizational unit or echelon to which the information pertains.
Organizational Unit/Echelon
Brigade
Light Task Force #1
Light Task Force #2
Light Task Force #3
Air Assault #1
Air Assault #2
Company/Team
Aviation TF
Field Artillery/Fire Support
Forward Support Bn/CSS
Special Operations Forces
Code
B
N
V
210

Element 6: File Type: For these rotations, element 6 indicates the file type. The file type indicator denotes the type of information which the file contains. See the file types indicated below:
File Type Code
Executive Summary/Trends T
Battlefield Operating System (BOS) Lessons Learned (Force-on-Force)
S
Battlefield Operating System Lessons Learned (Live Fire)
X
Company/Team BOS Lessons Learned c
Battle Statistics/Data (BDA) D
Element 7: Battlefield Operating System (BOS) Code: For these rotations, element 7 indicates the battlefield operating system/subject area to which the information pertains. See list of BOS/Subject Area Codes below:
Battlefield Operating System/Subject Area
All BOSs
Intelligence
Maneuver
Fire Support
Air Defense Artillery (ADA)
Mobility/Countermobility/Survivability
Code
Combat Service Support
Command & Control
Nuclear, Biological, Chemical
Other (e.g., Military Police, Safety, Individual Skills, Unit Ministry Team,
Electronic Warfare, etc.)
211
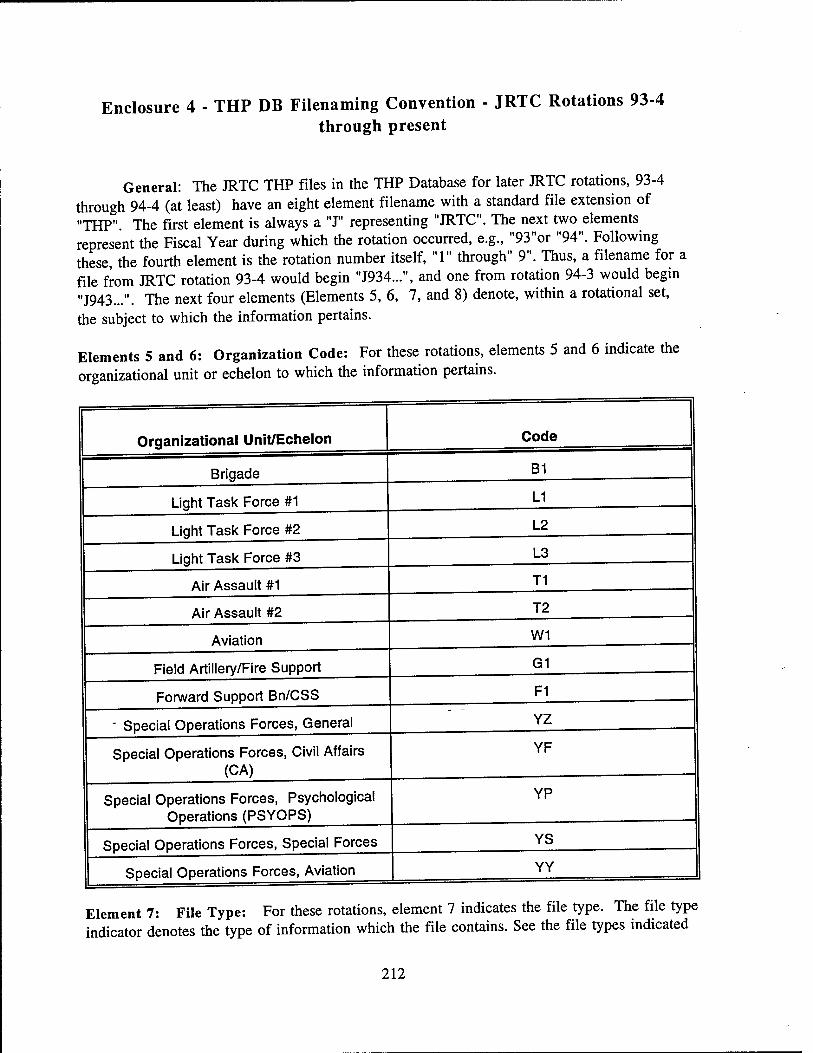
Enclosure 4 THP DB Filenaming Convention through present
JRTC Rotations 93-4
General: The JRTC THP files in the THP Database for later JRTC rotations, 93-4 through 94-4 (at least) have an eight element filename with a standard file extension of "THP". The first element is always a "J" representing "JRTC". The next two elements represent the Fiscal Year during which the rotation occurred, e.g., "93"or "94". Following these, the fourth element is the rotation number itself, "1" through" 9". Thus, a filename for a file from JRTC rotation 93-4 would begin "J934...", and one from rotation 94-3 would begin "J943...". The next four elements (Elements 5, 6, 7, and 8) denote, within a rotational set, the subject to which the information pertains.
Elements 5 and 6: Organization Code: For these rotations, elements 5 and 6 indicate the organizational unit or echelon to which the information pertains.
Organizational Unit/Echelon Code
Brigade
Light Task Force #1
Light Task Force #2
Light Task Force #3
Air Assault #1
Air Assault #2
Aviation
Field Artillery/Fire Support
Forward Support Bn/CSS
B1
L1
L2
L3
T1
T2
W1
G1
- Special Operations Forces, General
Special Operations Forces, Civil Affairs (CA)
Special Operations Forces, Psychological Operations (PSYOPS)
Special Operations Forces, Special Forces
Special Operations Forces, Aviation
F1
YZ
YF
YP
YS
YY
Element 7: File Type: For these rotations, element 7 indicates the file type. The file type indicator denotes the type of information which the file contains. See the file types indicated
212

below:
File Type
Executive Summary/Trends
Battlefield Operating System (BOS) Lessons Learned (Force-on-Force)
Battlefield Operating System (BOS) Lessons Learned (Live Fire)
Company/Team BOS Lessons Learned
Code
Battle Statistics/Data (BDA) D
Element 8: Battlefield Operating System (BOS) Code: For these rotations, element 8 indicates the battlefield operating system/subject area to which the information pertains. See list of BOS/Subject Area Codes below:
Battlefield Operating System/Subject Area
All BOSS
Intelligence
Maneuver
Fire Support
Air Defense Artillery (ADA)
Mobility/Countermobility/Survivability
Combat Service Support
Command & Control
Nuclear, Biological, Chemical
Other (e.g., Military Police, Safety, Individual Skills, Unit Ministry Team,
Electronic Warfare, etc.)
Code
213

Enclosure 4.1 - JRTC File Type Equations (to File Designator)
Use of this enclosure: This listing is intended to assist those processing JRTC Take Home Package (THP) files in properly segmenting the files and naming the parts of each file. It was made up by reviewing the tables of contents for all of the THP sections for all Fiscal Year 94 THPs received at the Archive. The first step in this process is to make a copy of the Table of Contents for each THP section received. Make sure you mark each page of each of these tables with the CTC and rotation number of the respective THP. For example, the pages of the THP for JRTC rotation 94-04 would be headed with "J944". These four alphanumerics form the first four elements of the individual filenames. Next, mark each page with the two element Task Force Designator for the respective task force. For example, the Task Force Designator for the Brigade would be "Bl", while that for the Light Infantry Task Force 1 would be "LI". (If in doubt as to the proper Task Force Designator, consult the Database Administrator or Archivist) Then, using this annotated copy of the Table of Contents, mark each of the titled THP parts with the respective filename equation derived from the list below. This is done by looking for the title of the THP part in the left column of the list below and using the respective "Filename Equation" from the middle column. You will notice that some of the "Filename Equations" below are four elements in length while most are two elements long. If you encounter a four-element Filename Equation, merely substitute all four elements for the Task Force Designator and File Equation mentioned above. Otherwise, append the two element Filename Equation to the Task Force Designator, and append this to the CTC/Rotation designator at the top of the page. Thus, when you are finished with this process, each part of each THP will have a full eight-element filename. (The file extension for all THP files is ".thp") (If you come upon a title in the Table of Contents which cannot be matched to a Filename Equation, consult a military Subject Matter
Expert)
THP Section Title Filename Equation
Remarks
81mm Mortar Platoon (Battalion) T3 - -
Air and Naval Gunfire Liaison Company (All)
T3
Air Defense Artillery (Battalion) T4
Air Defense Artillery (Brigade) T4
Air Defense Summary (Brigade) S4
I Air Defense (Battalion) T4
214

THP Section Title Filename Equation
Remarks
Annex A: Live Fire Exercises Battalion Task Force 1 (All)
xo
Annex A: Live Fire Exercises Battalion Task Force 2 (All)
xo
Annex A: Live Fire Exercises Combat Team (All)
xo
Annex A: Unit Summaries (Brigade)
N/A (See individual section headings)
Annex B: Brigade Task Force Observations (All)
N/A (See individual section headings)
Annex C: Fire Support Observations (All)
T3
Annex D: Aviation Observations (All)
W1T0
Annex E: Intelligence Operations (All)
T1
Annex F: Combat Service Support Observations (All)
T6
Annex F: Combat Support and Combat Service Support Observations (All)
T6
Annex G: Civil Affairs Operations (All)
YFTO ""
Annex G: Psychological Operations (All)
YPTO
Annex H: Civil Affairs Operations (All)
YFTO
Annex H: Psychological Operations (All)
YPTO
Antiarmor Company CO
215

THP Section Title Filename Equation
Remarks
Antiarmor (Antitank) Platoon CO
Appendix 1: Live Fire Exercises Fire Support Battalion
X3
Armor/Mechanized Operations CO
Armor/Mechanized Team 'x' CO
Aviation LO and (/) A2C2 (Brigade)
W1T0
Aviation Task Force Summary (Brigade)
W1S0
Battalion Fire Support Element T3
Battalion (TF) Ministry Team T9
Battalion S2 Section TO
Battalion S3 Section/Battle Command
TO
Battalion Task Force Summaries SO
Battalion Task Force Combat Trains
T6
Battalion Task Force Medical Platoon
T6
Battalion Task Force Combat Trains (S1/S4)
T6
Battalion Task Force Field Trains and Support Platoon
T6
Battalion Task Force Logistics Operations Center
T6
Battalion Task Force Support Platoon
T6
216

THP Section Title Filename Equation
Remarks
Battalion Task Force Unit Ministry Team
T9
Battalion Task Force 1 Summary SO
Battalion Task Force 2 Summary SO
Battalion Task Force 3 Operations (AN)
SO
Battalion Task Forces (Brigade/Regiment)
SO
Battle Command (Battalion) TO
Battle Command and Planning TO
Battle Command/TOC Operations TO
Brigade Aviation Summary W1T0
Brigade Intelligence System Summary
T1
Brigade Mission Summary SO
Civil Affairs Summary (Brigade) YFSO
Combat Service Support (Summary) (Brigade)
S6
Combat Support Company (Battalion)
CO
Combat Team Summary SO
Combat Trains (S1/S4) T6
Combat Trains, Field Trains, and Maintenance Platoon
T6
Command and Control (Battalion) T7 _—i
217

THP Section Title Filename Equation
Remarks
Command, Control, and Communications (Brigade)
T7
Company A (Battalion) CO
Company B (Battalion) CO
Company C (Battalion) CO
Engineer Summary (Brigade) S5
Engineers (Brigade) S5/T5
Field Trains and Support Platoon T6
Fire Support (Battalion) T3
Fire Support Element (Battalion) T3
Fire Support Section (Battalion) T3
Fire Support (Summary) (Brigade) S3
HHC, Signal Section T9
Intelligence (Battalion) T1
Intelligence System Summary (Brigade)
S1
Live Fire Exercise XO
Live-Fire Summary (Brigade) XO
Medical Platoon (Observations) T6
Mobility/Survivability (Battalion) T5
218

THP Section Title Filename Equation
Remarks
Mobility/Survivability (Summary) (Brigade)
S5
Nuclear, Biological, and Chemical (Battalion)
T8
Nuclear, Biological, and Chemical (Summary) (Brigade)
S8
Psychological Operations Summary (Brigade)
YPTO
Regimental Intelligence System Summary (Brigade)
S1
Regimental Mission Summary (Brigade)
SO
Safety (Battalion) T9
Safety (Brigade) S9
Scout Platoon (Battalion) T1
Signal (Brigade) T9
Special Operations Forces (SOF) (All except Civil Affairs, PSYOPS, and Spec Opns Avn)
YZTO
- -
Special Operations Forces (SOF) (Civil Affairs)
YFTO
Special Operations Forces (SOF) (Psychological Operations)
YPTO
Special Operations Forces (SOF) (Special Operations Aviation)
YZTO
Support Platoon, Combat Trains, and Field Trains (Battalion)
T6
Task Force Air Defense Artillery T4
219

THP Section Title Filename Equation
Remarks
Team Y, Armor Battalion CO
TOC Operations/Battle Command TO
Troop 'x' (Brigade) CO
Unit Ministry Team (Battalion) T9
220

Enclosure 5 - NTC THP Original File Naming Convention (Rotations 90-01 through 93-03 (except 93-03 Light Infantry Files))
General: At the National Training Center (NTC), the original Take Home Package (THP) files are given their filenames more or less according to a logical naming scheme. In general, the NTC THP filenames consist of a "rotational designator", a "filename suffix" and a "file extension" which, when taken together, describe the file's contents. This "rotational designator" takes the form of a 3- or 4-digit number. For example, the "rotational designator" for rotation 90-01 is "901", while the corresponding value for rotation 92-01 is "9201". In the case of all files except for Table(s) of Contents and Glossaries, the "filename suffix" part describes the type of file, and the "extension", the type of task force to which the file pertains. The remaining files, Table(s) of Contents, have a slightly different, but straightforward naming scheme. The following tables illustrate these principles.
Table 1 - Filename Suffixes and Explanation
Filename Suffix
ct
f1
Meaning
Armor Task Force (or any Task Force for which the Cobra Observer/Controller (O/C) Team served as O/Cs)
Brigade Task Force
Remarks
When file extension is "TOC"
Chemical Company
Company/Team Lessons Learned /Trends/Executive Summary
Company/Team Trends (as opposed to Lessons Learned when both are present)
When file extension is "TOC"
When file extension is "TOC"
Battle Statistics/ Statistical Analysis
Fire Support
Additional Fire Support Requirements
Individual Skills Observations
When file extension is "TOC"
When file extension is "TOC"
221

Filename Suffix Meaning Remarks
i Light Infantry Task Force (or any Task Force for which the Tarantula Observer/Controller (O/C) Team served as O/Cs)
When file extension is "TOC"
1 Forward Support Battalion When file extension is "TOC"
m Mechanized Task Force (or any Task Force for which the Scorpion Observer/Controller (O/C) Team served as O/Cs)
When file extension is "TOC"
m Mission Statements/ Commander's Intent/ Task Organization
n Noncommissioned Officer (NCO) Observations
s Battlefield Operating Systems (BOS) Lessons Learned(Force on Force)
t Trends/Executive Summary
toc/tocc Table(s) of Contents
V Aviation Task Force When file extension is "TOC"
X Battlefield Operating Systems (BOS) Lessons Learned(Live Fire)
Table 2 - (File) Extensions and Explanation
Extension
as
arm
bs
Meaning
Armor Task Force (or any Task Force for which the Cobra Observer/Controller (O/C) Team served as O/Cs)
Brigade Task Force
Remarks
222

Extension Meaning Remarks
bde ii it
b2 Brigade Task Force Part 2 of 2 parts
cs Chemical Company
es Additional Chemical Observations
fs Fire Support Task Force
is Light Infantry Task Force (or any Task Force for which the Tarantula Observer/Controller (O/C) Team served as O/Cs)
Is Forward Support Battalion
ms Mechanized Task Force (or any Task Force for which the Scorpion Observer/Controller (O/C) Team served as O/Cs)
toe Table of Contents
vs Aviation Task Force
zs Additional Aviation Observations
1bs Brigade Task Force Part 2 of 2 parts
Examples:
Using the above information, the file named "901 m.as" would contain Mission Statement/Commander's Intent for the Armor Task Force for rotation 90-01. Likewise, the file named "9201m.toc" would contain the Table of Contents for the Mech Task Force THP for rotation 92-01.
223

Enclosure 6 - NTC THP DB File Naming Convention (Rotations 90-01 through 93-03)
General: The NTC THP files in the THP Database for early NTC rotations, 90-01 through 93-03, have a seven-element filename with a standard file extension of "THP". The first element is always an "N", representing "NTC". The next two elements represent the Fiscal Year during which the rotation occurred, e.g., "90", "91", "92", or "93". Following these, the fourth element is the rotation number itself, "1" through" 9" or "A" through "E". ("A" represents "10", "B" represents "11", etc. , up to "E", which stands for "14". Thus, a filename for a file from NTC rotation 91-2 would begin "N912...", and one from rotation 92-3 would begin "N923...". The next three elements (Elements 5, 6, and 7) denote, within a rotational set, the subject to which the information pertains. Element 5, the Organization Code, represents the Organization/Echelon to which the information pertains. Element 6, the File Type, denotes the type of information being reported, whether Lessons Learned, Trends, Statistics, etc. Finally, the last element, element 7, indicates which Battlefield Operating System or Systems (BOS) the file addresses.
Element 5: Organization Code: For these rotations, element 5 indicates the organizational unit or echelon to which the information pertains.
Organizational Unit/Echelon Code
Brigade B
Armor Task Force #1 A
Armor Task Force #2 K
Light Task Force #1 I
Light Task Force #2 G
Mechanized Task Force #1 M
Mechanized Task Force #2 E
Aviation TF #1 V
Aviation TF #2 W
Air Assault TF #1 T
Air Assault TF #2 S
Cavalry TF #1 c Cavalry TF #2 V
224

Organizational Unit/Echelon Code
Motorized TF #1 Z
Motorized TF #2 N
Field Artillery/Fire Support F
Forward Support Bn/CSS L
Element 6: File Type: For these rotations, element 6 indicates the file type. The file type indicator denotes the type of information which the file contains. See the file types indicated below:
File Type Code
Executive Summary/Trends T
Mission Statement/Concept M
Battlefield Operating System (BOS) Lessons Learned (Force-on-Force)
S
Battlefield Operating System (BOS) Lessons Learned (Live Fire)
X
NCO Support Channel/Observations N
Company/Team/Battery BOS Lessons Learned/Daily Mission Summaries
C
Battle Statistics/Statistical Analysis (BDA) D
Element 7: Battlefield Operating System(BOS) Code: For these rotations, element 7 indicates the battlefield operating system/subject area to which the information pertains. See list of BOS/Subject Area Codes below:
Battlefield Operating System/Subject Area
Code
All BOSs 0
225

Battlefield Operating System/Subject Area
Code
Intelligence 1
Maneuver 2
Fire Support 3
Air Defense Artillery (ADA) 4
Mobility/Countermobility/Survivability (MCM/S)
5
Combat Service Support (CSS) 6
Command & Control 7
Nuclear, Biological, Chemical (NBC) 8
Other (e.g., Military Police, Safety, Individual Skills, Unit Ministry Team,
Electronic Warfare, etc.) 9
226

Enclosure 7 - NTC THP Original File Naming Convention (Rotations 93-03 Light 93-04 through 94-07)
General: At the National Training Center (NTC), the original Take Home Package (THP) files are given their filenames more or less according to a logical naming scheme. In general, the NTC THP filenames consist of a "rotational designator", a "filename suffix" and a "file extension" which, when taken together, describe the file's contents. This "rotational designator" takes the form of a 3- or 4-digit number. For example, the "rotational designator" for rotation 93-04 is "9304". In the case of all files except for Table(s) of Contents and Glossaries, the "filename suffix" describes the chapter number, and the "extension" the type of task force to which it pertains. The remaining files, Table(s) of Contents and Glossaries, have a slightly different, but straightforward naming scheme. The following tables illustrate these principles.
Table 1 - List of Filename Suffixes with Meanings
Filename Suffix
Meaning Remarks
a Armor Task Force (or any Task Force for which the Cobra Observer/Controller (O/C) Team served as O/Cs)
When file extension is "TOC"
b Brigade Task Force When file extension is "TOC"
cp1 Chapter 1
cp2 Chapter 2
cp3 Chapter 3
cp4 Chapter 4
cp5 Chapter 5
cp6 Chapter 6
cp7~ Chapter 7
cp8 Chapter 8
cp9 Chapter 9
cp10 Chapter 10
cp11 Chapter 11
cp12 Chapter 12
cp13 Chapter 13
cp14 Chapter 14
227

Filename Suffix
Meaning Remarks
cp15 Chapter 15
f Fire Support/Field Artillery When file extension is "TOC"
final/ finalw (Work Order) (Administrative File/Do not process)
glossary Glossary Found only in Armor THP files; do not add to THP DB
i Light Infantry Task Force (or any Task Force for which the Tarantula Observer/Controller (O/C) Team served as O/Cs)
When file extension is "TOC"
m Mechanized Infantry Task Force (or any Task Force for which the Scorpion Observer/Controller (O/C) Team served as O/Cs)
When file extension is "TOC"
0 "0 & I" elements; see Fire Support When file extension is "TOC"
t Trends
toc/tocc Table of Contents Do not process
tren/ tmd
Trends
V Aviation Task Force When file extension is "TOC"
z Additional Aviation Assets When file extension is "TOC"
Table 2 - List of Filename Extentions with Meanings
Filename Extension
Meaning Remarks
as Armor Task Force (or any Task Force for which the Cobra Observer/Controller (O/C) Team served as O/Cs)
b/bde/bk/bs Brigade Task Force
fs Fire Support/Field Artillery
foi 0 & I/Fire Support
228

Filename Extension
Meaning Remarks
is Light Infantry Task Force (or any Task Force for which the Tarantula Observer/Controller (O/C) Team served as O/Cs)
Is Forward Support Battalion/Combat Service Support
ms Mechanized (Infantry) Task Force (or any Task Force for which the Scorpion Observer/Controller (O/C) Team served as O/Cs)
OS 0 & 1 Forces; see Fire Support
toe Table of Contents
v/vs Aviation Task Force
wo Work Order Administrative; do not process
z/zs Additional Aviation Assets
229

Enclosure 8 - NTC THP DB File Naming Convention (Rotations 93-03 (Light) /93-04 through 94-07)
General: The NTC THP files in the THP Database for later NTC rotations, 93-04 through 94-07, have an eight element filename with a standard file extension of "THP". The first element is always an "N" representing "NTC". The next two elements represent the Fiscal Year during which the rotation occurred, e.g., "93" or "94". Following these, the fourth element is the rotation number itself, "1" through" 9" or "A" through "E". ("A" represents "10", "B" represents "11", etc. , up to "E", which stands for "14") Thus, a filename for a file from NTC rotation 93-04 would begin "N934...", and one from rotation 94-3 would begin "N943...". The next four elements (Elements 5, 6, 7, and 8) denote, within a rotational set, the subject to which the information pertains. Elements 5 and 6, the Organization Code, represent the Organization/Echelon to which the information pertains. Element 7, the Chapter/File Designation, denotes the chapter number or type of information (trends) being reported. Finally, the last element, element 8, indicates the file type, either mission-level or executive summary/trends.
Elements 5 and 6: Organization Code: For these rotations, elements 5 and 6 indicate the organizational unit or echelon to which the information pertains.
Organizational Unit/Echelon Code
Brigade B1
Armor Task Force #1 A1
Armor Task Force #2 A2
Light Task Force #1 L1
Light Task Force #2 L2
Mechanized Task Force #1 M1
Mechanized Task Force #2 M2
Aviation TF #1 W1
Aviation TF #2 W2
Aviation TF #3 W3
Air Assault TF #1 T1
Air Assault TF #2 T2
Cavalry TF #1 C1
230

Organizational Unit/Echelon Code
Cavalry TF #2 C2
0& 1 01
Field Artillery/Fire Support G1
Forward Support Bn/CSS F1
Element 7: Chapter/File Designation: For these rotations, element 7 indicates the chapter number/file designation. This indicator denotes either the chapter number of mission-based files or the fact that the file in question is a trend file. See the codes indicated below:
Chapter/File Designation Code
1 1
2 2
3 3
4 4
5 5
6 6
7 7
8 8
9 9
10 A
11 B
12 C
13 D
14 E
15 F
Trends T
231

Element 8: File Type: For these rotations, element 8 indicates whether the file in question is a mission file or an executive summary/trends file. See list of codes below:
File Type Code
Mission X
Executive Summary/ Trends/Recommendations
0
232

Enclosure 9 - NTC THP Original File Naming Convention (Rotations 94-08 through 94-09)
General: At the National Training Center (NTC), the original Take Home Package (THP) files are given their filenames more or less according to a logical naming scheme. In general, the NTC THP filenames consist of a "rotational designator", a "filename suffix" and a "file extension" which, when taken together, describe the file's contents. This "rotational designator" takes the form of a 3- or 4-digit number, and indicates the rotation to which the file pertains. For example, the "rotational designator" for rotation 94-08 is "9408". The filename suffix for these files specifies whether the file contains trend information, mission information, an executive summary, or merely which chapter's text the file contains. The file extension for these files is "PPT", which reflects that these files are provided to the Archive in Microsoft Powerpoint, version 4.0, format. The NTC THP from rotation 94-08 forward is presented in an abbreviated format, as a set of briefing slides. In some cases, for example, 94-08 Armor THP, the files contain most of the first part of the former THP text, presented in a new format. In this case, the only part not found in the new THP format is the Battlefield Operating System (BOS) detailed descriptive narrative. In other cases, it seems that most of the information which used to be contained in the "old" format has been lost, and only brief summary comments remain. However, it is still too soon to tell, since this change took place in May 1994. The following table contains the various filename suffixes for rotation 94-08 with their equations.
Filename Suffix
Meaning Remarks
cp1 Chapter 1 Armor, Fire Support, and O & I Files
cp2 Chapter 2 Armor, Fire Support, and O & I Files
cp3 Chapter 3 Armor, Fire Support, and O & I Files
cp4 Chapter 4 Armor, Fire Support, and O & I Files
cp5 Chapter 5 Armor, Fire Support, and O & I Files
cp6 Chapter 6 O & I Files
cp7 Chapter 7 O & I Files
t Trends Fire Support, Mech Task Force, and O & I
td1 Training Day 1 mission data
Brigade Files
td3 Training Day 3 mission data
Brigade Files
233

Filename Suffix
Meaning Remarks
td5 Training Day 5 mission data
Brigade Files
td7 Training Day 7 mission data
Brigade Files
td9 Training Day 9 mission data
Brigade Files
td11 Training Day 11 mission data
Brigade Files
td13 Training Day 13 mission data
Brigade Files
V Aviation data
234

DIAGRAM A
THP Database Loading Procedures (JRTC - All Rotations)
INPUT
fc.
PROCESS
THP Files on Diskette(s) Copy THP Files to Hard Drive w
Convert Files to ASCII Text
INPUT *
CopyofTHPtable(s)of contents
^ Determine Contents of each raw file w
Divide Table of Contents Entries into sections by
Qrg. / Type / BOS [ype
Determine file name for each section
Divide each original file into sections and save file
Assign appropriate file name to each object file
Perform Q.C. for line length and legibility -K Correct \
if needed/
Make backup copy of corrected files
Upload files to network server for local users
Upload files to UNIX server for remote users
235

DIAGRAM B
THP Database Loading Procedures (NTC - Rotations 90-01 through 93-03)
INPUT
fe,
PROCESS
THP Files on Diskette(s) Copy THP Files to Hard
Drive w
DisplayWrite Files £ Convert Files to ASCII Text
I
1 WordPerfect Files
Split "Lessons Learned" files by Battlefield Operating
System (BOS)
Perform Q.C. for line length and legibility
I
I Convert Files to ASCII Text
Split "Lessons Learned" files by Battlefield Operating
System (BOS)
I Perform Q.C. for line length
and legibility
I Rename files acccording to
file naming convention
I Make backup copy of corrected object files
I Upload files to network server for local users
I Upload files to UNIX server
for remote users
_^/ Correct \ "\if needed/
236

DIAGRAM C
THP Database Loading Procedures (NTC - Rotations 90-01 through 93-03)
INPUT PROCESS
THP Files on Diskette(s)
/ Correct Y \if needed/
Copy THP Files to Hard Drive
I Convert Files to ASCII Text
Perform Q.C. for line length and legibility
I Rename files acccording to
file naming convention
I Make backup copy of corrected object files
I Upload files to network server for local users
I Upload files to UNIX server
for remote users
(Rotation 94-04 through 94-07 ONLY)
Mission ID from Automated Finders Guide Rotation and
Mission Summary form
I Add Appropriate Msn. ID to
each "Lessons Learned" File (just above Msn. Statement)
237
Recommended


