

I
© 1991 - 2010 Equisys Plc
Table of Contents
Foreword 0
Part I How do I... 1
................................................................................................................................... 21 Zetafax Client actions
.......................................................................................................................................................... 3Send a fax?
.......................................................................................................................................................... 5Specify options when sending a fax?
.......................................................................................................................................................... 8View a fax?
.......................................................................................................................................................... 9Annotate a fax?
.......................................................................................................................................................... 11Print a fax?
.......................................................................................................................................................... 12Preview a message before sending it?
.......................................................................................................................................................... 15Send multiple documents as a single message?
.......................................................................................................................................................... 16Get information about a message?
.......................................................................................................................................................... 18Send a message to a mobile phone?
.......................................................................................................................................................... 20Specify options when sending a text message?
.......................................................................................................................................................... 21View a text message?
................................................................................................................................... 222 Addressbook actions
.......................................................................................................................................................... 23Add to my address book?
.......................................................................................................................................................... 24Use my address book?
.......................................................................................................................................................... 26Use my mail address book?
.......................................................................................................................................................... 27Use a CSV file to address faxes?
.......................................................................................................................................................... 28Link an ODBC database to my address book?
................................................................................................................................... 293 Advanced tasks
.......................................................................................................................................................... 30Archive my messages?
.......................................................................................................................................................... 32Scan a document?
.......................................................................................................................................................... 34Create a coversheet?
.......................................................................................................................................................... 37Create a continuation page?
.......................................................................................................................................................... 39Use Embedded Adressing
......................................................................................................................................................... 40Add embedded commands to my document?
......................................................................................................................................................... 41Addressing Commands
......................................................................................................................................................... 42Sending Commands
......................................................................................................................................................... 43Other Commands
.......................................................................................................................................................... 46Use mail merge and Zetafax?
.......................................................................................................................................................... 47Check for updates
.......................................................................................................................................................... 48Sign a fax before forwarding
Part II Zetafax Client 50
................................................................................................................................... 511 Menu options
.......................................................................................................................................................... 52File menu
......................................................................................................................................................... 53New fax
......................................................................................................................................................... 54New text message
......................................................................................................................................................... 56Print
......................................................................................................................................................... 57Print setup
......................................................................................................................................................... 58Move/Save
......................................................................................................................................................... 59Save as system file
......................................................................................................................................................... 60Delete/Abort
......................................................................................................................................................... 61Aquire
......................................................................................................................................................... 62Select source
......................................................................................................................................................... 63Server status

IIContents
II
© 1991 - 2010 Equisys Plc
......................................................................................................................................................... 64Server logs
......................................................................................................................................................... 65Search sent items
......................................................................................................................................................... 68Search sent archive
......................................................................................................................................................... 70Search received archive
......................................................................................................................................................... 72Sever reconnect
......................................................................................................................................................... 73Exit
.......................................................................................................................................................... 74Addresses menu
......................................................................................................................................................... 75Search
......................................................................................................................................................... 76New Entry
......................................................................................................................................................... 77New Group
.......................................................................................................................................................... 79Actions menu
......................................................................................................................................................... 80New fax
......................................................................................................................................................... 81New text message
......................................................................................................................................................... 83Forward to a Zetafax User
......................................................................................................................................................... 84Forward to fax number
......................................................................................................................................................... 85Forward to mobile number
......................................................................................................................................................... 87Forward to mail
......................................................................................................................................................... 88Forward other file to fax number
......................................................................................................................................................... 91Resend a fax
......................................................................................................................................................... 92Rush
......................................................................................................................................................... 93Hold
......................................................................................................................................................... 94Release
......................................................................................................................................................... 95Mark as junk
......................................................................................................................................................... 97Mark as unread
......................................................................................................................................................... 98Follow up
......................................................................................................................................................... 99Complete
......................................................................................................................................................... 100View
......................................................................................................................................................... 101Information
.......................................................................................................................................................... 102Options menu
......................................................................................................................................................... 103Scanners
......................................................................................................................................................... 104Fax message options
......................................................................................................................................................... 106SMS message options
......................................................................................................................................................... 107Inbox rules
......................................................................................................................................................... 109Alerts
......................................................................................................................................................... 110Name
......................................................................................................................................................... 111Fax annotation options
......................................................................................................................................................... 112OCR
......................................................................................................................................................... 113Customize
.......................................................................................................................................................... 114Tools menu
......................................................................................................................................................... 115Annotate
......................................................................................................................................................... 116Delete annotations
......................................................................................................................................................... 117OCR
......................................................................................................................................................... 118Name of sender
......................................................................................................................................................... 119Zetafax Viewer
......................................................................................................................................................... 120Coversheet Editor
......................................................................................................................................................... 121Tidy Up
.......................................................................................................................................................... 122Window menu
......................................................................................................................................................... 123Folder List
......................................................................................................................................................... 124Reset Layout
......................................................................................................................................................... 125Change Directory
......................................................................................................................................................... 126Change File Filter
......................................................................................................................................................... 127Refresh
................................................................................................................................... 1282 Status icons

III
© 1991 - 2010 Equisys Plc
................................................................................................................................... 1293 Toolbar
................................................................................................................................... 1304 Create Inbox rules and manage junk messages?
................................................................................................................................... 1325 Keyboard Shortcuts
Part III Zetafax Coversheet Editor 133
................................................................................................................................... 1341 Create a coversheet
................................................................................................................................... 1372 Menu options
.......................................................................................................................................................... 138File menu
......................................................................................................................................................... 139New
......................................................................................................................................................... 140Open
......................................................................................................................................................... 141Close
......................................................................................................................................................... 142Save
......................................................................................................................................................... 143Save As
......................................................................................................................................................... 144Delete
......................................................................................................................................................... 145Page Setup
......................................................................................................................................................... 146Exit
.......................................................................................................................................................... 147Edit menu
.......................................................................................................................................................... 148View menu
.......................................................................................................................................................... 149Insert menu
......................................................................................................................................................... 150Text
......................................................................................................................................................... 151Mark as read
......................................................................................................................................................... 152Field
......................................................................................................................................................... 154Line
......................................................................................................................................................... 155Box
......................................................................................................................................................... 156Bitmap
.......................................................................................................................................................... 157Format menu
.......................................................................................................................................................... 159Options menu
......................................................................................................................................................... 160Snap to grid
......................................................................................................................................................... 161Effects
......................................................................................................................................................... 162Settings
................................................................................................................................... 1633 Toolbar
................................................................................................................................... 1644 Keyboard Shortcuts
Part IV Zetafax Viewer 165
................................................................................................................................... 1671 Menu options
.......................................................................................................................................................... 168File menu
......................................................................................................................................................... 169Print
......................................................................................................................................................... 170Save
......................................................................................................................................................... 171Save As
......................................................................................................................................................... 172Import
......................................................................................................................................................... 173Export
......................................................................................................................................................... 174Previous Fax
......................................................................................................................................................... 175Next Fax
......................................................................................................................................................... 176Exit
.......................................................................................................................................................... 177Edit
......................................................................................................................................................... 178Undo
......................................................................................................................................................... 179Cut
......................................................................................................................................................... 180Copy
......................................................................................................................................................... 181Paste
.......................................................................................................................................................... 182View menu
......................................................................................................................................................... 183Next page

IVContents
IV
© 1991 - 2010 Equisys Plc
......................................................................................................................................................... 184Previous page
......................................................................................................................................................... 185First page
......................................................................................................................................................... 186Last page
......................................................................................................................................................... 187Toolbars
......................................................................................................................................................... 188Thumbnails
.......................................................................................................................................................... 189Annotation
......................................................................................................................................................... 190Straight line
......................................................................................................................................................... 191Pencil/ Freehand Line
......................................................................................................................................................... 192Rectangle
......................................................................................................................................................... 193Highlight
......................................................................................................................................................... 194Text Box
......................................................................................................................................................... 195Picture
......................................................................................................................................................... 196Stamp
......................................................................................................................................... 197Approved
......................................................................................................................................... 198Draft
......................................................................................................................................... 199Received
......................................................................................................................................... 200Rejected
......................................................................................................................................... 201User stamps
......................................................................................................................................... 202Add stamp
......................................................................................................................................... 203Manage stamp
......................................................................................................................................................... 204Select
......................................................................................................................................................... 205Delete annotation
......................................................................................................................................................... 206Remove all annotations
.......................................................................................................................................................... 207Page
......................................................................................................................................................... 208Move page up
......................................................................................................................................................... 209Move page down
......................................................................................................................................................... 210Rotate left
......................................................................................................................................................... 211Flip
......................................................................................................................................................... 212Rotate right
......................................................................................................................................................... 213Rotate all left
......................................................................................................................................................... 214Flip all
......................................................................................................................................................... 215Rotate all right
......................................................................................................................................................... 216Delete page
.......................................................................................................................................................... 217Zoom
......................................................................................................................................................... 218Zoom in
......................................................................................................................................................... 219Zoom out
......................................................................................................................................................... 220Fit to width
......................................................................................................................................................... 221Overview
......................................................................................................................................................... 222Full size (100%)
......................................................................................................................................................... 22325%
......................................................................................................................................................... 22450%
......................................................................................................................................................... 22575%
......................................................................................................................................................... 226150%
......................................................................................................................................................... 227200%
......................................................................................................................................................... 228500%
.......................................................................................................................................................... 229Format
......................................................................................................................................................... 230Font
.......................................................................................................................................................... 231Forward
......................................................................................................................................................... 232To Zetafax user
......................................................................................................................................................... 233To fax number
......................................................................................................................................................... 234To mail
.......................................................................................................................................................... 235Help
................................................................................................................................... 2362 Annotation toolbar

V
© 1991 - 2010 Equisys Plc
................................................................................................................................... 2373 Faxing toolbar
................................................................................................................................... 2384 Keyboard Shortcuts
Part V Hints and tips 239
................................................................................................................................... 2401 Integration with Microsoft Office and Outlook
.......................................................................................................................................................... 241Integration with Microsoft Office
......................................................................................................................................................... 242Integration with Microsoft Office 2003
......................................................................................................................................................... 245Integration with Microsoft Office 2007/2010
......................................................................................................................................................... 249Print to Zetafax from applications
.......................................................................................................................................................... 251Integration with Microsoft Outlook
......................................................................................................................................................... 252Integration with Microsoft Outlook 2003
......................................................................................................................................... 256Standard toolbar
......................................................................................................................................................... 257Integration with Microsoft Outlook 2007/2010
......................................................................................................................................................... 270How do I...
......................................................................................................................................... 271Send a fax using the new fax form
......................................................................................................................................... 272Send a message to a fax recipient
......................................................................................................................................... 273Set options on the new fax form
......................................................................................................................................... 274Set faxing options for my message
......................................................................................................................................... 275Preview a fax before sending
......................................................................................................................................... 276Release a fax held for preview
......................................................................................................................................... 277Send a fax for approval?
......................................................................................................................................... 278Review a fax sent for approval?
......................................................................................................................................... 279Resend a fax?
......................................................................................................................................... 280Work out why a fax has failed to be sent?
.......................................................................................................................................................... 284What is...
......................................................................................................................................................... 284The Zetafax Outlook Addin?
......................................................................................................................................................... 285The Zetafax Word Addin?
......................................................................................................................................................... 286The Zetafax Excel Addin?
................................................................................................................................... 2872 Mouse shortcuts
................................................................................................................................... 2883 Editing graphics files
................................................................................................................................... 2894 Scanning
................................................................................................................................... 2905 FAQs
Part VI Glossary 293
Index 294

1
© 1991 - 2010 Equisys Plc
How do I…
This section is designed to help you perform various common tasks that are possible using your Zetafaxsystem. Please click one
Send a fax?Specify options when sending a fax?View a fax?Annotate a fax?Print a fax?Preview a message before sending it?Send multiple documents as a single message?Send a message to a mobile phone?Specify options when sending a text message?View a text message?Add to my address book?Use my address book?Use my mail address book?Use a CSV file to address faxes?Link an ODBC database to my address book?Archive my messageScan a document?Create a continuation page?Use Embedded Addressing· Addressing Commands· Sending Commands· Other CommandsUse mail merge and Zetafax?Check for updatesSign a fax before forwarding

2
© 1991 - 2010 Equisys Plc
Zetafax Client actions
The following topics describe how to perform common tasks with the Zetafax Client:
Send a fax?Specify options when sending a fax?View a fax?Annotate a fax?Print a fax?Preview a message before sending it?Send multiple documents as a single message?Get information about a message?Send a message to a mobile phone?Specify options when sending a text message?View a text message?

3
© 1991 - 2010 Equisys Plc
How do I send a fax?
· To send a fax, on the File menu, click New > Fax. Alternatively, click the Send message button onthe toolbar.
· This displays the Fax Wizard - recipients dialog box allowing you to address your fax message.
· Enter a name, organization (optional), and the destination fax number. · Click the Next button to continue.
For more information about the addressing options, and using the address book, see How do I use my addressbook?
The Fax Wizard - Coversheet dialog box then allows you to choose the coversheet and add any content youwish to be sent with your fax, such as a subject and any notes, all information added to your coversheet isdisplayed to allow you to review the appearance of your fax message:

4
© 1991 - 2010 Equisys Plc
· In the Subject box, type a subject for your email. · Select a coversheet.· Add any notes you wish to send with your fax in the notes field. · Click the Next button to continue.
The Fax Wizard Options dialog box then allows you to set various options relating to the sending of yourfax:
· For simplicity, leave the Option settings as they are, and press Finish to send your fax. For more information about the options see How do I specify options when sending a fax?
· Switch to the Zetafax Client window.
The fax will appear in your Outbox window, and the icon in the Status column shows the status of the fax.
For more information, see Status icons.
Related Topics:How to Print to Zetafax from applications Integration with Microsoft Office and Outlook

5
© 1991 - 2010 Equisys Plc
How do I specify options when sending a fax?
The Fax Wizard - Options dialog box is displayed automatically when you send a fax, to allow you to specifyadditional options.
You can specify:
· Documents to be attached to the fax. · Whether you want a Quick view of your fax before it is sent.· Whether you want to hold your fax in your Outbox for previewing.· What charge code (if any) you want to use to send with your fax.
In addition, you can change message sending options by accessing the option tabs at the top of this dialog. These options are:
LetterheadPriorityTime of SendingResolutionFrom

6
© 1991 - 2010 Equisys Plc
Setting the letterhead optionThe Letterhead option allows you to use a letterhead that will be applied to every page of the first documentthat you are sending as a fax.
To select a letterhead:
1. Choose the Letterhead tab.2. Select the Add letterhead to first document option.3. In the Letterhead box, select the Letterhead you wish to use.
Note: If the Letterhead box is grayed out, your fax only consists of a coversheet, and therefore noletterhead can be added.
Click here for information on how to create a letterhead.
Setting the priority of your faxThe Priority option allows you to specify how urgent your fax job is. You can choose between:
Priority level DescriptionNormal Queues the fax at the server to be
sent in the order the server receivesthem.
Urgent Sends the fax to the front of theserver queue.
Background Queues the fax at the server to besent only when there are no otherfaxes waiting.
Setting the time of sendingThe Time of Sending option allows you to defer sending your fax until an Off peak time period (set using theZetafax Configuration program). You can also decide on an exact time and date you wish your fax to be sent.
To select a specific time and date:
1. Select the After option.2. In the Time box, select the time you wish you fax to be sent.3. In the Date box modify the day you wish the fax to be sent (this can be any time in the next 7 days).
Setting the resolution of your faxAs the Zetafax Server converts your fax to an image file, you can choose the quality of that fax image. Thehigher the resolution of your fax image, the better the quality of fax your recipient will receive.
Resolution level DescriptionDraft Low quality fax output, designed for
previews.Normal The standard fax format.High High quality output.
FromThe username that will be displayed on your fax, by default this will be your Zetafax username, and can bemodified permanently using the Zetafax Configuration program. To change your username for a single fax jobplease enter the desired username into the From box.
To create a letterhead1. Print your images to Zetafax, as part of a black and white Microsoft Word file.2. Select the Save as an attachment or other system file option.3. Click Coversheet, letterhead or attachment file. 4. Choose the Letterhead background - letterhead and continuation option.5. Type in a Filename and a Description to help you identify your coversheet.6. Click OK to save your letterhead on the Zetafax Server.

7
© 1991 - 2010 Equisys Plc

8
© 1991 - 2010 Equisys Plc
How do I view a fax?
Zetafax will alert you when you receive a new fax.
Received faxes are displayed in the Zetafax Inbox window and marked by the unread message icon.
To read the fax· Double-click the fax in the Inbox window.
The fax will be displayed in the Zetafax Viewer.
· Use the horizontal and vertical scroll bars to scroll the fax in the window. · Click the number buttons, or the Next and Previous buttons, to step up between successive pages of the
fax.
Faxes you have read remain in your Inbox window, but the icon changes to this in the status column toshow you have read them. For more information, see Status icons.

9
© 1991 - 2010 Equisys Plc
How do I annotate a fax?
Using the Zetafax viewer, faxes received in your Inbox can be annotated and saved either for your records orto be forwarded to another person.
To annotate a fax1. Double click the fax you wish to add annotations to.
The Zetafax viewer will automatically load the selected fax.
2. Using the annotations toolbar, you can add your annotations to your selected fax:
Annotationicon
Annotation type Description
Select Allows you to select Existing annotations in order to modifyor delete them.
Properties Allows you to modify the properties of an annotation. Forexample the thickness of a line or the transparency of astamp.
Straight line Allows you to draw a straight line.
Freehand line Allows you to draw a line in any direction.
Rectangle Allows you to draw a rectangle.
Highlight Allows you to shade a rectangle.
Text box Allows you to add a box of text to your fax.
Picture Allows you to add images to your fax.
Stamp Allows you to add a box of preset text to your fax.
Remove allannotations
Allows you to remove all non saved annotations.
3. Having added the annotations that you require, save your fax and exit the viewer.
To create a custom stamp1. Click the Stamp icon in the annotations toolbar to view the Stamp options menu.2. Select Add Stamp.
10
© 1991 - 2010 Equisys Plc
The New Stamp dialog will be displayed.
3. Enter a name for your stamp in the New Stamp Name field.
This should be something descriptive, as this will be displayed as the stamp name within the Zetafax viewer.
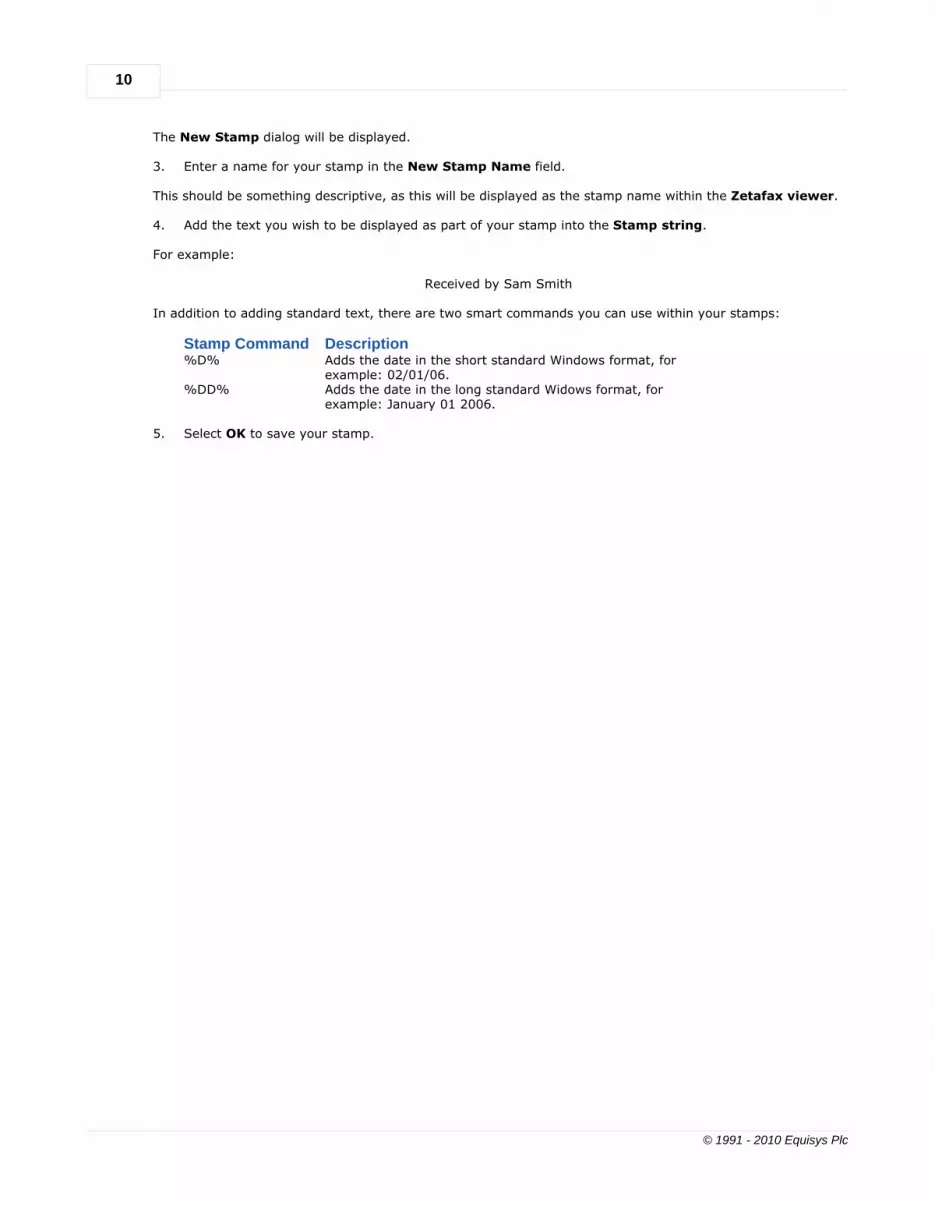
4. Add the text you wish to be displayed as part of your stamp into the Stamp string.
For example:
Received by Sam Smith
In addition to adding standard text, there are two smart commands you can use within your stamps:
Stamp Command Description%D% Adds the date in the short standard Windows format, for
example: 02/01/06.%DD% Adds the date in the long standard Widows format, for
example: January 01 2006.
5. Select OK to save your stamp.

11
© 1991 - 2010 Equisys Plc
How do I print a fax?
· On the Zetafax File menu, click Print or select the Print button on the toolbar.
Alternatively, you can print a fax directly from the In or Out window:
· Select the fax with the right mouse button and choose Print from the pop-up menu:
This will launch the Print Fax dialog where you can make your printing selections before proceeding withprinting.
· Click the OK button to print the fax.
12
© 1991 - 2010 Equisys Plc
How do I preview a message before sending it?
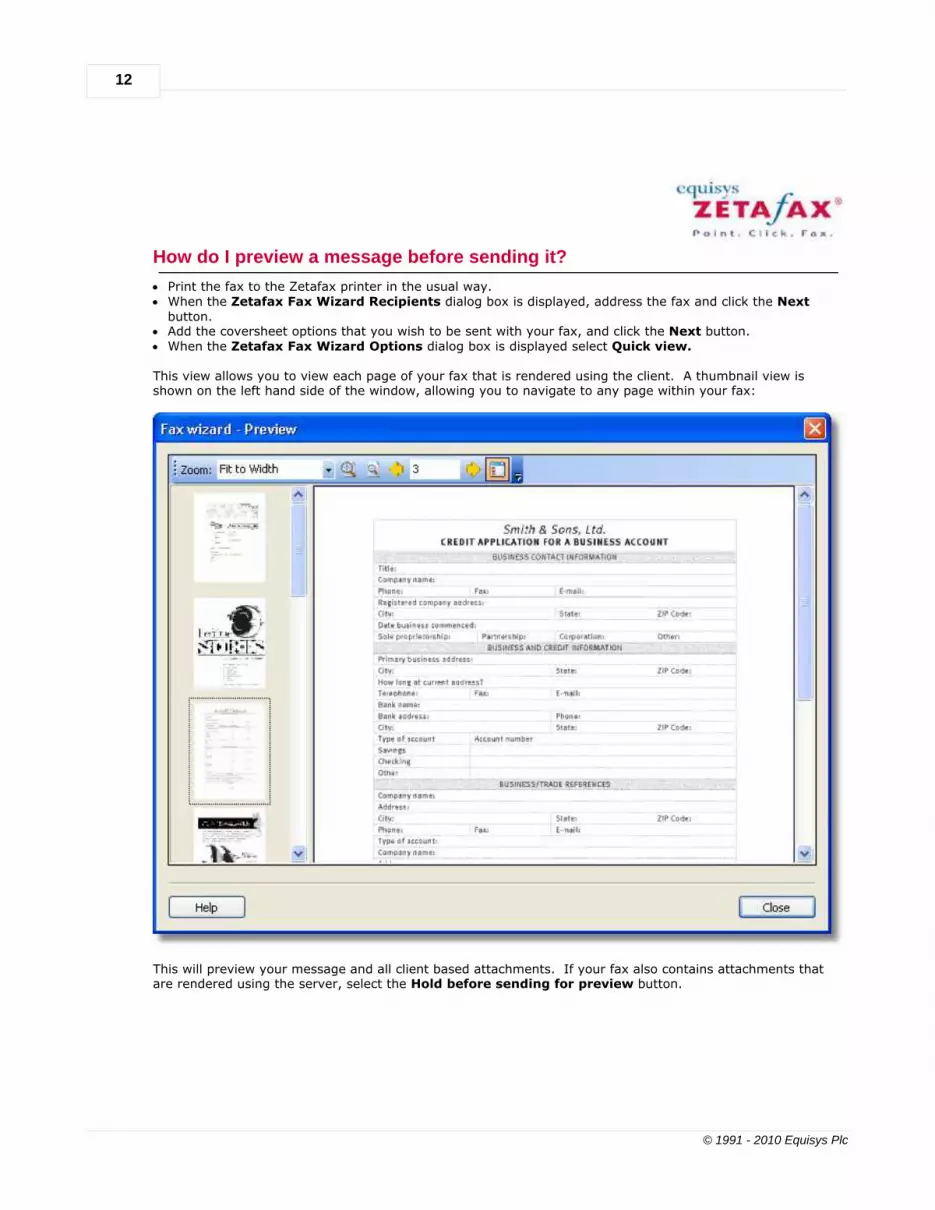
· Print the fax to the Zetafax printer in the usual way. · When the Zetafax Fax Wizard Recipients dialog box is displayed, address the fax and click the Next
button. · Add the coversheet options that you wish to be sent with your fax, and click the Next button. · When the Zetafax Fax Wizard Options dialog box is displayed select Quick view.
This view allows you to view each page of your fax that is rendered using the client. A thumbnail view isshown on the left hand side of the window, allowing you to navigate to any page within your fax:
This will preview your message and all client based attachments. If your fax also contains attachments thatare rendered using the server, select the Hold before sending for preview button.

13
© 1991 - 2010 Equisys Plc
· Click the Finish button to send the fax.
If you have selected Hold before sending for preview, when the fax is ready for preview, it will appear in
your Out window with the preview icon. For more information, see Status icons.
To preview a held fax
· Select the fax in the Outbox window.
This will display the fax in the Preview pane. To preview it in a full Zetafax Viewer window:
· Open the File menu and click View. Alternatively, double-click the fax in the Out window.
When you have finished checking the fax:
· On the File menu, click Exit to close the Zetafax Viewer, or click the close box.
A dialog box will be displayed to give you the option of releasing the fax for sending.
· Click the Yes button to release the fax or the No button to leave it held.
If you choose No the following dialog box is displayed to allow you to abort the message:

14
© 1991 - 2010 Equisys Plc
· Click the Yes button to abort the message and delete it from your Outbox window, or the No button toleave the message in your Out window, in which case you can send it at a later time by selecting it andchoosing Release.

15
© 1991 - 2010 Equisys Plc
How do I send multiple documents as a single message?
Zetafax allows you to send multiple documents as a single fax message using the Multi-documentfunctionality. Multi-document faxes can combine different file types, for example Word, WordPerfect and Exceldocuments, into one fax message. At any stage, you can select to release all the documents as a single fax orcancel the fax and start again.
Sending multi-document faxes · Send your document to the Zetafax Client· In the resulting Zetafax Fax Wizard - Welcome dialog box, select the Save as part of a
Multi-document fax option to display the Multi-document Fax dialog. · Click the OK button to continue.· Now open your next document to be attached and print it to the Zetafax printer.
This will launch the second Multi-document Fax dialog.
· To attach more documents to the fax message, select the second option from the list, open the nextdocument and print it once more to the Zetafax printer. This operation should be repeated for eachsubsequent document that you wish to attach.
· Once you have sent to print the last document that you intend to add to the fax message, select Add thisdocument to the multi-document fax and send the fax now and click OK. This will display the ZetafaxFax Wizard - Recipients dialog.
· Specify the recipients of the fax in the Zetafax Fax Wizard - Recipients dialog. Click OK to confirm your
selection.
· In the resulting Zetafax Fax Wizard - Coversheet dialog, select the appropriate coversheet. Specify asubject line and a coversheet note as required.
· Specify any other required information in the Zetafax Fax Wizard - Options dialog and click OK to submitthe multi-document fax to the Zetafax Server for sending.
Related Topics:How to Print to Zetafax from applications
16
© 1991 - 2010 Equisys Plc
How do I get information about a message?
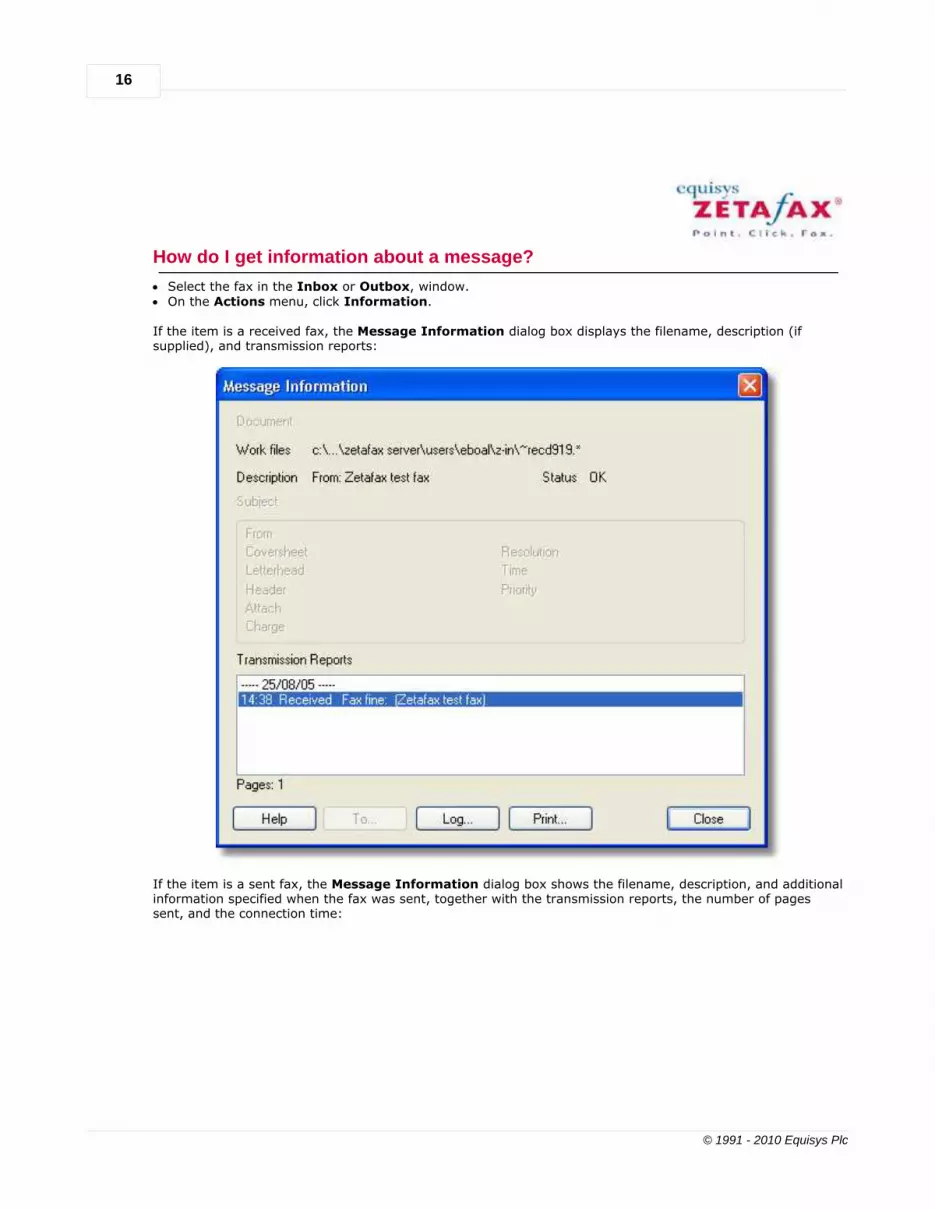
· Select the fax in the Inbox or Outbox, window. · On the Actions menu, click Information.
If the item is a received fax, the Message Information dialog box displays the filename, description (ifsupplied), and transmission reports:
If the item is a sent fax, the Message Information dialog box shows the filename, description, and additionalinformation specified when the fax was sent, together with the transmission reports, the number of pagessent, and the connection time:

17
© 1991 - 2010 Equisys Plc
Related topicsLogsStoring transmission reports

18
© 1991 - 2010 Equisys Plc
How do I send a text message to a mobile phone?
· Start the Zetafax Client. · Choose New> Text Message from the File Menu.
The Text Message - Addressing dialog box is then displayed to allow you to address the text message. · Enter a name, organization (optional), and the destination mobile number or select an existing contact from
the Previous recipients list:
· Click the Next button to continue.
For more information about the addressing options, and using the address book, see How do I use my addressbook?
The SMS Message dialog box then allows you to type a message and specify sending options.

19
© 1991 - 2010 Equisys Plc
Text messages can only contain 160 characters. As you type the message you will see a counter update. Thiscounter shows the number of remaining characters that a single message can contain.
· Choose Send in single message to limit the text to one message of maximum 160 characters. · Choose Send in multiple messages to send the message in multiple message instalments to allow for
more than 160 characters.
When the message is ready press the Next button to send the message.
The message will appear in your Out window, and the icon in the Status column shows the status of themessage. For more information, see Status icons.

20
© 1991 - 2010 Equisys Plc
SMS Message
Displays the Text Message Options dialog box to allow you to specify default settings for new textmessages:
· The Header lets you specify a default message header. · The Signature lets you specify a default message signature.
On first use this field is set to your full name.
· The Save sent messages in Sent Items folder checkbox allows you to determine whether or not textmessages are saved in the Sent Items Folder.

21
© 1991 - 2010 Equisys Plc
How do I view a text message?
Sent messages are displayed in the Zetafax Out window and marked with a mobile phone icon:
· when a message has been sent successfully.
· when a message has been sent with errors.
To read the message
· Double-click the message in the Out window.
The text message will be displayed:

22
© 1991 - 2010 Equisys Plc
Zetafax Address book actions
The following topics describe how to perform common tasks with the Zetafax Address book actions:
Add to my address book?Use my address book?Use my mail address book?Use a CSV file to address faxes?Link an ODBC database to my address book?

23
© 1991 - 2010 Equisys Plc
How do I add to my address book?
The address books provide a convenient way of addressing faxes to regular recipients at a single click.
· On the Addresses menu, click New Entry.
The Address Book Editor dialog box is displayed to allow you to create the entry.
· Enter the name and address details you want to add to your address book:
· Click Private to add the entry to your personal address book.
The More… button allows you to specify a full postal address, and specify how the recipient should beaddressed on the coversheet. For more information, see How do I specify options when sending a fax?
· Click the Add button to add the entry to your private address book.
A dialog box will be displayed to confirm that the entry was successfully added.
· Click the OK button to confirm. The Address Book Editor dialog box remains on the screen to allow you to add further entries.
· Click the Quit button to close the Address Book Editor dialog box.
Related topicsUsing a comma delimited distribution list (CSV file)Using an ODBC compliant database with my address book
24
© 1991 - 2010 Equisys Plc
How do I use my address book?
There are several different address books that you can use with Zetafax. By default pressing the Search buttonwill open the mail address book. Alternatively you can use "Other address books" by selecting this option fromthe drop down next to the search button. This help topic describes how to use address books other than themail address book.
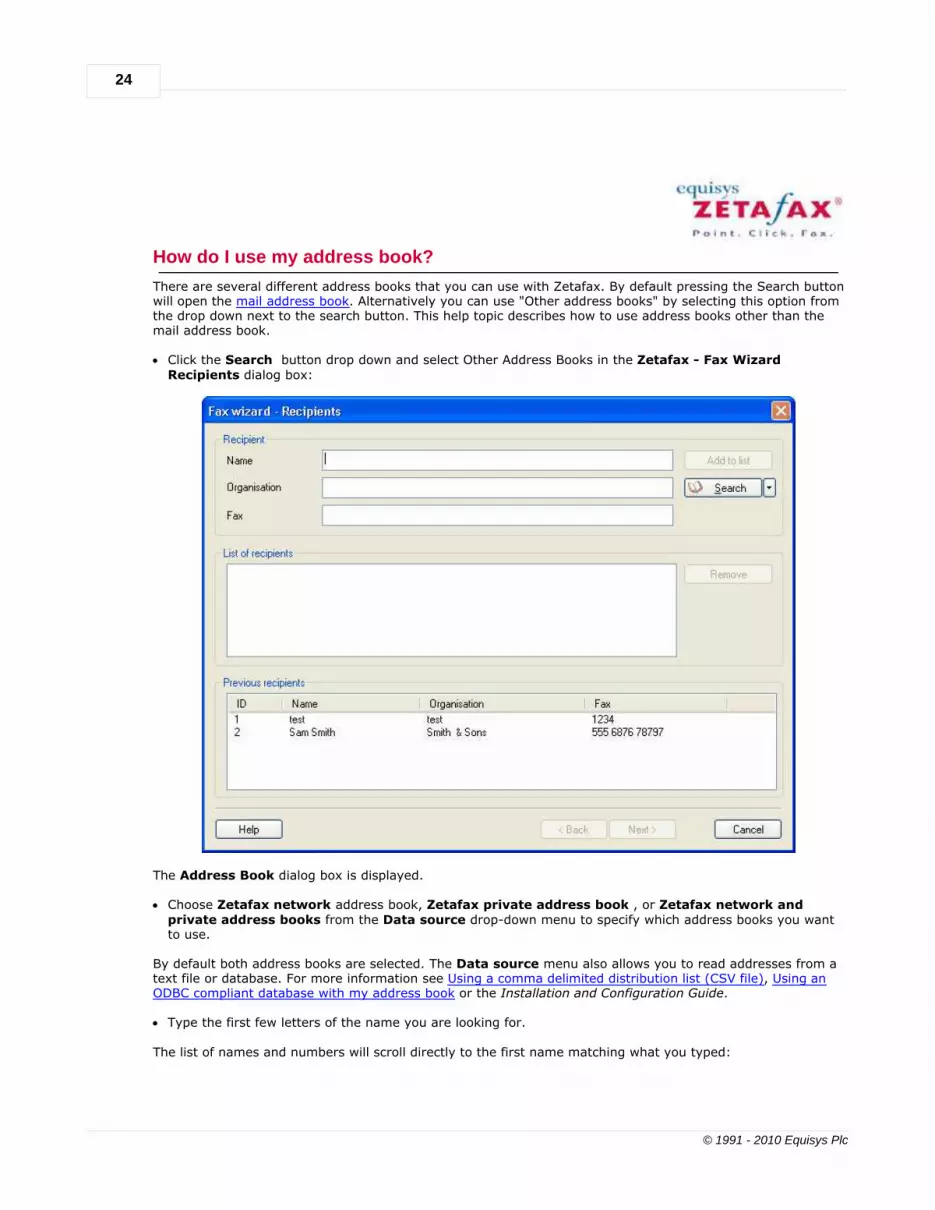
· Click the Search button drop down and select Other Address Books in the Zetafax - Fax WizardRecipients dialog box:
The Address Book dialog box is displayed.
· Choose Zetafax network address book, Zetafax private address book , or Zetafax network andprivate address books from the Data source drop-down menu to specify which address books you wantto use.
By default both address books are selected. The Data source menu also allows you to read addresses from atext file or database. For more information see Using a comma delimited distribution list (CSV file), Using anODBC compliant database with my address book or the Installation and Configuration Guide.
· Type the first few letters of the name you are looking for.
The list of names and numbers will scroll directly to the first name matching what you typed:

25
© 1991 - 2010 Equisys Plc
· If necessary, select the entry you want to use and click the Add to list button, or double-click the entry.
The address book entry will be added to the List of recipients list at the bottom of the Address Book dialogbox.
· If required add any additional recipients to the list. · Click the OK button to return to the Zetafax Fax Wizard Recipients dialog box.
The recipients will be shown in the List of recipients list.
Related topicsUsing a comma delimited distribution list (CSV file)Using an ODBC compliant database with my address book

26
© 1991 - 2010 Equisys Plc
How do I use my mail address book?
If you have an email system configured, you can use the email system (MAPI) address book instead of theZetafax address book to address your fax or text message. To choose whether to use the Zetafax or email address books:
· Click the Search button drop down and select Mail Address Book in the Zetafax - Fax Wizard Recipients
dialog box:
If you select the mail address books, any address book searches (either by entering a name without a faxnumber, or by clicking Search on the addressing dialog box) will look in the mail address books.
If you select an address from the Global Address List - Zetafax will select the Fax number for that entry or theMobile number when addressing a text message. If there is not a number to use a warning will be issued. Youcan also select a distribution list and Zetafax will unpack the list and add the individual members to the list ofrecipients.
If you select an address from Outlook contacts - Zetafax will select the Business Fax number for that contactor the Mobile number when addressing a text message. If there is not a number to use a warning will beissued. You can also select a distribution list from contacts and Zetafax will unpack the list and add theindividual members to the list of recipients.

27
© 1991 - 2010 Equisys Plc
Using a comma delimited distribution list (CSV file)
Zetafax allows the use of an external data source to address faxes in a fax shot, mail shot, or fax broadcast.This can be achieved by using a data source file which is in CSV (comma delimited) format. Most applicationsallow you to save database records into CSV format.
Your CSV text file should contain the following three columns (fields):
· Full name of recipient - optional · Organization name - optional · Fax number - required
Note: The order of the columns in your CSV file does not matter, these will be matched up at a later stage.
Sending a fax using a CSV listPrepare your CSV list as described above and follow these simple steps:
· Prepare the document you wish to send and print it using one of the Zetafax printer drivers. · From the Zetafax Fax Wizard Recipients dialog box, click Address book…. · From the dialog box shown below, select Import text file… from Data source. · Find and select the CSV text file that you require and click OK. You will now be required to match up the columns in your CSV file to the relevant fields in Zetafax. The firstrecord in your CSV file will be shown; this often contains the field names and can be ignored by selecting theoption Skip first record in file (displayed above).
· Once you have finished click OK .
You will now be taken back to the Zetafax Address book dialog box. Your CSV records will be listed and canbe searched and selected in the same way as recipients in the Zetafax address book.
Note: Selected recipients will be automatically split into groups of 50. Each message line in your Zetafax Clientwill represent each group of 50 recipients.
Related topicsHow do I use my address book?How do I add to my address book?Address books

28
© 1991 - 2010 Equisys Plc
Using an ODBC compliant database with my address book
Zetafax can link to an external data source via an ODBC link. This allows data to be set up in, for example, anAccess database and used from within Zetafax. The following steps describe how to set up an ODBC link. Some database applications may have differentcriteria for their set up as shown here. Please check that the database has been set up correctly beforeproceeding.
· Prepare the fax you wish to send and print to a Zetafax printer driver. When the Addressing dialog box appears:
· Click Address Book….· From the resulting dialog box select the ODBC-compliant database… option from Data source.
The next dialog box will appear.
· Click Machine Data Source .
All the configured ODBC data sources on your machine will be displayed.
· Select the data source you require. If you intend to use an Access 97 database then you should highlight MS Access 97 Database and click OK .
You can also add other data sources, however this can be complicated - contact your network administrator orcontact your local Zetafax distributor for assistance. Once you have selected the required data source you will be asked to select the database filename.
· Find the required database and click OK . Zetafax will now ask you to match up three columns in your ODBC table to the Zetafax addressing fields Fullname, Organization, and Fax number.
· Attach the required table field to the relevant Zetafax one. · Click OK once all three fields have been matched. You will now be taken back to the Zetafax Address book dialog box. Your ODBC compliant database recordswill be listed and can be searched and selected in the same way as recipients in the Zetafax address book.
Note: Selected recipients will be automatically split into groups of 50. Each message line in your Zetafax Clientwill represent each group of 50 recipients.
Related topicsHow do I use my address book?How do I add to my address book?Address books

29
© 1991 - 2010 Equisys Plc
Zetafax advanced tasks
The following topics describe how to perform advanced tasks with the Zetafax Client:
Archive my messages?Scan a document?Create a coversheet?Create a continuation page?Use mail merge and Zetafax?Check for updates?Sign a fax before forwarding?

30
© 1991 - 2010 Equisys Plc
How do I archive my messages?
You can archive messages you have received to a folder on your hard disk by using the following simpleprocedure:
· Create a folder for the archived faxes; for example you could call it My faxes. · Select it in the Folder List window.
This will display its contents in the List view and Preview Pane.
To archive a received message
· Select the message you want to archive in the Inbox window. On the File menu, click Move/Save. · The Save As dialog box will be displayed to allow you to save the fax with a specified filename, and with the
option of saving the transmission report with the fax:
· If necessary, edit the filename to give the fax a unique name. · Select Save transmission report to save a copy of the transmission report with the fax. · Enter a description of the fax to help you identify it at a later date. · Click the Save button to save the fax.
The fax will be displayed in the List view and Preview Pane in the folder you created. · The fax will automatically be deleted from the Inbox window.
To archive a sent message
· Select the message you want to archive in the Outbox or Sent Items window. On the File menu, clickMove/Save.

31
© 1991 - 2010 Equisys Plc
· The Save As dialog box will be displayed to allow you to choose what information you archive.
Since you probably have an original document for the sent fax, the Save As dialog box gives you the option ofsaving just the transmission report instead of the complete fax image file.
· Select Save transmission report only. · Give the fax a unique filename. · If required, edit the Description field to help you identify the fax at a later date. · Click the Save button to save the fax.

32
© 1991 - 2010 Equisys Plc
How do I scan a document?
If you have a suitable scanning device you can scan in letterheads, coversheets, and graphics for inclusion in afax.
Zetafax can also be used with a network attached scanning device, such as the Hewlett Packard DigitalSender.
To set up the default Zetafax Client TWAIN scanner · On the File menu, click Select Source. To specify whether or not you want Zetafax to use the scanner's own software user interface when scanning,on the Options menu, click Devices.
To scan the document · On the File menu, click Acquire.
If you are using a client TWAIN scanner, the document will be scanned a page at a time. You will be askedwhether you would like to stretch/shrink each image to fax size if it is substantially different in resolution froma fax page. The Zetafax Fax Wizard Recipients dialog box will then be displayed to allow you to address themessage and send it as a fax. Any document which has been scanned earlier using another application and saved as a graphics file may besent as a fax directly by dragging it from Windows Explorer and dropping it on the Zetafax main window.
Configuring your Scanner to work directly with ZetafaxIt is possible to adjust your computers response to a command given to your scanner such as pressing the
scan button. By adjusting these button events it is possible to enable the scanner to open Zetafax by default
upon scanning an item, alternatively you can set the scanner to prompt the user for the program they wish to
process the scanned item with.
To adjust the settings of a scanner already installed on the computer please follow the steps below, if the
scanner has yet to be installed on the machine please follow the manufacturer’s instructions before referring to
the instructions set out below.
· Open the Start Menu and select the Control Panel
· Select the Scanners and Cameras option
· Select the scanner you wish to consider from the list of available devices and select Properties
· Select the Events Tab
· From the Select an event drop down box choose the event you wish to configure Zetafax to work
with, such as on pressing the scan button or any other programmable button
· From the Actions section select one of the options below
o Start this Program: If you wish Zetafax to open upon the event specified, e.g. pressing the
scan button, select Zetafax from this list.(note: you will need to have opened the Zetafax Client
at least once prior to this for the Zetafax option to be represented in this list.)

33
© 1991 - 2010 Equisys Plc
o Prompt for which program to run: This allows the user to specify the program to run from a
list upon the event specified
o Take no action:
· Select the OK button to make your changes
Using a Scanner with ZetafaxIf you have set the scanner event to run Zetafax then upon the event, e.g. pressing the scan button, Zetafax
will open, if Zetafax is already open and button is pressed the scanning options will be displayed. Once
scanned the document will be passed to the Zetafax fax wizard where it can be processed as normal.

34
© 1991 - 2010 Equisys Plc
How do I create a coversheet?
Personalized coversheets can help your business identity. Allowing you to increase awareness of yourcorporate branding without incurring any extra costs.
Note: Coversheet creation can only be done by users that have Administrator status.
Coversheet Creation is done in two stages. This allows you to add both background data such as images, linesand words that you do not intend to change on a fax to fax basis and also foreground data such as faxaddresses, names and dates that will differ for each fax.
Create the coversheet background file 1. Open Word.2. Add your corporate logos, and design the layout for the background of your coversheet.3. Print your document to the Zetafax Printer.
The Zetafax Client will open and the Fax Wizard - Welcome dialog box will be displayed.
4. Select the Save as an attachment or other system file option.5. Click Next.
The Save As dialogue will be displayed:
6. Choose the Coversheet, letterhead or attachment file option.7. Select the Coversheet background - optional checkbox.8. Provide a name for your Coversheet within the File name text box.9. Add a description in the Description text box. 10. Select the OK button to save the background of your coversheet.
11. Select Yes to add variable fields to your fax form.
Create the coversheet foreground file1. On the Tools menu, click Coversheet Editor.2. Open the coversheet you wish to modify, or select New to create a blank coversheet or use one of the
standard coversheet templates.
Add a text fieldAdding a text field allows you to add information to your coversheet that is going to remain the same betweenfaxes.
1. Click on the Insert Text button:2. Choose where on you fax you would like this information to appear, and click the left button on your
mouse.3. Type the text you want to add.
Add a merge fieldAdding a merge field to your coversheet allows you to add fields that will personalize your coversheet.

35
© 1991 - 2010 Equisys Plc
1. Click on the Insert Field button:
The Field menu will be displayed:
2. Select the field you would like to add to the coversheet.3. Choose where on you fax you would like this information to appear, and click the left button on your
mouse.
Your field is now added to your coversheet.
Insert a lineOne or more lines can be added to your coversheet to separate sections.
1. Click on the Insert Line button:2. Draw your line by holding down the left button on your mouse and moving the mouse till you get a line of
the desired size.
Your line is now added to your coversheet.
Insert a boxBoxes can be added to your coversheet to allow information such as any notes you may wish to be add to beseparated from the rest of the information on the coversheet.
1. Click on the Insert Box button:2. Draw your box by holding down the left button on your mouse and moving the mouse till you get a box of
the desired size.
Your box is now added to your coversheet.
Editing your coversheetHaving added fields to your coversheet, these can be edited using the Coversheet Editor at anytime.
Having loaded the coversheet you wish to edit into the Coversheet Editor you can:
Edit textAny text fields added to your coversheet can be changed by selecting them with you left mouse button. Thiswill move your cursor to the field and allow you to add, delete or change text as required.
Format textBy clicking the right button of your mouse over any text or fax field, you will be given options to edit theformatting of that text. You can:
· Change the font.· Edit the text or change the fax field.· Justify the text or fax field.· Delete the item.
If you choose to change the font, the following menu will be displayed:

36
© 1991 - 2010 Equisys Plc
This allows you to change the appearance of your selected text.
Move fieldsAll fields can be moved by selecting them with you left mouse button and either dragging them or using thearrow keys on your keyboard.
Change line thicknessFor both lines and boxes that have been added you can change the thickness of lines by clicking the rightbutton of your mouse on the object and selecting the Properties option. This will provide you with aProperties menu for that item, allowing you to change the line thickness. In addition, you can add a shadowto any boxes you might have added.
Saving your CoversheetHaving created a coversheet you are happy with, simply select the Save As option from the File menu andprovide a name and description of your coversheet. You can now use your coversheet the next time that yousend a fax.

37
© 1991 - 2010 Equisys Plc
How do I create a coversheet continuation page?
A coversheet continuation page is used when the amount of text that you have added to your coversheet istoo large. As standard there is a default coversheet continuation page, that will be applied to all coversheets,however by following the procedure below you can either customize this page or add different continuationpages for different coversheets.
Editing the default coversheet continuation pageUse Coversheet editor to create the coversheet continuation page. Save the page as DEFAULT.
Once you have saved the coversheet follow the steps below:
1. On the Zetafax server system browse to the \Zfax\SYSTEM\Z-COVER folder.
2. This folder will contain all files for the coversheets that you have created, and one list control filenamed MSGDIR.CTL. Below is an example of a directory listing.
Template <DIR>CoversheetA.g3fCoversheetA.epnDEFAULT.g3fDEFAULT.epnMsgdir.ctl
3. Rename both DEFAULT files to:
DEFAULT.2.g3fDEFAULT.2.epn
4. Move both files to the template directory5. Restart the Zetafax Server
Creating a specific coversheet continuation pageUse Coversheet editor to create the coversheet continuation page. Save the page with a name you willrecognize.
Once you have saved the coversheet follow the steps below:
6. On the Zetafax server system browse to the \Zfax\SYSTEM\Z-COVER folder.
7. This folder will contain all files for the coversheets that you have created, and one list control filenamed MSGDIR.CTL. Below is an example of a directory listing.
Template <DIR>CoversheetA.g3fCoversheetA.epnCoversheetB.g3fCoversheetB.epnMsgdir.ctl
8. To turn these files into one coversheet of two pages, you need to rename the CoversheetB files usingthe following convention:
Template <DIR>CoversheetA.g3fCoversheetA.epnCoversheetA .2.g3fCoversheetA.2.epnMsgdir.ctl
Note: The additional coversheet should have the same name as the primary coversheet with the addition of a

38
© 1991 - 2010 Equisys Plc
.2 before the extension.
9. CoversheetA, is now the first page of the coversheet, CoversheetA.2 is the second page of thecoversheet.
10. Open the Msgdir.ctl using notepad; it will contain something similar the following entries.
[ZETAFAX]Type: LibDirRevision: A[DIRECTORY]File: CoversheetA "Coversheet"File: CoversheetB "Coversheet second page"
11. The entries need to be edited as below to remove the reference to the second page;
[ZETAFAX]Type: LibDirRevision: A[DIRECTORY]File: CoversheetA "Coversheet"
12. After you have made these changes, save the files and exit from notepad.
13. Restart the Zetafax server.
To verify the update has been successfulStart up the Zetafax Client and submit a fax with enough notes on the coversheet so that it will use the secondpage you have created. You can also test it by sending a fax via the email gateway.
The first page of the coversheet will be CoversheetA, and subsequent pages will be CoversheetA.2. (Note:faxes must be sent in plain text format when sending from the email gateway).
39
© 1991 - 2010 Equisys Plc
How do I use Embedded Addressing
Like many fax packages, Zetafax has a Windows printer driver. Print from a Windows application, and a dialogbox will pop-up asking you where the fax is to be sent. With the API this can be automated by includingoptions such as the fax number in the document being printed. Zetafax will pick out the embedded addressinginformation and act upon it.
You can use embedded addressing to broadcast faxes from a database or using a word processor mail mergeso each recipient's copy will be personalized.
The Zetafax Client program allows addressing instructions to be into documents using embedded commands:
How do I add embedded commands to my document?Addressing CommandsSending CommandsOther Commands

40
© 1991 - 2010 Equisys Plc
How do I add embedded commands to my document?
Embedded commands are pieces of information that can be processed by Zetafax if they are included in yourdocument.
The embedded commands that can be used by Zetafax can be found on the Insert tab from the ribbon forOffice 2007/2010 users, or on the toolbar for Offices 2003 users. These allow you to add stationery, andattachments directly from Word or Excel. Embedded commands must be included in the first page of thedocument you are sending.
1. Choose the embedded command you wish to add to your document from the Zetafax command.2. If required, modify the command to replace any information enclosed in brackets '<' and '>'.
For example:
%%[Name:<insert recipient name here>]
Should be modified to:
%%[Name:Sam Smith]
3. When you have added all the embedded commands you require, and your document is complete, sendyour document to Zetafax using the Send to Zetafax button.

41
© 1991 - 2010 Equisys Plc
Addressing Commands
Add a recipient nameSyntax
%%[Name: <insert recipient name here>] This is the person you are sending the fax to.
Example
%%[Name: Sam Smith]
FaxSyntax
%%[Fax: <insert fax number here>] This is the recipient's fax number
Example
%%[Fax: 123 456 7890]
OrganisationSyntax
%%[Organisation: <insert organization name here>]
where organization is the recipient's company or organization.
Example
%%[Organisation: Smith and Sons]

42
© 1991 - 2010 Equisys Plc
Sending Commands
Send your faxSyntax
%%[SEND]
Allows you to convert your document to a fax format, and send it automatically.
Example
%%[Send]
Preview your faxSyntax
%%[Preview]
Allows you to hold your fax for preview in your inbox.
Example %%[Preview]

43
© 1991 - 2010 Equisys Plc
Other Commands
Add a CoversheetSyntax
%%[COVERSHEET:: <type the name of your coversheet here>]
Allows you to add a coversheet to your document.
Example
%%[Coversheet: COVSHEET]
Add a CovernoteSyntax
%%[StartBodyText]<type coversheet note here>%%[EndBodyText]
Allows you to type in text in the body of the coversheet.
Example
%%[StartBodyText]Please find attached file%%[EndBodyText]
Add a SubjectlineSyntax
%%[SUBJECT: <type subject here>]
This is the subject of the fax.
Example
%%[Subject: About the new sales figures]
Add Time of sendingSyntax
%%[TIME: <insert time here>]
Specifies when the message is to be sent.
Example
%%[After: 99-03-01 18:00:00]

44
© 1991 - 2010 Equisys Plc
Add a LetterheadSyntax
%%[LETTERHEAD: <type the name of your letterhead here>]
Allows you to add a letterhead to the first page of your document that will be added by Zetafax when you sendyour fax to a recipient.
Example
%%[Letterhead: LETTHEAD]
Set the Priority of your faxSyntax
%%[PRIORITY: <insert URGENT, NORMAL or BACKGROUND>]
Allows you to choose the priority of your fax.
Example %%[Priority: NORMAL]
Set the Quality of your faxSyntax
%%[QUALITY: <insert DRAFT, NORMAL or HIGH>]
Allows you to choose the resolution of your fax.
Example
%%[Quality: NORMAL]
Add a ChargecodeSyntax
%%[CHARGE: <enter your charge code value>]
Allows you to add charge code information to your document that can be used by Zetafax to log which personor department has sent your fax
Example
%%[Charge: SALES]
Delete when completedSyntax %%[DELETE: delete] where delete is YES, OK or NO. Specifies whether the fax should be deleted after sending. If delete is YES then the faxes are deleted afterthey have been sent (successful or failed). If delete is NO then the faxes are not deleted after they have beensent
Example
%%[Delete: YES]

45
© 1991 - 2010 Equisys Plc
Add your informationSyntax %%[FROM: <enter your name here>]
Allows you to specify the name that will appear in the From field on your fax coversheet.
Example
%%[From: Jim Jones]

46
© 1991 - 2010 Equisys Plc
Use mail merge and Zetafax?
The easiest way to send out personalized faxes to multiple sources is to create your mail merge templatewithin Microsoft Word and import your data from an excel spreadsheet. By adding embedded commands toyour document, small fax shots can be created that will send specific information to every client.
Creating your mail merge template1. Open Microsoft Word ® .2. Start a new document, and add the text you wish to fax, along with fields you would like to change for
each fax (for example: <name> and <date>). 3. Ensure the Mail Merge Toolbar is shown (right click your mouse in the toolbar area and select the Mail
Merge option). 4. Select a data source (icon looks like a table). 5. Browse to you excel spreadsheet of data and select the sheet that contains your information. 6. This will allow you to use Mail Merge Fields within the document. 7. Replace all the fields you have added to your document with merge fields using the insert merge fields
option (6th from left). 8. Add Zetafax fields to the top of your document, for example:
%%[TO:<fax no>,<recipientname>,<organisation>]%%[subject: Support contracts due for renewal]
9. Replace the fields with the relevant mail merge fields.
10. Add a blank line at the very end of the document and type in %%[SEND]. This is the command thatinstructs Zetafax to automatically send all the faxes.
Sending your mail merge with a coversheet1. Ensure you have included the embedded command:
%%[COVERSHEET: <coversheet>]
2. Change the field <coversheet> to the name of the coversheet you wish to add. For example:
%%[COVERSHEET: MAILMERGE]
3. Select the Merge to new document option from the mail merge toolbar.4. Print your new document to the Zetafax printer.
Sending your mail merge without a coversheet1. Select the Merge to new document option from the mail merge toolbar.2. Print your new document to the Zetafax printer.

47
© 1991 - 2010 Equisys Plc
How do I check for client updates?
If your administrator has enabled automatic client updates, the Zetafax Client will detect each new updatewhen it is downloaded to your Server.
When a new update is available, the Zetafax Client will ask you if you wish to install it when the Client firststarted up.
· If you decide you would like to update your client, selecting the Yes option will close down your client andstart the update process.
· If you select No, your Zetafax Client will start as usual and you will not be prompted again to install thatupdate.
· If you want to update the client at a more convenient time select Remind me later, this will prompt youwith the update the next time you restart the Zetafax Client.
At any time whilst using the Zetafax Client, you can manually check for updates using the Check forupdates... option located within the Help menu:

48
© 1991 - 2010 Equisys Plc
How do I sign a fax before forwarding?
Creating a signatureTo create a signature file:
1. Sign a piece of paper.2. Scan your signature into your computer using a scanner attached to your network.3. Ensure your signature is cropped to the correct size, and is saved as a bitmap (*.bmp).4. Save your bitmap to a location you can find it on your network.
Adding a signature to a fax for forwardingTo add a signature to a fax:
1. Open your fax within the Zetafax Viewer.2. Using the annotation tool bar, select the Picture option.3. Select the location of your fax image where you would like your signature to appear, and left click
your mouse.
The Open image dialog will appear.
4. Browse to the location of your stored signature image.5. Double click the left button on your mouse to add your signature.
Manipulating your signatureIf your signature is not in the correct location, is the incorrect size or transparency, you can correct this usingthe Picture Properties dialog.
To change the location:
1. Use your mouse to select the signature image.2. Drag the image to the desired location.
To change the size or transparency of signature:
1. Use your mouse to select the signature image.2. Using the Right click menu select Properties.
The Picture Properties dialog is displayed:

49
© 1991 - 2010 Equisys Plc
· To change the file that is being loaded us the Browse (...) button in the File section.· To change the size of you image use the Width and Height scroll bars (if lock aspect ratio is checked, these
will both change proportionally when you modify either one).· To change the transparency of your signature use the Transparency bar.
Forwarding your fax1. Save your fax using the Save option.2. Select which method you would like use to forward your fax from the Forward menu.3. Select the pages you want to send.4. Add your recipient information and send your fax as usual.

50
© 1991 - 2010 Equisys Plc
Zetafax Client
This section explains the Zetafax Client menu options, toolbar and status icons, as well as the optionsavailable in the resulting dialogs.
Related topicsMenu optionsToolbarStatus icons

51
© 1991 - 2010 Equisys Plc
Menu options
You access the main functions of the Zetafax Client from the menus and toolbar. The options on each menuare as follows:
Menu DescriptionFile Provides options for sending, saving and scanning files, as well as
other file-oriented options.Addresses Maintains the storage of contacts.Actions Allows you to perform actions on your messages.Options For setting up defaults.Tools For launching other applications for use with the Zetafax Client.Window Selects which windows and toolbars to view in the main window.
Related topicsFile menuAddresses menuActions menuOptions menuTools menuWindow menu

52
© 1991 - 2010 Equisys Plc
File menu
The File menu provides options for sending, scanning, and filing messages, as well as other options.
New->FaxNew->Text MessagePrintPrint SetupMove/SaveSave As System FileAcquireDelete/AbortSelect SourceServer statusServer logsServer reconnectExit

53
© 1991 - 2010 Equisys Plc
New Fax
Select New Fax. The Zetafax Fax Wizard - Recipient dialog is then displayed to allow you to address thefax.
· Enter a name, organization (optional), and the destination fax number.· Click the Next button to continue.
For more information about the addressing options, and using the address book, see How do I use my addressbook?
The Zetafax Fax Wizard - Coversheet dialog then allows you to choose the coversheet, and add a subjectfor your fax.
· Click the Next button to continue.
The Zetafax Fax Wizard - Options screen allows you to add a letterhead, and specify sending options.
· For simplicity leave all the options unchanged.
For more information about the options see How do I specify options when sending a fax?
· Click the Finish button to continue. · Switch to the Zetafax Client window.
The fax will appear in your Out window, and the icon in the Status column shows the status of the fax. Formore information, see Status icons.

54
© 1991 - 2010 Equisys Plc
How do I send a text message to a mobile phone?
· Start the Zetafax Client. · Choose New> Text Message from the File Menu.
The Text Message - Addressing dialog box is then displayed to allow you to address the text message. · Enter a name, organization (optional), and the destination mobile number or select an existing contact from
the Previous recipients list:
· Click the Next button to continue.
For more information about the addressing options, and using the address book, see How do I use my addressbook?
The SMS Message dialog box then allows you to type a message and specify sending options.

55
© 1991 - 2010 Equisys Plc
Text messages can only contain 160 characters. As you type the message you will see a counter update. Thiscounter shows the number of remaining characters that a single message can contain.
· Choose Send in single message to limit the text to one message of maximum 160 characters. · Choose Send in multiple messages to send the message in multiple message instalments to allow for
more than 160 characters.
When the message is ready press the Next button to send the message.
The message will appear in your Out window, and the icon in the Status column shows the status of themessage. For more information, see Status icons.

56
© 1991 - 2010 Equisys Plc
Allows you to print faxes or fax graphic files. If an item is selected in the Zetafax Client window the PrintFax dialog box is displayed to allow you to print the item.
Otherwise the Print Fax dialog box is displayed to allow you to select a fax file to be printed.

57
© 1991 - 2010 Equisys Plc
Print Setup
Displays the Print Setup dialog box to allow you to set up the printer for printing faxes from your computer.

58
© 1991 - 2010 Equisys Plc
Move/Save
Allows you to archive a fax message from the In window or Out window, or save a copy of a file in the Filedwindow. Saving a message automatically deletes it from the appropriate window.
To save a message from the In or Filed windows
Selecting a message in the In or Filed windows and choosing Move/Save displays the Save As dialog box toallow you to specify a name for the message, and choose where to save it.
· Enter a filename for the message. · Select Save transmission report to save the transmission report and an optional description in the same
location as the message.
You can view the transmission report for a saved message using the Information command on the Filemenu.
To save a message from the Out window
Because you usually have an original version of the messages in your Out window, such as a word processordocument, selecting a message in the Out window and choosing Move/Save gives you the option of savingjust the transmission report for the message.
· Enter a filename for the message. · This defaults to the recipient.
If you selected the Save Image file option choose Save transmission report to include the transmissionreport with the file and enter an optional description.
You can display the transmission report and description for the message using the Information command onthe File menu.
Note: that you will not be allowed to save the message if it is waiting to be sent, and the following warning isdisplayed:
· Use Delete/Abort to delete it first, or wait until the message has been sent.

59
© 1991 - 2010 Equisys Plc
Save as System File
Allows you to reuse faxes or files from your In , Out , or Filed windows as a coversheet background,letterhead background, or attachment file.
Displays the Save as System File dialog box to allow you to specify the format in which to save the file.
The following options are available:
Option DescriptionCoversheet foreground - containing embedded fields Specifies that the fax should be saved as a coversheet
foreground file.Coversheet background - optional Specifies that the fax should be saved as a coversheet
background file.Letterhead background - letterhead and continuation Specifies that the fax should be saved as a letterhead
and continuation file.
Private attachment file - for your private use Specifies that the fax should be saved as a privateattachment file.
Public attachment file - for use by everyone Specifies that the fax should be saved for use by allusers.
· Enter a filename and optional description, and click the OK button to save the file.
If you are saving a message from the In window, a warning is displayed to give you the option of deleting it.Click Yes button to delete the original message or the No button to leave it.

60
© 1991 - 2010 Equisys Plc
Delete/Abort
Deletes the selected message from the In window or Out window, or deletes a file from the Filed window.
Selecting an unsent message in the Out window and choosing Delete/Abort displays the following warning toallow you to confirm that you want to abort the message:
· Click the Yes button to abort the message or the No button to leave it in the Out window.
Selecting a message that has already been sent and choosing Delete/Abort deletes it without warning.
Selecting a message in the In window and choosing Delete/Abort displays a warning to allow you to confirmthat you want to delete the message.
Selecting a message or file in the Filed window and choosing Delete/Abort displays a warning to allow youto choose whether to delete the transmission reports as well as the document.

61
© 1991 - 2010 Equisys Plc
Acquire
Acquires an image from the currently selected TWAIN scanner, if present, and sends it as a fax attachment.The Zetafax - Fax Wizard Recipients dialog box is displayed to allow you to address the fax in the usualway.

62
© 1991 - 2010 Equisys Plc
Select Source
Displays the Select Source dialog box to allow you to select a scanner from the list of currently installedscanners.

63
© 1991 - 2010 Equisys Plc
Server status
Displays the Server Status dialog box showing information about the status of faxes currently queued forsending and the available devices.
The user can abort and rush messages by highlighting an item in the 'Sending' window and selecting theappropriate button.
Note: Only users with Zetafax Administrator status can abort or rush another user's faxes. The user can selectthe 'Refresh' button to update the queue and device information.
Related topicQueue manager

64
© 1991 - 2010 Equisys Plc
Logs
Zetafax allows you to view events logged on the Zetafax server. Logs… (Status menu) allows you to selectwhich logged messages to display.
· Select Messages Sent or Messages Received/Scanned to display log entries for the corresponding typesof messages.
· Select Devices or Programs , and choose a device or program from the corresponding drop-down menu,to display all entries for the corresponding item.
· Select Everything to display log entries for all categories. · Select a user name from the For Username drop-down menu, or All displayed entries for all users. · Deselect Today only to display all log entries.
Selection criteria
Selection of log entries uses three criteria – entry type, recorded username, and time. Entry type is selectedsimply by clicking any one of the entry types available on the Zetafax server logs window. If selecting entrieslogged from a particular device or program, this is selected in the usual way from a box.
If you have administrator privileges, you can search for logged messages for any given user, or all users ofthe system. Select the user from the For Username drop-down menu.
Otherwise users can only search for their own messages.
Time of logging can be selected for today only or all days logged. The Today only box should be checked ifonly today's messages are required. The number of days that daily logs are kept is specified by the networkadministrator, and could be many days, creating a very long list.
Log format The format of log messages displayed is very simple – the time in 24 hour format (military time) followed bythe actual error or Zetafax server message. Often they also contain the username and temporary file nameinvolved in the action that created the message. Clicking on a message displays the server program whichgenerated it, the user and message ID it refers to, and an explanation of the error (if applicable).
To show log entries for a specific message
· Select an entry for the appropriate message and click the This message… button.
The log entries will be filtered to show only those entries that apply to the selected message.
Related topicFAX.LOG

65
© 1991 - 2010 Equisys Plc
Search Sent Items
Displays the Search Sent Items dialog box. This allows you to perform a search for messages that you havesent and are stored in the Sent Items folder. The Sent Items folder differs from the Sent Archive in that it onlyreflects the Sent Items of the user currently logged into Zetafax. When sending a batch or faxes please notethat only one fax needs to succeed for the batch to appear in the sent items folder.
To search for sent faxes:
1.Select File>Search>Search Sent Items.2.The Search Sent Items dialog box is displayed:
Search criteria
It is possible search the Sent Items folder using a number of criteria to filter the search results generated.
Date range: Today, Yesterday, In last week (last 7 days), In last month (since same date in previous month),None or Specified date range.
If you choose Specified date range, you will be presented with the Select date range dialog box:
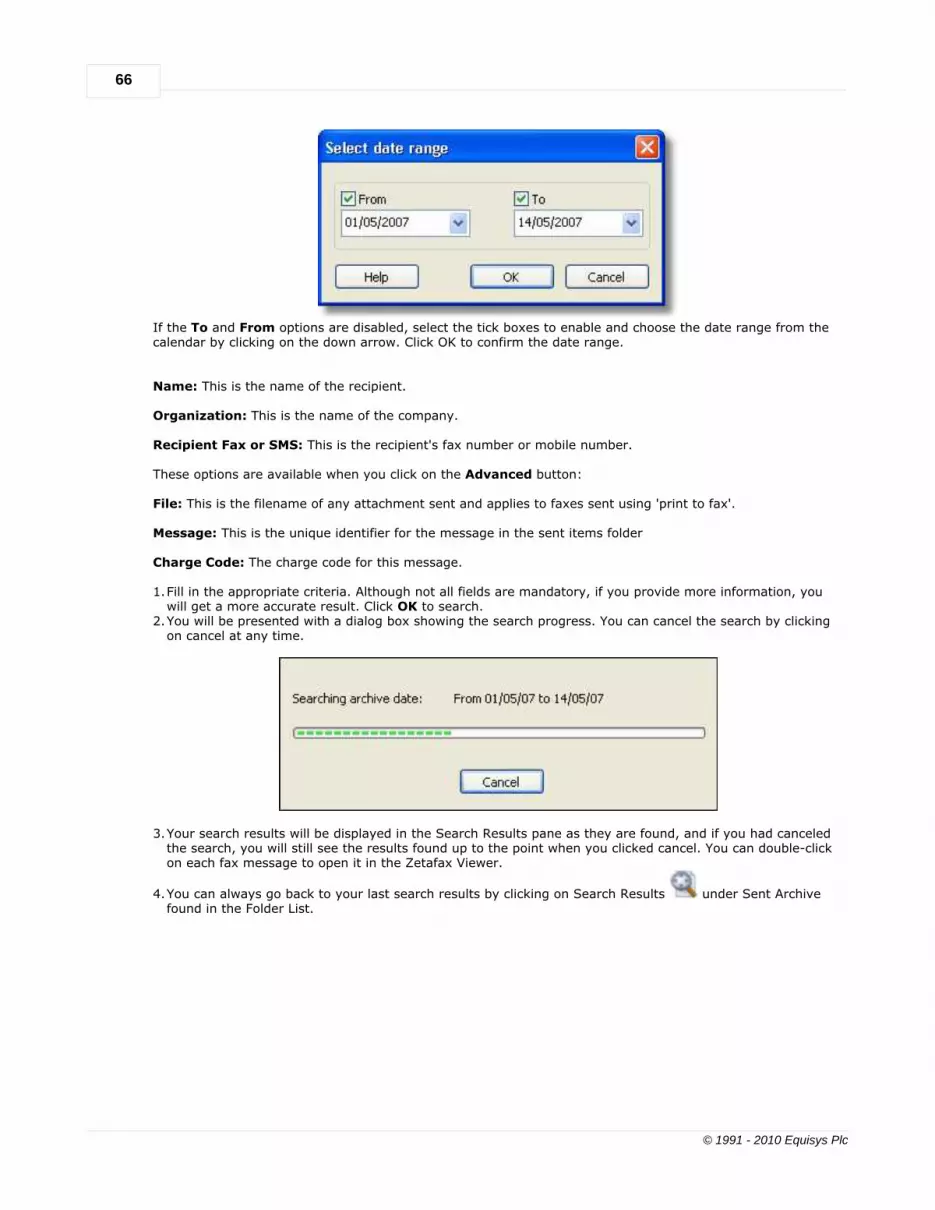
66
© 1991 - 2010 Equisys Plc
If the To and From options are disabled, select the tick boxes to enable and choose the date range from thecalendar by clicking on the down arrow. Click OK to confirm the date range.
Name: This is the name of the recipient.
Organization: This is the name of the company.
Recipient Fax or SMS: This is the recipient's fax number or mobile number.
These options are available when you click on the Advanced button:
File: This is the filename of any attachment sent and applies to faxes sent using 'print to fax'.
Message: This is the unique identifier for the message in the sent items folder
Charge Code: The charge code for this message.
1.Fill in the appropriate criteria. Although not all fields are mandatory, if you provide more information, youwill get a more accurate result. Click OK to search.
2.You will be presented with a dialog box showing the search progress. You can cancel the search by clickingon cancel at any time.
3.Your search results will be displayed in the Search Results pane as they are found, and if you had canceledthe search, you will still see the results found up to the point when you clicked cancel. You can double-clickon each fax message to open it in the Zetafax Viewer.
4.You can always go back to your last search results by clicking on Search Results under Sent Archivefound in the Folder List.

67
© 1991 - 2010 Equisys Plc

68
© 1991 - 2010 Equisys Plc
Search sent archive...
Displays the Search Sent Archive dialog box. This allows you to perform a search for messages that you havesent and are stored in the Sent Archive folder.
Note: This option is only available if you have a sent archive folder where all your sent faxes are stored.Otherwise the search option would not be available.
To search for faxes sent:
1.Select File>Search>Search Sent Archive.2.The Search Sent Archive dialog box is displayed:
Search criteria
Date range: Today, Yesterday, In last week (last 7 days), In last month (since same date in previous month),None or Specified date range.
If you choose Specified date range, you will be presented with the Select date range dialog box:
If the To and From options are disabled, select the tick boxes to enable and choose the date range from thecalendar by clicking on the down arrow. Click OK to confirm the date range.
Sending Zetafax user: choose the user who sent the fax messages from the drop down menu.

69
© 1991 - 2010 Equisys Plc
Name: This is the name of the recipient.
Organization: This is the name of the company.
Recipient Fax or SMS: This is the recipient's fax number or mobile number.
These options are available when you click on the Advanced button:
File: This is the filename of any attachment sent and applies to faxes sent using 'print to fax'.
Message: This is the unique identifier for the message in the archive
Charge Code: The charge code for this message.
3.Fill in the appropriate criteria. Although not all fields are mandatory, if you provide more information, youwill get a more accurate result. Click OK to search.
4.You will be presented with a dialog box showing the search progress. You can cancel the search by clickingon cancel at any time.
5.Your search results will be displayed in the Search Results pane as they are found, and if you had canceledthe search, you will still see the results found up to the point when you clicked cancel. You can double-clickon each fax message to open it in the Zetafax Viewer.
6.You can always go back to your last search results by clicking on Search Results under Sent Archivefound in the Folder List.

70
© 1991 - 2010 Equisys Plc
Search received archive...
Displays the Search Received Archive dialog box. This allows you to perform a search for messages that youhave received and are stored in the Received Archive folder.
Note: This option is only available if you have a received archive folder where all your received faxes arestored. Otherwise the search option would not be available.
To search for faxes received:
1.Select File>Search>Search Received Archive.2.The Search Received Archive dialog box is displayed:
Search criteria
Date range: Today, Yesterday, In last week (last 7 days), In last month (in the last 31 days), None orSpecified date range.
If you choose Specified date range, you will be presented with the Select date range dialog box:
If the To and From options are disabled, select the tick boxes to enable and choose the date range from thecalendar by clicking on the down arrow. Click OK to confirm the date range.
Receiving Zetafax user: choose the Receiving Zetafax user from the drop down menu
Sender Fax or SMS: This is the sender's fax number or mobile number
Message: This is the unique identifier for the message in the archive. This option is available when you click

71
© 1991 - 2010 Equisys Plc
on the Advanced button.
3.Fill in the appropriate criteria. Although not all fields are mandatory, if you provide more information, youwill get a more accurate result. Click OK to search.
4.You will be presented with a dialog box showing the search progress. You can cancel the search by clickingon cancel at any time.
5.Your search results will be displayed in the Search Results pane as they are found, and if you had canceledthe search, you will still see the results found up to the point when you clicked cancel. You can double-clickon each fax message to open it in the Zetafax Viewer.
6.You can always go back to your last search results by clicking on Search Results under Sent Archivefound in the Folder List.
72
© 1991 - 2010 Equisys Plc
Reconnect
If, during usage of Zetafax, the title changes to Zetafax - offline, this means the Zetafax server has beendisconnected for some reason. This will affect most of the operations of the Zetafax Client software. When this happens, all options that require contact with the Zetafax server are grayed out on the menus andcannot be chosen until the Zetafax server is reconnected. The Reconnect command (Status menu) becomesavailable, and allows you to reconnect immediately. Alternatively, the Zetafax Client program may reconnectautomatically a minute or so after the Zetafax server is restarted or the link to it is restored. If, when you try to reconnect, you still get the message Problem accessing Zetafax server , the problemmay not have been fixed properly, or there may be another problem. Ask your network administrator forassistance.

73
© 1991 - 2010 Equisys Plc
Exit
Quit Zetafax.

74
© 1991 - 2010 Equisys Plc
Addresses menu
The Addresses menu provides commands for working with the private and network address books.
SearchNew EntryNew Group

75
© 1991 - 2010 Equisys Plc
Search
Allows you to search the network and private address books for a particular entry, add new entries, and editor delete existing entries.
To search for an entry
· Select Zetafax network address book, Zetafax private address book, or Zetafax network andprivate address books from the Data source drop-down menu to specify which address books you wantto search.
· Type the first few letters of the name you want to search for.
The list of entries will be scrolled to the first entry matching what you typed.
To edit an entry
· Select the entry in the Address Book Search dialog box and click the Edit. button, or double-click theentry.
The entry will be displayed in the Address Book Editor dialog box.
· Edit the entry as required and click the OK button to save the changes.
To delete an entry
· Select the entry in the Address Book Search dialog box and click the Delete. button.
A dialog box is displayed to allow you to confirm that you want to delete the entry.
· Click the Yes button to delete the entry or the No button to cancel the operation.
To add a new entry to an address book
· Click the New. button.
Then proceed as for New Entry.

76
© 1991 - 2010 Equisys Plc
New Entry
Allows you to add a new entry to the private or network address book.
The Address Book Editor dialog box is displayed to allow you to enter the contact details.
· Enter the name, organization, and fax number in the appropriate fields. · Select Private or Network to specify whether the entry should be added to your private address book, or
the network address book accessible by all Zetafax users in your company. · Click the OK button to add the entry.
A dialog box will confirm that the entry was successfully added.
· Click the OK button to continue.
The Address Book Editor dialog box remains open to allow you to add further entries.
· Click the Quit button to close the Address Book Editor dialog box.
To print an entry from the address book
· Select the entry in the Address Book Search dialog box and click the Print… button.
The Print Address Book dialog box will be displayed to allow you to print the selected entry.
· In the Report format section select Standard to print just the name, company, and fax number, or Fulldetails to print the full name and address details defined in the Address Book Editor - More Detailsdialog box.
To add more details to an address book entry
· From the Address Book Editor dialog box click the More… button.
The Address Book Editor - More Details dialog box will be displayed to allow you add an address to theentry, together with information about how you want the recipient addressed on faxes, and additionalcompany information

77
© 1991 - 2010 Equisys Plc
New Group
Zetafax allows you to define address book groups, which make it easy to send one fax to a number of peopleor organizations.
Each group can contain up to 50 individuals, or references to other groups.
Groups are identified by an @ prefix in front of their name.
Groups can be stored in either the private address book or network address book.
To create a group
· On the Addresses menu click New Group.
The Group Edit dialog box is displayed to allow you to define the group.
· Specify a name for the group. Select Private or Network to specify which address book to use for thegroup.
· Enter a description of the group in the Description field. · Select each entry you want to add to the group by typing the first few letters of its name, selecting the
entry in the list, and then clicking the Add to list button.
Note that if you add another group to the group, that group should not itself contain any groups.
When you have specified all the members for the group:
· Click the Add button to create the group.
A dialog box will confirm that the group was created successfully.
· Click the OK button on the dialog box to return to the Group Edit window. · Click the Quit button to close the Group Edit window.
To edit a group
· On the Addresses menu, click Search. · In the Address Book Search dialog box select Search by Group .
The list of the available groups will be displayed.
You can then add a new group, or edit or delete an existing group, in exactly the same way as for otheraddress book entries.
To send a fax to all members of a group
In the Zetafax Fax Wizard Recipients dialog box click the Address book. button to display the AddressBook dialog box.
· Select Search by Group. · Select the group you want to use in the list of entries and click the Add to list button. · Click the OK button to close the Address Book dialog box.
The group name and description will be displayed in the List of recipients box, followed by the individualrecipients in the group:
@Committee Steering committee members

78
© 1991 - 2010 Equisys Plc
Joe Black, Runbolds (01234 56768) Susan Smith, Smith and Sons (0321 6547) Eileen Morris, Steelsen (09876 5432)
· Click the OK button to send the fax.
Note: When sending a message to a group of recipients only one entry will appear in your Out window.

79
© 1991 - 2010 Equisys Plc
Actions menu
The Actions menu provides commands for working with new and stored messages.
New->FaxNew->Text MessageForward->To Zetafax UserForward->To Fax NumberForward->To Mobile NumberForward->To MailForward->Other File to Fax NumberResendRushHoldReleaseMark as JunkMark as ReadMark as UnreadFollow up CompleteViewInformation

80
© 1991 - 2010 Equisys Plc
New Fax
Select New Fax. The Zetafax Fax Wizard - Recipient dialog is then displayed to allow you to address thefax.
· Enter a name, organization (optional), and the destination fax number.· Click the Next button to continue.
For more information about the addressing options, and using the address book, see How do I use my addressbook?
The Zetafax Fax Wizard - Coversheet dialog then allows you to choose the coversheet, and add a subjectfor your fax.
· Click the Next button to continue.
The Zetafax Fax Wizard - Options screen allows you to add a letterhead, and specify sending options.
· For simplicity leave all the options unchanged.
For more information about the options see How do I specify options when sending a fax?
· Click the Finish button to continue. · Switch to the Zetafax Client window.
The fax will appear in your Out window, and the icon in the Status column shows the status of the fax. Formore information, see Status icons.

81
© 1991 - 2010 Equisys Plc
How do I send a text message to a mobile phone?
· Start the Zetafax Client. · Choose New> Text Message from the File Menu.
The Text Message - Addressing dialog box is then displayed to allow you to address the text message. · Enter a name, organization (optional), and the destination mobile number or select an existing contact from
the Previous recipients list:
· Click the Next button to continue.
For more information about the addressing options, and using the address book, see How do I use my addressbook?
The SMS Message dialog box then allows you to type a message and specify sending options.

82
© 1991 - 2010 Equisys Plc
Text messages can only contain 160 characters. As you type the message you will see a counter update. Thiscounter shows the number of remaining characters that a single message can contain.
· Choose Send in single message to limit the text to one message of maximum 160 characters. · Choose Send in multiple messages to send the message in multiple message instalments to allow for
more than 160 characters.
When the message is ready press the Next button to send the message.
The message will appear in your Out window, and the icon in the Status column shows the status of themessage. For more information, see Status icons.

83
© 1991 - 2010 Equisys Plc
Forward To Zetafax User
Forwards an item selected in the Zetafax Client window to one or more specified Zetafax users.
For example if you received a fax intended for another user you can use the Forward command to forward itfrom your Zetafax In window.
The Forward Message dialog box is displayed:
· Select the users you want to forward the message to and click the OK button to continue.
If you forwarded a message from your In window Zetafax displays a warning to give you the option ofdeleting it when it has been successfully forwarded.
· Click the Yes button to delete the message or the No button to leave the original in your In window.

84
© 1991 - 2010 Equisys Plc
Forward To Fax Number
Select a fax and right click your mouse to display an options menu. Choose Forward > To Fax Number, thiswill display the Zetafax Fax Wizard - Recipients dialog.
· Enter a name, organization (optional), and the destination fax number.· Click the Next button to continue.
For more information about the addressing options, and using the address book, see How do I use my addressbook?
The Zetafax Fax Wizard - Coversheet dialog then allows you to choose the coversheet, and add a subjectfor your fax.
· Click the Next button to continue.
The Zetafax Fax Wizard - Options screen allows you to add a letterhead, and specify sending options.
· For simplicity leave all the options unchanged.
For more information about the options see How do I specify options when sending a fax?
· Click the Finish button to continue. · Switch to the Zetafax Client window.
The fax will appear in your Out window, and the icon in the Status column shows the status of the fax. Formore information, see Status icons.

85
© 1991 - 2010 Equisys Plc
Forward To Mobile Number
· Choose Forward->To Mobile Number from the toolbar.
The Text Message - Addressing dialog box is then displayed to allow you to address the text message.
· Enter a name, organization (optional), and the destination mobile number or select an existing contact fromthe Previous recipients list.
· Click the Next button to continue.
For more information about the addressing options, and using the address book, see How do I use my addressbook?
The SMS Message dialog box then allows you to type a message and specify sending options.
Text messages can only contain 160 characters. As you type the message you will see a counter update. Thiscounter shows the number of remaining characters that a single message can contain.
· Choose Send in single message to limit the text to one message of maximum 160 characters. · Choose Send in multiple messages to send the message in multiple message instalments to allow for
more than 160 characters.
When the message is ready press the Next button to send the message.

86
© 1991 - 2010 Equisys Plc
The message will appear in your Out window, and the icon in the Status column shows the status of themessage. For more information, see Status icons.

87
© 1991 - 2010 Equisys Plc
Forward To Mail
Allows a fax or text message to be forwarded via email. This displays the standard mail addressing dialog box.When forwarding a fax, the fax image will be added as an attachment.

88
© 1991 - 2010 Equisys Plc
Forward Other File to Fax Number
Choose Forward Other File to Fax Number. This allow sending of an existing graphics file to a fax number.
· Choose a file. Click the OK button.
The FaxWizard - Recipients dialog box is then displayed to allow you to address the fax.
· Enter a name, organization (optional), and the destination fax number:
· Click the Next button to continue.
For more information about the addressing options, and using the address book, see How do I use my addressbook?
The Zetafax Fax Wizard - Coversheet dialog then allows you to choose the coversheet, and add a subjectfor your fax.
· Click the Next button to continue.

89
© 1991 - 2010 Equisys Plc
The Zetafax - Options dialog box then allows you to add a letterhead, and specify sending options:

90
© 1991 - 2010 Equisys Plc
· For simplicity leave all the options unchanged.
For more information about the options see How do I specify options when sending a fax?
· Click the Finish button to continue. · Switch to the Zetafax Client window.
The fax will appear in your Out window, and the icon in the Status column shows the status of the fax. Formore information, see Status icons.

91
© 1991 - 2010 Equisys Plc
Resend
Resend is used when a fax or text message has been sent, but was not successfully delivered to some of therecipients. Resending a message will send the message again to all failed recipients. On the File menu click Resend . The Zetafax - Fax Wizard Recipients dialog box is then displayed to allowyou to address the fax. The failed recipients will entered into the recipient list.
· Click the Next button to continue to send the message.
For more information, see Status icons.

92
© 1991 - 2010 Equisys Plc
Rush
Moves the message selected in the Out window to the top of the list of messages waiting to be sent.

93
© 1991 - 2010 Equisys Plc
Hold
Puts the message selected in the Out window on hold, preventing it from being sent until released.
Held messages are displayed with a held status indicator in the Out window.
If the message is being held for preview, once it is ready for preview it will be marked by this icon.
Related topicsStatus icons
94
© 1991 - 2010 Equisys Plc
Release
Releases the message selected in the Out window, allowing it to be sent.
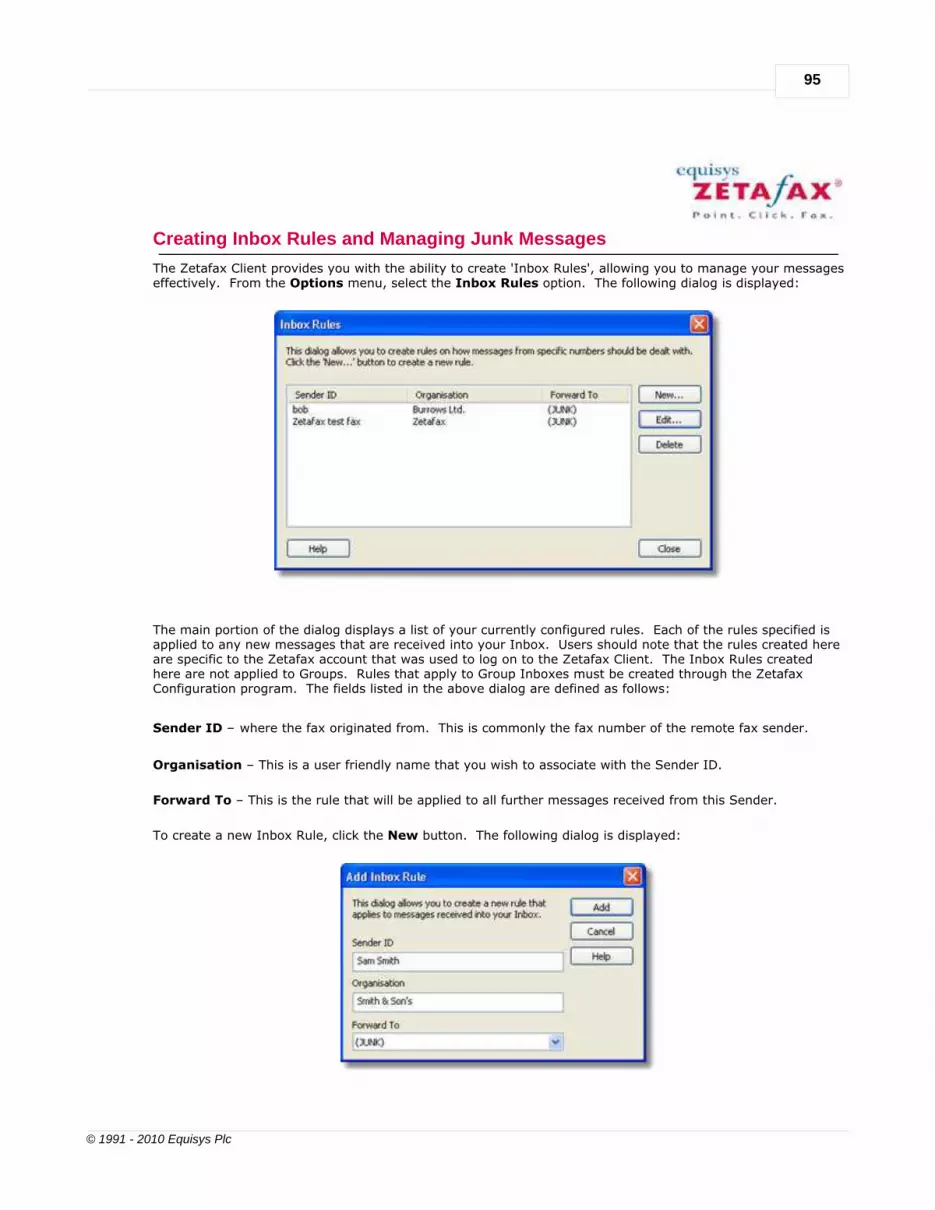
95
© 1991 - 2010 Equisys Plc
Creating Inbox Rules and Managing Junk Messages
The Zetafax Client provides you with the ability to create 'Inbox Rules', allowing you to manage your messageseffectively. From the Options menu, select the Inbox Rules option. The following dialog is displayed:
The main portion of the dialog displays a list of your currently configured rules. Each of the rules specified isapplied to any new messages that are received into your Inbox. Users should note that the rules created hereare specific to the Zetafax account that was used to log on to the Zetafax Client. The Inbox Rules createdhere are not applied to Groups. Rules that apply to Group Inboxes must be created through the ZetafaxConfiguration program. The fields listed in the above dialog are defined as follows:
Sender ID – where the fax originated from. This is commonly the fax number of the remote fax sender.
Organisation – This is a user friendly name that you wish to associate with the Sender ID.
Forward To – This is the rule that will be applied to all further messages received from this Sender.
To create a new Inbox Rule, click the New button. The following dialog is displayed:

96
© 1991 - 2010 Equisys Plc
Using this dialog, you can enter the three pieces of information described above. For the Forward To option,
you should select a value from the drop-down. Selecting (JUNK) will route any further messages received
from this sender to the junk user. This is a special user managed by the Zetafax Administrator. They willchoose how junk messages will be dealt with.
When you have entered all the relevant information, click Add to create the rule. The rule now appears inyour list.
From the main dialog, you can also edit and delete existing rules.
· To edit a rule, select it from the list, and hit the Edit button.
· To delete a rule, select it from the list and hit Delete. You will be asked for confirmation before the rule isremoved.
Marking messages as Junk
To mark message senders as junk, you can use a simplified mechanism. Simply right-click on a single fax inyour Inbox and select Mark as Junk from the pop-up menu. The following dialog is displayed:
Enter the Organisation, i.e. name that you wish to associate with the Sender ID (fax number) and press OK.
An Inbox rule is automatically created that will route all further messages to you from the specified Sender ID
to 'junk'. This rule can be viewed along with your other rules by selecting Inbox Rules from the Actions
menu.

97
© 1991 - 2010 Equisys Plc
Mark as unread
Changes the status of a selected message to unread.
98
© 1991 - 2010 Equisys Plc
Follow up
Marks a selected message with a flag to be identified as a message needing follow up.

99
© 1991 - 2010 Equisys Plc
Complete
Removes the flag from a message mark as needing follow up.

100
© 1991 - 2010 Equisys Plc
View
Displays the message selected. Equivalent to double-clicking the item. If no item is selected in the ZetafaxClient window the View Fax dialog box is displayed to allow you to select a file for viewing.
Viewing a fax in the Out window that was held for previewing gives you the option of sending or aborting thefax when you exit from the Zetafax Viewer. Once you have viewed it, you will be asked if you want to release it for sending.
Viewing an unread message in the In window changes its status to read.

101
© 1991 - 2010 Equisys Plc
Information
Displays information about the item selected in the Inbox or Outbox windows.
If the item is a received message, the Message Information dialog box displays the filename, description (ifsupplied), and transmission reports.
If the item is a sent message, the Message Information dialog box shows the filename, description, andadditional information specified when the message was sent, together with the transmission reports, thenumber of pages sent, and the connection time.
· Selecting the To. button displays a dialog box listing all the desired recipients for the message, with themethod contact for each (eg FAX/SMS plus fax/mobile number). The current status of each entry isdisplayed, ie. whether the transmission was successful, still in progress or failed. Selecting the Log. buttondisplays a dialog box listing logged entries for the current fax message. Information may only be kept for afew days; this length of time is defined by the fax server's configuration options.
· Selecting the Print. button allows you to print the logged information.

102
© 1991 - 2010 Equisys Plc
Options menu
The commands on the Options menu allow you to configure options affecting the operation of the ZetafaxClient to suit your preferences and the way in which you prefer to work.
DevicesFax MessageText MessageInbox rulesAlertsNameFax annotation optionsOCRCustomize

103
© 1991 - 2010 Equisys Plc
Scanners
Displays the Devices dialog box to allow you to specify options affecting connected scanners:
Select Invert TWAIN images to invert scanned images (as in a negative) when they are imported into afax.
Select Show scanner user interface to use the scanner's own software user interface when scanning.

104
© 1991 - 2010 Equisys Plc
Fax Message
Displays the Fax Message Options dialog box shown hereto allow you to specify default settings for newmessages.
Keep transmission reports
· Select Keep transmission reports to store a transmission report containing information about therecipients and time of sending in the same directory as each document.
Coversheet
Displays the Options - Coversheet dialog box to allow you to select the default coversheet file to be used forfaxes.
· Select the coversheet file from the Coversheet drop-down menu, or (None) for no coversheet.
Letterhead
Displays the Options - Letterhead dialog box to allow you to select a letterhead file for use on each of thesubsequent pages of the fax.
· Select the letterhead file from the Letterhead drop-down menu, or (None) for no letterhead.
Resolution

105
© 1991 - 2010 Equisys Plc
Displays the Options - Resolution dialog box to allow you to specify the default resolution for faxes - Draft,Normal, or High.
Priority
Allows you to specify the default priority - Normal, Urgent, or Background.
· You can only select Urgent if the network administrator has permitted you to do this.· Urgent faxes are sent ahead of any Normal faxes in the Zetafax Server queue.· Background faxes are sent when no other faxes are queued.
Time
Specifies the default time for faxes to be sent:
· Immediately· Off-peak· At a specified time
Note: When specifying a time, you can only select a time to send within the next 24 hours.
Header
Displays the Options - Page Header dialog box to allow you to specify what information is displayed in theheader on each page:
· Numbered· To· From· Date· Time Click the Reset button to enable all options.
Save Sent Faxes in the Sent Items Folder The save sent faxes checkbox allows you to determine whether or not you wish faxes that have been
successfully sent to be saved into the sent items folder. Un-checking this will result in your sent faxes not
being stored in the sent items folder.
Mail send options
Allows you to specify the format in which messages sent to email addresses are received.

106
© 1991 - 2010 Equisys Plc
SMS Message
Displays the Text Message Options dialog box to allow you to specify default settings for new textmessages:
· The Header lets you specify a default message header. · The Signature lets you specify a default message signature.
On first use this field is set to your full name.
· The Save sent messages in Sent Items folder checkbox allows you to determine whether or not textmessages are saved in the Sent Items Folder.
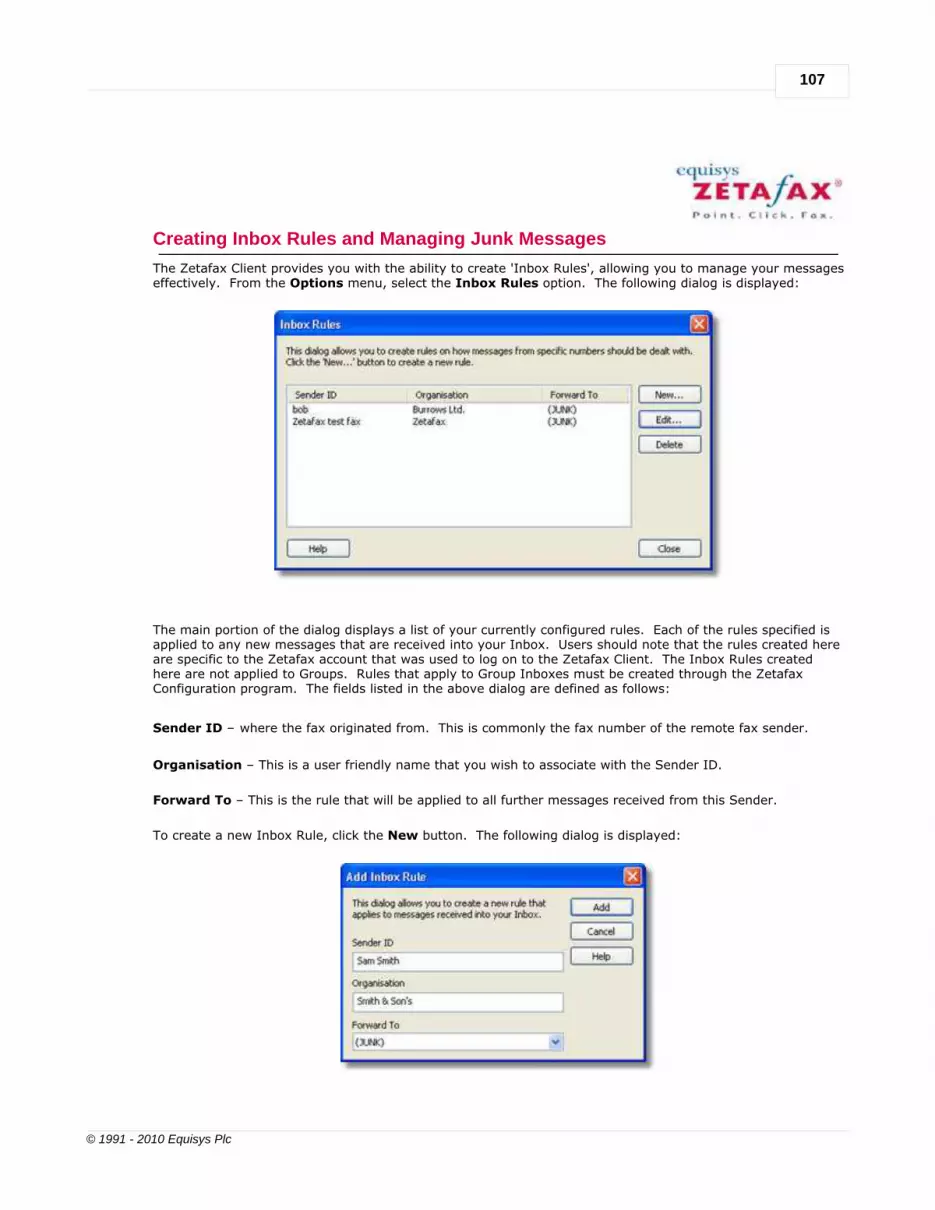
107
© 1991 - 2010 Equisys Plc
Creating Inbox Rules and Managing Junk Messages
The Zetafax Client provides you with the ability to create 'Inbox Rules', allowing you to manage your messageseffectively. From the Options menu, select the Inbox Rules option. The following dialog is displayed:
The main portion of the dialog displays a list of your currently configured rules. Each of the rules specified isapplied to any new messages that are received into your Inbox. Users should note that the rules created hereare specific to the Zetafax account that was used to log on to the Zetafax Client. The Inbox Rules createdhere are not applied to Groups. Rules that apply to Group Inboxes must be created through the ZetafaxConfiguration program. The fields listed in the above dialog are defined as follows:
Sender ID – where the fax originated from. This is commonly the fax number of the remote fax sender.
Organisation – This is a user friendly name that you wish to associate with the Sender ID.
Forward To – This is the rule that will be applied to all further messages received from this Sender.
To create a new Inbox Rule, click the New button. The following dialog is displayed:

108
© 1991 - 2010 Equisys Plc
Using this dialog, you can enter the three pieces of information described above. For the Forward To option,
you should select a value from the drop-down. Selecting (JUNK) will route any further messages received
from this sender to the junk user. This is a special user managed by the Zetafax Administrator. They willchoose how junk messages will be dealt with.
When you have entered all the relevant information, click Add to create the rule. The rule now appears inyour list.
From the main dialog, you can also edit and delete existing rules.
· To edit a rule, select it from the list, and hit the Edit button.
· To delete a rule, select it from the list and hit Delete. You will be asked for confirmation before the rule isremoved.
Marking messages as Junk
To mark message senders as junk, you can use a simplified mechanism. Simply right-click on a single fax inyour Inbox and select Mark as Junk from the pop-up menu. The following dialog is displayed:
Enter the Organisation, i.e. name that you wish to associate with the Sender ID (fax number) and press OK.
An Inbox rule is automatically created that will route all further messages to you from the specified Sender ID
to 'junk'. This rule can be viewed along with your other rules by selecting Inbox Rules from the Actions
menu.
109
© 1991 - 2010 Equisys Plc
Alerts
Displays the Options - Alerts dialog box to allow you to specify whether you want to be notified aboutdifferent events.
The options are:
Options DescriptionMessage received Displays an alert when an incoming fax is
received.Group message received Displays an alert when a message addressed to a
group has been received. This option is onlyavailable if a user account has been created for agroup using Zetafax Configuration.
Preview ready Displays an alert when a held fax is ready forpreviewing.
Message sent Displays an alert when a message has been successfully sent.
Message failed Displays an alert when a message being sent hasfailed.
Windows taskbar style Displays an alert in the Windows Taskbar.Message Box Style Displays a message box alert.

110
© 1991 - 2010 Equisys Plc
Name
Allows you to specify the details that will be displayed on the fax coversheet:
· Full name· Telephone number· Fax number· Email address· Other (for example, your company's URL or product descriptor)

111
© 1991 - 2010 Equisys Plc
Fax annotation
Allows you to specify an alternative viewer to be used for annotating faxes.
The Viewer menu will show a list of the available viewers on your computer.
· Select the viewer from the Viewer drop-down menu, or choose (other) and specify the command line ofthe viewer in the Command Line field.
· Select Use as default viewer to use the specified viewer as the default viewer when viewing faxes in theZetafax Client window.
Standard resolution faxes have a resolution of 200 x 100 dpi. However, some viewers do not handle graphicsfiles correctly if the resolution is different in the x and y directions and will display these faxes verticallycompressed. If this happens select the Always convert to 200 x 200 dpi option to ensure the faxes aredisplayed correctly.
Using annotation
If your viewer supports annotation it can be used to modify faxes in the In window. For example, you couldmodify a received fax and then forward it to another user.
For more information, see Annotate.
112
© 1991 - 2010 Equisys Plc
OCR
Displays the OCR Options dialog box to allow you to set up a third-party OCR program for use with Zetafax toallow you to convert received faxes into editable text files suitable for reading into a word processor.
Zetafax can be used with many leading third-party OCR products. Select the OCR program from the Programdrop-down menu, or choose (other) and specify the command line for the program in the Command linefield. If the OCR package does not support fax format graphics files, select an alternative format from the Fileformat menu and Zetafax will automatically convert the file format so your OCR package can read it.
Example - Using Microsoft Office Tools Document Imaging for OCR
1.Go to menu and select Options > OCR. 2.When the OCR Options window opens select Other from the Program field, you will then need to specify
the Command line for the program you wish to use3.In this case the path is:
"C:\Program Files\Common Files\Microsoft Shared\MODI\12.0\mspview.exe"
4.Whilst still in Inbox Folder select the message you wish to convert to text and select Tools > OCR.5.The selected OCR tool will activate. 6.You can then either Save the file for later use or in this case select Tools > Send Text to Word and then
edit etc as a word document.

113
© 1991 - 2010 Equisys Plc
Customize
Allows you to customize the Zetafax Client user interface, including the size and appearance of the toolbarbuttons, the font used for each element of the user interface, and the behavior of the Filed window.

114
© 1991 - 2010 Equisys Plc
Tools menu
The commands on the Tools menu allow you to use other tools in conjunction with Zetafax to annotate faxes,or convert them to editable text (OCR), and create and edit coversheets.
AnnotateDelete annotationsOCRName of SenderZetafax ViewerCoversheet EditorTidy Up

115
© 1991 - 2010 Equisys Plc
Annotate
Using the Zetafax viewer, faxes received in your Inbox can be annotated and saved either for your records orto be forwarded to another person.
To annotate a fax
1. Double click the fax you wish to add annotations to. The Zetafax viewer will automatically load theselected fax.
2. Using the annotations toolbar, you can add your annotations to your selected fax:
Annotation type DescriptionStraight line Allows you to draw a straight line.Freehand line Allows you to draw a line in any direction.Rectangle Allows you to draw a rectangle.Highlight Allows you to shade a rectangle.Text box Allows you to add a box of text to your fax.Picture Allows to add images to your fax.Stamp Allows you to add a box of preset text to your fax.
3. Having added the annotations that you require, save your fax and exit the viewer.
To create a custom stamp
1. Click the Stamp icon in the annotations toolbar to view the Stamp options menu.
2. Select Add Stamp. The New Stamp dialog will be displayed.
3. Enter a name for your stamp in the New Stamp Name field.
This should be something descriptive, as this will be displayed as the stamp name within the Zetafax viewer.
4. Add the text you wish to be displayed as part of your stamp into the Stamp string.
For example: Received by Sam Smith
In addition to adding standard text, there are two smart commands you can use within your stamps:
Stamp Command Description%D% Adds the date in the short standard Windows
format, for example: 02/01/07.%D% Adds the date in the long standard Windows format,
for example: January 01 2007.
5. Select OK to save your stamp.

116
© 1991 - 2010 Equisys Plc
Delete annotations
Deletes any annotations added to the fax selected in the In window using the Annotate command.

117
© 1991 - 2010 Equisys Plc
OCR
Submits the fax selected in the In window to a third-party OCR program to convert it into a text documentsuitable for editing in the word processor.
The command will only be available if a suitable OCR program has been set up in the OCR Options dialog.

118
© 1991 - 2010 Equisys Plc
Name of Sender
Displays the Name Of Sender dialog box to allow you to specify the organization associated with a faxselected in the In window:
The organization will be displayed in the From column of the In window instead of the sender's fax number.
119
© 1991 - 2010 Equisys Plc
Zetafax Viewer
Displays the View Fax dialog box to allow you to select a file and display it in the Zetafax Viewer.

120
© 1991 - 2010 Equisys Plc
Coversheet Editor
Runs the Zetafax Coversheet Editor to allow you to create a new coversheet or edit an existing coversheet.

121
© 1991 - 2010 Equisys Plc
Tidy Up
Displays the Quick Tidy Options dialog box which gives you a convenient way of clearing old messages fromyour In and Out windows.
Select the different categories of messages you want to delete and abort. Specify the number of days afterwhich you want to delete and abort the specified messages by editing the days field or clicking the up-arrowand down-arrow buttons.

122
© 1991 - 2010 Equisys Plc
Window menu
Allows you to specify which components of the Zetafax window are displayed.
Folder listUse this option to enable or disable the folder list which displays a tree view for navigating folders.
Reset layoutChanges the layout of the Zetafax Client back to the default settings.
RefreshRefreshes the view of the client, providing the most up to date information on the status of your messages.
ToolbarUse this option to enable or disable the toolbar.
Status barUse this option to enable or disable the status bar.
The following options are also available:Change DirectoryChange File FilterRefresh

123
© 1991 - 2010 Equisys Plc
Folder List
The Folder List option expands and collapses the list of folders.

124
© 1991 - 2010 Equisys Plc
Reset Layout
Resets the Zetafax Client screen layout to its original configuration.

125
© 1991 - 2010 Equisys Plc
Change Directory
Displays the Browse for Folder dialog box to allow you to select a directory to be displayed in the Filedwindow.

126
© 1991 - 2010 Equisys Plc
Change File Filter
Displays the Change File Filter dialog box to allow you to filter which files are shown in the Filed window.
· Select Show only files with transmission reports to hide files without transmission reports. This is agood way of showing only fax files if your chosen directory also displays other file types.
· Enter a pattern in the Match files of type box to show files matching a specified extension.
For example: Put *.epn to show only files with a .epn extension. Put a*.* to show only files beginning with 'a'.Put *.g3* to show only files with a .g3f or .g3n extension; ie graphics files.
127
© 1991 - 2010 Equisys Plc
Refresh
Refreshes the In, Out, and Filed windows.

128
© 1991 - 2010 Equisys Plc
Status icons
The files in the In and Out windows are identified with the following status icons. These change to indicate thestatus of a fax:
Icon DescriptionWaiting for preparation or a free device.
Message being prepared for sending.
Document held in queue.
Document ready for preview.
Received document.
Sending of fax message completed successfully.
Sending of text message completed successfully.
Sending or receiving of fax message completed with errors.
Sending of text message completed with errors.
Message being aborted.
Saved file or attachment.
Dialing remote fax or sending to local device.
Sending to remote fax.
Sending a text message to a mobile phone.
Sending to remote Zetafax server by LCR.
Remote Zetafax server accepted message by LCR.
Message being received from remote fax or LAN.
Document being scanned using fax server's scanner.
Scanned message for attaching.

129
© 1991 - 2010 Equisys Plc
Toolbar
Provides buttons that give direct access to the most commonly used commands.
Icon DescriptionSend message. Displays the Fax Wizard dialog box, toallow you to address the message and sent it. Thiscommand is equivalent to Send Fax (File menu).Forwards the selected message to one or more Zetafaxusers, opening the Forward Message dialog box to allowyou to select the addressees. This command is equivalent to Forward (File menu).Resends the selected message to a new recipient.
Requests that the message be sent as soon as possible. Thiscommand is equivalent to Rush (File menu).Places the selected message on hold, causing it not to besent until released. This command is equivalent to Hold (Filemenu).Releases the selected message from hold, causing it to besent. This command is equivalent to Release (File menu).Saves the selected message, opening the Save As dialogbox. This command is equivalent to Move/Save (File menu).Discards the selected message, by deleting it if it is notbeing processed or aborting if it is being processed. Thiscommand is equivalent to Delete (File menu).Displays information about the selected message or file.This command is equivalent to Information (File menu).Displays the message in the Zetafax Viewer or thealternative viewer configured in the Viewer Options dialogbox (Options menu). This command is equivalent to View(File menu).Prints a message, opening the Print Fax dialog box to printthe selected message, or if none is selected, a file fromdisc. This command is equivalent toPrint... (File menu).Displays server status information, opening the ServerStatus dialog box. This command is equivalent to Server(Status menu).Allows you to delete unwanted messages from the Outfolder, opening the Quick Tidy Options dialog box. Thiscommand is equivalent to Tidy Up (Window menu).By selecting this icon you can search the Sent Items Folder.Alternatively by selecting the drop down arrow you cansearch either the Sent or Received Archives.Displays this Zetafax Client Help. This command isequivalent to Index (Help menu).

130
© 1991 - 2010 Equisys Plc
Creating Inbox Rules and Managing Junk Messages
The Zetafax Client provides you with the ability to create 'Inbox Rules', allowing you to manage your messageseffectively. From the Options menu, select the Inbox Rules option. The following dialog is displayed:
The main portion of the dialog displays a list of your currently configured rules. Each of the rules specified isapplied to any new messages that are received into your Inbox. Users should note that the rules created hereare specific to the Zetafax account that was used to log on to the Zetafax Client. The Inbox Rules createdhere are not applied to Groups. Rules that apply to Group Inboxes must be created through the ZetafaxConfiguration program. The fields listed in the above dialog are defined as follows:
Sender ID – where the fax originated from. This is commonly the fax number of the remote fax sender.
Organisation – This is a user friendly name that you wish to associate with the Sender ID.
Forward To – This is the rule that will be applied to all further messages received from this Sender.
To create a new Inbox Rule, click the New button. The following dialog is displayed:

131
© 1991 - 2010 Equisys Plc
Using this dialog, you can enter the three pieces of information described above. For the Forward To option,
you should select a value from the drop-down. Selecting (JUNK) will route any further messages received
from this sender to the junk user. This is a special user managed by the Zetafax Administrator. They willchoose how junk messages will be dealt with.
When you have entered all the relevant information, click Add to create the rule. The rule now appears inyour list.
From the main dialog, you can also edit and delete existing rules.
· To edit a rule, select it from the list, and hit the Edit button.
· To delete a rule, select it from the list and hit Delete. You will be asked for confirmation before the rule isremoved.
Marking messages as Junk
To mark message senders as junk, you can use a simplified mechanism. Simply right-click on a single fax inyour Inbox and select Mark as Junk from the pop-up menu. The following dialog is displayed:
Enter the Organisation, i.e. name that you wish to associate with the Sender ID (fax number) and press OK.
An Inbox rule is automatically created that will route all further messages to you from the specified Sender ID
to 'junk'. This rule can be viewed along with your other rules by selecting Inbox Rules from the Actions
menu.

132
© 1991 - 2010 Equisys Plc
Keyboard Shortcuts
General ShortcutsShortcuts for general operations allow you to:
F1 Display Zetafax help. In dialog boxes, F1 displays help for a particular control.F5 Refresh connection with sever.
New Message Options
Ctrl + S Compose new fax message.Ctrl + T Compose new text message.
Selected Message Options
Ctrl + H Hold selected message.Ctrl + L Release selected message.Ctrl + R Rush selected message.Ctrl + P Print selected message.Ctrl + F Forward selected message to another user.Ctrl + M Forward selected message via email.Enter View message using the Zetafax Viewer.Alt Enter View message information.F7 Save selected message as an image file.Del Delete selected message.

133
© 1991 - 2010 Equisys Plc
Zetafax Coversheet Editor
The Zetafax Coversheet Editor allows you to create and edit coversheets for use with your faxes. It allows youto import image files, such as a company logo, scale and position them, and add text and other fields.
Foreground and background files
For flexibility each coversheet consists of two files:
· Background file, containing fixed information such as a company logo. · Foreground file, containing text specific to each fax, such as the name and organization.
The background file is optional and can be omitted if you include all the fixed information in the foregroundfile.
The foreground file is stored in .epn format. The background file is a graphics file with extension of .g3f forfine mode faxing or .g3n for normal mode faxing.
To run the Coversheet Editor
· On the Zetafax Client Tools menu, click Coversheet Editor.
To create a new coversheet
· On the File menu, click New. The New Coversheet dialog box will be displayed to allow you to select one of the coversheet templates:
· Select New blank coversheet to display a blank page in the Coversheet Editor window and click the OKbutton.
· Select an alternative coversheet from the list to display a template in the Coversheet Editor window.
Related topicsMenu optionsToolbar

134
© 1991 - 2010 Equisys Plc
How do I create a coversheet?
Personalized coversheets can help your business identity. Allowing you to increase awareness of yourcorporate branding without incurring any extra costs.
Note: Coversheet creation can only be done by users that have Administrator status.
Coversheet Creation is done in two stages. This allows you to add both background data such as images, linesand words that you do not intend to change on a fax to fax basis and also foreground data such as faxaddresses, names and dates that will differ for each fax.
Create the coversheet background file 1. Open Word.2. Add your corporate logos, and design the layout for the background of your coversheet.3. Print your document to the Zetafax Printer.
The Zetafax Client will open and the Fax Wizard - Welcome dialog box will be displayed.
4. Select the Save as an attachment or other system file option.5. Click Next.
The Save As dialogue will be displayed:
6. Choose the Coversheet, letterhead or attachment file option.7. Select the Coversheet background - optional checkbox.8. Provide a name for your Coversheet within the File name text box.9. Add a description in the Description text box. 10. Select the OK button to save the background of your coversheet.
11. Select Yes to add variable fields to your fax form.
Create the coversheet foreground file1. On the Tools menu, click Coversheet Editor.2. Open the coversheet you wish to modify, or select New to create a blank coversheet or use one of the
standard coversheet templates.
Add a text fieldAdding a text field allows you to add information to your coversheet that is going to remain the same betweenfaxes.
1. Click on the Insert Text button:2. Choose where on you fax you would like this information to appear, and click the left button on your
mouse.3. Type the text you want to add.
Add a merge fieldAdding a merge field to your coversheet allows you to add fields that will personalize your coversheet.

135
© 1991 - 2010 Equisys Plc
1. Click on the Insert Field button:
The Field menu will be displayed:
2. Select the field you would like to add to the coversheet.3. Choose where on you fax you would like this information to appear, and click the left button on your
mouse.
Your field is now added to your coversheet.
Insert a lineOne or more lines can be added to your coversheet to separate sections.
1. Click on the Insert Line button:2. Draw your line by holding down the left button on your mouse and moving the mouse till you get a line of
the desired size.
Your line is now added to your coversheet.
Insert a boxBoxes can be added to your coversheet to allow information such as any notes you may wish to be add to beseparated from the rest of the information on the coversheet.
1. Click on the Insert Box button:2. Draw your box by holding down the left button on your mouse and moving the mouse till you get a box of
the desired size.
Your box is now added to your coversheet.
Editing your coversheetHaving added fields to your coversheet, these can be edited using the Coversheet Editor at anytime.
Having loaded the coversheet you wish to edit into the Coversheet Editor you can:
Edit textAny text fields added to your coversheet can be changed by selecting them with you left mouse button. Thiswill move your cursor to the field and allow you to add, delete or change text as required.
Format textBy clicking the right button of your mouse over any text or fax field, you will be given options to edit theformatting of that text. You can:
· Change the font.· Edit the text or change the fax field.· Justify the text or fax field.· Delete the item.
If you choose to change the font, the following menu will be displayed:

136
© 1991 - 2010 Equisys Plc
This allows you to change the appearance of your selected text.
Move fieldsAll fields can be moved by selecting them with you left mouse button and either dragging them or using thearrow keys on your keyboard.
Change line thicknessFor both lines and boxes that have been added you can change the thickness of lines by clicking the rightbutton of your mouse on the object and selecting the Properties option. This will provide you with aProperties menu for that item, allowing you to change the line thickness. In addition, you can add a shadowto any boxes you might have added.
Saving your CoversheetHaving created a coversheet you are happy with, simply select the Save As option from the File menu andprovide a name and description of your coversheet. You can now use your coversheet the next time that yousend a fax.

137
© 1991 - 2010 Equisys Plc
Menu options
File menuEdit menuView menuInsert menuFormat menuOptions menu
138
© 1991 - 2010 Equisys Plc
File menu
The commands on the File menu allow you to create a new coversheet or open an existing coversheet, saveand print coversheet files, and exit from the Coversheet Editor.
NewOpenCloseSaveSave AsDeletePage SetupExit

139
© 1991 - 2010 Equisys Plc
New
Creates a new coversheet file.
The New Coversheet dialog box is displayed to allow you to select a coversheet template as the startingpoint for the coversheet, or New blank coversheet to start with a blank document.

140
© 1991 - 2010 Equisys Plc
Open
Displays the Open Coversheet dialog box to allow you to select an existing coversheet.

141
© 1991 - 2010 Equisys Plc
Close
Closes the coversheet, prompting you to save any changes first if necessary.

142
© 1991 - 2010 Equisys Plc
Save
Saves any changes you have made to the current coversheet.

143
© 1991 - 2010 Equisys Plc
Save As
Allows you to save the current coversheet with a different name.

144
© 1991 - 2010 Equisys Plc
Delete
Deletes the currently loaded coversheet from the Zetafax coversheet directory.

145
© 1991 - 2010 Equisys Plc
Page Setup
Displays the Page Setup dialog box to allow you to specify the paper size for the current coversheet.
Select Set as default to make the specified size the default size for new coversheets.

146
© 1991 - 2010 Equisys Plc
Exit
Exits from the Zetafax Coversheet Editor.
147
© 1991 - 2010 Equisys Plc
Edit menu
The Edit menu provide the standard Windows commands for use when editing coversheets:
Option DescriptionUndo Allows the most recent edit action to the currently open
coversheet to be undone.Cut Copies the currently selected item to the clipboard and
deletes it from the coversheet.Copy Copies the currently selected item to the clipboard.
Paste Inserts an object from the clipboard into the currentdocument.
Delete Removes the currently selected object from the coversheet.

148
© 1991 - 2010 Equisys Plc
View menu
The commands on the View menu allow you to customize the Zetafax Coversheet Editor window, andswitch between editing the foreground and background files in the coversheet.
· Select Toolbar and Status bar to determine whether the Toolbar and/or Status bar are displayed in theZetafax Coversheet Editor window.
· Select Fade Background to show the background file grayed out when you are editing the foreground fileand vice-versa. Select Edit Background to edit the background file instead of the foreground file.
· Select 1:1, Fit to Width, or Whole Page to determine the scale of the coversheet displayed in theZetafax Coversheet Editor window.

149
© 1991 - 2010 Equisys Plc
Insert menu
The options on the Insert menu allow you to insert a text object, field, line, box, or bitmap on the coversheetyou are editing.
TextFieldLineBoxBitmap

150
© 1991 - 2010 Equisys Plc
Text
Allows you to add a text box to the coversheet.
Selecting Text changes the cursor to an insertion pointer. Click where you want to add the text and type inthe text.
After adding the text box you can move it with the mouse pointer, or edit the text by double-clicking it.To change the appearance of the text, see Format menu.

151
© 1991 - 2010 Equisys Plc
Mark as read
Changes the status of a selected message to read.

152
© 1991 - 2010 Equisys Plc
Field
Allows you to add a field to the coversheet which will display custom text showing the addressee, subject, andother information supplied when the fax is sent. The Field dialog box is displayed to allow you to choose theinformation to be displayed:
· Click the Recipient, Sender, or Other tab to select the type of information you want to include. · Select the field from the appropriate list and click the OK button to add it to the coversheet. · Click on the coversheet to position the field.
The field is identified by the field name in angled brackets:

153
© 1991 - 2010 Equisys Plc
After adding the field you can move it with the mouse pointer, or edit the field by double-clicking it.To change the appearance of the field, see Format menu.

154
© 1991 - 2010 Equisys Plc
Line
Allows you to add a line to the coversheet. Drag to specify the start and end positions of the line.
You can then use the Properties option on the Format menu to specify the thickness of the line.

155
© 1991 - 2010 Equisys Plc
Box
Allows you to draw a box on the coversheet. Drag to define the size of the box.
You can then move the box by dragging to a new position or resize it by dragging one of the handles on theborder of the box.
The Properties command on the Format menu allows you to specify the thickness of the box, and add ashadow.

156
© 1991 - 2010 Equisys Plc
Bitmap
Allows you to add a bitmap to the background of the coversheet.
If you are editing the foreground file the following dialog box is displayed to allow you to switch to thebackground file:
An Open dialog box is then displayed to allow you to select the bitmap to add to the background.
You can select a fax graphics file (.g3* or .tiff,) or a .bump file.
For best results choose a monochrome bitmap file.

157
© 1991 - 2010 Equisys Plc
Format menu
The options on the Format menu change depending on what kind of object is selected in the ZetafaxCoversheet Editor window.
Text or Field
Provides Font, Edit Text, and Justify options to allow you to change the appearance of the text:
Font
Displays the Font dialog box to allow you to choose the typeface, style, size, and optionally underline thetext.
A sample of the text is shown in the sample box:
Edit text
Allows you to edit the text in the text box. Alternatively as a shortcut double-click the text.
Justify
Allows you to choose Left or Right to determine the justification of the text in the text box.
Line
Allows you to specify the line thickness:

158
© 1991 - 2010 Equisys Plc
Box
Allows you to specify the appearance of the box:

159
© 1991 - 2010 Equisys Plc
Options menu
Provides options for creating special effects and configuring the settings of the coversheets.
Snap to gridEffectsSettings

160
© 1991 - 2010 Equisys Plc
Snap to grid
Displays a rectangular grid in the background of the coversheet and snaps objects to the grid so that theyautomatically line up when you draw them.

161
© 1991 - 2010 Equisys Plc
Effects
Allows you to convert a bitmap to a watermark, greying it out so it appears as a faint tint in the background,or add a 3D shadow.

162
© 1991 - 2010 Equisys Plc
Settings
Allows you to choose the measurement units for the coversheet.

163
© 1991 - 2010 Equisys Plc
Toolbar
Provides buttons that directly access the most commonly used commands.
Icon DescriptionCreates a new coversheet, opening the New Coversheet dialog box. This command isequivalent to New (File menu).
Opens an existing coversheet stored on disc, opening the Open Coversheet dialogbox. This command is equivalent to Open (File menu).
Saves the coversheet being edited under its current name, or if it is unnamed, firstopens the Save Coversheet dialog box allowing it to be named. This command isequivalent to Save (File menu).
Cuts the selected objects to the clipboard. This command is equivalent to Cut (Editmenu).
Copies the selected objects to the clipboard. This command is equivalent to Copy (Editmenu).
Pastes the selected objects to the clipboard. This command is equivalent to Paste (Editmenu).
Inserts text objects in the foreground layer. This command is equivalent to Text(Insert menu).
Inserts a field object in the foreground layer, opening the Field dialog box allowing thetype of field to be chosen. This command is equivalent to Field (Insert menu).
Inserts a line object in the foreground layer. This command is equivalent to Line(Insert menu).
Inserts a box object in the background layer. This command is equivalent to Box(Insert menu).
Inserts a bitmap in the background layer, opening the Open dialog box allowing thebitmap file to be chosen. This command is equivalent to Bitmap (Insert menu).
Turns Edit background mode on and off. This command is equivalent to Editbackground (View menu).
Opens this Coversheet Editor Help. This command is equivalent to Help Topics (Helpmenu).

164
© 1991 - 2010 Equisys Plc
Keyboard Shortcuts
General ShortcutsShortcuts for general operations allow you to:
Ctrl + N Create a new coversheet.Ctrl + O Open an existing coversheet.Ctrl + S Save a coversheet.Ctrl + Z Undo last command.Ctrl + X Cut selected item.Ctrl + C Copy selected item.Ctrl + V Paste selected item.
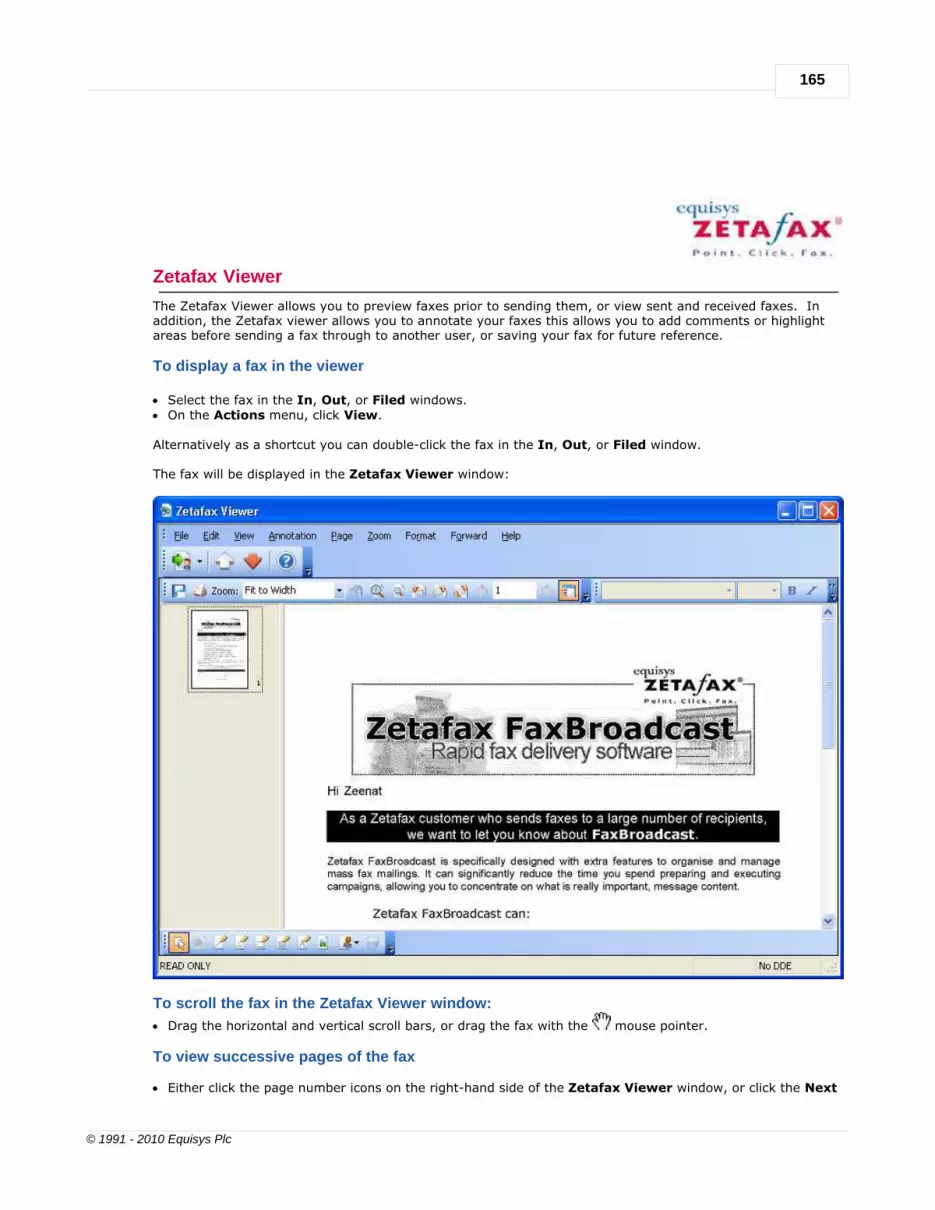
165
© 1991 - 2010 Equisys Plc
Zetafax Viewer
The Zetafax Viewer allows you to preview faxes prior to sending them, or view sent and received faxes. Inaddition, the Zetafax viewer allows you to annotate your faxes this allows you to add comments or highlightareas before sending a fax through to another user, or saving your fax for future reference.
To display a fax in the viewer
· Select the fax in the In, Out, or Filed windows. · On the Actions menu, click View. Alternatively as a shortcut you can double-click the fax in the In, Out, or Filed window.
The fax will be displayed in the Zetafax Viewer window:
To scroll the fax in the Zetafax Viewer window:
· Drag the horizontal and vertical scroll bars, or drag the fax with the mouse pointer.
To view successive pages of the fax
· Either click the page number icons on the right-hand side of the Zetafax Viewer window, or click the Next

166
© 1991 - 2010 Equisys Plc
and Previous buttons to step between pages.
Related topicsHow to annotate a faxMenu optionsStandard toolbarAnnotation toolbarFaxing toolbar

167
© 1991 - 2010 Equisys Plc
Menu options
There are many options that you can utilize from within the Zetafax Viewer, and the following menus allow youto access these commands:
Edit menuView menuAnnotation menuPage menuZoom menuFormat menuForward menuHelp menu

168
© 1991 - 2010 Equisys Plc
File menu
The commands on the File menu allow you to print a fax from the viewer, import a page, or export a page ina selected graphics format.
PrintSaveSave AsImportExportPrevious FaxNext FaxExit
169
© 1991 - 2010 Equisys Plc
The print option allows you to print a hard copy of pages from your fax. By selecting this option you canchoose which printer to send your fax to, specify which pages you would like to print, and the number ofcopies of your fax you require.
To activate the print dialog, select either the Print... option from the File menu or using the shortcut key:
Ctrl + P

170
© 1991 - 2010 Equisys Plc
Save
SaveSaves the changes you have made to this faximage.
The Save option allows you to save any changes to your fax. Such as pages that have been deleted andannotations that have been added.
To activate the Save dialog, select either the Save option from the File menu or using the shortcut key:
Ctrl + S
Note: The Save option will only be available if the fax has been saved to a location that is not your inbox oroutbox. To save your changes, when the Save option is de-selected, use the Save As option.

171
© 1991 - 2010 Equisys Plc
Save As
Save asSaves the changes you have made to this fax image to a different location.
The Save As option allows you to save a copy of your fax image, along with any changes you might havemade, to a new location. This gives you the option to save changes such as pages that have been deleted andannotations that have been added.
To activate the Save dialog, select either the Save option from the File menu.

172
© 1991 - 2010 Equisys Plc
Import
Displays the Import Page dialog box to allow you to select another fax or image file and import pages fromthat file into the fax you are currently viewing.
When importing files, you can:
· Import pages after the page you are currently viewing, using the Insert after option· Import pages before the page you are currently viewing, using the Import before option· Import pages instead of the page you are viewing, using the Replace current pages option
These options are available on the Import dialog.

173
© 1991 - 2010 Equisys Plc
Export
ExportAllows you to choose the type of file you saveyour fax image as.
Exporting a page from your fax allows you to save a single page or a selection of pages from your documentas a separate file. In addition, it allows you to change the format in which your fax image is stored.
This allows you to save core data without Coversheets or unwanted information.

174
© 1991 - 2010 Equisys Plc
Previous Fax
Loads the fax that was sent or received directly before the fax that is being viewed.
Using this option and the Next Fax option, you can navigate between faxes in either your Inbox or Outboxallowing you to find the fax you are searching for.

175
© 1991 - 2010 Equisys Plc
Next Fax
Loads the fax that was sent or received directly after the fax that is being viewed.
Using this option and the Previous Fax option, you can navigate between faxes in either your Inbox orOutbox allowing you to find the fax you are searching for.

176
© 1991 - 2010 Equisys Plc
Exit
Exits from the Zetafax Viewer.
If you are viewing a received fax in the In window, exiting changes its status from Unread to Read.
If you are viewing a fax held for previewing in the Out window, exiting prompts you to release it for sendingor aborting.

177
© 1991 - 2010 Equisys Plc
Edit menu
The commands on the Edit menu allow you to
UndoCutCopyPaste

178
© 1991 - 2010 Equisys Plc
Undo
Allows you to undo the last action that has been performed on a fax within the Zetafax Viewer.
For example, if you have added an annotation such as a text box, using the Undo command will remove thetext box.
Using the Undo command will delete actions in the reverse order to that in which they have been applied toyour fax.

179
© 1991 - 2010 Equisys Plc
Cut
Copies the currently selected item to the clipboard and deletes it from the fax.

180
© 1991 - 2010 Equisys Plc
Copy
Copies the currently selected item to the clipboard.

181
© 1991 - 2010 Equisys Plc
Paste
Inserts an object from the clipboard into the current document.

182
© 1991 - 2010 Equisys Plc
View menu
The options on the View menu allow you to choose which page of the fax to view and allows you to rotate thefax.
In addition, you can use the Toolbars and Thumbnails options, you can customize the look and feel of theZetafax Viewer allowing you to add and remove features as and when you require them.
Next pagePrevious pageFirst pageLast pageToolbarsThumbnails

183
© 1991 - 2010 Equisys Plc
Next Page
Allows you to move to the next page in your open fax. You can also navigate between pages by selecting theappropriate page image in your thumbnail view.

184
© 1991 - 2010 Equisys Plc
Previous page
Allows you to move to the previous page in your open fax. You can also navigate between pages by selectingthe appropriate page image in your thumbnail view.

185
© 1991 - 2010 Equisys Plc
First Page
Allow you to step directly to the first page of the fax. Especially useful if you have a large number of pages inyour fax.

186
© 1991 - 2010 Equisys Plc
Last page
Allow you to step to the last page of the current fax. Especially useful if you have a large number of pages inyour fax.

187
© 1991 - 2010 Equisys Plc
Toolbars
Allow you to choose which toolbars are displayed, within the Zetafax Viewer. This allows you to display thetoolbars that you wish to use on a regular basis.

188
© 1991 - 2010 Equisys Plc
Thumbnails
Allow you to preview all the pages of your fax in a small preview window to the side of your currentlydisplayed page. It also allows you to navigate to a different page of your fax by selecting the correct pagewithin the thumbnail view and using your left mouse button to select it.

189
© 1991 - 2010 Equisys Plc
Annotation menu
The options on the Annotation menu allow you to add comments, and highlight information within a faximage.
Straight LinePencil/Freehand LineRectangleHighlightText BoxPictureStamp
· Approved· Draft· Received· Rejected· User stamps· Add stamp· Manage stamp

190
© 1991 - 2010 Equisys Plc
Straight line
The straight line annotation, allows you to add straight lines to your fax image. This helps you to underlinekey points in your fax.
Once a straight line has been added to your fax, you can change the appearance of the straight line using the Properties option:
This dialog allows you to vary the color of the line you have drawn (black, grey and white only) and the widthof your line.

191
© 1991 - 2010 Equisys Plc
Pencil/Freehand line
The Pencil/Freehand line annotation, allows you to add freehand lines to your fax image. This helps you tohighlight key areas of your fax.
Once a Pencil/Freehand line has been added to your fax, you can change the appearance of thePencil/Freehand line using the Properties option:
This dialog allows you to vary the color of the line you have drawn (black, grey and white only) and the widthof your line.

192
© 1991 - 2010 Equisys Plc
Rectangle
The Rectangle annotation, allows you to add a transparent rectangle, with a border of lines to your fax image. This helps you to highlight key areas of your fax.
Once a Rectangle has been added to your fax, you can change the appearance of the Rectangle using the Properties option:
This dialog allows you to vary the color of the line you have drawn (black, grey and white only) and the widthof your line.

193
© 1991 - 2010 Equisys Plc
Highlight
The Highlight annotation, allows you to add a filled rectangle, without a border of lines to your fax image. Thishelps you to highlight key areas of your fax.
Once a Highlight has been added to your fax, you can change the appearance of the Highlight using the Properties option:
This dialog allows you to vary the fill color of the Highlight you have drawn (black, grey and white only) andthe transparency of your Highlighted area.

194
© 1991 - 2010 Equisys Plc
Text Box
The Text box annotation, allows you to a rectangle with text into your fax image. This helps you to addcomments to your fax.
Once a Text box has been added to your fax, you can change the appearance of the Text box using the Properties option:
This dialog allows you to vary the color and transparency of the rectangle you have drawn (black, grey andwhite only).
All text that you add can be modified using either the Format menu or toolbar:
Simply highlight the text you wish to change and modify the options.
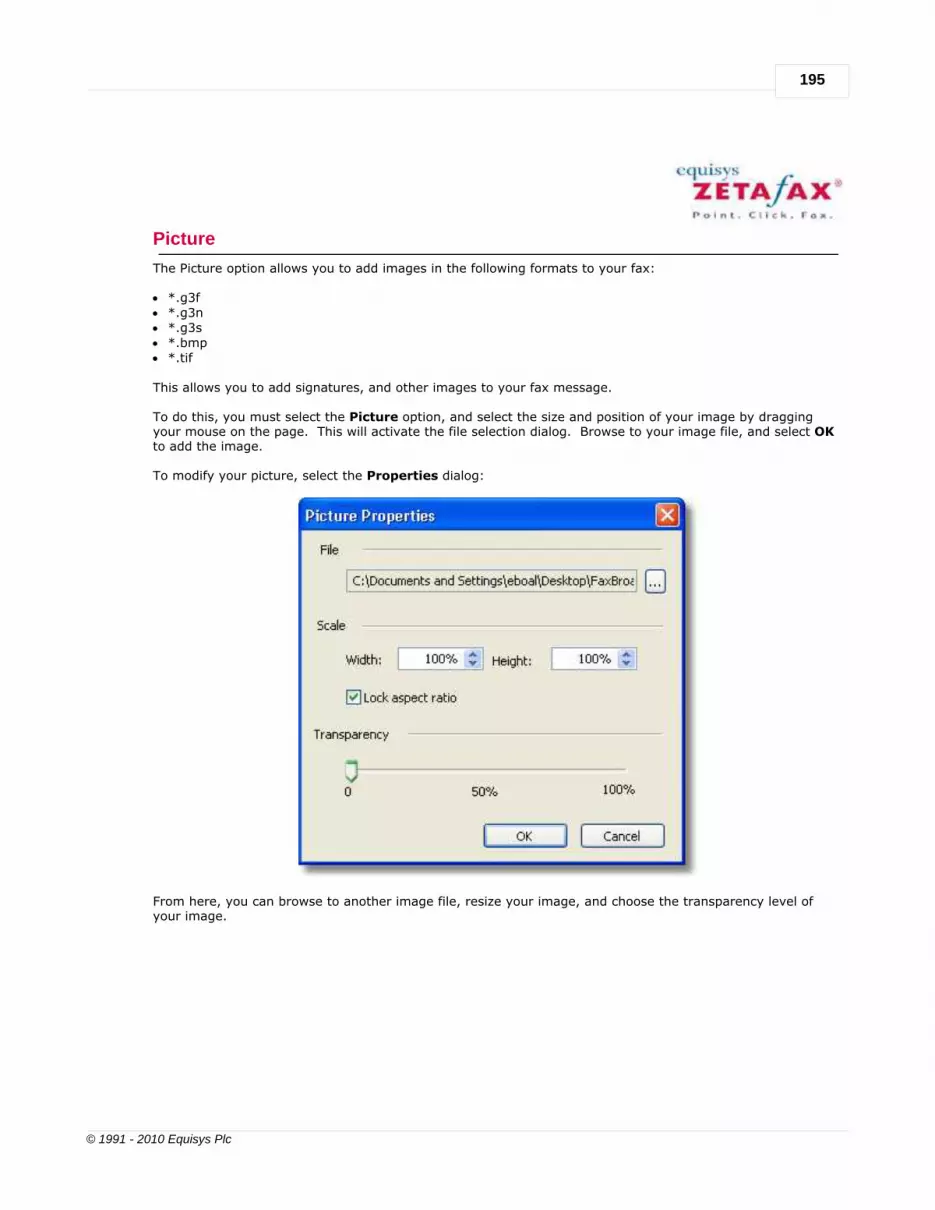
195
© 1991 - 2010 Equisys Plc
Picture
The Picture option allows you to add images in the following formats to your fax:
· *.g3f · *.g3n · *.g3s · *.bmp · *.tif
This allows you to add signatures, and other images to your fax message.
To do this, you must select the Picture option, and select the size and position of your image by draggingyour mouse on the page. This will activate the file selection dialog. Browse to your image file, and select OKto add the image.
To modify your picture, select the Properties dialog:
From here, you can browse to another image file, resize your image, and choose the transparency level ofyour image.

196
© 1991 - 2010 Equisys Plc
Stamp menu
The options on the Stamp menu allow you manage the stamps held on your system.
A Stamp is a set piece of text that can be applied to your stamps. Existing stamps allow you to set commontext that you may like to apply to a fax, for example the date it was received. In addition you can
ApprovedDraftReceivedRejectedUser stampsAdd stampManage stamp

197
© 1991 - 2010 Equisys Plc
Approved Stamp
This Stamp can be added to show that the contents of the fax is ready to be sent out, or that the fax has beenapproved prior to being sent.

198
© 1991 - 2010 Equisys Plc
Draft Stamp
This Stamp can be added to show that the contents of the fax is not ready to be sent out, or that the fax hasbeen created to be approved prior to being sent.

199
© 1991 - 2010 Equisys Plc
Received Stamp
This Stamp can be added to show that the fax has been received.

200
© 1991 - 2010 Equisys Plc
Rejected Stamp
This Stamp can be added to show that the fax has been rejected.

201
© 1991 - 2010 Equisys Plc
User Stamp
This option lists all the custom stamps that you have created. This allows you to use these stamps within yourfax.

202
© 1991 - 2010 Equisys Plc
Add Stamp
Allows you to create your own stamps to be stored for use on all faxes that are loaded into the Zetafax Viewer.
In addition to adding standard text, there are two smart commands you can use within your stamps:
StampCommand
Description
%D%Adds the date in the short standard Windows format, forexample: 02/01/06.
%DD%Adds the date in the long standard Widows format, forexample: January 01 2006.

203
© 1991 - 2010 Equisys Plc
Manage Stamp
Allows you to modify your stamps that are stored for use on all faxes that are loaded into the Zetafax Viewer.

204
© 1991 - 2010 Equisys Plc
Select Annotation
Allows you to select an annotation to allow you to edit or delete it.
Note: This command is only applicable to annotations that have no been saved.
205
© 1991 - 2010 Equisys Plc
Delete Annotation
Allows you to delete the annotation that has been selected.
Note: This command is only applicable to annotations that have no been saved.

206
© 1991 - 2010 Equisys Plc
Remove all annotation
Allows you to delete all the annotations.
Note: This command is only applicable to annotations that have no been saved.
207
© 1991 - 2010 Equisys Plc
Page menu
The options on the Page menu allow you to choose which page of the fax to view and allows you to rotate thefax.
Move page upMove page downRotate leftFlipRotate rightRotate all leftFlip allRotate all rightDelete page

208
© 1991 - 2010 Equisys Plc
Move page up
Moves the current page up a position in the document. This allows you to rearrange the pages of your fax.

209
© 1991 - 2010 Equisys Plc
Move page down
Moves the current page down a position in the document. This allows you to rearrange the pages of your fax.

210
© 1991 - 2010 Equisys Plc
Rotate left
Rotates the selected page of fax through 90° left to allow you to view a fax.

211
© 1991 - 2010 Equisys Plc
Flip
Rotates the selected page of the fax through 180° to allow you to view a fax that was received inverted.

212
© 1991 - 2010 Equisys Plc
Rotate right
Rotates the selected page of the fax through 90° right to allow you to view a fax.

213
© 1991 - 2010 Equisys Plc
Rotate all left
Rotates all pages of the fax message through 90° left to allow you to view a fax.

214
© 1991 - 2010 Equisys Plc
Flip all
Rotates all pages of the fax message through 180° to allow you to view a fax.

215
© 1991 - 2010 Equisys Plc
Rotate all right
Rotates all pages of the fax message through 90° right to allow you to view a fax.

216
© 1991 - 2010 Equisys Plc
Delete page
Removes the current page of the document.

217
© 1991 - 2010 Equisys Plc
Zoom menu
The options on the View menu allow you to choose which page of the fax to view and allows you to rotate thefax.
Zoom inZoom outFit to widthOverviewFull size (100%)25%50%75%150%200%500%

218
© 1991 - 2010 Equisys Plc
Zoom in
Changes the magnification of the fax image, allowing you to view the fax in more detail. This option can beused multiple times to increase the magnification level up to a maximum of 500%.

219
© 1991 - 2010 Equisys Plc
Zoom out
Changes the magnification of the fax image, allowing you to view the fax in less detail. This option can beused multiple times to decrease the magnification level up to a minimum of 15%.

220
© 1991 - 2010 Equisys Plc
Fit to width
Changes the magnification of the fax image, allowing you to view the fax at a magnification that sizes it exactly to the width of the viewing pane. This option is the default view, and can be used to view a summaryof each selected page.

221
© 1991 - 2010 Equisys Plc
Overview
Changes the magnification of the fax image, allowing you to view the full fax in viewing pane. This option isthe can be used to view a summary of each selected page.

222
© 1991 - 2010 Equisys Plc
Full size (100%)
This allows you to see your fax at full size. This may appear larger than you are expecting, as fax images thatare stored at high resolution will be compressed before being printed.

223
© 1991 - 2010 Equisys Plc
25%
This allows you to see your fax at 25% of it's full size. This may appear larger than you are expecting, as faximages that are stored at high resolution will be compressed before being printed.

224
© 1991 - 2010 Equisys Plc
50%
This allows you to see your fax at 50% of it's full size. This may appear larger than you are expecting, as faximages that are stored at high resolution will be compressed before being printed.

225
© 1991 - 2010 Equisys Plc
75%
This allows you to see your fax at 75% of it's full size. This may appear larger than you are expecting, as faximages that are stored at high resolution will be compressed before being printed.
226
© 1991 - 2010 Equisys Plc
150%
This allows you to see your fax at 150% of it's full size. This may appear larger than you are expecting, as faximages that are stored at high resolution will be compressed before being printed.

227
© 1991 - 2010 Equisys Plc
200%
This allows you to see your fax at 200% of it's full size. This may appear larger than you are expecting, as faximages that are stored at high resolution will be compressed before being printed.

228
© 1991 - 2010 Equisys Plc
500%
This allows you to see your fax at 500% of it's full size. This may appear larger than you are expecting, as faximages that are stored at high resolution will be compressed before being printed.

229
© 1991 - 2010 Equisys Plc
Format menu
The options on the View menu allow you to choose which page of the fax to view and allows you to rotate thefax.
Font

230
© 1991 - 2010 Equisys Plc
Font
This allows you to change the Font, Style and Size of text that you have added to text boxes.

231
© 1991 - 2010 Equisys Plc
Forward menu
The options on the Forward menu allow you to send you fax to other Zetafax Users, Fax recipients and Emailaddresses.
For every type of recipient, you will get a dialog that allows you to specify if you would like to send:
· All - the full fax · The current page - the page currently being viewed· Pages: - a selection of pages from the current fax.
Once you have selected which pages you wish to send, the selection will be sent to the Zetafax Client foraddressing and sending. To Zetafax userTo fax numberTo mail

232
© 1991 - 2010 Equisys Plc
To Zetafax user
Allows you to forward the fax that you are currently viewing to another Zetafax user on your system.

233
© 1991 - 2010 Equisys Plc
To fax number
Allows you to forward the fax that you are currently viewing to a fax number.
234
© 1991 - 2010 Equisys Plc
To mail
Allows you to forward the fax that you are currently viewing to an email address.
235
© 1991 - 2010 Equisys Plc
Help menu
The options on the Help menu allow you to access this help file. In addition, you can view information aboutthe Zetafax Viewer that you will need if you contact the Equisys support team about issues.

236
© 1991 - 2010 Equisys Plc
Annotation toolbar
Provides buttons that allow you to annotate your fax message.
Icon DescriptionSelectAllows you to select any of the annotationsyou have made and edit or delete it.
PropertiesAllows you to change the properties of anannotation.
Straight lineAllows you to draw a straight line.
Freehand lineAllows you to draw a line in any direction.
RectangleAllows you to draw a rectangle.
HighlightAllows you to shade a rectangle.
Text boxAllows you to add a box of text to your fax.
PictureAllows you to add an image to your fax.
StampAllows you to add a box of preset text toyour fax.
Remove all annotationsRemoves all unsaved annotations from yourfax image.

237
© 1991 - 2010 Equisys Plc
Faxing toolbar
Provides buttons that give direct access to the most commonly used commands.
Icon DescriptionForward faxAllows you to forward a fax to a Zetafaxuser, fax number or email account.
Previous faxMoves to the previous message in thewindow from which the Viewer was openedusing the View command (File menu orright-click menu) on a selected message.This command is equivalent to PreviousFax (View menu).Next faxMoves to the next message in the windowfrom which the Viewer was opened usingthe View command (File menu orright-click menu) on a selected message.This command is equivalent to Next Fax (View menu).HelpDisplays this Zetafax Client Help. Thiscommand is equivalent to Index (Helpmenu).

238
© 1991 - 2010 Equisys Plc
Keyboard Shortcuts
General ShortcutsShortcuts for general operations allow you to perform tasks quickly from within the Zetafax Viewer. Thefollowing list shows all the available shortcuts:
Shortcut keys ActionCtrl + P Print selected fax.Ctrl + G Go to a specific page.Ctrl + B Previous fax.Ctrl + N Next fax.Ctrl + S Save.Esc Escape.Page Up Next pagePage Down Previous pageHome First pageEnd Last page

239
© 1991 - 2010 Equisys Plc
Hints and tips
Mouse shortcutsEditing graphics filesIntegration with Microsoft OutlookIntegration with Microsoft OfficeScanningFAQ's

240
© 1991 - 2010 Equisys Plc
Integration with Microsoft Office and Outlook
Zetafax addins allow you to send faxes directly from Microsoft Office Applications such as Microsoft Word,Excel, PowerPoint and Outlook.
Zetafax Word and Excel addinsZetafax Word and Excel Addins are automatically installed as part of the Zetafax Client Applications Expressinstall, if you already have Word and Excel on your computer.
Zetafax Word and Excel Addins allow you to send faxes from Word and Excel. In addition, you can also addautomation commands (fax addressing, add coversheet, add letterhead, preview fax) to your document whichwill be used when you send it with Zetafax.
For more information please see Integration with Microsoft Office
Zetafax Outlook addinZetafax Outlook Addins are installed through the Custom Install type.
Zetafax Outlook Addin, allows you to send faxes from Outlook. Your can preview your fax before you send itto a recipient.
For Outlook 2003 users only: you can send your fax to another person for approval before you send it to arecipient.
There are two methods of sending a fax to a recipient via the Zetafax Outlook Addin, you can either:· Send a fax via the specific fax form, which only allows fax addresses· Send a fax as a standard Outlook message, this allows you to send the same message as both email and
fax, and you can access fax numbers from your Outlook contact list.
As the Zetafax Outlook Addin links to your Zetafax server, you can add coversheets, letterheads andattachments to your fax message that are stored on your local system.
For more information please see Integration with Microsoft Outlook

241
© 1991 - 2010 Equisys Plc
Integration with Microsoft Office
If you have chosen to install Zetafax addins, you have the option of sending your current document directly tothe Zetafax printer, speeding-up the process of sending a fax.
Whilst you may use the Print command on the File menu to fax from Microsoft Office applications, thisrequires you to select the Zetafax fax printer and then restore the original printer before you can use it again.Click on the topics below for more information on how you can use Zetafax without having to change theprinter settings:
Integration with Microsoft Office 2003Integration with Microsoft Office 2007/2010Print to Zetafax from applications

242
© 1991 - 2010 Equisys Plc
Integration with Microsoft Office 2003
The Zetafax toolbar button provides Zetafax addins for Microsoft Word, Excel and Powerpoint.
Installing the Microsoft Office addins
When you install Zetafax Client Applications using the Complete set-up type, the addins are automaticallyinstalled if you have Microsoft Office already on your computer. If you do not have Microsoft Office, then theaddins are not installed.
Or if you choose Custom set-up type, you can select Microsoft Office Addins from the list of programfeatures.
Using a Word or Excel addin
Once you have finished creating your document in Word or Excel, you can send your document to Zetafax toadd coversheets, letterheads and information about your recipients.
The Word, PowerPoint or Excel addins operate in a common fashion. Each provides two ways of sending thecurrent document as a fax:
· You can either click Send to from File menu and then click Zetafax… as shown below:

243
© 1991 - 2010 Equisys Plc
· Or you can click the Zetafax printer button on the toolbar.
If you have not already logged in to the Zetafax Client and Server, you will be prompted to do so. Once youhave logged in, the Fax wizard- Welcome dialog box, is displayed.
If you are using Windows 2000, the dialog box may be hidden under other windows.
· Click on the Taskbar icon to bring it to the front.
For more information about the Fax Wizard options please see Print to Zetafax from applications
For more information on how to send a fax please see How do I send a fax and How to send multipledocuments as a single message
You can also add automation commands (fax addressing, add coversheet, add letterhead, preview fax) to yourdocument which will be used when you send it with Zetafax. The embedded commands are found on theZetafax toolbar, within Add Commands. Click fax command and click on the commands that you wish toadd to your document.
For more information please see Embedded Addressing.
Uninstalling the Zetafax Word addin
· If Word is already running, on the File menu, click Exit to exit the program. · Open a Windows Explorer window, browse to the Microsoft Office folder (by default C:\Program

244
© 1991 - 2010 Equisys Plc
Files\Microsoft Office), and from there to the Office\Startup subfolder, and then delete the Zetafax.dotfile:
The uninstallation is now complete.
Uninstalling the Zetafax PowerPoint addin
· Launch PowerPoint. · On the Tools menu, click Add-ins. · In the Add-ins dialog box that appears, select the Zetafax item and then click Remove. · Click Close.
The uninstallation is now complete.
Uninstalling the Zetafax Excel addin
· Launch Excel. · On the Tools menu, click Add-ins…. · In the Add-ins dialog box that appears, uncheck the Zetafax. · Click OK. The uninstallation is now complete.

245
© 1991 - 2010 Equisys Plc
Integration with Microsoft Office 2007/2010
Please select your version of Office:· Integration with Microsoft Office 2007· Integration with Microsoft Office 2010
Integration with Microsoft Office 2010The Zetafax toolbar button provides Zetafax addins for Microsoft Word and Excel only.
Installing the Word and Excel addins
When you install Zetafax Client Applications using the Complete set-up type, the addins are automaticallyinstalled if you have Microsoft Office already on your computer. If you do not have Microsoft Office, then theaddins are not installed.
Alternatively if you choose Custom set-up type, you can select Microsoft Office Addins from the list ofprogram features.
Using a Word or Excel addin
Once you have finished creating your document in Word or Excel, you can send your document to Zetafax toadd coversheets, letterheads and information about your recipients. The Word or Excel addins operate in acommon fashion.
· Click on the File tab from the ribbon, click Share and select Fax using Zetafax. If you have not alreadylogged in to the Zetafax Client and Server, you will be prompted to log in.
Once you have logged in, the Fax wizard- Welcome dialog box is displayed. For more information about the Fax Wizard options please see Print to Zetafax from applications

246
© 1991 - 2010 Equisys Plc
For more information on how to send a fax please see How do I send a fax and Send multiple documents as asingle message?
You can also add automation commands (fax addressing, add coversheet, add letterhead, preview fax) to yourdocument which will be used when you send it with Zetafax. The embedded commands are found within theInsert tab on the ribbon menu.
For more information please see Embedded Addressing
Removing the Word add-in
· Launch Word. · Click the File tab, click on Word Options at the bottom of the menu.· This brings up the Word Options dialog box.· Click Add-Ins on the Left hand side · Select Zetadocs and Zetafax Addin· In the Manage field, select COM Add-Ins from the drop down menu and click the Go.. button. · This brings up the COM Add-Ins dialog box where you will find the that the Zetadocs and Zetafax Addin
is selected.· To remove the Zetadocs and Zetafax Addin, click the Remove button.· Click OK.
Removing the Excel add-in
· Launch Excel. · Click the File tab, click on Excel Options at the bottom of the menu, next to Exit.· This brings up the Excel Options dialog box.· Click Add-Ins on the left hand side · Select Zetadocs and Zetafax Addin· In the Manage field, select COM Add-Ins from the drop down menu and click the Go.. button. · This brings up the COM Add-Ins dialog box where you will find the that the Zetadocs and Zetafax Addin
is selected.· To remove the Zetadocs and Zetafax Addin, click the Remove button.· Click OK.
Integration with Microsoft Office 2007The Zetafax toolbar button provides Zetafax addins for Microsoft Word and Excel only.
Installing the Word and Excel addins
When you install Zetafax Client Applications using the Complete set-up type, the addins are automaticallyinstalled if you have Microsoft Office already on your computer. If you do not have Microsoft Office, then theaddins are not installed.
Or if you choose Custom set-up type, you can select Microsoft Office Addins from the list of programfeatures.
Using a Word or Excel addin
Once you have finished creating your document in Word or Excel, you can send your document to Zetafax toadd coversheets, letterheads and information about your recipients. The Word or Excel addins operate in acommon fashion.
· Click the Office Button, click Send and select send to Zetafax. If you have not already logged in to theZetafax Client and Server, you will be prompted to log in.

247
© 1991 - 2010 Equisys Plc
Once you have logged in, the Fax wizard- Welcome dialog box is displayed. For more information about the Fax Wizard options please see Print to Zetafax from applications
For more information on how to send a fax please see How do I send a fax and Send multiple documents as asingle message?
You can also add automation commands (fax addressing, add coversheet, add letterhead, preview fax) to yourdocument which will be used when you send it with Zetafax. The embedded commands are found within theInsert tab on the ribbon menu.
For more information please see Embedded Addressing
Removing the Word add-in
· Launch Word. · Click the Office Button, click on Word Options at the bottom of the menu, next to Exit Word.· This brings up the Word Options dialog box.· Click Add-Ins on the Left hand side · Select Zetadocs and Zetafax Addin· In the Manage field, select COM Add-Ins from the drop down menu and click the Go.. button. · This brings up the COM Add-Ins dialog box where you will find the that the Zetadocs and Zetafax Addin
is selected.· To remove the Zetadocs and Zetafax Addin, click the Remove button.· Click OK.
Removing the Excel add-in
· Launch Excel. · Click the Office Button, click on Excel Options at the bottom of the menu, next to Exit Excel.· This brings up the Excel Options dialog box.

248
© 1991 - 2010 Equisys Plc
· Click Add-Ins on the left hand side · Select Zetadocs and Zetafax Addin· In the Manage field, select COM Add-Ins from the drop down menu and click the Go.. button. · This brings up the COM Add-Ins dialog box where you will find the that the Zetadocs and Zetafax Addin
is selected.· To remove the Zetadocs and Zetafax Addin, click the Remove button.· Click OK.

249
© 1991 - 2010 Equisys Plc
Print to the Zetafax printer from applications
If you create a document and print it to the Zetafax printer, the Fax Wizard will be started automatically.
This will prompt you with three options:
· Send as fax· Save as part of a multi-document fax· Save as an attachment or system file
Send as fax
Selecting this option starts the New Fax Wizard, allowing you to send the document to your recipients.
Save as part of a multi-document fax
This option allows you to save the document temporarily, to be sent with other documents that you later sendto the Zetafax printer.
Save as an attachment or system file
This option should be used if you wish your document to be saved as:

250
© 1991 - 2010 Equisys Plc
· A coversheet· A letterhead· A public attachment - to be accessible by all people on your network· A private attachment - saved locally to your computer
For further information on how to create a coversheet, please click here.
Related Topics:how do I send multiple documents as a single message?

251
© 1991 - 2010 Equisys Plc
Integration with Microsoft Outlook
If you have installed the Zetafax email gateway option, you have the added convenience of being able to sendfaxes from your email client software, such as Microsoft Outlook.
Integration with Microsoft Outlook 2003Integration with Microsoft Outlook 2007/2010

252
© 1991 - 2010 Equisys Plc
Integration with Microsoft Outlook 2003
This section goes through the steps of sending a simple email message through the gateway using MicrosoftOutlook 2003.
Sending a faxSpecifying message optionsUsing Microsoft Outlook Contacts ManagerNotification
Sending a fax · Launch Microsoft Outlook 2003. · On the File menu, click New , then click New Fax on the submenu to display the Compose fax dialog
box.
You can directly enter the name, organization and fax number of the person to receive the fax in the FaxAddress section of the dialog box. When you click the Add button, Zetafax will enter the recipient's address inthe To line:
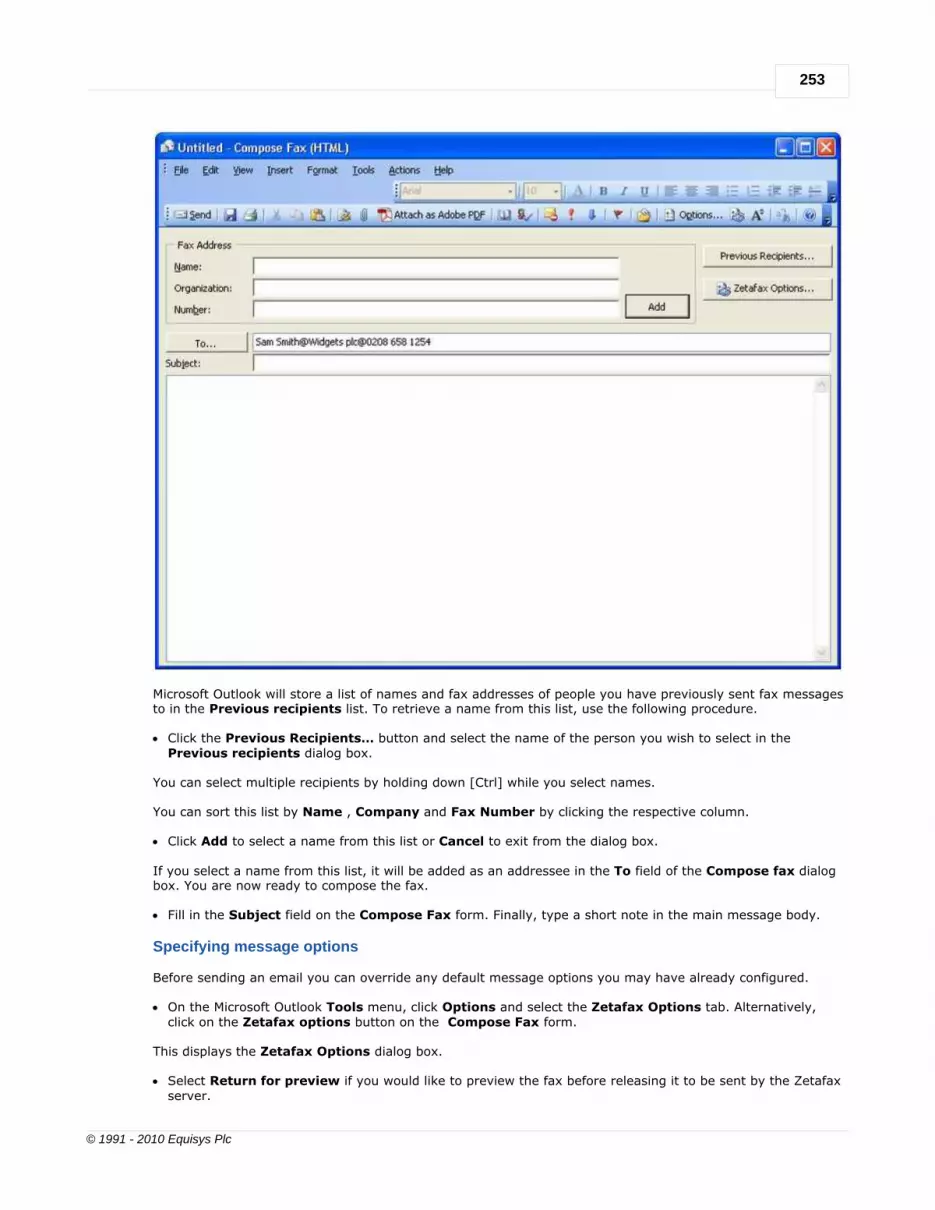
253
© 1991 - 2010 Equisys Plc
Microsoft Outlook will store a list of names and fax addresses of people you have previously sent fax messagesto in the Previous recipients list. To retrieve a name from this list, use the following procedure.
· Click the Previous Recipients… button and select the name of the person you wish to select in thePrevious recipients dialog box.
You can select multiple recipients by holding down [Ctrl] while you select names.
You can sort this list by Name , Company and Fax Number by clicking the respective column.
· Click Add to select a name from this list or Cancel to exit from the dialog box.
If you select a name from this list, it will be added as an addressee in the To field of the Compose fax dialogbox. You are now ready to compose the fax.
· Fill in the Subject field on the Compose Fax form. Finally, type a short note in the main message body.
Specifying message options
Before sending an email you can override any default message options you may have already configured.
· On the Microsoft Outlook Tools menu, click Options and select the Zetafax Options tab. Alternatively,click on the Zetafax options button on the Compose Fax form.
This displays the Zetafax Options dialog box.
· Select Return for preview if you would like to preview the fax before releasing it to be sent by the Zetafaxserver.

254
© 1991 - 2010 Equisys Plc
· Finally, send the email message.
Provided you selected the Return for preview option, once the message has been converted by the Zetafaxserver it will be returned to you and will appear in your Inbox for preview. You can preview the fax by openingthe email message.
When a fax message has been returned for preview, the Release Fax icon on the taskbar will be enabled.Click this icon to release the fax to the server for sending. You will be prompted a final time to edit the faxnumber to be dialed as well as to specify the delivery options.
Using Microsoft Outlook Contacts Manager
When using Microsoft Outlook as your email client software, you can address faxes using the Business Faxfield in the Outlook Contact manager:
· On the File menu, click New , then click New Fax to display the Compose fax form. · Click To to address the message. · Select Outlook address book, then the name of your contact database; for example Contacts from the
Show Names from the list:

255
© 1991 - 2010 Equisys Plc
Outlook lists the names from your database and their address type.
· Select an entry of type Business Fax and click To-> .
If you wish to address the message to other recipients, you can do so from this dialog box.
· Click OK and fill in the Subject field on the Microsoft Exchange message form. · Finally, type a short note in the main message body and send the email message.
Notification
After a few minutes the gateway will send a response by email to your Microsoft Exchange Inbox, indicatingwhether the message was sent successfully or not.
If the Insert receipts in special folder option was selected when you configured the default messageoptions, all notifications of successfully sent fax messages will be saved automatically to a Sent faxes folder.
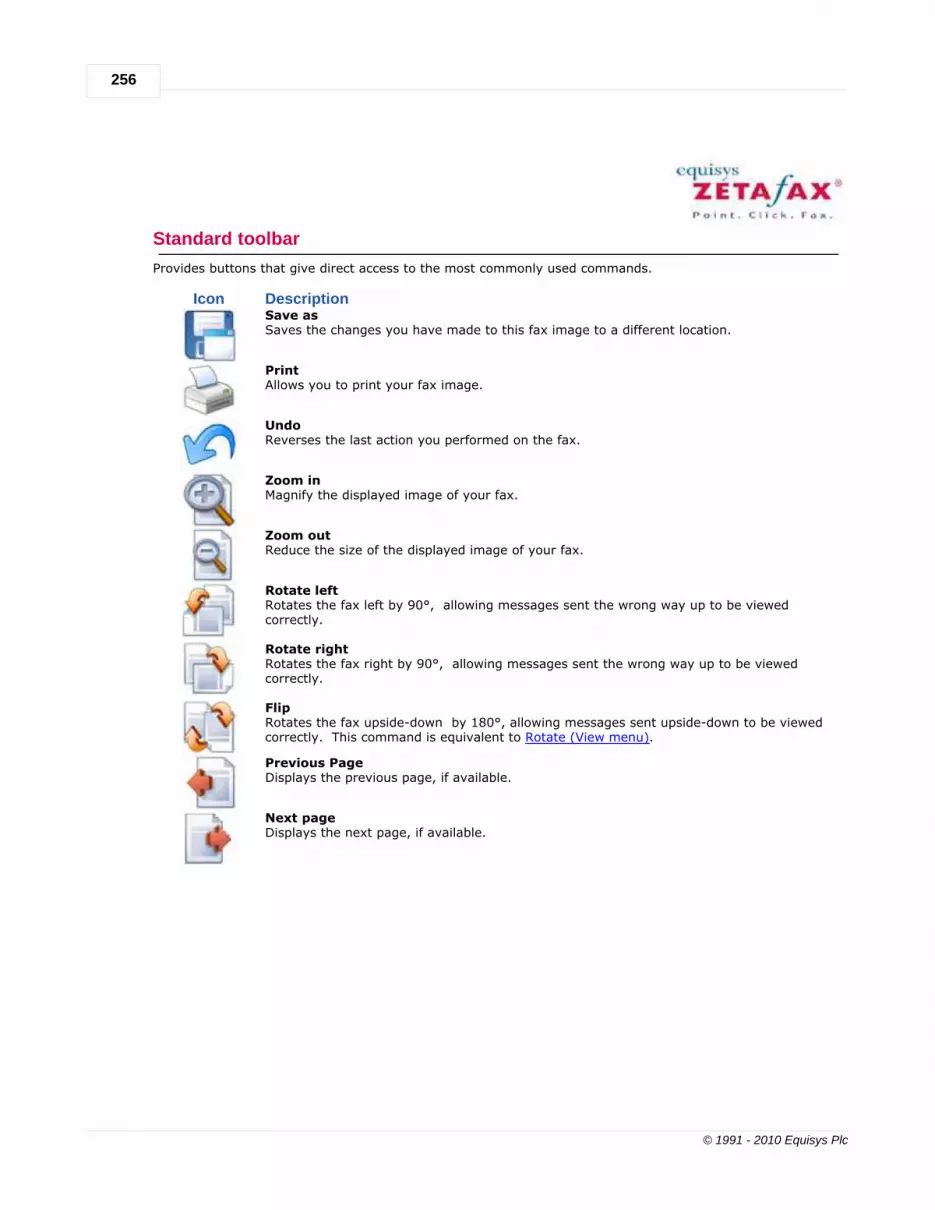
256
© 1991 - 2010 Equisys Plc
Standard toolbar
Provides buttons that give direct access to the most commonly used commands.
Icon DescriptionSave asSaves the changes you have made to this fax image to a different location.
PrintAllows you to print your fax image.
UndoReverses the last action you performed on the fax.
Zoom inMagnify the displayed image of your fax.
Zoom outReduce the size of the displayed image of your fax.
Rotate leftRotates the fax left by 90°, allowing messages sent the wrong way up to be viewedcorrectly.
Rotate rightRotates the fax right by 90°, allowing messages sent the wrong way up to be viewedcorrectly.
FlipRotates the fax upside-down by 180°, allowing messages sent upside-down to be viewedcorrectly. This command is equivalent to Rotate (View menu).
Previous PageDisplays the previous page, if available.
Next pageDisplays the next page, if available.

257
© 1991 - 2010 Equisys Plc
Integration with Microsoft Outlook 2007/2010
Please select your version of Outlook:· Integration with Microsoft Outlook 2007· Integration with Microsoft Outlook 2010
Integration with Microsoft Outlook 2010This section goes through the steps of sending a simple email message through the gateway using MicrosoftOutlook 2010.
Sending a faxSpecifying message optionsUsing Microsoft Outlook Contacts ManagerNotificationLogging
Sending a fax · Launch Microsoft Outlook 2010. · Click on the Home menu, click New Items, then click More Items and select Zetafax on the submenu to
display the Fax Message dialog box.
You can directly enter the name, organization and fax number of the person to receive the fax in the To... fieldof the dialog box in the following format: [Fax: <name>@<company name>@<fax number>]

258
© 1991 - 2010 Equisys Plc
Or you can click on the Add Recipients button on the Ribbon, under the Message menu, and bring up theFax Recipients dialog box.
· Type in the name, organization and fax number in the relevant fields.· Click on the Add to list button. This will add the details of this recipient to the List of recipients.

259
© 1991 - 2010 Equisys Plc
Microsoft Outlook will store a list of names and fax addresses of people you have previously sent fax messagesto in the Previous recipients list. To add a previous recipient to the List of recipients:
· Select the recipient from Previous recipients pane. · Click the Add to list button or double click on the selected recipient
To remove a recipient from the list
· Select the recipient you want to remove· Click on the Remove button
Once you have added all the recipients to the list:
· Click OK button to add all the recipients to the Fax Message form or Cancel button to exit from the dialogbox.
· Fill in the Subject field on the Fax Message dialog box. Finally, type a short note in the main messagebody and attach any required files.
Specifying message options
Before sending an email you can override any default message options you may have already configured.
· On the Fax Message dialog box, click on the Zetafax Options button next to the Add Recipients button,on the Ribbon to display the Zetafax Options dialog box:

260
© 1991 - 2010 Equisys Plc
· Select Preview fax if you would like to preview the fax before releasing it to be sent by the Zetafax Server.
You can also select the Prepare for Preview button found on the Ribbon next to Add Recipientson the Fax Message dialog box
· Finally, send the email message.
If you have selected the Preview fax option, once the message has been converted by the Zetafax Server itwill be returned to you and will appear in your Inbox for preview. You can preview the fax by opening theemail message.
When a fax message has been returned for preview, the Release Preview Fax button on the Zetafax toolbarwill be enabled. Click on this icon to release the fax to the server for sending. You will be prompted a final timeto check the Addressing Details and specify the delivery options:

261
© 1991 - 2010 Equisys Plc
Using Microsoft Outlook Contacts Manager
When using Microsoft Outlook as your email client software, you can address faxes using the Business Faxfield in the Outlook Contact manager:

262
© 1991 - 2010 Equisys Plc
· On the Fax Message dialog box, click To... button. This will bring up the Outlook Address Book.

263
© 1991 - 2010 Equisys Plc
Outlook lists the names from your database and their address types.· Select the name you require from the list and click the To-> button and click OK. You can also bring up this
address book by clicking on the Search button on the Fax recipients dialog box· Finally, type a short note in the main message body and send the email message.
Notification
After a few minutes the gateway will send a response by email to your Microsoft Exchange Inbox, indicatingwhether the message was sent successfully or not.
Logging
If you need any help with the Outlook integration you can always contact Equisys technical support forassistance. They will ask you for the log file ZFOutExt.log which is located in your local temp folder("\\Document and Settings\<username>\Local Settings\Temp"). You can enable or disable the logging fromthe Tools|Options menu under the Zetafax tab page at the bottom by checking or unchecking the EnableLogging box.
Integration with Microsoft Outlook 2007
This section goes through the steps of sending a simple email message through the gateway using MicrosoftOutlook 2007.
Sending a faxSpecifying message optionsUsing Microsoft Outlook Contacts ManagerNotificationLogging

264
© 1991 - 2010 Equisys Plc
Sending a fax · Launch Microsoft Outlook 2007. · Click on the File menu, click New, then click Zetafax on the submenu to display the Fax Message dialog
box.
You can directly enter the name, organization and fax number of the person to receive the fax in the To... fieldof the dialog box in the following format: [Fax: <name>@<company name>@<fax number>]
Or you can click on the Add Recipients button on the Ribbon, under the Message menu, and bring up theFax Recipients dialog box.
· Type in the name, organization and fax number in the relevant fields.· Click on the Add to list button. This will add the details of this recipient to the List of recipients.

265
© 1991 - 2010 Equisys Plc
Microsoft Outlook will store a list of names and fax addresses of people you have previously sent fax messagesto in the Previous recipients list. To add a previous recipient to the List of recipients:
· Select the recipient from Previous recipients pane. · Click the Add to list button or double click on the selected recipient
To remove a recipient from the list
· Select the recipient you want to remove· Click on the Remove button
Once you have added all the recipients to the list:
· Click OK button to add all the recipients to the Fax Message form or Cancel button to exit from the dialogbox.
· Fill in the Subject field on the Fax Message dialog box. Finally, type a short note in the main messagebody and attach any required files.
Specifying message options
Before sending an email you can override any default message options you may have already configured.
· On the Fax Message dialog box, click on the Zetafax Options button next to the Add Recipients button,on the Ribbon to display the Zetafax Options dialog box:

266
© 1991 - 2010 Equisys Plc
· Select Preview fax if you would like to preview the fax before releasing it to be sent by the Zetafax Server.
You can also select the Prepare for Preview button found on the Ribbon next to Add Recipientson the Fax Message dialog box
· Finally, send the email message.
If you have selected the Preview fax option, once the message has been converted by the Zetafax Server itwill be returned to you and will appear in your Inbox for preview. You can preview the fax by opening theemail message.
When a fax message has been returned for preview, the Release Preview Fax button on the Zetafax toolbarwill be enabled. Click on this icon to release the fax to the server for sending. You will be prompted a final timeto check the Addressing Details and specify the delivery options:

267
© 1991 - 2010 Equisys Plc
Using Microsoft Outlook Contacts Manager
When using Microsoft Outlook as your email client software, you can address faxes using the Business Faxfield in the Outlook Contact manager:

268
© 1991 - 2010 Equisys Plc
· On the Fax Message dialog box, click To... button. This will bring up the Outlook Address Book.

269
© 1991 - 2010 Equisys Plc
Outlook lists the names from your database and their address types.· Select the name you require from the list and click the To-> button and click OK. You can also bring up this
address book by clicking on the Search button on the Fax recipients dialog box· Finally, type a short note in the main message body and send the email message.
Notification
After a few minutes the gateway will send a response by email to your Microsoft Exchange Inbox, indicatingwhether the message was sent successfully or not.
Logging
If you need any help with the Outlook integration you can always contact Equisys technical support forassistance. They will ask you for the log file ZFOutExt.log which is located in your local temp folder("\\Document and Settings\<username>\Local Settings\Temp"). You can enable or disable the logging fromthe Tools|Options menu under the Zetafax tab page at the bottom by checking or unchecking the EnableLogging box.

270
© 1991 - 2010 Equisys Plc
How do I...
These topics show you how to perform the tasks that are possible with the Zetafax Outlook Addin.
Select a topic from the list below:
How do I send a fax using the new fax formHow do I send a message to a fax recipientHow do I set options on the new fax formHow do I set faxing options for my messageHow do I preview a fax before sendingHow do I release a fax held for previewHow do I send a fax for approval?How do I review a fax sent for approval?How do I resend a fax?How do I work out why a fax has failed to be sent?

271
© 1991 - 2010 Equisys Plc
How do I send a fax using the new fax form?
Create and send a new fax using the Compose Fax form
1. Select File->New->Zetafax command from the menu or New->Zetafax from the toolbar or press theZetafax button from the toolbar
2. Press the To… button or the Add Recipients button on the ribbon under the Message tab to bring up theFax Recipients dialog box
3. Add recipients:
a) New recipients from the fields provided in the dialog
b) New recipients from the Outlook address book
c) Previous recipients from the previous recipients list
7. Press the OK button in the Fax Recipients dialog
8. Press the Send button

272
© 1991 - 2010 Equisys Plc
How do I send a message to a fax recipient?
Create and send a new fax using the Message form
1. Select File->New->Mail Message command from the menu or New->Mail Message from the toolbar
2. Press the Add Recipients button to bring up the Fax Recipients dialog box
3. Add recipients:
a) New recipients from the fields provided in the dialog
b) New recipients from the Outlook address book
c) Previous recipients from the previous recipients list
4. Press the OK button in the Fax Recipients dialog
5. Press the Send button

273
© 1991 - 2010 Equisys Plc
How do I set options on the new fax form?
Set the Zetafax options for a new fax form from the Compose Fax form
1. From the Compose Fax form press the Zetafax Options… button from the ribbon under the Zetadocsgroup under the Message tab or the Zetafax Options… button from the view pane to bring up theZetafax Options dialog
Set the Zetafax options:
2. Select a coversheet
3. Select a letterhead
4. Select if the fax is going to be prepared for preview
5. Select the priority of the fax
6. Select the time the fax will be sent
7. Select the mail body format of the fax
8. Press the OK button

274
© 1991 - 2010 Equisys Plc
How do I set faxing options for your message?
Set the Zetafax options for a new fax from the Message form
1. From the Message form press the Zetafax Options… button from the ribbon under the Message tab tobring up the Zetafax Options dialog
Set the Zetafax Options:
2. Select a coversheet
3. Select a letterhead
4. Select if the fax is going to be prepared for preview
5. Select the priority of the fax
6. Select the time the fax will be sent
7. Select the mail body format of the fax
8. Press the OK button

275
© 1991 - 2010 Equisys Plc
How do I preview a fax before sending?
Send a fax for preview
1. Create a new fax
2. Bring up the Zetafax Options dialog
3. Select the Preview Fax check box
4. Press the OK button of the Zetafax Options dialog
5. Add fax recipients
6. Press the Send button

276
© 1991 - 2010 Equisys Plc
How do I release a fax held for preview?
Release a preview fax while fax item is open
1. Press the Release Preview Fax or Resend Fax button from the ribbon under the Zetafax group on theMessage tab to bring the Release Fax dialog up
2. Type in the fax number (optional)
3. Select the time the fax should be sent (optional)
4. Select the Priority (optional)
5. Press the Send button to send the fax
Release a preview fax from the main items list
1. Select the fax from the items list.
2. Press the Release Preview Fax or Resend Fax button from the main toolbar to bring the Release Faxdialog up
3. Type in the fax number (optional)
4. Select the time the fax should be sent (optional)
5. Select the Priority (optional)
6. Press the Send button to send the fax
277
© 1991 - 2010 Equisys Plc
How do I send a fax for approval?
Send a fax for approval while preview fax item is open
1. Press the Send fax for approval button from the ribbon under the Zetafax group in the Message tab tobring the Send Approve Fax form on.
Note: For Outlook 2003 users, the Send for approval button is found on the toolbar.
2. Press the To… button to add recipients from the Outlook address book
3. Add a subject in the Subject: field (optional)
4. Annotate the fax (optional)
5. Press the Annotate Fax… button to bring the Zetafax Viewer dialog on
6. Annotate the pages using the tools of the Zetafax Viewer
7. Save and Exit the Zetafax Viewer
8. Press the Send button to send the fax
Send a fax for approval from the main mail items list
1. Select the fax that you want to send for approval from the items list.
2. Press the Send fax for approval button from the main toolbar to bring the Send Approve Fax formon
3. Press the To… button to add recipients from the Outlook address book
4. Type in a subject in the Subject: field (optional)
5. Annotate the fax (optional)
6. Press the Annotate Fax… button to bring the Zetafax Viewer dialog on
7. Annotate the pages using the tools of the Zetafax Viewer
8. Save and Exit the Zetafax Viewer
9. Press the Send button to send the fax

278
© 1991 - 2010 Equisys Plc
How do I review a fax sent for approval?
Approved fax
1. Open the fax from the items list.
2. Type in some comments in the text box (optional)
3. Annotate the fax (optional)
4. Press the Annotate Fax… button to bring the Zetafax Viewer dialog on
5. Annotate the pages using the tools of the Zetafax Viewer
6. Save and Exit the Zetafax Viewer
7. Press the Accept Fax button from the ribbon under the Zetafax group in the Message tab to approve thefax
Not approved fax
1. Open the fax from the items list.
2. Type in some comments in the text box (optional)
3. Annotate the fax (optional)
4. Press the Annotate Fax… button to bring the Zetafax Viewer dialog on
5. Annotate the pages using the tools of the Zetafax Viewer
6. Save and Exit the Zetafax Viewer
7. Press the Reject Fax button from the ribbon under the Zetafax group in the Message tab to reject thefax
279
© 1991 - 2010 Equisys Plc
How do I resend a fax?
Resend a previously sent and rejected fax while fax item is open
1. Press the Release Preview Fax or Resend Fax button from the ribbon under the Zetafax group in theMessage tab to bring the Release Fax dialog up
2. Type in the fax number (optional)
3. Select the time the fax should be sent (optional)
4. Select the Priority (optional)
5. Press the Send button to send the fax
Resend a previously sent and rejected fax from the main mail items list
1. Select the rejected fax from the items list.
2. Press the Release Preview Fax or Resend Fax button from the main toolbar to bring the Release Faxdialog up
3. Type in the fax number (optional)
4. Select the time the fax should be sent (optional)
5. Select the Priority (optional)
6. Press the Send button to send the fax

280
© 1991 - 2010 Equisys Plc
How do I work out why a fax has failed to be sent?
There are different reasons why your fax has not been sent, and the following list lists reasons that will bereported by the Zetafax Server. This will allow you to check why your fax failed, and resend the fax ifappropriate.
General errorsF001 Invalid parameter (general) F002 No file handles available F003 Pathname invalid F004 Filename invalid F005 Run out of possible file names F006 Can’t open file (general) F007 Can’t open control file F008 Invalid control data F009 Can’t open message file F00a Task was aborted by request F00b System shut down F00c General file error F00d Wrong format file, etc F00e Illegal request F00f Feature not supported yet F010 Invalid message F011 Invalid device F012 No working devices of correct type F013 Unable to send F014 No space on disk F015 Can't convert file format F016 Error in receiving F017 Init variable not in environmentF018 Unable to open ZETAFAX.INI F019 Bad format ZETAFAX.INI file F01a Path does not exist F01b Error deleting file(s) F01c Not Tiff file F01d Only support normal byte order (" II" ) Tiff F01e Only support MH tiff F01f Only support 1 strip per page tiff F020 Only support inches for resolution unit F021 Only support certain extended (pointer) tags F022 Only support lsb first F023 Remote process not active F024 Error with licence F025 Missing UserArea: etc in ZETAFAX.INI F026 Can't open SETUP.INI F027 Can't determine format F028 Only support 100, 200 and 400 dpi F029 User not found in USERLIST.INI file F02a Can't open USERLIST F02b Bad USERLIST Dial: lineF02c Bad USERLIST NetworkEdit: F02d Bad USERLIST SendTime: F02e Bad USERLIST Urgent: F02f Bad USERLIST Admin: F030 No permission to send to this phone number F031 Licence expiry date passed F032 Bad USERLIST RushToTop:F033 Can't requeue message F034 Can't open ROUTING file F035 Invalid ROUTING file F036 No SUBADDR/SENDERID para F037 No ACCUSOFT.DLL F038 No ACCUSOFT.DLL F039 Bad USERLIST PrivateEdit: line

281
© 1991 - 2010 Equisys Plc
F03a Bad USERLIST SubmitAny: line F03b Memory allocation failed F03c O/S error F03d Bad USERLIST GroupAdmin: line F03e Queueman internal use F03f Couldn't load mail DLL F040 Couldn't logon to mail F041 Couldn't logoff from mail F042 User pressed CANCEL etc F043 General error sending mail F044 General error resolving name F045 Two or more matches for recipient specified F046 Attachment file error F047 Recipient not found F048 Recipient not found F049 V5 mail upgrade is for too few users F04a Couldn't write to mail directoryF04b Disk fullF04c Insufficient memoryF04e Invalid mail message identifierF04f Invalid mail session handleF050 Too many attachments to mail messageF051 Too many recipients for mail messageF052 No message foundF053 Failed to read mail messageF054 Invalid parameters for mail functionF055 Failed to delete mail messageF056 'Abort after preview' option set on mail messageF057 Win95 can't use foreign DLL if system locale is wrongF058 WinNT message box system font can't support foreign charsF059 Requested folder not available or invalidF060 Can't change 'mail type'F061 Can't specify password for this systemF062 Can't find required DLL (mail)
Dialling properties errorsF070 General dialling properties errorF071 No dialling properties data retrievedF072 Editing rules make this number too longF073 Invalid dialling properties settingsF074 Dialling properties switched off
TAPI errorsF080 General TAPI errorF081 TAPI not initialisedF082 Error initialising TAPIF083 Error with TAPI location data
Device specific errorsF100 Can't talk to device - permanentF101 Can't talk to device -in useF102 Should recover soon F103 No answer when sending F104 Destination ID doesn't match F105 Comms error sending F106 Comms error receiving F107 Serious error in communicating with the device F108 Device handler timeout F109 Server not running F10a Phone number engaged F10b Phone call not answered F10c No dial tone on line
Convert program errorsF200 Top word of all errors (convert programs only return low word)F201 Can’t open TOOLS.INI file F202 ServerArea: variable missing F203 CTL file not foundF204 Unrecognised destination format F205 Coversheet foreground file missing

282
© 1991 - 2010 Equisys Plc
F206 Message file not found F207 Letterhead file missing F208 Can't create message files F209 CVT file invalid F20a File too large F20b File error with intermediate files F20c File write error F20d File read error F20e Letterhead or Coversheet background file invalid F20f CVT file not found F210 Unable to initialise fonts F211 File error with FAX header line files F212 Run with invalid argumentsF213 NULL length message F214 Tiff message file invalid F215 AllUserArea not found F216 Init not in environment F217 General error F218 General file error F219 General init error F21a Graphics append file not found F21b Graphics include file not found F21c Graphics append file invalid F21d Graphics include file invalid F21e Control file invalid F21f Aborted by user F220 Invalid control char F221 Invalid escape sequence F222 Invalid %%[] command F223 Landscape buffer allocation failed
Address book errorsF300-F321
LCR and Router errorsF400 Message already listedF401 Message already tried and failedF402 No message IDF403 Too many files to processF404 Multiple hopping not allowedF405 Message type unrecognisedF406 Insufficient memoryF407 Expected attachment file missingF408 Invalid data in messageF409 Remote server too busy to send in timeF40a Link or run numbers don't matchF40b Remote server not allowed to receive fax submissionsF40c Failed to send messageF40d Local link failedF40e Remote server not onlineF40f Receiver's run number is wrongF410 No links to remote servers availableF411 This message can only be sent directly (locally)F412 Message priority too highF413 Message timed outF414 Message rejected by remote serverF415 Send attempt failed - link now inactiveF416 Send attempt failed - link no longer existsF417 Not allowed to send this message via local serverF418 Encryption errorF419 Link not 'Send enabled'
API errorsF700 63232 Invalid parametersF701 63233 Not initialisedF702 63234 No Zetafax initialisation fileF703 63235 Invalid Zetafax initialisation fileF704 63236 Unknown userF705 63237 Cannot log onF706 63238 Path not foundF707 63239 Too many files

283
© 1991 - 2010 Equisys Plc
F708 63240 Error creating fileF709 63241 Error opening fileF70A 63242 File errorF70B 63243 File not foundF70C 63244 Server not runningF70D 63245 Invalid data formatF70E 63246 Unknown messageF70F 63247 Message not completedF710 63248 Message already existsF711 63249 Error opening information fileF712 63250 Information file errorF713 63251 Information file invalidF714 63252 Cannot submit requestF715 63253 Buffer too smallF716 63254 Submit file invalidF717 63255 Cannot read message defaultsF718 63256 Error opening control fileF719 63257 Control file errorF71A 63258 Control file invalidF71B 63259 Server runningF71C 63260 Cannot run system managerF71D 63261 Error starting serverF71E 63262 Server initialisation file errorF71F 63263 Function abortedF720 63264 Timeout expiredF721 63265 Port invalidF722 63266 Port busyF723 63267 Port offlineF724 63268 Memory allocation failedF725 63269 License file errorF726 63270 API not licensedF727 63271 User not initialized
Workstation error codesF800 Cannot delete file F801 Cannot write to or create F802 Cannot create file F803 Cannot rename file F804 Cannot r/w file F805 Cannot access file details F806 File does not exist F807 Control file syntax error F808 Problem with global memory F809 Cannot read file F80A Problem writing file F80B Bad DDE command or parametersF80C Failure using %%[ ] commandF80D Library request failed F80E Problem with mail F80F INI file syntax error F810 .LST file has invalid .INI file format F811 Problem with ODBC DLL F812 Problem with control file checksum F813 Accusoft Error

284
© 1991 - 2010 Equisys Plc
What is the Zetafax Outlook Addin?
Installed as part of the main Zetafax Client Applications install process, the Zetafax Outlook Addin uses thecore functions of Zetafax to allow you to send and receive faxes from within Outlook.
Using the Zetafax Outlook Addin gives you the option to send faxes using either the standard email messageor the special fax message form.
Related TopicsIntegration with Microsoft Outlook

285
© 1991 - 2010 Equisys Plc
What is the Zetafax Word Addin?
Installed as part of the main Zetafax Client Applications install process, the Zetafax Word Addin allows you toconvert documents from within Word, allowing them to be sent out as faxes.
The Zetafax Word Addin consists of:· Buttons and menu options that allow you to convert your worksheets to fax attachments.· Embedded commands that can be automatically inserted into your document from the Zetafax command -
allowing you to automate document creation and sending.
Related TopicsIntegration with Microsoft OfficeUse Embedded Addressing

286
© 1991 - 2010 Equisys Plc
What is the Zetafax Excel Addin?
Installed as part of the main Zetafax Client Applications install process, the Zetafax Excel Addin allows you toconvert worksheets from within Excel, allowing them to be sent out as faxes.
The Zetafax Excel Addin consists of:· Buttons and menu options that allow you to convert your worksheets to fax attachments.· Embedded commands that can be automatically inserted into your document from the Zetafax command -
allowing you to automate document creation and sending.
Related TopicsIntegration with Microsoft OfficeUse Embedded Addressing

287
© 1991 - 2010 Equisys Plc
Mouse shortcuts
Zetafax includes several useful shortcuts to allow you to perform common actions directly with the mouse,without needing to use the keyboard or select a command.
This section lists the most useful tasks you can perform directly with the mouse; for more information refer tothe appropriate section in this Zetafax Client Help.
To view the message in the In window, Out window, or Filed window
· Double-click the message with the mouse pointer.
For more information, see Zetafax Viewer window.
To forward a message from your In window
· Drag the message and drop it onto your Out window.
The Zetafax - Fax Wizard Recipients dialog box will be displayed to allow you to address the message inthe usual way.
For more information, see Forward.
To fax a file from the Filed window
· Drag the file and drop it onto your Out window.
The Zetafax - FaxWizard dialog box will be displayed to allow you to address the message in the usual way.
For more information, see How do I use my address book to address a fax?
To archive a message from the In window or Out window
· Drag the message and drop it onto the Filed window.
A Save as dialog box will be displayed to allow you to name the archive, and specify additional options.
For more information, see How do I archive my messages?
To delete or abort a message from the In window or Out window
· Drag the message and drop it on to your Recycle Bin.
If the message is an unsent message in your Out window you will be given the option of aborting it.
To perform operations on a message
· Click the message with the right mouse button to display a pop-up menu of commands.
· Click the command you want to perform.

288
© 1991 - 2010 Equisys Plc
Editing graphics files
It may be necessary from time to time to edit graphics for a fax. Zetafax has the ability both to export and toimport graphics in the standard graphics file formats such as BMP. You can then use a program such as Paint,which is distributed with Microsoft Windows, to edit graphics images, whether scanned or received as incomingfaxes. This can be used for example to edit a page of a received fax or scanned document before sending it, orto create letterheads, coversheets, etc. for use in Zetafax.
In addition to the import and export procedures described below, graphics files may be directly inserted into afax using the embedded command Insert function.
The basic facility offered allows you to export the whole page of a fax, edit at will in Paint or similar, andimport the page to add or replace any existing page in any existing prepared fax.
To edit a graphics file
· On the File menu, click View. · Select the file to edit in the View Fax dialog box.
When viewing the document go to the relevant page either using the numbered box icons, or by clicking Go toPage from the Page menu.
When the correct page is displayed:
· On the File menu, click Export to display the Export page dialog box. · Give the file an appropriate name, select BMP from the Save file type: field, and click the OK button.
At this point, you can iconize Zetafax if you wish.
· Start Paint (it is in the Accessories group). · On the File menu, click Open, and select the file in the usual way. · Use the Paint facilities to edit the file as you wish. · On the File menu, click Save to save to the same name, or use Save As to save as a new file. · Close Paint and reopen Zetafax if iconized.
If you exited from view mode before loading Paint, select the document now and on the File menu, click View.
If you are still in view mode, but wish to load another document to receive the changed graphic page, on the File menu, click Quit Viewing , select the document, and on the File menu, click View.
If you are not at the page you wish to replace:
· Go to the page by clicking the numbered box icon, or by clicking Go to Page on the Page menu. · On the File menu, click Import , select the file, and click OK. · Select Replace pages so that the changed file replaces the current page.
Note that imported BMP files must be 1728 pixels wide and monochrome.
Note: If you have difficulty in creating graphics files for import which are compatible, it may be better to draga graphics file from Windows Explorer and drop it on the Zetafax main window. The Zetafax - Fax WizardRecipients dialog box will appear for you to send the file as a fax, or you can click Save As to save the file asa TIFF format file (which may be sent later). If you want to attach this file to faxes you send, you should saveit in the Private or Network graphics directory.

289
© 1991 - 2010 Equisys Plc
Scanning
If you have a suitable scanning device you can scan in letterheads, coversheets, and graphics for inclusion in afax.
Zetafax can also be used with a network attached scanning device, such as the Hewlett Packard DigitalSender.
To set up the default Zetafax Client TWAIN scanner
· On the File menu, click Select Source.
To specify whether or not you want Zetafax to use the scanner's own software user interface when scanning,on the Options menu, click Devices.
To scan the document
· On the File menu, click Acquire .
If you are using a client TWAIN scanner, the document will be scanned a page at a time. You will be askedwhether you would like to stretch/shrink each image to fax size if it is substantially different in resolution froma fax page. The Zetafax - Fax Wizard will then be displayed to allow you to address the message and send itas a fax. Any document which has been scanned earlier using another application and saved as a graphics file may besent as a fax directly by dragging it from Windows Explorer and dropping it on the Zetafax main window.

290
© 1991 - 2010 Equisys Plc
FAQ's
How do I send a simple fax?
· Open the Zetafax Client and select Send.
A dialog box will be displayed, asking whether you want to resend an existing message, send a coversheet orsend a file from the network.
· Select which you want.
Zetafax will notify you whether the sent fax was successfully received.
How do I send a fax from within an application?
Simply print your document to the Zetafax printer from whichever application you are in. If the client isalready running, the usual addressing dialog box will appear. If the program is not running it will either startup automatically once you select the Zetafax printer or you will be prompted to run the client.
How do I know when a fax has been sent?
Zetafax will automatically send you confirmation that a fax has been sent successfully. If not, you will receivea Fax failed message. If you look in the client and select the fax you will be able to see why it failed.
Can Zetafax maintain a list of regular contacts?
Yes. Zetafax has two types of address book: private and network. Users can add, change and remove entriesfrom their own private address books. No other user can access your private address book. All users haveaccess to the network wide address book. The network administrator determines which users can add, deleteor edit entries in the network address book.
Can I retrieve names and fax numbers from other sources?
Yes. You can retrieve lists of names and fax numbers from other sources in the following ways:
· Any fax number you enter is kept automatically in a list of past recipients. · Names and fax numbers in ODBC compliant databases may be accessed in situ from these databases. · Comma delimited (CSV) files of names and fax numbers may be used directly. · MAPI compliant email address books may be used in place of the Zetafax address books.
Can I get information on messages I have sent?
Yes, Zetafax will store information about each message sent. Once you have sent a message the icon to theleft of the entry will change as a visual check to the status of the fax that is being sent. You can check theprogress of the fax being sent by clicking with the right mouse button on a particular fax and selecting Info…. A Message Information dialog box will appear which tells you when the fax was submitted to the Zetafaxserver, when it was accepted and when the fax was sent. If the transmission was unsuccessful it will say Message failed.
How can I view faxes?
You will want to view a fax if it has been received or if you wish to view a fax you have prepared beforesending.
To view a fax from the Zetafax Client:

291
© 1991 - 2010 Equisys Plc
· Double-click a message in the In or Out window. · The Zetafax Viewer will appear with your selected fax. · Use the vertical scroll bar to scroll down the fax.
You can view multiple page faxes by clicking on the numbered boxes to the right of the viewing window.
Can I annotate faxes before forwarding them on?
Yes, certain third-party viewers are able to support annotation of faxes. If your viewer supports annotation, itcan be used to modify faxes in the In window.
To modify a fax from your In window:
· Highlight the fax and on the Zetafax Client Tools menu, click Annotate .
By default, Zetafax configures Windows Imaging as the default viewer for annotation. However, if you wish toselect another application, you can do so by clicking Viewer on the Options menu.
Can I convert a fax into a document so I can change it in a Word Processor?
Yes, with Optical Character Recognition (OCR). The program has to look at the dots in the received image inorder to recognize the individual letters and words. Zetafax can be used with many leading third party OCRproducts.
What are embedded Commends?
The Zetafax embedded commands allow you to customize the body of a fax for each recipient.
The embedded commands allow you to include system information, such as date and number of pages, orinstructions to incorporate a signature, or information from the Address Book, such as the recipient's nameand address.
Can Zetafax store transmission reports?
Yes, Zetafax keeps a detailed log of all sent faxes, together with any errors that occur. The Zetafax Clientprovides several options for viewing these, including:
· All faxes sent to me today. · All errors reported by the fax device. · All errors that occurred on this message.
Additionally each user can decide whether they want Zetafax to store transmission reports for faxes that theysend. These list the options used when the document was last faxed (whether a coversheet and letterheadwere used, etc), together with the people it has been sent to, and when.
If the user enables this feature, then this record is kept indefinitely and is stored in the same directory as theoriginal document file which it refers to, in a separate text file called ZETAFAX.DIR (one per directory).
How do I keep track of fax usage?
Every fax submitted by a user stays in their Out window until they delete it, allowing them to view what wassent and to retrieve the transmission history. The logging facility allows users to check whom they have sentfaxes to, and administrators can obtain a list for all users. Finally, the billing log has an entry made for everyfax that is sent, including details such as the fax number and connection time.
Does Zetafax store copies of sent and received faxes?
Yes, Zetafax has an archiving feature that is configured using the Zetafax configuration program ZFSETUP. Thearchiving feature stores a copy of every fax sent and/or received, exactly as transmitted. The fax itself issaved as a graphics file, which can subsequently be viewed or printed, and a transmission history for the fax issaved in a separate file.
Can Zetafax print hard copies of sent and received faxes?
Yes, you can print hard copies of any fax that you have sent or have received. You can also configure the
292
© 1991 - 2010 Equisys Plc
Zetafax server to print every fax sent or received automatically, with a status page that gives transmissiondetails.
Can Zetafax handle paper documents?
If you wish to send a paper document using Zetafax, simply scan in the document you wish to send and thenopen your scanning application to view the document. Once you are happy with it, print to the Zetafax printer.The Zetafax – Fax Wizard Recipients dialog box will appear and you can send the fax as usual.
Zetafax can also be used with a network attached scanning device, such as the Hewlett Packard DigitalSender. The Hewlett Packard Digital Sender devices connect directly to a network Zetafax server and allow faxes to besubmitted directly from the scanner, entering the required fax number on the scanner's control panel.
293
© 1991 - 2010 Equisys Plc
Glossary
AAddress bookAnnotationApplication Programmers Interface(API)Application serversArchiveAttachment filesAutomatic forwardingAutomatic submission program
B
Billing log
C
C language callable functionsCardiff TELEformCharge codesClassContact managersCoversheet EditorCoversheets
D
DDI/DID routingDTMF routingDynamic Data Exchange (DDE)
E
Email gatewayEmbedded addressingEvent Viewer
F
Fax classFax groupFAX.LOGFax Outbox folderFClassFile formats
G
Group
H
Hewlett Packard Digital Sender
I
Integrated fax viewerIntelligent fax boardsIntegration with Microsoft OfficeIntegration with Microsoft OutlookISDN
L
Least Cost RoutingLetterheads
M
MAPI address bookMicrosoft Small Business ServerMMC snap-inMulti-document faxing
N
Notebook computer
O
OCRODBC
P
Performance monitorPermissionsPrinter driver
Q
Queue manager
R
Routing
SSearch Sent ArchiveSearch Sent ItemsScanningSender ID routingSend fax formServer based renderingSMTP email gatewayStation ID suffixSub-address routing
T
TIFFTransmission reports
U
Usernames
V
Viewer
Z
Zetafax Report WriterZSUBMIT

294
© 1991 - 2010 Equisys Plc
Index- A -archive 68, 70
- E -Edit menu 147
Editing graphic files 288
- F -FAQs 290
Format menu 157
- G -Glossary 293
- H -How do I add to my address book? 23
How do I archive my messages? 30
How do I get information about a message? 16
How do I preview a message before sending it? 12
How do I print a fax? 11
How do I send a text message to a mobile phone? 85
How do I specify options when sending a fax? 5
How do I use my address book? 24
How do I view a text message? 21
- I -Integration with Microsoft Office 241
Integration with Microsoft Office 2003 242
Integration with Microsoft Office 2007 245
Integration with Microsoft Outlook 251
Integration with Microsoft Outlook 2003 252
Integration with Microsoft Outlook 2007 257
- L -Logs 64
- M -MAPI address book 26
Mouse shortcuts 287
- O -Options menu 160
Effects 161
Settings 162
- P -Print Setup
Exit 176
Export 173
Import 172
Print 169
Print to Zetafax 249
- R -received 70
received archive 70
- S -Save As 143
Delete 144
Exit 146
Menus 140, 141
New 139
Page Setup 145
Save 142
Scanning 289
How do I scan a document? 32
Search 68, 70, 75
How do I add to my address book? 23
New Entry 76
New Group 77
sent 68

Index 295
© 1991 - 2010 Equisys Plc
sent archive 68
SMTP e-mail gateway
Integration with Microsoft Outlook 251
Status icons 128
Status menu
Logs 64
Reconnect 72
Server 63
Storing transmission reports
Logs 64
- T -Text 150
Bitmap 156
Box 155
Field 152
Line 154
- U -Using the address book maintenance utility
How do I add to my address book? 23
How do I use my address book? 24
MAPI address book 26
- V -View 100
Acquire 61
DeleteAbort 60
Forward 83
Hold 93
How do I send a fax? 3
How do I send a text message to a mobilephone? 18, 54, 81
Information 101
MoveSave 58
Print 56
Print Setup 57
Release 94
Rush 92
Save 142
Save as System File 59
Select Source 62
Send Mail 87
View menu 148, 182
First Page and Last Page 185
Rotate 211
Viewer 111
Alerts 109
Customize 113
Devices 103
Name 110
OCR 112
Text Message 20, 106
- W -Window menu 122
Change Directory 125
Change File Filter 126
Refresh 127
Tidy Up 121
- Z -Zetafax Client window 50
Addresses menu 74
File menu 52
Menu options 51
Options menu 102
Tools menu 114
Window menu 122
Zetafax Coversheet Editor window 133
Edit menu 147
File menu 138
Format menu 157
Insert menu 149
Menu options 137
Options menu 159
View menu 148
Zetafax Viewer 119
Annotate 115
Coversheet Editor 120
Delete annotations 116
Name of Sender 118
OCR 117
Zetafax Viewer window 165
File menu 168
Menu options 167
View menu 182
Recommended


