pH Measurement Principles and Best Measurement Practices | Webinar
51
pH Measurement Principles and Best Measurement Practices HOW TO GET THE BEST pH DATA Laura St. Pierre Product Manager Chris Cushman Asst. Product Manager
pH Measurement Principles and Best Measurement Practices | Webinar
pH Measurement Principles and Best Measurement Practices
HOW TO GET THE BEST pH DATA
Laura St. Pierre Product Manager
Chris Cushman Asst. Product Manager
Presenter
Presentation Notes
Outline
• How a pH electrode works
• Electrode design - Important structures of a pH electrode (glass sensor, junction, electrolyte, etc.)
• Selecting the best electrode
• Calibration and measurement - Buffers and temperature - Calibration frequency, number of points, and data - Placing an electrode in solution
• Electrode maintenance and storage
• Selecting the best meter
• pH resources from YSI
2
IoLine in immunoassay production
Presenter
Presentation Notes
We are focused on helping our customers get the best possible pH data, so we will keep today’s presentation very practical. Although it will focus on the measurement of pH in the lab, information for field electrodes is also provided. If you want more information on field pH measurement, we have a previously recorded webinar on how to obtain high-quality field pH data. Please check it out on our YouTube channel. (https://www.youtube.com/watch?v=5AzmgBeeO9I). We will begin with a short discussion of how a pH electrode actually works. After establishing these basics, we will discuss the different structures that make up an electrode, which will lead us into electrode selection. Perhaps the most practical portion of this webinar will be focused on calibration, measurement, maintenance, and storage tips. After selecting an electrode, these tips will ensure the data you collect is accurate… and repeatable. We will wrap up with the most important questions you should ask when selecting a pH meter.
How a pH Electrode Works
3
How a pH Electrode Works
Relies on measurement of a voltage, which requires two points with different electrical potential values • Reference electrode (i.e. reference half-cell)
- Maintains constant potential (signal) independent of sample • Hydrogen ISE (i.e. sensing half-cell)
- Electrical potential depends upon the activity of hydrogen (H+) ions in solution
• Difference between these potentials (mV on display) is
correlated to pH based on the result of calibration
- Nernst equation establishes relationship between mV output and pH
E = E0 + (2.303 RT/nF) log a
H+
• Reference and ISE are often combined into one
electrode for convenience – combination electrode
4
A pH electrode has sensing and reference half-cells
Combination electrode
Presenter
Presentation Notes
pH measurement with a glass pH electrode relies on the measurement of a voltage. In order to measure the voltage, two points with different electrical potentials, basically electrical signals, are required. The reference electrode is designed to maintain a constant potential that is independent of the sample. The reference is sometimes referred to as a reference half-cell. In contrast, the sensing portion of the electrode, sometimes referred to as the hydrogen ion selective electrode or a sensing half-cell, provides a potential that is dependent upon the sample pH. The mV output seen on the pH meter represents the difference between these potentials. This measured voltage is correlated to the pH of the sample based on the Nernst equation. Therefore, both the reference electrode and the hydrogen ISE are needed when determining pH. The reference electrode and the hydrogen ISE can be separate electrodes or they can be combined into a single electrode for convenience. The combination-style electrode is used in about 90% of all pH measurement applications. All YSI electrodes are of the combination type.
pH Electrode Design
5
pH Electrode Design
Choosing the best electrode begins with understanding the main electrode structures.
• Electrode body
• Glass pH sensor
• Reference electrode
• Reference electrolyte
• Reference junction
6 Typical combination pH electrode
Presenter
Presentation Notes
A pH electrode consists of several structures, each of which can be seen in this figure of a typical combination electrode. The main components are the electrode body, glass pH sensor, reference electrode, reference electrolyte, and the reference junction. It is important to understand these structures before choosing an electrode, as some structures can vary from electrode to electrode. Your application will determine the characteristics your electrode should have.
pH Electrode Design – Electrode Body
• ‘Glass pH electrode’ – sensor portion of the electrode is made from glass
• Glass pH electrodes have either a glass or plastic electrode body
• Plastic body electrodes are more rugged; less likely to crack from impact
- Used more often in the field
• Glass body electrodes are more fragile, but have wider range of operating temperature and are commonly refillable
- Used more often in the lab 7
YSI TruLine pH 17 with glass body and conical sensor shape
YSI TruLine pH 25 with plastic body and cylindrical sensor shape
YSI ProDSS pH/ORP sensor with plastic sensor module. The rest of the sensor body is constructed of titanium for field
durability
Presenter
Presentation Notes
The term ‘glass pH electrode’ is commonly used, but this description is simply referring to the material used to construct the sensing portion of the pH sensor. Glass pH electrodes can have either a plastic or glass electrode body. Field electrodes typically have plastic bodies, as plastic body electrodes are more rugged than glass-body electrodes. YSI offers both glass and plastic body electrodes for the lab, with glass electrodes having a greater range of operating temperature. Glass body electrodes are also frequently used in more challenging samples, such as very acidic solutions where plastic body electrodes are not suitable.
Dissecting the Glass pH Sensor
• Glass used for sensor contains alkali ions (Na+ or Li+)
• Alkali ions and H+ ions from solution form a very thin ‘gel layer’ on the inside and outside of the glass - Sensor is filled with buffer, so inside has constant
binding of H+ ions
- Outside is exposed to sample with variable H+ ions
• Layer acts as ion exchanger; alkali ions are exchanged for H+ ions from solution
• Movement of H+ ions into or out of gel layer depends on pH
• Difference in pH between the inside and outside creates a voltage (potential) read by the meter
8
H+
H+
H+ H+
External Aqueous Solution
Li+
Li+
H+
Glass sensor (light blue) and gel layer (dark blue)
Presenter
Presentation Notes
The glass used to construct the sensing portion of the electrode contains alkali ions such as Na+ or Li+. These ions, along with hydrogen ions in solution, form a very thin “gel layer” on the inside and outside of the glass. The gel layer is in dark blue on this image, while the glass pH sensor is in light blue. This layer acts as an ion exchanger of hydrogen ions, as alkali ions from the gel layer are exchanged for hydrogen ions from the sample. Therefore, depending on the pH of the sample, hydrogen ions will move into or out of the gel layer. With a pH electrode, the glass pH sensor, sometimes referred to as a membrane, is fused to an electrode shaft. The inside of the sensor is filled with a buffer solution of known pH, commonly pH 7. This electrode design creates an environment with constant binding of H+ ions on the inside of the glass pH sensor, while the outside of the glass is exposed to the sample where a variable amount of H+ ions exist. The difference in pH creates a potential across the glass pH sensor that is compared to the stable potential of the reference electrode.
pH Electrode Design – Glass pH Sensor Shapes
• The shape of the sensor varies to meet application needs
• Sphere (bulb) and cone glass pH sensor shapes used for most applications
• Specialized shapes are available – spear tip and flat
9
Presenter
Presentation Notes
The glass pH sensor shape can vary in order to meet application needs. Sphere, otherwise known as bulb shaped sensors, as well as cone sensor shapes can be used for most applications, but unique applications may require a specialized sensor shape, such as the spear tipped YSI TruLine 21 which can penetrate semi-solid samples such as meat, and the YSI TruLine 27 with a flat sensor that can be used for surface pH measurement of items such as paper. This table provides an overview of the different types of glass pH sensor shapes.
pH Electrode Design – Reference Electrode
There are different types of reference electrodes available, each with different characteristics • Mercury chloride - Hg/Hg2Cl2
- In use for the longest time
- Very stable potential, but mercury is very toxic
- Narrow temperature range
• Silver/silver chloride - Ag/AgCl
- Most common
- Can be used in medicine and food applications
- Disposal less critical
- Wide temperature range
• Iodine/iodide
- Metal-ion free; can be used in Tris buffer and protein solutions • Metal ions will interact with these solutions, causing the junction to clog
- Rapid response time
- Increased stability, even at changing temperatures
10
YSI TruLine pH 17 (left) and IoLine (right)
Presenter
Presentation Notes
Now, moving on to the reference electrode. There are different types of reference electrodes, but we will focus on three here. The mercury chloride reference electrode has been in use for the longest time. It has a very stable potential, but it is rarely used due to the toxicity of mercury. Also, the reliable temperature range when using mercury chloride is relatively narrow. The most common type of reference electrode used today is the silver/silver chloride reference electrode. Since silver is non-toxic to humans, Ag/AgCl electrodes can be used in medicine and food technology. Disposal is also less critical with these electrodes compared to mercury. Ag/AgCl has a wide range of applications and most YSI lab and field electrodes feature this type of reference. The iodine/iodide system is a relatively new reference electrode that has several important advantages over other electrodes. This reference is metal ion free, which is very important when measuring in Tris buffer and protein solutions. Reference electrodes like Ag/AgCl have metal ions that will negatively interact with these solutions, resulting in the reference junction becoming clogged. The iodine/iodide electrode also has a low temperature dependence that allows for rapid response time. Also, the stability of this reference even at changing temperatures results in excellent measurement stability. The unique color of the YSI IoLine reference can be seen on the right.
pH Electrode Design – Reference Electrolyte
The reference electrode is immersed in a solution of reference electrolyte that has contact with the sample through the reference junction.
The electrolyte is needed because is closes the electrical circuit in the electrode.
Electrolyte will leak into sample during measurement; rate depends on form of electrolyte and junction type
Good electrolyte must have certain properties…
• Good electrical conductivity • Be chemically neutral • Ions that are equally mobile
11
Potassium Chloride (KCl) Others (potassium sulfate (K2SO4)) if allowed by electrode mfr.
Presenter
Presentation Notes
At this point I did want to further clarify the interaction between the reference electrode, electrolyte, and the junction. The reference electrode is placed in a solution of reference electrolyte that has contact with the sample through the reference junction. Therefore, the electrolyte has a connection to the sample through the junction, as it serves to close the electrical circuit in the electrode. A reference electrolyte must have certain qualities. It must have good electrical conductivity and, since some electrolyte will leak into the sample during measurement, it is also important the electrolyte not react with the measurement solution. The ions of an electrolyte solution must also be equally mobile. If they aren’t, unwanted potentials can develop, resulting in poor results. Potassium chloride (KCl) has all of these qualities, so it is by far the most commonly used electrolyte solution. Some applications require specialized electrolyte solutions. For example, a customer may need electrolyte that is completely chloride free. Therefore, other electrolyte solutions can be used, but only if the electrode manufacturer specifically states other electrolytes besides KCl are acceptable. Our YSI IoLine can make use of these other electrolytes.
pH Electrode Design – Reference Electrolyte
Reference electrolyte is offered in different forms
• Gel electrolyte - Still consists of KCl, but gelling agent added
- Virtually no loss of electrolyte; easy to maintain
- Theoretically shorter life
• Liquid electrolyte - Electrode can typically be refilled; longer electrode life
- Can be drained and replaced if it becomes contaminated
- Fast response time and used in wide range of applications
12
Tip: The refill hole must be open during measurement and
calibration
Electrodes with liquid (3 on left) and gel electrolyte (1 on right)
Presenter
Presentation Notes
The form of KCl can vary. Gel electrolyte still consists of KCl, but a gelling agent is added in order to prevent the electrode from losing electrolyte too quickly. Since they cannot be refilled, electrodes with gel electrolyte are easier to maintain, but they have a shorter lifetime than those with liquid electrolyte. Field electrodes are typically gel filled. Electrodes with liquid electrolyte can usually be refilled, thus resulting in a longer electrode life. This allows the user to easily refill the electrode when needed, as well as replace the electrolyte if it becomes contaminated. Response time of the electrode is typically faster and the measurement signal is more stable with liquid electrolyte. Faster electrolyte outflow from these electrodes also helps to reduce troublesome diffusion potentials that may develop, and it also ensures the electrode junction doesn’t become easily clogged. If you are in the lab, I would definitely recommend an electrode with liquid electrolyte. All YSI refillable lab electrodes use 3 molar KCl for the reference electrolyte, but other manufacturers may use slightly different forms. One important tip I did want to mention is that if your electrode is refillable, it is very important to have the refilling opening in the open position during calibration and measurement.
pH Electrode Design – Reference Junction
The reference junction creates contact between the reference electrode and the sample.
The reference junction should be permeable and allow consistent outflow of electrolyte.
Several types exist:
• Ceramic Junction - Uses the porosity of unglazed ceramic; can easily become
blocked - Outflow rate is low; diffusion potentials can develop - Useful in solutions with oxidizing substances
• Platinum - Fine, twisted platinum filaments between which electrolyte
flows - Constant outflow of electrolyte and does not easily become
blocked - More sensitive to mechanical stress - Can be used in many applications
13
Presenter
Presentation Notes
As was previously mentioned, the reference junction, sometimes referred to as a salt bridge, creates contact between the reference electrode and the sample. Like the reference electrolyte, the junction needs to have certain qualities. It must be permeable and allow a consistent outflow of electrolyte. Now I do want to mention there is a variety of junctions offered by manufacturers, but we will discuss the most relevant YSI junctions. The ceramic junction uses the porosity of unglazed ceramic. This type of junction can easily become blocked and its low rate of electrolyte outflow can result in the development of disruptive potentials. Although this junction is not good to use in solutions with either high or low ionic strength, it is good to use in solutions that contain oxidizing substances.� The platinum junction consists of fine, twisted platinum filaments between which electrolyte flows. This junction type features a constant outflow rate of about 1 mL per day and it does not become easily blocked. Care should be taken when cleaning this type of junction, as it is susceptible to mechanical stress. The platinum junction can be used almost universally, so it is the electrode I would recommend for most lab applications.
pH Electrode Design – Reference Junction
• Ground-Joint - Much faster outflow of electrolyte - Two ground glass surfaces mated to one another - Surfaces are tightly fit together, but electrolyte can
permeate between them - Best for solutions with a lot of suspended particles; also
useful in high and low-ion solutions
• Pellon Strip Junction - Junction used in YSI field electrodes - Utilizes pellon: non-woven nylon-like material - Strip of pellon held in place by a silicone bushing - Gel electrolyte, so outflow is nearly zero
• Variety of Other Junctions are Offered
14
YSI Science pHT-G with ground-joint junction
Before first use, the shrinkable tubing needs removed
Outflow rate is adjusted by moving the outer glass sleeve
up or down
YSI field pH electrode
Pellon junction
Presenter
Presentation Notes
However, for solutions with a lot of solids, low ionic strength, or high ionic strength, the ground joint junction is the best to use. This electrode features a much faster outflow of electrolyte and is very easy to clean. This junction, also known as a ground glass sleeve junction, features two ground glass surfaces mated to one another. These two surfaces fit tightly together, but they allow electrolyte to permeate between them. The outflow rate can be adjusted by moving the outer glass sleeve up or down. YSI field pH electrodes feature the pellon strip junction. A strip of pellon, which is a non-woven nylon-like material, is held in place by a silicone bushing. Just like other field electrodes, this electrode features gel electrolyte.
pH Electrode Design – Additional Junctions
Some electrodes feature additional reference junctions
• Reference electrode is immersed within an additional chamber; acts as additional barrier to contamination
• Additional junction(s) used to ensure contact with sample
• Reference can still become contaminated, but solution must first pass thru these additional junctions
15
Presenter
Presentation Notes
It is possible for the reference to become contaminated. In order to help prevent contamination, or at least slow it down, some electrodes feature additional internal junctions. With these electrodes, the reference is placed within an extra internal chamber. This chamber also has a junction in order to ensure contact between the reference and sample. This extra chamber is very effective in serving as an additional barrier to contamination. Many YSI electrodes feature a double junction design, and our IoLine even features a triple junction design.
Selecting the Best Electrode
16
Selecting a pH Electrode
Can a single pH electrode be used in every application? • No, sampling conditions can vary dramatically between applications
The most important consideration is your application - Will help determine the glass pH sensor shape, reference junction, reference
electrode, and other electrode characteristics you will need
17
YSI TruLine 21 for penetrating semi-solids YSI TruLine 27 for surface measurements YSI IoLine is ideal for measurements in challenging solutions such as proteins and Tris buffers
Presenter
Presentation Notes
All of the information we just covered can be used to help you select the best electrode for your application. Now a common question asked is if a single pH electrode can be used for every application. The answer to this is NO because sampling conditions and requirements can vary dramatically between applications. As an example, measuring in meats and cheeses will require a spear tip sensor while surface measurements require a flat sensor. If measuring in Tris buffer, an electrode with a metal free reference is required. The most important consideration when selecting an electrode is your application. This will help determine the shape of the glass sensor, the junction needed, the reference electrode, and other important characteristics such as electrode body.
Selecting a pH Electrode
Also consider convenience… • Built-in temp sensor prevents need for separate
half-cell in one body - 3-in-1 electrodes: sensing half-cell, reference half-
cell, and temp sensor in one body
• Plastic body electrode if concerned with electrode breaking
• Glass body for wider temperature range
• Liquid or gel electrolyte - Refillable electrodes have longer life and faster
response time - Gel are easier to maintain
18
It is best to order replacement 3 M KCl when ordering a refillable electrode – you will need it!
Presenter
Presentation Notes
In addition to considering the application, users should also consider convenience. All pH measurements need to be compensated for temperature. So rather than having a separate temp sensor, it is most convenient to have a temp sensor built into the electrode. An electrode with temp sensor, reference half-cell, and sensing half-cell all in one electrode body is sometimes termed a 3-in-1 electrode. A large number of YSI lab electrodes feature a built-in temp sensor. It is also important to consider the likelihood of the electrode being banged around in the lab. If this risk is high, perhaps it is best to go with a plastic-body electrode. Also, if you are concerned with the electrode being properly maintained, it might be best to get a gel-filled electrode, as they do not need to be refilled with electrolyte. However, if you would like the electrode to have a faster response time and a longer life, a refillable electrode is the way to the go. If ordering a refillable electrode, don’t forget to also order some replacement KCl solution – it will definitely come in handy.
pH Electrode Guides
19
bit.ly/pHselectguide bit.ly/pHappguide
Presenter
Presentation Notes
To help you select the best YSI lab electrode for your need, or if you just want to learn more about the different electrode structures, please check out our lab electrode selection and application guides. Please don’t hesitate to contact us if you have any questions about these tools.
Calibration & Measurement Tips
20
Presenter
Presentation Notes
If you have any questions about which option would be best for you, let us know and one of our technical application specialists can assist you. Now I would like to review some calibration and measurement recommendations to ensure you are getting accurate and repeatable pH measurements as well as maximizing the usable life of you electrode.
What Calibration Changes
The first step to an accurate measurement is calibration -Your results are only as good as your last calibration-
Calibrating a pH electrode establishes system:
• Plot Intercept or Zero Point - Sensor’s mV value when placed in pH 7 buffer - Theoretical is zero (0) mV - Practical can be -50 to +50mV - If outside of this range, electrode may need cleaned or replaced
• Electrode Slope - Theoretical Nernst slope is -59.16 mV/pH unit at 25 oC
- Actual slope will differ from theoretical and will change over time
21 -200
-100
0
100
200
4 7 10mV pH
The difference between each pH unit is 59.16 mV
Presenter
Presentation Notes
Let’s first address calibration. The absolute best thing you can do to obtain accurate, repeatable measurements is to ensure you are performing a good calibration on your pH system – the system includes the meter and electrodes. Let’s talk about the two major system types available which are analog and digital. Many newer instruments are digital and utilize digital, smart sensors. For these newer instruments, the calibration is stored on the sensor and digitally sent to the instrument. In this case, you can remove a calibrated sensor and place it on a different instrument without recalibration. On the other hand, it’s important to remember that many instruments in use today are of the older, analog type. In this case, it is VERY important that you calibrate the sensor and meter as a system and keep them together since the calibration is stored in the meter in this instance. In the end, regardless if you are using an analog or digital system, your data is only as good as your calibration so be sure to take the time to do a proper calibration. So what are we actually doing when we perform a calibration? Chris previously discussed that we calculate pH based on the established linear relationship between pH and the sensor’s mV output as defined by the Nernst equation. In order to apply this relationship to the electrode’s output, the instrument must be calibrated properly using buffers of known pH values. During the calibration, the sensor’s millivolt values and the pH buffer values are used to establish the electrode slope and intercept of the plot of millivolts vs pH. Once the system has been calibrated, the pH mV output of the electrode in any media can be converted by the instrument’s software to a pH value. We will define the practical limits of the zero and slope again later.
The Importance of Temperature
pH is Temperature Dependent
• Nernst slope (i.e. electrode response): S = -2.303 RT/nF
• Measurements must be completed with an accurate measurement of temperature
Options for Measuring Temperature - pH electrode with built-in temperature sensor
• 3-in-1 sensors have reference electrode, hydrogen ISE, and temperature sensor within one electrode body
- External temperature sensor connected to meter
- Apply temperature reading from another connected sensor with built-in temp
• Not all meters have this capability
- Manual input of temperature
22
YSI external temperature sensor
Presenter
Presentation Notes
Let’s discuss why it is important to accurately measure temperature when calibrating and measuring pH. During calibration, we establish the slope and intercept of the mVs to pH units plot at the temperature of calibration. In order to accurately make pH measurements at temperatures that are different from calibration, we need to adjust the slope and intercept of the plot for the temperature of the sample. The Nernst equation allows for this temperature-based adjustment and this is carried out by the instrument’s software. All you need to do is be sure you are accurately measuring temperature during calibration and subsequent measurements. With today’s pH systems, you have some options for measuring temperature. The best option is to select a pH electrode with a built-in temperature sensor. When pH electrodes have a built in reference electrode and temperature sensor, they are commonly referred to as 3-in-1 sensors. The next best option is to supply a temperature reading directly to the instrument via a stand alone temperature sensor. Most meters allow you to directly connect a temperature sensor. Just make sure this temperature sensor is in your buffers during calibration and in your sample during measurement. Some meters allow you to use a temperature reading from a different sensor. For example, on the YSI multilab, if you have a different probe installed, say a conductivity probe with built-in temperature, you can use the temperature reading of the conductivity probe to temperature compensate your pH measurements. Again, it is very important to understand that this is going on and to make sure you have the second sensor in both the buffer during calibration and in the sample during measurement. The last option would be to manually input your temperature value during calibration and measurement. I would only recommend this option if you are using a temp controlled bath where you are keeping the temperatures constant for both calibration and measurement. If you expect the temperature to vary from calibration and during measurements, it’s best to supply the instrument with a temperature measurement so proper compensation can be carried out consistently and accurately. Now that you know temperature is important, be sure you periodically check your temperature sensor for accuracy. This can be done by comparing it to a NIST traceable temperature sensor. When comparing two temperature sensors, be sure they are close to each other, preferable with the thermistors touching each other, and the measurements should be within the two sensor’s accuracy spec. For example, if one sensor is +/-0.2 °C and the other is +/- 0.1 °C, the two thermistors should be reading within 0.3 °C of each other.
Calibration – pH Buffers
• Calibration is completed using standard buffers - Solutions with a pH that doesn’t easily change - Often colored to differentiate - Should be NIST (4.01, 6.86, 9.18) or NIST-traceable
(YSI buffers with values 4, 7, 10)
• Buffer tips - Fresh buffer solutions should be used – don’t reuse
buffers - Don’t leave buffer bottles open - Ensure the correct buffer set is chosen on your meter - pH buffers are slightly temperature dependent 23
YSI buffers (4, 7, and 10)
Presenter
Presentation Notes
Now that we covered what the calibration is actually doing to the system and the importance of also measuring temperature, let’s talk about what you can do to ensure you are calibrating your system properly. First, make sure you are using fresh, traceable pH buffers. At YSI, we recommend using traceable buffers to guarantee you are using a highly accurate solution. We don’t want to introduce error to the system just by using an inaccurate solution for calibration. That would introduce error before we even got started. Just as important as using traceable buffers is making sure your solutions are fresh and not contaminated. Old or contaminated buffers will introduce error in your calibration and subsequent measurements. So check the expiration date on your bottle and note that buffers have two shelf lifes. One unopened and one opened. For example, YSI buffers have a two year shelf life unopened but once you open it, the shelf life is reduced to 6 months. So check with the manufacturer of your buffer solution to obtain this information AND write the date you open the buffer on the bottle. Since transpiration or evaporation can effect buffers, make sure you close the bottles when you are done with them. If this becomes an issue, there are buffers available in larger, airtight bags that will last longer. In order to avoid contaminating your buffers, make sure you thoroughly rinse your sensor with deionized water and blot dry with a kim wipe between calibration points. As a best practice in the lab, you should triple rinse with DI water between calibration points. Also, as a good laboratory practice, you should definitely not reuse buffers. Once buffers are used for calibration, they are assumed contaminated. Re-using buffers can lead to slow responding pH probe performance or the inability to calibrate at all. This re-use can also make it difficult to determine whether the probe or the buffers are causing the pH calibration failure. Once you have acquired your buffers, check your instrument to see if you have an auto buffer recognition feature. If you have this feature, select the buffer set that matches your buffers. Some instruments, like the YSI TruLab, can have over 20 different buffer set values pre-programmed in the instrument. If you can’t find your buffer set, I suggest you turn off auto buffer recognition so you don’t introduce error by calibrating to the wrong value. For example, NIST and NIST traceable buffers have different values as you can see in this slide. It is also important to note that pH buffers are slightly temperature dependent so the actual pH value of the buffer varies with temperature. For example, the actual pH of YSI buffer 7 at 20°C is 7.02 and at 25° C it is 7.00 (zero). pH buffer values based on temperature can usually be found on the bottle or certificate from the buffer manufacturer. For maximum accuracy in your pH measurements be sure that the auto buffer recognition is adjusting the buffer value based on temp or override the calibration value with the correct temperature adjusted value. All of YSI lab and field instruments have buffer values based on temperature pre-programmed into the instrument software and these temperature corrected values are used by the auto buffer recognition feature.
Number of Calibration Points
The number of calibration points is a common question. Most instruments will allow at least a 3 point calibration.
1 Point Calibration
• Must be completed with pH 7 buffer
• Zero point is determined but theoretical slope is used
• Range of use is limited; only within a range of 6.5 to 7.5 pH
2 Point Calibration
• Best to perform at least 2 point cal; pH 7 must be used (6.86 for NIST)
• Buffers must differ by at least 2 pH units
3 Point Calibration
• Used when pH conditions of sample not well understood
24
The YSI MultiLab and TruLab instruments will allow up to 5 point pH calibration
Presenter
Presentation Notes
The next thing to determine is the number of calibration points you want to use. You must do at least a one point calibration AND if you are only going to perform a one point calibration, it should be done at 7. This will establish the intercept of the plot. However, with a one point calibration, a practical slope is not calculated. Instead, the meter uses the theoretical slope which is 59.1 mV per pH unit. Because of this, a one point calibration should only be used when your expected measurement range is between 6.5 and 7.5. More common, and most recommended is to conduct a 2 or 3 point calibration. I suggest doing a 2 point calibration if you know which side of the pH scale you expect to measure in. For example, if you know you are going to be measuring acidic samples, it is only required to calibrate at 7 and 4. In this example, calibrating at 10 will not improve your readings below 7. If you are not sure which side of the pH scale you will be measuring, then perform a 3 point calibration at 4, 7 and 10. Some meters allow you to calibrate up to 7 points for pH. Just make sure that you calibrate at buffer 7 for one of them and that a second differs by at least 2 pH units from 7 in order to establish a good, practical slope. Sometimes, depending on the instrument, the order you calibrate is important. Older instruments require you start with buffer 7. Newer instruments allow you to calibrate in any order and calculate the intercept and slope after the calibration is complete. Just check with the instrument's operating manual to make sure you are following the manufacturer’s recommended procedure.
Additional Calibration Tips
• Enable mV values on the display during calibration - Buffer 7: -50 to 50 mV - Buffer 4: +177 mV away from the buffer 7 mV value (positive
change) - Buffer 10: -177 mV away from the buffer 7 mV value (negative
change) - Determine mV change between buffers. Ideal is 177, acceptable
is 165 to 180. Slope: 59 mV per pH unit.
25
Presenter
Presentation Notes
Next, make sure you are looking at the pH mVs during a calibration. Again, the pH mV value is the raw signal coming from the sensor that the instrument converts into pH units. Evaluating the mV values during calibration can help us document sensor aging and help us determine if the sensor needs serviced, cleaned or replaced. Evaluating the mV values will also tell us how good our calibration is or if we are nearing the outer edge of the acceptable limits. This can help us plan for future maintenance or replacement requirements. The acceptable values for the mV signal in buffer 7 is between -50 and +50. This is a general rule for all pH electrodes. Lab-specific electrodes or specialty electrodes may have a tighter recommended range for this, like the YSI TruLine, ScienceLine and Ioline electrodes which have a mV range of +30 to -30 when in buffer 7. The acceptable mV values for the other buffers depends on what the mV value is in 7 because we are looking to establish a slope. In Buffer 4, we are looking for a positive change in the mV value of 165 to 180 with 177 being the ideal. In buffer 10, we are looking for a negative change in the mV value of 165 to 180. For example, if we get a mV value of -10 in buffer 7, we would expect a mV of 167 in buffer 4 and -187 in buffer 10. Most modern instruments store these values as part of a calibration record so it can be reviewed later. We will discuss the calibration record in a few minutes.
Additional Calibration Tips
•Ensure the electrode and calibration cup are both clean
•Make sure the sensing electrode, reference electrode and temperature sensor are adequately immersed in the buffer
•Triple rinse the electrode and calibration container/cup with deionized water between calibration points
26
Presenter
Presentation Notes
There are several other things to consider when performing a calibration to ensure accurate measurements. You will want to make sure everything is clean so we don’t contaminate buffer solutions. This includes the electrodes, temperature sensor and calibration container. All should be cleaned and dry before starting. Next, make sure you are adequately immersing the sensing electrode, reference electrode and temperature sensor into the buffer. We will talk about this again in the next slide. Lastly, as a best laboratory practice, triple rinse the sensors and calibration container with deionized water between calibration points. Before continuing with the calibration be sure to shake off any excess DI water or dry the sensor and container with a kim wipe before placing it in the next buffer solution. When drying the sensor with the kim wipe, be sure to blot so you do not accidently damage the sensor.
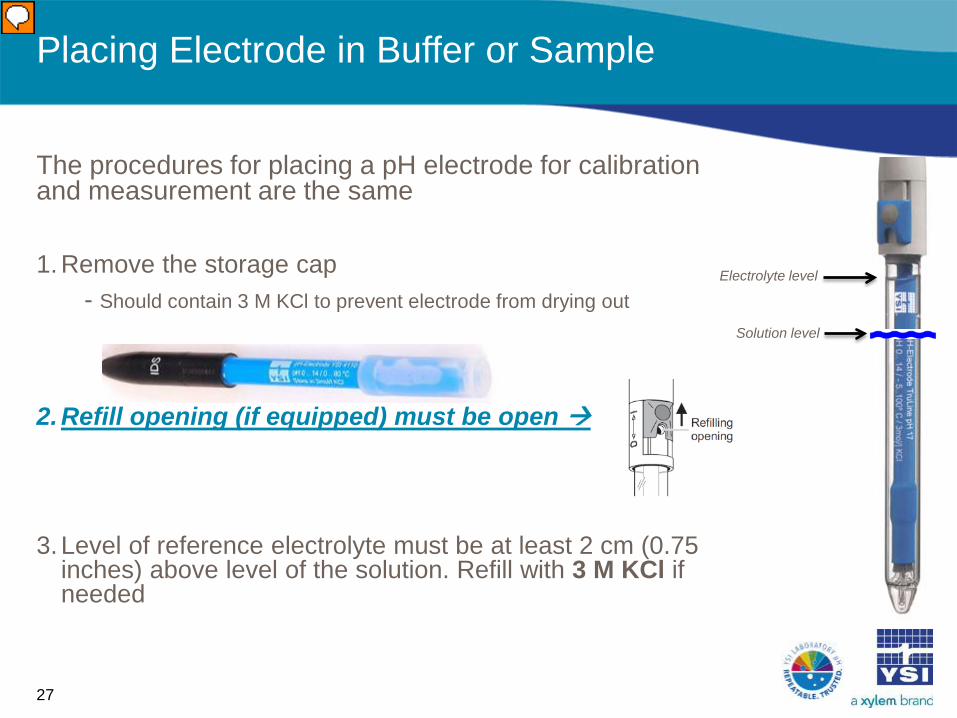
The procedures for placing a pH electrode for calibration and measurement are the same 1. Remove the storage cap
- Should contain 3 M KCl to prevent electrode from drying out
2. Refill opening (if equipped) must be open
3. Level of reference electrolyte must be at least 2 cm (0.75 inches) above level of the solution. Refill with 3 M KCl if needed
Placing Electrode in Buffer or Sample
27
Electrolyte level
Solution level
Presenter
Presentation Notes
When placing a sensor in either a buffer for calibration or a sample for measurement, make sure you first remove the storage cap from the tip of the sensor. The storage cap is provided for storing the electrode during shipment and long term storage. I consider anything 3 weeks or longer to be long term storage. The storage cap is filled with solution to keep the electrode from drying out and to slow the outflow of electrolyte. The solution used varies by manufacturer but is usually a KCl solution, buffer 4 or a mix of the two. Next, if using a refillable electrode, make sure the fill hole is OPEN for both calibration and measurement. This is very important and a commonly missed step especially if using a refillable electrode for the first time. Next, if using a refillable electrode, make sure the level of the reference electrolyte is higher than the level of the buffer or sample. The reference electrolyte should be at least 2 cm above the level of the solution. If it isn’t refill the electrode with 3 M KCl.
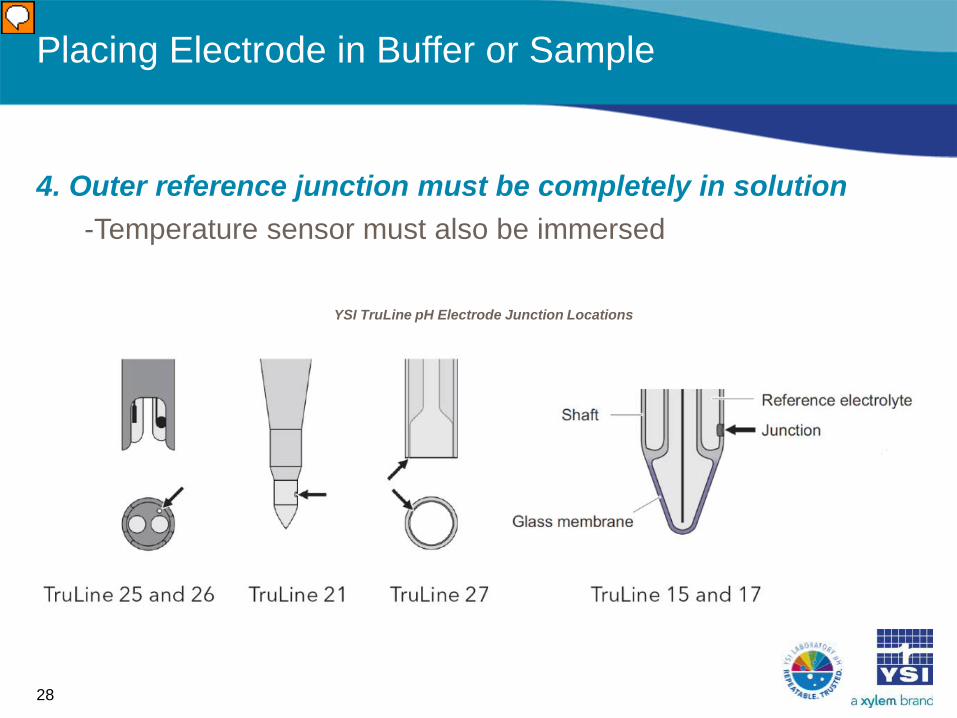
Placing Electrode in Buffer or Sample
4. Outer reference junction must be completely in solution -Temperature sensor must also be immersed
28
YSI TruLine pH Electrode Junction Locations
Presenter
Presentation Notes
Next, as mentioned before, make sure the sensing electrode, reference junction, and the temperature sensor are all immersed in the solution. To accomplish this, it’s important to know the physical characteristics of your sensor like where the reference junction and temperature sensor are located. If you don’t know where they are, you can’t guarantee they are in solution so take a moment to get familiar with your sensor. As you can see in this picture, the reference junction location is dependent on the sensor in use.
Calibration Record
• Many meters save calibrations to a GLP file (Good Laboratory Practice) - Zero point (mV or pH), slope, mV value in each buffer, temp
• Some meters evaluate the calibration result and display/store an electrode efficiency
• Some may show a percentage Electrode efficiency = Observed slope *100 -59.16 mV/pH
29
YSI MultiLab and TruLab Calibration Evaluation
Presenter
Presentation Notes
As mentioned before, many meters save calibrations in a GLP file or good laboratory practice file. The number of calibrations stored by the meter is instrument dependent so check with the operations manual if you are unsure how many records your instrument is saving. Many instruments will allow you to backup the GLP data to a PC or may provide the ability to print it out. Typically the information stored in a GLP record includes the number of calibration points, the buffer values used during calibration, and the mV value from the sensor at each calibration point. Some meters will calculate the slope and electrode efficiency for you as well. The electrode efficiency is the actual slope divided by the theoretical slope from the Nernst equation and then multiplied by 100 to give you a % value. As the efficiency nears 90% or lower, you should consider servicing the sensor. That is, of course, after making sure you are following all the necessary steps to ensure a proper calibration. We don’t want to service the electrode if isn’t necessary, so start by verifying the buffers and calibration routine first. Some instruments evaluate the GLP information for you can and provide the status of the calibration. For example, some instruments will tell you that the calibration is questionable or out of range and should not be accepted. Other instruments, like the MultiLab and TruLab, will show how close the sensor’s calibration is to the ideal both in the calibration record and on the display during measurements. As show in this chart, the more plus marks you have in the calibration record, or the number of dashes you have in the electrode icon, will indicate how close you are to the ideal, theoretical values of the Nernt equation. GLP records can be useful in helping track the sensor’s performance to determine when refilling, cleaning, reconditioning and/or replacement may be necessary.
Calibration Frequency
Over time the electrode slope and zero point (i.e. electrode response) drifts, so we must recalibrate Does a strict guideline for frequency exist?
• Simple answer is no
• Best practice - calibrate each day you use it until you better grasp the needed frequency
• More frequent calibration will be needed as the electrode ages!
• Frequency depends on application
• More frequent calibration when electrode is used in - Heavily contaminated, low-ion, strongly acidic, high temperature – these age the electrode faster
(slower response, change in slope and zero point)
Some instruments feature calibration timers
30
Presenter
Presentation Notes
A common question we are asked is “how often should I calibrate my sensor?” This is probably the most difficult question we get because there is no simple answer. Calibration frequency depends on the application and the age of the electrode. Being an electrochemical sensor, a pH sensor drifts over time due to it’s design and how it operates. This is why we must recalibrate. Older sensors tend to drift from calibration faster then newer sensors, so older sensors will require more frequent calibrations. More frequent calibrations will also be required when the application requires. This could be due to applications that may cause the sensor to drift faster, such as samples that are heavily contaminated, have low-ionic strength, are strongly acidic, or when used in higher temperature samples. Additionally, some application may require a higher accuracy or precision then others, in that case, the sensor should also be calibrated frequently. I suggest, as a best practice, start by calibrating the system every day you use it. If you find, for example, that you are using the system every day and the sensor is holding its calibration adequately for you for 2 or 3 days, then you may decide to only calibrate every three days. Another example would be if you are only using the instrument once per week, in that case, I would definitely perform a calibration before each use. Generally, a new electrode could hold its calibration for a week or more, while an aged electrode may drift out of calibration within 24 hours. If you are worried about forgetting to recalibrate, look for an instrument that provides a recalibration prompt or timer based on user-selected criteria.
Maintenance Tips
31
Presenter
Presentation Notes
Now that we have reviewed how to perform a proper calibration, let’s review maintenance tips for pH electrodes. If you are having issues with calibration or if the electrode is slow to respond, performing regular maintenance such as cleaning, refilling and reconditioning can be used to help bring an electrode back into spec and extend its usable life. Slow response is application dependent, but I would say if it takes the probe longer than 2 minutes to go from 7 to 4 or 10, then the response is less then ideal and electrode maintenance should be performed. Non-refillable electrodes do have a finite usable life. Generally, a non-refillable electrode will need to be replaced every 18 to 24 months due to the reference electrolyte leaching out and not being able to be replaced.
Electrode Cleaning
Clean the electrode if response time is poor (slow) or the calibration result is not acceptable General Guidelines for Cleaning • Recalibrate after cleaning
• Rinsing with DI water is OK, but don’t store in DI water • It is best to chemically, rather than mechanically
(physically), clean the electrode
• Check for physical damage – cracked membrane YSI does have different recommendations for field and lab pH electrodes 32
Presenter
Presentation Notes
If you are having slow electrode response or difficulty calibrating, try cleaning the electrode. We will go through the cleaning steps in a moment but here are some quick precautions on cleaning: First, you will always want to recalibrate after cleaning. Remember, your data is only as good as your calibration. Next, rinsing in DI water is part of the cleaning process and, in fact also part of the calibration process we reviewed. Even though we recommend rinsing in DI water, it is very important to note that a pH sensor should never be stored in DI water. As a general rule for pH electrodes, it is best to perform a chemical cleaning on the electrode and not a mechanical cleaning. The reason for this is because with mechanical cleaning, there is a greater risk of damaging the electrode and the damage may very well be irreversible. Also, please note that we have different cleaning recommendations for field and lab pH electrodes.
Lab pH Electrode Cleaning
Inorganic Debris • Place in 0.1 M HCl or 0.1 M NaOH for ~5 mins
• If buildup not removed, heat the solution up to 50 oC before increasing the acid or alkaline concentration
Organic Debris • Rinse with organic solvents (e.g. ethanol or
• Glass bulb can be carefully wiped with damp, lint-free, soft cloth
33
Ensure proper safety precautions are used
Presenter
Presentation Notes
If you see poor pH electrode performance and you suspect inorganic contamination, place the probe in 0.1 M HCl acid or 0.1 M sodium hydroxide for about 5 minutes. If the does not clean the electrode, try heating the solution to 50°C and then soaking the electrode. If you suspect organic debris, rinse the electrode with an organic solvent, such as ethanol or acetone. Before doing so, make sure there are not chemical compatibility issues between the sensor’s body material and the organic solvent you are using. Next, you can carefully wipe the glass bulb with a kim wipe or other lint-free, soft cloth. Kimwipes are a great tool in the lab, but they can scratch the glass bulb. It is best to use Kimwipes to BLOT dry, not wipe.
Lab pH Electrode Cleaning
Proteins • Place the electrode in a pepsin/HCl solution for at least 1 hour
Sulfides on Ceramic Junction • Place in thiourea/HCl solution (7.5% in 0.1 M HCl) until the discoloration on the
junction has disappeared
After Cleaning (any procedure) • Rinse with DI water
• Soak in electrolyte (3 M KCl) for at least 1 hour
34
The YSI IoLine can be used in protein solutions
Presenter
Presentation Notes
If you suspect the junction is clogged from proteins, try soaking the electrode in a pepsin/HCl acid solution for at least 1 hour. After performing any of the discussed cleaning procedures, thoroughly rinse the electrode with DI water and then soak it in 3 M KCl for at least 1 hour before attempting a calibration. Soaking in 3 M KCl can also help rejuvenate a reference junction that has dried out.
Lab pH Electrode Cleaning
Debris in Reference Electrolyte • Remove the old reference electrolyte
• Replace with fresh electrolyte (don’t use other chemicals)
• May need to repeat several times until debris is gone
• Crystals of KCl in electrolyte can be dissolved by heating electrode in water bath to 45 oC; replace electrolyte afterwards
Note: KCl crystals may develop on the watering cap and electrode during storage and shipment (new electrodes!). Clean with DI water and a lint-free cloth.
35 YSI Science pHT-G features liquid electrolyte
Don’t forget to order 3 M KCl when ordering a refillable electrode – you will need it!
Presenter
Presentation Notes
If you find that your reference electrolyte has been contaminated, it is necessary that you remove all of the electrolyte from the refillable sensor and replace it with fresh electrolyte. Do not try to rinse the electrolyte reservoir with anything but fresh electrolyte. You may need to repeat this step several times until all the contamination has been removed from the reservoir If the KCl has formed crystals in the reservoir, you can dissolve them by heating the electrode in a 45°C water bath. Be sure to drain and replace the electrolyte after doing this. It is very normal for KCl crystals to develop on the storage cap, electrode and around the filling hole during storage. New electrodes may also have salt crystals. This is normal and can be cleaned with DI water and a lint-free cloth
Storage Tips
36
Presenter
Presentation Notes
Next, I would like to discuss how to properly store pH electrodes.
Electrode Storage
Storage is perhaps the main contributor to the life, speed and precision of a pH
electrode
General Guidelines for Storage • pH electrodes can be permanently damaged
if improperly stored
• Storage recommendations vary based on length of intended storage
• Never allow a pH electrode to dry out
• Never store a pH electrode in DI water (rinsing with DI is OK)
37
Proper storage is critical for field and lab pH electrodes
Presenter
Presentation Notes
Electrode storage is very important to extending the life of the electrode and electrolyte. If not stored properly, a pH electrode can be permanently damaged. We have two different storage recommendations based on how long you plan to store your lab electrode. I will review that in the next slide. Some helpful tips of all pH electrodes, whether lab or field, is to make sure that you never let your pH electrode dry out and NEVER store your electrode in DI water.
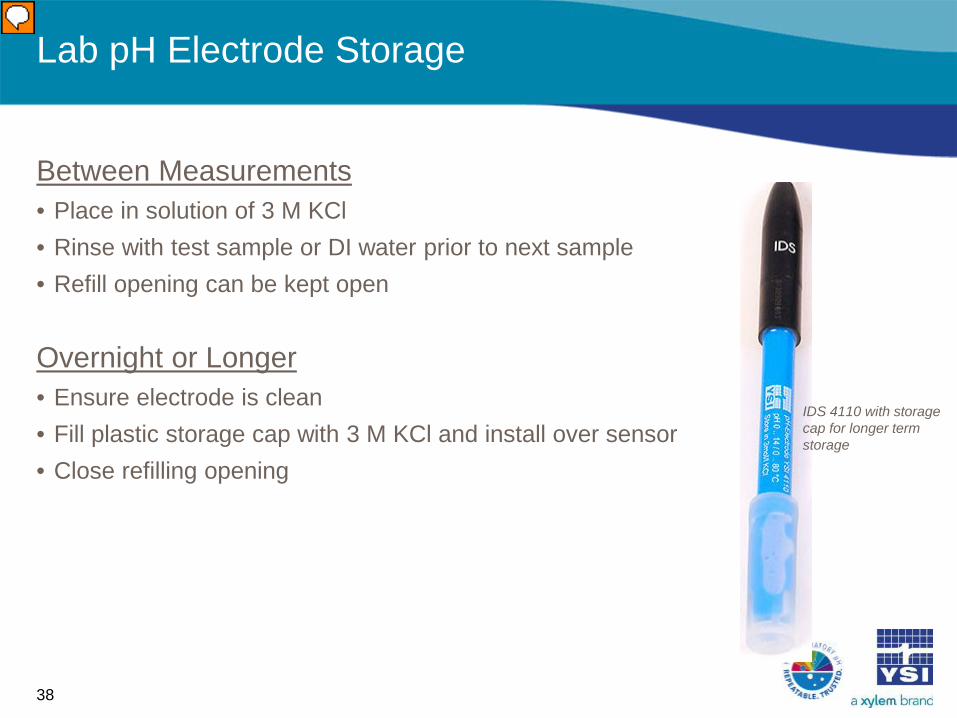
Lab pH Electrode Storage
Between Measurements • Place in solution of 3 M KCl • Rinse with test sample or DI water prior to next sample • Refill opening can be kept open
Overnight or Longer • Ensure electrode is clean • Fill plastic storage cap with 3 M KCl and install over sensor • Close refilling opening
38
IDS 4110 with storage cap for longer term storage
Presenter
Presentation Notes
When storing lab electrodes between measurements, place the electrode in a 3 M KCl solution. Be sure to rinse the probe with some sample or DI water before placing it in the sample for measurement. Also, as we have mentioned before, make sure the refill hole is open during measurements. If you are storing your lab probe overnight or longer, make sure it is clean, then fill the storage cap with 3 M KCl and install it over the sensor. Be sure to close the refill hole during storage so the electrolyte does not evaporate during storage.
Conditioning Dried Electrodes & Replacement
If your electrode has dried out, you MIGHT be able to rehydrate it
• Place field electrodes in pH 4 buffer and lab electrodes in 3 M KCl for at least 24 hours
• Clean and recalibrate afterwards
If all else fails (cleaning and rehydrating), you will likely need to replace your electrode.
Electrodes generally last 18-24 months, but electrode life can vary greatly based on electrode quality, application, and storage practices.
39
YSI pH 4 buffer
YSI 3 M KCl solution
Presenter
Presentation Notes
As mentioned, you can try to recondition your probes if cleaning does not bring them back into spec or improve the response. Field electrodes can be soaked in buffer 4 overnight or over the weekend to try and rejuvenate them. Lab electrodes can be soaked in 3 M KCl. If good calibration slope or response is not restored after cleaning and reconditioning, it is probably time to replace your sensor.
Selecting the Best Meter
40
Selecting a pH Meter – Questions to Ask
There are many pH meters available, so how do you choose the right one? Begin by asking these questions…
1. Do I need to measure other parameters in addition to pH?
41
YSI TruLab 1310: pH and ORP
MultiLab: pH, ORP, conductivity, DO/BOD, ISEs
Presenter
Presentation Notes
Now I would like to briefly discuss some things to consider when selecting a pH meter. The question I would first ask yourself is if you want to only measure pH and temperature, or if there are other parameters you would like to measure. There are pH only instruments on the market, such as our YSI TruLab 1310, as well as instruments that have the ability to measure many parameters, such as the YSI MultiLab series of instruments. By asking this question first, you will help narrow your search for a new instrument.
Selecting a pH Meter – Questions to Ask
2. How many measurement channels do I need? • Some instruments only allow 1 sensor to be connected
and displayed, while others allow more
42
YSI MultiLab 4010-2, a two channel instrument
YSI MultiLab 4010-3, a three channel instrument
YSI MultiLab 4010-1, a one channel instrument
Presenter
Presentation Notes
The next question to ask is the number of measurement channels you would like. A measurement channel is basically an input for a sensor. So a one measurement channel instrument will only allow one sensor to be connected and one measurement will be displayed on the instrument in addition to temperature. The MultiLab 4010-3 is a three channel instrument, so the user can connect 3 different sensors….such as pH, dissolved oxygen, and ammonia sensors.
Selecting a pH Meter – Questions to Ask
3. What type of sensor input do I want? • BNC: Very common connector; other mfr’s BNC electrodes can be used on meter
• Digital: Mfr’s call them different names (YSI MutliLab IDS)
- Specific to meter
- Typically store calibration data and serial number; auto-recognized by meter
43
YSI TruLab instruments feature BNC input
Electrode with BNC
YSI MultiLab instruments feature digital sensors
MultiLab IDS pH electrode
MultiLab 4010-2/3 BNC adapter –
converts one digital channel to BNC
Presenter
Presentation Notes
After narrowing your instrument search based on parameters and number of channels, I would further narrow it by considering the type of sensor connection you need. BNC is perhaps the most common type of connector. One major advantage to this sensor is how universal it is. Typically BNC electrodes can be connected to any pH meter with BNC input, regardless of manufacturer. So another manufacturers BNC electrode can be used on our TruLab, and our BNC pH electrodes can be used on other manufacturers BNC pH instruments. Another common type is the digital connector. These are specific to each manufacturer, so they don’t have the same flexibility as BNC pH electrodes. However, there are major advantages to a digital connection, as these sensors store their calibration data and serial number. They are also auto-recognized when connected to the meter, so there is no need to tell the instrument what is connected. Our MultiLab 2 and 3 channel instruments are digital, but they also allow the connection of a BNC electrode if a BNC adapter is installed. This allows the user to connect both digital and BNC pH sensors.
Selecting a pH Meter – Questions to Ask
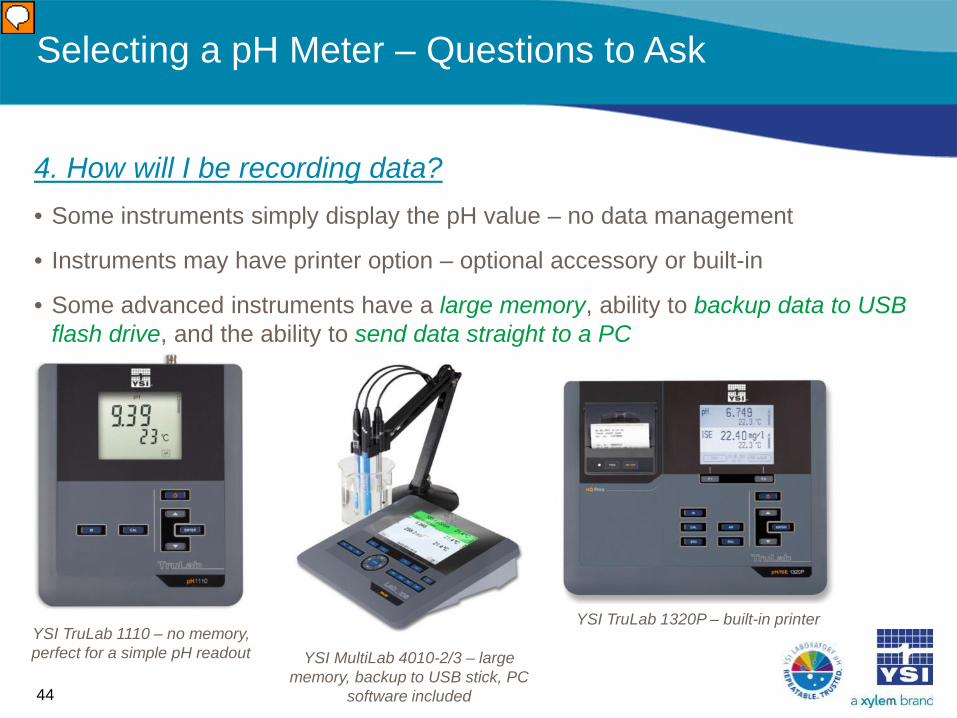
4. How will I be recording data? • Some instruments simply display the pH value – no data management
• Instruments may have printer option – optional accessory or built-in
• Some advanced instruments have a large memory, ability to backup data to USB flash drive, and the ability to send data straight to a PC
44
YSI TruLab 1110 – no memory, perfect for a simple pH readout YSI MultiLab 4010-2/3 – large
memory, backup to USB stick, PC software included
YSI TruLab 1320P – built-in printer
Presenter
Presentation Notes
Another major thing to consider is how you will be recording your data. If you simply write down the pH measurement in a notebook and that’s all you need, then there is no need to search for an instrument with a large memory. On the other hand, if you would like to save data to the instrument, backup data to a USB flash drive, and send data straight to Microsoft Excel, there are instruments with these advanced data management options. Some instruments can also come with an optional printer if your lab procedures require one.
Selecting a pH Meter – Questions to Ask
5. How important is the display quality? • Some instruments feature a very basic, segmented display
• Others may have a graphic display, color screen
• Easy to see - consider the display size, font size, and if display is backlit
45
YSI TruLab 1110 – segmented display
YSI MultiLab 4010-2/3 – large, easy to read, backlit, color display
Presenter
Presentation Notes
The instrument display quality should also be considered. Some instruments have a very basic display, while others have a large, backlit, graphic display with color. These instruments can clearly be seen from across the room, which is very helpful if you are preparing solutions and you want to keep an eye on the displayed measurement. Therefore, you will want to ensure the display is easy to see and will meet you needs.
Selecting a pH Meter – Other Considerations
Important Features
• Auto-buffer recognition: meter recognizes the buffer based on mV values and selected buffer set – speeds up calibration
• ATC (automatic temperature compensation): meter automatically compensates pH for temp – accurate pH measurements
• GLP (calibration) record: allows user to review detailed calibration information
• What’s included with purchase
46
YSI MultiLab 4010-1 pH kit
Presenter
Presentation Notes
Now that you have a meter selected, ensure it has other important features before making a purchasing decision. Auto-buffer recognition speeds up calibration by automatically recognizing the buffer being used. Automatic temperature compensation is very important, as this feature takes the temp reading and automatically compensates pH measurements for the influence of temperature. A detailed calibration record, also called a good laboratory practice record, allows the user to view important calibration information such as the slope, zero point, mV values in each buffer, and temperature for each calibration point. Also consider what is included when you purchase the meter, such as an electrode stand, power supply, and other accessories.
Selecting a pH Meter – Other Considerations
Important Features
• Number of stored buffer sets
• Warranty period and after sales support
• Available pH electrodes and other sensors
• Easy to use; auto-stable feature
• Ability to display mV values
47
YSI pH electrodes with BNC connection
YSI MultiLab 4010-3 displaying in mV
Presenter
Presentation Notes
Some instruments have many stored buffer sets within the instrument’s memory. Since buffer sets can have different temperature profiles and buffer values, selecting the exact buffer set you have will ensure an accurate calibration result. Since lab instruments should last a long time, please consider the meter warranty period and the quality of the company’s technical support. This will be very important if you ever have an issue with the meter. Ensure the meter has a variety of pH electrodes available. Also ensure the meter is easy to use by checking out reviews, a video overview of the meter, as well as other videos where the meter is actually being used. Instrument auto-stable will ensure calibration and measurement points are not recorded until the measurement is stable, so this is another important feature to consider. Finally, ensure the meter can display mV values, as this is an excellent troubleshooting tool when trying to determine any electrode issues.
Available pH Resources
48
YSI pH Handbook
The YSI pH Handbook covers:
• Basic concepts of pH measurement • pH electrode design • Measurement, calibration, and cleaning tips • Selecting an electrode • Lab pH ‘Quick Tips’ • And much more...
49
bit.ly/YSIpHbook
Presenter
Presentation Notes
Perhaps the most comprehensive resource is the YSI pH Handbook. Much of the information covered today is included in this handbook, although it is discussed in more detail. At the back of the handbook, the most practical points are summarized in the pH Quick Tips section. The pages can be printed and hung on a wall in your lab as a quick reference.
Other Resources
50
Electrode Selection Guide bit.ly/pHselectguide
Electrode Application Guide bit.ly/pHappguide
Electrode Calibration Guide bit.ly/pHcalguide
YouTube.com/ysiinc
YSI.com/blog
YSI Laboratory Newsletter YSI.com/subscribe
Presenter
Presentation Notes
We also have a calibration guide that discusses the most important aspects of calibration, as well as the electrode selection and application guides we saw earlier. Finally, we have a variety of helpful videos on our YouTube channel and we cover many lab-related topics on our blog and in our lab newsletter.