Embed Size (px)
Citation preview

IBM Rational Host Access Transformation Services
Advanced Macro GuideVersion 8.0
SC14-7295-00
���


IBM Rational Host Access Transformation Services
Advanced Macro GuideVersion 8.0
SC14-7295-00
���

Note:Before using this information and the product it supports, read the information in Appendix B, “Notices,” on page 203.
Fifth Edition (August 2011)
© Copyright IBM Corporation 2003, 2011.US Government Users Restricted Rights – Use, duplication or disclosure restricted by GSA ADP Schedule Contractwith IBM Corp.

Contents
Figures . . . . . . . . . . . . . . . . . . . . . . . . . . . . . . . . . . . . ix
Tables . . . . . . . . . . . . . . . . . . . . . . . . . . . . . . . . . . . . xiii
Part 1. Developing macros . . . . . . . . . . . . . . . . . . . . . . . . . . 1
Chapter 1. Introducing advanced macros . . . . . . . . . . . . . . . . . . . . . 3Adapting Host On-Demand macros for use in HATS . . . . . . . . . . . . . . . . . . . . . . 3Working with macros in HATS . . . . . . . . . . . . . . . . . . . . . . . . . . . . . 6Definitions of terms . . . . . . . . . . . . . . . . . . . . . . . . . . . . . . . . . 7Samples . . . . . . . . . . . . . . . . . . . . . . . . . . . . . . . . . . . . . 7
Chapter 2. Macro structure . . . . . . . . . . . . . . . . . . . . . . . . . . . 9Macro script . . . . . . . . . . . . . . . . . . . . . . . . . . . . . . . . . . . 9
XML elements . . . . . . . . . . . . . . . . . . . . . . . . . . . . . . . . . . 9Conceptual view of a macro script. . . . . . . . . . . . . . . . . . . . . . . . . . . 10
The macro screen and its subcomponents . . . . . . . . . . . . . . . . . . . . . . . . . 11Application screen . . . . . . . . . . . . . . . . . . . . . . . . . . . . . . . . 11Macro screen . . . . . . . . . . . . . . . . . . . . . . . . . . . . . . . . . . 12Conceptual view of a macro screen . . . . . . . . . . . . . . . . . . . . . . . . . . 13
Chapter 3. Data types, operators, and expressions . . . . . . . . . . . . . . . . . 15Basic and advanced macro format . . . . . . . . . . . . . . . . . . . . . . . . . . . . 15
Representation of strings and non-alphanumeric characters . . . . . . . . . . . . . . . . . . 15Converting your macro to a different format . . . . . . . . . . . . . . . . . . . . . . . 16
Standard data types . . . . . . . . . . . . . . . . . . . . . . . . . . . . . . . . 17Boolean data . . . . . . . . . . . . . . . . . . . . . . . . . . . . . . . . . . 17Integers. . . . . . . . . . . . . . . . . . . . . . . . . . . . . . . . . . . . 17Doubles . . . . . . . . . . . . . . . . . . . . . . . . . . . . . . . . . . . 17Strings . . . . . . . . . . . . . . . . . . . . . . . . . . . . . . . . . . . . 17
Fields . . . . . . . . . . . . . . . . . . . . . . . . . . . . . . . . . . . . . 18The value null . . . . . . . . . . . . . . . . . . . . . . . . . . . . . . . . . . 18Arithmetic operators and expressions. . . . . . . . . . . . . . . . . . . . . . . . . . . 18
Using arithmetic expressions . . . . . . . . . . . . . . . . . . . . . . . . . . . . 19String concatenation operator (+) . . . . . . . . . . . . . . . . . . . . . . . . . . . . 19Conditional and logical operators and expressions . . . . . . . . . . . . . . . . . . . . . . 19Automatic data type conversion . . . . . . . . . . . . . . . . . . . . . . . . . . . . 20
Effect of context . . . . . . . . . . . . . . . . . . . . . . . . . . . . . . . . . 20Conversion to boolean. . . . . . . . . . . . . . . . . . . . . . . . . . . . . . . 21Conversion to integer . . . . . . . . . . . . . . . . . . . . . . . . . . . . . . . 21Conversion to double . . . . . . . . . . . . . . . . . . . . . . . . . . . . . . . 21Conversion to string . . . . . . . . . . . . . . . . . . . . . . . . . . . . . . . 21Conversion errors . . . . . . . . . . . . . . . . . . . . . . . . . . . . . . . . 21
Equivalents . . . . . . . . . . . . . . . . . . . . . . . . . . . . . . . . . . . 21Significance of a negative value for a row or column . . . . . . . . . . . . . . . . . . . . . 22
Chapter 4. How the macro runtime processes a macro screen . . . . . . . . . . . . 25Overview of macro runtime processing . . . . . . . . . . . . . . . . . . . . . . . . . . 25
Scenario used as an example . . . . . . . . . . . . . . . . . . . . . . . . . . . . 25Stages in processing a macro screen . . . . . . . . . . . . . . . . . . . . . . . . . . 27Stage 1 . . . . . . . . . . . . . . . . . . . . . . . . . . . . . . . . . . . . 27Overview of all 3 stages of the entire process . . . . . . . . . . . . . . . . . . . . . . . 27
Stage 1: Determining the next macro screen to be processed . . . . . . . . . . . . . . . . . . . 28Step 1(a): Adding macro screen names to the list of valid next screens . . . . . . . . . . . . . . . 28
© Copyright IBM Corp. 2003, 2011 iii

Step 1(b): Screen recognition . . . . . . . . . . . . . . . . . . . . . . . . . . . . . 30Step 1(c): Removing the names of candidate macro screens from the list of valid next screens . . . . . . . 32
Stage 2: Making the successful candidate the new current macro screen . . . . . . . . . . . . . . . 32Stage 3: Performing the actions in the new current macro screen. . . . . . . . . . . . . . . . . . 32
Inserting a delay after an action . . . . . . . . . . . . . . . . . . . . . . . . . . . 33Repeating the processing cycle . . . . . . . . . . . . . . . . . . . . . . . . . . . . . 33Terminating the macro. . . . . . . . . . . . . . . . . . . . . . . . . . . . . . . . 33
Chapter 5. Screen description . . . . . . . . . . . . . . . . . . . . . . . . . . 35Definition of terms . . . . . . . . . . . . . . . . . . . . . . . . . . . . . . . . . 35Recorded descriptions . . . . . . . . . . . . . . . . . . . . . . . . . . . . . . . . 36
Why the recorded descriptions work . . . . . . . . . . . . . . . . . . . . . . . . . . 36Recorded descriptors provide a framework . . . . . . . . . . . . . . . . . . . . . . . . 36
Evaluation of descriptors . . . . . . . . . . . . . . . . . . . . . . . . . . . . . . . 37Overview of the process . . . . . . . . . . . . . . . . . . . . . . . . . . . . . . 37Evaluation of individual descriptors . . . . . . . . . . . . . . . . . . . . . . . . . . 38Default combining method . . . . . . . . . . . . . . . . . . . . . . . . . . . . . 38The uselogic attribute . . . . . . . . . . . . . . . . . . . . . . . . . . . . . . . 39
The descriptors . . . . . . . . . . . . . . . . . . . . . . . . . . . . . . . . . . 40OIA descriptor (<oia> element) . . . . . . . . . . . . . . . . . . . . . . . . . . . . 41Number of Fields descriptor (<numfields> element) . . . . . . . . . . . . . . . . . . . . . 41Number of Input Fields descriptor (<numinputfields> element) . . . . . . . . . . . . . . . . . 42String descriptor (<string> element) . . . . . . . . . . . . . . . . . . . . . . . . . . 42Cursor descriptor (<cursor> element) . . . . . . . . . . . . . . . . . . . . . . . . . . 45Attribute descriptor (<attrib> element) . . . . . . . . . . . . . . . . . . . . . . . . . 45Condition descriptor (<condition> element) . . . . . . . . . . . . . . . . . . . . . . . 45Custom descriptor (<customreco> element) . . . . . . . . . . . . . . . . . . . . . . . . 46
Variable update action (<varupdate> element) . . . . . . . . . . . . . . . . . . . . . . . . 46Processing a Variable update action in a description . . . . . . . . . . . . . . . . . . . . . 46Variable update with the uselogic attribute . . . . . . . . . . . . . . . . . . . . . . . . 47
Chapter 6. Screen recognition. . . . . . . . . . . . . . . . . . . . . . . . . . 49Recognizing valid next screens . . . . . . . . . . . . . . . . . . . . . . . . . . . . . 49Entry screens, exit screens, and transient screens . . . . . . . . . . . . . . . . . . . . . . . 49
Entry screens . . . . . . . . . . . . . . . . . . . . . . . . . . . . . . . . . . 49Exit screens . . . . . . . . . . . . . . . . . . . . . . . . . . . . . . . . . . 50Transient screens . . . . . . . . . . . . . . . . . . . . . . . . . . . . . . . . 50
Timeout settings for screen recognition . . . . . . . . . . . . . . . . . . . . . . . . . . 51Screen recognition . . . . . . . . . . . . . . . . . . . . . . . . . . . . . . . . 52Timeout attribute on the <HAScript> element . . . . . . . . . . . . . . . . . . . . . . . 52Timeout attribute on the <nextscreens> element . . . . . . . . . . . . . . . . . . . . . . 53
Recognition limit . . . . . . . . . . . . . . . . . . . . . . . . . . . . . . . . . 53Determining when the recognition limit is reached . . . . . . . . . . . . . . . . . . . . . 53Action when the Recognition limit is reached . . . . . . . . . . . . . . . . . . . . . . . 54
Chapter 7. Macro actions . . . . . . . . . . . . . . . . . . . . . . . . . . . . 55Actions by function. . . . . . . . . . . . . . . . . . . . . . . . . . . . . . . . . 55How actions are performed . . . . . . . . . . . . . . . . . . . . . . . . . . . . . . 55
The runtime context . . . . . . . . . . . . . . . . . . . . . . . . . . . . . . . 55The macro screen context . . . . . . . . . . . . . . . . . . . . . . . . . . . . . . 55Specifying parameters for actions . . . . . . . . . . . . . . . . . . . . . . . . . . . 56
The actions . . . . . . . . . . . . . . . . . . . . . . . . . . . . . . . . . . . 56Comm wait action (<commwait> element) . . . . . . . . . . . . . . . . . . . . . . . . 56Conditional action (<if> element and <else> element) . . . . . . . . . . . . . . . . . . . . 57Extract action (<extract> element) . . . . . . . . . . . . . . . . . . . . . . . . . . . 58Input action (<input> element) . . . . . . . . . . . . . . . . . . . . . . . . . . . . 62Mouse click action (<mouseclick> element) . . . . . . . . . . . . . . . . . . . . . . . . 66Pause action (<pause> element) . . . . . . . . . . . . . . . . . . . . . . . . . . . 66Perform action (<perform> element) . . . . . . . . . . . . . . . . . . . . . . . . . . 67PlayMacro action (<playmacro> element) . . . . . . . . . . . . . . . . . . . . . . . . 68
iv IBM Rational Host Access Transformation Services: Advanced Macro Guide

Prompt action (<prompt> element) . . . . . . . . . . . . . . . . . . . . . . . . . . 70SQLQuery action (<sqlquery> element) . . . . . . . . . . . . . . . . . . . . . . . . . 71Trace action (<trace> element) . . . . . . . . . . . . . . . . . . . . . . . . . . . . 72Variable update action (<varupdate> element) . . . . . . . . . . . . . . . . . . . . . . . 73
Chapter 8. Timing issues . . . . . . . . . . . . . . . . . . . . . . . . . . . . 77Macro timing and delay characteristics . . . . . . . . . . . . . . . . . . . . . . . . . . 77
What each element and attribute is for . . . . . . . . . . . . . . . . . . . . . . . . . 77How the HATS macro processing engine uses these timing elements and attributes . . . . . . . . . . 78What happens after a screen's actions have completed . . . . . . . . . . . . . . . . . . . . 79High-level, textual flow of macro engine processing . . . . . . . . . . . . . . . . . . . . . 80
Pause after an action . . . . . . . . . . . . . . . . . . . . . . . . . . . . . . . . 80Speed of processing actions . . . . . . . . . . . . . . . . . . . . . . . . . . . . . 80The pausetime attribute . . . . . . . . . . . . . . . . . . . . . . . . . . . . . . 81The pause attribute . . . . . . . . . . . . . . . . . . . . . . . . . . . . . . . . 81Adding a pause after a particular action . . . . . . . . . . . . . . . . . . . . . . . . . 82
Screen completion . . . . . . . . . . . . . . . . . . . . . . . . . . . . . . . . . 82Recognizing the next macro screen too soon . . . . . . . . . . . . . . . . . . . . . . . 82Attributes that deal with screen completion. . . . . . . . . . . . . . . . . . . . . . . . 84
Chapter 9. Variables and imported Java classes . . . . . . . . . . . . . . . . . . 87HATS variables . . . . . . . . . . . . . . . . . . . . . . . . . . . . . . . . . . 87
Global variables . . . . . . . . . . . . . . . . . . . . . . . . . . . . . . . . . 87Macro variables . . . . . . . . . . . . . . . . . . . . . . . . . . . . . . . . . 87
Introduction to macro variables and imported types . . . . . . . . . . . . . . . . . . . . . . 87Advanced macro format required . . . . . . . . . . . . . . . . . . . . . . . . . . . 88Scope of variables . . . . . . . . . . . . . . . . . . . . . . . . . . . . . . . . 88Creating a variable . . . . . . . . . . . . . . . . . . . . . . . . . . . . . . . . 88Creating an imported type for a Java class . . . . . . . . . . . . . . . . . . . . . . . . 89
Common issues . . . . . . . . . . . . . . . . . . . . . . . . . . . . . . . . . . 90Deploying Java libraries or classes . . . . . . . . . . . . . . . . . . . . . . . . . . . 90Variable names and type names . . . . . . . . . . . . . . . . . . . . . . . . . . . 90Transferring variables from one macro to another. . . . . . . . . . . . . . . . . . . . . . 90Field variables . . . . . . . . . . . . . . . . . . . . . . . . . . . . . . . . . 91
Using variables . . . . . . . . . . . . . . . . . . . . . . . . . . . . . . . . . . 91Using variables belonging to a standard type . . . . . . . . . . . . . . . . . . . . . . . 91Using variables belonging to an imported type . . . . . . . . . . . . . . . . . . . . . . 92Comparing variables of the same imported type . . . . . . . . . . . . . . . . . . . . . . 93
Calling Java methods . . . . . . . . . . . . . . . . . . . . . . . . . . . . . . . . 94Where method calls can be used . . . . . . . . . . . . . . . . . . . . . . . . . . . 94Syntax of a method call . . . . . . . . . . . . . . . . . . . . . . . . . . . . . . 94How the macro runtime searches for a called method . . . . . . . . . . . . . . . . . . . . 94
The Macro Utility Libraries (HML libraries). . . . . . . . . . . . . . . . . . . . . . . . . 95Invoking a method belonging to an HML library . . . . . . . . . . . . . . . . . . . . . . 96Variable names beginning with HML are reserved . . . . . . . . . . . . . . . . . . . . . 96$HMLFormatUtil$ . . . . . . . . . . . . . . . . . . . . . . . . . . . . . . . . 96$HMLPSUtil$. . . . . . . . . . . . . . . . . . . . . . . . . . . . . . . . . . 97$HMLSessionUtil$. . . . . . . . . . . . . . . . . . . . . . . . . . . . . . . . 103$HMLSQLUtil$. . . . . . . . . . . . . . . . . . . . . . . . . . . . . . . . . 104FormatNumberToString() and FormatStringToNumber() . . . . . . . . . . . . . . . . . . . 106
Chapter 10. Visual Macro Editor . . . . . . . . . . . . . . . . . . . . . . . . 107Creating a new macro . . . . . . . . . . . . . . . . . . . . . . . . . . . . . . . 107Using the editor . . . . . . . . . . . . . . . . . . . . . . . . . . . . . . . . . 107
Design tab . . . . . . . . . . . . . . . . . . . . . . . . . . . . . . . . . . 108Palette view . . . . . . . . . . . . . . . . . . . . . . . . . . . . . . . . . . 110Integrated terminal . . . . . . . . . . . . . . . . . . . . . . . . . . . . . . . 111Source tab . . . . . . . . . . . . . . . . . . . . . . . . . . . . . . . . . . 112
Working with macros. . . . . . . . . . . . . . . . . . . . . . . . . . . . . . . . 112Editing macro properties . . . . . . . . . . . . . . . . . . . . . . . . . . . . . 112
Contents v

Playing the macro . . . . . . . . . . . . . . . . . . . . . . . . . . . . . . . . 114Working with screens. . . . . . . . . . . . . . . . . . . . . . . . . . . . . . . . 114
Editing macro screen properties . . . . . . . . . . . . . . . . . . . . . . . . . . . 114Adding macro screens . . . . . . . . . . . . . . . . . . . . . . . . . . . . . . 114Associating a macro screen with a screen capture . . . . . . . . . . . . . . . . . . . . . 115Screen preview . . . . . . . . . . . . . . . . . . . . . . . . . . . . . . . . . 115Default screen recognition criteria . . . . . . . . . . . . . . . . . . . . . . . . . . 115Cut, delete, copy, and paste screens . . . . . . . . . . . . . . . . . . . . . . . . . . 116
Working with actions . . . . . . . . . . . . . . . . . . . . . . . . . . . . . . . . 118Adding and editing actions. . . . . . . . . . . . . . . . . . . . . . . . . . . . . 118Hiding and showing actions . . . . . . . . . . . . . . . . . . . . . . . . . . . . 119Actions . . . . . . . . . . . . . . . . . . . . . . . . . . . . . . . . . . . 120Custom action . . . . . . . . . . . . . . . . . . . . . . . . . . . . . . . . . 120Evaluate (If) action . . . . . . . . . . . . . . . . . . . . . . . . . . . . . . . 120Extract action . . . . . . . . . . . . . . . . . . . . . . . . . . . . . . . . . 121Extract All action . . . . . . . . . . . . . . . . . . . . . . . . . . . . . . . . 125Input action . . . . . . . . . . . . . . . . . . . . . . . . . . . . . . . . . . 125Pause action . . . . . . . . . . . . . . . . . . . . . . . . . . . . . . . . . . 126Perform action . . . . . . . . . . . . . . . . . . . . . . . . . . . . . . . . . 126Play macro action . . . . . . . . . . . . . . . . . . . . . . . . . . . . . . . . 126Prompt action . . . . . . . . . . . . . . . . . . . . . . . . . . . . . . . . . 127Prompt All action . . . . . . . . . . . . . . . . . . . . . . . . . . . . . . . . 129Set cursor position action . . . . . . . . . . . . . . . . . . . . . . . . . . . . . 129Update variable action . . . . . . . . . . . . . . . . . . . . . . . . . . . . . . 130
Working with next screen connections . . . . . . . . . . . . . . . . . . . . . . . . . . 130Adding a next screen connection from the palette . . . . . . . . . . . . . . . . . . . . . 130Reordering and changing next screen connections . . . . . . . . . . . . . . . . . . . . . 130
Working with VME preferences . . . . . . . . . . . . . . . . . . . . . . . . . . . . 131
Chapter 11. Advanced Macro Editor . . . . . . . . . . . . . . . . . . . . . . . 133Using the editor . . . . . . . . . . . . . . . . . . . . . . . . . . . . . . . . . 133
Macro tab . . . . . . . . . . . . . . . . . . . . . . . . . . . . . . . . . . 134Screens tab . . . . . . . . . . . . . . . . . . . . . . . . . . . . . . . . . . 136Links tab . . . . . . . . . . . . . . . . . . . . . . . . . . . . . . . . . . . 145Variables tab . . . . . . . . . . . . . . . . . . . . . . . . . . . . . . . . . 147
Working with actions. . . . . . . . . . . . . . . . . . . . . . . . . . . . . . . . 151Comm wait action. . . . . . . . . . . . . . . . . . . . . . . . . . . . . . . . 151Conditional action . . . . . . . . . . . . . . . . . . . . . . . . . . . . . . . . 152Extract action . . . . . . . . . . . . . . . . . . . . . . . . . . . . . . . . . 152Input action . . . . . . . . . . . . . . . . . . . . . . . . . . . . . . . . . . 154Mouse click action. . . . . . . . . . . . . . . . . . . . . . . . . . . . . . . . 154Pause action . . . . . . . . . . . . . . . . . . . . . . . . . . . . . . . . . . 155Perform action . . . . . . . . . . . . . . . . . . . . . . . . . . . . . . . . . 155Playmacro action . . . . . . . . . . . . . . . . . . . . . . . . . . . . . . . . 155Prompt action . . . . . . . . . . . . . . . . . . . . . . . . . . . . . . . . . 155SQLQuery action . . . . . . . . . . . . . . . . . . . . . . . . . . . . . . . . 158Trace action . . . . . . . . . . . . . . . . . . . . . . . . . . . . . . . . . . 163Variable update action . . . . . . . . . . . . . . . . . . . . . . . . . . . . . . 163
Part 2. The Host On-Demand macro language . . . . . . . . . . . . . . . . 165
Chapter 12. Macro language features . . . . . . . . . . . . . . . . . . . . . . 167Syntax and editing . . . . . . . . . . . . . . . . . . . . . . . . . . . . . . . . 167
XML syntax in the Host On-Demand macro language . . . . . . . . . . . . . . . . . . . . 167Source view editing . . . . . . . . . . . . . . . . . . . . . . . . . . . . . . . 168
Hierarchy of the elements . . . . . . . . . . . . . . . . . . . . . . . . . . . . . . 168Inserting comments into a macro script. . . . . . . . . . . . . . . . . . . . . . . . . . 169
Comment errors . . . . . . . . . . . . . . . . . . . . . . . . . . . . . . . . 169Examples of comments . . . . . . . . . . . . . . . . . . . . . . . . . . . . . . 169
Debugging macro scripts with the <trace> element . . . . . . . . . . . . . . . . . . . . . . 170
vi IBM Rational Host Access Transformation Services: Advanced Macro Guide
Chapter 13. Macro language elements. . . . . . . . . . . . . . . . . . . . . . 171Specifying the attributes . . . . . . . . . . . . . . . . . . . . . . . . . . . . . . . 171
XML requirements. . . . . . . . . . . . . . . . . . . . . . . . . . . . . . . . 171Advanced format in attribute values. . . . . . . . . . . . . . . . . . . . . . . . . . 171Typed data . . . . . . . . . . . . . . . . . . . . . . . . . . . . . . . . . . 171
<actions> element . . . . . . . . . . . . . . . . . . . . . . . . . . . . . . . . . 172Attributes . . . . . . . . . . . . . . . . . . . . . . . . . . . . . . . . . . 172XML samples . . . . . . . . . . . . . . . . . . . . . . . . . . . . . . . . . 172
<attrib> element . . . . . . . . . . . . . . . . . . . . . . . . . . . . . . . . . 173Attributes . . . . . . . . . . . . . . . . . . . . . . . . . . . . . . . . . . 173XML samples . . . . . . . . . . . . . . . . . . . . . . . . . . . . . . . . . 173
<comment> element . . . . . . . . . . . . . . . . . . . . . . . . . . . . . . . . 173Attributes . . . . . . . . . . . . . . . . . . . . . . . . . . . . . . . . . . 173XML samples . . . . . . . . . . . . . . . . . . . . . . . . . . . . . . . . . 174Alternate method for inserting comments . . . . . . . . . . . . . . . . . . . . . . . . 174
<commwait> element . . . . . . . . . . . . . . . . . . . . . . . . . . . . . . . 174Attributes . . . . . . . . . . . . . . . . . . . . . . . . . . . . . . . . . . 174XML samples . . . . . . . . . . . . . . . . . . . . . . . . . . . . . . . . . 174
<condition> element . . . . . . . . . . . . . . . . . . . . . . . . . . . . . . . . 175Attributes . . . . . . . . . . . . . . . . . . . . . . . . . . . . . . . . . . 175XML samples . . . . . . . . . . . . . . . . . . . . . . . . . . . . . . . . . 175
<create> element . . . . . . . . . . . . . . . . . . . . . . . . . . . . . . . . . 175Attributes . . . . . . . . . . . . . . . . . . . . . . . . . . . . . . . . . . 175XML samples . . . . . . . . . . . . . . . . . . . . . . . . . . . . . . . . . 176
<cursor> element . . . . . . . . . . . . . . . . . . . . . . . . . . . . . . . . . 176Attributes . . . . . . . . . . . . . . . . . . . . . . . . . . . . . . . . . . 176XML samples . . . . . . . . . . . . . . . . . . . . . . . . . . . . . . . . . 176
<custom> element . . . . . . . . . . . . . . . . . . . . . . . . . . . . . . . . . 176Attributes . . . . . . . . . . . . . . . . . . . . . . . . . . . . . . . . . . 177XML samples . . . . . . . . . . . . . . . . . . . . . . . . . . . . . . . . . 177
<customreco> element . . . . . . . . . . . . . . . . . . . . . . . . . . . . . . . 177Attributes . . . . . . . . . . . . . . . . . . . . . . . . . . . . . . . . . . 177XML samples . . . . . . . . . . . . . . . . . . . . . . . . . . . . . . . . . 177
<description> element . . . . . . . . . . . . . . . . . . . . . . . . . . . . . . . 178Attributes . . . . . . . . . . . . . . . . . . . . . . . . . . . . . . . . . . 178XML samples . . . . . . . . . . . . . . . . . . . . . . . . . . . . . . . . . 178
<else> element . . . . . . . . . . . . . . . . . . . . . . . . . . . . . . . . . . 178Attributes . . . . . . . . . . . . . . . . . . . . . . . . . . . . . . . . . . 179XML samples . . . . . . . . . . . . . . . . . . . . . . . . . . . . . . . . . 179
<extract> element . . . . . . . . . . . . . . . . . . . . . . . . . . . . . . . . . 179Attributes . . . . . . . . . . . . . . . . . . . . . . . . . . . . . . . . . . 179XML samples . . . . . . . . . . . . . . . . . . . . . . . . . . . . . . . . . 180
<HAScript> element . . . . . . . . . . . . . . . . . . . . . . . . . . . . . . . . 180Attributes . . . . . . . . . . . . . . . . . . . . . . . . . . . . . . . . . . 180XML samples . . . . . . . . . . . . . . . . . . . . . . . . . . . . . . . . . 181
<if> element. . . . . . . . . . . . . . . . . . . . . . . . . . . . . . . . . . . 182Attributes . . . . . . . . . . . . . . . . . . . . . . . . . . . . . . . . . . 182XML samples . . . . . . . . . . . . . . . . . . . . . . . . . . . . . . . . . 182
<import> element . . . . . . . . . . . . . . . . . . . . . . . . . . . . . . . . . 183Attributes . . . . . . . . . . . . . . . . . . . . . . . . . . . . . . . . . . 183XML samples . . . . . . . . . . . . . . . . . . . . . . . . . . . . . . . . . 183
<input> element . . . . . . . . . . . . . . . . . . . . . . . . . . . . . . . . . 184Attributes . . . . . . . . . . . . . . . . . . . . . . . . . . . . . . . . . . 184XML samples . . . . . . . . . . . . . . . . . . . . . . . . . . . . . . . . . 184
<mouseclick> element . . . . . . . . . . . . . . . . . . . . . . . . . . . . . . . 185Attributes . . . . . . . . . . . . . . . . . . . . . . . . . . . . . . . . . . 185XML samples . . . . . . . . . . . . . . . . . . . . . . . . . . . . . . . . . 185
<nextscreen> element. . . . . . . . . . . . . . . . . . . . . . . . . . . . . . . . 185Attributes . . . . . . . . . . . . . . . . . . . . . . . . . . . . . . . . . . 185XML samples . . . . . . . . . . . . . . . . . . . . . . . . . . . . . . . . . 185
<nextscreens> element . . . . . . . . . . . . . . . . . . . . . . . . . . . . . . . 185
Contents vii
Attributes . . . . . . . . . . . . . . . . . . . . . . . . . . . . . . . . . . 186XML samples . . . . . . . . . . . . . . . . . . . . . . . . . . . . . . . . . 186
<numfields> element . . . . . . . . . . . . . . . . . . . . . . . . . . . . . . . . 186Attributes . . . . . . . . . . . . . . . . . . . . . . . . . . . . . . . . . . 186XML samples . . . . . . . . . . . . . . . . . . . . . . . . . . . . . . . . . 186
<numinputfields> element . . . . . . . . . . . . . . . . . . . . . . . . . . . . . . 187Attributes . . . . . . . . . . . . . . . . . . . . . . . . . . . . . . . . . . 187XML samples . . . . . . . . . . . . . . . . . . . . . . . . . . . . . . . . . 187
<oia> element . . . . . . . . . . . . . . . . . . . . . . . . . . . . . . . . . . 187Attributes . . . . . . . . . . . . . . . . . . . . . . . . . . . . . . . . . . 187XML samples . . . . . . . . . . . . . . . . . . . . . . . . . . . . . . . . . 187
<pause> element . . . . . . . . . . . . . . . . . . . . . . . . . . . . . . . . . 188Attributes . . . . . . . . . . . . . . . . . . . . . . . . . . . . . . . . . . 188XML samples . . . . . . . . . . . . . . . . . . . . . . . . . . . . . . . . . 188
<perform> element . . . . . . . . . . . . . . . . . . . . . . . . . . . . . . . . 188Attributes . . . . . . . . . . . . . . . . . . . . . . . . . . . . . . . . . . 188XML samples . . . . . . . . . . . . . . . . . . . . . . . . . . . . . . . . . 188
<playmacro> element . . . . . . . . . . . . . . . . . . . . . . . . . . . . . . . 189Attributes . . . . . . . . . . . . . . . . . . . . . . . . . . . . . . . . . . 189XML samples . . . . . . . . . . . . . . . . . . . . . . . . . . . . . . . . . 189
<prompt> element. . . . . . . . . . . . . . . . . . . . . . . . . . . . . . . . . 189Attributes . . . . . . . . . . . . . . . . . . . . . . . . . . . . . . . . . . 189XML samples . . . . . . . . . . . . . . . . . . . . . . . . . . . . . . . . . 190
<recolimit> element . . . . . . . . . . . . . . . . . . . . . . . . . . . . . . . . 190Attributes . . . . . . . . . . . . . . . . . . . . . . . . . . . . . . . . . . 191XML samples . . . . . . . . . . . . . . . . . . . . . . . . . . . . . . . . . 191
<screen> element . . . . . . . . . . . . . . . . . . . . . . . . . . . . . . . . . 191Attributes . . . . . . . . . . . . . . . . . . . . . . . . . . . . . . . . . . 191XML samples . . . . . . . . . . . . . . . . . . . . . . . . . . . . . . . . . 192
<sqlquery> element . . . . . . . . . . . . . . . . . . . . . . . . . . . . . . . . 192Attributes . . . . . . . . . . . . . . . . . . . . . . . . . . . . . . . . . . 192XML samples . . . . . . . . . . . . . . . . . . . . . . . . . . . . . . . . . 192
<string> element . . . . . . . . . . . . . . . . . . . . . . . . . . . . . . . . . 193Attributes . . . . . . . . . . . . . . . . . . . . . . . . . . . . . . . . . . 193XML samples . . . . . . . . . . . . . . . . . . . . . . . . . . . . . . . . . 193
<trace> element . . . . . . . . . . . . . . . . . . . . . . . . . . . . . . . . . 194Attributes . . . . . . . . . . . . . . . . . . . . . . . . . . . . . . . . . . 194XML samples . . . . . . . . . . . . . . . . . . . . . . . . . . . . . . . . . 194
<type> element. . . . . . . . . . . . . . . . . . . . . . . . . . . . . . . . . . 194Attributes . . . . . . . . . . . . . . . . . . . . . . . . . . . . . . . . . . 194XML samples . . . . . . . . . . . . . . . . . . . . . . . . . . . . . . . . . 195
<vars> element . . . . . . . . . . . . . . . . . . . . . . . . . . . . . . . . . . 195Attributes . . . . . . . . . . . . . . . . . . . . . . . . . . . . . . . . . . 195XML samples . . . . . . . . . . . . . . . . . . . . . . . . . . . . . . . . . 195
<varupdate> element . . . . . . . . . . . . . . . . . . . . . . . . . . . . . . . . 196Attributes . . . . . . . . . . . . . . . . . . . . . . . . . . . . . . . . . . 196XML samples . . . . . . . . . . . . . . . . . . . . . . . . . . . . . . . . . 196
Appendix A. Additional information . . . . . . . . . . . . . . . . . . . . . . . 199Default rule for combining multiple descriptors in one macro screen . . . . . . . . . . . . . . . . 199Mnemonic keywords for the Input action . . . . . . . . . . . . . . . . . . . . . . . . . 199
Appendix B. Notices . . . . . . . . . . . . . . . . . . . . . . . . . . . . . 203Programming interface information . . . . . . . . . . . . . . . . . . . . . . . . . . . 204Trademarks . . . . . . . . . . . . . . . . . . . . . . . . . . . . . . . . . . . 205
viii IBM Rational Host Access Transformation Services: Advanced Macro Guide

Figures
1. Simple macro structure . . . . . . . . . . . . . . . . . . . . . . . . . . . . . . 52. Sample XML element . . . . . . . . . . . . . . . . . . . . . . . . . . . . . . 93. Sample XML element written in the shorthand format . . . . . . . . . . . . . . . . . . . 104. Conceptual view of a macro script . . . . . . . . . . . . . . . . . . . . . . . . . . 105. A sample application screen, the OS/390 ISPF Primary Option Menu . . . . . . . . . . . . . . 126. Conceptual view of a <screen> element . . . . . . . . . . . . . . . . . . . . . . . . 137. The OS/390 ISPF Primary Option Menu . . . . . . . . . . . . . . . . . . . . . . . . 258. The Utility Selection Panel application screen . . . . . . . . . . . . . . . . . . . . . . 269. Example of the uselogic attribute of the <description> element . . . . . . . . . . . . . . . . 40
10. Rows 14–18 of an application screen . . . . . . . . . . . . . . . . . . . . . . . . . 4411. The <description> element of ScreenB. . . . . . . . . . . . . . . . . . . . . . . . . 4712. Error message for screen recognition timeout . . . . . . . . . . . . . . . . . . . . . . 5213. Error message shown for host terminal . . . . . . . . . . . . . . . . . . . . . . . . 5314. Example of Comm wait action . . . . . . . . . . . . . . . . . . . . . . . . . . . 5715. Sample code fragment showing a Condition action . . . . . . . . . . . . . . . . . . . . 5816. <input> element with unencrypted input key sequence . . . . . . . . . . . . . . . . . . . 6317. <input> element with encrypted input key sequence . . . . . . . . . . . . . . . . . . . . 6318. Example of the Perform action . . . . . . . . . . . . . . . . . . . . . . . . . . . 6819. Example of the PlayMacro action . . . . . . . . . . . . . . . . . . . . . . . . . . 7020. Sample code TRACE . . . . . . . . . . . . . . . . . . . . . . . . . . . . . . 7321. Example 1 for pausetimevalue . . . . . . . . . . . . . . . . . . . . . . . . . . . 7922. Example 2 for pausetimevalue . . . . . . . . . . . . . . . . . . . . . . . . . . . 7923. Reminder message . . . . . . . . . . . . . . . . . . . . . . . . . . . . . . . 8824. Sample <vars> element . . . . . . . . . . . . . . . . . . . . . . . . . . . . . 8925. Imported type and variable of that type . . . . . . . . . . . . . . . . . . . . . . . . 8926. Example of invoking HML methods . . . . . . . . . . . . . . . . . . . . . . . . . 9627. Example for numberToString() . . . . . . . . . . . . . . . . . . . . . . . . . . . 9728. Example for stringToNumber() . . . . . . . . . . . . . . . . . . . . . . . . . . . 9729. Correspondence of row and column location in the presentation space . . . . . . . . . . . . . . 9930. Layout when 'Message' appears in row 1, column 1 . . . . . . . . . . . . . . . . . . . . 9931. Example for convertPosToCol() . . . . . . . . . . . . . . . . . . . . . . . . . . 10032. Example for convertPosToRow() . . . . . . . . . . . . . . . . . . . . . . . . . . 10033. Example for enableRoundTrip() . . . . . . . . . . . . . . . . . . . . . . . . . . 10134. Example for getCursorCol() . . . . . . . . . . . . . . . . . . . . . . . . . . . . 10135. Example for getCursorPos() . . . . . . . . . . . . . . . . . . . . . . . . . . . . 10136. Example for getCursorRow() . . . . . . . . . . . . . . . . . . . . . . . . . . . 10137. Example for getSize() . . . . . . . . . . . . . . . . . . . . . . . . . . . . . . 10238. Example for getSizeCols() . . . . . . . . . . . . . . . . . . . . . . . . . . . . 10239. Example for getSizeRows() . . . . . . . . . . . . . . . . . . . . . . . . . . . . 10240. Example for getString() . . . . . . . . . . . . . . . . . . . . . . . . . . . . . 10341. Example for searchString() . . . . . . . . . . . . . . . . . . . . . . . . . . . . 10342. Example for getHost(). . . . . . . . . . . . . . . . . . . . . . . . . . . . . . 10343. Example for getLabel() . . . . . . . . . . . . . . . . . . . . . . . . . . . . . 10444. Example for getName() . . . . . . . . . . . . . . . . . . . . . . . . . . . . . 10445. Example for getColumnSize() . . . . . . . . . . . . . . . . . . . . . . . . . . . 10546. Example for getDataByIndex() . . . . . . . . . . . . . . . . . . . . . . . . . . . 10547. Example for getDataByName() . . . . . . . . . . . . . . . . . . . . . . . . . . . 10648. Example for getRowSize() . . . . . . . . . . . . . . . . . . . . . . . . . . . . 10649. Visual Macro Editor parts . . . . . . . . . . . . . . . . . . . . . . . . . . . . 10850. Visual Macro Editor design tab . . . . . . . . . . . . . . . . . . . . . . . . . . 10951. Visual Macro Editor Palette view . . . . . . . . . . . . . . . . . . . . . . . . . . 11152. Visual Macro Editor integrated terminal. . . . . . . . . . . . . . . . . . . . . . . . 11253. Delete screen example - before cut or delete . . . . . . . . . . . . . . . . . . . . . . 11654. Delete screen example - after cut or delete . . . . . . . . . . . . . . . . . . . . . . . 11755. Copy screens example . . . . . . . . . . . . . . . . . . . . . . . . . . . . . 117
© Copyright IBM Corp. 2003, 2011 ix

56. Paste screens example. . . . . . . . . . . . . . . . . . . . . . . . . . . . . . 11857. Visual Macro Editor actions . . . . . . . . . . . . . . . . . . . . . . . . . . . . 11958. Hiding screen actions . . . . . . . . . . . . . . . . . . . . . . . . . . . . . . 11959. Showing screen actions . . . . . . . . . . . . . . . . . . . . . . . . . . . . . 12060. The Advanced Macro Editor . . . . . . . . . . . . . . . . . . . . . . . . . . . 13361. Macro tab of the AME . . . . . . . . . . . . . . . . . . . . . . . . . . . . . 13562. A sample <HAScript> element . . . . . . . . . . . . . . . . . . . . . . . . . . . 13663. Screens tab . . . . . . . . . . . . . . . . . . . . . . . . . . . . . . . . . 13664. Begin tag and end tag of a <screen> element . . . . . . . . . . . . . . . . . . . . . . 13865. Sample XML <screen> element . . . . . . . . . . . . . . . . . . . . . . . . . . 13866. Description tab . . . . . . . . . . . . . . . . . . . . . . . . . . . . . . . . 13967. Contents of the Descriptor list box with one actual descriptor . . . . . . . . . . . . . . . . 14068. Contents of the Descriptor list box with two actual descriptors . . . . . . . . . . . . . . . . 14069. A <description> element with three descriptors . . . . . . . . . . . . . . . . . . . . . 14270. Actions tab . . . . . . . . . . . . . . . . . . . . . . . . . . . . . . . . . 14471. Contents of the list of an Actions list box with no actions created . . . . . . . . . . . . . . . 14572. Contents of the list of an Actions list box with one actual action . . . . . . . . . . . . . . . 14573. Links tab . . . . . . . . . . . . . . . . . . . . . . . . . . . . . . . . . . 14674. Macro screen ScreenR with <nextscreens> element . . . . . . . . . . . . . . . . . . . . 14775. Variables tab . . . . . . . . . . . . . . . . . . . . . . . . . . . . . . . . . 14876. Contents of the Type list box after an imported type has been declared . . . . . . . . . . . . . 14977. SQL statement written on several lines . . . . . . . . . . . . . . . . . . . . . . . . 16178. Same SQL statement written on one line . . . . . . . . . . . . . . . . . . . . . . . 16179. SQL statement written for the basic macro format . . . . . . . . . . . . . . . . . . . . 16180. Same SQL statement written for the advanced macro format . . . . . . . . . . . . . . . . . 16181. Example of equivalent upper case and lower case . . . . . . . . . . . . . . . . . . . . 16282. Hierarchy of elements in the Host On-Demand macro language supported in HATS . . . . . . . . . 16883. Example of using the <trace> element . . . . . . . . . . . . . . . . . . . . . . . . 17084. Output from example of using the <trace> element . . . . . . . . . . . . . . . . . . . . 17085. Example for the <actions> element . . . . . . . . . . . . . . . . . . . . . . . . . 17286. Example for the <attrib> element . . . . . . . . . . . . . . . . . . . . . . . . . . 17387. Example for the <comment> element . . . . . . . . . . . . . . . . . . . . . . . . 17488. Example for the <commwait> element . . . . . . . . . . . . . . . . . . . . . . . . 17489. Example for the <condition> element . . . . . . . . . . . . . . . . . . . . . . . . 17590. Example for the <create> element. . . . . . . . . . . . . . . . . . . . . . . . . . 17691. Example for the <cursor> element . . . . . . . . . . . . . . . . . . . . . . . . . 17692. Example for the <custom> element . . . . . . . . . . . . . . . . . . . . . . . . . 17793. Example for the <customreco> element . . . . . . . . . . . . . . . . . . . . . . . . 17894. Example for the <description> element . . . . . . . . . . . . . . . . . . . . . . . . 17895. Example for the <else> element . . . . . . . . . . . . . . . . . . . . . . . . . . 17996. Example for the <extract> element . . . . . . . . . . . . . . . . . . . . . . . . . 18097. Example for the <HAScript> element . . . . . . . . . . . . . . . . . . . . . . . . 18198. Example for the <if> element . . . . . . . . . . . . . . . . . . . . . . . . . . . 18399. Example for the <import> element . . . . . . . . . . . . . . . . . . . . . . . . . 184
100. Example for the <input> element . . . . . . . . . . . . . . . . . . . . . . . . . . 184101. Example for the <mouseclick> element . . . . . . . . . . . . . . . . . . . . . . . . 185102. Example for the <nextscreen> element . . . . . . . . . . . . . . . . . . . . . . . . 185103. Example for the <nextscreens> element . . . . . . . . . . . . . . . . . . . . . . . . 186104. Example for the <numfields> element . . . . . . . . . . . . . . . . . . . . . . . . 186105. Example for the <numinputfields> element . . . . . . . . . . . . . . . . . . . . . . 187106. Example for the <oia> element. . . . . . . . . . . . . . . . . . . . . . . . . . . 187107. Example for the <pause> element. . . . . . . . . . . . . . . . . . . . . . . . . . 188108. Example for the <perform> element . . . . . . . . . . . . . . . . . . . . . . . . . 188109. Example for the <playmacro> element . . . . . . . . . . . . . . . . . . . . . . . . 189110. Example for the <prompt> element . . . . . . . . . . . . . . . . . . . . . . . . . 190111. Example for the <recolimit> element . . . . . . . . . . . . . . . . . . . . . . . . . 191112. Example for the <screen> element . . . . . . . . . . . . . . . . . . . . . . . . . 192113. Example for the <sqlquery> element . . . . . . . . . . . . . . . . . . . . . . . . . 193114. Example for the <string> element . . . . . . . . . . . . . . . . . . . . . . . . . . 194115. Example for the <trace> element . . . . . . . . . . . . . . . . . . . . . . . . . . 194116. Example for a <type> element . . . . . . . . . . . . . . . . . . . . . . . . . . . 195
x IBM Rational Host Access Transformation Services: Advanced Macro Guide

117. Example for the <vars> element . . . . . . . . . . . . . . . . . . . . . . . . . . 195118. Example for the <varupdate> element . . . . . . . . . . . . . . . . . . . . . . . . 197
Figures xi

xii IBM Rational Host Access Transformation Services: Advanced Macro Guide

Tables
1. Definitions of terms . . . . . . . . . . . . . . . . . . . . . . . . . . . . . . . 72. Arithmetic operators . . . . . . . . . . . . . . . . . . . . . . . . . . . . . . 183. Conditional operators . . . . . . . . . . . . . . . . . . . . . . . . . . . . . . 194. Logical operators. . . . . . . . . . . . . . . . . . . . . . . . . . . . . . . . 205. Negative value for row . . . . . . . . . . . . . . . . . . . . . . . . . . . . . 226. Negative value for column . . . . . . . . . . . . . . . . . . . . . . . . . . . . 227. Contents of macro screen Screen1 . . . . . . . . . . . . . . . . . . . . . . . . . . 268. Contents of macro screen Screen2 . . . . . . . . . . . . . . . . . . . . . . . . . . 279. Logical operators for the uselogic attribute . . . . . . . . . . . . . . . . . . . . . . . 40
10. Types of descriptors, how many of each type allowed . . . . . . . . . . . . . . . . . . . 4111. Example of variable names and values . . . . . . . . . . . . . . . . . . . . . . . . 7412. How the macro runtime maps macro data types to Java data types . . . . . . . . . . . . . . . 9413. HML variables . . . . . . . . . . . . . . . . . . . . . . . . . . . . . . . . 9514. Method summary for $HMLFormatUtil$ . . . . . . . . . . . . . . . . . . . . . . . . 9615. Method summary for $HMLPSUtil$ . . . . . . . . . . . . . . . . . . . . . . . . . 9716. Formulas for calculating values related to presentation space . . . . . . . . . . . . . . . . . 9917. Method summary for $HMLSessionUtil$ . . . . . . . . . . . . . . . . . . . . . . . 10318. Method summary for $HMLSQLUtil$ . . . . . . . . . . . . . . . . . . . . . . . . 10419. Example of two-dimensional array containing results . . . . . . . . . . . . . . . . . . . 10520. Three types of <description> element descriptors . . . . . . . . . . . . . . . . . . . . 14121. Valid settings for the descriptor Wait for OIA to Become Uninhibited . . . . . . . . . . . . . . 14222. Default initial values for variables . . . . . . . . . . . . . . . . . . . . . . . . . 14923. Communication states . . . . . . . . . . . . . . . . . . . . . . . . . . . . . 15124. Keywords for the Input action . . . . . . . . . . . . . . . . . . . . . . . . . . . 19925. Bidirectional keywords for the Input action . . . . . . . . . . . . . . . . . . . . . . 201
© Copyright IBM Corp. 2003, 2011 xiii

xiv IBM Rational Host Access Transformation Services: Advanced Macro Guide

Part 1. Developing macros
© Copyright IBM Corp. 2003, 2011 1

2 IBM Rational Host Access Transformation Services: Advanced Macro Guide

Chapter 1. Introducing advanced macros
As a developer using Host Access Transformation Services (HATS) Toolkit, you canincorporate macros into your HATS application. The HATS User's andAdministrator's Guide introduces the use of macros in HATS and describes how tocreate and modify basic macros. This document describes advanced macrofunctions that you can incorporate into your macro by using the Visual MacroEditor (VME) and the Advanced Macro Editor (AME). These tools providegraphical user interfaces that you can use to modify or add features to each screeninteraction with the host application.
Use these editors to make any of these changes to your HATS macros:v Add actions, such as new prompts, mouse clicks, or conditional actions.v Edit and enhance the macro's screen recognition behavior and user input.v Add more intelligent behavior to the macro, such as choosing between alternate
paths through an application.
Note: Support for the Macro Editor and the Advanced Macro Editor is deprecatedin HATS V8.0. While support continues for now, IBM reserves the right toremove these capabilities in a subsequent release of the product. Thissupport is replaced by the Visual Macro Editor.
Adapting Host On-Demand macros for use in HATSThis document describes the Host On-Demand macro language and its use. It isextracted from the Host On-Demand Macro Programming Guide Version 10, withsections modified to match the implementation of macros and the use of theeditors within HATS . This section explains how Host On-Demand macros areadapted for use within HATS.
The macros in a Host On-Demand environment typically run on the user'sworkstation. Although in a HATS rich client environment macros typically run onthe user's workstation, in a HATS Web environment macros typically run on acentralized server. Because of this difference, prompting for data to use in a macromust be done differently in HATS. This document describes opening a promptpanel on the user's workstation, but this is not done in HATS. Instead, HATSretrieves the data for the macro prompt from a HATS global variable, user list,HATS Integration Object input property, or the user through an HTML entry formsent to the user's workstation. Similarly, data extracted from a host screen cannotbe immediately displayed on the workstation of a HATS user. Instead, the data iscopied into a HATS global variable, copied into a HATS Integration Object outputproperty, or sent to the user's workstation in an HTML page. To help the HATSruntime's macro engine provide these additional macro interaction capabilities, theHATS Toolkit encapsulates each Host On-Demand macro script with another layerof XML that provides the HATS Toolkit and runtime with additional informationabout the macro script.
The Host On-Demand macro scripts described in this document begin with a<HAScript> tag and end with a </HAScript> tag. In HATS, each HostOn-Demand macro script is wrapped within the HATS <macro> begin tag and the</macro> end tag. The <macro> tag contains 4 elements:
© Copyright IBM Corp. 2003, 2011 3
v The <associatedConnections> tag defines connection definitions to associatewith this macro.– This helps the Toolkit when building drop-down lists of macro names as you
build and configure HATS applications.– This element is ignored by the HATS runtime macro engine.
v The <extracts> tag defines to the HATS macro engine how to handle dataextracted from a host screen while a macro is running. The information in thiselement is also used to indicate the size and type of Integration Object outputproperties to be created if the macro is used to create an Integration Object.– If the macro is played through a play macro action or a perform macro
transaction action, this element controls whether extracted data is stored intoa global variable or sent to the user's workstation with an HTML page.
– If this macro is played outside the HATS runtime's macro engine, this elementis ignored. For example, if the macro is run through a HATS IntegrationObject as a Web Service or as an EJB or a set of JSP pages, the extracted datais copied into output properties of the Integration Object and thus madeavailable to the Web service, EJB Access Bean, or JSP pages, respectively.
– Although the <extracts> tag is not used by an Integration Object at run time,the <extracts> tag is used to create an Integration Object from the HATSmacro, should you choose to do so. In particular, the structure of anIntegration Object's output properties is determined by this element. Theinformation in the <extracts> element must agree with the actual <extract>actions found inside the Host On-Demand macro script itself. Otherwise, thedata being extracted at run time will not fit correctly into the IntegrationObject's output properties, which might cause a loss of data. This is especiallyimportant when extracting tables of data, because the <extracts> tag willrecord the name, width, and number of elements in each column of data. TheHost On-Demand macro's <extract> tag must indicate the same area so thatparsing the data into the column output properties works correctly.
v The <prompts> tag describes for the HATS macro engine how to handle datarequired to complete running the macro. The information in this element also isused to indicate the size and type of Integration Object input properties to becreated if the macro is used to create an Integration Object.– If the HATS macro engine is running the macro (using a Play macro or
Perform macro transaction action) during a screen customization, this elementcontrols whether the required data is obtained from a global variable, from aspecified string literal, or is requested from the end user with an HTML page.
– If this macro is played outside of the HATS runtime's macro engine, thiselement is ignored, and any required data is supplied by the environmentrunning the macro (Web service, EJB, or Integration Object, for example).
– Although the <prompts> tag is not used by an Integration Object at run time,the <prompts> tag is used if you choose to create an Integration Object fromthe HATS macro. In particular, the structure of an Integration Object's inputproperties is determined by this element. The information in the <prompts>element must agree with the actual <prompt> actions found inside the HostOn-Demand macro script itself. Otherwise, the data being supplied by theIntegration Object at run time will not satisfy the data required for the HostOn-Demand macro's <prompt> actions, which can cause the macro to playincorrectly.
v The <HAScript> tag is the Host On-Demand macro script described in thisdocument.
4 IBM Rational Host Access Transformation Services: Advanced Macro Guide

The following example shows the structure with a simple macro containing twoprompts and a single extract:
<?xml version="1.0" encoding="UTF-8"?><macro>
<associatedConnections default="main"><connection name="main"/>
</associatedConnections><extracts>
<extract handler="default.jsp" index="-1" indexed="false"name="displayID" overwrite="true" save="true" separator=""showHandler="false" variableName="displayID"/>
</extracts><prompts>
<prompt handler="default.jsp" name="password" separator=""source="handler" value="" variableIndex="0"variableIndexed="false" variableName="" welApplID="" welIsPassword="false"/>
<prompt handler="default.jsp" name="userID" separator=""source="handler" value="" variableIndex="0"variableIndexed="false" variableName="" welApplID="" welIsPassword="false"/>
</prompts><HAScript author="" blockinput="false" creationdate=""
delayifnotenhancedtn="0" description=""ignorepauseforenhancedtn="false" name="SignOn" pausetime="300"promptall="true" supressclearevents="false" timeout="60000" usevars="false"><screen entryscreen="true" exitscreen="false" name="Screen1" transient="false">
<description uselogic="1 and 2"><oia invertmatch="false" optional="false" status="NOTINHIBITED"/><string casesense="false" col="35" invertmatch="false"
optional="false" row="1" value=" Sign On "/></description><actions>
<extract assigntovar="" continuous="false" ecol="79"erow="4" name="displayID" planetype="TEXT_PLANE"scol="70" srow="4" unwrap="false"/>
<prompt assigntovar="" clearfield="false" col="53"default="" description="" encrypted="false" len="10"movecursor="true" name="userID" required="false"row="6" title="" varupdateonly="false" xlatehostkeys="true"/>
<mouseclick col="53" row="7"/><prompt assigntovar="" clearfield="false" col="53"
default="" description="" encrypted="true" len="10"movecursor="true" name="password" required="false"row="7" title="" varupdateonly="false" xlatehostkeys="true"/>
<input col="0" encrypted="false" movecursor="true"row="0" value="[enter]" xlatehostkeys="true"/>
</actions><nextscreens timeout="0">
<nextscreen name="Screen2"/></nextscreens>
</screen><screen entryscreen="false" exitscreen="true" name="Screen2" transient="false">
<description uselogic="1 and (2 and 3 and 4)"><oia invertmatch="false" optional="false" status="NOTINHIBITED"/><cursor col="7" invertmatch="false" optional="false" row="20"/><numinputfields invertmatch="false" number="1" optional="false"/><string casesense="false" col="32" invertmatch="false"
optional="false" row="1" value=" i5/OS Main Menu " wrap="false"/></description><actions/><nextscreens timeout="0"/>
</screen></HAScript>
</macro>
Figure 1. Simple macro structure
Chapter 1. Introducing advanced macros 5
The example macro in Figure 1 on page 5 interacts with its environment differentlydepending on the engine playing the macro:v If this macro is run by the runtime macro engine in the connect event as a play
macro action, for example, the user is prompted by an HTML input form foruser ID and password, and the 5250 workstation display ID is stored in theHATS global variable displayID. See HATS User's and Administrator's Guide, formore information on the Play macro action.
v If instead the macro is run by a HATS Integration Object using a JSP page, aWeb service, an EJB Access Bean, or developer-supplied business logic, themacro fails if the Integration Object does not have the required values availablein its getUserID and getPassword methods when the macro is run. This isbecause an Integration Object supplies its own macro engine where all promptsget data from Integration Object getters, and all extracts place data intoIntegration Object setters. The names and types of the Integration Object's inputproperties and the output property are determined by the data in the <prompts>element and the <extracts> element, respectively. See HATS User's andAdministrator's Guide, for more information on Integration Objects.
v Also note that the above macro does not work as a connect macro associatedwith a HATS connection on the Connection Editor's Macros tab because connectand disconnect macros are special macros run automatically by the HATSconnection management subsystem instead of the runtime macro engine. Aconnect macro can only use a user list for its prompts. See HATS User's andAdministrator's Guide, for more information on connect and disconnect macros.
Working with macros in HATSYou can work with macros in several different ways within HATS Toolkit:v You can record macros in the HATS Toolkit using the host terminal. After you
record a macro, it is listed in the HATS Projects view, in the Macros folder. Formore information, see the chapter, Macros and host terminal, in the HATS User'sand Administrator's Guide.
v To edit a macro, double-click the macro name in the HATS Projects view to openthe default editor for the macro. The default editor for HATS macros is theVisual Macro Editor. For more information, see Chapter 10, “Visual MacroEditor,” on page 107.
v To use the basic HATS Macro Editor, right-click the macro name and selectOpen With > Macro Editor. If you open the basic Macro Editor for a macro inthis way, then it becomes the default editor for that macro. The tabs on thebottom of this editor enable you to work with the macro in different ways,including editing the XML source of the macro in the source view. For moreinformation, see the chapter, Macros and host terminal, in the HATS User's andAdministrator's Guide.
v On the Overview page of the basic HATS Macro Editor, click Advanced Editorto work with a macro using the Advanced Macro Editor.
6 IBM Rational Host Access Transformation Services: Advanced Macro Guide
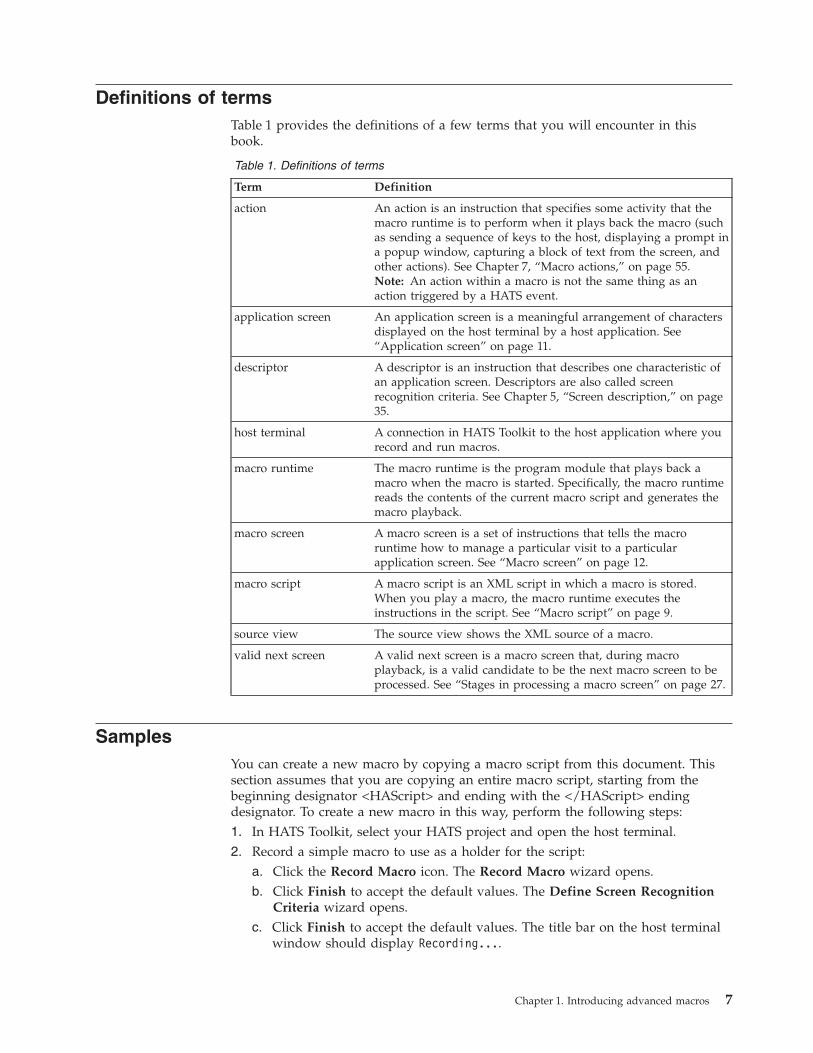
Definitions of termsTable 1 provides the definitions of a few terms that you will encounter in thisbook.
Table 1. Definitions of terms
Term Definition
action An action is an instruction that specifies some activity that themacro runtime is to perform when it plays back the macro (suchas sending a sequence of keys to the host, displaying a prompt ina popup window, capturing a block of text from the screen, andother actions). See Chapter 7, “Macro actions,” on page 55.Note: An action within a macro is not the same thing as anaction triggered by a HATS event.
application screen An application screen is a meaningful arrangement of charactersdisplayed on the host terminal by a host application. See“Application screen” on page 11.
descriptor A descriptor is an instruction that describes one characteristic ofan application screen. Descriptors are also called screenrecognition criteria. See Chapter 5, “Screen description,” on page35.
host terminal A connection in HATS Toolkit to the host application where yourecord and run macros.
macro runtime The macro runtime is the program module that plays back amacro when the macro is started. Specifically, the macro runtimereads the contents of the current macro script and generates themacro playback.
macro screen A macro screen is a set of instructions that tells the macroruntime how to manage a particular visit to a particularapplication screen. See “Macro screen” on page 12.
macro script A macro script is an XML script in which a macro is stored.When you play a macro, the macro runtime executes theinstructions in the script. See “Macro script” on page 9.
source view The source view shows the XML source of a macro.
valid next screen A valid next screen is a macro screen that, during macroplayback, is a valid candidate to be the next macro screen to beprocessed. See “Stages in processing a macro screen” on page 27.
SamplesYou can create a new macro by copying a macro script from this document. Thissection assumes that you are copying an entire macro script, starting from thebeginning designator <HAScript> and ending with the </HAScript> endingdesignator. To create a new macro in this way, perform the following steps:1. In HATS Toolkit, select your HATS project and open the host terminal.2. Record a simple macro to use as a holder for the script:
a. Click the Record Macro icon. The Record Macro wizard opens.b. Click Finish to accept the default values. The Define Screen Recognition
Criteria wizard opens.c. Click Finish to accept the default values. The title bar on the host terminal
window should display Recording....
Chapter 1. Introducing advanced macros 7

d. Click the Stop Macro icon. The Define Screen Recognition Criteria wizardopens.
e. Click Finish to accept the default values.f. Click the Save Macro icon.
3. Edit the macro that you just recorded.a. Double-click the name of the macro that you just recorded in the Macros
folder in the HATS Project View.b. Click the Source tab at the bottom of the editor to open the source view.c. In the source view, delete the lines beginning with <HAScript> and ending
with </HAScript>.d. Copy the entire text of a macro script from this document to the system
clipboard.e. Paste the macro script into the source view.f. Click File > Save (or press Ctrl+S) to save the macro script.
You can edit the macro further using any of the HATS macro editors.
Note: Not all samples in this book are complete macro scripts. A complete macroscript starts and ends with the element <HAScript> and does not containellipses (ellipses indicate missing information in the samples). Other samplesare macro code snippets and need to be pasted into the appropriate locationinside an existing, complete macro.
8 IBM Rational Host Access Transformation Services: Advanced Macro Guide

Chapter 2. Macro structure
This chapter describes the general structure of a macro as it can be seen in an XMLmacro script.
Macro scriptA macro script is an XML script used to store a macro. You can view and edit theXML text of a macro script by using the source view of the VME or the basicMacro Editor.
Learning a little about the XML elements of the macro language will greatlyincrease your understanding of important topics, including the following:v How to use the macro editorsv How macro playback worksv How to build effective macros
This book refers not only to the input fields, buttons, and list boxes provided bythe macro editors, but also to the corresponding XML elements in which the sameinformation is stored.
XML elementsTo understand macro scripts you do not need to learn a great deal about XML, justthe basics of the syntax. If your knowledge of XML syntax needs brushing up, youcan learn more about it in “XML syntax in the Host On-Demand macro language”on page 167. However, almost all of what you need to know is covered in thissubsection.
An XML script consists of a collection of XML elements, some of which containother XML elements, in much the same way that some HTML elements containother HTML elements. However, unlike HTML, XML allows a program developerto define new XML elements that reflect the structure of the information that thedeveloper wishes to store. The Host On-Demand macro language containsapproximately 35 different types of XML elements for storing the informationneeded to describe a macro. This macro language is described at length in Part 2,“The Host On-Demand macro language,” on page 165.
XML macro element names are enclosed in angle brackets. Examples: <HAScript>element, <screen> element.
Figure 2 shows an example of an XML element:
The element <SampleElement> shown in Figure 2 contains the key components ofevery macro element. The first line is the begin tag. It consists of a left anglebracket (<), followed by the name of the XML element (SampleElement), followedby attribute definitions, followed by a right angle bracket (>). The second line
<SampleElement attribute1="value1" attribute2="value2">...</SampleElement>
Figure 2. Sample XML element
© Copyright IBM Corp. 2003, 2011 9
consists of an ellipsis (...) that is not part of XML syntax but is used in the figureabove to indicate the possible presence of other elements inside the<SampleElement> element. The third line is the end tag. It contains the name of theelement enclosed in angle brackets with a forward slash after the first anglebracket (</Sample Element>).
In the begin tag, the attributes are specified by using the attribute name (such asattribute1), followed by an equals sign (=), followed by an attribute value enclosedin quotation marks (such as "value1"). Any number of attributes can occur withinthe begin tag.
If the macro element does not contain other XML elements then it can be writtenin the shorthand fashion shown in Figure 3:
In Figure 3, the element <SampleElement> is written with a left angle bracket (<)followed by the name (SampleElement), followed by the attributes, followed by aforward slash and a right angle bracket (/>). Thus the entire XML element iswritten within a single pair of angle brackets.
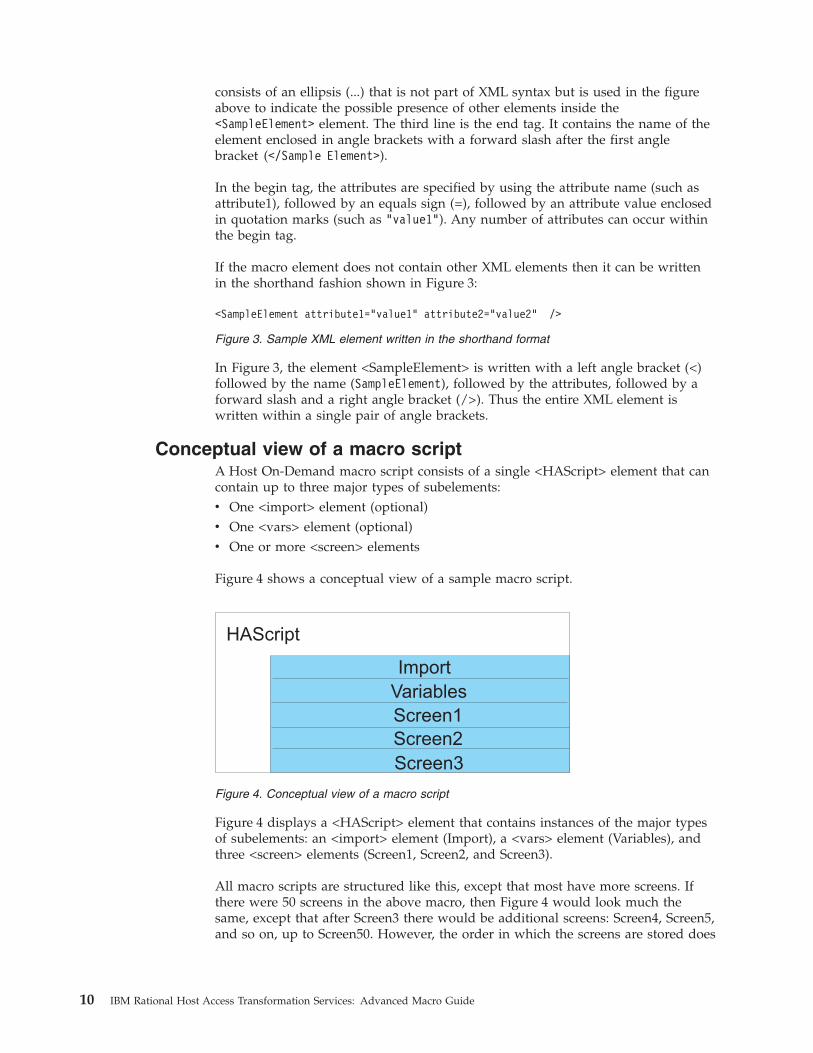
Conceptual view of a macro scriptA Host On-Demand macro script consists of a single <HAScript> element that cancontain up to three major types of subelements:v One <import> element (optional)v One <vars> element (optional)v One or more <screen> elements
Figure 4 shows a conceptual view of a sample macro script.
Figure 4 displays a <HAScript> element that contains instances of the major typesof subelements: an <import> element (Import), a <vars> element (Variables), andthree <screen> elements (Screen1, Screen2, and Screen3).
All macro scripts are structured like this, except that most have more screens. Ifthere were 50 screens in the above macro, then Figure 4 would look much thesame, except that after Screen3 there would be additional screens: Screen4, Screen5,and so on, up to Screen50. However, the order in which the screens are stored does
<SampleElement attribute1="value1" attribute2="value2" />
Figure 3. Sample XML element written in the shorthand format
Figure 4. Conceptual view of a macro script
10 IBM Rational Host Access Transformation Services: Advanced Macro Guide

not necessarily represent the order in which the screens are executed when themacro is played. See Chapter 4, “How the macro runtime processes a macroscreen,” on page 25.
The <HAScript> element is the master element of a macro script. (HAScript standsfor Host Access Script.) It encloses the entire macro and also contains, in its begintag, attributes that contain information applicable to the entire macro, such as themacro's name. For an example of an <HAScript> element, see Figure 1 on page 5.
The <import> element is used to import Java classes and is optional. ImportingJava classes is an advanced topic that is discussed in Chapter 9, “Variables andimported Java classes,” on page 87.
The <vars> element is used to declare and initialize variables belonging to one ofthe standard data types (boolean, integer, double, string, or field). Using standardvariables is an advanced topic that is discussed in Chapter 9, “Variables andimported Java classes,” on page 87.
The <screen> element is used to define a macro screen. The <screen> element isthe most important element that occurs inside the <HAScript> element. As you cansee in Figure 4 on page 10, a macro script is composed mostly of <screen>elements (such as Screen1, Screen2, and Screen3 in the figure). Also, most of theother kinds of XML elements in a macro script occur somewhere inside a <screen>element.
The macro screen and its subcomponentsThis section describes the macro screen and its major subcomponents. Thedefinition of macro screen depends on another term, application screen.
Application screenAn application screen is a meaningful arrangement of characters displayed on thehost terminal by a host application. An example of an application screen is theOS/390® ISPF Primary Option Menu, which is displayed in Figure 5 on page 12.
Chapter 2. Macro structure 11

In Figure 5 you can see that this application screen has menu selections displayedin a row across the top (Menu, Utilities, Compilers, Options, and so on), a titlenear the top (OS/390 Primary Option Menu), a list of options along the left side (0through DAT), and an input field in which to type an option number or letter(Option ===>). When the user provides input, for example by typing a 3 (forUtilities) followed by the enter key, the ISPF application removes all these visibleitems from the host terminal and displays a different application screen.
Macro screenA macro screen is a set of instructions that tell the macro runtime how to manage avisit to a particular application screen. A macro screen includes:v A description of a particular application screenv The actions to take when visiting this particular application screenv A list of the macro screens that can validly occur after this particular macro
screen
Although the concept is not very intuitive at this point, there might be within thesame macro several macro screens that refer to the same application screen.Because of the way macro screens are linked to one another, the macro runtimemight visit the same application screen several times during macro playback,processing a different macro screen at each visit.
Also, one macro screen might refer to more than one application screen. Whenseveral application screens are similar to each other, you might build a macroscreen that handles all of the similar application screens.
M U C O S Henu tilities ompilers ptions tatus elp
More: +
Option ===>
01234567891011121314DDAT
SettingsViewEditUtilitiesForegroundBatchCommandDialog TestLM FacilityIBM ProductsSCLMWorkplaceOS/390 SystemOS/390 UserDb2SDSFDB2 TOOL
Terminal and user parametersDisplay source data or listingsCreate or change source dataPerform utility functionsInteractive language processingSubmit job for language processingEnter TSO or Workstation commandsPerform dialog testingLibrary administrator functionsIBM program development productsSW Configuration Library ManagerISPF Object/Action WorkplaceOS/390 system programmer applicationsOS/390 user applicationsDB2 V9 SubsystemSDSFDB2 Administration Tool Version 7.2
OS/ 390 Primary Option Menu
User ID . :Time . . . :Terminal . :Screen . . :Language :Appl ID . . :TSO logon :TSO prefix :
:MVS acct. :System ID
Release . :
TODD12:5432781ENGLISHISROS390D9TODDRALNS31**NONE**ISPF 5.9
Enter to Terminate using log/list defaultsX
Host Terminal Host Screen Preview
main - Host Terminal
MA* a 04/014
PF2
PF8
PF4
PF10
PF1
PF7
PF6
PF12
PA1
PA2
PF5
PF711
Enter
Clear
Attn
SysReq
NewLine
NextPad
PF3
PF9
Figure 5. A sample application screen, the OS/390 ISPF Primary Option Menu
12 IBM Rational Host Access Transformation Services: Advanced Macro Guide

Nevertheless, each macro screen corresponds to some application screen. Whenyou record a macro, the Macro object creates and stores a macro screen for eachapplication screen that you visit during the course of the recording. If you visit thesame application screen more than once, the Macro object creates and stores amacro screen for each visit.
When you play back a recorded macro, the macro runtime processes one or moremacro screens for each application screen that it visits during the course of theplayback. Typically, a single macro screen runs for a given application screen.However, it is possible for a macro to be edited in such a way that the actions ofthe first macro screen do not cause the application screen to advance, and a secondmacro screen then matches the same application screen.
Conceptual view of a macro screenA macro screen consists of a single <screen> element that contains three requiredsubelements:v One <description> element (required)v One <actions> element (required)v One <nextscreens> element (required, except in an Exit Screen)
Each of the subelements is required, and only one of each can occur.
Figure 6 shows a conceptual view of a <screen> element:
Figure 6 shows a <screen> element (Screen1) that contains the three requiredsubelements: a <description> element (Description), an <actions> element(Actions), and a <nextscreens> element (Valid Next Screens).
All <screen> elements are structured in this way, with these three subelements. (Afourth and optional type of subelement, the <recolimit> element, is discussed laterin this book.)
The <screen> element is the master element of a macro screen. It contains all theother elements that belong to that particular macro screen, and it also contains, inits begin tag, attributes that contain information applicable to the macro screen as awhole, such as the macro screen's name.
The <description> element contains descriptors that enable the macro runtime torecognize that the <screen> element to which the <description> element belongs isassociated with a particular application screen. The descriptors and the<description> element are described in Chapter 5, “Screen description,” on page 35.
Figure 6. Conceptual view of a <screen> element
Chapter 2. Macro structure 13

The <actions> element contains various actions that the macro runtime performson the application screen, such as reading data from the application screen orentering keystrokes. The actions and the <actions> element are described inChapter 7, “Macro actions,” on page 55.
The <nextscreens> element (Valid Next Screens in Figure 6 on page 13) contains alist of the screen names of all the <screen> elements that might validly occur afterthe current macro screen. The <nextscreens> element and the elements that itencloses are described in Chapter 6, “Screen recognition,” on page 49.
14 IBM Rational Host Access Transformation Services: Advanced Macro Guide
Chapter 3. Data types, operators, and expressions
Basic and advanced macro formatYour macro can be stored in either the basic macro format or the advanced macroformat. When you record a macro using the host terminal, it is stored in the basicmacro format. If you edit the macro and add support for variables and arithmeticexpressions, your macro will be switched to the advanced macro format.
The basic macro format enables you to enter literal values, including integers,doubles, boolean (true or false), and strings.
In addition to the basic macro format functions, the advanced macro format offersthese added functions:v Allows string concatenation using the plus symbol (+) string operator.v Allows arithmetic expressions.v Allows conditional expressions.v Allows variables.v Allows imported Java variable types and methods.
Representation of strings and non-alphanumeric charactersYou must write strings and the two special characters single quote (') andbackslash (\) differently in the macro depending on whether you have chosen thebasic macro format or the advanced macro format. Also, some characters that areordinary characters in the basic macro format are used as operators in theadvanced macro format, for example, the plus sign (+) and the greater than sign(>).
However, these rules affect only input fields located on editor tabs used to definescreens (with the exception of the name), screen actions, and variables and types.
For other input fields, always use the rules for the basic macro format.
The following sections describe these differing rules.
Basic macro format rulesIf you have chosen the basic macro format, use the following rules for input fieldslocated on editor tabs used to define screens (with the exception of the name),screen actions, and variables and types:v Strings must be written without being enclosed in single quotes. Examples:
applebananaTo be or not to beJohn Smith
v The single quote (') and the backslash (\) are represented by the charactersthemselves without a preceding backslash. Examples:New Year’s Dayc:\Documents and Settings\User
v The following characters or character sequences are not treated as operators: +, -,*, /, %, ==, !=, >, <, >=, <=, &&, ||, !.
© Copyright IBM Corp. 2003, 2011 15
Advanced macro format rulesIf you have chosen the advanced macro format, use the following rules for inputfields located on editor tabs used to define screens (with the exception of thename), screen actions, and variables and types:v All strings must be written enclosed in single quotes. Examples:
’apple’’banana’’To be or not to be’’John Smith’
v The single quote (') and the backslash (\) are represented by the charactersthemselves preceded by a backslash. Examples:’New Year\’s Day’c:\\Documents and Settings\\User
v The following characters or character sequences are treated as operators:– String concatenation operators: +– Arithmetic operators: +, -, *, /, %– Conditional operators: ==, !=, >, <, >=, <=– Logical operators: &&, ||, !
Converting your macro to a different formatMacros in either format, basic or advanced, can be converted to the other format.The conversion process is automated when converting from basic format toadvanced, but must be done manually when converting from the advanced to thebasic format. Both conversions are described below.
Converting your basic format macro to the advanced formatYou can easily convert your macro from the basic macro format to the advancedmacro format, by selecting the Enable support for variables and arithmeticexpressions check box on the Variables and Types tab of the macro properties inthe VME or the Use Variables and Arithmetic Expressions in Macro check box onthe Macro tab of the AME. As a result the Macro object does the following:v It enables all the advanced features for your macro.v It automatically converts, in all input fields where conversion is required, all the
strings in your macro and all occurrences of the two special characters singlequote (') and backslash (\) from their basic representations to their advancedrepresentations.
That is, the Macro object will find all the strings in your macro and surround themwith single quotes, and the Macro object will change all occurrences of ' and \ to\' and \\. Also, any operator characters will be treated as operators.
Converting your advanced format macro to the basic formatConverting your macro from the advanced macro format to the basic macro formatcan be very difficult. There are no automatic conversions when you clear theoption to use variables and arithmetic expressions. The only automatic result isthat advanced features are disabled for the macro.
You must manually change, one at a time, all of the representations of strings andthe two special characters back to the basic representations. You must also deleteany instances where advanced features have been used in the macro. If you do notdo so, you might encounter errors or unexpected results when you try to save orrun the script. Any remaining advanced macro format operator characters will betreated as literal characters rather than as operators.
16 IBM Rational Host Access Transformation Services: Advanced Macro Guide

Standard data typesThe Macro object supports the following standard data types:v Booleanv Integersv Doublesv Strings
These types are described in the following subsections.
Boolean dataThe boolean values true and false can be written with any combination ofuppercase and lower case letters (such as True, TRUE, FALSE, falsE, and so on).
Examples of fields that require a boolean value are the Entry screen, Exit screen,and Transient screen fields for a macro screen definition. Enter true to set thecondition to true or false to set the condition to false.
Boolean values are not stringsBoolean values are not strings and are therefore never enclosed in single quotes.For example, whether you use the basic macro format or the advanced macroformat, booleans are always written true and false, not ’true’ and ’false’.
However, string values are converted to boolean values within a boolean context(see “Conversion to boolean” on page 21). Therefore with the advanced macroformat you could enter the string ’true’ within a boolean field because the macroeditor would convert the string ’true’ to the boolean value true.
IntegersIntegers are written without commas or other delimiters. Examples:100000-140
Integer constantsThe macro editor has a number of integer constants that are written using alluppercase characters. These values are treated as integers, not strings. Examples:v NOTINHIBITEDv FIELD_PLANEv COLOR_PLANE
DoublesDoubles are written without commas or other delimiters. Examples:3.14164.557e5-119.0431
StringsA string is any sequence of characters and can include leading, trailing, orintervening blank characters. Strings in some input fields must be representeddifferently, depending on whether the macro has been set to use the basic macroformat or the advanced macro format. See “Representation of strings andnon-alphanumeric characters” on page 15.
Chapter 3. Data types, operators, and expressions 17

The following examples use the advanced macro format representation:’apple’’User4’’Total number of users’’ This string has 3 leading blanks.’’This string has 3 trailing blanks. ’
Here are the same examples using the basic macro format representation:appleUser4Total number of users
This string has 3 leading blanks.This string has 3 trailing blanks.
Notice that with the basic macro format, trailing blanks are still allowed but aredifficult to detect. If in doubt, see the representation of the string in the sourceview.
FieldsSee “Field variables” on page 91.
The value nullThe value null is a reserved word, not a string. When used in place of an objectbelonging to an imported Java class, it has the same meaning as it does in the Javalanguage.
Do not use null to signify an empty string. To signify an empty string, use a pair ofsingle quotes ('') in the advanced macro format, or nothing at all in the basic macroformat. If you use the value null in a string context (for example, by assigning it toa string variable), then the macro editor or the macro runtime will convert thevalue null to the string ’null’.
Arithmetic operators and expressionsIn order to use arithmetic expressions you must first select the Enable support forvariables and arithmetic expressions check box on the Variables and Types tab ofthe macro properties in the VME or select the Use Variables and ArithmeticExpressions in Macro check box on the Macro tab of the AME. For moreinformation, see “Representation of strings and non-alphanumeric characters” onpage 15).
The arithmetic operators are shown in Table 2.
Table 2. Arithmetic operators
Operator Operation
+ Addition
- Subtraction
* Multiplication
/ Division
% Modulo
18 IBM Rational Host Access Transformation Services: Advanced Macro Guide

In an arithmetic expression the terms are evaluated left to right. The order ofprecedence of the operators is: *, /, %, +, -. For example, the result of the followingexpression is 8:4 * 2 + 16 / 8 - 1 * 2
You can use parentheses to indicate the order in which you want expressions to beevaluated:(4 * 2) + (16 / 8) - (1 * 2) evaluates to 8but4 * (( 2 + 16) / (8 - 1)) * 2 evaluates to 20.571
Using arithmetic expressionsYou can use an arithmetic expression almost anywhere that you can use anarithmetic value. Examples:v As a parameter for a screen, for example:
– To specify a recognition limit for a screen– To specify a pause time for a screen
v As a parameter for a descriptor, for example:– To specify a row or column in cursor descriptor– To specify the number of fields in a numeric field count descriptor– To specify a row, column, or attribute value in an attribute descriptor– As a term in a conditional descriptor
v As a parameter in an action, for example:– To specify a row or column in a mouse click action– As the number of milliseconds in a pause action– To specify a value in a variable update action– As a term in a conditional action
v As an initial value for a variable
String concatenation operator (+)You can use the string concatenation operator plus symbol (+) only if you usevariables and arithmetic expressions in your macro. See “Basic and advancedmacro format” on page 15.
You can write a string expression containing multiple concatenations. Thefollowing examples use the string representation required for the advanced format(see “Representation of strings and non-alphanumeric characters” on page 15).Expression: Evaluates to:
’Hello ’ + ’Fred’ + ’!’ ’Hello Fred!’’Hi’ ’There’ (Error, a + operator is required to concatenate strings)’Hi’ + ’There’ ’HiThere’
Conditional and logical operators and expressionsThe conditional operators are shown in Table 3.
Table 3. Conditional operators
Operator Operation
== Equal
Chapter 3. Data types, operators, and expressions 19

Table 3. Conditional operators (continued)
Operator Operation
!= Not equal
> Greater than
< Less than
>= Greater than or equal
<= Less than or equal
The logical operators are shown in Table 4.
Table 4. Logical operators
Operator Operation
&& AND
|| OR
! NOT
If you are entering && in an HTML or XML editor you might have to enter&&
In a conditional expression the terms are evaluated left to right. The order ofprecedence of the operators is the same order in which they are listed in the tablesabove. You can use parentheses to indicate the order in which you wantexpressions to be evaluated. Examples:Expression: Evaluates to:
(4 > 3) true!(4 > 3 ) false(4 > 3) && (8 > 10) false(4 > 3) || (8 > 10) true
A conditional expression can contain arithmetic expressions, variables, and calls tomethods of imported Java classes.
Conditional and logical operators can be used in only two contexts:v The Condition field of a conditional descriptorv The Condition field of a conditional action
Automatic data type conversion
Effect of contextIf an item of data belongs to one standard data type (boolean, integer, double, orstring) but the context requires a different standard data type, then when the datais evaluated (either when the macro editor saves the data or when the macroruntime plays the macro) it is automatically converted to the standard data typerequired by the context, if possible.
Examples of context are:v The Condition field of a Condition descriptor (expects a boolean value)v The Value field of a Variable update action when the variable is a field variable
(expects a location string)v The Row value of an Input action (expects an integer value)
20 IBM Rational Host Access Transformation Services: Advanced Macro Guide
However, if the data cannot be converted to the new data type (for example, thestring 123apple cannot be converted to an integer), then an error occurs. The macroeditor displays an error message. The macro runtime stops the macro playback anddisplays an error message.
The following subsections discuss the conversions that can occur for each standarddata type.
Conversion to booleanThe string ’true’ (or ’TRUE’, ’True’, and so on) in a boolean context is convertedto boolean true. Any other string in a boolean context (including ’false’, ’1’,’apple’, and any other) is converted to boolean false.’true’ (in an input field that requires a boolean) converts to true’apple’ (in an input field that requires a boolean) converts to false
Conversion to integerA string in valid integer format and occurring in an integer context converts tointeger.’4096’ converts to 4096’-9’ converts to -9
Conversion to doubleA string in valid double format occurring in a double context converts to double.’148.3’ converts to 148.3
An integer combined with a double results in a double:10 + 6.4 evaluates to 16.4
Conversion to stringA boolean, integer, or double in a string context converts to a string. (The booleanvalues true and false are not strings. See “Boolean data” on page 17.) Thefollowing values, when specified for an input field requiring a string value (suchas the String field of an Input action), will evaluate to the specified result.’The result is ’ + true evaluates to ’The result is true’FALSE (in an input field that requires a string) converts to ’false’’The answer is ’ + 15 evaluates to ’The answer is 15’22 (in an input field that requires a string) converts to ’22’14,52 (in an input field that requires a string) evaluates to’14,52’
Conversion errorsIf the context requires a conversion but the format of the data is not valid for theconversion then the macro editor displays an error message. For example, typing'123apple' into the Row field of an Input action will cause an error message to bedisplayed and the previous value will be restored.
EquivalentsAny context that accepts an immediate value of a particular standard data typealso accepts any entity of the same data type.
For example, if an input field accepts a string value, such as ’Standard Dialog’, italso accepts:v An expression that evaluates to a string
Chapter 3. Data types, operators, and expressions 21

v A value that converts to a stringv A string variablev A call to an imported method that returns a string
Similarly, if an input field accepts a boolean value (true or false), it also accepts:v An expression that evaluates to a boolean valuev A value that converts to a boolean valuev A boolean variablev A call to an imported method that returns a boolean
Recognizing this flexibility in the macro facility will help you write more powerfulmacros.
Significance of a negative value for a row or columnIn the String descriptor and in several other descriptors and actions, a negativevalue for a row or column indicates an offset from the last row or the last columnof the host terminal. The macro runtime calculates the row or column location asfollows:actual row = (number of rows in text area) + 1 + (negative row offset)actual column = (number of columns in text area) + 1 + (negative column offset)
For example, if the host screen has 24 rows of text then a row coordinate of -1indicates an actual row coordinate of 24 (calculated as: 24 + 1 - 1). Similarly if thehost screen has 80 columns of text then a column coordinate of -1 indicates anactual column coordinate of 80 (calculated as 80 + 1 - 1).
The row calculation above ignores the OIA row. For example, if the host screen has25 rows, it has only 24 rows of text.
The advantage of this convention is that if you want to specify a rectangle at thebottom of the host terminal, then this calculation gives the right result whether thehost screen has 25, 43, or 50 rows. Similarly, if you want to specify a rectangle atthe right side of the host terminal, then this calculation gives the right resultwhether the host screen has 80 columns or 132 columns.
Table 5 and Table 6 show the results for a few calculations:
Table 5. Negative value for row
Negative value forrow:
Actual value in hostterminal with 24rows of text (OIArow is ignored):
Actual value in hostterminal with 42rows of text (OIArow is ignored):
Actual value in hostterminal with 49rows of text (OIArow is ignored):
-1 24 42 49
-2 23 41 48
-3 22 40 47
Table 6. Negative value for column
Negative value for column: Actual value in hostterminal with 80 columns:
Actual value in hostterminal with 132 columns:
-1 80 132
-2 79 131
22 IBM Rational Host Access Transformation Services: Advanced Macro Guide

Table 6. Negative value for column (continued)
Negative value for column: Actual value in hostterminal with 80 columns:
Actual value in hostterminal with 132 columns:
-3 78 130
Whether you use this convention or not, you should at least remember that arectangular area with coordinates of (1,1) and (-1,-1) means the entire text area ofthe host terminal.
Chapter 3. Data types, operators, and expressions 23

24 IBM Rational Host Access Transformation Services: Advanced Macro Guide

Chapter 4. How the macro runtime processes a macro screen
This section describes the activities that occur when the macro runtime processes amacro screen.
Overview of macro runtime processing
Scenario used as an exampleAs an example, this chapter uses a scenario from a macro. This macro containsonly two macro screens, Screen1 and Screen2.
The scenario begins at the point at which the macro runtime has performed all theactions in Screen1 and is ready to search for the next macro screen to be processed.
Screen1 is the macro screen that handles the OS/390 ISPF Primary Option Menu(see Figure 7).
Table 7 on page 26 shows a conceptual view of the contents of Screen1:
M U C O S Henu tilities ompilers ptions tatus elp
More: +
Option ===>
01234567891011121314DDAT
SettingsViewEditUtilitiesForegroundBatchCommandDialog TestLM FacilityIBM ProductsSCLMWorkplaceOS/390 SystemOS/390 UserDb2SDSFDB2 TOOL
Terminal and user parametersDisplay source data or listingsCreate or change source dataPerform utility functionsInteractive language processingSubmit job for language processingEnter TSO or Workstation commandsPerform dialog testingLibrary administrator functionsIBM program development productsSW Configuration Library ManagerISPF Object/Action WorkplaceOS/390 system programmer applicationsOS/390 user applicationsDB2 V9 SubsystemSDSFDB2 Administration Tool Version 7.2
OS/ 390 Primary Option Menu
User ID . :Time . . . :Terminal . :Screen . . :Language :Appl ID . . :TSO logon :TSO prefix :
:MVS acct. :System ID
Release . :
TODD12:5432781ENGLISHISROS390D9TODDRALNS31**NONE**ISPF 5.9
Enter to Terminate using log/list defaultsX
Host Terminal Host Screen Preview
main - Host Terminal
MA* a 04/014
PF2
PF8
PF4
PF10
PF1
PF7
PF6
PF12
PA1
PA2
PF5
PF711
Enter
Clear
Attn
SysReq
NewLine
NextPad
PF3
PF9
Figure 7. The OS/390 ISPF Primary Option Menu
© Copyright IBM Corp. 2003, 2011 25

Table 7. Contents of macro screen Screen1
XML element contained in <screen>element Screen1:
Contents of XML element:
<description> Descriptors:
v The input inhibited indicator is cleared(input is not inhibited).
<actions> Actions:
1. Move the text cursor to row 4 andcolumn 14.
2. Type '3[enter]'.
<nextscreens> Names of macro screens that can validlyoccur after this macro screen:
v Screen2
Screen2 is the macro screen that handles the Utility Selection Panel (see Figure 8).
Table 8 on page 27 shows a conceptual view of the contents of Screen2:
Fi E V C A Hle dit iew ommunication ctions elp
Host Terminal Host Screen Preview
main - Host Terminal
PF1 PF2 PF3 PF4 PF5 PF6 Enter PA1 Attn NewLine
PF7 PF8 PF9 PF10 PF11 PF12 Clear PA2 SysReq NextPad
M Henu elp
Option ===>
1
2
34
5678911121314151617
Library
Data Set
Move/CopyDslist
ResetHardcopyTransferOutlistCommandsFormatSuperCSuperCESearch-ForSearch-ForETablesUdlist
Compress or print data set. Print index listing. Print,rename, delete, browse, edit or view members
Allocate, rename, delete, catalog, uncatalog, or displayinformation of an entire data set
Move, or copy members or data setsPrint or display (to process) list of data set names.
Print or display VTOC informationReset statistics for members of ISPF libraryInitiate hardcopy outputDownload ISPF Client/Server or Transfer data setDisplay, delete, or print held job outputCreate/change an application command tableFormat definition for formatted data Edit/BrowseCompare data setsCompare data sets ExtendedSearch data sets for strings of dataSearch data sets fro strings of data ExtendedISPF Table UtilityPrint or display (to process) z/OS UNIX directory list
Utility Selection Panel
M Henu elp
(Standard Dialog)(Extended Dialog)(Standard Dialog)(Extended Dialog)
MA* a 04/014
Figure 8. The Utility Selection Panel application screen
26 IBM Rational Host Access Transformation Services: Advanced Macro Guide

Table 8. Contents of macro screen Screen2
XML element contained in <screen>element Screen2:
Contents of XML element:
<description> Descriptors:
v The input inhibited indicator is cleared(input is not inhibited).
v There are 80 fields.
v There are 3 input fields.
<actions> Actions (the host application positions thetext cursor in the correct input field):
1. Type '4[enter]'.
<nextscreens> Names of macro screens that can validlyoccur after this macro screen:
v (None. This is the last macro screen in themacro.)
Stages in processing a macro screenDuring macro playback the macro runtime loops through the same three stages ofactivity again and again until the macro terminates, as summarized below. Noticethat stage 1 has three steps within it.1. Determine the next macro screen to be processed.
Step a. Add the names of candidate macro screens to the list of valid nextscreens.
Step b. Do screen recognition to match one of the candidate macro screens tothe actual application screen that is currently displayed in the hostterminal .
Step c. Remove the names of candidate macro screens from the list of validnext screens.
2. Make the selected macro screen the new current macro screen.3. Perform the actions in the new current macro screen's <actions> element.
Stage 1As noted above, stage 1 has three steps and, therefore, requires a more detailedexplanation than stages 2 or 3. Each of these steps involves the list of valid nextscreens.
The list of valid next screens is just a list that can hold macro screen names. Themacro runtime creates this list at the beginning of macro playback (before playingback the first macro screen), and discards this list after macro playback is complete.Initially the list is empty (except possibly for transient screens, which are describedin “How the macro runtime selects the names of candidate macro screens” on page29).
During macro playback, each time the macro runtime needs to determine the nextmacro screen to be processed, it performs the three steps 1(a), 1(b), and 1(c) usingthe list of valid next screens.
Overview of all 3 stages of the entire processIn stage 1 the macro runtime determines the next macro screen to be processed. Asstated in the previous section, stage 1 includes three steps.
Chapter 4. How the macro runtime processes a macro screen 27

In step 1(a) the macro runtime collects the names of macro screens that can occurafter the current macro screen, and adds these names to the list of valid nextscreens. There might be just one such screen in the list or several. In the examplescenario, the macro runtime would look in the <nextscreens> element of Screen1,find one name (Screen2), and add that name to the list (see Table 7 on page 26).
In step 1(b), the macro runtime periodically checks each macro screen on the list todetermine whether it matches the application screen.
Timing is a factor in this step. Because of an action that the macro runtime has justperformed in the current macro screen (in Screen1, typing '3[enter]' as the lastaction of the <actions> element), the host application is in the process of changingthe host terminal so that it displays the new application screen (the UtilitySelection Panel) instead of the old application screen (ISPF Primary Option Menu).However, this change does not occur immediately or all at once. The change takessome hundreds of milliseconds and might require several packets of data from thehost.
Therefore, during step 1(b), every time the OIA line or the host terminal'spresentation space is updated, the macro runtime again checks the macro screen(or screens) named in the list of valid next screens to determine whether one ofthem matches the application screen in its current state.
Eventually the host terminal is updated to the extent that the macro runtime isable to match one of the macro screens on the list to the application screen.
In step 1(c), the macro runtime removes all the macro screen names from the list ofvalid next screens (except transient screens if any).
In stage 2, the macro runtime makes the selected macro screen, the one thatmatched the application screen in step 1(b), the new current macro screen.
Finally, in stage 3, the macro runtime performs the actions in the <actions> elementof Screen2.
The remainder of this chapter provides detailed information about the stages andsteps presented in the above overview.
Stage 1: Determining the next macro screen to be processedAs stated earlier, stage 1 contains three steps: adding macro screen names to thelist of valid next screens, doing screen recognition, and removing the macro screennames from the list of valid next screens.
Step 1(a): Adding macro screen names to the list of valid nextscreens
In this step the macro runtime places the names of candidate macro screens on thelist of valid next screens.
Valid next screensWhen a host application has displayed an application screen in the host terminal,and a user input has occurred, then usually only a few application screens(frequently just one) can occur next.
28 IBM Rational Host Access Transformation Services: Advanced Macro Guide

In the example scenario, the current macro screen is Screen1, the currentapplication screen is the ISPF Primary Option menu, and the input is ’3’ plus theenter key (see Table 7 on page 26). In this context, only one application screen canoccur next, the Utility Selection Panel. Therefore the name of only one macroscreen needs to be added to the list of valid next screens: Screen2.
This might seem at first to be counter-intuitive. After all, the ISPF Primary OptionMenu has about 30 different possible inputs (15 options, 6 menu selections, and 8function keys). There should be 30 names of macro screens on the list, not just 1,right?
The reason that the list of valid next screens usually has only one or a few nameson it is that the macro is executing a series of instructions that are aimed ataccomplishing some specific task. In Screen1, the instructions are aimed at gettingfrom the ISPF Primary Option Menu to the Utility Selection Panel. The necessaryactions have been performed to make this transition occur (’3[enter]’), and themacro screen is now just waiting for the expected application screen to appear.
How the macro runtime selects the names of candidate macroscreensThis section describes how the macro runtime selects the macro screen names thatit places on the list of valid next screens. There are two cases:v For the very first macro screen to be played back, the macro runtime selects the
name of any macro screen in the macro that is marked as an entry screen.v For all subsequent macro screens being played back, the macro runtime uses the
names that it finds in the <nextscreens> element of the current macro screen.
First macro screen: When macro playback begins, the list of valid next screens isempty (except possibly for transient screens, see “Transient screens” on page 30).
To get candidates for the first macro screen to be processed, the macro runtimesearches the entire macro, finds each macro screen that is marked as an entryscreen, and adds the names of these macro screens to the list.
The entry screen setting (an attribute of the <screen> element) exists for exactlythis purpose, to mark macro screens that can occur as the first screen to beprocessed.
When a macro is recorded, the Macro object by default marks just the first macroscreen to be recorded as an entry screen. After recording is complete, you can mark(or unmark) any macro screen as an entry screen, and there can be multiple entryscreens.
Entry screens are described in more detail in “Entry screens” on page 49.
If no macro screen is marked as an entry screen, then the macro runtime uses allthe macro screens in the macro as candidates for the first macro screen to beprocessed.
Subsequent macro screens: For subsequent macro screens (including the oneimmediately after the first macro screen), the macro runtime finds the names of thecandidate macro screens listed in the <nextscreens> element of the current macroscreen.
Chapter 4. How the macro runtime processes a macro screen 29

In the example scenario, Screen1 is the current macro screen, and its <nextscreens>element contains the name of one macro screen, Screen2 (see Table 7 on page 26).Therefore the macro runtime adds Screen2 to the list.
All of the macro screen names listed in the element are added to the list of validnext screens by the macro runtime.
During macro recording, when the Macro object begins to record a new macroscreen, it stores the name of that new macro screen (such as Screen2) in the<nextscreens> element of the macro screen that it has just finished recording (suchas Screen1). Therefore each macro screen (except the last) of a recorded macro hasthe name of one macro screen stored in its <nextscreens> element.
Subsequently you can add or delete the name of any macro screen in the macro toor from the <nextscreens> element of any macro screen.
The <nextscreens> element is described in more detail in “Recognizing valid nextscreens” on page 49.
Transient screens: A transient screen is a screen that can occur at any point in themacro, that occurs unpredictably, and that always needs to be cleared. An exampleof a transient screen is an error screen that appears in response to invalid input.
The Macro object does not mark any macro screen as a transient screen duringmacro recording. However, subsequently you can mark any macro screen as atransient screen.
When macro playback begins, the macro runtime searches the macro, finds eachmacro screen that is marked as a transient screen, and adds the name of eachtransient macro screen to the list of valid next screens. These names remain on thelist for the duration of the macro playback.
For more information on transient screens see “Transient screens” on page 50.
Step 1(b): Screen recognitionIn this step the macro runtime matches one of the macro screens named in the listof valid next screens to the current application screen.
This process is called screen recognition because the macro runtime recognizes oneof the macro screens on the list as corresponding to the application screen that iscurrently displayed in the host terminal.
Overview of evaluationThe macro runtime evaluates the candidate macro screens in the order in whichtheir names appear in the list of valid next screens.
If the macro runtime finds that one of the candidates matches the applicationscreen, then the macro runtime immediately stops evaluating and goes on to thenext step of removing the candidate names from the list, step 1(c). The matchingscreen becomes the next macro screen to be processed (stage 2).
However, if the macro runtime evaluates each macro screen named in the listwithout finding a match, then the macro runtime stops evaluating, temporarily,and does nothing further until the host terminal is updated.
30 IBM Rational Host Access Transformation Services: Advanced Macro Guide

Repeated screen evaluationsWhile the macro runtime is working on screen recognition, the host application isworking on updating the host terminal with the new application screen. In theexample scenario, the host application is updating the host terminal so that itdisplays the Utility Selection Panel. This process takes some hundreds ofmilliseconds and might require several packets of data from the host.
This situation explains why the macro runtime temporarily stops working onscreen recognition until the screen is updated. If screen recognition has failed, thereason might be that the new application screen is incomplete. Therefore the macroruntime waits.
Each time that the OIA line is updated or the presentation space of the hostterminal is updated, the macro runtime again makes a pass through the list ofvalid next screens, trying to find a match to the current application screen. If nomatch occurs then the macro runtime waits again.
The macro runtime might go through several cycles of waiting and evaluationbefore screen recognition succeeds.
Eventually, enough of the new application screen arrives so that the macro runtimecan match one of the macro screens named in the list to the new applicationscreen.
Determining whether a macro screen matches the applicationscreenThe macro runtime determines whether a macro screen matches the currentapplication screen by comparing individual descriptors in the macro screen to thecurrent host terminal screen.
In the example scenario, the macro runtime finds the name Screen2 on the list ofvalid next screens, retrieves Screen2, looks at its descriptors, and compares thedescriptors with the host terminal.
Each macro screen contains a <description> element that itself contains one ormore descriptors. A descriptor is a statement of fact about the host terminal(application screen in its current state) that can be either true or false. In theexample scenario, Screen2 contains three descriptors:v The input inhibited indicator is cleared (input is not inhibited).v There are 80 fields in the host terminal.v There are 3 input fields in the host terminal.
When there are several descriptors in a <description> element, as here, the methodthat the macro runtime uses to evaluate the descriptors (as boolean true or false)and to combine their results into a single result (true or false) depends on someadditional configuration information that is not described here. See “Evaluation ofdescriptors” on page 37 for the configuration information.
In the example scenario, Screen2 is configured in the default manner, so that themacro runtime evaluates each of the three descriptors in turn. If all three are true,then the macro runtime concludes that the overall result is true, and that Screen2matches the current application screen.
For more information see “Evaluation of descriptors” on page 37.
Chapter 4. How the macro runtime processes a macro screen 31

Defining when to terminate recognition
Timeout setting for screen recognition: You can set a timeout value that causesthe macro runtime to terminate the macro if screen recognition does not occurbefore the timer expires (see “Timeout settings for screen recognition” on page 51).
Recognition limit: You can set a recognition count that causes the macro runtimeto terminate the macro, or to jump to a specified macro screen, if the macroruntime recognizes a macro screen, such as ScreenA, a number of times equal tothe count (see “Recognition limit” on page 53).
Step 1(c): Removing the names of candidate macro screensfrom the list of valid next screens
After screen recognition has succeeded, the macro runtime immediately begins itsnext task, which is cleaning up the list of valid next screens (step 1(c)).
This is a simple step. The macro runtime removes the names of all the candidatemacro screens, whether recognized or not, from the list of valid next screens.
If the list contains the names of transient screens, those names remain on the list(see “Transient screens” on page 50).
Stage 2: Making the successful candidate the new current macroscreen
Stage 2 is simple. In stage 2, the macro runtime makes the successful candidatemacro screen the new current macro screen.
In the example scenario, the macro runtime makes Screen2 the new current macroscreen. The host terminal displays the new application screen, the Utility SelectionPanel (see Table 7 on page 26 and Table 8 on page 27).
The macro runtime immediately begins stage 3.
Stage 3: Performing the actions in the new current macro screenIn stage 3, the macro runtime performs the actions in the new current macroscreen's <actions> element. If the new current macro screen does not contain an<actions> element or if the <actions> element is empty, then the macro runtimeskips this stage.
Each macro screen typically contains an <actions> element that contains one ormore actions to be performed. An action is an instruction that causes some type ofactivity, such as sending a sequence of keys to the host, displaying a prompt in apopup window for the user, capturing a block of text from the screen, or someother activity.
In the example scenario, Screen2 contains only one action:v Type 4 followed by the enter key.
Screen2 does not need an action to position the text cursor in the correct inputfield because the Utility Selection Panel automatically positions the text cursorthere.
32 IBM Rational Host Access Transformation Services: Advanced Macro Guide
If the <actions> element contains multiple actions, the macro run time performseach macro action in turn in the order in which it occurs in the <actions> element.
For more information on actions see Chapter 7, “Macro actions,” on page 55.
Inserting a delay after an actionBecause the macro runtime executes actions much more quickly than a human userdoes, unforeseen problems can occur during macro playback that cause an actionnot to perform as expected, because of a dependency on a previous action.
To avoid this type of problem, the macro runtime, by default, inserts a delay of 150milliseconds after every Input action or Prompt action in every macro screen, anda delay of 300 milliseconds after the last action of every macro screen (see “Thepausetime attribute” on page 81).
You should leave this feature enabled, although you can disable it if you want. Youcan change the delays from 150 milliseconds and 300 milliseconds to other values.
If you want to change the duration of the delay for a particular macro screen, youcan do so (see “The pause attribute” on page 81).
Also, for any particular action, you can increase the delay by adding a Pauseaction after the action (see “Pause action (<pause> element)” on page 66).
Repeating the processing cycleAfter the macro runtime has performed all the actions in the <actions> element ofthe current macro screen, the macro runtime immediately begins the processingcycle again, starting with step 1(a), and using the candidate macro screens listed inthe <nextscreens> element of the new current macro screen.
Terminating the macroWhether or not there are next screens, the macro runtime terminates the macrowhen it finishes processing a macro screen that is marked as an exit screen.
In the example scenario Screen2 is marked as an exit screen (see Table 8 on page27).
The exit screen setting, an attribute of the <screen> element, exists for exactly thispurpose, to mark macro screens that terminate the macro.
When a macro is recorded, the Macro object, by default, marks the last recordedmacro screen as an exit screen. After recording is complete, you can mark (orunmark) any macro screen as an exit screen, and there can be multiple exit screens.
Exit screens are described in more detail in “Exit screens” on page 50.
Chapter 4. How the macro runtime processes a macro screen 33

34 IBM Rational Host Access Transformation Services: Advanced Macro Guide

Chapter 5. Screen description
This chapter discusses:v The terms descriptor, screen recognition, and screen descriptionv How the Macro Facility records a description of an application screenv How to combine multiple descriptorsv The various types of descriptors
Screen description and screen recognition are related and intertwined topics. Thischapter concentrates primarily on the process of describing screens so that they canthen be recognized. It also contains enough information about screen recognition togive you a basic understanding of the relationship between the two functions.In-depth information about the screen recognition process is presented inChapter 6, “Screen recognition,” on page 49
Definition of termsDescriptor
An XML element that occurs in the <description> element of a macroscreen and that states an identifying characteristic of the application screento which the macro screen corresponds.
For example, a macro screen named ScreenB might contain a Stringdescriptor (<string> element) that states that row 3 of the applicationscreen contains the string ISPF Primary Option Menu. During macroplayback, when the macro runtime is determining which macro screen toprocess next, and when ScreenB is a candidate, the macro runtimecompares the descriptor in ScreenB with the actual application screen. Ifthe descriptor matches the actual application screen (row 3 of theapplication screen really does contain the string), then the macro runtimeselects ScreenB as the next macro screen to be processed.
Screen descriptionThe process of adding descriptors to the <description> element of a macroscreen. You engage in screen description when you use a macro editor tocreate or edit a descriptor for a macro screen (such as the String descriptorin the previous example). Likewise, the Macro object creates one or moredescriptors for each new macro screen that it creates during macrorecording (see “Recorded descriptions” on page 36).
Screen recognitionThe process that the macro runtime performs when it attempts to match acandidate macro screen to the current application screen.
As detailed in Chapter 4, “How the macro runtime processes a macroscreen,” on page 25, when the macro runtime needs to determine the nextmacro screen to be processed, the macro runtime places the names ofcandidate macro screens (usually found in the <nextscreens> element ofthe current macro screen) onto a list of valid next screens. Then, as the hostapplication updates the host terminal with the new application screen, themacro runtime compares the descriptors of each macro screen on the listwith the new application screen. Eventually the application screen isupdated to the extent (for example, the string ISPF Primary Option Menuappears in row 3) that the macro runtime can match one of the macro
© Copyright IBM Corp. 2003, 2011 35

screens on the list to the application screen. The matched macro screenbecomes the next macro screen to be processed (see “Overview of all 3stages of the entire process” on page 27).
For information about screen description using the VME, see “Screen Recognitiontab” on page 114, and using the AME, see “Description tab” on page 138.
Recorded descriptionsDuring macro recording in the HATS host terminal, one or more descriptors isadded to the new <description> element of each new macro screen that is created.
You must define the first macro screen of the macro being recorded. HATSautomatically adds the OIA descriptor to the description of the first screen.
For every other application screen of the macro after the first application screen,you have the choice of defining the screen or allowing HATS to define itautomatically. When HATS defines a screen, it creates three descriptors:v The OIA descriptor is set to NOTINHIBITED.v The Cursor descriptor is set to the actual cursor position of the application
screen.v The Number of Input Fields descriptor is set to the actual number of input fields
in the application screen (can be 0).
Therefore, when the recorded macro is played back (without having been revisedin any way), the macro runtime matches every macro screen after the first one toits corresponding application screen based on whether the input inhibited indicatoris cleared, whether the cursor position matches the cursor position of theapplication screen, and whether the number of input fields in the macro screen'sdescription matches the number of input fields in the application screen.
Why the recorded descriptions workThe recorded descriptions automatically created by HATS work well for at leastthree reasons.
First, the OIA descriptor, cursor position, and number of input fields can beapplied to every possible application screen. That is, every application screen hassome number of input fields (perhaps the number is 0), a starting cursor position,and an input inhibited indicator that is either set or cleared.
Second, the combination of the number of input fields and the cursor positionprovides a pretty reliable description of an application screen, because applicationscreens typically contain many fields, but only a certain number of them are inputfields. The cursor position is always in the first input field.
Third, and perhaps most important, during screen recognition the macro runtimecompares the new application screen to a short list (usually a very short list) ofmacro screens called valid next screens (see “Stages in processing a macro screen”on page 27). Therefore a single macro screen need not be differentiated from everyother macro screen in the macro, only from the other screens in the list of validnext screens. Frequently the list consists of a single macro screen.
Recorded descriptors provide a frameworkFor some macro screens, the recorded description might not be sufficient to allowthe macro runtime to reliably distinguish one application screen from another
36 IBM Rational Host Access Transformation Services: Advanced Macro Guide

similar application screen. Macro recording is still a very useful feature because itquickly provides a framework for your macro. From there you can improve therecorded description.
Often the most straightforward way to improve a recorded description is to add aString descriptor. For example, if the macro screen is for the Utility Selection Panel,then you might add a String descriptor specifying that the application screencontains the string Utility Selection Panel somewhere in row 3. Of course youare not limited to using a String descriptor. Some situations might require that youuse one or more of the other descriptors to assure that the application screen iscorrectly recognized.
Evaluation of descriptorsThis section describes in detail how the macro runtime determines whether amacro screen matches an application screen.
Keep the following in mind as you read through the following subsections:v In most macro screens, the <description> element contains more than one
descriptor.v The default in the macro editors is that all descriptors are required (the Optional
attribute of each descriptor is false) and that the default combining rule is used.v The most common scenario that you will encounter is that all descriptors are
required. That is, if you have defined three descriptors, you want all three ofthem to be true in order for the macro screen to be recognized. If you are facingthis scenario, then you should use the default settings.
v If you are faced with a scenario that is more complicated than the defaultscenario, then you should use the uselogic method (see “The uselogic attribute”on page 39.)
Overview of the processThe following is an overview of the process.1. The macro runtime evaluates each descriptor individually and arrives at a
boolean result for that descriptor, either true or false.2. The macro runtime then combines the boolean results of the individual
descriptors to determine whether the description as a whole is true (the macroscreen matches the application screen) or false. To combine the results of theindividual descriptors the macro runtime uses either the default combiningmethod or the uselogic method.v With the default combining method:
a. The macro runtime inverts the boolean result of any descriptor that hasthe invertmatch attribute set to true (see “Invertmatch attribute” on page38).
b. The macro runtime combines the boolean results of the individualdescriptors using:– The setting of the Optional attribute for each descriptor– The default rule for combining descriptors
v In contrast, with the uselogic method:a. The macro runtime ignores the settings for the invertmatch and Optional
attributes.b. The macro runtime combines the results of individual descriptors using a
rule that you provide in the uselogic attribute.
Chapter 5. Screen description 37
Evaluation of individual descriptorsFor each individual descriptor in the macro description, the macro runtimeevaluates the descriptor and arrives at a boolean result of true or false.
For example, if the descriptor is a String descriptor, then the macro runtime looksin the application screen at the row and column that the descriptor specifies, andcompares the string at that location with the string that the descriptor specifies. Ifthe two strings match, then the macro runtime assigns a value of true to the Stringdescriptor. If the two strings do not match then the macro assigns a value of falseto the String descriptor.
Usually a macro screen contains more than one descriptor. However, if a macroscreen contains only one descriptor (and assuming that the descriptor does nothave the invertmatch attribute set to true) then if the single descriptor is true theentire description is true, and the macro runtime recognizes the macro screen as amatch for the application screen. In contrast, if the single descriptor is false, thenthe entire description is false, and the macro screen is not recognized.
Default combining methodIf you have more than one descriptor in a <description> element, then you mustuse either the default combining method described in this section or the uselogicattribute described in “The uselogic attribute” on page 39.
When to use the default combining methodThe default combining method is appropriate for only two scenarios:v You want the description as a whole to be true only if all the individual
descriptors are true (this is the most common scenario).v You want the description as a whole to be true if at least one of the individual
descriptors is true.
You should not use the default method for any other scenario unless youthoroughly understand how the default combining method works.
The default combining method uses:v The boolean result for each individual descriptor (see “Evaluation of individual
descriptors”)v The value of the invertmatch attribute in each individual descriptorv The value of the Optional attribute in each individual descriptorv The default combining rule
Invertmatch attributeEvery descriptor has an invertmatch attribute.
By default this attribute is false, so that it has no effect on the evaluation of thedescriptor.
If this setting is true, then the macro runtime inverts the boolean result that itobtains from evaluating the descriptor, changing true to false or false to true.
For example, if the macro runtime determines that a String descriptor is true (thestring in the descriptor matches the screen in the application window), but theString descriptor has the invertmatch attribute set to true, then the macro runtimechanges the String descriptor's result from true to false.
38 IBM Rational Host Access Transformation Services: Advanced Macro Guide

Optional attributeEvery descriptor has an Optional attribute that is set to either false (the default) ortrue.
The Optional attribute states how an individual descriptor's result is to be treatedwhen the macro runtime uses the default combining rule to combine the booleanresults of the descriptors. By default this attribute is set to false, signifying that thedescriptor's result is required rather than optional.
Default combining ruleAs stated earlier, the default combining rule is appropriate for only two scenarios:v You want the description as a whole to be true only if all the individual
descriptors are true (this is the most common scenario).v You want the description as a whole to be true if at least one of the individual
descriptors is true.
If you want the description as a whole to be true only if all the descriptors aretrue, then set the Optional attribute of all the descriptors in the description to false(the default setting).
In contrast, if you want the description as a whole to be true if at least one of thedescriptors is true, then set the Optional attribute of all of the descriptors in thedescription to true.
You should not use the default combining rule in any other scenario where youhave multiple descriptors in one macro screen, unless you understand the rule andits implications thoroughly. For more information see “Default rule for combiningmultiple descriptors in one macro screen” on page 199.
Also, you should not set the Optional attributes of multiple descriptors in onemacro screen differently (some true, some false) unless you understand the ruleand its implications thoroughly.
The uselogic attributeThe uselogic attribute of the <description> element allows you to define morecomplex logical relations among multiple descriptors than are available with thedefault combining method described in the previous section.
HATS adds a default uselogic attribute to the <description> tag when you recordthe macro. It will be regenerated if you edit the macro in the host terminal or inthe macro editors. It will not be regenerated if you edit the macro in the sourceview.
Note: If you use the uselogic attribute, then the macro runtime ignores theinvertmatch and Optional attributes in the individual descriptors.
The value of the uselogic attribute is a simplified logical expression whose termsare 1-based indexes of the descriptors that follow. Figure 9 on page 40 shows anexample of a <description> element that contains a uselogic attribute (some of theattributes of the <string> element are omitted for clarity):
Chapter 5. Screen description 39

In Figure 9, the value of the uselogic attribute is:(1 and 2) or (!1 and 3)
This logical expression is not a regular logical expression (as described in“Conditional and logical operators and expressions” on page 19) but rather asimplified style of logical expression used only in the uselogic attribute. The rulesfor this style of logical expression are:v The numerals 1, 2, 3, and so on stand for the boolean results of, respectively, the
first, second, and third descriptors in the <description> element (<oia>, <string>,and <cursor> in the figure above). You can use any numeral for which acorresponding descriptor exists. For example, if a <description> element hasseven descriptors, then you can use 7 to refer to the boolean result of theseventh descriptor, 6 to refer to the boolean result of the sixth descriptor, and soon.
v Only the following logical operators are allowed:
Table 9. Logical operators for the uselogic attribute
Operator: Meaning:
and Logical AND
or Logical OR (inclusive)
! Logical NOT (inversion)
v You can use parentheses () to group terms.v The following entities are not allowed:
– Arithmetic operators and expressions– Conditional operators and expressions– Variables– Calls to Java methods
In the example in Figure 9 the macro runtime will determine that the descriptionas a whole is true if one of the following occurs:v The result of the first descriptor is true and the result of the second descriptor is
true (1 and 2)v The result of the first descriptor is false and the result of the third descriptor is
true (!1 and 3)
Remember that if you use the uselogic attribute, then the macro runtime ignoresthe invertmatch and the Optional attribute settings in the individual descriptors.
The descriptorsEach type of descriptor is stored as an individual XML element situated within the<description> element of one macro screen.
<description uselogic="(1 and 2) or (!1 and 3)" /><oia status="NOTINHIBITED" optional="false" invertmatch="false"/><string value="'Foreground' row="5" col="8"/><cursor row="18" col="19" optional="false" invertmatch="false"/>
</description>
Figure 9. Example of the uselogic attribute of the <description> element
40 IBM Rational Host Access Transformation Services: Advanced Macro Guide

You do not have to understand all the types of descriptors at first. Instead youshould begin by becoming familiar with just the following types:v The OIA descriptorv The Number of Fields descriptorv The Number of Input Fields descriptorv The String descriptor
These types of descriptors are sufficient to reliably describe many and perhapseven most application screens. However, if these types are not sufficient, then youshould turn for help to one of the other types of descriptors.
Table 10 lists all the types of descriptors and shows the number of descriptors ofeach type that are allowed to exist in one macro screen (more specifically, in one<description> element belonging to one <screen> element):
Table 10. Types of descriptors, how many of each type allowed
Type of descriptor: Number of this type of descriptor allowedper macro screen:
OIA 1 (required)
Number of Fields 0 or 1
Number of Input Fields 0 or 1
String descriptor 0 or more
Cursor descriptor 0 or 1
Attribute descriptor 0 or more
Condition descriptor 0 or more
The following subsections describe each type of descriptor in detail.
OIA descriptor (<oia> element)In almost all scenarios you can accept the default setting for this descriptor, whichis NOTINHIBITED. Then, during screen recognition:v If the input inhibited indicator in the host terminal is set (that is, input is
inhibited), then the macro runtime will evaluate this descriptor as false.v But if the input inhibited indicator is cleared (that is, input is not inhibited), then
the macro runtime will evaluate this descriptor as true.
These are the results that you would want and expect. You typically do not wantthe macro runtime to recognize the macro screen and immediately start processingits actions while the input inhibited indicator is still set. (For more informationabout timing, see “Screen completion” on page 82). But no matter how you resolvethat issue, you should almost always leave this descriptor at the default setting,which is NOTINHIBITED.
However, if you have a scenario in which you want the macro runtime to ignorethe input inhibited condition, then set this descriptor to DONTCARE.
Number of Fields descriptor (<numfields> element)The Number of Fields descriptor specifies a particular number of 3270, or 5250,fields. You can use an integer in the Number of Fields input field, or any entitythat evaluates to an integer (such as a variable, an arithmetic expression, or a callto an external Java method).
Chapter 5. Screen description 41

During screen recognition the macro runtime:1. Evaluates this descriptor and obtains an integer result.2. Counts the number of fields in the application screen (in its current state).3. Compares the two numbers.
If the two numbers are equal then the macro runtime evaluates this descriptor astrue. Otherwise the macro runtime evaluates this descriptor as false.
When the macro runtime counts the fields in the host terminal it counts all typesof 3270, or 5250, fields, including input fields.
If you do not want to use this descriptor then set the Number of Fields input fieldto blank.
Number of Input Fields descriptor (<numinputfields> element)The Number of Input Fields descriptor is very similar to the Number of Fieldsdescriptor described in the previous section. The difference is that the Number ofInput Fields descriptor specifies a number of 3270, or 5250, input fields, whereasthe Number of Fields descriptor specifies a number of fields of all types, includinginput fields.
You can use an integer in the Number of Input Fields field, or any entity thatevaluates to an integer (such as a variable, an arithmetic expression, or a call to anexternal Java method).
During screen recognition, the macro runtime:1. Evaluates this descriptor and obtains an integer result.2. Counts the number of input fields in the application screen (in its current state).3. Compares the two numbers.
If the two numbers are equal then the macro runtime evaluates this descriptor astrue. Otherwise the macro runtime evaluates this descriptor as false.
If you do not want to use this descriptor then set the Number of Input Fields fieldto blank.
String descriptor (<string> element)The String descriptor specifies the following information:v A sequence of characters (the string)v A rectangular area of text on the host terminal
The macro runtime searches inside the entire rectangular area of text for the stringyou specify. If the macro runtime finds the string inside the rectangular area oftext, then it evaluates the string descriptor as true. If not, then it evaluates thestring descriptor as false.
Specifying the rectangular areaYou define the rectangular area of text by specifying the row and columncoordinates of opposite corners. The default values for these coordinates are (1,1)and (-1,-1), indicating the entire text area of the host terminal. For the significanceof negative values such as -1,-1, see “Significance of a negative value for a row orcolumn” on page 22. You can use an integer or any entity that evaluates to aninteger (such as a variable, an arithmetic expression, or a call to an external Javamethod).
42 IBM Rational Host Access Transformation Services: Advanced Macro Guide

The rectangular area can be just large enough to contain the string, or much largerthan the string. For example, suppose that the application screen that you want tomatch to the macro screen has the string ’Terminal and user parameters’ in therectangular area (6,20), (6,37). This rectangular area is exactly large enough tocontain the string. If the application screen always has this string at this location,then you might specify the exact rectangular area.
However, suppose that the application screen that you want to match to the macroscreen has the same string, ’Terminal and user parameters’, located within it, butyou cannot predict which row of the application screen will contain the string. Inthis case you could specify the rectangular area (1,1), (-1,-1), indicating that themacro runtime should search every row of the application screen for theidentifying string.
For the string value you can use a string or any entity that evaluates to a string(such as a variable, an expression, or a call to an external Java method). The stringmust be in the form required by the macro format that you have chosen, eitherbasic or advanced.
During screen recognition the macro runtime:1. Evaluates the row and column values and obtains an integer result for each
value.2. Evaluates the string value and obtains a string result.3. Looks for the string anywhere within the rectangular block of text in the
application screen (in its current state) specified by the row and column values.
If the macro runtime finds the string within the rectangular block of text then themacro runtime evaluates this descriptor as true. Otherwise the macro runtimeevaluates this descriptor as false.
How the macro runtime searches the rectangular area (Wrapattribute)If the Wrap attribute is set to false (the default setting), then the macro runtimesearches each row of the rectangular area separately. This method works well whenthe entire string is contained within one row. For example, if the string is UtilitySelection Panel and the rectangular area is (1,1), (24,80), then the macro runtimesearches for the string as follows:1. Get the first row of the rectangular area. Determine whether the string occurs
in the this row. If it does not, then search the next row.2. Get the second row of the rectangular area. Determine whether the string
occurs in this row. If it does not, then search the next row.3. And so on.
In contrast, if the Wrap attribute is set to true then the macro runtime searches forthe string as follows:1. Get all the lines of the rectangular area and concatenate them in order.2. Determine whether the string occurs in the concatenated string.
If the string you are searching for can wrap from one line to the next of the hostterminal, then you should set the Wrap attribute to true. Do not confuse thisattribute with the Unwrap attribute of the Extract action, which is based on fieldsrather than blocks of text (see “Unwrap attribute” on page 60).
Chapter 5. Screen description 43

The following description provides an example in which the Wrap attribute is setto true.
Figure 10 shows rows 14 through 18 of an application screen:
In Figure 10, the first character of each row is a blank space. For example, in row14, the first two characters are ’ 6’, that is, a blank space followed by the numeral6. Suppose that you want to set up a String descriptor that checks for the followingrectangular block of text on this application screen:HardcopyTransferOutlistCommandsReserved
The steps in setting up the String descriptor for this multi-row block are as follows:1. Create a new String descriptor.2. Set the row and column location of the upper left corner of the text rectangle
above to (14, 5) and the row and column location of the lower right corner to(18, 12).
3. Set the string value. The string value is:’HardcopyTransferOutlist CommandsReserved’
4. Set the Wrap attribute to true.5. Leave all the other attributes set to the default.
Notice that in step 3 above the five rows are concatenated as a single string,without any filler characters added (such as a newline or space at the end).However, the string does contain a blank space after ’Outlist’ because that blankspace does fall within the boundaries of the rectangle.
Using an extracted string in a String descriptor: If you use an Extract action toread text from the screen into a string variable (see “Extract action (<extract>element)” on page 58) then in a subsequent screen you can use the string variablein the String input field of a String descriptor.
For example, in ScreenA you might read a company name from the host terminalinto a string variable named $strTmp$, using an Extract action. Then in ScreenByou could use $strTmp$ as the string to be searched for in a String descriptor.
You can do this when extracting multiple lines of text if you have the Wrapattribute set to true.
Multiple String descriptors in the same <description> elementYou can create more than one String descriptor in the same <description> element.You should use as many String descriptors as you need in order to create a reliabledescription.
6 Hardcopy Initiate hardcopy output7 Transfer Download ISPF Client/Server or Transfer data set8 Outlist Display, delete, or print held job output9 Commands Create/change an application command table* Reserved This option reserved for future expansion
Figure 10. Rows 14–18 of an application screen
44 IBM Rational Host Access Transformation Services: Advanced Macro Guide

You can even define two different strings for the same rectangular block of text inthe same <description> element. You might do this if the application screencorresponding to your macro screen displays different strings in the same locationat different times. However, if you do define two different strings for the samerectangular block of text, you should be careful to indicate that both of the stringsare not required (both are optional).
Cursor descriptor (<cursor> element)The Cursor descriptor specifies a row and column location on the applicationscreen, such as row 10 and column 50. For either the row value or the columnvalue you can use an integer or any entity that evaluates to an integer (such as avariable, an arithmetic expression, or a call to an external Java method).
During screen recognition the macro runtime:1. Evaluates the row value and obtains an integer result.2. Evaluates the column value and obtains an integer result.3. Looks at the row and column location of the text cursor in the application
screen (in its current state).4. Compares the row and column location in the descriptor with the row and
column location of the text cursor in the application screen.
If the two locations are the same then the macro runtime evaluates this descriptoras true. Otherwise the macro runtime evaluates this descriptor as false.
Attribute descriptor (<attrib> element)The attribute descriptor specifies a 3270, or 5250, attribute and a row and columnlocation on the application window.
During screen recognition the macro runtime compares the specified attribute (suchas 0x3) to the actual attribute at the row and column specified. If the attributes arethe same, then the macro runtime evaluates the descriptor as true. Otherwise themacro runtime evaluates the descriptor as false.
This descriptor can be useful when you are trying to differentiate between twoapplication screens that are very similar except for their attributes.
Condition descriptor (<condition> element)The Condition descriptor specifies a conditional expression that the macro runtimeevaluates during screen recognition, such as $intNumVisits$ == 0. For moreinformation on conditional expressions see “Conditional and logical operators andexpressions” on page 19.
During screen recognition the macro runtime evaluates the conditional expressionand obtains a boolean result.
If the conditional expression evaluates to true then the macro runtime evaluatesthis descriptor as true. Otherwise the macro runtime evaluates this descriptor asfalse.
The Condition descriptor increases the flexibility and power of screen recognitionby allowing the macro runtime to determine the next macro screen to be processedbased on the value of one or more variables or on the result of a call to a Javamethod.
Chapter 5. Screen description 45

Custom descriptor (<customreco> element)The Custom descriptor allows you to call custom description code.
To create a Custom descriptor you must use the source view to add a<customreco> element to the <description> element of the macro screen. For moreinformation on this element, see “<customreco> element” on page 177.
Note: If you are using custom screen recognition in the screen descriptors of aHATS macro, and the macro is invoked through the <playmacro> actionfrom within a separate macro, the custom screen recognition logic does notwork.
HATS can only register as a listener for custom recognition events in thefirst macro of a chain. HATS cannot register as a listener for any of thesubsequent macros in the chain.
To resolve this problem, use non-chained macros when using HATS customscreen recognition.
Variable update action (<varupdate> element)The Variable update entry is not a descriptor at all. Instead, it is an action that themacro language allows to occur inside a <description> element.
The Variable update action in a <description> element performs the very sametype of operation that it performs in an <actions> element, which is to store aspecified value into a specified variable.
For information about creating a Variable update action see “Variable update action(<varupdate> element)” on page 73.
Processing a Variable update action in a descriptionYou should be aware of how the macro runtime processes one or more Variableupdate actions when they occur in a <description> element:1. The macro runtime performs all the Variable update actions immediately, as if
they were first in sequence.2. The macro runtime then evaluates the remaining items (descriptors) in the
description as usual and arrives at an overall boolean result. The Variableupdate actions have no effect on the boolean result.
As you might remember, the macro runtime can go through the screen recognitionprocess a number of times before matching a macro screen to an application screen(see “Repeated screen evaluations” on page 31). Therefore, if a <description>element contains one or more Variable update actions, then the macro runtime willperform the Variable update actions each time that it evaluates the <description>element.
For example, suppose that a macro is being played back, that the screen nameScreenB is on the list of valid next screens, and that ScreenB contains a<description> element like the one shown in Figure 11 on page 47:
46 IBM Rational Host Access Transformation Services: Advanced Macro Guide
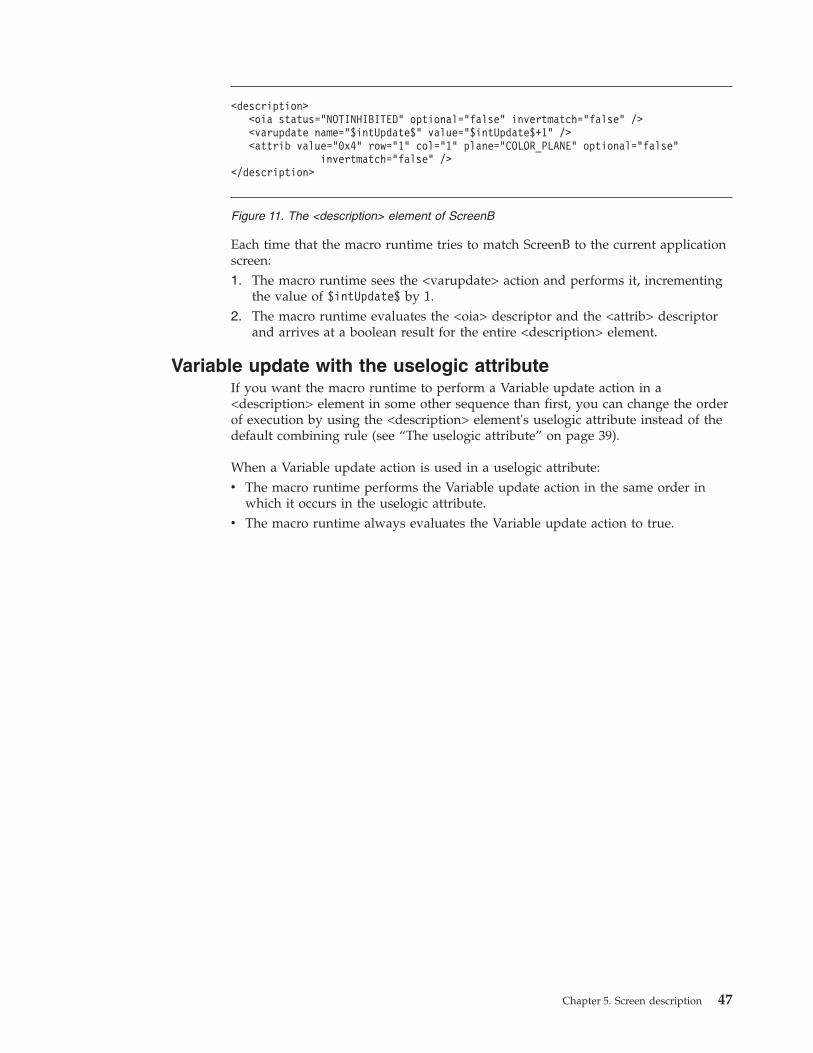
Each time that the macro runtime tries to match ScreenB to the current applicationscreen:1. The macro runtime sees the <varupdate> action and performs it, incrementing
the value of $intUpdate$ by 1.2. The macro runtime evaluates the <oia> descriptor and the <attrib> descriptor
and arrives at a boolean result for the entire <description> element.
Variable update with the uselogic attributeIf you want the macro runtime to perform a Variable update action in a<description> element in some other sequence than first, you can change the orderof execution by using the <description> element's uselogic attribute instead of thedefault combining rule (see “The uselogic attribute” on page 39).
When a Variable update action is used in a uselogic attribute:v The macro runtime performs the Variable update action in the same order in
which it occurs in the uselogic attribute.v The macro runtime always evaluates the Variable update action to true.
<description><oia status="NOTINHIBITED" optional="false" invertmatch="false" /><varupdate name="$intUpdate$" value="$intUpdate$+1" /><attrib value="0x4" row="1" col="1" plane="COLOR_PLANE" optional="false"
invertmatch="false" /></description>
Figure 11. The <description> element of ScreenB
Chapter 5. Screen description 47

48 IBM Rational Host Access Transformation Services: Advanced Macro Guide

Chapter 6. Screen recognition
Recognizing valid next screensAs described in Chapter 4, “How the macro runtime processes a macro screen,” onpage 25, the macro runtime typically finds the names of macro screens that arecandidates for becoming the next macro screen to be processed by looking in the<nextscreens> element of the current macro screen. That is, the macro screencontains within itself a list of the macro screens that can validly be processed next.Entry screens and transient screens are exceptions.
Entry screens, exit screens, and transient screensYou can use the entry screen, exit screen, and transient screen settings to markmacro screens that you want the macro runtime to treat in a special way. In thesource view, these settings appear as attributes of the <screen> element.
In Figure 1 on page 5, you can see these three attributes in the <screen> elementfor Screen1: entryscreen, exitscreen, and transient.
For information about where these settings are made using the VME, see “Generaltab” on page 114, and using the AME, see “Screens tab” on page 136.
Entry screensMark a screen as an entry screen if you want the macro screen to be considered asone of the first macro screens to be processed when the macro is played back. Youmight have only one macro screen that you mark as a entry screen, or you mighthave several.
When the macro playback begins, the macro runtime searches through the macroscript and finds all the macro screens that are designated as entry screens. Thenthe macro runtime adds the names of these entry macro screens to the runtime listof valid next screens. Finally the macro runtime tries in the usual way to matchone of the screens on the list to the current host terminal.
When the macro runtime has matched one of the entry macro screens to the hostterminal, that macro screen becomes the first macro screen to be processed. Beforeperforming the actions in the first macro screen, the macro runtime removes thenames of the entry macro screens from the runtime list of valid next screens.
Macro with several entry screensThe entry screens are evaluated in the order that they appear in the macro script.One of the situations in which you might have several entry screens in the samemacro is when a host application begins with a series of application screens oneafter another, such as application screen A, followed by application screen B,followed by application screen C. For instance, screen A might be a logon screen,screen B a screen that starts several supporting processes, and screen C the firstactual screen of the application.
In this situation, you might want the user to be able to run the macro whether theuser was at application screen A, B, or C.
© Copyright IBM Corp. 2003, 2011 49

Entry screen as a normal screenIf you mark a screen as an entry screen, it can still participate in the macro as anormal screen and be listed in the <nextscreens> lists of other macro screens.
For example, you might have a host application that has a central applicationscreen with a set of menu selections, so that each time you make a menu selectionthe application goes through several application screens of processing and thenreturns to the original central application screen.
In this situation, suppose that macro ScreenA is the macro screen corresponding tothe central application screen. Both of the following would apply:v ScreenA could be an entry screen, because the macro could start at the central
application screenv ScreenA could also appear in the <nextscreens> element of other macro screens,
because after each task the application returns to the central application screen
Exit screensMarking a macro screen as an exit screen causes the macro runtime to terminatethe macro after it has performed the actions for that macro screen. That is, after themacro runtime performs the actions, and before going on to screen recognition, themacro runtime looks to see if the current macro screen has the exit screen indicatorset to true. If so, then the macro runtime terminates the macro. (The macro runtimeignores the <nextscreens> element of an exit screen.)
You can have any number of exit screens for a macro. Here are some examples ofsituations in which there could be several exit screens.v A macro might have one normal termination point and several abnormal
termination points, which could be reached if an error occurred.v A macro might allow you to stop at a certain point in the processing, or to keep
going, so that there would be several normal termination points.
Transient screensA transient macro screen is used to process an application screen that has thefollowing characteristics:v The application screen occurs unpredictably during the flow of the application.
It might occur at several points or it might not occur at all.v The only action that needs to occur for the application screen is that it needs to
be cleared.
An example of such an application screen is an error screen that the applicationdisplays when the user enters invalid data. This error screen appears atunpredictable times (whenever the user enters invalid data) and as a macrodeveloper the only action that you want to take for this error screen is to clear itand to get the macro back on track.
When the macro runtime prepares to play back a macro, at the point where themacro runtime adds the names of entry screens to the runtime list of valid nextscreens, the macro runtime also adds the names of all macro screens marked astransient screens (if any) to the end of the list.
Transient screens are considered for the entry screen without being marked asentry screens. If a transient screen is selected as the entry screen, its actionsexecute, and then the macro checks all of the entry screens and all of the transientscreens to decide which screen to match next.
50 IBM Rational Host Access Transformation Services: Advanced Macro Guide

The names of these transient screens remain on the runtime list of valid nextscreens throughout the entire macro playback. Whenever the macro runtime addsthe names of new candidate macro screens (from the <nextscreens> element of thecurrent macro screen) to the list, the macro runtime adds these new candidatenames ahead of the names of the transient screens, so that the names of thetransient screens are always at the end of the list.
Whenever the macro runtime performs screen recognition, it evaluates the macroscreens of all the names on the list in the usual way. If the macro runtime does notfind a match to the application screen among the candidate macro screens whosenames are on the list, then the macro runtime goes on down the list trying tomatch one of the transient macro screens named on the list to the applicationscreen.
If the macro runtime matches one of the transient macro screens to the currentapplication screen, then the macro runtime does not remove any names from thelist. Instead, the macro runtime performs the actions in the transient macro screen(which should clear the unexpected application screen) and then goes back to thescreen recognition process that it was pursuing when the unexpected applicationscreen occurred.
Example of handling of transient screenSuppose that the macro runtime is doing screen recognition and that it has thenames of three macro screens on the list of valid next screens: ScreenB andScreenD, which are the names of candidate screens, and ScreenR, which is thename of a transient screen. The macro runtime performs the following steps:1. When the host terminal's presentation space is updated, the macro runtime
evaluates the names on the list of valid next screens in the usual way.2. Suppose that an unexpected application screen has occurred, so that neither
ScreenB nor ScreenD matches the current application screen, but that ScreenRdoes match the current application screen.
3. Because a transient screen has been recognized, the macro runtime does notremove any names from the list of valid next screens.
4. The macro runtime makes ScreenR the current macro screen to be processed.5. The macro runtime performs the actions in ScreenR. These actions clear the
unexpected application screen.6. The macro runtime ignores the <nextscreens> element, if any, in ScreenR.7. The macro runtime returns to the previous task of screen recognition in step 1
above. The list of valid next screens has not changed. This time, suppose thatan expected application screen is displayed and that the macro runtime findsthat ScreenD matches it. Therefore:a. The macro runtime makes ScreenD the next macro screen to be processed.b. The macro runtime removes the names ScreenB and ScreenD from the list of
valid next screens. The name ScreenR remains on the list.c. The macro runtime begins processing the actions in ScreenD.
Timeout settings for screen recognitionThis section discusses the scenario in which the macro runtime cannot advancebecause it cannot match a screen on the list of valid next screens to the currentapplication screen. There are two fields that let you set a timeout value thatterminates the macro if screen recognition does not succeed before the timeoutexpires:
Chapter 6. Screen recognition 51

v The timeout attribute on the <HAScript> element.v The timeout attribute on the <nextscreens> element.
Screen recognitionAfter the macro runtime has performed all the actions in the <actions> element ofa macro screen, the macro runtime attempts to match one of the screens on the listof valid next screens to the new application screen (see Chapter 4, “How the macroruntime processes a macro screen,” on page 25).
Sometimes, unforeseen circumstances make it impossible for the macro runtime tomatch any of the macro screens on the list of valid next screens to the applicationscreen. For example, the user might type an input sequence that navigates to anunforeseen application screen. Or, a systems programmer might have changed theapplication screen so that it no longer matches the description in the <description>element of the corresponding macro screen.
When such a scenario occurs, the result is that the macro appears to hang whilethe macro runtime continually and unsuccessfully attempts to find a match.
Timeout attribute on the <HAScript> elementThe timeout attribute on the <HAScript> element can be set using the Timeoutbetween screens setting in the VME, see “General tab” on page 113, and in theAME, see Figure 61 on page 135. This attribute specifies a timeout value for screenrecognition. By default, if specified the value applies to each and every macroscreen in the macro. However, you can change the value for a particular macroscreen by using the timeout attribute on the <nextscreens> element, see “Timeoutattribute on the <nextscreens> element” on page 53).
Whenever the macro runtime starts to perform screen recognition, it checks todetermine whether the timeout value is set for the entire macro or whether atimeout value is set for the macro screen's list of next screens. If a timeout value isset, then the macro runtime sets a timer to the number of milliseconds specified bythe timeout value. If the timer expires before the macro runtime has completedscreen recognition, then the macro runtime terminates the macro. An Error page isdisplayed in the browser, and a message such as the following is written to theserver console:
Notice that this message displays the name of the macro and the name of thescreen that was being processed when the timeout occurred. For example, if thescreen specified in this message is ScreenA, then the macro runtime had alreadyperformed all the actions in ScreenA and was trying to match a macro screen inthe Valid Next Screens list for ScreenA to the application screen.
If the macro is playing in the host terminal, the following message is displayed:
Macro timed out: (Macro=ispf_ex2, Screen=screen_address_type)
Figure 12. Error message for screen recognition timeout
52 IBM Rational Host Access Transformation Services: Advanced Macro Guide

When specified, the default timeout value is set to 60000 milliseconds (60 seconds).
Timeout attribute on the <nextscreens> elementThe timeout attribute on the <nextscreens> element specifies a timeout value forscreen recognition. It can be set using the Source tab in the VME and using theTimeout field in the AME, see Figure 73 on page 146. If this value is non-zero, thenthe macro runtime uses this value as a timeout value (in milliseconds) for screenrecognition for macro screens on the current list of valid next screens, instead ofusing the value set in the timeout attribute on the <HAScript> element.
If the timer expires before the macro runtime has completed screen recognition,then the macro runtime displays the message in Figure 12 on page 52.
Recognition limitThe recognition limit allows you to take some sort of action if the macro runtimeprocesses a particular macro screen too many times. If the macro runtime doesprocess the same macro screen a large number of times (such as 100), then thereason is probably that an error has occurred in the macro and that the macro isstuck in an endless loop.
The recognition limit is not an attribute in the begin tag of the <screen> element,but rather a separate element (the <recolimit> element) that optionally can occurinside a <screen> element, on the same level as the <description>, <actions>, and<nextscreens> elements.
The <recolimit> element can be added using the Source tab in the VME, and usingthe Set Recognition Limit check box and the Screens Before Error input field inthe AME, see “Screens tab” on page 136.
When the recognition limit is reached, the macro runtime either terminates themacro with an error message (this is the default action) or starts processinganother macro screen that you specify.
You should notice that the recognition limit applies to one particular screen andthat by default it is not specified. You can specify a recognition limit for any macroscreen, and you can specify the same or a different recognition limit value for eachmacro screen in which you include it.
Determining when the recognition limit is reachedThe macro runtime keeps a recognition count for every macro screen that includesa <recolimit> element. When macro playback begins the recognition count is 0 forall macro screens.
Suppose that a macro includes a macro screen named ScreenB and that ScreenBcontains a <recolimit> element with a recognition limit of 100. Each time the macroruntime recognizes ScreenB (that is, each time the macro runtime selects ScreenB asthe next macro screen to be processed), the macro runtime performs the followingsteps:
The host terminal does not match any expected screens.
Figure 13. Error message shown for host terminal
Chapter 6. Screen recognition 53

1. The macro runtime detects the presence of the <recolimit> element insideScreenB.
2. The macro runtime increments the recognition count for ScreenB.3. The macro runtime compares the recognition count with the recognition limit.4. If the recognition count is less than the recognition limit, then the macro
runtime starts performing the action elements of ScreenB as usual.5. However, if the recognition count is greater than or equal to the recognition
limit, then the macro runtime performs the action specified by the <recolimit>element. In this case macro runtime does not process any of the action elementsin ScreenB.
Action when the Recognition limit is reachedThe default action when the recognition limit is reached is that the macroterminates and an Error page is displayed in the browser. The following errormessage is written to the server console:Recolimit reached, but goto screen not provided, macro terminating.
If you want the macro runtime, as a recognition limit action, to go to anothermacro screen, then you must use the source view to add a goto attribute to the<recolimit> element and specify the name of the target macro screen as the valueof the attribute (see “<recolimit> element” on page 190).
If you use the goto attribute, the macro runtime does not terminate the macro butinstead starts processing the macro screen specified in the attribute.
You can use the target macro screen for any purpose. Some possible uses are:v For debuggingv To display an informative message to the user before terminating the macrov To continue processing the macro
54 IBM Rational Host Access Transformation Services: Advanced Macro Guide

Chapter 7. Macro actions
Actions by functionThe following is a list of all the actions, grouped according to function.v Interaction with the user:
– Input (keystrokes and key-activated functions, such as copy to clipboard)– Mouse click– Prompt
v Getting data from the application– Extract– SQLQuery– Variable update
v Waits– Comm wait– Pause
v Programming– Conditional– Perform (call a Java method)– Play macro (chain to another macro)– Variable update
v Debug– Trace
How actions are performed
The runtime contextAs you might remember from Chapter 4, “How the macro runtime processes amacro screen,” on page 25, when the macro runtime has selected a new currentmacro screen, the macro runtime immediately begins to perform the actions in the<actions> element of that macro screen.
After the macro runtime has performed all the actions, it immediately goes on tothe next step of determining the next macro screen to be processed.
The macro screen contextWithin a single macro screen, the macro runtime performs the actions in the orderin which they occur in the <actions> element. This is the same order in which youhave ordered the actions in the Actions list.
You are not required to create any actions for a macro screen. If there is no<actions> element or if the <actions> element is empty, then the macro runtimegoes straight to the next section of macro screen processing, which is selecting thenext macro screen to be processed.
© Copyright IBM Corp. 2003, 2011 55
Specifying parameters for actionsIn specifying the parameters of an action, remember that, in general, any contextthat accepts an immediate value of a particular standard data type also accepts anyentity of the same data type. For example, if an input field accepts a string value,then it also accepts an expression that evaluates to a string, a value that converts toa string, a string variable, or a call to an imported method that returns a string (see“Equivalents” on page 21).
However, there are a few fields in which you cannot use variables (see “Using thevalue that the variable holds” on page 91).
For information about specifying actions using the VME, see “Working withactions” on page 118, and using the AME, see “Actions tab” on page 143.
The actions
Comm wait action (<commwait> element)The Comm wait action waits until the communication status of the session changesto some state that you have specified in the action. For example, you might createa Comm wait action to wait until the session is completely connected.
This action can be specified using the Source tab in the VME, and using theActions tab in the AME, see “Comm wait action” on page 151.
How the action worksWhen the macro runtime starts to perform a Comm wait action, it looks at thecommunication status specified in the Comm wait action and compares it to theactual communication status of the session. If the two statuses match, then themacro runtime concludes that the Comm wait action is completed, and the macroruntime goes on to perform the next action.
However, if the two statuses do not match, then the macro runtime does no furtherprocessing, but just waits for the communication status that is specified in theComm wait action to actually occur in the session.
You can specify in the Comm wait action a timeout value in milliseconds thatcauses the macro runtime to end the Comm wait action when the timeout valuehas expired. That is, the macro runtime terminates the action when the timeoutvalue has expired, even if the communication status that the macro runtime hasbeen looking for has not been reached.
After a Comm wait action, you probably want to use some other action, such as anExtract action, to check some characteristic of the application screen that indicatesto you whether the session has actually reached the communication status that youwanted, or whether the Comm wait action ended because of a timeout.
Specify a communication status that is persistentAs the session connects or disconnects, the communication status typically movesquickly through some states (such as pending active, then active, then ready) untilit reaches a particular state at which it remains stable for some time (such asCONNECTION_WORKSTATION_ID_READY). In most situations you want tospecify that persistent, ending state in the Comm wait action.
56 IBM Rational Host Access Transformation Services: Advanced Macro Guide
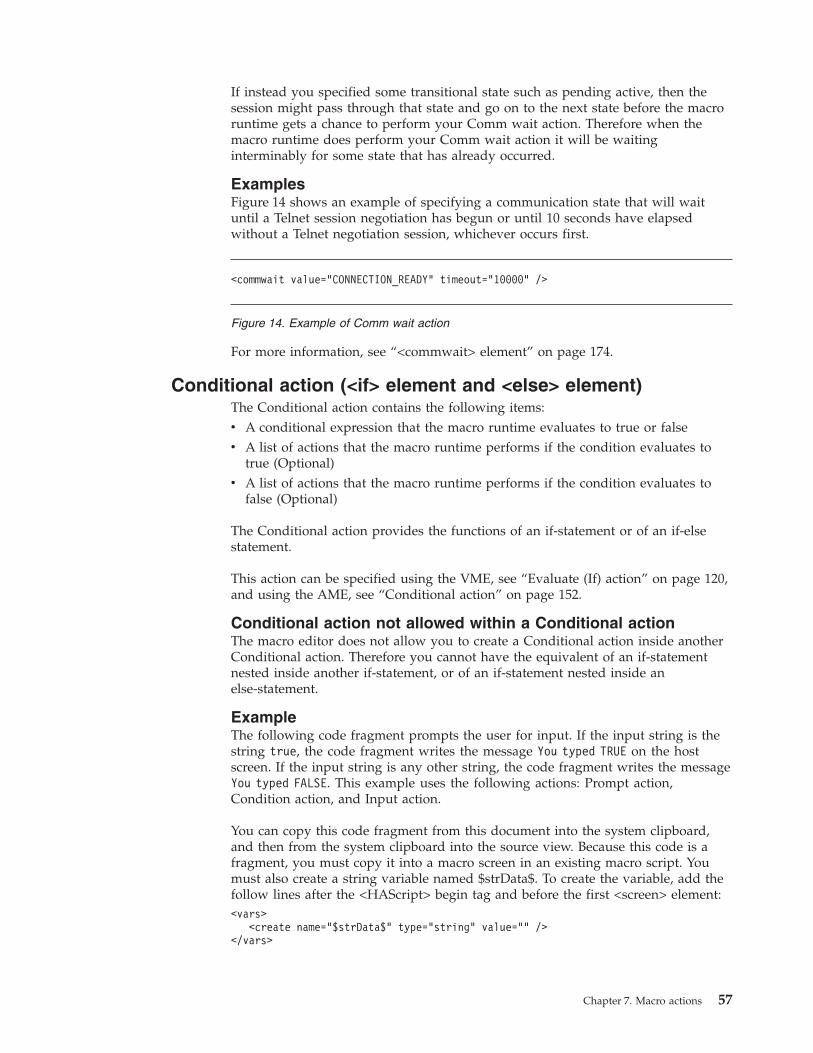
If instead you specified some transitional state such as pending active, then thesession might pass through that state and go on to the next state before the macroruntime gets a chance to perform your Comm wait action. Therefore when themacro runtime does perform your Comm wait action it will be waitinginterminably for some state that has already occurred.
ExamplesFigure 14 shows an example of specifying a communication state that will waituntil a Telnet session negotiation has begun or until 10 seconds have elapsedwithout a Telnet negotiation session, whichever occurs first.
For more information, see “<commwait> element” on page 174.
Conditional action (<if> element and <else> element)The Conditional action contains the following items:v A conditional expression that the macro runtime evaluates to true or falsev A list of actions that the macro runtime performs if the condition evaluates to
true (Optional)v A list of actions that the macro runtime performs if the condition evaluates to
false (Optional)
The Conditional action provides the functions of an if-statement or of an if-elsestatement.
This action can be specified using the VME, see “Evaluate (If) action” on page 120,and using the AME, see “Conditional action” on page 152.
Conditional action not allowed within a Conditional actionThe macro editor does not allow you to create a Conditional action inside anotherConditional action. Therefore you cannot have the equivalent of an if-statementnested inside another if-statement, or of an if-statement nested inside anelse-statement.
ExampleThe following code fragment prompts the user for input. If the input string is thestring true, the code fragment writes the message You typed TRUE on the hostscreen. If the input string is any other string, the code fragment writes the messageYou typed FALSE. This example uses the following actions: Prompt action,Condition action, and Input action.
You can copy this code fragment from this document into the system clipboard,and then from the system clipboard into the source view. Because this code is afragment, you must copy it into a macro screen in an existing macro script. Youmust also create a string variable named $strData$. To create the variable, add thefollow lines after the <HAScript> begin tag and before the first <screen> element:<vars>
<create name="$strData$" type="string" value="" /></vars>
<commwait value="CONNECTION_READY" timeout="10000" />
Figure 14. Example of Comm wait action
Chapter 7. Macro actions 57

After you save the script in the macro editor, you can edit it either with the macroeditor or in the source view.
Notice the following facts about this example:v The example consists of one code fragment containing an <actions> element and
the actions inside it.v The first action is a Prompt action that displays a message window and copies
the user's input into the variable $strData$, without writing the input into aninput field in the session window.
v The first part of the condition action (the <if> element) contains the condition,which is simply $strData$.
v Because $strData$ is a string variable in a boolean context, the macro runtimetries to convert the string to a boolean value (see “Automatic data typeconversion” on page 20). If the user's input is the string ’true’ (in upper, lower,or mixed case), then the conversion is successful and the condition contains theboolean value true. If the user's input is any other string, then the conversionfails and the condition contains the boolean value false.
v If the condition is true, then the macro runtime performs the action inside the<if> element, which is an Input action writing the message You typed TRUE onthe host screen. When all the actions inside the <if> element have beenperformed, the macro runtime skips over the <else> action and continues macroprocessing.
v If the condition is false, then the macro runtime skips over the actions in the<if> element and begins performing the actions in the <else> element, whichincludes one Input action that writes the message You typed FALSE on the hostscreen. After performing all the actions in the <else> action, the macro runtimecontinues macro processing.
For more information, see “<if> element” on page 182.
Extract action (<extract> element)The Extract action captures data from the host terminal and optionally stores thedata into a variable. This action is very useful and is the primary method that theMacro object provides for reading application data (instead of using programmingAPIs from the toolkit).
This action can be specified using the VME, see “Extract action” on page 121, andusing the AME, see “Extract action” on page 152.
<actions><prompt name="'Type true or false'" description="" row="0" col="0"
len="80" default="" clearfield="false" encrypted="false"movecursor="true" xlatehostkeys="true" assigntovar="$strData$"varupdateonly="true" />
<if condition="$strData$" ><input value="’You typed TRUE’" row="0" col="0" movecursor="true" xlatehostkeys="true" encrypted="false"/>
</if><else>
<input value="’You typed FALSE’" row="0" col="0" movecursor="true" xlatehostkeys="true" encrypted="false"/></else>
</actions>
Figure 15. Sample code fragment showing a Condition action
58 IBM Rational Host Access Transformation Services: Advanced Macro Guide

Treatment of nulls and other characters that do not displayText captured from the TEXT_PLANE does not contain any nulls (0x00) or othercharacters that do not display. Any character cell on the display screen thatappears to contain a blank space character will be captured as a blank spacecharacter.
Capturing a rectangular area of the host terminalWhen the continuous attribute is false (this is the default value), the macro runtimetreats the two pairs of row and column values as the upper left and lower rightcorners (inclusive) of a rectangular block of text. The rectangular block can be assmall as one character or as large as the entire application window.
The macro runtime:v Initializes the result string to an empty stringv Reads the rectangular block of text row by row, concatenating each row to the
result stringv Stores the result string in the specified variable
As an example, suppose that the first 40 characters of rows 16, 17, and 18 of thehost terminal are as follows:.8..Outlist.....Display, delete, or prin.9..Commands....Create/change an applica.10.Reserved....This option reserved for
In addition, suppose that the macro runtime is about to perform an Extract actionwith the following settings:v The continuous attribute is false.v The row and column pairs are (16, 5) (the 'O' of Outlist) and (18, 12) (the 'd' of
'Reserved').v The extraction name is 'Extract1'.v The data plane is TEXT_PLANE.v The string variable $strTmp$ is the variable in which the result string is to be
stored.
Because the continuous attribute is false, the macro runtime treats the row andcolumn pairs as marking a rectangular block of text, with the upper left corner atrow 16 and column 5 and the lower right corner at row 18 and column 12.
The macro runtime initializes the result string to an empty string. Then the macroruntime reads the rectangular block of text one row at a time ('Outlist.','Commands', 'Reserved'), concatenating each row to the result string. Finally themacro runtime stores the entire result string into the result variable $strTmp$. Thevariable $strTmp$ now contains the following string:’Outlist.CommandsReserved’
Capturing a sequence of text from the host terminalWhen the continuous attribute is true, the macro runtime treats the two pairs ofrow and column values as the beginning and ending positions (inclusive) of acontinuous sequence of text that wraps from line to line if necessary to get fromthe beginning position to the ending position. The sequence of text can be as smallas one character or as large as the entire application window.
The macro runtime:v Initializes the result string to an empty string
Chapter 7. Macro actions 59

v Reads the continuous sequence of text from beginning to end, wrapping aroundfrom the end of one line to the beginning of the next line if necessary
v Stores the result string in the specified variable
For example, suppose that rows 21 and 22 of the host terminal contain thefollowing text (each row is 80 characters):........Enter / on the data set list command field for the command prompt pop-upor ISPF line command............................................................
and suppose that the macro runtime is about to perform an Extract action with thefollowing settings:v The continuous attribute is true.v The row and column pairs are (21, 9) (the 'E' of 'Enter') and (22, 20) (the 'd' of
'command').v The extraction name is 'Extract1'.v The data plane is TEXT_PLANE.v The string variable $strTmp$ is the variable in which the result string is to be
stored.
Because the continuous attribute is true, the macro runtime treats the row andcolumn pairs as marking the beginning and end of a sequence of text, with thebeginning position at (21, 9) and the ending at (22, 20).
The macro runtime initializes the result string to an empty string. Then the macroruntime reads the sequence of text from beginning to end, wrapping around fromthe last character of row 21 to the first character of row 22. Finally the macroruntime stores the entire result string into the result variable $strTmp$. Thevariable $strTmp$ now contains the following string of 92 characters (the followingtext is hyphenated to fit on the page of this document, but actually represents onestring without a hyphen):’Enter / on the data set list command field for the com-mand prompt pop-up or ISPF line command’
In contrast, if the continuous attribute is set to false in this example, $strTmp$would contain a string of 24 characters, ’Enter / on tline command’.
Unwrap attributeYou can use this option with the continuous attribute set to either false or true.
When you set the unwrap attribute to true, the macro runtime uses not only therow and column pairs in the Extract window but also the field boundaries in thehost terminal in determining the data to collect. The macro runtime returns anarray of strings (if you are using the toolkit) or a single string of concatenatedstrings (if you are not using the toolkit).
Do not confuse the unwrap attribute with the wrap attribute of the Stringdescriptor, which is based on a rectangular block of text rather than fields (see“How the macro runtime searches the rectangular area (Wrap attribute)” on page43).
When unwrap is true and continuous is false: When the continuous attribute isfalse, the row and column pairs represent the corners of a rectangular block of text.When you set the unwrap attribute to true, the macro runtime reads each row ofthe rectangular block of text and processes each field in the row as follows:
60 IBM Rational Host Access Transformation Services: Advanced Macro Guide

v If the field begins outside the row and continues into the row, then the macroruntime ignores the field.
v If the field begins inside the row and ends inside the row, then the macroruntime includes the field's contents in the result.
v If the field begins inside the row and ends outside the row, then the macroruntime includes the contents of the entire field (including the part outside therectangular block of text) in the result.
The intent of the unwrap attribute is to capture the entire contents of a field as onestring even if the field wraps from one line to the next.
For example, suppose that the host terminal is 80 characters wide and that rows 9,10, 11, and 12 of the host terminal are as follows:...............................................Compress or print data set.....................................................................Reset statistics................................................................Catalog or displayinformation of an entire data set...............................................
Suppose also that the following text areas in the lines above are fields:Reset statisticsCatalog or display information of an entire data set
Finally, suppose that:v The continuous attribute is false (this is the default setting).v The unwrap attribute is true.v The row and column pairs are (9,63) (the 'n' of 'print') and (11,73) (the ' ' after
'or').v The extraction name is 'Extract1'.v The data plane is TEXT_PLANE.
The macro runtime concatenates the individual strings and stores them as a singlestring into the variable that you specified in the Extract window. In this examplethe macro runtime stores the string ’Reset statisticsCatalog or displayinformation of an entire data set’ into the variable.
When unwrap is true and continuous is true: When the continuous attribute istrue, the row and column pairs represent the beginning and ending locations of acontinuous sequence of text that wraps from line to line if necessary. When youthen set the unwrap attribute to true, the macro runtime processes the continuoussequence of text as follows:v If the field begins outside the sequence and continues into the sequence, then
the macro runtime ignores the field.v If the field begins inside the sequence and ends inside the sequence, then the
macro runtime includes the field's contents in the result.v If the field begins inside the sequence and ends outside the sequence, then the
macro runtime includes the contents of the entire field (including the partoutside the continuous sequence) in the result.
For more information, see “<extract> element” on page 179.
Chapter 7. Macro actions 61

Input action (<input> element)The Input action sends a sequence of keystrokes to the host terminal. The sequencecan include keys that display a character (such as a, b, c, #, &, and so on) and alsoaction keys (such as [enter] and others).
This action simulates keyboard input from an actual user.
This action can be specified using the VME, see “Input action” on page 125, andusing the AME, see “Input action” on page 154.
Location at which typing beginsUse the row and column fields to specify the row and column location in the hostterminal at which you want the input sequence to begin. For example, if youspecify row 23 and column 17 in the Input action, and you specify Hello world asthe String value of the Input action, then (assuming that the location you havespecified lies within an input field) the macro runtime types the key sequenceHello world on the host terminal starting at row 23 and column 17.
If you specify a row or column location of 0, then the macro runtime will type thekey sequence beginning at the actual row and column location of the text cursoron the host terminal when the Input action is performed. You should not specify arow or column of 0 unless the context is one in which the location of the textcursor does not matter or unless you can predict where the text cursor will belocated (for example, if a Mouse click action has just moved the text cursor to aspecific location, or if the application has positioned the text cursor as part ofdisplaying the application screen).
Input errorsDuring macro playback, the host terminal reacts to a key input error in the sameway as it would react if an actual user had typed the key.
For example, if an Input action sends a key that displays a character (such as a, b,c, #, & and so on) to the session when the text cursor is not located in a 3270 or5250 input field, then the session responds by inhibiting the key input anddisplaying an error symbol in the Operator Information Area, just as it would witha keystroke typed by an actual user.
Translate host action keys (xlatehostkeys attribute)The xlatehostkeys attribute indicates whether the macro runtime is to interpretaction key names (such as [copy], [enter], [tab], and so on) in the input sequence asaction keys or as literal sequences of characters. The default is true (interpret theaction key names as action keys).
For example, suppose that the input key sequence is ’[up][up]Hello world’ andthat the text cursor is at row 4, column 10. If the xlatehostkeys attribute is true,then in performing this input sequence the macro runtime moves the text cursorup two rows and then types Hello world beginning at row 2, column 10. Incontrast, if the xlatehostkeys attribute is false, then the macro runtime types[up][up]Hello world beginning at row 4, column 10.
Move cursor to end of input (movecursor attribute)When the movecursor attribute is true (the default), then the macro runtime movesthe text cursor in the same way that it would be moved if an actual user wereentering keyboard input. For example, if the key is a text character, such as 'a',then the macro runtime types the character on the host terminal and then moves
62 IBM Rational Host Access Transformation Services: Advanced Macro Guide
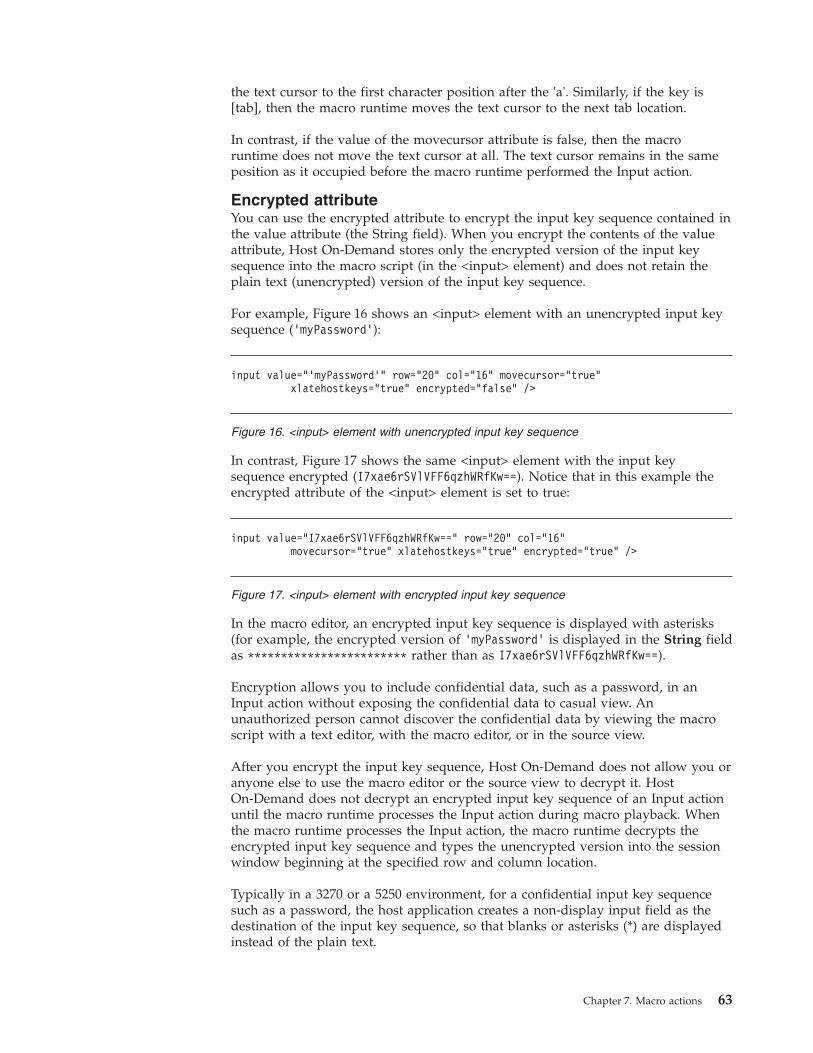
the text cursor to the first character position after the 'a'. Similarly, if the key is[tab], then the macro runtime moves the text cursor to the next tab location.
In contrast, if the value of the movecursor attribute is false, then the macroruntime does not move the text cursor at all. The text cursor remains in the sameposition as it occupied before the macro runtime performed the Input action.
Encrypted attributeYou can use the encrypted attribute to encrypt the input key sequence contained inthe value attribute (the String field). When you encrypt the contents of the valueattribute, Host On-Demand stores only the encrypted version of the input keysequence into the macro script (in the <input> element) and does not retain theplain text (unencrypted) version of the input key sequence.
For example, Figure 16 shows an <input> element with an unencrypted input keysequence (’myPassword’):
In contrast, Figure 17 shows the same <input> element with the input keysequence encrypted (I7xae6rSVlVFF6qzhWRfKw==). Notice that in this example theencrypted attribute of the <input> element is set to true:
In the macro editor, an encrypted input key sequence is displayed with asterisks(for example, the encrypted version of ’myPassword’ is displayed in the String fieldas ************************ rather than as I7xae6rSVlVFF6qzhWRfKw==).
Encryption allows you to include confidential data, such as a password, in anInput action without exposing the confidential data to casual view. Anunauthorized person cannot discover the confidential data by viewing the macroscript with a text editor, with the macro editor, or in the source view.
After you encrypt the input key sequence, Host On-Demand does not allow you oranyone else to use the macro editor or the source view to decrypt it. HostOn-Demand does not decrypt an encrypted input key sequence of an Input actionuntil the macro runtime processes the Input action during macro playback. Whenthe macro runtime processes the Input action, the macro runtime decrypts theencrypted input key sequence and types the unencrypted version into the sessionwindow beginning at the specified row and column location.
Typically in a 3270 or a 5250 environment, for a confidential input key sequencesuch as a password, the host application creates a non-display input field as thedestination of the input key sequence, so that blanks or asterisks (*) are displayedinstead of the plain text.
input value="'myPassword'" row="20" col="16" movecursor="true"xlatehostkeys="true" encrypted="false" />
Figure 16. <input> element with unencrypted input key sequence
input value="I7xae6rSVlVFF6qzhWRfKw==" row="20" col="16"movecursor="true" xlatehostkeys="true" encrypted="true" />
Figure 17. <input> element with encrypted input key sequence
Chapter 7. Macro actions 63

However, a security exposure still exists if the macro script is exposed to morethan casual view. A clever foe who gains access to a copy of the macro script candiscover the original unencrypted input key sequence by editing the row andcolumn fields of the Input action so that during macro playback the macro runtimetypes the decrypted input key sequence into a normal display field.
For greater security, you can use a Prompt action instead of an Input action. With aPrompt action, the input key sequence is not stored in the macro script, not even inencrypted form. Instead, during macro playback, when the macro runtimeprocesses the Prompt action, the macro runtime pops up a window with an inputfield and a message prompting the end user to type an input key sequence. Whenthe end user types the input key sequence and clicks OK, the macro runtimeremoves the popup window and directs the input key sequence into the sessionwindow at the specified row and column location.
Note: The default values for prompts are stored in macro files unencrypted. Thedefault values display in the clear when you edit prompts in the macroeditor. Therefore, while using a prompt to specify a password is anappropriate thing to do, for security reasons you should not specify adefault value for the password.
Using an Input action does have this advantage, that the macro script runsautomatically during macro playback without the end user having to intervene.However, if the confidential data changes (for example, if a password expires anda new and different password is required) then the Input action must be updatedwith the new input key sequence.
Automatic encryption during macro recording: During macro recording, for 3270Display and 5250 Display sessions only, HATS automatically records a passwordinput sequence as an Input action with an encrypted input key sequence.
Using the Encrypt string (VME) or Password (AME) check box: If the input keysequence was automatically encrypted during macro recording, when you look atthe Input action in the macro editor, the Encrypt string (VME), or Password(AME), check box is selected, and the String field contains some number ofasterisks (such as ******) representing the encrypted input key sequence.
In contrast, if the input key sequence was not automatically encrypted duringmacro recording (perhaps because the session was not a 3270 or 5250 displaysession, or perhaps because the input field was not a non-display input field) thenthe check box is cleared and the String field contains the unencrypted input keysequence.
If the input key sequence was not automatically encrypted during macro recording,you can encrypt it in the macro editor. Follow these steps to encrypt the input keysequence. Before you start, clear the check box if it is not already cleared.1. If the input key sequence that you want is not already present in the String
field, type the input key sequence into the String field.v The input key sequence appears normally in the String field (for example,
’myPassWord’).v If you are using the advanced macro format, remember to enclose the input
key sequence in single quotes (’myPassWord’).2. Select the check box.
v The macro editor encrypts the input key sequence and displays it in theString field using asterisks (***********************).
64 IBM Rational Host Access Transformation Services: Advanced Macro Guide

If you want to create an encrypted input key sequence, but you do not want theinput key sequence to be displayed in unencrypted form as you type it into theString field, use the following method:1. Clear the String field if it is not already empty.2. Select the check box.3. Type the input key sequence into the String field.
v If you are using the advanced macro format, remember to enclose the inputkey sequence in single quotes (’myPassWord’).
v As you type into the String field, the macro editor displays the charactersusing asterisks (’myPassword’ is displayed as ************).
v When the input focus leaves the String field (that is, when you click someother field) then the macro editor encrypts the input key sequence.
After the input key sequence is encrypted, you might decide that you do not wantit to be encrypted or that you want to revise it.
If the input key sequence is encrypted and you decide that you do not want it tobe encrypted, then follow these steps:1. Clear the check box.
v The macro editor discards the encrypted string and clears the String field.v If for some reason the String field is not cleared, then delete the characters in
it using the backspace key or the delete key.2. Type the unencrypted input key sequence into the String field.
If the input key sequence is encrypted and you decide that you want to revise it,follow these steps:1. Clear the String field using the backspace key or the delete key.
v Delete the entire encrypted input key sequence, so that the field is empty.2. Type the revised input key sequence into the String field.
v If you are using the advanced macro format, remember to enclose the inputkey sequence in single quotes (’myPassWord’).
v As you type into the String field, the macro editor displays the charactersusing asterisks (’myPassword’ is displayed as ************).
v When the input focus leaves the String field (that is, when you click someother field) then the macro editor encrypts the input key sequence.
Do not try to revise an encrypted input key sequence by typing over or insertingcharacters into the string of asterisks in the String field (*******)! If you do, thenyou corrupt the encrypted input key sequence with your unencrypted revisions.Then the macro editor, believing that you have typed in an unencrypted string,re-encrypts the corrupted sequence. The result is that during macro playback,when the macro runtime processes the Input action, the decrypted sequence is notthe input key sequence that you expected. (Also, if you are using the advancedmacro format and you do not enclose the corrupted input key sequence with singlequotes, the macro editor generates an error message).
Using the source view: The source view follows the same rules for encrypting aninput key sequence as the macro editor.
The source view always allows you to do either of the following actions:v Type into the editable text area a new <input> element that encrypts the input
key sequence.
Chapter 7. Macro actions 65

v Paste from the system clipboard into the editable text area an <input> elementthat encrypts the input key sequence.
You can also, while using the source view, change the value of the encryptedattribute (which activates or deactivates encryption) from true to false, or false totrue.
However, if you want to use the source view to modify the value of the valueattribute (which contains the encrypted or unencrypted input key sequence), andthe encrypted attribute is set to true, then completely delete the encrypted inputkey sequence (so that it reads value=""), then type in the new input key sequencethat you want encrypted.
Do not try to revise an encrypted input key sequence by typing over or insertingcharacters into an encrypted input key sequence in the value attribute! If you do,then you corrupt the encrypted input key sequence with your unencryptedrevisions.
Encrypting a variable name: Although you can type a variable name (such as$var1$) into the String field in the macro editor (or into the value part of the valueattribute in the source view) and encrypt the name of the variable (using the samesteps that you would use to encrypt a normal input key sequence) this normally isnot a useful thing to do. The reason is that when you encrypt a variable name onlythe characters making up the variable name are encrypted. The contents of thevariable itself are not encrypted.
During macro playback, the macro runtime decrypts the encrypted text to get theplain text (such as $var1$), sees that the plain text is a variable name, and thenevaluates the variable in the usual way.
For more information, see “<input> element” on page 184.
Mouse click action (<mouseclick> element)The Mouse click action simulates a user mouse click on the host terminal. As witha real mouse click, the text cursor jumps to the row and column position where themouse icon was pointing when the click occurred.
This action can be specified using the VME, see “Set cursor position action” onpage 129, and using the AME, see “Mouse click action” on page 154.
For more information, see “<mouseclick> element” on page 185.
Pause action (<pause> element)The Pause action waits for a specified number of milliseconds and then terminates.
More specifically, the macro runtime finds the <pause> element, reads the durationvalue, and waits for the specified number of milliseconds. Then the macro runtimegoes on to perform the next item.
Uses for this action are:v Any situation in which you want to insert a wait.v Waiting for the host to update the host terminal. For more information see
“Screen completion” on page 82.v To add delay for debugging purposes.
66 IBM Rational Host Access Transformation Services: Advanced Macro Guide

This action can be specified using the VME, see “Pause action” on page 126, andusing the AME, see “Pause action” on page 155.
For more information, see “<pause> element” on page 188.
Perform action (<perform> element)The Perform action invokes a method belonging to a Java class that you haveimported.
This action can be specified using the VME, see “Perform action” on page 126, andusing the AME, see “Perform action” on page 155.
You can invoke a method in many other contexts besides the Perform action.However, the Perform action is useful in certain scenarios, for example, when youwant to invoke a method that does not return a value.
Some of the contexts, other than the Perform action, in which you can invoke amethod are as follows:v You can invoke a method and assign the return value to a variable by using the
Update variable action. The variable that receives the return value can be eithera variable belonging to a standard type (boolean, integer, string, double) or avariable belonging to an imported type (for example, a variable named$objTmp$ that belongs to the imported type Object, based on the Java classObject).
v You can invoke a method and use the return value as a parameter in a macroaction by specifying the method call in the field for the parameter. For example,in the Row parameter of an Extract action you can use a method call thatreturns an integer value. The macro runtime sees that the parameter is a methodcall , invokes the method, and uses the integer return value as the value of theRow parameter.
v You can invoke a method as part of any expression by using the method call asa term in the expression. When the macro runtime evaluates the expression, itsees that the term is a method call, invokes the method, and uses the value ofthe method (for example, a string) as the value of the term.
v You can invoke a method and use the return value as the initial value of avariable that you have just declared.
In general, outside the Perform action, you can invoke a method in any context inwhich the value returned by the method is valid.
ExamplesThe Figure 18 on page 68 shows how to invoke a method using the Perform action.Notice the following facts about these examples:v In Example 1, the Perform action calls the update() method on the variable
$importedVar$. Notice that:– The entire method call is enclosed in dollar signs ($).– In the context of a method call, the variable name itself (importedVar) is not
enclosed in dollar signs ($).– A variable passed as a parameter to a method must be enclosed in dollar
signs ($) as usual ($str$).– A string passed as a parameter to a method must be enclosed in single quotes
as usual (’Application’).v In Example 2, the Perform action calls a static method.
Chapter 7. Macro actions 67

v In Example 3, the Perform action calls the close() method belonging to the classto which the variable belongs, such as java.io.FileInputStream.
v In Example 4, the Perform action calls the createZipEntry() method belonging tothe class to which the variable belongs, such as java.util.zip.ZipInputStream.
v In Example 5, the Perform action calls the clear() method belonging to the classto which the variable belongs, such as java.util.Hashtable.
For more information, see “<perform> element” on page 188.
PlayMacro action (<playmacro> element)The PlayMacro action launches another macro.
This action can be specified using the VME, see “Play macro action” on page 126,and using the AME, see “Playmacro action” on page 155.
When the macro runtime performs a PlayMacro action, it terminates the currentmacro (the one in which the PlayMacro action occurs) and begins to process thespecified macro screen of the target macro. This process is called chaining. Thecalling macro is said to "chain to" the target macro. There is no return to the callingmacro.
You must specify in the PlayMacro action the name of the target macro and,optionally, the name of the macro screen in the target macro that you want themacro runtime to process first.
You can have the macro runtime transfer all of the variables with their contentsfrom the calling macro to the target macro.
Adding a PlayMacro actionOutside a Condition element, you can add only one PlayMacro action to a macroscreen, and that PlayMacro action must be the last action in the Actions list(<actions> element) of the macro screen.
Inside a Condition element:v You can add one PlayMacro action to the true branch (<if> element), and that
PlayMacro action must be the last action in the branch (<if> element).
<actions><!-- Example 1 --><perform value="$importedVar.update( 5, ’Application’, $str$)$" />
<!-- Example 2 --><perform value="$MyClass.myInit(’all’)$" />
<!-- Example 3 --><perform value="$fip.close()$" />
<!-- Example 4 --><perform value="$zis.createZipEntry( $name$ )$" />
<!-- Example 5 --><perform value="$ht.clear()$" />
</actions>
Figure 18. Example of the Perform action
68 IBM Rational Host Access Transformation Services: Advanced Macro Guide
v You can also add one PlayMacro action to the false branch (<else> element), andthat PlayMacro action must be the last action in the branch (<else> element).
You can have as many Condition elements in the macro as you like, with eachCondition element containing one PlayMacro action in its true branch and onePlayMacro action in its false branch.
The Macro Editor enforces these rules.
Using target macros with promptsIf a target macro requires a prompt value, prompt for the required value in thefirst macro of the chain. For example, if you chain from calling MacroA to targetMacroB and MacroB needs an account number from the user, add the promptaction for the account number to MacroA. Assign the response to a macro variableusing the assigntovar attribute of the <prompt> action. In the <playmacro> actionin calling MacroA, specify that variables are transferred to the target macro bysetting transferVars="Transfer". In the target macro, use the macro variable in theplace where you would have used the prompt action. For example, use an <input>action with the macro variable as the input value instead of a prompt action. Ifthere are several macros in the chain, all prompts must occur in the first macro.For example, if you chain from MacroA to MacroB to MacroC and MacroC requiresa prompt value, prompt for the MacroC value in MacroA and pass it along thechain.
Any time that you use macro variables with prompts in macros, you must specifya value of promptall=true in the <HAScript> tag of the macro. This is the defaultvalue for the attribute. Ensure that your calling macro, which contains all of theprompts for the chain, is using a value of true for promptall.
Transferring variablesYou can have the macro runtime transfer to the target macro all the variables thatbelong to the calling macro, including the contents of those variables, by settingthe transferVars attribute to "Transfer" (the default is "No Transfer").
This transferring of variables and their contents allows you to use variables to passparameters from the calling macro to the target macro.
After the target macro gets control, it can read from and write to the transferredvariables in the same way that it reads from and writes to variables that it hasdeclared itself.
For example, if MacroA currently has two integer variables named StartRow andStartCol, with values of 12 and 2, and then MacroA launches MacroB with aPlayMacro action, then MacroB starts out having variables StartRow and StartColwith values of 12 and 2.
Even if the transferred variable belongs to an imported type and contains a Javaobject, the target macro can still refer to the transferred variable and call methodson the Java object, or can write some other object into that transferred variable.
Requirements for transferring variables: The target macro must have selected theadvanced macro format (see “Basic and advanced macro format” on page 15).
Restriction: The following restriction applies to all types of transferred variables:You cannot use the transferred variable in the Initial Value field of a variabledefined in the target macro.
Chapter 7. Macro actions 69
Additional information: If the target macro creates a variable with the samename and type as a transferred variable, then the macro runtime uses the createdvariable rather than the transferred variable.
When the target macro needs to import a type: In the target macro, if you wantto use a transferred variable that belongs to an imported type, then you do notneed to import that same type in the target macro. Examples of operations whereyou do not need to import the type are as follows:v Using the transferred variable as the value of an attributev Calling a method on the transferred variable
However, in the target macro, if you want to use the name of an imported type,then you must import that type. Examples of operations where you must importthe type:v Declaring a new variable of the imported typev Creating a new instance of the imported typev Calling a static method of the imported type
The following example shows a PlayMacro action:
For more information, see “<playmacro> element” on page 189
Prompt action (<prompt> element)The Prompt action provides a powerful way to send immediate user keyboardinput into the 3270 or 5250 application or into a variable.
This action can be specified using the VME, see “Prompt action” on page 127, andusing the AME, see “Prompt action” on page 155.
The Prompt action displays on top of the host terminal a prompt window thatcontains a message, an input field, and three buttons (OK, Cancel, Help). After theuser types text into the input field and clicks OK, the Prompt action uses the inputin one or both of the following ways:v The Prompt action types the input into an input field of the host terminal.v The Prompt action interprets the input as a string and stores the input into a
variable.
A typical use of this action, but by no means the only use, is to permit the user toprovide a password. Many scenarios require that a macro log on to a host or startan application that requires a password for access. Because a password is sensitivedata and also typically changes from time to time, you probably do not want tocode the password as an immediate value into the macro.
With the Prompt action, you can display a message that prompts the user for apassword and that lets the user type the password into the input field. After theuser clicks OK, the macro runtime types the input into the host terminal at the row
<actions><playmacro name="TargetMacro" startscreen="*DEFAULT*"
transferVars="Transfer" /></actions>
Figure 19. Example of the PlayMacro action
70 IBM Rational Host Access Transformation Services: Advanced Macro Guide

and column location that you specify. The input sequence can include action keyssuch as [enter], so that if the user types MyPassword[enter] the macro runtime notonly can type the password into the password field but also can type the key thatcompletes the logon or access action. (Or, you can put the action key into an Inputaction that immediately follows the Prompt action.)
Note: The default values for prompts are stored in macro files unencrypted. Thedefault values display in the clear when you edit prompts in the macroeditors. Therefore, while using a prompt to specify a password is anappropriate thing to do, for security reasons you should not specify adefault value for the password.
The promptall attributesYou can have the macro runtime combine the popup windows from all <prompt>elements into one large prompt window and display this large prompt window atthe beginning of the macro playback, by setting the promptall attribute of the<HAScript> element to true (see “<HAScript> element” on page 180).
The promptall attribute in the <actions> element works similarly (see “<actions>element” on page 172).
For more information, see “<prompt> element” on page 189.
SQLQuery action (<sqlquery> element)The SQLQuery action is a very useful and powerful action that allows you to sendan SQL statement to a host database, retrieve any data resulting from the SQLstatement, and then write the data into a Host On-Demand macro variable.
This action can be specified using the Source tab in the VME, and using theActions tab in the AME, see “SQLQuery action” on page 158.
You can use the SQLQuery action in any type of session that supports macros(3270 Display, 5250 Display, or VT Display).
The database server to which you connect can be on a different host than the hostrunning your application session.
The SQLQuery action supports only SQL statements of type Select. It does notsupport SQL statements of type Insert, Update, or Delete.
The SQLQuery action requires a database driver that is accessible to both theHATS Toolkit environment and the specific HATS applications using theSQLQuery action. The database driver is specific to the database being accessed;obtain this driver from the database administrator.
For the SQL Wizard to function correctly within the HATS Toolkit, the databasedriver file should be placed in the lib\ext directory of the Java RuntimeEnvironment (JRE) being used by the Rational® Software Delivery Platform (forexample, RAD_INSTALL_DIR\jre\lib\ext). You must restart the Rational SoftwareDelivery Platform (if it was active) after copying the database driver to the JRElocation.
The HATS application must also have access to the database driver file when it isdeployed. For HATS Web applications, the database driver file should be added tothe EAR level. After the file is added to the EAR level, each WAR in the HATSapplication that uses the SQLQuery action must have its META-INF/
Chapter 7. Macro actions 71

MANIFEST.MF file updated to include the database driver file. To ensure that theupdate to the MANIFEST.MF file is made correctly, edit it using the JARDependency Editor. For HATS rich-client applications, the database driver fileshould be added to the lib\ext directory of the JRE that is being used by the targetdeployment environment (Eclipse rich client, Lotus Notes®, or Lotus® ExpeditorClient).
For more information, see “<sqlquery> element” on page 192.
Trace action (<trace> element)The Trace action sends a trace message to a trace destination that you specify, suchas the HATS Toolkit console or the WebSphere® console. In addition, HATS addsmacro traces to the HATS runtime trace.
This action can be specified using the Source tab in the VME, and using theActions tab in the AME, see “Trace action” on page 163.
ExampleThe example in Figure 20 on page 73 shows how to send trace messages to theHATS Toolkit console. This example uses the following action elements: Trace andVariable update.
You can copy the text of this macro script from this document into the systemclipboard, and then from the system clipboard into the source view (see “Samples”on page 7). After you save this script in the macro editor, you can edit it.
Notice the following facts about this example:v The example consists of one entire macro script named TRACE.v The <create> element creates a string variable named $strData$ and initializes it
to an original value of ’Original value’.v The first action is a Trace action with the Trace Text set to ’The value is’ +
$strData$.v The second action is a Variable update action that sets the variable $strData$ to
a new value of ’Updated value'.v The third action is another Trace action identical to the first Trace action.
72 IBM Rational Host Access Transformation Services: Advanced Macro Guide

This script in Figure 20 causes the macro runtime to send the following data:The value is +{$strData$ = Original value}The value is +{$strData$ = Updated value}
In the trace output above, notice that instead of just displaying the value of$strData$, the Debug action displays both the variable's name and its value insidebraces.
For more information, see “<trace> element” on page 194.
Variable update action (<varupdate> element)The <varupdate> element stores a value into a variable. During macro playbackthe macro runtime performs the action by storing the specified value into thespecified variable.
You must specify:v The name of a variablev The value that you want to store into the variable
This action can be specified using the VME, see “Update variable action” on page130, and using the AME, see “Variable update action” on page 163.
You can also use the Variable update action in a <description> element (see“Processing a Variable update action in a description” on page 46).
The value can be an arithmetic expression and can contain variables and calls toimported methods. If the value is an expression, then during macro playback themacro runtime evaluates the expression and stores the resulting value into thespecified variable.
The Variable update action works like an assignment statement in a programminglanguage. In a Java program you could write assignment statements such as:
<HAScript name="TRACE" description=" " timeout="60000" pausetime="300"promptall="true" author="" creationdate="" supressclearevents="false"usevars="true" ignorepauseforenhancedtn="false"delayifnotenhancedtn="0">
<vars><create name="$strData$" type="string" value="'Original value'" />
</vars><screen name="Screen1" entryscreen="true" exitscreen="false" transient="false">
<description><oia status="NOTINHIBITED" optional="false" invertmatch="false" />
</description><actions>
<trace type="SYSOUT" value="'The value is '+$strData$" /><varupdate name="$strData$" value="'Updated value'" /><trace type="SYSOUT" value="'The value is '+$strData$" />
</actions><nextscreens timeout="0" ></nextscreens>
</screen>
Figure 20. Sample code TRACE
Chapter 7. Macro actions 73
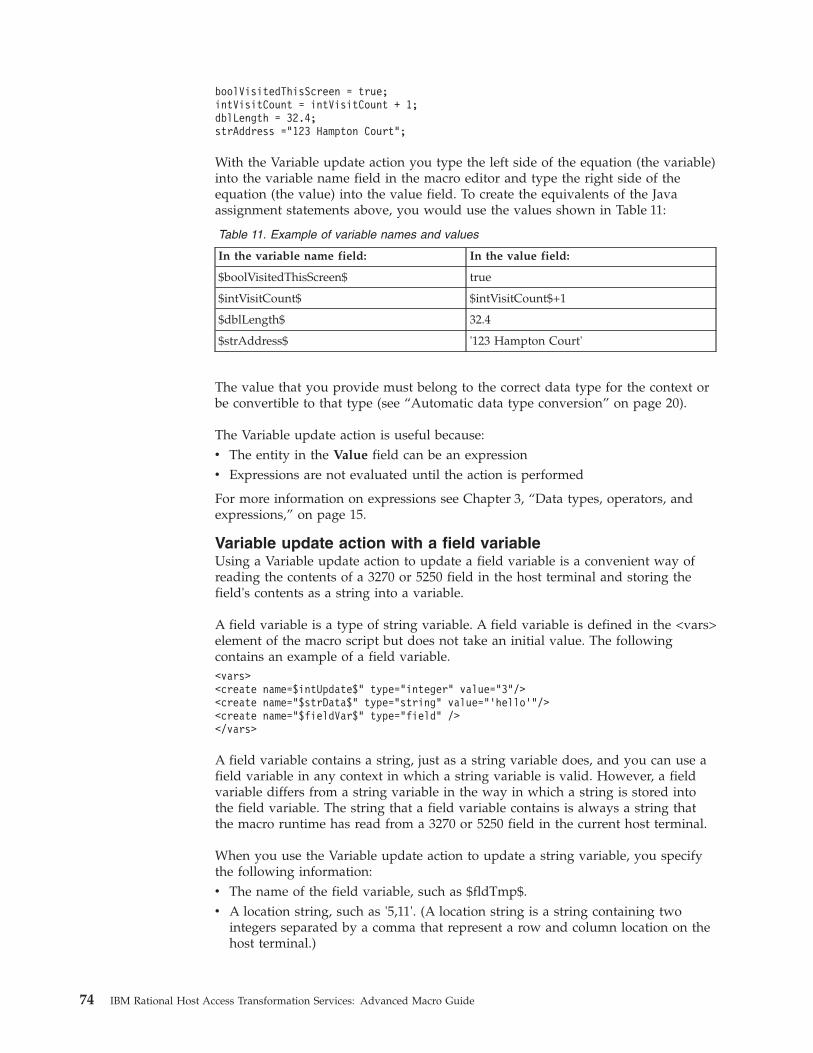
boolVisitedThisScreen = true;intVisitCount = intVisitCount + 1;dblLength = 32.4;strAddress ="123 Hampton Court";
With the Variable update action you type the left side of the equation (the variable)into the variable name field in the macro editor and type the right side of theequation (the value) into the value field. To create the equivalents of the Javaassignment statements above, you would use the values shown in Table 11:
Table 11. Example of variable names and values
In the variable name field: In the value field:
$boolVisitedThisScreen$ true
$intVisitCount$ $intVisitCount$+1
$dblLength$ 32.4
$strAddress$ '123 Hampton Court'
The value that you provide must belong to the correct data type for the context orbe convertible to that type (see “Automatic data type conversion” on page 20).
The Variable update action is useful because:v The entity in the Value field can be an expressionv Expressions are not evaluated until the action is performed
For more information on expressions see Chapter 3, “Data types, operators, andexpressions,” on page 15.
Variable update action with a field variableUsing a Variable update action to update a field variable is a convenient way ofreading the contents of a 3270 or 5250 field in the host terminal and storing thefield's contents as a string into a variable.
A field variable is a type of string variable. A field variable is defined in the <vars>element of the macro script but does not take an initial value. The followingcontains an example of a field variable.<vars><create name=$intUpdate$" type="integer" value="3"/><create name="$strData$" type="string" value="’hello’"/><create name="$fieldVar$" type="field" /></vars>
A field variable contains a string, just as a string variable does, and you can use afield variable in any context in which a string variable is valid. However, a fieldvariable differs from a string variable in the way in which a string is stored intothe field variable. The string that a field variable contains is always a string thatthe macro runtime has read from a 3270 or 5250 field in the current host terminal.
When you use the Variable update action to update a string variable, you specifythe following information:v The name of the field variable, such as $fldTmp$.v A location string, such as '5,11'. (A location string is a string containing two
integers separated by a comma that represent a row and column location on thehost terminal.)
74 IBM Rational Host Access Transformation Services: Advanced Macro Guide

When the macro runtime performs the Variable update action, the macro runtime:1. Recognizes that the variable is a field variable.2. Looks at the location string that is to be used to update the field variable.3. Finds in the current host terminal the row and column location specified by the
location string.4. Finds in the current host terminal the 3270 or 5250 field in which the row and
column location occurs.5. Reads the entire contents of the 3270 or 5250 field, including any leading and
trailing blanks.6. Stores the entire contents of the field as a string into the field variable.
You can then use the field variable in any context in which a string is valid. Forexample, you can concatenate the field variable with another string, as in thefollowing:’The field\’s contents are’+ $fldPrintOption$
As an example, suppose that the host terminal contains a 3270 or 5250 field withthe following characteristics:v It begins at row 5, column 8v It ends at row 5, column 32v It contains the string ’Print VTOC information’
You set up a Variable update action with the following values:v In the variable name field you type the name of a field variable that you have
just created, $fldData$.v In the value field you type a location string, ’5,11’. Notice that you have to
specify only one row and column location, and that it can be any row andcolumn location that lies within the field.
When the macro runtime performs this Variable update action, the macro runtimereads the entire contents of the field and stores the contents as a string into$fldData$. The field variable $fldData$ now contains the string ’Print VTOCinformation’.
Reading part of a field: When you are using a field variable in a Variable updateaction, you can specify a location string that contains two locations. Use thisfeature if you want to read only part of the contents of a field.
Type the first and second locations into the value field with a colon (:) betweenthem. For example, if the first location is 5,14 and the second location is 5,17, thenyou would type ’5,14:5,17’.
When you specify two locations:v The first location specifies the first position in the field to read from.v The second location specifies the last position in the field to read from.
As an example, suppose that the host terminal contains a 3270 or 5250 field withthe following characteristics:v It begins at row 5, column 8v It ends at row 5, column 32v It contains the string ’Print VTOC information’
Chapter 7. Macro actions 75

In addition, suppose that you set up a Variable update action with the followingvalues:v In the variable name field you type the name of a field variable that you have
just created, $fldData$.v In the value field you type a location string, ’5,14:5,17’. Here you are
specifying both a beginning location and an ending location within the field.
When the macro runtime performs this Variable update action, the macro runtimereads the string ’VTOC’ from the field (beginning at the position specified by thefirst location string and continuing until the position specified by the secondlocation string) and stores the string ’VTOC’ into $fldData$.
If the second location lies beyond the end of the field, the macro runtime reads thestring beginning at the first location and continuing until the end of the field. Themacro runtime then stores this string into the field variable.
For more information, see “<varupdate> element” on page 196.
76 IBM Rational Host Access Transformation Services: Advanced Macro Guide

Chapter 8. Timing issues
This chapter describes several timing issues involved in processing actions and theresources available for dealing with these issues.
Macro timing and delay characteristicsThis section addresses HATS macro timing parameters from a macro script level.For example, while there are multiple ways to affect the timing of macro executionfrom various places in the HATS Toolkit graphical user interface (including themacro editors), the explanations here deal with the results of those actions as theyare implemented in the XML script of the macro itself, not with the various ways(tabs in the macro editors, and so on) of causing them to be placed in the script.
There are several timing parameters that influence macro execution. Most timingparameters control delays in various parts of the macro's execution. This allows themacro to be resilient, robust, and successful in an environment where hostresponse time and certain other variables might be unpredictable. The mostcommon reason for adding delay in a macro is to allow the screen coming fromthe host to complete its arrival before it is processed by the macro. This delay canusually be reduced or totally avoided if enough additional description — forexample, looking for strings of characters on various parts of the screen — isadded to the screens that the delay addresses.
In a HATS macro, there are elements and there are attributes that modify elements(attributes are also referred to as parameters). Elements are framed by opening andclosing angle bracket tags and attributes are normally included within an element'stags, such as in this example of the screen element with a modifying pauseattribute:
<screen pause=15000>
The elements and attributes discussed in this chapter are:v pausetime attribute of the <HAScript> elementv pause attribute of the <screen> elementv <pause> element, which can appear along with other actions inside the
<actions> elementv ignorepauseforenhancedtn attribute of the <HAScript> elementv ignorepauseoverrideforenhancedtn attribute of the <pause> elementv delayifnotenhancedtn attribute of the <HAScript> element
What each element and attribute is forThe pausetime attribute of the <HAScript> element controls two things:1. A delay of pausetimevalue /2 (in milliseconds) that occurs after most <prompt>
and <insert> elements defined in a screen's actions, and2. A one-time delay of pausetimevalue (in milliseconds) that occurs after all of a
screen's actions have been executed (for most screens)
© Copyright IBM Corp. 2003, 2011 77

Exactly where, and on which screens, delays of pausetimevalue /2 andpausetimevalue are executed is explained in more detail below. The default value forpausetimevalue (if no explicit pausetime attribute is defined) is 300 milliseconds.
The pause attribute (not to be confused with the <pause> element) overrides thepausetime attribute. To be more precise, if a pause attribute is defined within anelement, it is used to override, for only that screen, the pausetime attribute defined(explicitly or by default) in the <HAScript> element for the macro. This means thatwhen the pause attribute is defined for a screen, the pausetime attribute is ignored,and the value of that screen's pause attribute is used in calculating anypausetime-related delays that occur during that <screen> element's processing. Thepause and pausetime attributes are not affected by, and do not affect, theprocessing of any <pause> elements.
The <pause> element is used to insert an explicit delay into the processing of ascreen's actions. One or more <pause> elements can be placed before, in between,and after other actions defined in a screen's <actions> element. The pause andpausetime attributes are not affected by, and do not affect, the processing of any<pause> elements.
The ignorepauseforenhancedtn attribute of the <HAScript> element, when set to"true," causes the macro runtime to skip Pause actions (<pause> elements) duringmacro playback if the session is running in a contention resolution environment.See “ignorepauseforenhancedtn=true/false” on page 84 for additional informationon the use of this attribute.
The ignorepauseoverrideforenhancedtn attribute of the <pause> element, when setto "true" in a particular <pause> element, causes the macro runtime to process that<pause> element (wait for the specified number of milliseconds) even if theignorepauseforenhancedtn attribute is set to "true" in the <HAScript> element. See“ignorepauseoverrideforenhancedtn=true/false” on page 85 for additionalinformation on the use of this attribute.
The delayifnotenhancedtn attribute of the <HAScript> element, when set to anon-zero value, causes the macro runtime to automatically pause the specifiednumber of milliseconds whenever the macro runtime receives a notification thatthe Operator Information Area has changed. This attribute is useful for allowingthe same macro to run successfully in both a contention resolution environment ora non-contention resolution environment. See“delayifnotenhancedtn=(milliseconds)” on page 85 for additional information onthe use of this attribute.
How the HATS macro processing engine uses these timingelements and attributes
For non-exit screens (the exitscreen attribute is set to “false”), a delay ofpausetimevalue is executed once after a screen's actions have all been executed, butbefore the registration or recognition of the next screen begins. If the pauseattribute is defined for the screen, then the value of pause is used instead of thevalue of pausetime for the post-actions delay.
For macro screens defined as exit screens (the exitscreen attribute set to “true”), thepausetime attribute (and any pause attribute defined for that exit screen) isessentially ignored and there is no additional delay automatically executed after allof the screen's actions are completed. This keeps the macro engine from addingextra delays once it has navigated to the final screen of the macro.
78 IBM Rational Host Access Transformation Services: Advanced Macro Guide

In addition, for all macro screens, the macro sleeps for pausetimevalue /2 after each<prompt> or <insert> that is not the last action on the screen.
For example, if pausetime="1000" and no pause attribute is defined for the screen,as shown in Figure 21, the macro will sleep for 500 ms after the first action (aprompt), 500 ms after 4th action and (if the current screen is not an exit screen)1000 ms after all the actions are played, for a total of 2000 ms.
In a macro, <pause> elements are executed inline wherever they are placed, andare not overridden by the pausetime attribute or pause attribute settings, but mightbe overridden by the ignorepauseforenhancedtn attribute of the <HAScript>element if it is set to "true".
To expand upon the above example, if pausetime="1000" and no pause attribute isdefined for the screen, shown in Figure 22, the macro will sleep for 500 ms afterthe first action (a prompt), 500 ms after 4th action (a prompt), 500 ms after 5thaction (an insert), 150 ms after the 6th action (the <pause> element), and (if thecurrent screen is not an exit screen) 1000 ms after all the actions are played, for atotal of 2650 ms.
Note that if this were an exit screen, the total sleep time would be 1650 ms. Alsonote that the ignorepauseforenhancedtn attribute of the <HAScript> element, andthe ignorepauseoverrideforenhancedtn attribute of the <pause> element, if set, willeffect whether the explicit <pause> element in this example is executed or ignored.
What happens after a screen's actions have completedIn a macro, after all actions for a screen have been processed (including sleepingafter all actions based on the pausetime or pause attribute value), the nextscreen isregistered and a timer (timeout clock) is started. The macro attempts to recognizethe screens at the time of registration and, if no screen is recognized, starts aniterative recognition process for the nextscreens, which is triggered by PSEVENTsand OIAEVENTs generated by data coming in from the host. Each time aPSEVENT or OIAEVENT arrives from the host, the macro tries to recognize thenextscreen again.
<actions><prompt...<extract...<extract...<prompt...<insert...
</actions>
Figure 21. Example 1 for pausetimevalue
<actions><prompt...<extract...<extract...<prompt...<insert...<pause value="150"/>
</actions>
Figure 22. Example 2 for pausetimevalue
Chapter 8. Timing issues 79
The screen recognition process continues to try to recognize the incoming screendata. It might fail several times before succeeding (messages are not logged forthese failures). The timeout parameter for the macro sets an upper limit on howlong each screen's recognition process (not the whole macro) will try to recognizethe incoming screen. Note that the screen recognition engine is not in a "busy"loop. The engine waits to be triggered by incoming PSEVENT and OIAEVENToccurrences to do each additional comparison. If the timeout value is exceededbefore the screen is recognized, screen recognition fails. The timer is stopped whena screen is recognized.
High-level, textual flow of macro engine processing1. ScreenX is recognized.2. ScreenX actions are completed. Note that there is the addition of
pausetimevalue /2 (or pauseattributevalue /2) after each action if the action isa <prompt> or <insert> and is not the last action in the set of actions.
3. Macro play stops here if the current screen is an exit screen.4. ScreenX pausetimevalue delay (set by the pausetime attribute or overridden by a
local pause attribute for this screen) is completed.5. Register nextscreens.6. Start a timeout clock for nextscreens.7. Recognition processing of nextscreens loops, doing a new recognition based on
each PSEVENT or OIAEVENT, the arrival of which might be controlled oraffected by contention resolution if it is active, until...
8. A nextscreen is recognized, in which case the timeout timer is stopped. Theprocess returns to the top of the sequence and starts again, or the timeout timer(timeout attribute of the <HAScript> element) expires and the macro ends witha timeout error.
Pause after an actionThis section discusses the scenario in which an action does not perform asexpected because a previous action has side effects that have not completed.
There are two attributes that let you add a pause after actions during runtime:v The pausetime attribute of the <HAScript> element.v The pause attribute of the <Screen> element.
Speed of processing actionsBecause the macro runtime executes actions much more quickly than a human userdoes, unforeseen problems can occur during macro playback that cause an actionnot to perform as expected, because of a dependency on a previous action.
One example is a keystroke that causes the application screen to change. If asubsequent action expects the application screen to have already changed, but infact the application screen is still in the process of being updated, then thesubsequent action can fail.
Timing-dependent errors between actions can occur in other situations, if themacro runtime performs each action immediately after the preceding action.
80 IBM Rational Host Access Transformation Services: Advanced Macro Guide

The pausetime attributeThe pausetime attribute of the <HAScript> element specifies a time period for themacro runtime to wait as follows:v After performing an Input action or a Prompt action, to allow all the possible
side effects of either of these two actions to completev After performing the last action in a macro screen, to allow any other side effects
of action-processing to complete
Through HATS Version 5, the pausetime attribute was implemented as a pauseafter every type of action, not just after Input and Prompt actions. It is nowimplemented as follows:v The macro runtime waits for the following:
– An interval equal to 50% of the pause time after every Input action or Promptaction except the last one in a macro screen.
– An interval equal to 100% of the pause time after the last action in a macroscreen.
v The macro runtime does not wait for the following:– After the last Input action or Prompt action in a macro screen, unless it is the
last action in the macro screen.– After any other type of action, unless it is the last action in the macro screen.
By default, the pausetime attribute is enabled and the timeout value is set to 300milliseconds. Therefore by default the macro runtime:v Waits 150 milliseconds after every Input action or Prompt action except the last
one in a macro screen.v Waits 300 milliseconds after the last action in a macro screen.
Notice that the pausetime attribute affects every macro screen. Therefore this onesetting allows you avoid timing errors throughout the macro, without having tochange each macro screen that might have a problem.
The pause attributeIf you want a longer or shorter pause between actions for a particular macroscreen, or if you have only a few macro screens in which a pause between actionsis important, then you can use the pause attribute of the <screen> element.
By default, this attribute is not specified.
If you specify this attribute for a macro screen, then the macro runtime uses thespecified number of milliseconds for the pause between actions for this particularmacro screen.
For example, if for ScreenA you set the pause attribute to 500 milliseconds, thenthe macro runtime waits 250 milliseconds after each Input action and Promptaction in ScreenA except the last one, and waits 500 milliseconds after the lastaction in ScreenA.
When the macro runtime processes a macro screen with the pause attribute of the<screen> element specified, it ignores the setting of the pausetime attribute of the<HAScript> element, and uses only the value in the pause attribute.
Chapter 8. Timing issues 81

Adding a pause after a particular actionIf you need an additional pause after one particular action in a macro screen, youcan add a Pause action after the action. The wait that you specify in the Pauseaction is in addition to any wait that occurs because of a pausetime or pauseattribute.
Screen completion
Recognizing the next macro screen too soonSuppose that you have a macro screen, ScreenB, with the following bug: the macroruntime starts processing the actions in ScreenB before the host has completelyfinished displaying the new application screen. Although this timing peculiaritymight not pose a problem for you in most situations, suppose that in this instancethe first action in ScreenB is an Extract action that causes the macro runtime toread data from rows 15 and 16 of the application screen. Unfortunately the macroruntime performs this action before the host has had time to write all the new datainto rows 15–16.
Analyzing this problem, you verify that:v The session is a 3270 Display session using the default connectivity, TN3270.v The following sequence of actions occurs:
1. In processing the previous macro screen, the macro runtime performs anInput action that causes an enter key to be sent to the host.
2. The host receives the enter key and sends the first block of commands anddata for the new application screen.
3. The client receives the first block and processes it, thereby updating someparts but not all of the host application screen. In particular, rows 15 and 16of the application screen have not yet been updated.
4. Meanwhile the macro runtime has started trying to recognize a valid nextmacro screen that matches the new application screen.
5. As a result of the changes in the application screen from the first block ofcommands and data, the macro runtime recognizes macro ScreenB as thenext macro screen to be processed.
6. The macro runtime performs the first action element in ScreenB, which is anExtract action that reads data from rows 15 and 16 of the application screen.
7. The client receives a second block of commands and data from the host andprocesses it, thereby updating other parts of the application screen, includingrows 15 and 16.
In short, as a result of this timing problem the macro runtime has read rows 15and 16 of the new application screen before the host could finish updating them.
The cause: Unenhanced TN3270 protocolThe reason for this problem is that the unenhanced TN3270 protocol does notinclude a way for a host to inform a client that the host application screen iscomplete. (TN3270 implements a screen-oriented protocol, 3270 Data Stream, overa character-oriented connection, Telnet). Therefore, the host cannot send severalblocks of data to the client and then issue a message to indicate that theapplication screen is complete and the user can now enter data. Instead, each blockarrives without any indication about whether it is the last block for this applicationscreen. From the client's point of view, something like the following events occur:
82 IBM Rational Host Access Transformation Services: Advanced Macro Guide
1. A block of commands and data arrives. The client sets the input inhibitindicator, processes the block, and displays the new data on the specified partsof the host terminal. The client then clears the input inhibit indicator and waits.
2. 30 milliseconds pass.3. Another block of commands and data arrives. The client processes the block as
in step 1 above. This block causes a different part of the screen to be updated.The client waits.
4. 50 milliseconds pass.
This process continues until the host has completely displayed a new hostapplication data screen. The client still waits, not knowing that the host applicationscreen is complete. (For more information, see Chapter 4, “How the macro runtimeprocesses a macro screen,” on page 25).
This process does not present problems for a human operator.
However, this process does present problems for the macro runtime during screenrecognition. Recall that during screen recognition the macro runtime tries to matchthe application screen to one of the valid next macro screens every time the screenis updated and every time an OIA event occurs (see “Repeated screen evaluations”on page 31). Therefore the macro runtime might find a match before the screen iscompletely updated. For example, a String descriptor might state that recognitionoccurs if row 3 of the application screen contains the characters "ISPF PrimaryOption Menu". When the host has updated row 3 to contain these characters, thenthe macro runtime determines that a match has occurred, regardless of whether thehost has finished updating the remainder of the application screen.
Solutions to early macro screen recognitionThere are three approaches to solving this problem:v Add more descriptors to the description.v Insert a delay after the Input action that sends an enter key (see step 1 in
“Recognizing the next macro screen too soon” on page 82).v Use the contention-resolution feature of TN3270E.
The following subsections describe these solutions.
Add more descriptors: This approach works sometimes but can be awkward andunreliable. You add enough descriptors to the description part of ScreenB so thatthe macro runtime will not recognize the ScreenB until the critical portion of theapplication screen has been updated.
Insert a delay after the input action: Inserting a delay is the best solution if thesession is an ordinary TN3270 session or if the session is a TN3270E sessionwithout contention-resolution. That is, after the Input action (in ScreenA in ourexample) that causes the host to send a new application screen, insert a pause ofseveral hundred milliseconds or longer. This delay allows enough time for the hostto update the application screen before the macro runtime starts processing theactions in the next macro screen (ScreenB).
In this scenario there are several ways to insert a pause after the Input action:v Increase the delay specified by the pausetime attribute of the <HAScript>
element.v Increase the delay specified by the pause attribute of the <screen> element for
ScreenA. This method is a good one. You are increasing the pause time only forScreenA, so that only ScreenA is affected.
Chapter 8. Timing issues 83

v Add a Pause action to ScreenA immediately after the Input action. This methodis also good. You are inserting a pause exactly where it is needed.
v Add a Pause action as the first action of ScreenB. You might prefer this methodin certain scenarios. However, using this method, if there are several macroscreens that can occur after ScreenA (such as ScreenB, ScreenC, ScreenD), and ifthe screen completion problem occurs for each of these following macro screens,then you must to insert a Pause as the first action for each of these followingmacro screens. It is easier to use the method that inserts a Pause Action in onemacro screen, ScreenA.
If your macro has to run both on ordinary TN3270 sessions and also on TN3270Esessions with contention-resolution enabled, the XML macro language has severalattributes that can help you. See “Attributes that deal with screen completion.”
Use the contention-resolution feature of TN3270E: TN3270E (Enhanced) is anenhanced form of the TN3270 protocol that allows users to specify an LU or LUpool to which the session will connect and that also supports the Network VirtualTerminal (NVT) protocol for connecting to servers in ASCII mode (for example, inorder to log on to a firewall).
Contention-resolution mode is an optional feature of TN3270E, supported by somebut not all TN3270E servers, that solves the client's problem of not knowing whenthe host has finished updating the application screen. If the client is running aTN3270E session and is connected to a server that supports contention-resolution,then the macro runtime does not recognize a new macro screen until the host hasfinished updating the application screen.
Attributes that deal with screen completionHost On-Demand has three element attributes that address problems that themacro developer encounters when trying to support a single version of a macro torun on both the following environments:v A non-contention-resolution environment (the macro is being run by clients
connected to a TN3270 server or to a TN3270E server without contentionresolution; consequently some macro screens might require a Pause action toallow time for the host to update the application screen).
v A content-resolution environment (the macro is being run by clients connected toa TN3270E server with contention resolution; consequently no macro screenrequires a Pause action to allow time for the host to update the applicationscreen).
You will have to add these attributes using the source view.
ignorepauseforenhancedtn=true/falseThe ignorepauseforenhancedtn attribute of the <HAScript> element, when set totrue, causes the macro runtime to skip Pause actions (<pause> elements) duringmacro playback if the session is running in a contention-resolution environment.You can use this attribute if you developed a macro to run in anon-contention-resolution environment (you inserted Pause actions) and you nowwant the macro to also run in a contention-resolution environment withoutunnecessary delays (you want the Pause actions to be ignored).
With this attribute set to true, the macro runtime processes Pause actions (waits thespecified number of milliseconds) in a non-contention-resolution environment butignores Pause actions in a contention-resolution environment.
84 IBM Rational Host Access Transformation Services: Advanced Macro Guide
Notice, however, that setting this attribute to true causes the macro runtime to skipall Pause actions (<pause> elements) in the macro, not just the pauses that havebeen inserted in order to time for the application screen to be updated. The nextsubsection addresses this secondary problem.
ignorepauseoverrideforenhancedtn=true/falseThe ignorepauseoverrideforenhancedtn attribute of the <pause> element, when setto true in a particular <pause> element, causes the macro runtime to process that<pause> element (wait for the specified number of milliseconds) even if theignorepauseforenhancedtn attribute is set to true in the <HAScript> element.
Set this attribute to true in a <pause> element if you want the <pause> elementalways to be performed, not skipped, even in a contention-resolution environmentwith the ignorepauseforenhancedtn attribute set to true in the <HAScript> element.
delayifnotenhancedtn=(milliseconds)The delayifnotenhancedtn attribute of the <HAScript> element, when set to anon-zero value, causes the macro runtime to automatically pause the specifiednumber of milliseconds whenever the macro runtime receives a notification thatthe OIA (Operator Information Area) has changed.
You can use this attribute if you developed a macro in a contention-resolutionenvironment (you did not need to insert Pause actions) but you now want themacro to run also in a non-contention-resolution environment (some macro screensmight need a Pause action to allow time for the application screen to becompleted).
With this attribute set to true, then when the macro is run in anon-contention-resolution environment the macro runtime inserts a pause for thespecified number of milliseconds each time it receives a notification that the OIAhas changed. For example, if you specify a pause of 200 milliseconds then themacro runtime waits for 200 milliseconds every time the OIA changes.
The cumulative effect of the macro runtime pausing briefly after each notificationof a change to the OIA is that the application screen is completed before the macroruntime begins processing the actions of the new macro screen. The macro runtimeinserts these extra pauses only when it detects that the session is running in anon-contention-resolution environment.
A limitation of this attribute is that the macro runtime adds these extra pausesduring every screen, not just during screens in which screen update is a problem.However, the additional time spent waiting is small. And more importantly, thisattribute lets you quickly adapt the macro to a non-contention resolutionenvironment, without having to test individual screens and insert a pause action ineach screen with a screen update problem.
Chapter 8. Timing issues 85

86 IBM Rational Host Access Transformation Services: Advanced Macro Guide

Chapter 9. Variables and imported Java classes
HATS variablesIn HATS, there are two main types of variables: global variables and macrovariables. The differences between them are outlined here.
Global variablesGlobal variables are variables created in HATS Toolkit and used by HATS projects.Global variables are stored outside of the macro script. They are maintained andupdated by HATS runtime. There are two types of global variables:
LocalA local global variable is one that is created within a HATS project, and is onlyvisible to the project.
SharedA shared global variable is one that is visible to and can be used by all theHATS Web applications in an .ear file, or by all HATS rich client applicationsrunning in the same rich client environment.
Whether a global variable is considered local or shared depends on whether theshared check box in the GUI is checked when the global variable is created, orwhether the value of the shared attribute of a set, prompt, or extract tag isspecified as yes or no in the HATS .hma source file.
Macro variablesUnlike global variables, macro variables are used and stored within macros in theHATS .hma source file. The macro editors can be used to create macro variables. Tocreate macro variables using the VME, see “Variables and Types tab” on page 113,and using the AME, see “Variables tab” on page 147. The macro variables arecreated, stored, and used by the macro engine, and listed in the macro script.
In a HATS macro (.hma) file source using HATS prompts and extracts for globalvariables, the prompts and extracts appear in the file before the macro scriptsyntax. The macro script, which contains the macro variables, is enclosed by thebegin <HAScript> and the end </HAScript> tags.
Introduction to macro variables and imported typesMacro variables help you to add programming intelligence to macros. With avariable you can store a value, save a result, keep a count, save a text string,remember an outcome, or do any number of other programming essentials.
You can create a variable that belongs to any of the standard data types (string,integer, double, boolean, and field).
You can also create a variable that belongs to an imported type representing a Javaclass. You can then create an instance of the class and call a method on theinstance. This capability opens the door to the abundant variety of functionalityavailable through Java class libraries, including libraries in the Java RuntimeEnvironment (JRE) libraries, classes or libraries that you implement yourself, orJava classes and libraries from other sources.
© Copyright IBM Corp. 2003, 2011 87

Advanced macro format requiredUsing variables requires that you use the advanced macro format for your macro(see “Basic and advanced macro format” on page 15). Therefore, if you want toadd variables to a macro that is in the basic macro format, you must decidewhether to convert the macro to the advanced macro format. If you have an oldmacro in the basic macro format that many users rely on and that works perfectly,you might want to leave the macro as it is.
However, remember that all recorded macros are recorded in the basic macroformat. So, if you have recently recorded a macro and are beginning to develop itfurther, then you might simply not have gotten around to switching to theadvanced macro format.
The macro editors address both these situations by popping up a window with thefollowing message when you start to define a variable in a macro that is still in thebasic macro format:
Click Yes if you are building a macro in which you plan to use variables, or No ifyou have a macro in the basic macro format that you do not want to convert.
Scope of variablesThe scope of every variable is global with respect to the macro in which thevariable is created. That is, every variable in a macro is accessible from any macroscreen in the macro. All that an action or a descriptor in a macro screen has to doto access the variable is just to use the variable name.
For example, suppose that you have a variable named $intPartsComplete$ that youinitialize to 0. You might use the variable in the following ways as the macroproceeds:1. ScreenC completes Part 1 of a task and increments $intPartsComplete$ using a
Variable update action.2. ScreenG completes Part 2 of a task and increments $intPartsComplete$ using a
Variable update action.3. ScreenM has a Conditional action that tests whether 1 or 2 parts have been
completed so far. Depending on the result, the macro expects either ScreenR orScreenS as the next macro screen to be processed.
4. ScreenS completes Part 3 of a task and increments $intPartsComplete$ using aVariable update action.
In this example, actions in several different macro screens were able to read fromor write to the variable $intPartsComplete$.
Creating a variableIn the Source view, you create a variable using a <create> element. There is acontaining element called <vars> that contains all the variables in the macro script,and there is a <create> element for each variable. Figure 24 on page 89 shows a
You are attempting to use an advanced macro feature. If you choose to continue,your macro will automatically be converted to advanced macro format. Would youlike to continue?
Figure 23. Reminder message
88 IBM Rational Host Access Transformation Services: Advanced Macro Guide

<vars> element that contains five <create> elements:
In Figure 24, the <vars> element creates one variable from each of the standarddata types (string, integer, double, boolean, and field).
You must put all variable creations (<create> elements) inside the <vars> element.The <vars> element itself must appear after the <import> element, if any (see thenext section), and before the first macro screen (<screen> element).
Creating an imported type for a Java classIn the Source view, you create an imported type using a <type> element. There is acontaining element called <import> that contains all the imported types in themacro script, and there is a <type> element for each imported type. Figure 25shows an <import> element that declares an imported type, followed by a <vars>element that creates and initializes a variable belonging to the imported type:
In the figure above the <import> element contains one <type> element, which hasa class attribute (containing the fully qualified class name, java.util.Hashtable)and a name attribute (containing the short name, Hashtable). The <vars> elementcontains one <create> element, which as usual specifies a name ($ht$), a type(Hashtable), and an initial value (which here is not null but rather is a call to aconstructor that returns an instance of the class, $new Hashtable(40)$).
If you are using the source view, you must put all imported types (<type>elements) inside the <import> element. The <import> element itself must appearinside the <HAScript> element (see “<HAScript> element” on page 180) andbefore the <vars> element.
<vars><create name="$strAccountName$" type="string" value="" /><create name="$intAmount$" type="integer" value="0" /><create name="$dblDistance$" type="double" value="0.0" /><create name="$boolSignedUp$" type="boolean" value="false" /><create name="$fldFunction$" type="field" />
</vars>
Figure 24. Sample <vars> element
<import><type class="java.util.Hashtable" name="Hashtable" />
</import>
<vars><create name=$ht$ type="Hashtable" value="$new Hashtable(40)$" />
</vars>
Figure 25. Imported type and variable of that type
Chapter 9. Variables and imported Java classes 89

Common issues
Deploying Java libraries or classesDuring macro playback, when the macro runtime processes a call to a Javamethod, the macro runtime searches all the available Java library files and classfiles for the class to which the method belongs. The search does not stop until itfinds the class.
Deploying a Java library or class consists of placing the library file or class filecontaining the class in a location where the macro runtime can find it duringmacro playback. The following Java classes are automatically available for use anddo not need to be deployed by you:v Classes in the Java API. The Java archive files are already present in the HATS
application and their locations are listed in the classpath that is specified whenthe HATS application is launched.
v Classes in the Host On-Demand Macro Utility Libraries. The HML libraries arestored with the HATS code (see “The Macro Utility Libraries (HML libraries)” onpage 95).
All other Java classes containing methods invoked by a macro script must bedeployed by you to a location where the macro runtime can find them. Dependingon the environment, you can deploy the Java classes as class files or as librariescontaining Java classes.
When using Java classes in a WebSphere Application Server runtime environment(not portal), be aware that the macro runtime is packaged in a Java EE EnterpriseApplication (.ear) file. If the Java classes are packaged in a HATS Web project, youmust update the Web archive (WAR) class loader policy to Single class loader forapplication to ensure that the macro runtime can access them when the macroruns. If this configuration is not done, ClassNotFoundExceptions will occur whenthe macro invokes the Java classes. To learn how to configure the class loaderpolicy, see Configuring application class loaders in the documentation for theversion of WebSphere Application Server that you are using .
Variable names and type namesThe rules for variable names are as follows:v A variable name can contain only alphanumeric characters (a-z, A-Z, 0-9),
underscore (_), or hyphen (-).v Case is significant (for example, strTmp and strtmp are two different names).v A variable name cannot be the same as the short name or the fully qualified
class name of an imported type.
The rules for type names are as follows:v A type name can contain only the alphanumeric characters, underscore (_),
hyphen (-), or period (.).v Type names are case sensitive.
Transferring variables from one macro to anotherThe PlayMacro action, in which one macro "chains to" another macro (a callwithout return), allows you to transfer all the variables and their values belonging
90 IBM Rational Host Access Transformation Services: Advanced Macro Guide

to the calling macro to the target macro. The target macro has access both to itsown variables and to the transferred variables (see “PlayMacro action(<playmacro> element)” on page 68).
Field variablesA field variable is a type of string variable. It holds a string, just as a stringvariable does, and you can use it in any context in which a string variable is valid.
However, a field variable differs from a string variable in the way in which astring is stored into the field variable. The string that a field variable contains isalways a string that the macro runtime reads from a 3270 or 5250 field in thecurrent host terminal. To get the macro runtime to read this string from the 3270 or5250 field, you have to create a Variable update action that specifies:1. The name of the field variable (such as $fldFilename$).2. A location string (a string containing a pair of integers separated by a comma,
such as ’5,11’).
When the macro runtime performs the Variable update action it takes the followingsteps:1. Looks in the host terminal at the row and column value specified by the
location string.2. Finds the 3270 or 5250 field in which the row and column value is located.3. Reads the entire contents of the field.4. Stores the entire contents of the field as a string into the field variable.
For more information, see “Variable update action with a field variable” on page74.
Using variablesThe macro runtime assigns initial values to variables at the start of the macroplayback, before processing any macro screen. The sections that follow describe theusage of those initial values for both standard and imported variable types.
Using variables belonging to a standard type
Using the value that the variable holdsA variable that belongs to a standard type (string, integer, double, boolean) can beused in much the same way as an immediate value of the same type (such as ’ElmStreet’, 10, 4.6e-2, true):v Except for the restrictions listed later in this subsection, a variable of standard
type can be used in any input field (in the macro editor) or attribute (in thesource view) in which an immediate value of the same data type can be used.For example, if an input field (such as the String field on the Input actionwindow) requires a string value, then the field likewise accepts a string variable.See “Equivalents” on page 21.
v Variables can be used with operators and expressions in the same ways thatimmediate values of the same types are used. See “Arithmetic operators andexpressions” on page 18.
v The value of a variable occurring in a context different from the type of thevariable is converted, if possible, to a value of the correct type, in the same waythat an immediate value of the same type is converted. See “Automatic datatype conversion” on page 20.
Chapter 9. Variables and imported Java classes 91

However, you cannot use a variable in certain contexts. In the AME, you cannotuse a variable in the following contexts:v Any field on the General tabv The Screen Name field on the Screens tabv The value of any field in the PlayMacro action window
In the source view, you cannot use a variable in the following contexts:v The name of an attribute of any elementv The value of any attribute of an <HAScript> elementv The value of the name attribute of a <screen> elementv The value of the uselogic attribute of the <description> elementv The name of a macro screen in a <nextscreen> elementv The value of any attribute of a <playmacro> element
Writing a value into a variable belonging to a standard typeYou can write a value into a variable belonging to a standard type in the followingways:v Assign an initial value when you create the variable.v Use a Variable update action to assign a value to the variable.v Use the Prompt action to get user input and assign it to the variable.v Use the Extract action to read data from the host terminal and assign it to the
variable.v Use an action that writes a return code value into a variable.
Restrictions: You cannot assign one of the following values to a variable ofstandard type:v The value null. (Exception: If you assign the value null to a string variable, it is
converted to the string 'null').v A call to a void method.v A call to a method that returns an array.
Writing a Java object into a variable of standard type: If you write a Java objectinto a variable of standard type, then the macro runtime calls the toString() methodof the imported type and then attempts to assign the resulting string to thevariable.
Using variables belonging to an imported type
Using the value that the variable holdsYou can use the value contained in a variable belonging to an imported type in thefollowing ways:v You can assign the variable to another variable of the same type using the
Variable update action.v You can call a Java method on the variable (see “Calling Java methods” on page
94). If the Java method returns a value belonging to a standard type (string,integer, double, boolean), then you can use the result as you would use anyvalue of that type.
RestrictionsYou cannot assign the following types of data to a variable of imported type:
92 IBM Rational Host Access Transformation Services: Advanced Macro Guide

v A value or variable belonging to a standard type (string, integer, double,boolean, field).
v A instance of, or a variable belonging to, a different imported type (unless it is asuperclass of the imported type).
v An array of instances of objects returned by a method called on a variable ofimported type.
If your macro attempts to assign one of these invalid types of values to a variableof imported type, then the Macro runtime generates a runtime error and halts themacro.
Writing into the variable belonging to an imported typeYou can write a value into a variable of imported type in the following ways:v You can assign a value to the variable when you create it.v You can assign a value to the variable using the Variable update action.
You can assign the following types of values to a variable belonging to animported type:v An instance of the same type. This instance can be either in a variable of the
same type, or from a call to a method that returns an instance of the same type.v The value null. To signify the value null, you can use one of the following:
– The keyword null.
– A blank input field (if you are using a macro editor), such as the Initial Valuefield when defining the variable, or the Value field in the Variable updateaction definition.
– An empty attribute (if you are using the source view), as in the valueattribute of the following <create> element:<create name=$ht$ type="Hashtable" value="" />
Comparing variables of the same imported typeIn any conditional expression (for example, in the Condition field of a conditionalaction) in which you are comparing two variables of the same imported type, youshould implement a comparison method (such as equals()) in the underlying classrather than using the variables themselves. For example,$htUserData.equals($htPortData$)$
If instead, you compare the variables themselves (for example $htUserData$ ==$htPortData$), then:1. The macro runtime, for each variable, calls the toString() method of the
underlying Java class and gets a string result2. The macro runtime compares the two string results and gets a boolean result.3. The macro runtime sets the result of the condition to the boolean result
obtained in step 2.
This will probably not yield the outcome that you expect from comparing the twovariables.
Chapter 9. Variables and imported Java classes 93

Calling Java methods
Where method calls can be usedYou can call a method in any context in which the value returned by the method isvalid. For example, in an Input action you can set the Row value to the integervalue returned by a method, such as:$importedVar.calculateRow()$
Also, you can use the Perform action to call a method when you do not need thereturn variable of the method or when the method has no return value (void) (see“Perform action (<perform> element)” on page 67).
Syntax of a method callTo call a method belonging to an imported class, use the same syntax that youwould use in Java. However, in addition, you must also enclose a method call indollar signs ($), just as you would a variable. Examples:$new FileInputStream(’filename’)$$fis.read()$
An immediate string value (such as ’Elm Street’, or ’myFileName’ in the firstexample above) passed as a parameter to a method must be enclosed in singlequotes, as usual (see “Advanced macro format rules” on page 16).
How the macro runtime searches for a called methodWhen you add a method call (such as $prp.get(’Group Name’)$) to a macro script,the macro editor does not verify that a called method or constructor exists in theclass to which the variable belongs. That check is done by the macro runtime whenthe call occurs.
The method must be a public method of the underlying Java class.
When the macro runtime searches in the Java class for a method to match themethod that you have called, the macro runtime maps macro data types (boolean,integer, string, field, double, imported type) to Java data types as shown inTable 12:
Table 12. How the macro runtime maps macro data types to Java data types
If the method parameter belongs to thismacro data type:
Then the macro runtime looks for a Javamethod with a parameter of this Java datatype:
boolean boolean
integer int
string String
field String
double double
imported type underlying class of the imported type
The macro runtime searches for a called method as follows:1. The macro runtime searches for the class specified in the imported type
definition (such as java.util.Properties).
94 IBM Rational Host Access Transformation Services: Advanced Macro Guide

2. The macro runtime searches in the class for a method with the same methodsignature (name, number of parameters, and types of parameters) as the calledmethod.
3. If the search succeeds, then the macro runtime calls the method.4. If the search fails, then the macro runtime searches in the class for a method
with the same name and number of parameters (disregarding the types of theparameters) as the called method.a. If the macro runtime finds such a method, it calls the method with the
specified parameters.b. If the call returns without an error, the macro runtime assumes that it has
called the right method.c. If the call returns with an error, the macro runtime searches for another
method.d. The search continues until all methods with the same name and number of
parameters have been tried. If none was successful, then the macro runtimegenerates a runtime error.
The Macro Utility Libraries (HML libraries)The Host On-Demand Macro Utility Libraries (HML libraries) are utility librariesthat are packaged with the HATS code. You can invoke a method from one ofthese libraries without:v Importing the underlying class; orv Creating a variable to contain an instance of the class; orv Creating an instance of the class.
In fact, you are not allowed to import a class contained in an HML Java library, orto create a variable belonging to an HML class, or to create an instance of an HMLobject.
The reason is that the macro runtime, during the initializing that goes on whenmacro playback is started:v Imports all the HML classes.v Creates one variable for each HML class to contain an instance of the class.v Creates one instance of each HML class and stores it in the appropriate variable.
The following table shows for each HML variable the variable name and the typesof methods in the underlying class.
Table 13. HML variables
HML variable: Description of methods:
$HMLFormatUtil$ Methods for formatting strings.
$HMLPSUtil$ Methods that access the presentation space of the sessionwindow.
$HMLSessionUtil$ Methods that return session values.
$HMLSQLUtil$ Methods that return information about the results of themost recent SQLQuery action.
Chapter 9. Variables and imported Java classes 95
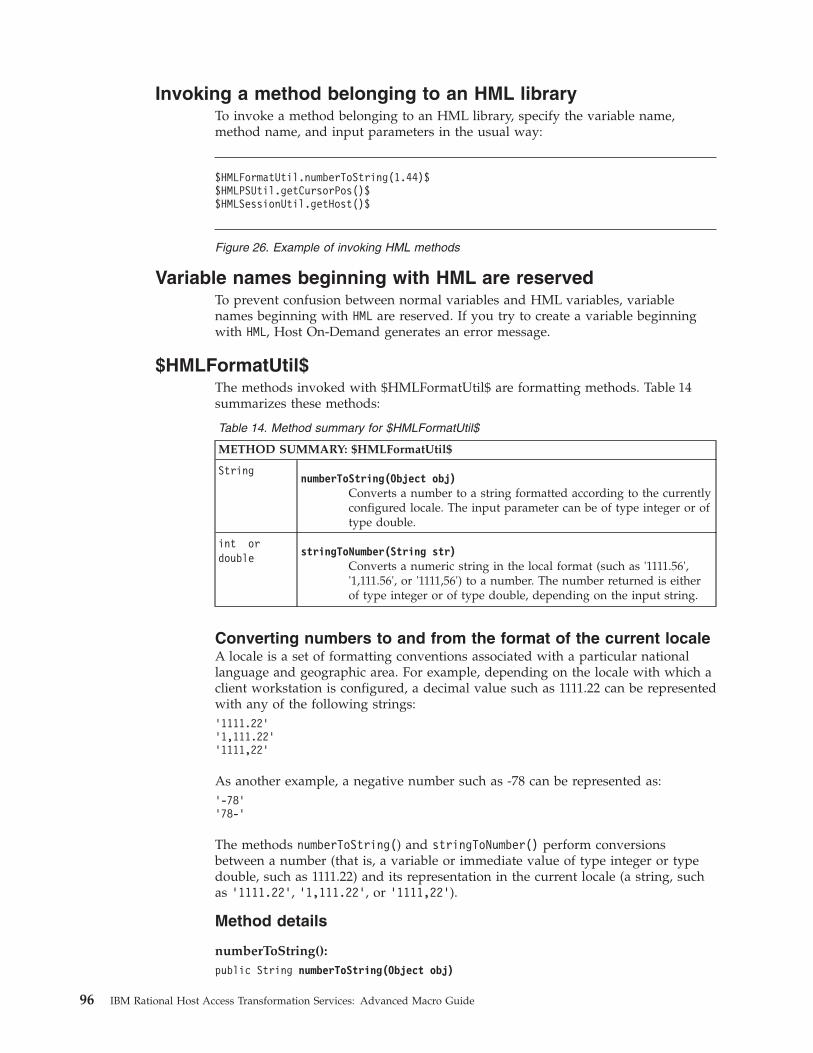
Invoking a method belonging to an HML libraryTo invoke a method belonging to an HML library, specify the variable name,method name, and input parameters in the usual way:
Variable names beginning with HML are reservedTo prevent confusion between normal variables and HML variables, variablenames beginning with HML are reserved. If you try to create a variable beginningwith HML, Host On-Demand generates an error message.
$HMLFormatUtil$The methods invoked with $HMLFormatUtil$ are formatting methods. Table 14summarizes these methods:
Table 14. Method summary for $HMLFormatUtil$
METHOD SUMMARY: $HMLFormatUtil$
StringnumberToString(Object obj)
Converts a number to a string formatted according to the currentlyconfigured locale. The input parameter can be of type integer or oftype double.
int ordouble stringToNumber(String str)
Converts a numeric string in the local format (such as '1111.56','1,111.56', or '1111,56') to a number. The number returned is eitherof type integer or of type double, depending on the input string.
Converting numbers to and from the format of the current localeA locale is a set of formatting conventions associated with a particular nationallanguage and geographic area. For example, depending on the locale with which aclient workstation is configured, a decimal value such as 1111.22 can be representedwith any of the following strings:’1111.22’’1,111.22’’1111,22’
As another example, a negative number such as -78 can be represented as:’-78’’78-’
The methods numberToString() and stringToNumber() perform conversionsbetween a number (that is, a variable or immediate value of type integer or typedouble, such as 1111.22) and its representation in the current locale (a string, suchas ’1111.22’, ’1,111.22’, or ’1111,22’).
Method details
numberToString():public String numberToString(Object obj)
$HMLFormatUtil.numberToString(1.44)$$HMLPSUtil.getCursorPos()$$HMLSessionUtil.getHost()$
Figure 26. Example of invoking HML methods
96 IBM Rational Host Access Transformation Services: Advanced Macro Guide

This method converts a number (integer or double) to a string formatted accordingto the currently configured locale. The input parameter can be of type integer or oftype double.
This method replaces the standalone method $FormatNumberToString()$, which isdeprecated.
stringToNumber():public int stringToNumber(String str)public double stringToNumber(String str)
This method converts a numeric string formatted according to the currentlyconfigured locale to a number. The number returned is either of type integer or oftype double, depending on the input string.
This method replaces the standalone method $FormatStringToNumber()$, which isdeprecated.
$HMLPSUtil$The methods invoked with $HMLPSUtil$ affect the presentation space of thesession window or return information about the presentation space of the sessionwindow. Table 15 summarizes these methods:
Table 15. Method summary for $HMLPSUtil$
METHOD SUMMARY: $HMLPSUtil$
intconvertPosToCol(int pos)
Returns the column number of the specified position in thepresentation space.
intconvertPosToRow(int Pos)
Returns the row number of the specified position in thepresentation space.
<input value="$HMLFormatUtil.numberToString(1111.44)$"row="20" col="16" movecursor="true"xlatehostkeys="true" encrypted="false" />
Figure 27. Example for numberToString()
<value="'1111.33'" /><extract name="’Extract’" planetype="TEXT_PLANE"
srow="1" scol="1"erow="1" ecol="10" unwrap="false"assigntovar="$value$" />
<if condition="$HMLFormatUtil.stringToNumber($value$)$ < 0 "...
</if>
Figure 28. Example for stringToNumber()
Chapter 9. Variables and imported Java classes 97
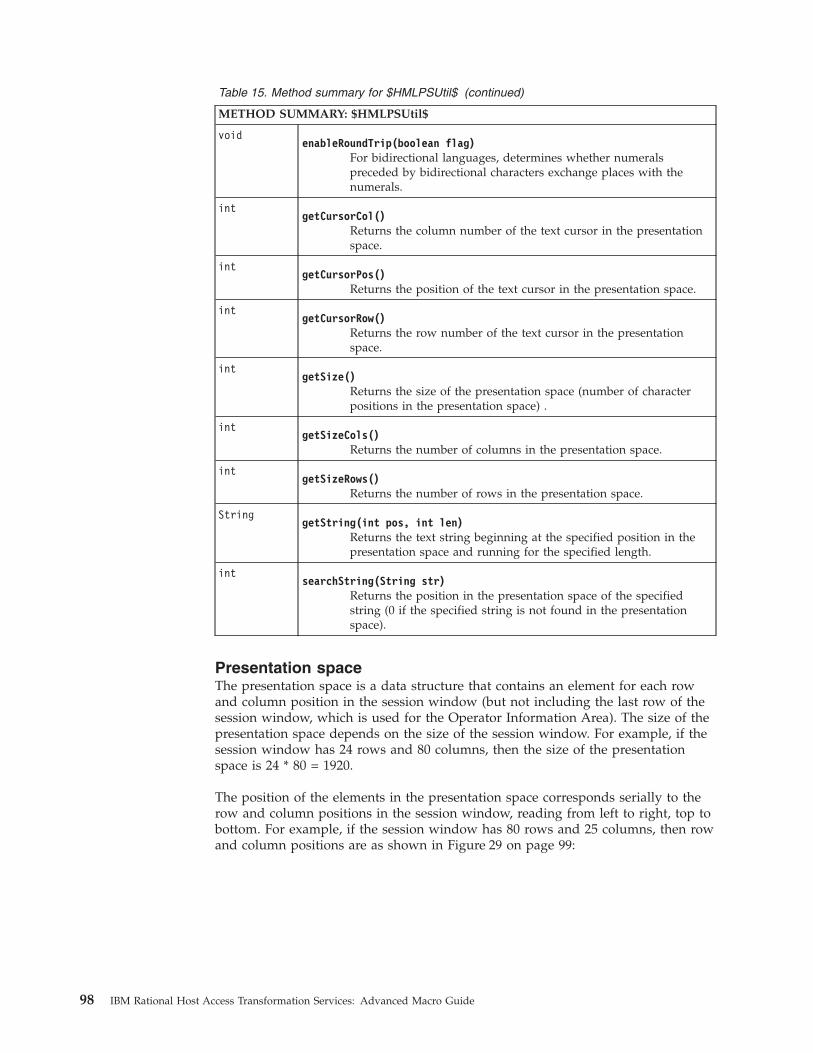
Table 15. Method summary for $HMLPSUtil$ (continued)
METHOD SUMMARY: $HMLPSUtil$
voidenableRoundTrip(boolean flag)
For bidirectional languages, determines whether numeralspreceded by bidirectional characters exchange places with thenumerals.
intgetCursorCol()
Returns the column number of the text cursor in the presentationspace.
intgetCursorPos()
Returns the position of the text cursor in the presentation space.
intgetCursorRow()
Returns the row number of the text cursor in the presentationspace.
intgetSize()
Returns the size of the presentation space (number of characterpositions in the presentation space) .
intgetSizeCols()
Returns the number of columns in the presentation space.
intgetSizeRows()
Returns the number of rows in the presentation space.
StringgetString(int pos, int len)
Returns the text string beginning at the specified position in thepresentation space and running for the specified length.
intsearchString(String str)
Returns the position in the presentation space of the specifiedstring (0 if the specified string is not found in the presentationspace).
Presentation spaceThe presentation space is a data structure that contains an element for each rowand column position in the session window (but not including the last row of thesession window, which is used for the Operator Information Area). The size of thepresentation space depends on the size of the session window. For example, if thesession window has 24 rows and 80 columns, then the size of the presentationspace is 24 * 80 = 1920.
The position of the elements in the presentation space corresponds serially to therow and column positions in the session window, reading from left to right, top tobottom. For example, if the session window has 80 rows and 25 columns, then rowand column positions are as shown in Figure 29 on page 99:
98 IBM Rational Host Access Transformation Services: Advanced Macro Guide
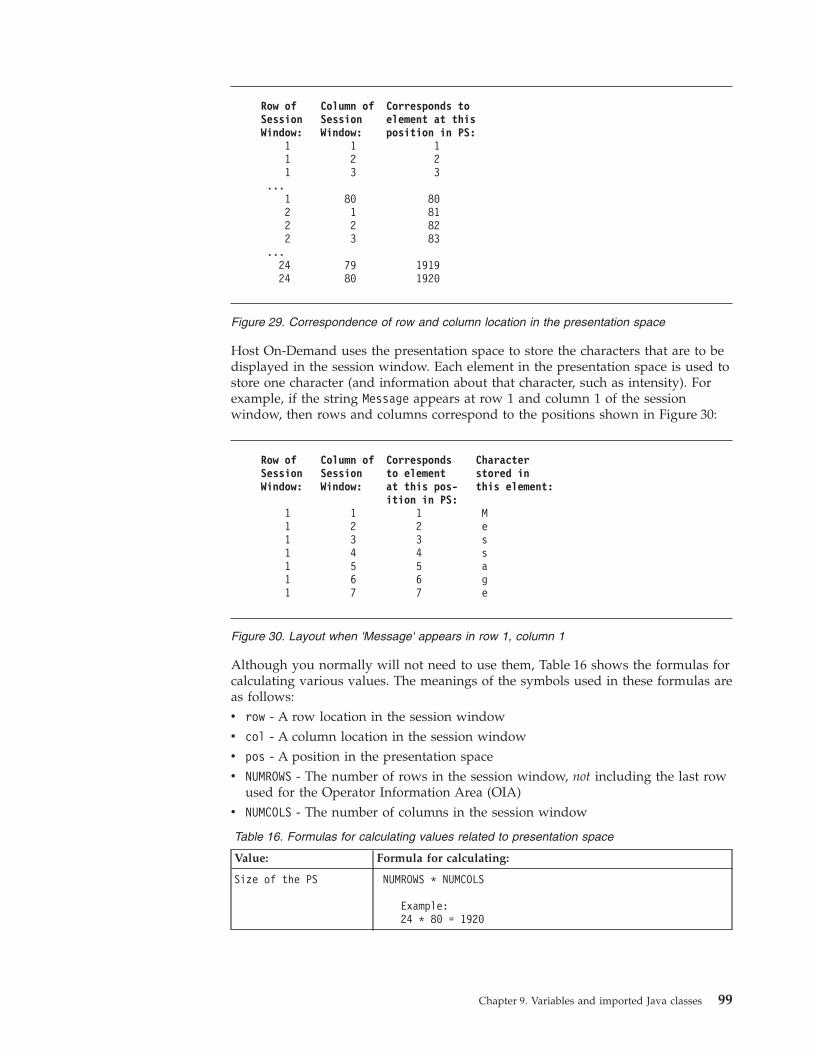
Host On-Demand uses the presentation space to store the characters that are to bedisplayed in the session window. Each element in the presentation space is used tostore one character (and information about that character, such as intensity). Forexample, if the string Message appears at row 1 and column 1 of the sessionwindow, then rows and columns correspond to the positions shown in Figure 30:
Although you normally will not need to use them, Table 16 shows the formulas forcalculating various values. The meanings of the symbols used in these formulas areas follows:v row - A row location in the session windowv col - A column location in the session windowv pos - A position in the presentation spacev NUMROWS - The number of rows in the session window, not including the last row
used for the Operator Information Area (OIA)v NUMCOLS - The number of columns in the session window
Table 16. Formulas for calculating values related to presentation space
Value: Formula for calculating:
Size of the PS NUMROWS * NUMCOLS
Example:24 * 80 = 1920
Row of Column of Corresponds toSession Session element at thisWindow: Window: position in PS:
1 1 11 2 21 3 3
...1 80 802 1 812 2 822 3 83
...24 79 191924 80 1920
Figure 29. Correspondence of row and column location in the presentation space
Row of Column of Corresponds CharacterSession Session to element stored inWindow: Window: at this pos- this element:
ition in PS:1 1 1 M1 2 2 e1 3 3 s1 4 4 s1 5 5 a1 6 6 g1 7 7 e
Figure 30. Layout when 'Message' appears in row 1, column 1
Chapter 9. Variables and imported Java classes 99
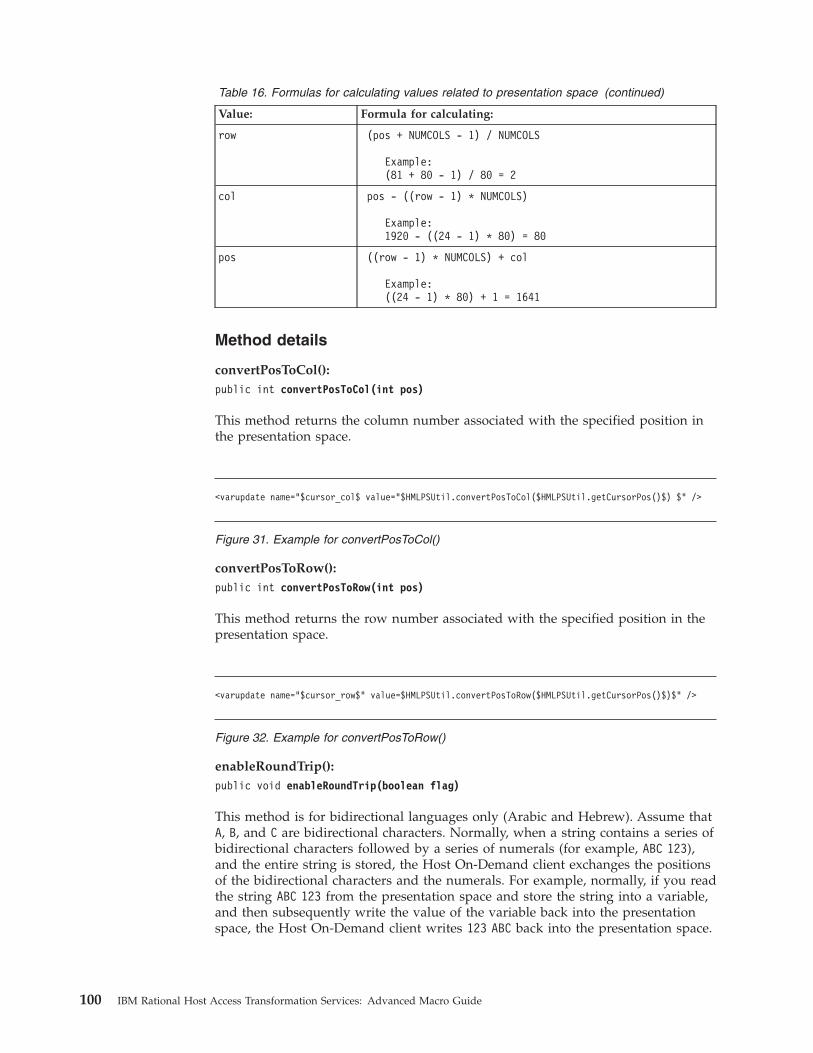
Table 16. Formulas for calculating values related to presentation space (continued)
Value: Formula for calculating:
row (pos + NUMCOLS - 1) / NUMCOLS
Example:(81 + 80 - 1) / 80 = 2
col pos - ((row - 1) * NUMCOLS)
Example:1920 - ((24 - 1) * 80) = 80
pos ((row - 1) * NUMCOLS) + col
Example:((24 - 1) * 80) + 1 = 1641
Method details
convertPosToCol():public int convertPosToCol(int pos)
This method returns the column number associated with the specified position inthe presentation space.
convertPosToRow():public int convertPosToRow(int pos)
This method returns the row number associated with the specified position in thepresentation space.
enableRoundTrip():public void enableRoundTrip(boolean flag)
This method is for bidirectional languages only (Arabic and Hebrew). Assume thatA, B, and C are bidirectional characters. Normally, when a string contains a series ofbidirectional characters followed by a series of numerals (for example, ABC 123),and the entire string is stored, the Host On-Demand client exchanges the positionsof the bidirectional characters and the numerals. For example, normally, if you readthe string ABC 123 from the presentation space and store the string into a variable,and then subsequently write the value of the variable back into the presentationspace, the Host On-Demand client writes 123 ABC back into the presentation space.
<varupdate name="$cursor_col$ value="$HMLPSUtil.convertPosToCol($HMLPSUtil.getCursorPos()$) $" />
Figure 31. Example for convertPosToCol()
<varupdate name="$cursor_row$" value=$HMLPSUtil.convertPosToRow($HMLPSUtil.getCursorPos()$)$" />
Figure 32. Example for convertPosToRow()
100 IBM Rational Host Access Transformation Services: Advanced Macro Guide
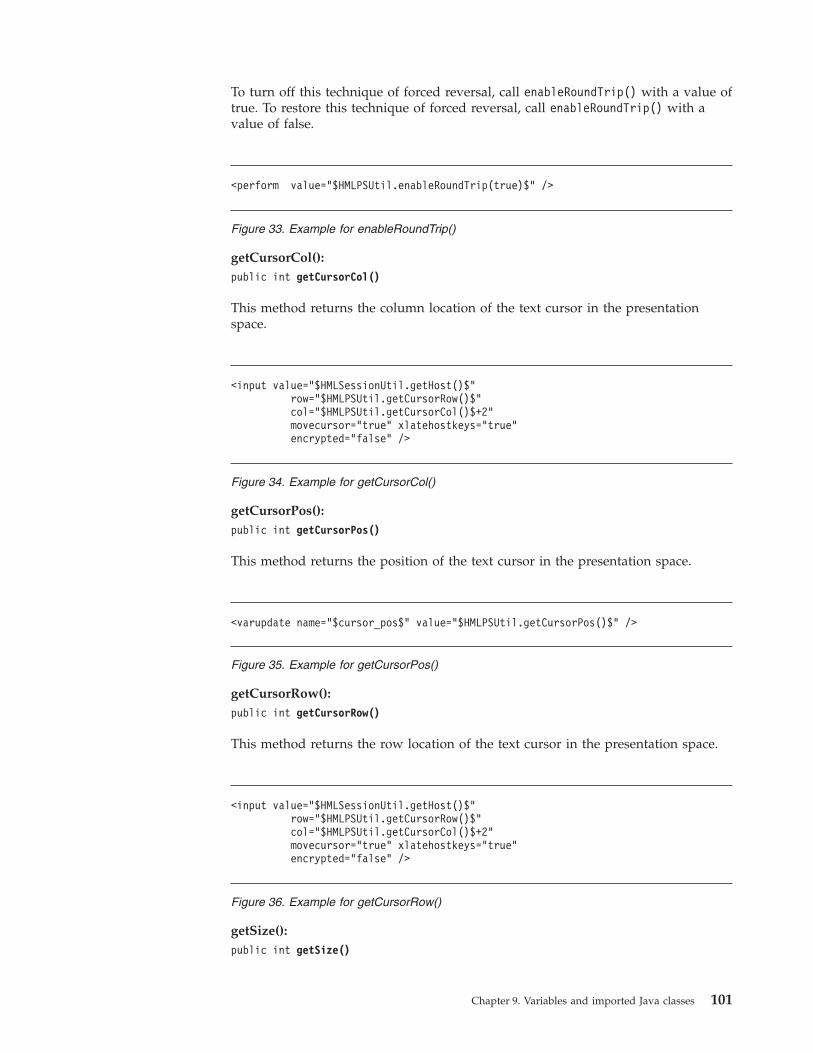
To turn off this technique of forced reversal, call enableRoundTrip() with a value oftrue. To restore this technique of forced reversal, call enableRoundTrip() with avalue of false.
getCursorCol():public int getCursorCol()
This method returns the column location of the text cursor in the presentationspace.
getCursorPos():public int getCursorPos()
This method returns the position of the text cursor in the presentation space.
getCursorRow():public int getCursorRow()
This method returns the row location of the text cursor in the presentation space.
getSize():public int getSize()
<perform value="$HMLPSUtil.enableRoundTrip(true)$" />
Figure 33. Example for enableRoundTrip()
<input value="$HMLSessionUtil.getHost()$"row="$HMLPSUtil.getCursorRow()$"col="$HMLPSUtil.getCursorCol()$+2"movecursor="true" xlatehostkeys="true"encrypted="false" />
Figure 34. Example for getCursorCol()
<varupdate name="$cursor_pos$" value="$HMLPSUtil.getCursorPos()$" />
Figure 35. Example for getCursorPos()
<input value="$HMLSessionUtil.getHost()$"row="$HMLPSUtil.getCursorRow()$"col="$HMLPSUtil.getCursorCol()$+2"movecursor="true" xlatehostkeys="true"encrypted="false" />
Figure 36. Example for getCursorRow()
Chapter 9. Variables and imported Java classes 101

This method returns the size of the presentation space, that is, the number ofcharacter positions in the presentation space. For example, if the session windowhas 25 rows and 80 columns, then the size of the presentation space is 24 * 80 =1920.
getSizeCols():public int getSizeCols()
This method returns the number of columns in the presentation space. Thepresentation space has the same number of columns as the session window. Forexample, if the session window has 25 rows and 80 columns, then the number ofcolumns in the presentation space is 80.
getSizeRows():public int getSizeRows()
This method returns the number of rows in the presentation space. Thepresentation space has one row less than the session window (because the last lineof the session window, which contains the Operator Information Area, is notincluded in the presentation space). For example, if the session window has 25rows and 80 columns, then the number of rows in the presentation space is 24.
getString():public String getString(int pos, int len)
This method returns the text string beginning at the specified position in thepresentation space and continuing for the specified number of characters.
<varupdate name="$size$" value="HMLPSUtil.getSize()$" />
Figure 37. Example for getSize()
<varupdate name="$size_cols$" value="$HMLPSUtil.getSizeCols()$" />
Figure 38. Example for getSizeCols()
<varupdate name="$size_rows$" value="$HMLPSUtil.getSizeRows()$" />
Figure 39. Example for getSizeRows()
102 IBM Rational Host Access Transformation Services: Advanced Macro Guide

searchString():public int searchString(String str)
This method returns the position in the presentation space of the specified string.This method returns 0 if the string is not found in the presentation space.
$HMLSessionUtil$The methods invoked with $HMLSessionUtil$ return values associated with thesession. Table 17 summarizes these methods:
Table 17. Method summary for $HMLSessionUtil$
METHOD SUMMARY: $HMLSessionUtil$
StringgetHost()
Returns the text string specified in the Destination Address fieldof the session configuration.
StringgetLabel()
Returns the string specified in the Session Name field of thesession configuration
StringgetName()
Returns the session instance identifier assigned to the session bythe host.
Method details
getHost():public String getHost()
This method returns the host name or the host address that you typed into theDestination Address field of the Connection section of the session configuration(such as myhost.myloc.mycompany.com or 9.27.63.45).
getLabel():
<varupdate name="$text_of_row_18$"value="$HMLPSUtil.getString(
$HMLPSUtil.getSizeCols()$*17+1,$HMLPSUtil.getSizeCols()$)$" />
Figure 40. Example for getString()
<varupdate name="$pos_ofIBM$" value="$HMLPSUtil.searchString(’IBM’)$" />
Figure 41. Example for searchString()
<varupdate name="$host$" value="$HMLSessionUtil.getHost()$" />
Figure 42. Example for getHost()
Chapter 9. Variables and imported Java classes 103
public String getLabel()
This method returns the session name that you typed into the Session Name fieldof the Connection section of the session configuration (a name such as 3270Display or 5250 Display).
getName():public String getName()
This method returns the identifying name that the host assigns to the session (suchas A , B, or C). When you start a session, the host assigns a name to the session todistinguish it from other instances of the same session that might be started.
$HMLSQLUtil$The methods invoked on $HMLSQLUtil$ return information about the results ofthe most recent SQLQuery action. Table 18 summarizes these methods:
Table 18. Method summary for $HMLSQLUtil$
METHOD SUMMARY: $HMLSQLUtil$
intgetColumnSize()
Returns the number of columns of data.
StringgetDataByIndex()
Returns the entry located at the specified row index and columnindex.
StringgetDataByName()
Returns the entry located at the specified row index and columnname (field name).
intgetRowSize()
Returns the number of rows of data.
Format of the stored dataThe results of the SQLQuery action are stored as a two-dimensional array that isone column wider and one row taller than the size of the block of data returned.Row 0 is used to store the names of the columns (the field names from thedatabase), and Column 0 is used to store a zero-based index (see Table 19 on page105 below). The entry at Row 0, Column 0 contains an empty string. Theremainder of the array contains the actual data. All values are strings.
<varupdate name="$label$" value="$HMLSessionUtil.getLabel()$" />
Figure 43. Example for getLabel()
<varupdate name="$name$" value="$HMLSessionUtil.getName()$" />
Figure 44. Example for getName()
104 IBM Rational Host Access Transformation Services: Advanced Macro Guide

Table 19 shows as an example the results of a query, a 3 x 5 block of data, stored ina 4 x 6 array:
Table 19. Example of two-dimensional array containing results
(emptystring)
TOPICID EXMPLID DESCRIPT
0 4 18 Create a toolbar with custom buttons.
1 9 54 Attach tables at startup.
2 11 74 Edit Products.
3 11 75 Enter or Edit Products
4 11 76 Find Customers
In the table above, the entry at Row 0, Column 0 contains an empty string. Theremainder of Row 0 contains the field names from the database (TOPICID,EXMPLID, DESCRIPT). The remainder of Column 0 contains index numbers forthe rows (0, 1, 2, 3, 4). The actual data is contained in the remainder of the array.All values are strings.
Method details
getColumnSize():public int getColumnSize()
This method returns the actual number of columns of data in the array, includingthe added Column 0. For example, for the array in Table 19 this method returns 4.
getDataByIndex():public int getDataByIndex(int row, int column)
This method returns the entry at the specified row and column index. Thefollowing list shows the values returned for the data shown in Table 19:v getDataByIndex(0,0) returns an empty string.v getDataByIndex(0,1) returns the string 'TOPICID'.v getDataByIndex(0,2) returns the string 'EXMPLID'.v getDataByIndex(1,1) returns the string '4'.v getDataByIndex(2,2) returns the string '54'.v getDataByIndex(3,3) returns the string 'Edit Products'.
getDataByName():public int getDataByName(int row, String fieldName)
<varupdate name="$col_size$" value="$HMLSessionUtil.getColumnSize()$" />
Figure 45. Example for getColumnSize()
<varupdate name="$data$" value="$HMLSessionUtil.getDataByIndex(3,3)$" />
Figure 46. Example for getDataByIndex()
Chapter 9. Variables and imported Java classes 105
This method returns the entry at the specified row and field name. The followinglist shows the values returned for the data shown in Table 19 on page 105:v getDataByIndex(1, TOPICID) returns the string '4'.v getDataByIndex(2, EXMPLID) returns the string '54'.v getDataByIndex(3, DESCRIPT) returns the string 'Edit Products'.
getRowSize():public int getRowSize()
This method returns the actual number of rows of data in the array, including theadded Row 0. For example, for the array in Table 19 on page 105 this methodreturns 6.
FormatNumberToString() and FormatStringToNumber()$FormatNumberToString()$ is deprecated in favor of$HMLFormatUtil.numberToString()$. The former has the same input parametersand return type as the latter (see “numberToString()” on page 96).
$FormatStringToNumber()$ is deprecated in favor of$HMLFormatUtil.stringToNumber()$. The former has the same input parametersand return type as the latter (see “stringToNumber()” on page 97).
<varupdate name="$data$" value="$HMLSessionUtil.getDataByName(3,’DESCRIPT’)$" />
Figure 47. Example for getDataByName()
<varupdate name="$row_size$" value="$HMLSessionUtil.getRowSize()$" />
Figure 48. Example for getRowSize()
106 IBM Rational Host Access Transformation Services: Advanced Macro Guide

Chapter 10. Visual Macro Editor
The Visual Macro Editor (VME) gives you the ability to visually develop HATSmacros. The VME combines many of the features of the HATS host terminal, basicMacro Editor, and Advanced Macro Editor, and allows for offline development ofmacros. It also allows flows to be copied between macros and providesdrag-and-drop support for adding new screens.
The VME is the default editor for HATS macros.
The Macro Editor can still be opened by right-clicking on the macro and selectingOpen With -> Macro Editor. The Advanced Macro Editor can still be opened fromthe Macro Editor Overview page. Prompts and Extracts can also still be editedfrom the Macro Editor.
Note: Support for the Macro Editor and the Advanced Macro Editor is deprecatedin HATS V8.0. While support continues for now, IBM reserves the right toremove these capabilities in a subsequent release of the product. Thissupport is replaced by the Visual Macro Editor.
Creating a new macroIn addition to using the host terminal, you can use the VME to create a new macrousing the New Macro wizard.
In the HATS perspective, use any of the following procedures to start the NewMacro wizard:v From the menu bar, click File > New > Other > HATS > HATS Macro.v From the menu bar, click HATS > New > Macro.v From the tool bar, click the Create a HATS macro icon.v From the HATS Projects view, right-click a project and select New HATS >
Macro.
The wizard includes one panel where you can:v Provide a name and description for the macro.v Select the project for the macro and the connection the macro will use.v Select whether to connect the terminal when the macro is opened.
Using the editorThe VME is the default editor for HATS macros. When you double-click on amacro object (.hma file), the VME opens.
The VME is composed of the following parts:1. Design tab2. Palette view3. Integrated terminal4. Source tab
© Copyright IBM Corp. 2003, 2011 107

Design tabThe design tab, or canvas, is the primary work area in the VME. It shows themacro objects graphically (macro screens, actions, and next screen connections) andallows you to make modifications to each object as well as change global macroproperties.
SignOn
DisplayProgramMessages
Prompt for userName
Prompt for password
Send [enter]
Send [enter]
MainMenu
CelDialCommunications
Input ‘go celdial[enter]’
Input ‘1[enter]’
Prompt for customerNumber
Send [enter]
CustomerInquiry
Extract errorMessage
BadCustomerNumberCustomerDetail
Extract number
Extract name
Extract address
Extract city
Extract country
3 more actions...
getCustomerInfo.hma
Select
Marquee
Next Screen Connection
Input
Prompt All
Extract
Extract All
Select Cursor Position
Prompt
Actions
Screen
Palette
Sign OnSystem . . . . . : ISERIESD
Subsystem . . . : QINTER
Display . . . . . : QPADEV000S
User . . . . . . . . . . . . . . . ____________. . . . .
Password . . . . . . . . . . . . . .. . .
Program/procedure . . . . . . . . . . . . ____________.
Menu . . . . . . . . . . . . . . . . . . . ____________.
Current library. . . . . . . . . . . . . . . . ____________
IBM s internal systems must only be used for conducting
IBM s business or for purposes authorized by IBM management
(C) COPYRIGHT IBM CORP. 1980, 2005.
Design Source
1 2
3
4
06/053MA* a
Figure 49. Visual Macro Editor parts
108 IBM Rational Host Access Transformation Services: Advanced Macro Guide

For each object, different actions are enabled using the object's pop-up menu(right-click on the object). All actions can be undone by selecting Undo from thepop-up menu or from the Edit menu on the menu bar. All actions can be redoneby selecting Redo from the pop-up menu or from the Edit menu. Once the macrois saved, changes cannot be undone. Once a change is made in the Source tab,previous actions made in the Design tab cannot be undone. Changes made on theDesign tab are reflected in the Source tab and vice versa.
Macro menuThe following actions are enabled on the macro's pop-up menu (right-click on thewhite macro canvas):
Save Saves the macro to a file, disabling the Undo and Redo actions.
Copy As imageCopies the entire image of the macro to the system clipboard. This is usefulfor pasting the image of the macro into an email, or design document.
Paste Only enabled after a screen copy or cut.
Reset LayoutResets the macro screens by attempting to minimize the number of crossednext screen connection lines. Entry screens are positioned at the top. Exitscreens are positioned at the bottom. By default, the layout is reset when ascreen is added using the integrated terminal. The layout of a macrocreated in a previous version of HATS is automatically set (using this samealgorithm) when the macro is opened the first time in the VME.
SignOn
MainMenu
DisplayProgramMessages
CelDialCommunications
CustomerInquiry
BadCustomerNumberCustomerDetail
Prompt for userName
Prompt for password
Send [enter]
Input 'go celdial[enter]'
Input '1[enter]'
Prompt for customerNumber
Send [enter]
Extract number
Extract name
Extract address
Extract city
Extract country
3 more actions...
Extract errorMessage
Send [enter]
Next screen connection
Macro screen
Macro canvas
Screen action
Figure 50. Visual Macro Editor design tab
Chapter 10. Visual Macro Editor 109

PropertiesAllows editing macro-level settings.
Screen menuThe following actions can be performed on a screen's pop-up menu (right-click amacro screen object):
Cut Deletes and copies the macro screen. For more information, see “Cut,delete, copy, and paste screens” on page 116.
Copy Copies the macro screen and allows pasting it into the same macro oranother macro. For more information, see “Cut, delete, copy, and pastescreens” on page 116.
Paste Only enabled after a screen copy or cut.
Delete Removes the macro screen from the macro. For more information, see“Cut, delete, copy, and paste screens” on page 116.
RenameAllows renaming the macro screen. Disabled if more than one screen isselected.
PropertiesAllows editing macro screen-level settings. Disabled if more than onescreen is selected.
Action menuThe following actions can be performed on a screen action's pop-up menu(right-click a screen action):
Edit Allows editing the screen action. Only enabled if one action is selected. Formore information, see“Adding and editing actions” on page 118.
RemoveRemoves the action from the macro screen.
Move UpMoves the action up in the list of screen actions. Disabled for the firstaction.
Move DownMoves the action down in the list of screen actions. Disabled for the lastaction.
Next screen connection menuThe following actions can be performed on a next screen connection's pop-upmenu (right-click a next screen connection object):
Delete Removes the next screen connection from the macro.
ReorderEnabled on a next screen connection if there are other next screenconnections originating from the same screen. Disabled when more thanone next screen is selected. For more information, see “Reordering andchanging next screen connections” on page 130.
Palette viewThe Palette allows you to:v Select an object using the Select tool.v Select multiple objects on the canvas using the Marquee tool.
110 IBM Rational Host Access Transformation Services: Advanced Macro Guide

v Add a macro screen using the Screen tool. For more information, see “Adding ascreen from the palette” on page 115.
v Add a next screen connection using the Next Screen Connection tool. For moreinformation, see “Adding a next screen connection from the palette” on page130.
v Add one of the actions listed in the Actions drawer. For more information, see“Adding an action to a screen from the palette” on page 119.
Integrated terminalThe integrated terminal toolbar allows for the following actions:
ConnectConnect to the host.
DisconnectDisconnect from the host.
Add ScreenSee “Adding a screen from the integrated terminal” on page 115.
Play MacroSee “Playing the macro” on page 114.
Stop MacroSee “Playing the macro” on page 114.
Host keypadInteract with the host using the host keypad pull-down.
Note: In the integrated terminal, when navigating the host application, theF12 key is intercepted by IBM® Rational Software Delivery Platform(Rational SDP), which then moves the focus to the design pane ofthe VME. The F12 key is never sent to the host application. To workaround this issue, and for other host keys as needed, use the hostkeypad pull-down from the toolbar.
Palette
Select
Marquee
Screen
Next Screen Connection
Actions
Input
Prompt
Prompt All
Extract
Extract All
Set Cursor Position
Figure 51. Visual Macro Editor Palette view
Chapter 10. Visual Macro Editor 111
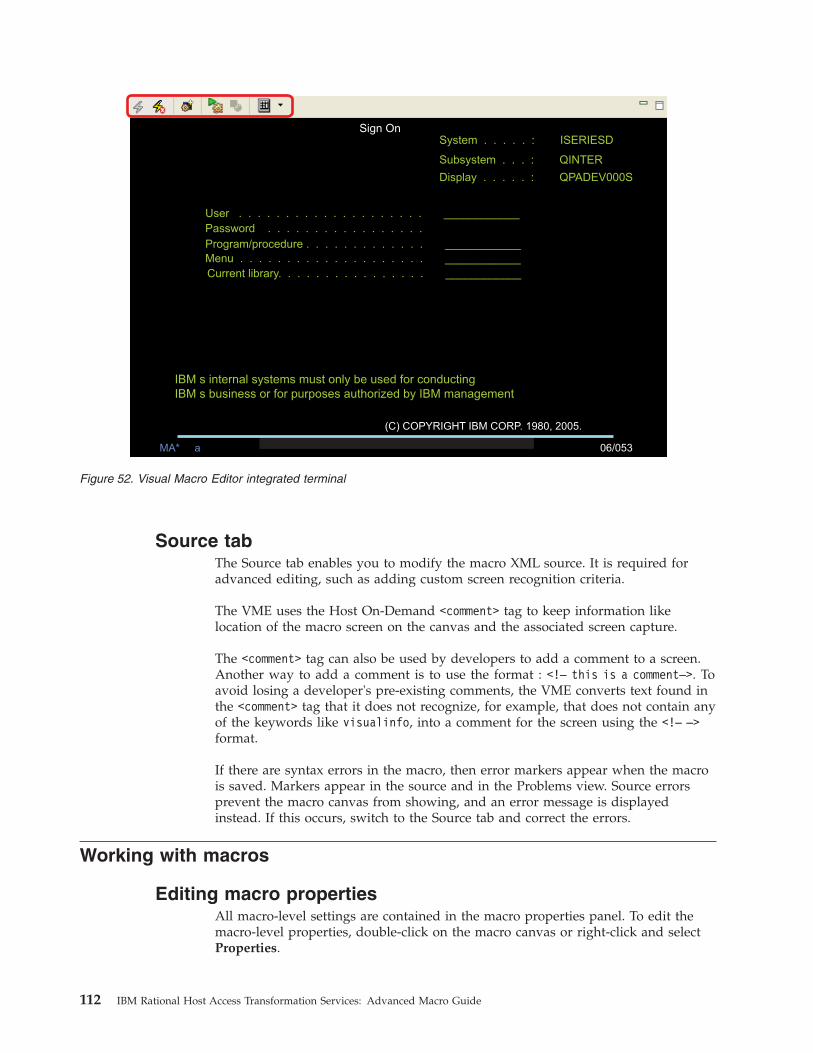
Source tabThe Source tab enables you to modify the macro XML source. It is required foradvanced editing, such as adding custom screen recognition criteria.
The VME uses the Host On-Demand <comment> tag to keep information likelocation of the macro screen on the canvas and the associated screen capture.
The <comment> tag can also be used by developers to add a comment to a screen.Another way to add a comment is to use the format : <!– this is a comment–>. Toavoid losing a developer's pre-existing comments, the VME converts text found inthe <comment> tag that it does not recognize, for example, that does not contain anyof the keywords like visualinfo, into a comment for the screen using the <!– –>format.
If there are syntax errors in the macro, then error markers appear when the macrois saved. Markers appear in the source and in the Problems view. Source errorsprevent the macro canvas from showing, and an error message is displayedinstead. If this occurs, switch to the Source tab and correct the errors.
Working with macros
Editing macro propertiesAll macro-level settings are contained in the macro properties panel. To edit themacro-level properties, double-click on the macro canvas or right-click and selectProperties.
Sign OnSystem . . . . . : ISERIESD
Subsystem . . . : QINTER
Display . . . . . : QPADEV000S
User . . . . . . . . . . . . . . . ____________. . . . .
Password . . . . . . . . . . . . . .. . .
Program/procedure . . . . . . . . . . . . ____________.
Menu . . . . . . . . . . . . . . . . . . . ____________.
Current library. . . . . . . . . . . . . . . . ____________
IBM s internal systems must only be used for conducting
IBM s business or for purposes authorized by IBM management
06/053MA* a
(C) COPYRIGHT IBM CORP. 1980, 2005.
Figure 52. Visual Macro Editor integrated terminal
112 IBM Rational Host Access Transformation Services: Advanced Macro Guide

The Properties panel includes a General tab and a Variables and Types tab.
General tabThe General tab allows you to view and modify the following macro properties:
Name Name of the macro (view only).
DescriptionDescription of the macro. Optional.
AuthorAuthor of the macro. Optional.
Creation dateDate and time when the macro was created. Optional.
Pause between actionsThe amount of time (in milliseconds) the macro playback engine waitsbetween executing actions in a macro screen.
Timeout between screensThe amount of time (in milliseconds) the macro playback engine waits fora next screen to appear.
Handle all prompts at start of macroSpecifies whether the user is prompted for all of the macro's prompts atthe start of the macro.
ConnectionThe name of the connection in the project to use. For HATS projects with asingle connection, the connection is typically named main. This setting isimportant if the macro is used in an Integration Object (IO) because thisvalue is hardcoded in the generated IO when the IO is created and is usedat runtime to select which connection to use.
Automatically connect terminal when the macro is openedSpecifies whether to automatically connect the integrated terminal whenthe macro is opened.
Variables and Types tabThe Variables and Types tab allows you to define macro variables and user-defined(imported) types.
The Enable support for variables and arithmetic expressions check box is clearedby default, can only be selected once, and is disabled afterwards. When the checkbox is selected, the macro is converted into the advanced macro format. Becausethis operation cannot be undone, a warning message is issued.
After the warning message is cleared by clicking Yes, the Variables andUser-Defined Types tables are enabled and you can Add, Edit, and Remove itemsfrom the tables.
The VME does not require you to include the variable name between dollar signs($). The editor adds the dollar signs ($) to the beginning and the end of thevariable name in the macro source and removes them to display the variable name.
For more information, see Chapter 3, “Data types, operators, and expressions,” onpage 15 and Chapter 9, “Variables and imported Java classes,” on page 87.
Chapter 10. Visual Macro Editor 113

Playing the macroThe Play Macro button of the integrated terminal allows you to test the macro. Asthe macro is played in the terminal, the path is highlighted in the canvas. Themacro is always started from the beginning regardless of the screen currentlyselected on the canvas.
Working with screens
Editing macro screen propertiesTo edit the properties of a macro screen, double-click on the object in the macrocanvas or right-click and select Properties.
The Screen Properties panel includes a General tab, a Screen Recognition Tab, andan Actions Tab.
General tabThe General tab allows you to modify the following properties:
Name Name of the macro screen.
Screen captureIf a screen capture is associated with the macro screen, then a preview isshown in the screen capture area. If no screen capture is associated withthe macro screen, then a message is displayed in the screen capture area.
You can use the Browse button to select a new screen capture and theClear button to remove the association to a screen capture. For moreinformation, see “Associating a macro screen with a screen capture” onpage 115.
Entry screenSpecifies a screen on which the macro can begin.
Exit Specifies a screen on which the macro can end.
Transient screenSpecifies an unpredictable screen that may appear at anytime.
Screen Recognition tabThe Screen Recognition tab is only enabled if a screen capture is associated withthe macro screen. For more information about screen description in the macrofacility, see Chapter 5, “Screen description,” on page 35.
Actions tabThe Actions tab allows you to configure the actions to perform when the screen isrecognized.
You can Add, Edit, Remove, and change the order of the actions using the Up andDown buttons. For more information, see “Adding and editing actions” on page118.
Adding macro screens
Adding a screen by dragging a screen captureA new screen can be added to the canvas by dragging a screen capture from anyproject.
114 IBM Rational Host Access Transformation Services: Advanced Macro Guide

When dragging from a project different than the one that contains the macro, youare prompted to select whether to import the screen capture file into the targetproject. If you click Yes, then the file is copied into the project's main ScreenCapture folder, not the macro specific folder, and associated with the new macroscreen on the canvas. If you click No, then the file is not imported, and no screencapture is associated with the new macro screen on the canvas.
If the default recognition criteria is defined, see “Default screen recognitioncriteria,” it is applied to the new screen's recognition criteria and adjusted to theselected screen capture.
You can double-click on the new screen to fully configure it and use the NextScreen Connection tool on the palette to wire it with the other screens in themacro.
Adding a screen from the integrated terminalThe Add Screen button of the integrated terminal allows you add the terminal'scurrent screen to the macro and configure it appropriately.
The Add Screen wizard allows you to:v Define screen attributes and screen relationships.v Define screen recognition criteria, see “Screen Recognition tab” on page 114.v Add actions, see “Adding and editing actions” on page 118.
Adding a screen from the paletteThe Screen tool of the palette allows you to add a new screen to the macro.
To add a screen, click Screen in the palette, then click on the canvas. This actionwill start the Add Screen wizard as described in “Adding a screen from theintegrated terminal.” The wizard forces you to select a screen capture using theScreen Capture panel described in “Associating a macro screen with a screencapture” before proceeding to allow you to configure the screen.
Associating a macro screen with a screen captureThe Browse button on the General tab of the Screen Properties panel, see “Editingmacro screen properties” on page 114, is used to select a screen capture from theproject to associate with the macro screen. The Screen Capture panel displays apreview of all the screen captures in the project, inside or outside the screencapture macro folder.
The Screen Capture panel is also displayed when the user adds a screen from thePalette.
Screen previewHovering the mouse over a screen on the canvas shows a preview of the screencapture associated with it, if any.
Default screen recognition criteriaWhen the Add Screen wizard is used to add a screen to the macro, using thepalette or the integrated terminal, you have the option to save the screenrecognition criteria as the default recognition criteria for all screens added to themacro using the palette, the integrated terminal, or by dragging a screen capture.To specify this option, select the Remember criteria for next time check box on theScreen Recognition Criteria panel.
Chapter 10. Visual Macro Editor 115

This feature is useful when many screens share the same recognition criteria. Forexample, if all your screens have a five character name or code at the upper leftcorner that uniquely identifies the screen, you can configure default recognitioncriteria so that every new screen recorded or added to the macro uses stringrecognition at that area of the screen. This saves time by not requiring you toconfigure recognition criteria on every screen.
There is only one default recognition criteria saved for the whole project, and itapplies to all macros in the project.
The default recognition criteria is overridden by the last screen recognition criteriadefined with the Remember criteria for next time check box selected.
When a default recognition criteria is defined, it is applied every time the AddScreen wizard is started and is also adjusted to the screen capture associated withthe new screen.
Cut, delete, copy, and paste screensOne or more screens can be cut, or copied, and pasted in the same macro oranother macro. The operation can be undone.
When one or more screens are selected and either Cut or Delete is executed, thenall of the selected screens and incoming and outgoing next screen connections areremoved from the macro canvas. This operation could force a reordering of thenext screen connections originating from screens not removed. In the examplebelow, the CelDialCommunications screen has next screen connections from theDisplayProgramMessages screen and to the MainMenu screen. It is also the secondin order of next screen connections from the SignOn screen.
After cutting or deleting the CelDialCommunications screen, all of the next screenconnections from and to it are removed, and the MainMenu screen becomes thesecond (instead of the third) in order of next screen connections from the SignOn
SignOn
Prompt for userName
Prompt for password
Send [enter]
DisplayProgramMessages
CelDialCommunications
MainMenu
Send[enter]
Input’1[enter]’
Input ‘go celdial[enter]’
Figure 53. Delete screen example - before cut or delete
116 IBM Rational Host Access Transformation Services: Advanced Macro Guide

screen.
When Paste is executed, after a Copy or a Cut, then the internal next screenconnections (next screen connections to other selected screens) are retained duringthe operation. In the example below the SignOn, DisplayProgramMessages, andMainMenu screens are selected to copy.
After pasting the copied screens back onto the same macro canvas, notice that allof the next screen connections among the three selected screens are also copied.Only the next screen connection from the MainMenu screen to theCelDialCommunications screen is not copied.
SignOn
Prompt for userName
Prompt for password
Send [enter]
DisplayProgramMessages
MainMenu
Send [enter]
Input 'go celdial[enter]'
Figure 54. Delete screen example - after cut or delete
SignOn
Prompt for userName
Prompt for password
Send [enter]
DisplayProgramMessages
Send[enter]
MainMenu
Input ‘go celdial[enter]’
CelDialCommunications
Input’1[enter]’
Undo Delete
Redo
Save
Cut
Copy
Copy As Image
Paste
Delete
Reset Layout
Properties
Ctrl+Z
Ctrl+Y
Ctrl+S
Ctrl+X
Ctrl+C
Ctrl+V
Delete
Alt+Enter
Figure 55. Copy screens example
Chapter 10. Visual Macro Editor 117

Some considerations must be made when pasting one or more screens from or to amacro in advanced macro format.v When pasting screens from a macro that is not in advanced macro format to a
macro in advanced format, then the screens being copied are converted toadvance format.
v When pasting screens from a macro that is in advanced macro format to a macrothat is not, a warning message is displayed, and you have the choice whether toconvert the target macro.
v Variables and user-defined types used by screens being pasted are not copied.
Working with actions
Adding and editing actions
Adding and editing actions from the macro screen propertiesActions can be added to macro screens from the Actions tab of the macro screenproperties, see “Editing macro screen properties” on page 114. The Add Actionwizard shows the list of actions that can be added and edited for a macro screen.
SignOn
DisplayProgramMessages
Copy of SignOn
Copy of DisplayProgramMessages
MainMenu
CelDialCommunications
Copy of MainMenu
Prompt for userName
Prompt for password
Send [enter]
Send [enter]
Prompt for userName
Prompt for password
Send [enter]
Send [enter]
Input ‘go celdial[enter]’
Input ‘1[enter]’
Input ‘go celdial[enter]’
Figure 56. Paste screens example
118 IBM Rational Host Access Transformation Services: Advanced Macro Guide

Adding an action to a screen from the paletteThe Actions tool of the palette allows you to add a new action to a macro screen.
To add an action, click the action in the palette, then click on the macro screen toadd the action.
A panel, applicable to the selected action type, appears so you can edit theproperties of the action.
Hiding and showing actionsScreen actions can be hidden or shown by clicking the toggle on the upper rightcorner of the screen figure.
If a screen has more actions than are permitted to be displayed, see “Working withVME preferences” on page 131, a line that reads nnn more actions is shown.
Input
Prompt
Prompt all
Extract
Extract all
Set cursor position
Play macro
Evaluate (If)
Pause
Custom
Update variable
Perform
Insert characters into a field and/or send a key
Insert a user-supplied or variable value into a field
Create prompt actions for all input fields
Extract data into a variable
Create extract actions for all fields
Move the cursor position
Run another macro
Run actions based on a condition
Wait a specified amount of time
Run a custom action
Update a macro variable
Invoke a Java method
Action
Select the type of action to add.
< Back FinishNext > Cancel
Add Action
Figure 57. Visual Macro Editor actions
CustomerDetail
Figure 58. Hiding screen actions
Chapter 10. Visual Macro Editor 119

ActionsThe following sections describe all the actions that can be added or edited usingthe VME. For more information about macro actions and more details about eachaction, see Chapter 7, “Macro actions,” on page 55.
Custom actionA Custom action allows you to invoke a Java program as a macro action andoptionally pass arguments to the program.
The fields you can specify are:
ID An arbitrary string that identifies the Java program that you want to run.
ArgumentsOptional. The arguments that you want to pass to the Java program.
For more information see “<custom> element” on page 176.
Evaluate (If) actionThe Evaluate (If) action provides the functions of an if-statement or of an if-elsestatement.
ConditionSpecify in the Condition field the conditional expression that you want themacro runtime to evaluate. The conditional expression can contain logicaloperators and conditional operators and can contain terms that includearithmetic expressions, immediate values, variables, and calls to Javamethods. For more information, see “Conditional and logical operators andexpressions” on page 19.
If TrueClick this tab and click Add to add actions to perform for the case if theCondition is true.
If FalseClick this tab and click Add to add actions to perform for the case if theCondition is false.
You can Add, Edit, Remove, move Up, or move Down, actions to perform for eachcase.
CustomerDetail
Extract number
Extract name
Extract address
Extract city
Extract country
3 more actions...
Figure 59. Showing screen actions
120 IBM Rational Host Access Transformation Services: Advanced Macro Guide
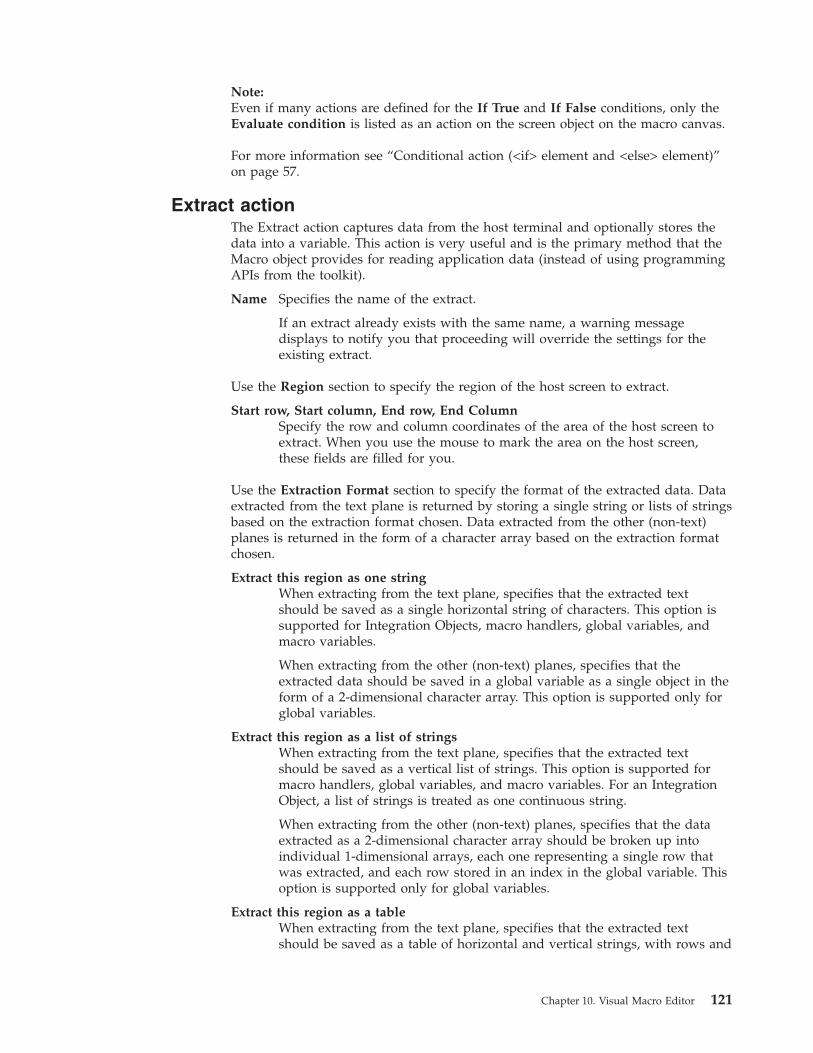
Note:Even if many actions are defined for the If True and If False conditions, only theEvaluate condition is listed as an action on the screen object on the macro canvas.
For more information see “Conditional action (<if> element and <else> element)”on page 57.
Extract actionThe Extract action captures data from the host terminal and optionally stores thedata into a variable. This action is very useful and is the primary method that theMacro object provides for reading application data (instead of using programmingAPIs from the toolkit).
Name Specifies the name of the extract.
If an extract already exists with the same name, a warning messagedisplays to notify you that proceeding will override the settings for theexisting extract.
Use the Region section to specify the region of the host screen to extract.
Start row, Start column, End row, End ColumnSpecify the row and column coordinates of the area of the host screen toextract. When you use the mouse to mark the area on the host screen,these fields are filled for you.
Use the Extraction Format section to specify the format of the extracted data. Dataextracted from the text plane is returned by storing a single string or lists of stringsbased on the extraction format chosen. Data extracted from the other (non-text)planes is returned in the form of a character array based on the extraction formatchosen.
Extract this region as one stringWhen extracting from the text plane, specifies that the extracted textshould be saved as a single horizontal string of characters. This option issupported for Integration Objects, macro handlers, global variables, andmacro variables.
When extracting from the other (non-text) planes, specifies that theextracted data should be saved in a global variable as a single object in theform of a 2-dimensional character array. This option is supported only forglobal variables.
Extract this region as a list of stringsWhen extracting from the text plane, specifies that the extracted textshould be saved as a vertical list of strings. This option is supported formacro handlers, global variables, and macro variables. For an IntegrationObject, a list of strings is treated as one continuous string.
When extracting from the other (non-text) planes, specifies that the dataextracted as a 2-dimensional character array should be broken up intoindividual 1-dimensional arrays, each one representing a single row thatwas extracted, and each row stored in an index in the global variable. Thisoption is supported only for global variables.
Extract this region as a tableWhen extracting from the text plane, specifies that the extracted textshould be saved as a table of horizontal and vertical strings, with rows and
Chapter 10. Visual Macro Editor 121

columns. This option is supported for Integration Objects, macro handlers,and macro variables. For a global variable, strings extracted as a tablebecome one continuous string.
Note: When extracting from the other (non-text) planes, this option isdisabled because this non-text data is not intended to be displayeddirectly to a user. Instead, it is meant for developers who need theextra data to determine how to display or handle certain hostscreens.
Click Define to define the table.
Table Extract ConfigurationUse this page to format the columns of the table.v Column name
Use this field to change the heading of the selected column.v Expand column
Expanding a column moves characters between columns. Whenyou highlight a column, the Left button moves the last characteron each line of the column to the left of the highlighted columnto become the first character on each line in the highlightedcolumn. The Right button moves the first character from eachline of the column to the right of the highlighted column tobecome the last character on each line in the highlighted column.
v Reduce column
Reducing a column moves characters between columns. Whenyou highlight a column, the Left button moves the first characterfrom each line of the highlighted column to become the lastcharacter on each line in the column to the left of thehighlighted column. The Right button moves the last characterfrom each line of the highlighted column to become the firstcharacter on each line in the column to the right of thehighlighted column.
v Merge
Use this button to merge two highlighted columns into a singlecolumn. The characters in the highlighted columns are joinedinto one column.
v Divide
Use this button to divide a highlighted column into two separatecolumns. The characters in the highlighted column are dividedequally between the two new columns. If there are an unevennumber of characters, the left column will contain one morecharacter than the right column.
Note:
When you click Divide, HATS divides the selectedcolumn. If the column contains double-byte (DBCS)characters, the division can split a character between thetwo columns. In this case, the character will not appear ineither column. If you see this happen while editing anextract action, use the Right and Left buttons to adjust thecolumns. The divided character will reappear when it iscontained in a single column.
122 IBM Rational Host Access Transformation Services: Advanced Macro Guide
Use the Handler section to specify how text extracted from the text plane isprocessed.
Note: When extracting from the other (non-text) planes, this option is disabledbecause this non-text data is not intended to be displayed directly to a user.Instead, it is meant for developers who need the extra data to determinehow to display or handle certain host screens.
Show handlerFor HATS Web applications, you can select a .jsp file to display theextracted information to the user. A default macro handler is shipped withHATS, and it is named default.jsp. You can find this in the HATS Projectsview, expanding the project name, and expanding Web Content > MacroEvent Handlers. If you want to create your own handler, ensure that youreturn control to the HATS runtime.
Note: Integration Objects do not use this option. Instead, the output pagewill retrieve the extracted data from the Integration Object anddisplay them.
For HATS rich client projects, you can specify a custom macro handler, orbrowse to select from the list of custom macro handlers defined in the richclient project, to prompt the user for the necessary information, andinclude a button for the user to submit the information. A default macrohandler is shipped with HATS, and it is named DefaultMacroHandler. Youcan find this file in the HATS Projects view, expanding the project name,and expanding Rich Content > Macro Event Handlers. If you want tocreate your own handler, ensure that you return control to the HATSruntime by calling the createButtonArea() and createButtons() methods inthe render() method of your custom macro handler. These methods arecalled in the default implementation of the RcpMacroHandler.render()method. For more information about RcpMacroHandler, see the HATS RCPAPI Reference section in the HATS Information Center athttp://publib.boulder.ibm.com/infocenter/hatshelp/v80/index.jsp?topic=/com.ibm.hats.doc/doc/rcpjavadoc/index.html.
Save as global variableYou can enter a name for the global variable in the Name field or select anexisting variable using the drop-down menu. If you select an existingglobal variable in the Name field, click Advanced and specify how tohandle the existing variable by selecting one of the following radiobuttons:v Overwrite the existing value with this new value.v Overwrite the existing value with this new value, starting at the specific
index.v Append this new value to the end of the existing value.v Insert this new value into the existing value, at the specific index.
You can also specify whether this variable is shared by selecting theShared check box.
If you select to save the extract data as a global variable, the Text option ofthe Planes to extract setting is automatically selected.
Note: If you extract a value and assign it to a global variable set by anextract, and you plan to use the global variable value for a prompt,you should set the promptall attribute to false. When the promptall
Chapter 10. Visual Macro Editor 123
attribute is set to true, the extract action is not run before theprompt values are retrieved. Because of this, the global variableused by the prompt does not contain a value. Macros recorded inHATS default to promptall=true. For further information regardingthe promptall attribute, see “The promptall attributes” on page 71.
Integration Objects do not directly extract to global variables.Instead, the output page for the Integration Object retrieves the datafrom the Integration Object after it has run, and then sets the globalvariables. Remember only shared global variables can be accessed byIntegration Objects.
Save as macro variableSelect this box to specify a macro variable in which to save the extractdata. This option is only displayed if macro variables are enabled for themacro.
If you select to save the extract data as a macro variable, the Text option ofthe Planes to extract setting is automatically selected. Only data from thetext plane can be saved to a macro variable.
VariableSelect the variable in which to save the extract data. Thedrop-down menu is populated with all variables defined in themacro.
Use the Advanced section to set the following options:
Extract as one continuous regionClear this box to capture a rectangular block of text. For more information,see “Capturing a rectangular area of the host terminal” on page 59. Selectthis box to capture a continuous sequence of text that wraps from line toline. For more information, see “Capturing a sequence of text from the hostterminal” on page 59.
UnwrapSelect this box to capture the entire contents of any field that begins insidethe specified extract area. For more information, see “Unwrap attribute” onpage 60.
Planes to extractSelect the plane from which the data is to be extracted. The options arelisted below. The default is Text.v Textv Colorv Fieldv Extended fieldv DBCSv Grid
Data from any plane can be extracted and saved as a global variable. Onlydata from one plane can be extracted per Extract action. Only data fromthe text plane can be saved to a macro variable or used in an IntegrationObject.
Notes:
1. For information about the format and contents of the different dataplanes in the Host Access Class Library (HACL) presentation space
124 IBM Rational Host Access Transformation Services: Advanced Macro Guide
model, see http://publib.boulder.ibm.com/infocenter/hodhelp/v10r0/topic/com.ibm.hod.doc/doc/hacl/DWYL0M88.HTML.
2. For an example of how to use non-text plane data in an IntegrationObject see the section, Extracting data from non-text planes, in theHATS Web Application Programmer's Guide.
For more information see “Extract action (<extract> element)” on page 58. Forconsiderations when using bidirectional language support, see Macro prompt andextract bidirectional options in the HATS User's and Administrator's Guide.
Extract All actionThe Extract All action enables you to add multiple Extract actions, for all fields onthe screen, at one time.
You can easily exclude single fields, all empty protected fields, or all input fields,and set names for the extracts.
If an extract already exists with the same name, a warning message displays tonotify you that proceeding will override the settings for the existing extract.
If you select the Save as global variable option, you can also select whether toSynchronize extract names and global variables names. If you do, then the namesare kept in sync. Otherwise, you can edit the global variable name to make itdifferent than the name of the extract.
For information about the other VME settings for this action, see “Extract action”on page 121. For more general information see “Extract action (<extract> element)”on page 58.
Input actionThe Input action simulates keyboard input from an actual user. The action sends asequence of keystrokes to the host terminal. The sequence can include keys thatdisplay a character (such as a, b, c, #, &, and so on) and also action keys (such as[enter] and others).
Insert at current cursor positionSelect this box to have the macro runtime insert the input at the currentcursor position on the host terminal. Clear this box to set the cursor Rowand Column fields yourself. Enter the cursor row and column at which toinsert the input. If a screen capture is available, you can click on it to setthe cursor row and column. You can also enter into the Row and Columnfields a variable name in the form $var$.
String Enter into this field the string to send to the host terminal. You can enteran AID key into this field. For example, pressing F12 on the keyboard willinsert [pf12]. Other AID keys can be inserted using the drop-down menunext to the field. Since a [tab] will be inserted if the TAB key is pressed,the mouse must be used to exit the field.
Translate host action keysSelect this box, which is the default value, to have the macro runtimeinterpret an action key string (such as [enter]) as an action key rather thanas a literal string.
Move cursor to end of inputSelect this box to have the macro runtime move the text cursor tothe end of the input
Chapter 10. Visual Macro Editor 125

Encrypt stringSelect this box to have the macro editor encrypt the sequence of keyscontained in the String field.
For more information see “Input action (<input> element)” on page 62.
Pause actionThe Pause action waits for a specified number of milliseconds and then terminates.
More specifically, the macro runtime finds the <pause> element, reads the durationvalue, and waits for the specified number of milliseconds. Then the macro runtimegoes on to perform the next item.
Uses for this action are:v Any situation in which you want to insert a wait.v Waiting for the host to update the host terminal. For more information see
“Screen completion” on page 82.v To add delay for debugging purposes.
Duration (in milliseconds)
Specifies the number of milliseconds to wait. The default is 10000 milliseconds (10seconds).
For more information, see “<pause> element” on page 188.
Perform actionThe Perform action allows you to specify a Java method to run. This action canonly be added for macros in advanced macro format.
The action invokes a method belonging to a Java class that you have imported as auser-defined type (see “Variables and Types tab” on page 113).
Java methodSpecifies the method to run. You must enclose a method call in dollar signs($), just as you would a variable (see “Syntax of a method call” on page94). The macro runtime invokes the method. See also “How the macroruntime searches for a called method” on page 94.
For more information see “Perform action (<perform> element)” on page 67.
Play macro actionThe Play macro action runs another macro.
Macro Select from this list box the macro to run. The list box is populated with allthe macros in the project.
Start screenSelect from this list box the macro screen in the target macro that you wantthe macro runtime to process first. Select (default) to start the target macroat its usual start screen.
Transfer macro variablesSelect this box to have the macro runtime transfer to the target macro allthe variables that belong to the calling macro, including the contents ofthose variables.
126 IBM Rational Host Access Transformation Services: Advanced Macro Guide
For more information, see “PlayMacro action (<playmacro> element)” on page 68.
Prompt actionThe Prompt action provides a powerful way to send immediate user keyboardinput into the 3270 or 5250 application or into a variable.
Name Specifies the name of the prompt. This name is displayed in the prompt tothe user, so you can use it to provide instructions related to the promptfield.
If a prompt already exists with the same name, a warning messagedisplays to notify you that proceeding will override the settings for theexisting prompt.
Default valueSpecifies a default value to use for the prompt field.
Password protect inputSelect this box to encrypt prompt input provided by the user.
Note: Default values that you specify for prompts are stored in macro filesunencrypted. The default values display in the clear when you editprompts using the macro editors. Therefore, while using a prompt tospecify a password is an appropriate thing to do, for securityreasons you should not specify a default value for the password.
Save value to macro variableSelect this box to specify a macro variable in which to save the promptinput. This option is only displayed if macro variables are enabled for themacro. The Do not insert value into field option is only enabled if Savevalue to macro variable is selected.
VariableSelect the variable in which to save the prompt input. Thedrop-down menu is populated with all variables defined in themacro.
Do not insert value into fieldSelect this box to have the macro runtime not display the promptinput in the input field. This field is enabled only when the Savevalue to macro variable box is selected.
Clear field before inserting valueSelect this box to have the macro runtime clear the contents of the inputfield before typing begins.
Insert at current cursor positionSelect this box to have the macro runtime insert the prompt input at thecurrent cursor position on the host terminal. Clear this box to set thecursor Row and Column fields yourself. Enter the cursor row and columnat which to insert the prompt input. If a screen capture is available, youcan click on it to set the cursor row and column. You can also enter intothe Row and Column fields a variable name in the form $var$.
Translate host action keysSelect this box, which is the default value, to have the macro runtimeinterpret an action key string (such as [enter]) as an action key rather thanas a literal string.
Chapter 10. Visual Macro Editor 127

Move cursor to end of inputSelect this box to have the macro runtime move the text cursor tothe end of the input
The Handler section enables you to determine how the prompt is processed. Youcan select one of the following radio buttons:
Show handlerFor HATS Web projects, you can select a .jsp file to prompt the user for thenecessary information, and include a button for the user to submit theinformation. A default macro handler, named default.jsp, is shipped withHATS. You can find this file by clicking the HATS Projects view of theToolkit, expanding the project name, and expanding Web Content > MacroEvent Handlers. If you want to create your own handler, ensure that youreturn control to the HATS runtime.
Note: Integration Objects ignore the selected .jsp handler. Instead, an inputpage is created for the Integration Object, and a prompt for thevalue is placed in that input page. The generated output page copiesthe value supplied by the input page into the Integration Objectbefore the Integration Object is run.
For HATS rich client projects, you can specify a custom macro handler, orbrowse to select from the list of custom macro handlers defined in the richclient project, to prompt the user for the necessary information, andinclude a button for the user to submit the information. A default macrohandler, named DefaultMacroHandler, is shipped with HATS. You can findthis file in the HATS Projects view, expanding the project name, andexpanding Rich Client Content > Macro Event Handlers. If you want tocreate your own handler, ensure that you return control to the HATSruntime by calling the createButtonArea() and createButtons() methods inthe render() method of your custom macro handler. These methods arecalled in the default implementation of the RcpMacroHandler.render()method. For more information about RcpMacroHandler, see the HATS RCPAPI Reference section in the HATS Information Center athttp://publib.boulder.ibm.com/infocenter/hatshelp/v80/index.jsp?topic=/com.ibm.hats.doc/doc/rcpjavadoc/index.html.
Set prompt to stringIf you know what value should be returned from a prompt, you can enterthat string in the String field.
Set prompt to global variableIf you want the value of the prompt to be provided by a global variable,enter a name for the global variable in the Name field or select an existingvariable using the drop-down menu next to the Global variable field. Ifyou click the Advanced button, you can specify whether your variable isshared or indexed. If it is an indexed variable, you also need to specifywhether to show all indexes or a single index. For more information aboutglobal variables, see the chapter, Interacting with global variables, in theHATS User's and Administrator's Guide.
Note:
If a prompt value is based on a global variable set by an extract, andthe promptall attribute is set to true, the extract action is not runbefore the prompts values are retrieved. Because of this, the globalvariable used by the prompt does not contain a value. If you use
128 IBM Rational Host Access Transformation Services: Advanced Macro Guide

global variables with extracts and prompts, you should set thepromptall attribute to false. For further information regarding thepromptall attribute, see “The promptall attributes” on page 71.
Integration Objects do not access global variables directly. Instead,the input and output pages for the Integration Object retrieve theglobal variable value, and set it into the Integration Object before itis run. Only shared global variables can be accessed by IntegrationObjects.
Set prompt to property from User ListIf you want the prompt to access a user list, select the User Profile fromthe drop-down list. The user profile is the key as to determining whetherto use the userid or password as the User List property. For moreinformation about user lists, see the section, User List, in the HATS User'sand Administrator's Guide.
Note: User list prompts can only be used in connect macros.
Use Web Express LogonIf you have configured your HATS application to use web express logon,enter the prompt type as either the user ID or password in the Prompttype drop-down list and enter the application ID in the Application IDfield.
Note: The Prompt type should be prefilled with the correct value.
For more information see “Prompt action (<prompt> element)” on page 70. Forconsiderations when using bidirectional language support, see Macro prompt andextract bidirectional options in the HATS User's and Administrator's Guide.
Prompt All actionThe Prompt All action enables you to add multiple Prompt actions, for all fields onthe screen, at one time.
You can easily exclude fields and set names for the prompts.
If a prompt already exists with the same name, a warning message displays tonotify you that proceeding will override the settings for the existing prompt.
If you select the Set prompt to global variable option, you can also select whetherto Synchronize prompt names and global variables names. If you do, then thenames are kept in sync. Otherwise, you can edit the global variable name to makeit different than the name of the prompt.
For information about the other VME settings for this action, see “Prompt action”on page 127. For more general information see “Prompt action (<prompt>element)” on page 70.
Set cursor position actionThe Set cursor position action simulates a user mouse click on the host terminal.As with a real mouse click, the text cursor jumps to the row and column positionwhere the mouse icon was pointing when the click occurred.
Chapter 10. Visual Macro Editor 129

Specify the Row and Column location where you want the mouse click to occur.The screen capture is displayed if it is available. If so, you can click on it to set theRow and Column fields. You can also enter into the Row and Column fields avariable name in the form $var$.
For more information see “<mouseclick> element” on page 185.
Update variable actionThe Update variable action allows you to update the value of a macro variable.This action can only be added for macros in advanced macro format.
VariableSelect from this list box the name of the variable to update. The list boxdrop-down is populated with all the variables defined for the macro
Type Displays the type of the selected variable.
Value Specifies the value to which to update the variable. The value must be inthe correct format for the type.
For more information see “Variable update action (<varupdate> element)” on page73.
Working with next screen connections
Adding a next screen connection from the paletteThe Next Screen Connection tool of the palette allows you to define a new nextscreen connection.
To add a next screen connection between two screens, click Next ScreenConnection in the palette, click on the source screen and then click on the targetscreen.
If other connections originating from the same source screen exist, the newconnection will have the highest order or priority. You can use the Reorder actionon the next screen connection pop-up menu to change the order.
To create a loop, that is a next screen connection with the same source and target,click on the same screen twice. The loop is displayed as an arrow, if no other nextscreen connection is defined for the screen, or as a circle showing the order, if morenext screen connections are defined for the screen.
Reordering and changing next screen connectionsThe Reorder action on the next screen connection pop-up menu allows the order(or priority) of the connection to be changed. This impacts the order of all theother next screen connections originating from the same screen.
The Reorder action works as an Up and Down. That is, if the connection withorder 2 is changed to order 3 (down 1), then the connection with order 3 goes toorder 2 (up 1).
The source or target of a next screen connection can be changed by dragging theappropriate end of the connection to a new source or target screen.
130 IBM Rational Host Access Transformation Services: Advanced Macro Guide
Working with VME preferencesTo work with VME preferences, from the menu bar select Window > Preferences >HATS > Visual Macro Editor. You can modify the following preferences:
Show screen actions by defaultSelect this preference to show actions on macro screen objects by default.Clear this preference to hide the actions by default. You can click the actiontoggle on the macro screen to show/hide the actions for the specific screen.This preference only affects macros opened in the VME for the first time.The default is selected.
Restrict number of screen actions shownSpecifies the maximum number of actions displayed for a macro screenobject. This is useful for complex macros where the interface is toocomplex if all actions are shown. The default is 5.
Chapter 10. Visual Macro Editor 131

132 IBM Rational Host Access Transformation Services: Advanced Macro Guide

Chapter 11. Advanced Macro Editor
The Advanced Macro Editor (AME) gives you the ability to set macro andscreen-level attributes, edit screen descriptions; and add actions, links (next screenconnections), and variables.
The basic Macro Editor can be opened by right-clicking on the macro and selectingOpen With -> Macro Editor. The Advanced Macro Editor can then be opened fromthe Macro Editor Overview page. Prompts and Extracts can also still be editedfrom the Macro Editor.
If you open a macro with the Macro Editor, instead of with the VME, then theMacro Editor becomes the default editor for that macro (only that macro).
Note: Support for the Macro Editor and the Advanced Macro Editor is deprecatedin HATS V8.0. While support continues for now, IBM reserves the right toremove these capabilities in a subsequent release of the product. Thissupport is replaced by the Visual Macro Editor.
Using the editorThe Advanced Macro Editor is a graphical user interface (with buttons, inputfields, list boxes, and so on) for editing the parts of a macro. Figure 60 shows theAdvanced Macro Editor.
Figure 60. The Advanced Macro Editor
© Copyright IBM Corp. 2003, 2011 133

Notes:
1. The AME is only aware of the <HAScript> element and its contents. Thismeans any prompts or extracts you add or edit using the AME must bemanually updated in the HATS <prompts> and <extracts> elements. This isimportant because a mismatch will cause Integration Objects to fail to run themacro properly, or will cause the macro to behave incorrectly when playedwith a Perform macro transaction or Play macro action. To minimize problems,we suggest that you use the HATS Macro Editor to define prompts andextracts, and use the AME for advanced logic within the macro as needed. See“Adapting Host On-Demand macros for use in HATS” on page 3 for moredetails on the HATS <prompts> and <extracts> elements.
2. The AME is not synchronized with the HATS Macro Editor. This means thatwhen you make a change in the AME, it will not be reflected immediately in,for example, the source view. However, when you save and exit one editor, thechanges will be reflected in the other.
Macro tabFor the purpose of getting you acquainted with the AME, this section consists of avery simple comparison between the Macro tab of the AME and the <HAScript>element described in the previous section.
The AME has four tabs: Macro, Screens, Links, and Variables. The first tab, theMacro tab, corresponds very closely to the <HAScript> element. In fact, the Macrotab is the graphical user interface for some of the information that is stored in theattributes of the begin tag of the <HAScript> element.
Therefore, as the <HAScript> element is the master element of a macro script andcontains in its attributes information that applies to the entire macro (such as themacro description), similarly the Macro tab is the first tab of the AME andprovides access to some of the same global information.
Figure 61 on page 135 shows the AME with the Macro tab selected.
134 IBM Rational Host Access Transformation Services: Advanced Macro Guide

In Figure 61, the Macro tab has input fields for the macro description and otherinformation, along with several check boxes. Also notice the following:
The Macro Name field contains the name that you assign to the macro. This is thesame name that you will select when you want to edit the macro or run the macro.Macro names are case-sensitive. For example, macro_1 is a different name thanMacro_1, MACRO_1, and so on.
The Use Variables and Arithmetic Expressions In Macro check box determineswhether the macro object uses the basic macro format or the advanced macroformat for this macro. In the figure above this check box is not selected, indicatingthat the basic macro format will be used (see “Basic and advanced macro format”on page 15).
Figure 62 on page 136 shows a sample <HAScript> element that contains the sameinformation as is shown on the Macro tab in Figure 61, as well as some additionalinformation. In the source view, a <HAScript> element is written on a single line;here the element is written on multiple lines so that you can see the attributes.
Figure 61. Macro tab of the AME
Chapter 11. Advanced Macro Editor 135
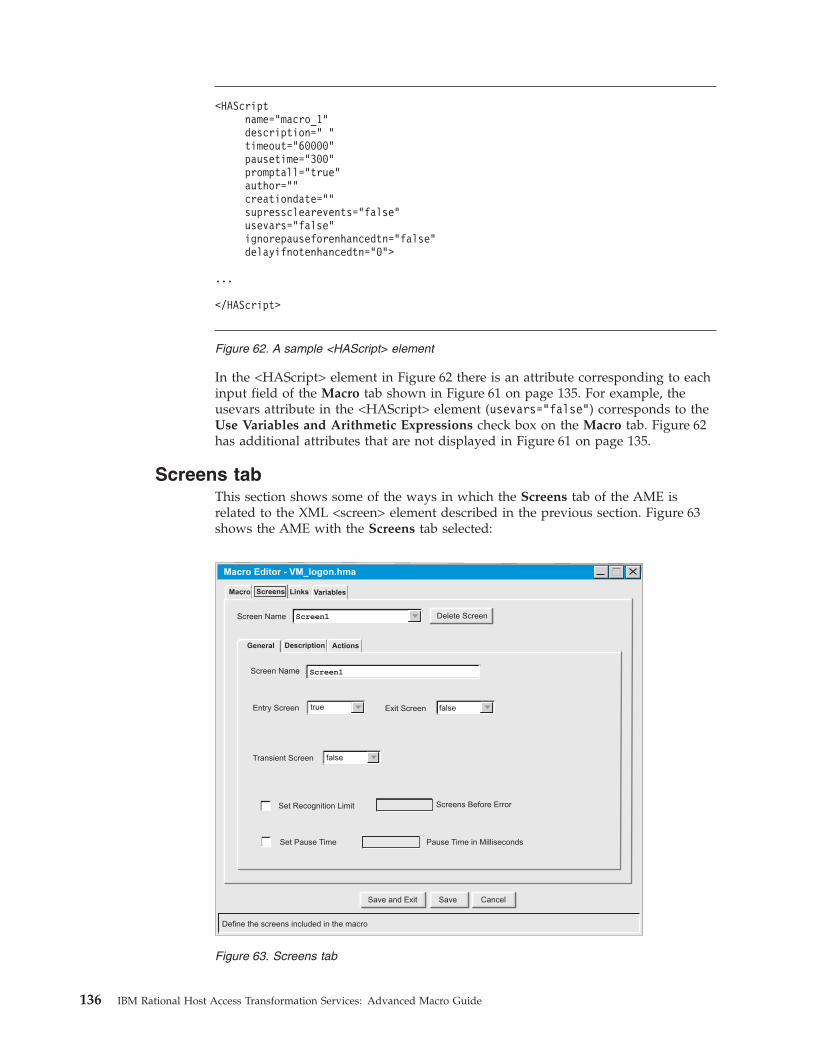
In the <HAScript> element in Figure 62 there is an attribute corresponding to eachinput field of the Macro tab shown in Figure 61 on page 135. For example, theusevars attribute in the <HAScript> element (usevars="false") corresponds to theUse Variables and Arithmetic Expressions check box on the Macro tab. Figure 62has additional attributes that are not displayed in Figure 61 on page 135.
Screens tabThis section shows some of the ways in which the Screens tab of the AME isrelated to the XML <screen> element described in the previous section. Figure 63shows the AME with the Screens tab selected:
<HAScriptname="macro_1"description=" "timeout="60000"pausetime="300"promptall="true"author=""creationdate=""supressclearevents="false"usevars="false"ignorepauseforenhancedtn="false"delayifnotenhancedtn="0">
...
</HAScript>
Figure 62. A sample <HAScript> element
Save CancelSave and Exit
Delete Screen
Macro Editor - VM_logon.hma
Entry Screen
Define the screens included in the macro
Macro Screens Links Variables
true
Set Pause Time Pause Time in Milliseconds
Set Recognition Limit Screens Before Error
Transient Screen
Screen Name
General Description Actions
Screen Name
Exit Screen false
false
Screen1
Screen1
Figure 63. Screens tab
136 IBM Rational Host Access Transformation Services: Advanced Macro Guide
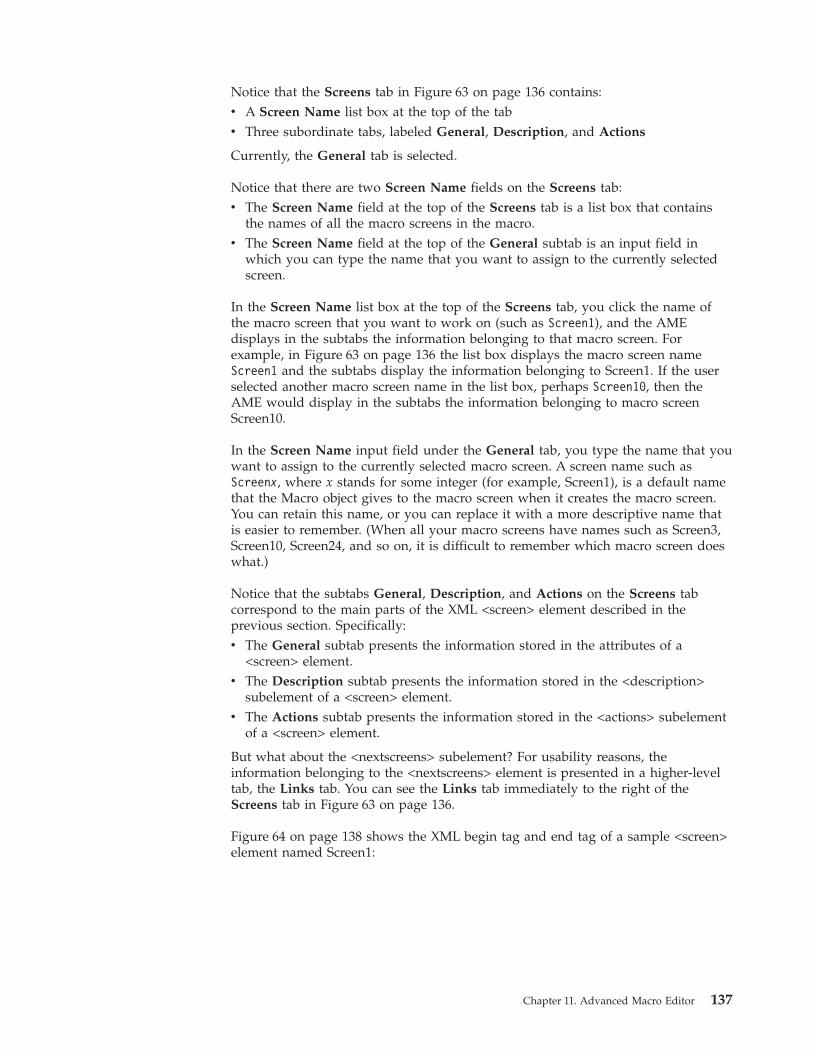
Notice that the Screens tab in Figure 63 on page 136 contains:v A Screen Name list box at the top of the tabv Three subordinate tabs, labeled General, Description, and Actions
Currently, the General tab is selected.
Notice that there are two Screen Name fields on the Screens tab:v The Screen Name field at the top of the Screens tab is a list box that contains
the names of all the macro screens in the macro.v The Screen Name field at the top of the General subtab is an input field in
which you can type the name that you want to assign to the currently selectedscreen.
In the Screen Name list box at the top of the Screens tab, you click the name ofthe macro screen that you want to work on (such as Screen1), and the AMEdisplays in the subtabs the information belonging to that macro screen. Forexample, in Figure 63 on page 136 the list box displays the macro screen nameScreen1 and the subtabs display the information belonging to Screen1. If the userselected another macro screen name in the list box, perhaps Screen10, then theAME would display in the subtabs the information belonging to macro screenScreen10.
In the Screen Name input field under the General tab, you type the name that youwant to assign to the currently selected macro screen. A screen name such asScreenx, where x stands for some integer (for example, Screen1), is a default namethat the Macro object gives to the macro screen when it creates the macro screen.You can retain this name, or you can replace it with a more descriptive name thatis easier to remember. (When all your macro screens have names such as Screen3,Screen10, Screen24, and so on, it is difficult to remember which macro screen doeswhat.)
Notice that the subtabs General, Description, and Actions on the Screens tabcorrespond to the main parts of the XML <screen> element described in theprevious section. Specifically:v The General subtab presents the information stored in the attributes of a
<screen> element.v The Description subtab presents the information stored in the <description>
subelement of a <screen> element.v The Actions subtab presents the information stored in the <actions> subelement
of a <screen> element.
But what about the <nextscreens> subelement? For usability reasons, theinformation belonging to the <nextscreens> element is presented in a higher-leveltab, the Links tab. You can see the Links tab immediately to the right of theScreens tab in Figure 63 on page 136.
Figure 64 on page 138 shows the XML begin tag and end tag of a sample <screen>element named Screen1:
Chapter 11. Advanced Macro Editor 137
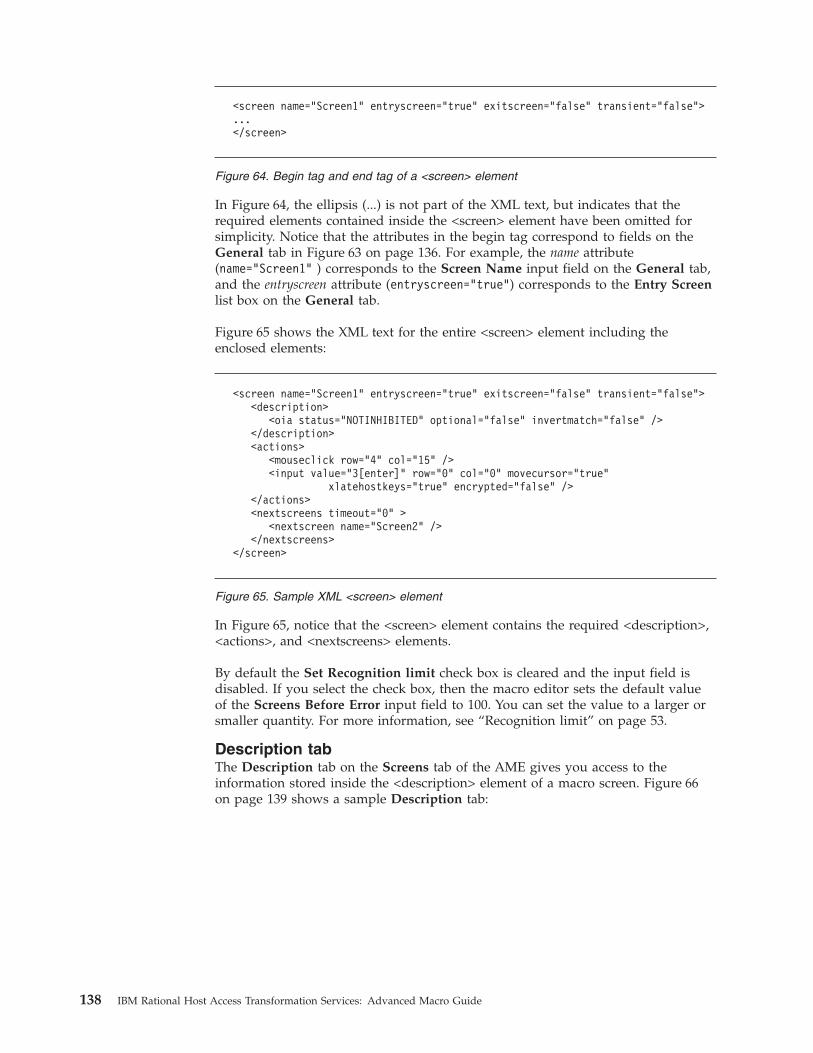
In Figure 64, the ellipsis (...) is not part of the XML text, but indicates that therequired elements contained inside the <screen> element have been omitted forsimplicity. Notice that the attributes in the begin tag correspond to fields on theGeneral tab in Figure 63 on page 136. For example, the name attribute(name="Screen1" ) corresponds to the Screen Name input field on the General tab,and the entryscreen attribute (entryscreen="true") corresponds to the Entry Screenlist box on the General tab.
Figure 65 shows the XML text for the entire <screen> element including theenclosed elements:
In Figure 65, notice that the <screen> element contains the required <description>,<actions>, and <nextscreens> elements.
By default the Set Recognition limit check box is cleared and the input field isdisabled. If you select the check box, then the macro editor sets the default valueof the Screens Before Error input field to 100. You can set the value to a larger orsmaller quantity. For more information, see “Recognition limit” on page 53.
Description tabThe Description tab on the Screens tab of the AME gives you access to theinformation stored inside the <description> element of a macro screen. Figure 66on page 139 shows a sample Description tab:
<screen name="Screen1" entryscreen="true" exitscreen="false" transient="false">...</screen>
Figure 64. Begin tag and end tag of a <screen> element
<screen name="Screen1" entryscreen="true" exitscreen="false" transient="false"><description>
<oia status="NOTINHIBITED" optional="false" invertmatch="false" /></description><actions>
<mouseclick row="4" col="15" /><input value="3[enter]" row="0" col="0" movecursor="true"
xlatehostkeys="true" encrypted="false" /></actions><nextscreens timeout="0" >
<nextscreen name="Screen2" /></nextscreens>
</screen>
Figure 65. Sample XML <screen> element
138 IBM Rational Host Access Transformation Services: Advanced Macro Guide

In Figure 66, the Screens tab of the AME is selected. The name of the currentlyselected screen, Screen2, is displayed in the Screen Name field at the top of theScreens tab. Below the Screen Name field are the General, Description, andActions subtabs. The Description tab is selected.
As you look at the Description tab in the figure above, you can see that it has anupper area and a lower area.
The upper area contains controls that operate on a single descriptor elementconsidered as a whole. In particular, the Descriptor list box situated in the upperleft corner of the Description tab contains the name of the currently selecteddescriptor. In the figure above, the currently selected descriptor is a Field Countsand OIA descriptor at the top of the list. (Descriptors do not have names. FieldCounts and OIA is the type of the descriptor.)
The lower area of the Description tab displays the contents of the currentlyselected descriptor. Because the currently selected descriptor is a Fields Counts andOIA descriptor, the lower area of the Description tab presents the contentsappropriate to that type of descriptor. If you created and selected another type ofdescriptor, such as a String descriptor, then the lower area would present thecontents appropriate to a String descriptor.
Looking more closely at the lower area of the Description tab in Figure 66, you cansee that the Field Counts and OIA descriptor contains three tests of identity:v The screen contains 80 fields (the Number of Fields field is set to 80).v The screen contains three input fields (the Number of Input Fields field is set to
3).v The screen has the input inhibited indicator cleared (the Wait for OIA to
Become Uninhibited list box is set to true).
Delete Screen
Number of Fields
Define the screens included in the macro
Macro Screens Links Variables
Wait for OIA to Become Uninhibited
Inverse DescriptorOptional
Screen Name
General Description Actions
Descriptor
false
Screen1
Delete
Number of Input Fields
Inverse DescriptorOptional false
true Optional false
false
false
Field Counts and OIA
Field Counts and OIA<new string descriptor><new cursor descriptor><new attribute descriptor><new condition descriptor><new variable update>
Macro Editor - VM_logon.hma
OIA Status
Save CancelSave and Exit
80
3
Figure 66. Description tab
Chapter 11. Advanced Macro Editor 139
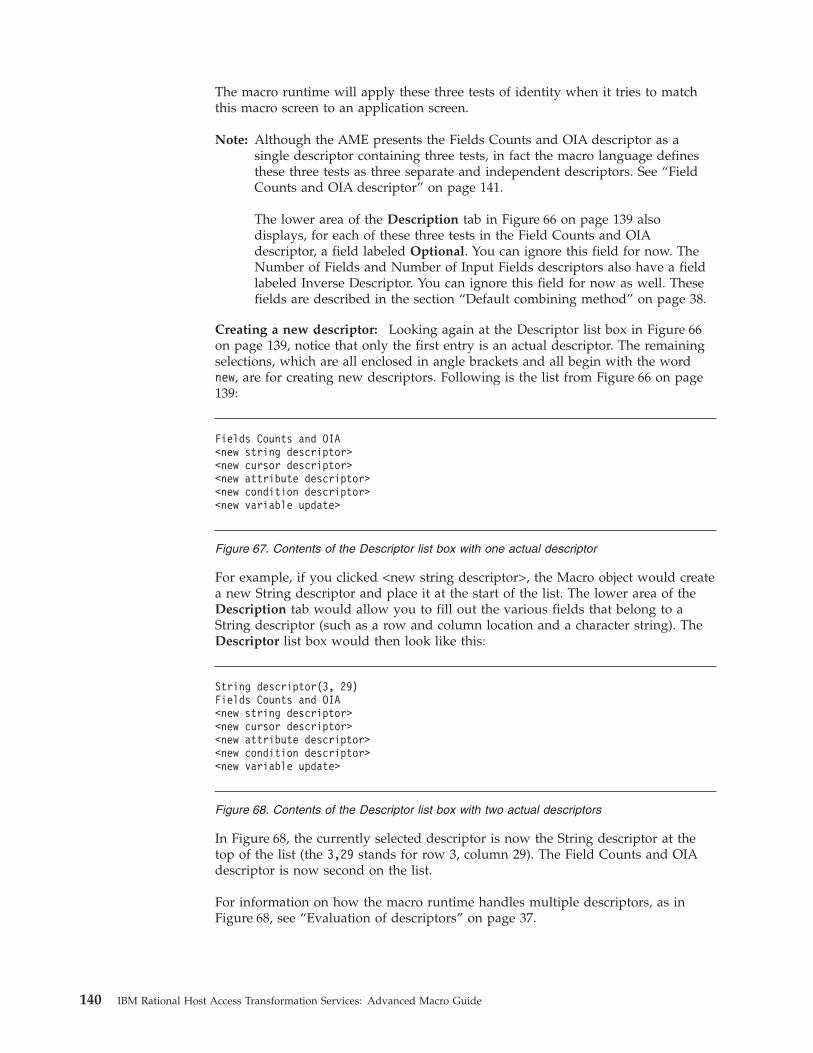
The macro runtime will apply these three tests of identity when it tries to matchthis macro screen to an application screen.
Note: Although the AME presents the Fields Counts and OIA descriptor as asingle descriptor containing three tests, in fact the macro language definesthese three tests as three separate and independent descriptors. See “FieldCounts and OIA descriptor” on page 141.
The lower area of the Description tab in Figure 66 on page 139 alsodisplays, for each of these three tests in the Field Counts and OIAdescriptor, a field labeled Optional. You can ignore this field for now. TheNumber of Fields and Number of Input Fields descriptors also have a fieldlabeled Inverse Descriptor. You can ignore this field for now as well. Thesefields are described in the section “Default combining method” on page 38.
Creating a new descriptor: Looking again at the Descriptor list box in Figure 66on page 139, notice that only the first entry is an actual descriptor. The remainingselections, which are all enclosed in angle brackets and all begin with the wordnew, are for creating new descriptors. Following is the list from Figure 66 on page139:
For example, if you clicked <new string descriptor>, the Macro object would createa new String descriptor and place it at the start of the list. The lower area of theDescription tab would allow you to fill out the various fields that belong to aString descriptor (such as a row and column location and a character string). TheDescriptor list box would then look like this:
In Figure 68, the currently selected descriptor is now the String descriptor at thetop of the list (the 3,29 stands for row 3, column 29). The Field Counts and OIAdescriptor is now second on the list.
For information on how the macro runtime handles multiple descriptors, as inFigure 68, see “Evaluation of descriptors” on page 37.
Fields Counts and OIA<new string descriptor><new cursor descriptor><new attribute descriptor><new condition descriptor><new variable update>
Figure 67. Contents of the Descriptor list box with one actual descriptor
String descriptor(3, 29)Fields Counts and OIA<new string descriptor><new cursor descriptor><new attribute descriptor><new condition descriptor><new variable update>
Figure 68. Contents of the Descriptor list box with two actual descriptors
140 IBM Rational Host Access Transformation Services: Advanced Macro Guide

Field Counts and OIA descriptor: The Field Counts and OIA descriptor isrequired and must be unique. That is, every Description tab must contain one andonly one Field Counts and OIA descriptor.
This should not cause you any trouble in practice, for the following reasons:v Although the Field Counts and OIA descriptor itself is required, only one of the
three tests that it contains is required. Therefore the actual requirement is thatevery <description> element must contain one and only one OIA descriptor.
v The AME enforces these rules and will not let you mistakenly include more thanone Field Counts and OIA descriptor in a Description tab. For example, theDelete button does not have any effect when you try to delete the Field Countsand OIA descriptor, and the Descriptor list box does not contain a <new> entryfor the Field Counts and OIA descriptor.
How three separate and independent descriptors are presented as one: TheAME presents the Field Counts and OIA descriptor as one descriptor (see Figure 66on page 139). However, in fact each of the three parts of the Field Counts and OIAdescriptor on the Description tab corresponds to a separate and independentdescriptor in the underlying XML macro language. Specifically:v The Number of Fields setting is stored as a <numfields> descriptor.v The Number of Input Fields setting is stored as a <numinputfields> descriptor.v The Wait for OIA to Become Uninhibited setting is stored as an <oia>
descriptor.
Table 20 lists these three types of descriptors and shows how many of each canoccur within a <description> element:
Table 20. Three types of <description> element descriptors
Type of descriptor: Number of this type of descriptor allowedper macro screen (that is, per <description>element):
<oia> 1 (required)
<numfields> 1 (optional)
<numinputfields> 1 (optional)
As Table 20 shows, only one of each type of these descriptors can occur in a<description> element. The <oia> descriptor is required, but the <numfields>descriptor and the <numinputfields> descriptor are optional. The macro editorenforces these rules.
For example, look at a Field Counts and OIA descriptor first as it appears on theDescription tab of the AME and then in the source view. Figure 66 on page 139shows a Field Counts and OIA descriptor on the Description tab. The settings ofthe three parts of the Field Counts and OIA descriptor are set as follows:Number of Fields: 80Number of Input fields: 3Wait for OIA to Become Uninhibited: true
But if you look at the corresponding <description> element in the source view, yousee the following:
Chapter 11. Advanced Macro Editor 141

The XML code fragment in Figure 69 shows that the <description> elementcontains three separate and independent descriptors, each corresponding to one ofthe three parts of the Field Counts and OIA descriptor.
Suppose that you change the Field Counts and OIA descriptor settings to be asfollows:Number of Fields: (blank)Number of Input fields: (blank)Wait for OIA to Become Uninhibited: true
Setting the first two fields to blank tells the AME that these items are not to beincluded in the script. If you look again at the corresponding <description>element in the source view you now see:<description>
<oia status="NOTINHIBITED" optional="false" invertmatch="false" /></description>
The XML code fragment above shows that the <description> element now containsonly one descriptor, an <oia> descriptor corresponding to the Wait for OIA toBecome Uninhibited setting in the Field Counts and OIA descriptor.
Wait for OIA to Become Uninhibited descriptor: Table 21 shows:v The three permissible settings for the Wait for OIA to Become Uninhibited list
boxv The corresponding values used in the <oia> elementv How the macro runtime evaluates the setting
Table 21. Valid settings for the descriptor Wait for OIA to Become Uninhibited
Setting on the Descriptiontab:
Value of the statusattribute in the <oia>element:
Meaning:
true NOTINHIBITED If the input inhibitedindicator in the host terminalis cleared (that is, input isnot inhibited) then the macroruntime evaluates thedescriptor as true. Otherwisethe macro runtime evaluatesthe descriptor as false.
false DONTCARE The macro runtime alwaysevaluates the descriptor astrue.
<Expression> 'NOTINHIBITED','DONTCARE', or anyexpression that evaluates toone of these strings.
The macro runtime evaluatesthe expression and theninterprets the resultingstring.
<description><oia status="NOTINHIBITED" optional="false" invertmatch="false" /><numfields number="80" optional="false" invertmatch="false" /><numinputfields number="3" optional="false" invertmatch="false" />
</description>
Figure 69. A <description> element with three descriptors
142 IBM Rational Host Access Transformation Services: Advanced Macro Guide

Counting fields in the host terminal during macro development: If you want toview the Number of Fields field and the Number of Input Fields field, you canview the values and set the descriptors automatically to the values on the currentscreen.
To use this feature follow these steps:1. Edit the macro in the host terminal. You can also use this feature while
recording a macro.2. In the host terminal, go to the application screen corresponding to the macro
screen that you are working on. The values are always based on the screenshown in the host terminal.
3. In the tree view on the left, right-click the screen name and select Edit to bringup the Define Screen Recognition Criteria page.
4. The macro editor displays the total number of fields, the number of inputfields, and the cursor position in the current application screen. Check theboxes for the criteria you want to use to recognize this screen.
5. To set the Number of Fields field and the Number of Input Fields field to thecorrect values, you can use the Refresh button beside each input field to countthe fields in the application screen for you.
6. Click Finish.
Treatment during screen recognition: During screen recognition, when the macroruntime evaluates individual descriptors and combines the boolean results, themacro runtime treats the <oia> descriptor, the <numfields> descriptor (if it ispresent), and the <numinputfields> descriptor (if it is present) each as a separateand independent descriptor, one like any other descriptor.
For more information about evaluating multiple descriptors see “Evaluation ofdescriptors” on page 37
The '*' string in a new String descriptor: When you create a new Stringdescriptor the AME places the string ’*’ into the String input field as an initial,default value. Just erase this initial string and fill in the string that you want. Theasterisk (*) does not mean anything or have any function. The initial string couldsay 'Default string value' and have the same effect.
Actions tabThe Actions tab on the Screens tab of the AME allows you to create and editactions. When you create an action in the Actions tab, the AME inserts the newaction into the <actions> element of the currently selected screen. Figure 70 onpage 144 shows a sample Actions tab:
Chapter 11. Advanced Macro Editor 143
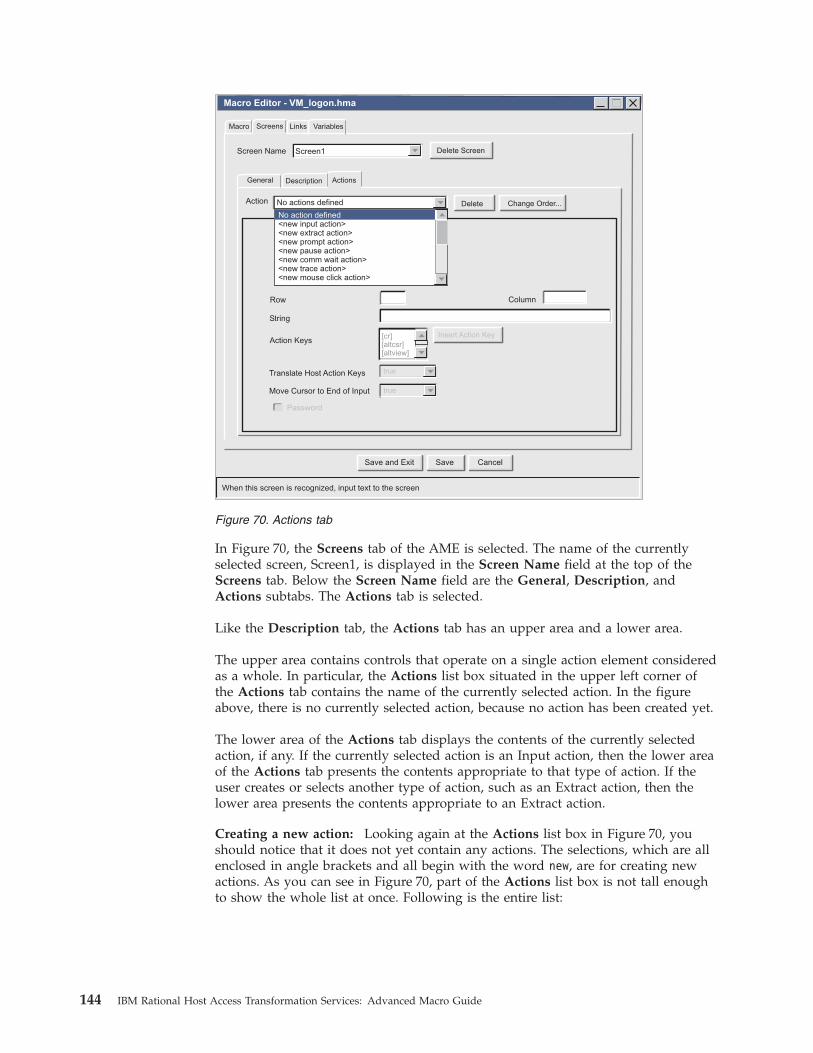
In Figure 70, the Screens tab of the AME is selected. The name of the currentlyselected screen, Screen1, is displayed in the Screen Name field at the top of theScreens tab. Below the Screen Name field are the General, Description, andActions subtabs. The Actions tab is selected.
Like the Description tab, the Actions tab has an upper area and a lower area.
The upper area contains controls that operate on a single action element consideredas a whole. In particular, the Actions list box situated in the upper left corner ofthe Actions tab contains the name of the currently selected action. In the figureabove, there is no currently selected action, because no action has been created yet.
The lower area of the Actions tab displays the contents of the currently selectedaction, if any. If the currently selected action is an Input action, then the lower areaof the Actions tab presents the contents appropriate to that type of action. If theuser creates or selects another type of action, such as an Extract action, then thelower area presents the contents appropriate to an Extract action.
Creating a new action: Looking again at the Actions list box in Figure 70, youshould notice that it does not yet contain any actions. The selections, which are allenclosed in angle brackets and all begin with the word new, are for creating newactions. As you can see in Figure 70, part of the Actions list box is not tall enoughto show the whole list at once. Following is the entire list:
Delete Screen
When this screen is recognized, input text to the screen
Macro Screens Links Variables
Column
String
Screen Name
General Description Actions
Action
Screen1
Delete Change Order...
Action KeysInsert Action Key
Translate Host Action Keys
Move Cursor to End of Input true
No actions defined
No action defined<new input action><new extract action><new prompt action><new pause action><new comm wait action><new trace action><new mouse click action>
[cr][altcsr][altview]
Macro Editor - VM_logon.hma
Password
Row
Save CancelSave and Exit
true
Figure 70. Actions tab
144 IBM Rational Host Access Transformation Services: Advanced Macro Guide

For example, if you click <new input action>, the Macro object creates a newInput action and places it at the top of the list. The lower area of the Actions taballows you to fill out the various fields that belong to an Input action (such as theinput key sequence). The new Input item is in the selected area of the Actions listbox, and the list part of the list box then looks like this:
When the macro runtime processes this macro screen, it performs the actions in thesame order in which they are listed in the Actions list box. To change the order ofthe actual actions, click the Change Order button to the right of the Actions listbox.
Links tabIn the AME, the Links tab provides the user interface for storing the names ofcandidate macro screens into the <nextscreens> element of a macro screen.Figure 73 on page 146 shows a sample Links tab:
<new input action><new extract action><new prompt action><new pause action><new comm wait action><new trace action><new mouse click action><new variable update action><new play macro action><new perform action><new conditional action><new sql query action>
Figure 71. Contents of the list of an Actions list box with no actions created
Input action1(0,0)<new input action><new extract action><new prompt action><new pause action><new comm wait action><new trace action><new mouse click action><new variable update action><new play macro action><new perform action><new conditional action><new sql query action>
Figure 72. Contents of the list of an Actions list box with one actual action
Chapter 11. Advanced Macro Editor 145
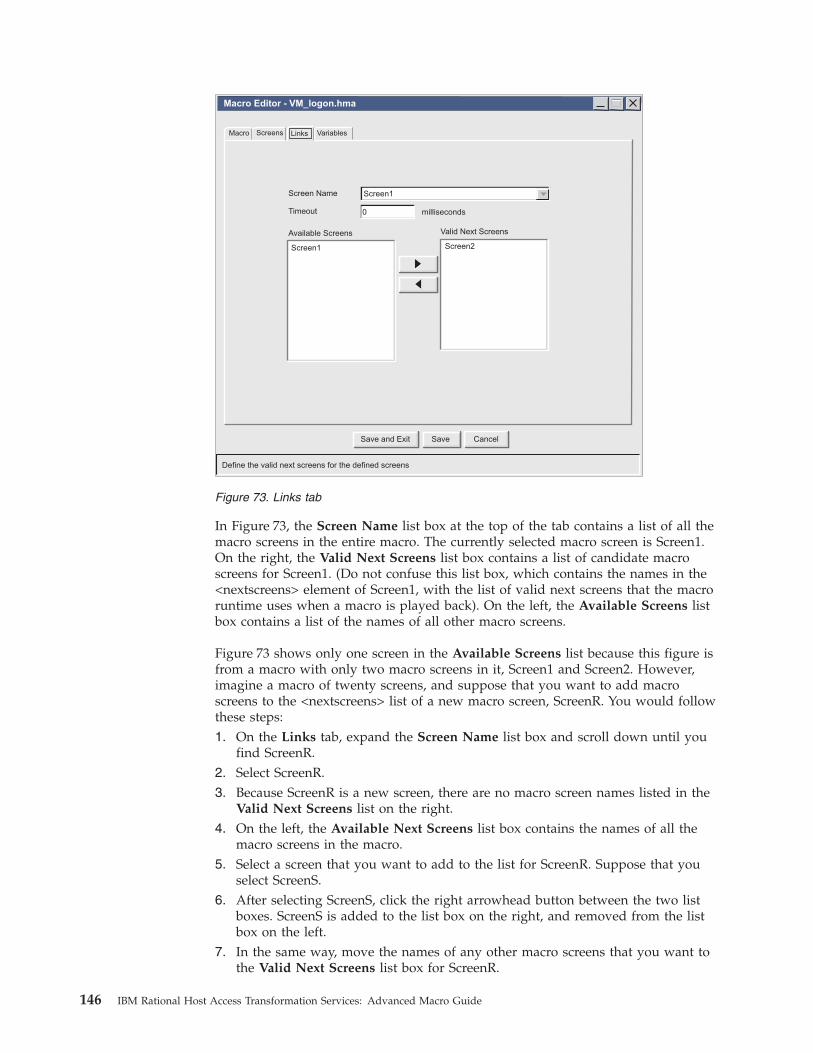
In Figure 73, the Screen Name list box at the top of the tab contains a list of all themacro screens in the entire macro. The currently selected macro screen is Screen1.On the right, the Valid Next Screens list box contains a list of candidate macroscreens for Screen1. (Do not confuse this list box, which contains the names in the<nextscreens> element of Screen1, with the list of valid next screens that the macroruntime uses when a macro is played back). On the left, the Available Screens listbox contains a list of the names of all other macro screens.
Figure 73 shows only one screen in the Available Screens list because this figure isfrom a macro with only two macro screens in it, Screen1 and Screen2. However,imagine a macro of twenty screens, and suppose that you want to add macroscreens to the <nextscreens> list of a new macro screen, ScreenR. You would followthese steps:1. On the Links tab, expand the Screen Name list box and scroll down until you
find ScreenR.2. Select ScreenR.3. Because ScreenR is a new screen, there are no macro screen names listed in the
Valid Next Screens list on the right.4. On the left, the Available Next Screens list box contains the names of all the
macro screens in the macro.5. Select a screen that you want to add to the list for ScreenR. Suppose that you
select ScreenS.6. After selecting ScreenS, click the right arrowhead button between the two list
boxes. ScreenS is added to the list box on the right, and removed from the listbox on the left.
7. In the same way, move the names of any other macro screens that you want tothe Valid Next Screens list box for ScreenR.
Define the valid next screens for the defined screens
Macro Screens Links Variables
Screen1Screen Name
Timeout 0 milliseconds
Screen1 Screen2
Available Screens Valid Next Screens
Macro Editor - VM_logon.hma
Save CancelSave and Exit
Figure 73. Links tab
146 IBM Rational Host Access Transformation Services: Advanced Macro Guide

8. Move a total of three screen names: ScreenS, ScreenG, and ScreenY.
When you are done, ScreenR, the currently selected macro screen, has the names ofthree macro screens in its list of valid next screens.
In the source view, you would see the names of the valid next macro screens,ScreenS, ScreenG, ScreenY, stored inside ScreenR as shown in Figure 74:Figure 74 shows the <screen> element for ScreenR, with the name attribute set to
"ScreenR". Inside are the three primary structural elements of a <screen> element:the <description> element, the <actions> element, and the <nextscreens> element.The contents of the <description> element and the <actions> element are notshown but are indicated with ellipses (...). The <nextscreens> element containsthree <nextscreens> elements, and each <nextscreen> element contains the name ofone of the valid next screens: ScreenS, ScreenG, and ScreenY.
For more information about runtime processing see Chapter 4, “How the macroruntime processes a macro screen,” on page 25.
Variables tabBecause a variable belongs to the entire macro, and not to any one screen, there isa separate high-level tab for Variables. The Variables tab allows you to:v Create a variable.v Remove a variable.v Import a Java class as a new variable type.
To create a variable belonging to a standard data type, use the Variables tab in theAME. Figure 75 on page 148 shows a sample Variables tab:
<screen name="ScreenR" entryscreen="true" exitscreen="false" transient="false"><description>
...</description><actions>
...</actions><nextscreens>
<nextscreen name="ScreenS"/><nextscreen name="ScreenG"/><nextscreen name="ScreenY"/>
</nextscreens></screen>
Figure 74. Macro screen ScreenR with <nextscreens> element
Chapter 11. Advanced Macro Editor 147

In Figure 75, the Variables tab of the AME is selected. The name of the currentlyselected variable, $strUserName$, is displayed in the Variables list box. Three otherfields contain information that the macro runtime needs to create this variable: theName input field, the Type list box, and the Initial Value input field.
The Variables list box contains the names of all the variables that have beencreated for this macro. It allows you to select a variable to edit or to remove, and italso contains a <new variable> entry for creating new variables.
Notice that the entry of the currently selected variable is contained in parenthesesafter another string:Variable1($strUserName$)
The string Variable1 is a setting that shows how many variables you have created.It is not saved in the macro script. The real name of the variable is $strUserName$,and you should use this name alone throughout the macro wherever you use thevariable.
You have probably noticed that the variable name $strUserName$ is enclosed indollar signs ($). This is a requirement. You must enclose the variable name indollar signs ($) wherever you use it in the macro.
The Name input field displays the name of the currently selected variable,$strUserName$. You can change the name of the variable by typing over the oldname. Mostly you should use this field only for assigning a name to a newlycreated variable. Although you can come back later at any time and change thename of this variable (for example to $strUserFirstName$), remember that youmight have already used the variable's old name elsewhere in the macro, in someaction or descriptor. If you change the name here in the Variables tab, then you
Remove
Import...
Variables
Recognize this screen by general screen characteristics
Name
Type
Initial Value
string
Macro Screens Links Variables
Variable1($strUserName$)
$strUserName$
Macro Editor - VM_logon.hma
Save CancelSave and Exit
Figure 75. Variables tab
148 IBM Rational Host Access Transformation Services: Advanced Macro Guide
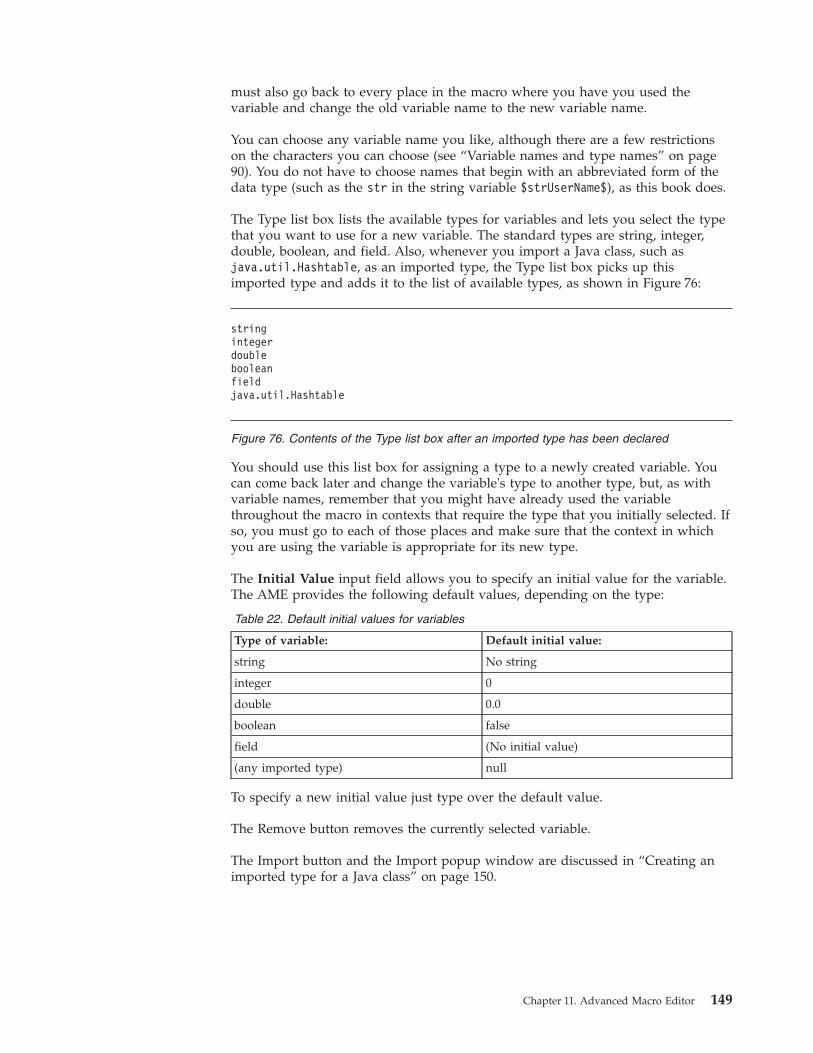
must also go back to every place in the macro where you have you used thevariable and change the old variable name to the new variable name.
You can choose any variable name you like, although there are a few restrictionson the characters you can choose (see “Variable names and type names” on page90). You do not have to choose names that begin with an abbreviated form of thedata type (such as the str in the string variable $strUserName$), as this book does.
The Type list box lists the available types for variables and lets you select the typethat you want to use for a new variable. The standard types are string, integer,double, boolean, and field. Also, whenever you import a Java class, such asjava.util.Hashtable, as an imported type, the Type list box picks up thisimported type and adds it to the list of available types, as shown in Figure 76:
You should use this list box for assigning a type to a newly created variable. Youcan come back later and change the variable's type to another type, but, as withvariable names, remember that you might have already used the variablethroughout the macro in contexts that require the type that you initially selected. Ifso, you must go to each of those places and make sure that the context in whichyou are using the variable is appropriate for its new type.
The Initial Value input field allows you to specify an initial value for the variable.The AME provides the following default values, depending on the type:
Table 22. Default initial values for variables
Type of variable: Default initial value:
string No string
integer 0
double 0.0
boolean false
field (No initial value)
(any imported type) null
To specify a new initial value just type over the default value.
The Remove button removes the currently selected variable.
The Import button and the Import popup window are discussed in “Creating animported type for a Java class” on page 150.
stringintegerdoublebooleanfieldjava.util.Hashtable
Figure 76. Contents of the Type list box after an imported type has been declared
Chapter 11. Advanced Macro Editor 149

Creating a new variableTo create a new variable in the AME, first click the <new variable> entry at theend of the Variable list box. The AME creates a new variable and assigns to it someinitial characteristics that you should modify to fit your needs. The initial valuesare:1. An initial name (such as $a1$).2. An initial type (string).3. An initial value, which depends on the type (see Table 22 on page 149).
Note: If you create a string variable, you must enclose the initial value in singlequotes. Otherwise you will see a message stating that the initial value is aninvalid expression.
Now you should set the values that you want for the new variable. For example, ifyou are creating an integer variable that is for counting screens and that shouldhave an initial value of 1, then you might set the initial values as follows:1. In the Name input field, type the name $intScreenCount$.2. In the Type list box, select the integer data type.3. In the Initial Value field, type 1.
Besides the Variables tab, the AME provides access, in several convenientlocations, to a popup window for creating new variables. For example, in theVariable update action, the Name list box contains not only all the names ofvariables that you have already created but also a <New Variable> entry. Click thisentry to bring up the popup window for creating a new variable. Variables createdusing this popup window are equivalent to variables created in the Variables tab.
For information about creating a variable in the Source view, see “Creating avariable” on page 88.
Creating an imported type for a Java classThe way that a Host On-Demand macro imports a Java class is through animported type. That is, you must first create an imported type and associate it witha particular Java class. You have to do this only once per Java class per macro.Follow these steps to create an imported type:1. On the Variables tab, click the Import button. The Import popup window
appears.2. In the Imported Types list box, select the entry <new imported type>.3. Type the Class name for the type, such as java.util.Hashtable. You must type
the fully qualified class name, including the package name if any.4. Type a Short Name, such as Hashtable. If you do not specify a short name then
the AME uses the fully qualified class name as the short name. If you dospecify a short name then you can use either the short name or the fullyqualified class name when you refer to the imported type.
5. Click OK.
To create a variable belonging to this imported type, create the variable in thenormal way, but select the imported type as the type of the variable. Follow thesesteps to create a variable of the imported type:1. In the Variables list box, click the <new variable> entry at the end. The AME
displays the default initial values in the usual way, including a name (such as$a1$), a type (string), and an initial value (blank).
2. In the Name input field, type the name that you want, such as $ht$.
150 IBM Rational Host Access Transformation Services: Advanced Macro Guide

3. In the Type list box, select the imported type, such as Hashtable (if youspecified a short name when you imported the type) or java.util.Hashtable(if you accepted the default short name, which is the same as the fully qualifiedclass name).
4. In the Initial Value field, you can either leave the field blank (which results inan initial value of null) or specify a method that returns an instance of theclass, such as $new Hashtable()$ (using the short name) or $newjava.util.Hashtable()$ (using the fully qualified class name).
Notice that the constructors are enclosed in dollar signs ($). You must use dollarsigns around every call to a Java method, just as you must use dollar signs aroundthe name of a variable. (The reason is that the enclosing dollar signs tell the macroruntime that it needs to evaluate the item.)
Going back to the Import popup window, the Imported Types list box allows youto create new types and to edit or delete the types that you have already created.To create a new type, click the <new imported type> entry at the end of the list. Toedit a type, select the type in the Imported Types list box and modify the values inthe Class and Short Name input fields. To remove a type, select the type and clickRemove.
When you specify a short name, you can use any name, with certain restrictions(see “Variable names and type names” on page 90).
For information about creating an imported type in the Source view, see “Creatingan imported type for a Java class” on page 89.
Working with actionsThe following sections describe all the actions that can be added or edited usingthe AME. For more information about macro actions and more details about eachaction, see Chapter 7, “Macro actions,” on page 55.
Comm wait action
Communication statesYou can specify any of the states listed in the Connection Status list box. Table 23lists the name and significance of each state:
Table 23. Communication states
Communication state: Significance:
Connection Initiated Initial state. Start Communications issued.
Connection Pending Active Request socket connect.
Connection Active Socket connected. Connection with host.
Connection Ready Telnet negotiation has begun.
Connection Device Name Ready Device name negotiated.
Connection Workstation ID Ready Workstation ID negotiated.
Connection Pending Inactive Stop Communications issued.
Connection Inactive Socket closed. No connection with host.
The stable states (that is, the ones that usually persist for more than a few seconds)are:
Chapter 11. Advanced Macro Editor 151

v Connection Inactive - Here the session is completely disconnectedv Connection Workstation ID Ready - Here the session is completely connected
If you select <Expression> in the Connection Status list box, then you mustspecify an expression that resolves to one of the keywords that the macro runtimeexpects to find in the value attribute of the <commwait> element (see“<commwait> element” on page 174). For example, you might specify a variablenamed $strCommState$) that resolves to CONNECTION_READY.
For more information, see “Comm wait action (<commwait> element)” on page 56.
Conditional action
Specifying the conditionSpecify in the Condition field the conditional expression that you want the macroruntime to evaluate. The conditional expression can contain logical operators andconditional operators and can contain terms that include arithmetic expressions,immediate values, variables, and calls to Java methods (see “Conditional andlogical operators and expressions” on page 19).
Condition is True (<if> element)Use the Condition is True tab to specify the actions that you want to be performedif the condition evaluates to true.
The Condition is True tab contains controls that are almost identical to the controlsfor the Actions tab. Specifically:v The Action list box on the Condition is True tab allows you to create and edit
actions in the same way that the Action list box on the Actions tab does.v The Delete button and the Change Order button on the Condition is True tab
allow you to delete or reorder actions in the same way that the Delete buttonand the Change Order button on the Actions tab do.
v The lower area of the Condition is True tab allows you to edit the values of thecurrently selected action in the same way that lower area of the Actions tabdoes.
Use these controls on the Condition is True tab to create and edit the actions thatyou want the macro runtime to perform if the condition is true.
Condition is False (<else> element)Use the Condition is False tab to specify the actions that you want to beperformed if the condition evaluates to false.
Like the Condition is True tab, the Condition is False tab contains controls thatare almost identical to the controls for the Actions tab. Use these controls on theCondition is False tab to create and edit the actions that you want the macroruntime to perform if the condition is false.
For more information see “Conditional action (<if> element and <else> element)”on page 57.
Extract action
Capturing textThe most common use of the Extract action is to capture text that is beingdisplayed in the host terminal.
152 IBM Rational Host Access Transformation Services: Advanced Macro Guide

Here is an overview of the steps to follow. Each step is described in more detail inthe following subsections.1. Set the Continuous Extract option, if necessary2. Specify an area on the host terminal that you want to capture.3. Specify an extraction name.4. Specify TEXT_PLANE as the data plane.5. Specify a variable in which you want the text to be stored.
Note: If you extract a value and assign it to a global variable set by an extract, andyou plan to use the global variable value for a prompt, you should set thepromptall attribute to false. When the promptall attribute is set to true, theextract action is not run before the prompts values are retrieved. Because ofthis, the global variable used by the prompt does not contain a value.Macros recorded in HATS default to promptall=true. For furtherinformation regarding the promptall attribute, see “The promptall attributes”on page 71.
Set the Continuous Extract option: If you want to capture a rectangular block oftext, then set the Continuous Extract option to false (this is the default value). Formore information, see “Capturing a rectangular area of the host terminal” on page59.
In contrast, if you want to capture a continuous sequence of text that wraps fromline to line, then set the Continuous Extract option to true. For more information,see “Capturing a sequence of text from the host terminal” on page 59.
Specify the area of the host terminal: To specify the area of the host screen thatyou want to capture, type the row and column coordinates of the text area into theRow and Column fields on the Extract action window.
The macro runtime interprets the values differently depending on whether theContinuous Extract option is set to false or true (see “Set the Continuous Extractoption”).
Type the first set of row and column coordinates into the first pair of Row andColumn values (labeled Top Corner on the Extract action window) and type thesecond set of coordinates into the second pair of Row and Column values (labeledBottom Corner). You can use the text cursor on the host screen as an aid todetermine the coordinates that you want.
In the Row (Bottom Corner) input field you can enter -1 to signify the last row ofthe data area on the host screen. This feature is helpful if your users work withhost screens of different heights (such as 25, 43, 50) and you want to capture datadown to the last row. Similarly for the Column (Bottom Corner) input field youcan enter -1 to signify the last column of the data on the host screen (see“Significance of a negative value for a row or column” on page 22).
Specify an extraction name: You must specify an extraction name, such as’Extract1’.
Specify TEXT_PLANE as the data plane: In the Data Plane list box clickTEXT_PLANE. This is the default.
Specify the variable in which you want the text to be stored: Set the check boxlabeled Assign Text Plane to a Variable and enter the name of the variable into
Chapter 11. Advanced Macro Editor 153
which you want the text to be stored. The text is returned as a string. In most casesyou probably want to store the string in a string variable, so that some other actionin your macro can process the string.
However, if you specify a variable of some other standard data type (boolean,integer, double) then the macro runtime converts the string to the format of thevariable, if possible. For example, if the text on the screen is 1024 and the variableis an integer variable then the macro runtime will convert the string 1024 to theinteger 1024 and store the value in the integer variable. If the format is not validfor converting the string to the data type of the variable then the macro runtimeterminates the macro with a run time error. For more information about dataconversion see “Automatic data type conversion” on page 20.
Input action
Input stringThe String field is an input field in which you specify the key sequence that youwant the action to perform.
To specify a key that causes a character to be displayed (such as a, b, c, #, &, andso on), type the key itself.
To specify a key from the Actions Keys list box, scroll the list to the key you want(such as [backspace]) and click Insert Action Key. The name of the key enclosedby square brackets appears at the next input position in the String field. Noticethat the keys in the Action Keys list box are not listed alphabetically throughout.You might have to keep scrolling down the list to find the key you want.
Another way to specify an action key is just to type the name itself into the inputfield, surrounded by square brackets (for example, [backspace]).
The following copy/paste keys occur in the Action Keys list for a 3270 DisplaySession:[copy] [mark right][copyappend] [mark up][cut] [paste][mark down] [pastenext][mark left] [unmark]
These keys are not supported by HATS since HATS does not create a DisplaySession (Host On-Demand Terminal).
For other keys see “Mnemonic keywords for the Input action” on page 199.
For more information, see “Input action (<input> element)” on page 62.
Mouse click actionThe Mouse click action simulates a user mouse click on the host terminal. As witha real mouse click, the text cursor jumps to the row and column position where themouse icon was pointing when the click occurred.
Specifying row and columnIn the lower area of the Actions window, specify the row and column location onthe host terminal where you want the mouse click to occur. Or, you can click onthe host terminal itself, and the macro editor updates the values in the Row andColumn fields to reflect the new location of the text cursor.
154 IBM Rational Host Access Transformation Services: Advanced Macro Guide

For more information, see “<mouseclick> element” on page 185.
Pause actionThe Pause action waits for a specified number of milliseconds and then terminates.
More specifically, the macro runtime finds the <pause> element, reads the durationvalue, and waits for the specified number of milliseconds. Then the macro runtimegoes on to perform the next item.
Uses for this action are:v Any situation in which you want to insert a wait.v Waiting for the host to update the host terminal. For more information see
“Screen completion” on page 82.v To add delay for debugging purposes.
Type the number of milliseconds in the Duration input field. The default is 10000milliseconds (10 seconds).
For more information, see “<pause> element” on page 188.
Perform actionThe Perform action invokes a method belonging to a Java class that you haveimported (see “Creating an imported type for a Java class” on page 150).
Invoking the methodType the method call into the Action to Perform field. You must enclose a methodcall in dollar signs ($), just as you would a variable (see “Syntax of a method call”on page 94). The macro runtime invokes the method. See also “How the macroruntime searches for a called method” on page 94.
For more information see “Perform action (<perform> element)” on page 67.
Playmacro actionThe PlayMacro action launches another macro.
Target macro file name and starting screenUse the Macro Name field to specify the name of the target macro.
Use the Start Screen Name list box to select the macro screen in the target macrothat you want the macro runtime to process first:v If you want to start the target macro at its usual start screen, then select the
*DEFAULT* entry in the Start Screen Name list box, or provide an expressionthat evaluates to the value *DEFAULT*.
v If you want to start the target macro at some other screen, then select the nameof that screen in the Start Screen Name list box.
For more information, see “PlayMacro action (<playmacro> element)” on page 68.
Prompt actionThe Prompt action provides a powerful way to send immediate user keyboardinput into the 3270 or 5250 application or into a variable.
Chapter 11. Advanced Macro Editor 155
Displaying the prompt window
Parts of the prompt window: You should type the prompt text (such as ’Pleasetype your password:') into the Prompt Name field, not into the Prompt Text field.(The Prompt Text field is an optional field than you can use to store a notecontaining details about the particular Prompt action.)
The macro runtime displays a prompt window with the following characteristics:v The prompt window appears on top of the session window and is located in the
center of the system's desktop window.v The title of the prompt window is the value of the Prompt Title field unless that
field is blank or there are multiple prompts in the macro and the macro isconfigured to show all prompts at the start of the macro. In those two instances,the title of the prompt window will be "Prompt".
v The message that you typed into the Prompt Name field is displayed in thecenter of the prompt window, followed by an input field.
v A button row across the bottom of the prompt window contains three buttons:– The OK button causes the macro runtime to process the contents of the input
field.– The Cancel button halts the macro.– The Help button displays help text explaining how to use the prompt
window.
Default Response: In the Default Response field, which is optional, you can typethe text of a default response that you want to appear in the input field of theprompt window when the prompt window is displayed. If the user does not typeany keyboard input into the input field of the prompt window, but rather justclicks OK to indicate that input is complete, then the macro runtime processes thedefault response that is contained in the input field.
For example, if the user normally uses ApplicationA but sometimes usesApplicationB, you could type ApplicationA into the Default Response field. Whenthe macro runtime performs the Prompt action, the prompt window appears withthe text ApplicationA already displayed in the input field. The user either can clickOK (in which case the macro processes ApplicationA as the contents of the inputfield) or else can type ApplicationB into the input field and then click OK (inwhich case the macro processes ApplicationB as the contents of the input field).
Password Response: If you select true in the Password Response list box (thedefault is false) then when the user types each key into the input field of theprompt window, the macro runtime displays an asterisk (*) instead of the characterassociated with the key.
For example, with the Password Response list box set to true (or resolving to trueat runtime) then if the user types 'Romeo' the macro runtime displays ***** in theinput field.
Require Response: If you select true in the Require Response list box (the defaultis false) then:v The macro runtime displays the text string (required) to the right of the input
field, to indicate to the end user that input is required for this input field.v The macro runtime disables the OK button of the prompt window until the
input field of the prompt window contains text.
156 IBM Rational Host Access Transformation Services: Advanced Macro Guide

– The input field can contain text either because you have specified a DefaultResponse or because the user has typed text into the input field.
– When OK is enabled, the end user can click either OK or Cancel, as usual:- Clicking OK causes the macro to process the Prompt action and continue
processing the macro.- Clicking Cancel terminates the macro playback.
– When OK is not enabled, the end user can click Cancel.- Clicking Cancel terminates the macro playback.
Thus, setting Require Response to true has the effects of reminding the end user(by displaying (required) to the right of the input field) that a response isrequired before proceeding, and of requiring the end user to enter text in the inputfield before clicking OK (by disabling OK until the input field contains text).However, if the Prompt action contains a Default Response, then OK is enabledand the default response is displayed in the input field.
If you select false in the Require Response list box then:v The macro runtime does not display the text string (required)to the right of the
input field.v The macro runtime enables the OK button on the prompt window immediately
as soon as the prompt window is displayed, whether or not the input fieldcontains text.– The user can click OK or Cancel, as usual:
- Clicking OK causes the macro runtime to process the Prompt action andthen to continue processing the macro. In the Prompt action, if the inputfield is blank, the macro runtime does not send an input key sequence tosession window.
- Clicking Cancel terminates the macro playback.
Thus, setting Require Response to false has the effect of allowing the user tocontinue processing the macro by clicking OK, even if the input field of theprompt is blank.
If the promptall attribute of the <HAScript> element (or of the <actions> element)is set to true, and you have several prompt actions in the macro (or in the macroscreen) with Require Response set to true, then at the start of macro playback (orat the start of the playback of the macro screen), when the macro runtime displaysall the prompt input fields in a single prompt window, the macro runtime does notenable the OK button in the prompt window until all required input fields containtext (see “The promptall attributes” on page 71 ).
Note: If a prompt value is based on a global variable set by an extract, and thepromptall attribute is set to true, the extract action is not run before theprompts values are retrieved. Because of this, the global variable used by theprompt does not contain a value. If you use global variables with extractsand prompts, you should set the promptall attribute to false. Macrosrecorded in HATS default to promptall=true.
Processing the contents of the input field
Response Length: The value in the Response Length field specifies not the sizeof the input field, but the number of characters that the macro runtime allows theuser to type into the input field.
Chapter 11. Advanced Macro Editor 157

For example, if you set the Response Length field to 10, then the macro runtimeallows the user to type only 10 characters into the input field.
Action keys and Translate Host Action Keys: Both you (in the Default Responseinput field) and the user (in the input field of the Prompt window) can use actionkeys (such as [enterreset], and so on) as you would in the String field of an Inputaction (see “Input string” on page 154).
The Translate Host Action Keys list box and its effect are exactly like the TranslateHost Action Keys list box in the Input action (see “Translate host action keys(xlatehostkeys attribute)” on page 62). If you set this list box to true, which is thedefault value, then the macro runtime interprets an action key string (such as[enter]) as an action key rather than as a literal string.
Handling the input sequence in the host terminalUse the Row and Column fields to specify the row and column position on thehost terminal at which you want the macro runtime to start typing the inputsequence. To have the macro runtime start typing the input sequence at the currentposition of the text cursor, you can set either or both of the Row and Columnfields to 0. As with the Input action, the row and column position must lie withina 3270 or 5250 input field at runtime, or else the host terminal responds byinhibiting the input and displaying an error symbol in the Operator InformationArea, just as it responds to keyboard input from an actual user.
You can have the macro runtime clear the contents of the input field before typingbegins, by setting the Clear Host Field list box to true.
The Move Cursor to End of Input field has the same function and effects as thebutton of the same name in the Input action (see “Move cursor to end of input(movecursor attribute)” on page 62).
You can have the macro runtime not display the input sequence in the input fieldby setting the Don't Write to Screen list box to true. This field is enabled onlywhen the Assign to a Variable check box is selected.
Assigning the input sequence to a variableYou can have macro runtime store the input sequence into a variable by checkingthe Assign to a Variable check box.
Create a new variable by clicking the <New Variable> entry in the list box. In thepopup window for specifying a new variable, you can specify the name of avariable that the current macro inherits from another macro, or you can specify thename of a new variable that you want to create in the current macro. If you wantto create a new variable in the current macro, select the Create variable in thismacro check box and select the type of the new variable.
The macro runtime stores the input sequence as a string, and consequently youcould specify a string variable as the variable to receive the input. However, if thevariable is of some other type than string, then the macro runtime tries to convertthe input to the data type of the target variable according to the usual rules (see“Automatic data type conversion” on page 20).
SQLQuery actionThe SQLQuery action is a very useful and powerful action that allows you to sendan SQL statement to a host database, retrieve any data resulting from the SQLstatement, and then write the data into a Host On-Demand macro variable.
158 IBM Rational Host Access Transformation Services: Advanced Macro Guide
You can create an SQL statement manually or compose and test an SQL statementusing the SQL Wizard.
The statement and results sectionThe SQLQuery action window has two main sections: a statement section and aresult section.
The statement section occupies the upper area of the window and includes thefollowing fields: Database URL, Driver Identifier, Driver Class, User ID,Password, and Statement. You can modify the information in this section in twoways:v By creating an SQL statement in the SQL Wizard.v By typing the information into the fields.
You can also edit any of the fields at any time by typing into the field.
The result section occupies the lower area of the window and includes theremaining field: Output Result To (the $HMLSQLUtil$ macro variable).
Using the SQL WizardYou can use the SQL Wizard to create an SQL statement and test it. The graphicaluser interface of the SQL Wizard makes it much easier to create an SQL statement,compared to typing in the entire text of the SQL statement into the Statement fieldof the AME. Also, in the SQL Wizard you can run an SQL statement that you areworking on and view the results.1. Click SQL Wizard to start the wizard.
v If there is any information already in the fields of the statement section, thenHATS uses this information to initialize the corresponding fields in the SQLWizard.
2. Use the SQL Wizard to create an SQL statement and test it.3. To close the SQL Wizard without changing your macro, click Cancel.4. To save the SQL statement to your macro, do one of the following actions:
v On the Review tab of the SQL Wizard, click Save.v On the Results tab of the SQL Wizard, click Save SQL.
The AME writes the information that you created in the SQL Wizard into theappropriate fields of the statement section. Any already existing information inthe fields of the statement section is overwritten. If the information that theAME writes into a field is a string (for example, the information written intothe Database URL field), then the AME also automatically correctly formats thestring depending on the underlying macro type. The following fields areupdatedv Fields in the statement section:
– Database URL
– Driver Identifier
– Driver Class
– User ID
– Password
– Statement
5. Click Cancel to close the SQL Wizard.
Chapter 11. Advanced Macro Editor 159

Using the fields in the statement sectionInstead of creating an SQL statement with the SQL Wizard, you can type theinformation directly into the fields of the statement section. You can also type intoany of the fields after you have created an SQL statement.
Database URL: In the Database URL field, type the database URL of the databaseserver that provides access to the database. The format of the database URLdepends on the type of Java Database Connectivity (JDBC) driver that you use toaccess the database (for more information on drivers see “Driver Identifier andDriver Class”).
The remote server can be located on a host other than the host to which theapplication session is connected. For example, a SQLQuery action can specify anIBM i host, even though the same SQLQuery action is part of a macro that isrunning in a 3270 Display session connected to a System z® host.
Consult the documentation provided by the driver vendor for the proper formatfor the database URL.
Driver Identifier and Driver Class: The JDBC driver that the SQLQuery actionuses to access the database is a Java client package used by the HATS applicationto communicate with a server program on a remote host. This server program onthe remote host provides access to the database.
If you need a JDBC driver, contact the administrator of the remote database serverto obtain the driver.
In the Driver Identifier list box of the SQLQuery action window in the macroeditor, select Other.
When you select Other in the Driver Identifier list box, then you must type thefully qualified class name of the driver into the Driver Class field. If you do notknow the fully qualified class name, contact the provider of the driver. When youtype in the name, remember that case is significant (for example, com is differentfrom COM).
User ID and Password: If the database connection requires a user ID and apassword, then type the user ID into the User ID field and the password into thePassword field.
HATS encrypts the key sequence that you type into the Password field. Thisencryption works exactly like the encryption used when the Password check box isselected in an Input action (see “Encrypted attribute” on page 63). Remember:v When you type a password (such as mypass) into the Password field, the AME
displays the password using asterisks (******).v When you move the input focus to another input field, the AME:
1. Generates an encrypted version of the password (such as q0eqOskTUBQ=).2. Displays the encrypted version of the password in the Password field using
asterisks (************). (You can see the actual characters of the encryptedversion of the password in the AME.)
v The password is a string. Therefore, if you are using the advanced macro format,remember to type the password enclosed in single quotes (for example,’mypass’). The AME encrypts the entire string, including the single quotes.
v If you need to modify the password after the AME has encrypted it, be sure tocompletely delete all the characters in the field before typing in the new password.
160 IBM Rational Host Access Transformation Services: Advanced Macro Guide
Note: The default values for prompts are stored in macro files unencrypted. Thedefault values display in the clear when you edit prompts in the macroeditors. Therefore, while using a prompt to specify a password is anappropriate thing to do, for security reasons you should not specify adefault value for the password.
Statement: Type or paste an SQL statement into the Statement field. If theStatement field already contains an SQL statement, you can edit it (even if the SQLstatement was created using the SQL Wizard).
The AME does not check the format of the SQL statement for validity. If the formatis invalid, a run time error occurs when the macro runtime processes theSQLQuery action.
You can spread the SQL statement over several lines or write it all on one line.Figure 77 and Figure 78 show the same SQL statement written over several linesand written as one line. Either way is correct.
Remember that if you are using the advanced macro format you must enclose theSQL statement in single quotes and follow the rules for special characters. Below,Figure 79 and Figure 80 show the same SQL statement written for the basic macroformat and for the advanced macro format:
You can use either upper case or lower case for reserved words (such as select)and database names and fields (such as hodtest.ex01.descript), but you must useexact case for matching strings (such as ’Edit Products’). Thus the two SQL
SELECT*
FROMSQLTEST.EX01
WHERE(
( SQLTEST.EX01.DESCRIPT is not null ))
Figure 77. SQL statement written on several lines
SELECT * FROM SQLTEST.EX01 WHERE((SQLTEST.EX01.DESCRIPT is not null))
Figure 78. Same SQL statement written on one line
select * from hodtest.ex01 where((hodtest.ex01.descript=’Edit Products’))
Figure 79. SQL statement written for the basic macro format
’select * from hodtest.ex01 where((hodtest.ex01.descript=\’Edit Products\’))’
Figure 80. Same SQL statement written for the advanced macro format
Chapter 11. Advanced Macro Editor 161

statements in Figure 81 are equivalent:
Using the result sectionThe fields in the result section control how the SQLQuery action uses the dataresulting from the SQL statement. You can write the data into a Host On-Demandmacro variable.
Storing the data into a macro variable ($HMLSQLUtil$): The default destinationfor the data resulting from an SQLQuery action is the Host On-Demand macrovariable $HMLSQLUtil$. The Host On-Demand runtime always updates thisvariable with the results of a successful SQLQuery action.
To store data into $HMLSQLUtil$, expand the Output Result To list box and click$HMLSQLUtil$.
To use the data stored in $HMLSQLUtil$ in a subsequent macro action, you mustinvoke methods from the Host On-Demand Macro Utility library (HML library)associated with $HMLSQLUtil$. See “$HMLSQLUtil$” on page 104.
Using the SQLQuery action with bidirectional languagesFor bidirectional languages (Arabic and Hebrew), some specific properties must beset for SQLQuery to work correctly. An Advanced button appears in the AME toaccess the options. The Advanced button is visible only if your workstation isconfigured for a bidirectional language.
The additional properties are:
Host-File TypeSpecifies whether the host file should be saved in logical or visual format.The default is Visual.
Local-File TypeSpecifies whether local files are in logical or visual format. The default isLogical.
Host-File OrientationSpecifies whether the host file should be saved in left-to-right orright-to-left format. The default is Left-to-Right.
Lam-Alef ExpansionSpecifies the behavior of the Lam-Alef characters. When receiving Arabicdata from the host through the SQL wizard statement, the characterLam-Alef is expanded into two characters, if there is space after theLam-Alef character: Lam followed by Alef.
Lam-Alef CompressionSpecifies the behavior of the Lam-Alef characters. When sending Arabicdata to the host through the SQL wizard statement, the characters Lamfollowed by Alef are compressed into one character and space is addedafter the Lam-Alef character. This option is enabled for Arabic systemsonly. The default is on.
select * from hodtest.ex01 where((hodtest.ex01.descript=’Edit Products’))
SELECT * FROM HODTEST.EX01 WHERE((HODTEST.EX01.DESCRIPT=’Edit Products’))
Figure 81. Example of equivalent upper case and lower case
162 IBM Rational Host Access Transformation Services: Advanced Macro Guide

Numerals ShapeSpecifies the shape of the numeral on the host file at the SQL wizardstatement; the numeral shape could be NOMINAL, NATIONAL orCONTEXTUAL. This option is enabled for Arabic systems only. Thedefault is NOMINAL.
Round TripSpecifies the behavior of numerals, disabling the reversal of the numerals ifpreceded by Arabic/Hebrew characters. The default is on.
Symmetric SwappingSpecifies the behavior of the symmetric characters, such as brackets; theinversion of the screen causes directional characters to be replaced by theircounterparts. The default is on.
For more information, see “SQLQuery action (<sqlquery> element)” on page 71.
Trace actionThe Trace action sends a trace message to a trace destination that you specify, suchas the HATS Toolkit console or the WebSphere console. In addition, HATS addsmacro traces to the HATS runtime trace.
Trace specificationUse the Trace Handler list box to specify the destination to which you want thetrace message sent:v Select Host On-Demand trace facility to send the trace message to the Host
On-Demand trace facility.v Select User trace event to send the trace message to a user trace handler.v Select Command line to send the message to the console.
Use the Trace Text input field to specify the string that you want to send to thetrace destination.
For more information, see “Trace action (<trace> element)” on page 72.
Variable update actionThe Variable update action stores a value into a variable. During macro playbackthe macro runtime performs the action by storing the specified value into thespecified variable.
You must specify:v The name of a variablev The value that you want to store into the variable
For more information, see “Variable update action (<varupdate> element)” on page73.
Chapter 11. Advanced Macro Editor 163

164 IBM Rational Host Access Transformation Services: Advanced Macro Guide

Part 2. The Host On-Demand macro language
© Copyright IBM Corp. 2003, 2011 165

166 IBM Rational Host Access Transformation Services: Advanced Macro Guide

Chapter 12. Macro language features
This chapter describes the syntax, editing, hierarchy, commenting and debuggingfeatures of the Host On-Demand macro language.
Syntax and editing
XML syntax in the Host On-Demand macro languageA Host On-Demand macro is stored in an XML script using Host On-Demandmacro language XML elements. This section describes some of the conventions ofXML and gives examples from the Host On-Demand macro language:v XML code is made up of elements. The Host On-Demand macro language
contains about 35 XML elements.v Element names in the macro language are not case-sensitive, except in the sense
that you must write an element in the same combination of upper and lowercase in both the begin tag and the end tag. All of the following are correct; theellipses (...) are not part of the XML text but are meant to indicate that anelement contains other elements:<screen> ... </screen><Screen> ... </Screen><scrEen> ... </scrEen>
However, customarily the master element is spelled HAScript and the otherelements are spelled with all lower case.
v Each XML element has a begin tag and an end tag, as shown in the examplesbelow from the Host On-Demand macro language:<HAScript> ... </HAScript><import> ... </import><vars> ... </vars><screen> ... </screen>
v Optionally you can combine the begin tag and end tag of an XML element intoone tag. This option is useful when the XML element includes attributes but notother elements. For example,<oia ... /><numfields ... />
v An element can contain attributes of the form attribute_name="attribute_value".For example:<oia status="NOTINHIBITED" optional="false" invertmatch="false"/><numfields number="80" optional="false" invertmatch="false"/>
You can use a pair of empty double quote characters (that is, two double quotecharacters with nothing in between) to specify that the attribute is not set to avalue.<HAScript name="ispf_ex1" description="" timeout="60000" ... author="" ...>
...</HAScript>
v An element can include other entire elements between its begin tag and end tag,in much the same way that HTML does. In the following example, a<description> element contains two elements: an <oia> element and a<numfields> element.
© Copyright IBM Corp. 2003, 2011 167

<description><oia status="NOTINHIBITED" optional="false" invertmatch="false"><numfields number="80" optional="false" invertmatch="false"/>
</description>
Source view editingYou can edit the XML text of a macro script directly in the source view.
You can cut and paste text between the source view and the system clipboard. Thisis a very important feature because it allows you to transfer text between thesource view and other XML editors or text editors.
Hierarchy of the elementsFigure 82 lists the begin tags of all the XML elements in the Host On-Demandmacro language supported in HATS. This list is not valid in terms of XML syntaxand does not indicate where more than one element of the same type can occur.However, the indentation in this list does shows which XML elements occur insideother XML elements. For example, the first element in the list, the <HAScript>element, which is not indented at all, is the master element and contains all theother elements. The second element, the <import> element, occurs inside an<HAScript> element and contains a <type> element, and so on.
<HAScript> Encloses all the other elements in the script.<import> Container for <type> elements.
<type> Declares an imported data type (Java class).<vars> Container for <create> elements.
<create> Creates and initializes a variable.<screen> Screen element, contains info about one macro screen.
<description> Container for descriptors.<attrib> Describes a particular field attribute.<cursor> Describes the location of the cursor.<customreco> Refers to a custom recognition element.<numfields> Describes the number of fields in the screen.<numinputfields> Describes the number of input fields in the screen.<string> Describes a character string on the screen.<varupdate> Assigns a value to a variable.
<actions> Container for actions.<commwait> Waits for the specified communication status to occur.<custom> Calls a custom action.<extract> Copies data from the host application screen.<else> Allows you to insert an else-condition.<if> Allows you to insert an if-condition.<input> Sends keystrokes to the host application.<mouseclick> Simulates a mouse click.<pause> Waits for the specified amount of time.<perform> Calls a Java method that you provide.<playmacro> Calls another macro.<prompt> Prompts the user for information.<trace> Writes out a trace record.<sqlquery> Sends an SQL statement to a host database, retrieves
data, and writes it or displays it.<varupdate> Assigns a value to a variable.
<nextscreens> Container for <nextscreen> elements.<nextscreen> Contains the name of a valid next macro screen.
<recolimit> Takes action if recognition limit is reached.
Figure 82. Hierarchy of elements in the Host On-Demand macro language supported inHATS
168 IBM Rational Host Access Transformation Services: Advanced Macro Guide
The hierarchy of the elements and the corresponding structure of the macro scriptare discussed in numerous places in this document. In particular, see the followingsections:v For the <HAScript> element, see “Conceptual view of a macro script” on page
10.v For the <screen> element, see “Conceptual view of a macro screen” on page 13.
For descriptions of individual elements, see Chapter 13, “Macro languageelements,” on page 171.
Inserting comments into a macro scriptYou can insert a comment anywhere inside an <HAScript> element by usingXML-style comment brackets <!-- --> around the text of your comment.
Comments are useful for:v Organizing a macro script by providing descriptive textv Documenting a macro script by explaining complexitiesv Debugging a macro script by commenting out executable elements in order to
determine which remaining element is causing a problem
Comment errorsThe source view will display an error message in the following situations:v Nested commentsv A comment that comments out part of an executable element
Also, you cannot use comment brackets <!-- --> outside the <HAScript> element.If you do so then the source view will discard those comment brackets and thesurrounded text when you save the script.
Examples of commentsFollowing are some examples of the use of comment brackets <!-- --> to insertcomments:<!--A multi-line comment that comments onthe following <screen> element--><screen name="Screen1" entryscreen="true" exitscreen="false" transient="false">
<!-- A comment on the following <description> element --><description>
<oia status="NOTINHIBITED" optional="false" invertmatch="false" /></description>
<!-- A comment on the following <actions> element --><actions>
<mouseclick row="4" col="16" /><input value="3[enter]" row="0" col="0" movecursor="true"
xlatehostkeys="true" /></actions><!--BEGINAn accidental comment that surrounds part ofa <nextscreens> element, thereby corruptingthe macro script.You will get an error when you try to savethis macro script
Chapter 12. Macro language features 169

<nextscreens timeout="0" ><nextscreen name="Screen2" />
END of accidental comment--></nextscreens></screen>
Debugging macro scripts with the <trace> elementWhen you are debugging, you can use the <trace> element to send text and valuesto a trace output destination. In particular, if you include the name of a variable inthe output, then the macro runtime will display both the name and the value ofthe variable in the output, enclosed in curly braces {}. Here is an example:
The code shown in the figure above prints the following text to the console:
Notice that the <trace> action displays each variable in curly braces {} that containboth the variable name and the contents of the variable.
<vars><create name="$var1$" type="string" value="’original’" /></vars>..<actions><trace type="SYSOUT" value="’Before update: ’+$var1$" /><varupdate name="$var1$" value="’updated’" /><trace type="SYSOUT" value="’After update: ’+$var1$" /></actions>
Figure 83. Example of using the <trace> element
Before update: +{$var1$ = original}After update: +{$var1$ = updated}
Figure 84. Output from example of using the <trace> element
170 IBM Rational Host Access Transformation Services: Advanced Macro Guide

Chapter 13. Macro language elements
This chapter describes the Host On-Demand macro language elements and theirattributes, and shows you how to use the macro language elements to create yourmacros.
Specifying the attributes
XML requirementsIn the macro language the value of every attribute must be enclosed in doublequotes. For example, in the following <mouseclick> element the values of the rowand col attributes are enclosed in double quotes:<mouseclick row="4" col="51" />
Advanced format in attribute valuesAs you might remember, even if a macro is in the advanced format, not all inputfields in the macro editor expect a string to be placed in single quotes ('') (see“Representation of strings and non-alphanumeric characters” on page 15).
Similarly, in the macro language, when you provide a string value for an attributethat corresponds to one of these input fields that is affected by the advancedformat, you must enter the string in the advanced format.<input value="’3[enter]’" row="0" col="0" movecursor="true"
xlatehostkeys="true" encrypted="false" />
However, if an attribute does not correspond to one of the input fields affected bythe advanced format, then you should not write the value enclosed in singlequotes, even if the macro is in the advanced format. For example, the nameattribute of the <screen> element should never be enclosed in single quotes:<screen name="Screen1" entryscreen="true" exitscreen="true" transient="false" >
...</screen>
In the descriptions in this chapter of macro language elements, this book indicatessuch attributes (attributes that are unaffected by the advanced format) by notspecifying a data type. For example, the description of the name attribute of the<screen> element is "Required" rather than as "Required string".
Typed dataMost attributes require a particular type of data: boolean, integer, string, double, orimported. For these attributes, the same rules apply as in the Macro Editor:v The consequences of selecting the basic macro format or advanced macro format
(see “Basic and advanced macro format” on page 15).v The rules for representing strings and special characters, and for treating
operator characters (see “Representation of strings and non-alphanumericcharacters” on page 15).
v The rules for equivalent entities (see “Equivalents” on page 21).v The rules for data type conversion (see “Automatic data type conversion” on
page 20).
© Copyright IBM Corp. 2003, 2011 171

v The rules for arithmetic operators and expressions (see “Arithmetic operatorsand expressions” on page 18).
v The rules for the string concatenation operator (see “String concatenationoperator (+)” on page 19).
v The rules for conditional and logical operators and expressions (see “Conditionaland logical operators and expressions” on page 19).
v The rules for representing variables (see “Introduction to macro variables andimported types” on page 87).
v The rules for calling methods on imported variables (see “Calling Java methods”on page 94).
<actions> elementThe <actions> element, the <description> element, and <nextscreens> element arethe three primary structural elements that occur inside the <screen> element (see“Conceptual view of a macro screen” on page 13).
The <actions> element contains elements called actions (such as simulating akeystroke, capturing data, and others) that the macro runtime performs duringmacro playback (see Chapter 7, “Macro actions,” on page 55).
Attributespromptall
Optional boolean (the default is false). If this attribute is set to true thenthe macro runtime, before performing any of the actions inside the<actions> element, collects user input for any <prompt> elements insidethe element. More specifically:1. The macro runtime searches the <actions> element to find any
<prompt> elements that occur within it.2. The macro runtime displays the prompts for all the <prompt> elements
immediately (all the prompts are combined into one popup).3. The macro runtime collects the user input for all the popup windows.4. The macro runtime now performs all the elements in the <actions>
element as usual, in sequence.5. When the macro runtime comes to a <prompt> action, it does not
display the popup window for user input, but instead performs the<prompt> action using the input from step 3 above.
The promptall attribute of the <HAScript> element performs the samefunction for all the <prompt> elements in one macro (see “<HAScript>element” on page 180).
XML samples
<actions promptall="true">...
</actions>
Figure 85. Example for the <actions> element
172 IBM Rational Host Access Transformation Services: Advanced Macro Guide

<attrib> elementThe <attrib> element is a descriptor that states the row and column location andthe value of a 3270 or 5250 attribute (see “Attribute descriptor (<attrib> element)”on page 45).
Attributesplane Required. The data plane in which the attribute resides. The valid values
are:v FIELD_PLANEv COLOR_PLANEv DBCS_PLANEv GRID_PLANEv EXFIELD_PLANEv Any expression that evaluates to one of the above.
value Required. A hexadecimal value in the format 0x37. The value of theattribute.
row Required integer. The row location of the attribute in the data plane.
col Required integer. The column location of the attribute in the data plane.
optionalOptional boolean (the default is false). See “Optional attribute” on page 39.
invertmatchOptional boolean. See “Invertmatch attribute” on page 38.
XML samples
<comment> elementThe <comment> element inserts a text comment as a sub-element within a<screen> element. Limitations are:v You cannot use a <comment> element outside a <screen> element.v You cannot use more than one <comment> element inside the same <screen>
element. If you do so then the source view will discard all the <comment>elements inside that <screen> element except the last one.
v No matter where in the <screen> element you place the <comment> element,the source view will move the comment up to be the first element within the<screen> element.
AttributesNone.
<attrib value="0x3" row="4" col="14" plane="COLOR_PLANE"optional="false" invertmatch="false" />
Figure 86. Example for the <attrib> element
Chapter 13. Macro language elements 173

XML samples
Alternate method for inserting commentsAn alternate method for inserting a comment is to use the XML-style commentbrackets <!-- -->. See “Inserting comments into a macro script” on page 169.
<commwait> elementThe <commwait> action waits for the communication status of the session tochange to some specified value (see “Comm wait action (<commwait> element)”on page 56). You must specify a timeout value.
Attributesvalue Required. The communication status to wait for. The value must be one of
the following states:v CONNECTION_INITv CONNECTION_PND_ACTIVEv CONNECTION_ACTIVEv CONNECTION_READYv CONNECTION_DEVICE_NAME_READYv CONNECTION_WORKSTATION_ID_READYv CONNECTION_PND_INACTIVEv CONNECTION_INACTIVE
timeoutRequired integer. A timeout value in milliseconds. The macro runtimeterminates the action if the timeout expires before the specifiedcommunication status occurs.
XML samples
<screen name="Screen2" entryscreen="false" exitscreen="true"transient="false">
<comment>This comment provides information about this macro screen.</comment>...
</screen>
Figure 87. Example for the <comment> element
<commwait value="CONNECTION_READY" timeout="10000" />
Figure 88. Example for the <commwait> element
174 IBM Rational Host Access Transformation Services: Advanced Macro Guide

<condition> elementThe <condition> element specifies a conditional expression that the macro runtimeevaluates during screen recognition. If the expression evaluates to true then themacro runtime evaluates the descriptor as true. If the expression evaluates to falsethen the macro runtime evaluates the descriptor as false (see “Condition descriptor(<condition> element)” on page 45).
For more information on conditional expressions see “Conditional and logicaloperators and expressions” on page 19.
Attributesvalue Required expression. The conditional expression that the macro runtime is
to evaluate. This conditional expression can contain arithmetic expressions,variables, return values from Java method calls, and other conditionalexpressions.
optionalOptional boolean (the default is false). See “Optional attribute” on page 39.
invertmatchOptional boolean. See “Invertmatch attribute” on page 38.
XML samples
<create> elementThe <create> element creates and initializes a variable (see “Creating a variable” onpage 88).
The <create> element must occur inside a <vars> element.
Attributesname Required. The name that you assign to the variable. There are a few
restrictions on the spelling of variable names (see “Variable names andtype names” on page 90).
type Required. The type of the variable. The standard types are string, integer,double, boolean, field. You an also define an imported type representing aJava class (see “Creating an imported type for a Java class” on page 89).
value Optional. The initial value for the variable. If you do not specify an initialvalue then the default initial value depends on the variable type.
<description><!-- Check the value of a variable --><condition value="$intPartsComplete$ == 4"
optional="false" invertmatch="false" />
<!-- Check the return value of a Java method --><condition value="$htHashTable.size()$ != 0"$
optional="false" invertmatch="false" /></description>
Figure 89. Example for the <condition> element
Chapter 13. Macro language elements 175

XML samples
<cursor> elementThe <cursor> element is a descriptor that states the row and column location of thetext cursor on the host terminal (see “Cursor descriptor (<cursor> element)” onpage 45).
Attributesrow Required integer. The row location of the text cursor.
col Required integer. The column location of the text cursor.
optionalOptional boolean (the default is false). See “Optional attribute” on page 39.
invertmatchOptional boolean. See “Invertmatch attribute” on page 38.
XML samples
<custom> elementThe <custom> element allows you to invoke a custom Java program from insidethe <actions> element of a macro screen.
Here is an overview of the process:1. Suppose that you have a Java program that you want to invoke as an action
during the processing of a macro screen's <actions> element.2. In the Macro Editor, add the following line to the <actions> element at the
location at which you want to invoke the custom Java program:<custom id="’MyProgram1’" args="’arg1 arg2 arg3’" />
<HAScript ... usevars="true" ... ><import>
<type class="java.util.Properties" name="Properties" /></import>
<vars><create name="$prp$" type="Properties" value="$new Properties()$" /><create name="$strAccountName$" type="string" value="" /><create name="$intAmount$" type="integer" value="0" /><create name="$dblDistance$" type="double" value="0.0" /><create name="$boolSignedUp$" type="boolean" value="false" /><create name="$fldFunction$" type="field" />
</vars>...
</HAScript>
Figure 90. Example for the <create> element
<cursor row="4" col="14" optional="false" invertmatch="false" />
Figure 91. Example for the <cursor> element
176 IBM Rational Host Access Transformation Services: Advanced Macro Guide

3. Follow the instructions in the MacroActionCustom class. You will create a classthat implements MacroCustomActionListener. The execute() method will becalled with an event when the macro runtime performs the <custom> action instep 2.
Attributesid Required. An arbitrary string that identifies the custom Java program that
you want to run.
args Optional. The arguments that you want to pass to the custom Javaprogram.
XML samples
<customreco> elementThis <customreco> element allows you to call custom description code.
The steps for creating a custom descriptor are as follows:1. Choose a string to identify the custom description, such as
MyCustomDescriptor01. An identifier is required because you can have severaltypes of custom descriptions.
2. Implement the ECLCustomRecoListener interface. In the doReco() method:a. Add code to check the identification string to verify that it is yours.b. Add your custom description code.c. Return true if the custom description is satisfied or false if it is not.
3. Use the source view to add a <customreco> element to the <description>element of the macro screen. The <customreco> element must specify theidentifier you chose in step 2.
The macro runtime performs the <customreco> element after performing all theother descriptors.
Attributesid Required string. The identifier that you have assigned to this custom
description.
optionalOptional boolean (the default is false). See “Optional attribute” on page 39.
invertmatchOptional boolean. See “Invertmatch attribute” on page 38.
XML samples
<custom id="’MyProgram1’" args="’arg1 arg2 arg3’" /><custom id="’MyProgram2’" args="’arg1 arg2’" />
Figure 92. Example for the <custom> element
Chapter 13. Macro language elements 177
<description> elementThe <actions> element, the <description> element, and the <nextscreens> elementare the three primary structural elements that can occur inside the <screen>element (see “Conceptual view of a macro screen” on page 13).
The <description> element contains elements called descriptors, each of whichstates an identifying characteristic of an application screen (see Chapter 5, “Screendescription,” on page 35). The macro runtime uses the descriptors to match themacro screen to an application screen.
Attributesuselogic
Optional boolean. Allows you to define more complex logical relationsamong multiple descriptors than are available with the default combiningmethod (see “The uselogic attribute” on page 39).
XML samples
<else> elementThe <else> element contains a sequence of macro actions and must occurimmediately after an <if> element. The macro runtime evaluates the conditionalexpression in the <if> element. Then:v If the conditional expression is true:
– The macro runtime performs the sequence of macro actions in the <if>element; and
– The macro runtime skips the following <else> element if there is one.v If the conditional expression is false:
– The macro runtime skips the sequence of macro actions in the <if> element;and
– The macro runtime performs the macro actions in the following <else>element if there is one.
The Macro object uses the <if> element, and if necessary the <else> element, tostore a Conditional action (see “Conditional action (<if> element and <else>element)” on page 57).
<customreco id="’MyCustomDescriptor01’" optional="false" invertmatch="false" />
Figure 93. Example for the <customreco> element
<description uselogic="true">...
</actions>
Figure 94. Example for the <description> element
178 IBM Rational Host Access Transformation Services: Advanced Macro Guide
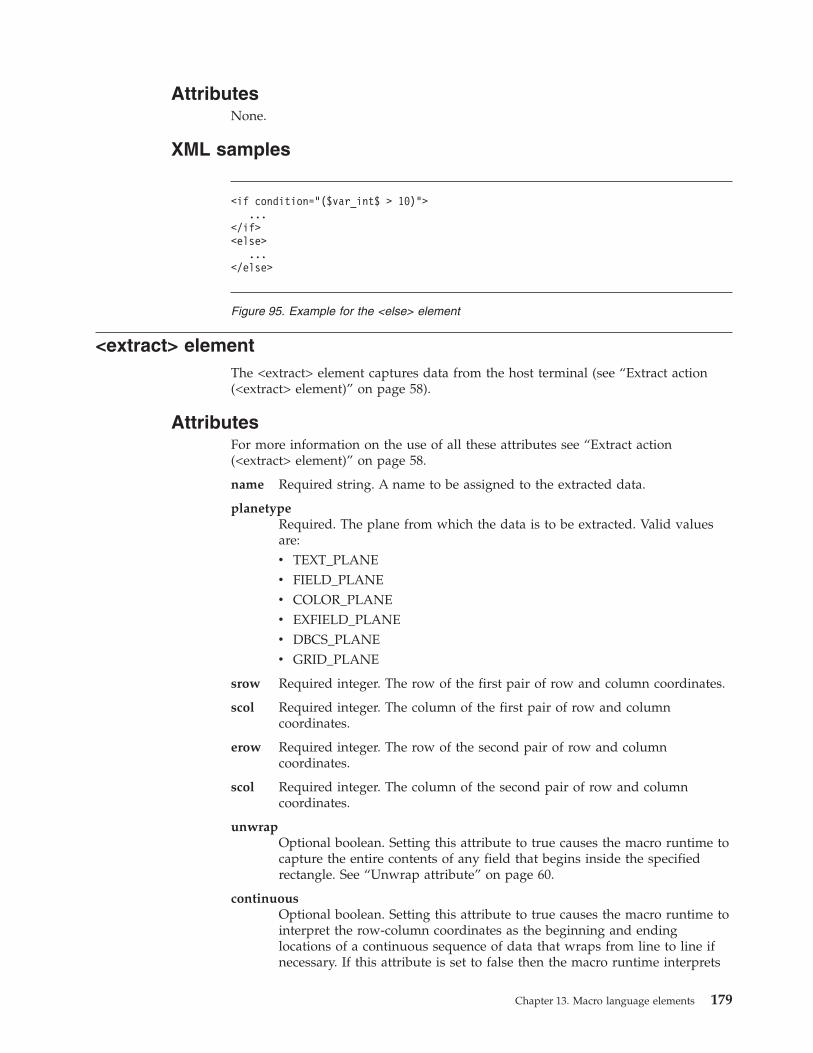
AttributesNone.
XML samples
<extract> elementThe <extract> element captures data from the host terminal (see “Extract action(<extract> element)” on page 58).
AttributesFor more information on the use of all these attributes see “Extract action(<extract> element)” on page 58.
name Required string. A name to be assigned to the extracted data.
planetypeRequired. The plane from which the data is to be extracted. Valid valuesare:v TEXT_PLANEv FIELD_PLANEv COLOR_PLANEv EXFIELD_PLANEv DBCS_PLANEv GRID_PLANE
srow Required integer. The row of the first pair of row and column coordinates.
scol Required integer. The column of the first pair of row and columncoordinates.
erow Required integer. The row of the second pair of row and columncoordinates.
scol Required integer. The column of the second pair of row and columncoordinates.
unwrapOptional boolean. Setting this attribute to true causes the macro runtime tocapture the entire contents of any field that begins inside the specifiedrectangle. See “Unwrap attribute” on page 60.
continuousOptional boolean. Setting this attribute to true causes the macro runtime tointerpret the row-column coordinates as the beginning and endinglocations of a continuous sequence of data that wraps from line to line ifnecessary. If this attribute is set to false then the macro runtime interprets
<if condition="($var_int$ > 10)">...
</if><else>
...</else>
Figure 95. Example for the <else> element
Chapter 13. Macro language elements 179

the row-column coordinates as the upper left and lower right corners of arectangular area of text. See “Capturing a sequence of text from the hostterminal” on page 59.
assigntovarOptional variable name. Setting this attribute to a variable name causes themacro runtime to store the text plane data as a string value into thevariable. If the variable is of some standard type other than string (that is,boolean, integer, or double) then the data is converted to that standardtype, if possible. If the data cannot be converted then the macro terminateswith a runtime error.
screenorientationOptional string. Use this attribute to define the host screen orientation touse for the extract during macro playback at runtime. Options are LTR andRTL.
XML samples
<HAScript> elementThe <HAScript> element is the master element of a macro script. It contains theother elements and specifies global information about the macro (see “Conceptualview of a macro script” on page 10).
Attributesname Required. The name of the macro.
descriptionOptional. Descriptive text about this macro. You should include here anyinformation that you want to remember about this macro.
timeoutOptional integer. The number of milliseconds allowed for screenrecognition. If this timeout value is specified and it is exceeded, then themacro runtime terminates the macro and displays a message (see “Timeoutattribute on the <HAScript> element” on page 52). By default the MacroEditor sets this value to 60000 milliseconds (60 seconds).
pausetimeOptional integer. The delay for the "pause between actions" (see “Thepausetime attribute” on page 81). By default the Macro Editor sets thisvalue to 300 milliseconds.
promptallRequired boolean. If this attribute is set to true then the macro runtime,before performing any action in the first macro screen, collects user inputfor all the <prompt> elements inside the entire macro, combining theindividual prompts into one large prompt. The promptall attribute of the<actions> element performs a similar function for all the <prompt>elements in one <actions> element (see “<actions> element” on page 172).
<extract name="’Get Data’" srow="1" scol="1" erow="11" ecol="11"assignto="$strText$" planetype="TEXT_PLANE" />
Figure 96. Example for the <extract> element
180 IBM Rational Host Access Transformation Services: Advanced Macro Guide

author Optional. The author or authors of this macro.
creationdateOptional. Information about the dates and versions of this macro.
suppresscleareventsOptional boolean (default false). Advanced feature that determines whetherthe system should ignore screen events when a host application sends aclear screen command immediately followed by an end of record indicatorin the data stream. You might want to set this value to true if you havescreens in your application flow that have all blanks in them. If there is avalid blank screen in the macro and clear commands are not ignored, it ispossible that a screen event with all blanks will be generated by clearcommands coming from an ill-behaved host application. This will cause ascreen recognition event to be processed and the valid blank screen willmatch when it shouldn't have matched.
usevarsRequired boolean (default false). If this attribute is set to true then themacro uses the advanced macro format (see “Basic and advanced macroformat” on page 15).
ignorepauseoverrideOptional. 3270 Display sessions only. If this attribute is set to true then themacro runtime skips all <pause> elements if the session is a TN3270Esession running in contention-resolution mode (see “Attributes that dealwith screen completion” on page 84). To re-enable a particular <pause>element see the ignorepauseoverrideforenhancedtn attribute of the<pause> element.
delayifnotenhancedtnOptional. 3270 Display Sessions only. This attribute specifies a value inmilliseconds and has an effect only when the session is not a TN3270Esession running in contention-resolution mode. In that situation, thisattribute causes the macro runtime to add a pause of the specified durationeach time the macro runtime receives a notification that the OIA indicatorhas changed (see “Attributes that deal with screen completion” on page84).
XML samples
<HAScript name="ispf_ex2" description="ISPF Sample2" timeout="60000"pausetime="300" promptall="true" author="Owner"creationdate="Sun Jun 08 12:04:26 PDT 2003"supressclearevents="false" usevars="true"ignorepauseforenhancedtn="false"delayifnotenhancedtn="0">
...</HAScript>
Figure 97. Example for the <HAScript> element
Chapter 13. Macro language elements 181

<if> elementThe <if> element contains a conditional expression and a sequence of macroactions. The macro runtime evaluates the conditional expression in the <if>element. Then:v If the conditional expression is true:
– The macro runtime performs the sequence of macro actions in the <if>element; and
– The macro runtime skips the following <else> element if there is one.v If the conditional expression is false:
– The macro runtime skips the sequence of macro actions in the <if> element;and
– The macro runtime performs the macro actions in the following <else>element if there is one.
The Macro object uses the <if> element, and if necessary the <else> element, tostore a Conditional action (see “Conditional action (<if> element and <else>element)” on page 57).
Attributescondition
Required. A conditional expression. The conditional expression can containlogical operators and conditional operators and can contain terms thatinclude arithmetic expressions, immediate values, variables, and calls toJava methods (see “Conditional and logical operators and expressions” onpage 19).
XML samples
182 IBM Rational Host Access Transformation Services: Advanced Macro Guide
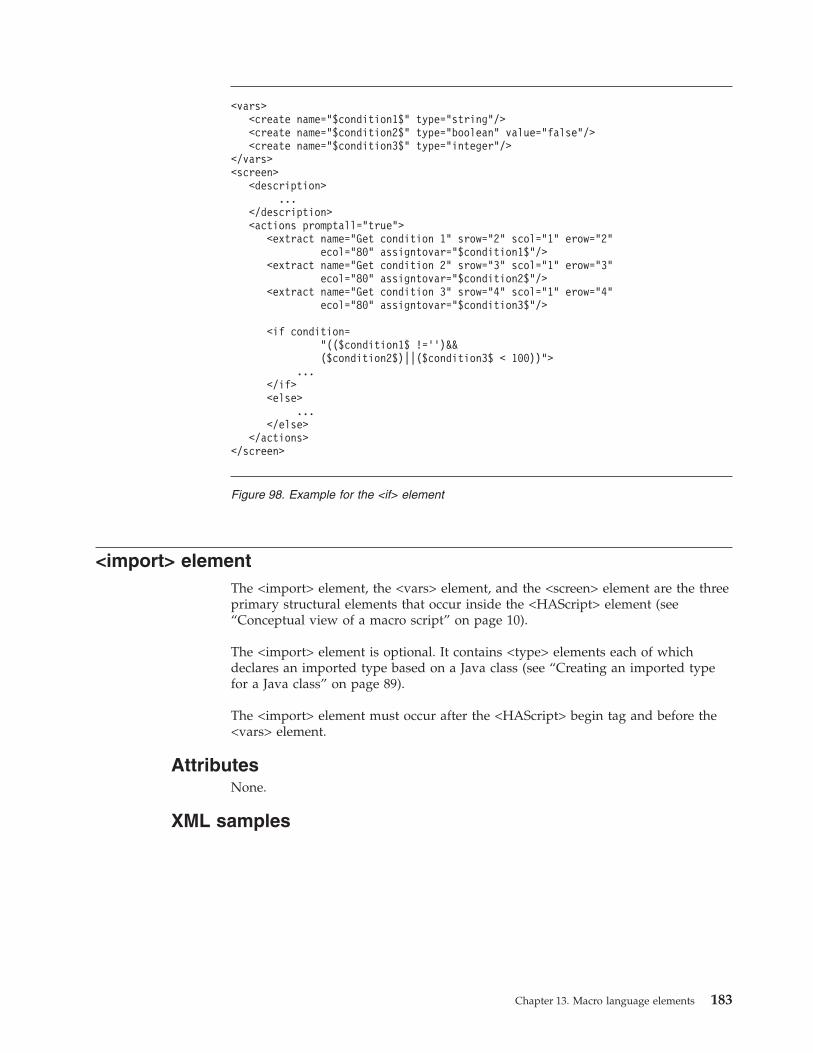
<import> elementThe <import> element, the <vars> element, and the <screen> element are the threeprimary structural elements that occur inside the <HAScript> element (see“Conceptual view of a macro script” on page 10).
The <import> element is optional. It contains <type> elements each of whichdeclares an imported type based on a Java class (see “Creating an imported typefor a Java class” on page 89).
The <import> element must occur after the <HAScript> begin tag and before the<vars> element.
AttributesNone.
XML samples
<vars><create name="$condition1$" type="string"/><create name="$condition2$" type="boolean" value="false"/><create name="$condition3$" type="integer"/>
</vars><screen>
<description>...
</description><actions promptall="true">
<extract name="Get condition 1" srow="2" scol="1" erow="2"ecol="80" assigntovar="$condition1$"/>
<extract name="Get condition 2" srow="3" scol="1" erow="3"ecol="80" assigntovar="$condition2$"/>
<extract name="Get condition 3" srow="4" scol="1" erow="4"ecol="80" assigntovar="$condition3$"/>
<if condition="(($condition1$ !=’’)&&($condition2$)||($condition3$ < 100))">
...</if><else>
...</else>
</actions></screen>
Figure 98. Example for the <if> element
Chapter 13. Macro language elements 183
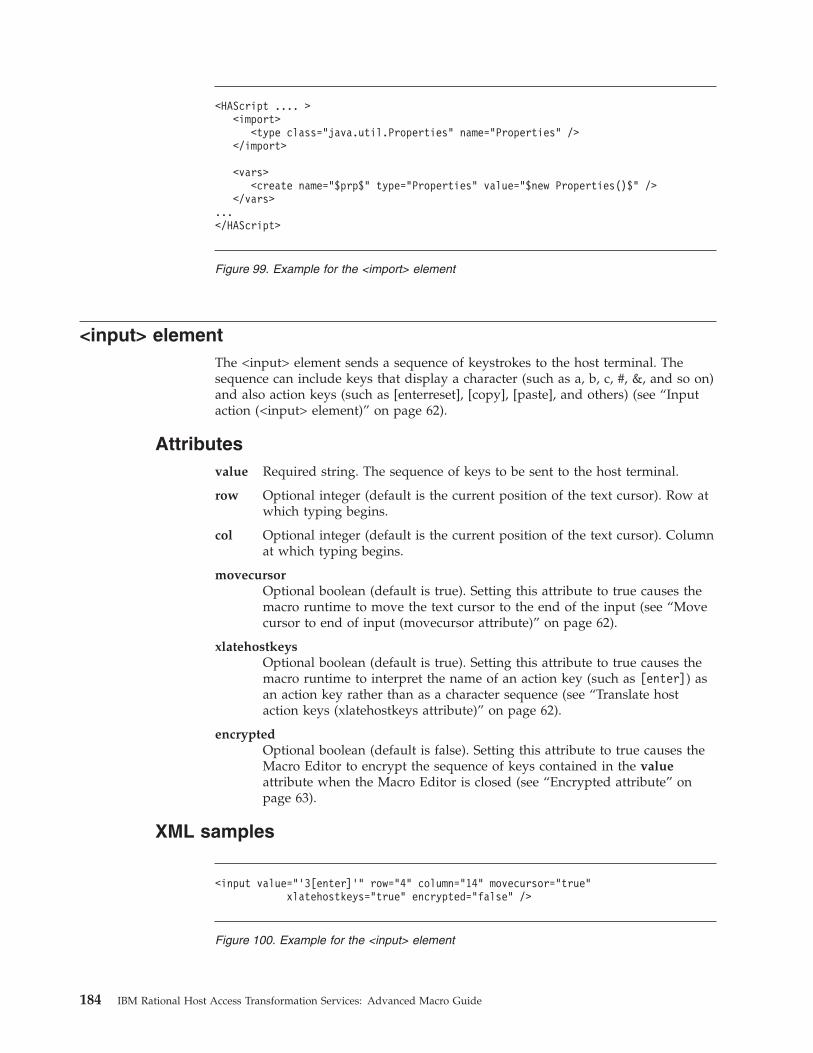
<input> elementThe <input> element sends a sequence of keystrokes to the host terminal. Thesequence can include keys that display a character (such as a, b, c, #, &, and so on)and also action keys (such as [enterreset], [copy], [paste], and others) (see “Inputaction (<input> element)” on page 62).
Attributesvalue Required string. The sequence of keys to be sent to the host terminal.
row Optional integer (default is the current position of the text cursor). Row atwhich typing begins.
col Optional integer (default is the current position of the text cursor). Columnat which typing begins.
movecursorOptional boolean (default is true). Setting this attribute to true causes themacro runtime to move the text cursor to the end of the input (see “Movecursor to end of input (movecursor attribute)” on page 62).
xlatehostkeysOptional boolean (default is true). Setting this attribute to true causes themacro runtime to interpret the name of an action key (such as [enter]) asan action key rather than as a character sequence (see “Translate hostaction keys (xlatehostkeys attribute)” on page 62).
encryptedOptional boolean (default is false). Setting this attribute to true causes theMacro Editor to encrypt the sequence of keys contained in the valueattribute when the Macro Editor is closed (see “Encrypted attribute” onpage 63).
XML samples
<HAScript .... ><import>
<type class="java.util.Properties" name="Properties" /></import>
<vars><create name="$prp$" type="Properties" value="$new Properties()$" />
</vars>...</HAScript>
Figure 99. Example for the <import> element
<input value="’3[enter]’" row="4" column="14" movecursor="true"xlatehostkeys="true" encrypted="false" />
Figure 100. Example for the <input> element
184 IBM Rational Host Access Transformation Services: Advanced Macro Guide
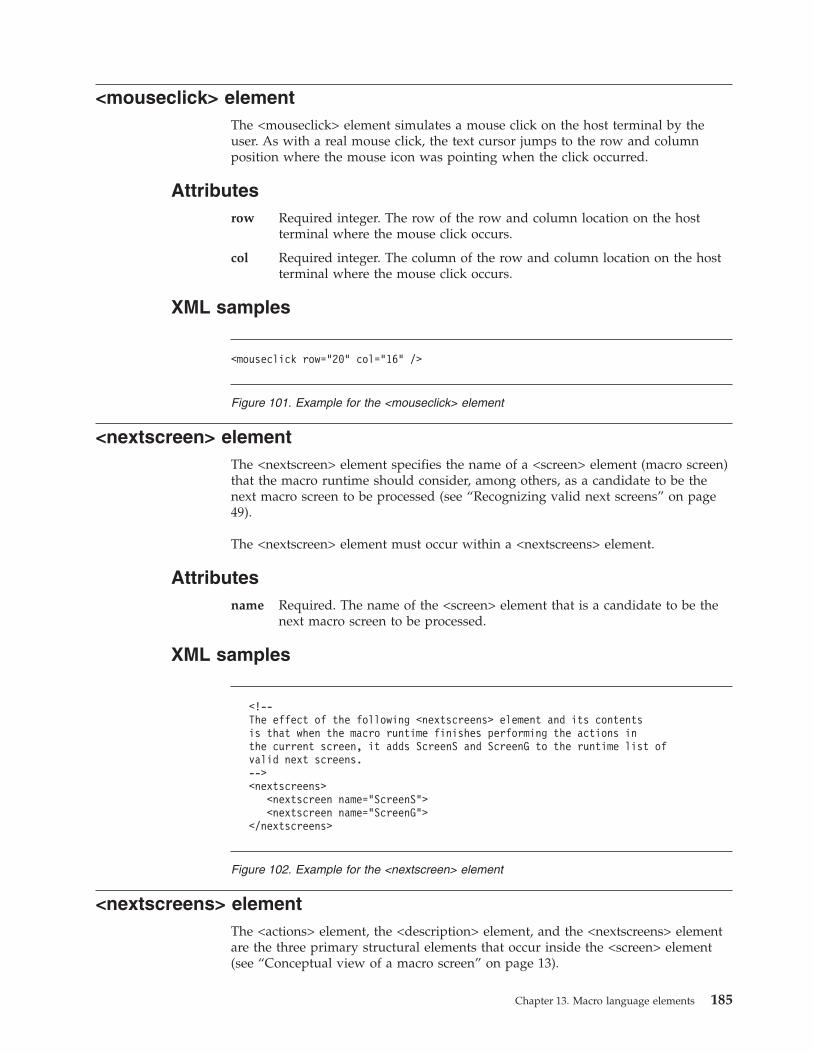
<mouseclick> elementThe <mouseclick> element simulates a mouse click on the host terminal by theuser. As with a real mouse click, the text cursor jumps to the row and columnposition where the mouse icon was pointing when the click occurred.
Attributesrow Required integer. The row of the row and column location on the host
terminal where the mouse click occurs.
col Required integer. The column of the row and column location on the hostterminal where the mouse click occurs.
XML samples
<nextscreen> elementThe <nextscreen> element specifies the name of a <screen> element (macro screen)that the macro runtime should consider, among others, as a candidate to be thenext macro screen to be processed (see “Recognizing valid next screens” on page49).
The <nextscreen> element must occur within a <nextscreens> element.
Attributesname Required. The name of the <screen> element that is a candidate to be the
next macro screen to be processed.
XML samples
<nextscreens> elementThe <actions> element, the <description> element, and the <nextscreens> elementare the three primary structural elements that occur inside the <screen> element(see “Conceptual view of a macro screen” on page 13).
<mouseclick row="20" col="16" />
Figure 101. Example for the <mouseclick> element
<!--The effect of the following <nextscreens> element and its contentsis that when the macro runtime finishes performing the actions inthe current screen, it adds ScreenS and ScreenG to the runtime list ofvalid next screens.--><nextscreens>
<nextscreen name="ScreenS"><nextscreen name="ScreenG">
</nextscreens>
Figure 102. Example for the <nextscreen> element
Chapter 13. Macro language elements 185

The <nextscreens> element contains <nextscreen> elements, each of which statesthe name of a macro screen that can validly occur after the current macro screen(see Chapter 6, “Screen recognition,” on page 49).
Attributestimeout
Optional integer. The value in milliseconds of the screen recognitiontimeout. The macro runtime terminates the macro if it cannot match amacro screen whose name is on the runtime list of valid next screens to theapplication screen before this timeout expires (see “Timeout settings forscreen recognition” on page 51).
XML samples
<numfields> elementThe <numfields> element is a descriptor that states the number of 3270 or 5250fields of all types that exist in the host terminal (see “Number of Fields descriptor(<numfields> element)” on page 41).
Attributesnumber
Required integer. The number of fields in the host terminal.
optionalOptional boolean (the default is false). See “Optional attribute” on page 39.
invertmatchOptional boolean (the default is false). See “Invertmatch attribute” on page38.
XML samples
<!--The effect of the following <nextscreens> element and its contentsis that when the macro runtime finishes performing the actions inthe current screen, it will attempt to recognize ScreenS and ScreenG.--><nextscreens>
<nextscreen name="ScreenS"><nextscreen name="ScreenG">
</nextscreens>
Figure 103. Example for the <nextscreens> element
<numfields number="10" optional="false" invertmatch="false" />
Figure 104. Example for the <numfields> element
186 IBM Rational Host Access Transformation Services: Advanced Macro Guide

<numinputfields> elementThe <numinputfields> element is a descriptor that states the number of 3270 or5250 input fields that exist in the host terminal (see “Number of Input Fieldsdescriptor (<numinputfields> element)” on page 42).
Attributesnumber
Required integer. The number of fields in the host terminal.
optionalOptional boolean (the default is false). See “Optional attribute” on page 39.
invertmatchOptional boolean (the default is false). See “Invertmatch attribute” on page38.
XML samples
<oia> elementThe <oia> element is a descriptor that describes the state of the input inhibitedindicator in the host terminal (see “OIA descriptor (<oia> element)” on page 41).
Attributesstatus Required. The value can be:
v NOTINHIBITEDThe macro runtime evaluates the descriptor as true if the input inhibitedindicator is cleared, or false if the input inhibited indicator is set.
v DONTCAREThe macro runtime always evaluates the descriptor as true.
v An expression that evaluates to either NOTINHIBITED or DONTCAREThe macro runtime evaluates the expression and then, depending on theresult, evaluates the descriptor as usual.
optionalOptional boolean (the default is false). See “Optional attribute” on page 39.
invertmatchOptional boolean. See “Invertmatch attribute” on page 38.
XML samples
<numinputfields number="10" optional="false" invertmatch="false" />
Figure 105. Example for the <numinputfields> element
<oia status="NOTINHIBITED" optional="false" invertmatch="false" />
Figure 106. Example for the <oia> element
Chapter 13. Macro language elements 187
<pause> elementThe <pause> element waits for the specified number of milliseconds (see “Pauseaction (<pause> element)” on page 66).
Attributesvalue Optional integer. The number of milliseconds to wait. If you do not specify
this attribute then the Macro object will add the attribute "value=10000" (10seconds) to the element when it saves the script.
ignorepauseoverrideOptional boolean (the default is false). For 3270 Display sessions only.Setting this attribute to true causes the macro runtime to process the<pause> element even if the ignorepauseforenhancedtn attribute of the<HAScript> element is set to true (see “Attributes that deal with screencompletion” on page 84).
XML samples
<perform> elementThe <perform> element invokes a method belonging to a Java class that you haveimported (see “Creating an imported type for a Java class” on page 89).
You can invoke a method in many other contexts besides the <perform> element.However, the <perform> element is useful when you want to invoke a method thatdoes not return a value (see “Perform action (<perform> element)” on page 67).
Attributesvalue Required. You must enclose a method call in dollar signs ($), just as you
would a variable (see “Syntax of a method call” on page 94). You shouldspecify the parameters, if any, of the method call in the same format thatyou would use if you were creating a Perform action in the Macro Editor.
XML samples
<pause timeout="5000">
Figure 107. Example for the <pause> element
<!-- Call the update() method associated with the class to whichimportedVar belongs (such as mypackage.MyClass).
--><perform value="$importedVar.update( 5, ’Application’, $str$)$" />
Figure 108. Example for the <perform> element
188 IBM Rational Host Access Transformation Services: Advanced Macro Guide

<playmacro> elementThe <playmacro> element terminates the current macro and launches anothermacro (see “PlayMacro action (<playmacro> element)” on page 68. This process iscalled chaining macros.
There are restrictions on where in the <actions> element you can place a<playmacro> element (see “Adding a PlayMacro action” on page 68).
Attributesname Required. The name of the target macro. The target macro must reside in
the same location as the calling macro.
startscreenOptional. The name of the macro screen (<screen> element) at which youwant the macro runtime to start processing the target macro. Use the value*DEFAULT* or omit this parameter to have the macro runtime start at theusual starting screen of the target macro.
transfervarsRequired. Setting this attribute to Transfer causes the macro runtime totransfer the variables belonging to the calling macro to the target macro(see “Transferring variables” on page 69). The default is No Transfer.
XML samples
<prompt> elementThe <prompt> element displays a popup window prompting the user for input,waits for the user to click OK, and then sends the input to the host terminal (see“Prompt action (<prompt> element)” on page 70).
Attributesname Optional string. The text that is to be displayed in the popup window,
such as ’Enter your response here:’.
descriptionOptional string. A description of this action. This description is notdisplayed.
row Required integer. The row on the host terminal at which you want themacro runtime to start typing the input from the user.
col Required integer. The column on the host terminal at which you want themacro runtime to start typing the input from the user.
len Required integer. The number of characters that the user is allowed toenter into the prompt input field.
defaultOptional string. The text to be displayed in the input field of the popup
<playmacro name="ispf_ex1.mac" startscreen="ScreenA"transfervars="Transfer" />
Figure 109. Example for the <playmacro> element
Chapter 13. Macro language elements 189

window. If the user does not type any input into the input field but justclicks OK, the macro runtime will send this default input to the hostterminal.
clearfieldOptional boolean. Setting this attribute to true causes the macro runtime,before sending the input sequence to the host terminal, to clear the inputfield of the host terminal in which the row and column location occur.
encryptedOptional boolean. Setting this attribute to true causes the macro runtime,when the user types a key into the input field of the window, to display anasterisk (*) instead of the character associated with the key.
movecursorOptional boolean. Setting this attribute to true causes the macro runtime tomove the cursor to the end of the input.
xlatehostkeysOptional boolean. Setting this attribute to true causes the macro runtime tointerpret the names of action keys (such as [enter]) as action keys ratherthan as sequences of characters.
assigntovarOptional variable name. Setting this attribute to a variable name causes themacro runtime to store the input into the variable whose name you specifyhere.
varupdateonlyOptional boolean. Setting this attribute to true causes the macro runtime tostore the input into a variable and not to send it to the host terminal. Thisattribute takes effect only if the assigntovar attribute is set to true.
requiredOptional boolean. Setting this attribute to true causes the macro runtime todisable the OK button in the prompt window until the input field of theprompt window contains text. The input field can contain text eitherbecause you have specified a Default Response or because the user hastyped text into the input field.
screenorientationOptional string. Use this attribute to define the host screen orientation touse for the prompt during macro playback at runtime. Options are LTR andRTL.
XML samples
<recolimit> elementThe <recolimit> element is an optional element that occurs within a <screen>element, at the same level as the <description>, <actions>, and <nextscreens>elements (see “Recognition limit” on page 53).
<prompt name="’ID’" row="1" col="1" len="8" description="’ID for Logon’"default="’guest’" clearfield="true" encrypted="true"assigntovar="$userID$" varupdateonly="true" required="true"/>
Figure 110. Example for the <prompt> element
190 IBM Rational Host Access Transformation Services: Advanced Macro Guide

The <recolimit> element allows you to take action if the macro runtime processesthe macro screen in which this element occurs more than some specified number oftimes.
Attributesvalue Required integer. The recognition limit. If the macro runtime recognizes the
macro screen this many times, then the macro runtime does not process theactions of this macro screen but instead performs the specified action.
goto Optional string (the default is for the macro runtime to display an errormessage and terminate the macro). The name of a macro screen that youwant the macro runtime to start processing when the recognition limit isreached.
XML samples
<screen> elementThe <screen> element, the <import> element, and the <vars> element are the threeprimary structural elements that occur inside the <HAScript> element (see“Conceptual view of a macro script” on page 10).
Multiple screen elements can occur inside a macro. One <screen> element containsall the information for one macro screen (see “The macro screen and itssubcomponents” on page 11).
The <screen> element contains three primary structural elements: the <actions>element, the <description> element, and <nextscreens> (see “Conceptual view of amacro screen” on page 13).
Attributesname Required. The name of this <screen> element (macro screen). The name
must not be the same as the name of an already existing <screen> element.
entryscreenOptional boolean (the default is false). Setting this attribute to true causesthe macro runtime to treat this <screen> element as a valid beginningscreen for the macro (see “Entry screens” on page 49).
exitscreenOptional boolean (the default is false). Setting this attribute to true causesthe macro runtime to treat this <screen> element as a valid ending screenfor the macro (see “Exit screens” on page 50).
transientOptional boolean (the default is false). Setting this attribute to true causesthe macro runtime to treat this <screen> element as a screen that canappear at any time and that always needs to be cleared (see “Transientscreens” on page 50).
pause Optional integer (the default is -1). Specifying a value in milliseconds for
<recolimit value="1" goto="RecoveryScreen1" />
Figure 111. Example for the <recolimit> element
Chapter 13. Macro language elements 191

this attribute causes the macro runtime, for this <screen> element, toignore the default delay for the "pause between actions" (set using thepausetime attribute of the <HAScript> element) and to use this valueinstead (see “The pause attribute” on page 81).
XML samples
<sqlquery> elementThe <sqlquery> element sends an SQL statement to a database, retrieves the dataresulting from the SQL statement, if any, and then stores the data into a macrovariable (see “SQLQuery action (<sqlquery> element)” on page 71).
Attributesurl Required string. The database URL for the database server to which the
SQL statement is sent, such as jdbc:as400://myHost.
driver Required string. The fully qualified package name of the driver used toconnect with the database server, such as COM.ibm.db2.jdbc.app.DB2DRIVER.This package must be present on the client workstation.
userid Optional string. The user ID required to access the database, if one isrequired.
passwordOptional string. The password required to access the database, if one isrequired.
statementRequired string. The SQL statement.
outputtypeRequired integer. The destination where the data resulting from the SQLstatement is to be directed. The valid value is: 0 - The data is stored in themacro variable $HMLSQLUtil$. You can retrieve the data by callingmethods on the variable.
XML samples
<screen name="ScreenB" entryscreen="false" exitscreen="false"transient="false">
<description>...
</description><actions>
...</actions><nextscreens>
...</nextscreens>
</screen>
Figure 112. Example for the <screen> element
192 IBM Rational Host Access Transformation Services: Advanced Macro Guide

<string> elementThe <string> element is a descriptor that specifies a sequence of characters and arectangular area of the host terminal in which the sequence occurs (see “Stringdescriptor (<string> element)” on page 42).
The sequence of characters can occur anywhere in the rectangular block.
Attributesvalue Required string. The sequence of characters.
row Optional integer (the default is to search the entire screen). The rowlocation of one corner of a rectangular block of text.
col Optional integer. The column location of one corner of a rectangular blockof text.
erow Optional integer. The row location of the opposite corner of a rectangularblock of text.
ecol Optional integer. The column location of the opposite corner of arectangular block of text.
casesenseOptional boolean (the default is false). Setting this attribute to true causesthe macro runtime to do a case-sensitive string compare.
wrap Optional boolean (the default is false).v Setting this attribute to false causes the macro runtime to search for the
sequence of characters in each separate row of the rectangular block oftext. If the sequence of characters wraps from one row to the next, themacro runtime will not find it.
v Setting this attribute to true causes the macro runtime to check for thesequence of characters occurring in any row or wrapping from one rowto the next of the rectangular block of text (see “How the macro runtimesearches the rectangular area (Wrap attribute)” on page 43).
optionalOptional boolean (the default is false). See “Optional attribute” on page 39.
invertmatchOptional boolean. See “Invertmatch attribute” on page 38.
XML samples
<sqlquery url="’jdbc:as400://elcrtp06’"driver="’com.ibm.as400.access.AS400JDBCDriver’"userid="’myuser’"password="Ex0bRtrf73mPrwGrWMT+/g=="statement="’SELECT * FROM SQLTEST WHERE ((SQLTEST.DESCRIPT is not null))’"outputtype="0" />
Figure 113. Example for the <sqlquery> element
Chapter 13. Macro language elements 193

<trace> elementThe <trace> element sends a trace message to a trace destination that you specify,such as a console (see “Trace action (<trace> element)” on page 72).
Attributestype Required. The destination for the trace data. The destination must be one
of the following:v HODTRACE: The Host On-Demand Trace Facility.v USER: A user trace handler.v SYSOUT: The WebSphere console.
value Required string. The string that is to be sent to the trace destination.
XML samples
<type> elementThe <type> element declares an imported type (such as Properties) that representsa Java class (such as java.util.Properties). After you have declared the type, youcan create variables based on the type, create an instance of the Java class, and callmethods on the instance (see “Creating an imported type for a Java class” on page89).
A type can also be used for directly calling static methods (no need to instantiate).
The <type> element must occur inside a <import> element.
Attributesclass Required. The fully qualified class name of the class being imported,
including the package name if any (such as java.util.Properties).
name Optional. A short name (such as Properties) that you can use elsewhere inthe macro to refer to the imported type. If you do not specify a short
<!-- The string must occur in one specific area of a single row --><string value="’Utility Selection Panel’" row="3" col="28"
erow="3" ecol="51" casesense="false" wrap="false"optional="false" invertmatch="false" />
<!-- The string can occur in any single row of the session area --><string value="’Utility Selection Panel’" row="1" col="1"
erow="-1" ecol="-1" casesense="false" wrap="false"optional="false" invertmatch="false" />
Figure 114. Example for the <string> element
<trace type="SYSOUT" value="'The value is '+$strData$" />
Figure 115. Example for the <trace> element
194 IBM Rational Host Access Transformation Services: Advanced Macro Guide

name, then the short name is the same as the fully qualified class name.There are a few restrictions on the spelling of type names (see “Variablenames and type names” on page 90).
XML samples
<vars> elementThe <vars> element, the <import> element, and the <screen> element are the threeprimary structural elements that occur inside the <HAScript> element (see“Conceptual view of a macro script” on page 10).
The <vars> element is optional. It contains <create> elements, each of whichdeclares and initializes a variable (see “Creating a variable” on page 88). The<vars> element must occur after the <import> element and before the first<screen> element.
To use variables, you must set the usevars element in <HAScript> to true.
AttributesNone.
XML samples
<import><type class="java.util.Date" name="Date"/><type class="java.io.FileInputStream"/><type class="com.ibm.eNetwork.beans.HOD.HODBean" name="HODBean"/><type class="myPackage.MyClass" name="MyClass"/>
</import>
Figure 116. Example for a <type> element
<HAScript ... usevars="true" .... ><import>
<type class="java.util.Properties" name="Properties" /></import>
<vars><create name="$prp$" type="Properties" value="$new Properties()$" /><create name="$strAccountName$" type="string" value="" /><create name="$intAmount$" type="integer" value="0" /><create name="$dblDistance$" type="double" value="0.0" /><create name="$boolSignedUp$" type="boolean" value="false" /><create name="$fldFunction$" type="field" />
</vars>...
</HAScript>
Figure 117. Example for the <vars> element
Chapter 13. Macro language elements 195
<varupdate> elementThe <varupdate> element causes the macro runtime to store a specified value intoa specified variable. The value can be an immediate value, a variable, a call to aJava method, or an arithmetic expression that can contain any of these values. Ifthe value is an expression, then during macro playback the macro runtimeevaluates the expression and stores the resulting value into the specified variable(see “Variable update action (<varupdate> element)” on page 73).
You can also use the <varupdate> action in a <description> element (see “Variableupdate action (<varupdate> element)” on page 73).
For more information on variables see Chapter 9, “Variables and imported Javaclasses,” on page 87.
Attributesname Required. The name of the variable.
value Required string. The value or expression to be assigned to the variable.
XML samples
196 IBM Rational Host Access Transformation Services: Advanced Macro Guide

<type><type class="mypackage.MyClass" name="MyClass" /><type class="java.util.Hashtable" name="Hashtable" /><type class="java.lang.Object" name="Object" />
</type>
<vars>...
</vars>
<screen><description>...</description><actions>
<varupdate name="$var_boolean1$" value="false" /><varupdate name="$var_int1$" value="5" /><varupdate name="$var_double1$" value="5" /><varupdate name="$var_string1$" value="’oak tree’" /><varupdate name="$var_field1$" value="4,5" />
<!-- null keyword --><varupdate name="$var_importedMC1$" value="null" /><!-- Equivalent to null keyword for an imported type --><varupdate name="$var_importedMC2$" value="" />
<varupdate name="$var_importedMC4$"value="$new MyClass( ’myparam1’, ’myparam2’ )$" />
<varupdate name="$var_importedMC5$"value="$var_importedMC4$" />
<varupdate name="$var_importedMC6$"value="$MyClass.createInstance( ’mystringparam1’ )$" />
<varupdate name="$var_boolean2$"value="$var_importedMC4.isEmpty()$" />
<varupdate name="$var_int2$"value="$($var_importedMC4.getHashtable()$).size()$" />
<varupdate name="$var_double2$"value="$var_importedMC4.getMeters()$" />
<varupdate name="$var_string2$"value="$var_importedMC4.toString()" />
</actions></screen>
Figure 118. Example for the <varupdate> element
Chapter 13. Macro language elements 197

198 IBM Rational Host Access Transformation Services: Advanced Macro Guide

Appendix A. Additional information
Default rule for combining multiple descriptors in one macro screenThere is a default processing rule that applies when multiple descriptors arecombined in one macro screen. It is called the default combining rule and it operatesas follows:1. Evaluate all the required descriptors (that is, descriptors for which the Optional
field is set to false).a. If all are true, then the screen matches.b. Otherwise, go to step 2.
2. Start evaluating the optional descriptors (descriptors for which the Optionalfield is set to true).a. If any optional descriptor is true, then the screen matches.b. Otherwise, go to step 3.
3. If you reach here, then the macro screen does not match the application screen.
Mnemonic keywords for the Input actionThis section contains the mnemonic keywords for the Input action and the type ofsession or sessions in which the mnemonic is supported. Session support for agiven mnemonic is denoted by an X, along with any special notes that apply to thefunction.
Table 24. Keywords for the Input action
Function: Keyword: 3270: 5250: VT:
Attention [attn] x x
Alternate view [altview] x3 x3
Backspace [backspace] x x x1
Backtab [backtab] x x
Beginning ofField
[bof] x x
Clear [clear] x x x1
Cursor Down [down] x x x1
Cursor Left [left] x x x1
Cursor Right [right] x x x1
Cursor Select [cursel] x x x1
Cursor Up [up] x x x1
Delete Character [delete] x x x1, 2
Display SO/SI [dspsosi] x3 x3
Dup Field [dup] x x
Enter [enter] x x x
End of Field [eof] x x x1, 2
Erase EOF [eraseeof] x x
Erase Field [erasefld] x x
© Copyright IBM Corp. 2003, 2011 199

Table 24. Keywords for the Input action (continued)
Function: Keyword: 3270: 5250: VT:
Erase Input [erinp] x x
Field Exit [fldext] x
Field Mark [fieldmark] x x
Field Minus [field-] x
Field Plus [field+] x
F1 [pf1] x x x
F2 [pf2] x x x
F3 [pf3] x x x
F4 [pf4] x x x
F5 [pf5] x x x
F6 [pf6] x x x
F7 [pf7] x x x
F8 [pf8] x x x
F9 [pf9] x x x
F10 [pf10] x x x
F11 [pf11] x x x
F12 [pf12] x x x
F13 [pf13] x x x
F14 [pf14] x x x
F15 [pf15] x x x
F16 [pf16] x x x
F17 [pf17] x x x
F18 [pf18] x x x
F19 [pf19] x x x
F20 [pf20] x x x
F21 [pf21] x x
F22 [pf22] x x
F23 [pf23] x x
F24 [pf24] x x
Help [help] x
Home [home] x x x1, 2
Insert [insert] x x x1, 2
Keypad 0 [keypad0] x
Keypad 1 [keypad1] x
Keypad 2 [keypad2] x
Keypad 3 [keypad3] x
Keypad 4 [keypad4] x
Keypad 5 [keypad5] x
Keypad 6 [keypad6] x
Keypad 7 [keypad7] x
200 IBM Rational Host Access Transformation Services: Advanced Macro Guide

Table 24. Keywords for the Input action (continued)
Function: Keyword: 3270: 5250: VT:
Keypad 8 [keypad8] x
Keypad 9 [keypad9] x
Keypad Dot [keypad.] x
Keypad Enter [keypadenter] x
Keypad Comma [keypad,] x
Keypad Minus [keypad-] x
New Line [newline] x x
PA1 [pa1] x x
PA2 [pa2] x x
PA3 [pa3] x x
Page Up [pageup] x x x1, 2
Page Down [pagedn] x x x1, 2
Reset [reset] x x x
System Request [sysreq] x x
Tab Field [tab] x x x1
Test Request [test] x
1. VT supports this function but it is up to the host application to act on it.2. Supported in VT200 mode only.3. The function is only available in a DBCS session.
The following table shows the bidirectional keywords for the Input action.
Table 25. Bidirectional keywords for the Input action
Function: Keyword: 3270: 5250: VT:
Auto Push [autopush] x
Auto Reverse [autorev] x x
Base [base] x x
BIDI Layer [bidilayer]
Close [close] x
CSD [csd] x
End Push [endpush] x
Field Reverse [fldrev] x x
Field Shape [fieldshape] x
Final [final] x
Initial [initial] x
Isolated [isolated] x
Latin Layer [latinlayer] x x
Middle [middle] x
Push [push] x
Screen Reverse [screenrev] x x
Appendix A. Additional information 201

202 IBM Rational Host Access Transformation Services: Advanced Macro Guide

Appendix B. Notices
This information was developed for products and services offered in the U.S.A.IBM might not offer the products, services, or features discussed in this documentin other countries. Consult your local IBM representative for information on theproducts and services currently available in your area. Any reference to an IBMproduct, program, or service is not intended to state or imply that only that IBMproduct, program, or service might be used. Any functionally equivalent product,program, or service that does not infringe any IBM intellectual property rightmight be used instead. However, it is the user's responsibility to evaluate andverify the operation of any non-IBM product, program, or service.
IBM might have patents or pending patent applications covering subject matterdescribed in this document. The furnishing of this document does not give youany license to these patents. You can send license inquiries, in writing, to:
IBM Director of LicensingIBM CorporationNorth Castle DriveArmonk, NY 10504-1785U.S.A.
For license inquiries regarding double-byte (DBCS) information, contact the IBMIntellectual Property Department in your country or send inquiries, in writing, to:
IBM World Trade Asia CorporationLicensing2-31 Roppongi 3-chome, Minato-kuTokyo 106, Japan
The following paragraph does not apply to the United Kingdom or any othercountry where such provisions are inconsistent with local law:INTERNATIONAL BUSINESS MACHINES CORPORATION PROVIDES THISPUBLICATION “AS IS” WITHOUT WARRANTY OF ANY KIND, EITHEREXPRESS OR IMPLIED, INCLUDING, BUT NOT LIMITED TO, THE IMPLIEDWARRANTIES OF NON-INFRINGEMENT, MERCHANTABILITY OR FITNESSFOR A PARTICULAR PURPOSE. Some states do not allow disclaimer of express orimplied warranties in certain transactions, therefore, this statement might not applyto you.
This information could include technical inaccuracies or typographical errors.Changes are periodically made to the information herein; these changes will beincorporated in new editions of the publication. IBM might make improvementsand/or changes in the product and/or the program described in this publication atany time without notice.
Any references in this information to non-IBM Web sites are provided forconvenience only and do not in any manner serve as an endorsement of those Websites. The materials at those Web sites are not part of the materials for this IBMproduct and use of those Web sites is at your own risk.
IBM might use or distribute any of the information you supply in any way itbelieves appropriate without incurring any obligation to you.
© Copyright IBM Corp. 2003, 2011 203

Licensees of this program who wish to have information about it for the purposeof enabling: (i) the exchange of information between independently createdprograms and other programs (including this one) and (ii) the mutual use of theinformation which has been exchanged, should contact:
IBM CorporationTL3B/0623039 Cornwallis RoadRTP, NC 27709-2195U.S.A.
Such information might be available, subject to appropriate terms and conditions,including in some cases, payment of a fee.
The licensed program described in this information and all licensed materialavailable for it are provided by IBM under terms of the IBM Customer Agreement,IBM International Program License Agreement, or any equivalent agreementbetween us.
Information concerning non-IBM products was obtained from the suppliers ofthose products, their published announcements or other publicly available sources.IBM has not tested those products and cannot confirm the accuracy ofperformance, compatibility or any other claims related to non-IBM products.Questions on the capabilities of non-IBM products should be addressed to thesuppliers of those products.
This information contains examples of data and reports used in daily businessoperations. To illustrate them as completely as possible, the examples include thenames of individuals, companies, brands, and products. All of these names arefictitious and any similarity to the names and addresses used by an actual businessenterprise is entirely coincidental.
COPYRIGHT LICENSE:
This information contains sample application programs in source language, whichillustrates programming techniques on various operating platforms. You may copy,modify, and distribute these sample programs in any form without payment toIBM, for the purposes of developing, using, marketing or distributing applicationprograms conforming to the application programming interface for the operatingplatform for which the sample programs are written. These examples have notbeen thoroughly tested under all conditions. IBM, therefore, cannot guarantee orimply reliability, serviceability, or function of these programs. The sampleprograms are provided "AS IS", without warranty of any kind. IBM shall not beliable for any damages arising out of your use of the sample programs.
If you are viewing this information softcopy, the photographs and colorillustrations might not appear.
Programming interface informationThis Advanced Macro Guide contains information on intended programminginterfaces that allow the customer to write programs to obtain the services ofHATS.
204 IBM Rational Host Access Transformation Services: Advanced Macro Guide

TrademarksIBM, the IBM logo, and ibm.com are trademarks or registered trademarks ofInternational Business Machines Corp., registered in many jurisdictions worldwide.Other product and service names might be trademarks of IBM or other companies.A current list of IBM trademarks is available on the Web at “Copyright andtrademark information” at www.ibm.com/legal/copytrade.shtml.
Java and all Java-based trademarks and logos are trademarks or registeredtrademarks of Oracle and/or its affiliates.
Other product and service names might be trademarks of IBM or other companies.
Appendix B. Notices 205

206 IBM Rational Host Access Transformation Services: Advanced Macro Guide


����
Printed in USA
SC14-7295-00