Embed Size (px)
Citation preview

XCCTechnicalUser’sGuide
XCC_R_12.0.0

XCCTechnicalUser’sGuide
XCC_R_12.0.0
2/79
Contents
1 Requirements...............................................................................................................5 1.1 IBMConnectionsversions.............................................................................................................5 1.2 Browser..........................................................................................................................................5
1.2.1 MicrosoftInternetExplorer.....................................................................................................5 1.2.2 MozillaFirefox........................................................................................................................5 1.2.3 GoogleChrome.......................................................................................................................5 1.2.4 AppleSafari.............................................................................................................................5
1.3 Mobiledevices...............................................................................................................................5
2 Prerequisites................................................................................................................6 2.1 Filesneededforinstallation..........................................................................................................6 2.2 SystemRequirements....................................................................................................................6
3 ArchitecturalInformation.............................................................................................7 3.1 XCCRuntimeModes......................................................................................................................7
3.1.1 On-premisemode(Desktopmode).........................................................................................7 3.1.2 Flyoutmode............................................................................................................................7 3.1.3 Communitymode....................................................................................................................7 3.1.4 Anonymousmode...................................................................................................................7 3.1.5 Cloudmode.............................................................................................................................7 3.1.6 Mobilemode...........................................................................................................................7
3.2 XCCAuthorization..........................................................................................................................8 3.3 XCCAuthorizationintheRuntimeModes.....................................................................................8
3.3.1 OnPremiseMode(DesktopMode).........................................................................................8 3.3.2 FlyoutMode............................................................................................................................9 3.3.3 CommunityMode...................................................................................................................9 3.3.4 AnonymousMode.................................................................................................................10 3.3.5 CloudMode(IBMConnectionsCloudMode)........................................................................10 3.3.6 MobileMode.........................................................................................................................11
3.4 XCCstartupbackgroundwork.....................................................................................................11
4 Installation.................................................................................................................13 4.1 InstallationPrerequisites.............................................................................................................13
4.1.1 CreatinganewApplicationServer(optional).......................................................................13 4.1.2 Enabletracelogstoanalyzeerrors(optional)......................................................................16 4.1.3 WebSphereApplicationServerconfigurations(required).....................................................20
4.2 XCCInstallation............................................................................................................................20 4.2.1 Mapusertosecurityroles.....................................................................................................24
5 Update.......................................................................................................................26 5.1 MSSQLupdatescript(required)..................................................................................................27

XCCTechnicalUser’sGuide
XCC_R_12.0.0
3/79
5.2 UpdatingtoXCC12......................................................................................................................27
6 Database....................................................................................................................28 6.1 UsingDB2asdatabase.................................................................................................................28
6.1.1 CreateDB2database-Windows..........................................................................................28 6.1.2 CreateDB2databaseforLinux(SingleandMultipleInstance).............................................29 6.1.3 CreateDB2databaseforIBMI/AS400..................................................................................29 6.1.4 CreateDB2JDBCprovider(optional)....................................................................................30 6.1.5 CreateDB2datasource........................................................................................................32
6.2 UsingMSSQLasdatabase............................................................................................................37 6.2.1 CreateMSSQLdatabase.......................................................................................................37 6.2.2 CreateMSSQLJAASsecurityalias.........................................................................................38 6.2.3 CreateMSSQLJDBCprovider(optional)................................................................................40 6.2.4 CreateMSSQLdatasource....................................................................................................42
6.3 UsingOracleasdatabase.............................................................................................................45 6.3.1 CreateOracledatabase........................................................................................................45 6.3.2 CreateOracleJAASsecurityalias..........................................................................................47 6.3.3 CreateOracleJDBCprovider(optional)................................................................................48 6.3.4 CreateOracledatasource....................................................................................................50
7 DatabaseMigration....................................................................................................54
8 Configuration.............................................................................................................55 8.1 GeneralXCCconfiguration...........................................................................................................55 8.2 XCCAnonymousmodeconfigurations........................................................................................58 8.3 XCCCommunitymodeconfigurations.........................................................................................59
8.3.1 widgets-config.xml................................................................................................................59 8.3.2 LotusConnections-config.xml................................................................................................61 8.3.3 Createandadjuststringpropertyfiles.................................................................................62 8.3.4 Publishconfiguration............................................................................................................63
8.4 XCCFlyoutmodeconfigurations..................................................................................................63 8.5 XCCMobilemodeconfigurations................................................................................................64 8.6 Licensekey...................................................................................................................................66 8.7 AddinganewlinktotheIBMConnectionsheadernavigation....................................................67 8.8 PeopleBirthdayWidget...............................................................................................................68 8.9 CustomizeXCClabelsfordifferentlanguages.............................................................................68 8.10 Adjusttheattributesforpersonalization..................................................................................69 8.11 IBMConnectionsProxyConfiguration.......................................................................................71 8.12 IHSXCClandingpageconfiguration...........................................................................................72 8.13 (Re-)BuildingthesearchindexofIBMConnections..................................................................72 8.14 ImportandexportofXMLfiles..................................................................................................72
8.14.1 ImportofXMLfiles..............................................................................................................72
XCCTechnicalUser’sGuide
XCC_R_12.0.0
4/79
8.15 ExportofXMLfiles.....................................................................................................................73 8.16 InternetExplorercompatibilitymode.......................................................................................74
9 UninstallXCC..............................................................................................................75
10 Operation.................................................................................................................76 10.1 AccessXCCapplication(onpremisemode)...............................................................................76 10.2 AccessXCCapplication(flyoutmode).......................................................................................76 10.3 AccessXCCapplication(cloudmode)........................................................................................77 10.4 AccessXCCapplication(communitymode)...............................................................................77 10.5 AccessXCCapplication(anonymousmode)..............................................................................78 10.6 AccessXCCapplication(mobilemode)......................................................................................79
XCCTechnicalUser’sGuide
XCC_R_12.0.0
5/79
1 Requirements
1.1 IBMConnectionsversionsThisversionofXCCsupportsIBMConnectionsversion5.0and5.5.
1.2 Browser
1.2.1 MicrosoftInternetExplorerSupportedversions:9,10and11
OlderversionsmayleadtodifferentUIlayout.
1.2.2 MozillaFirefoxSupportedversions:allmajorbuildsfrom32.0to42.0
Olderversionsdownto10.0arestillcompatiblebutnotsupported.
1.2.3 GoogleChromeSupportedversion:37.0to50.0
Olderversionsdownto10.0arestillcompatiblebutnotsupported.
1.2.4 AppleSafariSupportedversion:allmajorversionsgreaterthan5.1.6
Olderversionsdownto5.1arestillcompatiblebutnotsupported.
1.3 MobiledevicesCurrentlywesupportmobiledeviceswithiOSandAndroidasoperatingsystemforXCCintegratedin
theIBMConnectionsmobileapplication.

XCCTechnicalUser’sGuide
XCC_R_12.0.0
6/79
2 Prerequisites
2.1 FilesneededforinstallationXCCreleasepackageincludes:
− XCCdocumentations
− mobileicons
− SQLscripts(DB2,MSSQL,Oracle,MySQL)
− xcc-ear<VERSION>.ear
2.2 SystemRequirementsSinglesign-onintegrationbetweenIBMConnectionsapplicationsmustbeconfigured.Singlesign-on
fortheWindowsdesktopwithKerberosisalsosupportedbutisoptional.
XCCTechnicalUser’sGuide
XCC_R_12.0.0
7/79
3 ArchitecturalInformation
3.1 XCCRuntimeModesDependingontheenvironmentandrequirements,XCCcanbeexecutedin5differentmodes:
3.1.1 On-premisemode(Desktopmode)ThisisXCCstandardmodethatXCCprovidessincetheversion1.0.0.InthiscaseXCCwillbe
integratedwithagivenIBMConnectionsSystemandcanbesetupasthestartpageforyour
Connectionsenvironment.
3.1.2 FlyoutmodeYoucanconfigureaXCCpageasFlyoutpagetogetquickaccesstothispagewithinConnections.
3.1.3 CommunitymodeThismodeprovidesXCCintegrationforIBMCommunities.YoumayconfigureaXCCpagetobe
displayedwithinanyIBMConnectionCommunity.ItisalsopossibletoconfigureXCCpageasa
CommunityStartPage.
3.1.4 AnonymousmodeYoucansetupXCCpagestobeaccessiblepubliclytounauthenticatedusers.Inthiscase,onlypublic
ConnectionsContentcanbereferredwithinXCCWidgets.Furtherlimitationapply(likecommenting
beingdisabled).
3.1.5 CloudmodeThismodeprovidesintegrationofXCCwithIBMConnectionsCloud(IBMConnectionsCloud).Inthis
case,XCCcanbeinstalledasaseparateenvironmentinordertoreduceSystemfootprint.XCCis
usingOAuth2authenticationmechanismsandtheIBMSocialBusinessToolkitProxyinorderto
retrieveIBMConnectionsCloudorganizationcontents.
3.1.6 MobilemodeThismodeprovidesintegrationofXCCwiththeIBMConnectionsMobileApp.YoucansetupXCC
pagestobedisplayedwithintheiOSandtheAndroidConnectionsApp.
XCCTechnicalUser’sGuide
XCC_R_12.0.0
8/79
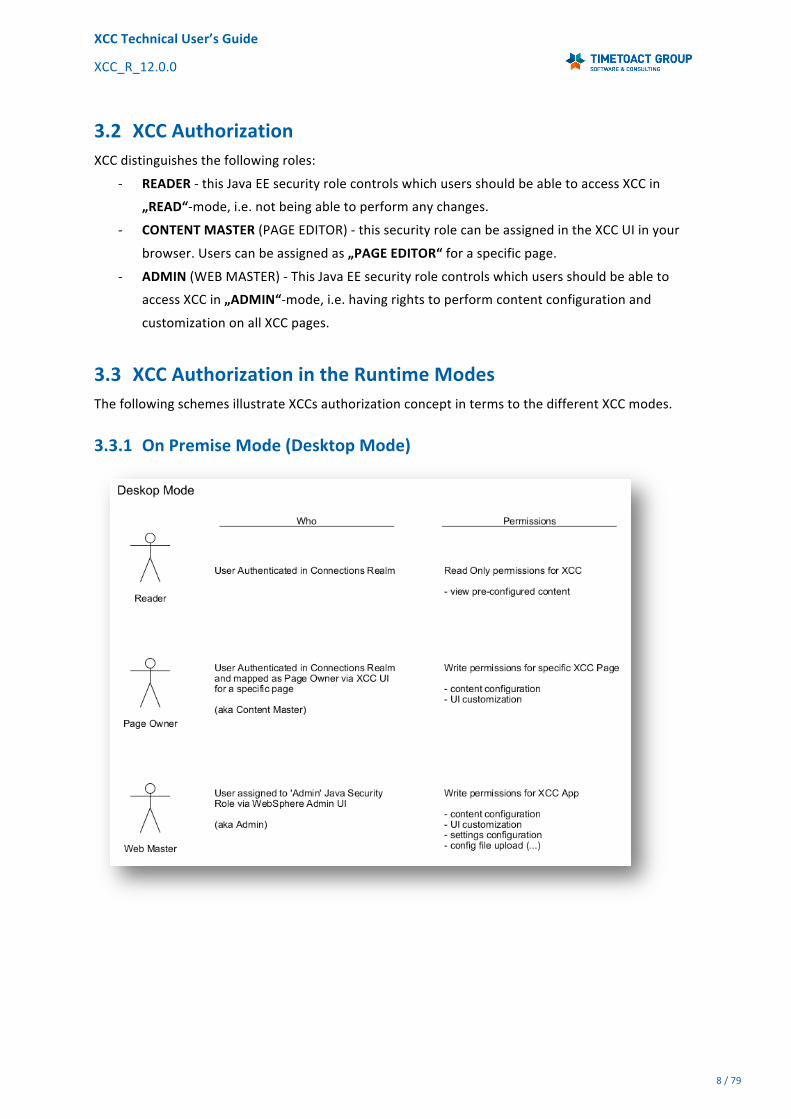
3.2 XCCAuthorizationXCCdistinguishesthefollowingroles:
- READER-thisJavaEEsecurityrolecontrolswhichusersshouldbeabletoaccessXCCin
„READ“-mode,i.e.notbeingabletoperformanychanges.
- CONTENTMASTER(PAGEEDITOR)-thissecurityrolecanbeassignedintheXCCUIinyour
browser.Userscanbeassignedas„PAGEEDITOR“foraspecificpage.
- ADMIN(WEBMASTER)-ThisJavaEEsecurityrolecontrolswhichusersshouldbeableto
accessXCCin„ADMIN“-mode,i.e.havingrightstoperformcontentconfigurationand
customizationonallXCCpages.
3.3 XCCAuthorizationintheRuntimeModesThefollowingschemesillustrateXCCsauthorizationconceptintermstothedifferentXCCmodes.
3.3.1 OnPremiseMode(DesktopMode)

XCCTechnicalUser’sGuide
XCC_R_12.0.0
9/79
3.3.2 FlyoutMode
3.3.3 CommunityMode

XCCTechnicalUser’sGuide
XCC_R_12.0.0
10/79
3.3.4 AnonymousMode
3.3.5 CloudMode(IBMConnectionsCloudMode)
XCCTechnicalUser’sGuide
XCC_R_12.0.0
11/79
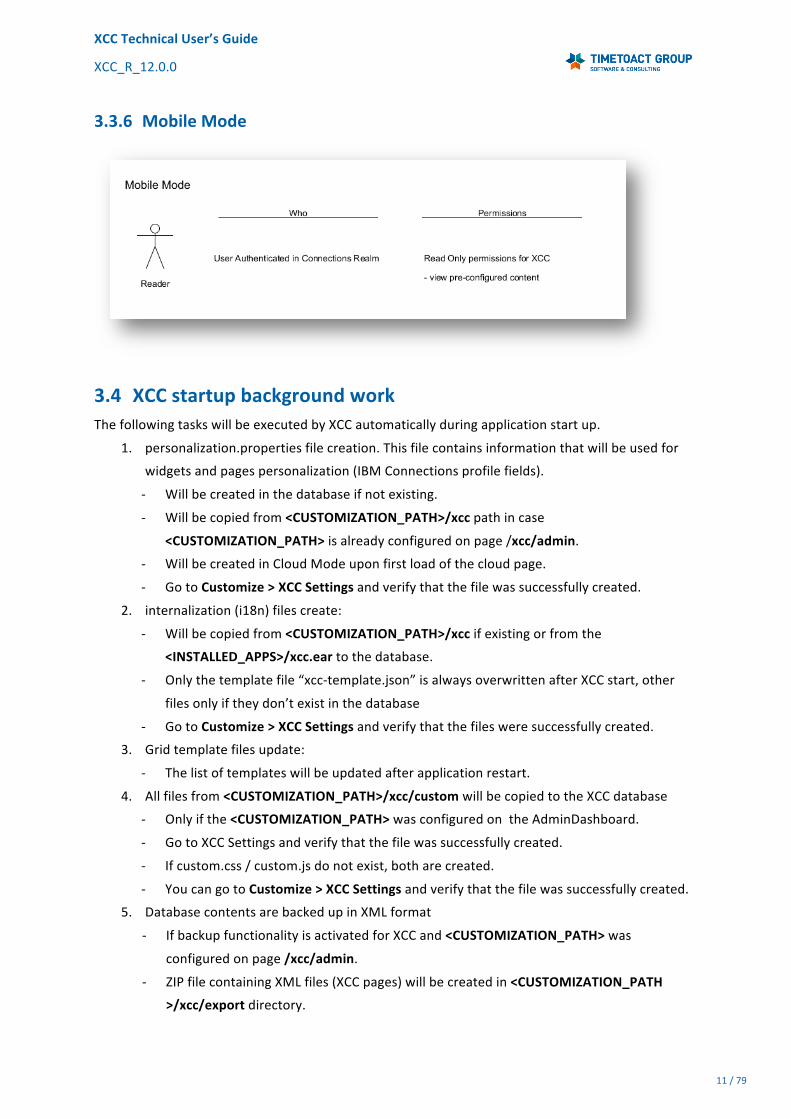
3.3.6 MobileMode
3.4 XCCstartupbackgroundworkThefollowingtaskswillbeexecutedbyXCCautomaticallyduringapplicationstartup.
1. personalization.propertiesfilecreation.Thisfilecontainsinformationthatwillbeusedfor
widgetsandpagespersonalization(IBMConnectionsprofilefields).
- Willbecreatedinthedatabaseifnotexisting.
- Willbecopiedfrom<CUSTOMIZATION_PATH>/xccpathincase
<CUSTOMIZATION_PATH>isalreadyconfiguredonpage/xcc/admin.
- WillbecreatedinCloudModeuponfirstloadofthecloudpage.
- GotoCustomize>XCCSettingsandverifythatthefilewassuccessfullycreated.
2. internalization(i18n)filescreate:
- Willbecopiedfrom<CUSTOMIZATION_PATH>/xccifexistingorfromthe
<INSTALLED_APPS>/xcc.eartothedatabase.
- Onlythetemplatefile“xcc-template.json”isalwaysoverwrittenafterXCCstart,other
filesonlyiftheydon’texistinthedatabase
- GotoCustomize>XCCSettingsandverifythatthefilesweresuccessfullycreated.
3. Gridtemplatefilesupdate:
- Thelistoftemplateswillbeupdatedafterapplicationrestart.
4. Allfilesfrom<CUSTOMIZATION_PATH>/xcc/customwillbecopiedtotheXCCdatabase
- Onlyifthe<CUSTOMIZATION_PATH>wasconfiguredontheAdminDashboard.
- GotoXCCSettingsandverifythatthefilewassuccessfullycreated.
- Ifcustom.css/custom.jsdonotexist,botharecreated.
- YoucangotoCustomize>XCCSettingsandverifythatthefilewassuccessfullycreated.
5. DatabasecontentsarebackedupinXMLformat
- IfbackupfunctionalityisactivatedforXCCand<CUSTOMIZATION_PATH>was
configuredonpage/xcc/admin.
- ZIPfilecontainingXMLfiles(XCCpages)willbecreatedin<CUSTOMIZATION_PATH
>/xcc/exportdirectory.

XCCTechnicalUser’sGuide
XCC_R_12.0.0
12/79
- ZIPFileshavethepattern“export<TIMESTAMP>”whereTIMESTAMPisaUNIX
timestampoftheexporttime,thatis:a12digitnumberrepresentingthemilliseconds
thathavepassedfrom1.1.1970tothetimerepresented.

XCCTechnicalUser’sGuide
XCC_R_12.0.0
13/79
4 Installation
4.1 InstallationPrerequisitesTheXCCApplicationcanbeinstalledonanygivenWebSphereApplicationServer(version8+)aswell
asonaWebSphereApplicationCluster.
IfyouwanttohaveXCClogsseparatedfromanyotherIBMConnectionslogs,youmaycreateanew
WebSphereApplicationServer.
4.1.1 CreatinganewApplicationServer(optional)
Step Instructions
1 OpentheIntegratedSolutionsConsole(ISC)ofyourDeploymentmanagerandperformthe
followingsteps.
2 Navigateto“Servers>Addaserver”.
2 Click“Next”.

XCCTechnicalUser’sGuide
XCC_R_12.0.0
14/79
3 Pleaseenteraservernameofyourchoiceandclick"Next".
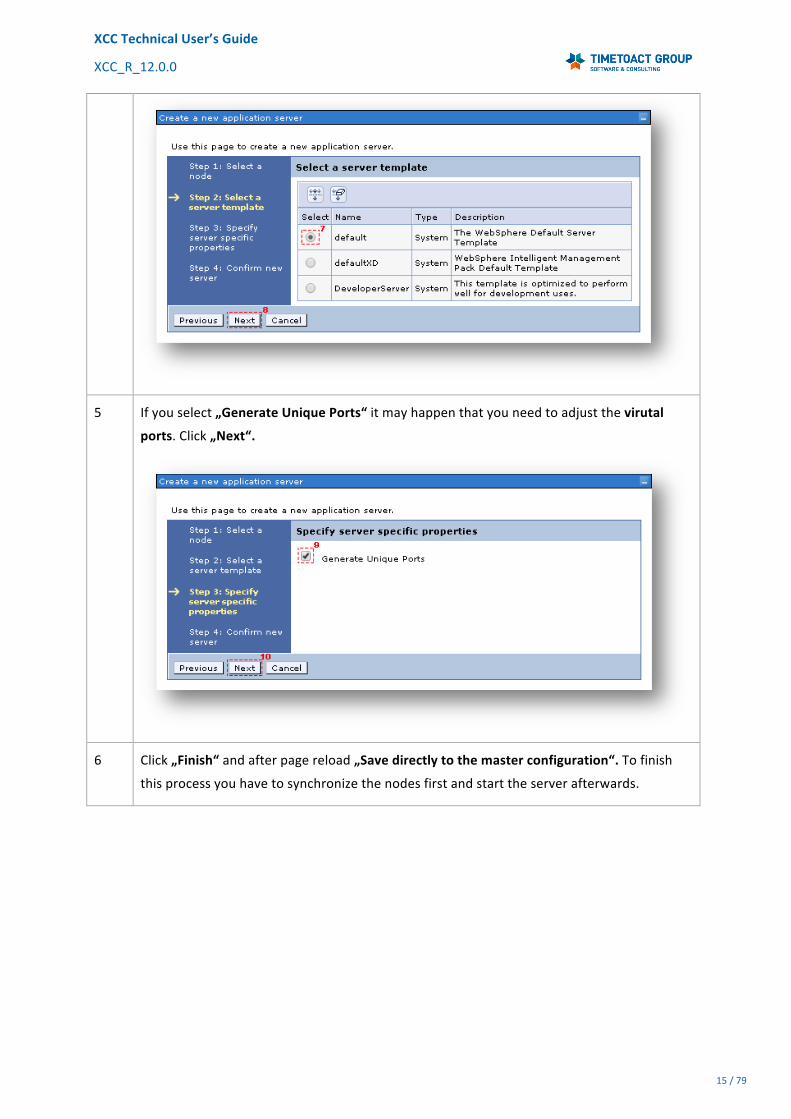
4 Select„default“andclick„Next“.
XCCTechnicalUser’sGuide
XCC_R_12.0.0
15/79
5 Ifyouselect„GenerateUniquePorts“itmayhappenthatyouneedtoadjustthevirutal
ports.Click„Next“.
6 Click„Finish“andafterpagereload„Savedirectlytothemasterconfiguration“.Tofinish
thisprocessyouhavetosynchronizethenodesfirstandstarttheserverafterwards.

XCCTechnicalUser’sGuide
XCC_R_12.0.0
16/79
4.1.2 Enabletracelogstoanalyzeerrors(optional)Inordertoanalyzeerrors,wewillaskyoutoenabletracelogsonyourserver.Theselogsarenot
configuredto“Finest”levelbydefaulttoincreasetheserversperformance.Byfollowingthe
followinginstructions,youenabletracelogsatfinestlevel.Thesesettingsarediscardedafterthe
nextCluster/AppServerrestartautomaticallyformakingsureyourapplicationsperformanceis
maximized.
Step Instructions
1 PleaseopentheISC("WebSphereIntegratedSolutionsConsole")andloginasan
administrativeuser.
2 ClickontheleftsideonTroubleshooting>Logsandtrace.
XCCTechnicalUser’sGuide
XCC_R_12.0.0
17/79
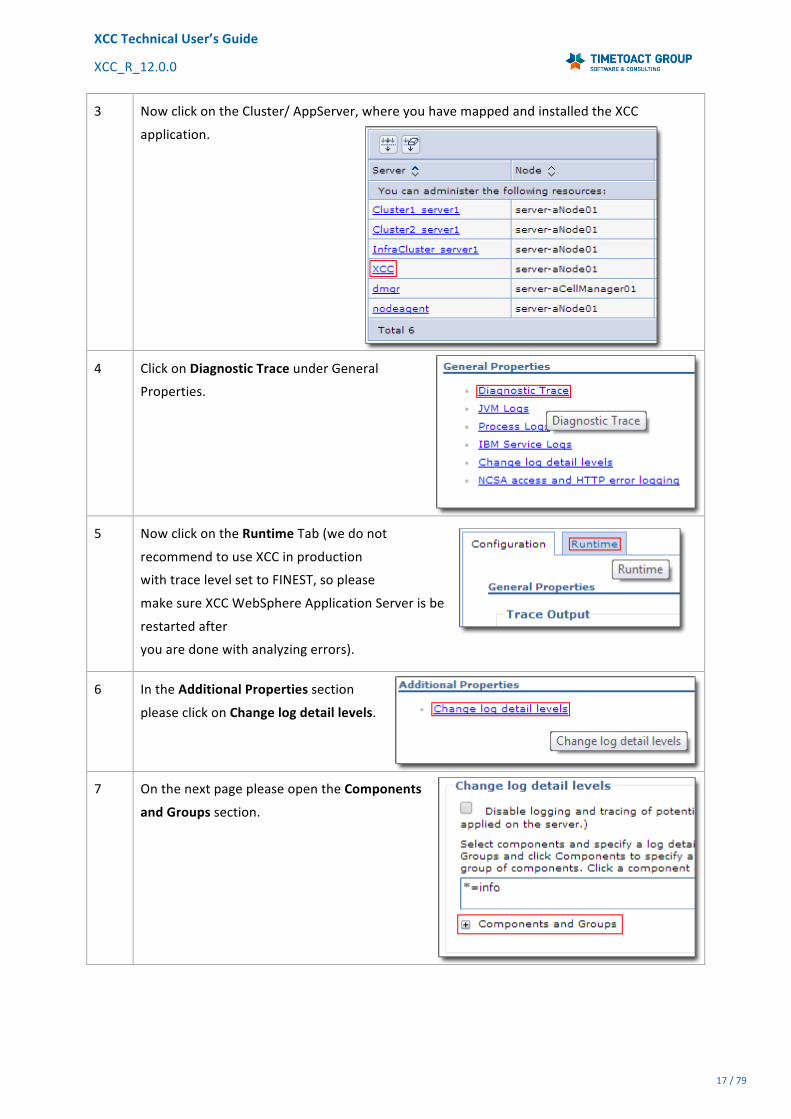
3 NowclickontheCluster/AppServer,whereyouhavemappedandinstalledtheXCC
application.
4 ClickonDiagnosticTraceunderGeneral
Properties.
5 NowclickontheRuntimeTab(wedonot
recommendtouseXCCinproduction
withtracelevelsettoFINEST,soplease
makesureXCCWebSphereApplicationServerisbe
restartedafter
youaredonewithanalyzingerrors).
6 IntheAdditionalPropertiessection
pleaseclickonChangelogdetaillevels.
7 OnthenextpagepleaseopentheComponents
andGroupssection.

XCCTechnicalUser’sGuide
XCC_R_12.0.0
18/79
8 Inthelistthatappears,pleasesearchthelist
sectionde.timetoact.*.
9 Clickwiththeleftmousekeyonde.timetoact.*andadropdownmenuwillappear.
Sometimesitmayhappenthatyouhavetoscrolltothebottomofthepagetoseethepopup
window.
NowclickonMessageandTraceLevelsfirstandthanonfinest.
10 Nowyouhavetoapplyyourchangesbyclickingon
theApplyButtonatthebottomofthepage.
11 NowyouhavetogotoyourXCCpageandtrytoreproducetheissuetobetraced.Please
makesurethatthepagewillbeloadedcompletelyoncesothatthetracelogsarewritten.
NowyouhavetoopenthelogsarchiveofyourCluster/AppServeronyourserver.

XCCTechnicalUser’sGuide
XCC_R_12.0.0
19/79
PleasecopythefilesSystemOut.log,trace.logandSystemErr.logandaddthesefilestoyour
email.

XCCTechnicalUser’sGuide
XCC_R_12.0.0
20/79
4.1.3 WebSphereApplicationServerconfigurations(required)TheonlyWebSphereApplicationServerconfigurationthatneedstobedoneistodisabletheSecurity
integrationforWebcontainer.Inordertodoso,clickonyourXCCserver,gotoWebContainer
Settings>Webcontainer>SessionmanagementandmakesuretheSecurityIntegrationcheckboxis
unchecked!
4.2 XCCInstallationAttention:TheXCChastobeinstalledintoaWebSphereApplicationServerprocessrunningwithin
yourIBMConnectionssystem!
Step Instructions
1 OpentheIntegratedSolutionsConsole(ISC)ofyourDeploymentmanagerandperformthe
followingsteps.
2 Navigateto“Applications>WebSphereenterpriseapplications”.

XCCTechnicalUser’sGuide
XCC_R_12.0.0
21/79
3 Click„Install“
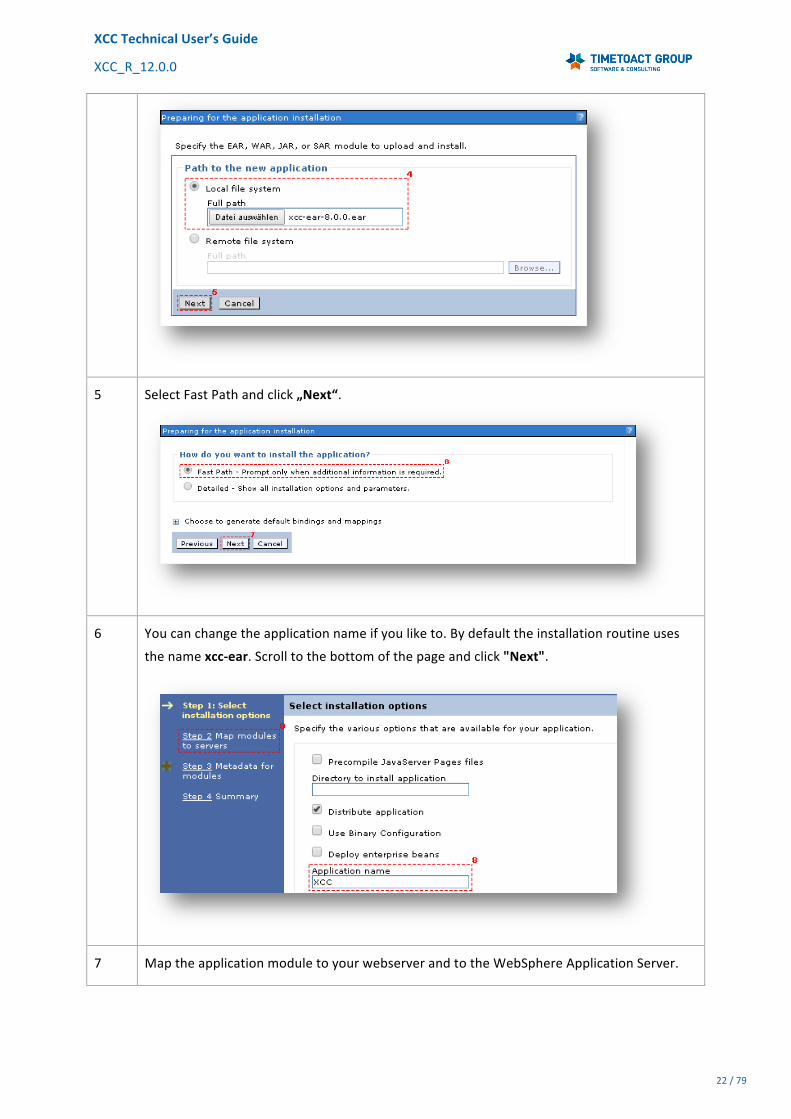
4 Enterthepathtoxcc-ear-<version>.earandclick"Next".
XCCTechnicalUser’sGuide
XCC_R_12.0.0
22/79
5 SelectFastPathandclick„Next“.
6 Youcanchangetheapplicationnameifyouliketo.Bydefaulttheinstallationroutineuses
thenamexcc-ear.Scrolltothebottomofthepageandclick"Next".
7 MaptheapplicationmoduletoyourwebserverandtotheWebSphereApplicationServer.

XCCTechnicalUser’sGuide
XCC_R_12.0.0
23/79
8 Click„Finish“andafterpagereload„Savedirectlytothemasterconfiguration“.
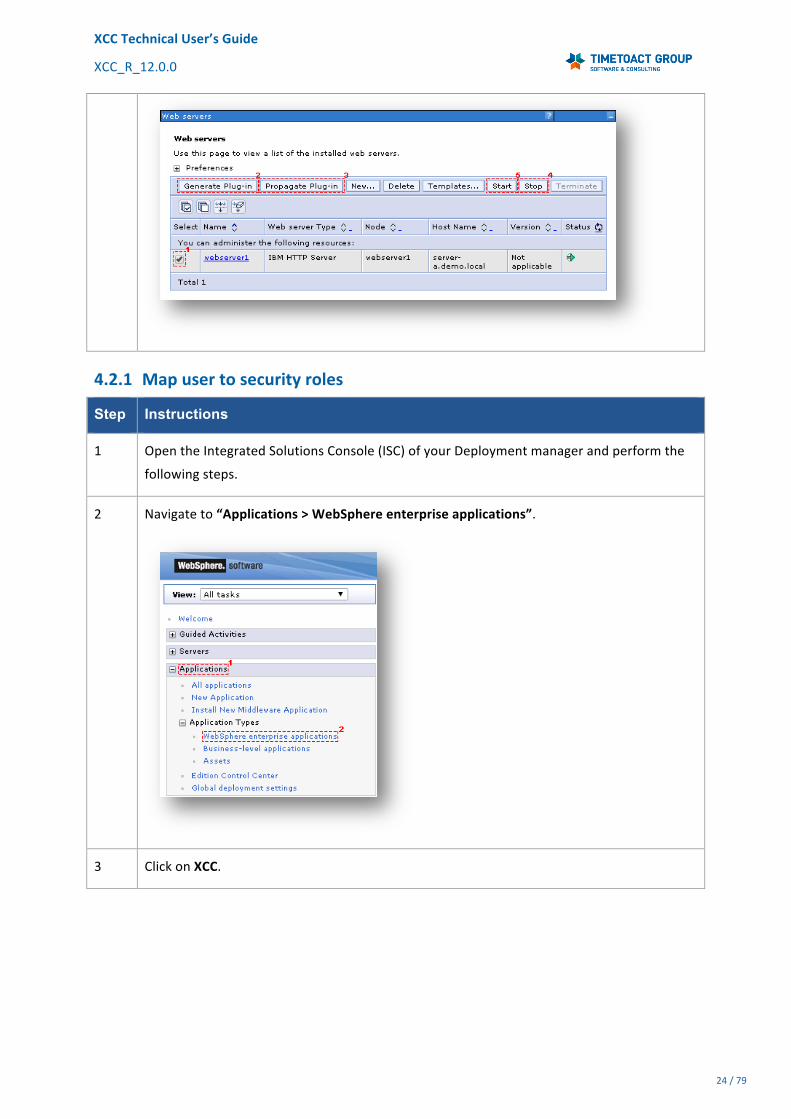
9 AftersavingtheconfigurationgotoServers>ServerTypes>Webservers,generateand
propagatetheHTTPServerPlug-InandrestarttheHTTPServer.
AfterwardsyouhavetostarttheinstalledXCCapplication,thereforegotoApplications>
ApplicationTypes>WebSphereenterpriseapplicationsandselectthecheckboxfor"xcc-
ear"andclick"Start".
XCCTechnicalUser’sGuide
XCC_R_12.0.0
24/79
4.2.1 Mapusertosecurityroles
Step Instructions
1 OpentheIntegratedSolutionsConsole(ISC)ofyourDeploymentmanagerandperformthe
followingsteps.
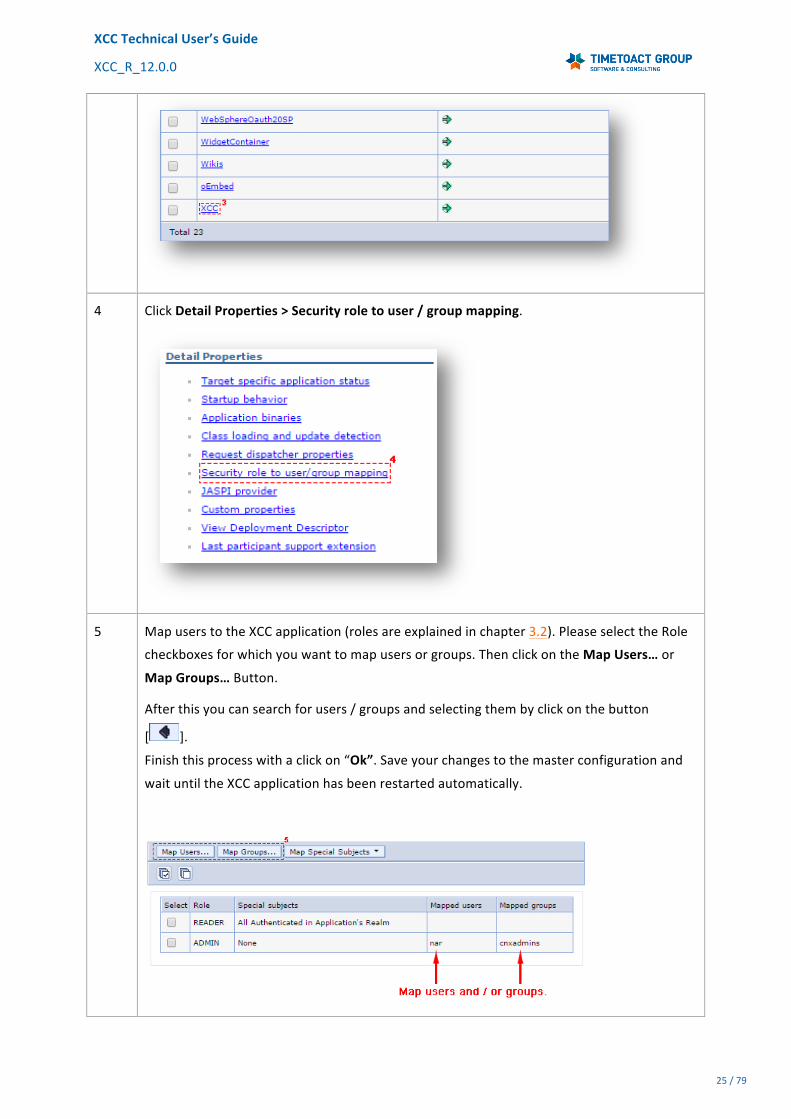
2 Navigateto“Applications>WebSphereenterpriseapplications”.
3 ClickonXCC.
XCCTechnicalUser’sGuide
XCC_R_12.0.0
25/79
4 ClickDetailProperties>Securityroletouser/groupmapping.
5 MapuserstotheXCCapplication(rolesareexplainedinchapter3.2).PleaseselecttheRole
checkboxesforwhichyouwanttomapusersorgroups.ThenclickontheMapUsers…or
MapGroups…Button.
Afterthisyoucansearchforusers/groupsandselectingthembyclickonthebutton
[ ].
Finishthisprocesswithaclickon“Ok”.Saveyourchangestothemasterconfigurationand
waituntiltheXCCapplicationhasbeenrestartedautomatically.

XCCTechnicalUser’sGuide
XCC_R_12.0.0
26/79
5 UpdateUpdatingtheXCCapplicationonaWebSphereApplicationserverisnotreallydifferenttoanupdate
ofotherenterpriseapplicationsonaWebSphereApplicationserver.
Important:WeimplementedafeaturetoimportandexportpagesfromthedatabaseasXMLfiles.
PleasemakesurethatyoumakeabackupofXCCyourpagesbeforeyoustarttheupdateprocedure.
Inordertodoso,pleasefollowtheinstructionsinthisdocumentation,describedinchapter8.14.
WeonlysupportanupdatetoXCCversion12.0.0fromversion>=11.0.X.Ifyouneedtoupdate
fromanearlierversionyouhavetoupdatethatversiontoXCCv11.0.XfirstandafterwardstoXCC
12.0.0.
Step Instructions
1 OpentheIntegratedSolutionsConsole(ISC)ofyourDeploymentManagerandnavigateto
Applications>ApplicationTypes>WebSphereenterpriseapplications,selecttheXCC
applicationandclickon„Update”.
2 Select„Replacetheentireapplication”andusethe„Browse”buttontonavigatetothe
updateearfileonyourfilesystem.
Click„Next”.
3 Choosethe„FastPath”installationoptionandclick"Next".
4 Step1:Selectinstallationoptions:click"Next"
5 Step2:Mapmodulestoservers:click"Next"
6 Step3:Summary:click„Finish”.
7 Click“Savedirectlytothemasterconfiguration”.
Afteranupdate:
RestarttheXCCapplicationusingtheISC.Pleasealsoclearthecacheofyourbrowser.Ifyouhave
modifiedoneormoreofthei18nfiles,pleasebackthemup.ThendeleteallfilesandrestarttheXCC
application.NewversionsofXCCwillbringnewerversionsofthepredefinedlanguagefilesandthe
templatefile.Incaseyouhavemodifiedanyofthelanguagesorcreatedanewlanguagefile,please
compareyourmodificationstothenewlycreatedfilesandre-applyyourmodificationsor
complementyourcreatedlanguagefileswiththenewkeysmissinginyourolderversionfiles.After
thisyouhavetouploadthenewversionsofthei18nfiles.Furtherdetailsonthistopiccanbefound
inchapter8.9.

XCCTechnicalUser’sGuide
XCC_R_12.0.0
27/79
5.1 MSSQLupdatescript(required)IfyouuseMSSQLasdatabaseforXCC,youhavetofollowthissteptoadjusttheexistingdatabase
scheme:
Pleaseexecutethe„MSSQL_migration_script.sql“fromtheXCCreleasepackageSQLScripts
folder.PleaserestarttheIBMWebSphereApplicationServer/IBMWebSphereCluster,whichyou
usedfortheXCC.
5.2 UpdatingtoXCC12ThelanguagefilesinXCC11havebeenchanged.Ifyouareupdatingfromapreviousversion,you
havetodeletealllanguagefilesonyoursystemandrestarttheapplication.
Important:Ifyouhavecustomizedyourcurrentlanguagefiles,itisnessesarytomanuallymerge
thechangeswiththenewlanguagefiles.

XCCTechnicalUser’sGuide
XCC_R_12.0.0
28/79
6 DatabaseXCCsupportsmultipleRDMSasitsdatastorage.FollowingyouwillseestepstoinstallXCConthe
supporteddatabasesystems.
6.1 UsingDB2asdatabaseImportant:YouMUSTbeloggedinintotheoperatingsystemasDB2administratorwhenyoucreate
thedatabase(normally:db2admin)!
6.1.1 CreateDB2database-WindowsWehaveincludedaSQLscriptfileforeachsupportedRDBMSintotheXCCReleasePackagezipfile.
TheSQLscriptscanbefoundinthesubdirectory"SQLScripts".
Step Instructions
1 OpenIBMDB2"CommandWindow-
Administrator":
2 Runthefollowingcommand:
db2-tvf<XCC_PACKAGE_PATH>/Create_XCC_DB2_Database.sql

XCCTechnicalUser’sGuide
XCC_R_12.0.0
29/79
Important:Weusethedefaultuser"LCUSER"withinthisscriptfiletograntthenecessaryaccess
rightstothedatabase.IfyouwanttouseanotherDB2useryouMUSTchangetheGRANT
instructionsinthescriptfilebeforerunningit!
3 Closethecommandwindow.
6.1.2 CreateDB2databaseforLinux(SingleandMultipleInstance)
Step Instructions
1 ConnecttoyourLinuxoperatingsystemwiththeinstanceuser(e.g.db2inst1).
Important:Ifyougotmultipleinstances,youneedtoconfigurethesetupasfollowing:
". /home/<DB2_INSTANCE_USER>/sqllib/db2profile"
2 Runthefollowingcommand:
db2-tvf<XCC_PACKAGE_PATH>/Create_XCC_DB2_Database.sql
Important:Weusethedefaultuser"LCUSER"withinthisscriptfiletograntthenecessaryaccess
rightstothedatabase.IfyouwanttouseanotherDB2useryouMUSTchangetheGRANT
instructionsinthescriptfilebeforerunningit!
3 Logoutfromsystem.
6.1.3 CreateDB2databaseforIBMI/AS400WehaveincludedaSQLscriptfileforeachsupportedRDBMSintotheXCCReleasePackagezipfile.
TheSQLscriptscanbefoundinthesubdirectory"SQLScripts".
Step Instructions

XCCTechnicalUser’sGuide
XCC_R_12.0.0
30/79
1 IfyougotaDB2onaIBMIOperatingSysteminstalled,youwillnotbeabletousethedefaultSQL
script.SoyouwillfindanextrascriptfortheIBMIsystem,whichyouhavetoruninsteadofthe
defaultSQLscript.WerecommendtousetheIBMTool“Navigatorfor
i“torunthescript.
2 Important:Weusethedefaultuser"LCUSER"withinthisscriptfiletograntthenecessaryaccess
rightstothedatabase.IfyouwanttouseanotherDB2useryouMUSTchangetheGRANT
instructionsinthescriptfilebeforerunningit!
6.1.4 CreateDB2JDBCprovider(optional)YoumayreuseanexistingJDBCprovidere.g."activitiesJDBC".Ifyouwanttohaveaclearseparation
fortheXCCdatabasefollowtheseinstructions.
Step Instructions
1 OpentheIntegratedSolutionsConsole(ISC)ofyourDeploymentmanagerandperformthe
followingsteps.
2 Navigateto“Resources>JDBC>JDBCProvider”.
XCCTechnicalUser’sGuide
XCC_R_12.0.0
31/79
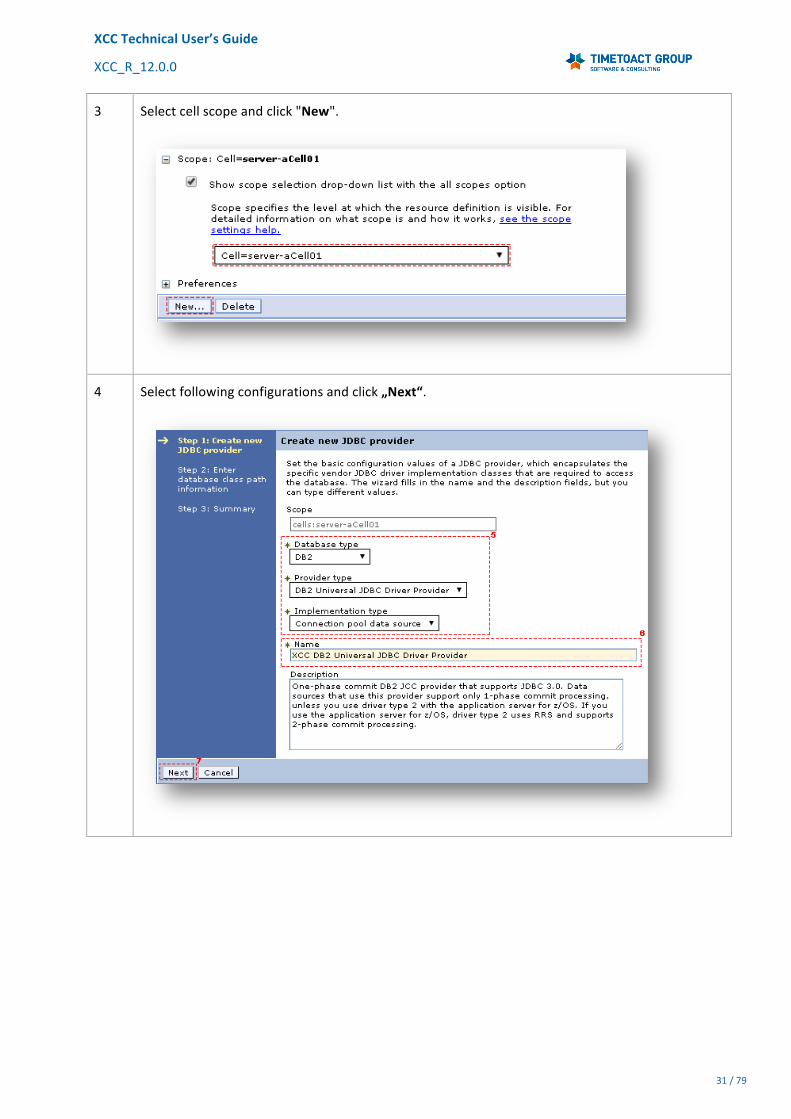
3 Selectcellscopeandclick"New".
4 Selectfollowingconfigurationsandclick„Next“.

XCCTechnicalUser’sGuide
XCC_R_12.0.0
32/79
5 Important:PleasemakesurethatthevariablesaresetintheEnvironment-WebSphere
variables.
Click“Next”
6 Verifythesummary,click"Finish"and“Saveyourchangesdirectlytothemasterconfiguration”.
6.1.5 CreateDB2datasource
Step Instructions
1 OpentheIntegratedSolutionsConsole(ISC)ofyourDeploymentmanagerandperformthefollowing
steps.
2 NavigatetoResources>JDBC>Datasources.

XCCTechnicalUser’sGuide
XCC_R_12.0.0
33/79
3 Selectcellscopeandclick"New".
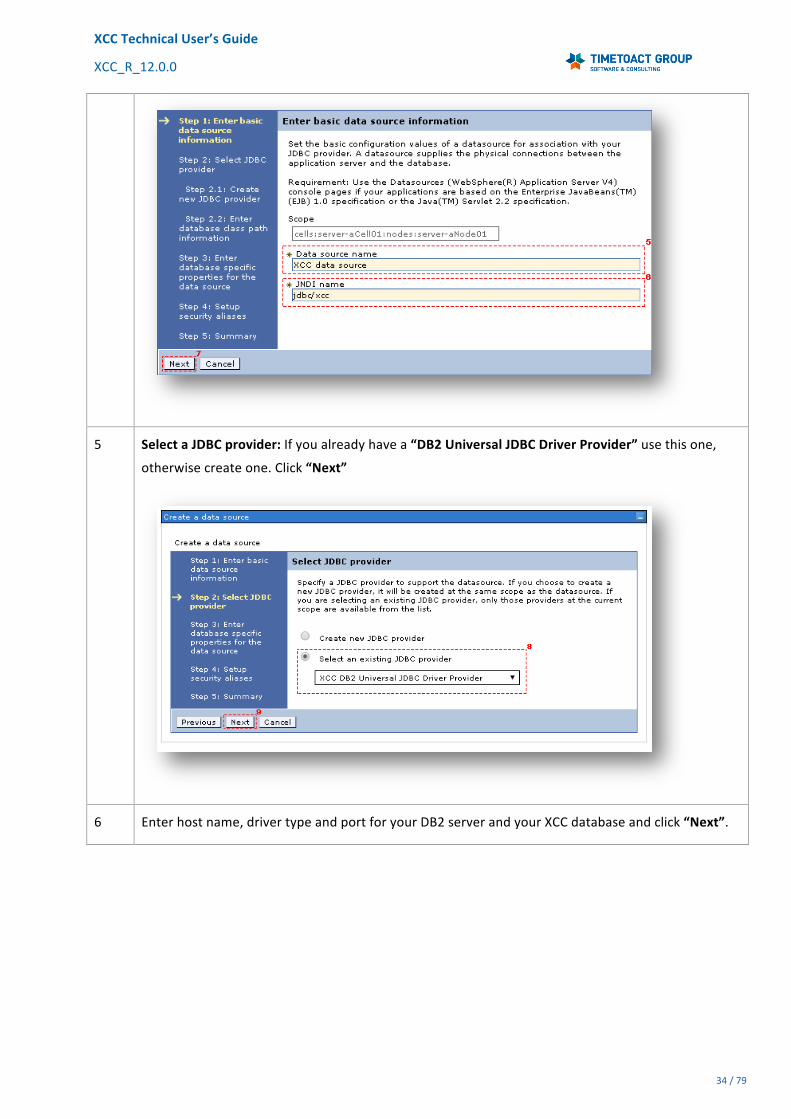
4 EnteradatasourcenameofyourchoiceandasJNDInamepleaseenter“jdbc/xcc”.
Click"Next"
XCCTechnicalUser’sGuide
XCC_R_12.0.0
34/79
5 SelectaJDBCprovider:Ifyoualreadyhavea“DB2UniversalJDBCDriverProvider”usethisone,
otherwisecreateone.Click“Next”
6 Enterhostname,drivertypeandportforyourDB2serverandyourXCCdatabaseandclick“Next”.

XCCTechnicalUser’sGuide
XCC_R_12.0.0
35/79
7 SelectasecurityauthenticationaliasforexampleactivitiesJAASAuth,makesurethatthedatabase
user,youselectedintheXCCcreatedatabasescript(defaultLCUSER),ismappedtothisalias.
Click„Next“onthefollowingscreenand„Finish”onthesummaryscreen.
8 OpenthedatasourceXCCandnavigatetoAdditionalProperties>CustomProperties
9 ChangepropertyresultSetHoldabilitytovalue1(type:Integer)
10 CreateanewpropertydowngradeHoldCursorsUnderXaandsetitsvaluetotrue(type:Boolean)
XCCTechnicalUser’sGuide
XCC_R_12.0.0
36/79
11 Important:IfyouareusingaDB2onaIBMI/AS400operatingsystem,youneedtocreatethe
propertycurrentSQLIDwiththevalueXCC(type:String).
IfarenotrunningonanIBMI/AS400os,youcanignorethisstep.
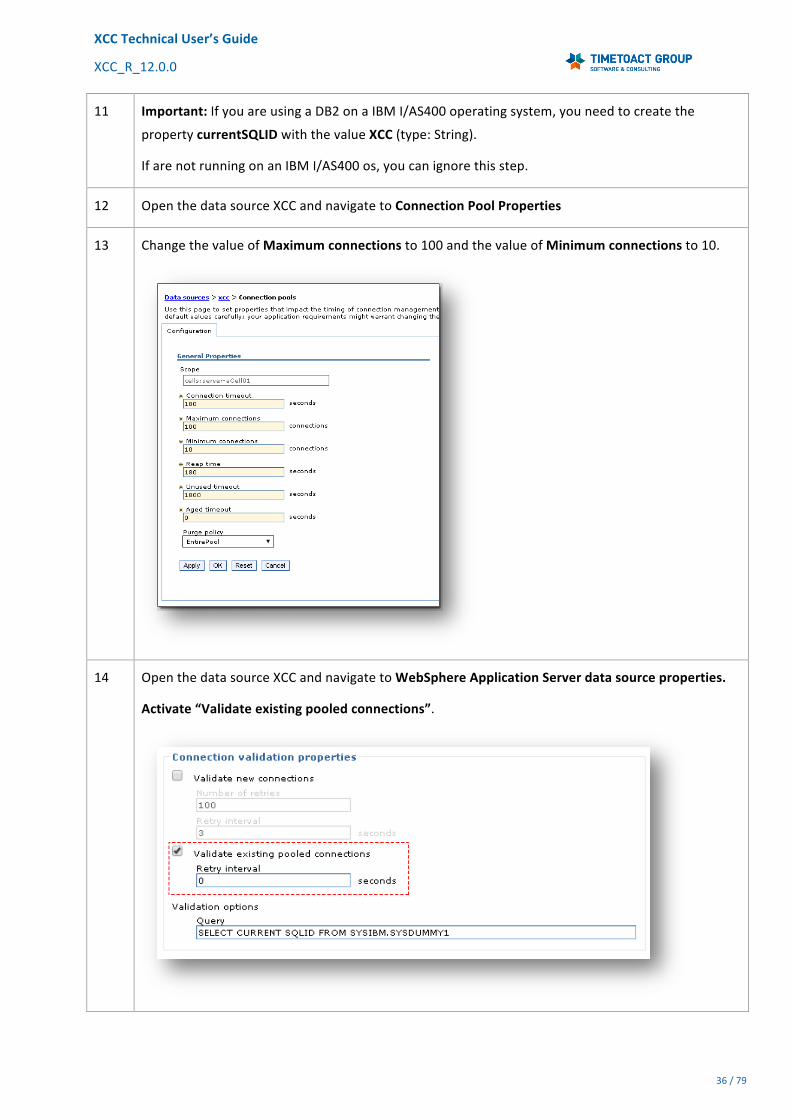
12 OpenthedatasourceXCCandnavigatetoConnectionPoolProperties
13 ChangethevalueofMaximumconnectionsto100andthevalueofMinimumconnectionsto10.
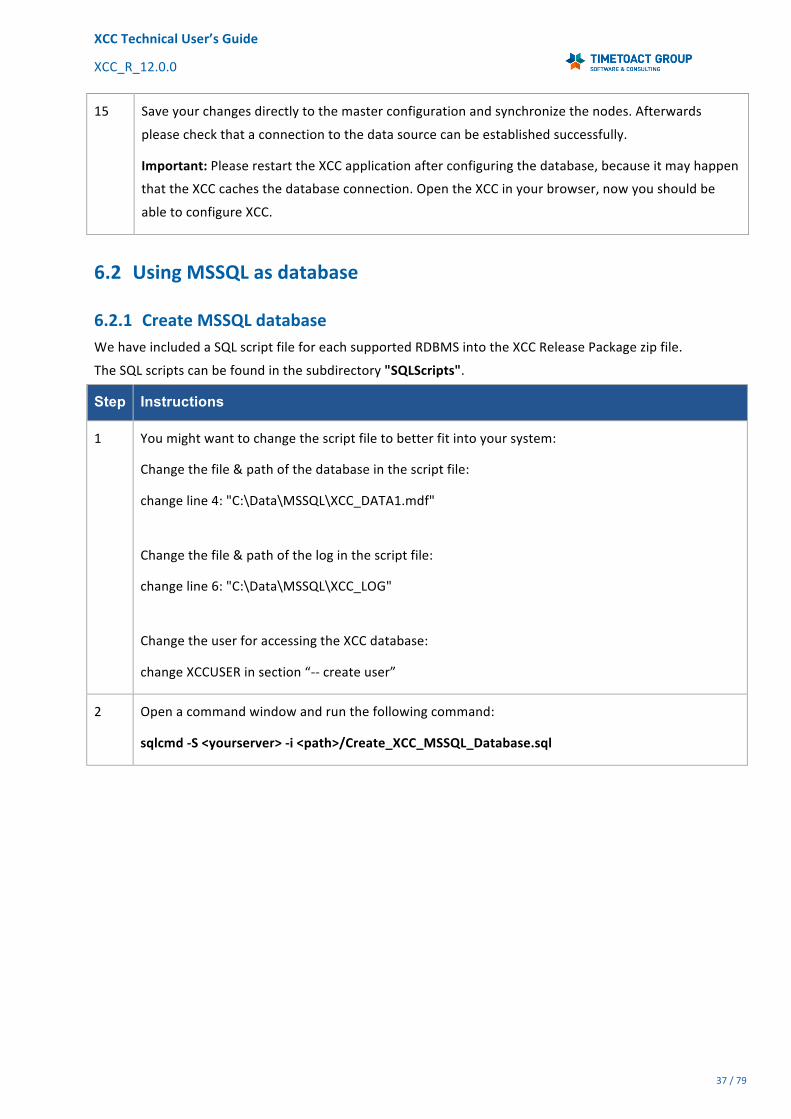
14 OpenthedatasourceXCCandnavigatetoWebSphereApplicationServerdatasourceproperties.
Activate“Validateexistingpooledconnections”.
XCCTechnicalUser’sGuide
XCC_R_12.0.0
37/79
15 Saveyourchangesdirectlytothemasterconfigurationandsynchronizethenodes.Afterwards
pleasecheckthataconnectiontothedatasourcecanbeestablishedsuccessfully.
Important:PleaserestarttheXCCapplicationafterconfiguringthedatabase,becauseitmayhappen
thattheXCCcachesthedatabaseconnection.OpentheXCCinyourbrowser,nowyoushouldbe
abletoconfigureXCC.
6.2 UsingMSSQLasdatabase
6.2.1 CreateMSSQLdatabaseWehaveincludedaSQLscriptfileforeachsupportedRDBMSintotheXCCReleasePackagezipfile.
TheSQLscriptscanbefoundinthesubdirectory"SQLScripts".
Step Instructions
1 Youmightwanttochangethescriptfiletobetterfitintoyoursystem:
Changethefile&pathofthedatabaseinthescriptfile:
changeline4:"C:\Data\MSSQL\XCC_DATA1.mdf"
Changethefile&pathoftheloginthescriptfile:
changeline6:"C:\Data\MSSQL\XCC_LOG"
ChangetheuserforaccessingtheXCCdatabase:
changeXCCUSERinsection“--createuser”
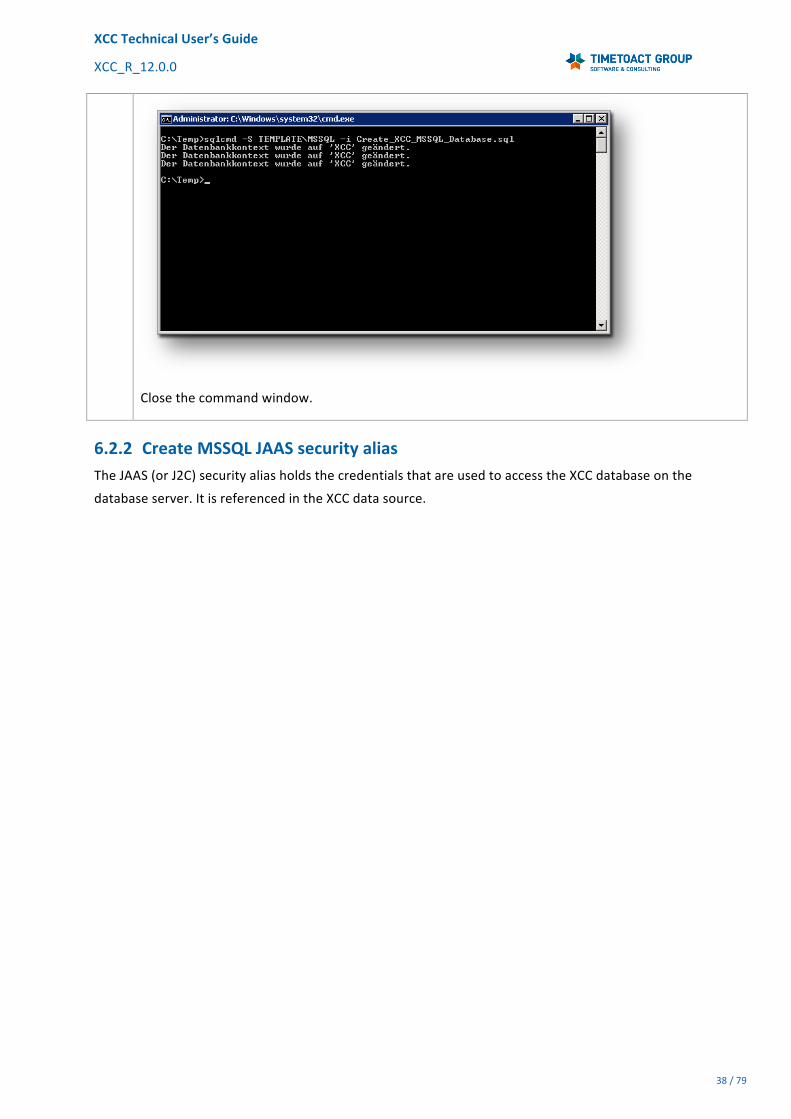
2 Openacommandwindowandrunthefollowingcommand:
sqlcmd-S<yourserver>-i<path>/Create_XCC_MSSQL_Database.sql
XCCTechnicalUser’sGuide
XCC_R_12.0.0
38/79
Closethecommandwindow.
6.2.2 CreateMSSQLJAASsecurityaliasTheJAAS(orJ2C)securityaliasholdsthecredentialsthatareusedtoaccesstheXCCdatabaseonthe
databaseserver.ItisreferencedintheXCCdatasource.

XCCTechnicalUser’sGuide
XCC_R_12.0.0
39/79
Step Instructions
1 OpentheIntegratedSolutionsConsole(ISC)ofyourDeploymentmanagerandperformthe
followingsteps.
2 Navigateto“Security>Globalsecurity”.
3 Insection"JavaAuthenticationandAuthorizationService"select"J2Cauthenticationdata"
4 Click"New":

XCCTechnicalUser’sGuide
XCC_R_12.0.0
40/79
5 Enterthevaluesandclick"OK".Afterwardssafeyourchangesdirectlytothemasterconfiguration.
6.2.3 CreateMSSQLJDBCprovider(optional)YoumayreuseanexistingJDBCprovidere.g."activitiesJDBC".Ifyouwanttohaveaclearseparation
fortheXCCdatabasefollowtheseinstructions.
Step Instructions
1 OpentheIntegratedSolutionsConsole(ISC)ofyourDeploymentmanagerandperformthe
followingsteps.
XCCTechnicalUser’sGuide
XCC_R_12.0.0
41/79
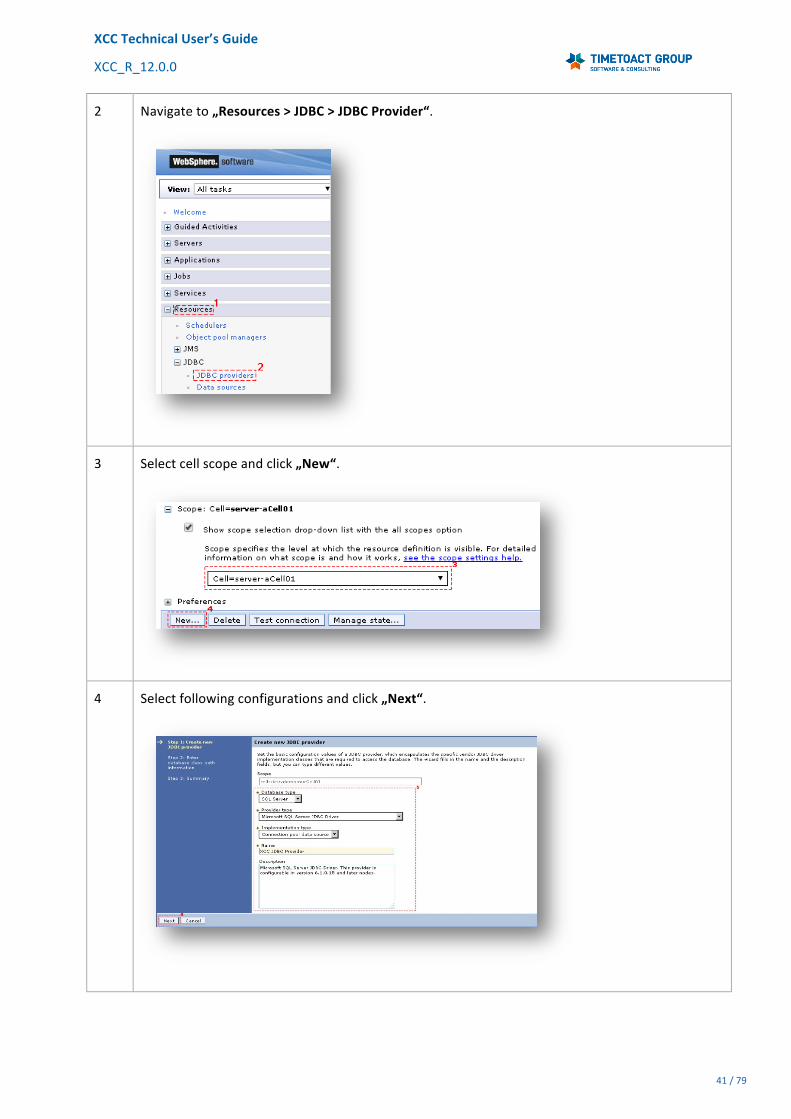
2 Navigateto„Resources>JDBC>JDBCProvider“.
3 Selectcellscopeandclick„New“.
4 Selectfollowingconfigurationsandclick„Next“.

XCCTechnicalUser’sGuide
XCC_R_12.0.0
42/79
5 Important:PleasemakesurethatthevariablesaresetintheEnvironment>WebSphere
variables.
Click„Next”
6 Verifythesummary,click„Finish“andsaveyourchangesdirectlytothemasterconfiguration.
6.2.4 CreateMSSQLdatasource
Step Instructions
1 OpentheIntegratedSolutionsConsole(ISC)ofyourDeploymentmanagerandperformthefollowing
steps.
2 NavigatetoResources>JDBC>Datasources.

XCCTechnicalUser’sGuide
XCC_R_12.0.0
43/79
3 Selectcellscopeandclick„New“.
4 EnteradatasourcenameofyourchoiceandasJNDInamepleaseenter„jdbc/xcc”.
Click„Next“
XCCTechnicalUser’sGuide
XCC_R_12.0.0
44/79
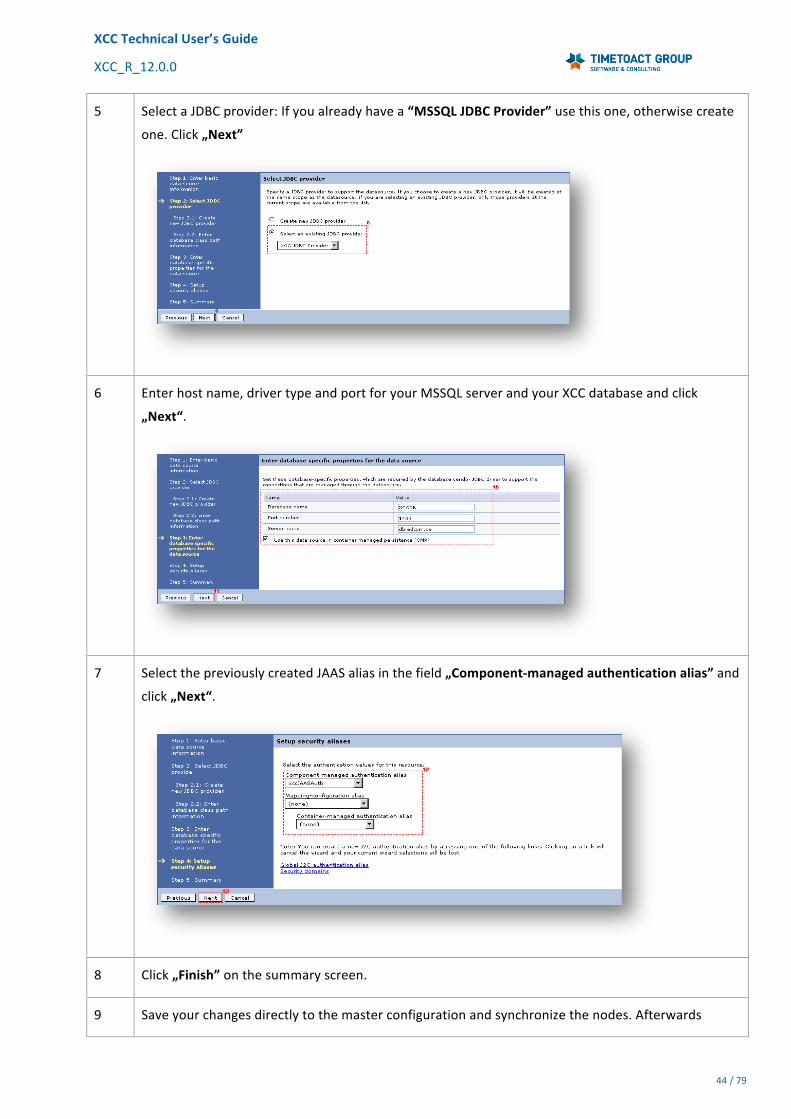
5 SelectaJDBCprovider:Ifyoualreadyhavea“MSSQLJDBCProvider”usethisone,otherwisecreate
one.Click„Next”
6 Enterhostname,drivertypeandportforyourMSSQLserverandyourXCCdatabaseandclick
„Next“.
7 SelectthepreviouslycreatedJAASaliasinthefield„Component-managedauthenticationalias”and
click„Next“.
8 Click„Finish”onthesummaryscreen.
9 Saveyourchangesdirectlytothemasterconfigurationandsynchronizethenodes.Afterwards

XCCTechnicalUser’sGuide
XCC_R_12.0.0
45/79
pleasecheckthataconnectiontothedatasourcecanbeestablishedsuccessfully.
Important:PleaserestarttheXCCapplicationafterconfiguringthedatabase,becauseitmayhappen
thattheXCCcachesthedatabaseconnection.OpentheXCCinyourbrowser,nowyoushouldbe
abletoconfigureXCC.
6.3 UsingOracleasdatabase
6.3.1 CreateOracledatabaseWehaveincludedaSQLscriptfileforeachsupportedRDBMSintotheXCCReleasePackagezipfile.
TheSQLscriptscanbefoundinthesubdirectory"SQLScripts".
Step Instructions
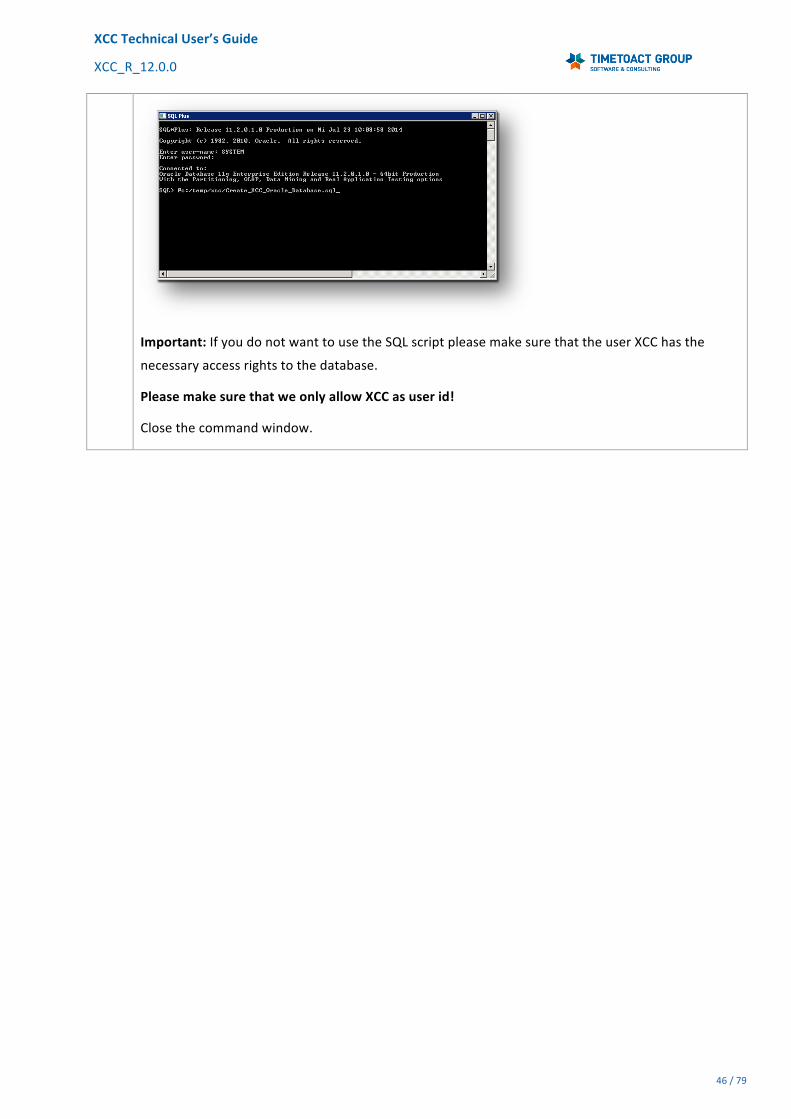
1 RuntheSQLPlustoolavailablefromyourOracleinstallation:
2 Logintothesystemandrunthefollowingcommand:
@<pathtoXCCinstallfiles>/Create_XCC_Oracle_Database.sql
XCCTechnicalUser’sGuide
XCC_R_12.0.0
46/79
Important:IfyoudonotwanttousetheSQLscriptpleasemakesurethattheuserXCChasthe
necessaryaccessrightstothedatabase.
PleasemakesurethatweonlyallowXCCasuserid!
Closethecommandwindow.

XCCTechnicalUser’sGuide
XCC_R_12.0.0
47/79
6.3.2 CreateOracleJAASsecurityaliasTheJAAS(orJ2C)securityaliasholdsthecredentialsthatareusedtoaccesstheXCCdatabaseonthe
databaseserver.ItisreferencedintheXCCdatasource.
Step Instructions
1 OpentheIntegratedSolutionsConsole(ISC)ofyourDeploymentmanagerandperformthe
followingsteps.
2 Navigateto„Security>Globalsecurity”.
3 Insection„JavaAuthenticationandAuthorizationService“select„J2Cauthenticationdata“
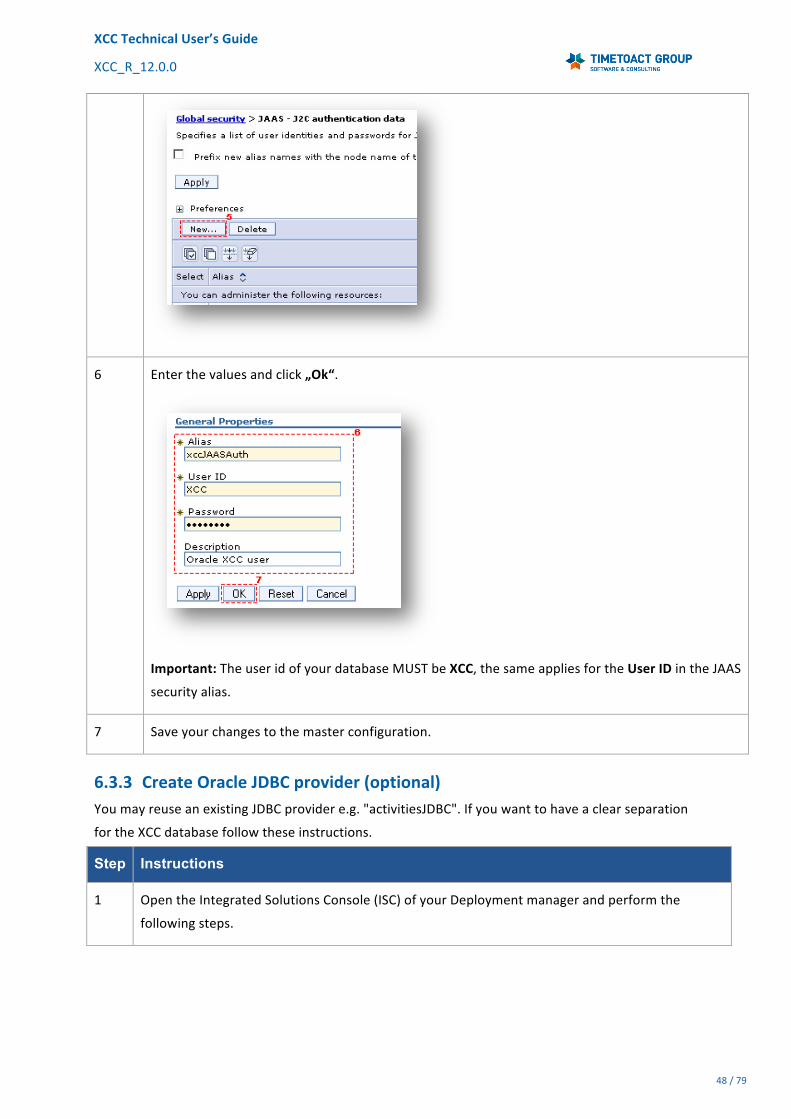
4 Click„New“:
XCCTechnicalUser’sGuide
XCC_R_12.0.0
48/79
6 Enterthevaluesandclick„Ok“.
Important:TheuseridofyourdatabaseMUSTbeXCC,thesameappliesfortheUserIDintheJAAS
securityalias.
7 Saveyourchangestothemasterconfiguration.
6.3.3 CreateOracleJDBCprovider(optional)YoumayreuseanexistingJDBCprovidere.g."activitiesJDBC".Ifyouwanttohaveaclearseparation
fortheXCCdatabasefollowtheseinstructions.
Step Instructions
1 OpentheIntegratedSolutionsConsole(ISC)ofyourDeploymentmanagerandperformthe
followingsteps.
XCCTechnicalUser’sGuide
XCC_R_12.0.0
49/79
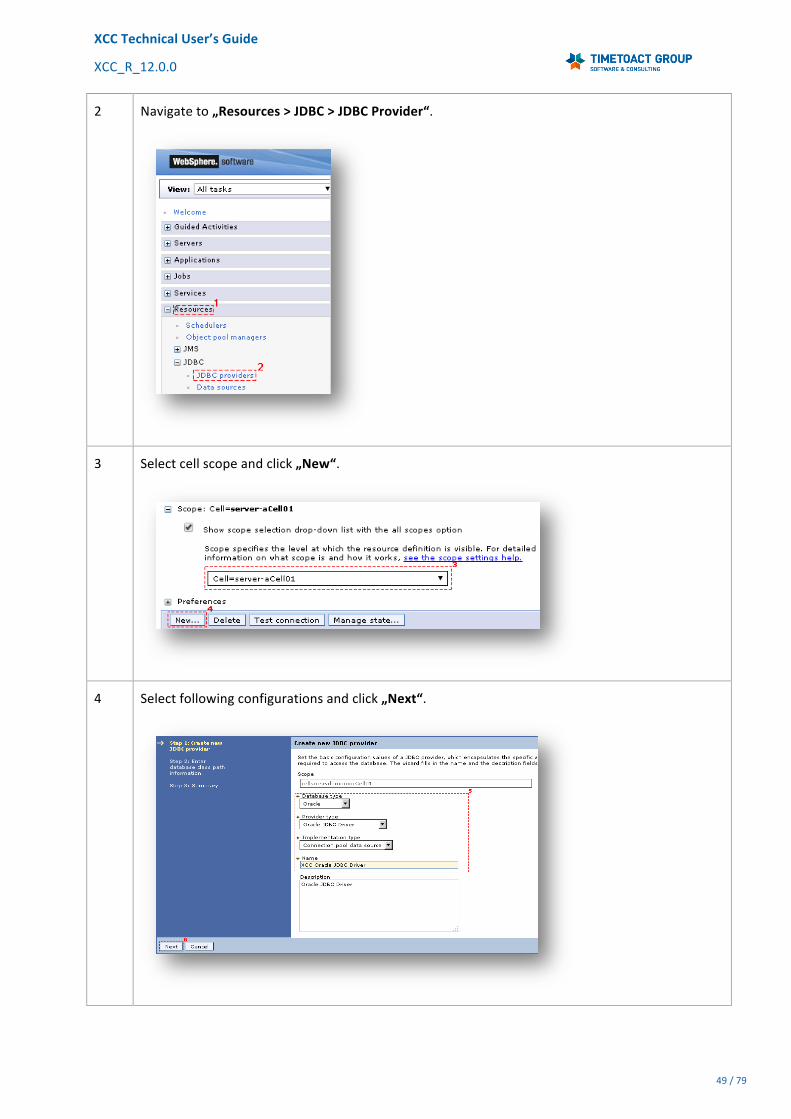
2 Navigateto„Resources>JDBC>JDBCProvider“.
3 Selectcellscopeandclick„New“.
4 Selectfollowingconfigurationsandclick„Next“.

XCCTechnicalUser’sGuide
XCC_R_12.0.0
50/79
5 Important:PleasemakesurethatthevariablesaresetintheEnvironment>WebSphere
variables.
Click„Next”
6 Verifythesummary,click„Finish“andsaveyourchangesdirectlytothemasterconfiguration.
6.3.4 CreateOracledatasource
Step Instructions
1 OpentheIntegratedSolutionsConsole(ISC)ofyourDeploymentmanagerandperformthefollowing
steps.
2 NavigatetoResources>JDBC>Datasources.

XCCTechnicalUser’sGuide
XCC_R_12.0.0
51/79
3 Selectcellscopeandclick„New“.
4 EnteradatasourcenameofyourchoiceandasJNDInamepleaseenter„jdbc/xcc”.
Click„Next“
XCCTechnicalUser’sGuide
XCC_R_12.0.0
52/79
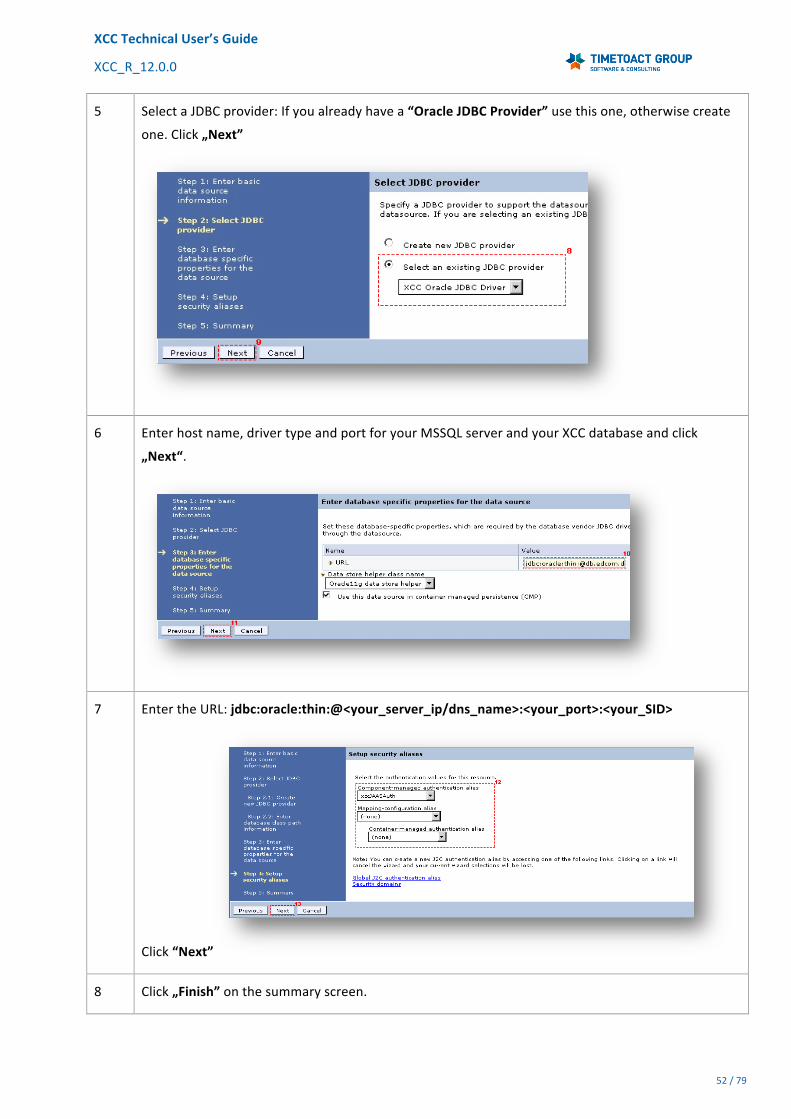
5 SelectaJDBCprovider:Ifyoualreadyhavea“OracleJDBCProvider”usethisone,otherwisecreate
one.Click„Next”
6 Enterhostname,drivertypeandportforyourMSSQLserverandyourXCCdatabaseandclick
„Next“.
7 EntertheURL:jdbc:oracle:thin:@<your_server_ip/dns_name>:<your_port>:<your_SID>
Click“Next”
8 Click„Finish”onthesummaryscreen.

XCCTechnicalUser’sGuide
XCC_R_12.0.0
53/79
9 Saveyourchangesdirectlytothemasterconfigurationandsynchronizethenodes.Afterwards
pleasecheckthataconnectiontothedatasourcecanbeestablishedsuccessfully.
Important:PleaserestarttheXCCapplicationafterconfiguringthedatabase,becauseitmayhappen
thattheXCCcachesthedatabaseconnection.OpentheXCCinyourbrowser,nowyoushouldbe
abletoconfigureXCC.
XCCTechnicalUser’sGuide
XCC_R_12.0.0
54/79
7 DatabaseMigrationStep Instructions
YoucanmigrateeachsupportedDatabasetoanothersupportedDatabase.Sometimesyoualso
wanttohaveanewenvironmente.g.ifyouwanttoupgradeIBMConnections.Thereforeyoudon’t
needtoworkonthedatabase,youonlyneedtoworkwiththeUserInterfaceofXCC.
1
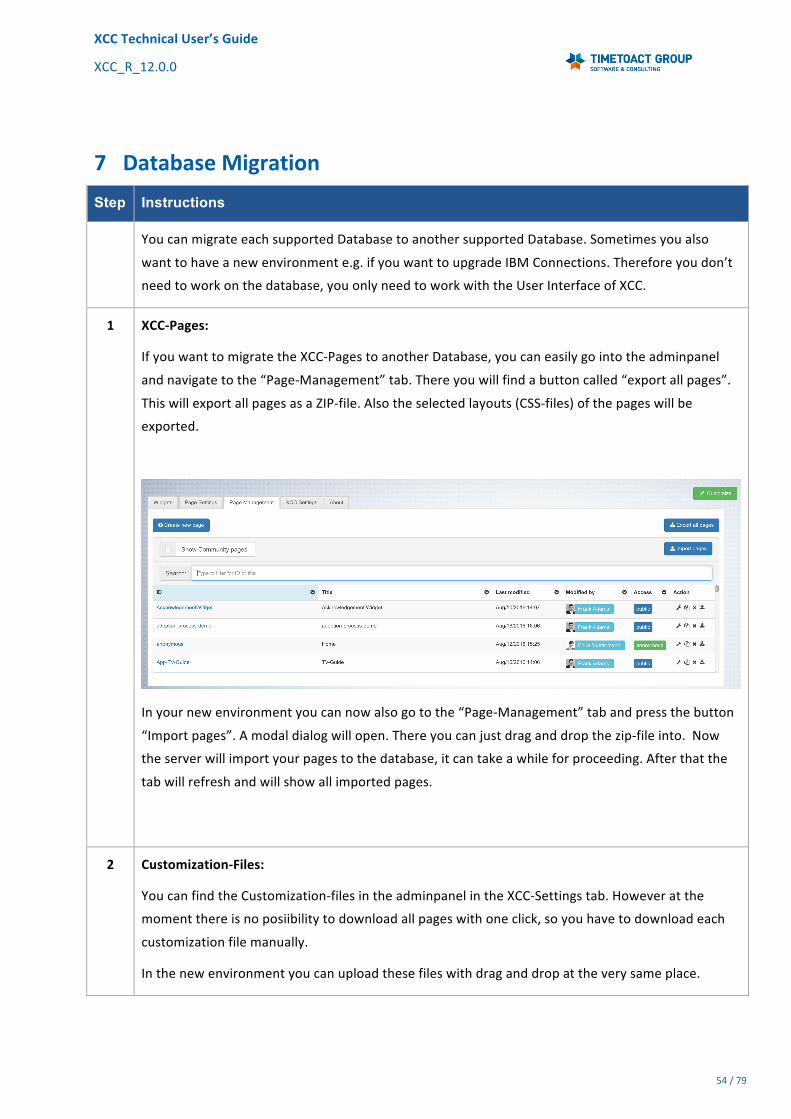
XCC-Pages:
IfyouwanttomigratetheXCC-PagestoanotherDatabase,youcaneasilygointotheadminpanel
andnavigatetothe“Page-Management”tab.Thereyouwillfindabuttoncalled“exportallpages”.
ThiswillexportallpagesasaZIP-file.Alsotheselectedlayouts(CSS-files)ofthepageswillbe
exported.
Inyournewenvironmentyoucannowalsogotothe“Page-Management”tabandpressthebutton
“Importpages”.Amodaldialogwillopen.Thereyoucanjustdraganddropthezip-fileinto.Now
theserverwillimportyourpagestothedatabase,itcantakeawhileforproceeding.Afterthatthe
tabwillrefreshandwillshowallimportedpages.
2 Customization-Files:
YoucanfindtheCustomization-filesintheadminpanelintheXCC-Settingstab.Howeveratthe
momentthereisnoposiibilitytodownloadallpageswithoneclick,soyouhavetodownloadeach
customizationfilemanually.
Inthenewenvironmentyoucanuploadthesefileswithdraganddropattheverysameplace.
XCCTechnicalUser’sGuide
XCC_R_12.0.0
55/79
8 Configuration
8.1 GeneralXCCconfigurationStep Instructions
AfterinstallingXCCyouwillseeaconfigurationpage(sincerelease6.0.0).HereyoucansetupXCC
configurationsinyourbrowser.Ifyouwanttomakechangeslater,youcanopentheconfiguration
pagemanuallyhttps://<your_server>/xcc/adminandedityoursettings.
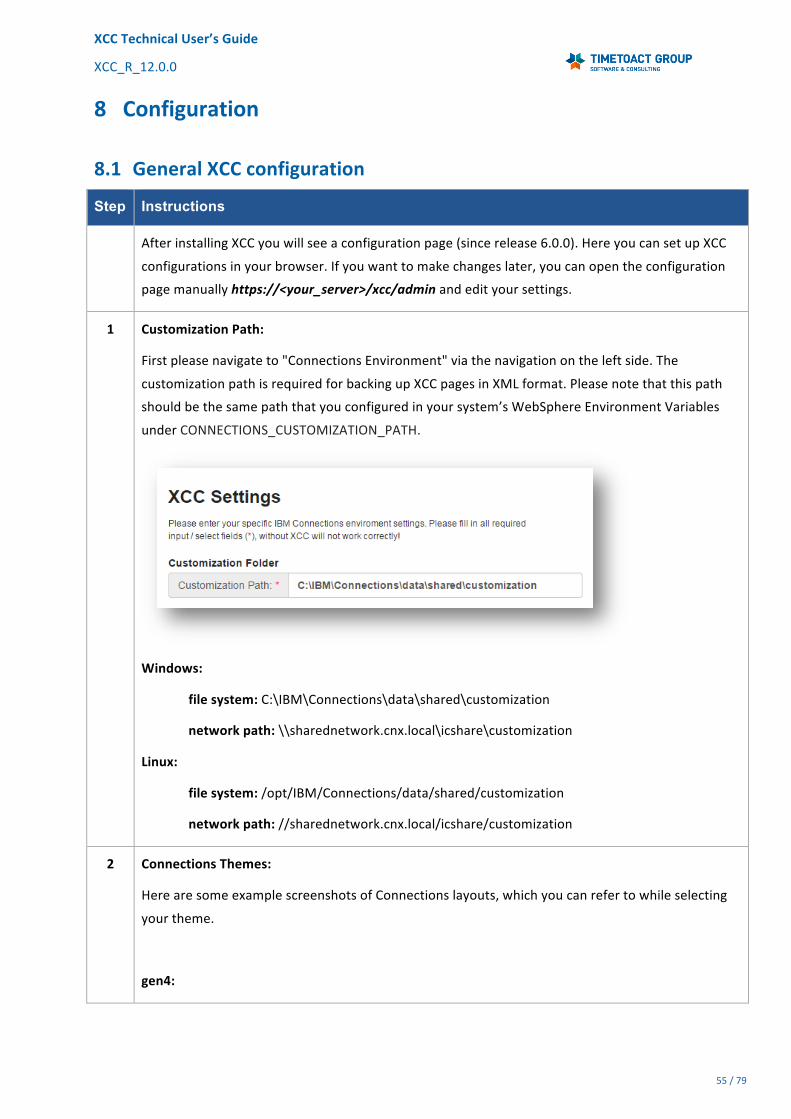
1 CustomizationPath:
Firstpleasenavigateto"ConnectionsEnvironment"viathenavigationontheleftside.The
customizationpathisrequiredforbackingupXCCpagesinXMLformat.Pleasenotethatthispath
shouldbethesamepaththatyouconfiguredinyoursystem’sWebSphereEnvironmentVariables
underCONNECTIONS_CUSTOMIZATION_PATH.
Windows:
filesystem:C:\IBM\Connections\data\shared\customization
networkpath:\\sharednetwork.cnx.local\icshare\customization
Linux:
filesystem:/opt/IBM/Connections/data/shared/customization
networkpath://sharednetwork.cnx.local/icshare/customization
2 ConnectionsThemes:
HerearesomeexamplescreenshotsofConnectionslayouts,whichyoucanrefertowhileselecting
yourtheme.
gen4:

XCCTechnicalUser’sGuide
XCC_R_12.0.0
56/79
hikariTheme:
3 ConnectionsSettings:
InordertoallowXCCadoptingyourConnectionslayout,pleasefilloutthefields“Connections
Version”(onlynecessary,ifwecannotgettheinformationautomatically)and“ConnectionsTheme”.
4 AutomaticBackup:
Checkthe“EnableBackup”propertyinthe“Backup”tab,ifyouwanttoenabletheautomatic
backupfeature.Selectoneofthreeoptions:Daily,weeklyormonthlytosetupthebackupschedule

XCCTechnicalUser’sGuide
XCC_R_12.0.0
57/79
respectively.
Bydefault,automaticbackupisdisabledfortheXCCapplication.
XCCTechnicalUser’sGuide
XCC_R_12.0.0
58/79
8.2 XCCAnonymousmodeconfigurations
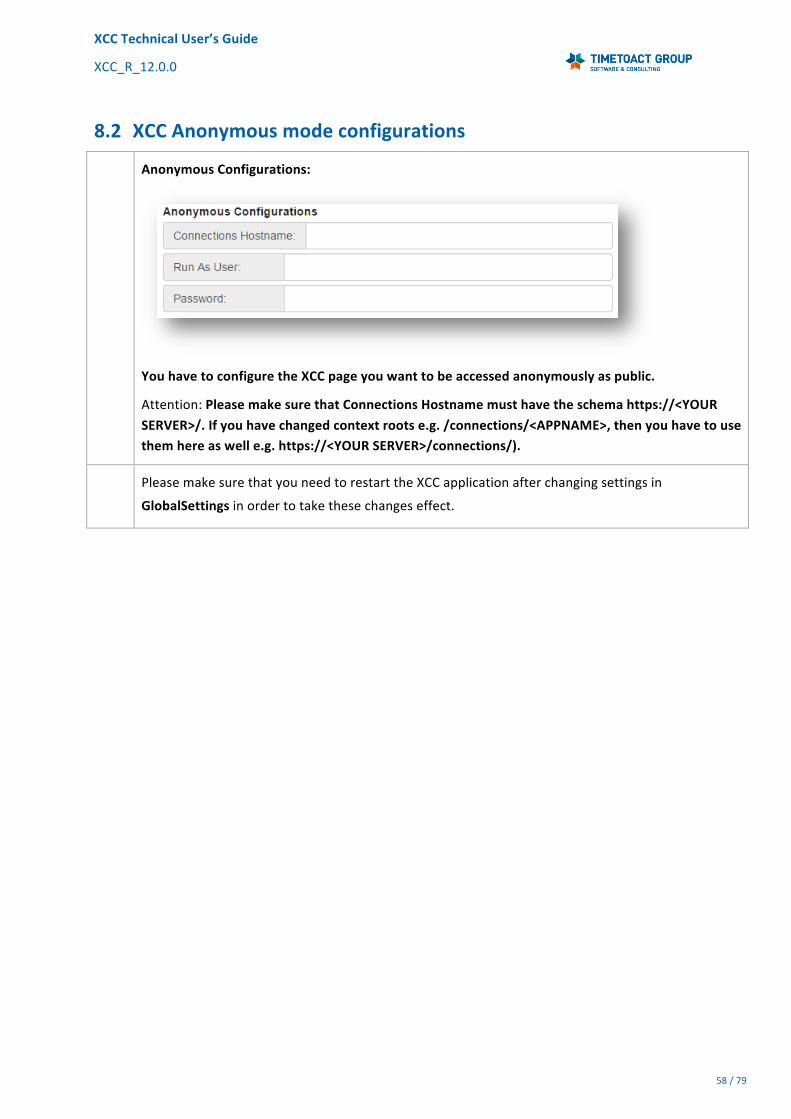
AnonymousConfigurations:
YouhavetoconfiguretheXCCpageyouwanttobeaccessedanonymouslyaspublic.
Attention:PleasemakesurethatConnectionsHostnamemusthavetheschemahttps://<YOURSERVER>/.Ifyouhavechangedcontextrootse.g./connections/<APPNAME>,thenyouhavetousethemhereaswelle.g.https://<YOURSERVER>/connections/).
PleasemakesurethatyouneedtorestarttheXCCapplicationafterchangingsettingsin
GlobalSettingsinordertotakethesechangeseffect.

XCCTechnicalUser’sGuide
XCC_R_12.0.0
59/79
8.3 XCCCommunitymodeconfigurationsIfyouwanttousetheXCCCommunityiWidget,youneedtoperformthefollowinginstructions.
8.3.1 widgets-config.xml
Step Instructions
1 OpenaWindowsshell(cmd.exe)andexecutefollowingscript(Alternativelyyoumayadjustthe
widgets-config.xmlmanuallyandsynchronizethenodesafterwardsintheISC):
cd C:\IBM\WebSphere\AppServer\profiles\Dmgr01\bin wsadmin -lang jython -user <wasadmin> -password <password> execfile("communitiesAdmin.py") CommunitiesConfigService.checkOutWidgetsConfig("<TEMP_DIRECTORY>", AdminControl.getCell())
2 Donotclosetheshellwindow
Pleaseopenthejustcheckedoutwidgets-config.xmlfileinanXMLeditorofyourchoiceandaddthe
followingcodetothe<resourcetype=“community“…>node.
IfyouareusingaversionlowerthanConnections5.5pleaseusethiscode:
<!-- TIMETOACT GROUP - XCC4Communities --> <widgetDef defId="XCC2" description="XCC.desc" bundleRefId="XCC" primaryWidget="false" modes="fullpage" showInPalette="true" uniqueInstance="true" iconUrl="/xcc/css/images/XCCLogo_S.png" url="/xcc/templates/iWidgetXCCCommunityDefinition.xml?etag={version}"> </widgetDef> <!-- TIMETOACT GROUP - XCC4Communities -->

XCCTechnicalUser’sGuide
XCC_R_12.0.0
60/79
Otherwisepleaseusethefollowingcode:
<!-- TIMETOACT GROUP - XCC4Communities --> <widgetDef defId="XCC2" description="XCC.desc" bundleRefId="XCC" iconUrl="/xcc/css/images/XCCLogo_S.png" modes="view edit fullpage" themes="wpthemeNarrow wpthemeWide wpthemeBanner" uniqueInstance="true" url="/xcc/templates/iWidgetXCCCommunityDefinition.xml?etag={version}"> <itemSet> <item name="lang" value="{lang}"/> </itemSet> </widgetDef> <!-- TIMETOACT GROUP - XCC4Communities -->
Attention: If you are using CNX5.5 CR0 you need to install the IFix, which is included in the XCC-Package. (5.5.0.0-IC-Container-IFLO88423.jar). Installation Guide on how to install an IFix: http://www.ibm.com/support/knowledgecenter/api/content/nl/de/SSYGQH_5.5.0/admin/migrate/t_install_interim-fix.html
3 Executethefollowingscript:
CommunitiesConfigService.checkInWidgetsConfig()

XCCTechnicalUser’sGuide
XCC_R_12.0.0
61/79
8.3.2 LotusConnections-config.xml
Step Instructions
1 Opencmdandexecutefollowingscript(Alternativelyyoucanadjustthe
LotusConnectionsConfig.xmlmanuallyandsynchronizethenodesafterwardsintheISC):
cd C:\IBM\WebSphere\AppServer\profiles\Dmgr01\bin wsadmin -lang jython -user <wasadmin> -password <password> execfile("connectionsConfig.py") LCConfigService.checkOutConfig("<TEMP_DIRECTORY>", AdminControl.getCell())
2 DonotclosetheCMDwindow
PleaseopenthejustcheckedoutLotusConnectionsConfig.xmlfileinanXMLeditorofyourchoice
andaddthewidgetBundlesectiontotheresourcesnode.
<resources> <!-- TIMETOACT GROUP - XCC4Communities --> <widgetBundle name="de.timetoact.resources.XCC" prefix="XCC"/> <!-- TIMETOACT GROUP - XCC4Communities --> </resources>
XCCTechnicalUser’sGuide
XCC_R_12.0.0
62/79
3 Executethefollowingscript:
LCConfigService.checkInConfig() LCConfigService.updateConfig("versionStamp", "")
8.3.3 Createandadjuststringpropertyfiles
Step Instructions
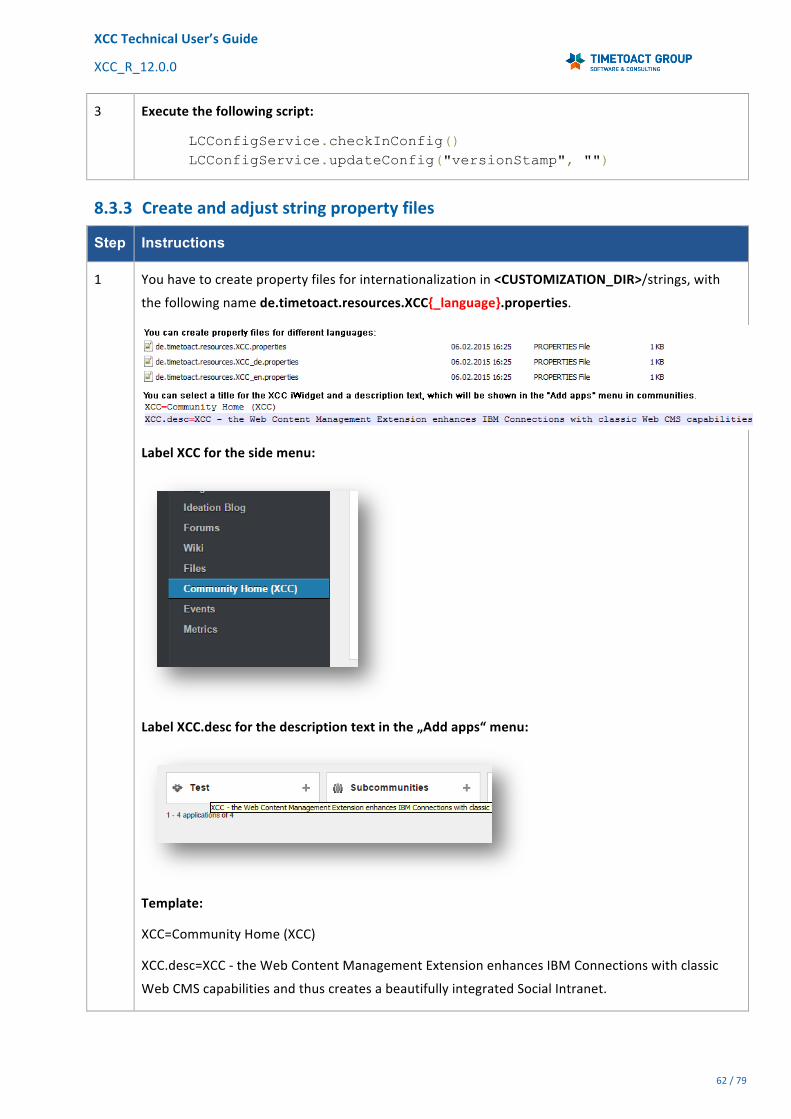
1 Youhavetocreatepropertyfilesforinternationalizationin<CUSTOMIZATION_DIR>/strings,with
thefollowingnamede.timetoact.resources.XCC{_language}.properties.
LabelXCCforthesidemenu:
LabelXCC.descforthedescriptiontextinthe„Addapps“menu:
Template:
XCC=CommunityHome(XCC)
XCC.desc=XCC-theWebContentManagementExtensionenhancesIBMConnectionswithclassic
WebCMScapabilitiesandthuscreatesabeautifullyintegratedSocialIntranet.

XCCTechnicalUser’sGuide
XCC_R_12.0.0
63/79
8.3.4 Publishconfiguration
Step Instructions
1 OpenaWindowsshell(cmd.exe)andexecutefollowingscript(Alternativelyyoumayclearwidget
cachesinConnectionswithanConnectionsadministrativeaccountandsynchronizethenodes
afterwardsintheISC.AfterwardsyouwillneedtorestartallConnectionsservers):
cd C:\IBM\WebSphere\AppServer\profiles\Dmgr01\bin wsadmin -lang jython -user <wasadmin> -password <password> ''' clear widgets cache ''' execfile("newsAdmin.py") NewsWidgetCatalogService.clearWidgetCaches() ''' synchronize active nodes ''' dmgr = AdminControl.queryNames("type=DeploymentManager,*") if dmgr: print "Please wait, until the nodes have been synchronized." nodes = AdminControl.invoke(dmgr, "syncActiveNodes", "true") print "The following nodes have been sucessfully synchronized. - " + str(nodes) else: print "An error occured please check your server, whether there is an active node."
AfterwardspleaserestartallConnectionsserverstopublishtheconfigurationtotheConnections
applications.
8.4 XCCFlyoutmodeconfigurationsIfyouwanttointegratetheXCCintotheConnectionsTopNavigationyouneedtoconfigureacustom
dropmenuintheheader.jspinthe<CUSTOMIZATION_DIR/>.
Step Instructions
1 Copy (if not already done so) the header.jsp file into Connections customization folder under ‘common/nav/templates/’.
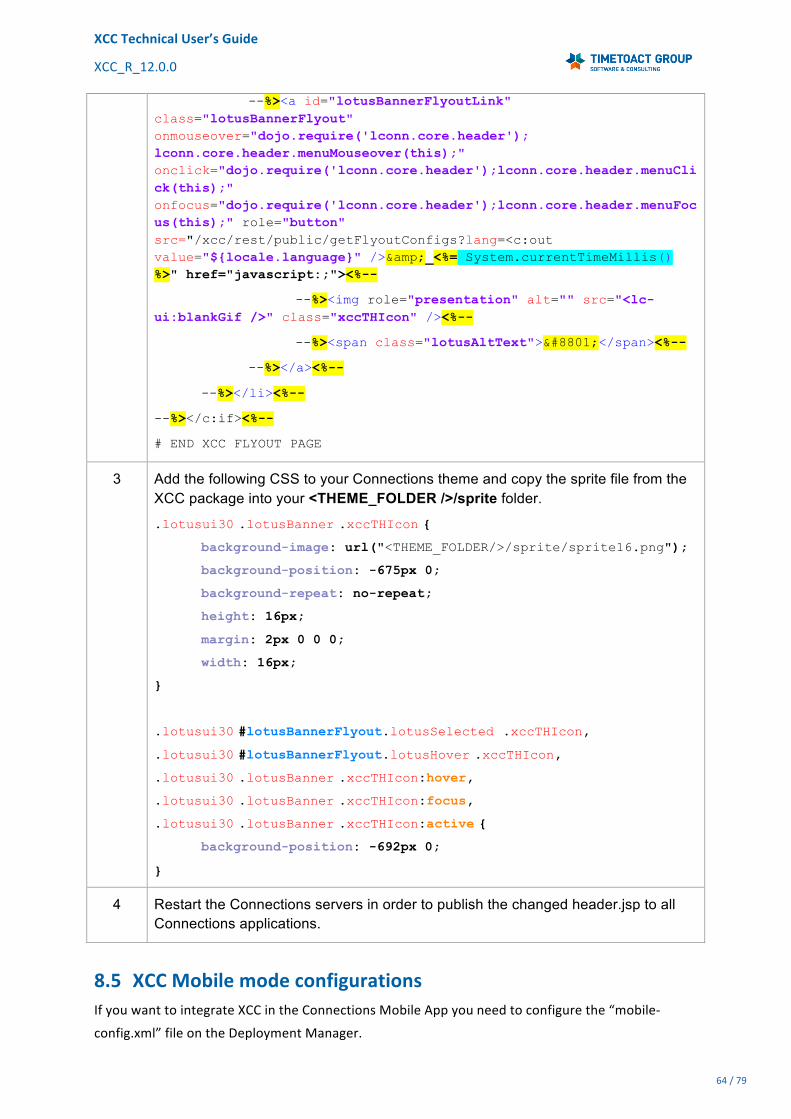
2 Add the following markup to the header.jsp (for example after --%><li><span class="lotusBranding">[...]</span></li><%--):
# Start XCC FLYOUT PAGE
--%><c:if test="${hasUsername || fn:indexOf(appName, ':search:') == -1}"><%--
--%><li id="lotusBannerFlyout"><%--
XCCTechnicalUser’sGuide
XCC_R_12.0.0
64/79
--%><a id="lotusBannerFlyoutLink" class="lotusBannerFlyout" onmouseover="dojo.require('lconn.core.header'); lconn.core.header.menuMouseover(this);" onclick="dojo.require('lconn.core.header');lconn.core.header.menuClick(this);" onfocus="dojo.require('lconn.core.header');lconn.core.header.menuFocus(this);" role="button" src="/xcc/rest/public/getFlyoutConfigs?lang=<c:out value="${locale.language}" />&_<%= System.currentTimeMillis() %>" href="javascript:;"><%--
--%><img role="presentation" alt="" src="<lc-ui:blankGif />" class="xccTHIcon" /><%--
--%><span class="lotusAltText">≡</span><%--
--%></a><%--
--%></li><%--
--%></c:if><%--
# END XCC FLYOUT PAGE
3 Add the following CSS to your Connections theme and copy the sprite file from the XCC package into your <THEME_FOLDER />/sprite folder.
.lotusui30 .lotusBanner .xccTHIcon {
background-image: url("<THEME_FOLDER/>/sprite/sprite16.png");
background-position: -675px 0;
background-repeat: no-repeat;
height: 16px;
margin: 2px 0 0 0;
width: 16px;
}
.lotusui30 #lotusBannerFlyout.lotusSelected .xccTHIcon,
.lotusui30 #lotusBannerFlyout.lotusHover .xccTHIcon,
.lotusui30 .lotusBanner .xccTHIcon:hover,
.lotusui30 .lotusBanner .xccTHIcon:focus,
.lotusui30 .lotusBanner .xccTHIcon:active {
background-position: -692px 0;
}
4 Restart the Connections servers in order to publish the changed header.jsp to all Connections applications.
8.5 XCCMobilemodeconfigurationsIfyouwanttointegrateXCCintheConnectionsMobileAppyouneedtoconfigurethe“mobile-
config.xml”fileontheDeploymentManager.
XCCTechnicalUser’sGuide
XCC_R_12.0.0
65/79
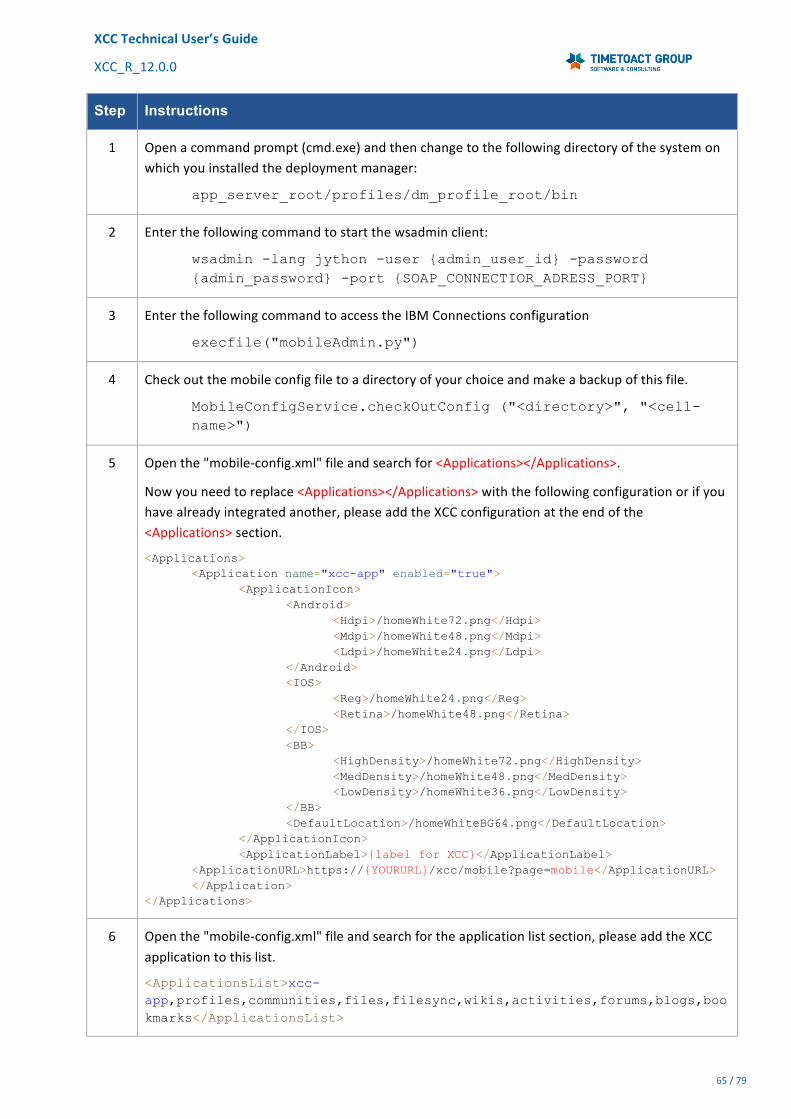
Step Instructions
1 Openacommandprompt(cmd.exe)andthenchangetothefollowingdirectoryofthesystemonwhichyouinstalledthedeploymentmanager:
app_server_root/profiles/dm_profile_root/bin
2 Enterthefollowingcommandtostartthewsadminclient:
wsadmin -lang jython -user {admin_user_id} -password {admin_password} -port {SOAP_CONNECTIOR_ADRESS_PORT}
3 EnterthefollowingcommandtoaccesstheIBMConnectionsconfiguration
execfile("mobileAdmin.py")
4 Checkoutthemobileconfigfiletoadirectoryofyourchoiceandmakeabackupofthisfile.
MobileConfigService.checkOutConfig ("<directory>", "<cell-name>")
5 Openthe"mobile-config.xml"fileandsearchfor<Applications></Applications>.
Nowyouneedtoreplace<Applications></Applications>withthefollowingconfigurationorifyouhavealreadyintegratedanother,pleaseaddtheXCCconfigurationattheendofthe<Applications>section.
<Applications> <Application name="xcc-app" enabled="true"> <ApplicationIcon> <Android> <Hdpi>/homeWhite72.png</Hdpi> <Mdpi>/homeWhite48.png</Mdpi> <Ldpi>/homeWhite24.png</Ldpi> </Android> <IOS> <Reg>/homeWhite24.png</Reg> <Retina>/homeWhite48.png</Retina> </IOS> <BB> <HighDensity>/homeWhite72.png</HighDensity> <MedDensity>/homeWhite48.png</MedDensity> <LowDensity>/homeWhite36.png</LowDensity> </BB> <DefaultLocation>/homeWhiteBG64.png</DefaultLocation> </ApplicationIcon> <ApplicationLabel>{label for XCC}</ApplicationLabel> <ApplicationURL>https://{YOURURL}/xcc/mobile?page=mobile</ApplicationURL> </Application> </Applications>
6 Openthe"mobile-config.xml"fileandsearchfortheapplicationlistsection,pleaseaddtheXCCapplicationtothislist.
<ApplicationsList>xcc-app,profiles,communities,files,filesync,wikis,activities,forums,blogs,bookmarks</ApplicationsList>
XCCTechnicalUser’sGuide
XCC_R_12.0.0
66/79
7 FurthermoreyoumayselecttheXCCasDefaultApplicationintheConnectionsMobileApp.Inordertodoso,youhavetosearchinthemobile-config.xmlfor
<!-- DefaultApplication: The application that the user is taken to after the login. --> <DefaultApplication>Updates</DefaultApplication>
andreplace"Updates"withthenameyouchoseby<Application enabled="true" name="xcc-app">.
8 Thenyouhaveto"checkin"theconfiguredfile.
MobileConfigService.checkInConfig("<directory>", "<cell-name>")
9 Pleaseopenthe"<CUSTOMIZATION_DIR/>/mobile"directory,thencopytheiconsfromthemobilefolderfromtheXCCpackagetothecustomizationmobilefolder.
10 AftertheconfigurationyouhavetofullsynchronizethenodesfirstandrestarttheIBMConnectionsserversthen.
11 ThenyoushouldbeabletousetheXCCintheIBMConnectionsMobileApponiOSandAndroiddevices.
8.6 LicensekeyXCCisprotectedbyalicensekey.Ifyouneedone,pleasecontactourSalesTeam
([email protected])forfurtherassistance.Forinformationaboutourlicensekeypleasereadour
XCCdocumentation.
Step Instructions
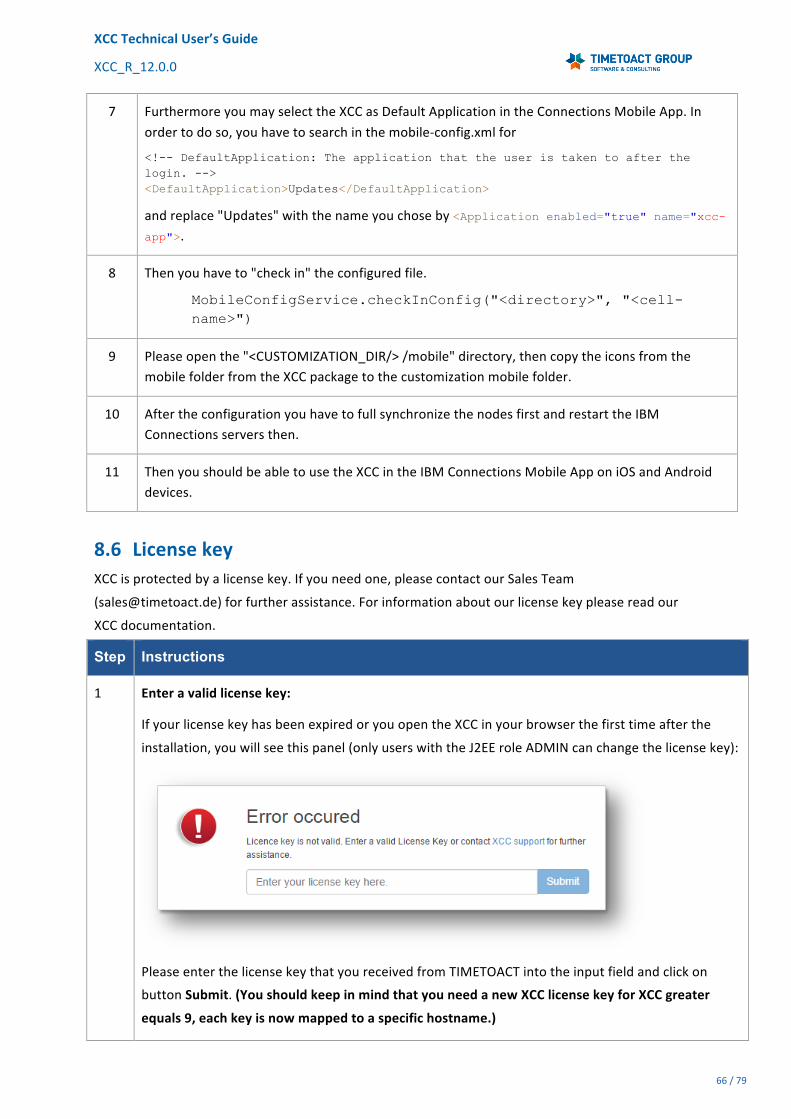
1 Enteravalidlicensekey:
IfyourlicensekeyhasbeenexpiredoryouopentheXCCinyourbrowserthefirsttimeafterthe
installation,youwillseethispanel(onlyuserswiththeJ2EEroleADMINcanchangethelicensekey):
PleaseenterthelicensekeythatyoureceivedfromTIMETOACTintotheinputfieldandclickon
buttonSubmit.(YoushouldkeepinmindthatyouneedanewXCClicensekeyforXCCgreater
equals9,eachkeyisnowmappedtoaspecifichostname.)

XCCTechnicalUser’sGuide
XCC_R_12.0.0
67/79
2 Viewpropertiesofthecurrentlicensekey:
Ifyouwanttoseetheinformationstoredinyourlicensekeypleaseclickonthe„Customize“button
intheXCCpageandthenonthe„About“tab.
Youwillseethispanel:
Pleasechangeyourlicensekeyinthispanelbeforeitexpires.
8.7 AddinganewlinktotheIBMConnectionsheadernavigation
Step Instructions
1 Copy(ifnotalreadydoneso)theheader.jspfileintoIBMConnections’customizationfolder
under“/common/nav/templates/”.
2 Add the following markup to the header.jsp <ul> node:
--%><li id="lotusBannerXCC" class="<c:if test="${first}">lotusFirst</c:if>"><%--
--%><a href="/xcc/main?page=xcc "><%--
--%><img alt="" role="presentation" src="<lc-ui:blankGif />" class="lconnBannerIcon lconnSprite lconnSprite-iconHomeBlue16"><%--
--%><span class="lotusBannerXCC">XCC</span><%--
--%></a><%--
--%></li><%--
3 TheID"lotusBannerXCC"ofthelitagisimportant,becausetheXCCwillsetthismenuitem
asselected,ifyouareonaXCCpage.Wecurrentlysupportonlyonemenuiteminthetop
navigation,whichisinstantlyhighlightedasselected.Youcanhavefurthermenuitemsin
theheader.jsp,thereforepleaseusedifferentID'sfortheLIelements,butthesewillnotbe
highlightedasselected.
4 RestarttheConnectionsserversinordertopublishthechangedheader.jsptoall
Connectionsapplications.

XCCTechnicalUser’sGuide
XCC_R_12.0.0
68/79
8.8 PeopleBirthdayWidgetForthepeoplebirthdaywidgetitisnecessarytomodifyyourIBMConnectionsProfilesconfiguration.
ThePeopleBirthdayWidgetsearchesforallprofiles,whichhaveaprofileextensionfield[name=
"birthday"]andvaluewiththeactualdate.Indateformat"*-MM-DD"e.g.*-10-16forthe16th
October.InsteadoftheasteriskyoucanenterforexampleYYYY,ifyoudonotsavethisinformation
youcanchangetheinputto“-MM-DD”.TIMETOACToffersthisconfigurationasanadditionalservice.
Ifyouneedassistancetomodifytheprofilefields,pleasesendusanemail(xcc-
8.9 CustomizeXCClabelsfordifferentlanguagesYoucancustomizeXCClabelsforalllanguagesthataresupportedbyIBMConnections.TheXCC
automaticallycreatesbothfilesxcc-de.jsonandxcc-template.jsoninthedirectory
customization/xcc/I18n.
Example:
Usinganexample,wewanttoshowyouhowtheXCClanguagefallbackworks.PleaseopentheXCC
pagewithabrowserandalanguagecookie,whichhasthevalue„pt”forPortugueselanguage.The
XCCwillsearchforafilewiththename„xcc-pt.json”inthedirectory„customization/xcc/I18n”.Ifthis
fileisfound,theXCCwilloutputthelabelscontainedinthisfile.OtherwiseXCCwillsearchforthefile
„xcc-en.json”.IfthisfiledoesalsonotexistthentheXCCwillfallbacktoEnglishlabelsincludedinthe
XCCsourcecode.
Workflow:
Youcanusethe„xcc-template.json”filetotranslateXCCintoyourdesiredlanguage.After
customizationofthisfile,youhavetorenameit.Thereforepleasesavethefileasxcc-
<LANGUAGE>.jsonwhere<LANGUAGE>isreplacedwiththeshortcutofyourdesiredlanguage(for
exampleen,de,pt,zhetc.).Youcanup-anddownloadthelanguagefilesonyourXCCpageinthe
customizationpanelundertheXCCSettingstab.
XCCTechnicalUser’sGuide
XCC_R_12.0.0
69/79
StructureofJSON:XCClanguagefilesarestoredinJSONformat.TheseJSONfilescontainkey-valuepairsembarcedin
quotesandseparatedbyacolon.Multiplekey-valuesareseparatedbyacommaandanewline.For
example:
"ee_pager_next" : "Next", "ee_pager_prev" : "Prev"
Someentriesneedplaceholdersforvaluestobecomputed.Theseentriescontainplaceholderslike
$1,$2,$3andsoon.Arrayentriesareseparatedbyacomma"a,b,c,d,e".Entriesspecifictodates
andtimesareusedwithaSimpleDateFormatlikeplaceholderstructurelikeTTfortheDayinMonth,
MMfortheMonthinYearasazerofilledNumberMMMorashortcutoftheMonthsnameMMMM
fortheMonthsfullnameandsoon.
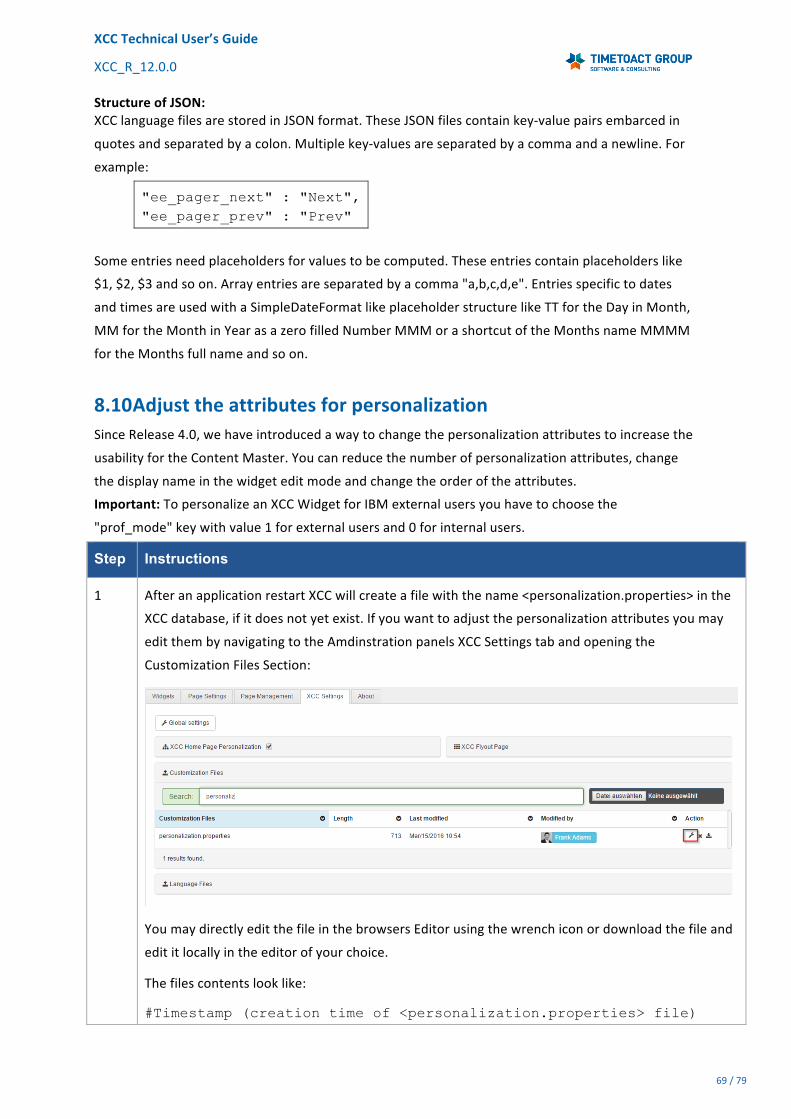
8.10 AdjusttheattributesforpersonalizationSinceRelease4.0,wehaveintroducedawaytochangethepersonalizationattributestoincreasethe
usabilityfortheContentMaster.Youcanreducethenumberofpersonalizationattributes,change
thedisplaynameinthewidgeteditmodeandchangetheorderoftheattributes.
Important:TopersonalizeanXCCWidgetforIBMexternalusersyouhavetochoosethe
"prof_mode"keywithvalue1forexternalusersand0forinternalusers.
Step Instructions
1 AfteranapplicationrestartXCCwillcreateafilewiththename<personalization.properties>inthe
XCCdatabase,ifitdoesnotyetexist.Ifyouwanttoadjustthepersonalizationattributesyoumay
editthembynavigatingtotheAmdinstrationpanelsXCCSettingstabandopeningthe
CustomizationFilesSection:
YoumaydirectlyeditthefileinthebrowsersEditorusingthewrenchiconordownloadthefileand
edititlocallyintheeditorofyourchoice.
Thefilescontentslooklike:
#Timestamp (creation time of <personalization.properties> file)

XCCTechnicalUser’sGuide
XCC_R_12.0.0
70/79
<key1> = <value1> <key2> = <value2> ...
Thepartonleftsideoftheequalitysignisthetablekeythatiseffectivelyusedforpersonalization.
ThesekeysaregeneratedautomaticallybyreadingthemfromthedatabaseintheonPremises
modeorbyprovidingatemplateinthecloudmode.Pleasetonotchangethekeysastheycannot
bechanged,asXCCwouldnolongerbeabletoconnecttheenteredvaluetotheuserproperty.
ThepartrighthandoftheequalitysigndenominatesthelabelthatisusedintheWidgeteditors.It
canbeeditedfreelytofilyourpersonaltaste.
Ifyouwanttoleaveanentireentryout,prefixthelinewithahashsymbol(#),ordeleteit.The#
symboldenominatesacommentlineandcanbeusedmultipletimesinthefile.Thatwayitis
possibletoleavecommentsforyourselfortotryvaluesandreturnlater.
Whenyouclickonsaveorreuploadalocallychangedfile,thechangestakeimmediateeffect.
Changingthefrontendvalue:
E.g.ifyouwanttodisplay"DisplayName"insteadof"display_name"inthepersonalization
dropdown,pleasechangetheline"prof_display_name=display_name"to
"prof_display_name=DisplayName".
ValuesinCloudmode
ThepossiblevaluesinCloudmodecannotbereadfromthedatabase.InsteadXCCprovidesyou
withatemplateofpossiblevalues.Youmaycommentoruncommentthemasyoulike.Also
renamingthemispossible.

XCCTechnicalUser’sGuide
XCC_R_12.0.0
71/79
8.11 IBMConnectionsProxyConfigurationFortheClippingandtheIFramewidgetitisnecessarytoconfiguretheConnectionsAjaxProxy.Start
thewsadminclientbycompletingthefollowingsteps(thefollowingexampleisforawindowsserver,
forotheroperatingsystemspleaserefertotheIBMdocumentation).
Step Instructions
1 Openacommandpromptandthenchangetothefollowingdirectoryofthesystemonwhichyouinstalledthedeploymentmanager:
<app_server_root>/profiles/dm_profile_root/bin
2 Enterthefollowingcommandtostartthewsadminclient:
wsadmin -lang jython -user {admin_user_id} -password {admin_password} -port {SOAP_CONNECTIOR_ADRESS_PORT}
3 EnterthefollowingcommandtoaccesstheIBMConnectionsconfiguration
execfile("connectionsConfig.py")
4 CheckouttheProxyConfigFiletoadirectoryofyourchoiceandmakeabackupofthisfile.
LCConfigService.checkOutProxyConfig("<directory>", "<cell-name>")
5 Openthe"proxy-config.tpl"fileandsearchfor<!--BEGINCUSTOMIZATIONSHERE-->.
Nowyouneedtocommentinthissection:
<proxy:policy url="{URL}" acf="none" basic-auth-support="true">
<proxy:actions>
<proxy:method>GET</proxy:method>
</proxy:actions>
<proxy:headers/>
<proxy:cookies/>
</proxy:policy>
Insteadof{URL}youhavetouseyourURL,whichyouwanttowhitelist.ForfurtherinformationusetheIBMDocumentation(link).
6 Thenyouhaveto"checkin"theconfiguredfile.
LCConfigService.checkInProxyConfig("<directory>", "<cell-name>")
AftertheconfigurationyouhavetofullsynchronizethenodesfirstandrestarttheApplicationserver(s)then.
7 AftersuccessfulconfigurationoftheAjaxProxy,youwillbeabletousethisURLsforexample:
Ú https://<YOUR_SERVER>/communities/ajaxProxy/http/google.de
XCCTechnicalUser’sGuide
XCC_R_12.0.0
72/79
Ú https://<YOUR_SERVER>/communities/ajaxProxy/https/google.de
8.12 IHSXCClandingpageconfigurationIfyouwanttoredirectallrequestsfortheserverroot(https://<your_server>/)toXCC,youmayuse
thefollowingtemplateforaddition/modificationofyourhttpd.conffile.Pleaseadjustthistemplate
accordingtoyourspecificneeds.LoadModule rewrite_module modules/mod_rewrite.so #SSL Rewrite RewriteEngine On RewriteRule ^\/$ https://HOSTNAME/xcc/main [NE,L,R] RewriteRule ^/?(.*) https://%{SERVER_NAME}/$1 [L] <IfModule mod_ibm_ssl.c> Listen 0.0.0.0:443 <VirtualHost *:443> ServerName HOSTNAME RewriteEngine On RewriteRule ^\/$ https://HOSTNAME/xcc/main [NE,L,R] ... </VirtualHost> </IfModule>
Afterediting,pleaserestartyourIHSservice.
8.13 (Re-)BuildingthesearchindexofIBMConnectionsXCCisusingIBMConnectionsAPI'sheavilyforitsoperation.ThisrequirestheIBMConnecitons
searchindextobeintactandoperatingwell.Pleasecheckwhetheryoursearchindexisworking
correctly.Ifnot,pleasefollowtheinstructionsofIBMtorebuildthesearchindex:
https://www.ibm.com/support/knowledgecenter/SSYGQH_5.5.0/admin/admin/t_admin_search_cre
ate_index.html.
8.14 ImportandexportofXMLfilesItispossibletoimportandexportXCCpageconfigurationstoandfromXMLfiles.Thisfeatureallows
youtoswitchbetweendifferentdatabasesortomakeabackupofyourXCCdatabase.
8.14.1 ImportofXMLfilesOpentheXCCinyourbrowserasanadministrativeuserandclickonCustomize.GototheTabPage
Management.HereyouwillfindtheImportPagesbutton.Clickonthisbuttonandyouwillopena
modaldialog.InthispopupwindowyouareabletouploadsingleXMLfilesormultiplexmlfilesaszip

XCCTechnicalUser’sGuide
XCC_R_12.0.0
73/79
file.AfteranuploadtheywillbemigratedintotheXCCdatabase.
8.15 ExportofXMLfilesSinglepage(s):OpenXCCinyourbrowserasanadministrativeuserandclickonCustomize.GotothetabPageManagement.Youwillfindtheexportlinkontherightsideofeachpageinthelist.WithaclickonthedownloadiconyouwilldownloadthepageasXMLfile.
Allpages: YoucanalsoexportallXCCpagesasazipfile.Todoso,pleaseopenXCCinyourbrowserasanadministrativeuserandclickonCustomize.GotothetabPageManagementandclickonExportallpages.

XCCTechnicalUser’sGuide
XCC_R_12.0.0
74/79
8.16 InternetExplorercompatibilitymodeToactivatetheInternetExplorercompatibilitymode,twocustompropertiescanbesetintheAdminDashboard.
• "override-x-ua-meta":Thispropertyisusedtosetthemetatag<metahttp-equiv="X-UA-Compatible">ontopofthepage.
• "override-x-ua-header":ThispropertyisusedtosettheHTTPheader(X-UA-Compatible).InordertochangesettingsfortheIEcompatibilitymode:
1. OpentheXCCinyourbrowserasanadministrativeuser
2. clickonCustomize
3. GototheTabXCCSettings
4. NowclickontheGlobalSettingsbutton
TheXCCAdminDashboardwillopeninanewbrowsertab.NowclickontheCustomPropertiestab
andcreatethepropertiesyouwanttouse.
InordertomaximizeXCCsperformance,propertyvaluesarecachedforatimespanof5minutes.
Changestopropertiesmayleadtoaneffectivedelayof5minutesuntiltheyappearinthebrowser.
Ifthevaluesarenotset,noheaderormetatagwillbecreated.
Formoreinformationseehttps://msdn.microsoft.com/en-us/library/ff955275(v=vs.85).aspx

XCCTechnicalUser’sGuide
XCC_R_12.0.0
75/79
9 UninstallXCCThisguideisnotacompletestep-by-stepguide,becausetheuninstallationstepsdependsontheXCC
version.Herearesomehintsonwhatyoushouldpayattention.
Step Instructions
1 OpentheIntegratedSolutionConsoleanduninstalltheXCCapplicationunder(Applications>
WebSphereEnterpriseApplications>ApplicationsTypes).
2 IfyouhavecreatedaseparateWebSphereApplicationServer/ClusterfortheXCC,youshould
removethisserverunder(Servers>ServerTypes>WebSphereapplicationservers/Servers>
Clusters>WebSphereapplicationserverclusters).
3 Generateandpropagatethewebserverpluginandrestartthewebserverafterwardsunder(Servers
>ServerTypes>Webservers).
4 IfyouhavecreatedaJDBCprovider,datasourceandJAASsecurityalias,youshouldremovethem.
5 DroptheXCCdatabase.
6 FullresynchronizethenodesfirstandrestarttheConnectionsApplicationserver(s)then.
7 Removethe<CUSTOMIZATION_DIR/>/xccfolder.
XCCTechnicalUser’sGuide
XCC_R_12.0.0
76/79
10 Operation
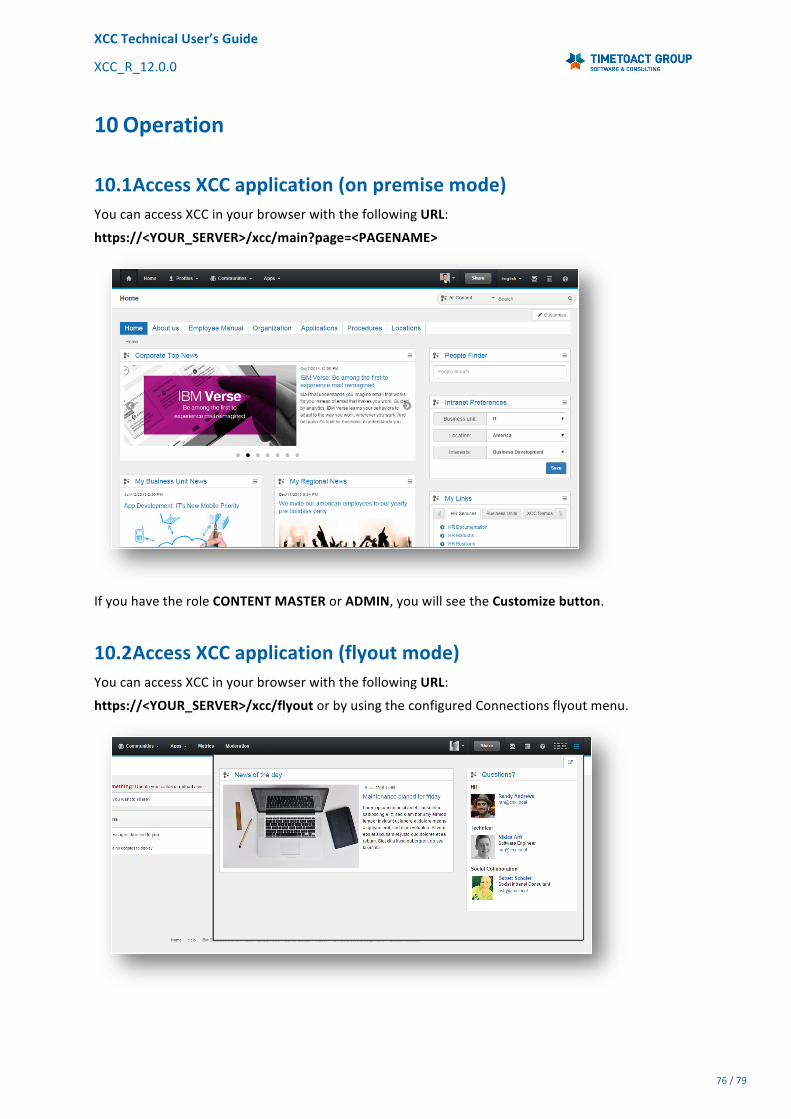
10.1 AccessXCCapplication(onpremisemode)YoucanaccessXCCinyourbrowserwiththefollowingURL:
https://<YOUR_SERVER>/xcc/main?page=<PAGENAME>
IfyouhavetheroleCONTENTMASTERorADMIN,youwillseetheCustomizebutton.
10.2 AccessXCCapplication(flyoutmode)YoucanaccessXCCinyourbrowserwiththefollowingURL:
https://<YOUR_SERVER>/xcc/flyoutorbyusingtheconfiguredConnectionsflyoutmenu.

XCCTechnicalUser’sGuide
XCC_R_12.0.0
77/79
10.3 AccessXCCapplication(cloudmode)YoucanaccessXCC4CloudinyourbrowserwiththefollowingURL:
https://<YOUR_SERVER>/xcc/cloud?page=<PAGENAME>.
IfyouhavetheroleCONTENTMASTERorADMIN,youwillseetheCustomizebutton.
10.4 AccessXCCapplication(communitymode)YoucanaccessXCC4CommunitiesinyourbrowserwiththefollowingURL:
https://<YOUR_SERVER>/communities/service/html/communitystart?communityUuid={commId}#
fullpageWidgetId={wId}.
CreateXCCWidgetusingCommunityActionslinkorselectitintheleftnavigation.

XCCTechnicalUser’sGuide
XCC_R_12.0.0
78/79
IfyouhavetheroleCONTENTMASTERorADMIN,youwillseetheCustomizebutton.
10.5 AccessXCCapplication(anonymousmode)YoucanaccessaXCC4AnonymousinyourbrowserwiththefollowingURL:
https://<YOUR_SERVER>/xcc/global?page=<PAGENAME>.
Pleasenotethatglobalpageshouldbealreadycreatedandconfiguredaspublicpage.

XCCTechnicalUser’sGuide
XCC_R_12.0.0
79/79
10.6 AccessXCCapplication(mobilemode)Youcanaccessamobilepageinyourbrowser/mobileappwiththefollowingURL:
https://<YOUR_SERVER>/xcc/mobile?page=<PAGENAME>.