Embed Size (px)
Citation preview
03 Make Things TalkWhen Things Talk to the World

MQTT• MQTT is a publish/subscribe
messaging protocol designed for lightweight M2M communications.
• It was originally developed by IBM and is now an open standard.
• MQTT has a client/server model, where every sensor is a client and connects to a server, known as a broker, over TCP.
• MQTT is message oriented, every message is published to an address, known as a topic.
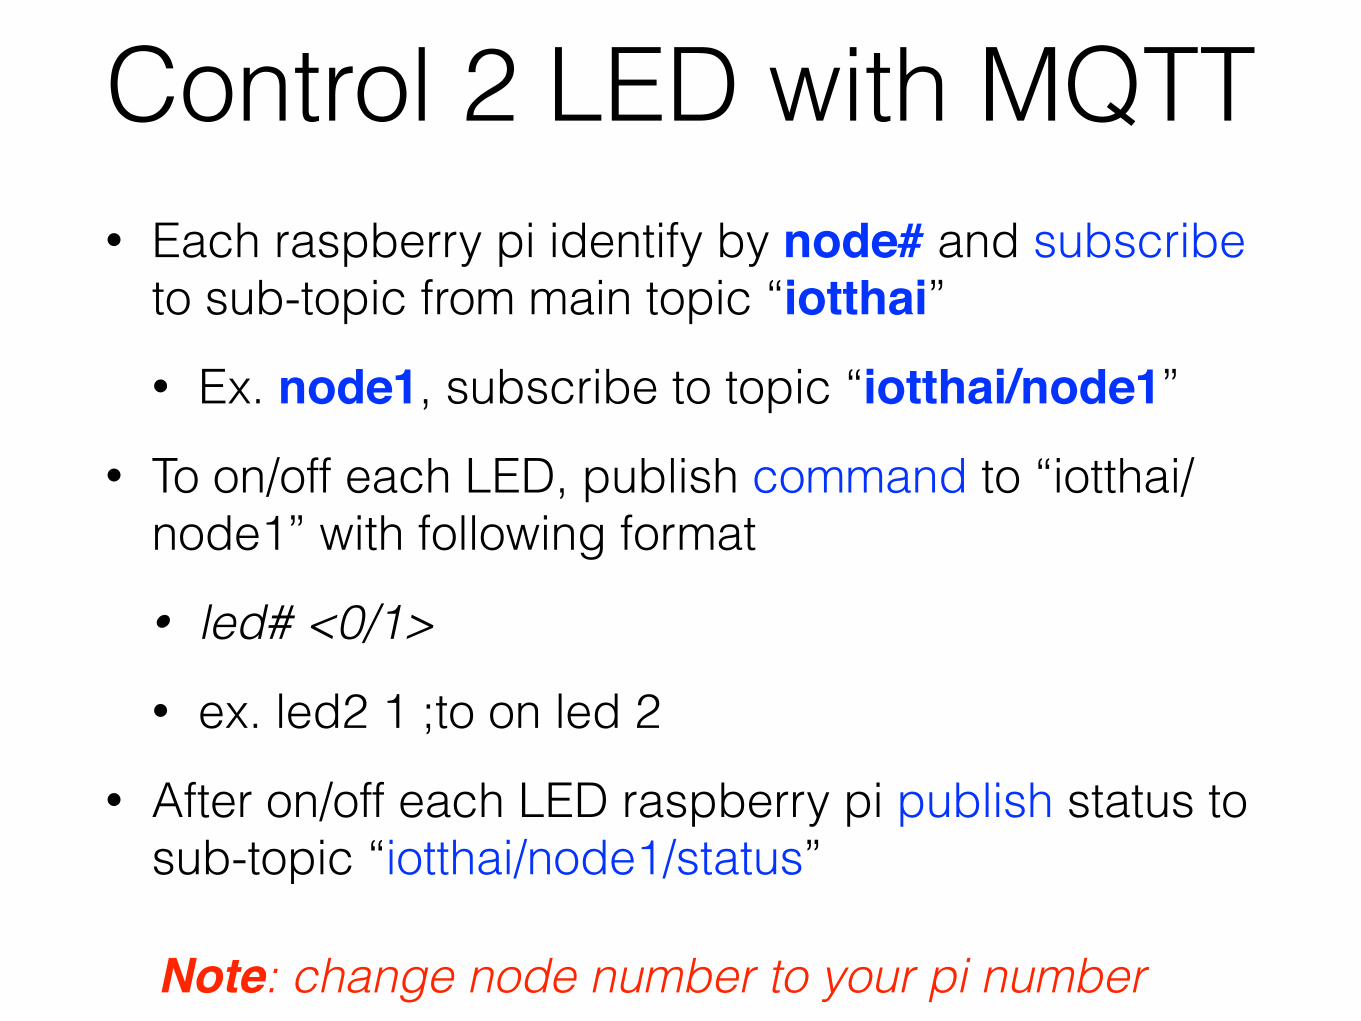
Control 2 LED with MQTT• Each raspberry pi identify by node# and subscribe
to sub-topic from main topic “iotthai” • Ex. node1, subscribe to topic “iotthai/node1”
• To on/off each LED, publish command to “iotthai/node1” with following format • led# <0/1> • ex. led2 1 ;to on led 2
• After on/off each LED raspberry pi publish status to sub-topic “iotthai/node1/status”
Note: change node number to your pi number
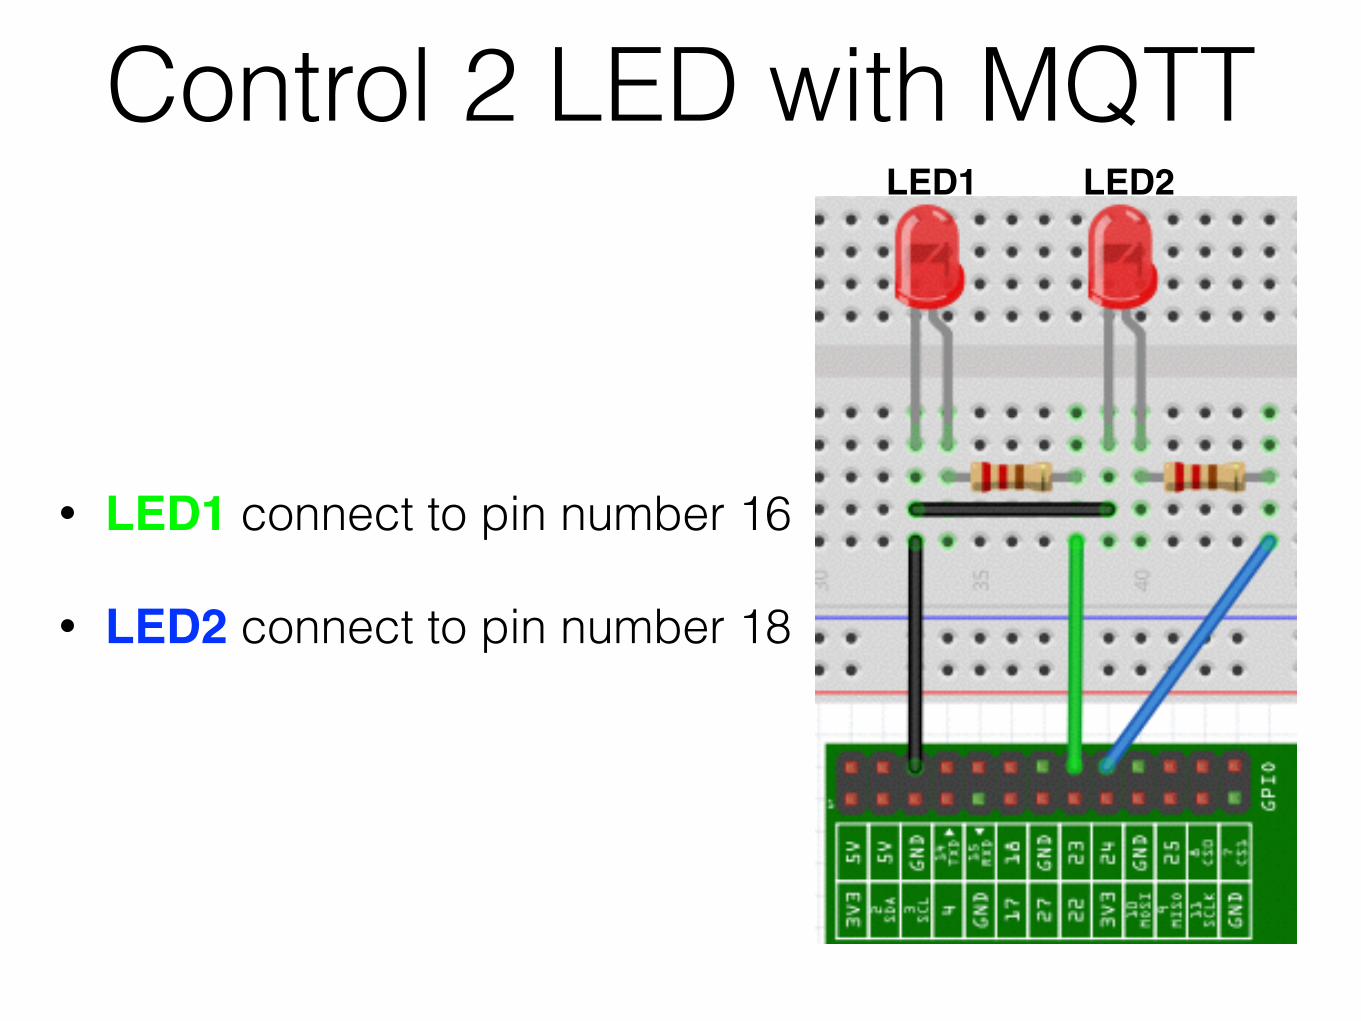
Control 2 LED with MQTT
• LED1 connect to pin number 16
• LED2 connect to pin number 18
LED1 LED2

Control 2 LED with MQTT
• Add 1 mqtt (input) node, 2 debug nodes and change parameter of mqtt node by double click
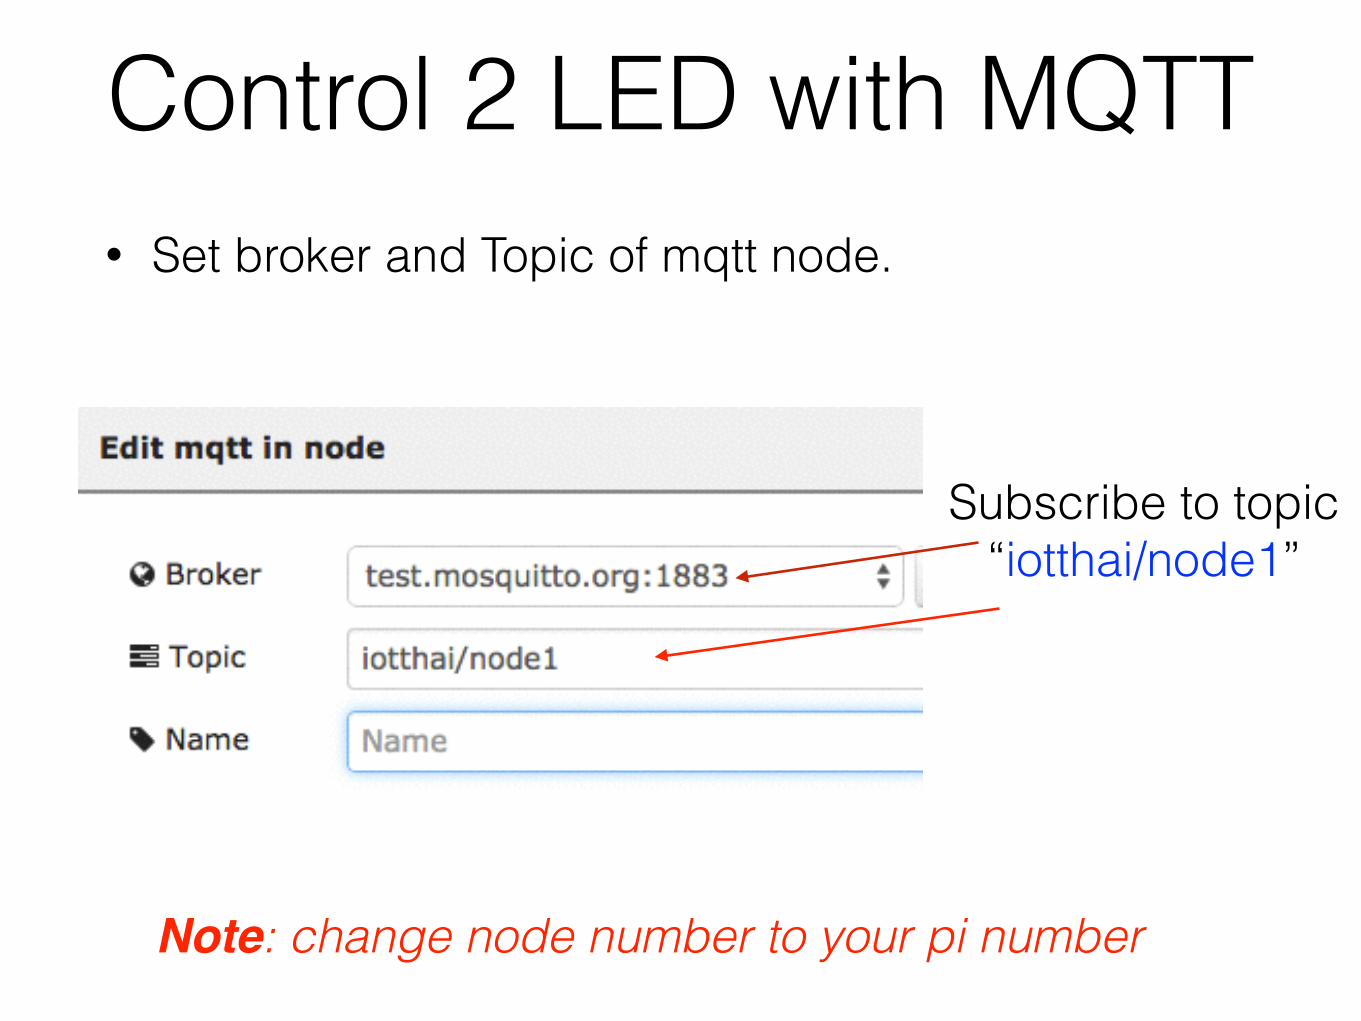
Control 2 LED with MQTT• Set broker and Topic of mqtt node.
Subscribe to topic “iotthai/node1”
Note: change node number to your pi number
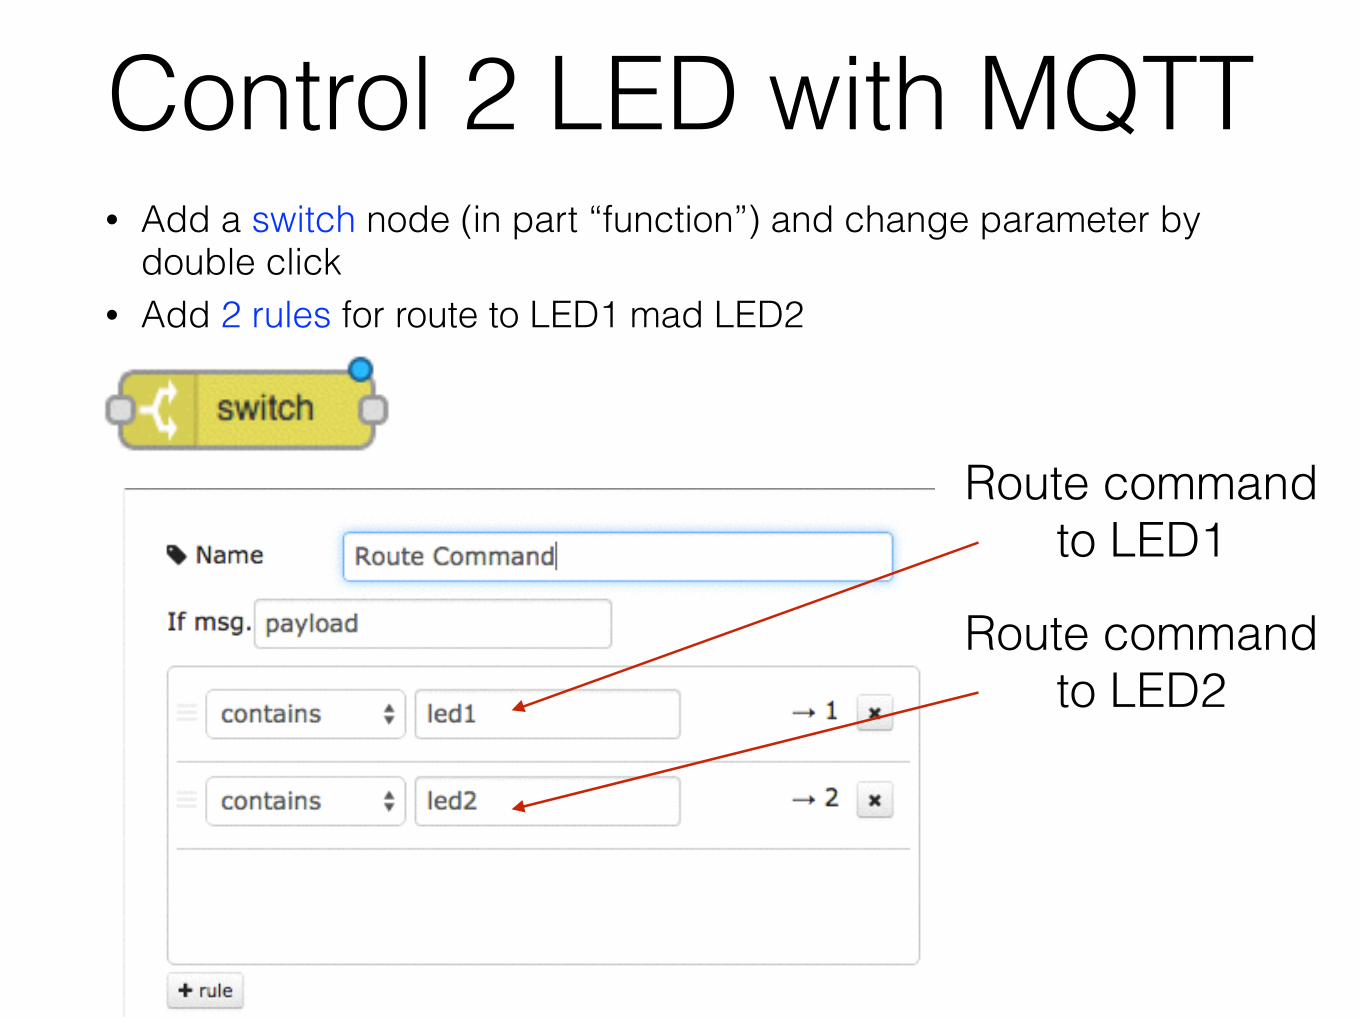
Control 2 LED with MQTT• Add a switch node (in part “function”) and change parameter by
double click • Add 2 rules for route to LED1 mad LED2
Route command to LED1
Route command to LED2

Control 2 LED with MQTT• Add 2 function nodes and double click to each
function to edit
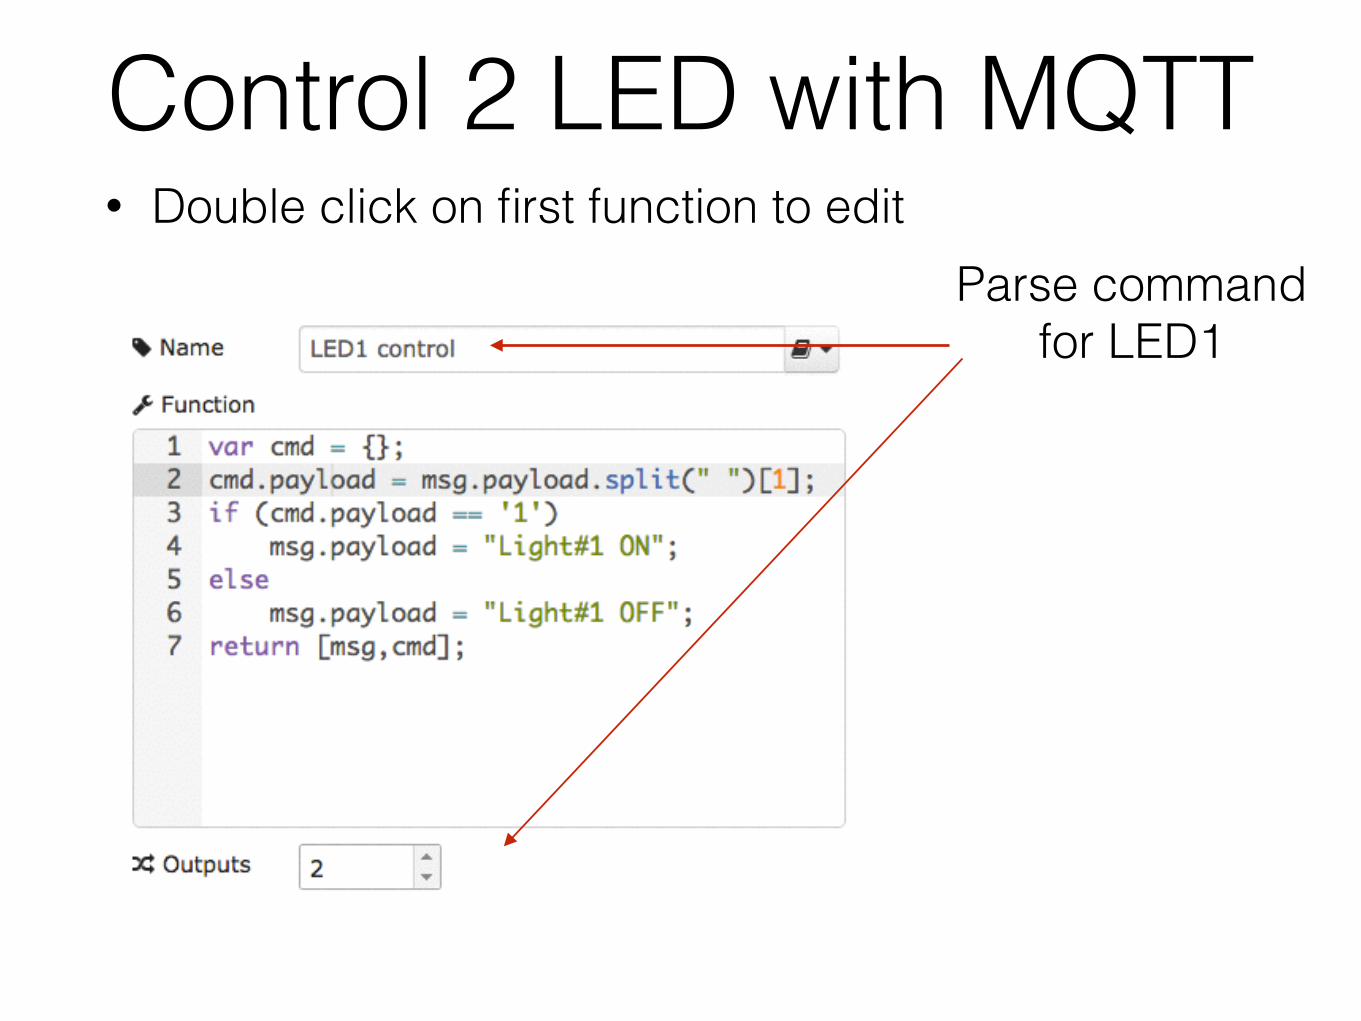
Control 2 LED with MQTT• Double click on first function to edit
Parse command for LED1
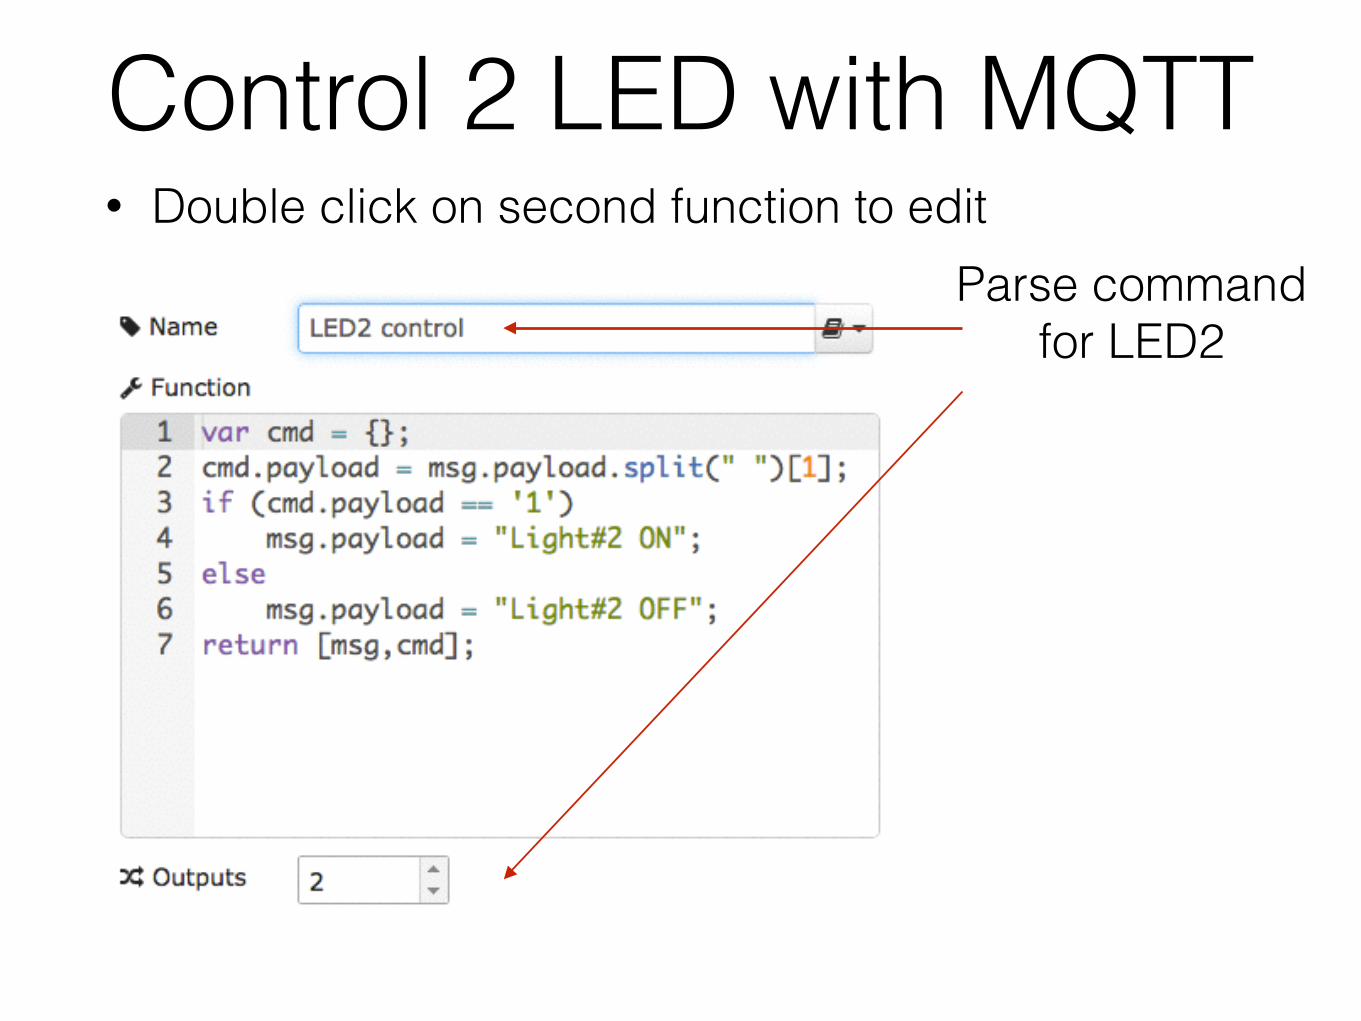
Control 2 LED with MQTT• Double click on second function to edit
Parse command for LED2
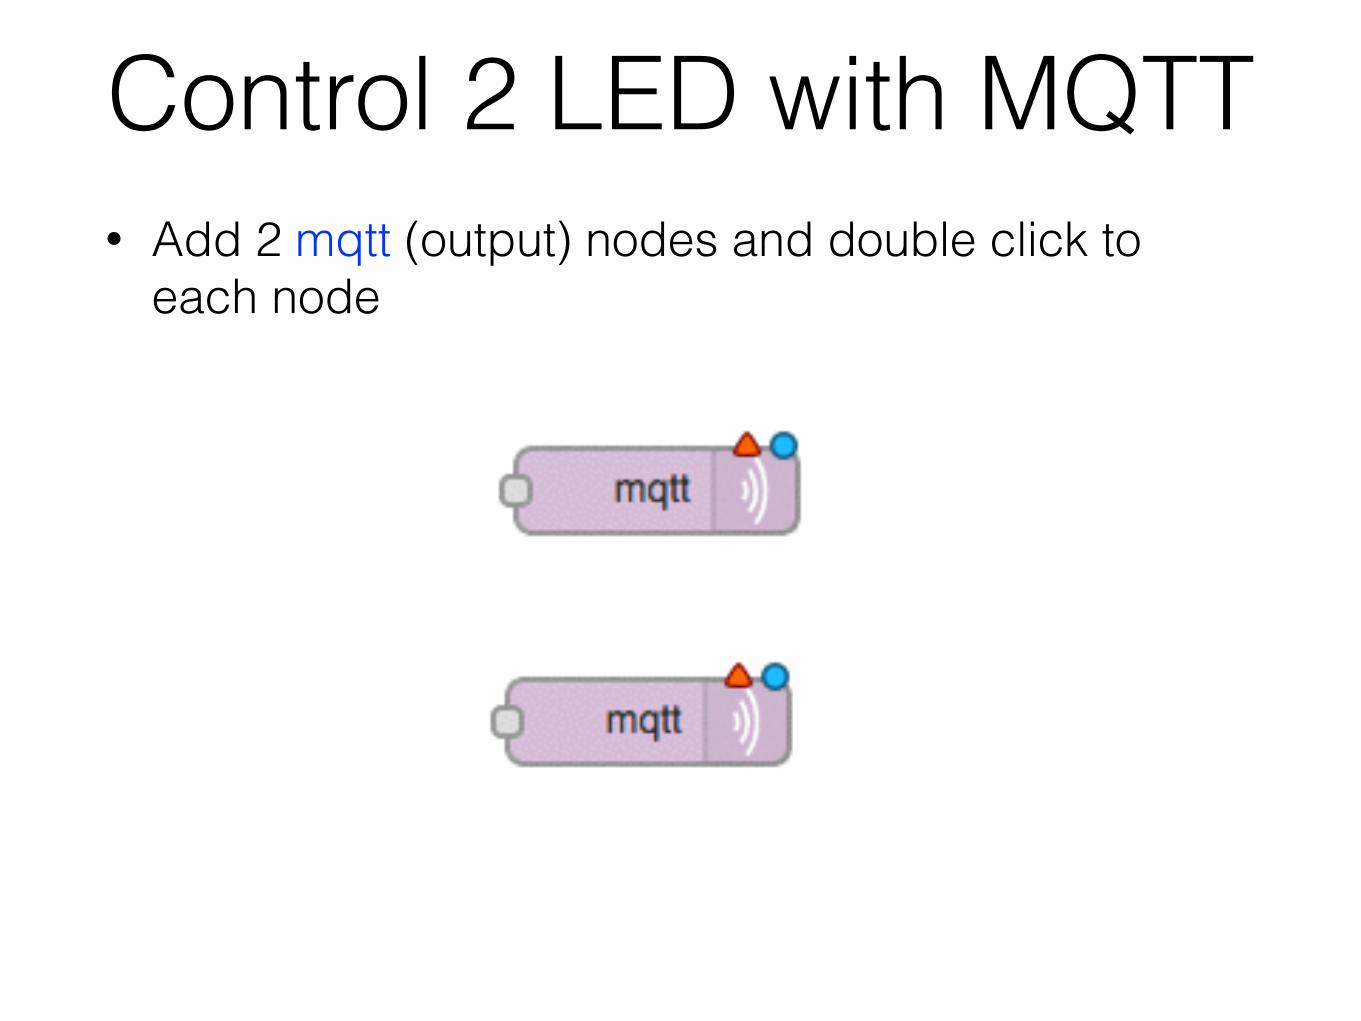
Control 2 LED with MQTT• Add 2 mqtt (output) nodes and double click to
each node
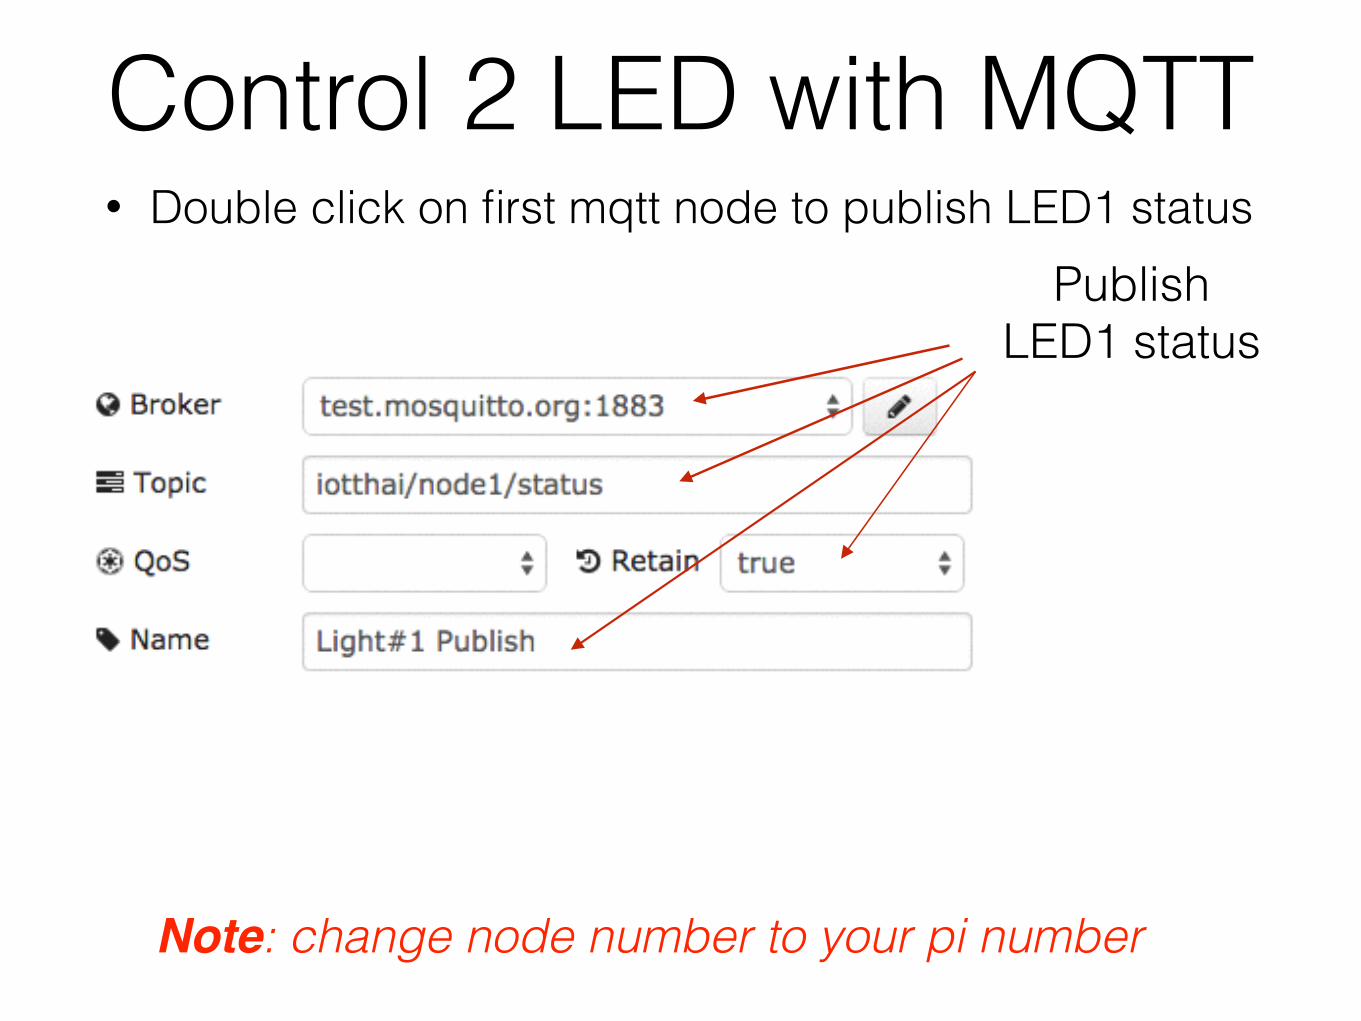
Control 2 LED with MQTT• Double click on first mqtt node to publish LED1 status
Publish LED1 status
Note: change node number to your pi number
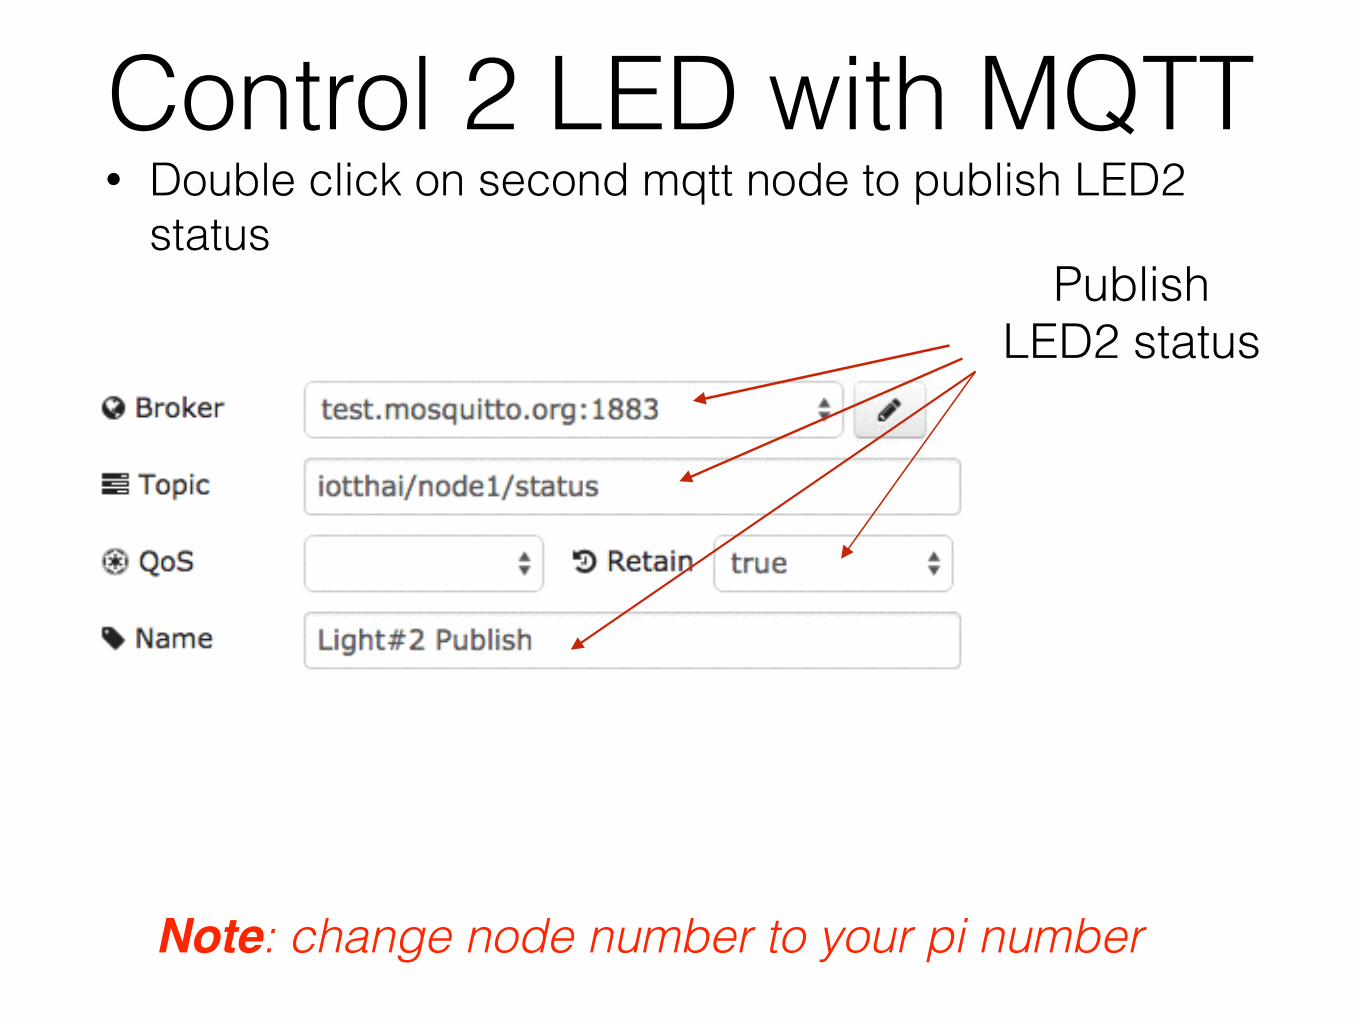
Control 2 LED with MQTT• Double click on second mqtt node to publish LED2
statusPublish
LED2 status
Note: change node number to your pi number
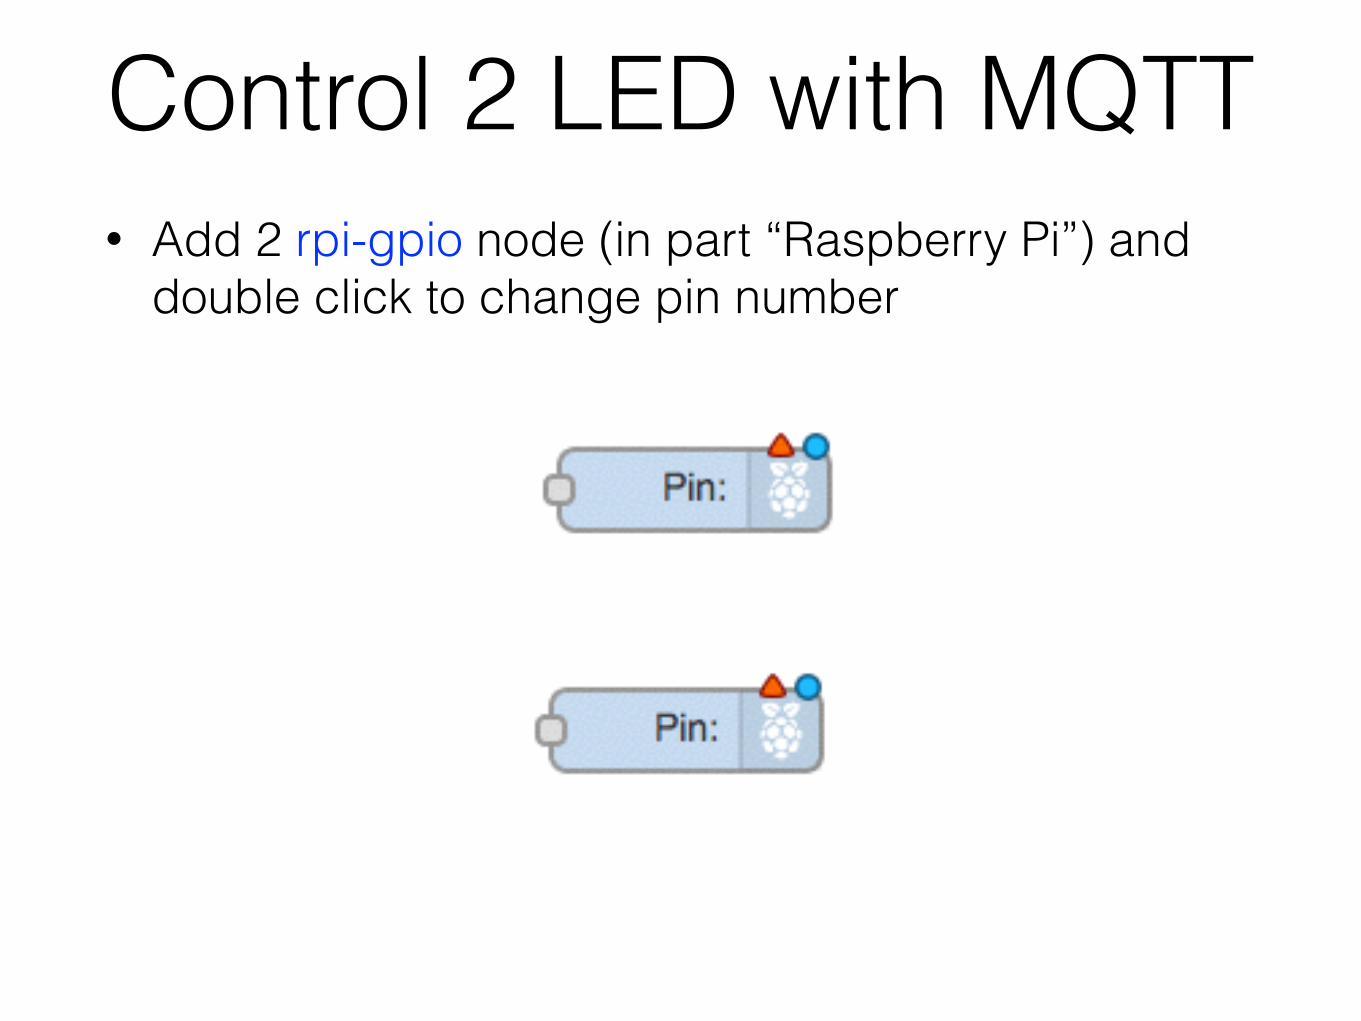
Control 2 LED with MQTT• Add 2 rpi-gpio node (in part “Raspberry Pi”) and
double click to change pin number
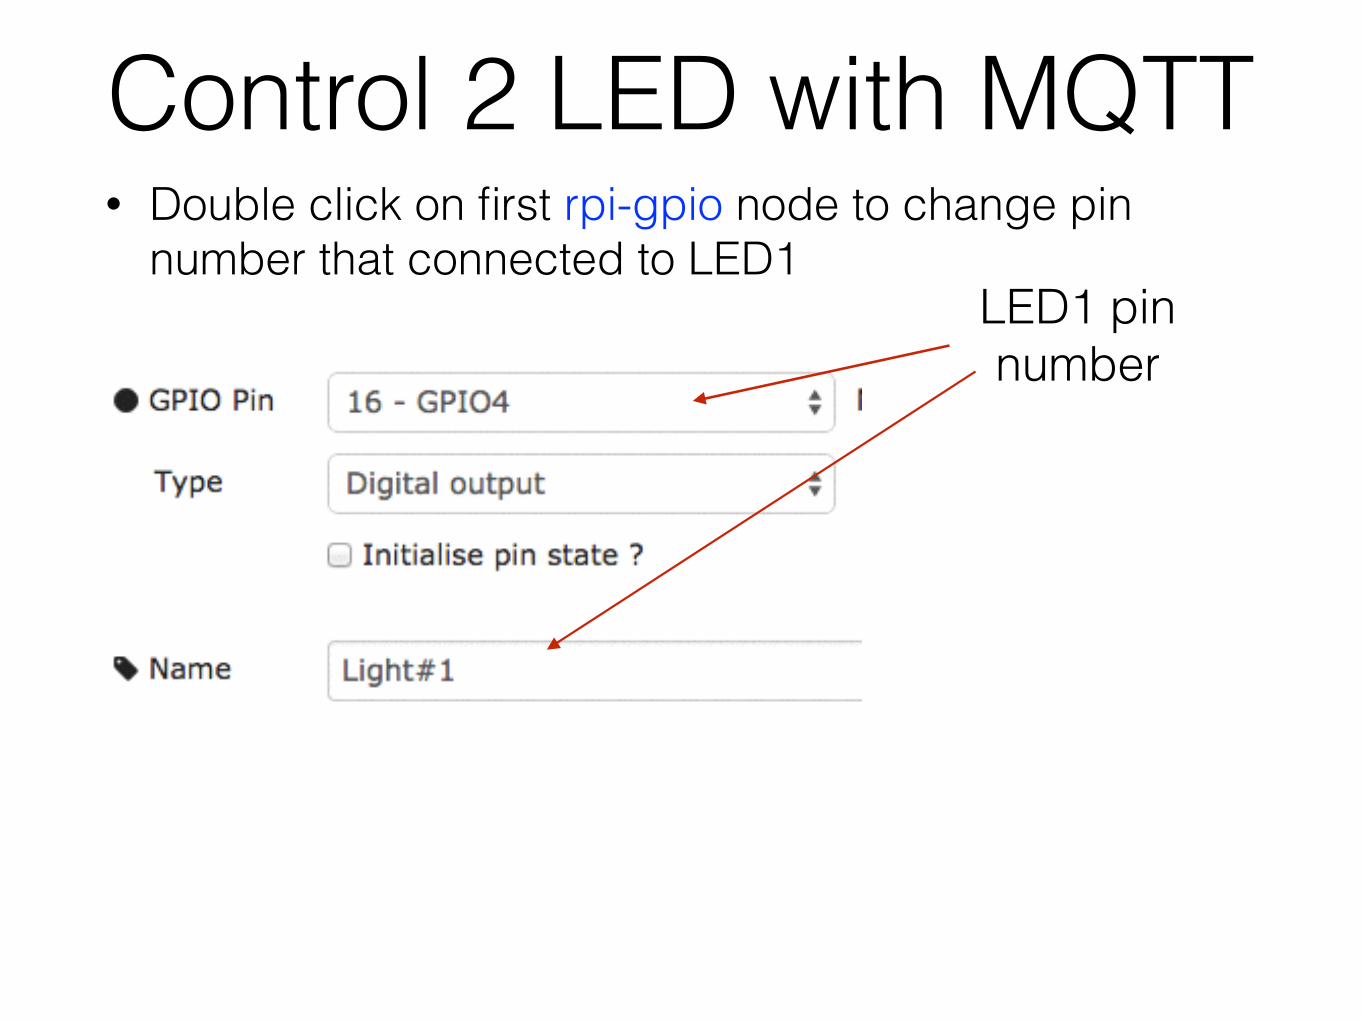
Control 2 LED with MQTT• Double click on first rpi-gpio node to change pin
number that connected to LED1LED1 pin number
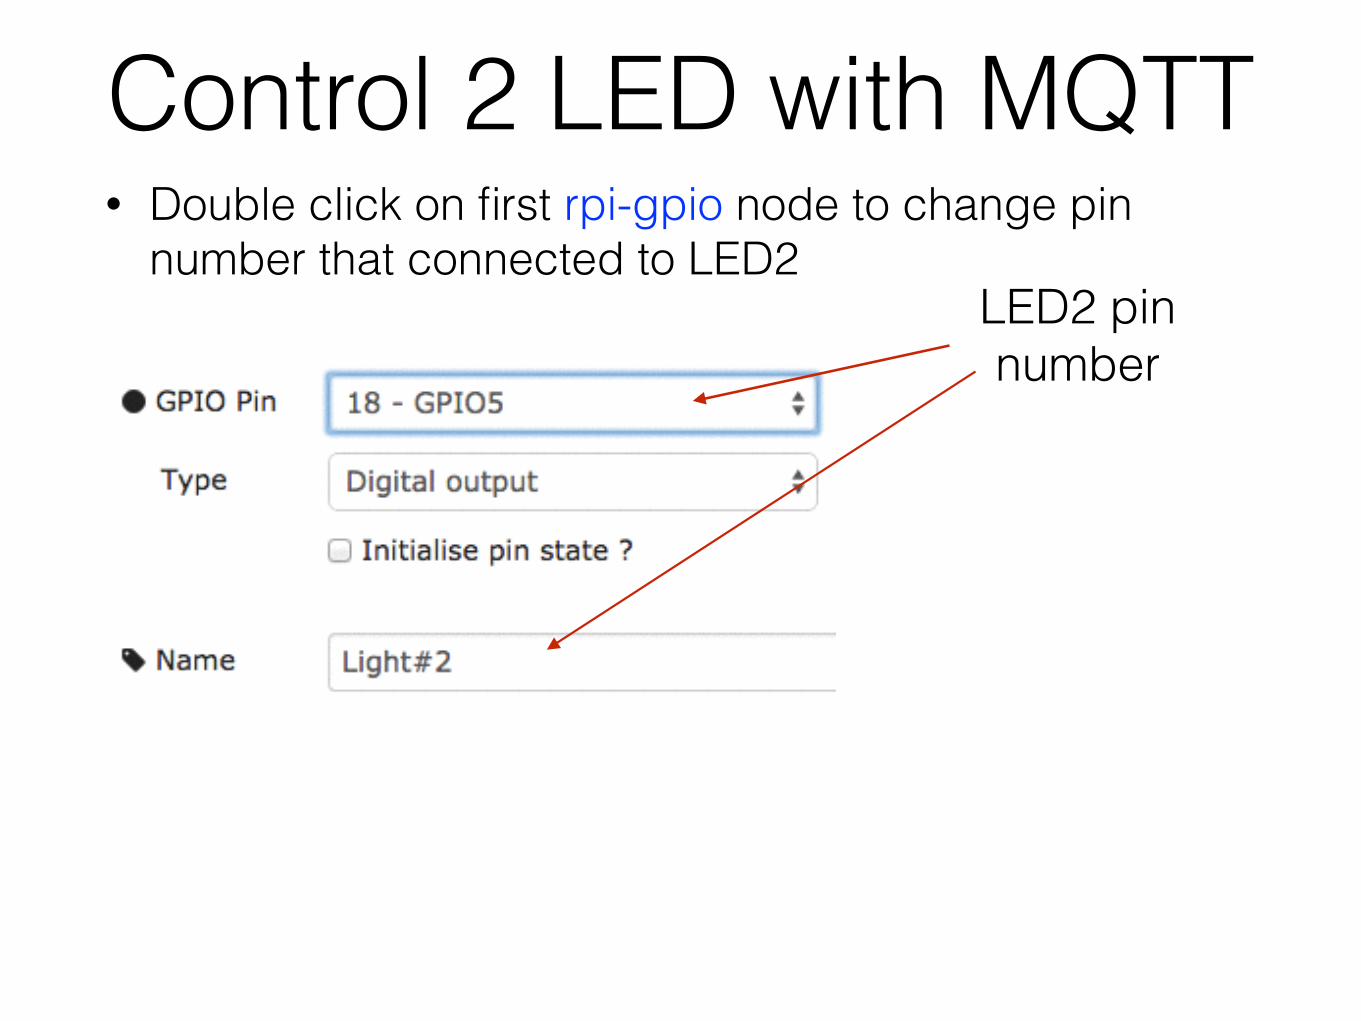
Control 2 LED with MQTT• Double click on first rpi-gpio node to change pin
number that connected to LED2LED2 pin number
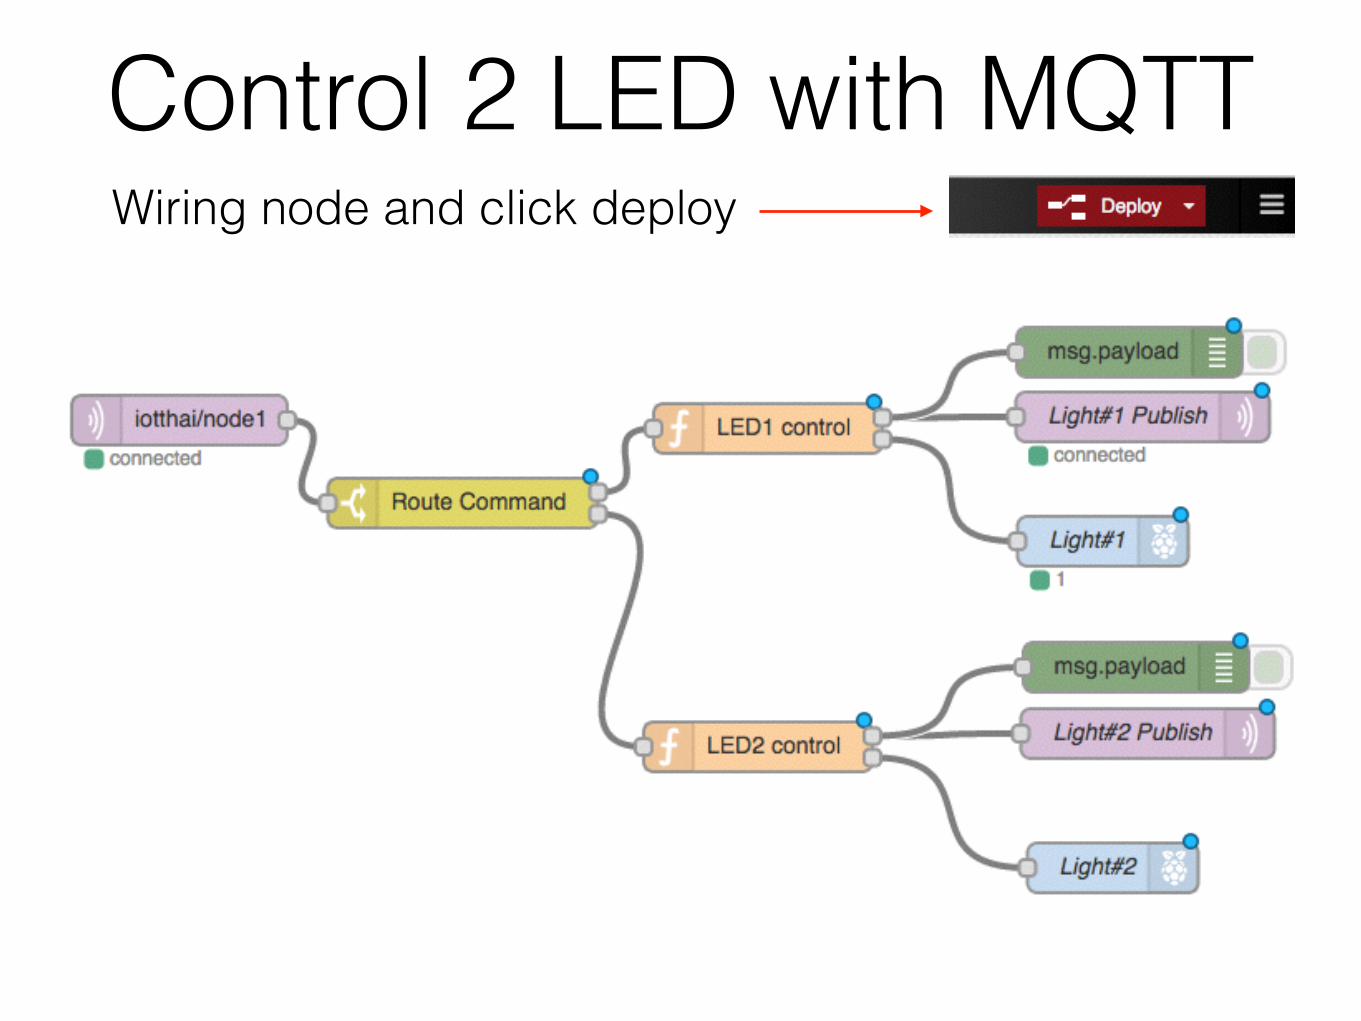
Control 2 LED with MQTTWiring node and click deploy
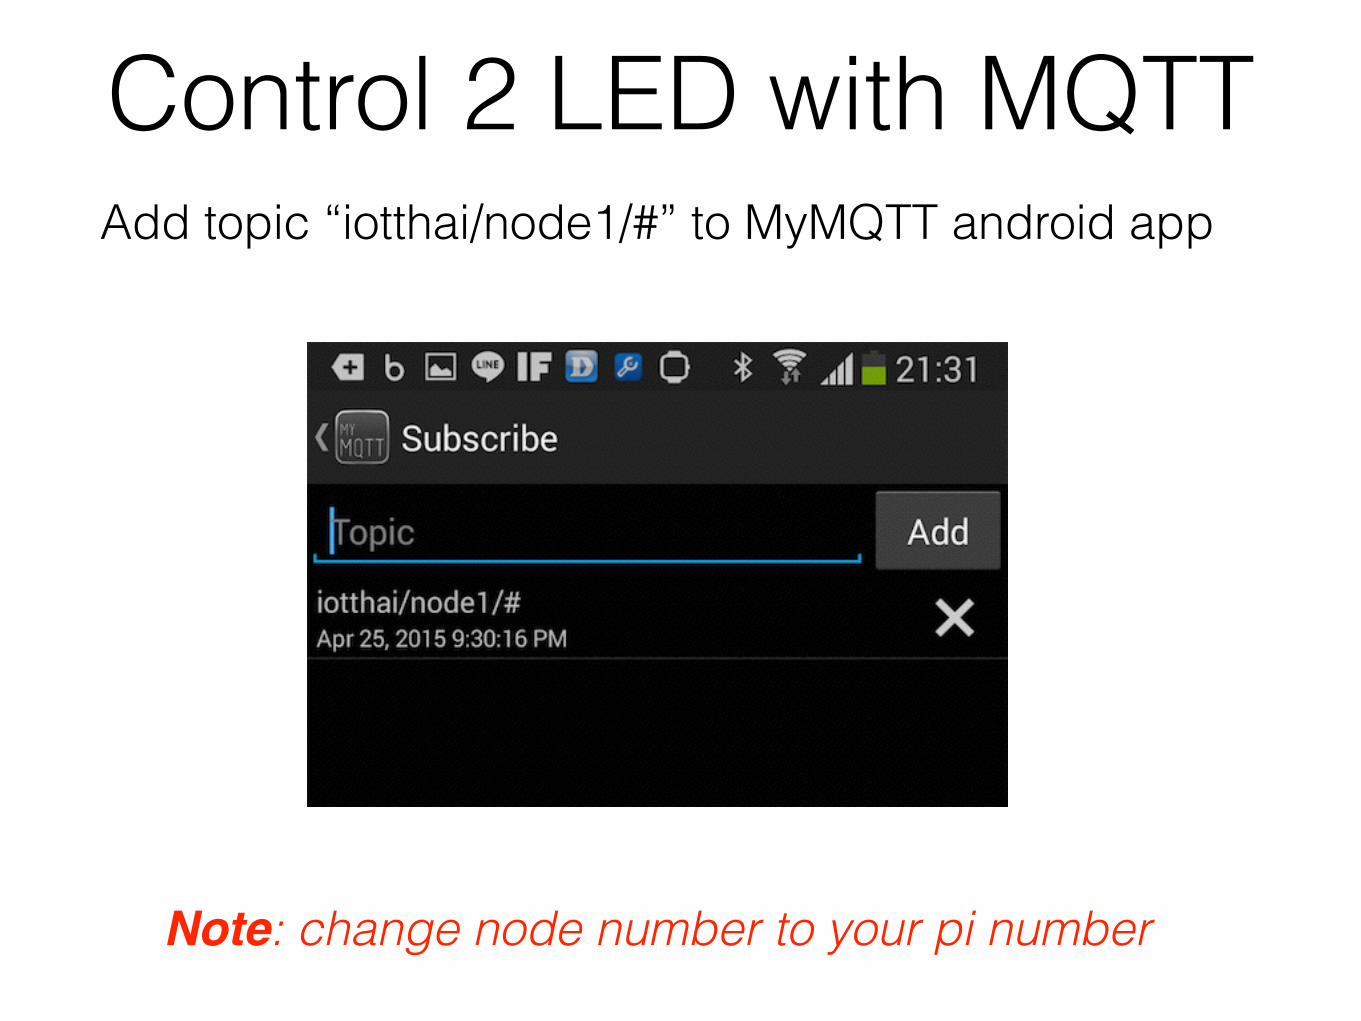
Control 2 LED with MQTTAdd topic “iotthai/node1/#” to MyMQTT android app
Note: change node number to your pi number
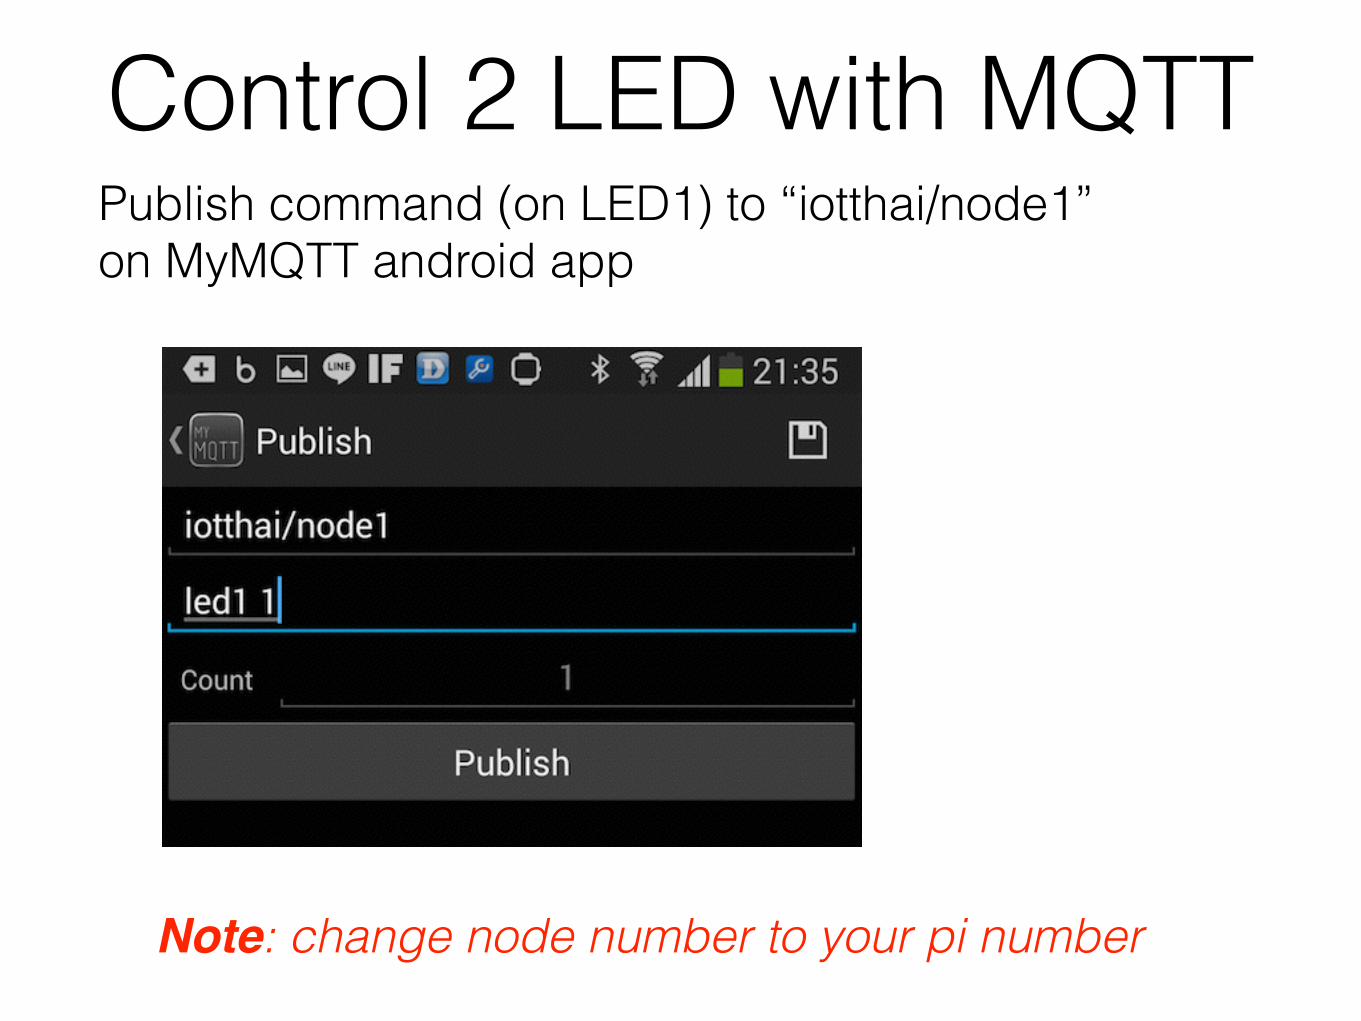
Control 2 LED with MQTTPublish command (on LED1) to “iotthai/node1” on MyMQTT android app
Note: change node number to your pi number
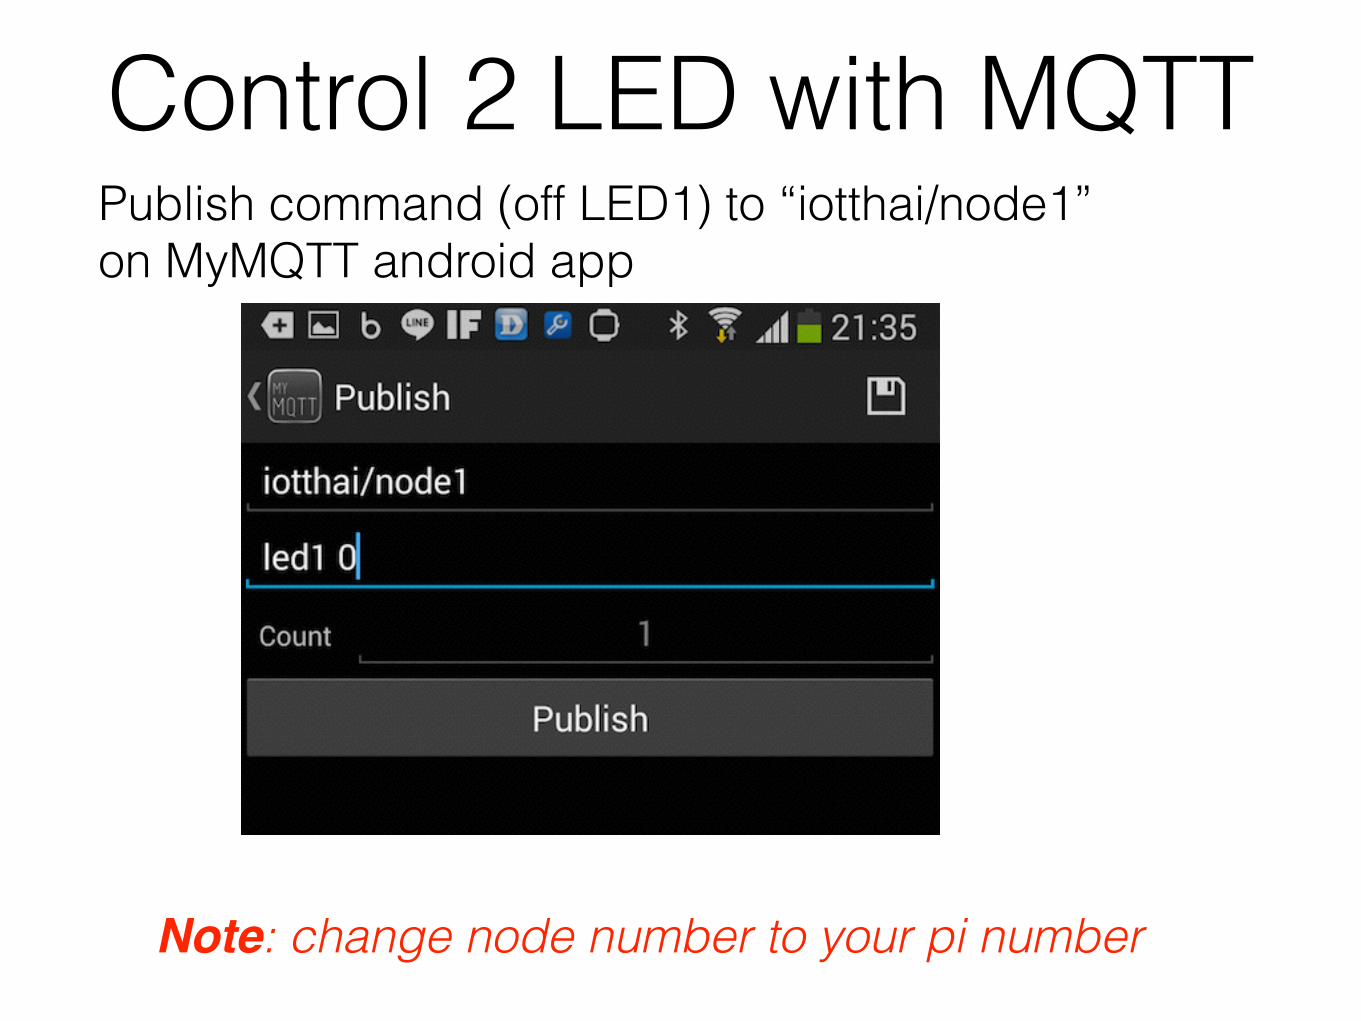
Control 2 LED with MQTTPublish command (off LED1) to “iotthai/node1” on MyMQTT android app
Note: change node number to your pi number
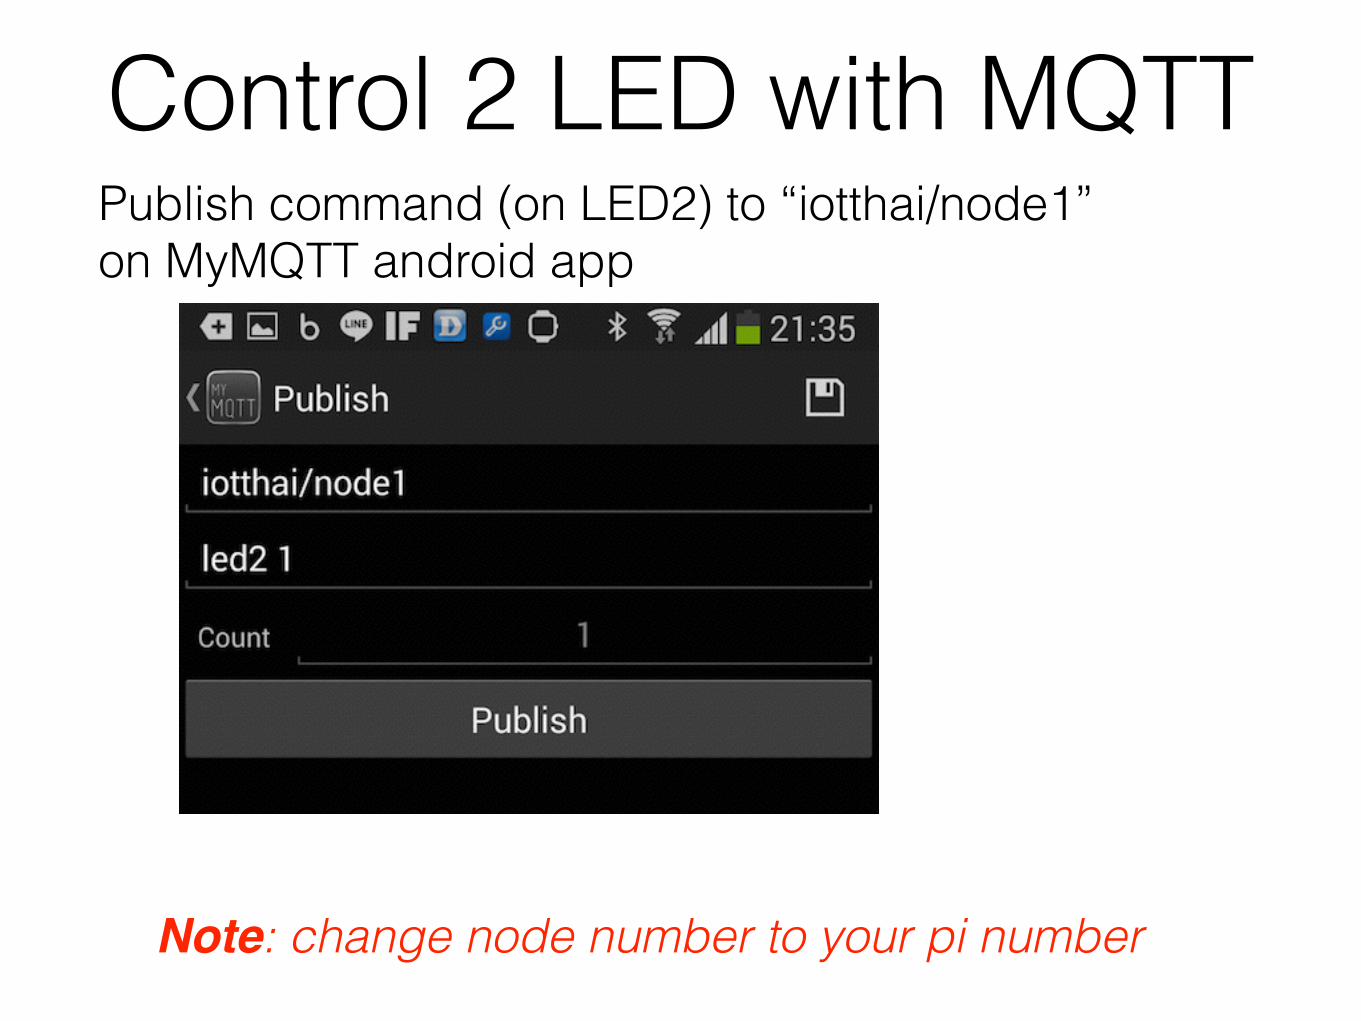
Control 2 LED with MQTTPublish command (on LED2) to “iotthai/node1” on MyMQTT android app
Note: change node number to your pi number

Control 2 LED with MQTTPublish command (off LED2) to “iotthai/node1” on MyMQTT android app
Note: change node number to your pi number
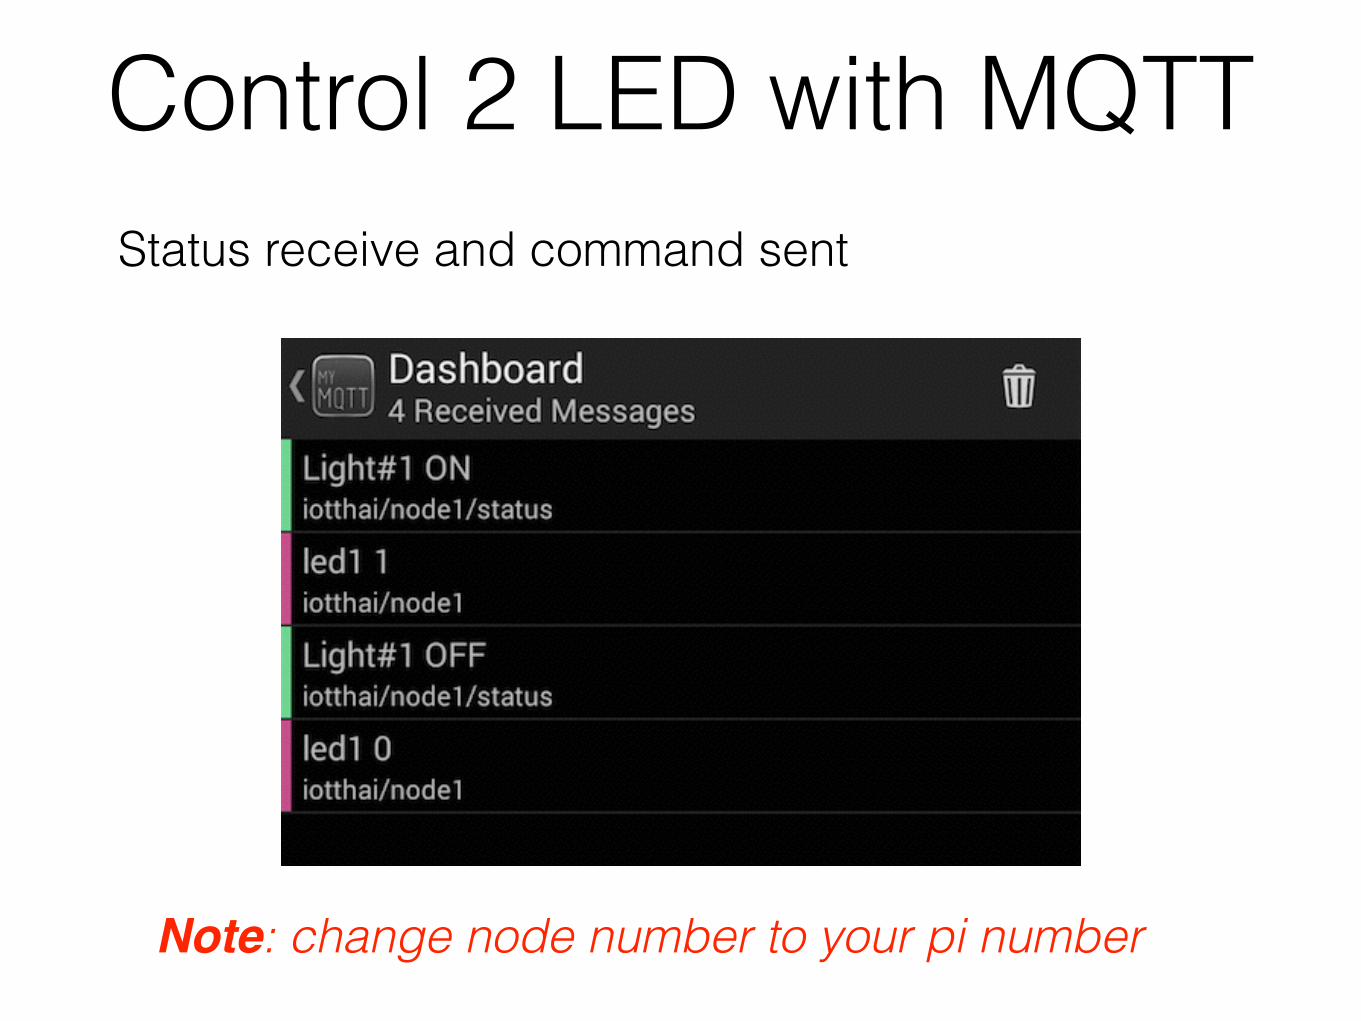
Control 2 LED with MQTTStatus receive and command sent
Note: change node number to your pi number
Temperature to Tinamous to Plot Graph
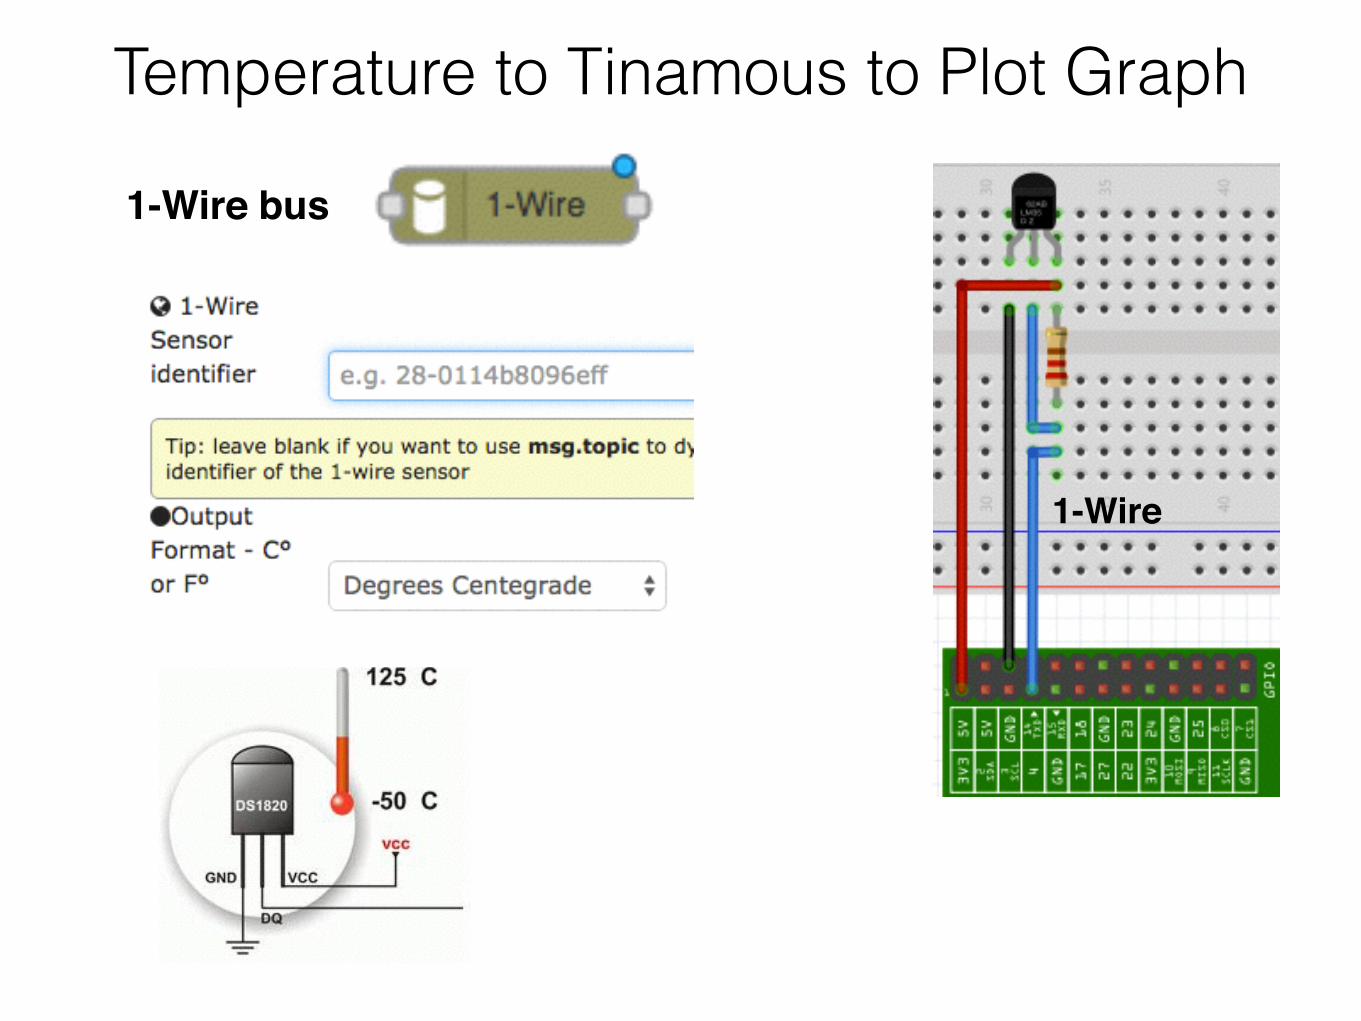
1-Wire
1-Wire bus
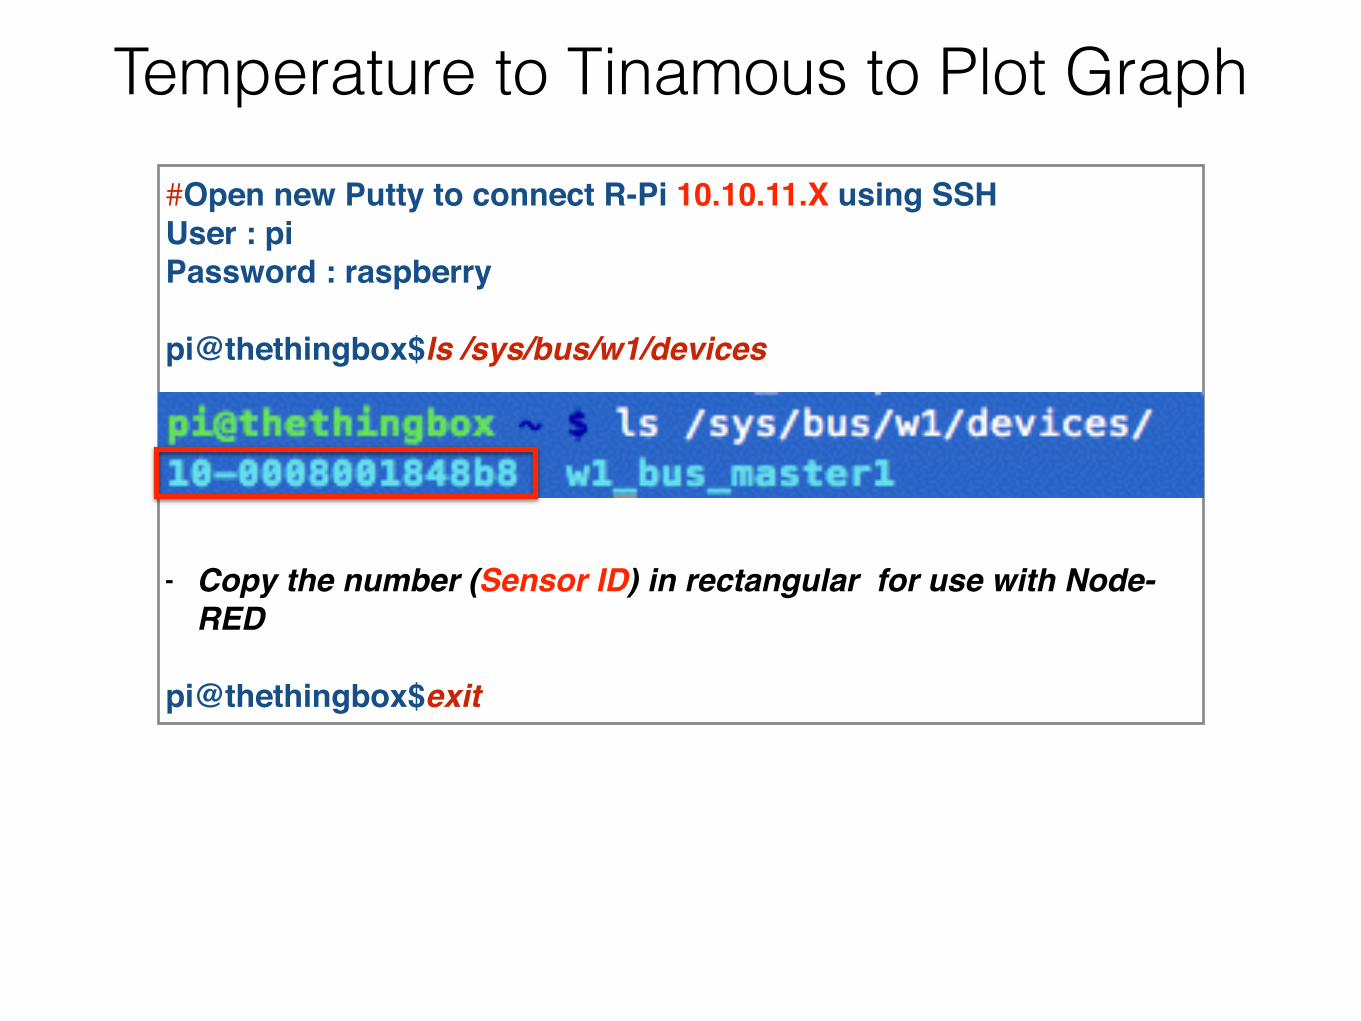
Temperature to Tinamous to Plot Graph#Open new Putty to connect R-Pi 10.10.11.X using SSH!User : pi!Password : raspberry!!pi@thethingbox$ls /sys/bus/w1/devices!!!!!!- Copy the number (Sensor ID) in rectangular for use with Node-
RED!!pi@thethingbox$exit!
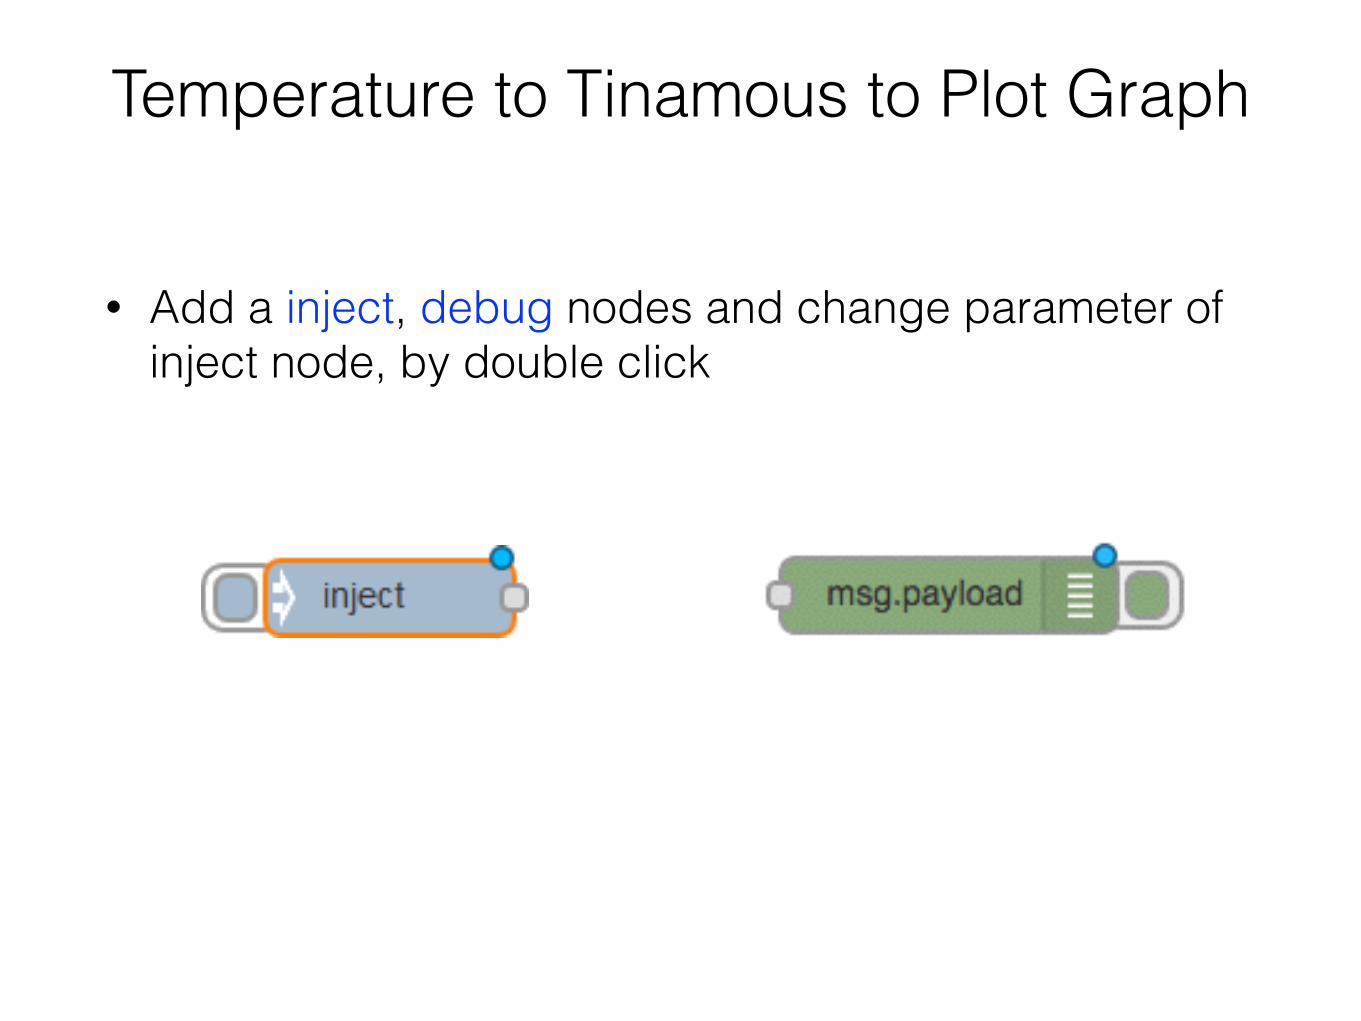
Temperature to Tinamous to Plot Graph
• Add a inject, debug nodes and change parameter of inject node, by double click
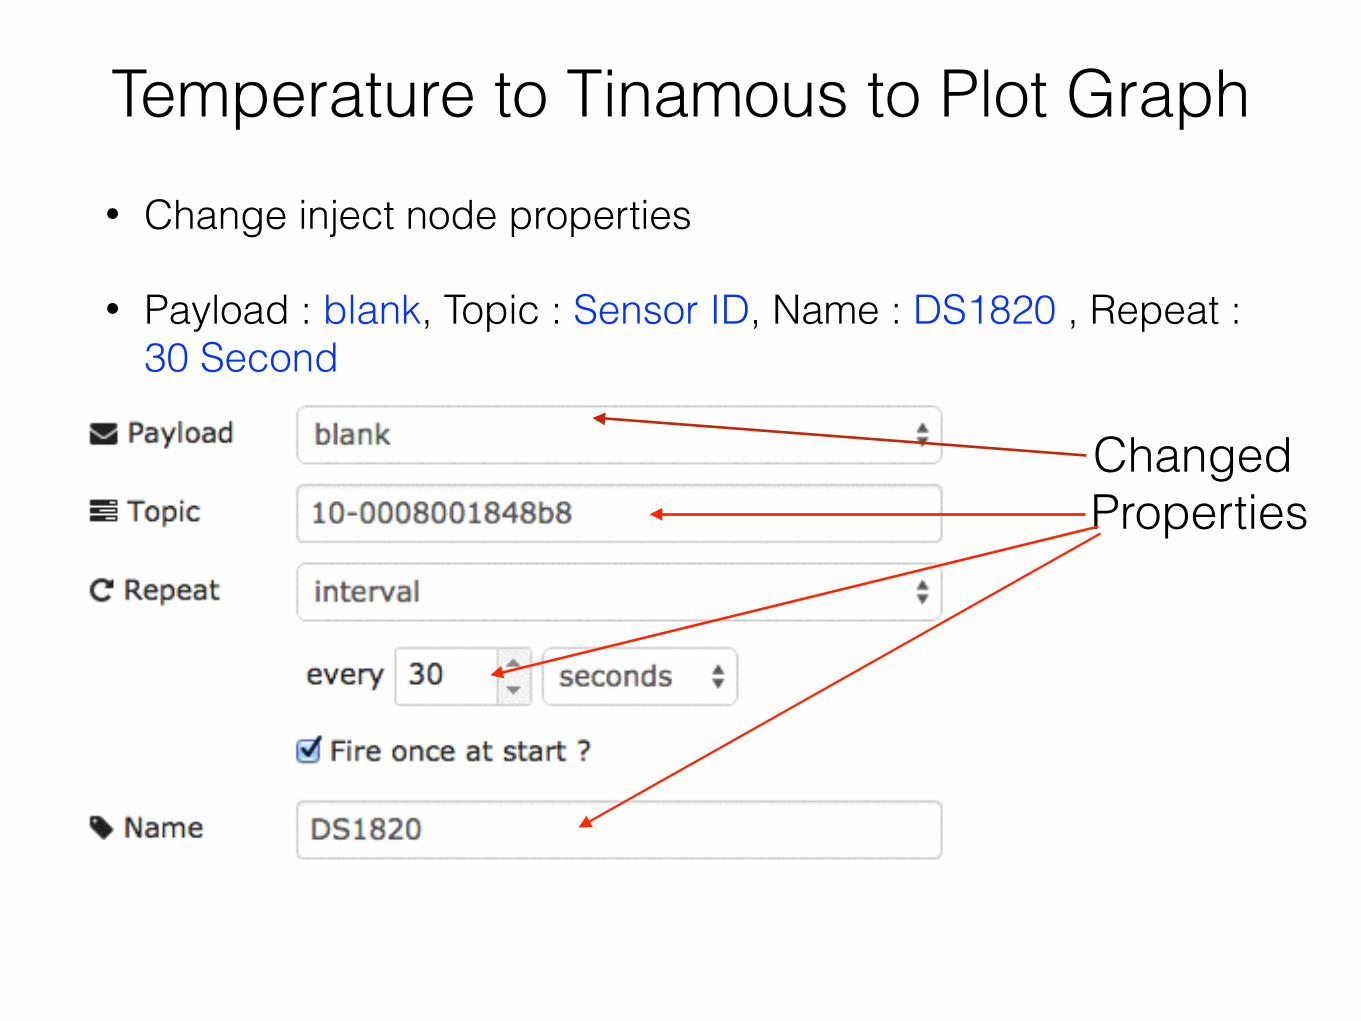
Temperature to Tinamous to Plot Graph• Change inject node properties
• Payload : blank, Topic : Sensor ID, Name : DS1820 , Repeat : 30 Second
Changed Properties
Temperature to Tinamous to Plot Graph
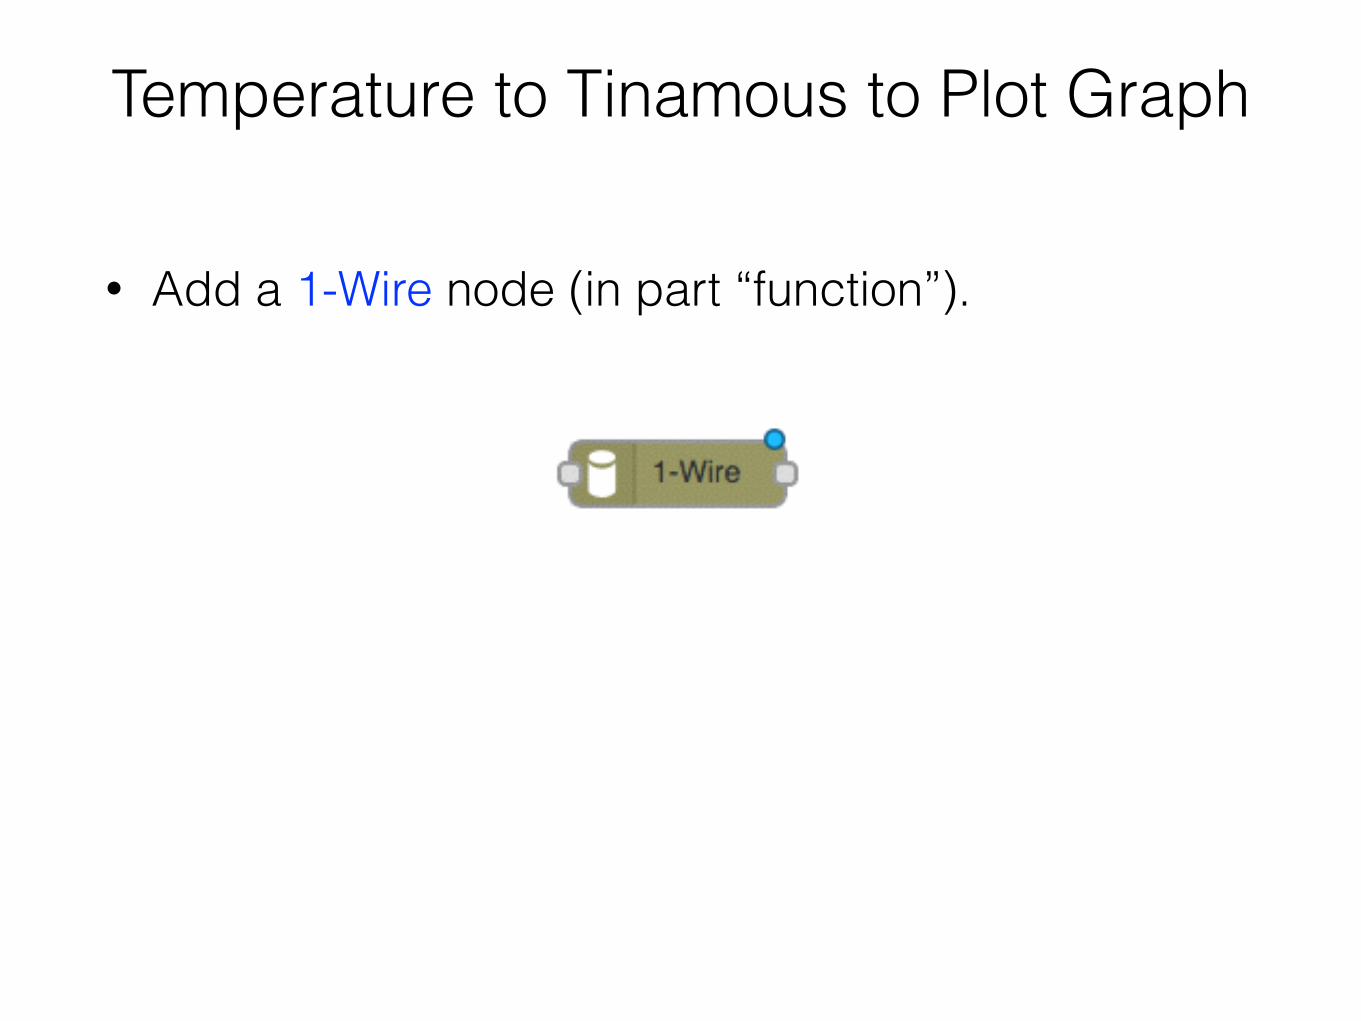
• Add a 1-Wire node (in part “function”).
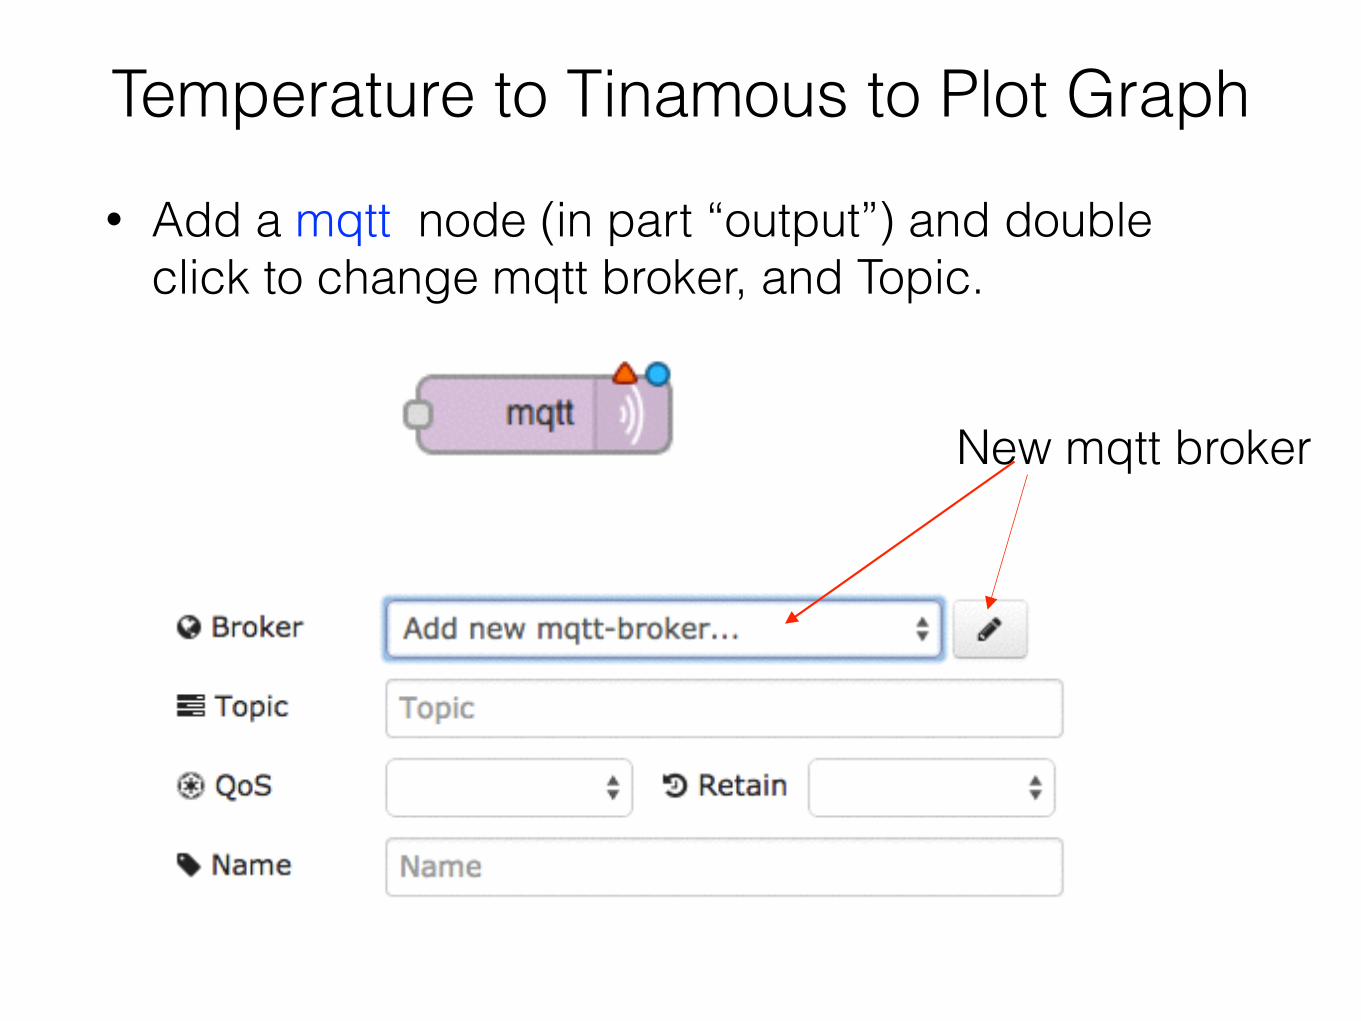
Temperature to Tinamous to Plot Graph• Add a mqtt node (in part “output”) and double
click to change mqtt broker, and Topic.
New mqtt broker
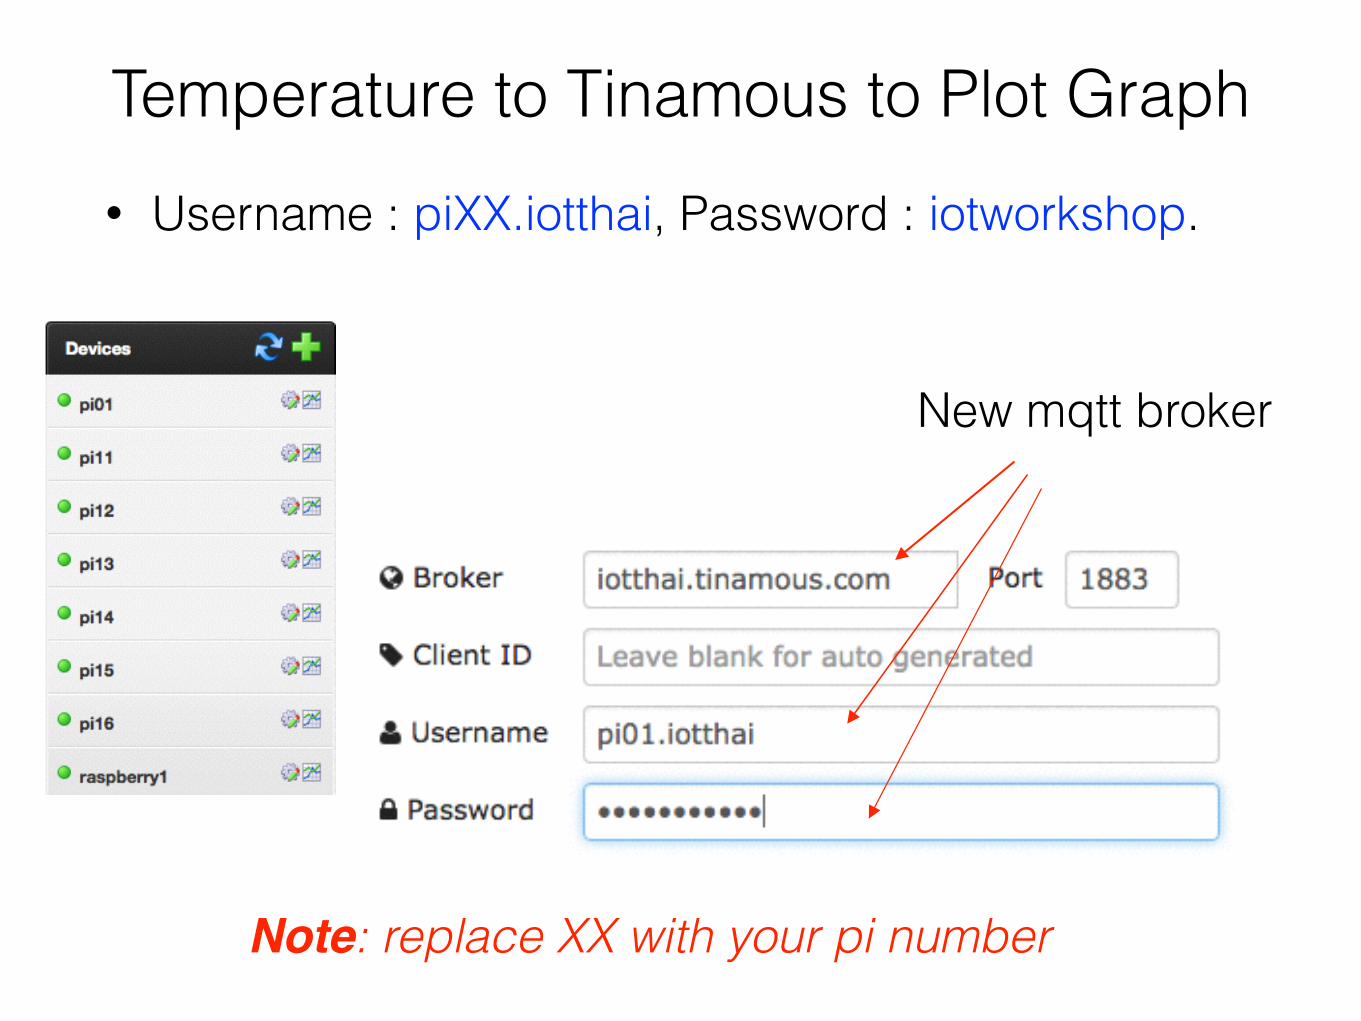
Temperature to Tinamous to Plot Graph• Username : piXX.iotthai, Password : iotworkshop.
New mqtt broker
Note: replace XX with your pi number
Temperature to Tinamous to Plot Graph
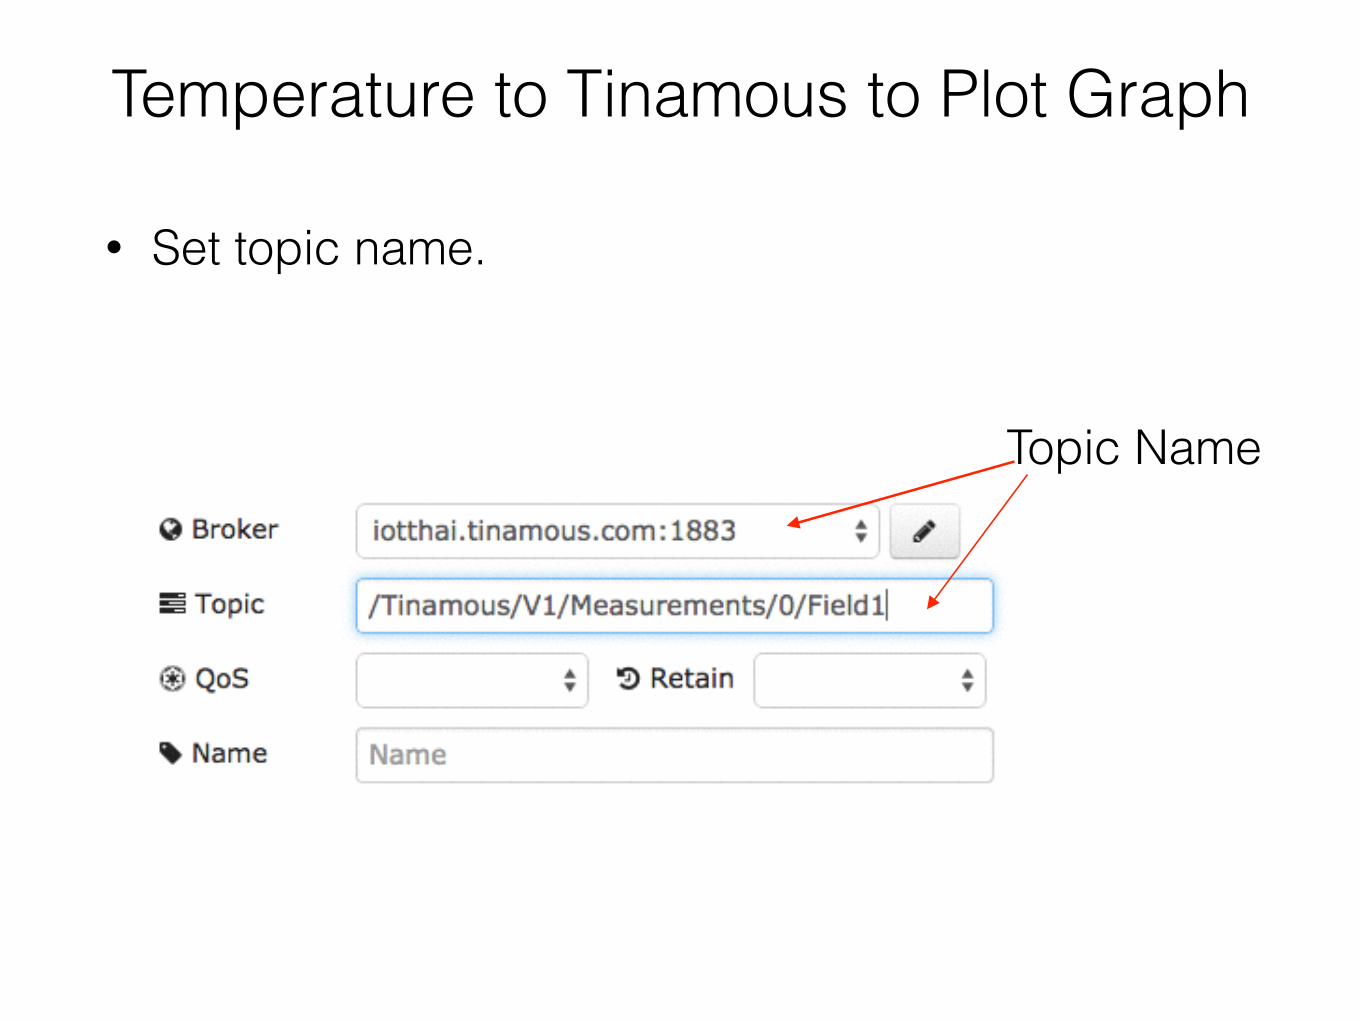
• Set topic name.
Topic Name
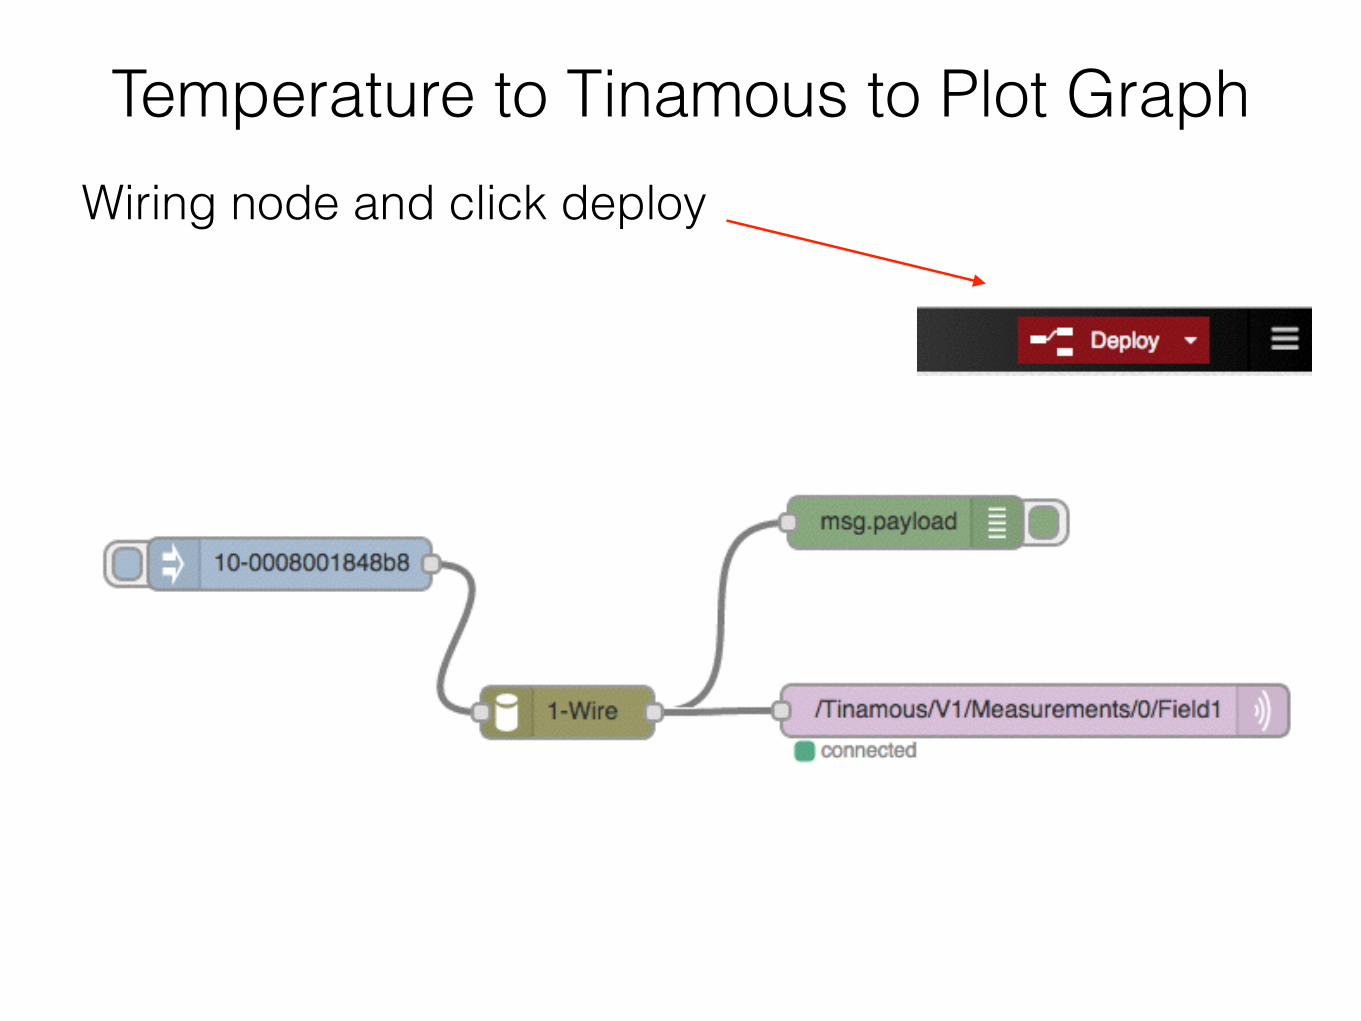
Temperature to Tinamous to Plot GraphWiring node and click deploy
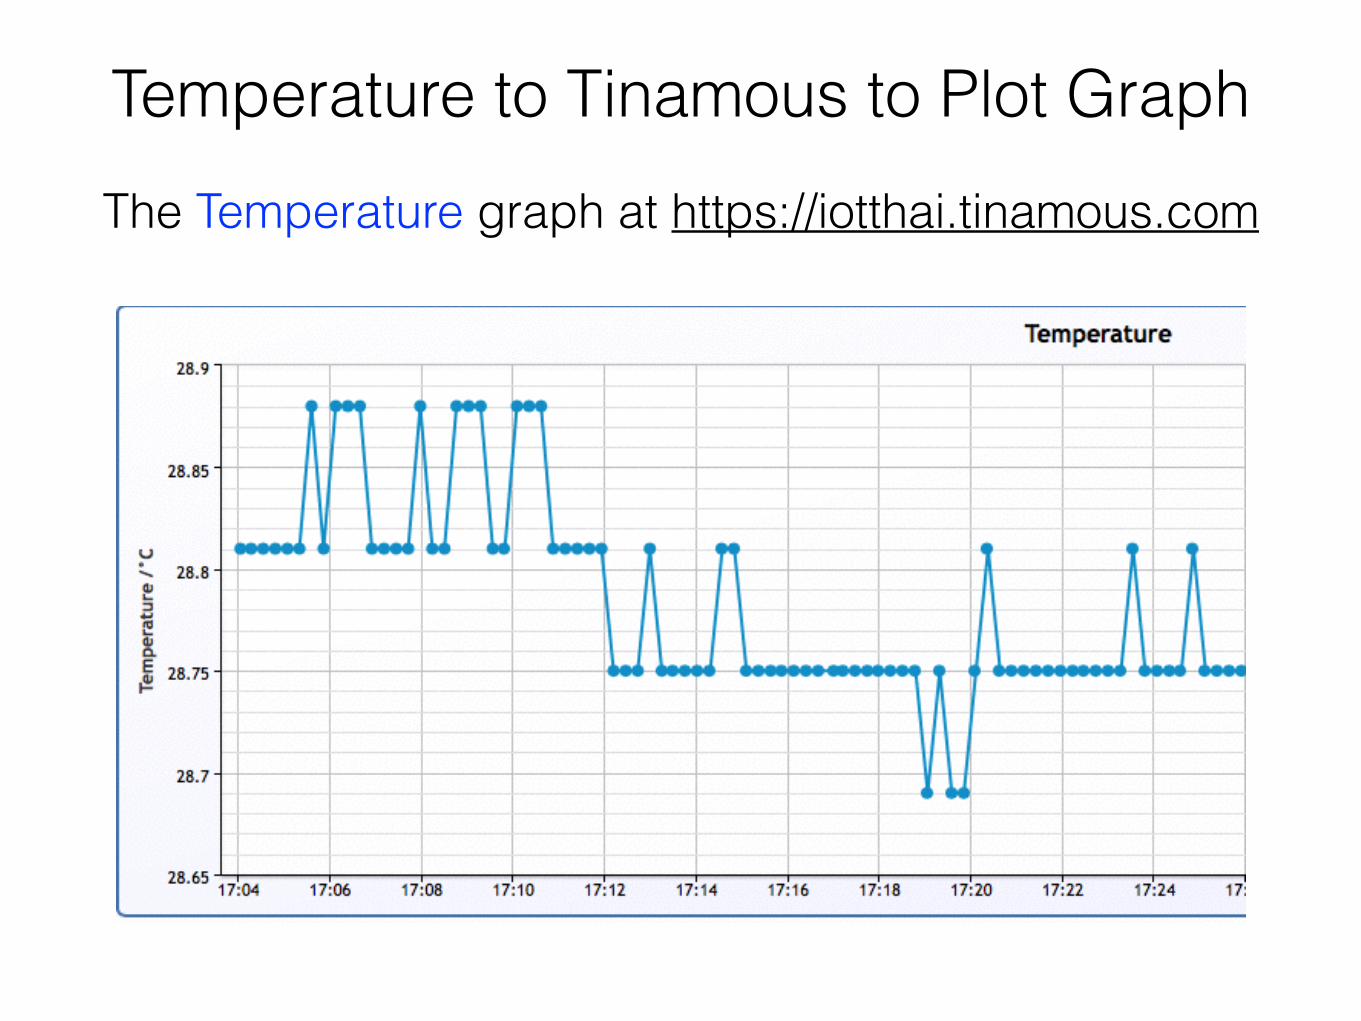
Temperature to Tinamous to Plot GraphThe Temperature graph at https://iotthai.tinamous.com
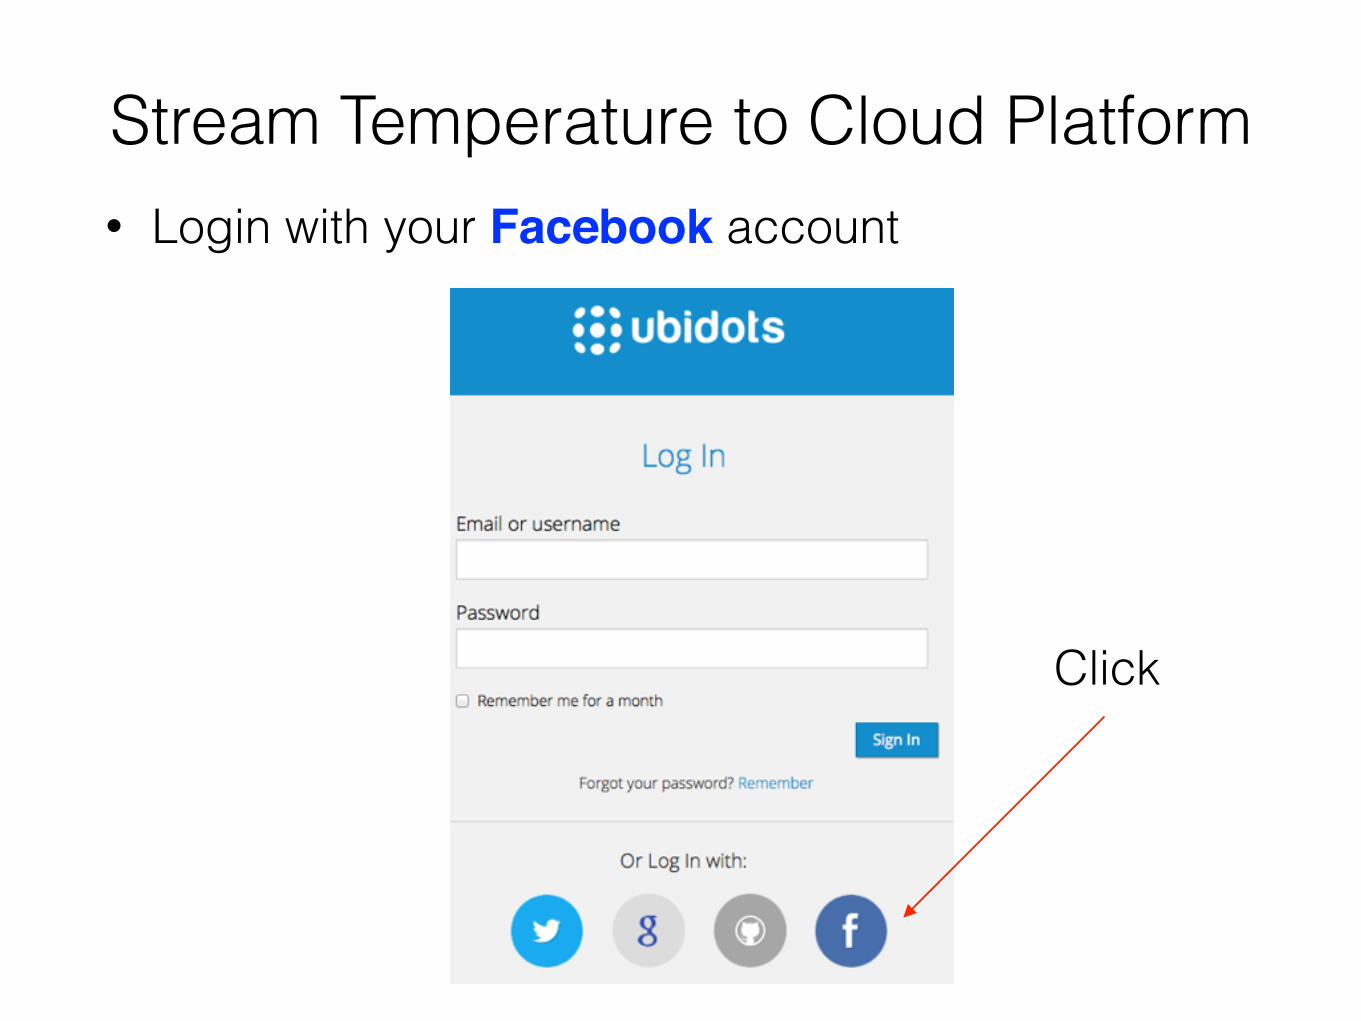
Stream Temperature to Cloud Platform • Login with your Facebook account
Click
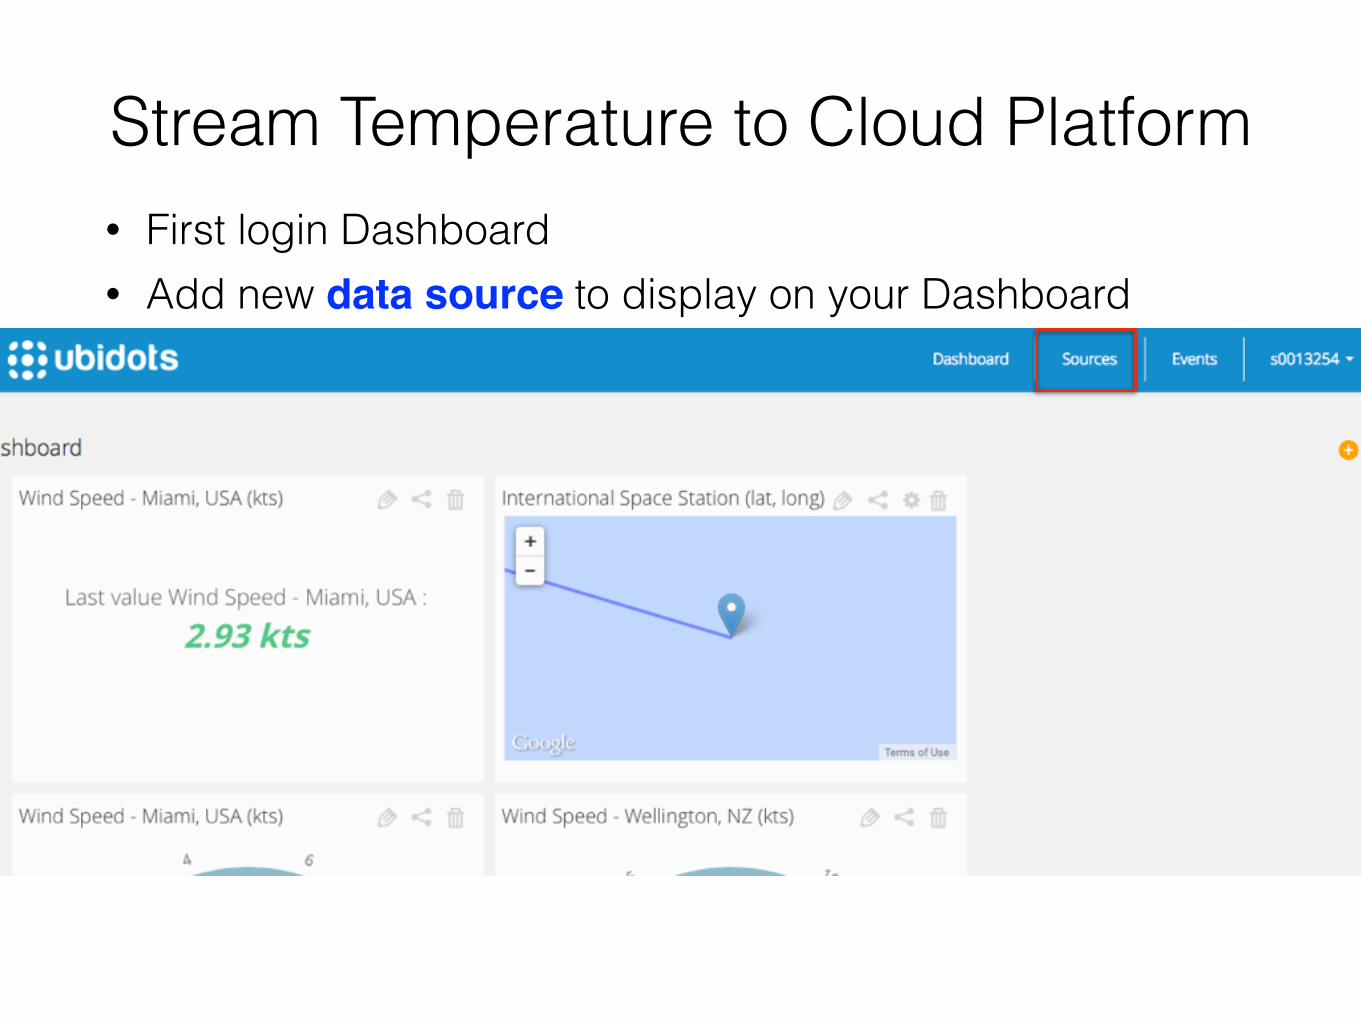
Stream Temperature to Cloud Platform• First login Dashboard • Add new data source to display on your Dashboard
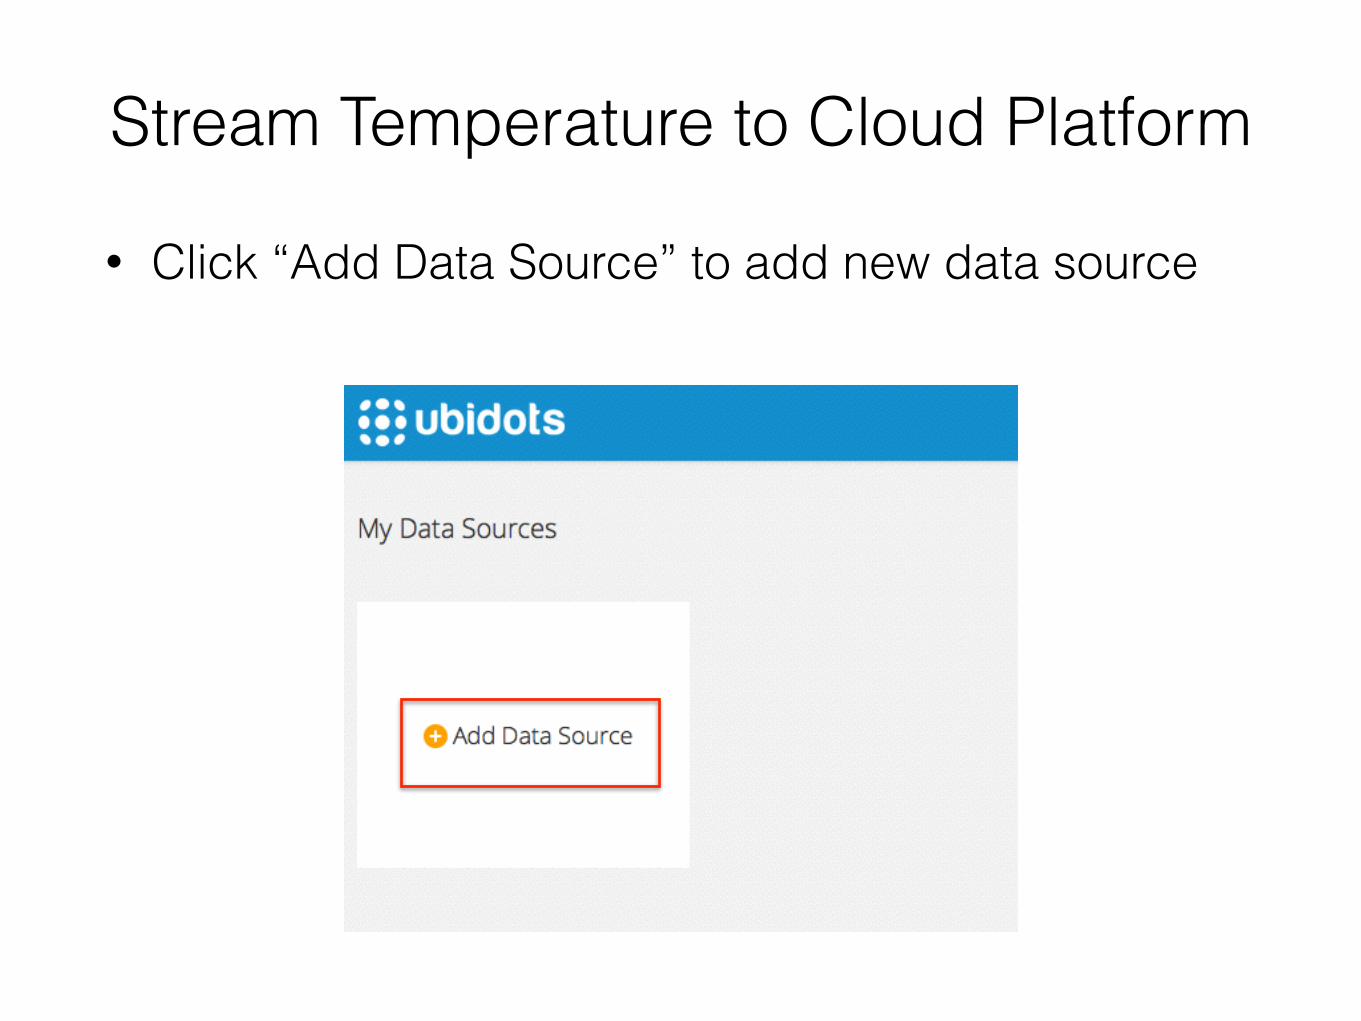
Stream Temperature to Cloud Platform
• Click “Add Data Source” to add new data source
Stream Temperature to Cloud Platform
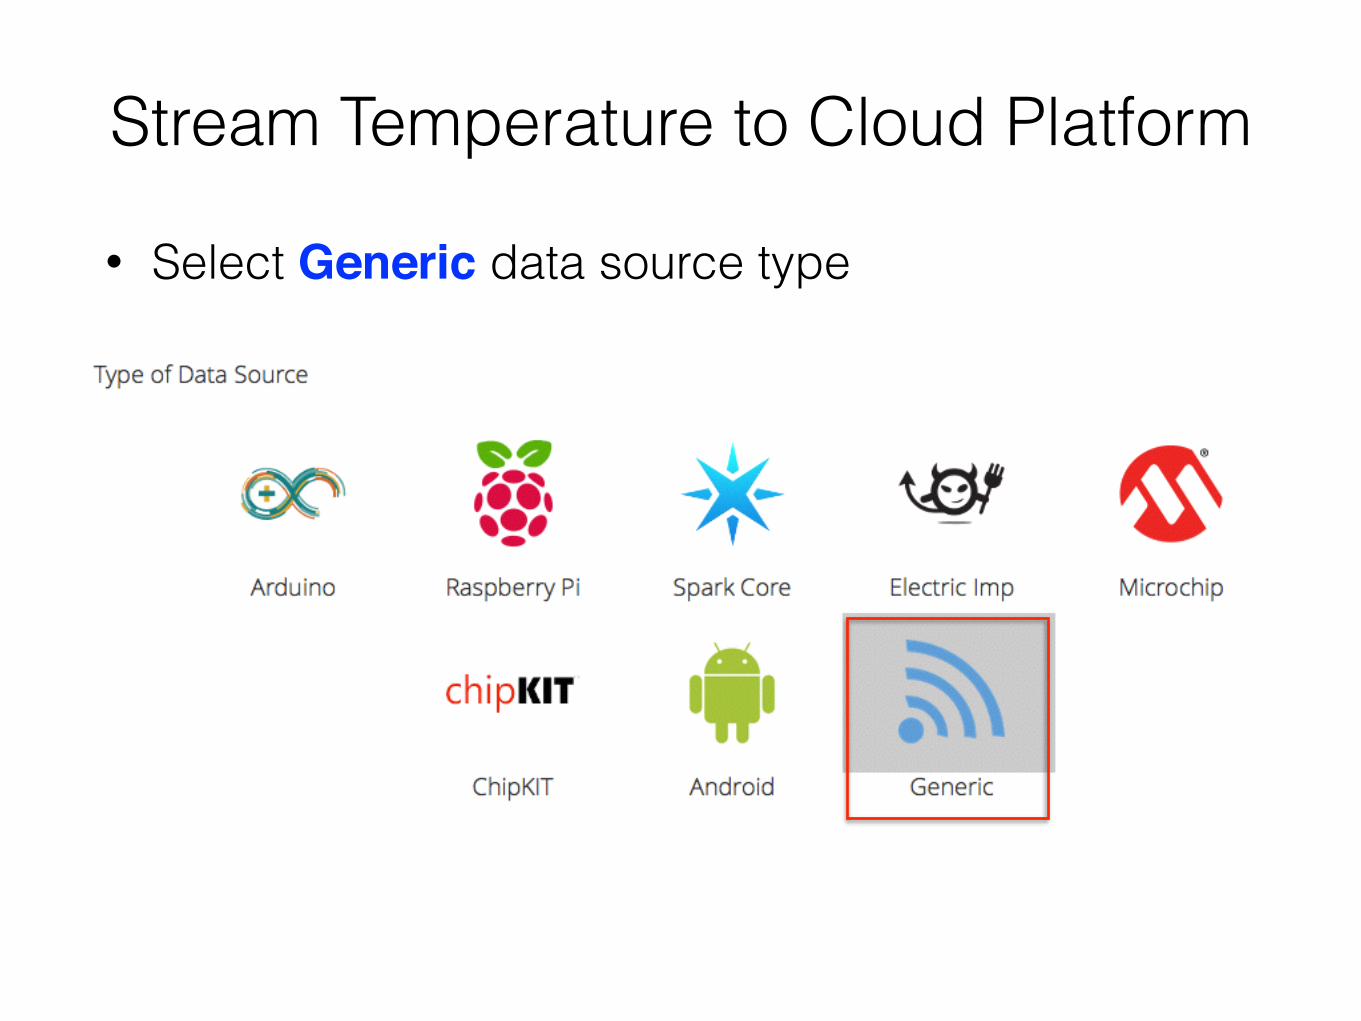
• Select Generic data source type
Stream Temperature to Cloud Platform
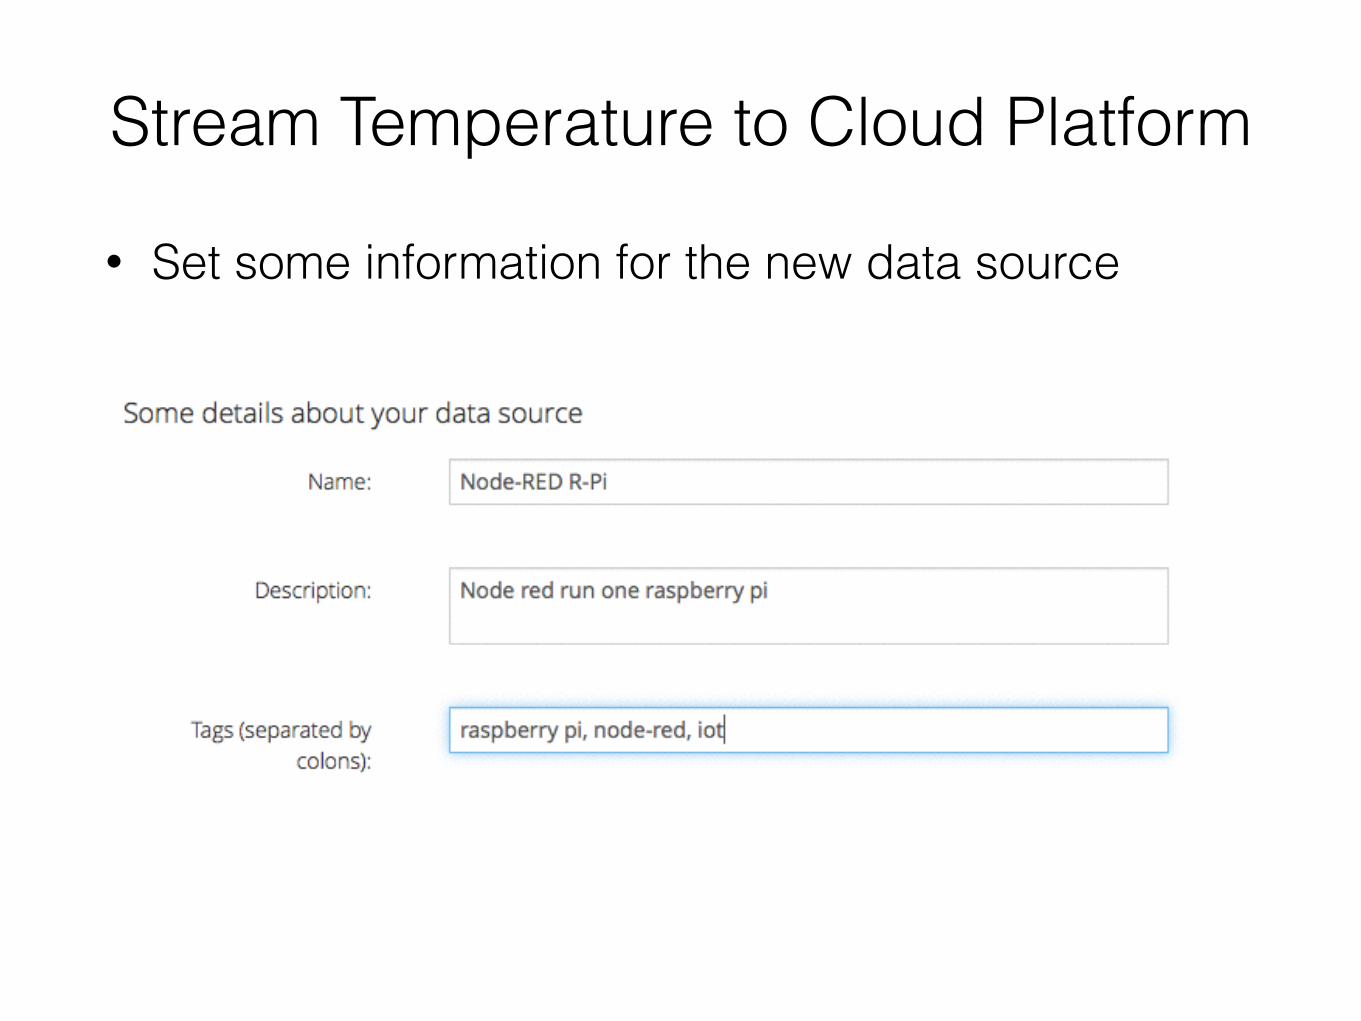
• Set some information for the new data source
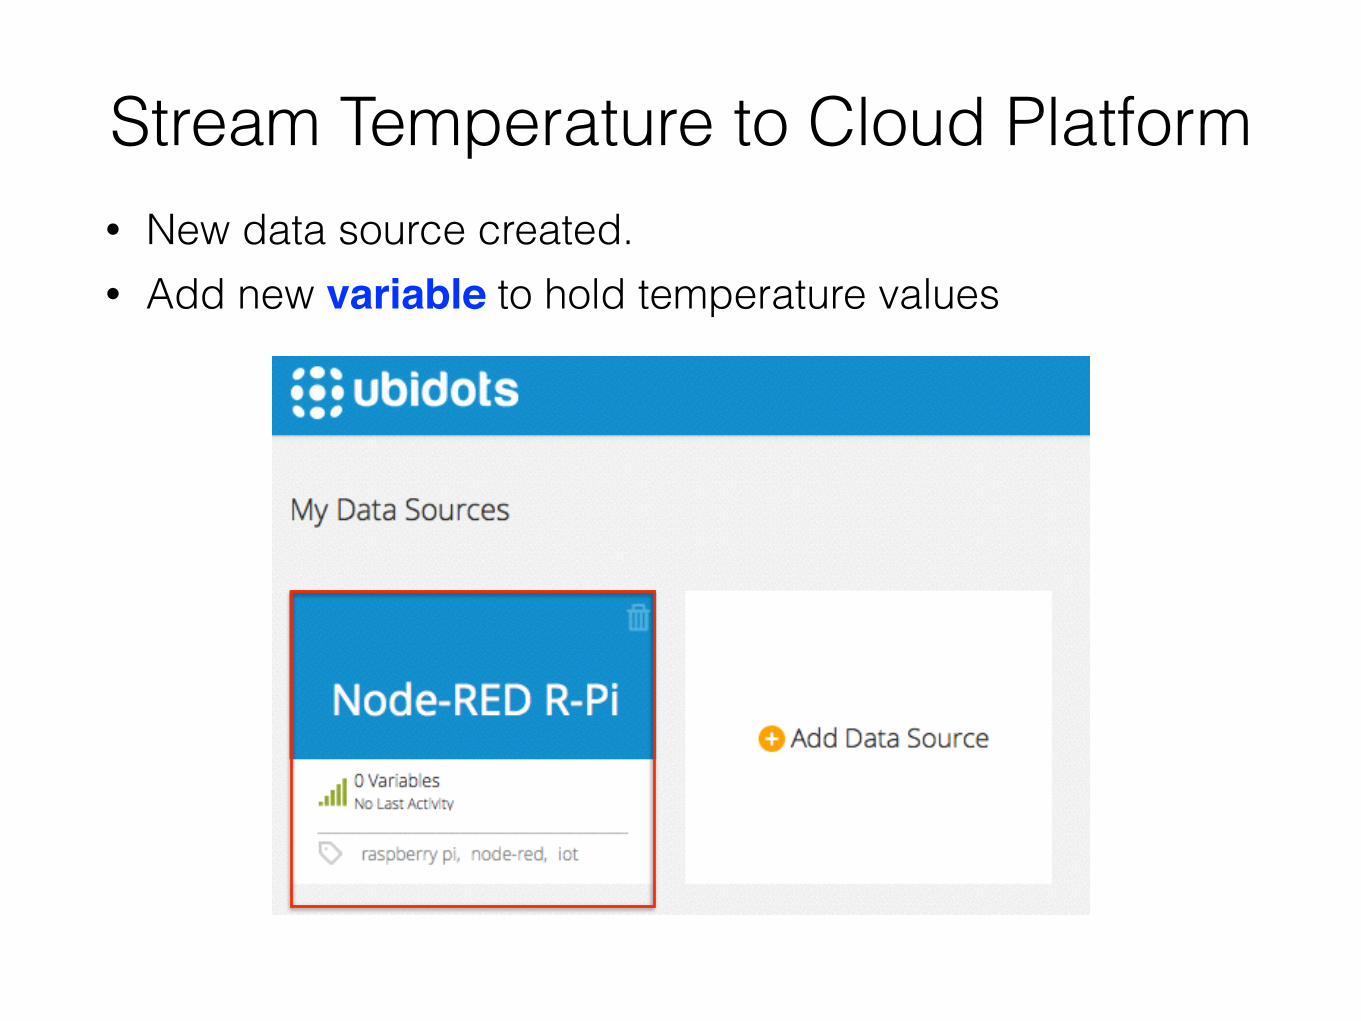
Stream Temperature to Cloud Platform• New data source created. • Add new variable to hold temperature values
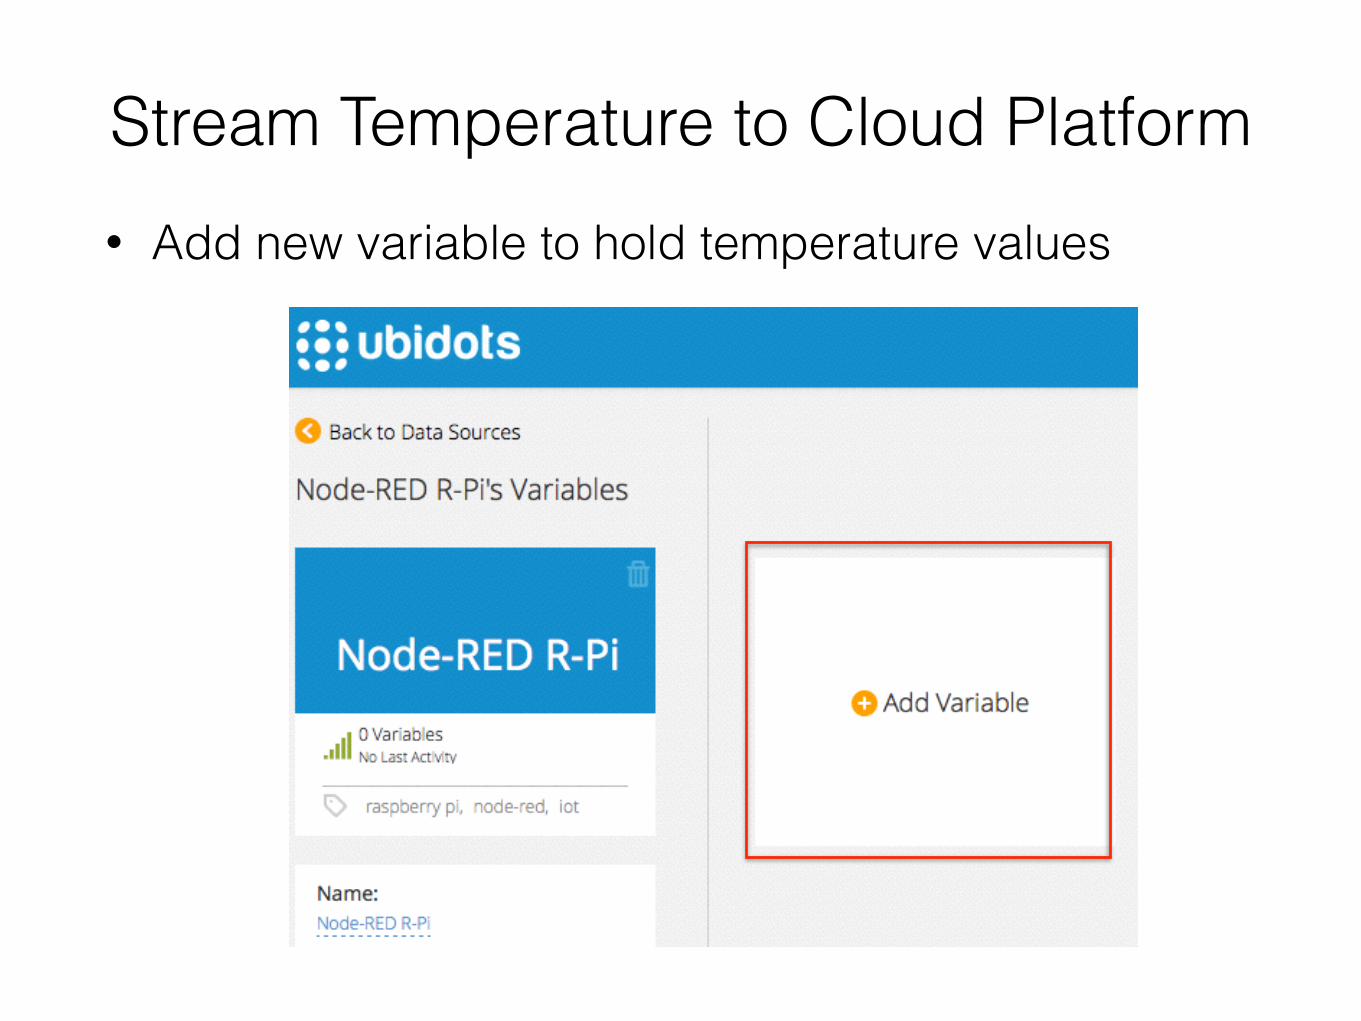
Stream Temperature to Cloud Platform• Add new variable to hold temperature values
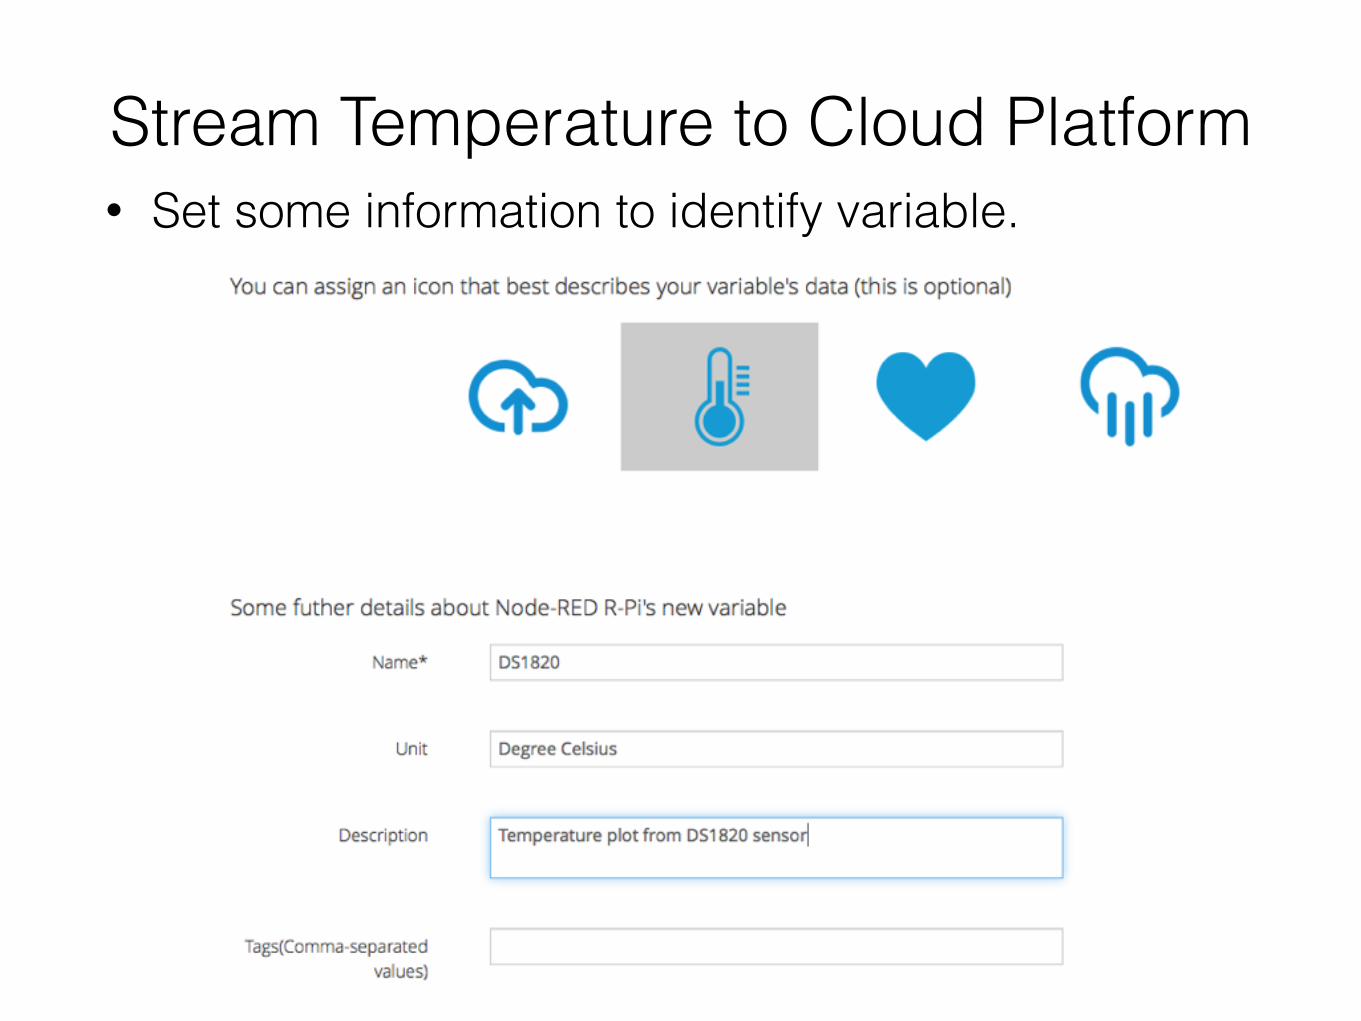
Stream Temperature to Cloud Platform• Set some information to identify variable.
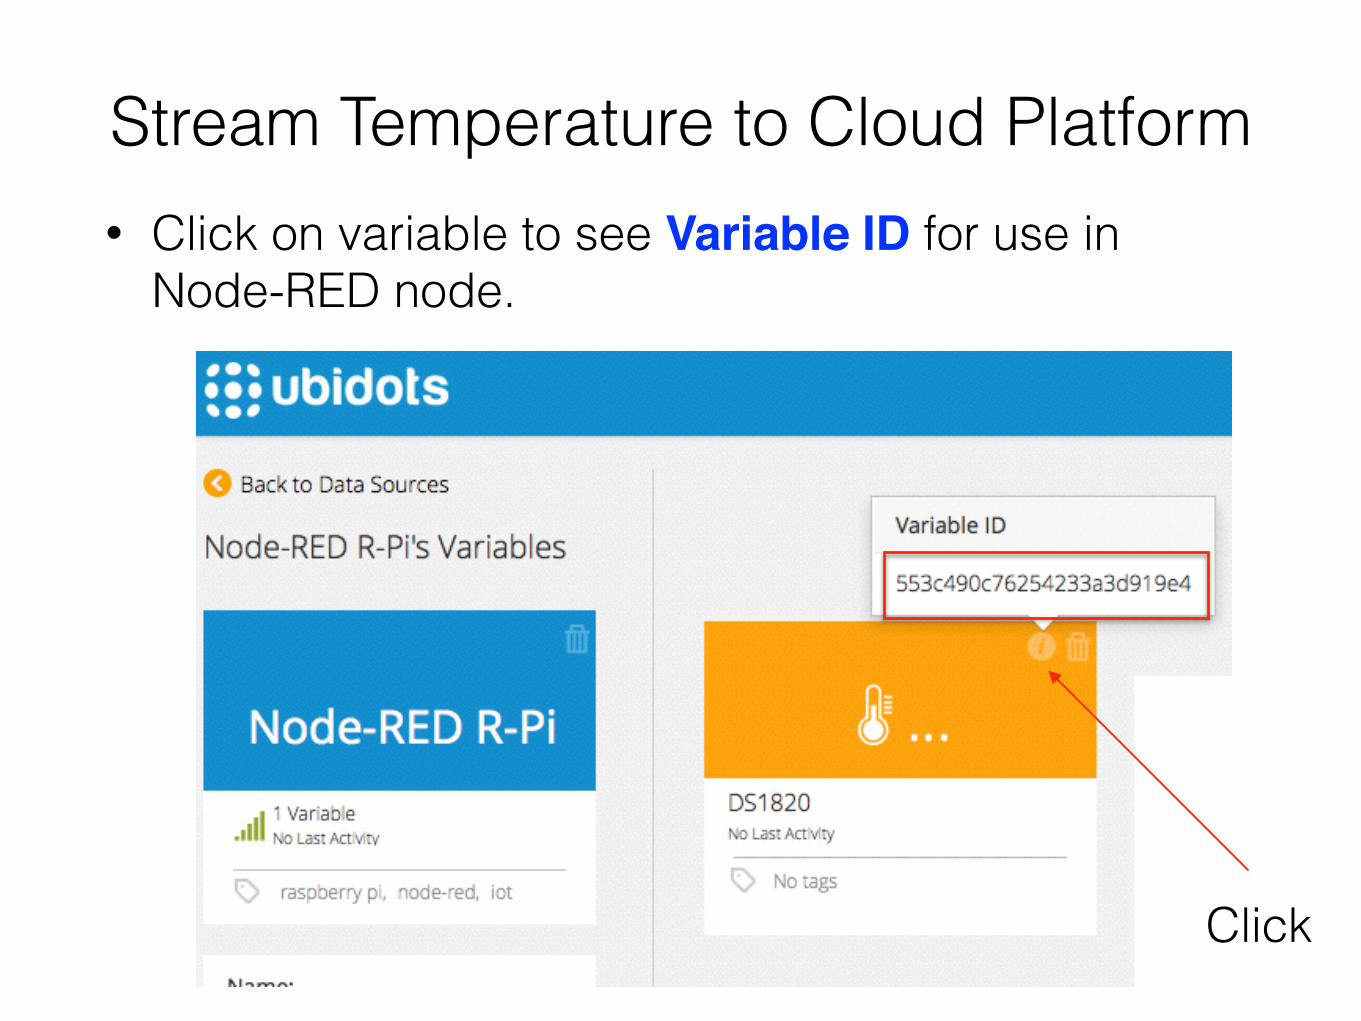
Stream Temperature to Cloud Platform• Click on variable to see Variable ID for use in
Node-RED node.
Click
Stream Temperature to Cloud Platform
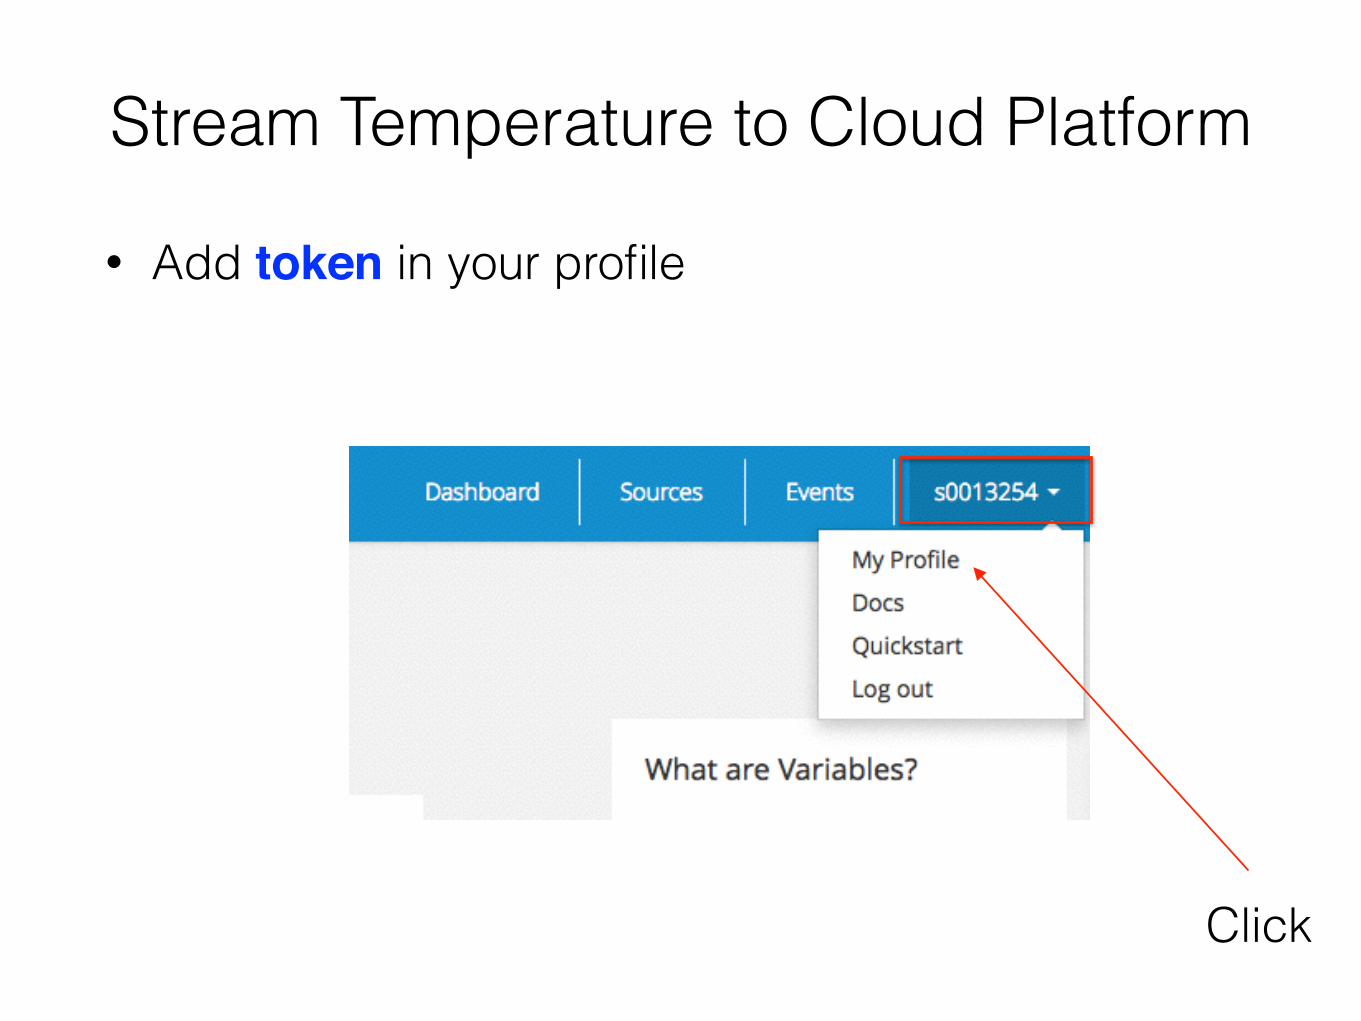
• Add token in your profile
Click
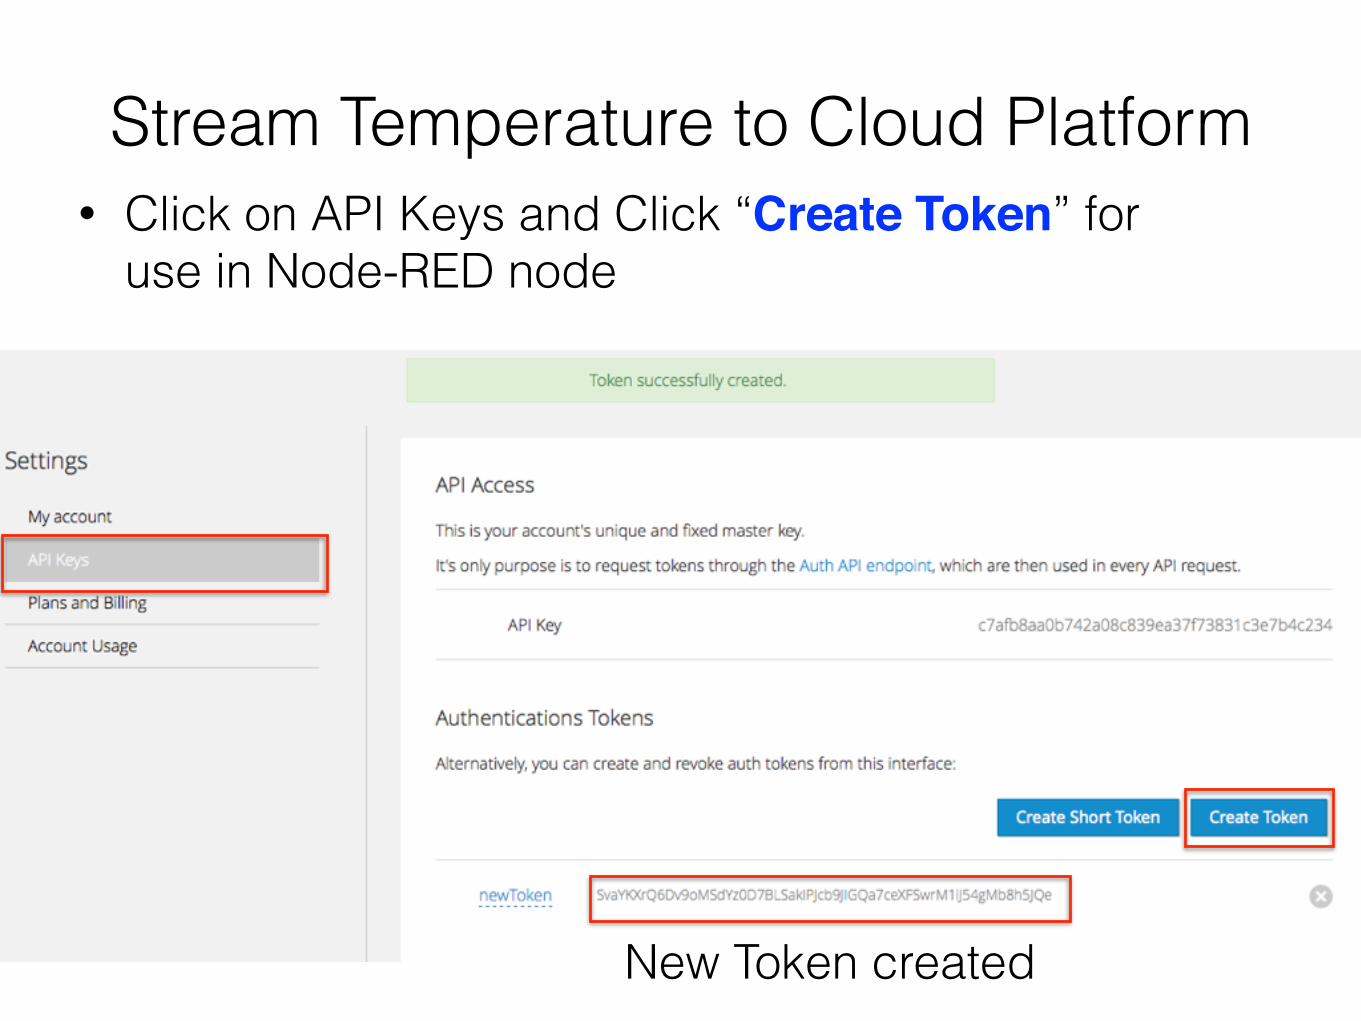
Stream Temperature to Cloud Platform• Click on API Keys and Click “Create Token” for
use in Node-RED node
New Token created
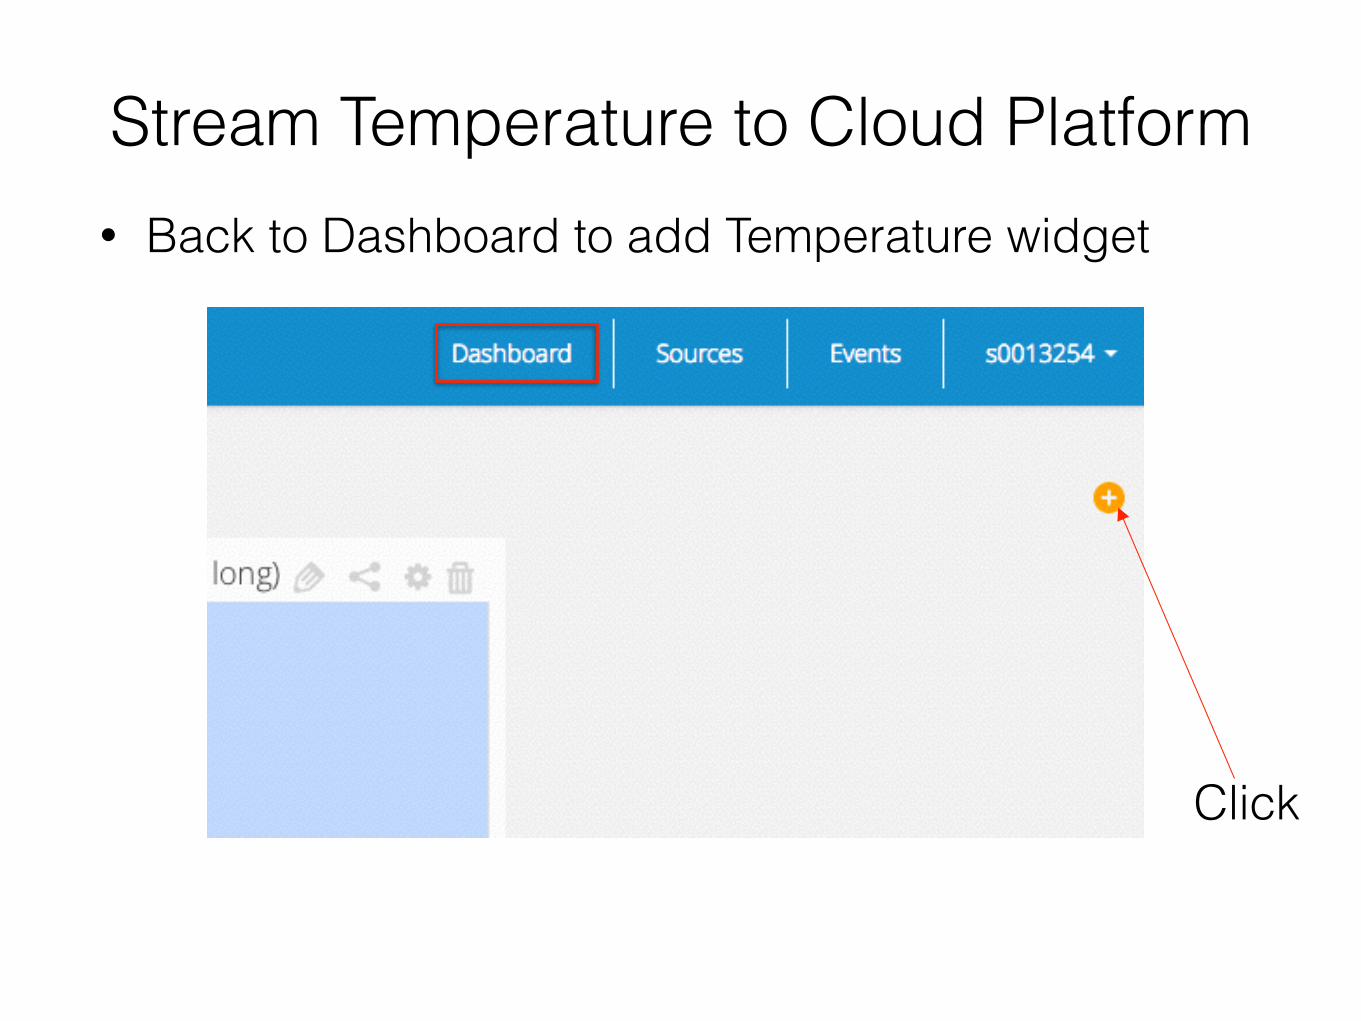
Stream Temperature to Cloud Platform• Back to Dashboard to add Temperature widget
Click

Stream Temperature to Cloud Platform• Set type of widget to display , in this case use
Gauge to display real-time temperature
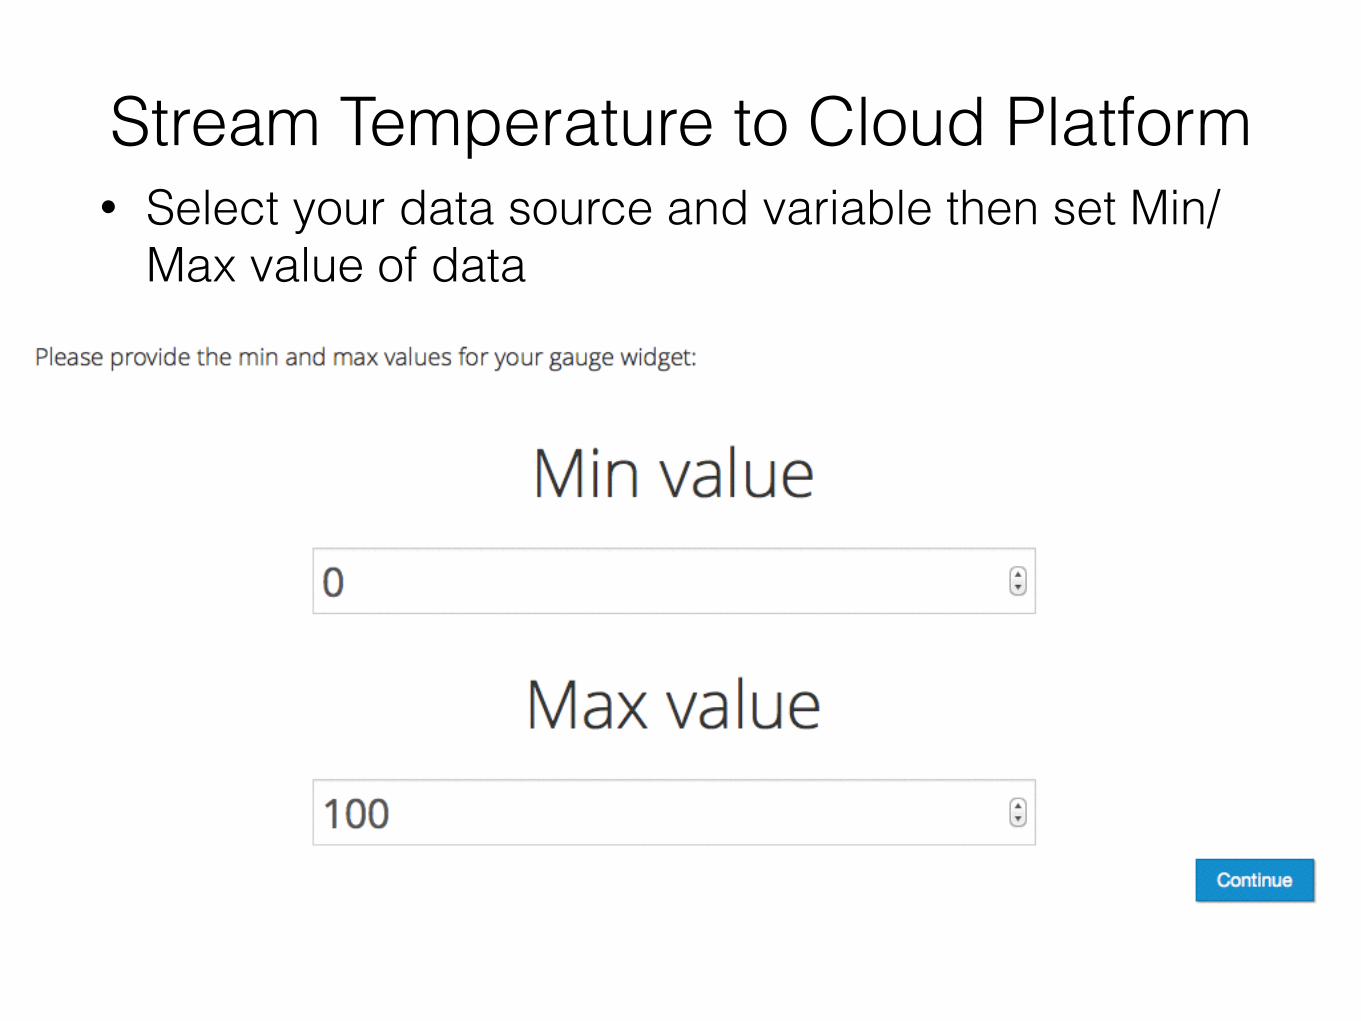
Stream Temperature to Cloud Platform• Select your data source and variable then set Min/
Max value of data
Stream Temperature to Cloud Platform
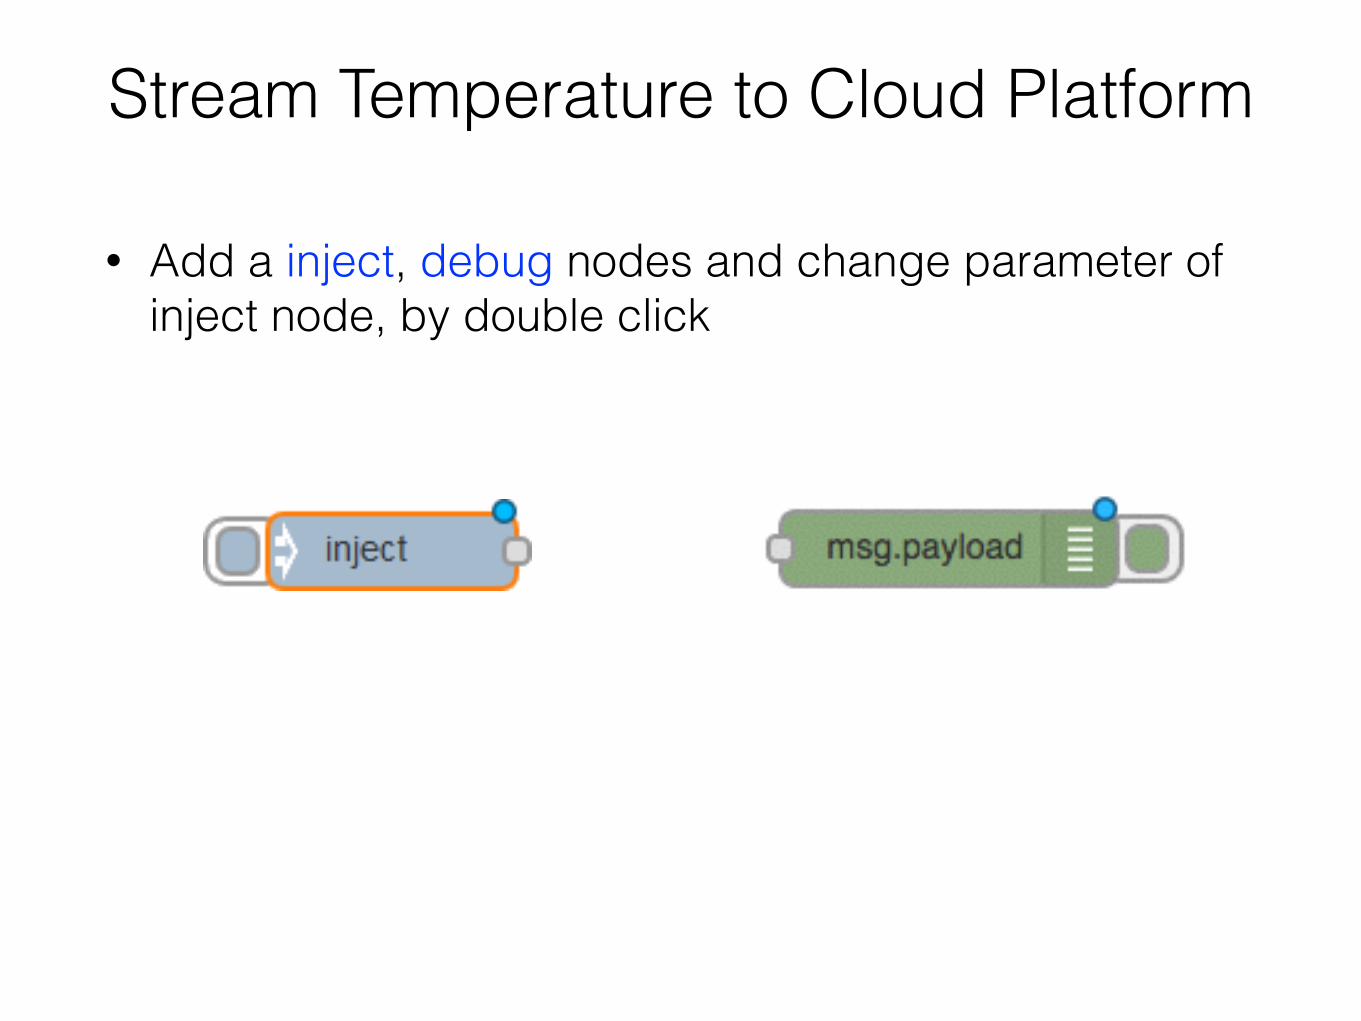
• Add a inject, debug nodes and change parameter of inject node, by double click
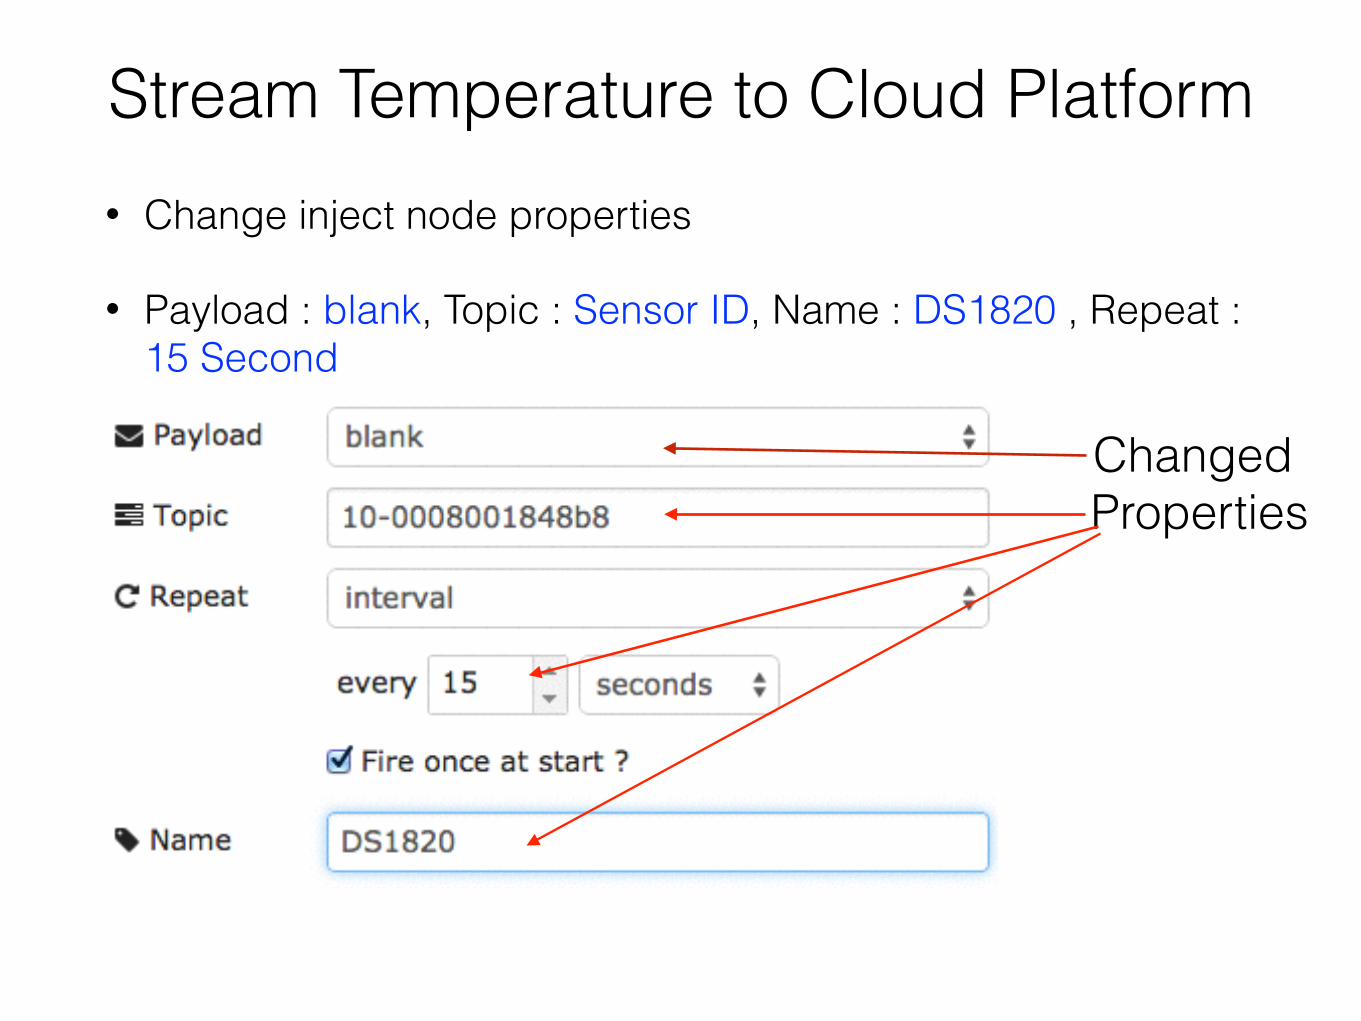
Stream Temperature to Cloud Platform• Change inject node properties
• Payload : blank, Topic : Sensor ID, Name : DS1820 , Repeat : 15 Second
Changed Properties
Stream Temperature to Cloud Platform
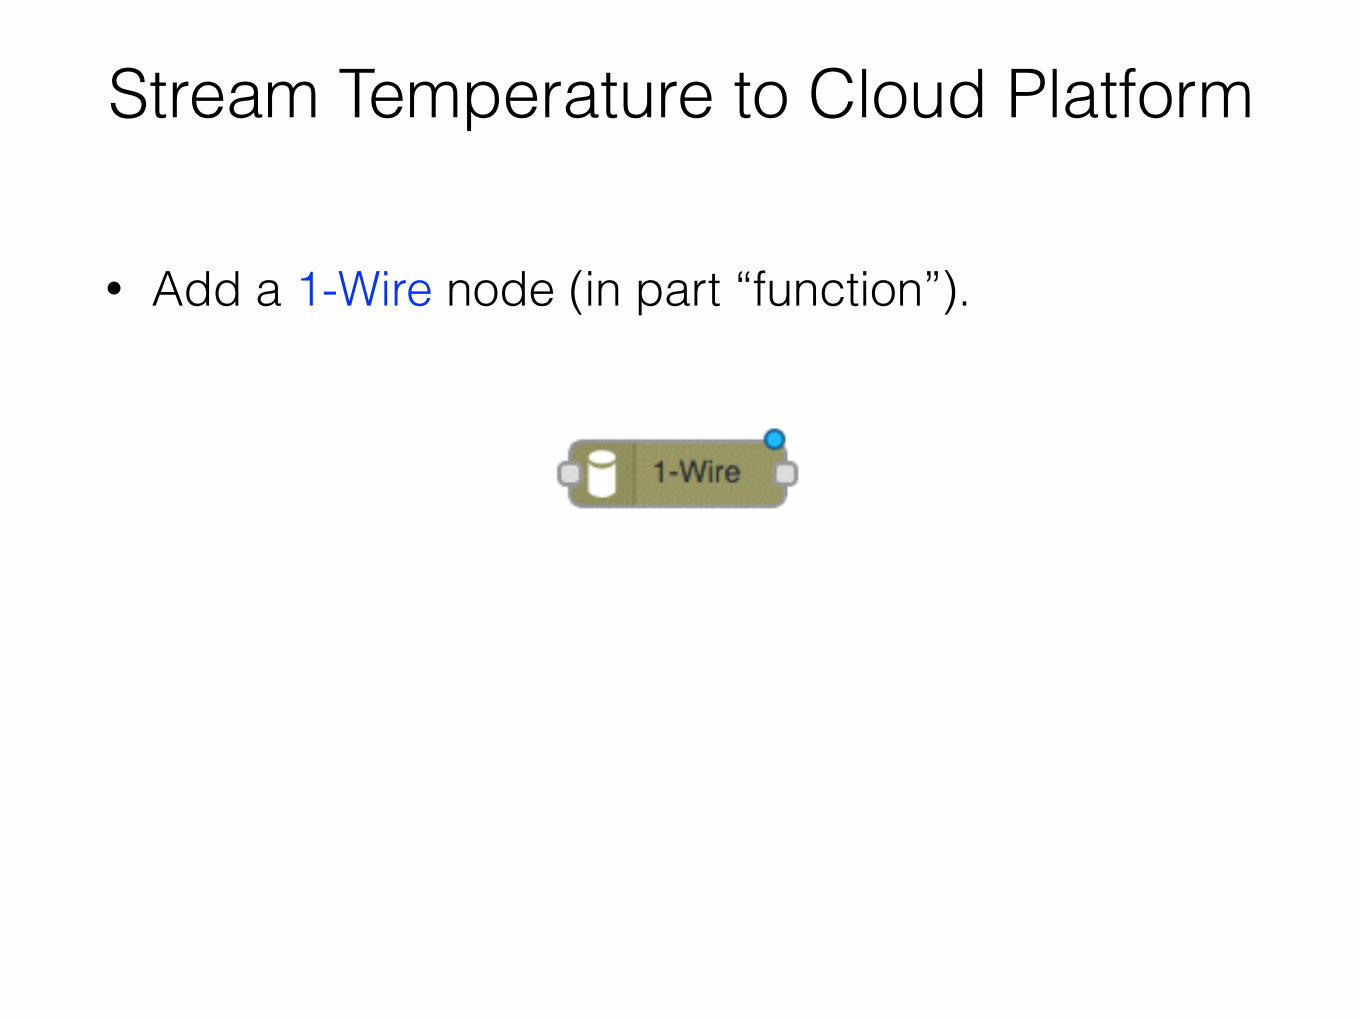
• Add a 1-Wire node (in part “function”).
Stream Temperature to Cloud Platform
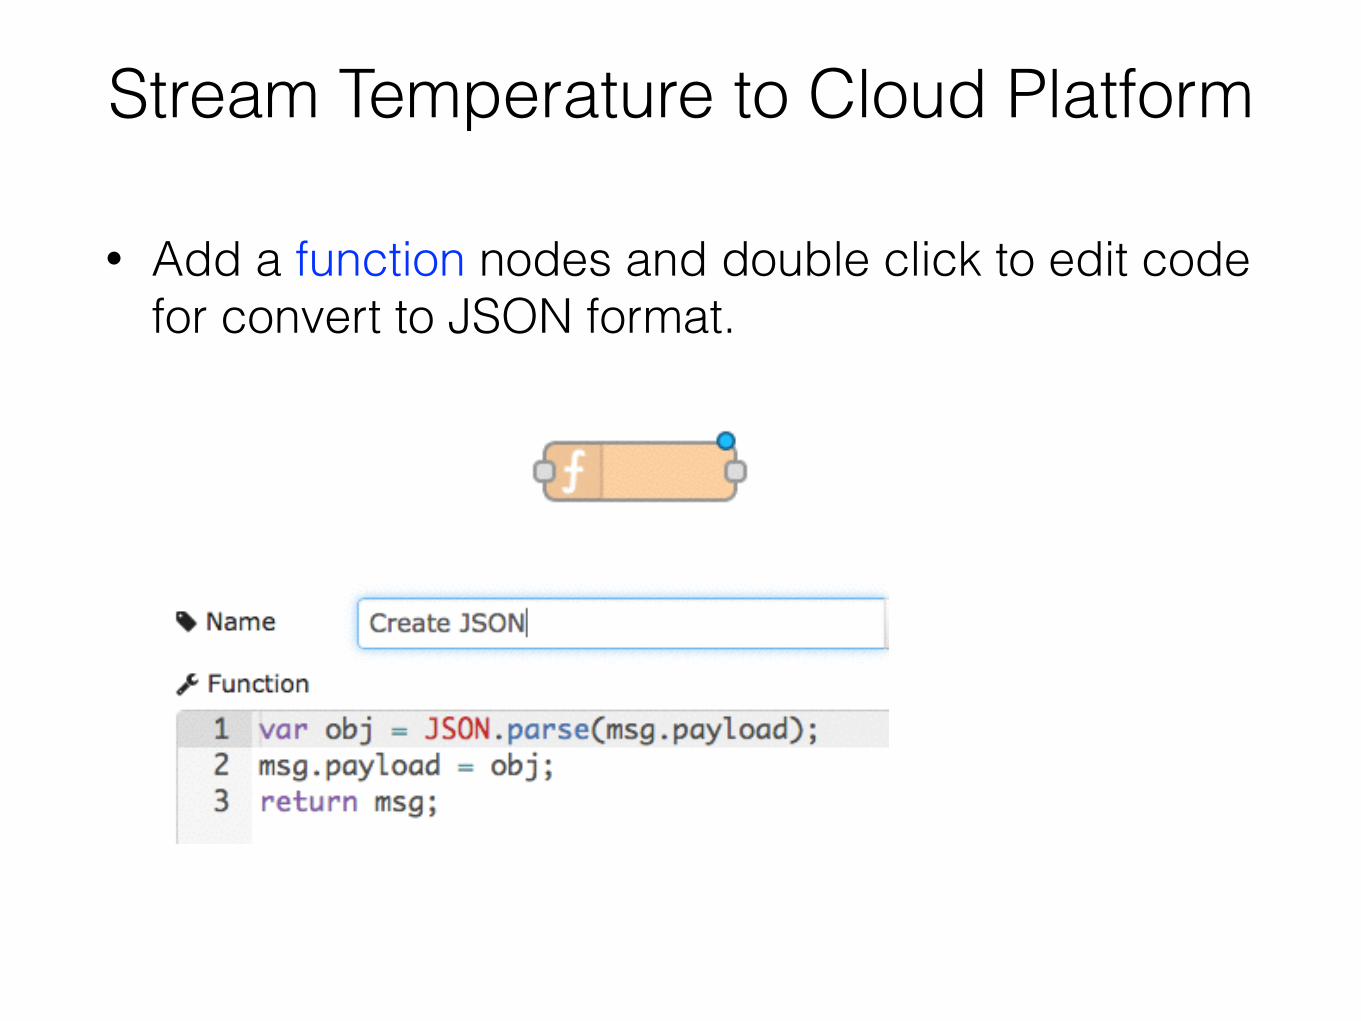
• Add a function nodes and double click to edit code for convert to JSON format.
Stream Temperature to Cloud Platform
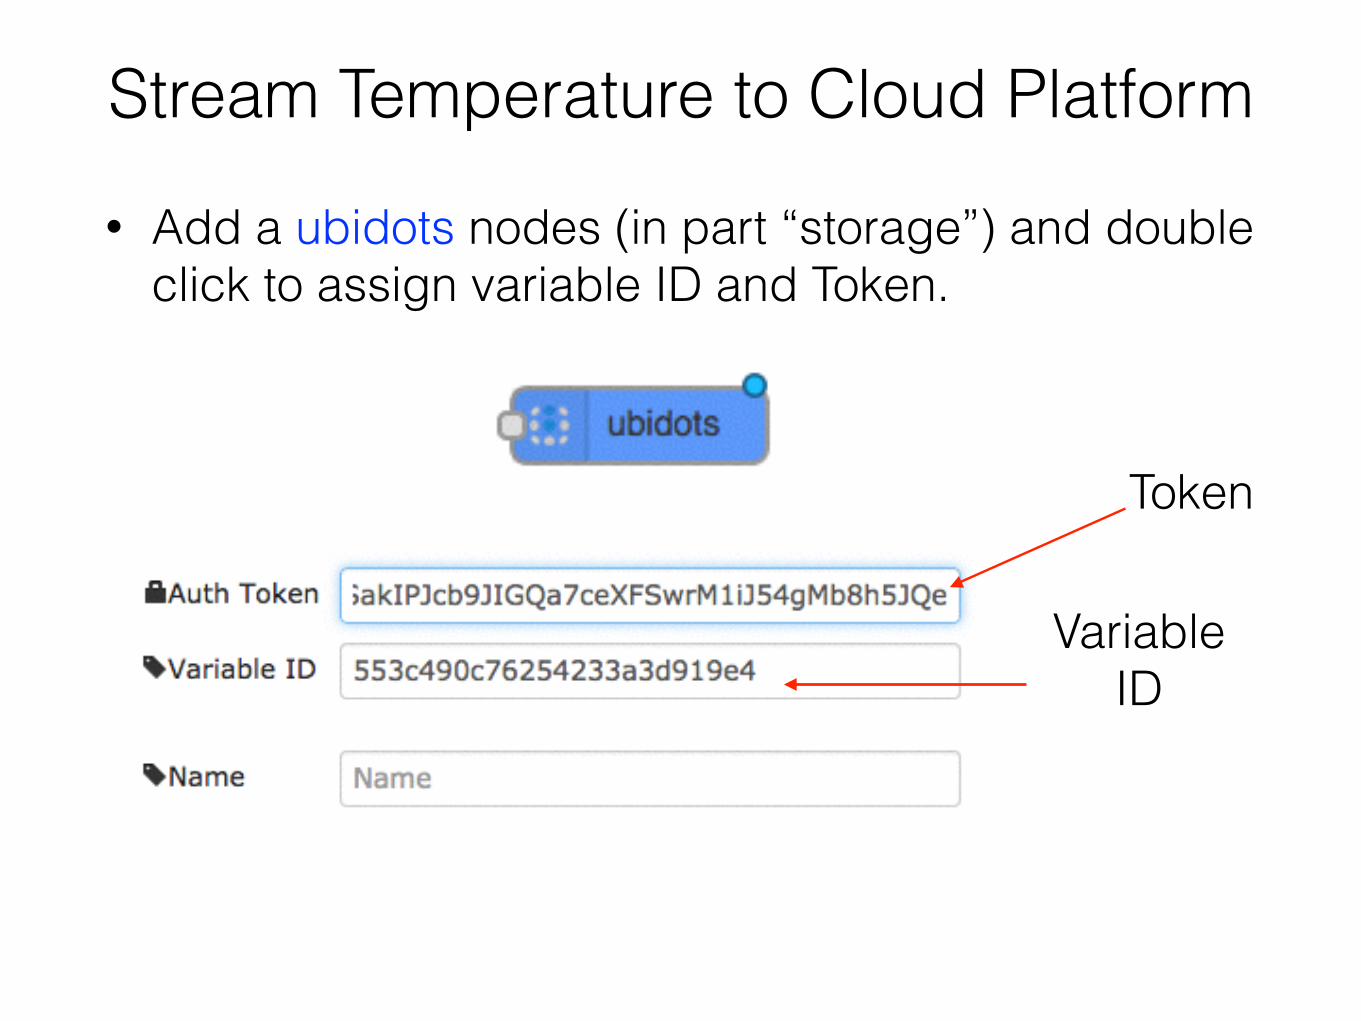
• Add a ubidots nodes (in part “storage”) and double click to assign variable ID and Token.
Variable ID
Token
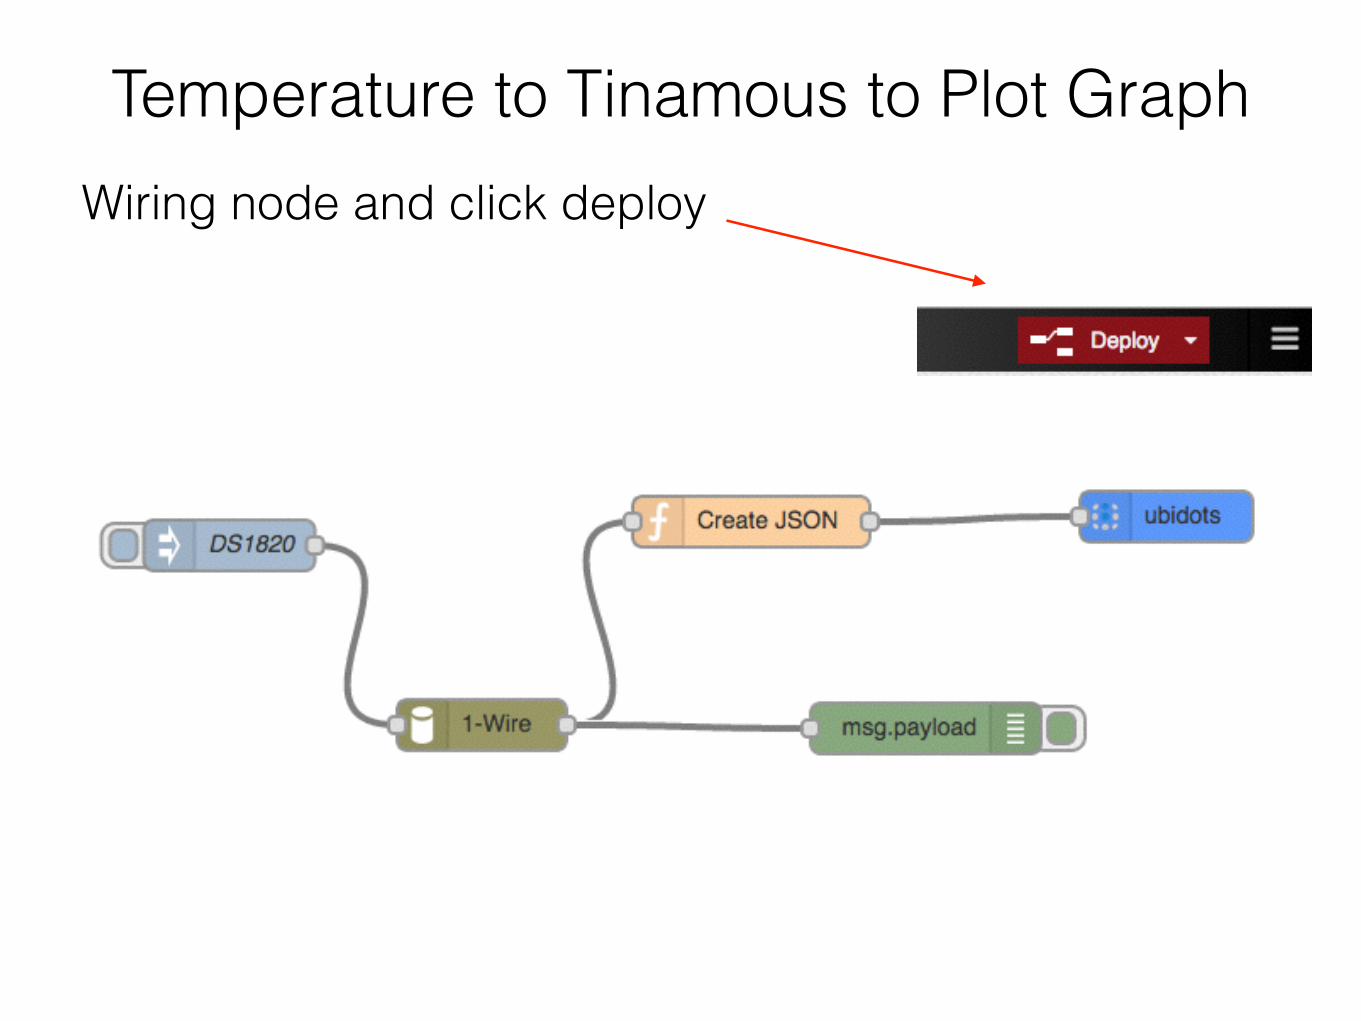
Temperature to Tinamous to Plot GraphWiring node and click deploy
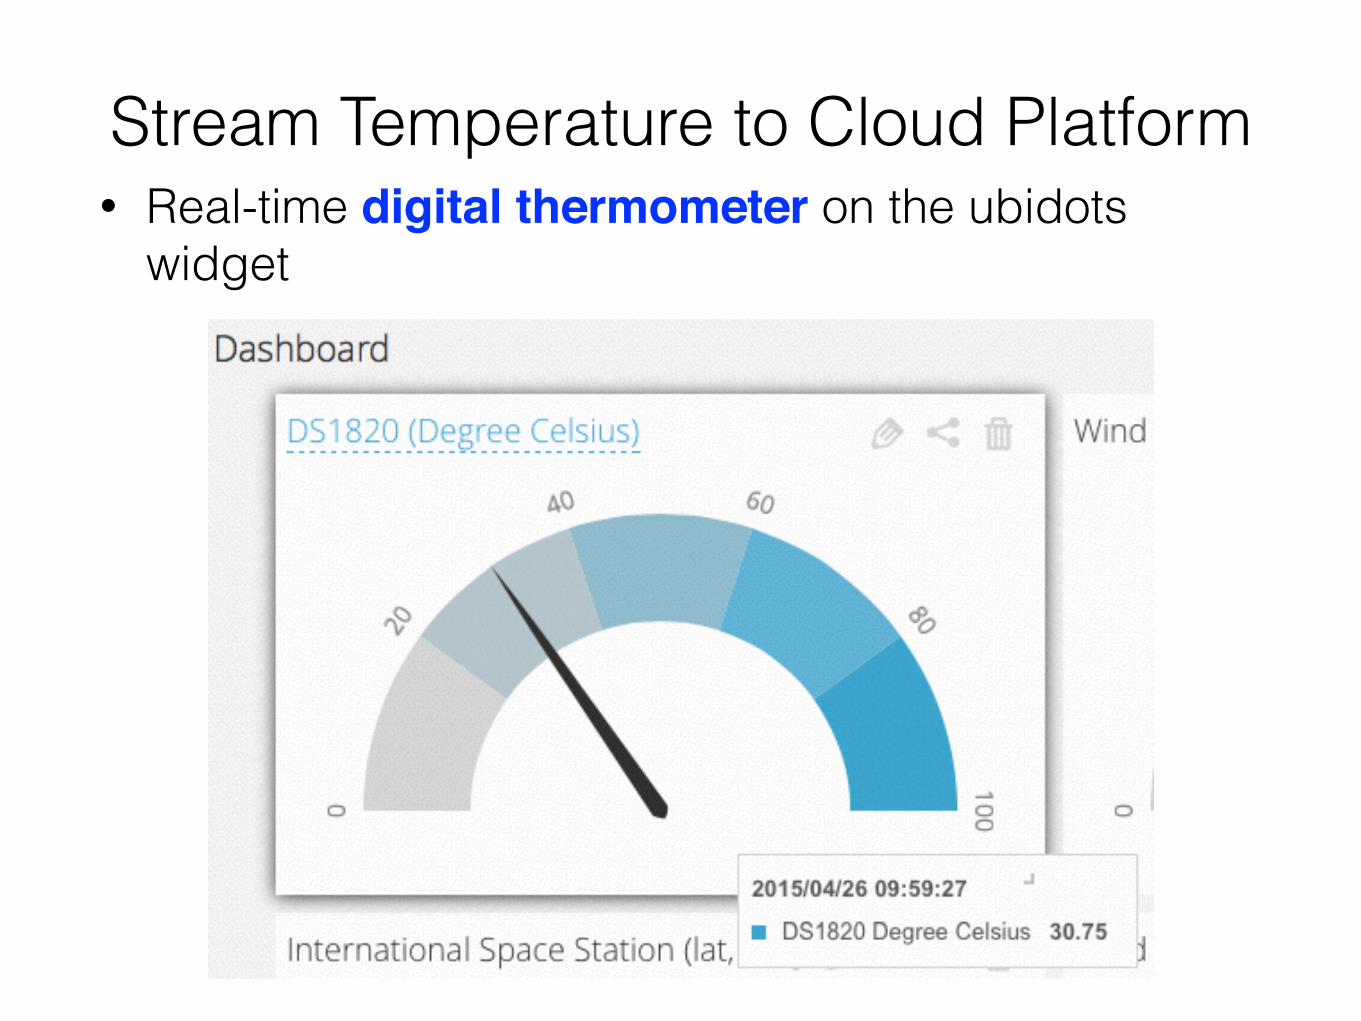
Stream Temperature to Cloud Platform• Real-time digital thermometer on the ubidots
widget

Project Idea?