Embed Size (px)
Citation preview

© Copyright Utilivista 2013
Utilivista Entranet - Getting Started (1)
• Connect the Entranet USB power adapter to the mains, and plug the USB cable into the Entranet.
The settings for IP networking can be changed, but the Entranet must first be accessed using its default IP address.
To add to a LAN which allows a new device with static IP address 192.168.1.130
• Connect the RJ45 Ethernet cable into a switch or router.
To connect directly to a computer (e.g. to change the IP address to suit your LAN)
• Ensure your computer is not connected to any other LAN, either wirelessly or through an Ethernet cable.
• Connect the RJ45 Ethernet cable into your computer’s Ethernet port.
• In the TCP / IP settings of the LAN connection for your computer, Set the IP address manually within the range 192.168.1.1 – 192.168.1.254, (but do not use 192.168.1.130), and the subnet mask to 255.255.255.0.

© Copyright Utilivista 2013
Utilivista Entranet - Getting Started (2)
• Open Internet Explorer or another browser on a computer on the network, and type into the address bar:
http://192.168.1.130

© Copyright Utilivista 2013
Utilivista Entranet - Front Page
The time is synchronized using the internet when the Entranet boots up, if an internet connection is available and the default Gateway is set correctly in ‘Network Settings’. An icon here allows time and date to be manually set, if the setting in ‘Administration’ for always using NTP to set time is ‘No’.
You can hover the mouse pointer over Question Mark icons to see more information.
© Copyright Utilivista 2013
Utilivista Entranet - Administration
Use the menu on the left to access all pages. The administration page allows you to alter general settings which affect all the other web pages on the Entranet.
© Copyright Utilivista 2013
Utilivista Entranet - Network Settings
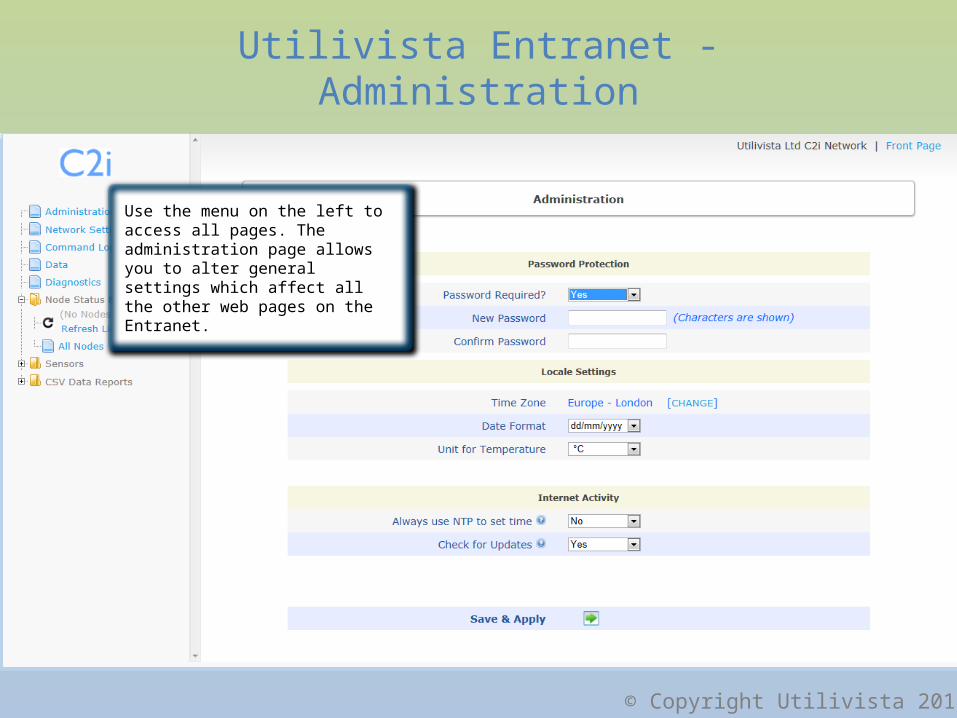
Once this setting is saved as ‘Yes’, new nodes can be put into learn mode using a magnet, and will then appear in the left menu when the node list is refreshed.
If IP addressing mode is changed to DHCP, you will need to use your router’s admin pages to find out the IP address for the Entranet to then access these pages again.
If Static Addressing is used, make sure the Default Gateway and DNS Server are set correctly (often this should be the IP address of the router) to allow internet access.

© Copyright Utilivista 2013
Utilivista Entranet - Command Log
The Command Log page shows you the entire history of commands for the C2i network.

© Copyright Utilivista 2013
Utilivista Entranet - Data
Use this page to see data for any input on any node. An entire history for each input is available when you use the Expand links.
© Copyright Utilivista 2013
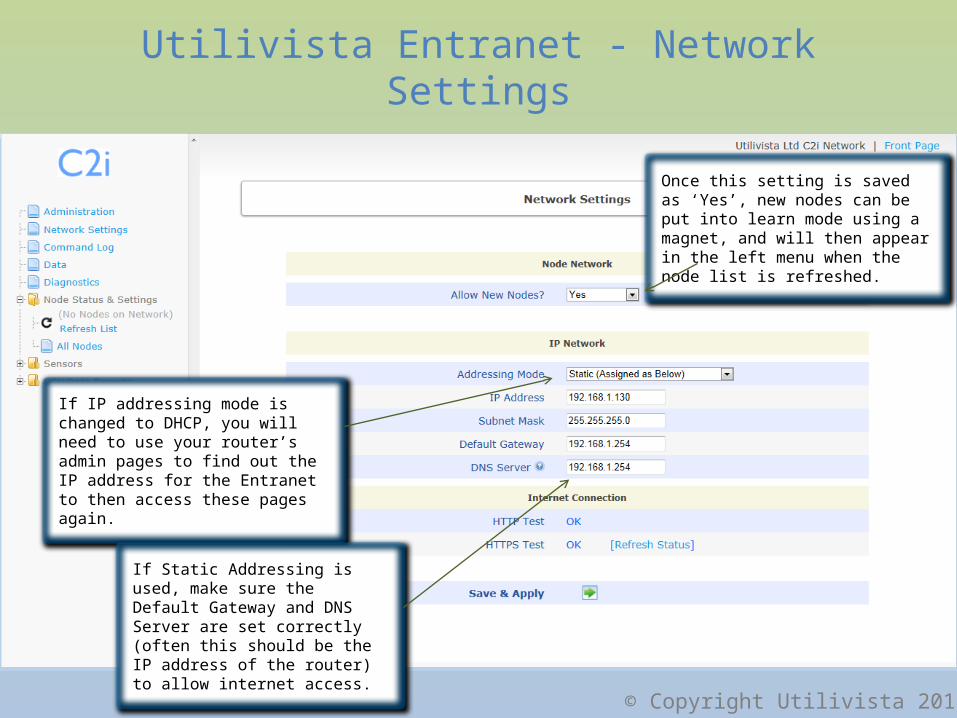
Utilivista Entranet - Network Diagnostics
Use this page to see the route that each node is currently taking, through any repeaters, back to the Entranet, and check the signal strengths, with histories available for this information.

© Copyright Utilivista 2013
Utilivista Entranet – All Nodes
This gives you global node settings.
© Copyright Utilivista 2013
Utilivista Entranet – Node Settings
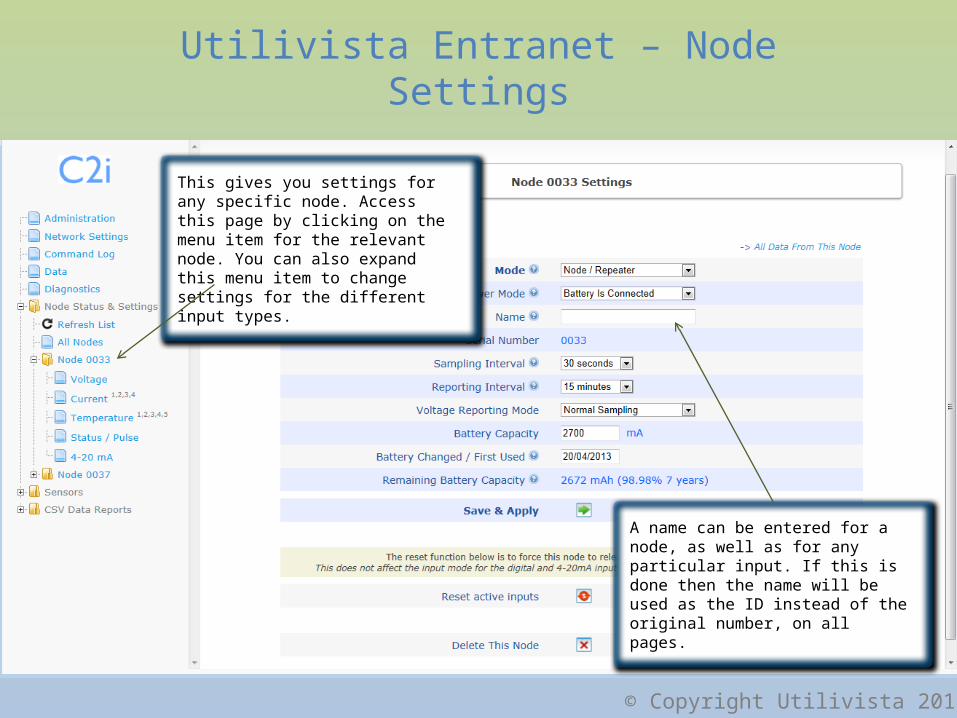
This gives you settings for any specific node. Access this page by clicking on the menu item for the relevant node. You can also expand this menu item to change settings for the different input types.
A name can be entered for a node, as well as for any particular input. If this is done then the name will be used as the ID instead of the original number, on all pages.

© Copyright Utilivista 2013
Utilivista Entranet – Sensors
Any new 4-20 mA sensor type or thermistor sensor type can be assigned to a node once scaling data has been entered in the appropriate ‘Sensors’ page.
© Copyright Utilivista 2013
Utilivista Entranet – CSV Data Reports
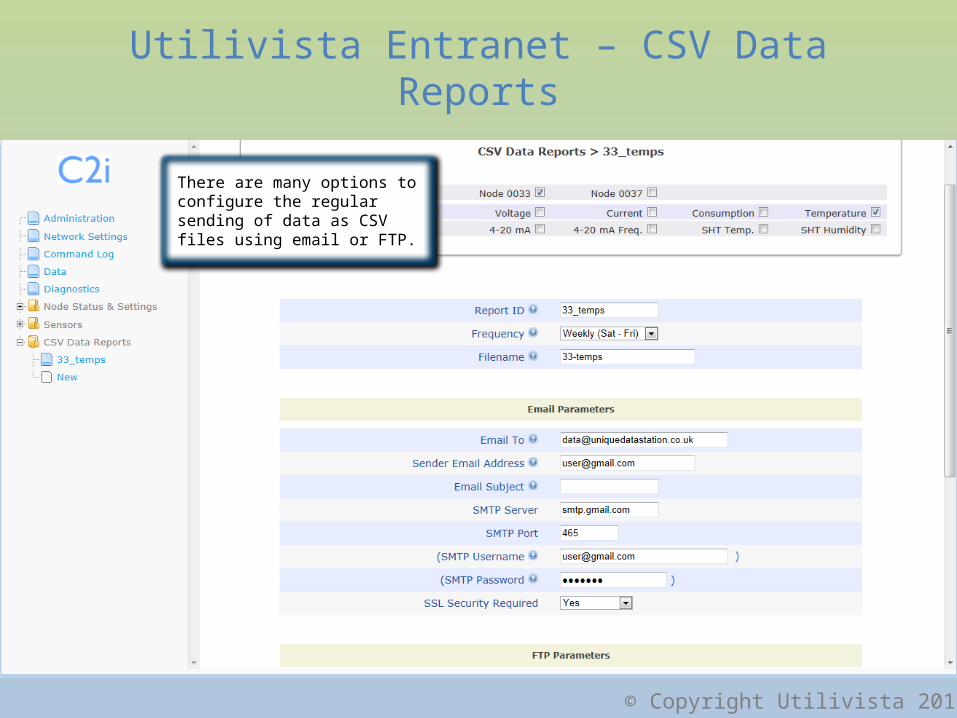
There are many options to configure the regular sending of data as CSV files using email or FTP.