Embed Size (px)
Citation preview
New York CitY College of teChNologYthe CitY UNiversitY of New York
EcotEct ModEling Basics
architEctural tEchnology dEpartMEntwritten by nicole seekely
revised april 21, 2010 8:27 pM

notes:
page 2 of 17
EcotEct ModEling Basics
Why ModEl in EcotEct?
While you can import models for lighting analysis and get fairly accurate results, you can-not import for thermal analysis. Ecotect needs to understand which zones are where, and this is more easily done within Ecotect.
Knowing how to model in Eco-tect also makes it better to make on-the-fly revisions to your model without becoming frustrated.
open Ecotect, and make sure you are in the 3d Editor tab.

notes:
page 3 of 17
EcotEct ModEling Basics
RotatE Pan sElEct
+ shift
ZooM
shoRtcuts
Right Mouse RotateCtrl + Right Mouse PanShift + Right Mouse ZoomF2 Repeat LastF3 or double click Nodes On/OffF4 Isolate Selected ZoneF5 PlanF6 SideF7 FrontF8 AxonometricX,Y,or Z Nudge Object in DirectionShift + X,Y, or Z Nudge Object in Negative DirectionInsert Insert Child Object (Door, Window, Void)Ctrl Hold to Move Cursor in Z direction instead of X,YN Snaps On/OffA,C,G,I,L,M,O,P Snap Option (Align, Centre, Grid, Intersections, Lines, Midpoints, Orthogonal, Points)Ctrl + F Fit Grid to ModelSpacebar Toggle among selected objects
notes:
page 4 of 17
EcotEct ModEling Basics
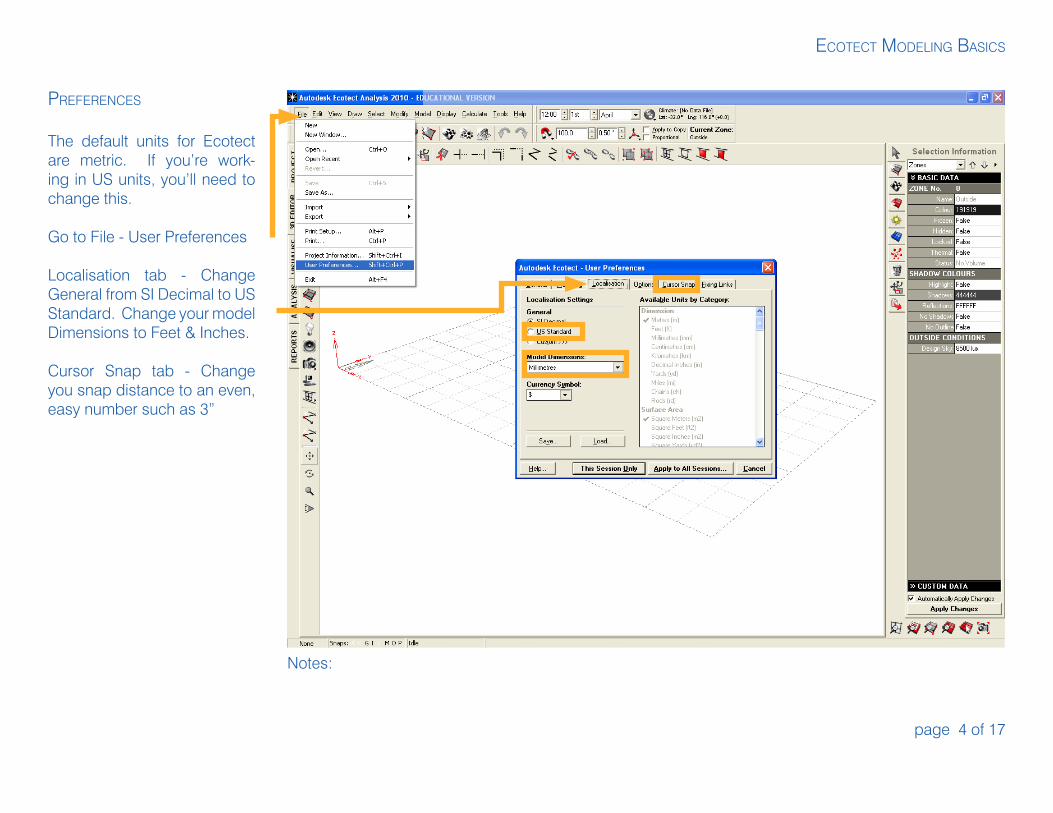
PREfEREncEs
the default units for Ecotect are metric. if you’re work-ing in us units, you’ll need to change this.
go to File - user preferences
localisation tab - change general from si decimal to us standard. change your model dimensions to Feet & inches.
cursor snap tab - change you snap distance to an even, easy number such as 3”

notes:
page 5 of 17
EcotEct ModEling Basics
selecttransform (Move, rotate, scale, Mirror, Extrude, set origin)MeasurepointlineplanepartitionZonepitched rooflightspeakercameraappliancechild object (Void, Window, panel, door)add nodesubtract nodepanrotateZoomperspective

page 6 of 17
EcotEct ModEling Basics
Move scale Extrude transform trim offset Join Fix links unlink ungroup Void door
rotate Mirror origin cut plane Extend intersect Break link group Window panel

page 7 of 17
EcotEct ModEling Basics
sEtting uP thE ModEl
you can set your grid size by clicking on the Model settings menu button. in this menu you can select the size of each square and the extents.
set your snaps to what is rec-ommended here. to the right of the snap option is where you can set the snap distance and angle.

page 8 of 17
EcotEct ModEling Basics
Editing a ZonE
all zones are initially modeled at the same height. you can adjust this by going to File - user preferences - Modeling tab. change the default Zone height to your desired height.
you can also interactively change the height of a zone within the model space. click on the floor of the zone. (if a wall is selected instead of a floor when you click on an edge, hit the spacebar to get Ecotect to scroll through the selections).
in the selection information tab to the right, you can adjust the height in the Z-axis of the Extrusion Vector submenu.

page 9 of 17
EcotEct ModEling Basics
adding a child oBjEct
draw another zone that is ad-jacent to the first one by using the snaps. here the height was adjusted for the second zone to make it higher.
select the adjacent face of the second zone. hit the insert key.
add a window. it automati-cally positions it in the center of the face. you can adjust the placement here or afterwards.
With the window still selected,

page 10 of 17
EcotEct ModEling Basics
adding a child oBjEct
With the window still selected, click the Move tool to move the window upwards into the ap-propriate spot. By hitting F3, you can move the nodes to adjust the size of the window.
do the same to insert a door.
page 11 of 17
EcotEct ModEling Basics
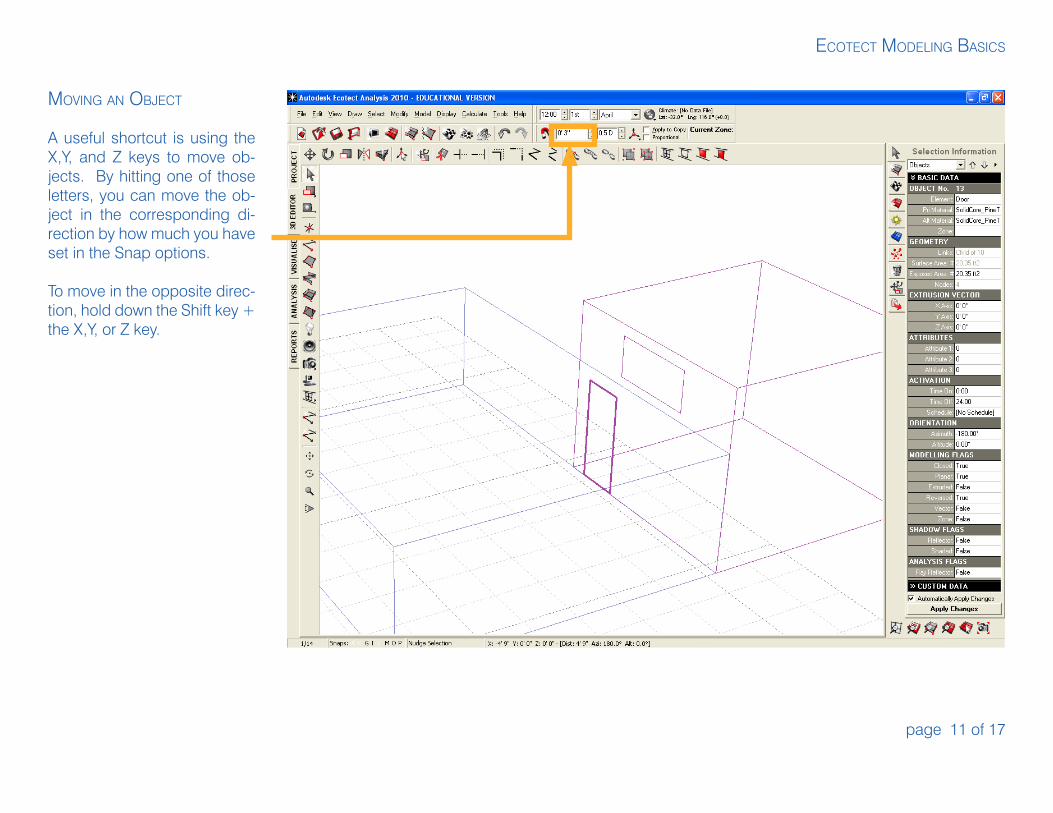
Moving an oBjEct
a useful shortcut is using the X,y, and Z keys to move ob-jects. By hitting one of those letters, you can move the ob-ject in the corresponding di-rection by how much you have set in the snap options.
to move in the opposite direc-tion, hold down the shift key + the X,y, or Z key.
page 12 of 17
EcotEct ModEling Basics
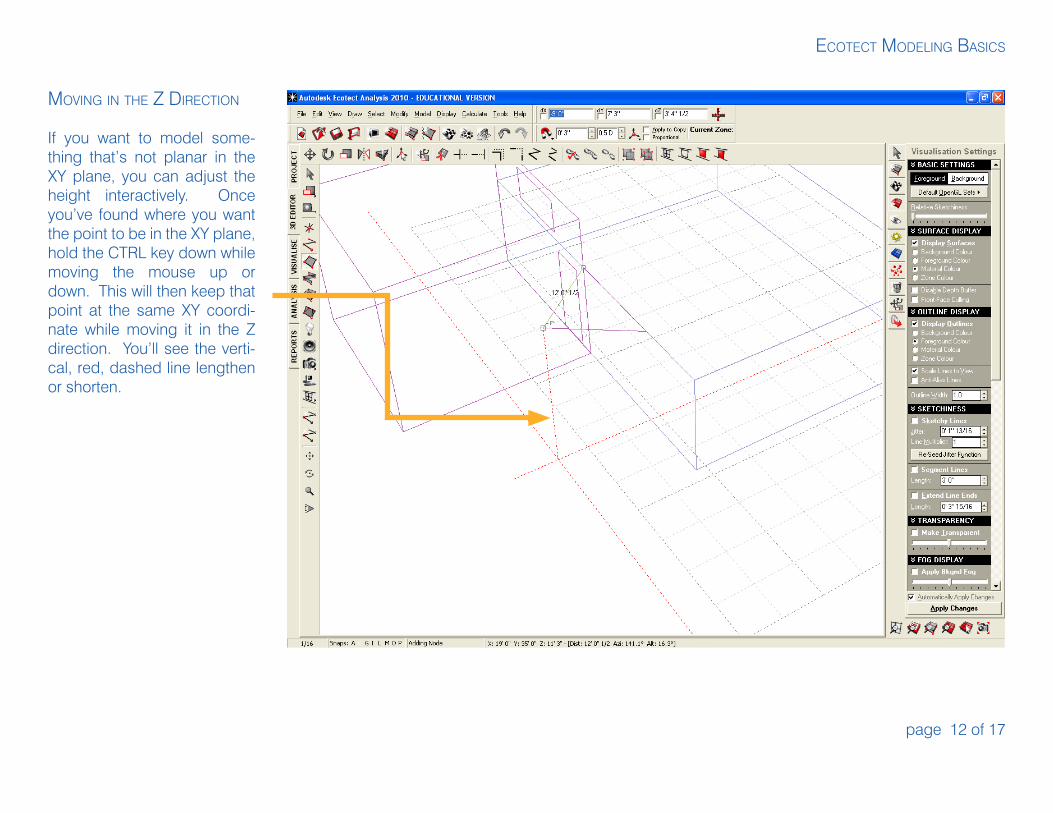
Moving in thE Z diREction
if you want to model some-thing that’s not planar in the Xy plane, you can adjust the height interactively. once you’ve found where you want the point to be in the Xy plane, hold the ctrl key down while moving the mouse up or down. this will then keep that point at the same Xy coordi-nate while moving it in the Z direction. you’ll see the verti-cal, red, dashed line lengthen or shorten.

page 13 of 17
EcotEct ModEling Basics
coPying/MoRPhing
to create a series of corner window slits, draw a line at the corner. then copy it by select-ing the Move tool and making sure the apply to copy box is checked. to make it a smaller size, just move the nodes us-ing F3.

page 14 of 17
EcotEct ModEling Basics
coPying/MoRPhing
then, with both objects se-lected, go to Edit - Morph Be-tween.
type in the number of objects you’d like in between. Ecotect will then generate a series of lines that morph between the larger and smaller one.
this will generage construc-tion lines with which you can trace windows.

page 15 of 17
EcotEct ModEling Basics
coPying/MoRPhing
click the insert Window but-ton.
now trace the windows on each side of the walls.
then click on one set of win-dows and the adjoining wall and link them by clicking the link button.
Be sure to assign a window material in the Material assign-ments tab.

page 16 of 17
EcotEct ModEling Basics
coPying/MoRPhing
click on the Visualize tab to make sure your windows are inserted properly.

page 17 of 17
EcotEct ModEling Basics
voids
if you want to insert a court-yard or opening in your zone, be sure to insert a Void so Ecotect understands what is happening.
here, another zone has been inserted inside the first zone. the roof of the third zone was deleted.
With the roof of the first zone selected, click on the insert Void button. then outline the roof of the courtyard. this will tell Ecotect that there is open space here.