Embed Size (px)
Citation preview

iQagent Five Minute Feature Walkthrough For iPad
Copyright © 2014, iQuest, Inc. www.iquestcorp.com
7/1/2014
2
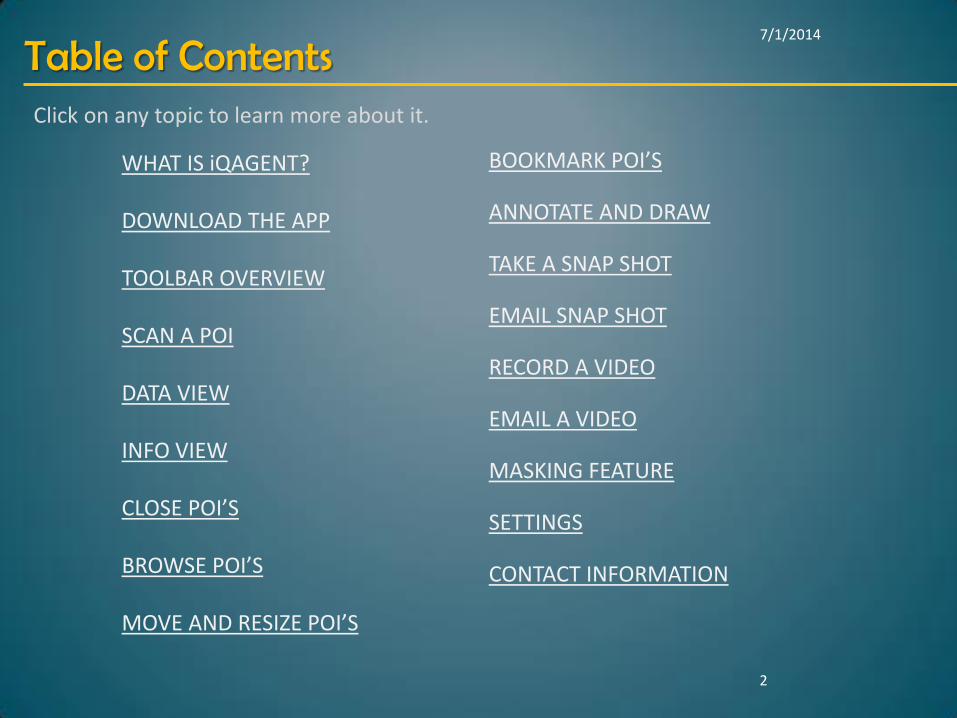
WHAT IS iQAGENT? DOWNLOAD THE APP TOOLBAR OVERVIEW SCAN A POI DATA VIEW INFO VIEW CLOSE POI’S BROWSE POI’S MOVE AND RESIZE POI’S
Table of Contents
BOOKMARK POI’S ANNOTATE AND DRAW TAKE A SNAP SHOT EMAIL SNAP SHOT RECORD A VIDEO EMAIL A VIDEO MASKING FEATURE SETTINGS CONTACT INFORMATION
Click on any topic to learn more about it.

• iQagent uses Point Of Interest (called POIs) QR codes to recognize equipment and display relevant data, schematics and other resources on the tablet.
• iQagent eliminates time wasted while searching for schematics, manuals and other electronic resources for the equipment you are working on.
7/1/2014
3
What is iQagent? iQagent displays data and resources about equipment it recognizes on your plant floor.
This 5 minute walkthrough will familiarize you with iQagent’s features, using our demo mode to simulate process data and resources.
Return to Table of Contents
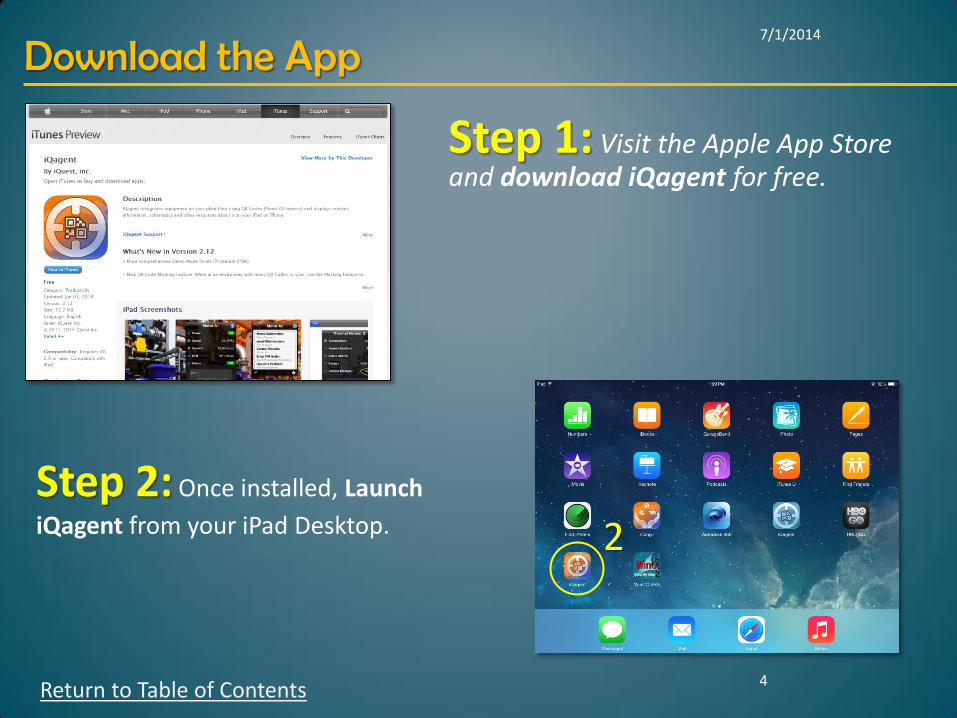
Step 1: Visit the Apple App Store and download iQagent for free.
7/1/2014
4
Download the App
2
Return to Table of Contents
Step 2: Once installed, Launch
iQagent from your iPad Desktop.
7/1/2014
5
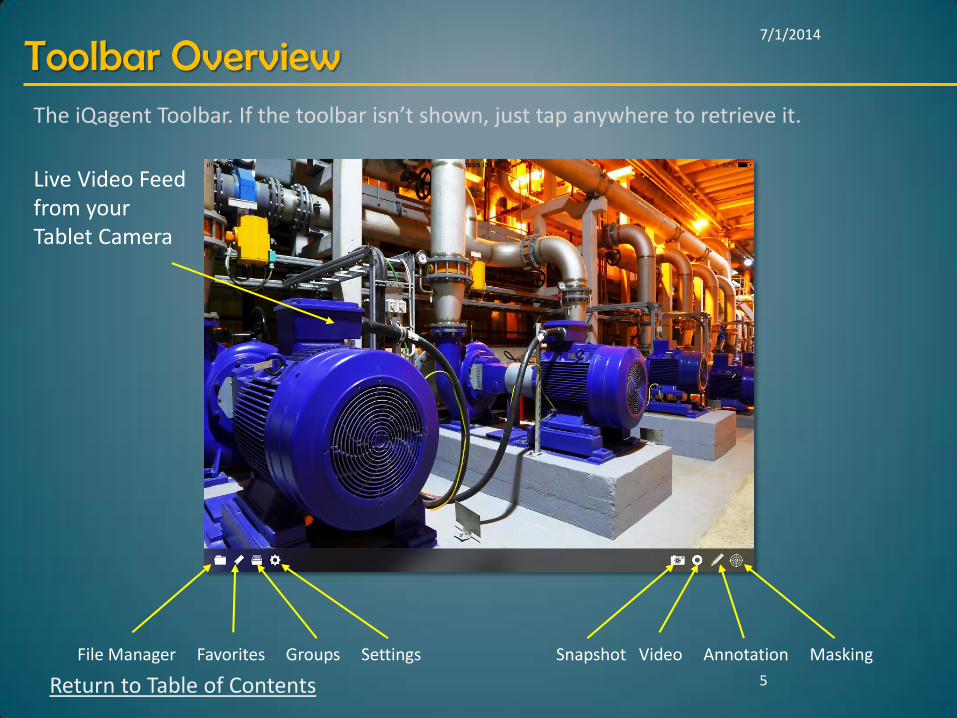
Toolbar Overview
File Manager Favorites Groups Settings Snapshot Video Annotation Masking
The iQagent Toolbar. If the toolbar isn’t shown, just tap anywhere to retrieve it.
Live Video Feed from your Tablet Camera
Return to Table of Contents

Step 3: With iQagent open, point your iPad camera at the POI Code to the left. This will cause iQagent to scan the code.
7/1/2014
6
Scan A POI with iQagent Point Of Interest, Or POI Codes are pre-configured and placed on or near plant equipment.
3
Return to Table of Contents
A Simulated POI Data view will appear on your device display, showing live data, schematics and resources related to the equipment or process area. Visit iQagent.com to get a free POI Code sample kit that works with demo mode.
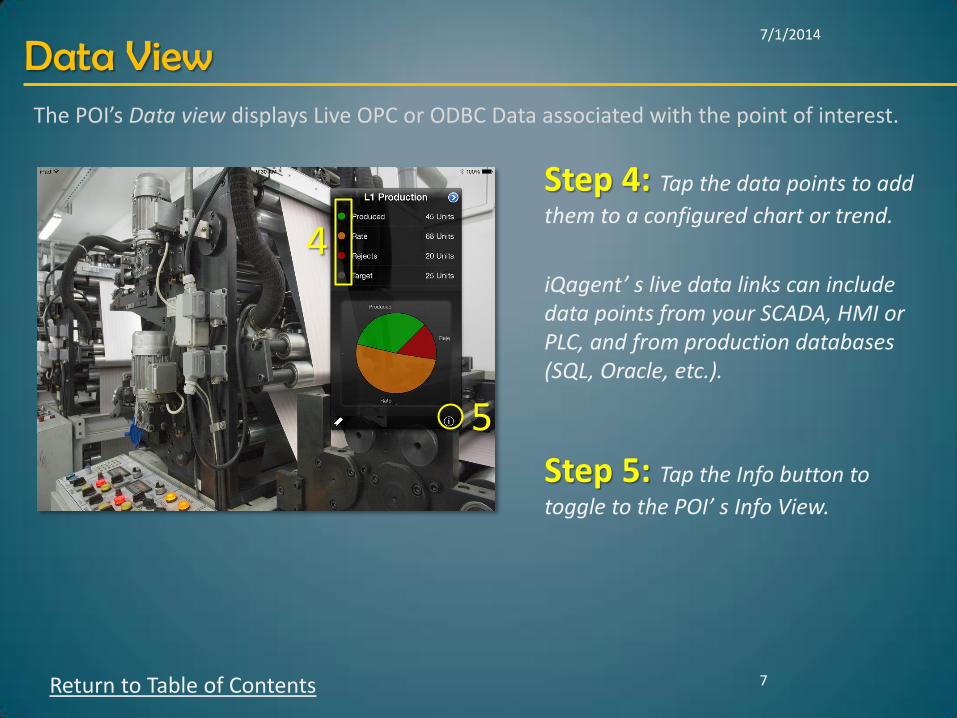
Step 4: Tap the data points to add
them to a configured chart or trend.
iQagent’ s live data links can include data points from your SCADA, HMI or PLC, and from production databases (SQL, Oracle, etc.).
Step 5: Tap the Info button to
toggle to the POI’ s Info View.
7/1/2014
7
Data View
4
5
The POI’s Data view displays Live OPC or ODBC Data associated with the point of interest.
Return to Table of Contents
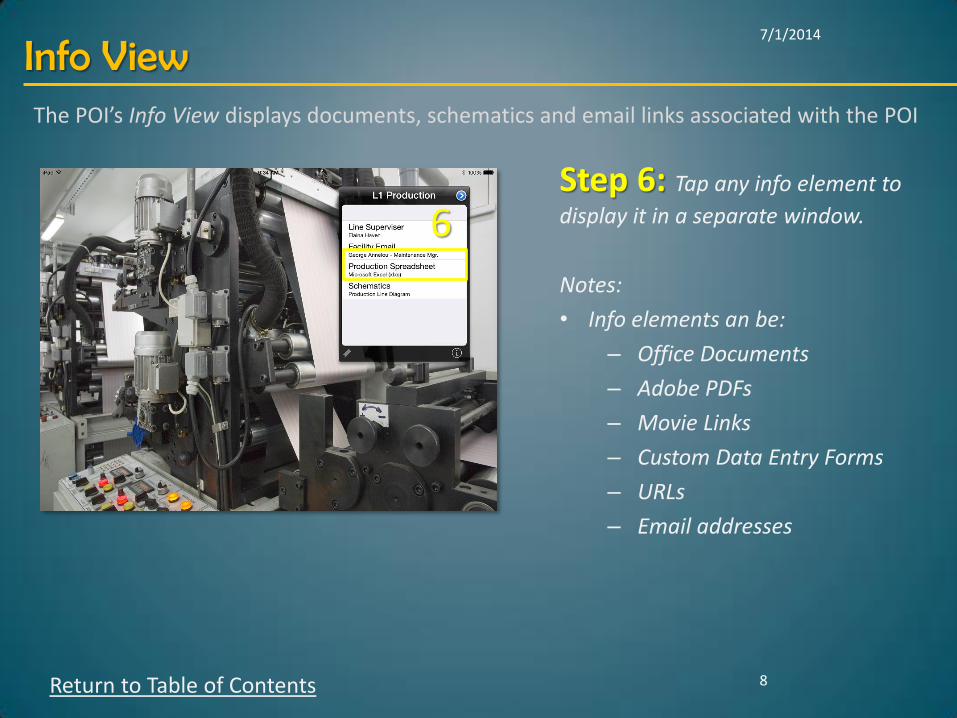
Step 6: Tap any info element to
display it in a separate window.
Notes:
• Info elements an be:
– Office Documents
– Adobe PDFs
– Movie Links
– Custom Data Entry Forms
– URLs
– Email addresses
7/1/2014
8
Info View
6
The POI’s Info View displays documents, schematics and email links associated with the POI
Return to Table of Contents
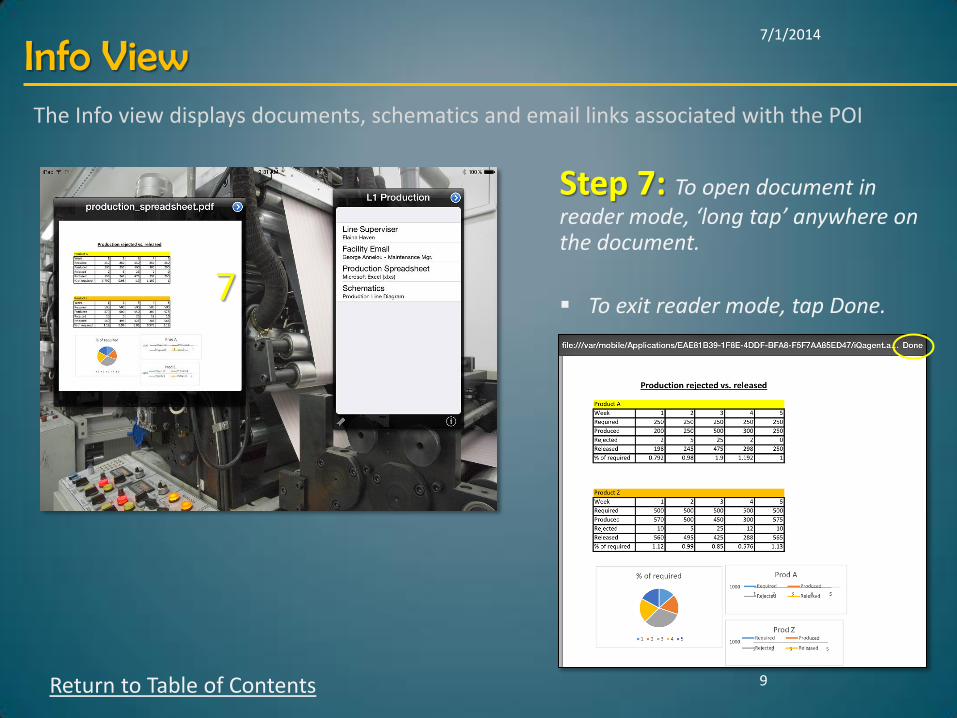
Step 7: To open document in reader mode, ‘long tap’ anywhere on the document.
To exit reader mode, tap Done.
7/1/2014
9
Info View The Info view displays documents, schematics and email links associated with the POI
Return to Table of Contents
7

Step 8: Long Tap (3 sec) on the
header of any POI to enable delete mode.
Each open item will shake and display a delete icon in the upper left-hand corner.
Close POIs individually by tapping the [ ] icon on each, or shake your tablet to remove all items.
7/1/2014
10
Close POIs and Documents
Return to Table of Contents
-
POIs can be closed one at a time, or all at once
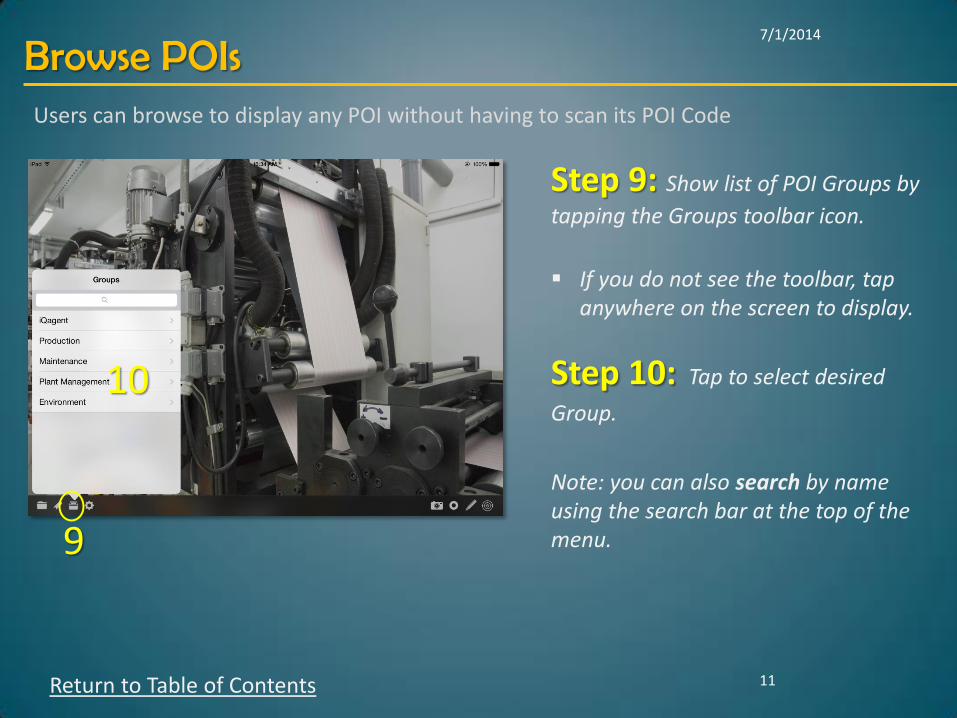
Step 9: Show list of POI Groups by
tapping the Groups toolbar icon.
If you do not see the toolbar, tap anywhere on the screen to display.
Step 10: Tap to select desired
Group.
Note: you can also search by name using the search bar at the top of the menu.
7/1/2014
11
Browse POIs
9
10
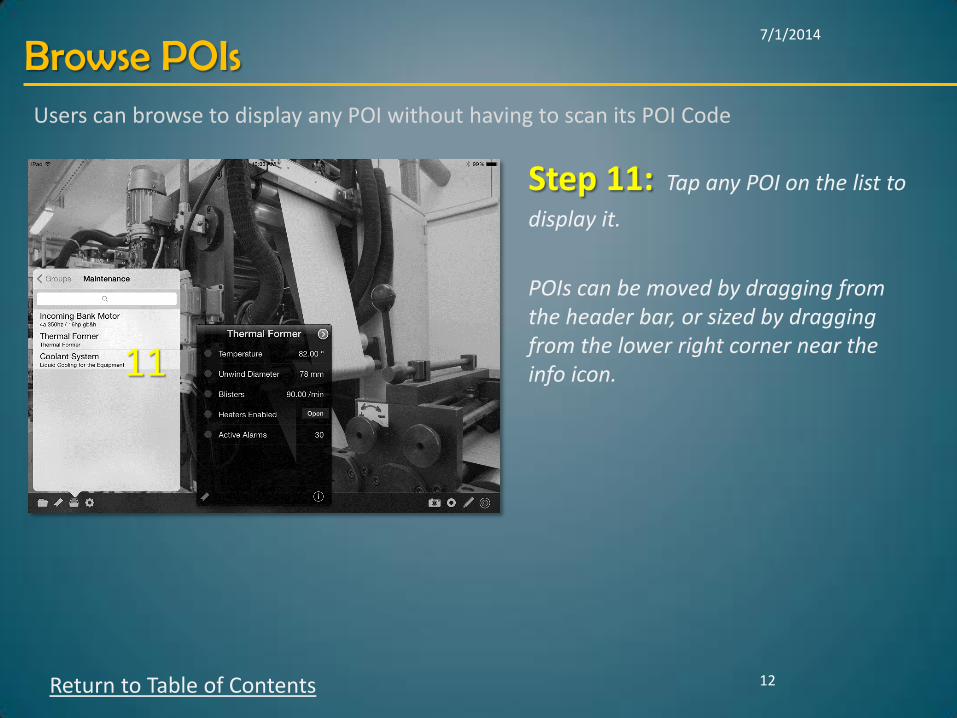
Users can browse to display any POI without having to scan its POI Code
Return to Table of Contents
7/1/2014
12
Browse POIs
Step 11: Tap any POI on the list to
display it.
POIs can be moved by dragging from the header bar, or sized by dragging from the lower right corner near the info icon.
11
Return to Table of Contents
Users can browse to display any POI without having to scan its POI Code
7/1/2014
13
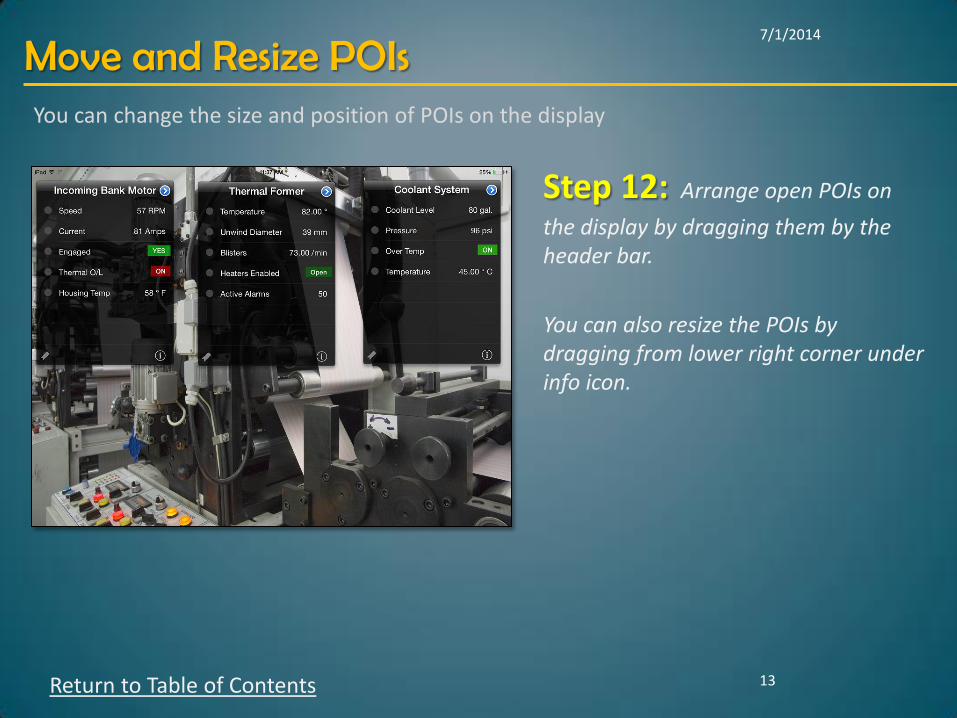
Move and Resize POIs
Step 12: Arrange open POIs on
the display by dragging them by the header bar.
You can also resize the POIs by dragging from lower right corner under info icon.
You can change the size and position of POIs on the display
Return to Table of Contents
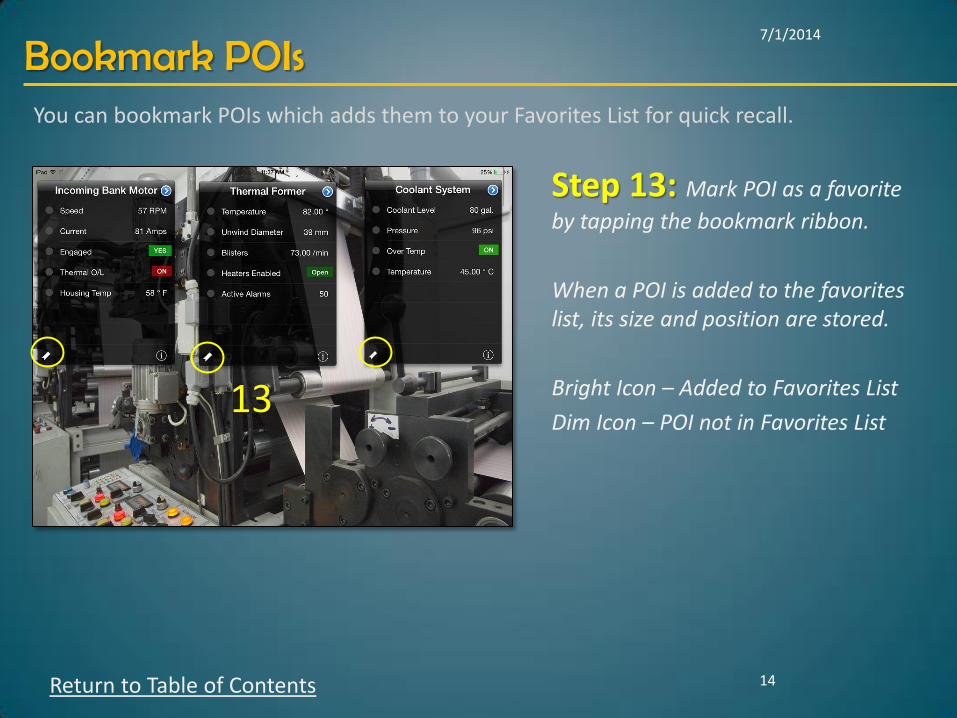
Step 13: Mark POI as a favorite
by tapping the bookmark ribbon.
When a POI is added to the favorites list, its size and position are stored.
Bright Icon – Added to Favorites List
Dim Icon – POI not in Favorites List
7/1/2014
14
Bookmark POIs
13
You can bookmark POIs which adds them to your Favorites List for quick recall.
Return to Table of Contents
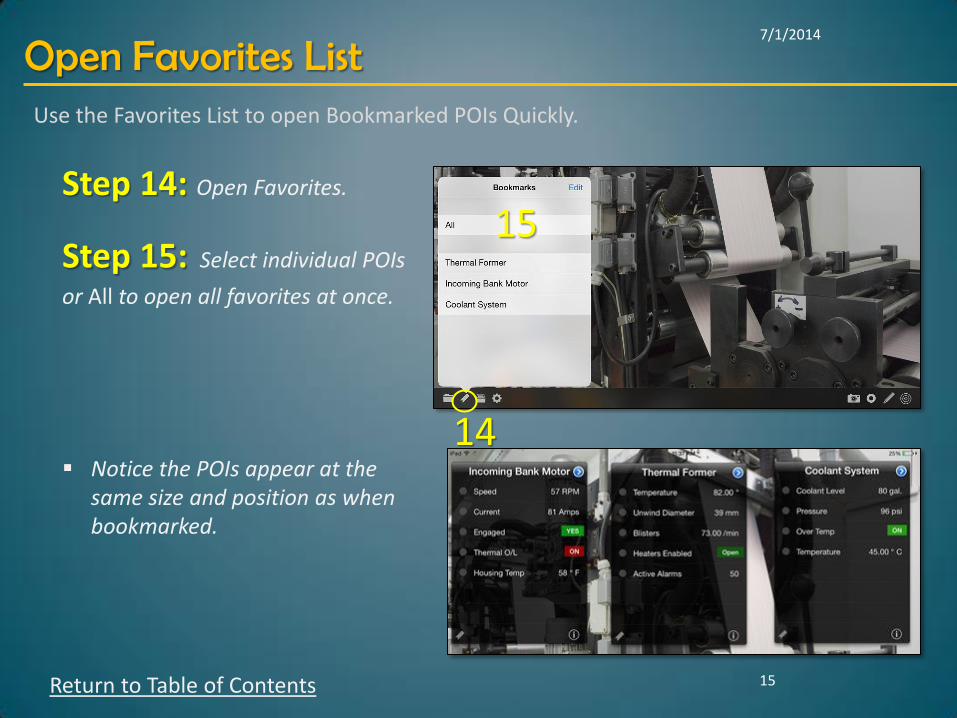
Step 14: Open Favorites.
Step 15: Select individual POIs
or All to open all favorites at once.
Notice the POIs appear at the same size and position as when bookmarked.
7/1/2014
15
Open Favorites List
14
15
Use the Favorites List to open Bookmarked POIs Quickly.
Return to Table of Contents
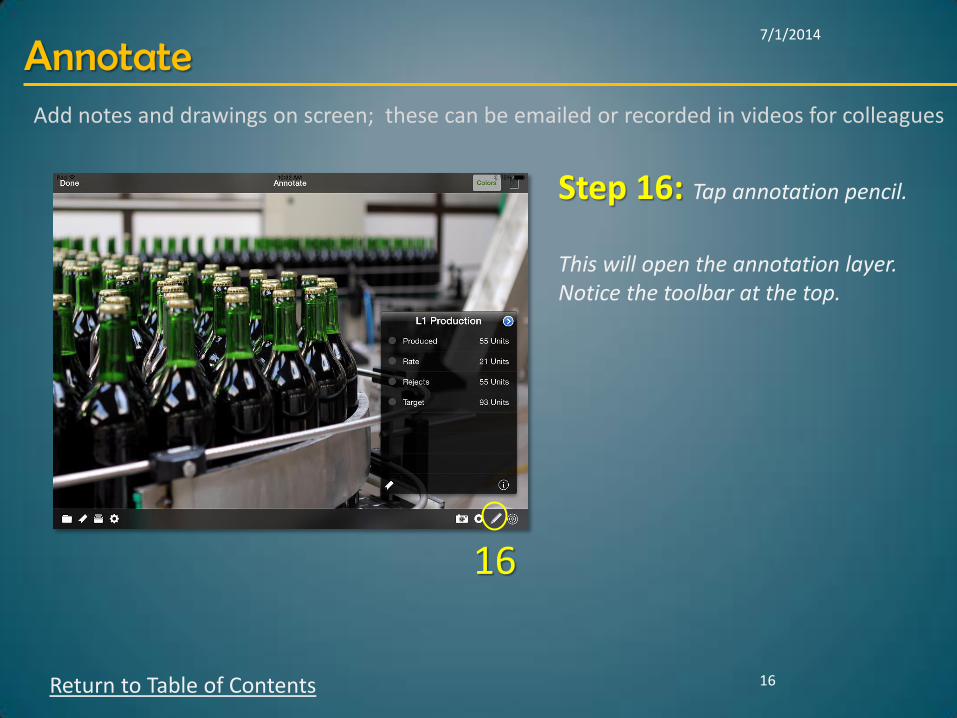
Step 16: Tap annotation pencil.
This will open the annotation layer. Notice the toolbar at the top.
7/1/2014
16
Annotate
16
Add notes and drawings on screen; these can be emailed or recorded in videos for colleagues
Return to Table of Contents
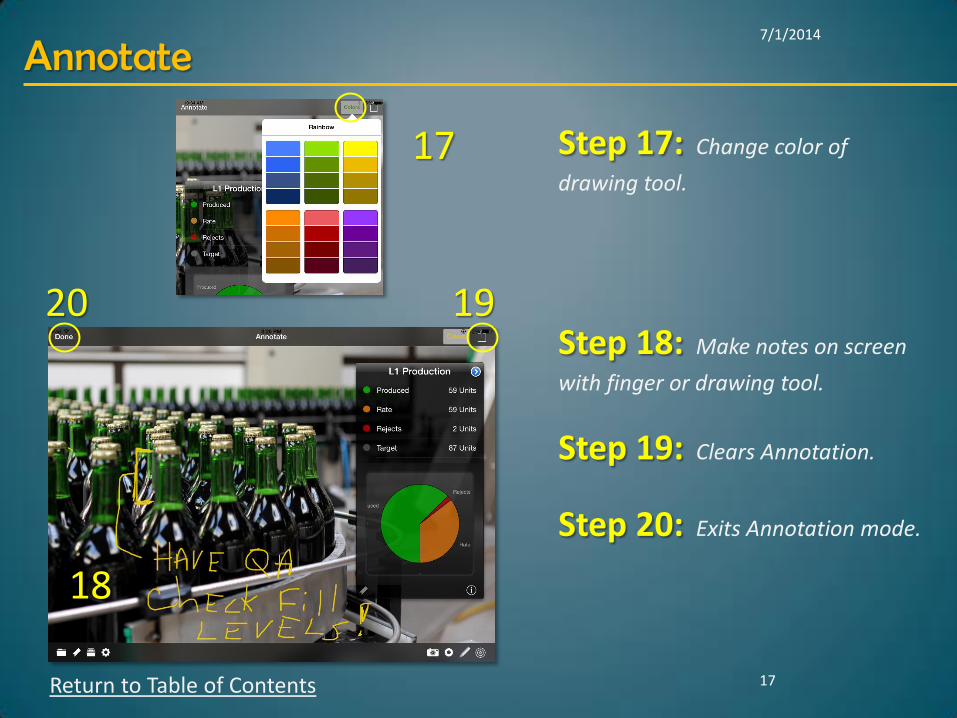
Step 17: Change color of
drawing tool.
Step 18: Make notes on screen
with finger or drawing tool.
Step 19: Clears Annotation.
Step 20: Exits Annotation mode.
7/1/2014
17
Annotate
17
18
20 19
Return to Table of Contents

Step 21: Tap the Camera icon to
take a snapshot of all screen contents, including POIs and annotations.
Snapshots are automatically saved and can be retrieved using the File Manager.
7/1/2014
18
Take a Snapshot
21
Capture snapshot of process issues which can be saved and emailed to colleagues
Return to Table of Contents
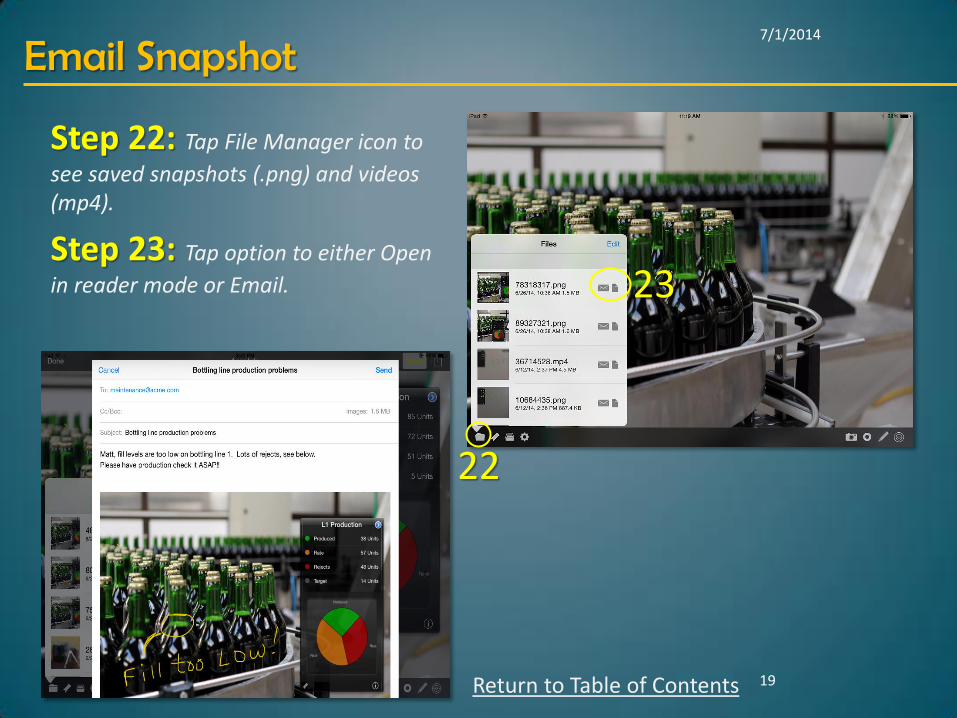
Step 22: Tap File Manager icon to
see saved snapshots (.png) and videos (mp4).
Step 23: Tap option to either Open
in reader mode or Email.
7/1/2014
19
Email Snapshot
22
23
Return to Table of Contents

Step 24: Tap Video Recorder
Note time stamp appears in top right when recording.
Step 25: To stop recording, just
tap recorder icon again. which looks like .
7/1/2014
20
Record a Video
24
Record a holistic video of display (incl. audio) to ‘show’ downtime issues to remote support
Return to Table of Contents
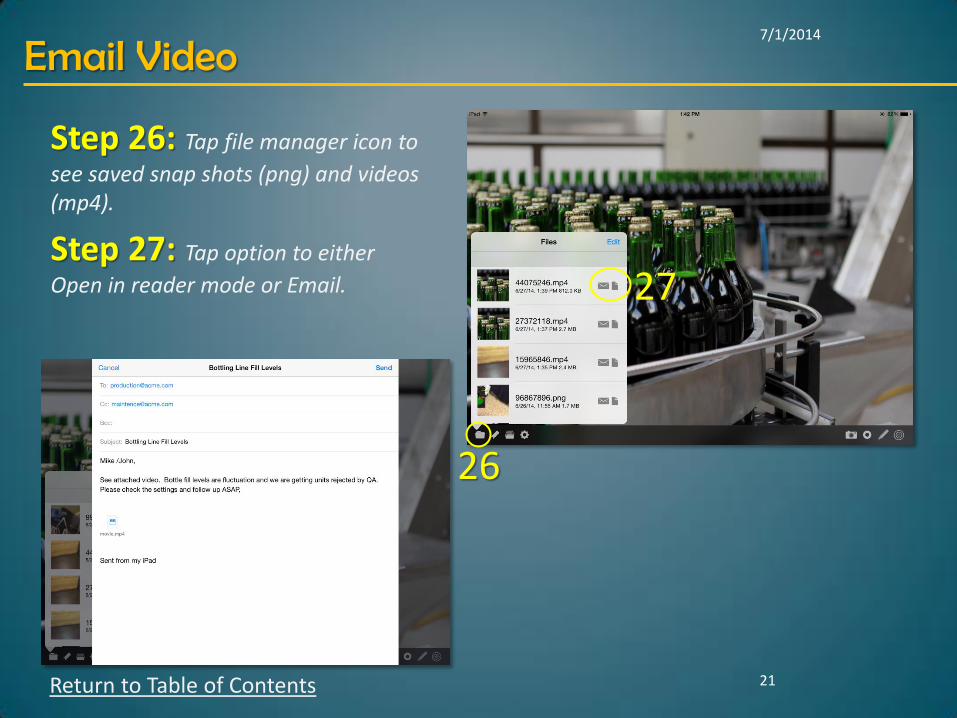
Step 26: Tap file manager icon to
see saved snap shots (png) and videos (mp4).
Step 27: Tap option to either
Open in reader mode or Email.
7/1/2014
21
Email Video
26
27
Return to Table of Contents
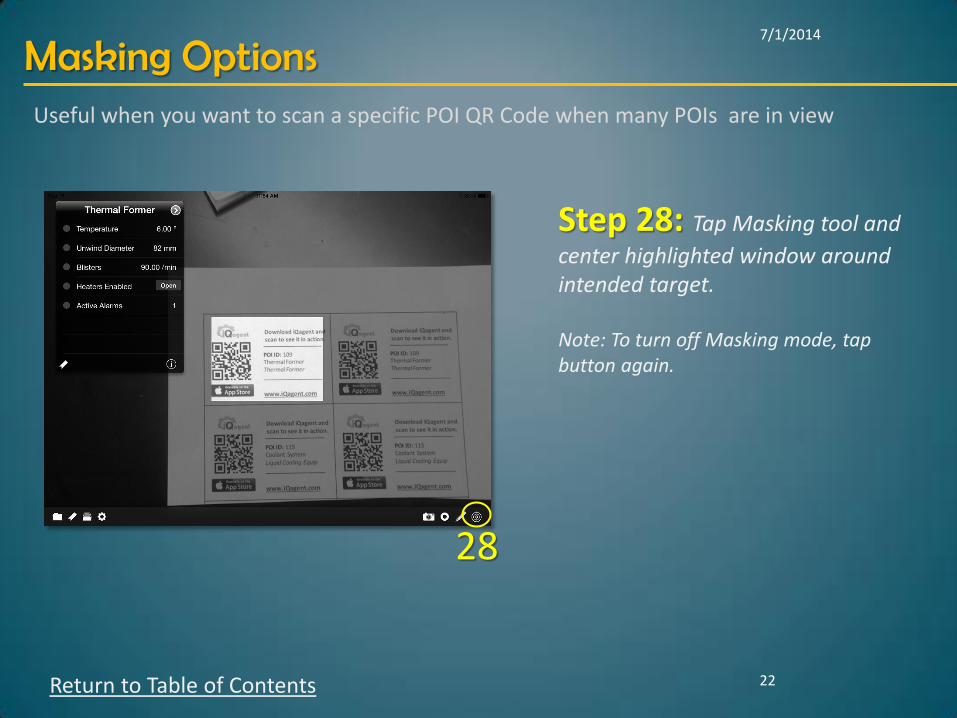
Step 28: Tap Masking tool and
center highlighted window around intended target.
Note: To turn off Masking mode, tap button again.
7/1/2014
22
Masking Options
28
Useful when you want to scan a specific POI QR Code when many POIs are in view
Return to Table of Contents

Step 29: Settings Menu
1. Turn Reader on/off Turns off camera, no POI Scanning.
2. Set background to color or image Selection will be shown when reader mode is off.
3. Allow multiple images of info links
4. Device Token used to register device with iQagent server.
5. Credentials Security credentials used when accessing
document server
7/1/2014
23
Settings
29
Additional settings for iQagent
Return to Table of Contents
7/1/2014
24
Next Steps Ready to see how iQagent can make your plant floor more productive?
Return to Table of Contents
Bob Meads
President
770.754.0427
Evelyn Behr
Technical Sales and Support
678.566.8151
iQagent 4385 Kimball Bridge Rd, Suite 202 Alpharetta, GA 30022
http://www.iQagent.com
CONTACT US: