Embed Size (px)
Citation preview

PAM1 MK2 Training 2014
Front Panel Control Explained
• USB port for configuration save/recall and system update
• Menu access
• Preset hotkey switches 1-5
Presets 1 to 4 default to SDI1,SDI2, AES, and Analog
• Headphone socket
• ‘Home’ Button – shortcut access
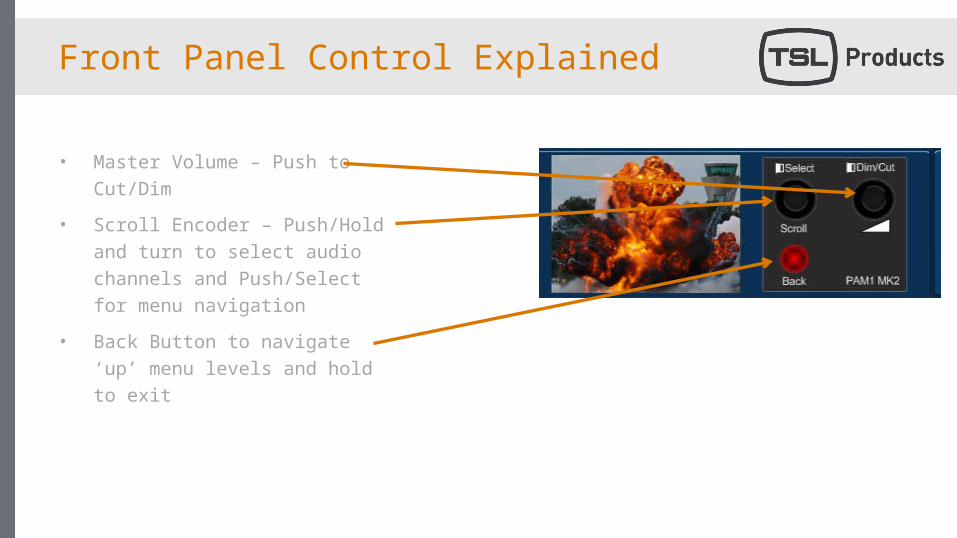
• Master Volume – Push to Cut/Dim
• Scroll Encoder – Push/Hold and turn to select audio channels and Push/Select for menu navigation
• Back Button to navigate ‘up’ menu levels and hold to exit
Front Panel Control Explained
Shortcut Mode Selection
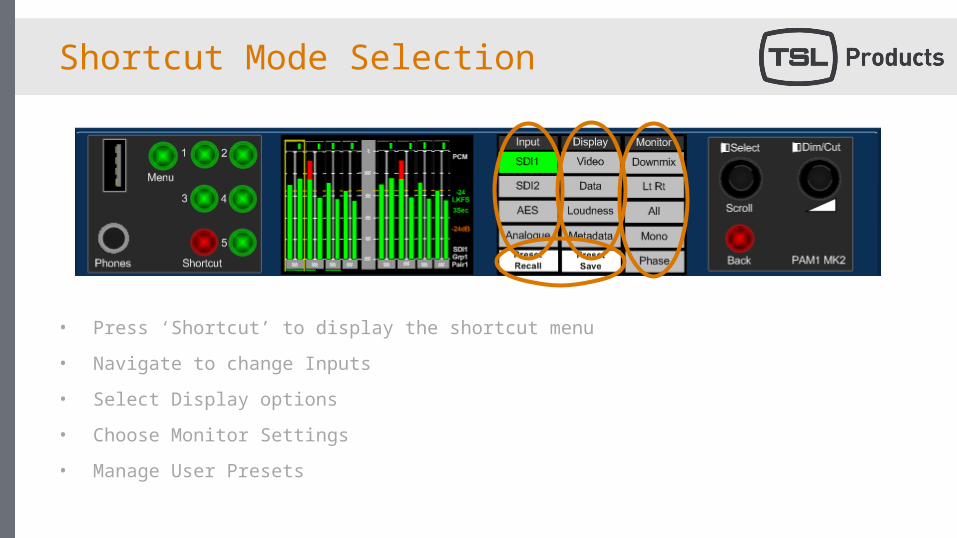
• Press ‘Shortcut’ to display the shortcut menu
• Navigate to change Inputs
• Select Display options
• Choose Monitor Settings
• Manage User Presets
Saving Hotkey Presets
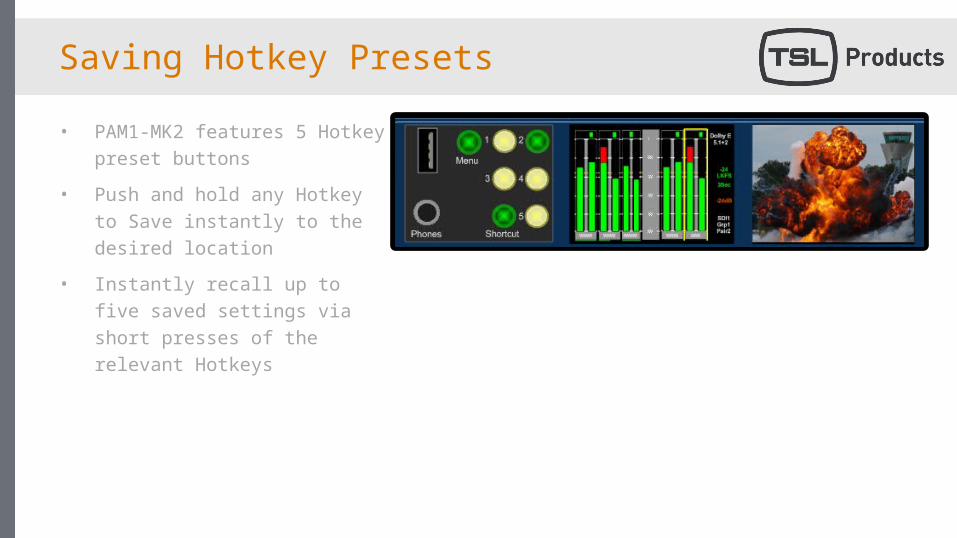
• PAM1-MK2 features 5 Hotkey preset buttons
• Push and hold any Hotkey to Save instantly to the desired location
• Instantly recall up to five saved settings via short presses of the relevant Hotkeys
Main Menu
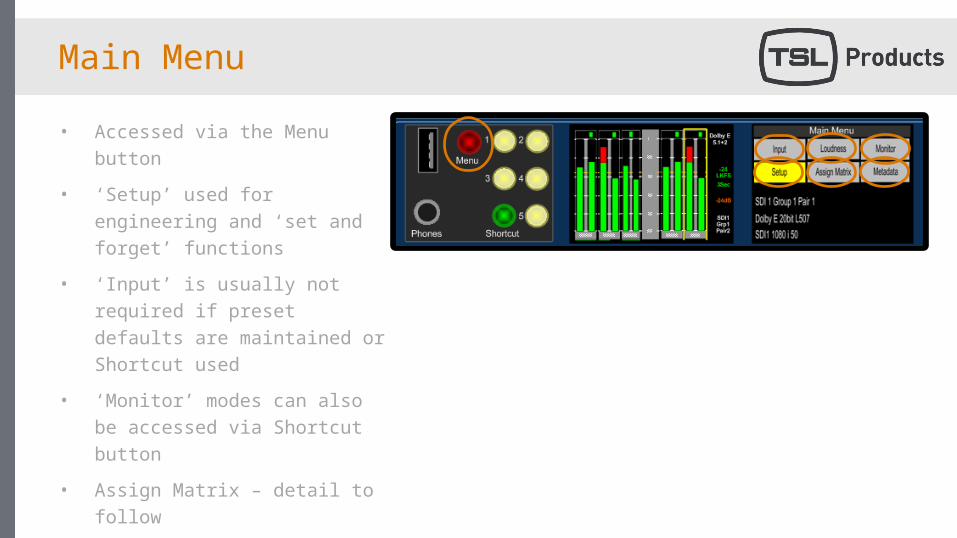
• Accessed via the Menu button
• ‘Setup’ used for engineering and ‘set and forget’ functions
• ‘Input’ is usually not required if preset defaults are maintained or Shortcut used
• ‘Monitor’ modes can also be accessed via Shortcut button
• Assign Matrix – detail to follow
• Loudness – detail to follow
• Metadata – view Dolby and S2020 Metadata
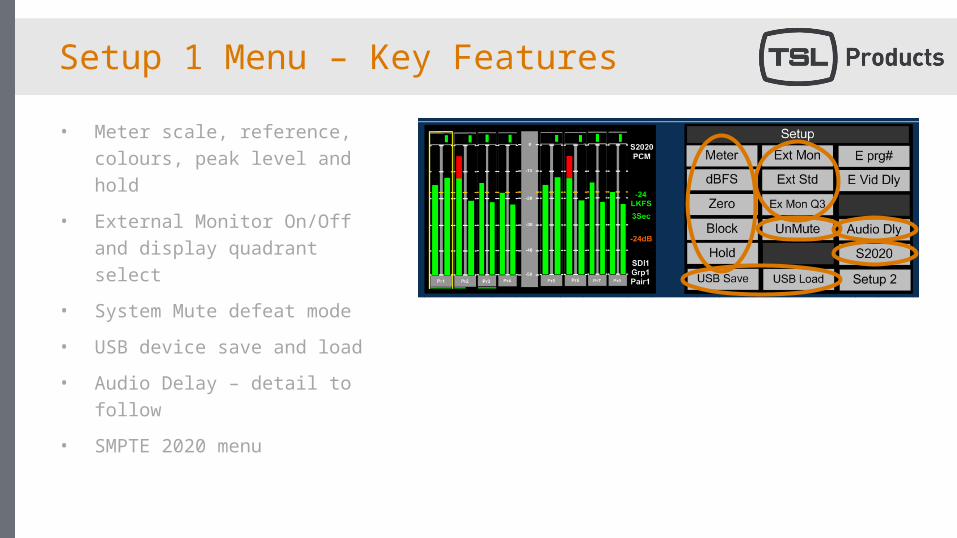
Setup 1 Menu – Key Features
• Meter scale, reference, colours, peak level and hold
• External Monitor On/Off and display quadrant select
• System Mute defeat mode
• USB device save and load
• Audio Delay – detail to follow
• SMPTE 2020 menu
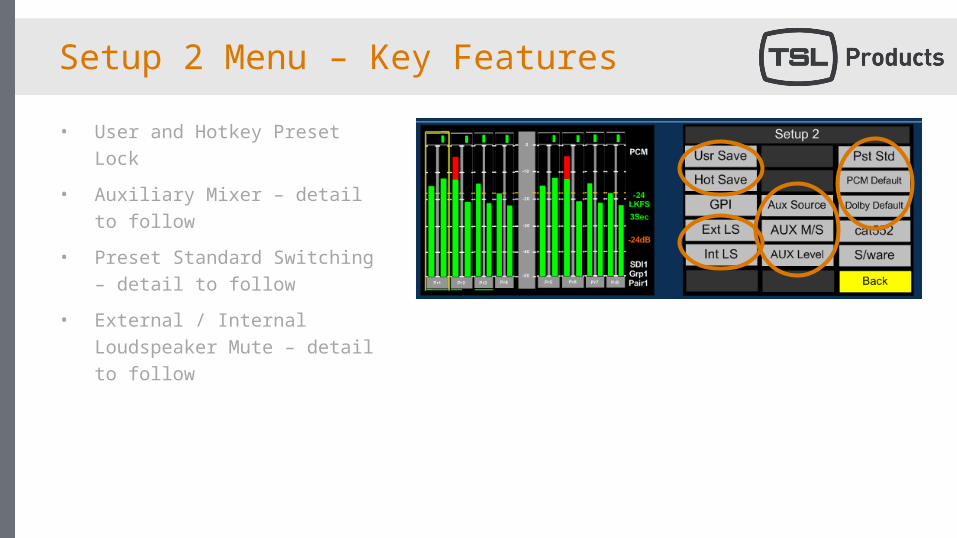
Setup 2 Menu – Key Features
• User and Hotkey Preset Lock
• Auxiliary Mixer – detail to follow
• Preset Standard Switching – detail to follow
• External / Internal Loudspeaker Mute – detail to follow
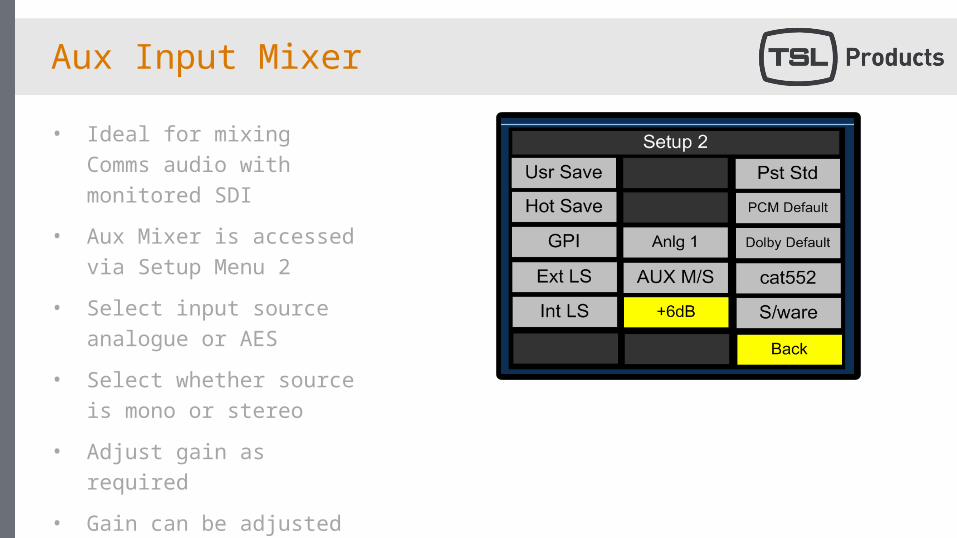
Aux Input Mixer
• Ideal for mixing Comms audio with monitored SDI
• Aux Mixer is accessed via Setup Menu 2
• Select input source analogue or AES
• Select whether source is mono or stereo
• Adjust gain as required
• Gain can be adjusted from the Input Menu
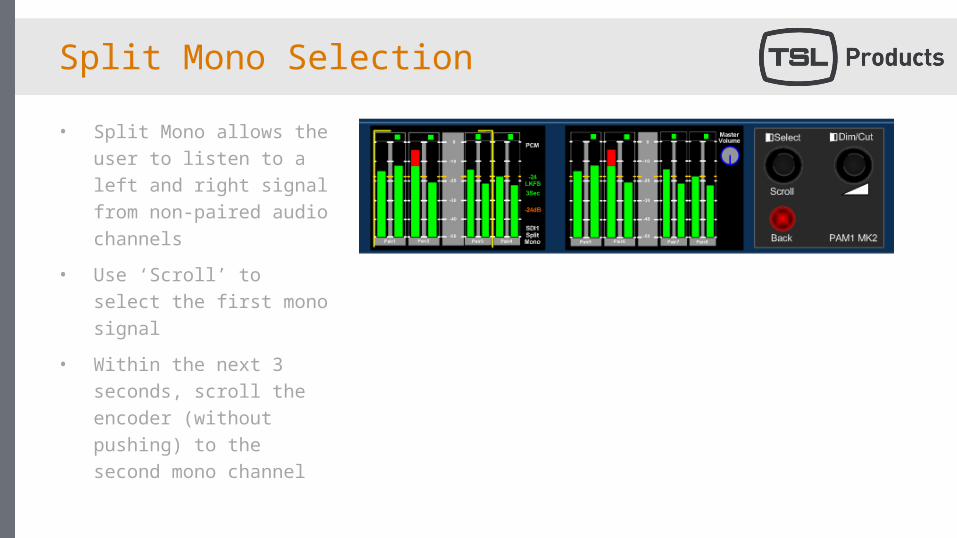
Split Mono Selection
• Split Mono allows the user to listen to a left and right signal from non-paired audio channels
• Use ‘Scroll’ to select the first mono signal
• Within the next 3 seconds, scroll the encoder (without pushing) to the second mono channel
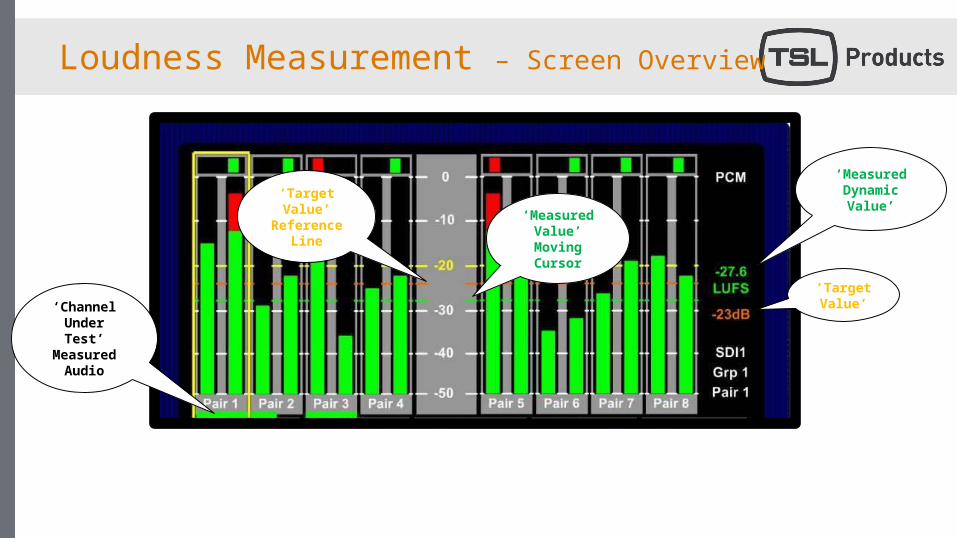
Loudness Measurement – Screen Overview
‘Target Value’
‘Measured Dynamic Value’
‘Measured Value’ Moving Cursor
‘Target Value’
Reference Line
‘Channel Under Test’
Measured Audio
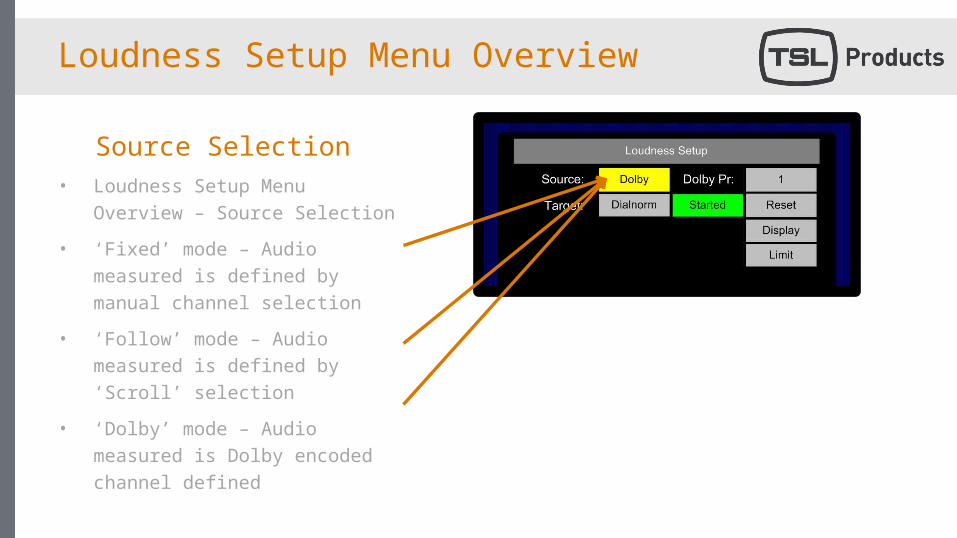
Loudness Setup Menu Overview
• Loudness Setup Menu Overview – Source Selection
• ‘Fixed’ mode – Audio measured is defined by manual channel selection
• ‘Follow’ mode – Audio measured is defined by ‘Scroll’ selection
• ‘Dolby’ mode – Audio measured is Dolby encoded channel defined
Source Selection
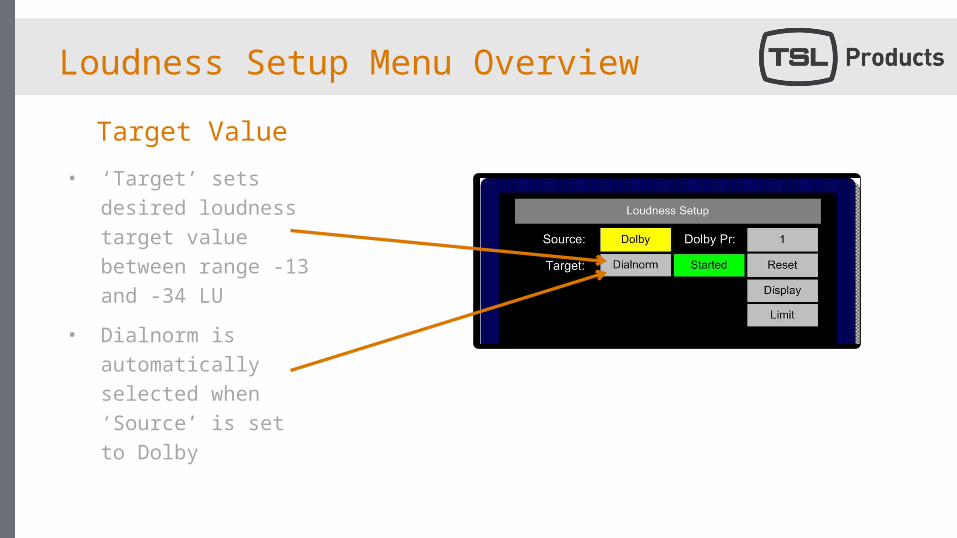
Loudness Setup Menu Overview
• ‘Target’ sets desired loudness target value between range -13 and -34 LU
• Dialnorm is automatically selected when ‘Source’ is set to Dolby
Target Value
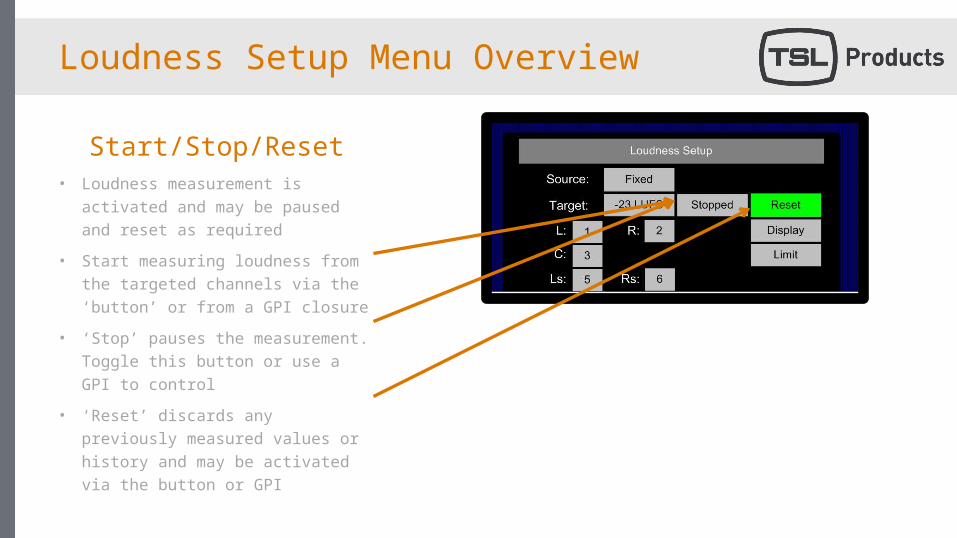
Loudness Setup Menu Overview
• Loudness measurement is activated and may be paused and reset as required
• Start measuring loudness from the targeted channels via the ‘button’ or from a GPI closure
• ‘Stop’ pauses the measurement. Toggle this button or use a GPI to control
• ‘Reset’ discards any previously measured values or history and may be activated via the button or GPI
Start/Stop/Reset
Loudness Setup Menu Overview
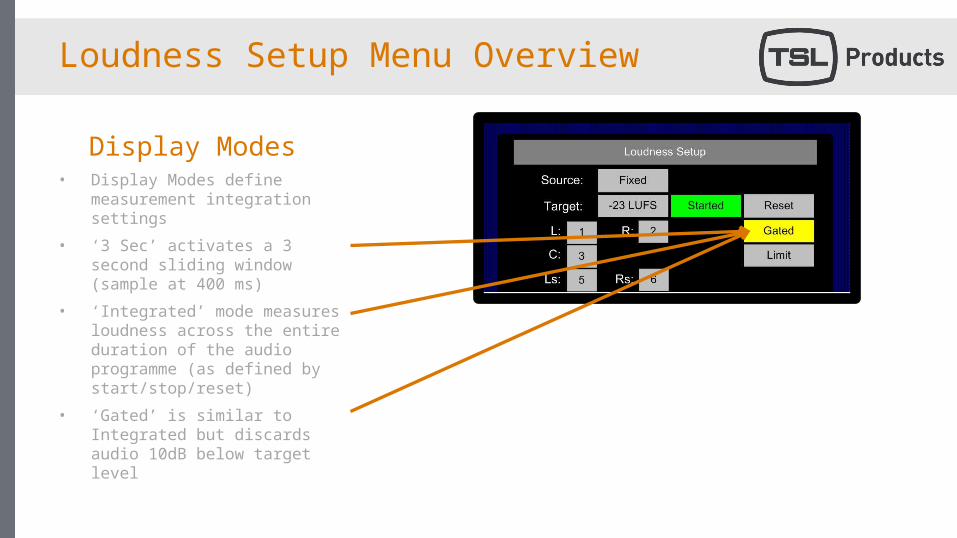
• Display Modes define measurement integration settings
• ‘3 Sec’ activates a 3 second sliding window (sample at 400 ms)
• ‘Integrated’ mode measures loudness across the entire duration of the audio programme (as defined by start/stop/reset)
• ‘Gated’ is similar to Integrated but discards audio 10dB below target level
Display Modes
Loudness Setup Menu Overview
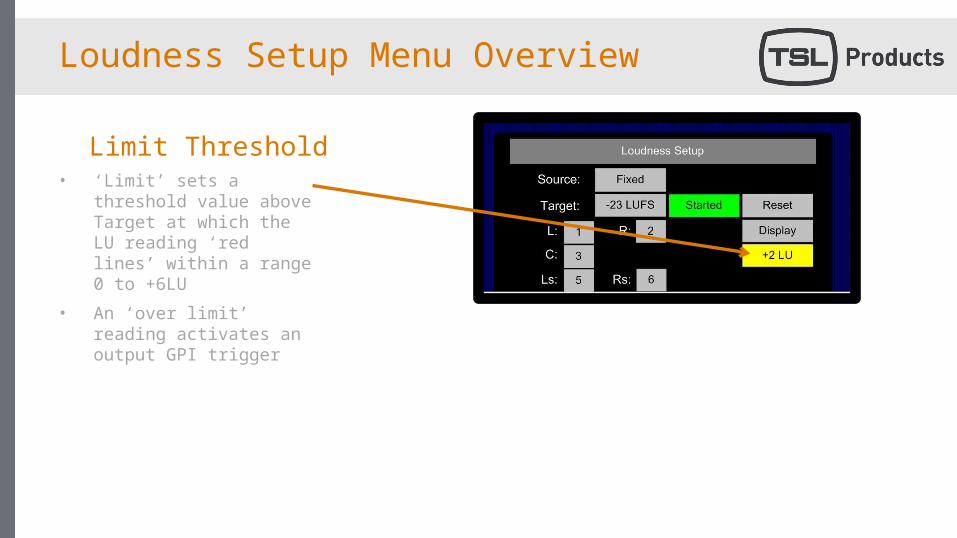
• ‘Limit’ sets a threshold value above Target at which the LU reading ‘red lines’ within a range 0 to +6LU
• An ‘over limit’ reading activates an output GPI trigger
Limit Threshold

Loudness Histogram
• To access Histogram from top level, press ‘Shortcut’ button
• Then press ‘Loudness’
Loudness Histogram
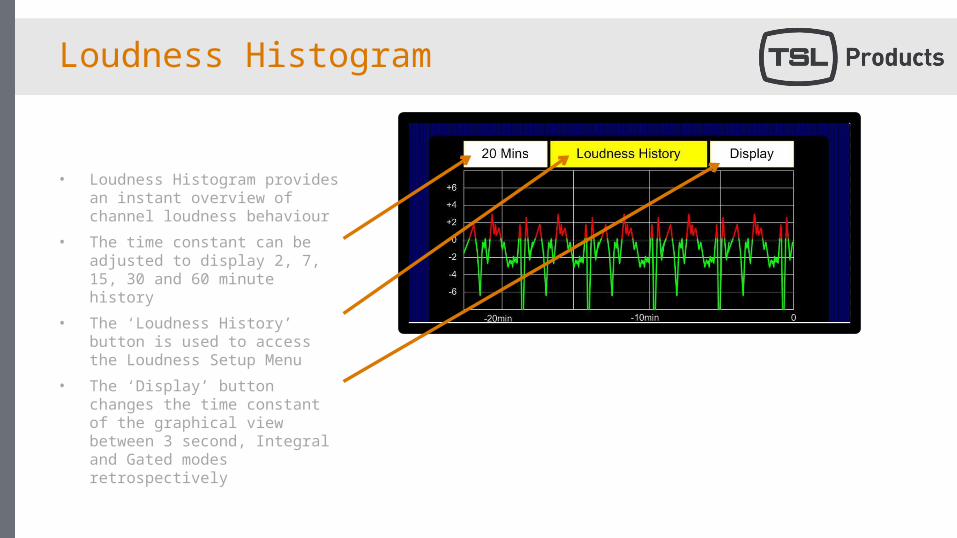
• Loudness Histogram provides an instant overview of channel loudness behaviour
• The time constant can be adjusted to display 2, 7, 15, 30 and 60 minute history
• The ‘Loudness History’ button is used to access the Loudness Setup Menu
• The ‘Display’ button changes the time constant of the graphical view between 3 second, Integral and Gated modes retrospectively
Assign Matrix - Overview
• The Assign Matrix is designed for use in applications where audio is delivered or transported in ‘non standard’ channel orders and where multiple commentary or language soundtracks are present within a common embedded video signal
• Assign Matrix functionality is based around a 16 into 6 user configurable tool which exclusively routes input audio channels to monitoring busses defined as Left, Right, Centre, LFE, Left Surround and Right Surround
• The key to use of the Assign Matrix is the ability to save complex setups as User Presets for instant recall
Assign Matrix
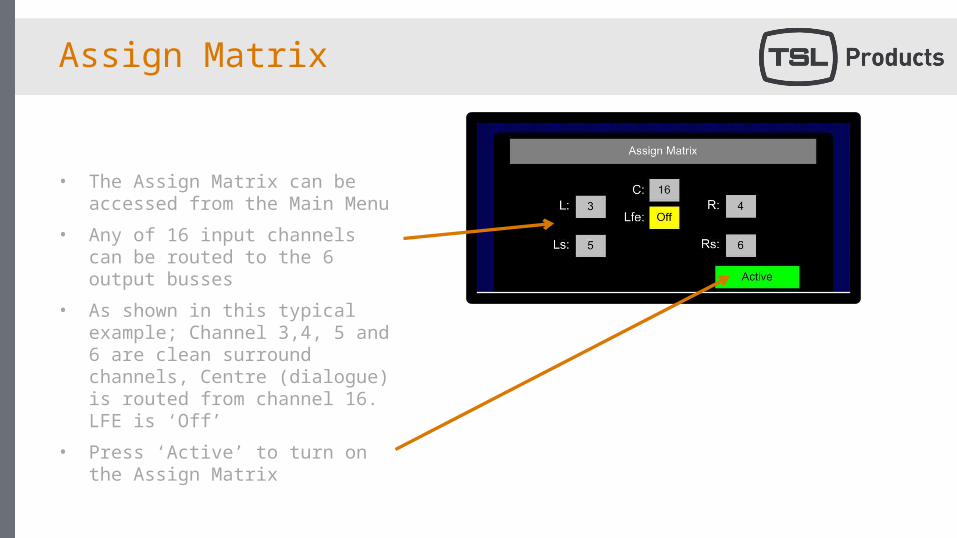
• The Assign Matrix can be accessed from the Main Menu
• Any of 16 input channels can be routed to the 6 output busses
• As shown in this typical example; Channel 3,4, 5 and 6 are clean surround channels, Centre (dialogue) is routed from channel 16. LFE is ‘Off’
• Press ‘Active’ to turn on the Assign Matrix
Assign Matrix – Bargraph Views
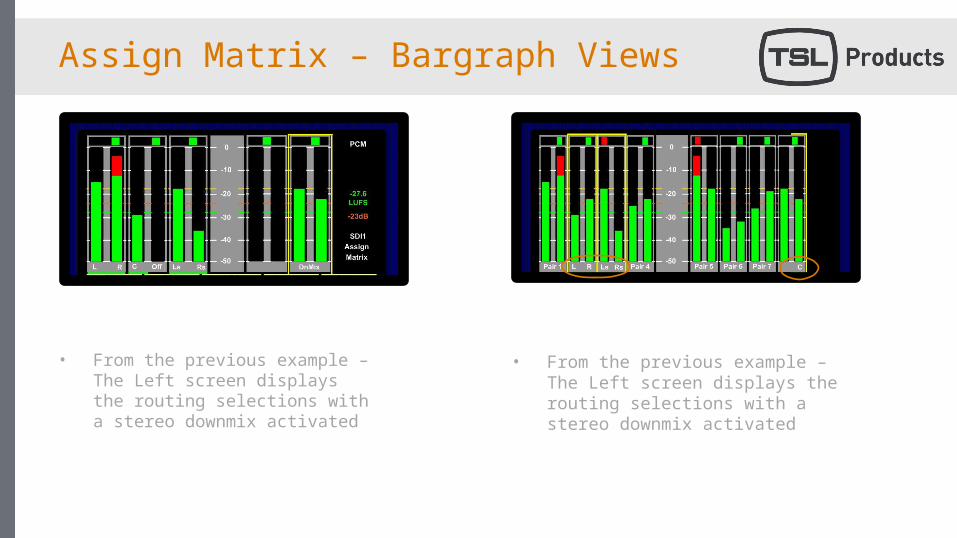
• From the previous example – The Left screen displays the routing selections with a stereo downmix activated
• From the previous example – The Left screen displays the routing selections with a stereo downmix activated
Audio Delay
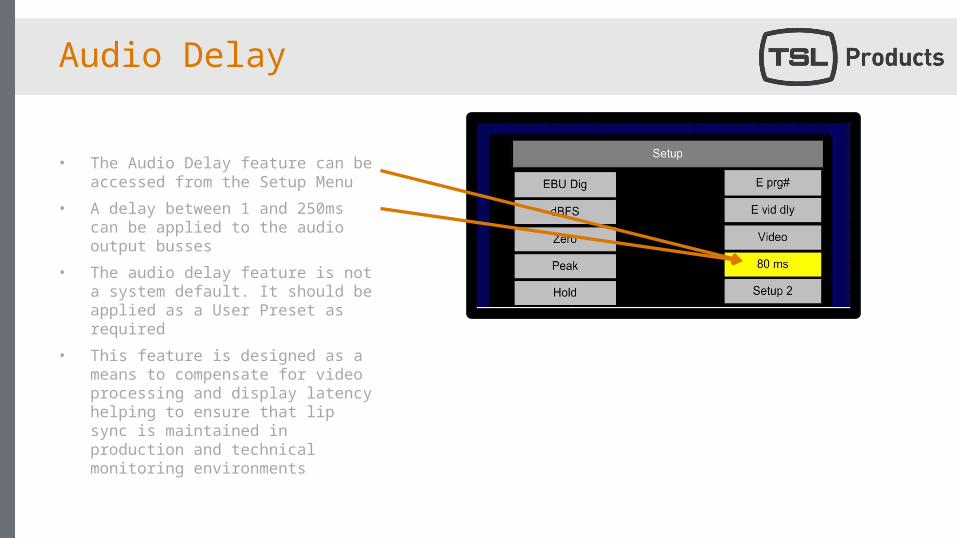
• The Audio Delay feature can be accessed from the Setup Menu
• A delay between 1 and 250ms can be applied to the audio output busses
• The audio delay feature is not a system default. It should be applied as a User Preset as required
• This feature is designed as a means to compensate for video processing and display latency helping to ensure that lip sync is maintained in production and technical monitoring environments
Loudspeaker Muting
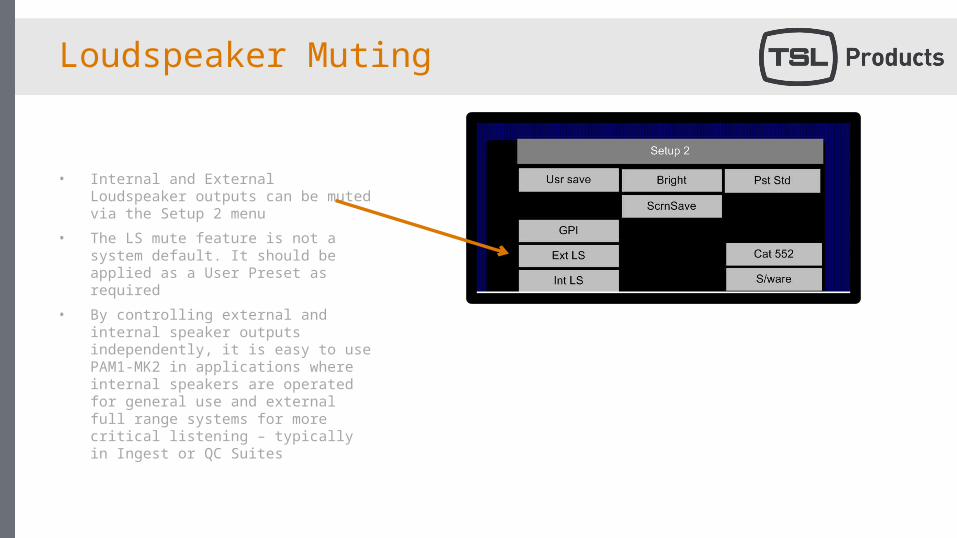
• Internal and External Loudspeaker outputs can be muted via the Setup 2 menu
• The LS mute feature is not a system default. It should be applied as a User Preset as required
• By controlling external and internal speaker outputs independently, it is easy to use PAM1-MK2 in applications where internal speakers are operated for general use and external full range systems for more critical listening – typically in Ingest or QC Suites
Preset Standard Switching - Overview
• Preset Standard switching was introduced into PAM1-MK2 following a request to be able to configure a condition where the audio monitoring unit automatically switches between listening states depending on the input signal format
• PAM1-MK2 is capable of determining which audio channels to monitor depending on whether the input video signal is SD or HD, Dolby encoded or PCM audio
• This feature is aimed for use in monitoring applications where outgoing video is switched between SD/stereo and HD/surround sound, with or without Dolby encoding – the operator no longer has to change audio selection manually as PAM1-MK2 will automatically choose the correct audio channel to monitor
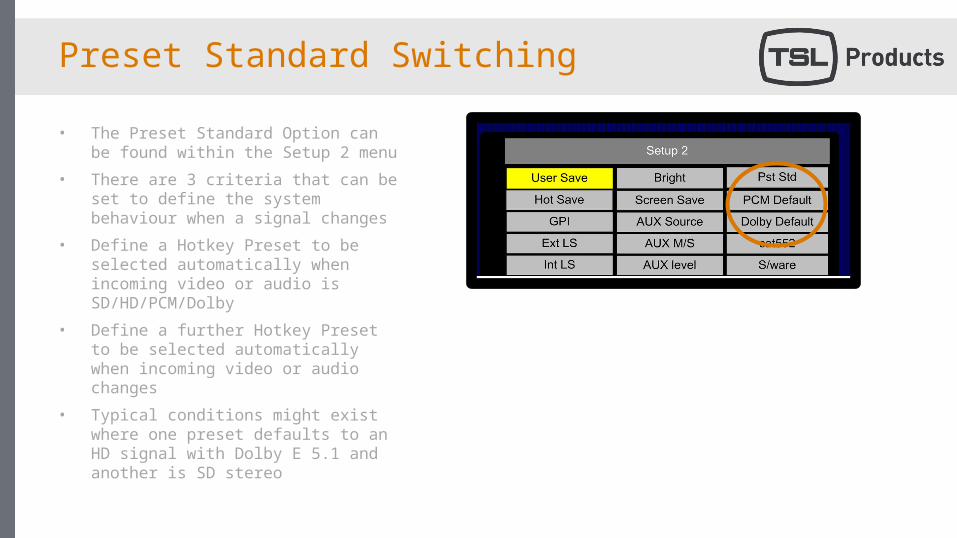
Preset Standard Switching
• The Preset Standard Option can be found within the Setup 2 menu
• There are 3 criteria that can be set to define the system behaviour when a signal changes
• Define a Hotkey Preset to be selected automatically when incoming video or audio is SD/HD/PCM/Dolby
• Define a further Hotkey Preset to be selected automatically when incoming video or audio changes
• Typical conditions might exist where one preset defaults to an HD signal with Dolby E 5.1 and another is SD stereo
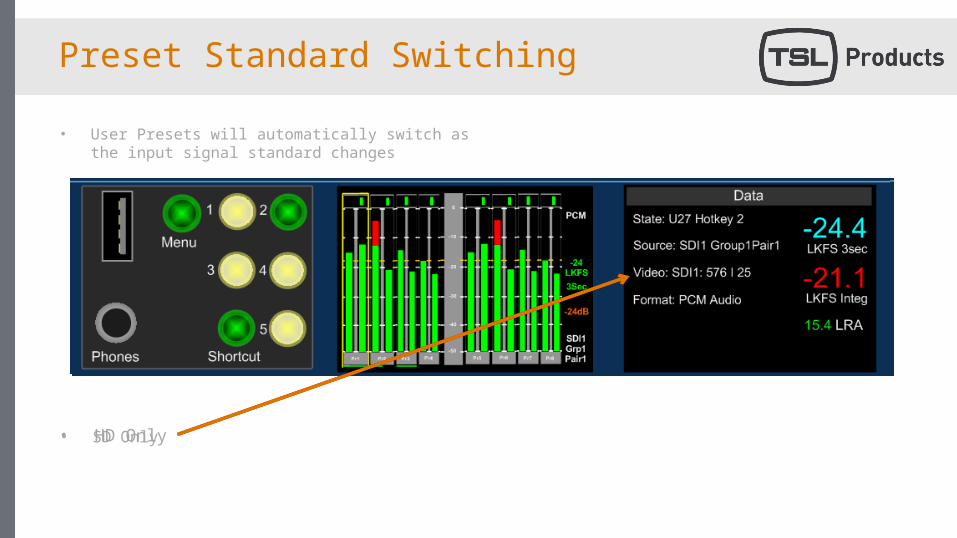
Preset Standard Switching
• User Presets will automatically switch as the input signal standard changes
• SD Only• HD Only