Embed Size (px)
Citation preview

Unit 67 3D Animation – Production Log
Week 1 – 20th to 24th of AprilI have now started work on this project, which will involve the process of giving a 3D modelled object a set of ‘bones’ and animating it.
This week I have produced a schedule that I will use to organise my workflow with regards to the deadline of this project, which will be the 19th of May. The pace I’ve chosen is fairly simple, with the amount of time spent doing preproduction and production being approximately equal. This is because I expect the process of selecting a model and designing an animation to possibly take up a large amount of time in the preproduction stage of this project.
I have also begun researching animation. I am primarily looking at the video game industry (because I feel it may be more relevant to the types of animations I’ll be likely to create, and because I have more experience with scrutinizing that type of media. This week I’ve looked at two particular examples – Killing Floor 2’s weapon animations, including weapon shooting and reloading animations, and also some gameplay of Devil May Cry 4, which shows animations from character movement and attack animations.
Week 2 – 27th to 30th of AprilThis week i’ve examined two more examples of animations, this time from assets not produced by larger video game companies; the first is a custom made NPC skin for a unit in the game DoTA 2, by a Youtube user called MaxOfS2D, and the second is a singular animation for a project I do not know of, by a Japanese user called gimbaling. The second example in particular is useful for me because even though it is sped up, it shows the actual methodology of animating a model, including various adjustments to individual bones.
Taking into account the varieties of research I’ve acquired, I’m considering making an animation of a humanoid model. However, I do not have a model with which to animate, so I will likely need to find a freeware model from one of various websites such as Turbosquid to use in this project. I’ve organised my various thoughts and ideas for animations into a mind map that separates concepts by function, by use and by the model or object they are based around.
Week 3 – 4th to 8th of MayThis week I have been looking at various websites to try and find a suitable model, particularly looking at humanoid models, since I’ve decided on that course. I’ve also decided to make an animation based around a medieval style character, so I’m looking at soldiers, knights, e.t.c.
I’ve currently not found one that particularly strikes me as being a perfect fit for my ideas, but regardless, next week I will need to have a model prepared in order to design an animation and begin production as according to schedule.
I’ve also encountered a new issue, in that the models I’ve acquired so far are created in different file types. This presents a variety of new problems, in that some of the file types seem to be incompatible with Lightwave Layout, which means I will be unable to animate them. Some types of model are compatible, but don’t carry across surface or image data into Layout, which means I may have to surface them myself before animating them.
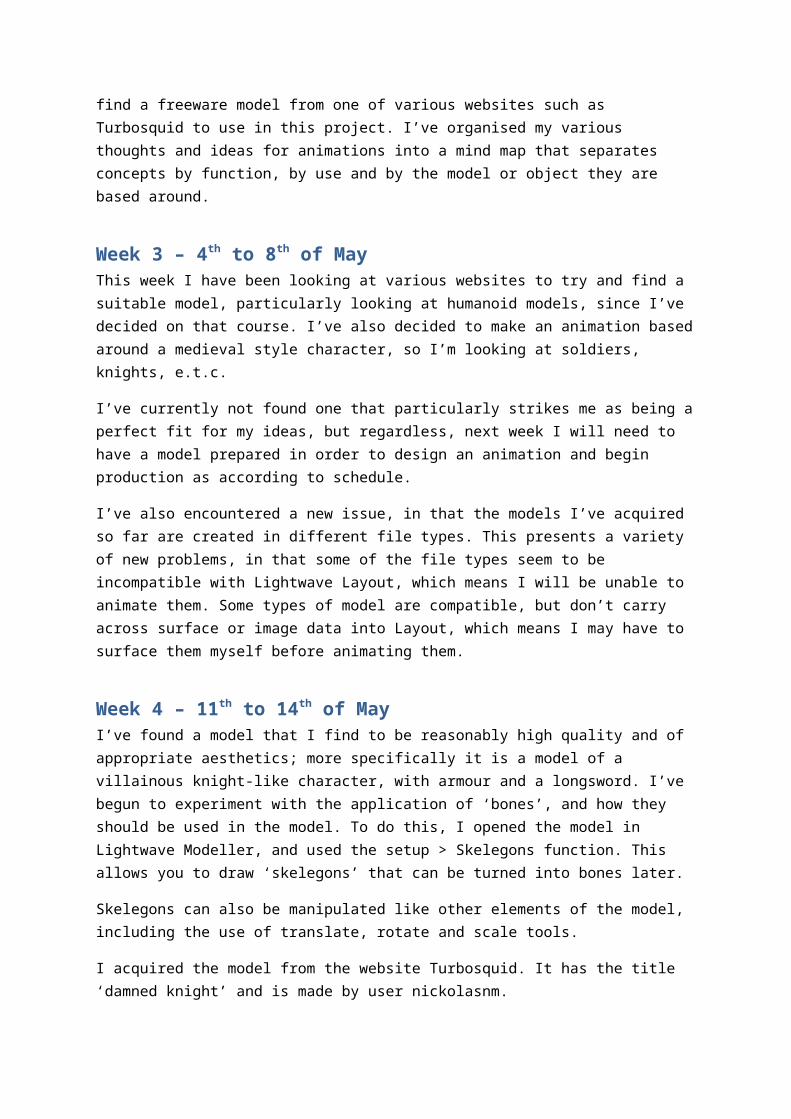
Week 4 – 11th to 14th of MayI’ve found a model that I find to be reasonably high quality and of appropriate aesthetics; more specifically it is a model of a villainous knight-like character, with armour and a longsword. I’ve begun to experiment with the application of ‘bones’, and how they should be used in the model. To do this, I opened the model in Lightwave Modeller, and used the setup > Skelegons function. This allows you to draw ‘skelegons’ that can be turned into bones later.
Skelegons can also be manipulated like other elements of the model, including the use of translate, rotate and scale tools.
I acquired the model from the website Turbosquid. It has the title ‘damned knight’ and is made by user nickolasnm.
Week 5 – 18th to 21st of MayI’ve begun to experiment with using a fully skelegoned model in Layout and attempting to do simple animations. The first step of doing that is using a Layout function called ‘cvt Skelegons’ which converts all skelegons to bones.

Now the bones I’ve set up can used to move (or more accurately, deform) the character to give the impression of movement, which can be done by setting up ‘key frames’ (set points indicated in time at which it records the coordinates of the model) and setting up the position I want the model to be in at that time.
I’ve encountered a few initially bewildering issues when beginning to do this work, the first being that initially the bones didn’t seem to have any effect on the model. What I had found was that I used a separate layer to create the bones in for the model, which means I have to indicate to the system that the model is intended to use the bones in the second layer.

Another issue I’ve encountered is that parts of the model deform in ways that are not intended when certain parts of the model move. I’ve discerned that this is caused by certain parts of the model being too close together, and so the bones that affect one part begin to affect others as well.
I will need to find a way to remedy this in order to continue the animation process.
Week 6 – 25th to 29th of MayThis week I have been focusing on fixing the issues I’ve laid out in the previous week. I’ve primarily been trying to resolve the issue whereby the model behaves oddly during animation. To attempt to fix this, I’ve been adding additional bones to parts of the model that are particularly affected.
It has certainly improved, however I am encountering new issues, where the model is now starting to glitch, with some coordinates on the model now behaving in particularly odd ways, and now some parts of the model don’t move when the bones do.

Week 7 – 1st to 5th of JuneAfter discovering that some of the model was created in such a way that it is basically impossible to adjust the bones to fix it (namely, the hands which had been modelled without independent fingers and the feet which are extremely close together near the back), I’ve decided to throw away the work I’d been doing using the damned knight model.
Instead, I’ll be using my own model that I had produced for unit 68 of this course, which is my Ray Bot model. I’ve prepared the bones and have begun to put together an animation sequence in Layout. Unfortunately, I have been delayed to the point that I now have very little time to finish this sequence, so the animation I can create will be much simpler than I originally intended.

Week 8 – 8th to 12th of JuneI have now finished the animation for my Ray Bot model, which consists of a singular sequence that moves the model from rest, to a coiled up position with the tail underneath, to a spring forwards, and then the model twists as if it were turning mid-air, and then returns to rest and flaps the wings are few times.
I found this part of the project to be somewhat challenging due to the short amount of time I had available to complete this part of the project due to my delays, especially in the movements of the tail, which had a large number of bones in that part of the model.
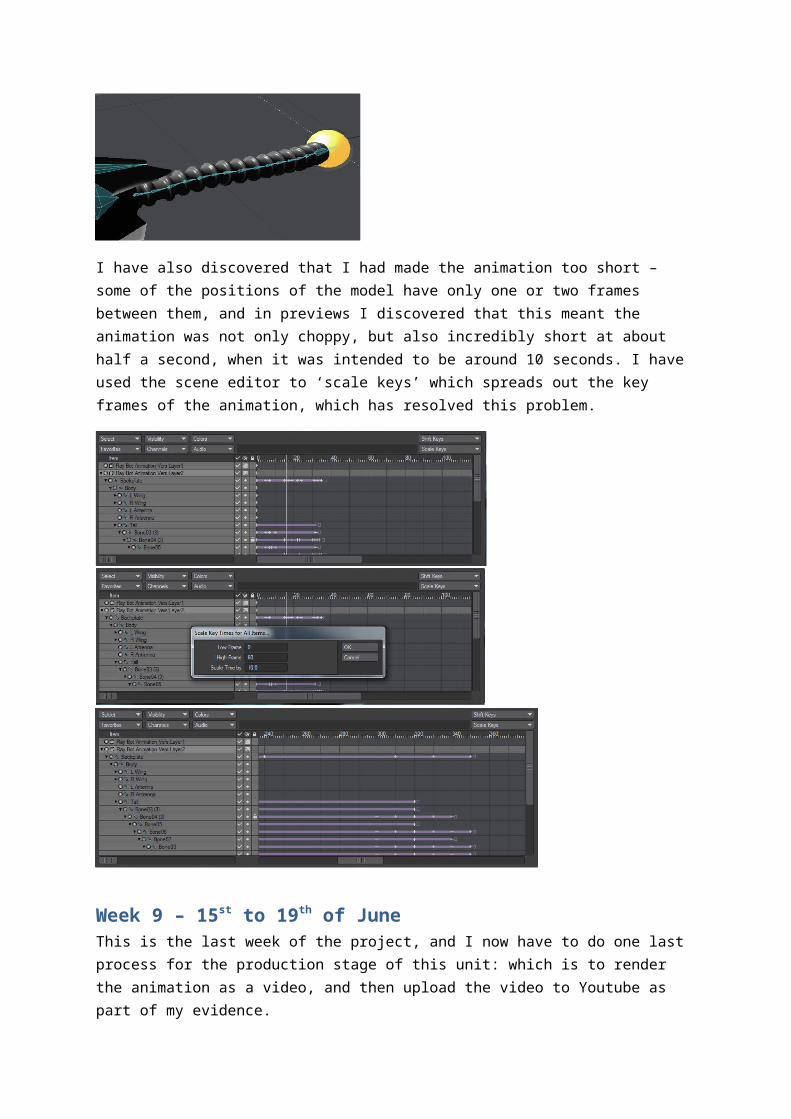
I have also discovered that I had made the animation too short – some of the positions of the model have only one or two frames between them, and in previews I discovered that this meant the animation was not only choppy, but also incredibly short at about half a second, when it was intended to be around 10 seconds. I have used the scene editor to ‘scale keys’ which spreads out the key frames of the animation, which has resolved this problem.

Week 9 – 15st to 19th of JuneThis is the last week of the project, and I now have to do one last process for the production stage of this unit: which is to render the animation as a video, and then upload the video to Youtube as part of my evidence.
Before rendering, I had to prepare some aspects of the animation in Layout. First, I set up three camera perspectives - one from the front, one from an upper perspective, and one from a lower back perspective.
Then I had to set up the render options so that it would produce 720p resolution Photoshop image files for the individual frames of the renders, which are separated by perspective into three folders, and then I proceeded to start the rendering process.
Once I had my render files, I needed to process them into an actual video, as opposed to a series of stills. This is done using Adobe Premier.

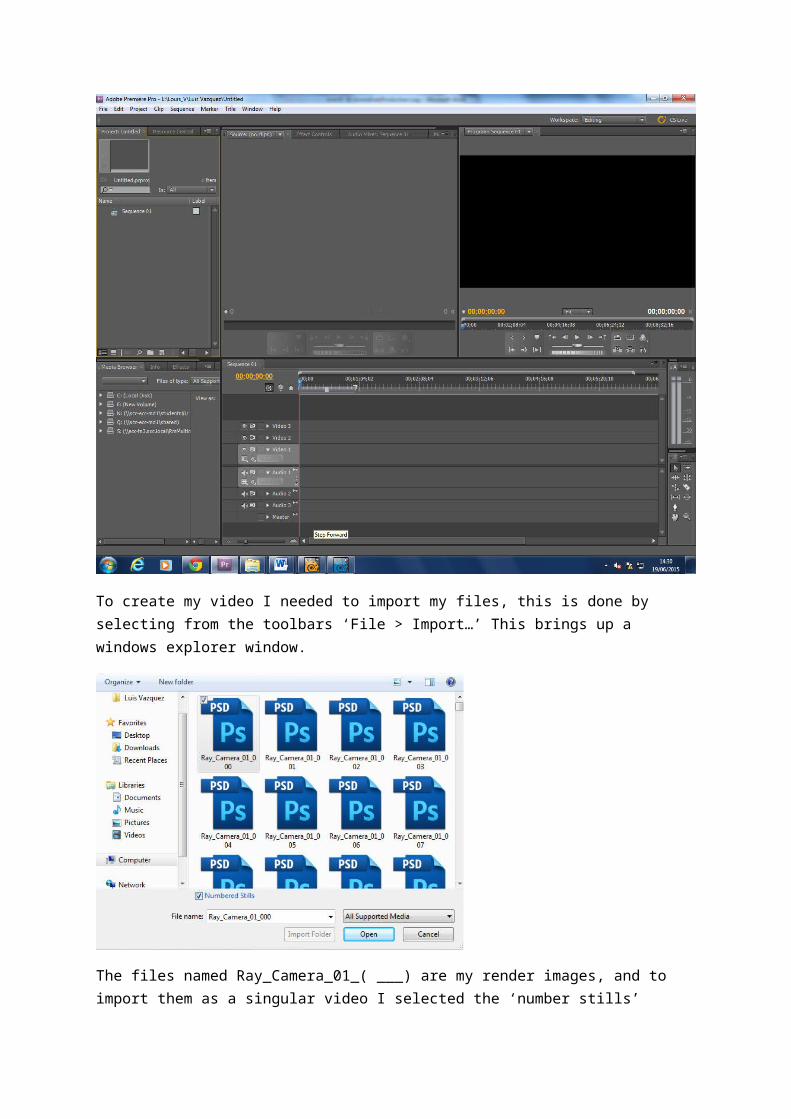
To create my video I needed to import my files, this is done by selecting from the toolbars ‘File > Import…’ This brings up a windows explorer window.
The files named Ray_Camera_01_( ___) are my render images, and to import them as a singular video I selected the ‘number stills’ tickbox that can be seen just below the icons. When ticked, the frames are imported all at once, as a video.
Once the video has been added, it can be manipulated. The only edit I’ll need to use is to go to ‘modify > interpret footage’ which brings up a number of options. Of which only ‘ignore alpha’ is useful. This is because the video has automatically made the background black, when it is supposed to be a reddish gray colour. Selection ignore alpha reverts this change.
Once I’ve added all three camera renders to the sequence and changed the setting on each, the only remaining step is to render the sequence as a 720p .avi file, which is done in ‘File > Export > Media…’.

Once the render process is complete, I have my final render of my animation, which is then uploaded to Youtube.