Embed Size (px)
Citation preview
AI-Library
Software Architecture
Version 1.0
09/12/2019
Revision History 3
Introduction 4 Purpose 4 Scope 4 Definitions, Acronyms, and Abbreviations 4 References 5 Overview 5
Functional Requirements 5
Actors 6 Type 1 users 6 Type 2 users 6 Type 3 users 6
Architecture 7 Physical View 7 Logical View 8 Process View 9 Use Case View (Scenarios) 12
Save Data 13 Request Prediction 14 Request Training 15 Use existing models 15 Modifying an existing model with new logic 29 Adding a new model 30
Deployment 31 Deploying AI-Library using ODH Operator 32 Deploying AI-Library using Ansible Roles 32
Model Structure 36 Seldon 36
.s2i/environment 36 model.py 37 requirements.txt 38 README.md 39 training.ipynb 39
Argo 39 model.py 39 requirements.txt 40 tools 40 README.md 44

Revision History Version Primary Author(s) Description Date Completed
v1.0 Prasanth Anbalagan, Christopher Chase Chad Roberts
Documentation on AI-Library architecture, deployment of AI-Library, usage of existing models in AI-Library, adding new models to AI-Library and modifying existing models.
09/12/2019
1. Introduction This document provides a detailed architectural design of AI-Library, a core
provider of machine learning models and solutions, model training and prediction services in order to drive open data hub's capabilities for AI/ML use cases.
This document explains how the system is structured. It presents a number of different use cases to depict the different aspects of the system and helps understand this project as a whole.
1.1. Purpose
The purpose of this document is to provide a comprehensive overview of AI-Library and its components. It will help users as well as developers understand the different components of the system and their functionality in detail.
1.2. Scope The scope of this document is to explain the various aspects of AI-Library from
the perspectives of the following 3 types of users: First, any user who wants to explore the machine learning services provided with the system as-is and understand them. Second, any user who wants to deploy the machine learning services, but utilize the services with their custom trained models. Finally, any user who wants to modify or create a new service and utilize them with custom model training and prediction.
1.3. Definitions, Acronyms, and Abbreviations
● ODH Open Data Hub ● REST Representational State Transfer ● UI User Interface (Dashboard and REST API) ● AI Artificial Intelligence ● ML Machine Learning
1.4. References
[1] Philippe Krutchen, https://www.cs.ubc.ca/~gregor/teaching/papers/4+1view-architecture.pdf

Open Data Hub https://opendatahub.io/ Openshift https://www.openshift.com/ Seldon Core https://www.seldon.io/open-source/ Ceph https://www.redhat.com/en/technologies/storage/ceph Argo project https://github.com/argoproj
1.5. Overview This document contains the following subsections
Section 2: describes many of the features of the system.
Section 3: describes use-case realizations surrounding the system.
Section 4: describes the architecture of the system.
Section 5: describes logical view and process view of the system.
Section 7: describes how the system can be deployed and used.
Section 8: describes how to develop custom services or machine learning solutions.
2. Functional Requirements AI-Library provides the following functionalities,
1. Train existing machine learning models with sample training data provided with AI-Library
2. Run prediction on sample data and pre-trained model provided with AI-Library. 3. Train existing machine learning models with user provided training data. 4. Run prediction on user provided data through pre-trained models provided with
AI-Library. 5. Run prediction on user provided data using custom trained models. 6. Add new machine learning models for training and prediction and turn them into a
service.
3. Actors
● Type 1 users
Any user who wants to explore the machine learning services as-is provided with the system. This type of user interact with the system with the purpose of understanding how the machine learning models function with the sample data provided with the system.
● Type 2 users
Any user who wants to deploy the machine learning services, but utilize the services with their custom trained models. This type of user either has an understanding of the models provided or has already explored them through demo services. Now the user is ready to utilize the services to train their own models and use it run prediction on custom data.
● Type 3 users
Any user who wants to modify or create a new model, train them, turn them in to a service, and run predictions using it. This type of user create their own models using the existing models and services as templates. Then the user turns their models in to a service for training and prediction purposes.
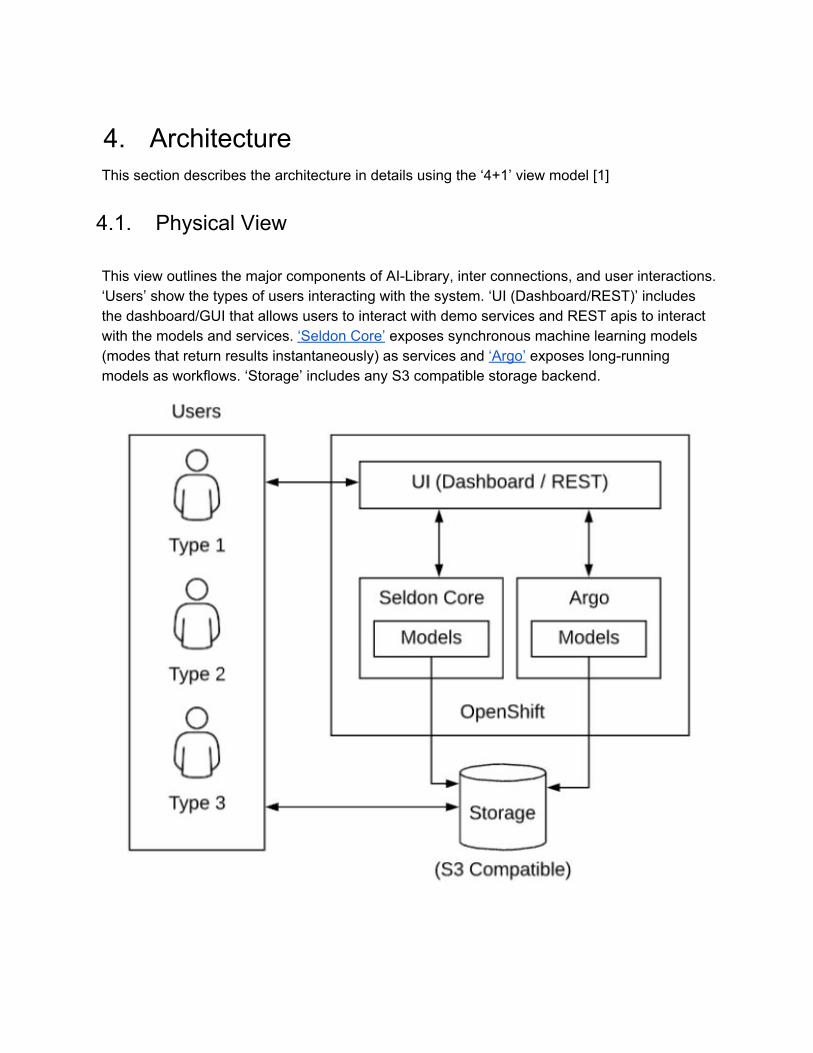
4. Architecture This section describes the architecture in details using the ‘4+1’ view model [1]
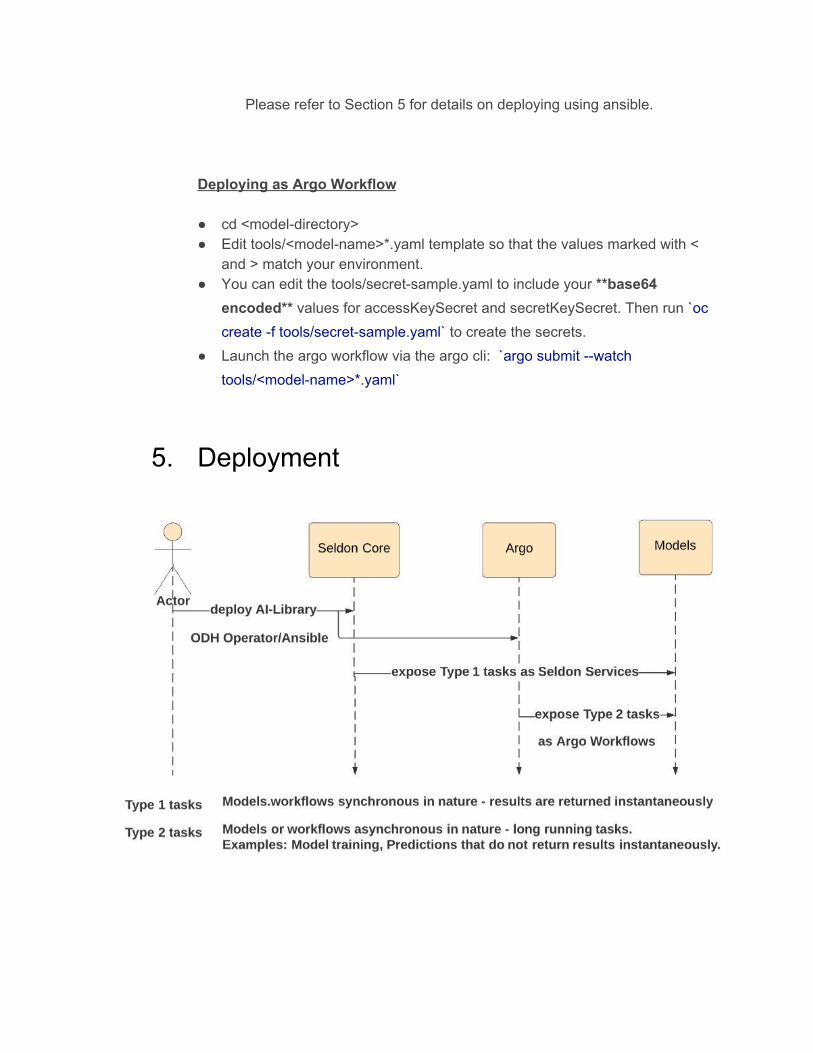
4.1. Physical View This view outlines the major components of AI-Library, inter connections, and user interactions. ‘Users’ show the types of users interacting with the system. ‘UI (Dashboard/REST)’ includes the dashboard/GUI that allows users to interact with demo services and REST apis to interact with the models and services. ‘Seldon Core’ exposes synchronous machine learning models (modes that return results instantaneously) as services and ‘Argo’ exposes long-running models as workflows. ‘Storage’ includes any S3 compatible storage backend.
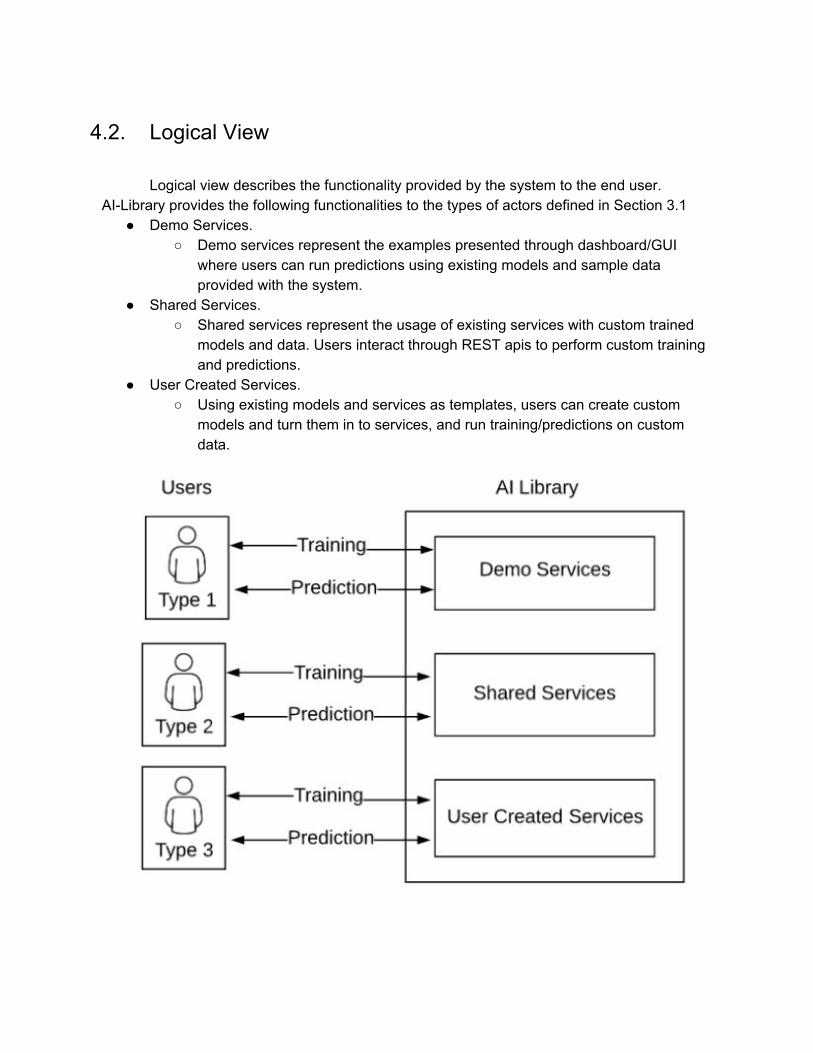
4.2. Logical View
Logical view describes the functionality provided by the system to the end user. AI-Library provides the following functionalities to the types of actors defined in Section 3.1
● Demo Services. ○ Demo services represent the examples presented through dashboard/GUI
where users can run predictions using existing models and sample data provided with the system.
● Shared Services. ○ Shared services represent the usage of existing services with custom trained
models and data. Users interact through REST apis to perform custom training and predictions.
● User Created Services. ○ Using existing models and services as templates, users can create custom
models and turn them in to services, and run training/predictions on custom data.
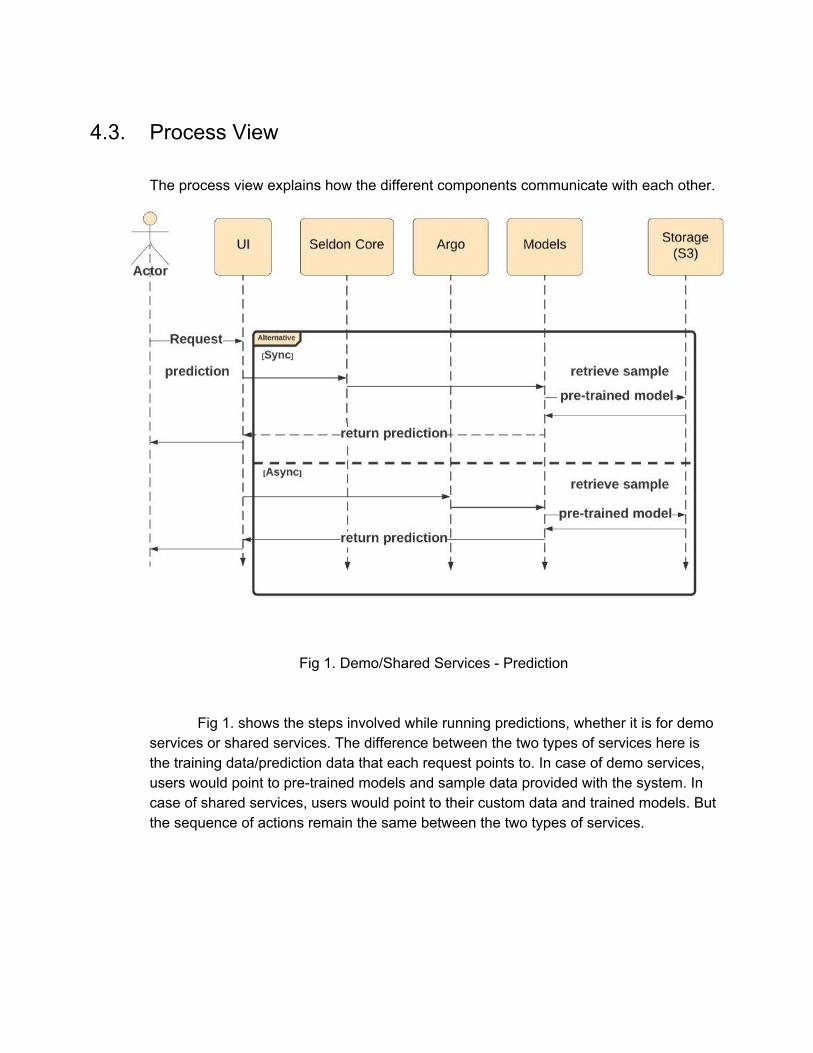
4.3. Process View
The process view explains how the different components communicate with each other.
Fig 1. Demo/Shared Services - Prediction
Fig 1. shows the steps involved while running predictions, whether it is for demo services or shared services. The difference between the two types of services here is the training data/prediction data that each request points to. In case of demo services, users would point to pre-trained models and sample data provided with the system. In case of shared services, users would point to their custom data and trained models. But the sequence of actions remain the same between the two types of services.
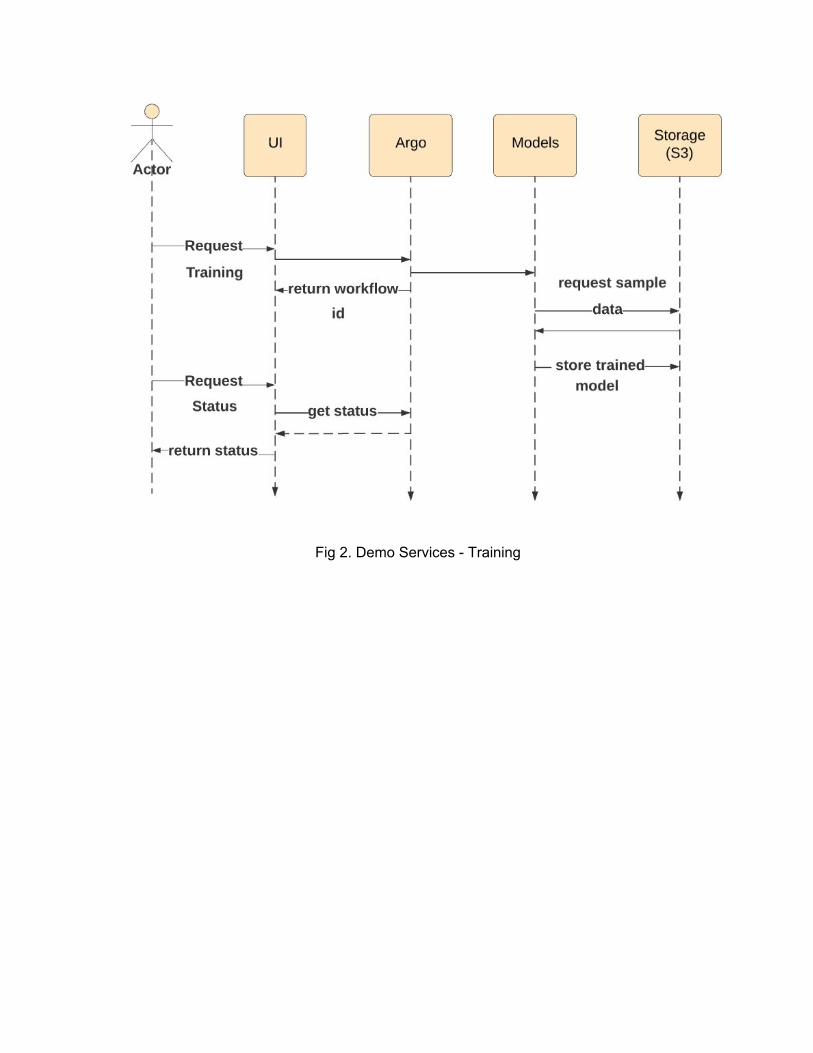
Fig 2. Demo Services - Training
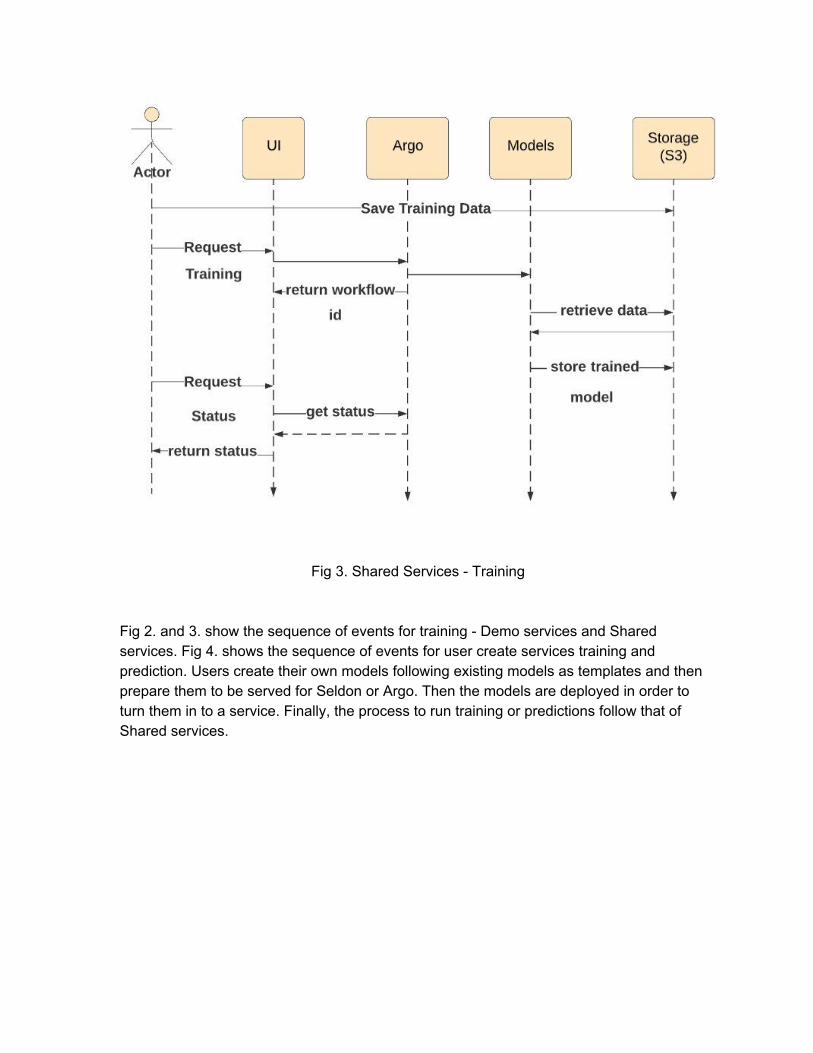
Fig 3. Shared Services - Training Fig 2. and 3. show the sequence of events for training - Demo services and Shared services. Fig 4. shows the sequence of events for user create services training and prediction. Users create their own models following existing models as templates and then prepare them to be served for Seldon or Argo. Then the models are deployed in order to turn them in to a service. Finally, the process to run training or predictions follow that of Shared services.
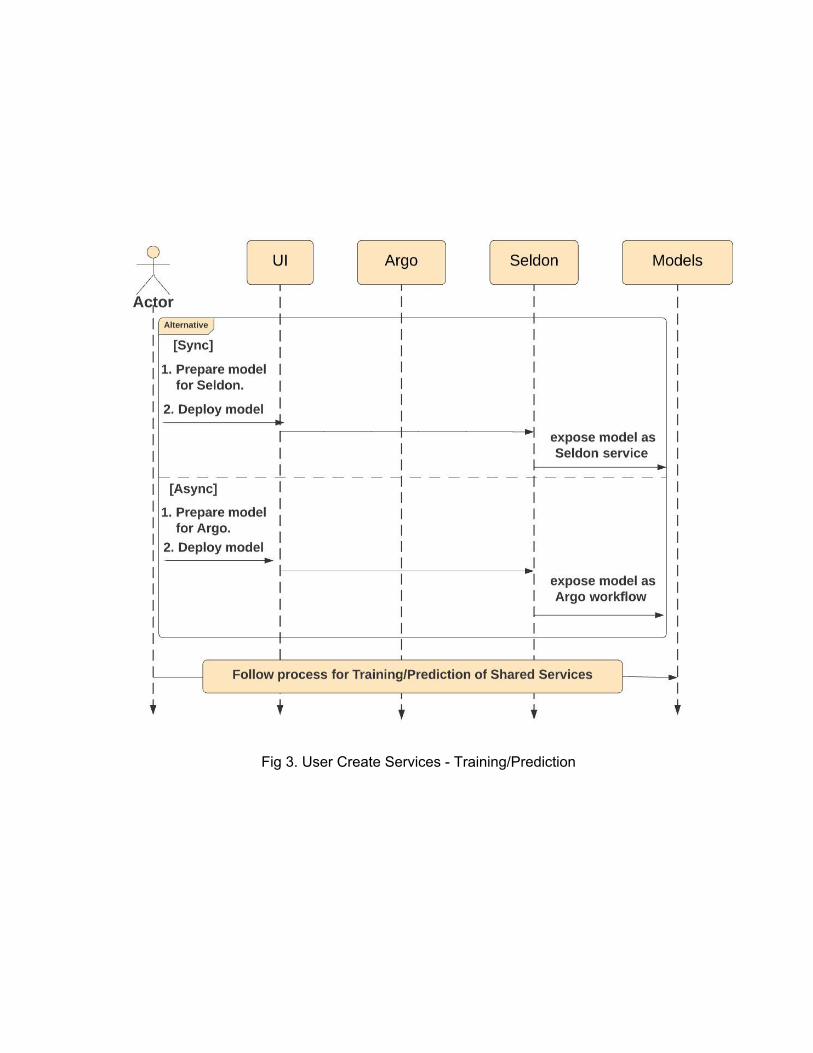
Fig 3. User Create Services - Training/Prediction
4.4. Use Case View (Scenarios)
4.4.1. Saving Data in Storage Backend Data required for interacting with the services can be stored in the S3 backend.
Sample data sets and pre-trained models have been provided here. The following steps detail how to copy the sample data set in to S3 backend.
1. Install s3cmd cli
○ pip3 install s3cmd
2. Configure the credentials either as environment variables or in s3cmd config file ○ export ACCESS_KEY= ○ export SECRET_KEY= ○ export HOST=
(or) ○ s3cmd --configure
3. Check connectivity by using the following command to list existing buckets
○ s3cmd ls --host=$HOST --access_key=$ACCESS_KEY --secret_key=$SECRET_KEY
4. Create a new bucket to copy data in to, ○ s3cmd mb s3://AI-LIBRARY --host=$HOST
--access_key=$ACCESS_KEY --secret_key=$SECRET_KEY
5. Clone the sample data set locally ○ git clone https://gitlab.com/opendatahub/sample-models.git ○ cd sample-models
6. Sync the required directory/files to your s3 backend.
○ s3cmd sync <MODEL-DIRECTORY> s3://AI-LIBRARY/ --host=$HOST --access_key=$ACCESS_KEY --secret_key=$SECRET_KEY
○ Examples: ■ s3cmd sync flake_analysis s3://AI-LIBRARY/ --host=$HOST
--access_key=$ACCESS_KEY --secret_key=$SECRET_KEY ■ s3cmd sync fraud_detection s3://AI-LIBRARY/ --host=$HOST
--access_key=$ACCESS_KEY --secret_key=$SECRET_KEY
7. Once copied, list the contents of the bucket AI-LIBRARY to check files have been copied
○ s3cmd ls s3://AI-LIBRARY --host=$HOST --access_key=$ACCESS_KEY --secret_key=$SECRET_KEY --recursive
4.4.2. Running Predictions
Models are served using Seldon or Argo depending on the type of tasks being performed by the model. If the model is instantaneous in returning the prediction, it will be served by Seldon. If not, argo workflows are used to handle the task.
Prediction template using Seldon
Data Required:
1. ROUTE - Route to the pod serving the model 2. DATA - Prediction data
Command:
curl -v <ROUTE> -d '{
<DATA> }' -H "Content-Type: application/json"
Prediction template using Argo
● git clone [email protected]:opendatahub/ai-library.git (or) https://gitlab.com/opendatahub/ai-library.git
● cd <model-directory> ● Edit tools/<model-name>*.yaml template so that the values marked
with < and > match your environment. ● You can edit the tools/secret-sample.yaml to include your **base64
encoded** values for accessKeySecret and secretKeySecret. Then run `oc create -f tools/secret-sample.yaml ̀ to create the secrets.
● Launch the argo workflow via the argo cli argo submit --watch tools/<model-name>*.yaml
4.4.3. Training a model
There are 2 ways to perform training of models. For training using argo workflows, refer to Section 4.4.2 (Prediction template using Argo - here the workflow would simply point to training code instead of prediction code). For examples on training through Jupyter notebooks, please refer to Section 4.4.5
4.4.4. Use existing models in AI-Library
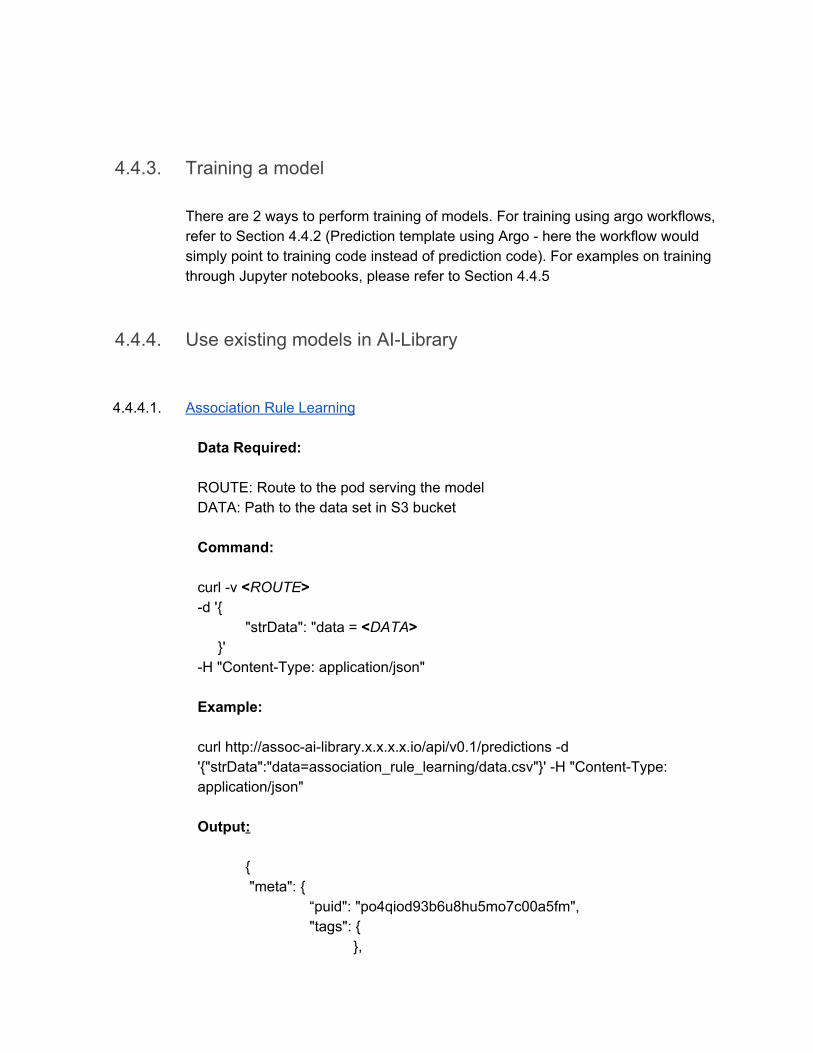
4.4.4.1. Association Rule Learning
Data Required:
ROUTE: Route to the pod serving the model DATA: Path to the data set in S3 bucket
Command: curl -v <ROUTE> -d '{
"strData": "data = <DATA> }' -H "Content-Type: application/json"
Example: curl http://assoc-ai-library.x.x.x.x.io/api/v0.1/predictions -d '{"strData":"data=association_rule_learning/data.csv"}' -H "Content-Type: application/json" Output:
{ "meta": {
“puid": "po4qiod93b6u8hu5mo7c00a5fm", "tags": { },
"routing": { },
"requestPath": { "c-assoc":
"docker.io/user1/association_rule_learning" },
"metrics": [ ] },
"strData": " item_A item_B freqAB supportAB freqA supportA freqB supportB confidenceAtoB
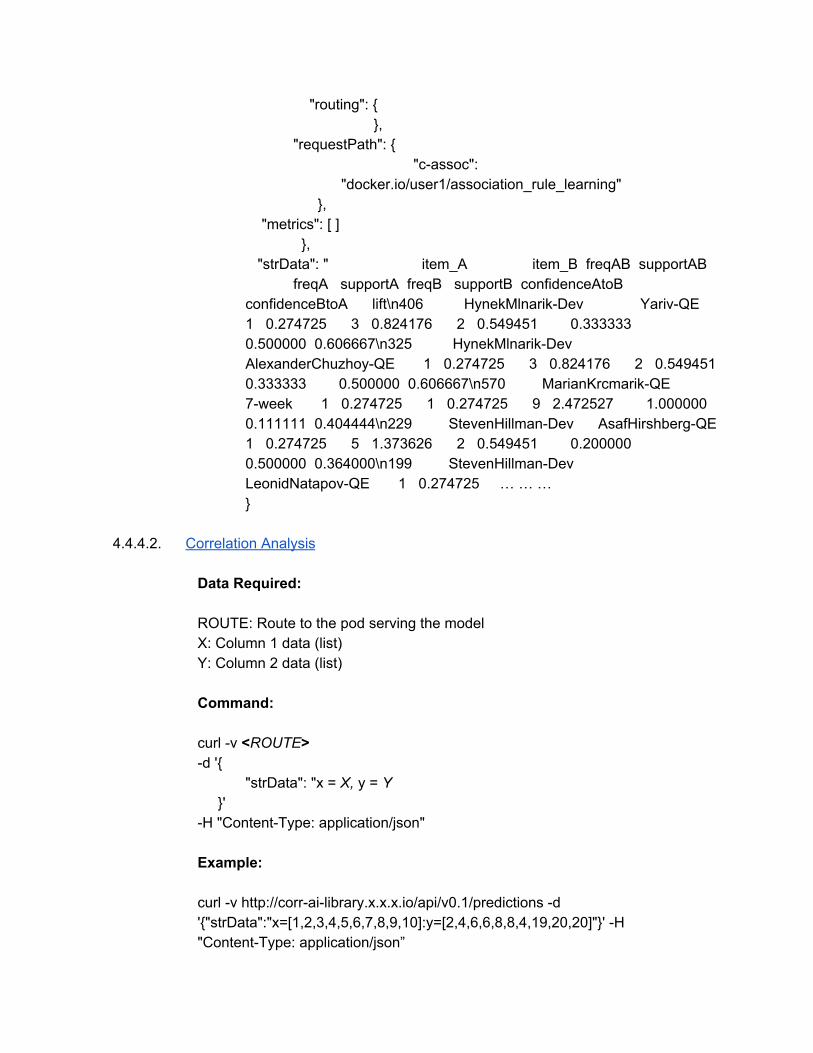
confidenceBtoA lift\n406 HynekMlnarik-Dev Yariv-QE 1 0.274725 3 0.824176 2 0.549451 0.333333 0.500000 0.606667\n325 HynekMlnarik-Dev AlexanderChuzhoy-QE 1 0.274725 3 0.824176 2 0.549451 0.333333 0.500000 0.606667\n570 MarianKrcmarik-QE 7-week 1 0.274725 1 0.274725 9 2.472527 1.000000 0.111111 0.404444\n229 StevenHillman-Dev AsafHirshberg-QE 1 0.274725 5 1.373626 2 0.549451 0.200000 0.500000 0.364000\n199 StevenHillman-Dev LeonidNatapov-QE 1 0.274725 … … … }
4.4.4.2. Correlation Analysis
Data Required:
ROUTE: Route to the pod serving the model X: Column 1 data (list) Y: Column 2 data (list)
Command: curl -v <ROUTE> -d '{
"strData": "x = X, y = Y }' -H "Content-Type: application/json"
Example:
curl -v http://corr-ai-library.x.x.x.io/api/v0.1/predictions -d '{"strData":"x=[1,2,3,4,5,6,7,8,9,10]:y=[2,4,6,6,8,8,4,19,20,20]"}' -H "Content-Type: application/json”
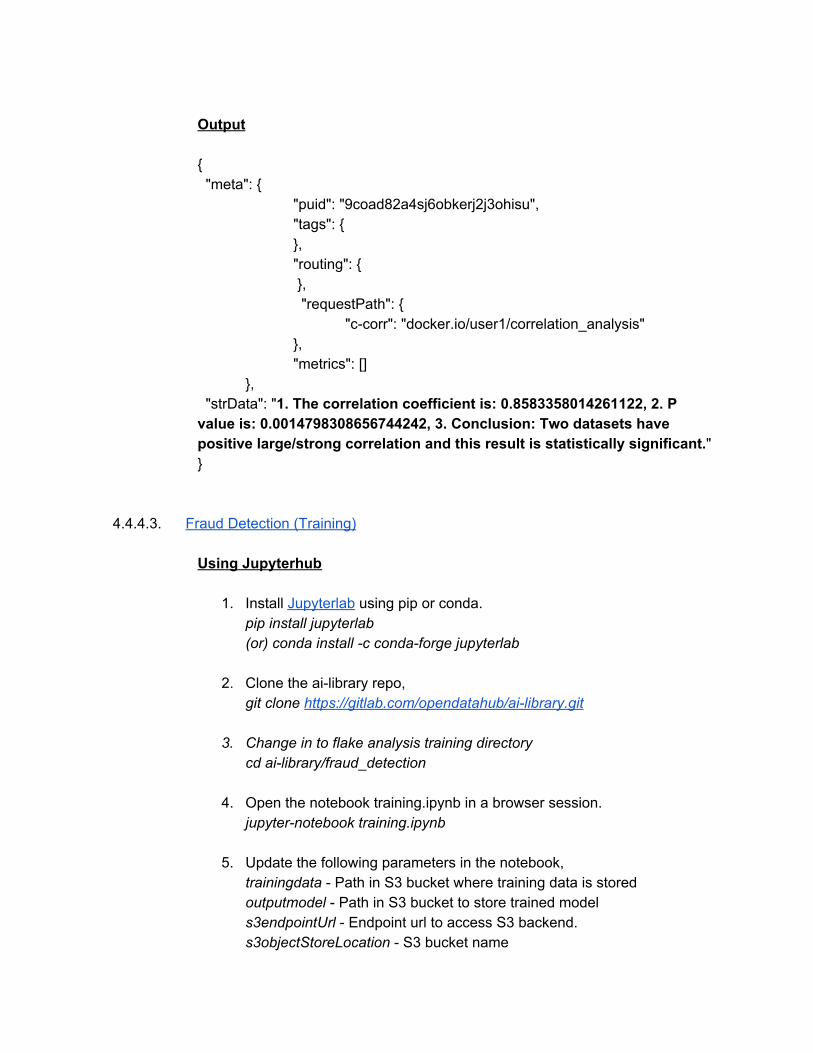
Output
{ "meta": {
"puid": "9coad82a4sj6obkerj2j3ohisu", "tags": { }, "routing": { }, "requestPath": { "c-corr": "docker.io/user1/correlation_analysis" }, "metrics": []
}, "strData": "1. The correlation coefficient is: 0.8583358014261122, 2. P value is: 0.0014798308656744242, 3. Conclusion: Two datasets have positive large/strong correlation and this result is statistically significant." }
4.4.4.3. Fraud Detection (Training)
Using Jupyterhub
1. Install Jupyterlab using pip or conda. pip install jupyterlab (or) conda install -c conda-forge jupyterlab
2. Clone the ai-library repo,
git clone https://gitlab.com/opendatahub/ai-library.git
3. Change in to flake analysis training directory cd ai-library/fraud_detection
4. Open the notebook training.ipynb in a browser session. jupyter-notebook training.ipynb
5. Update the following parameters in the notebook, trainingdata - Path in S3 bucket where training data is stored outputmodel - Path in S3 bucket to store trained model s3endpointUrl - Endpoint url to access S3 backend. s3objectStoreLocation - S3 bucket name
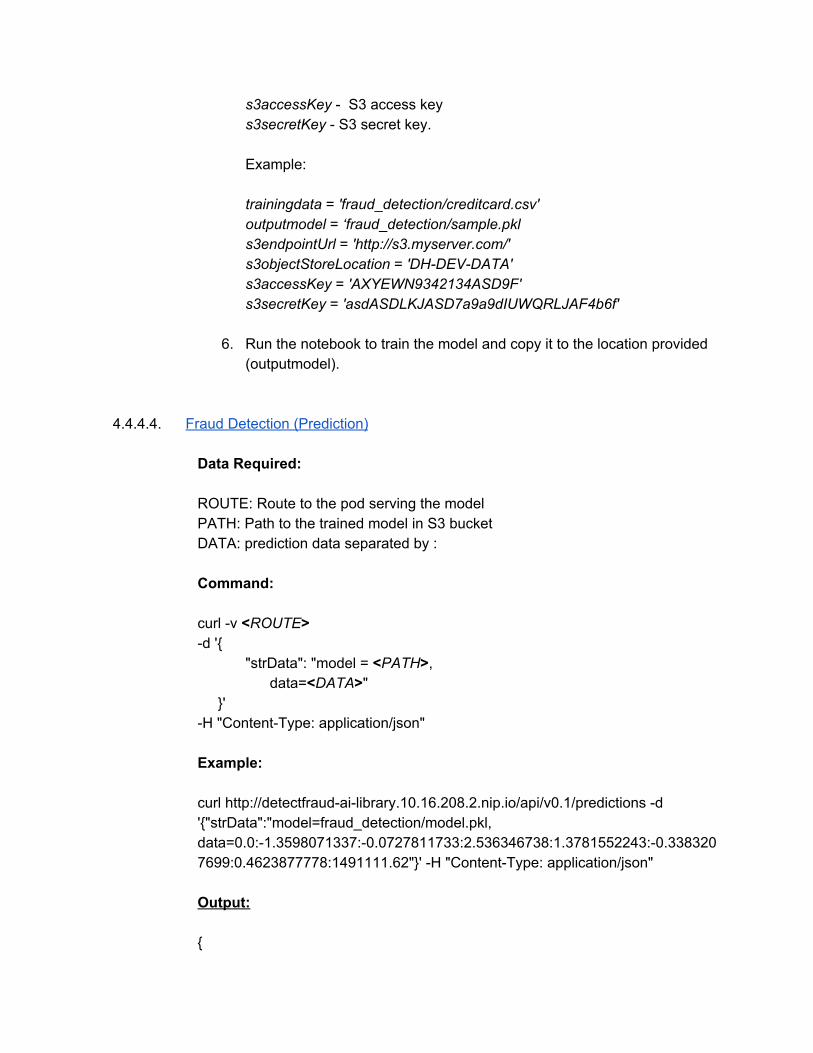
s3accessKey - S3 access key s3secretKey - S3 secret key. Example: trainingdata = 'fraud_detection/creditcard.csv' outputmodel = ‘fraud_detection/sample.pkl s3endpointUrl = 'http://s3.myserver.com/' s3objectStoreLocation = 'DH-DEV-DATA' s3accessKey = 'AXYEWN9342134ASD9F' s3secretKey = 'asdASDLKJASD7a9a9dIUWQRLJAF4b6f'
6. Run the notebook to train the model and copy it to the location provided (outputmodel).
4.4.4.4. Fraud Detection (Prediction)
Data Required:
ROUTE: Route to the pod serving the model PATH: Path to the trained model in S3 bucket DATA: prediction data separated by :
Command: curl -v <ROUTE> -d '{
"strData": "model = <PATH>, data=<DATA>"
}' -H "Content-Type: application/json" Example: curl http://detectfraud-ai-library.10.16.208.2.nip.io/api/v0.1/predictions -d '{"strData":"model=fraud_detection/model.pkl, data=0.0:-1.3598071337:-0.0727811733:2.536346738:1.3781552243:-0.3383207699:0.4623877778:1491111.62"}' -H "Content-Type: application/json" Output: {

"meta": { "puid": "dnj4e5feqqfmm5gbm1hnlfam1u", "tags": { }, "routing": { }, "requestPath": { "c-detectfraud": "docker.io/user1/fraud_detection" }, "metrics": [] },
"data": { "names": [], "tensor": {
"shape": [1], "values": [0.0]
} }
}
4.4.4.5. Linear Regression (Training)
Using Jupyterhub
1. Install Jupyterlab using pip or conda.
pip install jupyterlab (or) conda install -c conda-forge jupyterlab
2. Clone the ai-library repo,
git clone https://gitlab.com/opendatahub/ai-library.git
3. Change in to flake analysis training directory cd ai-library/linear_regression
4. Open the notebook training.ipynb in a browser session. jupyter-notebook training.ipynb
5. Update the following parameters in the notebook, trainingdata - Path in S3 bucket where training data is stored outputmodel - Path in S3 bucket to store trained model s3endpointUrl - Endpoint url to access S3 backend. s3objectStoreLocation - S3 bucket name
s3accessKey - S3 access key s3secretKey - S3 secret key. Example: trainingdata = ‘linear_regression/data.csv' outputmodel = ‘linear_regression/sample.pkl s3endpointUrl = 'http://s3.myserver.com/' s3objectStoreLocation = 'DH-DEV-DATA' s3accessKey = 'AXYEWN9342134ASD9F' s3secretKey = 'asdASDLKJASD7a9a9dIUWQRLJAF4b6f'
6. Run the notebook to train the model and copy it to the location provided (outputmodel).
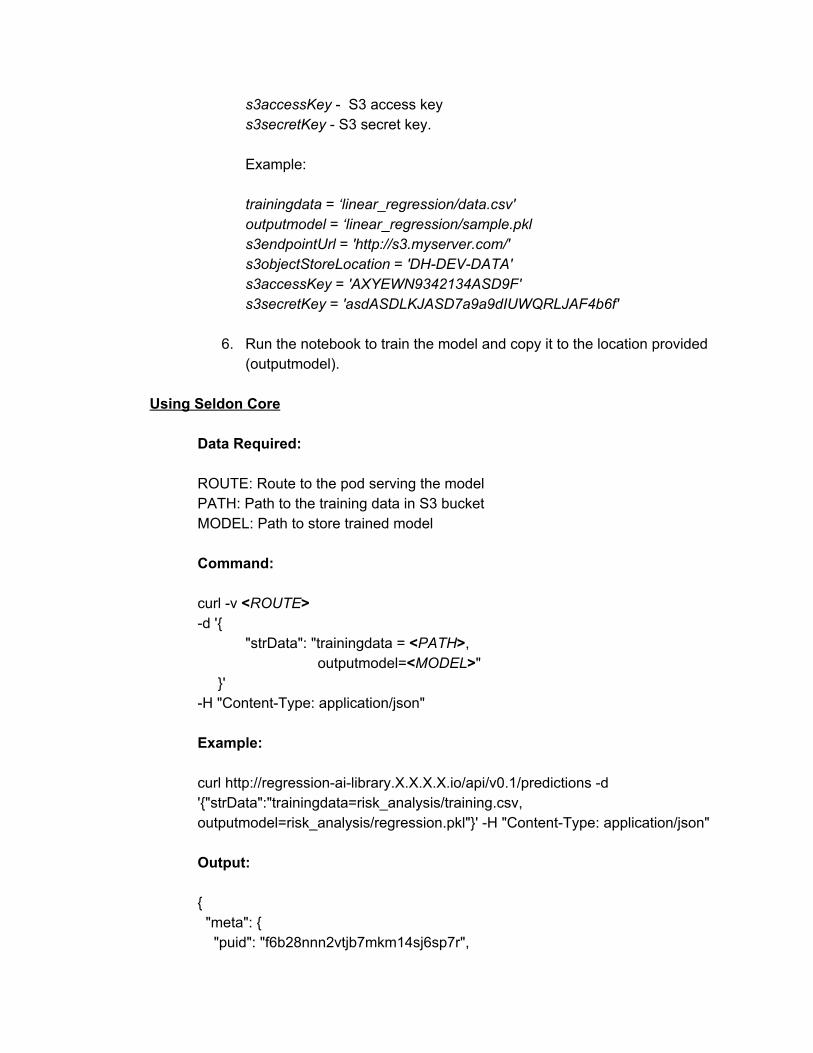
Using Seldon Core
Data Required:
ROUTE: Route to the pod serving the model PATH: Path to the training data in S3 bucket MODEL: Path to store trained model
Command: curl -v <ROUTE> -d '{
"strData": "trainingdata = <PATH>, outputmodel=<MODEL>"
}' -H "Content-Type: application/json"
Example:
curl http://regression-ai-library.X.X.X.X.io/api/v0.1/predictions -d '{"strData":"trainingdata=risk_analysis/training.csv, outputmodel=risk_analysis/regression.pkl"}' -H "Content-Type: application/json" Output: { "meta": { "puid": "f6b28nnn2vtjb7mkm14sj6sp7r",
"tags": { }, "routing": { }, "requestPath": { "c-regression": "docker.io/user1/regression_train" }, "metrics": [] }, "strData": "PASS"
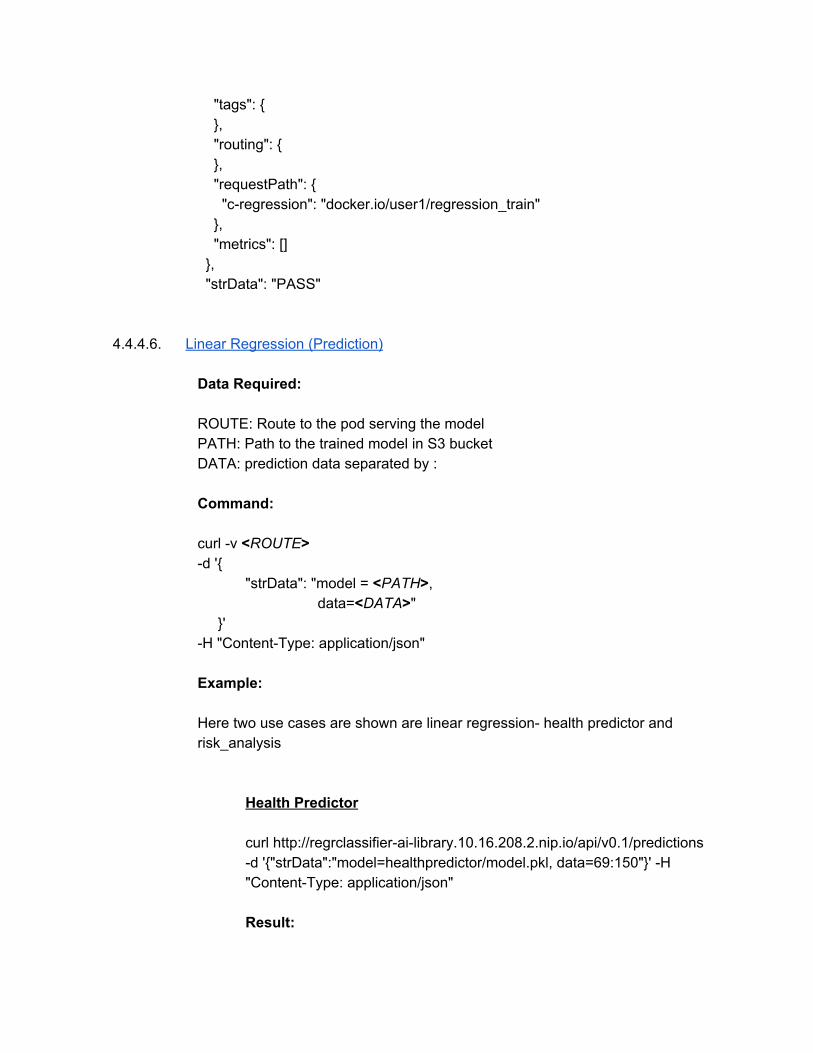
4.4.4.6. Linear Regression (Prediction)
Data Required:
ROUTE: Route to the pod serving the model PATH: Path to the trained model in S3 bucket DATA: prediction data separated by :
Command:
curl -v <ROUTE> -d '{
"strData": "model = <PATH>, data=<DATA>"
}' -H "Content-Type: application/json"
Example:
Here two use cases are shown are linear regression- health predictor and risk_analysis
Health Predictor curl http://regrclassifier-ai-library.10.16.208.2.nip.io/api/v0.1/predictions -d '{"strData":"model=healthpredictor/model.pkl, data=69:150"}' -H "Content-Type: application/json" Result:
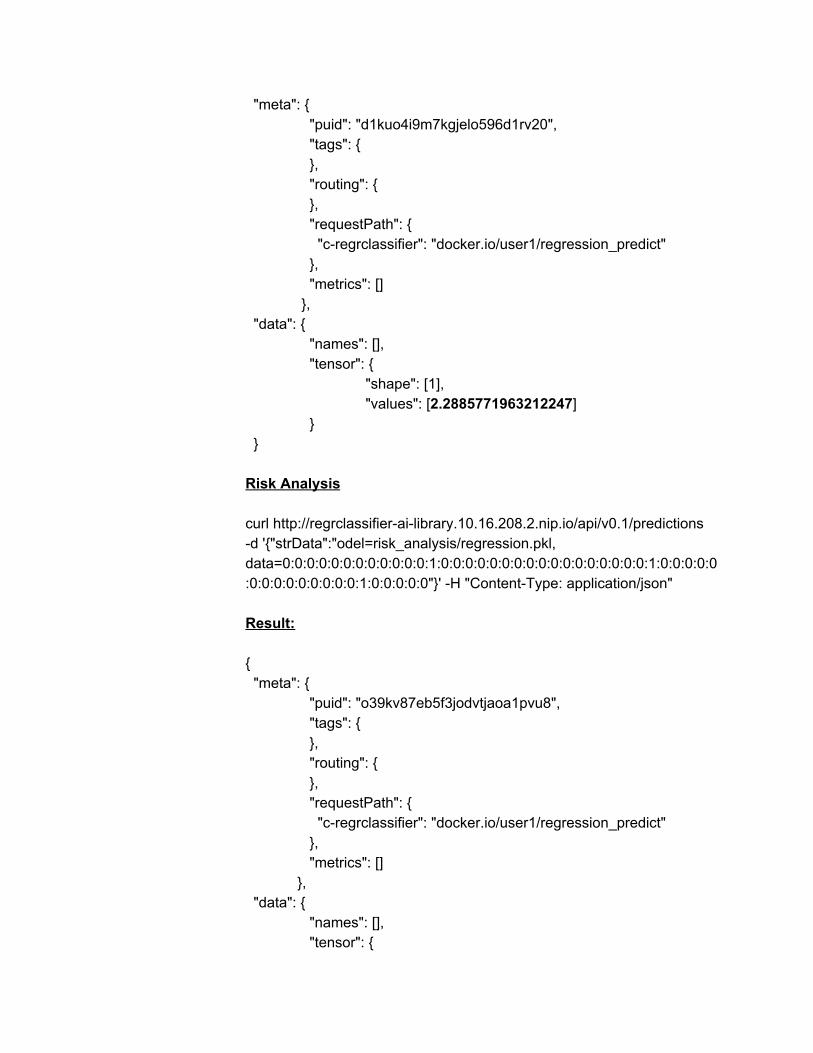
"meta": { "puid": "d1kuo4i9m7kgjelo596d1rv20", "tags": { }, "routing": { }, "requestPath": { "c-regrclassifier": "docker.io/user1/regression_predict" }, "metrics": [] },
"data": { "names": [], "tensor": {
"shape": [1], "values": [2.2885771963212247]
} } Risk Analysis curl http://regrclassifier-ai-library.10.16.208.2.nip.io/api/v0.1/predictions -d '{"strData":"odel=risk_analysis/regression.pkl, data=0:0:0:0:0:0:0:0:0:0:0:0:1:0:0:0:0:0:0:0:0:0:0:0:0:0:0:0:0:0:1:0:0:0:0:0:0:0:0:0:0:0:0:0:0:1:0:0:0:0:0"}' -H "Content-Type: application/json" Result: { "meta": {
"puid": "o39kv87eb5f3jodvtjaoa1pvu8", "tags": { }, "routing": { }, "requestPath": { "c-regrclassifier": "docker.io/user1/regression_predict" }, "metrics": []
}, "data": {
"names": [], "tensor": {
"shape": [1], "values": [0.819580078125]
}
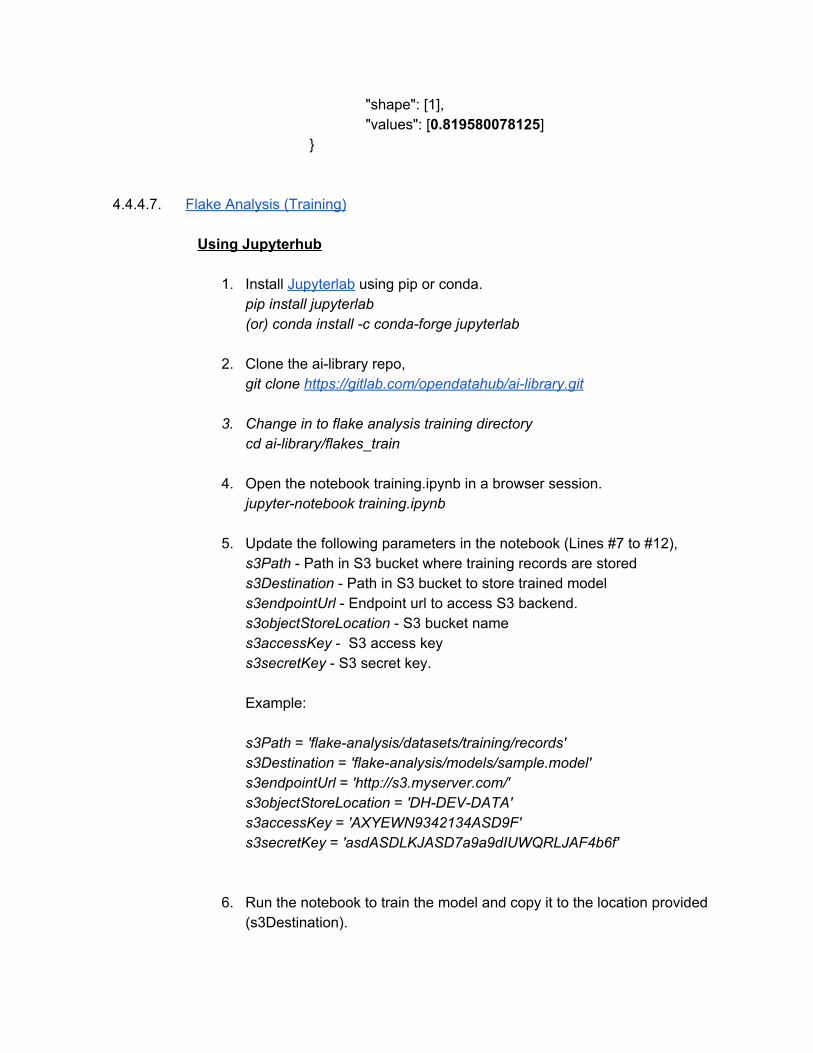
4.4.4.7. Flake Analysis (Training)
Using Jupyterhub
1. Install Jupyterlab using pip or conda.
pip install jupyterlab (or) conda install -c conda-forge jupyterlab
2. Clone the ai-library repo,
git clone https://gitlab.com/opendatahub/ai-library.git
3. Change in to flake analysis training directory cd ai-library/flakes_train
4. Open the notebook training.ipynb in a browser session. jupyter-notebook training.ipynb
5. Update the following parameters in the notebook (Lines #7 to #12), s3Path - Path in S3 bucket where training records are stored s3Destination - Path in S3 bucket to store trained model s3endpointUrl - Endpoint url to access S3 backend. s3objectStoreLocation - S3 bucket name s3accessKey - S3 access key s3secretKey - S3 secret key. Example: s3Path = 'flake-analysis/datasets/training/records' s3Destination = 'flake-analysis/models/sample.model' s3endpointUrl = 'http://s3.myserver.com/' s3objectStoreLocation = 'DH-DEV-DATA' s3accessKey = 'AXYEWN9342134ASD9F' s3secretKey = 'asdASDLKJASD7a9a9dIUWQRLJAF4b6f'
6. Run the notebook to train the model and copy it to the location provided (s3Destination).
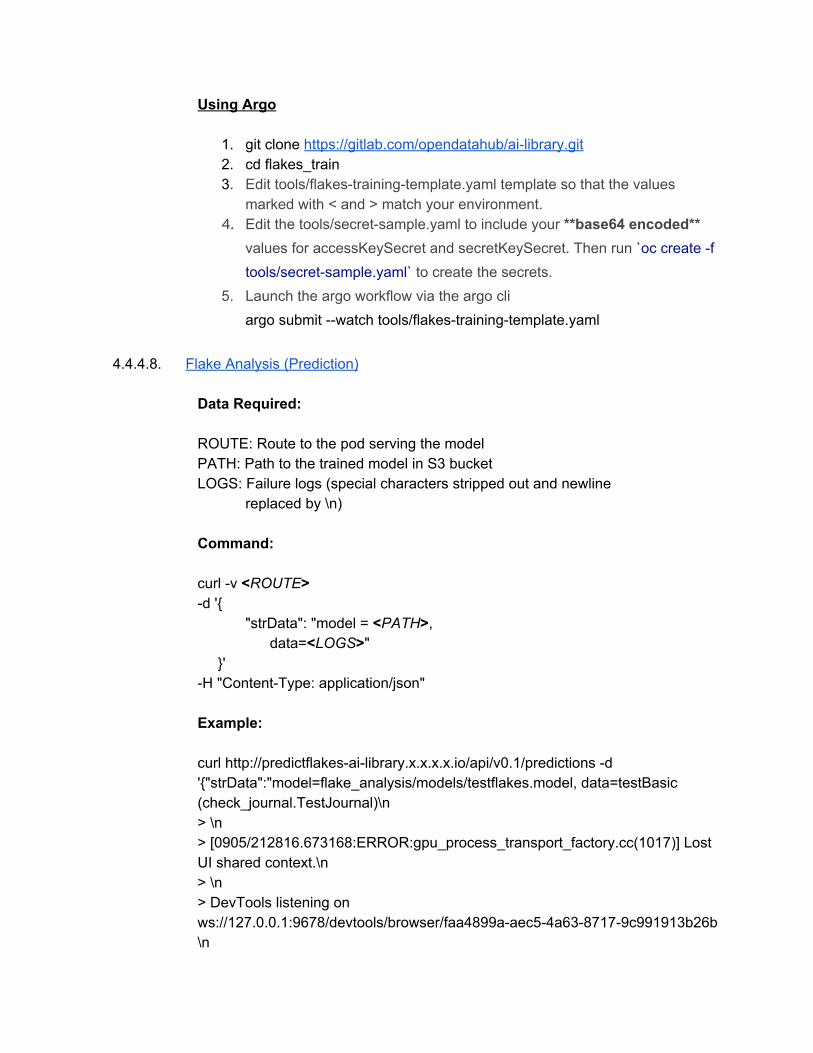
Using Argo
1. git clone https://gitlab.com/opendatahub/ai-library.git 2. cd flakes_train 3. Edit tools/flakes-training-template.yaml template so that the values
marked with < and > match your environment. 4. Edit the tools/secret-sample.yaml to include your **base64 encoded**
values for accessKeySecret and secretKeySecret. Then run `oc create -f tools/secret-sample.yaml ̀ to create the secrets.
5. Launch the argo workflow via the argo cli argo submit --watch tools/flakes-training-template.yaml
4.4.4.8. Flake Analysis (Prediction)
Data Required:
ROUTE: Route to the pod serving the model PATH: Path to the trained model in S3 bucket LOGS: Failure logs (special characters stripped out and newline
replaced by \n)
Command: curl -v <ROUTE> -d '{
"strData": "model = <PATH>, data=<LOGS>"
}' -H "Content-Type: application/json"
Example:
curl http://predictflakes-ai-library.x.x.x.x.io/api/v0.1/predictions -d '{"strData":"model=flake_analysis/models/testflakes.model, data=testBasic (check_journal.TestJournal)\n > \n > [0905/212816.673168:ERROR:gpu_process_transport_factory.cc(1017)] Lost UI shared context.\n > \n > DevTools listening on ws://127.0.0.1:9678/devtools/browser/faa4899a-aec5-4a63-8717-9c991913b26b\n
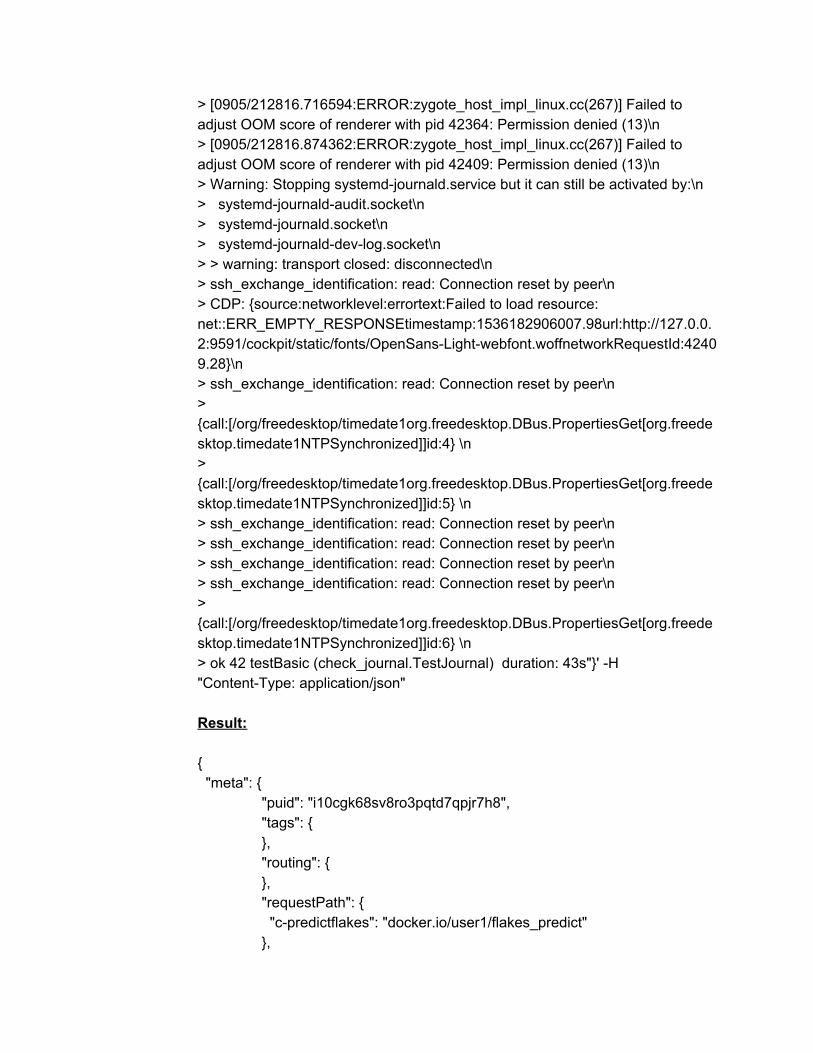
> [0905/212816.716594:ERROR:zygote_host_impl_linux.cc(267)] Failed to adjust OOM score of renderer with pid 42364: Permission denied (13)\n > [0905/212816.874362:ERROR:zygote_host_impl_linux.cc(267)] Failed to adjust OOM score of renderer with pid 42409: Permission denied (13)\n > Warning: Stopping systemd-journald.service but it can still be activated by:\n > systemd-journald-audit.socket\n > systemd-journald.socket\n > systemd-journald-dev-log.socket\n > > warning: transport closed: disconnected\n > ssh_exchange_identification: read: Connection reset by peer\n > CDP: {source:networklevel:errortext:Failed to load resource: net::ERR_EMPTY_RESPONSEtimestamp:1536182906007.98url:http://127.0.0.2:9591/cockpit/static/fonts/OpenSans-Light-webfont.woffnetworkRequestId:42409.28}\n > ssh_exchange_identification: read: Connection reset by peer\n > {call:[/org/freedesktop/timedate1org.freedesktop.DBus.PropertiesGet[org.freedesktop.timedate1NTPSynchronized]]id:4} \n > {call:[/org/freedesktop/timedate1org.freedesktop.DBus.PropertiesGet[org.freedesktop.timedate1NTPSynchronized]]id:5} \n > ssh_exchange_identification: read: Connection reset by peer\n > ssh_exchange_identification: read: Connection reset by peer\n > ssh_exchange_identification: read: Connection reset by peer\n > ssh_exchange_identification: read: Connection reset by peer\n > {call:[/org/freedesktop/timedate1org.freedesktop.DBus.PropertiesGet[org.freedesktop.timedate1NTPSynchronized]]id:6} \n > ok 42 testBasic (check_journal.TestJournal) duration: 43s"}' -H "Content-Type: application/json" Result: { "meta": {
"puid": "i10cgk68sv8ro3pqtd7qpjr7h8", "tags": { }, "routing": { }, "requestPath": { "c-predictflakes": "docker.io/user1/flakes_predict" },
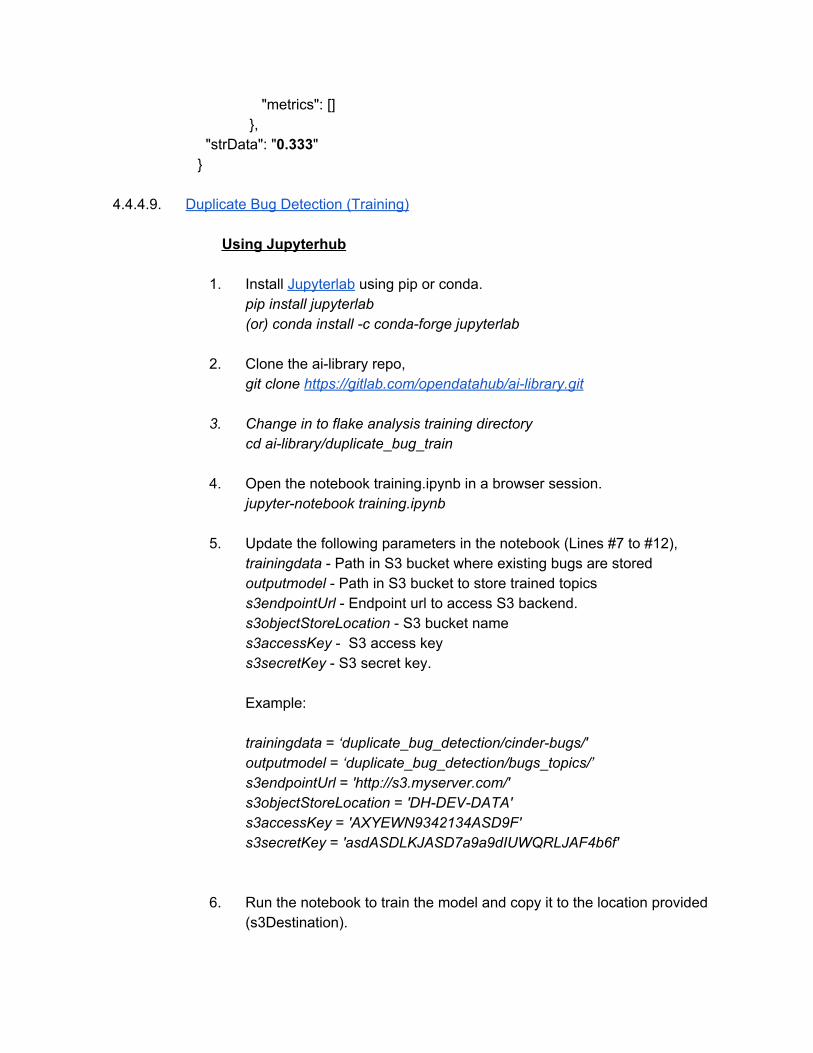
"metrics": [] }, "strData": "0.333" }
4.4.4.9. Duplicate Bug Detection (Training)
Using Jupyterhub
1. Install Jupyterlab using pip or conda.
pip install jupyterlab (or) conda install -c conda-forge jupyterlab
2. Clone the ai-library repo,
git clone https://gitlab.com/opendatahub/ai-library.git
3. Change in to flake analysis training directory cd ai-library/duplicate_bug_train
4. Open the notebook training.ipynb in a browser session. jupyter-notebook training.ipynb
5. Update the following parameters in the notebook (Lines #7 to #12), trainingdata - Path in S3 bucket where existing bugs are stored outputmodel - Path in S3 bucket to store trained topics s3endpointUrl - Endpoint url to access S3 backend. s3objectStoreLocation - S3 bucket name s3accessKey - S3 access key s3secretKey - S3 secret key. Example: trainingdata = ‘duplicate_bug_detection/cinder-bugs/' outputmodel = ‘duplicate_bug_detection/bugs_topics/’ s3endpointUrl = 'http://s3.myserver.com/' s3objectStoreLocation = 'DH-DEV-DATA' s3accessKey = 'AXYEWN9342134ASD9F' s3secretKey = 'asdASDLKJASD7a9a9dIUWQRLJAF4b6f'
6. Run the notebook to train the model and copy it to the location provided (s3Destination).

4.4.4.10. Topic Modeling
Data Required:
ROUTE: Route to the pod serving the model DATA: data in text format
Command: curl -v <ROUTE> -d '{
"strData": "data = <DATA>” }' -H "Content-Type: application/json"
Example:
curl http://topicmodel-ai-library.10.16.208.2.nip.io/api/v0.1/predictions -d '{"strData":"data=Joining forces with IBM gives Red Hat the opportunity to bring more open source innovation to an even broader range of organizations. IBM preserves Red Hat’s independence and neutrality. Red Hat will strengthen its existing partnerships to give customers freedom choice and flexibility"}' -H "Content-Type: application/json" Result: { "meta": {
"puid": "scvk9polkc1728k2l6jspg4g0s", "tags": { }, "routing": { }, "requestPath": { "c-topicmodel": "docker.io/user1/topic_model" }, "metrics": []
}, "strData": "opportunity innovation range source joining organizations bring broader open gives forces preserves" }
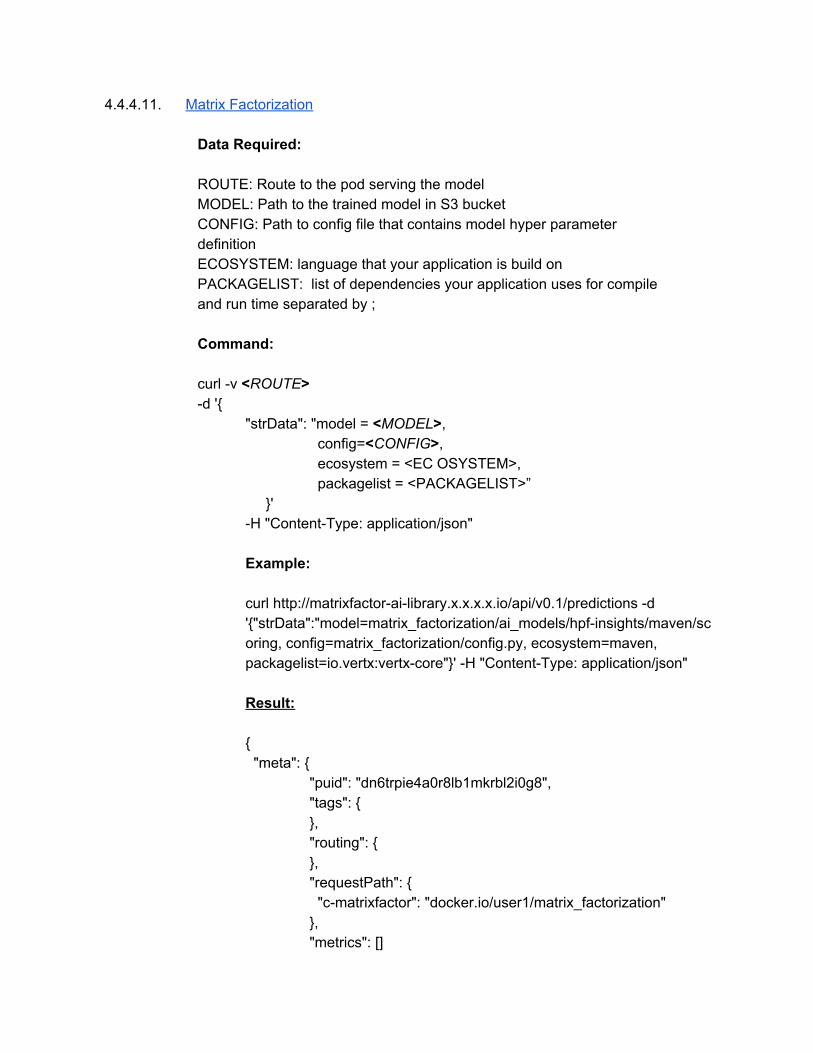
4.4.4.11. Matrix Factorization
Data Required:
ROUTE: Route to the pod serving the model MODEL: Path to the trained model in S3 bucket CONFIG: Path to config file that contains model hyper parameter definition ECOSYSTEM: language that your application is build on PACKAGELIST: list of dependencies your application uses for compile and run time separated by ;
Command: curl -v <ROUTE> -d '{
"strData": "model = <MODEL>, config=<CONFIG>, ecosystem = <EC OSYSTEM>, packagelist = <PACKAGELIST>”
}' -H "Content-Type: application/json" Example:
curl http://matrixfactor-ai-library.x.x.x.x.io/api/v0.1/predictions -d '{"strData":"model=matrix_factorization/ai_models/hpf-insights/maven/sc oring, config=matrix_factorization/config.py, ecosystem=maven, packagelist=io.vertx:vertx-core"}' -H "Content-Type: application/json"
Result: { "meta": {
"puid": "dn6trpie4a0r8lb1mkrbl2i0g8", "tags": { }, "routing": { }, "requestPath": { "c-matrixfactor": "docker.io/user1/matrix_factorization" }, "metrics": []

}, "strData": "{'alternate_packages': {},
'missing_packages': [], 'companion_packages': [
{'cooccurrence_probability': 15.727811076080656, 'package_name': 'commons-beanutils:commons-beanutils', 'topic_list': []}, {'cooccurrence_probability': 17.101134829381, 'package_name': 'javax.validation:validation-api', 'topic_list': []}, {'cooccurrence_probability': 15.711755144248645, 'package_name': 'javax.inject:javax.inject', 'topic_list': []}, {'cooccurrence_probability': 15.711755144248645, 'package_name': 'commons-validator:commons-validator', 'topic_list': []}, {'cooccurrence_probability': 15.711755144248645, 'package_name': 'mysql:mysql-connector-java', 'topic_list': []} ],
'ecosystem': 'maven', 'package_to_topic_dict': {'io.vertx:vertx-core': []}}"
4.4.5. Modifying an existing model with new logic
Modifying the model
● git clone https://gitlab.com/opendatahub/ai-library.git ● cd <model-directory> ● Modify code with new logic ● Redeploy the model as a Seldon service or argo workflow using the the following steps
Redeploying as Seldon Service
● cd ~/ai-library/ansible/ ● Edit roles/deploy_models/tasks/deploy_models.yml to redeploy only the
required models
● Please refer https://gitlab.com/opendatahub/ai-library to set the parameter values for your deployment environment.
● Redeploy the model as a service using, ansible-playbook roles/deploy_models/deploy.yml --tags | --skip-tags Please refer to Section 5 for details on deploying using ansible.
Redeploying as Argo Workflow
● cd <model-directory> ● Edit tools/<model-name>*.yaml template so that the values marked with <
and > match your environment. ● You can edit the tools/secret-sample.yaml to include your **base64
encoded** values for accessKeySecret and secretKeySecret. Then run `oc create -f tools/secret-sample.yaml ̀ to create the secrets.
● Launch the argo workflow via the argo cli: `argo submit --watch tools/<model-name>*.yaml`
4.4.6. Adding a new model to AI-Library
Preparing the model ● Prepare your model using one of the existing models as an example. Refer
to Section 6 for more details. ○ If model will be served using Seldon
https://gitlab.com/opendatahub/ai-library/blob/master/fraud_detection/detect_fraud.py
○ If model will be served as an argo workflow,
https://gitlab.com/opendatahub/ai-library/blob/master/flakes_train/flakes_training.py
Deploying as Seldon Service
● cd ~/ai-library/ansible/ ● Add your model specific parameters, tags and deployment tasks to the
following files (follow existing model definitions as examples) ○ roles/deploy_models/defaults/main.yml ○ roles/deploy_models/tasks/main.yml
● Redeploy the model as a service using, ansible-playbook roles/deploy_models/deploy.yml --tags | --skip-tags
Please refer to Section 5 for details on deploying using ansible.
Deploying as Argo Workflow
● cd <model-directory> ● Edit tools/<model-name>*.yaml template so that the values marked with <
and > match your environment. ● You can edit the tools/secret-sample.yaml to include your **base64
encoded** values for accessKeySecret and secretKeySecret. Then run `oc create -f tools/secret-sample.yaml ̀ to create the secrets.
● Launch the argo workflow via the argo cli: `argo submit --watch tools/<model-name>*.yaml`
5. Deployment
5.1. Deploying AI-Library using ODH Operator
The Open Data Hub operator can be installed manually by adding the ODH Custom Resource Definition (CRD) to cluster, creating the ODH service account & RBAC policies in the target namespace and deploying the operator image or via Operator LifeCycle Management (OLM) Catalog. Please refer the link below for detailed instructions.
Installation Steps: https://opendatahub.io/arch.html#installation Requirements: The following changes need to be made to install Seldon and AI-Library, https://gitlab.com/opendatahub/opendatahub-operator/blob/master/deploy/crds/opendatahub_v1alpha1_opendatahub_cr.yaml # Seldon Delployment seldon: odh_deploy: true # Deployment of AI Library models as SeldonDeployments. Can only be done if Seldon is also deployed. ai-library: odh_deploy: true
5.2. Deploying AI-Library using Ansible Roles
AI-Library contains ansible roles that helps deploy the models as services. https://gitlab.com/opendatahub/ai-library
1. Modify the ansible/roles/deploy_models/defaults/main.yml to set parameter values for
your environment. Some of the values are self-explanatory. Others are not. Some clarification is provided below.
● The following parameters MUST be changed before you try to install ○ workspace: This is a directory on your filesystem where the ai-library will
be cloned from gitlab ○ namespace: This is the OpenShift project where you want to install AI
Library
○ container_account: This should be a user of the registry specified by the container_repo parameter
○ apigateway: This should be essentially the base URL of your Openshift instance ie: https://:8443
○ s3endpointUrl | s3objectStoreLocation | s3accessKey | s3secretKey: Parameters required to access s3 backend.
● oc: This is the location for the OpenShift cli oc binary. Adjust to whichever path suits your environment.
● Each service has 3 parameters of the form <service>_[name|memory|cpu]. ● Sample: ● Sample main.yml
--- workspace: "/home/user1/workspace" namespace: "ai-library" base_image: "registry.access.redhat.com/ubi8/python-36" ailibrary_repo: "https://gitlab.com/opendatahub/ai-library.git" container_repo: "docker.io" container_account: "user1" s2i: "/usr/local/bin/s2i" oc: "/usr/local/bin/oc" curl: "/usr/bin/curl" regressiontrain_name: "regression" regressiontrain_memory: "10Mi" regressiontrain_cpu: "100m" correlation_name: "corr" correlation_memory: "10Mi" correlation_cpu: "100m" associationrule_name: "assoc" associationrule_memory: "10Mi" associationrule_cpu: "100m" flakestrain_name: "trainflakes" flakestrain_memory: "10Mi" flakestrain_cpu: "100m" flakespredict_name: "predictflakes" flakespredict_memory: "10Mi" flakespredict_cpu: "100m" duplicatetrain_name: "duplicatetrain" duplicatetrain_memory: "10Mi" duplicatetrain_cpu: "100m" duplicatepredict_name: "duplicatepredict" duplicatepredict_memory: "10Mi" duplicatepredict_cpu: "100m"

matrixfactor_name: "matrixfactor" matrixfactor_memory: "10Mi" matrixfactor_cpu: "100m" detectfraud_name: "detectfraud" detectfraud_memory: "10Mi" detectfraud_cpu: "100m" topicmodel_name: "topicmodel" topicmodel_memory: "10Mi" topicmodel_cpu: "100m" detectanomaly_name: "detectanomaly" detectanomaly_memory: "10Mi" detectanomaly_cpu: "100m" regressionpredict_name: "regrclassifier" regressionpredict_memory: "10Mi" regressionpredict_cpu: "100m" apigateway: "http://apiserver-ai-library.10.16.208.2.nip.io" s3endpointUrl: "http://storage.stage.com:8080/" s3objectStoreLocation: "AI-LIBRARY" s3accessKey: "XXXXXXXXXXX" s3secretKey: "XXXXXXXXXXXXXXXXXXXXXX"
Users can also choose the models to be deployed by using the respective tags associated with each model,
ansible/roles/deploy_models/tasks/deploy_models.yml --tags | --skip-tags
The following tags are supported for the models,
● Model related tags ○ correlation_analysis ○ association_rule_learning ○ flakes_predict ○ regression_train ○ matrix_factorization ○ fraud_detection ○ topic_model ○ regression_predict
● Build related tags ○ build_image - include or skip building image for each model.
● Route related tags ○ create_route - include or skip creating routes for each model.
● Sample commands:
○ Install regression prediction, skip the container build process and create a route to the pod serving the model
■ ansible-playbook roles/deploy_models/deploy.yml --tags prep_workspace,regression_predict,create_route --skip-tags build_image
○ Install all models and create routes to pods serving the models ■ ansible-playbook roles/deploy_models/deploy.yml
○ Install all models, skip build process and create routes to pods serving the models
■ ansible-playbook roles/deploy_models/deploy.yml --skip-tags build_image
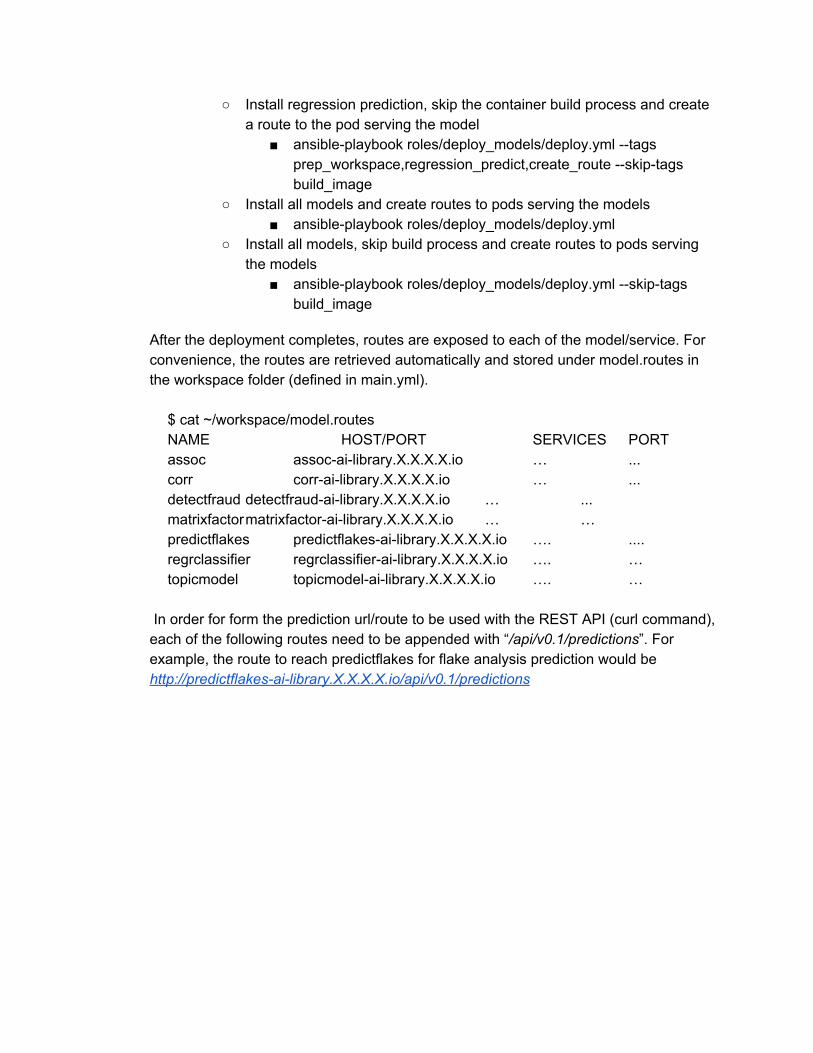
After the deployment completes, routes are exposed to each of the model/service. For convenience, the routes are retrieved automatically and stored under model.routes in the workspace folder (defined in main.yml).
$ cat ~/workspace/model.routes NAME HOST/PORT SERVICES PORT assoc assoc-ai-library.X.X.X.X.io … ... corr corr-ai-library.X.X.X.X.io … ... detectfraud detectfraud-ai-library.X.X.X.X.io … ... matrixfactormatrixfactor-ai-library.X.X.X.X.io … … predictflakes predictflakes-ai-library.X.X.X.X.io …. .... regrclassifier regrclassifier-ai-library.X.X.X.X.io …. … topicmodel topicmodel-ai-library.X.X.X.X.io …. …
In order for form the prediction url/route to be used with the REST API (curl command), each of the following routes need to be appended with “/api/v0.1/predictions”. For example, the route to reach predictflakes for flake analysis prediction would be http://predictflakes-ai-library.X.X.X.X.io/api/v0.1/predictions
6. Model Structure
6.1. Seldon
Download the repo to better understand the examples mentioned below ● git clone https://gitlab.com/opendatahub/ai-library.git ● cd fraud_detection
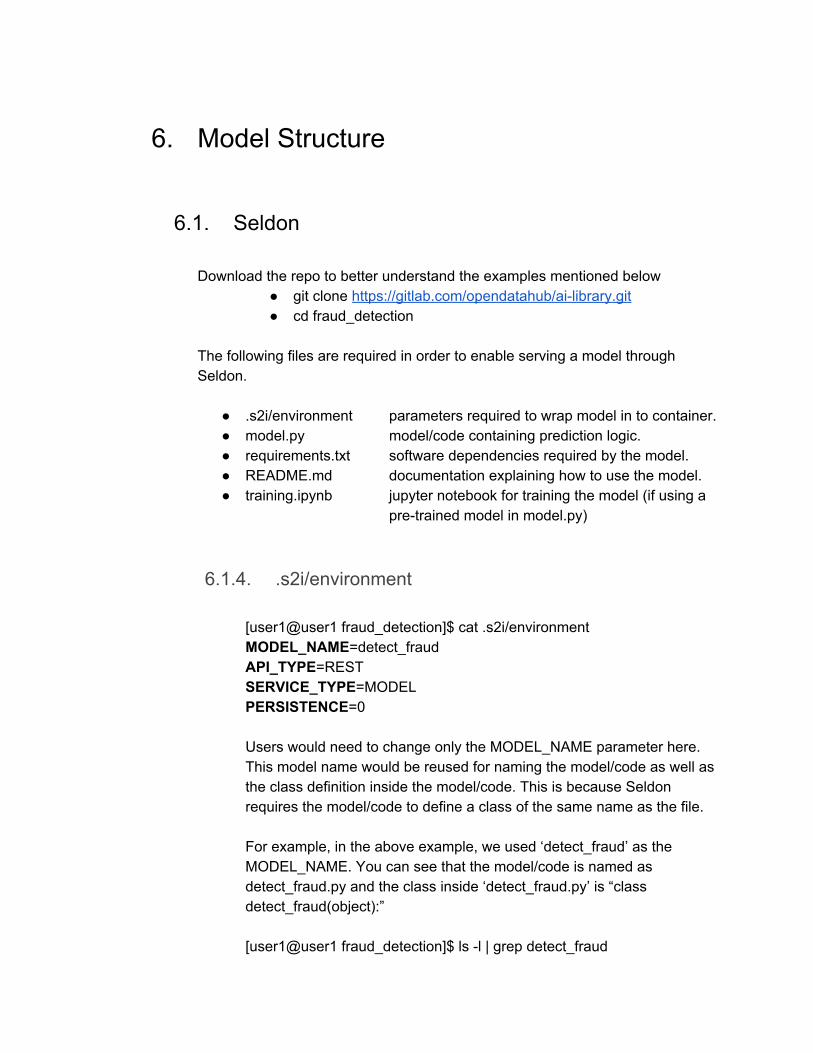
The following files are required in order to enable serving a model through Seldon.
● .s2i/environment parameters required to wrap model in to container. ● model.py model/code containing prediction logic. ● requirements.txt software dependencies required by the model. ● README.md documentation explaining how to use the model. ● training.ipynb jupyter notebook for training the model (if using a
pre-trained model in model.py)
6.1.4. .s2i/environment
[user1@user1 fraud_detection]$ cat .s2i/environment MODEL_NAME=detect_fraud API_TYPE=REST SERVICE_TYPE=MODEL PERSISTENCE=0
Users would need to change only the MODEL_NAME parameter here. This model name would be reused for naming the model/code as well as the class definition inside the model/code. This is because Seldon requires the model/code to define a class of the same name as the file. For example, in the above example, we used ‘detect_fraud’ as the MODEL_NAME. You can see that the model/code is named as detect_fraud.py and the class inside ‘detect_fraud.py’ is “class detect_fraud(object):” [user1@user1 fraud_detection]$ ls -l | grep detect_fraud
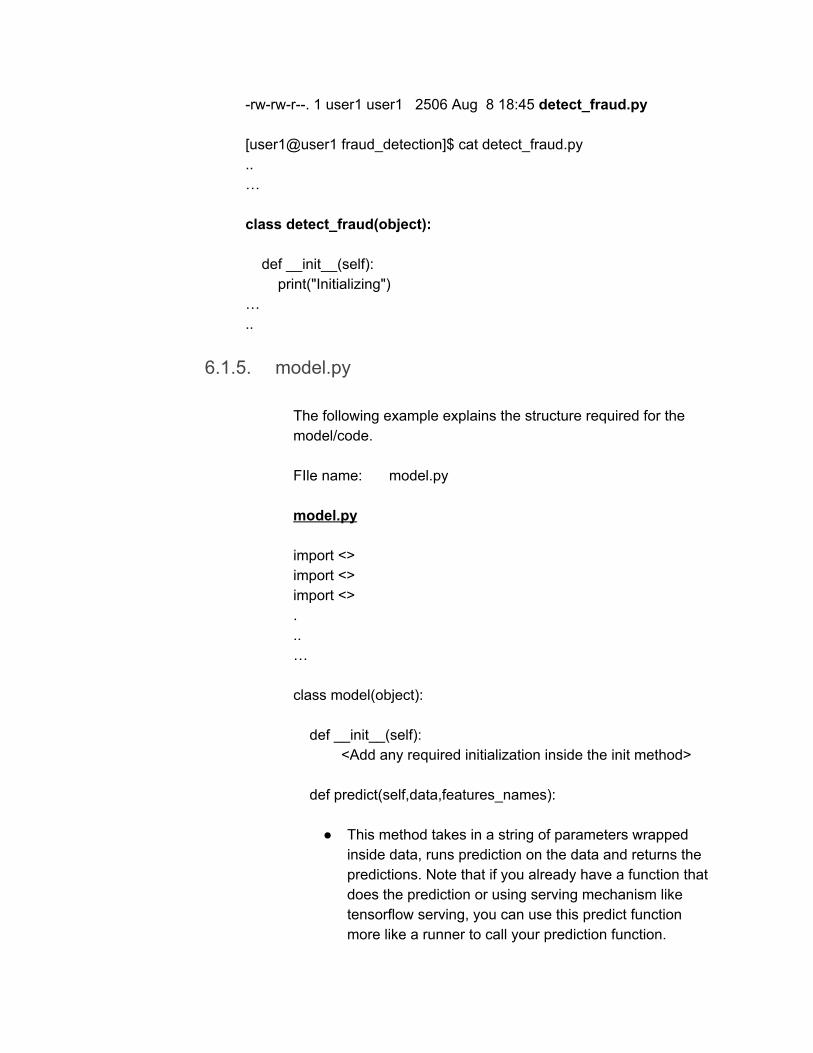
-rw-rw-r--. 1 user1 user1 2506 Aug 8 18:45 detect_fraud.py [user1@user1 fraud_detection]$ cat detect_fraud.py .. … class detect_fraud(object): def __init__(self): print("Initializing") … ..
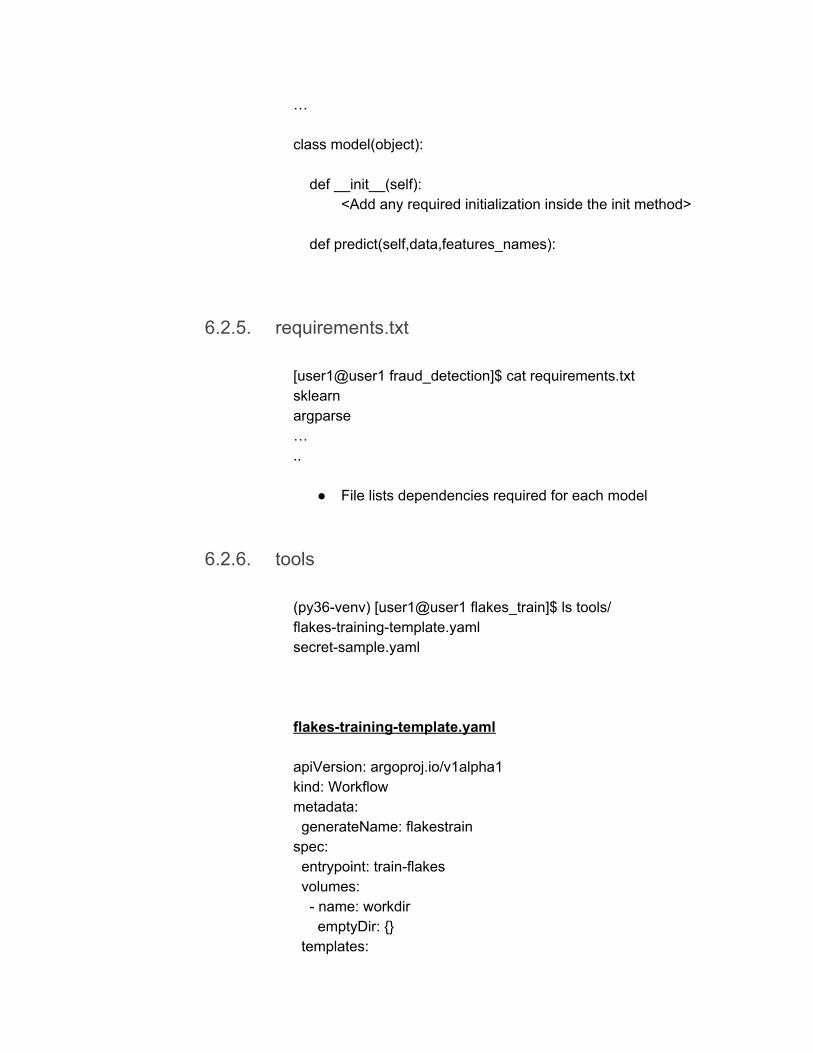
6.1.5. model.py The following example explains the structure required for the model/code. FIle name: model.py model.py import <> import <> import <> . .. … class model(object): def __init__(self):
<Add any required initialization inside the init method> def predict(self,data,features_names):
● This method takes in a string of parameters wrapped inside data, runs prediction on the data and returns the predictions. Note that if you already have a function that does the prediction or using serving mechanism like tensorflow serving, you can use this predict function more like a runner to call your prediction function.

● When deploying the models (using ansible or ODH
operator), the following s3 parameters will be added to .s2i/environment. This in turn gets populated as environment variables inside the containers. Your model/code can utilize these to access s3 backend for accessing data, pre-trained models or store any results.
s3endpointUrl = os.environ['S3ENDPOINTURL'] s3objectStoreLocation =
os.environ['S3OBJECTSTORELOCATION'] s3accessKey = os.environ['S3ACCESSKEY'] s3secretKey = os.environ['S3SECRETKEY']
● Add model logic (example - load model/run prediction). ● return prediction
6.1.6. requirements.txt
[user1@user1 fraud_detection]$ cat requirements.txt .. ... Seldon-core … ..
● Seldon-core is required in all requirements.txt ● Additional dependencies can be added based on specific
requirements for each model
6.1.7. README.md
This file contains documentation on the usage of the model. A sample structure to follow would be,
● Description ● Contents (of the directory) ● How to use the model
○ Sample REST call ○ Sample data
○ Sample results
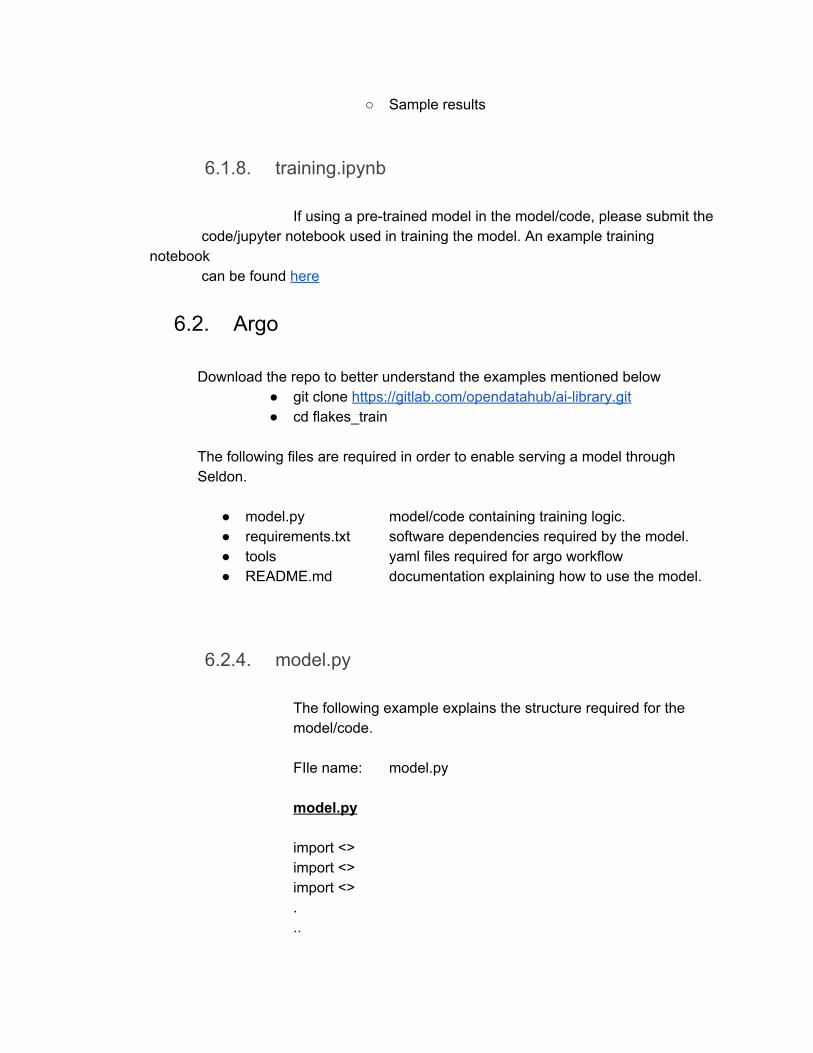
6.1.8. training.ipynb
If using a pre-trained model in the model/code, please submit the code/jupyter notebook used in training the model. An example training
notebook can be found here
6.2. Argo
Download the repo to better understand the examples mentioned below ● git clone https://gitlab.com/opendatahub/ai-library.git ● cd flakes_train
The following files are required in order to enable serving a model through Seldon.
● model.py model/code containing training logic. ● requirements.txt software dependencies required by the model. ● tools yaml files required for argo workflow ● README.md documentation explaining how to use the model.
6.2.4. model.py The following example explains the structure required for the model/code. FIle name: model.py model.py import <> import <> import <> . ..
… class model(object): def __init__(self):
<Add any required initialization inside the init method> def predict(self,data,features_names):
6.2.5. requirements.txt
[user1@user1 fraud_detection]$ cat requirements.txt sklearn argparse … ..
● File lists dependencies required for each model
6.2.6. tools
(py36-venv) [user1@user1 flakes_train]$ ls tools/ flakes-training-template.yaml secret-sample.yaml flakes-training-template.yaml apiVersion: argoproj.io/v1alpha1 kind: Workflow metadata: generateName: flakestrain spec: entrypoint: train-flakes volumes: - name: workdir emptyDir: {} templates:
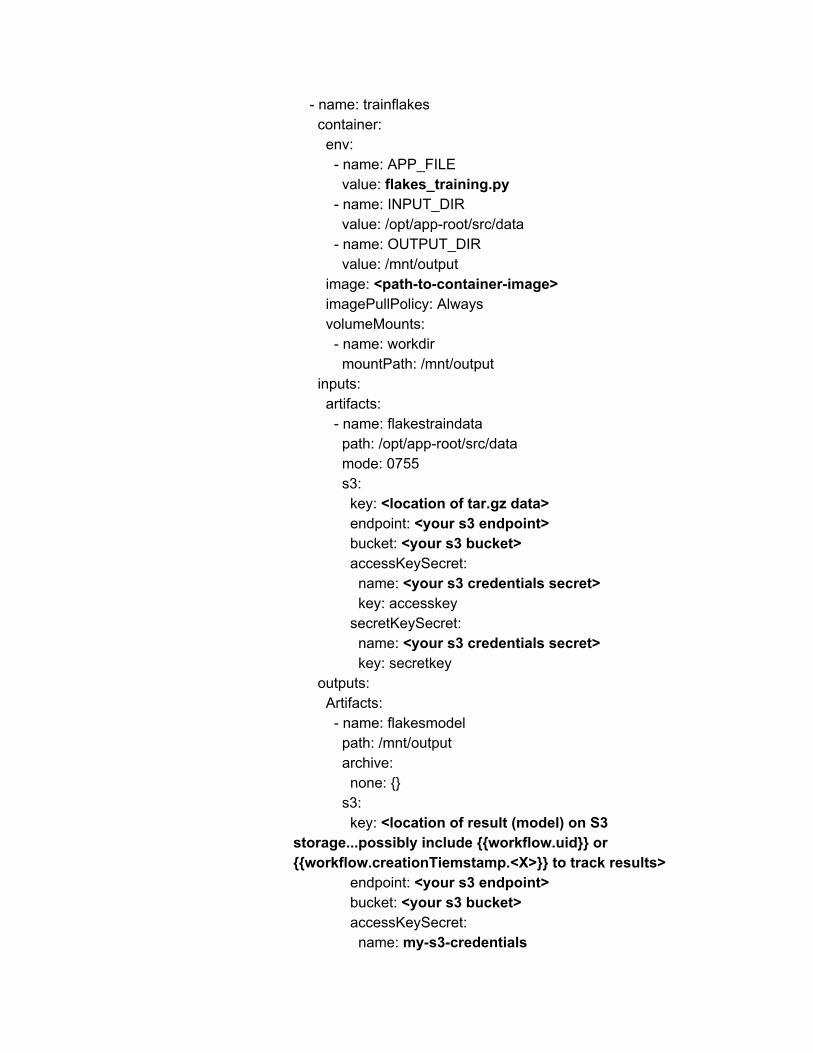
- name: trainflakes container: env: - name: APP_FILE value: flakes_training.py - name: INPUT_DIR value: /opt/app-root/src/data - name: OUTPUT_DIR value: /mnt/output image: <path-to-container-image> imagePullPolicy: Always volumeMounts: - name: workdir mountPath: /mnt/output inputs: artifacts: - name: flakestraindata path: /opt/app-root/src/data mode: 0755 s3: key: <location of tar.gz data> endpoint: <your s3 endpoint> bucket: <your s3 bucket> accessKeySecret: name: <your s3 credentials secret> key: accesskey secretKeySecret: name: <your s3 credentials secret> key: secretkey outputs: Artifacts: - name: flakesmodel path: /mnt/output archive: none: {} s3: key: <location of result (model) on S3 storage...possibly include {{workflow.uid}} or {{workflow.creationTiemstamp.<X>}} to track results> endpoint: <your s3 endpoint> bucket: <your s3 bucket> accessKeySecret: name: my-s3-credentials
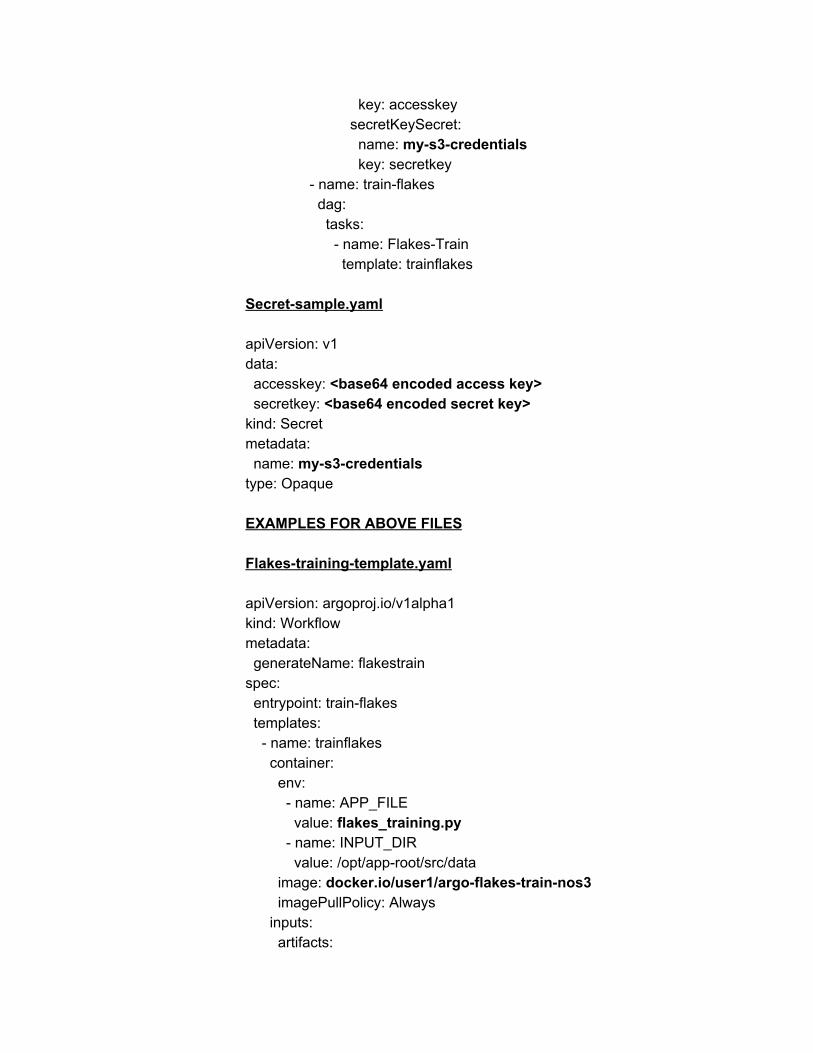
key: accesskey secretKeySecret: name: my-s3-credentials key: secretkey - name: train-flakes dag: tasks: - name: Flakes-Train template: trainflakes
Secret-sample.yaml
apiVersion: v1 data: accesskey: <base64 encoded access key> secretkey: <base64 encoded secret key> kind: Secret metadata: name: my-s3-credentials type: Opaque
EXAMPLES FOR ABOVE FILES
Flakes-training-template.yaml
apiVersion: argoproj.io/v1alpha1 kind: Workflow metadata: generateName: flakestrain spec: entrypoint: train-flakes templates: - name: trainflakes container: env: - name: APP_FILE value: flakes_training.py - name: INPUT_DIR value: /opt/app-root/src/data image: docker.io/user1/argo-flakes-train-nos3 imagePullPolicy: Always inputs: artifacts:
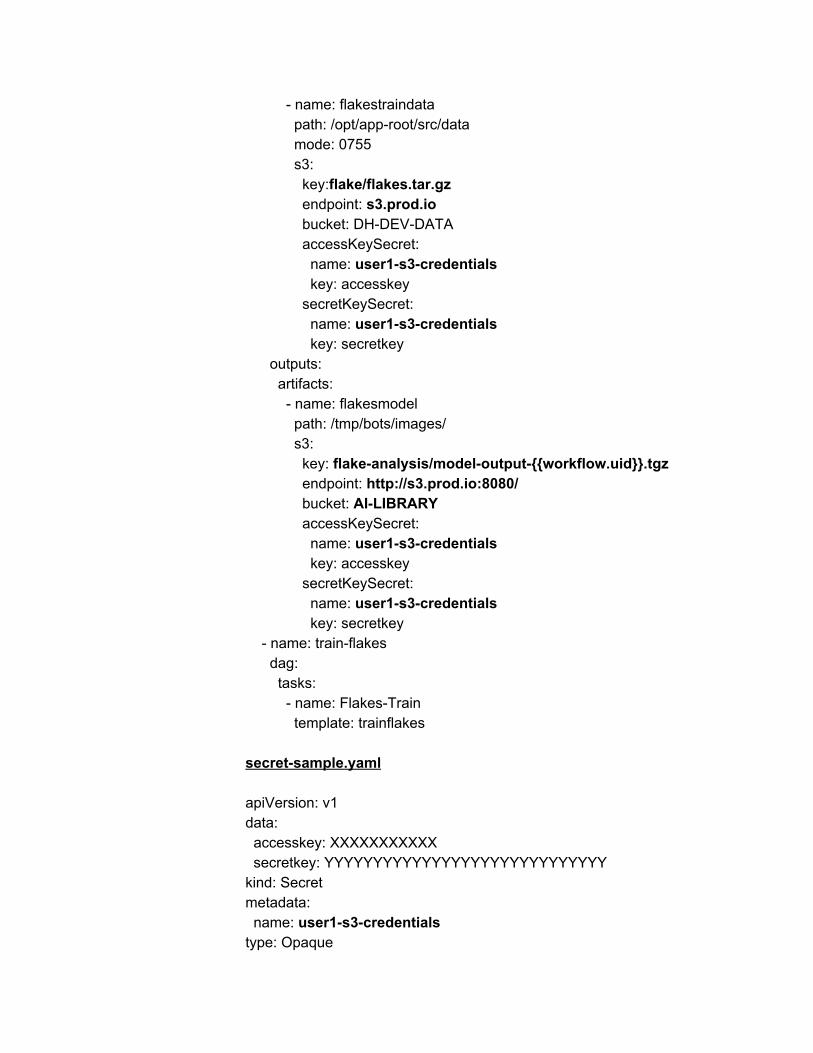
- name: flakestraindata path: /opt/app-root/src/data mode: 0755 s3: key:flake/flakes.tar.gz endpoint: s3.prod.io bucket: DH-DEV-DATA accessKeySecret: name: user1-s3-credentials key: accesskey secretKeySecret: name: user1-s3-credentials key: secretkey outputs: artifacts: - name: flakesmodel path: /tmp/bots/images/ s3: key: flake-analysis/model-output-{{workflow.uid}}.tgz endpoint: http://s3.prod.io:8080/ bucket: AI-LIBRARY accessKeySecret: name: user1-s3-credentials key: accesskey secretKeySecret: name: user1-s3-credentials key: secretkey - name: train-flakes dag: tasks: - name: Flakes-Train template: trainflakes secret-sample.yaml apiVersion: v1 data: accesskey: XXXXXXXXXXX secretkey: YYYYYYYYYYYYYYYYYYYYYYYYYYYYY kind: Secret metadata: name: user1-s3-credentials type: Opaque
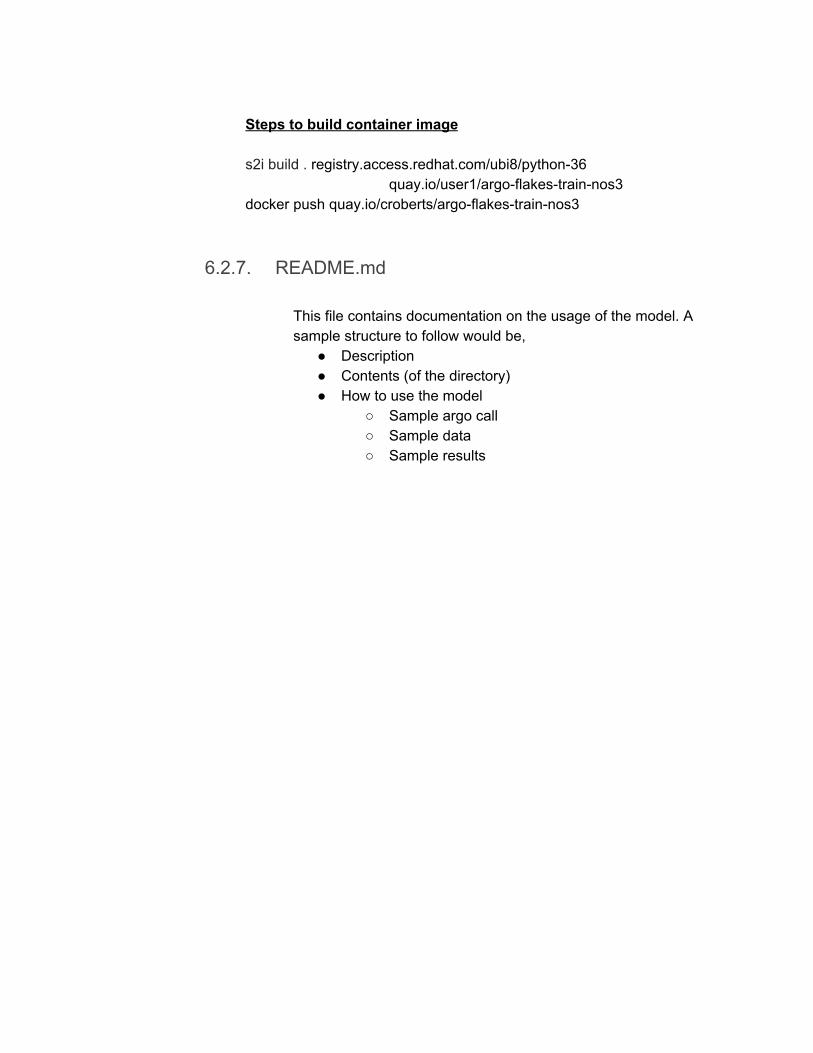
Steps to build container image s2i build . registry.access.redhat.com/ubi8/python-36
quay.io/user1/argo-flakes-train-nos3 docker push quay.io/croberts/argo-flakes-train-nos3
6.2.7. README.md
This file contains documentation on the usage of the model. A sample structure to follow would be,
● Description ● Contents (of the directory) ● How to use the model
○ Sample argo call ○ Sample data ○ Sample results


