Embed Size (px)
Citation preview
• •••••••••••••••••••••••••••••••••••• •• •• •• •• •• •• •• •• •• Ag in the Classroom •• •• •: Alabama Ag in the Classroom :• •• •••••••••o
•••••••••••••••••••••• • • • • • • • • • •• • • • •• • •• • •• •• •• • • • • • • • •
G
••e
•
••
••••••
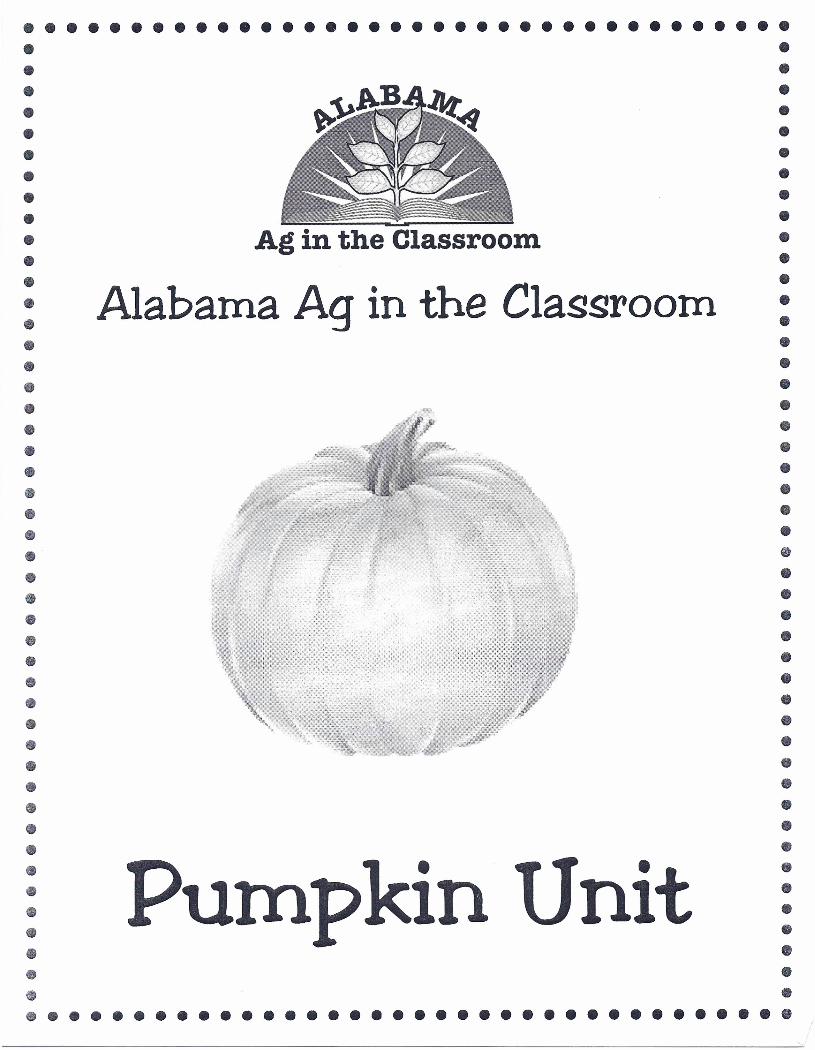
• Pumpkin Unit••e
Seeds of Discovery
What's large, orange, and filled with seeds? Even the youngest ofelementary-age students can answer this riddle with ease. Take a pumpkin toschool with you and create an atmosphere of fun and excitement with the activitiesincluded in this unit. Each activity featured can be used by itself or as part of aweek-long festival in honor of October's most famous fruit.
The specific activities are designed to be used by the elementary teacher andrequire readily available, inexpensive materials. There's a lot of mileage in onemodestly priced pumpkin. So plant the seeds of discovery and watch as learningtakes over in your classroom.
How Pumpkins Grow
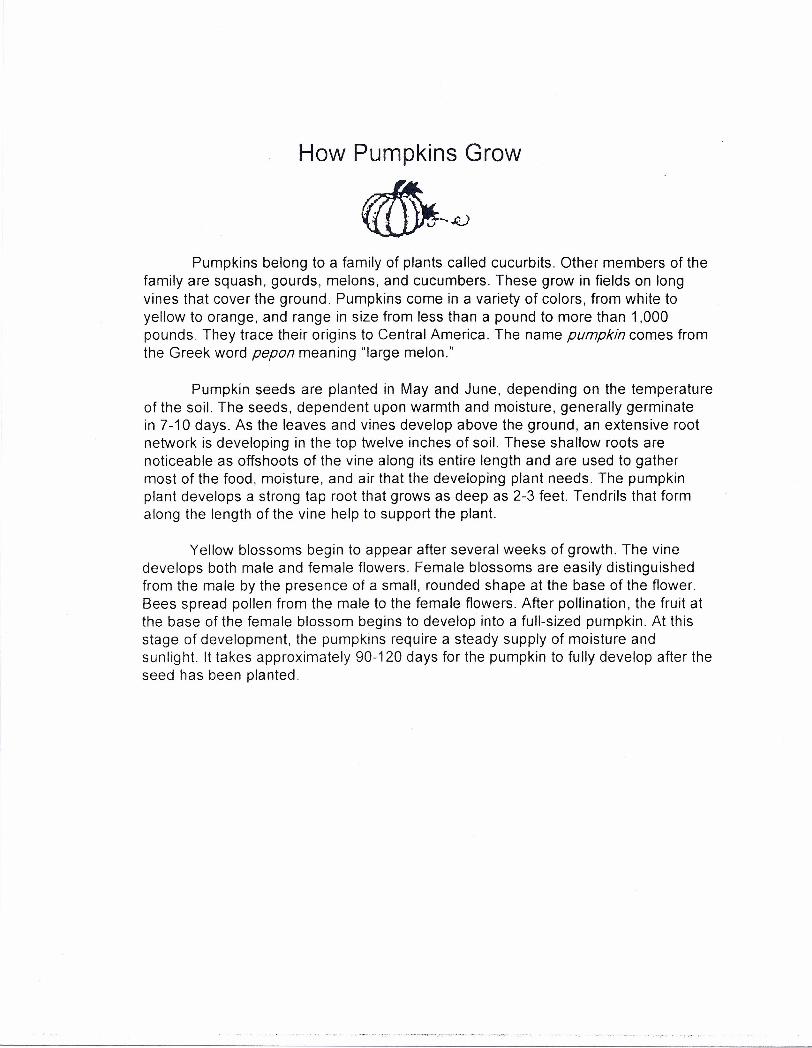
Pumpkins belong to a family of plants called cucurbits. Other members of thefamily are squash, gourds, melons, and cucumbers. These grow in fields on longvines that cover the ground. Pumpkins come in a variety of colors, from white toyellow to orange, and range in size from less than a pound to more than 1,000pounds. They trace their origins to Central America. The name pumpkin comes fromthe Greek word pep on meaning "large melon."
Pumpkin seeds are planted in May and June, depending on the temperatureof the soil. The seeds, dependent upon warmth and moisture, generally germinatein 7-10 days. As the leaves and vines develop above the ground, an extensive rootnetwork is developing in the top twelve inches of soil. These shallow roots arenoticeable as offshoots of the vine along its entire length and are used to gathermost of the food, moisture, and air that the developing plant needs. The pumpkinplant develops a strong tap root that grows as deep as 2-3 feet. Tendrils that formalong the length of the vine help to support the plant.
Yellow blossoms begin to appear after several weeks of growth. The vinedevelops both male and female flowers. Female blossoms are easily distinguishedfrom the male by the presence of a small, rounded shape at the base of the flower.Bees spread pollen from the male to the female flowers. After pollination, the fruit atthe base of the female blossom begins to develop into a full-sized pumpkin. At thisstage of development, the pumpkins require a steady supply of moisture andsunlight. It takes approximately 90-120 days for the pumpkin to fully develop after theseed has been planted.
Gardening with the Three Sisters
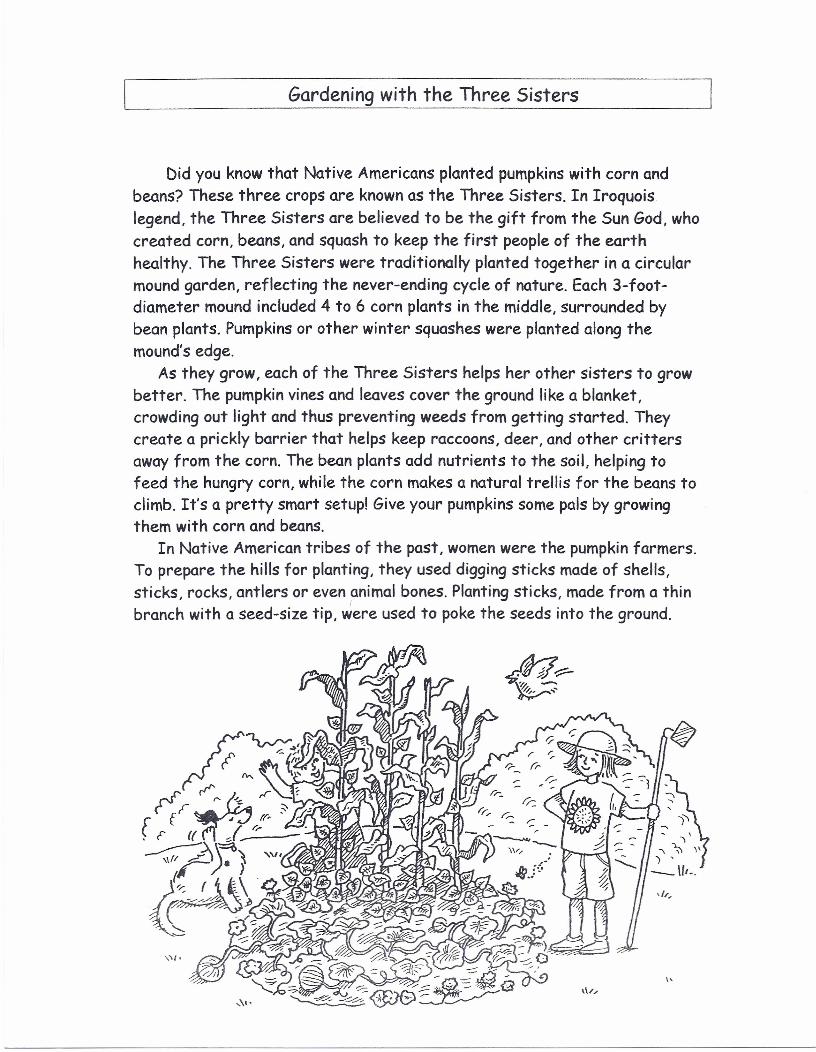
Did you know that Native Americans planted pumpkinswith corn andbeans? These three crops are knownas the Three Sisters. In Iroquoislegend, the Three Sisters are believed to be the gift from the Sun God, whocreated corn, beans, and squash to keep the first people of the earthhealthy. The Three Sisters were traditionally planted together in a circularmound garden, reflecting the never-ending cycle of nature. Each 3-foot-diameter mound included 4 to 6 corn plants in the middle, surrounded bybean plants. Pumpkinsor other winter squashes were planted along themound's edge.
As they grow, each of the Three Sisters helps her other sisters to growbetter. The pumpkinvines and leaves cover the ground like a blanket,crowding out light and thus preventing weeds from getting started. Theycreate a prickly barrier that helps keep raccoons, deer, and other crittersaway from the. corn. The bean plants add nutrients to the soil, helping tofeed the hungry corn, while the corn makes a natural trellis for the beans toclimb. It's a pretty smart setup! Give your pumpkins some pals by growingthem with corn and beans.
In Native American tribes of the past, womenwere the pumpkinfarmers.To prepare the hills for planting, they used digging sticks made of shells,sticks, rocks, antlers or even animal bones. Planting sticks, made from a thin
(
branch with a seed-size tip, were used to poke the seeds into the ground.

Growing Pumpkins inthe Classroom
What's Inside That Seed?
Objective: Students will observe the embryo of a seed.You'll need: Pumpkin seeds (enough so that each student has one), water,
shallow dish, hand magnifiersProcedure:
1. Discuss with students the conditions needed for seed germination:moisture, temperature. Is soil a requirement? Why or why not?
2. Explain the role and importance of the plant embryo.3. Place a moistened paper towel in a shallow dish. Cover with pumpkin
seeds. Cover with another paper towel and a small amount of water.The next day:
4. Direct student to examine the damp seeds with magnifiers, observingthe embryo. Have students illustrate, label, and write about their findings.
Ziplock Successl IIObjective: Students will observe germination of pumpkin seeds.You'll need: Seeds (clean and dry), ziplock bags, potting soil, permanent markerProcedure:
1. Have each student label his/her bag with a permanent marker.They should include the variety of pumpkin planted and the date.
2. Place a small amount of potting soil in each bag and add several seeds.3. Add a small amount of water and zip the bag closed.4. Hang bags up in the classroom and observe. They should require no
further care.5. Record changes noted over the next week. Send the young plants
home to be transplanted.
NOTE: This can also be done by substituting a moistened paper towel forthe potting soil.
More Growing Ideas.
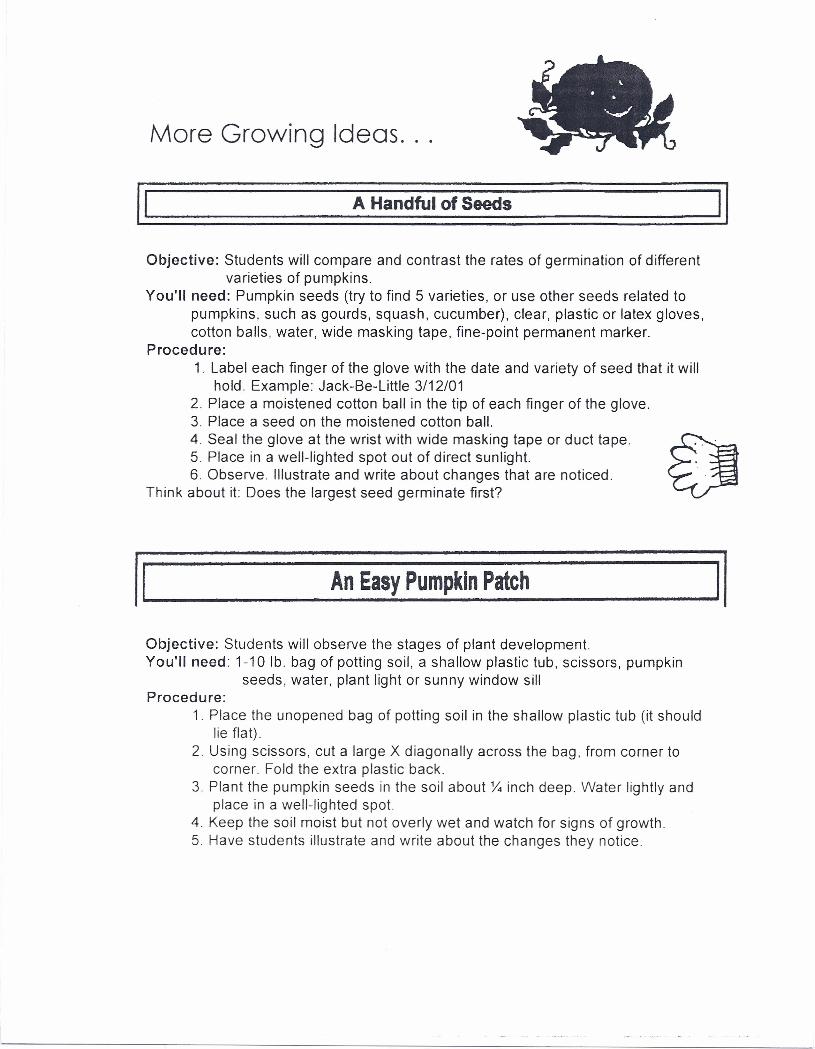
II A Handful of Seeds
Objective: Students will compare and contrast the rates of germination of differentvarieties of pumpkins.
You'll need: Pumpkin seeds (try to find 5 varieties, or use other seeds related topumpkins, such as gourds, squash, cucumber), clear, plastic or latex gloves,cotton balls, water, wide masking tape, fine-point permanent marker.
Procedure:1. Label each finger of the glove with the date and variety of seed that it will
hold. Example: Jack-Be-Little 3/12/012. Place a moistened cotton ball in the tip of each finger of the glove.3. Place a seed on the moistened cotton ball.4 Seal the glove at the wrist with wide masking tape or duct tape. €).....5. Place in a well-lighted spot out of direct sunlight.6. Observe. Illustrate and write about changes that are noticed.
Think about it: Does the largest seed germinate first?
11~ An_E_as.:...y p_um....:,.p_kln_p_atc_h 11
Objective: Students will observe the stages of plant development.You'll need: 1-10 lb. bag of potting soil, a shallow plastic tub, scissors, pumpkin
seeds, water, plant light or sunny window sillProcedure:
1. Place the unopened bag of potting soil in the shallow plastic tub (it shouldlie flat).
2. Using scissors, cut a large X diagonally across the bag, from corner tocorner. Fold the extra plastic back.
3. Plant the pumpkin seeds in the soil about Ys inch deep. Water lightly andplace in a well-lighted spot.
4. Keep the soil moist but not overly wet and watch for signs of growth.5. Have students illustrate and write about the changes they notice
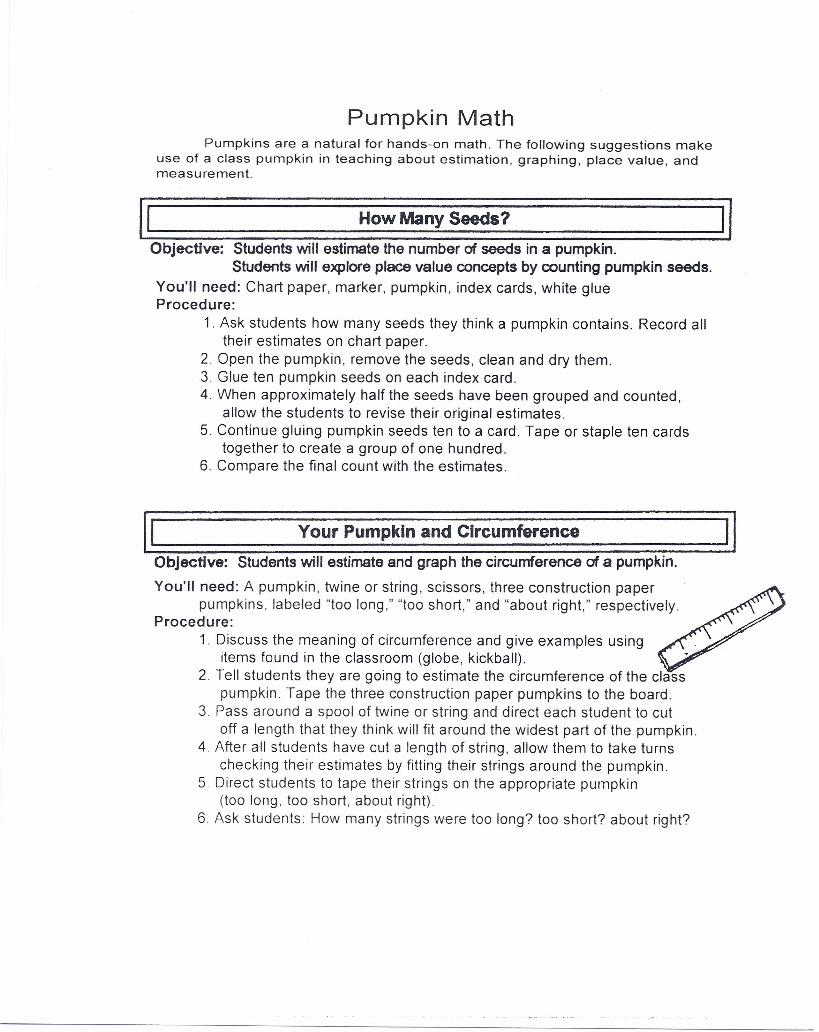
Pumpkin MathPumpkins are a natural for hands-on math. The following suggestions make
use of a class pumpkin in teaching about estimation, graphing, place value, andmeasurement.
II How Many Seeds? IIObjective: Students will estimate the number of seeds in a pumpkin.
Students will explore place value concepts by counting pumpkin seeds.You' II need: Chart paper, marker, pumpkin, index cards, white glueProcedure:
1. Ask students how many seeds they think a pumpkin contains. Record alltheir estimates on chart paper.
2. Open the pumpkin, remove the seeds, clean and dry them.3. Glue ten pumpkin seeds on each index card.4. When approximately half the seeds have been grouped and counted,
allow the students to revise their original estimates.5. Continue gluing pumpkin seeds ten to a card. Tape or staple ten cards
together to create a group of one hundred.6. Compare the final count with the estimates.
II Your Pumpkin and Circumference IIObjective: Students will estimate and graph the circumference of a pumpkin.
You'li need: A pumpkin, twine or string, scissors, three construction paperpumpkins, labeled "too long," "too short," and "about right," respectively.
Procedure:1. Discuss the meaning of circumference and give examples using
items found in the classroom (globe, kickball).2. Tell students they are going to estimate the circumference of the class
pumpkin. Tape the three construction paper pumpkins to the board.3. Pass around a spool of twine or string and direct each student to cut
off a length that they think will fit around the widest part of the pumpkin.4. After all students have cut a length of string, allow them to take turns
checking their estimates by fitting their strings around the pumpkin5. Direct students to tape their strings on the appropriate pumpkin
(too long, too short, about right).6. Ask students: How many strings were too long? too short? about right?
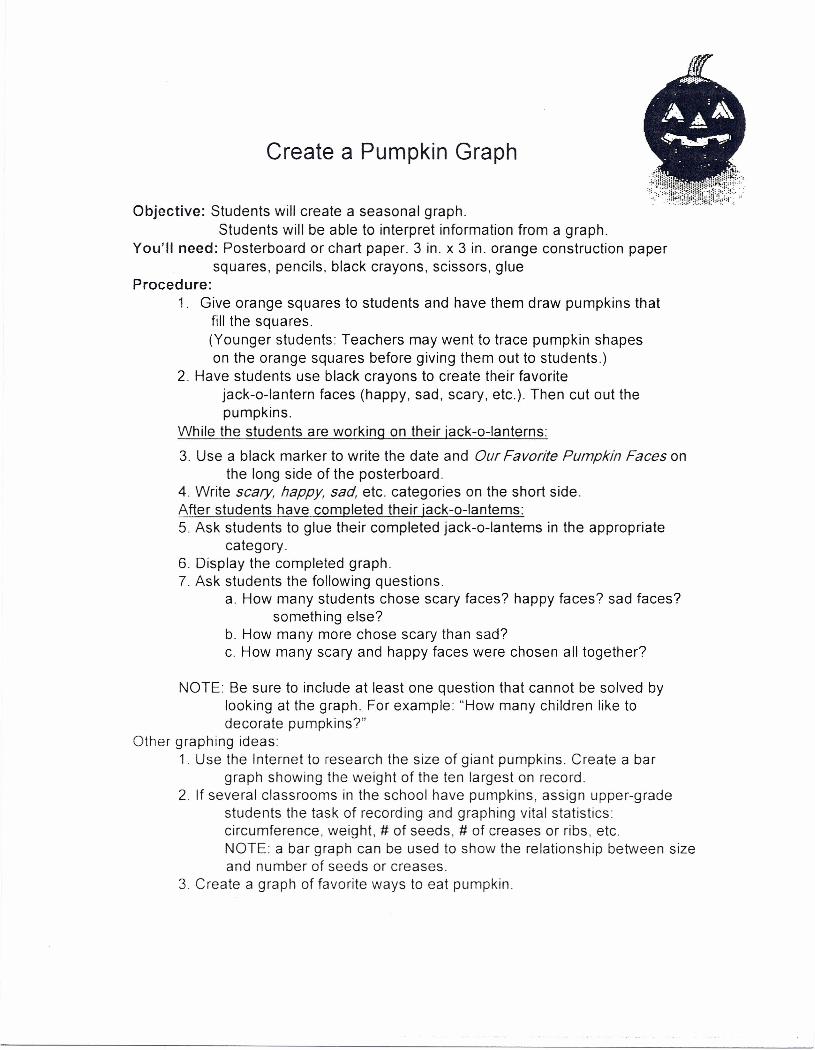
Create a Pumpkin Graph
Objective: Students will create a seasonal graph.Students will be able to interpret information from a graph.
You'll need: Posterboard or chart paper. 3 in. x 3 in. orange construction papersquares, pencils, black crayons, scissors, glue
Procedure:1. Give orange squares to students and have them draw pumpkins that
fill the squares.(Younger students: Teachers may went to trace pumpkin shapeson the orange squares before giving them out to students.)
2. Have students use black crayons to create their favoritejack-o-Iantern faces (happy, sad, scary, etc.). Then cut out thepumpkins.
While the students are working on their jack-o-Ianterns:
3. Use a black marker to write the date and Our Fevorite Pumpkin Faces onthe long side of the posterboard.
4. Write scary, happy, sad, etc. categories on the short side.After students have completed their jack-o-Iantems:5. Ask students to glue their completed jack-o-Iantems in the appropriate
category.6. Display the completed graph.7. Ask students the following questions.
a. How many students chose scary faces? happy faces? sad faces?something else?
b. How many more chose scary than sad?c. How many scary and happy faces were chosen all together?
NOTE: Be sure to include at least one question that cannot be solved bylooking at the graph. For example: "How many children like todecorate pumpkins?"
Other graphing ideas:1. Use the Internet to research the size of giant pumpkins. Create a bar
graph showing the weight of the ten largest on record.2. If several classrooms in the school have pumpkins, assign upper-grade
students the task of recording and graphing vital statistics:circumference, weight, # of seeds, # of creases or ribs, etc.NOTE: a bar graph can be used to show the relationship between sizeand number of seeds or creases.
3 Create a graph of favorite ways to eat pumpkin.
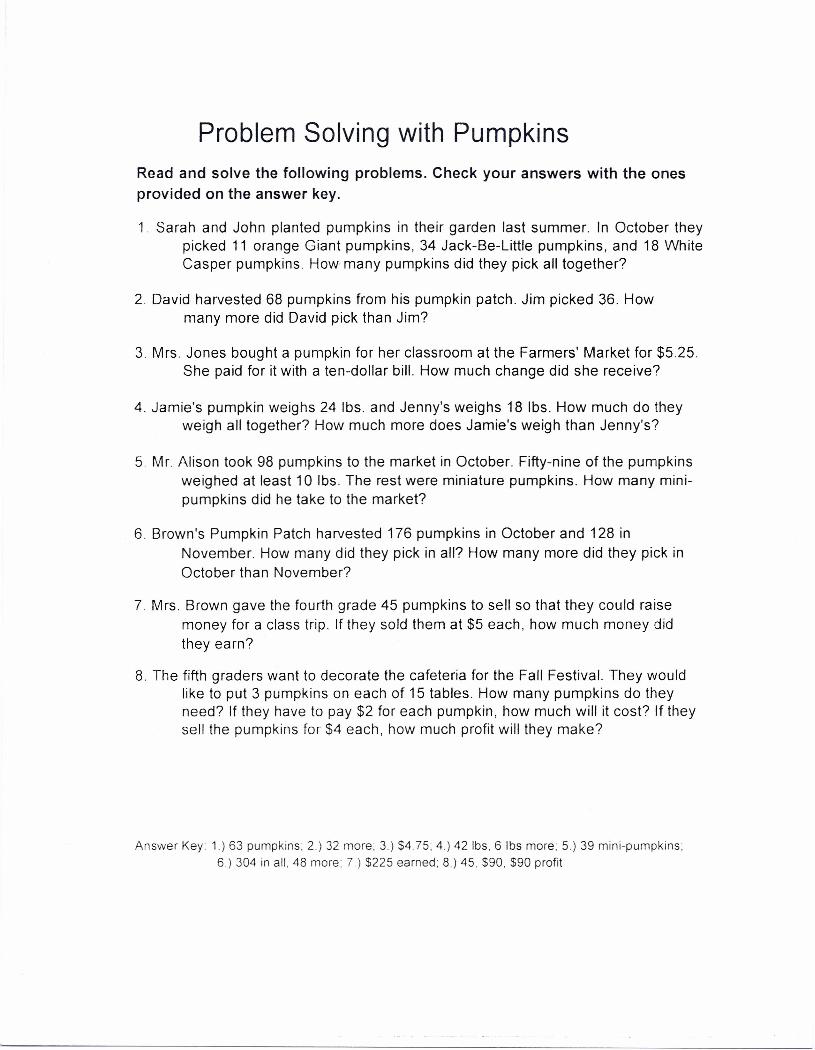
Problem Solving with PumpkinsRead and solve the following problems. Check your answers with the onesprovided on the answer key.
1. Sarah and John planted pumpkins in their garden last summer. In October theypicked 11 orange Giant pumpkins, 34 Jack-Be-Little pumpkins, and 18 WhiteCasper pumpkins. How many pumpkins did they pick all together?
2. David harvested 68 pumpkins from his pumpkin patch. Jim picked 36. Howmany more did David pick than Jim?
3. Mrs. Jones bought a pumpkin for her classroom at the Farmers' Market for $5.25.She paid for it with a ten-dollar bill. How much change did she receive?
4. Jamie's pumpkin weighs 24 Ibs. and Jenny's weighs 18 Ibs. How much do theyweigh all together? How much more does Jamie's weigh than Jenny's?
5 Mr Alison took 98 pumpkins to the market in October. Fifty-nine of the pumpkinsweighed at least 10 lbs. The rest were miniature pumpkins. How many mini-pumpkins did he take to the market?
6 Brown's Pumpkin Patch harvested 176 pumpkins in October and 128 inNovember. How many did they pick in all? How many more did they pick inOctober than November?
7. Mrs. Brown gave the fourth grade 45 pumpkins to sell so that they could raisemoney for a class trip. If they sold them at $5 each, how much money didthey earn?
8. The fifth graders want to decorate the cafeteria for the Fall Festival. They wouldlike to put 3 pumpkins on each of 15 tables. How many pumpkins do theyneed? If they have to pay $2 for each pumpkin, how much will it cost? If theysell the pumpkins for $4 each, how much profit will they make?
Answer Key 1.) 63 pumpkins; 2) 32 more; 3) $4.75; 4) 421bs, 6 Ibs more; 5.) 39 mini-pumpkins;6) 304 in all, 48 more; 7) $225 earned; 8) 45, $90, $90 profit
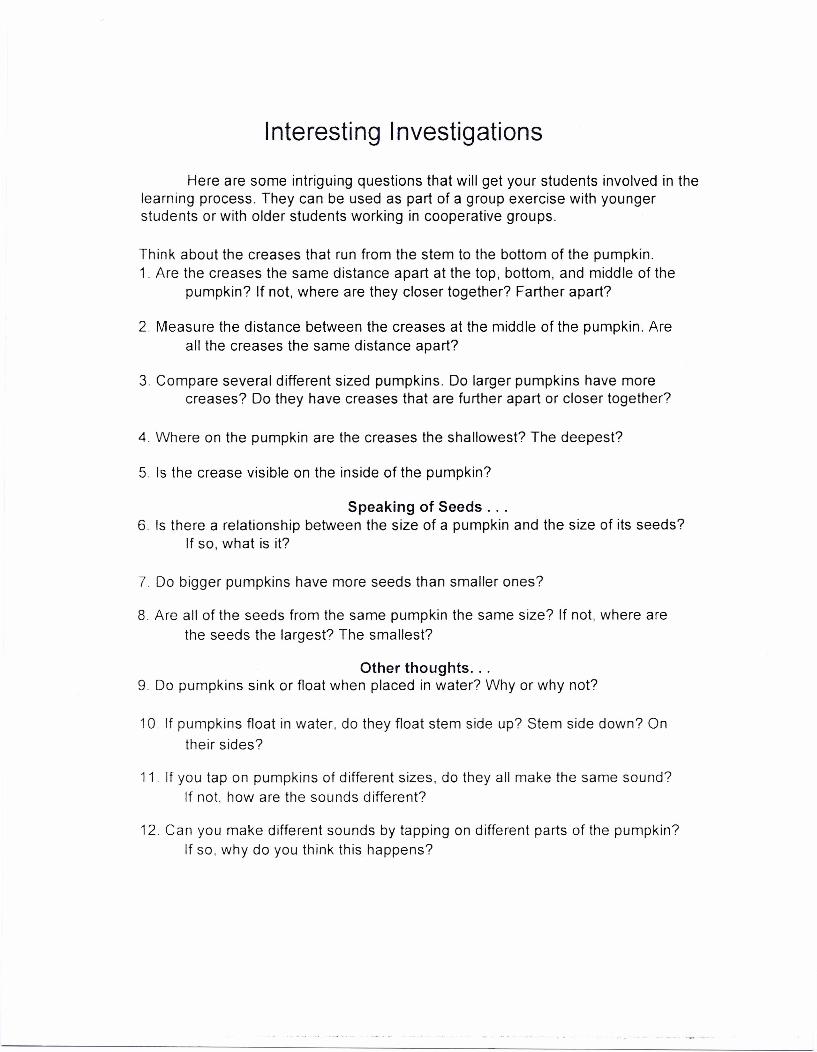
Interesting Investigations
Here are some intriguing questions that will get your students involved in thelearning process. They can be used as part of a group exercise with youngerstudents or with older students working in cooperative groups.
Think about the creases that run from the stem to the bottom of the pumpkin.1. Are the creases the same distance apart at the top, bottom, and middle of the
pumpkin? If not, where are they closer together? Farther apart?
2. Measure the distance between the creases at the middle of the pumpkin. Areall the creases the same distance apart?
3. Compare several different sized pumpkins. Do larger pumpkins have morecreases? Do they have creases that are further apart or closer together?
4. Where on the pumpkin are the creases the shallowest? The deepest?
5. Is the crease visible on the inside of the pumpkin?
Speaking of Seeds ...6. Is there a relationship between the size of a pumpkin and the size of its seeds?
If so, what is it?
7. Do bigger pumpkins have more seeds than smaller ones?
8. Are all of the seeds from the same pumpkin the same size? If not, where arethe seeds the largest? The smallest?
Other thoughts ...9. Do pumpkins sink or float when placed in water? Why or why not?
10 If pumpkins float in water, do they float stem side up? Stem side down? Ontheir sides?
11. If you tap on pumpkins of different sizes, do they all make the same sound?If not, how are the sounds different?
12 Can you make different sounds by tapping on different parts of the pumpkin?If so, why do you think this happens?
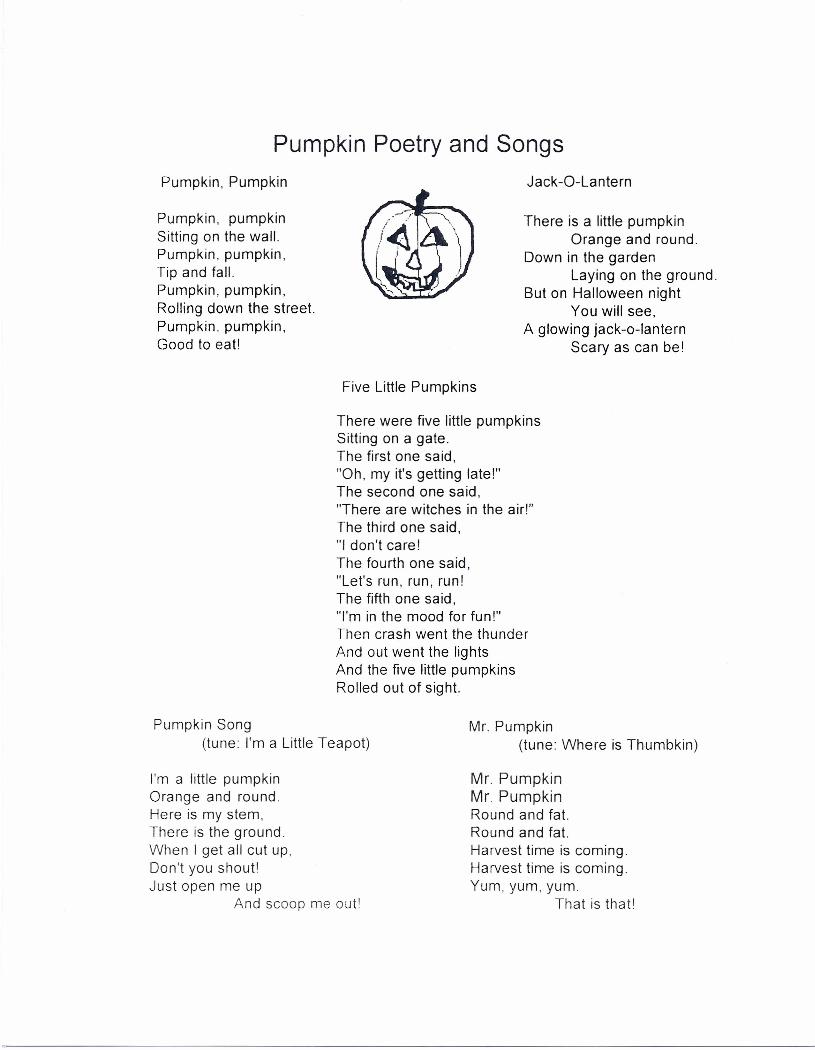
Pumpkin Poetry and SongsPumpkin, Pumpkin Jack-O-Lantern
Pumpkin, pumpkinSitting on the wall.Pumpkin, pumpkin,Tip and fall.Pumpkin, pumpkin,Rolling down the street.Pumpkin, pumpkin,Good to eat!
There is a little pumpkinOrange and round.
Down in the gardenLaying on the ground.
But on Halloween nightYou will see,
A glowing jack-a-lanternScary as can be!
Five Little Pumpkins
There were five little pumpkinsSitting on a gate.The first one said,"Oh, my it's getting late!"The second one said,"There are witches in the air!"The third one said,"I don't care!The fourth one said,"Let's run, run, run!The fifth one said,"I'm in the mood for fun!"Then crash went the thunderAnd out went the lightsAnd the five little pumpkinsRolled out of sight.
Pumpkin Song(tune: I'm a Little Teapot)
Mr. Pumpkin(tune: Where is Thumbkin)
I'm a little pumpkinOrange and round.Here is my stem,There is the groundWhen I get all cut up,Don't you shout!Just open me up
And scoop me out'
Mr. PumpkinMr. PumpkinRound and fat.Round and fat.Harvest time is coming.Harvest time is coming.Yum, yum, yum.
That is that!
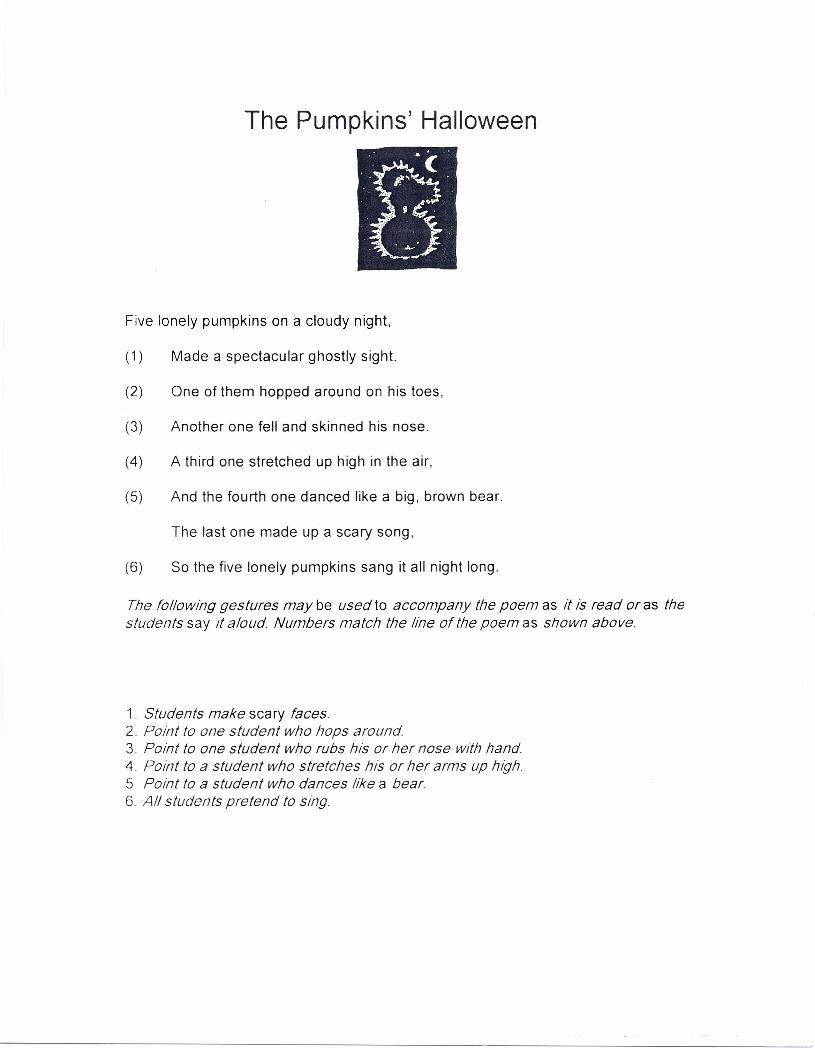
The Pumpkins' Halloween
Five lonely pumpkins on a cloudy night,
(1) Made a spectacular ghostly sight.
(2) One of them hopped around on his toes,
(3) Another one fell and skinned his nose.
(4) A third one stretched up high in the air,
(5) And the fourth one danced like a big, brown bear.
The last one made up a scary song,
(6) So the five lonely pumpkins sang it all night long.
The following gestures may be usedto accompany the poem as it is read oras thestudents say it aloud. Numbers match the line of the poem as shown above.
1. Students make scary faces.2 Point to one student who hops around.3. Point to one student who rubs his or her nose with hand.4. Point to a student who stretches his or her arms up high.5 Point to a student who dances like a bear.6. All students pretend to sing.
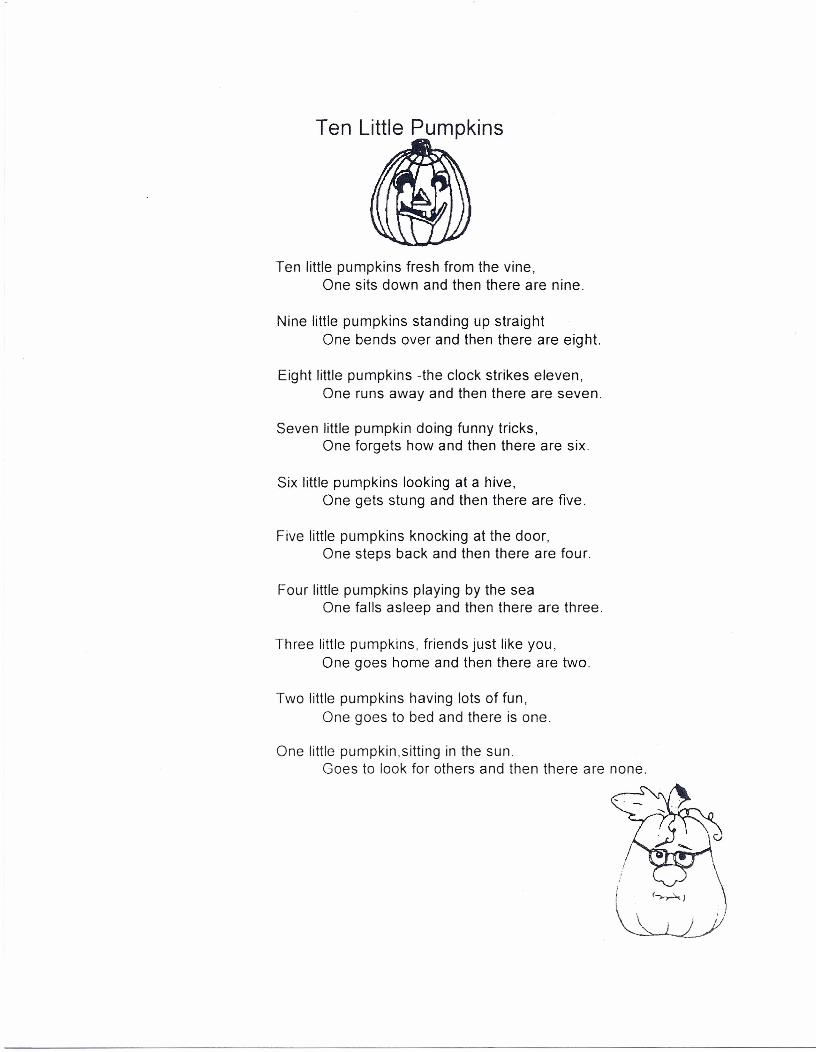
Ten Little Pumpkins
Ten little pumpkins fresh from the vine,One sits down and then there are nine.
Nine little pumpkins standing up straightOne bends over and then there are eight.
Eight little pumpkins -the clock strikes eleven,One runs away and then there are seven.
Seven little pumpkin doing funny tricks,One forgets how and then there are six.
Six little pumpkins looking at a hive,One gets stung and then there are five.
Five little pumpkins knocking at the door,One steps back and then there are four.
Four little pumpkins playing by the seaOne falls asleep and then there are three.
Three little pumpkins, friends just like you,One goes home and then there are two.
Two little pumpkins having lots of fun,One goes to bed and there is one.
One little pumpkin,sitting in the sun.Goes to look for others and then there are none.
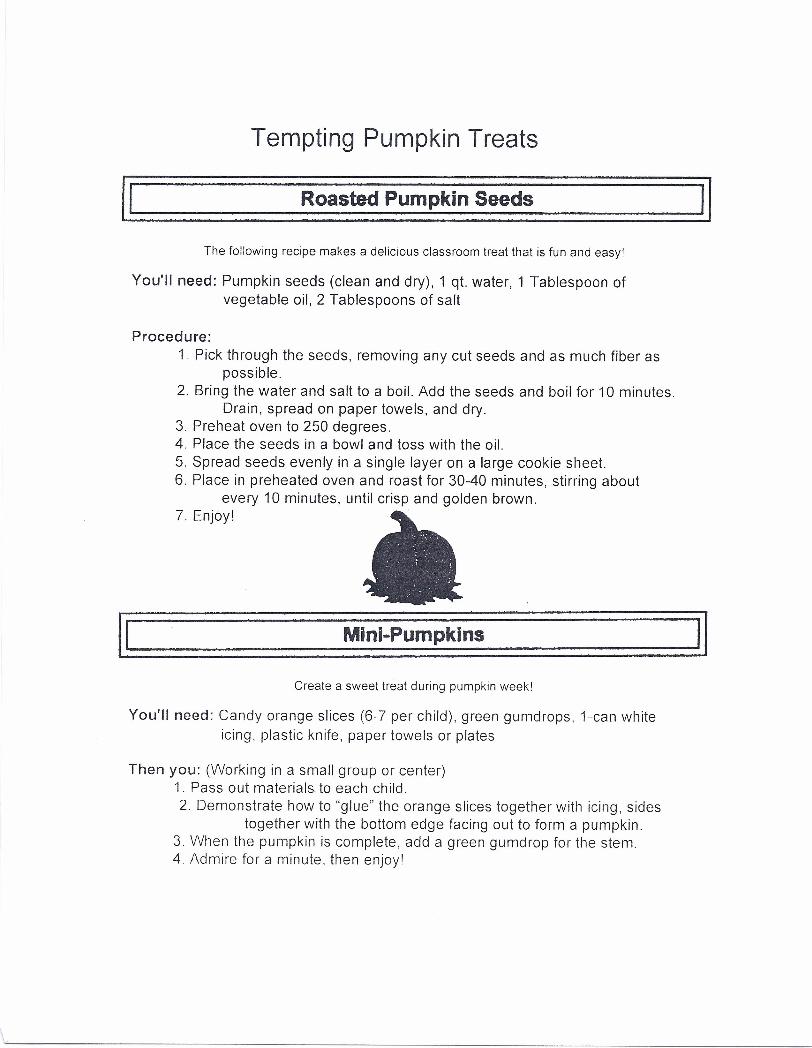
Tempting Pumpkin Treats
II Roasted Pumpkin Seeds IIThe following recipe makes a delicious classroom treat that is fun and easy:
You'll need: Pumpkin seeds (clean and dry), 1 qt. water, 1 Tablespoon ofvegetable oil, 2 Tablespoons of salt
Procedure:1. Pick through the seeds, removing any cut seeds and as much fiber as
possible.2. Bring the water and salt to a boil. Add the seeds and boil for 10 minutes.
Drain, spread on paper towels, and dry.3. Preheat oven to 250 degrees.4. Place the seeds in a bowl and toss with the oil.5. Spread seeds evenly in a single layer on a large cookie sheet.6. Place in preheated oven and roast for 30-40 minutes, stirring about
every 10 minutes, until crisp and golden brown.7. Enjoy!
IIMini-Pumpkins
Create a sweet treat during pumpkin weeki
You'll need: Candy orange slices (6-7 per child), green gumdrops, 1-can whiteicing, plastic knife, paper towels or plates
Then you: (Working in a small group or center)1. Pass out materials to each child.2. Demonstrate how to "glue" the orange slices together with icing, sides
together with the bottom edge facing out to form a pumpkin.3. When the pumpkin is complete, add a green gumdrop for the stem.4 Admire for a minute, then enjoy'
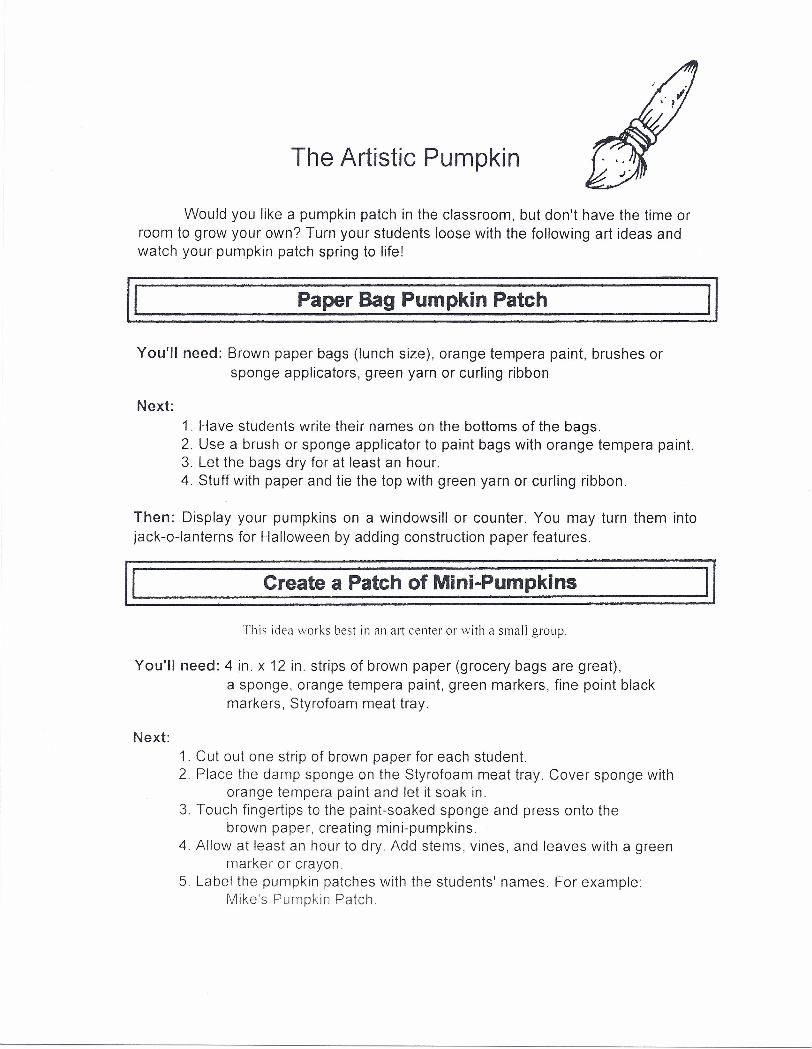
The Artistic Pumpkin
Would you like a pumpkin patch in the classroom, but don't have the time orroom to grow your own? Turn your students loose with the following art ideas andwatch your pumpkin patch spring to life!
II Paper Bag Pumpkin Patch IIYou'll need: Brown paper bags (lunch size), orange tempera paint, brushes or
sponge applicators, green yarn or curling ribbon
Next:1. Have students write their names on the bottoms of the bags.2. Use a brush or sponge applicator to paint bags with orange tempera paint.3. Let the bags dry for at least an hour.4. Stuff with paper and tie the top with green yarn or curling ribbon.
Then: Display your pumpkins on a windowsill or counter. You may turn them intojack-o-Ianterns for Halloween by adding construction paper features.
II Create a Patch of Mini-Pumpkins
This idea works best in an art center or with a small group.
You'll need: 4 in. x 12 in. strips of brown paper (grocery bags are great),a sponge, orange tempera paint, green markers, fine point blackmarkers, Styrofoam meat tray.
Next:1. Cut out one strip of brown paper for each student.2. Place the damp sponge on the Styrofoam meat tray. Cover sponge with
orange tempera paint and let it soak in.3. Touch fingertips to the paint-soaked sponge and press onto the
brown paper, creating mini-pumpkins.4. Allow at least an hour to dry Add stems, vines, and leaves with a green
marker or crayon.5. Label the pumpkin patches with the students' names. For example:
Mike's Pumpkin Patch
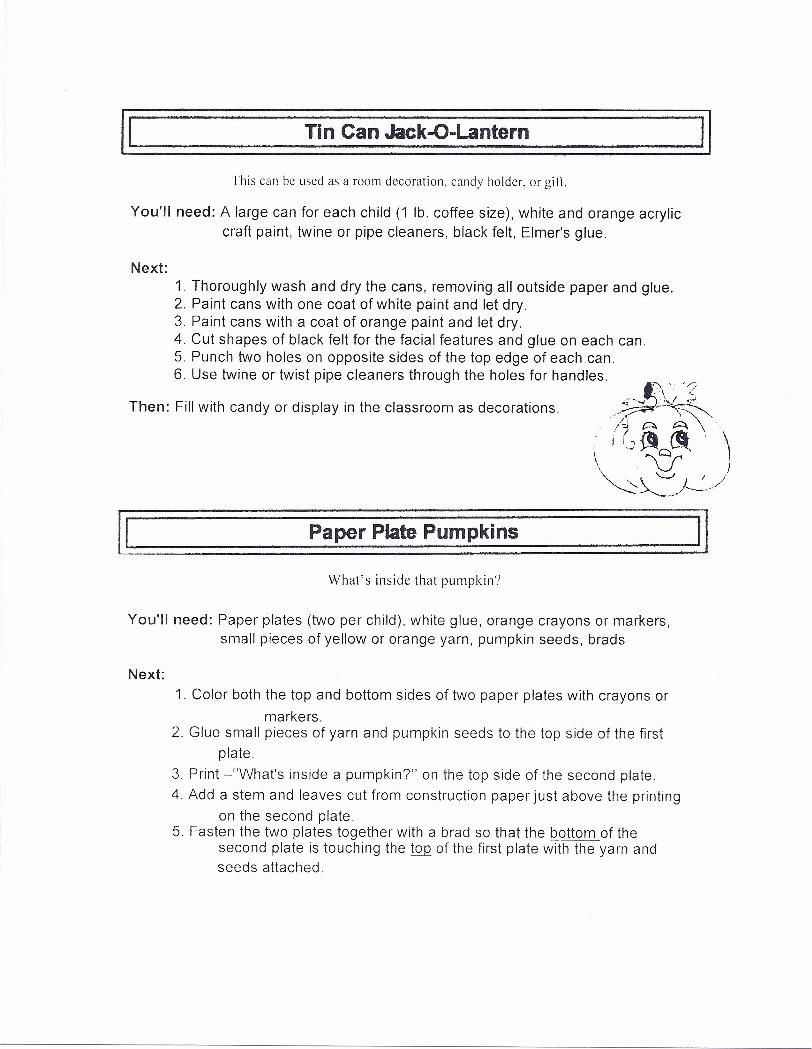
II Tin Can Jack-O-Lantern IIThis can be used as a room decoration, candy holder, or gift,
You'll need: A large can for each child (1 lb. coffee size), white and orange acryliccraft paint, twine or pipe cleaners, black felt, Elmer's glue.
Next:1. Thoroughly wash and dry the cans, removing all outside paper and glue.2. Paint cans with one coat of white paint and let dry.3. Paint cans with a coat of orange paint and let dry.4. Cut shapes of black felt for the facial features and glue on each can.5. Punch two holes on opposite sides of the top edge of each can.6. Use twine or twist pipe cleaners through the holes for handles. '"" .'Fi
Then: Fill with candy or display in the classroom as decorations. /~~~,·/~AA\.l i!.J })Q{§, , \
\V )\"-.:~\:::'.i-!--./
II Paper Plate Pumpkins IIWhat's inside that pumpkin?
You'll need: Paper plates (two per child), white glue, orange crayons or markers,small pieces of yellow or orange yarn, pumpkin seeds, brads
Next:1. Color both the top and bottom sides of two paper plates with crayons or
markers.2. Glue small pieces of yarn and pumpkin seeds to the top side of the first
plate.3. Print -"What's inside a pumpkin?" on the top side of the second plate.4. Add a stem and leaves cut from construction paper just above the printing
on the second plate.5. Fasten the two plates together with a brad so that the bottom of the
second plate is touching the !QQ of the first plate with the yarn andseeds attached.
Language Arts for Pumpkin Fans
11i.- p_u_m....:..p_ki_" _sh_a..:....pe_p_oetry--=~ llObjective: Students will be able to list and use adjectives.You'll need: A pumpkin, chart paper, marker, 8" x11" white drawing paper (one
sheet per student), pumpkin shapes to trace, pencils,fine-point black markers (optional)
Procedure:1. Display the pumpkin in a spot visible to all students.2. Lead students in a discussion of adjectives as describing words and elicit
specific examples of adjectives that describe the pumpkin.3. List student-supplied adjectives on chart paper for all to see.4. Have students choose their favorite five adjectives from the list and
record them on a piece of notebook paper.5. Distribute white art paper and ask each student to lightly trace around
one of the pumpkin patterns.(NOTE: using a variety of pumpkin shapes makes the final display more interesting)
6. Use the list of favorite adjectives and have students copy the words inorder around the outline of their pumpkins, repeating the pattern untilthe entire outline is complete. Trace over the words with a fine-pointmarker.
7. Erase all pencil marks.8. Share with other class members and display for all to admire.
11~ pu.:...m....!p_k_in_S_ha..!.pe_Boo_k_S 11
Objective: Students will create and share pumpkin stories.You'll need: Pumpkin shapes to trace (see previous lesson), orange construction
paper, white paper, crayons, pencils, stapler.Procedure:
1. Trace pumpkin shapes onto orange construction paper and plain whitepaper. Cut out in sufficient quantity for each student to make a book.
2. Brainstorm ideas for pumpkin stories. Develop an information web withstudents on large chart paper.
3. Direct students to complete a rough draft. Conference with students toedit their efforts.
4. Copy final stories on pumpkin-shaped white paper. Use orangeconstruction paper pumpkins for front and back covers. Addjack-o-Iantern faces with black crayon.
5. Share stories with other class members.
Make a Paper Pumpkin Garland
W¥1t1t !::jOIA. \'\.ted:
Orange construction paper - Scissors - Markers or paint - RulerW¥1t1t !::jOIA. clo:
1. On the top layer, draw a pumpkin with a stem. Make the widest sides of the pumpkin gobeyond the folded edge.
2. Cut a 3-inch by 12-inch strip from a piece of orange construction paper. Fold up the paper,accordion style, six times.
3. Now cut through all the layers except the sides of the pumpkin that touches the fold.4. Open the garland, and decorate the pumpkins with markers or paint.
Pumpkin Crayon Suncatcher
W¥1t1t !::j01A. \'\.teetOrange and green crayons - Pencil sharpener or cheese grater - Wax Paper - Iron - Scissors - Stringand tapeW¥1t1t !::jOIA. clo:
1. Sharpen the orange and green crayons and collect the shavings. Or, grate the crayons on acheese grater.
2. Sprinkle the orange shavings on a sheet of wax paper, so that they resemble a round pumpkin.Sprinkle the green Shavings at the top for the pumpkin stem. Cover with a second sheet ofwax paper.
3. Iron the wax paper "sandwich" on a low setting until the shavings melt, about 5 to 8 seconds.4. Use the scissors to trim around the pumpkin. Then, tape a loop of string to the pumpkin stem.
Hang your suncatcher in a sunny window to capture the sun's rays.
Plant a Play Clay Pumpkin Patch
W¥1t1t !::jOIA.'lt \'\.tecl:1 cup flour1 cup watert cup salt2 tsp. cream of tartar1 tbsp. cooking oilOrange and green food coloringW¥1t1t !::j01A. clo:
1. In a saucepan, mix dry ingredients. Add oil and water. Cook three minutes or until mixturepulls away from sides of the pan.
2. When the dough is cool enough to touch, divide it in half and knead immediately. Addorange to one half and green to the other.
3. Working over a sheet of wax paper, roll the orange dough into mini pumpkins or use apumpkin cookie cutter.
4. Using the green dough, make stems and leaves.5. Use green curling ribbon for the vines.6. Use styrofoam trays to hold your pumpkin garden.
--
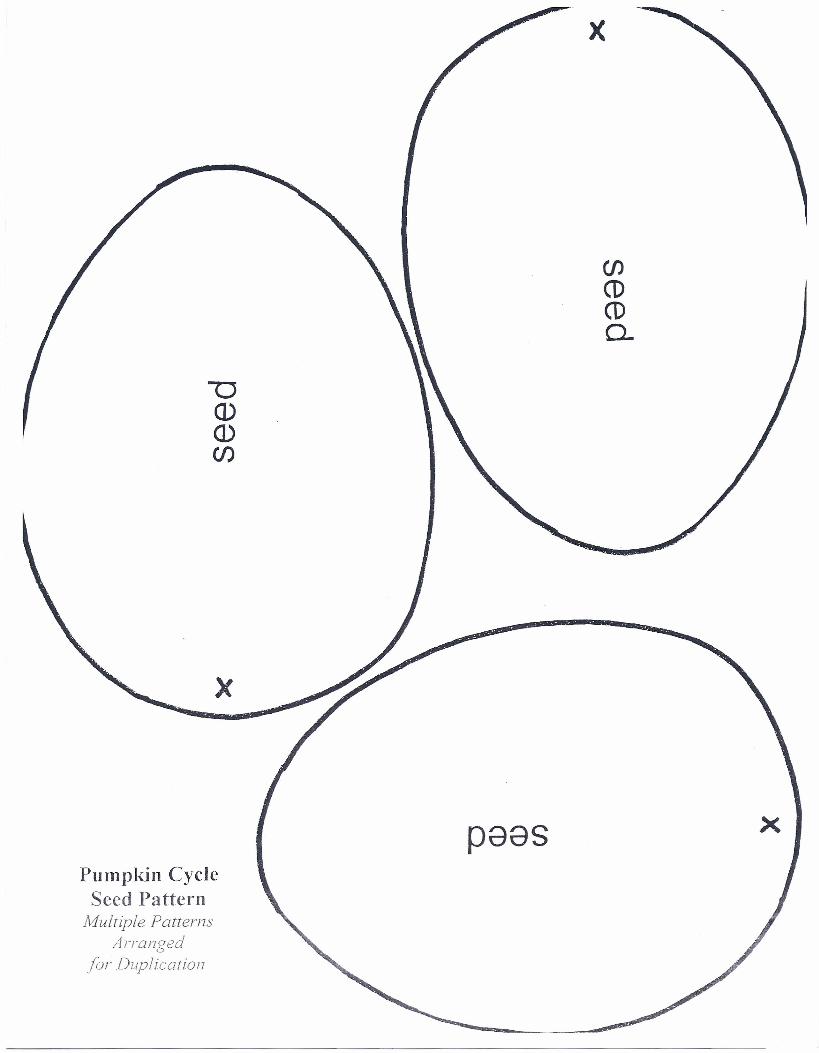
See How the Pumpkins Grow!
You'll Need:2 orange paper plates (per student)construction paper
green, orange, yellow, brownyarn - brown or green (four12-inch pieces per student)scissorsstaplerhole punchblack markerspatterns (attached)
Directions:Before you begin the activity1. Trace pattern pieces (for each student) onto the following colors ofconstruction paper:
seed ... brownleaf. .. greenflower. .. yellowimmature fruit. .. greenmaturing fruit. .. orange
During the activity2. Pass out to each student:
1 of each of the pattern pieces2 orange paper plates4 - 12 inch pieces of yarn (green or brown)
3. Direct the students to cut out their pattern pieces4. Demonstrate, then help students punch holes in opposite ends of each
pattern piece they have cut out.5. Connect the pattern pieces with yarn in the following order:
seed - leaf - flower - immature fruit - mature fruit6. Staple the yarn from the mature fruit to the top side of one of the orange
paper plates.7. Connect the two paper plates (bottom side out) with staples along the
edges, leaving room to slide the pattern pieces inside.8. Use markers to decorate the paper plate pumpkin to resemble a
jack-o-Iantern.
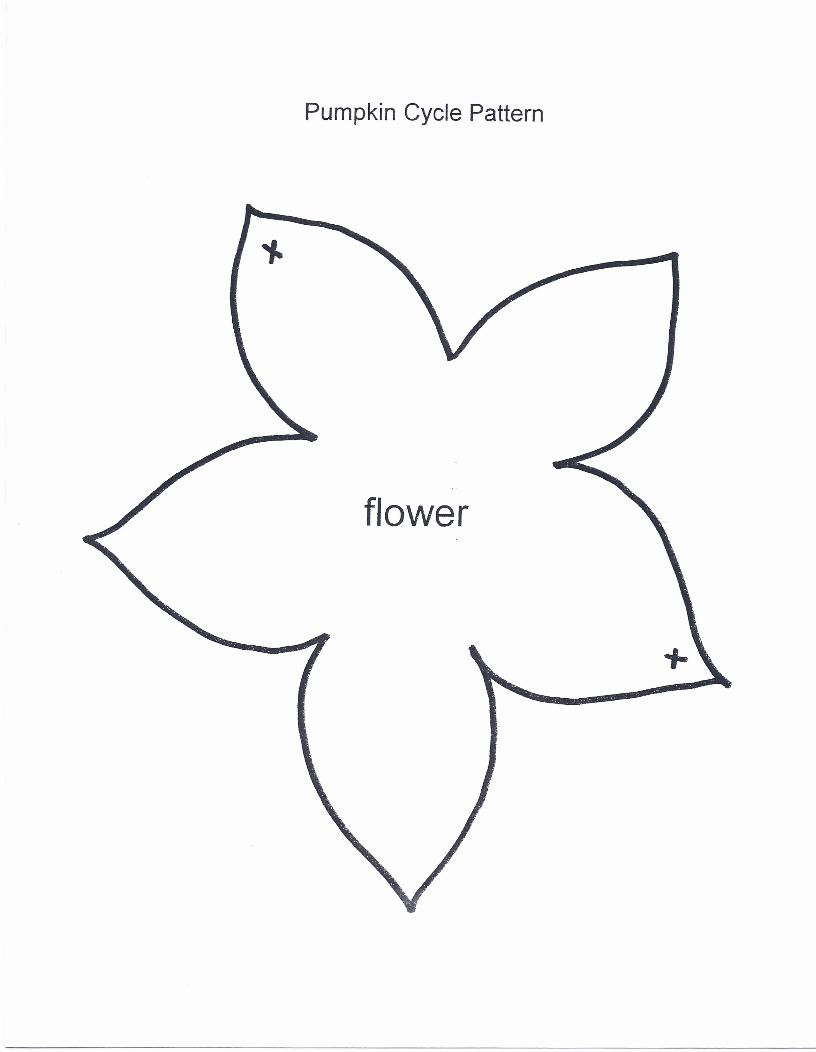
Pumpkin Cycle Pattern
flower
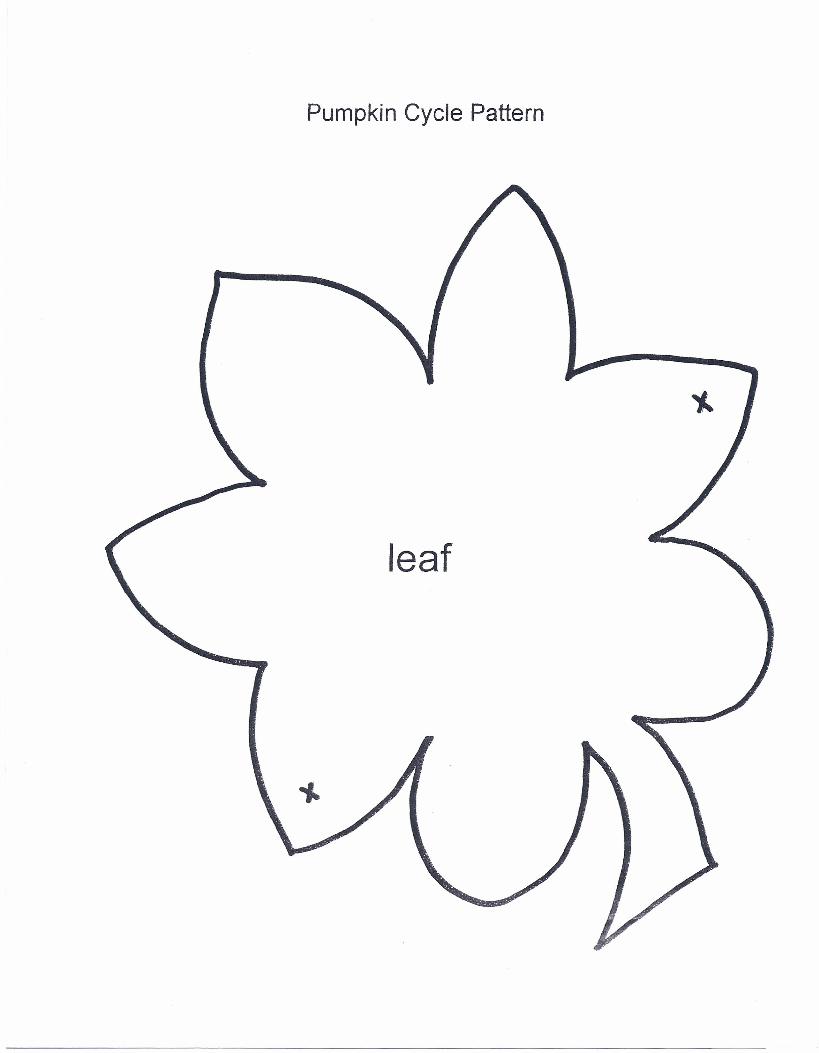
Pumpkin Cycle Pattern
leaf
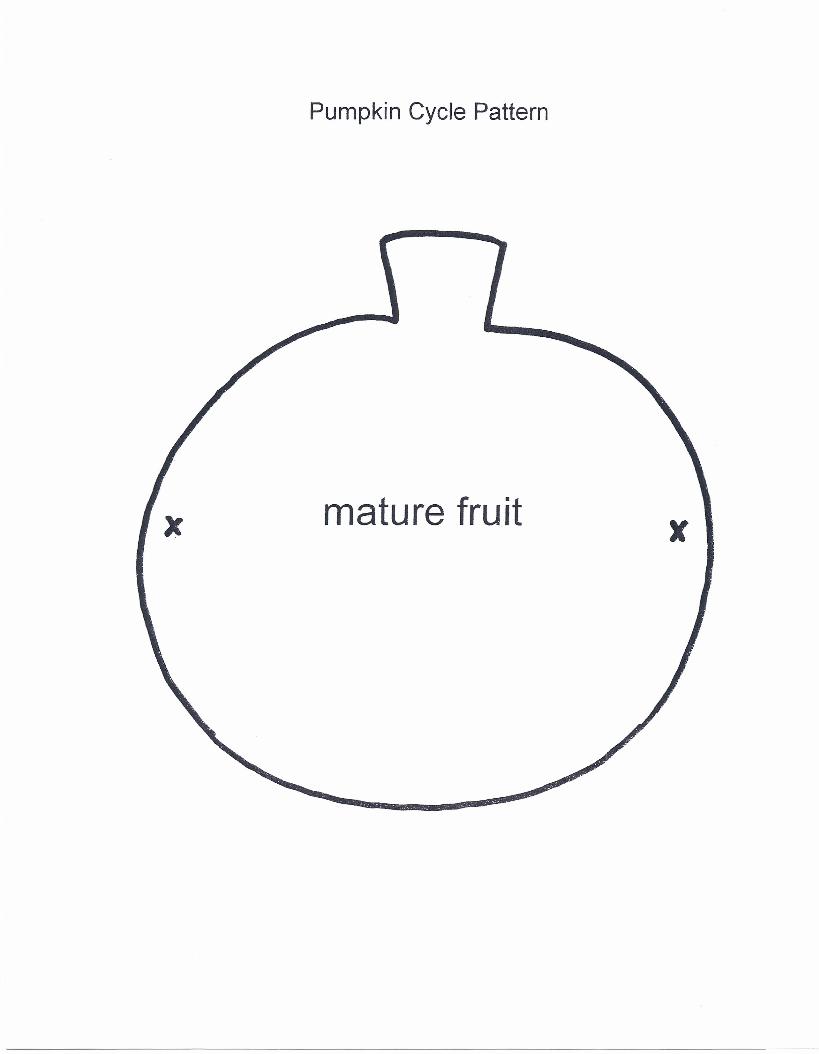
Pumpkin Cycle Pattern
mature fruit x
-0(])(])(j)
Pumpkin CycleSeed Pattern
1I1Z'Zu tip e PatternsArranged
for Duplication
x
(f)CD(00..
x
pees x
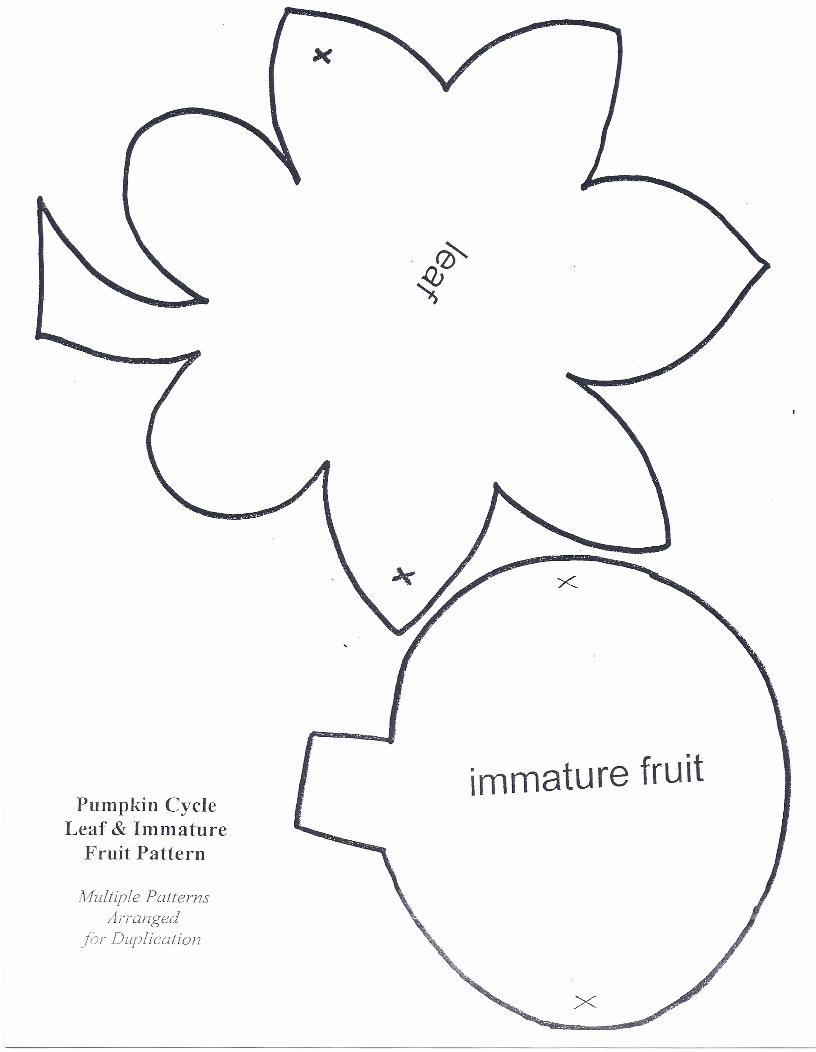
immature fruitPumpkin Cycle
Leaf & ImmatureFruit Pattern
Multiple PatternsArranged
for Duplication
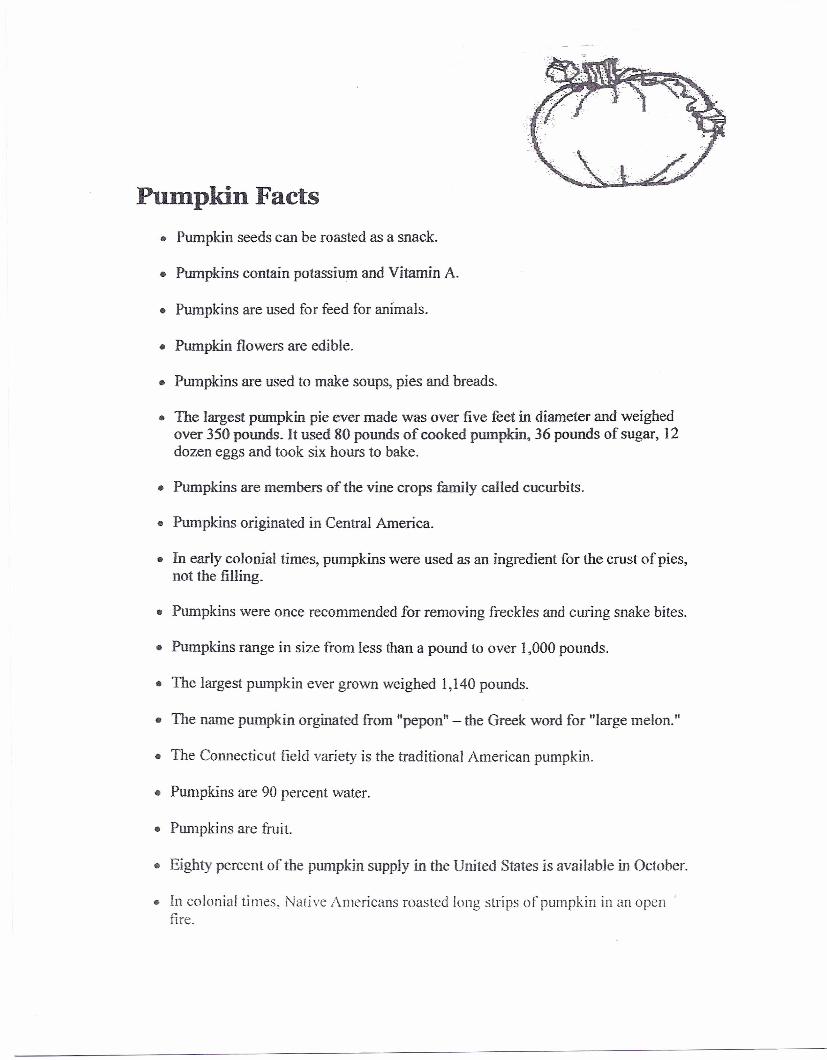
Pumpkin Facts• Pumpkin seeds can be roasted as a snack.
• Pumpkins contain potassium and Vitamin A.
• Pumpkins are used for feed for animals.
• Pumpkin flowers are edible.
• Pumpkins are used to make soups, pies and breads.
• The largest pumpkin pie ever made was over five feet in diameter and weighedover 350 pounds. It used 80 pounds of cooked pumpkin, 36 pounds of sugar, 12dozen eggs and took six hours to bake.
• Pumpkins are members of the vine crops family called cucurbits.
• Pumpkins originated in Central America.
• In early colonial times, pumpkins were used as an ingredient for the crust of pies,not the filling.
• Pumpkins were once recommended for removing freckles and curing snake bites.
• Pumpkins range in size from less than a pound to over 1,000 pounds.
• The largest pumpkin ever grown weighed 1,140 pounds.
• The name pumpkin orginated from "pepon" - the Greek word for "large melon."
• The Connecticut field variety is the traditional American pumpkin.
• Pumpkins are 90 percent water.
• Pumpkins are fruit.
• Eighty percent of the pumpkin supply in the United States is available in October.
• In colonial times, Native Americans roasted long strips of pumpkin in an openfire.
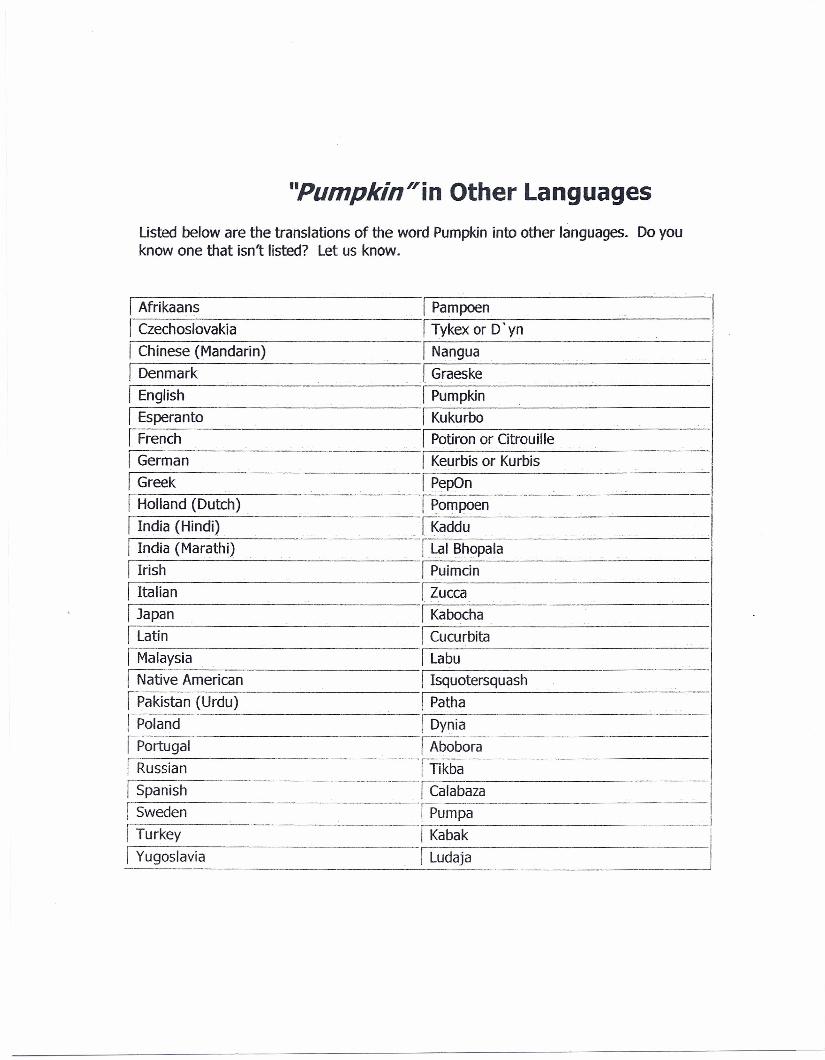
"Pumpkin"in Other LanguagesUsted below are the translations of the word Pumpkin into other languages. Do youknow one that isn't listed? Let us know.
I Afrikaans 1 PampoenI Czechoslovakia . I Tykex or D'ynI Chinese (Mandarin) I NanguaI Denmark I GraeskeI English I Pumpkin1 Esperanto I KukurboI French I Potiron or Citrouille
man IK rbi r KurbisI Ger . I .eu s 0 0 I
I Greek I PepOn .1
1 Holland (Dutch) 1 Pompoen o· .11I-I-n-di-a--:-(H---'i-nd-:-:i)-.-----'-'----'-------'--1 KadduI I dl (M thi) I~L"":":'I-B-h------'-:---'---'---'---'--"-"'--~-'--'n ra ara I a opa a
.0 o 0 o·
1 Irish 1 Puimcin1 Italian IZucca1 Japan I KabochaI Latin I CucurbitaI Malaysia I LabuI Native American I IsquotersquashI Pakistan (Urdu) i PathaI Poland I DyniaI Portugal I AboboraI Russian I Tikba
S anish CalabazaI pI Sweden
I TurkeyI Yugoslavia ------------------------------------------------~
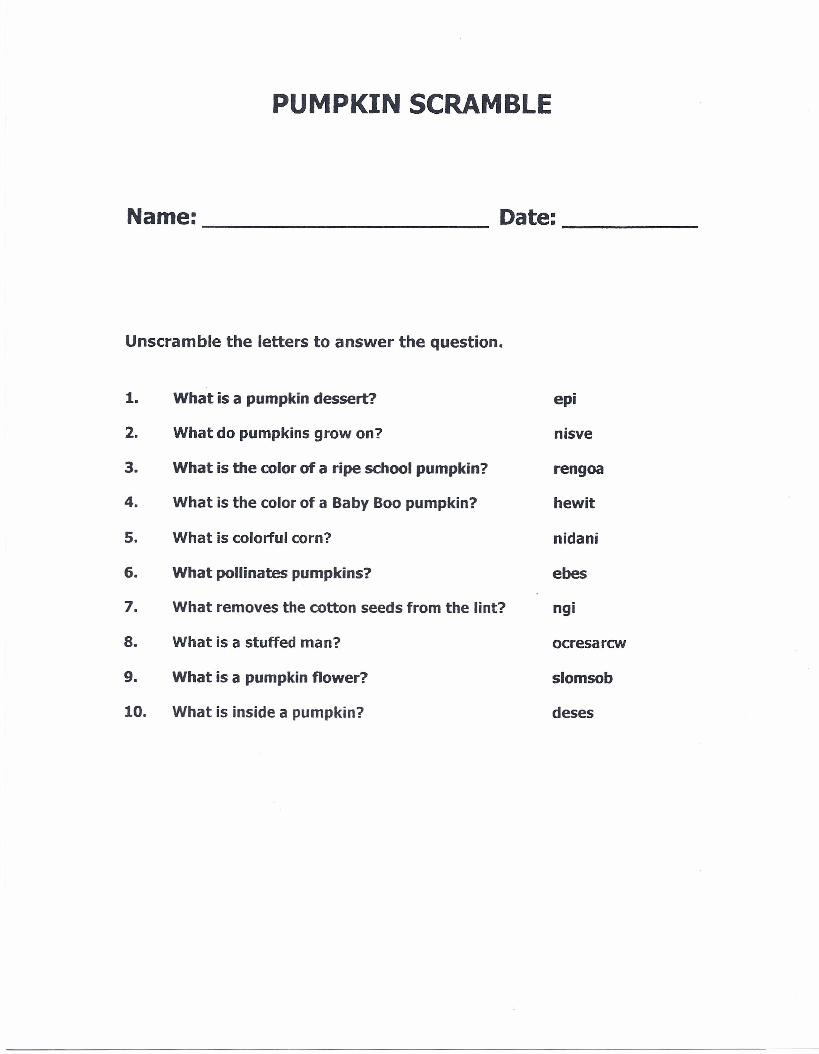
PUMPKIN SCRAMBLE
Name: ----------------------------- Date: _
Unscramble the letters to answer the question.
1. What is a pumpkin dessert? epi
2. What do pumpkins grow on? nisve
3. What is the color of a ripe school pumpkin? rengoa
4. What is the color of a Baby Boo pumpkin? hewit
5. What is colorful corn? nidani
6. What pollinates pumpkins? ebes
7. What removes the cotton seeds from the lint? ngi
8. What is a stuffed man? ocresarcw
9. What is a pumpkin flower? slomsob
10. What is inside a pumpkin? deses
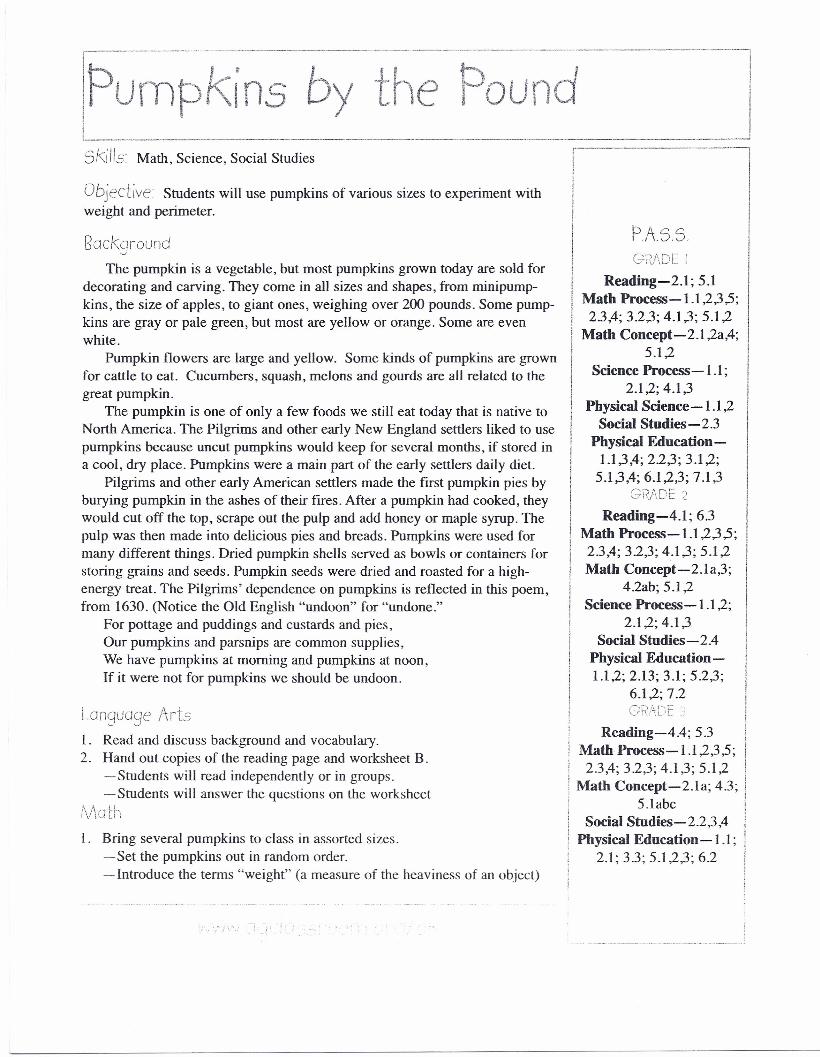
/PumpKins by the PoundiL- _skills Math, Science, Social Studies
Objective Students will use pumpkins of various sizes to experiment withweight and perimeter.
8ackgroundThe pumpkin is a vegetable, but most pumpkins grown today are sold for
decorating and carving. They come in all sizes and shapes, from minipump-kins, the size of apples, to giant ones, weighing over 200 pounds. Some pump-kins are gray or pale green, but most are yellow or orange. Some are evenwhite.
Pumpkin flowers are large and yellow. Some kinds of pumpkins are grownfor cattle to eat. Cucumbers, squash, melons and gourds are all related to thegreat pumpkin.
The pumpkin is one of only a few foods we still eat today that is native toNorth America. The Pilgrims and other early New England settlers liked to usepumpkins because uncut pumpkins would keep for several months, if stored ina cool, dry place. Pumpkins were a main part of the early settlers daily diet.
Pilgrims and other early American settlers made the first pumpkin pies byburying pumpkin in the ashes of their fires. After a pumpkin had cooked, theywould cut off the top, scrape out the pulp and add honey or maple syrup. Thepulp was then made into delicious pies and breads. Pumpkins were used formany different things. Dried pumpkin shells served as bowls or containers forstoring grains and seeds. Pumpkin seeds were dried and roasted for a high-energy treat. The Pilgrims' dependence on pumpkins is reflected in this poem,from 1630. (Notice the Old English "undoon" for "undone."
For pottage and puddings and custards and pies,Our pumpkins and parsnips are common supplies,We have pumpkins at morning and pumpkins at noon,If it were not for pumpkins we should be undoon.
Language ,t\rtsl. Read and discuss background and vocabulary.2. Hand out copies of the reading page and worksheet B.
-Students will read independently or in groups.-Students will answer the questions on the worksheet
J\;\athl . Bring several pumpkins to class in assorted sizes.
- Set the pumpkins out in random order.- Introduce the terms "weight" (a measure of the heaviness of an object)
I PA.S.S.I GRADE!I Reading-2.1; 5.1I Math Process -1.1 ,2,3,5;II 2.3,4; 3.2,3; 4.1,3; 5.1,2I Math Concept-2.1 ,2a,4;i 5.1,2I Science Process-I.l;II 2.1,2; 4.1,3I Physical Science -1.1,2I Social Studies - 2.3I Physical Education-I 1.1,3,4; 22,3; 3.1,2;i 5.1,3,4; 6.1,2,3; 7.1,3I GRhDE 2I Reading-4.1; 6.3
'
II'. Math Process-I.1,2,3,5;2.3,4; 32,3; 4.1,3; 5.1,2
I Math Concept-2.1a,3;I 4.2ab;5.1,2I Science Process-1.1,2;, 2.1,2; 4.1,3
Social Studies- 2.4Physical Education-1.1,2; 2.13; 3.1; 52,3;
6.1,2; 72
II
III
IReading-4.4; 5.3 !IMath Process -1.1 ,2,3,5;
2.3,4; 32,3; 4.1,3; 5.1,2; i! Math Concept-2.1a; 4.3; !: i, 5.1abc I
Social Studies-2.2,3,4 jPhysical Education - 1.1; i
2.1;3.3;5.1,2,3;6.2 I
string
scale
tape measure
1 large knife
and "perimeter" (the measure of the whole outer boundary of a body or fig-ure).-Students will lift the pumpkins one by one and estimate their weights.-Students will arrange the pumpkins according to their weights-fromlightest to heaviest.
2. Pass out student worksheet B.- Students will weigh the pumpkins and record their findings in poundsand kilograms.
3. Students will estimate the perimeter of each pumpkin by cutting lengths ofstring they think will reach around the pumpkin.-Students will measure the pumpkins with a tape measure.-Create a chalkboard graph with the words "too long," "too short,""same."-Students will tape the string estimates in the correct space on the chalk-board graph.-Discuss the graph. Ask how many pieces of yarn were too long? Tooshort? The same? Most estimates were '----Students will draw a model of the graph in a journal or on a separatesheet of paper
4. Introduce the abbreviation for pounds ("lbs.") and the pound symbol ("#").5. Students will estimate the number of seeds in a pumpkin.
- Divide class members into groups of four or five students.-Provide one pumpkin for each group. Allow students to handle the pump-kins.- Review the term "estimate."- Each group will estimate the number of seeds in their pumpkin.- Write the group estimates on the chalkboard.- Hand out three sheets of construction paper.-Groups will tape the construction paper together in a row to create placevalue boards.-One member of each group will write the place value terms:
"ones" across the top of the first sheet of construction paper,"tens" across the top of the second sheet"hundreds" across the top of the third sheet.
-Cut the top from each pumpkin.-Give each group 10 small cups and two large styrofoam cups. Keep extracontainers handy in case any of the pumpkins have unusually large numbersof seeds.-Students scoop the seeds from the pumpkins with their hands and placethem on the construction paper labeled "ones."- Students count the seeds into groups of ten and place them in the smallcups.-Students place the filled cups on the construction paper labeled "tens."- When students have counted ten groups of ten they dump those cups intothe larger cups and place them on the construction paper labeled "hun-dreds."-Continue the activity until all the seeds have been counted.
Ii13 sheets construction paper
I tape
1
10 small cups (muffin cup,bathroom cup, or nut cup)
I 2 large styrofoam cups
(for each group)
1 pumpkin
I
I
IIt.12.
I13.I! 4.iI15.IIIi 6.
Roasted PumbkinI
SeedsWash pumpkin seeds.Place seeds in a veg-etable steamer withsome water.Cover and cook for 30minutes.Dry the seeds with atowel.Spread seeds on acookie sheet, brushwith vegetable oil andsprinkle with salt.Bake the seeds in apreheated 300-degreeoven for 30 minutes, oruntil golden.
; .' ,.
-Students will write and read the exact number of seeds in their pumpkins.-Students compare exact numbers with estimates.
Science1. Students will guess whether the pumpkins will sink or float. Test guesses in
a tub of water.2. Use the recipe included with this lesson to make pumpkin pie in a bag.
-Students will describe the pie ingredients before baking.- Ask students to write what they think will happen after the ingredientsare baked.-Students will describe ingredients after they are baked.
Social studies1. Use pumpkins as globes to represent the Earth.
-Students will draw latitude and longitude lines on their pumpkins at 10degree increments.-Students will find north, south, east and west hemispheres.-Students will paint continents on their pumpkins with tempera paint.- After the continents have dried, students will paint bodies of water.
Visual Arts1. Make pumpkin seed art.
- Bake clean seeds in a 300-degree oven for 30 minutes, or until golden.-Let the seeds cool completely.- Provide students with tempera paint in autumn colors, and have them dipthe pumpkin seeds in the paint.-Let the seeds dry.-Students draw tree trunks with branches and glue seeds to the branches tomake beautiful full trees.
4. Students draw Jack-o-lanterns, color them and use different kinds of seedsto make their features.
Get Up and N\ove1. Play Pumpkin Man:
- Teach the following chant:Pumpkin man, pumpkin man, catch a brownie if you can,Yes Iwill, Yes Iwill, if the brownie will stand still.
-Divide students into two groups-a Pumpkin group and a Browniegroup.-Students form a circle, facing inward.-Pumpkins step forward and put their palms together to make "windows."(Don't weave fingers.)- Brownies go in and out of the windows at least twice as everyone saysthe chant.- When teacher says "stop," Pumpkins lower the "windows." All Browniesinside the circle become Pumpkins and join the Pumpkin circle.- Play twice so everyone who started as a Pumpkin gets to be a Brownie.
f--'--'-' "1 i
I Vocabulary Ii carve-to cut with care or i
I,exactness ,I
decorate-to make moreIattractive by adding some- I!
I thing that is beautiful orI becomingIgourd-any of a family of II tendril-bearing vines (as the Ii cucumber, melon, squash, i
! and pumpkin) IIPilgrim-one of the I! English colonists whoI founded the first permanenti settlement in New England! at Plymouth in 1620I pulp- the soft juicy orI fleshy part of a fruit or veg-I
Ietable! pumpkin - the usuallyI round orange fruit of a vineI! of the gourd family widelyIused as foodI settler-a person who set-I ties in a new regionIvegetable-a leafy plantI (as the cabbage, bean, or! potato) usually withoutII woody tissue grown for an! edible part that is usuallyII eaten as part of a meal
II
Gillis, Jennifer, In aPumpkin Shell: Over 20Pumpkin Projects forKids, Storey, 1992.
King, Elizabeth, PumpkinPatch, Dutton 1990.
Reading Page
Pumpkins by the PoundThe pumpkin is a vegetable, but most pumpkins grown today are sold for decorating and
carving. They come in all sizes and shapes, from minipumpkins, the size of apples, to giant
ones, weighing over 200 pounds. Some pumpkins are gray or pale green, but most are yellow
or orange. Some are even white.
Pumpkin flowers are large and yellow. Some kinds of pumpkins are grown for cattle to eat.
Cucumbers, squash, melons and gourds are all related to the great pumpkin.
The pumpkin is one of only a few foods we still eat today that is native to North America.
The Pilgrims and other early New England settlers liked to use pumpkins because uncut pump-
kins would keep for several months, if stored in a cool, dry place. Pumpkins were a main part
of the early settlers daily diet.
Pilgrims and other early American settlers made the first pumpkin pies by burying pumpkin
in the ashes of their fires. After a pumpkin had cooked, they would cut off the top, scrape out
the pulp and add honey or maple syrup. The pulp was then made into delicious pies and
breads. Pumpkins were used for many different things. Dried pumpkin shells served as bowls
or containers for storing grains and seeds. Pumpkin seeds were dried and roasted for a high-
energy treat. The Pilgrims' dependence on pumpkins is reflected in this poem, from 1630.
(Notice the Old English "undoon" for "undone.")
For pottage and puddings and custards and pies,
Our pumpkins and parsnips are common supplies,
We have pumpkins at morning and pumpkins at noon,
If it were not for pumpkins we should be undoon.
Oklahoma Ag in the Classroom i, J program of the Oklahoma Cooperative Extension Service, the Oklahoma Department atAgriculture, Food and Forestry and the Oklahoma State Department of Edication.
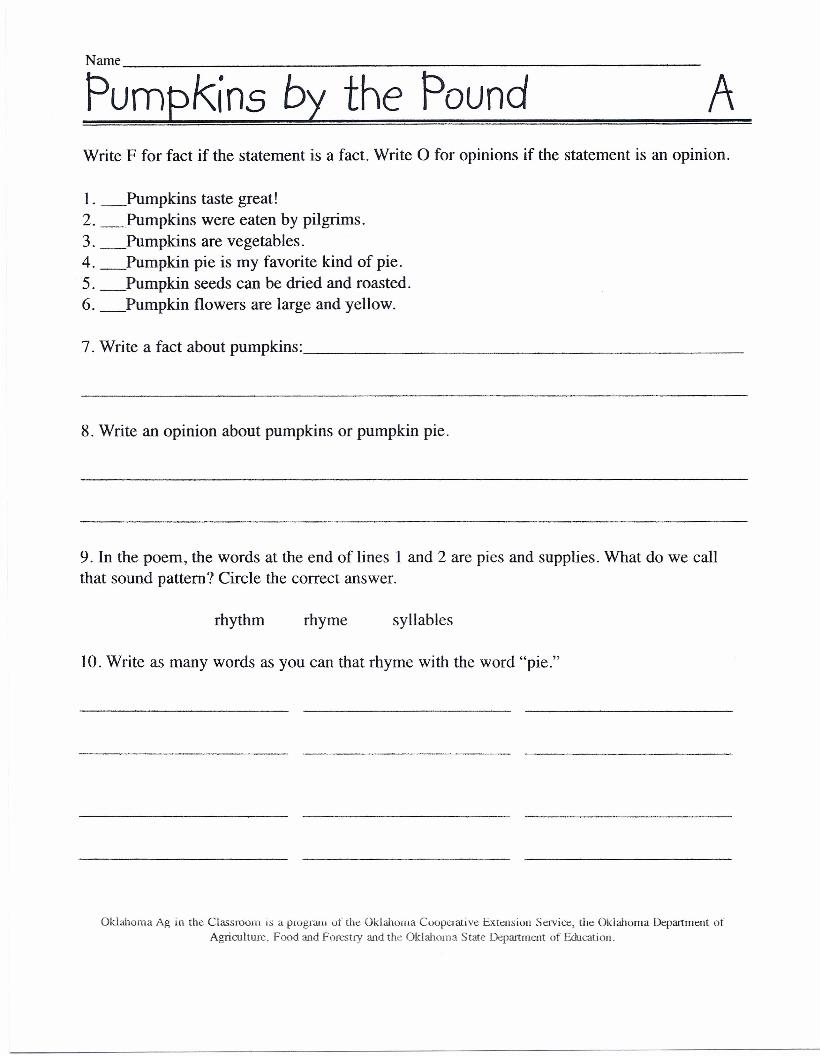
Name _
Pumpkins by the Pound AWrite F for fact if the statement is a fact. Write 0 for opinions if the statement is an opinion.
1. _Pumpkins taste great!2. _Pumpkins were eaten by pilgrims.3. _Pumpkins are vegetables.4. _Pumpkin pie is my favorite kind of pie.5. _Pumpkin seeds can be dried and roasted.6. _Pumpkin flowers are large and yellow.
7. Write a fact about pumplcins: _
8. Write an opinion about pumpkins or pumpkin pie.
9. In the poem, the words at the end of lines 1 and 2 are pies and supplies. What do we callthat sound pattern? Circle the correct answer.
rhythm rhyme syllables
10. Write as many words as you can that rhyme with the word "pie."
Oklahoma Ag in the Classroom is a program of the Oklahoma Cooperative Extension Service, the Oklahoma Department ofAgriculture, Food and Forestry and the Oklahoma Stare Department of Education.
Nmne _
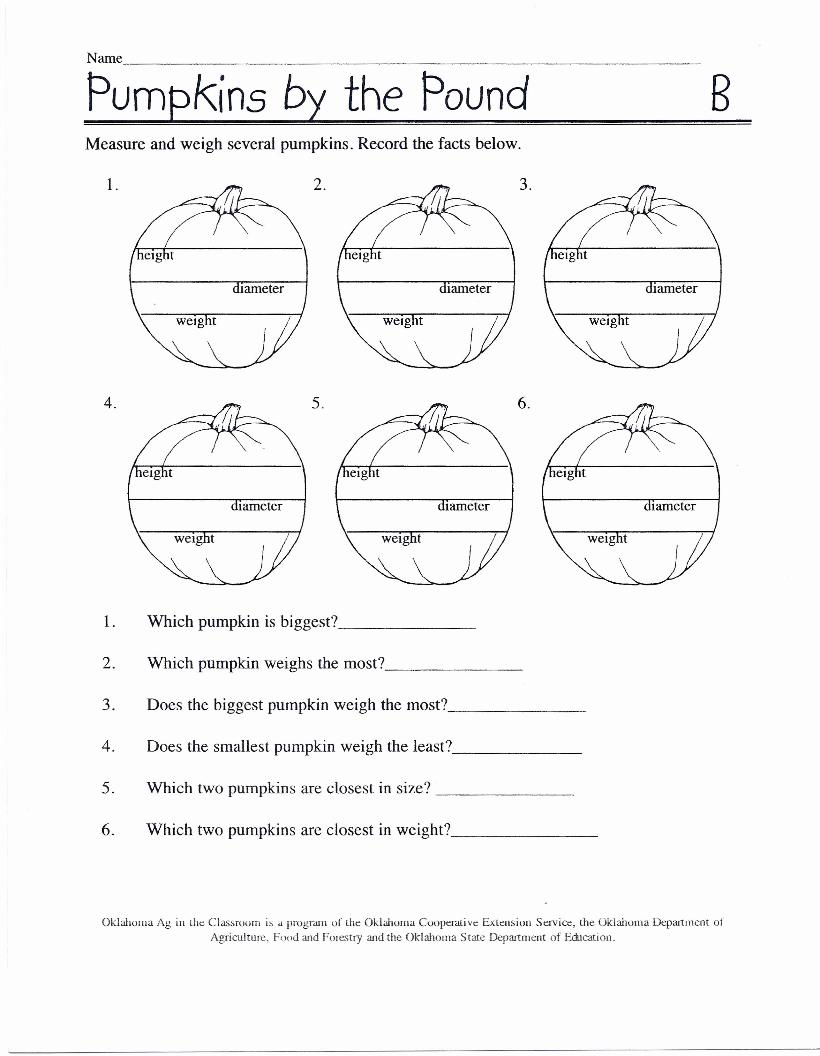
Pumpki ns by' the Pound BMeasure and weigh several pumpkins. Record the facts below.
1.
4.
2.
5.
1. Which pumpkin is biggest? _
2. Which pumpkin weighs the most? _
3.
6.
3. Does the biggest pumpkin weigh the most? _
4. Does the smallest pumpkin weigh the least? _
5. Which two pumpkins are closest in size? _
6. Which two pumpkins are closest in weight? _
Oklahoma Ag in the Classroom is a program of the Oklahoma Cooperative Extension Service, the Oklahoma Department ofAgriculture. Food and Forestry and the Oklahoma State Department of Education.
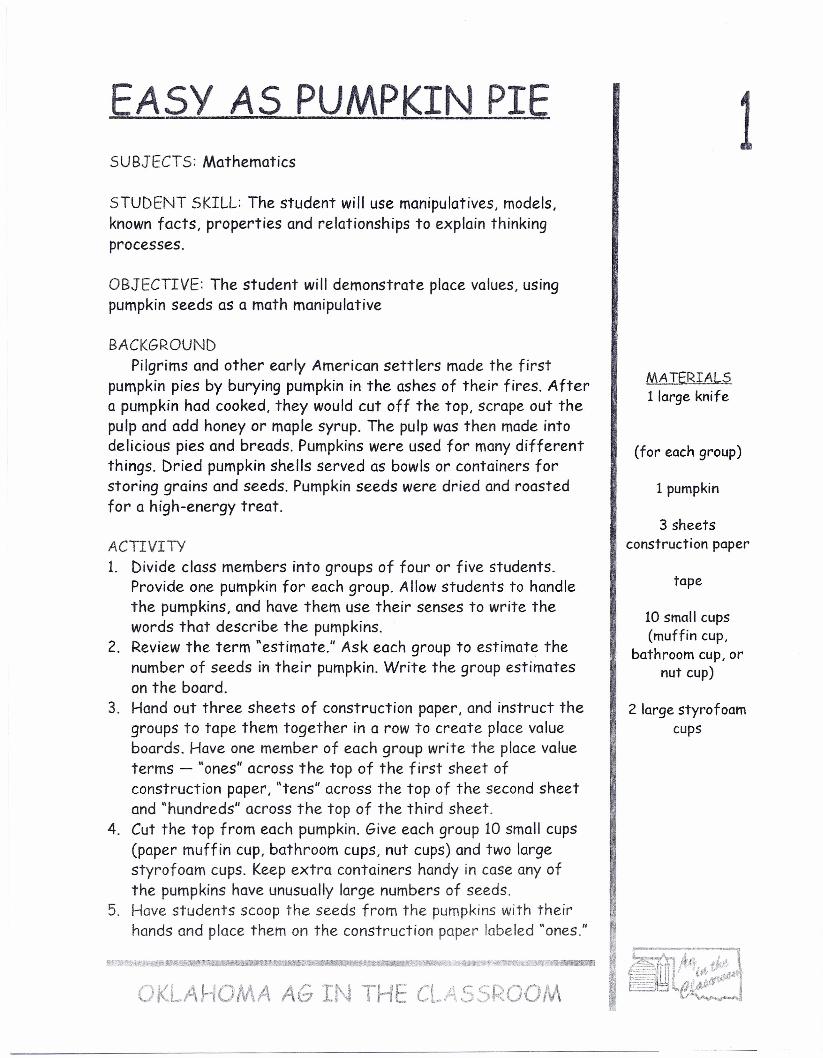
EASY AS PUMPKIN PIESUBJECTS: Mathematics
STUDENT SKILL: The student will use manipulatives, models,known facts, properties and relationships to explain thinkingprocesses.
OBJECTIVE: The student will demonstrate place values, usingpumpkin seeds as a math manipulative
BACKGROUNDPilgrims and other early American settlers made the first
pumpkin pies by burying pumpkin in the ashes of their fires. Aftera pumpkin had cooked, they would cut off the top, scrape out thepulp and add honey or maple syrup. The pulp was then made intodelicious pies and breads. Pumpkins were used for many differentthings. Dried pumpkin shells served as bowls or containers forstoring grains and seeds. Pumpkin seeds were dried and roastedfor a high-energy treat.
ACTIVITY1. Divide class members into groups of four or five students.
Provide one pumpkin for each group. Allow students to handlethe pumpkins, and have them use their senses to write thewords that describe the pumpkins.
2. Review the term "estimate." Ask each group to estimate thenumber of seeds in their pumpkin. Write the group estimateson the board.
3. Hand out three sheets of construction paper, and instruct thegroups to tape them together in a row to create place valueboards. Have one member of each group write the place valueterms - "ones" across the top of the first sheet ofconstruction paper, "tens" across the top of the second sheetand "hundreds" across the top of the third sheet.
4. Cut the top from each pumpkin. Give each group 10 small cups(paper muffin cup, bathroom cups, nut cups) and two largestyrofoam cups. Keep extra containers handy in case any ofthe pumpkins have unusually large numbers of seeds.
5. Have students scoop the seeds from the pumpkins with theirhands and place them on the construction paper labeled "ones."
OKLAHOlV\A AG II\} THE CLA.SSROO/V,
1
MATERIALS1 large knife
(for each group)
1 pumpkin
3 sheetsconstruction paper
tape
10 small cups(muffin cup,
bathroom cup, ornut cup)
2 large styrofoamcups
2
VOCABULARYPilgrims
pumpkin
settler
pulp
OkJohomo Ag Jr. the Clcssrocm i:; apr-cqrom of +hc OkkJIIJlt'lo Cccpc-ctivcExtension Service. 4-H YouthDcve!o-pmcn1, in cocper-c tion O\ifj, t beQkIQl\Q1:-£1 Depor-tment of Agdc.u!t>r.c endthe Ok!chomo State Dcpcr-troent ofEducation
OJ.;kJho~lAg in the ClacSrQo'TlOk~hQmc4-H rr~y·o~n.:205 4-H Youth Devclopmeo tOklohor:1OSta1"e Vni~crsrty51diwch.:r, OK 7.!078 .405- 744-3889
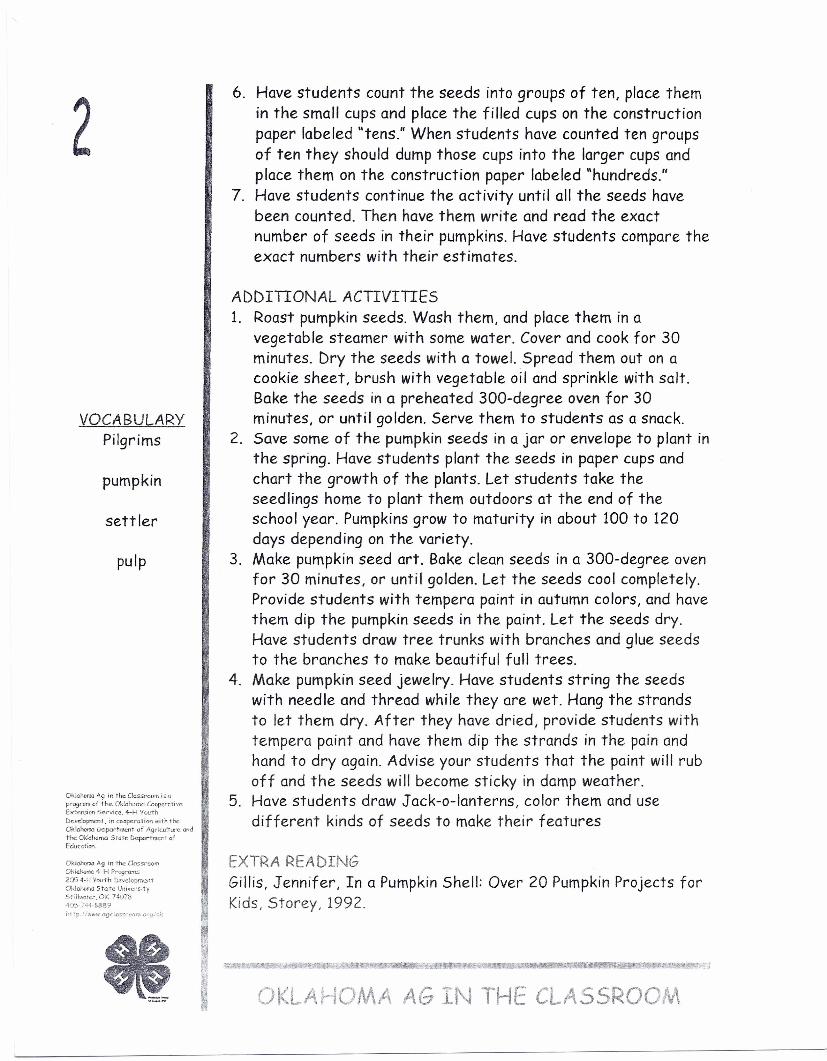
6. Have students count the seeds into groups of ten, place themin the small cups and place the filled cups on the constructionpaper labeled "tens." When students have counted ten groupsof ten they should dumpthose cups into the larger cups andplace them on the construction paper labeled "hundreds."
7. Have students continue the activity until all the seeds havebeen counted. Then have them write and read the exactnumber of seeds in their pumpkins. Have students compare theexact numbers with their estimates.
ADDITIONAL ACTIVITIES1. Roast pumpkin seeds. Wash them, and place them in a
vegetable steamer with some water. Cover and cook for 30minutes. Dry the seeds with a towel. Spread them out on acookie sheet, brush with vegetable oil and sprinkle with salt.Bake the seeds in a preheated 300-degree oven for 30minutes, or until golden. Serve them to students as a snack.
2. Save some of the pumpkin seeds in a jar or envelope to plant inthe spring. Have students plant the seeds in paper cups andchart the growth of the plants. Let students take theseedlings home to plant them outdoors at the end of theschool year. Pumpkinsgrow to maturity in about 100 to 120days depending on the variety.
3. Make pumpkin seed art. Bake clean seeds in a 300-degree ovenfor 30 minutes, or until golden. Let the seeds cool completely.Provide students with tempera paint in autumn colors, and havethem dip the pumpkin seeds in the paint. Let the seeds dry.Have students draw tree trunks with branches and glue seedsto the branches to make beautiful full trees.
4. Make pumpkin seed jewelry. Have students string the seedswith needle and thread while they are wet. Hang the strandsto let them dry. After they have dried, provide students withtempera paint and have them dip the strands in the pain andhand to dry again. Advise your students that the paint will ruboff and the seeds will become sticky in damp weather.
5. Have students draw Jack-o-Ianterns, color them and usedifferent kinds of seeds to make their features
EXTRA READINGGillis, Jennifer, In a PumpkinShell: Over 20 PumpkinProjects forKids, Storey, 1992.
~ OKLAHOMA AG Ij\J THF CLASSROOt\t\
EVALUATIONWere the students able to understand the place value concept?Did any group's estimate come close to the actual number? 3
I
~ ••.......•'---~ ....•.- ,'*
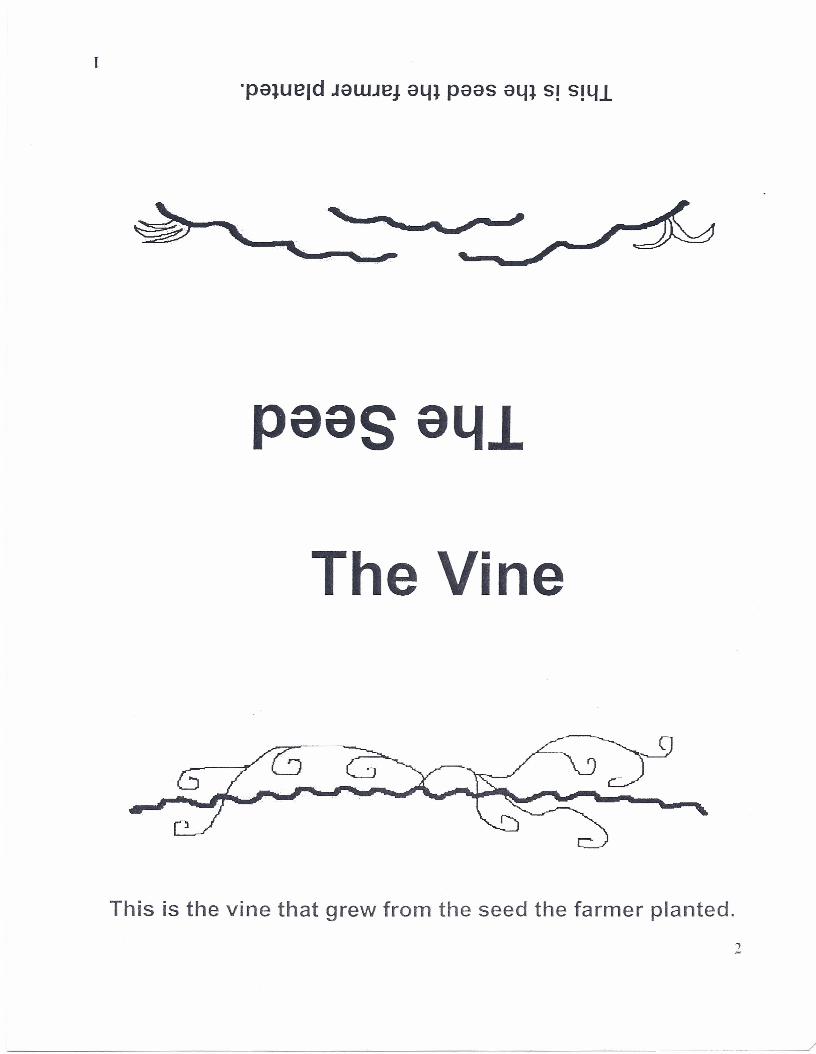
paas a41
The Vine
This is the vine that grew from the seed the farmer planted.
2
~_/
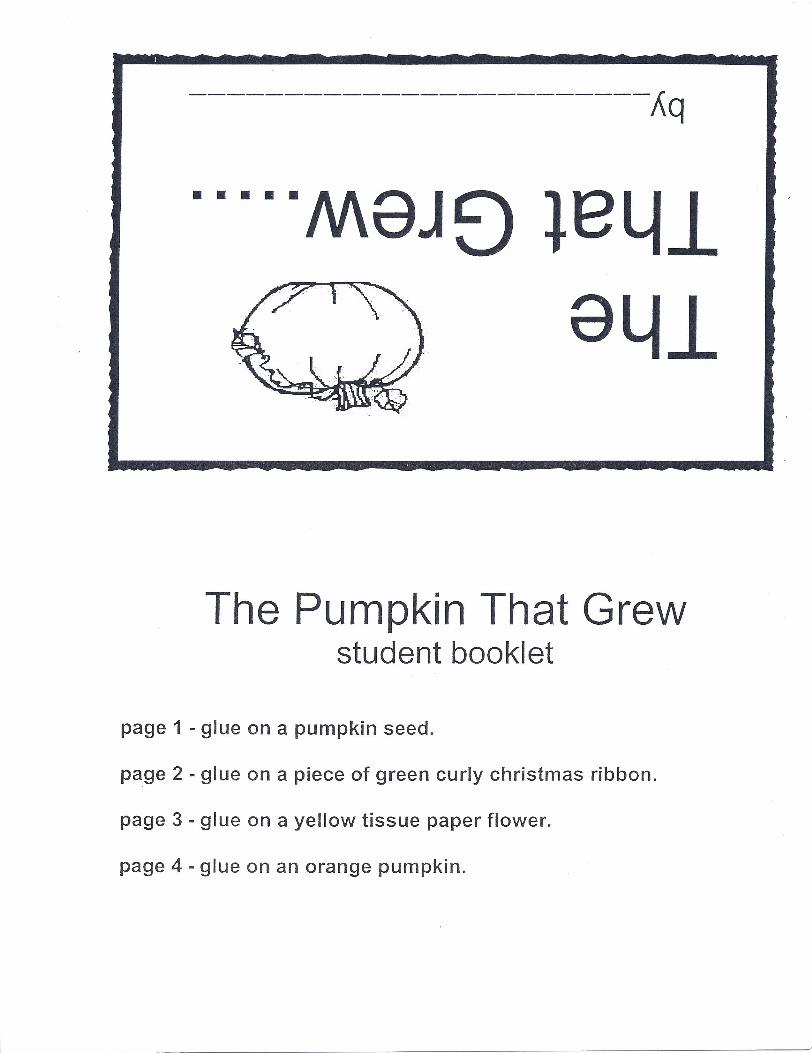
------------------------Aq
• • • •
The Pumpkin That Grewstudent booklet
page 1 - glue on a pumpkin seed.
page 2 - glue on a piece of green curly christmas ribbon.
page 3 - glue on a yellow tissue paper flower.
page 4 - glue on an orange pumpkin.
----------------------------------/
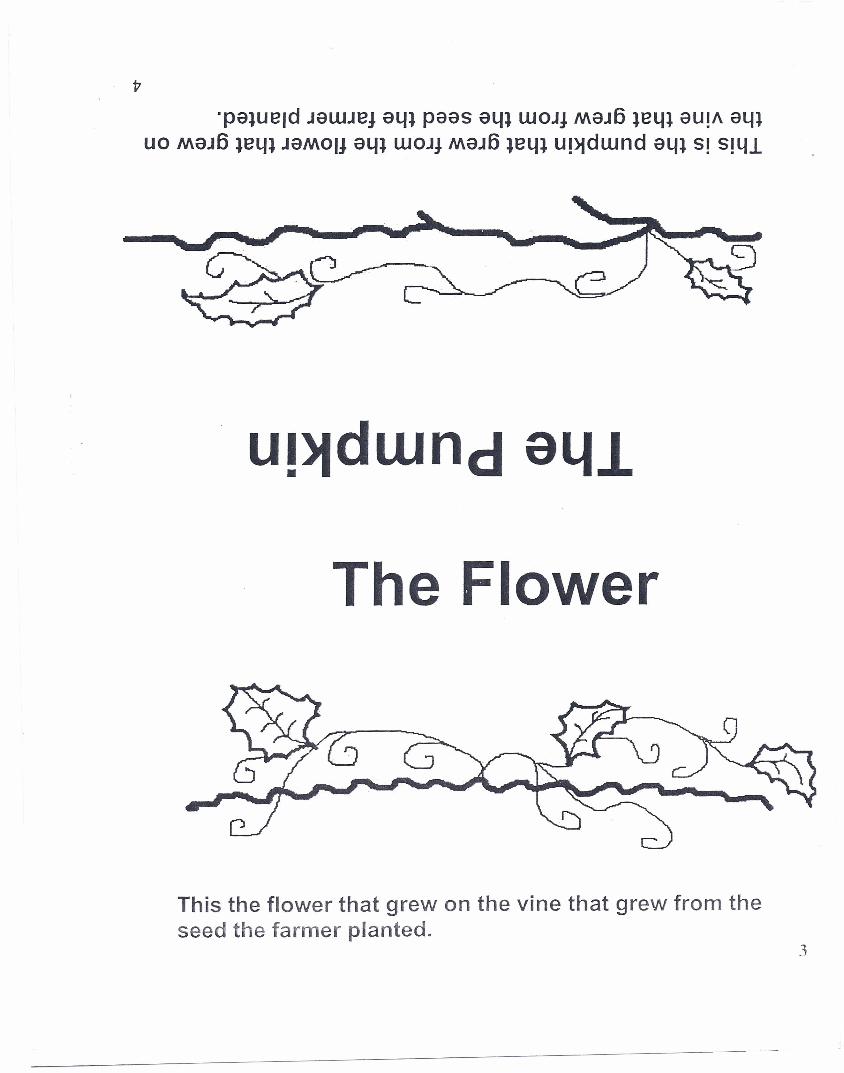
'peiuejd .rauuej a4l paas a4l WOJlMaJ6 leln aU!AalnUOMaJ6 le4l JaMoll a4l WOJlMaJ6 le4l uptdwnd a4l S! S!41
The Flower
This the flower that grew on the vine that grew from theseed the farmer planted.
3