Embed Size (px)
Citation preview

SPONSORED BY
popularwoodworking.com
From the editors of Popular Woodworking
Choosing Handplanes PAGE 1
Tools for DovetailingPAGE 4
Chipbreaker Theory & Use PAGE 6
Perfection by HandPAGE 9
Chisel Use PAGE 14
ALL ABOUT HAND TOOLS

To ensure your projects measure up to your expectations, Lee Valley and Veritas® offera broad selection of precision marking and measuring instruments that repeatedly score good marks among woodworking enthusiasts.
10
1
2
6
3
7
4
8
5
9 11
Marking and Measuring Solutions 1. 05N56.10 Veritas® Large Saddle Square 2. 05N61.05 Veritas® 1:8 Dovetail Saddle Marker 3. 06K15.01 Lee Valley 10’ Tape for Cabinetmakers 4. 05N35.01 Veritas® Precision Square, Imperial 5. 05D21.01 Veritas® Shop Knife 6. 15N05.01 Lee Valley Small Double Square 7. 05N36.31 Veritas® Micro-Adjust Wheel Marking Gauge 8. 05N70.01 Veritas® Dual Marking Gauge 9. 05N33.21 Veritas® Standard Wheel Marking Gauge 10. 05D20.05 Veritas® Workshop Striking Knife 11. 50N02.03 Lee Valley Register Caliper12. 15N07.01 Cast Masons' & Engravers' Square
12
Find us on:
1-800-683-8170 leevalley.com
Browse our catalog online or download it to the Lee Valley Library app for iPad®, iPod®, iPhone® or Android™ devices.

HAND TOOLS
popularwoodworking.com 1
Match the size to the job–that’s the key.
BY TOM CASPAR
Choosing Handplanes
Handplanes come in a bewildering variety of sizes.
Why are there so many? I’ll help explain this mystery
by dividing the field into four groups, in order of size:
block planes, smoothing planes, jack planes, and level-
ing planes. I’ll show you what the planes in each group
are used for, and recommend two different starter sets.
Each group best serves a particular purpose. Smooth-
ing planes, for example, are specifically designed to make
wood as smooth as silk, ready for a finish. In general,
length is the key to understanding a group. Picking a
plane at random, you could use it for most any task, but
pick a plane that’s the correct length and you’ll get the
job done much faster, with better results.
BLOCK PLANES
Block planes are often associated with
carpenters and do-it-yourselfers because
they’re inexpensive and small enough
to fit in a toolbox or toolbelt. They have
important roles in the woodshop, too. A
high-quality block plane can do amaz-
ing work, and may become one of your
favorite tools.
Types. Standard-angle block planes are
the most common. Their blades are bed-
ded at about 20°, with the bevel facing up.
If the blade is sharpened at 25°, its effective
cutting angle is 45°, which is similar to
larger planes. In a low-angle block plane,
the blade is bedded at about 12°, resulting
in a much lower cutting angle. Pocket-sized
planes have a standard bedding angle;
what distinguishes these planes is their
ultra-small size and light weight.
Uses. Block planes are well-suited for
planing end grain or for fitting drawers
and doors, where part of the assembly
is end grain. Planing end grain requires
more force than planing face grain and
POCKET-SIZELOW ANGLESTANDARD ANGLE
puts more stress on the blade. Block plane
blades chatter less because their bevels
face up, not down, as is the case with
most larger planes. Bevel up, the blade’s
tip has additional support from the plane’s
body. Planing end grain using a low-angle
block plane requires less force than using
a standard-angle block plane.
Block planes have more uses beyond
planing end grain, though. They’re very
comfortable to hold in one hand for shap-
ing parts and chamfering edges. A pocket
plane is easy to carry around in your apron.
Block planes are designed for cutting end grain, such as the stile of this door- frame. Their compact size also makes them perfect for planing with one hand.

2
SMOOTHING PLANESA smoothing plane is a serious hand-tool
user’s best friend. Set to cut a tissue-thin
shaving, it can make a board feel smooth
as silk. The wood’s grain will pop in a
way that you can’t achieve through sand-
ing alone.
Types. The No. 4 size is the type most
commonly used, although the larger No.
41/2 is gaining in popularity. The 41/2 is
heavier than the 4, and that added mass
makes it easier to maintain momentum
while planing difficult woods. A No. 4
blade is 2" wide, while a No. 41/2 blade is 2
³/8" wide. A No. 3 smoothing plane is lighter
and narrower than a No. 4. It’s perfect for
a user with less muscle power because its
shavings are narrower. The blade of a No.
3 is 1¾" wide.
Uses. Smoothing planes prepare boards
for finishing. Their relatively short length
makes them ideal for planing a wide board
or a glued-up top because they can follow
slight irregularities in a board’s surface
NO. 3NO. 4NO. 41/2
and still make a long, continuous thin
shaving, the gold standard in smoothing
work. Longer planes require a board to be
flatter in order to make continuous shav-
ings (flatter than need be, quite often), so
these planes are less practical to use in
preparing wood for finishing. Fine-tuning
a smoothing plane can really pay off: on
many woods, you can make a surface so
smooth that little or no scraping or sand-
ing is required.
Smoothing planes take the place of power sanders. They’re used for making a surface ultra-smooth and ready for finishing.
JACK PLANES“He’s a jack-of-all-trades, but master of
none.” That expression perfectly describes
a jack plane, and helps explain the origin
of its name. A jack plane is longer than a
smoothing plane, so it’s not as efficient
in smoothing a large top because it takes
more strokes to cut down to the low spots.
It’s shorter than a leveling plane, so it’s
more difficult to use in making an edge
straight or truing a large surface. But it can
smooth or level reasonably well.
Types. The classic jack plane is a No.
5. Its blade is 2" wide, the same as a No. 4,
but its body is about 5" longer. A No. 51/2
is longer, wider, and heavier than a No. 5.
Like a No. 41/2, this additional mass makes
it easier to plane difficult woods. The No.
51/4 is shorter, narrower and lighter than
a No. 5. It was designed for youngsters
learning to work wood in shop classes, and
is often referred to as a manual-training
NO. 51/4NO. 5NO. 51/2
plane or a junior jack.
Uses. You can smooth or level with a
jack plane–it just takes a bit longer than
using a more specialized smoothing or lev-
eling plane. If you sharpen a jack plane’s
blade with a pronounced curve, this tool is
perfect for hogging off a lot of wood fast,
in any situation. A jack plane is also useful
for evening joints, such as a table leg and
rail, because this operation combines both
leveling and smoothing.
Jack planes can both level and smooth a surface. They’re useful for evening up one piece with another, such as this bread-board end on a tabletop.

popularwoodworking.com
HAND TOOLS
3
LEVELING PLANES
Leveling planes are long, wide, and heavy.
They have two specific purposes: straight-
ening edges and flattening large surfaces.
Accuracy is the goal in both situations, and
that requires a plane with a long, flat sole.
Types. The leveling plane most often
used these days is the No. 7, more com-
monly known as a jointer plane. As its
name implies, a jointer is best suited for
straightening edges prior to joining them
together. A No. 6 plane is the same width
as a No. 7, but about 4 " shorter. The No. 6
is best suited for leveling the majority of
a large surface (such as breadboard ends).
It’s commonly known as a fore plane (be-
cause its used before a smoothing plane,
which finishes the job) or a trying plane
(because it makes a surface true and flat).
A No. 8 plane is a behemoth: it’s longer,
wider, and heavier than a No. 7.
Uses. One plane, either a No. 6 or a No.
NO. 8 NO. 7 NO. 6
7, can be used for jointing and truing, al-
though having both is ideal. If you have only
one, it is best to have two blades. Jointing
requires a blade that is sharpened dead
straight across; truing is most efficiently
done with a blade that’s sharpened with a
slight curve. A No. 8 is so large that it can
be a bit unwieldy, but it’s the perfect plane
for jointing a long, wide edge, and useful for
big jobs such as fitting an entryway door.
Leveling planes are used to make edges straight, such as these two boards, which’ll be glued together. Leveling planes are also used to make large surfaces flat and true.
STARTER-SET RECOMMENDATIONS
BASIC TWO‒PLANE SETA No. 5 jack plane and a standard-angle block plane will serve you
well in most situations. You’ll find dozens of uses for the block
plane, taking off a little bit here or there on your projects. With
the jack, you can do everything a smaller or larger plane can do,
such as straightening an edge, smoothing a surface, or evening
up a joint. The job will just take a bit longer.
ADVANCED THREE–PLANE SETThis is a good starter set for a woodworker who wants to enjoy
what handplanes can do. Each plane has a specialized purpose.
The low angle block plane excels at cutting end grain; the level-
ing plane (which can be either a No. 6 or a No. 7) joints edges and
flattens a large surface; the smoothing plane (either a No. 4 or a
No. 41/2) can make wood look so good that it hardly needs a finish.

4
Tools for Dovetailing
Cutting dovetails by hand is one of the most satisfying
jobs a woodworker can do. Sure, it can be frustrat-
ing, because mastering the art requires patience and
experience —plus a nice set of tools.
Here’s my set. I wouldn’t claim that they’re the
best set for everyone, but they’ve served me well.
I keep them in a box that also functions as a stand.
LAYOUT TOOLS• Square. A 4" to 6" square works best because it’s
easy to balance. A plain engineer’s square can work
fine, but when you must mark the same measurement
many times over, a square with a sliding blade and
rule is handier.
• Sliding T-bevel. This tool is for laying out dovetail
angles, of course. Some people prefer small T-bevels,
but I prefer a large one. A large bevel allows me to
draw long layout lines, which are easier to sight along
than short ones.
• Saddle square. This tool is a nice luxury—it allows
you to draw a line across the end of a board and a
mating line down its face at the same time. The two
lines will always meet. Of course, you can draw these
two lines in separate steps using a regular square, but
sometimes you’ll make a mistake and they won’t line
up. A saddle square takes the risk out of the operation.
• Cutting gauge. This tool is used for scoring the
baselines of a dovetail joint across the grain. When
sharp, it should make a line as fine as one made by
a surgeon’s knife. Most cutting gauges come with
knives that are sharpened to a point. I modified mine
to have a round profile by rotating it along its axis on
a grinder. A round profile will stay sharp much longer
because it has more points of contact with the wood.
A point only has one.
• Striking knife. This tool is used for laying out very
fine lines. I prefer a knife with a flat side and a beveled
side, rather than two beveled sides (like a utility knife).
Bearing the flat side against a square or a dovetail
makes it easier to draw an accurate, unwavering line.
• Pencils. Mechanical pencils never need sharpening,
right? I use two —one with a .5mm lead, for draw-
ing layout lines, and the other with a .7mm lead, for
shading in waste.
CUTTING & CHOPPING TOOLS• Dozuki saw. A Japanese-style pull saw takes a little
getting used to, but it’s an awesome tool. It requires
very little effort to cut, so you can concentrate on
following a line rather than fighting the saw. I’ve got
nothing against a good Western-style saw, which
cuts on the push stroke, but it’ll require occasional
sharpening and setting. Both operations can be quite
difficult. Most Japanese saws don’t need to be sharp-
ened—ever. When a blade gets dull, you replace it
with a new one. Japanese saws come with short or
long blades; I prefer a long blade because it requires
fewer strokes to cut to the same depth. Each stroke

popularwoodworking.com
HAND TOOLS
5
Pointers on choosing, modifying and using my favorite set of tools.
BY TOM CASPAR
introduces the possibility of error, so the fewer strokes
you make, the straighter your cut will be.
• Coping saw. This saw is used to remove the bulk of
the waste from a joint before the remainder is chopped
away. A fancy model certainly isn’t necessary, but you
should use a high-quality blade with the appropriate
number of teeth for the work at hand. I prefer a blade
with 15 teeth per inch —not too fine, but not too
aggressive, either.
• Chisels. I use two sets of chisels. One set has square
sides, while the other has sides that taper to a sharp
point. I use the first set for paring and hone them at
25°. (A low angle makes a chisel easier to push.) I use
the second set for chopping and hone them at 30°.
(The steeper the angle, the longer an edge will last.)
The tapered edges of the second set allow me to get
into angled corners, so I rarely have to use a skew
chisel to clean out a dovetail. The tapers are angled
at 12° and run back about ¾". I created the tapers by
using a grinder.
• Mallet. I prefer a round mallet to one with a square
head. Both will work fine, of course, but you have to
pay more attention to how you hold a square mallet to
avoid a glancing blow. A round mallet is more forgiv-
ing. I like a mallet with some heft—about 16 to 20
oz. The extra weight means you don’t have to strike
a chisel with so much force. Just dropping a heavier
mallet on a chisel often does the job.
• Strop. Stropping a chisel renews its edge in just a
few seconds. Stropping is easiest when a chisel’s edge
is hollow-ground; you just balance the edge on heel
and toe and go for it. I hone my dovetail chisels the
same way, without a jig, to make them easier to strop.
• Thin blades. I use these blades for paring the sides
of skinny sockets. One of the blades is just a block-
plane iron; I made the other from a broken-off power
hacksaw blade, wrapping tape around one end to
make it more comfortable to hold.
• Shims. These are the set of playing cards below, in
case you were wondering. Years ago, while in busi-
ness, I made dovetails by the artisan’s quick method
of sawing and chopping to a line. These days, I slow
down. I saw and chop away from a line, then pare
to a line using a guide block and shims. The block is
clamped right on the line. I place a few shims against
the block and remove one after each shaving. My rule
of thumb: the thinner the shaving, the more accurate
the paring.
SOURCESLee Valley, leevalley.com 800-871-8158Veritas Workshop Striking Knife, #05D20.05, $10.95Veritas Saddle Square, #05N56.01, $14.50Japanese Standard Dozuki Saw, #60T03.01, $52.50Veritas Journeyman’s Brass Mallet (not pictured), #05E14.01, $32.50Calvo, Davidcalvo.com, 978-283-0231 1.5 lb. Bronze Wood Carver’s Mallet (pictured), $70.

6
Most bench planes come equipped to eliminate tear-out.
Chipbreaker Theory & Use
BY KEES VAN DER HEIDEN AND
WILBUR PAN
Handplanes are great tools for creating a
smooth, finish-ready surface on a board
without the dust and noise from a sander.
If the board is straight grained and the
blade is sharp, it is easy to use a plane. But
if the board has some figure, such as that
commonly found in curly maple, figured
cherry or knotty pine, there is a risk of
tear-out.
There are many strategies that can be
used to reduce or eliminate handplane tear-
out on tricky surfaces. A tighter mouth,
a higher bed angle or, if you’re using a
bevel-up plane, a steep secondary bevel,
are all ways one can attack the problem.
But there is a device that comes standard
on many bench planes that is equally ef-
fective: the chipbreaker.
The ability of the chipbreaker to reduce
tear-out can be seen in the photo at left.
The cherry board shown was deliberately
planed against the grain with a Stanley No.
4, using a stock blade and chipbreaker.
On the near side in the picture, tear-out
can be seen, which is expected. On the
far side of the board, tear-out is nearly
nonexistent. The same plane and blade
were used to produce both surfaces. The
only difference is that the chipbreaker was
set up properly when planing the far side.
CHIPBREAKER THEORYIf a board is straight grained, planing is
easy when you’re going with the grain.
But nearly all boards have areas where the
grain reverses, so you’re forced to plane
against the grain. If the board is figured,
the grain can switch back and forth over
a short distance. In spots where the plane
LEAD PHOTO BY AL PARRISH; BLACK & WHITE PHOTOS FROM KATO/KAWAI VIDEO; STEP PHOTOS BY THE AUTHORS; ILLUSTRATIONS BY ROBERT W. LANG

popularwoodworking.com
HAND TOOLS
7
is cutting against the grain, instead of cut-
ting fibers, the blade acts as a wedge that
splits them. Eventually these fibers will
break and a small divot of wood comes
off, which leaves an uneven surface that
we know as tear-out.
In this situation, if there’s a way to alter
or break the fibers so there’s no leverage to
cause the divot of wood, tear-out can be
reduced. Chipbreakers work by making the
shaving deflect so the fibers in the shaving
lose their integrity, either by bending or
breaking. Therefore, the shaving loses the
ability to pry the divot out of the board
ahead of the plane blade, which reduces
the tear-out.
CHIPBREAKER HISTORYThe oldest written evidence we found of a
chipbreaker is from a 1767 advertisement by
Philadelphia planemaker Samuel Caruthers.
He describes the availability of “double-
ironed planes, of a late construction, far
exceeding any tooth planes or uprights
whatsoever, for cross-grained or curled
stuff.” Those chipbreakers were probably
imported from England, and were likely in
use before this first written record.
Other references to and explanations
of how the chipbreaker works have ap-
peared in books and articles over time. But
it wasn’t until professors Yasunori Kawai
and Chutaro Kato, at Yamagata University
in Japan, made a video that showed a chip-
breaker in action on a microscopic level
that we could see the exact mechanism of
how it works to prevents tear-out.
In the video (available at vimeo.
com/158558759), a sharpened plane blade
with a microadjustable chipbreaker was
filmed planing a board against the grain
to see what factors impacted the perfor-
mance. Kawai and Kato were able to show
that the face of the chipbreaker did indeed
bend the shaving over as the plane was
advanced on the wood. The effect was
greater the closer the chipbreaker was to
the edge of the plane blade — distances
on the order of 0.1-0.3 mm (about 1⁄128").
In addition, the angle of the face of the
chipbreaker changed the optimal distance
that the chipbreaker needed to be from
the edge of the blade. It appears that the
bending of the shaving causes the shaving
to be unable to lever out wood fibers ahead
of the cutting edge, thus reducing tear-out.
CHIPBREAKER SETUPSetting up a chipbreaker is a fairly straight-
forward procedure. The first step is to flat-
ten the back of the plane blade and sharpen
the blade as much as possible with your
favorite sharpening regimen.
Next, the chipbreaker should be ad-
justed so it mates tightly to the back of the
blade. (If there’s a gap between the edge
of the chipbreaker and the back of the
blade, shavings will find their way under
it and clog the mouth.) If the chipbreaker
and plane blade are pressed together and
held up to a light, no light should be visible
between the two components.
If there’s a gap, it’s often because the
edge of the chipbreaker isn’t completely
flat. If this is the case, flatten the mating
surface of the chipbreaker the same way
that you would the back of a plane blade.
Luckily, the steel in a chipbreaker isn’t
usually hardened to the same degree as
the plane blade, so flattening that surface
should be relatively easy.
Finally, if you are using an aftermar-
ket chipbreaker (one that doesn’t have a
Blow out. A still from the video by Yasunori Kawai and Chutaro Kato shows the mechanism of tear-out when planing against the grain. As the shaving comes up over the blade it levers up the fibers ahead of the cutting edge, which results in tear-out.
The bends. As the shaving comes up over the blade, it runs into the chipbreaker and bends over. The shaving loses structural integrity and cannot lever out wood ahead of the cutting edge, reducing tear-out. Here the chipbreaker is 0.02 mm (1⁄128") from the cutting edge.
Tight is right. The chipbreaker needs to mate flat to the back of the plane blade in order for it to work. Otherwise, shavings lodge in the gap and interfere with the plane’s function. An excellent way to check the fit is to hold the chipbreaker and the blade up to a light source.

8
hump like the Stanley), a secondary bevel
of about 45º should be honed on the lead-
ing edge (the exact angle isn’t critical). The
curve of the front edge of a stock Stanley
chipbreaker provides this angle. This sec-
ondary bevel provides the wall that bends
the shaving.
Set the chipbreaker on the back of the
blade and tighten the chipbreaker screw
with finger pressure only. The goal is to
place the edge of the chipbreaker as close
to the cutting edge of the plane blade as
possible, in the range of 1⁄64" or less.
From a practical standpoint, this dis-
tance is not easily measurable in the work-
shop, but it can be achieved. Turn the blade
assembly around until it reflects the light.
Now push the chipbreaker forward to the
edge and see how close it is by watch-
ing the reflection of light change in size.
This will take some practice. When you’re
happy with the result, tighten the screw.
Using the plane also provides feedback
on the position of the chipbreaker. If you
still get tear-out in reversing grain, the
chipbreaker is likely positioned too far
from the edge and not doing its job of bend-
ing the shaving before it tears the wood.
If the shavings are wrinkled, the chip-
breaker might be positioned a little too
close to the edge; you also may feel more
resistance when using the plane. Move the
chipbreaker back to alleviate these issues.
When the chipbreaker is in the right spot
the shavings straighten out and you’ll have
a surface relatively free from tear-out.
This technique isn’t only useful for
smoothing planes, but also for jointer and
jack planes. Because these planes are often
set up with a cambered edge, it may not
be possible to set the chipbreaker as close
as you can on a smoothing plane. In this
situation, tear-out may not be eliminated,
but it will reduce the depth of the tear-out,
so it will be easier to clean up the damage
with a smoothing plane afterward.
Try making adjustments on the loca-
tion of the chipbreaker in your plane to
see what works best in your shop, on the
woods that you commonly use. Do some
planing against the grain and feel how
and where setting the chipbreaker in this
manner gives you an advantage. It won’t
take long to get the hang of using this
approach to good effect.
DO YOU NEED A CHIPBREAKER?Obviously, there are other ways to achieve
a surface free from tear-out when planing
a board. In fact, one of the first sequences
of the Kawai and Kato video shows that
a chipbreaker isn’t needed when planing
against the grain, if taking a shaving that
is sufficiently thin. As mentioned before, a
tight mouth, a higher bed angle or a steep
secondary bevel are all valid approaches.
These methods all work by causing the
plane shaving to fail before it can lever a
chunk out of the wood ahead of the cut-
ting edge.
All these approaches have their ad-
vantages, although many times the only
way to take advantage of these features
is to buy a new plane (or a high-angle frog
if you can find one to fit your tool). The
benefit of knowing how to set up and use
a chipbreaker is that the vast majority of
bench planes that woodworkers already
own have a chipbreaker that is just waiting
to be used. PW
Special thanks to Yasunori Kawai, professor, and Chutaro Kato, honorary professor, Faculty of Education, Art and Science, Yamagata University, for the use of material from their video in this article, to Mia Iwasaki for translation help, and to Bill Tindall, who facilitated the use of the video. Kees Van Der Heiden is a woodworker from the Netherlands. Wilbur Pan is a woodworker from New Jersey. Both geek out over hand tools.
Get it tight. Flattening the edge of the chipbreaker is straightforward. In this photo, a standard Stanley chipbreaker is being flat-tened on a waterstone, although any sharp-ening medium can be used for this task.
Little by little. With an aftermarket chip-breaker, a small secondary bevel — created by holding the chipbreaker at about a 45º angle during the last step in your sharpening regimen— provides the “wall” against which the shaving bends. The angle doesn’t need to be exact and the bevel can be quite small.
Show me the light. For the chipbreaker to work best, you need to put its edge 1⁄64"-1⁄128" from the edge of the iron. Shine a light on the assembly and look at the reflection as you adjust the position. Despite the appearance of the reflection, this chipbreaker is less than 1⁄64" from the edge of the blade.

popularwoodworking.com
HAND TOOLS
9
These jigs help you hand cut flawless mortise-and-tenon joints.
Perfection by HandBY JEFF MILLER
Mortise-and-tenon joints tend to frustrate
woodworkers far more than dovetails do.
That’s no mystery; they are genuinely
harder to cut than dovetails. The large flat
tenon cheeks and mortise walls need to be
flat, smooth and parallel, the shoulders have
to line up perfectly all the way around the
tenon, and to get a fit that works, the toler-
ances are within a couple of thousandths
of an inch.
About a year ago, I started fooling
around with an idea to make hand-cut
mortise-and-tenon joints a little easier.
I came up with a pair of simple jigs that
make it possible to cut—in conjunction
with a good tenon saw and some mortise
and paring chisels —accurate, repeatable
joints by hand that rival those cut by ma-
chine. The jigs cut down on layout as well.
And they make it easy to cut angled ten-
ons. The final bonus is that the tenoning
jig can actually help improve your saw
technique.
That all may sound a bit like I’m ped-
dling snake oil, but the jigs are very simple
in concept. There’s a jig for paring mortise
walls, and for paring tenons, a sort of an
upright miter box combined with a sys-
tem of spacers. There’s no magic involved.
There is, however, a fair bit of tweaking
the jigs to tight tolerances.
Is it cheating? Maybe. But cheating in
the same way that a shooting board is
cheating: easy, accurate results on some-
thing you could conceivably do strictly
by hand. And you still need good saw
and good chisel technique to get the best
results.
Also, the jigs can certainly be used
independently. But they work better as a
complete system.

10
THE MORTISE-PARING JIGChopping mortises with a mortise chisel is
surprisingly fast and reasonably accurate,
but for the best results, it helps to pare the
side walls to clean them up. One of the
easiest ways to do that and get straight,
square results is to clamp a guide block
to your workpiece to act as a reference for
your chisel. This jig is actually a combi-
nation of chisel guides. With it, you can
pare both sides of a specific-size mortise
located a pre-determined distance from
the edge of the workpiece. The jig refer-
ences off only one edge of the workpiece
for greater accuracy. And you don’t need
to chop by hand for the jig to work; it will
clean up the sides of a mortise no matter
how you cut it.
This might seem like a lot of work for a
specific size joint, but the jig is very quick
to make, and most of the time, you need
to cut multiples of the same joint for your
projects. Make up one for a table or chair,
and it might well do for most other tables
or chairs you build.
Once you’ve decided on the mortise
location and size, you’re ready to make the
jig. The blank should be 11/2" thick and 12"
long, although it’s helpful to have some
extra length. Start by adding the distance
from the mortise to the edge of the work-
piece to 31/8" (this assumes an 1/8" table saw
blade; or you can calculate 27/8" plus the
width of two kerfs) to come up with the
width of the jig blank.
Rip the blank into three strips: one
equal in width to the distance from the
mortise to the edge, one 5/8" wide and the
other 21/4" wide. The 21/4" block should
then be crosscut to two equal lengths.
The pieces will be spaced equal to the
length of the mortise (or longer, if you
want to use the jig for various lengths of
mortises). The simplest way to do this is
to cut the block in half, then separate the
two halves the desired amount. (You can
trim off the ends later, and maybe even use
the trimmed parts for another jig.) Clamp
and screw the 5/8" strip to the separated 21/4"
blocks. Plane flush, if necessary.
The placement of the remaining po-
sitioning strip will determine the exact
size of the mortise. This strip lays flat on
the 21/4"-wide block faces, and the opening
between the edge of this and the 5/8" strip
should equal the width of the mortise plus
the distance from the mortise to the edge
of the workpiece. An easy way to come up
with this dimension without measuring
or fussing around is to take an offcut of
the positioning strip and a similarly sized
piece of scrap that is the same thickness as
the tenon you want. Use the two pieces as
spacers to align and space the positioning
strip. Clamp everything carefully in place,
then screw the strip to the 21/4" blocks.
USING THE JIGYou can easily use this jig for the initial
layout of the mortise. Hold the jig in place
against your workpiece with the position-
ing strip against the reference edge, and
scribe the far side and the two ends of the
mortise. Then flip the jig around so the
positioning strip is oriented vertically,
and use the rest of the jig as a fence against
the workpiece. Scribe the near side of the
mortise along the positioning strip.
I usually chop a slightly narrower mor-
tise inside these scribed lines, although
you can also excavate it using other meth-
ods. Once the mortise has been roughed
out, clamp the jig back into position with
Mortise layout. Hold the positioning strip against your reference edge and scribe the far side and two ends of your mortise. Then flip the jig around and scribe the near side.
Quick Jig for Paring Mortises
Thickness of positioning strip = distance from the edge of the piece to be mortised to the near side of mortise
Length of opening = length of mortise; width of the mortise PLUS thickness of positioning strip
MORTISE-PARING JIG

popularwoodworking.com
HAND TOOLS
11
the positioning strip against the refer-
ence edge and hold a 1/2"- or 5/8"-wide paring
chisel with its back against the inside face
of the jig. Pare down while still holding
the back of the chisel tight to the jig face.
Then move the chisel along just a bit and
make overlapping paring cuts until you’ve
cleaned up the whole side of the mortise.
Don’t try to take off too much wood as
you pare; the more you take off, the harder
you’ll work, and the less likely you are to
be accurate. Instead, you may want to take
a preliminary pass or two to get closer to
the final line (and the jig).
I keep a dedicated chisel for this type
of paring, which I ground to a 20° bevel
and a 23° micro-bevel. It makes the paring
easier, and seems to leave a cleaner side
wall to the mortise. But the edge is fragile,
and I never use this chisel for anything
other than this work.
THE TENONING JIGThe core of the tenoning jig is the saw
guide—a slot for the spine of the tenon
saw constructed out of two saw guide
blocks separated by a spacer (all made of
wood), and a pair of ultra-high molecular
weight (UHMW) plastic guides for the
sawplate. The combination creates a guide
that makes it hard to cut other than dead
straight and square. The rest of the jig
provides support for the workpiece and a
way to clamp the jig firmly to a workbench.
The critical dimensions of the saw
Crisp mortises. With this jig, you can pare all your mortise walls clean—hand cut or not.
guide are based specifically on your ten-
oning saw. Measure carefully the thick-
ness of the saw’s back and also the saw’s
overall height (the back plus the blade).
The back measurement, with a little added
clearance, provides the thickness for the
jig’s spacer. The overall height of the saw
plus 2 1/8" will be the overall length of the
inner and outer saw guide blocks.
Although the spacer is small, the
overall accuracy of the jig depends on its
precision. Because it is both difficult and
dangerous to try to work such a small
piece, mill up a larger strip that’s at least
12" long and then cut it down to size. The
two sides of the spacer should be carefully
milled so that they are perfectly parallel
and roughly the thickness of the saw back
(but no thicker).
Eventually, you want to wind up with
a spacer that is two to three thousandths
of an inch thicker than the saw’s back.
This will provide just the right amount
of clearance. But don’t bother measuring
this. You’re better off just testing the spacer
and adding shims to adjust to a sliding fit
that’s free of slop.
Getting to the point where you can ac-
curately check the fit requires a bit more
work, however. Clamping the parts to-
gether is certainly a possibility, but often,
the results are not the same once you bolt
together the parts. Drilling and bolting
together is more reliable.
You can either stick the spacer, the
guide blocks and the upright together
with double-sided tape between then
drill, or make a simple alignment jig for
Build a Tenoning Jig
Length of guide blocks may vary based on saw’s overall height; block is 21/8" longer than saw height.
UHMU plastic strips (3/8" x 3/4" x 43/8")Adjust depth of rabbet to leave minimal space for saw plate
Depth stop -thickness to fit between sawplate and outer guide block; notch to fit over UHMW strips; size width to stop saw black at desired depth of cut
1/4" spacer should be adjusted so that spine of saw slides between the guides with very little clearance; this dimen-sion may vary from saw to saw
Bolt components together
Notch for clamp
Optional support bracket
Ledger strip3/8" x 1" x 101/2"

12
the drill press to hold the parts in position
(using tape here isn’t a bad idea, either).
Either way, it helps to have another sec-
tion of spacer positioned at the bottom of
the guide blocks to help stabilize every-
thing. Drill the three 1/4" holes for the bolts
through the stacked-up parts. Wide-flange
connector bolts and nuts work well for
this jig; these will require counterboring
the holes for the nuts to 9 mm (or 3/8") in
the outer guide block. Bolt everything
together, then check the fit of the saw back
between the guide blocks. Adjust the fit
with paper (a typical sheet of 20 lb. ink-jet
paper is just under .004" thick), masking
tape (generally about .005" thick, but some-
what compressible), or clear plastic packing
tape (about .001" thick) until the saw can
slide between the guides with a little bit of
friction. A bit of wax on the guide blocks
will make the saw slide better.
The UHMW strips aren’t always sized
accurately or evenly. You can correct that
by handplaning them to an exact thick-
ness with the simple jig shown on the next
page (variations in the width won’t matter).
You’ll experience less flex in the plastic if
you cut the strips to length before planing
in the jig. The shavings are unusual, but
the material planes well. Once the strips
are the same thickness, it’s time to work
on the rabbets for the plastic strips. This
is a somewhat tedious process of bolt-
ing things together, testing the fit, tak-
ing them apart and making adjustments;
often many times over.
Measure the distance between your
guide blocks. Subtract that amount from
the thickness of two of your UHMW strips
measured together (somewhere around 3/4")
and divide the result in two. That should
be the starting point for the depth of the
rabbets.
Disassemble the guide blocks and spac-
er assembly, and cut the rabbets across
the bottoms of the blocks to the depth
you just determined by 7/8" wide. Now put
everything back together. There shouldn’t
be any space between the UHMW strips
when you slide them into place. Sneak
up on exactly the right amount of space
for the sawplate by deepening the rab-
bets a little at a time. A router plane is
perfect for this task, but you can choose
whatever method allows you to take off
small amounts while keeping the rabbets
flat and parallel.
Once fit, the strips should ride against
the saw plate without clearance. If you
happen to make the rabbet too deep, you
can always place shims behind the UHMW
strips to bring them closer together. When
you think you’re close, drill and counter-
sink the UHMW strips for the screws that
attach the strips to the guide blocks. The
screws securing the UHMW plastic to the
inner guide block go through the block
into the upright. Be sure all of the coun-
tersunk holes are deep enough to keep the
screw heads well below the surface of the
plastic. Put the jig together one more time
to verify the fit and make any additional
adjustments as needed.
The other important part to the core of
the jig is the vertical fence at the back of the
upright. The 1/4"-thick by 11/2"- to 13/4"-wide
strip should be screwed into a 1/4"-deep by
1/2"- or 5/8-wide rabbet. At this point, the jig
is functional, and you could call it quits.
But adding the support bracket makes it
much easier to clamp to your workbench.
THE SUPPORT BRACKETI designed the support bracket to work
with most shoulder vises. A ledger strip
let into the back of the bracket rests on
the benchtop, and the width of the brack-
et makes it easy to clamp in most vises
without racking. But this approach does
not work with every workbench and vise
setup. You may need to modify the support
bracket to set up the jig at a comfortable
sawing height and the most secure hold
in your vise.
Cut a 1/2"-wide x 1/2"-deep dado in the
upright, set 9 ⁄16" from the back edge, and a
rabbet to leave a matching tongue on the
edge of the support bracket. Cut a 3/8"-wide
x 3/8"-deep dado for the ledger strip across
the back of the support bracket, 4" up from
the bottom (to allow for clearance for your
vise screw). A cut-out just above this dado
TOP Drill with care. Position the parts to align the holes in all pieces. A leftover piece of spacer holds the work level.
LEFT Tape as shim. Masking tape can be used to make minor adjustments to thickness.

popularwoodworking.com
HAND TOOLS
13
along the rabbeted edge will create better
access for a clamp. Shape the bracket as
desired, then glue and screw it into place.
You should only glue about 1" of the end
of the ledger strip closest to the upright to
allow for cross-grain movement.
The tenoning jig is basically finished
now, and you can take it out for a test-
drive if you haven’t already. But there are
a few more components you should make
to significantly enhance its capabilities.
Most important is a set of spacers for
cutting various sizes of tenons automati-
cally. Each spacer controls the workpiece
location so that both cheeks of the tenon
will be cut exactly the right distance apart.
This approach allows you to reference off
of one face of the workpiece — much more
accurate. Make one cut with the spacer
in place, then remove it and re-clamp the
workpiece to make the second cut.
Each of the spacers needs to be the
thickness of the desired tenon plus the
width of your saw’s kerf. Sizing the spacers
accurately is key. Get as close as you can
with careful milling. Then use packing
tape, masking tape or paper in conjunc-
tion with tape to adjust for an exact fit to
a mortise made with a paring jig. Once
your spacer is adjusted to perfection, be
sure to mark it.
One refinement that can improve the
usability of the jig is a small rare earth
magnet (in a magnet cup) recessed flush
into the surface of the upright of the jig,
and a magnet washer likewise recessed
into the tenon spacers. While not neces-
sary, it makes it easier to juggle things as
you clamp the workpiece to the jig.
You’ll also need to make spacers to ad-
just for the tenon location on the work-
piece. These can be made as necessary for
various thicknesses of work and tenon
locations.
The last accessory you may find useful
is a set of depth stops. These are simply
strips of wood thin enough to fit freely
between the sawplate and one of the guide
blocks. Tabs at either end help keep the
stop in place. A depth stop cut to a specific
width will stop the saw from cutting any
deeper once the saw’s back reaches the
top of the strip.
USING THE JIGHold the workpiece (and any spacers) in
place against the rear fence and up against
the bottom of the guide blocks. Clamp
them securely to the upright. Slip your
saw between the guides and begin sawing.
Keep a light grip on the saw’s handle and
extend your forefinger. Align your forearm
with the saw back, and cut smoothly and
rhythmically until you reach the desired
depth (or the depth stop). An even and
steady touch will yield the best results.
Set up for the other tenon cheek by
removing the tenon spacer (if you’re us-
ing a second spacer to control location,
leave that one in place) and re-clamp the
workpiece. Saw to the shoulder line and
unclamp. Cut the tenon shoulders using
whatever method you prefer. Clamping a
simple guide block with a 90° fence right
over the scribed shoulder line can help you
pare the shoulders or act as a saw guide.
Saw the narrow shoulders close to the line,
then pare with a chisel that is wider than
the tenon but not as wide as the workpiece.
Angled tenons? Simply make a wedge
with the angle you want. Clamp the angled
wedge in place in conjunction with the
tenon spacer for one cheek, then remove
the spacer just as you would for a straight
tenon. A guide block with angled sides
will help get the shoulder angles just right.
The tenon cheeks should be f lat,
straight and smooth. There are a number
of things to check if you’re having prob-
lems. Be sure the saw slides smoothly in
the jig without any slop. Fine adjustments
can be made by changing the bolt tension.
Next, consider your saw. Better saws usu-
ally yield better results. Regardless, you
might want to check the evenness of the
set. Lightly and carefully stoning the sides
of the teeth can take down slight varia-
tions in set that cause a rougher surface.
Finally, look at your technique. The more
relaxed and steady the cut, the better the
results. PW
Jeff is a Chicago-based furniture maker and woodworking teacher.
LEFT Planing jig. Make a simple jig to plane the UHMW strips to the same thickness. The plane rides on ledges, which stop the cut at the desired thickness.
BELOW Fit to perfection. A router plane makes quick and precise work of the rabbets for the UHMW guide strips.

14
An easy guide to whether you should be pushing, paring or pounding your chisels in any given situation.
Chisel UseBY JIM STUARD
Back when I started as an apprentice cabi-
netmaker, a chisel was something to be
beaten with a large hammer. That was
before I learned how to properly sharpen
and use these tools. Since then it’s become
apparent there are three distinct chisel
operations that every woodworker should
know: paring, light chopping and heavy
mortise chopping.
There’s a right way and a wrong way
to make these cuts. This article will show
you how to use your chisel with the least
amount of effort, damage to the chisel and
damage to your work.
Before I begin, there are a couple things
to mention about safety. One nice thing
about chisels is you don’t have to wear
hearing protection. But there are safety
issues. Wear safety glasses when chopping
or mortising, and I mean that. A chisel
breaking can send pieces of metal flying,
possibly causing an eye injury.
Second, if you have any reservations
about using the sharp end of a chisel while
paring, consider using a Kevlar protective
glove, which is routinely used by carvers.
The glove will dull the impact of a slipped
chisel and reduce your chance of injury.
Finally, never use a chisel that’s pointing
toward your body. Always be mindful of
the direction a chisel is going and where
your hands are. This is the first thing to
check before making a cut of any kind.
The last thing you want to do on a Sunday
afternoon is explain to an emergency room
physician how you almost gave yourself a
DIY appendectomy while working on Aunt
Betty’s blanket chest.
PARINGThe one thing that amazes most beginning
woodworkers is how seldom you really
need to hit the chisel to get it to work right
(the exception to this is, of course, mortis-
ing). Paring is a process of using the knife
edge of a sharp chisel to slice small amounts
of wood off. With a little technique and a
sharp chisel, you can get into places inac-
cessible to a plane or knife.
Paring is basically the finest work you
can do with a chisel. Some examples of
paring include:
• Trimming the cheeks of a mortise to fit
a tenon that’s too large.
• In the absence of a shoulder plane, paring
the tenon to fit the mortise.
• When you lay out a hinge mortise, after
chopping the mortise sides, you basically
have to pare the waste out to the edges of
the hinge layout.
• If the space between dovetails is large
enough (i.e. the pins) for a chisel, they can
be pared, on their sides, to fit.
Before beginning, make sure your work
is secured on your bench or in your vise. This
will impart more of the force of your push-
ing into the work, thereby giving you more
control of the cut. Paring requires pushing
a chisel while it lies flat on a surface, slicing
into the wood grain. This can be either with
or across the grain. When you pare, you’re

popularwoodworking.com
HAND TOOLS
15
generally not taking off large amounts of
wood. Just gently slicing little shavings off.
To pare well, the chisel needs to have
a flat face and a sharp edge. See the story
at right on flattening for more about this.
You can generally tell when your edge isn’t
cutting the way it should when paring end
grain. If the grain starts to collapse and
bend over from the chisel pushing through,
the chisel needs sharpening. I won’t go
into a long diatribe on sharpening here,
but suffice it to say that if your chisels
are coming up dull, you either need to
increase the frequency or quality of your
sharpening.
LIGHT CHOPPINGAt some time you’ll have to do some chop-
ping with a bench chisel. A half-blind
dovetail joint is a good example of how to
use chopping to remove wood. Other uses
for chopping are defining a hinge mortise,
low relief carving and through-dovetails.
When chopping, you can use the same
force you would use when mortising – just
not as often. Bevel-edged bench chisels
shouldn’t be used for mortising. They aren’t
designed for this purpose. Mortise chisels
have a steeper cutting angle ground on
them: 30° compared to 25° for bench chis-
els. Their blades are thicker with square
flat sides to stand up to a pounding. Bench
chisels are thinner and beveled on the sides
to get into tight spaces.
Most bench chisel chopping consists of
light tapping of the chisel to define a cut
line or remove a small amount of waste.
Chopping is the most vigorous use that a
bench chisel should see. Upon reading our
reviews of 20 different bench chisels, only
about half stood up to repeated medium/
heavy chopping. If you plan on heavy use
for your chisels, consult our review to get
an idea of what to look for in a bench chisel.
Before beginning, make sure your work
has a direct connection with the ground.
That is, place the work directly over the
leg of a bench or table. This imparts all the
force of the blow directly into the cut and
not into flexing your bench’s top.
PARING: One Hand Steers, the Other Pushes To do this properly, you need to use both hands on the chisel to get the most control. One hand is on the chisel blade as close as you can get to the edge. The other hand is firmly on the handle. How much you push down on the blade as you push forward determines the amount of wood removed. You can also angle the chisel into the wood to get a more aggressive cut. That’s where having a flat face on your chisel is important.
One hand holds the chisel on course
One hand determines force and direction of the cut
LIGHT CHOPPING
1. After defining the pins with your dovetail saw, start chopping the waste out by chopping to a line approximately 1/32" away from the actual marked line. What happens when you chop with a chisel is the bevel will push the chisel toward the line as it’s struck. You have to compensate for this by starting in a little from the line, then remove the waste.
2-3. Use a combination of paring and light chopping technique to remove the waste. The procedure is to chop a line, across the grain, then remove the waste by pushing into the end grain down to the cut line. Depending on the wood, you may or may not need to tap the chisel with a mallet. Re-cut another line and repeat till you get down to the marking gauge line.
4. To remove the rest of the waste up to the gauge line, start by pushing a series of angled cuts into the waste up to the line. Yes, Virginia, you can pare end grain but only with sharp tools. Proceed to pare or gently chop out the waste, cutting across the end grain. Some light paring is required to get into the corners along with a sharp, pointy knife.
1
2
3
4

16
IN DEFENSE OF A FLAT CHISEL FACEDid you ever wonder why sharpening experts tell you that your chisel face has to be flat? Well, if your face isn’t flat, one of two things will occur. If the chisel face is bowed you’ll start dig-ging into the wood; if the chisel face is bellied, you’ll need to lift the chisel to get it to start cutting.
Either condition requires lapping. I like to use a coarse diamond stone, and then work up to a couple of finer grits. There’s lots of other lapping equipment out there, but one of the cheapest alternatives is to use dark gray wetsanding paper (start with #150 grit and move up gradually to #400 or #600) on a flat surface. A thick piece of glass does nicely. Just soak the paper in water before use. Lay it down on the flat surface and the surface tension of the water will adhere it to the surface fairly well. Rub the chisel until it’s flat at least two-thirds of the way up. This might take a while. Get as fine a polish on your chisel face as you can to eliminate catches or nicks. It also helps to finely sand the edges of the chisel face. If you pinch your finger between a piece of wood and the edge of the chisel, you’ll stand less chance of scissoring a cut on your hand.
MORTISINGI’m sure that back in the days when all mor-
tising was done with manual labor, there
were large muscular blokes all hammering
and chopping away. This is certainly the
woodworking equivalent of heavyweight
boxing. The chisel and the wood both take
an incredible pounding.
Mortising has one purpose: to make a
square flat-sided hole in a piece of wood
to receive a tenon. To that end, mortising
chisels are the beefiest chisels you can buy.
They have a steep grind (30°) and high flat
sides to take a beating and guide the chisel
while mortising. A bench chisel, with its
thin profile, is likely to wander in your cut,
ruining your mortise. Not to mention that
if you hit a bench chisel as hard as you hit a
mortising chisel, especially the small sizes
MORTISING
1. First, lay out a mortise and start by lightly chopping a series of lines, inside the layout lines, across the grain.
2. Next, using the bevel side of the chisel, remove the waste and repeat. After you get the first couple of layers knocked out, it’s easier to just wail away and start taking large amounts of waste out of the mortise. When you get to the bottom of the mortise, start checking the depth with a combination square. When you get towards the finished depth, it’s easier to just reach into the mortise with the chisel, bevel side down and pare out fine amounts of wood till you get to the finished depth. If necessary, use a wide bench chisel to pare the cheeks of the mortise.
3. Here’s the finished results of using a mortising machine (left) and a hand cut mortise (right). The hand-chopped mortise is prettier, wouldn’t you say?
32
1
like 1/2" and 3/8", they might actually fracture.
Also, repeated pounding of a bench chisel
will either roll or collapse the cutting edge.
If you own only one mortising chisel, I
recommend a 3/8" tool. Tenons are typically
half the thickness of your stock, and most
stock is 3/4" thick. Make sure the mortis-
ing chisel you buy has a long handle be-
cause you’re going to hit it pretty hard. If
the handle is too short, it’s your hand that
will take the abuse.
Mortising has three parts. One, light
tapping. This defines where the mortise
will go and begins the mortise. Two, heavy
pounding, which is what most of us think
about when we talk about mortising. Three,
paring. This is the only time you should
use a bench chisel while mortising: to pare
the sides of a mortise after chopping. PW
1-800-683-8170 leevalley.com
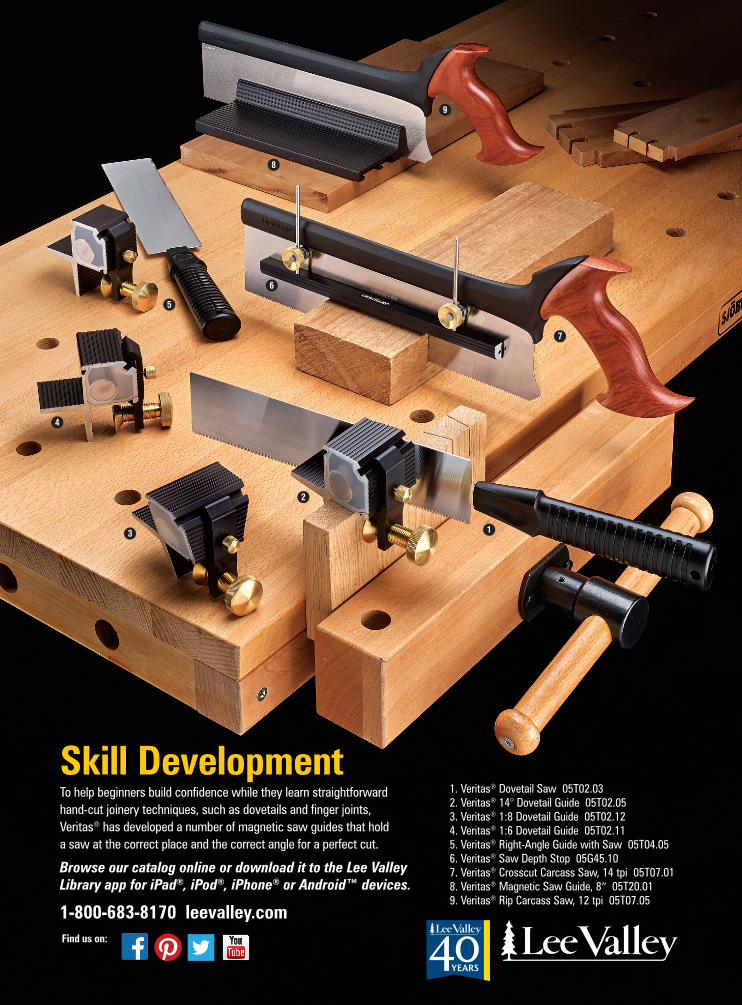
To help beginners build confi dence while they learn straightforward hand-cut joinery techniques, such as dovetails and fi nger joints, Veritas® has developed a number of magnetic saw guides that hold a saw at the correct place and the correct angle for a perfect cut.
Skill Development
Find us on:
Browse our catalog online or download it to the Lee Valley Library app for iPad®, iPod®, iPhone® or Android™ devices.
1. Veritas® Dovetail Saw 05T02.03 2. Veritas® 14° Dovetail Guide 05T02.05 3. Veritas® 1:8 Dovetail Guide 05T02.12 4. Veritas® 1:6 Dovetail Guide 05T02.11 5. Veritas® Right-Angle Guide with Saw 05T04.05 6. Veritas® Saw Depth Stop 05G45.107. Veritas® Crosscut Carcass Saw, 14 tpi 05T07.01 8. Veritas® Magnetic Saw Guide, 8 05T20.01 9. Veritas® Rip Carcass Saw, 12 tpi 05T07.05
2
1
6
3
4
5
7
8
9

1 2
6
3
7
4
8
5
9
Accurate joinery is also dependent on fi nal trimming and fi tting. Our ever-growing family of Veritas® hand planes helps you complete basic joinery tasks with confi dence and precision. From rabbets to dadoes to grooves, our planes can stand up to real shop-time use by amateur and professional woodworkers to ensure wood surfaces are square to another. Every plane is well designed, built to last, comfortable to handle, and made in Canada.
1. Veritas® Scraper Holder 05K33.01 2. Veritas® Medium Shoulder Plane 05P41.51 3. Super-Hard Milled Scrapers, set of 4 05K30.10 4. Veritas® Tri-Burnisher 05K32.01 5. Veritas® Small Scraping Plane 05P29.50 6. Veritas® Detail Rabbet Plane, 5/16” (8mm) 05P75.06 7. Veritas® Skew Block Plane, RH 05P76.01 8. Veritas® Cabinetmaker’s Trimming Plane 05P74.01 9. Veritas® Small Plow Plane, RH 05P58.01
Helping you obtain a perfect fi t
Find us on:
1-800-683-8170 leevalley.com
Browse our catalog online or download it to the Lee Valley Library app for iPad®, iPod®, iPhone® or Android™ devices.


