Embed Size (px)
Citation preview
1
BASIC SET-UP GUIDE
FOR USE WITH HEPARIN AND NO ANTICOAGULATION

2
We
PROTECTand
IMPROVE
HEALTHthe
of peoplearound the world
OUR VISION

3
This guide is for a basic set up for users based on the 1.75 software version and does not replace the IFU. For a full instructions for use please refer to the OMNI IFU SW 1.75.
This guide should be used in conjunction with appropriate training as an additional help guide.
Any clinical queries or any queries regarding the protocol, please speak to medical or senior nursing staff.
PREPARATION
THERAPY
DURING THERAPY
ENDING THERAPY
UNLOADING DISPOSBLES
NOTES
CONTENT

4

5
Press Treatment to be taken to the preparation stage for treatment.
All information required is provided on the screen, follow each step in turn. The hourglass on screen will change to a tick once the action is completed correctly, if no tick appears try the action again.
Press the i symbol to view the step-by-step instructions of the user guidance.
PREPARATION
WATCH YOUR HANDS: Risk of injury due to moving parts. Do not touch the pumps when they are rotating. DO NOT TOUCH the venous clamp or the 3-way clamp. Keep the doors of the machine closed during operation.WARNING
� Please ensure the OMNI is plugged in at all times and keep brakes on the machine when in use
� Switch machine on by pressing the green button, only press for one second. Press and hold will power the machine off
� This guide refers to arterial (red) and venous (blue) lines when discussing the blood lines within the kit
6
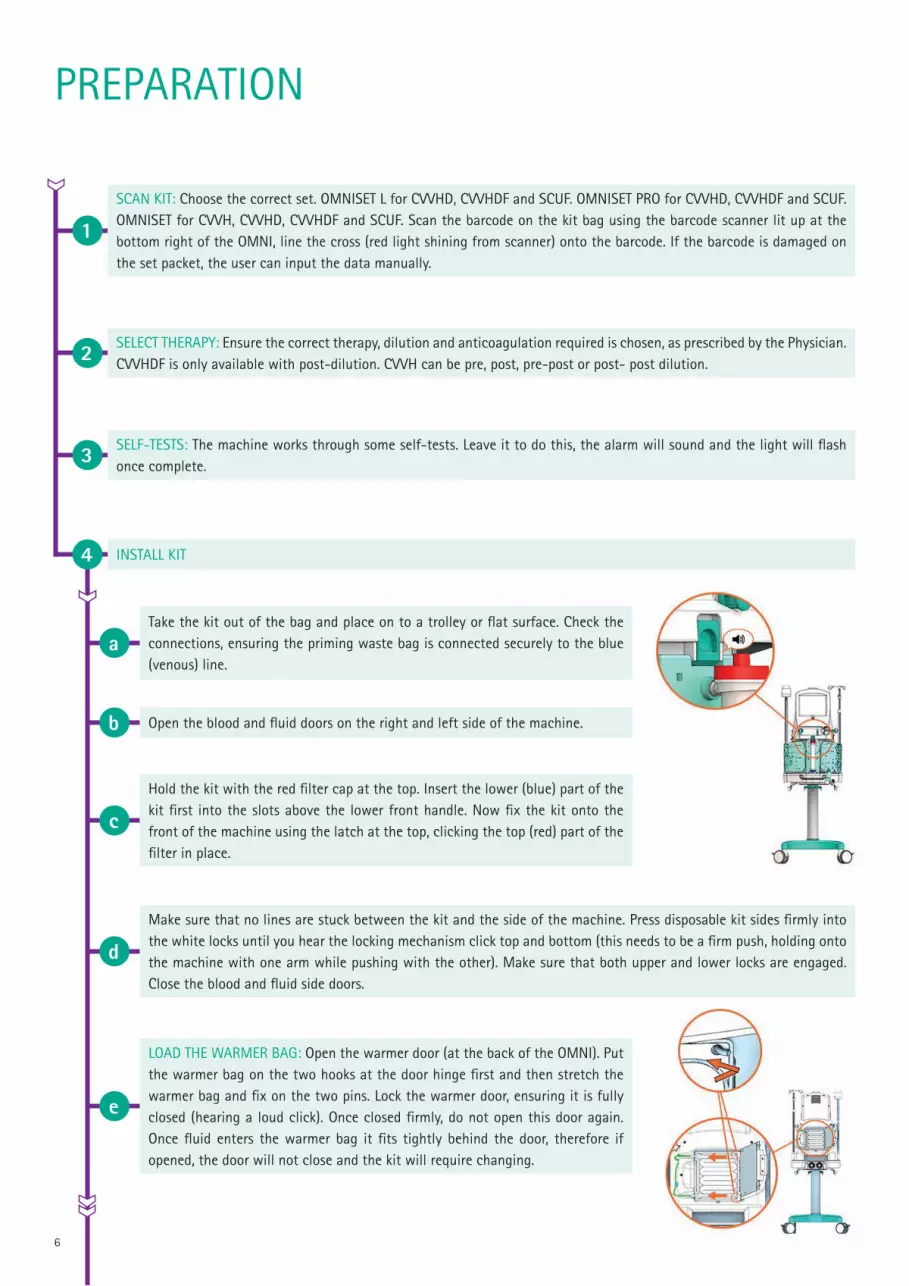
SCAN KIT: Choose the correct set. OMNISET L for CVVHD, CVVHDF and SCUF. OMNISET PRO for CVVHD, CVVHDF and SCUF. OMNISET for CVVH, CVVHD, CVVHDF and SCUF. Scan the barcode on the kit bag using the barcode scanner lit up at the bottom right of the OMNI, line the cross (red light shining from scanner) onto the barcode. If the barcode is damaged on the set packet, the user can input the data manually.
SELECT THERAPY: Ensure the correct therapy, dilution and anticoagulation required is chosen, as prescribed by the Physician. CVVHDF is only available with post-dilution. CVVH can be pre, post, pre-post or post- post dilution.
SELF-TESTS: The machine works through some self-tests. Leave it to do this, the alarm will sound and the light will flash once complete.
INSTALL KIT
Take the kit out of the bag and place on to a trolley or flat surface. Check the connections, ensuring the priming waste bag is connected securely to the blue (venous) line.
Open the blood and fluid doors on the right and left side of the machine.
LOAD THE WARMER BAG: Open the warmer door (at the back of the OMNI). Put the warmer bag on the two hooks at the door hinge first and then stretch the warmer bag and fix on the two pins. Lock the warmer door, ensuring it is fully closed (hearing a loud click). Once closed firmly, do not open this door again. Once fluid enters the warmer bag it fits tightly behind the door, therefore if opened, the door will not close and the kit will require changing.
Hold the kit with the red filter cap at the top. Insert the lower (blue) part of the kit first into the slots above the lower front handle. Now fix the kit onto the front of the machine using the latch at the top, clicking the top (red) part of the filter in place.
Make sure that no lines are stuck between the kit and the side of the machine. Press disposable kit sides firmly into the white locks until you hear the locking mechanism click top and bottom (this needs to be a firm push, holding onto the machine with one arm while pushing with the other). Make sure that both upper and lower locks are engaged. Close the blood and fluid side doors.
1
2
3
4
a
b
e
c
d
PREPARATION

7
CONNECTING THE PRESSURE LINES: This action does not get an hourglass or a tick on screen at this stage, however this step needs to be completed (a tick will appear once loaded). Remove coloured caps from the pressure lines. Connect the pressure lines to the corresponding coloured pressure sensor connector. For example: Red pressure line to (red) arterial connector (AP). Make sure all lines are firmly connected.
SETTING SYRINGE PARAMETERS: Select the syringe type from the drop down and set the correct volume.
LOAD: Once complete, press LOAD on screen. Make sure, once loaded, that the tube segments are loaded correctly (visualising the pumps by opening the blood and fluid side doors). In case of unsuccessful loading, press LOAD again. Once completed, press NEXT.
INSERTING THE SYRINGE: In therapies with heparin anticoagulation, the syringe is used to infuse heparin. If no anticoagulation is being used then no syringe is inserted and this step is not shown on screen. When using the OMNIset L or PRO, ensure to connect the heparin line (long thin line with no writing on it) to the heparin syringe, do not use the calcium or citrate lines, these are for citrate anticoagulation only.
f
h
i
g
Unlocking lever Syringe holder Slot - for gripping plate
Connect the heparin line to the heparin syringe.
Open the unlocking lever and the syringe holder by pushing the grey clip upwards and pulling the holder outwards.
Insert the syringe end into the clip and the wings into the gripping plate in the slot. The grey clip should automatically come down on its own when the syringe is inserted.
Close the unlocking lever.
Make sure the clamp on the syringe line is open.
i
ii
iii
iv
v
The tube holder at the line end of the syringe is for use with citrate anticoagulation and is not required to be used with heparin.
If the syringe insertion does not get a tick, try again until the tick appears.
Ensure correct dose and volume of anticoagulation is used as prescribed. WARNING
PREPARATION
KEY Clip - for piston plate Gripping plate Piston plate

8
INSTALL BAGS: Depending on the selected therapy type, different fluid bags are required on the load cells. The picture below corresponds to CVVHDF post dilution (heparin anticoagulation).5
For table of required fluid bags depending on therapy chosen please see the OMNI IFU SW 1.75 page 166. The bags discussed below correspond with CVVHD, CVVHDF AND CVVH PRE-POST DILUTION therapies with heparin or no anticoagulation, if using an alternative therapy please see the table in the IFU for correct bag placement.
When looking at the screen work clockwise from the IV pole to ensure no stages are missed. The colour of the bag on screen correlates to the line to be used. Make sure that the bags and lines hang freely and do not rest on the base.
INSTALLING THE DIALYSATE/SUBSTITUTION BAG (RIGHT LOAD CELL): Ensure the correct fluid bag as prescribed is chosen. Consult the instructions for use of the fluid bag. Duosol (or equivalent) is used with heparin and no anticoagulation. Calcium free bicarbonate solution is for citrate anticoagulation use only, do not use calcium free solution for Heparin or no anticoagulation.
INSTALLING WASTE BAG FOR PRIMING (IV POLE): Hang the priming waste bag attached to the venous line (blue) on the IV pole. Close clamp (red) on priming waste bag T-piece.
INSTALLING THE EFFLUENT BAG (CENTRE LOAD CELL): Hang one or two effluent bags on the centre load cell. Make sure that the inlet is on the right side of the bag. Remove cap(s) (green connector) and connect the effluent line (yellow) to the effluent bag(s). Close the drain outlet. Make sure the clamp is open on the effluent line. On the touch screen, select the number of connected effluent bags from the drop-down list.
INSTALLING A SALINE BAG FOR PRIMING (CENTRE LOAD CELL): Hang a saline bag (minimum 1000 ml but not more than 2000 ml) on the centre load cell directly on top of the effluent bag(s). Connect the arterial line (red) with the spike to the saline bag. This priming bag sits in front (on the same scale) of the effluent bag, as can be seen in the picture and on screen.
b
a
c
d
Hang one or two fluid bags on the right load cell (two is recommended to avoid frequent changes).
Remove cap(s) and connect the dialysate line (green) to the fluid bags (one green line y-piece to one fluid bag).
Break the frangible pin in the bag outlet, snapping it right and left/forward and back.
Make sure that the line clamps are open on all lines being utilised.
i
ii
iii
iv
PREPARATION

9
INSTALLING THE LEFT LOAD CELL BAG: The left load cell is the substitution scale (purple).
CITRATE LOAD CELL: This scale (on the left hand side to the top of the OMNI, with the black circle) is only for use with citrate anticoagulation. When using heparin or no anticoagulation this scale does not get used and nothing should be placed here.
e
f
Risk of patient death or injury due to incorrect treatment.
� Make sure that the used solutions are according to prescription � Make sure that the line clamps are closed on all lines not being utilised � Make sure that the line clamps are open on all lines being utilised � Make sure that each bag has been put on the correct load cell and is connected to the correct line � Do not hang anything other than the fluid bags intended for the therapy on the load cells
WARNING
AUTOMATIC PRIMING: During priming, all lines are filled with fluid in order to remove air and any remaining particles.
6
Make sure that all used clamps are open and all unused are closed. This includes closing clamps on all syringe lines not in use, and the clamp at the end of the calcium line next to the venous (blue) line if using OMNIset L or Pro.
Press Automatic Priming (press and hold until it turns light green and release). The machine primes and rinses the disposable kit.
To interrupt priming, press the Automatic Priming button to stop. To resume priming, press Automatic Priming again. If an alarm sounds, diagnose the problem and press reset alarm. The priming will then continue automatically without having to press the Automatic Priming button.
Wait until automatic priming is completed and ensure to check the blood lines for air prior to commencing to the next step.
To proceed to the Ready for Therapy step, press Next .
a
b
c
d
e
PREPARATION
For CVVHD: The scale is not used in this therapy, however the purple lines need to be primed. Hang one bag of saline (minimum 500 ml) and attach the purple line (a spike may be required, only one bag of fluid is needed for this purpose). Ensure to clamp the purple y-piece line that is not being used. This bag remains here for the entirety of the therapy (unless a change of therapy is initiated).
For CVVH Pre–Post dilution and CVVHDF: Hang one or two substitution bags on the left load cell as prescribed. Connect the purple line(s), one purple line to one fluid bag and break the frangible pin in the bag outlet. Ensure lines used are unclamped.
i
ii

10
READY FOR THERAPY:
CONFIRM THERAPY PARAMETERS:
7
8
OPTIONAL RINSING: The machine rinses the disposable kit with a specified amount of additional fluid. This function can be used for example, for re-priming with saline following a heparin prime. Follow the instructions on screen, pressing the i ⓘfor more information or referring to the IFU. This step is not necessary if not required.
To complete preparation, the Confirm Therapy Parameters screen shows all mandatory fields highlighted in orange on screen that need to be filled. Ensure all parameters are filled as per the protocol used.
OPTIONAL RECIRCULATION: This function can be used in order to keep the system on standby until the patient can be connected. Follow the steps on screen, pressing the i ⓘfor more information or referring to the IFU.
If starting with no fluid removal, ‘zero’ has to be input into the net fluid removal field. Otherwise put a volume in here, remembering it is volume removed in ml/hr.
When complete, press Confirm to move to the next step.
a
a
b
b
c
Arterial (red) line is removed from the saline priming bag and connected to the red t-piece on the priming waste bag where the venous (blue) line is on the IV pole. Dispose of the saline bag previously attached to the arterial (red) line.
Ensure to close the white clamp on the priming waste bag for recirculation to avoid sterilisation chemicals being recirculated.
Open the clamps on the arterial line (red) and the venous line (blue). Please see the picture to the right for optional recirculation.
To start recirculation, press the recirculation button and similarly to stop press recirculation again.
To proceed press Next.
i
ii
iii
iv
v
PREPARATION

11
CONNECT PATIENT:9
The patient’s access should be checked and prepared as per hospital guidelines prior to connecting to the OMNI. Keep the patient access securely clamped until the arterial (red) and venous (blue) lines from the OMNI are securely connected and are ready to start therapy.
Ensure all lines are clamped when disconnecting from priming waste bag. Follow all steps on screen.
Two different connection procedures are supported. The physician is responsible for choosing the appropriate patient connection method. White connection is discussed here, if requiring red connection (single connection) please see the OMNI IFU SW 1.75.
Closely monitor patient connections during blood line filling. The machine may not detect separation of the venous line.
WHITE CONNECTION: Double connection. The patient is connected to both the arterial (red) and venous (blue) lines prior to commencing. Blood lines can be filled at this stage using the Fill Blood Lines icon.
Follow the steps on screen to connect the patient, again pressing the i on screen or referring to the IFU for more information. Ensure to check the patient’s access prior to connection as per hospital policy.
Only unclamp the arterial (red) and venous (blue) lines when the patient is securely connected.
Once the patient is connected to the red and blue lines and it is safe to do so, please remove and dispose of all unused bags, including the priming waste bag.
To start filling the blood lines, press the Fill Blood Lines button. The volume of blood being delivered is indicated on the screen. When the blood lines are filled and the venous pressure is stable, press the Enter Therapy button. The machine enters therapy with the blood pump running. The machine does not automatically stop the blood pump in White Connection.
a
b
d
c
Risk of patient injury due to blood loss or air infusion!
� Ensure that there is no air in the venous line
� Connect the patient with great care
� Firmly tighten the Luer-Lock connectors at the patient access
� Ensure that the arterial (red) line is connected to the arterial (red) port of the patient access
� Ensure that the venous (blue) line is connected to the venous (blue) port of the patient access
� Ensure that the patient access always remains fully visible during therapy
� Regularly check the patient access
� Check the patient access after patient movement
� Pay special attention to the patient access when the blood pump is stopped and until the set blood flow is reached and the blood side pressures are stabilised
� Do not connect additional devices between the venous line and the patient access as this may impair the monitoring of the venous pressure
WARNING
PREPARATION

12
THERAPY
DURING THERAPY
If blood lines not previously filled press (and hold) the blinking blood pump icon . The blood pump is started and the red line begins to move around the icon. The blood begins to enter the kit from the patient and the syringe pump commences the heparin automatically.
� Pressing the blood pump icon during therapy interrupts the operation of all pumps. Pressing the blood pump icon again resumes the operation of all interrupted pumps
� Pressing the therapy icon during therapy interrupts the operation of the fluid side pumps. The blood pump and the heparin syringe continue running. Pressing the therapy icon again resumes operation of the fluid side pumps.
� Pressing the heparin icon during therapy interrupts operation of the syringe pump. Pressing the heparin icon again resumes operation of the syringe pump
� Please be careful to not stop the blood pump, therapy or anticoagulation without cause, to avoid interruptions in treatment and possible clotting of blood. The OMNI stops and starts these functions as required, for example during a bag change, the therapy will stop and start automatically
Increase the blood flow rate by pressing number in the middle of the screen to flow rate as per protocol at a rate based on the patient’s stability.
� Please refer to the alarms remedial action booklet for information on diagnosing and resolving alarms � When an alarm initially sounds press Audio Pause to silence the alarm � When an alarm is triggered a banner is shown in the bottom corner of the screen. By pressing on the banner it expands with the
i symbol giving advice and possible work arounds for the alarm � When the issue is resolved press Reset Alarm
Once the patient is stable, the blood is returning to the patient and at blood flow target, commence the therapy by pressing the therapy icon . This commences the substitution, dialysate and effluent pumps. The OMNI is now running.
1
2
3
Stopping and starting blood pump, therapy and anticoagulation
Diagnosing and resolving alarms
Starting the therapy (once the patient is connected)
Risk of blood loss due to improper connection of blood lines to patient. After starting the blood pump and specifying the blood flow rate, check the arterial line, venous line, patient access and hemofilter for leaks.
WARNING

13
DURING THERAPY
� The bags can be changed at any time during therapy � To start the bag change procedure, either press the bags icon on screen, or select functions > change bag on the menu bar.
Ensure to always press the bags icon when doing a bag change, do not lift any bags off their scale without doing so � The machine automatically determines the number of installed bags by weight when installed. The user has to select the correct
number of effluent bags only. Confirm the bag change by pressing the bag change/weight reset icon � The therapy will stop when bag change is pressed, when the bag change/weight reset icon is pressed the therapy will commence
on its own once again
Bag changes
Syringe changes
Press functions or parameters > anticoagulation on the menu bar.
Press the change syringe icon.
The syringe change screen pops up.
Simultaneously, the syringe pump is stopped while the blood pump and fluid side pumps continue running.
Disconnect and dispose of syringe and install new syringe (as per prescription) as done previously.
Enter syringe type and correct filled volume on screen. Press confirm, the heparin syringe will commence once again.
1
2
i
ii
3
4
How to change the heparin syringe:
� The machine can be set to patient care mode in order to provide nursing care to the patient without triggering any alarms � Setting the machine to patient care mode causes the fluid side pumps to stop. The blood flow rate is reduced to 50 ml/min. The
alarm parameters are widened to avoid triggering alarms during this time � An alarm is triggered when the patient care mode has been active for a period of time � Press patient care icon to activate this feature and once complete, press patient care to return to normal therapy
� Net fluid removal (mls/hr), dialysate, substitution and anticoagulation flow rates can be changed during therapy if required � To open the flow rates screen, select parameters on the menu bar and navigate to flow rates or anticoagulation
� To navigate to fluid balance information press on history > volumes > totals (totals being at the top right side of the page) � This will show net fluid removed during therapy, this can be shown as hourly for charting on the fluid balance chart
Patient care
Changing flow rates and parameters
History and volumes

14
The Return blood screen appears:
ENDING THERAPY
� A running therapy can be terminated any time
� Use End Therapy when the therapy is over and the patient shall not be connected to the machine again
� Use Temporarily Disconnect Patient when the therapy is not over and the patient is to be reconnected to the machine after a short period of time
� Change Kit is used to take the current kit off and replace with a new kit right away (e.g. if kit issue or reached kit expiry time)
� Navigate to Functions to see this screen:
During recirculation the venous (blue) and arterial (red) lines are connected to a saline bag in order to keep the machine on standby until reconnection of the patient is required. A saline bag (250 or 500 mls) and 3-way tap are required for this procedure, along with blood return equipment. The blood is returned to the patient prior to recirculation.
Press Functions on the menu bar.
Ensure all blood return equipment is prepared and ready (as the blood pump will stop once the disconnection process is commenced, causing the blood to begin to clot). Hang the saline bag on the IV pole.
Press the Temporarily Disconnect Patient icon on the Functions screen, as above, and press Yes to confirm your selection.
How to start the temporarily disconnect procedure
1
2
3
4
Risk to the patient due to blood loss or air infusion if the user fails to close the arterial (red) clamps or the venous (blue) clamps on the patient access! Check lines for clotting prior to returning the blood. If clotting is suspected, consider changing the kit without returning the blood to the patient.
WARNING
Return the blood as detailed on screen, following each step in turn. Remove the arterial (red) line from the patient and connect to the saline bag on the IV pole. Ensure to secure the patient access and clamp all clamps before disconnecting from the patient.
Press Return Blood when ready to return, after unclamping arterial (red) line at the saline bag and only when satisfied all connections are secure. Ensure to monitor the patient and the lines closely throughout.
The OMNI automatically returns the volume within the set. The blood return will automatically stop once the return volume has been reached. Alternatively, it can be manually stopped at any time by releasing the Return blood icon. If blood remains in the set, the user can press the Return +50 ml icon to return more blood to the patient. Ensure there is enough saline left in the saline bag to do this.
Once blood is returned, disconnect venous line (blue) from patient and connect to the 3-way tap on the IV pole for recirculation.
Ensure to clamp lines and patient access prior to disconnection. The patient should now be fully disconnected from the machine with access securely clamped.
i
ii
iii
iv
v

15
Press Next to proceed to the Recirculation step. Open clamps on arterial (red) and venous (blue) lines when on the 3-way tap connected to the saline bag.
To start recirculation, press Recirculation. The blood pump starts recirculating the fluid through the lines of the disposable kit, the machine is now recirculating and can be left until the user is ready to reconnect the patient. The time period the machine is in recirculation for is displayed. Do not reconnect if over the recommended recirculation time. Do not reconnect to the patient if there are clots in the set, a new kit is required. To stop recirculation press the Recirculation button.
Once ready to reconnect to the patient, press Reconnect to proceed to the Reconnection step. The Confirm reconnection parameters dialog appears. The parameter settings entered during preparation are displayed for verification. Keep or change the parameter settings if needed.
To proceed to the next step and to connect the patient, press Confirm and continue with patient connection as done previously.
5
6
7
8
How to start the temporarily disconnect procedure
Risk of patient injury due to clotting. Always inspect the venous line for signs of clotting before reconnecting the patient. If clotting is suspected, consider changing the kit.WARNING
Select Functions on the menu bar, as above.
Press the End Therapy icon on the Functions screen.
Once blood return is complete disconnect venous (blue) line from the patient and ensure the patient is fully disconnected from the machine prior to navigating to the unload disposables stage, clamping all clamps and patient access prior to disconnection.
Once ready with required equipment for blood return, press Yes to confirm your selection.
How to start the end of therapy procedure
1
2
4
3
The Return Blood screen appears. Return the blood as detailed on screen and above. Blood return can be skipped here if required. i
Risk to the patient due to blood loss or air infusion if the user fails to close the arterial (red) clamps or the venous (blue) clamps on the patient access! Check lines for clotting prior to returning the blood. If clotting is suspected, consider not returning the blood to the patient.
WARNING
ENDING THERAPY
Change of kit returns the blood in the same way as above, however following this will directly move to installing a new kit as done previously. Follow the steps on screen.
Change of kit

16
UNLOADING DISPOSABLES
� Make sure that the patient has been disconnected from the machine
� Follow all steps in turn on the screen, do not press UNLOAD until all steps have been done. Pressure lines again does not get a tick until the kit is unloaded, this step needs to be done in turn
� Press UNLOAD, the kit will unload. If any alarm triggers during unload, ensure to resolve the issue and press Reset Alarm to allow the unload process to continue
� Dispose of all disposables
� CAUTION! Risk of contamination of environment. Dispose of all used bags and used disposable kit as per facility protocol
� Navigate to the next stage, press NEW THERAPY and the start screen will appear
� Switch the machine off by pressing and holding the green button on the back of the OMNI
� Ensure the machine remains plugged in when not in use

17
NOTES

18
NOTES

19
EFFECTIVESOLUTIONS
and
customers and partners.
We develop
for thehealthcare system in a
with our
CONSTRUCTIVEDIALOGUE
GUIDINGSTANDARDS
OUR MISSION

20
B. Braun Avitum (UK) Ltd | Thorncliffe Park | Sheffield | S35 2PWTel 0114 225 9000 | Fax 0114 255 9111 | www.bbraun.co.uk
XX-OSGH-09-20


