Embed Size (px)
Citation preview
NATIONAL OPEN UNIVERSITY OF NIGERIA
SCHOOL OF SCIENCE AND TECHNOLOGY
COURSE CODE: BIO 191
COURSE TITLE: GENERAL PRACTICAL BIOLOGY
BIO 191 COURSE GUIDE
ii
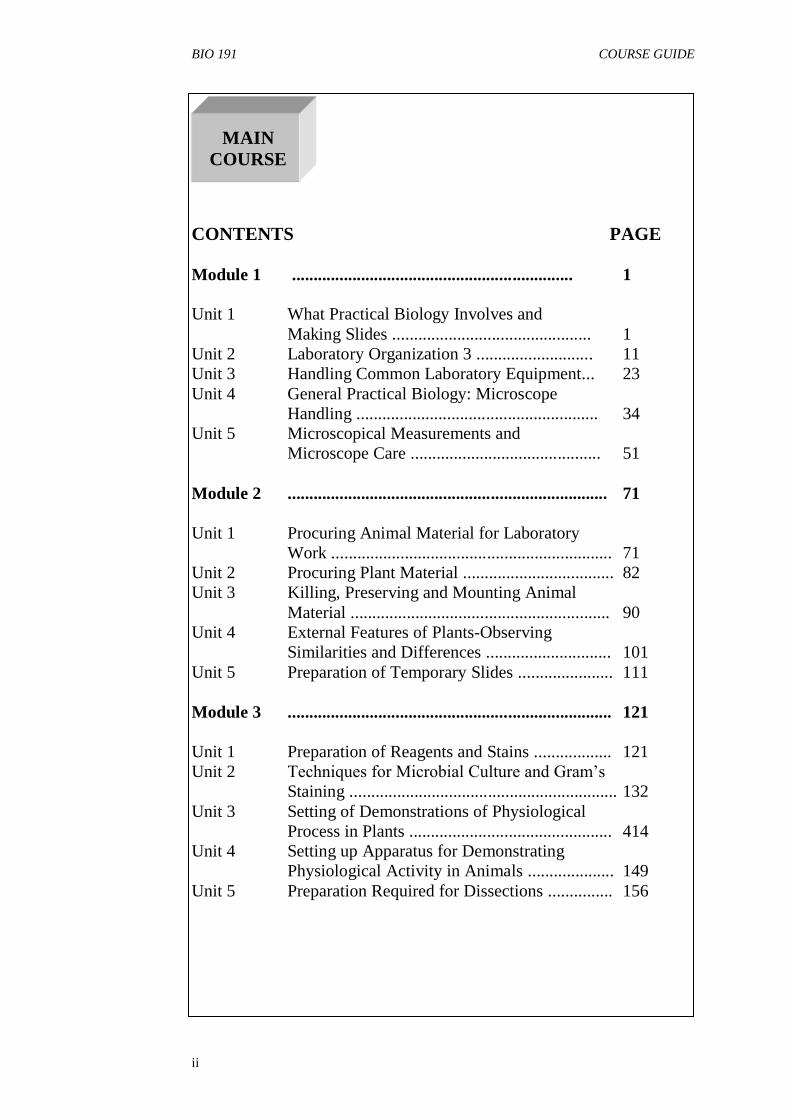
CONTENTS PAGE
Module 1 ................................................................. 1
Unit 1 What Practical Biology Involves and
Making Slides .............................................. 1
Unit 2 Laboratory Organization 3 ........................... 11
Unit 3 Handling Common Laboratory Equipment... 23
Unit 4 General Practical Biology: Microscope
Handling ........................................................ 34
Unit 5 Microscopical Measurements and
Microscope Care ............................................ 51
Module 2 .......................................................................... 71
Unit 1 Procuring Animal Material for Laboratory
Work ................................................................. 71
Unit 2 Procuring Plant Material ................................... 82
Unit 3 Killing, Preserving and Mounting Animal
Material ............................................................ 90
Unit 4 External Features of Plants-Observing
Similarities and Differences ............................. 101
Unit 5 Preparation of Temporary Slides ...................... 111
Module 3 ........................................................................... 121
Unit 1 Preparation of Reagents and Stains .................. 121
Unit 2 Techniques for Microbial Culture and Gram’s
Staining .............................................................. 132
Unit 3 Setting of Demonstrations of Physiological
Process in Plants ............................................... 414
Unit 4 Setting up Apparatus for Demonstrating
Physiological Activity in Animals .................... 149
Unit 5 Preparation Required for Dissections ............... 156
MAIN
COURSE
BIO 191 COURSE GUIDE
iii
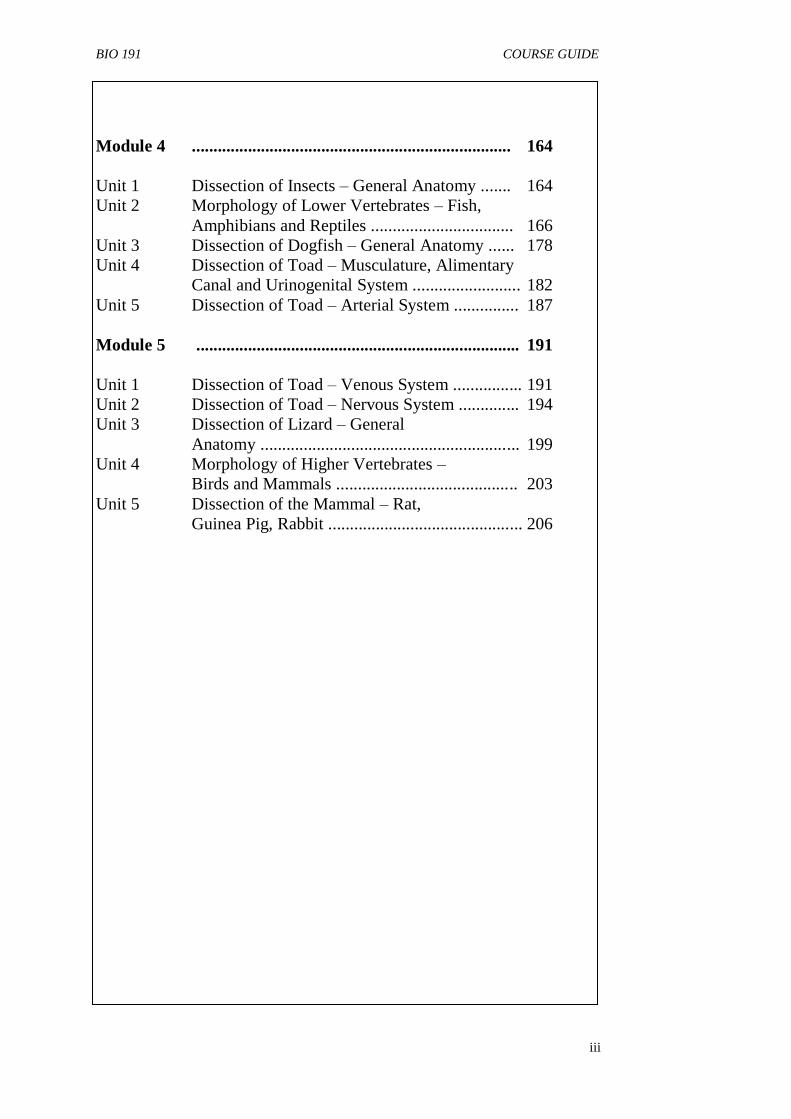
Module 4 .......................................................................... 164
Unit 1 Dissection of Insects – General Anatomy ....... 164
Unit 2 Morphology of Lower Vertebrates – Fish,
Amphibians and Reptiles ................................. 166
Unit 3 Dissection of Dogfish – General Anatomy ...... 178
Unit 4 Dissection of Toad – Musculature, Alimentary
Canal and Urinogenital System ......................... 182
Unit 5 Dissection of Toad – Arterial System ............... 187
Module 5 ........................................................................... 191
Unit 1 Dissection of Toad – Venous System ................ 191
Unit 2 Dissection of Toad – Nervous System .............. 194
Unit 3 Dissection of Lizard – General
Anatomy ............................................................ 199
Unit 4 Morphology of Higher Vertebrates –
Birds and Mammals .......................................... 203
Unit 5 Dissection of the Mammal – Rat,
Guinea Pig, Rabbit ............................................. 206
BIO 191 COURSE GUIDE
iv
BIO 191
GENERAL PRACTICAL BIOLOGY
Course Team C. T. Pwol (Course Developer/Writer)
Dr. Jari Sanusi (Course Editor) – NOUN
Dr. S. I. Ogunrinde (Programme Leader)NOUN
Prof. A. Adebayo (Course Coordinator) NOUN
NATIONAL OPEN UNIVERSITY OF NIGERIA
COURSE
GUIDE
BIO 191 COURSE GUIDE
v
National Open University of Nigeria
Headquarters
14/16 Ahmadu Bello Way
Victoria Island, Lagos
Abuja Office
5 Dar es Salaam Street
Off Aminu Kano Crescent
Wuse II, Abuja
e-mail: [email protected]
URL: www.nou.edu.ng
Published by
National Open University of Nigeria
Printed 2006
Reprinted 2014, 2015
ISBN: 978-058-771-3
All Rights Reserved
BIO 191 COURSE GUIDE
vi
CONTENTS PAGE
Introduction …………………………………………. iv
What You Will Learn In This Course ………………. iv
Course Aims …………………………………………. v
Course Objectives …………………………………… v
Working through This Course ………………………. vi
Course Materials …………………………………….. vi
Study Units …………………………………………… vi
Assignment File ………………………………………. viii
Presentation Schedule ……………………………….. viii
Assessment …………………………………………… ix
Tutor - Marked Assignments (TMAS) ………………. ix
Final Examination and Grading ……………………… ix
Course Marking Scheme ……………………………… x
Course Overview ……………………………………… x
Study Guide …………………………………………… x
How to Get the Most from This Course ………………. xii
Tutorials and Tutors …………………………………… xiii
Summary ………………………………………………. xiv

BIO 191 MODULE 5
191
The course is made up of fifteen units developed to enable you learn
about.
1. What practical work in biology involves
2. Laboratory organization
3. Handling common laboratory equipment
4. Microscope handling and maintenance
5. Making microscopically measurements and
6. Procuring animal material
7. Killing, preserving and maintaining animals’ materials
8. Procuring planted material
9. External features of plants - observing differences and
similarities.
10. Preparation of temporary slides
11. Preparation of stains and reagents
12. Techniques for microbial culture and grain staining.
13. Setting of Demonstrations for physiological processes in plants.
14. Setting up of apparatus for demonstrating physiological process
in animals
15. Preparation required for digestion.
INTRODUCTION
Biology 191 - General Practical Biology will run for two semesters. It
carries 2 credit units. It is one of the courses taken early in the B.sc
Education Biology.
The pre-requisite for this course is that you must have studied some (one
or two of ) science subjects like Biology, Integrated Science, Health
Science, Chemistry or Physics at the secondary school level, and have
obtained at least a credit in them.
In this course guide, you are told about the course materials you need
and how you can work through the course successfully. You are also
advised about the amount of time you must spend on your tutor -
marked assignments.
WHAT YOU WILL LEARN IN THIS COURSE
You will be introduced to the general principles of microscopy. You will
learn to use the microscope to study details and minute organisms that
cannot be seen with the naked eye. Usually biologists need to present the
object of their study in diagrammatic forms. Biological drawings are
different from other drawings. You will learn in the practical sense, how
to put organisms that belong together and those that do not separately
because of their features. Sometimes biologist try to create mediums
BIO 191 GENERAL PRACTICAL BIOLOGY
192
conducive for the growth of some organisms so that they can be
cultivated for study. Some of such medium is called culture medium.
You will also have1he opportunity to study the environments in which
organisms live, analyse then find pout why some environments are more
conducive to some organisms than others
COURSE AIMS
The aim of this course is to:
1. acquaint you with what practical work in biology involves.
2. enable you successfully study living organisms.
3. learn how to make slide preparations for study.
4. understand the importance of microscopes successfully without
damaging them.
5. provide opportunities for personal contact with biological
specimens and learn the differences and similarities they have.
6. enable you learn how to make biological cultures.
7. enable you learn about organisms through dissection.
Dissection is another important practical activity that biologists do in
order to study internal structures. You will dissect representative of the
invertebrates, prochordata and chordate and study their respiratory,
digestive, circulatory, osmoregulatory, endocrine, productive and neural
systems.
COURSE OBJECTIVES
To achieve these aims, the following overall course objectives are here
set for you to achieve. Therefore on successful completion of this
course,
You should be able to: -
1. name at least four things biologists do in the laboratory.
2. give six hints for successful practical work.
3. prepare slides of both plants and animals sections successfully.
4. apply the basic techniques in producing biological drawings.
5. organize a laboratory.
6. handle common laboratory equipments
7. observe similarities and differences between organisms studied in
practical biology.
8. procure organisms for biological studies.
9. identify organisms
10. kill and preserve organisms
11. prepare temporary slides.
BIO 191 MODULE 5
193
12. prepare stains and reagents.
13. make microbial cultures and grams stains .
14. set up demonstrations for physiological experiments in plants
and animals
15. dissect vertebrates and invertebrates.
Apart from these general objectives, unit objectives are set for individual
u I, which you will achieve if you are to successfully complete this
course. You are here advised to read the unit objectives as you go on so
that you can monitor your progress and ascertain all that you are
required to do.
WORKING THROUGH THE COURSE
If you want to complete this course, successfully, you will have to work
systematically through the unit according to instructions given because
this is a course work on practicals, you will need some materials like
microscope, hand lens dissecting sets, specimens of various types and so
on depending on the particular unit. Some of the unit will involve visits
to the zoological and botanical gardens. You will also have to respond to
self assessments. All of these, including the end of course examination
contribute to your final course grading. The course should last 34 weeks.
COURSE MATERIALS
The main components of the requirements for this course are:
1. The study guide
2. Study units
3. Other reference materials
4. Assignment file
5. Presentation schedule
6. Materials for practical work.
You must contact your tutor if you have problems in obtaining any of
these.
STUDY UNITS
The units in this course are listed here below:
Module 1
Unit 1 What practical work in biology involves.
Unit 2 Laboratory organization
Unit 3 Handling common laboratory equipment
BIO 191 GENERAL PRACTICAL BIOLOGY
194
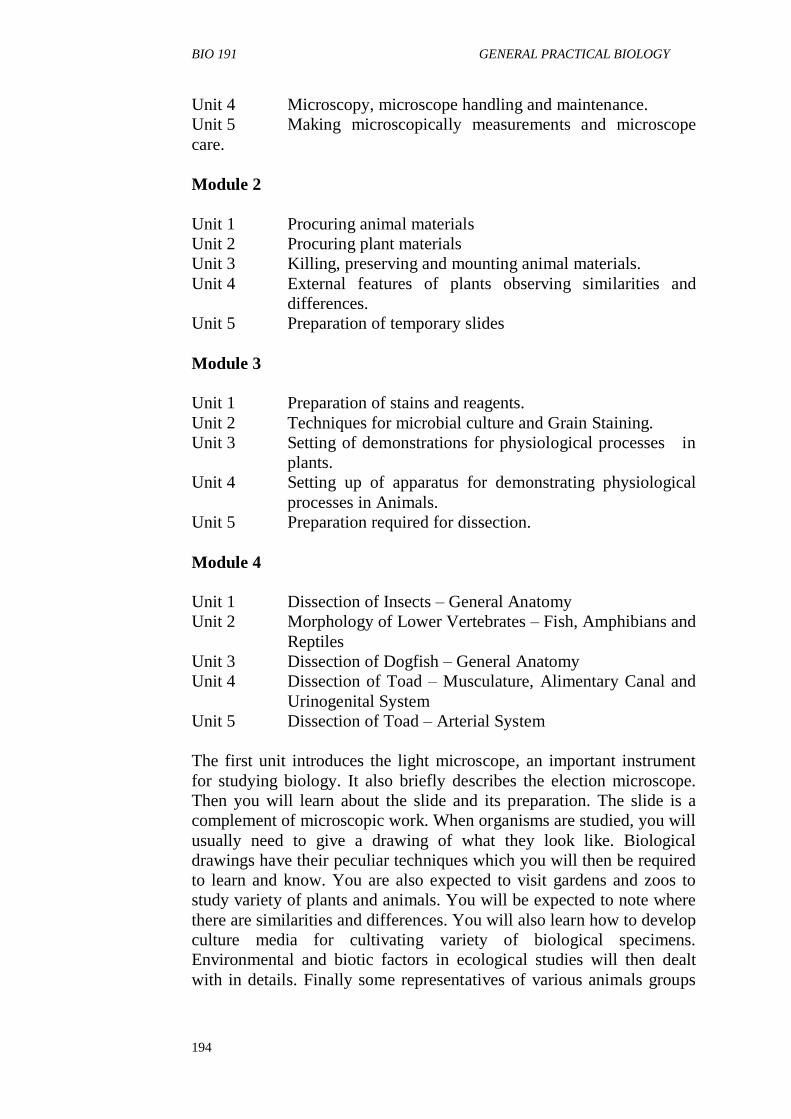
Unit 4 Microscopy, microscope handling and maintenance.
Unit 5 Making microscopically measurements and microscope
care.
Module 2
Unit 1 Procuring animal materials
Unit 2 Procuring plant materials
Unit 3 Killing, preserving and mounting animal materials.
Unit 4 External features of plants observing similarities and
differences.
Unit 5 Preparation of temporary slides
Module 3
Unit 1 Preparation of stains and reagents.
Unit 2 Techniques for microbial culture and Grain Staining.
Unit 3 Setting of demonstrations for physiological processes in
plants.
Unit 4 Setting up of apparatus for demonstrating physiological
processes in Animals.
Unit 5 Preparation required for dissection.
Module 4
Unit 1 Dissection of Insects – General Anatomy
Unit 2 Morphology of Lower Vertebrates – Fish, Amphibians and
Reptiles
Unit 3 Dissection of Dogfish – General Anatomy
Unit 4 Dissection of Toad – Musculature, Alimentary Canal and
Urinogenital System
Unit 5 Dissection of Toad – Arterial System
The first unit introduces the light microscope, an important instrument
for studying biology. It also briefly describes the election microscope.
Then you will learn about the slide and its preparation. The slide is a
complement of microscopic work. When organisms are studied, you will
usually need to give a drawing of what they look like. Biological
drawings have their peculiar techniques which you will then be required
to learn and know. You are also expected to visit gardens and zoos to
study variety of plants and animals. You will be expected to note where
there are similarities and differences. You will also learn how to develop
culture media for cultivating variety of biological specimens.
Environmental and biotic factors in ecological studies will then dealt
with in details. Finally some representatives of various animals groups
BIO 191 MODULE 5
195
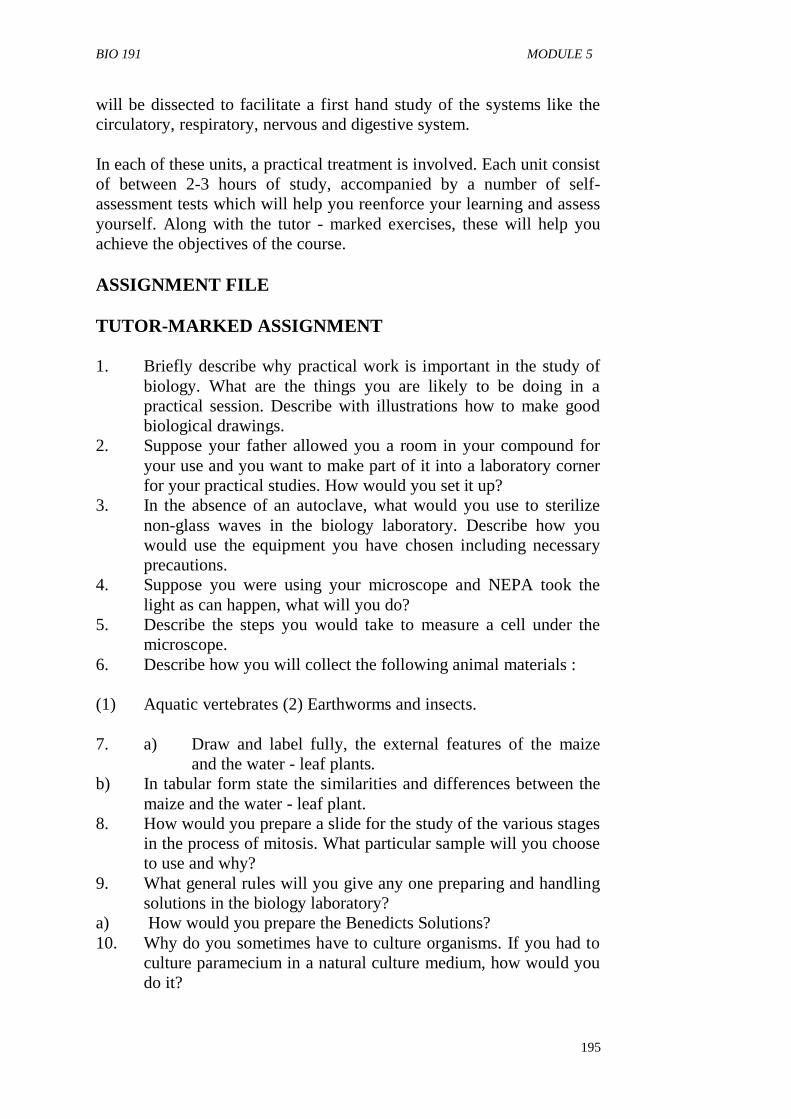
will be dissected to facilitate a first hand study of the systems like the
circulatory, respiratory, nervous and digestive system.
In each of these units, a practical treatment is involved. Each unit consist
of between 2-3 hours of study, accompanied by a number of self-
assessment tests which will help you reenforce your learning and assess
yourself. Along with the tutor - marked exercises, these will help you
achieve the objectives of the course.
ASSIGNMENT FILE
TUTOR-MARKED ASSIGNMENT
1. Briefly describe why practical work is important in the study of
biology. What are the things you are likely to be doing in a
practical session. Describe with illustrations how to make good
biological drawings.
2. Suppose your father allowed you a room in your compound for
your use and you want to make part of it into a laboratory corner
for your practical studies. How would you set it up?
3. In the absence of an autoclave, what would you use to sterilize
non-glass waves in the biology laboratory. Describe how you
would use the equipment you have chosen including necessary
precautions.
4. Suppose you were using your microscope and NEPA took the
light as can happen, what will you do?
5. Describe the steps you would take to measure a cell under the
microscope.
6. Describe how you will collect the following animal materials :
(1) Aquatic vertebrates (2) Earthworms and insects.
7. a) Draw and label fully, the external features of the maize
and the water - leaf plants.
b) In tabular form state the similarities and differences between the
maize and the water - leaf plant.
8. How would you prepare a slide for the study of the various stages
in the process of mitosis. What particular sample will you choose
to use and why?
9. What general rules will you give any one preparing and handling
solutions in the biology laboratory?
a) How would you prepare the Benedicts Solutions?
10. Why do you sometimes have to culture organisms. If you had to
culture paramecium in a natural culture medium, how would you
do it?
BIO 191 GENERAL PRACTICAL BIOLOGY
196
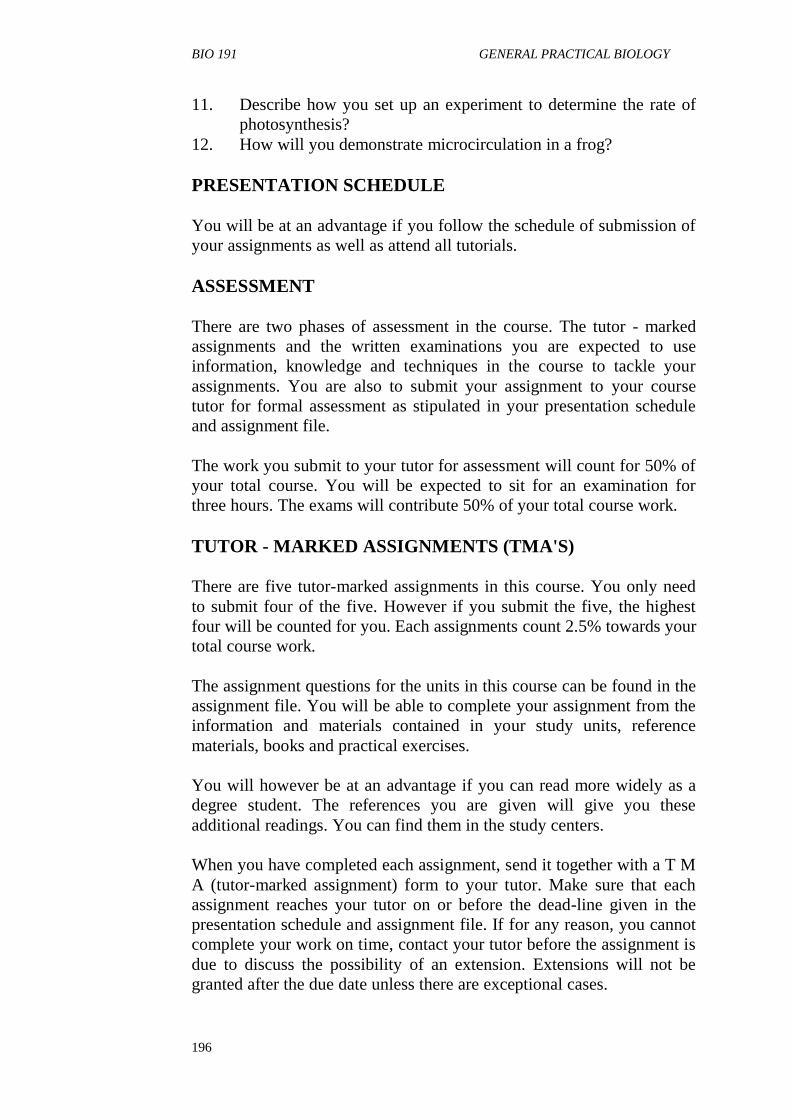
11. Describe how you set up an experiment to determine the rate of
photosynthesis?
12. How will you demonstrate microcirculation in a frog?
PRESENTATION SCHEDULE
You will be at an advantage if you follow the schedule of submission of
your assignments as well as attend all tutorials.
ASSESSMENT
There are two phases of assessment in the course. The tutor - marked
assignments and the written examinations you are expected to use
information, knowledge and techniques in the course to tackle your
assignments. You are also to submit your assignment to your course
tutor for formal assessment as stipulated in your presentation schedule
and assignment file.
The work you submit to your tutor for assessment will count for 50% of
your total course. You will be expected to sit for an examination for
three hours. The exams will contribute 50% of your total course work.
TUTOR - MARKED ASSIGNMENTS (TMA'S)
There are five tutor-marked assignments in this course. You only need
to submit four of the five. However if you submit the five, the highest
four will be counted for you. Each assignments count 2.5% towards your
total course work.
The assignment questions for the units in this course can be found in the
assignment file. You will be able to complete your assignment from the
information and materials contained in your study units, reference
materials, books and practical exercises.
You will however be at an advantage if you can read more widely as a
degree student. The references you are given will give you these
additional readings. You can find them in the study centers.
When you have completed each assignment, send it together with a T M
A (tutor-marked assignment) form to your tutor. Make sure that each
assignment reaches your tutor on or before the dead-line given in the
presentation schedule and assignment file. If for any reason, you cannot
complete your work on time, contact your tutor before the assignment is
due to discuss the possibility of an extension. Extensions will not be
granted after the due date unless there are exceptional cases.
BIO 191 MODULE 5
197
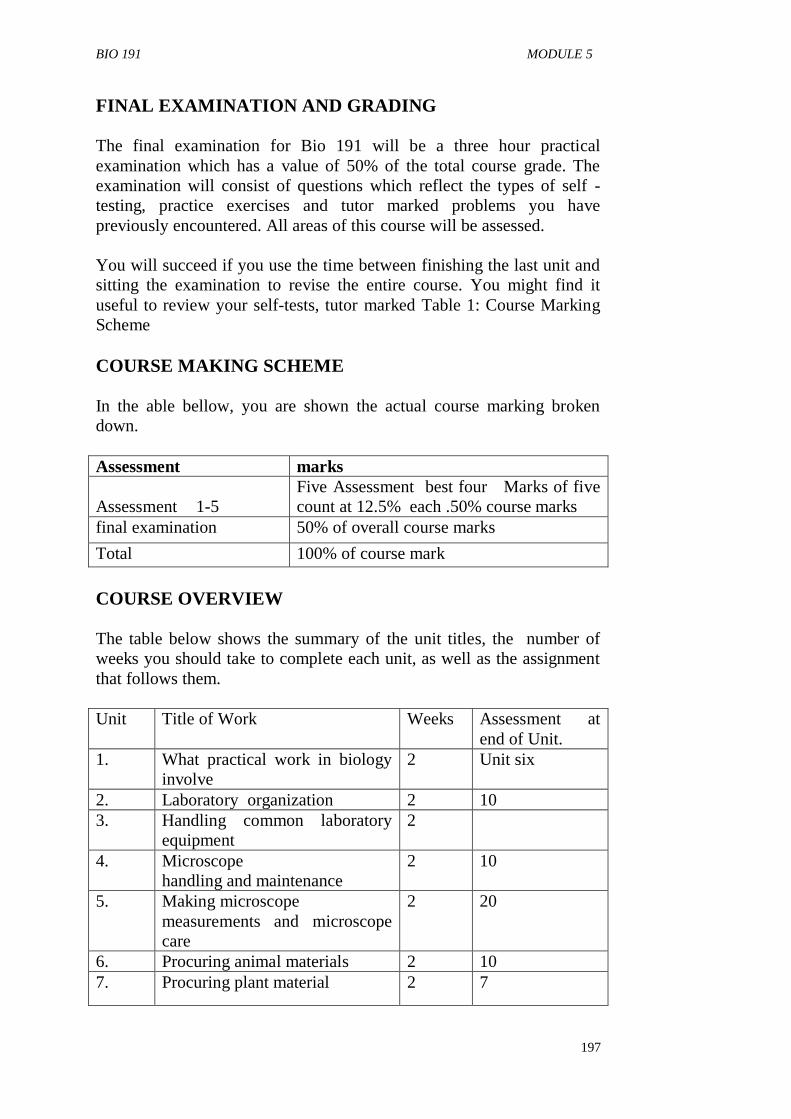
FINAL EXAMINATION AND GRADING
The final examination for Bio 191 will be a three hour practical
examination which has a value of 50% of the total course grade. The
examination will consist of questions which reflect the types of self -
testing, practice exercises and tutor marked problems you have
previously encountered. All areas of this course will be assessed.
You will succeed if you use the time between finishing the last unit and
sitting the examination to revise the entire course. You might find it
useful to review your self-tests, tutor marked Table 1: Course Marking
Scheme
COURSE MAKING SCHEME
In the able bellow, you are shown the actual course marking broken
down.
Assessment marks
Assessment 1-5
Five Assessment best four Marks of five
count at 12.5% each .50% course marks
final examination 50% of overall course marks
Total 100% of course mark
COURSE OVERVIEW
The table below shows the summary of the unit titles, the number of
weeks you should take to complete each unit, as well as the assignment
that follows them.
Unit Title of Work Weeks Assessment at
end of Unit.
1.
What practical work in biology
involve
2 Unit six
2. Laboratory organization 2 10
3.
Handling common laboratory
equipment
2
4.
Microscope
handling and maintenance
2 10
5. Making microscope
measurements and microscope
care
2 20
6. Procuring animal materials 2 10
7. Procuring plant material 2 7
BIO 191 GENERAL PRACTICAL BIOLOGY
198
8.
Killing preservation and
mounting animal material
2
9. External features of plants-
observing difference and
similarities
3 20
10.
Preparations of stains and
reagents
2 20
11.
Techniques for microbial culture
and Grain Steaming
2 10
12.
Setting up demonstration for
Physiological processes in
plants
2 10
13.
Setting up of Apparatus for
Demonstrating physiological
processes in animals
2 30
14 Preparation required for and
dissection of mammals
6
15 Dissection and mammals 6
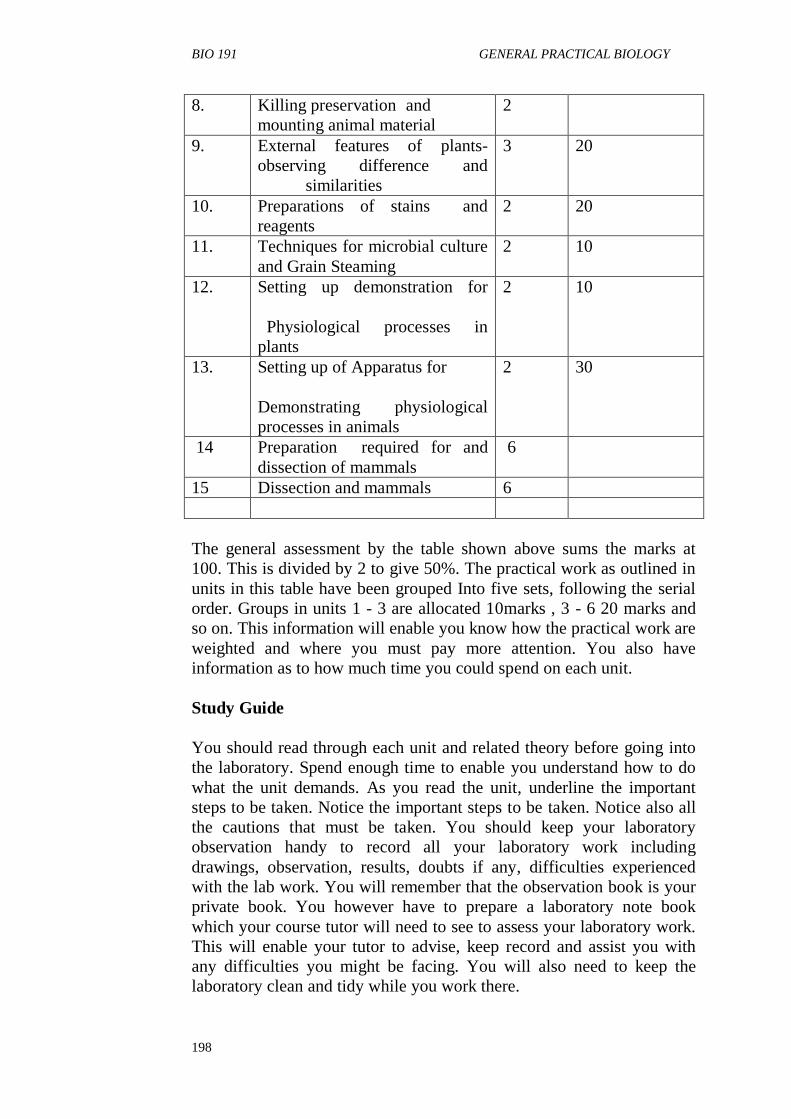
The general assessment by the table shown above sums the marks at
100. This is divided by 2 to give 50%. The practical work as outlined in
units in this table have been grouped Into five sets, following the serial
order. Groups in units 1 - 3 are allocated 10marks , 3 - 6 20 marks and
so on. This information will enable you know how the practical work are
weighted and where you must pay more attention. You also have
information as to how much time you could spend on each unit.
Study Guide
You should read through each unit and related theory before going into
the laboratory. Spend enough time to enable you understand how to do
what the unit demands. As you read the unit, underline the important
steps to be taken. Notice the important steps to be taken. Notice also all
the cautions that must be taken. You should keep your laboratory
observation handy to record all your laboratory work including
drawings, observation, results, doubts if any, difficulties experienced
with the lab work. You will remember that the observation book is your
private book. You however have to prepare a laboratory note book
which your course tutor will need to see to assess your laboratory work.
This will enable your tutor to advise, keep record and assist you with
any difficulties you might be facing. You will also need to keep the
laboratory clean and tidy while you work there.
BIO 191 MODULE 5
199
HOW TO GET THE MOST FROM THIS COURSE
The benefit of distance learning is that you can work through your study
material at your own pace, in your own time and at a place of your
choice. You read the lecture instead of listening to it. The same way
your lecturer gives you assignments in your study units.
All the study unit follow a common format which you will soon get used
to as you begin to use your study materials. There is first an introduction
to your subject of study. Secondly there is the objectives which should
serve you as sign post of the important issues you must try to achieve,
then the main content of the lesson which can be broken into sections. It
could be punctuated by activities and self assessment questions all of
which help you to know whether you are following the lecture properly.
It ends with a conclusion and a summary. At the end you could have a
tutor - marked assignment which is the assignment you must do and
submit to your course tutor before or on the specified date. You will
succeed more if through your course you get into the habit of going back
to the objectives set for the lesson as a check on your self. You will like
to ask yourself whether or not you have achieved these objectives for
example, if it says you will learn to follow all the techniques laid down
for making biological drawing, you will want to ensure that you can
draw following the hints on biological drawings you have been given.
You will note that unless you do this you cannot succeed.
The following are some practical steps for you to follow in working
through this course:
1. Read this course guide thoroughly.
2. Using the course 'over-view', organize a study schedule for
yourself. Pay attention to the time you are advised to spend on
each unit and how assignments are set for them. Keep a record of
the dates you want to work on each unit.
3. Once you have created a work schedule for yourself, the next
important thing is to ensure that you follow it. Many students fail
because they do not follow their work schedule, they get behind
their work schedule and are not able to meet with their
assignment and cover the course work. If you get into difficulty,
let your course tutor know before it is too late to help you.
4. Turn to unit 1 of this course and read the introduction and the
objectives.
5. Get all the material you need. You will get all the information
from the course overview at the beginning of each course. You
will usually need your course unit, probably a reference material
and your writing material.
BIO 191 GENERAL PRACTICAL BIOLOGY
200
6. Work through the content of the unit itself. It has been arranged
so that you will succeed. Follow the instructions very closely.
7. Collect your Assignment file and make sure you complete and
submit your assignment before the due date. The course
assignments have been designed to help you meet the objectives
of the course and succeed in your exams.
8. Review the objective of each study unit and ensure that you have
achieved them. If you are not sure of any objective, ask your
course tutor.
9. When you are sure you have achieved the objectives of a unit
then you can go to the next unit. Pace your work, repeating the
same procedure so far outlined for each unit. Work from unit to
unit ensuring that you follow your work schedule.
10. Do not wait for the result of the assignment of the previous unit
before you move to the next unit. Pay particular attention to all
comments made by the tutor on your assignment. Consult your
tutor as soon as possible if you have any problems.
11. After submitting the assignment for the last unit, review the
course objective both at the beginning and at the end of each unit.
Also review the course objectives in this guide. Then start
preparing yourself for the final examinations.
TUTORS AND TUTORIALS
The details of the tutorial hours will be given to you in due course. You
will be informed about the dates, times and location of these tutorials.
You will also be given the name and phone number of your tutor as soon
as you are allocated to a tutorial group.
Your tutor will mark and comment on your assignments, keep a close
watch on your progress and on any difficulty you might encounter and
provide assistance to you throughout the course. You must send your
tutor - marked assignment to your tutor well before the due date. They
will be marked by the tutor and returned to you as soon as possible.
Do not hesitate to phone or e-mail your tutor if you have any difficulties.
You could also contact your discussion board if necessary. You will
need to contact your tutor if:
1 You do not understand any part of the study units or references.
2 You have difficulty with the self test or exercises.
3 You have a question or problem with an assignment, with your
tutors, comments on an assignment.
Try to attend all the tutorials. It is the only chance to have face to face
contact with your tutor and ask questions which are instantly answered.
BIO 191 MODULE 5
201
During the tutorial you can raise any questions on problems you
encountered in the course of your study. To gain maximum benefit from
the course tutorials, prepare a question list before attending them. You
will learn a lot from participating actively in discussions.
SUMMARY
Biology 104 - introduces you to general practical work in biology. It
tells you what practical work in biology involves. It introduces you to
basic laboratory techniques as well as instruments. At the end of the
course you will have been able to answer questions like:
1. How do you make temporary slides?
2. How do you use and maintain the microscope successfully?
3. How can you make microbial cultures?
4. How do you prepares strains and reagents?
5. How do you procure plants and animals for practical work?
6. How do you preserve laboratory specimens?
7. How do you dissect animals?
These are only some of the questions you should be able to answer. To
gain the most from this course, observe the details in the instructions
you are given in your study guide.
We wish you success with the course and hope that you will find it both
interesting and useful. Enjoy your study with the National Open
University.
BIO 191 GENERAL PRACTICAL BIOLOGY
202
MODULE 1
Unit 1 What Practical Biology Involves and Making
Slides
Unit 2 Laboratory Organization 3
Unit 3 Handling Common Laboratory Equipment
Unit 4 General Practical Biology: Microscope
Handling
Unit 5 Microscopical Measurements and
Microscope Care
UNIT 1 WHAT PRATICAL BIOLOGY INVOLVES AND
MAKING SLIDES
CONTENTS
1.0 Introduction
2.0 Objectives
3.0 Main Content
3.1 Importance of practice Work.
3.2 Hints for Successful Practice Work.
3.3 Practical Biology – Involvements
3.4 Field study
3.5 Collection of Specimens
3.6 Preparing Specimens for study
3.7 Preservation and Storage
3.8 Making Section and Slides
3.9 Study of Specimens in the Laboratory
3.10 Biological Drawings
3.11 Views and Magnification
3.12 Labeling
3.13 Heading
3.14 Experimentation
4.0 Conclusion
5.0 Summary
6.0 Tutor-Marked Assignments
7.0 References/Further Readings
1.0 INTRODUCTION
You are going to start this general practical biology course by gathering
a general view of what practical biology involves. You must have, by
now read the course guide which gives you all you need to know about
the course. If you have not read it, you are advised to do so now.
Reading the Course Guide is very important for your success in the
BIO 191 MODULE 5
203
course work as a whole. Below are the objectives for this unit, which
you must work hard to achieve.
2.0 OBJECTIVES
As you go through this unit, you should be able to:
state why practicals are important in biology
give six hints on how to successfully do practical work in biology
state at least six things involved in practical biology
make good biological drawings
highlight the points in good biological drawing
3.0 MAIN CONTENT
3.1 Importance of Practical Biology
Biology is the study of living things. They (living things) perform
various activities which biologist could study as they perform these
activities. It is likely that if you see the organism you are studying
physically and even in its natural location, you will remember and
understand better than when you are taught only theoretically. Many
facts about living things are continuously discovered in the laboratories
and practical studies, most of these facts are discovered as biologists
physically study the organisms. The large-scale destruction of natural
flora and fauna upset the natural interdependence among living
organisms. These facts also are evident in practical biological studies.
Some of these interference which also have serious effects on man, can
be better understood when the studies involve practical work. It is
therefore important that practical, as part of the study of biology, should
go hand in hand with theory. Once relationships and patterns existing
among living things have been understood, biologists and other
scientists can approach the problems in a logical orderly manner.
Throughout history, man has been challenged by the mysteries of their
bodies and things that were around them. They wanted to know the
causes of diseases and how to fight them; how life is produced and
maintained and many other things. These are the knowledge that
practical biology as part of biology will make available to us.
You may already have known these facts about the importance of
practical biology. Take time to think of other important things not
mentioned here.

BIO 191 GENERAL PRACTICAL BIOLOGY
204
3.2 Hints for successful Practical Work
Even though these points look simple and commonplace, they will help
you to succeed in your practical work. First, let us list here what you
require to do a successful practical work. Without these you will
experience difficulties in your practical work.
Requirements
You should get these things for yourself. They are essential for
practicals:
l. Sharp pencils (H.B type)
2. Sharpener to resharpen when necessary
3. Sharp pen knife, razor-blade or scalpel
4. Dissecting pins
5. A flat piece of thick cardboard about l 10cm sq
6. Hand lens.
7. Pair of foolscaps
8. Watch glasses of various sizes
9. A small ruler
10. Microscopes and slides should be available to you at the study
centre. Ask your tutor for these.
Pencils: It is necessary to specifically mention that unless your pencils
are always sharp; your drawing will not be good. In an examination, you
sharpen two or more pencils ready so that you don't loose time reshaping
Observations: You should always observe your specimens closely and
very carefully. Look out for all details, size, texture, adaptive features
etc. Some examiners even count number of part of the specimen you are
supplied with. So your must draw exactly what you are given.
You must follow all the techniques for drawing in biology. They have
been spelt out in details in the section on biological drawings.
Following Instructions: You must know that in practical biology, you
must follow instruction that you are given to the letter. Sometimes, even
for laboratory safety reasons, it is imperative. When carrying out
experiments, your results could be wrong if you do not comply
Seek advice from your tutor when you are not sure of what to do in the
laboratory. This is safer and important. You save your time as well by
doing so.

BIO 191 MODULE 5
205
3.3 Practical Biology - Involvements
We will now consider six things involved in biology Practical. Practical
biology is part of the study of biology. It is ideally better if it goes side
by side with the theory. It involves at least six things.
3.4 Field study
Sometimes, Biologists choose to learn about organisms in their natural
habitats. In such places, you can see how they live and relate to others
organisms and how they impact on their environment. A lot of what is
done in ecology is done by field study.
However you as a student of biology could do a field trip to partly see
where such organisms inhabit, then collect the organisms, take them to
the laboratory for further studies.
SELF-ASSESSMENT EXERCISE 1
If you go out of the room where you are now, work a distance of about
100 meters radius, you will surely find some plants and animals. Look
closely to understand and describe where you find what. In the table
below, put in the required information.
Serial/No.
Name of Organism(s) (optional)
Describe organism
Where found.
Describe location
The items in the table can become your specimen(s). This takes us to the
next involvement in practical biology work.
3.5 Collection of Specimens
In the activity above, you may need tins or empty clean bottles to put in
your specimen. Let us imagine what you could have found. We could
name them as follows:
Rats, leaves, seeds, fruits, flowers, flies, fish, birds, lizards, snakes,
toads, frogs, butterflies, mosquitoes, grasshoppers, ants, snails, scorpion
ants, worms, etc.
If you want to “catch” or collect these specimens, you will agree that the
method of collection will vary with the type of organism and in which
BIO 191 GENERAL PRACTICAL BIOLOGY
206
state you want to have it and the kind of study you intend to do. You
desire to study how the toad breaths; you will have to device means of
collecting it without killing it. If you desire to study the structure of the
skeleton in the snake, you must consider how you can “catch” the snake
safely because of its nature, its land fragile skeleton. If however you
wish to collect different types of butterflies to study the difference in
their designs and colours, you will have to device or use an instrument
to reach them as they fly. A net used in collecting butterfly may be
different from the one which must necessarily be used for collecting fish
from a pond.
There-fore various methods are used depending on the type of study, the
type of organism, their habitats and how they live. Sometimes, the
biologist has to collect his specimen. He may however seek the help of a
laboratory assistance that may be specially trained to do so as well as
many other things in the laboratory.
3.6 Preparing Specimens for Laboratory Studies
When you would have collected your specimens, you may find it
necessary to bring them into the laboratory so that you could take time
to study them. Often, you want to keep them for as long enough as
necessary for sufficient studies to be made. For this reason, you need to
know how best to keep what preservation. The same methods may not
apply to all types of specimens. For example, bones will not be stored
the same way as worms. The laboratory technologists may handle the
details of these. It is however important for you to know that some
storage and preservation may be necessary.
3.7 Preservation and Storage
Apart from preservation and storage, you might also need to prepare the
specimen for the kind of study that is desired .For example, if you want
to study the structure of a section through the root of a plant, you need a
microscope to view the details of the sections. Besides, you need to
make a slid. In Module 2, unit 5 you will learn about making slides
3.8 Making Sections and Slides
When you have to study the internal structures of (some parts of) some
organisms you have to make sections.
These sections are described by the way they are made. A transverse
section across a root for example is cut with a sharp blade-or penknife
across the root. However, a longitudinal section is cut along the length
BIO 191 MODULE 5
207
of the root. These two sections for example, will show different
perspectives of the same structure.
Sections are most useful for biological studies when you cut them very
thin so that the cells can be made easily visible either by the use of hand
lens or microscopes.
You will need several practices to make good sections. So when you try
and you do not get the whole section sufficiently thin, do not worry, try
again you will soon be an expert. You may have to apply stains on
sections to make them visible. Your course tutor will direct you on this
matter. Remember that sections are best visible with magnifying glasses
and microscopes. They may need to be mounted on the slides and kept
well for viewing under the microscope.
3.9 Study of Specimens in the Laboratory
Identification is the first thing to do when you have brought your
specimens, into the laboratory. Here you look out for characteristic
features. In an examination or identification exercise, you state the
features you have observed before concluding by naming the specimen.
In other words, you are to give reasons first before saying what it is.
You will look out for details in the external features. As you do this, you
note the parts and their functions. You will look out for differences and
similarities and why these exist. If the object of study is small, you may
have to use the hand lens or the microscope.
3.10 Biological Drawings
Usually, the practical work includes drawings because it is a method of
putting on record, what you did in the laboratory. When you have
studied the details of an organism, be it the external or internal
structures, you want to make a diagrammatic report of what you saw. It
becomes very important for the biology student to be able make such
diagram. Sometimes, you are specially told what to do and draw. It is
very important to follow instructions and do exactly what you are told.
You must also ensure that you understand the instructions you are given.
You are advised not behave like some who choose to do what they like;
they do not follow instructions they are given for practical. They even
do not draw what they have seen in their practical work. They chose to
draw from memory and such drawings may not be exactly what they
have been given in the practical exercise. Examiners, they think will not
be able to tell when they are not complying with instructions. But this is
not true. Examiners are quick to know and they can interpret as
dishonest on the part of the students who often have to loose marks for
this reason. Your drawings should not be too small or too big your
BIO 191 GENERAL PRACTICAL BIOLOGY
208
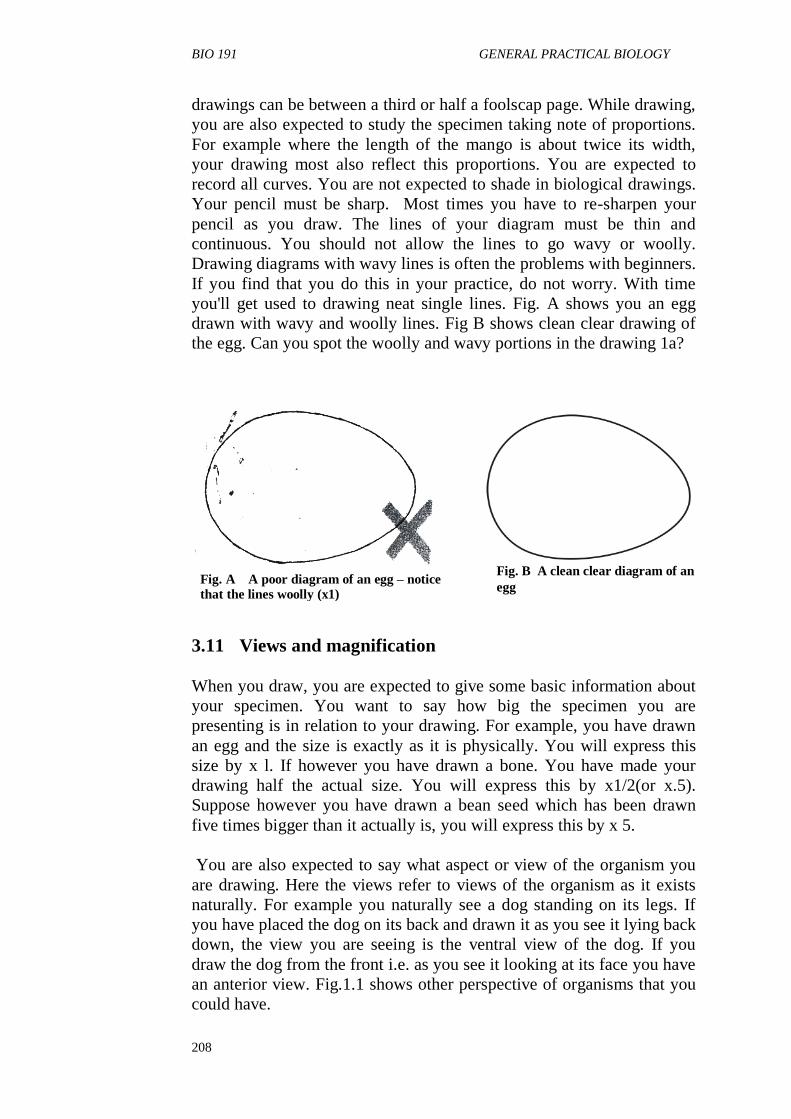
drawings can be between a third or half a foolscap page. While drawing,
you are also expected to study the specimen taking note of proportions.
For example where the length of the mango is about twice its width,
your drawing most also reflect this proportions. You are expected to
record all curves. You are not expected to shade in biological drawings.
Your pencil must be sharp. Most times you have to re-sharpen your
pencil as you draw. The lines of your diagram must be thin and
continuous. You should not allow the lines to go wavy or woolly.
Drawing diagrams with wavy lines is often the problems with beginners.
If you find that you do this in your practice, do not worry. With time
you'll get used to drawing neat single lines. Fig. A shows you an egg
drawn with wavy and woolly lines. Fig B shows clean clear drawing of
the egg. Can you spot the woolly and wavy portions in the drawing 1a?
3.11 Views and magnification
When you draw, you are expected to give some basic information about
your specimen. You want to say how big the specimen you are
presenting is in relation to your drawing. For example, you have drawn
an egg and the size is exactly as it is physically. You will express this
size by x l. If however you have drawn a bone. You have made your
drawing half the actual size. You will express this by x1/2(or x.5).
Suppose however you have drawn a bean seed which has been drawn
five times bigger than it actually is, you will express this by x 5.
You are also expected to say what aspect or view of the organism you
are drawing. Here the views refer to views of the organism as it exists
naturally. For example you naturally see a dog standing on its legs. If
you have placed the dog on its back and drawn it as you see it lying back
down, the view you are seeing is the ventral view of the dog. If you
draw the dog from the front i.e. as you see it looking at its face you have
an anterior view. Fig.1.1 shows other perspective of organisms that you
could have.
Fig. A A poor diagram of an egg – notice
that the lines woolly (x1)
Fig. B A clean clear diagram of an
egg

BIO 191 MODULE 5
209
Sometimes, you draw what you see as you cut through your specimen to
reveal internal structures. You call these sections. You may have to draw
a longitudinal section through the mango fruit. This is a section you
make by cutting the fruit from top to bottom along its natural length.
(see figs 1.2 and 1.3)
Fig. 1.2 Longitudinal section of a mango fruit( x 1).
Fig 1.3 Transverse section of a mango fruit (x 1)
BIO 191 GENERAL PRACTICAL BIOLOGY
210
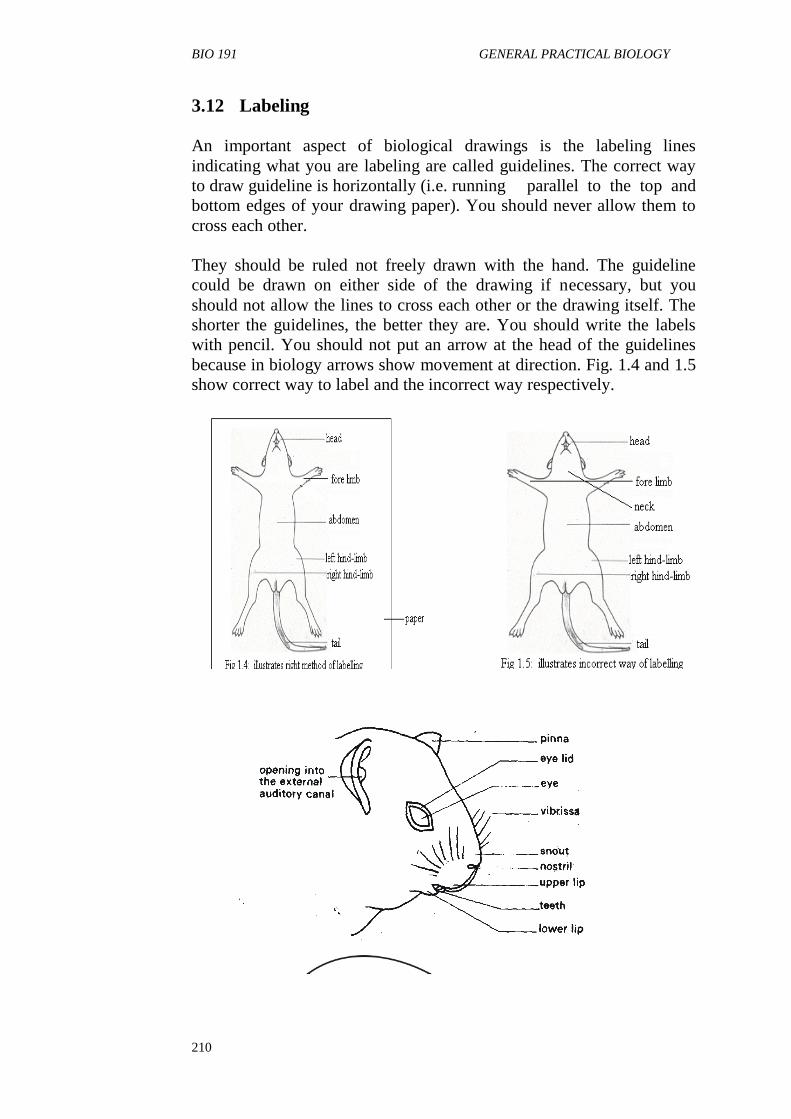
3.12 Labeling
An important aspect of biological drawings is the labeling lines
indicating what you are labeling are called guidelines. The correct way
to draw guideline is horizontally (i.e. running parallel to the top and
bottom edges of your drawing paper). You should never allow them to
cross each other.
They should be ruled not freely drawn with the hand. The guideline
could be drawn on either side of the drawing if necessary, but you
should not allow the lines to cross each other or the drawing itself. The
shorter the guidelines, the better they are. You should write the labels
with pencil. You should not put an arrow at the head of the guidelines
because in biology arrows show movement at direction. Fig. 1.4 and 1.5
show correct way to label and the incorrect way respectively.
Fig. 1.6 Fully labeled
diagram of the head of a guinea pig (x1)
BIO 191 MODULE 5
211
You will always remember to label your diagrams fully. (see fig 1.4)
3.13 Headings
You must put a heading for all diagrams that written above or below the
diagram.
The heading contains three vital elements:
1. The identity of what you have drawn e.g. diagram of the head
of a guinea pig.
2. The magnification or size.
3. The view or the organism, which you have drawn.
SELF-ASSESSMENT EXERCISE
1 What should be incomplete labeling of fig. 1.6?
2 Identify two reasons why fig. 16 is described as wrongly
labelled.
3. Identify good drawing in fig. 1.4 and state why they are good.
4. Identify bad drawing in fig. 1.5 and state why they are bad.
3.14 Experimentations
You have to perform certain experiments in biology practical. Scientists
do experiments to find out facts, or you do experiments in biology to
confirm them. You may have carried out experiments to show some
enzyme actions, prove that some processes (e.g. respiration and
transpiration) are taking place. You may also want to demonstrate
certain confirmed happenings organisms. For example, you know that
root grow downwards not upwards, or that plant grow towards light
source, or the impact of auxins on growth, you may also have to
determine the amount of water in a soil sample or amount of humus, or
differences in amount of capillarity between two types of soil: You can-,
continue to name other experiments you may have to carry out. The
important issue here is that your practical work in biology can also
involve doing experiments.
You are expected to report your experiment systematically.
The items of your report should include the following in the order
1. Date of experiment
2. Purpose-of experiment
3. Materials- A piece of raw potato - iodine Petri-dish
BIO 191 GENERAL PRACTICAL BIOLOGY
212
4. Procedure- Describe what you did e.g. place the piece of potato
the Petri dish add two to three drops of iodine. Here state what
happening e.g.
5. Result -A blue-black colour appear on the potatoes
6. Conclusion- Shows that starch is present (if necessary)
Sometimes you might want to make a diagrammatic representation of
the steps in the proceed. This is so where there are various set-ups on the
same experiment. You will number progressively or use arrow to show
directions.
3.15 Reporting Practical Works
Like the practical proceedings. You will record or report accurately all
the practical work that you have done.
4.0 CONCLUSION
In this unit you have learnt that practical work is an essential
complement of theoretical study of biology.
You have learnt about the basic essentials and techniques in practical
biology. You even learnt about the things you need for practical. We
have noted that all through practical work you need to be careful, exact
and follow instructions carefully.
5.0 SUMMARY
Now you are ready to apply these basic principles of practical biology to
your practical lessons, in biology. In the unit that follows, we will learn
about the structure and function of magnifying glasses. Remember that
we need them in practical biology to properly study small organisms or
small parts of large organisms.
6.0 TUTOR MARKED ASSIGNMENT
1. Briefly describe why practical work is important in the study of
biology
2. What are the things you are likely to be doing in a practical
session.
3. Describe with illustrations how to make good biological drawing.
7.0 REFERENCES/FURTHER READINGS
LT. 2 Laboratory Techniques manual Biology 3.
BIO 191 MODULE 5
213
UNIT 2 LABORATORY ORGANISATION 3
CONTENTS
1.0 Introduction
2.0 Objectives
3.0 Main Content
3.1 Laboratory Organisation
3.2 Activity 1.To plan the organization of laboratory
according to item
3.3 Activity 2. To plan the situation of items in the laboratory
based on available space.
3.4 Activity 3. To display general instructions for laboratory
use.
3.5 Activity 4. To label specimen, slides and reagents.
3.6 Activity 5. To compare notes on laboratory organization.
4.0 Conclusion
5.0 Summary
6.0 Tutor Marked Assignment
7.0 References/Further Readings
1.0 INTRODUCTION
In principle a well designed, organised, and aesthetically appealing lab.
is attractive to everyone. Besides, it’s convenient to use, easy to clean
and maintain. It elevates the mood, increases the enthusiasm of students
and teachers alike, and is conducive for working. Unfortunately, many
of us tend to neglect this aspect and do not make an effort in this
direction.
Whether you will be allowed to reorganize a lab. or not, through this
exercise, you will become aware of the approach and guidelines used for
organizing it. Besides, you may get a few tips for organizing other
places such as - home, work place, factory etc. and one would like that
whichever place you are allowed to implement your ideas you will take
the opportunity and do so.
In most jobs a well-organised place is primary for efficient functioning.
Organising a place is almost always a collective activity and a lab. is
also organised by the joint efforts of people using it. Though, there are a
set of guidelines common for most laboratories and dos' and don't are
well-defined but each lab. is unique in its set-up and reflects the talents
of the users. It is seen that many people are uncomfortable at the thought
of rearranging a place because it is quite demanding and involves
hassles. Therefore, they simply put up with any amount of disorder and
BIO 191 GENERAL PRACTICAL BIOLOGY
214
lack of cleanliness. This attitude is undesirable and we must strongly
discourage it.
In this exercise you will be doing the following activities with regard to
laboratory.
2.0 OBJECTIVES
As you do this exercise you should be able to:
itemise all the things available in the laboratory
plan the situation of available items in the laboratory
display general instructions for laboratory use
label specimens, slides and reagents in the laboratory
compare notes on laboratory organization.
3.0 MAIN CONTENT
3.1 Laboratory Organization
3.2 Activity 1 to Plan the Organisation of a Laboratory
According To Items Available
It is important for a technician to participate in lab. organization since
he/she is given the responsibility for its day to day management. He/she
is expected to know about everything that is present in the lab. and its
purpose. In this activity you will learn how to plan the organization of a
lab.
First, prepare a comprehensive account of the items 1 to 10, listed
below. Examine the lab in which you are conducting the practical and
find out what is available. To save your time we have listed the things
commonly available in most labs. Add the missing things to complete
the list and strike off what is not available. With regard to each item, it is
important to consider the size, number and suitable place for keeping
them. You should classify small items and put them together.
1. Accommodation.
No of main labs
Preparation room
Store
Office
Museum
BIO 191 MODULE 5
215
Any other (animal house, green house, herbarium etc.)
...................................................................................................................
....................................................................................................................
....................................................................................................................
2. Persons to be Accommodated
Number of Permanent Staff
Number of Teachers
Number of Supporting Staff
Number of Research Students
Number of Batches of Students
Number of Classes
Any other
3. Furniture
Teacher's table, chair
Work tables/ benches
Revolving stools Almirah for storage
Filing cabinet (s)
Slide cabinet
Open shelves
Office tables
Any other
4. Apparatus/Equipment
Dissecting Microscopes
Compound Microscopes
Microtomes
Spectrophotometer (s)
Incubators
Refrigerator (s)
Centrifuge (s)
Hot air oven
Hot plate
Water baths
Magnetic stirrer
Balances (physical and chemical)
Electrical balance
BIO 191 GENERAL PRACTICAL BIOLOGY
216
Distillation plant
Knife sharpener
Shaker
Autoclave
Pressure cooker
Safety cabinet
pH meter
Any other.
5. Glassware
Beakers
Test tubes
Conical flasks
Round bottom flasks
Volumetric flasks
Distillation flasks
Pipettes
Burettes
Measuring cylinders
Jars
Bell Jar
Desiccators
Troughs
Petri dishes
Watch glasses
Micro slides
Cover slips
Cavity blocks
Any other
It is important to know the quantity in each category to estimate the
space requirement
6. Chemicals
Solid chemicals
Liquid chemicals
Stock solutions, stains and culture media
Try to prepare a list of the above and estimate the space required.
7. Specimens, Charts and Models
Write details of each and estimate the space requirement and appropriate
place for each.
BIO 191 MODULE 5
217
8. Miscellaneous items
Bunsen burners
Spirit lamps
Iron stands
Tripod stands
Wire gauges
Dissecting kits
Any other
....................................................................................................................
....................................................................................................................
...................................................................................
Complete the list and try to categorise them.
9. Provision for disposal
Garbage cans
Incinerators
10. Files, -Records and Catalogues
Files for documents.
Records of activities/events.
Catalogues of classification for ease of reference.
3.3 Activity 2 to plan the placing of items in the laboratory
based on available space.
Ensure that you estimate in details the space required for each of the
items classified (I10) as already explained. Once your list is ready
examine the organization of the lab. See if there is scope for
improvement. It is also likely that you may come up with a completely
new plan of organization. If in any case you cannot implement your
ideas for this lab, then put down your suggestions in table 2.1
You must consider the following questions before your suggestions.
l. Is the present arrangement satisfactory?
2. Who will use the lab and for what purpose?
3. Is the furniture arranged in a manner that staff and students would
be able to move around easily?
4. What items are to be used everyday?
5. Which of the experiments are routinely performed?
BIO 191 GENERAL PRACTICAL BIOLOGY
218
6. What precautions are required while placing electrical
appliances?
7. Which is the best place for storing glassware?
8. Where could the different chemicals (acids/photosensitive/heat
sensitive) be safely stored?
9. Is the provision for storage most appropriate?
10. Are the provisions for safety adequate?
11. Is the arrangement of chemicals and equipment adequate for
independent student activity?
12. Are the provisions for good housekeeping adequate?
13. Is the arrangement of furniture, equipment, glassware etc.
convenient and serviceable.
14. Is the area for conducting certain experiments identified?
15. Is it possible for the students to study the displayed charts,
models and specimens?
16. Is there a convenient arrangement for frequent washing of the
glassware by the students?
17. Is the arrangement for disposal satisfactory?
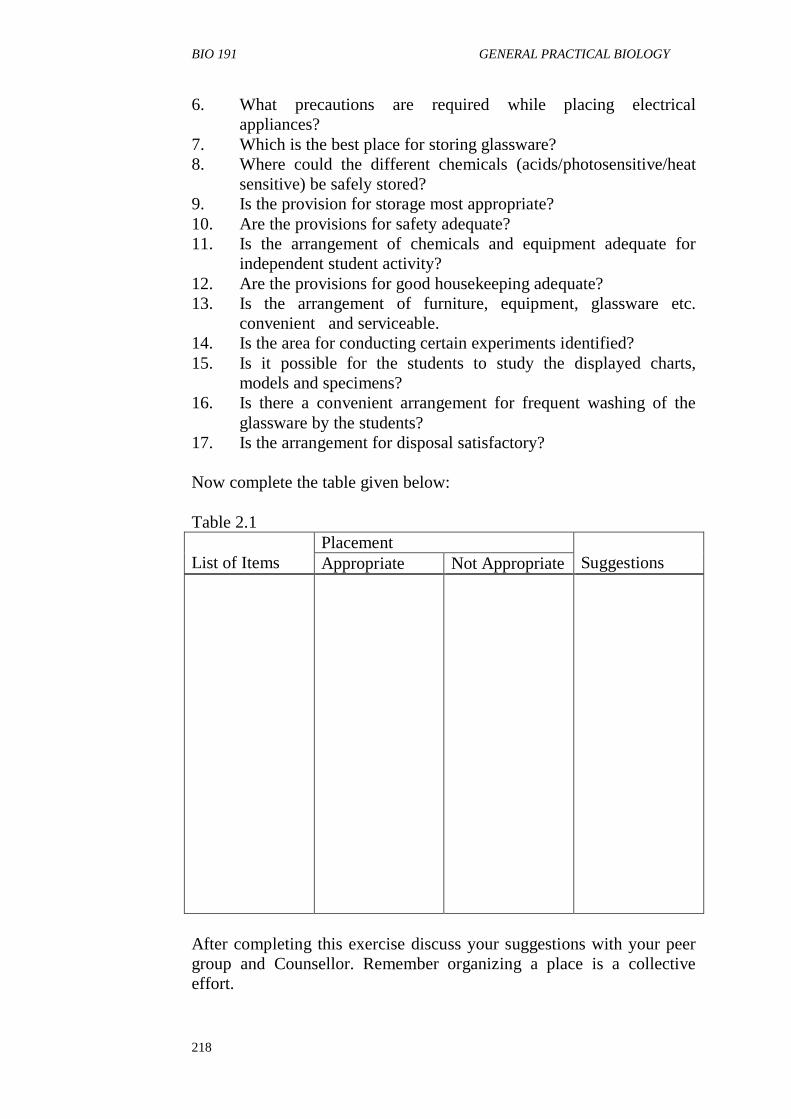
Now complete the table given below:
Table 2.1
List of Items
Placement
Suggestions Appropriate Not Appropriate
After completing this exercise discuss your suggestions with your peer
group and Counsellor. Remember organizing a place is a collective
effort.
BIO 191 MODULE 5
219
3.4 To display general instructions for laboratory use
Materials Required
You require the following materials in order to write and display general
instructions for laboratory use.
- Coloured chart paper - Scissors
- Coloured pens
- Adhesive tape
Procedure
Display instructions / rules is very important for housekeeping,
convenience, ease and above all the safety of a lab. Preparing a display
is partly a creative exercise since it requires a little bit of artistic ability.
A display should be conspicuous, legible, neat, and attractive.
Here we have listed some laboratory safety general guidelines. Choose
any 7 instructions that you consider more important that the rest for the
display. Cut a chart paper of an appropriate size, write the instructions
neatly using a colour pen that can highlight it and try to make it
attractive without missing the purpose. When it ready, display it at an
appropriate place, using the adhesive tape.
1. Keep the lab scrupulously clean and free of unnecessary things.
2. While entering the lab, place all books, notebooks and purses in
the designated areas and not on the working benches.
3. Do not eat, drink or smoke in the laboratory.
4. Do not make a noise in the lab.
5. Do not wear short or loose clothes in the lab.
6. Always wear a lab coat.
7. Do not perform unauthorized experiments.
8. Do not use equipment without reading the instructions.
9. Report all spills and accidents to your instructor immediately.
10. Never leave heat sources unattended.
11. Keep containers of alcohol, acetone, and other inflammable
liquids away from flame.
12. Leave the laboratory clean and organised for the next batch of
students.
13. Wash your hands with powdered soap prior to leaving the
laboratory.
14. Upon completion of laboratory exercises, place all discarded
materials in the disposal area designated by your Counsellor.
15. Do not allow any liquid to come into contact with electrical
cords. Handle electrical connectors with dry hands. Do not
BIO 191 GENERAL PRACTICAL BIOLOGY
220
attempt to disconnect electrical equipment that cracks, snap, or
smoke.
16. Wash skin immediately and thoroughly if exposed to chemicals
or microorganisms.
17. Never pipette by mouth. Use mechanical pipetting devices.
18. Wear disposal gloves whenever necessary.
19. Use bandage on cuts or scrapes before attending the lab.
20. Do not taste the chemicals
21. Do not lick the labels.
22. Decontaminate work surfaces after any spill of potentially
dangerous chemicals/micro-organisms
23. Wear safety glasses, gloves or other protective devices whenever
necessary.
24. Turn off gas, electricity and water before leaving the lab.
3.5 Activity 4: To label specimens, slides and reagents
Specimens Labels
Biology laboratories have a collection of a variety of plants and animals.
In units 6,7 and 8 you have learnt how to collect and preserve biological
specimens. After the collection it is essential that such specimens are
appropriately and attractively labeled. Likewise, certain slides of tissues,
organs or micro-organisms prepared by a teacher or student may be
essential or valuable for permanent record. These need to be
appropriately labeled for proper identification.
Specimen labels should therefore carry the following essential
information:
Example:
1. Common name of organism
2. Kingdom - planta
3. Phylum - Angiospermatophyta
4. Class - Angiosperms
5. Order – Moncotyledoneae
6. Family - poaceae
7. Genus - Zea
8. Species –zeamays
9. Place from where it was collected (optional)
10. Name of the collector, date.
BIO 191 MODULE 5
221
Labels for Slides
They should carry the following information
1. The name of the organism - if the whole organism is mounted
then the slide can be marked WM = whole amount or E = entire.
Examples: Paramecium WM, frog Blastula WM.
2. The part of the organism used, e.g liver, root, examples liver of
frog, onion root.
3. The type of preparation, e.g smear, squash: examples human
blood /smear
4. Type of section e.g. TS=transverse section; VS =vertical section;
LS = longitudinal section. Examples TS of kidney, VS of
phloem.
5. Other specifications e.g type of cell division (mitosis, meiosis)
stage of cell division (prophase/metaphase), sporulation.
The following information is desirable but not essential.
6. Stain(s) used e.g. H.E = Haematoxylin Eosin.
If the slide is prepared in house then it should be:
7. Dated
8. Installed.
It is common to use two labels, one on each end. Self - adhesive or
gummed slide labels pre-printed with lines are available form lab.
suppliers. Alternatively, use ordinary self-adhesive or gummed labels.
You will find it easier to write the label before you stick it one the slide
and remember if the label is gummed (rather than self adhesive) you
must not lick it. Instead use a wet sponge.
Prepare at least one label and stick it to a slide.
Sample Label
Onion root tip, squash
Mitosis, prophase
Vinita sharma,
20th October, 1999

BIO 191 GENERAL PRACTICAL BIOLOGY
222
Labels for Reagents
We also need to label routinely prepared stock solutions, stains and
culture media for identification. These should carry the following
information.
Name of the Chemical(s)
Percentage / molarity
Aqueous/any other solvent
Date
Initial
Sample Label
5% CuS04 (aqueous)
Lalit, 15/3/2000
3.6 Activity 5: to compare notes on laboratory organisation.
In order to compare notes on all that you have done, you need to look at
a demonstration on laboratory organization. You may use the
supplementary video clips for this purpose. Ask your course tutor for
help in making this available. Happy viewing as you compare notes
4.0 CONCLUSION
In this unit, you have learnt how to organise a laboratory. You will find
the experiment with the exercises very useful to you in general and for
laboratory work in particular. You have learnt that order and neatness
enhance the success of anything you do. Laboratories are places where
serious studies go on. Sometimes, a lot of care is necessary to keep safe
either in handling equipment or in ensuring your personal safety.
5.0 SUMMARY
Whether you are involved in organizing your study laboratory, you will
by this experience know why things are placed where they are, or why
you must follow instructions as well. The next thing you would want to
know is how you would handle the kind of equipment you will find in
your study laboratory.
6.0 TUTOR- MARKED ASSIGNMENT
Suppose your father allowed you a room in your compound for your use
and you want to make part of it into a laboratory corner for your
practical studies, how would you set it up?
BIO 191 MODULE 5
223
7.0 REFERENCES/FURTHER READINGS
Berril, N.J. (1979) Biology in action. London Heineman Educational
Books Ltd
Soper, R. (Ed) (1998) Biological Sciences. Cambridge UK, Cambridge
University Press.
Stone, R.N., Cozens, A.B, Emia, F.I (1972) New Biology for Tropical
Schools London, Longman Group Ltd.
A NOUN Video Demonstration on Laboratory Organisation (To be
produced by NETC)
BIO 191 GENERAL PRACTICAL BIOLOGY
224
UNIT 3 HANDLING COMMON LABORATORY
EQUIPMENT
CONTENTS
1.0 Introduction
2.0 Objectives
3.0 Main Content
3.1 Handling common laboratory equipment
3.2 Materials
3.2.1 Pressure Cooker
3.2.2 Autoclave
3.2.3 Hot Air Oven
3.2.4 Incubator
3.2.5 Water Bath
3.2.6 Centrifuge
3.2.7 Laminar Airflow System
3.2.8 Micro-tome Knives
3.2.9 Dissecting Kit
4.0 Conclusion
5.0 Summary
6.0 Tutor Marked Assignment
7.0 References/Further Readings
1.0 INTRODUCTION
Each Science lab. i.e. Physics, Chemistry and Biology is equipped with
equipment. In this unit, you will study about the equipment which are
necessary for a biology lab. A lab technician should know about various
types of equipment and their uses. As a lab. technician, you should also
know about the working and maintenance of equipment. If you have not
seen any of these equipment before, don't worry. You will soon get used
to seeing and using them. You only need to follow the guidance of your
course tutor and ask questions when you are not sure.
2.0 OBJECTIVES
After going through this unit, you should be able to:
use a pressure cooker and autoclave for sterilization
operate hot air oven and water-bath
handle a centrifuge
operate laminar air flow system
use microtome knives.
BIO 191 MODULE 5
225
3.0 MAIN CONTENT
3.1 Handling Common Laboratory Equipment
3.2 Materials
Autoclave
Pressure cooker
Microtome knives
Dissecting kit
Hot air oven
Incubator, Water bath, Centrifuge
Laminar Airflow System
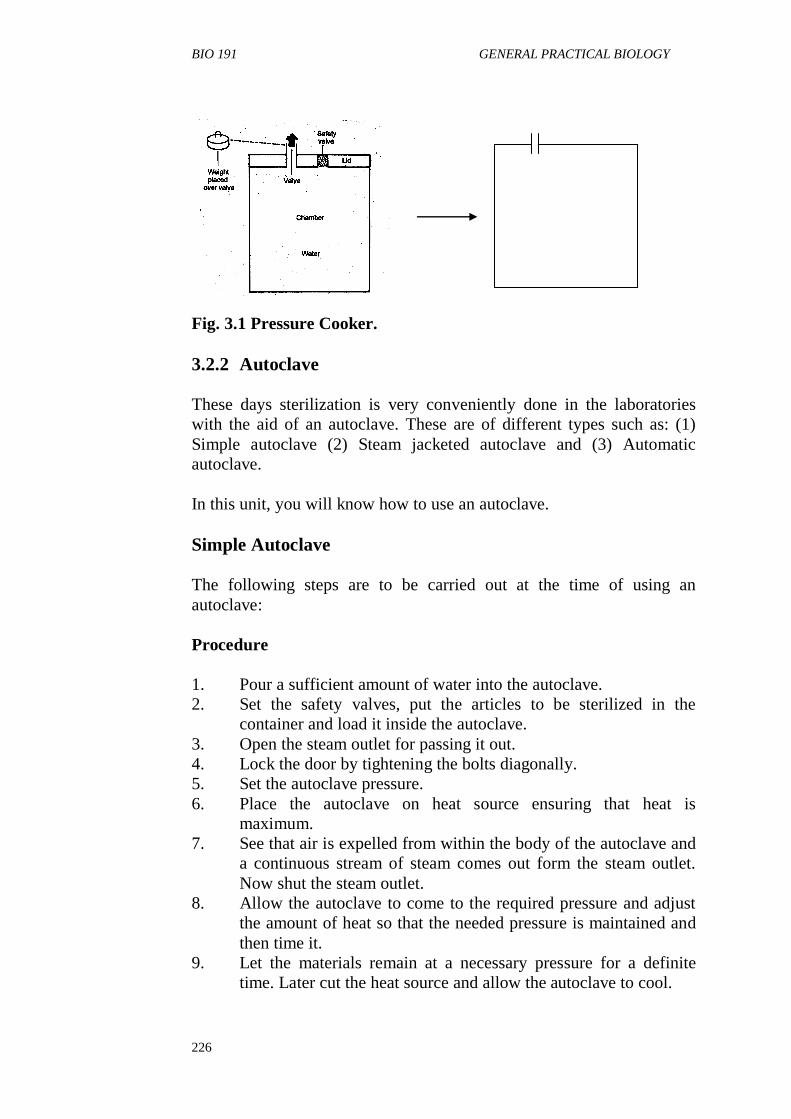
3.2.1 Pressure cooker
In this experiment you will study about the procedure to use a pressure
cooker.
Procedure
l. Pour 300 ml water into a cooker
2. Place the container with materials to be sterilized inside the
cooker and close the lid.
3. Lock the cooker making sure that it is sealed properly.
4. Place the cooker on a burning stove.
5. See that the air is expelled from inside the cooker and a clear and
continuous steam comes out from the vent tube. Fit the vent
weight on the vent tube immediately.
6. A hissing sound is heard in about 5 minutes and the vent weight
(pressure regulating device) will produce a whistle. It there is no
hissing sound after 5-7 minutes and the steam is seen escaping
around the rim, it means the lid has not been properly fitted. In
this condition take the cooker off the stove, adjust the lid with
thumbs pressing down slightly.
7. Now the steam will lift the vent weight and will be expelled from
the vent tube producing a loud hissing sound. This will indicate
that the full cooking pressure (sterilizing pressure) has been
reached.
8. Allow the cooker to remain on the stove for at least 15-20
minutes for sterilization.
9. Later, take the cooker off the stove and allow it to cool on its own
for a sufficient period without removing the lid or vent weight
(Fig 3.1)
BIO 191 GENERAL PRACTICAL BIOLOGY
226
Fig. 3.1 Pressure Cooker.
3.2.2 Autoclave
These days sterilization is very conveniently done in the laboratories
with the aid of an autoclave. These are of different types such as: (1)
Simple autoclave (2) Steam jacketed autoclave and (3) Automatic
autoclave.
In this unit, you will know how to use an autoclave.
Simple Autoclave
The following steps are to be carried out at the time of using an
autoclave:
Procedure
1. Pour a sufficient amount of water into the autoclave.
2. Set the safety valves, put the articles to be sterilized in the
container and load it inside the autoclave.
3. Open the steam outlet for passing it out.
4. Lock the door by tightening the bolts diagonally.
5. Set the autoclave pressure.
6. Place the autoclave on heat source ensuring that heat is
maximum.
7. See that air is expelled from within the body of the autoclave and
a continuous stream of steam comes out form the steam outlet.
Now shut the steam outlet.
8. Allow the autoclave to come to the required pressure and adjust
the amount of heat so that the needed pressure is maintained and
then time it.
9. Let the materials remain at a necessary pressure for a definite
time. Later cut the heat source and allow the autoclave to cool.

BIO 191 MODULE 5
227
10. Open the steam outlet when the needle reaches zero in the
pressure gauge.
11. Before opening the door of the autoclave and taking out
materials/articles which were sterilized, let the autoclave cool
down for a considerable time.
Precautions
l. Do not open the valve before zero is reached because the boiling
liquid will dampen the cotton wool plugs and there will be chance
of contamination by bacteria which may enter through the
moisture film up to the medium.
2. Do not open the valve when a vacuum has developed within
because the air will rush suddenly inside the autoclave and will
carry loose fitting plugs into the autoclave.
3. Do not allow the vacuum to remain for a long time because it will
take out moisture from the medium kept inside the autoclave for
sterilization.
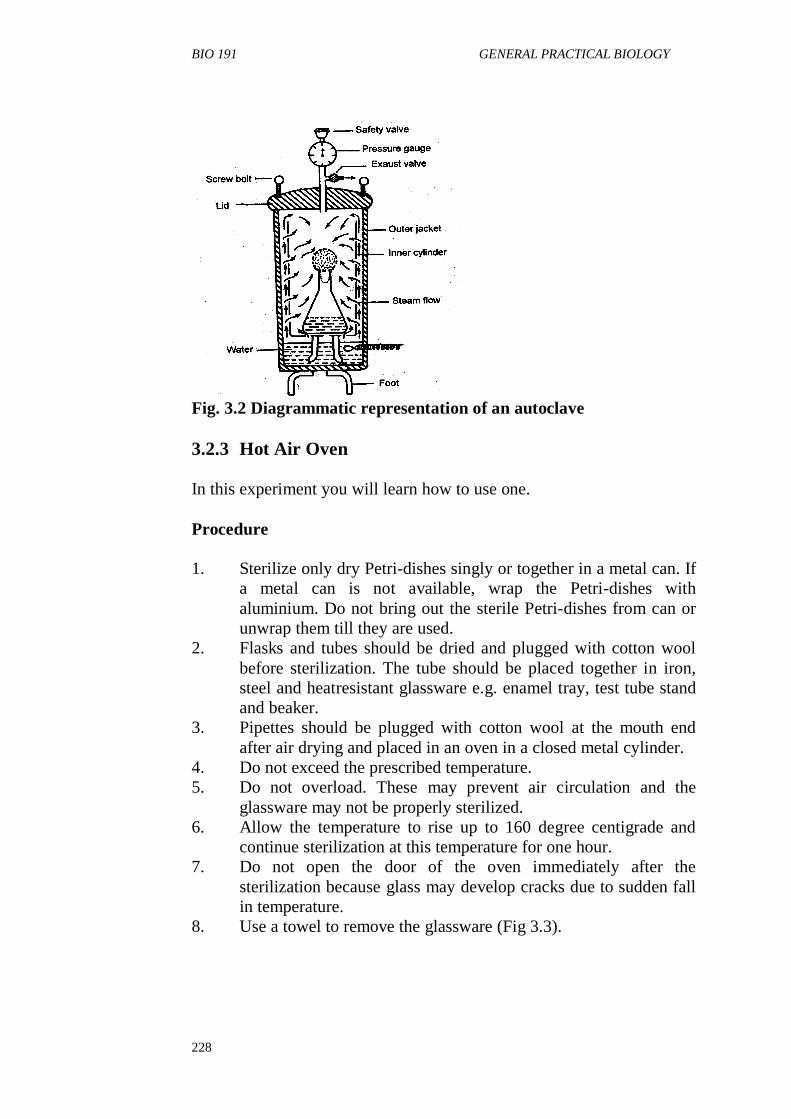
Steam-jacketed Autoclave
Procedure
1. Allow circulation of steam through jacket continuously at a
required pressure.
2. Put the articles inside the autoclave when the jacket has attained a
working temperature.
3. Shut the door, lock it in position and see that discharge outlet,
provided at the bottom of barrel, is open.
4. Close the discharge outlet when required temperature is reached.
(In automatic jacketed autoclaves he discharge outlet is
thermostatically controlled which automatically closes when
predetermined temperature is reached). Any drop in temperature
due to condensation of steam during sterilization helps in opening
of outlet. The condensed steam goes to waste allowing the fresh
steam to enter inside the barrel and predetermined temperature is
reached again.
5. Allow steam to enter from steam jacket through baffle fitted at
the back of barrel.
6. Count the period needed for sterilization after required
temperature has been reached and discharge outlet valve has
closed (15-20 minutes are needed for sterilization of media).
7. Cut down the supply of steam to barrel after 15-20 minutes of
sterilization and allow it to cool.
8. Open the door of autoclave when the pressure inside has become
atmosphere and take out the sterilized articles (Fig 3.2).
BIO 191 GENERAL PRACTICAL BIOLOGY
228
Fig. 3.2 Diagrammatic representation of an autoclave
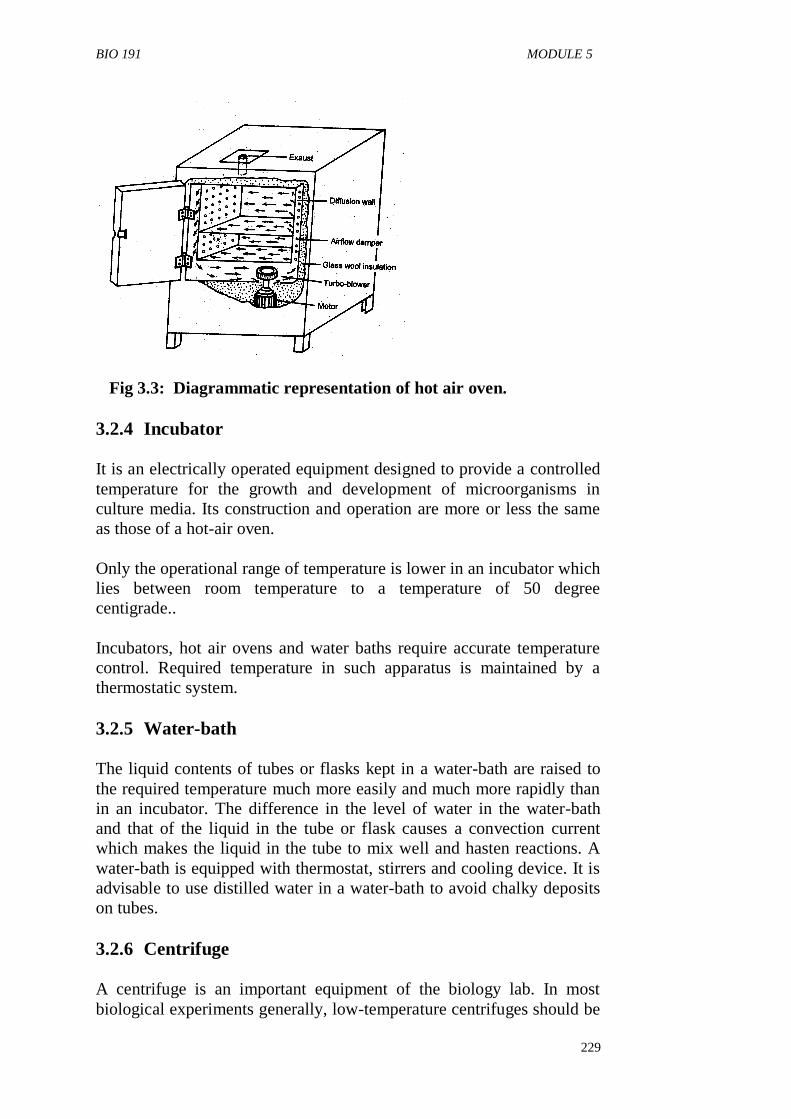
3.2.3 Hot Air Oven
In this experiment you will learn how to use one.
Procedure
1. Sterilize only dry Petri-dishes singly or together in a metal can. If
a metal can is not available, wrap the Petri-dishes with
aluminium. Do not bring out the sterile Petri-dishes from can or
unwrap them till they are used.
2. Flasks and tubes should be dried and plugged with cotton wool
before sterilization. The tube should be placed together in iron,
steel and heatresistant glassware e.g. enamel tray, test tube stand
and beaker.
3. Pipettes should be plugged with cotton wool at the mouth end
after air drying and placed in an oven in a closed metal cylinder.
4. Do not exceed the prescribed temperature.
5. Do not overload. These may prevent air circulation and the
glassware may not be properly sterilized.
6. Allow the temperature to rise up to 160 degree centigrade and
continue sterilization at this temperature for one hour.
7. Do not open the door of the oven immediately after the
sterilization because glass may develop cracks due to sudden fall
in temperature.
8. Use a towel to remove the glassware (Fig 3.3).
BIO 191 MODULE 5
229
Fig 3.3: Diagrammatic representation of hot air oven.
3.2.4 Incubator
It is an electrically operated equipment designed to provide a controlled
temperature for the growth and development of microorganisms in
culture media. Its construction and operation are more or less the same
as those of a hot-air oven.
Only the operational range of temperature is lower in an incubator which
lies between room temperature to a temperature of 50 degree
centigrade..
Incubators, hot air ovens and water baths require accurate temperature
control. Required temperature in such apparatus is maintained by a
thermostatic system.
3.2.5 Water-bath
The liquid contents of tubes or flasks kept in a water-bath are raised to
the required temperature much more easily and much more rapidly than
in an incubator. The difference in the level of water in the water-bath
and that of the liquid in the tube or flask causes a convection current
which makes the liquid in the tube to mix well and hasten reactions. A
water-bath is equipped with thermostat, stirrers and cooling device. It is
advisable to use distilled water in a water-bath to avoid chalky deposits
on tubes.
3.2.6 Centrifuge
A centrifuge is an important equipment of the biology lab. In most
biological experiments generally, low-temperature centrifuges should be
BIO 191 GENERAL PRACTICAL BIOLOGY
230
used. This can prevent metabolism and loss of viability or enzyme
activity during the operation of the centrifuge.
Precautions during centrifugation
1. Tubes must be put in pairs to balance.
2. Be sure that rubber cushions are in position at the bottom of the
bucket before inserting the tubes.
3. Be sure that cotton wool plug if used are not forced down during
centrifugation,
4. Make sure that the metal buckets are properly sealed on the ring
and are free to swing.
5. Secure the lid properly.
6. Bring the rheostat to zero before start. Gradually increase the
speed and bring the speed to required rpm (resolution per
minute).
7. After centrifugation, switch off the meter and then bring the
rheostat to zero position allowing it to come to a stop. Do not
apply hand to slow down the speed.
8. Take care to lubricate periodically.
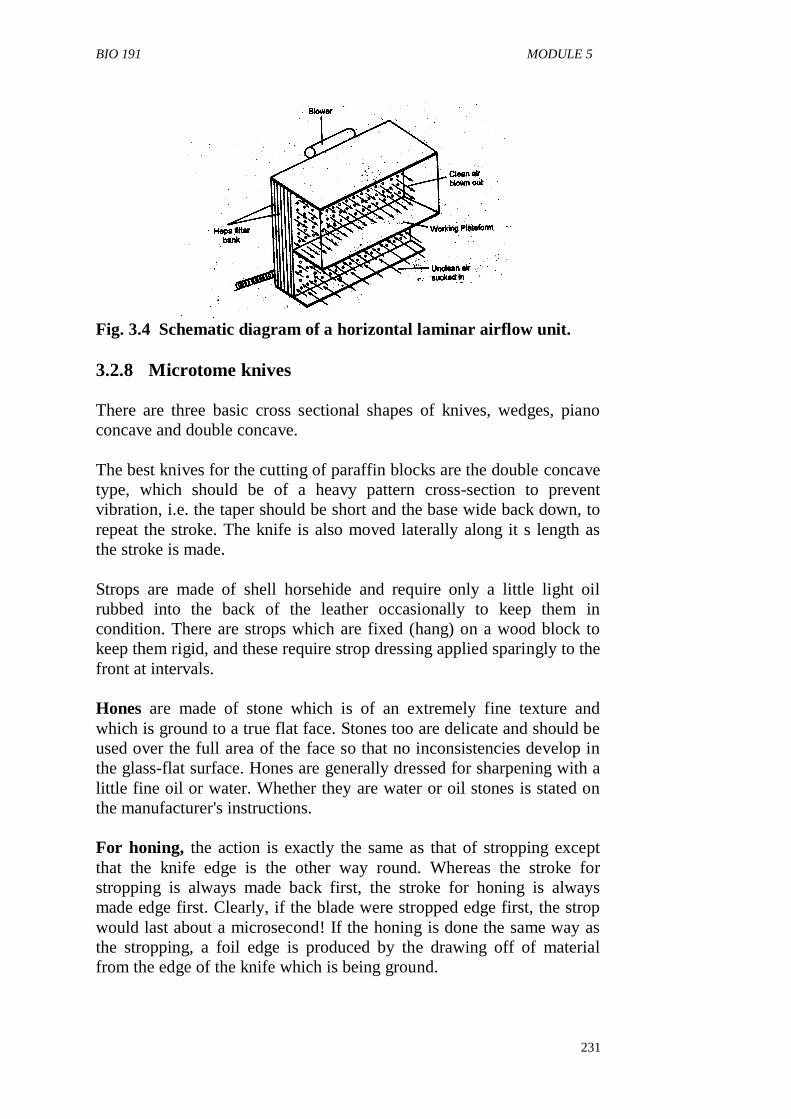
3.2.7 Laminar airflow system
Handling of microorganisms under a bacteriological safety cabinet may
not always be suitable for many practical reasons.
To keep such a room free of all microbes carrying particles, a new kind
of technology has been developed. This technique is known as laminar
airflow technique. In this technique, air of a closed room or cabinet is
allowed to pass through a High Efficiency Particulate Air (HEPA) filter
pack and the filtrate becomes free of all particles above 0.3 cm
dimension. The technique involves sucking in room air and blowing it
out through a bank of fitters with uniform velocity and in parallel flow
line used in microbiological and pharmaceutical laboratories and in
aerospace industries.
The advantage of the system is that in operation involving inoculation,
transfer of culture and in opening of lyophilized culture, no closed
chamber is necessary, instead that operation can be done on a platform
provided with the laminar airflow unit making it easier for handling (Fig
3.4)
BIO 191 MODULE 5
231
Fig. 3.4 Schematic diagram of a horizontal laminar airflow unit.
3.2.8 Microtome knives
There are three basic cross sectional shapes of knives, wedges, piano
concave and double concave.
The best knives for the cutting of paraffin blocks are the double concave
type, which should be of a heavy pattern cross-section to prevent
vibration, i.e. the taper should be short and the base wide back down, to
repeat the stroke. The knife is also moved laterally along it s length as
the stroke is made.
Strops are made of shell horsehide and require only a little light oil
rubbed into the back of the leather occasionally to keep them in
condition. There are strops which are fixed (hang) on a wood block to
keep them rigid, and these require strop dressing applied sparingly to the
front at intervals.
Hones are made of stone which is of an extremely fine texture and
which is ground to a true flat face. Stones too are delicate and should be
used over the full area of the face so that no inconsistencies develop in
the glass-flat surface. Hones are generally dressed for sharpening with a
little fine oil or water. Whether they are water or oil stones is stated on
the manufacturer's instructions.
For honing, the action is exactly the same as that of stropping except
that the knife edge is the other way round. Whereas the stroke for
stropping is always made back first, the stroke for honing is always
made edge first. Clearly, if the blade were stropped edge first, the strop
would last about a microsecond! If the honing is done the same way as
the stropping, a foil edge is produced by the drawing off of material
from the edge of the knife which is being ground.
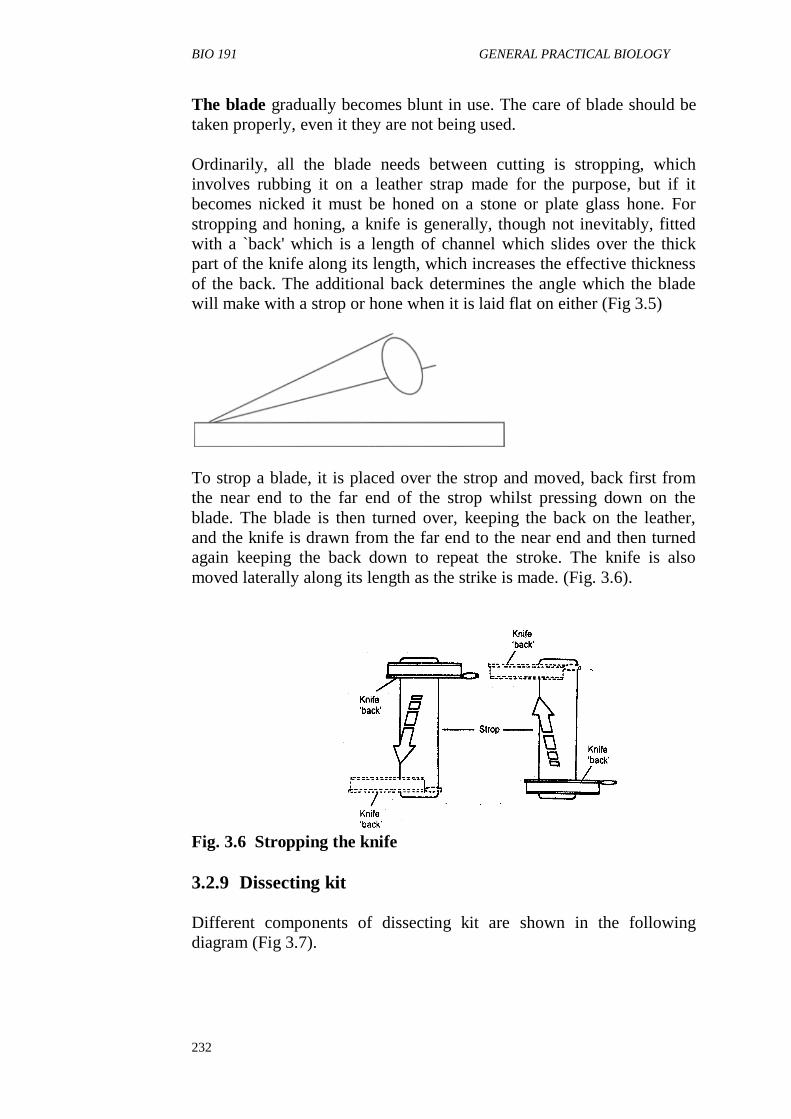
BIO 191 GENERAL PRACTICAL BIOLOGY
232
The blade gradually becomes blunt in use. The care of blade should be
taken properly, even it they are not being used.
Ordinarily, all the blade needs between cutting is stropping, which
involves rubbing it on a leather strap made for the purpose, but if it
becomes nicked it must be honed on a stone or plate glass hone. For
stropping and honing, a knife is generally, though not inevitably, fitted
with a `back' which is a length of channel which slides over the thick
part of the knife along its length, which increases the effective thickness
of the back. The additional back determines the angle which the blade
will make with a strop or hone when it is laid flat on either (Fig 3.5)
To strop a blade, it is placed over the strop and moved, back first from
the near end to the far end of the strop whilst pressing down on the
blade. The blade is then turned over, keeping the back on the leather,
and the knife is drawn from the far end to the near end and then turned
again keeping the back down to repeat the stroke. The knife is also
moved laterally along its length as the strike is made. (Fig. 3.6).
Fig. 3.6 Stropping the knife
3.2.9 Dissecting kit
Different components of dissecting kit are shown in the following
diagram (Fig 3.7).
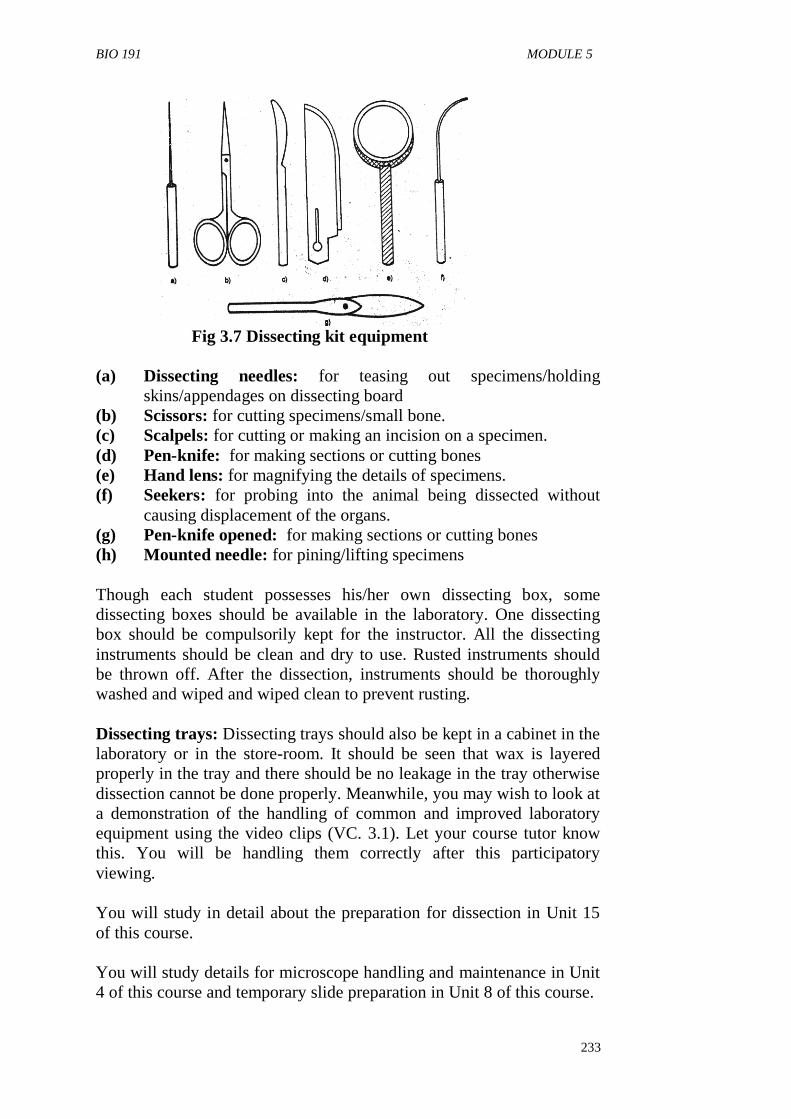
BIO 191 MODULE 5
233
Fig 3.7 Dissecting kit equipment
(a) Dissecting needles: for teasing out specimens/holding
skins/appendages on dissecting board
(b) Scissors: for cutting specimens/small bone.
(c) Scalpels: for cutting or making an incision on a specimen.
(d) Pen-knife: for making sections or cutting bones
(e) Hand lens: for magnifying the details of specimens.
(f) Seekers: for probing into the animal being dissected without
causing displacement of the organs.
(g) Pen-knife opened: for making sections or cutting bones
(h) Mounted needle: for pining/lifting specimens
Though each student possesses his/her own dissecting box, some
dissecting boxes should be available in the laboratory. One dissecting
box should be compulsorily kept for the instructor. All the dissecting
instruments should be clean and dry to use. Rusted instruments should
be thrown off. After the dissection, instruments should be thoroughly
washed and wiped and wiped clean to prevent rusting.
Dissecting trays: Dissecting trays should also be kept in a cabinet in the
laboratory or in the store-room. It should be seen that wax is layered
properly in the tray and there should be no leakage in the tray otherwise
dissection cannot be done properly. Meanwhile, you may wish to look at
a demonstration of the handling of common and improved laboratory
equipment using the video clips (VC. 3.1). Let your course tutor know
this. You will be handling them correctly after this participatory
viewing.
You will study in detail about the preparation for dissection in Unit 15
of this course.
You will study details for microscope handling and maintenance in Unit
4 of this course and temporary slide preparation in Unit 8 of this course.
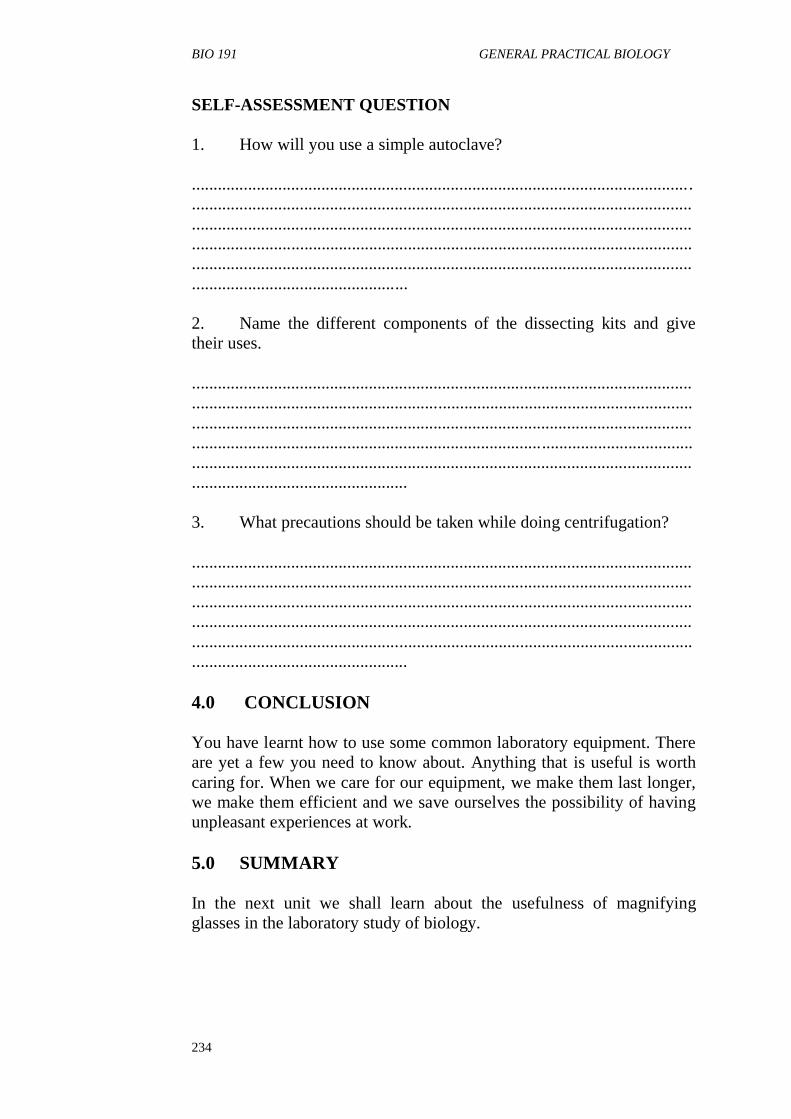
BIO 191 GENERAL PRACTICAL BIOLOGY
234
SELF-ASSESSMENT QUESTION
1. How will you use a simple autoclave?
....................................................................................................................
....................................................................................................................
....................................................................................................................
....................................................................................................................
....................................................................................................................
..................................................
2. Name the different components of the dissecting kits and give
their uses.
....................................................................................................................
....................................................................................................................
....................................................................................................................
....................................................................................................................
....................................................................................................................
..................................................
3. What precautions should be taken while doing centrifugation?
....................................................................................................................
....................................................................................................................
....................................................................................................................
....................................................................................................................
....................................................................................................................
..................................................
4.0 CONCLUSION
You have learnt how to use some common laboratory equipment. There
are yet a few you need to know about. Anything that is useful is worth
caring for. When we care for our equipment, we make them last longer,
we make them efficient and we save ourselves the possibility of having
unpleasant experiences at work.
5.0 SUMMARY
In the next unit we shall learn about the usefulness of magnifying
glasses in the laboratory study of biology.

BIO 191 MODULE 5
235
6.0 TUTOR - MARKED ASSIGNMENT
1. In the absence of an autoclave, what would you use to sterilize
non-glassware in the biology laboratory?
2. Describe how you would use the equipment you have chosen;
including necessary precautions.
7.0 REFERENCES/FURTHER READINGS
Beril, N. J (1979): Biology in Action London, Heinemann Edicational
Books Ltd
Soper, R. (Ed) Biological Sciences Cambridge U.K., Cambridge Press
Stone, R. N. Cozens, A. B. Emia, F. I. (1972), New Biology for Tropical
Schools, Longman Group Ltd)
BIO 191 GENERAL PRACTICAL BIOLOGY
236
UNIT 4 GENERAL PRACTICAL BIOLOGY
MICROSCOPE HANDLING
CONTENTS
1.0 Introduction
2.0 Objective
3.0 Main Content
3.1 Microscope handling
3.1.1 Setting up a student microscope
3.2 Trouble - shooting
3.3 Routine Fault Finding
3.4 Setting up a microscope with and without a condenser
3.5 Illumination without a condenser
3.5.1 Setting up a typical microscope using external
source
3.5.2 The use of Daylight Illumination
3.6 Illumination using an Abbe condenser
3.7 Setting up for Kohler Bright field illumination
3.8 Setting up for Phase Contrast Microscopy
3.9 A demonstration of microscope handling (video)
4.0 Conclusion
5.0 Summary
6.0 Tutor Marked Assignment
7.0 References/Further Readings
1.0 INTRODUCTION
Optical or light microscopes are widely and routinely used in all kinds
of biological laboratories, right from schools and colleges to hospital
pathology and research labs. They are used to examine various kinds of
cells, tissues, and micro-organisms and also to look at the chromosomes.
In order to carry out the above tasks smoothly and effectively, it is
essential that one should know how to handle the microscope. Handling
the microscope involves familiarity with the instrument and its parts, the
methods for its setting up, the focusing mechanism, and the use of
instrument based on the nature of the material to be studied.
This exercise is a composite one that will enable you to have hands on
experience in handling microscopes for specific purposes and in
different situations, as well as in knowing the nitty-gritty of its care and
maintenance.
BIO 191 MODULE 5
237
2.0 OBJECTIVES
As you complete this experiment you should be able to:
set the microscope's light source ensuring optimum direction and
intensity of illumination by manipulating mirror and iris
diaphragm;
focus objective/eyepiece upon a slide;
produce normal illumination by focusing the Abbe condenser
upon the light source.
3.0 MAIN CONTENT
3.1 Microscope handling
3.1.1 Setting up a student microscope
In the first part of the exercise you will learn to set up a student
microscope using a bench lamp for illumination, so that you can observe
a cell preparation on a microscope slide. If you are not familiar with the
use of this instrument, you should first understand and then practise the
setting up technique following the steps (iI-x) given below. After this,
you should practice from time to time without referring to the text.
Requirements
For this exercise you will need the following:
(a) A microscope, preferably one fitted with at least three eyepieces -
5x, 10x, and oil - immersion, a condenser and having a mirror for
use with an external light source.
(b) A 40 W or 60 W lamp, preferably with a front cover-field stop, to
restrict glare. The bulb should be frosted and ideally without any
markings on the lower end.
(c) A well-stained, prepared slide for observation.
A typical student microscope is shown in Fig 4.1. You are already
familiar with this figure, from your study of Unit 6 of this course.
Before you begin to set up the microscope remember that a microscope
is a delicate precision instrument, and you must handle it carefully. You
must not touch its optical surfaces or allow them to come into contact
with any liquid. You will spend quite some time with a microscope and
it is therefore important that you know how to use it correctly. The
following instructions should give you good results, so work through
them step by step. The numbers given in parentheses in the following
BIO 191 GENERAL PRACTICAL BIOLOGY
238
instructions, refer to the parts of a microscope, that has been illustrated
in Fig 4.1.
Method
(i) Put the bench lamp, with fitted iris to restrict the light, about 10
cm directly in front of the mirror (13). Point the lamp directly at
the plane side of the mirror and switch the lamp on.
(ii) Check that the sub-stage iris (9) is open and check that the top
lens of the condenser (8) is about 2 mm below the stage.
(iii) Rotate the nose-piece (6) to engage the 8x or 10x objective (7)
depending on the objectives available on your microscope.
(iv) Remove the eyepiece and adjust the mirror until a bright spot of
light is seen down the tube. Replace the eyepiece.
(v) Put the slide on the stage (18) so that the mounted object is under
the objective lens. Use the stage clips (20) or mechanical stage to
secure the slide.
(vi) View the microscope from one side and use the coarse focus
control (16) to lower the 8x or 10x objective to within about 5
mm of the slide.
(vii) Look down the eyepiece and use the coarse focus control (16) to
raise the objective slowly until the object on the slide comes into
focus. Make final adjustments with the fine focus control (15)
and, if necessary, readjust the mirror and condenser.
(viii) Move the slide to centralize the object to be observed.
(ix) If a higher objective magnification is required, first check that the
object is in focus and centralized for the 8x or lOx objective.
Then (without altering the focus controls) carefully rotate the
nose-piece (6) to engage the 20x or 40x objective lens. Refocus
using the fine focus control, (15) and move the slide as required.
It may be necessary to readjust the mirror and/or condenser to
give suitable lighting.
(x) You should note that some low power objective lenses such as
the Biolam 3.7x objective have a long focal length (about 6.5 cm)
and a wide field of and probably have to remove the condenser
and use the concave side of the mirror to direct light onto the
specimen. After using the 3.7x objective, replace the condenser
and rotate the mirror back to the plane side. Refocus the 8x or
10x objective - see steps (vi) and (vii), before using the 20x or
40x.
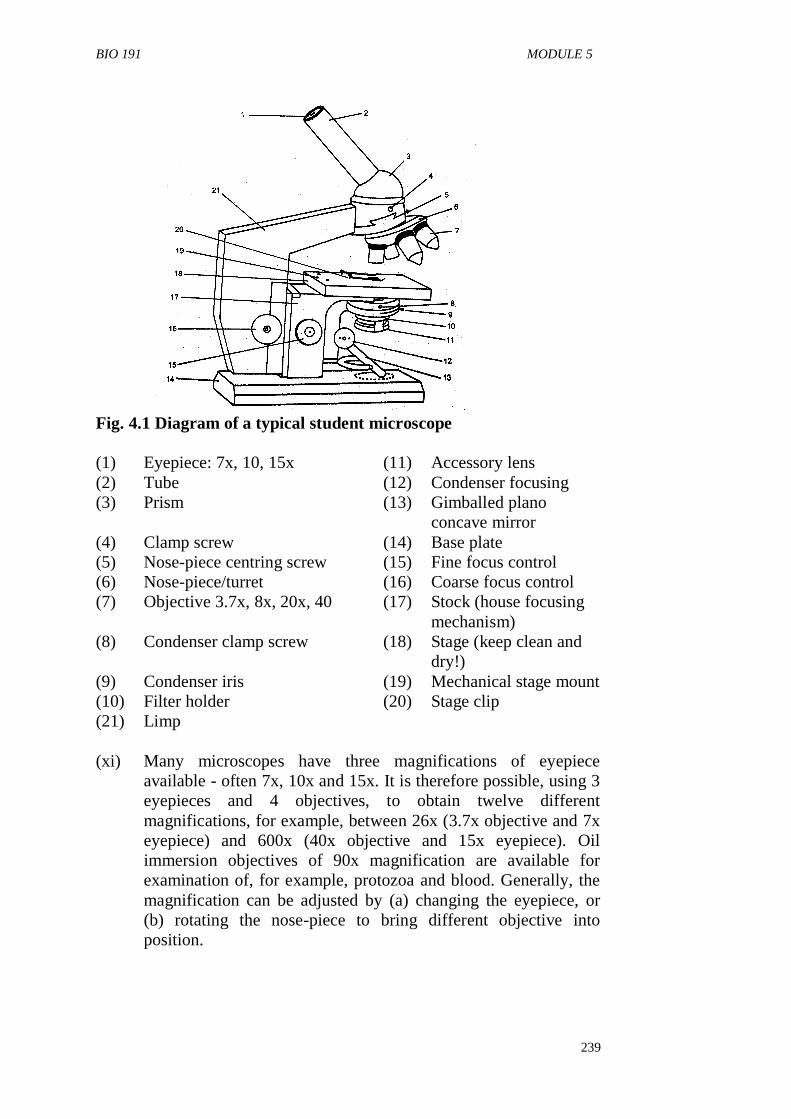
BIO 191 MODULE 5
239
Fig. 4.1 Diagram of a typical student microscope
(1) Eyepiece: 7x, 10, 15x (11) Accessory lens
(2) Tube (12) Condenser focusing
(3) Prism (13) Gimballed plano
concave mirror
(4) Clamp screw (14) Base plate
(5) Nose-piece centring screw (15) Fine focus control
(6) Nose-piece/turret (16) Coarse focus control
(7) Objective 3.7x, 8x, 20x, 40 (17) Stock (house focusing
mechanism)
(8) Condenser clamp screw (18) Stage (keep clean and
dry!)
(9) Condenser iris (19) Mechanical stage mount
(10) Filter holder (20) Stage clip
(21) Limp
(xi) Many microscopes have three magnifications of eyepiece
available - often 7x, 10x and 15x. It is therefore possible, using 3
eyepieces and 4 objectives, to obtain twelve different
magnifications, for example, between 26x (3.7x objective and 7x
eyepiece) and 600x (40x objective and 15x eyepiece). Oil
immersion objectives of 90x magnification are available for
examination of, for example, protozoa and blood. Generally, the
magnification can be adjusted by (a) changing the eyepiece, or
(b) rotating the nose-piece to bring different objective into
position.
BIO 191 GENERAL PRACTICAL BIOLOGY
240
3.2 Trouble-shooting
Did you encounter any difficulty in setting up your microscope?
Nevertheless, here are some tips for you.
(i) Not enough light? Check:
(a) that the iris (9) is open,
(b) that the condenser (8) is in position and properly focused,
(c) that the mirror (13) is properly angled,
(d) that the nose-piece (6) is properly located,
(e) that the sub-condenser filter holder (10) is not in the way.
(ii) Too much light?
Reduce the intensity by moving the lamp away from the mirror. Note
that the iris should not be used to adjust light intensity.
(iii) Dirt in the field of view?
It may be on the eyepiece, objective or slide. Look down the microscope
and see if the dirt moves when you:
(a) rotate the eyepiece, or
(b) move the slide.
If neither moves the dirt, then the dirt is on the objective. Clean the
lenses very carefully using proper lens tissue paper only.
(iv) ‘Cloudy' on high power?
The previous user (possibly you?) probably has allowed liquid onto the
objective. Clean the objective lens (7) carefully - moisten the lens tissue
if necessary.
(v) Dirty stage?
The previous user (surely not you?) has used a wet slide. So clean the
stage carefully.
(vi) Lenses missing?
Take a different microscope and report about the missing part(s) of the
instrument.
BIO 191 MODULE 5
241
3.3 Routine Fault Finding
This section discusses the probable causes of some common problems
encountered while setting up the microscope. Identification of the root
cause of the problem enables one to take the appropriate corrective
measures.
1. Inability to obtain a sharp image
There are two types of causes for it - optical causes and mechanical
causes.
Optical causes
(i) Aperture of condenser too wide for objective in use. Reduce it.
(ii) If hard false `haloes' present - condenser aperture too narrow,
increase it.
(iii) Field stop(s) set too wide (causing glare).
(iv) Use of eyepiece of too high a power for the quality of the
objective.
(v) Grease, dust or old immersion oil on slide. Clean with lens tissue
and polish with Selvyt cloth.
(vi) Lens surfaces not completely clean. Clean them. If the problem
remains, try an objective from a different instrument. If this is
satisfactory, the original objective is faulty.
(vii) Use of oil immersion objective without oil.
Mechanical causes
(i) Specimen slide upside down.
(ii) Stops wrongly set. The bottom stop should be set to prevent
further movement of the coarse drive when the fine focus is at the
middle of its range and the image is in focus. Even where stops
are fitted, the fine movement may come to the end of its travel
during focusing. This can usually be avoided if the fine
adjustment is set at mid-range before the microscope is
approximately focused with coarse drive.
(iii) Jamming of the lower part of a spring-loaded or retraceable
objective in the body. If very gently attempts to be free the lower
lens cell are unsuccessful, the objective should be returned.
BIO 191 GENERAL PRACTICAL BIOLOGY
242
2. Image moves slowly or suddenly goes out of focus
Its possible causes are:
(i) Body slip or slipping of the stage in stage focusing instruments,
caused by poor adjustment of the focusing mechanism.
(ii) Hand pressure on flexible stage.
3. Condenser will not focus the surface of the lamp in the field
of view
This may be caused by the following reasons:
(i) Condenser not pushed fully home in mount.
(ii) A stop (if present) set too low.
4. Field of view too bright
The probable causes for these are:
(i) Sub-stage condenser aperture or disc diaphragm aperture too
wide.
(ii) Power of source too high.
(iii) (If variable) lamp intensity set too high.
(iv) Neutral density filters needed.
5. Field of view too dull
It may be due to one of the following causes:
(i) Sub-stage condenser aperture or disc diaphragm aperture too
narrow.
(ii) Sub-stage condenser not properly focused.
(iii) Neutral density filters (if fitted) should be removed.
(iv) Power of bench lamp too low.
(v) (if variable) Internal lamp intensity set too low.
6. Specks in field of view
The possible causes of this may be:
(i) Specks ill defined and `floating' across field of view - in
observer's eye.
(ii) Specks normally stationary but revolving with eyepiece - clean
eyepiece lens, especially field lens.
(iii) Specks normally stationary and not revolving with eyepiece -
clean (in order) condenser lenses, slide, any filters, objective.
BIO 191 MODULE 5
243
7. Objective aperture will not fill with light
It may be due to any of the following reasons:
(i) Sub-stage condenser improperly focused.
(ii) Total condenser aperture inadequate for objective in use.
(iii) Oil immersion condenser (if used) not oiled to underside of slide.
8. Image moves sideways during focusing
This may result because of any of the following:
(i) Slide or specimen not perpendicular to optical axis.
(ii) Stage fitted `out of square'
(iii) (In a stage focusing instrument, if effect very small) poorly fitted
dovetails, allowing stage to move under hand pressure.
SELF-ASSESSMENT EXERCISE 1
Did you get a dull field of view in your microscope? List two probable
causes for it.
i) .........................................................................................................
ii) .........................................................................................................
SELF-ASSESSMENT EXERCISE 2
When setting up a microscope, if you find that you are unable to obtain a
sharp image, what do you think will be wrong? Write down four
possible causes.
i) .........................................................................................................
ii) .........................................................................................................
iii) .........................................................................................................
iv) .........................................................................................................
SELF-ASSESSMENT EXERCISE 3
If you do not focus the substrate condenser of a microscope properly,
what effect would this have? Tick the correct answer.
(i) Objective aperture would not fill with light.
(ii) Field of view would be too bright.
(iii) Field of view would be too dull.
(iv) Object would be out of focus.
BIO 191 GENERAL PRACTICAL BIOLOGY
244
3.4 Setting up Microscope with and without a Condenser
During the course of this practical you will set up microscope in
different light conditions, and also learn about the utility of a condenser
in this process. You can observe the differences brought about in
different set-ups.
You require the following items for exercises 3.2.2 to 3.2.5
Requirements
Microscope
Illuminator or lamp
Slides
Coverslips
Specimens of materials relevant to the techniques to be studied Already
prepared microscope mounts
Spatulas
Forceps
3.5 Illumination without a Condenser
There are two possible sources used for illumination, one an external
light source (this is described in a), and the other is the use of daylight
(discussed in b).
3.5.1 Setting up a Typical Microscope using an External
Source
For optimum illumination and resolution the aperture of the objective
should be filled (or nearly) with light. This is best achieved by having a
condenser with a properly regulated iris diaphragm. In the absence of
this, the apertures of medium and high power objectives may be-under
filled and resolution will suffer. The vast majority of microscopes used
at lower levels are not fitted with such condensers, but this is not serious
as long as the limitations are recognized.
The difficulties experienced in using the simpler kind of microscope
most often lie in obtaining optimal illumination with the simple controls
available. The field may be difficult to illuminate evenly and there may
be lack of contrast with excessive glare. The most common form of sub-
stage assembly for controlling illumination in simple microscopes, is the
disc diaphragm. This is a movable metal or plastic disc with a series of
circular holes of various diameters. Unlike the iris diaphragm of the
more advanced instrument, which is imaged at the back lens of the
BIO 191 MODULE 5
245
objective and is therefore called an aperture stop, a hole in a sub-stage
disc diaphragm is used mainly to limit the effective size of the source in
order to reduce glare improve contrast. The holes in a disc diaphragm
should be used to limit the area illuminated to the diameter of the field
of view - they act as field stops. One should therefore usually select the
smallest size of hole that will illuminate the field of view evenly. In fact,
on many simpler instruments only the use of the 4x of 5x objective
necessitates a change from the use of the smallest hole available.
Occasionally, it may prove difficult to illuminate the whole field of view
with the 4x or 5x objective. In this case, the converging mirror may have
to be used and the lamp moved nearer in order to produce an effectively
larger source. This is acceptable for low power work but produces a
distorted image of the source. On an ‘advanced’ instrument it may be
necessary to remove the condenser. Even if it can be left in place, it may
be difficult to focus.
3.5.2 The Use of Daylight Illumination
Ordinary daylight is often the most readily available of all sources of
illumination; it is used a great deal for routine microscopy. However,
there are limitations: daylight is a very diffuse source of virtually
unlimited extent, so that light enters the microscope at almost all angles.
It is, therefore difficult to know when the `source' is focused on the
object and to restrict the illuminated area to the field of view. So, there
is a greater tendency towards glare with daylight than with the more
controllable artificial sources. Apart from this problem of glare, there
are few serious objections to the use of daylight, provided care is
exercised in properly illuminating the aperture of the objective.
Setting up the microscope in this way is quite straightforward
(i) Place the microscope near a large window, preferably one
without too many glazing bars.
(ii) Focus the l0x (16mm) objective in the usual way using a well-
stained slide.
(iii) Remove the eyepiece and inspect the back of the objective.
(iv) If fitted, the sub-stage condenser should be racked up and down
until a fairly sharp image of the condenser iris diaphragm can be
seen at the back lens of the objective, and (when the diaphragm is
fully opened), the back lens can be filled with light fairly evenly.
With a simple instrument this step is omitted; use the sub-stage
disc diaphragm to control glare.
BIO 191 GENERAL PRACTICAL BIOLOGY
246
(v) Replace the eyepiece. A reasonably good image should be seen
and minor adjustments of the iris diaphragm can be made to
reduce glare.
Obviously with daylight the source cannot actually be focused on the
object. However, it can be helpful to hold a pointed article 150-200 mm
from the mirror and to focus this in the field of view. This often ensures
fairly good illumination of the back lens. Because the source is of almost
unlimited size the exact position of the mirror is not critical. The
imaging of glazing bars in the field of view can often be avoided by
tilting the mirror slightly or by placing the microscope closer to the
window.
To put it briefly, while daylight provides a very convenient and useful
source, giving adequate illumination when specimens with high contrast
are used, the more readily controllable artificial external sources are
generally preferred.
3.6 Illumination Using an Abbe Condenser
Using an External Source to Obtain Correct `Nelson' or Source-
Focused Illumination
Use a l0x (16 mm) objective and 10x eyepiece as follows:
(i) Place on the stage a specimen slide. Ensure that the coloured part
(that is the material to be seen) of the slide is directly under the
center of the objective.
(ii) Place the external lamp about 150-200 mm away from the
instrument and level to it. Ideally, the lamp should have an opal
bulb and should possess a circular field stop. Very often such
lamps are not available and an ordinary bench lamp has to be
employed. If this is the case, then draughtsman's tracing paper is
fixed to one side of a hole cut in a piece of blackened cardboard
or hardboard. This illuminated area then functions as a secondary
light source.
(iii) Focus the slide and manipulate the plane mirror to center the
illumination.
(iv) Focus the microscope condenser.The aim is to focus the image of
the source in the object plane. If a field stop is fitted to the lamp,
then the condenser may be focused on the edges of this. If there is
no field stop, or if, at its narrowest setting, it more than fills the
field of view, the condenser can be focused on a pencil point or
mounted needle held just in front of the lamp. The position of the
condenser should be adjusted by means of its focusing
BIO 191 MODULE 5
247
mechanism until the image of the field stop or pointed object is in
sharp focus at the same time as the image of the object on the
microscope stage. An image of the surface of the bulb (possibly
even of the manufacturer's name, etc.) may come into the field of
view.
To avoid this, the condenser may slightly defocused.
(v) Change to the 40x (40mm) objective.
(vi) The aperture of the iris diaphragm should now be adjusted to suit
the numerical aperture of the 40x objective. This is done by
removing the eyepiece and inspecting the illuminated circle at the
back of the objective lens. This can be done either by direct
inspection or by using a centering telescope focused on the back
lens of the objective. As the iris diaphragm is closed, the image
of its edge will be seen at the periphery of the illuminated area.
The diaphragm should be closed until the illuminated area occupies two
thirds to three-quarters of the diameter of the back lens of the objective.
It is usually recommended that this aperture adjustment be carried out
for each objective on each occasion it is brought into use. However, a
single setting for the 40x lens will usually also serve adequately for the
I0x objective and this saves time and trouble.
Readjustment of the iris aperture in the same way may well be needed
when the low power is brought into use.
(vii) Replace the eyepiece. The microscope is now correctly adjusted
and ready for use. If the light is too bright (not usual with a 60 or 100 W
lamp) the intensity should be lessened by the use of neutral density
filters, by changing to a lower power bulb, or by altering the field stop
on the lamp if one is fitted. The iris diaphragm of the condenser should
not be used to control the intensity of illumination, nor should the
condenser focusing controls be adjusted. Slight adjustments of these
controls may sometimes be necessary to control glare and obtain better
contrast, but as a general rule, intensity of illumination should be
adjusted at some point in the light path between the lamp and the iris
diaphragm of the condenser.
BIO 191 GENERAL PRACTICAL BIOLOGY
248
3.7 Setting up for Kohler Brightfield Illumination
This is an important technique which is in a sense a foundation upon
which other techniques rest. Here we refer to a simplified version,
pertinent to a monocular compound microscope of a basic type with an
Abbe condenser, using a mirror and an external source of illumination.
(i) Place the lamp about 20 cm in front of the microscope and switch
it on. Ensure that the microscope is in a comfortable working
position and is angled correctly for the user. Aim the light at the
mirror, plane surface, and angle the mirror so that it reflects the
light centrally on the base of the substage apparatus.
(ii) Close the iris.
(iii) If the lamp has a field iris, open it wide and focus the condenser
so that the light falling on the iris overfills its area slightly. By
closing and opening the field iris you can check the centricity of
the lamp and the mirror.
(iv) Open the aperture iris and place a slide on the microscope stage.
(v) Focus on this slide using a low power objective. Ensure that the
substage is as high as it will go, close down the field iris and look
for its image in the microscope.
(vi) Having identified the field iris, focus its image by moving the
substage condenser downward. If the field iris cannot be focused,
move the lamp towards or away from the microscope until it can
be focused; at this point the substage should be a little below the
top of its travel. If the substage is not central, it is time to centre it
using the image of the field iris as a guide.
(vii) Open the field iris until the whole field of view is just covered.
(viii) Remove the eyepiece and look down the tube. Open and close the
iris so that you can identify its image. Now open it wide and then
gradually close it until you just see it edges. Leave the aperture
iris in this position and replace the eyepiece.
(ix) If the light is too bright the lamp may be dimmed by means of an
electrical dimmer or by the use of neutral density filters.
Attempting to change the light by moving either iris or by
lowering the substage will destroy the Kohler illumination.
The illumination is set up for the critical lighting of the specimen.
Changes in objective power will necessitate only the increase or
decrease in intensity of light. The microscope nosepiece will ensure the
centricity of the other objectives.
BIO 191 MODULE 5
249
3.8 Setting Up for Phase Contrast Microscopy
For this exercise, you will additionally need a focusing telescope, also
known as a Bertrand lens, for the following series of operations. A
Bertrand lens is a supplementary lens system which may be introduced
into the tube above the objective. Together with the eyepiece this forms
a viewing telescope for examining the back focal plane of the objective.
It is chiefly used when setting up the microscope.
(i) The correct substage annulus must be chosen to accompany the
light ring of the objective required. Ensure that the objective
turret, if used, is properly placed in its notch so that the objective
is in the right place.
(ii) Open the iris diaphragm fully.
(iii) Place a slide of a thin section of animal tissue, e.g kidney, on the
stage of the microscope and critically focus on an edge of the
section.
(iv) Close down the field diaphragm and adjust the height of the
substage condenser unit. A sharp image of the diaphragm can be
seen.
(v) Open out the field diaphragm by means of the substage condenser
centering screws.
(vi) Open the field diaphragm until it just goes beyond the edge of the
field of view.
(vii) Take out the eyepiece and replace it with the focusing telescope.
There should be an adjusting collar on the telescope to enable you
to focus the telescope(you may have to undo a locking ring in
order to achieve this). Focus the telescope on the image of the
light ring on the phase ring.
(vii) The phase ring is axiomatically correctly placed; therefore it is
necessary to centre the substage annulus so that the two images
may be superimposed. This is achieved by means of a centering
mechanism separate from that of the main substage condenser
mount. The phase centering device often takes the form of a pair
of spring loaded screws which only engage when pushed in. Find
these screws and push them in until they engage and by screwing
and unscrewing them centres the image of the light ring on the
phase ring (see Fig. 4.2).
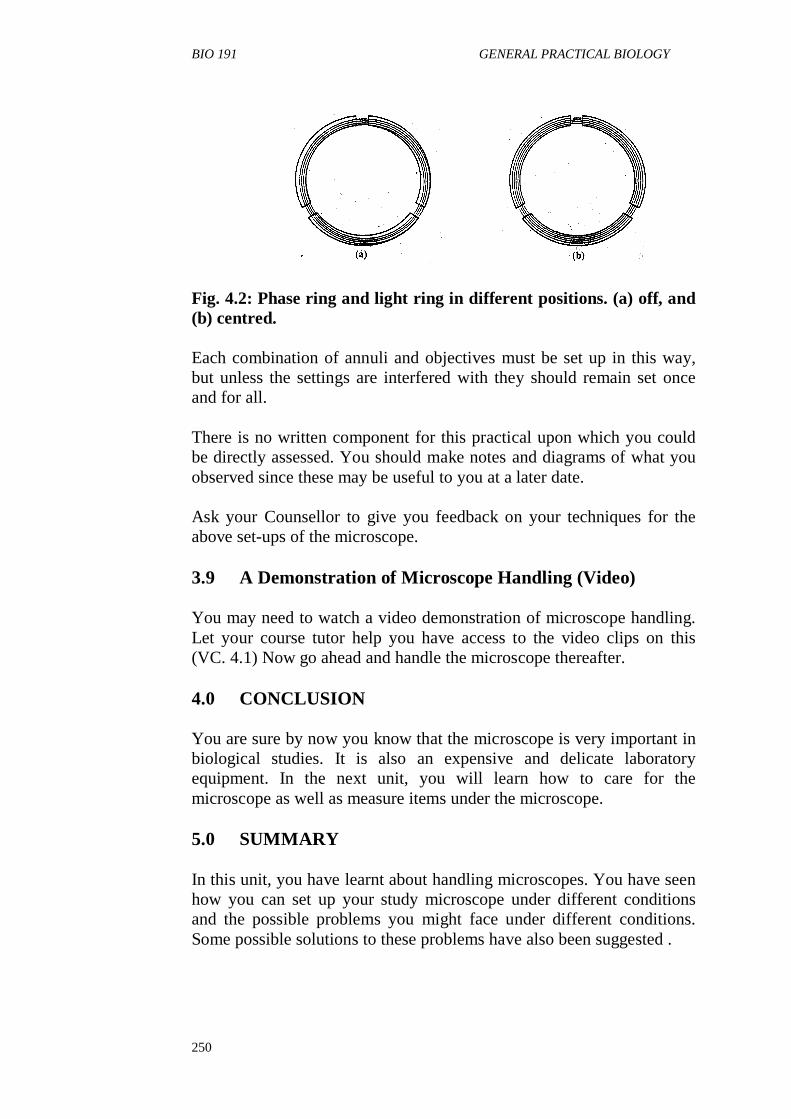
BIO 191 GENERAL PRACTICAL BIOLOGY
250
Fig. 4.2: Phase ring and light ring in different positions. (a) off, and
(b) centred.
Each combination of annuli and objectives must be set up in this way,
but unless the settings are interfered with they should remain set once
and for all.
There is no written component for this practical upon which you could
be directly assessed. You should make notes and diagrams of what you
observed since these may be useful to you at a later date.
Ask your Counsellor to give you feedback on your techniques for the
above set-ups of the microscope.
3.9 A Demonstration of Microscope Handling (Video)
You may need to watch a video demonstration of microscope handling.
Let your course tutor help you have access to the video clips on this
(VC. 4.1) Now go ahead and handle the microscope thereafter.
4.0 CONCLUSION
You are sure by now you know that the microscope is very important in
biological studies. It is also an expensive and delicate laboratory
equipment. In the next unit, you will learn how to care for the
microscope as well as measure items under the microscope.
5.0 SUMMARY
In this unit, you have learnt about handling microscopes. You have seen
how you can set up your study microscope under different conditions
and the possible problems you might face under different conditions.
Some possible solutions to these problems have also been suggested .
BIO 191 MODULE 5
251
6.0 TUTOR MARKED ASSIGNMENT
Suppose you were using your microscope and PHCN took the light as
can happen, what will you do?
7.0 REFERENCES/FURTHER READINGS
Berrit N.J. (1979) Biology in action London, Heinemann Educational
Books Ltd.
Soper, R. (Ed) (1998) Biological Sciences Cambridge. UK Cambridge
University Press.
Stone, R.N., Stone, A.B., Emia, F.1 (1972) New Biology for Tropical
Schools London, Longman Group Ltd.
Noun Video clips (VC.4.1) of a demonstration of microscope handling.
(To be produced by NETC)
BIO 191 GENERAL PRACTICAL BIOLOGY
252
UNIT 5 MICROSCOPICAL MEASUREMENTS AND
MICROSCOPE CARE
CONTENTS
1.0 Introduction
2.0 Objective
3.0 Main Content
3.1 Microscopical Measurements
3.1.1 Making Microscopical Measurements
3.2 The Oil Immersion Technique
3.3 Microscope Care And Maintenance
3.3.1 Some Do's and Don't
3.3.2 Microscope Maintenance
3.4 Tools and Working Arrangements
3.5 Working Sequence
4.0 Conclusion
5.0 Summary
6.0 Tutor-Marked Assignment
7.0 References/Further Readings
1.0 INTRODUCTION
Sometimes you want to know the size of the object you see under the
microscope. There are devices by which this can be done. Here you will
learn how to do so. You will also learn how to care for the microscope
2.0 OBJECTIVES
Sometimes when you have to work with very small biological
specimen(s), you have to find ways of enhancing the efficiency of your
microscope. The oil immersion technique is one of the ways we can do
this. You will also learn doing this in this unit.
Since the microscope must be kept clean to be useful, you will also learn
how to clean it after use especially the oil immersion objective. Doing
simple maintenance methods and tasks for a compound microscope will
also be part of this unit.
By the end of this practical session you should be able to:
Calibrate an eyepiece graticule against a stage micrometer, and
use it to measure various kinds of cells
Demonstrate the setting up of an oil immersion objective
Explain the need to clean off immersion oil after use.
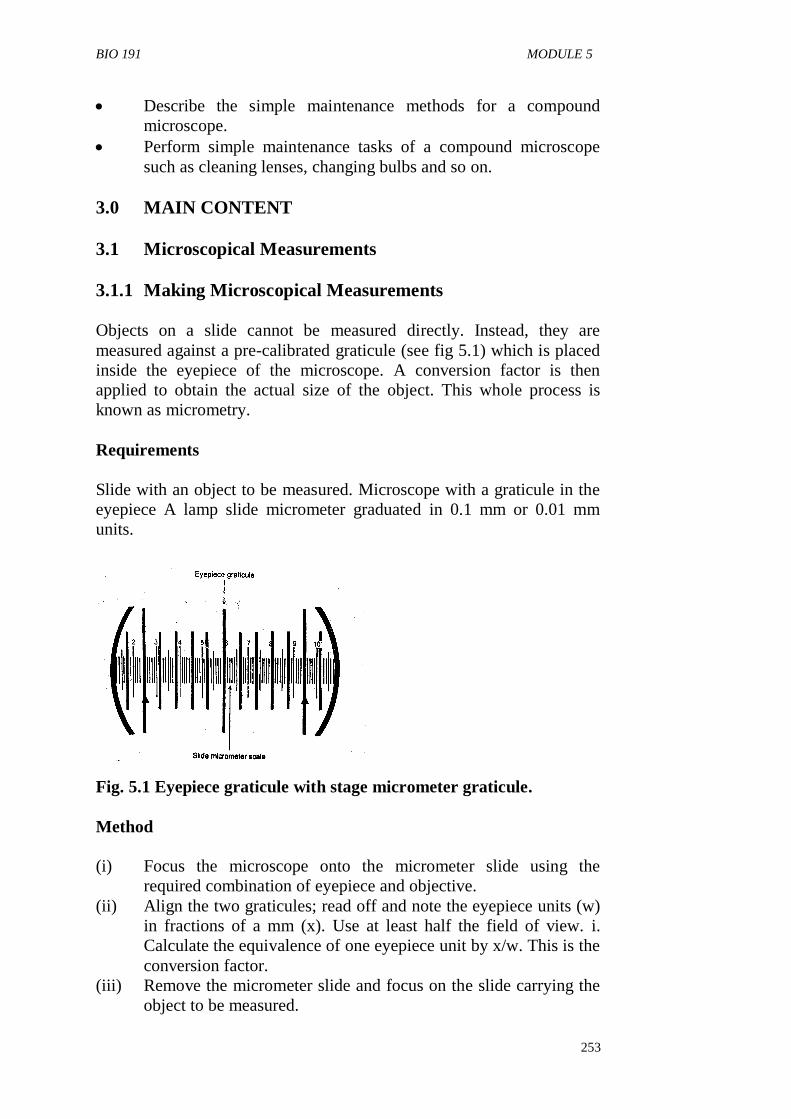
BIO 191 MODULE 5
253
Describe the simple maintenance methods for a compound
microscope.
Perform simple maintenance tasks of a compound microscope
such as cleaning lenses, changing bulbs and so on.
3.0 MAIN CONTENT
3.1 Microscopical Measurements
3.1.1 Making Microscopical Measurements
Objects on a slide cannot be measured directly. Instead, they are
measured against a pre-calibrated graticule (see fig 5.1) which is placed
inside the eyepiece of the microscope. A conversion factor is then
applied to obtain the actual size of the object. This whole process is
known as micrometry.
Requirements
Slide with an object to be measured. Microscope with a graticule in the
eyepiece A lamp slide micrometer graduated in 0.1 mm or 0.01 mm
units.
Fig. 5.1 Eyepiece graticule with stage micrometer graticule.
Method
(i) Focus the microscope onto the micrometer slide using the
required combination of eyepiece and objective.
(ii) Align the two graticules; read off and note the eyepiece units (w)
in fractions of a mm (x). Use at least half the field of view. i.
Calculate the equivalence of one eyepiece unit by x/w. This is the
conversion factor.
(iii) Remove the micrometer slide and focus on the slide carrying the
object to be measured.
BIO 191 GENERAL PRACTICAL BIOLOGY
254
(iv) Align the object to be measured with the eyepiece graticule.
Measure the object in graticule units and note the reading (z).
(v) Calculate the size of the object in mm by multiplying reading z
by conversion factor.
A worked out example is being presented below.
Note that 70 eyepiece units (w) are equivalent to 10 micrometer units
(x), i.e., 1 mm or 1000, um. Therefore:
1 eyepiece unit = 1000/70 = 14.3, um.
Suppose you are measuring a plant cell. Assume the cell measures 2.5
eyepiece units by 4 eyepiece units.
Its actual size, therefore, is (2.5 x 14.3), um by (4 x 14.3) um by 57.2,
um.
3.2 The Oil Immersion Technique
When we have to examine small objects such as red blood cell (7,um)
and bacteria (1-5,um), an objective lens of 90x or 100x is required.
These lenses have a very short working distance and the diameter of the
lower objective lens is very small. To maximize the light gathering
ability of the lens, i.e. to raise its NA, medium of high refractive index is
included between the objective and the coverglass. The medium
normally used is immersion oil, or more rarely water.
Requirements
Microscope fitted with Abbe condenser and usual objectives
Oil immersion objective lens
Good light source
Immersion oil
Lens tissue
1,2-dimethylbenzene (xylene) or 1,1,1 -dichloromethane
Suitable stained permanent slide which must have a thin
coverglass, recommended material - blood smear.
BIO 191 MODULE 5
255
Method
(i) Check that the oil immersion lens is clean.
(ii) Polish the slide with a lint-free cloth.
(iii) Screw the oil immersion lens into the turret next to the 40x
objective (or similar).
(iv) Set up the microscope. Pay particular attention to the condenser
settings.
(v) Select an object of interest which is on the slide. Center it in the
field of view and focus on it with the 40x objective. Use stage
clips or mechanical stage clips, to fix the slide.
(vi) Using the coarse focus control, rack up or raise the nose piece
and swing in the 90x or 100x oil immersion lens.
(vii) Put a drop of the immersion oil onto the slide.
(viii) Rack down until the oil immersion lens enters the oil and is very
nearly touching the coverglass.
(ix) Now look down the microscope. Slowly rack up using the fine
focus control. The object on the slide should come into view. If
necessary, readjust the lamp, mirror and condenser.
(x) The slide can be carefully moved to examine adjacent objects -
for example to compare the structure of red blood cells and white
blood cells.
(xi) When you have finished, rack up and remove the slide and oil
immersion objective.
(xii) The oil is removed from the objective lens with dry lens-tissue.
Ordinary tissue is suitable for the slide. Slide and objective
require more cleaning, use a tissue paper on which a few drops of
xylene have been poured.
Caution! Avoid excessive use of the solvent as it is poisonous by skin
contact and inhalation. Also it dissolves the content used to fix optical
components in place. Now that you are familiar with the oil immersion
technique, practice it and get the feedback from your counselor.
(xiii) Return the clean lens to its storage container and the slide to its
tray.
SELF-ASSESSMENT EXERCISE 1
Under what circumstances would you use the oil immersion techniques?
....................................................................................................................
....................................................................................................................
....................................................................................................................
BIO 191 GENERAL PRACTICAL BIOLOGY
256
SELF ASSESSMENT EXERCISE 2
Describe the procedure which you would use to correctly set up and
focus an oil immersion objective so as to prevent damage to the
objective and slide.
i) .........................................................................................................
ii) .........................................................................................................
iii) .........................................................................................................
iv) .........................................................................................................
v) .........................................................................................................
vi) .........................................................................................................
SELF-ASSESSMENT EXERCISE 3
Give two reasons why it is important to use only the minimal amount of
xylene (1, 2-dimethylbenzene) for cleaning the slides and the
objectives?
i) .........................................................................................................
ii) .........................................................................................................
iii) .........................................................................................................
iv) .........................................................................................................
v) .........................................................................................................
3.3 Microscope Care and Maintenance
This section would acquaint you with the main elements of microscope
care and maintenance. First we look up at some of the practices that we
must follow, described as Do's and the ones that are not quite
microscope - friendly also listed under the category of Don'ts in the
subsection that begins now.
BIO 191 MODULE 5
257
3.3.1 Some Do's and Don'ts
DO'S
Handle it carefully.
Focus correctly
Keep it clean.
Use the proper lens tissue.
Report problems.
DON'TS
Bang it down on the bench.
Focus high power lenses with the coarse control.
Use wet slides.
Use ordinary cloth or tissue for cleaning lenses.
Put it away dirty.
Remove slide with a high powered lens in place.
3.3.2 Microscope Maintenance
In the subsection some descriptions and instructions are given that
should enable you to tackle the routine servicing tasks, and also to keep
the instruments in good order.
Give below are some of the operation which can readily be carried out.
(1) Cleaning of optics,
(2) Cleaning and degreasing of dovetails and nosepiece movement,
(3) Adjustment of some types of coarse focusing mechanism.
Caution: Work which should not be attempted includes anything
requiring the dismantling of objectives, adjustments to fine focusing
mechanisms or, in general, the removal of pinions or pinion bearings.
If a number of instruments are in constant use, or if instruments have
complex focusing mechanisms, it may still be necessary to call in a
service engineer periodically (from either the makers or a firm
specializing in microscope servicing and repairs). However, regular
attention to instruments, even if limited, can go a long way towards
reducing the frequency of these visits.
BIO 191 GENERAL PRACTICAL BIOLOGY
258
3.4 Tools and Working Arrangements
Before starting operations, spread out a large, clean sheet of white paper
on the bench to one side of the work station and lay out these tools and
materials on the other side.
(1) Allen keys (Imperial and metric)
(2) A set of instrument (`watchmaker's) screwdrivers
(3) A range of larger flat-headed and a Philips screwdrivers (the
former with wide but fine blades)
(4) A rubber hand bellows of the type used by photographers
(5) Camel hair brushes (different grades - finer - medium - coarse)
(6) A good quality hand lens
(7) Lens tissues
(8) Selvyt clothes and dogwood pegs
(9) Clean, lint-free rags
(10) 1,2-dimethylbenzene (xylene)
(11) 1,1,1 -trichloroethane
(12) Distilled water
(13) Lubricants for the main dovetail slides and the pinion bearing
(14) Cotton buds.
A few small dishes or boxes are useful for components which are
removed. A well-shaded adjustable lamp is an asset, especially for the
inspection of lens' surfaces.
When working on an instrument, give yourself plenty of room. Work
well away from the edges of the bench so that screws and other small
parts do not find their way to the floor.
If possible, work on the instrument should be completed in an unbroken,
orderly sequence. If there are interruptions, it is not easy to remember
just what has been completed. It is also advisable to work on one
instrument at a time to rule out the possibility of parts getting mixed up.
(This also has the advantage that if one does make a mistake or come to
an impasse, there is only the embarrassment of one instrument in pieces,
and not a whole set!)
3.5 Working Sequence
The sequence of operations in servicing a microscope can be broken
down into a series of steps, these are illustrated in fig 5.2. The broken
lines indicate the work sequence in routine maintenance of the optics
when there isn't the time or the need to clean and regrease the
mechanical components.
BIO 191 MODULE 5
259
1. Removal of Optical Components
After removal, these should be placed on the sheet of clean paper to one
side of the work station. Whenever screws are removed, take great care
to use the correct size of screwdriver. If the blade is not an exact fit,
place a piece of paper towel or cloth over the screw slot. If the
instrument is relatively new and is being disassembled for the first time,
some screws may be hard to loosen because of the presence of a locking
compound.
Eyepiece
This should first be inspected to ascertain whether it is free or fixed.
Some eyepieces make a snug, push fit in the tube; some are fixed by a
grub screw which will require loosening with an Allen key or instrument
screwdriver, some are screwed to the tube and must be unscrewed
bodily.
Objectives
These can usually just be unscrewed carefully from the nosepiece. Small
nonstandard objectives without milled collars can be gripped in a clothes
peg type test-tube holder or, more simply, by sliding a short piece of
rubber tubing over them. On a few instrument objectives have locking
screws which must be loosened before the objective itself can be
unscrewed.
Mirror and gimbal
These are usually a push fit, the gimbal peg being a split shaft which is
housed in a hole at the base of the limb or on the base-top . However,
this shaft may well be fixed by a grub screw which will have to be
loosened before withdrawing the mirror gimbal. Illuminator disassembly
is done in a similar way.
Condenser
Most focusing condensers are held in their mounting by screws. There
may be one large clamping screw with a slotted head or several small
screws requiring the use of an instrument screwdriver. If the latter
arrangement is used, be careful to loosen only the actual clamping
screws and not those holding the condenser components together. Some
condenser mounts have a mirror or prism in the body tube. Do not
remove this, as it is difficult to replace it in the correct position.
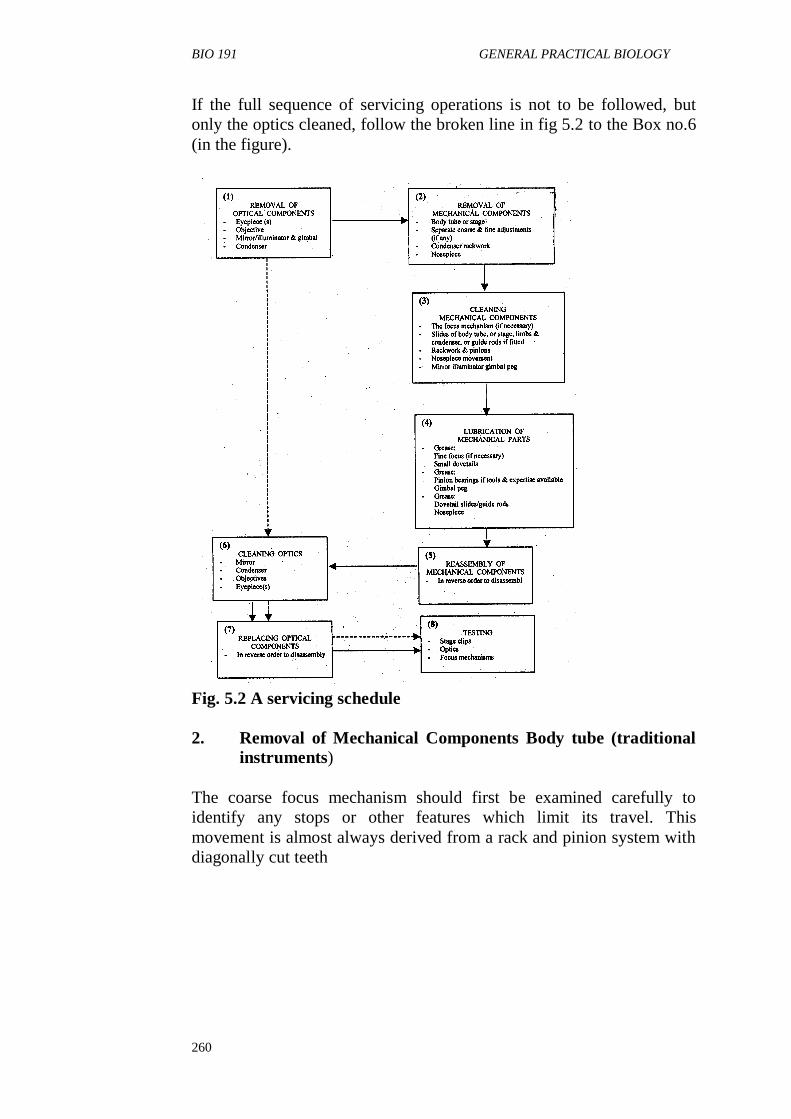
BIO 191 GENERAL PRACTICAL BIOLOGY
260
If the full sequence of servicing operations is not to be followed, but
only the optics cleaned, follow the broken line in fig 5.2 to the Box no.6
(in the figure).
Fig. 5.2 A servicing schedule
2. Removal of Mechanical Components Body tube (traditional
instruments)
The coarse focus mechanism should first be examined carefully to
identify any stops or other features which limit its travel. This
movement is almost always derived from a rack and pinion system with
diagonally cut teeth
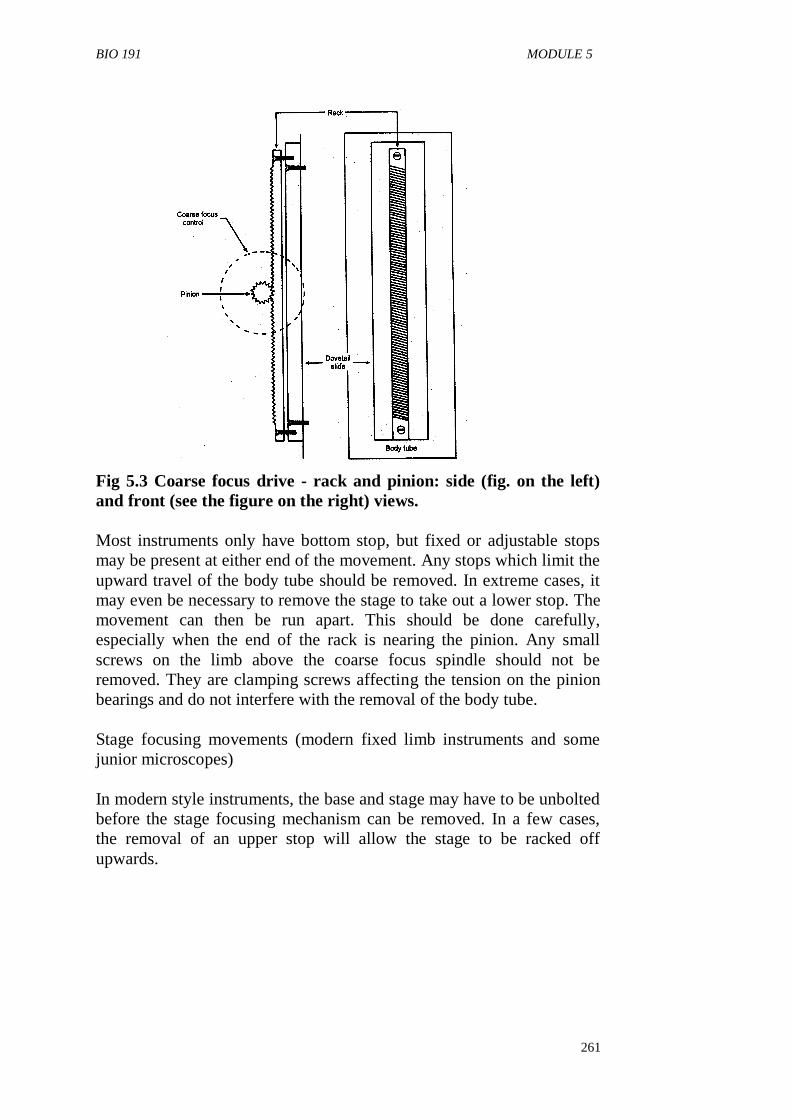
BIO 191 MODULE 5
261
Fig 5.3 Coarse focus drive - rack and pinion: side (fig. on the left)
and front (see the figure on the right) views.
Most instruments only have bottom stop, but fixed or adjustable stops
may be present at either end of the movement. Any stops which limit the
upward travel of the body tube should be removed. In extreme cases, it
may even be necessary to remove the stage to take out a lower stop. The
movement can then be run apart. This should be done carefully,
especially when the end of the rack is nearing the pinion. Any small
screws on the limb above the coarse focus spindle should not be
removed. They are clamping screws affecting the tension on the pinion
bearings and do not interfere with the removal of the body tube.
Stage focusing movements (modern fixed limb instruments and some
junior microscopes)
In modern style instruments, the base and stage may have to be unbolted
before the stage focusing mechanism can be removed. In a few cases,
the removal of an upper stop will allow the stage to be racked off
upwards.
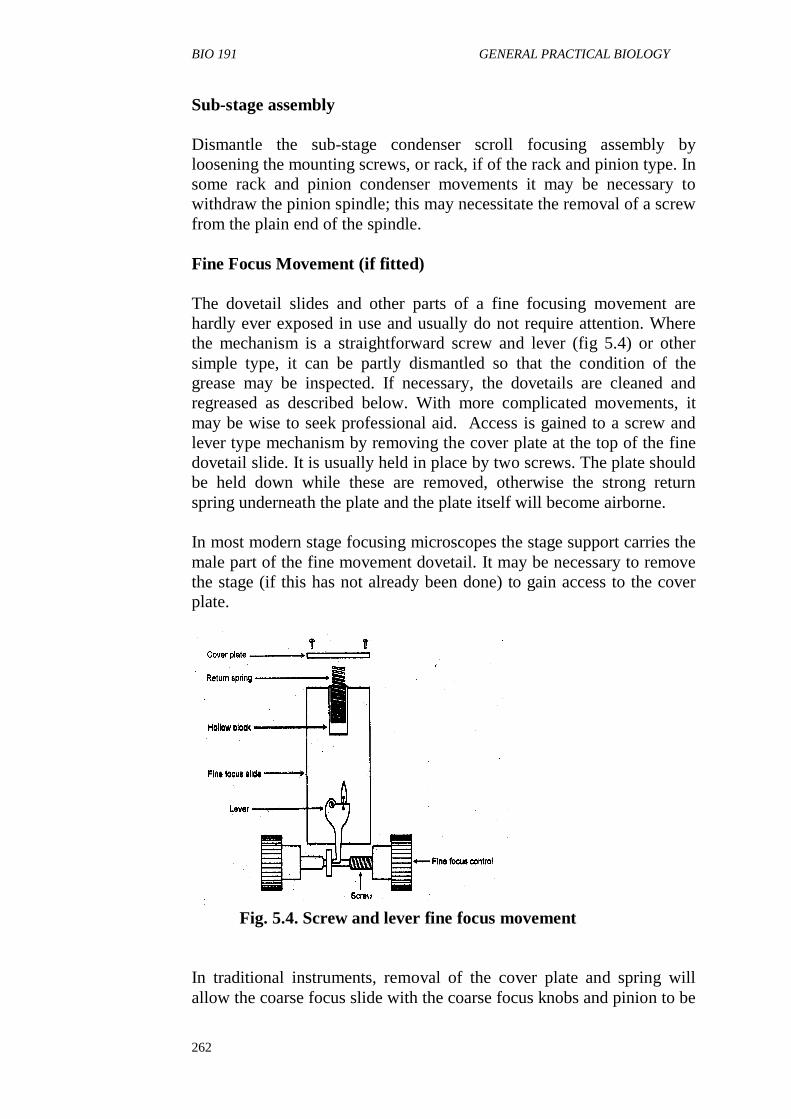
BIO 191 GENERAL PRACTICAL BIOLOGY
262
Sub-stage assembly
Dismantle the sub-stage condenser scroll focusing assembly by
loosening the mounting screws, or rack, if of the rack and pinion type. In
some rack and pinion condenser movements it may be necessary to
withdraw the pinion spindle; this may necessitate the removal of a screw
from the plain end of the spindle.
Fine Focus Movement (if fitted)
The dovetail slides and other parts of a fine focusing movement are
hardly ever exposed in use and usually do not require attention. Where
the mechanism is a straightforward screw and lever (fig 5.4) or other
simple type, it can be partly dismantled so that the condition of the
grease may be inspected. If necessary, the dovetails are cleaned and
regreased as described below. With more complicated movements, it
may be wise to seek professional aid. Access is gained to a screw and
lever type mechanism by removing the cover plate at the top of the fine
dovetail slide. It is usually held in place by two screws. The plate should
be held down while these are removed, otherwise the strong return
spring underneath the plate and the plate itself will become airborne.
In most modern stage focusing microscopes the stage support carries the
male part of the fine movement dovetail. It may be necessary to remove
the stage (if this has not already been done) to gain access to the cover
plate.
Fig. 5.4. Screw and lever fine focus movement
In traditional instruments, removal of the cover plate and spring will
allow the coarse focus slide with the coarse focus knobs and pinion to be
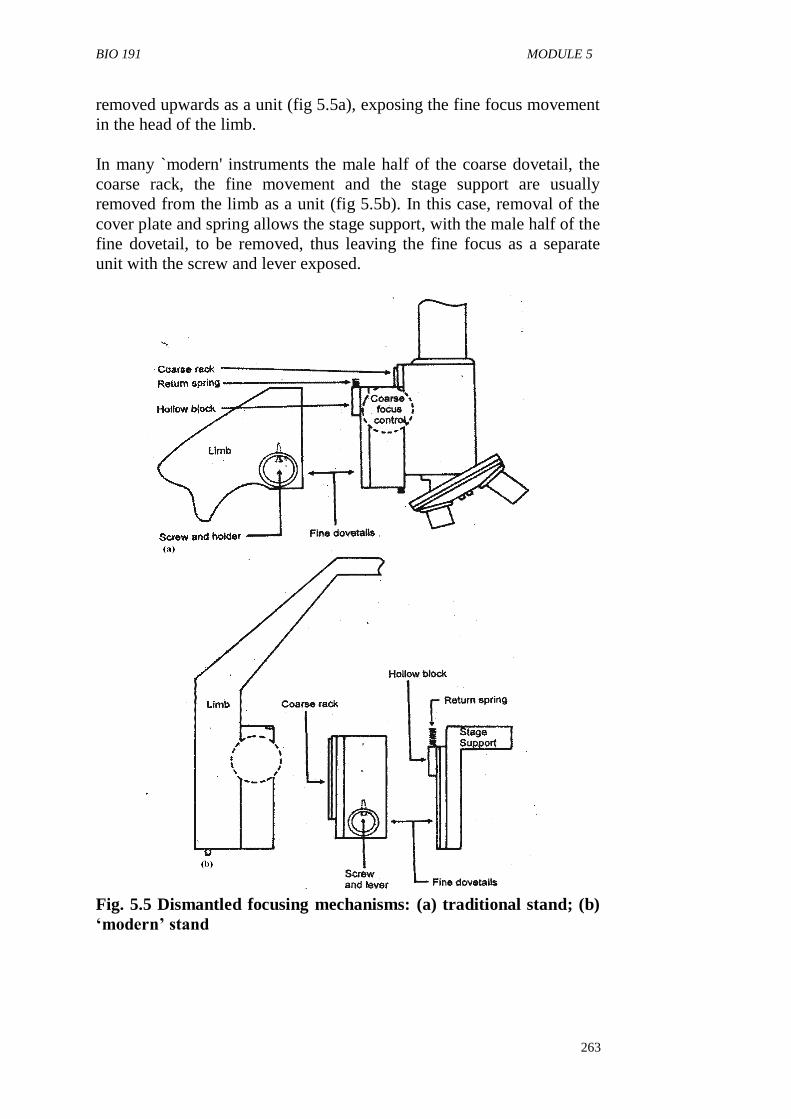
BIO 191 MODULE 5
263
removed upwards as a unit (fig 5.5a), exposing the fine focus movement
in the head of the limb.
In many `modern' instruments the male half of the coarse dovetail, the
coarse rack, the fine movement and the stage support are usually
removed from the limb as a unit (fig 5.5b). In this case, removal of the
cover plate and spring allows the stage support, with the male half of the
fine dovetail, to be removed, thus leaving the fine focus as a separate
unit with the screw and lever exposed.
Fig. 5.5 Dismantled focusing mechanisms: (a) traditional stand; (b)
‘modern’ stand
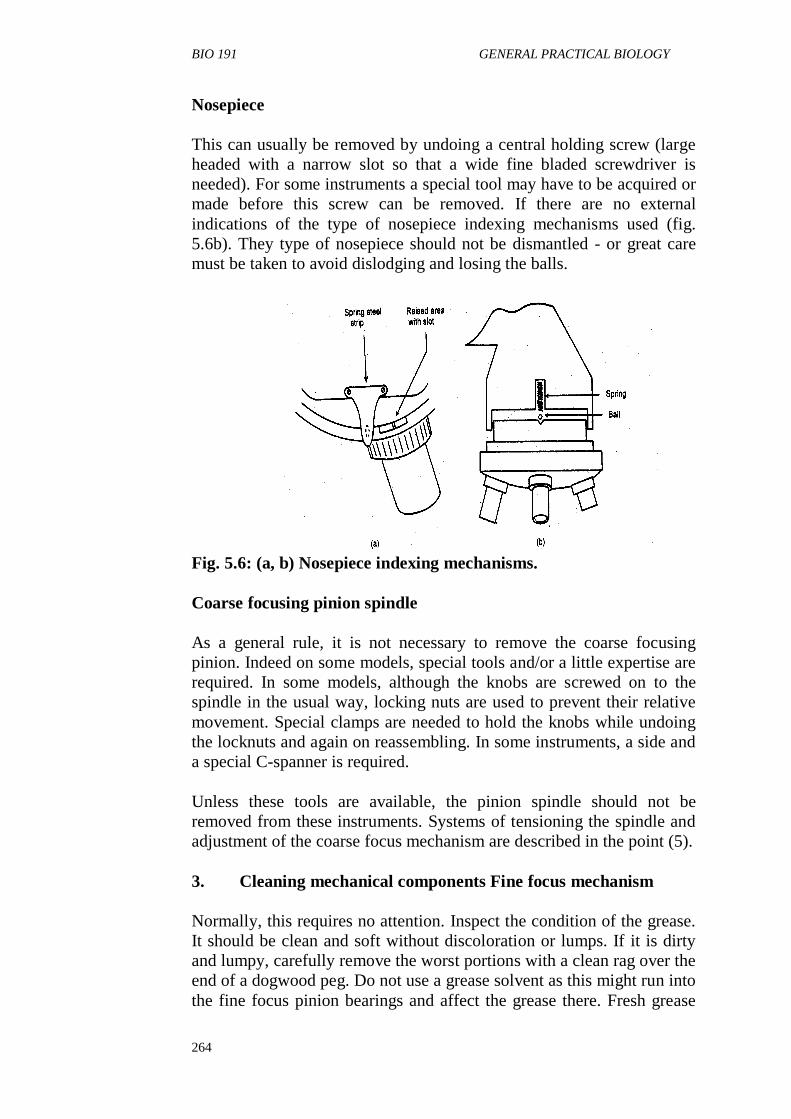
BIO 191 GENERAL PRACTICAL BIOLOGY
264
Nosepiece
This can usually be removed by undoing a central holding screw (large
headed with a narrow slot so that a wide fine bladed screwdriver is
needed). For some instruments a special tool may have to be acquired or
made before this screw can be removed. If there are no external
indications of the type of nosepiece indexing mechanisms used (fig.
5.6b). They type of nosepiece should not be dismantled - or great care
must be taken to avoid dislodging and losing the balls.
Fig. 5.6: (a, b) Nosepiece indexing mechanisms.
Coarse focusing pinion spindle
As a general rule, it is not necessary to remove the coarse focusing
pinion. Indeed on some models, special tools and/or a little expertise are
required. In some models, although the knobs are screwed on to the
spindle in the usual way, locking nuts are used to prevent their relative
movement. Special clamps are needed to hold the knobs while undoing
the locknuts and again on reassembling. In some instruments, a side and
a special C-spanner is required.
Unless these tools are available, the pinion spindle should not be
removed from these instruments. Systems of tensioning the spindle and
adjustment of the coarse focus mechanism are described in the point (5).
3. Cleaning mechanical components Fine focus mechanism
Normally, this requires no attention. Inspect the condition of the grease.
It should be clean and soft without discoloration or lumps. If it is dirty
and lumpy, carefully remove the worst portions with a clean rag over the
end of a dogwood peg. Do not use a grease solvent as this might run into
the fine focus pinion bearings and affect the grease there. Fresh grease
BIO 191 MODULE 5
265
may be applied. Use the brand recommended by the manufacturer.
However, if the original grease is in a very poor condition so that most
of it needs removing, it is wise to seek professional aid. This applies
especially where the movement is somewhat complicated.
Slides, Guide Rods, etc.
Dovetail slides, guide rods and the bearing surfaces of the nosepiece
rims and spindle should have the old, dirty grease removed from them.
A clean rag moistened with a solvent such as 1, 1, 1 - trichloroethane
can be used for these accessible places such as corner in the dovetails.
Caution: Trichloroethane is less hazardous than the solvents formerly
used, but the work area should still be well ventilated and the rag should
not be saturated with solvent. Care should be taken not to allow solvent
into the fine focus mechanism or on to the pinion, where it may run
along the shaft and into the bearings. The bearing surfaces of pinion
spindles are under very high loading and they must be kept separated by
a continuous layer of grease, otherwise the bearing may seize.
Rack work and pinions
These should be brushed out with an old toothbrush and the teeth of the
rack cleaned out with a sharpened dogwood peg. Similarly, treat any
substage rackwork which may be fitted.
Mirror or illuminator gimbal peg
This can have the old grease cleaned off with the solvent moistened rag
and its aperture in the limb or foot cleaned out with a rag over a
dogwood peg.
Other ‘mechanical' parts (such as limb, foot and stage)
Theses can be wiped over with a moist rag and polished with Selvyt
cloth. Gross staining or corrosion can be dealt with using appropriate
cleaning agents. Frequent changing of the cloth used for a new one
moistened with the cleaning material is advisable to minimise the risk of
damage to other parts of the instrument.
4. Lubrication of Mechanical Parts
Greases can be applied as a smear with the finger tip, or worked in with
a sharpened dogwood peg. All the larger dovetails and any scroll or
helical movement of condenser mounted can be regreased. The spindle
of the nosepiece and the touching surfaces of the rims should also have a

BIO 191 GENERAL PRACTICAL BIOLOGY
266
smear of the grease applied to them; for small dovetails and fine focus
movements, use a thin grease developed for high loading. Oil should not
be used on slides or most other moving parts of the microscope.
5. Reassembly of Mechanical Components
The mechanical parts of the stand can now be reassembled, in the
reverse order to disassemble, ready to receive the optics, once these have
been cleaned.
Take care while replacing rackwork. Slide the mating member down and
very gently feed the rack onto the pinion. Do not bump movements
together or serious damages may be done to the teeth. The mechanism
should be worked a few times, remove any excess grease which appears.
While replacing nosepiece movements, tighten the holding screw until
the movement is firm without being harsh.
On many instruments, it is a relatively simple matter to adjust the coarse
focus mechanism at this point. Usually there is some provision for
increasing the “tension” or pressure on the pinion spindle at the bearing
point. In some cases special tools and/or expertise may be required.
However, there are a number of instruments where all that is required to
effect an adjustment is simple contra-rotation of the knobs, this takes up
the play by pulling the knobs against a pressure pad.
Where the bearings have to be moved to bring the spindle closer to the
rack, trial and error will reveal just how hard to push while retightening
screws. If the spindle bearings are clamped by screws on top of the limb
these must be tightened alternatively by similar amounts until the system
is properly adjusted.
Take care that you are adjusting the proper screws. Sometimes the actual
adjusting screws lie at the bottom of holes in the top of the limb - the
screws which can be seen merely serve to close the holes!
After adjustments have been made, any locking devices present are
retightened and the movement is tested for “feel”. A smooth, but slightly
stiff action is aimed for. A properly adjusted movement should be free
from jerks even when operated very slowly.
If it is not obvious how adjustment is effected, consult the supplier. If a
complex instrument has noticeable body slip or backlash, it is best to
call in an engineer. Resist the temptation to effect a cure by making the
teeth of rack and pinion engage more deeply by fitting packing pieces or
by bending the rack. This will only make matters worse.
BIO 191 MODULE 5
267
6. Cleaning the Optics
There are two distinct schools of thought on this subject. Some claim
that frequent cleaning can do only harm, because the dust on being
repeatedly rubbed across polished surfaces is bound to scratch them.
Others claim that dust and grease must be removed regularly if
instruments are to give of their best.
Certainly great harm can be done by heavy-handed cleaning and little is
achieved by removing dust if a greasy fingerprint is left in its place.
Cleaning optical glass needs a light touch and a certain amount of care
to achieve best results and avoid damage. Compromise between too
frequent cleaning and complete neglect.
If the only `dirt' present on the glass is dust or other particular matter, it
can be removed by blowing air across the surface with hand bellows or
by dusting with a soft brush. The ideal tool is a combination of the two -
the photographer's blower brush'.
If there are greasy deposits, a gentle wipe with lens tissue may be
required.
Heavy contamination with grease may mean the use of 1,2-
dimenthylbenzene (xylene) as a solvent. However, this may attack the
mounting compounds used to hold the objective components. Therefore,
use enough only to moisten the lens tissue or Selvyt cloth.
Reminding once more
Another good reason for using only small amounts of xylene is its
toxicity. It should be used only in a well-ventilated work area for short
periods of time and should be kept off the skin. Objectives should never
be immersed in solvents to soak off heavy deposits - they are likely to
fall apart!
For contamination by `aqueous' materials such as sugar solution, blood,
glycerine and copper sulphate, use lens tissues moistened with distilled
water. Heavy contamination is best removed by repeated gentle rubbing,
changing the tissue frequently. Never use a tool of any kind, and avoid
the use of tap water (this may leave a deposit of salts after evaporation).
Immersion oil may be removed, using xylene instead of water, in the
same way. If the old type of oil has been used and has dried up to a
caked deposit, xylene may not remove it. In this case, fresh immersion
oil may be an efficient solvent and remove most f the deposit. The
reminder can then be leaned off with xylene.
BIO 191 GENERAL PRACTICAL BIOLOGY
268
It is wise to wear gloves, since some older types of immersion oil
contain polychlorobiphenyls (PCBs) which, like xylene, are poisonous
by skin absorption.
Use a hand bellows to blow off any loose fibres left behind by cloth or
tissues.
Objectives
Objectives are cleaned using the techniques described above, choosing
the actual cleaning methods according to the degree of contamination of
the lens. After cleaning the front lens, hold the objective with this lens
uppermost and puff air in strongly to remove any dust from inside. Hold
it up to the light and examine the back lens with a magnifier to ensure
that no dust remains. In persistent cases a camel hair brush may be used
to clean the back lens gently. In no circumstances must you take the
objectives apart. If components are displaced, the objectives will have to
be returned to the manufacturer.
Eyepieces
Eyepieces are cleaned in much the same way as objectives, except that
they can be dismantled for cleaning. If there is likely to be any
confusion as to which way a lens should face, mark an edge with a
grease pencil or make a sketch of the arrangement of the lenses as they
are removed. Most eyepieces are opened up by unscrewing the top half.
To minimise the amount of dust settling on cleaned surfaces, the top
(eye) lens should be tackled first. While reassembling, take care not to
cross the very pitched threads.
Condenser and mirror
Dirt on these components is relatively unimportant, though it may
sometimes cause glare or loss of intensity. Cleaning is as for lenses, but
there should be no need to use solvent. Some condensers can partly be
dismantled by unscrewing components; and this adds to ease of
cleaning. Mirror and condenser can be given a final polish with the
Selvyt cloth before inspection with the magnifier for traces of dirt or
grease.
Optical head of `modern' instruments
The prism or mirror in the angled head can be dusted with a blow-brush
and gently polished with a lens tissue or Selvyt cloth.
BIO 191 MODULE 5
269
7. Replacing Optical Components
These are refitted in the reverse order to disassembly - condenser,
mirror, objectives, eyepiece. Before replacing the eyepiece, look down
the eyepiece tube, using a centering telescope if available, and check the
alignment of the components refitted. Small adjustments might be
required to the mirror or condenser mounts or to the stage, to ensure that
all the parts are correctly centred on the optical axis. Many of the
threads used in the optical components are fine; care is needed to avoid
cross-threading.
8. Testing
Once it has been reassembled, the instrument should be checked over to
ensure that optical components have been thoroughly cleaned and that
stops, stage clips and condensers are properly adjusted. The instrument
should be set up appropriately.
SELF-ASSESSMENT EXERCISE 4
When you inspect the fine focus mechanism on one of the lab
microscopes, you notice that the grease is discoloured and you decide to
replace it. By which one of the following ways would you remove the
grease? Tick the correct answer.
1. Wiping the mechanism with a clean rag on a wooden peg;
2. Wiping the mechanism with a clean rag moistened with 1,1,1 -
trichloroethane; or
3. Flooding the mechanism with a solvent such as that mentioned in
(2) and then wiping it clean?
SELF-ASSESSMENT EXERCISE 5
Based on your experience, write some points in addition to the ones
mentioned in Section 3.3.1 that lists some Do's and Don'ts.
....................................................................................................................
....................................................................................................................
....................................................................................................................
....................................................................................................................
....................................................................................................................

BIO 191 GENERAL PRACTICAL BIOLOGY
270
SELF-ASSESSMENT EXERCISE 6
What basic `working rules' should one keep in mind for the maintenance
operations of a microscope?
....................................................................................................................
....................................................................................................................
....................................................................................................................
....................................................................................................................
....................................................................................................................
SELF-ASSESSMENT EXERCISE 7
Pick any five microscopes from your lab., and observe them carefully to
prepare an organizer for their servicing.
4.0 CONCLUSION
You have learnt to focus the microscope on the micrometer slide using
the eyepiece and the objective combination you need. You have learnt to
align the two graticules, read off and take note of a mm (x), using at
least half of the field to view the object. You have also learnt how to
calculate the equivalence of units measured.
BIO 191 MODULE 5
271
You have also learnt how to enhance the efficiency of your microscope
through the oil immersion technique. You have also learnt how to care
and maintain your microscope.
5.0 SUMMARY
You have learnt in Unit 1 about what the work involved in the practical
biology laboratory.
In unit 2 you learnt about laboratory organizations.
Unit 3 dealt with the handling of common laboratory equipment. Here
you have learnt about the microscope.
Now its time to go to the specimens themselves.
In module 2 unit 1, we will learn how to procure animal materials for
study.
6.0 TUTOR MARKED ASSIGNMENT
Describe the steps you would take to measure a cell under the
microscope.
7.0 REFERENCES/FURTHER READINGS
Berril, N.J. (1979) Biology in action London, Heineman Educational
Books Ltd.
Soper, R. (Ed.) (1998) Biological Sciences
Cambridge U.K. Cambridge University Press.
Store, R.N., Cozens, A.B., Emia, F.I. (1972) New Biology for Tropical
Schools London, Longman Group Ltd.
BIO 191 GENERAL PRACTICAL BIOLOGY
272
MODULE 2
Unit 1 Procuring Animal Material for Laboratory
Work
Unit 2 Procuring Plant Materials
Unit 3 Killing, Preserving and Mounting Animal
Material
Unit 4 External Features of Plants-Observing Similarities
and Differences
Unit 5 Preparation of Temporary Slides
PROCURING ANIMAL MATERIAL IGNOU ADAPTED
Published by National Open University of Nigeria 2006. This edition
has been adapted by the National Open University of Nigeria for use by
the students of the National Open University of Nigeria from (Lt-2)
(Laboratory Technique in Biology) designed and created by the Indira
Ghandi National Open University by arrangement with the owner.
UNIT 1 PROCURING ANIMAL MATERIAL FOR
LABORATORY WORK
CONTENTS
1.0 Introduction
2.0 Objectives
3.0 Main Content
3.1 Procuring animal material
3.2 Placing order for specimens and live animals
3.3 Collection of live animals
3.4 Collection of aquatic invertebrates
3.5 Collection of earthworms
3.6 Collection of insects
3.7 Collection of live animals demonstrated.
4.0 Conclusion
5.0 Summary
6.0 Tutor Marked Assignment
7.0 References/Further Readings.
BIO 191 MODULE 5
273
1.0 INTRODUCTION
One of the important duties of a lab technician is to collect, procure and
preserve animal specimens for the use of the students. The live animals
are collected with the use of accessories like nets, jars pans etc. From
water bodies (aquatic animals) as well as from different land areas
(terrestrial animals). The animals specimens are procured from the
market. For this you have to place the orders with the dealers. The ways
of procuring specimen and live animals and their preservation is dealt
with in this unit. You will also learn how to identify male and female
animals by studying the external features.
2.0 OBJECTIVES
After doing the exercises in this unit you will be able to:
place the order with a dealer for purchase of specimen and live
animals,
collect live animals from their natural environments.
3.0 MAIN CONTENT
3.1 Procuring animal material
3.2 Placing order for the specimens and live animals
Specimens are to be procured from the market. For that you have to first
invite quotations in sealed and marked envelopes for the articles to be
purchased. The purchase committee in your institution will open all the
quotations and decide from which dealer to purchase the specimens
and/or live animals. You will normally expect that the purchase order is
given to the lowest bidder. In some cases, you may realize that the
company's stock is not the best, even though cheap. Some companies
may fail to meet the deadline and you are forced to look up to the ones
that can perform. However this must have been after they have really
failed.
For this activity, two letters are to be written from your institution for
inviting quotations and the second for placing the order. The letters are
signed by the Head of the institutions or the person designated by the
Head. Given below are examples of these letters. The first letter is an
example of the format used for inviting quotations from the dealer and
the second is an example of a letter for placing the order. There can be
certain variations in the formats used in different institutions.
BIO 191 GENERAL PRACTICAL BIOLOGY
274
Letter No. 1
Dated:
Tel No ......... Fax No .........
The Manager,
Study Centre
National Open University
Coordinating Office
Jos.
M/s Vinay Chemicals
4, Ikpaja Road
Lagos.
Ref: EI/quotation/1999-2000
Dear Sir,
Quotations are invited for the supply of the apparatus/equipment as per
the enclosed list quoting the price/discount (%) on the catalogue prices
and the make of the apparatus/equipment.
It is requested that the following should be carefully observed in every
detail while submitting quotations, otherwise they may not be
considered.
Quotations should be sent under sealed cover addressed to the Manager,
Study Center, National Open University, Coordinating Office, Jos so as
to reach him not later than
The words "Quotations for apparatus" should be written prominently on
the envelope.
Quotations should be for the supply of articles F.O.R Manager, Study
Center, National Open University, Coordinating Office, Jos.
Kindly quote the price/discount (%) you will give on the listed price.
Thanking you,
Yours sincerely,
J.K. Babalola
BIO 191 MODULE 5
275
Letter No. 2
Dated:
Tel. No ............. Fax. No ..........
The Manager
Study Center
National Open University
Coordinating Office
Jos.
M/s Vinay Chemicals
4, Ikpaja Road
Lagos.
Ref: El/quotation/1999-2000/
Dear Sir,
Regarding your Quotation No ............... you are requested to kindly
supply the following .................... immediately.
Items Number
1.
2.
3.
4.
Bill may be sent in duplicate to the undersigned for payment.
Yours sincerely.
J.K. Babalola
3.3 Collection of live animals
Live animals are generally collected from aquatic and land areas. For
collection visit a nearby aquatic body (e.g pond) and land area
(eg. Park/Field) along with your course tutor and other students of your
group.
BIO 191 GENERAL PRACTICAL BIOLOGY
276
3.4 Collection of Aquatic Invertebrates Sources
The sources can be ponds, lakes, rivers for fresh water animals and
ocean/sea coasts for marine animals. However, in this section, as an
example we will study the collection of animals from ponds.
Materials Required
Nylon nets (Fine weave for small animals and coarse weave for large
animals) Large clean jars or buckets
Shallow white pans or papers
Method
1. Take a clean bucket or a jar and fill it up to about half with the
pond water from which you are going to collect the samples.
2. With a trowel, scoop a little amount of mud from the wet edge of
the pond and put it in the bucket or jar having pond water.
3. Also put one or two small submerged branches of aquatic plants
in the bucket or jar.
4. Take the suitable net and sweep through the water in the pond.
You have to sweep more than once (see fig. 6.1 for different
types of nets).
5. Take out the net. You will see the specimens trapped in the net.
Transfer the specimen into the bucket or the jar.
6. Take some extra pond mud, submerged branches or aquatic
plants along with some pond water and carry to the laboratory for
subsequent use, if needed.
7. In the lab, transfer the live specimens into shallow white pans or
place them on a large sheet of paper and spread them out for
study.
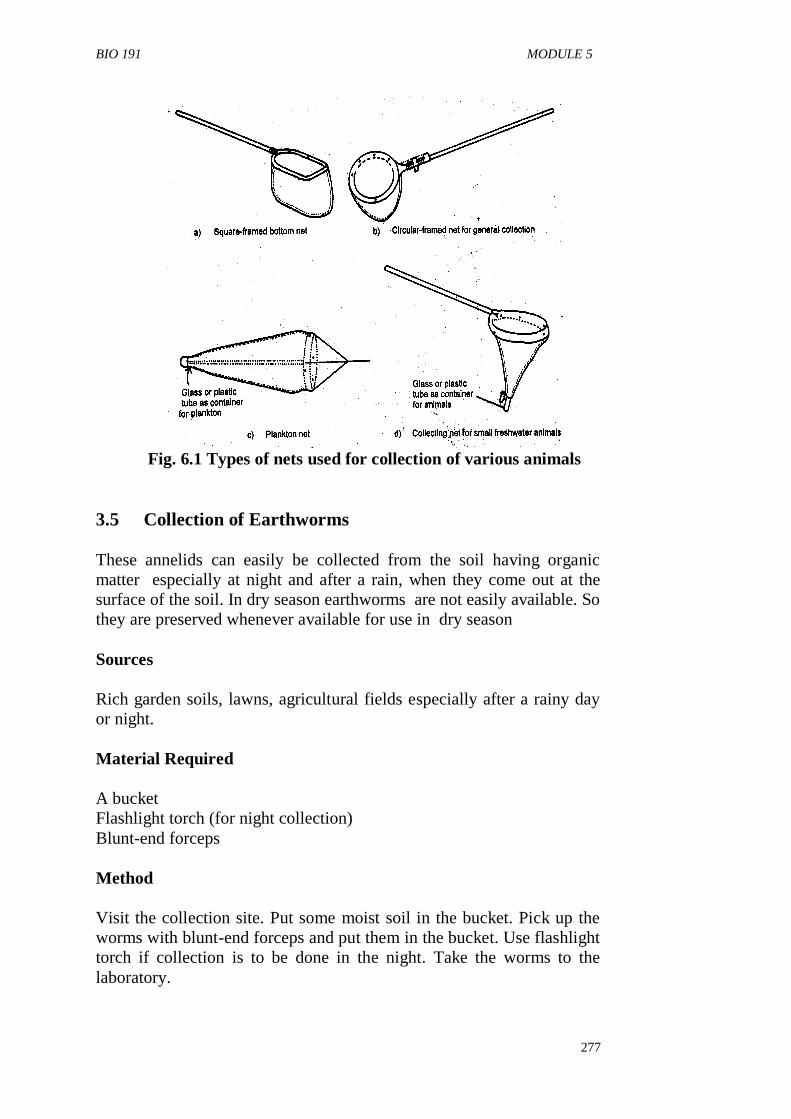
BIO 191 MODULE 5
277
Fig. 6.1 Types of nets used for collection of various animals
3.5 Collection of Earthworms
These annelids can easily be collected from the soil having organic
matter especially at night and after a rain, when they come out at the
surface of the soil. In dry season earthworms are not easily available. So
they are preserved whenever available for use in dry season
Sources
Rich garden soils, lawns, agricultural fields especially after a rainy day
or night.
Material Required
A bucket
Flashlight torch (for night collection)
Blunt-end forceps
Method
Visit the collection site. Put some moist soil in the bucket. Pick up the
worms with blunt-end forceps and put them in the bucket. Use flashlight
torch if collection is to be done in the night. Take the worms to the
laboratory.
BIO 191 GENERAL PRACTICAL BIOLOGY
278
3.6 Collection of Insects
Sources
Terrestrial insects are found in gardens especially during flowering
seasons, in the fields and of course indoors. Aquatic insects can be
collected from water bodies like ponds, lakes etc.
There are several methods of collecting insects but in this section you
will collect terrestrial insects by three methods using:
a) net
b) light trap, and
c) aspiration
Methods
(a) Sweep Net Method
This method is suitable for collecting many insects.
Materials Required
Insect-collecting net and Killing jar
Steps
1. Go to the garden/field and identify the insects to be collected.
2. Approach the specimen(s) very quietly. You should try to avoid
chasing the insects overtly as it would alert the insects and make
them fly/run away.
3. Sweep the net (fig 6.1a) through the herbage over the
specimen(s). You might have to sweep more than once.
4. When the insect(s) is trapped in the net, twist the net or your
wrist so that net is closed (fig 6.1b) and the specimen is not able
to escape.
5. Transfer the collected insects into the killing jar.
(b) Light Trap Method
In this method the collector is not required to be present. It is mainly
used for nocturnal insects like moths, midges, some beetles and winged
termites.
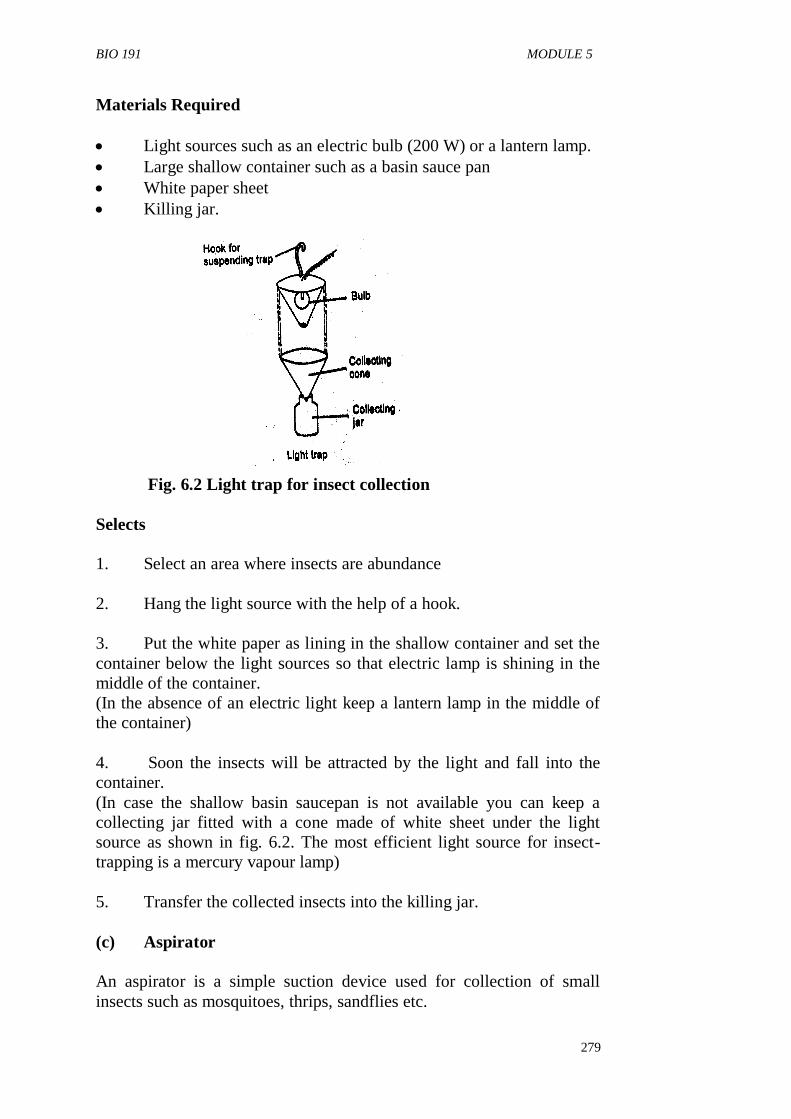
BIO 191 MODULE 5
279
Materials Required
Light sources such as an electric bulb (200 W) or a lantern lamp.
Large shallow container such as a basin sauce pan
White paper sheet
Killing jar.
Fig. 6.2 Light trap for insect collection
Selects
1. Select an area where insects are abundance
2. Hang the light source with the help of a hook.
3. Put the white paper as lining in the shallow container and set the
container below the light sources so that electric lamp is shining in the
middle of the container.
(In the absence of an electric light keep a lantern lamp in the middle of
the container)
4. Soon the insects will be attracted by the light and fall into the
container.
(In case the shallow basin saucepan is not available you can keep a
collecting jar fitted with a cone made of white sheet under the light
source as shown in fig. 6.2. The most efficient light source for insect-
trapping is a mercury vapour lamp)
5. Transfer the collected insects into the killing jar.
(c) Aspirator
An aspirator is a simple suction device used for collection of small
insects such as mosquitoes, thrips, sandflies etc.
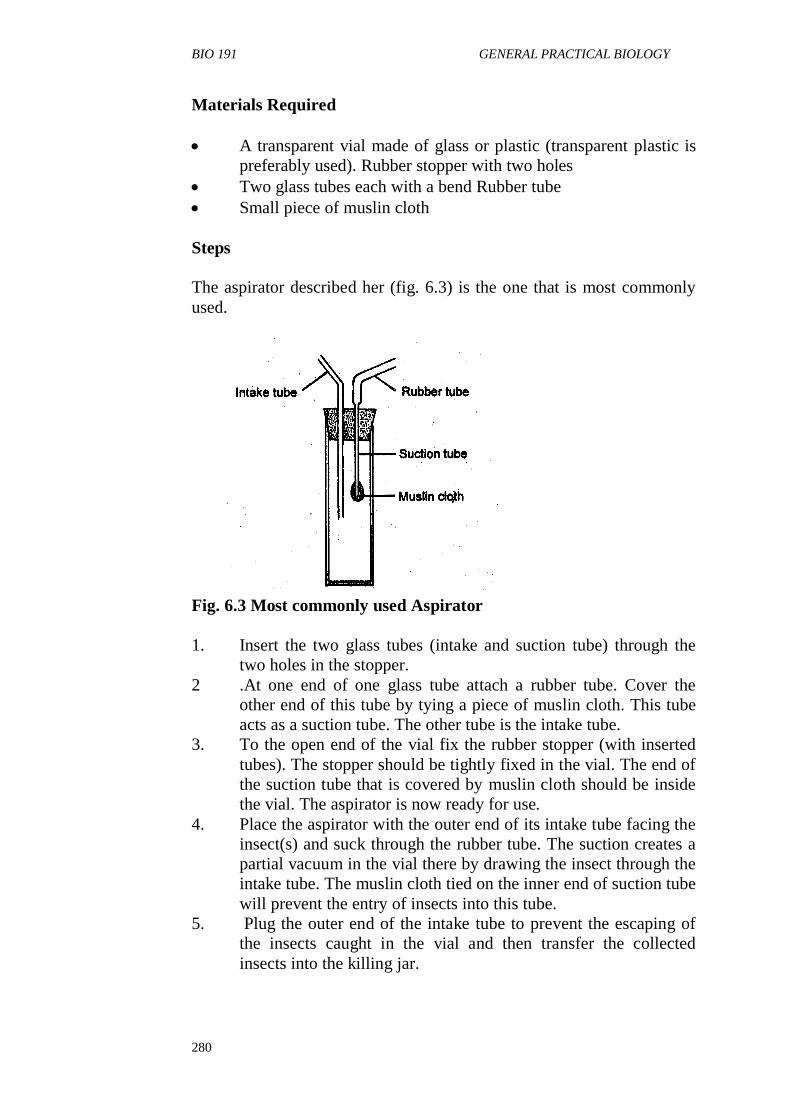
BIO 191 GENERAL PRACTICAL BIOLOGY
280
Materials Required
A transparent vial made of glass or plastic (transparent plastic is
preferably used). Rubber stopper with two holes
Two glass tubes each with a bend Rubber tube
Small piece of muslin cloth
Steps
The aspirator described her (fig. 6.3) is the one that is most commonly
used.
Fig. 6.3 Most commonly used Aspirator
1. Insert the two glass tubes (intake and suction tube) through the
two holes in the stopper.
2 .At one end of one glass tube attach a rubber tube. Cover the
other end of this tube by tying a piece of muslin cloth. This tube
acts as a suction tube. The other tube is the intake tube.
3. To the open end of the vial fix the rubber stopper (with inserted
tubes). The stopper should be tightly fixed in the vial. The end of
the suction tube that is covered by muslin cloth should be inside
the vial. The aspirator is now ready for use.
4. Place the aspirator with the outer end of its intake tube facing the
insect(s) and suck through the rubber tube. The suction creates a
partial vacuum in the vial there by drawing the insect through the
intake tube. The muslin cloth tied on the inner end of suction tube
will prevent the entry of insects into this tube.
5. Plug the outer end of the intake tube to prevent the escaping of
the insects caught in the vial and then transfer the collected
insects into the killing jar.
BIO 191 MODULE 5
281
3.7 Collection of Live Animals Demonstrated
Now that you know what to do in order to collect live animals let us see
it being done in real practice. Watch the video clips on the (take 6.1):
- Collection of some aquatic invertebrates (named).
- Collection of earthworms
- Collection of some insects (named)
Now try collecting live animals too and see how many of these varieties
you are able to collect.
Wishing you a pleasurable collecting experience.
Now you can do the following self assessment questions since you have
learnt about them in this unit.
SELF-ASSESSMENT QUESTIONS
1. Give some reason why you have to buy specimen animal from
any higher bidder.
2. Write a sample letter to a dealer making orders for some rabbits
and guinea pigs.
3. What type of light source is best for trapping insects?
4.0 CONCLUSION
In this unit you have learnt that you either buy or collect animal
materials for laboratory work. Once they have been acquired, they must
either be killed and preserved for studying or kept alive in suitable
conditions for the same purpose of being studied.
5.0 SUMMARY
Having procured our animal materials in this unit, we will learn how to
preserve them in the next unit.
6.0 TUTOR-MARKED ASSIGNMENT
Describe how you will collect the following animal materials:
1. Aquatic Invertebrates
2. Earthworms and Insects

BIO 191 GENERAL PRACTICAL BIOLOGY
282
7.0 REFERENCES/FURTHER READINGS
Berril, N.J. (1979) Biology in action London, Heinemann Educational
Books Ltd.
Soper, R. (Ed)(1998) Biological Science Cambridge U.K Cambridge
University Press
Stone. R.N., Cozens, A.B., Emia, F.I. (1972) New Biology for Tropical
Schools London, Longman Group Ltd.
An NOU Video Demonstration on `Collection of Live animals.' (To be
produced by NETC)
BIO 191 MODULE 5
283
UNIT 2 PROCURING PLANT MATERIALS
CONTENTS
1.0 Introduction
2.0 Objectives
3.0 Main Content
3.1 Growing of Material for Squash Preparation
3.2 Collection of Lower Plants
3.2.1 Algae
3.2.2 Bryophytes
3.2.3 Pteridophytes
3.2.4 Gymnosperms
3.3 Collection of Higher Plants for making a Herbarium
3.4 Collection of Plants
3.5 Carrying the Specimens
3.6 Examining the Plant
3.7 Drying
3.8 Hands-on Procuring Plant Material
4.0 Conclusion
5.0 Summary
6.0 Tutor Marked Assignment
7.0 References/Further Readings
1.0 INTRODUCTION
Laboratory work is an integral part of learning science. In biological
sciences living or preserved organisms have to be provided for the study
of anatomy, Physiology, taxonomy etc. As lab. technical staff, you will
have to provide various plant materials to the students for experiments.
You have to collect lower and higher plants for study. In this unit we are
going to describe all the techniques which will help in collection of
plants only. For collecting the plants you should know what type of
bottles, fixatives, solutions and equipment are needed. You can start by
collecting the plants with the teacher who will help you identify them.
In due course of time you will also be able to perform this activity
independently.
2.0 OBJECTIVES
After studying this unit you will be able to:
grow root tips of a plant species for squash preparation
fix the root tip
collect algae, bryophytes, pteridophytes and gymnosperms
collect, press, dry mount, label, store, and preserve angiosperm
specimens to make a herbarium.
BIO 191 GENERAL PRACTICAL BIOLOGY
284
3.0 MAIN CONTENT
3.1 Growing of material for squash preparation
The root tips may be obtained by allowing them to germinate on a wet
blotting paper disc or/sand free from soil and debris.
Squash preparation is a technique of preparing slides of biological
material which we will do in unit 10. In this unit you will only learn how
to grow the roots for this technique.
Materials Required
Onion bulbs
Coplin jars or wide mouth bottles
100 ml beakers
Scalpel
Onion Bulbs
1. Take an onion and scrape off the dry roots from the bulbs to
expose the disc.
2. Fill a coplin jar with tap water and place the onion bulb on it in
such a way that the disc touches the water.
3. Place this near the window to get enough light for three to four
days. Roots will start growing and the root tips can be clearly
seen.
3.2 Collection of Lower Plants
The collection of plant material is a simple job but one should take much
care of collected plants or their parts so that they are preserved without
any damage. The plants may be collected in vasculum, polythene bags
or in bottles. You will need a pair of secateurs for cutting hard material,
a sharp knife for cutting soft parts, pick for digging out underground
parts like roots and rhizomes, scalpel and forceps for separating those
plants which grow attached to the barks of trees and rocks.
The stems and roots are cut into pieces of size about 3 cm long with the
aid of sharp razor or knife so that the tissues at cut ends do not get
macerated. Bryophytes are made free from soil particles and debris
before storing in some preservative. The smaller leaves can be preserved
as such and larger ones can be cut in pieces, and then preserved.
We will now discuss the collection of algae, bryophytes, pteridophytes
and gymnosperms specimens one by one.
BIO 191 MODULE 5
285
3.2.1 Algae
Sources: The algae occur widely in nature viz on the soil surface and
below it, on the bark of trees, in fresh water, sea water, and a variety of
other habitats.
Collection from Bark
i) In case of bark algae pick up the algae patches from the tree trunk
with the help of iron spatula.
ii) Sterilize spatula by swirling it in spirit and then flaming it.
iii) Store various samples collected in separate sterilized bottles after
fixing and labeling in their respective shelves.
Collection from Fresh Water
i) Collect the fresh water algae at the spot in sterilized specimen
tubes containing some habitat water.
ii) Never fill the container more than a quarter so that the quantity of
oxygen present in the water may be sufficient for respiration.
iii) Fix the material, label them and keep in respective shelves.
Collection from Sea Water
i) In Nigeria the southern coast is best for marine algae collection
during low tides as during this period these are mostly in their
reproduction stages.
ii) Collect marine algae in large bottles.
iii) Fix them and label them and keep them in their respective
shelves,
3.2.2 Collection of Bryophytes
Now we will discuss the collection of bryophytes. Normally bryophytes
occur in nature attached to wet soil, rocks, bark of living and dead trees,
wood and humus rich in organic substances.
Scrape the bryophytes from the place of occurrence with the help
of sharp scapel or knife and keep them in polythene bags within
which they remain alive to a number of days.
Keep these bags loosely tied and in damp condition in laboratory.
Wash the soil growing species with ordinary water to remove soil
particles and dirt attached to plant.
Keep the bags under illumination at 0ºC - 5ºC to keep the plant
alive for a longer duration.
Fix the material, label and keep it in the cupboard.
BIO 191 GENERAL PRACTICAL BIOLOGY
286
3.2.3 Collection of Pterldophytes
Pteridophytes are commonly known as vascular cryptogams, these are
spore-producing vascular plants. They possess the vascular tissues
xylem and phloem. They grow in variable habitats. Most of the
pteridophytes are terrestrial which thrive well in moisture and shade
while others are found growing in xeric conditions. A few are epiphytes
and some of them are found in aquatic habitats.
Collect the pteridophytes from natural habitats in mature spore
producing stage.
Collect the plants with or without strobili or mature sporophyll in
polythene bags loosely tied at mouth.
If the material is large cut them into pieces, fix label and keep
them in a cupboard.
3.2.4 Collection of Gymnosperms
Gymnosperm belong to seed plants but the seeds are naked with a very
conspicuous and independent sporophyte which is the main plant and
have very reduced gametophyte dependent on the sporophyte. They
have xeric characteristics also.
i) Collect the root, stem, leaves, male and female gametophytes of
the plant.
ii) Cut the material into small pieces of 3 cm, fix them, label them
and keep them in a cupboard.
iii) You can collect the dry fruits an cones of gymnosperms and
preserve them as such.
3.3 Collection of higher plants for making a herbarium
In this section you will study about preserving plants for a herbarium
because as a technician you have to make and maintain a herbarium. It is
a place where plant specimens are kept, often in a dry state for
biological studies. Some plants are also grown in a botanical garden or
specially maintained in green house for this purpose.
3.3 Collection of Plants
1. You should remember one important thing about collection - Do
not pick plants haphazardly. Choose only those plants whose
flowers are large and whose organs are easily seen.
2. If possible collect complete plants with flowers and fruits
(sometimes they are necessary for recognizing species of some
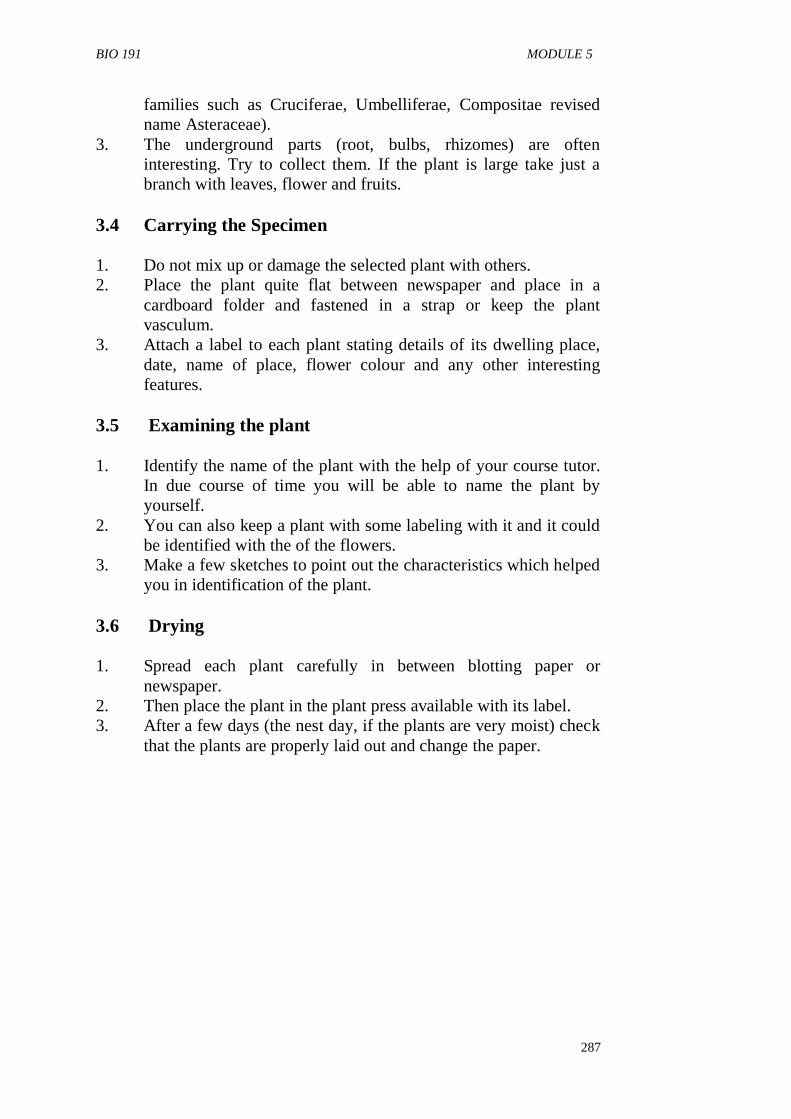
BIO 191 MODULE 5
287
families such as Cruciferae, Umbelliferae, Compositae revised
name Asteraceae).
3. The underground parts (root, bulbs, rhizomes) are often
interesting. Try to collect them. If the plant is large take just a
branch with leaves, flower and fruits.
3.4 Carrying the Specimen
1. Do not mix up or damage the selected plant with others.
2. Place the plant quite flat between newspaper and place in a
cardboard folder and fastened in a strap or keep the plant
vasculum.
3. Attach a label to each plant stating details of its dwelling place,
date, name of place, flower colour and any other interesting
features.
3.5 Examining the plant
1. Identify the name of the plant with the help of your course tutor.
In due course of time you will be able to name the plant by
yourself.
2. You can also keep a plant with some labeling with it and it could
be identified with the of the flowers.
3. Make a few sketches to point out the characteristics which helped
you in identification of the plant.
3.6 Drying
1. Spread each plant carefully in between blotting paper or
newspaper.
2. Then place the plant in the plant press available with its label.
3. After a few days (the nest day, if the plants are very moist) check
that the plants are properly laid out and change the paper.
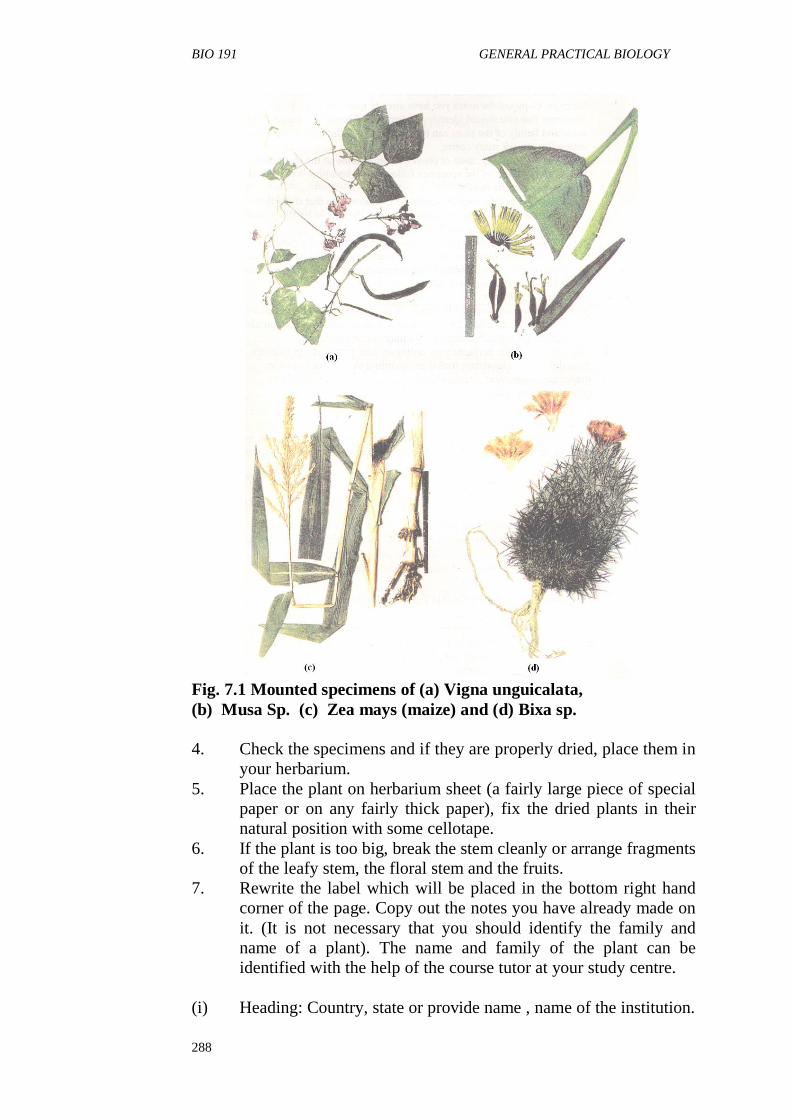
BIO 191 GENERAL PRACTICAL BIOLOGY
288
Fig. 7.1 Mounted specimens of (a) Vigna unguicalata,
(b) Musa Sp. (c) Zea mays (maize) and (d) Bixa sp.
4. Check the specimens and if they are properly dried, place them in
your herbarium.
5. Place the plant on herbarium sheet (a fairly large piece of special
paper or on any fairly thick paper), fix the dried plants in their
natural position with some cellotape.
6. If the plant is too big, break the stem cleanly or arrange fragments
of the leafy stem, the floral stem and the fruits.
7. Rewrite the label which will be placed in the bottom right hand
corner of the page. Copy out the notes you have already made on
it. (It is not necessary that you should identify the family and
name of a plant). The name and family of the plant can be
identified with the help of the course tutor at your study centre.
(i) Heading: Country, state or provide name , name of the institution.
BIO 191 MODULE 5
289
(ii) Scientific name of the specimen followed by the author's name
and the name of the family.
(iii) Locality: Specific locality should be mentioned, so that if another
person wants to collect the same specimen, he should be able to
reach the exact site without much difficulty.
(iv) Habitat: Vegetation type, moisture content of soil and
atmosphere, soil type, elevation, direction of slope, etc. should
also be mentioned.
(v) Date of collection should include the exact month and year to
indicate when the specimen was collected.
(vi) Name of collector.
(vii) Collection number: The literature on plant systematic identifies
and refers to the specimen by the collector's name and collection
number. Hence, the collection number is a must for any collector.
8. You can arrange the herbarium according to their surroundings
(aquatic, from dunes, from mountain rocks) or according to their
uses (edible, medicinal, ornamental, fodder plants ................;
harmful plants, poisonous plants etc.).
3.7 Hints on Procuring Plant Material
Watch the video clips demonstrating "Plant Material Collection". `Take
not of any similarities or differences in materials displayed in
comparison with your own collections.
SELF-ASSESSMENT EXERCISE
i. How will you procure growing roots for squash preparation?
ii. From which places can you collect specimens of Algae?
iii. What precautions will take when drying plants?
4.0 CONCLUSION
In this unit, you have learnt how to collect plants from algae to the
flowering plants. You have learnt that you go to the natural habitat of
these plants to find them. Most lower plants have to be fixed before
storing away in labeled sterilized bottles. For most higher plants, their
preservation process is drying and their storage place is the herbarium.
BIO 191 GENERAL PRACTICAL BIOLOGY
290
5.0 SUMMARY
Now we can assume that you have brought in all sorts of plant material
to the laboratory. The purpose of doing so is to have them for studies.
The next thing is to really start studying them. We will begin by
studying their external features are trying to find the similarities and
differences among them. This will be our focus in unit 9.
6.0 TUTOR MARKED ASSIGNMENT
Describe how to collect an alga plant from three (3) different habitats.
7.0 REFERENCES/FURTHER READINGS
Beril, N. J (1979): Biology in Action London, Heinemann Edicational
Books Ltd
Soper, R. (Ed) Biological Sciences Cambridge U.K., Cambridge Press
Stone, R. N. Cozens, A. B. Emia, F. I. (1972), New Biology for Tropical
Schools, Longman Group Ltd)
BIO 191 MODULE 5
291
UNIT 3 KILLING PRESERVING AND MOUNTING
ANIMAL MATERIALS
CONTENTS
1.0 Introduction
2.0 Objective
3.0 Main Content
3.1 Killing, Mounting and Display of Insect Specimen
3.2 General Information about mounting
3.3 Relaxing animals in relaxing box before mounting
3.4 Mounting
3.4.1 Direct mounting
3.4.2 Point mounting
3.4.3 Spreading
3.5 Displaying
3.6 Preservation of Animal Material
3.6.1 Preservation of Animal Specimen
3.6.2 Preservation of Live Animals
3.6.3 Preservation Method for one live and one dead
animal
3.7 Identification of male and female animals
4.0 Conclusion
5.0 Summary
6.0 Tutor Marked Assignment
7.0 References/Further Readings
1.0 INTRODUCTION
In unit1 of this module, you learnt how procure by buying or going to
collect animal material from their habitat (unit 2). When you have
brought them into the laboratory you will need to preserve all others you
are not using immediately. Sometimes you even want to make a
collection for display for the same purpose of studying and probably
classifying. Sometimes you even want to distinguish male and female
specimens. In this unit we learn how to kill, and preserve and display
invertebrate specimens.
2.0 OBJECTIVES
To guide our study in this unit, you may like to set some targets. So we
will say that by the end of this unit, you should be able to:
kill insect specimens
mount insect specimens
display insect specimen
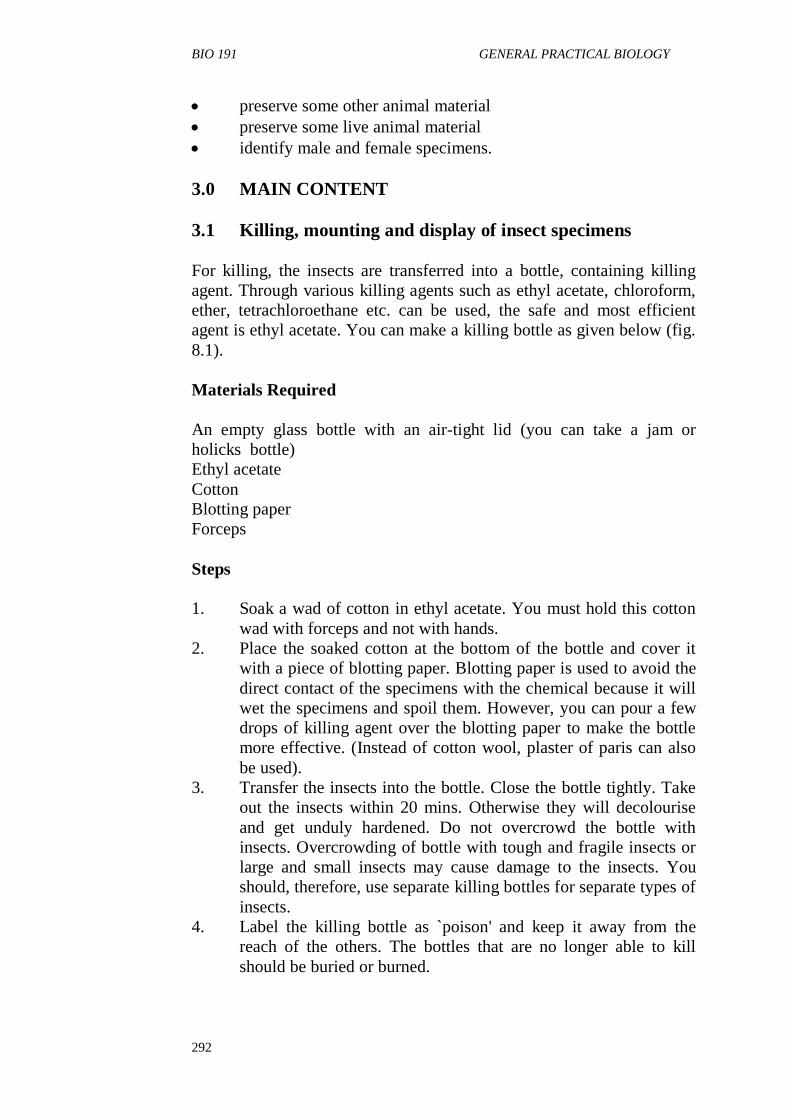
BIO 191 GENERAL PRACTICAL BIOLOGY
292
preserve some other animal material
preserve some live animal material
identify male and female specimens.
3.0 MAIN CONTENT
3.1 Killing, mounting and display of insect specimens
For killing, the insects are transferred into a bottle, containing killing
agent. Through various killing agents such as ethyl acetate, chloroform,
ether, tetrachloroethane etc. can be used, the safe and most efficient
agent is ethyl acetate. You can make a killing bottle as given below (fig.
8.1).
Materials Required
An empty glass bottle with an air-tight lid (you can take a jam or
holicks bottle)
Ethyl acetate
Cotton
Blotting paper
Forceps
Steps
1. Soak a wad of cotton in ethyl acetate. You must hold this cotton
wad with forceps and not with hands.
2. Place the soaked cotton at the bottom of the bottle and cover it
with a piece of blotting paper. Blotting paper is used to avoid the
direct contact of the specimens with the chemical because it will
wet the specimens and spoil them. However, you can pour a few
drops of killing agent over the blotting paper to make the bottle
more effective. (Instead of cotton wool, plaster of paris can also
be used).
3. Transfer the insects into the bottle. Close the bottle tightly. Take
out the insects within 20 mins. Otherwise they will decolourise
and get unduly hardened. Do not overcrowd the bottle with
insects. Overcrowding of bottle with tough and fragile insects or
large and small insects may cause damage to the insects. You
should, therefore, use separate killing bottles for separate types of
insects.
4. Label the killing bottle as `poison' and keep it away from the
reach of the others. The bottles that are no longer able to kill
should be buried or burned.
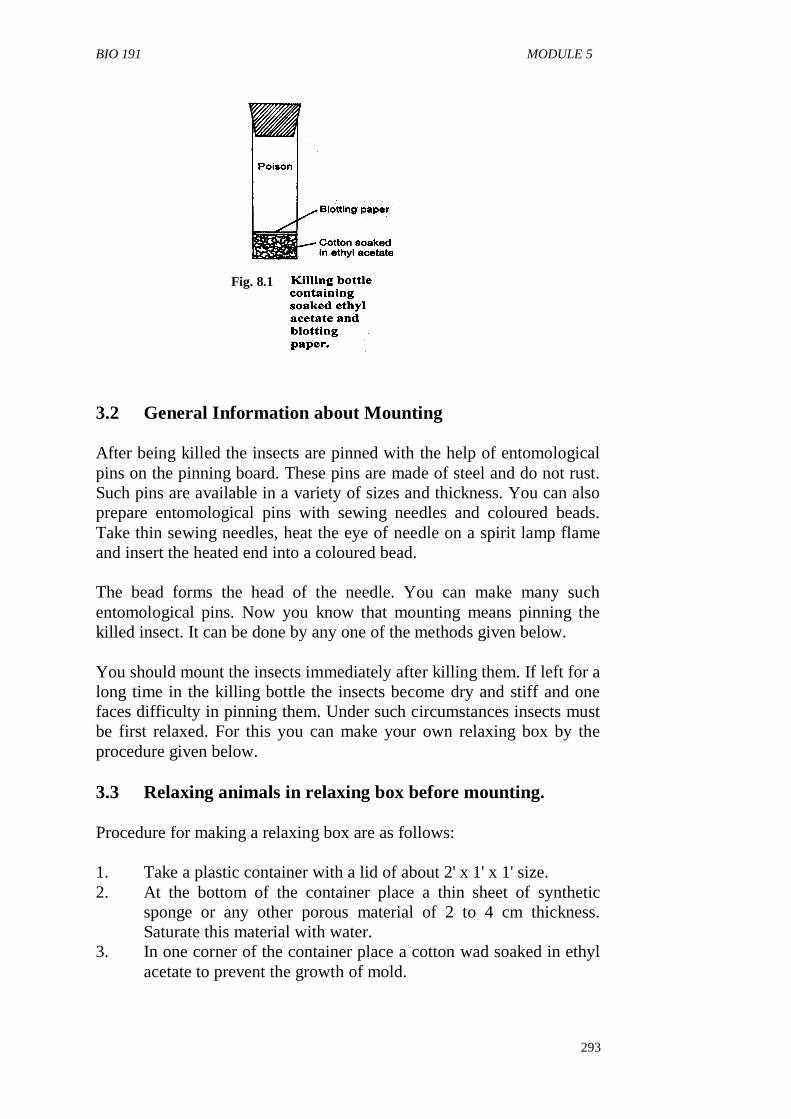
BIO 191 MODULE 5
293
3.2 General Information about Mounting
After being killed the insects are pinned with the help of entomological
pins on the pinning board. These pins are made of steel and do not rust.
Such pins are available in a variety of sizes and thickness. You can also
prepare entomological pins with sewing needles and coloured beads.
Take thin sewing needles, heat the eye of needle on a spirit lamp flame
and insert the heated end into a coloured bead.
The bead forms the head of the needle. You can make many such
entomological pins. Now you know that mounting means pinning the
killed insect. It can be done by any one of the methods given below.
You should mount the insects immediately after killing them. If left for a
long time in the killing bottle the insects become dry and stiff and one
faces difficulty in pinning them. Under such circumstances insects must
be first relaxed. For this you can make your own relaxing box by the
procedure given below.
3.3 Relaxing animals in relaxing box before mounting.
Procedure for making a relaxing box are as follows:
1. Take a plastic container with a lid of about 2' x 1' x 1' size.
2. At the bottom of the container place a thin sheet of synthetic
sponge or any other porous material of 2 to 4 cm thickness.
Saturate this material with water.
3. In one corner of the container place a cotton wad soaked in ethyl
acetate to prevent the growth of mold.
Fig. 8.1
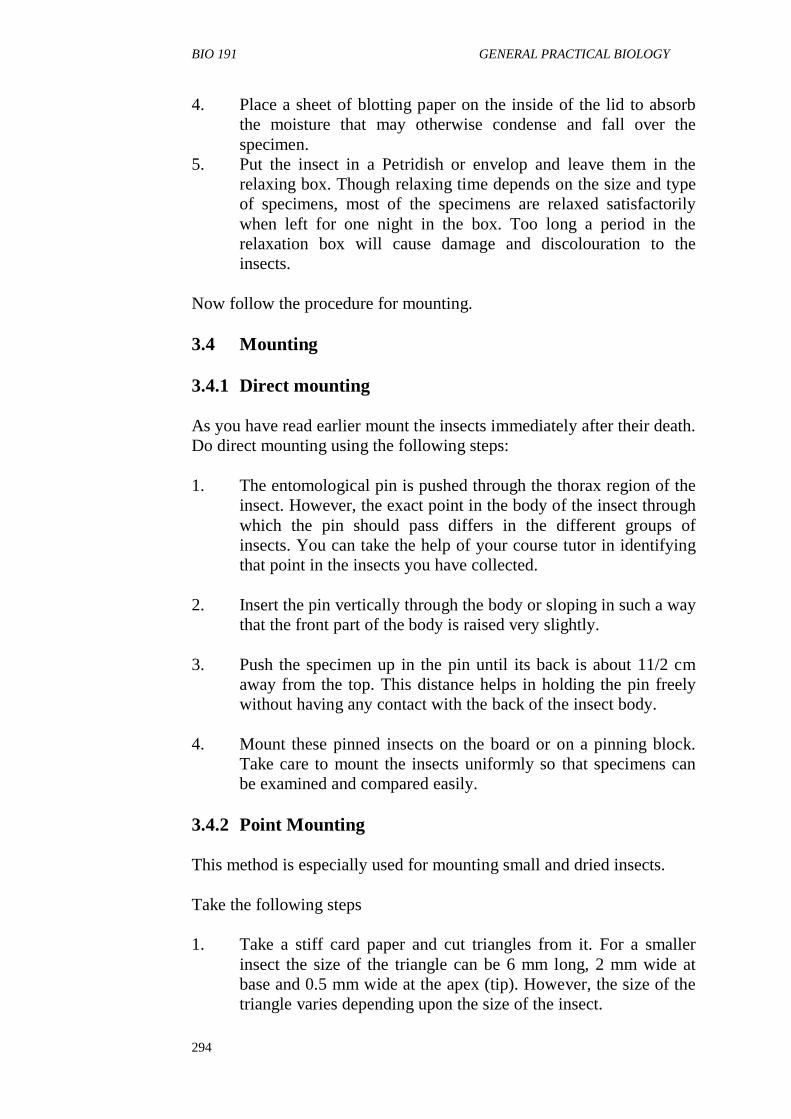
BIO 191 GENERAL PRACTICAL BIOLOGY
294
4. Place a sheet of blotting paper on the inside of the lid to absorb
the moisture that may otherwise condense and fall over the
specimen.
5. Put the insect in a Petridish or envelop and leave them in the
relaxing box. Though relaxing time depends on the size and type
of specimens, most of the specimens are relaxed satisfactorily
when left for one night in the box. Too long a period in the
relaxation box will cause damage and discolouration to the
insects.
Now follow the procedure for mounting.
3.4 Mounting
3.4.1 Direct mounting
As you have read earlier mount the insects immediately after their death.
Do direct mounting using the following steps:
1. The entomological pin is pushed through the thorax region of the
insect. However, the exact point in the body of the insect through
which the pin should pass differs in the different groups of
insects. You can take the help of your course tutor in identifying
that point in the insects you have collected.
2. Insert the pin vertically through the body or sloping in such a way
that the front part of the body is raised very slightly.
3. Push the specimen up in the pin until its back is about 11/2 cm
away from the top. This distance helps in holding the pin freely
without having any contact with the back of the insect body.
4. Mount these pinned insects on the board or on a pinning block.
Take care to mount the insects uniformly so that specimens can
be examined and compared easily.
3.4.2 Point Mounting
This method is especially used for mounting small and dried insects.
Take the following steps
1. Take a stiff card paper and cut triangles from it. For a smaller
insect the size of the triangle can be 6 mm long, 2 mm wide at
base and 0.5 mm wide at the apex (tip). However, the size of the
triangle varies depending upon the size of the insect.
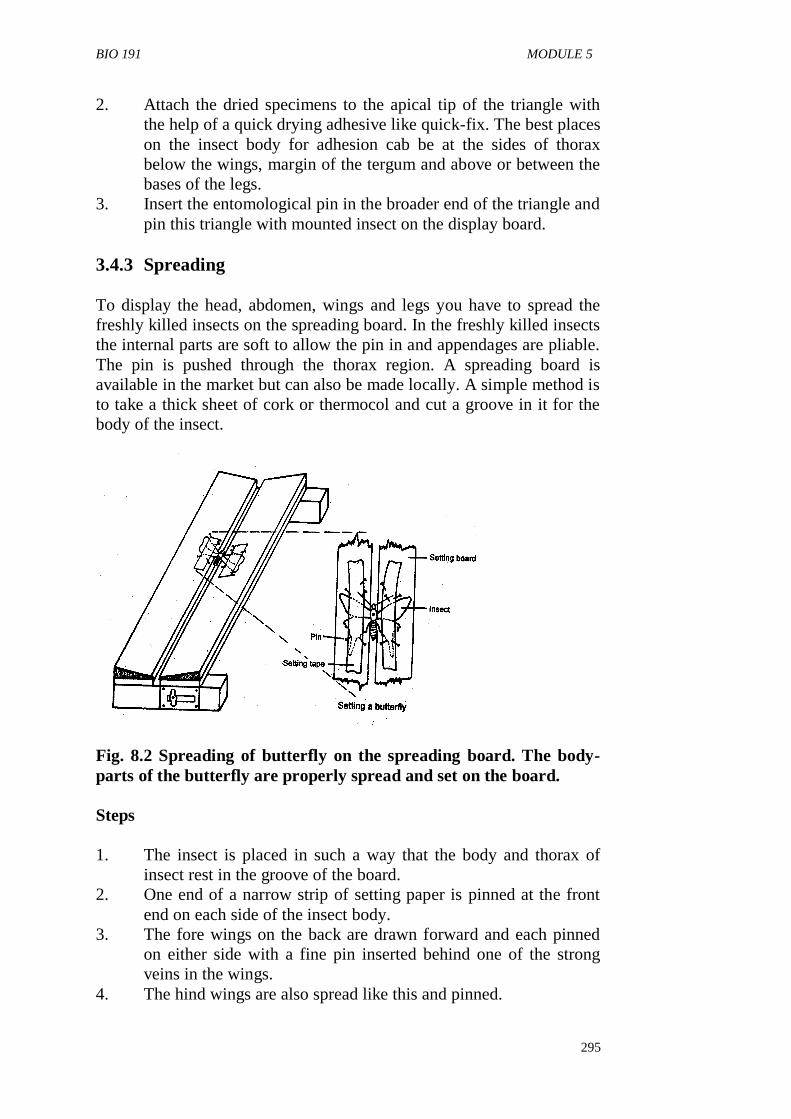
BIO 191 MODULE 5
295
2. Attach the dried specimens to the apical tip of the triangle with
the help of a quick drying adhesive like quick-fix. The best places
on the insect body for adhesion cab be at the sides of thorax
below the wings, margin of the tergum and above or between the
bases of the legs.
3. Insert the entomological pin in the broader end of the triangle and
pin this triangle with mounted insect on the display board.
3.4.3 Spreading
To display the head, abdomen, wings and legs you have to spread the
freshly killed insects on the spreading board. In the freshly killed insects
the internal parts are soft to allow the pin in and appendages are pliable.
The pin is pushed through the thorax region. A spreading board is
available in the market but can also be made locally. A simple method is
to take a thick sheet of cork or thermocol and cut a groove in it for the
body of the insect.
Fig. 8.2 Spreading of butterfly on the spreading board. The body-
parts of the butterfly are properly spread and set on the board.
Steps
1. The insect is placed in such a way that the body and thorax of
insect rest in the groove of the board.
2. One end of a narrow strip of setting paper is pinned at the front
end on each side of the insect body.
3. The fore wings on the back are drawn forward and each pinned
on either side with a fine pin inserted behind one of the strong
veins in the wings.
4. The hind wings are also spread like this and pinned.
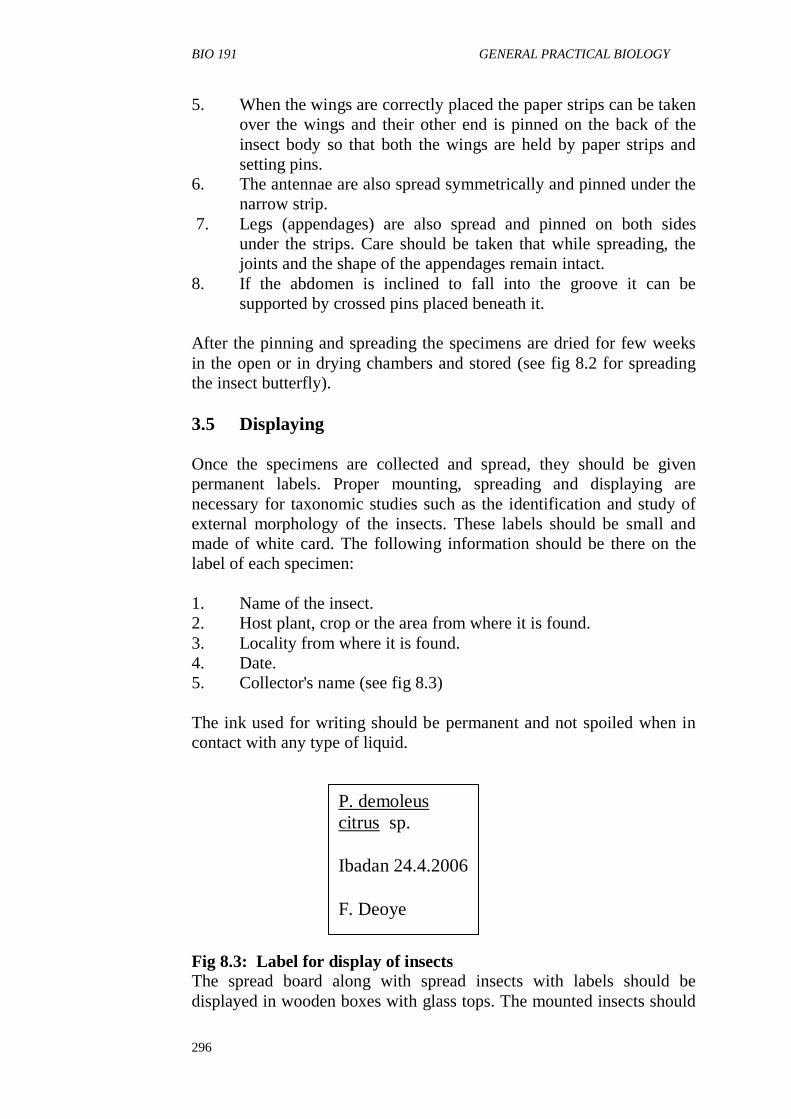
BIO 191 GENERAL PRACTICAL BIOLOGY
296
5. When the wings are correctly placed the paper strips can be taken
over the wings and their other end is pinned on the back of the
insect body so that both the wings are held by paper strips and
setting pins.
6. The antennae are also spread symmetrically and pinned under the
narrow strip.
7. Legs (appendages) are also spread and pinned on both sides
under the strips. Care should be taken that while spreading, the
joints and the shape of the appendages remain intact.
8. If the abdomen is inclined to fall into the groove it can be
supported by crossed pins placed beneath it.
After the pinning and spreading the specimens are dried for few weeks
in the open or in drying chambers and stored (see fig 8.2 for spreading
the insect butterfly).
3.5 Displaying
Once the specimens are collected and spread, they should be given
permanent labels. Proper mounting, spreading and displaying are
necessary for taxonomic studies such as the identification and study of
external morphology of the insects. These labels should be small and
made of white card. The following information should be there on the
label of each specimen:
1. Name of the insect.
2. Host plant, crop or the area from where it is found.
3. Locality from where it is found.
4. Date.
5. Collector's name (see fig 8.3)
The ink used for writing should be permanent and not spoiled when in
contact with any type of liquid.
Fig 8.3: Label for display of insects
The spread board along with spread insects with labels should be
displayed in wooden boxes with glass tops. The mounted insects should
P. demoleus
citrus sp.
Ibadan 24.4.2006
F. Deoye
BIO 191 MODULE 5
297
also be stored in closed boxes. You must keep naphthalene balls in the
storing or displaying boxes used for insect specimens. In case these
precautions are not taken the specimen insects can get spoiled or eaten
by other insects/small animals.
3.6 Preservation of animal material
Once you have purchased the animals from the dealers or collected them
yourselves, you might end up having material in surplus. In such a
situation you will need to preserve these animals for further use at a later
time. In this section you will study the way to preserve certain animals
that are normally used in the school or college lab.
3.6.1 Preservation of Specimen Animals
Material Required
Animal specimens
40% formalin
Glass jars with lids
Big containers with lids
Steps
l. All the museum specimens are stored in 40% formalin in glass
jars or containers with lids.
2. Earthworms, scolidon, rat and pigeon head, Mystus, prawns,
Sepia, Pila Crab etc are also stored in 40% formalin in the
containers.
3. For Pila Crab you need to make a hole in the shell before keeping
it in the formalin so that formalin enters the mantle cavity and
internal tissues are preserved.
4. Use different containers for different types of animals e.g, all
earthworms in one container, scolidons in another container and
so on.
All these preserved animals can stay fresh for 3-4 years.
3.6.2 Preservation of Live Animals
The live animals cannot be preserved for long. The methods for keeping
animals alive differ for different animals and are as follows.
The material requirements for specific animals are written beside them.
BIO 191 GENERAL PRACTICAL BIOLOGY
298
Leeches are kept in glass containers filled with fresh water. Water
should be changed everyday or on alternate days. The water used
should be clean and free of dirt.
Cockroaches are kept in a plastic or metal jar. The must have
many small holes so that air is available for their respiration. For
feeding the insects small pieces of paper are put in the jar. It is
advisable that fresh paper pieces are put in everyday.
Rats are kept in rat cages. For feeding they need to be given
bread pieces. If the rats are to be kept for a longer period i.e few
days, they should be kept in separate cages, otherwise they will
hurt each other and die. Prior to dissection the rats are killed with
chloroform and treated with disinfectants like phenyl, dettol
solution etc.
Frogs are kept in a sink that is covered with a wooden or plastic
plank having a few holes. The water tap should be adjusted to
allow the water to fall into the sink drop by drop only. This keeps
the skin of the frogs moist for respiration. (In some institutions a
cemented tank that has water and certain aquatic plants is built.
The cover of the tank has big holes for air circulation. The frogs
are kept in this tank. Here they live and breed. Within the tank
area a few cemented elevations of different heights and flat top
surfaces are also made. So when the frogs need to be out of the
water they can jump and sit on these elevations).
3.6.3 Preservation method for one live and one dead animal
l. Live leech can be preserved in clear clean fresh water. Fill the
container with clear clean water and place the leech. Water
should be changed at least every other day.
2. After killing a cockroach it could be preserved by mounting on a
pinning board using entomological pins directly especially if is
not dry. It is pinned by passed the needle through thorax and
pushing up the cockroach up the needle thorax and pushing up
the cockroach up the needle to about 2 cm away from the top of
the needle. In this way the insect can be carried in the needle
without being touched.
3.7 Identification of male and female animals
In the theory part of this course you have already read about the general
characters of the animal phyla one generally handles in the lab. In this
section you are going to identify and make a distinction between males
and females of certain types of animals. You must be aware that lower
invertebrates generally do not exhibit external variations in males and
females. Also a few of them have both male and female sex organs. Let
us now study some of the examples.
BIO 191 MODULE 5
299
Earthworm and Leech: Both are hermaphrodite i.e, the animal
has both male and female sex organs.
Cockroach: The female cockroach has two processes i.e, anal
cerci at the abdominal end. The male has four processes at the
abdominal end: two anal cerci and two anal styles.
Pila, Sepia and Prawn: Males and females of Pila and Sepia
cannot be distinguished externally. However, male prawns show
appendix masculine in the pleopods (swimmerets i.e abdominal
appendages).
Scolidon: In males pelvic claspers are present. However, it is not
easy to distinguish between male and female fish.
Rats: The male rat has one external opening and possesses
scrotal sacs. The female rat has two openings - vaginal and anal
opening and no scrotal sacs.
Frogs: Male and female frogs cannot be distinguished externally.
SELF-ASSESSMENT EXERCISE
Now that you have performed various activities of this section, you will
be confident in doing these activities as and when they are part of your
assignment. Attempt the following SAQs to recapitulate your
knowledge.
1. Differentiate between direct and point mounting procedure used
for insect specimens.
.........................................................................................................
.........................................................................................................
.........................................................................................................
.........................................................................................................
.........................................................................................................
BIO 191 GENERAL PRACTICAL BIOLOGY
300
2. Take any two animals and write the distinguishing characteristic
of the male and females of these animals.
.........................................................................................................
.........................................................................................................
.........................................................................................................
.........................................................................................................
........................................................................................................
3. Write the preservation method used for one live and one dead
animal.
.........................................................................................................
.........................................................................................................
.........................................................................................................
.........................................................................................................
.........................................................................................................
4.0 CONCLUSION
In this unit you have not only learnt how to kill animal material for
laboratory use, you have also learnt how to preserve them. You have
also learnt how to display and label, as well as to store them. You have
learnt of the right containers to place each type and for how long they
could be so usefully kept. You have further learnt of what precautions to
take to ensure that they will continue to be useful for laboratory studies.
5.0 SUMMARY
Animal material surely will need a different treatment from plant
material which you will also have to study in the biology laboratory. In
the next unit, we will learn how to procure plant materials.
6.0 TUTOR-MARKED ASSIGNMENT
1. What is Point Mounting?
2. Describe the steps involved in the process of Point Mounting.

BIO 191 MODULE 5
301
7.0 REFERENCES/FURTHER READINGS
Berril, N.J. (1979) Biology in action London, Heinemann Eductional
Books Ltd.
Soper, R. (Ed.) (1998) Biological Sciences Cambridge U.K Cambridge
University Press
Stone, R.N. Cozens, A.B., Emia, F.I. (1972) New Biology for Tropical
Schools London, Longman Group Ltd.
BIO 191 GENERAL PRACTICAL BIOLOGY
302
UNIT 4 EXTERNAL FEATURES OF PLANTS
OBSERVING SIMILARITIES AND
DIFFERENCES
CONTENTS
1.0 Introduction
2.0 Objectives
3.0 Main Contents
3.1 Spirogyra and Mucor
3.1.1 Spirogyra
3.1.2 Mucor
3.2 The Fern
3.3 The Seed Plants
3.3.1 Gymnosperms
3.3.2 Angiosperms
3.3.3 The Water-leaf Plant
4.0 Conclusion
5.0 Summary
6.0 Tutor-Marked Assignment.
7.0 References/Further Readings
1.0 INTRODUCTION
You have learnt that plants are those organisms that have chlorophyll
and a capacity to photosynthesize. The basic need of plant are water,
mineral salts and light irrespective of their habitat. In this unit we will
study the external features of a variety of plants. The features of
organisms form part of the means of classification. They also are related
to where they occupy, whether water, land or in-between. Let us study
the external features of some plants across the various possible habitat.
We shall study the spirogyra, a fresh water filamentous alga, mucor
(fungus) fern (pteridophyte), a pine (gymnosperm) and an angiosperm (a
flowering plant). To achieve this goals, the following objectives are set
for you.
2.0 OBJECTIVES
By the end of this unit you will be able to:
draw and label the following plants fully:- the external features
of:- spirogyra, mucor, fern, a pine, a maize and the water leaf
plant.
tabulate the differences and similarities between the following
pairs
BIO 191 MODULE 5
303
(a) the spirogyra and the mucor.
(b) The fern and the pine
(c) The maize and the water-leaf plant.
3.0 MAIN CONTENT
3.1 Spirogyra and Mucor
3.1.1 Spirogyra
Visit a pond or a slow moving stream near your home. You are likely to
see a netlike growth of green threads. You may also see air bubbles
within this bright-green network. These are spirogyra threads kept afloat
by the air bubbles.
Practical Activities
a. Collect some of these green threads with a cup or bowl, taking
along some of the water.
b.. When you come back to the laboratory use your bare fingers to
pick some of the green strands. Rub them gently with two fingers.
Describe how it feels to this touch!
c. Put a drop of this water with the strand on a microscope slide and
cover it with a cover slip.
Examine under the microscope
i Write down the magnification with which you are working.
ii Count the number of cells you can see in a thread of spirogyra.
iii Draw what you can see.
iv Using higher magnifications, make the drawing of one of the
cells. Your course tutor will help you identify some of the
structures.
v. Lift up the cover slip and put in a drop on iodine. The iodine will
mix with the water on the slide.
vi. Examine the spirogyra after 5 minutes under high power
magnifications.
Write down what you notice now to help you know how successful you
are in your practical exercise, look at the following records of the same
practical exercises as you did. Here are the answers that are correct for I
to vi above.
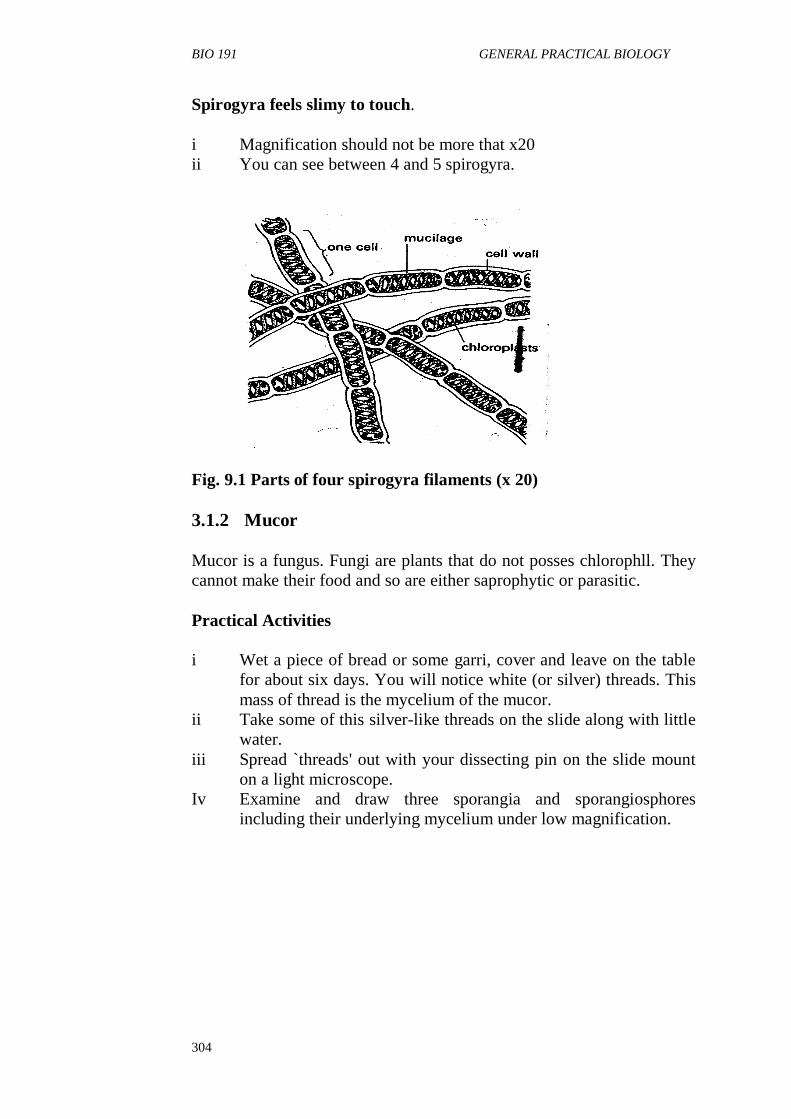
BIO 191 GENERAL PRACTICAL BIOLOGY
304
Spirogyra feels slimy to touch.
i Magnification should not be more that x20
ii You can see between 4 and 5 spirogyra.
Fig. 9.1 Parts of four spirogyra filaments (x 20)
3.1.2 Mucor
Mucor is a fungus. Fungi are plants that do not posses chlorophll. They
cannot make their food and so are either saprophytic or parasitic.
Practical Activities
i Wet a piece of bread or some garri, cover and leave on the table
for about six days. You will notice white (or silver) threads. This
mass of thread is the mycelium of the mucor.
ii Take some of this silver-like threads on the slide along with little
water.
iii Spread `threads' out with your dissecting pin on the slide mount
on a light microscope.
Iv Examine and draw three sporangia and sporangiosphores
including their underlying mycelium under low magnification.
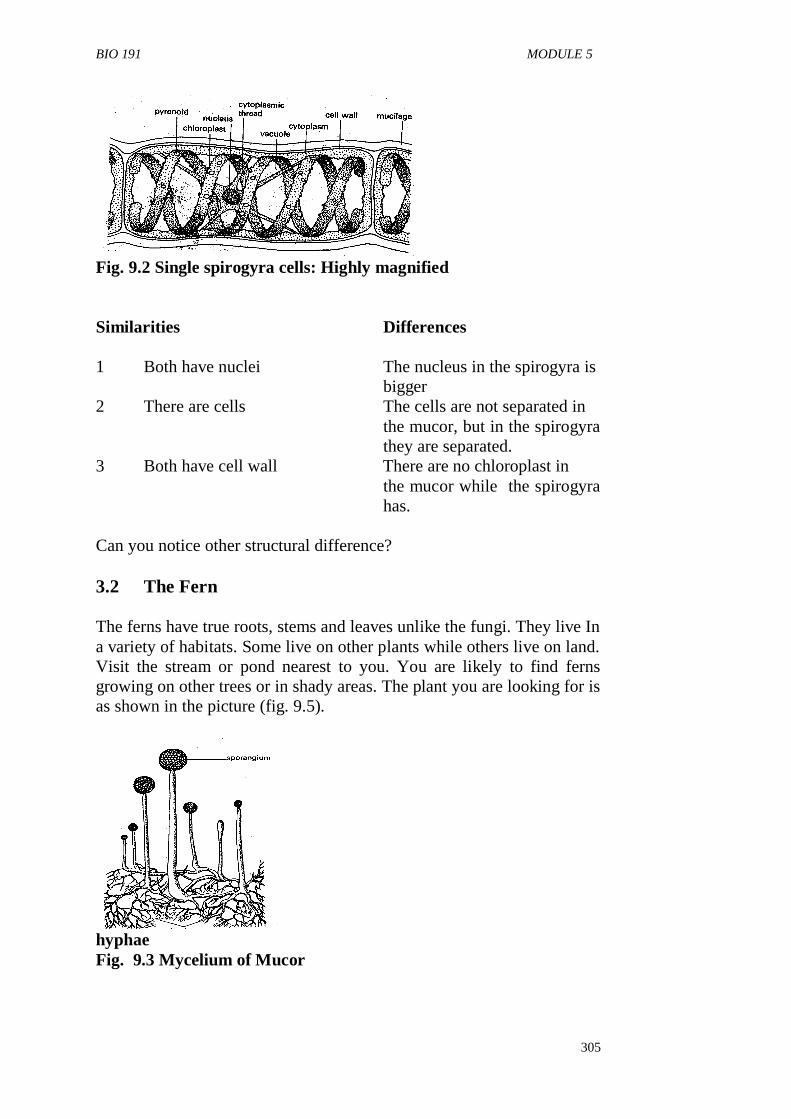
BIO 191 MODULE 5
305
Fig. 9.2 Single spirogyra cells: Highly magnified
Similarities Differences
1 Both have nuclei The nucleus in the spirogyra is
bigger
2 There are cells The cells are not separated in
the mucor, but in the spirogyra
they are separated.
3 Both have cell wall There are no chloroplast in
the mucor while the spirogyra
has.
Can you notice other structural difference?
3.2 The Fern
The ferns have true roots, stems and leaves unlike the fungi. They live In
a variety of habitats. Some live on other plants while others live on land.
Visit the stream or pond nearest to you. You are likely to find ferns
growing on other trees or in shady areas. The plant you are looking for is
as shown in the picture (fig. 9.5).
hyphae
Fig. 9.3 Mycelium of Mucor
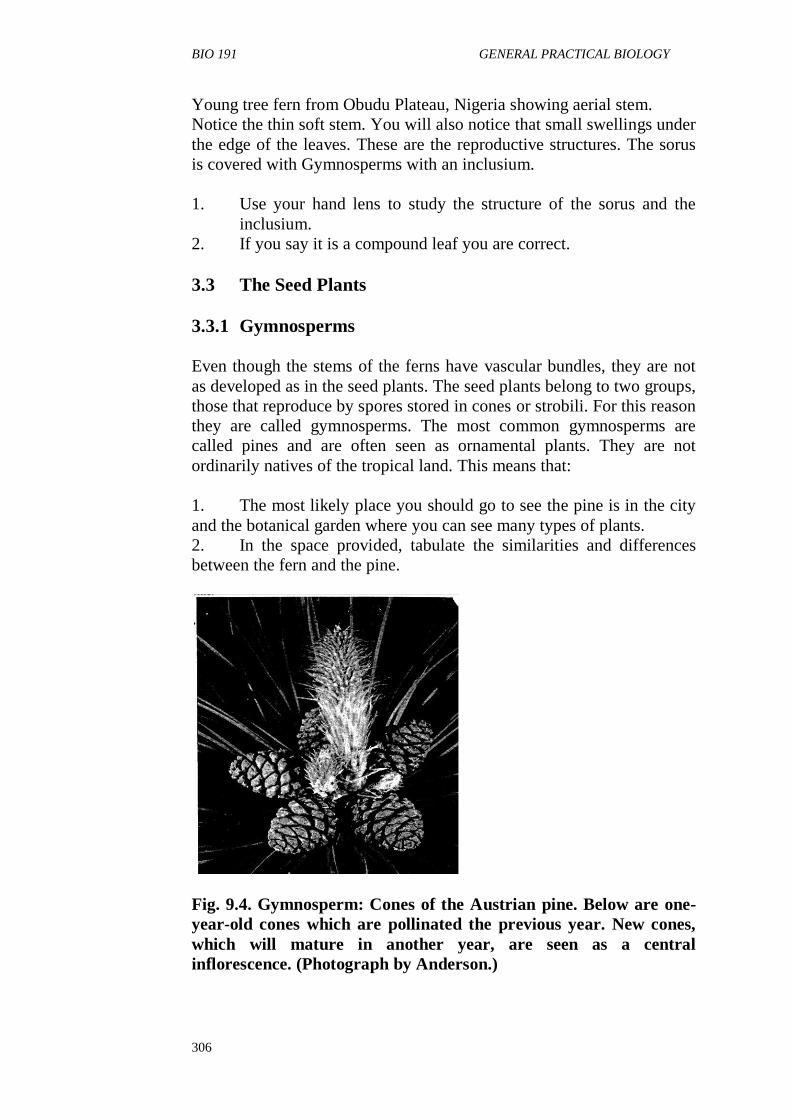
BIO 191 GENERAL PRACTICAL BIOLOGY
306
Young tree fern from Obudu Plateau, Nigeria showing aerial stem.
Notice the thin soft stem. You will also notice that small swellings under
the edge of the leaves. These are the reproductive structures. The sorus
is covered with Gymnosperms with an inclusium.
1. Use your hand lens to study the structure of the sorus and the
inclusium.
2. If you say it is a compound leaf you are correct.
3.3 The Seed Plants
3.3.1 Gymnosperms
Even though the stems of the ferns have vascular bundles, they are not
as developed as in the seed plants. The seed plants belong to two groups,
those that reproduce by spores stored in cones or strobili. For this reason
they are called gymnosperms. The most common gymnosperms are
called pines and are often seen as ornamental plants. They are not
ordinarily natives of the tropical land. This means that:
1. The most likely place you should go to see the pine is in the city
and the botanical garden where you can see many types of plants.
2. In the space provided, tabulate the similarities and differences
between the fern and the pine.
Fig. 9.4. Gymnosperm: Cones of the Austrian pine. Below are one-
year-old cones which are pollinated the previous year. New cones,
which will mature in another year, are seen as a central
inflorescence. (Photograph by Anderson.)
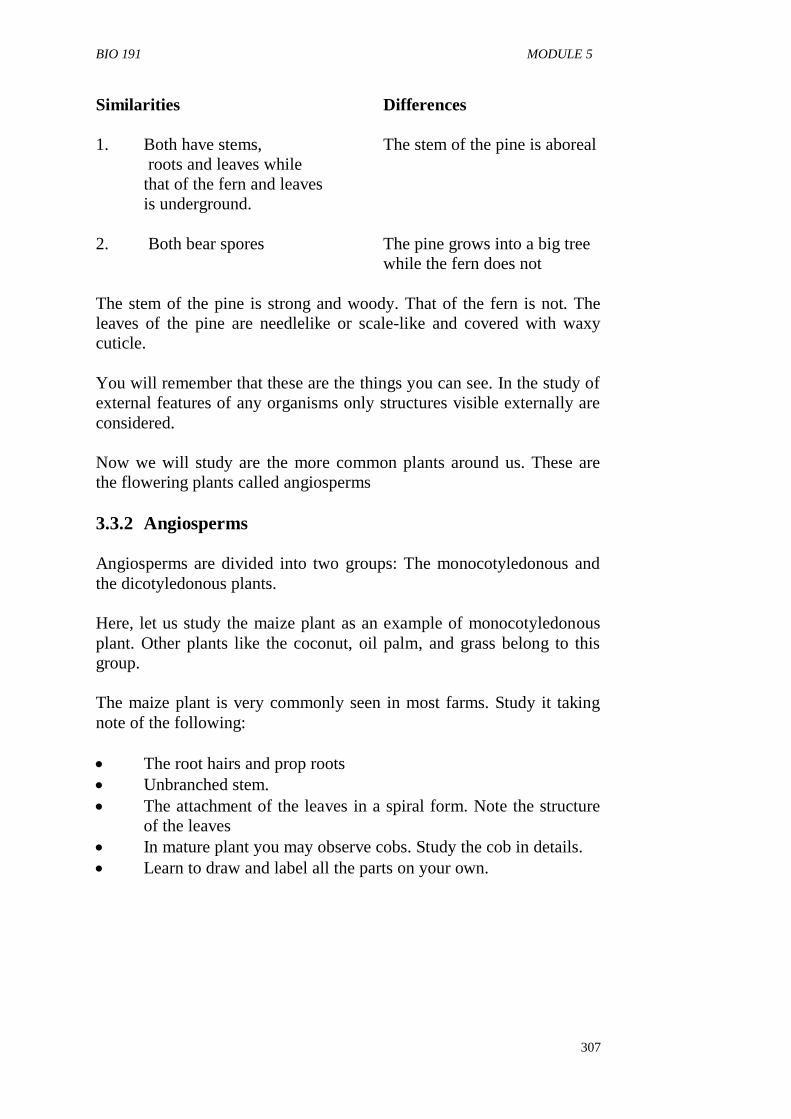
BIO 191 MODULE 5
307
Similarities Differences
1. Both have stems, The stem of the pine is aboreal
roots and leaves while
that of the fern and leaves
is underground.
2. Both bear spores The pine grows into a big tree
while the fern does not
The stem of the pine is strong and woody. That of the fern is not. The
leaves of the pine are needlelike or scale-like and covered with waxy
cuticle.
You will remember that these are the things you can see. In the study of
external features of any organisms only structures visible externally are
considered.
Now we will study are the more common plants around us. These are
the flowering plants called angiosperms
3.3.2 Angiosperms
Angiosperms are divided into two groups: The monocotyledonous and
the dicotyledonous plants.
Here, let us study the maize plant as an example of monocotyledonous
plant. Other plants like the coconut, oil palm, and grass belong to this
group.
The maize plant is very commonly seen in most farms. Study it taking
note of the following:
The root hairs and prop roots
Unbranched stem.
The attachment of the leaves in a spiral form. Note the structure
of the leaves
In mature plant you may observe cobs. Study the cob in details.
Learn to draw and label all the parts on your own.
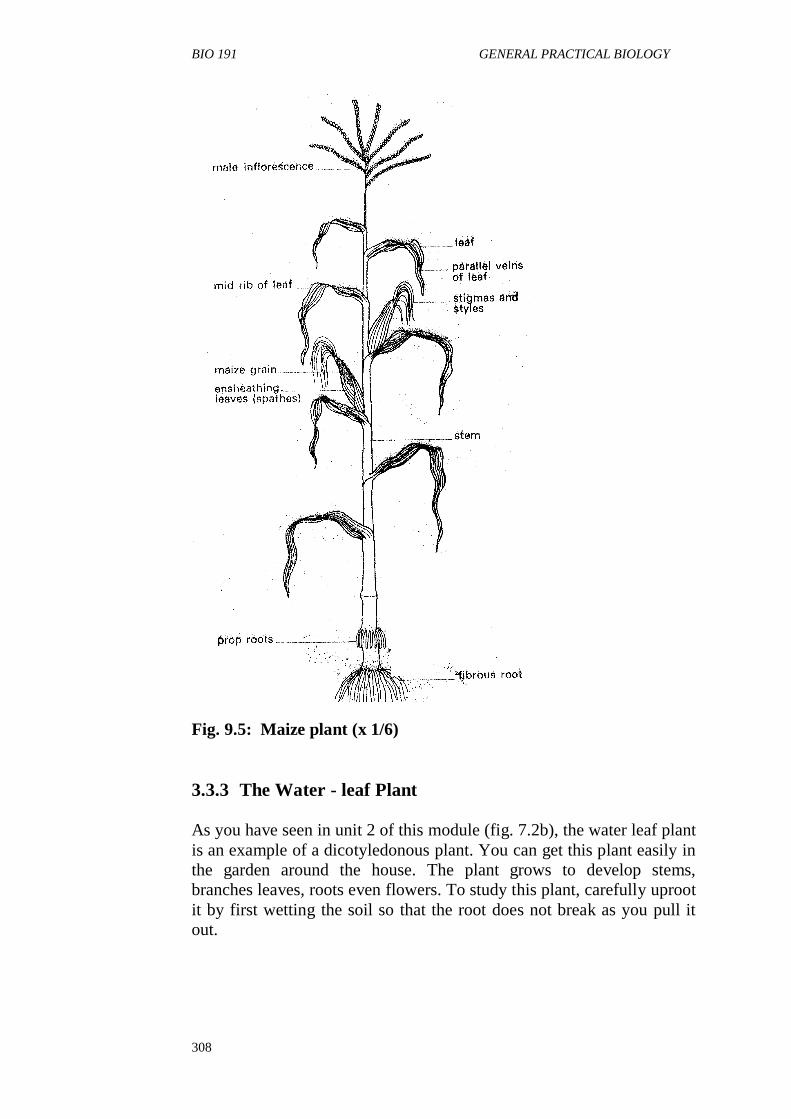
BIO 191 GENERAL PRACTICAL BIOLOGY
308
Fig. 9.5: Maize plant (x 1/6)
3.3.3 The Water - leaf Plant
As you have seen in unit 2 of this module (fig. 7.2b), the water leaf plant
is an example of a dicotyledonous plant. You can get this plant easily in
the garden around the house. The plant grows to develop stems,
branches leaves, roots even flowers. To study this plant, carefully uproot
it by first wetting the soil so that the root does not break as you pull it
out.
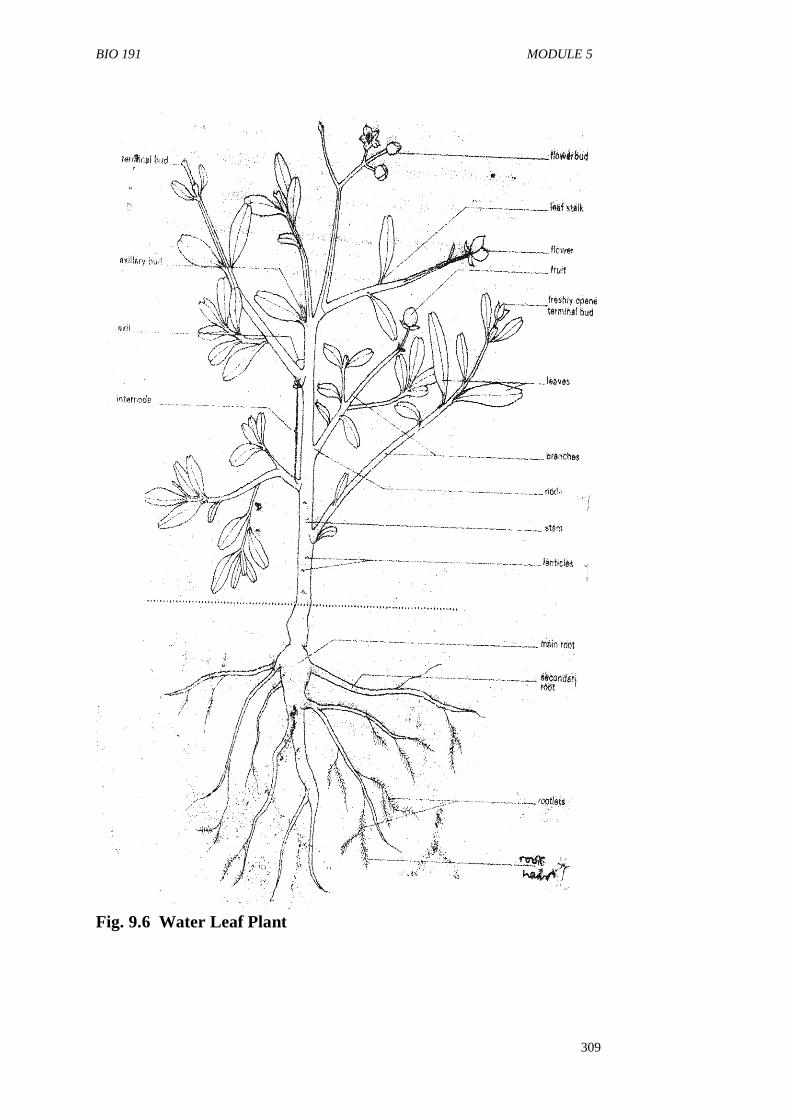
BIO 191 MODULE 5
309
Fig. 9.6 Water Leaf Plant
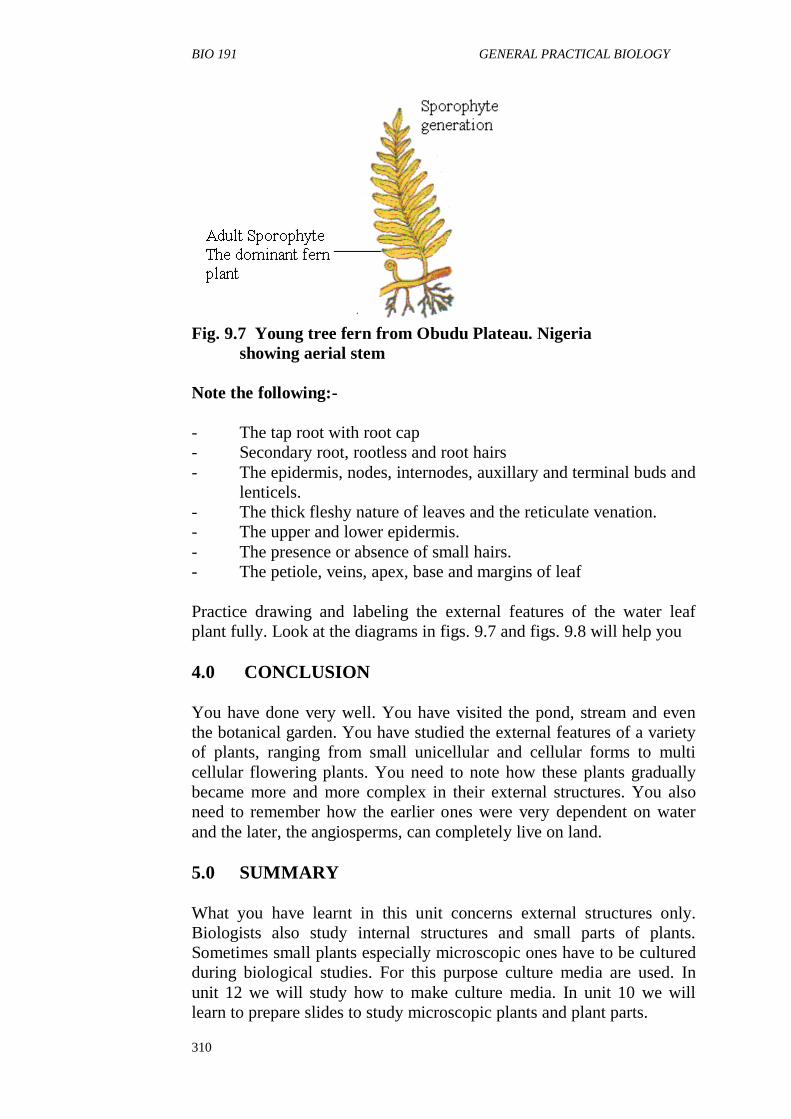
BIO 191 GENERAL PRACTICAL BIOLOGY
310
Fig. 9.7 Young tree fern from Obudu Plateau. Nigeria
showing aerial stem
Note the following:-
- The tap root with root cap
- Secondary root, rootless and root hairs
- The epidermis, nodes, internodes, auxillary and terminal buds and
lenticels.
- The thick fleshy nature of leaves and the reticulate venation.
- The upper and lower epidermis.
- The presence or absence of small hairs.
- The petiole, veins, apex, base and margins of leaf
Practice drawing and labeling the external features of the water leaf
plant fully. Look at the diagrams in figs. 9.7 and figs. 9.8 will help you
4.0 CONCLUSION
You have done very well. You have visited the pond, stream and even
the botanical garden. You have studied the external features of a variety
of plants, ranging from small unicellular and cellular forms to multi
cellular flowering plants. You need to note how these plants gradually
became more and more complex in their external structures. You also
need to remember how the earlier ones were very dependent on water
and the later, the angiosperms, can completely live on land.
5.0 SUMMARY
What you have learnt in this unit concerns external structures only.
Biologists also study internal structures and small parts of plants.
Sometimes small plants especially microscopic ones have to be cultured
during biological studies. For this purpose culture media are used. In
unit 12 we will study how to make culture media. In unit 10 we will
learn to prepare slides to study microscopic plants and plant parts.
BIO 191 MODULE 5
311
6.0 TUTOR-MARKED ASSIGNMENT
1. Draw and label fully the external features of the maize and the
water-leaf plants.
2. In tabular form state the similarities and differences between the
maize and the water-leaf plant.
Remember to submit your assignment before or on the due date.
7.0 REFERENCES/FURTHER READINGS
Berrill, NJ (1979) Biology in action London, Heinemann Educational
Books
Soper, R. (Ed) (1998) Biological Sciences Cambridge U.K Cambridge
University Press.
Stone, R.H Cozens, A.B, Emia, F.1 (1972) New Biology for London
Schools.
BIO 191 GENERAL PRACTICAL BIOLOGY
312
UNIT 5 PREPARATION OF TEMPORARY SLIDES
CONTENTS
1.0 Introduction
2.0 Objectives
3.0 Main Content
3.1 Preparation of Temporary Slides
3.2 General Method of Making Temporary Slides
3.1.1 Smear Technique for Check Scraping
3.1.2 Squash Technique for Onion Root Tip
3.3 Whole Mounts of Unicellular Organisms
4.0 Conclusion
5.0 Summary
6.0 Tutor-marked Assignment
7.0 References/Further Readings
1.0 INTRODUCTION
You have learnt in Unit 1 of this course that to observe cells clearly
under a microscope the cells need to be spread in a single layer. This
single layer of cells is then fixed and stained and observed as a
temporary preparation or a permanent slide is made which can be stored
and observed later.
In this practical unit you will learn to make temporary slide preparations
of cell suspension using the smear technique and of soft tissue using the
squash technique. You will also learn to make temporary as well as
permanent slides of whole mounts of protozoans and phytoplankton
2.0 OBJECTIVES
After completing this practical exercise you should be able to prepare a
temporary slide of a given cell suspension using smear
techique,
temporary slide of soft tissue using squash technique,
whole mounts of Paramecium, Chlamydomonas, Volvox.
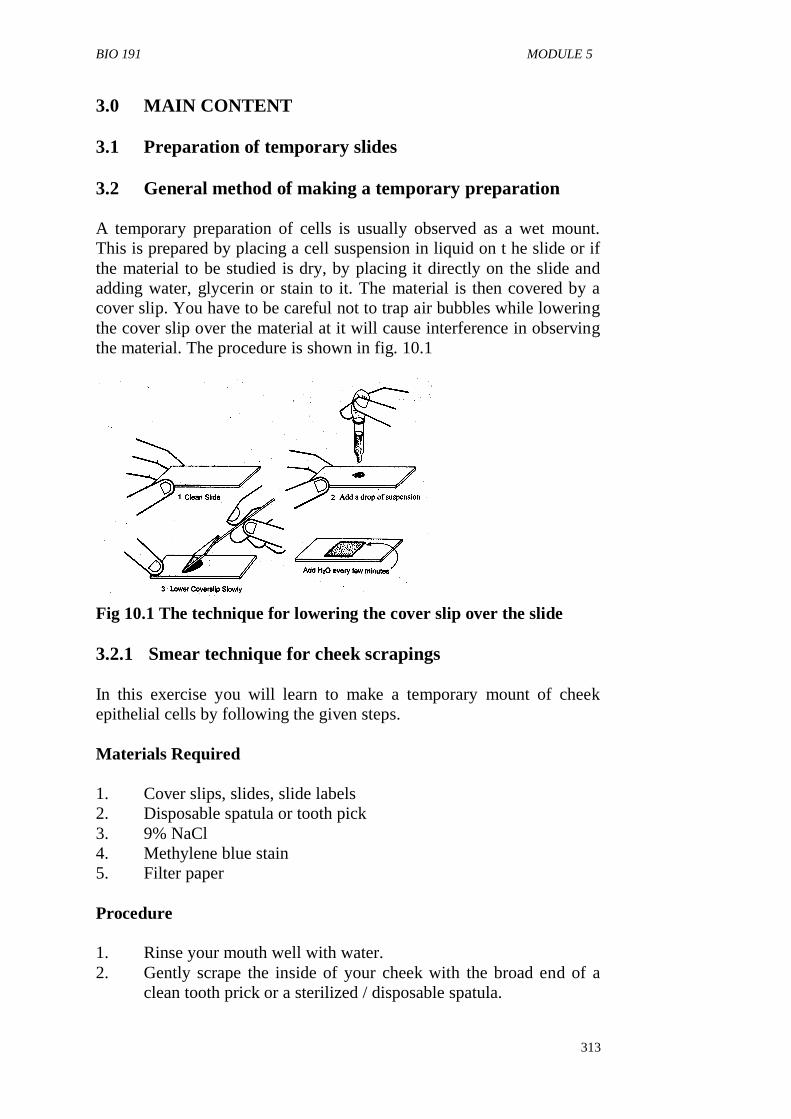
BIO 191 MODULE 5
313
3.0 MAIN CONTENT
3.1 Preparation of temporary slides
3.2 General method of making a temporary preparation
A temporary preparation of cells is usually observed as a wet mount.
This is prepared by placing a cell suspension in liquid on t he slide or if
the material to be studied is dry, by placing it directly on the slide and
adding water, glycerin or stain to it. The material is then covered by a
cover slip. You have to be careful not to trap air bubbles while lowering
the cover slip over the material at it will cause interference in observing
the material. The procedure is shown in fig. 10.1
Fig 10.1 The technique for lowering the cover slip over the slide
3.2.1 Smear technique for cheek scrapings
In this exercise you will learn to make a temporary mount of cheek
epithelial cells by following the given steps.
Materials Required
1. Cover slips, slides, slide labels
2. Disposable spatula or tooth pick
3. 9% NaCl
4. Methylene blue stain
5. Filter paper
Procedure
1. Rinse your mouth well with water.
2. Gently scrape the inside of your cheek with the broad end of a
clean tooth prick or a sterilized / disposable spatula.
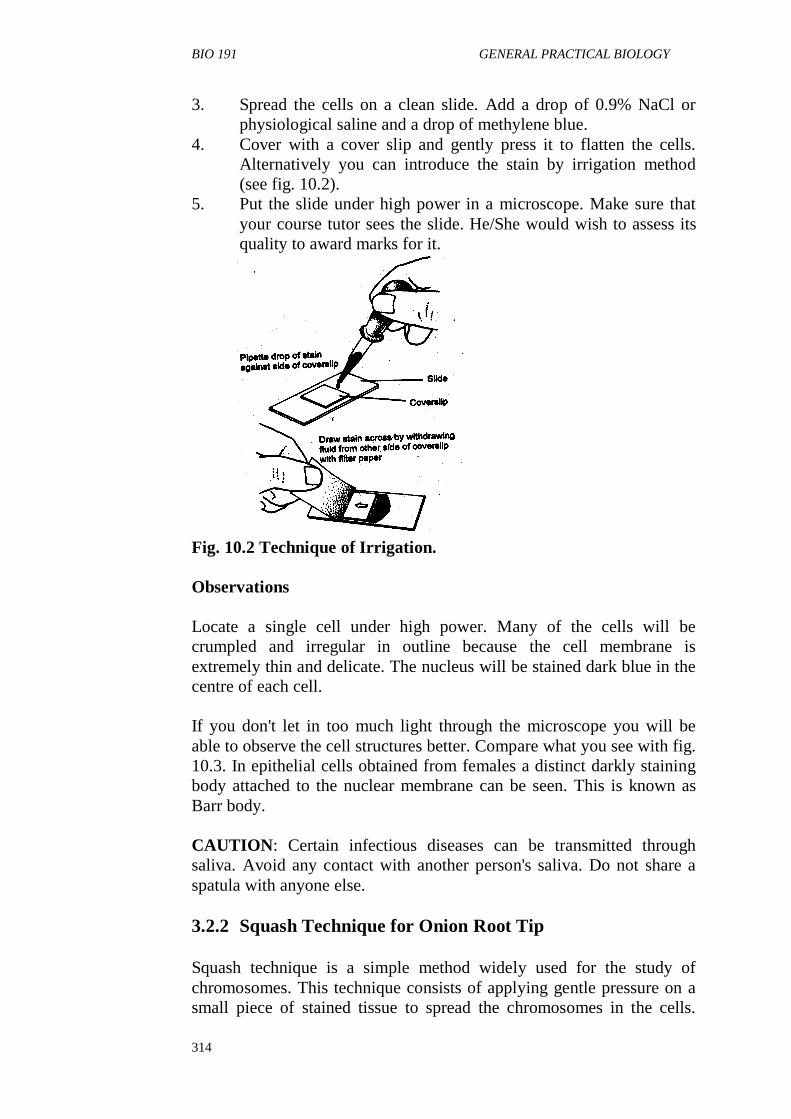
BIO 191 GENERAL PRACTICAL BIOLOGY
314
3. Spread the cells on a clean slide. Add a drop of 0.9% NaCl or
physiological saline and a drop of methylene blue.
4. Cover with a cover slip and gently press it to flatten the cells.
Alternatively you can introduce the stain by irrigation method
(see fig. 10.2).
5. Put the slide under high power in a microscope. Make sure that
your course tutor sees the slide. He/She would wish to assess its
quality to award marks for it.
Fig. 10.2 Technique of Irrigation.
Observations
Locate a single cell under high power. Many of the cells will be
crumpled and irregular in outline because the cell membrane is
extremely thin and delicate. The nucleus will be stained dark blue in the
centre of each cell.
If you don't let in too much light through the microscope you will be
able to observe the cell structures better. Compare what you see with fig.
10.3. In epithelial cells obtained from females a distinct darkly staining
body attached to the nuclear membrane can be seen. This is known as
Barr body.
CAUTION: Certain infectious diseases can be transmitted through
saliva. Avoid any contact with another person's saliva. Do not share a
spatula with anyone else.
3.2.2 Squash Technique for Onion Root Tip
Squash technique is a simple method widely used for the study of
chromosomes. This technique consists of applying gentle pressure on a
small piece of stained tissue to spread the chromosomes in the cells.
BIO 191 MODULE 5
315
This technique is used to study dividing cells showing either mitosis or
meiosis and suitable tissues for this are onion root tip, grasshopper testis
or another buds.
In this exercise you will learn to prepare a temporary slide of onion root
tip showing mitosis, which can later be made in a permanent slide.
The onion root should remain in the acetic alcohol solutions for 12 - 24
hours. After fixation the tissue can be transferred to 70% alcohol.
Materials Required
1. Onion root tips
2. 70% alcohol
3. Forceps and dissecting needles
4. Pitette, glass dropper watch glass beaker
5. 2N Hydrochloric acid
6. Acetocarmine/aceto-orcein stain
7. Slides, coverslips,
8. Acetic acid
9. Filter paper
10. Nail polish
Procedure
1. Transfer the roots from the fixative or storage solution
(70%alcohol) in a watch glass.
2. Wash in water until the roots sink.
3. Drain off the water using a pipette and add a few drops of 2N
HCl and leave for 10 minutes at room temperature or for a minute
over a spirit lamp. While hydrolyzing over the flame be careful
not to overheat by moving the watch glass. Alternately you can
warm the watch glass over a moving the beaker of boiling water
till the liquid steams.
4. After hydrolysis drain off the HCl and wash root tips in water.
5. Remove water and add 1 % acctocarmine or aceto - orcein to the
root tips for staining. The staining requires 10 - 15 minutes.
6. Transfer 2 - 3 root tips on a slide, cut above 2 mm from the
pointed end. Discard the rest.
7. Place a drop of 45% acetic acid on the root tip and carefully place
a cover slip. Remove excess acetic acid by the edge of a filter
paper.
8. Place the slide between 2 layers of filter paper and gently tap the
cover slip by the back of a pencil to get an even spread of
chromosomes.
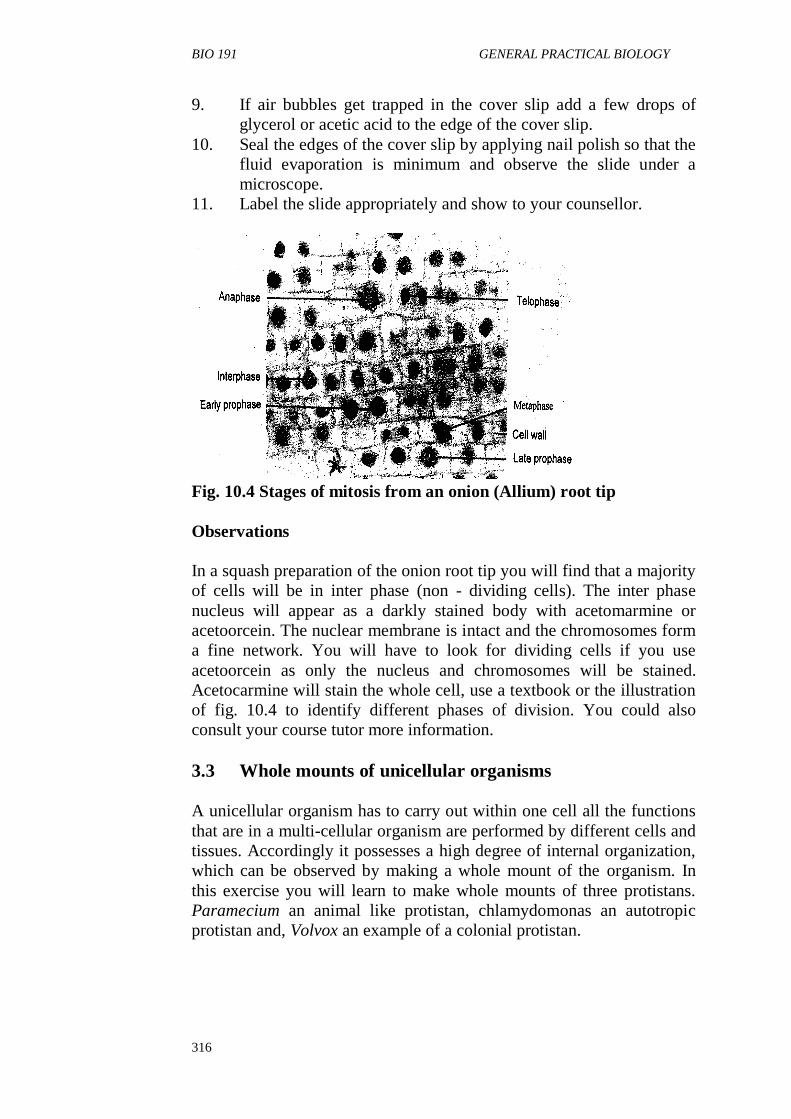
BIO 191 GENERAL PRACTICAL BIOLOGY
316
9. If air bubbles get trapped in the cover slip add a few drops of
glycerol or acetic acid to the edge of the cover slip.
10. Seal the edges of the cover slip by applying nail polish so that the
fluid evaporation is minimum and observe the slide under a
microscope.
11. Label the slide appropriately and show to your counsellor.
Fig. 10.4 Stages of mitosis from an onion (Allium) root tip
Observations
In a squash preparation of the onion root tip you will find that a majority
of cells will be in inter phase (non - dividing cells). The inter phase
nucleus will appear as a darkly stained body with acetomarmine or
acetoorcein. The nuclear membrane is intact and the chromosomes form
a fine network. You will have to look for dividing cells if you use
acetoorcein as only the nucleus and chromosomes will be stained.
Acetocarmine will stain the whole cell, use a textbook or the illustration
of fig. 10.4 to identify different phases of division. You could also
consult your course tutor more information.
3.3 Whole mounts of unicellular organisms
A unicellular organism has to carry out within one cell all the functions
that are in a multi-cellular organism are performed by different cells and
tissues. Accordingly it possesses a high degree of internal organization,
which can be observed by making a whole mount of the organism. In
this exercise you will learn to make whole mounts of three protistans.
Paramecium an animal like protistan, chlamydomonas an autotropic
protistan and, Volvox an example of a colonial protistan.
BIO 191 MODULE 5
317
Material Required
l. Paramecium culture, Volvox, Chlamydomonas
2. Methyl cellulose
3. Methyl green in ethanoic acid/acetocarmine
4. Acetic acid
5. Albumin glycerin
6. Petridishes, Beakers, Slides, Coverslips, Slide labels
7. Alcohol series for dehydration
8. Xylene
9. DPX mountant
10. Noland's solution
11. Iodine solution
Procedure
A Temporary whole mount of Paramecium
Put a drop of Paramecium culture on a clean slide and cover with a
cover slip. Since paramecia move very rapidly their movement can be
slowed down by adding an equal amount of methyl cellulose to a drop of
the culture. Irrigate your slide with either 1% methyl green in ethanoic
acid or acetocarmine. Both fix the organism and stain the nuclei green in
case of the first and red in the case of the second. Then observe under
high power in the microscope. Label and show the slide to your
counselor.
B Preparation of Permanent Mount
It is quite possible that some of you may be expected to make a
permanent preparation of some protozoan like Paramecium. It is a fairly
simple procedure and good results can be obtained if done carefully.
The procedure is given below:
1. Take a clean dry slide, put a small drop of albumin glycerin in the
centre of the slide and with the tip of your forefinger spread it in
the form of a thin film.
2. With a glass dropper add 1-2 drops of Paramecium culture on the
slide and observe under low power of the microscope. You will
see a large number of paramecia moving rapidly in the culture
medium.
3. Let the culture become dry you can put the slide under an electric
lamp.
4. Open a bottle of acetic acid and quickly pass the slide right side
down over the mouth of the bottle. This will fix the protozoan.
BIO 191 GENERAL PRACTICAL BIOLOGY
318
5. Keep this slide in a petridish of 6" diameter with the right side up.
Add a few drops of the stain acetocarmine so as to fully cover the
culture.
6. Stain the slide for about 5 - 7 minutes.
7. Drain off the excess stain by a blotting paper.
8. Wash the slide with 30%, 50%, 70%, 90% alcohol in ascending
order. Always keep the petridish covered by another petridish.
This will gradually remove the water from the culture.
9. Now wash the slide twice with absolute alcohol. This completes
the dehydration process. Be careful that the petridish is covered
tightly so that no atmosphere moisture gets in.
10. Remove the alcohol and add a few drops of xylene on the slide.
This will clear the protozoan so that it is visible more clearly
under the microscope.
Any turbidity with the addition of xylene shows that the dehydration
process is not complete. Repeat the step with absolute alcohol and then
xylene again.
11. Put a drop of DPX mountant over the culture, and lower a cover
slip carefully over it so as to trap no air bubbles.
12. Label the slide and keep the slide overnight in an incubator. Your
permanent mount is ready.
C Whole mount of Chlamydomonas and Volvox
Chlamydomonas and Volvox are phytoflagellates that are found in
freshwater ponds and ditches. Sometimes they are so abundant as to
produce a green scum on ponds. Chlamydomonas are single-celled green
flagellates while Volvox is an example of colonial phytoflagellate that
forms a hollow spheroid with several thousand cells embedded in its
mucilaginous wall. You would be supplied with specimens of these
phytoplagellates collected from ponds and ditches or cultured in the
laboratory. The method of preparing a temporary mount is the same for
both species.
1. Place a drop of culture or a drop of water containing the
flagellates on a clean slide and add a drop of 10 per cent methyl
cellulose which will restrict the movement of the organism and
allow you to study the organism.
2. Place a cover slip on the drop and observe under a microscope.
By cutting down the light you will be able to observe the flagellar
movement better.
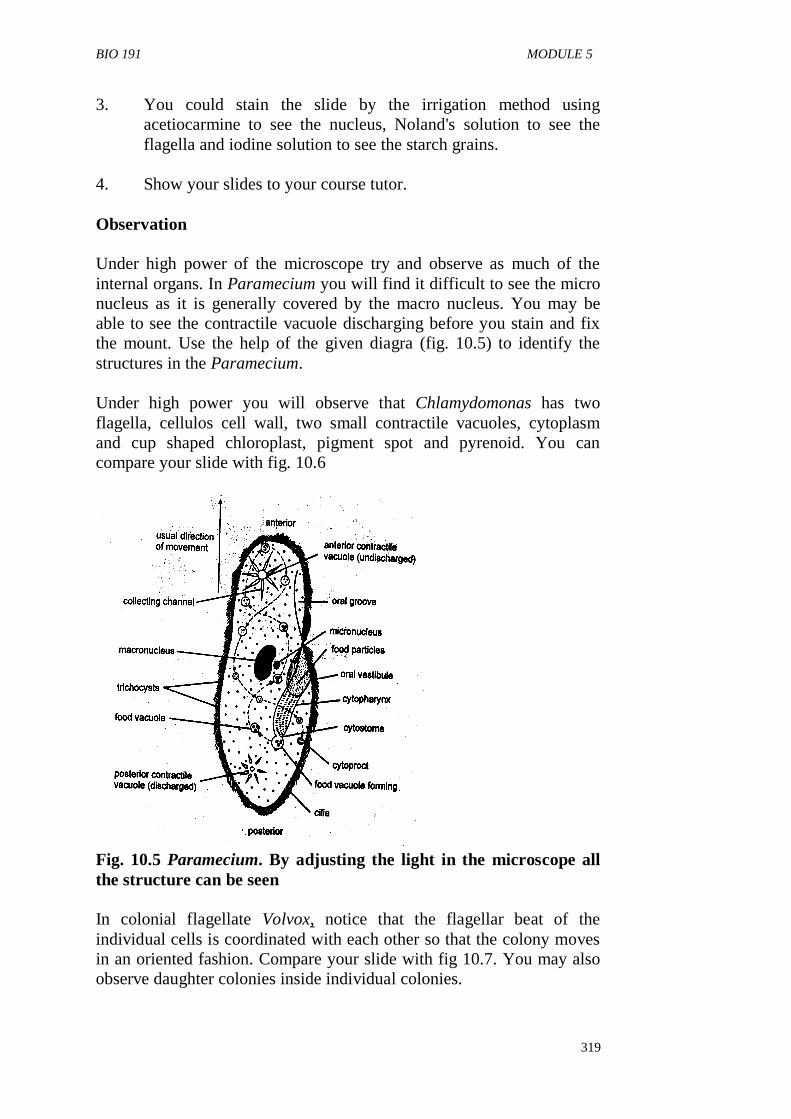
BIO 191 MODULE 5
319
3. You could stain the slide by the irrigation method using
acetiocarmine to see the nucleus, Noland's solution to see the
flagella and iodine solution to see the starch grains.
4. Show your slides to your course tutor.
Observation
Under high power of the microscope try and observe as much of the
internal organs. In Paramecium you will find it difficult to see the micro
nucleus as it is generally covered by the macro nucleus. You may be
able to see the contractile vacuole discharging before you stain and fix
the mount. Use the help of the given diagra (fig. 10.5) to identify the
structures in the Paramecium.
Under high power you will observe that Chlamydomonas has two
flagella, cellulos cell wall, two small contractile vacuoles, cytoplasm
and cup shaped chloroplast, pigment spot and pyrenoid. You can
compare your slide with fig. 10.6
Fig. 10.5 Paramecium. By adjusting the light in the microscope all
the structure can be seen
In colonial flagellate Volvox, notice that the flagellar beat of the
individual cells is coordinated with each other so that the colony moves
in an oriented fashion. Compare your slide with fig 10.7. You may also
observe daughter colonies inside individual colonies.
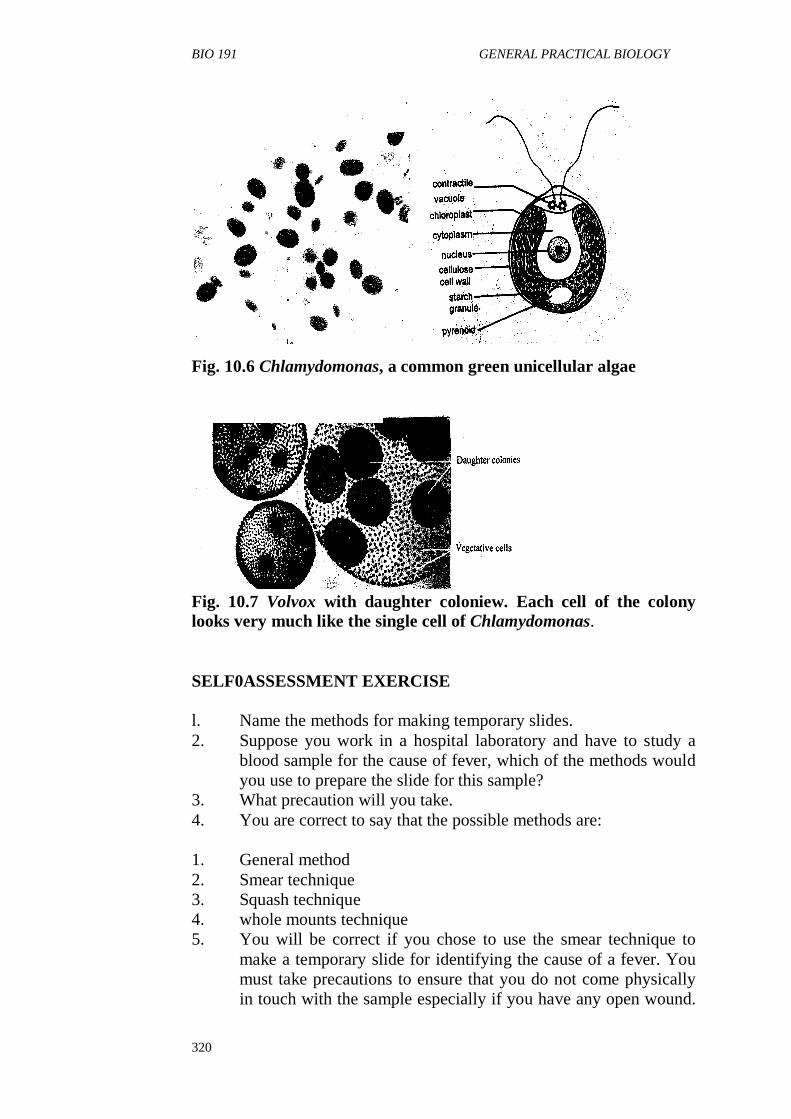
BIO 191 GENERAL PRACTICAL BIOLOGY
320
Fig. 10.6 Chlamydomonas, a common green unicellular algae
Fig. 10.7 Volvox with daughter coloniew. Each cell of the colony
looks very much like the single cell of Chlamydomonas.
SELF0ASSESSMENT EXERCISE
l. Name the methods for making temporary slides.
2. Suppose you work in a hospital laboratory and have to study a
blood sample for the cause of fever, which of the methods would
you use to prepare the slide for this sample?
3. What precaution will you take.
4. You are correct to say that the possible methods are:
1. General method
2. Smear technique
3. Squash technique
4. whole mounts technique
5. You will be correct if you chose to use the smear technique to
make a temporary slide for identifying the cause of a fever. You
must take precautions to ensure that you do not come physically
in touch with the sample especially if you have any open wound.
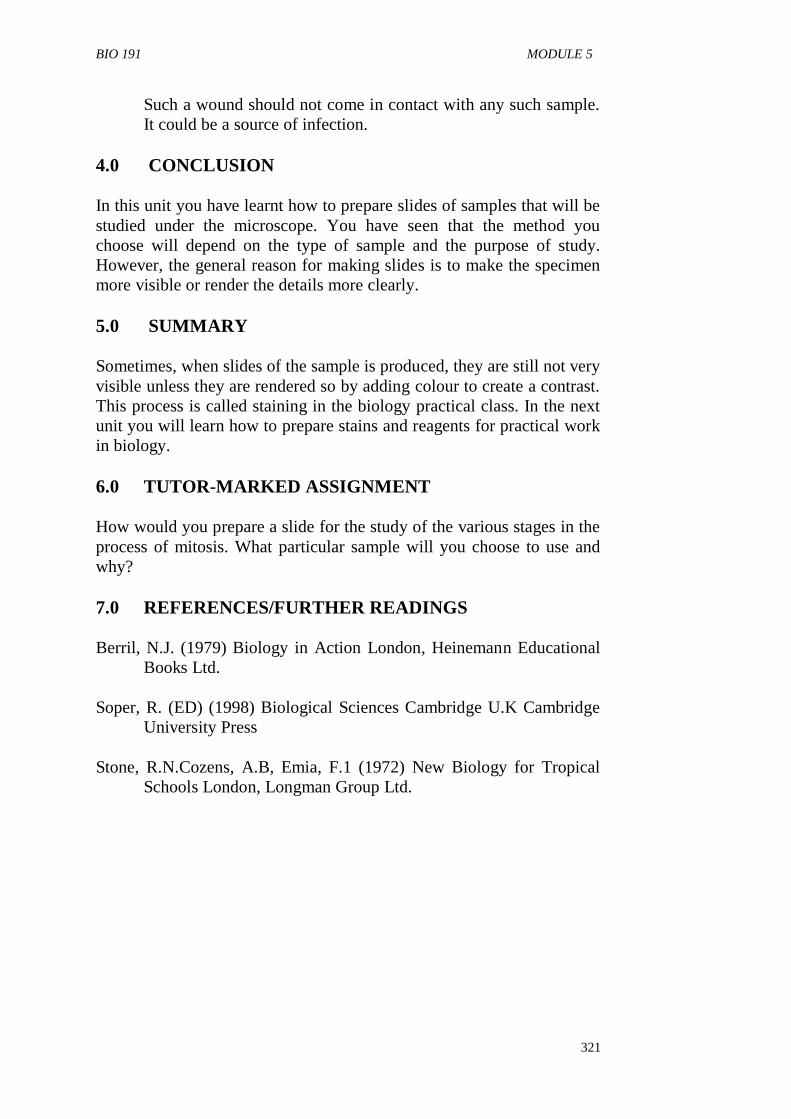
BIO 191 MODULE 5
321
Such a wound should not come in contact with any such sample.
It could be a source of infection.
4.0 CONCLUSION
In this unit you have learnt how to prepare slides of samples that will be
studied under the microscope. You have seen that the method you
choose will depend on the type of sample and the purpose of study.
However, the general reason for making slides is to make the specimen
more visible or render the details more clearly.
5.0 SUMMARY
Sometimes, when slides of the sample is produced, they are still not very
visible unless they are rendered so by adding colour to create a contrast.
This process is called staining in the biology practical class. In the next
unit you will learn how to prepare stains and reagents for practical work
in biology.
6.0 TUTOR-MARKED ASSIGNMENT
How would you prepare a slide for the study of the various stages in the
process of mitosis. What particular sample will you choose to use and
why?
7.0 REFERENCES/FURTHER READINGS
Berril, N.J. (1979) Biology in Action London, Heinemann Educational
Books Ltd.
Soper, R. (ED) (1998) Biological Sciences Cambridge U.K Cambridge
University Press
Stone, R.N.Cozens, A.B, Emia, F.1 (1972) New Biology for Tropical
Schools London, Longman Group Ltd.
BIO 191 GENERAL PRACTICAL BIOLOGY
322
MODULE 3
Unit 1 Preparation of Reagents and Stains
Unit 2 Techniques for Microbial Culture and Gram’s
Staining
Unit 3 Setting of Demonstrations of Physiological
Process in Plants
Unit 4 Setting up Apparatus for Demonstrating
Physiological Activity in Animals
Unit 5 Preparation Required for Dissections
UNIT 1 PREPARATION OF REAGENTS AND STAINS
CONTENTS
1.0 Introduction
2.0 Objectives
3.0 Main Content
3.1 Preparation of Reagents and Stains
3.2 General Rules for Preparing and Handling Solution.
3.3 Accuracy Required in Preparing Solution.
3.4 Use of Chemical
3.4.1 Acids
3.4.2 Alcohol
3.5 Preparation of Normal Physiological Saline for
Vertebrates
3.6 Preparation of Benedict Solution
3.7 Preparation of Millions Solution
3.8 Preparation of Fixatives
3.9 Preparation of Stains
4.0 Conclusion
5.0 Summary
6.0 Tutor Marked Assignment
7.0 References/Further Readings
1.0 INTRODUCTION
Biological structures are usually transparent. Staining is a means of
obtaining contrast between the different structures.
Table 9.1 shows some common stains used in light microscopy.
In unit 5 of module 2, you will remember we used some stains for
preparing temporary slides. In this unit however we will expect you to
prepare and remember the method of preparations of a few of the
BIO 191 MODULE 5
323
important reagents and stains that are commonly used in the biology
laboratories.
2.0 OBJECTIVES
After this laboratory experiment you will be able to prepare:
normal physiological saline for vertebrates Frog Ringer's
Solution
alcohol series or grades of the following strength - 30% - 50% -
70% - 90%
the plant fixative - Formalin Acetic Acid and the animal fixative -
Aqueous Bouin's Fluid.
stains - Aceto-orcein, Aceto-carmine, Noland's solution,
Methylene blue
benedict's solution
millions solution
3.0 MAIN CONTENT
3.1 Preparation of reagents and stains
3.2 General rules for preparing and handling solution
1. All solutions should be kept in clearly and correctly labeled
containers.
2. When stock solutions are provided nothing should be poured
back to stock bottle. If you take too much solution it is better to
discard the excess rather than risk contamination of the entire
supply by attempting to conserve a small amount.
3. Distilled water should be used in preparing solutions unless
otherwise specified.
4. When diluting acids always add the acid to the diluent, never the
diluent to the acid. The acid should be added slowly.
5. Use clean containers for preparing solutions
6. Strong acids and bases must be handled with care.
7. Avoid inhalation of acid and other fumes, particularly osmic acid
or mercuri chloride powder. The laboratory should be well
ventilated and volatile fluids such as xylol, tuluol, dioxane,
chloroform, ether, etc. should be kept covered as much of the
time as possible.
8. Flammable solutions should be kept away from open flames and
sparks. Be particularly careful with ether and with ether-alcoho-
celloidin mixtures.
BIO 191 GENERAL PRACTICAL BIOLOGY
324
9. Always wash your hands before smoking or eating after working
in the laboratory.
10. Many fixatives and other solutions are poisonous.
3.3 Accuracy Required in Preparing Solutions
It should be noted that formulas have been presented with what may
appear to be an inconsistent degree of accuracy. Thus, 0.5 ml of acid
may be combined with 100 ml (not 100.0 or 99.5) of alcohol. This has
been done intentionally, since it indicates the degree of accuracy
required in the measurements. The standard practice is to write formulas
to the degree of accuracy of the smallest component. Thus, 0.5 ml are
combined with 100.00 ml in one formula, 1 ml combined with 100 ml in
a second formula; and 100.00 ml combined with 0.24 gram in a third.
Although this may appear more consistent in print, it is not realistic. If a
volume is given as 100.00 ml it should indicate that the measurement is
to be made in a volumetric flask. For most technique purposes (such as
preparing fixatives and staining solutions) ordinary graduated cylinder
provide the necessary degree of accuracy. Volumes of 1 ml and less
should be measured in graduated pipettes. It is well to use a small
graduated cylinder for small quantities (thus use a graduated cylinder o
f10 ml, rather than a 1000 ml for measurements from 1 to 10 ml, and so
on). Most weights have been given to tenths of a gram and the balance
used should be accurate to one hundredth of a gram. A triple beam
balance reading to one-hundredths of a gram is ideal for the technique
laboratory. Unless milligrams are specified, an analytical balance is not
required for routine preparations in microscope technique.
3.4 Use of chemicals
3.4.1 Acids
The acids most commonly employed in technique procedures are acetic
and nitric acids in fixatives, and hydrochloric acid in decalcifying and
destaining solutions. When percentages are indicated they are based
upon dilutions of glacial acetic acid (99 percent); concentrated nitric
acid (about 70 percent), and concentrated hydrochloric acid (about 39
percent). Thus, 1 percent hydrochloric acid for destaining refers to a
solution prepared by adding 1 cc of concentrated hydrochloric acid to 99
ml of alcohol or water as specified. The exact percentages of the
concentrated acids vary slightly with different suppliers and grades and
this must be taken into account when a “normal” solution is specified.
BIO 191 MODULE 5
325
3.4.2 Alcohol
References to "alcohol" in technique procedures mean ethyl alcohol
unless otherwise specified. Isopropyl alcohol may be substituted for
ethyl alcohol in the dehydration and hydration series. Methyl alcohol is
preferred for the fixation of smears before staining in Giemsa's
WARNING: METHYL ALCOHOL IS HIGHLY POISONOUS ON
DRINKING.
3.5 Preparation of normal physiological saline for
vertebrates
Physiological saline is used for rinsing blood and debris from tissues
before placing them in the fixative. Physiological saline for invertebrates
and cold blooded vertebrates is different from that of warm blooded
vertebrates because of the proportion of sodium chloride. The
physiological saline for various groups within the warm blooded animal
vertebrates also vary. In this exercise you will learn to prepare the
physiological normal saline for mammals by following the given steps.
Materials Required
Analytical sodium chloride (NaCI) - 0.9 g;
Distilled water - 100 ml
Graduated measuring cylinder of 100 ml
Round flask of more than 100 ml capacity
Analytical balance.
Distilled water – 100ml
Graduated measuring cylinder of 100 ml
Round flask of more than 100 ml capacity
Analytical balance
Procedure
1. Weigh 0.9gms of analytical sodium chloride and put it in the
round flask.
2. Measure 100 ml of distilled water in the graduated cylinder and
pour it into the round flask gradually, shaking the flask in order to
dissolve and mix the NaCl in the water.
3.6 Preparation of Frog Ringer's Solution
Ringer's solution is used for moistening tissues which must be kept for
some period of time before fixation or for small animals or tissue study
which need to be observed in the living state. The Ringer solution for
BIO 191 GENERAL PRACTICAL BIOLOGY
326
invertebrate and cold blooded vertebrate is different from that of the
warm blooded vertebrates. In this exercise you will learn to prepare the
Ringer's solution for frog by following the given steps.
Material Required
Analytical sodium chloride (NaCI) - 0.65 gms;
Potassium chloride (KC1) - 0.025 gms
Calcium chloride (CaCl2) -0.03 g
Sodium hydrogen carbonate (NaHC03) - 0.2 g
Distilled water (a little more than 100 ml),
Analytical balance
100 ml graduated cylinder
Round flask with more than 100 ml capacity
Procedure
1. Weigh each of the following salts separately: 0.65 g of Nacl;
0.025 g of KCI, 0.03 g of CaC12 and 0.02 g of sodium hydrogen
carbonate and put into the round flask.
2. Measure 100 ml of distilled water in the graduated cylinder.
3. Pour the 100 ml of distilled water into the flask containing the
weighed salts and gradually dissolve the salts.
4. While pouring the distilled water into the flask, keep shaking the
flask in order to mix and dissolve the salts in the water.
3.7 Preparation of alcohol series or grades 30%, 50%,
70%, 90%
Alcohol is used in various dilutions - 30%-50%-70%-80%-90%-100%
(absolute alcohol) for dehydration of tissues and in the reverse (100%-
90%-80%-70%-50%-30%) for rehydration of tissues. It is also used as a
simple fixative primarily before certain histochemical tests.
Dilutions of alcohols or alcohol grades are usually prepared from
rectified spirit which contains approximately 95% or 96 percent of
alcohol and never from the much more expensive absolute alcohol. A
simple method of calculating the dilution is to take the number of cubic
centimeters of 95 percent alcohol as the percentage required (thus use 70
ml for 70 percent) and add enough distilled water to bring the final
volume to 95 ml. For 50 percent alcohol use 50ml of 95 percent alcohol
and dilute to prepare 95ml of 50 percent alcohol. Larger or smaller
volumes are prepared on a proportional basis. For example: 700 ml of 95
percent will provide 950 ml of 70 percent; 35 ml of 95 percent will
provide 47.5 ml of 70 percent. For technique purposes the latter dilution
may be 47 or 48 ml since the exact percentage in the graded series of

BIO 191 MODULE 5
327
solutions for hydration and dehydration is not critical. In this exercise
you will learn to prepare the alcohol grades of 30%, 50%, 70%, 80%,
90% by following the given steps.
Materials Required
96% Alcohol (Ethanol or Methanol)
Distilled water
Graduated measuring cylinder of 100 ml,
5- 100 ml bottles with stoppers
Procedure
1. Take a graduated cylinder of 100 ml for preparing the alcohol
dilution series.
(a) 90% Alcohol
(i) Pour 96% of alcohol into the measuring cylinder, upto 90 ml
measure mark.
(ii) Add distilled water to the cylinder containing the measured
amount of alcohol to make the volume up to 96 ml. Keep the
90% alcohol in a tightly stoppered bottle.
(b) 70% Alcohol
(i) Pour 96% of alcohol into the measuring cylinder, upto 70 ml
measure mark.
(ii) Add distilled water into the cylinder containing the measured
amount of alcohol to make the volume upto 96 ml. Keep the 70%
alcohol in a tightly stoppered bottle.
(c) 50% of Alcohol
(i) Pour 96% of alcohol into the measuring cylinder upto 50 ml
measure mark
(ii) Add distilled water into the cylinder containing the measured
amount of alcohol to make the volume up to 96 ml. Keep the
50% alcohol in a tightly stoppered bottle.
(d) 30% Alcohol
(i) Pour 96% of alcohol into the measuring cylinder upto 30 ml
measure mark.
(ii) Add distilled water into the cylinder containing the measured
amount of alcohol to make the volume upto 96m1. Keep the 30%
alcohol in a tightly stoppered bottle.
BIO 191 GENERAL PRACTICAL BIOLOGY
328
3.8 Preparation of Fixatives
The collected plant material or the animal material is stored in glass-
stopped wide mouth jars containing any general fixative. The purpose of
the fixative is to kill the material initially and to preserve the cells and
their contents in natural condition as far as possible. Although there are
several fixatives in use the best is that which changes the chemistry of
the cell to the minimum and which preserves the cells best. In this
exercise you will learn to prepare
(a) Plant fixative - FAA and
(b) Animal fixative - Bouins fluid
Materials Required
70% ethyl alcohol
Glacial acetic acid
40% formalin
Picric acid (saturated aqueous solution)
Graduated measuring cylinders of 50 ml, 100 ml
Round flask of 150 ml capacity
Bottles with stoppers
Procedure
(a) Plant Fixative - Formalin (Formol) Acetic Alcohol (FAA or
AFA). It is a general fixative for plant material and nemtodes.
1. Measure 85 ml of 70% alcohol in the graduated, measuring
cylinder and pour into the round flask.
2. Also measure 5.0 ml glacial acetic acid in the graduated
measuring cylinder and add to alcohol present in the round flask.
3. Again measure 10 ml of 40% formalin in the graduated
measuring cylinder and add to the round flask containing the
measured amounts of alcohol and acetic acid.
4. Shake the round flask containing all the measured chemicals in
order to mix the chemicals.
5. Pour the solution with all the ingredients in a bottle and stopper
it.
WARNING: THE VARIOUS INGREDIENTS OF SOLUTIONS
SHOULD BE COMBINED ONLY JUST BEFORE USE.
(b) Animal fixative – Aqueous Bouin’s Fluid
1. Measure 75ml of saturated aqueous solution of picric acid in the
graduated measuring cylinder or pour into a round flask.
BIO 191 MODULE 5
329
2. Also measure 40% of 25ml formalin in the graduated measuring
cylinder and add to the round flask containing the saturated
aqueous solution of picric acid.
3. Also measure 5ml of glacial acetic acid in the measuring cylinder
and add to the round flask containing the picric acid and formalin
solution.
4. Mix all the ingredients by shaking the flask gently.
5. Pour the mixture solution into a bottle and stopper. This solution
will keep indefinitely.
WARNING: PICRIC ACID MAY DRY ON THE CORK AND
BOTTLE RIM AND BECOME UNSTABLE DURING STORAGE:
WHEN REPLENISHING THE WATER IN THE BOTTLE
ENSURE THAT NO SOLUTION REMAINS IN THESE AREAS.
3.9 Preparation of Stains
Staining techniques are most difficult for the beginner to master because
they depend both on method of preparation of stain and the fact that
staining effects vary with different tissues. Staining also gets affected by
the use of different fixatives, different period of storage and on different
types of dyes used.
In this exercise you will learn to prepare some stains. The stains which
you will learn to prepare are:
(a) Aceto-orcein
(b) Aceto-carmine
(c) Noland's solution
(d) 1% Aqueous Methylene blue.
Materials Required
Orcein stain - 0 5 - 1.5 g
Glacial acetic acid - 90-100 ml
Dry Carmine stain - 0.5 - 1.0 g Methylene blue - 1.0 gm
Genetian violet (crystal violet) - 0.20 g
Phenol crystals - 60 g
40% Formalin - 20 ml
Glycerol (glycerine) - 4 ml
Distilled water - 250 ml
Round flask of 100 ml capacity
Round Corning Flask of more than 100 ml capacity
Graduated measuring cylinder of 100 ml measure capacity
Analytical balances
Burner
BIO 191 GENERAL PRACTICAL BIOLOGY
330
Filter paper
4 Stain bottles.
Procedure
a) Aceto-Carmine: This is one of the most commonly used stains
for chromosomal studies.
1. Weigh 0.5 g of dry carmine stain
2. Measure 45 ml of glacial acetic acid in a graduated measuring
cylinder and pour into a round, corning flask.
3. Measure 55 ml of distilled water in the measuring cylinder and
also add the round corning flask and mix the two.
4. Heat to boiling the corning flask containing distilled water and
glacial acetic acid.
5. Add the weighed amount of 0.5 g of carmine stain to the boiling
mixture and shake well to mix.
6. Cool the mixture and filter.
(b) Aceto-Orcein
1. Weigh 1.0 g of orcein stain and put in a round, corning flask.
2. Measure 45 ml of glacial acetic acid in the graduated measuring
cylinder and pour it into the round flask containing the weighed
stain powder.
3. Stopper the round flask with cotton wool and heat the mixture to
boiling.
4. Cool the mixture in the round flask and add distilled water to it.
5. Filter the prepared stain before use.
(c) Aqueous Methylene Blue
1. Weigh 1 g of methylene blue powder and put into a round flask
of 100 ml capacity.
2. Measure 100 ml of distilled water in a measuring cylinder and
add gradually to the flask containing the methylene blue stain.
3. Shake the flask gently while adding water, in order to dissolve
the methylene blue stain
4. Filter and pour the mixture into bottle for use.
(d) Noland's Solution
1. First prepare saturated solution of phenol in distilled water.
Weigh 6 gm phenol crystals and put into a round flask. Measure
90 ml of distilled water and add to the flask. Dissolve the crystal
BIO 191 MODULE 5
331
in the water by shaking the flask. Pour into a container which is
well closed and protected from light.
2. Weigh 0.2 g of genetian violet and put into a clean round flask.
3. Measure 20 ml of 40% formalin in a measuring cylinder of 100
ml capacity and add to the round flask containing the genetian
violet.
4. Also measure 4 ml glycerol in a measuring cylinder and add to
the flask.
5. Also measure 80 ml of saturated solution of phenol that has been
prepared earlier and add into the flask.
6. Shake the flask gently to dissolve the ingredients.
WARNING: DO NOT HANDLE PHENOL CRYSTALS WITH
BARE HANDS. DEATH HAS RESULTED FROM AS LITTLE AS
1.5 GRAM ABSORPTION. NEVER APPLY TO LARGE
PORTIONS OF BODY SURFACE.
SELF-ASSESSMENT EXERCISE
i. Name seven stains and reagents commonly used in the biology
laboratory and state their uses.
ii. Suppose you need to study the frog as a living thing, state what
reagent would you use.
iii. Why are stains necessary in biology laboratories?
4.0 CONCLUSION
In this unit, you have learnt how to prepare different solutions, and the
precautions you must take. You have also learnt the general rules for
handling solutions.
5.0 SUMMARY
Apart from such preparations for studies, it is sometimes necessary to
grow organisms under specified conditions in the laboratory. Such
cultures enhance certain type of studies. In the next unit, you will learn
the techniques of making cultures as well.
6.0 TUTOR-MARKED ASSIGNMENT
1. What general rules will you give to anyone preparing and
handling solutions in the biology laboratory?
2. How will you prepare the Benedicts solution?

BIO 191 GENERAL PRACTICAL BIOLOGY
332
7.0 REFERENCES/FURTHER READINGS
Berril, N.J. (1979) Biology in action London, Heinemann Educational
Books Ltd.
Soper, R. (ed) (1998) Biological Sciences Cambridge U.K. Cambridge
University Press.
Stone, R.N., Cozens, A.B., Emia, F.I. (1972) New Biology for Tropical
Schools London, Longman Group Ltd.
BIO 191 MODULE 5
333
UNIT 2 TECHNIQUES FOR MICROBIAL CULTURE
AND GRAM'S STAINING
CONTENTS
1.0 Introduction
2.0 Objectives
3.0 Main Content
3.1 Microbial Cultures and Grams Staining
3.2 Fungal Culture
3.2 Paramecium Culture
3.3 Gram's Staining of Bacteria
4.0 Conclusion
5.0 Summary
6.0 Tutor Marked Assignment
7.0 References/Further Readings
1.0 INTRODUCTION
Cultivation of micro-organism involves the provision of the correct
nutrients and physical conditions in the laboratory so as to enable the
organism to grow in an environment similar to their natural one. In the
theory part of this course we have discussed the nutritional requirements
of the micro-organisms in general. In this practical you will practise
growing micro-organisms in the laboratory.
On the basis of their response to Gram's stain, bacteria can be
categorized as Gram positive or Gram negative bacteria. You will use
Gram's staining technique to identify the type of bacteria. Wear gloves
while carrying out these experiments.
2.0 OBJECTIVES
After going through this practical session you should be able to:
prepare the medium required for culturing the microbes,
sterilize the medium and glassware in order to minimize the
contamination,
describe the ways of streaking the inoculum to get the isolated
colonies, list the stains, used in Gram's staining method, and
prepare and stain the bacterial smear for categorization as Gram
positive or Gram negative bacteria.
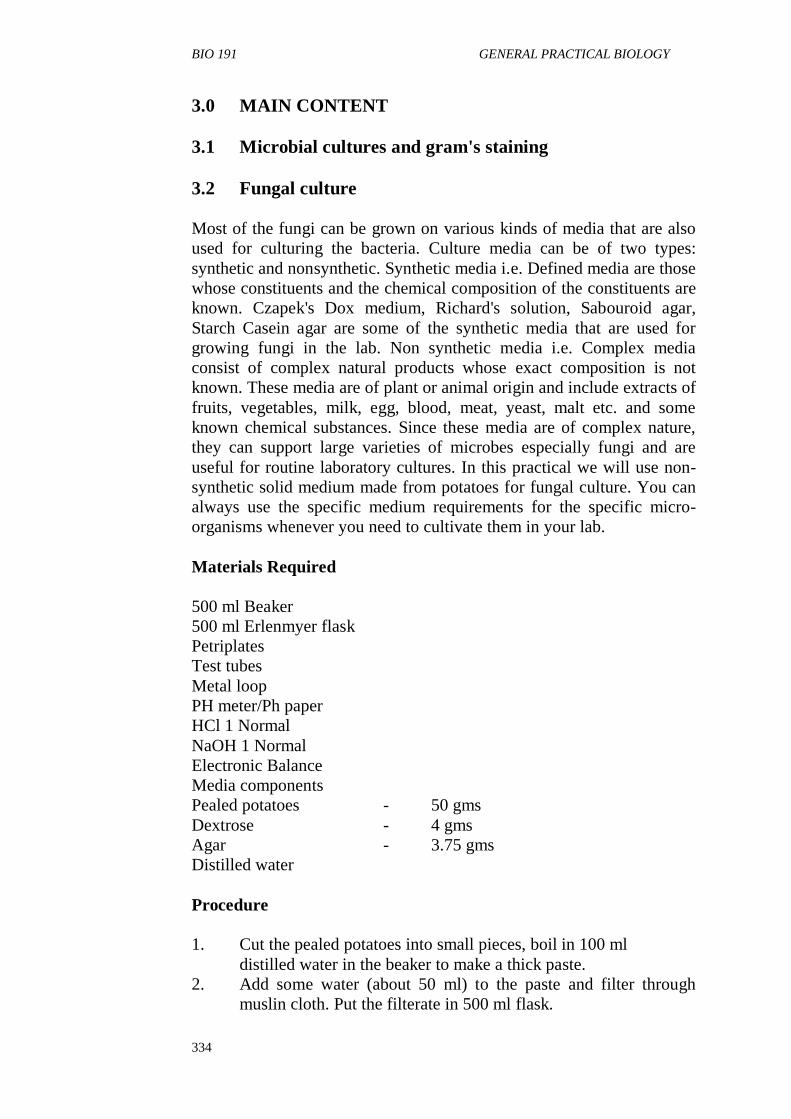
BIO 191 GENERAL PRACTICAL BIOLOGY
334
3.0 MAIN CONTENT
3.1 Microbial cultures and gram's staining
3.2 Fungal culture
Most of the fungi can be grown on various kinds of media that are also
used for culturing the bacteria. Culture media can be of two types:
synthetic and nonsynthetic. Synthetic media i.e. Defined media are those
whose constituents and the chemical composition of the constituents are
known. Czapek's Dox medium, Richard's solution, Sabouroid agar,
Starch Casein agar are some of the synthetic media that are used for
growing fungi in the lab. Non synthetic media i.e. Complex media
consist of complex natural products whose exact composition is not
known. These media are of plant or animal origin and include extracts of
fruits, vegetables, milk, egg, blood, meat, yeast, malt etc. and some
known chemical substances. Since these media are of complex nature,
they can support large varieties of microbes especially fungi and are
useful for routine laboratory cultures. In this practical we will use non-
synthetic solid medium made from potatoes for fungal culture. You can
always use the specific medium requirements for the specific micro-
organisms whenever you need to cultivate them in your lab.
Materials Required
500 ml Beaker
500 ml Erlenmyer flask
Petriplates
Test tubes
Metal loop
PH meter/Ph paper
HCl 1 Normal
NaOH 1 Normal
Electronic Balance
Media components
Pealed potatoes - 50 gms
Dextrose - 4 gms
Agar - 3.75 gms
Distilled water
Procedure
1. Cut the pealed potatoes into small pieces, boil in 100 ml
distilled water in the beaker to make a thick paste.
2. Add some water (about 50 ml) to the paste and filter through
muslin cloth. Put the filterate in 500 ml flask.
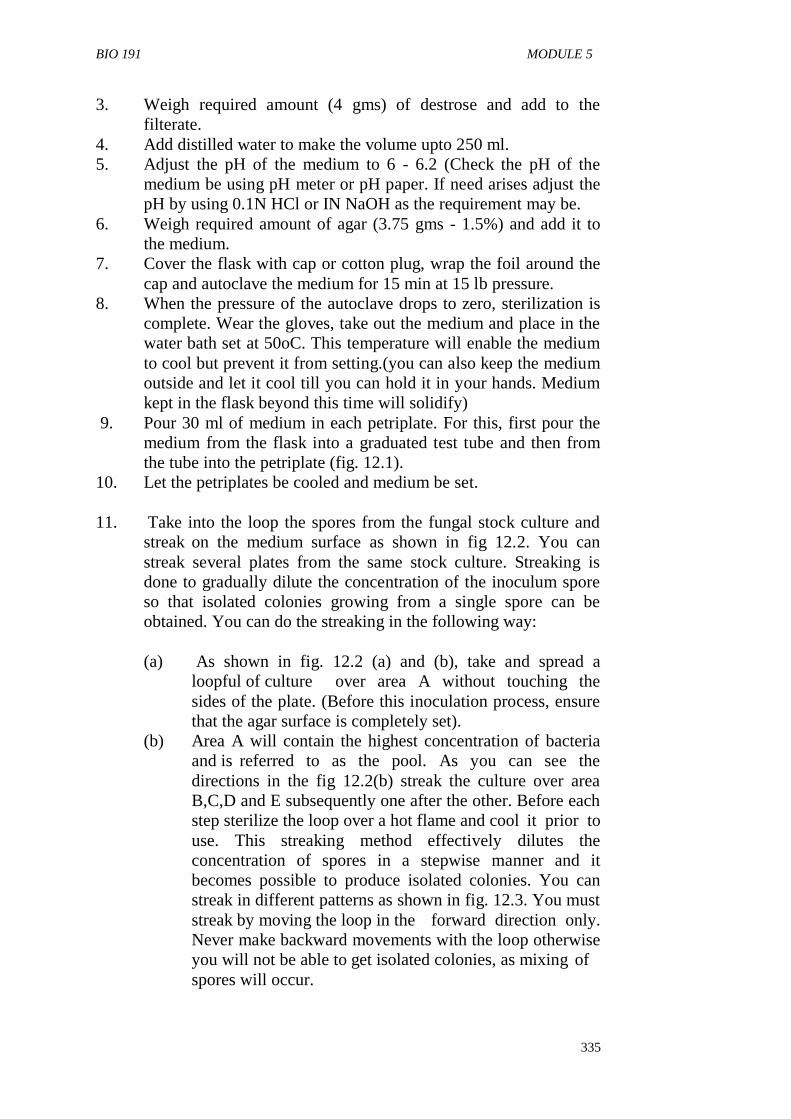
BIO 191 MODULE 5
335
3. Weigh required amount (4 gms) of destrose and add to the
filterate.
4. Add distilled water to make the volume upto 250 ml.
5. Adjust the pH of the medium to 6 - 6.2 (Check the pH of the
medium be using pH meter or pH paper. If need arises adjust the
pH by using 0.1N HCl or IN NaOH as the requirement may be.
6. Weigh required amount of agar (3.75 gms - 1.5%) and add it to
the medium.
7. Cover the flask with cap or cotton plug, wrap the foil around the
cap and autoclave the medium for 15 min at 15 lb pressure.
8. When the pressure of the autoclave drops to zero, sterilization is
complete. Wear the gloves, take out the medium and place in the
water bath set at 50oC. This temperature will enable the medium
to cool but prevent it from setting.(you can also keep the medium
outside and let it cool till you can hold it in your hands. Medium
kept in the flask beyond this time will solidify)
9. Pour 30 ml of medium in each petriplate. For this, first pour the
medium from the flask into a graduated test tube and then from
the tube into the petriplate (fig. 12.1).
10. Let the petriplates be cooled and medium be set.
11. Take into the loop the spores from the fungal stock culture and
streak on the medium surface as shown in fig 12.2. You can
streak several plates from the same stock culture. Streaking is
done to gradually dilute the concentration of the inoculum spore
so that isolated colonies growing from a single spore can be
obtained. You can do the streaking in the following way:
(a) As shown in fig. 12.2 (a) and (b), take and spread a
loopful of culture over area A without touching the
sides of the plate. (Before this inoculation process, ensure
that the agar surface is completely set).
(b) Area A will contain the highest concentration of bacteria
and is referred to as the pool. As you can see the
directions in the fig 12.2(b) streak the culture over area
B,C,D and E subsequently one after the other. Before each
step sterilize the loop over a hot flame and cool it prior to
use. This streaking method effectively dilutes the
concentration of spores in a stepwise manner and it
becomes possible to produce isolated colonies. You can
streak in different patterns as shown in fig. 12.3. You must
streak by moving the loop in the forward direction only.
Never make backward movements with the loop otherwise
you will not be able to get isolated colonies, as mixing of
spores will occur.
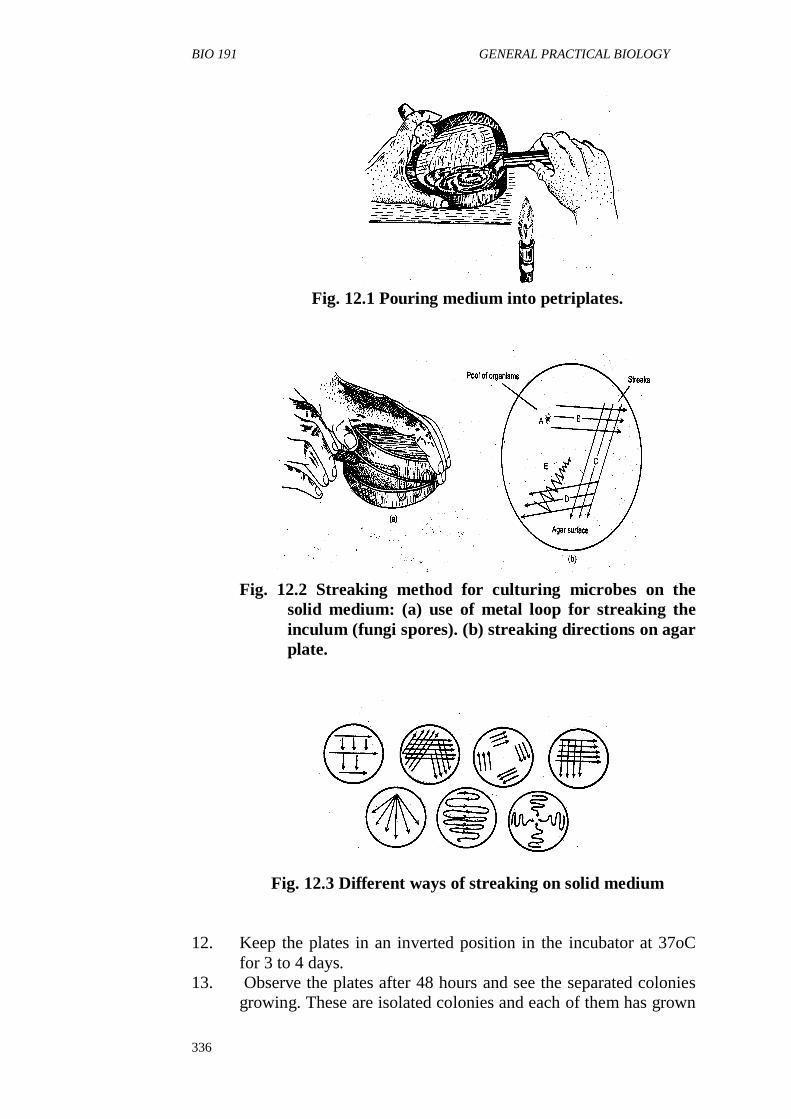
BIO 191 GENERAL PRACTICAL BIOLOGY
336
Fig. 12.1 Pouring medium into petriplates.
Fig. 12.2 Streaking method for culturing microbes on the
solid medium: (a) use of metal loop for streaking the
inculum (fungi spores). (b) streaking directions on agar
plate.
Fig. 12.3 Different ways of streaking on solid medium
12. Keep the plates in an inverted position in the incubator at 37oC
for 3 to 4 days.
13. Observe the plates after 48 hours and see the separated colonies
growing. These are isolated colonies and each of them has grown
BIO 191 MODULE 5
337
from a single spore. You can reculture these isolated colonies on
other solid medium plates and store as stock culture.
Precautions
1. All the glassware and the loop must be thoroughly washed, dried
and sterilized before use.
2. The medium should be poured and culture should be streaked on
the laminar flow bench. You have already read about how to
operate the laminar flow in the earlier practicals. In case you
don't have the laminar flow bench in your lab, perform these
activities on a normal bench. The bench should be first cleaned
by spirit or any other disinfectant. Light the spirit lamp and keep
it on the bench before you start your work. (Preferably use two
spirit lamps, one on each side on the bench). A spirit lamp is used
to sterilize the surrounding air.
3. Operate the autoclave, oven and incubator as you have already
learnt in earlier experiments.
4. Thoroughly wash your hands with soap and clean with
disinfectant before and after doing the experiment.
5. Clean the bench with disinfectant after finishing your experiment.
6. Mark the plates on the back of the petriplate for the culture
identification. To mark, write the name of the fungus cultured
and the date of the culturing. Preferably use a permanent marker
pen for writing.
7. Dispose off the culture material and sterilize the glassware as you
have read in Unit 3.
3.2 Paramecium Culture (hay culture)
Material Required
500 ml Erlenmyer flask
Petriplate
Wheat grains Hay
Tap water
Procedure
1. Collect some water from a pond having submerged leaves and
dead organic matter and Paramecium.
2. In the flask take 450 ml of tap water, add 20-25 grains of wheat
and some hay.
3. Boil this mixture for 5 to 10 mins, and allow it to cool down. This
is the culture solution.
Heat resistant glassware
BIO 191 GENERAL PRACTICAL BIOLOGY
338
4. In a petriplate pour 20-25 ml of culture solution and add 5 to 10
ml of water taken from the pond and cover this petriplate.
5. Keep this petriplate in the incubator. The optimum temperature
for culturing Paramecium is 22oC - 25oC.
6. You will see that Paramecium has appeared in the culture within
4 to 5 days. However, you may also observe the growth of certain
bacteria, when you make a slide of the culture and see it under
the microscope. These bacteria come along with pond water.
Observation
Study the structure of Paramecium by making a temporary mount of this
organism. Put a drop of culture on a slide, cover it with the cover slip
and see the slide under the microscope.
3.3 Gram's Staining Of Bacteria
Material Required
Reagents for Gram's Staining:
Crystal violet, Gram's iodine, Ethyl alcohol or Acetone, Safranin
Slides
Distilled water
Wash bottle
Pasteur Pipette
Inoculating loop (metal loop)
Cultures of nonpathogenic bacteria like pseudomonas, E.coli etc.
Procedure
1. Transfer a loopful of bacteria culture on a clean slide. Before it is
used, the inoculating loop is sterilized by heating in the flame
(Bunsen burner) and cooled. The loop should again be sterilized
before it is set down after use. (Ask for the bacteria culture from
your course tutor).
2. To make the smear, spread the bacteria culture on the slide with
the help of another slide and allow it to air-dry. This dry smear is
passed through the flame 4 to 6 times to heat fix the bacteria.
Because of heat fixing the bacteria enzymes are denatured and
autolysis is prevented. Also the bacterial cells adhere to the slide
because of heat exposure.
3. To the fixed smear apply crystal violet (called primary stain)
solution by Pasteur pipette. All bacteria are stained purple.
4. Next apply iodine solution (Gram's iodine also called mordant).
This intensifies the ionic bond between the crystal violet stain
and the bacteria.
BIO 191 MODULE 5
339
5. Apply ethyl alcohol or acetone (decolourizing agent). The
primary stain i.e. crystal violet can be washed out of bacterial
smear (decolorization) or the smear can remain unaffected.
Note: The bacteria are gram positive bacteria if the smear is not
decolourized and retains the deep violet colour due to crystal
violet stain. The decolourized smear contains gram negative
bacteria and should be processed as follows:
6. Apply to the decolourized smear safranin stain (secondary stain
or counter stain).
Note: The decolourised bacterial smear will be stained red due to
counter staining.
SELF -SSESSMENT EXERCISE
1. What is the difference between synthetic and non-synthetic
media?
.........................................................................................................
.........................................................................................................
.........................................................................................................
.........................................................................................................
.........................................................................................................
2. How can you obtain isolated colonies of fungal culture on solid
medium?
.........................................................................................................
.........................................................................................................
.........................................................................................................
.........................................................................................................
.........................................................................................................
BIO 191 GENERAL PRACTICAL BIOLOGY
340
3. List four important precautions you should take while working
with microbes.
.........................................................................................................
.........................................................................................................
.........................................................................................................
.........................................................................................................
.................... ....................................................................................
4. On the basis of staining, how can you differentiate between gram
positive and gram negative bacteria?
.........................................................................................................
.........................................................................................................
.........................................................................................................
.........................................................................................................
.........................................................................................................
4.0 CONCLUSION
You have successfully learnt how to make culture materials and how to
do the Gram staining of bacteria. As you must have noted that while
working with bacteria you need to be very careful. Always wear your
gloves and wash your hand before and after you finish.
5.0 SUMMARY
Whether natural or artificial, culture media are important in biology.
They enable us to grow organisms for study. They also facilitate the
isolation of organisms of particular interest. However, this is only one of
the many ways in which biological studies are studied. Sometimes
physiological experiments have to be carried out to estimate the extent
of a reaction or a process. In the next unit, we will see how you can set
up some of such experiments.
BIO 191 MODULE 5
341
6.0 TUTOR MARKED ASSIGNMENTS
1. Why do you sometimes have to cultivate organisms.
2. If you had to culture Paramecium in a natural culture medium,
how would you do it?
7.0 REFERENCES/FURTHER READINGS
Berril, N.J. (1979) Biology in action London, Heinemann Eductional
Books Ltd
Soper, R. (Ed.) (1998) Biological Sciences Cambridge U.K. Cambridge
University Press
Stone, R.N., Cozens, A.B., Emia, (1972) New Biology for Tropical
Schools London, Longman Group Ltd.
BIO 191 GENERAL PRACTICAL BIOLOGY
342
UNIT 3 SETTING OF DEMONSTRATIONS OF
PHYSIOLOGICAL PROCESS IN PLANTS
CONTENTS
1.0 Introduction
2.0 Objectives
3.0 Main Content
3.1 Setting Up Physiological Demonstrations
3.2 To set a Potometer
3.3 To set a Respirometer
3.4 To Set Up Demonstration Experiments for Photosynthesis
4.0 Conclusion
5.0 Summary
6.0 Tutor- Marked Assignment
7.0 References/Further Readings
1.0 INTRODUCTION
Certain experiments require special equipment and are tedious to set up.
Instead of asking students to perform such experiment individually,
demonstrations are set up for the class in such a way that each student
can record, interpret and analyse the readings and present the results.
The job of demonstrating experiments is assigned to a technician. In this
exercise, you will learn to set up demonstrations for the following three
physiological processes.
1. Transpiration
2. Respiration
3. Photosynthesis
2.0 OBJECTIVES
After doing this exercise you should be able to:
list and procure equipment and materials required to set up a
given demonstration
set up the demonstrations for transpiration, respiration and
photosynthesis, improvise suitable alternative equipment and
material for these demonstrations, if need be
help students in recording the readings.
BIO 191 MODULE 5
343
3.0 MAIN CONTENT
3.1 Setting Up Physiological Demonstrations
3.2 To Set a Potometer
The loss of water by a plant through stomata or other pores is called
transpiration. The instrument used to show the process and measure its
rate is called a potometer. In this exercise you will set up a potometer.
Materials Required
Potometer
250 ml beaker
Iron stand with a clamp
2 ml graduated pipette
Razor, sharp knife or scissors for cutting a branch
Rubber bung
A piece of rubber tubing (about 6 cm)
Stop watch
Eosin or any other soluble dye
Method
Potometer is generally available in most labs. If it isn't, you can
assemble one as shown in fig. 13.1. To set up the equipment you should
follow the steps given below:
1. Bring a small branch of a soft-leafed plant from your compound
it is important to see that the plant material used is in healthy
condition; therefore while you cut the branch minimize the
damage done. It is best to cut the part to be used for the
experiment under water. So keep a water container ready with
you and place the cut end of the twig quickly in it. Also
remember to make a second cut above 2 cm or more from the end
of the twig, while under water before you fix it in the rubber
bung.
2. Fit the lower end of the branch into a non-flexible rubber tube
and insert it tightly through the hole in the rubber bung. If you
need to drill a hole use a cork-borer. Both the bung and the cork-
borer must be kept wet all the time. You can drill better if water
plus a trace of surfactant is used. A surfactant is a detergent-like
chemical that lower surface tensions.
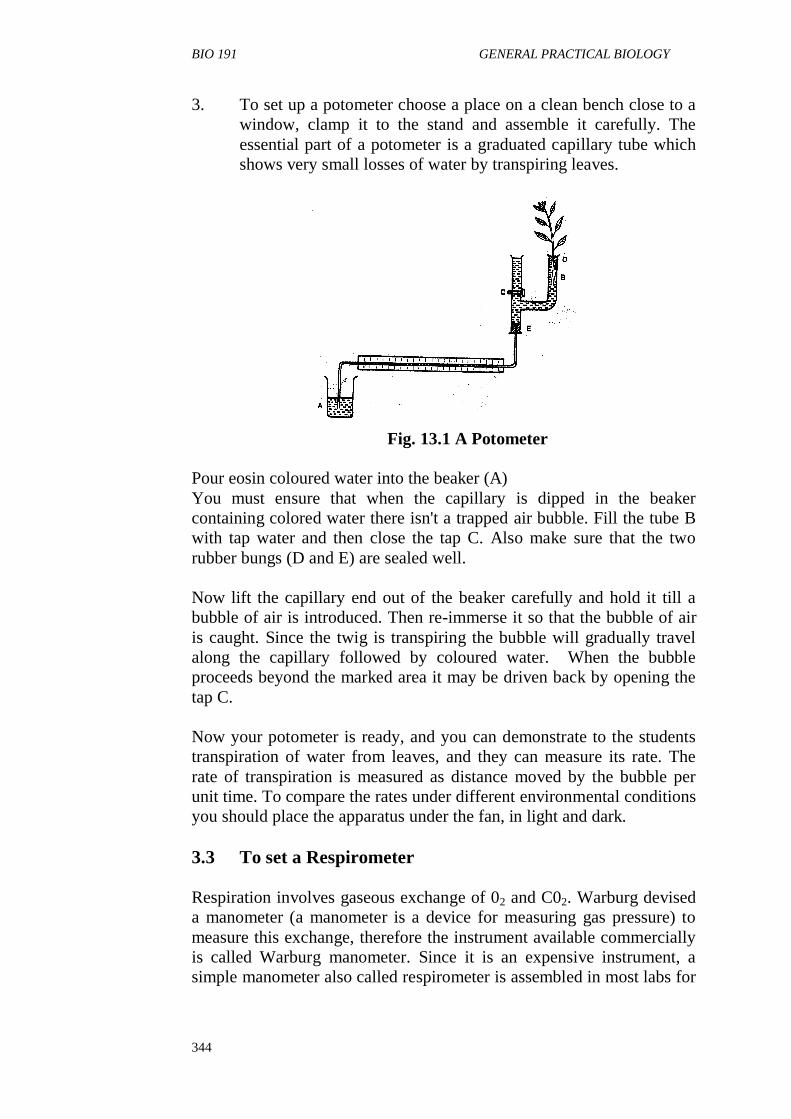
BIO 191 GENERAL PRACTICAL BIOLOGY
344
3. To set up a potometer choose a place on a clean bench close to a
window, clamp it to the stand and assemble it carefully. The
essential part of a potometer is a graduated capillary tube which
shows very small losses of water by transpiring leaves.
Fig. 13.1 A Potometer
Pour eosin coloured water into the beaker (A)
You must ensure that when the capillary is dipped in the beaker
containing colored water there isn't a trapped air bubble. Fill the tube B
with tap water and then close the tap C. Also make sure that the two
rubber bungs (D and E) are sealed well.
Now lift the capillary end out of the beaker carefully and hold it till a
bubble of air is introduced. Then re-immerse it so that the bubble of air
is caught. Since the twig is transpiring the bubble will gradually travel
along the capillary followed by coloured water. When the bubble
proceeds beyond the marked area it may be driven back by opening the
tap C.
Now your potometer is ready, and you can demonstrate to the students
transpiration of water from leaves, and they can measure its rate. The
rate of transpiration is measured as distance moved by the bubble per
unit time. To compare the rates under different environmental conditions
you should place the apparatus under the fan, in light and dark.
3.3 To set a Respirometer
Respiration involves gaseous exchange of 02 and C02. Warburg devised
a manometer (a manometer is a device for measuring gas pressure) to
measure this exchange, therefore the instrument available commercially
is called Warburg manometer. Since it is an expensive instrument, a
simple manometer also called respirometer is assembled in most labs for
BIO 191 MODULE 5
345
routine demonstrations to the students. In this exercise you will learn to
assemble a respirometer to measure respiration rates.
Materials Required
500 ml conical flask
25 ml test tube
T - tube
Pinch clip
A rubber bung
A piece of rubber tube
1 mm diameter graduated pipette
KOH pellets
Stop-clock
Wire gauze
Thermometer
Sprouted mungbean
Method
1 You can assemble a simple respirometer as shown in figure 13.2
2. Take a T - tube, fix its one end in the rubber bung and slip a
piece of rubber tubing and pinch clip to the other end.2 Now fix
the end with the rubber bung to a test tube.
3 Wrap 2 pellets of KOH in a piece of wire gauze and place them at
the bottom of tube. Add a few drops of water.
4 Now insert carefully a wad of cotton to partition KOH from the
specimen (see fig. 13.2). Make sure that the cotton is well above
the wire gauze.
5 Weigh 20 germinating mung bean and place them on the cotton
wad.
6 Join a 2 ml graduated pipette to the central arm of the T with a
piece of rubber tube.
7. Assemble the apparatus and place it in a 500 ml conical flask
containing water at room temperature or any other suitable water
bath. Place thermometer in it to record the temperature. Observe
the marking on the 2 ml graduated pipette of manometer and
calculate in ml the minimum volume change it indicates. If 2 ml
is divided into 20 fractions each fraction will be equal to 100 µl
(1 ml = 1000 µl).
8. Loosen the pinch clip and leave it to equilibrate for 5 to 10
minutes. Then tighten the pinch clip.
9. Insert a drop of colour solution (eosin) in the pipette. It will start
moving to the left. Adjust it to extreme right up to a certain mark
by carefully loosening the pinch clip.
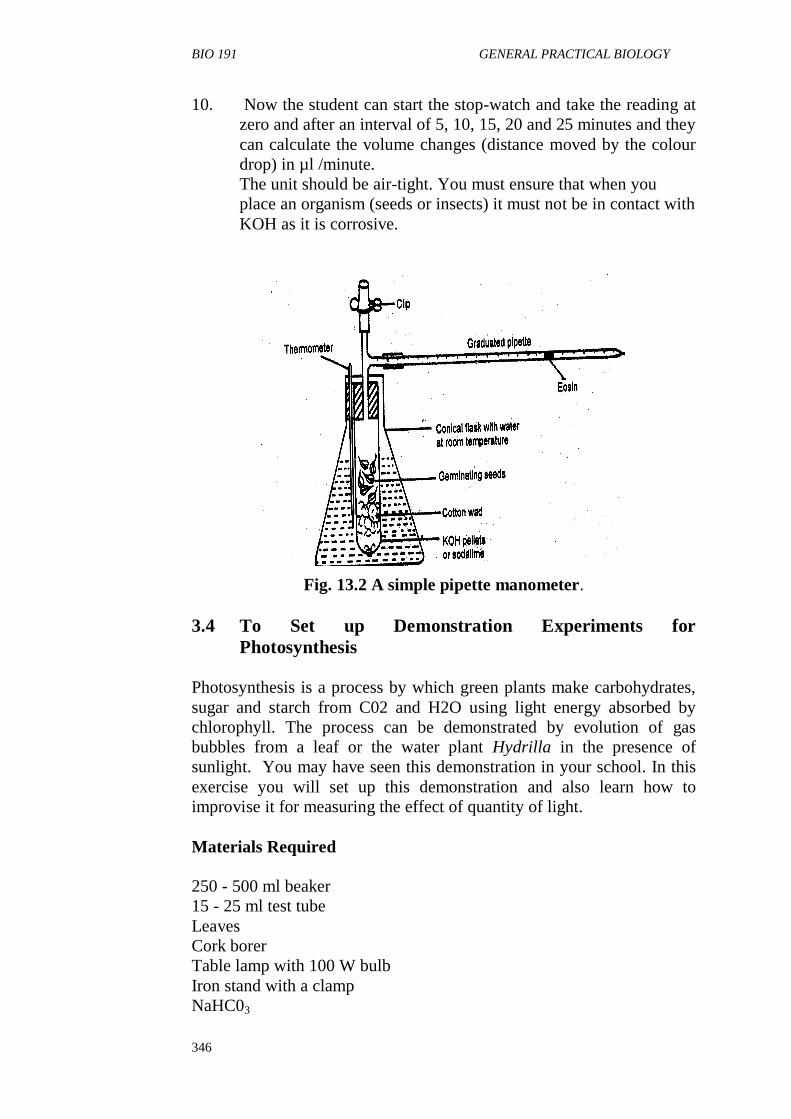
BIO 191 GENERAL PRACTICAL BIOLOGY
346
10. Now the student can start the stop-watch and take the reading at
zero and after an interval of 5, 10, 15, 20 and 25 minutes and they
can calculate the volume changes (distance moved by the colour
drop) in µl /minute.
The unit should be air-tight. You must ensure that when you
place an organism (seeds or insects) it must not be in contact with
KOH as it is corrosive.
Fig. 13.2 A simple pipette manometer.
3.4 To Set up Demonstration Experiments for
Photosynthesis
Photosynthesis is a process by which green plants make carbohydrates,
sugar and starch from C02 and H2O using light energy absorbed by
chlorophyll. The process can be demonstrated by evolution of gas
bubbles from a leaf or the water plant Hydrilla in the presence of
sunlight. You may have seen this demonstration in your school. In this
exercise you will set up this demonstration and also learn how to
improvise it for measuring the effect of quantity of light.
Materials Required
250 - 500 ml beaker
15 - 25 ml test tube
Leaves
Cork borer
Table lamp with 100 W bulb
Iron stand with a clamp
NaHC03
BIO 191 MODULE 5
347
Green, blue and red cellophane paper.
Method
The simple pipette manometer used for measuring the rate of respiration
can be used for the demonstration of the following experiments on
photosynthesis:
A. Measurement of Rate of Photosynthesis
1. Clean the manometer thoroughly and dry it before use.
2. Using a dropper pour 2 ml of 1 % sodium bicarbonate solution
into the tube. Make sure that it does not touch the sides of the test
tube. Now insert a cotton wad into the tube to partition
bicarbonate solution.
3. Cut several discs of leaves with 1 cm diameter cork borer and
keep them moist in a petridish in the dark. Insert one piece in the
tube and place it vertically on the cotton wad.
4. Assemble the apparatus and place it in a 500 ml flask containing
water at room temperature. Cover the flask with black paper
thoroughly. Let it equilibrate for 5 to 10 minutes.
5. Introduce a drop of eosin dye in the pipette and adjust it towards
a mark to extreme right.
6. Start the stop-watch and note the readings on the pipette
immediately and after an interval of 5 to 10 minutes.
7. Now adjust the black paper to make a vertical slit so that the leaf
can be exposed to the light source. Keep the light source 10 cm
away from the apparatus.
8. Again adjust the marker drop to the extreme left up to a mark.
9. Readings can be taken at zero time and after an interval of 5, 10,
15, 20 and 25 minutes.
B. Effect of Light Quality on the Rate of Photosynthesis
1. Cover the light source with green, blue or red cellophane paper.
Readings are taken as in the previous experiment.
SELF-ASSESSMENT EXERCISE
1. Why are KOH pellets kept in the boiling tube of a pipette
manometer?
.........................................................................................................
.. ......................................................................................................
BIO 191 GENERAL PRACTICAL BIOLOGY
348
........................................................................................................
.........................................................................................................
.........................................................................................................
2. Why is a drop of coloured solution introduced in the pipette?
.........................................................................................................
.........................................................................................................
.........................................................................................................
.................................................................................................... .....
.........................................................................................................
(3) What is the purpose of a pinch clip?
........... .............................................................................................
.........................................................................................................
.........................................................................................................
.........................................................................................................
.
(4) What would happened if the rubber tube is sealed at the top?
.........................................................................................................
.........................................................................................................
.........................................................................................................
.........................................................................................................
4.0 CONCLUSION
In these experiments you have learnt to set up demonstrations for
respiration, transpiration and photosynthesis. You have also known how
BIO 191 MODULE 5
349
to improvise alternative materials where necessary. You have also learnt
how to make readings from the experiments.
5.0 SUMMARY
Experiments like the ones in this unit are part of the things that are
involved in learning biology in the practical sessions. There are still
more other activities that biologists are involved in, in the practical
work. Dissection is another aspect which will learn about in the next
unit.
6.0 TUTOR-MARKED ASSIGNMENT
Describe how you set up an experiment to determine the rate of
photosynthesis.
7.0 REFERENCES/FURTHER READINGS
Berri], N.J. (1979) Biology in action London, Heinemann Educational
Books Ltd.
Soper, R. (Ed) (1998) Biological Sciences Cambridge U.K.,
Cambridge University Press.
Stone, R.N. Cozens, A.B., Emia, F.I (1972) New Biology for Tropical
Schools London, Longman Group Ltd.
BIO 191 GENERAL PRACTICAL BIOLOGY
350
UNIT 4 SETTING UP APPARATUS FOR
DEMONSTRATING PHYSIOLOGICAL
ACTIVITY IN ANIMALS
CONTENTS
1.0 Introduction
2.0 Objectives
3.0 Main Content
3.1 Apparatuses Animal Physiology
3.2 Setting up Kymograph Apparatus
3.3 Demonstrating Microcirculation in frog
3.3.1 How to Pith a Frog
4.0 Conclusion
5.0 Summary
6.0 Tutor Marked Assignment
7.0 References/Further Readings
1.0 INTRODUCTION
In the earlier experiment you learnt how to set up an apparatus to show
physiological processes in plants. In this experiment you will learn how
to set up two apparatuses to demonstrate physiological activity in
animals. You will set up the kymorgraph apparatus to show
physiological activity in the muscle and heart of a frog, and set up an
experiment to observe the capillary blood flow in the webbed foot of a
frog. These experiments are usually performed at undergraduate as well
as graduate level and it is the lab technical staff who are expected to
arrange all the equipment required for them. The students are expected
to do the dissection and make the actual recording. The
supervisor/school in charge of the lab usually demonstrate these
experiments to the students but it is the technical staff present who give
assistance where the students require it.
2.0 OBJECTIVES
After doing this experiment you will be able to:
set up a kymograph apparatus to measure the heart rate and
muscle activity in frog.
Set up an experiment to show the capillary blood flow in a frog,
and
immobilize a frog by pithing.
BIO 191 MODULE 5
351
3.0 MAIN CONTENT
3.1 Apparatuses for Animal Physiology
3.2 Setting up a Kymograph Apparatus
A kymograph apparatus consists of a vertical cylindrical drum which
can be made to rotate at a variety of speeds by an electric motor. It is
used for recording movements such as contraction of muscle,
contraction of heart, etc.The speed of rotation can be adjusted as
required. Movement can be recorded by either a pen filled with suitable
ink, writing on white paper, or a writing stylus marking on a writing
paper which has been blackened evenly. This paper is pasted on the
drum.
If the kymograph recordings are to be of any use, it is important to
provide a time scale. In most kymographs, the speed at which the drum
rotates is given and a time scale is worked out from this information.
An electrical stimulator is usually made by attaching wires on each side
of a 1.5 volt dry cell. The ends of these wires are fitted with simple
electrodes.
Materials Required
Kymograph Recording System Consisting of:
Kymograph apparatus
1.5 volt dry cell (stimulator) with electrodes attached to it
Muscle lever
Double hook
Femur Clamp and Stand
5 gm weight
Recording stylus
Dissection tray, dissection instruments
Bone cutter
Frog Ringer solution, 20% urethane
50 ml beaker
Cotton, Thread
Injection syringe and needle
Live Frog
Procedure
Blackening of Kymograph Paper.
BIO 191 GENERAL PRACTICAL BIOLOGY
352
1. Cut a strip of recording paper to the height of the drum and paste
it on the drum. Blacken it evenly by holding it over a kerosene /
zylene flame.
2. When the drum is ready for recording, mount the drum on the
instrument taking care not to smudge the blackening.
Setting up the instrument for recording the muscle twitch
1. Fit the femur clamp to the stand. This will hold the nerve
muscle preparation vertically directly above the point where it
will be attached to the muscle lever (dissected muscle preparation
will be provided by the course tutor Fig 14.1
2. Hook the thread to the lever with a double hook and to the other
end of the hook tie a 5 g weight. This arrangement keeps the
lever in a horizontal position and the muscle and thread in a
vertical position .
3. Clamp the muscle in such a way that the distance between the
fulcrum and the tendon attachment raises the lever by about 2
inches for every contraction of the muscle. Keep the preparation
moist by using a cotton soaked in frogs Ringer solution.
4. Attach the writing stylus to the horizontal lever in such a way that
it just touches the drum without affecting its speed. Set the motor
at a speed of 32 cm/sec. Now the kymograph apparatus is ready
for recording the muscle twitch.
Setting up the instrument for recording heart beat in situation
1. Cover the revolving drum with sooted writing paper.
2. Attach the thread to the lever by means of a small piece of
plasticine. Position the lever on the stand and counter balance it
with plasticine so that the heart is fairly stretched and the lever is
horizontal.
3. You will be provided with a frog with heart exposed. Attach a
hook with thread to the muscle of the ventricle. The writing point
should move up a centimeter with convulsion of the heart.
4. Be careful to adjust the writing lever in such a way that there is
hardly any friction between the writing stylus and paper.
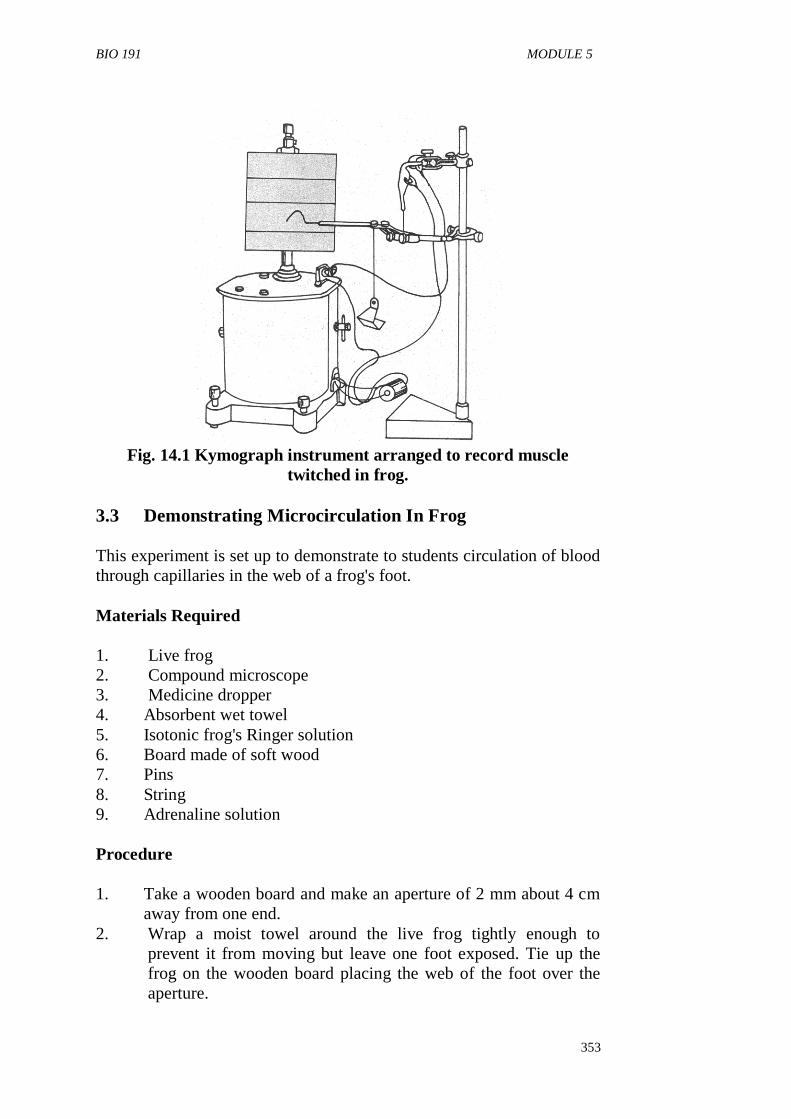
BIO 191 MODULE 5
353
Fig. 14.1 Kymograph instrument arranged to record muscle
twitched in frog.
3.3 Demonstrating Microcirculation In Frog
This experiment is set up to demonstrate to students circulation of blood
through capillaries in the web of a frog's foot.
Materials Required
1. Live frog
2. Compound microscope
3. Medicine dropper
4. Absorbent wet towel
5. Isotonic frog's Ringer solution
6. Board made of soft wood
7. Pins
8. String
9. Adrenaline solution
Procedure
1. Take a wooden board and make an aperture of 2 mm about 4 cm
away from one end.
2. Wrap a moist towel around the live frog tightly enough to
prevent it from moving but leave one foot exposed. Tie up the
frog on the wooden board placing the web of the foot over the
aperture.
BIO 191 GENERAL PRACTICAL BIOLOGY
354
3. Pin the web of the foot over the aperture. You will not hurt the
frog as long as you don't pin it by the foot. The web does not
have any nerves in it, therefore it does not feel any pain on being
pinned.
4. Support the plank on the stage of the microscope as shown in fig
14.2 and adjust the foot under the low power of the microscope.
The demonstration is now ready to be observed by the students.
3.3.1 How to Pith a Frog
When using live animals in the laboratory it is important to understand
the purpose for which they are to be used. They must always be treated
in a humane way. Never cause them unnecessary injury or irritation.
Accordingly, if any tissue or organ damage may results from
experimentation, first put the animal under an anesthetic or treat the
nervous system to make it insensitive to pain. Avoid injuring the
animal's tissue or making it bleed; such damage makes the animal less
capable of normal reactions.
A spinal frog, one in which the entire brain is destroyed, is prepared by a
procedure known as pithing.
1. Hold the frog as shown in fig. 14.3, using the thumb and finger to
secure the limbs.
2. With the index finger, press the snout down so that the head is at
a sharp angle to the body.
3. Run the dissecting needle down the midline of the head. 2-3mm
behind the posterior border of the eardrums, until a depression is
felt at the rear of the skull. This indicates the location of the
foramen magnum, the opening through which the spinal cord
emerges out of the skull.
4. Using the dissecting needle, with a sharp movement pierce the
skin at this point and insert the needle into the brain through the
foremen magnum. Twist and turn the needle to destroy the brain.
Halt any bleeding that may result and use the animal.

BIO 191 MODULE 5
355
Fig. 14.2: Demonstrating microcirculation in the web of frog
Fig. 14.3: Pithing the brain of a frog
SELF-ASSESSMENT EXERCISE
Practically demonstrate how you will immobilize a frog by pithing.
BIO 191 GENERAL PRACTICAL BIOLOGY
356
You may not find this easy. Don't worry; you will not have to do this too
often.
4.0 CONCLUSION
You have learnt that with some apparatuses you can study animals alive.
The advantage in such device is that the real happening in the organisms
can be clarified. Using only dead organisms may not be as explicit. So
you can see that biologist involve various means in their study of life.
5.0 SUMMARY
In this unit we saw how animals can be studied while still alive. In the
next unit we will see how they are studied as dead. We will be able to
discern those aspects of studies that can still be meaningful even with
dead animals.
6.0 TUTOR-MARKED ASSIGNMENT
How will you demonstrate microcirculation in a frog?
7.0 REFERENCES/FURTHER READINGS
Berril, N.J. (1979) Biological in action London, Heinemann Educational
Books Ltd.
Soper, R. (Ed) (1998) Biological Sciences Cambridge U.K. Cambridge
University Press.
Stone, R.N., Cozens, A. B, Emia, F.I. (1972) New Biology for Tropical
Schools London, Long man Group Ltd.
BIO 191 MODULE 5
357
UNIT 5 PREPARATION REQUIRED FOR
DISSECTIONS
CONTENTS
1.0 Introduction
2.0 Objectives
3.0 Main Content
3.1 Preparation for Dissection
3.2 Procuring Animals
3.3 Anaesthesizing the Animals
3.4 Theoretical knowledge
3.5 Setting up Dissection Trays
3.6 Pithing
3.7 Flag labeling
3.8 Safe Disposal of Dissected Animals
3.9 General Instructions for Dissection
3.10 Dissection of Earthworms – General Anatomy.
4.0 Conclusion
5.0 Summary
6.0 Tutor Marked Assignment
7.0 References/Further Readings
1.0 INTRODUCTION
Dissection is a major component of the biology practical. The meaning
of dissection is to cut open the animal in order to ascertain the structure
of its parts. The object of dissection is to separate the several parts from
one another, so as to define their boundaries and display clearly their
mutual relations. Dissection consists mainly in removing the connective
tissue which binds the several parts together. Dissection requires lots of
preparations before hand.
In this unit you are also provided with some dissecting guide to help you
through some dissections.
2.0 OBJECTIVES
After doing this experiment you should be able to:
prepare dissection trays/petriplates
use the dissection guides provided
anaesthesize the animals correctly
dispose dissected animals safely.
BIO 191 GENERAL PRACTICAL BIOLOGY
358
3.0 MAIN CONTNET
3.1 Preparation for Dissection
Materials Required
Dissection trays
Petridishes
Dissection kit
Chloroform
Ethane
Formalin
Urethane
Microscope
Table lamp
Animals
Procedure
In schools, colleges and universities, dissection of chordates/non-
chordates is one of the major practical. A lab technician has to perform
several tasks before and after dissection.
3.2 Procuring Animals
Orders for animals should be placed with an animal supplier according
to the number of students in a class. This exercise should be done two-
three days before dissection is to be performed.
3.3 Anaesthesizing the Animals
Before dissection animals are given anaesthesia. Chloroform and either
are used as anaesthesing agents. Rats, frogs, and pigeons are generally
freshly chloroformed for the dissection, though for some of the
dissections e.g. cranial nerves in rat and internal ear in frog, preserved
specimens are required. Similarly scoliodon is also preserved after
anaesthesizing them. Preservatives commonly used are formalin (5%,
8% or 10%) and 70% alcohol.
3.4 Theoretical Knowledge
Keep a well-labeled diagram of the dissection to be done in the
classroom. You should have some theoretical knowledge of the
dissection to be performed e.g if students have to dissect male or female
reproductive organs of rat, frog or other animals, then you should be
BIO 191 MODULE 5
359
able to differentiate them morphologically, just by looking at them
externally.
3.5 Setting up of dissection trays
Large animals like frog, rat, fish, pila, leech and other animals are
dissected in dissection trays whereas small animals such as cockroach
and small insects can be dissected in petriplates.
It should be seen that wax is spread over trays uniformly and water does
not drip from the trays. The trays should be half filled with water so that
the animal can be fully immersed in it. The trays should not be
completely filled with water.
One set of dissection kit (about which you have studied in detail in
Experiment 1), dissection tray, a microscope and a table lamp should be
arranged for the teacher/instructor. Similar sets should be arranged for
students. It should be seen that dissection instruments are clean and
sharp.
Water should be kept clean in the dissection tray during dissection by
changing it whenever it is stain with blood etc.; so that visibility remains
the same. If any animal is bleeding profusely, alcohol dipped cotton
should be applied to the affected organ blood vessel. See that every
waste of dissection is put in the petridish. It should not be thrown
carelessly on the top of table.
3.6 Pithing
Some of the experiments like muscle twitch and heart profusion in frog
do not require chloroform-anaesthetized animals. Before dissection is
started, you have to anesthetise the frog by injecting 2.5 ml of 20%
urethane intramuscularly. This would quieten the frog. Alternatively you
could immobilize the frog by pithing. You have learnt how to pith a frog
in Unit 4 module 3, of this course.
3.7 Flag Labeling
Frequently, the students are asked to dissect some organs, blood vessels
or nerves etc. and flag label them. For flag labeling, small pieces of
paper (2.5 x 0.7 cm) are prepared and a needle is passed through each
close to one end.
The names of organs, blood vessels or nerves are written on these flags
and each flag is inserted in the dissecting trays close to the organ, blood
vessel or nerve bearing the name on the flag.
BIO 191 GENERAL PRACTICAL BIOLOGY
360
Some of the dissections require black-preparing. You have to cut black
paper into small and thin strips which can be inserted underneath blood
vessels and nerves.
3.8 Safe Disposal of Dissected Animals
You have already studied in Unit 14 and Exercise 13 of LT - 1 course
that the dissected animals should be buried deep in the soil. Simply
placing the material in a plastic bag and putting it in the dustbin is not
good enough.
SELF-ASSESSMENT EXERCISE
1. Which are the commonly used anaesthesing agents?
.....................................................................................................
.....................................................................................................
.....................................................................................................
.....................................................................................................
2 How do you pith animals?
.....................................................................................................
.....................................................................................................
.....................................................................................................
....................................................................................................
3. How will you display the dissected specimens?
.....................................................................................................
.....................................................................................................
....................................................................................................
.....................................................................................................
BIO 191 MODULE 5
361
4. Which is the safest way to dispose off a dissected animal?
.....................................................................................................
.....................................................................................................
.........................................................................................................
3.9 General Rules for Dissection.
As you have learnt in section 3.2.2, you need to give some anaesthesia
to animals before you dissect them. The common anaesthesia used in the
biology laboratory are chloroform and ether. For rats, frogs and pigeons,
it is better to dissect them immediately after anaesthesia.
However, certain studies for example, of the nervous system are better
done with preserved animals. Formalin (5%, 8% or 10%) and 70%
alcohol are the common laboratory preservatives. It is usually better to
do dissection after you have done the theoretical studies.
Opening Up
Invertebrates are better opened up from their dorsal side while
vertebrates from their ventral side. In both cases, you pick the skin up
with a pair of forceps (if the animal is big), if it is small, you will have to
hold the animal with your left hand while with a pair of scissors you
make your incision with the right hand on the mid-line of the animal
with the scissors pointing upwards to avoid damage to lower internal
structures. This incision should go along the line of the animal as much
as possible. Then make side slits in the same manner, with the scissors
pointing upwards to avoid damage to underlying tissues.
With the scapel, gently scrape the inside layer of the skin to separate
skin from the underlying tissues by cutting through subcutenous tissue.
Once the skin has been removed the animal must be laid down (even if it
is small) and pinned securely to the dissecting board. It is important to
pin specimen securely down so that both hands will be free for use.
Seekers could then be used to probe parts. When other walls have to be
opened up to reach internal organs, the same cautions as we took for
opening up the skin will apply.
You have to be very gently in dissecting so as to avoid damage to
internal organs. If the dissection involves cutting through tissues
(especially blood vessels) then you must take steps to ensure that the
blood flow or the contents of the cut tissues or organs do not interfere
BIO 191 GENERAL PRACTICAL BIOLOGY
362
with your studies. Usually, you may have to wash, and soak away blood
with cotton wool or blotting paper.
Appendixes are laboratory
Mammal you could use for dissecting the earthworm,
Grasshopper,
The bony fish,
Cartilaginous fish,
Amphibia,
Reptile,
Fish,
Birds,
Mammals.
3.10 Dissection of Earthworms - General Anatomy
General Remarks
Earthworms are usually killed with chloroform soaked on cotton wool.
Avoid the liquid coming into direct contact with the worm as this will
make it contract violently and rupture. This contraction will cause rigor
which makes the worm stout and difficult to pin. An alternative method
is to kill the worm by immersion in very hot water and removed as
quickly as possible. If left for too long they become flabby and
decolorized. The dead earthworm should be allowed to relax for about
15 minutes.
Procedure
Examine the worm externally and note the prostomium, chaetae and the
position of the genital and clitellum. This is important in order to
ascertain the species of Lumbricus because the local species is definitely
not Leterrestris generally described in most text books.
Distinguish the dorsal and ventral sides of the worm and then proceed to
dissect.
i Hold the worm in the left hand between the thumb, forefinger and
the third finger with the dorsal side up.
ii With a pair of fine scissors make a slit on the body wall along the
middorsal line in the region of the clitellum. Do not cut too
deeply, keep the points of the scissors up and cut forwards as far
as to the prostomium.
iii Then proceed to pin the worm in the waxed plates as follows:
BIO 191 MODULE 5
363
a. Place a pin through the prostomium and another through
the mid posterior end such that the worm is fully stretched.
b. Starting from the anterior end, place pins in pairs as nearly
opposite as possible.
c. Use pins to tear off the septa and free the body wall
between each pair of pins.
Note: Each pin should be loped at an angle of about 45º so as to allow
free movement of instruments. It is absolutely important that the worm
be fully stretched as you work. Later adjustments by removing pins will
result in poor and unsatisfactory dissection.
Now that you have opened the viscera of the worm, proceed to identify
the various organs and systems without necessarily displacing them.
Nervous System
i Having pinned the gut to the side, display the nerve chord which
runs through the entire length of the animal and also the
segmental ganglia.
ii identify the circumpharyngeal nerve ring.
iii Display the ring to one side.
Excretory System
Identify the segmentally arranged paired nepthridia. Draw your own
dissection and label fully.
4.0 CONCLUSION
In this unit, you have learnt how to prepare different solutions, and the
precautions you must take,. You have also learnt the general rules for
handling solutions.
5.0 SUMMARY
The dissection of different parts of lower vertebrates, higher vertebrates,
and invertebrates has really shown us the complexity and linkages in the
body system of animals.
6.0 TUTOR-MARKED ASSIGNMENT
1. Describe the process of setting up a dissection tray in the
laboratory.
2. What are the rules one should observe in the process of carrying
out dissection?

BIO 191 GENERAL PRACTICAL BIOLOGY
364
7.0 REFERENCES/FURTHER READINGS
Beril, N. J (1979): Biology in Action London, Heinemann Edicational
Books Ltd
Soper, R. (Ed) Biological Sciences Cambridge U.K., Cambridge Press
Stone, R. N. Cozens, A. B. Emia, F. I. (1972), New Biology for Tropical
Schools, Longman Group Ltd)
BIO 191 MODULE 5
365
MODULE 4
Unit 1 Dissection of Insects – General Anatomy
Unit 2 Morphology of Lower Vertebrates – Fish, Amphibians and
Reptiles
Unit 3 Dissection of Dogfish – General Anatomy
Unit 4 Dissection of Toad – Musculature, Alimentary Canal and
Urinogenital System
Unit 5 Dissection of Toad – Arterial System
UNIT 1 DISSECTION OF INSECTS - GENERAL
ANATOMY
General Remarks
The essence of the dissection is to show as clearly as possible, the
various internal organs / systems of the animal. To this end, the organs /
systems should be displayed properly.
Materials
Freshly killed grasshoppers e.g Zonocerus variegatus or cockroaches.
Procedure
Pin down the insect to your waxed dissecting dish with the dorsal side
facing upwards. You may hold up the insect with your left hand as an
alternative approach. Then make longitudinal cut along the dorso-ventral
line (i.e. laterally preferably on the hand side, progressing from the
posterior tip of the abdomen to the anterior end of the animal (Fig 16.1).
If you held your insect while making the lateral cut, now pin down on
your dissecting dish. Carefully lift the roof of the abdomen (tergites)
intact from the right and turn it in such a way that the undersurface of
the roof faces upwards. If this is done properly, the hearts and aorta
circulatory system can be seen (Fig. 16.2)
Pin down the roof and cover the specimen with water. Then identify:
i The Alimentary System
Pull this out to the right and pin down and take note of the following:
Salivary glands, and ducts, oesophagus, crop, gizzard, caeare, midgut,
malphigian, tubules, lundgut and rectum.

BIO 191 GENERAL PRACTICAL BIOLOGY
366
ii The Reproductive System
A Female: ovarioles, a pair of calyx, a pair of lateral oviduct,
vagina, spermatheca, spermathecal duct.
B Male: Testes, follicles, testis, vas deferens, sEmial vesicles,
accessory gland, ejaculatory duct.
iii The Nervous System
Brain (lies on the dorsal side of the head, sub-oesophageal ganlion) (lies
under the oesophagus), circum-oesophageal commissures, three thoracic
ganglia, five abdomen ganglia, the connectives.
v Having dissected the insect to show the features listed above,
make a large drawing of your own dissection and label fully.
Questions
Why are invertebrates generally dissected from the dorsal
surface?
Fig. 16. 1Cutting open the insect (Variegated grasshopper, along the
broken line)
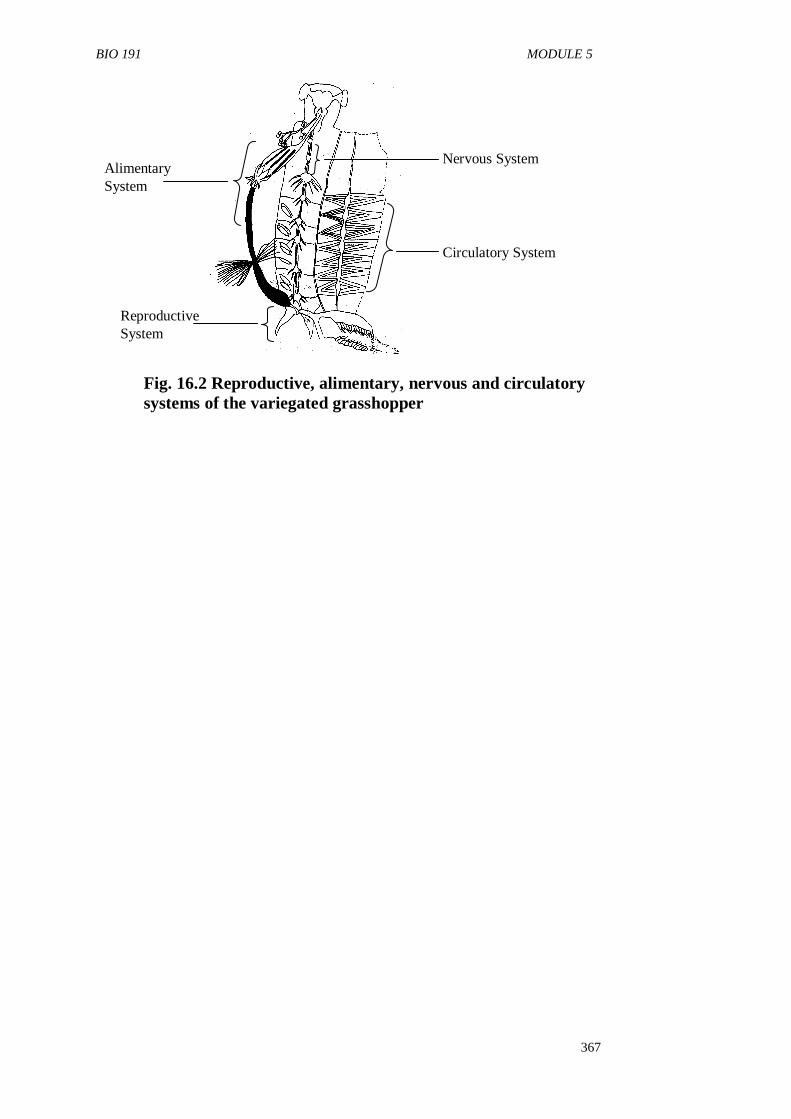
BIO 191 MODULE 5
367
Fig. 16.2 Reproductive, alimentary, nervous and circulatory
systems of the variegated grasshopper
Nervous System
Circulatory System
Reproductive
System
Alimentary
System
BIO 191 GENERAL PRACTICAL BIOLOGY
368
UNIT 2 MORPHOLOGY OF LOWER VERTEBRATES -
FISH, AMPHIBIANS AND REPTILES
General Remarks
A Fish
Fishes are the largest group of vertebrates. There are two classes of fish,
namely Bony fish or Osteichthyes and Cartilaginous fishes or
Chondricthyes
1. Bony and Cartilagenous Fishes
(a) Bony fish possess mainly bony endo-and exo-skeleton. They
constitute the largest number of living vertebrates. Tilapia is a
tropical and subtropical bony fish which live in fresh water and
estuarine waters of Africa. Tilapia zillii is here described as a
typical example.
Based on Nelso (1976) "Fishes of the World”, Tilapia zillii can be
classified as follows:
Phylum: Chrodata
Subphylum: Vertebrata
Subclass: Actinoptergii
Infraclas: Teleostei
Superorder: Acanthopterygii
Order: Perciformes
Family: Cichlidae
Genus: Tilapia
Species: Tilapia zillii
Many species of Tilapia abound in Africa and are very similar to each
other, differing only in minor details. Tilapia species are substrate
spawner while identical species which brood their egg and frys in the
mouth are called Sarotherodon.
Head
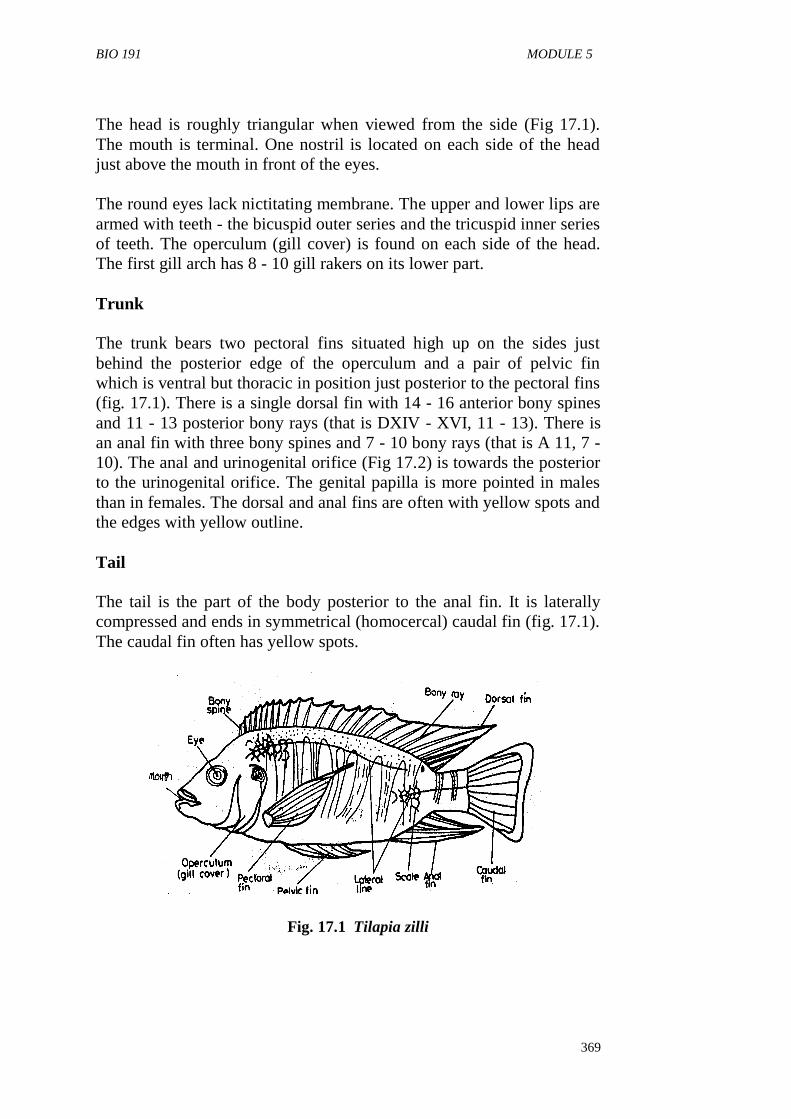
BIO 191 MODULE 5
369
The head is roughly triangular when viewed from the side (Fig 17.1).
The mouth is terminal. One nostril is located on each side of the head
just above the mouth in front of the eyes.
The round eyes lack nictitating membrane. The upper and lower lips are
armed with teeth - the bicuspid outer series and the tricuspid inner series
of teeth. The operculum (gill cover) is found on each side of the head.
The first gill arch has 8 - 10 gill rakers on its lower part.
Trunk
The trunk bears two pectoral fins situated high up on the sides just
behind the posterior edge of the operculum and a pair of pelvic fin
which is ventral but thoracic in position just posterior to the pectoral fins
(fig. 17.1). There is a single dorsal fin with 14 - 16 anterior bony spines
and 11 - 13 posterior bony rays (that is DXIV - XVI, 11 - 13). There is
an anal fin with three bony spines and 7 - 10 bony rays (that is A 11, 7 -
10). The anal and urinogenital orifice (Fig 17.2) is towards the posterior
to the urinogenital orifice. The genital papilla is more pointed in males
than in females. The dorsal and anal fins are often with yellow spots and
the edges with yellow outline.
Tail
The tail is the part of the body posterior to the anal fin. It is laterally
compressed and ends in symmetrical (homocercal) caudal fin (fig. 17.1).
The caudal fin often has yellow spots.
Fig. 17.1 Tilapia zilli
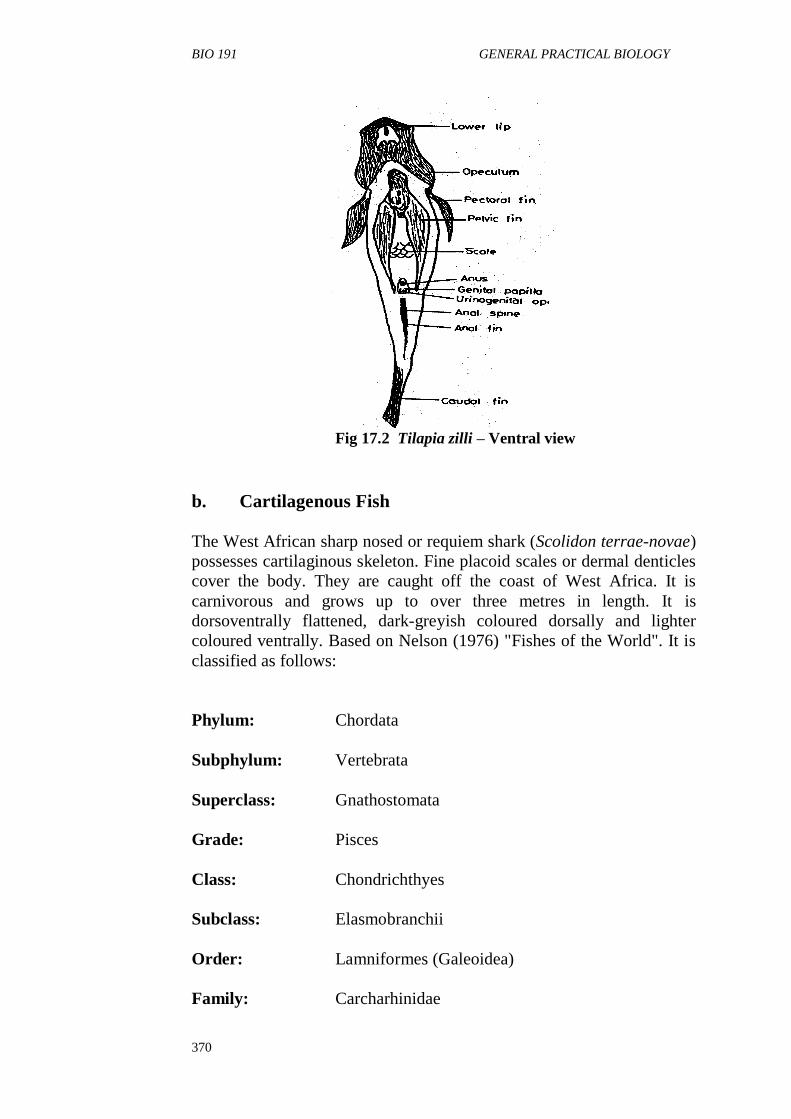
BIO 191 GENERAL PRACTICAL BIOLOGY
370
Fig 17.2 Tilapia zilli – Ventral view
b. Cartilagenous Fish
The West African sharp nosed or requiem shark (Scolidon terrae-novae)
possesses cartilaginous skeleton. Fine placoid scales or dermal denticles
cover the body. They are caught off the coast of West Africa. It is
carnivorous and grows up to over three metres in length. It is
dorsoventrally flattened, dark-greyish coloured dorsally and lighter
coloured ventrally. Based on Nelson (1976) "Fishes of the World". It is
classified as follows:
Phylum: Chordata
Subphylum: Vertebrata
Superclass: Gnathostomata
Grade: Pisces
Class: Chondrichthyes
Subclass: Elasmobranchii
Order: Lamniformes (Galeoidea)
Family: Carcharhinidae
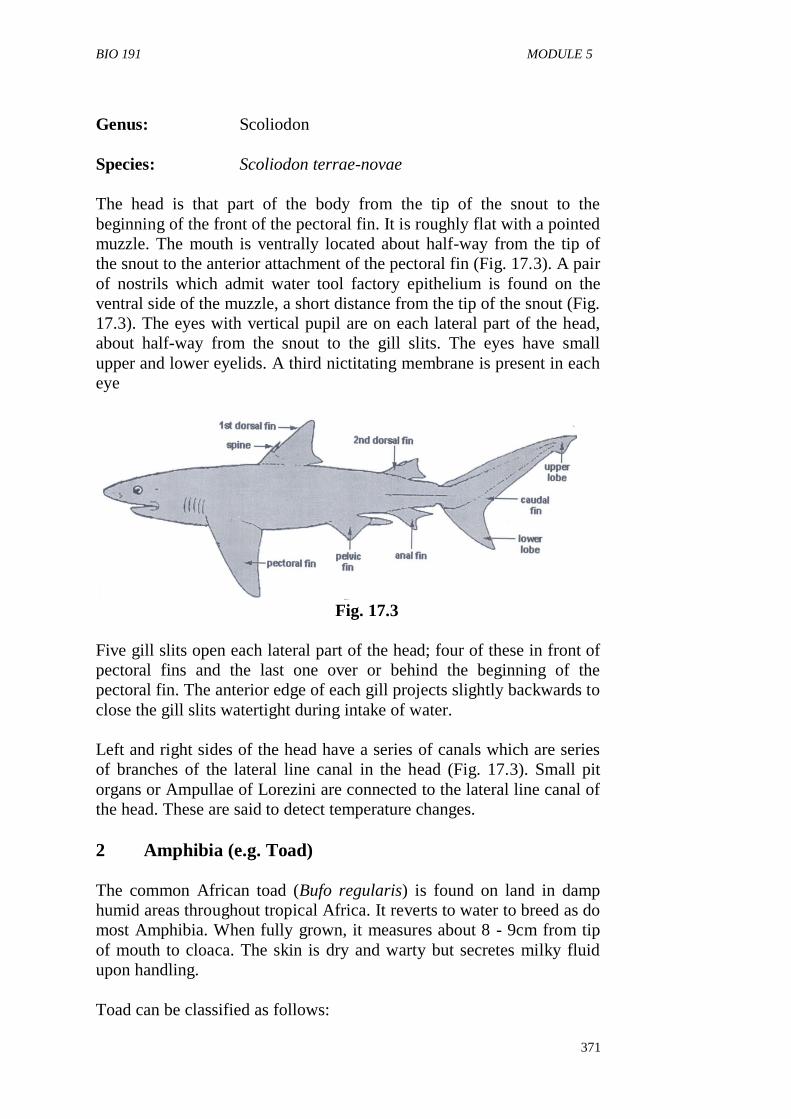
BIO 191 MODULE 5
371
Genus: Scoliodon
Species: Scoliodon terrae-novae
The head is that part of the body from the tip of the snout to the
beginning of the front of the pectoral fin. It is roughly flat with a pointed
muzzle. The mouth is ventrally located about half-way from the tip of
the snout to the anterior attachment of the pectoral fin (Fig. 17.3). A pair
of nostrils which admit water tool factory epithelium is found on the
ventral side of the muzzle, a short distance from the tip of the snout (Fig.
17.3). The eyes with vertical pupil are on each lateral part of the head,
about half-way from the snout to the gill slits. The eyes have small
upper and lower eyelids. A third nictitating membrane is present in each
eye
Fig. 17.3
Five gill slits open each lateral part of the head; four of these in front of
pectoral fins and the last one over or behind the beginning of the
pectoral fin. The anterior edge of each gill projects slightly backwards to
close the gill slits watertight during intake of water.
Left and right sides of the head have a series of canals which are series
of branches of the lateral line canal in the head (Fig. 17.3). Small pit
organs or Ampullae of Lorezini are connected to the lateral line canal of
the head. These are said to detect temperature changes.
2 Amphibia (e.g. Toad)
The common African toad (Bufo regularis) is found on land in damp
humid areas throughout tropical Africa. It reverts to water to breed as do
most Amphibia. When fully grown, it measures about 8 - 9cm from tip
of mouth to cloaca. The skin is dry and warty but secretes milky fluid
upon handling.
Toad can be classified as follows:
BIO 191 GENERAL PRACTICAL BIOLOGY
372
Phylum: Chordata
Subphylum: Vertebrata
Class: Amphibia
Subclass: Aspidospondyli
Order: Salienta (Anura, Batrachia)
Family: Bufonidae
Genus: Bufo
Species: Bufo regularis
Head
The head has a rounded snout bearing a terminal mouth with wide gape.
Two very bulbous eyes sit on upper part of the head. The eye has eyelids
that open the eye by up and down movement. Inside the eyelid is a third
eyelid, the nictitating membrane. A pair of external nares open just
above the mouth. A tympanic membrane or ear drum is seen as oval
patch of skin on the angle of the jaw just behind the eye. A little
posterior to the tympanum is oval patch marking the opening of poison
glands. These glands excrete milky fluid upon handling the toad
(Fig.17.4).

BIO 191 MODULE 5
373
The mouth bears no teeth. The tongue is attached to the anterior floor of
the lower jaw. At the roof of the mouth are two bulged rounded
structures corresponding t the position of the eye balls. Near these and
anterior to them are internal openings of the nasal cavity (Fig. 17.4).
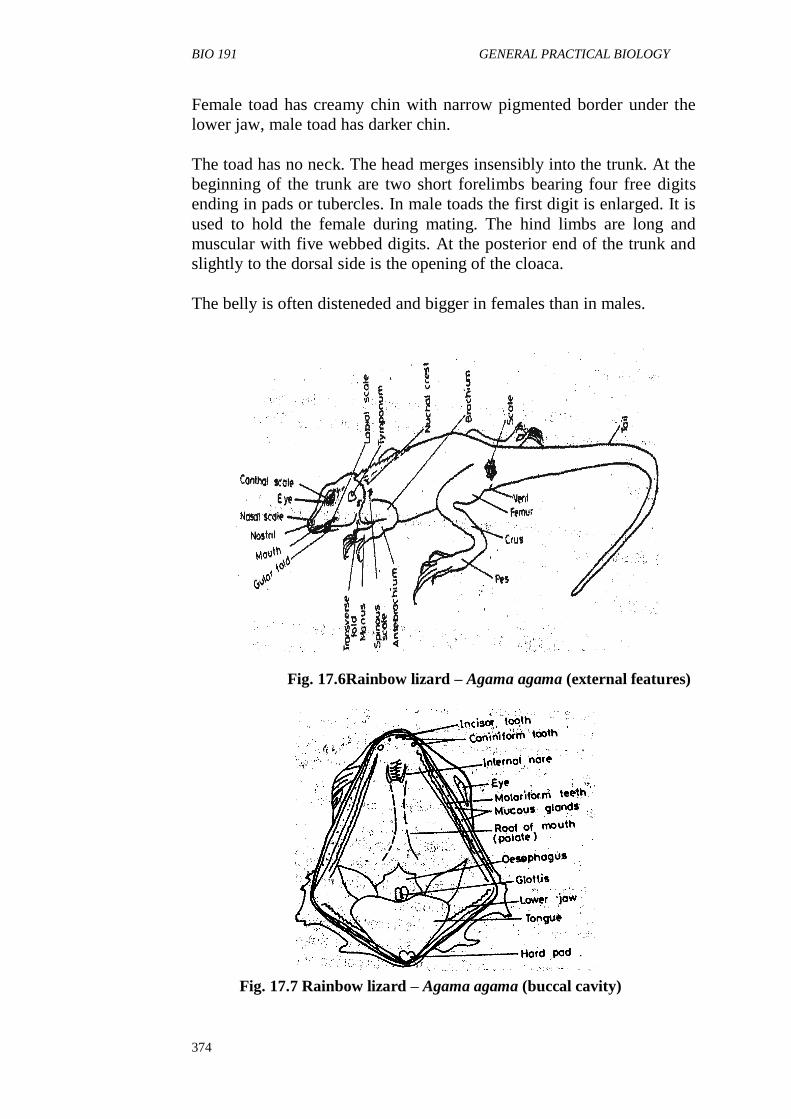
BIO 191 GENERAL PRACTICAL BIOLOGY
374
Female toad has creamy chin with narrow pigmented border under the
lower jaw, male toad has darker chin.
The toad has no neck. The head merges insensibly into the trunk. At the
beginning of the trunk are two short forelimbs bearing four free digits
ending in pads or tubercles. In male toads the first digit is enlarged. It is
used to hold the female during mating. The hind limbs are long and
muscular with five webbed digits. At the posterior end of the trunk and
slightly to the dorsal side is the opening of the cloaca.
The belly is often disteneded and bigger in females than in males.
Fig. 17.6Rainbow lizard – Agama agama (external features)
Fig. 17.7 Rainbow lizard – Agama agama (buccal cavity)
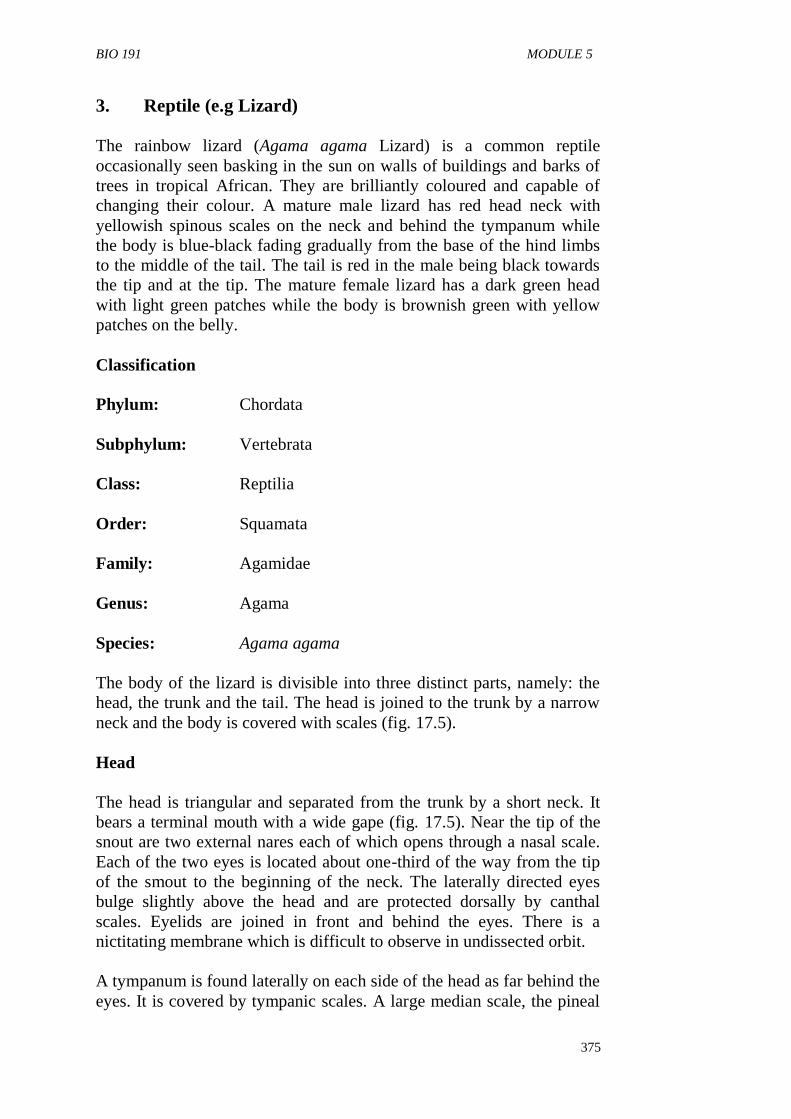
BIO 191 MODULE 5
375
3. Reptile (e.g Lizard)
The rainbow lizard (Agama agama Lizard) is a common reptile
occasionally seen basking in the sun on walls of buildings and barks of
trees in tropical African. They are brilliantly coloured and capable of
changing their colour. A mature male lizard has red head neck with
yellowish spinous scales on the neck and behind the tympanum while
the body is blue-black fading gradually from the base of the hind limbs
to the middle of the tail. The tail is red in the male being black towards
the tip and at the tip. The mature female lizard has a dark green head
with light green patches while the body is brownish green with yellow
patches on the belly.
Classification
Phylum: Chordata
Subphylum: Vertebrata
Class: Reptilia
Order: Squamata
Family: Agamidae
Genus: Agama
Species: Agama agama
The body of the lizard is divisible into three distinct parts, namely: the
head, the trunk and the tail. The head is joined to the trunk by a narrow
neck and the body is covered with scales (fig. 17.5).
Head
The head is triangular and separated from the trunk by a short neck. It
bears a terminal mouth with a wide gape (fig. 17.5). Near the tip of the
snout are two external nares each of which opens through a nasal scale.
Each of the two eyes is located about one-third of the way from the tip
of the smout to the beginning of the neck. The laterally directed eyes
bulge slightly above the head and are protected dorsally by canthal
scales. Eyelids are joined in front and behind the eyes. There is a
nictitating membrane which is difficult to observe in undissected orbit.
A tympanum is found laterally on each side of the head as far behind the
eyes. It is covered by tympanic scales. A large median scale, the pineal
BIO 191 GENERAL PRACTICAL BIOLOGY
376
scale, is found on top of the head beneath which is the pineal foramen.
Below the chin is a fold of skin, the jugular fold. Nuchal crest is found
on the dorsal side of the neck.
Trunk
The trunk is about two and a half times the length of the head. It is
roughly flattened dorso-ventrally. It bears two pairs of limbs with five
clawed digits on each limb. The fore-limbs are shorter than the hind-
limbs and fold close to the chest with digits pointening forwards. Each
fore-limb consists of brachium (upper arm), antibrachium of forearm,
and manus (hand). The hind-limbs has femur (thigh), crus (shank), and
pes (foot). The number of joints on digits starting from nearest the body
outwards and including the claws are 2.3.4.5.3 for manus and 2.3.4.5.4
for pes. Transverse vent occurs behind the hind-limbs and ventral to
them. A row of 8 or 10 callous pre-anal pads, border the bent in males.
Tail
The tail is about two times the body length from the snout to the vent. It
tapers gradually from the region of the vent to the most posterior tip.
Tails of adult males are thicker than those of adult females. They may be
stumpy due to frequent shedding (automy).
Dissection of the Fish, Toad and Lizard
Materials
A Fish
Tilapia, Scoliodon, measuring boards, meter rules, forceps, petri dishes,
dissecting microscopes or hand lens, dividers, scalpel, quinaldine (1%
solution).
B Amphibia
Freshly killed toad
C Reptile
Freshly killed or preserved lizards, hand lens, meter rule, weighting
balance.
BIO 191 MODULE 5
377
Procedure
Fish
You can kill the fish 1% quinaldine solution or head blow or by
applying a pointed seeker into the brain. Use a measuring board or ruler,
measure the standard length, (from tip of snout to base of tail), total
length and width of the fish. You can use a pair of dividers to transcribe
the width of the fish onto a ruler. Then weigh the specimen.
Examine the fish starting from the head to the tail. Take note of the
position and shape of the mouth and the eyes. Note also the shape of the
head, the number and position of the nostrils, the operculum and the
colour of spots on it.
Open the mouth with a pair of foreceps and examine the teeth. Note the
number of cusps. Lift the operculum on one side of the head and count
the number of lower gill rakers on the first gill. Write down all the
observations you have made. Take note of the colour of body, the
number and position of the lateral line. Count the number of scales along
the upper lateral line and record. Count also the number of spines and
fin rays on the dorsal fin, and on the anal fin, and record.
Draw the fish to show as many external features as possible.
Examine the ventral side of the fish with a magnifying lens or dissecting
microscope, taking note of the position of the anus, the urogenital
opening, and shape of urogenital papilla. Draw and identify the sex of
the fish. With a scalpel scrape out some scales and examine with a
magnifying lens and draw.
Toad
Examine the entire animal and then draw. Take note of its adaptations to
life in water and on land. Open the mouth of the animal and take note of
the point of attachment of the tongue, the glottis, the opening of the
Eustachian tubes etc (fig 17.5).
Lizard
Examine the entire animal for shape (fig. 17.6) Make a close
examination of
i. the head
ii. the mouth opened (fig. 17.7)
iii. the region of the vent.

BIO 191 GENERAL PRACTICAL BIOLOGY
378
Draw
Measure the length from the snout to the vent and from the vent to the
tip of the tail, and compare the relative lengths of the regions measured.
Weigh the animal and record the weight.
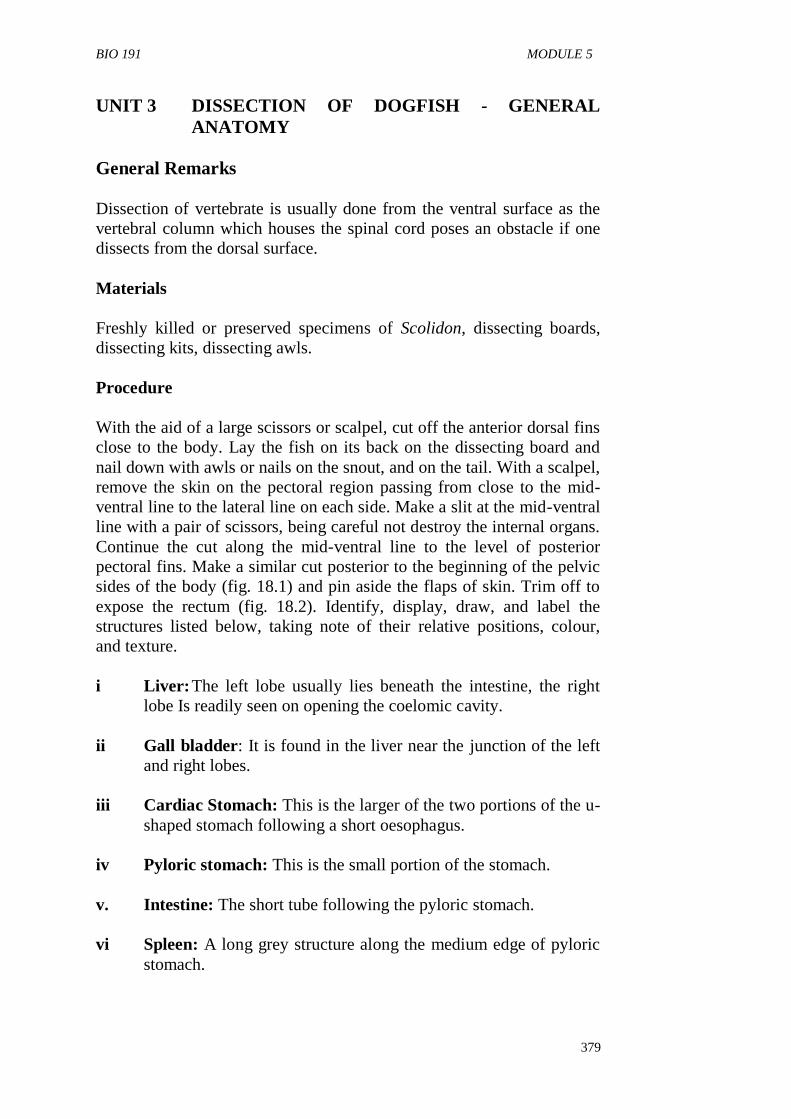
BIO 191 MODULE 5
379
UNIT 3 DISSECTION OF DOGFISH - GENERAL
ANATOMY
General Remarks
Dissection of vertebrate is usually done from the ventral surface as the
vertebral column which houses the spinal cord poses an obstacle if one
dissects from the dorsal surface.
Materials
Freshly killed or preserved specimens of Scolidon, dissecting boards,
dissecting kits, dissecting awls.
Procedure
With the aid of a large scissors or scalpel, cut off the anterior dorsal fins
close to the body. Lay the fish on its back on the dissecting board and
nail down with awls or nails on the snout, and on the tail. With a scalpel,
remove the skin on the pectoral region passing from close to the mid-
ventral line to the lateral line on each side. Make a slit at the mid-ventral
line with a pair of scissors, being careful not destroy the internal organs.
Continue the cut along the mid-ventral line to the level of posterior
pectoral fins. Make a similar cut posterior to the beginning of the pelvic
sides of the body (fig. 18.1) and pin aside the flaps of skin. Trim off to
expose the rectum (fig. 18.2). Identify, display, draw, and label the
structures listed below, taking note of their relative positions, colour,
and texture.
i Liver: The left lobe usually lies beneath the intestine, the right
lobe Is readily seen on opening the coelomic cavity.
ii Gall bladder: It is found in the liver near the junction of the left
and right lobes.
iii Cardiac Stomach: This is the larger of the two portions of the u-
shaped stomach following a short oesophagus.
iv Pyloric stomach: This is the small portion of the stomach.
v. Intestine: The short tube following the pyloric stomach.
vi Spleen: A long grey structure along the medium edge of pyloric
stomach.
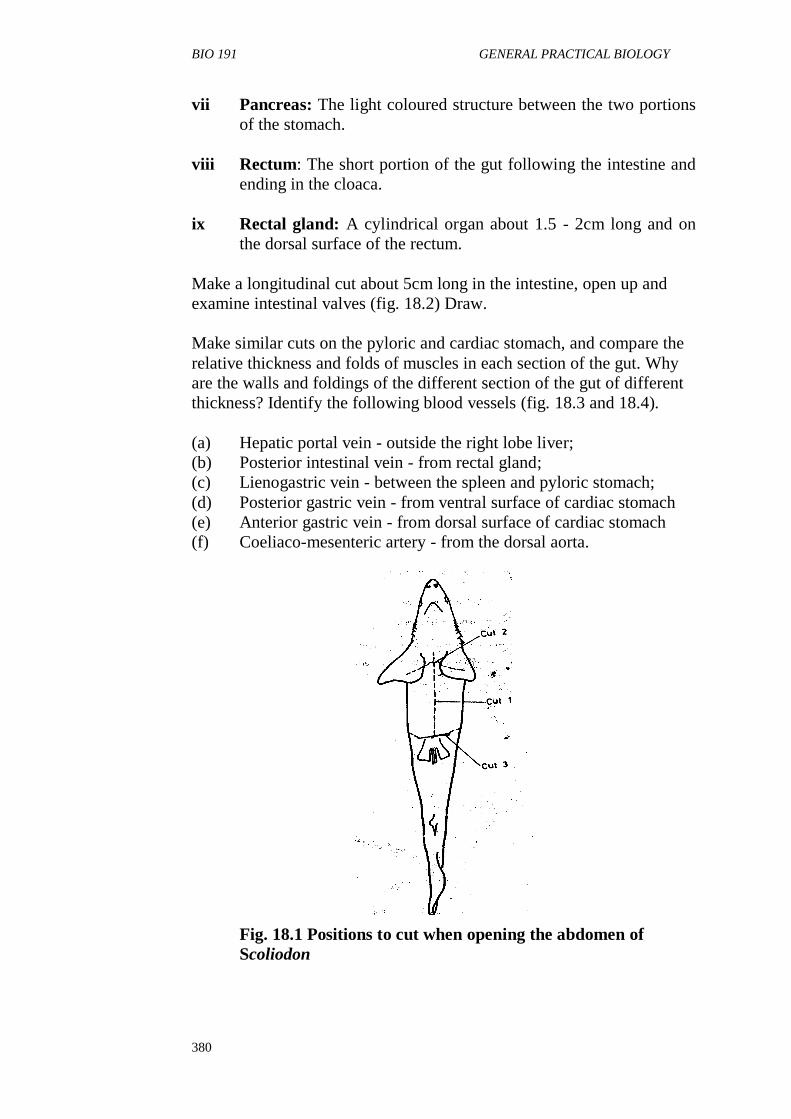
BIO 191 GENERAL PRACTICAL BIOLOGY
380
vii Pancreas: The light coloured structure between the two portions
of the stomach.
viii Rectum: The short portion of the gut following the intestine and
ending in the cloaca.
ix Rectal gland: A cylindrical organ about 1.5 - 2cm long and on
the dorsal surface of the rectum.
Make a longitudinal cut about 5cm long in the intestine, open up and
examine intestinal valves (fig. 18.2) Draw.
Make similar cuts on the pyloric and cardiac stomach, and compare the
relative thickness and folds of muscles in each section of the gut. Why
are the walls and foldings of the different section of the gut of different
thickness? Identify the following blood vessels (fig. 18.3 and 18.4).
(a) Hepatic portal vein - outside the right lobe liver;
(b) Posterior intestinal vein - from rectal gland;
(c) Lienogastric vein - between the spleen and pyloric stomach;
(d) Posterior gastric vein - from ventral surface of cardiac stomach
(e) Anterior gastric vein - from dorsal surface of cardiac stomach
(f) Coeliaco-mesenteric artery - from the dorsal aorta.
Fig. 18.1 Positions to cut when opening the abdomen of
Scoliodon
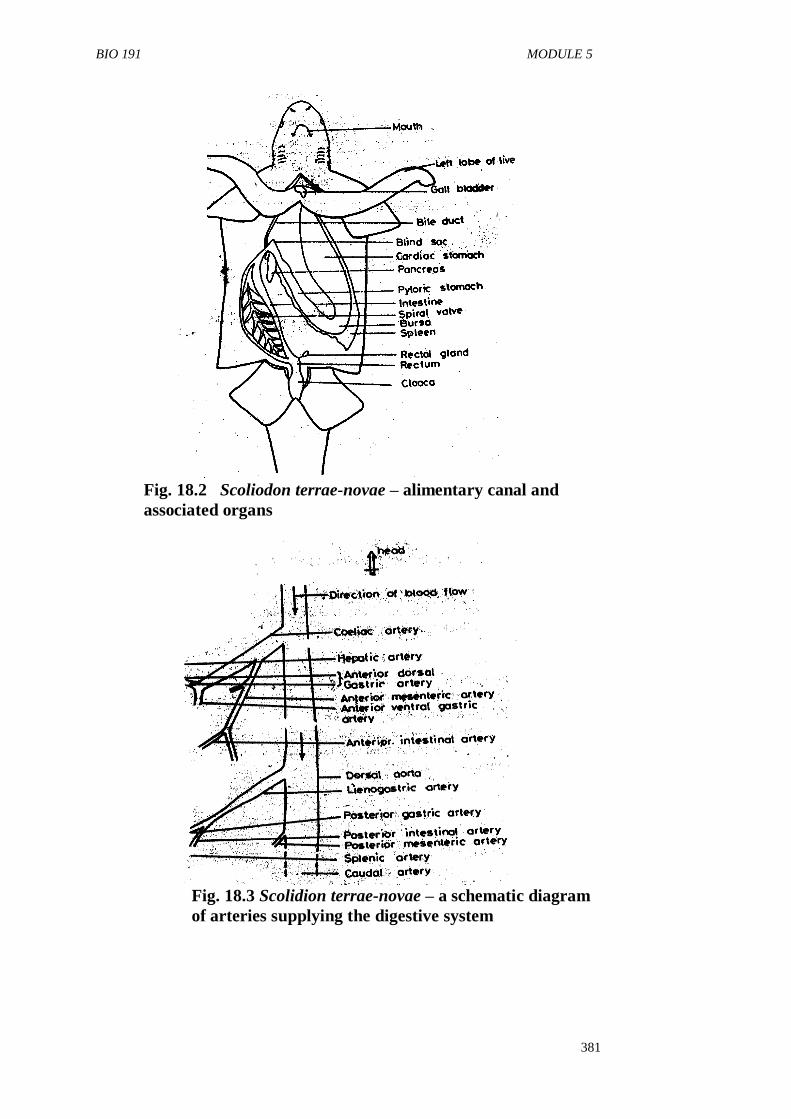
BIO 191 MODULE 5
381
Fig. 18.2 Scoliodon terrae-novae – alimentary canal and
associated organs
Fig. 18.3 Scolidion terrae-novae – a schematic diagram
of arteries supplying the digestive system
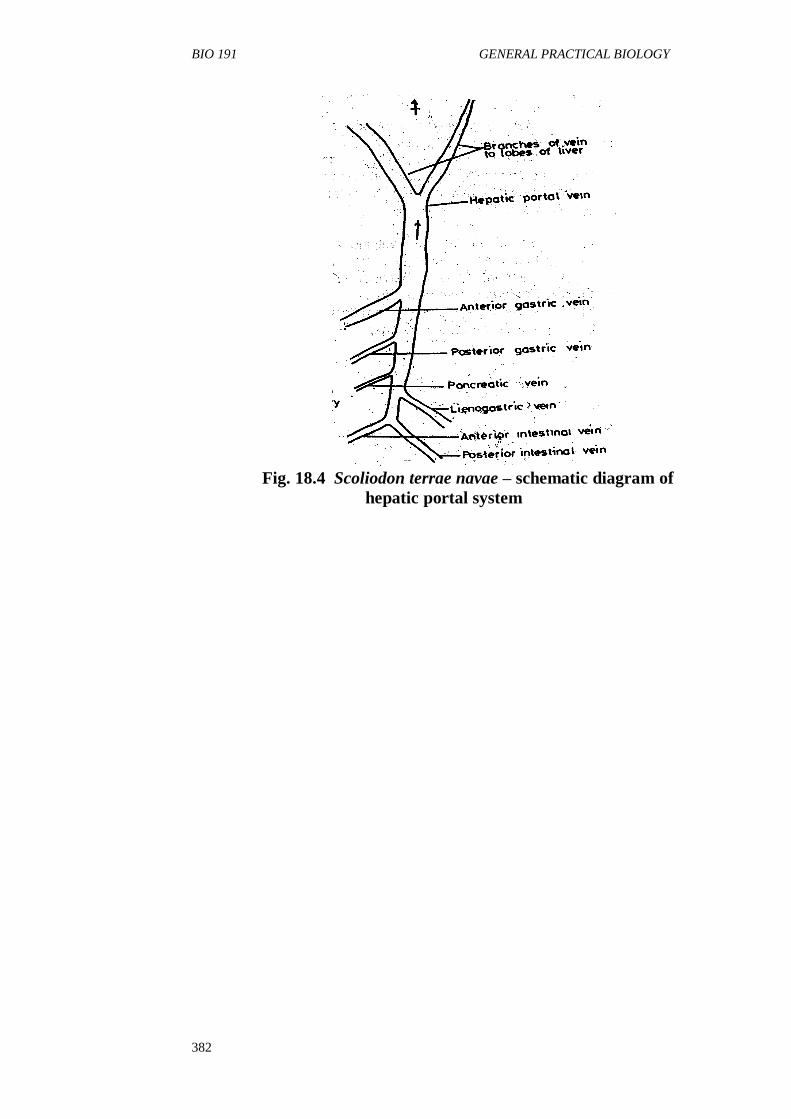
BIO 191 GENERAL PRACTICAL BIOLOGY
382
Fig. 18.4 Scoliodon terrae navae – schematic diagram of
hepatic portal system
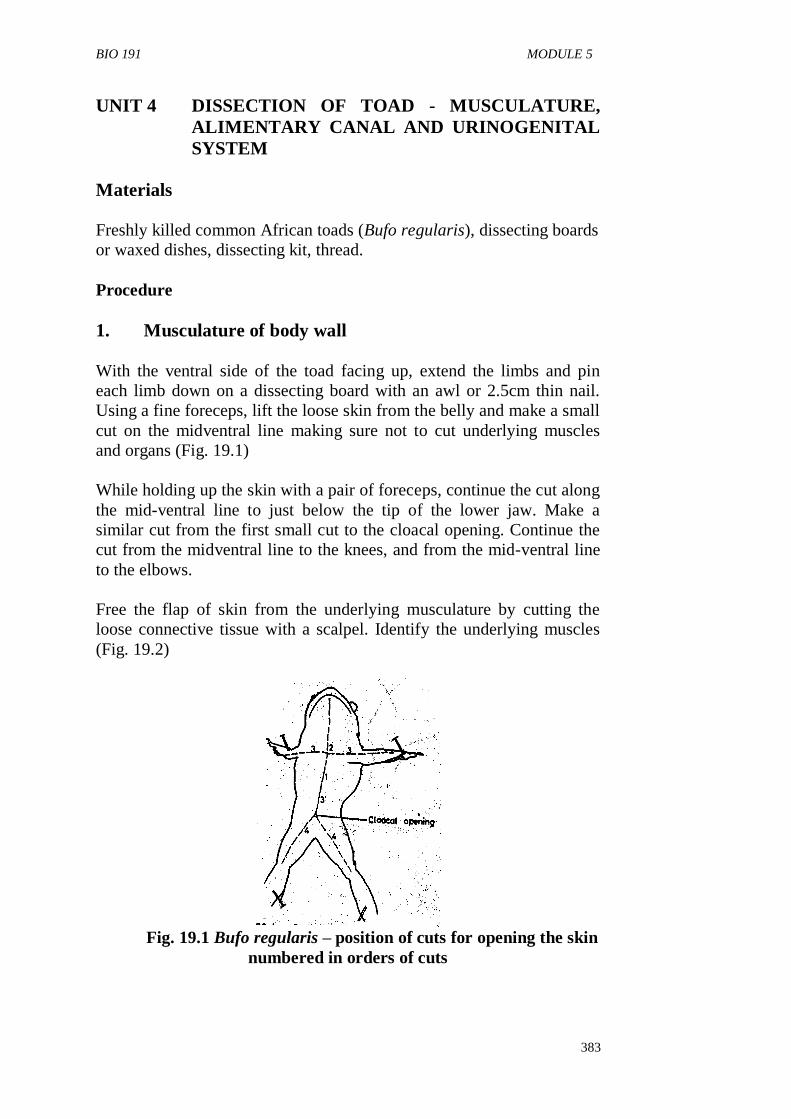
BIO 191 MODULE 5
383
UNIT 4 DISSECTION OF TOAD - MUSCULATURE,
ALIMENTARY CANAL AND URINOGENITAL
SYSTEM
Materials
Freshly killed common African toads (Bufo regularis), dissecting boards
or waxed dishes, dissecting kit, thread.
Procedure
1. Musculature of body wall
With the ventral side of the toad facing up, extend the limbs and pin
each limb down on a dissecting board with an awl or 2.5cm thin nail.
Using a fine foreceps, lift the loose skin from the belly and make a small
cut on the midventral line making sure not to cut underlying muscles
and organs (Fig. 19.1)
While holding up the skin with a pair of foreceps, continue the cut along
the mid-ventral line to just below the tip of the lower jaw. Make a
similar cut from the first small cut to the cloacal opening. Continue the
cut from the midventral line to the knees, and from the mid-ventral line
to the elbows.
Free the flap of skin from the underlying musculature by cutting the
loose connective tissue with a scalpel. Identify the underlying muscles
(Fig. 19.2)
Fig. 19.1 Bufo regularis – position of cuts for opening the skin
numbered in orders of cuts
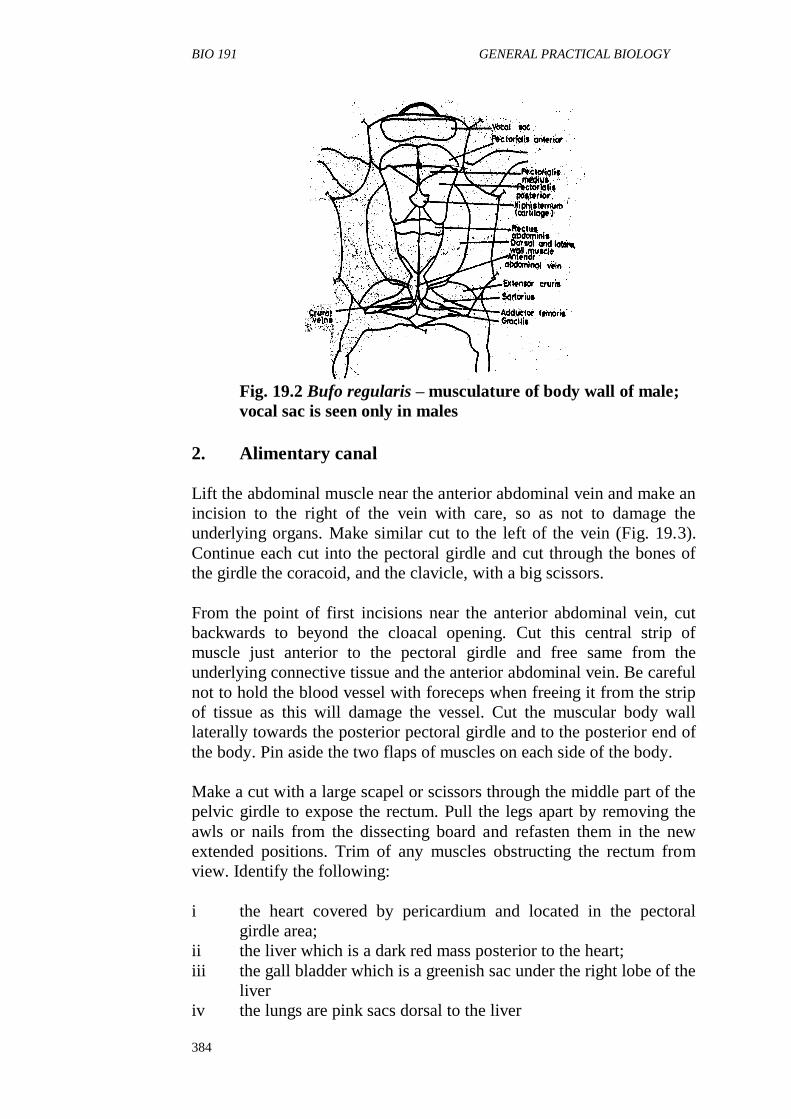
BIO 191 GENERAL PRACTICAL BIOLOGY
384
Fig. 19.2 Bufo regularis – musculature of body wall of male;
vocal sac is seen only in males
2. Alimentary canal
Lift the abdominal muscle near the anterior abdominal vein and make an
incision to the right of the vein with care, so as not to damage the
underlying organs. Make similar cut to the left of the vein (Fig. 19.3).
Continue each cut into the pectoral girdle and cut through the bones of
the girdle the coracoid, and the clavicle, with a big scissors.
From the point of first incisions near the anterior abdominal vein, cut
backwards to beyond the cloacal opening. Cut this central strip of
muscle just anterior to the pectoral girdle and free same from the
underlying connective tissue and the anterior abdominal vein. Be careful
not to hold the blood vessel with foreceps when freeing it from the strip
of tissue as this will damage the vessel. Cut the muscular body wall
laterally towards the posterior pectoral girdle and to the posterior end of
the body. Pin aside the two flaps of muscles on each side of the body.
Make a cut with a large scapel or scissors through the middle part of the
pelvic girdle to expose the rectum. Pull the legs apart by removing the
awls or nails from the dissecting board and refasten them in the new
extended positions. Trim of any muscles obstructing the rectum from
view. Identify the following:
i the heart covered by pericardium and located in the pectoral
girdle area;
ii the liver which is a dark red mass posterior to the heart;
iii the gall bladder which is a greenish sac under the right lobe of the
liver
iv the lungs are pink sacs dorsal to the liver
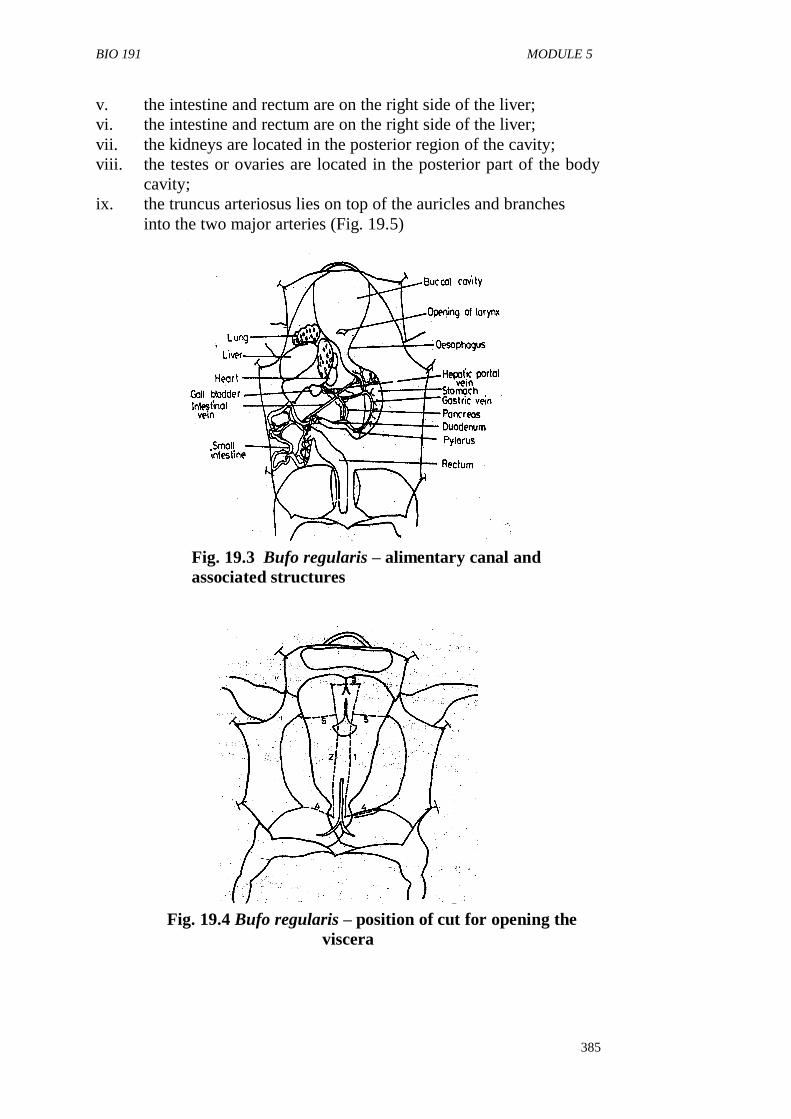
BIO 191 MODULE 5
385
v. the intestine and rectum are on the right side of the liver;
vi. the intestine and rectum are on the right side of the liver;
vii. the kidneys are located in the posterior region of the cavity;
viii. the testes or ovaries are located in the posterior part of the body
cavity;
ix. the truncus arteriosus lies on top of the auricles and branches
into the two major arteries (Fig. 19.5)
Fig. 19.3 Bufo regularis – alimentary canal and
associated structures
Fig. 19.4 Bufo regularis – position of cut for opening the
viscera
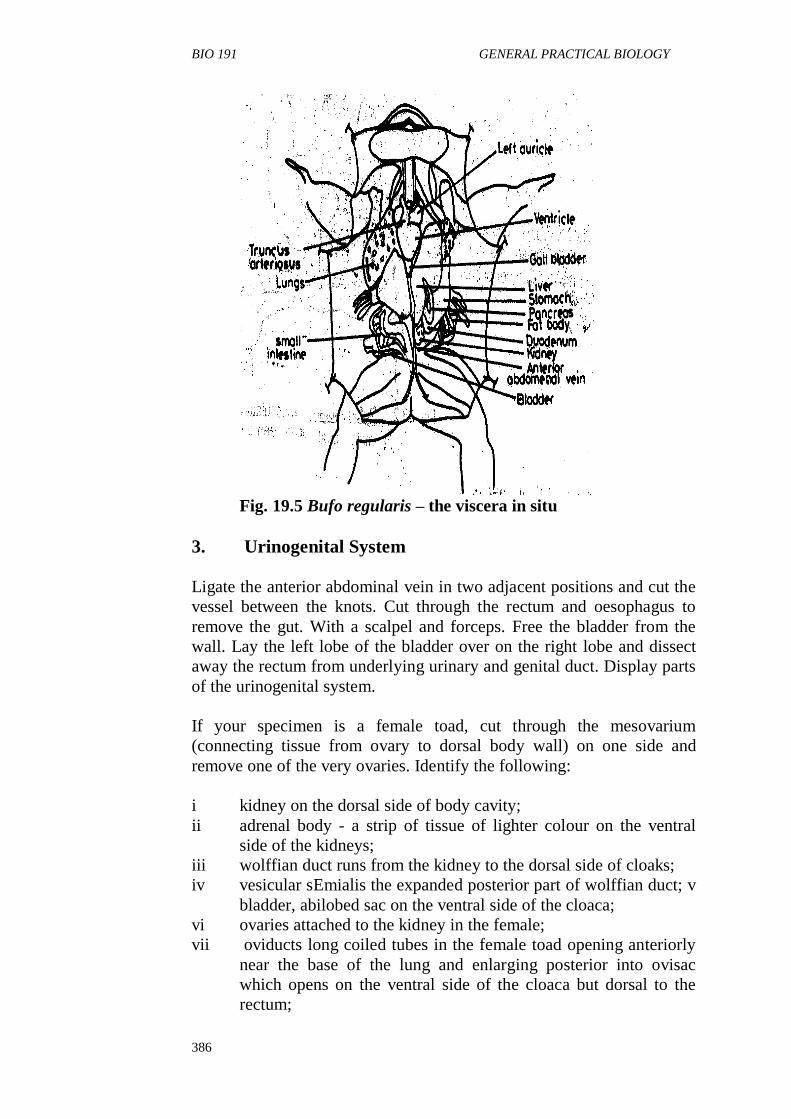
BIO 191 GENERAL PRACTICAL BIOLOGY
386
Fig. 19.5 Bufo regularis – the viscera in situ
3. Urinogenital System
Ligate the anterior abdominal vein in two adjacent positions and cut the
vessel between the knots. Cut through the rectum and oesophagus to
remove the gut. With a scalpel and forceps. Free the bladder from the
wall. Lay the left lobe of the bladder over on the right lobe and dissect
away the rectum from underlying urinary and genital duct. Display parts
of the urinogenital system.
If your specimen is a female toad, cut through the mesovarium
(connecting tissue from ovary to dorsal body wall) on one side and
remove one of the very ovaries. Identify the following:
i kidney on the dorsal side of body cavity;
ii adrenal body - a strip of tissue of lighter colour on the ventral
side of the kidneys;
iii wolffian duct runs from the kidney to the dorsal side of cloaks;
iv vesicular sEmialis the expanded posterior part of wolffian duct; v
bladder, abilobed sac on the ventral side of the cloaca;
vi ovaries attached to the kidney in the female;
vii oviducts long coiled tubes in the female toad opening anteriorly
near the base of the lung and enlarging posterior into ovisac
which opens on the ventral side of the cloaca but dorsal to the
rectum;
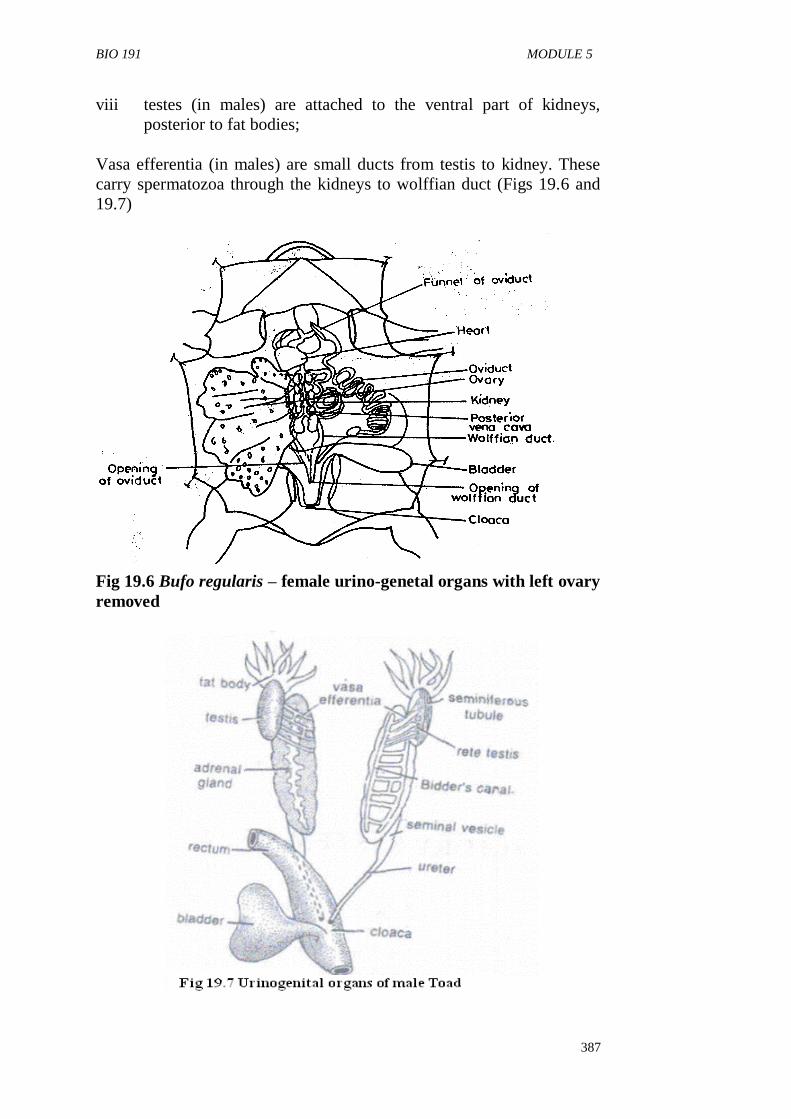
BIO 191 MODULE 5
387
viii testes (in males) are attached to the ventral part of kidneys,
posterior to fat bodies;
Vasa efferentia (in males) are small ducts from testis to kidney. These
carry spermatozoa through the kidneys to wolffian duct (Figs 19.6 and
19.7)
Fig 19.6 Bufo regularis – female urino-genetal organs with left ovary
removed
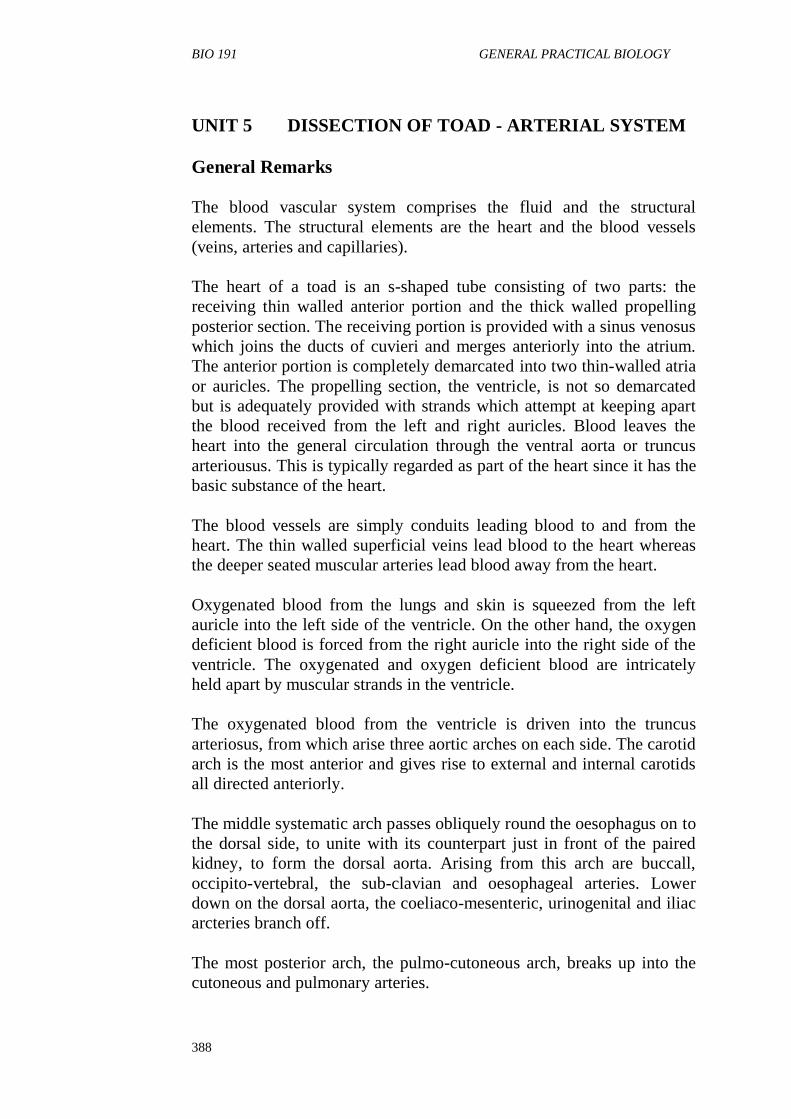
BIO 191 GENERAL PRACTICAL BIOLOGY
388
UNIT 5 DISSECTION OF TOAD - ARTERIAL SYSTEM
General Remarks
The blood vascular system comprises the fluid and the structural
elements. The structural elements are the heart and the blood vessels
(veins, arteries and capillaries).
The heart of a toad is an s-shaped tube consisting of two parts: the
receiving thin walled anterior portion and the thick walled propelling
posterior section. The receiving portion is provided with a sinus venosus
which joins the ducts of cuvieri and merges anteriorly into the atrium.
The anterior portion is completely demarcated into two thin-walled atria
or auricles. The propelling section, the ventricle, is not so demarcated
but is adequately provided with strands which attempt at keeping apart
the blood received from the left and right auricles. Blood leaves the
heart into the general circulation through the ventral aorta or truncus
arteriousus. This is typically regarded as part of the heart since it has the
basic substance of the heart.
The blood vessels are simply conduits leading blood to and from the
heart. The thin walled superficial veins lead blood to the heart whereas
the deeper seated muscular arteries lead blood away from the heart.
Oxygenated blood from the lungs and skin is squeezed from the left
auricle into the left side of the ventricle. On the other hand, the oxygen
deficient blood is forced from the right auricle into the right side of the
ventricle. The oxygenated and oxygen deficient blood are intricately
held apart by muscular strands in the ventricle.
The oxygenated blood from the ventricle is driven into the truncus
arteriosus, from which arise three aortic arches on each side. The carotid
arch is the most anterior and gives rise to external and internal carotids
all directed anteriorly.
The middle systematic arch passes obliquely round the oesophagus on to
the dorsal side, to unite with its counterpart just in front of the paired
kidney, to form the dorsal aorta. Arising from this arch are buccall,
occipito-vertebral, the sub-clavian and oesophageal arteries. Lower
down on the dorsal aorta, the coeliaco-mesenteric, urinogenital and iliac
arcteries branch off.
The most posterior arch, the pulmo-cutoneous arch, breaks up into the
cutoneous and pulmonary arteries.
BIO 191 MODULE 5
389
Materials
Freshly killed toads, dissecting board, dissecting kit, etc
Procedure
Open up the animal as described in unit 4 of this module. The arteries lie
dorsal to the veins and are more deeply seated. It is therefore essential to
litigate the major veins for good display of the arteries. The two major
veins normally affected are anterior abdominal vein and the anterior
vena cava. Ligature is achieved by tying two knots (Smm apart) round
the vein and cutting through the region between them (fig. 20.1). This
reduces blood loss and collapse of the vessels. Locate the following
arteries.
Truncus arteriosus and branches
Display the heart to expose the truncus arteriosus. This runs deep into
the anterior region. Soon after leaving the truncus arteriosu it bifurcates
to give rise to the external carootid, supplying blood to the base of the
muscle, of the tongue and the internal carotid that extends deep into
muscles, passing beneath and forward to enter the skull at the side of the
pro-otic bone.
Systemic arches
The left and right systemic arches bend backwards to join just beneath
the position of the stomach to form the dorsal aorta. Before uniting into
the dorsal aorta, each gives the following.
(a) the buccal artery supplying blood to the buccal cavity;
(b) the subclavian artery running to the muscles of the fore limb; and
(c) the occipito-vertebral artery emanting from the junction of the
subclavian and the main arch to supply blood to the pharynx.
Dorsal aorta and branches:
The dorsal aorta gives off the following arteries posteriorly.
i. the coeliaco-mesenteric artery - this further divided into two, the
celiac artery to the stomach, the pancrease, and the intestinal
artery which further breaks up into anterior mesenteric to the
upper intestine, posterior mesenteric to the lower intestine and
rectum, and splenic artery to the spleens.
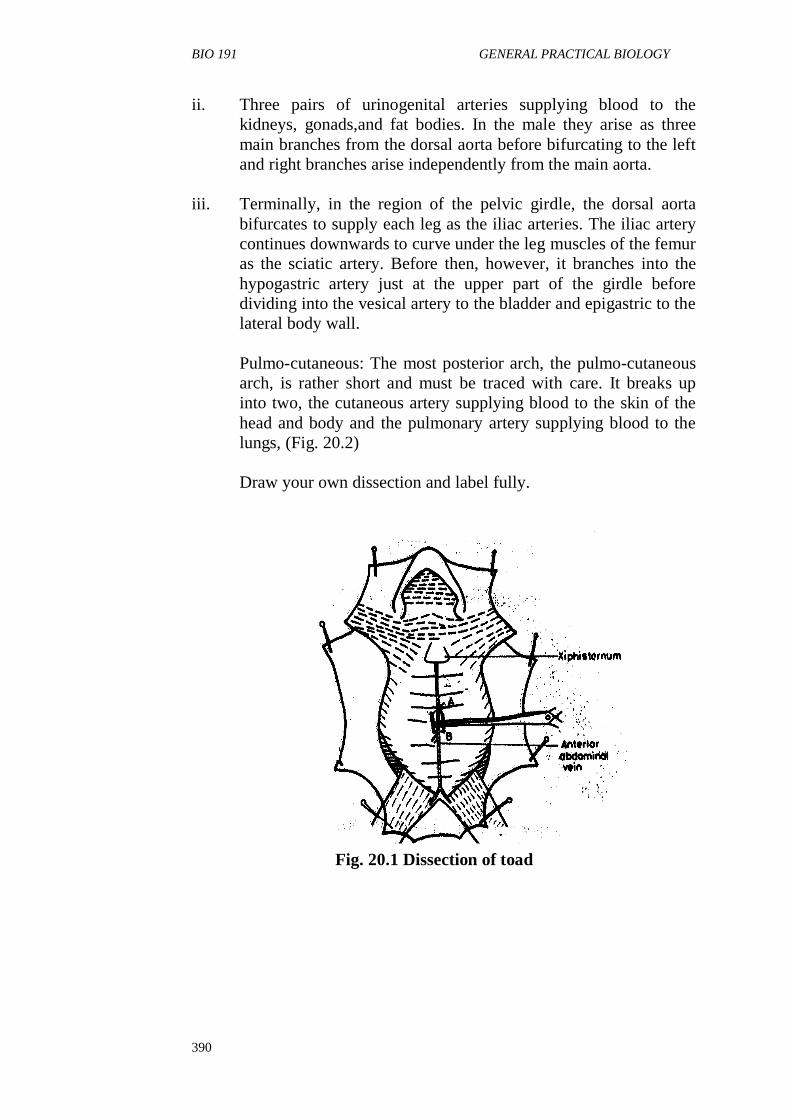
BIO 191 GENERAL PRACTICAL BIOLOGY
390
ii. Three pairs of urinogenital arteries supplying blood to the
kidneys, gonads,and fat bodies. In the male they arise as three
main branches from the dorsal aorta before bifurcating to the left
and right branches arise independently from the main aorta.
iii. Terminally, in the region of the pelvic girdle, the dorsal aorta
bifurcates to supply each leg as the iliac arteries. The iliac artery
continues downwards to curve under the leg muscles of the femur
as the sciatic artery. Before then, however, it branches into the
hypogastric artery just at the upper part of the girdle before
dividing into the vesical artery to the bladder and epigastric to the
lateral body wall.
Pulmo-cutaneous: The most posterior arch, the pulmo-cutaneous
arch, is rather short and must be traced with care. It breaks up
into two, the cutaneous artery supplying blood to the skin of the
head and body and the pulmonary artery supplying blood to the
lungs, (Fig. 20.2)
Draw your own dissection and label fully.
Fig. 20.1 Dissection of toad

BIO 191 MODULE 5
391
Fig. 20.2 Toad – arterial system
BIO 191 GENERAL PRACTICAL BIOLOGY
392
MODULE 5
Unit 1 Dissection of Toad – Venous System
Unit 2 Dissection of Toad – Nervous System
Unit 3 Dissection of Lizard – General Anatomy
Unit 4 Morphology of Higher Vertebrates – Birds and Mammals
Unit 5 Dissection of the Mammal – Rat, Guinea Pig, Rabbit
UNIT 1 DISSECTION OF TOAD - VENOUS SYSTEM
General Remarks
Two major vessels return blood to the heart. They are the venae cavae
and pulmonary veins. These are helped by two portal systems to ensure
complete and successful drainage of all blood to the heart.
The anterior vena cava is formed from the merging of three major veins
with six branches draining blood from the anterior region of the toad.
The most anterior, the external jugular, is composed of the lingual and
mandibular veins. The middle branch the innominate veins, comprises
the internal jugular and the subscapular veins. The posterior branch, the
subclavian, is made up of the branchial and the musculocutaneous veins.
The posterior vena cava is a large vessel and begins posteriorly in
between the kidneys. As it travels anteriorly, it receives the renal veins
and either the spermatic or the spermatic or the ovarian veins. Anterior
to the liver, it receives the hepatic veins before terminating in the
triangular sinus vernosus.
The typically short pulmonary veins drain from the lungs and pass to the
left auricle to unite before entering the heart.
Material
As listed in module 4 unit 5
Procedure
Open up the animal as described in Module 4 unit 4. The anterior
abdominal vein can now be clearly seen in the mid-ventral line. Cut
through the abdominal wall on either side of the anterior abdominal
vein. Continue the cut in anterior and posterior directions to the pectoral
girdle and leg muscles, respectively. In the anterior region, cut through
the coracoid and clavicle of the pectoral girdle. Pick the mid-ventral
strip just below the buccal region and cut to free it from the surrounding
BIO 191 MODULE 5
393
body wall. Using a scalpel, detach the anterior abdominal vein from the
strip. The heart can be seen lying beneath the pectoral girdle covered by
the pericardium. With the aid of a pair of forceps and a pair of fine
scissor, cut open and remove the pericardium to expose the thin walled
atria and the thick muscular ventricle. Turn the heart to one side to
expose the bulbous sinus venosus with the venae cavae emptying into it.
Slowly and gently remove the mesenteries and cut adhering muscles to
the veins in the anterior venae cavea. Warning : Do not pick up the veins
with forceps, instead pick cut the surrounding tissues. Locate the
following:
(a) The lower branch of the left vena cava, the subclavian vein,
draining blood from the fore limb through the branchial vein, and
the skin and muscular body wall, through the muscuao-cutaneous
vein;
(b) The mid-branch of the left vena cava, the innominate vein, which
returns blood from the skull and the fore limb through the internal
jugular and subscapular veins, respectively;
(c) Finally the most anterior, the external jugular vein, draining
blood from the tongue and the lower jaw through the lingual and
mandibular veins, respectively. Starting from the sinus venous in
the posterior direction, locate the following:
(e) The posterior vena cava, emptying directly into sinus venosus.
Immediately at the base of the sinus venosus the posterior vena
cava receives the left and right hepatic veins draining blood from
the liver.
(f) The posterior vena cava continues downward to terminate near
the base of the paired kidneys. The renal veins drain blood from
the kidneys into the posterior vena cava. This large also drains
blood from either the testis or ovary through the spermatic or
ovarian veins.
Turn the lungs to expose the pulmonary veins that unite by the left
auricle. They are short and usually obscured by the anterior vena cava.
Trace the terminal end of the anterior abdominal vein from where it
drains into the left and right liver. From here, advance to the pelvic
region and carefully tease out the muscles to show the pelvic veins that
unite to give rise to the anterior abdominal vein. Immediately after the
junction, the vescical vein from the bladder and the rectal vein join the
anterior abdominal-vein.
Locate the hepatic portal vein that drains blood into the liver near the
point of bifurcation of the anterior abdominal vein. It has two main
branches:
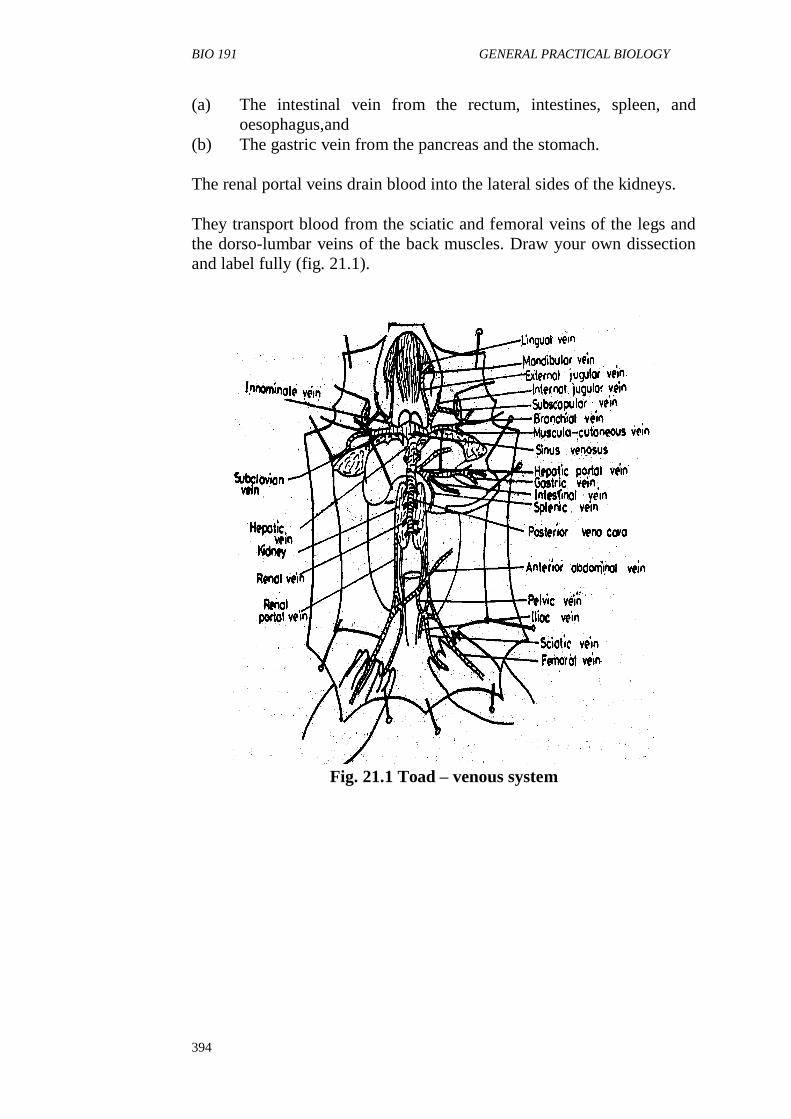
BIO 191 GENERAL PRACTICAL BIOLOGY
394
(a) The intestinal vein from the rectum, intestines, spleen, and
oesophagus,and
(b) The gastric vein from the pancreas and the stomach.
The renal portal veins drain blood into the lateral sides of the kidneys.
They transport blood from the sciatic and femoral veins of the legs and
the dorso-lumbar veins of the back muscles. Draw your own dissection
and label fully (fig. 21.1).
Fig. 21.1 Toad – venous system
BIO 191 MODULE 5
395
UNIT 2 DISSECTION OF TOAD - NERVOUS SYSTEM
General Remarks
The nervous system is made up of three main components:
1. The central nervous system made up of the brain and the spinal
cord:
2. The peripheral nervous system comprising all the verve tissues
outside the brain and the spinal cord and serves in the inter-
connection of sense organs, sense cells on the surface of the body
and muscles of the body wall and limbs to the central nervous
system;
(a) The autonomic nervous system made up of these nerves
arising from the brain and spinal cord and passing to the
viscera. Functional peculiarities separate this system into
two: the sympathetic comprising nerves from the spinal
cord in the neck, thoracic and lumbar regions, and the
parasympathetic, comprising nerves from the brain and the
spinal cord in the sacral region.
Materials
The specimens used for Module 4 unit 5 and Module 5 unit 1 but
preserved in 5% formalin, dissecting boards, dissecting kit etc.
Procedure
Brain and Spinal Cord: Dissection of the brain and the spinal cord is
done usually from the dorsal aspect and preferably on specimens
previously preserved for a week in 5% formain or 70% alcohol.
Place the toad on the dissecting board with the dorsal side upwards. Cut
away the skin of the head completely. Using a sharp scalpel in a
horizontal position cut carefully to the sides and raise up the roof of the
cranium leaving the brain intact.
The dorsal brain shows that most anterior left and right olfactory lobes
with tiny projections at the tip, the olfactory nerves. Just beneath them
are the larger and more elongated cerebral hemishpheres. Behind these
is the thalamencephalon in which is situated the pineal body. Two
almost circular bodies, the optic lobes, come next and joint with the disc
shaped cerebellum attached to the medulla oblongata. This medulla
oblongata narrows to the spinal cord to terminate finally in the tiny but
long fillium terminate.
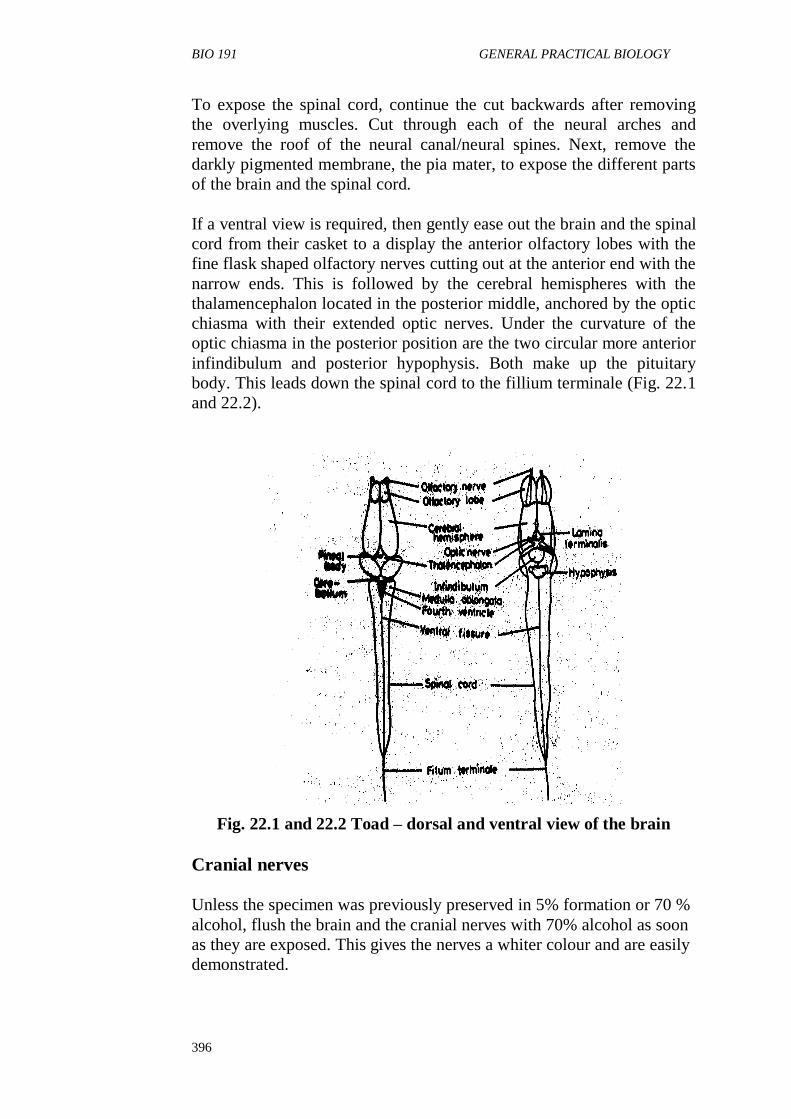
BIO 191 GENERAL PRACTICAL BIOLOGY
396
To expose the spinal cord, continue the cut backwards after removing
the overlying muscles. Cut through each of the neural arches and
remove the roof of the neural canal/neural spines. Next, remove the
darkly pigmented membrane, the pia mater, to expose the different parts
of the brain and the spinal cord.
If a ventral view is required, then gently ease out the brain and the spinal
cord from their casket to a display the anterior olfactory lobes with the
fine flask shaped olfactory nerves cutting out at the anterior end with the
narrow ends. This is followed by the cerebral hemispheres with the
thalamencephalon located in the posterior middle, anchored by the optic
chiasma with their extended optic nerves. Under the curvature of the
optic chiasma in the posterior position are the two circular more anterior
infindibulum and posterior hypophysis. Both make up the pituitary
body. This leads down the spinal cord to the fillium terminale (Fig. 22.1
and 22.2).
Fig. 22.1 and 22.2 Toad – dorsal and ventral view of the brain
Cranial nerves
Unless the specimen was previously preserved in 5% formation or 70 %
alcohol, flush the brain and the cranial nerves with 70% alcohol as soon
as they are exposed. This gives the nerves a whiter colour and are easily
demonstrated.
BIO 191 MODULE 5
397
The cranial nerves are ten in number:
1. The olfactory nerves extend anteriorly from the olfactory lobes
as single strands that arborise slightly to supply the olfactory
gland.
2. From the side of the brain ventral to the lobes arise the optic
nerves. They partially cross over to form the optic chiasma before
entering the eye.
3. Four muscles move the eye up and down, from side to side, or in
an oblique direction. These muscles are supplied by the
oculomotor nerve located on the ventral surface of the mid brain.
4. Another small nerve, the pathetic nerve arises from the dorsal
side of the brain to pass to the oblique muscle of the eye.
5. The trigEmial nerve arises at the side of the brain at the anterior
end of the medulla and breaks up in the region of the auditory
capsule with two branches: the ophthalmic nerve supplying the
skin to the fore part of the head and the maxillo-mandibular
which immediately splits into the maxillary and mandibular
nerves supplying the upper and lower jaws, respectively.
6. The abducens nerves arises from the ventral surface of the
medulla to enter the rectus muscle of the eye.
7. Just behind the trigEmial arises the facial nerve. It passes forward
in the anterior direction with the trigEmial before breaking up
into two: the anterior palatine supplying the roof of the mouth
and the posterior hyomandibular. This receive a branch from the
9th cranial nerve to give rise to a small mandibular just above the
angle of the jaw and runs forward as the hyoidean nerve to supply
the floor of the mouth.
8. The auditory nerve arises from the side of the medulla by the
facial nerve to enter angle of the jaw and runs forward as the
hyoidean nerve to supply the floor of the mouth.
9. The glossopharyngeal nerve arises from the side of the medulla
next to the auditory nerve. It is normally closely associated with
the 10`h cranial nerve. It has two branches: the anterior branch
joins the facial nerve while the main branch continues outwards
giving off a small branch to the buccal cavity. The main branch
continues to the muscles of the tongue.
10. Finally, behind the glossopharyngeal lies the vagus or
pneumogastric nerve. The main nerve gives off initially a
posterior branch to the muscles of the black and further on an
anterior branch to the musculature of the lateral body wall. The
main nerve moves round the body to break up to send two
branches to the gut, one to the lung and yet another to the heart.
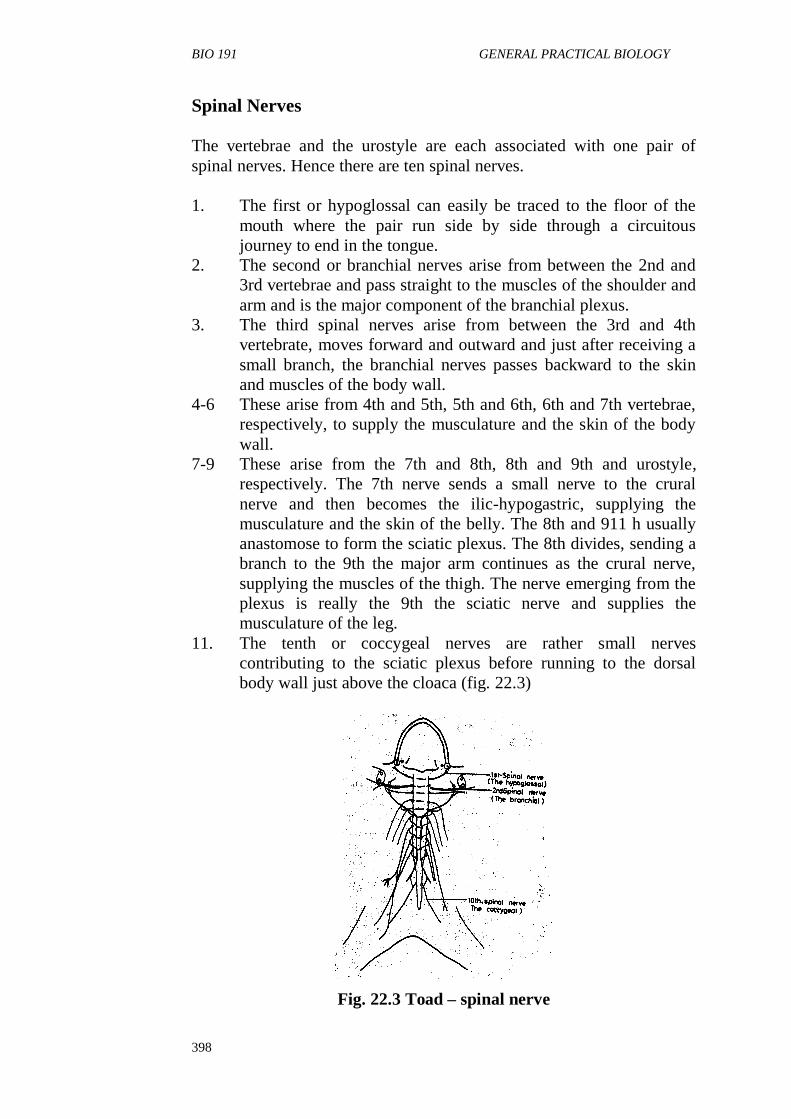
BIO 191 GENERAL PRACTICAL BIOLOGY
398
Spinal Nerves
The vertebrae and the urostyle are each associated with one pair of
spinal nerves. Hence there are ten spinal nerves.
1. The first or hypoglossal can easily be traced to the floor of the
mouth where the pair run side by side through a circuitous
journey to end in the tongue.
2. The second or branchial nerves arise from between the 2nd and
3rd vertebrae and pass straight to the muscles of the shoulder and
arm and is the major component of the branchial plexus.
3. The third spinal nerves arise from between the 3rd and 4th
vertebrate, moves forward and outward and just after receiving a
small branch, the branchial nerves passes backward to the skin
and muscles of the body wall.
4-6 These arise from 4th and 5th, 5th and 6th, 6th and 7th vertebrae,
respectively, to supply the musculature and the skin of the body
wall.
7-9 These arise from the 7th and 8th, 8th and 9th and urostyle,
respectively. The 7th nerve sends a small nerve to the crural
nerve and then becomes the ilic-hypogastric, supplying the
musculature and the skin of the belly. The 8th and 911 h usually
anastomose to form the sciatic plexus. The 8th divides, sending a
branch to the 9th the major arm continues as the crural nerve,
supplying the muscles of the thigh. The nerve emerging from the
plexus is really the 9th the sciatic nerve and supplies the
musculature of the leg.
11. The tenth or coccygeal nerves are rather small nerves
contributing to the sciatic plexus before running to the dorsal
body wall just above the cloaca (fig. 22.3)
Fig. 22.3 Toad – spinal nerve
BIO 191 MODULE 5
399
The Autonomic Nervous System
On either side of the vertebral column lie two strands of nervous tissue,
the autonomic nervous system. The sympathetic trunk possesses
segmental ganglia from which short branches, rami communicantes,
connect the trucks with the corresponding spinal nerves. Sympathetic
nerves are seen to arise from the ganglia and pass to the viscera and the
blood vessels.
The first sympathetic ganglion has a trunk adjacent to the hypoglossal
nerve. This trunk breaks up and rejoins it mate to form a ganglion in
association with the 10th cranial nerve. Sympathetic nerves from ganglia
4 and 5 form the solar plexus in the region of the coelicomesenteric
artery. From this plexus, nerves pass on to the viscera. Sympathetic
nerves from ganglia 6, 7, 8 and 9 are located mainly in the kidneys,
gonads and blood vessels. The 101h cranial nerve is connected to the
sympathetic chain by a branch from the 9th sympathetic ganglion.
Having displayed the structures listed above, draw the dorsal and ventral
views of the brain and relate the sizes of the various parts to the
functions they perform.
Draw the brain and the spinal cord and show clearly the cranial and
spinal nerves.
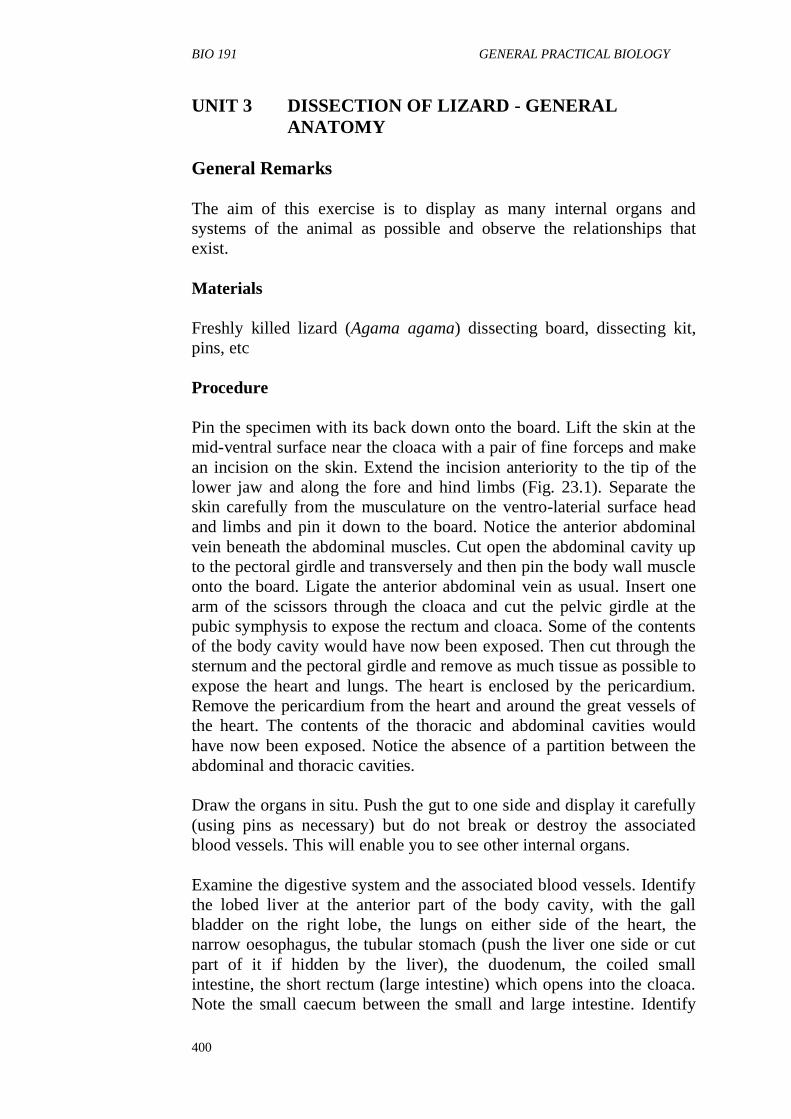
BIO 191 GENERAL PRACTICAL BIOLOGY
400
UNIT 3 DISSECTION OF LIZARD - GENERAL
ANATOMY
General Remarks
The aim of this exercise is to display as many internal organs and
systems of the animal as possible and observe the relationships that
exist.
Materials
Freshly killed lizard (Agama agama) dissecting board, dissecting kit,
pins, etc
Procedure
Pin the specimen with its back down onto the board. Lift the skin at the
mid-ventral surface near the cloaca with a pair of fine forceps and make
an incision on the skin. Extend the incision anteriority to the tip of the
lower jaw and along the fore and hind limbs (Fig. 23.1). Separate the
skin carefully from the musculature on the ventro-laterial surface head
and limbs and pin it down to the board. Notice the anterior abdominal
vein beneath the abdominal muscles. Cut open the abdominal cavity up
to the pectoral girdle and transversely and then pin the body wall muscle
onto the board. Ligate the anterior abdominal vein as usual. Insert one
arm of the scissors through the cloaca and cut the pelvic girdle at the
pubic symphysis to expose the rectum and cloaca. Some of the contents
of the body cavity would have now been exposed. Then cut through the
sternum and the pectoral girdle and remove as much tissue as possible to
expose the heart and lungs. The heart is enclosed by the pericardium.
Remove the pericardium from the heart and around the great vessels of
the heart. The contents of the thoracic and abdominal cavities would
have now been exposed. Notice the absence of a partition between the
abdominal and thoracic cavities.
Draw the organs in situ. Push the gut to one side and display it carefully
(using pins as necessary) but do not break or destroy the associated
blood vessels. This will enable you to see other internal organs.
Examine the digestive system and the associated blood vessels. Identify
the lobed liver at the anterior part of the body cavity, with the gall
bladder on the right lobe, the lungs on either side of the heart, the
narrow oesophagus, the tubular stomach (push the liver one side or cut
part of it if hidden by the liver), the duodenum, the coiled small
intestine, the short rectum (large intestine) which opens into the cloaca.
Note the small caecum between the small and large intestine. Identify
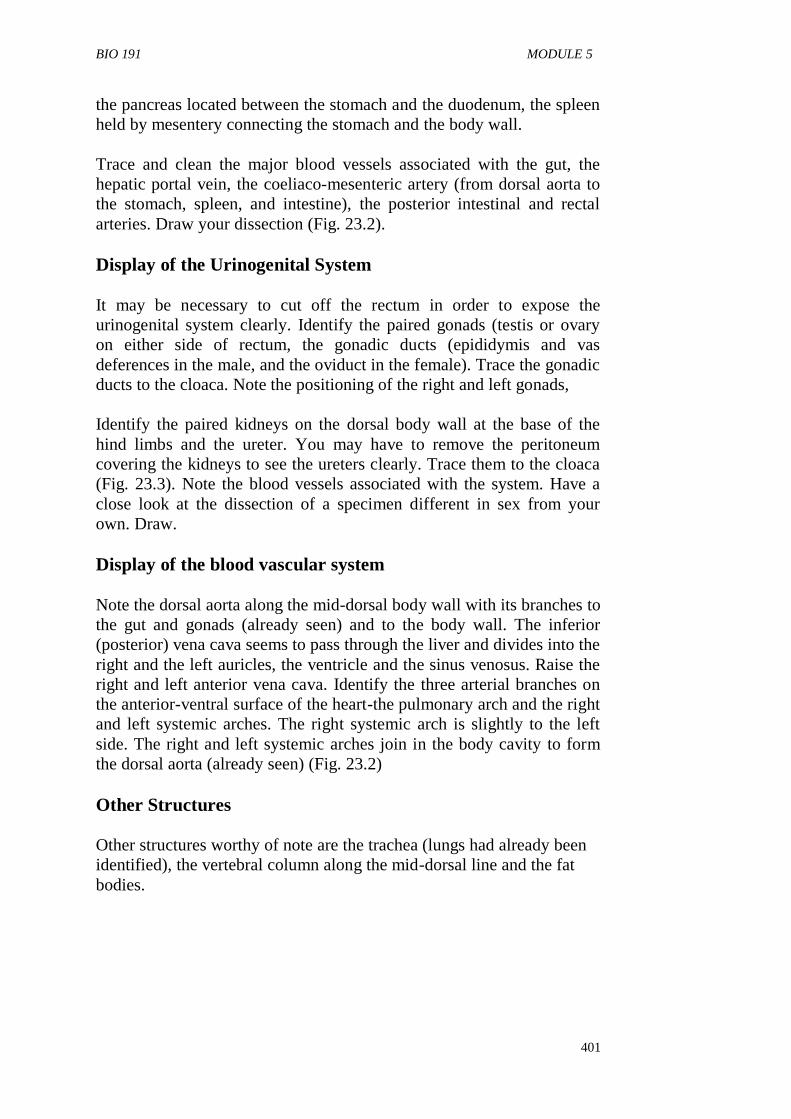
BIO 191 MODULE 5
401
the pancreas located between the stomach and the duodenum, the spleen
held by mesentery connecting the stomach and the body wall.
Trace and clean the major blood vessels associated with the gut, the
hepatic portal vein, the coeliaco-mesenteric artery (from dorsal aorta to
the stomach, spleen, and intestine), the posterior intestinal and rectal
arteries. Draw your dissection (Fig. 23.2).
Display of the Urinogenital System
It may be necessary to cut off the rectum in order to expose the
urinogenital system clearly. Identify the paired gonads (testis or ovary
on either side of rectum, the gonadic ducts (epididymis and vas
deferences in the male, and the oviduct in the female). Trace the gonadic
ducts to the cloaca. Note the positioning of the right and left gonads,
Identify the paired kidneys on the dorsal body wall at the base of the
hind limbs and the ureter. You may have to remove the peritoneum
covering the kidneys to see the ureters clearly. Trace them to the cloaca
(Fig. 23.3). Note the blood vessels associated with the system. Have a
close look at the dissection of a specimen different in sex from your
own. Draw.
Display of the blood vascular system
Note the dorsal aorta along the mid-dorsal body wall with its branches to
the gut and gonads (already seen) and to the body wall. The inferior
(posterior) vena cava seems to pass through the liver and divides into the
right and the left auricles, the ventricle and the sinus venosus. Raise the
right and left anterior vena cava. Identify the three arterial branches on
the anterior-ventral surface of the heart-the pulmonary arch and the right
and left systemic arches. The right systemic arch is slightly to the left
side. The right and left systemic arches join in the body cavity to form
the dorsal aorta (already seen) (Fig. 23.2)
Other Structures
Other structures worthy of note are the trachea (lungs had already been
identified), the vertebral column along the mid-dorsal line and the fat
bodies.
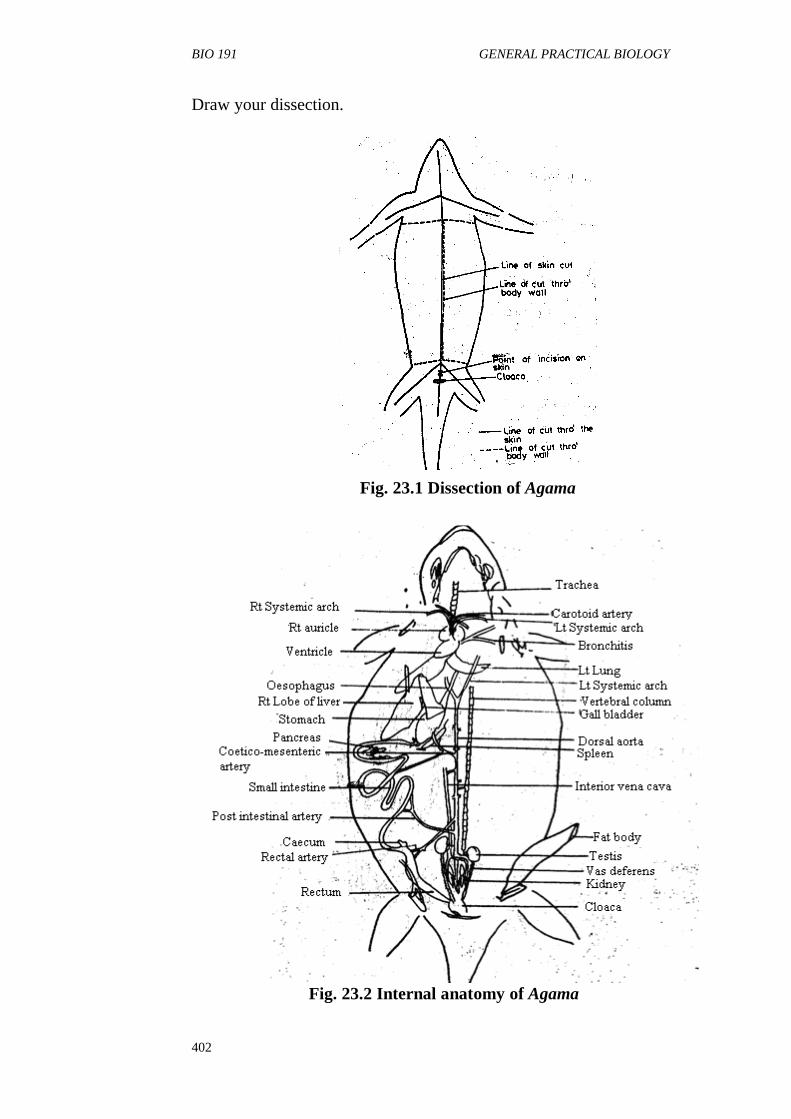
BIO 191 GENERAL PRACTICAL BIOLOGY
402
Draw your dissection.
Fig. 23.1 Dissection of Agama
Fig. 23.2 Internal anatomy of Agama
BIO 191 MODULE 5
403
Fig. 23.3 Urinogenital system of male Agama
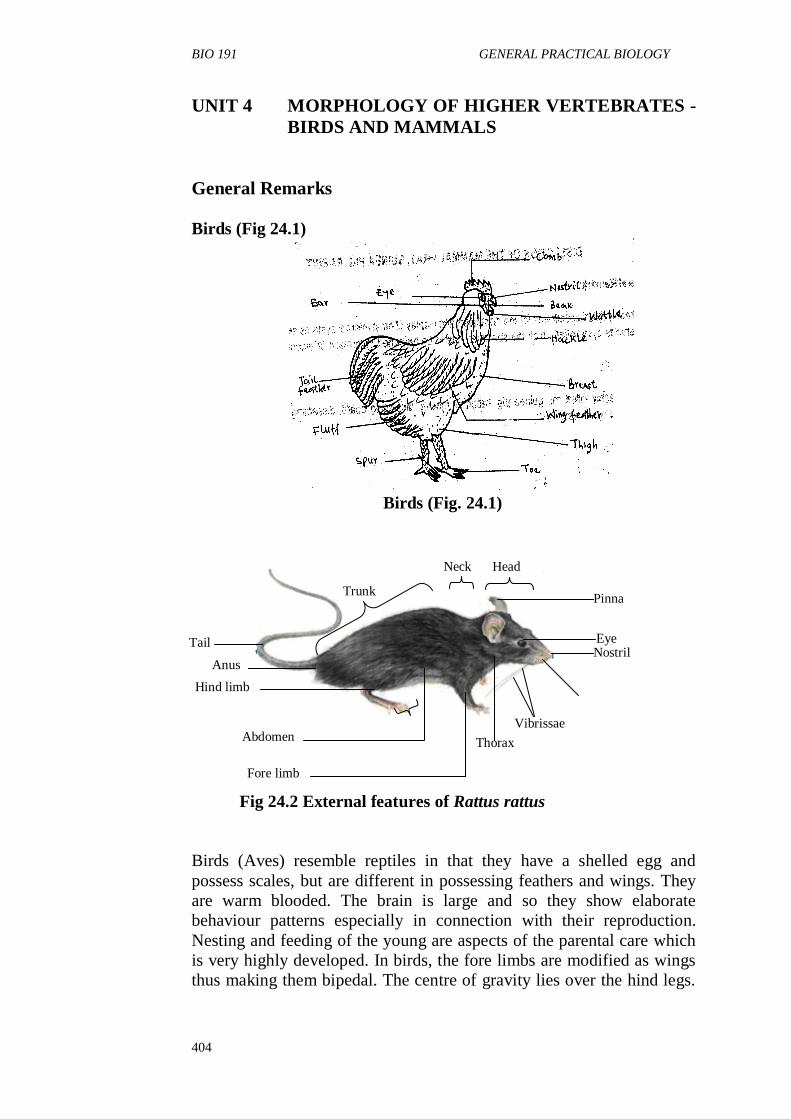
BIO 191 GENERAL PRACTICAL BIOLOGY
404
UNIT 4 MORPHOLOGY OF HIGHER VERTEBRATES -
BIRDS AND MAMMALS
General Remarks
Birds (Fig 24.1)
Birds (Fig. 24.1)
Fig 24.2 External features of Rattus rattus
Birds (Aves) resemble reptiles in that they have a shelled egg and
possess scales, but are different in possessing feathers and wings. They
are warm blooded. The brain is large and so they show elaborate
behaviour patterns especially in connection with their reproduction.
Nesting and feeding of the young are aspects of the parental care which
is very highly developed. In birds, the fore limbs are modified as wings
thus making them bipedal. The centre of gravity lies over the hind legs.
Abdomen
Fore limb
Thorax
Vibrissae
Nostril Eye
Pinna
Head Neck
Trunk
Hind limb
Anus
Tail
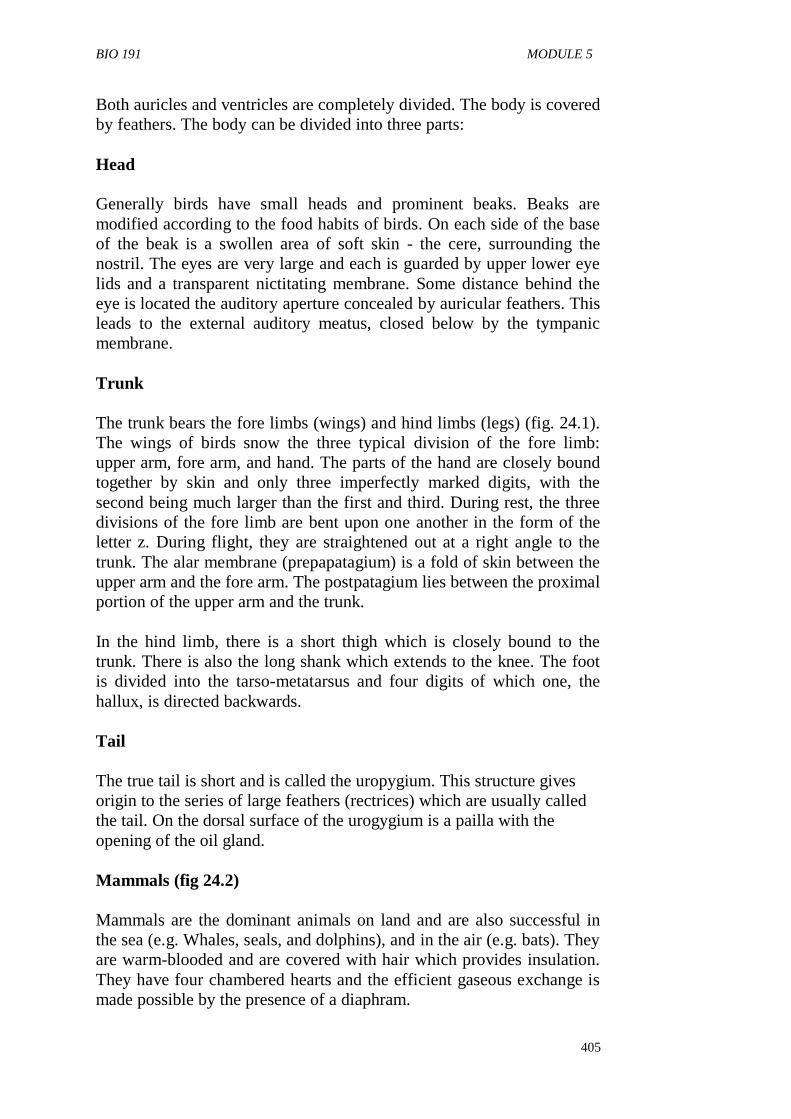
BIO 191 MODULE 5
405
Both auricles and ventricles are completely divided. The body is covered
by feathers. The body can be divided into three parts:
Head
Generally birds have small heads and prominent beaks. Beaks are
modified according to the food habits of birds. On each side of the base
of the beak is a swollen area of soft skin - the cere, surrounding the
nostril. The eyes are very large and each is guarded by upper lower eye
lids and a transparent nictitating membrane. Some distance behind the
eye is located the auditory aperture concealed by auricular feathers. This
leads to the external auditory meatus, closed below by the tympanic
membrane.
Trunk
The trunk bears the fore limbs (wings) and hind limbs (legs) (fig. 24.1).
The wings of birds snow the three typical division of the fore limb:
upper arm, fore arm, and hand. The parts of the hand are closely bound
together by skin and only three imperfectly marked digits, with the
second being much larger than the first and third. During rest, the three
divisions of the fore limb are bent upon one another in the form of the
letter z. During flight, they are straightened out at a right angle to the
trunk. The alar membrane (prepapatagium) is a fold of skin between the
upper arm and the fore arm. The postpatagium lies between the proximal
portion of the upper arm and the trunk.
In the hind limb, there is a short thigh which is closely bound to the
trunk. There is also the long shank which extends to the knee. The foot
is divided into the tarso-metatarsus and four digits of which one, the
hallux, is directed backwards.
Tail
The true tail is short and is called the uropygium. This structure gives
origin to the series of large feathers (rectrices) which are usually called
the tail. On the dorsal surface of the urogygium is a pailla with the
opening of the oil gland.
Mammals (fig 24.2)
Mammals are the dominant animals on land and are also successful in
the sea (e.g. Whales, seals, and dolphins), and in the air (e.g. bats). They
are warm-blooded and are covered with hair which provides insulation.
They have four chambered hearts and the efficient gaseous exchange is
made possible by the presence of a diaphram.
BIO 191 GENERAL PRACTICAL BIOLOGY
406
Characteristic features
All mammals possess dermal milk glands. Only mammals possess this
structure from which the name mammal is derived. They are generally
viviparous and show parental care. The body of all mammals comprise
the head, neck trunk, and tail (fig. 24.2). The head has a pointed snout,
nostrils, a narrow mouth with short lower jaw, two small eyes that can
look diagonally, forwards, or side ways, except in the primates. There is
also the ear lobe (pinna) and numerous whiskers (vibrissae) around the
mouth. On the jaws of mammals are different types of teeth.
Materials
Live or mounted birds, assorted beaks adapted for seed cracking, insect
catching, fish and frog catching and for tearing flesh; feet adapted for
perching, walking, swimming, wading, scratching, tearing, and clinging;
rats, rabbits, or mice.
Procedure
Draw the range of beaks and feet of birds provided, indicating (with
reasons) what each of them is adapted for:
Name the bird or group of birds that possesses each of the structures.
Draw the mammal (s) provided and list the main characteristics of the
group as found in the specimen (s). Which of these characteristics have
contributed to the success of the group?
BIO 191 MODULE 5
407
UNIT 5 DISSECTION OF THE MAMMAL - RAT,
GUINEA PIG, RABBIT
General Remark
Use freshly killed specimens for the dissection and display of most
internal systems except the nervous system for which the specimen has
to be hardened in formalin or alcohol.
Materials
Freshly killed rat, guinea pi, rabbit or mouse; dissecting board,
dissecting set, pins, cotton wool, water.
Procedure
Opening up of the Animal
Place the animal in the position for dissection i.e. with the ventral side
facing up, and pin down to the board. Make a small slit on the mid-
ventral line of the abdomen, avoiding cutting through the underlying
muscles. Pull the skin away from the body wall using your fingers.
Extend the cut up to the lower jaw and down to the anal region. Free the
skin from the fore limbs by turning it inside out and pulling on the
elbow. Pull it as far down as the paw. Cut it away leaving a small
portion of the skin to the paw area. Repeat the process for the hind
limbs. While freeing the skin in the neck region, be careful so as to
avoid rupturing the blood vessels, especially the jugular veins.
Notice the limits of the thorax and the abdomen and the parts of the
alimentary canal showing through the thin abdominal wall. Lift the
abdominal wall with forceps and make a slit in the mid-line, but be
careful so that you do not puncture the underlying intestine. Cut
upwards to the sternum and downward to the anal area. Cut sideways
along the boundary of the abdomen and thorax very near the diaphragm.
Display of the alimentary System
Pin down the wall to expose the alimentary canals. The alimentary
canals is much coiled in situ. Examine and draw the alimentary system
in situ. Then display the duodenum and parts of the hepatic portal
system. The intestine should be displayed away from the animal on the
board (with important blood vessels intact) but not severed from the
animal.
BIO 191 GENERAL PRACTICAL BIOLOGY
408
Lay the caecum over to the animals left side. Push back the lobes of the
liver to expose the stomach. Pull the duodenum to the right. Display the
duodenum in such a way that the pancreas becomes visible. Adjust the
stomach and the liver lobes to expose the gall bladder and bile duct.
Draw the alimentary canal as exposed (Label fully)
The diaphragm can be displayed by pulling the liver away, allowing it to
suspend in the falciform ligament holding it. Hold up the xiphoid
cartilage and observe the outline of the lungs and heart. Also notice the
posterior vena cava close to the falciform ligament.
Display of Unrinogenital systems
The urinary and reproductive systems are generally considered together.
Sometimes the alimentary canal is cut off but if properly displayed way
from
the rest of the body, it can be retained while examining the structures of
the two systems.
Hold the liver away from the kidneys with a pin. Cut through the public
symphysis. For a male specimen cut also through the wall of the
scrotum. Remove the flap of muscle and bones to expose the bladder
and urethra. Pin the bladder aside. Loosen the connective tissue in the
pelvic region to display the ureters, vagina in female, and rectum; or the
vasa deferentia, urethra and rectum in the males. Clear away any
available fat from the ureters and kidneys Draw.
Display of heart, lungs, and anterior blood vessels
For the neck and thorax, place pins through the cheeks to hold the head
steady and to arch the neck. Insert one blade of a pair of scissors through
the lower part of the wall of the thorax and cut along one side of the
thorax up to the clavicle. Turn the cut portion asides so that the lungs
and heart can be seen. Take care so as to avoid puncturing any of them.
Repeat the cutting exercise on other side of the thorax and remove the
ventral par to the thorax. Tie a thread round the xiphoid cartilage and
attach the other end of this thread to a pin near the tail. Then observe the
structures within. After observation, loosen the large pectoral muscles
carefully and cut away. Further, loosen and cut the small tare muscles.
Clear the superficial connective tissue away from the external jugular
vein and the anterior and posterior facial veins. Also loosen and cut
away the mastoid muscle of the neck very close to the skull. Repeat all
the processes on the other side.

BIO 191 MODULE 5
409
Lay aside the sub maxillary salivary glands to expose the salivary ducts.
Loosen the sterno-hyoid muscles from under the jugular anaestomosis.
Cut away the stylo-hyoid and mandibular muscles and trim the edges of
the cut thorax to the level of the anterior vanae cavae.
Slit and remove the entire pericarduium up to the aortic-heart junction.
Pin the heart to the right. Loosen the connective tissue around the blood
vessels and identify them.
Display of posterior blood vessels
Cut one ureter and one uterus in the female animal or one ureter and one
vas deferens as well as the gubernaculums of the corresponding testis
laying aside the testis in the male. Pin aside the vagina and rectum (or
just the rectum in the male) then clear the connective tissue from the
blood vessels. This exposes the abdominal blood vessels identify them
and draw.
Note
It is possible to expose all or most of these structures in one animal and
a comprehensive drawing made of the total dissection. The nervous
system is best studied with preserved specimens.
Questions
1 List the blood vessels that make up the arterial system.
2. What are the organs associated with the alimentary system and
what are their functions?
3. By means of annotated drawings compare and contrast the male
and female reproductive organs.
4. What is the difference between urethra and ureter?
Examining the content of the abdomen of the Guinea Pig in
Sitn'
Whenever you are told to examine `in situ' it means that you should
study the organs in their natural position without displacing any part. In
the rat for example, you will see in Situ' the thoracic cage, and
immediately below it, the lobes of the liver. Under the liver, you will see
a large sac lying across the abdominal cavity. This is the stomach.
Below the stomach on the left hand side is the spleen. The rest of the
abdominal cavity is predominantly coils of intestine, the largest part of
which is the caecum lying across the lowest part of the cavity.
BIO 191 GENERAL PRACTICAL BIOLOGY
410
The alimentary canal
Now you can use your hands, weaving your gloves to gently spread out
the organs, especially the intestines to enable you see all parts of the
alimentary canal. The oesophagus will appear below the diaphragm to
join the stomach. Your course tutor will help you trace the rest of the
alimentary canal and displace the organs for you to see them clearly.
The Excretory and Reproductive System
To reach this, you will have to remove the alimentary canal. Observe the
position of the two kidneys on the wall of the abdominal cavity and note
which of the kidneys is placed a little higher than the other. You may
want to slice open a kidney to see the structure.
DISSECTION OF THE RAT TO SHOW THE FEMALE URINO
GENITAL SYSTEM
The Respiratory System
Your course tutor will show you how to open the thoracic cage. You
will have to cut the ribs. The two main organs in this cage are the heart
and the lungs. You can also cut open the neck to observe the different
structures - the larynx, trachea, bronchi, lungs and diaphragm.


