Embed Size (px)
Citation preview
Oracle® CloudCollaborating on Documents with OracleContent Management
F24095-39May 2022
Oracle Cloud Collaborating on Documents with Oracle Content Management,
F24095-39
Copyright © 2019, 2022, Oracle and/or its affiliates.
Primary Author: Bruce Silver
Contributing Authors: Sarah Bernau, Bonnie Vaughan, Ron van de Crommert, Jean Wilson
This software and related documentation are provided under a license agreement containing restrictions onuse and disclosure and are protected by intellectual property laws. Except as expressly permitted in yourlicense agreement or allowed by law, you may not use, copy, reproduce, translate, broadcast, modify, license,transmit, distribute, exhibit, perform, publish, or display any part, in any form, or by any means. Reverseengineering, disassembly, or decompilation of this software, unless required by law for interoperability, isprohibited.
The information contained herein is subject to change without notice and is not warranted to be error-free. Ifyou find any errors, please report them to us in writing.
If this is software or related documentation that is delivered to the U.S. Government or anyone licensing it onbehalf of the U.S. Government, then the following notice is applicable:
U.S. GOVERNMENT END USERS: Oracle programs (including any operating system, integrated software,any programs embedded, installed or activated on delivered hardware, and modifications of such programs)and Oracle computer documentation or other Oracle data delivered to or accessed by U.S. Government endusers are "commercial computer software" or "commercial computer software documentation" pursuant to theapplicable Federal Acquisition Regulation and agency-specific supplemental regulations. As such, the use,reproduction, duplication, release, display, disclosure, modification, preparation of derivative works, and/oradaptation of i) Oracle programs (including any operating system, integrated software, any programsembedded, installed or activated on delivered hardware, and modifications of such programs), ii) Oraclecomputer documentation and/or iii) other Oracle data, is subject to the rights and limitations specified in thelicense contained in the applicable contract. The terms governing the U.S. Government’s use of Oracle cloudservices are defined by the applicable contract for such services. No other rights are granted to the U.S.Government.
This software or hardware is developed for general use in a variety of information management applications.It is not developed or intended for use in any inherently dangerous applications, including applications thatmay create a risk of personal injury. If you use this software or hardware in dangerous applications, then youshall be responsible to take all appropriate fail-safe, backup, redundancy, and other measures to ensure itssafe use. Oracle Corporation and its affiliates disclaim any liability for any damages caused by use of thissoftware or hardware in dangerous applications.
Oracle, Java, and MySQL are registered trademarks of Oracle and/or its affiliates. Other names may betrademarks of their respective owners.
Intel and Intel Inside are trademarks or registered trademarks of Intel Corporation. All SPARC trademarks areused under license and are trademarks or registered trademarks of SPARC International, Inc. AMD, Epyc,and the AMD logo are trademarks or registered trademarks of Advanced Micro Devices. UNIX is a registeredtrademark of The Open Group.
This software or hardware and documentation may provide access to or information about content, products,and services from third parties. Oracle Corporation and its affiliates are not responsible for and expresslydisclaim all warranties of any kind with respect to third-party content, products, and services unless otherwiseset forth in an applicable agreement between you and Oracle. Oracle Corporation and its affiliates will not beresponsible for any loss, costs, or damages incurred due to your access to or use of third-party content,products, or services, except as set forth in an applicable agreement between you and Oracle.
Contents
Preface
Audience ix
Documentation Accessibility ix
Diversity and Inclusion ix
Related Resources ix
Conventions x
1 Get Started
Overview of Oracle Content Management 1-1
Access Oracle Content Management 1-2
Understand Roles 1-2
Manage Assets 1-2
Manage Content 1-3
Collaborate on Content 1-3
Build Sites 1-3
Integrate and Extend Oracle Content Management 1-4
Get Started 1-4
Key Concepts 1-4
Files and Folders 1-5
User Roles 1-6
Data Security 1-7
Synchronization 1-7
Mobile Apps 1-8
Sharing 1-10
Conversations 1-11
Annotating and Reviewing 1-12
Groups 1-13
Sign Up and Sign In 1-14
Learn About User Roles 1-14
Download the Apps 1-15
Supported Languages, Devices, and Software 1-16
Keyboard Shortcuts 1-16
iii

Global Keyboard Shortcuts 1-16
Calendar Keyboard Shortcuts 1-17
Content Type Editor Keyboard Shortcuts 1-17
Conversation Keyboard Shortcuts 1-17
Message List Keyboard Shortcuts 1-17
Posting or Replying Keyboard Shortcuts 1-18
Adding Annotations Using Keyboard Shortcuts 1-18
Icon Quick Reference 1-18
Web Client Icons 1-19
Mobile App Icons 1-20
Desktop Icons 1-20
Digital Asset Icons 1-21
Microsoft Radial Menu 1-21
Service Accessibility 1-21
Support 1-22
2 Manage Your Files and Folders
Get to Know the Documents Page 2-1
Work with Your Files and Folders 2-3
Customize Your Profile and Preferences 2-8
View Files 2-9
Upload Files 2-11
Download Files 2-11
Extract Multiple Files From A Compressed File 2-12
Search Content and Conversations 2-13
Lock a File 2-14
Edit a File 2-14
Use Metadata 2-15
Use Assets 2-16
Share Files and Folders 2-16
Use Conversations 2-16
Use Workflows 2-17
3 Work with the Desktop App
Set Up Local File Sync 3-2
Sync Subfolders and Files 3-4
Install and Configure the Desktop App 3-4
Set Notifications and Preferences 3-5
Sync Your Files 3-6
iv
Sync Files in Multiple Accounts 3-8
Work with Synced Files 3-8
Share Files and Folders 3-11
Use Conversations 3-11
4 Work with Microsoft Office
Create Microsoft Office Files in the Web Client 4-1
Edit Microsoft Office Files 4-2
Use the Radial Menu 4-2
Add Links Using Microsoft Outlook 4-3
Use Oracle Content as a Storage Option 4-3
5 Use the Mobile Apps
Use the Android Mobile App 5-2
Get to Know the Android Mobile App 5-3
Sign In or Out 5-5
Set a Passcode 5-5
Access Multiple Oracle Content Accounts 5-6
Manage Notifications 5-6
Work with Files and Folders 5-6
View Files or File and Folder Details 5-8
Edit Files 5-9
Upload Files and Media 5-9
Download (Sync) Files 5-10
Search Content and Conversations 5-10
Use Assets 5-12
Share Files and Folders 5-13
Use Conversations 5-13
Use the iPhone/iPad Mobile App 5-14
Get to Know the iPhone/iPad Mobile App 5-15
Sign In or Out 5-16
Set a Passcode 5-16
Access Multiple Oracle Cloud Accounts 5-17
Manage Notifications 5-17
Work with Files and Folders 5-18
View Files or File Details 5-20
Edit Files 5-20
Upload Files or Media 5-21
Download Files or Media 5-22
v
Search Content and Conversations 5-23
Use Assets 5-24
Share Files and Folders 5-25
Use Conversations 5-26
6 Share Files and Folders
Sharing Overview 6-1
Share Files 6-3
Share Folders 6-4
Stop Sharing 6-5
Check File Access History 6-6
Recover a Deleted File in a Shared Folder 6-6
Sharing Tips 6-6
7 Use Conversations
Conversations Overview 7-1
Get to Know the Conversations Page 7-3
Filter or Sort Conversations 7-5
Start a Conversation 7-5
Add or Remove People in a Conversation 7-5
Add or Remove Files in a Conversation 7-7
Manage Your Conversations 7-8
Add Annotations 7-8
Add Links to Another Conversation 7-9
Use Flags 7-9
8 Use Groups
Groups Overview 8-1
Create or Delete a Group 8-2
Add People to a Group 8-3
Join or Leave a Group 8-3
9 Troubleshoot
Troubleshoot Web Browser 9-2
I can't sign in 9-3
I can't move or copy a file 9-3
I don’t see digital assets or content items 9-3
I can't upload or download a file 9-4
vi
I can't find my downloaded files 9-4
I can't create a folder 9-4
I exceeded my storage quota but I didn't think I had that many files 9-4
I need to edit a file but it’s locked by someone else 9-5
I can't edit an Office 365 file online 9-5
I’m having trouble loading the software 9-5
I'm having trouble viewing a file or video 9-5
There are multiple version numbers after a file name but I only uploaded one version 9-5
I don't see the folders that I expected to see in my folder list 9-5
URLs copied from a spreadsheet don’t paste correctly 9-6
I don’t see the results I expected when searching 9-6
Troubleshoot the Desktop App and Sync 9-7
I can’t sign in to the desktop app 9-7
I don’t see a folder to sync or I can’t find a synced file 9-7
PDF files created in a synced folder disappear 9-8
Links in my synced files aren't working 9-8
I have sync problems or slow syncing 9-8
I can't change an Oracle Content account folder location 9-9
Icons in an Oracle Content account folder don't show sync status 9-10
My files aren't compressed when I add them to a compressed folder 9-10
I can’t check for updates 9-10
Files and folders in my Oracle Content folder are wrong or out of date 9-11
I can't work with a file on my desktop after I rename it 9-11
I exited or quit the desktop app and don't know what's happened to sync 9-11
I can’t restore a folder I deleted 9-12
Troubleshoot Microsoft Office Add-On 9-12
Why are there two Oracle Content storage services when using Microsoft Office? 9-12
My Office add-in or Outlook add-in isn’t working 9-12
Links in Outlook email on a Mac don’t work as I expect 9-13
Troubleshoot Mobile 9-13
I need to reset my passcode 9-14
I can't view a file when I have Viewer rights in a shared folder 9-14
I can't view a file that I downloaded 9-14
I’m having trouble viewing a video 9-14
I can't find my downloaded files on my device 9-14
My file didn't sync in the Android app 9-15
I got an error when transferring a file during sync in the Android app 9-15
My edits don't appear in a file I synchronized on my Android device 9-15
What do I do if my device is lost or stolen? 9-15
Troubleshoot Sharing 9-16
I shared a folder with someone, but they can't use it the way I expected 9-16
vii
Someone sent me a folder link, but I can't access the files there 9-16
I stopped sharing a folder and now the subfolders aren't shared 9-16
I have a link to a file or folder but it requires an access code 9-17
I can't get a public link to send to someone in a folder that's shared with me 9-17
Files are missing from one of my folders that I shared 9-17
I can't create a public link to a folder I own 9-17
viii
Preface
This document describes how to use and manage content stored in Oracle Cloud.
AudienceThis publication is intended for Oracle Cloud users who want to work with files using a webbrowser, via the desktop synchronization application, or a mobile device.
Documentation AccessibilityFor information about Oracle's commitment to accessibility, visit the Oracle AccessibilityProgram website at http://www.oracle.com/pls/topic/lookup?ctx=acc&id=docacc.
Access to Oracle Support
Oracle customers that have purchased support have access to electronic support through MyOracle Support. For information, visit http://www.oracle.com/pls/topic/lookup?ctx=acc&id=infoor visit http://www.oracle.com/pls/topic/lookup?ctx=acc&id=trs if you are hearing impaired.
Diversity and InclusionOracle is fully committed to diversity and inclusion. Oracle respects and values having adiverse workforce that increases thought leadership and innovation. As part of our initiative tobuild a more inclusive culture that positively impacts our employees, customers, andpartners, we are working to remove insensitive terms from our products and documentation.We are also mindful of the necessity to maintain compatibility with our customers' existingtechnologies and the need to ensure continuity of service as Oracle's offerings and industrystandards evolve. Because of these technical constraints, our effort to remove insensitiveterms is ongoing and will take time and external cooperation.
Related ResourcesFor more information, see these Oracle resources:
• Getting Started with Oracle Cloud
• Managing Assets with Oracle Content Management
• Building Sites with Oracle Content Management
• Developing with Oracle Content Management As a Headless CMS
• Administering Oracle Content Management
• Integrating and Extending Oracle Content Management
ix
• What's New for Oracle Content Management
• Known Issues for Oracle Content Management
ConventionsThe following text conventions are used in this document:
Convention Meaning
boldface Boldface type indicates graphical user interface elements associatedwith an action, or terms defined in text or the glossary.
italic Italic type indicates book titles, emphasis, or placeholder variables forwhich you supply particular values.
monospace Monospace type indicates commands within a paragraph, URLs, codein examples, text that appears on the screen, or text that you enter.
Preface
x
1Get Started
Oracle Content Management is a cloud-based content hub where you manage your contentand digital assets quickly and easily.
• What's New
• Take a quick tour of Oracle Content Management (English only)
• Overview of Oracle Content Management
• Key Concepts
• Sign Up and Sign In
• Manage Your Password
• Download the Apps
• Supported Languages, Devices, and Software
• Keyboard Shortcuts
• Icon Quick Reference
• Service Accessibility
• Support
Overview of Oracle Content ManagementOracle Content Management is a cloud-based content hub to drive omni-channel contentmanagement and accelerate experience delivery. It offers powerful collaboration andworkflow management capabilities to streamline the creation and delivery of content andimprove customer and employee engagement.
With Oracle Content Management, you can rapidly collaborate internally and externally onany device to approve content and create contextualized experiences. Built-in business-friendly tools make building new web experiences with stunning content a breeze. You candrive digital engagement with all your stakeholders using the same content platform and thesame processes. Technical and organizational bottlenecks are gone, so you no longer havebarriers to create engaging experiences.
Note:
Oracle Content Management Starter Edition has a limited feature set. To takeadvantage of the full feature set, upgrade to the Premium Edition.
1-1
Access Oracle Content ManagementAfter you've been granted access to Oracle Content Management, you receive awelcome email with details about the instance URL and your user name. You'll needthis information to log in to the service, so it's a good idea to keep it for futurereference.
There are different ways to interact with Oracle Content Management:
• The web interface provides easy access from your favorite web browser. You canmanage your content in the cloud, share files and folders with others, start andparticipate in conversations, create websites (if allowed), and more.
• The desktop app lets you keep your files and folders synchronized between thecloud and your computer. You can sync your own files and those shared with you,making sure you always have access to the latest versions.
• A Microsoft Office add-on gives you access to Oracle Content Managementfeatures directly from Microsoft Word, Excel, PowerPoint, and Outlook.
• Mobile apps for Android and iOS provide easy access on your phone or othermobile devices. The mobile apps are instantly familiar, because they look and actjust like the service in your web browser. You can access your cloud content,search and sort your files and folders, share content, and work with conversations.
• REST APIs and SDKs provide developers with powerful tools to programmaticallyincorporate Oracle Content Management functionality into web applications andmobile apps.
Understand RolesThe Oracle Content Management features that you can access depend on the roleyou’ve been assigned. You’ll see different options depending on your application role.Standard users can work with documents, conversations, and sites. Enterprise userscan also access assets. Developers see options to build and customize website piecessuch as templates, themes, components, and layouts. Administrators see options toconfigure the service, integrate the service with other business applications, and setup asset repositories.
There are different types of roles in Oracle Content Management:
• Organization roles — Your role within your organization determines what tasksyou need to perform and how you use features.
• Application roles — Application roles control what features you see in OracleContent Management.
• Resource roles (permissions) — What you can see and do with a resource, suchas a document, content item, site, or template, depends on the role you’reassigned when the resource is shared with you.
Learn more...
Manage AssetsOracle Content Management offers powerful capabilities to manage all your assets foruse in different channels, including websites, marketing materials, email campaigns,online stores, and blogs. It provides a central content hub for all your assets, where
Chapter 1Overview of Oracle Content Management
1-2

you can organize them into repositories and collections, and create rules to define how theycan be used and where.
There are also extensive management and workflow features to guide assets through theircreation and approval process and to ensure that only authorized versions are available foruse.
It's easy to tag and filter assets so you can quickly find the assets you need, and use themwhere they're allowed. And smart content features will tag and suggest assets automaticallyas you use them!
Create asset types to define what information you need to collect when users create assets.Digital asset types define the custom attributes required for your digital assets (files, images,and videos). Content types group different pieces of content into reusable units. Users canthen create digital assets and content items based on these asset types for consistent useand presentation among channels.
Learn more...
Manage ContentWith Oracle Content Management, you can manage your content in the cloud, all in oneplace and accessible from anywhere.
You can group your files in folders and perform common file management operations (copy,move, delete, and so on) in much the same way as on your local computer. And since all yourfiles reside in the cloud, you have access to them wherever you go, also on your mobiledevices. If you install the desktop app, all your content can be automatically synchronized toyour local computer, so you always have the most recent versions at your fingertips.
Learn more...
Collaborate on ContentWith all your content in the cloud, it’s easy to share your files or folders to collaborate withothers inside or outside your organization. Everyone you share your content with has accessto the latest information—wherever they are, whenever they need it. You can grant access toentire folders or provide links to specific items. All access to shared items is recorded, so youcan monitor how and when each shared item was accessed.
Conversations in Oracle Content Management allow you to collaborate with other people bydiscussing topics and posting comments in real time. You can start a stand-aloneconversation on any topic, adding files as needed. Or you can start a conversation about aspecific file, folder, asset, or site for quick and easy feedback.
All messages, files, and annotations associated with a conversation are retained, so it’s easyto track and review the discussion. And your conversations live in the cloud, so you can alsoview them and participate on the go from your mobile devices.
Learn more...
Build SitesWith Oracle Content Management, you can rapidly build and publish marketing andcommunity websites—from concept to launch—to provide engaging online experiences. Theprocess is completely integrated: content, collaboration, and creativity are combined in asingle authoring and publishing environment.
Chapter 1Overview of Oracle Content Management
1-3
To get started quickly, use an out-of-the-box template, drag-and-drop components,sample page layouts, and site themes to assemble a site from predefined buildingblocks. Or developers can create custom templates, custom themes, or customcomponents to create unique online experiences.
Add YouTube videos, streaming videos, images, headlines, paragraphs, social medialinks, and other site objects simply by dragging and dropping components intodesignated slots on a page. Switch themes and rebrand a site at the touch of a buttonto provide an optimized, consistent look and feel across your organization.
You can work on one or more updates, preview an update in the site, and then, whenyou're ready, publish the update with a single click.
In addition to creating and publishing sites in Site Builder, Oracle ContentManagement also supports 'headless' site development using REST APIs, React JS,Node JS, and other web technologies.
Learn more...
Integrate and Extend Oracle Content ManagementAs an Oracle Platform-as-a-Service (PaaS) offering, Oracle Content Managementworks seamlessly with other Oracle Cloud services.
You can embed the web UI into your web applications so users can interact withcontent directly. Use the Application Integration Framework (AIF) to integrate third-party services and applications into the Oracle Content Management interface through custom actions. Or develop content connectors to bring content that you have alreadycreated elsewhere into Oracle Content Management, manage it centrally, and use it innew experiences across multiple channels.
With a rich set of REST APIs and SDKs for content and site management, delivery,and collaboration, you can incorporate Oracle Content Management functionality intoyour web applications.
Create client applications that interact with your content SDKs and assets in the cloud.Develop custom integrations with collaboration objects or retrieve assets for usewherever you need them. You can access and deliver all your content and assetsoptimized for each channel, whether it’s through a website, content delivery network(CDN), or mobile apps.
Learn more...
Get StartedTo help you get started with Oracle Content Management, visit the Oracle Help Center,which has lots of resources, including documentation, videos, guided tours, and developer information.
And if you need it, there’s support and a community to help.
Key ConceptsOracle Content Management provides a number of user-friendly tools that help youcollaborate on documents with others within and outside your organization. These are
Chapter 1Key Concepts
1-4
some of the key concepts to understand about collaborating on documents with OracleContent Management:
• Files and Folders
• User Roles
• Data Security
• Synchronization
• Mobile Apps
• Sharing
• Conversations
• Annotating and Reviewing
• Groups
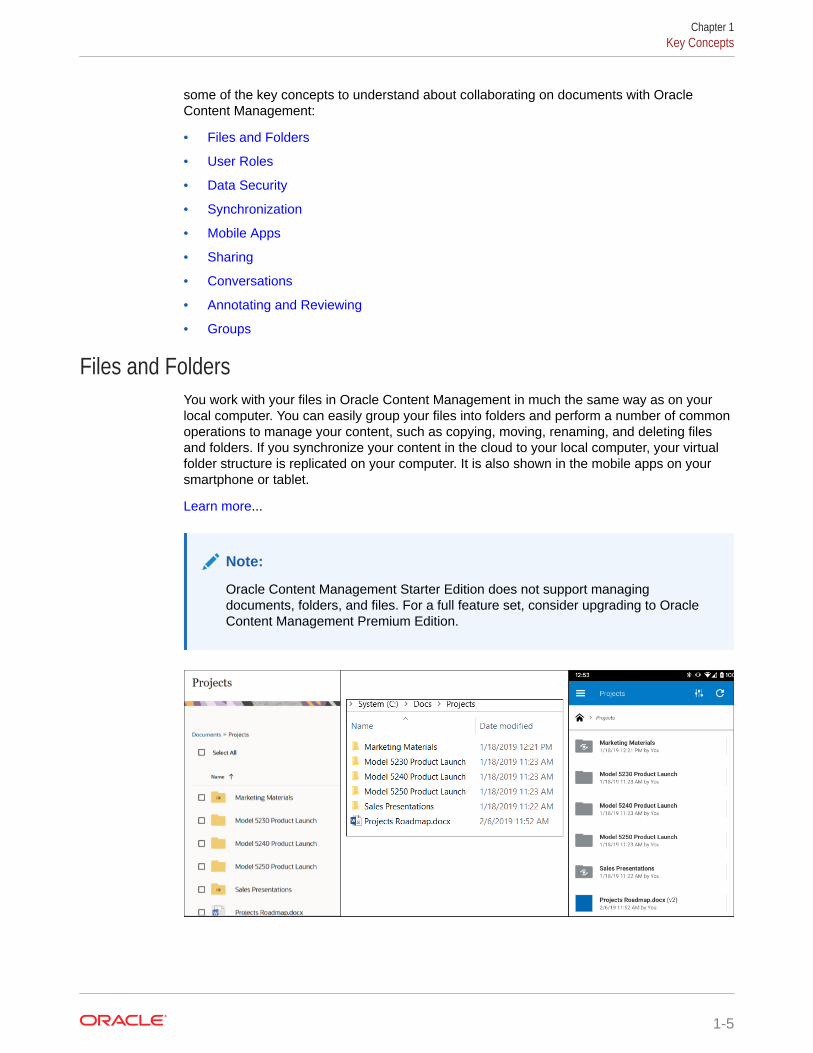
Files and FoldersYou work with your files in Oracle Content Management in much the same way as on yourlocal computer. You can easily group your files into folders and perform a number of commonoperations to manage your content, such as copying, moving, renaming, and deleting filesand folders. If you synchronize your content in the cloud to your local computer, your virtualfolder structure is replicated on your computer. It is also shown in the mobile apps on yoursmartphone or tablet.
Learn more...
Note:
Oracle Content Management Starter Edition does not support managingdocuments, folders, and files. For a full feature set, consider upgrading to OracleContent Management Premium Edition.
Chapter 1Key Concepts
1-5
User RolesWhat you see and what you can do in Oracle Content Management are determined byhow resources are shared and what role you're assigned. Roles are assigned by yourservice administrator, the person who manages all the features of your Oracle ContentManagement service.
Organization roles determine what tasks a person needs to perform in theorganization. User roles control what features a person sees when using the service.And resource roles or permissions control what a person can do with content items,files, and so on.
Some common organization roles include:
• Anonymous user: a person engaging with a public website or other digitalexperience. This user can download documents or make purchases via a digitalchannel.
• Visitor: someone engaging your website, mobile site or other digital experience tolearn about the company. Visitors can interact with specific secure sites, make apurchase, and so on.
• Employee: a person who shares documents with coworkers and views documentsthat were shared. They may also collaborate through conversations and createteam sites or partner sites from pre-built templates.
• Content contributor: a person who writes articles to be published to a channel.
• Administrators: Repository administrators create and maintain repositories usedto store digital assets. Site administrators create and manage sites, eitherenterprise sites or standard sites. Content administrators review submitted contentand submit content to translation vendors.
• Developers: developers create and maintain tools used for websites, such astemplates, themes, and style sheets. Those kinds of tasks are described in detailin Developing with Oracle Content Management As a Headless CMS.
User roles include:
• Administrators, including a cloud account administrator, an identity domainadministrator, site administrators, content administrators, repositoryadministrators, storage administrator, and an entitlement administrator.
• Developers, including enterprise developers and standard developers.
• Users, including standard users, enterprise users, and integration users.
• Visitors
Resource roles include:
• Viewer: people who can view content but can’t edit or download it.
• Downloader: people who can download the associated resource and save it to apersonal computer.
• Contributor: people who can view, download, and edit the resource.
• Manager: people who have full control of a resource.
Learn more...
Chapter 1Key Concepts
1-6
Data SecurityOracle Content Management uses a multilayered approach to protect your files in the cloud:
• User name and password: You need a user account to access the service. Accountsare set up and managed by your service administrator, the person in charge of managingthe service for your organization.
• File encryption: Your files are protected using Secure Sockets Layer (SSL) technology.Files are encrypted while they're uploaded (in transit) and when they’re stored (at rest) inthe cloud. That prevents unauthorized use of the files.
• Access control: You have total control over who can access your files. You can addcoworkers as members of a folder, and you set the access rights for those users whenthey're added. In addition to sharing folders, you can also share files using links. If yousend a link to a member of a folder, that person can sign in and use the file in the service.If you send the link to a nonmember, that person is restricted from seeing other files inthe folder.
• Virus scanning: When you upload files to the cloud, they can be checked by a virusscanner if that option is set by your service administrator. Any files found to be infectedare quarantined in the Trash bin and a special icon marks the file as infected.
• Passcodes on mobile devices: When accessing your files on a mobile device, you canset a passcode to provide additional security. The passcode is a four-digit number that isset and managed by you on your device and it's used in addition to your user name andpassword. Any files that you download to your device are encrypted and you can't accessthose files outside of the Oracle Content Management app unless you specificallydownload the file for use on the device.
Learn more...
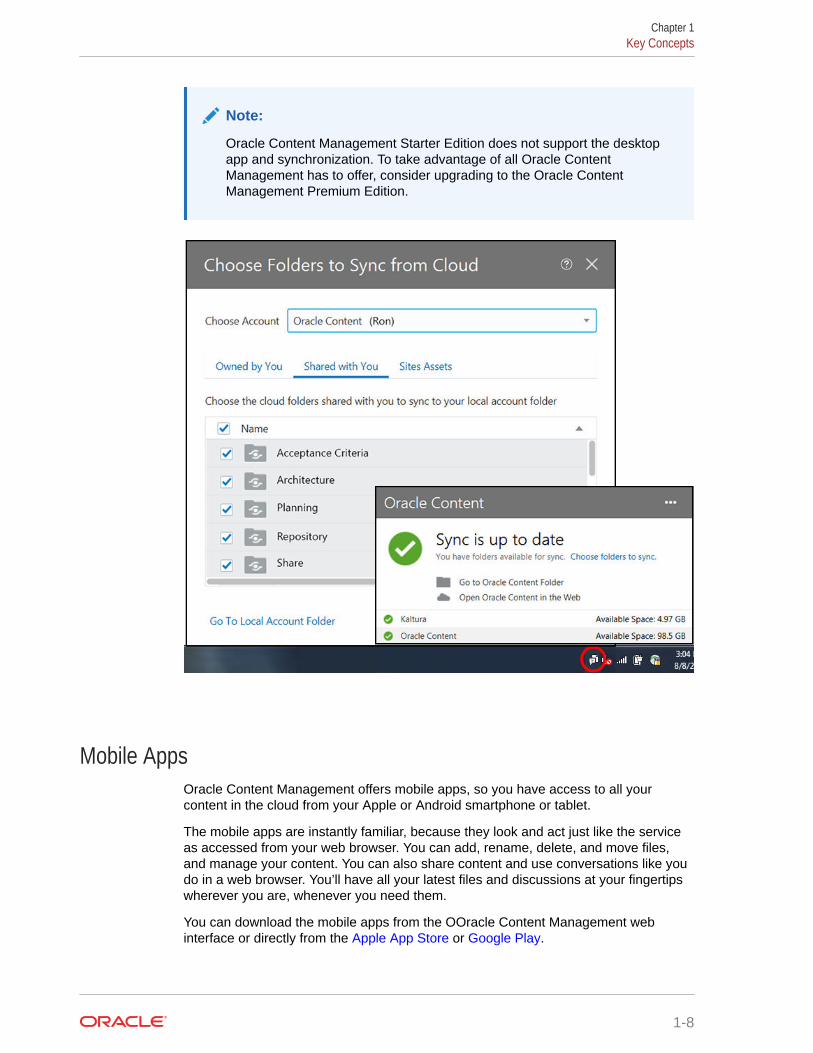
SynchronizationThe Oracle Content Management desktop app for Windows and Mac lets you synchronizeyour Oracle Cloud content to all your computers and devices. After installing the application,enter your account information and choose the folders you want to sync. Once you’ve setthings up, everything runs in the background. All cloud folders that you choose to sync arestored locally on your computer. The changes you make to your local files are automaticallysynced to your files in the cloud. And if you make changes to files in the cloud, then thesechanges are reflected in the copies on your local computer.
You can sync multiple Oracle Content Management accounts and multiple computers. Withsyncing both ways, your files in the cloud and on your local computers are always up to date.The files on your mobile device are also current, so you'll always have the most recentversion at your fingertips, wherever you are and whatever computer or mobile device youuse.
Learn more...
Chapter 1Key Concepts
1-7
Note:
Oracle Content Management Starter Edition does not support the desktopapp and synchronization. To take advantage of all Oracle ContentManagement has to offer, consider upgrading to the Oracle ContentManagement Premium Edition.
Mobile AppsOracle Content Management offers mobile apps, so you have access to all yourcontent in the cloud from your Apple or Android smartphone or tablet.
The mobile apps are instantly familiar, because they look and act just like the serviceas accessed from your web browser. You can add, rename, delete, and move files,and manage your content. You can also share content and use conversations like youdo in a web browser. You’ll have all your latest files and discussions at your fingertipswherever you are, whenever you need them.
You can download the mobile apps from the OOracle Content Management webinterface or directly from the Apple App Store or Google Play.
Chapter 1Key Concepts
1-8
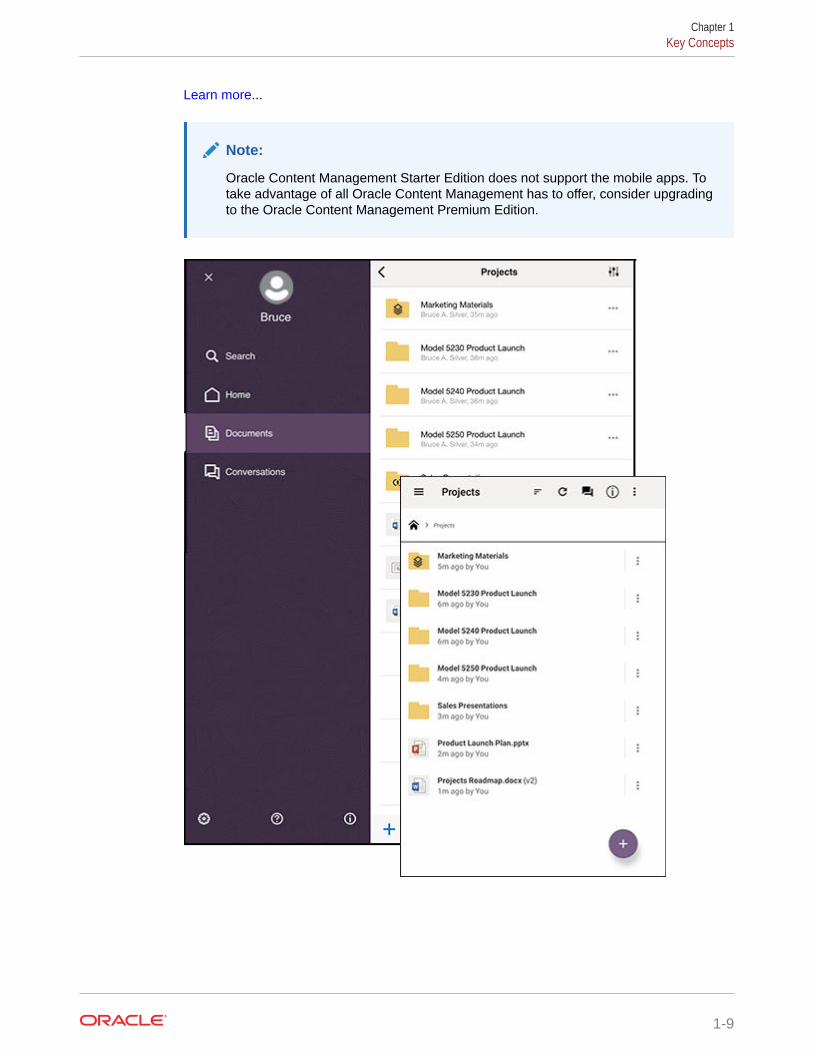
Learn more...
Note:
Oracle Content Management Starter Edition does not support the mobile apps. Totake advantage of all Oracle Content Management has to offer, consider upgradingto the Oracle Content Management Premium Edition.
Chapter 1Key Concepts
1-9
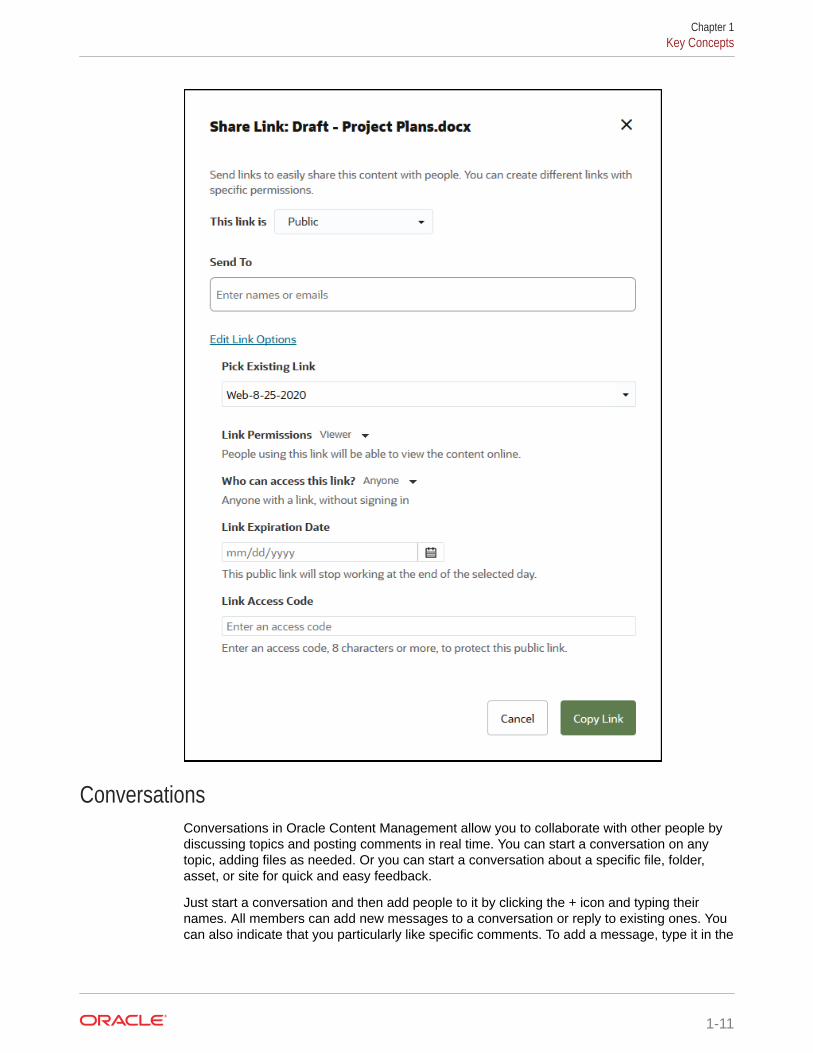
SharingWith all your content in the cloud, it's easy to share your files or folders to collaboratewith others inside or outside your organization. Everyone you share your content withhas access to the latest information—wherever they are, whenever they need it.
You can share an entire folder by adding members to that folder. This gives themaccess to everything in that folder and all subfolders. Members must log in to theirOracle Content Management account to access the shared folder.
Another way to share your content is to create links to files or folders. You can sendthese links to other people to give them convenient access to your content. Links toshared files always point to the latest revisions, so they never get outdated.
You can create members-only links, which can only be used by members of thefolder who sign in to their accounts. If you create a members-only link to a file, you canchoose to let recipients view the file online in their web browser or download it directlywithout viewing. You can add recipients by searching for their names or emailaddresses.
You can also create public links to files or folders. These can be used by anyone,even without an Oracle Content Management account. A service administrator maylimit the use of public links, depending on the policies in your organization. You canalso turn off public links in any of the folders that you own (in the folder properties).
You decide what public link recipients can do with your shared content. You may allowpeople to only view shared files online, or you may decide they should also be able todownload files or edit them and upload new versions. You can name your public linksso you can easily identify which links are used for what purpose.
For added security, you can limit access to registered Oracle Content Managementusers only. You can also create public links that expire automatically on a specific dateor protect them with an access code.
All access to shared items is recorded, so you can monitor how and when each shareditem was accessed. Open an item's properties in your web browser to view its accesshistory. You see actual user names for member links and link names for public links.
Learn more...
Chapter 1Key Concepts
1-10
ConversationsConversations in Oracle Content Management allow you to collaborate with other people bydiscussing topics and posting comments in real time. You can start a conversation on anytopic, adding files as needed. Or you can start a conversation about a specific file, folder,asset, or site for quick and easy feedback.
Just start a conversation and then add people to it by clicking the + icon and typing theirnames. All members can add new messages to a conversation or reply to existing ones. Youcan also indicate that you particularly like specific comments. To add a message, type it in the
Chapter 1Key Concepts
1-11
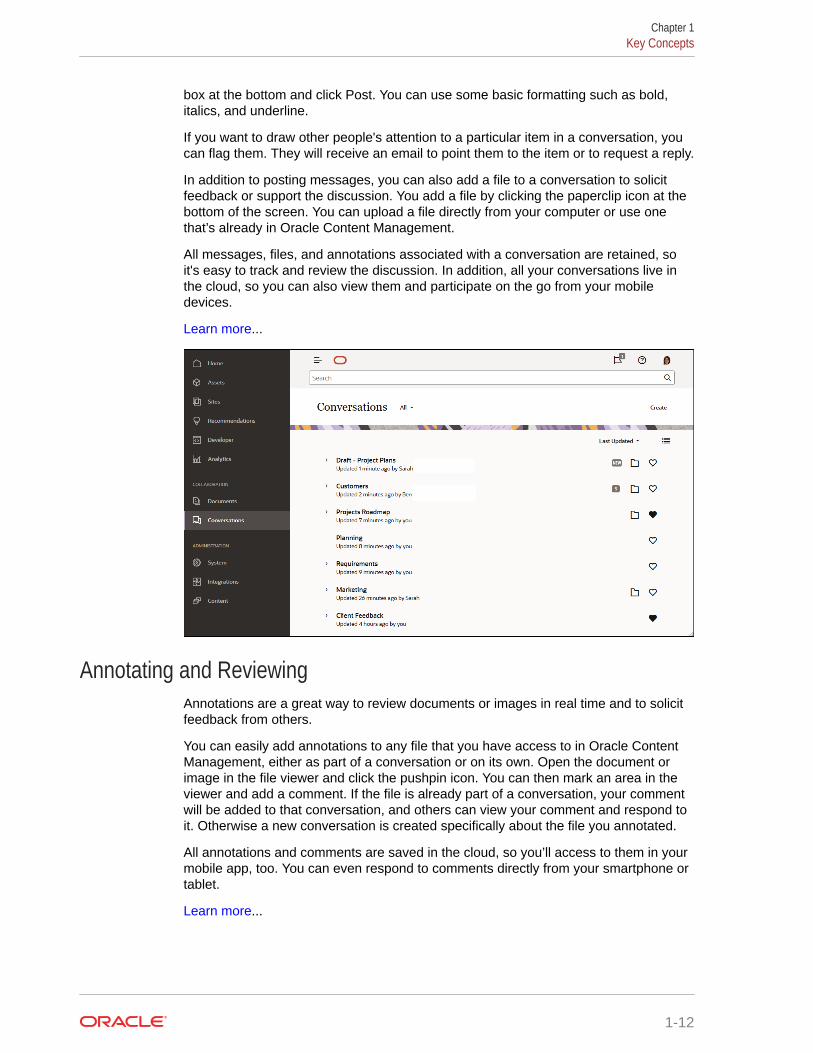
box at the bottom and click Post. You can use some basic formatting such as bold,italics, and underline.
If you want to draw other people's attention to a particular item in a conversation, youcan flag them. They will receive an email to point them to the item or to request a reply.
In addition to posting messages, you can also add a file to a conversation to solicitfeedback or support the discussion. You add a file by clicking the paperclip icon at thebottom of the screen. You can upload a file directly from your computer or use onethat’s already in Oracle Content Management.
All messages, files, and annotations associated with a conversation are retained, soit's easy to track and review the discussion. In addition, all your conversations live inthe cloud, so you can also view them and participate on the go from your mobiledevices.
Learn more...
Annotating and ReviewingAnnotations are a great way to review documents or images in real time and to solicitfeedback from others.
You can easily add annotations to any file that you have access to in Oracle ContentManagement, either as part of a conversation or on its own. Open the document orimage in the file viewer and click the pushpin icon. You can then mark an area in theviewer and add a comment. If the file is already part of a conversation, your commentwill be added to that conversation, and others can view your comment and respond toit. Otherwise a new conversation is created specifically about the file you annotated.
All annotations and comments are saved in the cloud, so you’ll access to them in yourmobile app, too. You can even respond to comments directly from your smartphone ortablet.
Learn more...
Chapter 1Key Concepts
1-12
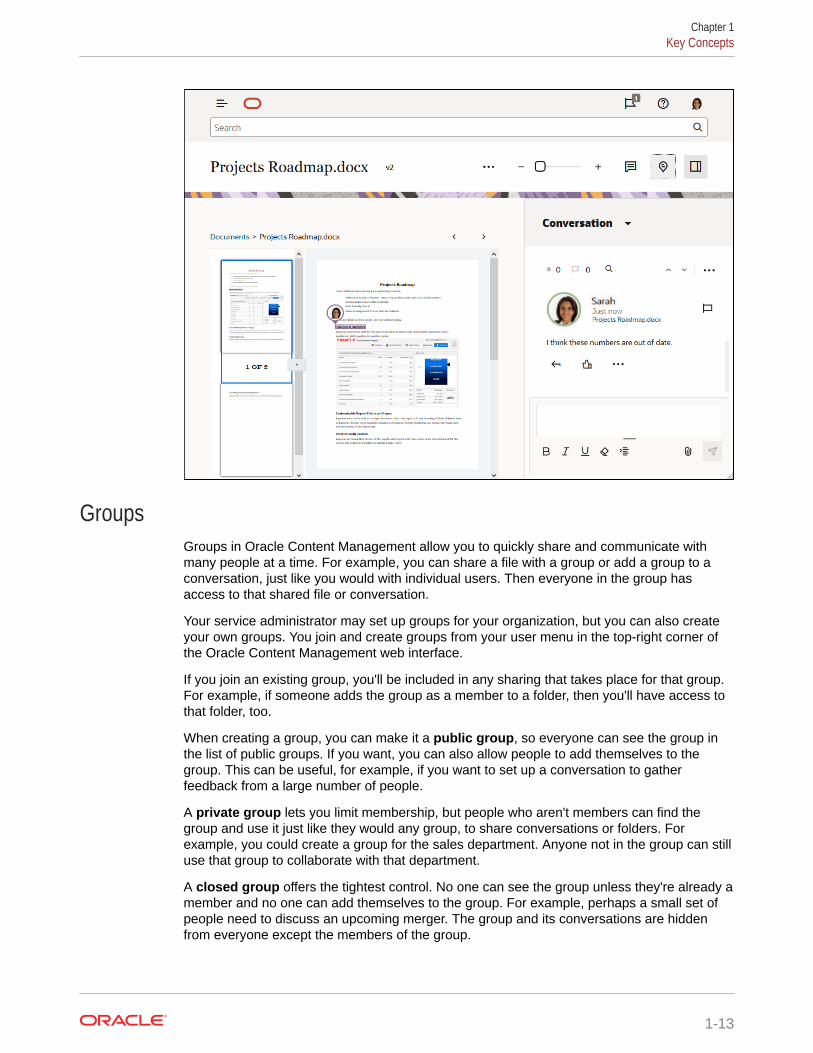
GroupsGroups in Oracle Content Management allow you to quickly share and communicate withmany people at a time. For example, you can share a file with a group or add a group to aconversation, just like you would with individual users. Then everyone in the group hasaccess to that shared file or conversation.
Your service administrator may set up groups for your organization, but you can also createyour own groups. You join and create groups from your user menu in the top-right corner ofthe Oracle Content Management web interface.
If you join an existing group, you'll be included in any sharing that takes place for that group.For example, if someone adds the group as a member to a folder, then you'll have access tothat folder, too.
When creating a group, you can make it a public group, so everyone can see the group inthe list of public groups. If you want, you can also allow people to add themselves to thegroup. This can be useful, for example, if you want to set up a conversation to gatherfeedback from a large number of people.
A private group lets you limit membership, but people who aren't members can find thegroup and use it just like they would any group, to share conversations or folders. Forexample, you could create a group for the sales department. Anyone not in the group can stilluse that group to collaborate with that department.
A closed group offers the tightest control. No one can see the group unless they're already amember and no one can add themselves to the group. For example, perhaps a small set ofpeople need to discuss an upcoming merger. The group and its conversations are hiddenfrom everyone except the members of the group.
Chapter 1Key Concepts
1-13
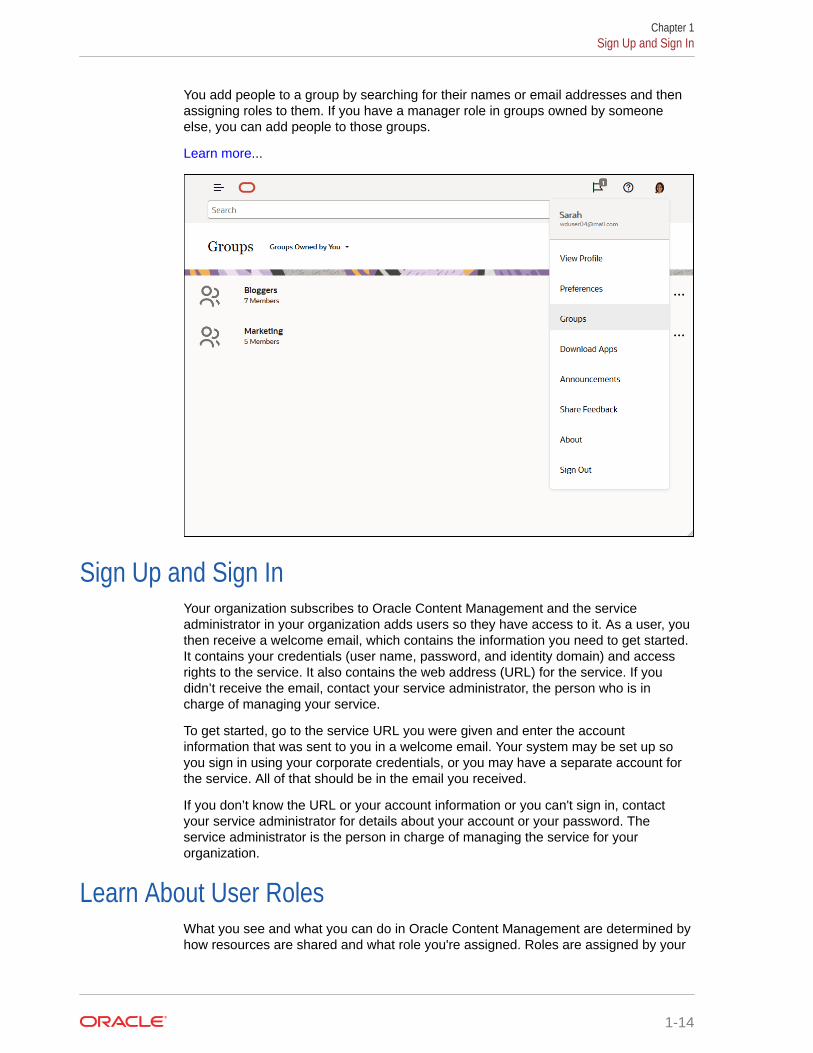
You add people to a group by searching for their names or email addresses and thenassigning roles to them. If you have a manager role in groups owned by someoneelse, you can add people to those groups.
Learn more...
Sign Up and Sign InYour organization subscribes to Oracle Content Management and the serviceadministrator in your organization adds users so they have access to it. As a user, youthen receive a welcome email, which contains the information you need to get started.It contains your credentials (user name, password, and identity domain) and accessrights to the service. It also contains the web address (URL) for the service. If youdidn’t receive the email, contact your service administrator, the person who is incharge of managing your service.
To get started, go to the service URL you were given and enter the accountinformation that was sent to you in a welcome email. Your system may be set up soyou sign in using your corporate credentials, or you may have a separate account forthe service. All of that should be in the email you received.
If you don’t know the URL or your account information or you can't sign in, contactyour service administrator for details about your account or your password. Theservice administrator is the person in charge of managing the service for yourorganization.
Learn About User RolesWhat you see and what you can do in Oracle Content Management are determined byhow resources are shared and what role you're assigned. Roles are assigned by your
Chapter 1Sign Up and Sign In
1-14
service administrator, the person who manages all the features of your Oracle ContentManagement service.
Organization roles determine what tasks a person needs to perform in the organization. Userroles control what features a person sees when using the service. And resource roles orpermissions control what a person can do with content items, files, and so on.
Some common organization roles include:
• Anonymous user: a person engaging with a public website or other digital experience.This user can download documents or make purchases via a digital channel.
• Visitor: someone engaging your website, mobile site or other digital experience to learnabout the company. Visitors can interact with specific secure sites, make a purchase, andso on.
• Employee: a person who shares documents with coworkers and views documents thatwere shared. They may also collaborate through conversations and create team sites orpartner sites from pre-built templates.
• Content contributor: a person who writes articles to be published to a channel.
• Administrators: Repository administrators create and maintain repositories used to storedigital assets. Site administrators create and manage sites, either enterprise sites orstandard sites. Content administrators review submitted content and submit content totranslation vendors.
• Developers: developers create and maintain tools used for websites, such as templates,themes, and style sheets. Those kinds of tasks are described in detail in Developing withOracle Content Management As a Headless CMS.
User roles include:
• Administrators, including a cloud account administrator, an identity domainadministrator, site administrators, content administrators, repository administrators,storage administrator, and an entitlement administrator.
• Developers, including enterprise developers and standard developers.
• Users, including standard users, enterprise users, and integration users.
• Visitors
Resource roles include:
• Viewer: people who can view content but can’t edit or download it.
• Downloader: people who can download the associated resource and save it to apersonal computer.
• Contributor: people who can view, download, and edit the resource.
• Manager: people who have full control of a resource.
Learn more...
Download the AppsTo get the desktop app to use to synchronize your files, click your user name when accessingOracle Content Management in a browser. Click Download Apps. You can download theWindows version or the Mac version.
Chapter 1Download the Apps
1-15
The mobile apps are available in the appropriate app store (Apple App Store or Google Play). You can download the apps from the store, or you can access OracleContent Management through a browser on your mobile device. When you do, you’llbe prompted to download the app.
Supported Languages, Devices, and SoftwareBy default, the web interface language type matches the web browser locale, but youcan override that in your user preferences. Click the menu next to your user name andselect Preferences then choose your language option. If you change your languagesetting, that won’t take effect until the next time you sign in.
The user interface language for the desktop and mobile apps is set automaticallybased on the user locale set for the operating system. You can’t override this languagesetting in the apps.
See Supported Software, Devices, Languages, and File Formats in AdministeringOracle Content Management for a complete list.
Keyboard ShortcutsThe desktop app, Android mobile app, and web browser interface support the standardaccessibility features and assistive technologies of the operating system that they runon, such as keyboard shortcuts, voice assistance, and so on. Consult your operatingsystem help for details.
When using a Safari browser, you might need to configure tabbing behavior whichmight not be set by default. Access your Safari preferences and select Press Tab tohighlight each item on web page.
When using Firefox with the macOS/OS X operating system, you might need to settabbing behavior as well. Open your operating system preferences and chooseKeyboard Preferences. Select the Shortcuts tab. In the Full Keyboard Accesssection, set the option to All Controls.
To see all keyboard shortcuts in the web client, press the question mark (?). A list ofavailable shortcuts is shown in a dialog.
When you play audio or video in accessibility mode, you can’t navigate to the actionbar to perform actions such as viewing file properties. You can only access thecontrols to play or pause the audio or video. To perform other actions on the file, goback to the file listing (using Backspace or Esc), where you can use the keyboard toaccess file actions.
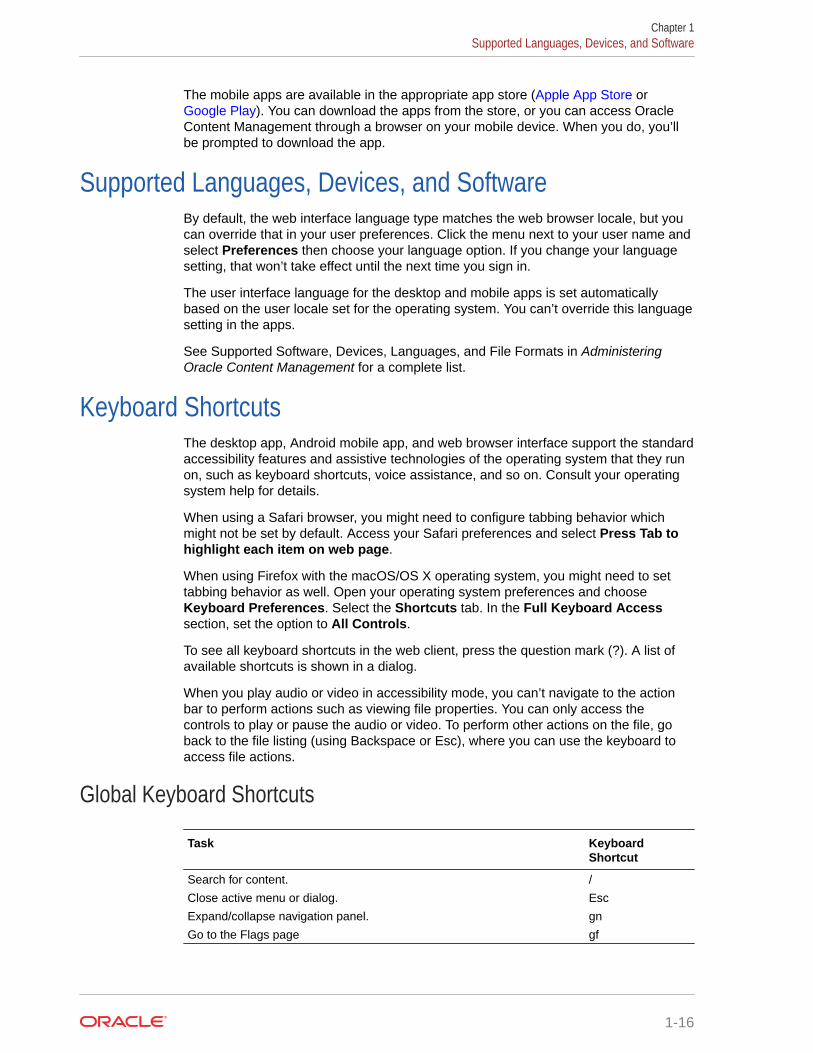
Global Keyboard Shortcuts
Task KeyboardShortcut
Search for content. /
Close active menu or dialog. Esc
Expand/collapse navigation panel. gn
Go to the Flags page gf
Chapter 1Supported Languages, Devices, and Software
1-16

Calendar Keyboard Shortcuts
Task Keyboard Shortcut
Open the date picker if closed. Ctrl+Home
Move to previous/next month. Page Up/Page Down
Move to previous/next year. Ctrl+Page Up/PageDown
Move to previous/next day. Ctrl+Command+Left/Right
Move to the previous/next week. Ctrl+Command+Up/Down
Move to the current month. Ctrl+Command+Home
Select the focused date. Enter
Close without selection. Escape
Close the calendar, and erase selections. Ctrl+Command+End
Content Type Editor Keyboard Shortcuts
Task Keyboard Shortcut
Move focus to previous/next data field. Up Arrow/DownArrow
Select a data field to add to content type definition. Enter
When data field is selected, place it as first item/last item in content typedefinition.
Alt+Up Arrow/DownArrow
When focus is on item in content type definition, move data field up/down indefinition list.
Alt+Up Arrow/DownArrow
Conversation Keyboard Shortcuts
Task Keyboard Shortcut
Open selected conversation. Enter
Move focus into conversation entry. Shift+Enter
Create a new conversation. n
Mark all messages in selected conversation as read. m
Mark or clear selected conversation as favorite. v
Insert a reference. Alt+Shift+t to moveto the messagetoolbar; tab to InsertReference.
Message List Keyboard Shortcuts
Task Keyboard Shortcut
Post a message. t
Chapter 1Keyboard Shortcuts
1-17
Task Keyboard Shortcut
Reply to selected message. r
Edit selected message. e
Like selected message. l
Clear flag for you on selected message. c
Manage flags for selected message. f
Mark selected message as read. m
Next message. j
Find next item (based on selected find criteria). x
Find previous item (based on selected find criteria). p
Posting or Replying Keyboard Shortcuts
Task KeyboardShortcut
Applies bold style. Ctrl+b
Applies italic style. Ctrl+i
Applies underline style. Ctrl+u
Remove formatting from selected text. Ctrl+f
Upload document. Ctrl+d
Send post or reply. Ctrl+Enter
Clear your message text. Esc
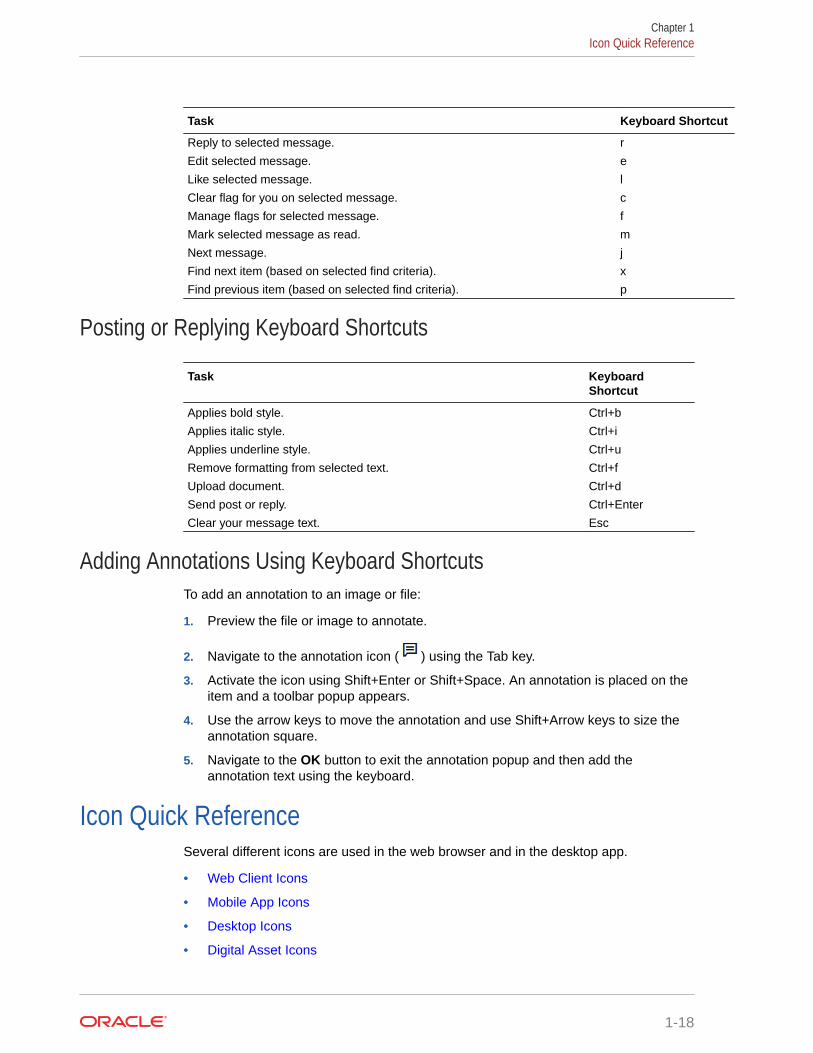
Adding Annotations Using Keyboard ShortcutsTo add an annotation to an image or file:
1. Preview the file or image to annotate.
2. Navigate to the annotation icon ( ) using the Tab key.
3. Activate the icon using Shift+Enter or Shift+Space. An annotation is placed on theitem and a toolbar popup appears.
4. Use the arrow keys to move the annotation and use Shift+Arrow keys to size theannotation square.
5. Navigate to the OK button to exit the annotation popup and then add theannotation text using the keyboard.
Icon Quick ReferenceSeveral different icons are used in the web browser and in the desktop app.
• Web Client Icons
• Mobile App Icons
• Desktop Icons
• Digital Asset Icons
Chapter 1Icon Quick Reference
1-18
• Microsoft Radial Menu
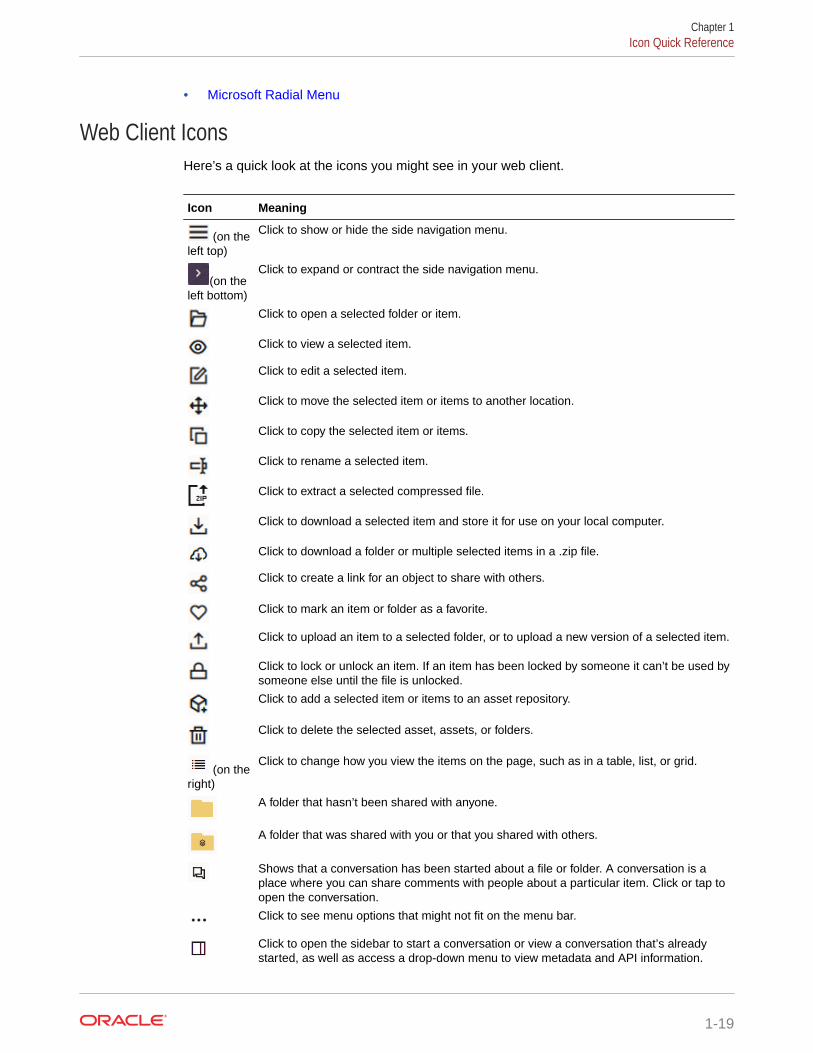
Web Client IconsHere’s a quick look at the icons you might see in your web client.
Icon Meaning
(on theleft top)
Click to show or hide the side navigation menu.
(on theleft bottom)
Click to expand or contract the side navigation menu.
Click to open a selected folder or item.
Click to view a selected item.
Click to edit a selected item.
Click to move the selected item or items to another location.
Click to copy the selected item or items.
Click to rename a selected item.
Click to extract a selected compressed file.
Click to download a selected item and store it for use on your local computer.
Click to download a folder or multiple selected items in a .zip file.
Click to create a link for an object to share with others.
Click to mark an item or folder as a favorite.
Click to upload an item to a selected folder, or to upload a new version of a selected item.
Click to lock or unlock an item. If an item has been locked by someone it can’t be used bysomeone else until the file is unlocked.
Click to add a selected item or items to an asset repository.
Click to delete the selected asset, assets, or folders.
(on theright)
Click to change how you view the items on the page, such as in a table, list, or grid.
A folder that hasn’t been shared with anyone.
A folder that was shared with you or that you shared with others.
Shows that a conversation has been started about a file or folder. A conversation is aplace where you can share comments with people about a particular item. Click or tap toopen the conversation.
Click to see menu options that might not fit on the menu bar.
Click to open the sidebar to start a conversation or view a conversation that’s alreadystarted, as well as access a drop-down menu to view metadata and API information.
Chapter 1Icon Quick Reference
1-19
Icon Meaning
Click to view a list of conversation posts others have assigned to you, or filter to showflags you have assigned to others.
(showswhenviewingtags andmetadata inthe sidebar)
Click to manage metadata of a file or folder.
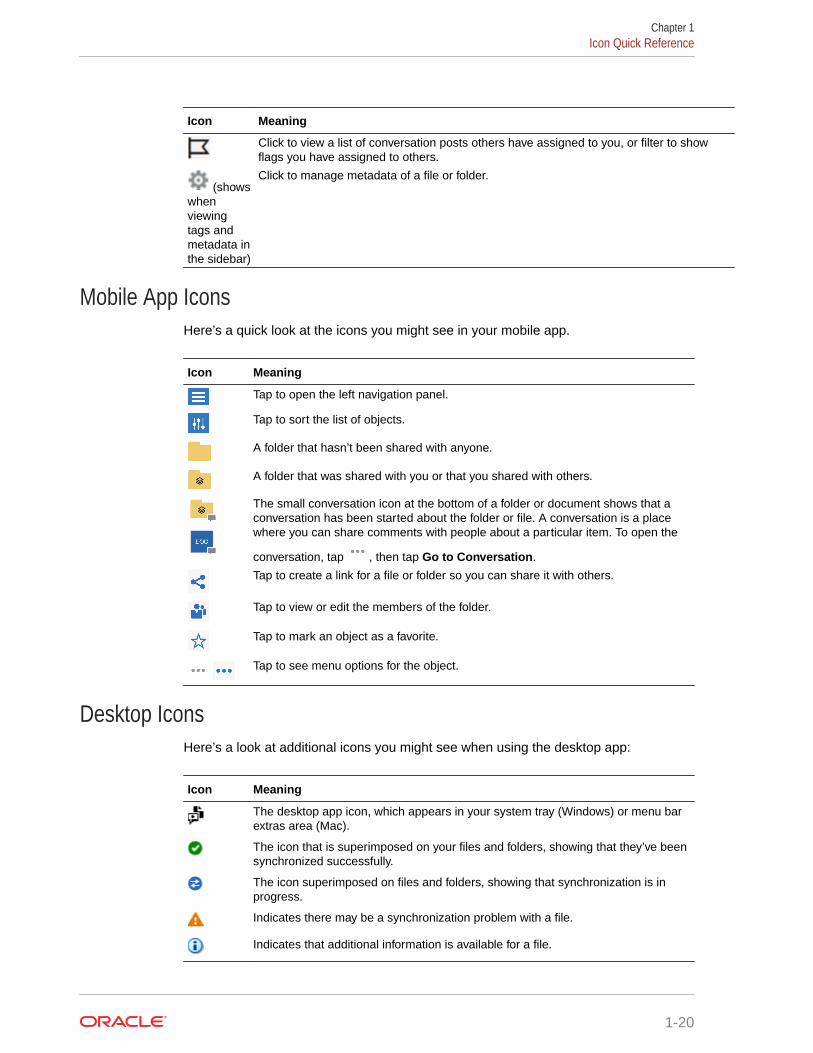
Mobile App IconsHere’s a quick look at the icons you might see in your mobile app.
Icon Meaning
Tap to open the left navigation panel.
Tap to sort the list of objects.
A folder that hasn’t been shared with anyone.
A folder that was shared with you or that you shared with others.
The small conversation icon at the bottom of a folder or document shows that aconversation has been started about the folder or file. A conversation is a placewhere you can share comments with people about a particular item. To open the
conversation, tap , then tap Go to Conversation.
Tap to create a link for a file or folder so you can share it with others.
Tap to view or edit the members of the folder.
Tap to mark an object as a favorite.
Tap to see menu options for the object.
Desktop IconsHere’s a look at additional icons you might see when using the desktop app:
Icon Meaning
The desktop app icon, which appears in your system tray (Windows) or menu barextras area (Mac).
The icon that is superimposed on your files and folders, showing that they’ve beensynchronized successfully.
The icon superimposed on files and folders, showing that synchronization is inprogress.
Indicates there may be a synchronization problem with a file.
Indicates that additional information is available for a file.
Chapter 1Icon Quick Reference
1-20
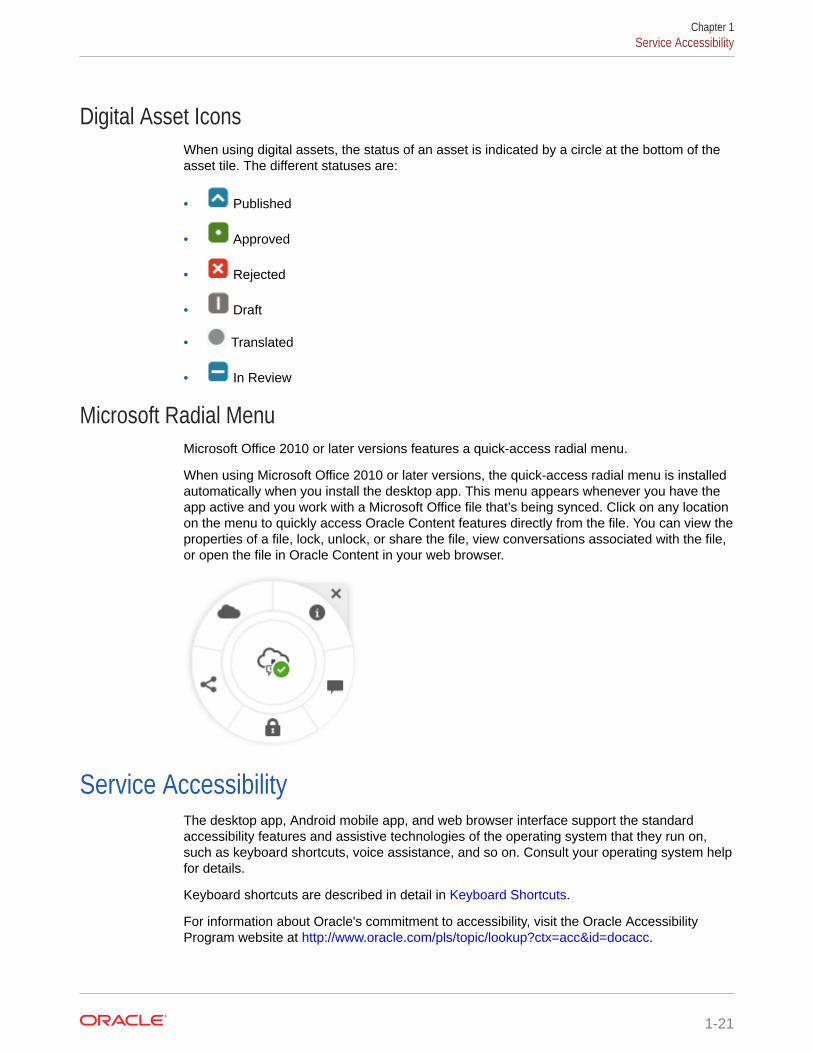
Digital Asset IconsWhen using digital assets, the status of an asset is indicated by a circle at the bottom of theasset tile. The different statuses are:
• Published
• Approved
• Rejected
• Draft
• Translated
• In Review
Microsoft Radial MenuMicrosoft Office 2010 or later versions features a quick-access radial menu.
When using Microsoft Office 2010 or later versions, the quick-access radial menu is installedautomatically when you install the desktop app. This menu appears whenever you have theapp active and you work with a Microsoft Office file that’s being synced. Click on any locationon the menu to quickly access Oracle Content features directly from the file. You can view theproperties of a file, lock, unlock, or share the file, view conversations associated with the file,or open the file in Oracle Content in your web browser.
Service AccessibilityThe desktop app, Android mobile app, and web browser interface support the standardaccessibility features and assistive technologies of the operating system that they run on,such as keyboard shortcuts, voice assistance, and so on. Consult your operating system helpfor details.
Keyboard shortcuts are described in detail in Keyboard Shortcuts.
For information about Oracle's commitment to accessibility, visit the Oracle AccessibilityProgram website at http://www.oracle.com/pls/topic/lookup?ctx=acc&id=docacc.
Chapter 1Service Accessibility
1-21
SupportVisit our community forum to browse topics and post questions or ideas. Click theShare Your Feedback link in the user menu.
If you still need assistance, ask your service administrator (the person in charge ofmanaging Oracle Content Management for your organization) to file a support requestat https://support.oracle.com.
Chapter 1Support
1-22
2Manage Your Files and Folders
The Basics
• Get to Know the Documents Page
• Work with Your Files and Folders
• Customize Your Profile and Preferences
• View Files
Work with Files and Folders
• Create Microsoft Office Files in the Web Client
• Upload Files
• Download Files
• Search Content and Conversations
• Lock a File
• Edit a File
• Use Metadata
• Use Assets
Collaborate with Others
• Share Files and Folders
• Use Conversations
• Use Workflows
Get to Know the Documents PageOracle Content Management gives you collaboration and content sharing with just a fewclicks of your mouse. Take a minute to learn how and where to find what you need.
Note:
Oracle Content Management Starter Edition has a limited feature set that does notsupport Documents or the desktop and mobile apps. To take advantage of the fullfeature set, upgrade to the Premium Edition.
By default you see the table view of the Documents page:
2-1
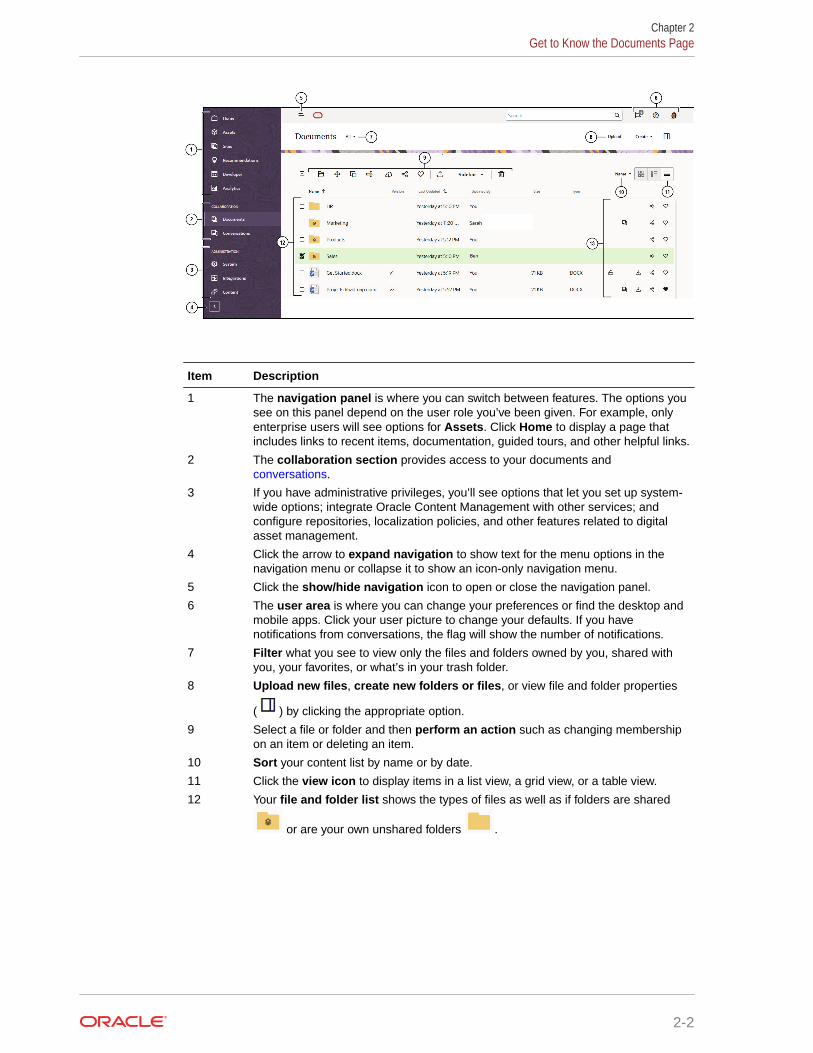
Item Description
1 The navigation panel is where you can switch between features. The options yousee on this panel depend on the user role you’ve been given. For example, onlyenterprise users will see options for Assets. Click Home to display a page thatincludes links to recent items, documentation, guided tours, and other helpful links.
2 The collaboration section provides access to your documents and conversations.
3 If you have administrative privileges, you’ll see options that let you set up system-wide options; integrate Oracle Content Management with other services; andconfigure repositories, localization policies, and other features related to digitalasset management.
4 Click the arrow to expand navigation to show text for the menu options in thenavigation menu or collapse it to show an icon-only navigation menu.
5 Click the show/hide navigation icon to open or close the navigation panel.
6 The user area is where you can change your preferences or find the desktop andmobile apps. Click your user picture to change your defaults. If you havenotifications from conversations, the flag will show the number of notifications.
7 Filter what you see to view only the files and folders owned by you, shared withyou, your favorites, or what’s in your trash folder.
8 Upload new files, create new folders or files, or view file and folder properties
( ) by clicking the appropriate option.
9 Select a file or folder and then perform an action such as changing membershipon an item or deleting an item.
10 Sort your content list by name or by date.
11 Click the view icon to display items in a list view, a grid view, or a table view.
12 Your file and folder list shows the types of files as well as if folders are shared
or are your own unshared folders .
Chapter 2Get to Know the Documents Page
2-2
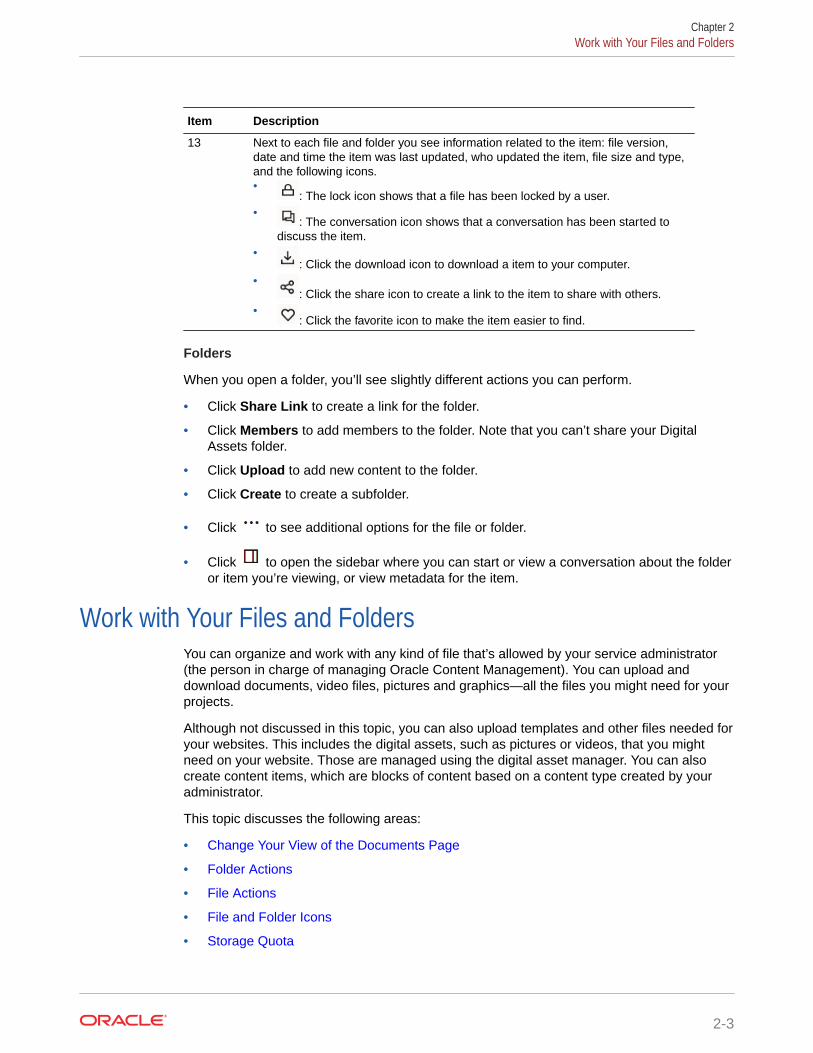
Item Description
13 Next to each file and folder you see information related to the item: file version,date and time the item was last updated, who updated the item, file size and type,and the following icons.•
: The lock icon shows that a file has been locked by a user.•
: The conversation icon shows that a conversation has been started todiscuss the item.
•: Click the download icon to download a item to your computer.
•: Click the share icon to create a link to the item to share with others.
•: Click the favorite icon to make the item easier to find.
Folders
When you open a folder, you’ll see slightly different actions you can perform.
• Click Share Link to create a link for the folder.
• Click Members to add members to the folder. Note that you can’t share your DigitalAssets folder.
• Click Upload to add new content to the folder.
• Click Create to create a subfolder.
• Click to see additional options for the file or folder.
• Click to open the sidebar where you can start or view a conversation about the folderor item you’re viewing, or view metadata for the item.
Work with Your Files and FoldersYou can organize and work with any kind of file that’s allowed by your service administrator(the person in charge of managing Oracle Content Management). You can upload anddownload documents, video files, pictures and graphics—all the files you might need for yourprojects.
Although not discussed in this topic, you can also upload templates and other files needed foryour websites. This includes the digital assets, such as pictures or videos, that you mightneed on your website. Those are managed using the digital asset manager. You can alsocreate content items, which are blocks of content based on a content type created by youradministrator.
This topic discusses the following areas:
• Change Your View of the Documents Page
• Folder Actions
• File Actions
• File and Folder Icons
• Storage Quota
Chapter 2Work with Your Files and Folders
2-3
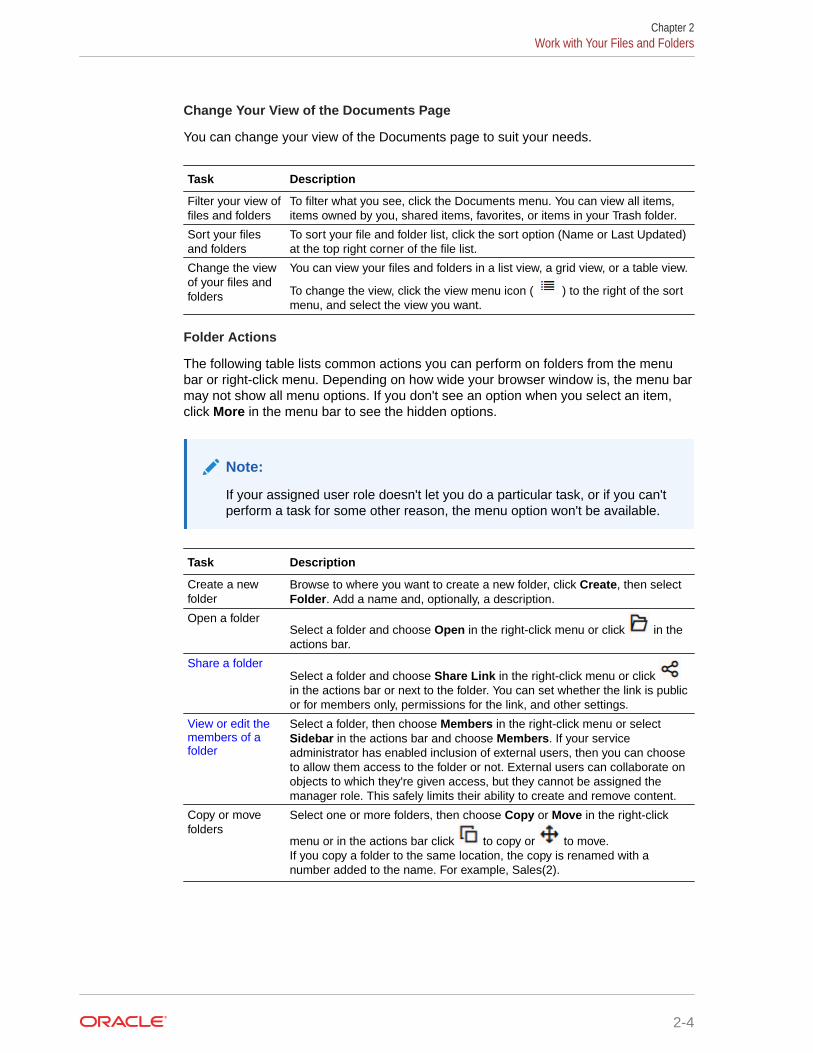
Change Your View of the Documents Page
You can change your view of the Documents page to suit your needs.
Task Description
Filter your view offiles and folders
To filter what you see, click the Documents menu. You can view all items,items owned by you, shared items, favorites, or items in your Trash folder.
Sort your filesand folders
To sort your file and folder list, click the sort option (Name or Last Updated)at the top right corner of the file list.
Change the viewof your files andfolders
You can view your files and folders in a list view, a grid view, or a table view.
To change the view, click the view menu icon ( ) to the right of the sortmenu, and select the view you want.
Folder Actions
The following table lists common actions you can perform on folders from the menubar or right-click menu. Depending on how wide your browser window is, the menu barmay not show all menu options. If you don't see an option when you select an item,click More in the menu bar to see the hidden options.
Note:
If your assigned user role doesn't let you do a particular task, or if you can'tperform a task for some other reason, the menu option won't be available.
Task Description
Create a newfolder
Browse to where you want to create a new folder, click Create, then selectFolder. Add a name and, optionally, a description.
Open a folderSelect a folder and choose Open in the right-click menu or click in theactions bar.
Share a folderSelect a folder and choose Share Link in the right-click menu or click in the actions bar or next to the folder. You can set whether the link is publicor for members only, permissions for the link, and other settings.
View or edit themembers of afolder
Select a folder, then choose Members in the right-click menu or selectSidebar in the actions bar and choose Members. If your serviceadministrator has enabled inclusion of external users, then you can chooseto allow them access to the folder or not. External users can collaborate onobjects to which they're given access, but they cannot be assigned themanager role. This safely limits their ability to create and remove content.
Copy or movefolders
Select one or more folders, then choose Copy or Move in the right-click
menu or in the actions bar click to copy or to move.If you copy a folder to the same location, the copy is renamed with anumber added to the name. For example, Sales(2).
Chapter 2Work with Your Files and Folders
2-4
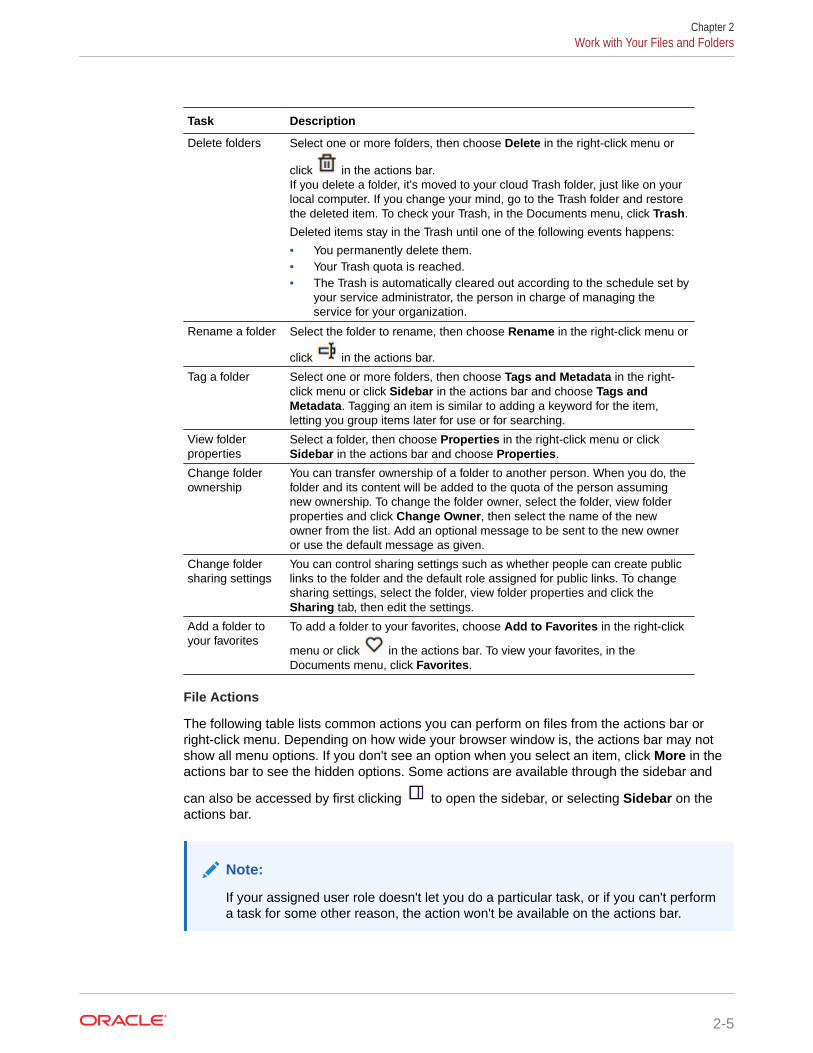
Task Description
Delete folders Select one or more folders, then choose Delete in the right-click menu or
click in the actions bar.If you delete a folder, it's moved to your cloud Trash folder, just like on yourlocal computer. If you change your mind, go to the Trash folder and restorethe deleted item. To check your Trash, in the Documents menu, click Trash.
Deleted items stay in the Trash until one of the following events happens:
• You permanently delete them.• Your Trash quota is reached.• The Trash is automatically cleared out according to the schedule set by
your service administrator, the person in charge of managing theservice for your organization.
Rename a folder Select the folder to rename, then choose Rename in the right-click menu or
click in the actions bar.
Tag a folder Select one or more folders, then choose Tags and Metadata in the right-click menu or click Sidebar in the actions bar and choose Tags andMetadata. Tagging an item is similar to adding a keyword for the item,letting you group items later for use or for searching.
View folderproperties
Select a folder, then choose Properties in the right-click menu or clickSidebar in the actions bar and choose Properties.
Change folderownership
You can transfer ownership of a folder to another person. When you do, thefolder and its content will be added to the quota of the person assumingnew ownership. To change the folder owner, select the folder, view folderproperties and click Change Owner, then select the name of the newowner from the list. Add an optional message to be sent to the new owneror use the default message as given.
Change foldersharing settings
You can control sharing settings such as whether people can create publiclinks to the folder and the default role assigned for public links. To changesharing settings, select the folder, view folder properties and click theSharing tab, then edit the settings.
Add a folder toyour favorites
To add a folder to your favorites, choose Add to Favorites in the right-click
menu or click in the actions bar. To view your favorites, in theDocuments menu, click Favorites.
File Actions
The following table lists common actions you can perform on files from the actions bar orright-click menu. Depending on how wide your browser window is, the actions bar may notshow all menu options. If you don't see an option when you select an item, click More in theactions bar to see the hidden options. Some actions are available through the sidebar and
can also be accessed by first clicking to open the sidebar, or selecting Sidebar on theactions bar.
Note:
If your assigned user role doesn't let you do a particular task, or if you can't performa task for some other reason, the action won't be available on the actions bar.
Chapter 2Work with Your Files and Folders
2-5
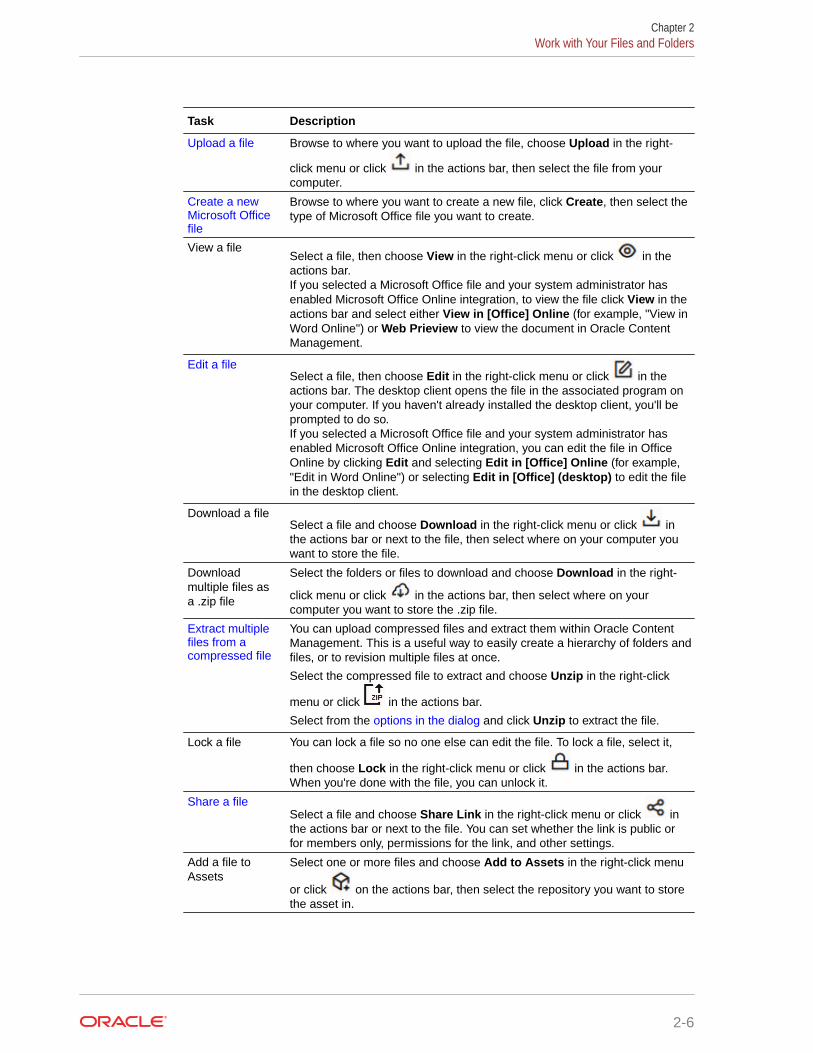
Task Description
Upload a file Browse to where you want to upload the file, choose Upload in the right-
click menu or click in the actions bar, then select the file from yourcomputer.
Create a newMicrosoft Officefile
Browse to where you want to create a new file, click Create, then select thetype of Microsoft Office file you want to create.
View a fileSelect a file, then choose View in the right-click menu or click in theactions bar.If you selected a Microsoft Office file and your system administrator hasenabled Microsoft Office Online integration, to view the file click View in theactions bar and select either View in [Office] Online (for example, "View inWord Online") or Web Prieview to view the document in Oracle ContentManagement.
Edit a fileSelect a file, then choose Edit in the right-click menu or click in theactions bar. The desktop client opens the file in the associated program onyour computer. If you haven't already installed the desktop client, you'll beprompted to do so.If you selected a Microsoft Office file and your system administrator hasenabled Microsoft Office Online integration, you can edit the file in OfficeOnline by clicking Edit and selecting Edit in [Office] Online (for example,"Edit in Word Online") or selecting Edit in [Office] (desktop) to edit the filein the desktop client.
Download a fileSelect a file and choose Download in the right-click menu or click inthe actions bar or next to the file, then select where on your computer youwant to store the file.
Downloadmultiple files asa .zip file
Select the folders or files to download and choose Download in the right-
click menu or click in the actions bar, then select where on yourcomputer you want to store the .zip file.
Extract multiplefiles from acompressed file
You can upload compressed files and extract them within Oracle ContentManagement. This is a useful way to easily create a hierarchy of folders andfiles, or to revision multiple files at once.
Select the compressed file to extract and choose Unzip in the right-click
menu or click in the actions bar.
Select from the options in the dialog and click Unzip to extract the file.
Lock a file You can lock a file so no one else can edit the file. To lock a file, select it,
then choose Lock in the right-click menu or click in the actions bar.When you're done with the file, you can unlock it.
Share a fileSelect a file and choose Share Link in the right-click menu or click inthe actions bar or next to the file. You can set whether the link is public orfor members only, permissions for the link, and other settings.
Add a file toAssets
Select one or more files and choose Add to Assets in the right-click menu
or click on the actions bar, then select the repository you want to storethe asset in.
Chapter 2Work with Your Files and Folders
2-6
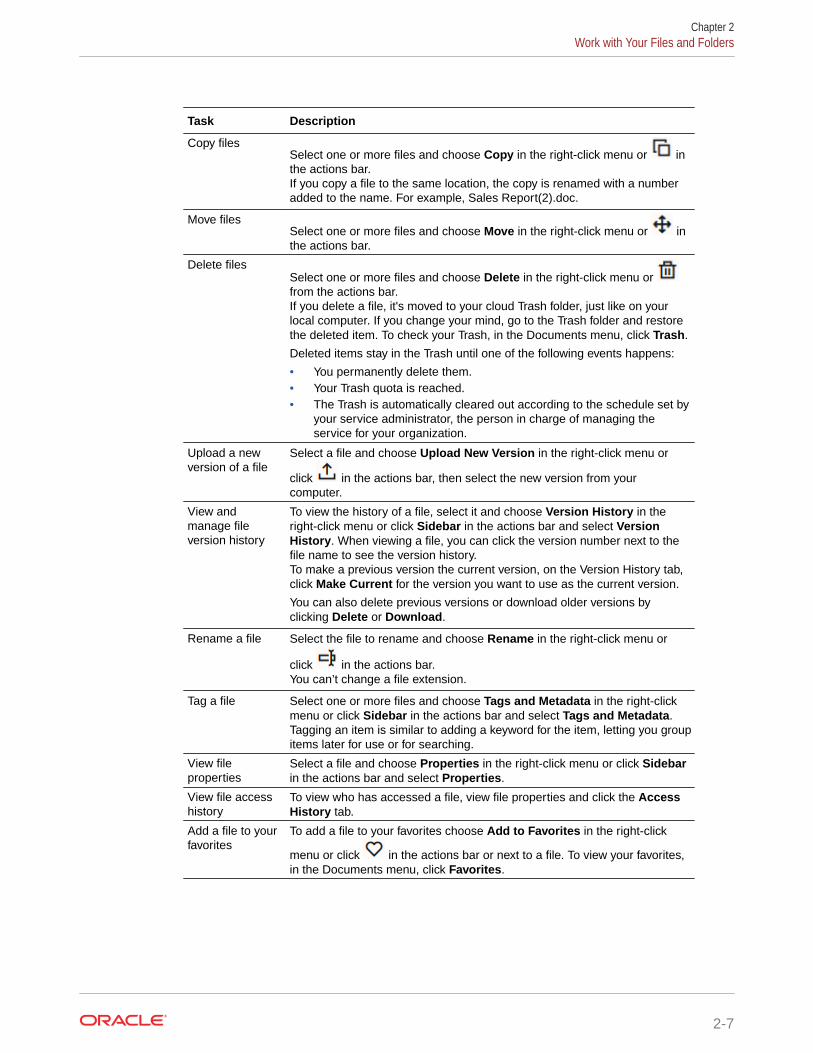
Task Description
Copy filesSelect one or more files and choose Copy in the right-click menu or inthe actions bar.If you copy a file to the same location, the copy is renamed with a numberadded to the name. For example, Sales Report(2).doc.
Move filesSelect one or more files and choose Move in the right-click menu or inthe actions bar.
Delete filesSelect one or more files and choose Delete in the right-click menu or from the actions bar.If you delete a file, it's moved to your cloud Trash folder, just like on yourlocal computer. If you change your mind, go to the Trash folder and restorethe deleted item. To check your Trash, in the Documents menu, click Trash.
Deleted items stay in the Trash until one of the following events happens:
• You permanently delete them.• Your Trash quota is reached.• The Trash is automatically cleared out according to the schedule set by
your service administrator, the person in charge of managing theservice for your organization.
Upload a newversion of a file
Select a file and choose Upload New Version in the right-click menu or
click in the actions bar, then select the new version from yourcomputer.
View andmanage fileversion history
To view the history of a file, select it and choose Version History in theright-click menu or click Sidebar in the actions bar and select VersionHistory. When viewing a file, you can click the version number next to thefile name to see the version history.To make a previous version the current version, on the Version History tab,click Make Current for the version you want to use as the current version.
You can also delete previous versions or download older versions byclicking Delete or Download.
Rename a file Select the file to rename and choose Rename in the right-click menu or
click in the actions bar.You can’t change a file extension.
Tag a file Select one or more files and choose Tags and Metadata in the right-clickmenu or click Sidebar in the actions bar and select Tags and Metadata.Tagging an item is similar to adding a keyword for the item, letting you groupitems later for use or for searching.
View fileproperties
Select a file and choose Properties in the right-click menu or click Sidebarin the actions bar and select Properties.
View file accesshistory
To view who has accessed a file, view file properties and click the AccessHistory tab.
Add a file to yourfavorites
To add a file to your favorites choose Add to Favorites in the right-click
menu or click in the actions bar or next to a file. To view your favorites,in the Documents menu, click Favorites.
Chapter 2Work with Your Files and Folders
2-7
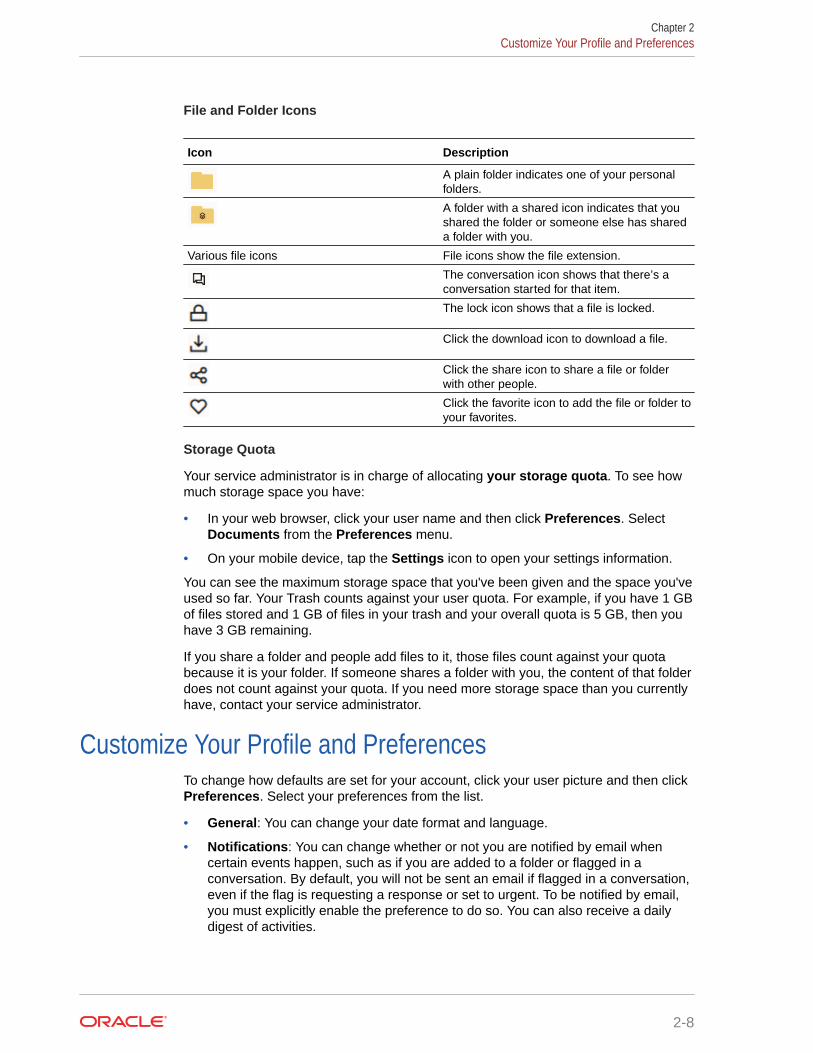
File and Folder Icons
Icon Description
A plain folder indicates one of your personalfolders.
A folder with a shared icon indicates that youshared the folder or someone else has shareda folder with you.
Various file icons File icons show the file extension.
The conversation icon shows that there’s aconversation started for that item.
The lock icon shows that a file is locked.
Click the download icon to download a file.
Click the share icon to share a file or folderwith other people.
Click the favorite icon to add the file or folder toyour favorites.
Storage Quota
Your service administrator is in charge of allocating your storage quota. To see howmuch storage space you have:
• In your web browser, click your user name and then click Preferences. SelectDocuments from the Preferences menu.
• On your mobile device, tap the Settings icon to open your settings information.
You can see the maximum storage space that you've been given and the space you'veused so far. Your Trash counts against your user quota. For example, if you have 1 GBof files stored and 1 GB of files in your trash and your overall quota is 5 GB, then youhave 3 GB remaining.
If you share a folder and people add files to it, those files count against your quotabecause it is your folder. If someone shares a folder with you, the content of that folderdoes not count against your quota. If you need more storage space than you currentlyhave, contact your service administrator.
Customize Your Profile and PreferencesTo change how defaults are set for your account, click your user picture and then clickPreferences. Select your preferences from the list.
• General: You can change your date format and language.
• Notifications: You can change whether or not you are notified by email whencertain events happen, such as if you are added to a folder or flagged in aconversation. By default, you will not be sent an email if flagged in a conversation,even if the flag is requesting a response or set to urgent. To be notified by email,you must explicitly enable the preference to do so. You can also receive a dailydigest of activities.
Chapter 2Customize Your Profile and Preferences
2-8
• Conversations: You can change the way messages are managed and change yourmembership options in conversations.
• Documents: You can view your space quota and the notifications you’d like to set whendocument-specific behavior occurs. You can also specify if you'll allow public links to yourfiles and folders, and what the default role for new public links should be. You can alsoset the maximum role you’ll allow for any public links that are created. Overall sharingrules are set for the entire system by your service administrator, so some of these optionsmay not be available.
• Linked devices: This shows any mobile devices or desktop apps that are linked to youraccount. If you change devices or lose one, you can click Revoke and your sign-insession is ended. All local content stored on the device for that account is deleted.
Revoking access for the device affects only one account, so if you're using multipleaccounts, you need to revoke access separately for each account to block all access toOracle Content Management and delete all local content stored on the device.
• Applications: If custom applications were added to your service, information about thoseapplications appears here.
To change your profile information, click your user picture and then click View Profile andthen Edit Profile. You can alter your contact information, enter a description, or define yourareas of expertise. Click Update to save your changes. The profile information appears onyour user “wall”. When someone follows you, they can view this profile information.
View FilesTo view a file, like a document or an image, click the file name or thumbnail and the vieweropens.
Depending on how wide your browser window is, the menu bar may not show all menu
options. If you don't see an option when you select an item, click in the menu bar to seethe hidden options.
Note:
If your assigned user role doesn't let you do a particular task, or if you can't performa task for some other reason, the menu option won't be available.
Task Description
View the file in Microsoft Office Online If you're viewing a Microsoft Office file and yoursystem administrator has enabled Microsoft OfficeOnline integration, you can view the file inMicrosoft Office Online by clicking View, thenchoosing View in [Office] Online (for example,"View in Word Online").
Chapter 2View Files
2-9
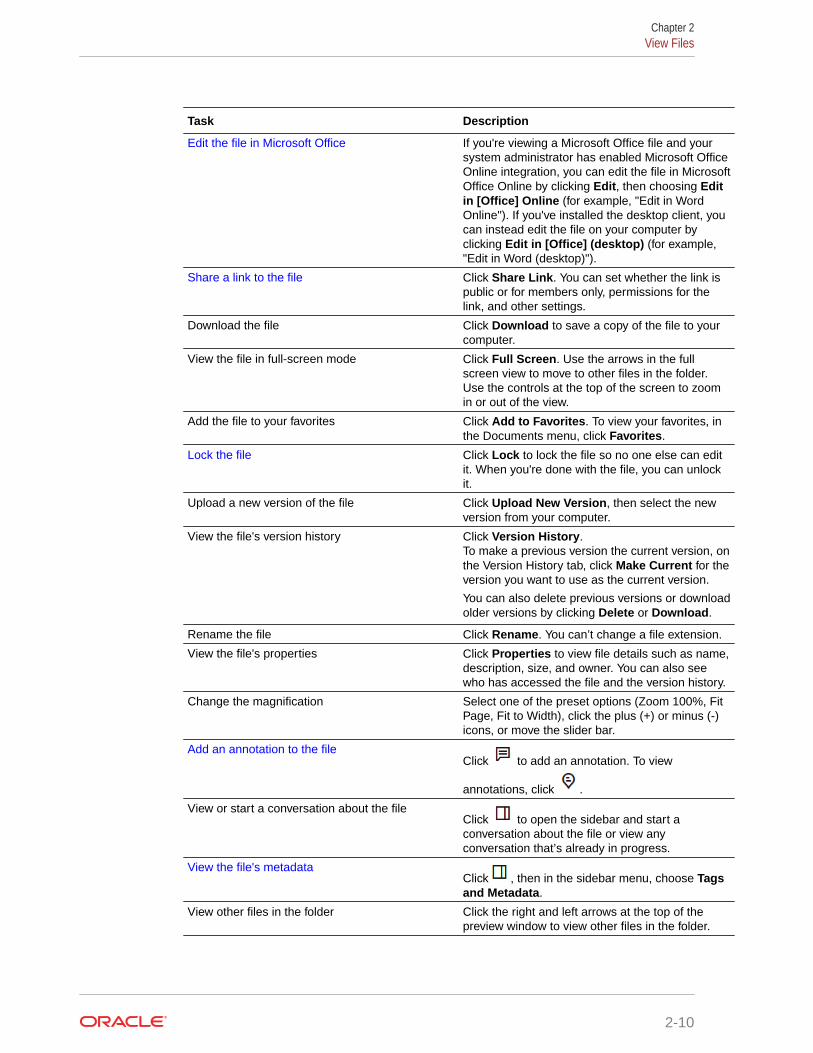
Task Description
Edit the file in Microsoft Office If you're viewing a Microsoft Office file and yoursystem administrator has enabled Microsoft OfficeOnline integration, you can edit the file in MicrosoftOffice Online by clicking Edit, then choosing Editin [Office] Online (for example, "Edit in WordOnline"). If you've installed the desktop client, youcan instead edit the file on your computer byclicking Edit in [Office] (desktop) (for example,"Edit in Word (desktop)").
Share a link to the file Click Share Link. You can set whether the link ispublic or for members only, permissions for thelink, and other settings.
Download the file Click Download to save a copy of the file to yourcomputer.
View the file in full-screen mode Click Full Screen. Use the arrows in the fullscreen view to move to other files in the folder.Use the controls at the top of the screen to zoomin or out of the view.
Add the file to your favorites Click Add to Favorites. To view your favorites, inthe Documents menu, click Favorites.
Lock the file Click Lock to lock the file so no one else can editit. When you're done with the file, you can unlockit.
Upload a new version of the file Click Upload New Version, then select the newversion from your computer.
View the file's version history Click Version History.To make a previous version the current version, onthe Version History tab, click Make Current for theversion you want to use as the current version.
You can also delete previous versions or downloadolder versions by clicking Delete or Download.
Rename the file Click Rename. You can’t change a file extension.
View the file's properties Click Properties to view file details such as name,description, size, and owner. You can also seewho has accessed the file and the version history.
Change the magnification Select one of the preset options (Zoom 100%, FitPage, Fit to Width), click the plus (+) or minus (-)icons, or move the slider bar.
Add an annotation to the fileClick to add an annotation. To view
annotations, click .
View or start a conversation about the fileClick to open the sidebar and start aconversation about the file or view anyconversation that’s already in progress.
View the file's metadataClick , then in the sidebar menu, choose Tagsand Metadata.
View other files in the folder Click the right and left arrows at the top of thepreview window to view other files in the folder.
Chapter 2View Files
2-10
Upload FilesThere are several ways to copy your files from your computer to the cloud. File uploadingcontinues in the background, so you can continue to work while files are being added.
• Drag and drop the files from your local computer to your web browser.
• Click Upload on the menu bar to add files to the current location.
• Select an unopened folder and choose Upload to this Folder from the right-click menu
or click in the actions bar.
• You can also select a file and choose Upload New Version from the right-click menu or
click in the actions bar.
Keep these things in mind when you’re uploading files:
• You can tag files as you upload them by giving them identifying keywords. If you decidelater that you want to use that item as a digital asset, you can easily search for the tagand add it to your digital assets collection or folder.
• Try to keep file uploads smaller than 5 GB. Some web browsers can't process files biggerthan that.
• To add the contents of an entire folder, you can upload a .zip file of the folder andcontents and unzip it in Oracle Content Management. You can also set up the desktopapp. Just add the folder into the sync folder and the content is added to Oracle ContentManagement for you.
• If someone shared a folder with you, you must have at least a Contributor role in thefolder to be able to edit a file there. When you edit a file you are uploading a new versionof the file to the folder.
• Your service administrator may limit the kinds of files you can upload. To see what filetypes aren't allowed, open your user menu. Click Preferences . The Documents sectionlists any limitations on file types and file sizes (if there are any). Files types are listedaccording to the file extensions, such as .mp3 or .exe.
• To cancel an upload, click the Details link on the information bar at the top of the screenwhile the file uploads. Click the X for the file you want to cancel.
Download FilesIf you have the Download resource role on a file, you can download the file from the cloud toyour local computer in a couple of ways:
• When viewing the file, click Download in the file viewer.
• When viewing files in a list, table, or grid, select the file and choose Download from the
right-click menu or click in the actions bar or next to an the individual item.
When you download a file, it goes to the download location configured for your web browseror you may be able to choose the location to download the file to, depending on your webbrowser settings.
Chapter 2Upload Files
2-11
Download Multiple Files
You can download more than one file at a time or a folder with multiple files in it. Todownload more than one file or folder at a time, select the files and folders and choose
Download in the right-click menu or in the actions bar. A .zip file is prepared withthe selected files and folders and automatically downloaded when ready.
If a folder contains subfolders with files, they are also included in the .zip file. If youselect an empty folder that does not contain any files, then it is not included in the .zipfile.
There are some limitations:
• .zip files larger than 2 gigabytes cannot be downloaded.
• .zip files cannot contain more than 1000 items.
Note:
A document and the folder that contains it are considered as separateitems in the .zip file, so if you select 4 folders that each have 250documents in them, there are 1004 items in the .zip (4 folders + 1000documents) and the download will fail.
Extract Multiple Files From A Compressed FileYou can upload compressed files and extract them within Oracle ContentManagement. This is a useful way to easily create a hierarchy of folders and files, or torevision multiple files at once.
1. Select the compressed file to extract and choose Unzip in the right-click menu or
click in the actions bar.
2. By default, the option to create a new folder for the extracted files is selected. Tochange the default and select an existing folder where you want the file extracted,scroll to the bottom of the dialog and enable Select an existing folder.
3. Select the folder where you want to either create the new folder or unzip the fileand click Unzip.
If you chose to create a new folder, the new folder uses the name of the .zip fileand the .zip file is extracted into the new folder. If a folder of that name alreadyexists, both folders are kept and a number is appended to the new folder name.For example, if a file named MyZip.zip is extracted into a new folder, the newfolder would be named MyZip. If MyZip.zip is extracted to a new folder at alocation that already has a MyZip folder, the new folder would be named MyZip(2).
4. If you chose to extract into an existing folder, then you must choose how to resolveduplicate names. Options are:
• Keep both files (default)—Duplicate names are adjusted
• Replace existing files—the extracted file becomes a new revision of theexisting file of the same name
Chapter 2Extract Multiple Files From A Compressed File
2-12
• Ignore duplicate files—files in the .zip file with the same name as existing files arenot extracted from the .zip file.
5. Once you've selected how to resolve duplicate names, click Apply.
Note:
Oracle Content Management extracts compressed files that are encoded with theUTF-8 character set. If the files and folders in a compressed .zip file are encodedwith a character set other than UTF-8, an error may occur and the file and foldernames and other properties may be unreadable.
Search Content and ConversationsEnter a search term, such as a file name, conversation name, digital asset tag, or hashtag, atthe top of the screen and press Enter or click the Search icon. If you want to search only in aspecific folder, open the folder and enter your search term. You can enter just a fewcharacters of your search term and a list of possible matches is shown, separated by type(documents, conversations, and so on). This lets you quickly find what you need even if youdon’t know the entire search term.
If you don't have permission to view an item, you won't see it in your search results even if itmet your search criteria. After your search results are listed, you can use the results like youwould normally. You can add files to folders, add posts to conversations, upload files,download files, or share folders with others, provided you have the appropriate permissions.
Search tips
• A search looks through the titles, the content (such as words in a document), fileextensions, the name of the person who last modified the file, and the information aboutan item (like a folder's description). It also checks any metadata associated with the item,tags for digital assets, conversation messages, hashtags used in conversations, andpeople in the conversation.
• If you search for an item that has special characters in the name, the item isn’t returnedin the suggested search results for documents or folders.
• You can search for multiple terms by separating the terms with a comma or a space.
• To search for a phrase, use double quotes around the phrase. For example, "UnitedStates" returns files with the exact phrase United States in the file.
• You can filter your search results by clicking or tapping the Results menu. For example,you can view only conversations that match the search criteria, or only the people whomatch it.
• There may be a slight time delay to show the newest search results. For example, if yousearch for the term Report and then add another document with the term Report in it,that newest document will be not be returned in search results for a few seconds.
• Searching is case-insensitive. This means that report will find the same results asReport.
• You can use the following search operators. The operators are case-insensitive, so NOT isthe same as not:
Chapter 2Search Content and Conversations
2-13
– not or the dash (-). For example, Report2018,Report2019 -sales returnsReport2018 or Report2019, but not items with the keyword sales in them.
– or or a comma. For example, Report2018 or Report2019 returns the sameresults as Report2018,Report2019.
– and or a space. For example, Report2018 and Report2019 returns the sameresults as Report2018 Report2019.
The not operator has higher precedence than the others, with and having lowestprecedence. For example, a search of Report2018 and Report2019 notReport2019 returns nothing because not is evaluated first.
• Use parentheses to group complex queries. For example, you can search forStates and (not "United States").
• If you have more than 100 shared folders (either shared by you or with you), aglobal search may not return the expected results. The search is done on Favoriteshared folders first and then other shared folders, up to 100. You may want todesignate some folders as Favorites before searching, to ensure better searchresults.
• If a file is larger than 10MB in size, it won't be included in full-text search (a searchthrough the content of a file, not just the metadata about a file). You can find theitem by searching for the entire name.
Lock a FileLocking a file shows other people that you are working with the file. Select the file you
want to lock and choose Lock in the right-click menu or click in the actions bar.
When viewing a file, click and then select Lock. The Lock icon ( ) is added tothe file’s information line.
Other people can unlock the file if they need to use the it. If they do, you get an emailtelling you who unlocked it and when.
If someone tries to upload a new version of a file you locked, they'll be informed youlocked it. They can unlock the file and upload the new version if necessary. If you setyour preferences to be notified, you’ll get an email when that happens.
Edit a FileYou can edit files stored in Oracle Content Management and if you have the OracleContent Management desktop app installed, any changes you make to the file will thenbe synced to any device synced with your account.
To edit a file, select the file from your file list and choose Edit in the right-click menu or
click in the actions bar. You can also view the file then click Edit in the menu bar.You’re prompted to open the file using the Oracle Content Management desktop appor using the Microsoft Online app. The file opens with the software installed on yourcomputer to make your edits (for example, Microsoft Word when editing a .doc file).
If your system administrator has enabled Microsoft Office Online integration, you canalso edit files in Microsoft Office or Microsoft Office Online.
Chapter 2Lock a File
2-14
When you finish editing, save the file as you would normally. If you’re already syncing the file,the latest version is shown in your folder and on your other devices as well. If you didn’t syncthe file beforehand, the newly synced file is stored in your .download folder in your OracleContent folder on your desktop.
Keep these things in mind when you’re editing files:
• Try to keep files smaller than 5 GB. Some web browsers can't process files bigger thanthat.
• If someone shared a folder with you, you must have at least a Contributor role in thefolder to be able to edit a file there. When you edit a file you are uploading a new versionof the file to the folder.
• A new version of the file is created each time the file is autosaved.
Use MetadataMetadata is used to quickly categorize your files and folders with additional descriptions.
Your service administrator may have created metadata that is specific to your organization.For example, perhaps you need to track when an item is approved by other people and whoapproved it. Metadata called “Document Approval” could be created which lists fields such asfile type, the originator of the file, who approved it, and when it was approved.
You could then move all files that have been approved into one folder and apply the metadatato the folder. All the files in the folder will be identified as approved. You can edit metadata forthe different files to show their approval date, who approved it, and any other pertinentdetails.
People with the Owner, Manager, or Contributor resource role can apply metadata to files andfolders. People with the Viewer or Downloader resource role can view any metadata that isset.
Metadata is automatically created for items that are stored as digital assets. Only serviceadministrators can create additional metadata. Work with your administrator to develop themetadata you need.
To start using metadata:
1. Select the file or folder you want to add metadata to and click to open the sidebar.
2. Select Tags and Metadata from the pane's drop-down menu.
3. Click to open a list of available metadata.
4. Select the name of the metadata you want to use, and then click Save.
5. The fields that were created for the metadata are displayed in the side panel. Enter theinformation as needed. Remember, if this is a metadata for a folder, any informationentered will be used for all the files in the folder.The following restrictions apply to the field values users can enter:
• Text: Maximum of 1,000 characters. Can't include # * & | ? < > ^ ; { } ( ) ' = + \
• Number: Maximum of 15 characters. Must be a whole number, no decimals.
6. Click Save when done.
Chapter 2Use Metadata
2-15
Use AssetsDigital assets are images, documents, and videos that you manage with a specialinterface. Digital asset management is only available to enterprise users.
“Digital asset management” is a way to group and manage all the assets that are usedfor one purpose, like in a website or for a particular project. Assets can includegraphics or text documents. They’re stored in a repository, which is created by contentadministrators. You can add the files (“assets”) to a repository, and the files aremanaged in your Asset view. You can upload files from your computer, or add files thatare already stored in your home directory. You can tag assets, too, b y adding akeyword when you add the asset. This makes it easy to find and sort them later.
If you don’t see any repositories listed when you click on Assets in the navigationpanel, that means that repositories haven’t been shared with you. The contentadministrator must share the repositories with individuals or groups in order for peopleto use them. If you don’t see any repositories listed, contact your content administrator.
Digital assets and repositories are discussed in detail in Managing Assets with OracleContent Management and in the Get Started with Building Sites chapter in BuildingSites with Oracle Content Management.
Share Files and FoldersYou can share individual files, or you can share an entire folder.
Files can only be shared by using a link to the file. You can email the link, or get a linkto a file or folder and use it however you want to, like in an instant message or adocument. Sending a link is useful if you need to give access to people on an as-needed basis. The only way the recipient can access the file or folder is by using thelink.
You can also add members to a folder, giving those people access to all the content inthe folder. This is useful when you're working on a large project, for example, andpeople may need to continually access information.
You can even add external users who may not be a part of your organization to afolder, provided your service administrator allows it and their email address isregistered with your service. External users can collaborate on objects to which they'regiven access, but they cannot be assigned the manager role. This safely limits theirability to create and remove content.
See Share Files and Folders for more details.
Use ConversationsConversations are a way for you to collaborate with other people by posting commentsand discussing topics in real time. You can start a conversation about a specificdocument or folder, or create an independent conversation. You can also createannotations, which are comments about specific sections of a file. For more details,see Use Conversations.
Chapter 2Use Assets
2-16
Use WorkflowsIf Oracle Process Cloud Service is integrated with your service, you can use it to initiate andtrack workflows and tasks.
To use the folders in Oracle Content Management with a process, you must designate thefolder as one that’s used with Oracle Process Cloud Service. You must also share the folderwith the person who initiated the process.
1. Select the folder.
2. Choose Properties in the right-click menu or select Sidebar from the actions bar andthen choose Properties.
3. Set Initiate process on document arrival to Yes.
4. Choose the process name from the list. If the list is empty, see your service administrator,who is in charge of setting up the process workflows.
5. Click Save.
The folder and its subfolders are now available for use within the Oracle Process CloudService interface. Any files that are changed in the folder or new files uploaded in the foldertrigger the process associated with the folder. You can override the inherited process for asubfolder but you can’t disable the association with a process.
To learn more, see Getting Started with Oracle Process Cloud Service.
Chapter 2Use Workflows
2-17
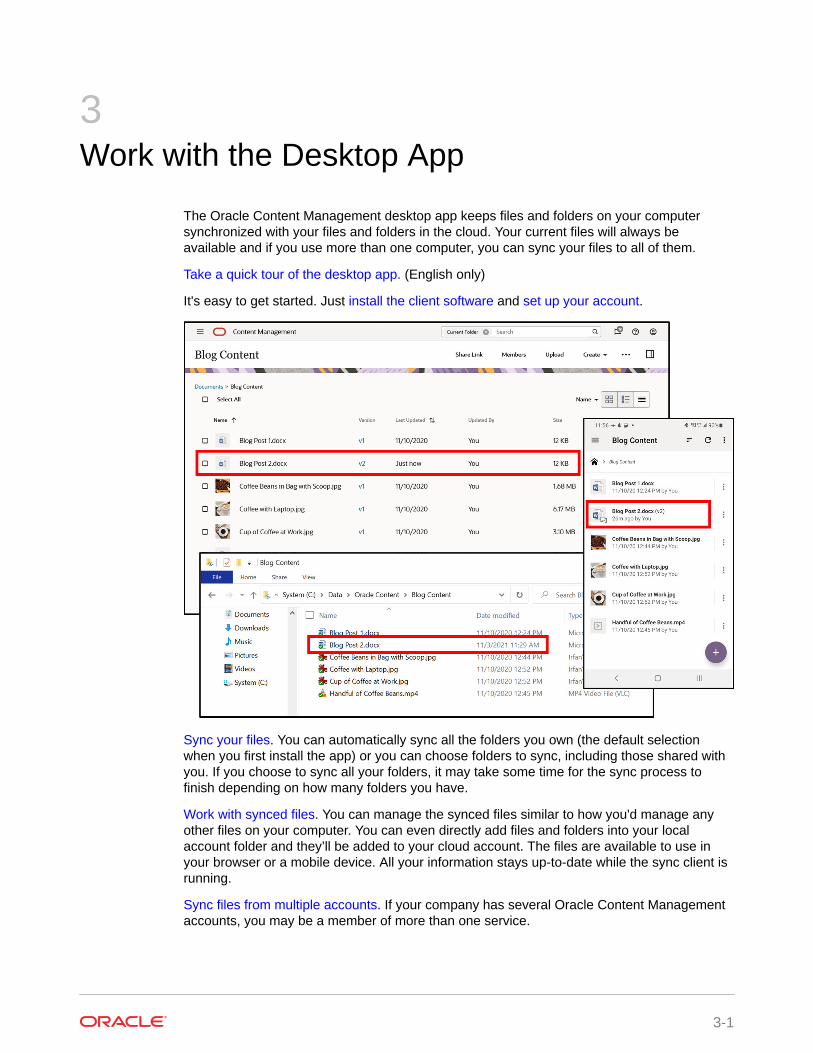
3Work with the Desktop App
The Oracle Content Management desktop app keeps files and folders on your computersynchronized with your files and folders in the cloud. Your current files will always beavailable and if you use more than one computer, you can sync your files to all of them.
Take a quick tour of the desktop app. (English only)
It's easy to get started. Just install the client software and set up your account.
Sync your files. You can automatically sync all the folders you own (the default selectionwhen you first install the app) or you can choose folders to sync, including those shared withyou. If you choose to sync all your folders, it may take some time for the sync process tofinish depending on how many folders you have.
Work with synced files. You can manage the synced files similar to how you'd manage anyother files on your computer. You can even directly add files and folders into your localaccount folder and they’ll be added to your cloud account. The files are available to use inyour browser or a mobile device. All your information stays up-to-date while the sync client isrunning.
Sync files from multiple accounts. If your company has several Oracle Content Managementaccounts, you may be a member of more than one service.
3-1
Get notifications, letting you know when the conversations you’re active in arechanged. You can customize what notifications you’ll receive so you can follow onlythose conversations that are important to you.
Share your files and folders and collaborate with other users through conversationsjust like you do when you use a web browser.
If you have any problems, check the sync activity and try to resync, or refer to the troubleshooting section.
Set Up Local File SyncOracle Content Management keeps your files safe in the cloud while allowing you toconveniently sync them to a local account folder. This lets you work on your computeras you like, and is useful in several situations:
• while travelling without access to the cloud.
• if working on multiple computers.
• when uploading a folder with multiple files.
To set up local file sync, you first have to make sure that desktop sync is installed. Itmay come pre-installed or you may need to download and install from your OracleContent Management cloud account.
Choose Folders to Sync from the Cloud to Your Local Account Folder
When desktop sync is installed, an account folder is created where local copies of allcloud folders you choose to sync are stored. You can explicitly choose the cloud
folders to sync by clicking to open sync activity and then click , and selectChoose Folders to Sync from Cloud to open up the folder sync dialog.
Chapter 3Set Up Local File Sync
3-2
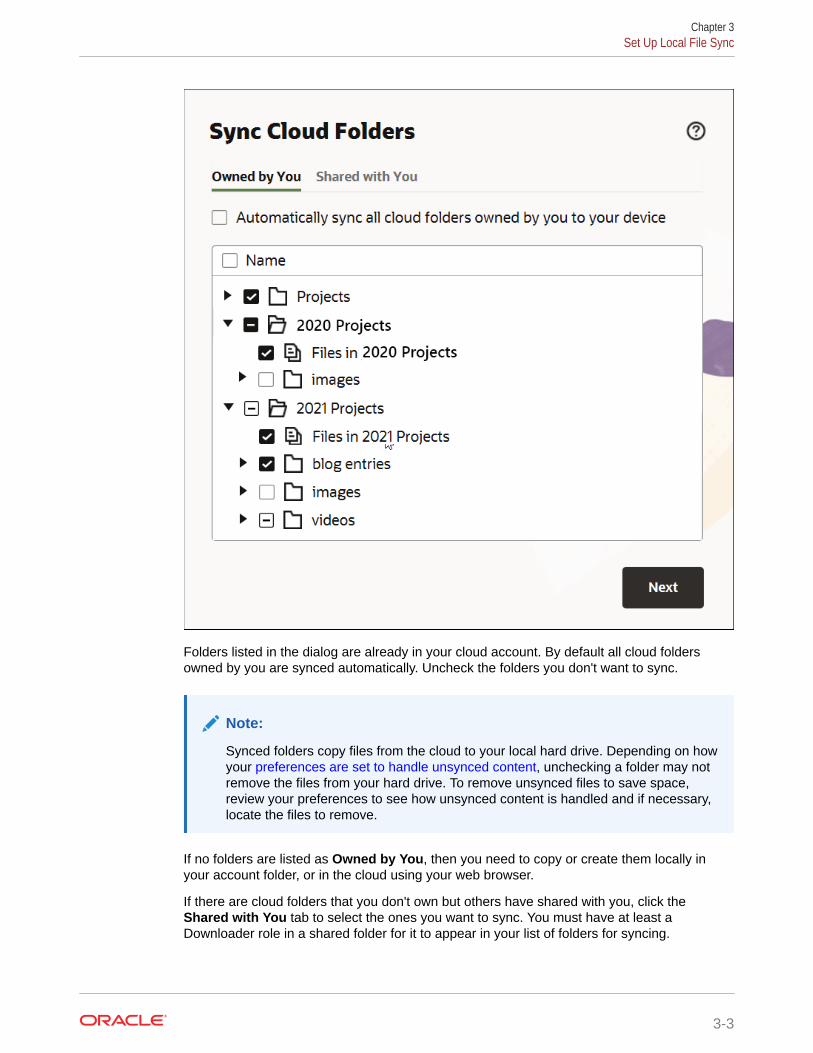
Folders listed in the dialog are already in your cloud account. By default all cloud foldersowned by you are synced automatically. Uncheck the folders you don't want to sync.
Note:
Synced folders copy files from the cloud to your local hard drive. Depending on howyour preferences are set to handle unsynced content, unchecking a folder may notremove the files from your hard drive. To remove unsynced files to save space,review your preferences to see how unsynced content is handled and if necessary,locate the files to remove.
If no folders are listed as Owned by You, then you need to copy or create them locally inyour account folder, or in the cloud using your web browser.
If there are cloud folders that you don't own but others have shared with you, click theShared with You tab to select the ones you want to sync. You must have at least aDownloader role in a shared folder for it to appear in your list of folders for syncing.
Chapter 3Set Up Local File Sync
3-3
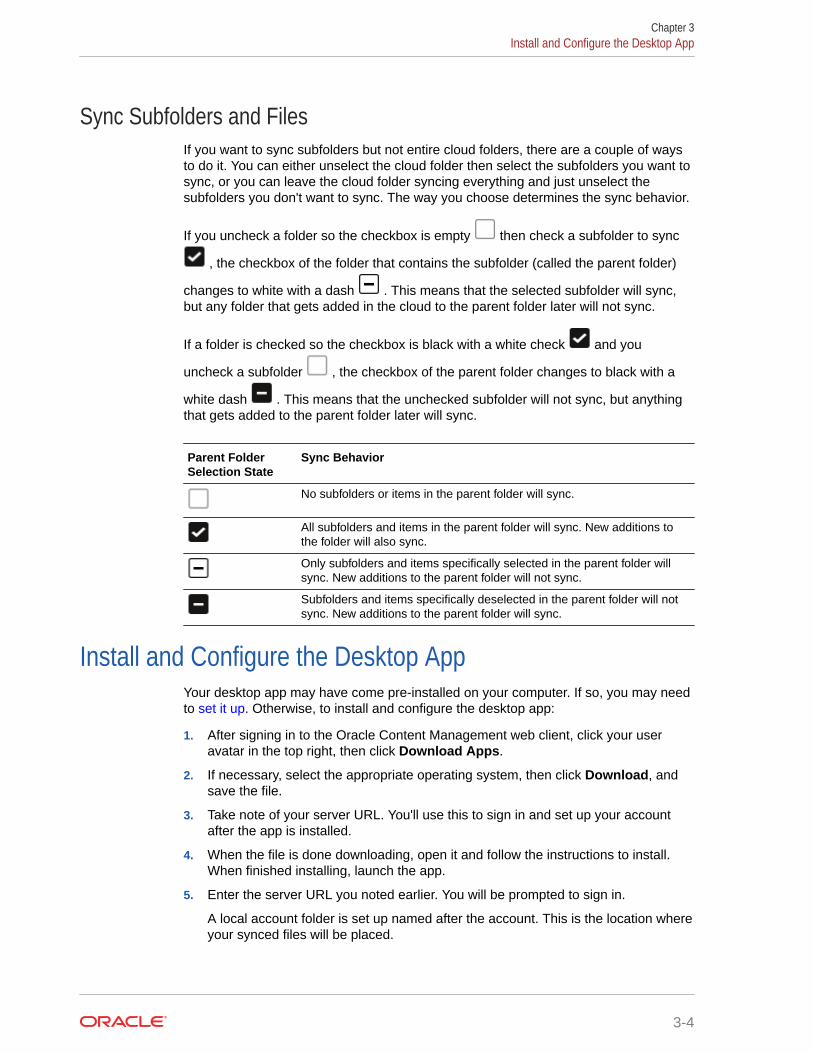
Sync Subfolders and FilesIf you want to sync subfolders but not entire cloud folders, there are a couple of waysto do it. You can either unselect the cloud folder then select the subfolders you want tosync, or you can leave the cloud folder syncing everything and just unselect thesubfolders you don't want to sync. The way you choose determines the sync behavior.
If you uncheck a folder so the checkbox is empty then check a subfolder to sync
, the checkbox of the folder that contains the subfolder (called the parent folder)
changes to white with a dash . This means that the selected subfolder will sync,but any folder that gets added in the cloud to the parent folder later will not sync.
If a folder is checked so the checkbox is black with a white check and you
uncheck a subfolder , the checkbox of the parent folder changes to black with a
white dash . This means that the unchecked subfolder will not sync, but anythingthat gets added to the parent folder later will sync.
Parent FolderSelection State
Sync Behavior
No subfolders or items in the parent folder will sync.
All subfolders and items in the parent folder will sync. New additions tothe folder will also sync.
Only subfolders and items specifically selected in the parent folder willsync. New additions to the parent folder will not sync.
Subfolders and items specifically deselected in the parent folder will notsync. New additions to the parent folder will sync.
Install and Configure the Desktop AppYour desktop app may have come pre-installed on your computer. If so, you may needto set it up. Otherwise, to install and configure the desktop app:
1. After signing in to the Oracle Content Management web client, click your useravatar in the top right, then click Download Apps.
2. If necessary, select the appropriate operating system, then click Download, andsave the file.
3. Take note of your server URL. You'll use this to sign in and set up your accountafter the app is installed.
4. When the file is done downloading, open it and follow the instructions to install.When finished installing, launch the app.
5. Enter the server URL you noted earlier. You will be prompted to sign in.
A local account folder is set up named after the account. This is the location whereyour synced files will be placed.
Chapter 3Install and Configure the Desktop App
3-4
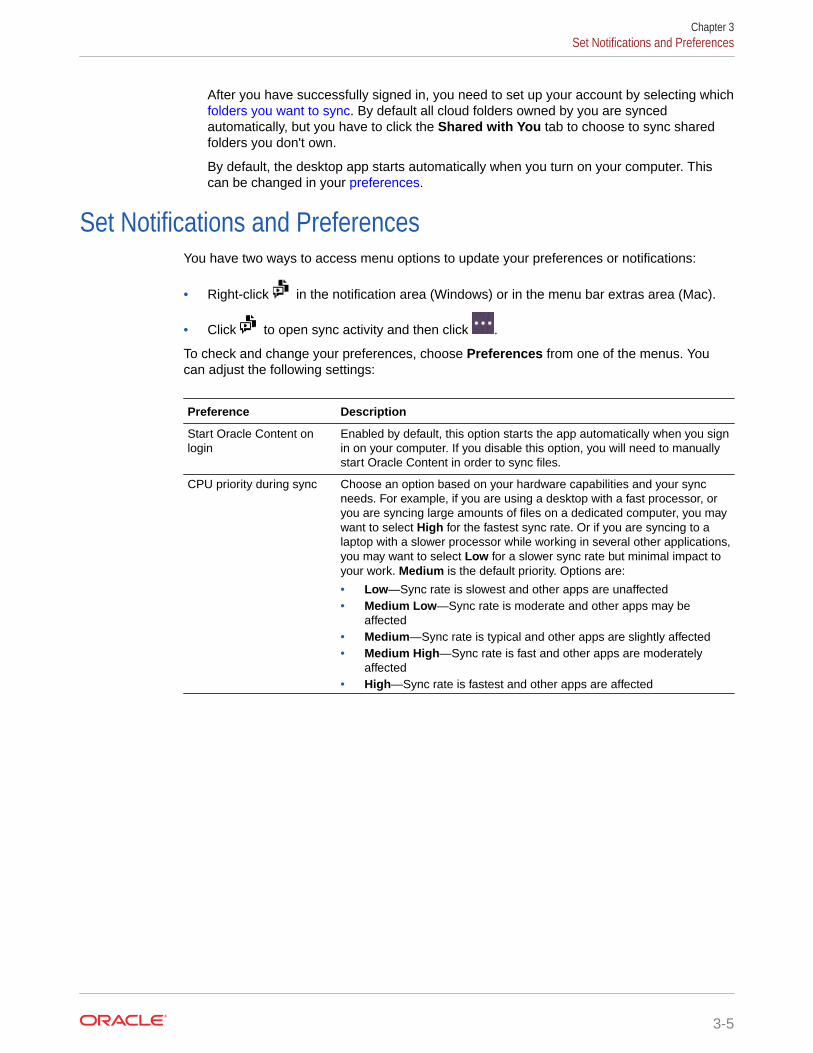
After you have successfully signed in, you need to set up your account by selecting which folders you want to sync. By default all cloud folders owned by you are syncedautomatically, but you have to click the Shared with You tab to choose to sync sharedfolders you don't own.
By default, the desktop app starts automatically when you turn on your computer. Thiscan be changed in your preferences.
Set Notifications and PreferencesYou have two ways to access menu options to update your preferences or notifications:
• Right-click in the notification area (Windows) or in the menu bar extras area (Mac).
• Click to open sync activity and then click .
To check and change your preferences, choose Preferences from one of the menus. Youcan adjust the following settings:
Preference Description
Start Oracle Content onlogin
Enabled by default, this option starts the app automatically when you signin on your computer. If you disable this option, you will need to manuallystart Oracle Content in order to sync files.
CPU priority during sync Choose an option based on your hardware capabilities and your syncneeds. For example, if you are using a desktop with a fast processor, oryou are syncing large amounts of files on a dedicated computer, you maywant to select High for the fastest sync rate. Or if you are syncing to alaptop with a slower processor while working in several other applications,you may want to select Low for a slower sync rate but minimal impact toyour work. Medium is the default priority. Options are:
• Low—Sync rate is slowest and other apps are unaffected• Medium Low—Sync rate is moderate and other apps may be
affected• Medium—Sync rate is typical and other apps are slightly affected• Medium High—Sync rate is fast and other apps are moderately
affected• High—Sync rate is fastest and other apps are affected
Chapter 3Set Notifications and Preferences
3-5
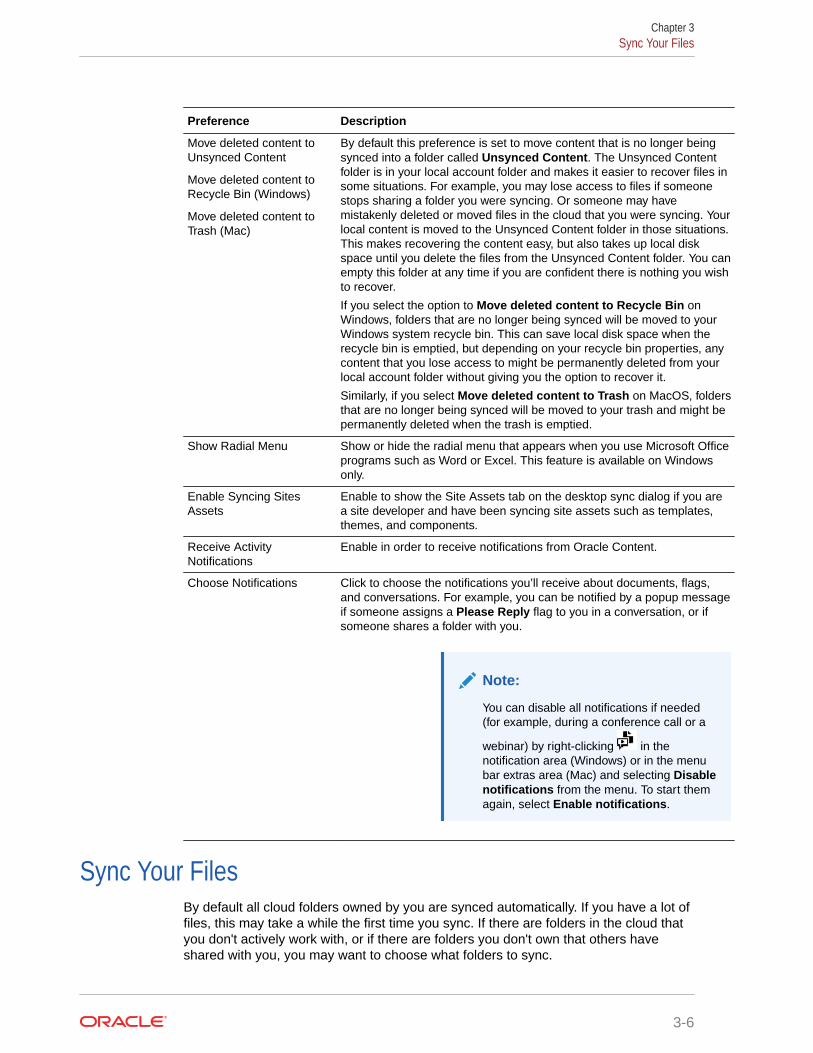
Preference Description
Move deleted content toUnsynced Content
Move deleted content toRecycle Bin (Windows)
Move deleted content toTrash (Mac)
By default this preference is set to move content that is no longer beingsynced into a folder called Unsynced Content. The Unsynced Contentfolder is in your local account folder and makes it easier to recover files insome situations. For example, you may lose access to files if someonestops sharing a folder you were syncing. Or someone may havemistakenly deleted or moved files in the cloud that you were syncing. Yourlocal content is moved to the Unsynced Content folder in those situations.This makes recovering the content easy, but also takes up local diskspace until you delete the files from the Unsynced Content folder. You canempty this folder at any time if you are confident there is nothing you wishto recover.
If you select the option to Move deleted content to Recycle Bin onWindows, folders that are no longer being synced will be moved to yourWindows system recycle bin. This can save local disk space when therecycle bin is emptied, but depending on your recycle bin properties, anycontent that you lose access to might be permanently deleted from yourlocal account folder without giving you the option to recover it.
Similarly, if you select Move deleted content to Trash on MacOS, foldersthat are no longer being synced will be moved to your trash and might bepermanently deleted when the trash is emptied.
Show Radial Menu Show or hide the radial menu that appears when you use Microsoft Officeprograms such as Word or Excel. This feature is available on Windowsonly.
Enable Syncing SitesAssets
Enable to show the Site Assets tab on the desktop sync dialog if you area site developer and have been syncing site assets such as templates,themes, and components.
Receive ActivityNotifications
Enable in order to receive notifications from Oracle Content.
Choose Notifications Click to choose the notifications you’ll receive about documents, flags,and conversations. For example, you can be notified by a popup messageif someone assigns a Please Reply flag to you in a conversation, or ifsomeone shares a folder with you.
Note:
You can disable all notifications if needed(for example, during a conference call or a
webinar) by right-clicking in thenotification area (Windows) or in the menubar extras area (Mac) and selecting Disablenotifications from the menu. To start themagain, select Enable notifications.
Sync Your FilesBy default all cloud folders owned by you are synced automatically. If you have a lot offiles, this may take a while the first time you sync. If there are folders in the cloud thatyou don't actively work with, or if there are folders you don't own that others haveshared with you, you may want to choose what folders to sync.
Chapter 3Sync Your Files
3-6
To choose what folders to sync, click to open sync activity and then click , and selectChoose Folders to Sync from Cloud to open up the folder sync dialog.
You can also open the dialog by right-clicking in the notification area (Windows) or in themenu bar extras area (Mac) and selecting Choose Folders to Sync from Cloud from thecontextual menu.
In the dialog, you can opt to automatically sync all the folders you own or you can choosefolders to sync, including those shared with you. You don’t have to do anything more. Thedesktop app is "set and forget" software. It runs until you tell it to stop.
If you want to sync subfolders but not entire cloud folders, there are a couple of ways to do it.You can either unselect the cloud folder then select the subfolders you want to sync, or youcan leave the cloud folder syncing everything and just unselect the subfolders you don't wantto sync. The way you choose determines the sync behavior.
You must have at least a Downloader role in a shared folder for it to appear in your list offolders for syncing. If you’re building websites, you can also sync themes, templates, andother assets associated with your sites. You must have a manager role for those items inorder to see them in the list of items available for syncing.
Storage Location
When you initially signed in, a local account folder was created for you by default namedOracle Content. If you have only one account, this is where your synced files are stored andwhere you add files and folders you want synced to the cloud. To view the contents, right-
click in the notification area (on Windows) and select Open in Explorer or in the menubar extras area (on Mac) and select Open in Finder.
If you are a member of multiple services and sync more than one account, then your syncedfiles are stored in a folder that you name when you add each account.
In Windows, the default location for all local account folders is:
• C:\Users\USER_NAME\Oracle Content-Accounts
On a Mac, the default location for all local account folders is:
• /Users/USER_NAME/Oracle Content-Accounts
You can change the location of any local account folder using the sync activity dialog.
1. Click in the notification area (Windows) or in the menu bar extras area (Mac) to openthe sync activity.
2. Click to open the Accounts dialog.
3. Hover over the account to change and click , then select Edit.
4. Click Change Location and navigate to the place you want the local account folder.
5. Once you've selected a new location, click Done.
Chapter 3Sync Your Files
3-7

Note:
You can’t move the location to an external drive.
Sync Files in Multiple AccountsIf you are a member of multiple services, you may need to sync more than oneaccount. You can display the Accounts dialog to add and edit multiple accounts by
clicking on the sync activity dialog or right-clicking the in the notification area(Windows) or in the menu bar extras area (Mac) and selecting Accounts from thecontextual menu.
You can set up a maximum of five separate accounts, so that you can sync with eachOracle Content Management account you have.
To add an account from the Accounts section of the sync activity dialog:
1. Click Add New Account to open the Add Account dialog.
2. Enter the service URL of the account you want to add.
3. Enter the user name and password for the account.
4. Add an account name. The account name is used for the folder created on yourcomputer that holds the synced files.
5. Click Done. The account is listed in the Accounts section of the sync activitydialog.
By default all cloud folders owned by you are synced automatically, which can takesome time initially. If you want to limit the folders to sync, or choose to sync folders thatothers have shared with you, see Sync Your Files.
If you need to edit any account information, including where the local account folder islocated, hover over the account in the Accounts section of the sync activity dialog and
click , then select Edit.
In the Edit Accounts dialog you can change the account name, the service URL, andthe local account folder location.
Work with Synced FilesYou manage many of the same sync tasks using one of several methods.
• Right-click in the notification area (Windows) or menu bar extras area (Mac) toaccess a context menu.
• Right-click a folder or file in your local account folder to access a context menuthat has some sync tasks. Select Oracle Content in the context menu to accessmost sync tasks.
• Click to open the sync activity dialog and click to access most of the sameoptions found in the context menus. A few options in the sync activity dialog areaccessed using icons on the title bar.
Chapter 3Sync Files in Multiple Accounts
3-8
Typical tasks and options are detailed in the following table.
Task Description
Sync folders from thecloud
Select Choose Folders to Sync from Cloud and click the checkbox for itemsto sync. To stop syncing, de-select an item.
Pause sync of allfolders
Most of the time you can let the desktop app do its job and always sync yourfiles. But sometimes you may want to temporarily pause sync if you have a slowconnection and need to improve the performance of other online tasks. Forexample, you may want to pause sync if the online training video you areviewing is stuttering, or if a download keeps failing.
Access the sync menu using one of the above methods and choose Pause AllSync. To resume sync, choose Resume All Sync.
When you resume sync, changes you made during the pause are applied, andany conflicting changes in the files need to be fixed.
Initiate a sync Select Sync Now.
Stop syncing aspecific folder
If you want to stop syncing a specific folder in your local account folder, you canright-click the folder and select Oracle Content then Stop Sync. This is thesame as deselecting the folder in the Choose Folders to Sync from Clouddialog.If you stop syncing a folder on a computer, the folder and its files are removedfrom the local account folder on that computer. Nothing is lost because thefolder and its files remain in the cloud and on any other computer you havesynced. You can restart sync of the folder later.
Note:
If you mistakenly choose a folder to sync and thenstop syncing the folder shortly after, it's possiblecontent in the folder didn't finish syncing, and sonot all the content gets to the cloud. If thishappens and you've set Oracle Desktop to moveunsynced content to the Windows recycle bin, it'spossible some content could be permanentlydeleted, depending on your recycle bin settingsand available storage space. To avoid this, setOracle Desktop to move unsynced content to theUnsynced Content folder, where it can easily berestored. The Unsynced Content folder is found inthe Oracle Content folder of the account.
Delete a local folderand its content fromthe cloud
If you want to delete a specific folder and content in your local account folderfrom the cloud, you can right-click the folder and select Oracle Content thenDelete from Cloud to send the folder to your Trash folder in the cloud.
Investigate syncproblems
Select Sync Problems. To view sync problems for a specific folder, right-clickthe folder in the local account folder and select Sync Problems from the right-click menu.
Go to a local accountfolder
From the context menu on Windows, select Open in Explorer. From thecontext menu on a Mac, select Open in Finder.
From the sync activity dialog, click .
If you sync to multiple accounts, choose the account folder to open.
If you want to open a specific local folder that is listed in the sync activity dialog,or that contains an item listed in the sync activity dialog, click the title.
Chapter 3Work with Synced Files
3-9
Task Description
Open the cloudversion of a folder
From the context menu, select Open in the Cloud.
From the sync activity dialog, click .
If you sync to multiple accounts, choose the account folder to open.
If you want to open a specific cloud folder that is listed in the sync activity
dialog, select it, click , then select Open in the Cloud.
If you want to locate a specific file listed in the sync activity dialog, select it,
click , then select Open Location in the Cloud.
Stop all notifications Select Disable Notifications to prevent all your notifications from appearing(for example, during a conference call or a webinar). To start them again, selectEnable Notifications.
Collaborate withothers
Right-click a file or folder in your local account folder, select Oracle Contentand then Conversation. A conversation associated with the file or folder isopened in your web browser that you can use to comment on content, flagothers, and get people involved in real time.
See the properties ofa folder or file
Right-click the file in your local account folder, then choose Oracle Contentand then Properties.
Stop sync activitydialog animations
If your sync is running slowly or if you want to stop animations on the sync
activity dialog for some other reason, open sync activity and click thenselect Disable Animations.
To restart animations, select Enable Animations.
Edit an account From the context menu, select Accounts.
From the sync activity dialog, click .
Select the account to edit and click . Select Edit to change the accountname, location of the local account folder, and service URL.
It may be useful to put your content on a drive with a large amount storagespace. If you move an account folder to a different drive, you must re-sync allthe folders.
Remove an account From the context menu, select Remove.
From the sync activity dialog, click .
Select the account to remove and click . Select Remove to no longer syncthe account to the desktop. Removing an account does not delete any contentfrom the cloud or local account folder. Instead, the local account folder is nolonger synced to the cloud account and the local name is changed to specifythat it is removed. This means that any changes made to items in the localfolder after the account has been removed will not be synced with the cloud.
Repair an account In some rare instance you may have sync problems that persist and are difficultto resolve. You may want to repair an account or folder. If the account is large,or the individual folder is large, repair can take a long time. It's a good idea totry to initiate a sync first to see if that resolves the problem. If it does not, youcan try to repair the account or individual folder.
From the context menu, select Repair.
From the sync activity dialog, click .
Select the account to repair and click . Select Repair.
Chapter 3Work with Synced Files
3-10
Task Description
Save a log fileshowing the synctransactions on yourdesktop
Choose Troubleshoot from the Help menu then choose Save Logs.
The following options can be accessed by finding the item you want in the local accountfolder on your desktop, and right-clicking on the file or folder.
Task Description
Lock a file Select Lock. You can also lock a synced file by opening the file and
clicking on the radial menu when editing a Microsoft Office file.
Share a synced file or folder You can add members to a folder or send a link to a file or folder thesame way you do when using a web browser or mobile device. Right-click on the item name in the desktop folder and choose Members orShare Link in the Oracle Content context area.
See the properties of a folder orfile
Select the file in your local account folder, then choose OracleContent and then Properties.
Share Files and FoldersYou can share individual files, or you can share an entire folder.
Files can only be shared by using a link to the file. You can email the link, or get a link to a fileor folder and use it however you want to, like in an instant message or a document. Sendinga link is useful if you need to give access to people on an as-needed basis. The only way therecipient can access the file or folder is by using the link.
You can also add members to a folder, giving those people access to all the content in thefolder. This is useful when you're working on a large project, for example, and people mayneed to continually access information.
You can even add external users who may not be a part of your organization to a folder,provided your service administrator allows it and their email address is registered with yourservice. External users can collaborate on objects to which they're given access, but theycannot be assigned the manager role. This safely limits their ability to create and removecontent.
See Share Files and Folders for more details.
Use ConversationsConversations are a way for you to collaborate with other people by posting comments anddiscussing topics in real time. You can start a conversation about a specific document orfolder, or create an independent conversation. You can also create annotations, which arecomments about specific sections of a file. For more details, see Use Conversations.
In your Oracle Content desktop folder, right-click on the file or folder you want to use for aconversation. Choose Oracle Content and then Conversation. Enter a post to get theconversation started.
Chapter 3Share Files and Folders
3-11
You can also start a conversation by clicking on the radial menu when using anOffice file.
Chapter 3Use Conversations
3-12
4Work with Microsoft Office
When you install the desktop app, an add-in for Microsoft Office 2016 or later versions isautomatically installed so you can work with synced files directly from Microsoft Office. If yoursystem administrator enabled Microsoft Office Online integration, you can work in MicrosoftOffice Online directly from the web client.
Microsoft Office and Microsoft Office Online integration enable you to perform the followingtasks:
• Create new Microsoft Office files from the Oracle Content Management web client.
• Edit Microsoft Office files that are stored in Oracle Content Management.
• Use the radial menu that shows up when you're working in any synced Microsoft Officefile to quickly access Oracle Content Management features directly from Microsoft Office.
• Embed links to your synchronized documents, folders, or most recently usedconversations into Microsoft Outlook email messages and calendar appointments.
• Save files directly from Microsoft Office to your synced desktop folder.
Note:
If you install Microsoft Office after you install the desktop app, you'll need to reinstallthe desktop app to get this functionality. It’s only installed if Microsoft Office ispresent on your computer. For other issues, refer to the troubleshooting section.
Create Microsoft Office Files in the Web ClientYou can create new Microsoft Office files directly from the Oracle Content Management webclient.
To create a new Microsoft Office file:
1. In the Oracle Content Management web client, browse to where you want to create anew file and click Create, then select the type of Microsoft Office file you want to create.You can create a Word, PowerPoint, or Excel file.
2. Enter a name and description (optional) for your file, then click Create.
3. If you haven't already signed in to Microsoft Office Online, you'll be asked to do so.The new file is saved to the Oracle Content Management folder from which you createdthe file. To return to the folder, click the link in the toolbar.
Keep these things in mind when you’re creating files:
• Try to keep file uploads smaller than 5 GB. Some web browsers can't process files biggerthan that.
4-1
• If someone shared a folder with you, you must have at least a Contributor role inthe folder to be able to create a file there. If you have a lesser role, you won't seethe option to create a file.
• A new version of the file is created each time the file is autosaved.
Edit Microsoft Office FilesYou can edit Microsoft Office files directly from the Oracle Content Management webclient.
There are several ways to edit Microsoft Office files that are stored in Oracle ContentManagement:
• Download: In the web client, select the file, download it to your computer, edit it inthe associated program on your computer, then upload a new version to the webclient.
• Desktop client from web browser: If you've installed the desktop client, you canedit it directly from the web client. In the web client, select the file, and click Edit.The desktop client will open the file in the associated program on your computer.When you finish editing, save the file as you normally would. If you’re alreadysyncing the file, any changes you make to the file will be synced to Oracle ContentManagement. If you didn’t sync the file beforehand, the newly synced file is storedin your .download folder in your Oracle Content folder on your computer.
• Desktop client from file explorer: If you've installed the desktop client andyou've synced the file to your computer, you can edit the synced file directly fromyour file explorer as you would any file. The file will open in the associatedprogram on your computer, and any changes you make to the file will be synced toOracle Content Management.
• Microsoft Office Online: If your system administrator has enabled MicrosoftOffice Online integration, you can edit the file in Microsoft Office Online directlyfrom the web client. In the web client, select the file, then click Edit in [Office]Online (for example, "Edit in Word Online"). The file will open in Microsoft OfficeOnline, and any changes you make to the file will be synced to Oracle ContentManagement.If you've installed the desktop client, you can instead edit the file on your computerby clicking Edit in [Office] (desktop) (for example, "Edit in Word (desktop)").
Keep these things in mind when you’re editing files:
• Try to keep files smaller than 5 GB. Some web browsers can't process files biggerthan that.
• If someone shared a folder with you, you must have at least a Contributor role inthe folder to be able to edit a file there. When you edit a file you are uploading anew version of the file to the folder.
• A new version of the file is created each time the file is autosaved.
Use the Radial MenuWhen using Microsoft Office 2016 or later versions on a PC, a quick-access radialmenu is installed automatically when you install the desktop app. This menu appearswhenever you have the app active and you work with a Microsoft Office file that’sbeing synced. Click on any location on the menu to quickly access Oracle Content
Chapter 4Edit Microsoft Office Files
4-2
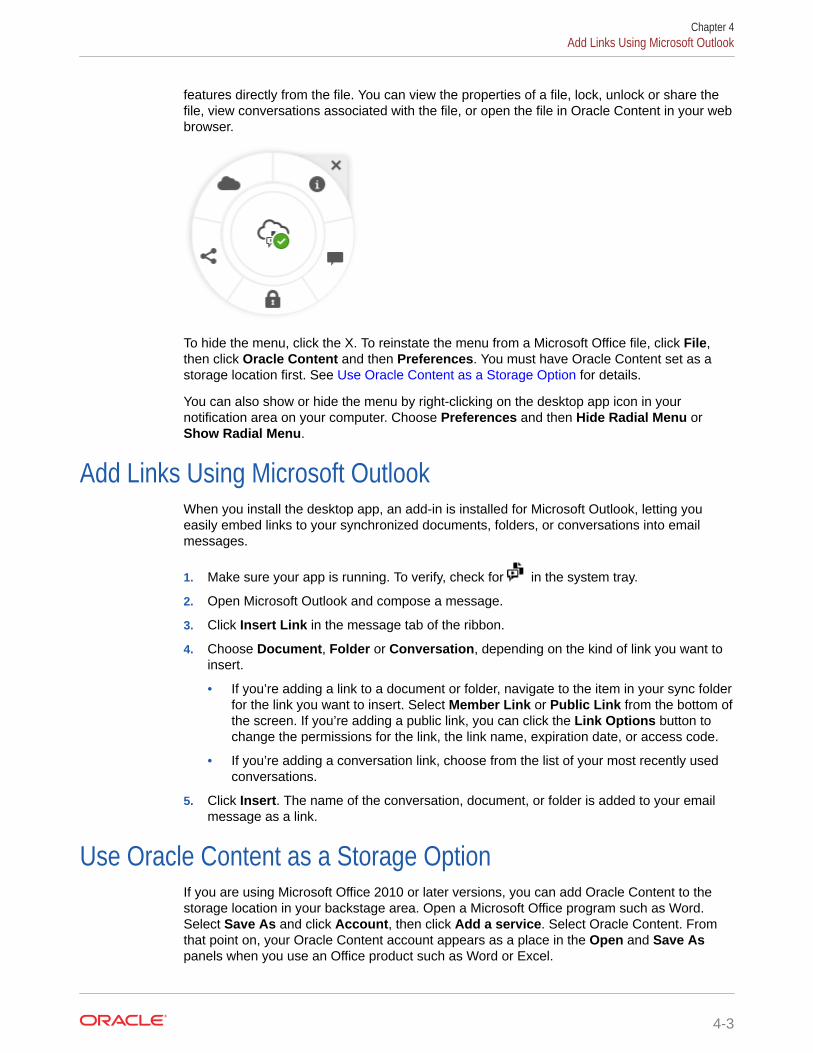
features directly from the file. You can view the properties of a file, lock, unlock or share thefile, view conversations associated with the file, or open the file in Oracle Content in your webbrowser.
To hide the menu, click the X. To reinstate the menu from a Microsoft Office file, click File,then click Oracle Content and then Preferences. You must have Oracle Content set as astorage location first. See Use Oracle Content as a Storage Option for details.
You can also show or hide the menu by right-clicking on the desktop app icon in yournotification area on your computer. Choose Preferences and then Hide Radial Menu orShow Radial Menu.
Add Links Using Microsoft OutlookWhen you install the desktop app, an add-in is installed for Microsoft Outlook, letting youeasily embed links to your synchronized documents, folders, or conversations into emailmessages.
1. Make sure your app is running. To verify, check for in the system tray.
2. Open Microsoft Outlook and compose a message.
3. Click Insert Link in the message tab of the ribbon.
4. Choose Document, Folder or Conversation, depending on the kind of link you want toinsert.
• If you’re adding a link to a document or folder, navigate to the item in your sync folderfor the link you want to insert. Select Member Link or Public Link from the bottom ofthe screen. If you’re adding a public link, you can click the Link Options button tochange the permissions for the link, the link name, expiration date, or access code.
• If you’re adding a conversation link, choose from the list of your most recently usedconversations.
5. Click Insert. The name of the conversation, document, or folder is added to your emailmessage as a link.
Use Oracle Content as a Storage OptionIf you are using Microsoft Office 2010 or later versions, you can add Oracle Content to thestorage location in your backstage area. Open a Microsoft Office program such as Word.Select Save As and click Account, then click Add a service. Select Oracle Content. Fromthat point on, your Oracle Content account appears as a place in the Open and Save Aspanels when you use an Office product such as Word or Excel.
Chapter 4Add Links Using Microsoft Outlook
4-3
Oracle Content also appears as an option under the File tab in Microsoft Office. Youcan use options such as saving files, collaborate, and more from within MicrosoftOffice.
Chapter 4Use Oracle Content as a Storage Option
4-4
5Use the Mobile Apps
You can access your cloud files from anywhere while you’re on the go. Just use the mobileapp on your device to stay in touch wherever you are.
The Android and iOS mobile apps have almost all the same functionality as using OracleContent Management in a web browser. You can access your content, search and sort yourfiles and folders, share content, and work with conversations.
The mobile apps are available in the appropriate app store (Google Play or Apple App Store).You can also access Oracle Content Management through a web browser on your mobiledevice. When you do, you’ll be prompted to download the app.
After installing the mobile app, you can use it on your Android device or iPhone/iPad.
5-1
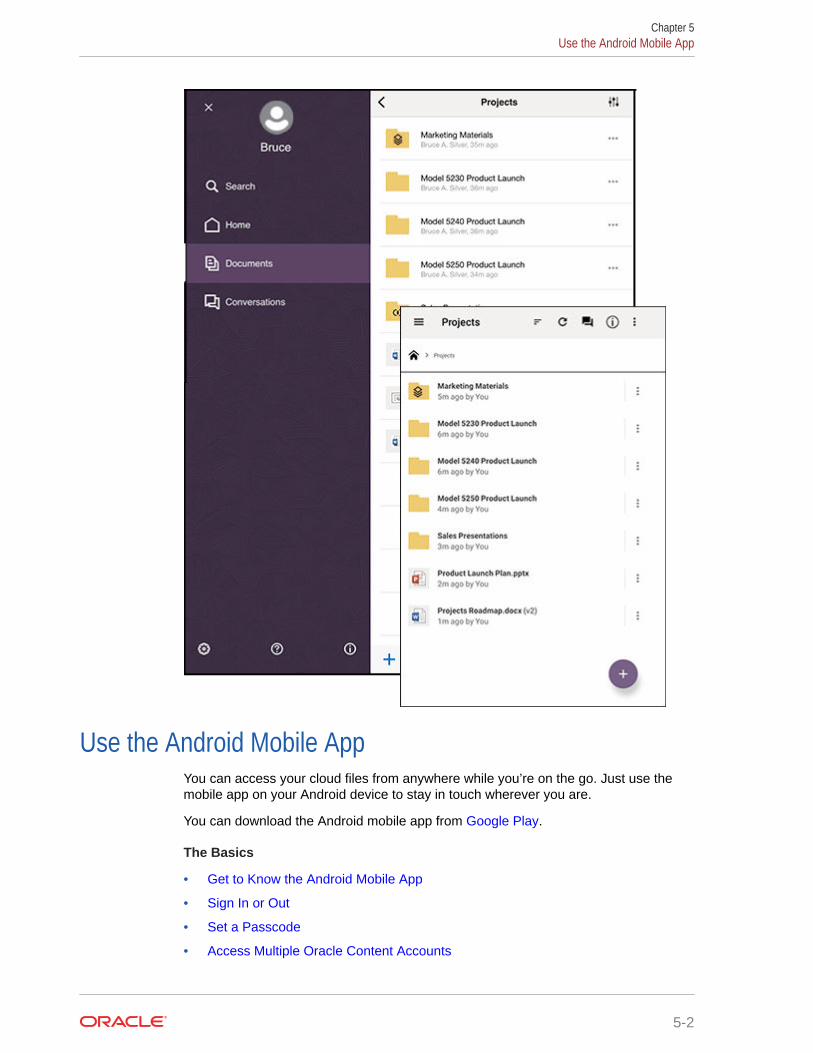
Use the Android Mobile AppYou can access your cloud files from anywhere while you’re on the go. Just use themobile app on your Android device to stay in touch wherever you are.
You can download the Android mobile app from Google Play.
The Basics
• Get to Know the Android Mobile App
• Sign In or Out
• Set a Passcode
• Access Multiple Oracle Content Accounts
Chapter 5Use the Android Mobile App
5-2
• Manage Notifications
Manage Content
• Work with Files and Folders
• View Files or File and Folder Details
• Edit Files
• Upload Files and Media
• Download (Sync) Files
• Search Content and Conversations
• Use Assets
Collaborate with Others
• Share Files and Folders
• Use Conversations
Troubleshooting
• Troubleshoot Mobile
Get to Know the Android Mobile AppOracle Content Management gives you collaboration and content sharing on the go with theAndroid mobile app. Take a minute to learn how and where to find what you need.
When you launch the mobile app, you first see your dashboard (home page), with
personalized information and links to your favorite documents and conversations. Tap inthe top left corner to see the navigation panel, from where you can go to your documents,conversations, or settings.
To help you find your way around, here’s what the Documents page in the Android mobileapp looks like:
Chapter 5Use the Android Mobile App
5-3
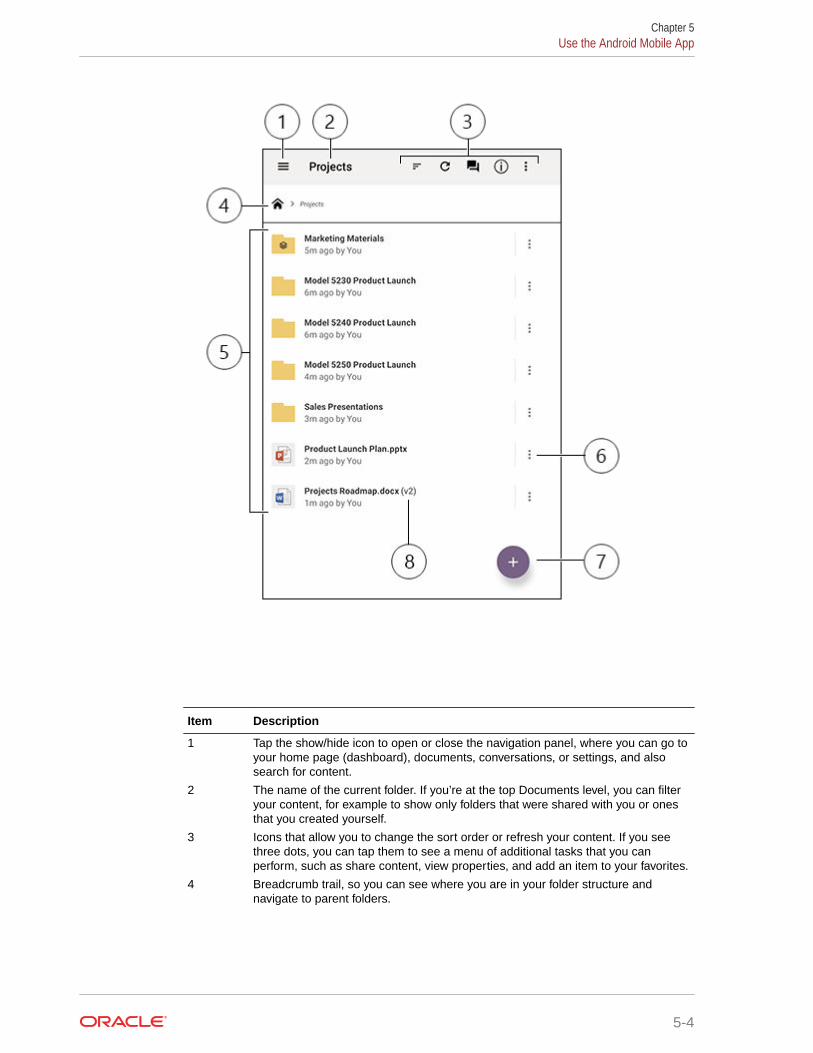
Item Description
1 Tap the show/hide icon to open or close the navigation panel, where you can go toyour home page (dashboard), documents, conversations, or settings, and alsosearch for content.
2 The name of the current folder. If you’re at the top Documents level, you can filteryour content, for example to show only folders that were shared with you or onesthat you created yourself.
3 Icons that allow you to change the sort order or refresh your content. If you seethree dots, you can tap them to see a menu of additional tasks that you canperform, such as share content, view properties, and add an item to your favorites.
4 Breadcrumb trail, so you can see where you are in your folder structure andnavigate to parent folders.
Chapter 5Use the Android Mobile App
5-4
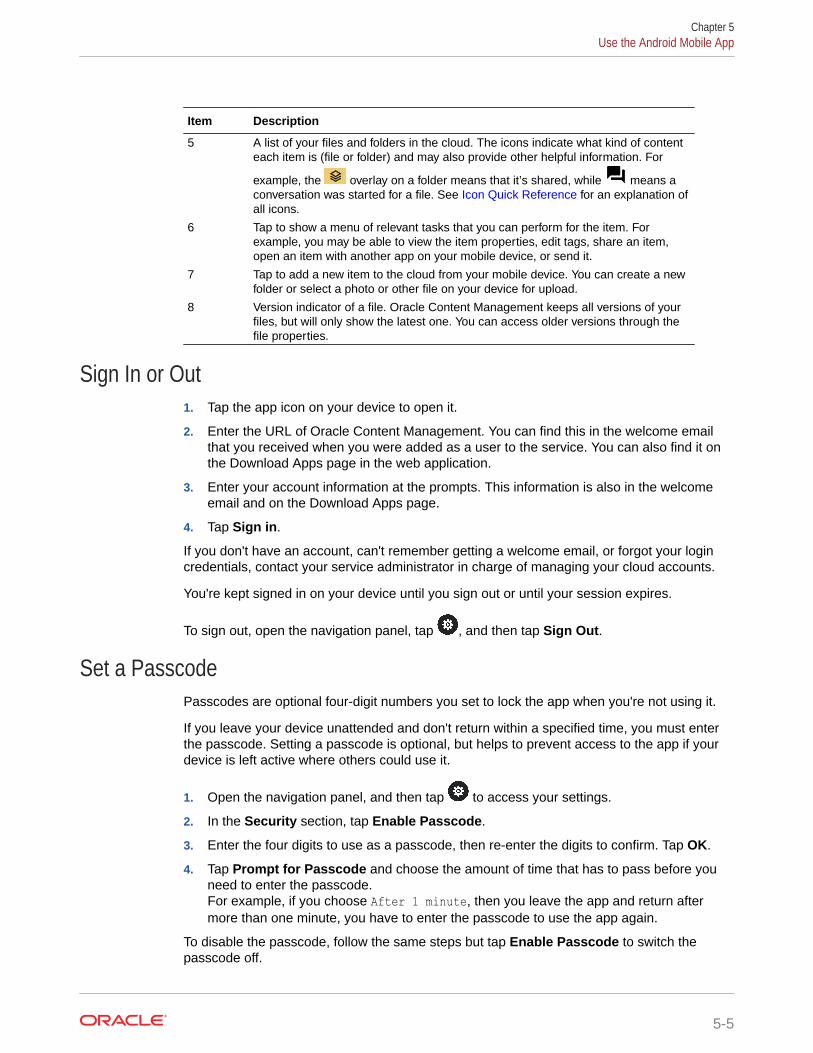
Item Description
5 A list of your files and folders in the cloud. The icons indicate what kind of contenteach item is (file or folder) and may also provide other helpful information. For
example, the overlay on a folder means that it’s shared, while means aconversation was started for a file. See Icon Quick Reference for an explanation ofall icons.
6 Tap to show a menu of relevant tasks that you can perform for the item. Forexample, you may be able to view the item properties, edit tags, share an item,open an item with another app on your mobile device, or send it.
7 Tap to add a new item to the cloud from your mobile device. You can create a newfolder or select a photo or other file on your device for upload.
8 Version indicator of a file. Oracle Content Management keeps all versions of yourfiles, but will only show the latest one. You can access older versions through thefile properties.
Sign In or Out1. Tap the app icon on your device to open it.
2. Enter the URL of Oracle Content Management. You can find this in the welcome emailthat you received when you were added as a user to the service. You can also find it onthe Download Apps page in the web application.
3. Enter your account information at the prompts. This information is also in the welcomeemail and on the Download Apps page.
4. Tap Sign in.
If you don't have an account, can't remember getting a welcome email, or forgot your logincredentials, contact your service administrator in charge of managing your cloud accounts.
You're kept signed in on your device until you sign out or until your session expires.
To sign out, open the navigation panel, tap , and then tap Sign Out.
Set a PasscodePasscodes are optional four-digit numbers you set to lock the app when you're not using it.
If you leave your device unattended and don't return within a specified time, you must enterthe passcode. Setting a passcode is optional, but helps to prevent access to the app if yourdevice is left active where others could use it.
1. Open the navigation panel, and then tap to access your settings.
2. In the Security section, tap Enable Passcode.
3. Enter the four digits to use as a passcode, then re-enter the digits to confirm. Tap OK.
4. Tap Prompt for Passcode and choose the amount of time that has to pass before youneed to enter the passcode.For example, if you choose After 1 minute, then you leave the app and return aftermore than one minute, you have to enter the passcode to use the app again.
To disable the passcode, follow the same steps but tap Enable Passcode to switch thepasscode off.
Chapter 5Use the Android Mobile App
5-5
To change a passcode, follow the same steps, but choose Change Passcode.
Note:
When you set a passcode to take effect immediately, if you minimize the appand restore it within 5 seconds, you aren’t prompted for the passcode. This isexpected behavior for an Android device and not an indication that thepasscode hasn’t been set correctly.
Access Multiple Oracle Content AccountsYou can use files from multiple accounts and you can easily switch between accountswhile using your app. To add an account:
1. Open the navigation panel, and then tap .
2. Tap Add Account.
3. Enter a name for the account, the service URL, and your user name andpassword.
4. Tap Add when done.
You can add a maximum of five different accounts. To switch between accounts, tapthe account name at the bottom of the navigation panel.
Manage NotificationsYou can customize what kinds of notifications you’ll receive when using the app onyour device:
1. Open the navigation panel, and then tap to access your settings.
2. Tap the account name that you want to customize.
3. Tap Push Notifications and choose the option you need.
You can customize how your notifications appear on your device by going to thesettings for your device and selecting Oracle Content from the list of apps. Then youcan choose notification types for the app such as showing messages on the lockscreen, in the notification area, and so on.
Work with Files and FoldersTo create a new folder, go to the location in the Documents area where you want the
folder and tap . Tap , and then enter a folder name and optional description.You can't use symbols such as / \ ? or * in the name. Tap OK when done.
To mark an item as a favorite, select or open it, tap , and tap Add to Favorites.
You can also mark an item as a favorite from its properties page by tapping . Tosee a list of your favorites, tap the drop-down menu next to the header on theDocuments page and select Favorites.
Chapter 5Use the Android Mobile App
5-6
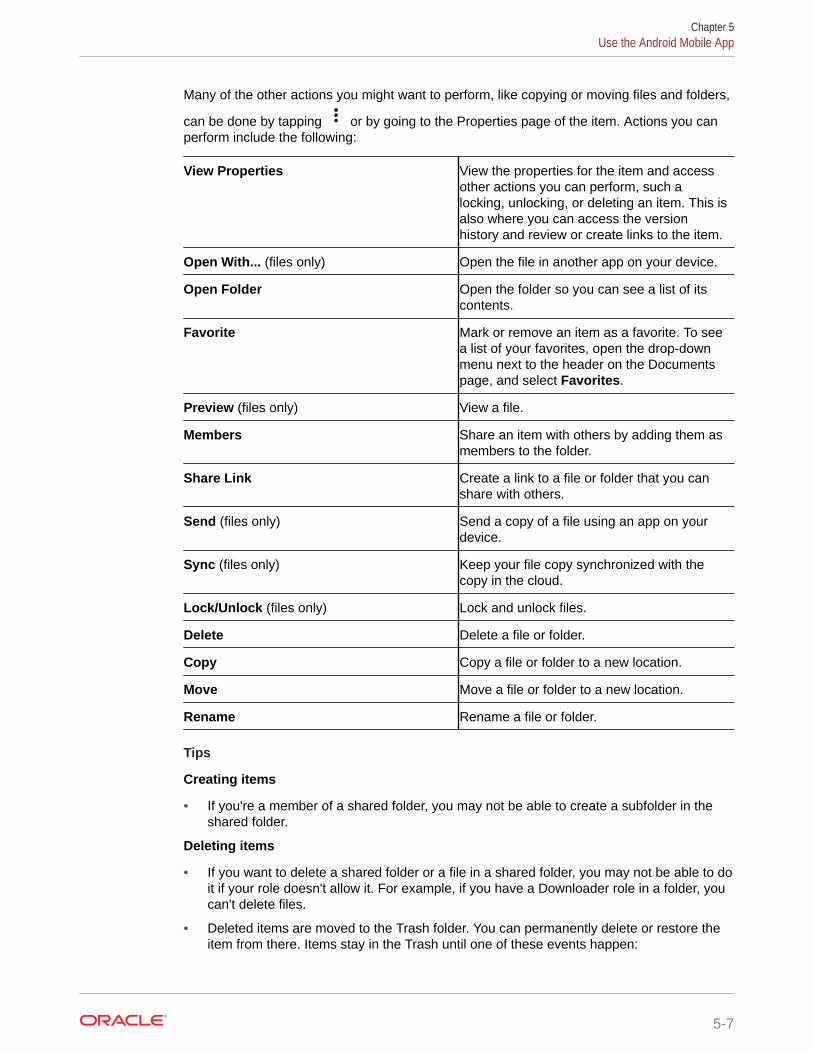
Many of the other actions you might want to perform, like copying or moving files and folders,
can be done by tapping or by going to the Properties page of the item. Actions you canperform include the following:
View Properties View the properties for the item and accessother actions you can perform, such alocking, unlocking, or deleting an item. This isalso where you can access the versionhistory and review or create links to the item.
Open With... (files only) Open the file in another app on your device.
Open Folder Open the folder so you can see a list of itscontents.
Favorite Mark or remove an item as a favorite. To seea list of your favorites, open the drop-downmenu next to the header on the Documentspage, and select Favorites.
Preview (files only) View a file.
Members Share an item with others by adding them asmembers to the folder.
Share Link Create a link to a file or folder that you canshare with others.
Send (files only) Send a copy of a file using an app on yourdevice.
Sync (files only) Keep your file copy synchronized with thecopy in the cloud.
Lock/Unlock (files only) Lock and unlock files.
Delete Delete a file or folder.
Copy Copy a file or folder to a new location.
Move Move a file or folder to a new location.
Rename Rename a file or folder.
Tips
Creating items
• If you're a member of a shared folder, you may not be able to create a subfolder in theshared folder.
Deleting items
• If you want to delete a shared folder or a file in a shared folder, you may not be able to doit if your role doesn't allow it. For example, if you have a Downloader role in a folder, youcan't delete files.
• Deleted items are moved to the Trash folder. You can permanently delete or restore theitem from there. Items stay in the Trash until one of these events happen:
Chapter 5Use the Android Mobile App
5-7
– You permanently delete them.
– Your Trash quota is reached.
– The Trash is automatically cleared out, according to the interval set by yourservice administrator, who is the person in charge of managing the service foryour organization.
– You restore the item from the Trash.
You can see your Trash folder by going to the Documents page and tapping themenu under the heading. Tap Trash to see what’s there.
Copying items
• If you copy a file to the original location, it's saved with a number after the filename indicating it's a copy. For example, if you already had a file named StatusReport.docx, a new copy of it is named Status Report(2).docx.
Locking files
• When you lock a file, other people will know the file is in use. You can check theproperties for the file to see who locked it and when.
• Other people can unlock the file if they need to use it. If they do, you get an emailtelling you who unlocked it and when.
• If someone tries to upload a new version of a file you locked, they can unlock itand upload the new version. You'll be notified by email if that happens.
View Files or File and Folder DetailsView Files
1. Tap the file name in the Documents area.
2. When viewing a multi-page file, tap anywhere on the screen to see thumbnails ofthe pages in the file. Tap any thumbnail to view that page. The current pagenumber and the total number of pages are displayed at the bottom of the screen(for example, 1/33). Tap that designation to jump to a specific page.
3. Press the side arrows to view the previous or next file in the folder.
If you want to use another app to view a file, tap and then tap Open With.... Selectthe app to use. The listed apps are those installed on your device that can be used toopen the file.
View File or Folder Details
You may need to find out when a file was created or who created it. Or maybe youwant to see when a folder was last updated and who updated it. Use the Properties
page to see information about an item. Tap next to a file or folder, and then tap
View Properties in the actions menu. You can also tap when viewing a file.
See Version History
Oracle Content Management keeps all versions of your files, but only shows the latestone. To see the version history of a file, go to its Properties page, and tap Version
Chapter 5Use the Android Mobile App
5-8

History. You can delete versions or email versions of the file, or make an older file the
current version. Tap on the version you want to use to select those options.
Edit FilesIf you know you'll be offline soon (for example, if you're boarding a plane and using AirplaneMode), sync the file you want to use. Then you can work with it even if you're not connectedto the Internet. See Download (Sync) Files. It's also a good idea to lock the file before youedit it. That way other people know the file is in use.
If you have the Microsoft Word app installed on your mobile device and you have a MicrosoftOffice 365 subscription, you can open a document directly from Oracle Content and edit thatdocument in Word:
1. In Word, tap Open.
2. Tap Browse. A list of places is shown.
3. Choose the Oracle Content account you want to use from the list.
4. Find the file you want to edit.
5. After editing the file, tap Save to save the file back to its original location or tap Save Asto save it to a new location, either in the same Oracle Content account or a differentaccount or location.
You can also edit files using other apps on your device:
1. Find the file you want to edit. If you're online, you can find files through Browse,Favorites, or Search. When offline, you can choose files you've synced.
2. Tap and then tap Open With....
3. Select the app on your device that you'll use to edit the file. The apps that are shown arethose that can be used to edit a file of that type.
4. Edit the file as needed, and then tap Save As to save the file locally on your device.
5. When you're online, you can upload the local copy of the file back to Oracle Content fromwithin the editing app if it has a Send option. Just tap Send and select Oracle Content asa location.
Upload Files and Media1. Go to the location in the Documents area where you want to add the file.
2. Tap .
3. Tap .
4. Choose a file on your device to upload. You can add one or more tags (separated by
commas) and also edit the file name or add a description (tap , then tap Edit).
You can also take a photo and upload it. Just tap . You can choose any photos youcurrently have, or take a new photo and then upload it.
You can upload files from one Oracle Content account to another. Say, you have twoaccounts: Corporate and SalesDept. You could sign in to your Corporate account, and select
Chapter 5Use the Android Mobile App
5-9
the option to upload a file. Then you could select Oracle Content as the location youwant to choose from, select your SalesDept account, find the file you want to upload,and select a location in your Corporate account to store it.
Some apps may let you upload a file directly through the app. For example, someapps have a Send menu option that lets you select a file on your device and open it.You can then choose a location for the file and send it to Oracle Content so it's storedin the cloud.
Download (Sync) FilesFiles that you download (synchronize) with Oracle Content are available even if youaren't connected to the Internet. For example, maybe you're going on a business tripand you want to view or edit a file while offline (say, on an airplane flight). Bysynchronizing the file, you can be sure that you can access the file regardless of yourconnectivity. When you sync a file, it's downloaded to a secure area within the OracleContent app, and you can access it from within the mobile app, even if you're notconnected to the cloud. For security reasons, it's not accessible outside the OracleContent app, so you won't find it in your regular Android download folder or otherfolder on your device. You control how and when the local copy is kept up to date toensure you have the latest version.
1. Find the file you want to synchronize.
2. Tap and then View Properties.
3. Tap Sync.
To see a list of all synced files, tap the header menu on the Documents page headerand tap Offline.
To remove a synced file, long-tap the file, select it, and then tap the delete icon.
To immediately synchronize your selected files:
1. Tap Offline in the filter menu under the header.
2. Tap .
The files in the Offline area are updated to match the latest versions in the cloud. You
can also tap on the Offline screen, and then choose to unsync all files listed. Or
you can tap for an individual file and choose Unsync from the menu. If you unsynca file, its local copy is removed from your device. It remains untouched in the cloud.
You can have your files synchronized automatically:
1. Tap in the navigation panel.
2. Tap the account name with the files you want to keep synchronized, then tapSynchronization Settings.
3. Choose how to auto-synchronize and how often.
Search Content and ConversationsYou can search through your conversations and files by tapping Search in thenavigation panel. You can search for a word in a file or folder name or a word included
Chapter 5Use the Android Mobile App
5-10
in a file or conversation. You can also search for any hashtags used in conversations, or forconversation names or tags used in digital assets. Type your search terms, and then tapEnter.
For example, if you search for the word "report", you'll find Status Report 2019.xls and ReportLogo.jpg, as well as Writing Instructions.doc if the word report is in that document orconversation. You can filter your results by type (for example, by conversations or by files).
After your search results are listed, you can use the results like you would normally. You canpreview files, add files to folders, add posts to conversations, upload files, or share files orfolders with others.
Search tips
• A search looks through the titles, the content (such as words in a document), fileextensions, the name of the person who last modified the file, and the information aboutan item (like a folder's description). It also checks any metadata associated with the item,tags for digital assets, conversation messages, hashtags used in conversations, andpeople in the conversation.
• If you search for an item that has special characters in the name, the item isn’t returnedin the suggested search results for documents or folders.
• You can search for multiple terms by separating the terms with a comma or a space.
• To search for a phrase, use double quotes around the phrase. For example, "UnitedStates" returns files with the exact phrase United States in the file.
• You can filter your search results by clicking or tapping the Results menu. For example,you can view only conversations that match the search criteria, or only the people whomatch it.
• There may be a slight time delay to show the newest search results. For example, if yousearch for the term Report and then add another document with the term Report in it,that newest document will be not be returned in search results for a few seconds.
• Searching is case-insensitive. This means that report will find the same results asReport.
• You can use the following search operators. The operators are case-insensitive, so NOT isthe same as not:
– not or the dash (-). For example, Report2018,Report2019 -sales returnsReport2018 or Report2019, but not items with the keyword sales in them.
– or or a comma. For example, Report2018 or Report2019 returns the same resultsas Report2018,Report2019.
– and or a space. For example, Report2018 and Report2019 returns the same resultsas Report2018 Report2019.
The not operator has higher precedence than the others, with and having lowestprecedence. For example, a search of Report2018 and Report2019 not Report2019returns nothing because not is evaluated first.
• Use parentheses to group complex queries. For example, you can search for States and(not "United States").
• If you have more than 100 shared folders (either shared by you or with you), a globalsearch may not return the expected results. The search is done on Favorite shared
Chapter 5Use the Android Mobile App
5-11
folders first and then other shared folders, up to 100. You may want to designatesome folders as Favorites before searching, to ensure better search results.
• If a file is larger than 10MB in size, it won't be included in full-text search (a searchthrough the content of a file, not just the metadata about a file). You can find theitem by searching for the entire name.
Use AssetsAssets are those items you want to group together for use on a website or for otherprojects. They can include graphics, text, video, or other types of files.
The following is a brief overview of how you can use assets on your mobile device.
Work with Assets
You can review an asset to either approve, reject, or comment on it using your mobiledevice. Asset approval might just change status, or, if your service and contentadministrators have configured Oracle Content Management to use additionalworkflow options, approval might be part of a workflow that changes statusautomatically.
Approve and Reject Assets
In the Home view, you see items that require simple asset approval in the Approvalstile, and you see items that require workflow approval in the Workflow Tasks tile. Tapthe tile to view the items.
Approvals
In the list of assets waiting approval, tap an asset to review if needed. If the asset hasmultiple pages, tap the page number to open a strip of thumbnail images to navigate
and view multiple pages. To see a list of asset properties, tap .
When you're ready, tap to approve the asset. Tap to reject the asset.
You can also quickly approve or reject an asset directly from the approvals list byswiping a list item right to approve, or left to reject.
Workflow Tasks
In the list of assets waiting approval, you see the due date (if there is one), a previewof the asset, details about the asset, and your workflow task.
To act on the workflow task, tap the workflow task name or . Select an action,optionally add a comment, and then tap Submit.
You can also take action on an item while viewing it by tapping at the bottom ofthe screen.
To learn more about workflow, see Use Workflows in Managing Assets with OracleContent Management.
Comment on Assets in Review
Chapter 5Use the Android Mobile App
5-12
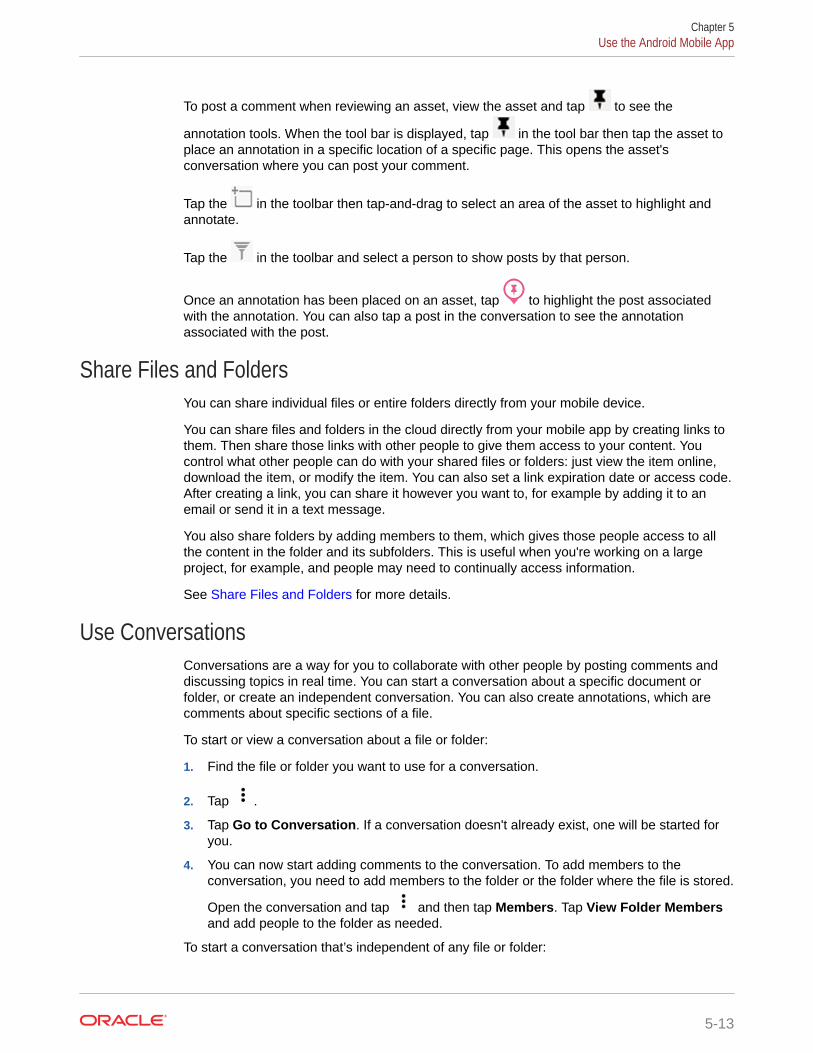
To post a comment when reviewing an asset, view the asset and tap to see the
annotation tools. When the tool bar is displayed, tap in the tool bar then tap the asset toplace an annotation in a specific location of a specific page. This opens the asset'sconversation where you can post your comment.
Tap the in the toolbar then tap-and-drag to select an area of the asset to highlight andannotate.
Tap the in the toolbar and select a person to show posts by that person.
Once an annotation has been placed on an asset, tap to highlight the post associatedwith the annotation. You can also tap a post in the conversation to see the annotationassociated with the post.
Share Files and FoldersYou can share individual files or entire folders directly from your mobile device.
You can share files and folders in the cloud directly from your mobile app by creating links tothem. Then share those links with other people to give them access to your content. Youcontrol what other people can do with your shared files or folders: just view the item online,download the item, or modify the item. You can also set a link expiration date or access code.After creating a link, you can share it however you want to, for example by adding it to anemail or send it in a text message.
You also share folders by adding members to them, which gives those people access to allthe content in the folder and its subfolders. This is useful when you're working on a largeproject, for example, and people may need to continually access information.
See Share Files and Folders for more details.
Use ConversationsConversations are a way for you to collaborate with other people by posting comments anddiscussing topics in real time. You can start a conversation about a specific document orfolder, or create an independent conversation. You can also create annotations, which arecomments about specific sections of a file.
To start or view a conversation about a file or folder:
1. Find the file or folder you want to use for a conversation.
2. Tap .
3. Tap Go to Conversation. If a conversation doesn't already exist, one will be started foryou.
4. You can now start adding comments to the conversation. To add members to theconversation, you need to add members to the folder or the folder where the file is stored.
Open the conversation and tap and then tap Members. Tap View Folder Membersand add people to the folder as needed.
To start a conversation that’s independent of any file or folder:
Chapter 5Use the Android Mobile App
5-13
1. Tap Conversations in the navigation panel.
2. Tap . A new, empty conversation is started for you.
3. Add the conversation name.
4. Tap OK.
5. To add members to the conversation, open the conversation and tap and tap
Members. Tap to select people to add to the conversation.
If the conversation was started about a folder, you’ll need to add people as membersto the folder. You can’t add them through the conversation.
To add content to a conversation, tap to add a post, upload a file from your device,add a photo, or add a file that’s already in Oracle Content.
Use the iPhone/iPad Mobile AppYou can access your cloud files from anywhere while you’re on the go. Just use themobile app on your iPad or iPhone to stay in touch wherever you are.
You can download the iOS mobile app from Apple App Store.
The Basics
• Get to Know the iPhone/iPad Mobile App
• Sign In or Out
• Set a Passcode
• Access Multiple Oracle Cloud Accounts
• Manage Notifications
Manage Content
• Work with Files and Folders
• View Files or File Details
• Edit Files
• Upload Files or Media
• Download Files or Media
• Search Content and Conversations
• Use Assets
Collaborate with Others
• Share Files and Folders
• Use Conversations
Troubleshooting
• Troubleshoot Mobile
Chapter 5Use the iPhone/iPad Mobile App
5-14
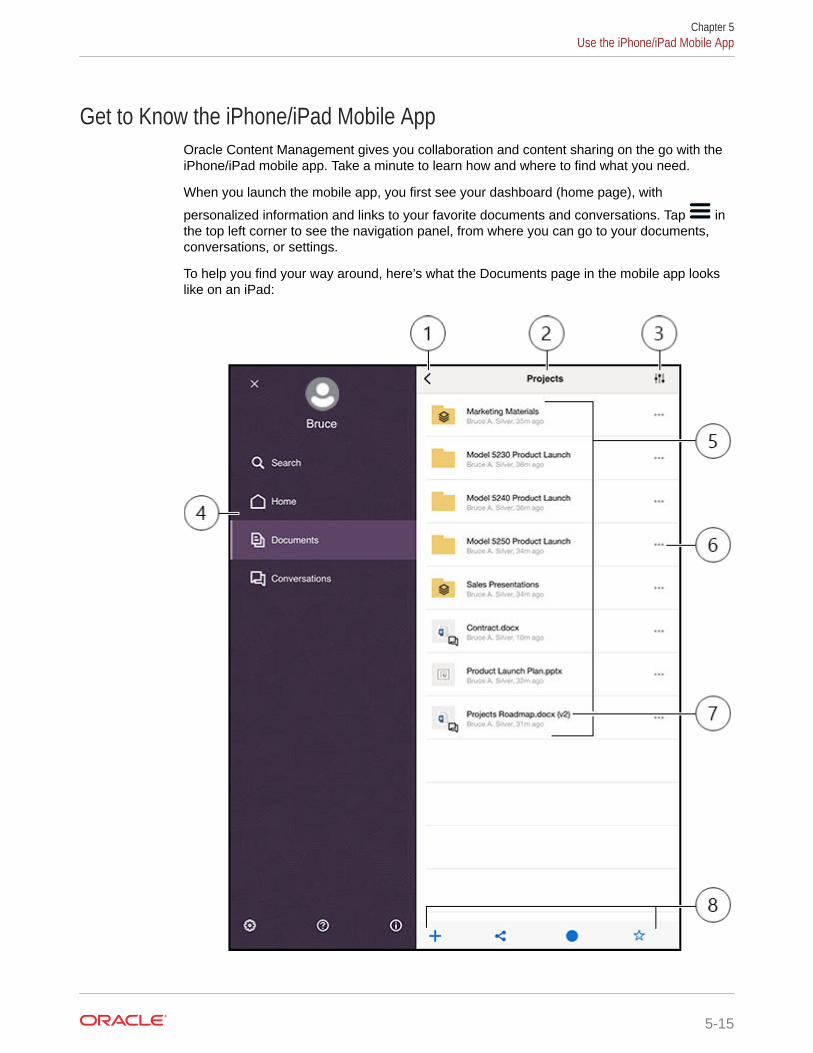
Get to Know the iPhone/iPad Mobile AppOracle Content Management gives you collaboration and content sharing on the go with theiPhone/iPad mobile app. Take a minute to learn how and where to find what you need.
When you launch the mobile app, you first see your dashboard (home page), with
personalized information and links to your favorite documents and conversations. Tap inthe top left corner to see the navigation panel, from where you can go to your documents,conversations, or settings.
To help you find your way around, here’s what the Documents page in the mobile app lookslike on an iPad:
Chapter 5Use the iPhone/iPad Mobile App
5-15
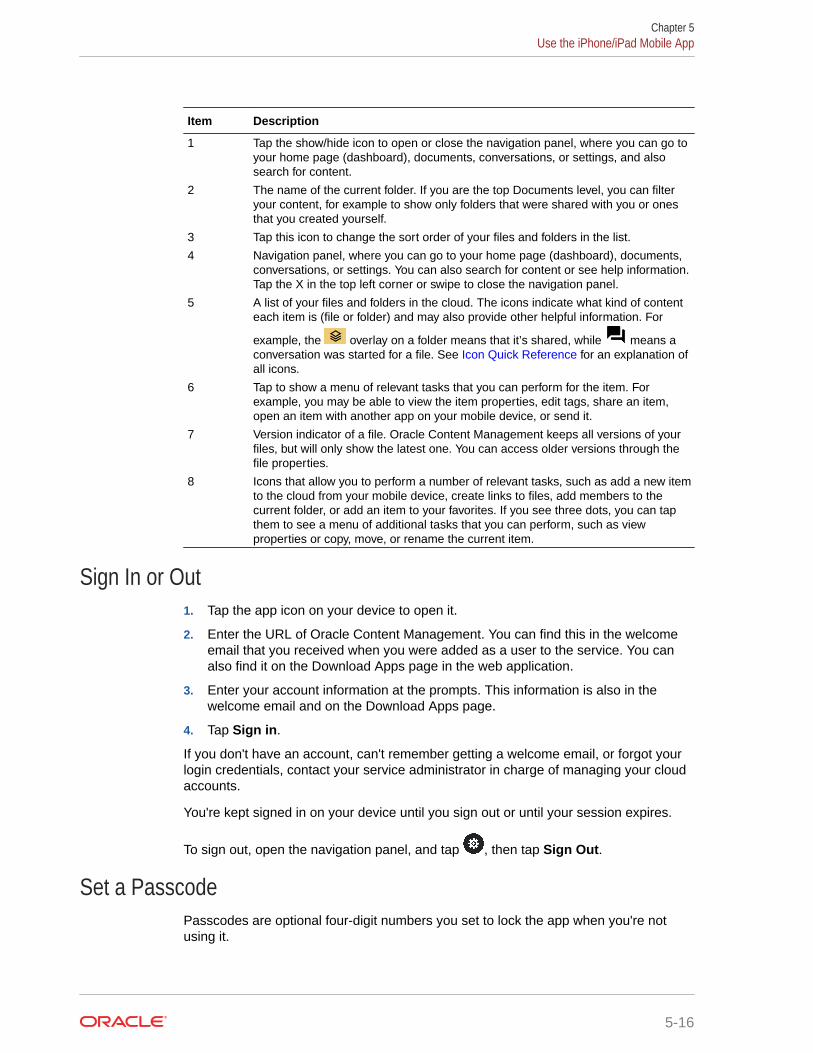
Item Description
1 Tap the show/hide icon to open or close the navigation panel, where you can go toyour home page (dashboard), documents, conversations, or settings, and alsosearch for content.
2 The name of the current folder. If you are the top Documents level, you can filteryour content, for example to show only folders that were shared with you or onesthat you created yourself.
3 Tap this icon to change the sort order of your files and folders in the list.
4 Navigation panel, where you can go to your home page (dashboard), documents,conversations, or settings. You can also search for content or see help information.Tap the X in the top left corner or swipe to close the navigation panel.
5 A list of your files and folders in the cloud. The icons indicate what kind of contenteach item is (file or folder) and may also provide other helpful information. For
example, the overlay on a folder means that it’s shared, while means aconversation was started for a file. See Icon Quick Reference for an explanation ofall icons.
6 Tap to show a menu of relevant tasks that you can perform for the item. Forexample, you may be able to view the item properties, edit tags, share an item,open an item with another app on your mobile device, or send it.
7 Version indicator of a file. Oracle Content Management keeps all versions of yourfiles, but will only show the latest one. You can access older versions through thefile properties.
8 Icons that allow you to perform a number of relevant tasks, such as add a new itemto the cloud from your mobile device, create links to files, add members to thecurrent folder, or add an item to your favorites. If you see three dots, you can tapthem to see a menu of additional tasks that you can perform, such as viewproperties or copy, move, or rename the current item.
Sign In or Out1. Tap the app icon on your device to open it.
2. Enter the URL of Oracle Content Management. You can find this in the welcomeemail that you received when you were added as a user to the service. You canalso find it on the Download Apps page in the web application.
3. Enter your account information at the prompts. This information is also in thewelcome email and on the Download Apps page.
4. Tap Sign in.
If you don't have an account, can't remember getting a welcome email, or forgot yourlogin credentials, contact your service administrator in charge of managing your cloudaccounts.
You're kept signed in on your device until you sign out or until your session expires.
To sign out, open the navigation panel, and tap , then tap Sign Out.
Set a PasscodePasscodes are optional four-digit numbers you set to lock the app when you're notusing it.
Chapter 5Use the iPhone/iPad Mobile App
5-16
If you leave your device unattended and don't return within a specified time, you must enterthe passcode. Setting a passcode is optional, but helps to prevent access to the app if yourdevice is left active where others could use it.
1. Open the navigation panel, and then tap to access your settings.
2. In the Security section, tap Passcode Lock and then Turn Passcode On.
3. Enter the four digits to use as a passcode, then re-enter the digits to confirm.
4. Tap Require Passcode and choose the amount of time that has to pass before you needto enter the passcode.For example, if you choose After 1 minute, then you leave the app and return aftermore than one minute, you have to enter the passcode to use the app again.
If you have Touch ID or Face ID enabled on your device, you can use it to unlock access tothe app. Enable the appropriate options in the Passcode Lock screen after setting thepasscode.
To disable the passcode, follow the same steps but tap Turn Passcode Off to switch thepasscode off.
To change a passcode, follow the same steps, but choose Change Passcode.
Access Multiple Oracle Cloud AccountsYou can use files from multiple Oracle Content accounts and you can easily switch betweenaccounts while using your app. To add an account:
1. Open the navigation panel, and then tap to access your settings.
2. Tap Add New Account.
3. Enter a name for the account. Tap Next.
4. Enter your user name and password, and then tap Next.
5. Tap Connect. You’re now connected to the new account.
You can add a maximum of five accounts. To switch between accounts, tap the accountnames at the bottom of the navigation panel. Tap on an account name from the ones that areshown to switch accounts.
Manage NotificationsYou can customize what kinds of notifications you’ll receive when using the app on yourdevice.
1. Open the navigation panel, and then tap to access your settings.
2. Tap the account name that you want to customize.
3. Tap Push Notifications. You can elect to turn off all notification or choose specific onesyou’d like to receive. For example, you may want to only be notified when someoneassigns a Please Reply flag to you or when someone adds you to a conversation.
You can customize how your notifications appear on your device by going to the settings foryour device and selecting Content from the list of apps. Then you can choose notificationtypes for the app such as showing messages on the lock screen, in the notification area, andso on.
Chapter 5Use the iPhone/iPad Mobile App
5-17
Work with Files and FoldersYou work with files and folders in the Documents area. To view the Documents area,open the navigation panel, and then tap Documents.
You can also see your files in the Files app, in the Oracle Content location, but you canperform only those actions supported by the Files app. For example, you won't be ableto upload a file while viewing the Oracle Content location in the Files app.
To create a folder, go to the location in the Documents area where you want the folder,
tap , and then tap Create Folder. Enter a folder name and optional description.You can't use symbols such as / \ ? or * in the name. Tap OK when done.
To upload a file, go to the location in the Documents area where you want add the file,
tap , and then tap Upload Media or Files. Click one of the icons to select the typeof file or media you want to upload, select your file, then tap Done.
When looking at your file and folder listing, you can perform the following actions by
tapping , and then tapping the action:
Go to Conversation Start or view a conversation about a file orfolder.
View Properties Open the folder or file property page. Thisis also where you can access the versionhistory and review or create links to theitem.
Share Link Create a link to the file or folder.
Members Add members to the folder.
Open In... (files only) Open a file using an app on your device orsave the file to your device.
Send (files only) Send a copy of a file using an app on yourdevice.
Edit Tags Add a keyword or tag for an item, makingit easy to find when you search.
When looking at file or folder properties, you can perform the following actions:
(files only) Download a file for use offline.
Open the file in another app (files only),send the file (files only), or share a link tothe file or folder.
View or edit the members and assignedroles for the file or folder.
Mark or remove an item as a favorite. Tosee a list of your favorites, tap the drop-
Chapter 5Use the iPhone/iPad Mobile App
5-18
down menu next to the header on theDocuments page and select Favorites.
Shows additional options:
• Delete: lets you delete a file or folder.
• Go to Conversation: used to start aconversation about a file or folder.
• Lock/Unlock Files: used to managefile access.
• Copy: used to copy a file or folder to anew location.
• Move: used to move a file or folder toa new location.
• Rename: used to rename a file orfolder.
You can perform additional actions and manage multiple files or folders by long-tapping a fileor folder and then selecting the files you want to manage. Use the options at the bottom ofthe screen:
Mark or remove an item as a favorite. To seea list of your favorites, tap the drop-downmenu next to the header on the Documentspage and select Favorites.
Copy files or folders.
Move files or folders.
Delete files or folders.
(files only)Lock or unlock a file.
Tips
Deleting items
• If you want to delete a shared folder or a file in a shared folder, you may not be able to doit if your role doesn't allow it. For example, if you have a Downloader role in a folder, youcan't delete files.
• Deleted items are moved to the Trash folder. You can permanently delete or restore theitem from there. Items stay in the Trash until one of these events happen:
– You permanently delete them.
– Your Trash quota is reached.
– The Trash is automatically cleared out, according to the interval set by your serviceadministrator, who is the person in charge of managing the service for yourorganization.
– You restore the item from the Trash.
Chapter 5Use the iPhone/iPad Mobile App
5-19
Copying items
• If you copy a file to the original location, it's saved with a number after the filename indicating it's a copy. For example, if you already had a file named StatusReport.docx, a new copy of it is named Status Report(2).docx.
Locking files
• To lock a file, long press on the file name then select the file. Tap the lock icon atthe bottom of the screen.
• Other people can unlock the file if they need to use it. If they do, you get an emailtelling you who unlocked it and when.
• If someone tries to upload a new version of a file you locked, they can unlock itand upload the new version. You'll be notified by email if that happens.
View Files or File DetailsTap a file or photo name to view the item. To view a video or listen to audio, tap theitem name then use the controls to start, stop, or skip through the video. You can viewvideo formats such as mp4, .m4v, .mov. The .mp3, .aac, .wav (for iPhone voicememos), and .mov audio formats are supported. Some .mov formats may not beviewable.
When viewing a multi-page file, thumbnails of the pages in the file are shown at thebottom of the screen. The current page number and the total number of pages isdisplayed (for example, 1 of 33). Tap that designation to jump to a specific page.
View details
You may need to find out when a file was created or who created it. Or maybe youwant to see when a folder was last updated and who updated it.
1. Find the file or folder.
2. Tap , then View Properties.
Tap the dropdown menu next to the Properties header to see the revision history for afile and the links created for the file. When viewing folder properties, tap the dropdownmenu to access the Members screen and the Links screen.
When viewing an item’s properties, you can perform many common tasks, such asdownloading a file, sending or sharing the item, viewing members who share the item.
Tap at the bottom of the Properties page to see the additional actions you canperform such as copying or renaming the item.
Edit FilesIf you have an app on your device that can edit a particular file type, you can open thefile from Oracle Content in that other app to edit it.
To edit a file from Oracle Content:
1. Open the file you want to edit.
2. It's a good idea to lock the file before you edit it. That way other people know the
file is in use. In the toolbar at the bottom, tap , and then tap Lock.
Chapter 5Use the iPhone/iPad Mobile App
5-20
3. Tap , tap Open In..., and select the app on your device that you'll use to edit the file.The apps that are shown are those that can be used to edit a file of that type.
4. Edit the file as needed.
5. Depending on the app you chose for editing the file, you may need to use a menu choicein the app such as Open In..., Send a Copy, or another file sharing option such as aFiles Location to send the file to Oracle Content. If you're offline, you can use one ofthose options after you're reconnected.
6. Navigate to the folder where you want to store the file. You can save it in its old location(and create a new version) or you can save it as a new file in a different location.
7. Tap Upload to copy the file to Oracle Content.
If you know you'll be offline soon (for example, if you're boarding a plane and using AirplaneMode), download the file to edit. Then you can work with it even if you're not connected to theInternet.
1. View the file you want to edit.
2. In the toolbar at the bottom, tap , tap Save for Offline.
If you have the Microsoft Word app installed and you have a Microsoft Office 365subscription, you can open a Oracle Content document and edit that document directly fromthe Word app.
You must enable Oracle Content as a valid location in the iOS Files app before editing a file.
1. In Word, tap Open and then tap More.
2. Tap Browse.
3. In the Locations dialog, turn on Oracle Content.
To edit a file using Microsoft Word:
1. In Word, tap Open.
2. Tap More, then Locations.
3. Choose the Oracle Content account you want to use from the list.
4. Find the file you want to edit.
5. After editing the file, tap Save to save it back to its original location or Save As to chooseanother location in Oracle Content.
Upload Files or MediaYou can upload files or media to Oracle Content in several ways.
• Upload Files in the Content App
• Upload Files from Your Phone or Other Apps
• Upload Files from One Oracle Content Account to Another
Chapter 5Use the iPhone/iPad Mobile App
5-21
Note:
If you're a member of a shared folder, you may not be able to add files to theshared folder. It depends on the role you were assigned when you wereadded to the folder. If you can't perform an action, the action isn't available.
Upload Files in the Content App
1. Go to the location, either a folder or a conversation, where you want the file orphoto.
2. Tap .
3. Tap Upload Media or Files.
4. Choose what you want to upload:
• Tap to upload a photo or take a new photo and upload it.
• Tap to record a voice message and upload it.
• Tap to select a file from another location, such as Google Drive or fromanother Oracle Content account.
5. Select the item you want to upload. You can upload a maximum of 25 items at onetime.
6. Edit the name of the item if needed, and enter an optional description.
7. Enter optional tags for the item. A tag is like a keyword, which helps youcategorize files. If you upload multiple items, the same tags will be applied to allthe files.
8. Tap Add or Post when done.
Upload Files from Your Phone or Other Apps
You can add photos from your photo gallery, files from the File app, or files from otherapps to Oracle Content. Open your gallery and select the photos you want to add. Tap
and choose Oracle Content as your location. Find the account and folder you wantto use and tap Select and then tap Upload. You can also add tags to the items if youplan to use it as a digital asset.
Upload Files from One Oracle Content Account to Another
You can upload files from one Oracle Content account to another. Say, you have twoaccounts: Corporate and SalesDept. You could sign in to your Corporate account, andselect the option to upload a file. Then you could select Oracle Content as the locationyou want to choose from, select your SalesDept account, find the file you want toupload, and select a location in your Corporate account to store it.
Download Files or MediaWhen you download a file, you'll be able to use it even if you're not connected to thecloud. If you're traveling, for example, and have to set your device to Airplane Mode,
Chapter 5Use the iPhone/iPad Mobile App
5-22
you can still view or edit a file that's stored for offline use in the Content app or saved to yourdevice.
There are two ways to download a file:
• Save a File for Offline Use in the Content App
• Save the File to Locally Your Device
Save a File for Offline Use in the Content App
1. Find the file and open it to view it.
2. Tap . Choose Save for Offline.
3. When prompted, choose to download the file.
Downloaded files are encrypted and stored in the Offline area of the app. To see a list ofdownloaded files, open the drop-down menu in the header on the Documents page, and tapOffline.
To remove a downloaded file, long-tap the file, select it, and then tap .
Save the File to Locally Your Device
1. Locate the file, tap , then tap Open In....
You can also save the file while viewing it by tapping , tapping Open In....
2. Tap Save to Files.
3. Select the location where you want to save the file, and then tap Save. If you want to beable to use the file when you're offline, make sure to save it locally to your device. Whenyou save a file locally to your device, you can see it in the Files app.
Search Content and ConversationsYou can search through your conversations and files by tapping Search in the navigationpanel. You can search for a word in a file or folder name or a word included in a file orconversation. You can also search for any hashtags used in conversations, or forconversation names or tags used in digital assets. Type your search terms, and then tapEnter.
For example, if you search for the word "report", you'll find Status Report 2019.xls and ReportLogo.jpg, as well as Writing Instructions.doc if the word report is in that document orconversation. You can filter your results by type (for example, by conversations or by files).
After your search results are listed, you can use the results like you would normally. You canpreview files, add files to folders, add posts to conversations, upload files, or share files orfolders with others.
Search tips
• A search looks through the titles, the content (such as words in a document), fileextensions, the name of the person who last modified the file, and the information aboutan item (like a folder's description). It also checks any metadata associated with the item,tags for digital assets, conversation messages, hashtags used in conversations, andpeople in the conversation.
Chapter 5Use the iPhone/iPad Mobile App
5-23
• If you search for an item that has special characters in the name, the item isn’treturned in the suggested search results for documents or folders.
• You can search for multiple terms by separating the terms with a comma or aspace.
• To search for a phrase, use double quotes around the phrase. For example,"United States" returns files with the exact phrase United States in the file.
• You can filter your search results by clicking or tapping the Results menu. Forexample, you can view only conversations that match the search criteria, or onlythe people who match it.
• There may be a slight time delay to show the newest search results. For example,if you search for the term Report and then add another document with the termReport in it, that newest document will be not be returned in search results for afew seconds.
• Searching is case-insensitive. This means that report will find the same results asReport.
• You can use the following search operators. The operators are case-insensitive, soNOT is the same as not:
– not or the dash (-). For example, Report2018,Report2019 -sales returnsReport2018 or Report2019, but not items with the keyword sales in them.
– or or a comma. For example, Report2018 or Report2019 returns the sameresults as Report2018,Report2019.
– and or a space. For example, Report2018 and Report2019 returns the sameresults as Report2018 Report2019.
The not operator has higher precedence than the others, with and having lowestprecedence. For example, a search of Report2018 and Report2019 notReport2019 returns nothing because not is evaluated first.
• Use parentheses to group complex queries. For example, you can search forStates and (not "United States").
• If you have more than 100 shared folders (either shared by you or with you), aglobal search may not return the expected results. The search is done on Favoriteshared folders first and then other shared folders, up to 100. You may want todesignate some folders as Favorites before searching, to ensure better searchresults.
• If a file is larger than 10MB in size, it won't be included in full-text search (a searchthrough the content of a file, not just the metadata about a file). You can find theitem by searching for the entire name.
Use AssetsAssets are those items you want to group together for use on a website or for otherprojects.
The following is a brief overview of how you can use assets on your mobile device.
Work with Assets
You can review an asset to either approve, reject, or comment on it using your mobiledevice. Asset approval might just change status, or, if your service and content
Chapter 5Use the iPhone/iPad Mobile App
5-24
administrators have configured Oracle Content Management to use additional workflowoptions, approval might be part of a workflow that changes status automatically.
Approve and Reject Assets
In the Home view, you see items that require simple asset approval in the Approvals tile, andyou see items that require workflow approval in the Workflow Tasks tile. Tap the tile to viewthe items.
Approvals
In the list of assets waiting approval, tap an asset to review if needed. If the asset hasmultiple pages, tap the page number to open a strip of thumbnail images to navigate and
view multiple pages. To see a list of asset properties, tap .
When you're ready, tap to approve the asset. Tap to reject the asset.
You can also quickly approve or reject an asset directly from the approvals list by swiping alist item right to approve, or left to reject.
Workflow Tasks
In the list of assets waiting approval, you see the due date (if there is one), a preview of theasset, details about the asset, and your workflow task.
To act on the workflow task, tap the workflow task name or . Select an action, optionallyadd a comment, and then tap Submit.
You can also take action on an item while viewing it by tapping at the bottom of thescreen.
To learn more about workflow, see Use Workflows in Managing Assets with Oracle ContentManagement.
Comment on Assets in Review
To post a comment when reviewing an asset, view the asset and tap to see the
annotation tools. When the tool bar is displayed, tap in the tool bar then tap the asset toplace an annotation in a specific location of a specific page. This opens the asset'sconversation where you can post your comment.
Tap the in the toolbar then tap-and-drag to select an area of the asset to highlight andannotate.
Tap the in the toolbar and select a person to show posts by that person.
Once an annotation has been placed on an asset, tap to highlight the post associatedwith the annotation. You can also tap a post in the conversation to see the annotationassociated with the post.
Share Files and FoldersYou can share individual files or entire folders directly from your mobile device.
Chapter 5Use the iPhone/iPad Mobile App
5-25
You can share files and folders in the cloud directly from your mobile app by creatinglinks to them. Then share those links with other people to give them access to yourcontent. You control what other people can do with your shared files or folders: justview the item online, download the item, or modify the item. You can also set a linkexpiration date or access code. After creating a link, you can share it however youwant to, for example by adding it to an email or send it in a text message.
You also share folders by adding members to them, which gives those people accessto all the content in the folder and its subfolders. This is useful when you're working ona large project, for example, and people may need to continually access information.
See Share Files and Folders for more details.
Use ConversationsConversations are a way for you to collaborate with other people by posting commentsand discussing topics in real time. You can start a conversation about a specificdocument or folder, or create an independent conversation. You can also createannotations, which are comments about specific sections of a file.
To create or view a conversation about a specific file or folder:
1. Find the file or folder you want to use for a conversation.
2. Tap .
3. Tap Go to Conversation. If a conversation doesn't already exist, one will bestarted for you.
To create a conversation that’s independent of a file or folder:
1. Open the navigation panel, and then tap Conversations.
2. Tap . A new, empty conversation is started for you.
3. Add the conversation name.
4. Tap Create.
To add members to conversations:
1. Open the conversation, and, then in the members bar, tap .
2. Tap .
3. Start typing the name of the person to add. A list of names matching the lettersyou entered is shown. Select the people from the list, then tap Add.
If the conversation was started about a folder, you’ll need to add people as membersto the folder. You can’t add them through the conversation.
To add a post to the conversation, open the conversation, type your message in themessage field, and then tap Post.
Chapter 5Use the iPhone/iPad Mobile App
5-26
6Share Files and Folders
You can easily share your files and folders with others, and control who has access and whatthey can do with the content.
• Take a quick tour of sharing (English only)
• Sharing Overview
• Share Files
• Share Folders
• Stop Sharing
• Check File Access History
• Recover a Deleted File in a Shared Folder
• Sharing Tips
• Troubleshoot Sharing
Video
Sharing OverviewYou may need to collaborate with other people and share information, but you want to makesure only the right people have access to that information. The type of sharing you usedepends on what you need to share:
• Files: You can create a link and email the link to someone or use it in an instant messageor a document or another app. Sending a link is useful if you need to give access topeople on an as-needed basis to specific files. The only way the recipient can access thefile is by using the link. There are public links and members links, described below.
• Folders: you can send a link to a folder or you can add people or groups as members tothe folder. When you add members to a folder, those people and groups can access allthe content in the folder. This is useful when you're working on a large project, forexample, and people may need to continually access information.
If you share folders with other people and give them permission to add content to the folder,that content counts against your storage quota. For example, if your folder contains 500 MBof files and after sharing it, other users add another 300 MB of files, then the combined 800MB counts towards your quota.
If you have access to more than 100 folders (either owned by you or shared with you), yoursearch results will be incomplete, as searches are limited to 100 folders.
Your service administrator is in charge of managing Oracle Content Management for yourorganization. That person sets the amount of storage you can use. If you need more storagespace than you currently have, contact your service administrator.
You decide what people can do with your shared content by assigning them roles. Whenadding members to folders, you determine their role in that folder. You may allow documents
6-1
to only be viewed or you may decide people should be able to edit them and uploadnew versions. The following roles can be used:
• Viewer: Viewers can look at files and folders, but can't change things.
• Downloader: Downloaders can also download files and save them to their owncomputer.
• Contributor: Contributors can also modify files, update files, upload new files, anddelete files.
• Manager: Managers have all the privileges of the other roles and can add orremove other people as members.
Note:
If your system administrator has enabled Microsoft Office Online integration,viewers can only see the preview of the file in the web client, downloaderscan also view the file in Microsoft Office Online, and contributors andmanagers can also edit the file in Microsoft Office Online.
There's also an Owner role with all the permissions to manage a folder, includingdeleting the folder.
Contributors and Managers can delete content and delete subfolders. If a shared itemis deleted, it appears in the Trash folder of the person who owns the item and theperson who deleted it.
When collaborating with partners and outside vendors, you can provide secure publiclinks to files so everyone has the right level of access. You can also set access codesand expiration dates on links to add more security. You can also maintain oversight bymonitoring who accessed which shared files and when.
Take a quick tour of sharing (English only).
Public Links
A public link provides access to that specific file or folder, no others.
Your service administrator can disable the use of public links and can set who canaccess those links (anyone or only registered users).
When you create a public link, you add a name to the link so you can track if it wasused. You can also add a message with the link and choose permissions for the link.This determines what the recipient can do with the link. You can adjust the maximumrole used for public links in your preferences, accessed through your web browser.Your service administrator may also limit the roles allowed for public links. Roles arethe same as those used when adding members to folders (Viewer, Downloader, orContributor).
When creating a public link, if your administrator has allowed it, you can choose tosend the link to Anyone, which means you can send it to people who don’t have anOracle Content Management account, or you can limit the recipients to All RegisteredUsers, those people who have an account.
You also can set an optional expiration date when the public link will stop working andan access code. Access codes are like passwords for a public link. You can set anaccess code and the person who gets the link will need to enter the code before the
Chapter 6Sharing Overview
6-2
link can be used. This helps you add an additional measure of security on any public link yousend. You'll need to send the access code to the person receiving the link so they can usethe link. Otherwise, they will be unable to access the content associated with the link.
Member Links
This kind of link requires a person to be a member of the folder and requires the person tosign in to an Oracle Content Management account in order to use the link. When you use amember link, you can choose Online Access, which lets the recipient view the file or folder.You can also use a Direct Download link when sharing a file. This lets the recipientdownload a file without viewing it.
Share FilesYou can share a link to a file, which lets people access only that file and not other files in afolder. And depending on the app you use, you may be able to send a file directly to someoneelse. For example, when using a mobile device, there’s an option to send a file to someone.
Create Links
• Browser:
1. Select the file and choose Share Link in the right-click menu or click in theactions bar.
2. Choose the type of link (member or public). You can't create member links for files inthe root folder.Note: If you create a member link, access to the file is based on the user's role onthe folder. If you create a public link, access to the file is based on the role set as thesystem-wide default set by your administrator or by the setting on the parent folder.The role is shown at the bottom of the dialog. To change the role, click Edit LinkOptions, and select a new role.
3. If you want to email the link to people, enter the users' names or email addresses.
4. Link options, such as the type of access to this folder, and, for public links, expiration,are shown at the bottom of the dialog. To can change these options, click Edit LinkOptions.
– For member links, you can select whether the file opens online or downloads tothe user's computer. If you select open online, the user's access is based on theirrole on the parent folder.
– For public links, you can select a previously created public link, change thepermission, select whether anyone can access the file or only registered users,set an expiration date, and set an access code to limit access to the link.
You can copy the link and use it elsewhere or enter an email address to send the linkdirectly to someone with an optional note about the link.
• Desktop app: select the file in your Oracle Content folder and right-click. You can use theCopy Link option in the Oracle Content context section to quickly create a default publiclink and have it copied to your clipboard for use where you need it. Or you can chooseShare Link . A dialog opens where you can elect to create a Member link or a Public linkor open your email program to send the link in an email message. When creating a publiclink, you can use the defaults or click Edit Link Options to set an access code,expiration date, and so on. You can also copy the link you create and use it elsewhere.
Chapter 6Share Files
6-3
• Mobile device: Tap (Android) or (iOS). Tap Share Link. Tap PickExisting Link to see available links and Member links. When using a member link,you can choose an app to use to download the file or copy the link for use inanother app. To create a new public link, enter the necessary details. When done,click Create and select the app to use to share the link.
See Sharing Overview for details about Member and Public links.
Configure Access to Links
To configure access to folder links, access the Properties for the folder in either thedesktop app or your browser. Then click Sharing and adjust the values as needed:
• To prohibit public links for an individual folder and its items, disable the public linksoption.
• To change the role that’s automatically assigned to people when public links arecreated, select a new role from the drop-down list. For example, maybe you chosethe default role of Viewer for most of your folders, but for one folder, you'd like adefault role of Downloader. This helps you customize link behavior for specificfolders.
Share FoldersYou can share a folder by sending a link to the folder or by adding members to thefolder. Links work the same way for folders as they do for files. When you add a groupor a person as a member, they have access to all the content in a folder.
Your administrator can configure public link settings, determining if you're allowed tocreate public links, the default and maximum permissions for links, and whether linksneed to expire. If you don't see some of the options described below, contact youradministrator.
Create Folder Links
You can only share folder links with individuals, not groups.
• Browser:
1. Select the folder and click or Share Link in the right-click menu or in theactions bar.
2. Choose the type of link (member or public).Note: If you create a member link, access to the folder and its items is basedon the user's role on the folder. If you create a public link, access to the folderand its items is based on the role set as the system-wide default set by youradministrator or by the setting on the parent folder. The role is shown at thebottom of the dialog. To change the role, click Edit Link Options, and select anew role.
3. If you want to email the link to people, enter the users' names or emailaddresses.
4. Link options, such as the type of access to this folder, and, for public links,expiration, are shown at the bottom of the dialog. If you're creating a publiclink, you can change these options by clicking Edit Link Options. You canselect a previously created public link, change the permission, set anexpiration date, and set an access code to limit access to the link.
Chapter 6Share Folders
6-4
If you're creating a member link, you change the type of access a user has bychanging member roles on the folder.
• Desktop app: select the folder in your Oracle Content folder and right-click. You can usethe Copy Link option from the Oracle Content context section to quickly create a defaultpublic link and have it copied to your clipboard for use where you need it. Or you canchoose Share Link. A dialog opens where you can elect to create a Member link or aPublic link or open your email program to send the link in an email message. Whencreating a public link, you can use the defaults or click Edit Link Options to set anaccess code, expiration date, and so on. You can also copy any link you create and use itelsewhere.
• Mobile device: Tap (Android) or (iOS). Tap Share Link. Tap Pick Existing Linkto see available links and Member links. To create a new link, enter the necessary details.When done, click Create and select the app to use to share the link.
Choose the kind of link you want to use.
Configure Access to Links
To configure access to links for the folder and its contents, access the Properties for thefolder in either the desktop app or your browser. Then click Sharing and adjust the values asneeded:
• To prohibit public links for this folder and its items, disable the public links option.
• To change the role that’s automatically assigned to people when public links are created,select a new role from the drop-down list. For example, maybe you chose the default roleof Viewer for most of your folders, but for one folder, you'd like a default role ofDownloader. This helps you customize link behavior for specific folders.
Add Folder Members
• Browser: select the folder and choose Sidebar in the actions bar and select Members.Click Add Members.
• Desktop app: select the folder in your Oracle Content folder, right-click, and chooseMembers from the Oracle Content context section.
• Mobile device: tap (Android) or (iOS). Tap Members or .
Enter the people or groups you want to add and an optional message, then select the role themembers will have in the folder. If you add a group, all group members will have the samerole,.
You can even add external users who may not be a part of your organization to a folder,provided your service administrator allows it and their email address is registered with yourservice. External users can collaborate on objects to which they're given access, but theycannot be assigned the manager role. If they are a member of a group that is assigned amanager role, they will have only contributor rights. This safely limits their ability to create andremove content.
Stop SharingTo remove yourself or one person from a folder, go to the Members menu for the folder.
• In your browser choose Members in the right-click menu or select Sidebar in the actionsbar and choose Members.
Chapter 6Stop Sharing
6-5
• When using the desktop app, go to your Oracle Content folder. Right click on thefolder you want to use and choose Members .
• On your iPad or iPhone, tap . Tap Members.
• On your Android device, tap . Tap Members
Select a name and select Remove from the list next to your name or the person'sname. If you remove yourself and want to access the folder again, you’ll need to askthe folder owner to add you to the folder again.
To stop sharing an entire folder:
• Remove all individuals from the folder or
• Move the contents of the folder to a new folder. If you move the folder to a newlocation, the membership information is moved with the folder.
Check File Access HistoryTo check the access history of a file choose Properties from the right-click menu orselect Sidebar on the actions bar and choose Properties. When viewing a file, click
and then click Properties. Click the Access History tab to see all activity for thatfile.
The list there shows you when the file was accessed, how the file was accessed (forexample, by using a link) and by whom, and what was done, such as download orview. If a public link was used by someone who’s not a member of the folder, the linkname is shown.
Recover a Deleted File in a Shared FolderPeople with the Manager or Contributor role in a folder you shared can delete filesfrom your folder. If someone deletes a file, you'll find it in your Trash folder. You canselect the file in the Trash and then click Restore.
Your service administrator (the person in charge of managing Oracle ContentManagement for your organization) can set how long items are retained in Trash. Yourfile may be permanently deleted if the Trash is automatically emptied.
Sharing Tips• If you share a folder, the sharing role applies to subfolders, too, unless you change
those rights specifically.
• Your service administrator can allow or prevent the use of public links for yourservice and set who can receive those links (anyone or only registered users).
• When someone shares a folder with you, you're assigned a role. You may not beable to do some things, like uploading or deleting, because your role may not allowit. If you can't do something, then that menu option isn't available. For example, ifyou have a Viewer role in a folder, the Download option isn't available when usinga web browser and the folder isn’t available for syncing when using the sync client.To check your role, view the list of members in a folder. Your role is listed next toyour name.
Chapter 6Check File Access History
6-6
• You don't have to share a parent folder to share subfolders. For example, you can have aparent folder called Current Projects, and in that folder you can have subfolders calledDiscount Program, Monthly Newsletter, and so on. You can share Discount Program orMonthly Newsletter with people without sharing the Current Projects folder.
• The same person can have a different role for each subfolder in an unshared parentfolder. For example, you can share Discount Program with Leo and assign him theContributor role for that folder. You can share Monthly Newsletter with Leo and assignhim the Viewer role for the files in that folder.
• If you share a parent folder that you own, then you can increase rights for the subfolders,but you can't decrease the rights. This means:
– if the role assigned at the parent folder level is higher than the role assigned at thesubfolder level, then the highest role is used for all subfolders.
– if the role assigned at the parent level is lower than the one assigned at thesubfolder, then the subfolder role doesn't change.
• If you have access to more than 100 folders (either owned by you or shared with you),your search results will be incomplete, as searches are limited to 100 folders.
Chapter 6Sharing Tips
6-7
7Use Conversations
You can create conversations to discuss folders and individual files, letting you quicklycollaborate with others.
• Take a quick tour of conversations (English only)
• Conversations Overview
• Get to Know the Conversations Page
• Filter or Sort Conversations
• Start a Conversation
• Add or Remove People in a Conversation
• Add or Remove Files in a Conversation
• Manage Your Conversations
• Add Annotations
• Add Links to Another Conversation
• Use Flags
Video
Conversations OverviewConversations are a way for you to collaborate with other people by posting comments anddiscussing topics in real time.
You can create a conversation to discuss a specific document, folder, asset, collection, orsite; or you can create a stand-alone conversation to discuss any topic you want.Conversation members can add, reply to, and like comments; add attachments; makeannotations on associated documents and sites; and add flags to bring people's attention toan item or comment.
You can also use hashtags (#) to add keywords to your conversations. A hashtag in amessage designates a meaningful term or topic so it’s easy to group all content associatedwith that term or topic.
You can see all conversations to which you have access on the Conversations page. Fromhere you can quickly create a new stand-alone conversation, view an existing conversation,see how many unread messages are in the conversation, or reply to or like the most recentmessage in a conversation.
7-1
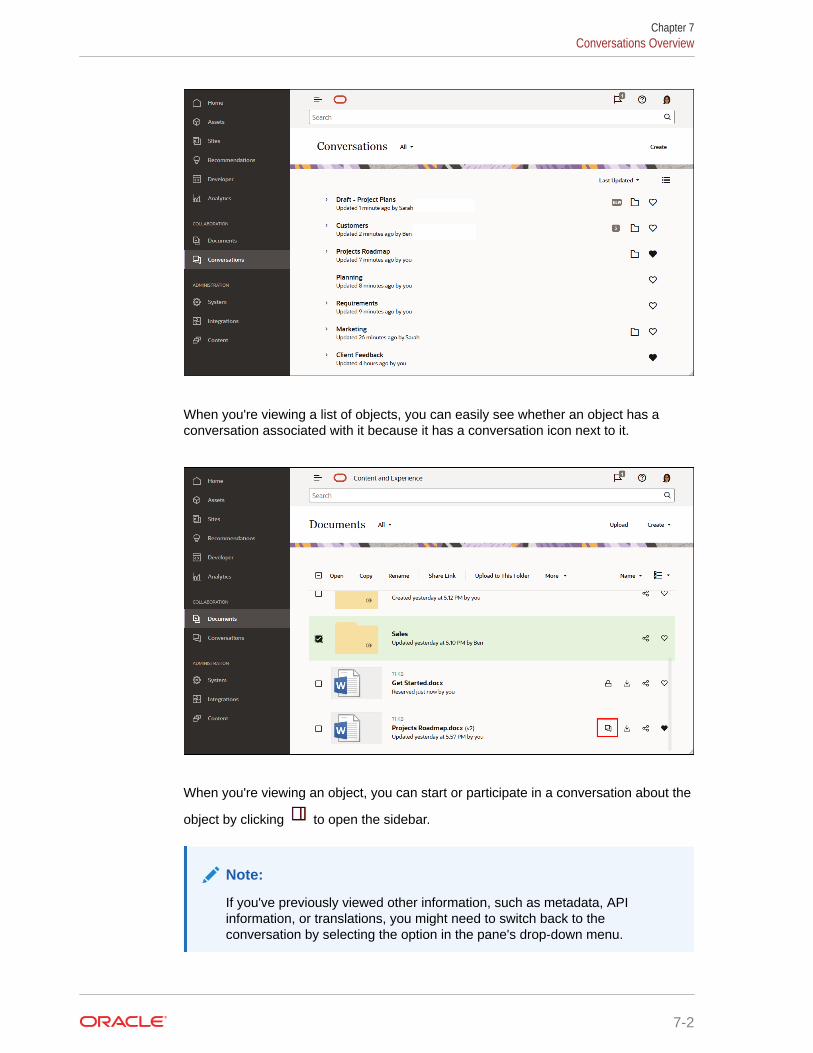
When you're viewing a list of objects, you can easily see whether an object has aconversation associated with it because it has a conversation icon next to it.
When you're viewing an object, you can start or participate in a conversation about the
object by clicking to open the sidebar.
Note:
If you've previously viewed other information, such as metadata, APIinformation, or translations, you might need to switch back to theconversation by selecting the option in the pane's drop-down menu.
Chapter 7Conversations Overview
7-2
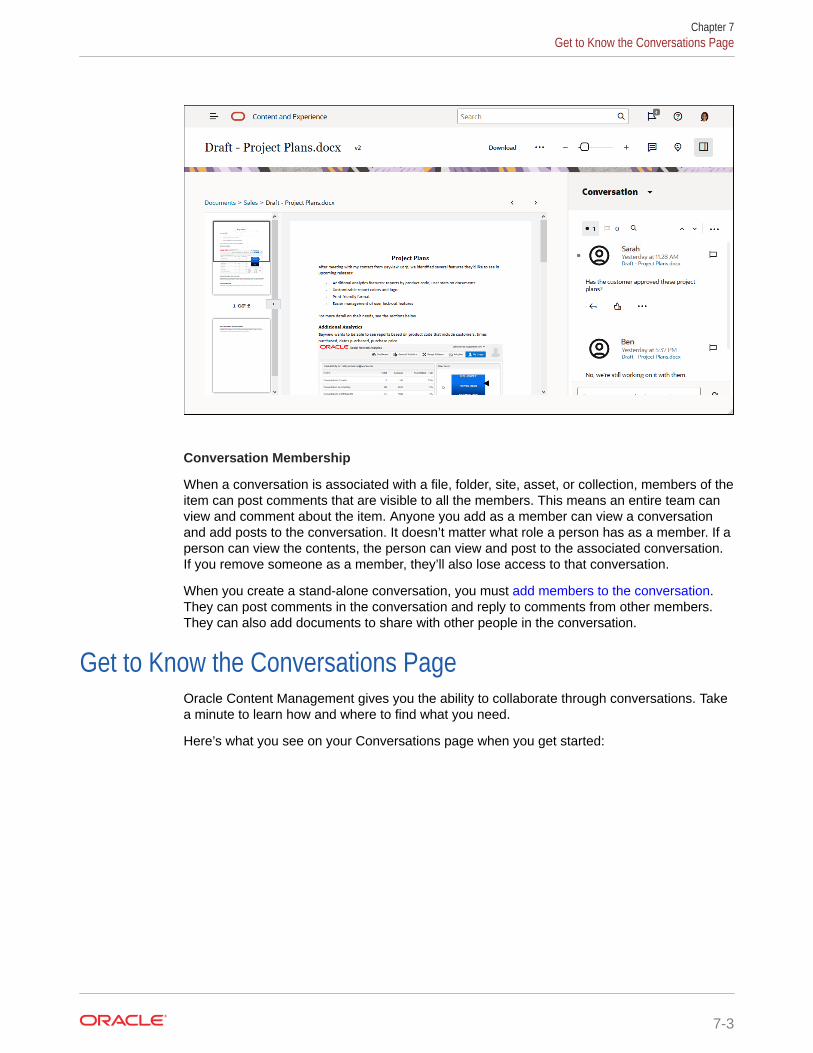
Conversation Membership
When a conversation is associated with a file, folder, site, asset, or collection, members of theitem can post comments that are visible to all the members. This means an entire team canview and comment about the item. Anyone you add as a member can view a conversationand add posts to the conversation. It doesn’t matter what role a person has as a member. If aperson can view the contents, the person can view and post to the associated conversation.If you remove someone as a member, they’ll also lose access to that conversation.
When you create a stand-alone conversation, you must add members to the conversation.They can post comments in the conversation and reply to comments from other members.They can also add documents to share with other people in the conversation.
Get to Know the Conversations PageOracle Content Management gives you the ability to collaborate through conversations. Takea minute to learn how and where to find what you need.
Here’s what you see on your Conversations page when you get started:
Chapter 7Get to Know the Conversations Page
7-3
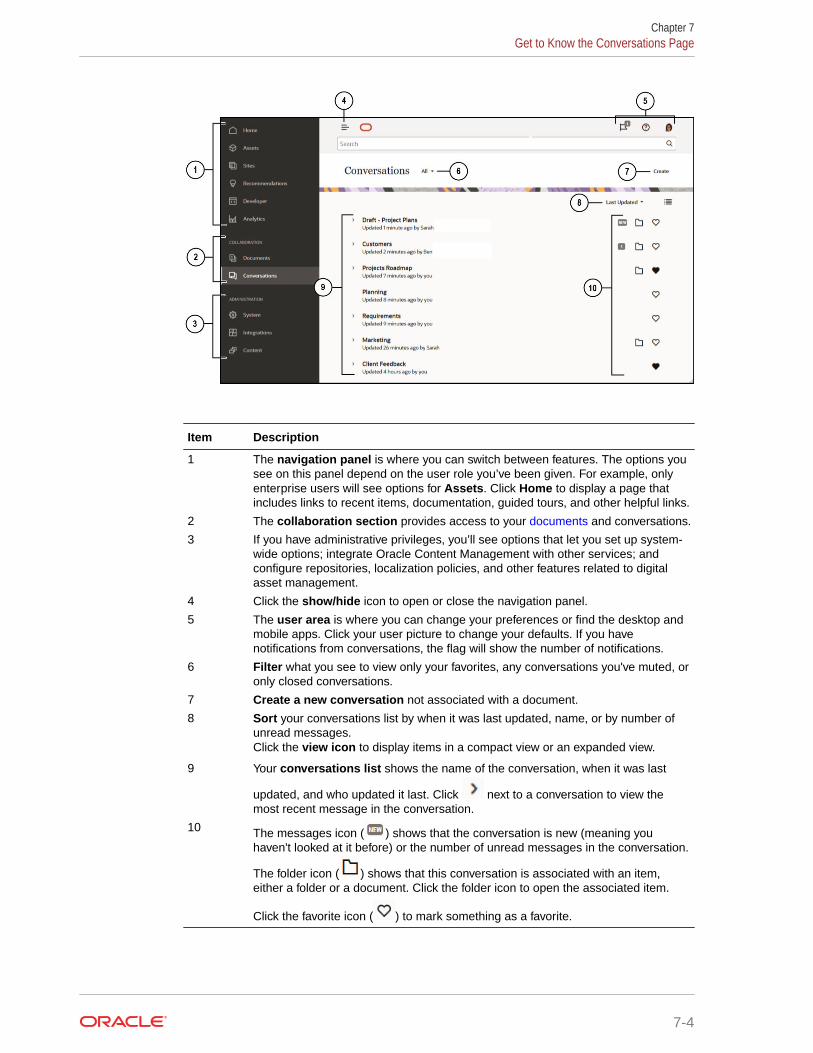
Item Description
1 The navigation panel is where you can switch between features. The options yousee on this panel depend on the user role you’ve been given. For example, onlyenterprise users will see options for Assets. Click Home to display a page thatincludes links to recent items, documentation, guided tours, and other helpful links.
2 The collaboration section provides access to your documents and conversations.
3 If you have administrative privileges, you’ll see options that let you set up system-wide options; integrate Oracle Content Management with other services; andconfigure repositories, localization policies, and other features related to digitalasset management.
4 Click the show/hide icon to open or close the navigation panel.
5 The user area is where you can change your preferences or find the desktop andmobile apps. Click your user picture to change your defaults. If you havenotifications from conversations, the flag will show the number of notifications.
6 Filter what you see to view only your favorites, any conversations you've muted, oronly closed conversations.
7 Create a new conversation not associated with a document.
8 Sort your conversations list by when it was last updated, name, or by number ofunread messages.Click the view icon to display items in a compact view or an expanded view.
9 Your conversations list shows the name of the conversation, when it was last
updated, and who updated it last. Click next to a conversation to view themost recent message in the conversation.
10 The messages icon ( ) shows that the conversation is new (meaning youhaven't looked at it before) or the number of unread messages in the conversation.
The folder icon ( ) shows that this conversation is associated with an item,either a folder or a document. Click the folder icon to open the associated item.
Click the favorite icon ( ) to mark something as a favorite.
Chapter 7Get to Know the Conversations Page
7-4
Filter or Sort ConversationsIn your web browser
Click Conversations. To filter your conversations, choose what you want to see from thedropdown list at the top. For example, you may only want to see muted conversations, orthose conversations that are closed.
To sort your list, choose an option from the menu in the top right corner of the screen. Youcan sort the list based on update time, name, or by those conversations with unreadmessages.
On a Mobile Device
Tap Conversations in the navigation panel. To filter your conversations, choose what youwant to see from the dropdown list at the top. For example, you may only want to see mutedconversations, or those that are marked as favorites.
To sort your list, tap the Sort icon in the top corner of the screen and select the sorting optionyou’d like to use.
Start a ConversationYou can start a conversation that’s associated with a digital asset, file, or folder, or you canstart an independent conversation.
To start a conversation about an asset, a file, or a folder:
1. Open the item you want to use.
2. Click .
3. Start the conversation by posting a message in the conversation pane.
To start a private conversation with someone, click on the person’s picture in a conversation.Click One-on-One to start a conversation with that person.
To start an independent conversation to collaborate with others:
1. Click Conversations in the navigation sidebar.
2. Click Create and enter the conversation name.
To add a post to a conversation, type your comment in the conversation pane and click Post.
Add or Remove People in a ConversationTo add people to a conversation about a file or folder, add the person as a member to thefolder or the folder where the file is stored. After a person is added as a member, they’ll beable to access the conversation.
When working with independent conversations (not one created about a document or folder),you can add people directly to the conversation. When you add someone to a conversation,they’re given management rights to that conversation. This means they can add othermembers, rename the conversation, or even close the conversation.
Chapter 7Filter or Sort Conversations
7-5
You can even add external users who may not be part of your organization to a folderor conversation, provided your service administrator allows it and their email addressis registered with your service. They cannot rename or close the conversation, or addother members.
You can see a person’s activity status in the conversation where the person is amember. The colored circle around a person’s picture indicates the person’s status:
• A full green circle around the picture shows that the person is signed in andcurrently using their account.
• A three-quarter yellow circle around the picture shows that the person is signed inbut not currently using their account.
• A half gray circle around the person's picture shows that the person is offline andnot signed in.
When viewing status in your browser, an animated pencil icon in the lower right cornerof a picture shows that the person is entering content in the current conversation.
Web Browser
To add people to an independent conversation in your web browser:
1. Open the conversation.
2. Click .
3. In the Share dialog, click Add Members. Begin entering the name or emailaddress of the people to add. Select names from the list then click Add.
A quick way to remove a person from a conversation (including yourself) is to click theperson's picture in the membership bar, then select Remove from Conversation. You
can also click and click Remove under the name of the person you want toremove.
To remove someone from a conversation created in a file or folder, you need toremove them as a member from the folder where the file is stored. That revokes theiraccess to both the file and its conversation.
iPhone/iPad
To add someone from within a conversation, tap . Tap . Enter a name or part ofa name in the search bar. Select the person from the list and tap Done.
To remove someone from the conversation, tap next to the person’s name. TapRemove Member.
Android devices
Open the conversation and tap and then tap Members. To add new members, tap
. Enter a name or part of a name in the search bar. Select the person from the listand tap Add. To remove someone from the conversation, tap their picture, then tapRemove from Conversation.
Chapter 7Add or Remove People in a Conversation
7-6
Add or Remove Files in a ConversationYou can add files to an independent conversation as attachments to messages or asindividual items without a message. There are no restrictions on the types of file you can add.File previews are limited to the first 100 pages and not all file types can show a preview.
In a web browser
1. Open the conversation where you want to add a file.
2. Click .
3. Select where the file is stored, either on your computer or already stored in OracleContent Management. Navigate to the file, select it, then click Post.
4. You can add a message with the file, or just click Post to add the file by itself.
On your iPhone or iPad
1. Open the conversation on your iPhone or iPad.
2. Tap .
3. Tap Choose from Folder to add a file from your Oracle Content account. Tap UploadMedia or Files to:
• Choose a photo or video from items stored on your device.
• Record a voice message to add to the conversation.
• Upload a file. Select the location where the file is stored (for example, Google Driveor another Oracle Content account). Choose the file then select the location whereyou want to store it in Oracle Content.
4. Tap Edit to change the name or add an optional description.
5. Tap Post.
On your Android device
1. Open the conversation where you’ll add the document.
2. Tap .
3. Choose what you’ll add to the conversation.
• Choose a photo or video from ones on your device.
• Upload a file. Select the location where the file is stored (for example, Google Driveor another Oracle Content account). Choose the file then select the location whereyou want to store it in your account.
• Choose a file already in Oracle Content. Navigate to the location where the file isstored and select the file.
4. Choose the location in Oracle Content where you want to store the item.
5. Tap and then tap Edit to change the name or add an optional description.
6. Tap Done.
Chapter 7Add or Remove Files in a Conversation
7-7
Manage Your ConversationsWhen viewing a conversation, you can manage your conversation by clicking . If
you're viewing a conversation associated with an item, click in the Conversation
pane. If you're viewing an independent conversation, click in the Conversationtoolbar.
• Mark All Read: (shows when you have unread messages) You can mark all theposts in the conversation as read. The “read” count appears in the conversationlisting.
• Add to Favorites: Add the conversation or remove it from your list of favorites.
• Share Conversation: Share the conversation by adding members to it or bysending a link to the conversation.
• Upload Document: Add a document to the conversation.
• Rename Conversation: Change the name of the conversation.
• Mute Conversation or Unmute Conversation: Muting a conversation hides itfrom your list of conversations and stops messages about it from appearing in youremail digest if you chose to have one sent to you.
• Close Conversation or Open Conversation: Closing a conversation preventspeople from adding new messages to it and removes it from people's list ofconversations.
• Discard Conversation: (shows only if you are the only member of theconversation) You can discard a conversation that was created independently of afile or folder. When you discard it, the conversation is removed from the listing ofconversations for yourself and any members.
• Show Membership Messages or Hide Membership Messages: (shows only inindependent conversations) These types of messages show when a person wasadded to a conversation and who added them.
• Set Conversation Language: You can adjust the language setting for individualconversations by choosing a language from the list.
Add AnnotationsYou can use annotations to add comments about a specific part of a file or asset whenyou view it in your web browser. For example, if a colleague uploads a presentation,you can scroll through the presentation and add a comment on page 2, page 7, andpage 10, discussing aspects of the presentation. Or if someone adds a photo to acollection that’s being used for one of your projects, you can create a conversation andadd annotations about that photo before it’s used. Collections and digital assets areavailable to enterprise users. Standard users won’t see those options in theirnavigation panel.
Your annotation appears in the conversation pane as a post. If you add an annotationto the file named Upcoming Project Details.pptx, for example, your annotation appearsin the conversation pane as a post with via Upcoming Project Details.pptx underneaththe date and time of the annotation.
Chapter 7Manage Your Conversations
7-8
Anyone who is a member of the folder where the file is stored or a member of the collectionwhere it’s used can view the annotations on files. It doesn’t matter what role a person has asa member of the folder. In order to add an annotation, a person must have a Downloader,Contributor, or Manager role.
When you add an annotation to an asset, that annotation only appears in the context of therepository where the asset is stored. For example, suppose you have a photo of a bicycle inthe Cyclist collection. The photo is actually stored in your Bicycle folder, but it’s being used inthe repository. If you add an annotation to the photo in the Cyclist repository, the annotationdoes not appear in your Bicycle folder.
1. View the file where you want to add a comment.
2. Click .
• To highlight text and leave a comment about the highlighted area, hold down theright-button and drag your cursor to select an area. Release the button and add yourcomment in the Conversation pane.
• To insert a comment at a spot in the file, go to the area where you want to add acomment. Click at the spot then add your comment in the Conversation pane.
3. Click Post to save your annotation.
After you add an annotation to a file, a conversation is started for the file so others can addcomments, too.
To view annotations, click .
Add Links to Another ConversationWhile writing a post to a conversation, you may find it handy to link to another conversation.
1. Open the conversation where you’ll post your message. It can be an independentconversation or one created for a document or folder.
2. Enter your text in the message box. When using a browser, formatting options areavailable under the text box.
3. Click or tap .
4. Search for a conversation or choose one from the Recent list. A link to that conversationis added to the body of your message.
5. Click Post or press Enter, depending on how you set up your preferences.
Use FlagsFlags are a way to bring an item, like a message or a file, to someone's attention. Dependingon the priority you assign, you can capture people's attention quickly.
To assign a flag, view the items in a conversation and click the right of the item. Next,select the person to be flagged and the priority level. You can assign a different flag priority toeach person.
Chapter 7Add Links to Another Conversation
7-9
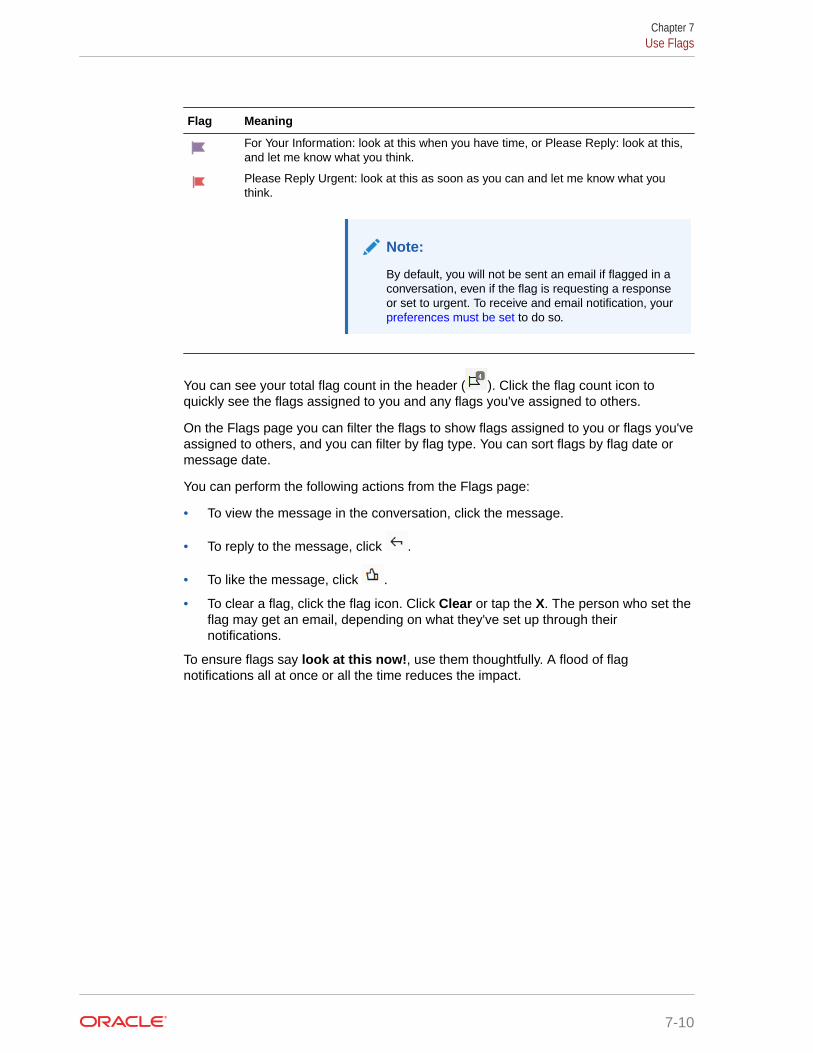
Flag Meaning
For Your Information: look at this when you have time, or Please Reply: look at this,and let me know what you think.
Please Reply Urgent: look at this as soon as you can and let me know what youthink.
Note:
By default, you will not be sent an email if flagged in aconversation, even if the flag is requesting a responseor set to urgent. To receive and email notification, your preferences must be set to do so.
You can see your total flag count in the header ( ). Click the flag count icon toquickly see the flags assigned to you and any flags you've assigned to others.
On the Flags page you can filter the flags to show flags assigned to you or flags you'veassigned to others, and you can filter by flag type. You can sort flags by flag date ormessage date.
You can perform the following actions from the Flags page:
• To view the message in the conversation, click the message.
• To reply to the message, click .
• To like the message, click .
• To clear a flag, click the flag icon. Click Clear or tap the X. The person who set theflag may get an email, depending on what they've set up through theirnotifications.
To ensure flags say look at this now!, use them thoughtfully. A flood of flagnotifications all at once or all the time reduces the impact.
Chapter 7Use Flags
7-10
8Use Groups
You can set up groups of people, making it easy to share with several people at one time.
• Take a quick tour about groups (English only)
• Groups Overview
• Create or Delete a Group
• Add People to a Group
• Join or Leave a Group
Groups OverviewGroups can help you communicate and coordinate with several people at one time.
Take a quick tour about groups (English only).
A group can be added to a conversation, so you can quickly start a collaboration with severalpeople. Or you can add a group as a member to a folder, letting you quickly share thecontents of that folder with others. Content types can also be shared with groups, the sameway they’re shared with individuals. The only things you can't share with a group arecollections and public or member links.
You can create your own groups, or groups may have already been created for yourorganization by your service administrator.
Here are some tips to keep in mind when creating and using groups:
• Don’t duplicate groups. Use the Find Public Groups option on the Group menu to seeif a group already exists that might be useful for your purpose.
• Use a meaningful name. Don’t use acronyms or abbreviations for your group name.Make it meaningful so people will understand its purpose.
• Choose the right privacy control for your group. You can control who can find anduse the group and if people can add themselves to the group. You can create thefollowing types of groups:
– Public group—A public group is visible to anyone, and people can add themselves tothe group. You should use this kind of group sparingly. For example, you might havea rollout of a project and you’d like to gather feedback from anyone who used theproject. You can open up a group to everyone and let people add themselves so theycan add feedback about that specific project.
– Private group—A private group is one that can be seen by anyone, but people can’tadd themselves to the group. This can be useful when you want to limit a group to asubset of people. People could discover the group exists and use the group to shareinformation with those people. For example, you can create a group for theEngineering department. Anyone who needs to collaborate or share with thatdepartment can add that group as a member to a conversation or folder.
8-1
– Closed group—This type of group gives you the tightest control onmembership. No one will be able to see the group unless they’re already amember, and no one can add themselves to the group. For example, perhapsa small set of people need to discuss an upcoming acquisition or project. Noone else in the organization needs to know about this, so by creating a groupfor restricted members, you control who can see the information.
• You can add a group as a member to any item. If you add someone to a group orremove someone from a group, they will be added or removed from the item. If anindividual was added as an individual but not as part of a group, they remain amember unless removed as an individual.
• If you add a group as a member of an item that requires a specific user role, onlyusers with that role will be able to access the item. For example, if you add a userwith the Standard User role to a group, and then add that group as a member of arepository, the standard user won't have access to the repository because youmust have the Enterprise User role to access repositories.
• If a group is deleted, access to any shared folder, content type or conversation isremoved from the people in that group.
• You can use groups on your mobile device and with the desktop app, but youmanage groups using the web browser interface.
To use a group, select it just like you’d select a person to share with. For example,when sharing a folder or conversation, type the name of a group in the Membersdialog. Choose the permissions (View, Contributor, and so on) for the individuals in thegroup then add the group as a member to the folder or conversation.
Create or Delete a GroupGroups let you quickly share content and collaborate with several other people at onetime.
Groups are managed using your web browser interface. You can use groups on yourmobile device and with the desktop app (add them as members to folders andconversations and so on) but you can’t create, delete, join, or leave groups using amobile device.
Create a Group
1. Click your user picture to open the user menu and then click Groups. ChooseFind Public Groups from the menu at the top of the Group page. If you don’t finda group you can use, select Create Group.
2. Create a meaningful name for the group. Don’t use abbreviations or acronyms thatmight be confusing. Use a name that will tell people the purpose of your group.
3. Choose the privacy settings you want to use.
• Select who can find the group. If you select Anyone, then users will be able tosee the group in the list of public groups. If you select Members, only userswho are already members will know this group exists.
• If you selected that anyone can find the group, you can select whether userscan add themselves to the group.
For examples of how to use these settings to create the right type of group for yoursituation, see Groups Overview.
Chapter 8Create or Delete a Group
8-2
4. Click Done when finished.
5. Add members as needed. Click Add Members and search for people to add. Select therole you want the person to have then click Add.
To edit your group’s settings, click next to the group name or in the group's toolbar. You’llsee options to edit the group, add members, or delete the group.
Delete a Group
To delete a group, click next to the group name or in the group's toolbar, and selectDelete.
Know that if you shared a folder, a content type, or a conversation with the group you deleted,the shared object is now unavailable to the group members. If you shared something with anindividual who was also in a deleted group, that individual will still have access to the object.
Add People to a GroupIf you own a group or if you have a manager role in a group, you can add people as membersto the group.
Groups are managed using your web browser interface. You can use groups on your mobiledevice (add them as members to folders and conversations and so on) but you can’t addpeople to groups using a mobile device.
To add someone to a group, click Groups in your user menu. Open the group or click next to the group name, then click Add Members.
You can add individuals or you can add other groups. If you add a group and a person is inthat group, you won’t be able to add the person as an individual.
When you add an individual as a member of a group, you assign permissions to them, eitheras a manager or a member of the group. If you add a group as a member, the permission youassign to the group applies to everyone in that group.
You can even add external users who are not part of your organization to a group, providedyour service administrator allows it and their email address is registered with your service.External users can only be added to private groups, not public groups, and cannot be givenmanager permissions to a group. Any group they are a member of can be added to a folderas a manager, but the external user permissions will only be that of a contributor.
Join or Leave a GroupYou can join public groups if the membership is open or you may be added to other groups bythe group manager.
Groups are managed using your web browser interface. You can use groups on your mobiledevice (add them as members to folders and conversations and so on) but you can’t create,delete, join, or leave groups using a mobile device.
Chapter 8Add People to a Group
8-3
Join a Group
To join a group, click Groups in your user menu. Choose Find Public Groups fromthe menu at the top of the Group page. Choose the group you want to join and click
next to the group name. If the membership is open, you can select Join Group.
You may already be in a group without joining it. People can create groups and addyou to them. The group name appears in your list of groups. If you’re in a group andinformation was shared with the group (for example, if the group was added as amember to folder), that shared item appears in your list of conversations, folders, andcontent items.
Leave a Group
To leave a group, open the group and click in the group's toolbar. Select LeaveGroup. If a conversation, folder, or content item was shared with that group, you’ll loseaccess to those things immediately.
Chapter 8Join or Leave a Group
8-4
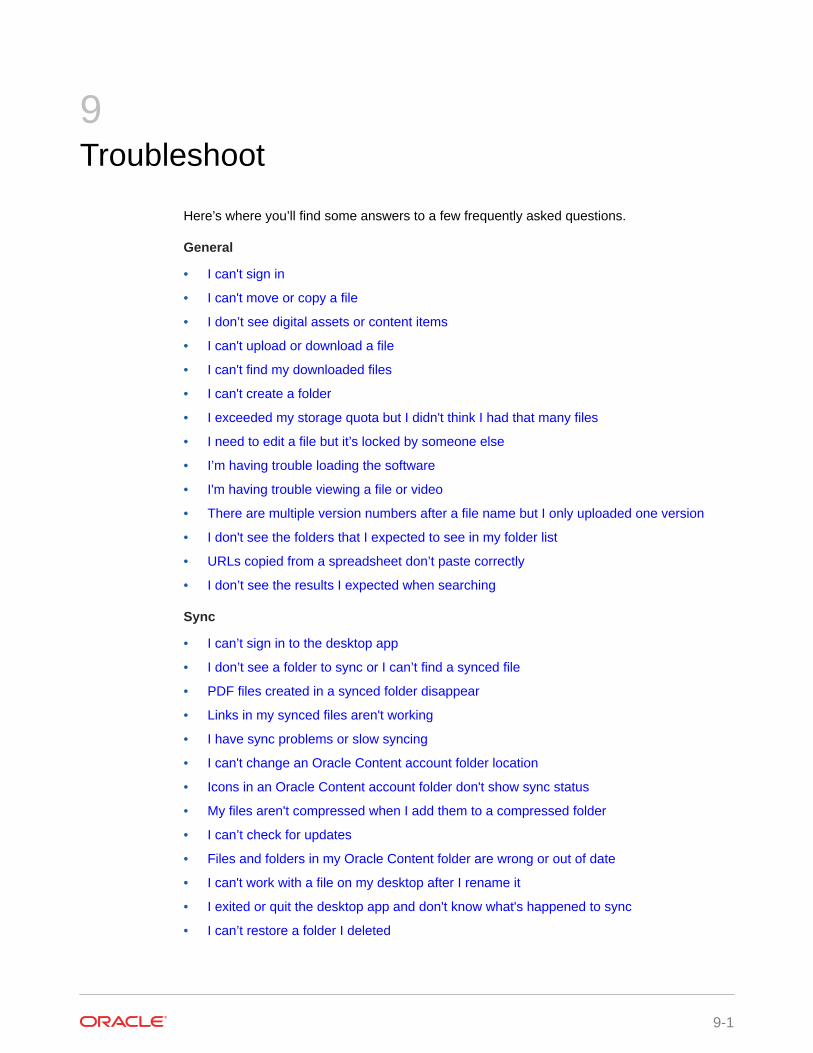
9Troubleshoot
Here’s where you’ll find some answers to a few frequently asked questions.
General
• I can't sign in
• I can't move or copy a file
• I don’t see digital assets or content items
• I can't upload or download a file
• I can't find my downloaded files
• I can't create a folder
• I exceeded my storage quota but I didn't think I had that many files
• I need to edit a file but it’s locked by someone else
• I’m having trouble loading the software
• I'm having trouble viewing a file or video
• There are multiple version numbers after a file name but I only uploaded one version
• I don't see the folders that I expected to see in my folder list
• URLs copied from a spreadsheet don’t paste correctly
• I don’t see the results I expected when searching
Sync
• I can’t sign in to the desktop app
• I don’t see a folder to sync or I can’t find a synced file
• PDF files created in a synced folder disappear
• Links in my synced files aren't working
• I have sync problems or slow syncing
• I can't change an Oracle Content account folder location
• Icons in an Oracle Content account folder don't show sync status
• My files aren't compressed when I add them to a compressed folder
• I can’t check for updates
• Files and folders in my Oracle Content folder are wrong or out of date
• I can't work with a file on my desktop after I rename it
• I exited or quit the desktop app and don't know what's happened to sync
• I can’t restore a folder I deleted
9-1
Microsoft Office Add-On
• Why are there two Oracle Content storage services when using Microsoft Office?
• My Office add-in or Outlook add-in isn’t working
• Links in Outlook email on a Mac don’t work as I expect
Sharing
• I shared a folder with someone, but they can't use it the way I expected
• Someone sent me a folder link, but I can't access the files there
• I stopped sharing a folder and now the subfolders aren't shared
• I have a link to a file or folder but it requires an access code
• I can't get a public link to send to someone in a folder that's shared with me
• Files are missing from one of my folders that I shared
• I can't create a public link to a folder I own
Mobile
• I need to reset my passcode
• I can't view a file when I have Viewer rights in a shared folder
• I can't view a file that I downloaded
• I’m having trouble viewing a video
• I can't find my downloaded files on my device
• My file didn't sync in the Android app
• I got an error when transferring a file during sync in the Android app
• My edits don't appear in a file I synchronized on my Android device
• What do I do if my device is lost or stolen?
Troubleshoot Web BrowserHere are some questions that may come up about working in your browser.
• I can't sign in
• I can't move or copy a file
• I don’t see digital assets or content items
• I can't upload or download a file
• I can't find my downloaded files
• I can't create a folder
• I exceeded my storage quota but I didn't think I had that many files
• I need to edit a file but it’s locked by someone else
• I’m having trouble loading the software
• I'm having trouble viewing a file or video
Chapter 9Troubleshoot Web Browser
9-2
• There are multiple version numbers after a file name but I only uploaded one version
• I don't see the folders that I expected to see in my folder list
• URLs copied from a spreadsheet don’t paste correctly
• I don’t see the results I expected when searching
I can't sign inIf you don’t know your service URL or your login information, you can find that information ina welcome information that was sent to you after you were assigned an Oracle ContentManagement account. Look for an email with the subject line “Welcome to Oracle Content!”Your service administrator may have also sent a separate email with more details. If you’retrying to sign in to the desktop app, use the same URL for the service as that which is used tosign in on a browser.
Note the following when logging in:
• Your login information is case-sensitive, so make sure the caps lock key isn't on.
• Check your user name and the URL for your service. This information was sent to you inan email.
• Make sure you have Internet connectivity.
• Your service is set up for specific number of users. It's possible the maximum number ofusers has been reached.
If you need help resetting your password, see Managing Your Password for details.
If you still can't sign in, contact your service administrator for details about your account oryour password. The service administrator is the person in charge of managing the service foryour organization.
I can't move or copy a fileYou must have the Manager or Contributor role to move items to a shared folder or moveitems out of a shared folder.
You also may not be able to move a file if its size is larger than allowed or its file type isblocked. Your service administrator (the person who manages Oracle Content Managementfor your organization) sets any file size and type restrictions.
You must have a Manager, Contributor or Downloader role to copy a file from a shared folder.To copy a file into a shared folder, you need a Manager or Contributor role in the sharedfolder.
I don’t see digital assets or content itemsThe digital asset and content items navigation options are only shown if you have anenterprise user role.
If your organization does not have an enterprise edition of Oracle Content Managementinstalled, you won’t see the Assets navigation option in your browser or your mobile device.
Chapter 9Troubleshoot Web Browser
9-3
I can't upload or download a fileYour service administrator sets the maximum file size and types of files that you canupload to the cloud. You'll get an error message if you try to upload a file that's too bigor the wrong type, or if you've exceeded your storage quota. You can see themaximum file size and allowed file types on your user preferences page, which youcan open from your user menu.
Some browsers can't process very large files when uploading. If that happens, theupload will fail. Try splitting your file into sizes smaller than 5 GB and upload again.
When downloading a file, you must have the Download role in the folder.
If you create a public link to a file that doesn’t pass virus scanning, it can’t bedownloaded through that public link.
I can't find my downloaded filesWhen you download a file, it goes to the download location configured for your webbrowser or you may be able to choose the location to download the file to, dependingon your web browser settings.
To remove a downloaded file, long-tap the file, select it, and then click DELETE.Removing these files from your computer won't affect the original copy stored in thecloud.
I can't create a folderThere's a few reasons you may not be able to create a folder:
• If you use invalid characters, like < or /, in the folder name.
• If you use certain reserved words in the name, like NULL, AUX, or other systemterms.
• You may not have the right permissions. If you're a member of a shared folder, youneed a Contributor or a Manager role to create a folder.
If you can't perform an action, the action isn't available. For example, if you can'tcreate a subfolder, the option to create a folder isn’t shown.
I exceeded my storage quota but I didn't think I had that many filesIf you shared folders with others and gave people permission to add content to thefolder, that content counts against your storage quota. You may want to check yourshared folders to see how much content is stored there. For example, if your foldercontains 500 MB of files and after sharing it, other users add another 300 MB of files,then the combined 800 MB counts towards your quota.
You may also have multiple versions of a file, which count against your quota. Checkthe number of versions you have for your files and see if you can remove some.
Chapter 9Troubleshoot Web Browser
9-4
I need to edit a file but it’s locked by someone elseIf you need to work on a file that someone else has locked, you can unlock the file and an e-mail will notify them. It is still a good idea to contact them when they are available to check ifthey have made any edits to the document that should be incorporated into your revision.
I can't edit an Office 365 file onlineIn some situations when you try to edit a file in Microsoft 365, the page continually refreshesand doesn't load the file for editing. To resolve this, open your browser privacy settings andmake sure to allow cross-site tracking.
I’m having trouble loading the softwareSome plugins or extensions may interfere with the operation of the software in differentbrowsers. If your access becomes unstable, check the history of usage for your browser tosee if any new extensions have been added. Disable all browser plugins and extensions andtry again.
I'm having trouble viewing a file or videoYou may not be able to view a file because some file formats aren't supported, and those filescan't be viewed. For example, a .zip file can't be viewed but if you have adequatepermissions (at least the Downloader role), you can download the file for use.
Your service administrator may also have prohibited certain file types, so you won't be able toview those.
File previews are limited to the first 100 pages. The entire file size must be less than 158MB.
Supported video file formats are dependent on your browser, which must support the HTML5video tag. The currently supported formats are:
• Chrome: MP4, WebM, and Ogg
• Firefox: MP4, WebM, and Ogg
• Safari: MP4
There are multiple version numbers after a file name but I only uploadedone version
Someone else may change the file if it's stored in a shared folder. If they do that and thenupload the changed version, each version of the file is saved. That way, you can compare thedifferent versions and decide which one you want to keep.
I don't see the folders that I expected to see in my folder listMake sure your listing shows all the items you can view. The page navigation control is at thebottom of the screen, and there may be more than one page of items.
Chapter 9Troubleshoot Web Browser
9-5
Make sure your list displays all the files and folders you can access. Click the menunext to the heading and select All Files. To change your viewing list, click Sharedwith You or Owned by You.
If you're looking for a shared folder, it should appear in your folder list with a sharedicon. Contact the person who shared the folder to make sure the invitation to sharewas sent and that the folder is still being shared.
If a folder was shared with a public link, it won't show in your listing as a shared folder.You can only access that folder via the public link.
If you have access to more than 100 folders (either owned by you or shared with you),your search results will be incomplete, as searches are limited to 100 folders.
URLs copied from a spreadsheet don’t paste correctlyWhen copying a URL from a spreadsheet into a conversation, the URL may exceedthe size of the conversation pane and thus not paste correctly. You must first convertthe URL to text format to paste it correctly:
1. Highlight the cell containing the hyperlink.
2. Open the hyperlink dialog box.
3. Highlight the entire URL and copy it.
4. Close the hyperlink dialog box.
5. Paste the URL to the desired location.
I don’t see the results I expected when searchingYour search results may not be as expected because of a few different factors.
Check and see if any of these search tips apply to your search:
• A search looks through the titles, the content (such as words in a document), fileextensions, the name of the person who last modified the file, and the informationabout an item (like a folder's description). It also checks any metadata associatedwith the item, tags for digital assets, conversation messages, hashtags used inconversations, and people in the conversation.
• There may be a slight time delay to show the newest search results. For example,if you search for the term Report and then add another document with the termReport in it, that newest document will be not be returned in search results for afew seconds.
• If you have more than 100 shared folders (either shared by you or with you), aglobal search may not return the expected results. The search is done on Favoriteshared folders first and then other shared folders, up to 100. You may want todesignate some folders as Favorites before searching, to ensure better searchresults.
• If an item is larger than 10MB in size, it will not appear as a possibility in full-textsearch (a search through the content of a file, not just the metadata about a file).You can find the item by searching for the entire name.
Chapter 9Troubleshoot Web Browser
9-6

Troubleshoot the Desktop App and SyncHere are some questions you might have about using the desktop app and sync.
• I can’t sign in to the desktop app
• I don’t see a folder to sync or I can’t find a synced file
• PDF files created in a synced folder disappear
• Links in my synced files aren't working
• I have sync problems or slow syncing
• I can't change an Oracle Content account folder location
• Icons in an Oracle Content account folder don't show sync status
• My files aren't compressed when I add them to a compressed folder
• I can’t check for updates
• Files and folders in my Oracle Content folder are wrong or out of date
• I can't work with a file on my desktop after I rename it
• I exited or quit the desktop app and don't know what's happened to sync
• I can’t restore a folder I deleted
I can’t sign in to the desktop appIf you're having trouble signing in to the desktop app, here are some things to try:
• Make sure you're using the correct server URL. You can see the server URL on theDownload Apps page (accessed from your user menu).
• Make sure you're using the correct user name and password. You can see your username on the Download Apps page (accessed from your user menu). If you've forgottenyour password, contact your system administrator.
• If you're using Mac OSX Mojave, sign-in might be failing due to updated security used bySafari embedded in OSX Mojave. This issue might be fixed if you apply the latest OSXMojave security updates. If applying the updates doesn't work or you'd prefer aguaranteed fix, upgrade the OS from Mojave to Catalina.
I don’t see a folder to sync or I can’t find a synced fileYou must have at least a Downloader role in a folder in order for it to appear in the list offolders available for syncing. For example, if someone shared a folder with you and you’d liketo sync it, you must have at least a Downloader role in that folder for you to see it in your listof available folders. Check with the person who shared it with you and request that your rolebe changed.
If a file is edited or moved on your desktop computer while the file or the folder it’s containedin is modified, the file might be missing from your list of synced files. Check the local trashfolder on your desktop computer for the file.
Chapter 9Troubleshoot the Desktop App and Sync
9-7
PDF files created in a synced folder disappearIf you try to use Microsoft Print to PDF to create a PDF in a synced folder, theoperation won't complete correctly and the file disappears. Instead use Export to PDFor PrimoPDF.
Alternatively, you can create the PDF in another folder, and then move it to the syncedfolder; or pause syncing while you create the PDF, and then restart syncing after it'sdone.
Links in my synced files aren't workingFixed links (links that include the drive and directory structure of the target document'slocation, for example C:\Finance\Sales\sales-report.doc) probably won't work insynced files because the drive and directory structures of the synced computers areprobably not identical.
Relative links (for example, ..\..\sales-report.doc) should continue to work insynced files, if the linked files are kept in the same locations relative to each other onall computers.
I have sync problems or slow syncingYou probably won't encounter problems with file sync, because the desktop sync clientresolves most of them automatically. However, sometimes a more serious underlyingcause is found and you may have to intervene to resolve it.
If there is a problem, you might see in the notification area or next to a file in yourOracle Content folder.
You can view all problems by selecting Sync Problems using one of these methods:
• Right-click in the notification area (Windows) or in the menu bar extras area(Mac).
• Click and then click .
The Problems window opens where you see a list of files and problems. Click on oneand you'll get an explanation of the problem and a suggestion on how to resolve it.After you make changes, the list may refresh automatically or you can click Retry orRetry All to clear all problems.
You might get a system error, which is usually a problem with your cloud connection.
To see the error, click . An error dialog is shown and there may be a View Detailslink, where you can find out more about the problem.
If you edit a file in a shared folder and someone else locks the file while you're editingit, a sync error occurs. Your changes won't be saved unless you override and unlockthe file and explicitly save the file from the Problems dialog.
If your sync process is running slowly, your desktop app can be optimized for betterperformance. Over time, the database that tracks your synced files grows slowly and
Chapter 9Troubleshoot the Desktop App and Sync
9-8
can reduce productivity. From the menu, click Help and then Troubleshoot. ClickOptimize to clear out old data.
File Conflicts
Conflicts happen when a file is changed on more than one computer at the same time. Thefirst version of the file to be saved or uploaded to the cloud is considered the new authenticfile, and that file is then synced across all computers and the cloud. One exception to this is ifthe only change is the file's name. In that case, the new name is applied to the authentic file,and it's synced.
If someone tries to save or upload another version of the file, it's kept in Oracle Content but isgiven a different name. That file isn't automatically synced across computers.
If you want to sync a version of the file that wasn't the first saved, rename that file yourself.This triggers the desktop app to treat the file like a new one and it will be synced to allcomputers and the cloud. This new version of the file is kept with the original. You can thendecide whether to keep both versions, keep only the latest, or merge the content of the two.
The desktop app doesn't merge the contents of conflicting files for you. Some applications(for example, Microsoft Word) let you compare the contents of files. You can use it to view thedifferences between two files and decide what material from each file should be kept.
Items Not Syncing
The following types of files or folders aren't synced:
• Hidden files, like system files
• Temporary files (beginning with a tilde (~) or with a .tmp extension)
• Windows shortcuts
• Symbolic links (symlinks)
• Hidden folders
• Encrypted folders on Mac computers
• A file with a name containing any of these characters: | \ / ? " : < > *
• Files known to contain viruses. If a local virus scanner isn't enabled, an infected file istransferred from the Oracle Content folder to the cloud during sync. There it's scanned forviruses and moved to the Trash folder.
Files with file paths exceeding the 247-character limit in Windows will sync, but long pathscan cause issues when using Windows. This limit doesn't apply to files in the cloud or on Maccomputers.
Windows Briefcase folders are synced as if they were typical Windows folders. The specialfeatures of Windows Briefcase folders aren't supported.
I can't change an Oracle Content account folder locationYou can change the location of an account folder if you need to, but only to a new location ona local hard drive. Hard drives must use NTFS formatting for Windows computers, or eitherApple File System (APFS) or HFS+ formatting for Mac computers. FAT32 formatting isn’tsupported. You can't use other locations, such as network drives and external hard drives.
Chapter 9Troubleshoot the Desktop App and Sync
9-9
Icons in an Oracle Content account folder don't show sync statusIn some situations, the sync status overlays may disappear in the Oracle Contentaccount folder. Often this is due to the Microsoft Windows operating system limitingthe number of overlays that can be made to icons in the Windows file system. If youexceed the limitation, you may not see any sync status on your icons. If this happens,your files will still sync as long as the desktop app is still running.
Sometimes the overlays may disappear for a different reason. To try to restore thesync overlays, you can re-run the installer and select the option to repair theapplication.
1. In Windows 10, open the Start menu and click Settings.
2. On the Windows Settings page, click Apps.
3. Scroll to the bottom of the page to find the Related settings section and clickPrograms and Features.
4. Select Content for Windows in the list of programs, then click Uninstall/Change.If you are prompted to let the application make changes, click Yes.
5. When the installer is opened, click Next to continue.
6. Select Repair and click Next.
7. Verify that the screen specifies that it is ready to repair the program and notremove it. If it is ready to repair, click Install.
8. Once the installation is done, click Finish.
After you finish the repair, you need to restart the Oracle Content app. This happensautomatically when you restart your computer, or you can do it manually.
1. Right-click on the Oracle Content icon in your Windows task bar and click Exit.
2. Locate the Oracle Content app in your Start menu and open it. The sync overlaysshould now be displayed in the account folder.
Note:
If the sync overlays do not reappear, then the issue is likely the problemimposed by the Microsoft Windows operating system limiting the numberof overlays that can be made to icons in the Windows file system.
My files aren't compressed when I add them to a compressed folderCompression of synced files is not supported. You're able to add compressed foldersto the Oracle Content folder for sync, but files added to these folders aren'tcompressed. Sync and sharing does work correctly for such folders.
I can’t check for updatesIf you install the desktop app, you can typically check for updates at any time byselecting Check for Updates from the Help menu.
Chapter 9Troubleshoot the Desktop App and Sync
9-10
If the desktop app was installed for you by a service administrator, they may prevent theability to check for updates. If so, the option in the help menu is disabled.
Files and folders in my Oracle Content folder are wrong or out of dateThere are different potential causes for this, and different levels of action that you can take tofix it.
• Refresh your content
Right-click in the notification area (Windows) or in the menu bar extras area (Mac),choose Help, choose Troubleshoot, and then choose Refresh.
• Rebuild your synced foldersIf changes made in the cloud or on other computers aren't showing correctly on yourcurrent computer, it may be because the number and complexity of changes made tofolders and files in an Oracle Content folder has caused sync to be permanently lost.
If only one or a few folders are affected, you can rebuild those folders one at a time. Thisuses sync records from the desktop sync client and from the cloud to rebuild each folderin an Oracle Content folder on the affected computer. To rebuild a single folder, select itfrom your Oracle Content folder, right-click and select Oracle Content and chooseRebuild Folder.
• Delete the Oracle Content account from your computerIf most or all of your folders become unsynced, or if there are other problems that can't befixed by rebuilding individual folders, you can remove the Oracle Content account fromyour computer and start over.
This process will automatically remove the account folder from your computer. All filesthat were in the cloud will continue to be available from there.
To remove the account, select Preferences using one of these methods:
– Right-click in the task bar (Windows) or in the menu bar extras area (Mac).
– Click and then click .
Select the account to delete and click Delete. Deleting an account clears your useraccount information and deletes the Oracle Content folder on your computer. You mustreenter your user account information. You can re-select folders to sync and you canbring those folders back onto your computer by starting sync in the usual way.
I can't work with a file on my desktop after I rename itThere is a limit to how long the combination of file name and path to a file can be on adesktop, which is lower than that in the cloud. If you rename a file in your web browser to alength that exceeds the desktop limit, the file syncs to your computer but you can't rename,edit, or delete it. It's best to avoid lengthy file names. Try to ensure that the length of thecombination of path and file name does not exceed 256 characters.
I exited or quit the desktop app and don't know what's happened to syncIf you exit or quit the desktop app on your current computer, changes to files on this computerare no longer synced to other computers, and changes from other computers are no longersynced to this computer. Sync does continue between the cloud and other computers running
Chapter 9Troubleshoot the Desktop App and Sync
9-11
the desktop app (that is, between the cloud and your other computers, and those ofpeople you are sharing files with).
When you restart the desktop app on your current computer, the files are synced withthose in the cloud.
If restarting sync causes a file conflict, you see an error icon overlaid on the app iconin the system trap. Select Sync Problems from one of these menus to view anyerrors.
• Right-click in the notification area (Windows) or in the menu bar extras area(Mac).
• Click and then click .
I can’t restore a folder I deletedWhen you delete a folder from your cloud account using your browser, that folder ismoved to your Trash bin in the cloud and if you’re synchronizing that folder, it’s alsomoved to the Recycle Bin on your desktop. If you need to restore the folder, it iseasiest to do it from the cloud Trash. However, if you try to restore the folder from yourdesktop Recycle Bin, the “restore” location is a “.tmp” folder in your desktop accountfolder, not the original location. Make sure you can view all files, including hidden files,in your account folder and you can then restore the folder by moving it from thetemporary location to the location you want.
Troubleshoot Microsoft Office Add-OnHere are answers to questions that may come up about using the Microsoft Outlook orOffice add-ons.
• Why are there two Oracle Content storage services when using Microsoft Office?
• My Office add-in or Outlook add-in isn’t working
• Links in Outlook email on a Mac don’t work as I expect
Why are there two Oracle Content storage services when usingMicrosoft Office?
If you use Microsoft Office 2013 and 2016, you may see an additional Oracle Contentstorage service account available. This is caused by a compatibility problem betweenMicrosoft Office 2013 and Microsoft Office 2016. If you attempt to add the secondaccount, an error may result that indicates the Oracle Content add-in is not correctlyinstalled. If you use the same version of the software on all your desktops you won’tsee this incompatibility.
My Office add-in or Outlook add-in isn’t workingThe Office add-in radial menu appears when you edit a Microsoft file, such an Excelspreadsheet and it lets you quickly access several menu options. The Outlook add-inlets you add links to conversations and documents in your email using the Outlook
Chapter 9Troubleshoot Microsoft Office Add-On
9-12
toolbar. If these add-ins become disabled, you can re-enable them following these steps:
1. Open any Microsoft file, such as a Word, Power Point, or Excel file.
2. Click File, then Options and then Add-Ins.
3. In the Manage area at the bottom of the dialog, make sure COM Add-ins is selected andthen click Go.
4. In the COM Add-Ins dialog, select Oracle Content Add-In for Office.
5. Exit and restart your Microsoft program to enable the add-in.
If your Office add-in is enabled but not working, there may be another reason:
• You only see the Office radial menu for files that are being synced using the OracleContent sync client. Make sure your files are being synced and that the sync app isactive.
• Make sure the radial menu is enabled. You can also show or hide the menu by right-clicking on the desktop app icon in your notification area on your computer. ChoosePreferences and then Hide Radial Menu or Show Radial Menu.
• The radial menu only works with Office versions 2010 and later.
• The radial menu only works with locally installed Office applications, not web-basedapplications.
Links in Outlook email on a Mac don’t work as I expectLinks to an Office file, such as a Word file or spreadsheet, may not open correctly on anApple Mac computer.
When a link is sent to an Office document to a person using a Mac, the document link will notopen correctly. The Outlook software recognizes the Office extension and attempts to openthe corresponding Office app rather than use the browser to view the document.
There are several workarounds for this issue:
• Right click on the link and select Open Link to open the link in a browser.
• Remove the document name from the link.
• Replace the period in the document name with an underscore.
Any of those actions will open the file correctly.
Troubleshoot MobileHere are some questions you might encounter when using your mobile device.
• I need to reset my passcode
• I can't view a file when I have Viewer rights in a shared folder
• I can't view a file that I downloaded
• I’m having trouble viewing a video
• I can't find my downloaded files on my device
• My file didn't sync in the Android app
• I got an error when transferring a file during sync in the Android app
Chapter 9Troubleshoot Mobile
9-13
• My edits don't appear in a file I synchronized on my Android device
• What do I do if my device is lost or stolen?
I need to reset my passcodeTo reset your passcode, you have to know the old passcode. Sign in to the app and onthe Settings page, go to the Security section. You'll see an option there to change yourpasscode.
If you don't know your old passcode, tap Forgot Passcode to sign out of the app. Youcan then sign back in and reset your passcode.
I can't view a file when I have Viewer rights in a shared folderYou need to have a Downloader, Contributor, or Manager role to view files on aniPhone or iPad because files must be downloaded first before you can view them. Ifyou don't have a role that lets you download a file, then you can't view the file.
I can't view a file that I downloadedTo view a file, you need the right software on your device. For example, if youdownloaded a PDF file, you would need an app on your device that can open a PDFfile. If you don't have the right app, you won't be able to view the file.
I’m having trouble viewing a videoWhen playing a video on an iPad or iPhone, the video is downloaded and played in theapp using the native iOS viewer. If a format can’t be viewed, you can download thevideo and open it another app for viewing.
When playing a video on an Android device, use the Open In option to play the videousing a different viewer on the device.
I can't find my downloaded files on my deviceYou can see all your downloaded files by tapping Documents in the Oracle Contentapp navigation menu, then, in the filter menu, tap Offline.
When you download a file, it's downloaded to a secure area within the Oracle Contentapp, and you can access it from within the mobile app even if you're not connected tothe cloud. For security reasons, it's not accessible outside the Oracle Content app, soyou won't find it in your regular download folder or other folder on your device.
Note:
If you're using an iOS device and saved the file locally to your device, youcan see it in the Files app.
To remove a downloaded or synchronized file, long-tap the file, select it, and then tapthe delete icon. Removing these files from your device won't affect the original copystored in the cloud.
Chapter 9Troubleshoot Mobile
9-14
My file didn't sync in the Android appSync may not happen for a couple of reasons:
• If you aren't connected to a network.
• If you don't have automatic sync turned on. Tap to access your settings. Choose theaccount you want to use then tap Synchronization Settings and turn on auto-sync.
I got an error when transferring a file during sync in the Android appA sync error might happen in the following circumstances:
• If you're syncing a file and you lose your connection to Oracle Content or to the network.Try re-syncing the individual file or do a full sync of all files.
• If your local file storage is full. Your device may be out of space and can't save thesynced file. Check your storage amount and delete files if needed.
My edits don't appear in a file I synchronized on my Android deviceWhen you choose to auto-synchronize a file on your Android phone or tablet, the file on yourdevice is kept current with the file that's stored in the cloud according to the update frequencyyou specified. When the file in the cloud is updated, the copy on your device is automaticallyupdated, too.
If you edit the file using another app on your Android phone or tablet, its counterpart in thecloud isn't updated automatically. You'll have to upload it to the cloud to update the copythere.
What do I do if my device is lost or stolen?When you use Oracle Content Management from a mobile device or the sync client, theinformation about that access is saved. If you lose your device or it’s taken, you shouldremove that device from the list of those used to access the service. To remove a device andrevoke the access for it:
1. Sign in to Oracle Content Management in a web browser.
2. Click your user name and select Preferences.
3. Select Linked Devices from the dropdown menu near the Preferences heading.
4. Find the device to remove and click Revoke.
Your device's authorization to access the service is removed. The next time you or anyoneelse tries to activate the app on the device, the account is signed out and all local contentstored on the device for that account is deleted.
Revoking access for the device affects only one account, so if you're using multiple accounts,you need to revoke access separately for each account to block all access to Oracle ContentManagement and delete all local content stored on the device.
Chapter 9Troubleshoot Mobile
9-15
Troubleshoot SharingHere are some questions you might have about sharing your content or sites.
• I shared a folder with someone, but they can't use it the way I expected
• Someone sent me a folder link, but I can't access the files there
• I stopped sharing a folder and now the subfolders aren't shared
• I have a link to a file or folder but it requires an access code
• I can't get a public link to send to someone in a folder that's shared with me
• Files are missing from one of my folders that I shared
• I can't create a public link to a folder I own
I shared a folder with someone, but they can't use it the way Iexpected
When you share a folder, you assign a role to the people you invite to the folder.Depending on the role you assigned, that person may not be able to download files,edit files, or do other actions. You can change the role assigned to someone asneeded
If you email a Member link to someone, that person must be able to log in to OracleContent Management to access the files in a folder. If you need to share a folder withsomeone who doesn't have access to the service, email a public link instead.
If you created a public link for a folder then emailed that link to someone, that personmay not have the necessary rights to the folder. The default role for public links isViewer but you can change the default role. To see the defaults for your account, clickyour user name and then click Preferences.
Someone sent me a folder link, but I can't access the files thereYou may not have the appropriate permissions to access a file in a folder. If the link isto a shared folder, you may have been removed as a member of the folder or your rolemay have changed in the folder, limiting your access to the files.
If the folder link was created as a public link, that public link might be removed andtherefore the link will stop working. When a public link is sent, a role is assigned to theperson receiving the link. If the link was sent with a Viewer role, then files can't bedownloaded.
It's possible that someone may have deleted the folder that was shared with you. Inthat case, the link won't work.
I stopped sharing a folder and now the subfolders aren't sharedIf you share a parent folder that you own and then change your mind and removesharing, all the subfolders that were shared are no longer shared.
Chapter 9Troubleshoot Sharing
9-16
I have a link to a file or folder but it requires an access codeA public link can be created that requires an access code to use the link. This is created bythe person who creates the link. You’ll need to contact the person who sent the link to get theaccess code.
I can't get a public link to send to someone in a folder that's shared with meWhen someone shares a folder with you, you're assigned a role. Depending on your role, youmay not be able to email a public link to a file in that shared folder. When that happens, thePublic link tab isn't available.
Files are missing from one of my folders that I sharedIf you share a folder and assign a Manager or Contributor role to someone for the folder, thatperson can also delete files from the folder or delete subfolders.
If the item is deleted using the browser, the items appear in the Oracle Content ManagementTrash folder for the owner of the items and the person who deleted the items. Either theowner or the person who deleted the items can restore the items from Trash. Only the ownercan permanently delete the items in Trash.
If the items are being synchronized using the desktop sync client, the deleted items appear inthe recycle bin on your desktop even if you were not the person who deleted the items.
It's best to restore the files from the Trash folder using the web browser. That way you can besure you have the latest copy of the information.
Your service administrator can set the length of time that items in Trash are retained. If theitem is missing, it may be that your Trash was automatically emptied.
I can't create a public link to a folder I ownYour service administrator may have disabled public links. To check, click Preferences, then,in the menu, select Documents. Under Sharing, if the public links are disabled, you'll see amessage to that affect.
Chapter 9Troubleshoot Sharing
9-17


