Embed Size (px)
Citation preview
Cisco Secure Access Control ServeOL-16932-02
C H A P T E R 1
Configuring Cisco Secure Access Control Server for NAC/NAP InteroperabilityThis chapter describes how to set up Cisco Secure Access Control Server 4.2, hereafter referred to as ACS, to work in a Cisco Network Admission Control and Microsoft Network Access Protection (NAC/NAP) environment. This chapter contains:
• NAC/NAP Solution Components, page 1-1
• Configuration Workflow, page 1-1
NAC/NAP Solution ComponentsThe NAC/NAP solution components include Cisco Secure Access Control Server (ACS) version 4.2, Cisco 802.1x-capable Catalyst switches, Microsoft Network Policy Server (NPS), and Microsoft NAP-enabled Vista desktops.
The Cisco NAC appliance does not support NAP at this time and is not part of the solution.
Configuration WorkflowTable 1-1 streamlines the ACS configuration workflow for NAC/NAP.
Table 1-1 ACS Configuration Workflow
Task Refer to...
Step 1 Install ACS Installing ACS, page 1-2
Step 2 Perform Network Configuration Tasks Performing Network Configuration Tasks, page 1-3
Step 3 Set Up Interface Configuration Setting Up Interface Configuration, page 1-6
Step 4 Set Up System Configuration Setting Up System Configuration, page 1-8
Step 5 Set Up Administration Control Setting Up Administration Control, page 1-20
Step 6 Set Up Shared Profile Components Setting Up Shared Profile Components, page 1-23
Step 7 Configure Group Setup Configuring Group Setup, page 1-29
Step 8 Configure User Setup Configuring User Setup, page 1-29
Step 9 Set Up External Posture Validation Setting Up External Posture Validation, page 1-30
1-1r Configuration Guide for NAC/NAP Interoperability
Chapter 1 Configuring Cisco Secure Access Control Server for NAC/NAP InteroperabilityInstalling ACS
Installing ACSThis section describes the installation process that you perform to run ACS, which runs on a Windows 2003 server or on a Cisco Secure ACS Solution Engine (ACS SE).
For detailed information on ACS installation, refer to the:
• Installation Guide for Cisco Secure ACS for Windows Release 4.2
• Installation Guide for Cisco Secure ACS Solution Engine Release 4.2
To install ACS:
Step 1 Start the ACS installation:
If you are installing ACS for Windows:
a. Using a local administrator account, log in to the computer on which you want to install ACS.
b. Insert the ACS CD into a CD-ROM drive on the computer.
c. If the CD-ROM drive supports the Windows autorun feature, the ACS for Windows dialog box appears; otherwise, run setup.exe, located in the root directory of the ACS CD.
d. In the Cisco Secure ACS for Windows dialog box, click Install.
If you are installing ACS SE, follow the instructions in the Installation Guide for Cisco Secure ACS Solution Engine 4.2. Chapter 2, “Installing and Configuring Cisco Secure ACS Solution Engine 4.2,” provides detailed installation instructions.
During the installation process, you are prompted to enter a password for encrypting the internal database.
Step 2 Enter a password that is at least 8 characters long, and contains letters and numbers.
The ACS installation process for ACS for Windows automatically creates a shortcut to the ACS administrative GUI on your desktop.
Step 3 Double-click the icon to open a browser window to the ACS administrative GUI.
Step 4 If you do not see the icon on the desktop, open your browser from the machine on which you installed ACS and go to one of these addresses:
• http://IP_address:2002
• http://hostname:2002
where IP_address is the IP address of the host that is running ACS and hostname is the hostname of the host that is running ACS.
Step 10 Configure Windows Server 2008 and Microsoft Clients
Configuring the Windows Server 2008 and the Microsoft Clients, page 1-33
Step 11 Configure 802.1x on the IOS Switch Configuring 802.1x on an IOS Switch, page 1-33
Step 12 Set Up Network Access Profiles Setting Up Network Access Profiles, page 1-33
Table 1-1 ACS Configuration Workflow (continued)
Task Refer to...
1-2Cisco Secure Access Control Server Configuration Guide for NAC/NAP Interoperability
OL-16932-02
Chapter 1 Configuring Cisco Secure Access Control Server for NAC/NAP InteroperabilityPerforming Network Configuration Tasks
Performing Network Configuration TasksThis section describes:
• Configure a RADIUS AAA Client, page 1-3
• Configure the AAA Server, page 1-5
Configure a RADIUS AAA ClientBefore you can configure NAC/NAP support, you must configure a RADIUS AAA client.
To configure a RADIUS AAA client:
Step 1 In the navigation bar, click Network Configuration.
The Network Configuration page opens.
Step 2 Do one of the following:
• If you are using Network Device Groups (NDGs), click the name of the NDG to which you want to assign the AAA client. Then, click Add Entry below the AAA Clients table.
• To add AAA clients when you have not enabled NDGs, click Not Assigned and then click Add Entry below the AAA Clients table.
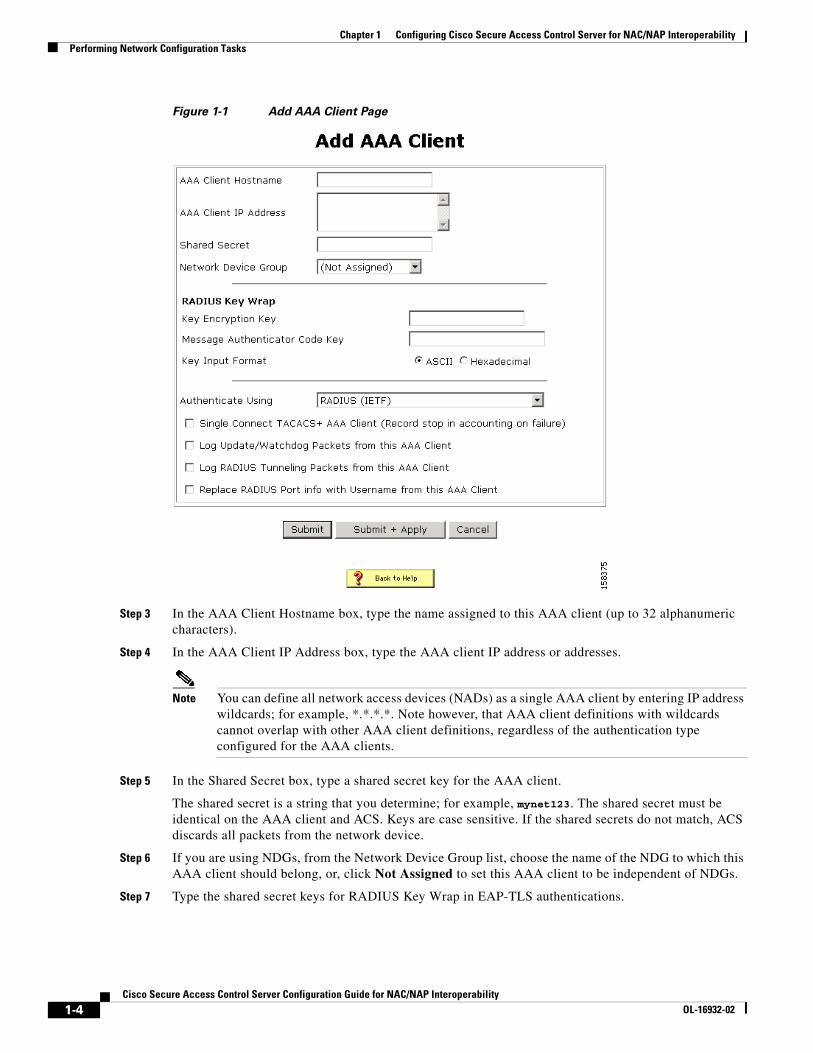
The Add AAA Client page opens, shown in Figure 1-1.
1-3Cisco Secure Access Control Server Configuration Guide for NAC/NAP Interoperability
OL-16932-02
Chapter 1 Configuring Cisco Secure Access Control Server for NAC/NAP InteroperabilityPerforming Network Configuration Tasks
Figure 1-1 Add AAA Client Page
Step 3 In the AAA Client Hostname box, type the name assigned to this AAA client (up to 32 alphanumeric characters).
Step 4 In the AAA Client IP Address box, type the AAA client IP address or addresses.
Note You can define all network access devices (NADs) as a single AAA client by entering IP address wildcards; for example, *.*.*.*. Note however, that AAA client definitions with wildcards cannot overlap with other AAA client definitions, regardless of the authentication type configured for the AAA clients.
Step 5 In the Shared Secret box, type a shared secret key for the AAA client.
The shared secret is a string that you determine; for example, mynet123. The shared secret must be identical on the AAA client and ACS. Keys are case sensitive. If the shared secrets do not match, ACS discards all packets from the network device.
Step 6 If you are using NDGs, from the Network Device Group list, choose the name of the NDG to which this AAA client should belong, or, click Not Assigned to set this AAA client to be independent of NDGs.
Step 7 Type the shared secret keys for RADIUS Key Wrap in EAP-TLS authentications.
1-4Cisco Secure Access Control Server Configuration Guide for NAC/NAP Interoperability
OL-16932-02
Chapter 1 Configuring Cisco Secure Access Control Server for NAC/NAP InteroperabilityPerforming Network Configuration Tasks
Each key must be unique, and must also be distinct from the RADIUS shared key. You can configure these shared keys for each AAA client, as well as for each NDG. The NDG key configuration overrides the AAA client configuration. If the key entry is null, ACS uses the AAA client key. You must enable the Key Wrap feature in the Network Access Profile Authentication Settings page to implement these shared keys in EAP-TLS authentication:
a. Key Encryption Key (KEK)—Used for encryption of the Pairwise Master Key (PMK). The maximum length is 20 characters.
b. Message Authenticator Code Key (MACK)—Used for the keyed hashed message authentication code (HMAC) calculation over the RADIUS message. The maximum length is 16 characters.
c. Key Input Format—Click the format of the key, ASCII or hexadecimal strings (the default is ASCII).
Step 8 From the Authenticate Using list, choose RADIUS (IOS/PIX).
Step 9 Specify additional AAA client settings as required.
Step 10 Click Submit + Apply.
Configure the AAA ServerYour AAA server is automatically populated during the installation of ACS, using the hostname assigned to Windows 2003 system. You must specify some additional configuration information to enable the server to communicate with AAA clients.
To configure the AAA server:
Step 1 In the navigation bar, click Network Configuration.
The Network Configuration page opens.
Step 2 In the AAA Servers table, click the name of the AAA server in the AAA Server Name column.
1-5Cisco Secure Access Control Server Configuration Guide for NAC/NAP Interoperability
OL-16932-02
Chapter 1 Configuring Cisco Secure Access Control Server for NAC/NAP InteroperabilitySetting Up Interface Configuration
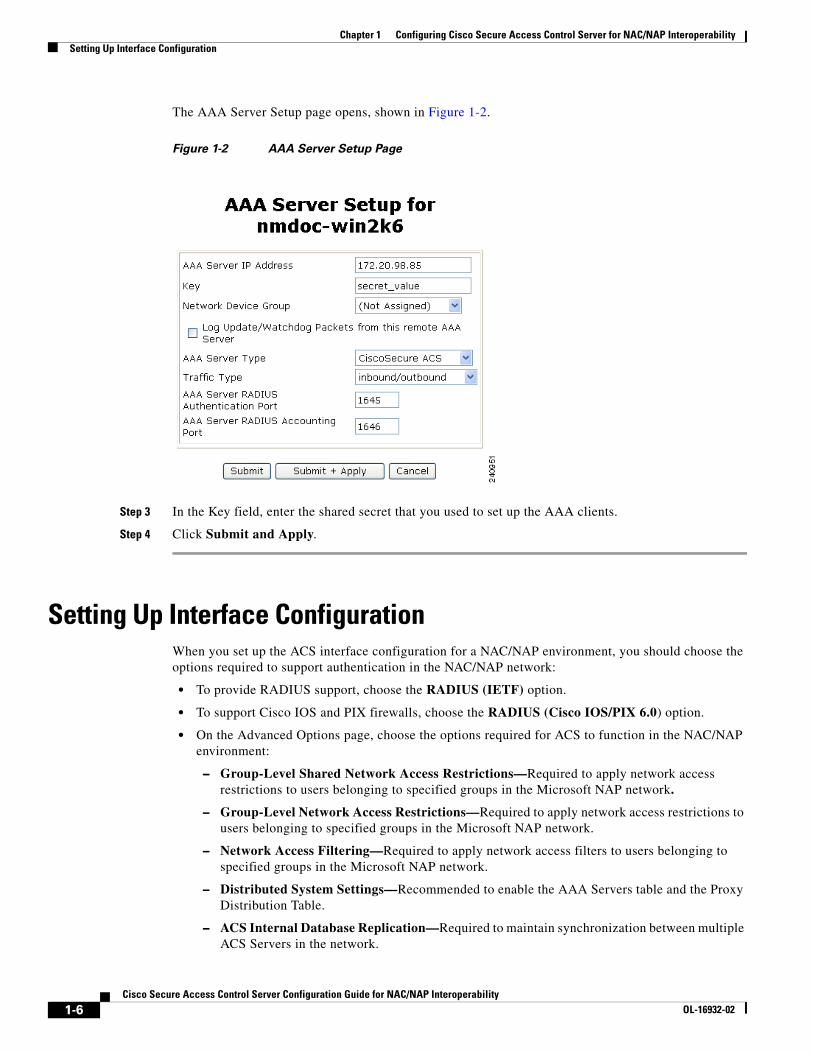
The AAA Server Setup page opens, shown in Figure 1-2.
Figure 1-2 AAA Server Setup Page
Step 3 In the Key field, enter the shared secret that you used to set up the AAA clients.
Step 4 Click Submit and Apply.
Setting Up Interface ConfigurationWhen you set up the ACS interface configuration for a NAC/NAP environment, you should choose the options required to support authentication in the NAC/NAP network:
• To provide RADIUS support, choose the RADIUS (IETF) option.
• To support Cisco IOS and PIX firewalls, choose the RADIUS (Cisco IOS/PIX 6.0) option.
• On the Advanced Options page, choose the options required for ACS to function in the NAC/NAP environment:
– Group-Level Shared Network Access Restrictions—Required to apply network access restrictions to users belonging to specified groups in the Microsoft NAP network.
– Group-Level Network Access Restrictions—Required to apply network access restrictions to users belonging to specified groups in the Microsoft NAP network.
– Network Access Filtering—Required to apply network access filters to users belonging to specified groups in the Microsoft NAP network.
– Distributed System Settings—Recommended to enable the AAA Servers table and the Proxy Distribution Table.
– ACS Internal Database Replication—Required to maintain synchronization between multiple ACS Servers in the network.
1-6Cisco Secure Access Control Server Configuration Guide for NAC/NAP Interoperability
OL-16932-02
Chapter 1 Configuring Cisco Secure Access Control Server for NAC/NAP InteroperabilitySetting Up Interface Configuration
– Network Device Groups—This setting is not mandatory, but is recommended to enable grouping AAA servers into groups to which you can apply a common configuration.
– Microsoft Network Access Protection Settings—Required to enable the NAC/NAP options in ACS.
To set up ACS interface configuration for NAC/NAP:
Step 1 In the navigation bar, click Interface Configuration.
The Interface Configuration page opens.
Step 2 Click RADIUS (IETF).
The Interface Configuration page for RADIUS (IETF) opens.
Step 3 Check the User or Group check box next to:
• [027] Session-Timeout
• [029] Termination-Action
• [064] Tunnel-Type
• [065] Tunnel-Medium-Type
• [081] Tunnel-Private-Group-ID
Step 4 Click Submit.
The Interface Configuration page opens.
Step 5 Click RADIUS (Cisco IOS/PIX 6.0).
Step 6 The Interface Configuration page for Cisco IOS/PIX 6.0 opens.
Step 7 Check the User or Group check box next to [026/009/001] cisco-av-pair and then click Submit.
The Interface Configuration page opens.
Step 8 Click Advanced Options.
The Advanced Options Interface Configuration page opens.
Step 9 Check the check box next to:
• Group-Level Shared Network Access Restrictions
• Group-Level Network Access Restrictions
• Network Access Filtering
• Distributed System Settings
• ACS Internal Database Replication
• Network Device Groups
• Microsoft Network Access Protection Settings
Step 10 Click Submit.
1-7Cisco Secure Access Control Server Configuration Guide for NAC/NAP Interoperability
OL-16932-02
Chapter 1 Configuring Cisco Secure Access Control Server for NAC/NAP InteroperabilitySetting Up System Configuration
Setting Up System ConfigurationThis section describes the following tasks:
• Install and Set Up an ACS Security Certificate, page 1-8
• Set Up Global Configuration, page 1-11
Install and Set Up an ACS Security CertificateYou must configure ACS with a digital certificate for establishing client trust when ACS challenges the client for its credentials. Note these points:
• For authenticated in-band Protected Access Credential (PAC) provisioning for EAP-FAST, the client must have a certificate that matches the one installed in ACS.
• For the most scalable NAC environments, Cisco recommends a production public key infrastructure (PKI) that the production certificate authority (CA) or registration authorities (RAs) sign.
• If your NAC/NAP deployment is going into an Active Directory (AD) domain, then consider which authentication mechanism, if any, is required: domain certificates or domain credentials.
This section describes a simplified procedure for the ACS for Windows platform. For detailed information on installing certificates and for information on how to install certificates on the Cisco Secure ACS Solution Engine platform, see Chapter 9 of the User Guide for Cisco Secure ACS 4.2, “Advanced Configuration: Authentication and Certificates.”
Obtain Certificates and Copy Them to the ACS Host
To copy a certificate to the ACS host:
Step 1 Obtain a security certificate.
Step 2 Create a \certs directory on the ACS server.
a. Open a DOS command window.
b. To create a certificates directory, enter:
mkdir <selected_drive>:\certs
where selected_drive is the currently selected drive.
Step 3 For example, copy the following files to the \certs directory:
• ACS-1.nac.cisco.com.cer (server certificate)
• ACS-1.PrivateKey.txt (server certificate private key)
• ca.nac.cisco.com.cer (CA certificate)
You are now ready to set up the ACS certification authority.
1-8Cisco Secure Access Control Server Configuration Guide for NAC/NAP Interoperability
OL-16932-02
Chapter 1 Configuring Cisco Secure Access Control Server for NAC/NAP InteroperabilitySetting Up System Configuration
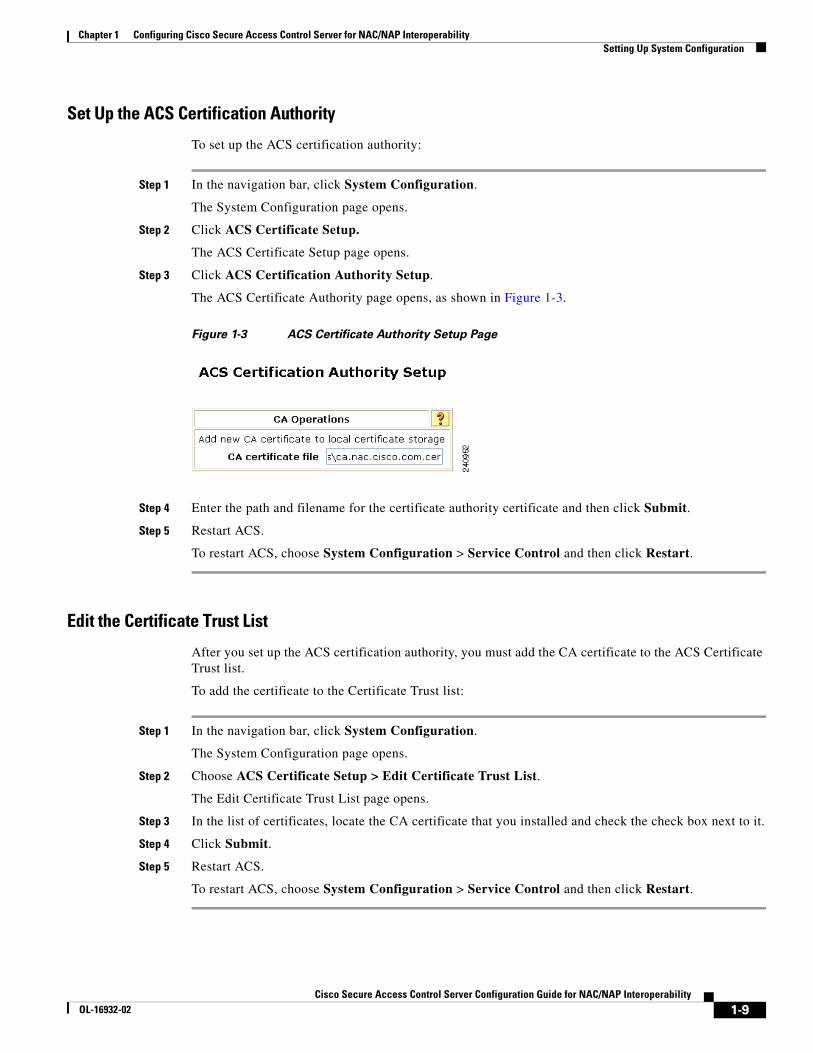
Set Up the ACS Certification Authority
To set up the ACS certification authority:
Step 1 In the navigation bar, click System Configuration.
The System Configuration page opens.
Step 2 Click ACS Certificate Setup.
The ACS Certificate Setup page opens.
Step 3 Click ACS Certification Authority Setup.
The ACS Certificate Authority page opens, as shown in Figure 1-3.
Figure 1-3 ACS Certificate Authority Setup Page
Step 4 Enter the path and filename for the certificate authority certificate and then click Submit.
Step 5 Restart ACS.
To restart ACS, choose System Configuration > Service Control and then click Restart.
Edit the Certificate Trust List
After you set up the ACS certification authority, you must add the CA certificate to the ACS Certificate Trust list.
To add the certificate to the Certificate Trust list:
Step 1 In the navigation bar, click System Configuration.
The System Configuration page opens.
Step 2 Choose ACS Certificate Setup > Edit Certificate Trust List.
The Edit Certificate Trust List page opens.
Step 3 In the list of certificates, locate the CA certificate that you installed and check the check box next to it.
Step 4 Click Submit.
Step 5 Restart ACS.
To restart ACS, choose System Configuration > Service Control and then click Restart.
1-9Cisco Secure Access Control Server Configuration Guide for NAC/NAP Interoperability
OL-16932-02
Chapter 1 Configuring Cisco Secure Access Control Server for NAC/NAP InteroperabilitySetting Up System Configuration
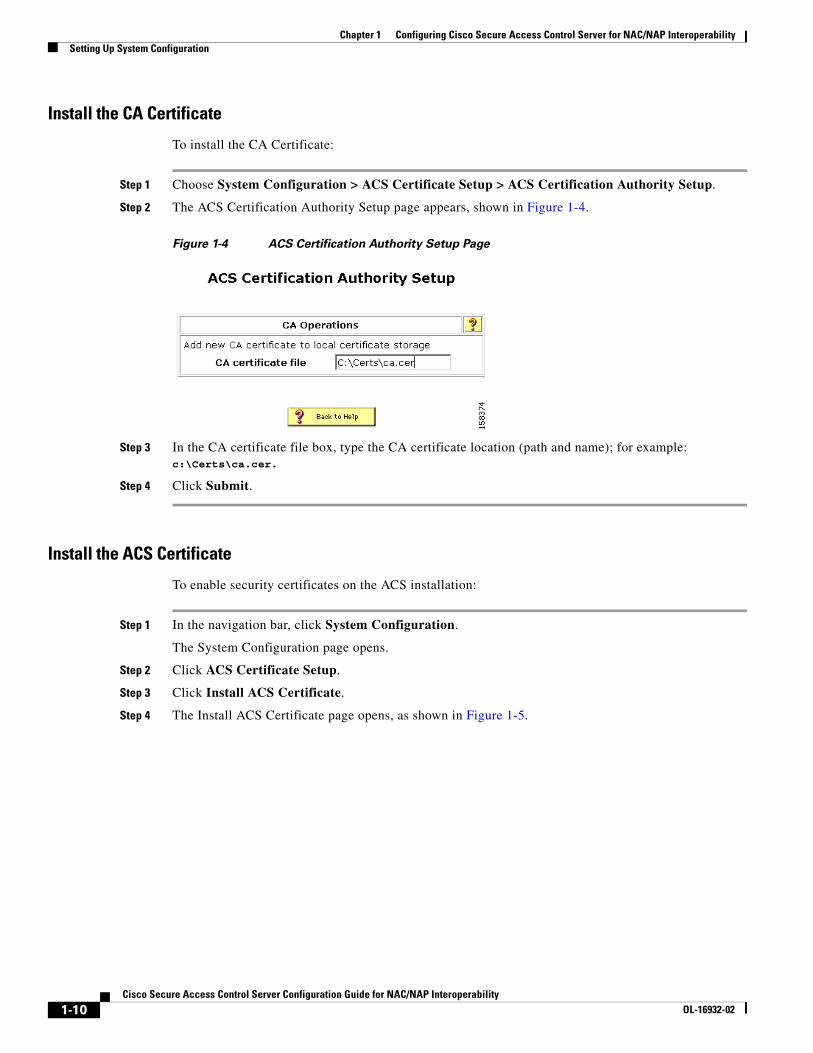
Install the CA Certificate
To install the CA Certificate:
Step 1 Choose System Configuration > ACS Certificate Setup > ACS Certification Authority Setup.
Step 2 The ACS Certification Authority Setup page appears, shown in Figure 1-4.
Figure 1-4 ACS Certification Authority Setup Page
Step 3 In the CA certificate file box, type the CA certificate location (path and name); for example: c:\Certs\ca.cer.
Step 4 Click Submit.
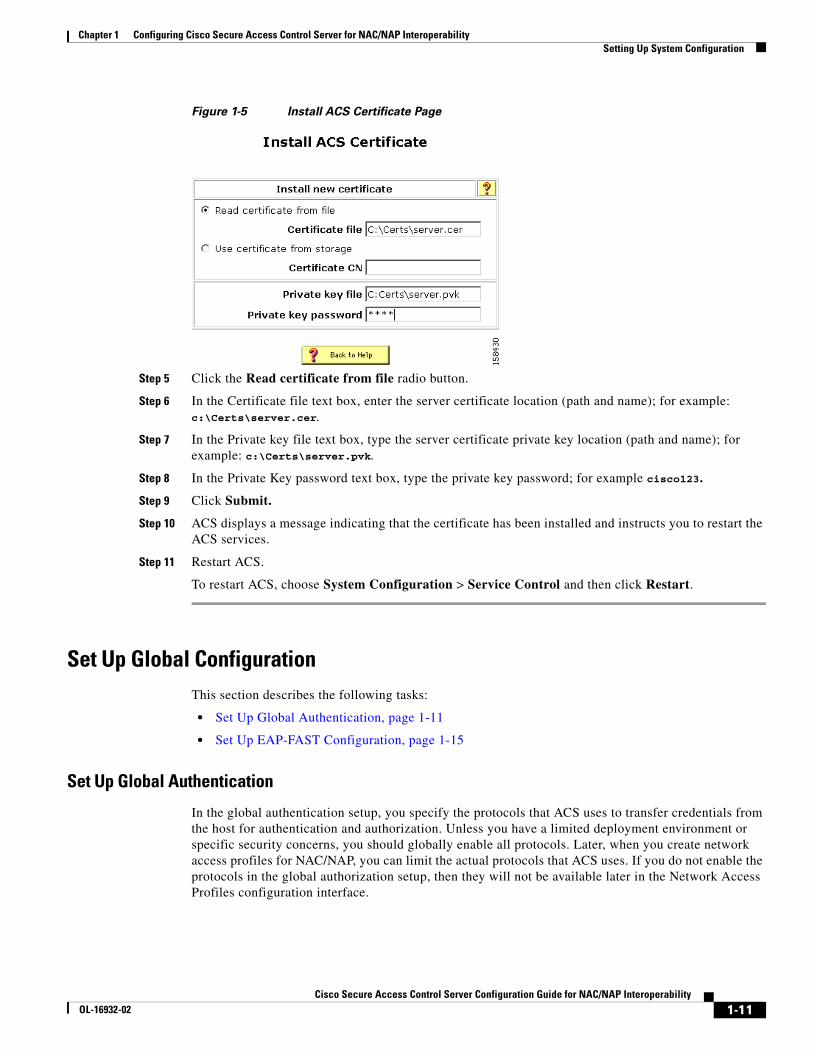
Install the ACS Certificate
To enable security certificates on the ACS installation:
Step 1 In the navigation bar, click System Configuration.
The System Configuration page opens.
Step 2 Click ACS Certificate Setup.
Step 3 Click Install ACS Certificate.
Step 4 The Install ACS Certificate page opens, as shown in Figure 1-5.
1-10Cisco Secure Access Control Server Configuration Guide for NAC/NAP Interoperability
OL-16932-02
Chapter 1 Configuring Cisco Secure Access Control Server for NAC/NAP InteroperabilitySetting Up System Configuration
Figure 1-5 Install ACS Certificate Page
Step 5 Click the Read certificate from file radio button.
Step 6 In the Certificate file text box, enter the server certificate location (path and name); for example: c:\Certs\server.cer.
Step 7 In the Private key file text box, type the server certificate private key location (path and name); for example: c:\Certs\server.pvk.
Step 8 In the Private Key password text box, type the private key password; for example cisco123.
Step 9 Click Submit.
Step 10 ACS displays a message indicating that the certificate has been installed and instructs you to restart the ACS services.
Step 11 Restart ACS.
To restart ACS, choose System Configuration > Service Control and then click Restart.
Set Up Global ConfigurationThis section describes the following tasks:
• Set Up Global Authentication, page 1-11
• Set Up EAP-FAST Configuration, page 1-15
Set Up Global Authentication
In the global authentication setup, you specify the protocols that ACS uses to transfer credentials from the host for authentication and authorization. Unless you have a limited deployment environment or specific security concerns, you should globally enable all protocols. Later, when you create network access profiles for NAC/NAP, you can limit the actual protocols that ACS uses. If you do not enable the protocols in the global authorization setup, then they will not be available later in the Network Access Profiles configuration interface.
1-11Cisco Secure Access Control Server Configuration Guide for NAC/NAP Interoperability
OL-16932-02
Chapter 1 Configuring Cisco Secure Access Control Server for NAC/NAP InteroperabilitySetting Up System Configuration
To set up global authentication:
Step 1 In the navigation bar, click System Configuration.
The System Configuration page opens.
Step 2 Click Global Authentication Setup.
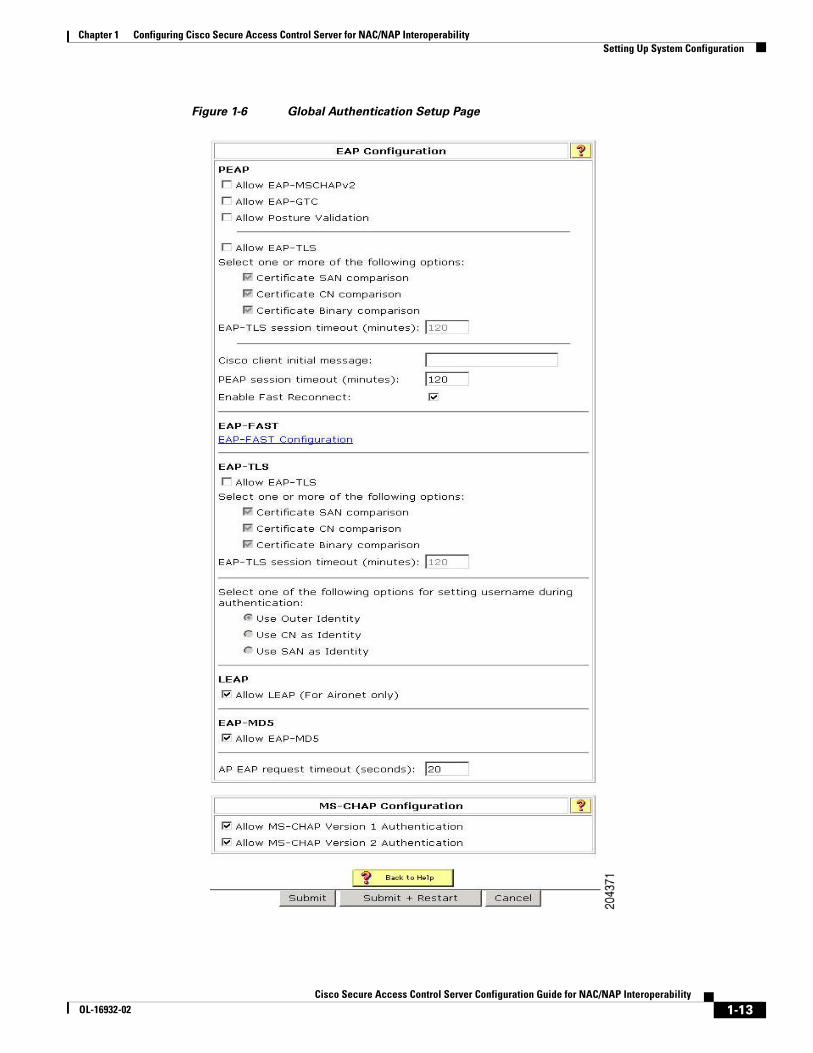
The Global Authentication Setup Page appears, as shown in Figure 1-6.
1-12Cisco Secure Access Control Server Configuration Guide for NAC/NAP Interoperability
OL-16932-02
Chapter 1 Configuring Cisco Secure Access Control Server for NAC/NAP InteroperabilitySetting Up System Configuration
Figure 1-6 Global Authentication Setup Page
1-13Cisco Secure Access Control Server Configuration Guide for NAC/NAP Interoperability
OL-16932-02

Chapter 1 Configuring Cisco Secure Access Control Server for NAC/NAP InteroperabilitySetting Up System Configuration
Step 3 To make the PEAP global authentication parameters available in the Network Access Profile configuration, check the check boxes for:
• Allow EAP-MSCHAPv2.
EAP-MSCHAP is a variation of the Microsoft Challenge and Response Protocol that is used with the Protected Extensible Access Protocol (PEAP). For a description of the EAP-MSCHAPv2 protocol, see the “Authentication” section in Chapter 1 of the User Guide for Cisco Secure ACS, 4.2, “Overview.”
• Allow EAP-GTC.
For a description of the EAP Generic Token Card (EAP-GTC) protocol, see “EAP-FAST Authentication” in Chapter 9 of the User Guide for Cisco Secure ACS 4.2, “System Configuration: Authentication and Certificates.”
• Allow Posture Validation.
For a description of Posture Validation, see the “What Is Posture Validation” section in Chapter 13 of the User Guide for Cisco Secure ACS, 4.2, “Posture Validation.”
Note Even though PEAP is not required for NAC/NAP integration, you can select PEAP and its inner authentication methods to make them available in the Network Access Profile configuration. You can later disable these methods in the network access profiles.
Step 4 In the EAP-TLS section:
a. Check the Allow EAP-TLS check box.
b. Check the Certificate SAN comparison and Certificate Binary comparison check boxes.
c. Leave the EAP-TLS timeout field set to the default (120 minutes).
Step 5 In the EAP-MD5 section, check the Allow EAP-MD5 check box.
Step 6 Scroll down to the MS-CHAP configuration section, and check the Allow MS-CHAP Version 1 Authentication and Allow MS-CHAP Version 2 Authentication check boxes, as shown in Figure 1-7.
Figure 1-7 MS-CHAP Authentication Selection
Step 7 Click Submit + Restart.
Step 8 Go to Set Up EAP-FAST Configuration, page 1-15, and configure EAP-FAST authentication.
1-14Cisco Secure Access Control Server Configuration Guide for NAC/NAP Interoperability
OL-16932-02
Chapter 1 Configuring Cisco Secure Access Control Server for NAC/NAP InteroperabilitySetting Up System Configuration
Set Up EAP-FAST Configuration
To configure ACS to work with NAC/NAP and use EAP-FAST with posture validation:
Step 1 In the navigation bar, click System Configuration.
The System Configuration page opens.
Step 2 Click Global Authentication Setup.
The Global Authentication Setup Page appears, as shown in Figure 1-6.
Step 3 Click EAP-FAST Configuration.
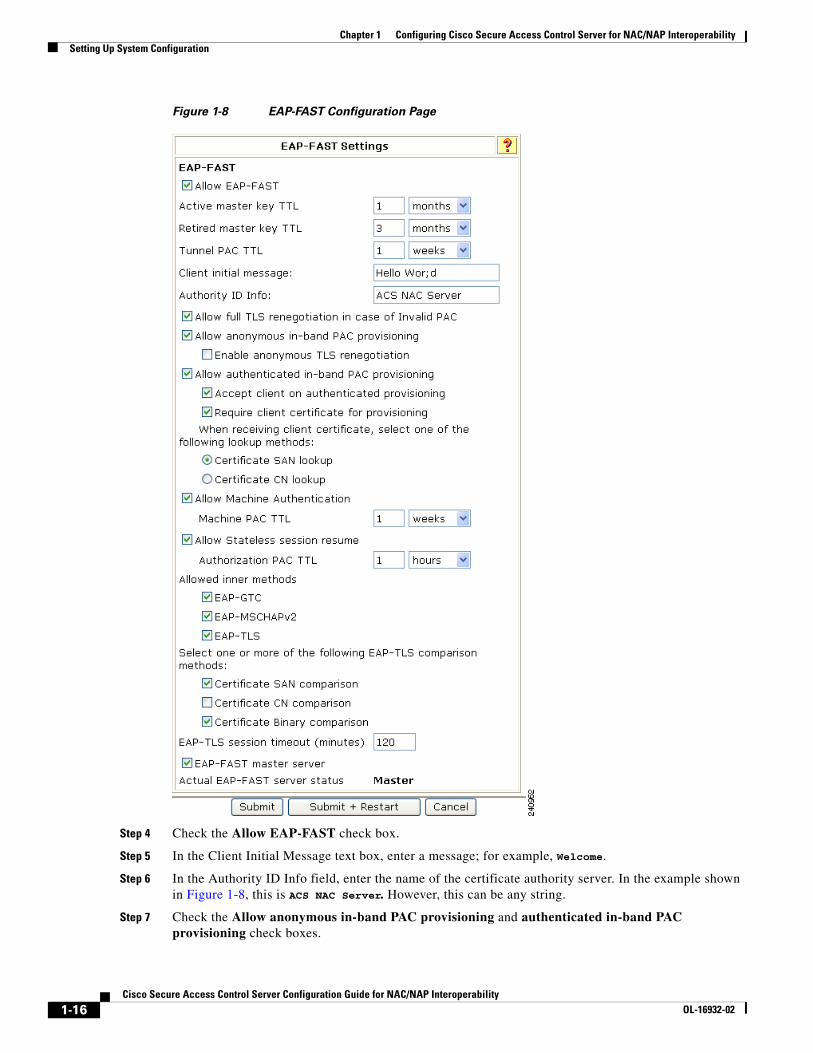
The EAP FAST Configuration page appears, as shown in Figure 1-8.
1-15Cisco Secure Access Control Server Configuration Guide for NAC/NAP Interoperability
OL-16932-02
Chapter 1 Configuring Cisco Secure Access Control Server for NAC/NAP InteroperabilitySetting Up System Configuration
Figure 1-8 EAP-FAST Configuration Page
Step 4 Check the Allow EAP-FAST check box.
Step 5 In the Client Initial Message text box, enter a message; for example, Welcome.
Step 6 In the Authority ID Info field, enter the name of the certificate authority server. In the example shown in Figure 1-8, this is ACS NAC Server. However, this can be any string.
Step 7 Check the Allow anonymous in-band PAC provisioning and authenticated in-band PAC provisioning check boxes.
1-16Cisco Secure Access Control Server Configuration Guide for NAC/NAP Interoperability
OL-16932-02
Chapter 1 Configuring Cisco Secure Access Control Server for NAC/NAP InteroperabilitySetting Up System Configuration
Note NAC/NAP is available for anonymous and authenticated in-band provisioning. You can choose these options to make them available in Network Access Profile configuration.
Step 8 Check the Accept client on authenticated provisioning and Require client certificate for provisioning check boxes.
Step 9 Check the check boxes for the EAP-GTC, EAP-MSCHAPv2, and EAP-TLS inner methods.
The EAP-FAST Master Server check box is automatically checked (enabled).
Check the check boxes for Certificate SAN comparison, Certificate CN comparison, and Certificate Binary comparison to enable these EAP-TLS comparison methods.
Step 10 Click Submit + Restart.
Configure the Logging Level
To set ACS to full logging capabilities:
Step 1 In the navigation bar, click System Configuration.
The System Configuration page opens.
Step 2 Click Service Control.
Step 3 Under Level of Detail, click the Full radio button.
Note Setting the logging level to Full might affect system performance. Therefore, you should set the logging level to Full for an initial deployment when detailed troubleshooting is required. After the network has become stable, set the logging level to Normal.
Step 4 Check the Manage Directory check box and choose how many days of logging to keep. (Enter the number of days, based on how much space you have on your hard drive. Cisco recommends that you specify seven days.)
Step 5 Click Restart to restart ACS. (Wait until the browser’s progress bar shows that the page has reloaded completely.)
Configure Logs and Reports
ACS logs records of users who gain or are refused network access, as well as records of other actions. You can output the information in the logs to reports that you view in the ACS GUI, which you can then save or print out and review. These reports summarize the logs, and provide useful information for debugging and tracking problems.
For detailed information on ACS logs and reports, see Chapter 10 of the User Guide for Cisco Secure ACS. 4.2, “Logs and Reports.”
1-17Cisco Secure Access Control Server Configuration Guide for NAC/NAP Interoperability
OL-16932-02

Chapter 1 Configuring Cisco Secure Access Control Server for NAC/NAP InteroperabilitySetting Up System Configuration
The Failed Attempts report and the RADIUS Accounting report are useful tools for monitoring the performance of the NAC/NAP network. And the Passed Authentications report is particularly useful in NAC-enabled networks; because, it shows the group mapping for each posture validation request. By default, the Passed Authentication report is unchecked (disabled).
To enable the Passed Authentications report:
Step 1 In the navigation bar, click System Configuration.
The System Configuration page opens.
Step 2 Click Logging.
The Logging Configuration page opens.
The CSV Passed Authentications File Configuration page opens, as shown in Figure 1-9.
Figure 1-9 CSV Passed Authentications File Configuration Page
Step 3 Check the Log to CSV Passed Authentications Report check box.
Step 4 Move the attributes that you want to log from the Attributes list to Logged Attributes list.
Some useful attributes to log are:
• Message-Type
1-18Cisco Secure Access Control Server Configuration Guide for NAC/NAP Interoperability
OL-16932-02
Chapter 1 Configuring Cisco Secure Access Control Server for NAC/NAP InteroperabilitySetting Up System Configuration
• User-Name
• Caller-ID
• NAS-Port
• NAS-IP-Address
• AAA Server
• Filter Information
• Network Device Group
• Access Device
• PEAP/EAP-FAST-Clear-Name
• Logged Remotely
• EAP Type
• EAP Type Name
• Network Access Profile Name
• Outbound Class
• Shared RAC
• Downloadable ACL
• System-Posture-Token
• Application-Posture-Token
• Reason
• Profile Name
• Reason
• System-posture-token
• Application-posture-token
Step 5 Click Submit.
Step 6 In the ACS Reports table, click the Configure link for the CSV RADIUS Accounting report.
The CSV RADIUS Accounting File Configuration page appears.
Check the Log to CSV RADIUS Accounting Report check box.
Step 7 Move the attributes that you want to log from the Attributes list to the Logged Attributes list.
Some useful attributes to log are:
• User-Name
• Group-Name
• Calling-Station-Id
• Acct-Status-Type
• Acct-Session-Id
• Acct-Session-Time
• Acct-Input-Octets
• Acct-Output-Octets
• Acct-Input-Packets
1-19Cisco Secure Access Control Server Configuration Guide for NAC/NAP Interoperability
OL-16932-02
Chapter 1 Configuring Cisco Secure Access Control Server for NAC/NAP InteroperabilitySetting Up Administration Control
• Acct-Output-Packets
• Framed-IP-Address
• NAS-Port
• NAS-IP-Address
• Class
• Termination-Action
• Called-Station-Id
• Acct-Delay-Time
• Acct-Authentic
• Acct-Terminate-Cause
• Event-Timestamp
• NAS-Port-Type
• Port-Limit
• NAS-Port-Id
• AAA Server
• ExtDB Info
• Network Access Profile Name
• cisco-av-pair
• Access Device
• Logged Remotely
Step 8 Click Submit.
Setting Up Administration ControlThis section describes how to add remote administrator access.
Add Remote Administrator AccessTo prepare ACS for remote administration:
Step 1 In the navigation bar, click Administration Control.
The System Configuration page opens.
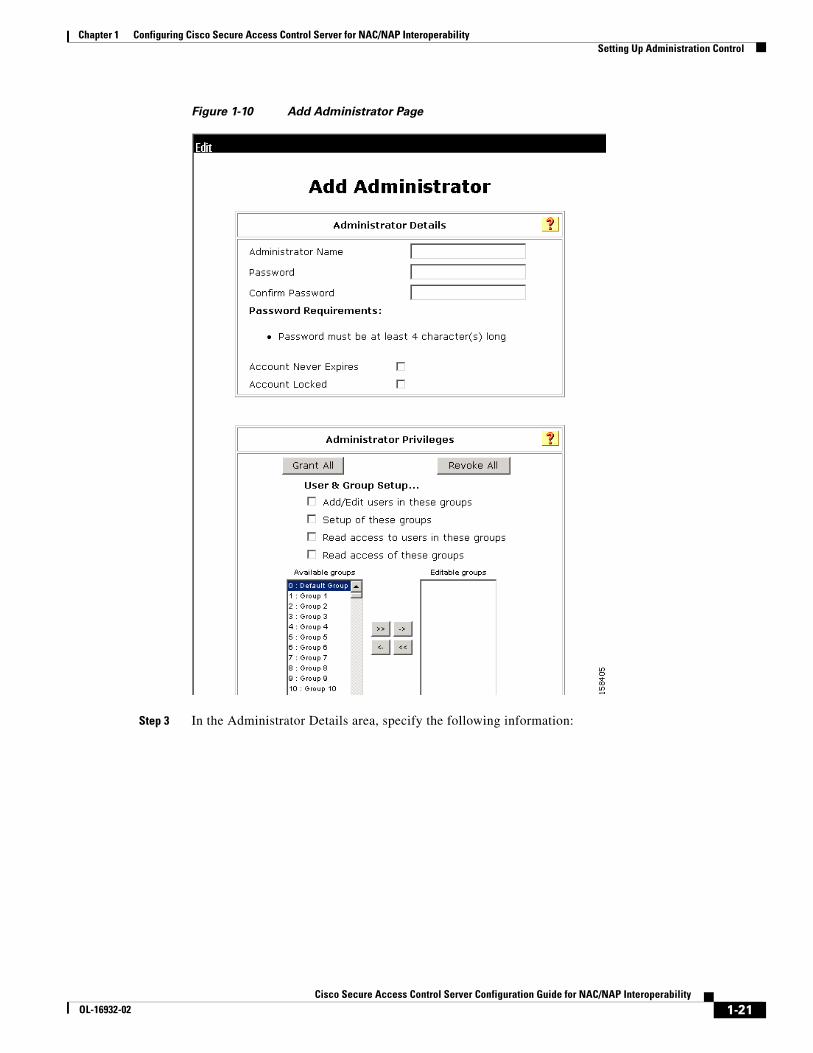
Step 2 Click Add Administrator.
The Add Administrator page opens, as shown in Figure 1-10.
1-20Cisco Secure Access Control Server Configuration Guide for NAC/NAP Interoperability
OL-16932-02
Chapter 1 Configuring Cisco Secure Access Control Server for NAC/NAP InteroperabilitySetting Up Administration Control
Figure 1-10 Add Administrator Page
Step 3 In the Administrator Details area, specify the following information:
1-21Cisco Secure Access Control Server Configuration Guide for NAC/NAP Interoperability
OL-16932-02
Chapter 1 Configuring Cisco Secure Access Control Server for NAC/NAP InteroperabilitySetting Up Administration Control
Step 4 Click Grant All.
This grants all privileges to the new administrator; or, specifies to which groups or actions this administrator is granted access.
Note For more information on administrative privileges, see the “Add Administrator and Edit Administrator Pages” section in Chapter 11 of the User Guide for Cisco Secure Access Control Server 4.2, “Administrators and Administrative Policy.”
Step 5 Click Submit.
Option Description
Administrator Name Enter the login name for the ACS administrator account. Administrator names can contain 1 to 32 characters, but cannot contain the left angle bracket (<), the right angle bracket (>), or the backslash (\). An ACS administrator name does not have to match a network user name.
Password Enter the password for the administrator to access the ACS web interface.
The password can match the password that the administrator uses for dial-in authentication; or, it can be a different password. ACS enforces the options in the Password Validation Options section on the Administrator Password Policy page.
Passwords must be at least 4 characters long and contain at least 1 numeric character. The password cannot include the username or the reverse username, must not match any of the previous 4 passwords, and must be in ASCII characters. If you make a password error, ACS displays the password criteria.
If the password policy changes and the password does not change, the administrator remains logged in. ACS enforces the new password policy at the next login.
Confirm Password Reenter the password that you entered in the password field.
Account Never Expires
If you want to override the lockout options set up on the Administrator Password Policy page (with the exception of manual lockout), check the check box next to Account Never Expires. If you check this option, the account never expires, but the password change policy remains in effect. The default value is unchecked (disabled).
Account Locked If you want to lock out an administrator who is denied access due to the account policy options specified on the Password Policy page, check the Account Locked check box. When unchecked (disabled), this option unlocks an administrator who was locked out.
Administrators who have the Administration Control privilege can use this option to manually lock out an account or reset locked accounts. The system displays a message that explains the reason for a lockout.
When an administrator unlocks an account, ACS resets the Last Password Change and the Last Activity fields to the day on which the administrator unlocks the account.
The reset of a locked account does not affect the configuration of the lockout and unlock mechanisms for failed attempts.
1-22Cisco Secure Access Control Server Configuration Guide for NAC/NAP Interoperability
OL-16932-02
Chapter 1 Configuring Cisco Secure Access Control Server for NAC/NAP InteroperabilitySetting Up Shared Profile Components
After performing these steps, from a remote host, you can open a browser in which to administer ACS.
The URLs for remote access are:
• http://IP_address:2002
• http://hostname:2002
Setting Up Shared Profile ComponentsBefore you can set up network access profiles, you must set up Shared Profile Components.
Shared Profile Components are configurations that can be reused across many different network access profiles to set up filtering within ACS or to control network authorizations within RADIUS.
A Network Access Profile is a classification of network-access requests for applying a common policy. You can use network access profiles to aggregate all policies that should be activated for a certain location in the network or for users who connect to the network by using specified protocols such as 802.1x.
For detailed information on network access profiles, see Chapter 14 of the User Guide for Cisco Secure ACS, 4.2, “Network Access Profiles.”
This section describes the following tasks:
• Configure Network Access Filtering (Optional), page 1-23
• Configure Radius Authorization Components, page 1-24
Configure Network Access Filtering (Optional)NAF is an ACS feature that groups several devices into one group. The devices can be ACS clients, ACS servers, ACS network device groups (NDGs), or a specific IP address. NAFs are particularly useful for defining network access profiles.
When you set up Downloadable IP ACLs, you can:
• Assign the default NAF, which is All AAA Clients.
This default allows access to all clients.
• Set up a NAF to limit access to specified clients.
To set up a NAF:
Step 1 In the navigation bar, click Shared Profile Components.
The Shared Profile Components page opens.
Step 2 Click Network Access Filtering.
The Network Access Filtering table appears. Initially, this table does not contain shared profile components.
Step 3 Click Add.
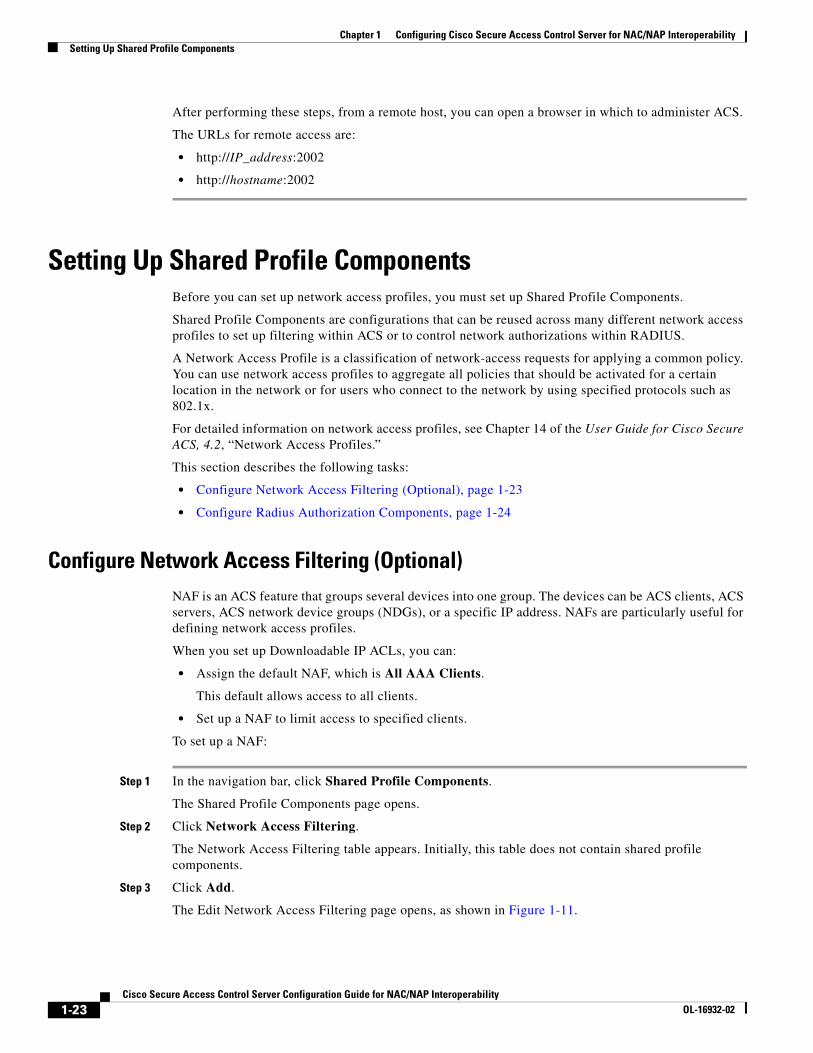
The Edit Network Access Filtering page opens, as shown in Figure 1-11.
1-23Cisco Secure Access Control Server Configuration Guide for NAC/NAP Interoperability
OL-16932-02
Chapter 1 Configuring Cisco Secure Access Control Server for NAC/NAP InteroperabilitySetting Up Shared Profile Components
Figure 1-11 Edit Network Access Filtering Page
Step 4 In the Name text box, enter a name for the network access filter.
Step 5 Move any devices or device groups to the Selected Items list.
To move a device or device group, select the item to move and then click the right arrow button to move it to the Selected Items list.
Step 6 Click Submit.
Configure Radius Authorization ComponentsShared RADIUS Authorization Components (RACs) are sets of RADIUS attributes that ACS applies to Network Access Devices (NADs) during network authorization. Each RAC can contain one or more vendor RADIUS attributes, including Cisco IOS.PIX 6.0, IETF, and Ascend attributes.
By setting up RACs, you can dynamically assign RADIUS attributes to user sessions based on a policy. For example, you can create a RAC that gathers RADIUS attributes to define a VLAN. Users who access the network through a switch; for example, are then given access to specified VLANs based on how they are authorized and authenticated.
The sample RACs in this section provide RADIUS configurations to handle the most important services in the NAC/NAP environment:
• NAC L2 802.1x
The sample RACs are:
• Cisco_FullAccess—Provides full access to the Cisco network. You use this RAC to grant access to clients that qualify as healthy.
1-24Cisco Secure Access Control Server Configuration Guide for NAC/NAP Interoperability
OL-16932-02
Chapter 1 Configuring Cisco Secure Access Control Server for NAC/NAP InteroperabilitySetting Up Shared Profile Components
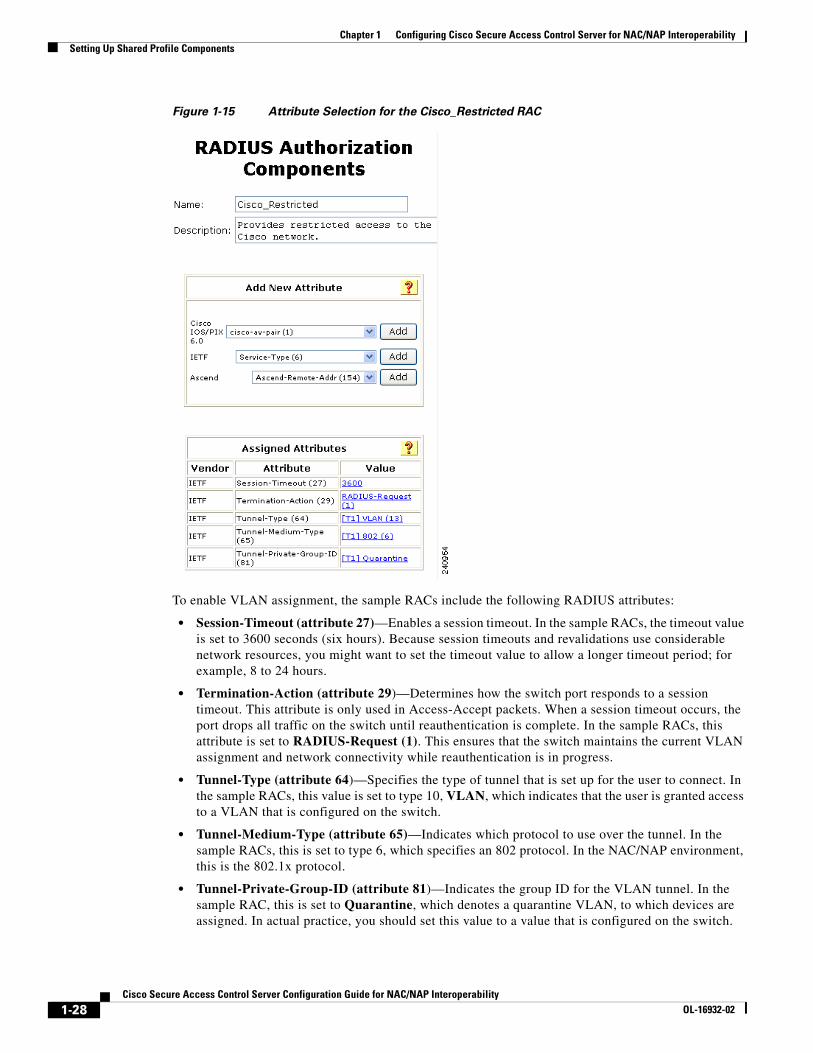
• Cisco_Restricted—Provides restricted access to the Cisco network. You use this RAC to grant partial (quarantined) access to clients that do not qualify as healthy.
To define RACs:
Step 1 In the navigation bar, click Shared Profile Components.
The Shared Profile Components page opens.
Step 2 Click RADIUS Authorization Components.
The RADIUS Authorization Components table appears. Initially, this table does not contain any RACs.
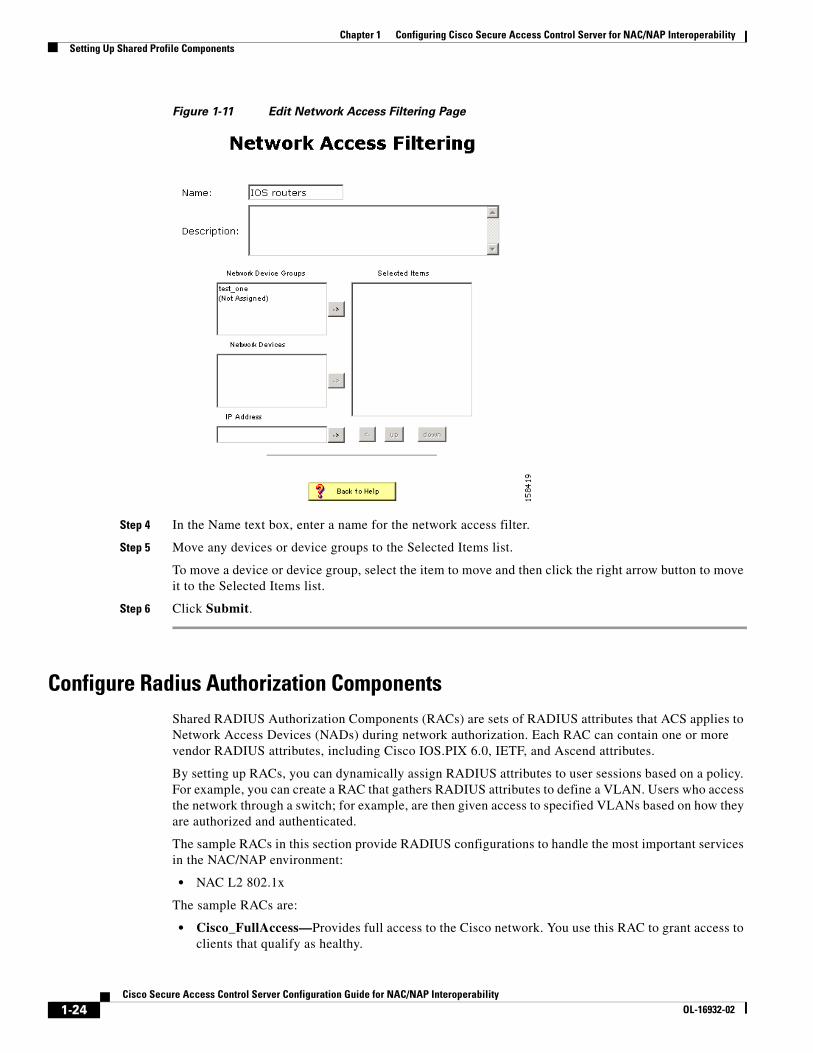
Step 3 Click Add.
The RADIUS Authorization Components Page opens, as shown in Figure 1-12.
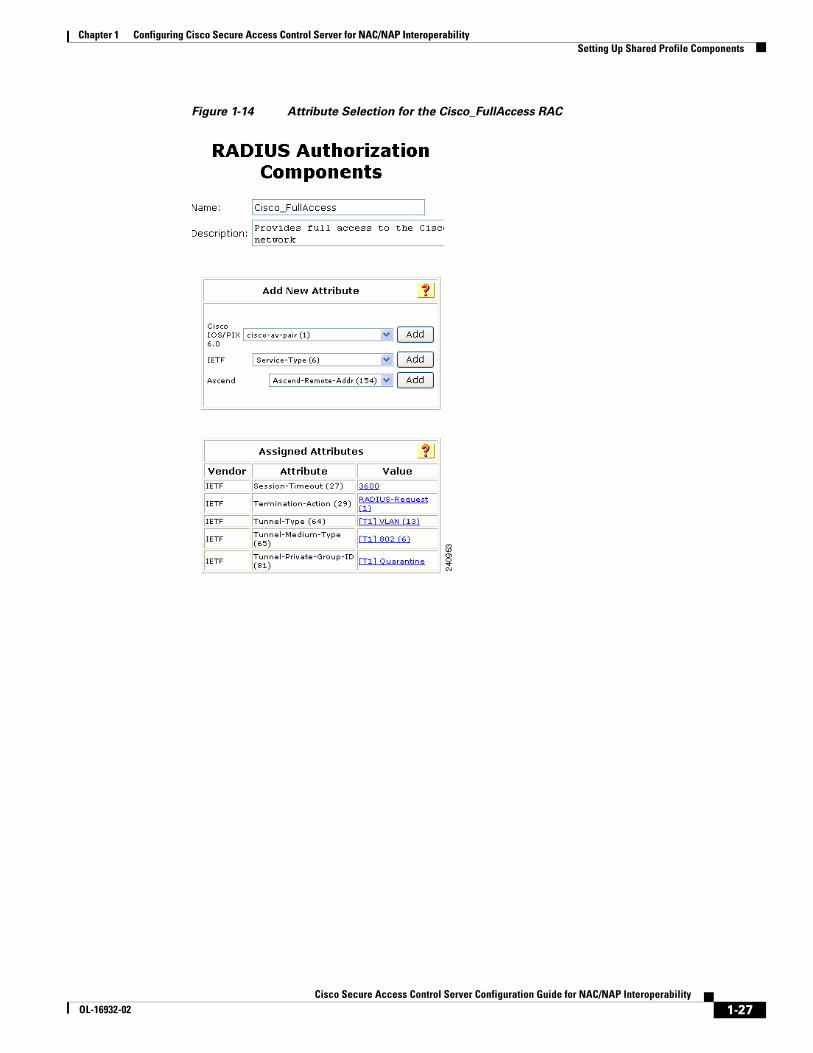
Figure 1-12 RADIUS Authorization Components Page
Step 4 Enter a Name and Description in the RADIUS Authorization Components page.
Step 5 In the Add New Attribute section, add the RADIUS attributes for the RAC.
a. To add an attribute, from the drop-down lists for Cisco IOS/PIX 6.0, IETF, and Ascend, choose the attribute that you want to add and then click Add.
For example, from the IETF drop-down list, choose Session-Timeout (27) and click Add.
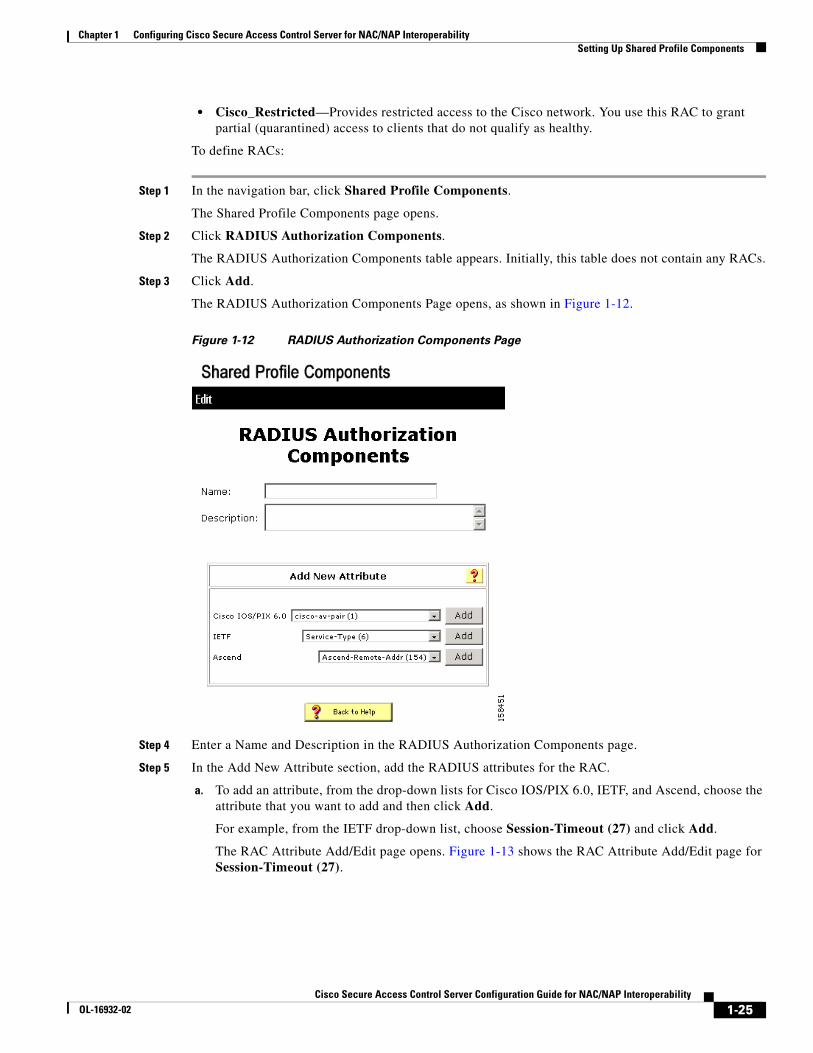
The RAC Attribute Add/Edit page opens. Figure 1-13 shows the RAC Attribute Add/Edit page for Session-Timeout (27).
1-25Cisco Secure Access Control Server Configuration Guide for NAC/NAP Interoperability
OL-16932-02
Chapter 1 Configuring Cisco Secure Access Control Server for NAC/NAP InteroperabilitySetting Up Shared Profile Components
Figure 1-13 RAC Attribute Add/Edit Page
b. In the Value field for the attribute, enter an appropriate value. Each attribute has specific value types based on how the attribute is defined.
For example, for the Session-Timeout (27) attribute, enter a timeout value in seconds.
c. Click Submit.
Note The Session-Timeout values used for NAC/NAP deployments can have a significant impact on ACS performance. Cisco recommends that you adjust the timeout value for the scale of your network and the transaction capability of your ACS installation.
Step 6 When you are finished adding attributes, click Submit.
Step 7 To enable the RAC, from the navigation bar, choose System Configuration > Service Control and then click Restart.
Figure 1-14 shows attribute selection for the Cisco_FullAccess RAC and Figure 1-15 shows attribute selection for the Cisco_Restricted RAC.
1-26Cisco Secure Access Control Server Configuration Guide for NAC/NAP Interoperability
OL-16932-02
Chapter 1 Configuring Cisco Secure Access Control Server for NAC/NAP InteroperabilitySetting Up Shared Profile Components
Figure 1-14 Attribute Selection for the Cisco_FullAccess RAC
1-27Cisco Secure Access Control Server Configuration Guide for NAC/NAP Interoperability
OL-16932-02
Chapter 1 Configuring Cisco Secure Access Control Server for NAC/NAP InteroperabilitySetting Up Shared Profile Components
Figure 1-15 Attribute Selection for the Cisco_Restricted RAC
To enable VLAN assignment, the sample RACs include the following RADIUS attributes:
• Session-Timeout (attribute 27)—Enables a session timeout. In the sample RACs, the timeout value is set to 3600 seconds (six hours). Because session timeouts and revalidations use considerable network resources, you might want to set the timeout value to allow a longer timeout period; for example, 8 to 24 hours.
• Termination-Action (attribute 29)—Determines how the switch port responds to a session timeout. This attribute is only used in Access-Accept packets. When a session timeout occurs, the port drops all traffic on the switch until reauthentication is complete. In the sample RACs, this attribute is set to RADIUS-Request (1). This ensures that the switch maintains the current VLAN assignment and network connectivity while reauthentication is in progress.
• Tunnel-Type (attribute 64)—Specifies the type of tunnel that is set up for the user to connect. In the sample RACs, this value is set to type 10, VLAN, which indicates that the user is granted access to a VLAN that is configured on the switch.
• Tunnel-Medium-Type (attribute 65)—Indicates which protocol to use over the tunnel. In the sample RACs, this is set to type 6, which specifies an 802 protocol. In the NAC/NAP environment, this is the 802.1x protocol.
• Tunnel-Private-Group-ID (attribute 81)—Indicates the group ID for the VLAN tunnel. In the sample RAC, this is set to Quarantine, which denotes a quarantine VLAN, to which devices are assigned. In actual practice, you should set this value to a value that is configured on the switch.
1-28Cisco Secure Access Control Server Configuration Guide for NAC/NAP Interoperability
OL-16932-02
Chapter 1 Configuring Cisco Secure Access Control Server for NAC/NAP InteroperabilityConfiguring Group Setup
Step 8 Create additional RACs as needed for your NAC/NAP network.
The RAC examples in Figure 1-14 and Figure 1-15 show basic attributes for a RAC developed for the NAC/NAP environment. ACS might send several additional attributes in a RADIUS-Accept response for NAC/NAP.
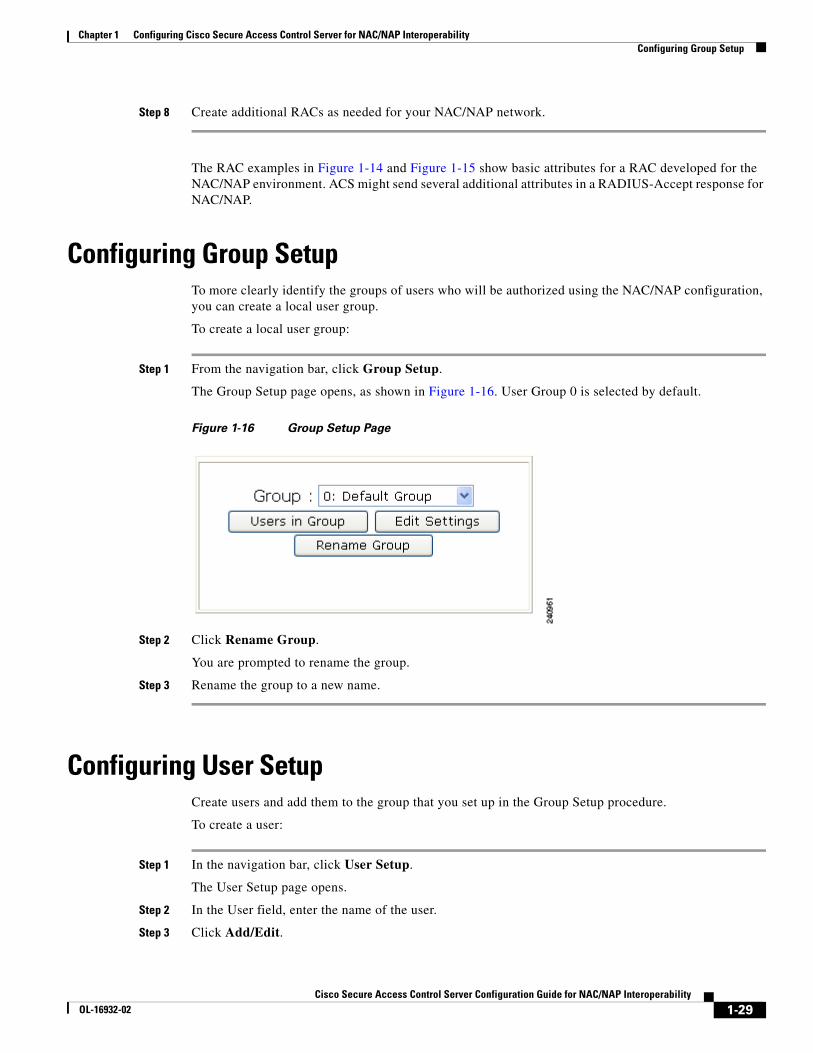
Configuring Group SetupTo more clearly identify the groups of users who will be authorized using the NAC/NAP configuration, you can create a local user group.
To create a local user group:
Step 1 From the navigation bar, click Group Setup.
The Group Setup page opens, as shown in Figure 1-16. User Group 0 is selected by default.
Figure 1-16 Group Setup Page
Step 2 Click Rename Group.
You are prompted to rename the group.
Step 3 Rename the group to a new name.
Configuring User SetupCreate users and add them to the group that you set up in the Group Setup procedure.
To create a user:
Step 1 In the navigation bar, click User Setup.
The User Setup page opens.
Step 2 In the User field, enter the name of the user.
Step 3 Click Add/Edit.
1-29Cisco Secure Access Control Server Configuration Guide for NAC/NAP Interoperability
OL-16932-02
Chapter 1 Configuring Cisco Secure Access Control Server for NAC/NAP InteroperabilitySetting Up External Posture Validation
The New User page for the specified user opens.
Step 4 (optional) In the Supplementary User Info section, enter supplementary user information such as the real name for the user and a description of the user.
Step 5 From the drop-down list in the Password Authentication field, select the database to use for authentication of the user.
Step 6 In the Password field, enter a password for the user.
Step 7 In the Confirm Password field, re-enter the password.
Step 8 Assign the user to the Default Group or to another Group, as appropriate.
Step 9 Click Submit.
Repeat the process for any additional users that you want to add.
Setting Up External Posture ValidationAn external posture validation policy uses an external server that returns a posture assessment (token) to ACS according to data that the ACS forwards to this server.
In a NAC/NAP installation, you configure external posture AAA server to forward Microsoft Vista client Statement of Health (SoH) information from ACS to a Microsoft Network Policy Server (NPS) for posture validation. An NPS is a Microsoft 2008 server that validates the SoH information from NAP clients and provides remediation instructions, if needed.
To set up an external posture validation server:
Step 1 On the navigation bar, click Posture Validation.
The Posture Validation Components Setup page appears.
Step 2 In the Posture Validation Components Setup page, click External Posture Validation Setup.
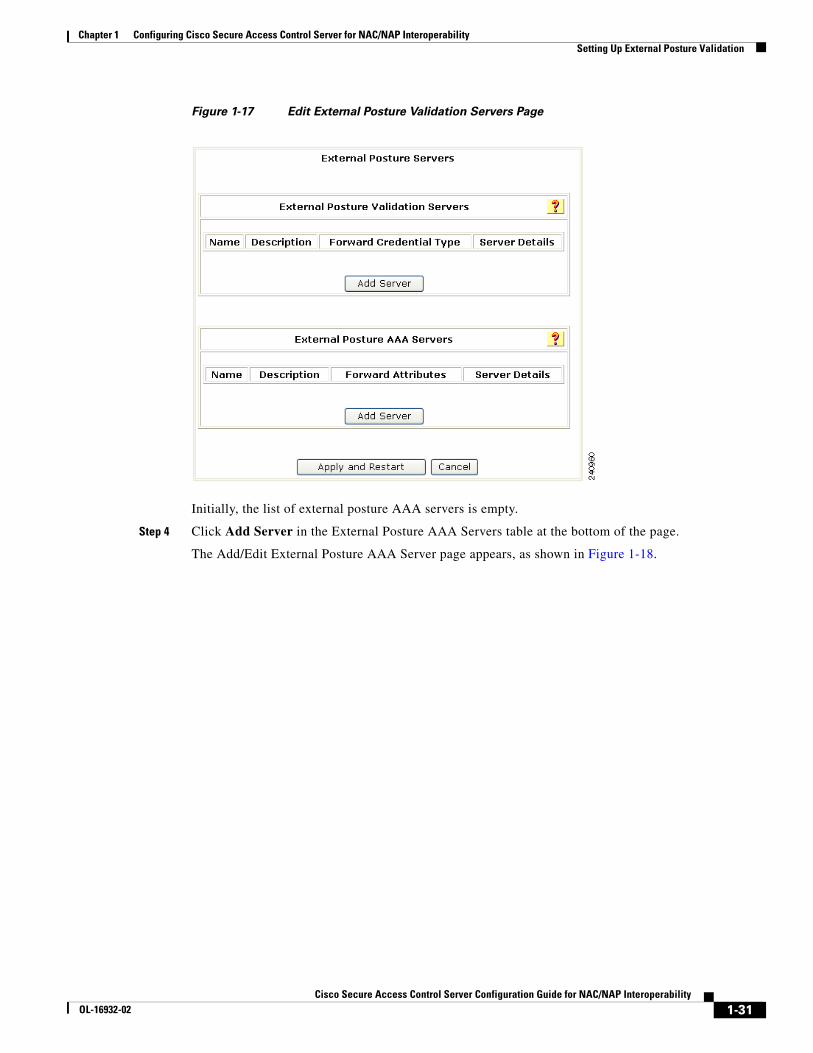
Step 3 The Edit External Posture Validation Servers page opens, as shown in Figure 1-17.
1-30Cisco Secure Access Control Server Configuration Guide for NAC/NAP Interoperability
OL-16932-02
Chapter 1 Configuring Cisco Secure Access Control Server for NAC/NAP InteroperabilitySetting Up External Posture Validation
Figure 1-17 Edit External Posture Validation Servers Page
Initially, the list of external posture AAA servers is empty.
Step 4 Click Add Server in the External Posture AAA Servers table at the bottom of the page.
The Add/Edit External Posture AAA Server page appears, as shown in Figure 1-18.
1-31Cisco Secure Access Control Server Configuration Guide for NAC/NAP Interoperability
OL-16932-02
Chapter 1 Configuring Cisco Secure Access Control Server for NAC/NAP InteroperabilitySetting Up External Posture Validation
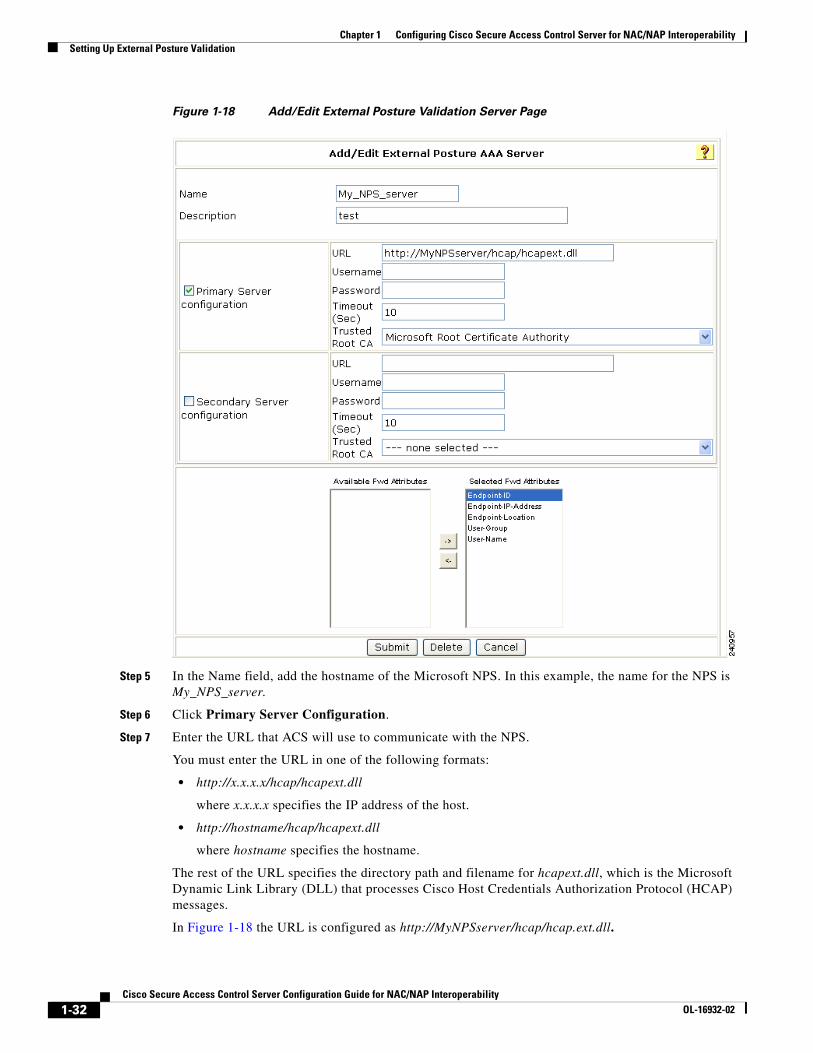
Figure 1-18 Add/Edit External Posture Validation Server Page
Step 5 In the Name field, add the hostname of the Microsoft NPS. In this example, the name for the NPS is My_NPS_server.
Step 6 Click Primary Server Configuration.
Step 7 Enter the URL that ACS will use to communicate with the NPS.
You must enter the URL in one of the following formats:
• http://x.x.x.x/hcap/hcapext.dll
where x.x.x.x specifies the IP address of the host.
• http://hostname/hcap/hcapext.dll
where hostname specifies the hostname.
The rest of the URL specifies the directory path and filename for hcapext.dll, which is the Microsoft Dynamic Link Library (DLL) that processes Cisco Host Credentials Authorization Protocol (HCAP) messages.
In Figure 1-18 the URL is configured as http://MyNPSserver/hcap/hcap.ext.dll.
1-32Cisco Secure Access Control Server Configuration Guide for NAC/NAP Interoperability
OL-16932-02
Chapter 1 Configuring Cisco Secure Access Control Server for NAC/NAP InteroperabilityConfiguring the Windows Server 2008 and the Microsoft Clients
Note Do not configure any username or password.
Step 8 Accept the default Timeout value (10 seconds).
Step 9 (Optional) If you wish to use an HTTPS connection between ACS and NPS, choose the Trusted Root CA used for ACS and NPS. In this example, the Trusted Root CA is Microsoft Root Certificate Authority.
Step 10 Click all of the available fwd attributes and move them to the selected fwd attributes. These include: User-Name, Endpoint ID, Endpoint IP Address, Endpoint Location, User Group, and User Name.
Step 11 Click Submit.
Configuring the Windows Server 2008 and the Microsoft ClientsRefer to the Cisco Network Admission Control and Microsoft Network Access Protection Troubleshotting Guide for instructions on configuring the Windows Server 2008 and Microsoft Vista clients.
Configuring 802.1x on an IOS SwitchThe IEEE 802.1x protocol is a data-link layer protocol. This implies that the host must be directly connected to the switch port that is performing the NAC process. NAC-L2-802.1x is the NAC mode that combines the 802.1x protocol with NAC for machine and user identity checking along with posture validation for endpoint authentication.
Because the host is directly connected to the switch port performing NAC, an Ethernet linkup signal from the host is enough to trigger EAP and the NAC process. The host can also send an EAP over LAN (EAPoL) start packet to trigger this process in certain circumstances while the Ethernet link is maintained. Thus, the EAP exchange can be triggered when:
• The host first connects to the network.
• The RADIUS Session-Timeout on the switch expires.
• A System Health Agent (SHA) notifies the NAP agent when there is a change in the health state.
In all cases, the NADs begin the actual EAP protocol with the client.
Refer to the Cisco Network Admission Control and Microsoft Network Access Protection Troubleshotting Guide for instructions on configuring the IOS switch for 802.1x.
Setting Up Network Access ProfilesA Network Access Profile, also known as a profile, is a way to classify access requests according to the AAA clients' IP addresses, membership in a network device group, protocol types, or other specific RADIUS attribute values sent by the network device through which the user connects.
If you configure network access profiles, ACS traverses the ordered list of active profiles, and maps a RADIUS transaction to a profile by using a first-match strategy on the first access-request of the transaction.
1-33Cisco Secure Access Control Server Configuration Guide for NAC/NAP Interoperability
OL-16932-02
Chapter 1 Configuring Cisco Secure Access Control Server for NAC/NAP InteroperabilitySetting Up Network Access Profiles
After you set up a profile, you associate a set of rules or policies with it, to reflect your organization’s security policies. These associations are called profile-based policies. Configuring a profile-based policy includes creating rules for:
• Protocols
• Authentication
• Posture validation
• Authorization
A profile is a classification of network access requests for applying a common policy.
You can create a profile in two ways:
• Manually, by choosing options in the Network Access Profile configuration pages.
• By using the sample NAC templates provided with ACS 4.2 to start a profile and then editing the profile as required for your installation.
You can classify (filter) a user request by choosing a NAF from the list of existing NAFs. You configure NAF objects in the Shared Profile Components pages.
You can use protocol types to choose one or more protocol types as a filter. The protocol types are a subset of the vendor-specific attributes (VSAs) that a network access server supports. ACS 4.2 does not support the TACACS+ protocol for network access profiles.
You can use Advanced Filtering to create a specific rule that contains one or more RADIUS attributes and values. The Advanced Filtering rules are based on a Boolean AND expression that uses RADIUS attributes to examine the request packet.
Each Network Access Profile contains a name, description, an active flag, and a set of classifications that you use to rank an access request based on different parameters.
Sample NAC Profile TemplatesACS 4.2 provides the following sample profile templates for NAC:
• NAC Layer 2 profile template (NAC L2 IP)
• NAC Layer 2 802.1x template (NAC L2 802.1x)
• NAC L3 IP
• Microsoft IEEE 802.1x
• Wireless (NAC L2 802.1x)
• Agentless Host for L2 (802.1x Fallback)
• Agentless Host for L3
The following sections describe how to customize the NAC L2 IP template for use with 802.1x.
Set Up a NAC L2 802.1x ProfileCreate the NAC L2 802.1x Network Access Profile from the NAC L2 802.1x template.
To create a Layer 2 NAC 802.1x Network Access Profile from the template:
1-34Cisco Secure Access Control Server Configuration Guide for NAC/NAP Interoperability
OL-16932-02
Chapter 1 Configuring Cisco Secure Access Control Server for NAC/NAP InteroperabilitySetting Up Network Access Profiles
Step 1 In the navigation bar, click Network Access Profiles.
The Network Access Profiles page opens.
Step 2 Click Add Template Profile.
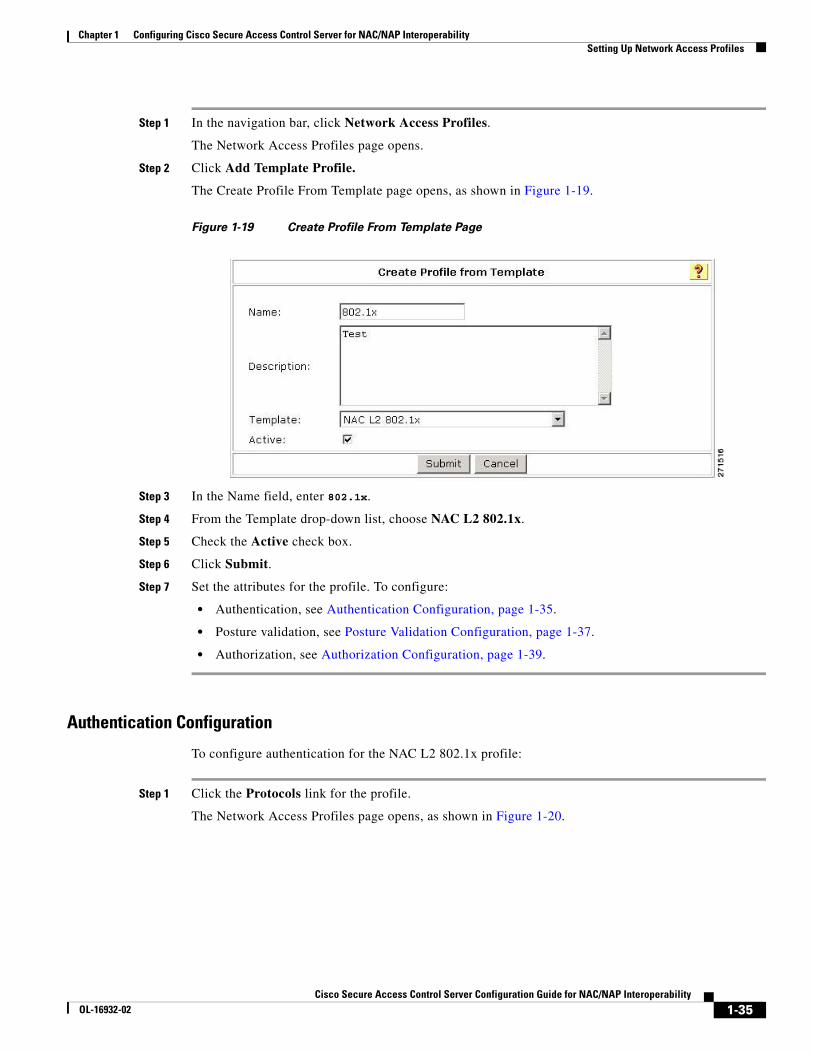
The Create Profile From Template page opens, as shown in Figure 1-19.
Figure 1-19 Create Profile From Template Page
Step 3 In the Name field, enter 802.1x.
Step 4 From the Template drop-down list, choose NAC L2 802.1x.
Step 5 Check the Active check box.
Step 6 Click Submit.
Step 7 Set the attributes for the profile. To configure:
• Authentication, see Authentication Configuration, page 1-35.
• Posture validation, see Posture Validation Configuration, page 1-37.
• Authorization, see Authorization Configuration, page 1-39.
Authentication Configuration
To configure authentication for the NAC L2 802.1x profile:
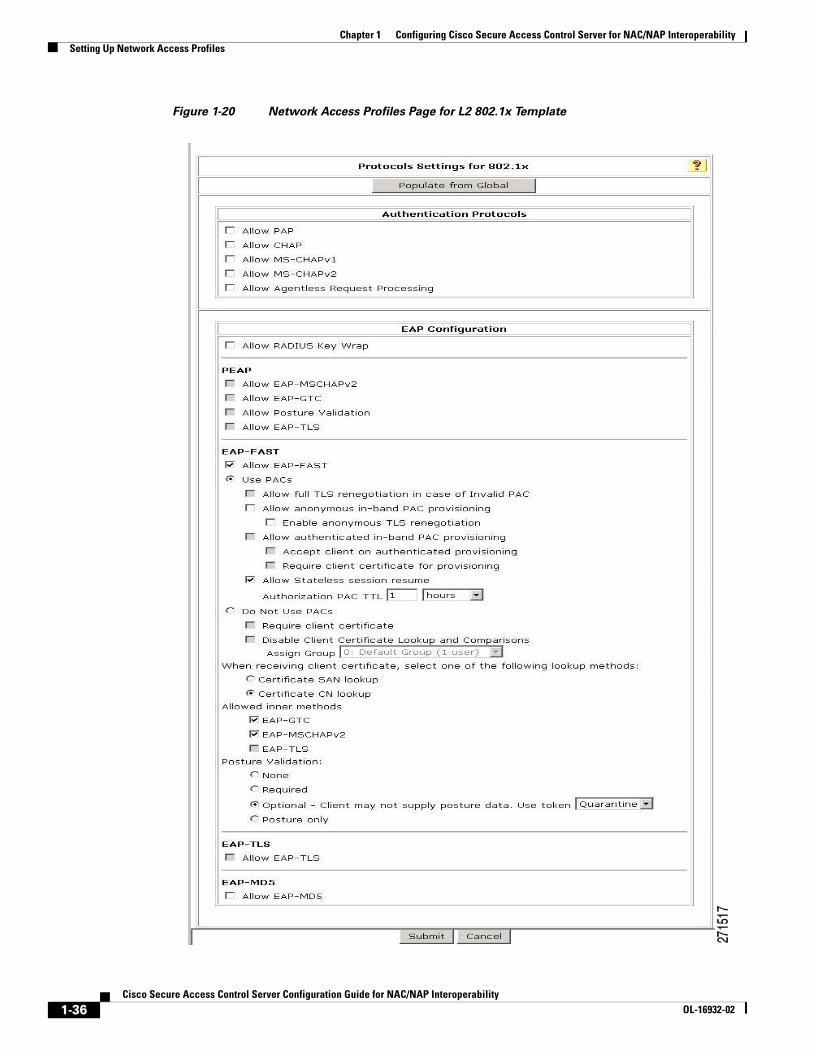
Step 1 Click the Protocols link for the profile.
The Network Access Profiles page opens, as shown in Figure 1-20.
1-35Cisco Secure Access Control Server Configuration Guide for NAC/NAP Interoperability
OL-16932-02
Chapter 1 Configuring Cisco Secure Access Control Server for NAC/NAP InteroperabilitySetting Up Network Access Profiles
Figure 1-20 Network Access Profiles Page for L2 802.1x Template
1-36Cisco Secure Access Control Server Configuration Guide for NAC/NAP Interoperability
OL-16932-02
Chapter 1 Configuring Cisco Secure Access Control Server for NAC/NAP InteroperabilitySetting Up Network Access Profiles
EAP-FAST is selected by default.
Step 2 Do not check the Allow anonymous in-band PAC provisioning check box.
Step 3 Uncheck the EAP-GTC check box.
Step 4 Click Submit.
Posture Validation Configuration
To configure posture validation and an SoH rule for the NAC L2 802.1x profile:
Step 1 Click the Posture Validation link for the NAC L2 802.1x profile.
The Posture Validation for 802.1x page opens.
Step 2 Click Add Rule under the Statement of Health Posture Validation Rule table.
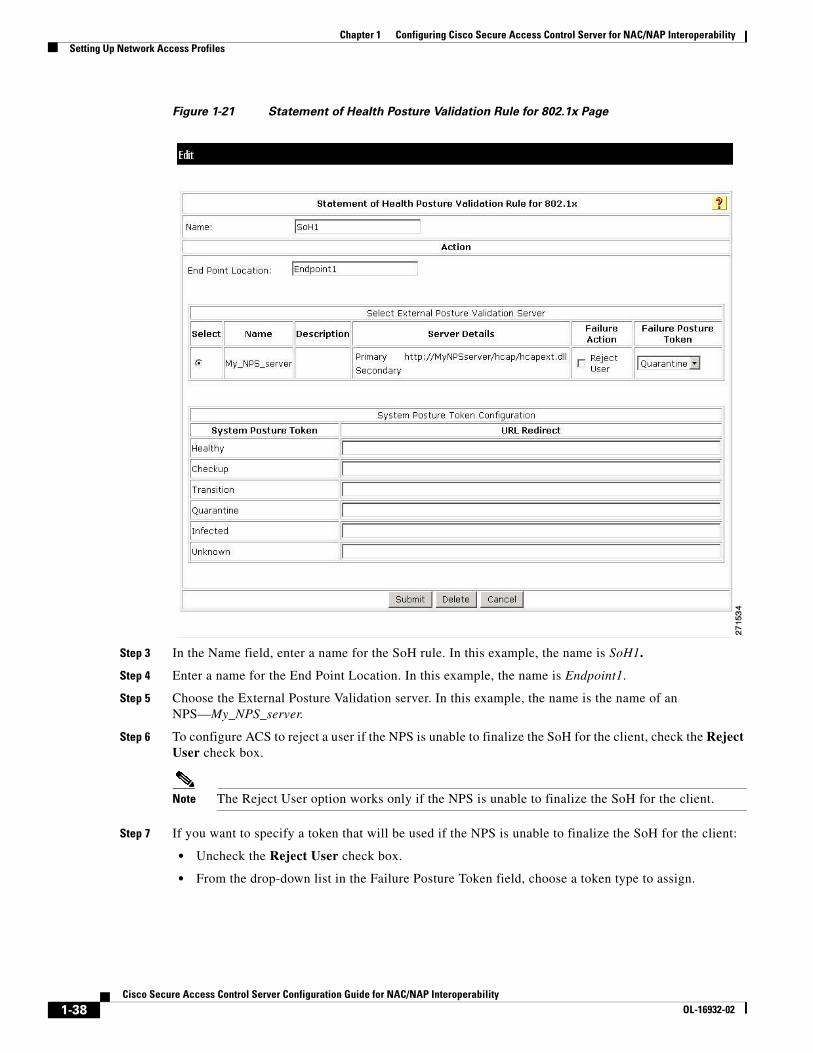
The Statement of Health Posture Validation Rule for 802.1x page opens, as shown in Figure 1-21.
1-37Cisco Secure Access Control Server Configuration Guide for NAC/NAP Interoperability
OL-16932-02
Chapter 1 Configuring Cisco Secure Access Control Server for NAC/NAP InteroperabilitySetting Up Network Access Profiles
Figure 1-21 Statement of Health Posture Validation Rule for 802.1x Page
Step 3 In the Name field, enter a name for the SoH rule. In this example, the name is SoH1.
Step 4 Enter a name for the End Point Location. In this example, the name is Endpoint1.
Step 5 Choose the External Posture Validation server. In this example, the name is the name of an NPS—My_NPS_server.
Step 6 To configure ACS to reject a user if the NPS is unable to finalize the SoH for the client, check the Reject User check box.
Note The Reject User option works only if the NPS is unable to finalize the SoH for the client.
Step 7 If you want to specify a token that will be used if the NPS is unable to finalize the SoH for the client:
• Uncheck the Reject User check box.
• From the drop-down list in the Failure Posture Token field, choose a token type to assign.
1-38Cisco Secure Access Control Server Configuration Guide for NAC/NAP Interoperability
OL-16932-02
Chapter 1 Configuring Cisco Secure Access Control Server for NAC/NAP InteroperabilitySetting Up Network Access Profiles
Note Even if the user is not rejected, the NPS validates the SoH and returns an appropriate token to ACS.
ACS uses the token that you specify for the SoH posture rule only if the NPS is unable to finalize the SoH for the client. Therefore, the token that you choose here is a fail-safe token that is used only when the NPS cannot process the SoH, and it is not mandatory that you choose one.
Step 8 If you select a posture token, then in the URL Redirect table, enter a URL for a server to which to redirect users when the specified token is assigned.
Step 9 Click Submit.
Authorization Configuration
To configure authorization for the NAC L2 802.1x profile.
Step 1 Click the Authorization link for the profile.
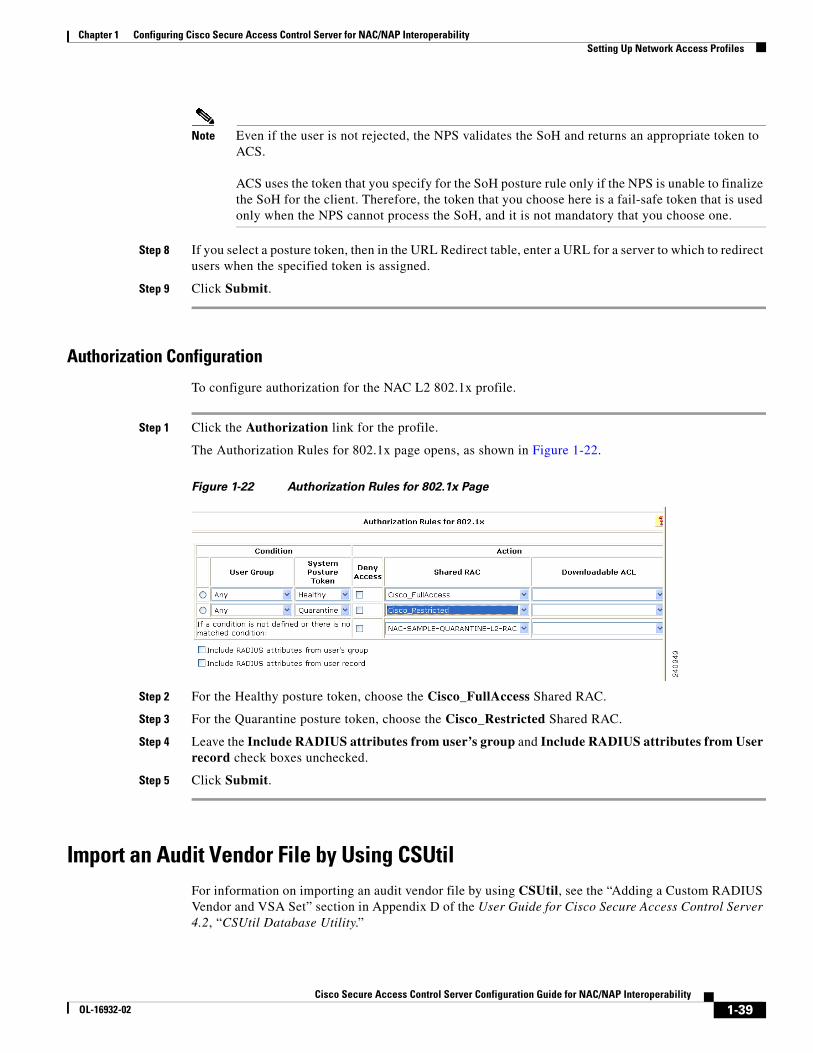
The Authorization Rules for 802.1x page opens, as shown in Figure 1-22.
Figure 1-22 Authorization Rules for 802.1x Page
Step 2 For the Healthy posture token, choose the Cisco_FullAccess Shared RAC.
Step 3 For the Quarantine posture token, choose the Cisco_Restricted Shared RAC.
Step 4 Leave the Include RADIUS attributes from user’s group and Include RADIUS attributes from User record check boxes unchecked.
Step 5 Click Submit.
Import an Audit Vendor File by Using CSUtilFor information on importing an audit vendor file by using CSUtil, see the “Adding a Custom RADIUS Vendor and VSA Set” section in Appendix D of the User Guide for Cisco Secure Access Control Server 4.2, “CSUtil Database Utility.”
1-39Cisco Secure Access Control Server Configuration Guide for NAC/NAP Interoperability
OL-16932-02
Chapter 1 Configuring Cisco Secure Access Control Server for NAC/NAP InteroperabilitySetting Up Network Access Profiles
Import a Device-Type Attribute File by Using CSUtilBefore you can configure GAME group feedback, you must import an attribute file that contains a device-type attribute.
The format of a text file to set up a device-type attributes is:
[attr#0]vendor-id=<the vendor identifier number>vendor-name=<the name of the vendor>application-id=6application-name=Auditattribute-id=00012attribute-name=Device-Typeattribute-profile=in outatribute-type=string
To import the file:
Step 1 Save the text file that sets up the device-type attribute in an appropriate directory.
Step 2 Open a DOS command window.
Step 3 Enter:
CSUtil -addAVP <device-type filename>where device-type filename is the name of the text file that contains the device-type attribute.
Step 4 Restart ACS:
a. In the navigation bar, click System Configuration.
b. Click Service Control.
c. Click Restart.
Import NAC Attribute-Value PairsTo import NAC attribute-value pairs:
Step 1 Use a text editor to create a NAC attribute-value pairs file.
Step 2 Import the file by using CSUtil. Then:
a. Start a DOS command window.
b. Enter:
CSUtil -addAVP <NAC AV-pair filename>
where NAC AV-pair filename is the name of the text file that contains the device-type attribute.
Step 3 Restart ACS:
a. In the navigation bar, click System Configuration.
b. Click Service Control.
c. Click Restart.
1-40Cisco Secure Access Control Server Configuration Guide for NAC/NAP Interoperability
OL-16932-02
Chapter 1 Configuring Cisco Secure Access Control Server for NAC/NAP InteroperabilitySetting Up Network Access Profiles
Configure Database Support for Agentless Host ProcessingThe database that you use can be an external LDAP database (preferred) or the ACS internal database.
For information on configuring database support for agentless host processing, see the Configuration Guide for Cisco Secure ACS 4.2. Chapter 6, “Agentless Host Support Configuration Scenario” provides additional information.
Enable Posture ValidationYou must enable posture validation in two places:
• Global Authentication Page, as part of the configuration for PEAP.
• EAP configuration section of the Protocols page for the Network Access Profile that enables agentless host support.
Configure an External Audit ServerFor detailed instructions on configuring an external audit server, see the Configuration Guide for Cisco Secure ACS 4.2. Chapter 9, “NAC Configuration Scenario” provides additional information.
Enable GAME Group FeedbackTo enable GAME group feedback:
Step 1 On the External Posture Validation Audit Server Setup page, in the GAME Group Feedback section, check the Request Device Type from Audit Server check box.
If this check box is not available, define an audit-device type attribute for the vendor in the internal ACS dictionary.
ACS for Windows:
With ACS for Windows, you use the CSUtil command. For detailed information, see “Posture Validation Attributes” in Appendix D of the User Guide for Cisco Secure ACS.
ACS Solution Engine:
With ACS Solution Engine, you use the NAC Attributes Management page in the web interface. See “NAC Attribute Management (ACS Solution Engine Only)” in Chapter 8 of the User Guide for Cisco Secure ACS for more information.
Step 2 If you want to configure a default destination group that ACS uses if the audit server does not return a device type, check the Assign This Group if Audit Server Did not Return a Device-Type check box.
You should now add entries to the group assignment table. The group assignment table is a list of rules that set conditions that determine the user group to which to assign a particular device type that the audit server returns.
Step 3 Click Add to display the group assignment table and add a device-type feedback rule.
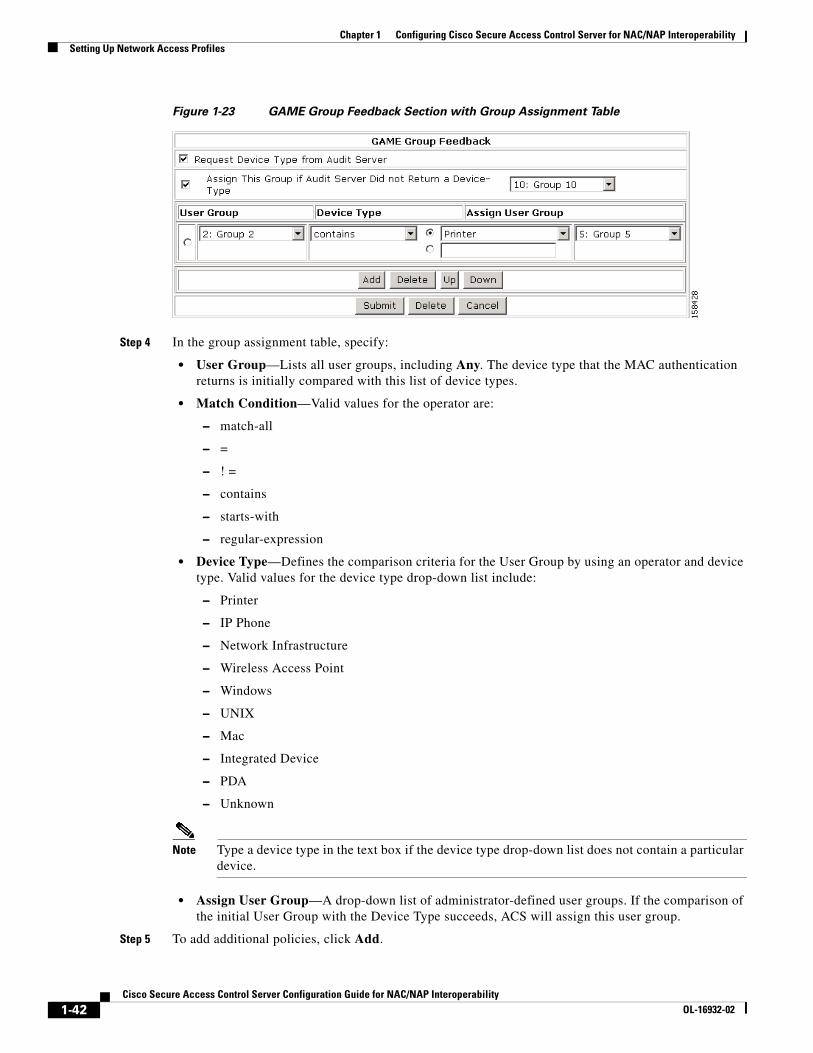
The group assignment table appears, as shown in Figure 1-23.
1-41Cisco Secure Access Control Server Configuration Guide for NAC/NAP Interoperability
OL-16932-02
Chapter 1 Configuring Cisco Secure Access Control Server for NAC/NAP InteroperabilitySetting Up Network Access Profiles
Figure 1-23 GAME Group Feedback Section with Group Assignment Table
Step 4 In the group assignment table, specify:
• User Group—Lists all user groups, including Any. The device type that the MAC authentication returns is initially compared with this list of device types.
• Match Condition—Valid values for the operator are:
– match-all
– =
– ! =
– contains
– starts-with
– regular-expression
• Device Type—Defines the comparison criteria for the User Group by using an operator and device type. Valid values for the device type drop-down list include:
– Printer
– IP Phone
– Network Infrastructure
– Wireless Access Point
– Windows
– UNIX
– Mac
– Integrated Device
– PDA
– Unknown
Note Type a device type in the text box if the device type drop-down list does not contain a particular device.
• Assign User Group—A drop-down list of administrator-defined user groups. If the comparison of the initial User Group with the Device Type succeeds, ACS will assign this user group.
Step 5 To add additional policies, click Add.
1-42Cisco Secure Access Control Server Configuration Guide for NAC/NAP Interoperability
OL-16932-02

Chapter 1 Configuring Cisco Secure Access Control Server for NAC/NAP InteroperabilitySetting Up Network Access Profiles
Step 6 To delete a policy, highlight the policy and click Delete.
Step 7 To move the policies up and down in the group assignment table, click the Up and Down buttons.
Step 8 When you finish setting up policies for group assignment, click Submit.
Step 9 Click Apply and Restart.
1-43Cisco Secure Access Control Server Configuration Guide for NAC/NAP Interoperability
OL-16932-02

Chapter 1 Configuring Cisco Secure Access Control Server for NAC/NAP InteroperabilitySetting Up Network Access Profiles
1-44Cisco Secure Access Control Server Configuration Guide for NAC/NAP Interoperability
OL-16932-02


