Embed Size (px)
Citation preview

Consumer OASIS
User Guide
1040630-0001 Revision F.07 April 1, 2020
2 Introduction 1040630-0001 Revision F.07
Copyright © 2015–2017, 2019–2020 Hughes Network Systems, LLC
Allrightsreserved.ThispublicationanditscontentsareproprietarytoHughesNetworkSystems,LLC.No part of this publicationmay be reproduced in any formor by anymeanswithout thewritten permission of Hughes Network Systems, LLC, 11717 Exploration Lane, Germantown,Maryland20876.
HughesNetworkSystems,LLChasmadeeveryefforttoensurethecorrectnessandcompletenessof thematerial in this document. Hughes Network Systems, LLC shall not be liable for errorscontainedherein.Theinformationinthisdocumentissubjecttochangewithoutnotice.HughesNetworkSystems,LLCmakesnowarrantyofanykindwithregardtothismaterial,including,butnotlimitedto,theimpliedwarrantiesofmerchantabilityandfitnessforaparticularpurpose.
Trademarks
HUGHES, HughesNet, HughesON, IPoS, SPACEWAY, and JUPITER are trademarks of HughesNetworkSystems,LLC.Allothertrademarksarethepropertyoftheirrespectiveowners.

Contents 1040630-0001 Revision F.07 3
Contents
Chapter 1 ................................................................................................................................... 5Introduction .............................................................................................................................. 5
Scopeandaudience...............................................................................................................................5Overview................................................................................................................................................5InstallingOASIS......................................................................................................................................5LaunchingandloggingintoOASISdaily.................................................................................................5
OASIShomepage.............................................................................................................................7Beginninganinstall..............................................................................................................................10Stepprogression..................................................................................................................................10Backingupattachments......................................................................................................................12Troubleshooting...................................................................................................................................13
Chapter 2 ................................................................................................................................. 15Site arrival ............................................................................................................................... 15
Introducingyourselftothecustomer..................................................................................................15Performinganindoorsitesurvey........................................................................................................16Performinganoutdoorsitesurvey......................................................................................................17GPSandArrivalsteps...........................................................................................................................17SatInfostep.........................................................................................................................................19LOSstep...............................................................................................................................................20PreSignstep.........................................................................................................................................22BeforePhotosstep..............................................................................................................................24SBCstep...............................................................................................................................................25BOMstep.............................................................................................................................................26Gaugestep...........................................................................................................................................29SatInstallstep......................................................................................................................................31
Chapter 3 ................................................................................................................................. 35Pointing the antenna ............................................................................................................... 35
Antennainstallation.............................................................................................................................35Pointingstep........................................................................................................................................35
Chapter 4 ................................................................................................................................. 39Registering and activating the modem ................................................................................... 39
Registerstep........................................................................................................................................39IV/OVTstep..........................................................................................................................................40Activatestep........................................................................................................................................45
Chapter 5 ................................................................................................................................. 47Taking photos .......................................................................................................................... 47
AfterPhotosstep.................................................................................................................................47
Chapter 6 ................................................................................................................................. 49Departing from the site ........................................................................................................... 49
Activatingthecustomer’sservice........................................................................................................49CustSignOff(CustomerSignoff)step..................................................................................................49Auditstep.............................................................................................................................................51Departurestep.....................................................................................................................................52Recordspage.......................................................................................................................................54Verifydataupload...............................................................................................................................55Deletelocalfiles...................................................................................................................................58

4 Introduction 1040630-0001 Revision F.07
.............................................................................................................................. 61Performing repair orders ......................................................................................................... 61
Diagnosisstep......................................................................................................................................61Auditresolutioncodes.........................................................................................................................62
.............................................................................................................................. 69Troubleshooting ...................................................................................................................... 69
Softwareupdates.................................................................................................................................69FAQs.....................................................................................................................................................69
Chapter 1 • Introduction 1040630-0001 Revision F.07 5
Chapter 1 Introduction
Scope and audience
ThisdocumentexplainshowtousetheOnsiteAcceleratedServiceInstallationSystem(OASIS)appwhenperformingaConsumerinstallation.Itiswrittenforprofessionalinstallerswhousetheappontheirsmartdevicetofacilitatetheirdutiesduringasitevisit.
Installersshouldreferencethisdocumentwhenevertheyneedadditionalguidance.
Overview
TheOASISappisdesignedforusewithsmartdevices(e.g.,tabletsandsmartphones).Itprovidesastep-by-stepprocessfortheinstallertofollowfromsitearrivaltositedeparture.
Thisguideisbestreadfrombeginningtoend.Itfollowstheflowoftheappandthechronologyoftheinstallationprocess.
Installing OASIS
OASISisavailableasadownloadfromtheHughesAppstore(http:\\appstore.hughes.com);youcannotdownloadthisappfromtheAppleAppStoreortheGooglePlaystore.Youmustdownloadthisappfromthemobilebrowserofasmartdevice(i.e.,notfromacomputer).
Notes:
• Makesureyoudeleteanypreviousversionsoftheappfromyourdevicebeforeinstallinganewversion.
• Theappconsumesapproximately15MBofspaceinAppleiOSand12MBofspaceinGoogleAndroid,butHughesrecommendsyourdevicehasatleast100MBoffreespacetoaccommodatethephotosyouwilltakeduringyourinstallations.
• ForAndroiddevices,checkyoursettingstomakesureappsfromunknownsourcesareallowed.• ForiOSdevices,checkyourDeviceManagementsettingstomakesureHughesNetworkSystems
islistedasatrustedsource.• Beforeyouinstallasoftwareupdateforyoursmartdevice,uninstallOASIS.Onceyouhave
appliedthesoftwareupdate,downloadandreinstallthelatestversionofOASISfromtheInstallationPortal.
• ForOASIStoworkcorrectly,youmusthaveGPSlocationservicesenabledonyoursmartdevice.Consultyoursmartdevice’sdocumentationforinstructionsonhowtoenablethis.
Launching and logging into OASIS daily
Beforeyoudepartforanyinstallation,youmustconnectyoursmartdevicetotheInternetandlogintoOASISsotheappcanverifyyourinstalleraccount,synchronizeyourfieldserviceorders(FSOs),anddownloadthelatestSBCfile.Ifyoudonotsyncyourdevicedaily,youmaynothavethelatestSBCfile,whichwillpreventyoufromgettingahighenoughsignalqualityfactor(SQF)tocompletetheinstallation.
Note: WhileyouneedInternetaccessforinitialsyncing,youwillnotneedInternetaccesswhileyouareperformingtheinstallation.
6 Chapter 1 • Introduction 1040630-0001 Revision F.07
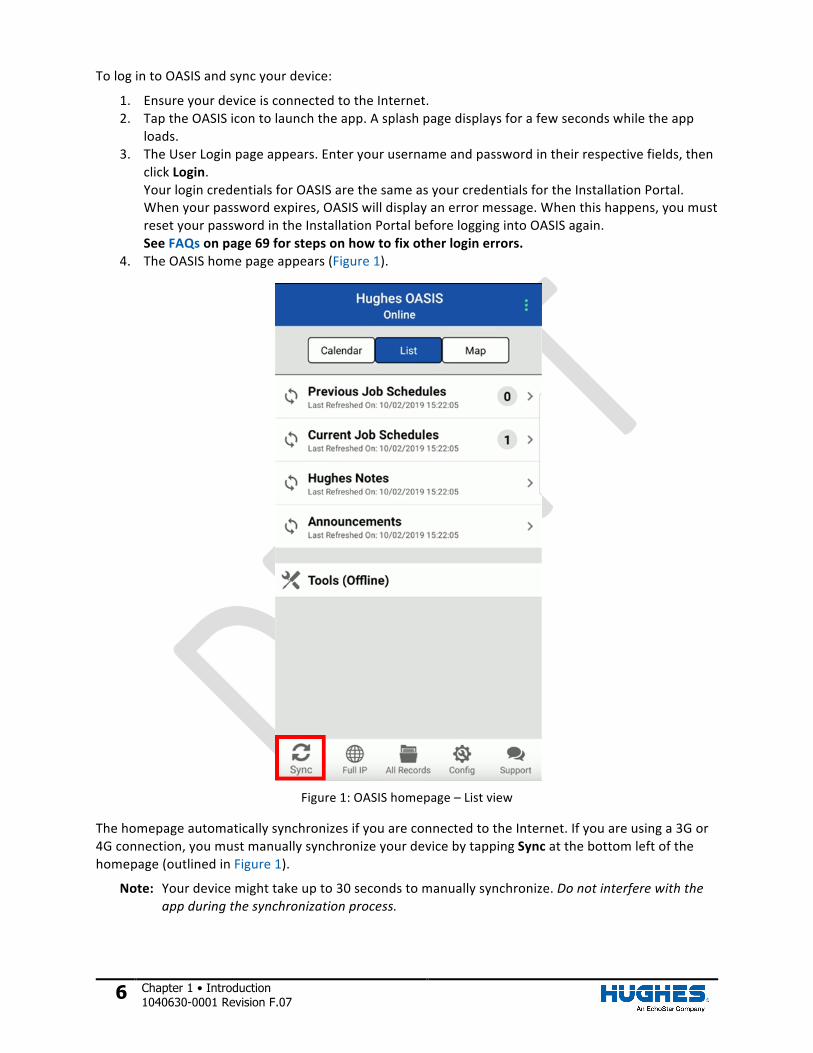
TologintoOASISandsyncyourdevice:
1. EnsureyourdeviceisconnectedtotheInternet.2. TaptheOASISicontolaunchtheapp.Asplashpagedisplaysforafewsecondswhiletheapp
loads.3. TheUserLoginpageappears.Enteryourusernameandpasswordintheirrespectivefields,then
clickLogin.YourlogincredentialsforOASISarethesameasyourcredentialsfortheInstallationPortal.Whenyourpasswordexpires,OASISwilldisplayanerrormessage.Whenthishappens,youmustresetyourpasswordintheInstallationPortalbeforeloggingintoOASISagain.SeeFAQsonpage69forstepsonhowtofixotherloginerrors.
4. TheOASIShomepageappears(Figure1).
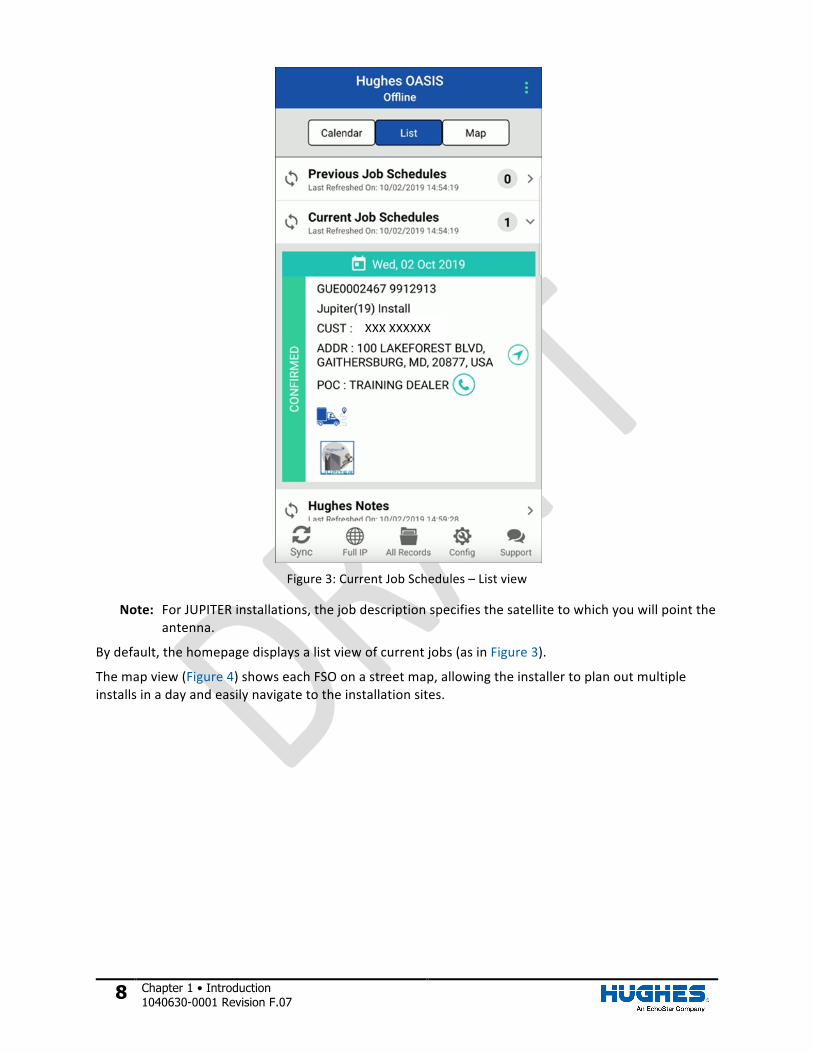
Figure1:OASIShomepage–Listview
ThehomepageautomaticallysynchronizesifyouareconnectedtotheInternet.Ifyouareusinga3Gor4Gconnection,youmustmanuallysynchronizeyourdevicebytappingSyncatthebottomleftofthehomepage(outlinedinFigure1).
Note: Yourdevicemighttakeupto30secondstomanuallysynchronize.Donotinterferewiththeappduringthesynchronizationprocess.
Chapter 1 • Introduction 1040630-0001 Revision F.07 7
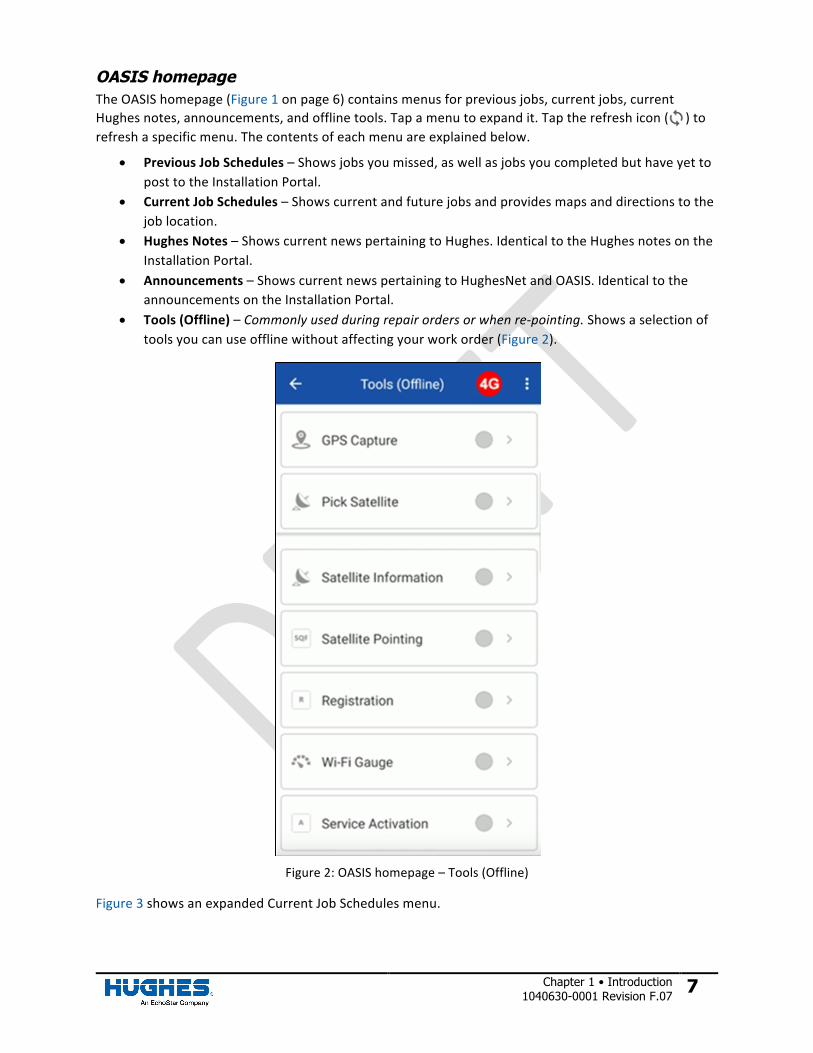
OASIS homepage
TheOASIShomepage(Figure1onpage6)containsmenusforpreviousjobs,currentjobs,currentHughesnotes,announcements,andofflinetools.Tapamenutoexpandit.Taptherefreshicon( )torefreshaspecificmenu.Thecontentsofeachmenuareexplainedbelow.
• PreviousJobSchedules–Showsjobsyoumissed,aswellasjobsyoucompletedbuthaveyettoposttotheInstallationPortal.
• CurrentJobSchedules–Showscurrentandfuturejobsandprovidesmapsanddirectionstothejoblocation.
• HughesNotes–ShowscurrentnewspertainingtoHughes.IdenticaltotheHughesnotesontheInstallationPortal.
• Announcements–ShowscurrentnewspertainingtoHughesNetandOASIS.IdenticaltotheannouncementsontheInstallationPortal.
• Tools(Offline)–Commonlyusedduringrepairordersorwhenre-pointing.Showsaselectionoftoolsyoucanuseofflinewithoutaffectingyourworkorder(Figure2).
Figure2:OASIShomepage–Tools(Offline)
Figure3showsanexpandedCurrentJobSchedulesmenu.
8 Chapter 1 • Introduction 1040630-0001 Revision F.07
Figure3:CurrentJobSchedules–Listview
Note: ForJUPITERinstallations,thejobdescriptionspecifiesthesatellitetowhichyouwillpointtheantenna.
Bydefault,thehomepagedisplaysalistviewofcurrentjobs(asinFigure3).
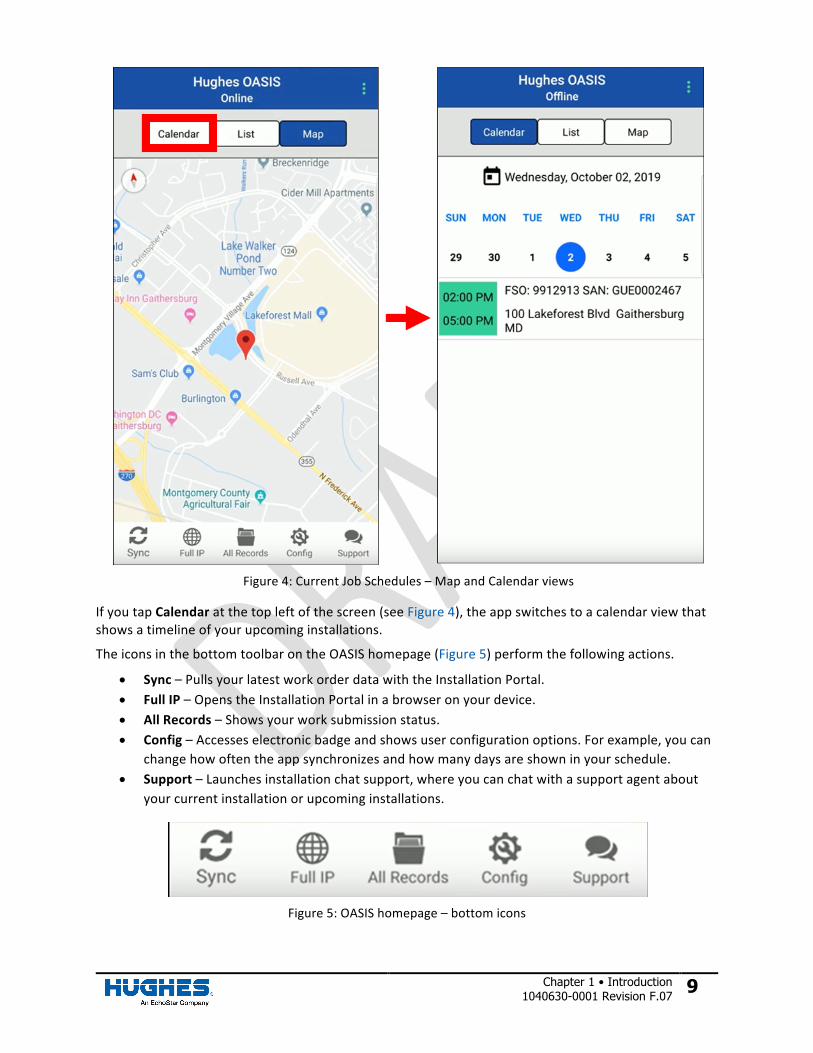
Themapview(Figure4)showseachFSOonastreetmap,allowingtheinstallertoplanoutmultipleinstallsinadayandeasilynavigatetotheinstallationsites.
Chapter 1 • Introduction 1040630-0001 Revision F.07 9
Figure4:CurrentJobSchedules–MapandCalendarviews
IfyoutapCalendaratthetopleftofthescreen(seeFigure4),theappswitchestoacalendarviewthatshowsatimelineofyourupcominginstallations.
TheiconsinthebottomtoolbarontheOASIShomepage(Figure5)performthefollowingactions.
• Sync–PullsyourlatestworkorderdatawiththeInstallationPortal.• FullIP–OpenstheInstallationPortalinabrowseronyourdevice.• AllRecords–Showsyourworksubmissionstatus.• Config–Accesseselectronicbadgeandshowsuserconfigurationoptions.Forexample,youcan
changehowoftentheappsynchronizesandhowmanydaysareshowninyourschedule.• Support–Launchesinstallationchatsupport,whereyoucanchatwithasupportagentabout
yourcurrentinstallationorupcominginstallations.
Figure5:OASIShomepage–bottomicons
10 Chapter 1 • Introduction 1040630-0001 Revision F.07
Beginning an install
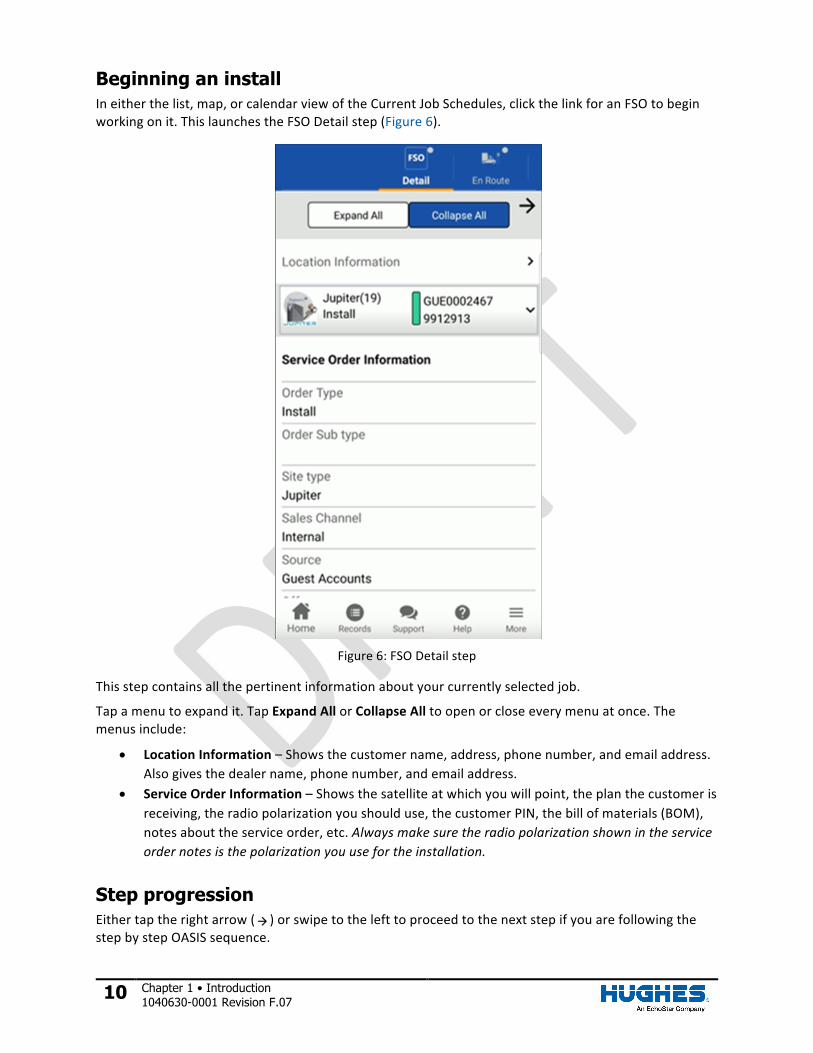
Ineitherthelist,map,orcalendarviewoftheCurrentJobSchedules,clickthelinkforanFSOtobeginworkingonit.ThislaunchestheFSODetailstep(Figure6).
Figure6:FSODetailstep
Thisstepcontainsallthepertinentinformationaboutyourcurrentlyselectedjob.
Tapamenutoexpandit.TapExpandAllorCollapseAlltoopenorcloseeverymenuatonce.Themenusinclude:
• LocationInformation–Showsthecustomername,address,phonenumber,andemailaddress.Alsogivesthedealername,phonenumber,andemailaddress.
• ServiceOrderInformation–Showsthesatelliteatwhichyouwillpoint,theplanthecustomerisreceiving,theradiopolarizationyoushoulduse,thecustomerPIN,thebillofmaterials(BOM),notesabouttheserviceorder,etc.Alwaysmakesuretheradiopolarizationshownintheserviceordernotesisthepolarizationyouusefortheinstallation.
Step progression
Eithertaptherightarrow( )orswipetothelefttoproceedtothenextstepifyouarefollowingthestepbystepOASISsequence.
Chapter 1 • Introduction 1040630-0001 Revision F.07 11
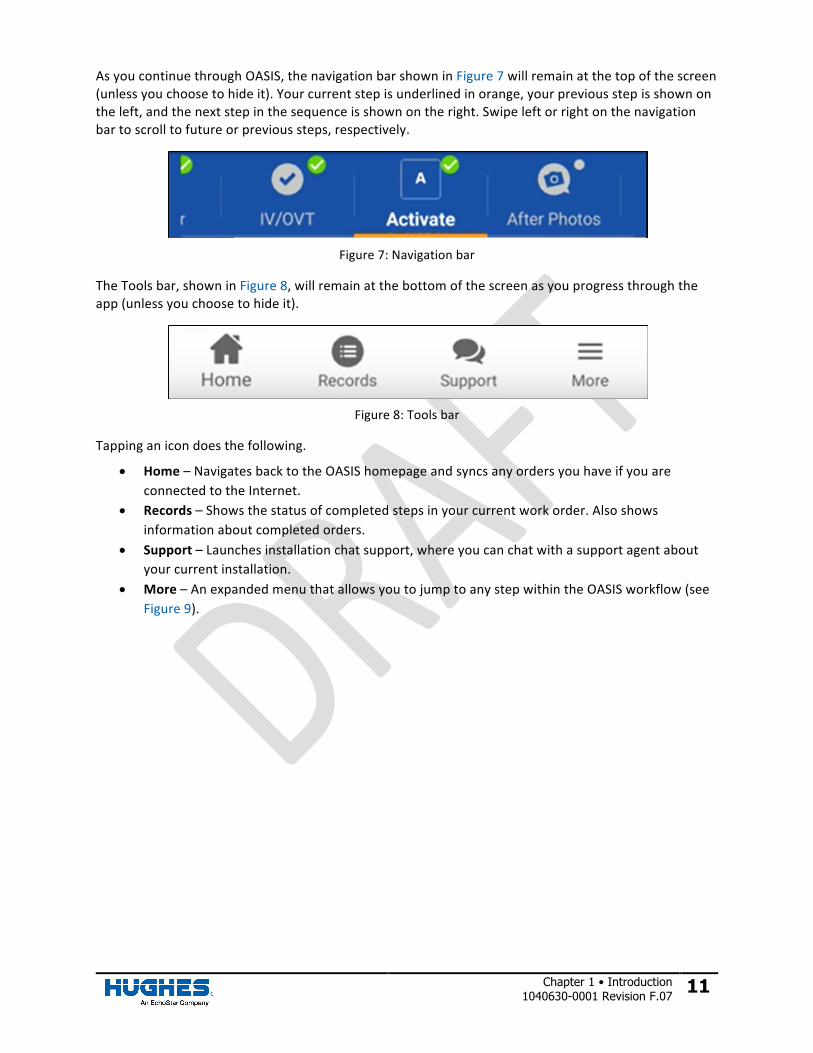
AsyoucontinuethroughOASIS,thenavigationbarshowninFigure7willremainatthetopofthescreen(unlessyouchoosetohideit).Yourcurrentstepisunderlinedinorange,yourpreviousstepisshownontheleft,andthenextstepinthesequenceisshownontheright.Swipeleftorrightonthenavigationbartoscrolltofutureorprevioussteps,respectively.
Figure7:Navigationbar
TheToolsbar,showninFigure8,willremainatthebottomofthescreenasyouprogressthroughtheapp(unlessyouchoosetohideit).
Figure8:Toolsbar
Tappinganicondoesthefollowing.
• Home–NavigatesbacktotheOASIShomepageandsyncsanyordersyouhaveifyouareconnectedtotheInternet.
• Records–Showsthestatusofcompletedstepsinyourcurrentworkorder.Alsoshowsinformationaboutcompletedorders.
• Support–Launchesinstallationchatsupport,whereyoucanchatwithasupportagentaboutyourcurrentinstallation.
• More–AnexpandedmenuthatallowsyoutojumptoanystepwithintheOASISworkflow(seeFigure9).

12 Chapter 1 • Introduction 1040630-0001 Revision F.07
Figure9:Moremenu
Backing up attachments
Atanypointduringtheinstallation,youcanbackupanyattachmentsyouhave(forexample,picturesandsignatures).Thispreventsdatalossintheeventofanappcrash.IfyoudonothaveInternetaccesstouploadtheattachmentstotheInstallationPortalattheendofaninstallation,thisallowsyoutosavetheattachmentsanduploadthemlaterwhenyouhaveabetterconnection.
Toexportyourattachmentstothephotogalleryonyoursmartdevice:
1. Inthebottomtoolbarofthehomepage,tapAllRecords(outlinedinFigure10)tonavigatetotheRecordspage.
Figure10:AllRecordsiconinbottomtoolbar
Chapter 1 • Introduction 1040630-0001 Revision F.07 13
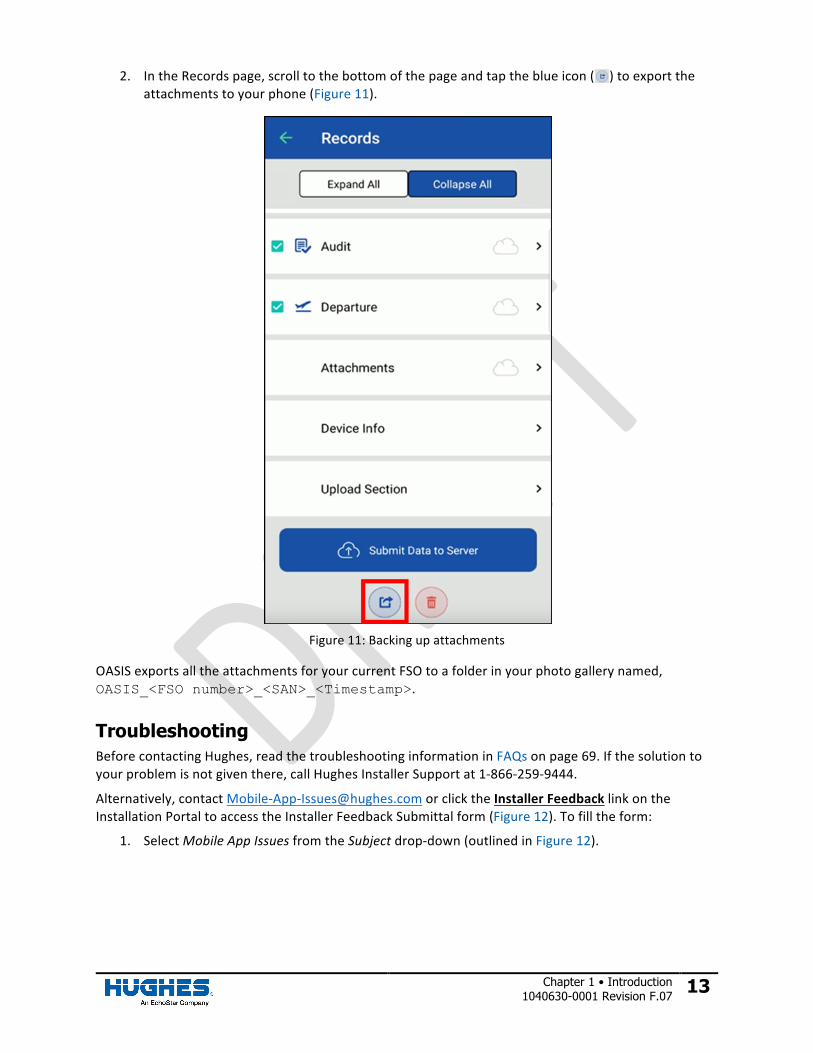
2. IntheRecordspage,scrolltothebottomofthepageandtaptheblueicon( )toexporttheattachmentstoyourphone(Figure11).
Figure11:Backingupattachments
OASISexportsalltheattachmentsforyourcurrentFSOtoafolderinyourphotogallerynamed,OASIS_<FSO number>_<SAN>_<Timestamp>.
Troubleshooting
BeforecontactingHughes,readthetroubleshootinginformationinFAQsonpage69.Ifthesolutiontoyourproblemisnotgiventhere,callHughesInstallerSupportat1-866-259-9444.
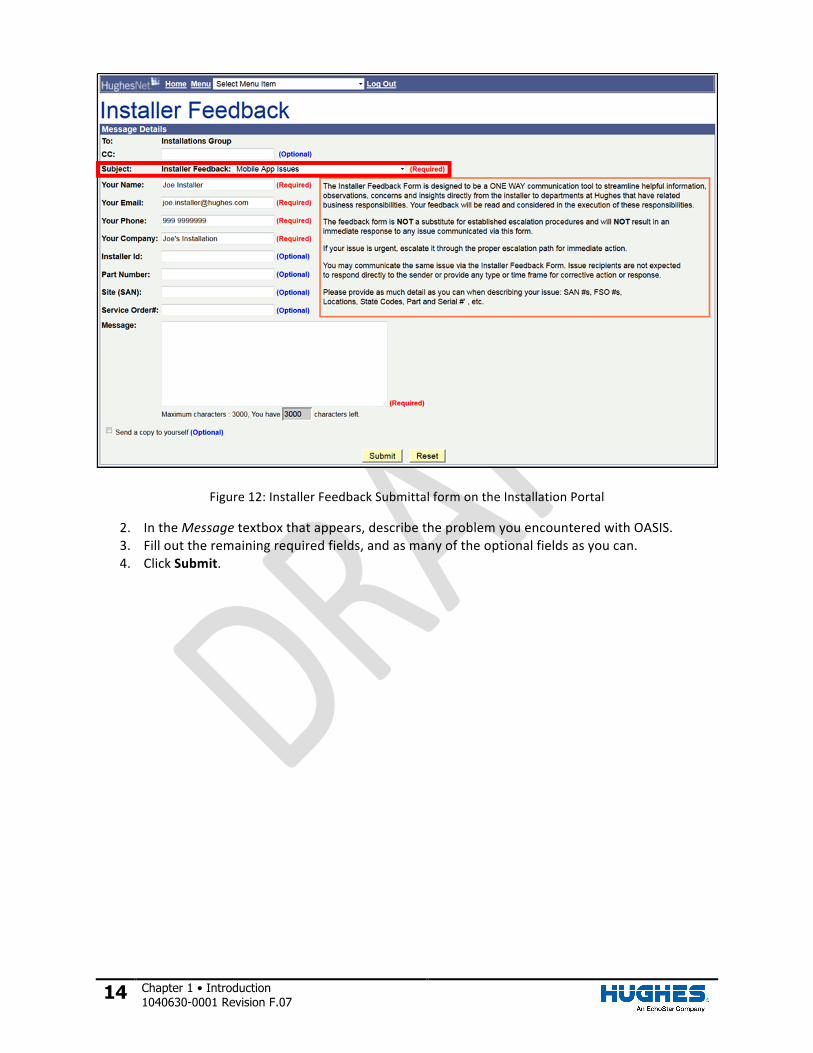
Alternatively,contactMobile-App-Issues@hughes.comorclicktheInstallerFeedbacklinkontheInstallationPortaltoaccesstheInstallerFeedbackSubmittalform(Figure12).Tofilltheform:
1. SelectMobileAppIssuesfromtheSubjectdrop-down(outlinedinFigure12).
14 Chapter 1 • Introduction 1040630-0001 Revision F.07
Figure12:InstallerFeedbackSubmittalformontheInstallationPortal
2. IntheMessagetextboxthatappears,describetheproblemyouencounteredwithOASIS.3. Fillouttheremainingrequiredfields,andasmanyoftheoptionalfieldsasyoucan.4. ClickSubmit.
Chapter 2 • Site arrival 1040630-0001 Revision F.07 15
Chapter 2 Site arrival
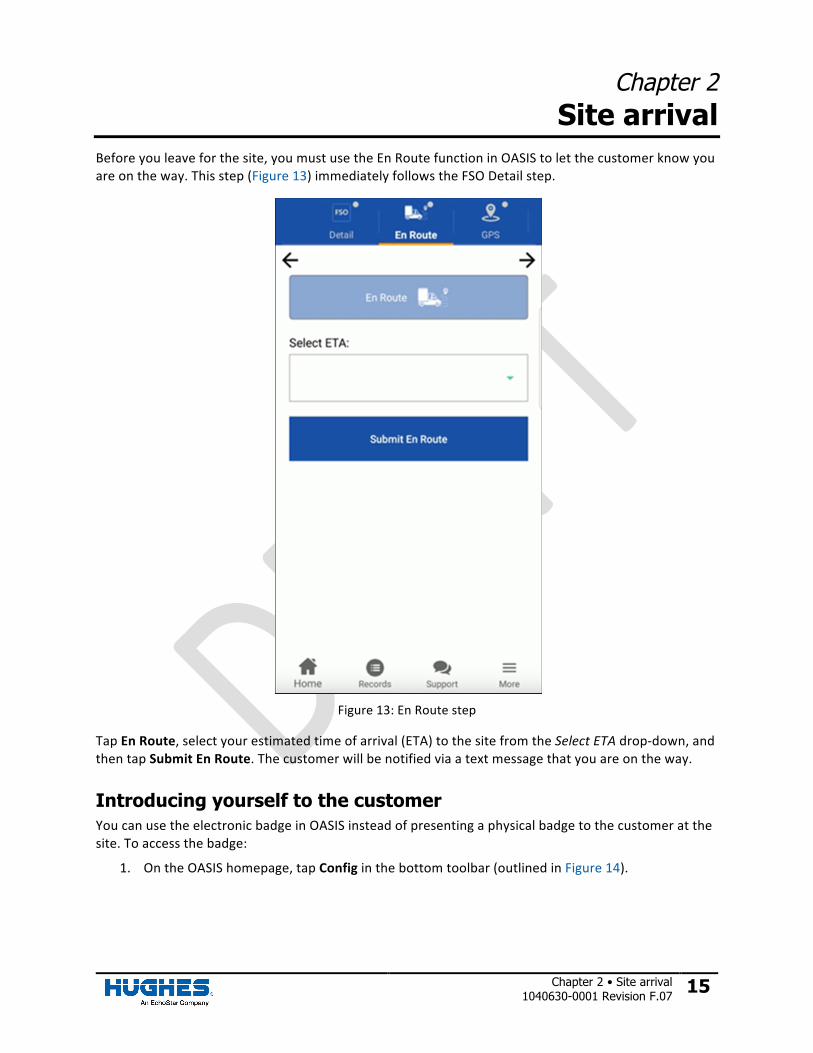
Beforeyouleaveforthesite,youmustusetheEnRoutefunctioninOASIStoletthecustomerknowyouareontheway.Thisstep(Figure13)immediatelyfollowstheFSODetailstep.
Figure13:EnRoutestep
TapEnRoute,selectyourestimatedtimeofarrival(ETA)tothesitefromtheSelectETAdrop-down,andthentapSubmitEnRoute.Thecustomerwillbenotifiedviaatextmessagethatyouareontheway.
Introducing yourself to the customer
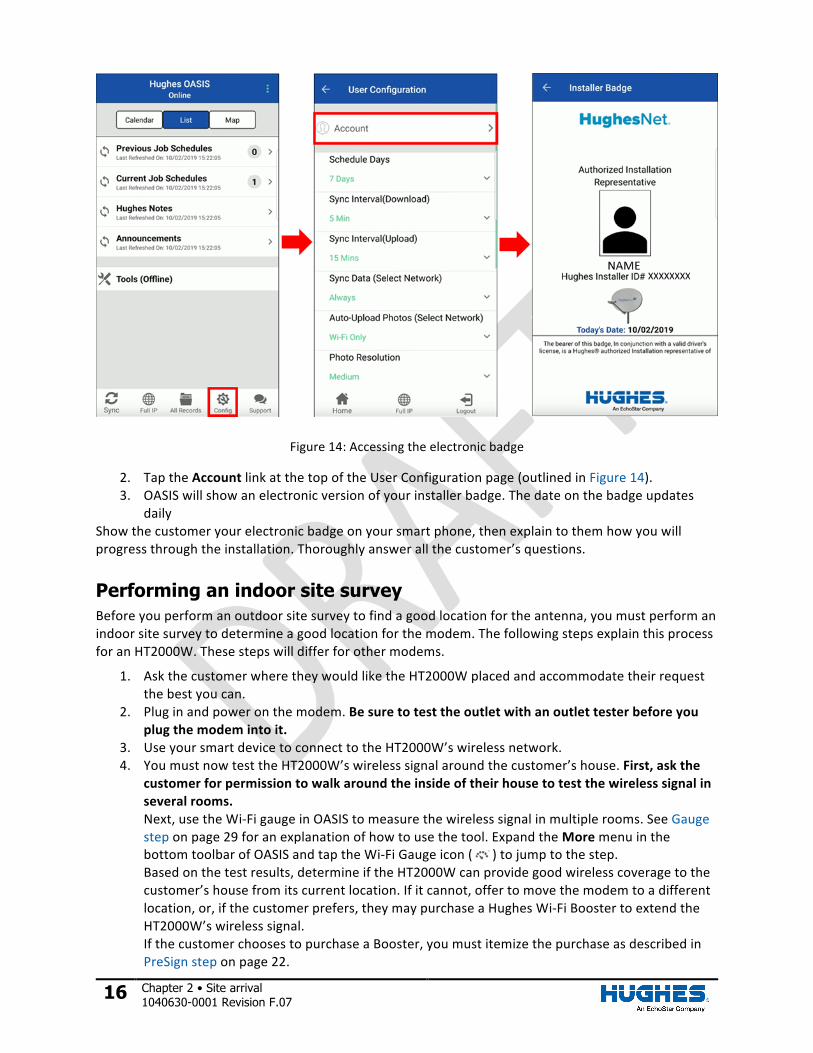
YoucanusetheelectronicbadgeinOASISinsteadofpresentingaphysicalbadgetothecustomeratthesite.Toaccessthebadge:
1. OntheOASIShomepage,tapConfiginthebottomtoolbar(outlinedinFigure14).
16 Chapter 2 • Site arrival 1040630-0001 Revision F.07
Figure14:Accessingtheelectronicbadge
2. TaptheAccountlinkatthetopoftheUserConfigurationpage(outlinedinFigure14).3. OASISwillshowanelectronicversionofyourinstallerbadge.Thedateonthebadgeupdates
dailyShowthecustomeryourelectronicbadgeonyoursmartphone,thenexplaintothemhowyouwillprogressthroughtheinstallation.Thoroughlyanswerallthecustomer’squestions.
Performing an indoor site survey
Beforeyouperformanoutdoorsitesurveytofindagoodlocationfortheantenna,youmustperformanindoorsitesurveytodetermineagoodlocationforthemodem.ThefollowingstepsexplainthisprocessforanHT2000W.Thesestepswilldifferforothermodems.
1. AskthecustomerwheretheywouldliketheHT2000Wplacedandaccommodatetheirrequestthebestyoucan.
2. Pluginandpoweronthemodem.Besuretotesttheoutletwithanoutlettesterbeforeyouplugthemodemintoit.
3. UseyoursmartdevicetoconnecttotheHT2000W’swirelessnetwork.4. YoumustnowtesttheHT2000W’swirelesssignalaroundthecustomer’shouse.First,askthe
customerforpermissiontowalkaroundtheinsideoftheirhousetotestthewirelesssignalinseveralrooms.Next,usetheWi-FigaugeinOASIStomeasurethewirelesssignalinmultiplerooms.SeeGaugesteponpage29foranexplanationofhowtousethetool.ExpandtheMoremenuinthebottomtoolbarofOASISandtaptheWi-FiGaugeicon( )tojumptothestep.Basedonthetestresults,determineiftheHT2000Wcanprovidegoodwirelesscoveragetothecustomer’shousefromitscurrentlocation.Ifitcannot,offertomovethemodemtoadifferentlocation,or,ifthecustomerprefers,theymaypurchaseaHughesWi-FiBoostertoextendtheHT2000W’swirelesssignal.IfthecustomerchoosestopurchaseaBooster,youmustitemizethepurchaseasdescribedinPreSignsteponpage22.
Chapter 2 • Site arrival 1040630-0001 Revision F.07 17
Performing an outdoor site survey
Oncethecustomeragreestothemodemplacementlocation,beginanoutdoorsitesurveytodeterminethelocationfortheantenna.Usetheinformationprovidedintheappropriatesitepreparationandmountinstallationguide,dependingonthetypeofinstallationyouareperforming.Makesurethecustomerapprovesofyourchosenantennalocation.
Ifyoudiscussanyinstallationextraswiththecustomerduringtheoutdoorsitesurvey,besuretoitemizethoseextrasasdescribedinPreSignsteponpage22.
GPS and Arrival steps
Onceyouhavefoundasuitableinstallationlocationfortheantenna,andthecustomerhasapprovedthatlocation,followthestepsbelow.
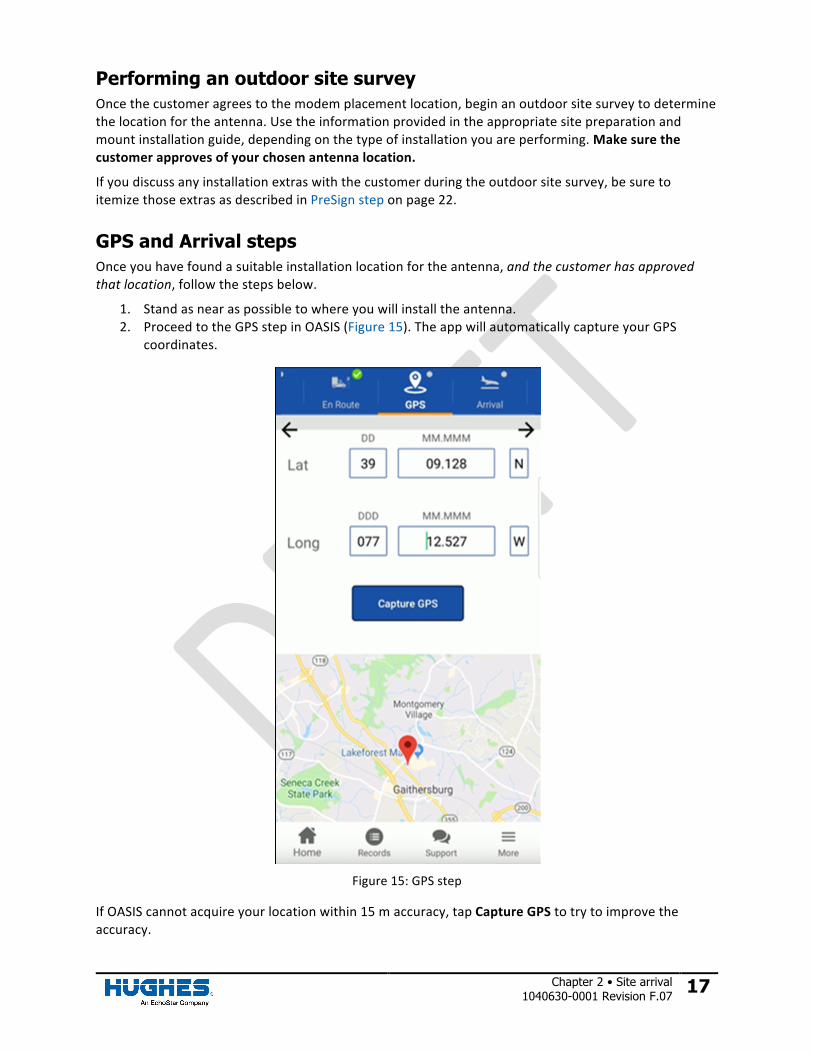
1. Standasnearaspossibletowhereyouwillinstalltheantenna.2. ProceedtotheGPSstepinOASIS(Figure15).TheappwillautomaticallycaptureyourGPS
coordinates.
Figure15:GPSstep
IfOASIScannotacquireyourlocationwithin15maccuracy,tapCaptureGPStotrytoimprovetheaccuracy.
18 Chapter 2 • Site arrival 1040630-0001 Revision F.07
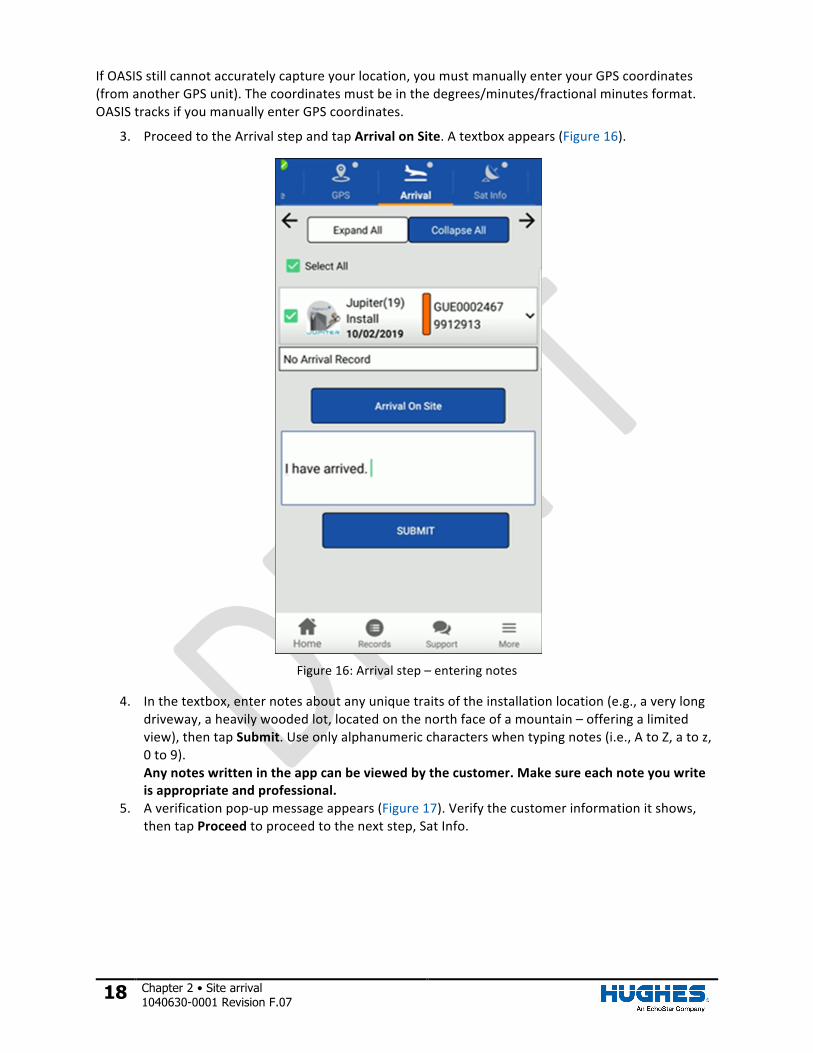
IfOASISstillcannotaccuratelycaptureyourlocation,youmustmanuallyenteryourGPScoordinates(fromanotherGPSunit).Thecoordinatesmustbeinthedegrees/minutes/fractionalminutesformat.OASIStracksifyoumanuallyenterGPScoordinates.
3. ProceedtotheArrivalstepandtapArrivalonSite.Atextboxappears(Figure16).
Figure16:Arrivalstep–enteringnotes
4. Inthetextbox,enternotesaboutanyuniquetraitsoftheinstallationlocation(e.g.,averylongdriveway,aheavilywoodedlot,locatedonthenorthfaceofamountain–offeringalimitedview),thentapSubmit.Useonlyalphanumericcharacterswhentypingnotes(i.e.,AtoZ,atoz,0to9).Anynoteswrittenintheappcanbeviewedbythecustomer.Makesureeachnoteyouwriteisappropriateandprofessional.
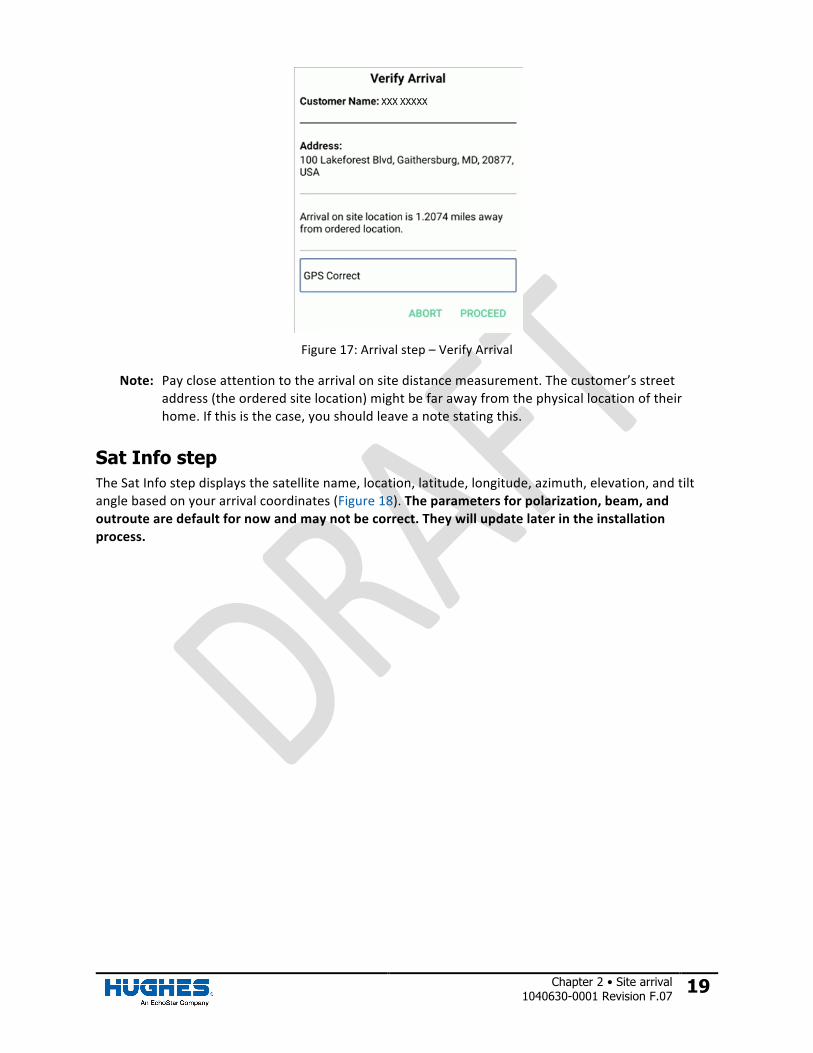
5. Averificationpop-upmessageappears(Figure17).Verifythecustomerinformationitshows,thentapProceedtoproceedtothenextstep,SatInfo.
Chapter 2 • Site arrival 1040630-0001 Revision F.07 19
Figure17:Arrivalstep–VerifyArrival
Note: Paycloseattentiontothearrivalonsitedistancemeasurement.Thecustomer’sstreetaddress(theorderedsitelocation)mightbefarawayfromthephysicallocationoftheirhome.Ifthisisthecase,youshouldleaveanotestatingthis.
Sat Info step
TheSatInfostepdisplaysthesatellitename,location,latitude,longitude,azimuth,elevation,andtiltanglebasedonyourarrivalcoordinates(Figure18).Theparametersforpolarization,beam,andoutroutearedefaultfornowandmaynotbecorrect.Theywillupdatelaterintheinstallationprocess.

20 Chapter 2 • Site arrival 1040630-0001 Revision F.07
Figure18:SatInfostep
Tap toproceedtothenextstep–LOS.
LOS step
Important: Makesurethecompassonyoursmartdeviceiscalibratedcorrectlypriortousingthisstep.Calibratethecompassbyfollowingtheinstructionsprovidedbyyourdevice.
IfOASISdoesnotautomaticallylaunchthelineofsight(LOS)tool,tapLaunchLOS.TofindLOStothesatellite:
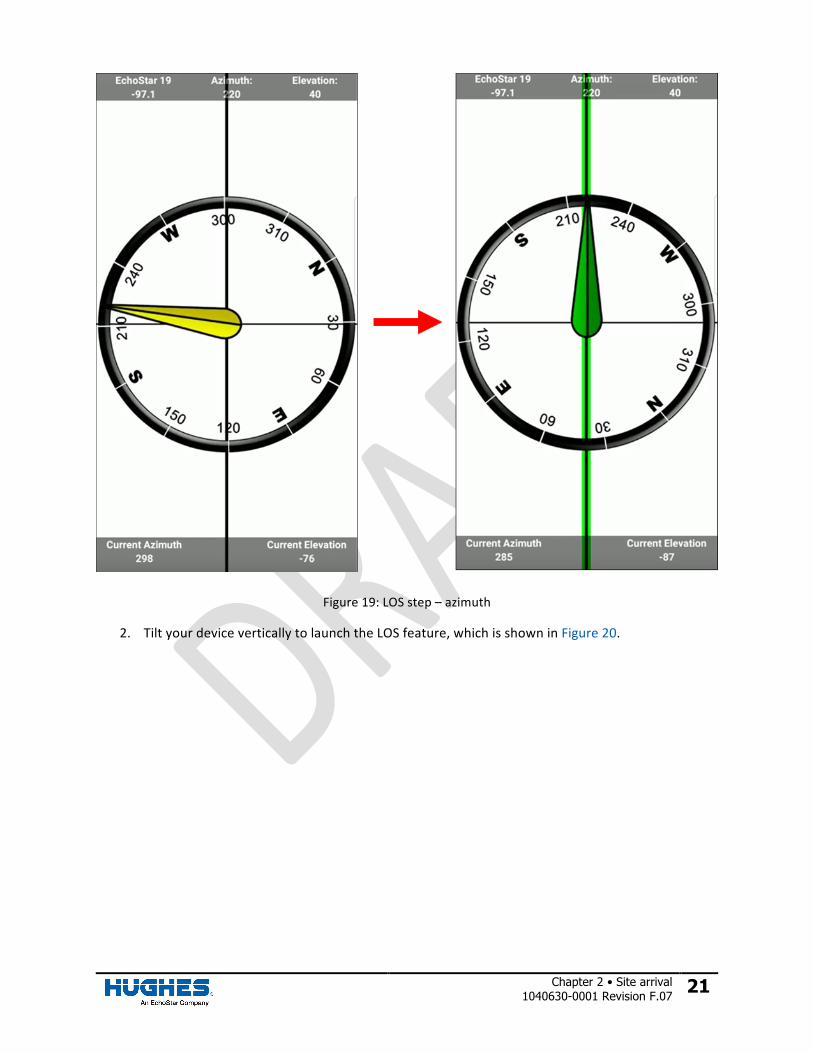
1. Whileholdingyoursmartdeviceparalleltotheground,orienttheonscreencompassuntiltheneedlelinesupwiththecorrectazimuthreading.AsshowninFigure19,thecompassneedleandtheverticallineturngreenwhenyourdeviceiscorrectlyoriented.
Chapter 2 • Site arrival 1040630-0001 Revision F.07 21
Figure19:LOSstep–azimuth
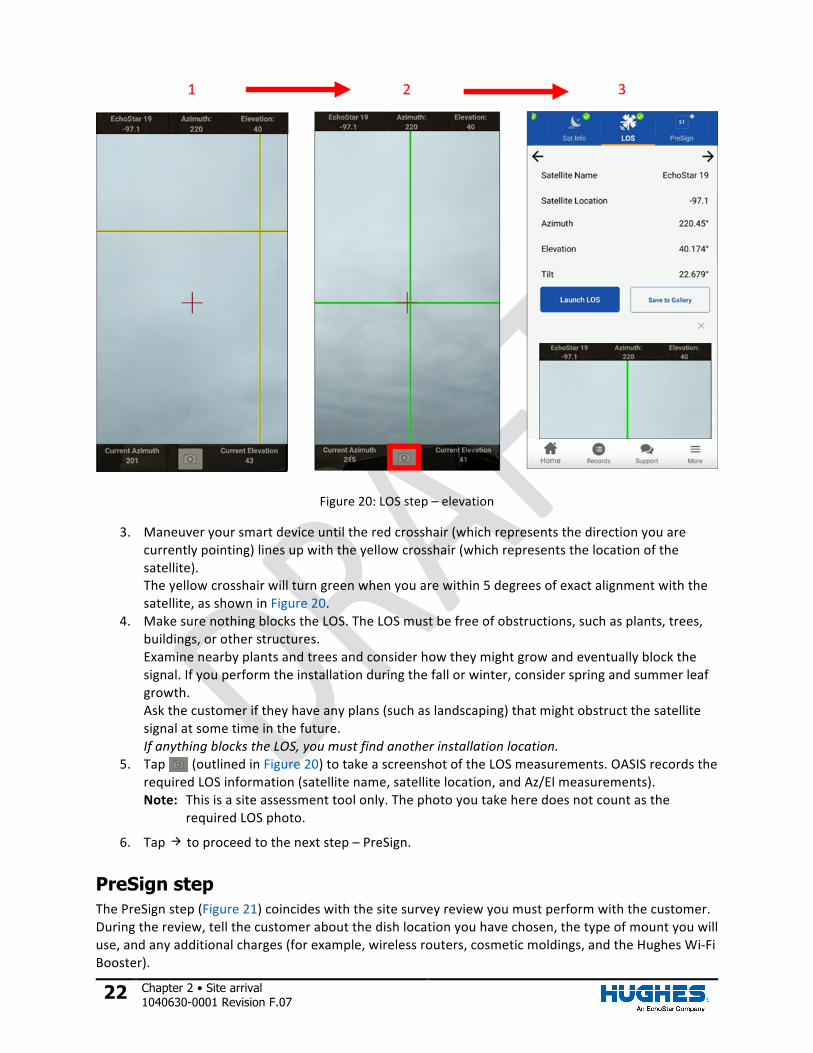
2. TiltyourdeviceverticallytolaunchtheLOSfeature,whichisshowninFigure20.
22 Chapter 2 • Site arrival 1040630-0001 Revision F.07
Figure20:LOSstep–elevation
3. Maneuveryoursmartdeviceuntiltheredcrosshair(whichrepresentsthedirectionyouarecurrentlypointing)linesupwiththeyellowcrosshair(whichrepresentsthelocationofthesatellite).Theyellowcrosshairwillturngreenwhenyouarewithin5degreesofexactalignmentwiththesatellite,asshowninFigure20.
4. MakesurenothingblockstheLOS.TheLOSmustbefreeofobstructions,suchasplants,trees,buildings,orotherstructures.Examinenearbyplantsandtreesandconsiderhowtheymightgrowandeventuallyblockthesignal.Ifyouperformtheinstallationduringthefallorwinter,considerspringandsummerleafgrowth.Askthecustomeriftheyhaveanyplans(suchaslandscaping)thatmightobstructthesatellitesignalatsometimeinthefuture.IfanythingblockstheLOS,youmustfindanotherinstallationlocation.
5. Tap (outlinedinFigure20)totakeascreenshotoftheLOSmeasurements.OASISrecordstherequiredLOSinformation(satellitename,satellitelocation,andAz/Elmeasurements).Note: Thisisasiteassessmenttoolonly.Thephotoyoutakeheredoesnotcountasthe
requiredLOSphoto.
6. Tap toproceedtothenextstep–PreSign.
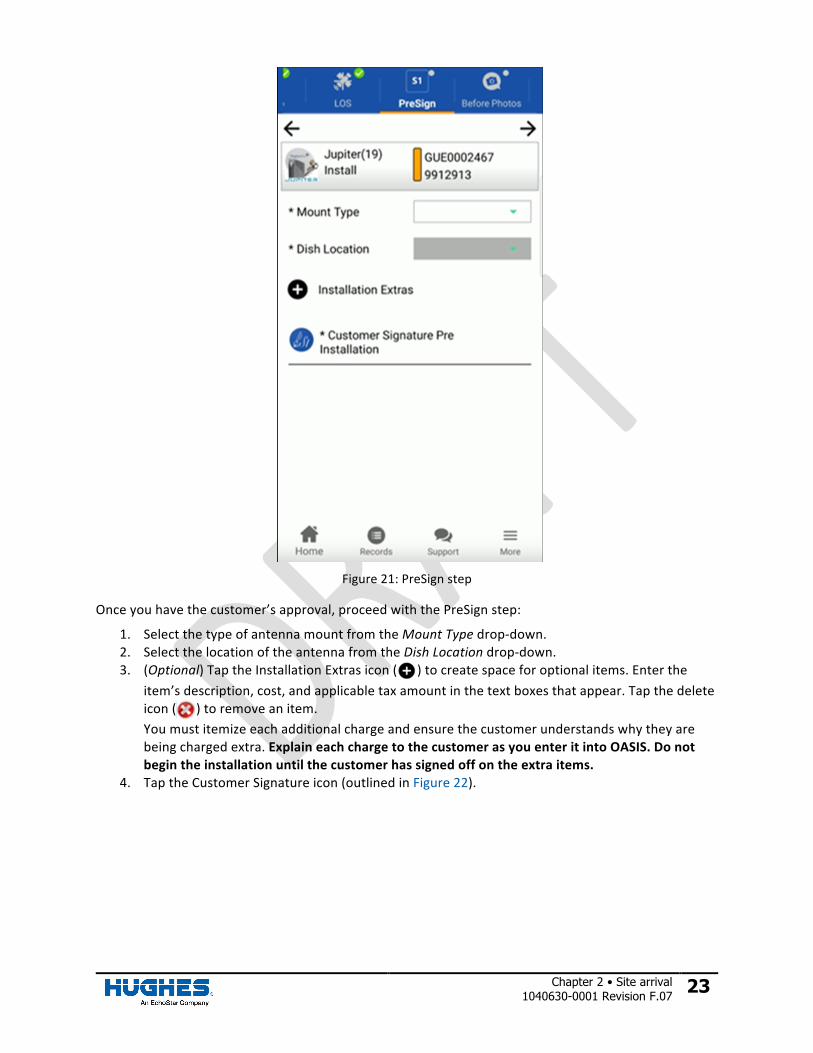
PreSign step
ThePreSignstep(Figure21)coincideswiththesitesurveyreviewyoumustperformwiththecustomer.Duringthereview,tellthecustomeraboutthedishlocationyouhavechosen,thetypeofmountyouwilluse,andanyadditionalcharges(forexample,wirelessrouters,cosmeticmoldings,andtheHughesWi-FiBooster).
Chapter 2 • Site arrival 1040630-0001 Revision F.07 23
Figure21:PreSignstep
Onceyouhavethecustomer’sapproval,proceedwiththePreSignstep:
1. SelectthetypeofantennamountfromtheMountTypedrop-down.2. SelectthelocationoftheantennafromtheDishLocationdrop-down.3. (Optional)TaptheInstallationExtrasicon( )tocreatespaceforoptionalitems.Enterthe
item’sdescription,cost,andapplicabletaxamountinthetextboxesthatappear.Tapthedeleteicon( )toremoveanitem.Youmustitemizeeachadditionalchargeandensurethecustomerunderstandswhytheyarebeingchargedextra.ExplaineachchargetothecustomerasyouenteritintoOASIS.Donotbegintheinstallationuntilthecustomerhassignedoffontheextraitems.
4. TaptheCustomerSignatureicon(outlinedinFigure22).
24 Chapter 2 • Site arrival 1040630-0001 Revision F.07
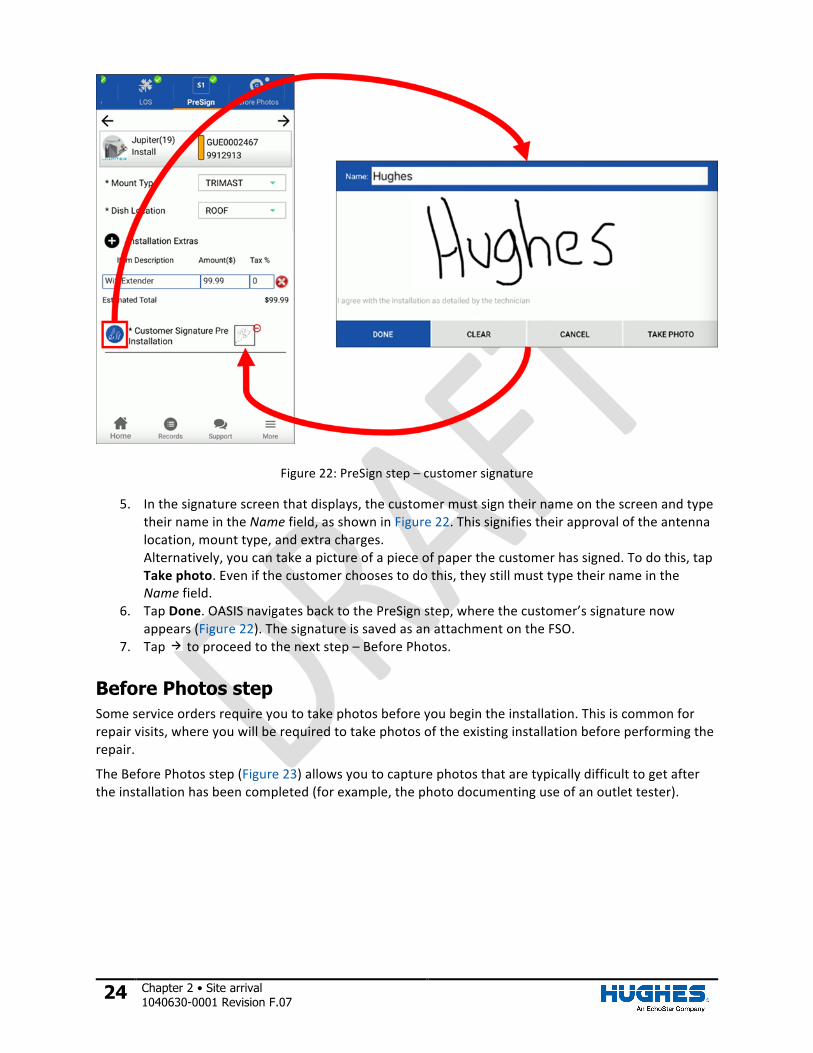
Figure22:PreSignstep–customersignature
5. Inthesignaturescreenthatdisplays,thecustomermustsigntheirnameonthescreenandtypetheirnameintheNamefield,asshowninFigure22.Thissignifiestheirapprovaloftheantennalocation,mounttype,andextracharges.Alternatively,youcantakeapictureofapieceofpaperthecustomerhassigned.Todothis,tapTakephoto.Evenifthecustomerchoosestodothis,theystillmusttypetheirnameintheNamefield.
6. TapDone.OASISnavigatesbacktothePreSignstep,wherethecustomer’ssignaturenowappears(Figure22).ThesignatureissavedasanattachmentontheFSO.
7. Tap toproceedtothenextstep–BeforePhotos.
Before Photos step
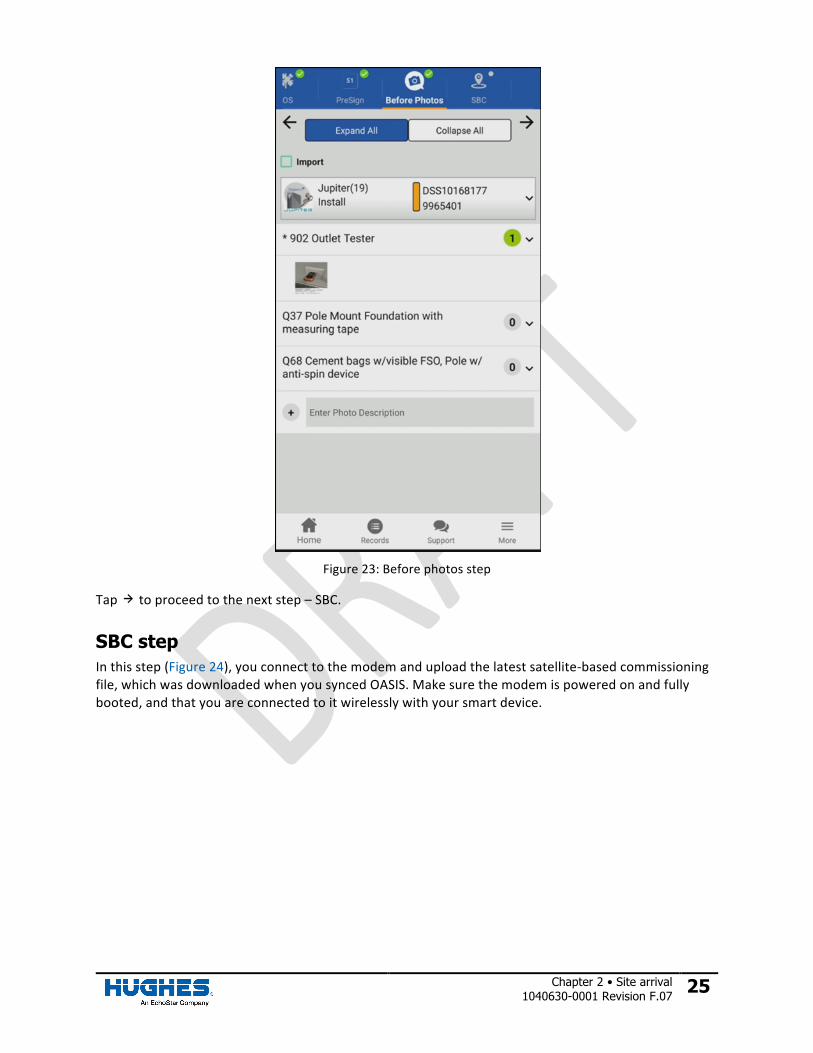
Someserviceordersrequireyoutotakephotosbeforeyoubegintheinstallation.Thisiscommonforrepairvisits,whereyouwillberequiredtotakephotosoftheexistinginstallationbeforeperformingtherepair.
TheBeforePhotosstep(Figure23)allowsyoutocapturephotosthataretypicallydifficulttogetaftertheinstallationhasbeencompleted(forexample,thephotodocumentinguseofanoutlettester).
Chapter 2 • Site arrival 1040630-0001 Revision F.07 25
Figure23:Beforephotosstep
Tap toproceedtothenextstep–SBC.
SBC step
Inthisstep(Figure24),youconnecttothemodemanduploadthelatestsatellite-basedcommissioningfile,whichwasdownloadedwhenyousyncedOASIS.Makesurethemodemispoweredonandfullybooted,andthatyouareconnectedtoitwirelesslywithyoursmartdevice.
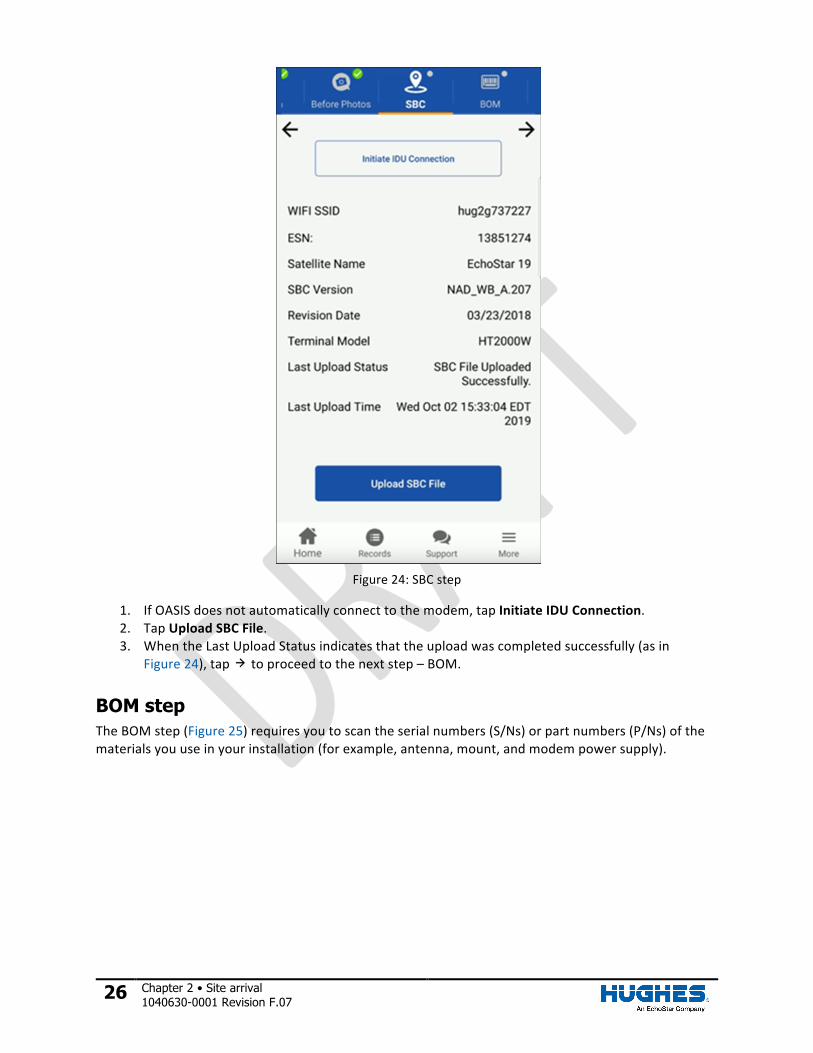
26 Chapter 2 • Site arrival 1040630-0001 Revision F.07
Figure24:SBCstep
1. IfOASISdoesnotautomaticallyconnecttothemodem,tapInitiateIDUConnection.2. TapUploadSBCFile.3. WhentheLastUploadStatusindicatesthattheuploadwascompletedsuccessfully(asin
Figure24),tap toproceedtothenextstep–BOM.
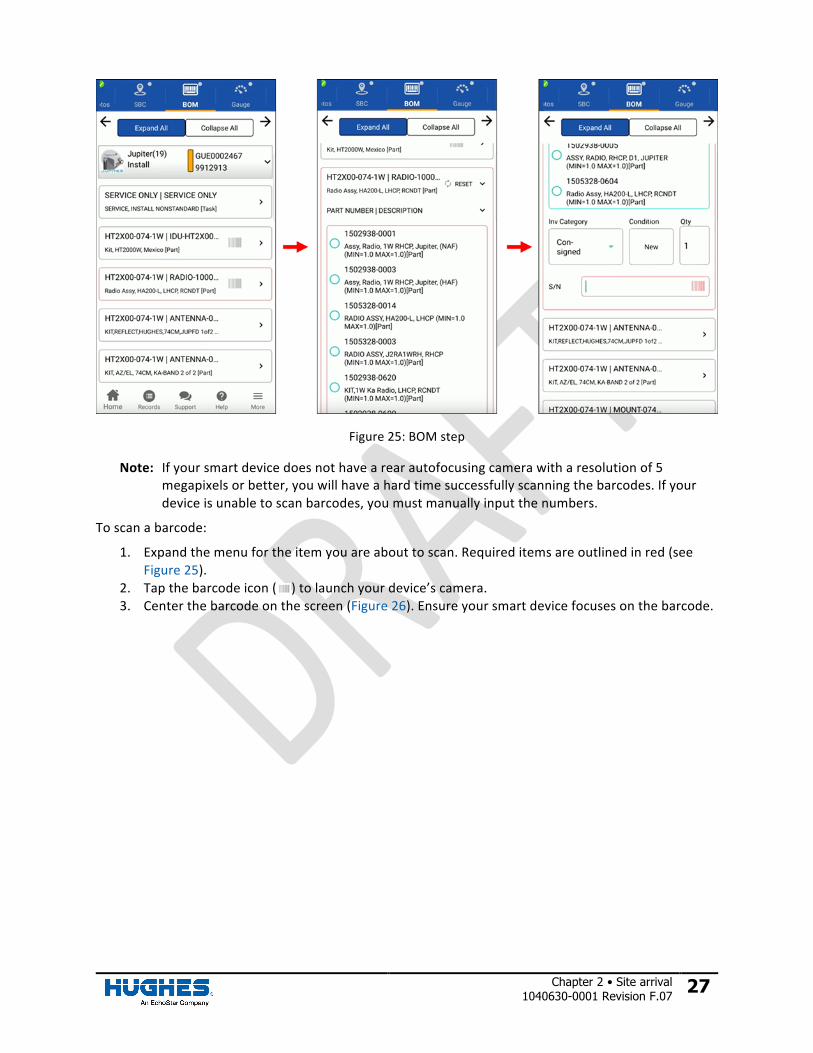
BOM step
TheBOMstep(Figure25)requiresyoutoscantheserialnumbers(S/Ns)orpartnumbers(P/Ns)ofthematerialsyouuseinyourinstallation(forexample,antenna,mount,andmodempowersupply).
Chapter 2 • Site arrival 1040630-0001 Revision F.07 27
Figure25:BOMstep
Note: Ifyoursmartdevicedoesnothavearearautofocusingcamerawitharesolutionof5megapixelsorbetter,youwillhaveahardtimesuccessfullyscanningthebarcodes.Ifyourdeviceisunabletoscanbarcodes,youmustmanuallyinputthenumbers.
Toscanabarcode:
1. Expandthemenufortheitemyouareabouttoscan.Requireditemsareoutlinedinred(seeFigure25).
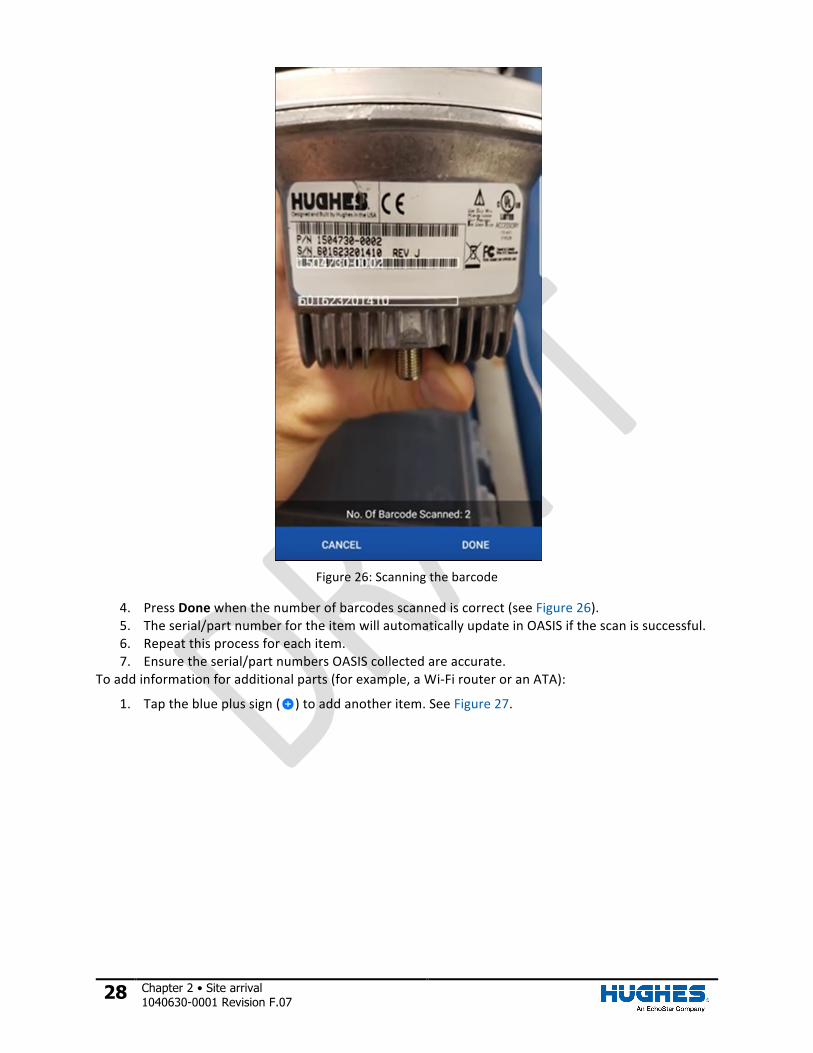
2. Tapthebarcodeicon( )tolaunchyourdevice’scamera.3. Centerthebarcodeonthescreen(Figure26).Ensureyoursmartdevicefocusesonthebarcode.
28 Chapter 2 • Site arrival 1040630-0001 Revision F.07
Figure26:Scanningthebarcode
4. PressDonewhenthenumberofbarcodesscannediscorrect(seeFigure26).5. Theserial/partnumberfortheitemwillautomaticallyupdateinOASISifthescanissuccessful.6. Repeatthisprocessforeachitem.7. Ensuretheserial/partnumbersOASIScollectedareaccurate.
Toaddinformationforadditionalparts(forexample,aWi-FirouteroranATA):
1. Taptheblueplussign( )toaddanotheritem.SeeFigure27.

Chapter 2 • Site arrival 1040630-0001 Revision F.07 29
Figure27:Addinganinstallationpart
2. Filleachofthefieldsinthemenubasedonthetypeofpart.Forthepartnumberandserialnumber,tapthebarcodeicons( )toscantheactualbarcodestickeronthepart,asyoudidbefore.
3. Repeatthisprocessforeachadditionalitem.Note: TaptheXicon( )intheexpandedmenufortheitemtodeleteit.
4. Whenyouaredone,tap toproceedtothenextstep–Gauge.
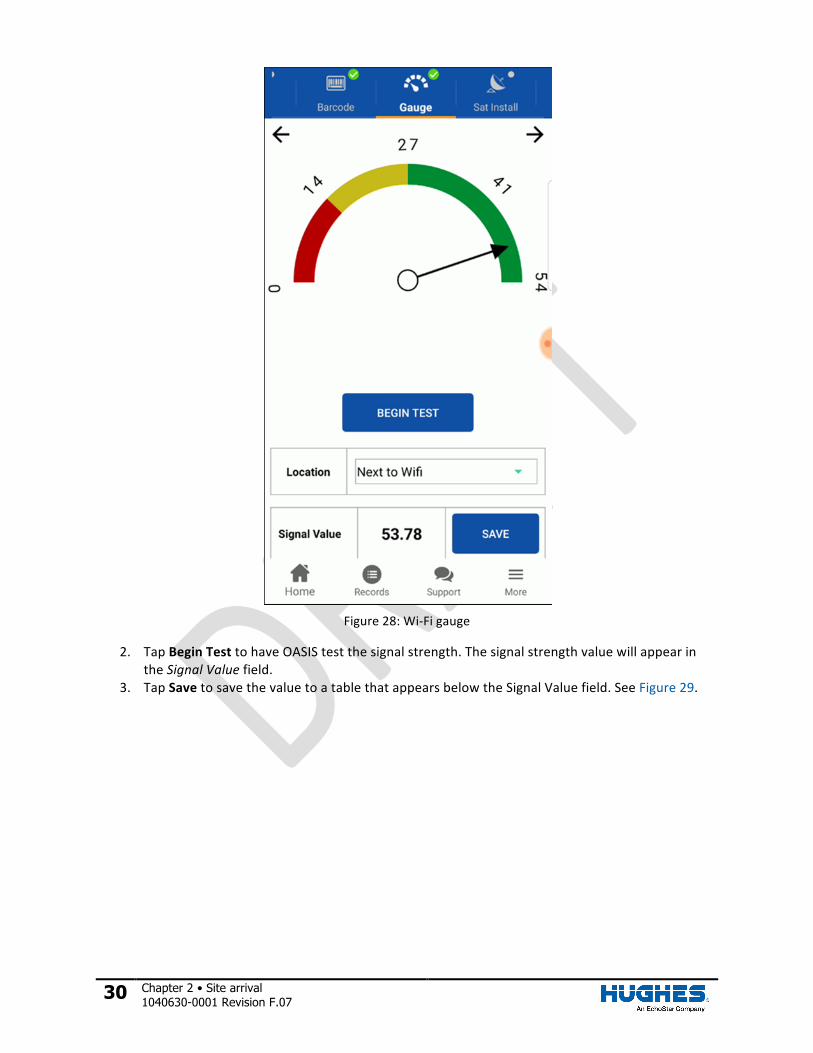
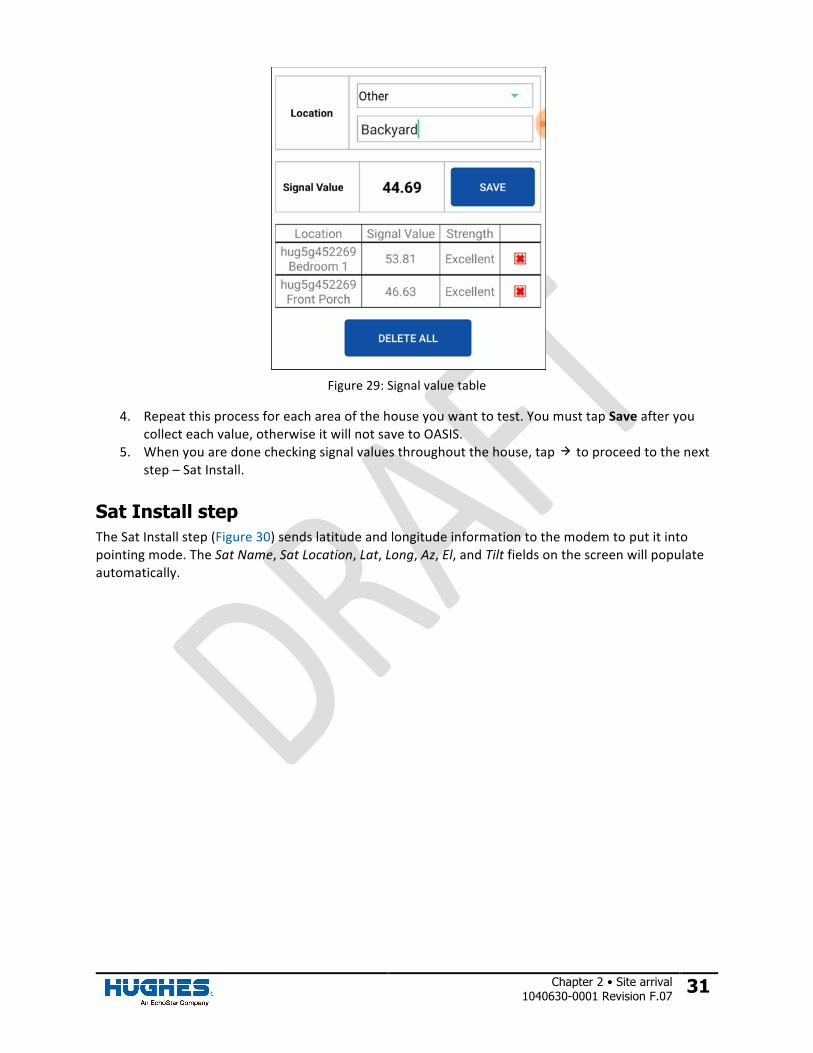
Gauge step
TheWi-Figauge(Figure28)teststhesignalstrengthofthewirelessrouter.UsethegaugetohelpdetermineiftheroutercanprovideadequateWi-Ficoveragetothehousebyitself.Tousethegauge:
1. SelectanareaofthehousefromtheLocationdrop-down.OASIShasseverallocationsfromwhichtochoose(forexample,livingroom,masterbedroom,andbasement),butyoucanalsocreateyourownlocationbyselectingOtherandtypingthenameofthelocationinthefieldthatappears.
30 Chapter 2 • Site arrival 1040630-0001 Revision F.07
Figure28:Wi-Figauge
2. TapBeginTesttohaveOASIStestthesignalstrength.ThesignalstrengthvaluewillappearintheSignalValuefield.
3. TapSavetosavethevaluetoatablethatappearsbelowtheSignalValuefield.SeeFigure29.
Chapter 2 • Site arrival 1040630-0001 Revision F.07 31
Figure29:Signalvaluetable
4. Repeatthisprocessforeachareaofthehouseyouwanttotest.YoumusttapSaveafteryoucollecteachvalue,otherwiseitwillnotsavetoOASIS.
5. Whenyouaredonecheckingsignalvaluesthroughoutthehouse,tap toproceedtothenextstep–SatInstall.
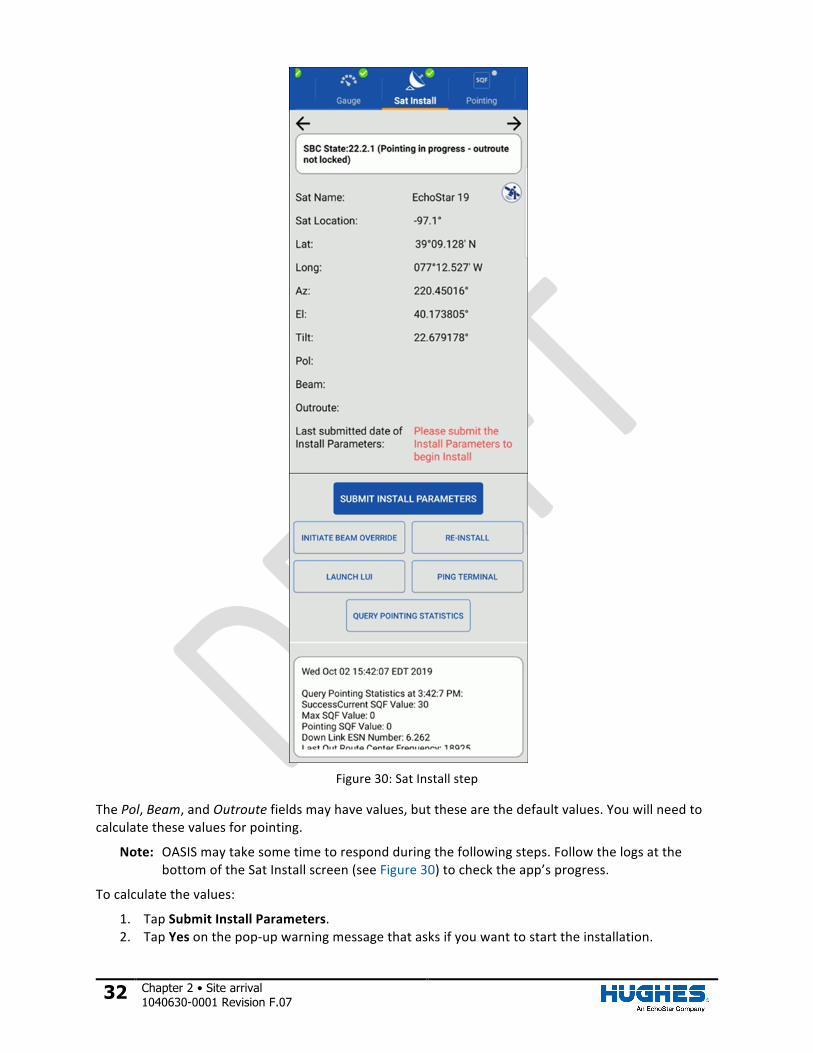
Sat Install step
TheSatInstallstep(Figure30)sendslatitudeandlongitudeinformationtothemodemtoputitintopointingmode.TheSatName,SatLocation,Lat,Long,Az,El,andTiltfieldsonthescreenwillpopulateautomatically.
32 Chapter 2 • Site arrival 1040630-0001 Revision F.07
Figure30:SatInstallstep
ThePol,Beam,andOutroutefieldsmayhavevalues,butthesearethedefaultvalues.Youwillneedtocalculatethesevaluesforpointing.
Note: OASISmaytakesometimetorespondduringthefollowingsteps.FollowthelogsatthebottomoftheSatInstallscreen(seeFigure30)tochecktheapp’sprogress.
Tocalculatethevalues:
1. TapSubmitInstallParameters.2. TapYesonthepop-upwarningmessagethatasksifyouwanttostarttheinstallation.
Chapter 2 • Site arrival 1040630-0001 Revision F.07 33
OASISpopulatestheODUPol,Beam,andOutroutefieldsoncethemodemcalculatesthecorrectvalues.Important:EnsuretheODU(radio)polarizationshowninOASISmatchesthepolarizationshown
intheserviceordernotesintheFSODetailstep.SeeBeginninganinstallonpage10.
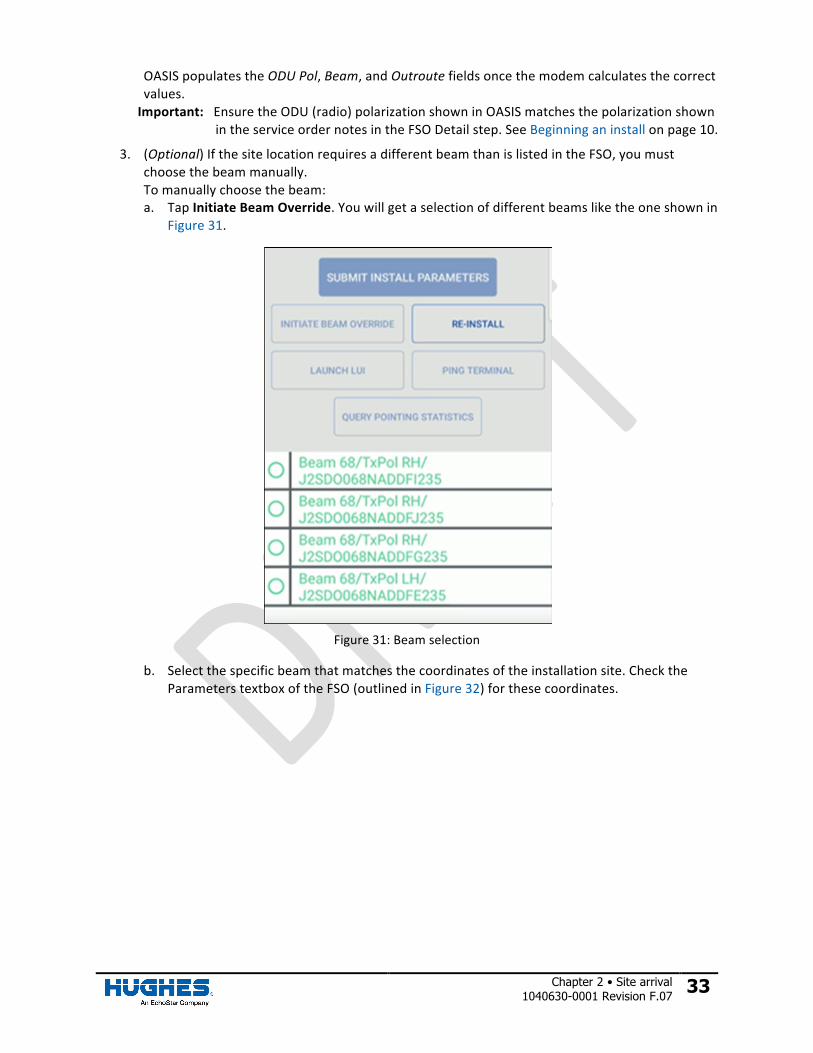
3. (Optional)IfthesitelocationrequiresadifferentbeamthanislistedintheFSO,youmustchoosethebeammanually.Tomanuallychoosethebeam:a. TapInitiateBeamOverride.Youwillgetaselectionofdifferentbeamsliketheoneshownin
Figure31.
Figure31:Beamselection
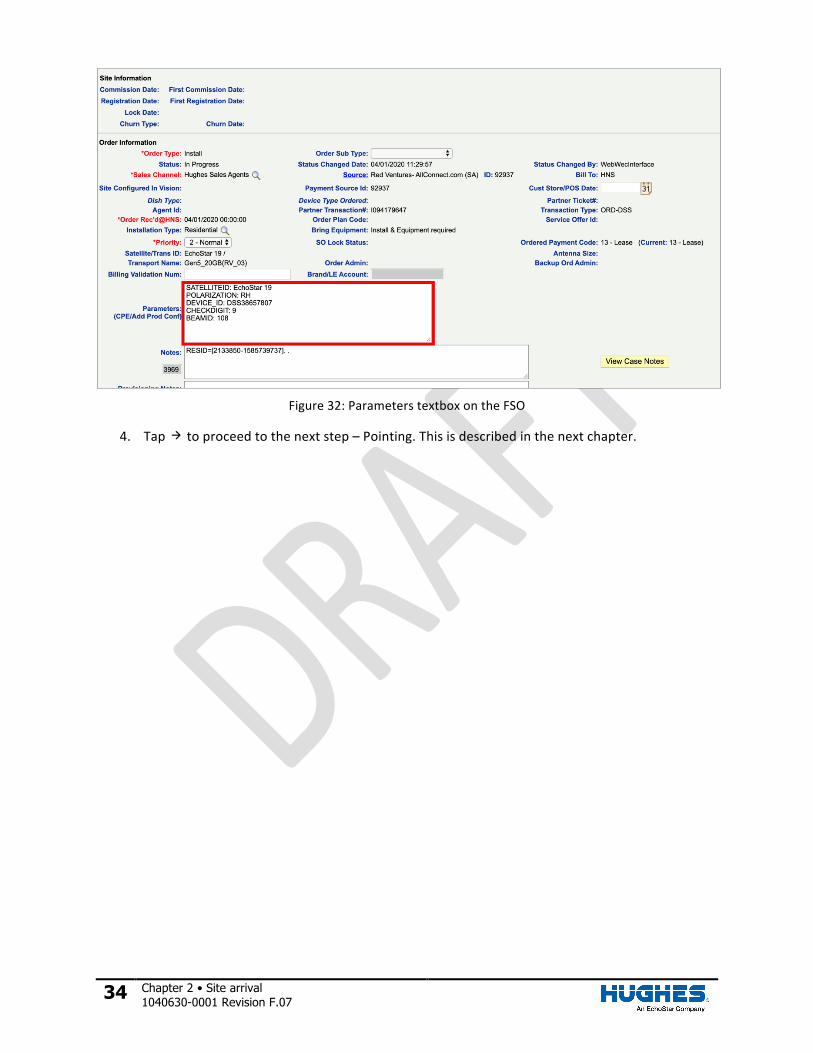
b. Selectthespecificbeamthatmatchesthecoordinatesoftheinstallationsite.ChecktheParameterstextboxoftheFSO(outlinedinFigure32)forthesecoordinates.
34 Chapter 2 • Site arrival 1040630-0001 Revision F.07
Figure32:ParameterstextboxontheFSO
4. Tap toproceedtothenextstep–Pointing.Thisisdescribedinthenextchapter.
Chapter 3 • Pointing the antenna 1040630-0001 Revision F.07 35
Chapter 3 Pointing the antenna
Antenna installation
Atthispoint,youmustinstalltheantennamountandantennaatthelocationyoudeterminedwouldbethebestduringthesitesurvey.Thestepsbelowprovideageneraloverviewforthisprocess.
1. Assembleandinstalltheantennamount(forexample,trimast,pole,ornonpen).Refertotheappropriatesitepreparationandmountinstallationguide,dependingonthetypeofinstallationyouareperforming,foradditionalinformationaboutpreparingtheinstallationsiteandassemblingtheantennamount.
2. RuntheIFLcableandinstallthegroundblock.3. Assembleandmounttheantenna.Presettheantennatilt,elevation,andpolarizationtothe
valuesindicated.Refertotheappropriateantennainstallationguideforadditionalinformationaboutassemblingandmountingtheantenna.
4. GroundtheantennaandconnecttheIFL.5. GetreadytopointtheantennausingOASIS.StandneartheantennaandreturntotheOASIS
app.Important:Beforeyoupointtheantenna,makesuretheradiopolarizationmatchesthe
polarizationgivenintheserviceordernotesshownintheFSODetailstep.SeeBeginninganinstallonpage10.
Pointing step
Note: YoucanonlyusethepointingfunctionalityofOASISduringJUPITERinstallations.TopointtheantennaduringSPACEWAYinstallations,youmustlaunchthesatelliteterminal’suserinterfacefromyoursmartdevice’sInternetbrowser,thenproceedasyounormallywouldifusingalaptop.
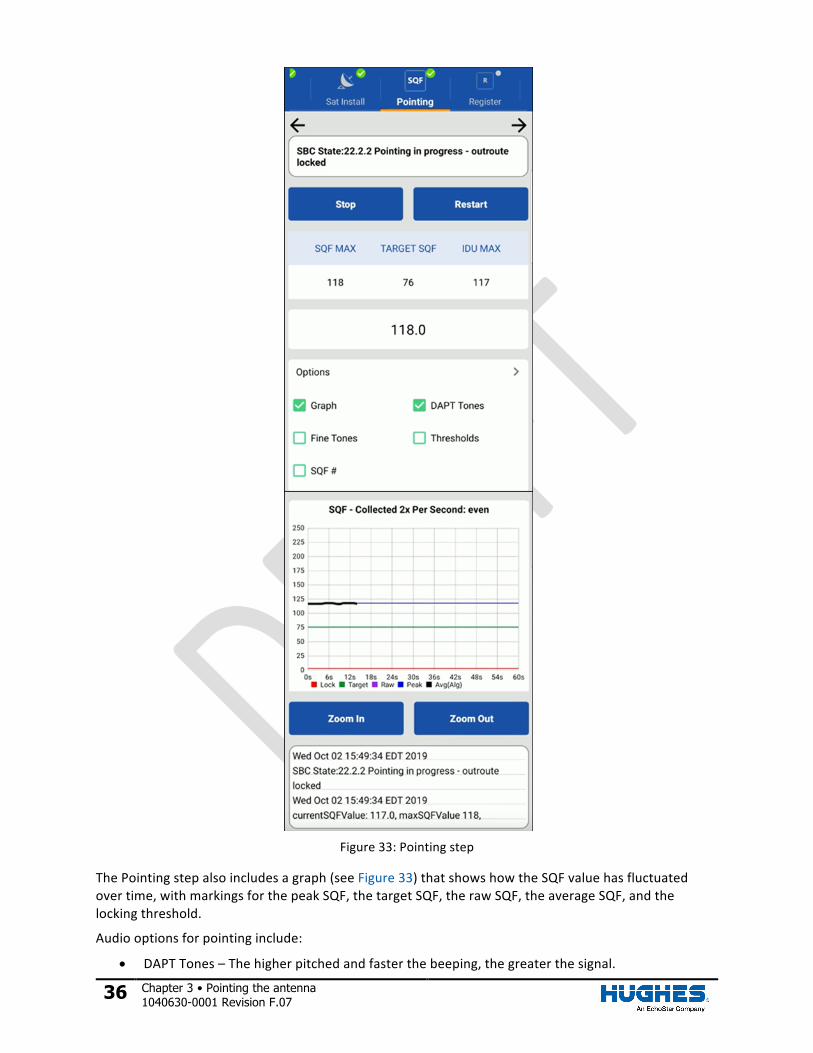
ThePointingstep(Figure33)aidsyouinpointingtheantennabyshowingthesignalqualityfactor(SQF).Itdisplaysthe:
• MaximumIDUvalueachievedduringthissession• TargetSQFvaluedeterminedbyOVTwithina6-mileradius• MaximumSQFvalueachievedduringthissession
36 Chapter 3 • Pointing the antenna 1040630-0001 Revision F.07
Figure33:Pointingstep
ThePointingstepalsoincludesagraph(seeFigure33)thatshowshowtheSQFvaluehasfluctuatedovertime,withmarkingsforthepeakSQF,thetargetSQF,therawSQF,theaverageSQF,andthelockingthreshold.
Audiooptionsforpointinginclude:
• DAPTTones–Thehigherpitchedandfasterthebeeping,thegreaterthesignal.

Chapter 3 • Pointing the antenna 1040630-0001 Revision F.07 37
• FineTones–IndicateswhethertheSQFisrising,falling,orremainingeven.• Thresholds–Indicateswhenyoucrossacertainthreshold(peak,target,etc.)• SQF#–AcomputerizedvoicespeaksthecurrentSQFvalueevery3seconds.
Topointtheantenna:
DonotattempttopointtheDonotattempttopointtheantennamanuallybypullingonthefeedsupportarm.Thiscancausepermanentdamagetotheantenna.Instead,usetheantennamechanicaladjustments.
Youmaygentlymaneuvertheantennareflectortocoarselypointtheantenna,butonlyiftheAz/Elcanisterboltsarelooseenoughsothatthereflectorrotateseasily.
1. Presettheantennaelevationto1°abovethenumberspecifiedintheSatInfostepinOASIS.Thishelpscompensateforanyelevationlosscausedbythelooseantennacanister.Remembertoaligntheelevationvaluewiththeblacklineundertheelevationbolt.
2. SweeptheantennainthedirectionoftheazimuthvalueuntilyoutogetanSQFabove30,indicatingyouacquiredthesatellite.
3. ContinuetocarefullysweeptheantennauntilyouachieveanSQFvalueof50ormore.4. Lockdownthecanisterboltstosteadytheantennaonthemount.Youwillnowbegintofine-
pointtheantenna.Note: Afteryouhavelockeddownthecanisterbolts,donotattempttoadjusttheantennaby
grabbingthereflector.Thiswilldamagethereflector.
5. WaitfortheSQFtosettleonavalue,thenusetheappropriatelysizedwrenchfortheantenna(foundinthemanualspecifictothatantenna)tofine-tunetheantenna’sazimuthandelevationadjustments.ContinueuntilyouachievethehighestpossibleSQFvalue.
6. Whenthesignalsarepeaked,tightentheazimuthandelevationboltscompletely.Note: Becauseslightmovementoftheantennaoccursduringlockdown,alwaysmeasurethe
signalpeakvalueafterlockingdowntheantenna.
7. Whenyouaredonepointing,makesurealloutdoorcableconnectionsareweatherproofedwithdielectricgreaseandsecurelytightened.AlooseconnectorwilldegradeSQF.Dependingonyourinstallationenvironment,additionalweatherproofingmayalsobeneeded.Note: Usecabletiesandcablehangersthatareresistanttoultravioletraystosecureall
outdoorcables.
Hughes-approvedconnectors,inconjunctionwiththedielectricgreaseontheFconnectorthreads,provideweatherproofingforoutdoorconnections.Theseconnectorsshouldbeusedinnewinstallations,upgrades,andanyrepairs.
Outdoorconnectorsonradiosandgroundblocksthatareinareaswithcorrosiveenvironments(e.g.,saltair)mayneedadditionalweatherproofing,suchasweatherproofingtapeoraweatherbootfilledwithdielectricgrease.
8. Tap toproceedtothenextstep,Register,foundinChapter4–Registeringandactivatingthemodem.

Chapter 4 • Registering and activating the modem 1040630-0001 Revision F.07 39
Chapter 4 Registering and activating the modem
YoucanonlyregisterandactivateamodemviaOASISduringJUPITERinstallations.Assuch,allthecontentinthischapter,exceptfortheIV/OVTstep,onlypertainstoJUPITERinstallations.
ToregisterandactivatethemodemduringinstallationsoftheHN9000orHN7000seriesmodems,youmustlaunchthemodem’suserinterfacefromyoursmartdevice’sInternetbrowser,thenproceedasyounormallywouldasifusingalaptop.
Register step
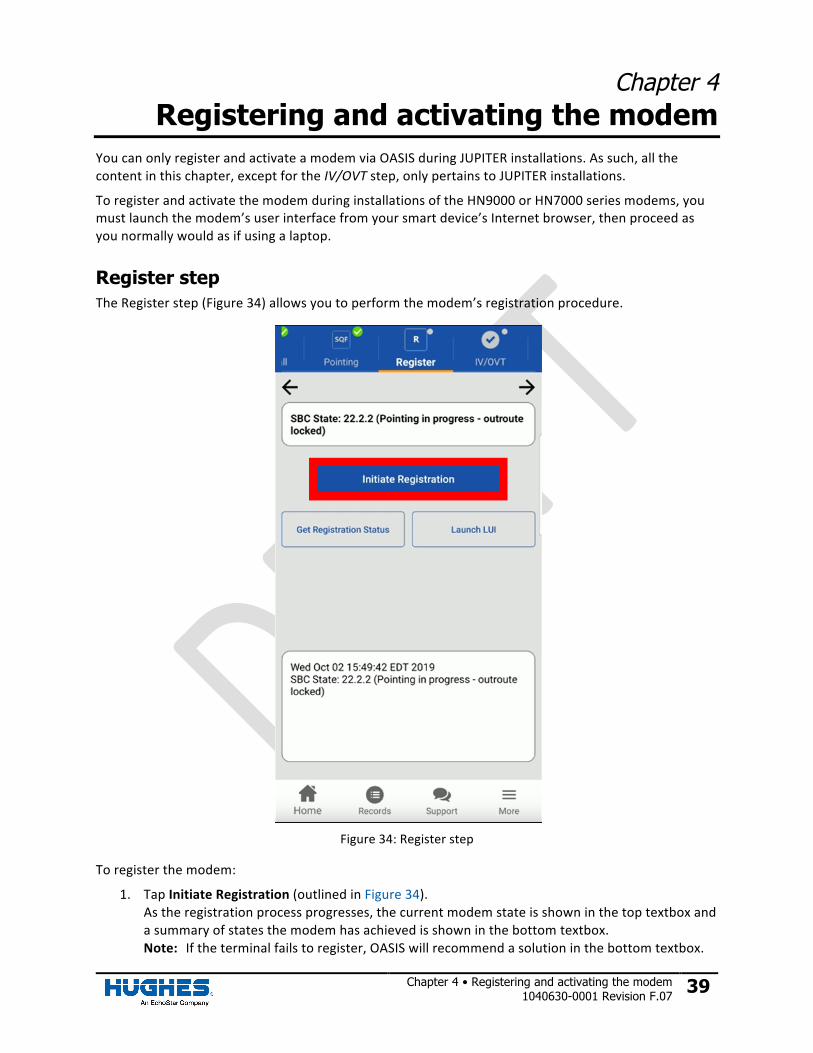
TheRegisterstep(Figure34)allowsyoutoperformthemodem’sregistrationprocedure.
Figure34:Registerstep
Toregisterthemodem:
1. TapInitiateRegistration(outlinedinFigure34).Astheregistrationprocessprogresses,thecurrentmodemstateisshowninthetoptextboxandasummaryofstatesthemodemhasachievedisshowninthebottomtextbox.Note: Iftheterminalfailstoregister,OASISwillrecommendasolutioninthebottomtextbox.
40 Chapter 4 • Registering and activating the modem 1040630-0001 Revision F.07
2. Whenthemodemsuccessfullyregisters,asuccesspop-upmessageappears(Figure35).TapOk.
Figure35:Registrationsuccessful
3. Tap toproceedtothenextstep–IV/OVT.
IV/OVT step
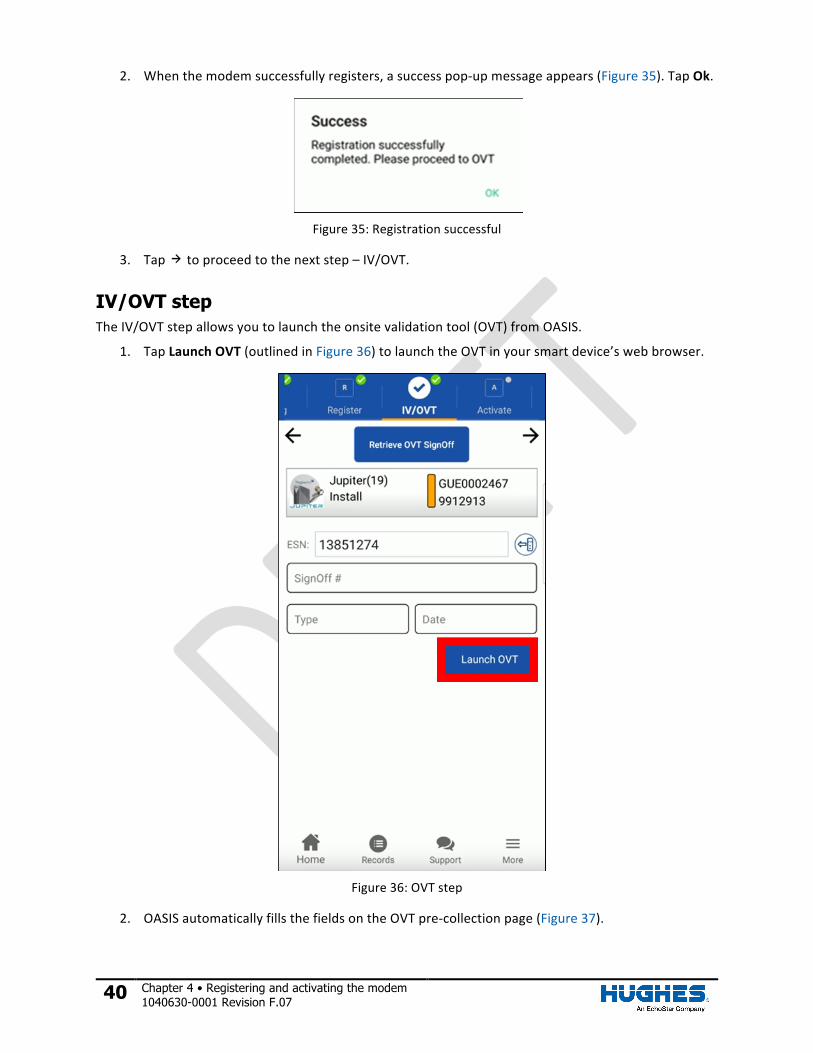
TheIV/OVTstepallowsyoutolaunchtheonsitevalidationtool(OVT)fromOASIS.
1. TapLaunchOVT(outlinedinFigure36)tolaunchtheOVTinyoursmartdevice’swebbrowser.
Figure36:OVTstep
2. OASISautomaticallyfillsthefieldsontheOVTpre-collectionpage(Figure37).
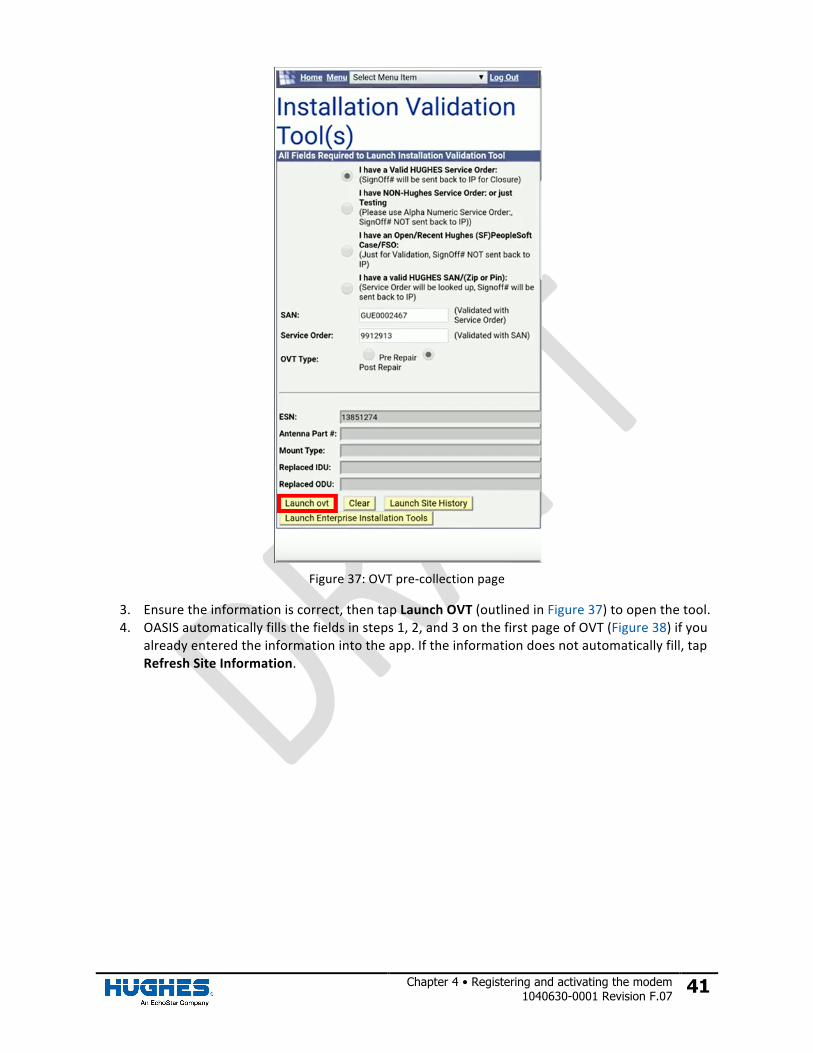
Chapter 4 • Registering and activating the modem 1040630-0001 Revision F.07 41
Figure37:OVTpre-collectionpage
3. Ensuretheinformationiscorrect,thentapLaunchOVT(outlinedinFigure37)toopenthetool.4. OASISautomaticallyfillsthefieldsinsteps1,2,and3onthefirstpageofOVT(Figure38)ifyou
alreadyenteredtheinformationintotheapp.Iftheinformationdoesnotautomaticallyfill,tapRefreshSiteInformation.
42 Chapter 4 • Registering and activating the modem 1040630-0001 Revision F.07
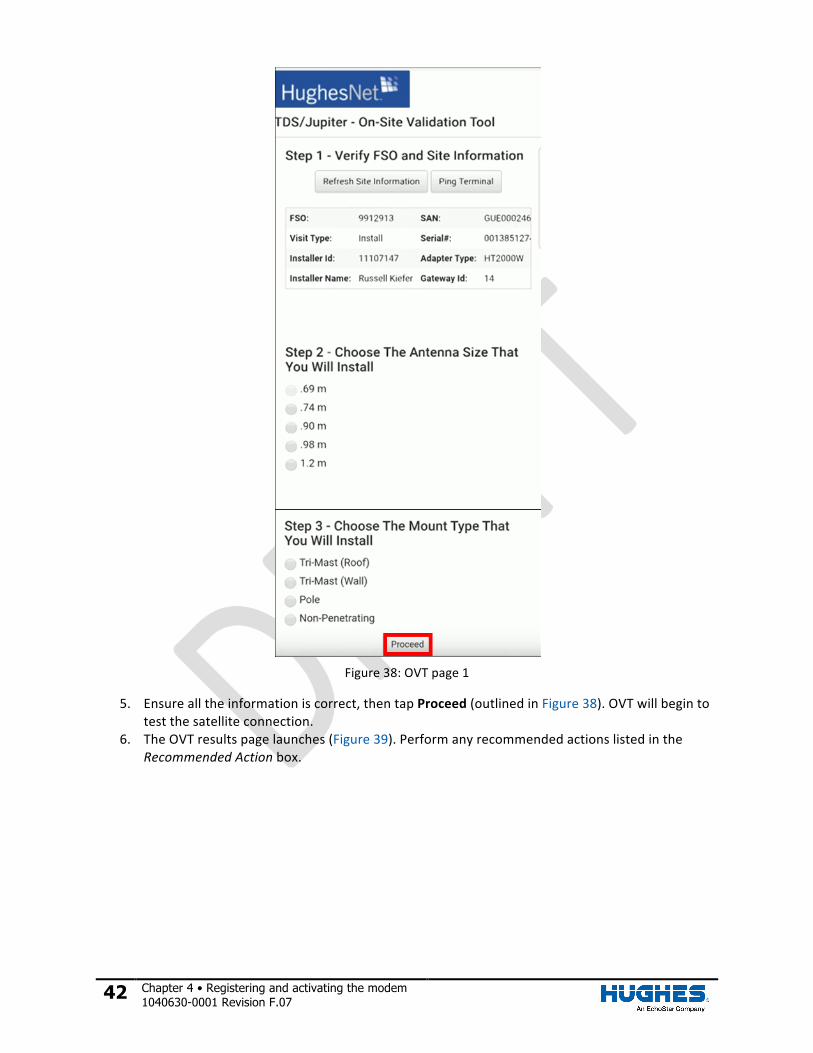
Figure38:OVTpage1
5. Ensurealltheinformationiscorrect,thentapProceed(outlinedinFigure38).OVTwillbegintotestthesatelliteconnection.
6. TheOVTresultspagelaunches(Figure39).PerformanyrecommendedactionslistedintheRecommendedActionbox.
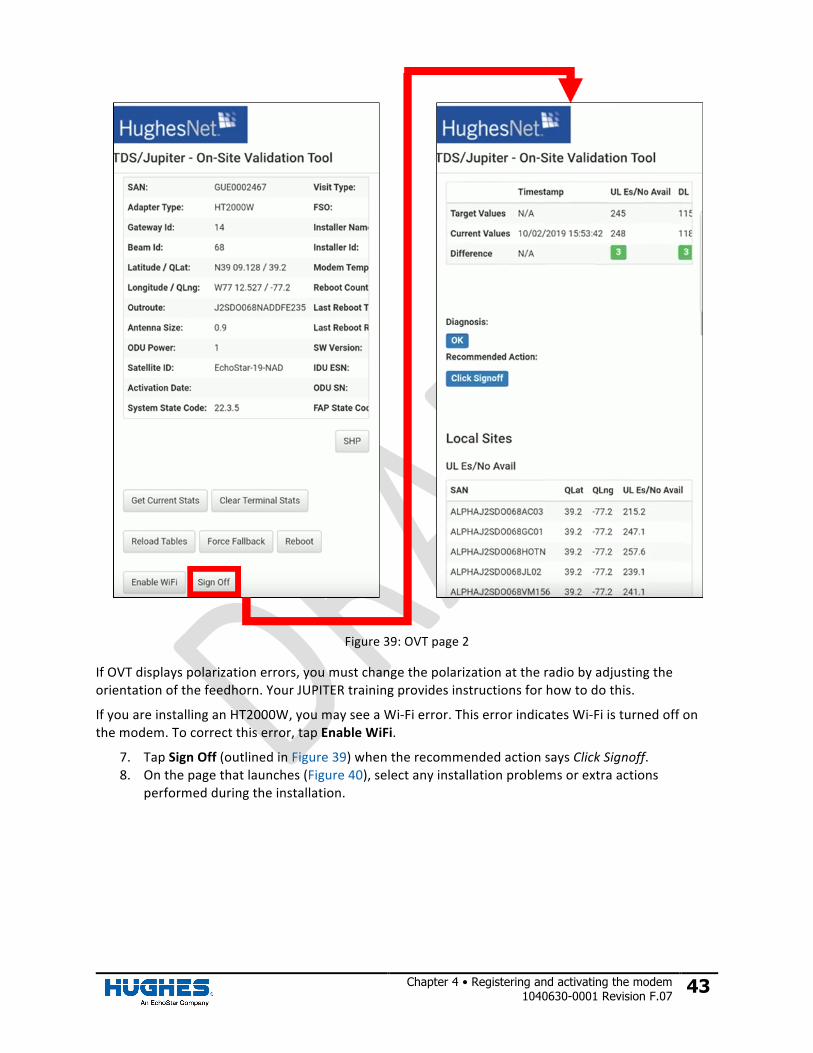
Chapter 4 • Registering and activating the modem 1040630-0001 Revision F.07 43
Figure39:OVTpage2
IfOVTdisplayspolarizationerrors,youmustchangethepolarizationattheradiobyadjustingtheorientationofthefeedhorn.YourJUPITERtrainingprovidesinstructionsforhowtodothis.
IfyouareinstallinganHT2000W,youmayseeaWi-Fierror.ThiserrorindicatesWi-Fiisturnedoffonthemodem.Tocorrectthiserror,tapEnableWiFi.
7. TapSignOff(outlinedinFigure39)whentherecommendedactionsaysClickSignoff.8. Onthepagethatlaunches(Figure40),selectanyinstallationproblemsorextraactions
performedduringtheinstallation.
44 Chapter 4 • Registering and activating the modem 1040630-0001 Revision F.07
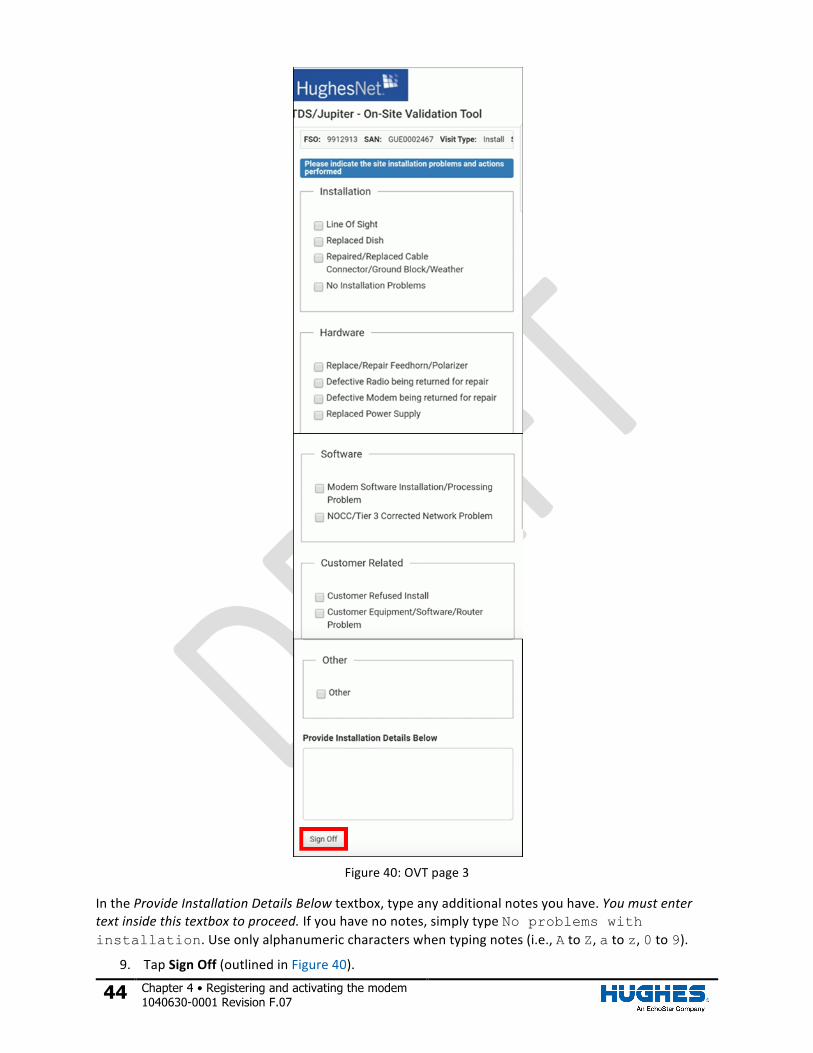
Figure40:OVTpage3
IntheProvideInstallationDetailsBelowtextbox,typeanyadditionalnotesyouhave.Youmustentertextinsidethistextboxtoproceed.Ifyouhavenonotes,simplytypeNo problems with installation.Useonlyalphanumericcharacterswhentypingnotes(i.e.,AtoZ,atoz,0to9).
9. TapSignOff(outlinedinFigure40).
Chapter 4 • Registering and activating the modem 1040630-0001 Revision F.07 45
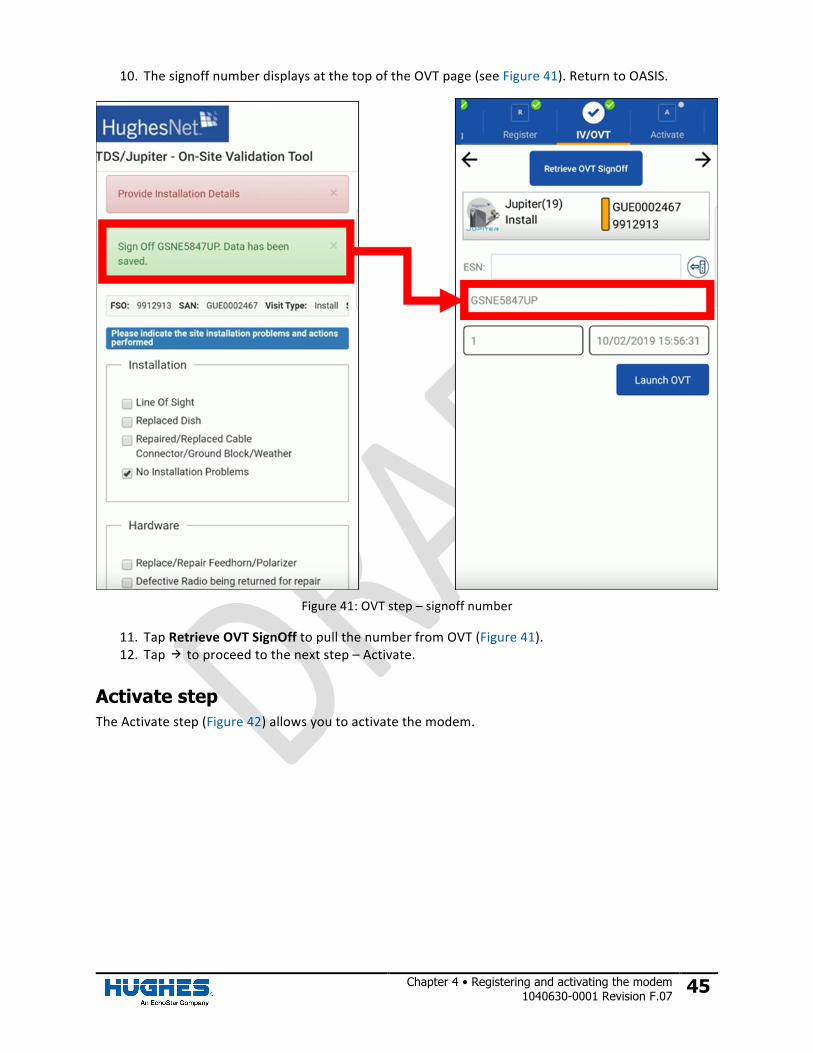
10. ThesignoffnumberdisplaysatthetopoftheOVTpage(seeFigure41).ReturntoOASIS.
Figure41:OVTstep–signoffnumber
11. TapRetrieveOVTSignOfftopullthenumberfromOVT(Figure41).12. Tap toproceedtothenextstep–Activate.
Activate step
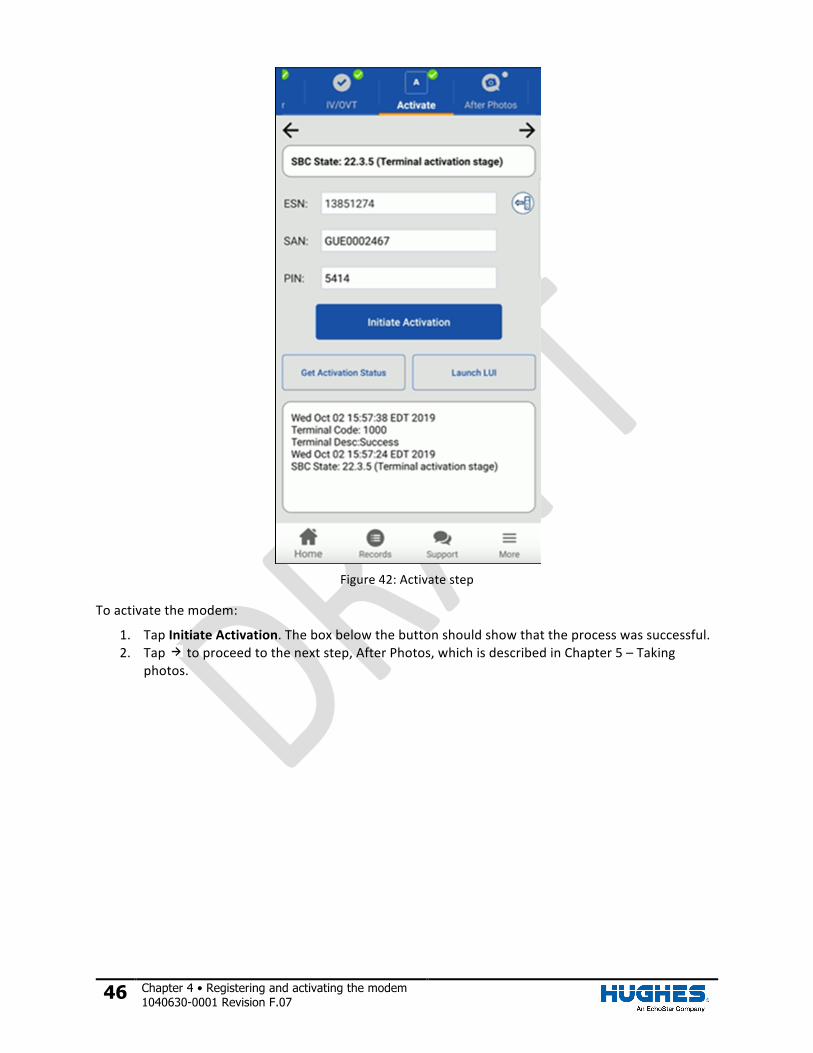
TheActivatestep(Figure42)allowsyoutoactivatethemodem.
46 Chapter 4 • Registering and activating the modem 1040630-0001 Revision F.07
Figure42:Activatestep
Toactivatethemodem:
1. TapInitiateActivation.Theboxbelowthebuttonshouldshowthattheprocesswassuccessful.2. Tap toproceedtothenextstep,AfterPhotos,whichisdescribedinChapter5–Taking
photos.
Chapter 5 • Taking photos 1040630-0001 Revision F.07 47
Chapter 5 Taking photos
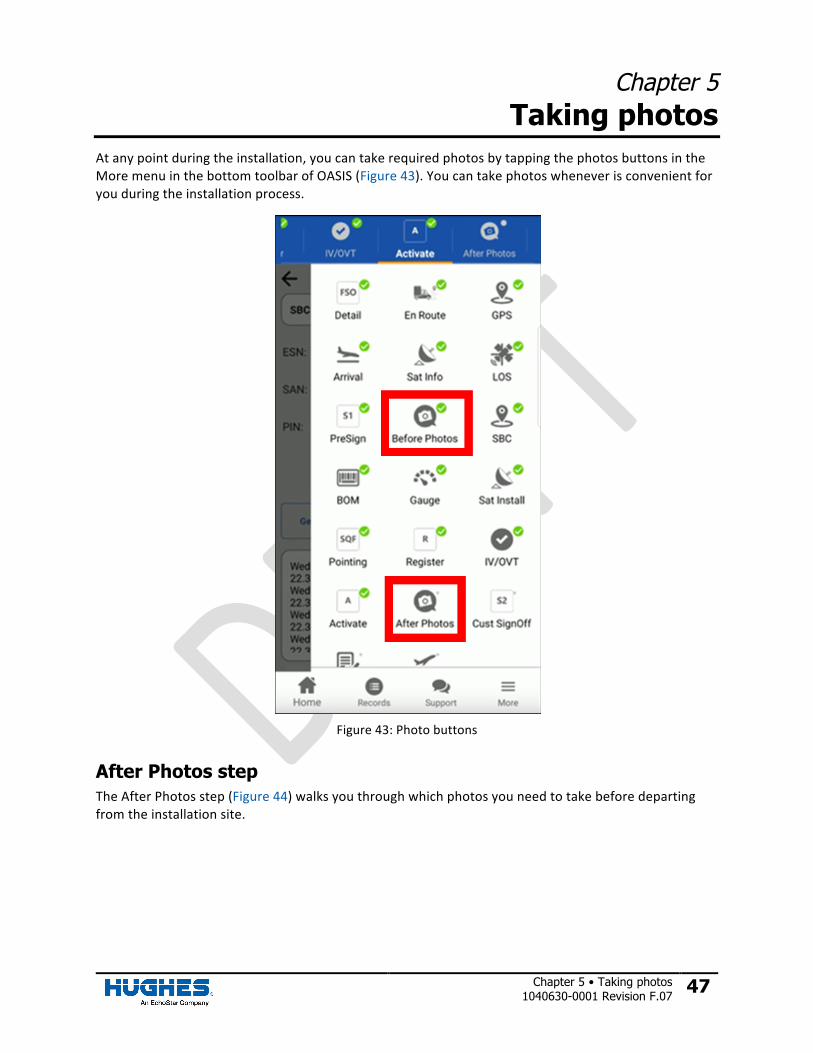
Atanypointduringtheinstallation,youcantakerequiredphotosbytappingthephotosbuttonsintheMoremenuinthebottomtoolbarofOASIS(Figure43).Youcantakephotoswheneverisconvenientforyouduringtheinstallationprocess.
Figure43:Photobuttons
After Photos step
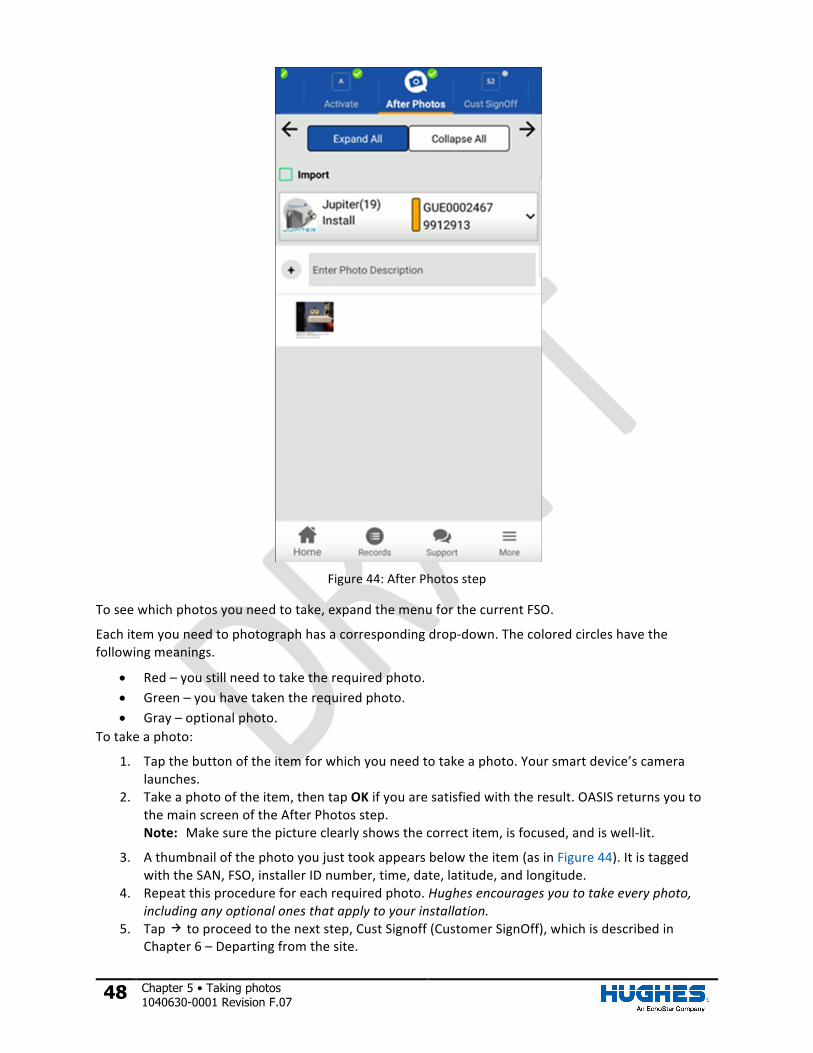
TheAfterPhotosstep(Figure44)walksyouthroughwhichphotosyouneedtotakebeforedepartingfromtheinstallationsite.
48 Chapter 5 • Taking photos 1040630-0001 Revision F.07
Figure44:AfterPhotosstep
Toseewhichphotosyouneedtotake,expandthemenuforthecurrentFSO.
Eachitemyouneedtophotographhasacorrespondingdrop-down.Thecoloredcircleshavethefollowingmeanings.
• Red–youstillneedtotaketherequiredphoto.• Green–youhavetakentherequiredphoto.• Gray–optionalphoto.
Totakeaphoto:
1. Tapthebuttonoftheitemforwhichyouneedtotakeaphoto.Yoursmartdevice’scameralaunches.
2. Takeaphotooftheitem,thentapOKifyouaresatisfiedwiththeresult.OASISreturnsyoutothemainscreenoftheAfterPhotosstep.Note: Makesurethepictureclearlyshowsthecorrectitem,isfocused,andiswell-lit.
3. Athumbnailofthephotoyoujusttookappearsbelowtheitem(asinFigure44).ItistaggedwiththeSAN,FSO,installerIDnumber,time,date,latitude,andlongitude.
4. Repeatthisprocedureforeachrequiredphoto.Hughesencouragesyoutotakeeveryphoto,includinganyoptionalonesthatapplytoyourinstallation.
5. Tap toproceedtothenextstep,CustSignoff(CustomerSignOff),whichisdescribedinChapter6–Departingfromthesite.

Chapter 6 • Departing from the site 1040630-0001 Revision F.07 49
Chapter 6 Departing from the site
Thischapterexplainsthefinalstepsyoumusttaketocompletetheinstallation.
Activating the customer’s service
PriortoproceedinginOASIS,youmustwalkthecustomerthroughtheserviceactivationprocessontheircomputerorotherdevice.ThefulldetailsofserviceactivationaredescribedinyourJUPITERtrainingandinthemodemguidespecifictothetypeofmodemyouareinstalling,butthestepsbelowsummarizetheprocess.
1. Connectthecustomer’scomputerorotherdevicetothemodem,eitherwirelesslyorviaaLANconnection.
2. Usingabrowseronthecustomer’scomputerordevice,enterwww.systemcontrolcenter.comintotheaddressbartoaccessthemodem’sSystemControlCenter.
3. ClickontheServiceActivationlinkintheSystemControlCenter’ssidemenu,andthenguidethecustomerthroughtheHughesNetWelcomeExperience.EncouragethemtodownloadtheHughesNetUsageMetertomonitortheirserviceplandata.
4. FortheHT2000W,besuretoexplaintothecustomerthedifferencebetweenthe2.4GHzand5GHzWi-Fibands.
ReturntoOASISonceyouhaveactivatedthecustomer’sservice.YouwillbeontheCustSignoffstep.
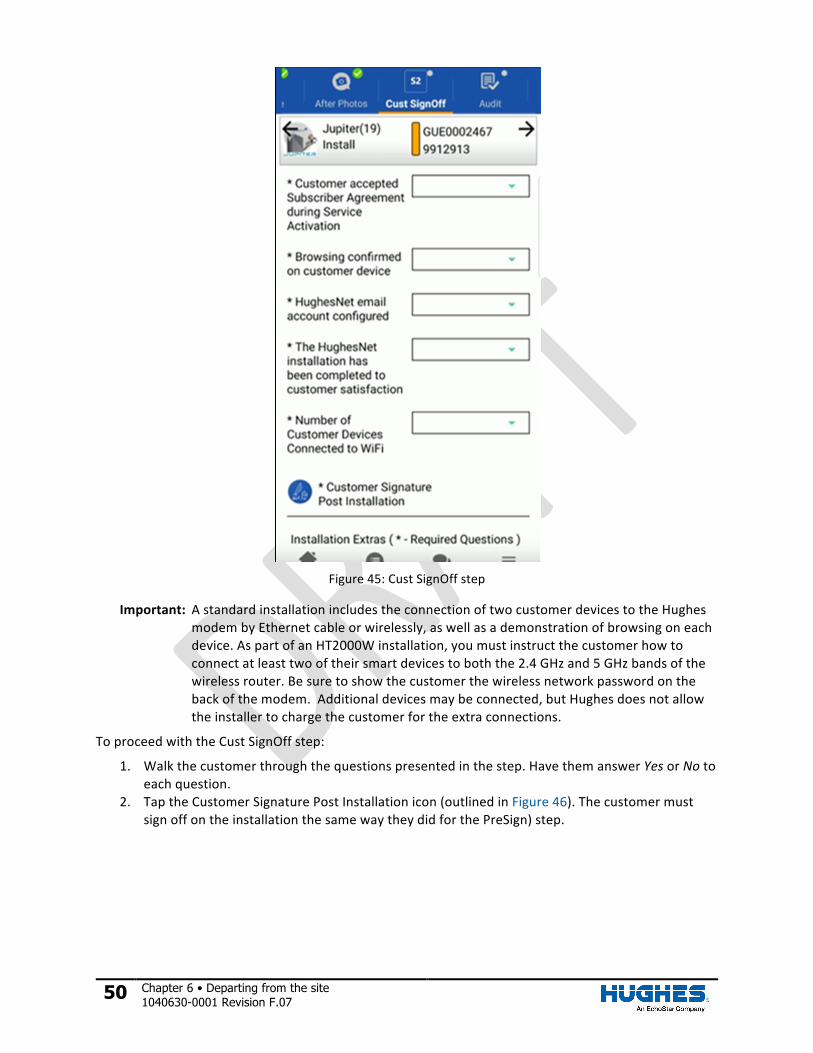
Cust SignOff (Customer Signoff) step
TheCustSignOffstep(Figure45)helpsensuretheinstallationwascompletedsuccessfullyandthecustomerhasnofurtherissues.
50 Chapter 6 • Departing from the site 1040630-0001 Revision F.07
Figure45:CustSignOffstep
Important: AstandardinstallationincludestheconnectionoftwocustomerdevicestotheHughesmodembyEthernetcableorwirelessly,aswellasademonstrationofbrowsingoneachdevice.AspartofanHT2000Winstallation,youmustinstructthecustomerhowtoconnectatleasttwooftheirsmartdevicestoboththe2.4GHzand5GHzbandsofthewirelessrouter.Besuretoshowthecustomerthewirelessnetworkpasswordonthebackofthemodem.Additionaldevicesmaybeconnected,butHughesdoesnotallowtheinstallertochargethecustomerfortheextraconnections.
ToproceedwiththeCustSignOffstep:
1. Walkthecustomerthroughthequestionspresentedinthestep.HavethemanswerYesorNotoeachquestion.
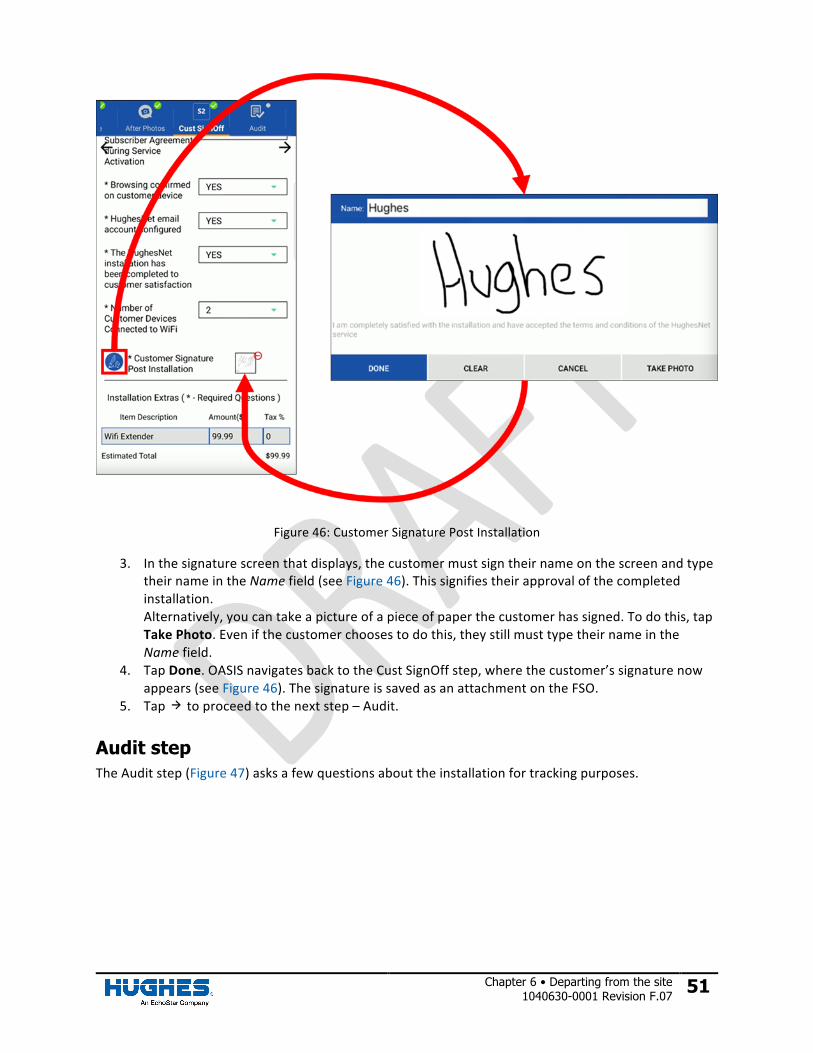
2. TaptheCustomerSignaturePostInstallationicon(outlinedinFigure46).ThecustomermustsignoffontheinstallationthesamewaytheydidforthePreSign)step.
Chapter 6 • Departing from the site 1040630-0001 Revision F.07 51
Figure46:CustomerSignaturePostInstallation
3. Inthesignaturescreenthatdisplays,thecustomermustsigntheirnameonthescreenandtypetheirnameintheNamefield(seeFigure46).Thissignifiestheirapprovalofthecompletedinstallation.Alternatively,youcantakeapictureofapieceofpaperthecustomerhassigned.Todothis,tapTakePhoto.Evenifthecustomerchoosestodothis,theystillmusttypetheirnameintheNamefield.
4. TapDone.OASISnavigatesbacktotheCustSignOffstep,wherethecustomer’ssignaturenowappears(seeFigure46).ThesignatureissavedasanattachmentontheFSO.
5. Tap toproceedtothenextstep–Audit.
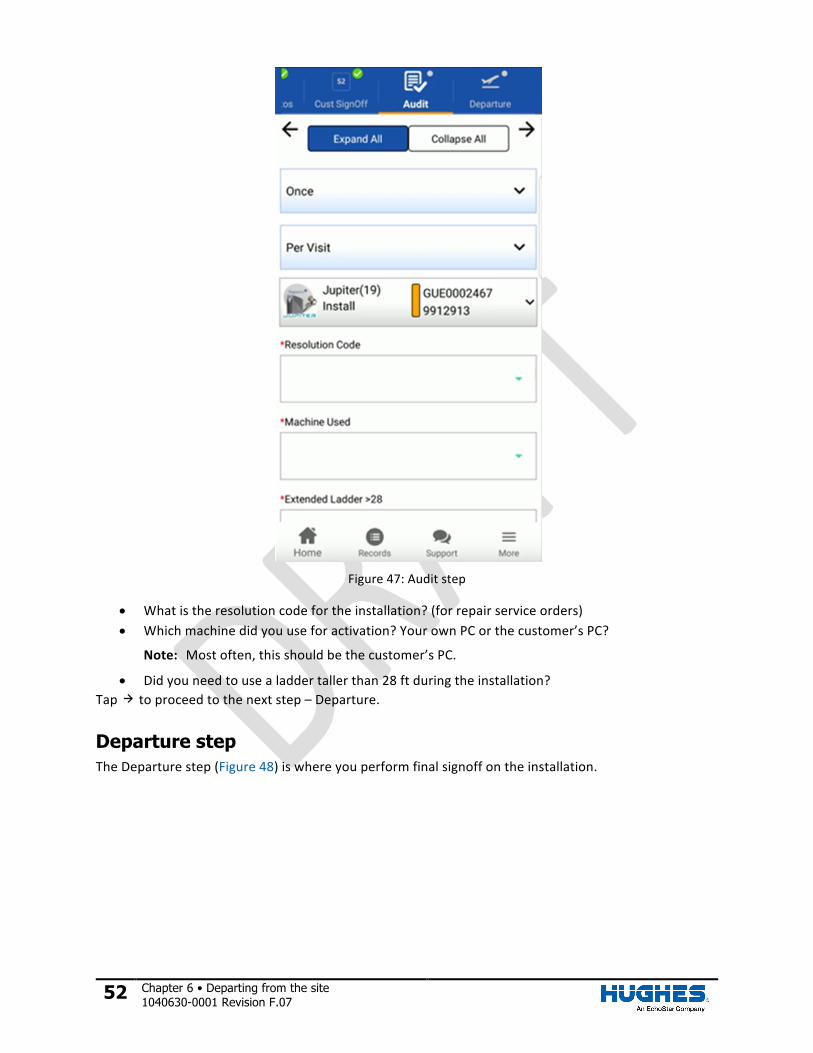
Audit step
TheAuditstep(Figure47)asksafewquestionsabouttheinstallationfortrackingpurposes.
52 Chapter 6 • Departing from the site 1040630-0001 Revision F.07
Figure47:Auditstep
• Whatistheresolutioncodefortheinstallation?(forrepairserviceorders)• Whichmachinedidyouuseforactivation?YourownPCorthecustomer’sPC?
Note: Mostoften,thisshouldbethecustomer’sPC.
• Didyouneedtousealaddertallerthan28ftduringtheinstallation?Tap toproceedtothenextstep–Departure.
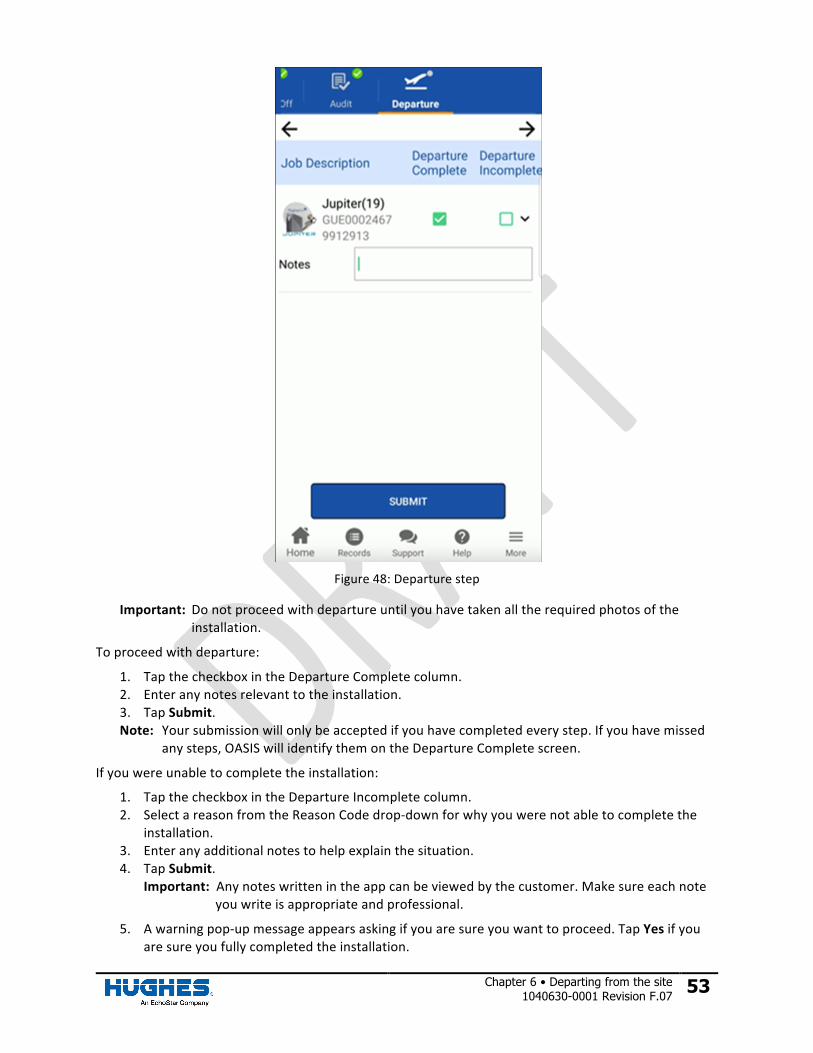
Departure step
TheDeparturestep(Figure48)iswhereyouperformfinalsignoffontheinstallation.
Chapter 6 • Departing from the site 1040630-0001 Revision F.07 53
Figure48:Departurestep
Important: Donotproceedwithdepartureuntilyouhavetakenalltherequiredphotosoftheinstallation.
Toproceedwithdeparture:
1. TapthecheckboxintheDepartureCompletecolumn.2. Enteranynotesrelevanttotheinstallation.3. TapSubmit.Note: Yoursubmissionwillonlybeacceptedifyouhavecompletedeverystep.Ifyouhavemissed
anysteps,OASISwillidentifythemontheDepartureCompletescreen.
Ifyouwereunabletocompletetheinstallation:
1. TapthecheckboxintheDepartureIncompletecolumn.2. SelectareasonfromtheReasonCodedrop-downforwhyyouwerenotabletocompletethe
installation.3. Enteranyadditionalnotestohelpexplainthesituation.4. TapSubmit.
Important:Anynoteswrittenintheappcanbeviewedbythecustomer.Makesureeachnoteyouwriteisappropriateandprofessional.
5. Awarningpop-upmessageappearsaskingifyouaresureyouwanttoproceed.TapYesifyouaresureyoufullycompletedtheinstallation.
54 Chapter 6 • Departing from the site 1040630-0001 Revision F.07
Important:OnceyouproceedbeyondtheDeparturestep,youcannoteditanyinformationintheFSO.Makesureyouhavealltherequiredinformationandhavecompletedeachstepfullybeforeproceeding.
6. OASISlaunchestheRecordspage.Seethenextsection,Recordspage.
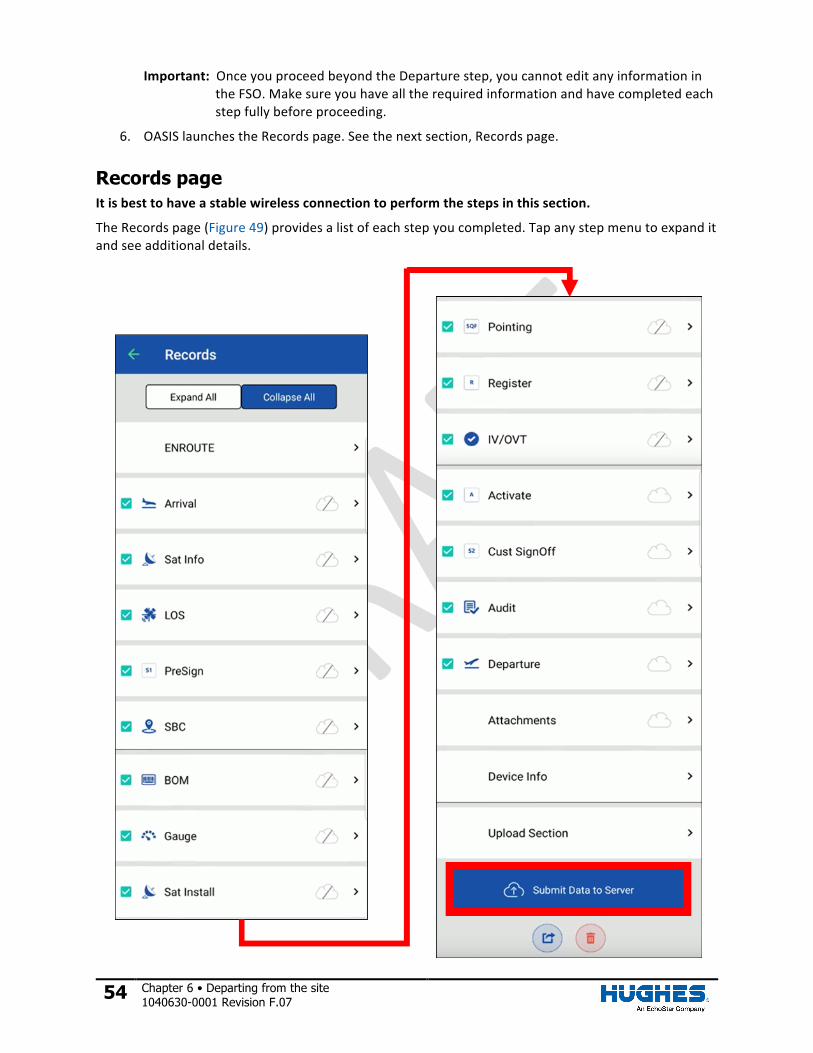
Records page
Itisbesttohaveastablewirelessconnectiontoperformthestepsinthissection.
TheRecordspage(Figure49)providesalistofeachstepyoucompleted.Tapanystepmenutoexpanditandseeadditionaldetails.
Chapter 6 • Departing from the site 1040630-0001 Revision F.07 55
Figure49:Recordspage
Thecheckmarks( )indicateyouhavevisitedthestep.Thewhitecloudswithlinesthroughthem( )indicatethatthestepdatahasnotyetbeenuploadedtotheHughesserver.OASISremovesthelinefromthecloud( )oncethedatahasbeenuploaded.
Theblueicon( )atthebottomofthescreenexportsallattachmentstoyoursmartdevice,sotheyaresavedlocally.Theredtrashcanicon( )deletesthedatafromOASIS.DonotdothisuntilyouhavesuccessfullyuploadedthedatatotheInstallationPortal.
TouploadtheinformationtotheHughesservers:
1. TapSubmitDatatoServer(outlinedinFigure49).2. TapOkonthesuccesspop-upmessagethatappears.
Onceyouhavesuccessfullyuploadedthedata,taptheHomeicontonavigatebacktotheOASIShomepage,whereyouwillverifythedataupload.
Verify data upload
Note: Itisbesttohaveastablewirelessconnectiontoperformthestepsinthissection.
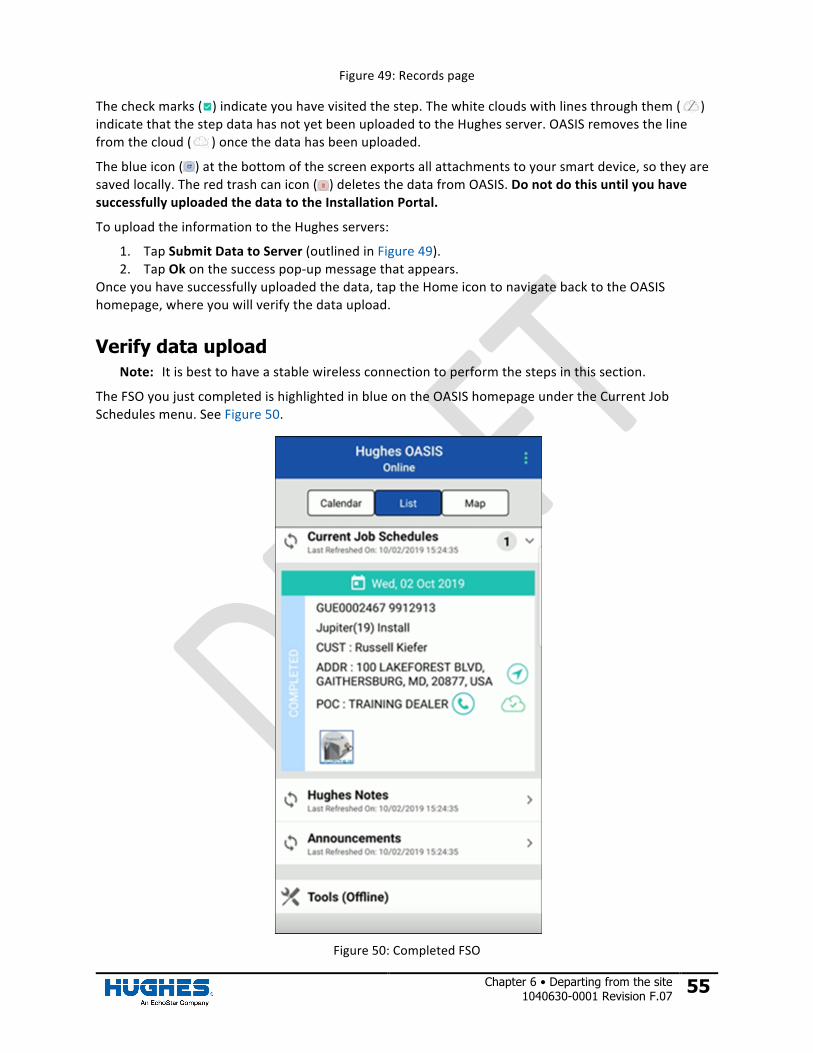
TheFSOyoujustcompletedishighlightedinblueontheOASIShomepageundertheCurrentJobSchedulesmenu.SeeFigure50.
Figure50:CompletedFSO
56 Chapter 6 • Departing from the site 1040630-0001 Revision F.07
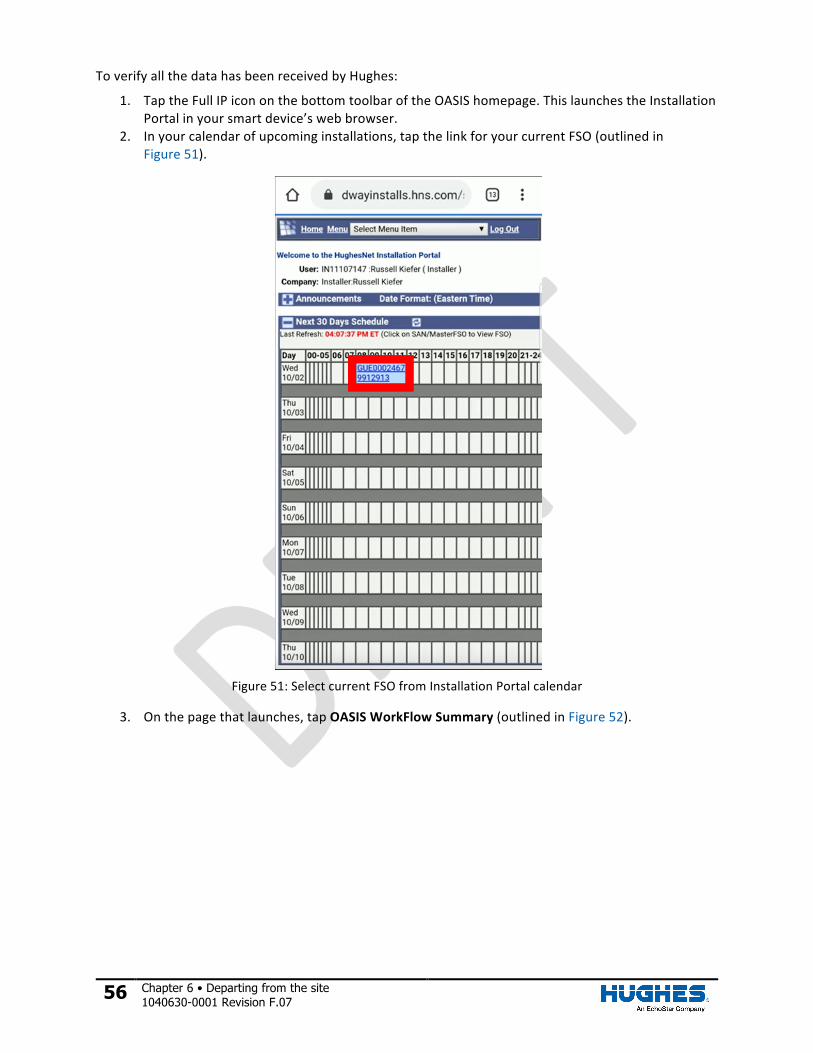
ToverifyallthedatahasbeenreceivedbyHughes:
1. TaptheFullIPicononthebottomtoolbaroftheOASIShomepage.ThislaunchestheInstallationPortalinyoursmartdevice’swebbrowser.
2. Inyourcalendarofupcominginstallations,tapthelinkforyourcurrentFSO(outlinedinFigure51).
Figure51:SelectcurrentFSOfromInstallationPortalcalendar
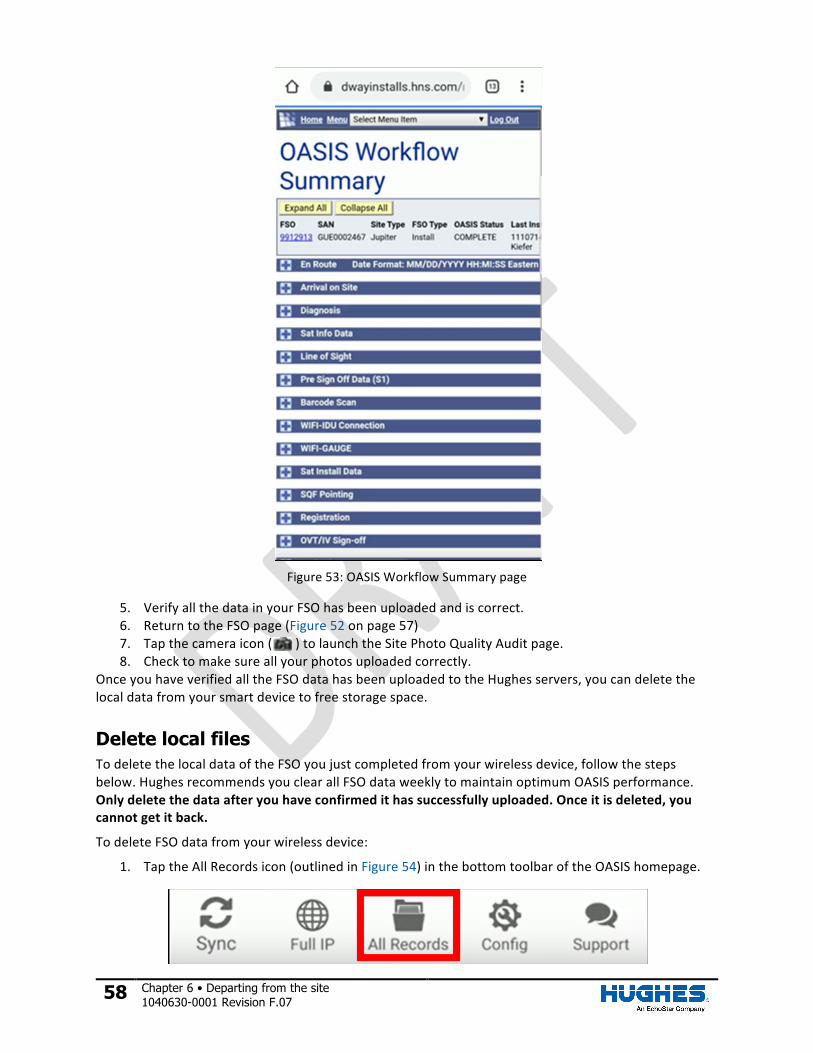
3. Onthepagethatlaunches,tapOASISWorkFlowSummary(outlinedinFigure52).

Chapter 6 • Departing from the site 1040630-0001 Revision F.07 57
Figure52:FSOpageonInstallationPortal
4. TheOASISWorkflowSummarypagelaunches(Figure53).
58 Chapter 6 • Departing from the site 1040630-0001 Revision F.07
Figure53:OASISWorkflowSummarypage
5. VerifyallthedatainyourFSOhasbeenuploadedandiscorrect.6. ReturntotheFSOpage(Figure52onpage57)7. Tapthecameraicon( )tolaunchtheSitePhotoQualityAuditpage.8. Checktomakesureallyourphotosuploadedcorrectly.
OnceyouhaveverifiedalltheFSOdatahasbeenuploadedtotheHughesservers,youcandeletethelocaldatafromyoursmartdevicetofreestoragespace.
Delete local files
TodeletethelocaldataoftheFSOyoujustcompletedfromyourwirelessdevice,followthestepsbelow.HughesrecommendsyouclearallFSOdataweeklytomaintainoptimumOASISperformance.Onlydeletethedataafteryouhaveconfirmedithassuccessfullyuploaded.Onceitisdeleted,youcannotgetitback.
TodeleteFSOdatafromyourwirelessdevice:
1. TaptheAllRecordsicon(outlinedinFigure54)inthebottomtoolbaroftheOASIShomepage.
Chapter 6 • Departing from the site 1040630-0001 Revision F.07 59
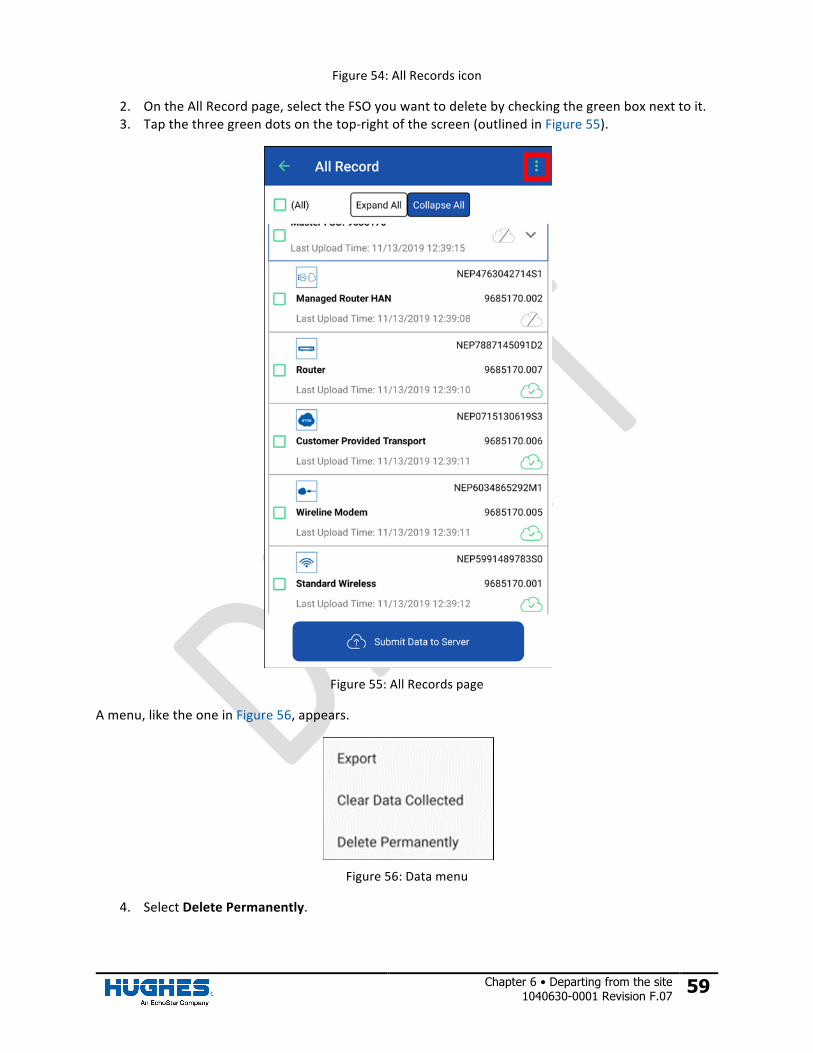
Figure54:AllRecordsicon
2. OntheAllRecordpage,selecttheFSOyouwanttodeletebycheckingthegreenboxnexttoit.3. Tapthethreegreendotsonthetop-rightofthescreen(outlinedinFigure55).
Figure55:AllRecordspage
Amenu,liketheoneinFigure56,appears.
Figure56:Datamenu
4. SelectDeletePermanently.

Appendix A • Performing repair orders 1040630-0001 Revision F.07 61
Performing repair orders
InstallerscanusecertainstepsinOASIStohelpwithJUPITERrepairorders.
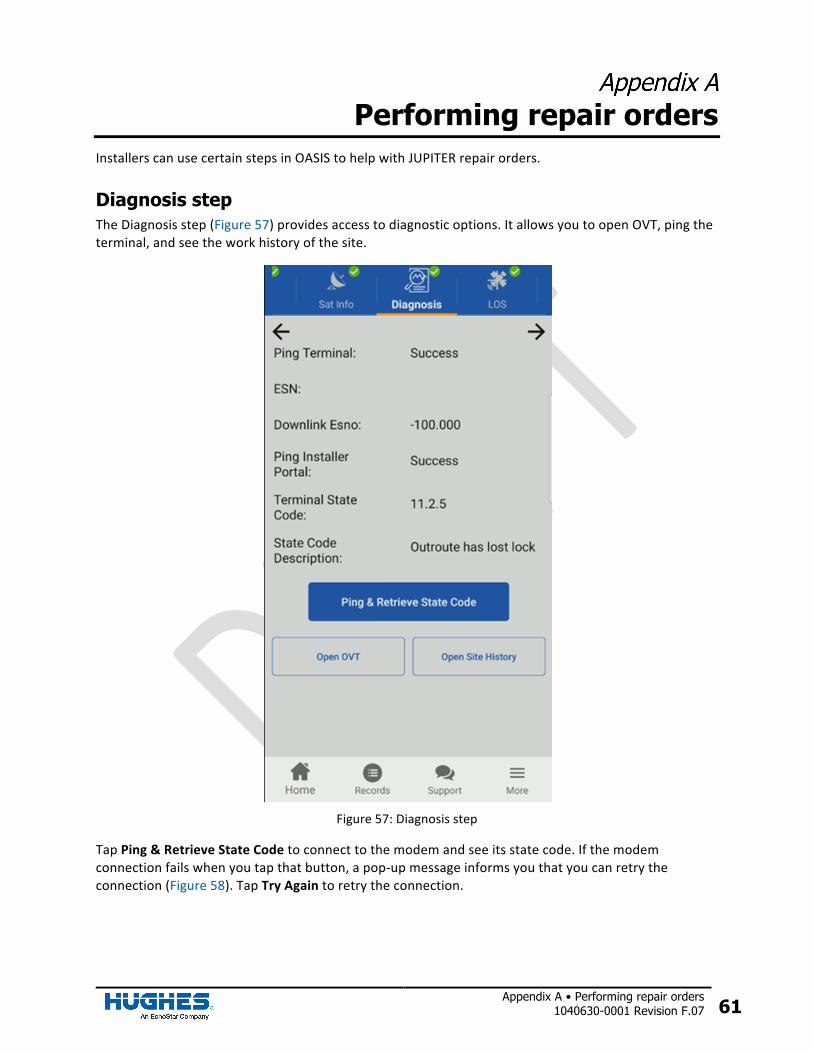
Diagnosis step
TheDiagnosisstep(Figure57)providesaccesstodiagnosticoptions.ItallowsyoutoopenOVT,pingtheterminal,andseetheworkhistoryofthesite.
Figure57:Diagnosisstep
TapPing&RetrieveStateCodetoconnecttothemodemandseeitsstatecode.Ifthemodemconnectionfailswhenyoutapthatbutton,apop-upmessageinformsyouthatyoucanretrytheconnection(Figure58).TapTryAgaintoretrytheconnection.
62 Chapter 6 • Performing repair orders 1040630-0001 Revision F.07
Figure58:Diagnosisstep:Unabletoconnecttomodem
Audit resolution codes
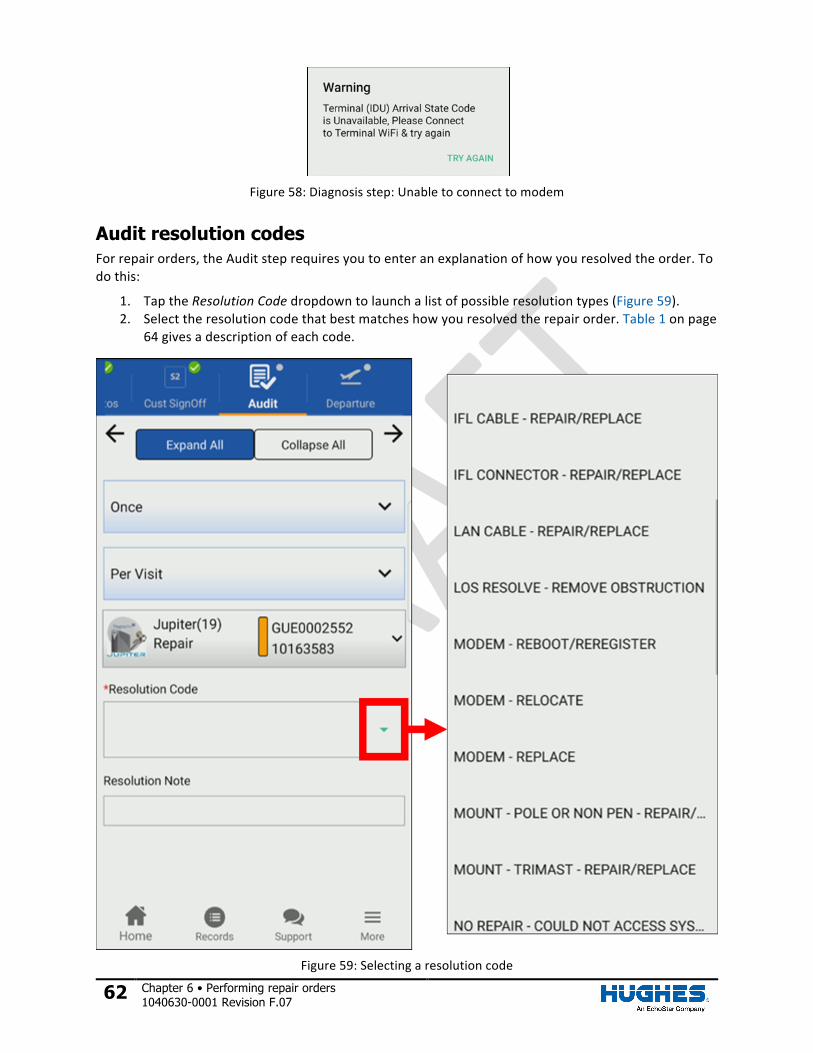
Forrepairorders,theAuditsteprequiresyoutoenteranexplanationofhowyouresolvedtheorder.Todothis:
1. TaptheResolutionCodedropdowntolaunchalistofpossibleresolutiontypes(Figure59).2. Selecttheresolutioncodethatbestmatcheshowyouresolvedtherepairorder.Table1onpage
64givesadescriptionofeachcode.
Figure59:Selectingaresolutioncode
Appendix A • Performing repair orders 1040630-0001 Revision F.07 63
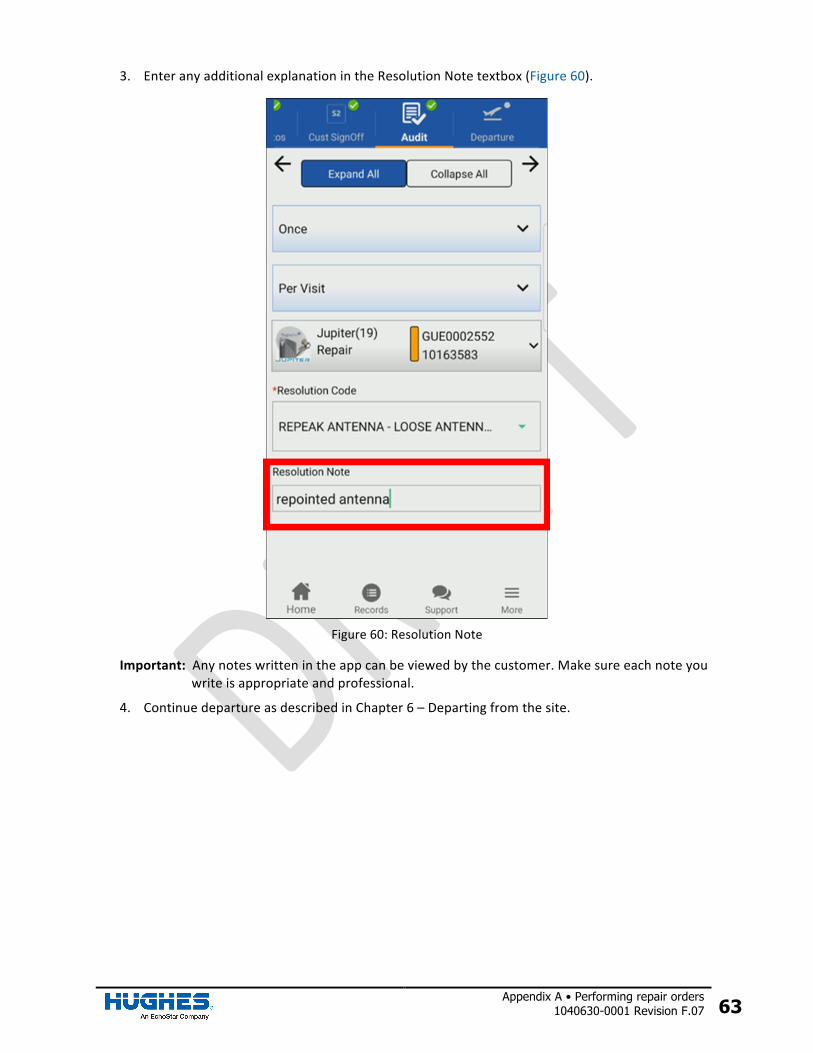
3. EnteranyadditionalexplanationintheResolutionNotetextbox(Figure60).
Figure60:ResolutionNote
Important:Anynoteswrittenintheappcanbeviewedbythecustomer.Makesureeachnoteyouwriteisappropriateandprofessional.
4. ContinuedepartureasdescribedinChapter6–Departingfromthesite.
64 Chapter 6 • Performing repair orders 1040630-0001 Revision F.07
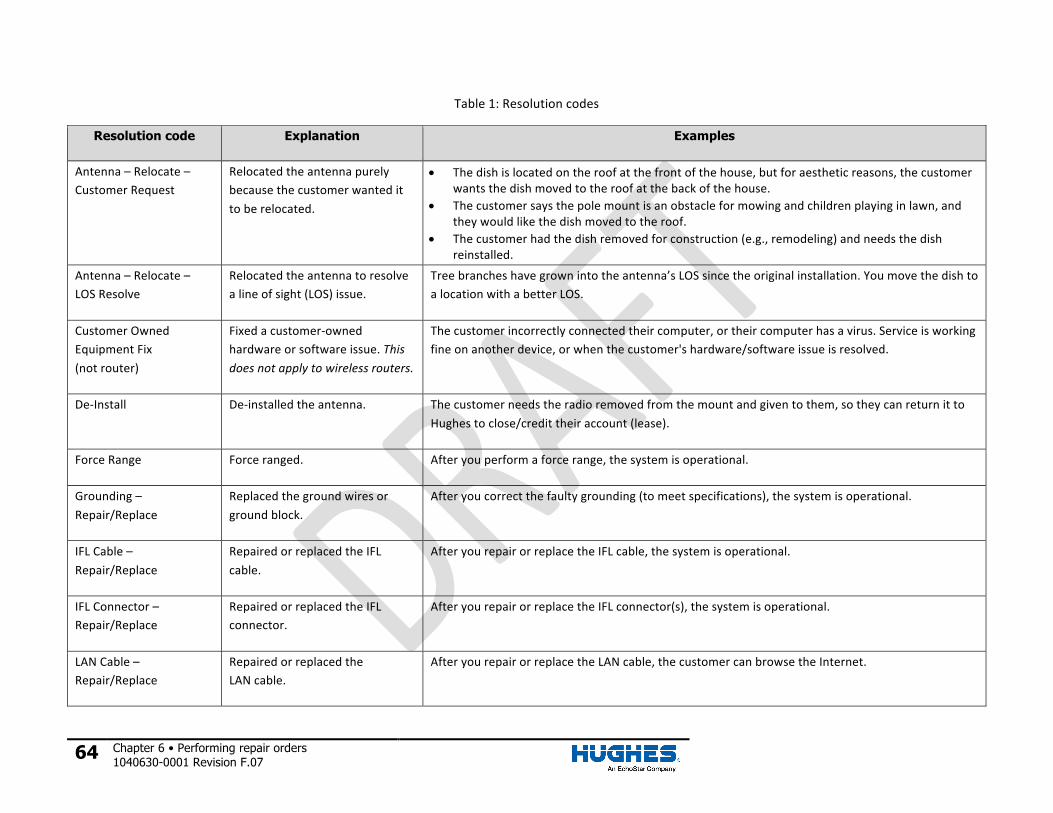
Table1:Resolutioncodes
Resolution code Explanation Examples
Antenna–Relocate–CustomerRequest
Relocatedtheantennapurelybecausethecustomerwantedittoberelocated.
• Thedishislocatedontheroofatthefrontofthehouse,butforaestheticreasons,thecustomerwantsthedishmovedtotheroofatthebackofthehouse.
• Thecustomersaysthepolemountisanobstacleformowingandchildrenplayinginlawn,andtheywouldlikethedishmovedtotheroof.
• Thecustomerhadthedishremovedforconstruction(e.g.,remodeling)andneedsthedishreinstalled.
Antenna–Relocate–LOSResolve
Relocatedtheantennatoresolvealineofsight(LOS)issue.
Treebrancheshavegrownintotheantenna’sLOSsincetheoriginalinstallation.YoumovethedishtoalocationwithabetterLOS.
CustomerOwnedEquipmentFix(notrouter)
Fixedacustomer-ownedhardwareorsoftwareissue.Thisdoesnotapplytowirelessrouters.
Thecustomerincorrectlyconnectedtheircomputer,ortheircomputerhasavirus.Serviceisworkingfineonanotherdevice,orwhenthecustomer'shardware/softwareissueisresolved.
De-Install De-installedtheantenna. Thecustomerneedstheradioremovedfromthemountandgiventothem,sotheycanreturnittoHughestoclose/credittheiraccount(lease).
ForceRange Forceranged. Afteryouperformaforcerange,thesystemisoperational.
Grounding–Repair/Replace
Replacedthegroundwiresorgroundblock.
Afteryoucorrectthefaultygrounding(tomeetspecifications),thesystemisoperational.
IFLCable–Repair/Replace
RepairedorreplacedtheIFLcable.
AfteryourepairorreplacetheIFLcable,thesystemisoperational.
IFLConnector–Repair/Replace
RepairedorreplacedtheIFLconnector.
AfteryourepairorreplacetheIFLconnector(s),thesystemisoperational.
LANCable–Repair/Replace
RepairedorreplacedtheLANcable.
AfteryourepairorreplacetheLANcable,thecustomercanbrowsetheInternet.
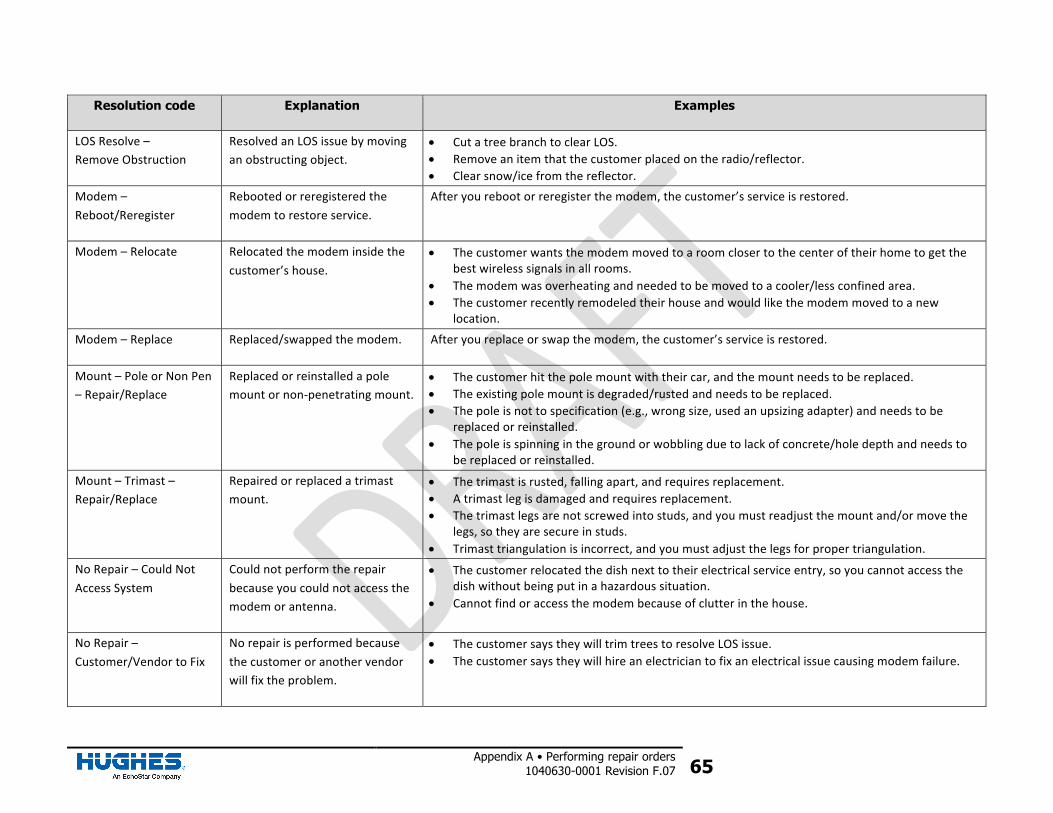
Appendix A • Performing repair orders 1040630-0001 Revision F.07 65
Resolution code Explanation Examples
LOSResolve–RemoveObstruction
ResolvedanLOSissuebymovinganobstructingobject.
• CutatreebranchtoclearLOS.• Removeanitemthatthecustomerplacedontheradio/reflector.• Clearsnow/icefromthereflector.
Modem–Reboot/Reregister
Rebootedorreregisteredthemodemtorestoreservice.
Afteryourebootorreregisterthemodem,thecustomer’sserviceisrestored.
Modem–Relocate Relocatedthemodeminsidethecustomer’shouse.
• Thecustomerwantsthemodemmovedtoaroomclosertothecenteroftheirhometogetthebestwirelesssignalsinallrooms.
• Themodemwasoverheatingandneededtobemovedtoacooler/lessconfinedarea.• Thecustomerrecentlyremodeledtheirhouseandwouldlikethemodemmovedtoanew
location.
Modem–Replace Replaced/swappedthemodem. Afteryoureplaceorswapthemodem,thecustomer’sserviceisrestored.
Mount–PoleorNonPen–Repair/Replace
Replacedorreinstalledapolemountornon-penetratingmount.
• Thecustomerhitthepolemountwiththeircar,andthemountneedstobereplaced.• Theexistingpolemountisdegraded/rustedandneedstobereplaced.• Thepoleisnottospecification(e.g.,wrongsize,usedanupsizingadapter)andneedstobe
replacedorreinstalled.• Thepoleisspinninginthegroundorwobblingduetolackofconcrete/holedepthandneedsto
bereplacedorreinstalled.
Mount–Trimast–Repair/Replace
Repairedorreplacedatrimastmount.
• Thetrimastisrusted,fallingapart,andrequiresreplacement.• Atrimastlegisdamagedandrequiresreplacement.• Thetrimastlegsarenotscrewedintostuds,andyoumustreadjustthemountand/ormovethe
legs,sotheyaresecureinstuds.• Trimasttriangulationisincorrect,andyoumustadjustthelegsforpropertriangulation.
NoRepair–CouldNotAccessSystem
Couldnotperformtherepairbecauseyoucouldnotaccessthemodemorantenna.
• Thecustomerrelocatedthedishnexttotheirelectricalserviceentry,soyoucannotaccessthedishwithoutbeingputinahazardoussituation.
• Cannotfindoraccessthemodembecauseofclutterinthehouse.
NoRepair–Customer/VendortoFix
Norepairisperformedbecausethecustomeroranothervendorwillfixtheproblem.
• ThecustomersaystheywilltrimtreestoresolveLOSissue.• Thecustomersaystheywillhireanelectriciantofixanelectricalissuecausingmodemfailure.
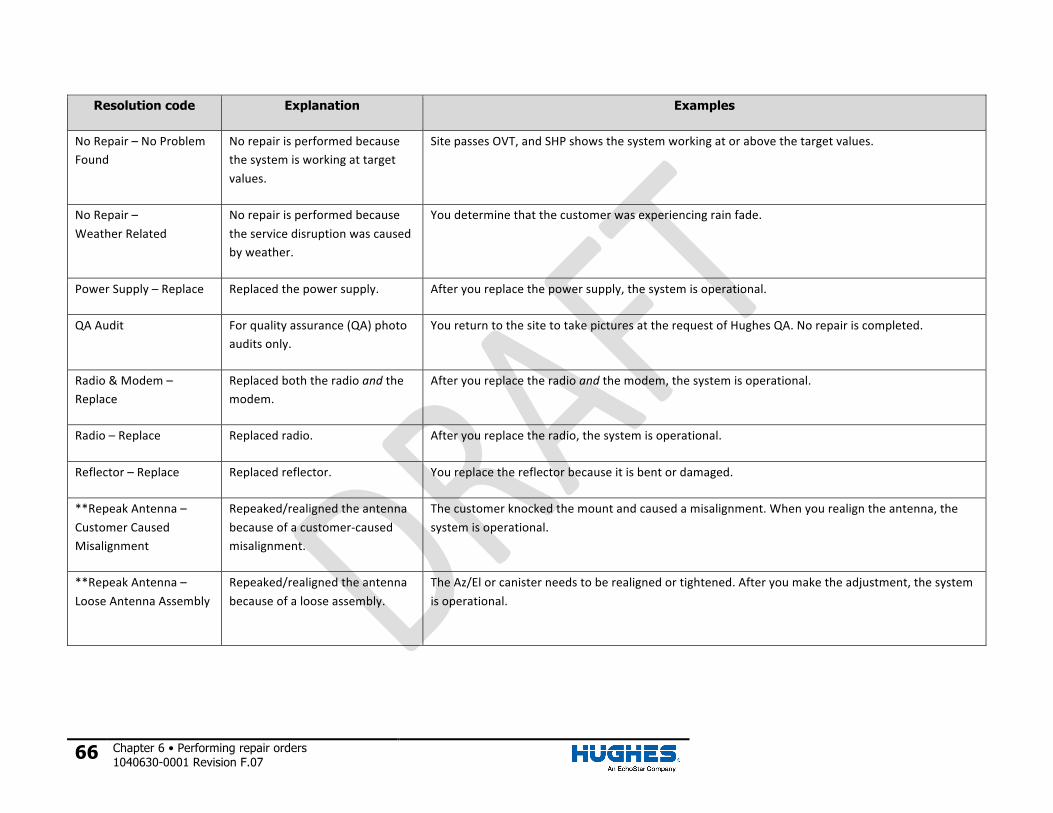
66 Chapter 6 • Performing repair orders 1040630-0001 Revision F.07
Resolution code Explanation Examples
NoRepair–NoProblemFound
Norepairisperformedbecausethesystemisworkingattargetvalues.
SitepassesOVT,andSHPshowsthesystemworkingatorabovethetargetvalues.
NoRepair–WeatherRelated
Norepairisperformedbecausetheservicedisruptionwascausedbyweather.
Youdeterminethatthecustomerwasexperiencingrainfade.
PowerSupply–Replace Replacedthepowersupply. Afteryoureplacethepowersupply,thesystemisoperational.
QAAudit Forqualityassurance(QA)photoauditsonly.
YoureturntothesitetotakepicturesattherequestofHughesQA.Norepairiscompleted.
Radio&Modem–Replace
Replacedboththeradioandthemodem.
Afteryoureplacetheradioandthemodem,thesystemisoperational.
Radio–Replace Replacedradio. Afteryoureplacetheradio,thesystemisoperational.
Reflector–Replace Replacedreflector. Youreplacethereflectorbecauseitisbentordamaged.
**RepeakAntenna–CustomerCausedMisalignment
Repeaked/realignedtheantennabecauseofacustomer-causedmisalignment.
Thecustomerknockedthemountandcausedamisalignment.Whenyourealigntheantenna,thesystemisoperational.
**RepeakAntenna–LooseAntennaAssembly
Repeaked/realignedtheantennabecauseofalooseassembly.
TheAz/Elorcanisterneedstoberealignedortightened.Afteryoumaketheadjustment,thesystemisoperational.
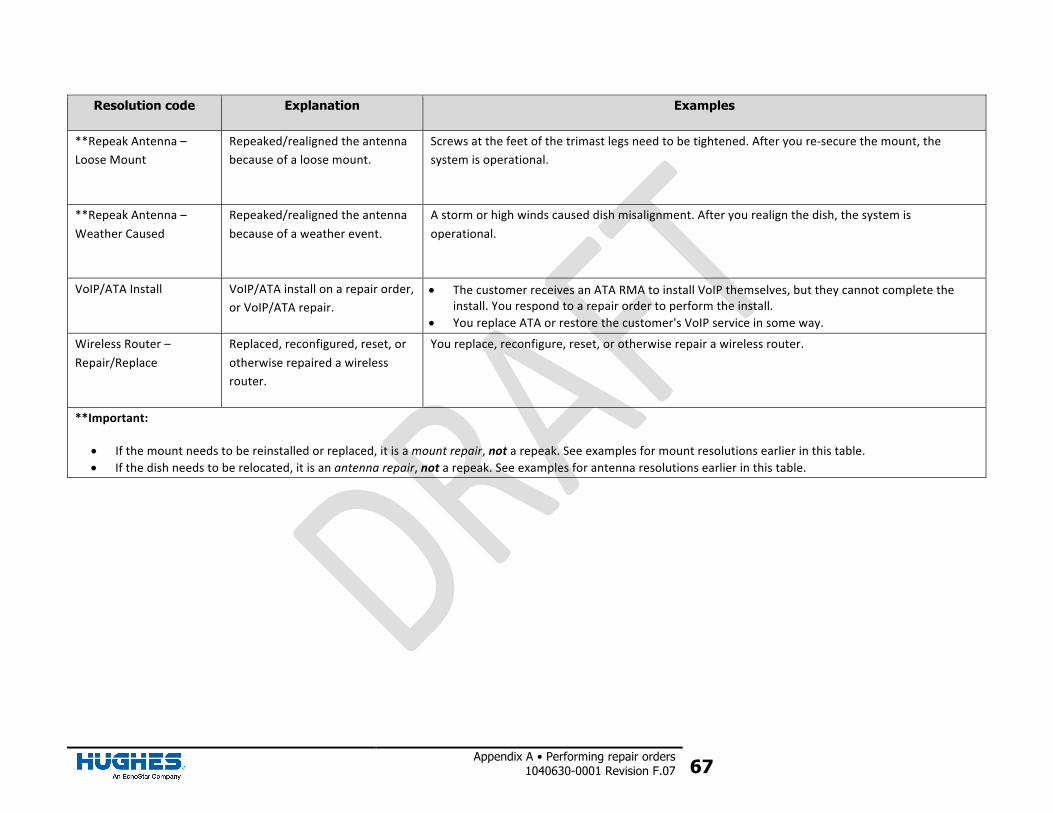
Appendix A • Performing repair orders 1040630-0001 Revision F.07 67
Resolution code Explanation Examples
**RepeakAntenna–LooseMount
Repeaked/realignedtheantennabecauseofaloosemount.
Screwsatthefeetofthetrimastlegsneedtobetightened.Afteryoure-securethemount,thesystemisoperational.
**RepeakAntenna–WeatherCaused
Repeaked/realignedtheantennabecauseofaweatherevent.
Astormorhighwindscauseddishmisalignment.Afteryourealignthedish,thesystemisoperational.
VoIP/ATAInstall VoIP/ATAinstallonarepairorder,orVoIP/ATArepair.
• ThecustomerreceivesanATARMAtoinstallVoIPthemselves,buttheycannotcompletetheinstall.Yourespondtoarepairordertoperformtheinstall.
• YoureplaceATAorrestorethecustomer'sVoIPserviceinsomeway.
WirelessRouter–Repair/Replace
Replaced,reconfigured,reset,orotherwiserepairedawirelessrouter.
Youreplace,reconfigure,reset,orotherwiserepairawirelessrouter.
**Important:
• Ifthemountneedstobereinstalledorreplaced,itisamountrepair,notarepeak.Seeexamplesformountresolutionsearlierinthistable.• Ifthedishneedstoberelocated,itisanantennarepair,notarepeak.Seeexamplesforantennaresolutionsearlierinthistable.

Troubleshooting 1040630-0001 Revision F.07 69
Troubleshooting
IfyouencounteranerrorwithOASISthatyoucannotresolve,checkthefrequentlyaskedquestions(FAQs)belowtoseeiftheissuehasbeenpreviouslyencountered.IfafterreadingtheFAQsyoustillcannotresolvetheissue,contactHughesviaoneofthemethodsgiveninTroubleshootingonpage13.
MakesureyouhavedownloadedthemostrecentversionoftheOASISapptoyoursmartdevicefromtheInstallationPortal.SeeInstallingOASISonpage5.
Software updates Whenyoursmartdevice’smanufacturerreleasesanewsoftwareupdate(e.g.,anewversionofiOSorAndroid),Hughesrecommendsyouwaitatleast30daystoupdateyourdevicefromthetimeofthesoftware’srelease.ThisgivesHughestimetoupdateOASIStofunctioncorrectlywiththenewsoftwareversion.
Afterthe30-dayperiod,youshouldupdateyourdeviceandOASISusingthefollowingsteps.
1. UninstallOASISfromyourdevice.2. Downloadyoursmartdevice’slatestsoftwarepackage.3. InstallthelatestversionofOASISfromtheInstallationPortal.SeeInstallingOASISonpage5.Note: ChecktheNotessectionofInstallationPortalforadditionalguidanceondevice-specific
softwareupdates.
FAQs 1. IamhavingtroubleloggingintoOASISorIamencounteringa“tokennotfound”error.
– MakesureyouhaveInternetconnectivityforeachfirstloginafterdownloadingtheapp.– MakesuretheInstallationPortalisoperationalbylogginginviaawebbrowser.– Makesureyourpasswordhasnotexpired.Passwordsexpireevery90days.Youmustlogin
totheInstallationPortalviaawebbrowsertochangeyourpassword.Donotusespecialcharactersinyourpassword.
2. Iamgettinga“PasswordExpired”errorwhentryingtologintoOASIS.– YouusethesameloginandpasswordtoaccessOASISasyoudotoaccesstheInstallation
Portal.Ifyourpasswordhasexpired,youmustresetitintheportal,thenlogintoOASISagain.
3. IamusinganAndroiddeviceandamhavingissueswithitsGPSfunctionalityinOASIS.– Makesureyouhavelocationservicesturnedonand“highaccuracymode”isenabledin
yoursettings.4. IamusinganAndroiddeviceandamhavingissueswithtouchfunctionalityinOASIS.Iam
usinganolderversionoftheapp.– TouchissuesareresolvedinthelatestversionofOASIS.Pleaseupgradeyourapp.
5. IamusinganiPhone4/4swithiOS8andamencounteringproblemswithOASIS.– OASISnolongersupportstheiPhone4/4s.
6. IamunabletoloadaphotooramhavingotherproblemsonthephotoscreenofOASIS.– IfyouhavealreadycompletedtheDeparturestep,OASISlockssomefeatures.Youneedto
initiatetheArrivalstepagaintoregainaccess.

70 Chapter 6 • Troubleshooting 1040630-0001 Revision F.07
– IfyouhavemultipleoldFSOsstoredonyoudevice,thiscouldcauseissueswiththeapp.EnsurealloldFSOsareuploadedtotheInstallationPortal,thendeletethemfromtheappbyfollowingtheprocedureinDeletelocalfilesonpage58.
7. IamhavingissueswithuploadingmyFSOinformation(attachments)totheInstallationPortal.– MakesureyouhaveastableandstrongInternetconnection(i.e.,not3Gor4G).– MakesuretheInstallationPortalisoperationalbylogginginviaawebbrowser.– Trytoresubmityourupload.IntheOASISFSOstepsummarypage(seeFigure49onpage
55),tapClearUploadStatus,thentapSubmitDatatoServertoresubmittheFSOdata.– IfyouaretryingtouploadmultipleFSOsatonce,tryinsteaduploadingoneatatime.– Ifallelsefails,youcantakescreenshotsoftheFSOattachmentsanduploadthose
screenshotsmanuallytotheInstallationPortalusingacomputer.8. TheLOStoolinOASISisnotfunctioningproperly(e.g.,thecrosshairsarenotmoving
correctly).– Makesureyourdevice’scompassiscorrectlycalibrated.Ifnecessary,recalibrateit.TheLOS
toolreliesonthecompasstoproperlyfunction.9. ThecrosshairoverlayintheLOStooldoesnotappearorisnotorientedcorrectly,ortheGPSis
notworking.– UninstallandreinstallOASIS.Thismayhappenifyouupdateyourdevice’ssoftwareversion
withoutfirstuninstallingOASIS.10. IlostdatawhenIswitchedtoasecondarylogin.
– OASISstorestheinformationofonlyoneuseratatime.Switchingtoanotherinstallerloginwillerasetheprevioususer’sdata.OASISwarnsyoubeforeitdeletestheprevioususer’sdata.
11. OASISisconsumingalotofmycellulardata.– WhenmanuallyuploadingdatatotheInstallationPortal,makesureyourdeviceis
connectedtoawirelessnetwork(i.e.,notyourcellularnetwork).12. Mydeviceisnotabletocorrectlyscanbarcodes.
– BarcodescanninginOASISrequiresthatyourdevicehavearear-facingcamerawithautofocusandatleastfivemegapixelsresolution.
13. IcannotfindtheinformationforanFSOIpreviouslycompletedbutdidnotuploadtotheInstallationPortal.– WheneveryoucompleteanFSO,youshouldexportallofitsattachmentstothephotos
galleryofyoursmartdevice(seeBackingupattachmentsonpage12)tosafeguardagainstdataloss.
14. Icannotconnectwiththeterminal.InWiFi/IDUstep,thestatusisConnectiontoIDUFailed;orintheSatInfostep,thePingTerminalcommandortheQueryPointingStatisticscommandgivesafailedresponse.a. GototheSatInfostepandtaptheTerminalicon.b. Apop-upmessageappearsthatsaysTerminal (IDU) is unavailable, do you
want to continue?c. TapYes.d. Yourphone’swebbrowserlaunchesandtriestoconnectwiththeterminal.e. Oncethebrowserconnectswiththeterminalandshowstheterminalpage,returntoOASIS.
Youwillnowbeabletoconnectwiththeterminal


