Embed Size (px)
Citation preview

1 | P a g e
Converting PDMS/E3D for PlantSight
2022-07-06

2 | P a g e
Contents
1. Introduction ...................................................................................................................................... 3
2. Software to download ...................................................................................................................... 3
2.1. PlantSight E3D Bridge Extractor .................................................................................................... 3
2.2. PlantSight Open 3D Model Bridge ................................................................................................ 3
3. Smart 3D and PDMS sample data ..................................................................................................... 4
4. Set Logon as a Service ....................................................................................................................... 4
5. Software Installation and configuration ........................................................................................... 8
5.1. Installation of PlantSight E3D Bridge Extractor ............................................................................. 8
5.1.1. Configure Licensing ................................................................................................................... 8
5.2. Installation of Open 3D Model Bridge ........................................................................................ 17
6. Configure PlantSight E3D Bridge Extractor ..................................................................................... 17
7. Configure the PlantSight Open 3D Model Controller ..................................................................... 21
8. Importing 3D model into PlantSight ............................................................................................... 28

3 | P a g e
1. Introduction
This document outlines the steps required to setup software required for using setup and use the E3D
Bridge Extractor and the PlantSight Open 3D Model Bridge with PlantSight.
2. Software to download
2.1. E3D Bridge Extractor Navigate to:
https://softwaredownloads.bentley.com/en/ProductDetails/2360
2.2. Open 3D Model Bridge Navigate to:
https://softwaredownloads.bentley.com/en/ProductDetails/2736

4 | P a g e
3. PDMS sample data
A copy of data exported from the PDMS Sample project can be found on the Teams site:
stabilizer.pdmx.xml.7z
4. Set Logon as a Service
Before installing E3D Bridge Extractor, you must enable logon as a service for the current user. This is
required as these programs are required to run as a service.
Open Administrative Tools, select Local Security Policy and open it

5 | P a g e
Go to Local Policies and User Rights Assignment, then select Log on as a service

6 | P a g e

7 | P a g e
Add the user name and click OK

8 | P a g e
5. Software Installation and configuration
5.1. Installation of E3D Bridge Extractor
Install Setup_PlantSightE3DBridgeExtractorx64_10.08.xx.yy.exe.
5.1.1. Configure Licensing
When the install finishes, you should configure the licensing. The licensing for E3D Bridge Extractor now
uses SES licensing.
Clicking finish will bring up the Bentley Login Client. Enter the credentials you normally use for the
CONNECTION Client.

9 | P a g e
After entering your credentials, you should get this:

10 | P a g e
Closing this window will bring up the activation wizard where you will add the licensed products you will
be using.

11 | P a g e
Select a country:

12 | P a g e
And click Next.
Now you will need to add the products that will be used. Note that when using server based licensing,
all products used on this machine will have the usage against this user.

13 | P a g e
Click “+ Add Product”
Type in “E3D Bridge Extractor”. Make sure the selection is in the text box and then click the check mark
at the right.

14 | P a g e
You should then have this:

15 | P a g e
Click the “+ Add Product” again and this time add “Open 3D Model Connector”. After adding this
product, the wizard should look like this:

16 | P a g e
Click Next. You should see that the status for both products is labeled with a green checkmark.

17 | P a g e
Press close and the install of the PlantSight E3D Bridge Extractor should be complete.
5.2. Installation of Open 3D Model Bridge
Install o3db10080008en.exe.
6. Configure PlantSight E3D Bridge Extractor To configure E3D data, run “PlantSight E3D Bridge Extractor”
Ensure that the “Convert to OpenPlant EC Schema” checkbox is enabled.
If the Convert to OpenPlant EC Schema option is not selected, select and hit apply. You will be
asked to restart the service and you should accept this.
Click on “Manage Projects”

18 | P a g e
Then Click on New…
Name it “Stabilizer”

19 | P a g e
Click OK
Change the units to Metric
Click OK.
We do not need to configure this project to connect to E3D as we will use models that have
already been exported from E3D.

20 | P a g e
Click Project Folder and Windows Explorer will open up to the Stabilizer project folder.
Go into the Stabilizer folder and then the Export Files folder.

21 | P a g e
Copy stabilizer.pdmx.xml to this folder
Close the Project Repository Manager, then click OK to close the PDMx Admin. You may get this
message:
If so, click Yes.
7. Configure the PlantSight Open 3D Model Controller From the start menu find the “PlantSight Open 3D Controller”

22 | P a g e
Since it was just installed, it may be at the top of the start menu, otherwise you should be able to find it
under Bentley in the start menu.
Run the application, and the first time you run the application, it will need to authenticate you.
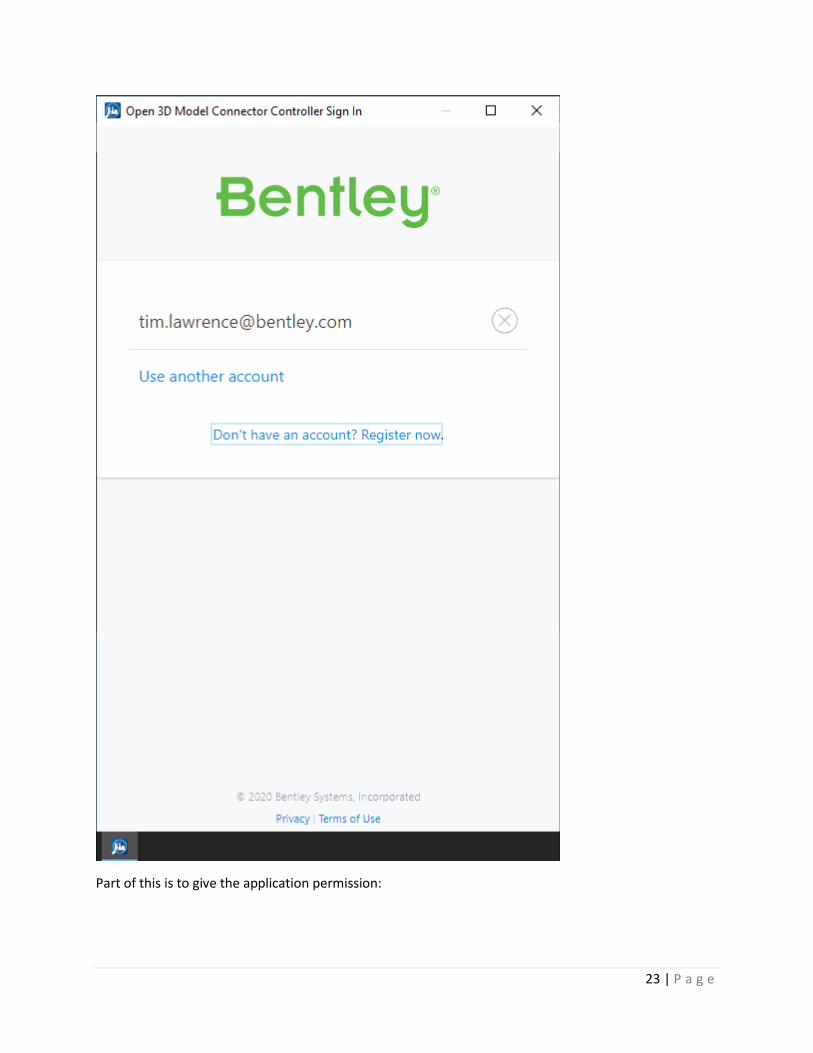
23 | P a g e
Part of this is to give the application permission:

24 | P a g e
At the bottom of this window is a green button labeled “Yes, Allow”. Click this button to continue.
The main window for the controller will be displayed.

25 | P a g e
Click Register and select PDMx/S3D
Select the PlantSight project that you have created:

26 | P a g e
Then click Associate.
This brings up the Create Controller window.
Give the Controller a name and use “local host” for the server site since the E3D Extractor is running on
the same machine as the controller. If this is not the case, then you can use the IP Address or the
machine name instead of local host.
You also need to set the port number. The default value is set to 32767, which is the default value for
the Smart 3D Extractor. Set the value used for the E3D Extractor, this can be confirmed by running the
PlantSight E3D Extractor Admin application.

27 | P a g e
You can see that the default value is 32770.
Once you finish updating the fields for the controller it should look something like this:
Then click Add.

28 | P a g e
You will see now that you have added a controller to the PlantSight_Project.
This means that anyone who accesses the “PlantSight_Project” and then goes to import a 3D Model will
see that they can import PDMS or E3D data from this machine.
8. Importing 3D model into PlantSight
Go to https://plantsight.bentley.com/ and enter your project.

29 | P a g e
Then click on Acquisition, once that appears, click New Import and select 3D.
30 | P a g e
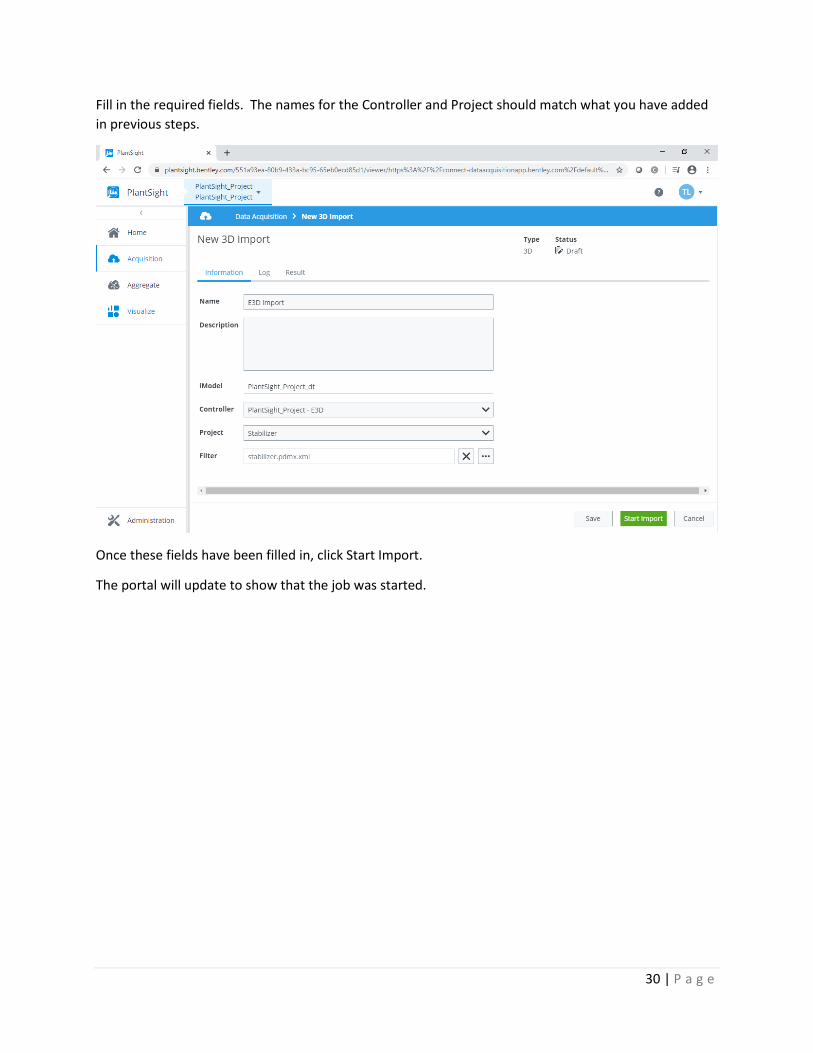
Fill in the required fields. The names for the Controller and Project should match what you have added
in previous steps.
Once these fields have been filled in, click Start Import.
The portal will update to show that the job was started.

31 | P a g e
To view more detailed progress of the conversion, you can go back to the controller and switch to the
jobs monitor. If the job has already started, you should see something similar:

32 | P a g e
You can also see progress of the data conversion from the E3D Extractor by going to the Session Monitor
of the PlantSight E3D Bridge Extractor Admin application:
When a conversion from E3D is started the following steps should happen:

33 | P a g e
1) If connected directly to the E3D project, the selected location in the project hierarchy will be
exported to a pdmx.xml file.
2) A pdmx.xml file will be converted using the E3D Bridge Extractor, this file will either have come
from the previous step, or if exports have already been made from the file stored in the E3D
Extractor project.
3) The PlantSight Open 3D Model Bridge will convert the output from the previous step into the
PlantSight project.


