Embed Size (px)
Citation preview
EDDIE KANTAR TEACHESAdvanced Bridge Defense
MASTER POINT PRESS
TORONTO
E D D I E K A N TA R T E A C H E S
Advanced Bridge Defense
© 1999 Edwin B. Kantar
All rights reserved. It is illegal to reproduce any portion of thismaterial, except by special arrangement with the publisher.Reproduction of this material without authorization, by any dupli-cation process whatsoever, is a violation of copyright.
Master Point Press331 Douglas AvenueToronto, Ontario, CanadaM5M 1H2 (416)781-0351Websites: www.masterpointpress.com
www.masteringbridge.comwww.bridgeblogging.comwww.ebooksbridge.com
Email: [email protected]
Canadian Cataloguing in Publication Data
Kantar, Edwin B., 1932-Eddie Kantar teaches advanced bridge defense
Includes indexISBN 978-1-55494-041-7
1. Contract bridge — Defensive play. I. Title.
GV1282.42.K36 1999 795.41’53 C98-932700-0
Editor Ray LeeCover and Interior design Opus HouseAuthor photograph Shireen Mohandes
Printed and bound in Canada
1 2 3 4 5 6 7 06 05 04 03 02 01 00 99
I know that it is customary for the author to thankthe people who have helped with the book you areabout to read. I have two people I wish to thank:Ray Lee, the publisher, whose idea and patience(with me) made this book possible, and YvonneSnyder, who read every word and told me in nouncertain terms when I wrote something thatwasn’t clear. Since Yvonne plays at the level atwhich this book is written, I made every changeshe suggested. If this book turns out to be awinner, it’s because of these two people.
Eddie Kantar

Introduction
Hello again. I’m assuming that you have read (survived) the firstbook in this series, Eddie Kantar teaches Modern Bridge Defense. Well,whether you have or whether you haven’t, prepare yourself forsome advanced defensive techniques.
The emphasis in this book will be on defensive logic. Trump pro-motion, card combinations, deceptive play and most of all, count-ing. In fact, three whole chapters are devoted to counting: count-ing declarer’s tricks, declarer’s distribution and declarer’s high cardpoints, to be specific.
Having spent a lifetime teaching intermediate players, I can saywith some authority that very few can count properly. (I guess ifthey could count, they wouldn’t be intermediate players!) Some saythat when they try to count, it slows down the game too much;others says they can’t play and count at the same time; othersdon’t think they can do it, so they won’t even try. I’m going to askyou to try, because if you are not counting, you are playing a differ-ent game.
A warning. Once you start counting, your game will sink a bit. It’salmost inevitable. One tends to forget about everything else andmake more mistakes than ever. But once you master the basiccounting skills, your game will improve so much that you won’teven recognize the player you once were. The players you used tothink were such hot shots are now suddenly looking human. Youcan do some of the same stuff they can. This book is going to helpyou think; it’s going to help you count; it’s going to turn you into acompetent defensive player. But you must make a commitment tohang in there. Don’t let me down on this one.
Eddie Kantar
Contents
Chapter 1 Planning the Defense at Suit Contracts 11Identifying the dummy 13Other considerations 19Practice Hands 26Test Yourself 29Solutions 31Key Ideas 35
Chapter 2 Learning to Think 37Inferences from the lead 39Inferences from the play 40Inferences from the bidding 45Practice Hands 48Test Yourself 50Solutions 53Key Ideas 54
Chapter 3 Counting Distribution 55Major suit openings 56Notrump openings 62Minor suit openings 64The opening lead 73The count signal 76The wrap-up 78Practice Hands 79Test Yourself 82Solutions 85Key Ideas 88
Chapter 4 Counting Tricks 89Clues from the bidding 90Clues from the dummy 91Clues from the first trick 93Counting dummy’s suit 105Counting declarer’s suit 109Counting trump tricks 112When dummy’s long suit can be established 117Practice Hands 119Test Yourself 122Solutions 124Key Ideas 128
Chapter 5 Counting High Card Points 129Notrump sequences 130Suit sequences 135Other ways of counting points 138When partner bids 142Notrump ranges in competition 145Practice Hands 147Test Yourself 150Solutions 151Key Ideas 152
Chapter 6 Tricks with Trumps 153Getting your ruff 154Giving partner a ruff 156Overruffing positions 163The uppercut 165The forcing defense 168The dreaded ruff-sluff 171Ruffing air 175Holding the master trump 176Practice Hands 179Test Yourself 181Solutions 184Key Ideas 188
Chapter 7 Doubling for the Lead 189Doubles of voluntarily-bid suit slams 190Doubles of artificial bids 191Doubles of 3NT contracts 196Miscellaneous doubles 202Practice Hands 204Test Yourself 207Solutions 210Key Ideas 212
Chapter 8 Card Tricks 213Leading unsupported honors 214Escaping an endplay 215Surrounding plays 216Telling them nothing 220Stealing tricks 225Falsecards 227Practice Hands 230Test Yourself 232Solutions 235Key Ideas 237
Index 238

WHATYOU’RE GOING
TO LEARN IN THIS
CHAPTER:• How to recognize what declar-
er’s plan will be from the bid-ding and the dummy
• How to plan your own defen-sive strategy accordingly
• Some useful defensive strata-gems you can apply in variouscommon situations
Identifying the dummy 13Other considerations 19Practice Hands 26Test Yourself 29Solutions 31Key ideas 35
The opponents are bidding their heads off; suddenly, the bidding isover and it’s your lead. And just what have you been doing whilethe opponents were merrily sending these coded messages to eachother across the table? Not daydreaming, I hope.
Defensive planning starts with the bidding and comes into clearerfocus when the dummy appears. The bidding helps determine youropening lead. The dummy, partner's signals, and bridge logic helpdetermine your follow-up plays. During the bidding you should betrying to build a picture of declarer's (and dummy's) distributionand strength. This picture also influences your opening lead. If theopponents wind up in a trump contract, you should ask yourself:
1) What kind of a trump fit do I expect from the bidding? Will it bea 6-3, 5-3, 5-4, 4-4, etc. Or are the opponents playing a misfit?
2) Did the opponents stretch to get to this contract or was it bidconfidently with no invitational bids?
3) Does dummy figure to have a long side suit? 4) Has dummy preferred one of declarer's two suits to the other,
1Planning theDefense atSuit ContractsReady in defense, full of resources.
EDMUND BURKE
♥ 11
particularly the second over the first, indicating shortness in thefirst suit?
5) Do you have four trumps, a side-suit singleton, or an honorsequence?
The answers to these questions help determine your lead. Althoughthis chapter deals primarily with planning your defense after thedummy comes down, it can't hurt to review the opening-lead deci-sion. After all, if you screw up on opening lead, it may be too lateto recover no matter how clever a defender you are.
Opening leads can be categorized as: attacking, passive (includingtrump leads), short suit, or honor sequence. The last two are self-explanatory. Attacking leads are generally made in suits headed bythe ace or king. They are made when you fear (or see) a long sidesuit in dummy or are looking for a ruff. Leading from long brokensuits also falls under this category. These leads are often madewhen you (or partner) have four trumps and your goal is to whittledeclarer's trump length down to your size or shorter. Passive leadsare safe leads, leads that neither gain nor cost a trick. There is anart in knowing how and when to make passive leads. Much of thischapter will be spent going over this aspect of defensive play.
If you have an idea of how declarer will get rid of her losers, youmay be able to thwart declarer's plans. Basically there are threeways declarer disposes of losers:
1) Discarding them on dummy's strong side suit.2) Ruffing them in the short hand, usually the dummy.3) Via endplays, elimination plays, loser on loser plays, etc.
If (1) and (2), the two common techniques, are not available,declarer is usually stuck with whatever losers she has. There is noneed for the defenders to rush madly to take their aces and kings,perhaps giving up tricks by attacking new suits. Declarer's losersaren't going anywhere. Don’t panic!
12 ♥ EDDIE KANTAR TEACHES ADVANCED BRIDGE DEFENSE ♥ CHAPTER ONE
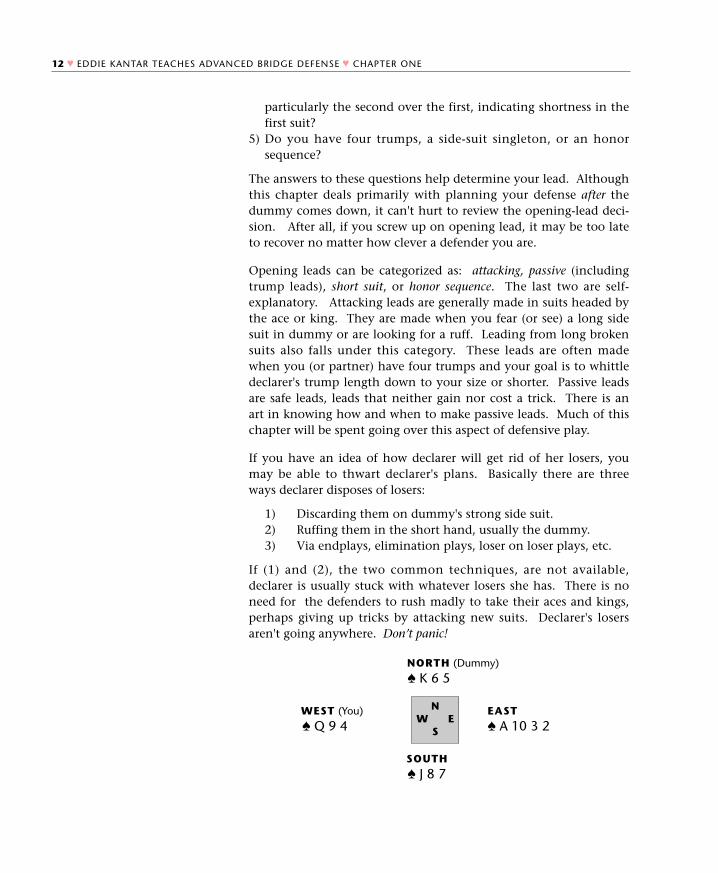
NORTH (Dummy)
♠ K 6 5
WEST (You) EAST
♠ Q 9 4 ♠ A 10 3 2
SOUTH
♠ J 8 7
NW E
S
This is a typical card combination where South, left to his owndevices, has three losers and no winners. If the defenders get ner-vous and start the suit, declarer makes an undeserved trick.
If you and partner can identify these ‘dangerous’ suits (not alwayseasy), these are suits to stay away from, far away. Declarer, on theother hand, is either hoping you will make a friendly play in one ofthese suits, or failing that, wants to force you to lead one. Thus theconstant struggle between the declarer and the defenders to seewho can get the other to break a dangerous suit.
Identifying the dummyOnce the dummy appears you can usually tell if you had it rightwith your choice of opening leads. If not, you may have to changehorses in midstream. There are three common dummy types thatshould hit you in the face when you see them.
Type 1. Dummy has ruffing potential but little else
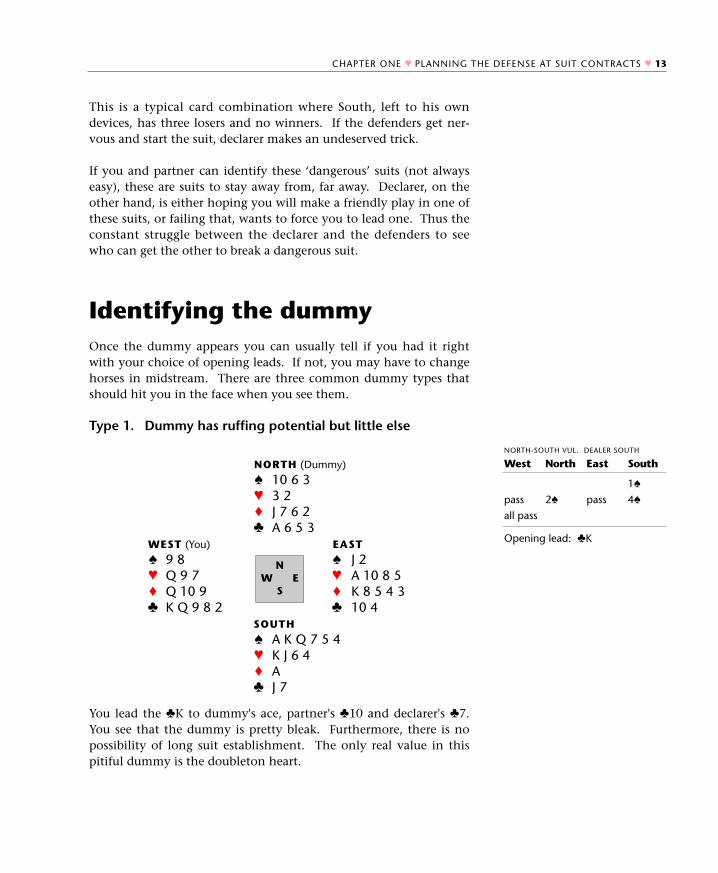
You lead the ♣K to dummy's ace, partner's ♣10 and declarer's ♣7.You see that the dummy is pretty bleak. Furthermore, there is nopossibility of long suit establishment. The only real value in thispitiful dummy is the doubleton heart.
Opening lead: ♣K
CHAPTER ONE ♥ PLANNING THE DEFENSE AT SUIT CONTRACTS ♥ 13
NORTH (Dummy)
♠ 10 6 3♥ 3 2♦ J 7 6 2♣ A 6 5 3
WEST (You) EAST
♠ 9 8 ♠ J 2♥ Q 9 7 ♥ A 10 8 5♦ Q 10 9 ♦ K 8 5 4 3♣ K Q 9 8 2 ♣ 10 4
SOUTH
♠ A K Q 7 5 4♥ K J 6 4♦ A♣ J 7
NW E
S
NORTH-SOUTH VUL. DEALER SOUTH
West
pass
all pass
North
2♠
East
pass
South
1♠
4♠
Sure enough, declarer leads a heart to the jack and your queen attrick two. No need to cash the ♣Q, that winner isn't going away.More important is to shift to a spade at trick three. Declarer can dono better than win in her hand and lead a low heart. Either you orpartner can grab this and lead a second trump. Declarer can ruffonly one heart in dummy and winds up losing three hearts and oneclub. When the only value dummy has is a short side suit, trumpleads are usually top priority.
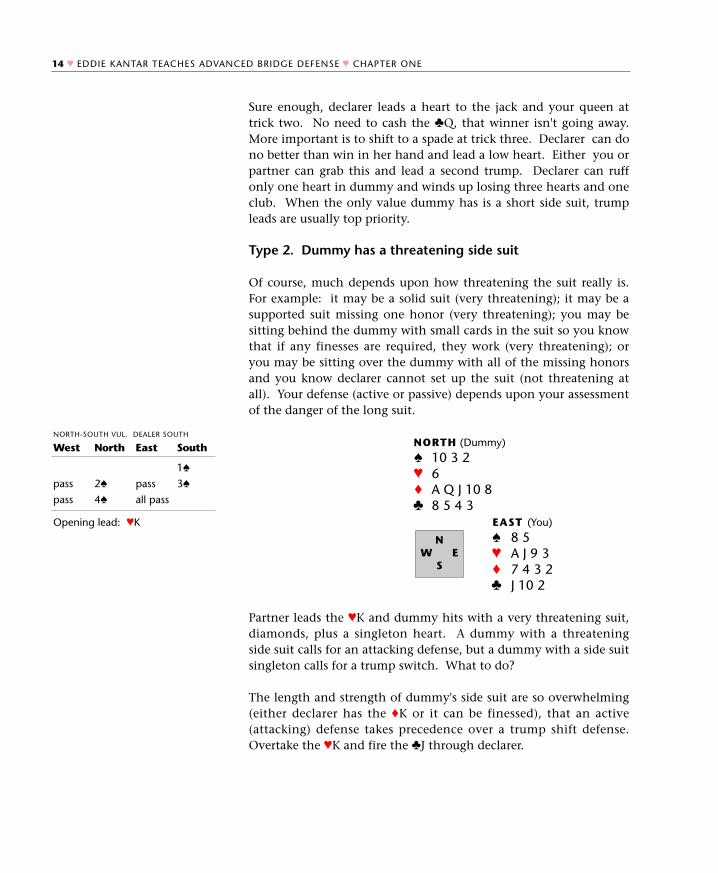
Type 2. Dummy has a threatening side suit
Of course, much depends upon how threatening the suit really is.For example: it may be a solid suit (very threatening); it may be asupported suit missing one honor (very threatening); you may besitting behind the dummy with small cards in the suit so you knowthat if any finesses are required, they work (very threatening); oryou may be sitting over the dummy with all of the missing honorsand you know declarer cannot set up the suit (not threatening atall). Your defense (active or passive) depends upon your assessmentof the danger of the long suit.
Partner leads the ♥K and dummy hits with a very threatening suit,diamonds, plus a singleton heart. A dummy with a threateningside suit calls for an attacking defense, but a dummy with a side suitsingleton calls for a trump switch. What to do?
The length and strength of dummy's side suit are so overwhelming(either declarer has the ♦K or it can be finessed), that an active(attacking) defense takes precedence over a trump shift defense.Overtake the ♥K and fire the ♣J through declarer.
Opening lead: ♥K
14 ♥ EDDIE KANTAR TEACHES ADVANCED BRIDGE DEFENSE ♥ CHAPTER ONE
NORTH (Dummy)
♠ 10 3 2♥ 6♦ A Q J 10 8♣ 8 5 4 3
EAST (You)
♠ 8 5♥ A J 9 3♦ 7 4 3 2♣ J 10 2
NW E
S
NORTH-SOUTH VUL. DEALER SOUTH
West
pass
pass
North
2♠
4♠
East
pass
all pass
South
1♠
3♠
If the hand turns out to be something like this, you will be a realhero.
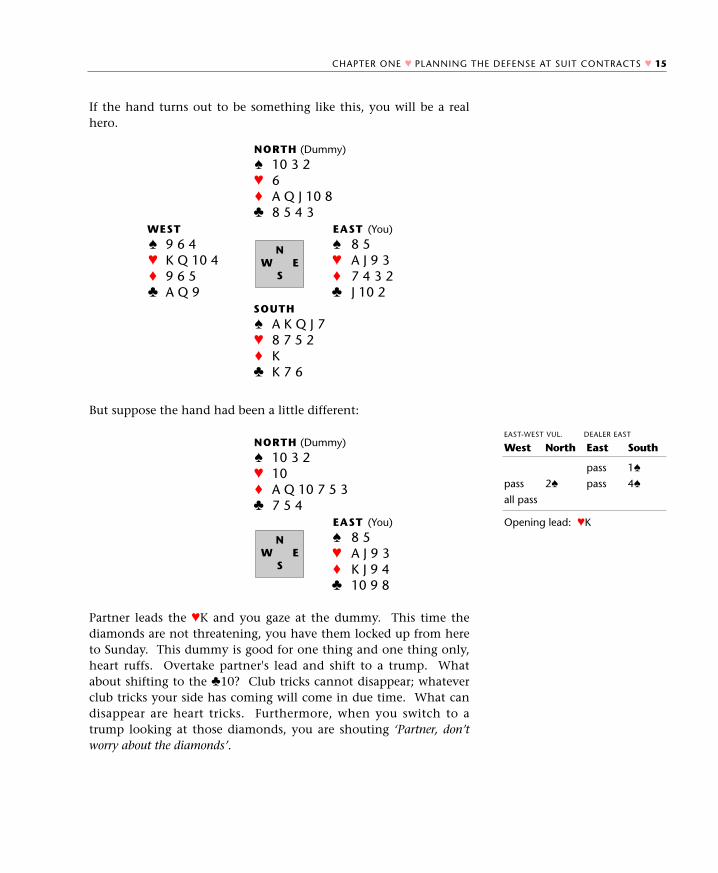
But suppose the hand had been a little different:
Partner leads the ♥K and you gaze at the dummy. This time thediamonds are not threatening, you have them locked up from hereto Sunday. This dummy is good for one thing and one thing only,heart ruffs. Overtake partner's lead and shift to a trump. Whatabout shifting to the ♣10? Club tricks cannot disappear; whateverclub tricks your side has coming will come in due time. What candisappear are heart tricks. Furthermore, when you switch to atrump looking at those diamonds, you are shouting ‘Partner, don’tworry about the diamonds’.
Opening lead: ♥K
CHAPTER ONE ♥ PLANNING THE DEFENSE AT SUIT CONTRACTS ♥ 15
NORTH (Dummy)
♠ 10 3 2♥ 6♦ A Q J 10 8♣ 8 5 4 3
WEST EAST (You)
♠ 9 6 4 ♠ 8 5♥ K Q 10 4 ♥ A J 9 3♦ 9 6 5 ♦ 7 4 3 2♣ A Q 9 ♣ J 10 2
SOUTH
♠ A K Q J 7♥ 8 7 5 2♦ K♣ K 7 6
NW E
S
NORTH (Dummy)
♠ 10 3 2♥ 10♦ A Q 10 7 5 3♣ 7 5 4
EAST (You)
♠ 8 5♥ A J 9 3♦ K J 9 4♣ 10 9 8
NW E
S
EAST-WEST VUL. DEALER EAST
West
pass
all pass
North
2♠
East
pass
pass
South
1♠
4♠
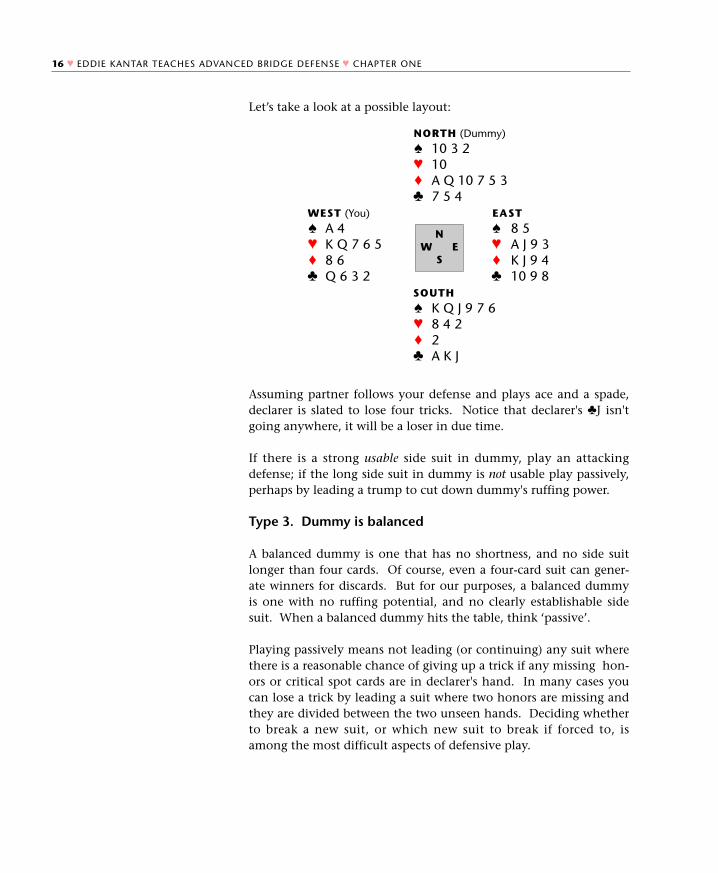
Let’s take a look at a possible layout:
Assuming partner follows your defense and plays ace and a spade,declarer is slated to lose four tricks. Notice that declarer's ♣J isn'tgoing anywhere, it will be a loser in due time.
If there is a strong usable side suit in dummy, play an attackingdefense; if the long side suit in dummy is not usable play passively,perhaps by leading a trump to cut down dummy's ruffing power.
Type 3. Dummy is balanced
A balanced dummy is one that has no shortness, and no side suitlonger than four cards. Of course, even a four-card suit can gener-ate winners for discards. But for our purposes, a balanced dummyis one with no ruffing potential, and no clearly establishable sidesuit. When a balanced dummy hits the table, think ‘passive’.
Playing passively means not leading (or continuing) any suit wherethere is a reasonable chance of giving up a trick if any missing hon-ors or critical spot cards are in declarer's hand. In many cases youcan lose a trick by leading a suit where two honors are missing andthey are divided between the two unseen hands. Deciding whetherto break a new suit, or which new suit to break if forced to, isamong the most difficult aspects of defensive play.
16 ♥ EDDIE KANTAR TEACHES ADVANCED BRIDGE DEFENSE ♥ CHAPTER ONE
NORTH (Dummy)
♠ 10 3 2♥ 10♦ A Q 10 7 5 3♣ 7 5 4
WEST (You) EAST
♠ A 4 ♠ 8 5♥ K Q 7 6 5 ♥ A J 9 3♦ 8 6 ♦ K J 9 4♣ Q 6 3 2 ♣ 10 9 8
SOUTH
♠ K Q J 9 7 6♥ 8 4 2♦ 2♣ A K J
NW E
S
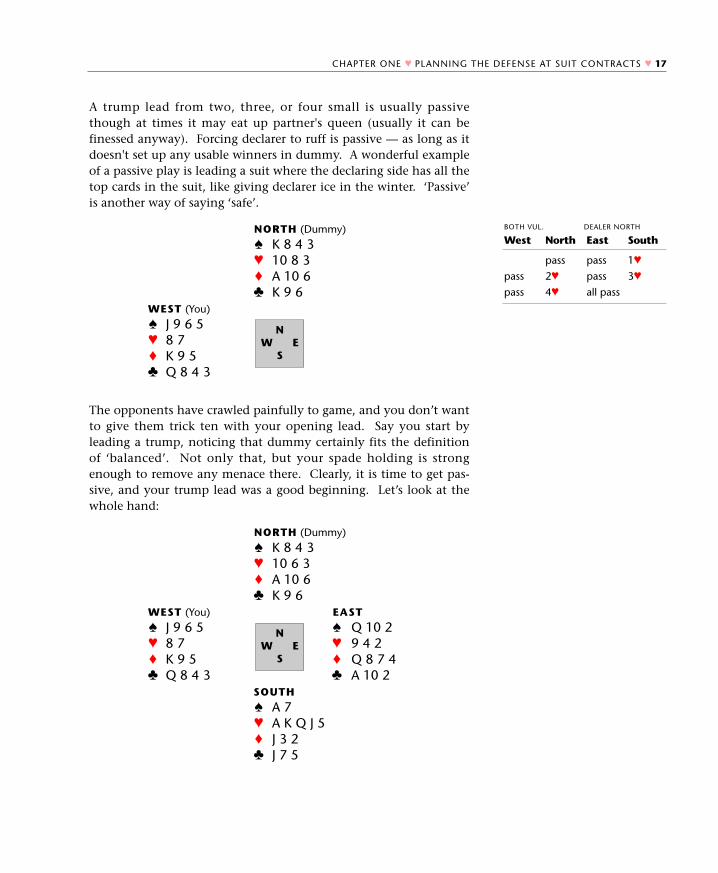
A trump lead from two, three, or four small is usually passivethough at times it may eat up partner's queen (usually it can befinessed anyway). Forcing declarer to ruff is passive — as long as itdoesn't set up any usable winners in dummy. A wonderful exampleof a passive play is leading a suit where the declaring side has all thetop cards in the suit, like giving declarer ice in the winter. ‘Passive’is another way of saying ‘safe’.
The opponents have crawled painfully to game, and you don’t wantto give them trick ten with your opening lead. Say you start byleading a trump, noticing that dummy certainly fits the definitionof ‘balanced’. Not only that, but your spade holding is strongenough to remove any menace there. Clearly, it is time to get pas-sive, and your trump lead was a good beginning. Let’s look at thewhole hand:
CHAPTER ONE ♥ PLANNING THE DEFENSE AT SUIT CONTRACTS ♥ 17
NORTH (Dummy)
♠ K 8 4 3♥ 10 8 3♦ A 10 6♣ K 9 6
WEST (You)
♠ J 9 6 5♥ 8 7♦ K 9 5♣ Q 8 4 3
NW E
S
BOTH VUL. DEALER NORTH
West
pass
pass
North
pass
2♥
4♥
East
pass
pass
all pass
South
1♥
3♥
NORTH (Dummy)
♠ K 8 4 3♥ 10 6 3♦ A 10 6♣ K 9 6
WEST (You) EAST
♠ J 9 6 5 ♠ Q 10 2♥ 8 7 ♥ 9 4 2♦ K 9 5 ♦ Q 8 7 4♣ Q 8 4 3 ♣ A 10 2
SOUTH
♠ A 7♥ A K Q J 5♦ J 3 2♣ J 7 5
NW E
S
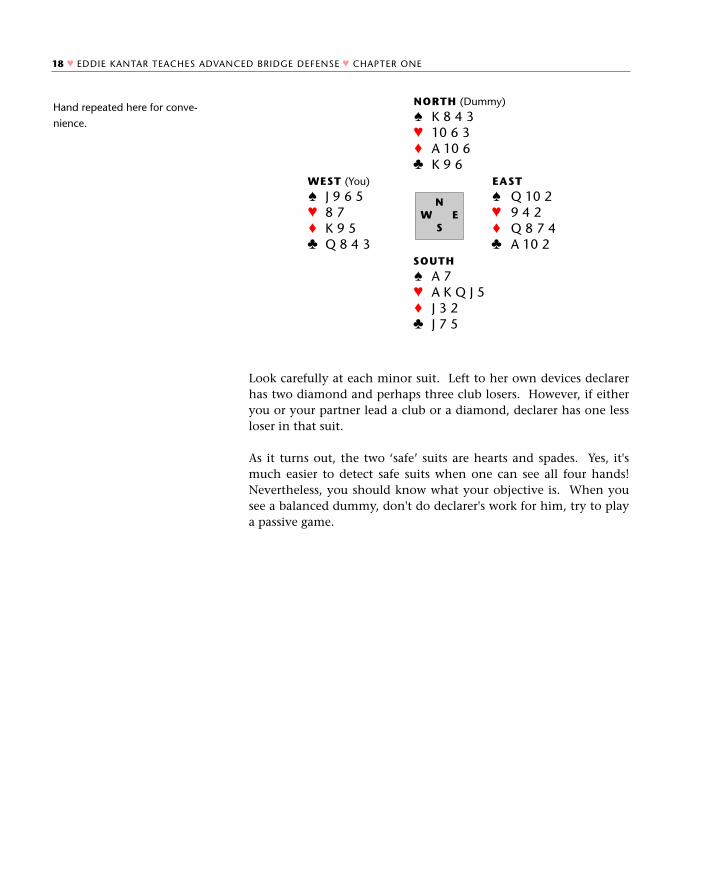
Look carefully at each minor suit. Left to her own devices declarerhas two diamond and perhaps three club losers. However, if eitheryou or your partner lead a club or a diamond, declarer has one lessloser in that suit.
As it turns out, the two ‘safe’ suits are hearts and spades. Yes, it'smuch easier to detect safe suits when one can see all four hands!Nevertheless, you should know what your objective is. When yousee a balanced dummy, don't do declarer's work for him, try to playa passive game.
Hand repeated here for conve-
nience.
18 ♥ EDDIE KANTAR TEACHES ADVANCED BRIDGE DEFENSE ♥ CHAPTER ONE
NORTH (Dummy)
♠ K 8 4 3♥ 10 6 3♦ A 10 6♣ K 9 6
WEST (You) EAST
♠ J 9 6 5 ♠ Q 10 2♥ 8 7 ♥ 9 4 2♦ K 9 5 ♦ Q 8 7 4♣ Q 8 4 3 ♣ A 10 2
SOUTH
♠ A 7♥ A K Q J 5♦ J 3 2♣ J 7 5
NW E
S
Other considerationsDeclarer’s second suit
When declarer has a known two-suiter (assume 5-5), and a fit isuncovered in one of the two suits, defenders have three differentstrategies available:
1) Playing an active defense2) Playing a forcing defense 3) Leading trumps
The trick is to know which one to use. The examples that followare designed to show you how to answer that question.
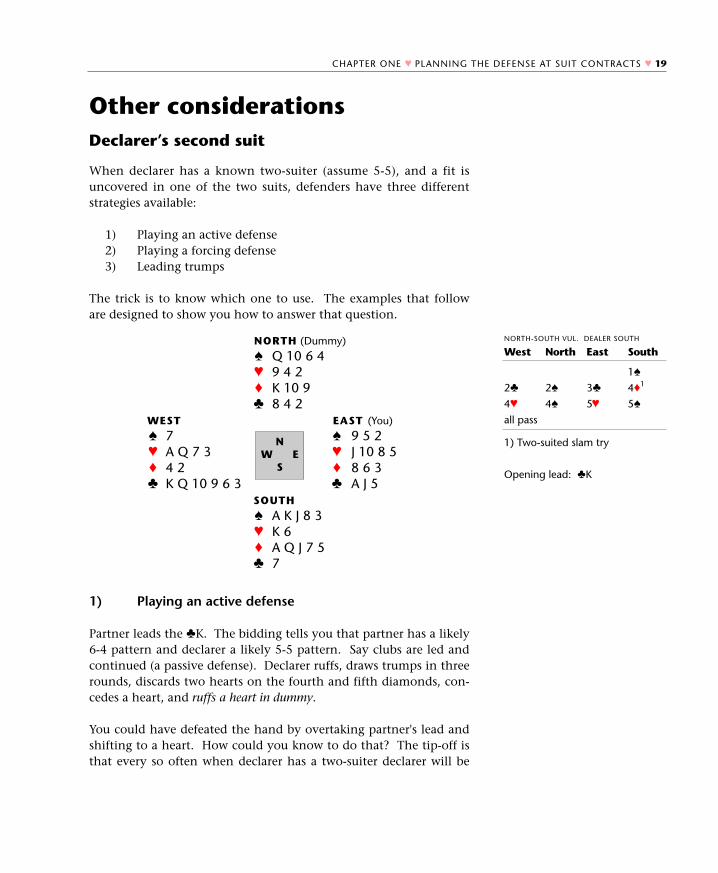
1) Playing an active defense
Partner leads the ♣K. The bidding tells you that partner has a likely6-4 pattern and declarer a likely 5-5 pattern. Say clubs are led andcontinued (a passive defense). Declarer ruffs, draws trumps in threerounds, discards two hearts on the fourth and fifth diamonds, con-cedes a heart, and ruffs a heart in dummy.
You could have defeated the hand by overtaking partner's lead andshifting to a heart. How could you know to do that? The tip-off isthat every so often when declarer has a two-suiter declarer will be
1) Two-suited slam try
Opening lead: ♣K
CHAPTER ONE ♥ PLANNING THE DEFENSE AT SUIT CONTRACTS ♥ 19
NORTH (Dummy)
♠ Q 10 6 4♥ 9 4 2♦ K 10 9♣ 8 4 2
WEST EAST (You)
♠ 7 ♠ 9 5 2♥ A Q 7 3 ♥ J 10 8 5♦ 4 2 ♦ 8 6 3♣ K Q 10 9 6 3 ♣ A J 5
SOUTH
♠ A K J 8 3♥ K 6♦ A Q J 7 5♣ 7
NW E
S
NORTH-SOUTH VUL. DEALER SOUTH
West
2♣
4♥
all pass
North
2♠
4♠
East
3♣
5♥
South
1♠
4♦1
5♠
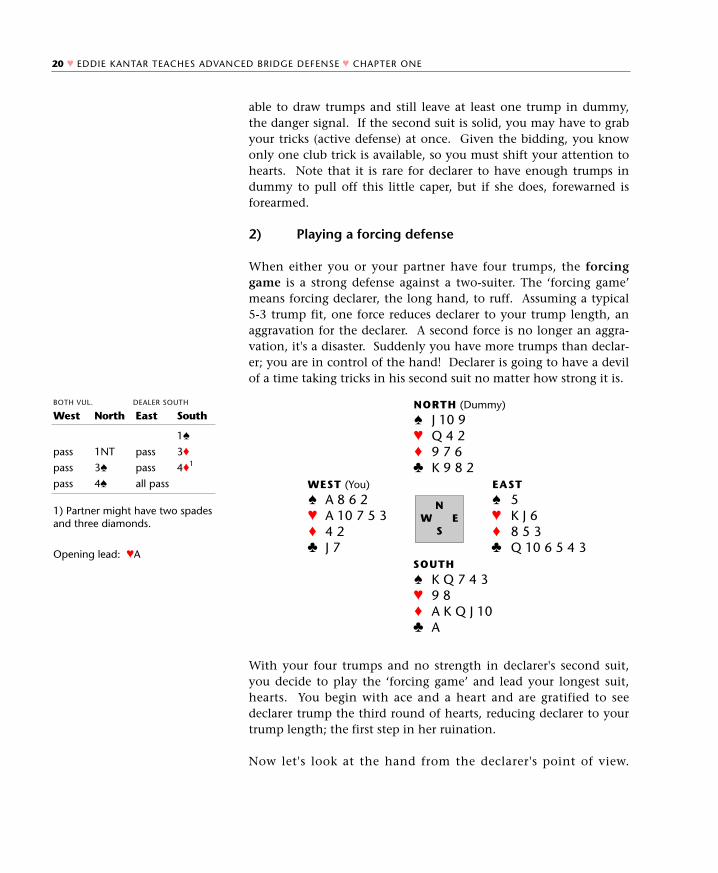
able to draw trumps and still leave at least one trump in dummy,the danger signal. If the second suit is solid, you may have to grabyour tricks (active defense) at once. Given the bidding, you knowonly one club trick is available, so you must shift your attention tohearts. Note that it is rare for declarer to have enough trumps indummy to pull off this little caper, but if she does, forewarned isforearmed.
2) Playing a forcing defense
When either you or your partner have four trumps, the forcinggame is a strong defense against a two-suiter. The ‘forcing game’means forcing declarer, the long hand, to ruff. Assuming a typical5-3 trump fit, one force reduces declarer to your trump length, anaggravation for the declarer. A second force is no longer an aggra-vation, it's a disaster. Suddenly you have more trumps than declar-er; you are in control of the hand! Declarer is going to have a devilof a time taking tricks in his second suit no matter how strong it is.
With your four trumps and no strength in declarer's second suit,you decide to play the ‘forcing game’ and lead your longest suit,hearts. You begin with ace and a heart and are gratified to seedeclarer trump the third round of hearts, reducing declarer to yourtrump length; the first step in her ruination.
Now let's look at the hand from the declarer's point of view.
1) Partner might have two spadesand three diamonds.
Opening lead: ♥A
20 ♥ EDDIE KANTAR TEACHES ADVANCED BRIDGE DEFENSE ♥ CHAPTER ONE
NORTH (Dummy)
♠ J 10 9♥ Q 4 2♦ 9 7 6♣ K 9 8 2
WEST (You) EAST
♠ A 8 6 2 ♠ 5♥ A 10 7 5 3 ♥ K J 6♦ 4 2 ♦ 8 5 3♣ J 7 ♣ Q 10 6 5 4 3
SOUTH
♠ K Q 7 4 3♥ 9 8♦ A K Q J 10♣ A
NW E
S
BOTH VUL. DEALER SOUTH
West
pass
pass
pass
North
1NT
3♠
4♠
East
pass
pass
all pass
South
1♠
3♦
4♦1
Declarer would like to draw trumps and then run diamonds, a rea-sonable objective, but you have other things in mind. Bothdummy and declarer are void in hearts. Your goal is to force declar-er to trump another heart. You can't do that as long as there is atrump in dummy. What you have to do is win the third round ofspades, the one that voids dummy, and then play a heart forcingdeclarer to ruff with her last trump. Now when declarer starts play-ing diamonds, you ruff the third diamond and cash your fifthheart: down two.
If declarer doesn't play a third round of spades, reverting to dia-monds instead, you ruff the third round of diamonds. Down one.
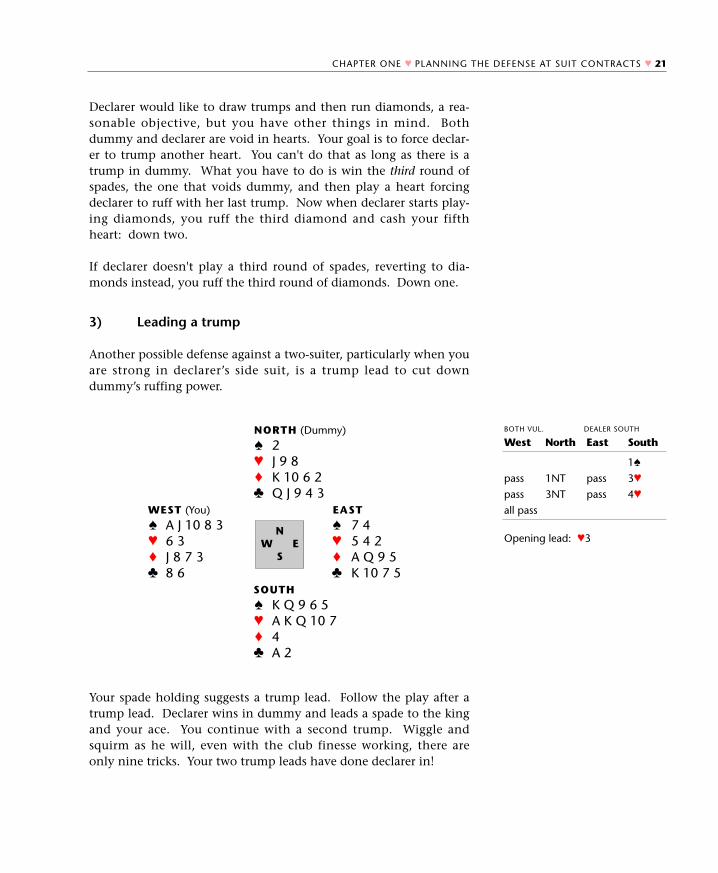
3) Leading a trump
Another possible defense against a two-suiter, particularly when youare strong in declarer’s side suit, is a trump lead to cut downdummy’s ruffing power.
Your spade holding suggests a trump lead. Follow the play after atrump lead. Declarer wins in dummy and leads a spade to the kingand your ace. You continue with a second trump. Wiggle andsquirm as he will, even with the club finesse working, there areonly nine tricks. Your two trump leads have done declarer in!
Opening lead: ♥3
CHAPTER ONE ♥ PLANNING THE DEFENSE AT SUIT CONTRACTS ♥ 21
NORTH (Dummy)
♠ 2♥ J 9 8♦ K 10 6 2♣ Q J 9 4 3
WEST (You) EAST
♠ A J 10 8 3 ♠ 7 4♥ 6 3 ♥ 5 4 2♦ J 8 7 3 ♦ A Q 9 5♣ 8 6 ♣ K 10 7 5
SOUTH
♠ K Q 9 6 5♥ A K Q 10 7♦ 4♣ A 2
NW E
S
BOTH VUL. DEALER SOUTH
West
pass
pass
all pass
North
1NT
3NT
East
pass
pass
South
1♠
3♥
4♥
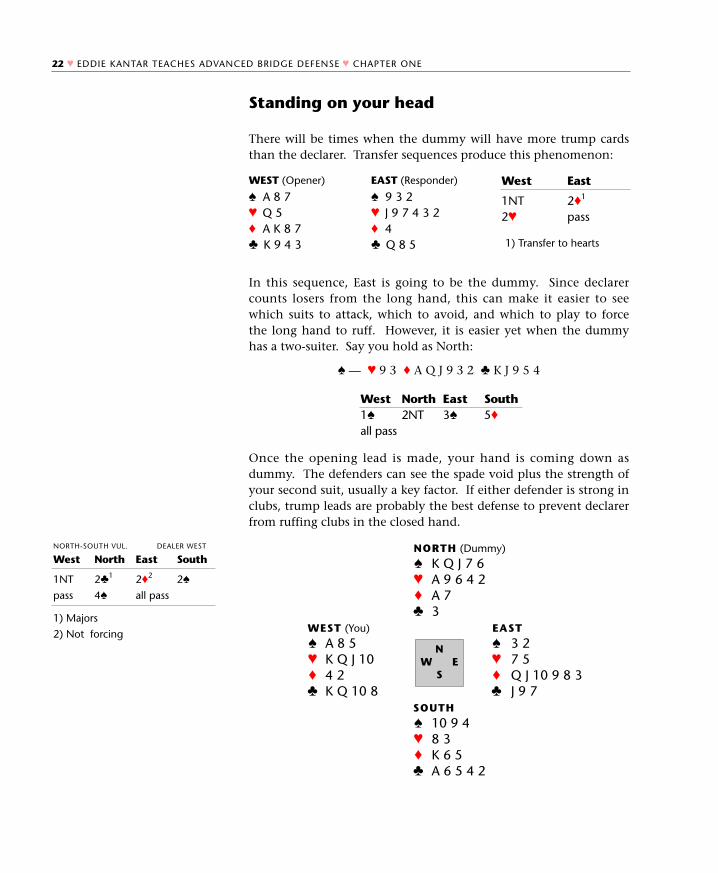
Standing on your head
There will be times when the dummy will have more trump cardsthan the declarer. Transfer sequences produce this phenomenon:
1) Transfer to hearts
In this sequence, East is going to be the dummy. Since declarercounts losers from the long hand, this can make it easier to seewhich suits to attack, which to avoid, and which to play to forcethe long hand to ruff. However, it is easier yet when the dummyhas a two-suiter. Say you hold as North:
♠ — ♥ 9 3 ♦ A Q J 9 3 2 ♣ K J 9 5 4
Once the opening lead is made, your hand is coming down asdummy. The defenders can see the spade void plus the strength ofyour second suit, usually a key factor. If either defender is strong inclubs, trump leads are probably the best defense to prevent declarerfrom ruffing clubs in the closed hand.
1) Majors
2) Not forcing
22 ♥ EDDIE KANTAR TEACHES ADVANCED BRIDGE DEFENSE ♥ CHAPTER ONE
♠ A 8 7♥ Q 5♦ A K 8 7♣ K 9 4 3
WEST (Opener)
♠ 9 3 2♥ J 9 7 4 3 2♦ 4♣ Q 8 5
EAST (Responder) West
1NT2♥
East
2♦1
pass
West1♠
all pass
North2NT
East3♠
South5♦
NORTH (Dummy)
♠ K Q J 7 6♥ A 9 6 4 2♦ A 7♣ 3
WEST (You) EAST
♠ A 8 5 ♠ 3 2♥ K Q J 10 ♥ 7 5♦ 4 2 ♦ Q J 10 9 8 3♣ K Q 10 8 ♣ J 9 7
SOUTH
♠ 10 9 4♥ 8 3♦ K 6 5♣ A 6 5 4 2
NW E
S
NORTH-SOUTH VUL. DEALER WEST
West
1NT
pass
North
2♣1
4♠
East
2♦2
all pass
South
2♠
On this hand you have so many good leads they're coming outyour ears. Your partner has bid diamonds, you have a perfectsequence in hearts, you have strong clubs — what should you lead?A trump! A trump lead is a standout. Dummy is known to have amajor two-suiter and South surely has more spades than hearts.What is going to happen to dummy's hearts? Declarer is going totry to trump them. Your best bet is to lead the ace and a trump incase declarer has a singleton heart. As it happens, declarer mustgive up a heart trick before she can trump even one heart in theclosed hand. Oh no. When declarer gives up a heart, you can playa third spade. Don't look now, but because of your brilliant defensedeclarer has to lose three hearts and a spade.
We now enter a new realm of defensive play — reducing the longstrong suit in dummy to mush. It’s called:
Killing the dummyThere are three ways to ‘kill’ a dummy besides shooting the poorguy. They are:
1) Giving partner an early ruff in the long suit.2) Killing the long suit by leading it once or twice.3) Killing the entry to a long suit that can be established by ruffing.
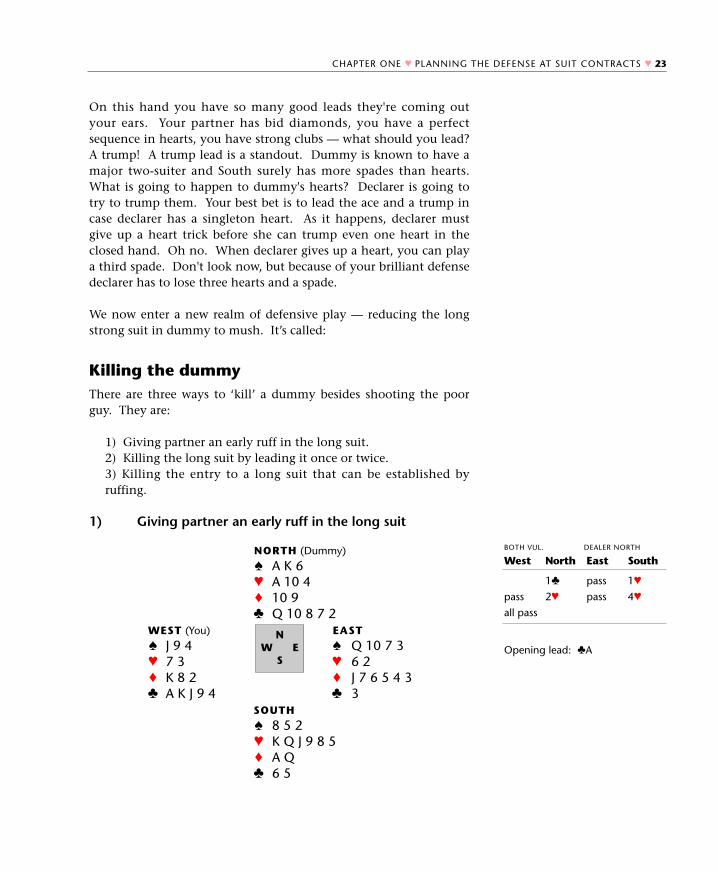
1) Giving partner an early ruff in the long suit
Opening lead: ♣A
CHAPTER ONE ♥ PLANNING THE DEFENSE AT SUIT CONTRACTS ♥ 23
NORTH (Dummy)
♠ A K 6♥ A 10 4♦ 10 9♣ Q 10 8 7 2
WEST (You) EAST
♠ J 9 4 ♠ Q 10 7 3♥ 7 3 ♥ 6 2♦ K 8 2 ♦ J 7 6 5 4 3♣ A K J 9 4 ♣ 3
SOUTH
♠ 8 5 2♥ K Q J 9 8 5♦ A Q♣ 6 5
NW E
S
BOTH VUL. DEALER NORTH
West
pass
all pass
North
1♣
2♥
East
pass
pass
South
1♥
4♥
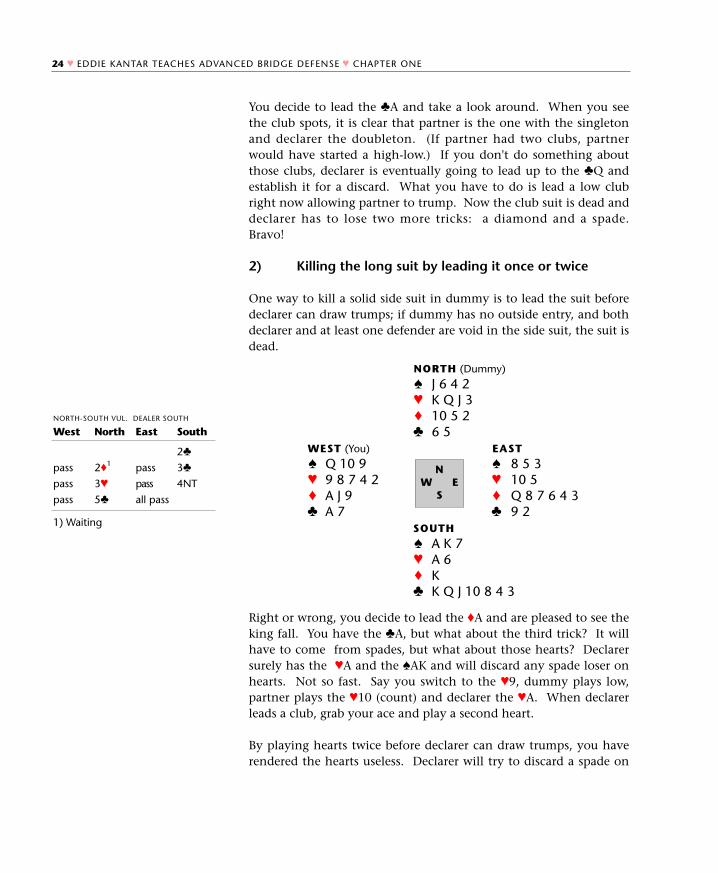
You decide to lead the ♣A and take a look around. When you seethe club spots, it is clear that partner is the one with the singletonand declarer the doubleton. (If partner had two clubs, partnerwould have started a high-low.) If you don't do something aboutthose clubs, declarer is eventually going to lead up to the ♣Q andestablish it for a discard. What you have to do is lead a low clubright now allowing partner to trump. Now the club suit is dead anddeclarer has to lose two more tricks: a diamond and a spade.Bravo!
2) Killing the long suit by leading it once or twice
One way to kill a solid side suit in dummy is to lead the suit beforedeclarer can draw trumps; if dummy has no outside entry, and bothdeclarer and at least one defender are void in the side suit, the suit isdead.
Right or wrong, you decide to lead the ♦A and are pleased to see theking fall. You have the ♣A, but what about the third trick? It willhave to come from spades, but what about those hearts? Declarersurely has the ♥A and the ♠AK and will discard any spade loser onhearts. Not so fast. Say you switch to the ♥9, dummy plays low,partner plays the ♥10 (count) and declarer the ♥A. When declarerleads a club, grab your ace and play a second heart.
By playing hearts twice before declarer can draw trumps, you haverendered the hearts useless. Declarer will try to discard a spade on
1) Waiting
24 ♥ EDDIE KANTAR TEACHES ADVANCED BRIDGE DEFENSE ♥ CHAPTER ONE
NORTH (Dummy)
♠ J 6 4 2♥ K Q J 3♦ 10 5 2♣ 6 5
WEST (You) EAST
♠ Q 10 9 ♠ 8 5 3♥ 9 8 7 4 2 ♥ 10 5♦ A J 9 ♦ Q 8 7 6 4 3♣ A 7 ♣ 9 2
SOUTH
♠ A K 7♥ A 6♦ K♣ K Q J 10 8 4 3
NW E
S
NORTH-SOUTH VUL. DEALER SOUTH
West
pass
pass
pass
North
2♦1
3♥
5♣
East
pass
pass
all pass
South
2♣
3♣
4NT
the third heart, but partner will ruff and your ♠Q becomes the set-ting trick.
3) Killing the entry to a long suit that can be estab-lished by ruffing
You lead the ♥A and partner plays the ♥7, a suit preference signalsuggesting that you continue hearts. When partner's bidding showsa six-card suit or longer, and you lead that suit, partner's first play issuit preference. If partner had wished a club switch, she wouldhave played a low heart. If partner had wanted a diamond shift,she would have played an unusually high heart, usually an honorcard.
How are you going to get a club trick with those diamonds staringyou in the face? First you must project the ♦Q in partner's hand.Next, you have to face reality. Declarer is going to set up the dia-monds with one ruff and then draw trumps ending in dummy, shed-ding clubs and hearts on the established diamonds.
But you can prevent this. If you play a second heart and forcedummy to ruff a heart prematurely, declarer can no longer set updiamonds and then draw trumps ending in dummy. Dummy willhave only two trumps left while you will have three. After thesmoke clears, the ♣K will be the setting trick.
Opening lead: ♥A
CHAPTER ONE ♥ PLANNING THE DEFENSE AT SUIT CONTRACTS ♥ 25
NORTH (Dummy)
♠ K 7 4♥ 3♦ A K 8 6 4 3♣ 6 5 2
WEST (You) EAST
♠ 9 6 3 ♠ —♥ A Q 6 ♥ K J 10 9 7 5 4♦ 7 5 2 ♦ Q 10 9♣ K 10 8 4 ♣ 9 7 3
SOUTH
♠ A Q J 10 8 5 2♥ 8 2♦ J♣ A Q J
NW E
S
NORTH-SOUTH VUL. DEALER EAST
West
5♥
North
6♠
East
3♥
all pass
South
4♠

Practice Hands
Warned by the bidding that there is likely to be diamond shortnessin the dummy, your best bet to protect your diamond winners is tolead a trump. Each trump you remove from dummy is one fewerdiamond declarer can ruff, one more diamond trick for you. If youlead two rounds of trumps before declarer can ruff a diamond, yourside takes three diamonds and one heart. Down one.
Opening lead: ♠K
26 ♥ EDDIE KANTAR TEACHES ADVANCED BRIDGE DEFENSE ♥ CHAPTER ONE
Hand 2 NORTH (Dummy)
♠ 7 2♥ 6 4 2♦ A Q 10 8 5♣ K Q 2
WEST EAST (You)
♠ K Q 10 9 5 ♠ A J 3♥ K 7 ♥ 9 5 3♦ 7 6 ♦ K J 9 4 2♣ J 8 7 4 ♣ 10 9
SOUTH
♠ 8 6 4♥ A Q J 10 8♦ 3♣ A 6 5 3
NW E
S
EAST-WEST VUL. DEALER SOUTH
West
1♠
pass
North
2♦
3♥
East
2♠
all pass
South
1♥
pass
NEITHER VUL. DEALER EAST
West
pass
pass
all pass
North
1NT
3♠
East
pass
pass
pass
South
1♠
3♦
4♠
Hand 1 NORTH (Dummy)
♠ J 9♥ Q 7 6 4 3♦ 7 5♣ K 7 5 2
WEST (You) EAST
♠ 10 6 3 ♠ 7 5 2♥ K 10 5 2 ♥ A J 8♦ K Q 10 3 ♦ 8 2♣ 8 4 ♣ Q J 10 6 3
SOUTH
♠ A K Q 8 4♥ 9♦ A J 9 6 4♣ A 9
NW E
S
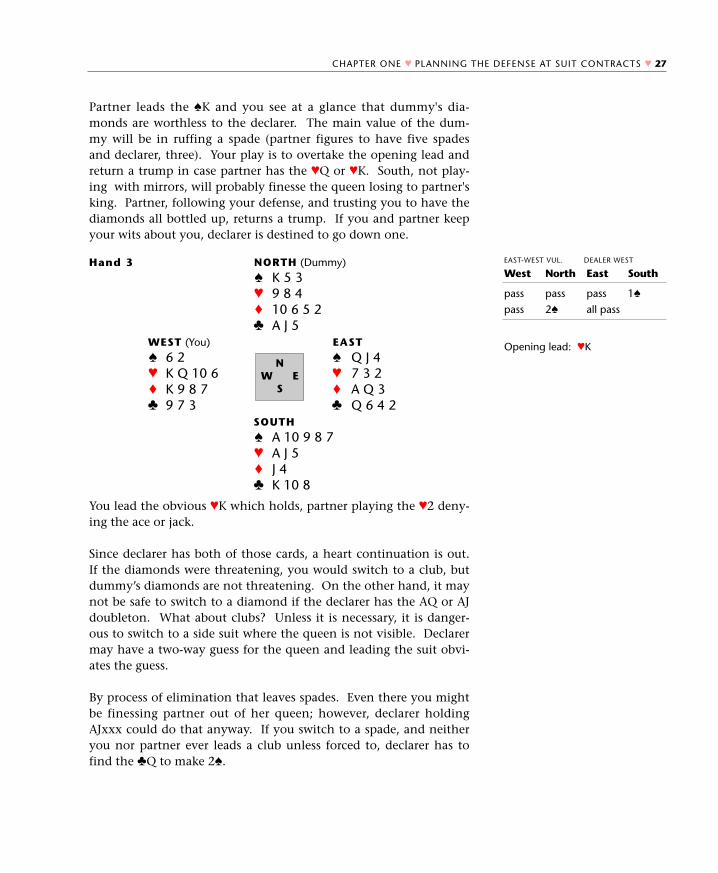
Partner leads the ♠K and you see at a glance that dummy's dia-monds are worthless to the declarer. The main value of the dum-my will be in ruffing a spade (partner figures to have five spadesand declarer, three). Your play is to overtake the opening lead andreturn a trump in case partner has the ♥Q or ♥K. South, not play-ing with mirrors, will probably finesse the queen losing to partner'sking. Partner, following your defense, and trusting you to have thediamonds all bottled up, returns a trump. If you and partner keepyour wits about you, declarer is destined to go down one.
You lead the obvious ♥K which holds, partner playing the ♥2 deny-ing the ace or jack.
Since declarer has both of those cards, a heart continuation is out.If the diamonds were threatening, you would switch to a club, butdummy’s diamonds are not threatening. On the other hand, it maynot be safe to switch to a diamond if the declarer has the AQ or AJdoubleton. What about clubs? Unless it is necessary, it is danger-ous to switch to a side suit where the queen is not visible. Declarermay have a two-way guess for the queen and leading the suit obvi-ates the guess.
By process of elimination that leaves spades. Even there you mightbe finessing partner out of her queen; however, declarer holdingAJxxx could do that anyway. If you switch to a spade, and neitheryou nor partner ever leads a club unless forced to, declarer has tofind the ♣Q to make 2♠.
Opening lead: ♥K
CHAPTER ONE ♥ PLANNING THE DEFENSE AT SUIT CONTRACTS ♥ 27
Hand 3 NORTH (Dummy)
♠ K 5 3♥ 9 8 4♦ 10 6 5 2♣ A J 5
WEST (You) EAST
♠ 6 2 ♠ Q J 4♥ K Q 10 6 ♥ 7 3 2♦ K 9 8 7 ♦ A Q 3♣ 9 7 3 ♣ Q 6 4 2
SOUTH
♠ A 10 9 8 7♥ A J 5♦ J 4♣ K 10 8
NW E
S
EAST-WEST VUL. DEALER WEST
West
pass
pass
North
pass
2♠
East
pass
all pass
South
1♠
Partner leads the ♠10 and dummy's jack goes to your ace. Your job,looking at that dummy, is to project (imagine) some possibility totake four tricks. Clearly no more are coming in the black suits; it'sgoing to have to come from the red ones. It is unlikely that partnercan have more than one trump trick, so you must try for two dia-mond tricks. If partner has the ♦K, it doesn't matter which dia-mond you lead, but if partner has the ♦Q and declarer the ♦KJ, youmust put declarer to an immediate guess before the diamonds gobye-bye on the black suits. Lead a low diamond at trick two, it'syour best chance.
1) Transfer to hearts
2) Good hand with four hearts
Opening lead: ♠10
28 ♥ EDDIE KANTAR TEACHES ADVANCED BRIDGE DEFENSE ♥ CHAPTER ONE
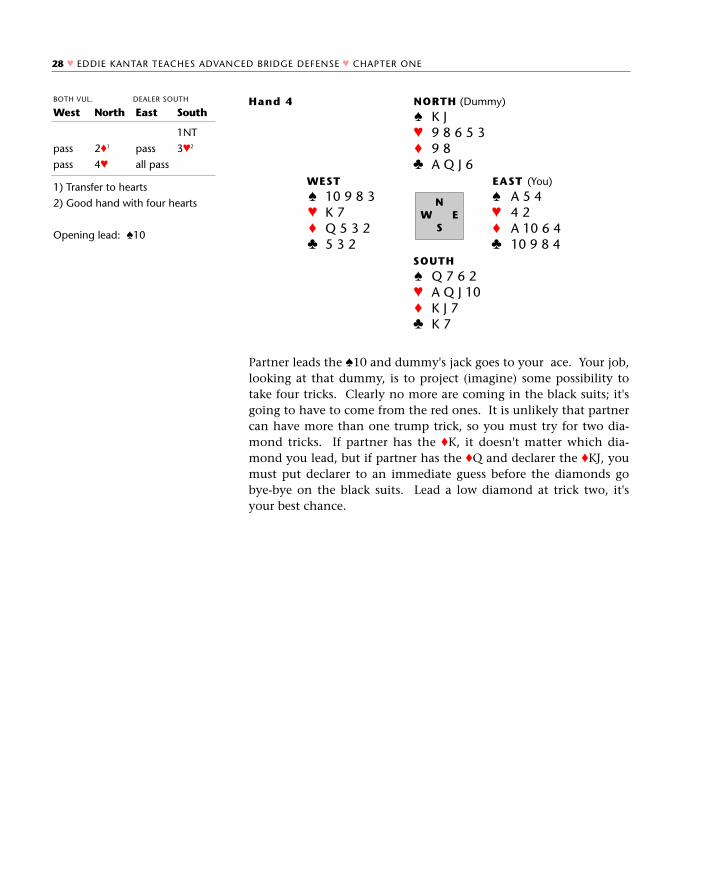
Hand 4 NORTH (Dummy)
♠ K J♥ 9 8 6 5 3♦ 9 8♣ A Q J 6
WEST EAST (You)
♠ 10 9 8 3 ♠ A 5 4♥ K 7 ♥ 4 2♦ Q 5 3 2 ♦ A 10 6 4♣ 5 3 2 ♣ 10 9 8 4
SOUTH
♠ Q 7 6 2♥ A Q J 10♦ K J 7♣ K 7
NW E
S
BOTH VUL. DEALER SOUTH
West
pass
pass
North
2♦1
4♥
East
pass
all pass
South
1NT
3♥2
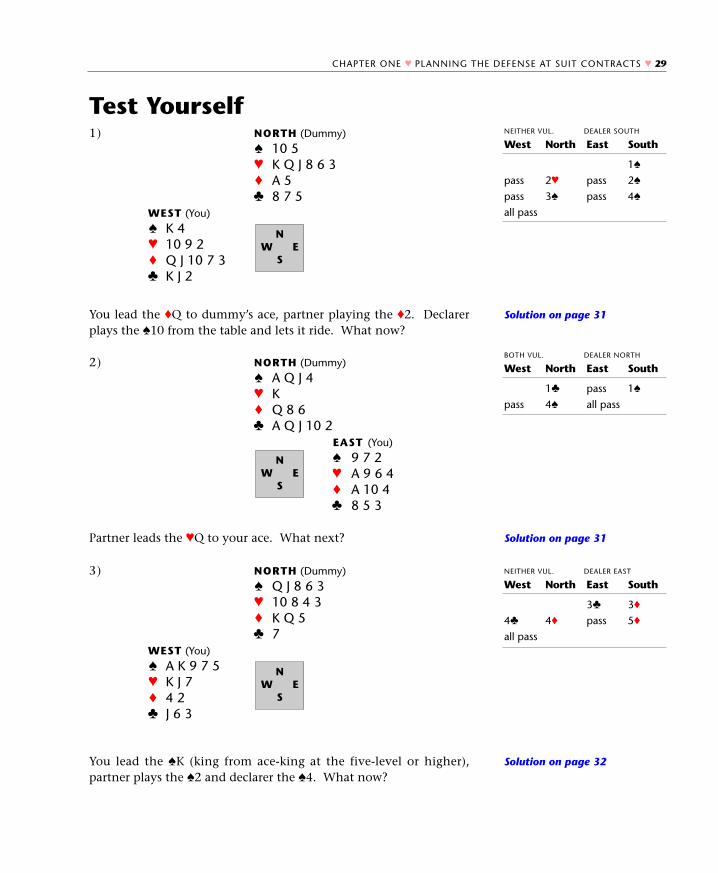
Test Yourself
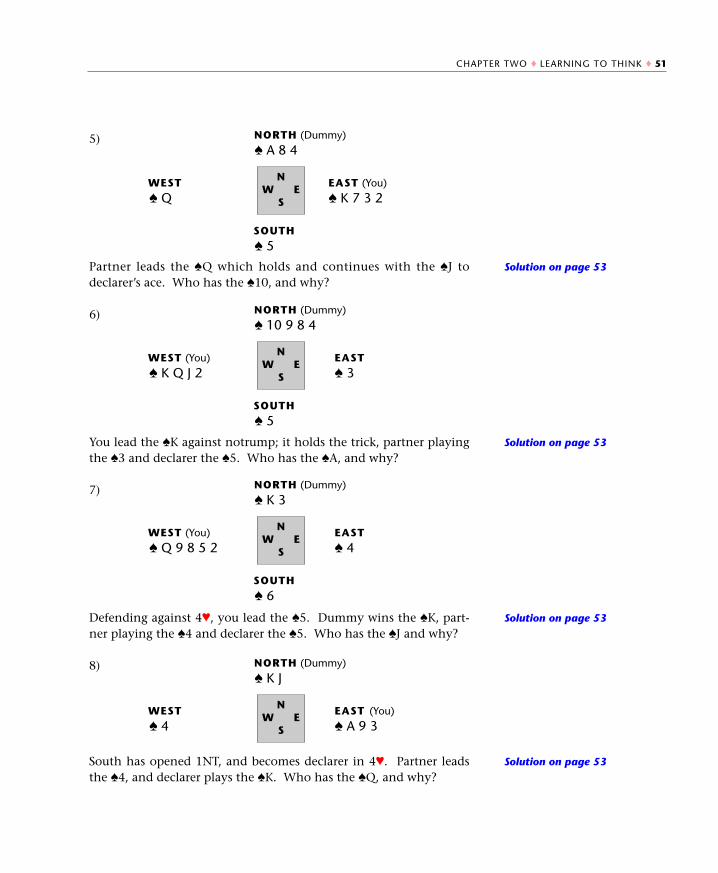
You lead the ♦Q to dummy’s ace, partner playing the ♦2. Declarerplays the ♠10 from the table and lets it ride. What now?
Partner leads the ♥Q to your ace. What next?
You lead the ♠K (king from ace-king at the five-level or higher),partner plays the ♠2 and declarer the ♠4. What now?
Solution on page 31
Solution on page 31
Solution on page 32
CHAPTER ONE ♥ PLANNING THE DEFENSE AT SUIT CONTRACTS ♥ 29
1) NORTH (Dummy)
♠ 10 5♥ K Q J 8 6 3♦ A 5♣ 8 7 5
WEST (You)
♠ K 4♥ 10 9 2♦ Q J 10 7 3♣ K J 2
NW E
S
NEITHER VUL. DEALER SOUTH
West
pass
pass
all pass
North
2♥
3♠
East
pass
pass
South
1♠
2♠
4♠
2) NORTH (Dummy)
♠ A Q J 4♥ K♦ Q 8 6♣ A Q J 10 2
EAST (You)
♠ 9 7 2♥ A 9 6 4♦ A 10 4♣ 8 5 3
NW E
S
BOTH VUL. DEALER NORTH
West
pass
North
1♣
4♠
East
pass
all pass
South
1♠
3) NORTH (Dummy)
♠ Q J 8 6 3♥ 10 8 4 3♦ K Q 5♣ 7
WEST (You)
♠ A K 9 7 5♥ K J 7♦ 4 2♣ J 6 3
NW E
S
NEITHER VUL. DEALER EAST
West
4♣
all pass
North
4♦
East
3♣
pass
South
3♦
5♦
Partner leads the ♠5, and dummy plays low. After you win thetrick, what are you going to do next?
Partner leads the ♠3 and you win the ♠A. How are you going to tryto beat this hand?
Partner leads the ♣Q to your ace and declarer's five. What now?
Solution on page 32
Solution on page 33
1) 15-17 HCP
2) Transfer to spades
Solution on page 34
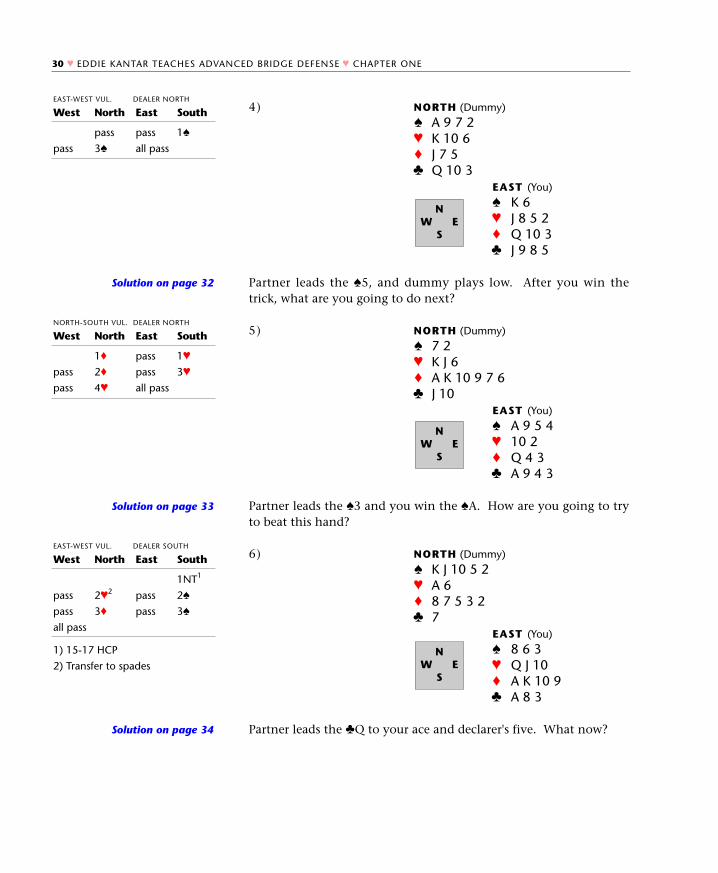
30 ♥ EDDIE KANTAR TEACHES ADVANCED BRIDGE DEFENSE ♥ CHAPTER ONE
4) NORTH (Dummy)
♠ A 9 7 2♥ K 10 6♦ J 7 5♣ Q 10 3
EAST (You)
♠ K 6♥ J 8 5 2♦ Q 10 3♣ J 9 8 5
NW E
S
EAST-WEST VUL. DEALER NORTH
West
pass
North
pass
3♠
East
pass
all pass
South
1♠
5) NORTH (Dummy)
♠ 7 2♥ K J 6♦ A K 10 9 7 6♣ J 10
EAST (You)
♠ A 9 5 4♥ 10 2♦ Q 4 3♣ A 9 4 3
NW E
S
NORTH-SOUTH VUL. DEALER NORTH
West
pass
pass
North
1♦
2♦
4♥
East
pass
pass
all pass
South
1♥
3♥
6) NORTH (Dummy)
♠ K J 10 5 2♥ A 6♦ 8 7 5 3 2♣ 7
EAST (You)
♠ 8 6 3♥ Q J 10♦ A K 10 9♣ A 8 3
NW E
S
EAST-WEST VUL. DEALER SOUTH
West
pass
pass
all pass
North
2♥2
3♦
East
pass
pass
South
1NT1
2♠
3♠
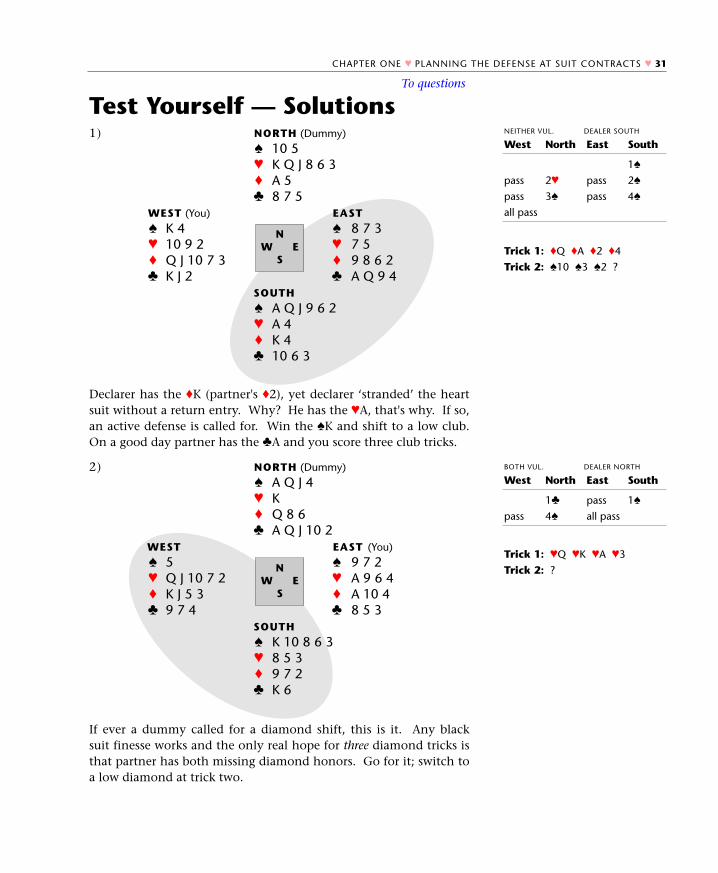
Test Yourself — Solutions
Declarer has the ♦K (partner's ♦2), yet declarer ‘stranded’ the heartsuit without a return entry. Why? He has the ♥A, that's why. If so,an active defense is called for. Win the ♠K and shift to a low club.On a good day partner has the ♣A and you score three club tricks.
If ever a dummy called for a diamond shift, this is it. Any blacksuit finesse works and the only real hope for three diamond tricks isthat partner has both missing diamond honors. Go for it; switch toa low diamond at trick two.
Trick 1: ♦Q ♦A ♦2 ♦4
Trick 2: ♠10 ♠3 ♠2 ?
Trick 1: ♥Q ♥K ♥A ♥3
Trick 2: ?
CHAPTER ONE ♥ PLANNING THE DEFENSE AT SUIT CONTRACTS ♥ 31
1) NORTH (Dummy)
♠ 10 5♥ K Q J 8 6 3♦ A 5♣ 8 7 5
WEST (You) EAST
♠ K 4 ♠ 8 7 3♥ 10 9 2 ♥ 7 5♦ Q J 10 7 3 ♦ 9 8 6 2♣ K J 2 ♣ A Q 9 4
SOUTH
♠ A Q J 9 6 2♥ A 4♦ K 4♣ 10 6 3
NW E
S
2) NORTH (Dummy)
♠ A Q J 4♥ K♦ Q 8 6♣ A Q J 10 2
WEST EAST (You)
♠ 5 ♠ 9 7 2♥ Q J 10 7 2 ♥ A 9 6 4♦ K J 5 3 ♦ A 10 4♣ 9 7 4 ♣ 8 5 3
SOUTH
♠ K 10 8 6 3♥ 8 5 3♦ 9 7 2♣ K 6
NW E
S
NEITHER VUL. DEALER SOUTH
West
pass
pass
all pass
North
2♥
3♠
East
pass
pass
South
1♠
2♠
4♠
BOTH VUL. DEALER NORTH
West
pass
North
1♣
4♠
East
pass
all pass
South
1♠
To questions
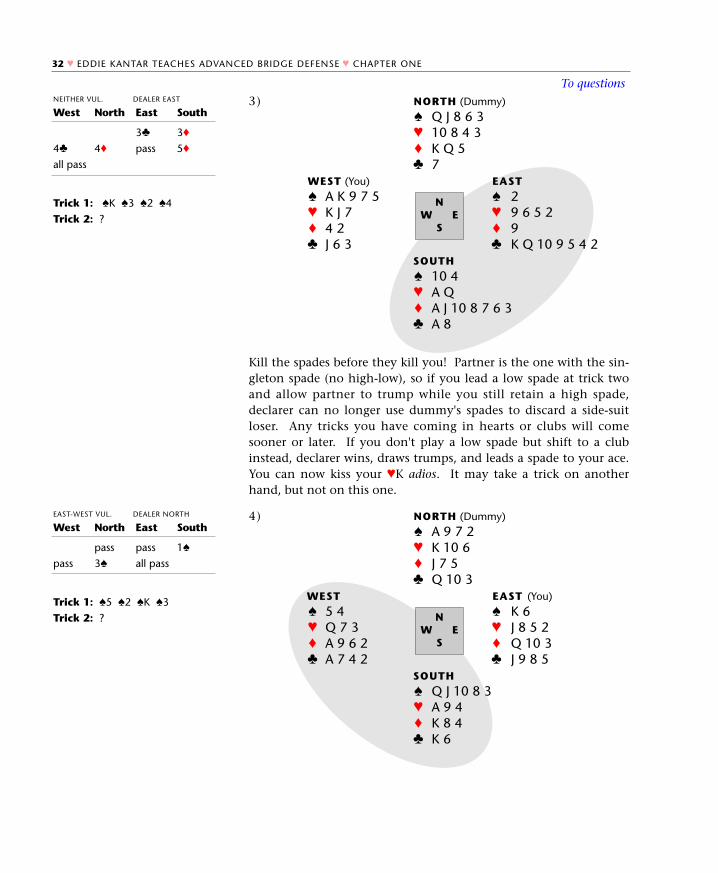
Kill the spades before they kill you! Partner is the one with the sin-gleton spade (no high-low), so if you lead a low spade at trick twoand allow partner to trump while you still retain a high spade,declarer can no longer use dummy's spades to discard a side-suitloser. Any tricks you have coming in hearts or clubs will comesooner or later. If you don't play a low spade but shift to a clubinstead, declarer wins, draws trumps, and leads a spade to your ace.You can now kiss your ♥K adios. It may take a trick on anotherhand, but not on this one.
Trick 1: ♠K ♠3 ♠2 ♠4
Trick 2: ?
Trick 1: ♠5 ♠2 ♠K ♠3
Trick 2: ?
32 ♥ EDDIE KANTAR TEACHES ADVANCED BRIDGE DEFENSE ♥ CHAPTER ONE
3) NORTH (Dummy)
♠ Q J 8 6 3♥ 10 8 4 3♦ K Q 5♣ 7
WEST (You) EAST
♠ A K 9 7 5 ♠ 2♥ K J 7 ♥ 9 6 5 2♦ 4 2 ♦ 9♣ J 6 3 ♣ K Q 10 9 5 4 2
SOUTH
♠ 10 4♥ A Q♦ A J 10 8 7 6 3♣ A 8
NW E
S
4) NORTH (Dummy)
♠ A 9 7 2♥ K 10 6♦ J 7 5♣ Q 10 3
WEST EAST (You)
♠ 5 4 ♠ K 6♥ Q 7 3 ♥ J 8 5 2♦ A 9 6 2 ♦ Q 10 3♣ A 7 4 2 ♣ J 9 8 5
SOUTH
♠ Q J 10 8 3♥ A 9 4♦ K 8 4♣ K 6
NW E
S
NEITHER VUL. DEALER EAST
West
4♣
all pass
North
4♦
East
3♣
pass
South
3♦
5♦
EAST-WEST VUL. DEALER NORTH
West
pass
North
pass
3♠
East
pass
all pass
South
1♠
To questions
Partner's trump lead, usually suggesting broken honor strength inall suits, plus the balanced dummy suggest a passive defense.Clearly the most passive exit card you have is your remainingspade. This return, plus a continued passive defense (avoid break-ing new suits), leaves declarer with four more losers.
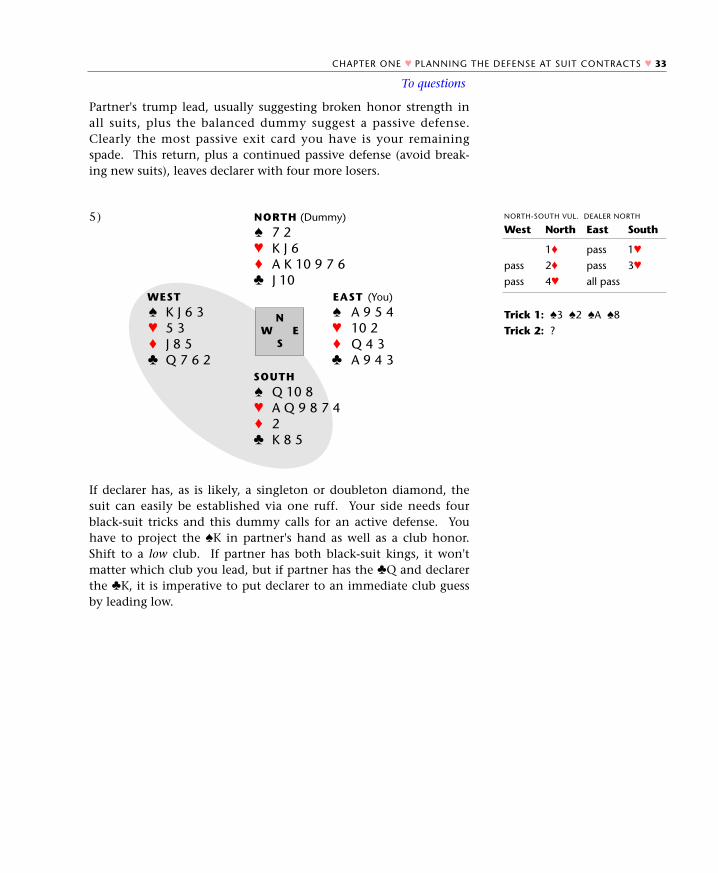
If declarer has, as is likely, a singleton or doubleton diamond, thesuit can easily be established via one ruff. Your side needs fourblack-suit tricks and this dummy calls for an active defense. Youhave to project the ♠K in partner's hand as well as a club honor.Shift to a low club. If partner has both black-suit kings, it won'tmatter which club you lead, but if partner has the ♣Q and declarerthe ♣K, it is imperative to put declarer to an immediate club guessby leading low.
Trick 1: ♠3 ♠2 ♠A ♠8
Trick 2: ?
CHAPTER ONE ♥ PLANNING THE DEFENSE AT SUIT CONTRACTS ♥ 33
5) NORTH (Dummy)
♠ 7 2♥ K J 6♦ A K 10 9 7 6♣ J 10
WEST EAST (You)
♠ K J 6 3 ♠ A 9 5 4♥ 5 3 ♥ 10 2♦ J 8 5 ♦ Q 4 3♣ Q 7 6 2 ♣ A 9 4 3
SOUTH
♠ Q 10 8♥ A Q 9 8 7 4♦ 2♣ K 8 5
NW E
S
NORTH-SOUTH VUL. DEALER NORTH
West
pass
pass
North
1♦
2♦
4♥
East
pass
pass
all pass
South
1♥
3♥
To questions
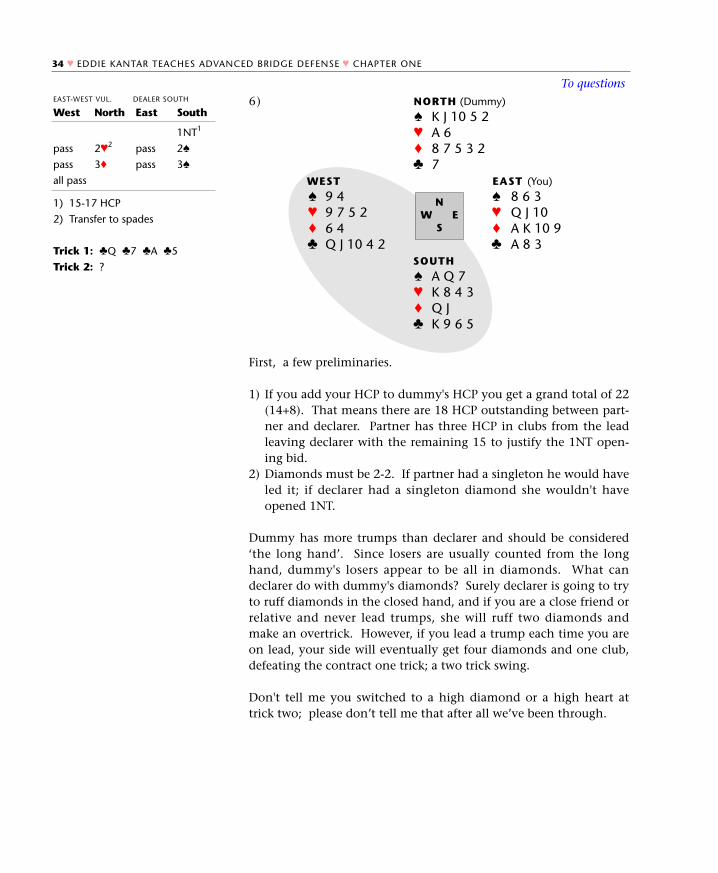
First, a few preliminaries.
1) If you add your HCP to dummy's HCP you get a grand total of 22(14+8). That means there are 18 HCP outstanding between part-ner and declarer. Partner has three HCP in clubs from the leadleaving declarer with the remaining 15 to justify the 1NT open-ing bid.
2) Diamonds must be 2-2. If partner had a singleton he would haveled it; if declarer had a singleton diamond she wouldn't haveopened 1NT.
Dummy has more trumps than declarer and should be considered‘the long hand’. Since losers are usually counted from the longhand, dummy's losers appear to be all in diamonds. What candeclarer do with dummy's diamonds? Surely declarer is going to tryto ruff diamonds in the closed hand, and if you are a close friend orrelative and never lead trumps, she will ruff two diamonds andmake an overtrick. However, if you lead a trump each time you areon lead, your side will eventually get four diamonds and one club,defeating the contract one trick; a two trick swing.
Don't tell me you switched to a high diamond or a high heart attrick two; please don’t tell me that after all we’ve been through.
1) 15-17 HCP
2) Transfer to spades
Trick 1: ♣Q ♣7 ♣A ♣5
Trick 2: ?
34 ♥ EDDIE KANTAR TEACHES ADVANCED BRIDGE DEFENSE ♥ CHAPTER ONE
6) NORTH (Dummy)
♠ K J 10 5 2♥ A 6♦ 8 7 5 3 2♣ 7
WEST EAST (You)
♠ 9 4 ♠ 8 6 3♥ 9 7 5 2 ♥ Q J 10♦ 6 4 ♦ A K 10 9♣ Q J 10 4 2 ♣ A 8 3
SOUTH
♠ A Q 7♥ K 8 4 3♦ Q J♣ K 9 6 5
NW E
S
EAST-WEST VUL. DEALER SOUTH
West
pass
pass
all pass
North
2♥2
3♦
East
pass
pass
South
1NT1
2♠
3♠
To questions
CHAPTER ONE ♥ PLANNING THE DEFENSE AT SUIT CONTRACTS ♥ 35
Key ideas from Chapter 1
• Listen to the bidding before you make your opening lead.• Re-evaluate your defensive strategy when the dummy
comes down, paying particular attention to the strength ofdummy's side suits.
• Defensive strategy is basically divided into two categories:active and passive. An ‘active’ or attacking defense meansattacking side suits quickly to secure tricks before they dis-appear on dummy's side suit. A ‘passive’ or safe defensemeans sitting back and waiting patiently for tricks to cometo you. A passive defense implies not breaking new suitsthat appear risky.
• If dummy has a strong usable side suit, play an activedefense; go after your tricks before the mice get at them.
• If dummy's strong side suit is not usable, play a passivedefense, perhaps even leading a trump to cut downdummy's ruffing power.
• If dummy's only value is side suit shortness, trump leadsare usually best.
• If dummy tables with more trumps than declarer, think ofthe dummy as the declarer and count losers from thedummy's perspective.
• If declarer has a known two-suiter consider an activedefense if her second suit is solid and she can draw trumpsand remain with at least one trump in dummy. Play a forc-ing defense if you have four trumps or suspect partnerdoes. Lead a trump if you are strong in declarer's side suit.
• When dummy tables with a strong side suit, there are threepossible ways to kill that suit: 1) give partner a ruff while retaining control of the suit; 2) lead the suit once or twice before declarer can drawtrumps. To pull this one off:
(a)there cannot be any side suit entry to dummy;(b) either you or partner must be short in the suit.
3) if the suit must be established by ruffing, attack the sidesuit entry that declarer must eventually use to reach theestablished suit.

WHATYOU’RE GOING
TO LEARN IN THIS
CHAPTER:• What inferences you can draw
from the bidding• What partner’s lead can tell
you• What you can infer from the
way declarer is playing thehand
• How to watch for negativeinferences from things that donot happen
• How to figure out what to dobased on the inferences youmake
Inferences from the lead 39Inferences from the play 40Inferences from the bidding 45Practice Hands 48Test Yourself 50Solutions 53Key Ideas 54
You have probably at some time had the experience of drivingalong and approaching a traffic light with the sun directly in youreyes. The sun is so bright that you can’t actually see the signal, butyou can see all the other cars around you are going through theintersection. What color do you think the light is? Green, ofcourse.
You don’t actually know for certain that the light is green (althoughyou’re probably going to find out the hard way if it isn’t when youenter the intersection). What you have done is to draw an infer-ence, or a logical conclusion, from the facts you have observed: theother cars are going through, so the light must be green.
2LearningtoThink“I am inclined to think —,” said I. “I should do so,” Holmes remarked impatiently.
CONAN DOYLE
♦ 37
You can apply the same logic at the bridge table, particularly ondefense. For openers you have to make the assumption that bothpartner and declarer are playing rationally! (Yes, yes, I know whatyou are thinking.) If either one makes a completely irrational play,you could find yourself making an even worse one! One idiocycan easily breed another — the bridge equivalent of drivingthrough a red light.
Say you are defending a heart contract and you lead the ♠K. Youhave the ♣A, and you notice that there are ten clubs between yourhand and dummy. Partner overtakes your opening lead and shiftsto a club. There is an overwhelming inference that partner has asingleton club. If partner lets the ♠K hold instead of overtaking andshifting to a club, there is a negative inference involved: partner isunlikely to have a singleton club.
Here's another that you should have no trouble with after the lastchapter. You lead a low spade against a heart contract and dummytables with trump support plus the ♣AQ1085; you have three littleclubs. Partner wins the opening lead and shifts to a trump. Theinference is that partner has the clubs locked up and that youshouldn't worry about that suit. If a trump switch is possible, butpartner does not shift to a trump, the negative inference is thatpartner does not have the clubs locked up.
Inferences are also available when dummy tables with a powerfulsuit such as KQJ10(x) or AQJ(x) and declarer shies away from thesuit. The inference is that declarer, not partner, has the missinghonor.
The following inferences related to discarding were discussed indetail in Chapter 7 of Eddie Kantar teaches Modern Bridge Defense butbear repeating nevertheless:
1) If dummy has something like the ♦AKJx(x) and declarer discardsa small diamond from dummy, declarer cannot have the ♦Q.
2) When dummy has trump support plus side-suit shortness, yetdeclarer draws all of dummy's trumps or draws them after ruffingonce or twice in dummy, the inference is that declarer has nomore losers in that suit to ruff. The defenders can now discardthat suit with impunity.
This famous exchange is a good
example of a negative inference:
‘Is there any point to which you
would wish to draw my atten-
tion?’
‘To the curious incident of the
dog in the night-time.’
‘The dog did nothing in the
night-time.’
‘That was the curious incident,’
remarked Sherlock Holmes.
Silver Blaze, Conan Doyle.
38 ♦ EDDIE KANTAR TEACHES ADVANCED BRIDGE DEFENSE ♦ CHAPTER TWO
Inferences from the leadSay you are defending a spade contract; clubs is an unbid suit, aclub is not led, and when dummy appears, you can't see the ♣A orthe ♣K. The inference is that partner cannot have both of thosecards (he would have led one). Either declarer has them both orthey are split between the two unseen hands. To a slightly lesserdegree you can take the same inference when the king and queen ofa suit are not visible and not led.
Say partner bids a suit, you support the suit, and partner leadsanother suit. Why? There are four possible reasons. (1) Partnermay have a suit headed by the AQ or the AJ and fears leading thesuit in case declarer has the king. However, if you have the ace ofthe supported suit or dummy does, there must be another reason.(2) Partner has a sequence lead in another suit. (3) Partner hasshortness with a likely trump entry and is planning on putting youon lead in the supported suit to get a ruff. (4) Partner has forgottenthe bidding.
Say partner has preempted. Most preempts contain side-suit single-tons and most partners will lead a singleton without even lookingat the rest of their hand. If partner preempts and doesn't lead a sin-gleton, the inference is that partner's singleton, if she has one, is inthe trump suit. Unfortunately, sharp declarers are also aware ofthese inferences as well as the ones coming up.
Another lead inference: say dummy has trump support with expect-ed side-suit length, yet partner leads a trump. The inference is thatpartner is strong in the side suit or else partner would not be play-ing a passive defense. If partner leads dummy's bid and rebid suit,the inference is that partner has a singleton, otherwise the lead istoo dangerous.
At notrump with no suits having been bid, partner leads the ♠2,fourth best, indicating a four-card suit. Early in the play partnerturns up with a singleton diamond. The inference is that partner'soriginal distribution was 4-4-1-4. Why? Because with a side five-card suit, partner would have probably led that suit.
When partner leads from shortness at notrump, the inference isthat partner's long suit(s) has been bid.
Partner might well lead a strong
four-card suit (KQJx, say) in pref-
erence to a broken five-card suit,
but when he leads a low card, he
has no honor sequence in the
suit.
CHAPTER TWO ♦ LEARNING TO THINK ♦ 39
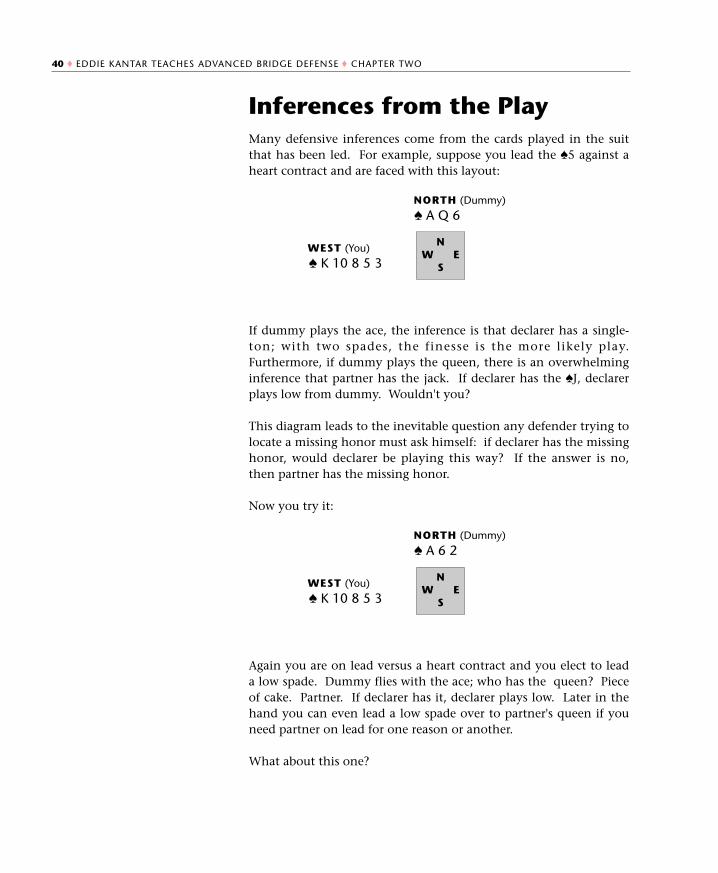
Inferences from the Play Many defensive inferences come from the cards played in the suitthat has been led. For example, suppose you lead the ♠5 against aheart contract and are faced with this layout:
If dummy plays the ace, the inference is that declarer has a single-ton; with two spades, the finesse is the more likely play.Furthermore, if dummy plays the queen, there is an overwhelminginference that partner has the jack. If declarer has the ♠J, declarerplays low from dummy. Wouldn't you?
This diagram leads to the inevitable question any defender trying tolocate a missing honor must ask himself: if declarer has the missinghonor, would declarer be playing this way? If the answer is no,then partner has the missing honor.
Now you try it:
Again you are on lead versus a heart contract and you elect to leada low spade. Dummy flies with the ace; who has the queen? Pieceof cake. Partner. If declarer has it, declarer plays low. Later in thehand you can even lead a low spade over to partner's queen if youneed partner on lead for one reason or another.
What about this one?
40 ♦ EDDIE KANTAR TEACHES ADVANCED BRIDGE DEFENSE ♦ CHAPTER TWO
NORTH (Dummy)
♠ A Q 6
WEST (You)
♠ K 10 8 5 3
NW E
S
NORTH (Dummy)
♠ A 6 2
WEST (You)
♠ K 10 8 5 3
NW E
S
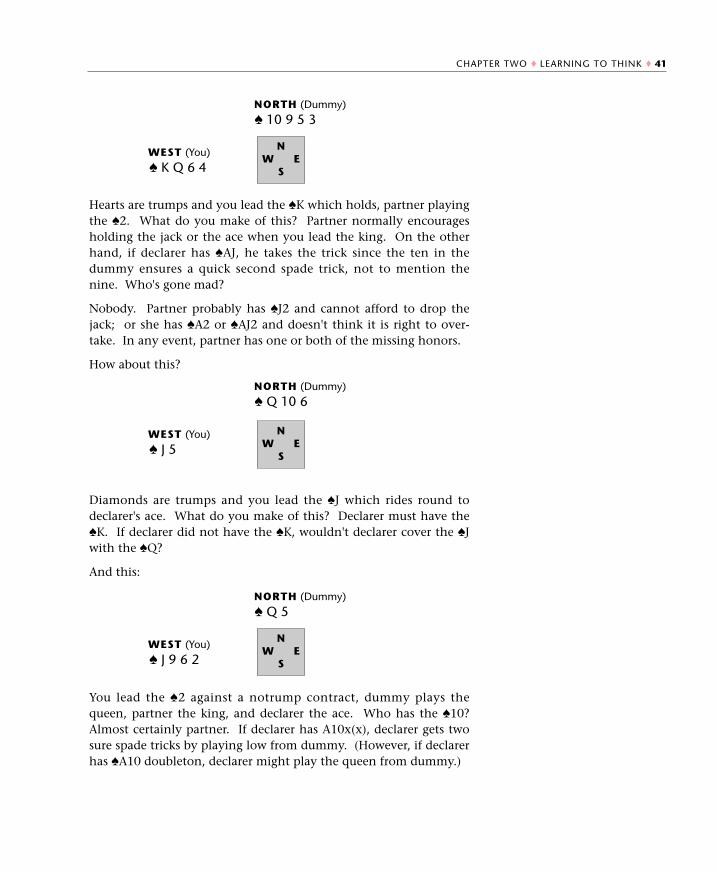
Hearts are trumps and you lead the ♠K which holds, partner playingthe ♠2. What do you make of this? Partner normally encouragesholding the jack or the ace when you lead the king. On the otherhand, if declarer has ♠AJ, he takes the trick since the ten in thedummy ensures a quick second spade trick, not to mention thenine. Who's gone mad?
Nobody. Partner probably has ♠J2 and cannot afford to drop thejack; or she has ♠A2 or ♠AJ2 and doesn't think it is right to over-take. In any event, partner has one or both of the missing honors.
How about this?
Diamonds are trumps and you lead the ♠J which rides round todeclarer's ace. What do you make of this? Declarer must have the♠K. If declarer did not have the ♠K, wouldn't declarer cover the ♠Jwith the ♠Q?
And this:
You lead the ♠2 against a notrump contract, dummy plays thequeen, partner the king, and declarer the ace. Who has the ♠10?Almost certainly partner. If declarer has A10x(x), declarer gets twosure spade tricks by playing low from dummy. (However, if declarerhas ♠A10 doubleton, declarer might play the queen from dummy.)
CHAPTER TWO ♦ LEARNING TO THINK ♦ 41
NORTH (Dummy)
♠ 10 9 5 3
WEST (You)
♠ K Q 6 4
NW E
S
NORTH (Dummy)
♠ Q 10 6
WEST (You)
♠ J 5N
W ES
NORTH (Dummy)
♠ Q 5
WEST (You)
♠ J 9 6 2
NW E
S
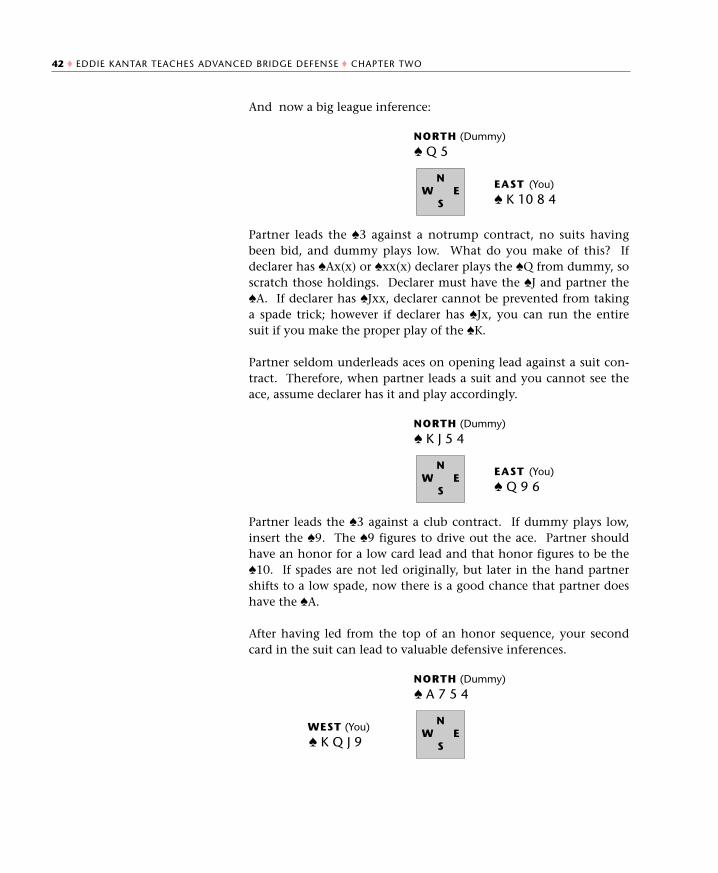
And now a big league inference:
Partner leads the ♠3 against a notrump contract, no suits havingbeen bid, and dummy plays low. What do you make of this? Ifdeclarer has ♠Ax(x) or ♠xx(x) declarer plays the ♠Q from dummy, soscratch those holdings. Declarer must have the ♠J and partner the♠A. If declarer has ♠Jxx, declarer cannot be prevented from takinga spade trick; however if declarer has ♠Jx, you can run the entiresuit if you make the proper play of the ♠K.
Partner seldom underleads aces on opening lead against a suit con-tract. Therefore, when partner leads a suit and you cannot see theace, assume declarer has it and play accordingly.
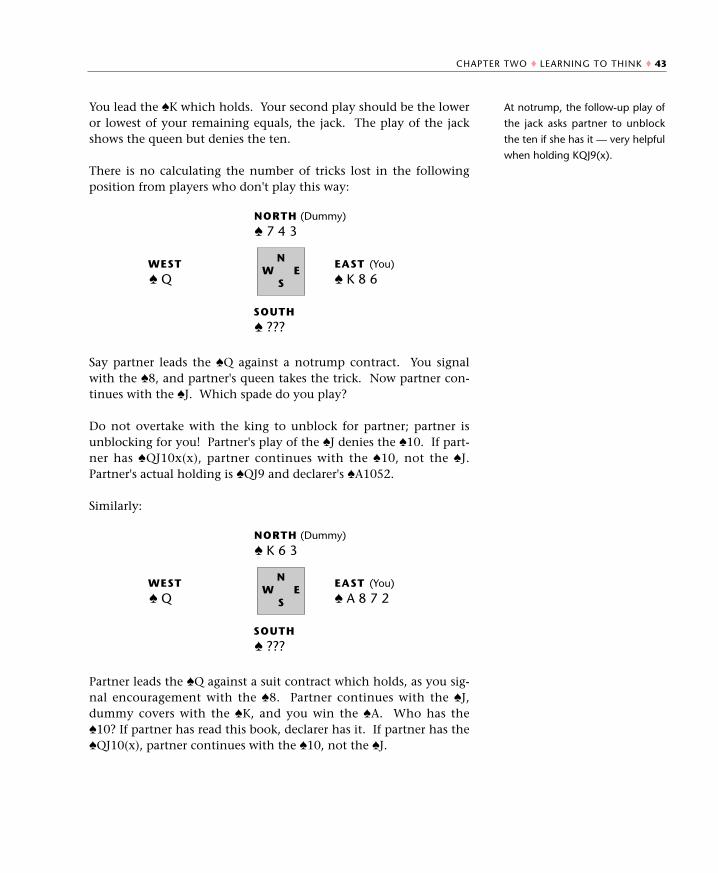
Partner leads the ♠3 against a club contract. If dummy plays low,insert the ♠9. The ♠9 figures to drive out the ace. Partner shouldhave an honor for a low card lead and that honor figures to be the♠10. If spades are not led originally, but later in the hand partnershifts to a low spade, now there is a good chance that partner doeshave the ♠A.
After having led from the top of an honor sequence, your secondcard in the suit can lead to valuable defensive inferences.
42 ♦ EDDIE KANTAR TEACHES ADVANCED BRIDGE DEFENSE ♦ CHAPTER TWO
NORTH (Dummy)
♠ A 7 5 4
WEST (You)
♠ K Q J 9
NW E
S
NORTH (Dummy)
♠ Q 5
EAST (You)
♠ K 10 8 4
NW E
S
NORTH (Dummy)
♠ K J 5 4
EAST (You)
♠ Q 9 6
NW E
S
You lead the ♠K which holds. Your second play should be the loweror lowest of your remaining equals, the jack. The play of the jackshows the queen but denies the ten.
There is no calculating the number of tricks lost in the followingposition from players who don't play this way:
Say partner leads the ♠Q against a notrump contract. You signalwith the ♠8, and partner's queen takes the trick. Now partner con-tinues with the ♠J. Which spade do you play?
Do not overtake with the king to unblock for partner; partner isunblocking for you! Partner's play of the ♠J denies the ♠10. If part-ner has ♠QJ10x(x), partner continues with the ♠10, not the ♠J.Partner's actual holding is ♠QJ9 and declarer's ♠A1052.
Similarly:
Partner leads the ♠Q against a suit contract which holds, as you sig-nal encouragement with the ♠8. Partner continues with the ♠J,dummy covers with the ♠K, and you win the ♠A. Who has the♠10? If partner has read this book, declarer has it. If partner has the♠QJ10(x), partner continues with the ♠10, not the ♠J.
At notrump, the follow-up play of
the jack asks partner to unblock
the ten if she has it — very helpful
when holding KQJ9(x).
CHAPTER TWO ♦ LEARNING TO THINK ♦ 43
NORTH (Dummy)
♠ 7 4 3
WEST EAST (You)
♠ Q ♠ K 8 6
SOUTH
♠ ???
NW E
S
NORTH (Dummy)
♠ K 6 3
WEST EAST (You)
♠ Q ♠ A 8 7 2
SOUTH
♠ ???
NW E
S
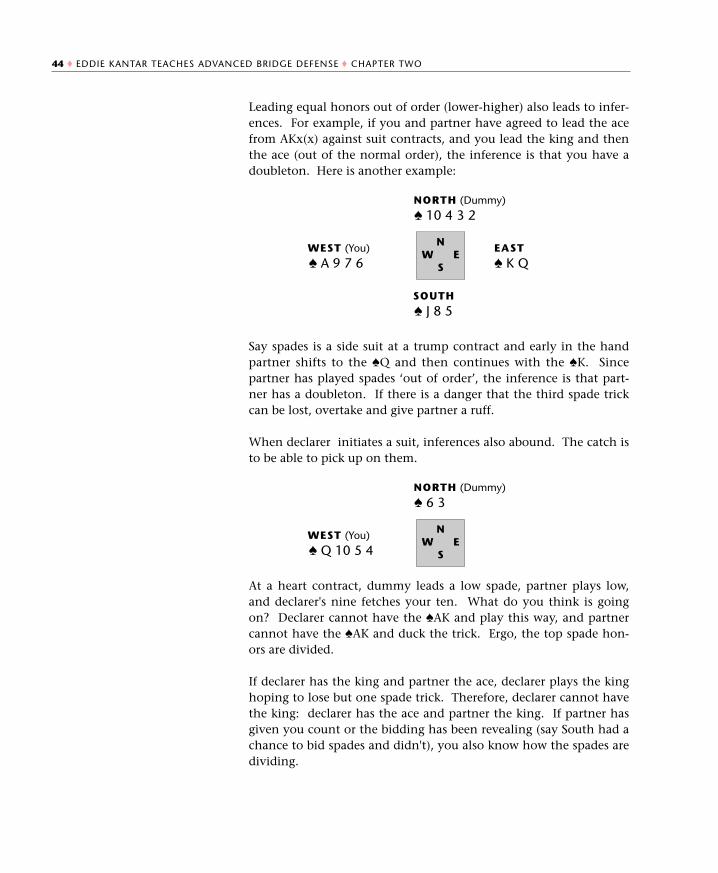
Leading equal honors out of order (lower-higher) also leads to infer-ences. For example, if you and partner have agreed to lead the acefrom AKx(x) against suit contracts, and you lead the king and thenthe ace (out of the normal order), the inference is that you have adoubleton. Here is another example:
Say spades is a side suit at a trump contract and early in the handpartner shifts to the ♠Q and then continues with the ♠K. Sincepartner has played spades ‘out of order’, the inference is that part-ner has a doubleton. If there is a danger that the third spade trickcan be lost, overtake and give partner a ruff.
When declarer initiates a suit, inferences also abound. The catch isto be able to pick up on them.
At a heart contract, dummy leads a low spade, partner plays low,and declarer's nine fetches your ten. What do you think is goingon? Declarer cannot have the ♠AK and play this way, and partnercannot have the ♠AK and duck the trick. Ergo, the top spade hon-ors are divided.
If declarer has the king and partner the ace, declarer plays the kinghoping to lose but one spade trick. Therefore, declarer cannot havethe king: declarer has the ace and partner the king. If partner hasgiven you count or the bidding has been revealing (say South had achance to bid spades and didn't), you also know how the spades aredividing.
44 ♦ EDDIE KANTAR TEACHES ADVANCED BRIDGE DEFENSE ♦ CHAPTER TWO
NORTH (Dummy)
♠ 10 4 3 2
WEST (You) EAST
♠ A 9 7 6 ♠ K Q
SOUTH
♠ J 8 5
NW E
S
NORTH (Dummy)
♠ 6 3
WEST (You)
♠ Q 10 5 4
NW E
S
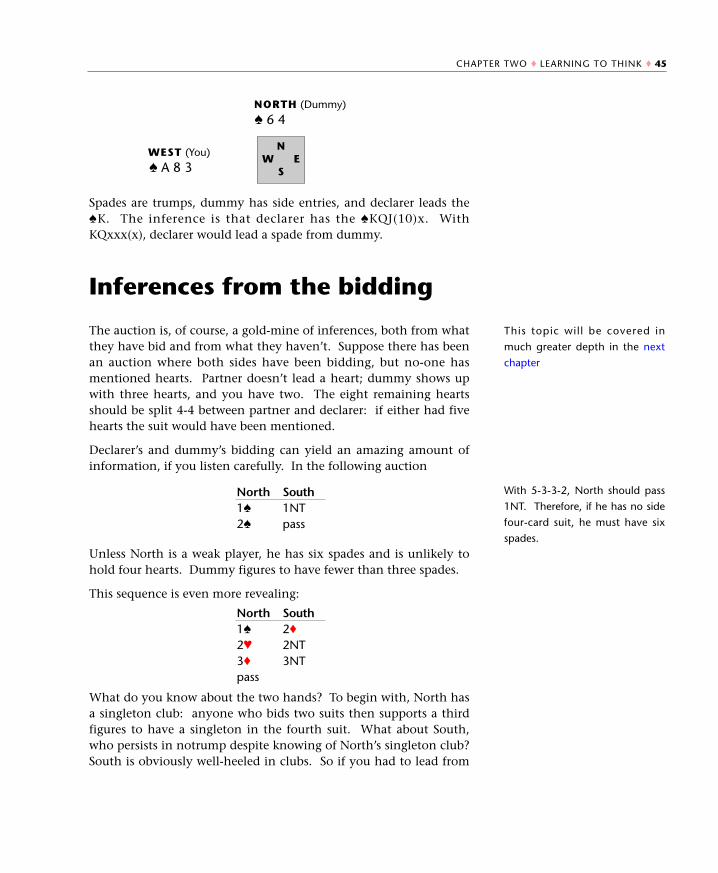
Spades are trumps, dummy has side entries, and declarer leads the♠K. The inference is that declarer has the ♠KQJ(10)x. WithKQxxx(x), declarer would lead a spade from dummy.
Inferences from the bidding
The auction is, of course, a gold-mine of inferences, both from whatthey have bid and from what they haven’t. Suppose there has beenan auction where both sides have been bidding, but no-one hasmentioned hearts. Partner doesn’t lead a heart; dummy shows upwith three hearts, and you have two. The eight remaining heartsshould be split 4-4 between partner and declarer: if either had fivehearts the suit would have been mentioned.
Declarer’s and dummy’s bidding can yield an amazing amount ofinformation, if you listen carefully. In the following auction
Unless North is a weak player, he has six spades and is unlikely tohold four hearts. Dummy figures to have fewer than three spades.
This sequence is even more revealing:
What do you know about the two hands? To begin with, North hasa singleton club: anyone who bids two suits then supports a thirdfigures to have a singleton in the fourth suit. What about South,who persists in notrump despite knowing of North’s singleton club?South is obviously well-heeled in clubs. So if you had to lead from
This topic wil l be covered in
much greater depth in the next
chapter
With 5-3-3-2, North should pass
1NT. Therefore, if he has no side
four-card suit, he must have six
spades.
CHAPTER TWO ♦ LEARNING TO THINK ♦ 45
NORTH (Dummy)
♠ 6 4
WEST (You)
♠ A 8 3
NW E
S
North1♠
2♥
3♦
pass
South2♦
2NT3NT
North1♠
2♠
South1NTpass
this hand
♠ Q42 ♥ J5 ♦ A742 ♣ J542
which card would you pick?
Many experts would opt for the ♥J, a suit where partner is markedwith four or five cards. If the opponents had as many as eighthearts between them, hearts would be trumps. They figure to havesix or seven hearts, meaning that partner has four or five hearts. Inaddition, your inferior club spots plus South's insistence onnotrump facing a known singleton club argue for another lead. Thebidding also tells you that partner likely has a singleton diamond.A two-level response is generally made on a five-card suit and Northsurely has three diamonds. Although partner is likely to have fourspades, spades is dummy's long suit and your spade holding alsoargues against that lead.
Sometimes you can draw an inference about partner’s hand fromthe opponents’ bidding, and this can lead to a spectacularly success-ful defense. Suppose you have ♠A5 ♥6 ♦10963 ♣QJ10652 and theauction goes:
What would you lead? The bidding tells you that partner has onediamond at most (with a diamond void partner doubles 6♠ askingfor an unusual lead). Holding the ace of trumps you can envisiongiving partner a second-round diamond ruff. What about your sin-gleton heart? Probably the worst lead in your hand. A singletonlead against a slam contract works out great if partner has the ace ofthe singleton suit or the ace of trumps. But you have the ace oftrumps and partner can't have the ♥A — the opponents wouldn't bein a slam off two aces after a Blackwood sequence! What about the♣Q? That would be a reasonable choice if the diamond ruff possi-bility wasn't so compelling; lead a diamond.
See Chapter 8 for a full discussion
of lead-directing doubles.
46 ♦ EDDIE KANTAR TEACHES ADVANCED BRIDGE DEFENSE ♦ CHAPTER TWO
North1♠
3♦
4♦
5♥
pass
South2♦
3♠
4NT6♠
Distributional inferences oncethe dummy comes down
Once dummy tables, you can often work out the declarer's distribu-tion by adding the number of cards dummy has in a suit to thenumber of cards you have in that suit and then figuring out fromthe bidding the distribution of the unseen hands in the suit. Thislittle gimmick works particularly well in unbid majors.
Say partner, East, opens 1♦, South overcalls 2♣ and that ends thebidding. You lead a diamond and dummy has a doubleton heartwhile you have three hearts. There are eight hearts unaccountedfor. If either partner or declarer had a five-card heart suit, the suitwould have been mentioned. The conclusion is that hearts are 4-4.
Supported major suits may lead to simple inferences.
Play responder for four spades. If responder had more than fourspades, spades would be trumps. Skipping over major suits to rebidnotrump also leads to distributional inferences:
The inference is that opener does not have four spades.
To summarize: One reason bridge experts are experts is that theyhave the knack of making inferences quickly from the bidding, thelead, partner's defense, and the way declarer is attacking the hand.Of course, having defended thousands upon thousands of handsdoesn't hurt either. The point is that you, too, can make many ofthese inferences; those that have been touched upon in this chapterplus many others you will be able to work out on your own. Justdon't go through too many red lights!
Some pairs (especially those play-
ing a weak notrump) do not deny
spades in this sequence. If in
doubt, ask your opponents.
CHAPTER TWO ♦ LEARNING TO THINK ♦ 47
Opener1♣
2♠
pass
Responder1♠
3NT
Opener1♣
1NT
Responder1♥
pass
Practice Hands
You lead the ♥Q, and South can do nothing except run off all hiswinners and hope someone unguards clubs. You are too shrewd forthis, however: you know that if declarer had a third heart, he wouldhave ruffed a heart in dummy after drawing trumps. So you haveno problem throwing away all your hearts to keep the guarded ♣10!
The bidding suggests that dummy has a strong red two-suiter, and apossible defense is to lead a low spade hoping partner has the kingand can lead a club through declarer’s envisioned king. Don’t looknow, but declarer is shaking his head in disbelief.
Opening lead: ♥Q
Your aggressive bidding has
pushed the opponents to the five-
level, but where are your defen-
sive tricks coming from? Surely
you have no more than one
spade trick, and any club losers
declarer happens to have will dis-
appear pretty quickly on
dummy’s diamonds.
48 ♦ EDDIE KANTAR TEACHES ADVANCED BRIDGE DEFENSE ♦ CHAPTER TWO
NORTH-SOUTH VUL. DEALER SOUTH
West
pass
pass
all pass
North
2♦
4♠
East
pass
pass
South
2♣
2♠
7♠
Hand 1 NORTH (Dummy)
♠ 9 7 4 2♥ 6 4♦ Q J♣ 9 8 7 5 3
WEST (You) EAST
♠ 10 5 ♠ 6♥ Q J 10 8 2 ♥ 9 7 5 3♦ 6 4 3 ♦ 10 9 8 7 5 2♣ 10 6 2 ♣ Q J
SOUTH
♠ A K Q J 8 3♥ A K♦ A K ♣ A K 4
NW E
S
NORTH-SOUTH VUL. DEALER EAST
West
1♠
pass
North
2♦
5♥
East
pass
4♠
all pass
South
1♥
pass
Hand 2 NORTH (Dummy)
♠ 7♥ Q 8 3 2♦ A Q J 6 3 2♣ 6 4
WEST (You) EAST
♠ A J 9 6 5 ♠ K 8 4 3 2♥ J 6 ♥ 10 5♦ 9 8 5 ♦ 10 4♣ A Q 3 ♣ J 10 8 2
SOUTH
♠ Q 10♥ A K 9 7 4♦ K 7♣ K 9 7 5
NW E
S
Partner leads the ♦2 and you capture dummy's king with your ace.If declarer had the ♦J, he would surely have played low fromdummy, so your play is to lead a low diamond to put partner in fora spade play. You must project that partner has either a club trickor a trump trick. If so, you need that spade play quickly!
Dummy plays low on partner’s ♠Q. Declarer figures to have 10 or11 minor-suit cards and likely a singleton spade. It seems that, ifyou don’t attack hearts early, declarer will be able to pitch dummy’shearts on good clubs, and then ruff hearts in dummy. It may take alittle courage on your part, but your play is to overtake the ♠Q andswitch to the ♥Q before the mice get at those heart losers.
Opening lead: ♦2
Yes, declarer should have played
low from dummy at trick one.
Nevertheless, you must be able to
take advantage of errant play.
1) Natural
Opening lead: ♠Q
CHAPTER TWO ♦ LEARNING TO THINK ♦ 49
BOTH VUL. DEALER SOUTH
West
pass
pass
North
2♣
4♥
East
pass
all pass
South
1♥
2♥
Hand 4 NORTH (Dummy)
♠ K 8 7 2♥ 10 7 3♦ 9 8 6 5♣ K 5
WEST EAST (You)
♠ Q 4 ♠ A J 10 9 6 3♥ A 9 8 6 5 ♥ Q J 4♦ 4 3 ♦ 7 2♣ 8 7 3 2 ♣ 9 4
SOUTH
♠ 5♥ K 2♦ A K Q J 10♣ A Q J 10 6
NW E
S
NORTH-SOUTH VUL. DEALER SOUTH
West
pass
pass
all pass
North
1♠
4♦
East
2♠1
pass
South
1♦
4♣
5♦
Hand 3 NORTH (Dummy)
♠ A Q♥ 10 8 7♦ K 8♣ K J 10 9 5 2
WEST EAST (You)
♠ 10 8 7 6 2 ♠ K 9 5♥ 6 4 ♥ 9 3♦ J 9 3 2 ♦ A Q 10 5♣ A 3 ♣ 8 7 6 4
SOUTH
♠ J 4 3♥ A K Q J 5 2♦ 7 6 4♣ Q
NW E
S

Test Yourself1)
Against 4♥, you lead the ♠K. Dummy plays low, partner the ♠4,and declarer the ♠5. Who has the ♠A and why?
2)
Diamonds are trumps, and in the middle of the hand, declarer playsthe ♠K from dummy. Who has the ♠Q, and why?
3)
You lead the ♠4 against notrump, and the trick continues jack,queen, king. Who has the ♠9, and why?
4)
You lead the ♠3, dummy plays low, partner plays the ♠A and declar-er the ♠4. Who has the ♠J, and why?
Solution on page 53
Solution on page 53
Solution on page 53
Solution on page 53
50 ♦ EDDIE KANTAR TEACHES ADVANCED BRIDGE DEFENSE ♦ CHAPTER TWO
NORTH (Dummy)
♠ J 6 3
WEST (You) EAST
♠ K Q 10 2 ♠ 4
SOUTH
♠ 5
NW E
S
NORTH (Dummy)
♠ K J 6
WEST (You)
♠ A 10 5 3
NW E
S
NORTH (Dummy)
♠ A J 3
WEST (You) EAST
♠ 10 7 6 4 ♠ Q
SOUTH
♠ K
NW E
S
NORTH (Dummy)
♠ Q 10 5 2
WEST (You) EAST
♠ K 9 3 ♠ A
SOUTH
♠ 4
NW E
S
5)
Partner leads the ♠Q which holds and continues with the ♠J todeclarer’s ace. Who has the ♠10, and why?
6)
You lead the ♠K against notrump; it holds the trick, partner playingthe ♠3 and declarer the ♠5. Who has the ♠A, and why?
7)
Defending against 4♥, you lead the ♠5. Dummy wins the ♠K, part-ner playing the ♠4 and declarer the ♠5. Who has the ♠J and why?
8)
South has opened 1NT, and becomes declarer in 4♥. Partner leadsthe ♠4, and declarer plays the ♠K. Who has the ♠Q, and why?
Solution on page 53
Solution on page 53
Solution on page 53
Solution on page 53
CHAPTER TWO ♦ LEARNING TO THINK ♦ 51
NORTH (Dummy)
♠ K J
WEST EAST (You)
♠ 4 ♠ A 9 3
NW E
S
NORTH (Dummy)
♠ K 3
WEST (You) EAST
♠ Q 9 8 5 2 ♠ 4
SOUTH
♠ 6
NW E
S
NORTH (Dummy)
♠ 10 9 8 4
WEST (You) EAST
♠ K Q J 2 ♠ 3
SOUTH
♠ 5
NW E
S
NORTH (Dummy)
♠ A 8 4
WEST EAST (You)
♠ Q ♠ K 7 3 2
SOUTH
♠ 5
NW E
S
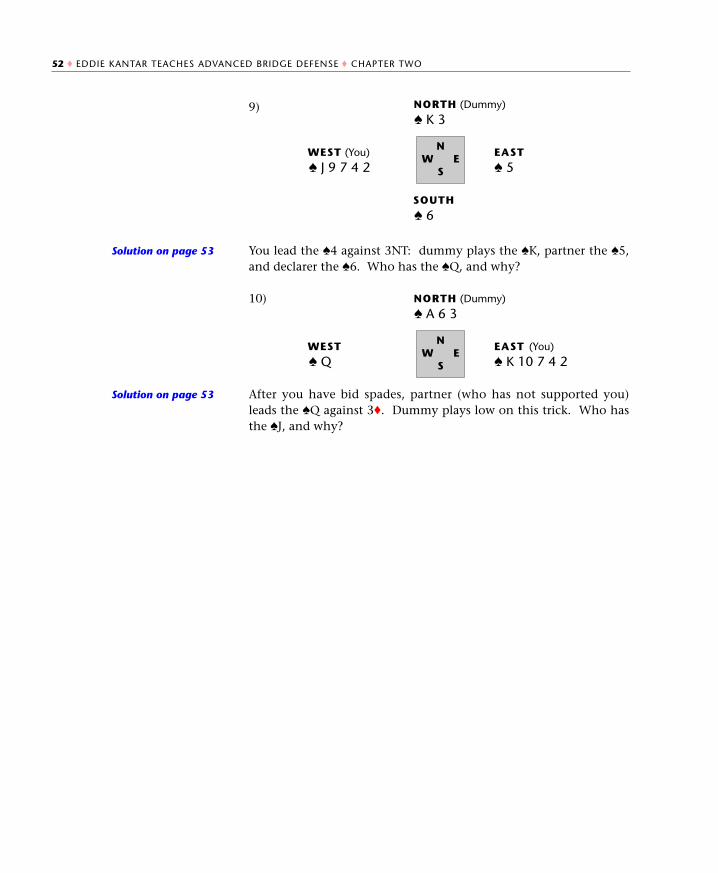
9)
You lead the ♠4 against 3NT: dummy plays the ♠K, partner the ♠5,and declarer the ♠6. Who has the ♠Q, and why?
10)
After you have bid spades, partner (who has not supported you)leads the ♠Q against 3♦. Dummy plays low on this trick. Who hasthe ♠J, and why?
Solution on page 53
Solution on page 53
52 ♦ EDDIE KANTAR TEACHES ADVANCED BRIDGE DEFENSE ♦ CHAPTER TWO
NORTH (Dummy)
♠ K 3
WEST (You) EAST
♠ J 9 7 4 2 ♠ 5
SOUTH
♠ 6
NW E
S
NORTH (Dummy)
♠ A 6 3
WEST EAST (You)
♠ Q ♠ K 10 7 4 2
NW E
S
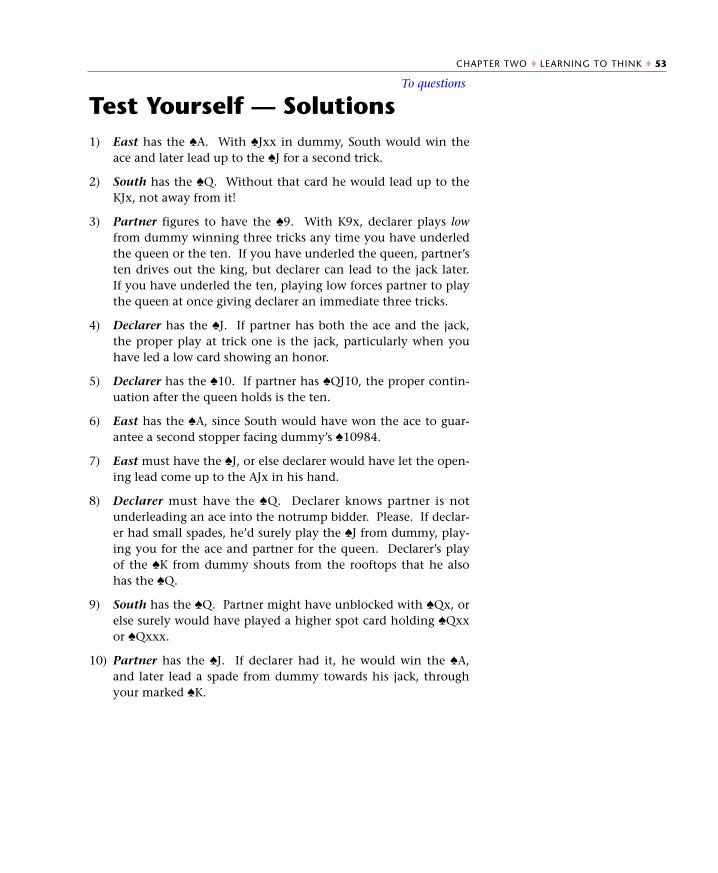
Test Yourself — Solutions1) East has the ♠A. With ♠Jxx in dummy, South would win the
ace and later lead up to the ♠J for a second trick.
2) South has the ♠Q. Without that card he would lead up to theKJx, not away from it!
3) Partner figures to have the ♠9. With K9x, declarer plays lowfrom dummy winning three tricks any time you have underledthe queen or the ten. If you have underled the queen, partner’sten drives out the king, but declarer can lead to the jack later.If you have underled the ten, playing low forces partner to playthe queen at once giving declarer an immediate three tricks.
4) Declarer has the ♠J. If partner has both the ace and the jack,the proper play at trick one is the jack, particularly when youhave led a low card showing an honor.
5) Declarer has the ♠10. If partner has ♠QJ10, the proper contin-uation after the queen holds is the ten.
6) East has the ♠A, since South would have won the ace to guar-antee a second stopper facing dummy’s ♠10984.
7) East must have the ♠J, or else declarer would have let the open-ing lead come up to the AJx in his hand.
8) Declarer must have the ♠Q. Declarer knows partner is notunderleading an ace into the notrump bidder. Please. If declar-er had small spades, he’d surely play the ♠J from dummy, play-ing you for the ace and partner for the queen. Declarer’s playof the ♠K from dummy shouts from the rooftops that he alsohas the ♠Q.
9) South has the ♠Q. Partner might have unblocked with ♠Qx, orelse surely would have played a higher spot card holding ♠Qxxor ♠Qxxx.
10) Partner has the ♠J. If declarer had it, he would win the ♠A,and later lead a spade from dummy towards his jack, throughyour marked ♠K.
CHAPTER TWO ♦ LEARNING TO THINK ♦ 53
To questions
54 ♦ EDDIE KANTAR TEACHES ADVANCED BRIDGE DEFENSE ♦ CHAPTER TWO
Key ideas from Chapter 2
• Inferences can be drawn by alert defenders from the bid-ding, the opening lead, and the way suits are played duringthe hand.
• Inferences allow you to build a picture of the distribution,place missing high cards, and form a strategy for defense.
• Negative inferences can be as revealing as positive ones.• Declarer has similar inferences available at all stages of the
hand.• Expert players ‘guess right’ more often than not because
they are aware of all these subtle inferences and are verygood at acting upon them.
WHATYOU’RE GOING
TO LEARN IN THIS
CHAPTER:• How to draw inferences from
the opponents’ bidding abouttheir trump length and overalldistribution
• How to use information frompartner’s opening lead to helpyou figure out the distribution
• How experts use count signalsmore effectively
Major-suit openings 56Notrump openings 62Minor-suit openings 64Responder is declarer 67Partner bids 70Someone preempts 71The opening lead 73The count signal 76The wrap-up 78Practice Hands 79Test Yourself 82Solutions 85Key ideas 88
The opponents have bought the contract and you and partner areon defense. Declarer has an edge because once that dummyappears, she can see her partner's hand and make big-time plans.Your job is to try to thwart those plans (with partner's help, ofcourse). But unless you do some counting (the dreaded word), eventhe best partner in the world can't save you from yourself.
There are three things you are supposed to count on defense duringthe play of the hand: (1) declarer's distribution, what this chapter isall about; (2) declarer's potential tricks and (3) declarer's HCP, whatthe next two chapters are all about.
The quicker you get a read on declarer's distribution, the easier it isto defend a hand without making mistakes. Players who don'tcount make many more defensive errors than players who do.That's a given.
3Counting DistributionNot everything that can be counted counts, and noteverything that counts can be counted.
ALBERT EINSTEIN
♣ 55
It all boils down to this: declarer has thirteen cards just like you do.Those cards have to be divided into some distributional pattern justas yours are. Your job is to try to figure out what that pattern isbefore the hand is over. But how do you do it?
Counting is not nearly as difficult as some make it out to be. Thereare times when declarer's bidding is so revealing that you will beable to zero in on declarer's distribution before the opening lead ismade!
Major-suit openings
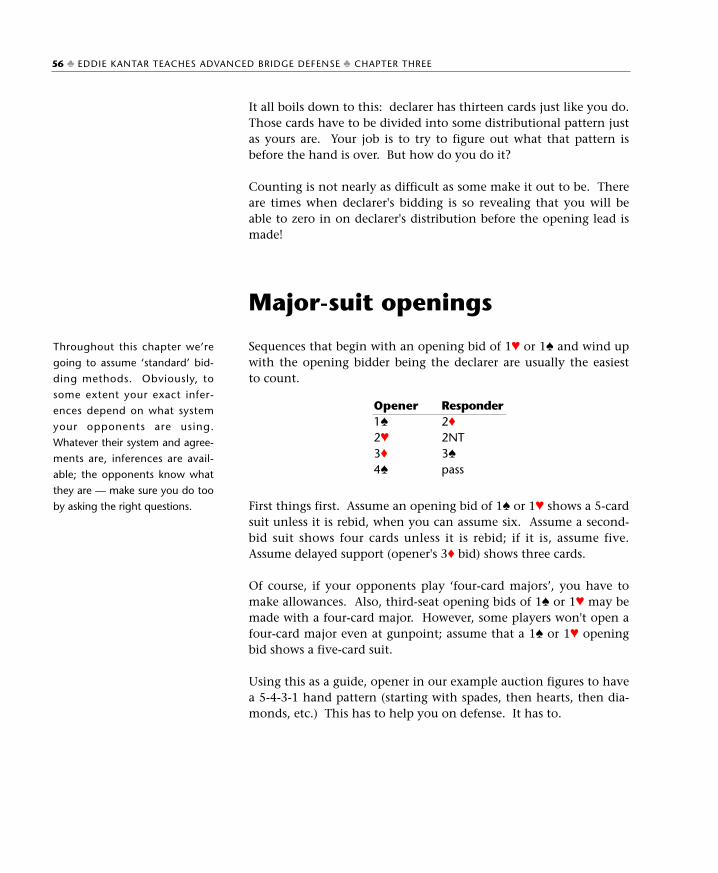
Sequences that begin with an opening bid of 1♥ or 1♠ and wind upwith the opening bidder being the declarer are usually the easiestto count.
First things first. Assume an opening bid of 1♠ or 1♥ shows a 5-cardsuit unless it is rebid, when you can assume six. Assume a second-bid suit shows four cards unless it is rebid; if it is, assume five.Assume delayed support (opener's 3♦ bid) shows three cards.
Of course, if your opponents play ‘four-card majors’, you have tomake allowances. Also, third-seat opening bids of 1♠ or 1♥ may bemade with a four-card major. However, some players won't open afour-card major even at gunpoint; assume that a 1♠ or 1♥ openingbid shows a five-card suit.
Using this as a guide, opener in our example auction figures to havea 5-4-3-1 hand pattern (starting with spades, then hearts, then dia-monds, etc.) This has to help you on defense. It has to.
Throughout this chapter we’re
going to assume ‘standard’ bid-
ding methods. Obviously, to
some extent your exact infer-
ences depend on what system
your opponents are using.
Whatever their system and agree-
ments are, inferences are avail-
able; the opponents know what
they are — make sure you do too
by asking the right questions.
56 ♣ EDDIE KANTAR TEACHES ADVANCED BRIDGE DEFENSE ♣ CHAPTER THREE
Opener1♠
2♥
3♦
4♠
Responder2♦
2NT3♠
pass
When you count declarer's hand, you only need a count on threesuits, not four. Once you know three, you know all four.
In the example sequence, declarer bid three suits, so counting herhand was a piece of cake. Sometimes declarer bids only two suits.
Assume opener has five spades and four diamonds. Say the open-ing lead is the ♣A followed by the ♣K which declarer ruffs. Younow have a count on the third suit, clubs, and declarer's likely dis-tribution is 5-3-4-1. ‘Can't declarer have five diamonds?’ you mayask. Of course, but until you learn otherwise, assume four.
Revising your count
Maybe the diamonds in the above auction are divided like this:
South is declarer in 3♦, and plays the ♦K and a diamond to the ace,felling your jack and partner's queen simultaneously. Clearly eachof you have played your last diamond so declarer must have five,not four diamonds. Time to revise your estimate of declarer's distri-bution. The revised count is 5-2-5-1. You must remain ‘count flex-ible’ in the face of new evidence.
The fall of the cards in a side suit may also offer a chance for a‘count revision’.
CHAPTER THREE ♣ COUNTING DISTRIBUTION ♣ 57
Opener1♠
2♦
pass
Responder1NT3♦
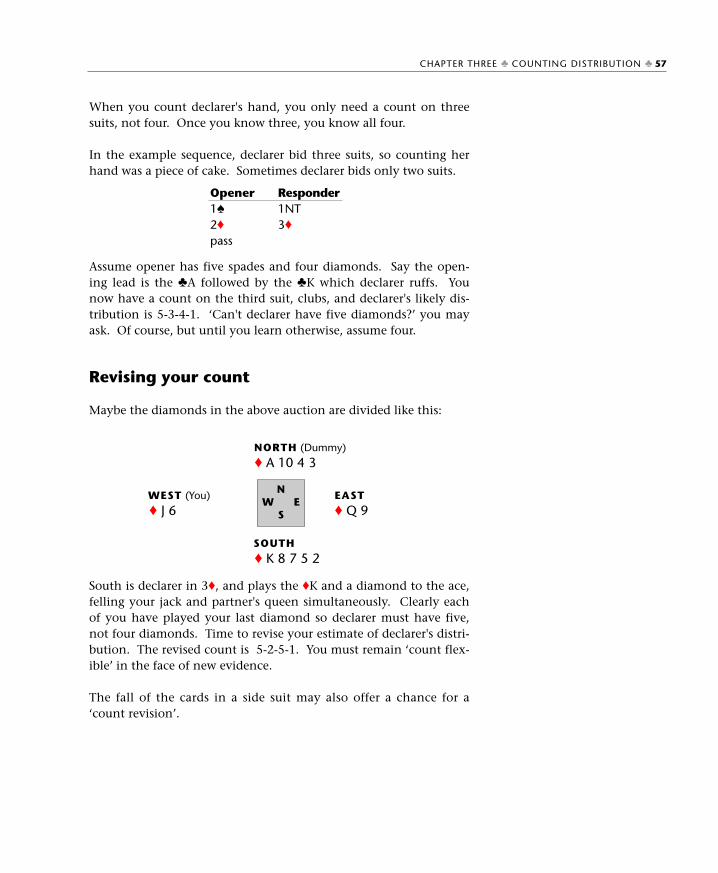
NORTH (Dummy)
♦ A 10 4 3
WEST (You) EAST
♦ J 6 ♦ Q 9
SOUTH
♦ K 8 7 5 2
NW E
S
You go into battle figuring declarer has 5-5 in the majors. Say part-ner leads the ♦A which declarer ruffs. Your provisional ‘count esti-mate’ should be 5-5-0-3. Say declarer continues by playing the aceand a low spade ruffing in dummy, partner playing the ♠K on thesecond lead. Partner's play of the ♠K is supposed to deny the queen(defenders follow suit with the lower of equals). Since partner hastwo spades, declarer has six. The new revised count reads 6-5-0-2.
This is declarer's hand:
♠ AQ10763 ♥ A8542 ♦ — ♣ 73.
Say declarer, instead of cashing the ♠A, makes the stronger play attrick two of a club to the jack, partner playing the ♣2, a count sig-nal. If partner has three clubs, declarer has two clubs. Given thisinformation, again you have to revise your count and should playdeclarer for 6-5 or possibly 5-6 in the majors. Opener, with sixhearts and five spades, may not have been strong enough to open1♥ and reverse into spades.
On a bad day declarer only bids one suit, but even that suit may be‘count revealing’.
You start by assuming declarer has six spades. Your job is to zero inon two other suits. Help may be just around the corner. Say thedefense begins with three high hearts, and declarer ruffs the thirdround. Good. That's two suits you know about. Declarer has sixspades and two hearts. Now declarer attacks clubs. You and part-ner will probably be giving each other a count signal in clubs,something coming up again later in this chapter. Say you can tell
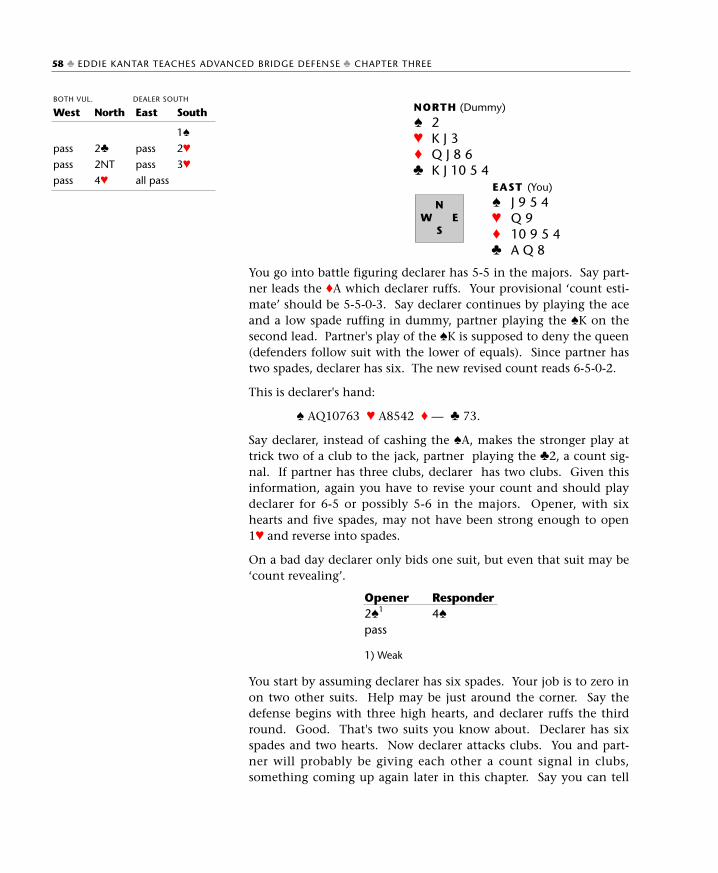
58 ♣ EDDIE KANTAR TEACHES ADVANCED BRIDGE DEFENSE ♣ CHAPTER THREE
Opener2♠1
pass
Responder4♠
1) Weak
NORTH (Dummy)
♠ 2♥ K J 3♦ Q J 8 6♣ K J 10 5 4
EAST (You)
♠ J 9 5 4♥ Q 9♦ 10 9 5 4♣ A Q 8
NW E
S
BOTH VUL. DEALER SOUTH
West
pass
pass
pass
North
2♣
2NT
4♥
East
pass
pass
all pass
South
1♠
2♥
3♥
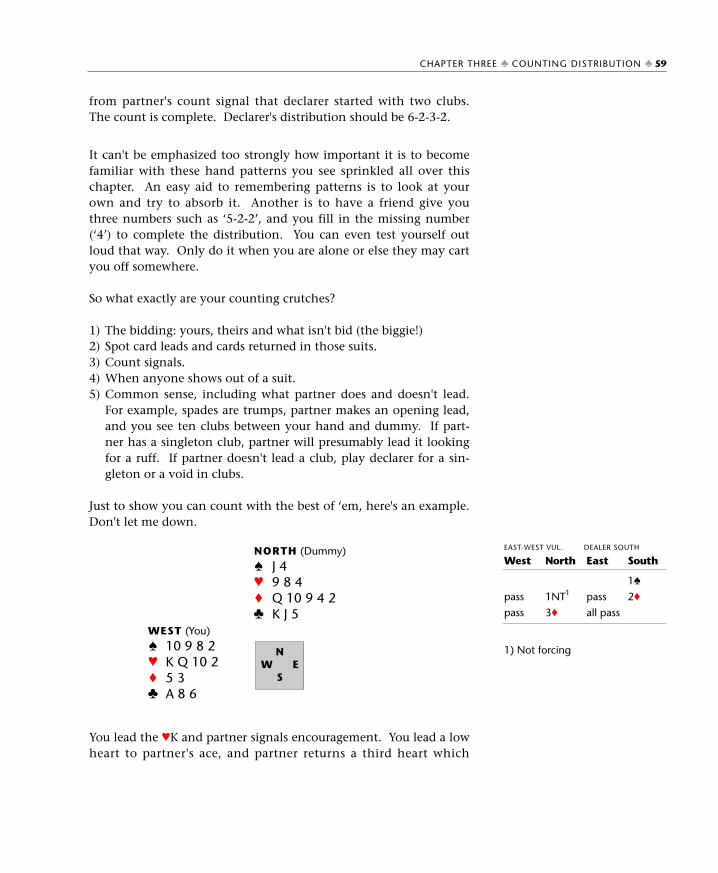
from partner's count signal that declarer started with two clubs.The count is complete. Declarer's distribution should be 6-2-3-2.
It can't be emphasized too strongly how important it is to becomefamiliar with these hand patterns you see sprinkled all over thischapter. An easy aid to remembering patterns is to look at yourown and try to absorb it. Another is to have a friend give youthree numbers such as ‘5-2-2’, and you fill in the missing number(‘4’) to complete the distribution. You can even test yourself outloud that way. Only do it when you are alone or else they may cartyou off somewhere.
So what exactly are your counting crutches?
1) The bidding: yours, theirs and what isn't bid (the biggie!)2) Spot card leads and cards returned in those suits. 3) Count signals.4) When anyone shows out of a suit.5) Common sense, including what partner does and doesn't lead.
For example, spades are trumps, partner makes an opening lead,and you see ten clubs between your hand and dummy. If part-ner has a singleton club, partner will presumably lead it lookingfor a ruff. If partner doesn't lead a club, play declarer for a sin-gleton or a void in clubs.
Just to show you can count with the best of ‘em, here's an example.Don't let me down.
You lead the ♥K and partner signals encouragement. You lead a lowheart to partner's ace, and partner returns a third heart which
1) Not forcing
CHAPTER THREE ♣ COUNTING DISTRIBUTION ♣ 59
NORTH (Dummy)
♠ J 4♥ 9 8 4♦ Q 10 9 4 2♣ K J 5
WEST (You)
♠ 10 9 8 2♥ K Q 10 2♦ 5 3♣ A 8 6
NW E
S
EAST-WEST VUL. DEALER SOUTH
West
pass
pass
North
1NT1
3♦
East
pass
all pass
South
1♠
2♦
declarer ruffs. What do you make of declarer's distribution?Declarer should be 5-2-4-2. Consequently, if declarer leads a lowclub, play low and hope declarer misguesses. However, if declarerfollows to a third round of hearts implying that declarer hasa 5-3-4-1 hand pattern, grab your ♣A if declarer leads a club, or ifyou lead the suit, lead the ace. A possible defense in that case is tocash the ♣A and exit with a spade. If declarer started with
♠ AKxxx ♥ xxx ♦ AJxx ♣ x,
declarer will not be able to get to dummy to take the diamondfinesse. If declarer tries to ruff a third round of spades, partneroverruffs.
Now try these sequences and see what you come up with:
Play declarer for six spades and four hearts. Once you get a counton either minor, the puzzle is solved.
Again opener shows six spades and four hearts. The differencebetween this sequence and the last is that bidding a second suit andthen returning to the first shows a stronger 6-4 hand.
Opener figures to be 5-5 in the reds with fewer than three spades.With three-card spade support, opener is supposed to show thatsupport sooner or later. Yes, opener might have six hearts and fivediamonds or even five hearts and six diamonds with a hand notstrong enough to reverse (10-13 HCP). Nevertheless, play openerfor the most likely distribution until you learn otherwise.
60 ♣ EDDIE KANTAR TEACHES ADVANCED BRIDGE DEFENSE ♣ CHAPTER THREE
Opener1♠
2♥
3♠
pass
Responder2♣
2NT4♠
Opener1♥
2♦
3♦
Responder1♠
2NTpass
Opener1♠
2♠
3♥
pass
Responder1NT2NT3♠
Opener should have a balanced hand without any singletons.Opener's most likely distribution is some 5-3-3-2 pattern. In fact,once you discover opener's doubleton, you should assume 3-3 inthe two other suits. There is a further inference that declarer's dou-bleton is in hearts. The 2♥ response shows a five-card suit so ifopener has three hearts, he tends to raise. Start by assuming thatopener is 5-2-3-3, keeping ‘revision time’ open.
What other patterns fit this auction? Declarer may be 5-2-4-2 andnot be strong enough to introduce diamonds at the three-level.Opener may even be 5-1-3-4 with a singleton honor in hearts; theopening lead may tell you that declarer started with four clubs.‘Revision time’ has arrived.
What about when declarer jump shifts? Unless opener rebids thesecond suit, assume for the moment that it is a four-card suit.
Opener figures to have 5-4 in the reds with fewer than three spades.Play opener for 1-5-4-3 or 2-5-4-2.
When opener rebids a major the assumption is a six-card suit, butthere are exceptions.
In each of these sequences opener has skipped over three possiblerebids to rebid the original suit. Whenever opener skips over threepossible rebids, assume a six-card suit (whether the suit is a minoror a major). Of course, we are referring to openers who know howto bid, not those that rebid a five-card minor just to show theirpartners that it wasn't a short club or a short diamond!
Be wary of sequences like:
3♣ may have been bid on a
three-card suit to create a game
force. Opener could have:
♠ Ax ♥ AQJxxx ♦ xx ♣ AKx
The more suits the opener skips
over to rebid the original suit,
the more likely it is to be a six-
card suit.
CHAPTER THREE ♣ COUNTING DISTRIBUTION ♣ 61
Opener1♠
2NTpass
Responder2♥
3NT
Opener1♥
3♦
3NT
Responder1♠
3♥
pass
Opener1♥
2♥
Responder1♠
pass
Opener1♠
2♠
Responder1NTpass
Opener1♥
3♣
3♥
pass
Responder1♠
3♦
4♥
When the original response is made in the suit directly beneath theopener's suit in rank, opener may have a second suit and not bestrong enough to introduce it at the next level, which constitutes areverse. The inference of a six-card suit has shrunk from nearly100% to something like 60%.
Jump rebids show six- or seven-card suits; double-jump rebids tendto show seven-card suits, or possibly six-card suits if partner has bidnotrump and indicated a balanced hand.
Either of these jumps can show a six- or seven-card suit, but thejump to 4♥ is more likely to contain a seven-card suit because the1NT response does not show a balanced hand.
Notrump openings
An opening bid of 1NT, 2NT, or 3NT is presumed to show one ofthree possible distributions: any 4-3-3-3, any 4-4-3-2 or some 5-3-3-2 patterns. If opener has a five-card suit, it is more likely that suit isa minor. Some players won't open 1NT with a five-card major, oth-ers will, while others will pick and choose. This is something youhave to ask about. Knowing your opponents’ bidding tendencies isimportant when trying to count a hand; very important.
Your job is to figure out which of these three distributions declarerhas as quickly as possible. The bidding, especially when Staymanenters the picture, simplifies the problem. Here's an easy one:
Players are more likely to open
1NT with a five-card major at
matchpoints, where playing in
notrump can result in a much
higher score. On the other hand,
it is relatively common for players
to open 2NT with a five-card
major.
62 ♣ EDDIE KANTAR TEACHES ADVANCED BRIDGE DEFENSE ♣ CHAPTER THREE
South1NT2♥
4♠
North2♣
3NTpass
Opener1♠
2♠pass
Responder2♥
4♠
Opener1♥
2♥pass
Responder2♦
4♥
Opener1♥
3♥pass
Responder1♠
4♥
Opener1♥
4♥pass
Responder1NT
South must have four hearts and four spades. Once you discoverhow many clubs or diamonds South has, South's distribution isknown.
Now look at this sequence:
South has four hearts but fewer than four spades. With four spadesSouth bids 4♠ over 3NT because North has promised four spades.
The worst; South can have any of the three distributions. Help maybe on the way, however. Say partner leads the ♦2, showing four;dummy tables with ♦K6, and your diamonds, regrettably, are the♦95. Right off the bat you know declarer has five diamonds andsome 5-3-3-2 pattern. You also know that partner has made anunfortunate lead smack into declarer's five-card suit. What else isnew? Once you discover declarer's doubleton, at least you will havea ‘read’ on the hand — though it may be too late!
Say North's 3♥ bid systemically shows five hearts and four spades.If so, South, who has denied a four-card major, shows two heartsand three spades with his 3NT rebid. Your partner's expectedminor-suit lead may clarify declarer's exact distribution.
Transfer sequences can also lead to distributional inferences.
CHAPTER THREE ♣ COUNTING DISTRIBUTION ♣ 63
South1NT2♥
pass
North2♣
3NT
South1NTpass
North3NT
South2NT3♦
3NT
North3♣
3♥
pass
South1NT2♥
pass
North2♦1
2NT
1) Transfer to hearts
South's pass of 2NT typically denies three hearts, so start by playingSouth for a doubleton heart; not much to go on. However, if Southturns up with five clubs, play South to be 3-2-3-5. If South turns upwith four clubs, South is either 4-2-3-4 or 3-2-4-4.
South loves spades, and the way most people play, the jump showsfour spades.
Minor-suit openings
Clearly it is easier to count declarer's hand after a major-suit open-ing bid because you can assume a five-card suit and usually be right.A minor-suit opening bid can be made with as few as three cards inthe suit, however. It might be a good idea to dismiss some mythsright away. There is a large group out there that thinks every timepartner opens 1♣ or 1♦, it is likely to be a ‘short club’ or a ‘shortdiamond’. Not true.
Let's start with the 1♣ opening bid. Say you pick up
♠ A943 ♥ A754 ♦ KQ2 ♣ 65.
Playing five-card majors, you have no choice but to open 1♦. This,by the way, is the only distribution where you are supposed to open1♦ with a three-card diamond suit. Do you have any idea howoften this happens? Less than 5% of the time! In other words,when partner opens 1♦, chances are partner has four or more dia-monds 95+% of the time. To turn this figure around: whendefending against a declarer who opens 1♦ and turns up with threediamonds, assume a 4-4-3-2 pattern.
What about those who play ‘better minor’ and open 1♦ with
♠ AQ4 ♥ J875 ♦ AQ4 ♣ 987?
Even including this aberration (my feeling), an opening bid of 1♦
with a three-card diamond suit is unlikely.
With three hearts and a minimum
hand, South would convert to
3♥.
Another restricting factor is that
with the same distribution and
more high cards, you would open
1NT.
64 ♣ EDDIE KANTAR TEACHES ADVANCED BRIDGE DEFENSE ♣ CHAPTER THREE
South1NT3♠
pass
North2♥1
4♠
1) Transfer to spades
What about a ‘short club’? How often can you expect a 1♣ openingto be made with exactly three clubs? Less than 15% of the time. Toturn this figure around: if partner opens 1♣ you can expect to findfour or more clubs in partner's hand at least 85% of the time. Ifmore players realized what these numbers were, they would supportminor-suit opening bids more often.
Let's look at sequences that begin with 1♣ or 1♦.
This is an easy one. Opener has skipped over three possible rebids,1♥, 1♠, and 1NT. Opener has at least six clubs and does not figureto have a four-card major.
This sequence brings us to the topic of opener skipping over one ortwo major suits to rebid a minor suit. When this happens, theinference is that the opener does not have four cards in a ‘skipped-over’ major. Once again, nothing is written in stone. Opener mayhave:
♠K4 ♥ 8653 ♦ 2 ♣ AKQ1087
and feel it is more descriptive to rebid 2♣ rather than 1♥ over a 1♦
response.
Several inferences available: (1) opener has skipped over 1♥ to rebid1♠ so opener does not have four hearts; (2) opener has bid two suitsand supported a third. When this happens, assume five cards inthe first suit, four in the second, and three in the third. Play openerfor 4-1-3-5. Notice a ‘short club’ is not even a ballpark thoughtwhen three suits are bid. Many players would be better off if theyhad never heard of a short club or a short diamond when trying towork out declarer’s distribution. The frequency is too low. On thepreceding sequence, opener might have
♠ AK87 ♥ 2 ♦ AJ5 ♣ Q10874.
CHAPTER THREE ♣ COUNTING DISTRIBUTION ♣ 65
Opener1♣
2♣
Responder1♦
pass
Opener1♣
1♠
2♦
Responder1♦
1NTpass
1NT and 2NT rebids are supposed to show balanced hands:
This one is not as easy as it looks. A possible distribution is 3-2-3-5.Opener should not rebid a five-card minor suit in preference torebidding 1NT with a balanced hand. Another possibility is3-2-4-4; however, some players always open 1♦ with 4-4 in theminors, others always open 1♣. You can save yourself muchocounting headaches if you ask your opponents about their agree-ments concerning opening the bidding with 4-4 in the minors.
Continuing with this sequence: has opener denied four spades? Itwould appear so. However, there is an auxiliary problem with anopener who opens a short club with 4-3-3-3 distribution.
♠ Q843 ♥ AJ3 ♦ K104 ♣ QJ5
Is opener better served to rebid 1♠ or 1NT with this distribution?Suffice it to say that many top players rebid 1♠ while many othersrebid 1NT. You should ask whether opener has denied four spadesbefore making your opening lead. Also, you and your partnershould decide how you plan to rebid such hands yourselves.
When opener makes a jump rebid, showing at least a six-card suit,and then bids the suit again, assume a seven-bagger.
Play opener for seven clubs and no spade stopper.
When opener reverses, assume five cards in the first suit and four inthe second, and go from there.
66 ♣ EDDIE KANTAR TEACHES ADVANCED BRIDGE DEFENSE ♣ CHAPTER THREE
Opener1♣
3♣
4♣
pass
Responder1♦
3♥
5♣
Opener1♣
2♥
4♥
Responder1♠
3♥
pass
Opener1♣
1NTpass
Responder1♥
2NT
Play opener for five clubs and four hearts. Don't even think about ashort club in reversing sequences.
When opener makes a jump rebid of 2NT and responder raises to3NT, you don't know much.
This one is a toughie. Opener can have many possible distributionsincluding some with up to six diamonds! This one requires yourantennae to be up, way up. For starters, opener cannot have a shortdiamond: with 4-4-3-2 distribution, opener raises spades.
However, when opener makes a jump rebid of 2NT and responderbids a second suit, things begin to clear up.
Responder figures to have five spades and four hearts. Openershould have fewer than three spades and cannot have four hearts.Opener’s most likely distributions are 2-3-4-4, 2-3-5-3, 2-2-6-3 and2-3-6-2.
When responderbecomes declarerIn the previous examples opener always wound up being the declar-er. Let's not discriminate. Responder is quite apt to become thedeclarer, particularly if opener supports one of responder’s suits, ifresponder has a long, strong suit, or if responder bids notrump andplays there.
The rules stay in place. If responder bids two suits, assume 5-4; ifresponder rebids the same suit, assume a six-card suit; if the initialresponse is a natural 2NT or 3NT (not 1NT) assume one of the threebalanced-hand distributions.
A jump rebid of 2NT after a
minor-suit opening bid can con-
ceal a six-card suit.
CHAPTER THREE ♣ COUNTING DISTRIBUTION ♣ 67
Opener1♦
2NTpass
Responder1♠
3NT
Opener1♦
2NT3NT
Responder1♠
3♥
pass
The assumption is that responder has six hearts and fewer than fourspades. Had responder jumped to 3♥ over 1♠, the assumptionwould still be a six-card suit. However, had responder leaped to 4♥
over 1♠, not knowing of any heart support, seven hearts is morelikely than six.
Responder has four spades and denies four hearts. With 4-4 in themajors, the normal response is 1♥. What about diamonds? Hasresponder denied four diamonds by skipping over that suit too?No. In the modern game the emphasis is on bidding major suits asquickly as possible before competition, particularly preemptivecompetition, may cause you to ‘lose the suit’. With strong hands,hands approaching opening-bid strength, responder can afford togo slowly and bid 1♦ (especially with strong diamonds) and thenbid the major next, but with weaker hands, the major suit is nor-mally bid first.
This one is also a bit tricky. If opener ‘promises’ four spades withthat raise (as some play), then responder can leap to game with afour-card spade suit. However, if opener can have three spades, asmost play, then the leap to 4♠ shows at least five spades. Ask.
Play responder for 5-5 in the majors.
As usual, you should realize that
not everyone plays this way. Ask!
68 ♣ EDDIE KANTAR TEACHES ADVANCED BRIDGE DEFENSE ♣ CHAPTER THREE
Opener1♣
2♠
pass
Responder1♠
4♠
Opener1♦
2♦
2NT4♥
Responder1♠
2♥
3♥
pass
Opener1♣
1♠
pass
Responder1♥
2♥
Opener1♣
2♠
3♠
Responder1♠
2NTpass
Play responder for five spades and six hearts. With 5-5, regardlessof strength, the first response is in spades, the higher-ranking suit,not hearts.
Responder has exactly four spades and denies four hearts. Openerapparently has three spades. With four spades, opener usuallyreturns to 4♠ on this sequence. However, if opener has promisedfour spades with the raise, opener may pass 3NT.
Distributional inferences change dramatically when the originalresponse is 2NT as opposed to an original suit response followed bya 2NT rebid.
Responder is balanced and does not figure to have a four-cardmajor. The 3♥ bid says, ‘my hearts are much stronger than myspades, so don't bid 3NT unless you have a spade honor or spadelength’. Perhaps responder has
♠ Q54 ♥ AKJ ♦ 1076 ♣ K532.
Now compare the previous sequence to this one:
The 2NT rebid does not necessarily promise a balanced hand;responder might be 3-4-1-5 or even 3-3-1-6.
Be wary of a 1NT response, particularly to a major-suit opening bid.
CHAPTER THREE ♣ COUNTING DISTRIBUTION ♣ 69
Opener1♦
2♦
2NT4♥
Responder1♥
2♠
3♠
pass
Opener1♦
2♠
pass
Responder1♠
3NT
Opener1♦
3♣
3NT
Responder2NT3♥
pass
Opener1♦
2♠
3NT
Responder2♣
2NTpass
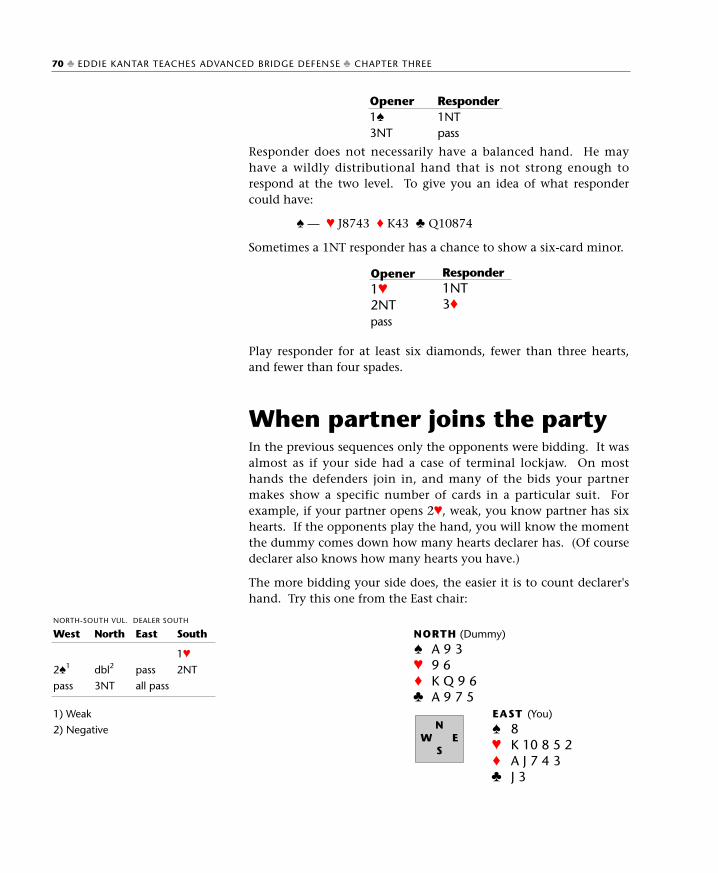
Responder does not necessarily have a balanced hand. He mayhave a wildly distributional hand that is not strong enough torespond at the two level. To give you an idea of what respondercould have:
♠ — ♥ J8743 ♦ K43 ♣ Q10874
Sometimes a 1NT responder has a chance to show a six-card minor.
Play responder for at least six diamonds, fewer than three hearts,and fewer than four spades.
When partner joins the partyIn the previous sequences only the opponents were bidding. It wasalmost as if your side had a case of terminal lockjaw. On mosthands the defenders join in, and many of the bids your partnermakes show a specific number of cards in a particular suit. Forexample, if your partner opens 2♥, weak, you know partner has sixhearts. If the opponents play the hand, you will know the momentthe dummy comes down how many hearts declarer has. (Of coursedeclarer also knows how many hearts you have.)
The more bidding your side does, the easier it is to count declarer'shand. Try this one from the East chair:
1) Weak
2) Negative
70 ♣ EDDIE KANTAR TEACHES ADVANCED BRIDGE DEFENSE ♣ CHAPTER THREE
NORTH (Dummy)
♠ A 9 3♥ 9 6♦ K Q 9 6♣ A 9 7 5
EAST (You)
♠ 8♥ K 10 8 5 2♦ A J 7 4 3♣ J 3
NW E
S
NORTH-SOUTH VUL. DEALER SOUTH
West
2♠1
pass
North
dbl2
3NT
East
pass
all pass
South
1♥
2NT
Opener1♠
3NT
Responder1NTpass
Opener1♥2NTpass
Responder1NT3♦
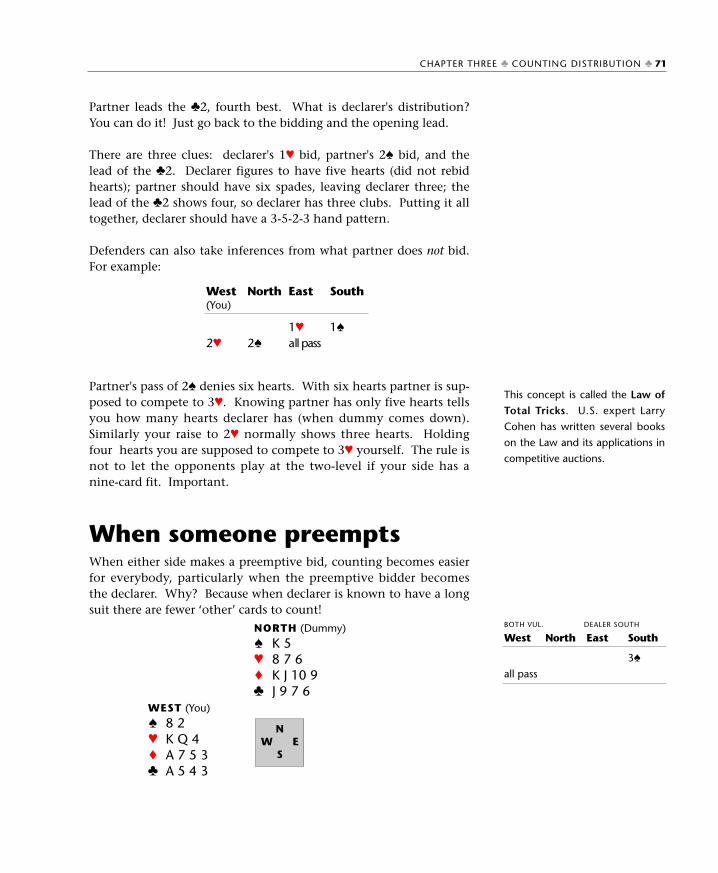
Partner leads the ♣2, fourth best. What is declarer's distribution?You can do it! Just go back to the bidding and the opening lead.
There are three clues: declarer's 1♥ bid, partner's 2♠ bid, and thelead of the ♣2. Declarer figures to have five hearts (did not rebidhearts); partner should have six spades, leaving declarer three; thelead of the ♣2 shows four, so declarer has three clubs. Putting it alltogether, declarer should have a 3-5-2-3 hand pattern.
Defenders can also take inferences from what partner does not bid.For example:
Partner's pass of 2♠ denies six hearts. With six hearts partner is sup-posed to compete to 3♥. Knowing partner has only five hearts tellsyou how many hearts declarer has (when dummy comes down).Similarly your raise to 2♥ normally shows three hearts. Holdingfour hearts you are supposed to compete to 3♥ yourself. The rule isnot to let the opponents play at the two-level if your side has anine-card fit. Important.
When someone preemptsWhen either side makes a preemptive bid, counting becomes easierfor everybody, particularly when the preemptive bidder becomesthe declarer. Why? Because when declarer is known to have a longsuit there are fewer ‘other’ cards to count!
This concept is called the Law ofTotal Tricks. U.S. expert Larry
Cohen has written several books
on the Law and its applications in
competitive auctions.
CHAPTER THREE ♣ COUNTING DISTRIBUTION ♣ 71
West(You)
2♥
North
2♠
East
1♥
all pass
South
1♠
NORTH (Dummy)
♠ K 5♥ 8 7 6♦ K J 10 9♣ J 9 7 6
WEST (You)
♠ 8 2♥ K Q 4♦ A 7 5 3♣ A 5 4 3
NW E
S
BOTH VUL. DEALER SOUTH
West
all pass
North East South
3♠
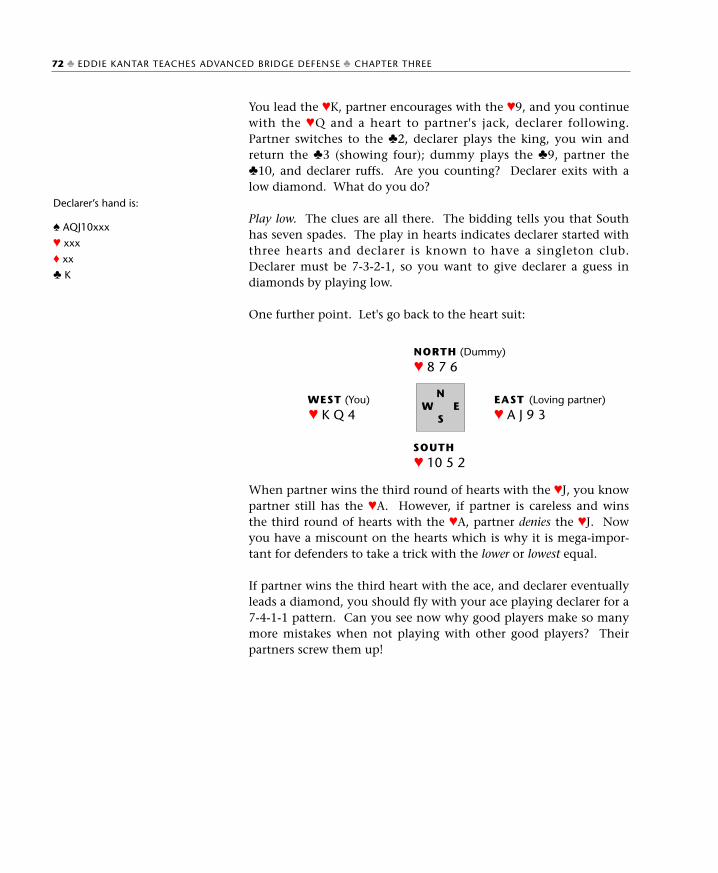
You lead the ♥K, partner encourages with the ♥9, and you continuewith the ♥Q and a heart to partner's jack, declarer following.Partner switches to the ♣2, declarer plays the king, you win andreturn the ♣3 (showing four); dummy plays the ♣9, partner the♣10, and declarer ruffs. Are you counting? Declarer exits with alow diamond. What do you do?
Play low. The clues are all there. The bidding tells you that Southhas seven spades. The play in hearts indicates declarer started withthree hearts and declarer is known to have a singleton club.Declarer must be 7-3-2-1, so you want to give declarer a guess indiamonds by playing low.
One further point. Let's go back to the heart suit:
When partner wins the third round of hearts with the ♥J, you knowpartner still has the ♥A. However, if partner is careless and winsthe third round of hearts with the ♥A, partner denies the ♥J. Nowyou have a miscount on the hearts which is why it is mega-impor-tant for defenders to take a trick with the lower or lowest equal.
If partner wins the third heart with the ace, and declarer eventuallyleads a diamond, you should fly with your ace playing declarer for a7-4-1-1 pattern. Can you see now why good players make so manymore mistakes when not playing with other good players? Theirpartners screw them up!
Declarer’s hand is:
♠ AQJ10xxx
♥ xxx
♦ xx
♣ K
72 ♣ EDDIE KANTAR TEACHES ADVANCED BRIDGE DEFENSE ♣ CHAPTER THREE
NORTH (Dummy)
♥ 8 7 6
WEST (You) EAST (Loving partner)
♥ K Q 4 ♥ A J 9 3
SOUTH
♥ 10 5 2
NW E
S
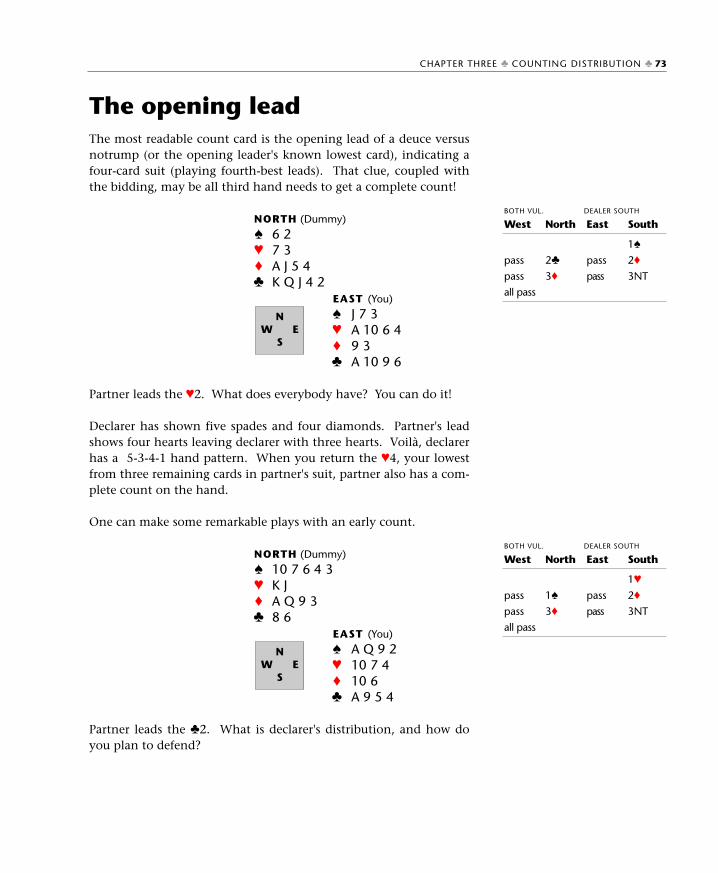
The opening leadThe most readable count card is the opening lead of a deuce versusnotrump (or the opening leader's known lowest card), indicating afour-card suit (playing fourth-best leads). That clue, coupled withthe bidding, may be all third hand needs to get a complete count!
Partner leads the ♥2. What does everybody have? You can do it!
Declarer has shown five spades and four diamonds. Partner's leadshows four hearts leaving declarer with three hearts. Voilà, declarerhas a 5-3-4-1 hand pattern. When you return the ♥4, your lowestfrom three remaining cards in partner's suit, partner also has a com-plete count on the hand.
One can make some remarkable plays with an early count.
Partner leads the ♣2. What is declarer's distribution, and how doyou plan to defend?
CHAPTER THREE ♣ COUNTING DISTRIBUTION ♣ 73
NORTH (Dummy)
♠ 6 2♥ 7 3♦ A J 5 4♣ K Q J 4 2
EAST (You)
♠ J 7 3♥ A 10 6 4♦ 9 3♣ A 10 9 6
NW E
S
BOTH VUL. DEALER SOUTH
West
pass
pass
all pass
North
2♣
3♦
East
pass
pass
South
1♠
2♦
3NT
NORTH (Dummy)
♠ 10 7 6 4 3♥ K J♦ A Q 9 3♣ 8 6
EAST (You)
♠ A Q 9 2♥ 10 7 4♦ 10 6♣ A 9 5 4
NW E
S
BOTH VUL. DEALER SOUTH
West
pass
pass
all pass
North
1♠
3♦
East
pass
pass
South
1♥
2♦
3NT
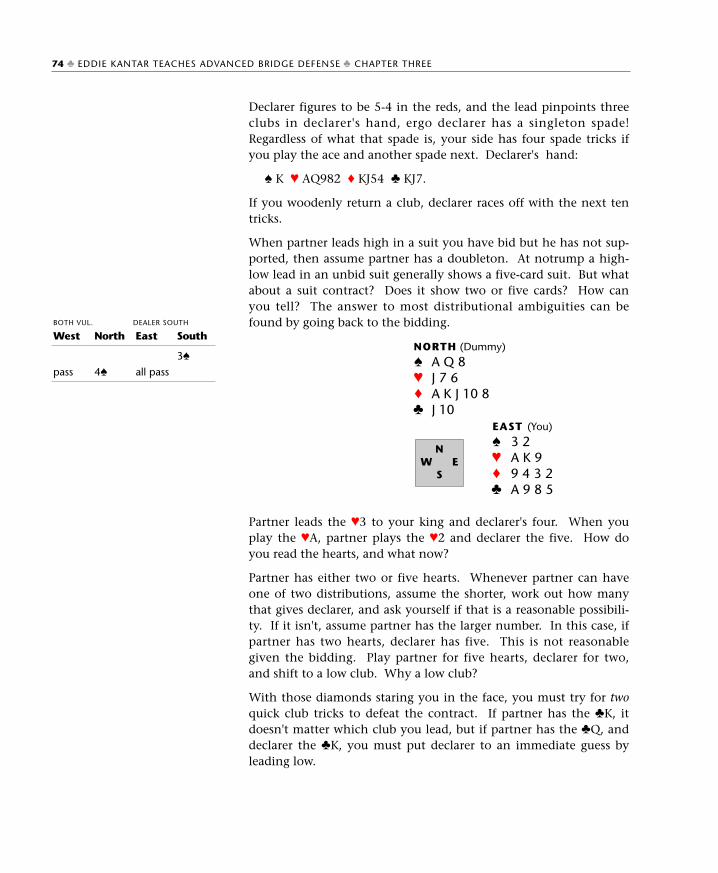
Declarer figures to be 5-4 in the reds, and the lead pinpoints threeclubs in declarer's hand, ergo declarer has a singleton spade!Regardless of what that spade is, your side has four spade tricks ifyou play the ace and another spade next. Declarer's hand:
♠ K ♥ AQ982 ♦ KJ54 ♣ KJ7.
If you woodenly return a club, declarer races off with the next tentricks.
When partner leads high in a suit you have bid but he has not sup-ported, then assume partner has a doubleton. At notrump a high-low lead in an unbid suit generally shows a five-card suit. But whatabout a suit contract? Does it show two or five cards? How canyou tell? The answer to most distributional ambiguities can befound by going back to the bidding.
Partner leads the ♥3 to your king and declarer's four. When youplay the ♥A, partner plays the ♥2 and declarer the five. How doyou read the hearts, and what now?
Partner has either two or five hearts. Whenever partner can haveone of two distributions, assume the shorter, work out how manythat gives declarer, and ask yourself if that is a reasonable possibili-ty. If it isn't, assume partner has the larger number. In this case, ifpartner has two hearts, declarer has five. This is not reasonablegiven the bidding. Play partner for five hearts, declarer for two,and shift to a low club. Why a low club?
With those diamonds staring you in the face, you must try for twoquick club tricks to defeat the contract. If partner has the ♣K, itdoesn't matter which club you lead, but if partner has the ♣Q, anddeclarer the ♣K, you must put declarer to an immediate guess byleading low.
74 ♣ EDDIE KANTAR TEACHES ADVANCED BRIDGE DEFENSE ♣ CHAPTER THREE
NORTH (Dummy)
♠ A Q 8♥ J 7 6♦ A K J 10 8♣ J 10
EAST (You)
♠ 3 2♥ A K 9♦ 9 4 3 2♣ A 9 8 5
NW E
S
BOTH VUL. DEALER SOUTH
West
pass
North
4♠
East
all pass
South
3♠
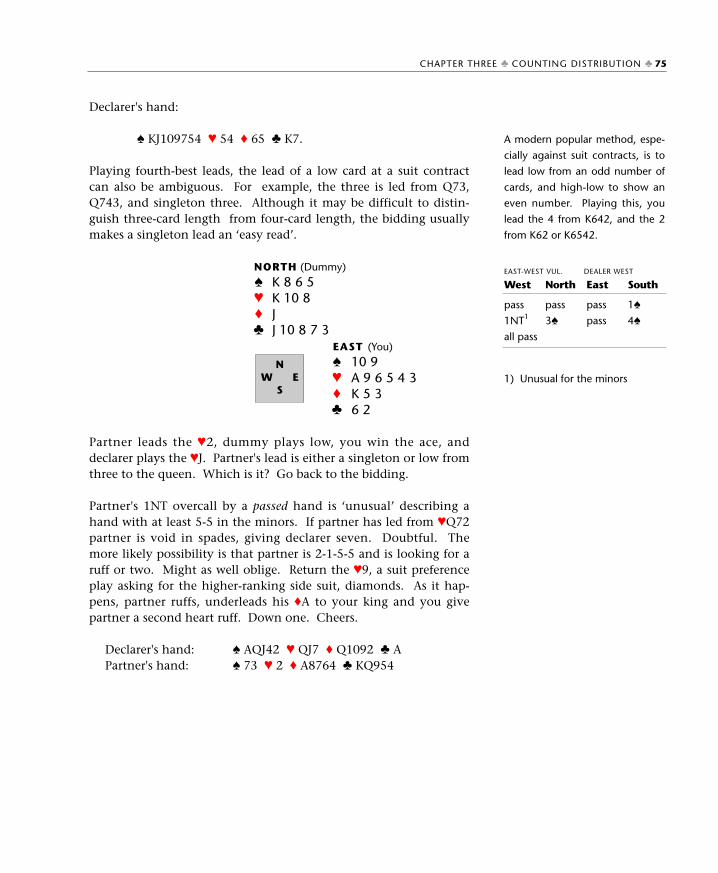
Declarer's hand:
♠ KJ109754 ♥ 54 ♦ 65 ♣ K7.
Playing fourth-best leads, the lead of a low card at a suit contractcan also be ambiguous. For example, the three is led from Q73,Q743, and singleton three. Although it may be difficult to distin-guish three-card length from four-card length, the bidding usuallymakes a singleton lead an ‘easy read’.
Partner leads the ♥2, dummy plays low, you win the ace, anddeclarer plays the ♥J. Partner's lead is either a singleton or low fromthree to the queen. Which is it? Go back to the bidding.
Partner's 1NT overcall by a passed hand is ‘unusual’ describing ahand with at least 5-5 in the minors. If partner has led from ♥Q72partner is void in spades, giving declarer seven. Doubtful. Themore likely possibility is that partner is 2-1-5-5 and is looking for aruff or two. Might as well oblige. Return the ♥9, a suit preferenceplay asking for the higher-ranking side suit, diamonds. As it hap-pens, partner ruffs, underleads his ♦A to your king and you givepartner a second heart ruff. Down one. Cheers.
Declarer's hand: ♠ AQJ42 ♥ QJ7 ♦ Q1092 ♣ A Partner's hand: ♠ 73 ♥ 2 ♦ A8764 ♣ KQ954
A modern popular method, espe-
cially against suit contracts, is to
lead low from an odd number of
cards, and high-low to show an
even number. Playing this, you
lead the 4 from K642, and the 2
from K62 or K6542.
1) Unusual for the minors
CHAPTER THREE ♣ COUNTING DISTRIBUTION ♣ 75
NORTH (Dummy)
♠ K 8 6 5♥ K 10 8♦ J♣ J 10 8 7 3
EAST (You)
♠ 10 9♥ A 9 6 5 4 3♦ K 5 3♣ 6 2
NW E
S
EAST-WEST VUL. DEALER WEST
West
pass
1NT1
all pass
North
pass
3♠
East
pass
pass
South
1♠
4♠
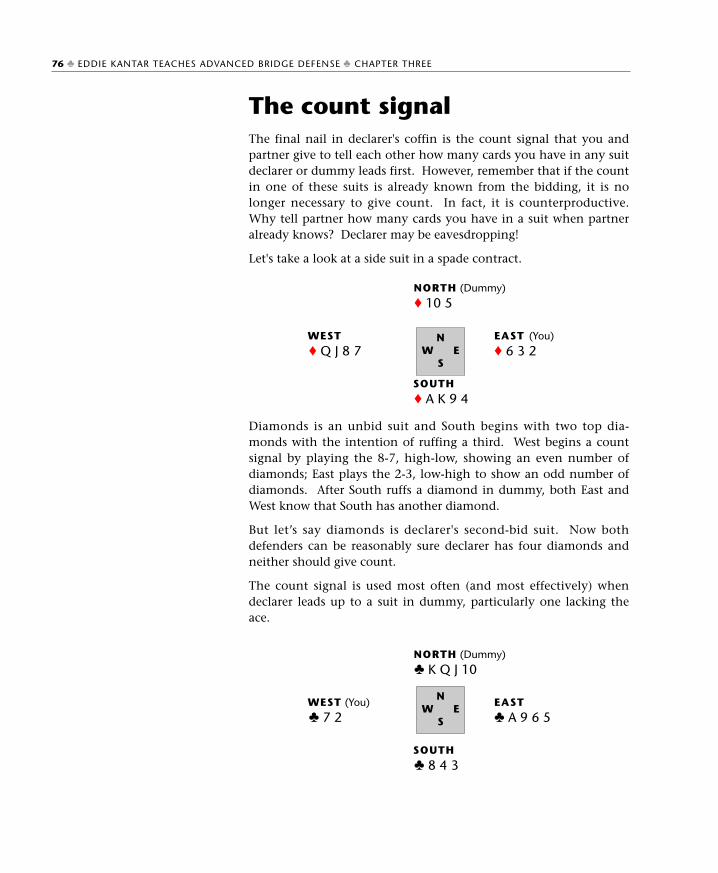
The count signalThe final nail in declarer's coffin is the count signal that you andpartner give to tell each other how many cards you have in any suitdeclarer or dummy leads first. However, remember that if the countin one of these suits is already known from the bidding, it is nolonger necessary to give count. In fact, it is counterproductive.Why tell partner how many cards you have in a suit when partneralready knows? Declarer may be eavesdropping!
Let's take a look at a side suit in a spade contract.
Diamonds is an unbid suit and South begins with two top dia-monds with the intention of ruffing a third. West begins a countsignal by playing the 8-7, high-low, showing an even number ofdiamonds; East plays the 2-3, low-high to show an odd number ofdiamonds. After South ruffs a diamond in dummy, both East andWest know that South has another diamond.
But let’s say diamonds is declarer's second-bid suit. Now bothdefenders can be reasonably sure declarer has four diamonds andneither should give count.
The count signal is used most often (and most effectively) whendeclarer leads up to a suit in dummy, particularly one lacking theace.
76 ♣ EDDIE KANTAR TEACHES ADVANCED BRIDGE DEFENSE ♣ CHAPTER THREE
NORTH (Dummy)
♦ 10 5
WEST EAST (You)
♦ Q J 8 7 ♦ 6 3 2
SOUTH
♦ A K 9 4
NW E
S
NORTH (Dummy)
♣ K Q J 10
WEST (You) EAST
♣ 7 2 ♣ A 9 6 5
SOUTH
♣ 8 4 3
NW E
S
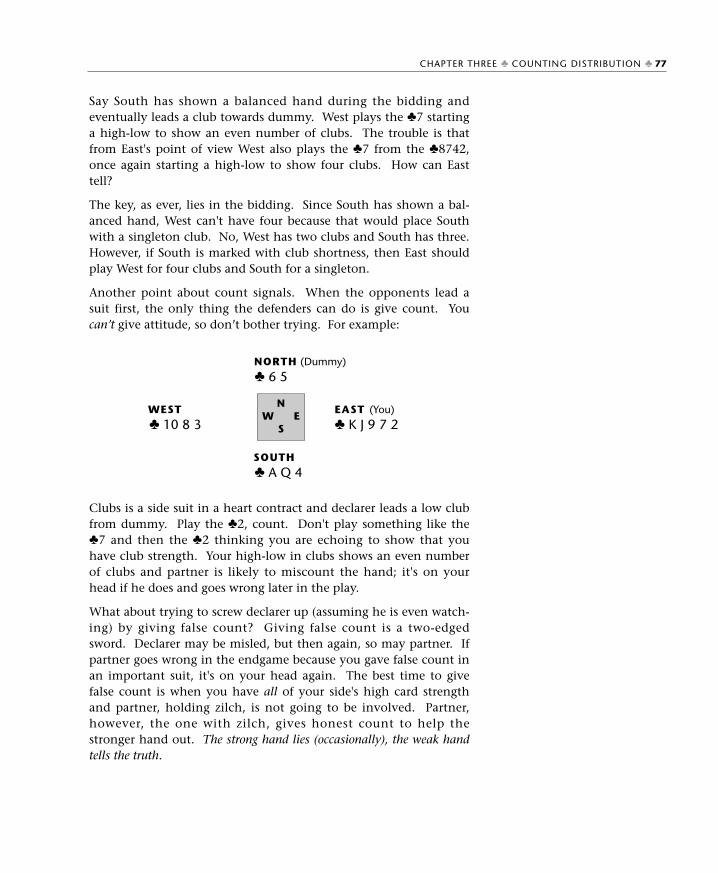
Say South has shown a balanced hand during the bidding andeventually leads a club towards dummy. West plays the ♣7 startinga high-low to show an even number of clubs. The trouble is thatfrom East's point of view West also plays the ♣7 from the ♣8742,once again starting a high-low to show four clubs. How can Easttell?
The key, as ever, lies in the bidding. Since South has shown a bal-anced hand, West can't have four because that would place Southwith a singleton club. No, West has two clubs and South has three.However, if South is marked with club shortness, then East shouldplay West for four clubs and South for a singleton.
Another point about count signals. When the opponents lead asuit first, the only thing the defenders can do is give count. Youcan’t give attitude, so don’t bother trying. For example:
Clubs is a side suit in a heart contract and declarer leads a low clubfrom dummy. Play the ♣2, count. Don't play something like the♣7 and then the ♣2 thinking you are echoing to show that youhave club strength. Your high-low in clubs shows an even numberof clubs and partner is likely to miscount the hand; it's on yourhead if he does and goes wrong later in the play.
What about trying to screw declarer up (assuming he is even watch-ing) by giving false count? Giving false count is a two-edgedsword. Declarer may be misled, but then again, so may partner. Ifpartner goes wrong in the endgame because you gave false count inan important suit, it's on your head again. The best time to givefalse count is when you have all of your side's high card strengthand partner, holding zilch, is not going to be involved. Partner,however, the one with zilch, gives honest count to help thestronger hand out. The strong hand lies (occasionally), the weak handtells the truth.
CHAPTER THREE ♣ COUNTING DISTRIBUTION ♣ 77
NORTH (Dummy)
♣ 6 5
WEST EAST (You)
♣ 10 8 3 ♣ K J 9 7 2
SOUTH
♣ A Q 4
NW E
S
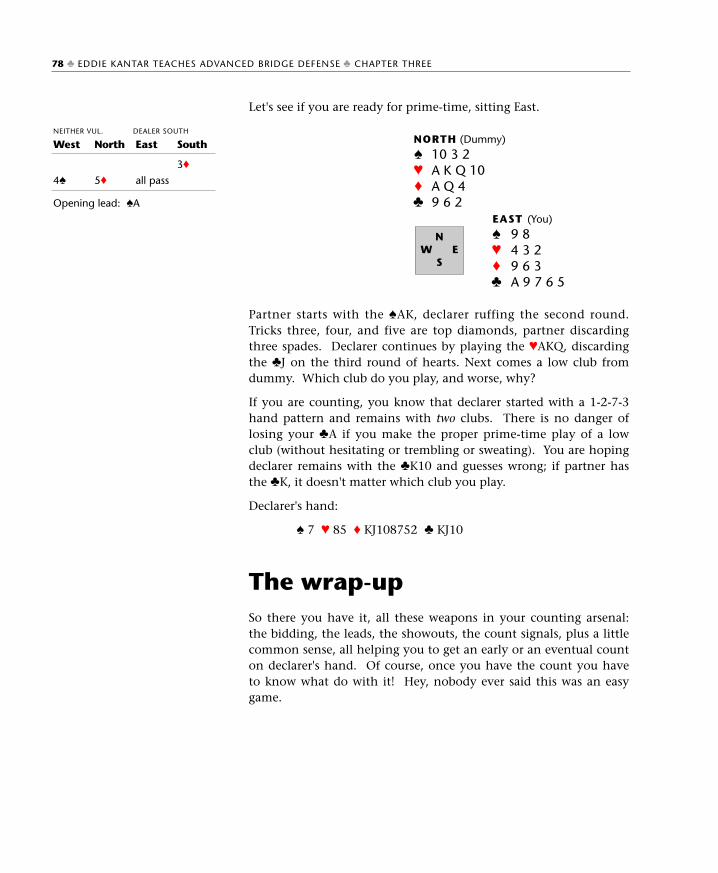
Let's see if you are ready for prime-time, sitting East.
Partner starts with the ♠AK, declarer ruffing the second round.Tricks three, four, and five are top diamonds, partner discardingthree spades. Declarer continues by playing the ♥AKQ, discardingthe ♣J on the third round of hearts. Next comes a low club fromdummy. Which club do you play, and worse, why?
If you are counting, you know that declarer started with a 1-2-7-3hand pattern and remains with two clubs. There is no danger oflosing your ♣A if you make the proper prime-time play of a lowclub (without hesitating or trembling or sweating). You are hopingdeclarer remains with the ♣K10 and guesses wrong; if partner hasthe ♣K, it doesn't matter which club you play.
Declarer's hand:
♠ 7 ♥ 85 ♦ KJ108752 ♣ KJ10
The wrap-upSo there you have it, all these weapons in your counting arsenal:the bidding, the leads, the showouts, the count signals, plus a littlecommon sense, all helping you to get an early or an eventual counton declarer's hand. Of course, once you have the count you haveto know what do with it! Hey, nobody ever said this was an easygame.
Opening lead: ♠A
78 ♣ EDDIE KANTAR TEACHES ADVANCED BRIDGE DEFENSE ♣ CHAPTER THREE
NORTH (Dummy)
♠ 10 3 2♥ A K Q 10♦ A Q 4♣ 9 6 2
EAST (You)
♠ 9 8♥ 4 3 2♦ 9 6 3♣ A 9 7 6 5
NW E
S
NEITHER VUL. DEALER SOUTH
West
4♠
North
5♦
East
all pass
South
3♦
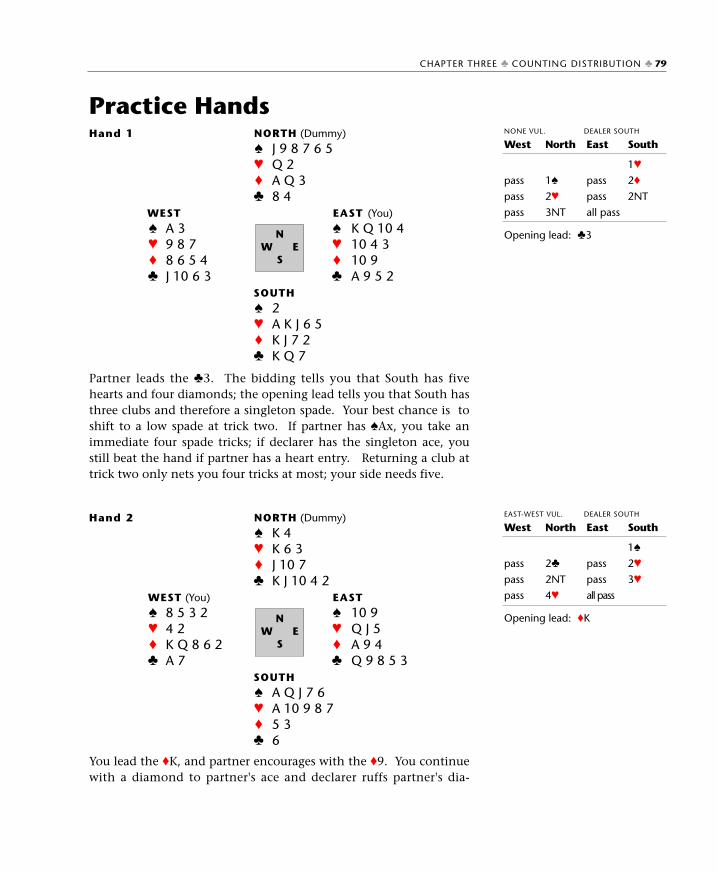
Practice Hands
Partner leads the ♣3. The bidding tells you that South has fivehearts and four diamonds; the opening lead tells you that South hasthree clubs and therefore a singleton spade. Your best chance is toshift to a low spade at trick two. If partner has ♠Ax, you take animmediate four spade tricks; if declarer has the singleton ace, youstill beat the hand if partner has a heart entry. Returning a club attrick two only nets you four tricks at most; your side needs five.
You lead the ♦K, and partner encourages with the ♦9. You continuewith a diamond to partner's ace and declarer ruffs partner's dia-
Opening lead: ♣3
Opening lead: ♦K
CHAPTER THREE ♣ COUNTING DISTRIBUTION ♣ 79
Hand 1 NORTH (Dummy)
♠ J 9 8 7 6 5♥ Q 2♦ A Q 3♣ 8 4
WEST EAST (You)
♠ A 3 ♠ K Q 10 4♥ 9 8 7 ♥ 10 4 3♦ 8 6 5 4 ♦ 10 9♣ J 10 6 3 ♣ A 9 5 2
SOUTH
♠ 2♥ A K J 6 5♦ K J 7 2♣ K Q 7
NW E
S
Hand 2 NORTH (Dummy)
♠ K 4♥ K 6 3♦ J 10 7♣ K J 10 4 2
WEST (You) EAST
♠ 8 5 3 2 ♠ 10 9♥ 4 2 ♥ Q J 5♦ K Q 8 6 2 ♦ A 9 4♣ A 7 ♣ Q 9 8 5 3
SOUTH
♠ A Q J 7 6♥ A 10 9 8 7♦ 5 3♣ 6
NW E
S
NONE VUL. DEALER SOUTH
West
pass
pass
pass
North
1♠
2♥
3NT
East
pass
pass
all pass
South
1♥
2♦
2NT
EAST-WEST VUL. DEALER SOUTH
West
pass
pass
pass
North
2♣
2NT
4♥
East
pass
pass
all pass
South
1♠
2♥
3♥
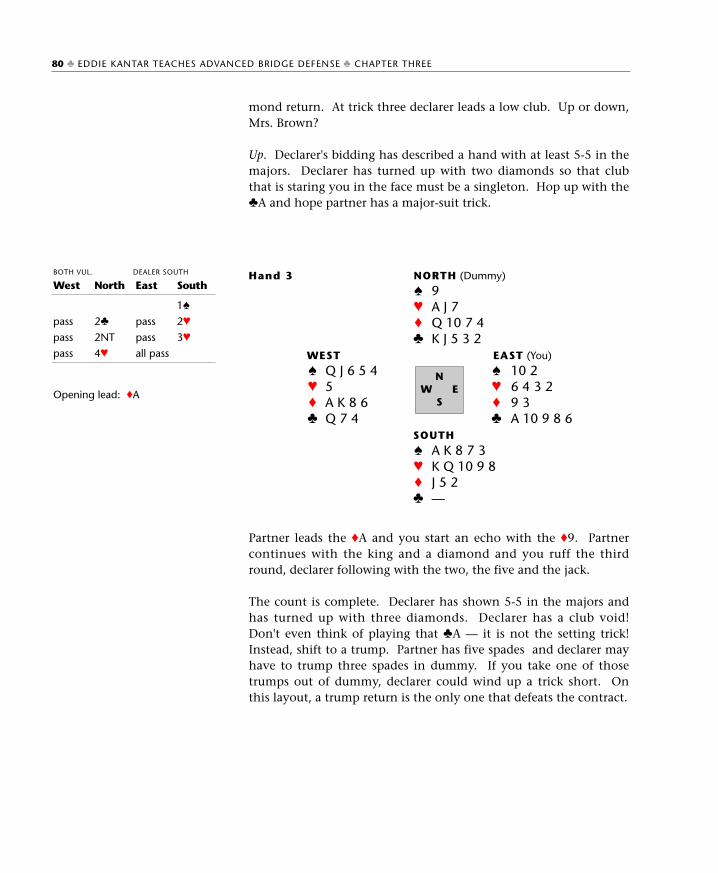
mond return. At trick three declarer leads a low club. Up or down,Mrs. Brown?
Up. Declarer's bidding has described a hand with at least 5-5 in themajors. Declarer has turned up with two diamonds so that clubthat is staring you in the face must be a singleton. Hop up with the♣A and hope partner has a major-suit trick.
Partner leads the ♦A and you start an echo with the ♦9. Partnercontinues with the king and a diamond and you ruff the thirdround, declarer following with the two, the five and the jack.
The count is complete. Declarer has shown 5-5 in the majors andhas turned up with three diamonds. Declarer has a club void!Don't even think of playing that ♣A — it is not the setting trick!Instead, shift to a trump. Partner has five spades and declarer mayhave to trump three spades in dummy. If you take one of thosetrumps out of dummy, declarer could wind up a trick short. Onthis layout, a trump return is the only one that defeats the contract.
Opening lead: ♦A
80 ♣ EDDIE KANTAR TEACHES ADVANCED BRIDGE DEFENSE ♣ CHAPTER THREE
Hand 3 NORTH (Dummy)
♠ 9♥ A J 7♦ Q 10 7 4♣ K J 5 3 2
WEST EAST (You)
♠ Q J 6 5 4 ♠ 10 2♥ 5 ♥ 6 4 3 2♦ A K 8 6 ♦ 9 3♣ Q 7 4 ♣ A 10 9 8 6
SOUTH
♠ A K 8 7 3♥ K Q 10 9 8♦ J 5 2♣ —
NW E
S
BOTH VUL. DEALER SOUTH
West
pass
pass
pass
North
2♣
2NT
4♥
East
pass
pass
all pass
South
1♠
2♥
3♥
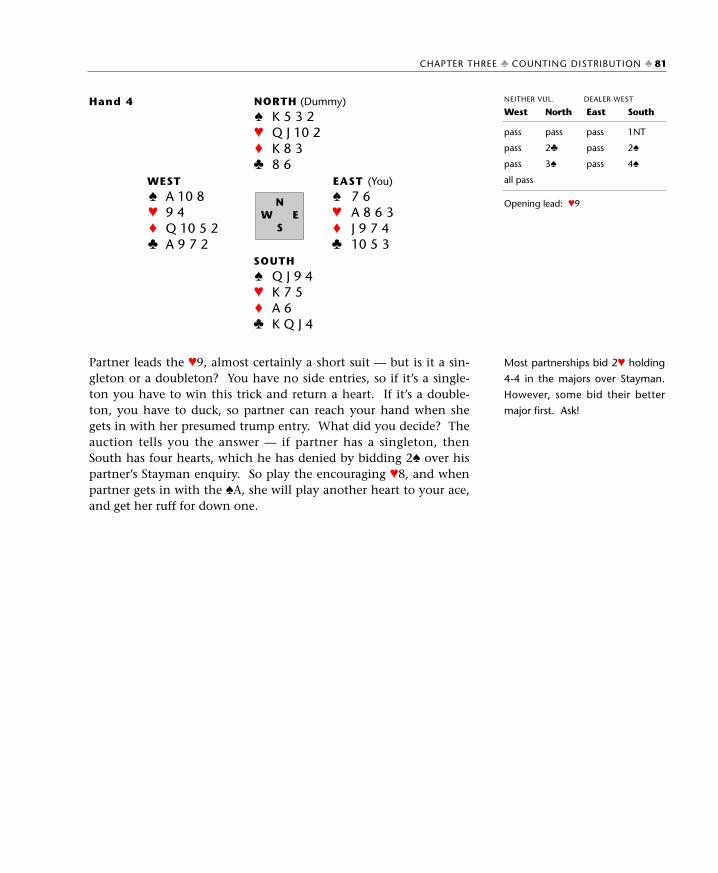
Partner leads the ♥9, almost certainly a short suit — but is it a sin-gleton or a doubleton? You have no side entries, so if it’s a single-ton you have to win this trick and return a heart. If it’s a double-ton, you have to duck, so partner can reach your hand when shegets in with her presumed trump entry. What did you decide? Theauction tells you the answer — if partner has a singleton, thenSouth has four hearts, which he has denied by bidding 2♠ over hispartner’s Stayman enquiry. So play the encouraging ♥8, and whenpartner gets in with the ♠A, she will play another heart to your ace,and get her ruff for down one.
Opening lead: ♥9
Most partnerships bid 2♥ holding
4-4 in the majors over Stayman.
However, some bid their better
major first. Ask!
CHAPTER THREE ♣ COUNTING DISTRIBUTION ♣ 81
Hand 4 NORTH (Dummy)
♠ K 5 3 2♥ Q J 10 2♦ K 8 3♣ 8 6
WEST EAST (You)
♠ A 10 8 ♠ 7 6♥ 9 4 ♥ A 8 6 3♦ Q 10 5 2 ♦ J 9 7 4♣ A 9 7 2 ♣ 10 5 3
SOUTH
♠ Q J 9 4♥ K 7 5♦ A 6♣ K Q J 4
NW E
S
NEITHER VUL. DEALER WEST
West
pass
pass
pass
all pass
North
pass
2♣
3♠
East
pass
pass
pass
South
1NT
2♠
4♠
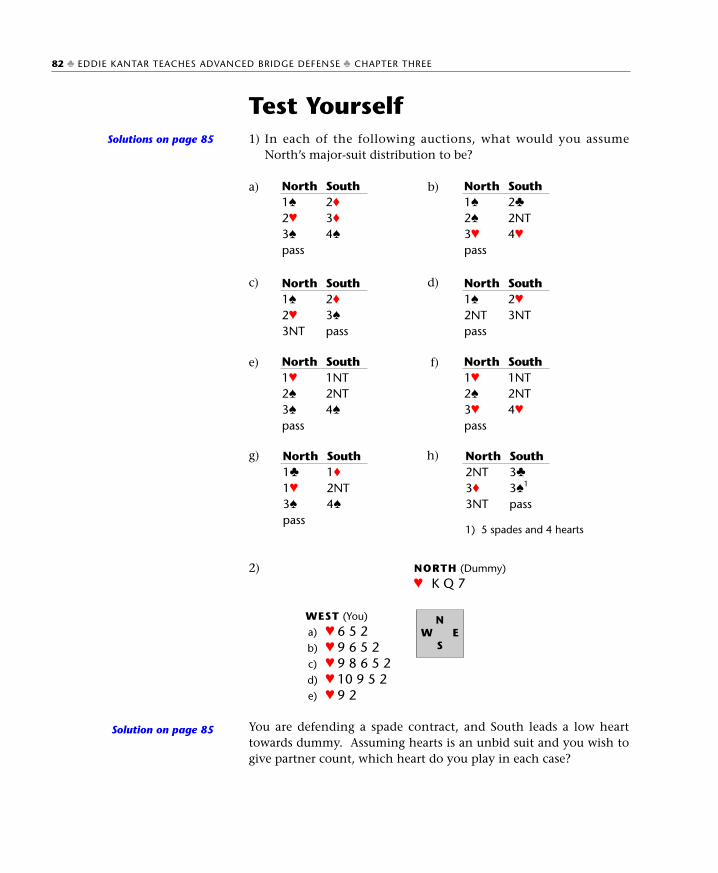
Test Yourself1) In each of the following auctions, what would you assume
North’s major-suit distribution to be?
a) b)
c) d)
e) f)
g) h)
You are defending a spade contract, and South leads a low hearttowards dummy. Assuming hearts is an unbid suit and you wish togive partner count, which heart do you play in each case?
Solutions on page 85
Solution on page 85
82 ♣ EDDIE KANTAR TEACHES ADVANCED BRIDGE DEFENSE ♣ CHAPTER THREE
2) NORTH (Dummy)
♥ K Q 7
WEST (You)
a) ♥ 6 5 2b) ♥ 9 6 5 2c) ♥ 9 8 6 5 2d) ♥ 10 9 5 2e) ♥ 9 2
NW E
S
North1♣
1♥
3♠
pass
South1♦
2NT4♠
North2NT3♦
3NT
South3♣
3♠1
pass
North1♠
2♥
3♠
pass
South2♦
3♦
4♠
North1♠
2♠
3♥
pass
South2♣
2NT4♥
North1♠
2♥
3NT
South2♦
3♠
pass
North1♥
2♠
3♠
pass
South1NT2NT4♠
North1♥
2♠
3♥
pass
South1NT2NT4♥
North1♠
2NTpass
South2♥
3NT
1) 5 spades and 4 hearts
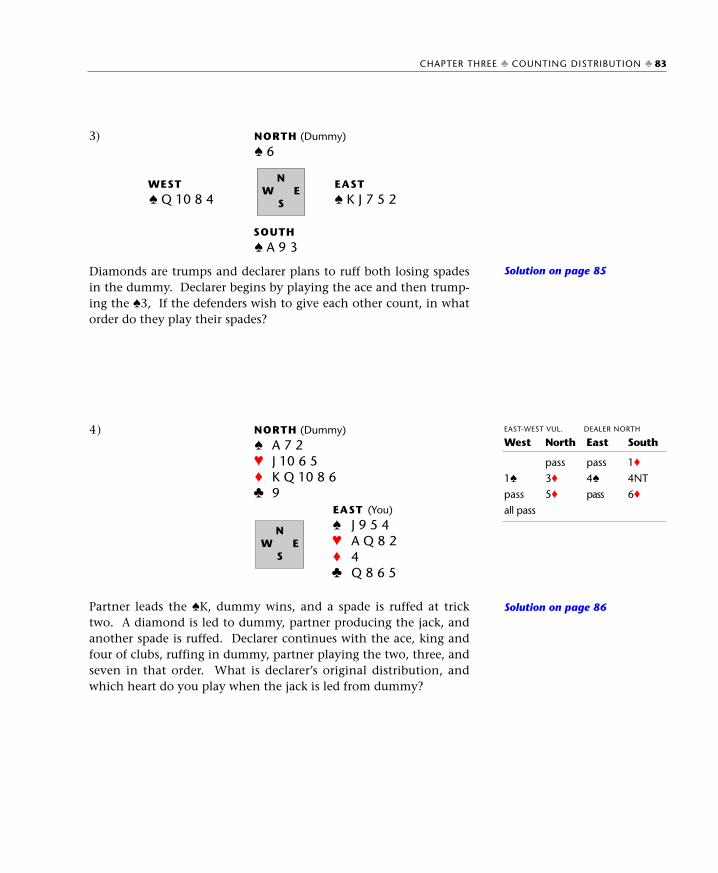
Diamonds are trumps and declarer plans to ruff both losing spadesin the dummy. Declarer begins by playing the ace and then trump-ing the ♠3, If the defenders wish to give each other count, in whatorder do they play their spades?
Partner leads the ♠K, dummy wins, and a spade is ruffed at tricktwo. A diamond is led to dummy, partner producing the jack, andanother spade is ruffed. Declarer continues with the ace, king andfour of clubs, ruffing in dummy, partner playing the two, three, andseven in that order. What is declarer’s original distribution, andwhich heart do you play when the jack is led from dummy?
Solution on page 85
Solution on page 86
CHAPTER THREE ♣ COUNTING DISTRIBUTION ♣ 83
3) NORTH (Dummy)
♠ 6
WEST EAST
♠ Q 10 8 4 ♠ K J 7 5 2
SOUTH
♠ A 9 3
NW E
S
4) NORTH (Dummy)
♠ A 7 2♥ J 10 6 5♦ K Q 10 8 6♣ 9
EAST (You)
♠ J 9 5 4♥ A Q 8 2♦ 4♣ Q 8 6 5
NW E
S
EAST-WEST VUL. DEALER NORTH
West
1♠
pass
all pass
North
pass
3♦
5♦
East
pass
4♠
pass
South
1♦
4NT
6♦
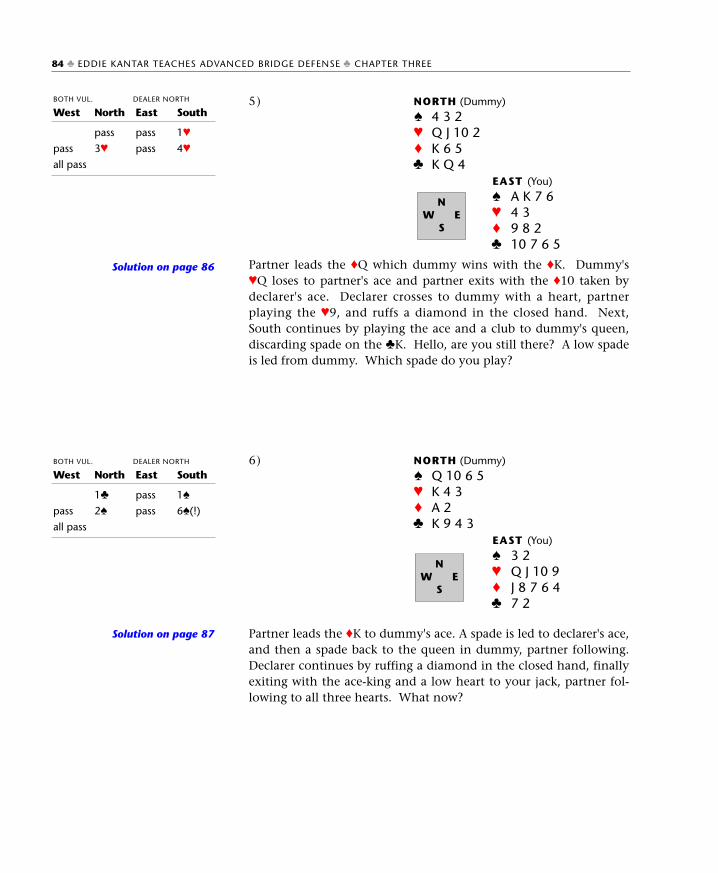
Partner leads the ♦Q which dummy wins with the ♦K. Dummy's♥Q loses to partner's ace and partner exits with the ♦10 taken bydeclarer's ace. Declarer crosses to dummy with a heart, partnerplaying the ♥9, and ruffs a diamond in the closed hand. Next,South continues by playing the ace and a club to dummy's queen,discarding spade on the ♣K. Hello, are you still there? A low spadeis led from dummy. Which spade do you play?
Partner leads the ♦K to dummy's ace. A spade is led to declarer's ace,and then a spade back to the queen in dummy, partner following.Declarer continues by ruffing a diamond in the closed hand, finallyexiting with the ace-king and a low heart to your jack, partner fol-lowing to all three hearts. What now?
Solution on page 86
Solution on page 87
84 ♣ EDDIE KANTAR TEACHES ADVANCED BRIDGE DEFENSE ♣ CHAPTER THREE
5) NORTH (Dummy)
♠ 4 3 2♥ Q J 10 2♦ K 6 5♣ K Q 4
EAST (You)
♠ A K 7 6♥ 4 3♦ 9 8 2♣ 10 7 6 5
NW E
S
BOTH VUL. DEALER NORTH
West
pass
all pass
North
pass
3♥
East
pass
pass
South
1♥
4♥
6) NORTH (Dummy)
♠ Q 10 6 5♥ K 4 3♦ A 2♣ K 9 4 3
EAST (You)
♠ 3 2♥ Q J 10 9♦ J 8 7 6 4♣ 7 2
NW E
S
BOTH VUL. DEALER NORTH
West
pass
all pass
North
1♣
2♠
East
pass
pass
South
1♠
6♠(!)

Test Yourself — SolutionsProblem 1a) Six spades and four hearts.b) Six spades and four hearts.
The difference between this and (a) is that North is showing aweaker hand here by rebidding 2♠ immediately and bidding theheart suit later.
c) Five spades and four hearts. Apparently North has weak spades and a fitting honor in dia-monds, plus a club stopper or two.
d) Five spades and two hearts. With three hearts, North tends to raise hearts. He might evenhave a singleton heart honor, but not, of course, a heart void!
e) Six hearts and five spades. The spade rebid promises five, and if North has only five heartsthe proper opening bid is 1♠.
f) Six hearts and four spades. North already showed five hearts and four spades with the firsttwo bids; the heart rebid shows six but denies five spades — seethe answer to part (e).
g) Four hearts and four spades. North should be 4-4-1-4 or 4-4-0-5.
h) Two spades and three hearts. South shows five spades and four hearts. With three spadesNorth normally raises to 4♠.
Problem 2a) ♥2 Low from odd.b) ♥6 Second highest from four.c) ♥2 Low from odd.d) ♥5 Third-highest from four in this case, since the ♥9 may be
an important spot.e) ♥ 9 High-low from a doubleton.
Problem 3West plays the 8-4, high-low to show an even number of spades.Even though one tries to play second highest with four if possible,care must be taken if the second-highest card has trick-takingpotential, particularly when dummy has four or five cards in thesuit. Don't waste a potential trick to give count. Period. East plays2-7, low high to show an odd number of cards.
CHAPTER THREE ♣ COUNTING DISTRIBUTION ♣ 85
To questions
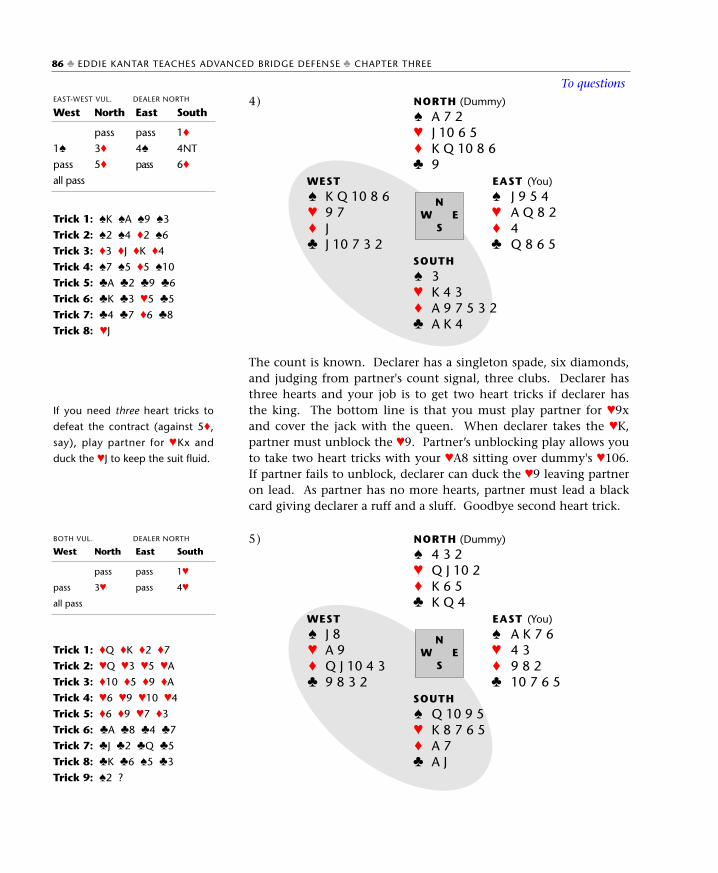
Trick 1: ♠K ♠A ♠9 ♠3
Trick 2: ♠2 ♠4 ♦2 ♠6
Trick 3: ♦3 ♦J ♦K ♦4
Trick 4: ♠7 ♠5 ♦5 ♠10
Trick 5: ♣A ♣2 ♣9 ♣6
Trick 6: ♣K ♣3 ♥5 ♣5
Trick 7: ♣4 ♣7 ♦6 ♣8
Trick 8: ♥J
If you need three heart tricks to
defeat the contract (against 5♦,
say), play partner for ♥Kx and
duck the ♥J to keep the suit fluid.
Trick 1: ♦Q ♦K ♦2 ♦7
Trick 2: ♥Q ♥3 ♥5 ♥A
Trick 3: ♦10 ♦5 ♦9 ♦A
Trick 4: ♥6 ♥9 ♥10 ♥4
Trick 5: ♦6 ♦9 ♥7 ♦3
Trick 6: ♣A ♣8 ♣4 ♣7
Trick 7: ♣J ♣2 ♣Q ♣5
Trick 8: ♣K ♣6 ♠5 ♣3
Trick 9: ♠2 ?
The count is known. Declarer has a singleton spade, six diamonds,and judging from partner's count signal, three clubs. Declarer hasthree hearts and your job is to get two heart tricks if declarer hasthe king. The bottom line is that you must play partner for ♥9xand cover the jack with the queen. When declarer takes the ♥K,partner must unblock the ♥9. Partner’s unblocking play allows youto take two heart tricks with your ♥A8 sitting over dummy's ♥106.If partner fails to unblock, declarer can duck the ♥9 leaving partneron lead. As partner has no more hearts, partner must lead a blackcard giving declarer a ruff and a sluff. Goodbye second heart trick.
86 ♣ EDDIE KANTAR TEACHES ADVANCED BRIDGE DEFENSE ♣ CHAPTER THREE
4) NORTH (Dummy)
♠ A 7 2♥ J 10 6 5♦ K Q 10 8 6♣ 9
WEST EAST (You)
♠ K Q 10 8 6 ♠ J 9 5 4♥ 9 7 ♥ A Q 8 2♦ J ♦ 4♣ J 10 7 3 2 ♣ Q 8 6 5
SOUTH
♠ 3♥ K 4 3♦ A 9 7 5 3 2♣ A K 4
NW E
S
5) NORTH (Dummy)
♠ 4 3 2♥ Q J 10 2♦ K 6 5♣ K Q 4
WEST EAST (You)
♠ J 8 ♠ A K 7 6♥ A 9 ♥ 4 3♦ Q J 10 4 3 ♦ 9 8 2♣ 9 8 3 2 ♣ 10 7 6 5
SOUTH
♠ Q 10 9 5♥ K 8 7 6 5♦ A 7♣ A J
NW E
S
EAST-WEST VUL. DEALER NORTH
West
1♠
pass
all pass
North
pass
3♦
5♦
East
pass
4♠
pass
South
1♦
4NT
6♦
BOTH VUL. DEALER NORTH
West
pass
all pass
North
pass
3♥
East
pass
pass
South
1♥
4♥
To questions
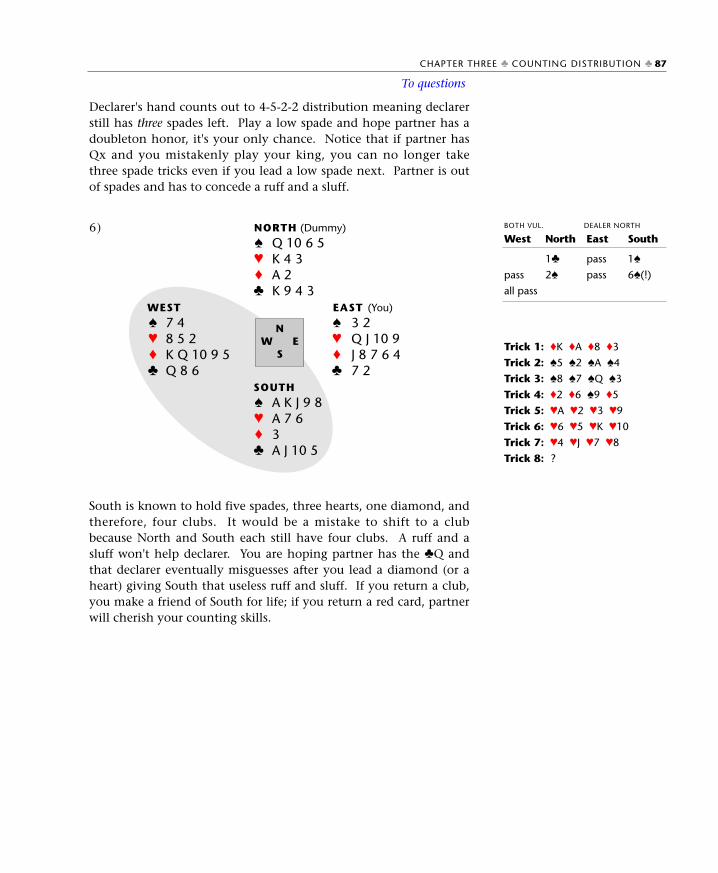
Declarer's hand counts out to 4-5-2-2 distribution meaning declarerstill has three spades left. Play a low spade and hope partner has adoubleton honor, it's your only chance. Notice that if partner hasQx and you mistakenly play your king, you can no longer takethree spade tricks even if you lead a low spade next. Partner is outof spades and has to concede a ruff and a sluff.
South is known to hold five spades, three hearts, one diamond, andtherefore, four clubs. It would be a mistake to shift to a clubbecause North and South each still have four clubs. A ruff and asluff won't help declarer. You are hoping partner has the ♣Q andthat declarer eventually misguesses after you lead a diamond (or aheart) giving South that useless ruff and sluff. If you return a club,you make a friend of South for life; if you return a red card, partnerwill cherish your counting skills.
CHAPTER THREE ♣ COUNTING DISTRIBUTION ♣ 87
6) NORTH (Dummy)
♠ Q 10 6 5♥ K 4 3♦ A 2♣ K 9 4 3
WEST EAST (You)
♠ 7 4 ♠ 3 2♥ 8 5 2 ♥ Q J 10 9♦ K Q 10 9 5 ♦ J 8 7 6 4♣ Q 8 6 ♣ 7 2
SOUTH
♠ A K J 9 8♥ A 7 6♦ 3♣ A J 10 5
NW E
S
BOTH VUL. DEALER NORTH
West
pass
all pass
North
1♣
2♠
East
pass
pass
South
1♠
6♠(!)
Trick 1: ♦K ♦A ♦8 ♦3
Trick 2: ♠5 ♠2 ♠A ♠4
Trick 3: ♠8 ♠7 ♠Q ♠3
Trick 4: ♦2 ♦6 ♠9 ♦5
Trick 5: ♥A ♥2 ♥3 ♥9
Trick 6: ♥6 ♥5 ♥K ♥10
Trick 7: ♥4 ♥J ♥7 ♥8
Trick 8: ?
To questions
88 ♣ EDDIE KANTAR TEACHES ADVANCED BRIDGE DEFENSE ♣ CHAPTER THREE
Key ideas from Chapter 3
• The answer to most defensive problems, particularly countproblems, lies in the bidding: yours, theirs, and what isn'tbid!
• At times you must ask your opponents about their meth-ods to help you with the count. (Will they raise a majorsuit response with three trumps or do they require four?Which suit do they open with 4-4 in the minors? Etcetera.)
• The opening lead frequently plays a vital role in counting. • Giving each other count in ‘mystery suits’ (not suits
declarer has bid or where the count is known), completesor helps complete the count picture in many a hand.
• If you make a real commitment to try to count each hand,you may find yourself playing worse for the first fewmonths — too much to do, not enough time to do it. Notto worry, everyone goes through that phase. However, onceyou climb the hurdle, you will be playing at a completelydifferent level. Trust me.
It is inescapable.
Bridge is a game of counting. Once you make a ‘counting commit-ment’ you are on the way to becoming a much better player. In theprevious chapter you zeroed in on counting declarer’s distribution.In this chapter you will zero in on counting tricks — yours anddeclarer’s. After all is said and done, bridge is a game of tricks. Youbid for tricks, you take as many tricks as you can in the play, and ondefense you try to prevent the opponents from taking enough tricksto make their contract.
4CountingTricksThey don’t ask how, just how many
OLD GOLF SAYING
♠ 89
WHATYOU’RE GOING
TO LEARN IN THIS
CHAPTER:• How to count declarer’s tricks
using clues from the biddingand the play
• How to use the same kind ofclues to count your own tricks
• How to change your defensivestrategy according to your trickcount
Clues from the bidding 90Clues from the dummy 91Clues from the first trick 93Counting dummy’s suit 105Counting declarer’s suit 109Counting trump tricks 112When dummy’s long suit
can be established 117Practice Hands 119Test Yourself 122Solutions 124Key ideas 128
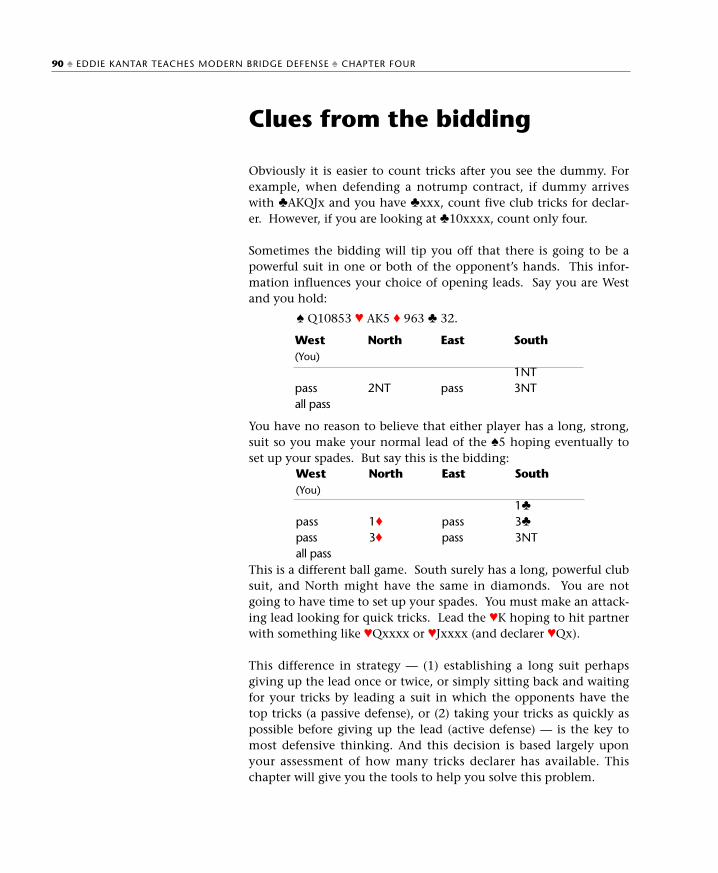
Clues from the bidding
Obviously it is easier to count tricks after you see the dummy. Forexample, when defending a notrump contract, if dummy arriveswith ♣AKQJx and you have ♣xxx, count five club tricks for declar-er. However, if you are looking at ♣10xxxx, count only four.
Sometimes the bidding will tip you off that there is going to be apowerful suit in one or both of the opponent’s hands. This infor-mation influences your choice of opening leads. Say you are Westand you hold:
♠ Q10853 ♥ AK5 ♦ 963 ♣ 32.
You have no reason to believe that either player has a long, strong,suit so you make your normal lead of the ♠5 hoping eventually toset up your spades. But say this is the bidding:
This is a different ball game. South surely has a long, powerful clubsuit, and North might have the same in diamonds. You are notgoing to have time to set up your spades. You must make an attack-ing lead looking for quick tricks. Lead the ♥K hoping to hit partnerwith something like ♥Qxxxx or ♥Jxxxx (and declarer ♥Qx).
This difference in strategy — (1) establishing a long suit perhapsgiving up the lead once or twice, or simply sitting back and waitingfor your tricks by leading a suit in which the opponents have thetop tricks (a passive defense), or (2) taking your tricks as quickly aspossible before giving up the lead (active defense) — is the key tomost defensive thinking. And this decision is based largely uponyour assessment of how many tricks declarer has available. Thischapter will give you the tools to help you solve this problem.
90 ♠ EDDIE KANTAR TEACHES MODERN BRIDGE DEFENSE ♠ CHAPTER FOUR
West (You)
passall pass
North
2NT
East
pass
South
1NT3NT
West (You)
passpassall pass
North
1♦
3♦
East
passpass
South
1♣
3♣
3NT
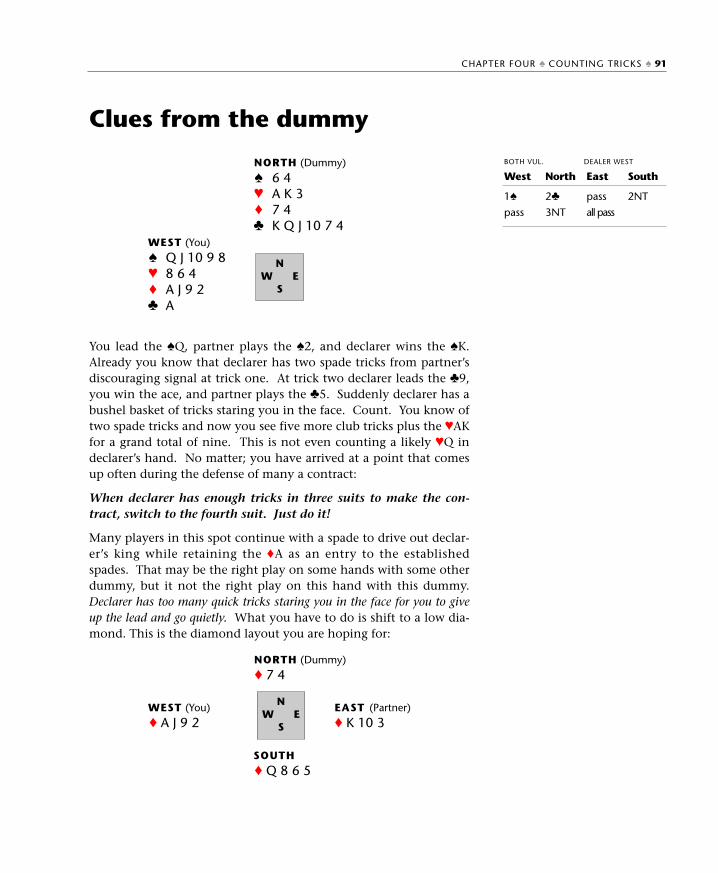
Clues from the dummy
You lead the ♠Q, partner plays the ♠2, and declarer wins the ♠K.Already you know that declarer has two spade tricks from partner’sdiscouraging signal at trick one. At trick two declarer leads the ♣9,you win the ace, and partner plays the ♣5. Suddenly declarer has abushel basket of tricks staring you in the face. Count. You know oftwo spade tricks and now you see five more club tricks plus the ♥AKfor a grand total of nine. This is not even counting a likely ♥Q indeclarer’s hand. No matter; you have arrived at a point that comesup often during the defense of many a contract:
When declarer has enough tricks in three suits to make the con-tract, switch to the fourth suit. Just do it!
Many players in this spot continue with a spade to drive out declar-er’s king while retaining the ♦A as an entry to the establishedspades. That may be the right play on some hands with some otherdummy, but it not the right play on this hand with this dummy.Declarer has too many quick tricks staring you in the face for you to giveup the lead and go quietly. What you have to do is shift to a low dia-mond. This is the diamond layout you are hoping for:
CHAPTER FOUR ♠ COUNTING TRICKS ♠ 91
NORTH (Dummy)
♠ 6 4♥ A K 3♦ 7 4♣ K Q J 10 7 4
WEST (You)
♠ Q J 10 9 8♥ 8 6 4♦ A J 9 2♣ A
NW E
S
West
1♠
pass
North
2♣
3NT
East
pass
all pass
South
2NT
BOTH VUL. DEALER WEST
NORTH (Dummy)
♦ 7 4
WEST (You) EAST (Partner)
♦ A J 9 2 ♦ K 10 3
SOUTH
♦ Q 8 6 5
NW E
S
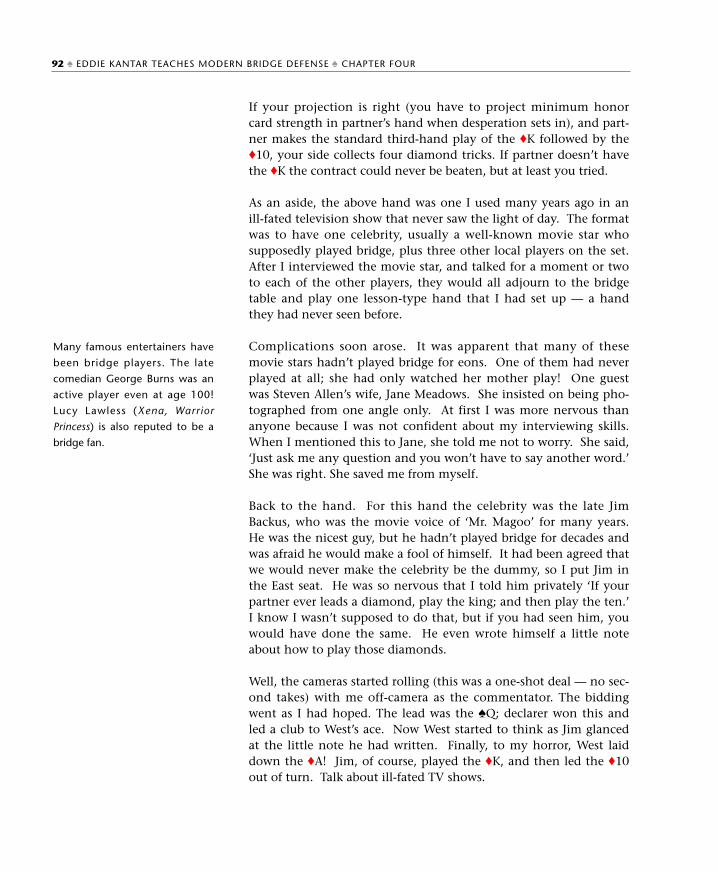
If your projection is right (you have to project minimum honorcard strength in partner’s hand when desperation sets in), and part-ner makes the standard third-hand play of the ♦K followed by the♦10, your side collects four diamond tricks. If partner doesn’t havethe ♦K the contract could never be beaten, but at least you tried.
As an aside, the above hand was one I used many years ago in anill-fated television show that never saw the light of day. The formatwas to have one celebrity, usually a well-known movie star whosupposedly played bridge, plus three other local players on the set.After I interviewed the movie star, and talked for a moment or twoto each of the other players, they would all adjourn to the bridgetable and play one lesson-type hand that I had set up — a handthey had never seen before.
Complications soon arose. It was apparent that many of thesemovie stars hadn’t played bridge for eons. One of them had neverplayed at all; she had only watched her mother play! One guestwas Steven Allen’s wife, Jane Meadows. She insisted on being pho-tographed from one angle only. At first I was more nervous thananyone because I was not confident about my interviewing skills.When I mentioned this to Jane, she told me not to worry. She said,‘Just ask me any question and you won’t have to say another word.’She was right. She saved me from myself.
Back to the hand. For this hand the celebrity was the late JimBackus, who was the movie voice of ‘Mr. Magoo’ for many years.He was the nicest guy, but he hadn’t played bridge for decades andwas afraid he would make a fool of himself. It had been agreed thatwe would never make the celebrity be the dummy, so I put Jim inthe East seat. He was so nervous that I told him privately ‘If yourpartner ever leads a diamond, play the king; and then play the ten.’I know I wasn’t supposed to do that, but if you had seen him, youwould have done the same. He even wrote himself a little noteabout how to play those diamonds.
Well, the cameras started rolling (this was a one-shot deal — no sec-ond takes) with me off-camera as the commentator. The biddingwent as I had hoped. The lead was the ♠Q; declarer won this andled a club to West’s ace. Now West started to think as Jim glancedat the little note he had written. Finally, to my horror, West laiddown the ♦A! Jim, of course, played the ♦K, and then led the ♦10out of turn. Talk about ill-fated TV shows.
Many famous entertainers have
been bridge players. The late
comedian George Burns was an
active player even at age 100!
Lucy Lawless (Xena, Warrior
Princess) is also reputed to be a
bridge fan.
92 ♠ EDDIE KANTAR TEACHES MODERN BRIDGE DEFENSE ♠ CHAPTER FOUR
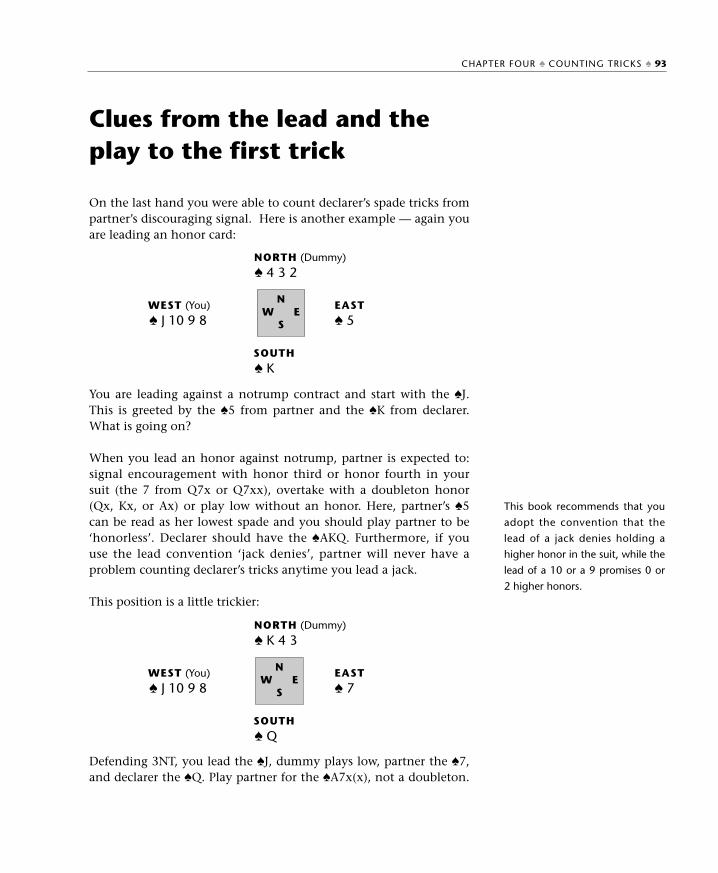
Clues from the lead and theplay to the first trick
On the last hand you were able to count declarer’s spade tricks frompartner’s discouraging signal. Here is another example — again youare leading an honor card:
You are leading against a notrump contract and start with the ♠J.This is greeted by the ♠5 from partner and the ♠K from declarer.What is going on?
When you lead an honor against notrump, partner is expected to:signal encouragement with honor third or honor fourth in yoursuit (the 7 from Q7x or Q7xx), overtake with a doubleton honor(Qx, Kx, or Ax) or play low without an honor. Here, partner’s ♠5can be read as her lowest spade and you should play partner to be‘honorless’. Declarer should have the ♠AKQ. Furthermore, if youuse the lead convention ‘jack denies’, partner will never have aproblem counting declarer’s tricks anytime you lead a jack.
This position is a little trickier:
Defending 3NT, you lead the ♠J, dummy plays low, partner the ♠7,and declarer the ♠Q. Play partner for the ♠A7x(x), not a doubleton.
This book recommends that you
adopt the convention that the
lead of a jack denies holding a
higher honor in the suit, while the
lead of a 10 or a 9 promises 0 or
2 higher honors.
CHAPTER FOUR ♠ COUNTING TRICKS ♠ 93
NORTH (Dummy)
♠ 4 3 2
WEST (You) EAST
♠ J 10 9 8 ♠ 5
SOUTH
♠ K
NW E
S
NORTH (Dummy)
♠ K 4 3
WEST (You) EAST
♠ J 10 9 8 ♠ 7
SOUTH
♠ Q
NW E
S
At notrump encouraging signals are generally reserved for honorcards, not shortness; assume declarer has one spade trick. If partnerplays a discouraging spade, play declarer for three spade tricks.
When an honor card is led, both players have a pretty good idea ofhow many tricks declarer can take in that suit. However, when aspot card is led, it is usually the opening leader who is in a betterposition to count declarer’s tricks.
Defending a notrump contract, you lead the ♠6 to the ♠10 and ♠A.How many spade tricks does declarer have coming? Two. Partnermust have the ♠J, or else declarer would have taken the trick withthat card. Partner cannot have the ♠K. He would have played itwith KJ10(x) in case you had led from the ace. Also, the play of the♠10 denies the ♠9. Declarer has the ♠AK9, partner ♠J10 doubleton.
Say declarer wins the opening lead with the ♠J, not the ace. Nowwhat is going on? Declarer must have the ♠AKJ9, and partner thesingleton ♠10. At notrump you have run into a hornet’s nest; in asuit contract, you can start giving partner spade ruffs.
Partner’s normal play of third hand high, but the lower of equals, isvery helpful in counting declarer’s tricks. Also, if partner wins thetrick in the suit you have led and returns the suit, the card partnerreturns is usually all you need to get a complete ‘read’ on the suit.
94 ♠ EDDIE KANTAR TEACHES MODERN BRIDGE DEFENSE ♠ CHAPTER FOUR
NORTH (Dummy)
♠ 5 4 3
WEST (You) EAST
♠ Q 8 7 6 2 ♠ 10
SOUTH
♠ A
NORTH (Dummy)
♠ 5 4
WEST (You) EAST
♠ A 10 8 3 2 ♠ K 9 7
SOUTH
♠ Q J 6
NW E
S
NW E
S
During the bidding South has denied holding four spades andwinds up in notrump. You lead the ♠3 to the king and six. Whenpartner returns the ♠9 (higher of two remaining cards), you knowdeclarer has the ♠QJ blank left. It is usually right to allow declarerto win the second round of the suit, keeping a spade in partner’shand to return to you in case partner has an outside entry.
Say the bidding has not been revealing and you lead the ♠3 againstnotrump. Partner wins the ace and returns her lowest card, the ♠6,showing an original holding of two or four cards. Most of the timethe bidding resolves these ambiguities; some of the time it doesn’t!
In the above diagram, partner started with two spades and it willcost you a trick to play the king on declarer’s queen and return thesuit. Partner will not be impressed. But suppose the spades weredistributed like this:
Again partner wins the ace and returns the six. Again declarer playsthe queen. This time your side has five spade tricks available andyou had better win the king and play back a low spade or you’llnever hear the end of it. Not to worry, nine times out of ten thebidding and/or the strength of the dummy tells you how manyspades declarer (or partner) has. Sometimes you have to play yourpartner for length to have any chance of defeating the contract.
When dummy wins your opening lead with the queen or a lower
CHAPTER FOUR ♠ COUNTING TRICKS ♠ 95
NORTH (Dummy)
♠ 5 4
WEST (You) EAST
♠ K 10 8 3 2 ♠ A 6
SOUTH
♠ Q J 9 7
NW E
S
NORTH (Dummy)
♠ 5 4
WEST (You) EAST
♠ K 10 8 3 2 ♠ A J 9 6
SOUTH
♠ Q 7
NW E
S
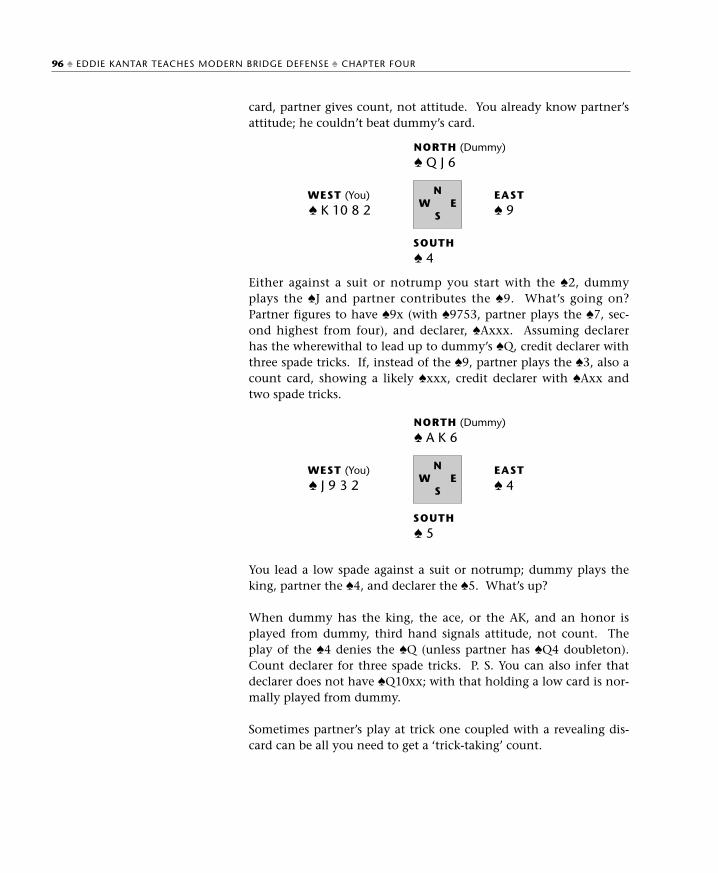
card, partner gives count, not attitude. You already know partner’sattitude; he couldn’t beat dummy’s card.
Either against a suit or notrump you start with the ♠2, dummyplays the ♠J and partner contributes the ♠9. What’s going on?Partner figures to have ♠9x (with ♠9753, partner plays the ♠7, sec-ond highest from four), and declarer, ♠Axxx. Assuming declarerhas the wherewithal to lead up to dummy’s ♠Q, credit declarer withthree spade tricks. If, instead of the ♠9, partner plays the ♠3, also acount card, showing a likely ♠xxx, credit declarer with ♠Axx andtwo spade tricks.
You lead a low spade against a suit or notrump; dummy plays theking, partner the ♠4, and declarer the ♠5. What’s up?
When dummy has the king, the ace, or the AK, and an honor isplayed from dummy, third hand signals attitude, not count. Theplay of the ♠4 denies the ♠Q (unless partner has ♠Q4 doubleton).Count declarer for three spade tricks. P. S. You can also infer thatdeclarer does not have ♠Q10xx; with that holding a low card is nor-mally played from dummy.
Sometimes partner’s play at trick one coupled with a revealing dis-card can be all you need to get a ‘trick-taking’ count.
96 ♠ EDDIE KANTAR TEACHES MODERN BRIDGE DEFENSE ♠ CHAPTER FOUR
NORTH (Dummy)
♠ Q J 6
WEST (You) EAST
♠ K 10 8 2 ♠ 9
SOUTH
♠ 4
NW E
S
NORTH (Dummy)
♠ A K 6
WEST (You) EAST
♠ J 9 3 2 ♠ 4
SOUTH
♠ 5
NW E
S
You elect to lead the ♦4 in preference to the ♥4 and partner’s ♦Jloses to the king. At trick two a low club is led to the jack, partnerfollowing. When declarer continues with the ♣10 from dummy,partner discards the ♠2. What now? Think like this: ‘I knowdeclarer has two diamond tricks from the play to trick one.Furthermore, because the ♦9 is in dummy I can establish my dia-monds using the king of hearts as my entry to get in and cash mydiamonds’. That’s one way to look at this problem, but it’s thewrong way. It only takes into account your eventual tricks; it doesnot take into account declarer’s immediate tricks, tricks that can betaken the next time declarer has the lead.
Declarer has two diamond tricks, and now four club tricks for atotal of six. The discard of the ♠2 tells you that declarer has the ♠A.This, in turn, means you can add at least three tricks to your previ-ous total of declarer’s ‘immediate tricks’ giving declarer nine or tentricks ‘on the ready’ (they can be taken the next time declarer hasthe lead).
Players who are not counting declarer’s tricks will continue with ahigh diamond upon winning the ♣A. Happily you are no longer acard-carrying member of that union. Your play is to shift to a lowheart upon winning the ♣A. You must find partner with the♥Axx(x) to defeat this contract. These are the unseen hands:
Declarer’s hand: ♠ A3 ♥ Q109 ♦ AK76 ♣ Q753Partner’s hand: ♠ J876542 ♥ A32 ♦ J5 ♣ 8
If partner wins the ♥A and returns a heart, your side takes fourheart tricks and defeats the contract. But what if partner wins the♥A and returns a diamond? Horrors! Now declarer has nine tricks.
CHAPTER FOUR ♠ COUNTING TRICKS ♠ 97
NORTH (Dummy)
♠ K Q 10♥ 8 7 6♦ 9 2♣ K J 10 9 4
WEST (You)
♠ 9♥ K J 5 4♦ Q 10 8 4 3♣ A 6 2
NW E
S
West
pass
North
3NT
East
all pass
South
1NT
NEITHER VUL. DEALER SOUTH
How does partner know to return a diamond, your first suit, or aheart, your second suit? It goes by the relative size of the card youlead in the second suit. If you lead a relatively low card in your sec-ond suit, you are asking partner to return your second suit; if youlead a relatively high card in your second suit, you are asking part-ner to return the first suit. Got it?
This ‘rule of switching’ is consistent with the lead of a low cardshowing strength and the lead of a high card denying strength.You just have to educate your partner on how to deal with yourmagnificent switches. If you had wanted partner to return a dia-mond because you couldn’t safely lead one yourself, you wouldhave switched to a high heart. Say your hearts were something like♥J8x(x) or ♥108x(x). With those holdings switch to the ♥8.
Most important is that you realize why you are shifting to a secondsuit when you can so easily set up your first suit. You don’t have timeto set up your first suit! Now try this one:
Blessed with a beautiful spade sequence you lead the ♠Q, capturedby dummy’s ♠K. The ♣J is led from dummy, partner plays the ♣2,count, and you win the ♣K. How many tricks does declarer haveready to roll?
You know declarer has two spade tricks, and at most three hearttricks (South has denied a four-card major, remember?) for a total offive. What about clubs? Partner’s ♣2 shows an odd number ofclubs, clearly three, which means declarer started with four clubsand has three club tricks established for a grand total of eight.There is no need to panic and shift to a diamond. Bide your time;
‘Relatively’ in this sense means
that if you switch to, say, a six in
your second suit, and the 2,3,4
and 5 are all visible, the six is a
‘relatively’ low card. In fact, it is a
very low card! Conversely if you
switch to a six and none of the
lower cards is visible, that six
should be considered a ‘relatively’
high card.
98 ♠ EDDIE KANTAR TEACHES MODERN BRIDGE DEFENSE ♠ CHAPTER FOUR
NORTH (Dummy)
♠ K 4 3 2♥ K Q J♦ 6 5♣ J 10 6 3
WEST (You)
♠ Q J 10 9 7♥ 9 2♦ A J 9 3♣ K 5
NW E
S
West
pass
pass
North
2♣
3NT
East
pass
all pass
South
1NT
2♦
EAST-WEST VUL. DEALER SOUTH
drive out declarer’s ♠A, and sit back and wait for declarer who even-tually will have to lead a diamond. When she does, you will beready.
For the curious: Declarer’s hand: ♠ A85 ♥ A86 ♦ K107 ♣ AQ87Partner’s hand: ♠ 6 ♥ 107543 ♦ Q842 ♣ 942
Bridge is a strange game. If partner had played the ♣9 at trick two,showing a doubleton, declarer’s immediate trick count after youwon the ♣K would have been nine, not eight (four clubs, twospades and three hearts). Now the right play is to shift to a low dia-mond hoping partner has ♦Kx or ♦Kxx to defeat the contract.
The Rule of E1even helps third hand count declarer’s tricks in thesuit that has been led:
Assume South opens 1NT, denies a four-card major, and winds upin 3NT. Partner leads the ♠6 and your ♠Q loses to the ♠K. What canyou deduce using the Rule ?
The Rule of Eleven (subtracting the card partner has led from 11)tells you that there are five spades higher than the ♠6 in the threeremaining hands: dummy’s, yours, and declarer’s. You can see fourhigher spades (two in your hand, two in the dummy) so declarerhas started life with only one spade higher than the ♠6, the ♠K.
The implications are clear. Partner has started with ♠AJ8xx(x) andthe spades are ready to rumble. Do not let declarer steal a trickfrom you in another suit by playing second hand low with a side-suit winner when your side has the setting tricks ready to be taken.
Speaking of ‘stealing’, defenders live by the rule
Thou shalt not steal the contract-fulfilling trick from under me.
CHAPTER FOUR ♠ COUNTING TRICKS ♠ 99
NORTH (Dummy)
♠ 9 7
WEST EAST (You)
♠ 6 ♠ Q 10 2
SOUTH
♠ K
NW E
S
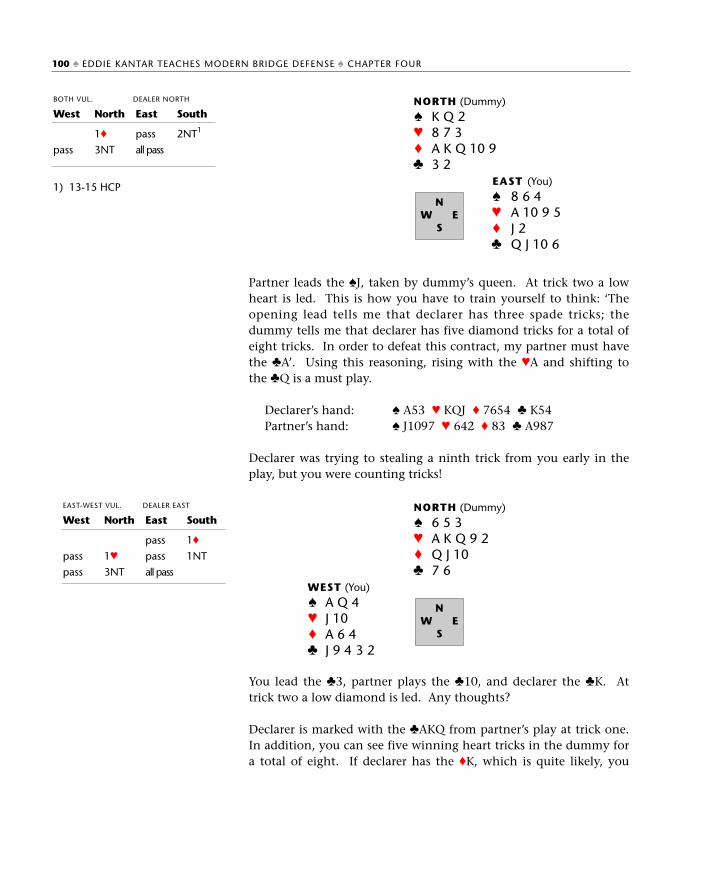
Partner leads the ♠J, taken by dummy’s queen. At trick two a lowheart is led. This is how you have to train yourself to think: ‘Theopening lead tells me that declarer has three spade tricks; thedummy tells me that declarer has five diamond tricks for a total ofeight tricks. In order to defeat this contract, my partner must havethe ♣A’. Using this reasoning, rising with the ♥A and shifting tothe ♣Q is a must play.
Declarer’s hand: ♠ A53 ♥ KQJ ♦ 7654 ♣ K54Partner’s hand: ♠ J1097 ♥ 642 ♦ 83 ♣ A987
Declarer was trying to stealing a ninth trick from you early in theplay, but you were counting tricks!
You lead the ♣3, partner plays the ♣10, and declarer the ♣K. Attrick two a low diamond is led. Any thoughts?
Declarer is marked with the ♣AKQ from partner’s play at trick one.In addition, you can see five winning heart tricks in the dummy fora total of eight. If declarer has the ♦K, which is quite likely, you
1) 13-15 HCP
100 ♠ EDDIE KANTAR TEACHES MODERN BRIDGE DEFENSE ♠ CHAPTER FOUR
NORTH (Dummy)
♠ K Q 2♥ 8 7 3♦ A K Q 10 9♣ 3 2
EAST (You)
♠ 8 6 4♥ A 10 9 5 ♦ J 2♣ Q J 10 6
NW E
S
West
pass
North
1♦
3NT
East
pass
all pass
South
2NT1
BOTH VUL. DEALER NORTH
West
pass
pass
North
1♥
3NT
East
pass
pass
all pass
South
1♦
1NT
EAST-WEST VUL. DEALER EAST NORTH (Dummy)
♠ 6 5 3♥ A K Q 9 2♦ Q J 10♣ 7 6
WEST (You)
♠ A Q 4♥ J 10♦ A 6 4♣ J 9 4 3 2
NW E
S
cannot afford to play low. You would be giving declarer her ninthtrick! A better play is to go up with the ♦A and switch to the ace-queen of spades! If declarer has the ♦K, not only does partner needthe ♠K to defeat the contract, but he is also marked with that card.With the ♣AKQ and two more kings, South would have opened1NT. What if partner has the ♦K and declarer the ♠K? Then youcould be looking very silly, couldn’t you?
Declarer’s hand: ♠ J108 ♥ 543 ♦ K832 ♣ AKQPartner’s hand: ♠ K972 ♥ 876 ♦ 975 ♣ 1085
When a ‘conventional’ lead is made
If the opening lead is a conventional card such as a jack (jackdenies) or a 9 or 10 (zero or two higher), third hand can often directthe course of the defense more accurately. Of course, this assumesyou are using these lead conventions.
(1) How do you defend if partner leads the ♥10 (0 or 2 higher)?(2) How do you defend if partner leads the ♥9 (0 or 2 higher)?
If partner leads a conventional ♥10 and you are looking at the ♥J,partner must be leading top of a sequence, giving declarer the ♥KQ.That in itself isn’t so terrible, but that plus the dummy you arelooking at, is. You don’t have time to develop partner’s hearts witheight or nine black-suit tricks staring you in the face. Your play isto rise with the ♥A and shift to the ♦J hoping partner has ♦AQxx.
However, if partner leads a conventional ♥9, partner figures to beleading from the ♥K109xx or ♥Q109xx. It would be nice to know
Even if partner has the ♦K, and
declarer the ♠K, you still can’t
beat the hand if declarer has
♠K10x or ♠KJx even if partner is
clairvoyant enough to return a
spade instead of a club. Winning
the ♦A and shifting to a high
spade is your percentage action.
1) 13-15 HCP
CHAPTER FOUR ♠ COUNTING TRICKS ♠ 101
NORTH (Dummy)
♠ A J 9♥ 5 4♦ 7 6♣ A Q 10 6 5 2
EAST (You)
♠ 7 6 2♥ A J 3♦ J 10 9 8♣ 9 8 7
NW E
S
West
pass
North
1♣
3NT
East
pass
all pass
South
2NT1
EAST-WEST VUL. DEALER NORTH
which, but your best shot is to win the ♥A and return the ♥J hoping(praying) partner has led from the ♥K109xx. Playing partner for onecard, the ♥K, is better than playing partner for two cards, the ♦AQ. Partner leads the ♠J (jack denies) and you begin an unblock by play-
ing the ♠Q which holds. You continue with the ♠K which alsoholds. Should you play a third spade to drive out the ace?
Count tricks. Declarer has the ♠A, six diamond tricks (whoever hasthe ♦K), and surely several club tricks once your ace is driven out.And how are you going to get partner in to score those establishedspades if you do play a third spade?
If partner has the ♥K, you can underlead your ♥A after you get inwith the ♣A and all will be rosy. But what if declarer has the ♥K?When you lead a low heart he will surely play it to prevent partnerfrom getting in. Actually, all you need in partner’s hand to defeatthis contract is the ♥Q, not the ♥K.
Simply switch to a low heart at trick three before your ♣A has beendriven out. Even if declarer plays the ♥K, you have five tricks readyto be taken once you get in with the ♣A: two spades, the ♣A, andtwo hearts. Counting your tricks and their tricks was once againthe answer.
102 ♠ EDDIE KANTAR TEACHES MODERN BRIDGE DEFENSE ♠ CHAPTER FOUR
NORTH (Dummy)
♠ 4♥ 6 3 2♦ A Q J 10 8 7♣ K Q 3
WEST EAST (You)
♠ J 10 9 8 5 2 ♠ K Q 3♥ Q 8 5 ♥ A 7 4♦ 9 ♦ 6 4 3 2♣ 9 5 4 ♣ A 7 6
SOUTH
♠ A 7 6♥ K J 10 9♦ K 5♣ J 10 8 2
NW E
S
West
pass
all pass
North
1♦
2♦
East
pass
pass
South
1♥
3NT
BOTH VUL. DEALER NORTH
When partner leads an obvious singleton
Partner leads the ♦4, an obvious singleton. Of course the firstimpulse is to win the ace and give partner a diamond ruff.However, first impulses are not always right. A better impulse is tocount your tricks. You need four tricks to defeat this contract andyou can see three: the ♦A, the ♠A and a diamond ruff. Furthermore,you know you can give partner that diamond ruff later when atrump is played because partner figures to have two spades (partneris unlikely to have two singletons and be silent throughout theentire auction). A far better play at trick two is a heart, trying tobuild up your fourth defensive trick there before declarer’s hearts goaway on the established diamonds.
Opening leader’s play with ‘remaining equals’
Wondering what that means? Consider this diagram:
CHAPTER FOUR ♠ COUNTING TRICKS ♠ 103
NORTH (Dummy)
♠ K 10 9 5♥ Q 10♦ K Q 10 7 6♣ A K
WEST EAST (You)
♠ 6 3 ♠ A 8 4♥ K J 4 3 2 ♥ 9 6 5♦ 4 ♦ A 9 3 2♣ Q 8 7 3 2 ♣ 10 9 5
SOUTH
♠ Q J 7 2♥ A 8 7♦ J 8 5♣ J 6 4
NW E
S
West
pass
pass
all pass
North
1♦
3♠
East
pass
pass
South
1♠
4♠
BOTH VUL. DEALER WEST
NORTH (Dummy)
♠ 7 3
WEST (You) EAST
♠ J 9 8 6 5 ♠ A 10 2
SOUTH
♠ K Q 4
NW E
S
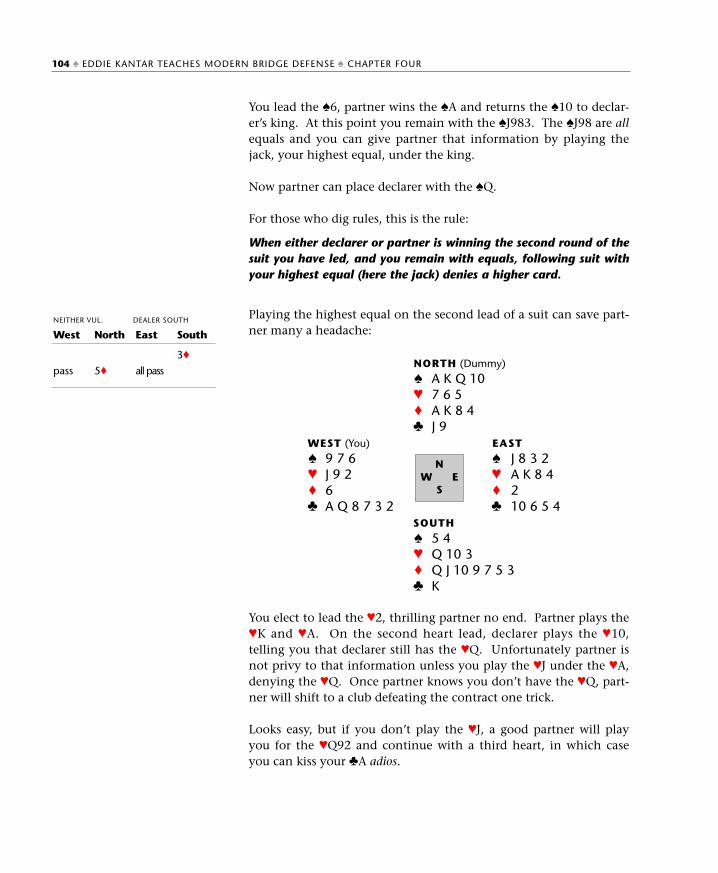
You lead the ♠6, partner wins the ♠A and returns the ♠10 to declar-er’s king. At this point you remain with the ♠J983. The ♠J98 are allequals and you can give partner that information by playing thejack, your highest equal, under the king.
Now partner can place declarer with the ♠Q.
For those who dig rules, this is the rule:
When either declarer or partner is winning the second round of thesuit you have led, and you remain with equals, following suit withyour highest equal (here the jack) denies a higher card.
Playing the highest equal on the second lead of a suit can save part-ner many a headache:
You elect to lead the ♥2, thrilling partner no end. Partner plays the♥K and ♥A. On the second heart lead, declarer plays the ♥10,telling you that declarer still has the ♥Q. Unfortunately partner isnot privy to that information unless you play the ♥J under the ♥A,denying the ♥Q. Once partner knows you don’t have the ♥Q, part-ner will shift to a club defeating the contract one trick.
Looks easy, but if you don’t play the ♥J, a good partner will playyou for the ♥Q92 and continue with a third heart, in which caseyou can kiss your ♣A adios.
104 ♠ EDDIE KANTAR TEACHES MODERN BRIDGE DEFENSE ♠ CHAPTER FOUR
NORTH (Dummy)
♠ A K Q 10♥ 7 6 5♦ A K 8 4♣ J 9
WEST (You) EAST
♠ 9 7 6 ♠ J 8 3 2♥ J 9 2 ♥ A K 8 4♦ 6 ♦ 2♣ A Q 8 7 3 2 ♣ 10 6 5 4
SOUTH
♠ 5 4♥ Q 10 3♦ Q J 10 9 7 5 3♣ K
NW E
S
West
pass
North
5♦
East
all pass
South
3♦
NEITHER VUL. DEALER SOUTH
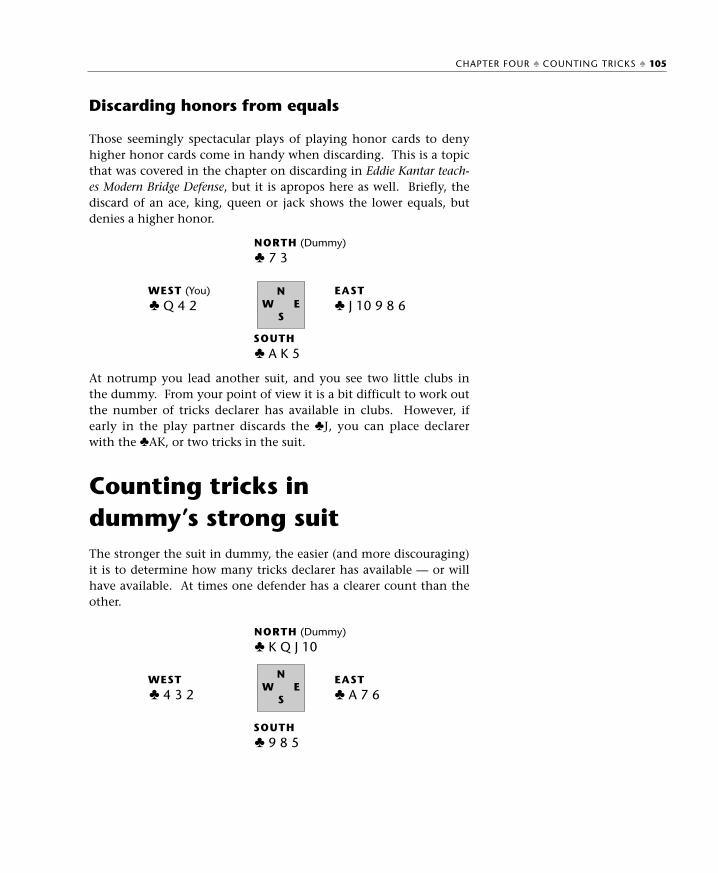
Discarding honors from equals
Those seemingly spectacular plays of playing honor cards to denyhigher honor cards come in handy when discarding. This is a topicthat was covered in the chapter on discarding in Eddie Kantar teach-es Modern Bridge Defense, but it is apropos here as well. Briefly, thediscard of an ace, king, queen or jack shows the lower equals, butdenies a higher honor.
At notrump you lead another suit, and you see two little clubs inthe dummy. From your point of view it is a bit difficult to work outthe number of tricks declarer has available in clubs. However, ifearly in the play partner discards the ♣J, you can place declarerwith the ♣AK, or two tricks in the suit.
Counting tricks indummy’s strong suitThe stronger the suit in dummy, the easier (and more discouraging)it is to determine how many tricks declarer has available — or willhave available. At times one defender has a clearer count than theother.
CHAPTER FOUR ♠ COUNTING TRICKS ♠ 105
NORTH (Dummy)
♣ 7 3
WEST (You) EAST
♣ Q 4 2 ♣ J 10 9 8 6
SOUTH
♣ A K 5
NW E
S
NORTH (Dummy)
♣ K Q J 10
WEST EAST
♣ 4 3 2 ♣ A 7 6
SOUTH
♣ 9 8 5
NW E
S

This is notrump and there are side entries to the dummy. FromWest’s point of view, declarer has either three or four club tricksdepending upon who has the ace. East, on the other hand, knowsthat declarer soon will have three club tricks available.
For the sake of discussion, exchange the East and South clubs. Nowneither defender can see the ♣A. However, if declarer does not tryto drive out the ♣A, a play that is almost automatic with a suit ofthis strength in the dummy, the inference is that declarer has the♣A and both defenders should count declarer for four club tricks.
At times looks can be deceiving:
This time West can’t be sure how many club tricks declarer has, butEast knows that declarer has only two club tricks coming. If East’s♣10 is a smaller club, East counts three club tricks as the ten is like-ly to fall under the KQJ unless declarer started with a small single-ton.
Strong suits in the dummy missing the king lend themselves to easytrick counting:
NORTH (Dummy)
♣ A Q J 10
When you see a suit like this and declarer doesn’t attack this suit,play declarer for the king. If declarer takes the finesse and it loses,play declarer for three tricks. If you (West) have the king, and thefinesse can be repeated as many times as necessary, count fourtricks.
When you do have honor cards in dummy’s long suit, the relation-ship of your honors to dummy’s honors is critical. First, the goodnews: when your honors are sitting ‘over’ dummy’s honors (youplay after dummy).
106 ♠ EDDIE KANTAR TEACHES MODERN BRIDGE DEFENSE ♠ CHAPTER FOUR
NORTH (Dummy)
♣ K Q J 9
WEST EAST
♣ 7 2 ♣ A 10 5 3
SOUTH
♣ 8 6 4
NW E
S
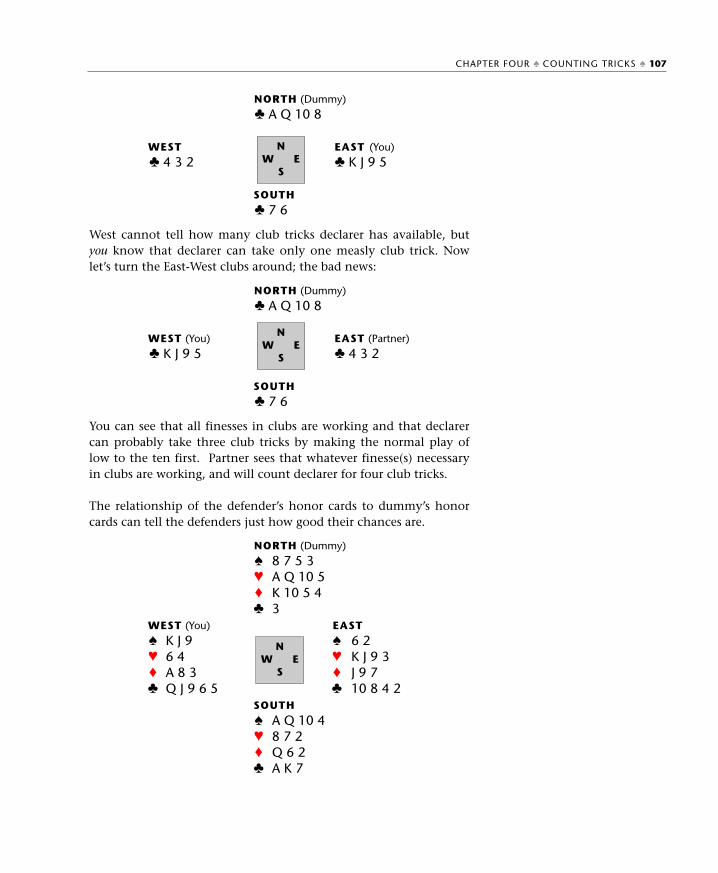
West cannot tell how many club tricks declarer has available, butyou know that declarer can take only one measly club trick. Nowlet’s turn the East-West clubs around; the bad news:
You can see that all finesses in clubs are working and that declarercan probably take three club tricks by making the normal play oflow to the ten first. Partner sees that whatever finesse(s) necessaryin clubs are working, and will count declarer for four club tricks.
The relationship of the defender’s honor cards to dummy’s honorcards can tell the defenders just how good their chances are.
CHAPTER FOUR ♠ COUNTING TRICKS ♠ 107
NORTH (Dummy)
♣ A Q 10 8
WEST EAST (You)
♣ 4 3 2 ♣ K J 9 5
SOUTH
♣ 7 6
NW E
S
NORTH (Dummy)
♣ A Q 10 8
WEST (You) EAST (Partner)
♣ K J 9 5 ♣ 4 3 2
SOUTH
♣ 7 6
NW E
S
NORTH (Dummy)
♠ 8 7 5 3♥ A Q 10 5♦ K 10 5 4♣ 3
WEST (You) EAST
♠ K J 9 ♠ 6 2♥ 6 4 ♥ K J 9 3♦ A 8 3 ♦ J 9 7♣ Q J 9 6 5 ♣ 10 8 4 2
SOUTH
♠ A Q 10 4♥ 8 7 2♦ Q 6 2♣ A K 7
NW E
S
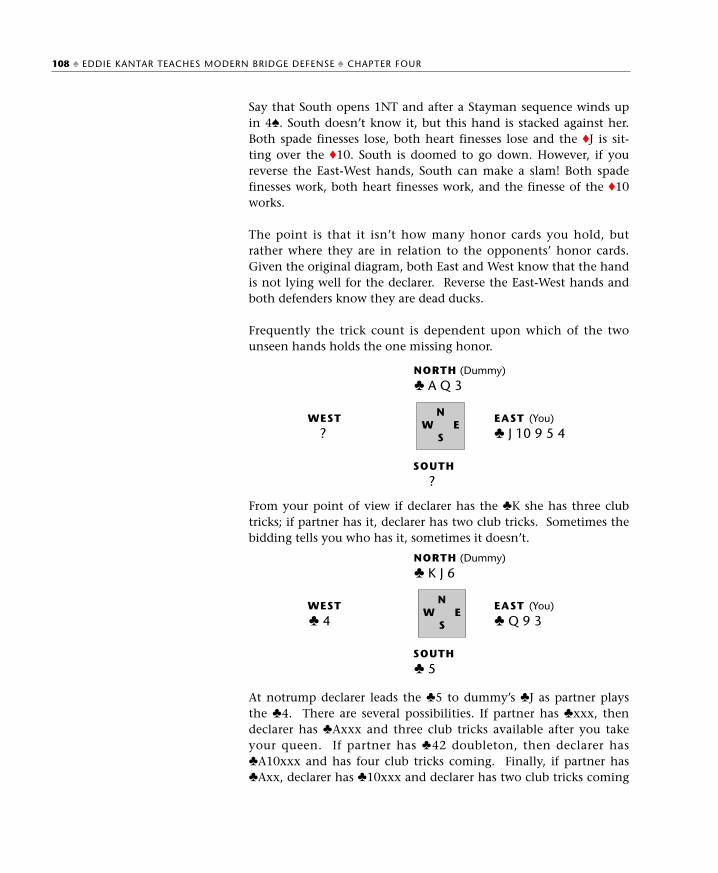
Say that South opens 1NT and after a Stayman sequence winds upin 4♠. South doesn’t know it, but this hand is stacked against her.Both spade finesses lose, both heart finesses lose and the ♦J is sit-ting over the ♦10. South is doomed to go down. However, if youreverse the East-West hands, South can make a slam! Both spadefinesses work, both heart finesses work, and the finesse of the ♦10works.
The point is that it isn’t how many honor cards you hold, butrather where they are in relation to the opponents’ honor cards.Given the original diagram, both East and West know that the handis not lying well for the declarer. Reverse the East-West hands andboth defenders know they are dead ducks.
Frequently the trick count is dependent upon which of the twounseen hands holds the one missing honor.
From your point of view if declarer has the ♣K she has three clubtricks; if partner has it, declarer has two club tricks. Sometimes thebidding tells you who has it, sometimes it doesn’t.
At notrump declarer leads the ♣5 to dummy’s ♣J as partner playsthe ♣4. There are several possibilities. If partner has ♣xxx, thendeclarer has ♣Axxx and three club tricks available after you takeyour queen. If partner has ♣42 doubleton, then declarer has♣A10xxx and has four club tricks coming. Finally, if partner has♣Axx, declarer has ♣10xxx and declarer has two club tricks coming
108 ♠ EDDIE KANTAR TEACHES MODERN BRIDGE DEFENSE ♠ CHAPTER FOUR
NORTH (Dummy)
♣ A Q 3
WEST EAST (You)
? ♣ J 10 9 5 4
SOUTH
?
NW E
S
NORTH (Dummy)
♣ K J 6
WEST EAST (You)
♣ 4 ♣ Q 9 3
SOUTH
♣ 5
NW E
S
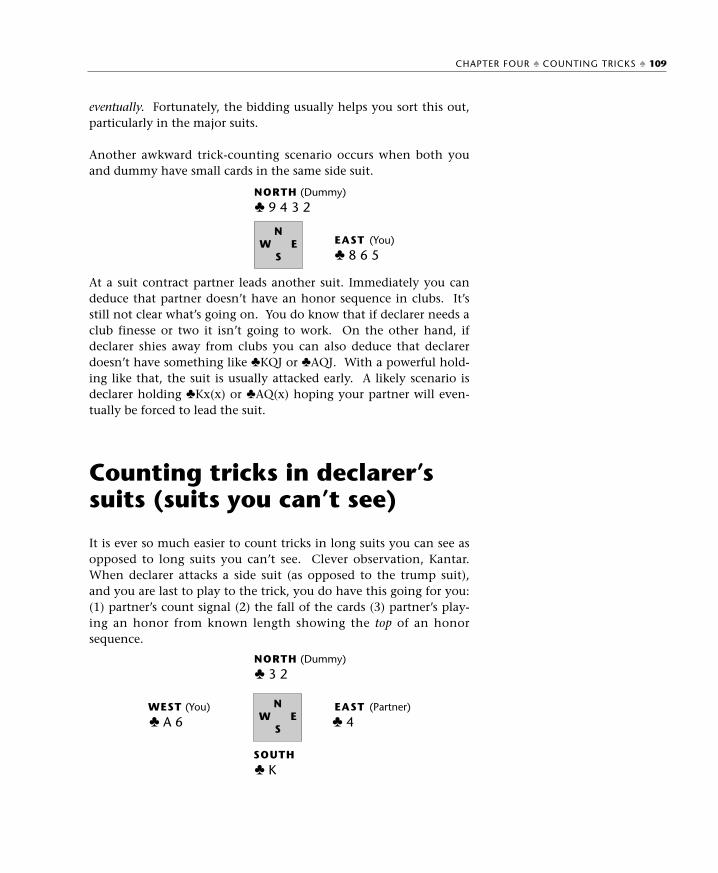
eventually. Fortunately, the bidding usually helps you sort this out,particularly in the major suits.
Another awkward trick-counting scenario occurs when both youand dummy have small cards in the same side suit.
At a suit contract partner leads another suit. Immediately you candeduce that partner doesn’t have an honor sequence in clubs. It’sstill not clear what’s going on. You do know that if declarer needs aclub finesse or two it isn’t going to work. On the other hand, ifdeclarer shies away from clubs you can also deduce that declarerdoesn’t have something like ♣KQJ or ♣AQJ. With a powerful hold-ing like that, the suit is usually attacked early. A likely scenario isdeclarer holding ♣Kx(x) or ♣AQ(x) hoping your partner will even-tually be forced to lead the suit.
Counting tricks in declarer’ssuits (suits you can’t see)
It is ever so much easier to count tricks in long suits you can see asopposed to long suits you can’t see. Clever observation, Kantar.When declarer attacks a side suit (as opposed to the trump suit),and you are last to play to the trick, you do have this going for you:(1) partner’s count signal (2) the fall of the cards (3) partner’s play-ing an honor from known length showing the top of an honorsequence.
CHAPTER FOUR ♠ COUNTING TRICKS ♠ 109
NORTH (Dummy)
♣ 9 4 3 2
EAST (You)
♣ 8 6 5
NW E
S
NORTH (Dummy)
♣ 3 2
WEST (You) EAST (Partner)
♣ A 6 ♣ 4
SOUTH
♣ K
NW E
S
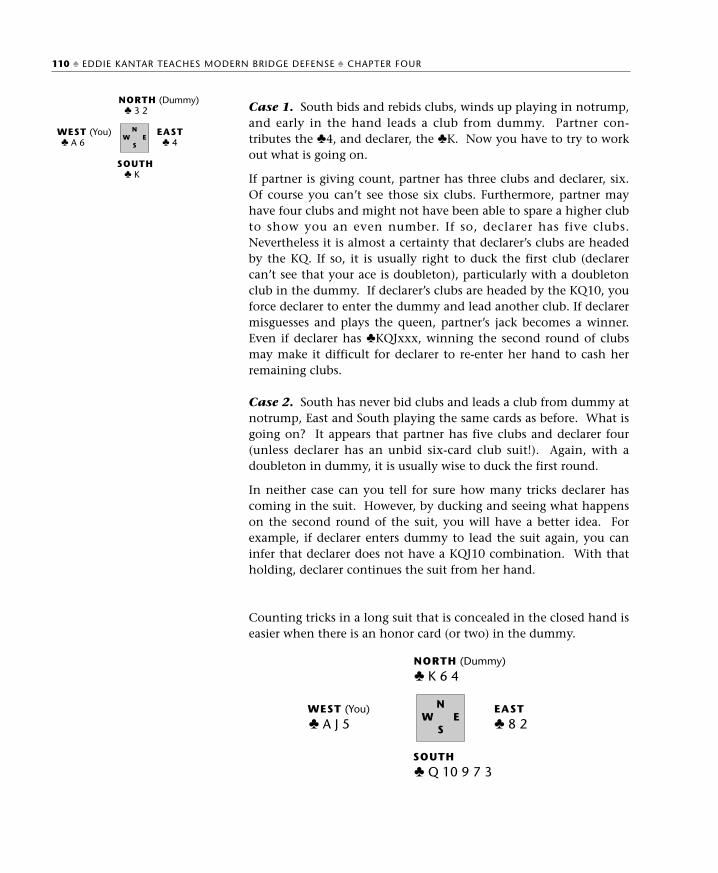
NORTH (Dummy)♣ 3 2
WEST (You) EAST♣ A 6 ♣ 4
SOUTH♣ K
Case 1. South bids and rebids clubs, winds up playing in notrump,and early in the hand leads a club from dummy. Partner con-tributes the ♣4, and declarer, the ♣K. Now you have to try to workout what is going on.
If partner is giving count, partner has three clubs and declarer, six.Of course you can’t see those six clubs. Furthermore, partner mayhave four clubs and might not have been able to spare a higher clubto show you an even number. If so, declarer has five clubs.Nevertheless it is almost a certainty that declarer’s clubs are headedby the KQ. If so, it is usually right to duck the first club (declarercan’t see that your ace is doubleton), particularly with a doubletonclub in the dummy. If declarer’s clubs are headed by the KQ10, youforce declarer to enter the dummy and lead another club. If declarermisguesses and plays the queen, partner’s jack becomes a winner.Even if declarer has ♣KQJxxx, winning the second round of clubsmay make it difficult for declarer to re-enter her hand to cash herremaining clubs.
Case 2. South has never bid clubs and leads a club from dummy atnotrump, East and South playing the same cards as before. What isgoing on? It appears that partner has five clubs and declarer four(unless declarer has an unbid six-card club suit!). Again, with adoubleton in dummy, it is usually wise to duck the first round.
In neither case can you tell for sure how many tricks declarer hascoming in the suit. However, by ducking and seeing what happenson the second round of the suit, you will have a better idea. Forexample, if declarer enters dummy to lead the suit again, you caninfer that declarer does not have a KQJ10 combination. With thatholding, declarer continues the suit from her hand.
Counting tricks in a long suit that is concealed in the closed hand iseasier when there is an honor card (or two) in the dummy.
110 ♠ EDDIE KANTAR TEACHES MODERN BRIDGE DEFENSE ♠ CHAPTER FOUR
NORTH (Dummy)
♣ K 6 4
WEST (You) EAST
♣ A J 5 ♣ 8 2
SOUTH
♣ Q 10 9 7 3
NW E
S
NW E
S
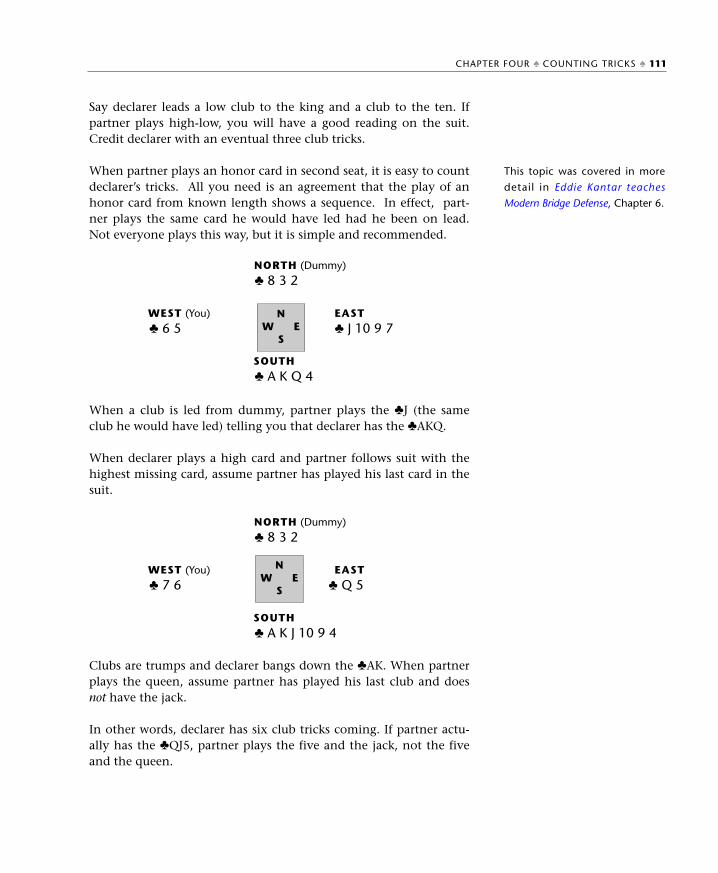
Say declarer leads a low club to the king and a club to the ten. Ifpartner plays high-low, you will have a good reading on the suit.Credit declarer with an eventual three club tricks.
When partner plays an honor card in second seat, it is easy to countdeclarer’s tricks. All you need is an agreement that the play of anhonor card from known length shows a sequence. In effect, part-ner plays the same card he would have led had he been on lead.Not everyone plays this way, but it is simple and recommended.
When a club is led from dummy, partner plays the ♣J (the sameclub he would have led) telling you that declarer has the ♣AKQ.
When declarer plays a high card and partner follows suit with thehighest missing card, assume partner has played his last card in thesuit.
Clubs are trumps and declarer bangs down the ♣AK. When partnerplays the queen, assume partner has played his last club and doesnot have the jack.
In other words, declarer has six club tricks coming. If partner actu-ally has the ♣QJ5, partner plays the five and the jack, not the fiveand the queen.
This topic was covered in more
detail in Eddie Kantar teaches
Modern Bridge Defense, Chapter 6.
CHAPTER FOUR ♠ COUNTING TRICKS ♠ 111
NORTH (Dummy)
♣ 8 3 2
WEST (You) EAST
♣ 6 5 ♣ J 10 9 7
SOUTH
♣ A K Q 4
NW E
S
NORTH (Dummy)
♣ 8 3 2
WEST (You) EAST
♣ 7 6 ♣ Q 5
SOUTH
♣ A K J 10 9 4
NW E
S
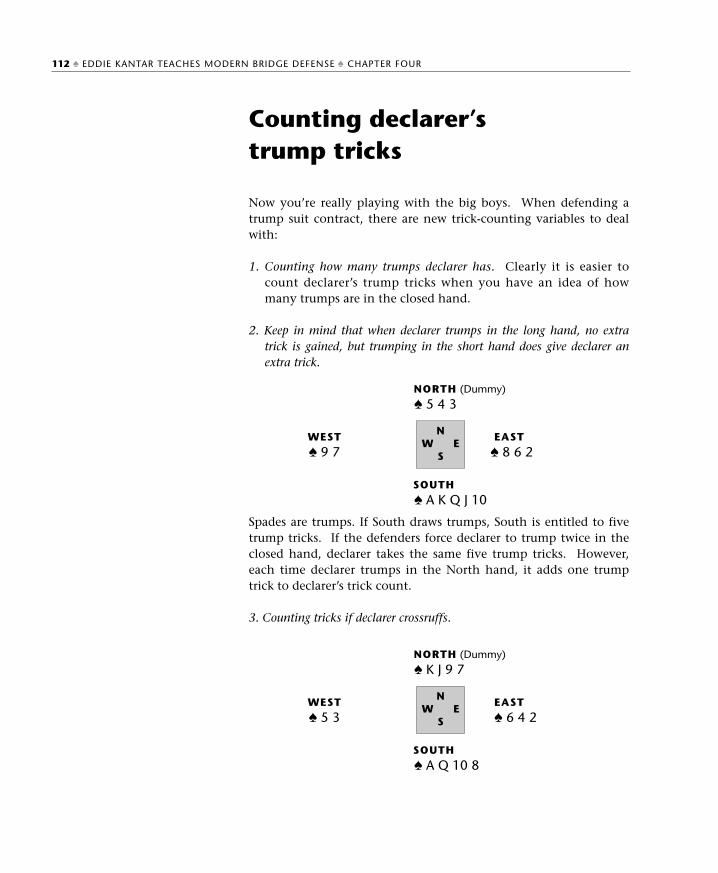
Counting declarer’strump tricks
Now you’re really playing with the big boys. When defending atrump suit contract, there are new trick-counting variables to dealwith:
1. Counting how many trumps declarer has. Clearly it is easier tocount declarer’s trump tricks when you have an idea of howmany trumps are in the closed hand.
2. Keep in mind that when declarer trumps in the long hand, no extratrick is gained, but trumping in the short hand does give declarer anextra trick.
Spades are trumps. If South draws trumps, South is entitled to fivetrump tricks. If the defenders force declarer to trump twice in theclosed hand, declarer takes the same five trump tricks. However,each time declarer trumps in the North hand, it adds one trumptrick to declarer’s trick count.
3. Counting tricks if declarer crossruffs.
112 ♠ EDDIE KANTAR TEACHES MODERN BRIDGE DEFENSE ♠ CHAPTER FOUR
NORTH (Dummy)
♠ 5 4 3
WEST EAST
♠ 9 7 ♠ 8 6 2
SOUTH
♠ A K Q J 10
NW E
S
NORTH (Dummy)
♠ K J 9 7
WEST EAST
♠ 5 3 ♠ 6 4 2
SOUTH
♠ A Q 10 8
NW E
S
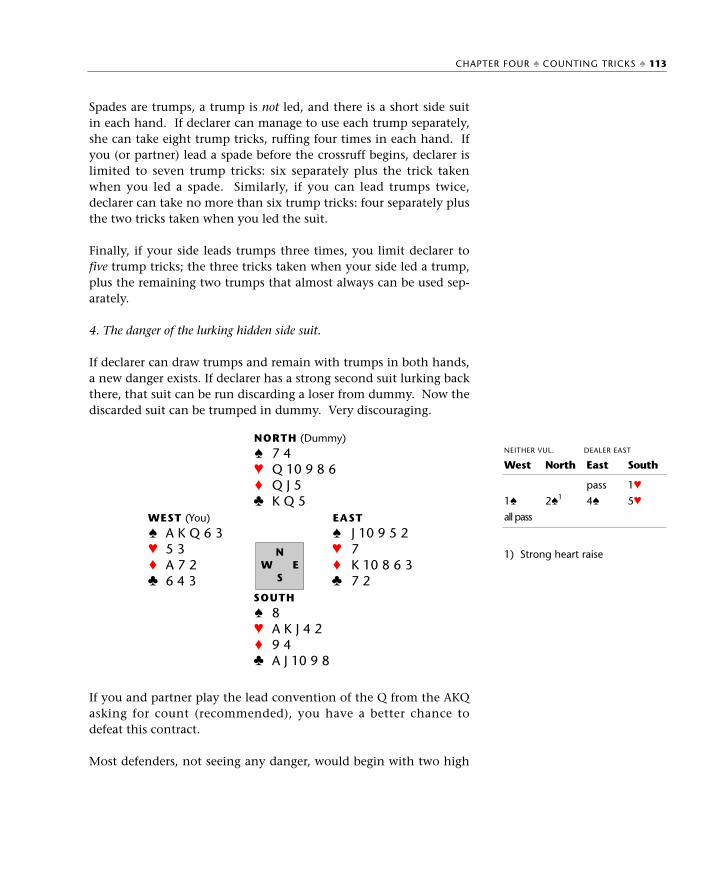
Spades are trumps, a trump is not led, and there is a short side suitin each hand. If declarer can manage to use each trump separately,she can take eight trump tricks, ruffing four times in each hand. Ifyou (or partner) lead a spade before the crossruff begins, declarer islimited to seven trump tricks: six separately plus the trick takenwhen you led a spade. Similarly, if you can lead trumps twice,declarer can take no more than six trump tricks: four separately plusthe two tricks taken when you led the suit.
Finally, if your side leads trumps three times, you limit declarer tofive trump tricks; the three tricks taken when your side led a trump,plus the remaining two trumps that almost always can be used sep-arately.
4. The danger of the lurking hidden side suit.
If declarer can draw trumps and remain with trumps in both hands,a new danger exists. If declarer has a strong second suit lurking backthere, that suit can be run discarding a loser from dummy. Now thediscarded suit can be trumped in dummy. Very discouraging.
If you and partner play the lead convention of the Q from the AKQasking for count (recommended), you have a better chance todefeat this contract.
Most defenders, not seeing any danger, would begin with two high
1) Strong heart raise
CHAPTER FOUR ♠ COUNTING TRICKS ♠ 113
NORTH (Dummy)
♠ 7 4♥ Q 10 9 8 6♦ Q J 5♣ K Q 5
WEST (You) EAST
♠ A K Q 6 3 ♠ J 10 9 5 2♥ 5 3 ♥ 7♦ A 7 2 ♦ K 10 8 6 3♣ 6 4 3 ♣ 7 2
SOUTH
♠ 8♥ A K J 4 2♦ 9 4♣ A J 10 9 8
NW E
S
West
1♠
all pass
North
2♠1
East
pass
4♠
South
1♥
5♥
NEITHER VUL. DEALER EAST
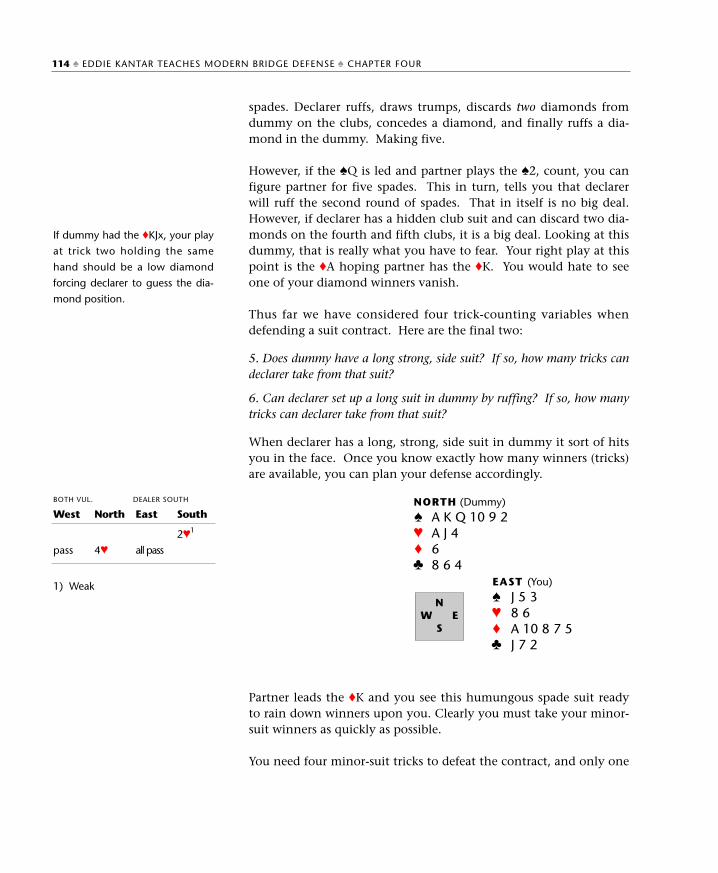
spades. Declarer ruffs, draws trumps, discards two diamonds fromdummy on the clubs, concedes a diamond, and finally ruffs a dia-mond in the dummy. Making five.
However, if the ♠Q is led and partner plays the ♠2, count, you canfigure partner for five spades. This in turn, tells you that declarerwill ruff the second round of spades. That in itself is no big deal.However, if declarer has a hidden club suit and can discard two dia-monds on the fourth and fifth clubs, it is a big deal. Looking at thisdummy, that is really what you have to fear. Your right play at thispoint is the ♦A hoping partner has the ♦K. You would hate to seeone of your diamond winners vanish.
Thus far we have considered four trick-counting variables whendefending a suit contract. Here are the final two:
5. Does dummy have a long strong, side suit? If so, how many tricks candeclarer take from that suit?
6. Can declarer set up a long suit in dummy by ruffing? If so, how manytricks can declarer take from that suit?
When declarer has a long, strong, side suit in dummy it sort of hitsyou in the face. Once you know exactly how many winners (tricks)are available, you can plan your defense accordingly.
Partner leads the ♦K and you see this humungous spade suit readyto rain down winners upon you. Clearly you must take your minor-suit winners as quickly as possible.
You need four minor-suit tricks to defeat the contract, and only one
If dummy had the ♦KJx, your play
at trick two holding the same
hand should be a low diamond
forcing declarer to guess the dia-
mond position.
1) Weak
114 ♠ EDDIE KANTAR TEACHES MODERN BRIDGE DEFENSE ♠ CHAPTER FOUR
NORTH (Dummy)
♠ A K Q 10 9 2♥ A J 4♦ 6♣ 8 6 4
EAST (You)
♠ J 5 3♥ 8 6♦ A 10 8 7 5♣ J 7 2
NW E
S
West
pass
North
4♥
East
all pass
South
2♥1
BOTH VUL. DEALER SOUTH
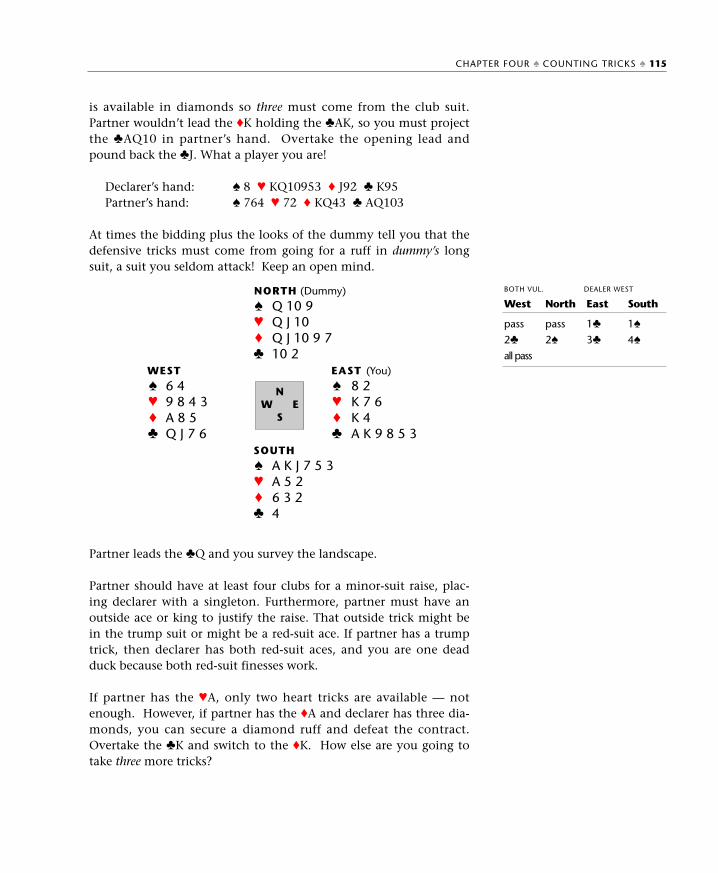
is available in diamonds so three must come from the club suit.Partner wouldn’t lead the ♦K holding the ♣AK, so you must projectthe ♣AQ10 in partner’s hand. Overtake the opening lead andpound back the ♣J. What a player you are!
Declarer’s hand: ♠ 8 ♥ KQ10953 ♦ J92 ♣ K95 Partner’s hand: ♠ 764 ♥ 72 ♦ KQ43 ♣ AQ103
At times the bidding plus the looks of the dummy tell you that thedefensive tricks must come from going for a ruff in dummy’s longsuit, a suit you seldom attack! Keep an open mind.
Partner leads the ♣Q and you survey the landscape.
Partner should have at least four clubs for a minor-suit raise, plac-ing declarer with a singleton. Furthermore, partner must have anoutside ace or king to justify the raise. That outside trick might bein the trump suit or might be a red-suit ace. If partner has a trumptrick, then declarer has both red-suit aces, and you are one deadduck because both red-suit finesses work.
If partner has the ♥A, only two heart tricks are available — notenough. However, if partner has the ♦A and declarer has three dia-monds, you can secure a diamond ruff and defeat the contract.Overtake the ♣K and switch to the ♦K. How else are you going totake three more tricks?
CHAPTER FOUR ♠ COUNTING TRICKS ♠ 115
NORTH (Dummy)
♠ Q 10 9♥ Q J 10♦ Q J 10 9 7♣ 10 2
WEST EAST (You)
♠ 6 4 ♠ 8 2♥ 9 8 4 3 ♥ K 7 6♦ A 8 5 ♦ K 4♣ Q J 7 6 ♣ A K 9 8 5 3
SOUTH
♠ A K J 7 5 3♥ A 5 2♦ 6 3 2♣ 4
NW E
S
West
pass
2♣
all pass
North
pass
2♠
East
1♣
3♣
South
1♠
4♠
BOTH VUL. DEALER WEST
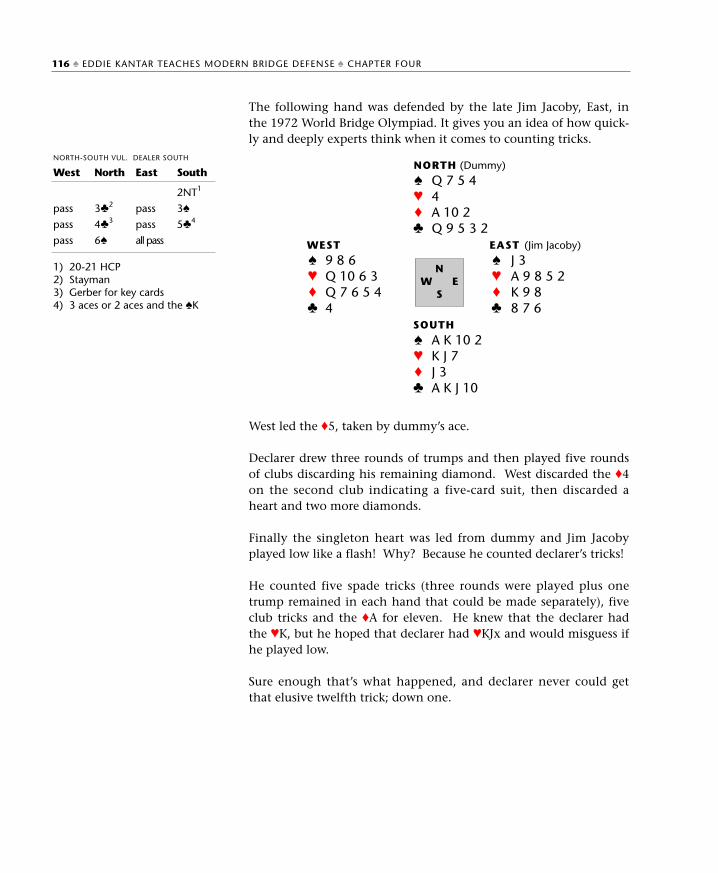
The following hand was defended by the late Jim Jacoby, East, inthe 1972 World Bridge Olympiad. It gives you an idea of how quick-ly and deeply experts think when it comes to counting tricks.
West led the ♦5, taken by dummy’s ace.
Declarer drew three rounds of trumps and then played five roundsof clubs discarding his remaining diamond. West discarded the ♦4on the second club indicating a five-card suit, then discarded aheart and two more diamonds.
Finally the singleton heart was led from dummy and Jim Jacobyplayed low like a flash! Why? Because he counted declarer’s tricks!
He counted five spade tricks (three rounds were played plus onetrump remained in each hand that could be made separately), fiveclub tricks and the ♦A for eleven. He knew that the declarer hadthe ♥K, but he hoped that declarer had ♥KJx and would misguess ifhe played low.
Sure enough that’s what happened, and declarer never could getthat elusive twelfth trick; down one.
1) 20-21 HCP2) Stayman3) Gerber for key cards4) 3 aces or 2 aces and the ♠K
116 ♠ EDDIE KANTAR TEACHES MODERN BRIDGE DEFENSE ♠ CHAPTER FOUR
NORTH (Dummy)
♠ Q 7 5 4♥ 4♦ A 10 2♣ Q 9 5 3 2
WEST EAST (Jim Jacoby)
♠ 9 8 6 ♠ J 3♥ Q 10 6 3 ♥ A 9 8 5 2♦ Q 7 6 5 4 ♦ K 9 8♣ 4 ♣ 8 7 6
SOUTH
♠ A K 10 2♥ K J 7♦ J 3♣ A K J 10
NW E
S
West
pass
pass
pass
North
3♣2
4♣3
6♠
East
pass
pass
all pass
South
2NT1
3♠
5♣4
NORTH-SOUTH VUL. DEALER SOUTH
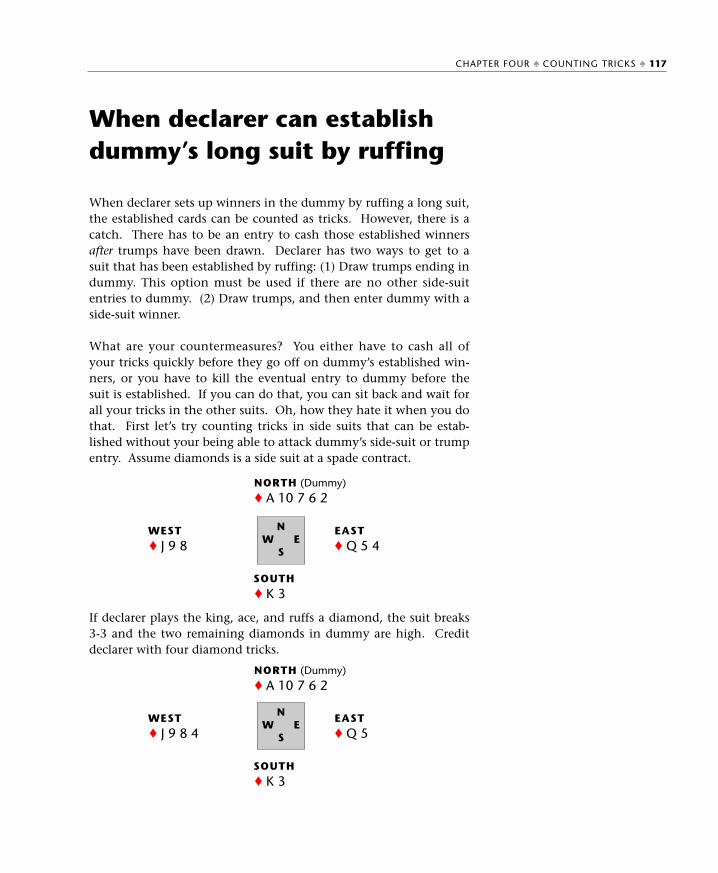
When declarer can establishdummy’s long suit by ruffing
When declarer sets up winners in the dummy by ruffing a long suit,the established cards can be counted as tricks. However, there is acatch. There has to be an entry to cash those established winnersafter trumps have been drawn. Declarer has two ways to get to asuit that has been established by ruffing: (1) Draw trumps ending indummy. This option must be used if there are no other side-suitentries to dummy. (2) Draw trumps, and then enter dummy with aside-suit winner.
What are your countermeasures? You either have to cash all ofyour tricks quickly before they go off on dummy’s established win-ners, or you have to kill the eventual entry to dummy before thesuit is established. If you can do that, you can sit back and wait forall your tricks in the other suits. Oh, how they hate it when you dothat. First let’s try counting tricks in side suits that can be estab-lished without your being able to attack dummy’s side-suit or trumpentry. Assume diamonds is a side suit at a spade contract.
If declarer plays the king, ace, and ruffs a diamond, the suit breaks3-3 and the two remaining diamonds in dummy are high. Creditdeclarer with four diamond tricks.
CHAPTER FOUR ♠ COUNTING TRICKS ♠ 117
NORTH (Dummy)
♦ A 10 7 6 2
WEST EAST
♦ J 9 8 ♦ Q 5 4
SOUTH
♦ K 3
NW E
S
NORTH (Dummy)
♦ A 10 7 6 2
WEST EAST
♦ J 9 8 4 ♦ Q 5
SOUTH
♦ K 3
NW E
S
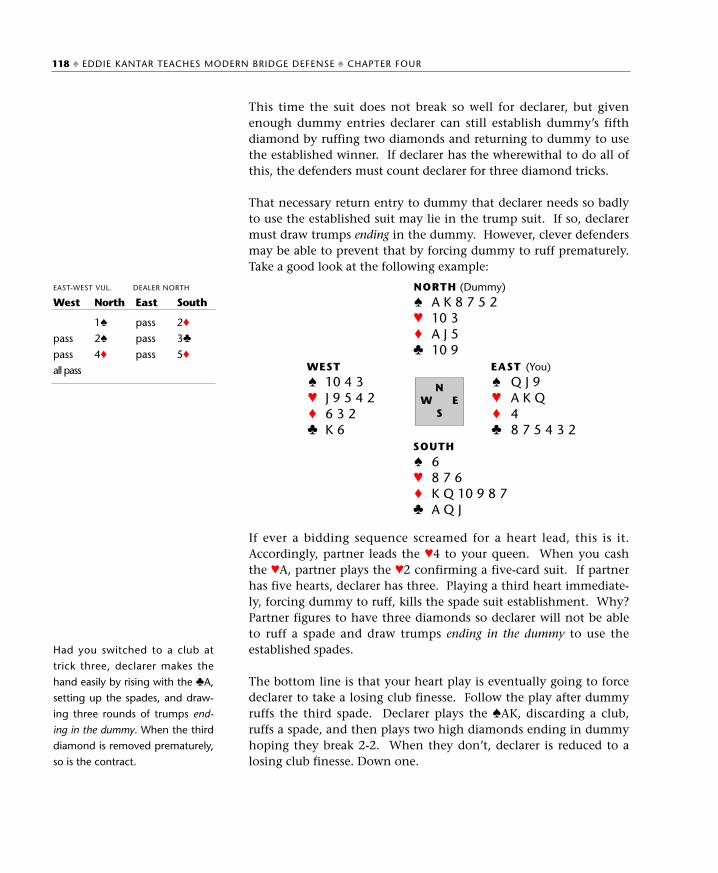
This time the suit does not break so well for declarer, but givenenough dummy entries declarer can still establish dummy’s fifthdiamond by ruffing two diamonds and returning to dummy to usethe established winner. If declarer has the wherewithal to do all ofthis, the defenders must count declarer for three diamond tricks.
That necessary return entry to dummy that declarer needs so badlyto use the established suit may lie in the trump suit. If so, declarermust draw trumps ending in the dummy. However, clever defendersmay be able to prevent that by forcing dummy to ruff prematurely.Take a good look at the following example:
If ever a bidding sequence screamed for a heart lead, this is it.Accordingly, partner leads the ♥4 to your queen. When you cashthe ♥A, partner plays the ♥2 confirming a five-card suit. If partnerhas five hearts, declarer has three. Playing a third heart immediate-ly, forcing dummy to ruff, kills the spade suit establishment. Why?Partner figures to have three diamonds so declarer will not be ableto ruff a spade and draw trumps ending in the dummy to use theestablished spades.
The bottom line is that your heart play is eventually going to forcedeclarer to take a losing club finesse. Follow the play after dummyruffs the third spade. Declarer plays the ♠AK, discarding a club,ruffs a spade, and then plays two high diamonds ending in dummyhoping they break 2-2. When they don’t, declarer is reduced to alosing club finesse. Down one.
Had you switched to a club at
trick three, declarer makes the
hand easily by rising with the ♣A,
setting up the spades, and draw-
ing three rounds of trumps end-
ing in the dummy. When the third
diamond is removed prematurely,
so is the contract.
118 ♠ EDDIE KANTAR TEACHES MODERN BRIDGE DEFENSE ♠ CHAPTER FOUR
NORTH (Dummy)
♠ A K 8 7 5 2♥ 10 3♦ A J 5♣ 10 9
WEST EAST (You)
♠ 10 4 3 ♠ Q J 9♥ J 9 5 4 2 ♥ A K Q♦ 6 3 2 ♦ 4♣ K 6 ♣ 8 7 5 4 3 2
SOUTH
♠ 6♥ 8 7 6♦ K Q 10 9 8 7♣ A Q J
NW E
S
West
pass
pass
all pass
North
1♠
2♠
4♦
East
pass
pass
pass
South
2♦
3♣
5♦
EAST-WEST VUL. DEALER NORTH
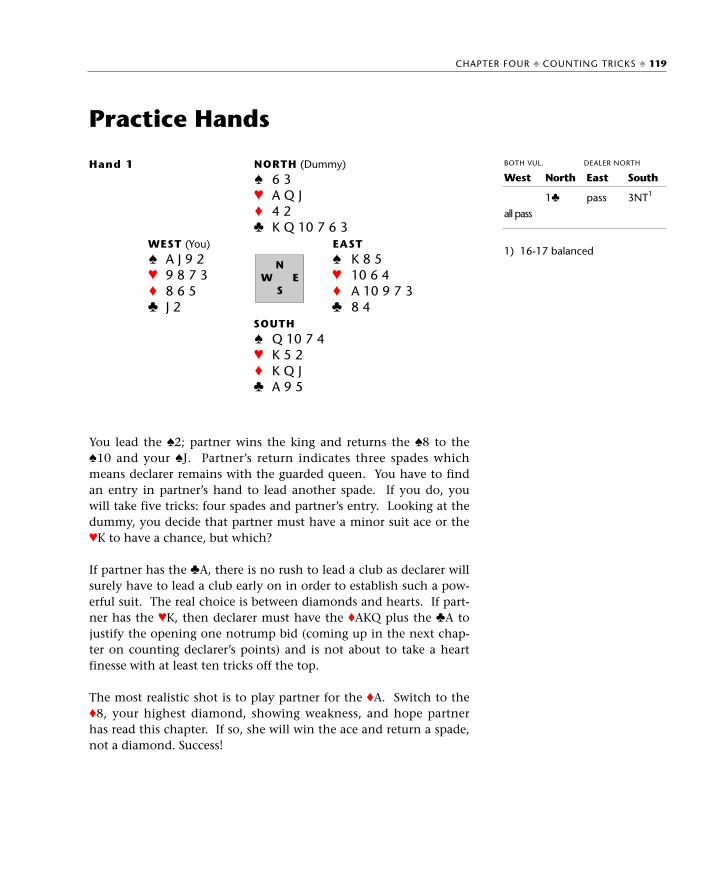
Practice Hands
You lead the ♠2; partner wins the king and returns the ♠8 to the♠10 and your ♠J. Partner’s return indicates three spades whichmeans declarer remains with the guarded queen. You have to findan entry in partner’s hand to lead another spade. If you do, youwill take five tricks: four spades and partner’s entry. Looking at thedummy, you decide that partner must have a minor suit ace or the♥K to have a chance, but which?
If partner has the ♣A, there is no rush to lead a club as declarer willsurely have to lead a club early on in order to establish such a pow-erful suit. The real choice is between diamonds and hearts. If part-ner has the ♥K, then declarer must have the ♦AKQ plus the ♣A tojustify the opening one notrump bid (coming up in the next chap-ter on counting declarer’s points) and is not about to take a heartfinesse with at least ten tricks off the top.
The most realistic shot is to play partner for the ♦A. Switch to the♦8, your highest diamond, showing weakness, and hope partnerhas read this chapter. If so, she will win the ace and return a spade,not a diamond. Success!
1) 16-17 balanced
CHAPTER FOUR ♠ COUNTING TRICKS ♠ 119
Hand 1 NORTH (Dummy)
♠ 6 3♥ A Q J♦ 4 2♣ K Q 10 7 6 3
WEST (You) EAST
♠ A J 9 2 ♠ K 8 5♥ 9 8 7 3 ♥ 10 6 4♦ 8 6 5 ♦ A 10 9 7 3♣ J 2 ♣ 8 4
SOUTH
♠ Q 10 7 4♥ K 5 2♦ K Q J♣ A 9 5
NW E
S
West
all pass
North
1♣
East
pass
South
3NT1
BOTH VUL. DEALER NORTH
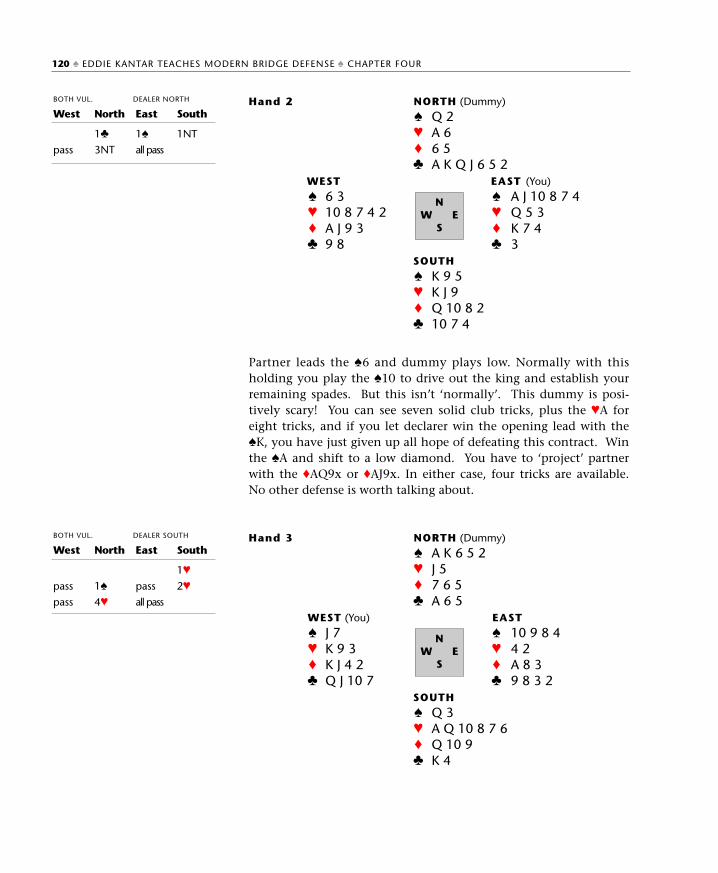
Partner leads the ♠6 and dummy plays low. Normally with thisholding you play the ♠10 to drive out the king and establish yourremaining spades. But this isn’t ‘normally’. This dummy is posi-tively scary! You can see seven solid club tricks, plus the ♥A foreight tricks, and if you let declarer win the opening lead with the♠K, you have just given up all hope of defeating this contract. Winthe ♠A and shift to a low diamond. You have to ‘project’ partnerwith the ♦AQ9x or ♦AJ9x. In either case, four tricks are available.No other defense is worth talking about.
120 ♠ EDDIE KANTAR TEACHES MODERN BRIDGE DEFENSE ♠ CHAPTER FOUR
Hand 2 NORTH (Dummy)
♠ Q 2♥ A 6♦ 6 5♣ A K Q J 6 5 2
WEST EAST (You)
♠ 6 3 ♠ A J 10 8 7 4♥ 10 8 7 4 2 ♥ Q 5 3♦ A J 9 3 ♦ K 7 4♣ 9 8 ♣ 3
SOUTH
♠ K 9 5♥ K J 9♦ Q 10 8 2♣ 10 7 4
NW E
S
Hand 3 NORTH (Dummy)
♠ A K 6 5 2♥ J 5♦ 7 6 5♣ A 6 5
WEST (You) EAST
♠ J 7 ♠ 10 9 8 4♥ K 9 3 ♥ 4 2♦ K J 4 2 ♦ A 8 3♣ Q J 10 7 ♣ 9 8 3 2
SOUTH
♠ Q 3♥ A Q 10 8 7 6♦ Q 10 9♣ K 4
NW E
S
West
pass
North
1♣
3NT
East
1♠
all pass
South
1NT
BOTH VUL. DEALER NORTH
West
pass
pass
North
1♠
4♥
East
pass
all pass
South
1♥
2♥
BOTH VUL. DEALER SOUTH
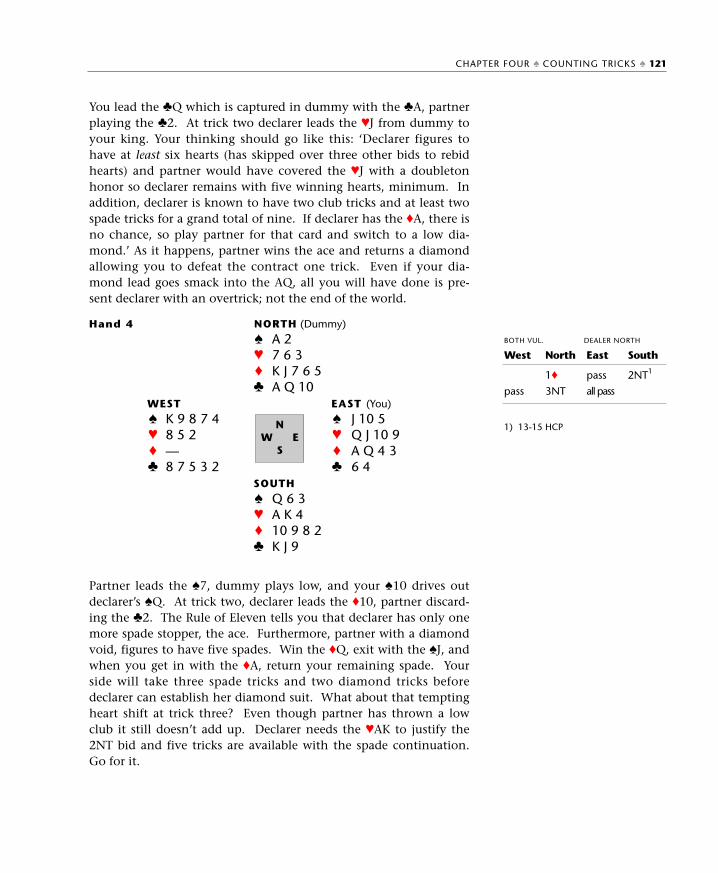
You lead the ♣Q which is captured in dummy with the ♣A, partnerplaying the ♣2. At trick two declarer leads the ♥J from dummy toyour king. Your thinking should go like this: ‘Declarer figures tohave at least six hearts (has skipped over three other bids to rebidhearts) and partner would have covered the ♥J with a doubletonhonor so declarer remains with five winning hearts, minimum. Inaddition, declarer is known to have two club tricks and at least twospade tricks for a grand total of nine. If declarer has the ♦A, there isno chance, so play partner for that card and switch to a low dia-mond.’ As it happens, partner wins the ace and returns a diamondallowing you to defeat the contract one trick. Even if your dia-mond lead goes smack into the AQ, all you will have done is pre-sent declarer with an overtrick; not the end of the world.
Partner leads the ♠7, dummy plays low, and your ♠10 drives outdeclarer’s ♠Q. At trick two, declarer leads the ♦10, partner discard-ing the ♣2. The Rule of Eleven tells you that declarer has only onemore spade stopper, the ace. Furthermore, partner with a diamondvoid, figures to have five spades. Win the ♦Q, exit with the ♠J, andwhen you get in with the ♦A, return your remaining spade. Yourside will take three spade tricks and two diamond tricks beforedeclarer can establish her diamond suit. What about that temptingheart shift at trick three? Even though partner has thrown a lowclub it still doesn’t add up. Declarer needs the ♥AK to justify the2NT bid and five tricks are available with the spade continuation.Go for it.
1) 13-15 HCP
CHAPTER FOUR ♠ COUNTING TRICKS ♠ 121
Hand 4 NORTH (Dummy)
♠ A 2♥ 7 6 3♦ K J 7 6 5♣ A Q 10
WEST EAST (You)
♠ K 9 8 7 4 ♠ J 10 5♥ 8 5 2 ♥ Q J 10 9♦ — ♦ A Q 4 3♣ 8 7 5 3 2 ♣ 6 4
SOUTH
♠ Q 6 3♥ A K 4♦ 10 9 8 2♣ K J 9
NW E
S
West
pass
North
1♦
3NT
East
pass
all pass
South
2NT1
BOTH VUL. DEALER NORTH
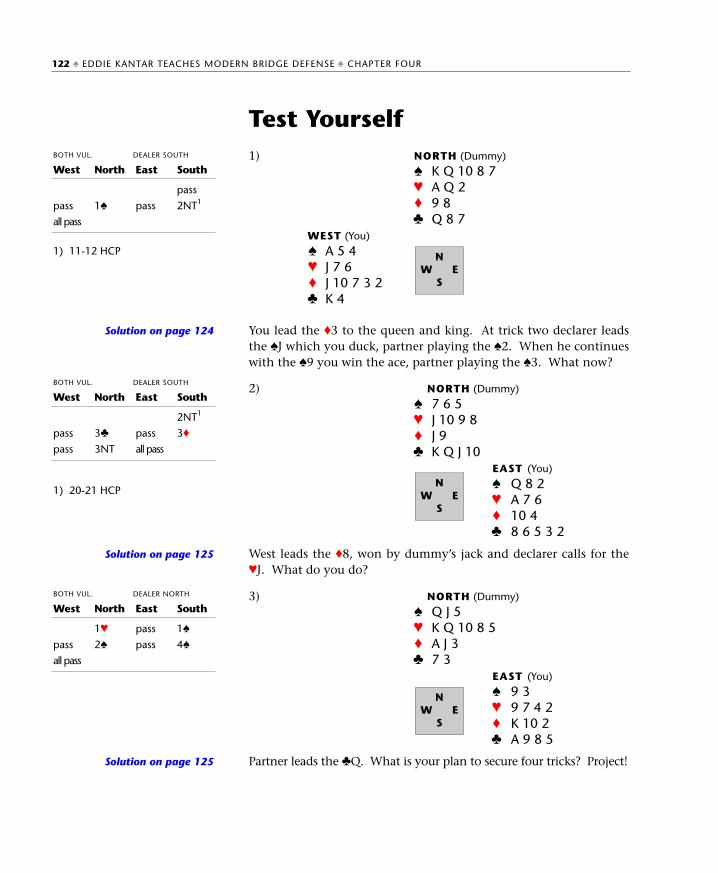
Test Yourself
You lead the ♦3 to the queen and king. At trick two declarer leadsthe ♠J which you duck, partner playing the ♠2. When he continueswith the ♠9 you win the ace, partner playing the ♠3. What now?
West leads the ♦8, won by dummy’s jack and declarer calls for the♥J. What do you do?
Partner leads the ♣Q. What is your plan to secure four tricks? Project!
1) 11-12 HCP
Solution on page 124
1) 20-21 HCP
Solution on page 125
Solution on page 125
122 ♠ EDDIE KANTAR TEACHES MODERN BRIDGE DEFENSE ♠ CHAPTER FOUR
1) NORTH (Dummy)
♠ K Q 10 8 7♥ A Q 2♦ 9 8♣ Q 8 7
WEST (You)
♠ A 5 4♥ J 7 6♦ J 10 7 3 2♣ K 4
NW E
S
2) NORTH (Dummy)
♠ 7 6 5♥ J 10 9 8♦ J 9♣ K Q J 10
EAST (You)
♠ Q 8 2♥ A 7 6♦ 10 4♣ 8 6 5 3 2
NW E
S
West
pass
all pass
North
1♠
East
pass
South
pass
2NT1
BOTH VUL. DEALER SOUTH
West
pass
pass
North
3♣
3NT
East
pass
all pass
South
2NT1
3♦
BOTH VUL. DEALER SOUTH
3) NORTH (Dummy)
♠ Q J 5♥ K Q 10 8 5♦ A J 3♣ 7 3
EAST (You)
♠ 9 3♥ 9 7 4 2♦ K 10 2♣ A 9 8 5
NW E
S
West
pass
all pass
North
1♥
2♠
East
pass
pass
South
1♠
4♠
BOTH VUL. DEALER NORTH

Partner leads the ♠5 to your nine and declarer’s queen. Declarerleads a diamond to the king, then the ♦Q to partner’s ace. How doyou play 1) if partner returns the ♣3? 2) if partner returns the ♣7?
You lead the ♦Q to the deuce and king. Declarer crosses to the ♥A(♥2 from partner, count) and leads the ♣Q, ducked to your king.How do you continue if partner plays 1) the ♣2? 2) the ♣7?
Enough is enough. You are not going to let them push you around!You lead the ♠K and declarer ruffs. Declarer continues with the♣AK and a club to your queen, partner following to the first club,then discarding the ♦2 and the ♥5. Now what?
Solution on page 126
Solution on page 126
Solution on page 127
CHAPTER FOUR ♠ COUNTING TRICKS ♠ 123
4) NORTH (Dummy)
♠ 6♥ A Q 4♦ K Q J 10 9 5♣ 9 8 2
EAST (You)
♠ 10 9 3♥ J 7 6 5♦ 8 7 2♣ A 10 6
NW E
S
5) NORTH (Dummy)
♠ 9 6 4♥ A K Q 6♦ 9 8 6♣ Q J 5
WEST (You)
♠ A J 7 3♥ 10 7♦ Q J 10 7 3♣ K 9
NW E
S
6) NORTH (Dummy)
♠ J 8 7 6 4♥ J 2♦ A Q J 10♣ 3 2
WEST (You)
♠ K Q 10 9 5 2♥ A 8♦ 9 6♣ Q 10 9
NW E
S
West
1♠
dbl
North
1NT
all pass
East
2♥
South
1♣
5♣ (!)
BOTH VUL. DEALER SOUTH
West
1♦
pass
North
1♥
3NT
East
pass
all pass
South
1♣
1NT
BOTH VUL. DEALER SOUTH
West
1♠
pass
North
2♦
3NT
East
pass
all pass
South
2NT
BOTH VUL. DEALER WEST
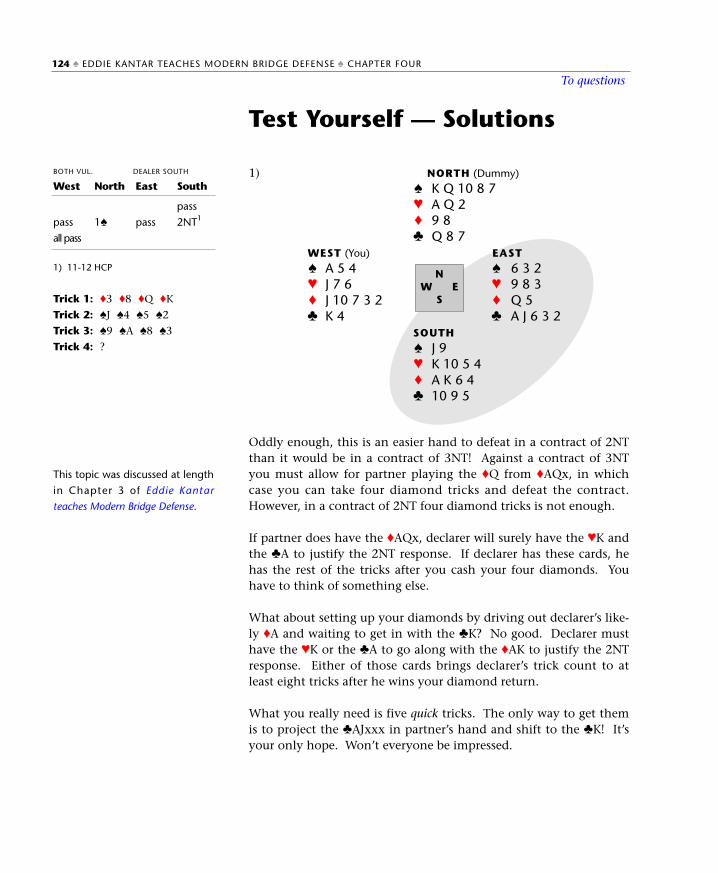
Test Yourself — Solutions
Oddly enough, this is an easier hand to defeat in a contract of 2NTthan it would be in a contract of 3NT! Against a contract of 3NTyou must allow for partner playing the ♦Q from ♦AQx, in whichcase you can take four diamond tricks and defeat the contract.However, in a contract of 2NT four diamond tricks is not enough.
If partner does have the ♦AQx, declarer will surely have the ♥K andthe ♣A to justify the 2NT response. If declarer has these cards, hehas the rest of the tricks after you cash your four diamonds. Youhave to think of something else.
What about setting up your diamonds by driving out declarer’s like-ly ♦A and waiting to get in with the ♣K? No good. Declarer musthave the ♥K or the ♣A to go along with the ♦AK to justify the 2NTresponse. Either of those cards brings declarer’s trick count to atleast eight tricks after he wins your diamond return.
What you really need is five quick tricks. The only way to get themis to project the ♣AJxxx in partner’s hand and shift to the ♣K! It’syour only hope. Won’t everyone be impressed.
124 ♠ EDDIE KANTAR TEACHES MODERN BRIDGE DEFENSE ♠ CHAPTER FOUR
1) 11-12 HCP
Trick 1: ♦3 ♦8 ♦Q ♦K
Trick 2: ♠J ♠4 ♠5 ♠2
Trick 3: ♠9 ♠A ♠8 ♠3
Trick 4: ?
This topic was discussed at length
in Chapter 3 of Eddie Kantar
teaches Modern Bridge Defense.
1) NORTH (Dummy)
♠ K Q 10 8 7♥ A Q 2♦ 9 8♣ Q 8 7
WEST (You) EAST
♠ A 5 4 ♠ 6 3 2♥ J 7 6 ♥ 9 8 3♦ J 10 7 3 2 ♦ Q 5♣ K 4 ♣ A J 6 3 2
SOUTH
♠ J 9♥ K 10 5 4♦ A K 6 4♣ 10 9 5
NW E
S
West
pass
all pass
North
1♠
East
pass
South
pass
2NT1
BOTH VUL. DEALER SOUTH
To questions
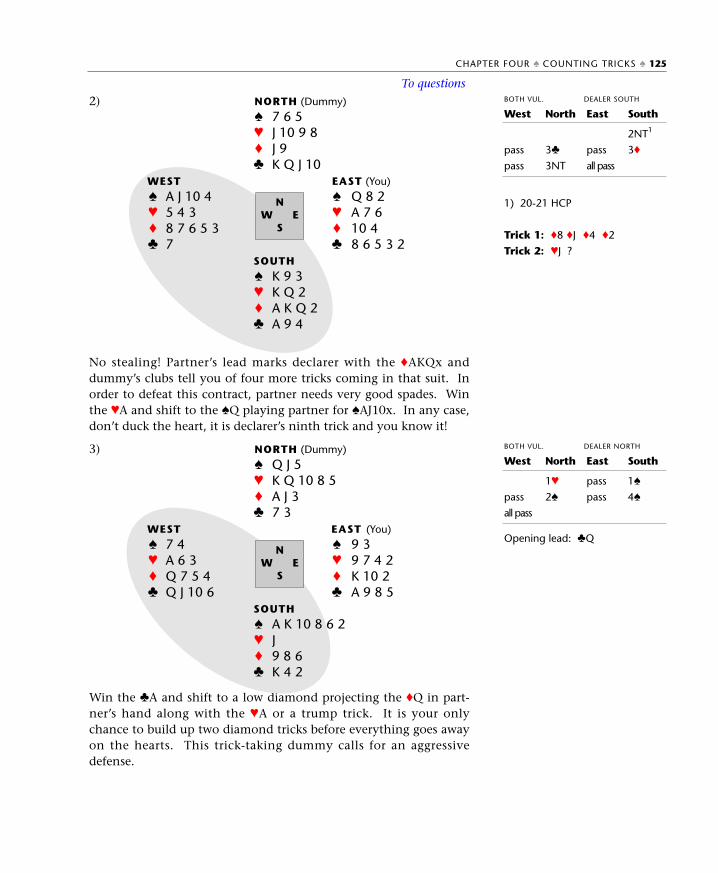
No stealing! Partner’s lead marks declarer with the ♦AKQx anddummy’s clubs tell you of four more tricks coming in that suit. Inorder to defeat this contract, partner needs very good spades. Winthe ♥A and shift to the ♠Q playing partner for ♠AJ10x. In any case,don’t duck the heart, it is declarer’s ninth trick and you know it!
Win the ♣A and shift to a low diamond projecting the ♦Q in part-ner’s hand along with the ♥A or a trump trick. It is your onlychance to build up two diamond tricks before everything goes awayon the hearts. This trick-taking dummy calls for an aggressivedefense.
CHAPTER FOUR ♠ COUNTING TRICKS ♠ 125
3) NORTH (Dummy)
♠ Q J 5♥ K Q 10 8 5♦ A J 3♣ 7 3
WEST EAST (You)
♠ 7 4 ♠ 9 3♥ A 6 3 ♥ 9 7 4 2♦ Q 7 5 4 ♦ K 10 2♣ Q J 10 6 ♣ A 9 8 5
SOUTH
♠ A K 10 8 6 2♥ J♦ 9 8 6♣ K 4 2
1) 20-21 HCP
Trick 1: ♦8 ♦J ♦4 ♦2
Trick 2: ♥J ?
Opening lead: ♣QN
W ES
West
pass
pass
North
3♣
3NT
East
pass
all pass
South
2NT1
3♦
BOTH VUL. DEALER SOUTH
West
pass
all pass
North
1♥
2♠
East
pass
pass
South
1♠
4♠
BOTH VUL. DEALER NORTH
2) NORTH (Dummy)
♠ 7 6 5♥ J 10 9 8♦ J 9♣ K Q J 10
WEST EAST (You)
♠ A J 10 4 ♠ Q 8 2♥ 5 4 3 ♥ A 7 6♦ 8 7 6 5 3 ♦ 10 4♣ 7 ♣ 8 6 5 3 2
SOUTH
♠ K 9 3♥ K Q 2♦ A K Q 2♣ A 9 4
NW E
S
To questions

Partner’s switch to a low club shows strength and asks for a clubreturn. Win the ♣A and return the ♣10. Had partner switched tothe ♣7, a relatively high club (you can see the 8, 9, and 10), show-ing weakness, win the ♣A and return the ♠10, partner’s first suit.What you need to defeat the contract with a spade return is to findpartner with ♠AJ8xx.
1) If partner plays the ♣2 suggesting three clubs, declarer has fiveclubs and nine tricks ready to rumble: three heart tricks (partner
126 ♠ EDDIE KANTAR TEACHES MODERN BRIDGE DEFENSE ♠ CHAPTER FOUR
Trick 1: ♠5 ♠6 ♠9 ♠Q
Trick 2: ♦4 ♦3 ♦K ♦2
Trick 3: ♦Q ♦7 ♦6 ♦A
Trick 4: ♣3 ?
Trick 1: ♦Q ♦6 ♦2 ♦K
Trick 2: ♥5 ♥7 ♥A ♥2
Trick 3: ♣Q ♣2 ♣4 ♣K
Trick 4: ?
West
1♠
pass
North
2♦
3NT
East
pass
all pass
South
2NT
BOTH VUL. DEALER WEST
5) NORTH (Dummy)
♠ 9 6 4♥ A K Q 6♦ 9 8 6♣ Q J 5
WEST (You) EAST
♠ A J 7 3 ♠ K 8 2♥ 10 7 ♥ J 9 4 3 2♦ Q J 10 7 3 ♦ 4 2♣ K 9 ♣ 7 3 2
SOUTH
♠ Q 10 5♥ 8 5♦ A K 5♣ A 10 8 6 4
NW E
S
West
1♦
pass
North
1♥
3NT
East
pass
all pass
South
1♣
1NT
BOTH VUL. DEALER SOUTH
NORTH (Dummy)
♠ 6♥ A Q 4♦ K Q J 10 9 5♣ 9 8 2
WEST EAST (You)
♠ K J 8 5 4 ♠ 10 9 3♥ 9 8 ♥ J 7 6 5♦ A 3 ♦ 8 7 2♣ K J 7 3 ♣ A 10 6
SOUTH
♠ A Q 7 2♥ K 10 3 2♦ 6 4♣ Q 5 4
NW E
S
To questions
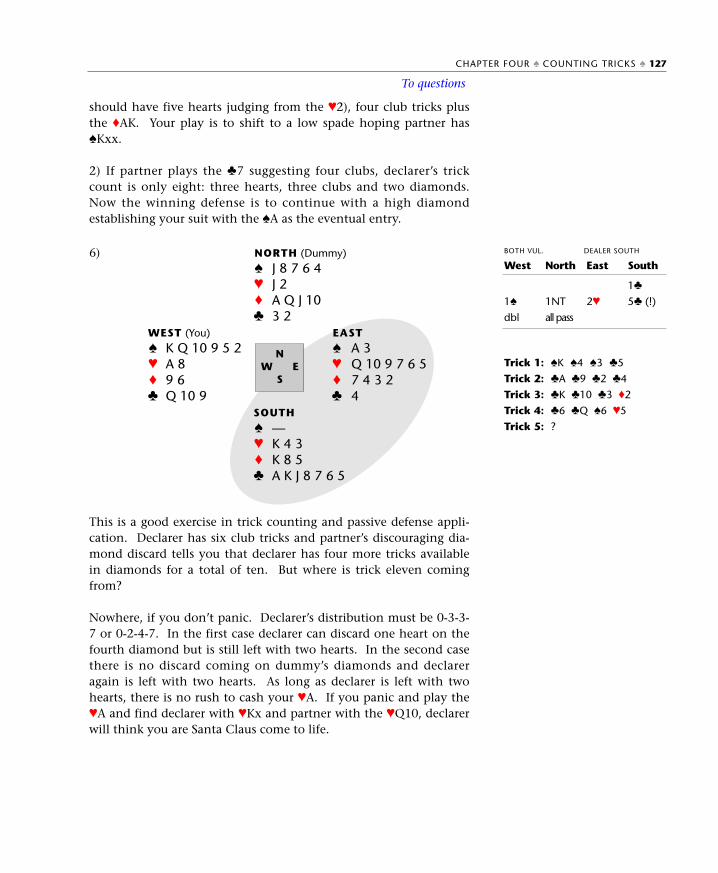
should have five hearts judging from the ♥2), four club tricks plusthe ♦AK. Your play is to shift to a low spade hoping partner has♠Kxx.
2) If partner plays the ♣7 suggesting four clubs, declarer’s trickcount is only eight: three hearts, three clubs and two diamonds.Now the winning defense is to continue with a high diamondestablishing your suit with the ♠A as the eventual entry.
This is a good exercise in trick counting and passive defense appli-cation. Declarer has six club tricks and partner’s discouraging dia-mond discard tells you that declarer has four more tricks availablein diamonds for a total of ten. But where is trick eleven comingfrom?
Nowhere, if you don’t panic. Declarer’s distribution must be 0-3-3-7 or 0-2-4-7. In the first case declarer can discard one heart on thefourth diamond but is still left with two hearts. In the second casethere is no discard coming on dummy’s diamonds and declareragain is left with two hearts. As long as declarer is left with twohearts, there is no rush to cash your ♥A. If you panic and play the♥A and find declarer with ♥Kx and partner with the ♥Q10, declarerwill think you are Santa Claus come to life.
CHAPTER FOUR ♠ COUNTING TRICKS ♠ 127
Trick 1: ♠K ♠4 ♠3 ♣5
Trick 2: ♣A ♣9 ♣2 ♣4
Trick 3: ♣K ♣10 ♣3 ♦2
Trick 4: ♣6 ♣Q ♠6 ♥5
Trick 5: ?
6) NORTH (Dummy)
♠ J 8 7 6 4♥ J 2♦ A Q J 10♣ 3 2
WEST (You) EAST
♠ K Q 10 9 5 2 ♠ A 3♥ A 8 ♥ Q 10 9 7 6 5♦ 9 6 ♦ 7 4 3 2♣ Q 10 9 ♣ 4
SOUTH
♠ —♥ K 4 3♦ K 8 5♣ A K J 8 7 6 5
NW E
S
West
1♠
dbl
North
1NT
all pass
East
2♥
South
1♣
5♣ (!)
BOTH VUL. DEALER SOUTH
To questions
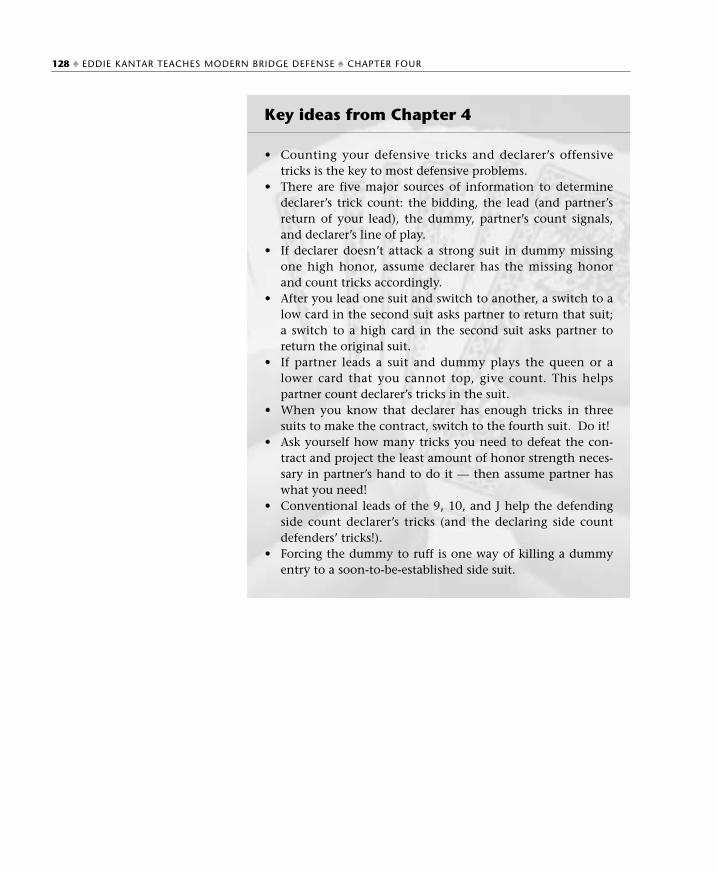
128 ♠ EDDIE KANTAR TEACHES MODERN BRIDGE DEFENSE ♠ CHAPTER FOUR
Key ideas from Chapter 4
• Counting your defensive tricks and declarer’s offensivetricks is the key to most defensive problems.
• There are five major sources of information to determinedeclarer’s trick count: the bidding, the lead (and partner’sreturn of your lead), the dummy, partner’s count signals,and declarer’s line of play.
• If declarer doesn’t attack a strong suit in dummy missingone high honor, assume declarer has the missing honorand count tricks accordingly.
• After you lead one suit and switch to another, a switch to alow card in the second suit asks partner to return that suit;a switch to a high card in the second suit asks partner toreturn the original suit.
• If partner leads a suit and dummy plays the queen or alower card that you cannot top, give count. This helpspartner count declarer’s tricks in the suit.
• When you know that declarer has enough tricks in threesuits to make the contract, switch to the fourth suit. Do it!
• Ask yourself how many tricks you need to defeat the con-tract and project the least amount of honor strength neces-sary in partner’s hand to do it — then assume partner haswhat you need!
• Conventional leads of the 9, 10, and J help the defendingside count declarer’s tricks (and the declaring side countdefenders’ tricks!).
• Forcing the dummy to ruff is one way of killing a dummyentry to a soon-to-be-established side suit.
WHATYOU’RE GOING
TO LEARN IN THIS
CHAPTER:• How to estimate declarer’s
point-count range fromnotrump auctions and fromsuit auctions
• How to use your estimate,along with clues from theopening lead and partner’ssignals, to help you placethe missing honor cards
Notrump sequences 130Suit sequences 135Other ways of counting
points 138When partner bids 142Notrump ranges in
competition 145Practice hands 147Test yourself 150Solutions 151Key ideas 152
Who’s got that missing queen of hearts?
We’ve discussed two kinds of counting that help you to figure outwhat is going on during the play of a hand, and to determine yourappropriate defensive strategy: counting distribution and countingtricks. Implicit in both of these, but definitely worth inclusion inthis book, is a third kind of counting — counting the high cardpoints around the table.
It goes without saying that once you know who has the missinghonors, you can defend like a demon. It all starts with analyzingthe bidding.
5CountingHigh CardPointsAll the powerful kings and queens...
JOHN DONNE
♥ 129
Notrump sequences Opener rebids notrump
Most opening notrump bids are limit bids, typically with a three-point range. You must keep in mind, however, that not everyoneuses the same ranges as you do!
As an example, for many years 16-18 HCP was the biblically pre-scribed point count range for an opening bid of 1NT; in the modernstyle this has been shaded down to 15-17. However many playersplay a ‘weak notrump’, swearing by a 12-14 range; players who playthe Precision Club system opt for a 13-15 range; and let's not forgetthe ‘mini’-notrumpers who rejoice with 10-12, or the ‘Kamikaze’fringe group who are out to get you with an 8-10 range!
The opening bid of 2NT has undergone the same metamorphosis. Itused to be 22-24 in the good old Goren days. Nowadays it is morelike 20-21 or 20-22. The stronger hands are shown by opening anartificial 1♣ or 2♣ and rebidding 2NT.
The idea here is not to determine which is the best range, but ratherto know which range your opponents are using, and to try to workout where the missing honors are early in the play.
In tournament bridge, the opponents’ convention cards are sup-posed to be marked telling you what their ranges are on the mostcommon notrump sequences. But there are too many sequencesfor any convention card to include them all. What you might haveto do is ask if you are not sure. Besides, you may not be playing ina tournament, and there may not be any convention cards lyingaround. Ask!
Now let's look at a few bidding sequences where opener is limitedby a notrump rebid (assume a 1NT opening would be 15-17 HCP):
Opener shows a hand too weak toopen 1NT; play opener has 12-14.
We’re assuming a strong notrump
system in all the bidding sequ-
ences in this chapter. If your
opponents are using a different
range for the opening 1NT, then
their rebids will also show differ-
ent ranges from ‘standard’.
130 ♥ EDDIE KANTAR TEACHES ADVANCED BRIDGE DEFENSE ♥ CHAPTER FIVE
Opener1♣
1NT
Responder1♠
CHAPTER FIVE ♥ COUNTING HIGH CARD POINTS ♥ 131
Every so often, opener will have a
six-card suit with 15-17 HCP.
Opener describes a hand that istoo strong to open 1NT and notstrong enough to open 2NT. Playopener for 18-19.
This is an atypical case whereopener describes a hand with along, solid minor suit, not neces-sarily balanced. This is more of atrick-taking rebid. Play opener forabout 15-17 HCP but expect a six-or seven-card running suit tocome showering down upon youonce opener gets in.
This is one you may have to askabout. Some play that it shows aminimum, 12-14, others play itshows the range of a strongnotrump, 15-17. Ask.
If a 2NT rebid shows 12-14, thena 3NT rebid shows 15-17; if a 2NTrebid shows 15-17, then a 3NTrebid shows 18-19. Ask.
In this 2NT sequence, most playthat opener has the equivalent ofa 1NT rebid after a one-levelresponse — 12-14. ‘Most’ doesn'tmean ‘all’. Check it out.
Opener should have 18-19. With15-17, opener begins with 1NT.
This is a strong rebid showing 18-19, the equivalent of a jump rebidof 2NT. It does not mean thatopener has a ‘short club’ and isrunning away from his suit.
Opener1♣
2NTpass
Responder1♠
3NT
Opener1♣
3NT
Responder1♠
pass
Opener1♠
2NTpass
Responder2♦
3NT
Opener1♠
3NTpass
Responder2♦
6NT
Opener1♦
2NTpass
Responder2♣
4NT
Opener1♦
3NT
Responder2♣
pass
Opener1♣
2NTpass
Responder2♣
3♣
Sometimes opener doesn't bid notrump until the third round ofbidding. No matter; notrump bids are still limit bids and you wantto get a handle on the range. The following ‘third-round’ notrumprebids come after responder has bid the fourth suit, an artificialforce, asking opener to limit her hand. Once opener limits thehand, your job becomes much easier.
After the ‘fourth suit’ is bid, lookfor opener to limit the hand.When opener bids the cheapestnotrump bid available, assume aminimum, 12-14.
This one shows 15-17 HCP. Onceagain opener is limited.Responder’s 4NT is natural, invit-ing opener to bid slam with amaximum hand.
After the ‘fourth suit’, 4NT is nat-ural. Opener should have 18-19HCP.
Opener may also rebid 3NT after responder’s invitational rebid:
This time opener's range is a mys-tery. If opener has a fitting dia-mond honor, opener will gamble3NT on a wing and a prayer; witha misfit for diamonds opener,unless a loony-tune, should haveextras.
Again, not so easy to determine.If opener has five clubs, opener ismore apt to gamble 3NT with aminimum hand. With a four cardclub suit, opener should haveextras, perhaps 14-17.
Fourth-suit forcing is a popular
and useful convention in which a
bid of the only unbid suit by
responder at his second turn is an
artificial waiting bid. It promises
nothing about the suit bid, but
simply gives opener another
chance to describe his hand.
Some pairs play FSF as creating a
game force, particularly after an
original two-level response.
132 ♥ EDDIE KANTAR TEACHES ADVANCED BRIDGE DEFENSE ♥ CHAPTER FIVE
Opener1♠
2♦
2NTpass
Responder2♣
2♥
3NT
Opener1♠
2♦
3NTpass
Responder2♣
2♥
4NT
Opener1♠
2♦
4NTpass
Responder2♣
2♥
6NT
Opener1♣
1♥
3NT
Responder1♦
3♦1
pass
1) Invitational
Opener1♣
1♠
3NT
Responder1♥
3♣1
pass
1) Invitational
Responder bids notrump
Responder can also bid notrump naturally and wind up being thedeclarer. Again, the notrump bid must have a range; it's your job toknow the range.
After a 1♣ opening, a 1NTresponse usually shows 8-10 HCP.
This one is a bit different asresponder may have long clubsand may not be strong enough tobid them. Figure responder for 6-10, a wide range.
The typical range is 6-10.However, if the opponents playthe 1NT response as forcing, therange is 6-11.
There are two possible ranges.Some play this sequence to show10-12, others 13-15. Ask.
The most common range is 16-17,possibly a ‘bad’ 18 if there is suchan animal. However, some play13-15. Ask.
If not artificial, this shows 13-15,balanced; some play it as 11-12.
If not artificial, 16-17, balanced;some play it as 13-15.
Many five-card major systems usea forcing 1NT response to 1♥
and 1♠ as part of their structure.It is especially common in Two-over-One methods, where a two-level response to an opening bidis usually game-forcing.
Many pairs use the 2NT and 3NTresponses to major-suit openingsas conventional bids that showspecific kinds of strong raises.
CHAPTER FIVE ♥ COUNTING HIGH CARD POINTS ♥ 133
Opener1♣
pass
Responder1NT
Opener1♦
3NT
Responder1NTpass
Opener1♥ or 1♠
Responder1NT
Opener1♣ or 1♦
Responder2NT
Opener1♣ or 1♦
6NT
Responder3NTpass
Opener1♥ or 1♠
Responder2NT
Opener1♥ or 1♠
Responder3NT
Responder rebids notrump
When the responder rebids notrump, the defenders should have agood idea of the range.
The 1NT rebid is similar to a 1NT response excluding 6-point handswhich sometimes pass the 1♠
rebid. Figure responder for 7-10.
This is one you want to be famil-iar with. The range is 11-12 (attimes a ‘good’ 10). The bid is notforcing.
11-12. It doesn't matter whetherthe 2NT rebid is a jump or not,the range remains constant. If 2♦
is a game force, play responder for12-14/15.
Responder shows 13-15, perhaps16.
A passed-hand jump response of2NT shows 11-12; more oftenthan not, 11.
It is easier to determine responder's range after opener shows a min-imum opening bid. However, when opener jumps and responderbids notrump, don't look for any easy answers — or ranges!
God alone knows what responderhas. Responder can be gamblingor can have a pretty good handjust short of a slam try.
This one is even worse than theprevious one. In the previousexample, opener made a non-forcing jump which responder
134 ♥ EDDIE KANTAR TEACHES ADVANCED BRIDGE DEFENSE ♥ CHAPTER FIVE
Opener1♣
1♠
pass
Responder1♥
1NT
Opener1♣
1♠
pass
Responder1♥
2NT
Opener1♠
2♥
3NT
Responder2♦1
2NTpass
1) Not a game force
Opener1♣
1♥
pass
Responder1♦
3NT
Opener
1♥
Responderpass2NT
Opener1♥
3♣
pass
Responder1♠
3NT
Opener1♣
3♣
pass
Responder1♥
3NT
was at liberty to pass. In thissequence, if responder passes 3♣,it may be the last call he evermakes! Responder's range in thissequence is something like 6-11.
In sequences where opener begs to be let off the hook, but respon-der persists to game, play responder for a full opening bid:
Opener shows a minimum handwith long, long, diamonds.Responder figures to have 13-16.
Whatever the range, the overriding objective of the defense is todefeat the contract. However, at tournament play, when beatingthe contract is clearly out of the question, holding down the over-tricks becomes the main goal.
Suit sequencesIf opener becomes the declarer in a suit contract, opener's hand fig-ures to fall into one of these ranges:
6-9 Preemptive opening bid 11-14/15 Minimum opening bid15-17/18 Intermediate opening bid18-21 Powerhouse opening bid22+ Rock Crusher
Notice the overlaps, particularly the 15- and 18-point hands. Withthese counts, opener has to decide which way to go on the rebid.Distribution, system, and degree of fit with partner's suit, all enterinto the picture.
Hands in all groups except preempts and rock crushers are openedwith one of a suit. Therefore you have to wait for opener's rebid, oreven opener's third bid (if the first rebid doesn't limit opener'shand), to get a handle on opener's range.
CHAPTER FIVE ♥ COUNTING HIGH CARD POINTS ♥ 135
Opener1♥
3♣
pass
Responder1♠
3NT
Opener1♦
2♦
3♦
pass
Responder1♠
2♥
3NT
Here are some of the easy sequences:
Opener has a minimum hand(11-14/15).
Opener has an intermediate hand(15-18).
Opener has a powerhouse (18-21).
Opener has reversed after a one-level response, showing a mini-mum of 17 HCP.
Opener has reversed, but hasmade no move toward slam. Playopener for 17-18
The toughest sequences are those where the opener bids a secondsuit without reversing or jump-shifting. The range can vary froman unlikely 11 all the way up to 18. What you have to do is waitfor opener to clarify on her next bid... if there is a next bid.
There is no way of knowing(unless opener groans), whetheropener has a minimum or anintermediate type hand; with apowerhouse, opener jump shifts.
Opener has a minimum in theface of an invitational bid.
This last sequence raises the point of ‘narrowing’ the range. Whena bid shows a range, any range, and the bidder’s partner makes an
136 ♥ EDDIE KANTAR TEACHES ADVANCED BRIDGE DEFENSE ♥ CHAPTER FIVE
Opener1♦
2♦
Responder1♥
Opener1♦
3♦
Responder1♥
Opener1♦
2♠
Responder1♥
Opener1♦
2♥
Responder1♠
Opener1♦
2♥
4♥
Responder1♠
3♥
Opener1♥
2♣
Responder1♠
pass
Opener1♥
2♣
pass
Responder1♠
3♣
invitational bid which is passed, the defenders can assume that theplayer who passes is at the low end of the range; a player whoaccepts is at the high end of the range. In this case, opener figuresto be at the low end: play opener for 11-13 HCP.
Figure opener for trash.
This one isn't as easy as it looks.The reason is that opener's rangefor the 1♠ bid was 11-18. The factthat opener has bid 4♠ simplymeans that opener doesn't havecheese.
A limited opener has accepted an invitational bid and should havemore than a bare minimum.
Here's one where you have to know your customers:
Opener has reversed after a two-level response. Some play that areverse after a two-level responsecan show a minimum; othersinsist that it shows at least anintermediate type hand.
Sequences where responderbecomes declarer
Responder often times becomes the declarer. Responder's handscan usually be classified by range:
6-9/10 Minimum 10-12 Invitational 12-15 Game-going16-19 Slam try19+ Usually on to a slam
In Two-over-One methods, a two-
level response is a game-force
and reverses over them usually
need not show extras.
CHAPTER FIVE ♥ COUNTING HIGH CARD POINTS ♥ 137
Opener1♦
1♠
pass
Responder1♥
3♠
Opener1♦
1♠
4♠
Responder1♥
3♠
pass
Opener1♠
2♠
4♠
Responder2♣
3♠
pass
Opener1♥
2♠
Responder2♦
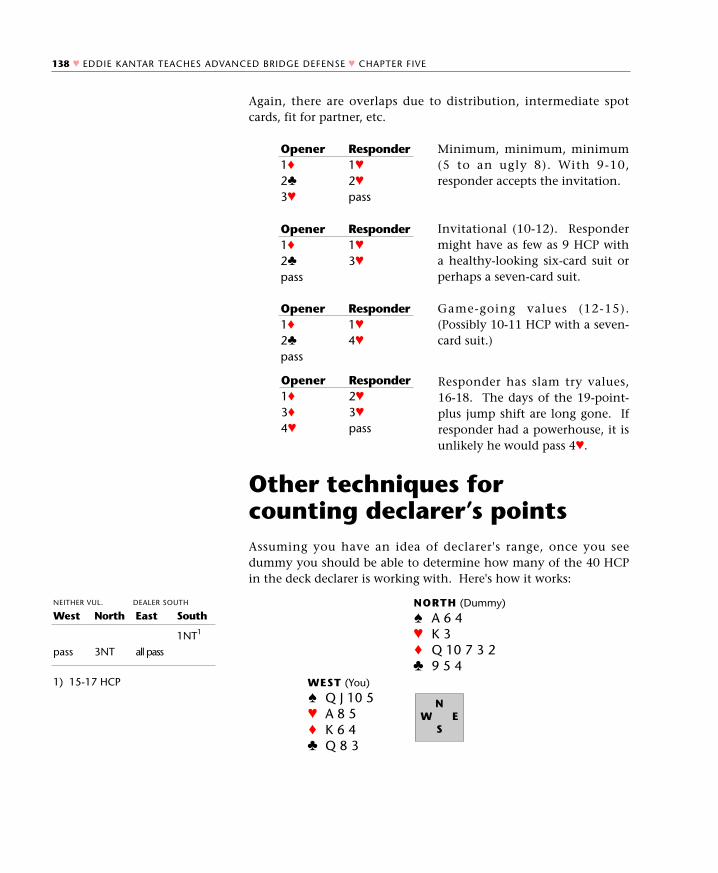
Again, there are overlaps due to distribution, intermediate spotcards, fit for partner, etc.
Minimum, minimum, minimum(5 to an ugly 8). With 9-10,responder accepts the invitation.
Invitational (10-12). Respondermight have as few as 9 HCP witha healthy-looking six-card suit orperhaps a seven-card suit.
Game-going values (12-15).(Possibly 10-11 HCP with a seven-card suit.)
Responder has slam try values,16-18. The days of the 19-point-plus jump shift are long gone. Ifresponder had a powerhouse, it isunlikely he would pass 4♥.
Other techniques forcounting declarer’s pointsAssuming you have an idea of declarer's range, once you seedummy you should be able to determine how many of the 40 HCPin the deck declarer is working with. Here's how it works:
1) 15-17 HCP
138 ♥ EDDIE KANTAR TEACHES ADVANCED BRIDGE DEFENSE ♥ CHAPTER FIVE
Opener1♦
2♣
3♥
Responder1♥
2♥
pass
Opener1♦
2♣
pass
Responder1♥
3♥
Opener1♦
2♣
pass
Responder1♥
4♥
Opener1♦
3♦
4♥
Responder2♥
3♥
pass
NORTH (Dummy)
♠ A 6 4♥ K 3♦ Q 10 7 3 2♣ 9 5 4
WEST (You)
♠ Q J 10 5♥ A 8 5♦ K 6 4♣ Q 8 3
NW E
S
NEITHER VUL. DEALER SOUTH
West
pass
North
3NT
East
all pass
South
1NT1
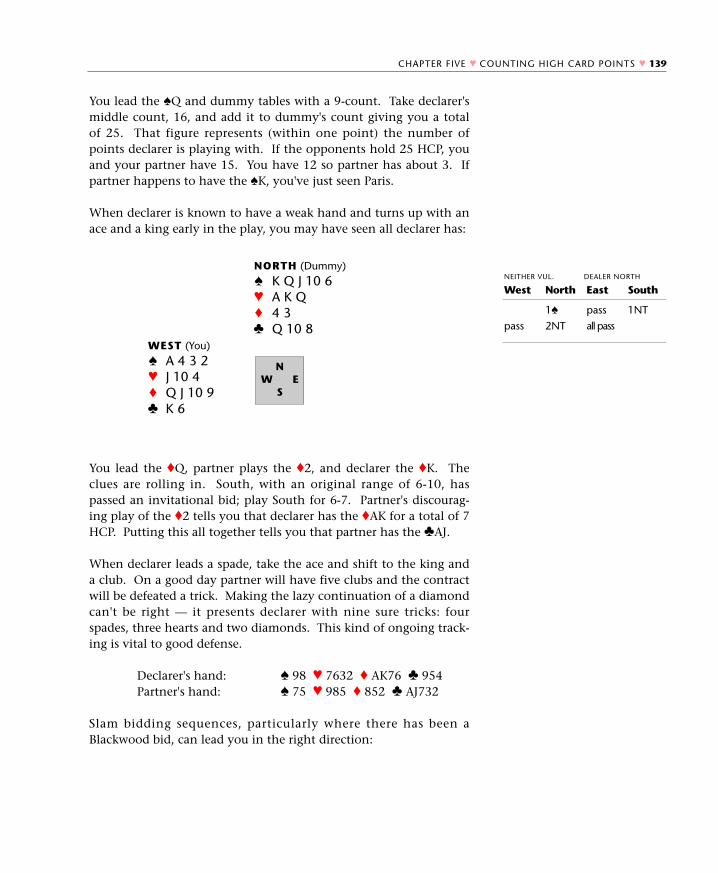
You lead the ♠Q and dummy tables with a 9-count. Take declarer'smiddle count, 16, and add it to dummy's count giving you a totalof 25. That figure represents (within one point) the number ofpoints declarer is playing with. If the opponents hold 25 HCP, youand your partner have 15. You have 12 so partner has about 3. Ifpartner happens to have the ♠K, you've just seen Paris.
When declarer is known to have a weak hand and turns up with anace and a king early in the play, you may have seen all declarer has:
You lead the ♦Q, partner plays the ♦2, and declarer the ♦K. Theclues are rolling in. South, with an original range of 6-10, haspassed an invitational bid; play South for 6-7. Partner's discourag-ing play of the ♦2 tells you that declarer has the ♦AK for a total of 7HCP. Putting this all together tells you that partner has the ♣AJ.
When declarer leads a spade, take the ace and shift to the king anda club. On a good day partner will have five clubs and the contractwill be defeated a trick. Making the lazy continuation of a diamondcan't be right — it presents declarer with nine sure tricks: fourspades, three hearts and two diamonds. This kind of ongoing track-ing is vital to good defense.
Declarer's hand: ♠ 98 ♥ 7632 ♦ AK76 ♣ 954 Partner's hand: ♠ 75 ♥ 985 ♦ 852 ♣ AJ732
Slam bidding sequences, particularly where there has been aBlackwood bid, can lead you in the right direction:
CHAPTER FIVE ♥ COUNTING HIGH CARD POINTS ♥ 139
NORTH (Dummy)
♠ K Q J 10 6♥ A K Q♦ 4 3♣ Q 10 8
WEST (You)
♠ A 4 3 2♥ J 10 4♦ Q J 10 9♣ K 6
NW E
S
NEITHER VUL. DEALER NORTH
West
pass
North
1♠
2NT
East
pass
all pass
South
1NT
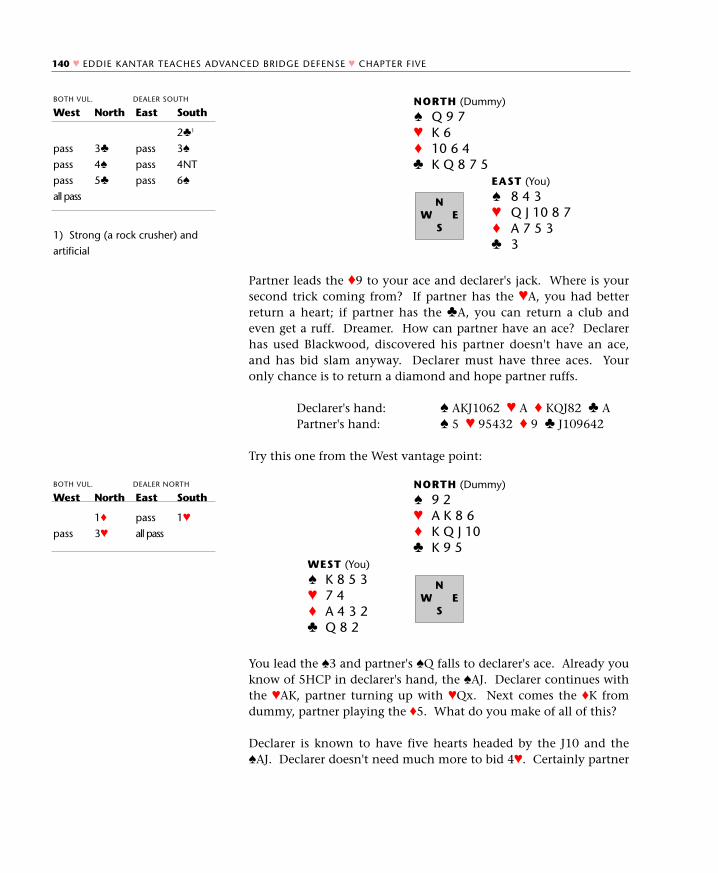
Partner leads the ♦9 to your ace and declarer's jack. Where is yoursecond trick coming from? If partner has the ♥A, you had betterreturn a heart; if partner has the ♣A, you can return a club andeven get a ruff. Dreamer. How can partner have an ace? Declarerhas used Blackwood, discovered his partner doesn't have an ace,and has bid slam anyway. Declarer must have three aces. Youronly chance is to return a diamond and hope partner ruffs.
Declarer's hand: ♠ AKJ1062 ♥ A ♦ KQJ82 ♣ A Partner's hand: ♠ 5 ♥ 95432 ♦ 9 ♣ J109642
Try this one from the West vantage point:
You lead the ♠3 and partner's ♠Q falls to declarer's ace. Already youknow of 5HCP in declarer's hand, the ♠AJ. Declarer continues withthe ♥AK, partner turning up with ♥Qx. Next comes the ♦K fromdummy, partner playing the ♦5. What do you make of all of this?
Declarer is known to have five hearts headed by the J10 and the♠AJ. Declarer doesn't need much more to bid 4♥. Certainly partner
1) Strong (a rock crusher) and
artificial
140 ♥ EDDIE KANTAR TEACHES ADVANCED BRIDGE DEFENSE ♥ CHAPTER FIVE
NORTH (Dummy)
♠ Q 9 7♥ K 6♦ 10 6 4♣ K Q 8 7 5
EAST (You)
♠ 8 4 3♥ Q J 10 8 7♦ A 7 5 3♣ 3
NW E
S
BOTH VUL. DEALER SOUTH
West
pass
pass
pass
all pass
North
3♣
4♠
5♣
East
pass
pass
pass
South
2♣1
3♠
4NT
6♠
NORTH (Dummy)
♠ 9 2♥ A K 8 6♦ K Q J 10♣ K 9 5
WEST (You)
♠ K 8 5 3♥ 7 4♦ A 4 3 2♣ Q 8 2
NW E
S
BOTH VUL. DEALER NORTH
West
pass
North
1♦
3♥
East
pass
all pass
South
1♥
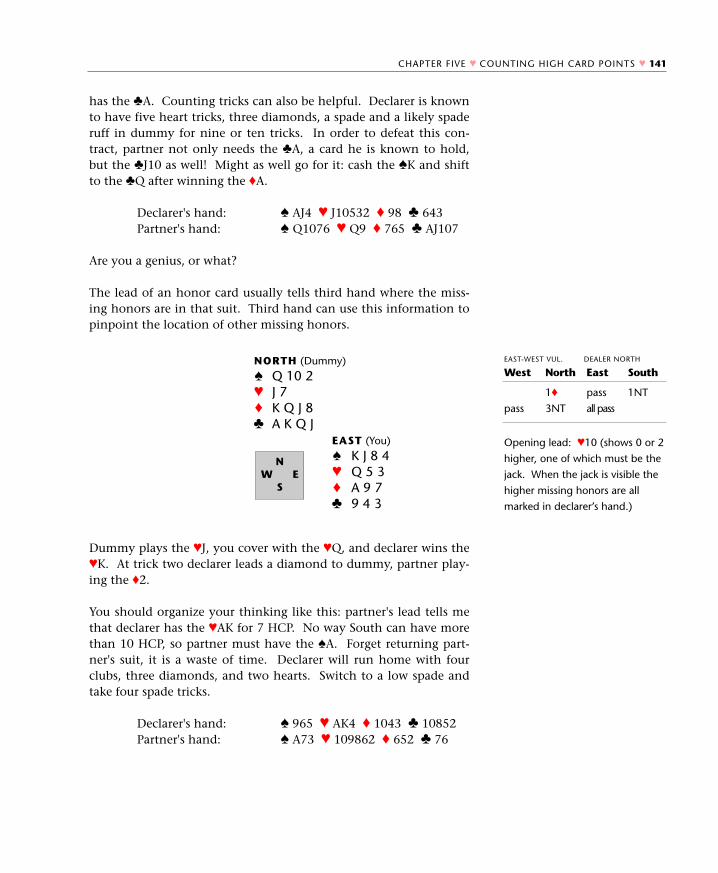
has the ♣A. Counting tricks can also be helpful. Declarer is knownto have five heart tricks, three diamonds, a spade and a likely spaderuff in dummy for nine or ten tricks. In order to defeat this con-tract, partner not only needs the ♣A, a card he is known to hold,but the ♣J10 as well! Might as well go for it: cash the ♠K and shiftto the ♣Q after winning the ♦A.
Declarer's hand: ♠ AJ4 ♥ J10532 ♦ 98 ♣ 643 Partner's hand: ♠ Q1076 ♥ Q9 ♦ 765 ♣ AJ107
Are you a genius, or what?
The lead of an honor card usually tells third hand where the miss-ing honors are in that suit. Third hand can use this information topinpoint the location of other missing honors.
Dummy plays the ♥J, you cover with the ♥Q, and declarer wins the♥K. At trick two declarer leads a diamond to dummy, partner play-ing the ♦2.
You should organize your thinking like this: partner's lead tells methat declarer has the ♥AK for 7 HCP. No way South can have morethan 10 HCP, so partner must have the ♠A. Forget returning part-ner's suit, it is a waste of time. Declarer will run home with fourclubs, three diamonds, and two hearts. Switch to a low spade andtake four spade tricks.
Declarer's hand: ♠ 965 ♥ AK4 ♦ 1043 ♣ 10852 Partner's hand: ♠ A73 ♥ 109862 ♦ 652 ♣ 76
Opening lead: ♥10 (shows 0 or 2
higher, one of which must be the
jack. When the jack is visible the
higher missing honors are all
marked in declarer’s hand.)
CHAPTER FIVE ♥ COUNTING HIGH CARD POINTS ♥ 141
NORTH (Dummy)
♠ Q 10 2♥ J 7♦ K Q J 8♣ A K Q J
EAST (You)
♠ K J 8 4♥ Q 5 3♦ A 9 7♣ 9 4 3
NW E
S
EAST-WEST VUL. DEALER NORTH
West
pass
North
1♦
3NT
East
pass
all pass
South
1NT
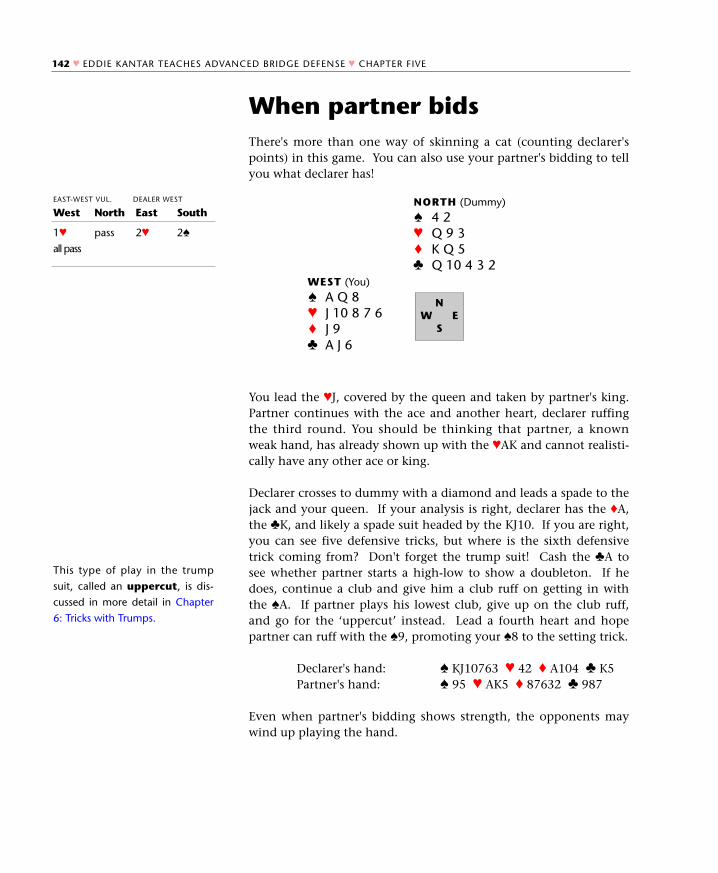
When partner bidsThere's more than one way of skinning a cat (counting declarer'spoints) in this game. You can also use your partner's bidding to tellyou what declarer has!
You lead the ♥J, covered by the queen and taken by partner's king.Partner continues with the ace and another heart, declarer ruffingthe third round. You should be thinking that partner, a knownweak hand, has already shown up with the ♥AK and cannot realisti-cally have any other ace or king.
Declarer crosses to dummy with a diamond and leads a spade to thejack and your queen. If your analysis is right, declarer has the ♦A,the ♣K, and likely a spade suit headed by the KJ10. If you are right,you can see five defensive tricks, but where is the sixth defensivetrick coming from? Don't forget the trump suit! Cash the ♣A tosee whether partner starts a high-low to show a doubleton. If hedoes, continue a club and give him a club ruff on getting in withthe ♠A. If partner plays his lowest club, give up on the club ruff,and go for the ‘uppercut’ instead. Lead a fourth heart and hopepartner can ruff with the ♠9, promoting your ♠8 to the setting trick.
Declarer's hand: ♠ KJ10763 ♥ 42 ♦ A104 ♣ K5 Partner's hand: ♠ 95 ♥ AK5 ♦ 87632 ♣ 987
Even when partner's bidding shows strength, the opponents maywind up playing the hand.
This type of play in the trump
suit, called an uppercut, is dis-
cussed in more detail in Chapter
6: Tricks with Trumps.
142 ♥ EDDIE KANTAR TEACHES ADVANCED BRIDGE DEFENSE ♥ CHAPTER FIVE
NORTH (Dummy)
♠ 4 2♥ Q 9 3♦ K Q 5♣ Q 10 4 3 2
WEST (You)
♠ A Q 8♥ J 10 8 7 6♦ J 9♣ A J 6
NW E
S
EAST-WEST VUL. DEALER WEST
West
1♥
all pass
North
pass
East
2♥
South
2♠
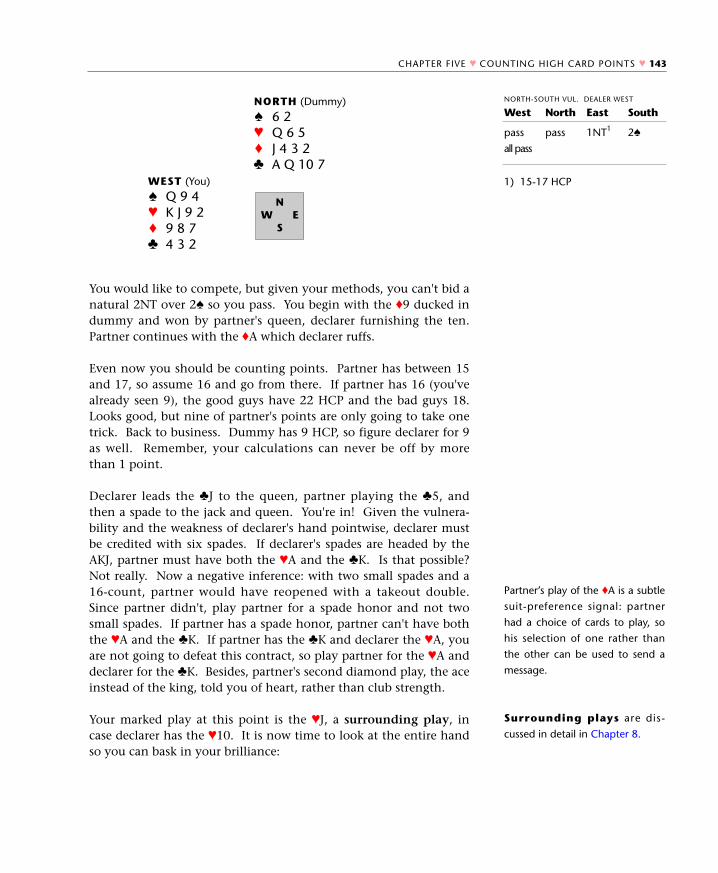
You would like to compete, but given your methods, you can't bid anatural 2NT over 2♠ so you pass. You begin with the ♦9 ducked indummy and won by partner's queen, declarer furnishing the ten.Partner continues with the ♦A which declarer ruffs.
Even now you should be counting points. Partner has between 15and 17, so assume 16 and go from there. If partner has 16 (you'vealready seen 9), the good guys have 22 HCP and the bad guys 18.Looks good, but nine of partner's points are only going to take onetrick. Back to business. Dummy has 9 HCP, so figure declarer for 9as well. Remember, your calculations can never be off by morethan 1 point.
Declarer leads the ♣J to the queen, partner playing the ♣5, andthen a spade to the jack and queen. You're in! Given the vulnera-bility and the weakness of declarer's hand pointwise, declarer mustbe credited with six spades. If declarer's spades are headed by theAKJ, partner must have both the ♥A and the ♣K. Is that possible?Not really. Now a negative inference: with two small spades and a16-count, partner would have reopened with a takeout double.Since partner didn't, play partner for a spade honor and not twosmall spades. If partner has a spade honor, partner can't have boththe ♥A and the ♣K. If partner has the ♣K and declarer the ♥A, youare not going to defeat this contract, so play partner for the ♥A anddeclarer for the ♣K. Besides, partner's second diamond play, the aceinstead of the king, told you of heart, rather than club strength.
Your marked play at this point is the ♥J, a surrounding play, incase declarer has the ♥10. It is now time to look at the entire handso you can bask in your brilliance:
1) 15-17 HCP
Partner’s play of the ♦A is a subtle
suit-preference signal: partner
had a choice of cards to play, so
his selection of one rather than
the other can be used to send a
message.
Surrounding plays are dis-
cussed in detail in Chapter 8.
CHAPTER FIVE ♥ COUNTING HIGH CARD POINTS ♥ 143
NORTH (Dummy)
♠ 6 2♥ Q 6 5♦ J 4 3 2♣ A Q 10 7
WEST (You)
♠ Q 9 4♥ K J 9 2♦ 9 8 7♣ 4 3 2
NW E
S
NORTH-SOUTH VUL. DEALER WEST
West
pass
all pass
North
pass
East
1NT1
South
2♠
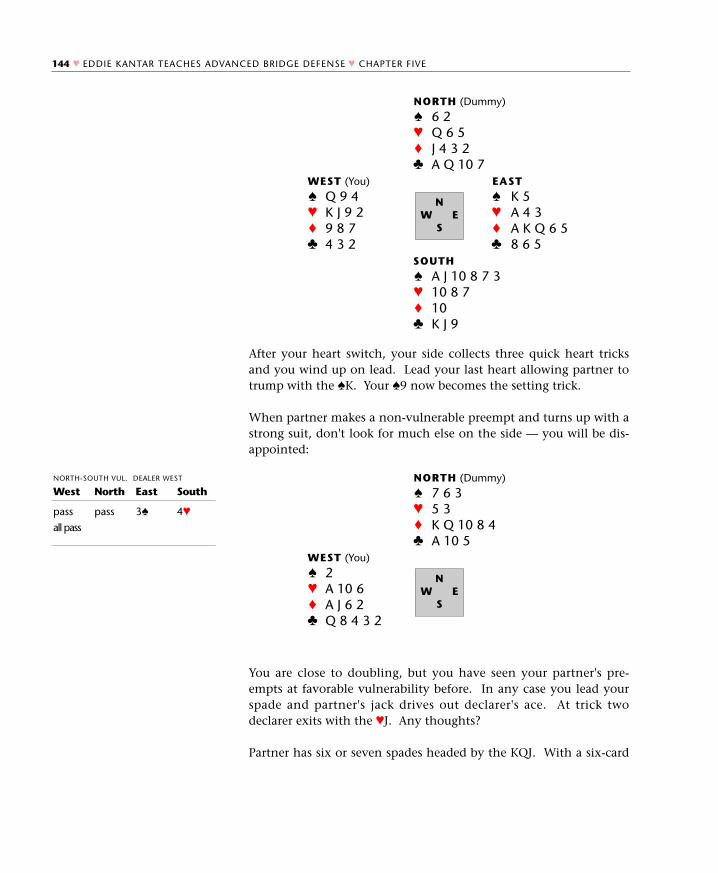
After your heart switch, your side collects three quick heart tricksand you wind up on lead. Lead your last heart allowing partner totrump with the ♠K. Your ♠9 now becomes the setting trick.
When partner makes a non-vulnerable preempt and turns up with astrong suit, don't look for much else on the side — you will be dis-appointed:
You are close to doubling, but you have seen your partner's pre-empts at favorable vulnerability before. In any case you lead yourspade and partner's jack drives out declarer's ace. At trick twodeclarer exits with the ♥J. Any thoughts?
Partner has six or seven spades headed by the KQJ. With a six-card
144 ♥ EDDIE KANTAR TEACHES ADVANCED BRIDGE DEFENSE ♥ CHAPTER FIVE
NORTH (Dummy)
♠ 6 2♥ Q 6 5♦ J 4 3 2♣ A Q 10 7
WEST (You) EAST
♠ Q 9 4 ♠ K 5♥ K J 9 2 ♥ A 4 3♦ 9 8 7 ♦ A K Q 6 5♣ 4 3 2 ♣ 8 6 5
SOUTH
♠ A J 10 8 7 3♥ 10 8 7♦ 10♣ K J 9
NW E
S
NORTH (Dummy)
♠ 7 6 3♥ 5 3♦ K Q 10 8 4♣ A 10 5
WEST (You)
♠ 2♥ A 10 6♦ A J 6 2♣ Q 8 4 3 2
NW E
S
NORTH-SOUTH VUL. DEALER WEST
West
pass
all pass
North
pass
East
3♠
South
4♥
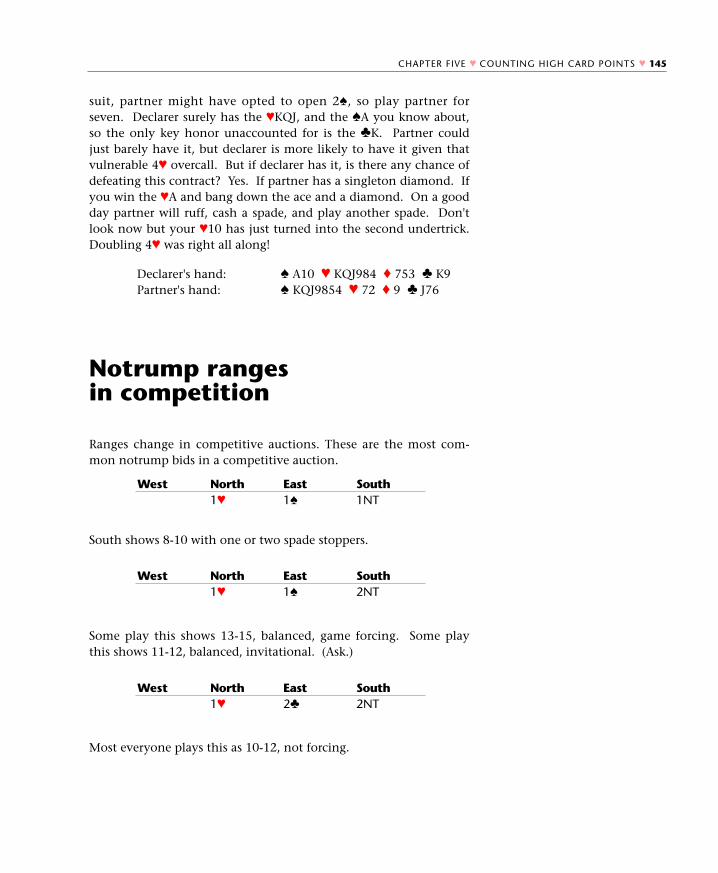
suit, partner might have opted to open 2♠, so play partner forseven. Declarer surely has the ♥KQJ, and the ♠A you know about,so the only key honor unaccounted for is the ♣K. Partner couldjust barely have it, but declarer is more likely to have it given thatvulnerable 4♥ overcall. But if declarer has it, is there any chance ofdefeating this contract? Yes. If partner has a singleton diamond. Ifyou win the ♥A and bang down the ace and a diamond. On a goodday partner will ruff, cash a spade, and play another spade. Don'tlook now but your ♥10 has just turned into the second undertrick.Doubling 4♥ was right all along!
Notrump rangesin competition
Ranges change in competitive auctions. These are the most com-mon notrump bids in a competitive auction.
South shows 8-10 with one or two spade stoppers.
Some play this shows 13-15, balanced, game forcing. Some playthis shows 11-12, balanced, invitational. (Ask.)
Most everyone plays this as 10-12, not forcing.
CHAPTER FIVE ♥ COUNTING HIGH CARD POINTS ♥ 145
Declarer's hand: ♠ A10 ♥ KQJ984 ♦ 753 ♣ K9 Partner's hand: ♠ KQJ9854 ♥ 72 ♦ 9 ♣ J76
West North1♥
East1♠
South1NT
West North1♥
East1♠
South2NT
West North1♥
East2♣
South2NT
The 1NT response to an overcall typically shows 9 to a bad 12. Abad 12 usually means a singleton in partner's suit. The 2NTresponse shows 12 to a bad 15 and is invitational. The 3NTresponse shows 15+.
After a two-level overcall, a response of 2NT shows 10-12; a 3NTresponse shows 12+. Again, the overlap occurs when you have a fit-ting honor in partner's suit. Bid ‘em up with those fitting honors!
Would you believe 16-22? Well, that is the range.
The 2NT overcall shows the strength of a strong notrump, typically15 to a bad 18. The 3NT overcall, if a balanced hand, showsupwards of 18 HCP. However, if South has a long running suit, for-get the points: South is basing her overcall on tricks.
The 1NT response has a wide range: 5-9 HCP. The 2NT responseshows 10 to a bad 13. The 3NT response shows 13-16. Theseranges are based to a certain extent on how light North can be tomake a takeout double. If North can double with as few as 11 HCP(4-1-4-4 pattern), then responder has to exercise a little cautionwhen jumping to game!
146 ♥ EDDIE KANTAR TEACHES ADVANCED BRIDGE DEFENSE ♥ CHAPTER FIVE
West1♥
North1♠
Eastpass
South1NT, 2NT, or3NT
West1♠
North2♦
Eastpass
South2NT or 3NT
West North East2♠
South2NT or 3NT
West1♥
Northdbl
Eastpass
South1NT, 2NT, or3NT
West North East3♦
South3NT
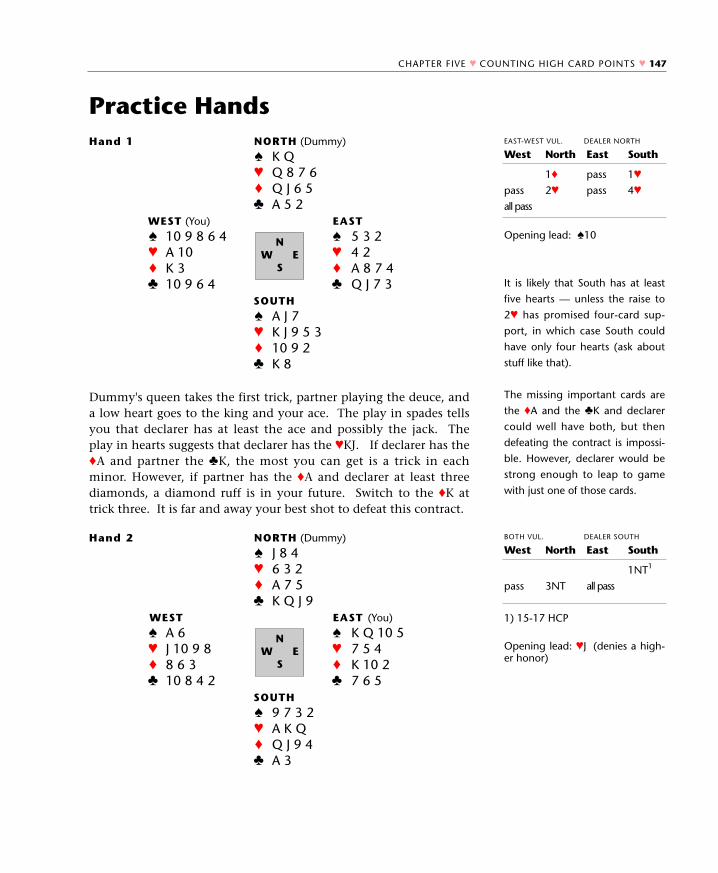
Practice Hands
Dummy's queen takes the first trick, partner playing the deuce, anda low heart goes to the king and your ace. The play in spades tellsyou that declarer has at least the ace and possibly the jack. Theplay in hearts suggests that declarer has the ♥KJ. If declarer has the♦A and partner the ♣K, the most you can get is a trick in eachminor. However, if partner has the ♦A and declarer at least threediamonds, a diamond ruff is in your future. Switch to the ♦K attrick three. It is far and away your best shot to defeat this contract.
Opening lead: ♠10
It is likely that South has at least
five hearts — unless the raise to
2♥ has promised four-card sup-
port, in which case South could
have only four hearts (ask about
stuff like that).
The missing important cards are
the ♦A and the ♣K and declarer
could well have both, but then
defeating the contract is impossi-
ble. However, declarer would be
strong enough to leap to game
with just one of those cards.
1) 15-17 HCP
Opening lead: ♥J (denies a high-er honor)
CHAPTER FIVE ♥ COUNTING HIGH CARD POINTS ♥ 147
Hand 1 NORTH (Dummy)
♠ K Q♥ Q 8 7 6♦ Q J 6 5♣ A 5 2
WEST (You) EAST
♠ 10 9 8 6 4 ♠ 5 3 2♥ A 10 ♥ 4 2♦ K 3 ♦ A 8 7 4♣ 10 9 6 4 ♣ Q J 7 3
SOUTH
♠ A J 7♥ K J 9 5 3♦ 10 9 2♣ K 8
NW E
S
EAST-WEST VUL. DEALER NORTH
West
pass
all pass
North
1♦
2♥
East
pass
pass
South
1♥
4♥
Hand 2 NORTH (Dummy)
♠ J 8 4♥ 6 3 2♦ A 7 5♣ K Q J 9
WEST EAST (You)
♠ A 6 ♠ K Q 10 5♥ J 10 9 8 ♥ 7 5 4♦ 8 6 3 ♦ K 10 2♣ 10 8 4 2 ♣ 7 6 5
SOUTH
♠ 9 7 3 2♥ A K Q♦ Q J 9 4♣ A 3
NW E
S
BOTH VUL. DEALER SOUTH
West
pass
North
3NT
East
all pass
South
1NT1
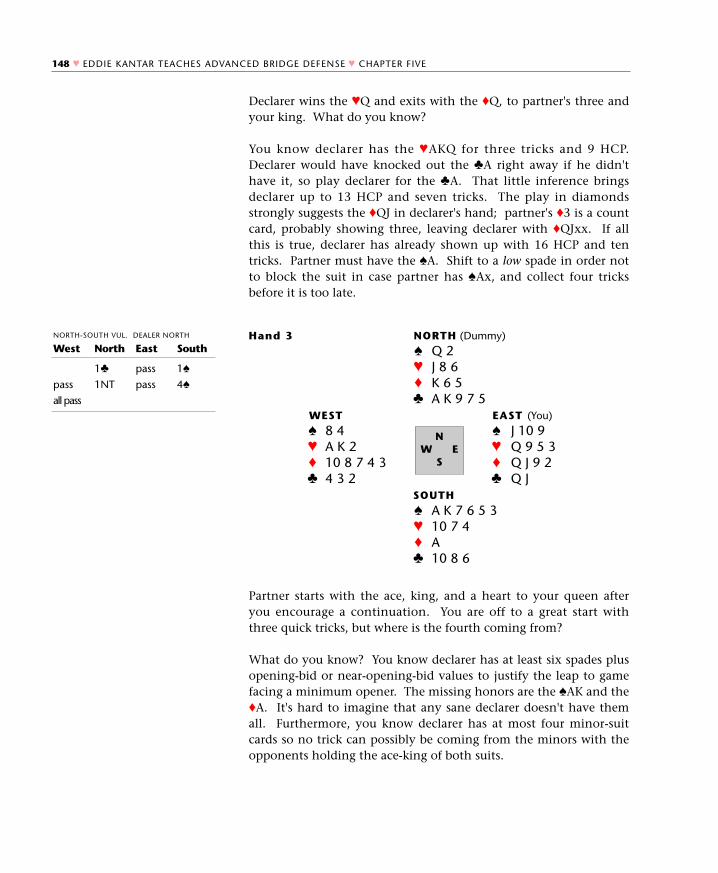
Declarer wins the ♥Q and exits with the ♦Q, to partner's three andyour king. What do you know?
You know declarer has the ♥AKQ for three tricks and 9 HCP.Declarer would have knocked out the ♣A right away if he didn'thave it, so play declarer for the ♣A. That little inference bringsdeclarer up to 13 HCP and seven tricks. The play in diamondsstrongly suggests the ♦QJ in declarer's hand; partner's ♦3 is a countcard, probably showing three, leaving declarer with ♦QJxx. If allthis is true, declarer has already shown up with 16 HCP and tentricks. Partner must have the ♠A. Shift to a low spade in order notto block the suit in case partner has ♠Ax, and collect four tricksbefore it is too late.
Partner starts with the ace, king, and a heart to your queen afteryou encourage a continuation. You are off to a great start withthree quick tricks, but where is the fourth coming from?
What do you know? You know declarer has at least six spades plusopening-bid or near-opening-bid values to justify the leap to gamefacing a minimum opener. The missing honors are the ♠AK and the♦A. It's hard to imagine that any sane declarer doesn't have themall. Furthermore, you know declarer has at most four minor-suitcards so no trick can possibly be coming from the minors with theopponents holding the ace-king of both suits.
148 ♥ EDDIE KANTAR TEACHES ADVANCED BRIDGE DEFENSE ♥ CHAPTER FIVE
Hand 3 NORTH (Dummy)
♠ Q 2♥ J 8 6♦ K 6 5♣ A K 9 7 5
WEST EAST (You)
♠ 8 4 ♠ J 10 9♥ A K 2 ♥ Q 9 5 3♦ 10 8 7 4 3 ♦ Q J 9 2♣ 4 3 2 ♣ Q J
SOUTH
♠ A K 7 6 5 3♥ 10 7 4♦ A♣ 10 8 6
NW E
S
NORTH-SOUTH VUL. DEALER NORTH
West
pass
all pass
North
1♣
1NT
East
pass
pass
South
1♠
4♠
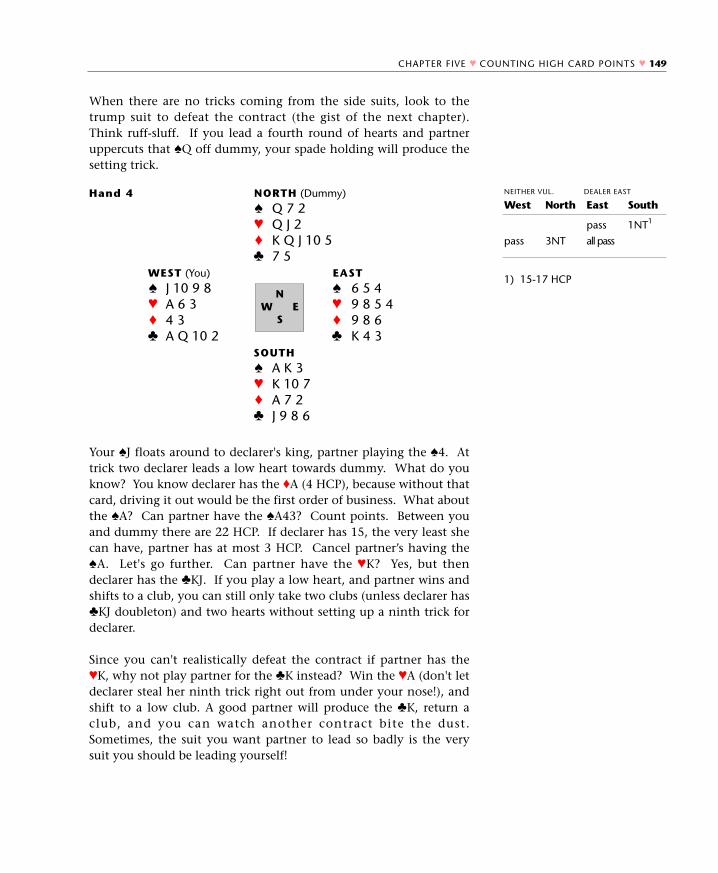
When there are no tricks coming from the side suits, look to thetrump suit to defeat the contract (the gist of the next chapter).Think ruff-sluff. If you lead a fourth round of hearts and partneruppercuts that ♠Q off dummy, your spade holding will produce thesetting trick.
Your ♠J floats around to declarer's king, partner playing the ♠4. Attrick two declarer leads a low heart towards dummy. What do youknow? You know declarer has the ♦A (4 HCP), because without thatcard, driving it out would be the first order of business. What aboutthe ♠A? Can partner have the ♠A43? Count points. Between youand dummy there are 22 HCP. If declarer has 15, the very least shecan have, partner has at most 3 HCP. Cancel partner’s having the♠A. Let's go further. Can partner have the ♥K? Yes, but thendeclarer has the ♣KJ. If you play a low heart, and partner wins andshifts to a club, you can still only take two clubs (unless declarer has♣KJ doubleton) and two hearts without setting up a ninth trick fordeclarer.
Since you can't realistically defeat the contract if partner has the♥K, why not play partner for the ♣K instead? Win the ♥A (don't letdeclarer steal her ninth trick right out from under your nose!), andshift to a low club. A good partner will produce the ♣K, return aclub, and you can watch another contract bite the dust.Sometimes, the suit you want partner to lead so badly is the verysuit you should be leading yourself!
1) 15-17 HCP
CHAPTER FIVE ♥ COUNTING HIGH CARD POINTS ♥ 149
Hand 4 NORTH (Dummy)
♠ Q 7 2♥ Q J 2♦ K Q J 10 5♣ 7 5
WEST (You) EAST
♠ J 10 9 8 ♠ 6 5 4♥ A 6 3 ♥ 9 8 5 4♦ 4 3 ♦ 9 8 6♣ A Q 10 2 ♣ K 4 3
SOUTH
♠ A K 3♥ K 10 7♦ A 7 2♣ J 9 8 6
NW E
S
NEITHER VUL. DEALER EAST
West
pass
North
3NT
East
pass
all pass
South
1NT1
Test YourselfEstimate declarer’s point range and distribution on each auction.
150 ♥ EDDIE KANTAR TEACHES ADVANCED BRIDGE DEFENSE ♥ CHAPTER FIVE
1)
4)
7)
10)
13)
16)
19)
22)
2)
5)
8)
11)
14)
17)
20)
23)
3)
6)
9)
12)
15)
18)
21)
24)
North
1♥
2♥
pass
South
1♠
4♥
North
1♠
2♦
3NT
South
2♣
3♣
pass
North
1♥
3♣
3NT
South
1♠
3♠
pass
North
1♥
2♦
pass
South
2♣
3♣
North
1♦
3NT
South
2NTpass
North
1♦
3NT
South
1♥
pass
North
pass2♦
South
1♠
pass
North
2♣
2NTpass
South
2♦
3NT
North
1♥
3♥
pass
South
1♠
4♥
North
2♥1
pass
South
4♥
North
pass1♠
2NT
South
1♦
2♠
pass
North
1♠
3♦
4♠
South
2♥
3♠
pass
North
1♣
1♠
3NT
South
1♥
2NTpass
North
1♣
2NT3NT
South
1♥
3♦
pass
North
1♣
2♥
3NT
South
1♠
2♠
pass
North
1♣
1♠
2NT
South
1♥
2♥
pass
North
1♣
1NTpass
South
1♥
4♥
North
1♦
3♠
pass
South
1♠
4♠
North
1♥
2♣
pass
South
1♠
3♠
North
1NT1
pass
South
4NTpass
North
1♥
4♥
South
1♠
pass
North
2NT3♠
pass
South
3♣
4♠
North
1♠
2♦
pass
South
1NT2NT
North
1♦
2NTpass
South
1NT3NT
1) 15-17 HCP
1) Weak
To Answers
Test Yourself — Solutions1) 11-14 At least six hearts.2) 15-18 At least six hearts; 18 HCP would be the exception.3) 18-19 Fewer than three hearts, and very unlikely to have four
diamonds.4) 22-24 Balanced.5) 6-9 Six hearts — unlikely to have four spades.6) 19-21 Five clubs, four hearts, fewer than three spades. With
17-18, opener rebids 2NT over 2♠.7) 10-11 Five or six diamonds. A passed hand response at the
two-level, which can be passed, promises a five-card suit, minimum.
8) 10-12 Exactly four spades. If responder has exactly 10 HCP, anexception, she should have good intermediates plus a fitting diamond honor. Assume 11-12.
9) 16-18 Responder signed off: opener must have serious extras.10) 15-17 Solid diamonds; usually a seven-bagger. It is a trick-
taking bid, not a point-count bid. It can be made with asingleton or void in partner's suit.
11) 15-17 At least five spades. With a stronger hand, opener makes a slam try over 3♠. (Some play the 3♦ rebid does not show extras. Ask.)
12) 11-14 At least six hearts.13) 13-15 Flat, typically no-four-card major. Some play this as 10-
12. Ask.14) 10-12 With 10 responder should have either a good five-card
suit, a fitting honor in opener's first suit, or great inter-mediates. With 10 HCP you can also make a 1NT rebid.Assume 11-12.
15) 8+ All you know is that responder was strong enough to try for game, but not strong enough to make a slam try.
16) 9-11 With six or seven clubs.17) 9-11 With at least six spades. With only 9 HCP responder
figures to have a side four-card suit or a seven-bagger. 18) 15-16 With 17 opener bids on; with 15 opener passes; with 16
opener usually bids on unless he’s exactly 4-3-3-3.19) 18-20 Fewer than three spades. Opener's most likely distribu-
tion is 1-5-3-4.20) 16-19 At least six hearts, maybe more. The more hearts, the
fewer high card points needed. 21) 20-21 Four spades and fewer than four hearts. Check your
opponents’ range: not everyone plays 20-21.
CHAPTER FIVE ♥ COUNTING HIGH CARD POINTS ♥ 151
To questions
22) 15-18 Responder’s 3♣ rebid is not forcing, therefore opener needs extras ( or a club fit) to go on.
23) 9-10 Usually 10. If the 1NT response is forcing, 10-11.24) 8-10 No four-card major. In this sequence, responder's long
suit is usually clubs. Beware of a club lead!
152 ♥ EDDIE KANTAR TEACHES ADVANCED BRIDGE DEFENSE ♥ CHAPTER FIVE
Key ideas from Chapter 5
• Notrump bids have ranges. If the bidder has a 3-pointrange, assume the middle count until it proves otherwise.
• When a limited hand passes an invitational sequence,assume it is at the bottom of the range; if the invitation isaccepted, assume it is at the top or near top of the range.
• When an unlimited hand accepts an invitational bid, allyou know is that the hand is not a bare minimum and notstrong enough to make a slam try.
• When opener declares a suit contract, you should havesome idea (within three or four) how many HCP declarerhas. Add dummy's HCP to declarer's estimated HCP todetermine how many HCP you and partner have. Start bytaking declarer's middle count unless you need declarer tobe minimum to defeat the contract.
• Use partner's bidding to help determine declarer's pointcount. If you know within a point or two how strong part-ner is, you know the same about declarer's hand.
• After you determine partner's point count, assume thosepoints that you haven't already seen are where you needthem in order to defeat the contract.
• If declarer is known to be weak and turns up with beau-coup high-card strength early in the play, assume partnerhas what's left.
• When partner leads an honor card, you usually know howmany points (and tricks) declarer has in that suit.
• Partner's signal can give you information about declarer'shigh-card strength in that suit.
• If all else fails, look to the trump suit for the setting trick;perhaps an uppercut or an overruff possibility exists.
• Keep track of declarer's strength as the hand progresses. It'show you know who has what near the end of a hand.
To questions
WHATYOU’RE GOING
TO LEARN IN THIS
CHAPTER:• How to use the defensive
trump holdings to make extratricks
• The importance of timingwhen giving and getting ruffs
• How to make tricks by refusingto overruff
• How to execute an uppercut• How to use a ruff-sluff to force
declarer
Getting your ruff 154Giving partner a ruff 156Overruffing positions 163The uppercut 165The forcing defense 168The dreaded ruff-sluff 171Ruffing air 175Holding the master trump 176Practice Hands 179Test Yourself 181Solutions 184Key ideas 188
When a hand is played at a suit contract, it is harder for the defend-ers to figure out what declarer is going to do, and how close he is tomaking his contract. This is because declarer can use trumps to rufflosers, establish side suits, and ruff the defenders’ winners, none ofwhich he can do in notrump contracts. The good news is that thedefenders can make use of the trump suit too. In the first place,defensive winners in the trump suit aren’t going to go away: the aceof trumps is always a trick, for example. In the second place, thereare a host of stratagems that the defenders can employ to squeezeextra tricks out of their trump holdings. We’re going to look atsome of them in this chapter
6TricksWithTrumpsA wise man will make more opportunitiesthan he finds
FRANCIS BACON
♦ 153
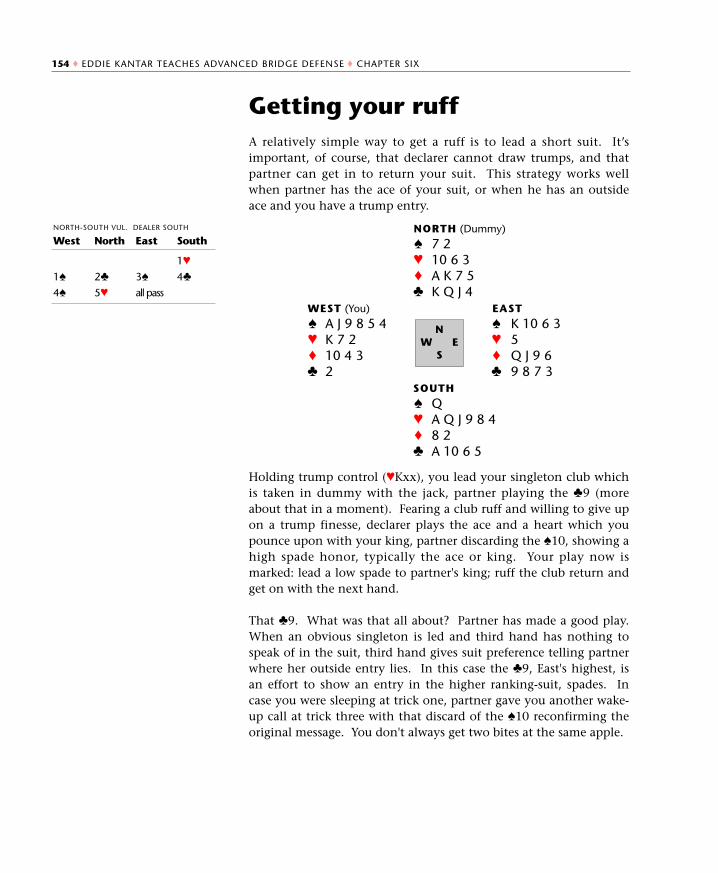
Getting your ruffA relatively simple way to get a ruff is to lead a short suit. It’simportant, of course, that declarer cannot draw trumps, and thatpartner can get in to return your suit. This strategy works wellwhen partner has the ace of your suit, or when he has an outsideace and you have a trump entry.
Holding trump control (♥Kxx), you lead your singleton club whichis taken in dummy with the jack, partner playing the ♣9 (moreabout that in a moment). Fearing a club ruff and willing to give upon a trump finesse, declarer plays the ace and a heart which youpounce upon with your king, partner discarding the ♠10, showing ahigh spade honor, typically the ace or king. Your play now ismarked: lead a low spade to partner's king; ruff the club return andget on with the next hand.
That ♣9. What was that all about? Partner has made a good play.When an obvious singleton is led and third hand has nothing tospeak of in the suit, third hand gives suit preference telling partnerwhere her outside entry lies. In this case the ♣9, East's highest, isan effort to show an entry in the higher ranking-suit, spades. Incase you were sleeping at trick one, partner gave you another wake-up call at trick three with that discard of the ♠10 reconfirming theoriginal message. You don't always get two bites at the same apple.
154 ♦ EDDIE KANTAR TEACHES ADVANCED BRIDGE DEFENSE ♦ CHAPTER SIX
NORTH (Dummy)
♠ 7 2♥ 10 6 3♦ A K 7 5♣ K Q J 4
WEST (You) EAST
♠ A J 9 8 5 4 ♠ K 10 6 3♥ K 7 2 ♥ 5♦ 10 4 3 ♦ Q J 9 6♣ 2 ♣ 9 8 7 3
SOUTH
♠ Q♥ A Q J 9 8 4♦ 8 2♣ A 10 6 5
NW E
S
NORTH-SOUTH VUL. DEALER SOUTH
West
1♠
4♠
North
2♣
5♥
East
3♠
all pass
South
1♥
4♣
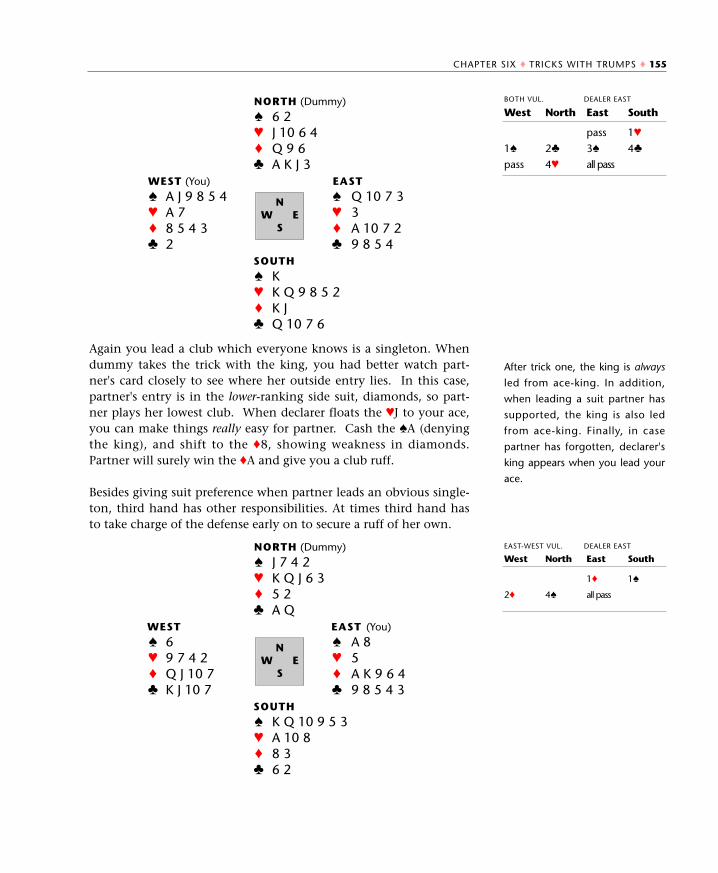
CHAPTER SIX � TRICKS WITH TRUMPS � 155
After trick one, the king is always
led from ace-king. In addition,
when leading a suit partner has
supported, the king is also led
from ace-king. Finally, in case
partner has forgotten, declarer's
king appears when you lead your
ace.
Again you lead a club which everyone knows is a singleton. Whendummy takes the trick with the king, you had better watch part-ner's card closely to see where her outside entry lies. In this case,partner's entry is in the lower-ranking side suit, diamonds, so part-ner plays her lowest club. When declarer floats the �J to your ace,you can make things really easy for partner. Cash the �A (denyingthe king), and shift to the �8, showing weakness in diamonds.Partner will surely win the �A and give you a club ruff.
Besides giving suit preference when partner leads an obvious single-ton, third hand has other responsibilities. At times third hand hasto take charge of the defense early on to secure a ruff of her own.
BOTH VUL. DEALER EAST
West
1�
pass
North
2�
4�
East
pass
3�
all pass
South
1�
4�
NORTH (Dummy)
� 6 2� J 10 6 4� Q 9 6� A K J 3
WEST (You) EAST
� A J 9 8 5 4 � Q 10 7 3� A 7 � 3� 8 5 4 3 � A 10 7 2� 2 � 9 8 5 4
SOUTH
� K� K Q 9 8 5 2� K J� Q 10 7 6
NW E
S
NORTH (Dummy)
� J 7 4 2� K Q J 6 3� 5 2� A Q
WEST EAST (You)
� 6 � A 8� 9 7 4 2 � 5� Q J 10 7 � A K 9 6 4� K J 10 7 � 9 8 5 4 3
SOUTH
� K Q 10 9 5 3� A 10 8� 8 3� 6 2
NW E
S
EAST-WEST VUL. DEALER EAST
West
2�
North
4�
East
1�
all pass
South
1�
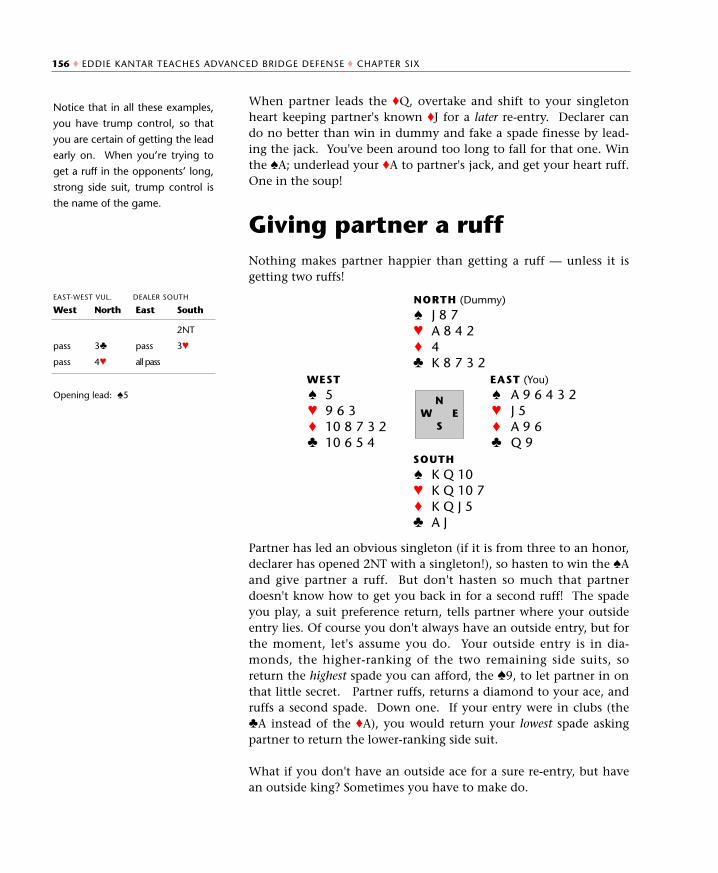
When partner leads the ♦Q, overtake and shift to your singletonheart keeping partner's known ♦J for a later re-entry. Declarer cando no better than win in dummy and fake a spade finesse by lead-ing the jack. You've been around too long to fall for that one. Winthe ♠A; underlead your ♦A to partner's jack, and get your heart ruff.One in the soup!
Giving partner a ruffNothing makes partner happier than getting a ruff — unless it isgetting two ruffs!
Partner has led an obvious singleton (if it is from three to an honor,declarer has opened 2NT with a singleton!), so hasten to win the ♠Aand give partner a ruff. But don't hasten so much that partnerdoesn't know how to get you back in for a second ruff! The spadeyou play, a suit preference return, tells partner where your outsideentry lies. Of course you don't always have an outside entry, but forthe moment, let's assume you do. Your outside entry is in dia-monds, the higher-ranking of the two remaining side suits, soreturn the highest spade you can afford, the ♠9, to let partner in onthat little secret. Partner ruffs, returns a diamond to your ace, andruffs a second spade. Down one. If your entry were in clubs (the♣A instead of the ♦A), you would return your lowest spade askingpartner to return the lower-ranking side suit.
What if you don't have an outside ace for a sure re-entry, but havean outside king? Sometimes you have to make do.
Notice that in all these examples,
you have trump control, so that
you are certain of getting the lead
early on. When you’re trying to
get a ruff in the opponents’ long,
strong side suit, trump control is
the name of the game.
Opening lead: ♠5
156 ♦ EDDIE KANTAR TEACHES ADVANCED BRIDGE DEFENSE ♦ CHAPTER SIX
EAST-WEST VUL. DEALER SOUTH
West
pass
pass
North
3♣
4♥
East
pass
all pass
South
2NT
3♥
NORTH (Dummy)
♠ J 8 7♥ A 8 4 2♦ 4♣ K 8 7 3 2
WEST EAST (You)
♠ 5 ♠ A 9 6 4 3 2♥ 9 6 3 ♥ J 5♦ 10 8 7 3 2 ♦ A 9 6♣ 10 6 5 4 ♣ Q 9
SOUTH
♠ K Q 10♥ K Q 10 7♦ K Q J 5♣ A J
NW E
S

You seem to have found a partner who always has a singleton tolead. Even though you do not have an outside ace for a re-entry,you do have a king. Win the ♦A and return the ♦2, a suit prefer-ence play for clubs. Partner ruffs and underleads his ♣A to your ♣Kto get another diamond ruff. Down one again.
Well, you are probably thinking, in these lovely examples thatKantar makes up I always have the ace of the suit partner leads andan outside king or ace too. In real life I seldom have the ace of part-ner' s suit, or if I do, I never seem to have an outside ace or king.What should I do then? Hold the fort. If you have the ace of part-ner's singleton suit, and no outside entry, signal for the side suitthat you think is the safer for partner to return — the lesser of evils.
Opening lead: ♦3
Again, you can tell the lead is a
singleton from the bidding.
Next time North has that hand hemight cuebid 3♠ looking for a3NT rebid from South, thus arriv-ing at a makable game contract.
Opening lead: ♠2
CHAPTER SIX ♦ TRICKS WITH TRUMPS ♦ 157
NORTH (Dummy)
♠ K J 6 4♥ K Q J 4 2♦ 10 9 8♣ 7
WEST EAST (You)
♠ 5 3 2 ♠ 10 8 7♥ 10 8 6 ♥ 5♦ 3 ♦ A J 7 5 4 2♣ A J 8 6 3 2 ♣ K 9 5
SOUTH
♠ A Q 9♥ A 9 7 3♦ K Q 6♣ Q 10 4
NW E
S
BOTH VUL. DEALER SOUTH
West
pass
pass
North
2♣
4♥
East
pass
all pass
South
1NT
2♥
NORTH (Dummy)
♠ 8 6 4 3♥ K 6 5♦ A K Q♣ 5 4 3
WEST EAST (You)
♠ 2 ♠ A Q 10 9 7 5♥ 10 9 4 2 ♥ 3♦ 10 7 4 3 ♦ 6 5 2♣ K J 6 2 ♣ 10 9 8
SOUTH
♠ K J♥ A Q J 8 7♦ J 9 8♣ A Q 7
NW E
S
NORTH-SOUTH VUL. DEALER EAST
West
pass
North
4♥
East
2♠
all pass
South
3♥
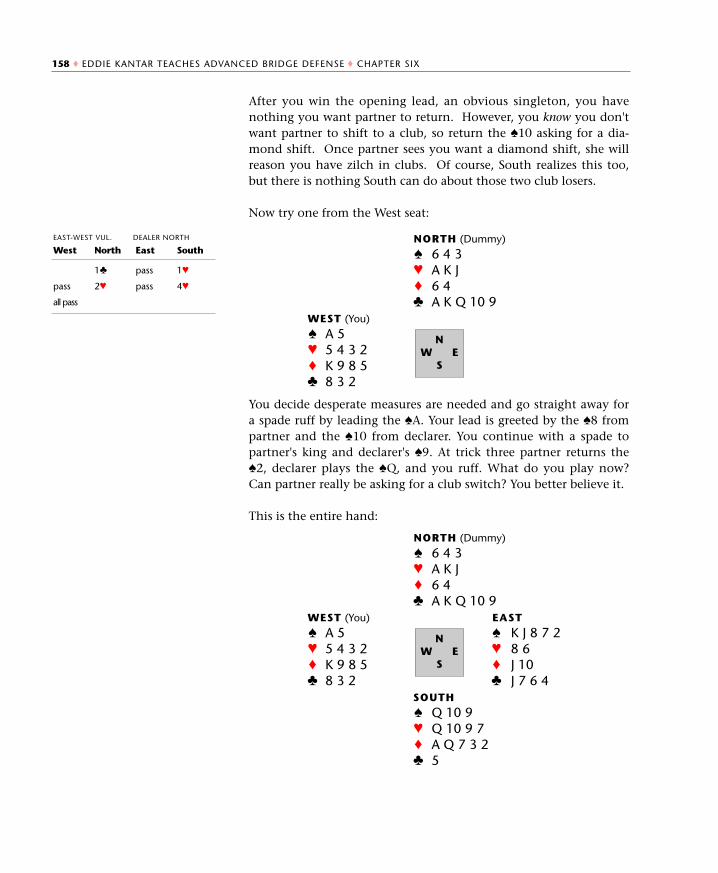
After you win the opening lead, an obvious singleton, you havenothing you want partner to return. However, you know you don'twant partner to shift to a club, so return the ♠10 asking for a dia-mond shift. Once partner sees you want a diamond shift, she willreason you have zilch in clubs. Of course, South realizes this too,but there is nothing South can do about those two club losers.
Now try one from the West seat:
You decide desperate measures are needed and go straight away fora spade ruff by leading the ♠A. Your lead is greeted by the ♠8 frompartner and the ♠10 from declarer. You continue with a spade topartner's king and declarer's ♠9. At trick three partner returns the♠2, declarer plays the ♠Q, and you ruff. What do you play now?Can partner really be asking for a club switch? You better believe it.
This is the entire hand:
158 ♦ EDDIE KANTAR TEACHES ADVANCED BRIDGE DEFENSE ♦ CHAPTER SIX
NORTH (Dummy)
♠ 6 4 3♥ A K J♦ 6 4♣ A K Q 10 9
WEST (You)
♠ A 5♥ 5 4 3 2♦ K 9 8 5♣ 8 3 2
NW E
S
EAST-WEST VUL. DEALER NORTH
West
pass
all pass
North
1♣
2♥
East
pass
pass
South
1♥
4♥
NORTH (Dummy)
♠ 6 4 3♥ A K J♦ 6 4♣ A K Q 10 9
WEST (You) EAST
♠ A 5 ♠ K J 8 7 2♥ 5 4 3 2 ♥ 8 6♦ K 9 8 5 ♦ J 10♣ 8 3 2 ♣ J 7 6 4
SOUTH
♠ Q 10 9♥ Q 10 9 7♦ A Q 7 3 2♣ 5
NW E
S
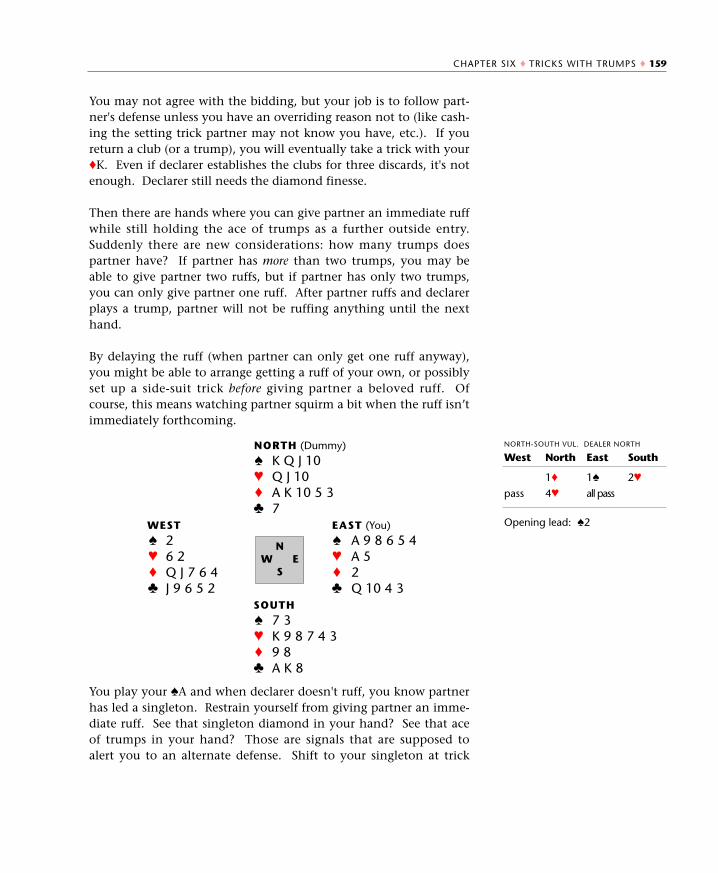
You may not agree with the bidding, but your job is to follow part-ner's defense unless you have an overriding reason not to (like cash-ing the setting trick partner may not know you have, etc.). If youreturn a club (or a trump), you will eventually take a trick with your♦K. Even if declarer establishes the clubs for three discards, it's notenough. Declarer still needs the diamond finesse.
Then there are hands where you can give partner an immediate ruffwhile still holding the ace of trumps as a further outside entry.Suddenly there are new considerations: how many trumps doespartner have? If partner has more than two trumps, you may beable to give partner two ruffs, but if partner has only two trumps,you can only give partner one ruff. After partner ruffs and declarerplays a trump, partner will not be ruffing anything until the nexthand.
By delaying the ruff (when partner can only get one ruff anyway),you might be able to arrange getting a ruff of your own, or possiblyset up a side-suit trick before giving partner a beloved ruff. Ofcourse, this means watching partner squirm a bit when the ruff isn’timmediately forthcoming.
You play your ♠A and when declarer doesn't ruff, you know partnerhas led a singleton. Restrain yourself from giving partner an imme-diate ruff. See that singleton diamond in your hand? See that aceof trumps in your hand? Those are signals that are supposed toalert you to an alternate defense. Shift to your singleton at trick
Opening lead: ♠2
CHAPTER SIX ♦ TRICKS WITH TRUMPS ♦ 159
NORTH (Dummy)
♠ K Q J 10♥ Q J 10♦ A K 10 5 3♣ 7
WEST EAST (You)
♠ 2 ♠ A 9 8 6 5 4♥ 6 2 ♥ A 5♦ Q J 7 6 4 ♦ 2♣ J 9 6 5 2 ♣ Q 10 4 3
SOUTH
♠ 7 3♥ K 9 8 7 4 3♦ 9 8♣ A K 8
NW E
S
NORTH-SOUTH VUL. DEALER NORTH
West
pass
North
1♦
4♥
East
1♠
all pass
South
2♥
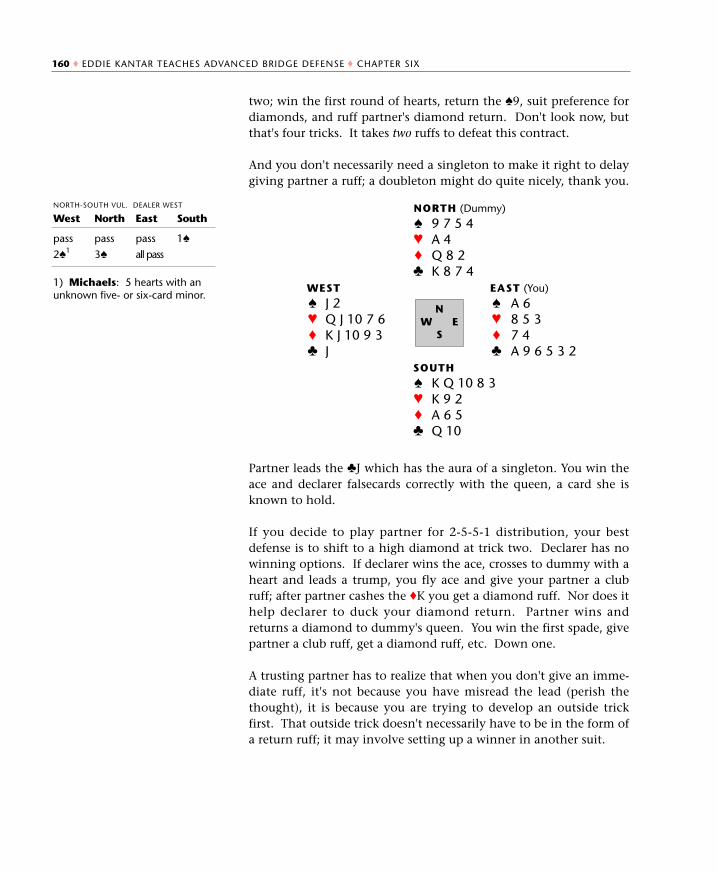
two; win the first round of hearts, return the ♠9, suit preference fordiamonds, and ruff partner's diamond return. Don't look now, butthat's four tricks. It takes two ruffs to defeat this contract.
And you don't necessarily need a singleton to make it right to delaygiving partner a ruff; a doubleton might do quite nicely, thank you.
Partner leads the ♣J which has the aura of a singleton. You win theace and declarer falsecards correctly with the queen, a card she isknown to hold.
If you decide to play partner for 2-5-5-1 distribution, your bestdefense is to shift to a high diamond at trick two. Declarer has nowinning options. If declarer wins the ace, crosses to dummy with aheart and leads a trump, you fly ace and give your partner a clubruff; after partner cashes the ♦K you get a diamond ruff. Nor does ithelp declarer to duck your diamond return. Partner wins andreturns a diamond to dummy's queen. You win the first spade, givepartner a club ruff, get a diamond ruff, etc. Down one.
A trusting partner has to realize that when you don't give an imme-diate ruff, it's not because you have misread the lead (perish thethought), it is because you are trying to develop an outside trickfirst. That outside trick doesn't necessarily have to be in the form ofa return ruff; it may involve setting up a winner in another suit.
1) Michaels: 5 hearts with anunknown five- or six-card minor.
160 ♦ EDDIE KANTAR TEACHES ADVANCED BRIDGE DEFENSE ♦ CHAPTER SIX
NORTH (Dummy)
♠ 9 7 5 4♥ A 4♦ Q 8 2♣ K 8 7 4
WEST EAST (You)
♠ J 2 ♠ A 6♥ Q J 10 7 6 ♥ 8 5 3♦ K J 10 9 3 ♦ 7 4♣ J ♣ A 9 6 5 3 2
SOUTH
♠ K Q 10 8 3♥ K 9 2♦ A 6 5♣ Q 10
NW E
S
NORTH-SOUTH VUL. DEALER WEST
West
pass
2♠1
North
pass
3♠
East
pass
all pass
South
1♠
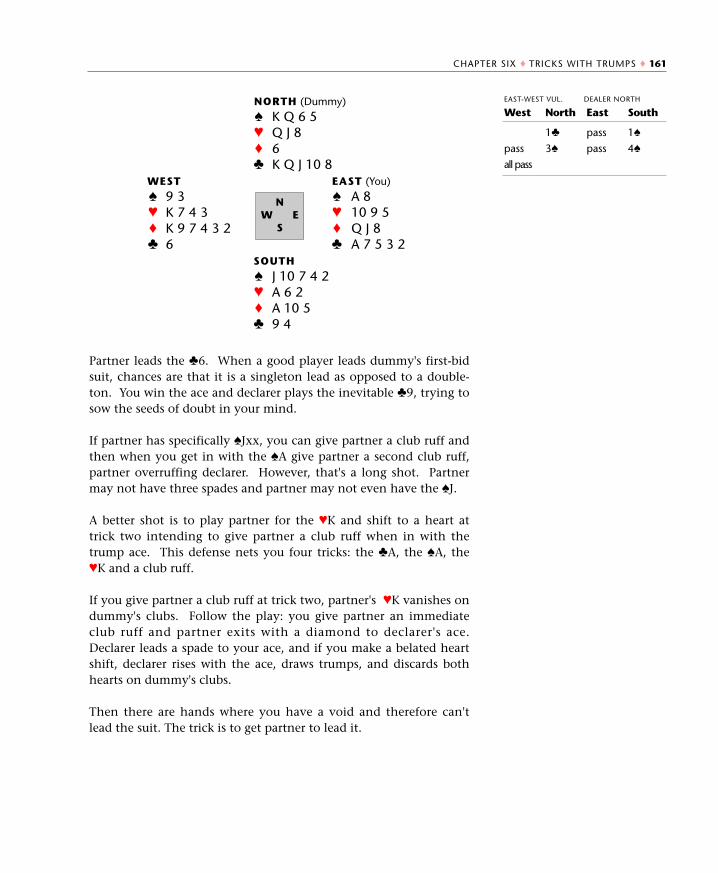
Partner leads the ♣6. When a good player leads dummy's first-bidsuit, chances are that it is a singleton lead as opposed to a double-ton. You win the ace and declarer plays the inevitable ♣9, trying tosow the seeds of doubt in your mind.
If partner has specifically ♠Jxx, you can give partner a club ruff andthen when you get in with the ♠A give partner a second club ruff,partner overruffing declarer. However, that's a long shot. Partnermay not have three spades and partner may not even have the ♠J.
A better shot is to play partner for the ♥K and shift to a heart attrick two intending to give partner a club ruff when in with thetrump ace. This defense nets you four tricks: the ♣A, the ♠A, the♥K and a club ruff.
If you give partner a club ruff at trick two, partner's ♥K vanishes ondummy's clubs. Follow the play: you give partner an immediateclub ruff and partner exits with a diamond to declarer's ace.Declarer leads a spade to your ace, and if you make a belated heartshift, declarer rises with the ace, draws trumps, and discards bothhearts on dummy's clubs.
Then there are hands where you have a void and therefore can'tlead the suit. The trick is to get partner to lead it.
CHAPTER SIX ♦ TRICKS WITH TRUMPS ♦ 161
NORTH (Dummy)
♠ K Q 6 5♥ Q J 8♦ 6♣ K Q J 10 8
WEST EAST (You)
♠ 9 3 ♠ A 8♥ K 7 4 3 ♥ 10 9 5♦ K 9 7 4 3 2 ♦ Q J 8♣ 6 ♣ A 7 5 3 2
SOUTH
♠ J 10 7 4 2♥ A 6 2♦ A 10 5♣ 9 4
NW E
S
EAST-WEST VUL. DEALER NORTH
West
pass
all pass
North
1♣
3♠
East
pass
pass
South
1♠
4♠
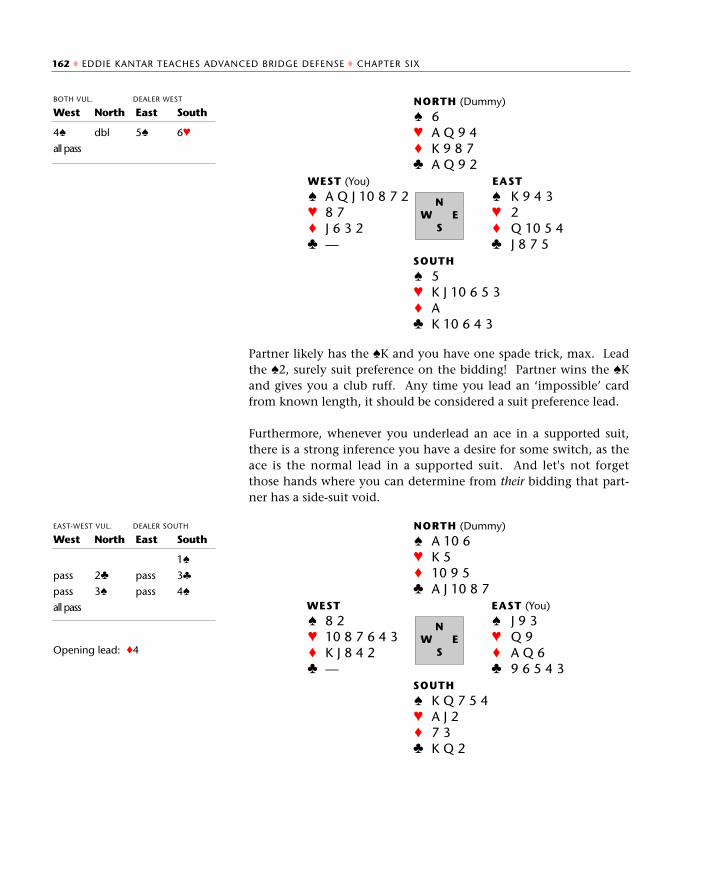
Partner likely has the ♠K and you have one spade trick, max. Leadthe ♠2, surely suit preference on the bidding! Partner wins the ♠Kand gives you a club ruff. Any time you lead an ‘impossible’ cardfrom known length, it should be considered a suit preference lead.
Furthermore, whenever you underlead an ace in a supported suit,there is a strong inference you have a desire for some switch, as theace is the normal lead in a supported suit. And let's not forgetthose hands where you can determine from their bidding that part-ner has a side-suit void.
Opening lead: ♦4
162 ♦ EDDIE KANTAR TEACHES ADVANCED BRIDGE DEFENSE ♦ CHAPTER SIX
NORTH (Dummy)
♠ 6♥ A Q 9 4♦ K 9 8 7♣ A Q 9 2
WEST (You) EAST
♠ A Q J 10 8 7 2 ♠ K 9 4 3♥ 8 7 ♥ 2♦ J 6 3 2 ♦ Q 10 5 4♣ — ♣ J 8 7 5
SOUTH
♠ 5♥ K J 10 6 5 3♦ A♣ K 10 6 4 3
NW E
S
NORTH (Dummy)
♠ A 10 6♥ K 5♦ 10 9 5♣ A J 10 8 7
WEST EAST (You)
♠ 8 2 ♠ J 9 3♥ 10 8 7 6 4 3 ♥ Q 9♦ K J 8 4 2 ♦ A Q 6♣ — ♣ 9 6 5 4 3
SOUTH
♠ K Q 7 5 4♥ A J 2♦ 7 3♣ K Q 2
NW E
S
BOTH VUL. DEALER WEST
West
4♠
all pass
North
dbl
East
5♠
South
6♥
EAST-WEST VUL. DEALER SOUTH
West
pass
pass
all pass
North
2♣
3♠
East
pass
pass
South
1♠
3♣
4♠
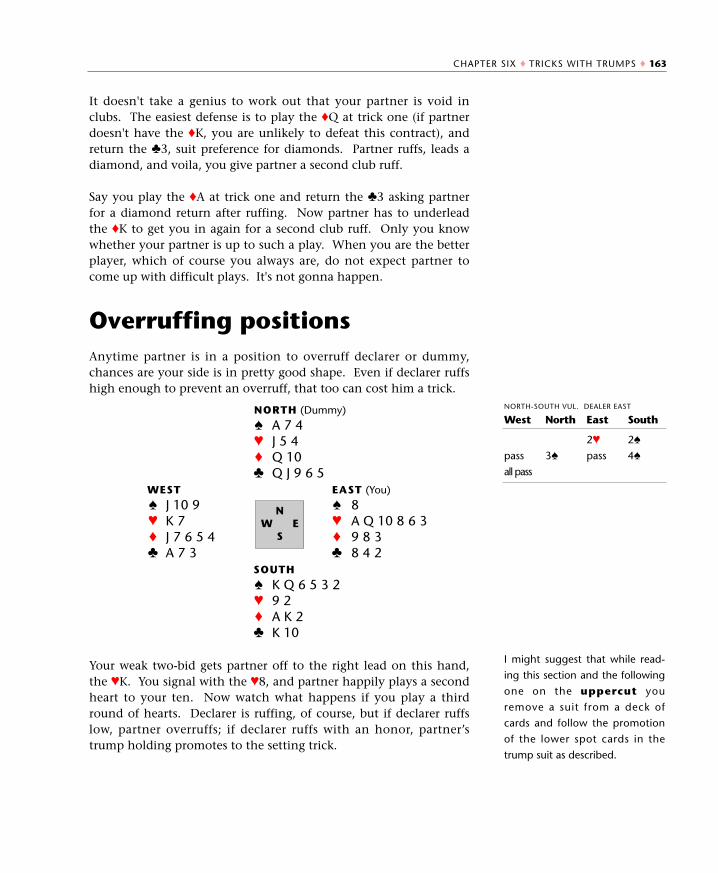
It doesn't take a genius to work out that your partner is void inclubs. The easiest defense is to play the ♦Q at trick one (if partnerdoesn't have the ♦K, you are unlikely to defeat this contract), andreturn the ♣3, suit preference for diamonds. Partner ruffs, leads adiamond, and voila, you give partner a second club ruff.
Say you play the ♦A at trick one and return the ♣3 asking partnerfor a diamond return after ruffing. Now partner has to underleadthe ♦K to get you in again for a second club ruff. Only you knowwhether your partner is up to such a play. When you are the betterplayer, which of course you always are, do not expect partner tocome up with difficult plays. It's not gonna happen.
Overruffing positionsAnytime partner is in a position to overruff declarer or dummy,chances are your side is in pretty good shape. Even if declarer ruffshigh enough to prevent an overruff, that too can cost him a trick.
Your weak two-bid gets partner off to the right lead on this hand,the ♥K. You signal with the ♥8, and partner happily plays a secondheart to your ten. Now watch what happens if you play a thirdround of hearts. Declarer is ruffing, of course, but if declarer ruffslow, partner overruffs; if declarer ruffs with an honor, partner’strump holding promotes to the setting trick.
I might suggest that while read-
ing this section and the following
one on the uppercut you
remove a suit from a deck of
cards and follow the promotion
of the lower spot cards in the
trump suit as described.
CHAPTER SIX ♦ TRICKS WITH TRUMPS ♦ 163
NORTH (Dummy)
♠ A 7 4♥ J 5 4♦ Q 10♣ Q J 9 6 5
WEST EAST (You)
♠ J 10 9 ♠ 8♥ K 7 ♥ A Q 10 8 6 3♦ J 7 6 5 4 ♦ 9 8 3♣ A 7 3 ♣ 8 4 2
SOUTH
♠ K Q 6 5 3 2♥ 9 2♦ A K 2♣ K 10
NW E
S
NORTH-SOUTH VUL. DEALER EAST
West
pass
all pass
North
3♠
East
2♥
pass
South
2♠
4♠
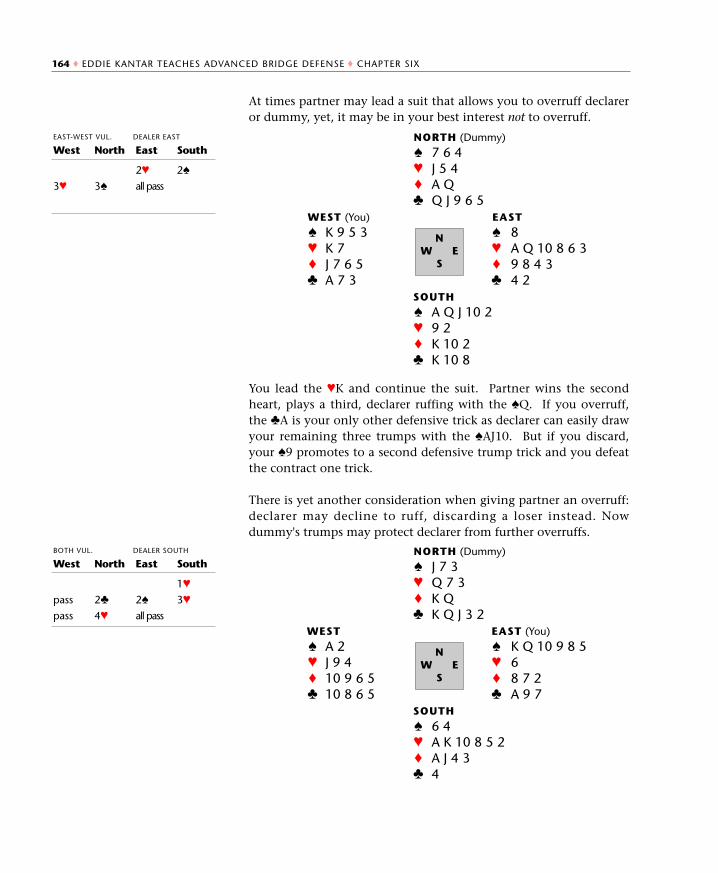
At times partner may lead a suit that allows you to overruff declareror dummy, yet, it may be in your best interest not to overruff.
You lead the ♥K and continue the suit. Partner wins the secondheart, plays a third, declarer ruffing with the ♠Q. If you overruff,the ♣A is your only other defensive trick as declarer can easily drawyour remaining three trumps with the ♠AJ10. But if you discard,your ♠9 promotes to a second defensive trump trick and you defeatthe contract one trick.
There is yet another consideration when giving partner an overruff:declarer may decline to ruff, discarding a loser instead. Nowdummy's trumps may protect declarer from further overruffs.
164 ♦ EDDIE KANTAR TEACHES ADVANCED BRIDGE DEFENSE ♦ CHAPTER SIX
NORTH (Dummy)
♠ 7 6 4♥ J 5 4♦ A Q♣ Q J 9 6 5
WEST (You) EAST
♠ K 9 5 3 ♠ 8♥ K 7 ♥ A Q 10 8 6 3♦ J 7 6 5 ♦ 9 8 4 3♣ A 7 3 ♣ 4 2
SOUTH
♠ A Q J 10 2♥ 9 2♦ K 10 2♣ K 10 8
NW E
S
EAST-WEST VUL. DEALER EAST
West
3♥
North
3♠
East
2♥
all pass
South
2♠
NORTH (Dummy)
♠ J 7 3♥ Q 7 3♦ K Q♣ K Q J 3 2
WEST EAST (You)
♠ A 2 ♠ K Q 10 9 8 5♥ J 9 4 ♥ 6♦ 10 9 6 5 ♦ 8 7 2♣ 10 8 6 5 ♣ A 9 7
SOUTH
♠ 6 4♥ A K 10 8 5 2♦ A J 4 3♣ 4
NW E
S
BOTH VUL. DEALER SOUTH
West
pass
pass
North
2♣
4♥
East
2♠
all pass
South
1♥
3♥
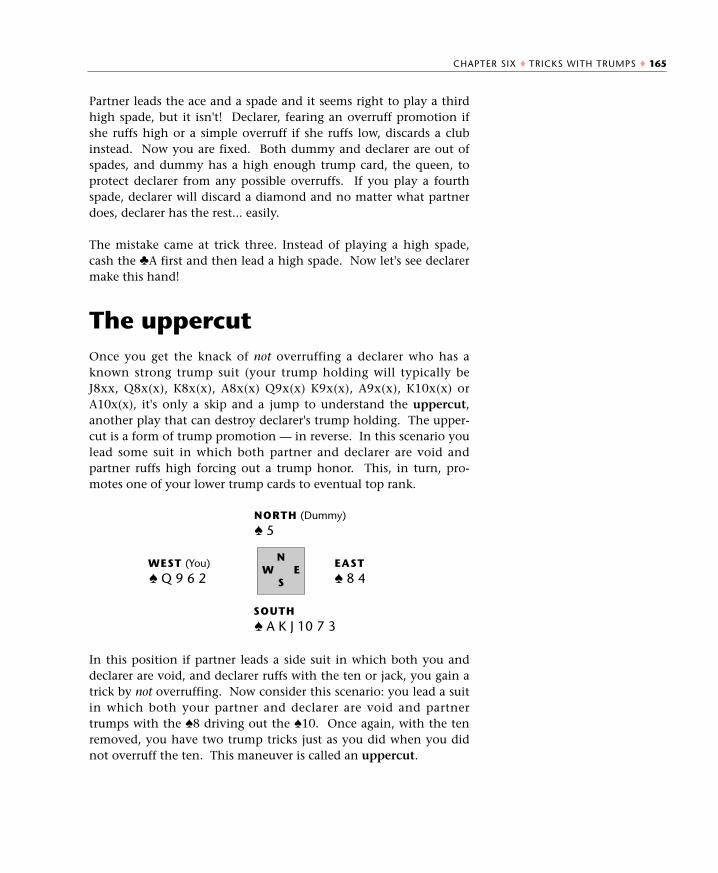
Partner leads the ace and a spade and it seems right to play a thirdhigh spade, but it isn't! Declarer, fearing an overruff promotion ifshe ruffs high or a simple overruff if she ruffs low, discards a clubinstead. Now you are fixed. Both dummy and declarer are out ofspades, and dummy has a high enough trump card, the queen, toprotect declarer from any possible overruffs. If you play a fourthspade, declarer will discard a diamond and no matter what partnerdoes, declarer has the rest... easily.
The mistake came at trick three. Instead of playing a high spade,cash the ♣A first and then lead a high spade. Now let's see declarermake this hand!
The uppercutOnce you get the knack of not overruffing a declarer who has aknown strong trump suit (your trump holding will typically beJ8xx, Q8x(x), K8x(x), A8x(x) Q9x(x) K9x(x), A9x(x), K10x(x) orA10x(x), it's only a skip and a jump to understand the uppercut,another play that can destroy declarer's trump holding. The upper-cut is a form of trump promotion — in reverse. In this scenario youlead some suit in which both partner and declarer are void andpartner ruffs high forcing out a trump honor. This, in turn, pro-motes one of your lower trump cards to eventual top rank.
In this position if partner leads a side suit in which both you anddeclarer are void, and declarer ruffs with the ten or jack, you gain atrick by not overruffing. Now consider this scenario: you lead a suitin which both your partner and declarer are void and partnertrumps with the ♠8 driving out the ♠10. Once again, with the tenremoved, you have two trump tricks just as you did when you didnot overruff the ten. This maneuver is called an uppercut.
CHAPTER SIX ♦ TRICKS WITH TRUMPS ♦ 165
NORTH (Dummy)
♠ 5
WEST (You) EAST
♠ Q 9 6 2 ♠ 8 4
SOUTH
♠ A K J 10 7 3
NW E
S
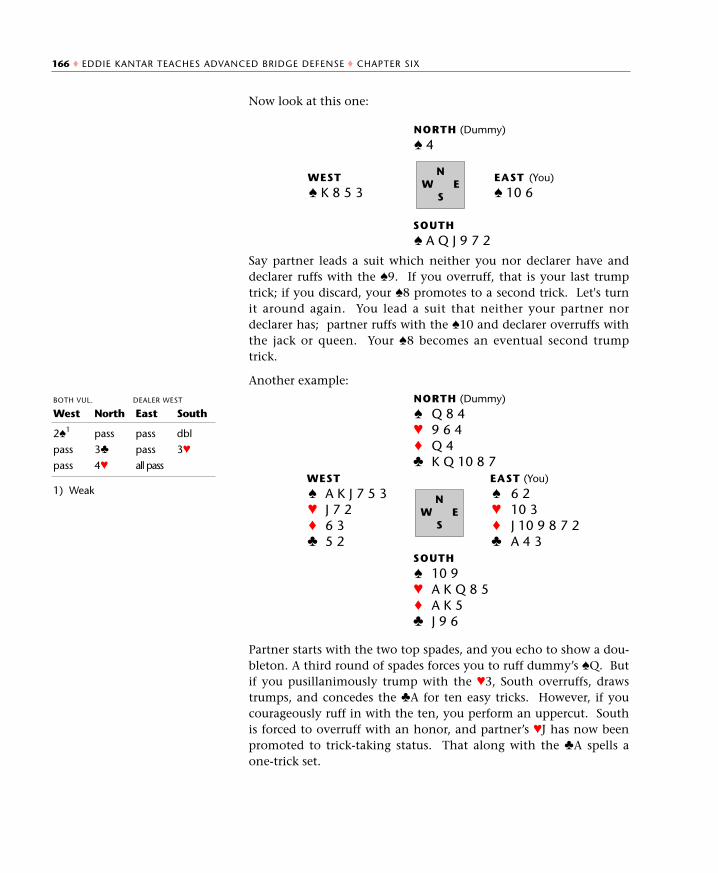
Now look at this one:
Say partner leads a suit which neither you nor declarer have anddeclarer ruffs with the ♠9. If you overruff, that is your last trumptrick; if you discard, your ♠8 promotes to a second trick. Let's turnit around again. You lead a suit that neither your partner nordeclarer has; partner ruffs with the ♠10 and declarer overruffs withthe jack or queen. Your ♠8 becomes an eventual second trumptrick.
Another example:
Partner starts with the two top spades, and you echo to show a dou-bleton. A third round of spades forces you to ruff dummy’s ♠Q. Butif you pusillanimously trump with the ♥3, South overruffs, drawstrumps, and concedes the ♣A for ten easy tricks. However, if youcourageously ruff in with the ten, you perform an uppercut. Southis forced to overruff with an honor, and partner’s ♥J has now beenpromoted to trick-taking status. That along with the ♣A spells aone-trick set.
1) Weak
166 ♦ EDDIE KANTAR TEACHES ADVANCED BRIDGE DEFENSE ♦ CHAPTER SIX
NORTH (Dummy)
♠ 4
WEST EAST (You)
♠ K 8 5 3 ♠ 10 6
SOUTH
♠ A Q J 9 7 2
NW E
S
NORTH (Dummy)
♠ Q 8 4♥ 9 6 4♦ Q 4♣ K Q 10 8 7
WEST EAST (You)
♠ A K J 7 5 3 ♠ 6 2♥ J 7 2 ♥ 10 3♦ 6 3 ♦ J 10 9 8 7 2♣ 5 2 ♣ A 4 3
SOUTH
♠ 10 9♥ A K Q 8 5♦ A K 5♣ J 9 6
NW E
S
BOTH VUL. DEALER WEST
West
2♠1
pass
pass
North
pass
3♣
4♥
East
pass
pass
all pass
South
dbl
3♥
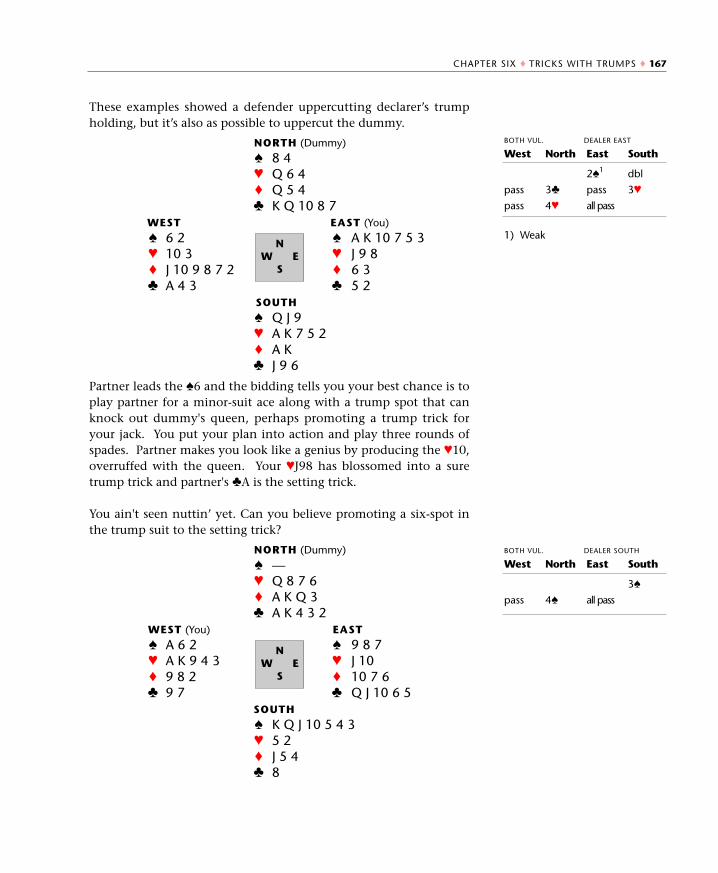
These examples showed a defender uppercutting declarer’s trumpholding, but it’s also as possible to uppercut the dummy.
Partner leads the ♠6 and the bidding tells you your best chance is toplay partner for a minor-suit ace along with a trump spot that canknock out dummy's queen, perhaps promoting a trump trick foryour jack. You put your plan into action and play three rounds ofspades. Partner makes you look like a genius by producing the ♥10,overruffed with the queen. Your ♥J98 has blossomed into a suretrump trick and partner's ♣A is the setting trick.
You ain't seen nuttin’ yet. Can you believe promoting a six-spot inthe trump suit to the setting trick?
1) Weak
CHAPTER SIX ♦ TRICKS WITH TRUMPS ♦ 167
NORTH (Dummy)
♠ 8 4♥ Q 6 4♦ Q 5 4♣ K Q 10 8 7
WEST EAST (You)
♠ 6 2 ♠ A K 10 7 5 3♥ 10 3 ♥ J 9 8♦ J 10 9 8 7 2 ♦ 6 3♣ A 4 3 ♣ 5 2
SOUTH
♠ Q J 9♥ A K 7 5 2♦ A K♣ J 9 6
NW E
S
NORTH (Dummy)
♠ —♥ Q 8 7 6♦ A K Q 3♣ A K 4 3 2
WEST (You) EAST
♠ A 6 2 ♠ 9 8 7♥ A K 9 4 3 ♥ J 10♦ 9 8 2 ♦ 10 7 6♣ 9 7 ♣ Q J 10 6 5
SOUTH
♠ K Q J 10 5 4 3♥ 5 2♦ J 5 4♣ 8
NW E
S
BOTH VUL. DEALER EAST
West
pass
pass
North
3♣
4♥
East
2♠1
pass
all pass
South
dbl
3♥
BOTH VUL. DEALER SOUTH
West
pass
North
4♠
East
all pass
South
3♠
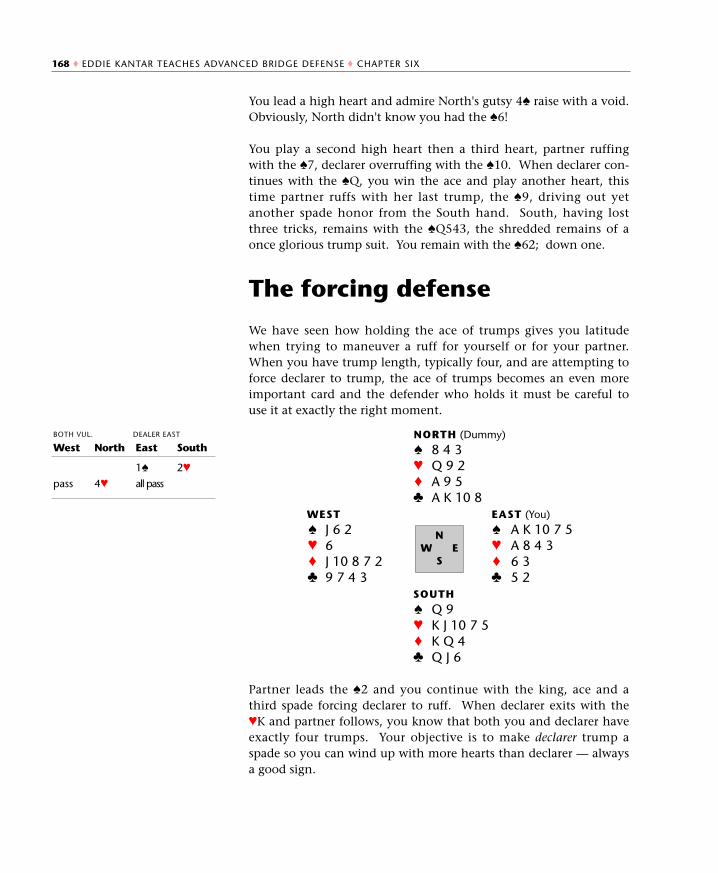
You lead a high heart and admire North's gutsy 4♠ raise with a void.Obviously, North didn't know you had the ♠6!
You play a second high heart then a third heart, partner ruffingwith the ♠7, declarer overruffing with the ♠10. When declarer con-tinues with the ♠Q, you win the ace and play another heart, thistime partner ruffs with her last trump, the ♠9, driving out yetanother spade honor from the South hand. South, having lostthree tricks, remains with the ♠Q543, the shredded remains of aonce glorious trump suit. You remain with the ♠62; down one.
The forcing defense
We have seen how holding the ace of trumps gives you latitudewhen trying to maneuver a ruff for yourself or for your partner.When you have trump length, typically four, and are attempting toforce declarer to trump, the ace of trumps becomes an even moreimportant card and the defender who holds it must be careful touse it at exactly the right moment.
Partner leads the ♠2 and you continue with the king, ace and athird spade forcing declarer to ruff. When declarer exits with the♥K and partner follows, you know that both you and declarer haveexactly four trumps. Your objective is to make declarer trump aspade so you can wind up with more hearts than declarer — alwaysa good sign.
168 ♦ EDDIE KANTAR TEACHES ADVANCED BRIDGE DEFENSE ♦ CHAPTER SIX
NORTH (Dummy)
♠ 8 4 3♥ Q 9 2♦ A 9 5♣ A K 10 8
WEST EAST (You)
♠ J 6 2 ♠ A K 10 7 5♥ 6 ♥ A 8 4 3♦ J 10 8 7 2 ♦ 6 3♣ 9 7 4 3 ♣ 5 2
SOUTH
♠ Q 9♥ K J 10 7 5♦ K Q 4♣ Q J 6
NW E
S
BOTH VUL. DEALER EAST
West
pass
North
4♥
East
1♠
all pass
South
2♥
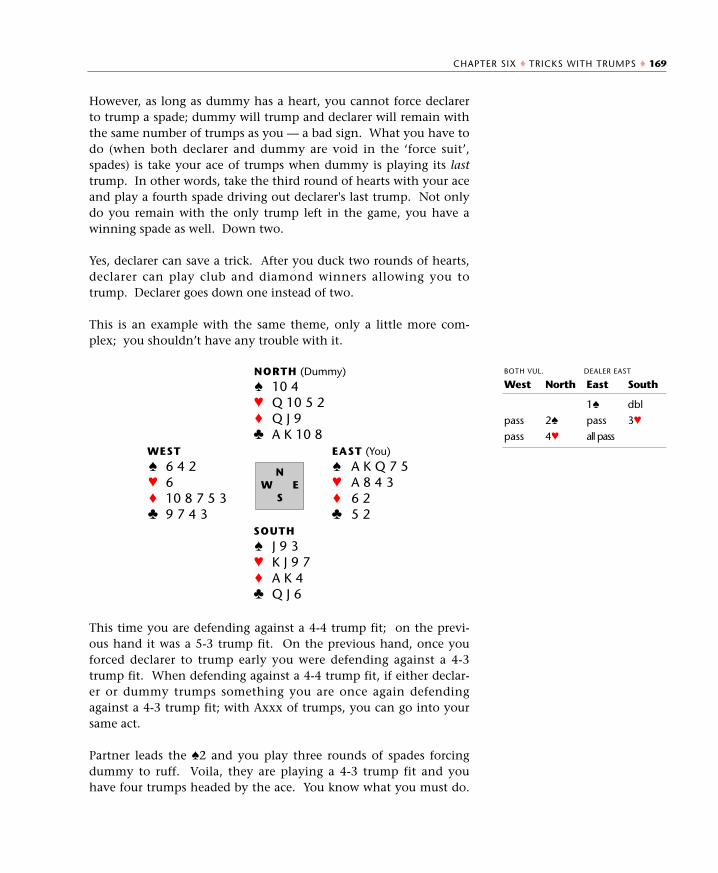
However, as long as dummy has a heart, you cannot force declarerto trump a spade; dummy will trump and declarer will remain withthe same number of trumps as you — a bad sign. What you have todo (when both declarer and dummy are void in the ‘force suit’,spades) is take your ace of trumps when dummy is playing its lasttrump. In other words, take the third round of hearts with your aceand play a fourth spade driving out declarer's last trump. Not onlydo you remain with the only trump left in the game, you have awinning spade as well. Down two.
Yes, declarer can save a trick. After you duck two rounds of hearts,declarer can play club and diamond winners allowing you totrump. Declarer goes down one instead of two.
This is an example with the same theme, only a little more com-plex; you shouldn’t have any trouble with it.
This time you are defending against a 4-4 trump fit; on the previ-ous hand it was a 5-3 trump fit. On the previous hand, once youforced declarer to trump early you were defending against a 4-3trump fit. When defending against a 4-4 trump fit, if either declar-er or dummy trumps something you are once again defendingagainst a 4-3 trump fit; with Axxx of trumps, you can go into yoursame act.
Partner leads the ♠2 and you play three rounds of spades forcingdummy to ruff. Voila, they are playing a 4-3 trump fit and youhave four trumps headed by the ace. You know what you must do.
CHAPTER SIX ♦ TRICKS WITH TRUMPS ♦ 169
NORTH (Dummy)
♠ 10 4♥ Q 10 5 2♦ Q J 9♣ A K 10 8
WEST EAST (You)
♠ 6 4 2 ♠ A K Q 7 5♥ 6 ♥ A 8 4 3♦ 10 8 7 5 3 ♦ 6 2♣ 9 7 4 3 ♣ 5 2
SOUTH
♠ J 9 3♥ K J 9 7♦ A K 4♣ Q J 6
NW E
S
BOTH VUL. DEALER EAST
West
pass
pass
North
2♠
4♥
East
1♠
pass
all pass
South
dbl
3♥
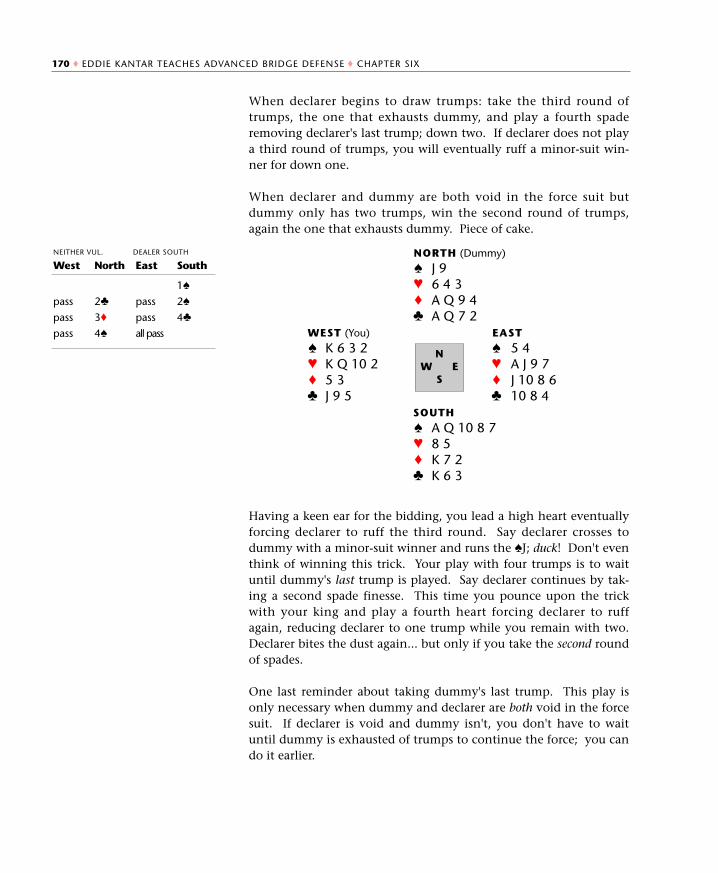
When declarer begins to draw trumps: take the third round oftrumps, the one that exhausts dummy, and play a fourth spaderemoving declarer's last trump; down two. If declarer does not playa third round of trumps, you will eventually ruff a minor-suit win-ner for down one.
When declarer and dummy are both void in the force suit butdummy only has two trumps, win the second round of trumps,again the one that exhausts dummy. Piece of cake.
Having a keen ear for the bidding, you lead a high heart eventuallyforcing declarer to ruff the third round. Say declarer crosses todummy with a minor-suit winner and runs the ♠J; duck! Don't eventhink of winning this trick. Your play with four trumps is to waituntil dummy's last trump is played. Say declarer continues by tak-ing a second spade finesse. This time you pounce upon the trickwith your king and play a fourth heart forcing declarer to ruffagain, reducing declarer to one trump while you remain with two.Declarer bites the dust again... but only if you take the second roundof spades.
One last reminder about taking dummy's last trump. This play isonly necessary when dummy and declarer are both void in the forcesuit. If declarer is void and dummy isn't, you don't have to waituntil dummy is exhausted of trumps to continue the force; you cando it earlier.
170 ♦ EDDIE KANTAR TEACHES ADVANCED BRIDGE DEFENSE ♦ CHAPTER SIX
NORTH (Dummy)
♠ J 9♥ 6 4 3♦ A Q 9 4♣ A Q 7 2
WEST (You) EAST
♠ K 6 3 2 ♠ 5 4♥ K Q 10 2 ♥ A J 9 7♦ 5 3 ♦ J 10 8 6♣ J 9 5 ♣ 10 8 4
SOUTH
♠ A Q 10 8 7♥ 8 5♦ K 7 2♣ K 6 3
NW E
S
NEITHER VUL. DEALER SOUTH
West
pass
pass
pass
North
2♣
3♦
4♠
East
pass
pass
all pass
South
1♠
2♠
4♣
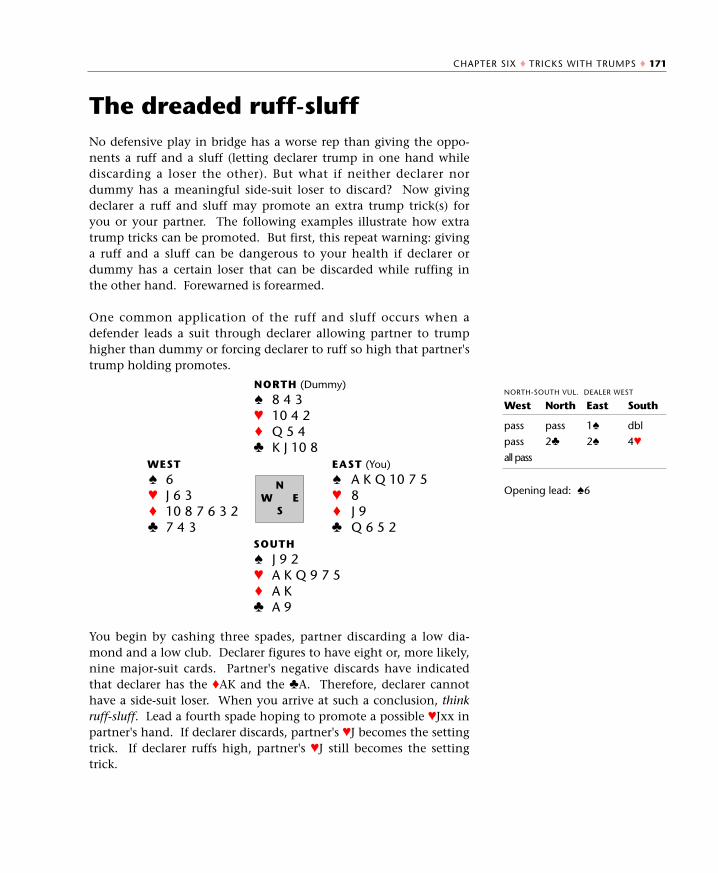
The dreaded ruff-sluffNo defensive play in bridge has a worse rep than giving the oppo-nents a ruff and a sluff (letting declarer trump in one hand whilediscarding a loser the other). But what if neither declarer nordummy has a meaningful side-suit loser to discard? Now givingdeclarer a ruff and sluff may promote an extra trump trick(s) foryou or your partner. The following examples illustrate how extratrump tricks can be promoted. But first, this repeat warning: givinga ruff and a sluff can be dangerous to your health if declarer ordummy has a certain loser that can be discarded while ruffing inthe other hand. Forewarned is forearmed.
One common application of the ruff and sluff occurs when adefender leads a suit through declarer allowing partner to trumphigher than dummy or forcing declarer to ruff so high that partner'strump holding promotes.
You begin by cashing three spades, partner discarding a low dia-mond and a low club. Declarer figures to have eight or, more likely,nine major-suit cards. Partner's negative discards have indicatedthat declarer has the ♦AK and the ♣A. Therefore, declarer cannothave a side-suit loser. When you arrive at such a conclusion, thinkruff-sluff. Lead a fourth spade hoping to promote a possible ♥Jxx inpartner's hand. If declarer discards, partner's ♥J becomes the settingtrick. If declarer ruffs high, partner's ♥J still becomes the settingtrick.
Opening lead: ♠6
CHAPTER SIX ♦ TRICKS WITH TRUMPS ♦ 171
NORTH (Dummy)
♠ 8 4 3♥ 10 4 2♦ Q 5 4♣ K J 10 8
WEST EAST (You)
♠ 6 ♠ A K Q 10 7 5♥ J 6 3 ♥ 8♦ 10 8 7 6 3 2 ♦ J 9♣ 7 4 3 ♣ Q 6 5 2
SOUTH
♠ J 9 2♥ A K Q 9 7 5♦ A K♣ A 9
NW E
S
NORTH-SOUTH VUL. DEALER WEST
West
pass
pass
all pass
North
pass
2♣
East
1♠
2♠
South
dbl
4♥
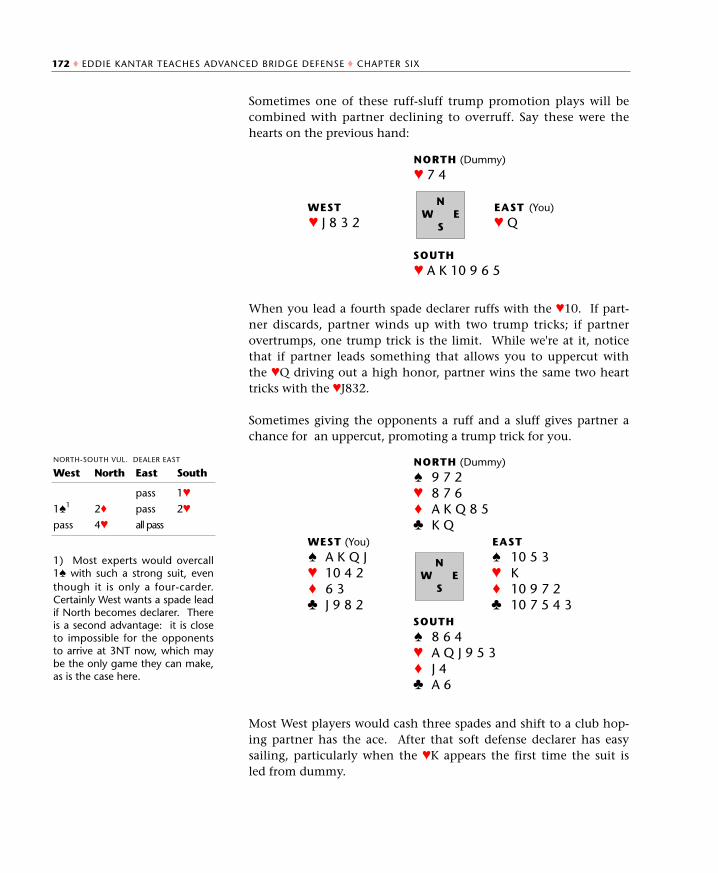
Sometimes one of these ruff-sluff trump promotion plays will becombined with partner declining to overruff. Say these were thehearts on the previous hand:
When you lead a fourth spade declarer ruffs with the ♥10. If part-ner discards, partner winds up with two trump tricks; if partnerovertrumps, one trump trick is the limit. While we're at it, noticethat if partner leads something that allows you to uppercut withthe ♥Q driving out a high honor, partner wins the same two hearttricks with the ♥J832.
Sometimes giving the opponents a ruff and a sluff gives partner achance for an uppercut, promoting a trump trick for you.
Most West players would cash three spades and shift to a club hop-ing partner has the ace. After that soft defense declarer has easysailing, particularly when the ♥K appears the first time the suit isled from dummy.
1) Most experts would overcall1♠ with such a strong suit, eventhough it is only a four-carder.Certainly West wants a spade leadif North becomes declarer. Thereis a second advantage: it is closeto impossible for the opponentsto arrive at 3NT now, which maybe the only game they can make,as is the case here.
172 ♦ EDDIE KANTAR TEACHES ADVANCED BRIDGE DEFENSE ♦ CHAPTER SIX
NORTH (Dummy)
♥ 7 4
WEST EAST (You)
♥ J 8 3 2 ♥ Q
SOUTH
♥ A K 10 9 6 5
NW E
S
NORTH (Dummy)
♠ 9 7 2♥ 8 7 6♦ A K Q 8 5♣ K Q
WEST (You) EAST
♠ A K Q J ♠ 10 5 3♥ 10 4 2 ♥ K♦ 6 3 ♦ 10 9 7 2♣ J 9 8 2 ♣ 10 7 5 4 3
SOUTH
♠ 8 6 4♥ A Q J 9 5 3♦ J 4♣ A 6
NW E
S
NORTH-SOUTH VUL. DEALER EAST
West
1♠1
pass
North
2♦
4♥
East
pass
pass
all pass
South
1♥
2♥
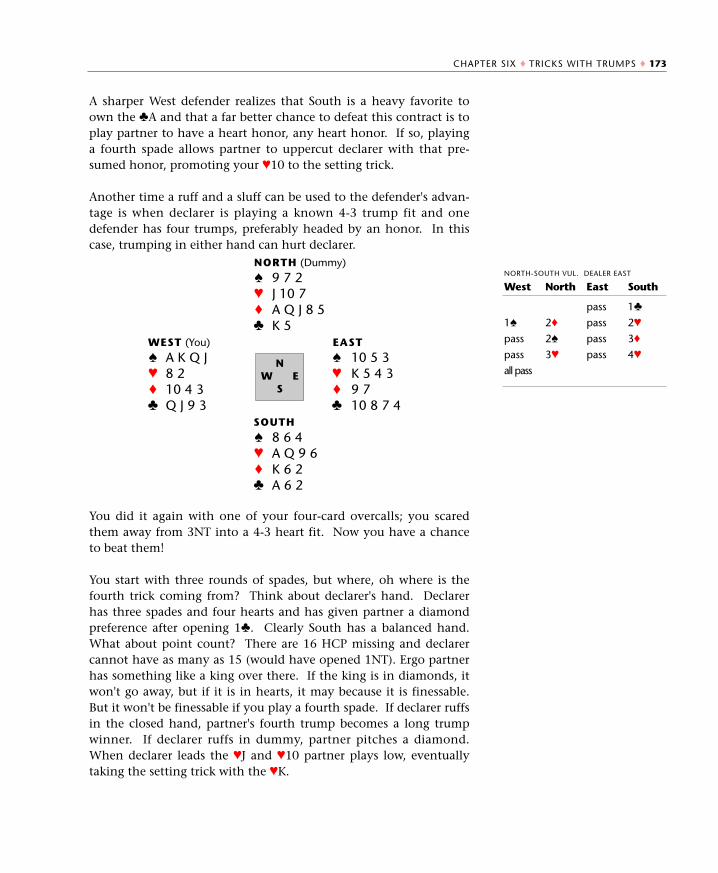
A sharper West defender realizes that South is a heavy favorite toown the ♣A and that a far better chance to defeat this contract is toplay partner to have a heart honor, any heart honor. If so, playinga fourth spade allows partner to uppercut declarer with that pre-sumed honor, promoting your ♥10 to the setting trick.
Another time a ruff and a sluff can be used to the defender's advan-tage is when declarer is playing a known 4-3 trump fit and onedefender has four trumps, preferably headed by an honor. In thiscase, trumping in either hand can hurt declarer.
You did it again with one of your four-card overcalls; you scaredthem away from 3NT into a 4-3 heart fit. Now you have a chanceto beat them!
You start with three rounds of spades, but where, oh where is thefourth trick coming from? Think about declarer's hand. Declarerhas three spades and four hearts and has given partner a diamondpreference after opening 1♣. Clearly South has a balanced hand.What about point count? There are 16 HCP missing and declarercannot have as many as 15 (would have opened 1NT). Ergo partnerhas something like a king over there. If the king is in diamonds, itwon't go away, but if it is in hearts, it may because it is finessable.But it won't be finessable if you play a fourth spade. If declarer ruffsin the closed hand, partner's fourth trump becomes a long trumpwinner. If declarer ruffs in dummy, partner pitches a diamond.When declarer leads the ♥J and ♥10 partner plays low, eventuallytaking the setting trick with the ♥K.
CHAPTER SIX ♦ TRICKS WITH TRUMPS ♦ 173
NORTH (Dummy)
♠ 9 7 2♥ J 10 7♦ A Q J 8 5♣ K 5
WEST (You) EAST
♠ A K Q J ♠ 10 5 3♥ 8 2 ♥ K 5 4 3♦ 10 4 3 ♦ 9 7♣ Q J 9 3 ♣ 10 8 7 4
SOUTH
♠ 8 6 4♥ A Q 9 6♦ K 6 2♣ A 6 2
NW E
S
NORTH-SOUTH VUL. DEALER EAST
West
1♠
pass
pass
all pass
North
2♦
2♠
3♥
East
pass
pass
pass
pass
South
1♣
2♥
3♦
4♥
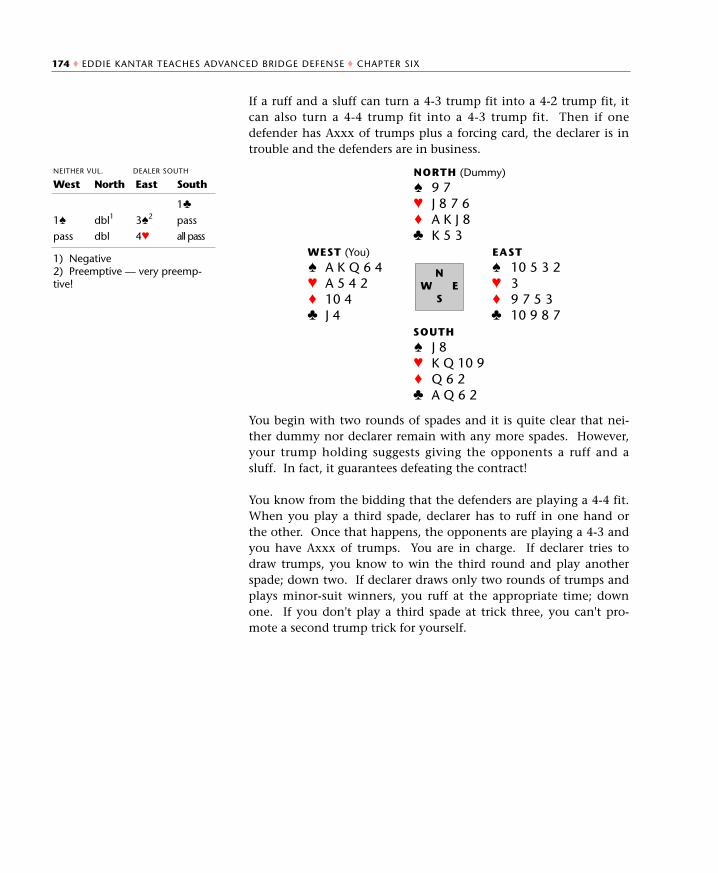
If a ruff and a sluff can turn a 4-3 trump fit into a 4-2 trump fit, itcan also turn a 4-4 trump fit into a 4-3 trump fit. Then if onedefender has Axxx of trumps plus a forcing card, the declarer is introuble and the defenders are in business.
You begin with two rounds of spades and it is quite clear that nei-ther dummy nor declarer remain with any more spades. However,your trump holding suggests giving the opponents a ruff and asluff. In fact, it guarantees defeating the contract!
You know from the bidding that the defenders are playing a 4-4 fit.When you play a third spade, declarer has to ruff in one hand orthe other. Once that happens, the opponents are playing a 4-3 andyou have Axxx of trumps. You are in charge. If declarer tries todraw trumps, you know to win the third round and play anotherspade; down two. If declarer draws only two rounds of trumps andplays minor-suit winners, you ruff at the appropriate time; downone. If you don't play a third spade at trick three, you can't pro-mote a second trump trick for yourself.
1) Negative2) Preemptive — very preemp-tive!
174 ♦ EDDIE KANTAR TEACHES ADVANCED BRIDGE DEFENSE ♦ CHAPTER SIX
NORTH (Dummy)
♠ 9 7♥ J 8 7 6♦ A K J 8♣ K 5 3
WEST (You) EAST
♠ A K Q 6 4 ♠ 10 5 3 2♥ A 5 4 2 ♥ 3♦ 10 4 ♦ 9 7 5 3♣ J 4 ♣ 10 9 8 7
SOUTH
♠ J 8♥ K Q 10 9♦ Q 6 2♣ A Q 6 2
NW E
S
NEITHER VUL. DEALER SOUTH
West
1♠
pass
North
dbl1
dbl
East
3♠2
4♥
South
1♣
pass
all pass
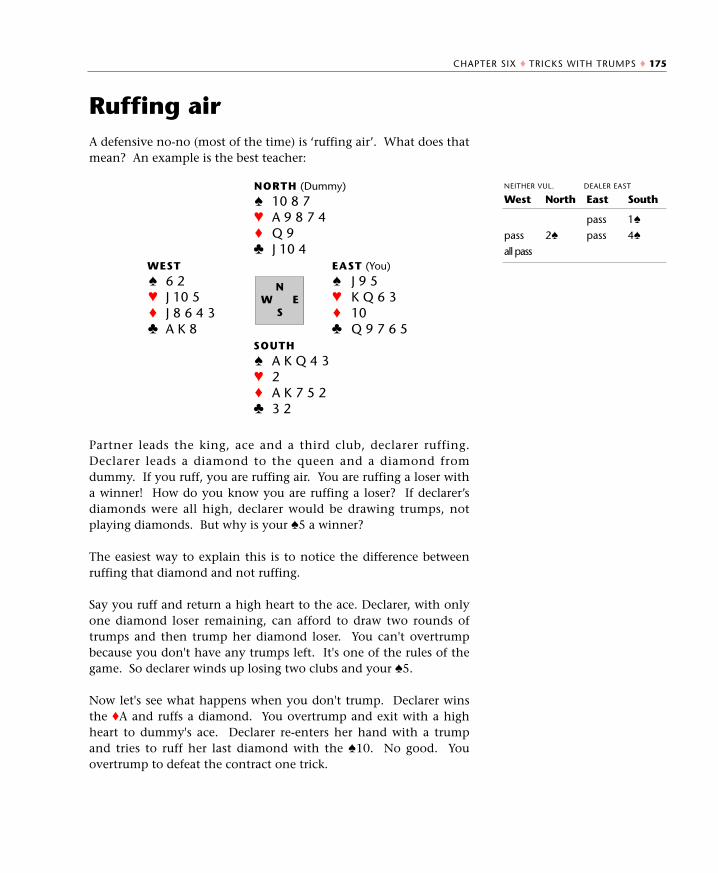
Ruffing airA defensive no-no (most of the time) is ‘ruffing air’. What does thatmean? An example is the best teacher:
Partner leads the king, ace and a third club, declarer ruffing.Declarer leads a diamond to the queen and a diamond fromdummy. If you ruff, you are ruffing air. You are ruffing a loser witha winner! How do you know you are ruffing a loser? If declarer’sdiamonds were all high, declarer would be drawing trumps, notplaying diamonds. But why is your ♠5 a winner?
The easiest way to explain this is to notice the difference betweenruffing that diamond and not ruffing.
Say you ruff and return a high heart to the ace. Declarer, with onlyone diamond loser remaining, can afford to draw two rounds oftrumps and then trump her diamond loser. You can't overtrumpbecause you don't have any trumps left. It's one of the rules of thegame. So declarer winds up losing two clubs and your ♠5.
Now let's see what happens when you don't trump. Declarer winsthe ♦A and ruffs a diamond. You overtrump and exit with a highheart to dummy's ace. Declarer re-enters her hand with a trumpand tries to ruff her last diamond with the ♠10. No good. Youovertrump to defeat the contract one trick.
CHAPTER SIX ♦ TRICKS WITH TRUMPS ♦ 175
NORTH (Dummy)
♠ 10 8 7♥ A 9 8 7 4♦ Q 9♣ J 10 4
WEST EAST (You)
♠ 6 2 ♠ J 9 5♥ J 10 5 ♥ K Q 6 3♦ J 8 6 4 3 ♦ 10♣ A K 8 ♣ Q 9 7 6 5
SOUTH
♠ A K Q 4 3♥ 2♦ A K 7 5 2♣ 3 2
NW E
S
NEITHER VUL. DEALER EAST
West
pass
all pass
North
2♠
East
pass
pass
South
1♠
4♠
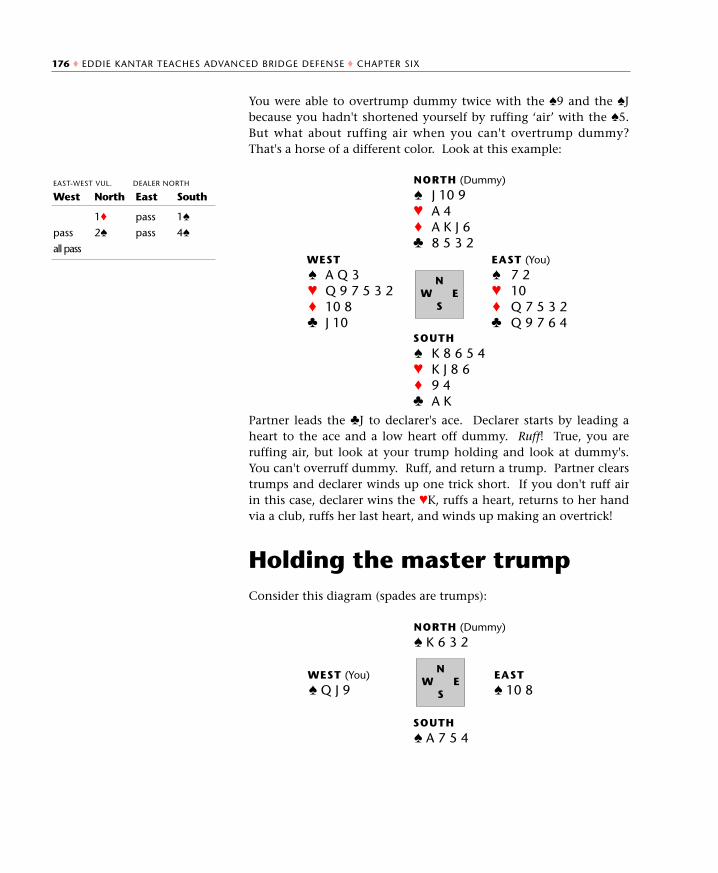
You were able to overtrump dummy twice with the ♠9 and the ♠Jbecause you hadn't shortened yourself by ruffing ‘air’ with the ♠5.But what about ruffing air when you can't overtrump dummy?That's a horse of a different color. Look at this example:
Partner leads the ♣J to declarer's ace. Declarer starts by leading aheart to the ace and a low heart off dummy. Ruff! True, you areruffing air, but look at your trump holding and look at dummy's.You can't overruff dummy. Ruff, and return a trump. Partner clearstrumps and declarer winds up one trick short. If you don't ruff airin this case, declarer wins the ♥K, ruffs a heart, returns to her handvia a club, ruffs her last heart, and winds up making an overtrick!
Holding the master trump Consider this diagram (spades are trumps):
176 ♦ EDDIE KANTAR TEACHES ADVANCED BRIDGE DEFENSE ♦ CHAPTER SIX
NORTH (Dummy)
♠ J 10 9♥ A 4♦ A K J 6♣ 8 5 3 2
WEST EAST (You)
♠ A Q 3 ♠ 7 2♥ Q 9 7 5 3 2 ♥ 10♦ 10 8 ♦ Q 7 5 3 2♣ J 10 ♣ Q 9 7 6 4
SOUTH
♠ K 8 6 5 4♥ K J 8 6♦ 9 4♣ A K
NW E
S
EAST-WEST VUL. DEALER NORTH
West
pass
all pass
North
1♦
2♠
East
pass
pass
South
1♠
4♠
NORTH (Dummy)
♠ K 6 3 2
WEST (You) EAST
♠ Q J 9 ♠ 10 8
SOUTH
♠ A 7 5 4
NW E
S
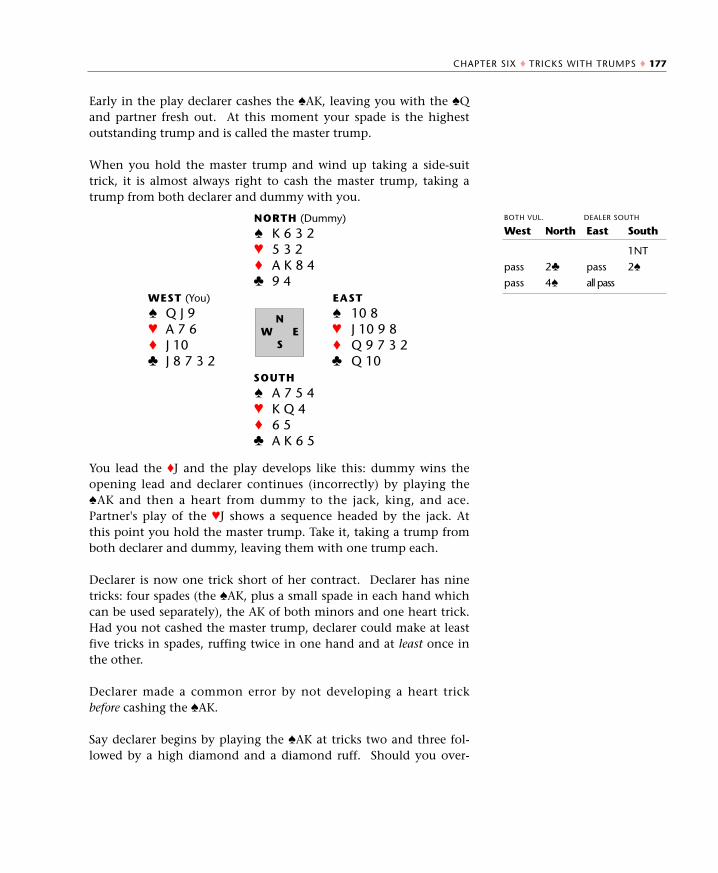
Early in the play declarer cashes the ♠AK, leaving you with the ♠Qand partner fresh out. At this moment your spade is the highestoutstanding trump and is called the master trump.
When you hold the master trump and wind up taking a side-suittrick, it is almost always right to cash the master trump, taking atrump from both declarer and dummy with you.
You lead the ♦J and the play develops like this: dummy wins theopening lead and declarer continues (incorrectly) by playing the♠AK and then a heart from dummy to the jack, king, and ace.Partner's play of the ♥J shows a sequence headed by the jack. Atthis point you hold the master trump. Take it, taking a trump fromboth declarer and dummy, leaving them with one trump each.
Declarer is now one trick short of her contract. Declarer has ninetricks: four spades (the ♠AK, plus a small spade in each hand whichcan be used separately), the AK of both minors and one heart trick.Had you not cashed the master trump, declarer could make at leastfive tricks in spades, ruffing twice in one hand and at least once inthe other.
Declarer made a common error by not developing a heart trickbefore cashing the ♠AK.
Say declarer begins by playing the ♠AK at tricks two and three fol-lowed by a high diamond and a diamond ruff. Should you over-
CHAPTER SIX ♦ TRICKS WITH TRUMPS ♦ 177
NORTH (Dummy)
♠ K 6 3 2♥ 5 3 2♦ A K 8 4♣ 9 4
WEST (You) EAST
♠ Q J 9 ♠ 10 8♥ A 7 6 ♥ J 10 9 8♦ J 10 ♦ Q 9 7 3 2♣ J 8 7 3 2 ♣ Q 10
SOUTH
♠ A 7 5 4♥ K Q 4♦ 6 5♣ A K 6 5
NW E
S
BOTH VUL. DEALER SOUTH
West
pass
pass
North
2♣
4♠
East
pass
all pass
South
1NT
2♠
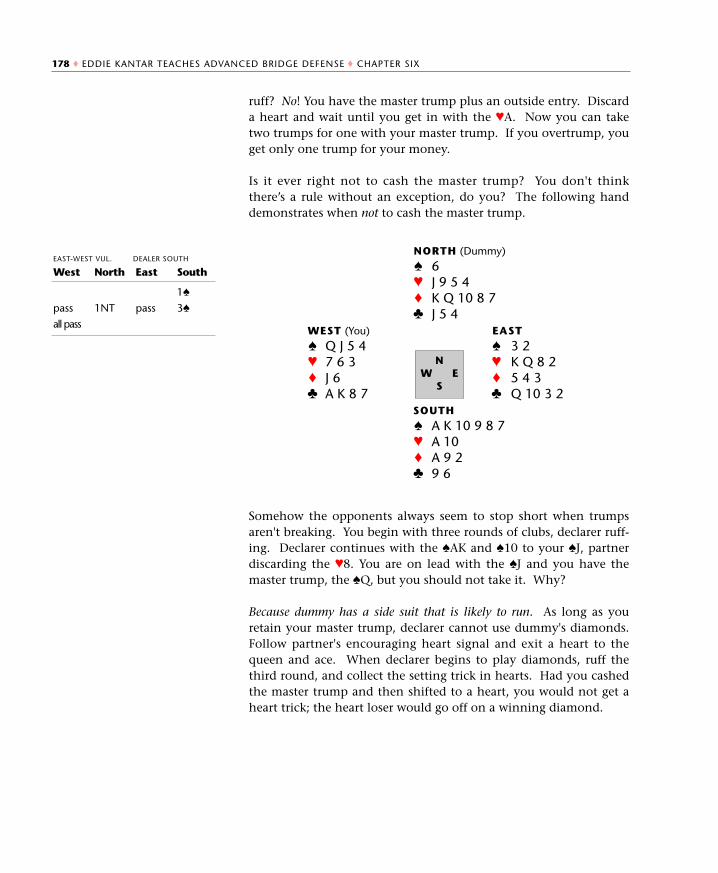
ruff? No! You have the master trump plus an outside entry. Discarda heart and wait until you get in with the ♥A. Now you can taketwo trumps for one with your master trump. If you overtrump, youget only one trump for your money.
Is it ever right not to cash the master trump? You don't thinkthere’s a rule without an exception, do you? The following handdemonstrates when not to cash the master trump.
Somehow the opponents always seem to stop short when trumpsaren't breaking. You begin with three rounds of clubs, declarer ruff-ing. Declarer continues with the ♠AK and ♠10 to your ♠J, partnerdiscarding the ♥8. You are on lead with the ♠J and you have themaster trump, the ♠Q, but you should not take it. Why?
Because dummy has a side suit that is likely to run. As long as youretain your master trump, declarer cannot use dummy's diamonds.Follow partner's encouraging heart signal and exit a heart to thequeen and ace. When declarer begins to play diamonds, ruff thethird round, and collect the setting trick in hearts. Had you cashedthe master trump and then shifted to a heart, you would not get aheart trick; the heart loser would go off on a winning diamond.
178 ♦ EDDIE KANTAR TEACHES ADVANCED BRIDGE DEFENSE ♦ CHAPTER SIX
NORTH (Dummy)
♠ 6♥ J 9 5 4♦ K Q 10 8 7♣ J 5 4
WEST (You) EAST
♠ Q J 5 4 ♠ 3 2♥ 7 6 3 ♥ K Q 8 2♦ J 6 ♦ 5 4 3♣ A K 8 7 ♣ Q 10 3 2
SOUTH
♠ A K 10 9 8 7♥ A 10♦ A 9 2♣ 9 6
NW E
S
EAST-WEST VUL. DEALER SOUTH
West
pass
all pass
North
1NT
East
pass
South
1♠
3♠
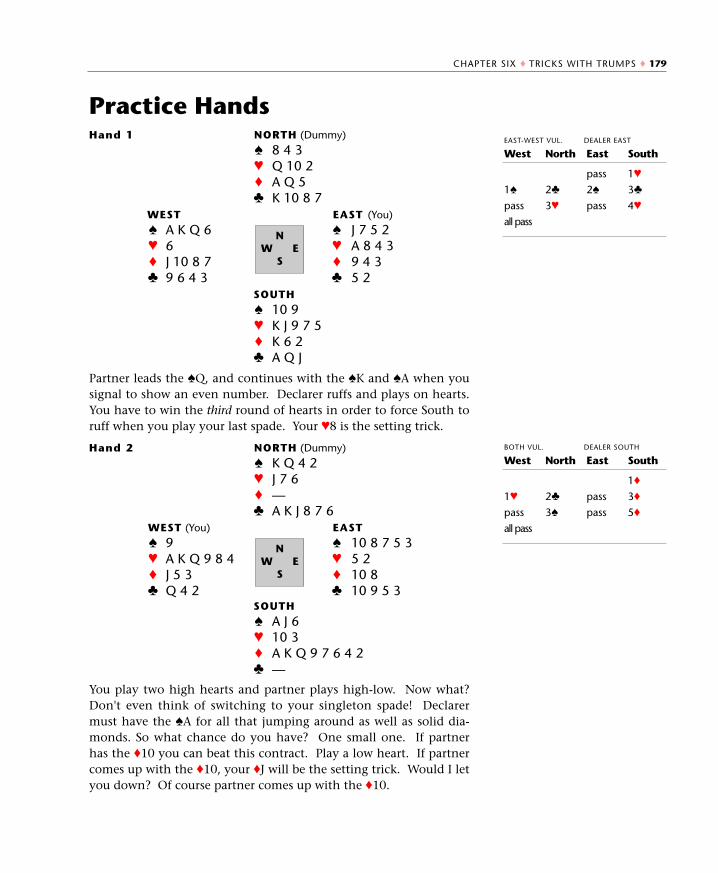
Practice Hands
Partner leads the ♠Q, and continues with the ♠K and ♠A when yousignal to show an even number. Declarer ruffs and plays on hearts.You have to win the third round of hearts in order to force South toruff when you play your last spade. Your ♥8 is the setting trick.
You play two high hearts and partner plays high-low. Now what?Don't even think of switching to your singleton spade! Declarermust have the ♠A for all that jumping around as well as solid dia-monds. So what chance do you have? One small one. If partnerhas the ♦10 you can beat this contract. Play a low heart. If partnercomes up with the ♦10, your ♦J will be the setting trick. Would I letyou down? Of course partner comes up with the ♦10.
CHAPTER SIX ♦ TRICKS WITH TRUMPS ♦ 179
Hand 1 NORTH (Dummy)
♠ 8 4 3♥ Q 10 2♦ A Q 5♣ K 10 8 7
WEST EAST (You)
♠ A K Q 6 ♠ J 7 5 2♥ 6 ♥ A 8 4 3♦ J 10 8 7 ♦ 9 4 3♣ 9 6 4 3 ♣ 5 2
SOUTH
♠ 10 9♥ K J 9 7 5♦ K 6 2♣ A Q J
NW E
S
EAST-WEST VUL. DEALER EAST
West
1♠
pass
all pass
North
2♣
3♥
East
pass
2♠
pass
South
1♥
3♣
4♥
Hand 2 NORTH (Dummy)
♠ K Q 4 2♥ J 7 6♦ —♣ A K J 8 7 6
WEST (You) EAST
♠ 9 ♠ 10 8 7 5 3♥ A K Q 9 8 4 ♥ 5 2♦ J 5 3 ♦ 10 8♣ Q 4 2 ♣ 10 9 5 3
SOUTH
♠ A J 6♥ 10 3♦ A K Q 9 7 6 4 2♣ —
NW E
S
BOTH VUL. DEALER SOUTH
West
1♥
pass
all pass
North
2♣
3♠
East
pass
pass
South
1♦
3♦
5♦
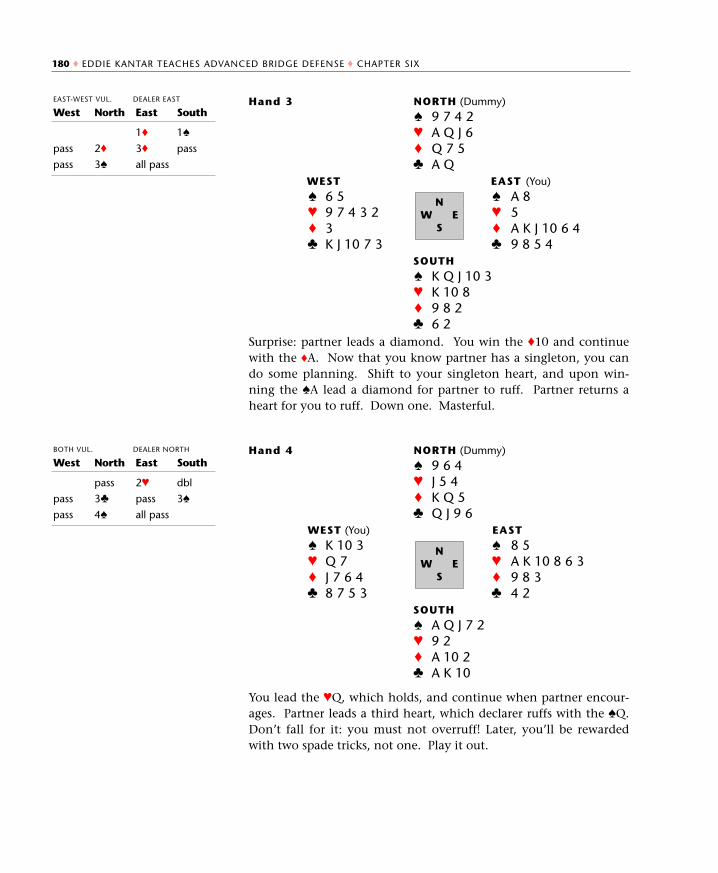
Surprise: partner leads a diamond. You win the ♦10 and continuewith the ♦A. Now that you know partner has a singleton, you cando some planning. Shift to your singleton heart, and upon win-ning the ♠A lead a diamond for partner to ruff. Partner returns aheart for you to ruff. Down one. Masterful.
You lead the ♥Q, which holds, and continue when partner encour-ages. Partner leads a third heart, which declarer ruffs with the ♠Q.Don’t fall for it: you must not overruff! Later, you’ll be rewardedwith two spade tricks, not one. Play it out.
180 ♦ EDDIE KANTAR TEACHES ADVANCED BRIDGE DEFENSE ♦ CHAPTER SIX
Hand 3 NORTH (Dummy)
♠ 9 7 4 2♥ A Q J 6♦ Q 7 5♣ A Q
WEST EAST (You)
♠ 6 5 ♠ A 8♥ 9 7 4 3 2 ♥ 5♦ 3 ♦ A K J 10 6 4♣ K J 10 7 3 ♣ 9 8 5 4
SOUTH
♠ K Q J 10 3♥ K 10 8♦ 9 8 2♣ 6 2
NW E
S
EAST-WEST VUL. DEALER EAST
West
pass
pass
North
2♦
3♠
East
1♦
3♦
all pass
South
1♠
pass
Hand 4 NORTH (Dummy)
♠ 9 6 4♥ J 5 4♦ K Q 5♣ Q J 9 6
WEST (You) EAST
♠ K 10 3 ♠ 8 5♥ Q 7 ♥ A K 10 8 6 3♦ J 7 6 4 ♦ 9 8 3♣ 8 7 5 3 ♣ 4 2
SOUTH
♠ A Q J 7 2♥ 9 2♦ A 10 2♣ A K 10
NW E
S
BOTH VUL. DEALER NORTH
West
pass
pass
North
pass
3♣
4♠
East
2♥
pass
all pass
South
dbl
3♠
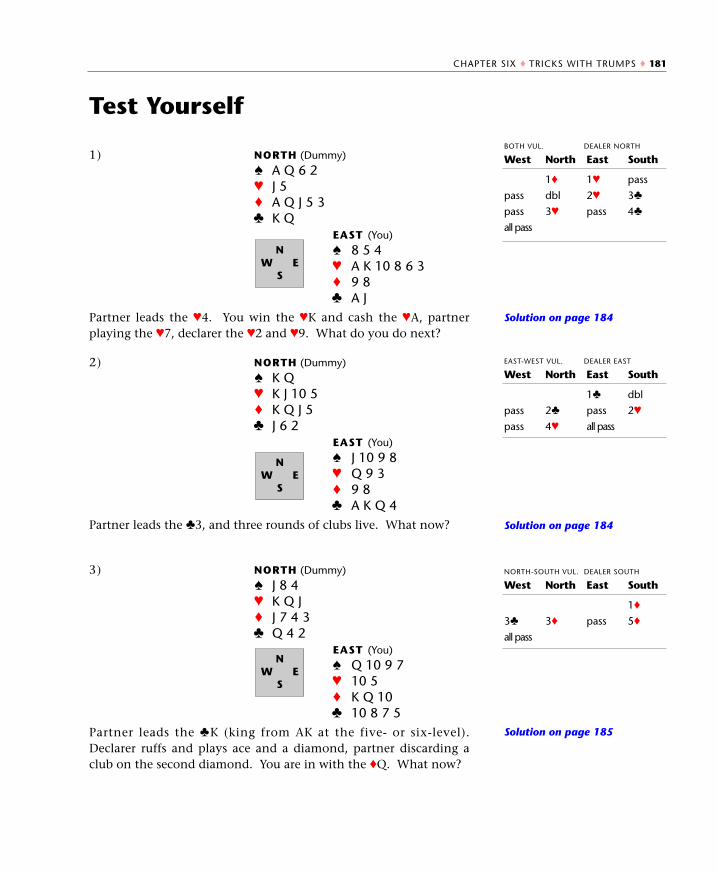
Test Yourself
Partner leads the ♥4. You win the ♥K and cash the ♥A, partnerplaying the ♥7, declarer the ♥2 and ♥9. What do you do next?
Partner leads the ♣3, and three rounds of clubs live. What now?
Partner leads the ♣K (king from AK at the five- or six-level).Declarer ruffs and plays ace and a diamond, partner discarding aclub on the second diamond. You are in with the ♦Q. What now?
Solution on page 184
Solution on page 184
Solution on page 185
CHAPTER SIX ♦ TRICKS WITH TRUMPS ♦ 181
1) NORTH (Dummy)
♠ A Q 6 2♥ J 5♦ A Q J 5 3♣ K Q
EAST (You)
♠ 8 5 4♥ A K 10 8 6 3♦ 9 8♣ A J
NW E
S
BOTH VUL. DEALER NORTH
West
pass
pass
all pass
North
1♦
dbl
3♥
East
1♥
2♥
pass
South
pass
3♣
4♣
2) NORTH (Dummy)
♠ K Q♥ K J 10 5♦ K Q J 5♣ J 6 2
EAST (You)
♠ J 10 9 8♥ Q 9 3♦ 9 8♣ A K Q 4
NW E
S
EAST-WEST VUL. DEALER EAST
West
pass
pass
North
2♣
4♥
East
1♣
pass
all pass
South
dbl
2♥
3) NORTH (Dummy)
♠ J 8 4♥ K Q J♦ J 7 4 3♣ Q 4 2
EAST (You)
♠ Q 10 9 7♥ 10 5♦ K Q 10♣ 10 8 7 5
NW E
S
NORTH-SOUTH VUL. DEALER SOUTH
West
3♣
all pass
North
3♦
East
pass
South
1♦
5♦
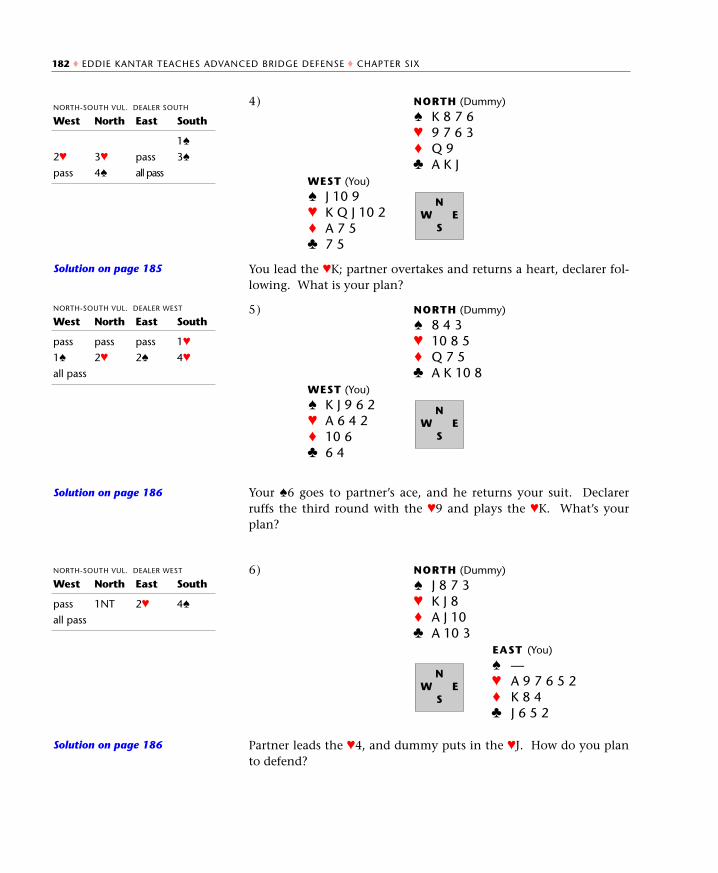
You lead the ♥K; partner overtakes and returns a heart, declarer fol-lowing. What is your plan?
Your ♠6 goes to partner’s ace, and he returns your suit. Declarerruffs the third round with the ♥9 and plays the ♥K. What’s yourplan?
Partner leads the ♥4, and dummy puts in the ♥J. How do you planto defend?
Solution on page 185
Solution on page 186
Solution on page 186
182 ♦ EDDIE KANTAR TEACHES ADVANCED BRIDGE DEFENSE ♦ CHAPTER SIX
NORTH-SOUTH VUL. DEALER SOUTH
West
2♥
pass
North
3♥
4♠
East
pass
all pass
South
1♠
3♠
4) NORTH (Dummy)
♠ K 8 7 6♥ 9 7 6 3♦ Q 9♣ A K J
WEST (You)
♠ J 10 9♥ K Q J 10 2♦ A 7 5♣ 7 5
NW E
S
5) NORTH (Dummy)
♠ 8 4 3♥ 10 8 5♦ Q 7 5♣ A K 10 8
WEST (You)
♠ K J 9 6 2♥ A 6 4 2♦ 10 6♣ 6 4
NW E
S
NORTH-SOUTH VUL. DEALER WEST
West
pass
1♠
all pass
North
pass
2♥
East
pass
2♠
South
1♥
4♥
6) NORTH (Dummy)
♠ J 8 7 3♥ K J 8♦ A J 10♣ A 10 3
EAST (You)
♠ —♥ A 9 7 6 5 2♦ K 8 4♣ J 6 5 2
NORTH-SOUTH VUL. DEALER WEST
West
pass
all pass
North
1NT
East
2♥
South
4♠
NW E
S
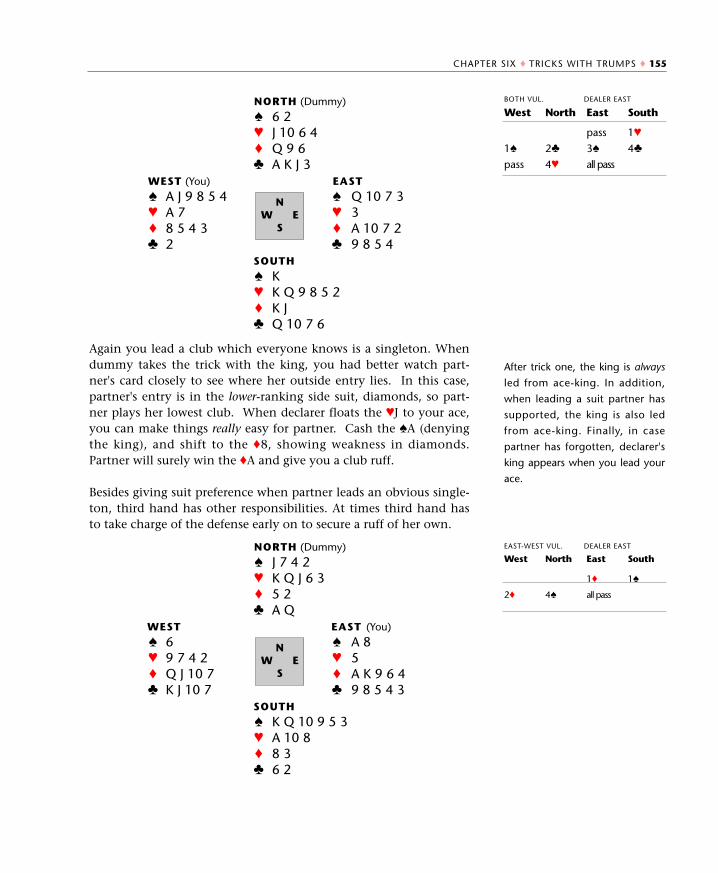
CHAPTER SIX ♦ TRICKS WITH TRUMPS ♦ 155
After trick one, the king is always
led from ace-king. In addition,
when leading a suit partner has
supported, the king is also led
from ace-king. Finally, in case
partner has forgotten, declarer's
king appears when you lead your
ace.
Again you lead a club which everyone knows is a singleton. Whendummy takes the trick with the king, you had better watch part-ner's card closely to see where her outside entry lies. In this case,partner's entry is in the lower-ranking side suit, diamonds, so part-ner plays her lowest club. When declarer floats the ♥J to your ace,you can make things really easy for partner. Cash the ♠A (denyingthe king), and shift to the ♦8, showing weakness in diamonds.Partner will surely win the ♦A and give you a club ruff.
Besides giving suit preference when partner leads an obvious single-ton, third hand has other responsibilities. At times third hand hasto take charge of the defense early on to secure a ruff of her own.
BOTH VUL. DEALER EAST
West
1♠
pass
North
2♣
4♥
East
pass
3♠
all pass
South
1♥
4♣
NORTH (Dummy)
♠ 6 2♥ J 10 6 4♦ Q 9 6♣ A K J 3
WEST (You) EAST
♠ A J 9 8 5 4 ♠ Q 10 7 3♥ A 7 ♥ 3♦ 8 5 4 3 ♦ A 10 7 2♣ 2 ♣ 9 8 5 4
SOUTH
♠ K♥ K Q 9 8 5 2♦ K J♣ Q 10 7 6
NW E
S
NORTH (Dummy)
♠ J 7 4 2♥ K Q J 6 3♦ 5 2♣ A Q
WEST EAST (You)
♠ 6 ♠ A 8♥ 9 7 4 2 ♥ 5♦ Q J 10 7 ♦ A K 9 6 4♣ K J 10 7 ♣ 9 8 5 4 3
SOUTH
♠ K Q 10 9 5 3♥ A 10 8♦ 8 3♣ 6 2
NW E
S
EAST-WEST VUL. DEALER EAST
West
2♦
North
4♠
East
1♦
all pass
South
1♠
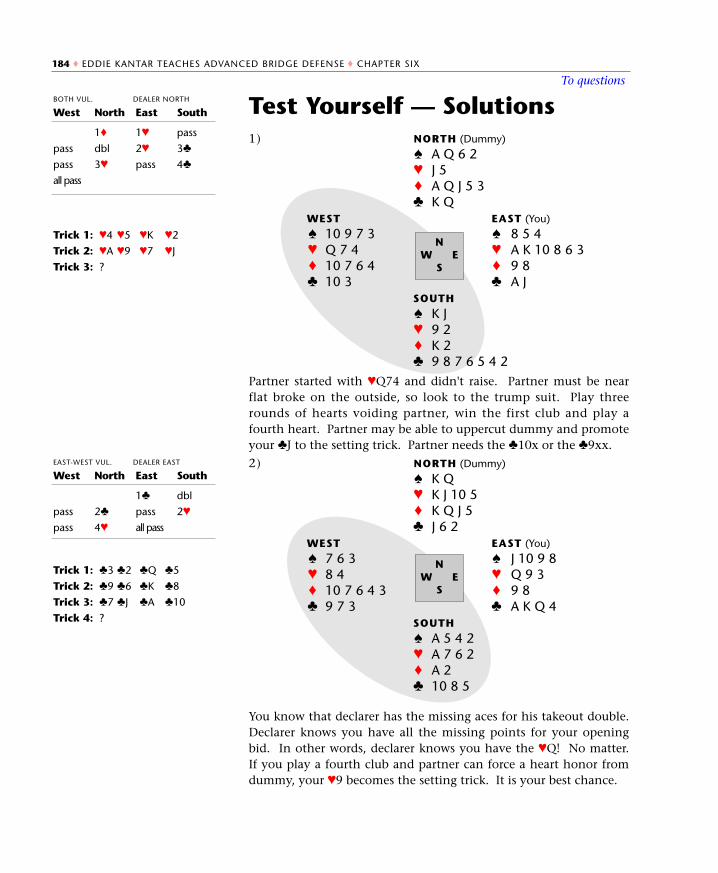
Test Yourself — Solutions
Partner started with ♥Q74 and didn't raise. Partner must be nearflat broke on the outside, so look to the trump suit. Play threerounds of hearts voiding partner, win the first club and play afourth heart. Partner may be able to uppercut dummy and promoteyour ♣J to the setting trick. Partner needs the ♣10x or the ♣9xx.
You know that declarer has the missing aces for his takeout double.Declarer knows you have all the missing points for your openingbid. In other words, declarer knows you have the ♥Q! No matter.If you play a fourth club and partner can force a heart honor fromdummy, your ♥9 becomes the setting trick. It is your best chance.
2) NORTH (Dummy)
♠ K Q♥ K J 10 5♦ K Q J 5♣ J 6 2
WEST EAST (You)
♠ 7 6 3 ♠ J 10 9 8♥ 8 4 ♥ Q 9 3♦ 10 7 6 4 3 ♦ 9 8♣ 9 7 3 ♣ A K Q 4
SOUTH
♠ A 5 4 2♥ A 7 6 2♦ A 2♣ 10 8 5
1) NORTH (Dummy)
♠ A Q 6 2♥ J 5♦ A Q J 5 3♣ K Q
WEST EAST (You)
♠ 10 9 7 3 ♠ 8 5 4♥ Q 7 4 ♥ A K 10 8 6 3♦ 10 7 6 4 ♦ 9 8♣ 10 3 ♣ A J
SOUTH
♠ K J♥ 9 2♦ K 2♣ 9 8 7 6 5 4 2
Trick 1: ♥4 ♥5 ♥K ♥2
Trick 2: ♥A ♥9 ♥7 ♥J
Trick 3: ?
Trick 1: ♣3 ♣2 ♣Q ♣5
Trick 2: ♣9 ♣6 ♣K ♣8
Trick 3: ♣7 ♣J ♣A ♣10
Trick 4: ?
184 ♦ EDDIE KANTAR TEACHES ADVANCED BRIDGE DEFENSE ♦ CHAPTER SIX
NW E
S
BOTH VUL. DEALER NORTH
West
pass
pass
all pass
North
1♦
dbl
3♥
East
1♥
2♥
pass
South
pass
3♣
4♣
NW E
S
EAST-WEST VUL. DEALER EAST
West
pass
pass
North
2♣
4♥
East
1♣
pass
all pass
South
dbl
2♥
To questions
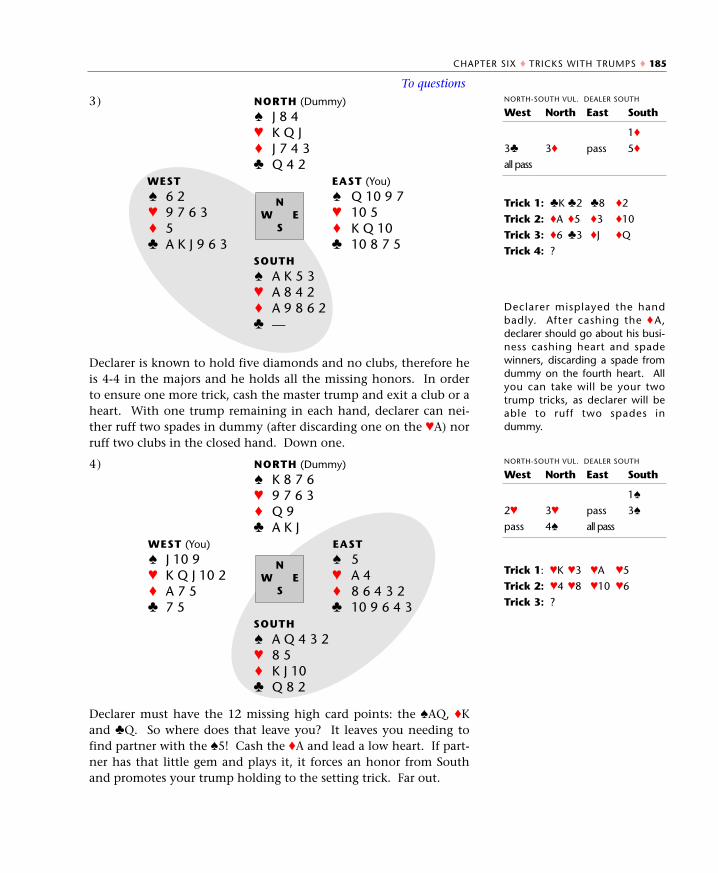
Declarer is known to hold five diamonds and no clubs, therefore heis 4-4 in the majors and he holds all the missing honors. In orderto ensure one more trick, cash the master trump and exit a club or aheart. With one trump remaining in each hand, declarer can nei-ther ruff two spades in dummy (after discarding one on the ♥A) norruff two clubs in the closed hand. Down one.
Declarer must have the 12 missing high card points: the ♠AQ, ♦Kand ♣Q. So where does that leave you? It leaves you needing tofind partner with the ♠5! Cash the ♦A and lead a low heart. If part-ner has that little gem and plays it, it forces an honor from Southand promotes your trump holding to the setting trick. Far out.
4) NORTH (Dummy)
♠ K 8 7 6♥ 9 7 6 3♦ Q 9♣ A K J
WEST (You) EAST
♠ J 10 9 ♠ 5♥ K Q J 10 2 ♥ A 4♦ A 7 5 ♦ 8 6 4 3 2♣ 7 5 ♣ 10 9 6 4 3
SOUTH
♠ A Q 4 3 2♥ 8 5♦ K J 10♣ Q 8 2
Trick 1: ♣K ♣2 ♣8 ♦2
Trick 2: ♦A ♦5 ♦3 ♦10
Trick 3: ♦6 ♣3 ♦J ♦Q
Trick 4: ?
Declarer misplayed the handbadly. After cashing the ♦A,declarer should go about his busi-ness cashing heart and spadewinners, discarding a spade fromdummy on the fourth heart. Allyou can take will be your twotrump tricks, as declarer will beable to ruff two spades indummy.
Trick 1: ♥K ♥3 ♥A ♥5
Trick 2: ♥4 ♥8 ♥10 ♥6
Trick 3: ?
CHAPTER SIX ♦ TRICKS WITH TRUMPS ♦ 185
3) NORTH (Dummy)
♠ J 8 4♥ K Q J♦ J 7 4 3♣ Q 4 2
WEST EAST (You)
♠ 6 2 ♠ Q 10 9 7♥ 9 7 6 3 ♥ 10 5♦ 5 ♦ K Q 10♣ A K J 9 6 3 ♣ 10 8 7 5
SOUTH
♠ A K 5 3♥ A 8 4 2♦ A 9 8 6 2♣ —
NW E
S
NORTH-SOUTH VUL. DEALER SOUTH
West
3♣
all pass
North
3♦
East
pass
South
1♦
5♦
NW E
S
NORTH-SOUTH VUL. DEALER SOUTH
West
2♥
pass
North
3♥
4♠
East
pass
all pass
South
1♠
3♠
To questions
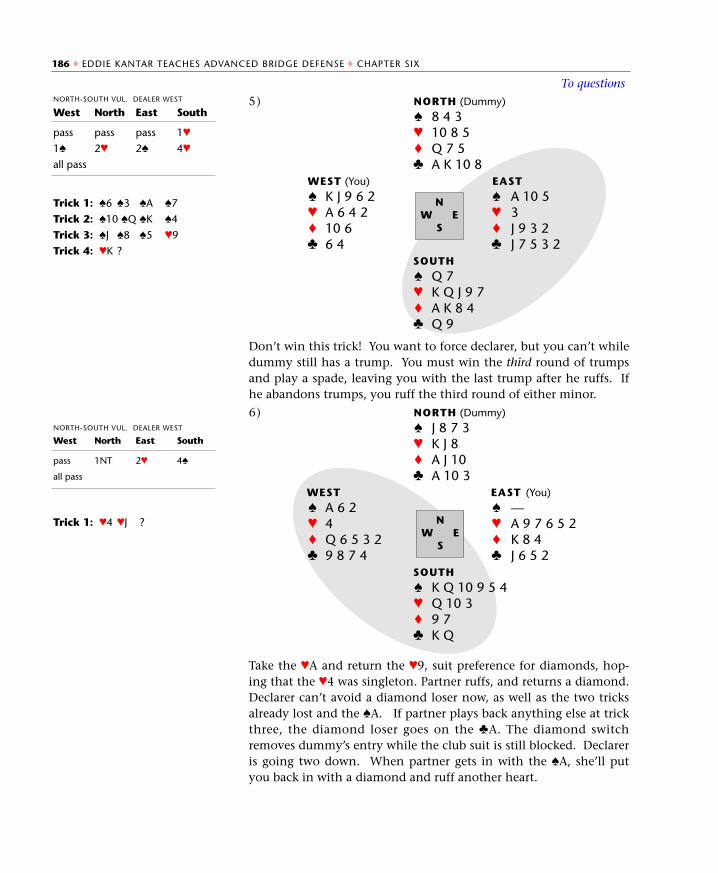
Don’t win this trick! You want to force declarer, but you can’t whiledummy still has a trump. You must win the third round of trumpsand play a spade, leaving you with the last trump after he ruffs. Ifhe abandons trumps, you ruff the third round of either minor.
Take the ♥A and return the ♥9, suit preference for diamonds, hop-ing that the ♥4 was singleton. Partner ruffs, and returns a diamond.Declarer can’t avoid a diamond loser now, as well as the two tricksalready lost and the ♠A. If partner plays back anything else at trickthree, the diamond loser goes on the ♣A. The diamond switchremoves dummy’s entry while the club suit is still blocked. Declareris going two down. When partner gets in with the ♠A, she’ll putyou back in with a diamond and ruff another heart.
6) NORTH (Dummy)
♠ J 8 7 3♥ K J 8♦ A J 10♣ A 10 3
WEST EAST (You)
♠ A 6 2 ♠ —♥ 4 ♥ A 9 7 6 5 2♦ Q 6 5 3 2 ♦ K 8 4♣ 9 8 7 4 ♣ J 6 5 2
SOUTH
♠ K Q 10 9 5 4♥ Q 10 3♦ 9 7♣ K Q
5) NORTH (Dummy)
♠ 8 4 3♥ 10 8 5♦ Q 7 5♣ A K 10 8
WEST (You) EAST
♠ K J 9 6 2 ♠ A 10 5♥ A 6 4 2 ♥ 3♦ 10 6 ♦ J 9 3 2♣ 6 4 ♣ J 7 5 3 2
SOUTH
♠ Q 7♥ K Q J 9 7♦ A K 8 4♣ Q 9
Trick 1: ♠6 ♠3 ♠A ♠7
Trick 2: ♠10 ♠Q ♠K ♠4
Trick 3: ♠J ♠8 ♠5 ♥9
Trick 4: ♥K ?
Trick 1: ♥4 ♥J ?
186 ♦ EDDIE KANTAR TEACHES ADVANCED BRIDGE DEFENSE ♦ CHAPTER SIX
NW E
S
NORTH-SOUTH VUL. DEALER WEST
West
pass
1♠
all pass
North
pass
2♥
East
pass
2♠
South
1♥
4♥
NW E
S
NORTH-SOUTH VUL. DEALER WEST
West
pass
all pass
North
1NT
East
2♥
South
4♠
To questions
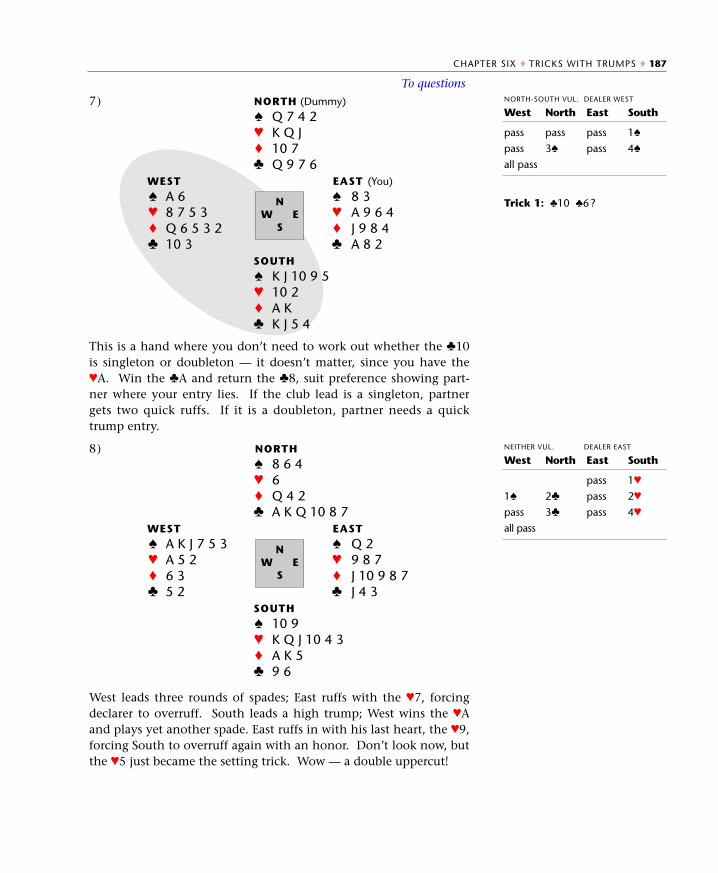
This is a hand where you don’t need to work out whether the ♣10is singleton or doubleton — it doesn’t matter, since you have the♥A. Win the ♣A and return the ♣8, suit preference showing part-ner where your entry lies. If the club lead is a singleton, partnergets two quick ruffs. If it is a doubleton, partner needs a quicktrump entry.
West leads three rounds of spades; East ruffs with the ♥7, forcingdeclarer to overruff. South leads a high trump; West wins the ♥Aand plays yet another spade. East ruffs in with his last heart, the ♥9,forcing South to overruff again with an honor. Don’t look now, butthe ♥5 just became the setting trick. Wow — a double uppercut!
7) NORTH (Dummy)
♠ Q 7 4 2♥ K Q J♦ 10 7♣ Q 9 7 6
WEST EAST (You)
♠ A 6 ♠ 8 3♥ 8 7 5 3 ♥ A 9 6 4♦ Q 6 5 3 2 ♦ J 9 8 4♣ 10 3 ♣ A 8 2
SOUTH
♠ K J 10 9 5♥ 10 2♦ A K♣ K J 5 4
NW E
S
Trick 1: ♣10 ♣6?
CHAPTER SIX ♦ TRICKS WITH TRUMPS ♦ 187
NORTH-SOUTH VUL. DEALER WEST
West
pass
pass
all pass
North
pass
3♠
East
pass
pass
South
1♠
4♠
NEITHER VUL. DEALER EAST
West
1♠
pass
all pass
North
2♣
3♣
East
pass
pass
pass
South
1♥
2♥
4♥
8) NORTH
♠ 8 6 4♥ 6♦ Q 4 2♣ A K Q 10 8 7
WEST EAST
♠ A K J 7 5 3 ♠ Q 2♥ A 5 2 ♥ 9 8 7♦ 6 3 ♦ J 10 9 8 7♣ 5 2 ♣ J 4 3
SOUTH
♠ 10 9♥ K Q J 10 4 3♦ A K 5♣ 9 6
NW E
S
To questions
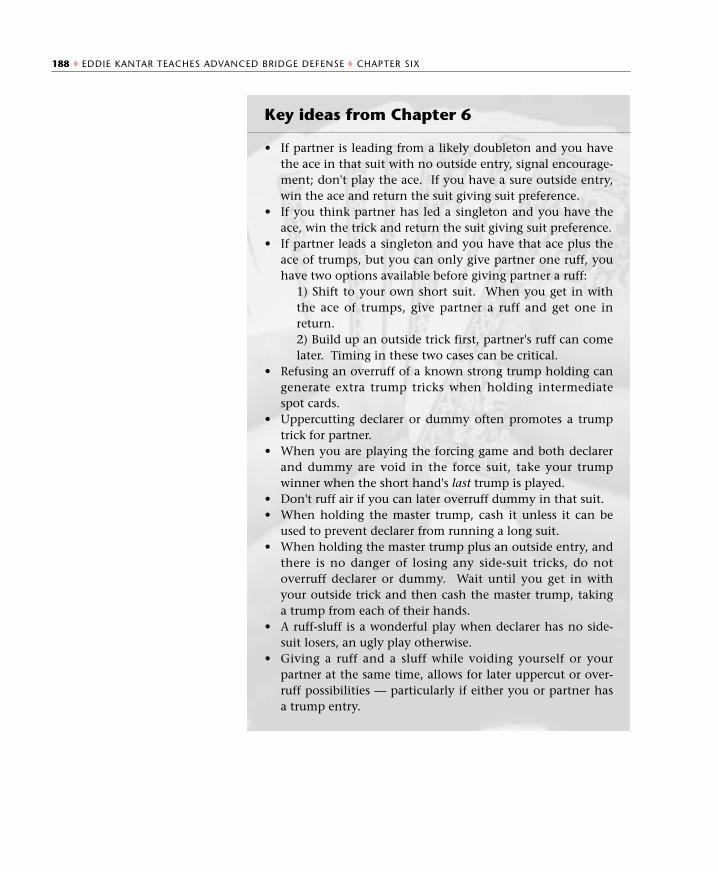
188 ♦ EDDIE KANTAR TEACHES ADVANCED BRIDGE DEFENSE ♦ CHAPTER SIX
Key ideas from Chapter 6
• If partner is leading from a likely doubleton and you havethe ace in that suit with no outside entry, signal encourage-ment; don't play the ace. If you have a sure outside entry,win the ace and return the suit giving suit preference.
• If you think partner has led a singleton and you have theace, win the trick and return the suit giving suit preference.
• If partner leads a singleton and you have that ace plus theace of trumps, but you can only give partner one ruff, youhave two options available before giving partner a ruff:
1) Shift to your own short suit. When you get in withthe ace of trumps, give partner a ruff and get one inreturn. 2) Build up an outside trick first, partner's ruff can comelater. Timing in these two cases can be critical.
• Refusing an overruff of a known strong trump holding cangenerate extra trump tricks when holding intermediatespot cards.
• Uppercutting declarer or dummy often promotes a trumptrick for partner.
• When you are playing the forcing game and both declarerand dummy are void in the force suit, take your trumpwinner when the short hand's last trump is played.
• Don't ruff air if you can later overruff dummy in that suit. • When holding the master trump, cash it unless it can be
used to prevent declarer from running a long suit. • When holding the master trump plus an outside entry, and
there is no danger of losing any side-suit tricks, do notoverruff declarer or dummy. Wait until you get in withyour outside trick and then cash the master trump, takinga trump from each of their hands.
• A ruff-sluff is a wonderful play when declarer has no side-suit losers, an ugly play otherwise.
• Giving a ruff and a sluff while voiding yourself or yourpartner at the same time, allows for later uppercut or over-ruff possibilities — particularly if either you or partner hasa trump entry.
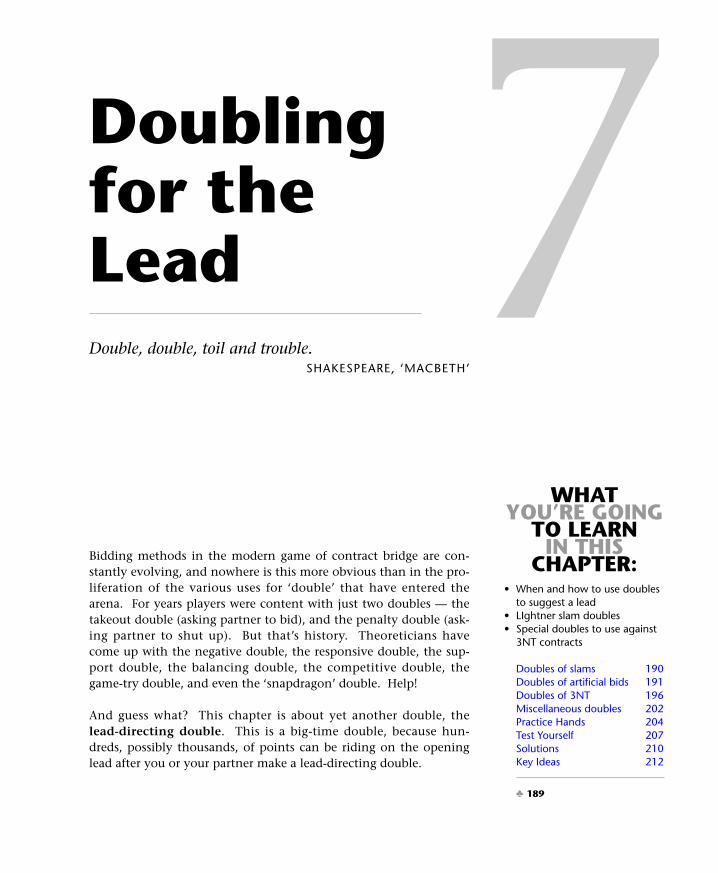
WHATYOU’RE GOING
TO LEARN IN THIS
CHAPTER:• When and how to use doubles
to suggest a lead• LIghtner slam doubles• Special doubles to use against
3NT contracts
Doubles of slams 190Doubles of artificial bids 191Doubles of 3NT 196Miscellaneous doubles 202Practice Hands 204Test Yourself 207Solutions 210Key Ideas 212
Bidding methods in the modern game of contract bridge are con-stantly evolving, and nowhere is this more obvious than in the pro-liferation of the various uses for ‘double’ that have entered thearena. For years players were content with just two doubles — thetakeout double (asking partner to bid), and the penalty double (ask-ing partner to shut up). But that’s history. Theoreticians havecome up with the negative double, the responsive double, the sup-port double, the balancing double, the competitive double, thegame-try double, and even the ‘snapdragon’ double. Help!
And guess what? This chapter is about yet another double, thelead-directing double. This is a big-time double, because hun-dreds, possibly thousands, of points can be riding on the openinglead after you or your partner make a lead-directing double.
7Doublingfor theLeadDouble, double, toil and trouble.
SHAKESPEARE, ‘MACBETH’
♣ 189
A lead-directing double has two outstanding characteristics: (1) it isa penalty double so partner is expected to pass; (2) it strongly sug-gests a particular lead. Partner had better be listening!
Most lead-directing doubles fall into these categories:
1. Doubles of voluntarily-bid suit slams2. Doubles of artificial bids (Stayman, Jacoby, Blackwood) and
cuebids (usually at the four level or higher) 3. Doubles of 3NT 4. Miscellaneous lead-directing doubles
Doubles of voluntarily-bid suit slamsNotice that word ‘voluntarily’. The opponents may bid a slam as asacrifice; doubling a sacrifice does not call for any particular lead, itis a penalty double pure and simple.
Doubling a voluntarily-bid slam asks for a particular lead. Ofcourse, if you can beat the slam regardless of what lead your dou-bles calls for, double anyway. However, most slams require a specif-ic lead to ensure defeat. There are two main situations:
1. Doubling a slam, with neither defender having bid.2. Doubling a slam, with one or both defenders having bid.
When you double a slam without having previously bid, you aretelling partner in no uncertain terms not to lead an unbid suit, theexpected lead, and not to lead a trump. In this example clubswould be the expected lead and your double says don’t lead that suitand don’t lead a trump.
Basically partner is reduced to leading one of the suits they havebid, a heart or a diamond. You could be void in one of those suitsor you could have the AK of one of those suits. Partner has to look
A major advantage of using lead-
directing doubles in the sequ-
ences discussed in this chapter (as
well as some not discussed), is the
negative inference factor.
When partner does not double an
artificial bid or cuebid, you can
rule out that suit as an opening
lead choice if it’s a close call.
See page 202 for a discussion of
doubles of 6NT.
190 ♣ EDDIE KANTAR TEACHES ADVANCED BRIDGE DEFENSE ♣ CHAPTER SEVEN
West
passpasspass
North
2♥
4♠
pass
East(You)
passpassdbl
South
1♠
3♦
6♠
all pass
CHAPTER SEVEN ♣ DOUBLING FOR THE LEAD ♣ 191
For the record the lead-directing
double of a voluntarily-bid suit
slam is called a Lightner
Double , after bridge legend
Theodore Lightner, who devised
all of this in 1929 — an idea that
has stood the test of time.
at her hand and decide. If it’s a close call, partner leads dummy’sfirst-bid suit.
If you (or partner) have bid a suit and then double a slam, the rulesare a bit different. The double forbids the lead of any suit the part-nership has bid, as well as, of course, a trump. Doubles of suitslams call for unexpected leads, usually dummy’s first-bid suit.
What lead are you asking for this time? Well, it can’t be a heart, thesuit you have bid, or a spade, a trump. Already partner has a 50-50shot of getting it right. You probably want a club lead as it doesn’tseem possible that you could hold the ♦AK — South would not bebidding a slam with no diamond control.
The most common application of a Lightner Double takes placewhen a preemptive bidder doubles a slam contract. This doubleusually shows a side-suit void. The opening leader has to figure outwhere it is. For example, if you open 4♥ holding
♠ 63 ♥ AKJ9843 ♦ — ♣ J1032
and the opponents arrive at 6♠, partner on lead, lash them with adouble. Your double forbids a heart or a spade lead and alerts yourpartner to the likelihood of a minor-suit void.
Doubles of artificial bidsAn artificial bid doesn’t necessarily show length in the suit beingbid, it has an altogether different meaning. The most commonexample is the Stayman response of 2♣ to a 1NT opening bid (or 3♣
to a 2NT opening bid). A double of an artificial bid is both a penal-ty double and a lead-directing double. What does that mean? Itmeans that the double has to be made with high honors as well aslength in the suit at the lower levels. After you double an artificialbid, the opponents usually move on to some other contract. If yourpartner is on lead, he usually leads the suit you doubled. Therefore,you have to be able to stand the lead against other contracts.
West
passpasspasspass
North
2♣
4♠
5♥
pass
East(You)
2♥
passpassdbl
South
1♠
3♠
4NT6♠
all pass
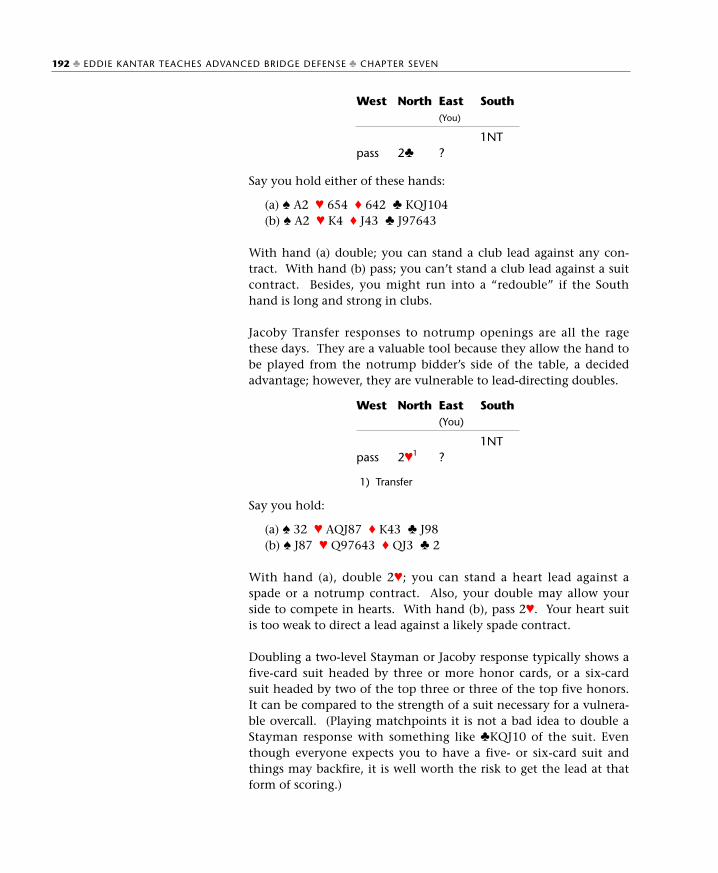
Say you hold either of these hands:
(a) ♠ A2 ♥ 654 ♦ 642 ♣ KQJ104(b) ♠ A2 ♥ K4 ♦ J43 ♣ J97643
With hand (a) double; you can stand a club lead against any con-tract. With hand (b) pass; you can’t stand a club lead against a suitcontract. Besides, you might run into a “redouble” if the Southhand is long and strong in clubs.
Jacoby Transfer responses to notrump openings are all the ragethese days. They are a valuable tool because they allow the hand tobe played from the notrump bidder’s side of the table, a decidedadvantage; however, they are vulnerable to lead-directing doubles.
1) Transfer
Say you hold:
(a) ♠ 32 ♥ AQJ87 ♦ K43 ♣ J98(b) ♠ J87 ♥ Q97643 ♦ QJ3 ♣ 2
With hand (a), double 2♥; you can stand a heart lead against aspade or a notrump contract. Also, your double may allow yourside to compete in hearts. With hand (b), pass 2♥. Your heart suitis too weak to direct a lead against a likely spade contract.
Doubling a two-level Stayman or Jacoby response typically shows afive-card suit headed by three or more honor cards, or a six-cardsuit headed by two of the top three or three of the top five honors.It can be compared to the strength of a suit necessary for a vulnera-ble overcall. (Playing matchpoints it is not a bad idea to double aStayman response with something like ♣KQJ10 of the suit. Eventhough everyone expects you to have a five- or six-card suit andthings may backfire, it is well worth the risk to get the lead at thatform of scoring.)
192 ♣ EDDIE KANTAR TEACHES ADVANCED BRIDGE DEFENSE ♣ CHAPTER SEVEN
West
pass
North
2♣
East(You)
?
South
1NT
West
pass
North
2♥1
East(You)
?
South
1NT
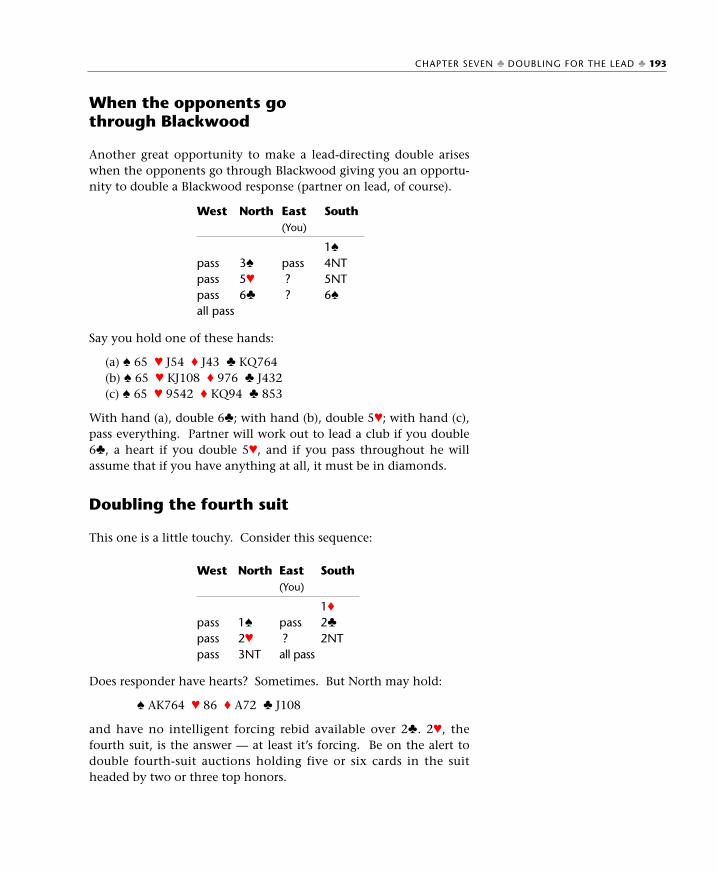
When the opponents gothrough Blackwood
Another great opportunity to make a lead-directing double ariseswhen the opponents go through Blackwood giving you an opportu-nity to double a Blackwood response (partner on lead, of course).
Say you hold one of these hands:
(a) ♠ 65 ♥ J54 ♦ J43 ♣ KQ764(b) ♠ 65 ♥ KJ108 ♦ 976 ♣ J432(c) ♠ 65 ♥ 9542 ♦ KQ94 ♣ 853
With hand (a), double 6♣; with hand (b), double 5♥; with hand (c),pass everything. Partner will work out to lead a club if you double6♣, a heart if you double 5♥, and if you pass throughout he willassume that if you have anything at all, it must be in diamonds.
Doubling the fourth suit
This one is a little touchy. Consider this sequence:
Does responder have hearts? Sometimes. But North may hold:
♠ AK764 ♥ 86 ♦ A72 ♣ J108
and have no intelligent forcing rebid available over 2♣. 2♥, thefourth suit, is the answer — at least it’s forcing. Be on the alert todouble fourth-suit auctions holding five or six cards in the suitheaded by two or three top honors.
CHAPTER SEVEN ♣ DOUBLING FOR THE LEAD ♣ 193
West
passpasspassall pass
North
3♠
5♥
6♣
East(You)
pass??
South
1♠
4NT5NT6♠
West
passpasspass
North
1♠
2♥
3NT
East(You)
pass?all pass
South
1♦
2♣
2NT
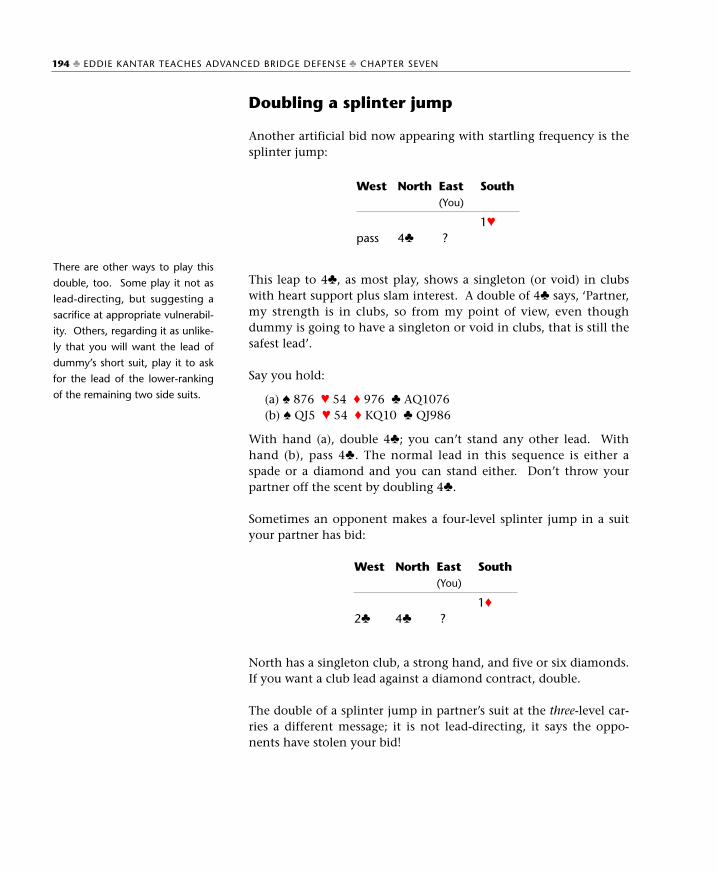
Doubling a splinter jump
Another artificial bid now appearing with startling frequency is thesplinter jump:
This leap to 4♣, as most play, shows a singleton (or void) in clubswith heart support plus slam interest. A double of 4♣ says, ‘Partner,my strength is in clubs, so from my point of view, even thoughdummy is going to have a singleton or void in clubs, that is still thesafest lead’.
Say you hold:
(a) ♠ 876 ♥ 54 ♦ 976 ♣ AQ1076(b) ♠ QJ5 ♥ 54 ♦ KQ10 ♣ QJ986
With hand (a), double 4♣; you can’t stand any other lead. Withhand (b), pass 4♣. The normal lead in this sequence is either aspade or a diamond and you can stand either. Don’t throw yourpartner off the scent by doubling 4♣.
Sometimes an opponent makes a four-level splinter jump in a suityour partner has bid:
North has a singleton club, a strong hand, and five or six diamonds.If you want a club lead against a diamond contract, double.
The double of a splinter jump in partner’s suit at the three-level car-ries a different message; it is not lead-directing, it says the oppo-nents have stolen your bid!
There are other ways to play this
double, too. Some play it not as
lead-directing, but suggesting a
sacrifice at appropriate vulnerabil-
ity. Others, regarding it as unlike-
ly that you will want the lead of
dummy’s short suit, play it to ask
for the lead of the lower-ranking
of the remaining two side suits.
194 ♣ EDDIE KANTAR TEACHES ADVANCED BRIDGE DEFENSE ♣ CHAPTER SEVEN
West
pass
North
4♣
East(You)
?
South
1♥
West
2♣
North
4♣
East(You)
?
South
1♦
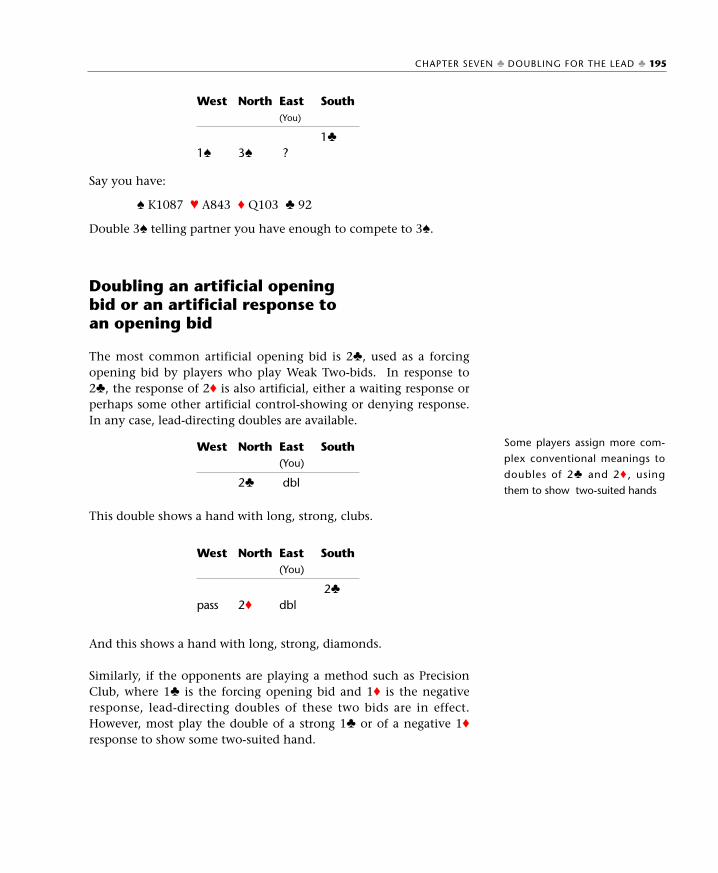
Say you have:
♠ K1087 ♥ A843 ♦ Q103 ♣ 92
Double 3♠ telling partner you have enough to compete to 3♠.
Doubling an artificial openingbid or an artificial response toan opening bid
The most common artificial opening bid is 2♣, used as a forcingopening bid by players who play Weak Two-bids. In response to2♣, the response of 2♦ is also artificial, either a waiting response orperhaps some other artificial control-showing or denying response.In any case, lead-directing doubles are available.
This double shows a hand with long, strong, clubs.
And this shows a hand with long, strong, diamonds.
Similarly, if the opponents are playing a method such as PrecisionClub, where 1♣ is the forcing opening bid and 1♦ is the negativeresponse, lead-directing doubles of these two bids are in effect.However, most play the double of a strong 1♣ or of a negative 1♦
response to show some two-suited hand.
Some players assign more com-
plex conventional meanings to
doubles of 2♣ and 2♦ , using
them to show two-suited hands
CHAPTER SEVEN ♣ DOUBLING FOR THE LEAD ♣ 195
West
1♠
North
3♠
East(You)
?
South
1♣
West North
2♣
East(You)
dbl
South
West
pass
North
2♦
East(You)
dbl
South
2♣
Doubling a cuebid
Doubles of most cuebids, in particular those at the four-level orhigher, are lead-directing. Just make sure you are not the one thatis going to be on lead when you double a cuebid. There are no‘reminder’ lead-directing doubles.
Do not double 4♣ with strong clubs; you are going to be on leadagainst a spade contract. However, if partner has a suitable dia-mond holding such as KQx(x) or KJ10(x), partner is expected todouble 4♦ to help you out on opening lead.
Doubles of 3NT contracts We start with the most difficult of all, the lead-directing double of3NT. These are the five sticklers and they all presume that the part-ner of the player who is on opening lead has doubled.
a) No suits have been bid by either side. b) Neither defender has bid, but dummy has bid one or two
suits.c) A defender opens or overcalls at the one-level and then
doubles.d) One defender bids a suit and partner doubles. e) Each defender bids a different suit.
No suits have been bid by either side
Your double announces a solid suit, and asks partner to lead it.Partner would love to, of course, if she only knew which one it was!
196 ♣ EDDIE KANTAR TEACHES ADVANCED BRIDGE DEFENSE ♣ CHAPTER SEVEN
West
pass?
North
1♠
4♣
East(You)
pass?
South
3♠
4♦
West
pass
North
3NT
East(You)
dbl
South
1NTall pass
Given that your double shows a solid suit, partner should lead asuit with no honors. If West has two suits without honor cards, theshorter one is usually the winner. Say partner is gazing at:
♠ 4 ♥ 107632 ♦ Q543 ♣ J76
Your suit could be spades, hearts, or even clubs (♣AKQ109), but thesmart money is riding on the singleton spade lead.
Neither defender has bid, butdummy has bid one or two suits
Your double calls for a heart lead, dummy’s first bid suit. Even witha heart void, partner should lead one! Partner better have a goodreason handy if a heart isn’t led.
You might have:
♠ 54 ♥ AKJ10 ♦ 54 ♣ Q9743
The double still asks for a heart lead, dummy’s first-bid suit.However, there is something to be said for allowing West the optionof leading a diamond.
Say you, East, are looking at either of these hands:
(a) ♠ K8743 ♥ 104 ♦ J1042 ♣ 109(b) ♠ 9874 ♥ KQ1094 ♦ 52 ♣ 98
CHAPTER SEVEN ♣ DOUBLING FOR THE LEAD ♣ 197
West
passpasspass
North
1♥
2NTpass
East(You)
passpassdbl
South
1♦
1NT3NTall pass
West
passpassdbl
North
1♣
1♠
2NTall pass
East(You)
passpasspass
South
1♥
2♦
3NT
With hand (a), lead the ♥10. With hand (b), common sense tellsyou that partner is asking for a diamond. This is one sequence youmight wish to discuss. One other point: with strong diamonds,partner might have doubled 2♦. Since that didn’t happen, chancesare partner wants dummy’s first, not second, bid suit.
In the remaining sequences, you, partner, or both you and partnerhave bid before the ‘dreaded’ double.
A defender opens or overcallsa major suit at the one-level
Consider these two East hands before jumping to any conclusionsas to the lead-directing implications of your double.
(a) ♠ KQJ104 ♥ 3 ♦ KJ874 ♣ A9(b) ♠ KJ874 ♥ 3 ♦ KQJ104 ♣ A9
With hand (a), you are almost certain to set the contract with aspade lead. With hand (b), you may or may not set the contractwith a spade lead, but you are a heavy favorite to do so with a dia-mond lead.
Before discussing what lead this double asks for, let it be knownthat partner is likely to lead a spade if you pass. After all, as mostplay, a major-suit opening bid shows a five-card suit, minimum, asdoes a one-level major-suit overcall. A spade is the expected lead,double or no double.
Assuming partner is likely to lead a spade, why use the double toask for a spade lead, the suit partner is going to lead anyway? My(minority) feeling is that this double should be used to alert partnerthat you have a powerful, hidden, lower-ranking suit — a suit youwere not able to mention at the two-level — hand (b).
Whichever way you decide to play this double, make sure yourpartner is playing the same way!
198 ♣ EDDIE KANTAR TEACHES ADVANCED BRIDGE DEFENSE ♣ CHAPTER SEVEN
West
pass
North
3NT
East(You)
1♠
dbl
South
1NTall pass
This minority reasoning can also be applied after a one-level majorsuit overcall. Say you are looking at either of these hands:
(a) ♠ KQJ107 ♥ 94 ♦ A1076 ♣ 92(b) ♠ Q10764 ♥ 5 ♦ A10 ♣ KQJ102
With hand (a) you want a spade lead. With hand (b) you want aclub lead. If you play ‘standard’ methods, you will double with (a)to ensure getting a spade lead, and pass with (b). If you believe oth-erwise as I do, you will pass with (a) expecting a spade lead, anddouble with (b) to tell your partner not to lead a spade.
A defender opens 1♣ or 1♦
However, after you open 1♣ or 1♦, a minor suit, and later double3NT, your double should call for the lead of the suit you have bid.Why? Because after a minor-suit opening bid followed by anotrump overcall, partner is apt to think you have opened a shortclub or a short diamond or perhaps have opened the bidding with aweak four-card suit and will look elsewhere for tricks.
Your hand:
♠ A10 ♥ A75 ♦ QJ3 ♣ QJ1095
With that club suit and your certain outside entries, you want aclub lead; ‘double’ is the way to get it.
Overcalls at the two- or three-level normally show one-suitedhands. Therefore, you seldom have any surprise hidden suits whenyou make one of these overcalls. Consequently a double of 3NT
CHAPTER SEVEN ♣ DOUBLING FOR THE LEAD ♣ 199
West
passpasspass
North
1♥
2NTpass
East(You)
1♠
pass?
South
1♦
1NT3NT
West
passpass
North
2♦
3NT
East(You)
1♣
passdbl
South
1♥
2NTall pass
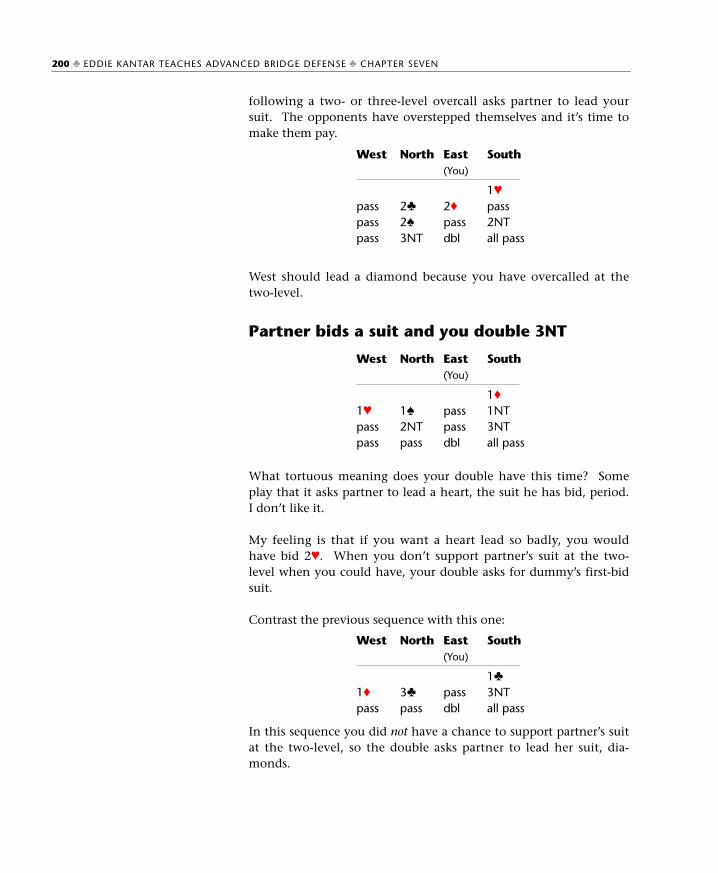
following a two- or three-level overcall asks partner to lead yoursuit. The opponents have overstepped themselves and it’s time tomake them pay.
West should lead a diamond because you have overcalled at thetwo-level.
Partner bids a suit and you double 3NT
What tortuous meaning does your double have this time? Someplay that it asks partner to lead a heart, the suit he has bid, period.I don’t like it.
My feeling is that if you want a heart lead so badly, you wouldhave bid 2♥. When you don’t support partner’s suit at the two-level when you could have, your double asks for dummy’s first-bidsuit.
Contrast the previous sequence with this one:
In this sequence you did not have a chance to support partner’s suitat the two-level, so the double asks partner to lead her suit, dia-monds.
200 ♣ EDDIE KANTAR TEACHES ADVANCED BRIDGE DEFENSE ♣ CHAPTER SEVEN
West
passpasspass
North
2♣
2♠
3NT
East(You)
2♦
passdbl
South
1♥
pass2NTall pass
West
1♥
passpass
North
1♠
2NTpass
East(You)
passpassdbl
South
1♦
1NT3NTall pass
West
1♦
pass
North
3♣
pass
East(You)
passdbl
South
1♣
3NTall pass
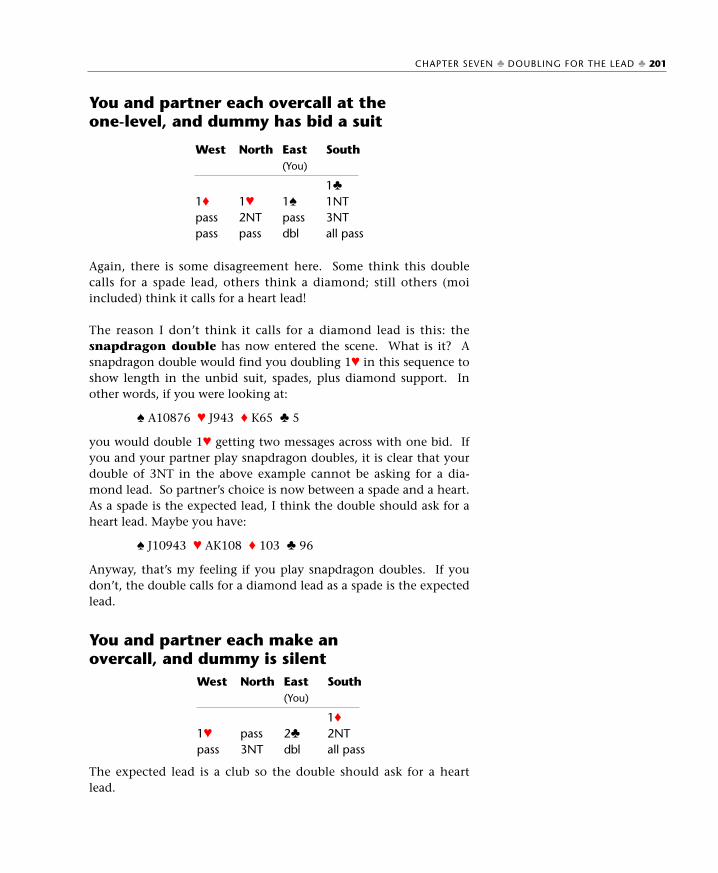
You and partner each overcall at theone-level, and dummy has bid a suit
Again, there is some disagreement here. Some think this doublecalls for a spade lead, others think a diamond; still others (moiincluded) think it calls for a heart lead!
The reason I don’t think it calls for a diamond lead is this: thesnapdragon double has now entered the scene. What is it? Asnapdragon double would find you doubling 1♥ in this sequence toshow length in the unbid suit, spades, plus diamond support. Inother words, if you were looking at:
♠ A10876 ♥ J943 ♦ K65 ♣ 5
you would double 1♥ getting two messages across with one bid. Ifyou and your partner play snapdragon doubles, it is clear that yourdouble of 3NT in the above example cannot be asking for a dia-mond lead. So partner’s choice is now between a spade and a heart.As a spade is the expected lead, I think the double should ask for aheart lead. Maybe you have:
♠ J10943 ♥ AK108 ♦ 103 ♣ 96
Anyway, that’s my feeling if you play snapdragon doubles. If youdon’t, the double calls for a diamond lead as a spade is the expectedlead.
You and partner each make anovercall, and dummy is silent
The expected lead is a club so the double should ask for a heartlead.
CHAPTER SEVEN ♣ DOUBLING FOR THE LEAD ♣ 201
West
1♦
passpass
North
1♥
2NTpass
East(You)
1♠
passdbl
South
1♣
1NT3NTall pass
West
1♥
pass
North
pass3NT
East(You)
2♣
dbl
South
1♦
2NTall pass
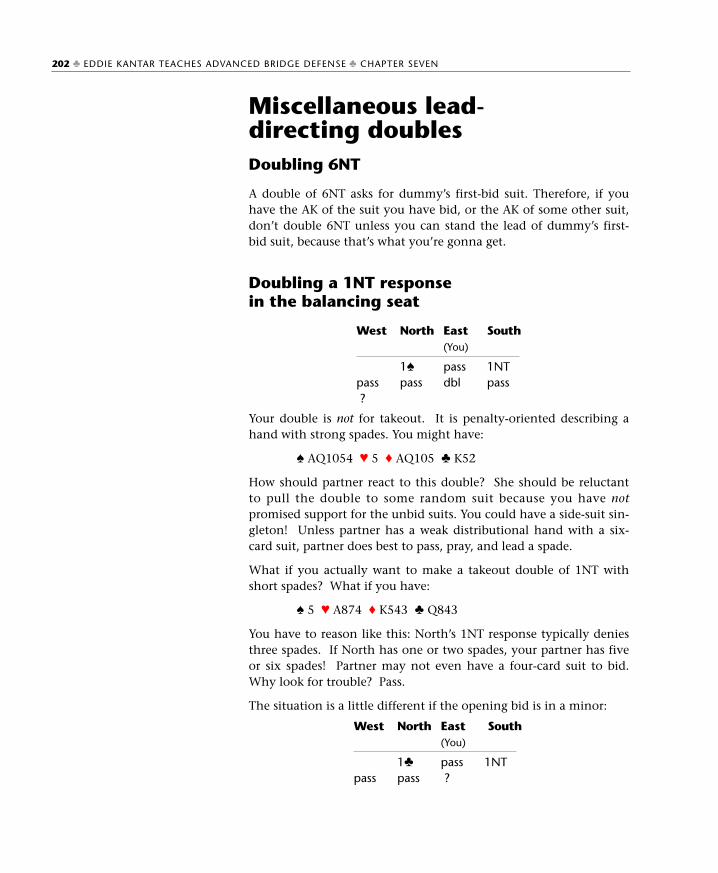
Miscellaneous lead-directing doublesDoubling 6NT
A double of 6NT asks for dummy’s first-bid suit. Therefore, if youhave the AK of the suit you have bid, or the AK of some other suit,don’t double 6NT unless you can stand the lead of dummy’s first-bid suit, because that’s what you’re gonna get.
Doubling a 1NT responsein the balancing seat
Your double is not for takeout. It is penalty-oriented describing ahand with strong spades. You might have:
♠ AQ1054 ♥ 5 ♦ AQ105 ♣ K52
How should partner react to this double? She should be reluctantto pull the double to some random suit because you have notpromised support for the unbid suits. You could have a side-suit sin-gleton! Unless partner has a weak distributional hand with a six-card suit, partner does best to pass, pray, and lead a spade.
What if you actually want to make a takeout double of 1NT withshort spades? What if you have:
♠ 5 ♥ A874 ♦ K543 ♣ Q843
You have to reason like this: North’s 1NT response typically deniesthree spades. If North has one or two spades, your partner has fiveor six spades! Partner may not even have a four-card suit to bid.Why look for trouble? Pass.
The situation is a little different if the opening bid is in a minor:
202 ♣ EDDIE KANTAR TEACHES ADVANCED BRIDGE DEFENSE ♣ CHAPTER SEVEN
West
pass?
North
1♠
pass
East(You)
passdbl
South
1NTpass
West
pass
North
1♣
pass
East(You)
pass?
South
1NT
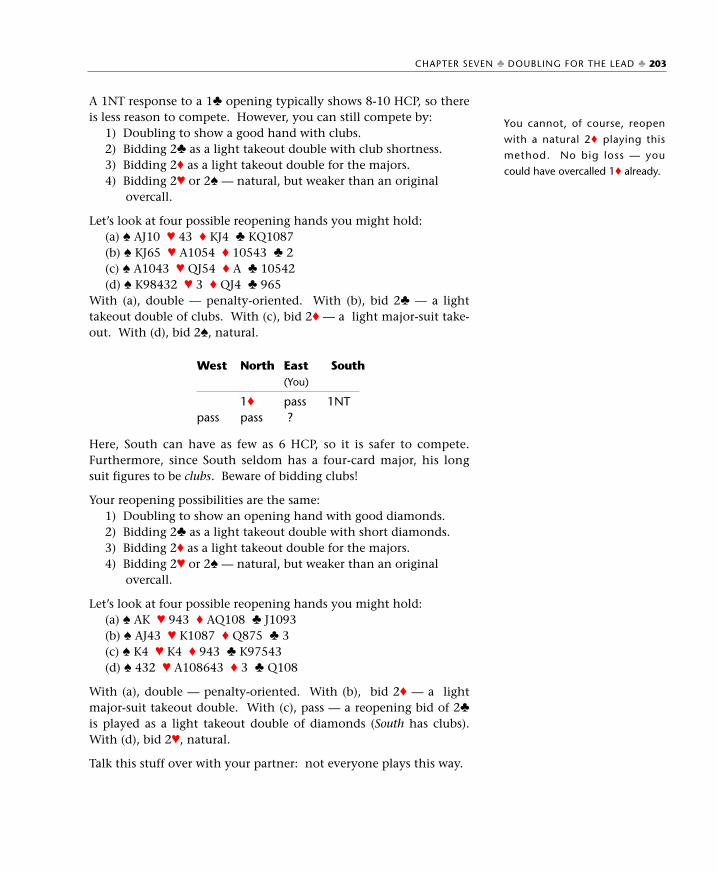
A 1NT response to a 1♣ opening typically shows 8-10 HCP, so thereis less reason to compete. However, you can still compete by:
1) Doubling to show a good hand with clubs.2) Bidding 2♣ as a light takeout double with club shortness.3) Bidding 2♦ as a light takeout double for the majors.4) Bidding 2♥ or 2♠ — natural, but weaker than an original
overcall.
Let’s look at four possible reopening hands you might hold:(a) ♠ AJ10 ♥ 43 ♦ KJ4 ♣ KQ1087(b) ♠ KJ65 ♥ A1054 ♦ 10543 ♣ 2(c) ♠ A1043 ♥ QJ54 ♦ A ♣ 10542(d) ♠ K98432 ♥ 3 ♦ QJ4 ♣ 965
With (a), double — penalty-oriented. With (b), bid 2♣ — a lighttakeout double of clubs. With (c), bid 2♦ — a light major-suit take-out. With (d), bid 2♠, natural.
Here, South can have as few as 6 HCP, so it is safer to compete.Furthermore, since South seldom has a four-card major, his longsuit figures to be clubs. Beware of bidding clubs!
Your reopening possibilities are the same:1) Doubling to show an opening hand with good diamonds.2) Bidding 2♣ as a light takeout double with short diamonds.3) Bidding 2♦ as a light takeout double for the majors.4) Bidding 2♥ or 2♠ — natural, but weaker than an original
overcall.
Let’s look at four possible reopening hands you might hold:(a) ♠ AK ♥ 943 ♦ AQ108 ♣ J1093(b) ♠ AJ43 ♥ K1087 ♦ Q875 ♣ 3(c) ♠ K4 ♥ K4 ♦ 943 ♣ K97543(d) ♠ 432 ♥ A108643 ♦ 3 ♣ Q108
With (a), double — penalty-oriented. With (b), bid 2♦ — a lightmajor-suit takeout double. With (c), pass — a reopening bid of 2♣
is played as a light takeout double of diamonds (South has clubs).With (d), bid 2♥, natural.
Talk this stuff over with your partner: not everyone plays this way.
You cannot, of course, reopen
with a natural 2♦ playing this
method. No big loss — you
could have overcalled 1♦ already.
CHAPTER SEVEN ♣ DOUBLING FOR THE LEAD ♣ 203
West
pass
North
1♦
pass
East(You)
pass?
South
1NT

Practice Hands
Partner has seized the opportunity to make a lead-directing doubleof the artificial 5♥ response to Blackwood. You would normallylead a diamond, but you comply by leading a heart.
The ball is now in South’s court. South knows from the double thatEast must have the ♥K, so South must plan a strip and endplay toovercome this killing lead. South plays low from dummy at trickone, wins the ace, draws trumps and strips the diamonds, finallyexiting with a heart to the queen and king. What can East do? IfEast exits a club, South has no club loser; if East exits with a redcard, conceding a ruff and a sluff, South ruffs in dummy and dis-cards a club from the closed hand.
However, even though South can still make the hand with a heartlead, South has to play it well. If South plays the ♥Q at trick one,for example, the hand can no longer be made. After the strippingprocess, West can win the heart exit and fire a club through dummypromoting the ♣K to the setting trick.
Also, a finessaholic sitting South might take the club finesse afterthe heart lead instead of playing for the strip and endplay, eventhough the latter is a near 100% line requiring only that East hasthe ♥K.
Opening lead: ♥3
204 ♣ EDDIE KANTAR TEACHES ADVANCED BRIDGE DEFENSE ♣ CHAPTER SEVEN
Hand 1 NORTH (Dummy)
♠ A J 10 7♥ Q 5♦ K 2♣ A J 10 8 4
WEST (You) EAST
♠ 6 5 ♠ 4♥ 10 7 6 3 2 ♥ K J 9 8♦ Q J 10 8 ♦ 9 5 4 3♣ 9 3 ♣ K 7 6 2
SOUTH
♠ K Q 9 8 3 2♥ A 4♦ A 7 6♣ Q 5
NW E
S
BOTH VUL. DEALER NORTH
West
pass
pass
pass
all pass
North
1♣
3♠
5♥
6♦
East
pass
pass
dbl
pass
South
1♠
4NT
5NT
6♠
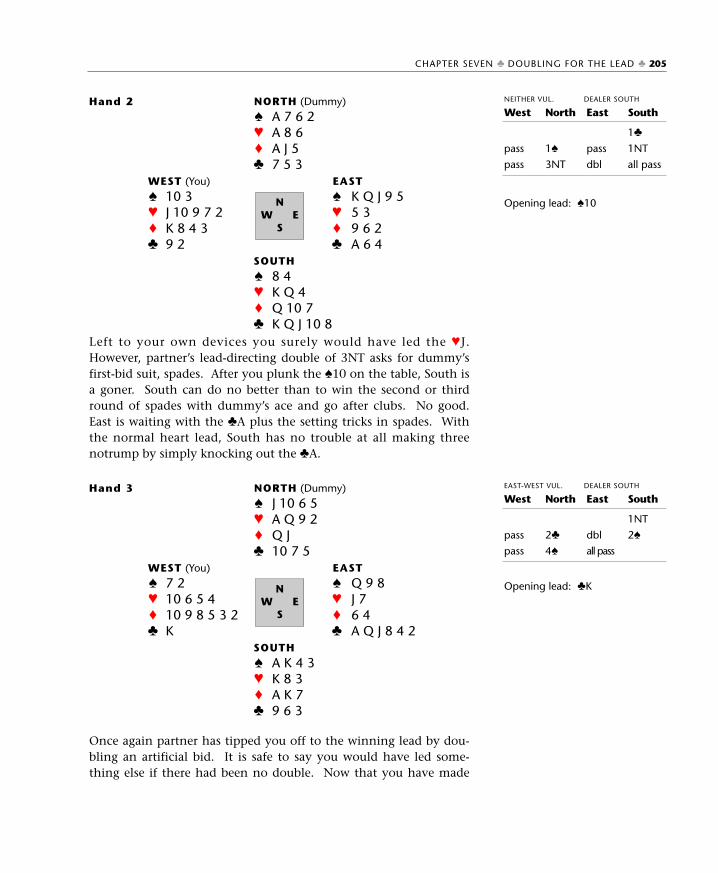
Left to your own devices you surely would have led the ♥J.However, partner’s lead-directing double of 3NT asks for dummy’sfirst-bid suit, spades. After you plunk the ♠10 on the table, South isa goner. South can do no better than to win the second or thirdround of spades with dummy’s ace and go after clubs. No good.East is waiting with the ♣A plus the setting tricks in spades. Withthe normal heart lead, South has no trouble at all making threenotrump by simply knocking out the ♣A.
Once again partner has tipped you off to the winning lead by dou-bling an artificial bid. It is safe to say you would have led some-thing else if there had been no double. Now that you have made
Opening lead: ♠10
Opening lead: ♣K
CHAPTER SEVEN ♣ DOUBLING FOR THE LEAD ♣ 205
Hand 2 NORTH (Dummy)
♠ A 7 6 2♥ A 8 6♦ A J 5♣ 7 5 3
WEST (You) EAST
♠ 10 3 ♠ K Q J 9 5♥ J 10 9 7 2 ♥ 5 3♦ K 8 4 3 ♦ 9 6 2♣ 9 2 ♣ A 6 4
SOUTH
♠ 8 4♥ K Q 4♦ Q 10 7♣ K Q J 10 8
NW E
S
NEITHER VUL. DEALER SOUTH
West
pass
pass
North
1♠
3NT
East
pass
dbl
South
1♣
1NT
all pass
EAST-WEST VUL. DEALER SOUTH
West
pass
pass
North
2♣
4♠
East
dbl
all pass
South
1NT
2♠
Hand 3 NORTH (Dummy)
♠ J 10 6 5♥ A Q 9 2♦ Q J♣ 10 7 5
WEST (You) EAST
♠ 7 2 ♠ Q 9 8♥ 10 6 5 4 ♥ J 7♦ 10 9 8 5 3 2 ♦ 6 4♣ K ♣ A Q J 8 4 2
SOUTH
♠ A K 4 3♥ K 8 3♦ A K 7♣ 9 6 3
NW E
S
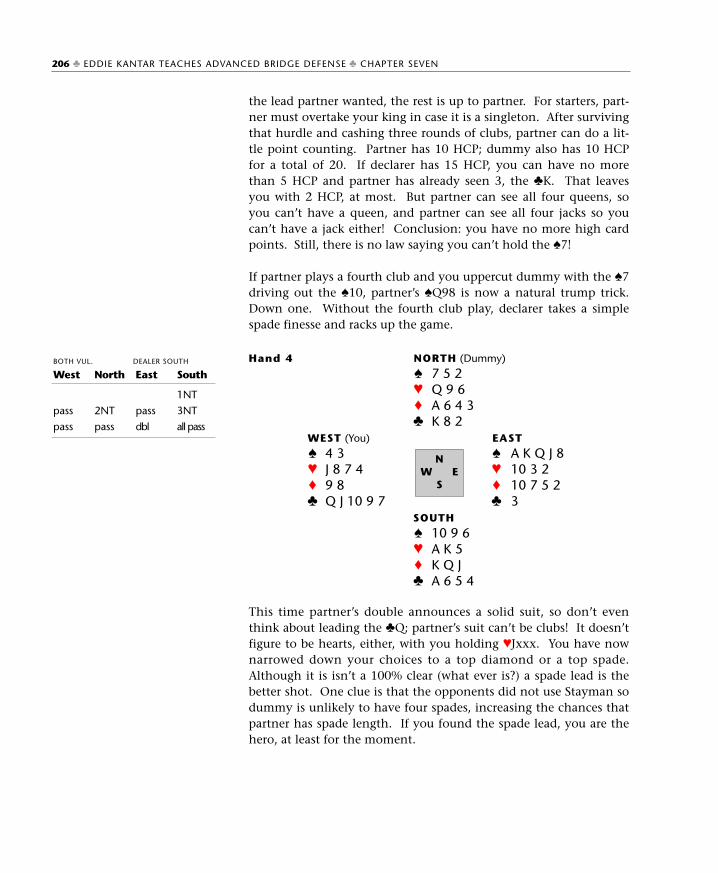
the lead partner wanted, the rest is up to partner. For starters, part-ner must overtake your king in case it is a singleton. After survivingthat hurdle and cashing three rounds of clubs, partner can do a lit-tle point counting. Partner has 10 HCP; dummy also has 10 HCPfor a total of 20. If declarer has 15 HCP, you can have no morethan 5 HCP and partner has already seen 3, the ♣K. That leavesyou with 2 HCP, at most. But partner can see all four queens, soyou can’t have a queen, and partner can see all four jacks so youcan’t have a jack either! Conclusion: you have no more high cardpoints. Still, there is no law saying you can’t hold the ♠7!
If partner plays a fourth club and you uppercut dummy with the ♠7driving out the ♠10, partner’s ♠Q98 is now a natural trump trick.Down one. Without the fourth club play, declarer takes a simplespade finesse and racks up the game.
This time partner’s double announces a solid suit, so don’t eventhink about leading the ♣Q; partner’s suit can’t be clubs! It doesn’tfigure to be hearts, either, with you holding ♥Jxxx. You have nownarrowed down your choices to a top diamond or a top spade.Although it is isn’t a 100% clear (what ever is?) a spade lead is thebetter shot. One clue is that the opponents did not use Stayman sodummy is unlikely to have four spades, increasing the chances thatpartner has spade length. If you found the spade lead, you are thehero, at least for the moment.
206 ♣ EDDIE KANTAR TEACHES ADVANCED BRIDGE DEFENSE ♣ CHAPTER SEVEN
BOTH VUL. DEALER SOUTH
West
pass
pass
North
2NT
pass
East
pass
dbl
South
1NT
3NT
all pass
Hand 4 NORTH (Dummy)
♠ 7 5 2♥ Q 9 6♦ A 6 4 3♣ K 8 2
WEST (You) EAST
♠ 4 3 ♠ A K Q J 8♥ J 8 7 4 ♥ 10 3 2♦ 9 8 ♦ 10 7 5 2 ♣ Q J 10 9 7 ♣ 3
SOUTH
♠ 10 9 6♥ A K 5♦ K Q J♣ A 6 5 4
NW E
S
Test Yourself1) You are West, holding:
♠ 6 3 ♥ Q J 9 5 ♦ K 10 7 3 ♣ 6 5 2
What do you lead?
2) You are West, holding
♠ 6 3 ♥ Q J 9 5 ♦ K 10 7 3 ♣ 6 5 2
What do you lead?
3) You are West, holding
♠ 6 3 ♥ Q J 9 5 ♦ K 10 7 3 ♣ 6 5 2
What do you lead?
4) You are West, holding
♠ 3 ♥ J 10 9 3 ♦ J 10 9 3 ♣ J 10 9 3
What do you lead?
Solution on page 210
Solution on page 210
Solution on page 210
Solution on page 210
CHAPTER SEVEN ♣ DOUBLING FOR THE LEAD ♣ 207
West
passpass
North
1♠
3NT
East
passdbl
South
1♦
2NTall pass
West
pass
North
1♠
pass
East
passdbl
South
1NTall pass
West
passpass
North
2NTpass
East
passdbl
South
1NT3NTall pass
West
passpasspassall pass
North
1♦
3♠
5♥
6♦
East
passpasspasspass
South
1♠
4NT5NT6♠
5) You are West, and the bidding has proceeded:
1) 15-17 HCP2) Transfer to hearts
What should you bid on each of the following hands:a) ♠ 7 4 ♥ A 6 3 ♦ J 8 6 5 3 2 ♣ K 4b) ♠ 7 4 ♥ A 6 3 ♦ K Q 10 9 3 ♣ 5 4 2c) ♠ 7 4 ♥ A 6 3 ♦ K Q 10 9 5 4 3 2 ♣ —
6) You are West, and the auction has been:
What should you lead from each of the following hands:a) ♠ J 4 2 ♥ J 10 9 8 7 6 ♦ A 7 2 ♣ 2b) ♠ 3 2 ♥ 3 2 ♦ Q J 10 4 ♣ J 7 5 4 3
7) You are West, holding
♠ A K Q J 10 8 7 ♥ 5 3 2 ♦ — ♣ J 4 2
What’s your call now?
8) You are West, holding
♠ A K 8 ♥ J 10 9 8 5 3 ♦ 8 6 ♣ K 2
What is your call now?
Solutions on page 210
Solutions on page 210
Solution on page 210
Solution on page 210
208 ♣ EDDIE KANTAR TEACHES ADVANCED BRIDGE DEFENSE ♣ CHAPTER SEVEN
West
?
North
1NT1
East
pass
South
2♦2
West
pass
North
3NT
East
dbl
South
2NTall pass
West
4♠
pass?
North
2♣
4NT6♥
East
passpasspass
South
2♦
5♣
pass
West
1♥
?
North
4♣
East
pass
South
1♦
6♣
9) You are West, holding
♠ 9 8 ♥ Q J 10 9 ♦ 8 6 5 4 ♣ J 4 2
What do you lead?
10) This is a hand that I once defended in an important tourna-ment. Can you find the winning lead? I was West, holding:
♠ J 9 8 7 6 4 2 ♥ 10 3 ♦ J 6 5 ♣ 2
1) Showing an ace
What would you lead?
Solution on page 210
Solution on page 210
CHAPTER SEVEN ♣ DOUBLING FOR THE LEAD ♣ 209
West
passpasspasspass
North
2♦
4♠
5♦
pass
East
passpasspassdbl
South
1♠
4♦
4NT6♠
1pass
West
passpass
North
4NT6♣
East
5♦
dbl
South
3♣
5♥1
all pass
Test Yourself — Solutions1) ♠6 If neither you nor your partner have bid, lead dummy’s
first-bid suit.2) ♠6 Partner’s double indicates a “trap pass” with spade
length and strength. Do as you are told and lead aspade.
3) ♠6 This double says partner has a solid suit, and your bestshot at hitting it looks like spades. After all, they didn’tbother with Stayman.
4) ♣J Partner had two shots at doubling the heart and the dia-mond responses to Blackwood, and didn’t. Might aswell try a club.
Problem 5a) pass Don’t bid or double on a suit this weak.b) dbl You want a diamond lead, especially against notrump.c) 4♦ Yes, you could double, but holding such a long suit it’s
more effective to preempt.Problem 6a) ♣2 Again, partner supposedly has a solid or near-solid suit,
and this looks like the best candidate.b) ??? Do you have a coin handy to toss? Partner has herds of
either spades or hearts, and you have no way of tellingwhich. You can’t even lead your stronger doubleton!
7) dbl When you, the preemptive bidder, double a final con-tract, it is typically because of a side-suit void. Partner isforbidden from leading your suit or a trump. With luck,partner will have a bushelful of diamonds and will putone on the track.
8) dbl If you pass you will get a heart lead — not good. If youdouble, you forbid a heart lead (and a trump). Unlikethe previous example you have not preempted, so yourdouble does not necessarily show a void suit. Your dou-ble might include the ♠AK or it might indicate a strongdiamond holding. Partner has to work that out. Atleast you have a better chance to set this contract if part-ner doesn’t lead a heart.
9) any ♦ The bidding suggests that partner has a diamond voidwith an outside ace.
10) Well, did you lead a spade for partner to ruff? I did, butthis was the whole hand:
210 ♣ EDDIE KANTAR TEACHES ADVANCED BRIDGE DEFENSE ♣ CHAPTER SEVEN
To questions
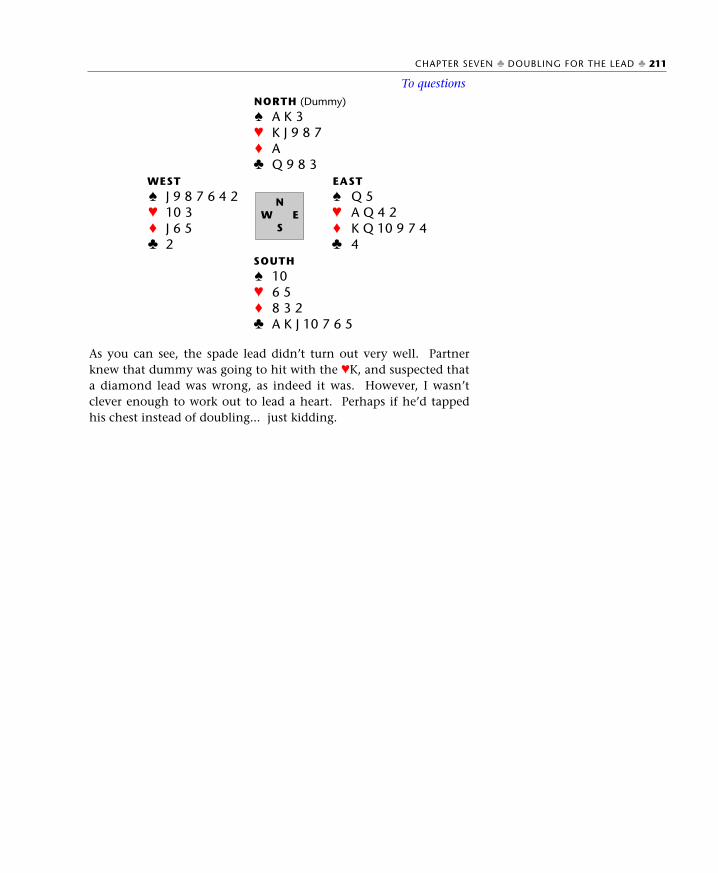
As you can see, the spade lead didn’t turn out very well. Partnerknew that dummy was going to hit with the ♥K, and suspected thata diamond lead was wrong, as indeed it was. However, I wasn’tclever enough to work out to lead a heart. Perhaps if he’d tappedhis chest instead of doubling... just kidding.
CHAPTER SEVEN ♣ DOUBLING FOR THE LEAD ♣ 211
NORTH (Dummy)
♠ A K 3♥ K J 9 8 7♦ A♣ Q 9 8 3
WEST EAST
♠ J 9 8 7 6 4 2 ♠ Q 5♥ 10 3 ♥ A Q 4 2♦ J 6 5 ♦ K Q 10 9 7 4♣ 2 ♣ 4
SOUTH
♠ 10♥ 6 5♦ 8 3 2♣ A K J 10 7 6 5
NW E
S
To questions
212 ♣ EDDIE KANTAR TEACHES ADVANCED BRIDGE DEFENSE ♣ CHAPTER SEVEN
Key ideas from Chapter 7
• The most common lead-directing doubles are doubles of3NT contracts, slam contracts, and artificial bids such asStayman, transfers, splinters, high-level cuebids, the fourthsuit, or Blackwood responses.
• If either you or partner has bid a suit and the opponentsarrive voluntarily in a suit slam, a double expressly forbidspartner from leading any suit your side has bid or a trump.
• If neither defender has bid and the opponents voluntarilybid a suit slam, a double forbids the lead of any unbid suitor a trump. It usually calls for dummy’s first-bid suit.
• When partner preempts and later doubles a slam contract,assume he has a void and try to find it on opening lead!
• If you can defeat a slam contract only if partner leads thesuit you have bid, don’t double! The double forbids part-ner to lead your suit.
• If no suits have been bid, a double of 3NT shows a solidsuit and asks partner to lead it. Amen.
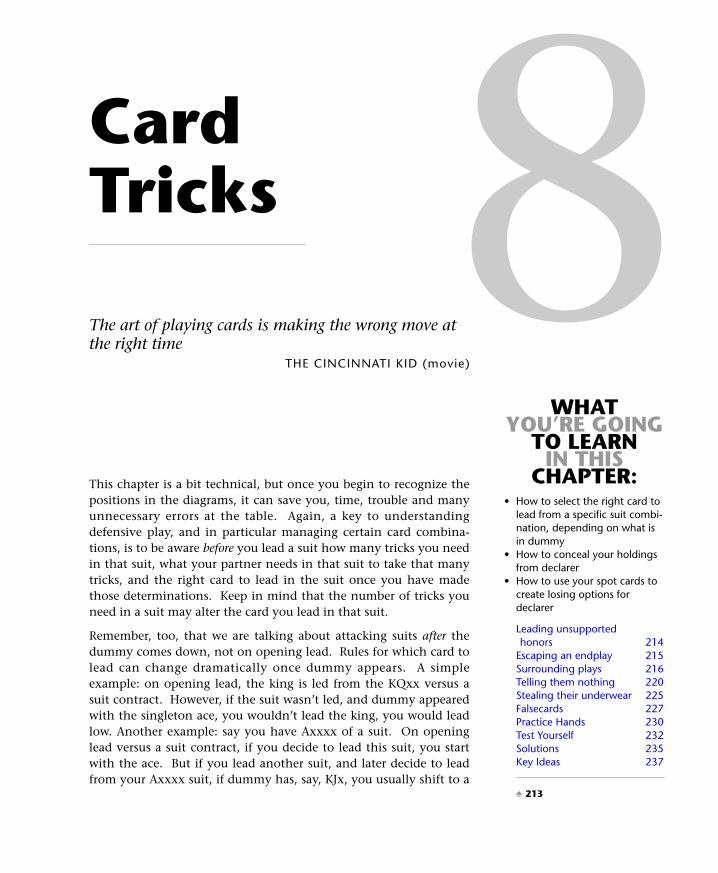
WHATYOU’RE GOING
TO LEARN IN THIS
CHAPTER:• How to select the right card to
lead from a specific suit combi-nation, depending on what isin dummy
• How to conceal your holdingsfrom declarer
• How to use your spot cards tocreate losing options fordeclarer
Leading unsupportedhonors 214
Escaping an endplay 215Surrounding plays 216Telling them nothing 220Stealing their underwear 225Falsecards 227Practice Hands 230Test Yourself 232Solutions 235Key Ideas 237
This chapter is a bit technical, but once you begin to recognize thepositions in the diagrams, it can save you, time, trouble and manyunnecessary errors at the table. Again, a key to understandingdefensive play, and in particular managing certain card combina-tions, is to be aware before you lead a suit how many tricks you needin that suit, what your partner needs in that suit to take that manytricks, and the right card to lead in the suit once you have madethose determinations. Keep in mind that the number of tricks youneed in a suit may alter the card you lead in that suit.
Remember, too, that we are talking about attacking suits after thedummy comes down, not on opening lead. Rules for which card tolead can change dramatically once dummy appears. A simpleexample: on opening lead, the king is led from the KQxx versus asuit contract. However, if the suit wasn’t led, and dummy appearedwith the singleton ace, you wouldn’t lead the king, you would leadlow. Another example: say you have Axxxx of a suit. On openinglead versus a suit contract, if you decide to lead this suit, you startwith the ace. But if you lead another suit, and later decide to leadfrom your Axxxx suit, if dummy has, say, KJx, you usually shift to a
8CardTricks
The art of playing cards is making the wrong move atthe right time
THE CINCINNATI KID (movie)
♠ 213
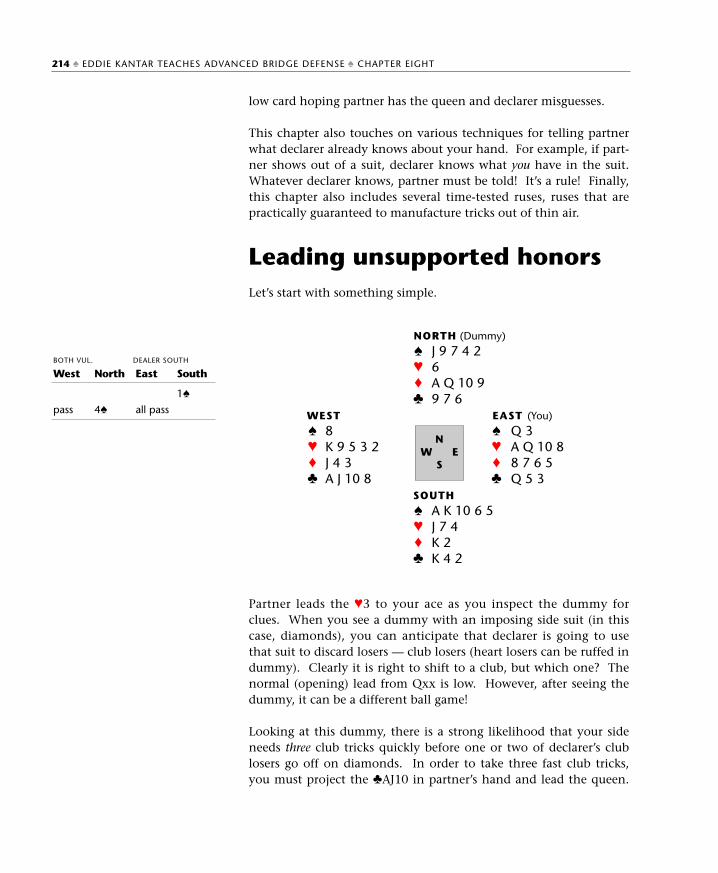
low card hoping partner has the queen and declarer misguesses.
This chapter also touches on various techniques for telling partnerwhat declarer already knows about your hand. For example, if part-ner shows out of a suit, declarer knows what you have in the suit.Whatever declarer knows, partner must be told! It’s a rule! Finally,this chapter also includes several time-tested ruses, ruses that arepractically guaranteed to manufacture tricks out of thin air.
Leading unsupported honorsLet’s start with something simple.
Partner leads the ♥3 to your ace as you inspect the dummy forclues. When you see a dummy with an imposing side suit (in thiscase, diamonds), you can anticipate that declarer is going to usethat suit to discard losers — club losers (heart losers can be ruffed indummy). Clearly it is right to shift to a club, but which one? Thenormal (opening) lead from Qxx is low. However, after seeing thedummy, it can be a different ball game!
Looking at this dummy, there is a strong likelihood that your sideneeds three club tricks quickly before one or two of declarer’s clublosers go off on diamonds. In order to take three fast club tricks,you must project the ♣AJ10 in partner’s hand and lead the queen.
214 ♠ EDDIE KANTAR TEACHES ADVANCED BRIDGE DEFENSE ♠ CHAPTER EIGHT
NORTH (Dummy)
♠ J 9 7 4 2♥ 6♦ A Q 10 9♣ 9 7 6
WEST EAST (You)
♠ 8 ♠ Q 3♥ K 9 5 3 2 ♥ A Q 10 8♦ J 4 3 ♦ 8 7 6 5♣ A J 10 8 ♣ Q 5 3
SOUTH
♠ A K 10 6 5♥ J 7 4♦ K 2♣ K 4 2
NW E
S
BOTH VUL. DEALER SOUTH
West
pass
North
4♠
East
all pass
South
1♠
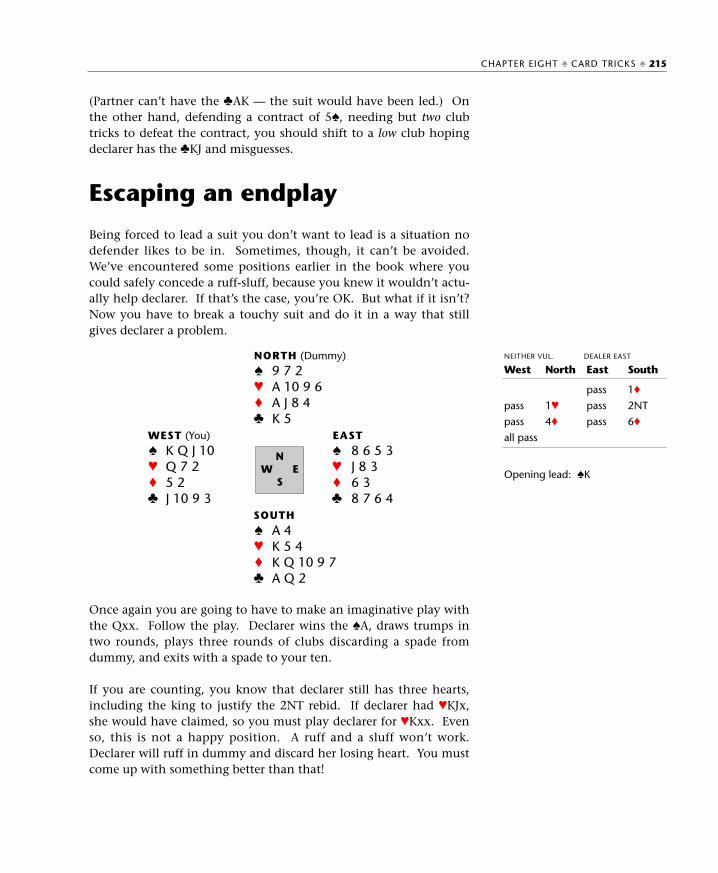
CHAPTER EIGHT ♠ CARD TRICKS ♠ 215
Opening lead: ♠K
(Partner can’t have the ♣AK — the suit would have been led.) Onthe other hand, defending a contract of 5♠, needing but two clubtricks to defeat the contract, you should shift to a low club hopingdeclarer has the ♣KJ and misguesses.
Escaping an endplay
Being forced to lead a suit you don’t want to lead is a situation nodefender likes to be in. Sometimes, though, it can’t be avoided.We’ve encountered some positions earlier in the book where youcould safely concede a ruff-sluff, because you knew it wouldn’t actu-ally help declarer. If that’s the case, you’re OK. But what if it isn’t?Now you have to break a touchy suit and do it in a way that stillgives declarer a problem.
Once again you are going to have to make an imaginative play withthe Qxx. Follow the play. Declarer wins the ♠A, draws trumps intwo rounds, plays three rounds of clubs discarding a spade fromdummy, and exits with a spade to your ten.
If you are counting, you know that declarer still has three hearts,including the king to justify the 2NT rebid. If declarer had ♥KJx,she would have claimed, so you must play declarer for ♥Kxx. Evenso, this is not a happy position. A ruff and a sluff won’t work.Declarer will ruff in dummy and discard her losing heart. You mustcome up with something better than that!
NORTH (Dummy)
♠ 9 7 2♥ A 10 9 6♦ A J 8 4♣ K 5
WEST (You) EAST
♠ K Q J 10 ♠ 8 6 5 3♥ Q 7 2 ♥ J 8 3♦ 5 2 ♦ 6 3♣ J 10 9 3 ♣ 8 7 6 4
SOUTH
♠ A 4♥ K 5 4♦ K Q 10 9 7♣ A Q 2
NW E
S
NEITHER VUL. DEALER EAST
West
pass
pass
all pass
North
1♥
4♦
East
pass
pass
pass
South
1♦
2NT
6♦
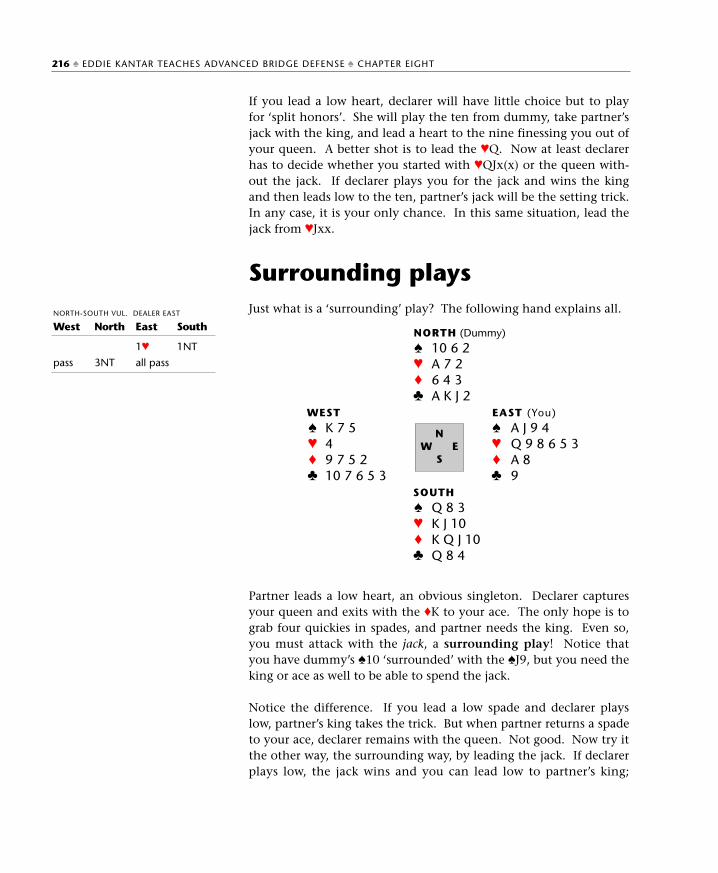
If you lead a low heart, declarer will have little choice but to playfor ‘split honors’. She will play the ten from dummy, take partner’sjack with the king, and lead a heart to the nine finessing you out ofyour queen. A better shot is to lead the ♥Q. Now at least declarerhas to decide whether you started with ♥QJx(x) or the queen with-out the jack. If declarer plays you for the jack and wins the kingand then leads low to the ten, partner’s jack will be the setting trick.In any case, it is your only chance. In this same situation, lead thejack from ♥Jxx.
Surrounding playsJust what is a ‘surrounding’ play? The following hand explains all.
Partner leads a low heart, an obvious singleton. Declarer capturesyour queen and exits with the ♦K to your ace. The only hope is tograb four quickies in spades, and partner needs the king. Even so,you must attack with the jack, a surrounding play! Notice thatyou have dummy’s ♠10 ‘surrounded’ with the ♠J9, but you need theking or ace as well to be able to spend the jack.
Notice the difference. If you lead a low spade and declarer playslow, partner’s king takes the trick. But when partner returns a spadeto your ace, declarer remains with the queen. Not good. Now try itthe other way, the surrounding way, by leading the jack. If declarerplays low, the jack wins and you can lead low to partner’s king;
216 ♠ EDDIE KANTAR TEACHES ADVANCED BRIDGE DEFENSE ♠ CHAPTER EIGHT
NORTH (Dummy)
♠ 10 6 2♥ A 7 2♦ 6 4 3♣ A K J 2
WEST EAST (You)
♠ K 7 5 ♠ A J 9 4♥ 4 ♥ Q 9 8 6 5 3♦ 9 7 5 2 ♦ A 8♣ 10 7 6 5 3 ♣ 9
SOUTH
♠ Q 8 3♥ K J 10♦ K Q J 10♣ Q 8 4
NW E
S
NORTH-SOUTH VUL. DEALER EAST
West
pass
North
3NT
East
1♥
all pass
South
1NT
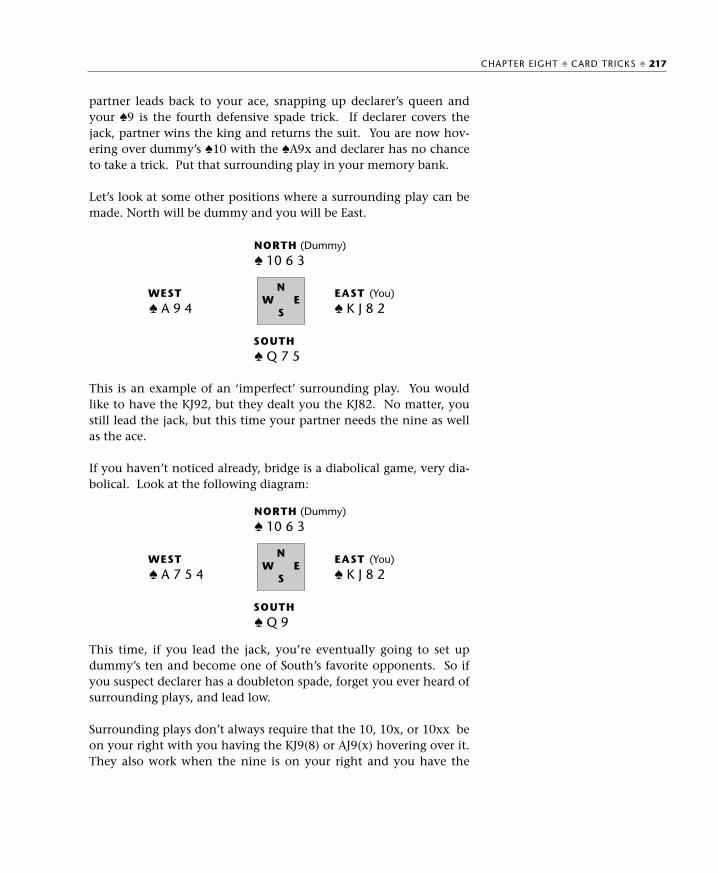
partner leads back to your ace, snapping up declarer’s queen andyour ♠9 is the fourth defensive spade trick. If declarer covers thejack, partner wins the king and returns the suit. You are now hov-ering over dummy’s ♠10 with the ♠A9x and declarer has no chanceto take a trick. Put that surrounding play in your memory bank.
Let’s look at some other positions where a surrounding play can bemade. North will be dummy and you will be East.
This is an example of an ‘imperfect’ surrounding play. You wouldlike to have the KJ92, but they dealt you the KJ82. No matter, youstill lead the jack, but this time your partner needs the nine as wellas the ace.
If you haven’t noticed already, bridge is a diabolical game, very dia-bolical. Look at the following diagram:
This time, if you lead the jack, you’re eventually going to set updummy’s ten and become one of South’s favorite opponents. So ifyou suspect declarer has a doubleton spade, forget you ever heard ofsurrounding plays, and lead low.
Surrounding plays don’t always require that the 10, 10x, or 10xx beon your right with you having the KJ9(8) or AJ9(x) hovering over it.They also work when the nine is on your right and you have the
CHAPTER EIGHT ♠ CARD TRICKS ♠ 217
NORTH (Dummy)
♠ 10 6 3
WEST EAST (You)
♠ A 9 4 ♠ K J 8 2
SOUTH
♠ Q 7 5
NW E
S
NORTH (Dummy)
♠ 10 6 3
WEST EAST (You)
♠ A 7 5 4 ♠ K J 8 2
SOUTH
♠ Q 9
NW E
S
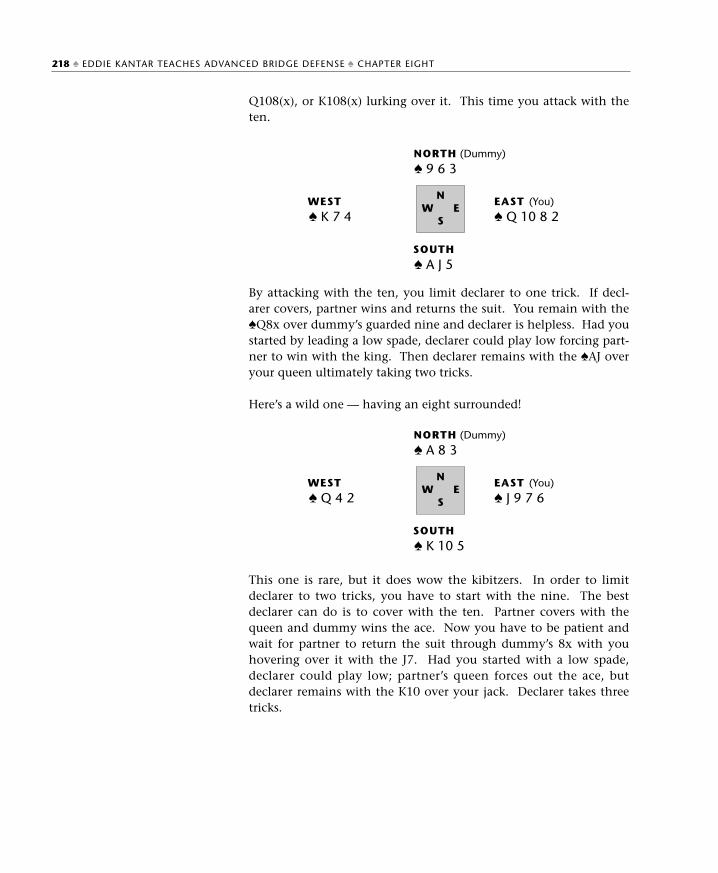
Q108(x), or K108(x) lurking over it. This time you attack with theten.
By attacking with the ten, you limit declarer to one trick. If decl-arer covers, partner wins and returns the suit. You remain with the♠Q8x over dummy’s guarded nine and declarer is helpless. Had youstarted by leading a low spade, declarer could play low forcing part-ner to win with the king. Then declarer remains with the ♠AJ overyour queen ultimately taking two tricks.
Here’s a wild one — having an eight surrounded!
This one is rare, but it does wow the kibitzers. In order to limitdeclarer to two tricks, you have to start with the nine. The bestdeclarer can do is to cover with the ten. Partner covers with thequeen and dummy wins the ace. Now you have to be patient andwait for partner to return the suit through dummy’s 8x with youhovering over it with the J7. Had you started with a low spade,declarer could play low; partner’s queen forces out the ace, butdeclarer remains with the K10 over your jack. Declarer takes threetricks.
218 ♠ EDDIE KANTAR TEACHES ADVANCED BRIDGE DEFENSE ♠ CHAPTER EIGHT
NORTH (Dummy)
♠ 9 6 3
WEST EAST (You)
♠ K 7 4 ♠ Q 10 8 2
SOUTH
♠ A J 5
NW E
S
NORTH (Dummy)
♠ A 8 3
WEST EAST (You)
♠ Q 4 2 ♠ J 9 7 6
SOUTH
♠ K 10 5
NW E
S
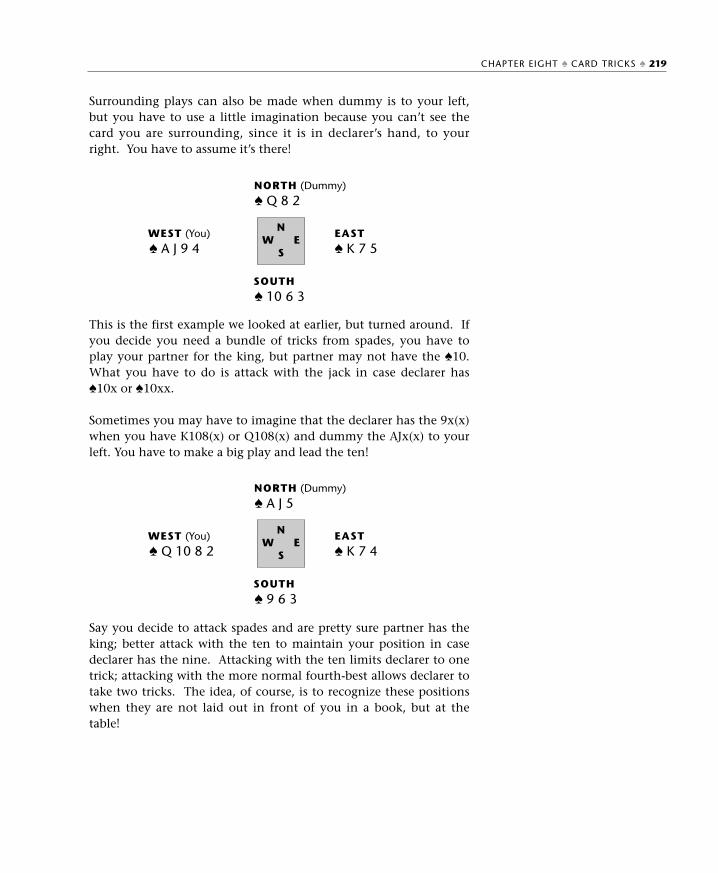
Surrounding plays can also be made when dummy is to your left,but you have to use a little imagination because you can’t see thecard you are surrounding, since it is in declarer’s hand, to yourright. You have to assume it’s there!
This is the first example we looked at earlier, but turned around. Ifyou decide you need a bundle of tricks from spades, you have toplay your partner for the king, but partner may not have the ♠10.What you have to do is attack with the jack in case declarer has♠10x or ♠10xx.
Sometimes you may have to imagine that the declarer has the 9x(x)when you have K108(x) or Q108(x) and dummy the AJx(x) to yourleft. You have to make a big play and lead the ten!
Say you decide to attack spades and are pretty sure partner has theking; better attack with the ten to maintain your position in casedeclarer has the nine. Attacking with the ten limits declarer to onetrick; attacking with the more normal fourth-best allows declarer totake two tricks. The idea, of course, is to recognize these positionswhen they are not laid out in front of you in a book, but at thetable!
CHAPTER EIGHT ♠ CARD TRICKS ♠ 219
NORTH (Dummy)
♠ Q 8 2
WEST (You) EAST
♠ A J 9 4 ♠ K 7 5
SOUTH
♠ 10 6 3
NW E
S
NORTH (Dummy)
♠ A J 5
WEST (You) EAST
♠ Q 10 8 2 ♠ K 7 4
SOUTH
♠ 9 6 3
NW E
S

Telling them nothingBesides trying to work out what the declarer has, defenders have tobe careful not to tell declarer too much about what they have!What follows are several techniques that every experienced defend-er must employ.
Discarding from a suit whereyour length is known
You lead the king, ace, and a spade against 3♦. Partner ruffs anddeclarer overruffs. So much for spades. Not so fast. Declarer knowsyou started with six spades. If you have to discard later in thehand, it is almost always right to discard a spade. Why give declar-er any extra information? Why make it easier to count your hand?
Playing cards you are known to hold
This time you lead the ♣2 in an unbid suit against a diamond con-tract. Partner wins the ace, continues with the queen, and thenplays a third club, declarer ruffing. I hope you don’t still have the♣K in your hand! The moment partner wins the ♣A, you aremarked with the ♣K. As long as it can’t cost your side a trick,unload it as soon as possible. If you keep it, you are being overlyfriendly giving declarer GDI (gratuitous distributional information).
220 ♠ EDDIE KANTAR TEACHES ADVANCED BRIDGE DEFENSE ♠ CHAPTER EIGHT
NORTH (Dummy)
♠ Q 7 2
WEST (You) EAST
♠ A K 10 9 5 3 ♠ 8 4
SOUTH
♠ J 6
NW E
S
NORTH (Dummy)
♣ 6 5 3
WEST (You) EAST
♣ K 10 8 2 ♣ A Q J 7
SOUTH
♣ 9 4
NW E
S
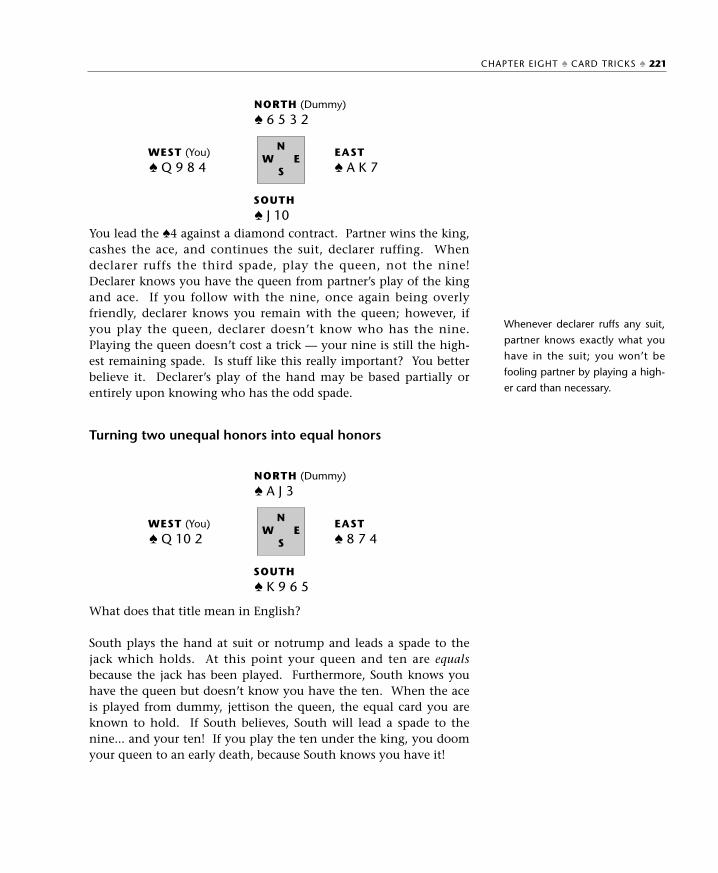
You lead the ♠4 against a diamond contract. Partner wins the king,cashes the ace, and continues the suit, declarer ruffing. Whendeclarer ruffs the third spade, play the queen, not the nine!Declarer knows you have the queen from partner’s play of the kingand ace. If you follow with the nine, once again being overlyfriendly, declarer knows you remain with the queen; however, ifyou play the queen, declarer doesn’t know who has the nine.Playing the queen doesn’t cost a trick — your nine is still the high-est remaining spade. Is stuff like this really important? You betterbelieve it. Declarer’s play of the hand may be based partially orentirely upon knowing who has the odd spade.
Turning two unequal honors into equal honors
What does that title mean in English?
South plays the hand at suit or notrump and leads a spade to thejack which holds. At this point your queen and ten are equalsbecause the jack has been played. Furthermore, South knows youhave the queen but doesn’t know you have the ten. When the aceis played from dummy, jettison the queen, the equal card you areknown to hold. If South believes, South will lead a spade to thenine... and your ten! If you play the ten under the king, you doomyour queen to an early death, because South knows you have it!
Whenever declarer ruffs any suit,
partner knows exactly what you
have in the suit; you won’t be
fooling partner by playing a high-
er card than necessary.
CHAPTER EIGHT ♠ CARD TRICKS ♠ 221
NORTH (Dummy)
♠ 6 5 3 2
WEST (You) EAST
♠ Q 9 8 4 ♠ A K 7
SOUTH
♠ J 10
NW E
S
NORTH (Dummy)
♠ A J 3
WEST (You) EAST
♠ Q 10 2 ♠ 8 7 4
SOUTH
♠ K 9 6 5
NW E
S
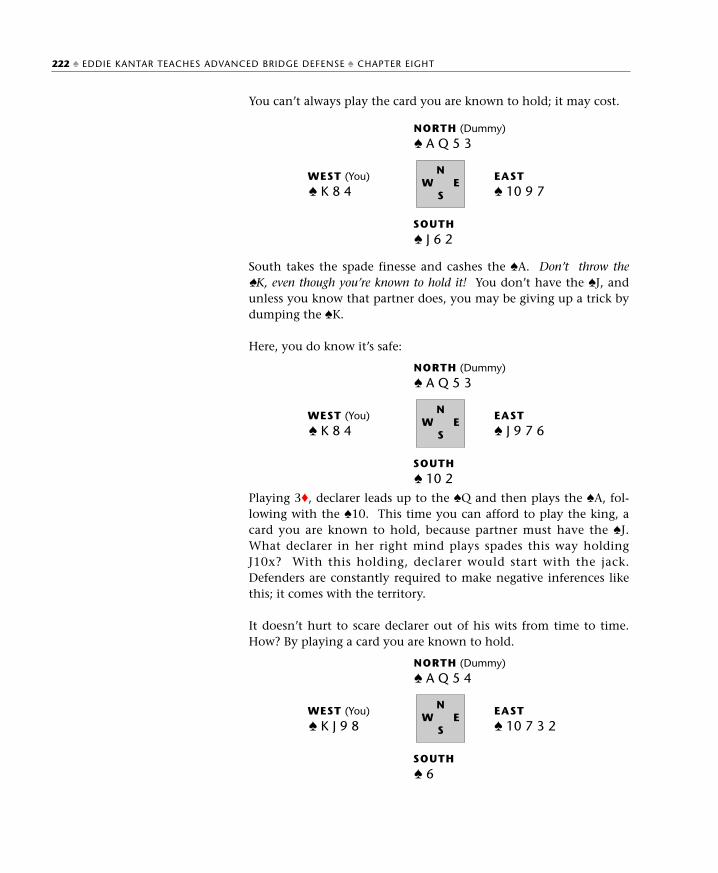
You can’t always play the card you are known to hold; it may cost.
South takes the spade finesse and cashes the ♠A. Don’t throw the♠K, even though you’re known to hold it! You don’t have the ♠J, andunless you know that partner does, you may be giving up a trick bydumping the ♠K.
Here, you do know it’s safe:
Playing 3♦, declarer leads up to the ♠Q and then plays the ♠A, fol-lowing with the ♠10. This time you can afford to play the king, acard you are known to hold, because partner must have the ♠J.What declarer in her right mind plays spades this way holdingJ10x? With this holding, declarer would start with the jack.Defenders are constantly required to make negative inferences likethis; it comes with the territory.
It doesn’t hurt to scare declarer out of his wits from time to time.How? By playing a card you are known to hold.
222 ♠ EDDIE KANTAR TEACHES ADVANCED BRIDGE DEFENSE ♠ CHAPTER EIGHT
NORTH (Dummy)
♠ A Q 5 3
WEST (You) EAST
♠ K 8 4 ♠ 10 9 7
SOUTH
♠ J 6 2
NW E
S
NORTH (Dummy)
♠ A Q 5 3
WEST (You) EAST
♠ K 8 4 ♠ J 9 7 6
SOUTH
♠ 10 2
NW E
S
NORTH (Dummy)
♠ A Q 5 4
WEST (You) EAST
♠ K J 9 8 ♠ 10 7 3 2
SOUTH
♠ 6
NW E
S
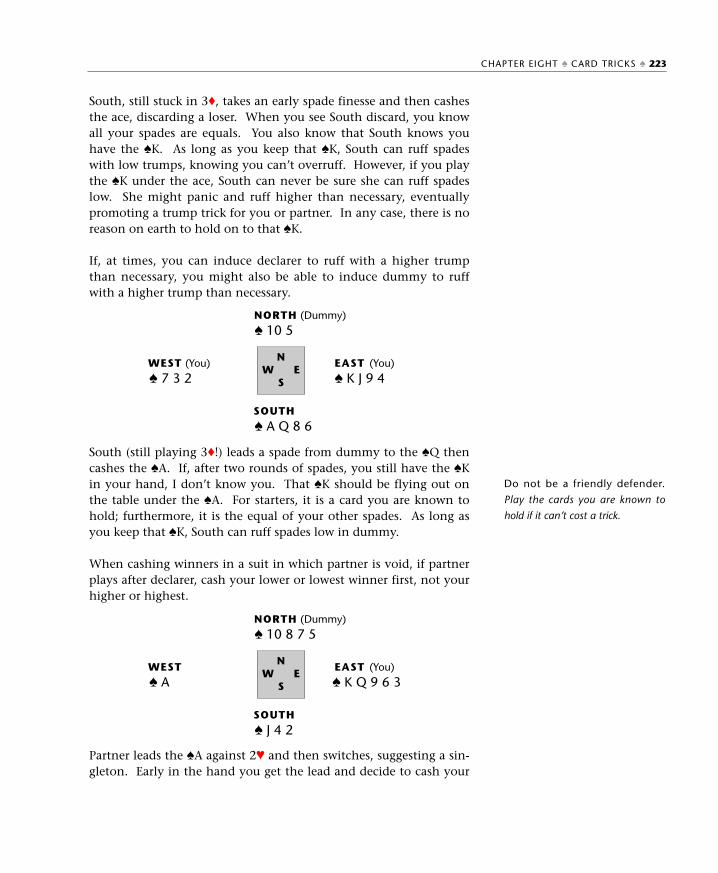
South, still stuck in 3♦, takes an early spade finesse and then cashesthe ace, discarding a loser. When you see South discard, you knowall your spades are equals. You also know that South knows youhave the ♠K. As long as you keep that ♠K, South can ruff spadeswith low trumps, knowing you can’t overruff. However, if you playthe ♠K under the ace, South can never be sure she can ruff spadeslow. She might panic and ruff higher than necessary, eventuallypromoting a trump trick for you or partner. In any case, there is noreason on earth to hold on to that ♠K.
If, at times, you can induce declarer to ruff with a higher trumpthan necessary, you might also be able to induce dummy to ruffwith a higher trump than necessary.
South (still playing 3♦!) leads a spade from dummy to the ♠Q thencashes the ♠A. If, after two rounds of spades, you still have the ♠Kin your hand, I don’t know you. That ♠K should be flying out onthe table under the ♠A. For starters, it is a card you are known tohold; furthermore, it is the equal of your other spades. As long asyou keep that ♠K, South can ruff spades low in dummy.
When cashing winners in a suit in which partner is void, if partnerplays after declarer, cash your lower or lowest winner first, not yourhigher or highest.
Partner leads the ♠A against 2♥ and then switches, suggesting a sin-gleton. Early in the hand you get the lead and decide to cash your
Do not be a friendly defender.
Play the cards you are known to
hold if it can’t cost a trick.
CHAPTER EIGHT ♠ CARD TRICKS ♠ 223
NORTH (Dummy)
♠ 10 5
WEST (You) EAST (You)
♠ 7 3 2 ♠ K J 9 4
SOUTH
♠ A Q 8 6
NW E
S
NORTH (Dummy)
♠ 10 8 7 5
WEST EAST (You)
♠ A ♠ K Q 9 6 3
SOUTH
♠ J 4 2
NW E
S
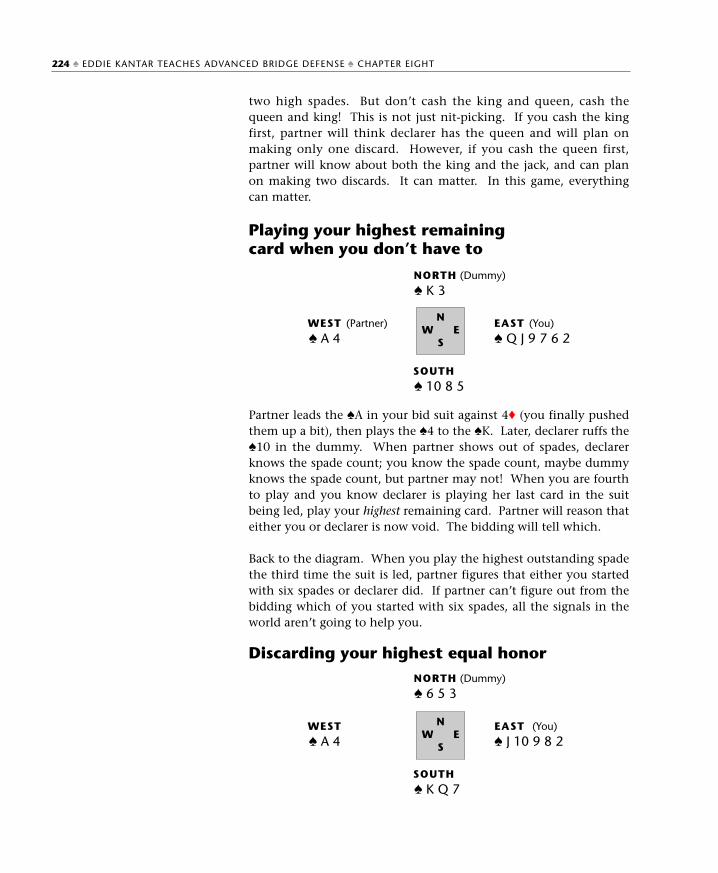
two high spades. But don’t cash the king and queen, cash thequeen and king! This is not just nit-picking. If you cash the kingfirst, partner will think declarer has the queen and will plan onmaking only one discard. However, if you cash the queen first,partner will know about both the king and the jack, and can planon making two discards. It can matter. In this game, everythingcan matter.
Playing your highest remaining card when you don’t have to
Partner leads the ♠A in your bid suit against 4♦ (you finally pushedthem up a bit), then plays the ♠4 to the ♠K. Later, declarer ruffs the♠10 in the dummy. When partner shows out of spades, declarerknows the spade count; you know the spade count, maybe dummyknows the spade count, but partner may not! When you are fourthto play and you know declarer is playing her last card in the suitbeing led, play your highest remaining card. Partner will reason thateither you or declarer is now void. The bidding will tell which.
Back to the diagram. When you play the highest outstanding spadethe third time the suit is led, partner figures that either you startedwith six spades or declarer did. If partner can’t figure out from thebidding which of you started with six spades, all the signals in theworld aren’t going to help you.
Discarding your highest equal honor
224 ♠ EDDIE KANTAR TEACHES ADVANCED BRIDGE DEFENSE ♠ CHAPTER EIGHT
NORTH (Dummy)
♠ K 3
WEST (Partner) EAST (You)
♠ A 4 ♠ Q J 9 7 6 2
SOUTH
♠ 10 8 5
NW E
S
NORTH (Dummy)
♠ 6 5 3
WEST EAST (You)
♠ A 4 ♠ J 10 9 8 2
SOUTH
♠ K Q 7
NW E
S
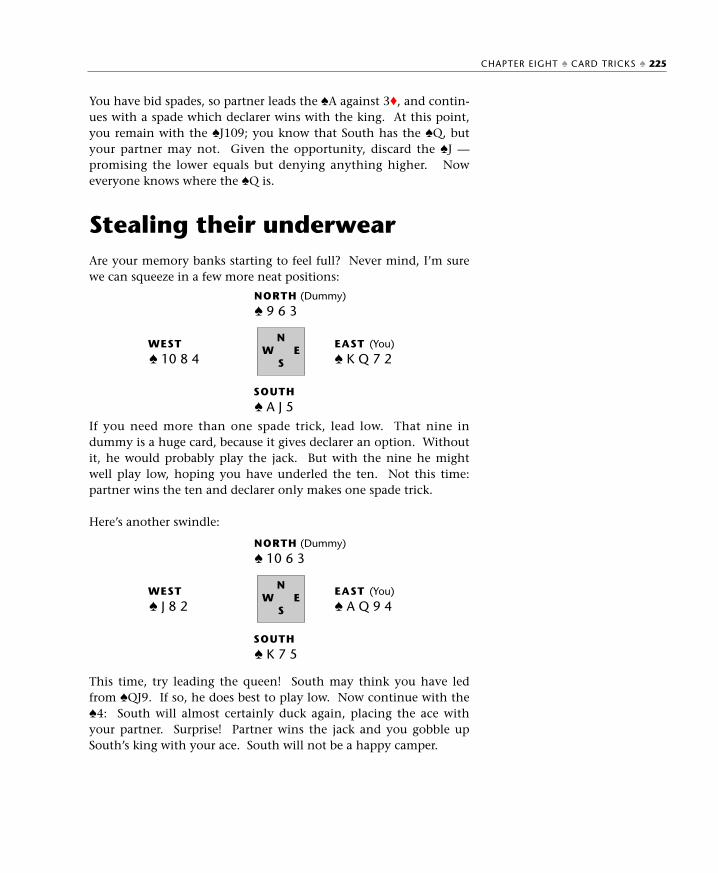
You have bid spades, so partner leads the ♠A against 3♦, and contin-ues with a spade which declarer wins with the king. At this point,you remain with the ♠J109; you know that South has the ♠Q, butyour partner may not. Given the opportunity, discard the ♠J —promising the lower equals but denying anything higher. Noweveryone knows where the ♠Q is.
Stealing their underwear Are your memory banks starting to feel full? Never mind, I’m surewe can squeeze in a few more neat positions:
If you need more than one spade trick, lead low. That nine indummy is a huge card, because it gives declarer an option. Withoutit, he would probably play the jack. But with the nine he mightwell play low, hoping you have underled the ten. Not this time:partner wins the ten and declarer only makes one spade trick.
Here’s another swindle:
This time, try leading the queen! South may think you have ledfrom ♠QJ9. If so, he does best to play low. Now continue with the♠4: South will almost certainly duck again, placing the ace withyour partner. Surprise! Partner wins the jack and you gobble upSouth’s king with your ace. South will not be a happy camper.
CHAPTER EIGHT ♠ CARD TRICKS ♠ 225
NORTH (Dummy)
♠ 9 6 3
WEST EAST (You)
♠ 10 8 4 ♠ K Q 7 2
SOUTH
♠ A J 5
NW E
S
NORTH (Dummy)
♠ 10 6 3
WEST EAST (You)
♠ J 8 2 ♠ A Q 9 4
SOUTH
♠ K 7 5
NW E
S
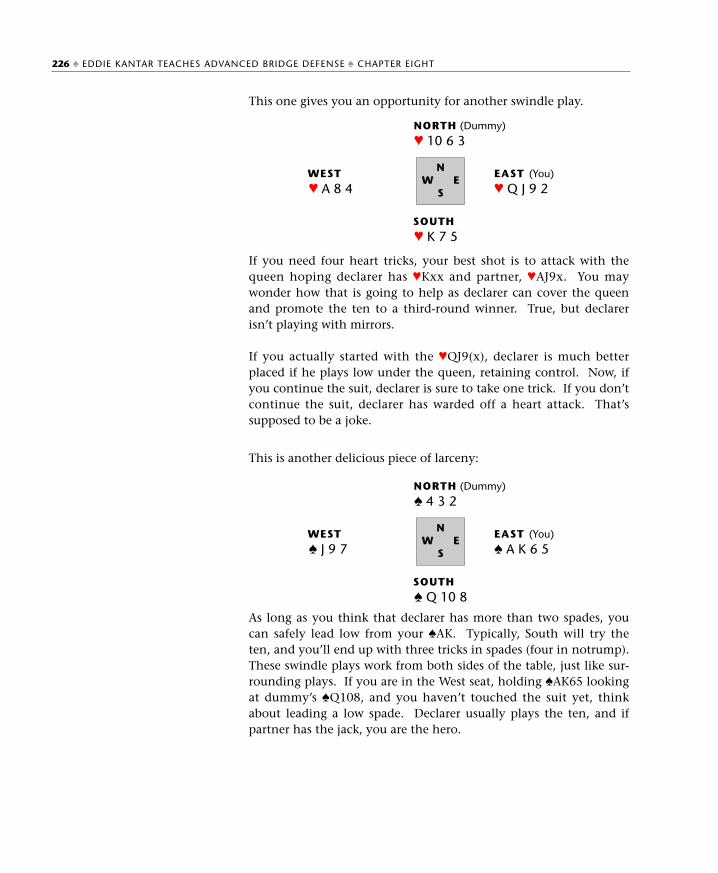
This one gives you an opportunity for another swindle play.
If you need four heart tricks, your best shot is to attack with thequeen hoping declarer has ♥Kxx and partner, ♥AJ9x. You maywonder how that is going to help as declarer can cover the queenand promote the ten to a third-round winner. True, but declarerisn’t playing with mirrors.
If you actually started with the ♥QJ9(x), declarer is much betterplaced if he plays low under the queen, retaining control. Now, ifyou continue the suit, declarer is sure to take one trick. If you don’tcontinue the suit, declarer has warded off a heart attack. That’ssupposed to be a joke.
This is another delicious piece of larceny:
As long as you think that declarer has more than two spades, youcan safely lead low from your ♠AK. Typically, South will try theten, and you’ll end up with three tricks in spades (four in notrump).These swindle plays work from both sides of the table, just like sur-rounding plays. If you are in the West seat, holding ♠AK65 lookingat dummy’s ♠Q108, and you haven’t touched the suit yet, thinkabout leading a low spade. Declarer usually plays the ten, and ifpartner has the jack, you are the hero.
226 ♠ EDDIE KANTAR TEACHES ADVANCED BRIDGE DEFENSE ♠ CHAPTER EIGHT
NORTH (Dummy)
♥ 10 6 3
WEST EAST (You)
♥ A 8 4 ♥ Q J 9 2
SOUTH
♥ K 7 5
NW E
S
NORTH (Dummy)
♠ 4 3 2
WEST EAST (You)
♠ J 9 7 ♠ A K 6 5
SOUTH
♠ Q 10 8
NW E
S
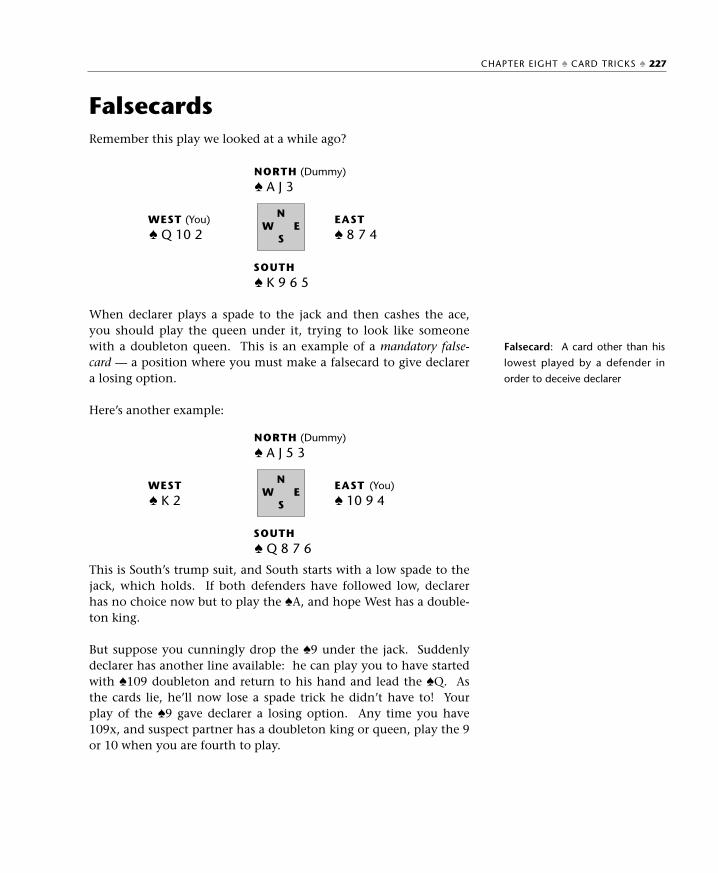
FalsecardsRemember this play we looked at a while ago?
When declarer plays a spade to the jack and then cashes the ace,you should play the queen under it, trying to look like someonewith a doubleton queen. This is an example of a mandatory false-card — a position where you must make a falsecard to give declarera losing option.
Here’s another example:
This is South’s trump suit, and South starts with a low spade to thejack, which holds. If both defenders have followed low, declarerhas no choice now but to play the ♠A, and hope West has a double-ton king.
But suppose you cunningly drop the ♠9 under the jack. Suddenlydeclarer has another line available: he can play you to have startedwith ♠109 doubleton and return to his hand and lead the ♠Q. Asthe cards lie, he’ll now lose a spade trick he didn’t have to! Yourplay of the ♠9 gave declarer a losing option. Any time you have109x, and suspect partner has a doubleton king or queen, play the 9or 10 when you are fourth to play.
Falsecard: A card other than his
lowest played by a defender in
order to deceive declarer
CHAPTER EIGHT ♠ CARD TRICKS ♠ 227
NORTH (Dummy)
♠ A J 3
WEST (You) EAST
♠ Q 10 2 ♠ 8 7 4
SOUTH
♠ K 9 6 5
NW E
S
NORTH (Dummy)
♠ A J 5 3
WEST EAST (You)
♠ K 2 ♠ 10 9 4
SOUTH
♠ Q 8 7 6
NW E
S
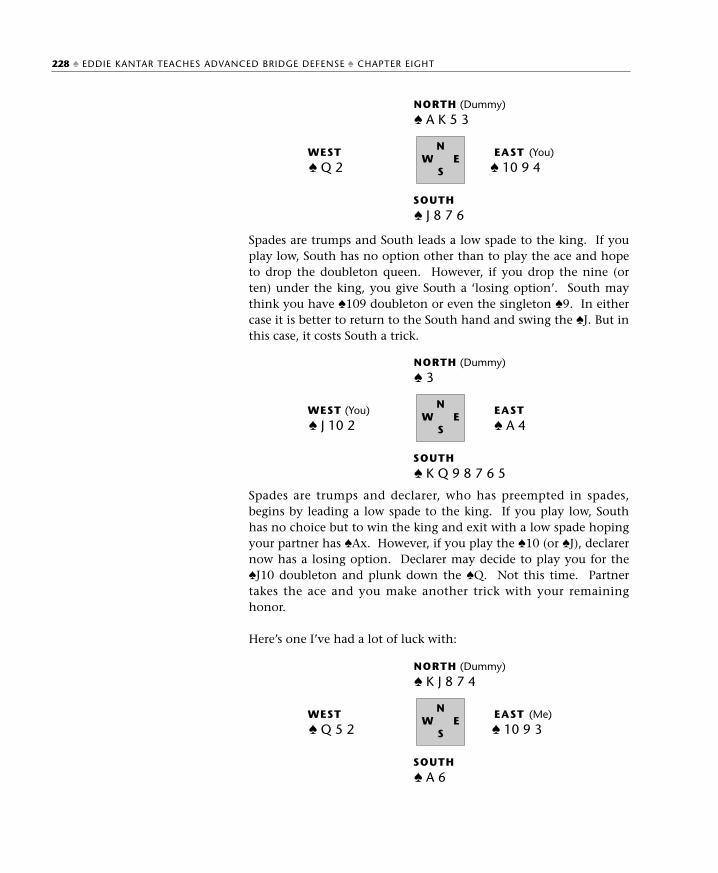
Spades are trumps and South leads a low spade to the king. If youplay low, South has no option other than to play the ace and hopeto drop the doubleton queen. However, if you drop the nine (orten) under the king, you give South a ‘losing option’. South maythink you have ♠109 doubleton or even the singleton ♠9. In eithercase it is better to return to the South hand and swing the ♠J. But inthis case, it costs South a trick.
Spades are trumps and declarer, who has preempted in spades,begins by leading a low spade to the king. If you play low, Southhas no choice but to win the king and exit with a low spade hopingyour partner has ♠Ax. However, if you play the ♠10 (or ♠J), declarernow has a losing option. Declarer may decide to play you for the♠J10 doubleton and plunk down the ♠Q. Not this time. Partnertakes the ace and you make another trick with your remaininghonor.
Here’s one I’ve had a lot of luck with:
228 ♠ EDDIE KANTAR TEACHES ADVANCED BRIDGE DEFENSE ♠ CHAPTER EIGHT
NORTH (Dummy)
♠ A K 5 3
WEST EAST (You)
♠ Q 2 ♠ 10 9 4
SOUTH
♠ J 8 7 6
NW E
S
NORTH (Dummy)
♠ 3
WEST (You) EAST
♠ J 10 2 ♠ A 4
SOUTH
♠ K Q 9 8 7 6 5
NW E
S
NORTH (Dummy)
♠ K J 8 7 4
WEST EAST (Me)
♠ Q 5 2 ♠ 10 9 3
SOUTH
♠ A 6
NW E
S
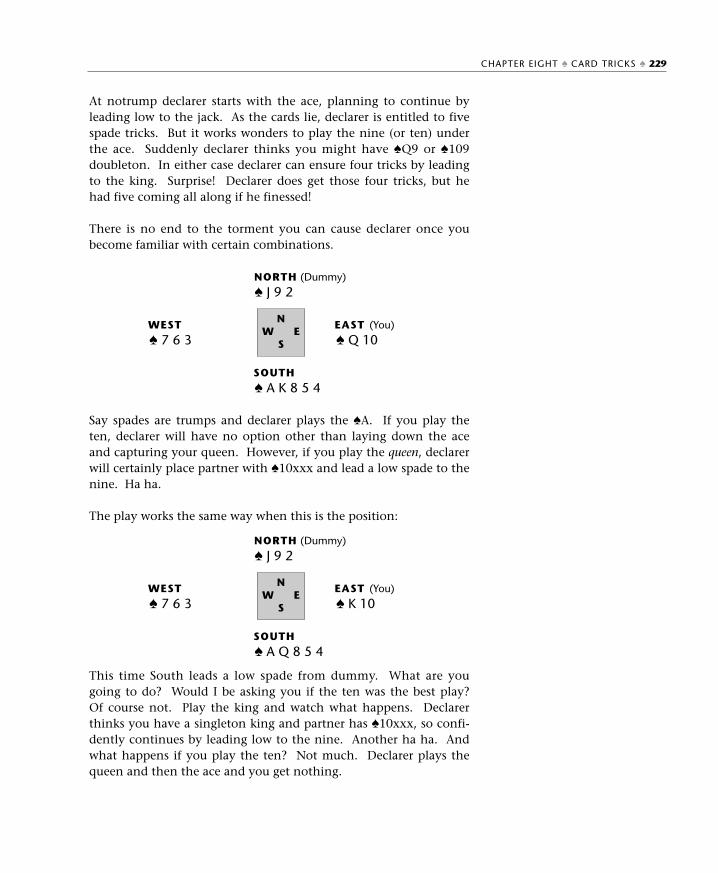
At notrump declarer starts with the ace, planning to continue byleading low to the jack. As the cards lie, declarer is entitled to fivespade tricks. But it works wonders to play the nine (or ten) underthe ace. Suddenly declarer thinks you might have ♠Q9 or ♠109doubleton. In either case declarer can ensure four tricks by leadingto the king. Surprise! Declarer does get those four tricks, but hehad five coming all along if he finessed!
There is no end to the torment you can cause declarer once youbecome familiar with certain combinations.
Say spades are trumps and declarer plays the ♠A. If you play theten, declarer will have no option other than laying down the aceand capturing your queen. However, if you play the queen, declarerwill certainly place partner with ♠10xxx and lead a low spade to thenine. Ha ha.
The play works the same way when this is the position:
This time South leads a low spade from dummy. What are yougoing to do? Would I be asking you if the ten was the best play?Of course not. Play the king and watch what happens. Declarerthinks you have a singleton king and partner has ♠10xxx, so confi-dently continues by leading low to the nine. Another ha ha. Andwhat happens if you play the ten? Not much. Declarer plays thequeen and then the ace and you get nothing.
CHAPTER EIGHT ♠ CARD TRICKS ♠ 229
NORTH (Dummy)
♠ J 9 2
WEST EAST (You)
♠ 7 6 3 ♠ Q 10
SOUTH
♠ A K 8 5 4
NW E
S
NORTH (Dummy)
♠ J 9 2
WEST EAST (You)
♠ 7 6 3 ♠ K 10
SOUTH
♠ A Q 8 5 4
NW E
S
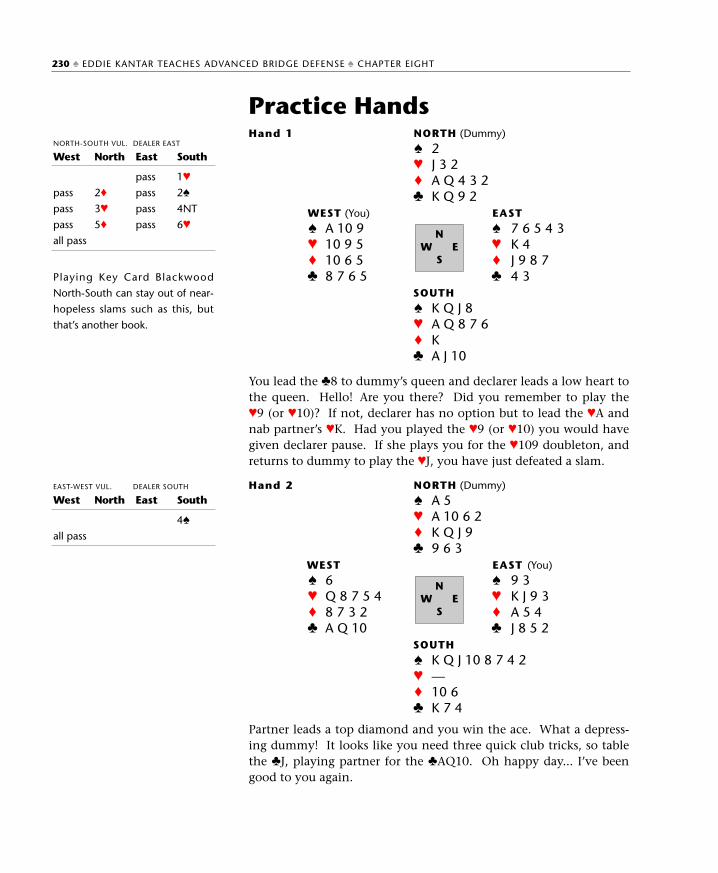
Practice Hands
You lead the ♣8 to dummy’s queen and declarer leads a low heart tothe queen. Hello! Are you there? Did you remember to play the♥9 (or ♥10)? If not, declarer has no option but to lead the ♥A andnab partner’s ♥K. Had you played the ♥9 (or ♥10) you would havegiven declarer pause. If she plays you for the ♥109 doubleton, andreturns to dummy to play the ♥J, you have just defeated a slam.
Partner leads a top diamond and you win the ace. What a depress-ing dummy! It looks like you need three quick club tricks, so tablethe ♣J, playing partner for the ♣AQ10. Oh happy day... I’ve beengood to you again.
Playing Key Card Blackwood
North-South can stay out of near-
hopeless slams such as this, but
that’s another book.
230 ♠ EDDIE KANTAR TEACHES ADVANCED BRIDGE DEFENSE ♠ CHAPTER EIGHT
Hand 1 NORTH (Dummy)
♠ 2♥ J 3 2♦ A Q 4 3 2♣ K Q 9 2
WEST (You) EAST
♠ A 10 9 ♠ 7 6 5 4 3♥ 10 9 5 ♥ K 4♦ 10 6 5 ♦ J 9 8 7♣ 8 7 6 5 ♣ 4 3
SOUTH
♠ K Q J 8♥ A Q 8 7 6♦ K♣ A J 10
NW E
S
NORTH-SOUTH VUL. DEALER EAST
West
pass
pass
pass
all pass
North
2♦
3♥
5♦
East
pass
pass
pass
pass
South
1♥
2♠
4NT
6♥
Hand 2 NORTH (Dummy)
♠ A 5♥ A 10 6 2♦ K Q J 9♣ 9 6 3
WEST EAST (You)
♠ 6 ♠ 9 3♥ Q 8 7 5 4 ♥ K J 9 3♦ 8 7 3 2 ♦ A 5 4♣ A Q 10 ♣ J 8 5 2
SOUTH
♠ K Q J 10 8 7 4 2♥ —♦ 10 6♣ K 7 4
NW E
S
EAST-WEST VUL. DEALER SOUTH
West
all pass
North East South
4♠
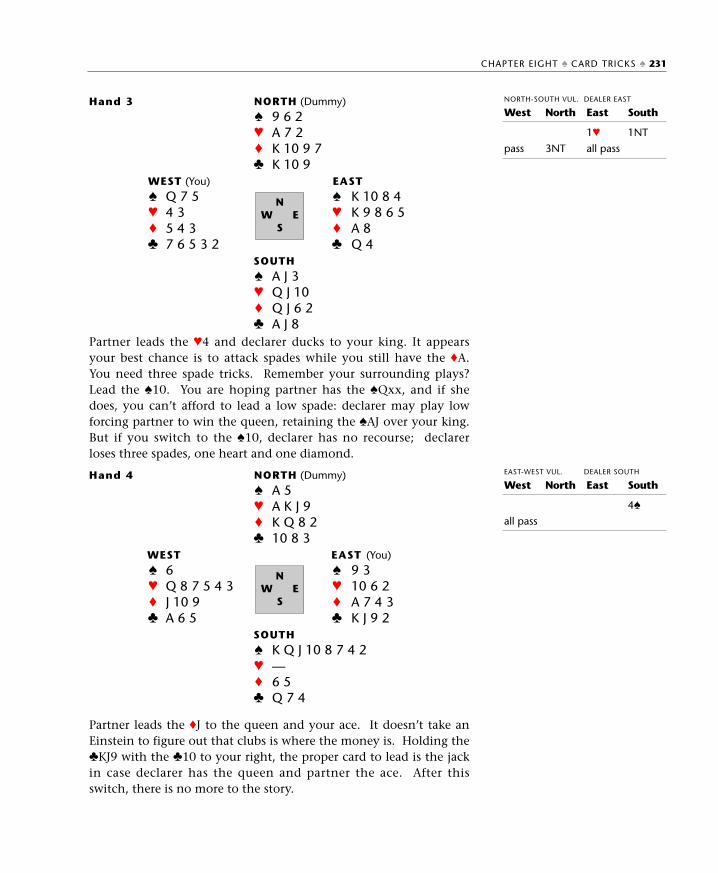
Partner leads the ♥4 and declarer ducks to your king. It appearsyour best chance is to attack spades while you still have the ♦A.You need three spade tricks. Remember your surrounding plays?Lead the ♠10. You are hoping partner has the ♠Qxx, and if shedoes, you can’t afford to lead a low spade: declarer may play lowforcing partner to win the queen, retaining the ♠AJ over your king.But if you switch to the ♠10, declarer has no recourse; declarerloses three spades, one heart and one diamond.
Partner leads the ♦J to the queen and your ace. It doesn’t take anEinstein to figure out that clubs is where the money is. Holding the♣KJ9 with the ♣10 to your right, the proper card to lead is the jackin case declarer has the queen and partner the ace. After thisswitch, there is no more to the story.
CHAPTER EIGHT ♠ CARD TRICKS ♠ 231
Hand 3 NORTH (Dummy)
♠ 9 6 2♥ A 7 2♦ K 10 9 7♣ K 10 9
WEST (You) EAST
♠ Q 7 5 ♠ K 10 8 4♥ 4 3 ♥ K 9 8 6 5♦ 5 4 3 ♦ A 8 ♣ 7 6 5 3 2 ♣ Q 4
SOUTH
♠ A J 3♥ Q J 10♦ Q J 6 2♣ A J 8
NW E
S
Hand 4 NORTH (Dummy)
♠ A 5♥ A K J 9♦ K Q 8 2♣ 10 8 3
WEST EAST (You)
♠ 6 ♠ 9 3♥ Q 8 7 5 4 3 ♥ 10 6 2♦ J 10 9 ♦ A 7 4 3♣ A 6 5 ♣ K J 9 2
SOUTH
♠ K Q J 10 8 7 4 2♥ —♦ 6 5♣ Q 7 4
NW E
S
NORTH-SOUTH VUL. DEALER EAST
West
pass
North
3NT
East
1♥
all pass
South
1NT
EAST-WEST VUL. DEALER SOUTH
West
all pass
North East South
4♠
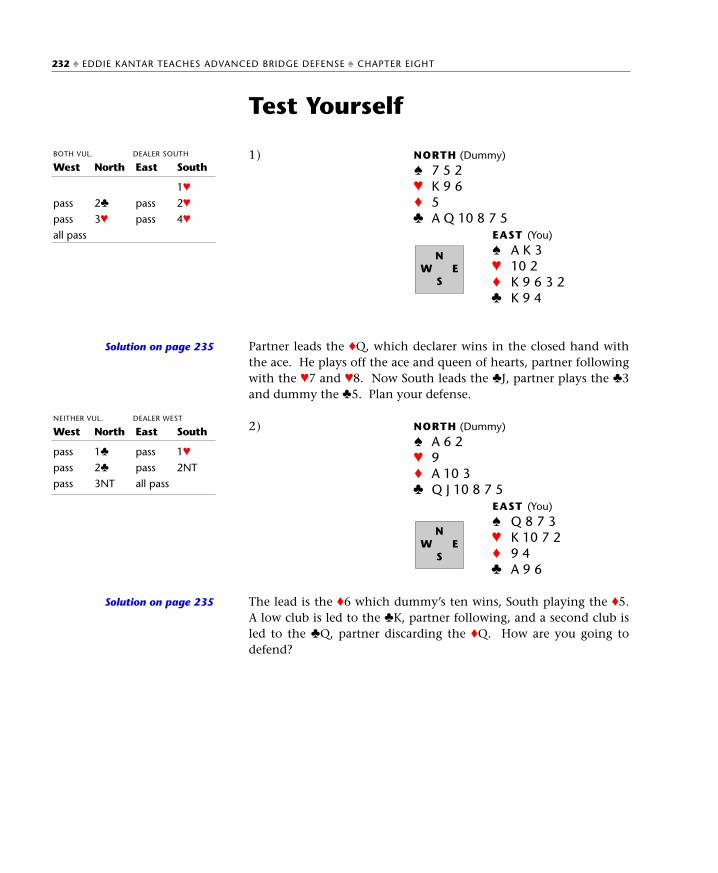
Test Yourself
Partner leads the ♦Q, which declarer wins in the closed hand withthe ace. He plays off the ace and queen of hearts, partner followingwith the ♥7 and ♥8. Now South leads the ♣J, partner plays the ♣3and dummy the ♣5. Plan your defense.
The lead is the ♦6 which dummy’s ten wins, South playing the ♦5.A low club is led to the ♣K, partner following, and a second club isled to the ♣Q, partner discarding the ♦Q. How are you going todefend?
Solution on page 235
Solution on page 235
232 ♠ EDDIE KANTAR TEACHES ADVANCED BRIDGE DEFENSE ♠ CHAPTER EIGHT
1) NORTH (Dummy)
♠ 7 5 2♥ K 9 6♦ 5♣ A Q 10 8 7 5
EAST (You)
♠ A K 3♥ 10 2♦ K 9 6 3 2♣ K 9 4
2) NORTH (Dummy)
♠ A 6 2♥ 9♦ A 10 3♣ Q J 10 8 7 5
EAST (You)
♠ Q 8 7 3♥ K 10 7 2♦ 9 4♣ A 9 6
BOTH VUL. DEALER SOUTH
West
pass
pass
all pass
North
2♣
3♥
East
pass
pass
South
1♥
2♥
4♥
NEITHER VUL. DEALER WEST
West
pass
pass
pass
North
1♣
2♣
3NT
East
pass
pass
all pass
South
1♥
2NT
NW E
S
NW E
S
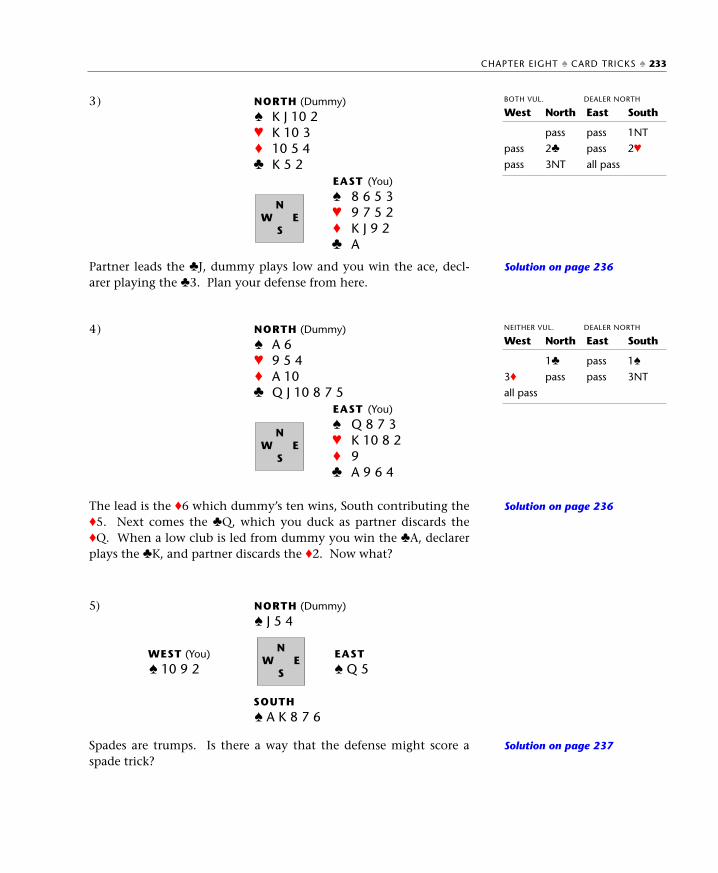
Partner leads the ♣J, dummy plays low and you win the ace, decl-arer playing the ♣3. Plan your defense from here.
The lead is the ♦6 which dummy’s ten wins, South contributing the♦5. Next comes the ♣Q, which you duck as partner discards the♦Q. When a low club is led from dummy you win the ♣A, declarerplays the ♣K, and partner discards the ♦2. Now what?
Spades are trumps. Is there a way that the defense might score aspade trick?
Solution on page 236
Solution on page 236
Solution on page 237
CHAPTER EIGHT ♠ CARD TRICKS ♠ 233
3) NORTH (Dummy)
♠ K J 10 2♥ K 10 3♦ 10 5 4♣ K 5 2
EAST (You)
♠ 8 6 5 3♥ 9 7 5 2♦ K J 9 2♣ A
NW E
S
BOTH VUL. DEALER NORTH
West
pass
pass
North
pass
2♣
3NT
East
pass
pass
all pass
South
1NT
2♥
4) NORTH (Dummy)
♠ A 6♥ 9 5 4♦ A 10♣ Q J 10 8 7 5
EAST (You)
♠ Q 8 7 3♥ K 10 8 2♦ 9♣ A 9 6 4
NW E
S
NEITHER VUL. DEALER NORTH
West
3♦
all pass
North
1♣
pass
East
pass
pass
South
1♠
3NT
5) NORTH (Dummy)
♠ J 5 4
WEST (You) EAST
♠ 10 9 2 ♠ Q 5
SOUTH
♠ A K 8 7 6
NW E
S
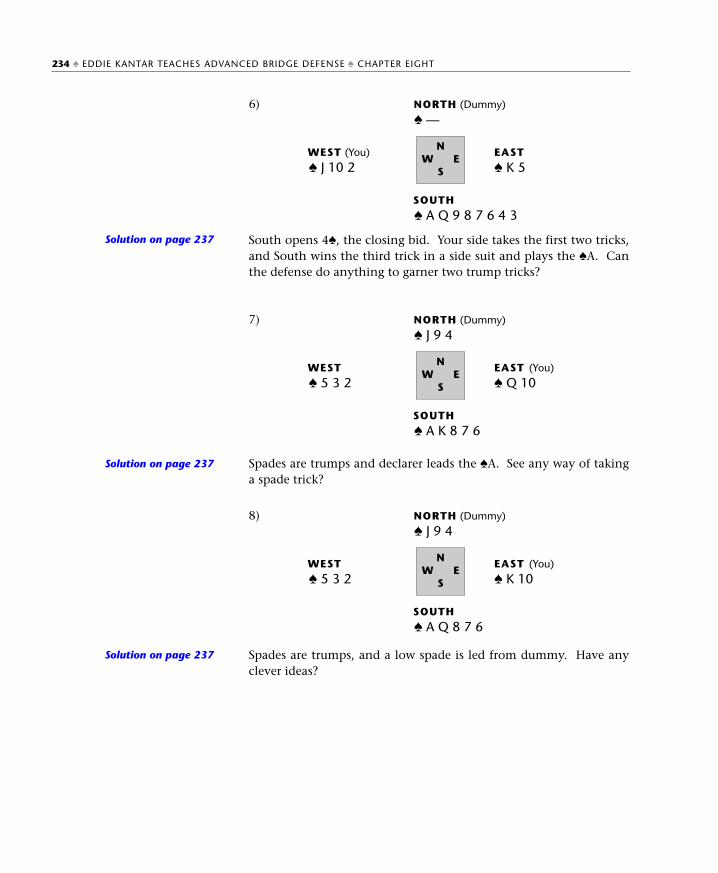
South opens 4♠, the closing bid. Your side takes the first two tricks,and South wins the third trick in a side suit and plays the ♠A. Canthe defense do anything to garner two trump tricks?
Spades are trumps and declarer leads the ♠A. See any way of takinga spade trick?
Spades are trumps, and a low spade is led from dummy. Have anyclever ideas?
Solution on page 237
Solution on page 237
Solution on page 237
234 ♠ EDDIE KANTAR TEACHES ADVANCED BRIDGE DEFENSE ♠ CHAPTER EIGHT
6) NORTH (Dummy)
♠ —
WEST (You) EAST
♠ J 10 2 ♠ K 5
SOUTH
♠ A Q 9 8 7 6 4 3
NW E
S
7) NORTH (Dummy)
♠ J 9 4
WEST EAST (You)
♠ 5 3 2 ♠ Q 10
SOUTH
♠ A K 8 7 6
NW E
S
8) NORTH (Dummy)
♠ J 9 4
WEST EAST (You)
♠ 5 3 2 ♠ K 10
SOUTH
♠ A Q 8 7 6
NW E
S
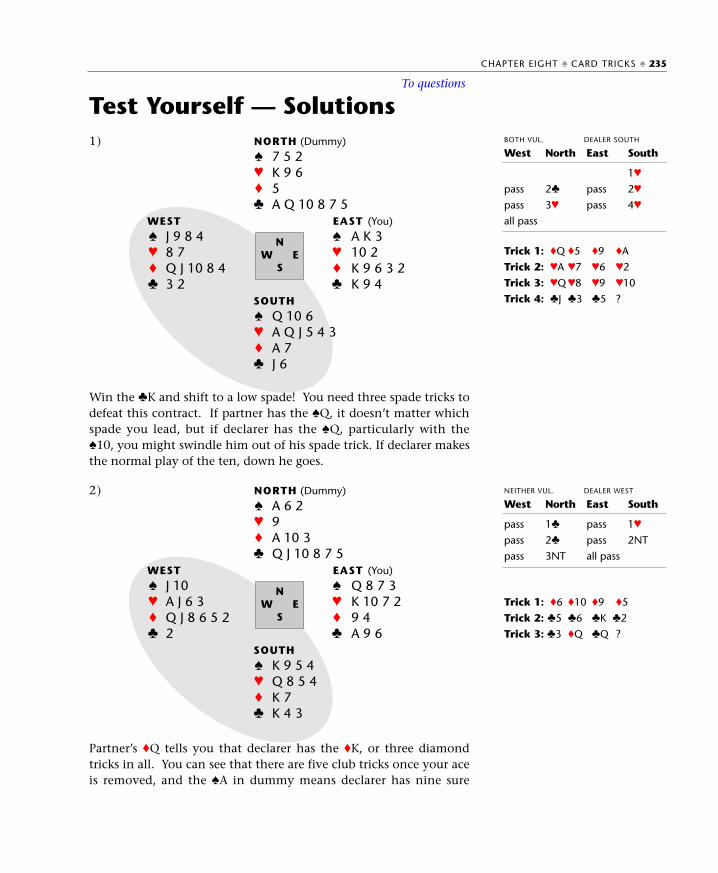
Test Yourself — Solutions
Win the ♣K and shift to a low spade! You need three spade tricks todefeat this contract. If partner has the ♠Q, it doesn’t matter whichspade you lead, but if declarer has the ♠Q, particularly with the♠10, you might swindle him out of his spade trick. If declarer makesthe normal play of the ten, down he goes.
Partner’s ♦Q tells you that declarer has the ♦K, or three diamondtricks in all. You can see that there are five club tricks once your aceis removed, and the ♠A in dummy means declarer has nine sure
Trick 1: ♦Q ♦5 ♦9 ♦A
Trick 2: ♥A ♥7 ♥6 ♥2
Trick 3: ♥Q ♥8 ♥9 ♥10
Trick 4: ♣J ♣3 ♣5 ?
Trick 1: ♦6 ♦10 ♦9 ♦5
Trick 2: ♣5 ♣6 ♣K ♣2
Trick 3: ♣3 ♦Q ♣Q ?
CHAPTER EIGHT ♠ CARD TRICKS ♠ 235
1) NORTH (Dummy)
♠ 7 5 2♥ K 9 6♦ 5♣ A Q 10 8 7 5
WEST EAST (You)
♠ J 9 8 4 ♠ A K 3♥ 8 7 ♥ 10 2♦ Q J 10 8 4 ♦ K 9 6 3 2♣ 3 2 ♣ K 9 4
SOUTH
♠ Q 10 6♥ A Q J 5 4 3♦ A 7♣ J 6
NW E
S
BOTH VUL. DEALER SOUTH
West
pass
pass
all pass
North
2♣
3♥
East
pass
pass
South
1♥
2♥
4♥
2) NORTH (Dummy)
♠ A 6 2♥ 9♦ A 10 3♣ Q J 10 8 7 5
WEST EAST (You)
♠ J 10 ♠ Q 8 7 3♥ A J 6 3 ♥ K 10 7 2♦ Q J 8 6 5 2 ♦ 9 4♣ 2 ♣ A 9 6
SOUTH
♠ K 9 5 4♥ Q 8 5 4♦ K 7♣ K 4 3
NW E
S
NEITHER VUL. DEALER WEST
West
pass
pass
pass
North
1♣
2♣
3NT
East
pass
pass
all pass
South
1♥
2NT
To questions
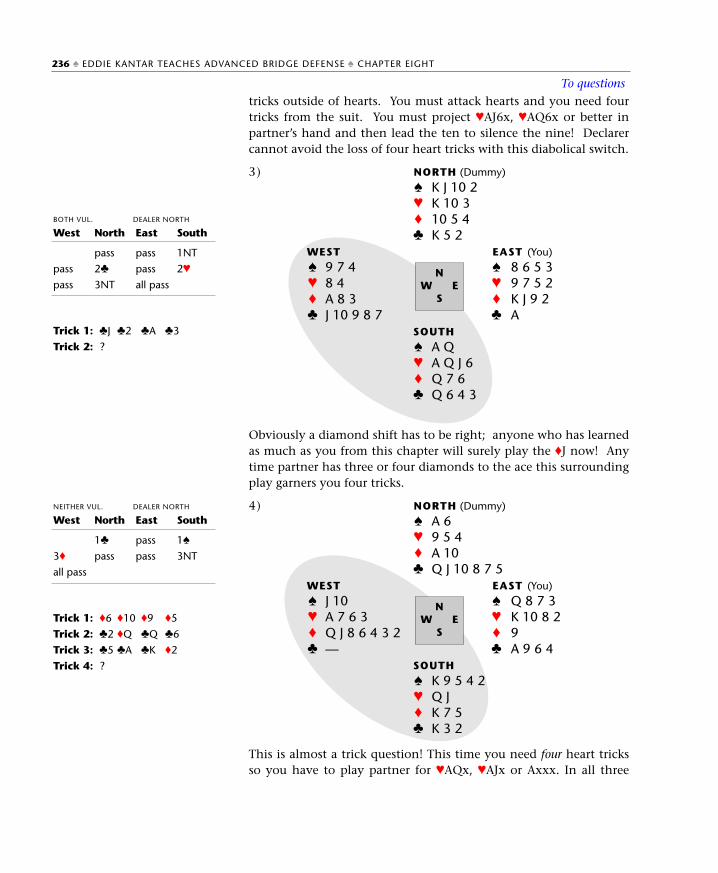
tricks outside of hearts. You must attack hearts and you need fourtricks from the suit. You must project ♥AJ6x, ♥AQ6x or better inpartner’s hand and then lead the ten to silence the nine! Declarercannot avoid the loss of four heart tricks with this diabolical switch.
Obviously a diamond shift has to be right; anyone who has learnedas much as you from this chapter will surely play the ♦J now! Anytime partner has three or four diamonds to the ace this surroundingplay garners you four tricks.
This is almost a trick question! This time you need four heart tricksso you have to play partner for ♥AQx, ♥AJx or Axxx. In all three
4) NORTH (Dummy)
♠ A 6♥ 9 5 4♦ A 10♣ Q J 10 8 7 5
WEST EAST (You)
♠ J 10 ♠ Q 8 7 3♥ A 7 6 3 ♥ K 10 8 2♦ Q J 8 6 4 3 2 ♦ 9♣ — ♣ A 9 6 4
SOUTH
♠ K 9 5 4 2♥ Q J♦ K 7 5♣ K 3 2
Trick 1: ♣J ♣2 ♣A ♣3
Trick 2: ?
Trick 1: ♦6 ♦10 ♦9 ♦5
Trick 2: ♣2 ♦Q ♣Q ♣6
Trick 3: ♣5 ♣A ♣K ♦2
Trick 4: ?
236 ♠ EDDIE KANTAR TEACHES ADVANCED BRIDGE DEFENSE ♠ CHAPTER EIGHT
3) NORTH (Dummy)
♠ K J 10 2♥ K 10 3♦ 10 5 4♣ K 5 2
WEST EAST (You)
♠ 9 7 4 ♠ 8 6 5 3♥ 8 4 ♥ 9 7 5 2♦ A 8 3 ♦ K J 9 2♣ J 10 9 8 7 ♣ A
SOUTH
♠ A Q♥ A Q J 6♦ Q 7 6♣ Q 6 4 3
NW E
S
BOTH VUL. DEALER NORTH
West
pass
pass
North
pass
2♣
3NT
East
pass
pass
all pass
South
1NT
2♥
NW E
S
NEITHER VUL. DEALER NORTH
West
3♦
all pass
North
1♣
pass
East
pass
pass
South
1♠
3NT
To questions
cases it is correct to switch to a low heart, particularly when partnerhas ♥Axxx and declarer ♥QJ. If you switch to the ten, (the normalplay when declarer has three hearts), you set up a trick for declarerwith the ♥9. Only a scoundrel would include this problem.
5) Assuming declarer starts with the ♠A or ♠K, you have a chance ifyou play the ♠9 or ♠10. If declarer plays you for ♠109 doubletonand crosses to dummy to lead the jack, you wind up with a spadetrick. If you play low the first time, you have no chance of winninga trick if declarer needs five spade tricks; declarer is forced to playanother high spade.
6) When declarer cashes the ♠A, drop the ♠J or ♠10, or else Southwill have no choice but to play someone for ♠Kx and lead low.However, if you play an honor, declarer may try to pin the sup-posed ♠J10 doubleton by playing the ♠Q next. That won’t work.
7) You have a chance if you drop the ♠Q. If declarer believes, andmost declarers will, a spade will be led to the ♠9... and your ♠10!
8) Here again, you should play the ♠K. It costs nothing, but ifSouth believes you, he’ll finesse the ♠9 coming back. Very tricky!
CHAPTER EIGHT ♠ CARD TRICKS ♠ 237
Key ideas from Chapter 8
• The card you lead on opening lead may not be the samecard you lead from that very same combination after yousee the dummy.
• When dummy has an unguarded 10 (to your right) andyou have the KJ9 or AJ9, it is usually right to attack withthe jack. When dummy has an unguarded 9 (to your right)and you have the Q108 or K108, it is usually right to attackwith the 10. These ‘surrounding plays’ can also be madeby the player leading through dummy; that player mustproject the unguarded nine or ten in declarer’s hand.
• Try to give partner any information about your hand thatdeclarer already has.
• Playing the card(s) you are known to hold when it can’tcost you a trick is the mark of an experienced defender.
• Be on the lookout for opportunities to create losing optionsfor declarer by playing unnecessarily high cards in situa-tions where it cannot cost you; situations you must learnto recognize. Amen.
To questions

Allen, Steve, 92Backus, Jim, 92Burns, George, 92Card combinations, 213-237Escaping an endplay, 215Falsecards, 227-229
Leading unsupported hon-ors, 214
Key ideas, 237Surrounding plays, 216-219Swindles, 225-226
Concealing information from declarer, 220-225
Discarding from a suit where your length is known, 220
Discarding your highest equalhonor, 224
Playing cards you are known to hold, 220-224
Playing your highest remain-ing card, 224
Counting distribution, 55-88From a count signal, 76-78From the bidding, 56-72
After a preempt, 71-72Major-suit openings, 56-62
Minor-suit openings, 64-70Notrump openings, 62-64Responder becomes declar-
er, 67Revising your count, 57When partner bids, 70-71
From the opening lead, 73-75Key ideas, 88
Counting high card points,129-152
Key ideas, 152Notrump sequences, 130-135,
145-146Notrump ranges in com-
petition, 145Opener rebids notrump,
130Responder bids notrump,
133Responder rebids notrump,
134Other techniques, 138-141Suit sequences, 135-138
Point ranges, 135Where responder becomes
declarer, 137When partner bids, 142-145
238 ♠ EDDIE KANTAR TEACHES ADVANCED BRIDGE DEFENSE ♠ CHAPTER EIGHT
Index
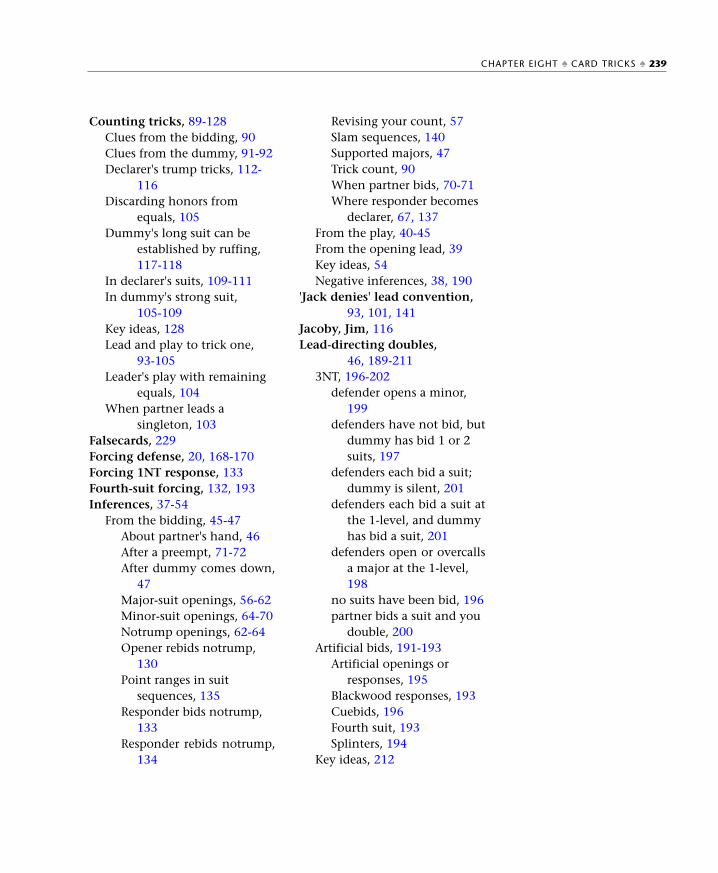
Counting tricks, 89-128Clues from the bidding, 90Clues from the dummy, 91-92Declarer's trump tricks, 112-
116Discarding honors from
equals, 105Dummy's long suit can be
established by ruffing, 117-118
In declarer's suits, 109-111In dummy's strong suit,
105-109Key ideas, 128Lead and play to trick one,
93-105Leader's play with remaining
equals, 104When partner leads a
singleton, 103Falsecards, 229Forcing defense, 20, 168-170Forcing 1NT response, 133Fourth-suit forcing, 132, 193Inferences, 37-54
From the bidding, 45-47About partner's hand, 46After a preempt, 71-72After dummy comes down,
47Major-suit openings, 56-62Minor-suit openings, 64-70Notrump openings, 62-64Opener rebids notrump,
130Point ranges in suit
sequences, 135Responder bids notrump,
133Responder rebids notrump,
134
Revising your count, 57Slam sequences, 140Supported majors, 47Trick count, 90When partner bids, 70-71Where responder becomes
declarer, 67, 137From the play, 40-45From the opening lead, 39Key ideas, 54Negative inferences, 38, 190
'Jack denies' lead convention,93, 101, 141
Jacoby, Jim, 116Lead-directing doubles,
46, 189-2113NT, 196-202
defender opens a minor, 199
defenders have not bid, butdummy has bid 1 or 2 suits, 197
defenders each bid a suit; dummy is silent, 201
defenders each bid a suit atthe 1-level, and dummy has bid a suit, 201
defenders open or overcallsa major at the 1-level, 198
no suits have been bid, 196partner bids a suit and you
double, 200Artificial bids, 191-193
Artificial openings or responses, 195
Blackwood responses, 193Cuebids, 196Fourth suit, 193Splinters, 194
Key ideas, 212
CHAPTER EIGHT ♠ CARD TRICKS ♠ 239

Miscellaneous, 202-203balancing double of a 1NT
response, 202doubling 6NT, 202
Suit slams, 190-191Lightner doubles, see Doubles
of suit slamsLightner, Theodore, 191Master trump, 176-178Meadows, Jane, 92Opening lead
Counting distribution from, 73-75
Inferences from, 39, 93'Jack denies' convention, 93,
101, 141Leader's play with remaining
equals, 104Leading unsupported honors,
214Leads other than fourth-best,
75Suit preference, 162Trump lead, 21
Overruff positions, 163-165Refusing to overruff, 164Ruffing air, 175
Planning the defense against suit contracts, 11-35
Identifying the dummy, 13-18Type 1. Ruffing potential
only, 13Type 2. Dummy has a
strong side suit, 14Type 3. Dummy is bal-
anced, 16Key ideas, 35
Other considerations, 19-25Declarer's second suit,
19-21Active defense, 19Forcing defense, 20Leading a trump, 21
Dummy is the long trump hand, 22
Killing the dummy, 23-25Giving partner a ruff in the
long suit, 23Killing the late entry, 25Leading the long suit, 24
Play with remaining equals,104
Practice Hands, 26, 48, 79, 119, 147, 179, 204, 230
Ruff-sluff, 171-174Ruffing air, 175-176Rule of Eleven, 99Stayman, alternative responses
to, 81Suit preference lead, 162Suit preference signal, 154,
156-163Surrounding play, 143, 216-219Test Yourself, 29, 50, 82, 122,
150, 181, 207, 232Trump tricks, 153-188
Getting a ruff, 154Giving partner a ruff, 156-63Key ideas, 188Master trump, 176-178
TV show, 92Unblock, requesting an, 43Uppercut, 142, 148, 165-168
240 ♠ EDDIE KANTAR TEACHES ADVANCED BRIDGE DEFENSE ♠ CHAPTER EIGHT

Master Point Press on the Internet
www.masterpointpress.com
Our main site, with information about our books and software, reviews and more.
www.masteringbridge.com
Our site for bridge teachers and students – free downloadable support material for our books, helpful
articles, forums and more.
www.ebooksbridge.com
Purchase downloadable electronic versions of MPP books.
www.bridgeblogging.com
Read and comment on regular articles from MPP authors and other bridge notables.
Eddie Kantar’s various bridge books have sold hundreds of thousands of copies in tenlanguages, not least because of his unique style and the humor that he introduces intothe learning process. Advanced Bridge Defense is intended to cover some of the more com-plex concepts of defense for the modern novice player, and will undoubtedly be a stan-dard reference work and teaching tool for many years to come. The topics covered here(including defensive strategy, inferences, various ways of counting the hand, develop-ing extra trump tricks, falsecarding, and lead-directing doubles) are handled so thor-oughly that even more advanced players will benefit from studying this book.
Designed to be used by students learning on their own or by bridge teachers, this bookcontains a host of features that help the reader to grasp the material: clearly laid-outconcepts, margin notes, practice hands, chapter-end quizzes, key-point summaries atregular intervals, and an index. This book covers more advanced topics than its com-panion, Eddie Kantar teaches Modern Bridge Defense.
Praise for Eddie Kantar teaches Modern Bridge Defense and Eddie Kantarteaches Advanced Bridge Defense:
‘Defensive play has never been explained better’ BOBBY GOLDMAN, four-time World Champion
‘Kantar tackles the hardest part of the game and wins hands down’ ZIA MAHMOOD, World Life Master
‘These two books are to defensive play what Watson’s ‘Play of the Hand’ is to declarer play’ PAUL SOLOWAY, three-time World Champion
and ACBL all-time leading master point holder
Eddie Kantar is a professional bridge player, writer, and teacher, and has been induct-ed into the Bridge Hall of Fame. He has been World Champion twice, and has won thir-teen North American Championship titles. Among his many books are Defensive BridgePlay Complete, Introduction to Defender’s Play, Bridge for Dummies and Roman KeyCard Blackwood. He writes regularly for numerous bridge magazines around the world,and is a frequent host on bridge cruises. He lives in Santa Monica, CA.
Master Point Press
AL
L L
EV
EL
S


