Embed Size (px)
Citation preview
AntiVirus Best Practice GuideVersion 8.5 Update 3
Endpoint Securitypowered by HEAT Software
Contents
Introduction 3What Does AntiVirus Do? 3Overview 4
Phase 1: Prepare Your Infrastructure 5Remove Existing/Previous AntiVirus Solution 5Deploy Caching Proxy Servers 7Control AntiVirus Definition Distribution 8Obtain AntiVirus Updates for Disconnected Endpoints 9Phase 1: Recap 13
Phase 2: Discover 14Schedule Scan 14Review Scan Progress 15Phase 2: Recap 17
Phase 3: Remediate 18Review Alerts 18Identify Alerts 18Malware Cleaner 19Submit Files for Analysis 19Phase 3: Recap 19
Phase 4: Monitor 20Create Real-Time Monitoring Policy 20Add/Import Exclusions 22Create a Recurring Virus and Malware Scan Policy 22Phase 4: Recap 24
Phase 5: Manage 25Email Notifications 25AntiVirus Dashboard Widgets 26AntiVirus Reports 26Phase 5: Recap 27
Phase 6: Recover 28Submit Suspect Files for Analysis 28Create Temporary Exclusions for False Positives 29Manually Restore or Delete Files From Quarantine 30Phase 6: Recap 30
Document Summary 31
Copyright © 2019, Ivanti. All Rights Reserved. Terms of Use.
Page 2 of 31
Endpoint Security Version 8.5 Update 3 AntiVirus Best Practice Guide
IntroductionThe Ivanti Endpoint Security AntiVirus module provides protection against known malware usingsignature-based detection combined with behavioral analysis, including Sandbox technology toprovide protection against unknown malware.
This document provides a best practice workflow to act as a guide for administrators whenimplementing AntiVirus.
Following the workflow outlined in this document should help to ensure a successful deployment andongoing virus and malware protection.
What Does AntiVirus Do?AntiVirus blocks known malware and provides protection against unknown malware withoutimpacting productivity. AntiVirus examines executable files and employs the following capabilities toprovide a multi-layered defense against existing and new malware:
l Full signature matching, also known as blacklisting, to recognize, block and remove knownmalware. Signature updates are made available twice daily to ensure that protection againstthe latest known malware is always available.
l DNA matching or partial signature matching to recognize, block and remove unknown malwareand new variants of known malware based on inherited or re-used malware code fragments.
l Exploit detection to recognize, block and remove malware hidden or embedded in seeminglyinnocent files.
l Behavioral detection using SandBox technology which allows code to execute in an emulatedenvironment and block and removes it if it exhibits malicious behavior.
Policies are defined on the Endpoint Security console to define the actions taken by the AntiVirusengine on the endpoint. The following policy types are available:
l Real-Time Monitoring: This policy defines the actions taken by the engine when files areopened, moved or copied.
l Recurring Scan: This policy defines the frequency at which full or partial disk scans areconducted to remove any dormant malware from the endpoints.
l Scan Now: This is a one-time scan which would typically be performed when AntiVirus is initiallyintroduced, in the case of a suspected outbreak or prior to going into lock-down if deployingIvanti Application Control.
Copyright © 2019, Ivanti. All Rights Reserved. Terms of Use.
Page 3 of 31
Endpoint Security Version 8.5 Update 3 AntiVirus Best Practice Guide
If malware is detected on the endpoint, the AntiVirus engine will initially attempt to clean the malwareand if it is unable to clean it, depending on the policy settings, it will either quarantine or delete thefile. The endpoint will also send an alert to the server so that the administrator becomes aware of theincident and can take action, if necessary.
If the AntiVirus engine has been unable to clean the malware, the administrator can submit the file toIvanti support for further analysis.
OverviewThe recommended workflow can be summarized as follows:
1. "Phase 1: Prepare Your Infrastructure" on the next page
Steps to be taken to prepare for the introduction of AntiVirus.
2. "Phase 2: Discover" on page 14
Scan endpoints to identify if any known malware is present and clean, quarantine or delete theinfected files as appropriate.
3. "Phase 3: Remediate" on page 18
For files that have not been automatically cleaned, review alerts on the console to identifywhich endpoints need further action and what malware is present on those endpoints.
4. "Phase 4: Monitor" on page 20
Create real-time and recurring scan policies to provide ongoing protection against knownmalware.
5. "Phase 5: Manage" on page 25
Leverage reports, widgets, email notifications and other information provided by the EndpointSecurity console to manage the AntiVirus module on an ongoing basis and understand ifendpoints are getting infected or if a malware outbreak is occurring.
6. "Phase 6: Recover" on page 28
In the event that an endpoint has experienced one or more false positives, take steps to restoreclean files to their correct locations.
This workflow is discussed in greater detail in the remainder of this document. You should go throughthe entire workflow for a small number of endpoints / test group before rolling out to remainingendpoints.
In addition to following this workflow, you should also develop a recovery plan in the event thatwidespread infections occur. If it does not already exist you should also develop a support escalationplan so that users will be able to report if malware infections or false positives have occurred on theirendpoints. Finally, you will also need to train your IT Help Desk team to deal with such escalations.
Copyright © 2019, Ivanti. All Rights Reserved. Terms of Use.
Page 4 of 31
Endpoint Security Version 8.5 Update 3 AntiVirus Best Practice Guide
Phase 1: Prepare Your InfrastructurePrior to introducing AntiVirus, you will need to take steps to ensure that the rollout is successful andthat both the initial deployment and the ongoing definition and engine updates do not adverselyimpact on your overall network bandwidth and cause communication difficulties between officelocations.
In this phase you will:
1. "Remove Existing/Previous AntiVirus Solution" below
Ensure that any other vendor’s AntiVirus solution is fully removed prior to installing AntiVirus.
2. "Deploy Caching Proxy Servers" on page 7
Review your network topology to identify where caching proxy servers should be located to actas distribution points for AntiVirus definition and engine updates.
3. "Control AntiVirus Definition Distribution" on page 8
Identify the strategy to be followed when rolling out new AntiVirus engine and definitionupdates to ensure that they get rolled out in a controlled manner and define the distributiongroups to align with this strategy.
4. "Obtain AntiVirus Updates for Disconnected Endpoints" on page 9
Set up a caching proxy server so that endpoints can still receive AntiVirus definition and engineupdates when they are disconnected from the corporate network.
This phase is key to ensuring a successful and problem-free rollout of AntiVirus, so ensure that youtake the time to lay the groundwork before proceeding to rollout on a large scale.
Remove Existing/Previous AntiVirus SolutionHaving multiple antivirus products installed on the same endpoint is not a good practice and couldcause issues such as:
l Endpoint becomes unstable or unusable.
l End users are disrupted and productivity decreases.
AntiVirus does not include inbuilt AntiVirus removal tools. However, customers can leverage theEndpoint Security capabilities to deploy an AntiVirus uninstall package to each endpoint to removethe old AntiVirus solution and clean up any residual files. It is important to minimize the protectiongap – the gap that occurs between disabling or removing one AntiVirus solution and adding another.This section outlines the recommended steps to plan your migration strategy and minimize the risk ofleaving an endpoint unprotected.
Copyright © 2019, Ivanti. All Rights Reserved. Terms of Use.
Page 5 of 31
Endpoint Security Version 8.5 Update 3 AntiVirus Best Practice Guide
Before you begin removing AntiVirus:
1. Review the Previous AntiVirus Vendor’s recommendations and best practices for uninstallingtheir security technologies.
2. Prior to planning your migration from the previous AntiVirus Vendor to Ivanti, make sure yourEndpoint Security Server is licensed for the following products:
l Patch and Remediationl AntiVirusl Content Wizard
AntiVirus Replacement Steps:
1. Create the <Previous AntiVirus vendor> Uninstall Package
Use the Ivanti Content Wizard to create a package that detects and removes the previousAntiVirus vendor from your endpoints. When you create the package, make sure the contenthas the reboot flag to force a restart of the endpoint which should put the endpoint in a cleanstate.
The properties of the package should contain the following attributes:
l Applicable to only endpoints with <Previous AntiVirus Vendor> products installed.
l Reboot Flag to restart the endpoint when <Previous AntiVirus Vendor> products havebeen uninstalled.
Once the previous AntiVirus vendor uninstall package has been created, run the package inyour lab to verify the correct uninstall behavior and expected outcome.
2. Add excludes to the <Previous AntiVirus vendor> AntiVirus policies for the Ivanti folders whichwill exist once AntiVirus is installed ( C:\ProgramData\HEAT Software\ and C:\ProgramFiles\HEAT Software\). This will help avoid potential conflicts while AntiVirus is being installed.Testing will need to be done to ensure there aren’t any other features in <Previous AntiVirusvendor> which might otherwise block the install of AntiVirus.
3. Create groups to minimize the impact of rolling out AntiVirus. Assuming Ivanti Patch andRemediation is being used, you can leverage FastPath proxy servers at remote locations to seedthe proxies with the install package. Using proxies and/or group-based rollout is necessary toavoid an AntiVirus storm on install when rolling out to large numbers of endpoints across thenetwork. Do this out of hours where possible.
4. Install AntiVirus to groups in a controlled manner to minimize network bandwidth utilizationissues. AntiVirus will be installed with no AntiVirus policies enabled. Work around any WindowsSecurity Center notification issues.
5. Create AntiVirus real-time monitoring policy but do not assign it. Add recommended excludesas per KB775. Also, exclude <Previous AntiVirus vendor> directories if required.
Copyright © 2019, Ivanti. All Rights Reserved. Terms of Use.
Page 6 of 31
Endpoint Security Version 8.5 Update 3 AntiVirus Best Practice Guide
6. Disable <Previous AntiVirus vendor> AntiVirus on-access policy. Endpoints are nowunprotected.
7. Assign AntiVirus real-time monitoring policy to groups that have <Previous AntiVirus vendor>on-access policy disabled. Endpoints are now protected.
8. Deploy your <Previous AntiVirus vendor> uninstall package including reboot to remove<Previous AntiVirus vendor> and clean up any residual files.
Monitor the deployment to the group by leveraging the Manage > Deployment and Tasks pagein the Endpoint Security Console to track status of the deployment.
9. Remove the <Previous AntiVirus vendor> excludes from the AntiVirus real-time monitoringpolicy as it is no longer required and is a potential security hole.
Deploy Caching Proxy ServersAntiVirus definitions get distributed approximately twice per day and must be downloaded to eachendpoint so that they remain updated and can detect the latest known malware. Unless planned for,these updates can place a significant load on the corporate network and could cause delays to occuron interoffice business communications.
The base definition file of AntiVirus definitions is approximately 400MB in size. This file is distributed oninitial install and is also redistributed occasionally (e.g. when the AntiVirus engine is updated). Inaddition the twice daily incremental update file can range from ~1MB to ~15MB in size. The networkinfrastructure needs to be designed to cater for distribution of these files to all endpoints.
Where network infrastructure supports it, QoS settings can be used to deprioritize AntiVirusdefinition and engine updates vs other corporate critical communications. However, for a distributedenterprise environment, caching proxies such as the Ivanti Caching Proxy may be leveraged to assist inconserving WAN/LAN bandwidth during mass deployments through Endpoint Security.
A cache server is a dedicated network server or service acting as a server that saves Web pages orother Internet content locally. By placing previously requested information in temporary storage, orcache, a cache server both speeds up access to data and reduces demand on an enterprise'sbandwidth. When an agent is configured to utilize a caching proxy, deployments sent to an agent willbe cached by the caching proxy. This allows other agents to be given the cached payload from thecaching proxy instead of the storage repository on the Endpoint Security Server, saving bandwidthbetween the caching proxy location and the Endpoint Security Server, while significantly increasingperformance.
Ivanti Patch and Remediation includes FastPath which allows an administrator to assign cachingproxies to specific groups of agents through a policy instead of assigning a proxy manually throughthe Agent Control Panel or during the installation of the agent. It is designed to provide backupcaching proxies in case of a failure of the primary caching proxy.
For additional information, please consult the Ivanti Caching Proxy 2.7 User Guide.
Copyright © 2019, Ivanti. All Rights Reserved. Terms of Use.
Page 7 of 31
Endpoint Security Version 8.5 Update 3 AntiVirus Best Practice Guide
Control AntiVirus Definition DistributionWhen new AntiVirus definitions or engine files become available, the Endpoint Security Server notifiesall endpoints that updated files are available and, assuming they are online, endpoints will check-inand download the new files.
It is possible, however, to stagger definitions distribution so that all endpoints don’t try to retrievethem simultaneously. There are a few reasons why you might want to do this:
l Provide an opportunity for caching proxies to get the new files first (seed the proxies) so thatother endpoints at that location will obtain the files from there instead of pulling them acrossthe network. To achieve this, create a group with a couple of endpoints (that are always online)from each location where a proxy has been added.
l If you want to test new definitions with a test group prior to rolling the definitions out to thegeneral population. Create a group containing the test endpoints (which could also include the“caching proxy” endpoints above) which will receive the definitions immediately as soon as theyare available on the server. Create another group for the general population to receive thedefinitions some time later. You could also create a third group for corporate critical serverswhich would receive the definitions after the general population.
l If you need to alleviate the impact on virtual infrastructures that are sensitive to increases innetwork latency during AntiVirus Definition distribution.
To apply different delays to these groups, use the “Delay AntiVirus definition distribution” setting inthe Agent Policy sets. The default delay is 0. Change this value in the Global Agent Policy set towhatever delay you want to for the general population (e.g. 4 hours). Create a zero delay agent policyset (with the delay set to 0) and apply this policy set to the test group or cache proxy servers group.Create a critical server policy set (with the delay set to a figure greater than the general population(e.g. 8 hours). The maximum delay value that can be applied is 72 hours.
Remember that endpoints remain unprotected from new known malware until they receive the latestAntiVirus definitions so you should minimize any delay in getting definitions to the endpoints toensure the best protection is available.
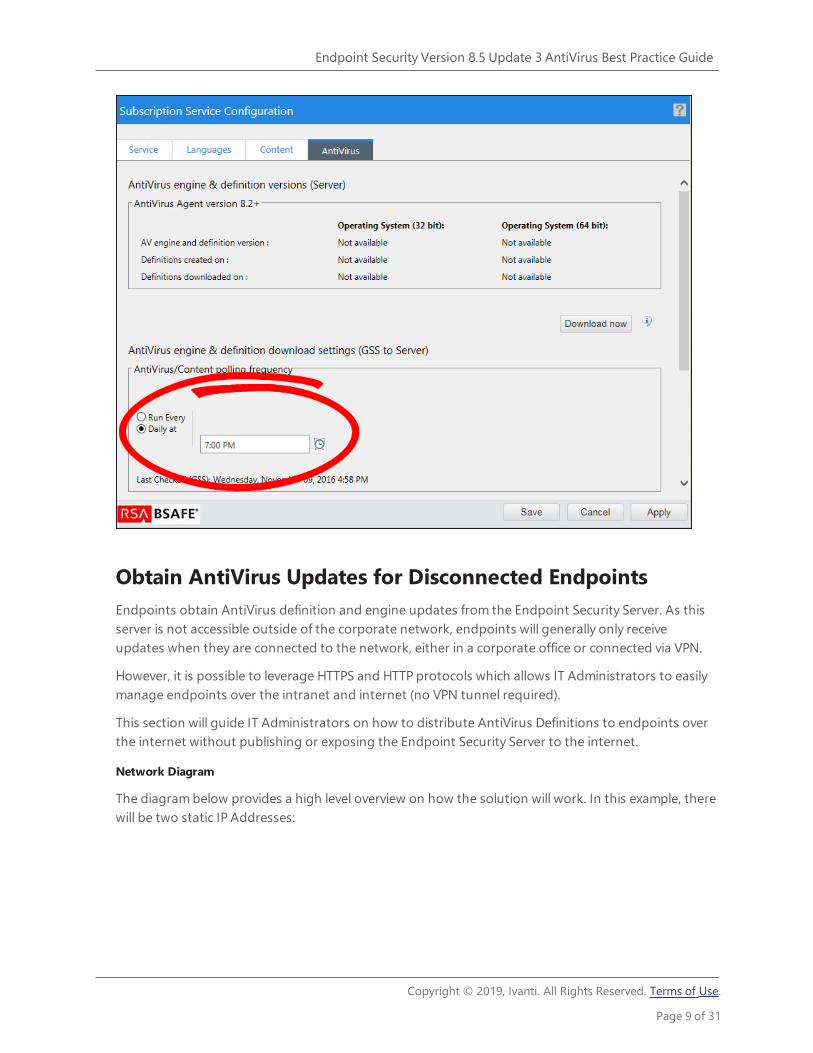
An additional option is available to achieve greater predictability for AntiVirus definition distributionand prevent definitions from being made available for distribution during business hours. On theEndpoint Security Server (see screen shot below), you can set the AntiVirus Subscription Servicedownload time from GSS to Server. This allows the Administrator to control when AntiVirus definitionsand engine are downloaded to the Endpoint Security Server which acts as the starting point for thesubsequent delivery to endpoints.
Copyright © 2019, Ivanti. All Rights Reserved. Terms of Use.
Page 8 of 31
Endpoint Security Version 8.5 Update 3 AntiVirus Best Practice Guide
Obtain AntiVirus Updates for Disconnected EndpointsEndpoints obtain AntiVirus definition and engine updates from the Endpoint Security Server. As thisserver is not accessible outside of the corporate network, endpoints will generally only receiveupdates when they are connected to the network, either in a corporate office or connected via VPN.
However, it is possible to leverage HTTPS and HTTP protocols which allows IT Administrators to easilymanage endpoints over the intranet and internet (no VPN tunnel required).
This section will guide IT Administrators on how to distribute AntiVirus Definitions to endpoints overthe internet without publishing or exposing the Endpoint Security Server to the internet.
Network Diagram
The diagram below provides a high level overview on how the solution will work. In this example, therewill be two static IP Addresses:
Copyright © 2019, Ivanti. All Rights Reserved. Terms of Use.
Page 9 of 31
Endpoint Security Version 8.5 Update 3 AntiVirus Best Practice Guide
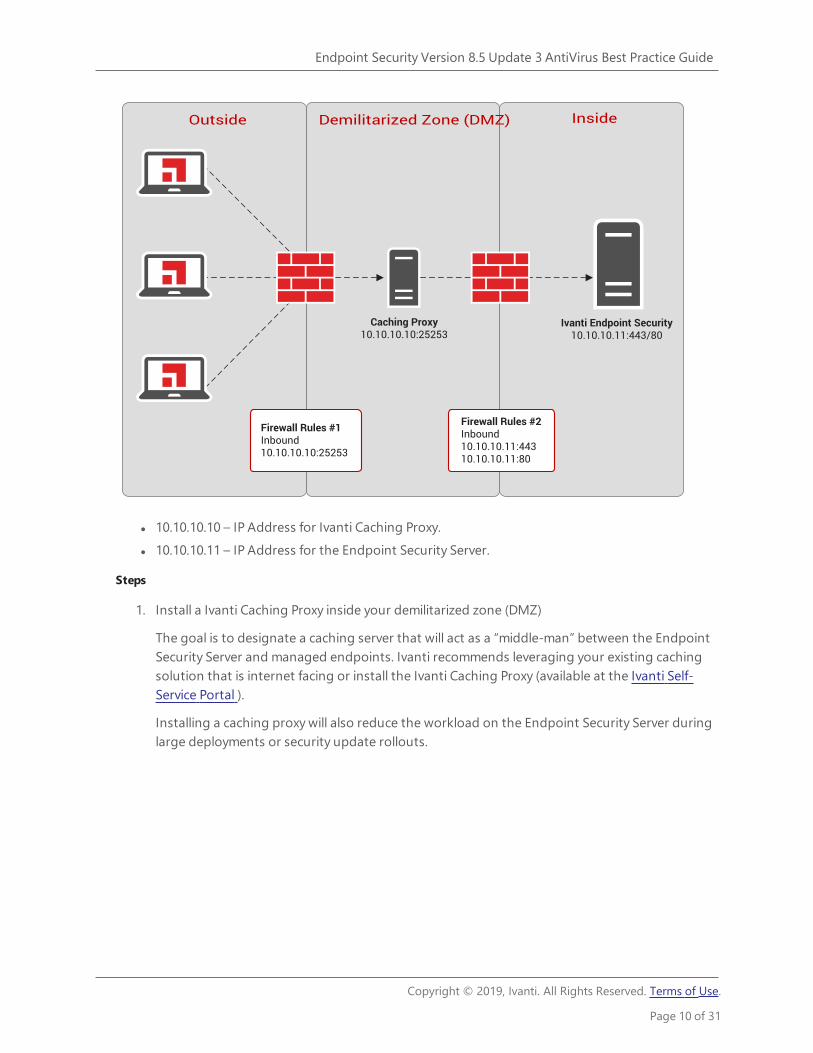
l 10.10.10.10 – IP Address for Ivanti Caching Proxy.l 10.10.10.11 – IP Address for the Endpoint Security Server.
Steps
1. Install a Ivanti Caching Proxy inside your demilitarized zone (DMZ)
The goal is to designate a caching server that will act as a “middle-man” between the EndpointSecurity Server and managed endpoints. Ivanti recommends leveraging your existing cachingsolution that is internet facing or install the Ivanti Caching Proxy (available at the Ivanti Self-Service Portal ).
Installing a caching proxy will also reduce the workload on the Endpoint Security Server duringlarge deployments or security update rollouts.
Copyright © 2019, Ivanti. All Rights Reserved. Terms of Use.
Page 10 of 31
Endpoint Security Version 8.5 Update 3 AntiVirus Best Practice Guide
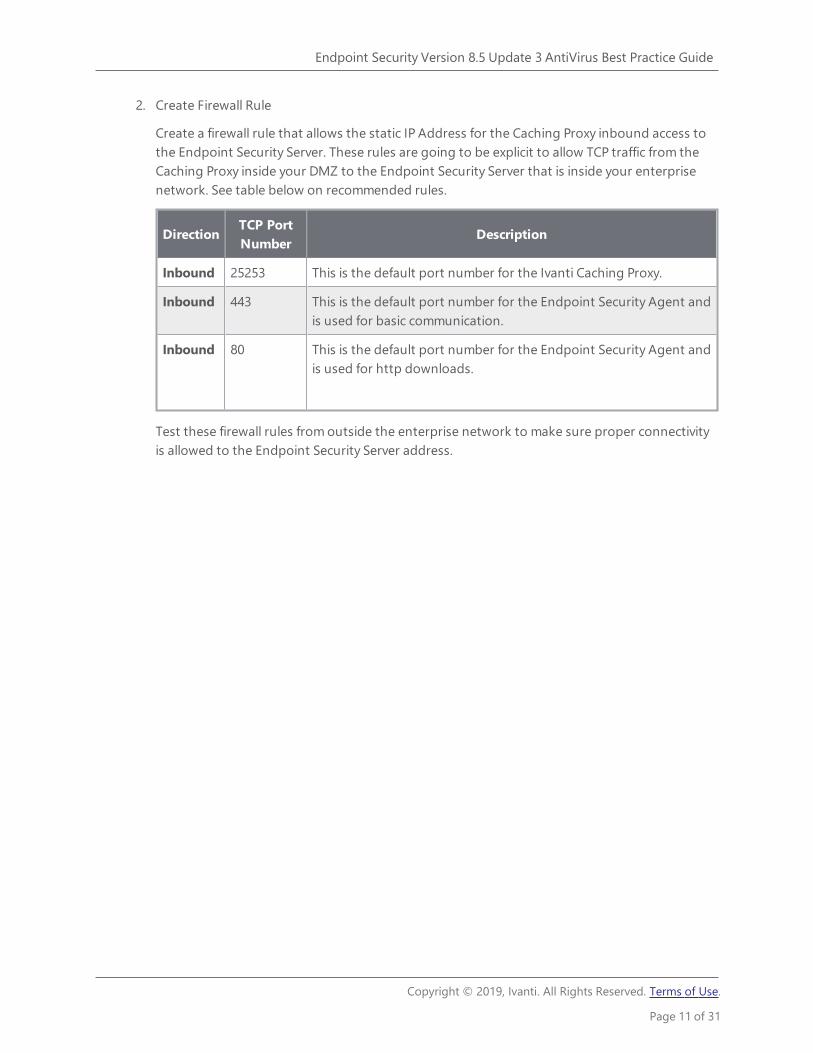
2. Create Firewall Rule
Create a firewall rule that allows the static IP Address for the Caching Proxy inbound access tothe Endpoint Security Server. These rules are going to be explicit to allow TCP traffic from theCaching Proxy inside your DMZ to the Endpoint Security Server that is inside your enterprisenetwork. See table below on recommended rules.
DirectionTCP PortNumber
Description
Inbound 25253 This is the default port number for the Ivanti Caching Proxy.
Inbound 443 This is the default port number for the Endpoint Security Agent andis used for basic communication.
Inbound 80 This is the default port number for the Endpoint Security Agent andis used for http downloads.
Test these firewall rules from outside the enterprise network to make sure proper connectivityis allowed to the Endpoint Security Server address.
Copyright © 2019, Ivanti. All Rights Reserved. Terms of Use.
Page 11 of 31
Endpoint Security Version 8.5 Update 3 AntiVirus Best Practice Guide
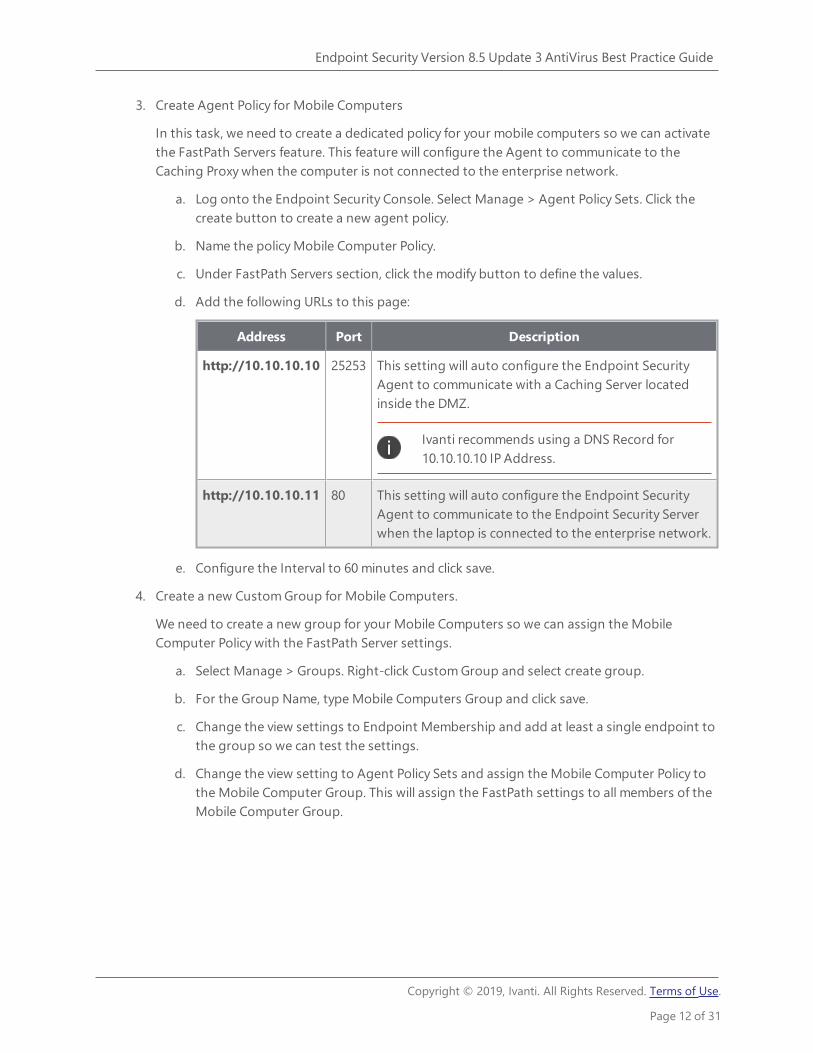
3. Create Agent Policy for Mobile Computers
In this task, we need to create a dedicated policy for your mobile computers so we can activatethe FastPath Servers feature. This feature will configure the Agent to communicate to theCaching Proxy when the computer is not connected to the enterprise network.
a. Log onto the Endpoint Security Console. Select Manage > Agent Policy Sets. Click thecreate button to create a new agent policy.
b. Name the policy Mobile Computer Policy.
c. Under FastPath Servers section, click the modify button to define the values.
d. Add the following URLs to this page:
Address Port Description
http://10.10.10.10 25253 This setting will auto configure the Endpoint SecurityAgent to communicate with a Caching Server locatedinside the DMZ.
Ivanti recommends using a DNS Record for10.10.10.10 IP Address.
http://10.10.10.11 80 This setting will auto configure the Endpoint SecurityAgent to communicate to the Endpoint Security Serverwhen the laptop is connected to the enterprise network.
e. Configure the Interval to 60 minutes and click save.
4. Create a new Custom Group for Mobile Computers.
We need to create a new group for your Mobile Computers so we can assign the MobileComputer Policy with the FastPath Server settings.
a. Select Manage > Groups. Right-click Custom Group and select create group.
b. For the Group Name, type Mobile Computers Group and click save.
c. Change the view settings to Endpoint Membership and add at least a single endpoint tothe group so we can test the settings.
d. Change the view setting to Agent Policy Sets and assign the Mobile Computer Policy tothe Mobile Computer Group. This will assign the FastPath settings to all members of theMobile Computer Group.
Copyright © 2019, Ivanti. All Rights Reserved. Terms of Use.
Page 12 of 31
Endpoint Security Version 8.5 Update 3 AntiVirus Best Practice Guide
5. Test the settings
If possible, if you have a Guest Wi-Fi Router that does not have access to the enterprisenetwork, configure the computer to connect to the Guest Wi-Fi. Make sure this computer is thesame computer is that a member of the Mobile Computers Group.
If you leverage Squid Proxy Server or our Ivanti Caching Proxy as your caching appliance you canmonitor the traffic by review the access.log located in <installpath>\ CachingProxy\var\logs.
6. Add all mobile computers to the Mobile Computers Group
Once you are satisfied with the testing results, now you can add all of your mobile computersbeing managed by the Endpoint Security Server to the Mobile Computers Group. This willactivate the FastPath Settings and now you can manage endpoints over the Internet with theEndpoint Security Server being inside enterprise network.
Phase 1: RecapThis phase is used to prepare the environment for the introduction of AntiVirus and to ensure thatthe AntiVirus rollout is successful. Distribution of the initial AntiVirus module along with on-goingAntiVirus definition and engine updates consume network bandwidth and it is important to ensurethat the network has been designed to handle this traffic / traffic pattern as otherwise it could impactbusiness productivity. Implementations differ from one vendor to another so you should not simplyassume that because you already had an AntiVirus solution in place already that this preparationphase is not required.
If replacing an existing AntiVirus solution, you also need to ensure that the existing solution getsremoved prior to enabling AntiVirus while ensuring that you minimize the protection gap whenneither AntiVirus solution is enabled.
You can configure your AntiVirus definition distribution so that it minimizes any impacts to thenetwork and end-users, and provides a test window if required.
You can also configure your network so that endpoints continue to receive AntiVirus definitions whenendpoints are disconnected from the corporate network.
At the end of this phase the AntiVirus module should be installed on some or all endpoints and youcan now proceed to the next phase.
Copyright © 2019, Ivanti. All Rights Reserved. Terms of Use.
Page 13 of 31
Endpoint Security Version 8.5 Update 3 AntiVirus Best Practice Guide
Phase 2: DiscoverIn the discovery phase, endpoints are scanned to identify any dormant, known malware and remove itfrom the endpoints.
1. "Schedule Scan" below
Conduct a thorough AntiVirus scan to remove any dormant malware on your endpoints.
2. Schedule the scan to execute out of hours, where possible, to minimize any productivity impact.
3. Communicate with your users so they understand why this scan is being performed.
4. "Review Scan Progress" on the next page
Use the Deployments & Tasks page to understand when the Scan Task has completed.
5. Use Custom Scan to assess external drives.
In this section we describe how you would scan your endpoints using AntiVirus. As this is the very firsttime these endpoints are being scanned with AntiVirus, the recommendation is to perform athorough scan to ensure that any dormant malware (e.g., malware buried within archives) is identifiedand removed.
A thorough AntiVirus scan could take an extensive amount of time to complete so you shouldschedule the scan to execute out of hours, if possible, to minimize any user disruption. If the scan isexecuted during working hours, ensure that you communicate with the affected users so that they areaware of what is happening.
Schedule ScanIn addition to being able to run the scan immediately, it is also possible to schedule the scan to run ata later date & time. Note, however, that the scan will always be scheduled in server time. If there areendpoints in different time zones and you want the scan to occur at a specific time in that time zone,you will need to create a specific Scan Now task for the group of endpoints at that location andschedule it based on the appropriate offset from server time.
Scanning Offline Endpoints
The recurring AntiVirus scan schedule is controlled by an endpoint scheduler. So long as the recurringscan policy has been delivered to the endpoint, the scan will execute at the appointed time so long asthe endpoint is powered up at that time. The endpoint does not need to be online at the time thescan is due to execute.
Scan Options
To implement a thorough AntiVirus scan using AntiVirus, conduct a “Scan Now – Virus and MalwareScan” and select all the scanning options including Archive scan as shown below.
Copyright © 2019, Ivanti. All Rights Reserved. Terms of Use.
Page 14 of 31
Endpoint Security Version 8.5 Update 3 AntiVirus Best Practice Guide
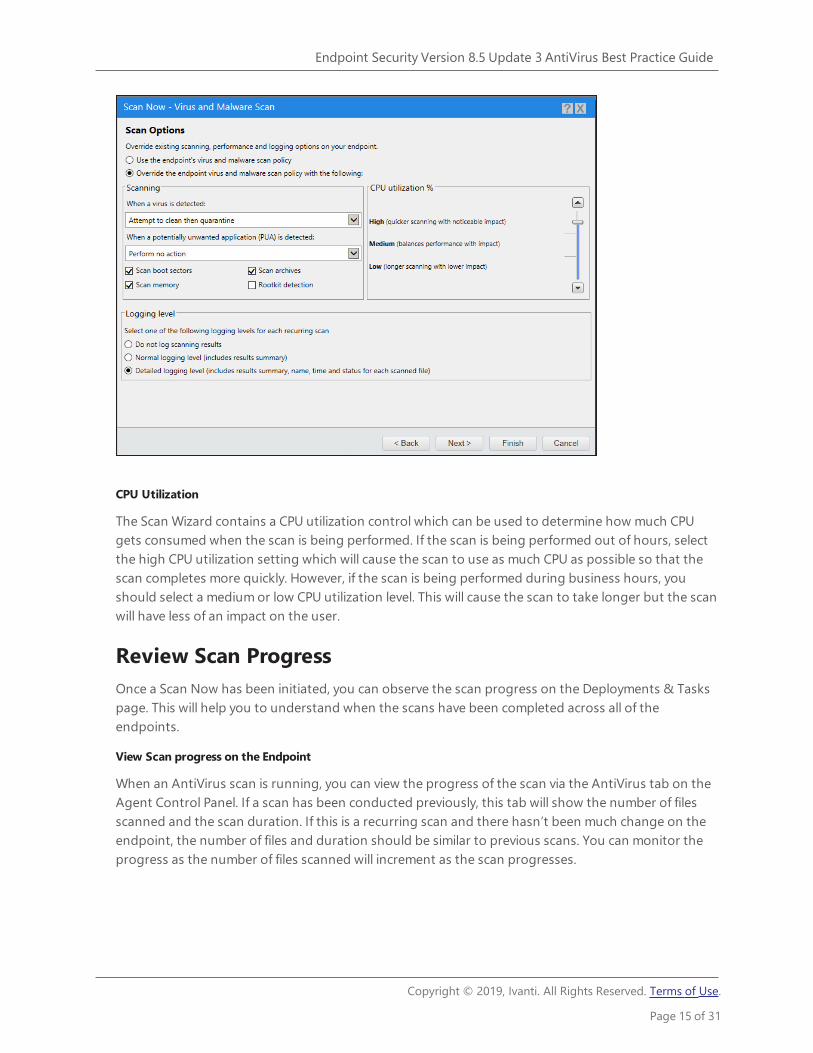
CPU Utilization
The Scan Wizard contains a CPU utilization control which can be used to determine how much CPUgets consumed when the scan is being performed. If the scan is being performed out of hours, selectthe high CPU utilization setting which will cause the scan to use as much CPU as possible so that thescan completes more quickly. However, if the scan is being performed during business hours, youshould select a medium or low CPU utilization level. This will cause the scan to take longer but the scanwill have less of an impact on the user.
Review Scan ProgressOnce a Scan Now has been initiated, you can observe the scan progress on the Deployments & Taskspage. This will help you to understand when the scans have been completed across all of theendpoints.
View Scan progress on the Endpoint
When an AntiVirus scan is running, you can view the progress of the scan via the AntiVirus tab on theAgent Control Panel. If a scan has been conducted previously, this tab will show the number of filesscanned and the scan duration. If this is a recurring scan and there hasn’t been much change on theendpoint, the number of files and duration should be similar to previous scans. You can monitor theprogress as the number of files scanned will increment as the scan progresses.
Copyright © 2019, Ivanti. All Rights Reserved. Terms of Use.
Page 15 of 31
Endpoint Security Version 8.5 Update 3 AntiVirus Best Practice Guide
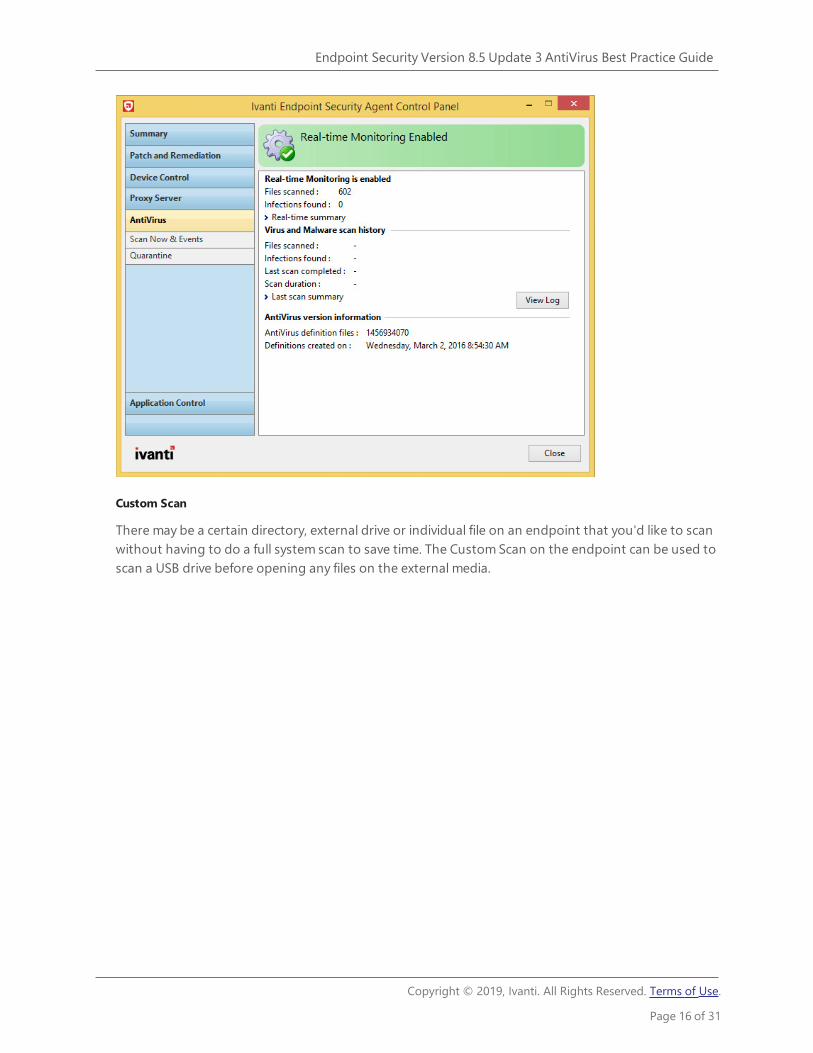
Custom Scan
There may be a certain directory, external drive or individual file on an endpoint that you'd like to scanwithout having to do a full system scan to save time. The Custom Scan on the endpoint can be used toscan a USB drive before opening any files on the external media.
Copyright © 2019, Ivanti. All Rights Reserved. Terms of Use.
Page 16 of 31
Endpoint Security Version 8.5 Update 3 AntiVirus Best Practice Guide
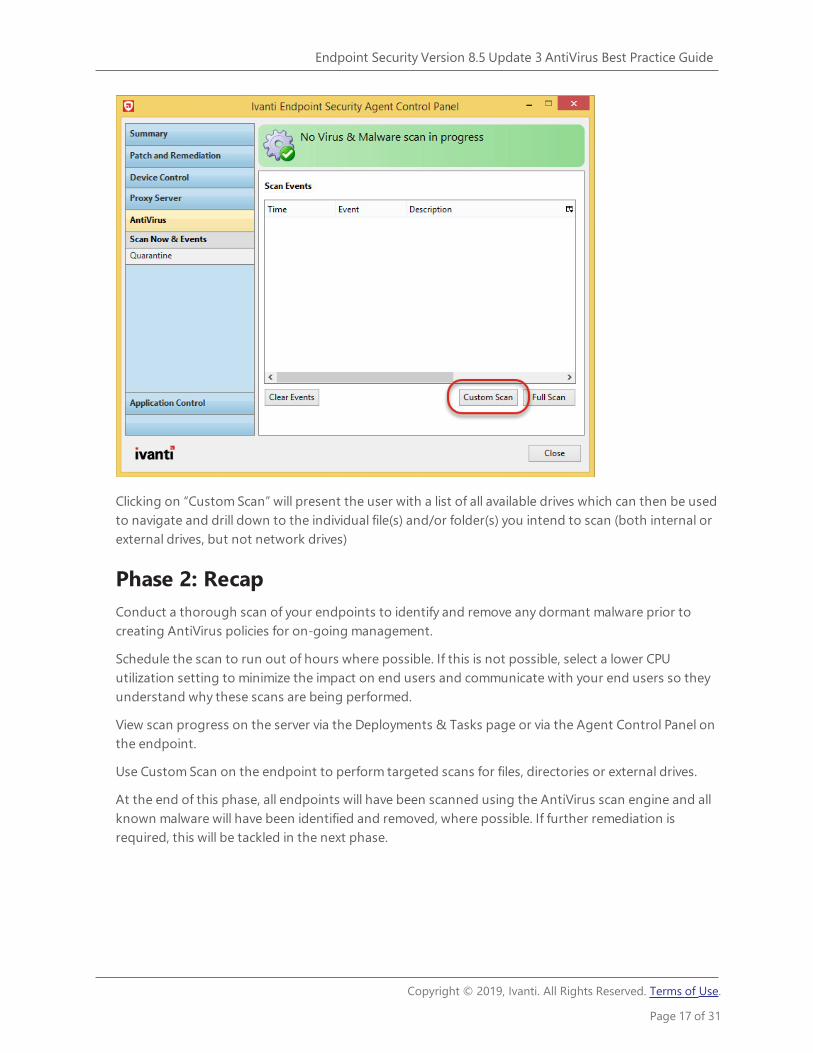
Clicking on “Custom Scan” will present the user with a list of all available drives which can then be usedto navigate and drill down to the individual file(s) and/or folder(s) you intend to scan (both internal orexternal drives, but not network drives)
Phase 2: RecapConduct a thorough scan of your endpoints to identify and remove any dormant malware prior tocreating AntiVirus policies for on-going management.
Schedule the scan to run out of hours where possible. If this is not possible, select a lower CPUutilization setting to minimize the impact on end users and communicate with your end users so theyunderstand why these scans are being performed.
View scan progress on the server via the Deployments & Tasks page or via the Agent Control Panel onthe endpoint.
Use Custom Scan on the endpoint to perform targeted scans for files, directories or external drives.
At the end of this phase, all endpoints will have been scanned using the AntiVirus scan engine and allknown malware will have been identified and removed, where possible. If further remediation isrequired, this will be tackled in the next phase.
Copyright © 2019, Ivanti. All Rights Reserved. Terms of Use.
Page 17 of 31
Endpoint Security Version 8.5 Update 3 AntiVirus Best Practice Guide
Phase 3: RemediateIn the remediate phase, alerts from the endpoints are reviewed to identify any endpoints that need tobe remediated.
In this phase you will:
1. "Review Alerts" below
Review alerts on the Centralized Alerts page.
2. "Identify Alerts" below
Identify alerts and the associated endpoints that need further action.
3. "Malware Cleaner" on the next page
Obtain tool to remediate ‘not cleaned’ detections.
4. "Submit Files for Analysis" on the next page
Submit files to Ivanti Support for further analysis.
Review AlertsWhen endpoints identify malware, they create alerts which are sent back to the Endpoint SecurityServer. If the AntiVirus engine has identified malware on the endpoints and has been unable to cleanit, alerts are sent up the server immediately as prompt action may be required. However, if the enginehas already cleaned and/or has quarantined the file or deleted the file, the AntiVirus module waitsuntil the scan has been completed before sending up the alerts. This is done to minimize the numberof messages being sent for unimportant events.
When the alerts are returned to the server, they can be viewed on the Centralized Alerts page. On thispage, the endpoints are grouped into categories of:
l Not Cleanedl Quarantinedl Cleanedl Deleted
Identify AlertsFiles which are Not Cleaned are still active on the endpoints and additional remediation is required toremove this malware and stop it from being spread throughout your environment.
Copyright © 2019, Ivanti. All Rights Reserved. Terms of Use.
Page 18 of 31
Endpoint Security Version 8.5 Update 3 AntiVirus Best Practice Guide
Files which are quarantined may also require additional attention. Once a file has been quarantined itwill no longer be allowed to execute or, if this file is part of an application, that application may beblocked from executing or may execute with errors. The file has been quarantined because the enginewas unable to clean it directly so additional steps may be required to clean the file so that it can berestored. The file can be submitted to Ivanti Support for further analysis.
Malware CleanerWhile Ivanti does not provide standalone Malware Cleaners, these tools can be obtained from othervendors such as MalwareBytes. In the event that AntiVirus has identified malware but is unable toremediate it directly, a first step is to use these tools to try and clean any infected endpoints.
Submit Files for AnalysisIt is recommended that you submit suspect files via Ivanti Support so that progress on the analysiscan be tracked and, in the event that it is a false positive rather than a malicious file, the false positivecan be addressed with the next set of AntiVirus definitions and the file gets automatically restored.
Phase 3: RecapWhen the AntiVirusscans have completed, you can identify which endpoints require additionalremediation using the Centralized Alerts page. You can also submit suspect files for additionalanalysis.
Once this phase is completed, all endpoints should now be in a “known good” state in that they arefree of known malware.
Copyright © 2019, Ivanti. All Rights Reserved. Terms of Use.
Page 19 of 31
Endpoint Security Version 8.5 Update 3 AntiVirus Best Practice Guide
Phase 4: MonitorIn the monitor phase, real-time and recurring scan policies are created to provide ongoing malwareprotection.
In this phase you will:
1. "Create Real-Time Monitoring Policy" below
Create real-time monitoring policies to provide protection every time files are opened orexecuted.
2. "Add/Import Exclusions" on page 22
Add or import files or file paths to be excluded from the AntiVirus scan to reduce theperformance impact associated with scanning for malware.
3. "Create a Recurring Virus and Malware Scan Policy" on page 22
Create recurring scan policies to scan for malware on a scheduled basis.
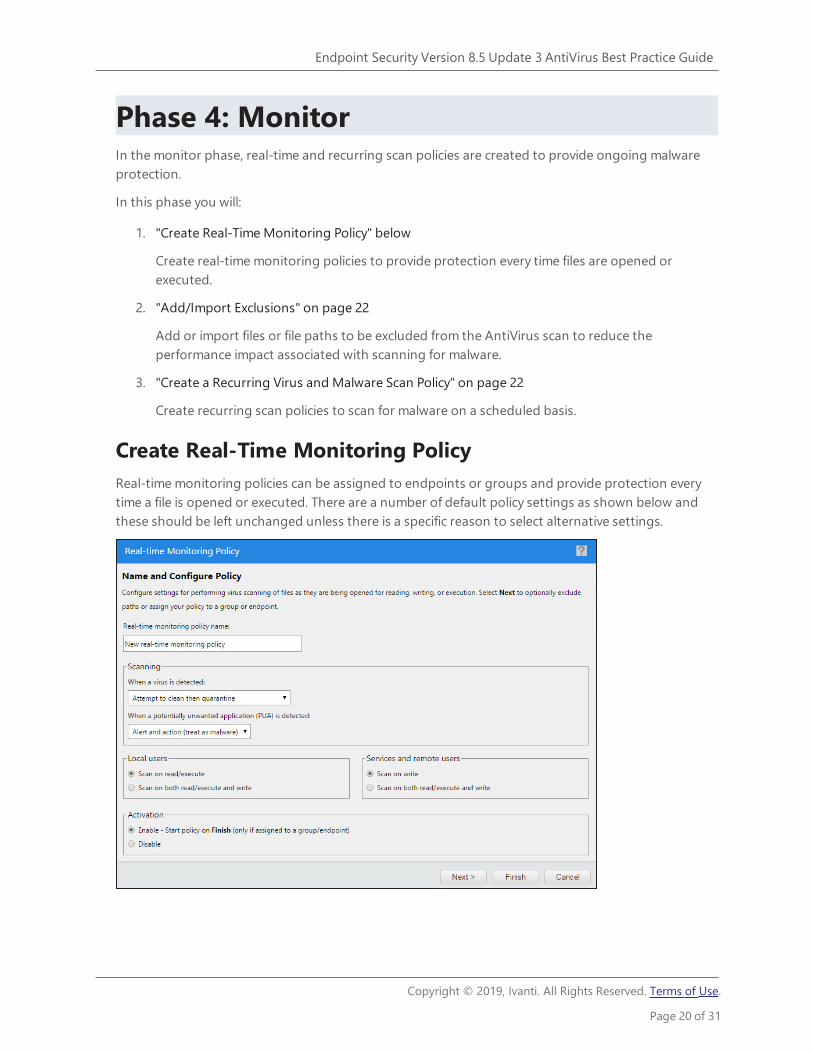
Create Real-Time Monitoring PolicyReal-time monitoring policies can be assigned to endpoints or groups and provide protection everytime a file is opened or executed. There are a number of default policy settings as shown below andthese should be left unchanged unless there is a specific reason to select alternative settings.
Copyright © 2019, Ivanti. All Rights Reserved. Terms of Use.
Page 20 of 31
Endpoint Security Version 8.5 Update 3 AntiVirus Best Practice Guide
Scanning Options
When a virus is detected, the default behavior is to attempt to clean the file but, if the AntiVirus engineis unable to clean it, to move it into quarantine for further action. Other actions can be selectedincluding:
l Perform no actionl Attempt to clean then deletel Attempt to clean then quarantine then delete
The option to perform no action might be selected to prevent critical files from being moved toquarantine which might render the system unusable. In such cases, an alert would be sent up to theserver. This option should only be selected if there are processes in place to deal with alertsimmediately when they are created as otherwise the malware will be allowed to operate unhinderedand spread to other endpoints in your network.
The default option of “Clean then Quarantine” is designed to prevent the file from executing if itcannot be cleaned by placing it in a protected quarantine folder. This is also useful in terms of locatinga sample of the file for further analysis, for example, in the case that it is a suspected false positive. Inthe event that such analysis is not required, it is possible to select either of the “Delete” options whichwill cause the file to be deleted if the AntiVirus engine is unable to clean it or quarantine it. However,note that, in the event that the file is incorrectly identified as malware (i.e. a false positive) and the filehas been deleted, it can no longer be restored.
Local Users/Services and Remote Users
Files are treated differently for scanning purposes depending on whether the file action was initiatedby a local or remote user. A local user is any file interaction that happens on the local machine in thelocal user context. A service running on the local machine is considered to be a local user. Remote useris anything which is initiated externally. Connections via RDP, Citrix, Terminal services are considered tobe remote users.
In the case of local users, the default behaviour is to scan files when they are read or executed. Forremote users, the default behaviour is to scan when the remote user or service is writing to the file toensure that they are not adding malware to the system.
In the case of a malware outbreak, changing the settings to “scan on both read/execute and write”will provide a greater level of protection. However, note that it also increases the performance impactassociated with AntiVirus scans.
Copyright © 2019, Ivanti. All Rights Reserved. Terms of Use.
Page 21 of 31
Endpoint Security Version 8.5 Update 3 AntiVirus Best Practice Guide
Add/ImportExclusionsSpecific files, file types or file paths can be excluded from AntiVirus scans. This can be done, for example, where scanning these entities provides no benefit because they are safe but scanning them causes a noticeable performance impact on the endpoint. Exclusions might also be used temporarily in the event of a false positive whereby a clean file gets quarantined incorrectly. Adding an exclusion for this file enables the file to be restored immediately instead of waiting for an updated set of AntiVirus definitions whereby the file will be restored automatically if the false positive has been addressed with that new set of definitions.
You can view a set of recommended exclusions based on application vendor recommendations on Ivanti Community Article 58945. The article includes XML files containing these excludes which can be imported directly into the policy. There is one XML file for core system excludes which should be appliedto all endpoints in your environment (subject to your review and acceptance). In addition, there is aCommon Application Exclusions XML file which should be edited and applied selectively for anyendpoints containing those applications.
Excluding file paths adds risk in that malware can execute from these locations without beingscanned. You should minimize the use of file path exclusions to minimize the associated risk.
Create a Recurring Virus and Malware Scan PolicyWhile the real time monitoring policy is used to protect users from malware whenever they open orexecute files, you should also create a recurring virus and malware scan policy and this policy is used toscan for malware on a scheduled basis to remove any dormant malware from the endpoint.
Scan Frequency
The recurring scan can be executed daily or weekly as shown below. In general, customers will opt toconduct weekly or fortnightly recurring scans. As real-time monitoring provides immediate protectionwhen files are accessed, there may be limited benefit from conducting more frequent recurring scansto remove dormant malware.
Copyright © 2019, Ivanti. All Rights Reserved. Terms of Use.
Page 22 of 31
Endpoint Security Version 8.5 Update 3 AntiVirus Best Practice Guide
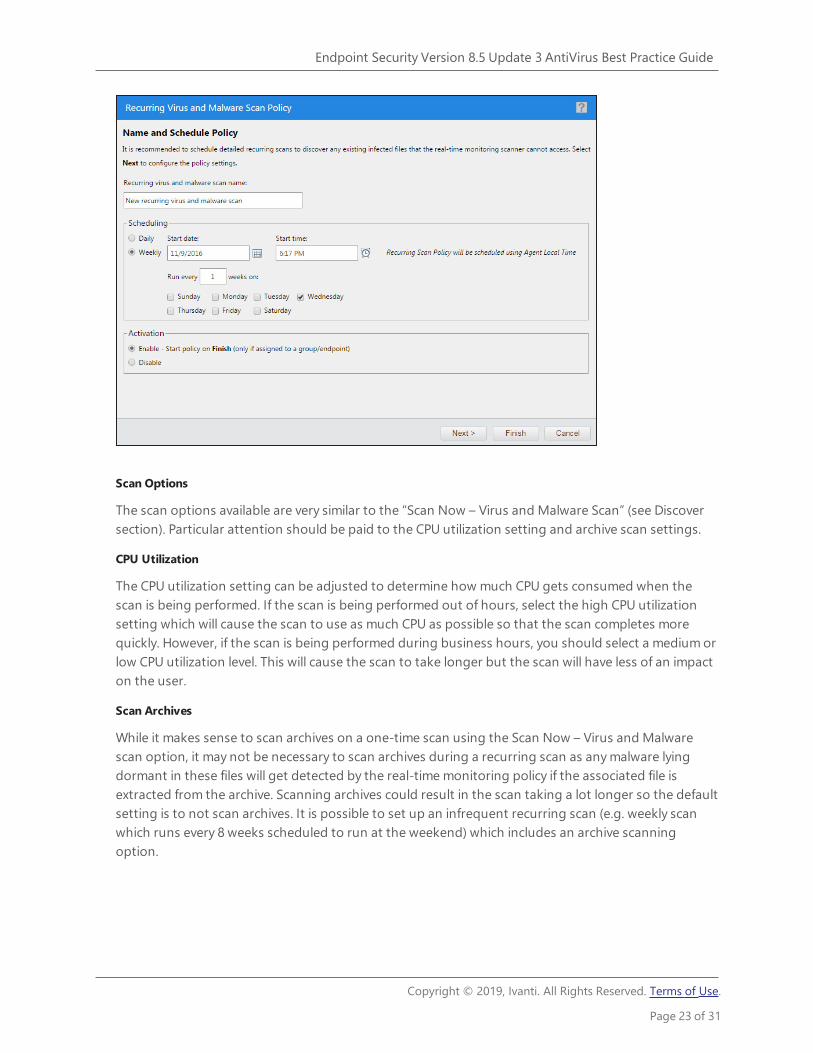
Scan Options
The scan options available are very similar to the “Scan Now – Virus and Malware Scan” (see Discoversection). Particular attention should be paid to the CPU utilization setting and archive scan settings.
CPU Utilization
The CPU utilization setting can be adjusted to determine how much CPU gets consumed when thescan is being performed. If the scan is being performed out of hours, select the high CPU utilizationsetting which will cause the scan to use as much CPU as possible so that the scan completes morequickly. However, if the scan is being performed during business hours, you should select a medium orlow CPU utilization level. This will cause the scan to take longer but the scan will have less of an impacton the user.
Scan Archives
While it makes sense to scan archives on a one-time scan using the Scan Now – Virus and Malwarescan option, it may not be necessary to scan archives during a recurring scan as any malware lyingdormant in these files will get detected by the real-time monitoring policy if the associated file isextracted from the archive. Scanning archives could result in the scan taking a lot longer so the defaultsetting is to not scan archives. It is possible to set up an infrequent recurring scan (e.g. weekly scanwhich runs every 8 weeks scheduled to run at the weekend) which includes an archive scanningoption.
Copyright © 2019, Ivanti. All Rights Reserved. Terms of Use.
Page 23 of 31
Endpoint Security Version 8.5 Update 3 AntiVirus Best Practice Guide
Logging
The log level for real-time monitoring is set to “Normal” which means that log events are created in theevent that malware is detected. It is possible to change this level to “Detailed” whereby a log entry iscreated for every file that is scanned. This logging level would only be used for diagnostic purposes(e.g. to analyse an application conflict or performance issue) so is not available as a policy optionbecause it would create large log files and could cause performance issues. However, if you need to dosome troubleshooting and require a detailed logging level, please contact Ivanti Support to get thisenabled temporarily.
Phase 4: RecapIn this phase, real-time and recurring scan policies are created to provide ongoing protection againstmalware. These policies can be tuned to balance performance and productivity using exclusions andpolicy settings including CPU utilization and archive scanning. Recurring scans can be scheduled toexecute out of hours to minimize end-user impact.
Copyright © 2019, Ivanti. All Rights Reserved. Terms of Use.
Page 24 of 31
Endpoint Security Version 8.5 Update 3 AntiVirus Best Practice Guide
Phase 5: ManageNow that the policies have been established, on-going AntiVirus management is achieved throughthe use of AntiVirus reports, dashboard widgets and email notifications.
In this phase you will:
l "Email Notifications" below
Create email notifications to alert the administrator of unusual malware activity that requiresattention
l "AntiVirus Dashboard Widgets" on the next page
Enable AntiVirus dashboard widgets to provide an at-a-glance indication of the overall systemstatus from a malware perspective.
l "AntiVirus Reports" on the next page
Create reports to perform more detailed analysis
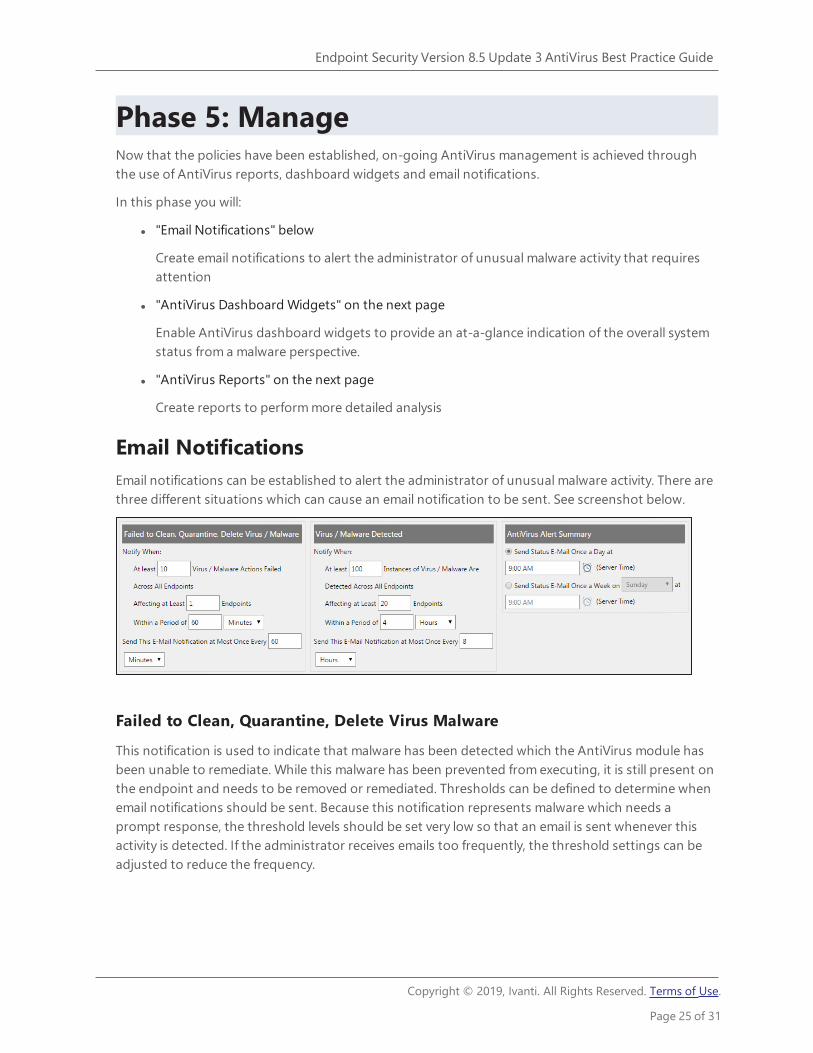
Email NotificationsEmail notifications can be established to alert the administrator of unusual malware activity. There arethree different situations which can cause an email notification to be sent. See screenshot below.
Failed to Clean, Quarantine, Delete Virus Malware
This notification is used to indicate that malware has been detected which the AntiVirus module hasbeen unable to remediate. While this malware has been prevented from executing, it is still present onthe endpoint and needs to be removed or remediated. Thresholds can be defined to determine whenemail notifications should be sent. Because this notification represents malware which needs aprompt response, the threshold levels should be set very low so that an email is sent whenever thisactivity is detected. If the administrator receives emails too frequently, the threshold settings can beadjusted to reduce the frequency.
Copyright © 2019, Ivanti. All Rights Reserved. Terms of Use.
Page 25 of 31
Endpoint Security Version 8.5 Update 3 AntiVirus Best Practice Guide
AntiVirus Alert Summary
It is also possible to get a daily or weekly email summary of the overall AntiVirusmodule status whichcan be used as a daily or weekly reminder of the AntiVirus remediation tasks which need to beperformed. Depending on your preferences and security posture, this could be used as an alternativeto either of the other email notifications.
AntiVirus Dashboard WidgetsThere are three dashboard widgets which can be enabled to provide an at-a-glance indication of theoverall status of the AntiVirus module. Each of these widgets is actionable, in that the administratorcan click on the widget to drill down to obtain the associated detailed information from which thewidget is derived:
Endpoints with Unresolved AntiVirus Alerts
This widget identifies the number of endpoints which have malware which the AntiVirus engine hasquarantined or has been unable to clean. These represent malware which requires prompt action andis useful in terms of prioritising malware response.
Top 10 Infected Endpoints
This widget identifies which endpoints have got the greatest number of malware infections and isuseful in prioritizing endpoints requiring remediation or follow-up security training.
Top 10 Virus/malware Threats
This widget identifies the most prevalent malware that has been detected in your environment and isuseful in terms of understanding how malware is getting into your environment enabling you to takesteps to reduce the associated attack vectors.
AntiVirus ReportsThere are 2 standard reports which can be created for more detailed analysis:
AntiVirus Definition Version Status
This report can be used to determine which endpoints are most out-of-date with respect to AntiVirusdefinitions and to take remedial action to bring them up to date.
Endpoints/Groups with infections by date
This report enables you to perform analysis to determine how malware is entering your environmentby identifying which endpoints get infected most frequently or were first to report on specific types ofmalware. This information can then be used to determine how to prevent future occurrences andprovide end-user security training as appropriate.
Copyright © 2019, Ivanti. All Rights Reserved. Terms of Use.
Page 26 of 31
Endpoint Security Version 8.5 Update 3 AntiVirus Best Practice Guide
Phase 5: RecapIn this phase, email notifications and dashboard widgets are used to act as a reminder and to help youprioritize the AntiVirus remediation activities that are required. In addition, AntiVirus reports can beused for more detailed analysis to help you manage your environment and take action to reduce theincidence of malware in the future.
Copyright © 2019, Ivanti. All Rights Reserved. Terms of Use.
Page 27 of 31
Endpoint Security Version 8.5 Update 3 AntiVirus Best Practice Guide
Phase 6: RecoverAt this point you have completed all of the steps needed to be in control of your environment from anAntiVirus perspective. However, you will occasionally encounter incidents that require furtherinvestigation.
In this phase you will:
l "Submit Suspect Files for Analysis" below
Submit suspect files for analysis or for validation and removal as false positives.
l "Create Temporary Exclusions for False Positives" on the next page
l "Manually Restore or Delete Files From Quarantine" on page 30
Manually restore or delete files from quarantine that have not been automatically restored.
Submit Suspect Files for AnalysisSubmit suspect files for analysis If a file has been quarantined, you can submit this for further analysisto obtain remediation information (in the event that it is confirmed to be malware) or to get theAntiVirus signatures updated to remove/modify this signature (in the event that this is a falsepositive). There are a couple of different methods that can be used to submit files for analysis.
Submit file to Ivanti Support
This is the best mechanism to submit files for analysis. It ensures that the submission is tracked andprioritized. As the file has been detected as malware, the file needs to be protected prior tosubmission as otherwise it could get blocked during transmission. Quarantined files are stored in ahardened location in the endpoint’s \Ivanti\LMAgent\Data\persist\AntiVirus\quarantine folder. If thisfolder is not accessible then contact Ivanti Support for details on how to retrieve the file.
To prepare a file for submission, the file should be added to a password protected archive file withpassword = Infected. Once this has been done the file can then be safely emailed to Ivanti Support,added to a case in the Ivanti Self-Service Portal , or uploaded to an FTP location for download (if toolarge for email).
Ivanti Support will then have the file analyzed and report back on the results whether the filecontained malware or was a false positive.
Submit file for analysis directly
In order to get an initial assessment on a quarantined file, you can submit it directly via Virus Total.
Copyright © 2019, Ivanti. All Rights Reserved. Terms of Use.
Page 28 of 31
Endpoint Security Version 8.5 Update 3 AntiVirus Best Practice Guide
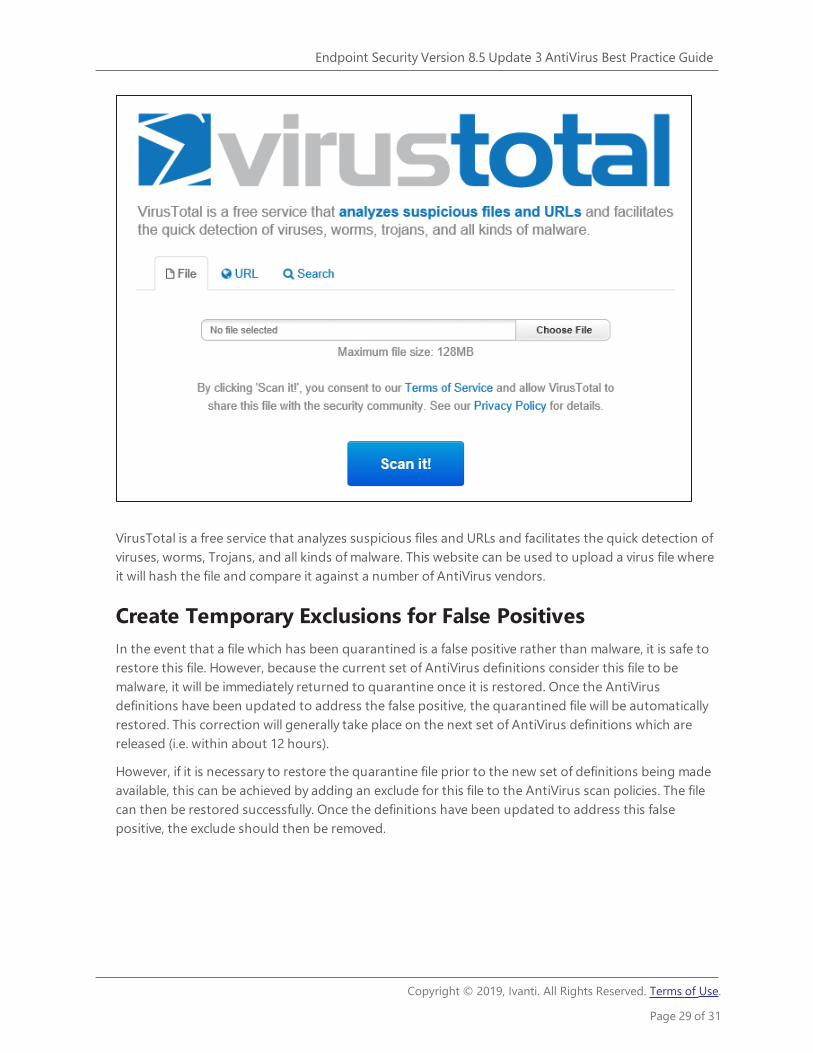
VirusTotal is a free service that analyzes suspicious files and URLs and facilitates the quick detection ofviruses, worms, Trojans, and all kinds of malware. This website can be used to upload a virus file whereit will hash the file and compare it against a number of AntiVirus vendors.
Create Temporary Exclusions for False PositivesIn the event that a file which has been quarantined is a false positive rather than malware, it is safe torestore this file. However, because the current set of AntiVirus definitions consider this file to bemalware, it will be immediately returned to quarantine once it is restored. Once the AntiVirusdefinitions have been updated to address the false positive, the quarantined file will be automaticallyrestored. This correction will generally take place on the next set of AntiVirus definitions which arereleased (i.e. within about 12 hours).
However, if it is necessary to restore the quarantine file prior to the new set of definitions being madeavailable, this can be achieved by adding an exclude for this file to the AntiVirus scan policies. The filecan then be restored successfully. Once the definitions have been updated to address this falsepositive, the exclude should then be removed.
Copyright © 2019, Ivanti. All Rights Reserved. Terms of Use.
Page 29 of 31
Endpoint Security Version 8.5 Update 3 AntiVirus Best Practice Guide
Manually Restore or Delete Files From QuarantineQuarantined files will automatically be restored from quarantine if they can be successfully cleaned orare considered clean (i.e. false positive) with a new set of AntiVirus definitions. In some circumstances,it may not be possible to automatically restore a cleaned file from quarantine.
This includes:
l If the filename already exists in the restored location (i.e. the file has already been replaced).l If the file was quarantined from removable media (e.g. USB stick), the file will not be
automatically restored for security reasons.
In these situations, the quarantined file can be manually restored from the quarantine or deleted asappropriate.
Phase 6: RecapIn this phase, you will submit files for further analysis to confirm whether they are malware or todetermine whether they have been quarantined in error (i.e. false positive). Submitting the files willenable you to obtain remediation steps in the case of malware or get an updated set of definitionswith a signature correction in the case of a false positive. While false positives will be automaticallyrestored with the updated set of definitions you can exclude these files so that they can be restored inadvance of the new definitions being available. You can also manually restore files which are notautomatically restored from quarantine which can occur in certain situations.
Copyright © 2019, Ivanti. All Rights Reserved. Terms of Use.
Page 30 of 31
Endpoint Security Version 8.5 Update 3 AntiVirus Best Practice Guide
Document SummaryThis document has been written to provide a best practice process for administrators whenimplementing AntiVirus in their environments. Hopefully you find this to be useful as you roll theproduct out in your environment.
If you identify any issues in this document or any best practices you think should be added, pleasesend an email to Ivanti Support with the details.
Copyright © 2019, Ivanti. All Rights Reserved. Terms of Use.
Page 31 of 31
Endpoint Security Version 8.5 Update 3 AntiVirus Best Practice Guide


