Embed Size (px)
Citation preview

www.it-
Making Everything Eas•ierJ.™
Learn to:• Use the essential tools and operationsforVBA
• Get the most out of Excel's macro recording feature
• Handle errors and eliminate bugs in your code
• Develop custom worksheetfunctions and user-oriented applications
John Walkenbach

www.it-
Author of Excel 2013 Bible

www.it-
Get More and Do More atDummies.com®
Start with FREE CheatSheets
Cheat Sheetsinclude
•Checklist
s-
Charts
·CommonInstructions
• And Other GoodStuff!
To access the Cheat Sheet created specificallyforthis book, go to
www.dummies.com/cheatsheet/excelvbaprogramming
Get Smart at Dummies.comDummies.com makes your life easier with 1,000sof answers on everything from removing wallpaper to using the latest version of Windows.
Check out our-Videos·Illustrated Articles·Step-by-Step Instructions
www.it-
Plus, each month you can win valuable prizes by entering our Dummies.com sweepstakes.*
Want a weekly dose of Dummies? Sign up for Newsletters on• Digital Photography·Microsoft Windows & Office• Personal Finance & Investing-Health & Wellness·Computing, iPods & Cell Phones·eBay-Internet• Food, Home & Garden
Find out "HOW"at Dummies.com*Sweepstakesnot currently available in all countries;visit Dummies.com for official rules.

www.it-
Excel® VBAProgrammin
gFOR
DUMmIES‰
3RD EDITION
by John Walkenbach

www.it-

www.it-
Excel® VBA Programming For Dummies®, 3rd EditionPublished byJohn Wiley & Sons, Inc.111 River StreetHoboken, NJ 07030-5774www.wiley.comCopyright © 2013 by John Wiley & Sons, Inc., Hoboken, New Jersey Published by John Wiley &Sons, Inc., Hoboken, New Jersey Published simultaneously in CanadaNo part of this publication may be reproduced, stored in a retrieval system or transmitted in any form or by any means, electronic, mechanical, photocopying, recording, scanning or otherwise, except as permit- ted under Sections 107 or 108 of the 1976 United States Copyright Act, without either the prior written permission of the Publisher, or authorization through payment of the appropriate per-copy fee to the Copyright Clearance Center, 222 Rosewood Drive, Danvers,MA 01923, (978) 750-8400, fax (978) 646-8600. Requests to the Publisher forpermission should be addressed to the Permissions Department, John Wiley& Sons, Inc., 111 River Street, Hoboken, NJ 07030, (201) 748-6011, fax (201) 748-6008, or online at http://www.wiley.com/go/permissions.Trademarks: Wiley, the Wiley logo, For Dummies, the Dummies Man logo, A Reference for the Rest of Us!, The Dummies Way, Dummies Daily, The Fun andEasy Way, Dummies.com, Making Everything Easier, and related trade dress are trademarks or registered trademarks of John Wiley & Sons, Inc. and/or its affili- ates in the United States and other countries,and may not be used without written permission. All othertrademarks are the property of their respective owners. John Wiley & Sons, Inc. is not associated with any product or vendor mentioned in this book.
LIMIT OF LIABILITY/DISCLAIMER OF WARRANTY: THE PUBLISHER AND THE AUTHOR MAKE NOREPRESENTATIONS OR WARRANTIES WITH RESPECT TO THE ACCURACY OR COMPLETENESS OF THECONTENTS OF THIS WORK AND SPECIFICALLY DISCLAIM ALL WARRANTIES, INCLUDING WITH- OUTLIMITATION WARRANTIES OF FITNESS FOR A PARTICULAR PURPOSE. NO WARRANTY MAY BECREATED OR EXTENDED BY SALES OR PROMOTIONAL MATERIALS. THE ADVICE AND STRATEGIESCONTAINED HEREIN MAY NOT BE SUITABLE FOR EVERY SITUATION. THIS WORK IS SOLD WITHTHE UNDERSTANDING THAT THE PUBLISHER IS NOT ENGAGED IN RENDERING LEGAL, ACCOUNTING,OR OTHER PROFESSIONAL SERVICES. IF PROFESSIONAL ASSISTANCE IS REQUIRED, THESERVICES OF A COMPETENT PROFESSIONAL PERSON SHOULD BE SOUGHT. NEITHER THEPUBLISHER NOR THE AUTHOR SHALL BE LIABLE FOR DAMAGES ARISING HEREFROM. THE FACTTHAT AN ORGANIZA- TION OR WEBSITE IS REFERRED TO IN THIS WORK AS A CITATION AND/ORA POTENTIAL SOURCE OF FURTHER INFORMATION DOES NOT MEAN THAT THE AUTHOR OR THEPUBLISHER ENDORSES THE INFORMATION THE ORGANIZATION OR WEBSITE MAY PROVIDE ORRECOMMENDATIONS IT MAY MAKE. FURTHER, READERS SHOULD BE AWARE THAT INTERNETWEBSITES LISTED IN THIS WORK MAY HAVE CHANGED OR DISAPPEARED BETWEEN WHEN THISWORK WAS WRITTEN AND WHEN IT IS READ. FULFILLMENT OF EACH COUPON OFFER IS THE SOLERESPONSIBILITY OF THE OFFEROR.
For general information on our other products and services, please contact our Customer CareDepartment within the U.S. at 877-762-2974, outside the U.S. at 317-572-3993, or fax 317-572-4002.For technical support, please visit www.wiley.com/techsupport.Wiley publishes in a variety of print and electronic formats and by print-on-demand. Some material included with standard print versions of this book may not be included in e-books or in print-on-demand. If

www.it-
this book refers to media such as a CD or DVD that is not included in the version you purchased, you may download this material at http://booksupport.wiley.com. For more information about Wiley products, visit www.wiley.com.Library of Congress Control Number: 2012956413ISBN 978-1-118-49037-2 (pbk); ISBN 978-1-118-49038-9 (ePub); ISBN 978-1-118-49181-2 (eMobi); ISBN 978-1-118-49174-4 (ePDF)Manufactured in the United States of America10 9 8 7 6 5 4 3 2 1

www.it-
About the AuthorJohn Walkenbach is the best-selling author of more than 50 spreadsheet books and lives in southern Arizona. When he’s not using Excel, he’sprobably playing clawhammer banjo.
DedicationSub Book_Dedication()name = Application.UserNamereason = InputBox(“What makes “ & name & “ so
special?”)
msg = “This book is dedicated to “ &namemsg = msg & “ because “ & reasonMsgBox msg, vbInformation, “Dedication”
End Sub
Author’s AcknowledgmentsI’m grateful to all the talented people at Wiley Publishing for giving me the opportunity to write Excel books. Special thanks to Kelly Ewing (project editor) and Niek Otten (technical editor). They certainly made my job easier.

www.it-
Publisher’s AcknowledgmentsWe’re proud of this book; please send us your comments at http://dummies.custhelp.com.For other comments, please contact our Customer Care Department within the U.S. at 877-762-2974, outside the U.S. at 317-572-3993, or fax 317-572-4002.Some of the people who helped bring this book to market include the following:Acquisitions and Editorial
Project Editor: Kelly Ewing(Previous Edition: Colleen Totz
Diamond) Senior Acquisitions Editor: Katie Mohr Technical Editor: Niek OttenEditorial Manager: Jodi Jensen Editorial Assistant: Anne Sullivan Sr. Editorial Assistant: Cherie CaseCover Photo: ©Konstantin Inozemtsev/
iStockphoto
Composition Services
Project Coordinator: Katherine CrockerLayout and Graphics:
Jennifer Creasey, Christin Swinford
Proofreaders: Melissa Cossell, Jessica Kramer, Tricia Liebig, Rob Springer
Indexer: BIM Indexing & Proofreading Services
Publishing and Editorial for Technology Dummies
Richard Swadley, Vice President and Executive Group PublisherAndy Cummings, Vice President andPublisher Mary Bednarek, ExecutiveAcquisitions Director Mary C. Corder, Editorial Director
Publishing for Consumer Dummies
Kathleen Nebenhaus, Vice President and Executive PublisherComposition Services
Debbie Stailey, Director of Composition Services

www.it-
Contents at a Glance
Introduction ................................................................ 1Part I: Getting Started with Excel VBA Programming...... 9Chapter 1: What Is VBA?................................................................................................. 11Chapter 2: Jumping Right In........................................................................................... 21
Part II: How VBA Works with Excel............................. 31Chapter 3: Working in the Visual Basic Editor............................................................. 33Chapter 4: Introducing the Excel Object Model........................................................... 53Chapter 5: VBA Sub and Function Procedures............................................................ 67Chapter 6: Using the Excel Macro Recorder................................................................ 79

www.it-
Part III: Programming Concepts.................................. 91Chapter 7: Essential VBA Language Elements.............................................................. 93Chapter 8: Working with Range Objects..................................................................... 115Chapter 9: Using VBA and Worksheet Functions....................................................... 129Chapter 10: Controlling Program Flow and Making Decisions................................. 143Chapter 11: Automatic Procedures and Events......................................................... 163Chapter 12: Error-Handling Techniques..................................................................... 183Chapter 13: Bug Extermination Techniques..............................................................197Chapter 14: VBA Programming Examples................................................................... 209
Part IV: Communicating with Your Users................... 231Chapter 15: Simple Dialog Boxes................................................................................. 233Chapter 16: UserForm Basics....................................................................................... 249Chapter 17: Using UserForm Controls........................................................................ 265Chapter 18: UserForm Techniques and Tricks.......................................................... 283

www.it-
Chapter 19: Accessing Your Macros through the User Interface ............................ 307
Part V: Putting It All Together.................................. 327Chapter 20: Creating Worksheet Functions — and Living to Tell about It............. 329Chapter 21: Creating Excel Add-Ins............................................................................. 347

www.it-
Part VI: The Part of Tens.......................................... 359Chapter 22: Ten VBA Questions (and Answers)........................................................ 361Chapter 23: (Almost) Ten Excel Resources................................................................ 365Chapter 24: Ten VBA Do’s and Don’ts......................................................................... 369
Index ...................................................................... 375
www.it-
Table of ContentsIntroduction ................................................................. 1
Is This the Right Book?................................................................................... 1So You Want to Be a Programmer. . . ........................................................... 2Why Bother?..................................................................................................... 2What I Assume about You.............................................................................. 3Obligatory Typographical Conventions Section......................................... 4Check Your Security Settings......................................................................... 5How This Book Is Organized.......................................................................... 6
Part I: Getting Started with Excel VBA Programming........................ 6Part II: How VBA Works with Excel...................................................... 6Part III: Programming Concepts........................................................... 6Part IV: Communicating with Your Users........................................... 7

www.it-
Part V: Putting It All Together.............................................................. 7Part VI: The Part of Tens....................................................................... 7
Icons Used in This Book................................................................................. 7Getting the Sample Files................................................................................. 8Now What?........................................................................................................ 8
Part I: Getting Started with Excel VBA Programming ...... 9
Chapter 1: What Is VBA? . . . . . . . . . . . . . . . . . . . .. . . . . . . . . . . . . . . . . . .11
Okay, So What Is VBA?.................................................................................. 11What Can You Do with VBA?........................................................................ 12
Inserting a bunch of text..................................................................... 13Automating a task you perform frequently...................................... 13Automating repetitive operations..................................................... 13Creating a custom command.............................................................. 13Creating a custom button................................................................... 13

www.it-
Developing new worksheet functions............................................... 14Creating custom add-ins for Excel..................................................... 14Creating complete, macro-driven applications................................ 14
Advantages and Disadvantages of VBA......................................................14
VBA advantages................................................................................... 14VBA disadvantages.............................................................................. 15
VBA in a Nutshell........................................................................................... 15An Excursion into Versions.......................................................................... 18

www.it-
viii
Excel VBA Programming For Dummies, 3rd Edition
Chapter 2: Jumping Right In . . . . . . . . . . . . . . . . . . . . . . . . . . . . . . . . . . . .21
First Things First............................................................................................ 21What You’ll Be Doing.................................................................................... 22Taking the First Steps................................................................................... 22Recording the Macro..................................................................................... 23Testing the Macro.......................................................................................... 24Examining the Macro .................................................................................... 25Modifying the Macro..................................................................................... 27Saving Workbooks That Contain Macros................................................... 27Understanding Macro Security.................................................................... 28More about the NameAndTime Macro....................................................... 30
Part II: How VBA Works with Excel.............................. 31
Chapter 3: Working in the Visual Basic Editor . .. . . . . . . . . . . . . . . . . .33

www.it-
What Is the Visual Basic Editor?.................................................................. 33
Activating the VBE............................................................................... 33Understanding VBE components....................................................... 34
Working with the Project Window.............................................................. 36
Adding a new VBA module................................................................. 37Removing a VBA module..................................................................... 38Exporting and importing objects....................................................... 38
Working with a Code Window...................................................................... 39
Minimizing and maximizing windows............................................... 39Creating a module................................................................................ 40Getting VBA code into a module........................................................ 41Entering code directly......................................................................... 41Using the macro recorder................................................................... 44Copying VBA code............................................................................... 46
Customizing the VBA Environment............................................................. 47
www.it-
Using the Editor tab............................................................................. 47Using the Editor Format tab............................................................... 50Using the General tab.......................................................................... 51Using the Docking tab......................................................................... 52
Chapter 4: Introducing the Excel Object Model . .. . . . . . . . . . . . . . . . .53
Excel Is an Object?......................................................................................... 54Climbing the Object Hierarchy.................................................................... 54Wrapping Your Mind around Collections................................................... 55Referring to Objects...................................................................................... 56
Navigating through the hierarchy..................................................... 57Simplifying object references............................................................. 57
Diving into Object Properties and Methods.............................................. 58
Object properties................................................................................. 60Object methods.................................................................................... 61Object events........................................................................................ 62

www.it-
Table of Contents ixFinding Out More........................................................................................... 63
Using VBA’s Help system.................................................................... 63Using the Object Browser................................................................... 64Automatically listing properties and methods................................ 65
Chapter 5: VBA Sub and Function Procedures . . .. . . . . . . . . . . . . . . . .67
Subs versus Functions.................................................................................. 67
Looking at Sub procedures................................................................. 68Looking at Function procedures........................................................ 68Naming Subs and Functions............................................................... 69
Executing Sub procedures............................................................................ 69
Executing the Sub procedure directly.............................................. 71Executing the procedure from the Macro dialog box..................... 72Executing a macro by using a shortcut key...................................... 72Executing the procedure from a button or shape........................... 74Executing the procedure from another procedure......................... 75

www.it-
Executing Function procedures................................................................... 76
Calling the function from a Sub procedure...................................... 76Calling a function from a worksheet formula................................... 77
Chapter 6: Using the Excel Macro Recorder. . . . . . . . . . . . . . . . . .
. . . .79Is It Live, or Is It VBA?................................................................................... 79Recording Basics........................................................................................... 80Preparing to Record...................................................................................... 82Relative or Absolute?.................................................................................... 82
Recording in absolute mode............................................................... 82Recording in relative mode................................................................ 83
What Gets Recorded?.................................................................................... 85Recording Options......................................................................................... 86
Macro name.......................................................................................... 87Shortcut key......................................................................................... 87Store Macro In...................................................................................... 87Description ........................................................................................... 87

www.it-
Is This Thing Efficient?.................................................................................. 88
Part III: Programming Concepts...................................91
Chapter 7: Essential VBA Language Elements . . .. . . . . . . . . . . . . . . . .93
Using Comments in Your VBA Code........................................................... 93Using Variables, Constants, and Data Types............................................. 95
Understanding variables..................................................................... 95What are VBA’s data types?............................................................... 96Declaring and scoping variables........................................................ 98Working with constants.................................................................... 104Pre-made constants........................................................................... 105Working with strings......................................................................... 106Working with dates............................................................................ 107
www.it-
x Excel VBA Programming For Dummies, 3rd Edition
Using Assignment Statements.................................................................... 108
Assignment statement examples..................................................... 108About that equal sign........................................................................ 109Smooth operators.............................................................................. 109
Working with Arrays ................................................................................... 111
Declaring arrays................................................................................. 111Multidimensional arrays................................................................... 112Dynamic arrays.................................................................................. 113
Using Labels................................................................................................. 114
Chapter 8: Working with Range Objects . . . . .. . . . . . . . . . . . . . . . . . .115
A Quick Review............................................................................................ 115Other Ways to Refer to a Range................................................................. 117
The Cells property............................................................................. 117

www.it-
The Offset property........................................................................... 118
Some Useful Range Object Properties......................................................119
The Value property............................................................................ 120The Text property.............................................................................. 121The Count property........................................................................... 121The Column and Row properties..................................................... 121The Address property....................................................................... 122The HasFormula property................................................................ 122The Font property.............................................................................. 123The Interior property........................................................................ 125The Formula property....................................................................... 125The NumberFormat property........................................................... 126
Some Useful Range Object Methods......................................................... 126
The Select method............................................................................. 126The Copy and Paste methods.......................................................... 127

www.it-
The Clear method.............................................................................. 128The Delete method............................................................................ 128
Chapter 9: Using VBA and Worksheet Functions. . . . . . . . . . . . . . . . .129
What Is a Function?..................................................................................... 129Using Built-In VBA Functions..................................................................... 130
VBA function examples..................................................................... 130VBA functions that do more than return a value........................... 132Discovering VBA functions............................................................... 133
Using Worksheet Functions in VBA........................................................... 136
Worksheet function examples.......................................................... 136Entering worksheet functions.......................................................... 139More about using worksheet functions.......................................... 140
Using Custom Functions............................................................................. 140

www.it-
Table of Contents xiChapter 10: Controlling Program Flow and Making
Decisions . . . . .143Going with the Flow, Dude......................................................................... 143The GoTo Statement................................................................................... 144Decisions, Decisions.................................................................................... 145
The If-Then structure........................................................................ 146The Select Case structure................................................................. 150
Knocking Your Code for a Loop................................................................. 153
For-Next loops.................................................................................... 153Do-While loop..................................................................................... 159Do-Until loop....................................................................................... 159
Using For Each-Next Loops With Collections.......................................... 160
Chapter 11: Automatic Procedures and Events . . .. . . . . . . . . . . . . . . .163Preparing for the Big Event........................................................................ 163
Are events useful?.............................................................................. 165

www.it-
Programming event-handler procedures........................................ 165
Where Does the VBA Code Go?................................................................. 166Writing an Event-Handler Procedure........................................................ 167Introductory Examples............................................................................... 168
The Open event for a workbook...................................................... 168The BeforeClose event for a workbook........................................... 171The BeforeSave event for a workbook............................................ 172
Examples of Activation Events.................................................................. 173
Activate and deactivate events in a sheet...................................... 173Activate and deactivate events in a workbook.............................. 174Workbook activation events............................................................. 175
Other Worksheet-Related Events..............................................................176
The BeforeDoubleClick event........................................................... 176The BeforeRightClick event.............................................................. 176The Change event.............................................................................. 177
Events Not Associated with Objects......................................................... 179
The OnTime event............................................................................. 179Keypress events................................................................................. 181

www.it-
Chapter 12: Error-Handling Techniques . . . . .. . . . . . . . . . . . . . . . .
. . .183Types of Errors............................................................................................ 183An Erroneous Example............................................................................... 184
The macro’s not quite perfect.......................................................... 185The macro is still not perfect........................................................... 186Is the macro perfect yet?.................................................................. 186Giving up on perfection..................................................................... 187
Handling Errors Another Way.................................................................... 188
Revisiting the EnterSquareRoot procedure.................................... 188About the On Error statement......................................................... 189

www.it-
xii
Excel VBA Programming For Dummies, 3rd Edition
Handling Errors: The Details...................................................................... 190
Resuming after an error.................................................................... 190Error handling in a nutshell.............................................................. 192Knowing when to ignore errors....................................................... 192Identifying specific errors................................................................. 193
An Intentional Error .................................................................................... 194
Chapter 13: Bug Extermination Techniques . . . .. . . . . . . . . . . . . . . . .197
Species of Bugs............................................................................................ 197Identifying Bugs........................................................................................... 198Debugging Techniques............................................................................... 199
Examining your code......................................................................... 199Using the MsgBox function............................................................... 200Inserting Debug.Print statements.................................................... 201

www.it-
Using the VBA debugger................................................................... 202
About the Debugger.................................................................................... 202
Setting breakpoints in your code..................................................... 202Using the Watch window.................................................................. 205Using the Locals window.................................................................. 207
Bug Reduction Tips..................................................................................... 208
Chapter 14: VBA Programming Examples. . . . . . . . . . . . . . . . . .. . . . .209
Working with Ranges .................................................................................. 209
Copying a range................................................................................. 210Copying a variable-sized range........................................................ 211Selecting to the end of a row or column......................................... 212Selecting a row or column................................................................ 213Moving a range................................................................................... 213Looping through a range efficiently................................................ 214Looping through a range efficiently (Part II).................................. 216

www.it-
Prompting for a cell value................................................................. 216Determining the selection type........................................................ 217Identifying a multiple selection........................................................ 218
Changing Excel Settings.............................................................................. 219
Changing Boolean settings............................................................... 219Changing non-Boolean settings........................................................ 220
Working with Charts................................................................................... 220
AddChart versus AddChart2............................................................ 221Modifying the chart type .................................................................. 223Looping through the ChartObjects collection............................... 223Modifying chart properties............................................................... 224Applying chart formatting................................................................ 224
VBA Speed Tips............................................................................................ 225
Turning off screen updating............................................................. 226Turning off automatic calculation................................................... 227Eliminating those pesky alert messages......................................... 227

www.it-
Simplifying object references........................................................... 228Declaring variable types................................................................... 229Using the With-End With structure.................................................. 229

www.it-
Table of Contents
Part IV: Communicating with Your Users.................... 231
Chapter 15: Simple Dialog Boxes . . . . . . . . . . . . . . . . . . . . . . . . . . . . . .233
UserForm Alternatives................................................................................ 233The MsgBox Function................................................................................. 234
Displaying a simple message box.................................................... 235Getting a response from a message box......................................... 235Customizing message boxes............................................................. 236
The InputBox Function............................................................................... 240
InputBox syntax................................................................................. 240An InputBox example........................................................................ 240Another type of InputBox................................................................. 242
The GetOpenFilename Method.................................................................. 243
The syntax for the GetOpenFilename method............................... 243A GetOpenFilename example........................................................... 244
The GetSaveAsFilenameMethod ...............................................................246Getting aFolderName............................................................................... 246DisplayingExcel’s Built-in DialogBoxes

www.it-
................................................... 247
Chapter 16: UserForm Basics . . . . . . . .. . . . . . . . . . . . . . . . . . . . . . . . . .249
Knowing When to Use a UserForm............................................................ 249Creating UserForms: An Overview............................................................ 250Working with UserForms............................................................................ 251
Inserting a new UserForm................................................................. 251Adding controls to a UserForm........................................................ 252Changing properties for a UserForm control................................. 253Viewing the UserForm Code window.............................................. 254Displaying a UserForm...................................................................... 255Using information from a UserForm................................................ 255
A UserForm Example................................................................................... 256
Creating the UserForm...................................................................... 256Adding the CommandButtons.......................................................... 257Adding the OptionButtons................................................................ 258Adding event-handler procedures................................................... 259
Creatinga macroto displaythe dialog box....................................261Makingmacro availabl............................................................. 262Testingthe macro...........................................................................
Chapter 17: Using User

www.it-
Form Controls . . . . . . . . . . . . . .. . . . . . . . . . . . .265
Getting Started with Dialog Box Controls................................................. 265
Adding controls.................................................................................. 265Introducing control properties........................................................ 266
Dialog Box Controls: The Details............................................................... 269
CheckBox control.............................................................................. 269ComboBox control............................................................................. 270CommandButton control.................................................................. 270Frame control..................................................................................... 271Image control...................................................................................... 271
xiii

www.it-
xiv
Excel VBA Programming For Dummies, 3rd Edition
Label control...................................................................................... 272ListBox control................................................................................... 272MultiPage control............................................................................... 274OptionButton control........................................................................ 274RefEdit control................................................................................... 275ScrollBar control................................................................................ 276SpinButton control............................................................................ 277TabStrip control................................................................................. 277TextBox control................................................................................. 278ToggleButton control........................................................................ 279
Working with Dialog Box Controls............................................................ 279
Moving and resizing controls........................................................... 279Aligning and spacing controls.......................................................... 280

www.it-
Accommodating keyboard users..................................................... 280Testing a UserForm........................................................................... 282
Dialog Box Aesthetics................................................................................. 282
Chapter 18: UserForm Techniques and Tricks . . .. . . . . . . . . . . . . . . .283
Using Dialog Boxes...................................................................................... 283A UserForm Example................................................................................... 284
Creating the dialog box..................................................................... 284Writing code to display the dialog box........................................... 286Making the macro available.............................................................. 286Trying out your dialog box............................................................... 287Adding event-handler procedures................................................... 288Validating the data............................................................................. 289Now the dialog box works................................................................ 290
More UserForm Examples.......................................................................... 290
A ListBox example............................................................................. 290Selecting a range..................................................

www.it-
.............................. 295Using multiple sets of OptionButtons............................................. 297Using a SpinButton and a TextBox..................................................297Using a UserForm as a progress indicator..................................... 299Creating a modeless tabbed dialog box.......................................... 303Displaying a chart in a UserForm..................................................... 304
A Dialog Box Checklist................................................................................ 305
Chapter 19: Accessing Your Macros through the UserInterface . . .307
Ribbon Customization................................................................................ 307
Customizing the Ribbon manually................................................... 307Adding a macro to the Ribbon......................................................... 310Customizing the Ribbon with XML..................................................310
Customizing Shortcut Menus..................................................................... 314
Commanding the CommandBars collection................................... 315Listing all shortcut menus................................................................ 315Referring to CommandBars.............................................................. 315Referring to controls in a CommandBar......................................... 316

www.it-
Properties of CommandBar controls.............................................. 317

www.it-
Table of Contents xvVBA Shortcut Menu Examples................................................................... 319
Resetting all built-in, right-click menus........................................... 320Adding a new item to the Cell shortcut menu................................ 320Disabling a shortcut menu................................................................ 322
Creating a Custom Toolbar........................................................................ 323
Part V: Putting It All Together...................................327
Chapter 20: Creating Worksheet Functions —and Living to Tell about It . . . . . . . . . . . . . . . . . . . . . . . . . . . . . . . . . . . . .329
Why Create Custom Functions?................................................................. 329Understanding VBA Function Basics........................................................ 330Writing Functions........................................................................................ 331Working with Function Arguments........................................................... 331Function Examples...................................................................................... 332
A function with no argument............................................................ 332

www.it-
A function with one argument.......................................................... 333A function with two arguments........................................................ 334A function with a range argument................................................... 336A function with an optional argument............................................ 337
Wrapper Functions...................................................................................... 339
The NumberFormat function............................................................ 339The ExtractElement function............................................................ 340The SayIt function.............................................................................. 340The IsLike function............................................................................ 341
Functions That Return an Array................................................................ 341
Returning an array of month names................................................ 341Returning a sorted list....................................................................... 342
Using the Insert Function Dialog Box........................................................ 344
Displaying the function’s description............................................. 344Argument descriptions..................................................................... 345
Chapter 21: Creating Excel Add-Ins . . . . . . . .. . . . . . . . . . . . . . . . . . . .347

www.it-
Okay . . . So What’s an Add-In?................................................................... 347Why Create Add-Ins?................................................................................... 348Working with Add-Ins.................................................................................. 349Add-In Basics................................................................................................ 350An Add-In Example...................................................................................... 351
Setting up the workbook................................................................... 351Testing the workbook....................................................................... 353Adding descriptive information....................................................... 354Protecting the VBA code................................................................... 354Creating the add-in............................................................................ 355Opening the add-in............................................................................ 355Distributing the add-in...................................................................... 356Modifying the add-in.......................................................................... 356

www.it-
xvi
Excel VBA Programming For Dummies, 3rd Edition
Part VI: The Part of Tens........................................... 359
Chapter 22: Ten VBA Questions (and Answers) . . .. . . . . . . . . . . . . . .361
Chapter 23: (Almost) Ten Excel Resources . . . . . . . . . . . . . . . . . .. . . .365
The VBA Help System................................................................................. 365Microsoft Product Support........................................................................ 365Internet Websites........................................................................................ 366Excel Blogs................................................................................................... 366Google ........................................................................................................... 367Bing................................................................................................................ 367Local User Groups....................................................................................... 367My Other Books........................................................................................... 367
Chapter 24: Ten VBA Do’s and Don’ts . . . . . .. . . . . . . . . . . . . . . . . .. . .369

www.it-
Do Declare All Variables............................................................................. 369Don’t Confuse Passwords with Security................................................... 370Do Clean Up Your Code.............................................................................. 370Don’t Put Everything in One Procedure................................................... 371Do Consider Other Software...................................................................... 371Don’t Assume That Everyone Enables Macros........................................ 371Do Get in the Habit of Experimenting....................................................... 372Don’t Assume That Your Code Will Work with Other Excel Versions .... 372Do Keep Your Users in Mind...................................................................... 372Don’t Forget About Backups...................................................................... 373
Index ....................................................................... 375

www.it-
IntroductionGreetings, prospective Excel programmer. . . .
Thanks for buying my book. I think you’ll find that it offers a fast, enjoy-able way to discover the ins and outs of MicrosoftExcel programming. Even if you don’t have the foggiest idea of what programming is all about, this book can help you make Excel jump through hoops in no time (well, it will take some time).
Unlike most programming books, this one is written inplain English, andeven normal people can understand it. Even better, it’s filled with information of the “just the facts, ma’am” variety — and not the drivel you might need once every third lifetime.
Is This the Right Book?Go to any large bookstore (in-person or online), andyou’ll find many Excel books (far too many, as far asI’m concerned). A quick overview can help you decide whether this book is really right for you. This book
✓ Is designed for intermediate to advanced Excel users who want to get up to speed with Visual Basic for Applications (VBA) programming.
✓ Requires no previous programming experience.✓ Covers the most commonly used commands.✓ Is appropriate for Excel 2010 or Excel 2013.✓ Just might make you crack a smile occasionally — it even has cartoons.
If you’re using Excel 2000, XP, or 2003, this book isnot for you. If you’re using Excel 2007, it might be

www.it-
okay, but some things have changed. You’d probably be better off with the previous edition.
Oh yeah, this is not an introductory Excel book. If you’re looking for a gen- eral-purpose Excel book, check out any of the following books, which are allpublished by Wiley:
✓ Excel 2013 For Dummies, by Greg Harvey✓ Excel 2013 Bible, by John Walkenbach (yep, that’s me)

www.it-
2 Excel VBA Programming For Dummies, 3rd Edition
These books are also available in editions for earlier versions of Excel.
Notice that the title of this book isn’t The Complete Guide to Excel VBA Programming For Dummies. I don’t cover all aspects of Excel programming — but then again, you probably don’t want to know everything about this topic. If you consume this book and find that you’re hungry for a more compre- hensive Excel programming book, you might try Microsoft Excel 2013Power Programming with VBA, by John Walkenbach, also published by Wiley. And, yes, editions for older versions of Excel are also available.
So You Want to Be a Programmer. . . .
Besides earning money to pay my bills, my main goal inwriting this book isto show Excel users how to use the VBA language — atool that helps you sig- nificantly enhance thepower of the world’s most popular spreadsheet.Using VBA, however, involves programming. (Yikes! Thep word.)
If you’re like most computer users, the word programmer conjures up an image of someone who looksand behaves nothing like you. Perhaps words such as nerd, geek, and dweeb come to mind.
Times have changed. Computer programming has become much easier, and even so-called normal people now engage in this activity — and even admit it to friends and family. Programming simply means developing instructionsthat the computer automatically carries out. Excel programming refers to the fact that you can instructExcel to automatically do things that you normally do manually — saving you lots of time and (you

www.it-
hope) reducing errors. I could go on, but I need tosave some good stuff for Chapter 1.
If you’ve read this far, it’s a safe bet that you need to become an Excel pro- grammer. This could be something you came up with yourself or (more likely) something your boss decided. In this book, I tell you enough about Excel programming so that you won’t feel like an idiot the next time you’re trapped in a conference room with a group of Excel aficionados. And by the time you finish this book, you can honestly say, “Yeah, I do some Excel pro- gramming.”
Why Bother?Most Excel users never bother to explore VBA programming. Your interest in this topic definitelyplaces you among an elite group. Welcome to the fold! If you’re still not convinced that mastering Excel programming is a good idea, I’ve come up with afew good reasons why you might want to take the time to learn VBA programming:

www.it-
Introduction 3✓ It will make you more marketable. Like it or not,
Microsoft’s applica- tions are extremely popular.You may already know that all applications in Microsoft Office support VBA. The more you know about VBA, the better your chances for advancement in your job.
✓ It lets you get the most out of your software investment (or, more likely, your employer’s software investment). Using Excel without knowingVBA is sort of like buying a TV set and watching only the odd-numbered channels.
✓ It will improve your productivity (eventually). Mastering VBA definitely takes some time, but you’ll more than make up for this in the amount of time you ultimately save because you’re more productive. Sort of like what they told you about going to college.
✓ It’s fun (well, sometimes). Some people really enjoy making Excel do things that are otherwise impossible. By the time you finish this book, you just might be one of those people.
Now are you convinced?
What I Assume about YouPeople who write books usually have a target reader in mind. For this book, my target reader is a conglomerate of dozens of Excel users I’ve met over the years (either in person or out in cyberspace). The following points more or less describe my hypothetical target reader:
✓ You have access to a PC at work — and probably at home. And those computers are connected to the Internet.
✓ You’re running Excel 2010 or Excel 2013.✓ You’ve been using computers for several years.
www.it-
✓ You use Excel frequently in your work, and you consider yourself to be more knowledgeable about Excel than the average bear.
✓ You need to make Excel do some things that you currently can’t make it do.
✓ You have little or no programming experience.✓ You understand that the Help system in Excel can actually be useful.
Face it, this book doesn’t cover everything. If you get on good speakingterms with the Help system, you’ll be able to fill in some of the missing pieces.
✓ You need to accomplish some work, and you havea low tolerance for thick, boring computer books.

www.it-
4 Excel VBA Programming For Dummies, 3rd Edition
Obligatory TypographicalConventions Section
All computer books have a section like this. (I thinksome federal law requires it.) Read it or skip it.
Sometimes, I refer to key combinations — whichmeans you hold down one key while you pressanother. For example, Ctrl+Z means you hold downthe Ctrl key while you press Z.
For menu commands, I use a distinctive character to separate items on the Ribbon or menu. For example, you use the following command to create a named range in a worksheet:
Formulas➪Defined Names➪Define Name
Formulas is the tab at the top of the Ribbon, Defined Names is the Ribbon group, and Define Nameis the actual command.
The Visual Basic editor still uses old-fashioned menus and toolbars. So I might tell you to choose Tools➪Options. That means choose the Tools menu and then choose the Options menu item.
Any text you need to enter appears in bold. For example, I might say, enter=SUM(B:B) in cell A1.
Excel programming involves developing code — that is, the instructions Excel follows. All code in this book appears in a monospace font, like this:
Range(“A1:A12”).Select
Some long lines of code don’t fit between the margins in this book. In such cases, I use the standard VBA line-continuation character sequence:

www.it-
a space followed by an underscore character. Here’san example:
Selection.PasteSpecial Paste:=xlValues, _ Operation:=xlNone, SkipBlanks:=False, _ Transpose:=False
When you enter this code, you can type it as written or place it on a single line (omitting the space and underscore combination).

www.it-
Introduction 5Check Your Security Settings
It’s a cruel world out there. It seems that some scam artist is always trying to take advantage of you or cause some type of problem. The world of com-puting is equally cruel. You probably know about computer viruses, which can cause some nasty things to happen to your system. But did you know that computer viruses can also reside in an Excel file? It’s true. In fact, it’s relatively easy to write a computer virus by using VBA. An unknowing user can open an Excel file and spread the virus to other Excel workbooks, and to other systems.
Over the years, Microsoft has become increasingly concerned about security issues. This is a good thing, but it also means that Excel users need to under- stand how things work. You can check Excel’s security settings by using the File➪Options➪Trust Center➪Trust Center Settings command. There is a plethora of options in there, and people have been known to open that dialog boxand never be heard from again.
If you click the Macro Settings tab (on the left side of the Trust Center dialog box), your optionsare as follows:
✓ Disable all macros without notification: Macroswill not work, regard- less of what you do.
✓ Disable all macros with notification: When you open a workbook with macros, you will either see the Message Bar open with an option you can clickto enable macros, or (if the Visual Basic Editor window is open) you’ll get a message asking if youwant to enable macros.
✓ Disable all macros except digitally signed macros: Only macros with a digital signature are allowed to run (but even for those signatures you haven’t marked as trusted, you still get thesecurity warning).

www.it-
✓ Enable all macros: Let all macros run with no warnings. This option is not recommended becausepotentially dangerous code can be executed.
Consider this scenario: You spend a week writing a killer VBA program that will revolutionize your company. You test it thoroughly and then send it toyour boss. He calls you into his office and claims that your macro doesn’t do anything at all. What’s going on? Chances are, your boss’s security setting does not allow macros to run. Or maybe he chose to go along with Microsoft’s default suggestion and disable the macros when he opened the file.
Bottom line? Just because an Excel workbook containsa macro, it is no guar- antee that the macro willever be executed. It all depends on the securityset- ting and whether the user chooses to enable ordisable macros for that file.

www.it-
6 Excel VBA Programming For Dummies, 3rd Edition
In order to work with this book, you will need to enable macros for the files you work with. My advice is to use the second security level. Then whenyou open a file that you’ve created, you can simply enable the macros. If you open a file from someone you don’t know, you should disable the macros and check the VBA code to ensure that it doesn’t contain anything destructive or malicious. Usually, it’s pretty easy to identify suspicious VBA code.
Another option is to designate a trusted folder. Choose File➪Options➪Trust Center➪Trust Center Settings. Select the Trusted Locations option and then designate a particular folder to be a trustedlocation. Store your trusted workbooks there, and Excel won’t bug you about enabling macros. For example, if you download the sample files for this book, you can put them in a trusted location.
How This Book Is OrganizedI divided this book into six major parts, each of which contains several chap- ters. Although I arranged the chapters in a fairly logical sequence,you can read them in any order you choose. Here’s a quick preview of what’s in store for you.
Part I: Getting Started withExcel VBA ProgrammingPart I has but two chapters. I introduce the VBA language in the first chapter. In Chapter 2, I let you get your feet wet right away by taking you on a hands- on guided tour.

www.it-
Part II: How VBA Works with ExcelIn writing this book, I assume that you already know how to use Excel. The four chapters in Part II give you a better grasp on how VBA is implemented in Excel. These chapters are all important, so I don’t recommend skipping them, okay?
Part III: Programming ConceptsThe eight chapters in Part III get you into the nitty-gritty of what program- ming is all about. Youmay not need to know all this stuff, but you’ll be glad it’s there if you ever do need it.

www.it-
Introduction 7Part IV: Communicating with YourUsersOne of the coolest parts of programming in Excel is designing custom dialog boxes (well, at least I like it). The five chapters in Part IV show you how to create dialog boxes that look like they came straight from the software lab at Microsoft.
Part V: Putting It All TogetherThe two chapters in Part V pull together information from the preceding chapters. You discover how to include your own custom buttons in the Excel user interface, and you find out how to develop custom worksheet functions, create add-ins,design user-oriented applications, and even work with other Office applications.
Part VI: The Part of TensTraditionally, books in the For Dummies series containa final part that consists of short chapters withhelpful or informative lists. Because I’m a sucker fortradi- tion, this book has three such chapters thatyou can peruse at your convenience.
Icons Used in This BookSomewhere along the line, a market research companymust have shown that publishers can sell more copies of their computer books if they add icons to the margins of those books. Icons are those littlepictures that supposedly draw your attention to
www.it-
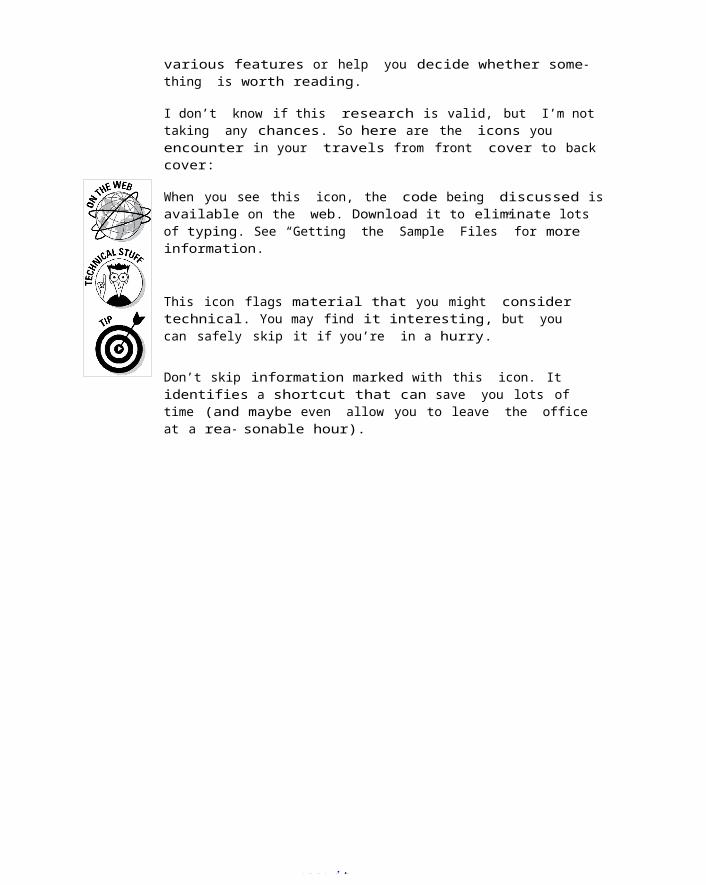
various features or help you decide whether some- thing is worth reading.
I don’t know if this research is valid, but I’m not taking any chances. So here are the icons you encounter in your travels from front cover to backcover:
When you see this icon, the code being discussed is available on the web. Download it to eliminate lots of typing. See “Getting the Sample Files” for more information.
This icon flags material that you might consider technical. You may find it interesting, but you can safely skip it if you’re in a hurry.
Don’t skip information marked with this icon. It identifies a shortcut that can save you lots of time (and maybe even allow you to leave the office at a rea- sonable hour).

www.it-
8 Excel VBA Programming For Dummies, 3rd Edition
This icon tells you when you need to store information in the deep recesses of your brain for later use.
Read anything marked with this icon. Otherwise, you may lose your data, blow up your computer, cause a nuclear meltdown — or maybe even ruin your whole day.
Getting the Sample FilesThis book has its very own website where you can download the example files. To get these files, point your web browser to
http://dummies.com/go/excelvbaprogrammingfd3e
Having the sample files will save you a lot oftyping. Better yet, you can play around with themand experiment with various changes. In fact, Ihighly rec- ommend playing around with these files.Experimentation is the best way to master VBA.
Now What?Reading this introduction was your first step. Now, it’s time to move on and become a programmer (there’s that p word again!).
If you’re a programming virgin, I strongly suggest that you start with Chapter1 and progress through the book until you’ve discovered enough to do what you want to do. Chapter 2 gives you some immediate hands-on experience, so you have the illusion that you’re making quick progress.

www.it-
But it’s a free country (at least it was when I wrote these words); I won’t sic the Computer Book Police on you if you opt to thumb through randomly and read whatever strikes your fancy.
I hope you have as much fun reading this book as I
did writing it. Occasionally, John Wiley & Sons has
updates to its technology books. If thisbook does have technical updates, they will be posted at
http://dummies.com/go/excelvbaprogrammingfdupdates

www.it-
Par tI

www.it-
Visit www.dummies.com for great Dummies content online.

www.it-
In thispart . . .
✓ Meet Visual Basic for Applications✓ See examples of some of the things you can do with VBA✓ Travel back in time and see what Excel
was like in the olden days✓ Work through a real-live Excel programming session✓ Get a handle on how Excel deals with macro security✓ Visit www.dummies.com for great
Dummies content online.

I
www.it-
Chapter1
What IsVBA?
In This Chapter▶ Getting a conceptual overview of VBA▶ Finding out what you can do with VBA▶ Discovering the advantages and disadvantages of using VBA▶ Taking a mini-lesson on the history of Excel
f you’re anxious to jump into VBA programming, hold your horses. This chapter is completely devoid of any hands-on training material. It does,
however, contain some essential background information that assists you in becoming an Excel programmer. In other words, this chapter paves theway for everything else that follows and gives you a feel for how Excel program- ming fits into the overall scheme of the universe. It’s not as boring as you might think, so please try to resist the urge to jump to Chapter 2.
Okay, So What Is VBA?VBA, which stands for Visual Basic for Applications, is a programming lan- guage developed by Microsoft — you

www.it-
know, the company that tries to get you to buy a newversion of Windows every few years. Excel, along withthe other members of Microsoft Office, includes the VBA language (at no extra charge). In a nutshell, VBA is the tool that people like you and me use to develop pro- grams that control Excel.
Imagine an intelligent robot that knows all about Excel. This robot can read instructions, and it can also operate Excel very fast and accurately. When you want the robot to do something in Excel, you write up a set of robot instruc- tions by using special codes. Then you tell the robot to follow your instruc- tions, while you sit back and drink a glass of lemonade. That’s kind of what VBA is all about — a code language for robots. Note, however, that Exceldoes not come with a robot or lemonade.

www.it-
12 Part I: Getting Started with Excel VBA Programming
A few words about terminologyExcel programming terminologycan be a bit confusing. Forexample, VBA is a programminglanguage, but it also servesas a macro lan- guage. What doyou call something written inVBA and executed in Excel? Isit a macro, or is it a program?Excel’s Help system oftenrefers to VBA procedures asmacros, so I use that ter-minology. But I also call thisstuff a program.
I use the term automatethroughout this book. This termmeans that a series ofsteps are
completed automatically. Forexample, if you write a macrothat adds color to some cells,prints the worksheet, and thenremoves the color, you haveautomated those three steps.By the way, macro does notstand for Messy And ConfusingRepeated Operation. Rather, itcomes from the Greek makros,which means large — which alsodescribes your paycheck afteryou become an expert macroprogrammer.
What Can You Do withVBA?
You’re probably aware that people use Excel for thousands of different tasks. Here are just a few examples:
✓ Analyzing scientific data✓ Budgeting and forecasting✓ Creating invoices and other forms✓ Developing charts from data✓ Keeping lists of things such as customers’ names, students’ grades, or holiday gift ideas(a nice fruitcake would be lovely)
✓ Yadda, yadda, yadda

www.it-
The list could go on and on, but I think you get theidea. My point is simply that Excel is used for a wide variety of tasks, and everyone reading this book has different needs and expectations regarding Excel. One thing virtually every reader has in common is the need to automate some aspect of Excel. That, dear reader, is what VBA is all about.
For example, you might create a VBA program to import some numbers and then format and print yourmonth-end sales report. After developing and testing the program, you can execute the macro witha single command, causing Excel to automatically perform many time-consuming procedures. Rather thanstruggle through a tedious sequence of commands, you can click a button and then hop on over to Facebook and kill some time while your macro does the work.

www.it-
Chapter 1: What Is VBA? 13In the following sections, I briefly describe some common uses for VBAmacros. One or two of these may push your button.
Inserting a bunch of textIf you often need to enter your company name, address, and phone numberin your worksheets, you can create a macro to do thetyping for you. You can extend this concept as far asyou like. For example, you might develop a macro thatautomatically types a list of all salespeople who work for your company.
Automating a task you perform frequentlyAssume you’re a sales manager and you need to prepare a month-end sales report to keep your bosshappy. If the task is straightforward, you can develop a VBA program to do it for you. Your boss willbe impressed by the consistently high quality of your reports, and you’ll be promoted to a new job for which you are highly unqualified.
Automating repetitive operationsIf you need to perform the same action on, say, 12 different Excel workbooks, you can record a macro while you perform the task on the first workbook andthen let the macro repeat your action on the otherworkbooks. The nice thing about this is that Excel never complains about being bored. Excel’s macro recorder is similar to recording live action on a video recorder. But it doesn’t require a camera, andthe battery never needs to be recharged.

www.it-
Creating a custom commandDo you often issue the same sequence of Excel menu commands? If so, save yourself a few seconds by developing a macro that combines these commands into a single custom command, which you can execute with a single keystroke or button click. You probablywon’t save that much time, but you’ll probablybe more accurate. And the guy in the next cubicle will be really impressed.
Creating a custom buttonYou can customize your Quick Access toolbar with your own buttons that execute the macros you write. Office workers tend to be very impressed bybuttons that perform magic. And if you really want toimpress your fellow employees, you can even add new buttons to the Ribbon.

www.it-
14 Part I: Getting Started with Excel VBA Programming
Developing new worksheet functionsAlthough Excel includes hundreds of built-in functions (such as SUM and AVERAGE), you can createcustom worksheet functions that can greatly simplifyyour formulas. I guarantee you’ll be surprised by how easy this is. (I show you how to do this in Chapter 20.) Even better, the Insert Functiondialog box displays your custom functions, making them appear built-in. Very snazzy stuff.
Creating custom add-ins for ExcelYou’re probably familiar with some of the add-ins that ship with Excel. For example, the Analysis ToolPak is a popular add-in. You can use VBA to develop your own special-purpose add-ins. I developed my Power Utility Pak add-in by using onlyVBA, and people all around the world pay me real money so they can use it.
Creating complete, macro-driven applicationsIf you’re willing to spend some time, you can use VBA to create large-scale applications complete with a custom Ribbon tab, dialog boxes, on-screen help, and lots of other accoutrements. This book doesn’t go quite that far, but I’m just telling you this to impress you with how powerful VBA reallyis.

www.it-
Advantages andDisadvantages of VBAIn this section, I briefly describe the good things about VBA — and I also explore its darker side.
VBA advantagesYou can automate almost anything you do in Excel. To do so, you write instructions that Excel carries out. Automating a task by using VBA offers several advantages:
✓ Excel always executes the task in exactly the same way. (In most cases, consistency is a good thing.)
✓ Excel performs the task much faster than you can do it manually (unless, of course, you’re Clark Kent).

www.it-
Chapter 1: What Is VBA? 15✓ If you’re a good macro programmer, Excel always performs the task without errors (which probably can’t be said about you or me).
✓ If you set things up properly, someone who doesn’t know anything about Excel can performthe task.
✓ You can do things in Excel that are otherwise impossible — which can make you a very popular person around the office.
✓ For long, time-consuming tasks, you don’t have to sit in front of your computer and get bored. Excel does the work, while you hang out at the water cooler.
VBA disadvantagesIt’s only fair that I give equal time to listing the disadvantages (or potentialdisadvantages) of VBA:
✓ You have to know how to write programs in VBA (but that’s why you bought this book, right?).Fortunately, it’s not as difficult as you might expect.
✓ Other people who need to use your VBA programsmust have their own copies of Excel. It would benice if you could press a button that trans- forms your Excel/VBA application into a stand-alone program, but that isn’t possible (and probably never will be).
✓ Sometimes, things go wrong. In other words, youcan’t blindly assume that your VBA program willalways work correctly under all circum- stances.Welcome to the world of debugging and, if others are using your macros, technical support.
✓ VBA is a moving target. As you know, Microsoft is continually upgrad- ing Excel. Even though Microsoft puts great effort into compatibility between versions, you may discover that the VBA code you’ve written doesn’t work properly
www.it-
with older versions or with a future version ofExcel.
VBA in a NutshellJust to let you know what you’re in for, I’ve prepared a quick and dirty sum- mary of what VBA is all about. Of course, I describe all this stuff in semi- excruciating detail later in the book.
✓ You perform actions in VBA by writing (or recording) code in a VBA module. You view and edit VBA modules by using the Visual Basic Editor (VBE).

www.it-
16 Part I: Getting Started with Excel VBA Programming
✓ A VBA module consists of Sub procedures. A Sub procedure has noth- ing to do with underwater vessels or tasty sandwiches. Rather, it’s a chunk of computer code that performs some action on or with objects (discussed in a moment). The following example shows a simple Sub procedure called AddEmUp. This amazing program displays the result of 1 plus 1:Sub
AddEmUp() Sum = 1 + 1MsgBox “The answer is “ & Sum
End Sub
A Sub procedure that doesn’t perform properlyis said to be substan- dard.
✓ A VBA module can also have Function procedures. A Function proce- dure returns a single value. You can call it from another VBA procedure or even use it as a function in a worksheet formula. An example of a Function procedure (named AddTwo) follows. This Function accepts two numbers (called arguments) and returns the sum of those values:Function
AddTwo(arg1, arg2) AddTwo = arg1 + arg2
End Function
A Function procedure that doesn’t work correctly is said to be dysfunc- tional.
✓ VBA manipulates objects. Excel provides dozens and dozens of objects that you can manipulate. Examples of objects include a workbook, a worksheet, a cell range, a chart, and a shape. You have many more objects at your disposal, and you can manipulate them by using VBA code.
✓ Objects are arranged in a hierarchy. Objects canact as containers for other objects. At the top of the object hierarchy is Excel. Excel itselfis an object called Application. The Application object contains other objects such as Workbook objects and Add-In objects. The Workbook object

www.it-
can contain other objects, such as Worksheet objects and Chart objects. A Worksheet object can contain objects such as Range objects and PivotTable objects. The term object model refers to the arrangement of these objects. (Object modelmavens can find out more in Chapter 4.)
✓ Objects of the same type form a collection. For example, the Worksheets collection consists of all the worksheets in a particular workbook. TheCharts collection consists of all Chart objectsin a work- book. Collections are themselves objects.
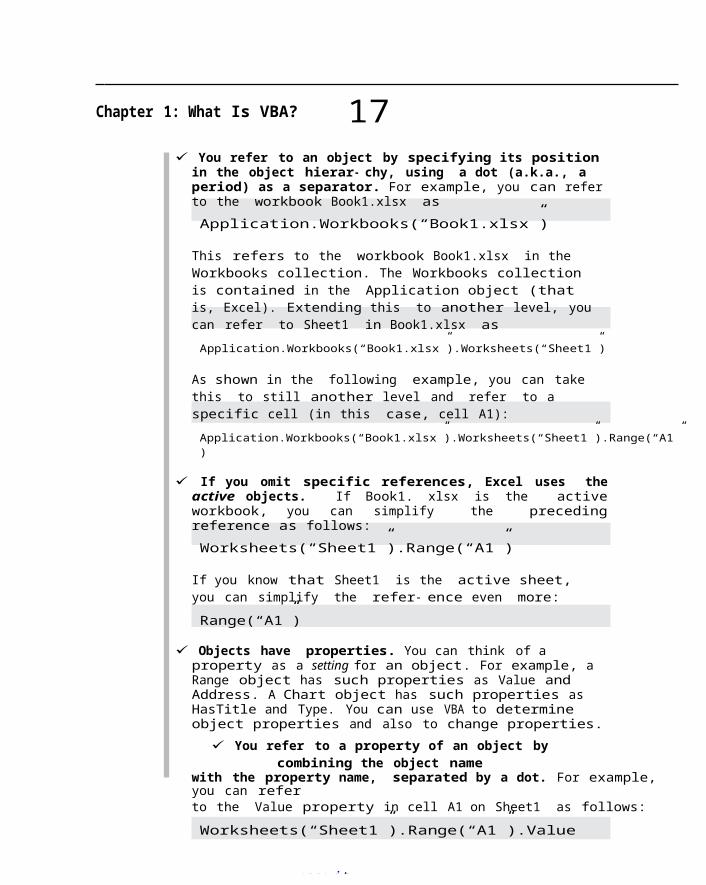
www.it-
Chapter 1: What Is VBA? 17✓ You refer to an object by specifying its position
in the object hierar- chy, using a dot (a.k.a., a period) as a separator. For example, you can referto the workbook Book1.xlsx asApplication.Workbooks(“Book1.xlsx”)
This refers to the workbook Book1.xlsx in the Workbooks collection. The Workbooks collection is contained in the Application object (that is, Excel). Extending this to another level, youcan refer to Sheet1 in Book1.xlsx asApplication.Workbooks(“Book1.xlsx”).Worksheets(“Sheet1”)
As shown in the following example, you can takethis to still another level and refer to a specific cell (in this case, cell A1):Application.Workbooks(“Book1.xlsx”).Worksheets(“Sheet1”).Range(“A1”)
✓ If you omit specific references, Excel uses theactive objects. If Book1. xlsx is the activeworkbook, you can simplify the precedingreference as follows:Worksheets(“Sheet1”).Range(“A1”)
If you know that Sheet1 is the active sheet, you can simplify the refer- ence even more:Range(“A1”)
✓ Objects have properties. You can think of a property as a setting for an object. For example, a Range object has such properties as Value and Address. A Chart object has such properties as HasTitle and Type. You can use VBA to determine object properties and also to change properties.
✓ You refer to a property of an object bycombining the object name
with the property name, separated by a dot. For example, you can referto the Value property in cell A1 on Sheet1 as follows:Worksheets(“Sheet1”).Range(“A1”).Value

www.it-
✓ You can assign values to variables. A variable is anamed element that stores information. You can use variables in your VBA code to store such things as values, text, or property settings. To assign the valuein cell A1 on Sheet1 to a variable called Interest, use the following VBAstatement:Interest = Worksheets(“Sheet1”).Range(“A1”).Value

www.it-
18 Part I: Getting Started with Excel VBA Programming
✓ Objects have methods. A method is an action Excel performs with an object. For example, one of the methods for a Range object is ClearContents. This aptly named method clears the contents of the range.
✓ You specify a method by combining the object withthe method, sepa- rated by a dot. For example, thefollowing statement clears the contents of cellA1:Worksheets(“Sheet1”).Range(“A1”).ClearContents
✓ VBA includes all the constructs of modern programming languages, including variables, arrays, and looping. In other words, if you’re will- ing to spend a little time mastering the ropes, you can write code that does some incredible things.
Believe it or not, the preceding list pretty much describes VBA in a nutshell. Now you just have to find out the details. That’s why this book has more pages.
An Excursion into VersionsIf you plan to develop VBA macros, you should have some understanding of Excel’s history. I know you weren’t expecting a history lesson when you picked up this book, but bear with me. This is important stuff that might make you a hit at the next nerd party.
Here are all the major Excel for Windows versions that have seen the light of day, along with a few words about how they handle macros:
✓ Excel 2: The original version of Excel for Windows was called Version
2 (rather than 1) so that it would correspond tothe Macintosh version.Excel 2 first appeared in 1987, but nobody usesit anymore, so you can pretty much forget thatit ever existed.

www.it-
✓ Excel 3: Released in late 1990, this version features the XLM macro lan- guage. Nobody uses this version either.
✓ Excel 4: This version hit the streets in early 1992. It also uses the XLM macro language. Perhaps 10 to12 people still use this version. (They subscribe to the philosophy if it ain’t broke, don’t fix it.)
✓ Excel 5: This one came out in early 1994. It wasthe first version to use VBA (but it alsosupports XLM). I haven’t heard from anyone whouses Excel 5 in years.

www.it-
Chapter 1: What Is VBA? 19✓ Excel 95: Technically known as Excel 7 (there is
no Excel 6), this version began shipping in the summer of 1995. It has a few VBA enhancements, andit supports the XLM language. It’s rarely used any more.
✓ Excel 97: This version (also known as Excel 8) wasborn in January 1997.
It has many enhancements, and it features an entirely newinterface forprogramming VBA macros. Excel 97 also uses a new file format (which previous Excel versions cannotopen). Occasionally, I run into someone who still uses this version.
✓ Excel 2000: This version’s numbering scheme jumped to four digits.
Excel 2000 (also known as Excel 9) made its public debut in June 1999.It includes only a few enhancements from a programmer’s perspective. Excel 2000 is also rarely used.
✓ Excel 2002: This version (also known as Excel 10or Excel XP) appeared in late 2001. Perhaps thisversion’s most significant feature is theability to recover your work when Excel crashes.People still use it.
✓ Excel 2003: Of all the Excel upgrades I’ve ever seen (and I’ve seen them all), Excel 2003 has thefewest new features. In other words, most hard-core Excel users (including yours truly) were very disappointed with Excel 2003. As I write this, Excel 2003 is still a commonly used version. It’s also the last “pre-Ribbon” versionof Excel.
✓ Excel 2007: Excel 2007 signaled the beginning of a new era. Excel 2007 dumped the old menu and toolbar interface and introduced the Ribbon. I,for one, was disappointed to discover that you can’t modify theRibbon by using VBA. But it had enough new features to satisfy me, such as a new file formatand support for much larger worksheets — more than a million rows.

www.it-
✓ Excel 2010: Microsoft outdid its corporate selfwith this version. This version has some slick new features (such as sparkline graphics), andit also performs quite a bit better in some areas. And if you need really, really huge workbooks, you can install the 64-bit version. But again, I was disappointed because there’s still no way to modify the Ribbon using VBA.
✓ Excel 2013: The latest version, and the one I used while I was writing this edition of the book. Excel 2013 is also available in an online version and for tablets. The Ribbon is still around, but it now has a flat look — and you still can’t modify it using VBA!
This book is written for Excel 2010 and Excel 2013. If you don’t have one of those versions, you run the risk of getting confused in a few places.

www.it-
20 Part I: Getting Started with Excel VBA Programming
So what’s the point of this mini history lesson? If you plan to distribute your Excel/VBA files to other users, it’s vitally important that you understand which version of Excel they use. People using an older version won’t be able to take advantage of features introduced in later versions. For example,if you write VBA code that references cell XFD1048576(the last cell in a workbook), those who use a version prior to Excel 2007 will get an error because those pre-Excel 2007 worksheets only had 65,536 rows and 255 columns (the last cell is IV65536).
Excel 2010 and later also have some new objects, methods, and properties.If you use these in your code, users with an olderversion of Excel will get an error when they run your macro — and you’ll get the blame.
The good news is that Microsoft has made available an Office Compatibility Pack, which allows users of Excel 2003 and Excel XP to open and save work- books in the new file format. This product (which is free, by the way) doesn’t give these older versions the new features. It just lets them open and save files in the newer file format.

I
www.it-
Chapter2
JumpingRight In
In This Chapter▶ Developing a useful VBA macro: A hands-on, step-by-step example▶ Recording your actions by using Excel’s macro recorder▶ Examining and testing recorded code▶ Dealing with macro security issues▶ Changing a recorded macro
’m not much of a swimmer, but I have found that the best way to get into a cold body of water isto jump right in — no sense prolonging the agony.
By wading through this chapter, you can get your feet wet immediately but avoid getting in over your head.
By the time you reach the end of this chapter, you may start feeling better about this Excel programming business, and you’ll be glad you took the plunge. This chapter provides a step-by-step demonstration of how to develop a simple but useful VBA macro.

www.it-
First Things FirstBefore you can call yourself an Excel programmer, youmust go through the initiation rites. That means you need to make a small change so Excel will displaya new tab at the top of the screen: Developer. Getting Excel to display the Developer tab is easy (and you only have to do it one time). Just follow these steps:
1. Right-click any part of the Ribbon and choose Customize the Ribbon.2. In the Customize Ribbon tab of the Excel Options dialog box, locate
Developer in the secondcolumn.
3. Put a check mark next to Developer.4. Click OK, and you’re back to Excel with a brand-new tab: Developer.

www.it-
22 Part I: Getting Started with Excel VBA Programming
When you click the Developer tab, the Ribbon displays information that is of interest to programmers (that’s you!). Figure 2-1 shows how the Ribbon looks when the Developer tab is selected in Excel 2013.
Figure2-1: TheDeveloper tab
isnormallyhidden,but it’seasy tounhide.
What You’ll Be DoingIn this section, I describe how to create your first macro. The macro that you’re about to create will do this.
✓ Type your name into a cell.✓ Enter the current date and time into the cell below.✓ Format both cells to display bold.✓ Change the font size of both cells to 16 point.
This macro won’t be winning any prizes in the AnnualVBA Programmer’s Competition, but everyone must start somewhere. The macro accomplishes all these steps in a single action. As I describe in the following sections, you start by recording your actions as you go through these steps. Then you test the macro to see whether it works. Finally, you edit the macro to add some finishing touches. Ready?

www.it-
Taking the First StepsThis section describes the steps you take prior to recording the macro. In other words, you needto make a few preparations before the fun begins.
1. Start Excel if it’s not already running.2. If necessary, create a new, empty workbook
(Ctrl+N is my favorite way to do that).

www.it-
Chapter 2: Jumping Right In 233. Click the Developer tab, and take a look at the Use RelativeReferences button in theCode group.If the color of that button is different thanthe other buttons, then you’re in good shape.If the Use Relative References button is thesame color as the other buttons, then you needto click it.
I explain more about the Use Relative References button in Chapter 6. For now, just make sure that the option is turned on. When it’s turned on, it will be a different color.
Recording the MacroHere comes the hands-on part. Follow these instructions carefully:
1. Select a cell — any cell will do.2. Choose Developer➪Code➪Record Macro or click
the macro recording button on the status bar.The Record Macro dialog box appears, asshown in Figure 2-2.
Figure2-2: TheRecordMacrodialog
boxappears
when you’re about to record a macro.

www.it-
3. Enter a name for themacro.
Excel provides a default nam
e (something like Macro1), but it’s better to usea more descriptive name. NameAndTime (with no spaces) is a good name for this macro.
4. Click in the Shortcut Key box and enter Shift+N (for an uppercase N)
as the shortcut key.Specifying a shortcut key is optional. If you do specify one, then you can execute the macroby pressing a key combination — in this case, Ctrl+Shift+N.
5. Make sure the Store Macro In setting is This Workbook.

www.it-
24 Part I: Getting Started with Excel VBA Programming
6. You can enter some text in the Description box, if you like.
This step is optional. Some people like to describe what the macro does(or is supposed to do).
7. Click OK.The Record Macro dialog box closes, and Excel’smacro recorder is turned on. From this point, Excel monitors everything you do and con- vertsit to VBA code.
8. Type your name in the active cell.9. Move the cell pointer to the cell below and enterthis formula:
=NOW()
The formula displays the current date and time.10. Select the formula cell and press Ctrl+C to copy that cell to the
Clipboard.11. Choose Home➪Clipboard➪Paste➪Values (V).
This command converts the formula to its value.12. With the date cell selected, press Shift+up
arrow to select that cell and the one above it (which contains your name).
13. Use the controls in the Home➪Font group to change the formatting to
Bold and make the font size 16 point.14. Choose Developer➪Code➪Stop Recording.
The macro recorder is turned off.
Congratulations! You just created your first Excel VBA macro. You may want to phone your mother and tell her the good news.

www.it-
Testing theMacroNow you can try out this macro and see whether itworks properly. To test your macro, move to an empty cell and press Ctrl+Shift+N.
In a flash, Excel executes the macro. Your name and the current date and time are displayed in large, bold letters.
Another way to execute the macro is to choose Developer➪Code➪Macros (or press Alt+F8) to displaythe Macros dialog box. Select the macro from the list (in this case, NameAndTime) and click Run. Make sure you select the cell that will hold your name before executing the macro.

www.it-
Chapter 2: Jumping Right In 25Examining the Macro
You’ve recorded a macro, and you’ve tested it. If you’re a curious type, you’re probably wondering what this macro looks like. And you might even wonder where it’s stored.
Remember when you started recording the macro? You indicated that Excel should store the macro in This Workbook. The macro is stored in the work- book, but you need to activate the Visual Basic Editor (VBE, forshort) to see it.
Follow these steps to see the macro:
1. Choose Developer➪Code➪Visual Basic (or press Alt+F11).The Visual Basic Editor program window appears, asshown in Figure 2-3. This window is highlycustomizable, so your VBE window may look a bitdifferent. The VBE program window containsseveral other windows and is probably veryintimidating. Don’t fret; you’ll get used to it.
2. In the VBE window, locate the window called Project.The Project window (also known as the Project Explorer window) con- tains a list of all workbooks and add-ins that are currently open.Each project is arranged as a tree and can be expanded (to show more infor- mation) or contracted (to show less information).The VBE uses quite a few different windows, any of which can be either open or closed. If a window isn’t immediately visible in the VBE, you can choose an option from the View menu to display the window.For instance, if the Project window is not visible, you can choose View➪Project Explorer (or press Ctrl+R) to display it. You can displayany other VBE window in a similar manner. I

www.it-
explain more about the components of the Visual Basic Editor in Chapter 3.
3. Select the project that corresponds to the workbook in which you recorded the macro.If you haven’t saved the workbook, the project is probably calledVBAProject (Book1).
4. Click the plus sign (+) to the left of the folder named Modules.
The tree expands to show Module1, which is the only module in the project.
5. Double-click Module1.The VBA code in that module is displayed in a Code window. Figure 2-3 shows how it looks on my screen. Your screen may not look exactly the same. The code that’s recorded depends on the specific actions you made while recording the macro.

www.it-
26 Part I: Getting Started with Excel VBA Programming
Figure2-3: The
VBEdisplaysthe VBAcode inModule1
of Book1.
At this point, the macro probably looks like Greek to you. Don’t worry.Travel a few chapters down the road, and all will beas clear as the view fromOlympus.
The NameAndTime macro consists of several statements. Excel executes the statements one by one, from top to bottom. A statement that’s preceded by an apostrophe (’) is a comment. Comments are included only for your infor- mation and are ignored. In other words, Excel skips right over comments.
Hey, I didn’t record that!Earlier in this chapter, Imentioned that the macrorecorder is like recording
sound on a recorder.When you play back arecording and listento your own voice, you

www.it-
invariably say, “I don’t soundlike that.” And when you lookat your recorded macro, youmay see some actions that youdidn’t think you recorded.
When you recorded theNameAndTime example, you changedonly the font size, yet therecorded code shows all sortsof font-changing state- ments(Strikethrough, Superscript,Shadow, and so on). Don’t worry;it happens all the time. Exceloften records lots of seeminglyuseless code. In laterchapters, you find out how toremove the extra stuff from arecorded macro.

www.it-
Chapter 2: Jumping Right In 27The first VBA statement (which begins with the word Sub) identifies the macro as a Sub procedure and gives its name — you provided this name before you started recording the macro. If you read through the code, you may be able to make sense of some of it. You see your name, the formula you entered, andlots of additional code that changes the font. The Sub procedure ends with the End Sub statement.
Modifying the MacroAs you might expect, not only can you view yourmacro in the VBE, you can also change it. Eventhough you probably have no idea what you’re doingat this point, I bet you can make these changes tothe code:
✓ Change the name that’s entered into the active cell. If you have a dog, use your dog’s name.
✓ Change the font name or size.✓ See if you can figure out the appropriate location for this new statement that makes the cells italic:Selection.Font.Italic = True
Working in a VBA code module is much like working in aword-processing document (except there’s no word wrap, and you can’t format the text). On second thought, I guess it’s more like working in Windows Notepad. You can press Enter to start a new line, and the familiar editing keys work as expected.
After you’ve made your changes, jump back to Exceland try out the revised macro to see how itworks. Just as you can press Alt+F11 in Excel todisplay the VBE, you can press Alt+F11 in the VBE toswitch back to Excel.

www.it-
Saving Workbooks That Contain Macros
If you store one or more macros in a workbook, the file mustbe saved asa “macro-enabled” file type. In other words, the file must be saved with anXLSM extension rather than the normal XLSX extension.
For example, when you save the workbook that contains your NameAndTime macro, the file format in the Save As dialog box defaults to XLSX (a format that cannot contain macros). Unless you change the file format to XLSM, Excel displays the warning shownin Figure 2-4. You need to click No, and then choose Excel Macro-Enabled Workbook (*.xlsm) from the Save As Type drop-down list.

www.it-
28 Part I: Getting Started with Excel VBA Programming
Figure2-4: If
yourworkbookcontainsmacros,and youattemptto save
it ina non-macrofile
format,Excelwarnsyou.
Understanding Macro SecurityMacro security is a key feature in Excel. The reasonis that VBA is a power- ful language — so powerful that it’s possible to create a macro that can do serious damage to your computer. A macro can deletefiles, send information to other computers, and even destroy Windows so that you can’t even start your system.
The macro security features introduced in Excel 2007 were created to help prevent these types of problems.
Figure 2-5 shows the Macro Settings section of the Trust Center dialog box. To display this dialog box, choose Developer➪Code➪Macro Security.

www.it-
Figure2-5: The
MacroSetting
ssectionof theTrust
Centerdia-
log box.

www.it-
Chapter 2: Jumping Right In 29By default, Excel uses the Disable All Macros with Notification option. With this setting in effect, ifyou open a workbook that contains macros (and the file is not digitally “signed” or stored in a trusted location), Excel displays a warning like theone in Figure 2-6. If you are certain that the workbook comes from a trusted source, click Enable Macros, and the macros will be enabled.
You see the pop-up box in Figure 2-6 only if the VBE is open. Otherwise, Excel displays an eye-catching Security Warning above the Formula bar, as shown in Figure 2-7. If you know the workbook is safe, click theEnable Content buttonto enable the macros. To use the workbook without macros, click the X to dis- miss the warning.
Figure2-6:
Excel’swarning
that thefile to
beopene
dcontains
macros.
Excel will remember if you’ve designated a workbook to be safe. So, the next time you open it, you won’t see the Security Warning. (That’s not the case with Excel 2007, though.)
Figure2-7:
Excel’swarning that
the

www.it-
workbook
justopene
dcontains
macros.
You seethis
warning if
the VBEis notopen.

www.it-
30 Part I: Getting Started with Excel VBA Programming
Perhaps the best way to handle macro security isto designate one or more folders as trusted locations. All the workbooks in a trusted location are opened without a macro warning. You designate trusted folders in the Trusted Locations sectionof the Trust Center dialog box.
If you want to find out what the other macro security settings imply, pressF1 while the Macro Settings section of the Trust Center dialog box is in view. You’ll get a Help screen that describes the security settings.
More about the NameAndTime Macro
By the time you finish this book, you’ll completelyunderstand how the NameAndTime macro works — and you’ll be able to develop more sophisti- cated macros. For now, I wrap up the example with a few additional points about the macro:
✓ For this macro to work, its workbook must be open. If you close the workbook, the macro doesn’t work (and the Ctrl+Shift+N shortcut hasno effect).
✓ As long as the workbook containing the macro isopen, you can run the macro while any workbook is active. In other words, the macro’s own workbook doesn’t have to be active.
✓ The macro isn’t “pro-quality” code. It will overwrite existing text with no warning — and itseffects can’t be undone.
✓ Before you started recording the macro, you assigned it a new shortcut key. This is just one of several ways to execute the macro. (You discover other ways in Chapter 5.)
✓ You can create this macro manually rather than record it. To do so, you need a good understanding of VBA. (Be patient, you’ll get there.)

www.it-
✓ You can store this macro in your Personal Macro Workbook. If you do so, the macro is available automatically whenever you start Excel. (See Chapter 6 for details about your Personal Macro Workbook.)
✓ You can also convert the workbook to an add-in file. (More about this inChapter 21.)
Congratulations. You’ve been initiated into the world of Excel programming. (Sorry, there’s no secret handshake or decoder ring.) I hope this chapter helps you realize that Excel programming issomething you can actuallydo — and even live to tell about. Keep reading. Subsequent chapters almost certainly answer any questions you have, and you’ll soon understand exactly what you did in this hands-on session.

www.it-
Par tII
How VBA Works withExcel

www.it-
Try the Excel VBA Programming For Dummies interactive course for more in- depth instruction online at www.dummies.com/extras/excelvba programming.

www.it-
In this part . . .✓ See how to access the important part of the Visual Basic
Editor✓ Discover VBA code modules (the sheets that store your VBA
code).✓ Get an overview of the Excel object model✓ Discover a bit about two key concepts:
object properties and methods✓ Find out the difference between subroutines and functions✓ Get a crash course in the Excel macro recorder.✓ Try the Excel VBA Programming For Dummies
interactive course for more in-depth instruction online at www. dummies.com/extras/excelvbaprogramming.

A
www.it-
Chapter3
Working in the Visual Basic EditorIn This Chapter▶ Understanding the Visual Basic Editor▶ Discovering the Visual Basic Editor parts▶ Knowing what goes into a VBA module▶ Understanding three ways to get VBA code into a module▶ Customizing the VBA environment
s a more experienced-than-average Excel user, you probably know a good deal about workbooks, formulas, charts, and other Excel goodies.
Now it’s time to expand your horizons and explore an entirely new aspect of Excel: the Visual Basic Editor. In this chapter, you find out how to work with the Visual Basic Editor, and you get down to the nitty-gritty of writing some VBA code.
What Is the Visual Basic Editor?
I’m going to save some wear and tear on my fingersand refer to the Visual Basic Editor as the VBE.

www.it-
The VBE is a separate application where you write and edit your VBA macros. It works seamlessly withExcel. By seamlessly, I mean that Excel takes care of opening the VBE when you need it.
In Excel 2013, every workbook displays in a separate window. However, there is only one VBE window, and itworks with all open Excel windows.
You can’t run the VBE separately; Excel must be running in order for the VBEto run.
Activating the VBEThe quickest way to activate the VBE is to press Alt+F11 when Excel is active. To return to Excel, press Alt+F11 again. Or, you can just click the Closebutton in the VBE’s title bar. When the VBE window closes, Excel is activated.

www.it-
34 Part II: How VBA Works with Excel
You can also activate the VBE by using the Developer➪Code➪Visual Basic command. If you don’t have a Developer tab at the top of your Excel window, refer to the beginning of Chapter 2 where I explain how to get that handy Developer tab to show up.
Understanding VBE componentsFigure 3-1 shows the VBE program, with some of the key parts identified. Because so much is going on inthe VBE, I like to maximize the window to see as much as possible.
Chances are your VBE program window won’t look exactly like what you see in Figure 3-1. The VBE contains several windows, and it’s highly customiz-able. You can hide windows, rearrange windows, dockwindows, and so on.
Actually, the VBE has even more parts than are shown in Figure 3-1. I discuss these additional components throughout the book, when they become relevant.
Figure3-1: The

www.it-
VBE isyourcus-
tomizable
friend.

www.it-
Chapter 3: Working in the Visual Basic Editor 35Menu barThe VBE menu bar works just like every other menu bar you’ve encountered. It contains commands that you use to do things with the various components inthe VBE. You also find that many of the menu commands have shortcut keys associated with them.
The VBE also features shortcut menus. You can right-click virtually anything in the VBE and get a shortcut menu of common commands.
ToolbarThe Standard toolbar, which is directly under the menu bar by default (refer to Figure 3-1), is one offour VBE toolbars available. You can customize the toolbars, move them around, display other toolbars, and so on. If you’re so inclined, use theView➪Toolbars command to work with VBE toolbars. Most people (including me) just leave them as they are.
Project windowThe Project window displays a tree diagram thatshows every workbook cur- rently open in Excel(including add-ins and hidden workbooks). Double-click items to expand or contract them within theoutline. I discuss this window in more detail in theupcoming “Working with the Project Window” section.
If the Project window is not visible, press Ctrl+R or use the View➪Project Explorer command. To hide the Project window, click the Close button in its title bar. Or right-click anywhere in the Project window and select Hide from the shortcut menu.
Code windowA Code window is where you put your VBA code. Every object in a project has an associated Code window. To view an object’s Code window, double- click the object in the Project window. For example, to view

www.it-
the Code window for the Sheet1 object in Book1, double-click Sheet1 in the VBAProject for Book1. Unless you’ve added some VBA code, the Code window will be empty.
You find out more about Code windows later in this chapter’s “Working with a Code Window” section.
Immediate windowThe Immediate window may or may not be visible. If it isn’t visible, press Ctrl+G or use the View➪Immediate Window command. To close the Immediate window, click the Close button in its title bar (or right-click any- where in the Immediate window and select Hide from the shortcutmenu).
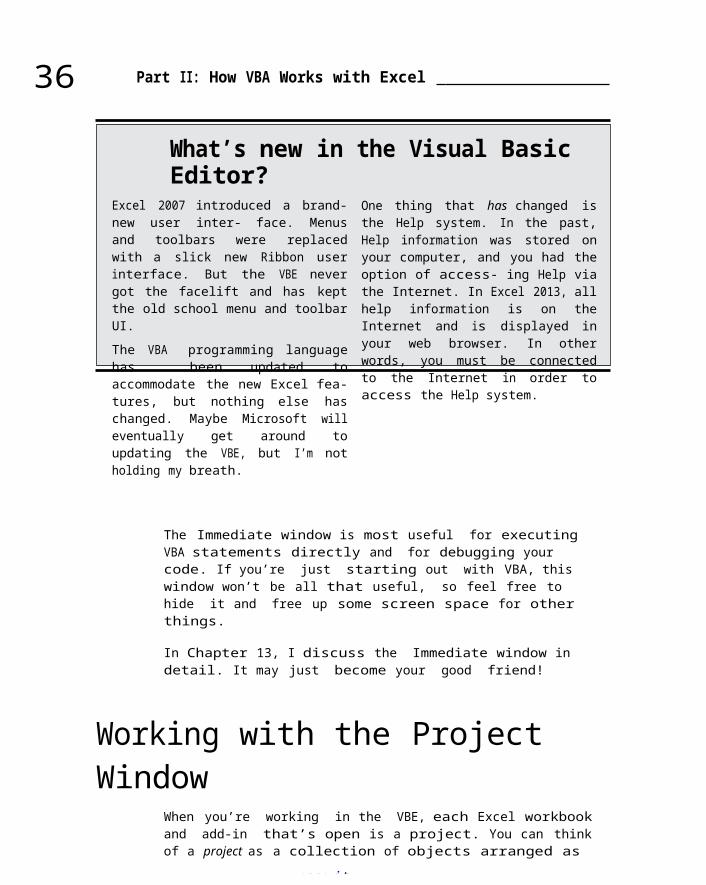
www.it-
36 Part II: How VBA Works with Excel
What’s new in the Visual Basic Editor?
Excel 2007 introduced a brand-new user inter- face. Menusand toolbars were replacedwith a slick new Ribbon userinterface. But the VBE nevergot the facelift and has keptthe old school menu and toolbarUI.The VBA programming languagehas been updated toaccommodate the new Excel fea-tures, but nothing else haschanged. Maybe Microsoft willeventually get around toupdating the VBE, but I’m notholding my breath.
One thing that has changed isthe Help system. In the past,Help information was stored onyour computer, and you had theoption of access- ing Help viathe Internet. In Excel 2013, allhelp information is on theInternet and is displayed inyour web browser. In otherwords, you must be connectedto the Internet in order toaccess the Help system.
The Immediate window is most useful for executing VBA statements directly and for debugging your code. If you’re just starting out with VBA, this window won’t be all that useful, so feel free to hide it and free up some screen space for other things.
In Chapter 13, I discuss the Immediate window in detail. It may just become your good friend!
Working with the Project Window
When you’re working in the VBE, each Excel workbook and add-in that’s open is a project. You can think of a project as a collection of objects arranged as

www.it-
an outline. You can expand a project by clicking theplus sign (+) at the left of the project’s name in the Project window. Contract a project by clicking the minus sign (–) to the left of a project’s name. Or you can double-click the items to expand and contract them.
If a project is password-protected, you’re prompted for the password when you double-click a project name. If you don’t know the password, you can’t expand the project — which means that you can’t view or modify any part of the project.
Figure 3-2 shows a Project window with three projects listed: an add-in named pup7.xlam, a workbook named investments.xlsm, and the PersonalMacro Workbook (which is always named PERSONAL.XLSB). Of the three, only the investments.xlsm project is expanded to show all of its objects.

www.it-
Chapter 3: Working in the Visual Basic Editor 37Figure
3-2: ThisProjectwindowliststhree
projects. One ofthem is
expandedto show
itsobjects.
Every project expands to show at least one node called Microsoft Excel Objects. This node expands to show an item for each sheet in the work- book (each sheet is considered an object) and anotherobject called ThisWorkbook (which represents the Workbook object). If the project hasany VBA modules, the project listing also shows a Modules node. And, as you see in Part IV, a project may also contain a node called Forms, which con- tains UserForm objects (which hold custom dialog boxes).
The concept of objects may be a bit fuzzy for you. However, I guarantee that things become much clearer in subsequent chapters. Don’t be too concerned if you don’t understand what’s going on atthis point.
Adding a new VBA moduleFollow these steps to add a new VBA module to a project:

www.it-
1. In the VBE, select the project’s name in the Project window.2. Choose Insert➪Module.
Or
1. Right-click the project’s name.2. Choose Insert➪Module from the shortcut menu.
When you record a macro, Excel automatically insertsa VBA module to hold the recorded code. Which workbook holds the module for the recorded macro depends on where you chose to store the recorded macro, just before you started recording.

www.it-
38 Part II: How VBA Works with Excel
Removing a VBA moduleSometimes you need to remove a VBA module from a project. For example, it may contain code that you no longer need, or it’s empty because you inserted the module and then changed your mind. To remove a VBA module from a project:
1. Select the module’s name in the Project window.2. Choose File➪Remove xxx, where xxx is the module name.
Or
1. Right-click the module’s name.2. Choose Remove xxx from the shortcut menu.
Excel, always trying to keep you from doing something you’ll regret, will ask if you want to export the code in the module before you deleteit. Almost always, you don’t. (If you do want to export the module, see the next section.)
You can remove VBA modules, but there is no way to remove the other code modules — those for the Sheet objects or ThisWorkbook.
Exporting and importing objectsEvery object in a VBA project can be saved to a separate file. Saving an indi- vidual object in a project is known as exporting. It stands to reason that you can also import objects to a project. Exporting and importing objects might be useful ifyou want to use a particular object (such as a VBAmodule or a UserForm) in a different project. Or, maybe you want to send a coworker a copy of a VBA module, which she can then import into her project.

www.it-
Follow these steps to export an object:
1. Select an object in the Project window.2. Choose File➪Export File or press Ctrl+E.
You get a dialog box that asks for a filename. Note that the object remains in the project; only a copy of it is exported. Excel provides thefile extension for you, and the extension depends on what type of object you’re exporting.In all cases, the result is a text file. If you’reso inclined, you can open it with a text editor and take a look.

www.it-
Chapter 3: Working in the Visual Basic Editor 39Importing a file to aproject goes like this:
1. Select the project’s name in the Explorer window.2. Choose File➪Import File or press Ctrl+M.
You get a dialog box that asks for a file. Locate the file and click Open. You should only import a file if the file was exported by using the File➪Export File command.
Working with a Code WindowAs you become proficient with VBA, you spend lots oftime working in Code windows. Macros that yourecord are stored in a module, and you can type VBAcode directly into a VBA module.
Minimizing and maximizingwindowsIf you have several projects open, the VBE may have lots of Code windows at any given time. Figure 3-3 shows an example of what I mean.

www.it-
Figure3-3:Code
windowoverload isn’tpretty.

www.it-
40 Part II: How VBA Works with Excel
Code windows are much like workbook windows in Excel.You can minimize them, maximize them, resize them, hide them, rearrange them, and so on. Most people find it much easier to maximize the Code window that they’re working on. Doing so lets you see morecode and keeps you from getting distracted.
To maximize a Code window, click the Maximize buttonin its title bar (right next to the X). Or just double-click its title bar to maximize it. To restore a Code window to its original size, click the Restore button. When a window is maximized, itstitle bar isn’t visible, so you’ll find the Restorebutton below the VBE title bar.
Sometimes you may want to have two or more Code windows visible. For example, you may want to compare the code in two modules or copy code fromone module to another. You can arrange the windows manually oruse the Window➪Tile Horizontally or Window➪Tile Vertically command to arrange them automatically.
You can quickly switch among Code windows by pressingCtrl+F6. If you repeat that key combination, you keepcycling through all the open Code win- dows. Pressing Ctrl+Shift+F6 cycles through the windows in reverse order.
Minimizing a Code window gets it out of the way. You can also click the win- dow’s Close button (which displays X) in a Code window’s title bar to close thewindow completely. (Closing a window just hides it; you won’t lose any- thing.) To open it again, just double-click the appropriate object in the Project window. By the way, working with these Code windows sounds more difficult than it really is.
Creating a moduleIn general, a VBA module can hold three types of code:

www.it-
✓ Declarations: One or more information statements that you provide to VBA. For example,you can declare the data type for variables youplan to use, or set some other module-wide options. Declarations are basi- cally housekeeping statements. They aren’t actually executed.
✓ Sub procedures: A set of programming instructions that, when exe- cuted, performssome action.
✓ Function procedures: A set of programming instructions that returns a single value (similar in concept to a worksheet function, such as SUM).
A single VBA module can store any number of Sub procedures, Function procedures, and declarations. Well, there is a limit — about 64,000 charac- ters per module. By way of comparison, this particular chapter has about

www.it-
Chapter 3: Working in the Visual Basic Editor 41half that many characters. After more than 15years of VBA programming, I haven’t even come closeto reaching the 64,000-character limit. And if Idid, the solution is simple: Just insert a newmodule.
How you organize a VBA module is completely up to you.Some people prefer to keep all their VBA code for anapplication in a single VBA module; others like to split up the code into several different modules. It’s a personal choice, just like arranging furniture.
Getting VBA code into a moduleAn empty VBA module is like the fake food you see in the windows of some Chinese restaurants; it looks good but it doesn’t really do much for you. Before you can do anything meaningful, you must have some VBA code in the VBA module. You can get VBA code into a VBA module in three ways:
✓ Enter the code directly.✓ Use the Excel macro recorder to record your actions and convert those actions to VBA code (see Chapter 6).
✓ Copy the code from one module and paste it into another.
Entering code directlySometimes, the best route is the most direct one. Entering code directly involves . . . well, entering the code directly. In other words, you type the code using your keyboard. Entering and editing text in a VBA module works as you might expect. You can select, copy, cut, paste, and do other thingsto the text.

www.it-
Pause for a terminology breakI need to digress for a momentto discuss ter- minology.Throughout this book, I use theterms Sub procedure, routine,program, procedure, and macro.These terms are a bitconfusing. Programming folksusually use the word proce- dureto describe an automated task.Technically, a procedure canbe a Sub procedure or a
Function procedure — both ofwhich are some- times calledroutines — or even programs. I useall these termsinterchangeably. As detailed inlater chapters, however, thereis an important differencebetween Sub and Functionproce- dures. For now, don’tworry about the terminol- ogy.Just try to understand theconcepts.

www.it-
42 Part II: How VBA Works with Excel
Use the Tab key to indent some of the lines to make your code easier to read. Indenting isn’t necessary, but it’s a good habit to acquire. As youstudy the code I present in this book, you’ll understand why indenting code lines is helpful.
A single line of VBA code can be as long as you need it to me. However, you may want to use the line-continuation characters to break up lengthy lines of code. To continue a single line of code (also known as a statement) from one line to the next, end the first line with a space followed by an underscore (_). Then continue the statement on the next line. And don’t forget the space. An underscore character that’s not preceded by a space won’t do the job.
Here’s an example of a single statement split into three lines:
Selection.Sort Key1:=Range(“A1”), _ Order1:=xlAscending, Header:=xlGuess, _ Orientation:=xlTopToBottom
This statement would perform exactly the same way if it were entered in a single line (with no line-continuation characters). Notice that I indented the second and third lines of this statement. Indenting is optional, but it helps clarify the fact that these lines are not separate statements.
The white-coated engineers who designed the VBE anticipated that people like us would be making mistakes. Therefore, the VBE has multiple levels of undo and redo. If you deleted a statement that you shouldn’t have, use the Undo button on the toolbar (or press Ctrl+Z) until the statement shows up again. After undoing, you can use the Redo button to perform the changes you’ve undone. I recommend playing around with this feature until you understand how it works.

www.it-
Are you ready to enter some real-live code? Try the following steps:
1. Create a new workbook in Excel.2. Press Alt+F11 to activate the VBE.3. Click the new workbook’s name in the Project window.4. Choose Insert➪Module to insert a VBA module intothe project.5. Type the following code into the module:
Sub GuessName()Msg = “Is your name “ & Application.UserName & “?” Ans = MsgBox(Msg, vbYesNo)If Ans = vbNo Then MsgBox “Oh, never mind.”If Ans = vbYes Then MsgBox “I must
be psychic!” End Sub

www.it-
Chapter 3: Working in the Visual Basic Editor 436. Position the cursor anywhere within the text
you typed and press F5 to execute the procedure.F5 is a shortcut for the Run➪Run Sub/UserForm command. If you entered the code correctly, Excel executes the procedure, and you can respond to the simple dialog box shown in Figure3-4. Unless your name happens to be the same as mine, the text in the dialog box will be differ-ent from the text shown in the figure.
Figure3-4: TheGuessNam
eprocedur
edisplays
thisdialog
box.
When you enter the code listed in Step 5, you might notice that the VBE makes some adjustments to the text you enter. For example, after you type the Sub statement, the VBE automatically inserts the End Substatement. And if you omit the space before or after an equal sign, the VBE inserts the space for you. Also, the VBE changes the color and capitalization ofsome text. This is all per- fectly normal. It’s just the VBE’s way of keeping things neat and readable.
If you followed the previous steps, you just wrote a VBA Sub procedure, also known as a macro. When you press F5, Excel executes the code and follows the instructions. In other words, Excel evaluates eachstatement and does what you told it to do. (Don’t let this newfound power go to your head.) You can execute this macro any number of times — although

www.it-
it tends to lose its appeal after a few dozen times.
Compile Error?There’s a chance that theGuessName macro won’t work.When you try to run it, Excelmay com- plain and pop up anerror message: CompileError: Variable NotDefined. Don’t worry; there’san easy fix for that.If you get that error, look atthe top of your module, andyou’ll see this text:Option Explicit. Justdelete that line, and the
macro should work. That line,when present at the top of amodule, means that you must“declare” all of yourvariables. I cover this topicin Chapter 7 (see “Declaringand scoping variables”). If thatline was added, it means thatyour VBE is set up to add theline automatically. For now,don’t worry about it. Justdelete the line and forgetabout the rude interruption.

www.it-
44 Part II: How VBA Works with Excel
For the record, this simple macro uses the following concepts, all of which are covered laterin this book:
✓ Defining a Sub procedure (the first line)✓ Assigning values to variables (Msg and Ans)✓ Concatenating (joining) a string (using the & operator)✓ Using a built-in VBA function (MsgBox)✓ Using built-in VBA constants (vbYesNo, vbNo, and vbYes)✓ Using an If-Then construct (twice)✓ Ending a Sub procedure
(the last line) Not bad for
a beginner, eh?
Using the macro recorderAnother way you can get code into a VBA module is by recording your actions, using the Excel macro recorder. If you worked through the hands-on exercise in Chapter 2, you already have some experience with this technique.
By the way, there is absolutely no way you can record the GuessName pro- cedure shown in the preceding section. You can record only things that you can do directly in Excel. Displaying a message boxis not in Excel’s normal repertoire. (It’s a VBA thing.) The macro recorder is useful, but in many cases, you’ll probably need to enter at least some code manually.
Here’s a step-by-step example that shows you how to record a macro that inserts a new worksheet and hides all but the first 10 rows and all but the

www.it-
first 10 columns. If you want to try this example, start with a new, blank work- book and follow these steps:
1. Activate a worksheet in the workbook.Any worksheet will do.
2. Click the Developer tab and make sure that Use Relative References is
not highlighted.This macro will be recorded using Absolute References.
3. Choose Developer➪Code➪Record Macro, or you can click the icon next to the Ready indicatorin the left side of the status bar.Excel displays its Record Macro dialog box.
4. In the Record Macro dialog box, name the macro TenByTen and type
Shift+T for the shortcut key.The macro can be executed when you press Ctrl+Shift+T.

www.it-
Chapter 3: Working in the Visual Basic Editor 455. Click OK to start recording.
Excel automatically inserts a new VBA module into the project that cor- responds to the active workbook. From this point on, Excel converts your actions into VBA code. While recording, the icon in the status bar turns into a small square. This is a reminder that the macro recorder is running. You can also click that blue square to stop the macro recorder.
6. Click the New Sheet icon to the right of the last sheet tab.
Excel inserts a new worksheet.7. Select the entire Column K (the 11th column)
and press Ctrl+Shift+RightArrow; then right-click any selected column and choose Hide from the shortcut menu.Excel hides all of the selected columns.
8. Select the entire Row 11 and press Ctrl+Shift+Down Arrow; then right- click any selected row and choose Hide from the shortcut menu.Excel hides all of the selected columns.
9. Select cell A1.10. Choose Developer➪Code➪Stop Recording, or click
the Stop Recording button in the status bar (the small square).Excel stops recording your actions.
To view this newly recorded macro, press Alt+F11 to activate the VBE. Locate the workbook’s name in the Project window. You see that the project has a new module listed. The name of the module depends on whether you had any other modules in the workbook when you started recording the macro. If you didn’t,the module will be named Module1. You can double-click the module

www.it-
to view the Code window for
the module. Here’s the code
generated by your actions:
Sub TenByTen()‘‘ TenByTen Macro‘‘ Keyboard Shortcut: Ctrl+Shift+T‘
Sheets.Add After:=ActiveSheetColumns(“K:K”).SelectRange(Selection, Selection.End(xlToRight)).SelectSelection.EntireColumn.Hidden = TrueRows(“11:11”).SelectRange(Selection, Selection.End(xlDown)).SelectSelection.EntireRow.Hidden = TrueRange(“A1”).Select
End Sub

www.it-
46 Part II: How VBA Works with Excel
To try out this macro, activate any worksheet and press the shortcut key that you assigned in Step 4:Ctrl+Shift+T.
If you didn’t assign a shortcut key to the macro, don’t worry. Here’s how to display a list of all macros available and run the one you want:
1. Choose Developer➪Code➪Macros.Keyboard fans can press Alt+F8. Either of these methods displays a dialog box that lists all the available macros.
2. Select the macro in the list (in this case, TenByTen).3. Click the Run button.
Excel executes the macro, and you get a new worksheet with 10 visible rows and 10 visible columns.
You can execute any number of commands and performany number of actions while the macro recorder is running. Excel dutifully translates your mouse actions and keystrokes to VBA code.
And, of course, you can also edit the macro afteryou record it. To test your new skills, try editingthe macro so that it inserts a worksheet with ninevis- ible rows and columns — perfect for a Sudokupuzzle.
Copying VBA codeThe final method for getting code into a VBA module is to copy it from another module or from some other place (such as a website). For example, a Subor Function procedure that you write for one project might also be useful in another project. Instead of wasting time reentering the code, you can activate the module and use the normal Clipboard copy-and-paste procedures (I’m rather fond of the keyboard shortcuts, Ctrl+C to copy and

www.it-
Ctrl+V to paste). After pasting it into a VBA module,you can modify the code if necessary.
By the way, you’ll find lots of VBA code examples onthe web. If you’d like to try them, select the codein your browser and press Ctrl+C to copy it. Then,activate a module and press Ctrl+V to paste it.

www.it-
Chapter 3: Working in the Visual Basic Editor 47Customizing the VBA Environment
If you’re serious about becoming an Excel programmer, you’ll spend a lot of time with VBA modules on your screen. To help make things as comfortable as possible (no, please keep your shoes on), the VBE provides quite a few customization options.
When the VBE is active, choose Tools➪Options.You’ll see a dialog box with four tabs: Editor,Editor Format, General, and Docking. I discuss someof the most useful options in the sections thatfollow.
Using the Editor tabFigure 3-5 shows the options accessed by clicking the Editor tab of the Options dialog box. Use the options in the Editor tab to control how certain things work in the VBE.
Figure3-5: Thisis theEditortab in
theOptionsdialog
box.Auto Syntax Check optionThe Auto Syntax Check setting determines whether theVBE pops up a dialog box if it discovers a syntax
www.it-
error while you’re entering your VBA code. The
dialog box tells roughly what the problem is. If you don’t choose this setting, VBE flags syntax errors by displaying them in a different color from the rest of the code, and you don’t have to deal with any dialog boxes popping up on your screen.

www.it-
48 Part II: How VBA Works with Excel
I usually keep this setting turned off because I find the dialog boxes annoying, and I can usually figure out what’s wrong with a statement. But back in the olden days (before I was a VBA veteran), I found this assistance quite helpful.
Require Variable Declaration optionIf the Require Variable Declaration option is set,VBE inserts the following statement at the beginning of each new VBA module you insert:
Option Explicit
Changing this setting affects only new modules, notexisting modules. If this statement appears in yourmodule, you must explicitly define each variableyou use. In Chapter 7, I explain why you shoulddevelop this habit.
Normally, I keep this option turned off because I prefer to add the OptionExplicit statement myself.
Auto List Members optionIf the Auto List Members option is set, VBE providessome help when you’re entering your VBA code. It displays a list that would logically complete the statement you’re typing. This bit of magic is sometimes called IntelliSense.
This is one of the best features of the VBE, and I always keep it turned on. Figure 3-6 shows an example (which will make lots more sense when youstart writing VBA code).
Figure 3-6: An example of Auto List members.
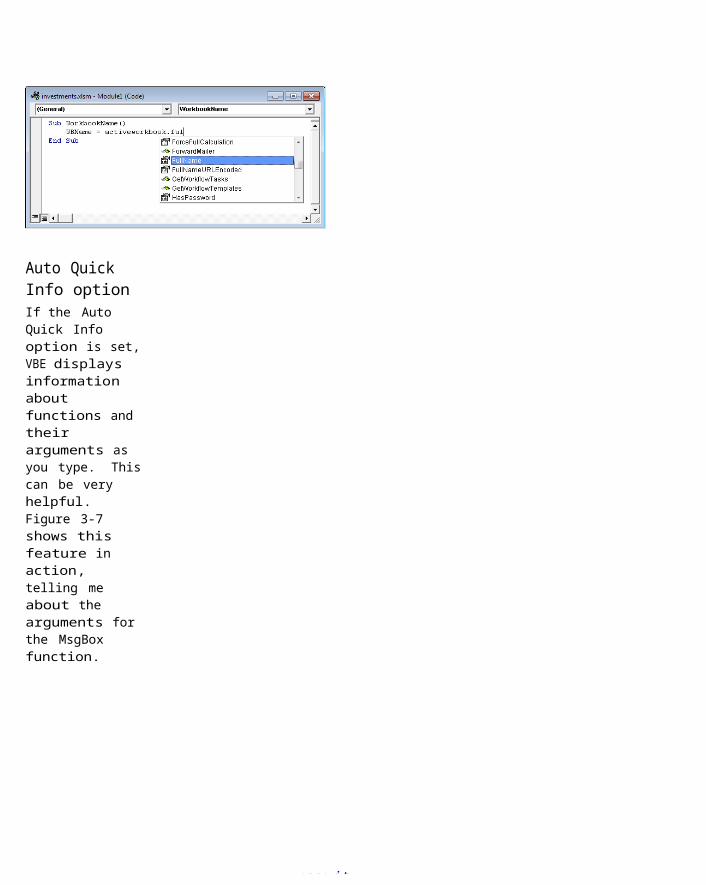
www.it-
Auto Quick Info optionIf the Auto Quick Info option is set,VBE displays information about functions and their arguments as you type. Thiscan be very helpful. Figure 3-7 shows this feature in action, telling me about the arguments for the MsgBox function.

www.it-
Chapter 3: Working in the Visual Basic Editor 49Figure
3-7: AutoQuickInfo
offershelp
aboutthe
MsgBoxfunction
.
Auto Data Tips optionIf the Auto Data Tips option is set, VBE displays thevalue of the variable over which your cursor is placed when you’re debugging code. When you enterthe wonderful world of debugging, as I describe in Chapter 13, you’ll appreci- ate this option.
Auto Indent settingThe Auto Indent setting determines whether VBEautomatically indents each new line of code thesame as the previous line. I’m big on usingindentations in my code, so I keep this option on.
Use the Tab key to indent your code, not the spacebar. Also, you can use Shift+Tab to “unindent” a line of code. If you want to indent more than just one line, select all the lines you want to indent. Then press the Tab key.
The VBE’s Edit toolbar (which is hidden by default) contains two useful but- tons: Indent and Outdent. These buttons let you quickly indent or “unindent” a block of code. Select the code and click one of these buttons to change the block’s indenting.
Drag-and-Drop Text Editing optionThe Drag-and-Drop Text Editing option, whenenabled, lets you copy and move text bydragging and dropping with your mouse. I keepthis option turned on, but I never use it. Iprefer to copy and move by using the key-board.

www.it-
Defaultto FullModule View optionThe Default to Full Module View option
sets the default state for new mod- ules. (It doesn’t affect existing modules.) If set, procedures in the Code window appear as a single scrollable list. If this option is turned off, you can see only one procedure at a time. I keep this option turned on.

www.it-
50 Part II: How VBA Works with Excel
Procedure Separator optionWhen the Procedure Separator option is turned on, separator bars appear at the end of each procedure in a Code window. I like the idea of separator bars, so I keep this option turned on.
Using the Editor Format tabFigure 3-8 shows the Editor Format tab of the Options dialog box. With this tab, you can customize the way the VBE looks.
Figure3-8:
Changethe
VBE’slookswiththe
EditorFormat tab.
Code Colors optionThe Code Colors option lets you set the text colorand background color displayed for various elements of VBA code. This is largely a matter of per- sonal preference. Personally, I find the default colors to be just fine. But for a change of scenery, I occasionally play around with these settings.
Font optionThe Font option lets you select the font that’s used in your VBA modules. For best results, stick with a fixed-width font such as Courier New. In a fixed-width font, all characters are exactly the same width. This makes your code more readable because the

www.it-
characters arenicely alignedvertically, andyou can easily distinguish multiple spaces (which is sometimes useful).

www.it-
Chapt
er 3: Working in the Visual Basic Editor 51Size settingThe Size setting specifies the point size of thefont in the VBA modules. This setting is a matterof personal preference determined by your videodisplay resolution and how many carrots you’vebeen eating.
Margin Indicator Bar optionThis option controls the display of the vertical margin indicator bar in your modules. You should keep this turned on; otherwise, you won’t be able to see the helpful graphical indicators when you’redebugging your code.
Using the General tabFigure 3-9 shows the options available under the General tab in the Options dialog box. In almost every case, the default settings are just fine.
The most important setting is Error Trapping. I strongly suggest that you use the Break On Unhandled Errors setting (which is the default). If you use a different setting, your error-handlingcode won’t work. You can read more about this in Chapter 12.
If you’re really interested in these options, click the Help button for details.
Figure3-9: The

www.it-
Generaltab of
theOptions
dia- logbox.

www.it-
52 Part II: How VBA Works with Excel
Using the Docking tabFigure 3-10 shows the Docking tab. These options determine how the various windows in the VBE behave. When a window is docked, it is fixed in place along one of the edges of the VBE program window. This makes it much easier to identify and locate a particular window. If you turn off all docking, you have a big, confusing mess of windows. Generally, the default settings work fine.
You’ll find that sometimes the VBE seems to have amind of its own when you’re trying to dock a window. If docking doesn’t seem to work correctly,just stick with it, and you’ll get the hang of things.
Figure 3-10: TheDockingtab of
theOptions
dia- logbox.

E
www.it-
Chapter4
Introducingthe
Excel ObjectModel
In This Chapter▶ Introducing the concept of objects▶ Finding out about the Excel object hierarchy▶ Understanding object collections▶ Referring to specific objects in your VBA code▶ Accessing or changing an object’s properties▶ Performing actions with an object’s methods
veryone is familiar with the word object. Well, folks, forget the definition you think you know. In the world of programming, the word object has a
object-ori-different meaning. You often see it used as part of the expressionented programming, or OOP for short. OOP is based on theidea that software deals with distinct objects that have attributes (or properties) and can be manipulated. These objects are not material things. Rather, they exist in the form of bits and bytes.

www.it-
In this chapter, I introduce you to the Excel object model, which is a hierar- chy of objects contained in Excel. By the time you finish this chapter, you’ll have a reasonably good understanding of what OOP is all about — and why youneed to understand this concept to become a VBA programmer. After all, Excel programming really boilsdown to manipulating the objects that make up Excel. It’s as simple as that.
The material in this chapter may be a bit overwhelming. But please take my advice and plow through it, even if you don’t fully grasp it at first. The impor- tant concepts presented here willmake a lot more sense as you progress through the book.

www.it-
54 Part II: How VBA Works with Excel
Excel Is anObject?You’ve used Excel for quite a while, but you probably never thought of it as an object. The more you work with VBA, the more you view Excel in those terms. You’ll understand that Excel is an object and that it contains other objects. Thoseobjects, in turn, contain still more objects. In other words, VBA programming involves working with an object hierarchy.
At the top of this hierarchy is the Application object — in this case, Excel itself (the mother of all objects).
Climbing the Object Hierarchy
The Application object contains other objects. Following is a list of some of the more useful objects contained in the Excel Application:
✓ Addin✓ Window✓ Workbook✓ WorksheetFunction
Each object contained in the Application object can contain other objects. For example, the following is a list of objects that can be contained in a Workbook object:
✓ Chart (which is a chart sheet)✓ Name✓ VBProject

www.it-
✓ Window✓ Worksheet
In turn, each of these objects can contain still other objects. Consider a Worksheet object, which is contained in a Workbook object, which is con- tained in the Application object. Some of the objects that can be contained in a Worksheet objectare
✓ Comment✓ Hyperlink✓ Name

www.it-
Chapter
4: Introducing the Excel Object Model 55✓ PageSetup✓ PivotTable✓ Range
Put another way, if you want to do something with a range on a particular worksheet, you may find ithelpful to visualize that range in the following manner:
Range➪contained in Worksheet➪contained in Workbook➪contained in Excel
Is this beginning to make sense?
When you start digging around, you’ll find that Excel has more objects than you can shake a stick at. Evenold-timers like me can get overwhelmed. The good newsis that you’ll never have to actually deal with mostof these objects. When you’re working on a problem, you can just focus on a few relevant objects — which you can often discover by recording a macro.
Wrapping Your Mind around Collections
Collections are another key concept in VBA programming. A collection is a group of objects of the same type. And to add to the confusion, a collection is itself an object.
Here are a few examples of commonly used collections:
✓ Workbooks: A collection of all currently open Workbook objects✓ Worksheets: A collection of all Worksheet objects contained in a par- ticular Workbook object

www.it-
✓ Charts: A collection of all Chart objects (chart sheets) contained in a particular Workbook object
✓ Sheets: A collection of all sheets (regardless of their type) contained in a particular Workbook object
You may notice that collection names are all plural, which makes sense (at least I think so).
“What are collections for?” you may rightfully ask. Well, for example, they are very useful when you want to do stuff with not just one worksheet, but with a couple of them or all of them. As you’ll see, your VBA code can loop through all members of a collection and do something to each one.

www.it-
56 Part II: How VBA Works with Excel
Referring toObjectsI presented the information in the previous sections to prepare you for the next concept: referring to objects in your VBA code. Referring to an object is important because you must identify the object that you want to work with. After all, VBA can’t read your mind — yet. I believe the mind-reading object will be introduced in Excel 2016.
You can work with an entire collection of objects inone fell swoop. More often, however, you need to work with a specific object in a collection (such as a particular worksheet in a workbook). To reference a single object froma collection, you put the object’s name or index number in parentheses after the name of the collection, like this:
Worksheets(“Sheet1”)
Notice that the sheet’s name is in quotationmarks. If you omit the quotation marks, Excel won’tbe able to identify the object (Excel will assumethat it’s a variable name).
If Sheet1 is the first (or only) worksheet in the collection, you can also use the following reference:
Worksheets(1)
In this case, the number is not in quotation marks. Bottom line? If you refer to an object by using its name, use quotation marks. If you refer to an object by using its index number, use a plain number without quotation marks.
What about chart sheets? A chart sheet contains asingle chart. It has a sheet tab, but it’s not a

www.it-
worksheet. Well, as it turns out, the object modelhas a col- lection called Charts. This collectioncontains all of the chart sheet objects in aworkbook.
And just to keep things logical, there’s another collection called Sheets. The Sheets collection contains all sheets (worksheets and chart sheets) in a work- book. The Sheets collection is handy if you want to work with all sheets in a workbook and don’t care if they are worksheets or chart sheets.
So, a single worksheet named Sheet1 is a member of two collections: the Worksheets collection and the Sheets collection. You can refer to it in either of two ways:
Worksheets(“She
et1”)
Sheets(“Sheet1
”)

www.it-
Chapter
4: Introducing the Excel Object Model 57Navigating through the hierarchyIf you want to work with the Application object, it’s easy: You start by typingApplication.
Every other object in Excel’s object model is under the Application object. You get to these objects by moving down the hierarchy and connecting each object on your way with the dot (.) operator. To get to the Workbook object named Book1.xlsx, start with the Application object and navigate down to the Workbooks collection object.
Application.Workbooks(“Book1.xlsx”)
To navigate farther to a specific worksheet, add a dot operator and access the Worksheets collection object.
Application.Workbooks(“Book1.xlsx”).Worksheets(1)
Not far enough yet? If you really want to get the value from cell A1 on the first Worksheet of the Workbook named Book1.xlsx, you need to navigate one more level to the Range object.
Application.Workbooks(“Book1.xlsx”).Worksheets(1).Range(“A1”).Value
When you refer to a Range object in this way, it’s called a fully qualified refer- ence. You’ve told Excel exactly which range you want, on which worksheet and in which workbook, and have left nothing to the imagination. Imagination is good in people, but not so good in computer programs.
By the way, workbook names also have a dot to separate the filename from the extension (for example, Book1.xlsx). That’s just a coincidence. The dotin a filename has nothing at all to do with the dot operator I referred to a few paragraphs ago.

www.it-
Simplifying object referencesIf you were required to fully qualify every object reference you make, your code would get quite long,and it might be more difficult to read. Fortunately, Excel provides you with some shortcutsthat can improve the readability (and save you some typing). For starters, the Application object is always assumed. There are only a few cases when it makes sense to type it. Omitting the Applicationobject reference shortens the example from the previous section to
Workbooks(“Book1.xlsx”).Worksheets(1).Range(“A1”).Value

www.it-
58 Part II: How VBA Works with Excel
That’s a pretty good improvement. But wait, there’smore. If you’re sure that Book1.xlsx is the active workbook, you can omit that reference, too. Now you’re down to
Worksheets(1).Range(“A1”).Value
Now you’re getting somewhere. Have you guessed thenext shortcut? That’s right, if you know the firstworksheet is the currently active worksheet, thenExcel will assume that reference and allow you tojust type
Range(“A1”).Value
Contrary to what some people may think, Excel does not have a Cell object. Acell is simply a Range object that consists of just oneelement.
The shortcuts described here are great, but theycan also be dangerous. What if you only think Book1.xlsx is the active workbook? You could get an error, or worse, you could get the wrong valueand not even realize it’swrong. For that reason, it’s often best to fully qualify your object references.
In Chapter 14, I discuss the With-End Withstructure, which helps you fully qualify yourreferences but also helps to make the code morereadable and cuts down on the typing. The best ofboth worlds!
Diving into Object Properties and Methods
Although knowing how to refer to objects is important, you can’t do anything useful by simply

www.it-
referring to an object (as in the examples in the preced-ing sections). To accomplish anything meaningful, you must do one of two things:
✓ Read or modify an object’s properties.✓ Specify a method of action to be used with an object.
With literally thousands of properties and methods available, you can easily be overwhelmed. I’ve been working with this stuff for years, and I’m still overwhelmed. But as I’ve said before and I say again:You’ll never need to use most of the available properties and methods.

www.it-
Chapter
4: Introducing the Excel Object Model 59
Another slant on McObjects, McProperties, and McMethods
Here’s an analogy that may helpyou understand therelationships among objects,properties, and methods in VBA.In this analogy, I compare Excelwith a fast-food restaurantchain.The basic unit of Excel is aWorkbook object. In a fast-foodchain, the basic unit is anindividual restaurant. WithExcel, you can add a workbookand close a workbook, and allthe open work- books are knownas Workbooks (a collection ofWorkbook objects). Similarly,the management of a fast-foodchain can add a restaurant andclose a restaurant, and all therestaurants in the chain can beviewed as the Restaurantscollec- tion (a collection ofRestaurant objects).An Excel workbook is an object,but it also con- tains otherobjects such as worksheets,chart sheets, VBA modules, andso on. Furthermore, eachobject in a workbook cancontain its own objects. Forexample, a Worksheet object cancontain Range objects,
PivotTable objects, Shape objects, andso on.Continuing with the analogy, a fast-food res- taurant (like a workbook)contains objects such as the Kitchen,DiningArea, and Tables (a col- lection).Furthermore, management can add orremove objects from the Restaurantobject. For example, management may addmore tables to the Tables collection.Each of these objects can contain otherobjects. For example, the Kitchen objecthas a Stove object, VentilationFanobject, Chef object, Sink object, and soon.So far, so good. This analogy seems towork. Let me see if I can take itfurther.

www.it-
Excel’s objects haveproperties. Forexample, a Rangeobject has propertiessuch as Value andName, and a Shapeobject has proper-ties such as Width,Height, and so on.Not surprisingly,objects in a fast-foodrestaurant also haveproperties. The Stoveobject, for example,has properties such asTemperature andNumberofBurners. TheVentilationFan has itsown set of properties(TurnedOn, RPM, and soon).Besides properties,Excel’s objects alsohave methods, whichperform an operationon an object. Forexample, theClearContents methoderases the contents ofa Range object. Anobject in a fast-foodrestaurant also hasmethods. You caneasily envision aChangeThermostatmethod for a Stoveobject or a SwitchOnmethod for aVentilationFan object.In Excel, methodssometimes change anobject’s properties.The ClearContentsmethod for a Rangechanges the Range’s
Value prop- erty. Similarly, theChangeThermostat method on aStove object affects itsTemperature property. With VBA,you can write procedures tomanipulate Excel’s objects. Ina fast-food restaurant, themanagement can give orders tomanipulate the objects in therestaurants. (“Turn the stoveon and switch the ventilationfan to high.”)The next time you visit yourfavorite fast-food joint, justsay, “Use the Fry method on aBurger object with the Onionproperty set to False.”

www.it-
60 Part II: How VBA Works with Excel
Object propertiesEvery object has properties. You can think ofproperties as attributes that describe the object.An object’s properties determine how it looks,how it behaves, and even whether it is visible.Using VBA, you can do two things with an object’sproperties:
✓ Examine the current setting for a property.✓ Change the property’s setting.
For example, a single-cell Range object has a property called Value. The Value property stores the value contained in the cell. You can write VBAcode to display the Value property, or you may write VBA code to set the Value property to a specific value. The following macro uses the VBA built- in MsgBox function to bring up a box that displays the value in cell A1 on Sheet1 of the active workbook. See Figure 4-1.
Sub ShowValue()Contents = Worksheets(“Sheet1”).Range(“A1”).ValueMsgBox Contents
End Sub
Figure4-1:Thismes-sagebox
displaysa
Rangeobject
’s

www.it-
Valueproper
ty.
By the way, MsgBox is a very useful function. You can use it to display results while Excel executes your VBA code. I tell you more about this function in Chapter 15, so be patient (or just go ahead and read all about it).
The code in the preceding example displays the current setting of a cell’s Value property. What if you want to change the setting for that property? The following macro changes the value in cell A1 by changing the cell’s Value property:
Sub ChangeValue() Worksheets(“Sheet1”).Range(“A1”).Value = 994.92
End Sub

www.it-
Chapter
4: Introducing the Excel Object Model 61After Excel executes this procedure, cell A1 on Sheet1 of the active work- book contains the value 994.92. If the active workbook does not have a sheet named Sheet1, executing that macro will display an error message. VBA just follows instructions, and it can’t work with a sheet that doesn’t exist.
Each object has its own set of properties, although some properties are common to many objects. For example, many (but not all) objectshave a Visible property. Most objects also have a Name property.
Some object properties are read-only properties, which means that you can see the property’s value,but you can’t change it.
As I mention earlier in this chapter, a collection is also an object. This means that a collection also has properties. For example, you can determine how many workbooks are open by accessing the Count property of the Workbooks collection. The following VBA procedure displays a message box that tells you how many workbooks are open:
Sub CountBooks()MsgBox Workbooks.Count
End Sub
Object methodsIn addition to properties, objects have methods. Amethod is an action you perform with an object. A method can change an object’s properties or make the object do something.
This simple example uses the ClearContents methodon a Range object to erase the contents of 12 cells on the active sheet:

www.it-
Sub ClearRange() Range(“A1:A12”).ClearContents
End Sub
Some methods take one or more arguments. An argument isa value that further specifies the action toperform. You place the arguments for a method afterthe method, separated by a space. Multiple argumentsare separated by a comma.
The following example activates Sheet1 (in the active workbook) and then copies the contents of cell A1 to cell B1 by using the Range object’s Copy method. In this example, the Copy method has one argument — the destina- tion range for the copy operation:
Sub CopyOne() Worksheets(“Sheet1”).Activate Range(“A1”).Copy Range(“B1”)
End Sub

www.it-
62 Part II: How VBA Works with Excel
Notice that I omit the worksheet reference when I refer to the Range objects. I can do this safely because I used a statement to activate Sheet1 (using the Activate method).
Another way to specify an argument for a method is touse the official name of the argument followed by a colon and an equal sign. Using named argu- ments is optional, but doing so can often make your code easier to under- stand. The second statement in the CopyOne procedure could be written like this:
Range(“A1”).Copy Destination:=Range(“B1”)
In Figure 4-2, notice the little prompt as the statement is being typed. That prompt shows the official name of the argument.
Figure4-2: The
VBEdisplaysa list
of argu-mentswhileyou
type.
Because a collection is also an object, collections have methods. The following macro uses the Add method for the Workbooks collection:
Sub AddAWorkbook() Workbooks.Add
End Sub
As you may expect, this statement creates a newworkbook. In other words, it adds a new workbook tothe Workbooks collection. After you execute thismacro, a fresh workbook will be the activeworkbook.

www.it-
Object eventsIn this section, I briefly touchon one more topic that you need to know about: events. Objects respond to various events that occur. For example, when you’re working in Excel and you activate a different workbook, a Workbook Activate eventoccurs. You could, for example, have a VBA macro that is designed to execute whenever an Activate event occurs for a particu-lar Workbook object.

www.it-
Chapter
4: Introducing the Excel Object Model 63Excel supports many events, but not all objects can respond to all events. And some objects don’t respond to any events. The only events you can use are those made available by the programmers of Microsoft Excel. The con- cept of an event becomes clear in Chapter 11 and also in Part IV.
Finding Out MoreConsider yourself initiated into the wonderful world of objects, properties, methods, and events. You find out more about these concepts inthe chap- ters that follow. If you just can’t get enough, you may also be interested in three otherexcellent tools:
✓ VBA’s Help system✓ The Object Browser✓ Auto List Members
Using VBA’s Help systemThe VBA Help system describes every object, property, and method avail- able to you. This is anexcellent resource for finding out about VBA, and it is more comprehensive than any book on the market. But it’s also very boring to read.
If you’re using Excel 2013, you must be connected to the Internet to use theVBA Help system. Previous versions don’t have this requirement.
If you’re working in a VBA module and want information about a particular object, method, or property, move the cursor to the word you’re interested in and press F1. In a few seconds, you see the appropriate help topic dis- played in your

www.it-
web browser, complete with cross-references and perhaps even an example or two.
Figure 4-3 shows part of a screen from the VBA Help system — in this case, for a Worksheet object.
✓ Click Methods to get a listing of its methods.✓ Click Properties to get a complete list of this object’s properties.✓ Click Events to get a listing of the events it responds to.
You can use the Contents pane on the left to explore various topics related to the Excel object model — a perfect way to spend a rainy afternoon.

www.it-
64 Part II: How VBA Works with Excel
Figure4-3: Anexample
fromVBA’sHelp
system.
Using the Object BrowserThe VBE includes another tool known as the Object Browser. As the name implies, this tool lets you browse through the objects available to you. To access the Object Browser, press F2 when the VBE is active (or choose View➪Object Browser). You seea window like the one shown in Figure 4-4.
Figure4-4:
Browsing for
objectswiththe
ObjectBrowser
.
The drop-down list at the top contains a list of allcurrently available object libraries. Figure 4-4 shows All Libraries. If you want to browse through

www.it-
Excel’s objects, select Excel from the drop-down list.

www.it-
Chapter
4: Introducing the Excel Object Model 65The second drop-down list is where you enter a search string. For example, if you want to look at all Excel objects that deal with comments, type comment into the second field and click the Search button. (It has a pair of binoculars on it.) The Search Results window displays everything in the object library that contains the text comment. If you see something that looks like it may be of interest, select it and press F1 for more information online.
Automatically listing properties and methodsIn Chapter 3, I noted a handy feature called Auto List Members. This feature provides a list of properties and methods as you type. Figure 4-5 shows an example for the Workbooks collection.
Figure 4-5:Th
e AutoList
Members feature helps you identify properties and meth- ods for anobject.

www.it-
After I typed the dot after work
books, the VBE volunteered to help by display- ing a list of properties and methods for that collection.After I typed the cthe list was narrowed to items that began with that letter. Highlight the item you need, press Tab, and voilà! You’ve eliminated some typing — and also ensured that the property or method was spelled correctly.

66 Part II: How VBA Works with Excel

www.it-ebooks.info

S
www.it-
Chapter5
VBA Sub and Function ProceduresIn This Chapter▶ Understanding the difference between Sub procedures and Function procedures▶ Executing Sub procedures (many ways)▶ Executing Function procedures (two ways)
everal times in preceding chapters, I mention Sub procedures and alludeto the fact that Function procedures also play a role in
VBA. In this chapter, the secrets are revealed, and I clear up any confusion about these concepts.
Subs versus FunctionsThe VBA code that you write in the Visual Basic Editor is known as a proce- dure. The two most common types of procedures are Sub and Function.
✓ A Sub procedure is a group of VBA statements thatperforms an action
(or actions) with Excel.✓ A Function procedure is a group of VBA statements that performs a cal- culation and returns a single value (or an array).

www.it-
Most of the macros you write in VBA are Subprocedures. You can think of a Sub procedure asbeing like a command: Execute the Sub procedureand something happens. (Of course, exactly whathappens depends on the Sub procedure’s VBA code.)
A Function is also a procedure, but it’s quite different from a Sub. You’re already familiar with the concept of a function. Excel includes many work- sheet functions that you use every day (well, at least every weekday). Examples include SUM, PMT, and VLOOKUP. You use these worksheet func- tions in formulas. Each function takes one or more arguments(although a few functions don’t use any arguments).The function does some behind-the-scenes calculations using those arguments, and then it returns a single value. The same goes for Function procedures that you develop with VBA.

www.it-
68 Part II: How VBA Works with Excel
Looking at Sub proceduresEvery Sub procedure starts with the keyword Sub andends with an End Sub statement. Here’s an example:
Sub ShowMessage()MsgBox “That’s all folks!”
End Sub
This example shows a procedure named ShowMessage. A set of parentheses follows the procedure’s name. In most cases, these parentheses are empty. However, you may pass arguments to Sub procedures from other proce- dures. If your Sub uses arguments, list them between the parentheses.
When you record a macro with the Excel macro recorder, the result is always a Sub procedure that takes no arguments.
As you see later in this chapter, Excel provides quite a few ways to execute aVBA Sub procedure.
Looking at Function proceduresEvery Function procedure starts with the keyword Function and ends with anEnd Function statement. Here’s a simple example:
Function CubeRoot(number) CubeRoot = number ^ (1 / 3)
End Function
This function, named CubeRoot, takes one argument (named number), which is enclosed in parentheses. Functions can have as many as 255 arguments

www.it-
or none at all. When you execute the function, it returns a single value — the cube root of the argument passed to the function.
VBA allows you to specify what type of information(also known as data type) is returned by aFunction procedure. Chapter 7 contains moreinformation on specifying data types.
You can execute a Function procedure in only two ways. You can execute it from another procedure (a Sub or another Function procedure) or use it in a worksheet formula.
No matter how hard you try, you can’t use the Excel macro recorder to record a Function procedure. You must manually enter every Function procedurethat you create.

www.it-
Chapter 5: VBA Sub and Function Procedures 69Naming Subs and FunctionsLike humans, pets, and hurricanes, every Sub and Function procedure must have a name. Although it is perfectly acceptable to name your dog Hairball Harris, it’s usually not a good idea to use such afreewheeling attitude when naming procedures. When naming procedures, you must follow a few rules:
✓ You can use letters, numbers, and some punctuation characters, but the first charactermust be a letter.
✓ You can’t use any spaces or periods in the name.✓ VBA does not distinguish between uppercase and lowercase letters.✓ You can’t embed any of the following characters in a procedure name: #,
$, %, &, @, ^, *, or !. In other words, your procedure namecan’t look likecomic strip curse words.
✓ If you write a Function procedure for use in a formula, avoid using a name that looks like a cell address (for example, A1 or AK47). Actually, Excel allows such function names, but why make things more confusing than they are already?
✓ Procedure names can be no longer than 255 characters. (Of course, you would never make a procedure name this long.)
Ideally, a procedure’s name describes the routine’s purpose. A good prac- tice is to createa name by combining a verb and a noun — for example, ProcessData, PrintReport, Sort_Array, or CheckFilename.
Some programmers prefer using sentence-like namesthat provide a complete description of theprocedure. Some examples includeWriteReportToTextFile andGet_Print_Options_and_Print_Report. The use of suchlengthy names

www.it-
has pros and cons. On the one hand, such names aredescriptive and usually unambiguous. On the other hand, they take longer to type. Everyone devel- opsa naming style, but if your macro isn’t just a quick and dirty temporary macro, it’s a good idea to be descriptive and to avoid meaningless names such as DoIt, Update, Fix, and Macro1.
Executing Sub proceduresAlthough you may not know much about developing Subprocedures at this point, I’m going to jump ahead abit and discuss how to execute these pro- cedures.This is important because a Sub procedure is worthless unless you know how to execute it.
By the way, executing a Sub procedure means the same thing as running orcalling a Sub procedure. You can use whatever terminology you like.

www.it-
70 Part II: How VBA Works with Excel
How do I run you? Let me count the ways. You can execute a VBA Sub in many ways — that’s one reason you can do so many useful things with Sub procedures. Here’s an exhaustive list of the ways (well, at least all the ways I could think of) to execute a Sub procedure:
✓ With the Run➪Run Sub/UserForm command (in the VBE). Excel executes the Sub procedure in which the cursor is located. This menu command has twoalternatives: the F5 key and the Run Sub/UserForm button onthe Standard toolbar in the VBE. These methods don’t work if the proce- dure requires one or more arguments.
✓ From Excel’s Macro dialog box. You open this boxby choosing Developer➪Code➪Macros or by choosing View➪Macros➪Macros. Or bypass the Ribbon and just press the Alt+F8 shortcut key. When the Macro dialog box appears, select the Sub procedure you want and click Run. This dialog box lists only the procedures that don’trequire an argument.
✓ Using the Ctrl+key (or Ctrl+Shift+key) shortcut assigned to the Sub pro- cedure (assuming you assigned one).
✓ Clicking a button or a shape on a worksheet. The button or shape must have a Sub procedure assigned to it — which is very easy to do.
✓ From another Sub procedure that you write.✓ From a button that you’ve added to the Quick Access toolbar. (SeeChapter 19.)
✓ From a custom item you’ve added to the Ribbon. (See Chapter 19.)✓ When an event occurs. As I explain in Chapter
11, these events include opening the workbook, closing the workbook, saving the workbook, making a change to a cell, activating a sheet, and other things.
✓ From the Immediate window in the VBE. Just typethe name of the Sub procedure and press Enter.

www.it-
I demonstrate some of these techniques in the following sections. Before Ican do that, you need to enter a Sub procedure into a VBA module.
1. Start with a new workbook.2. Press Alt+F11 to activate the VBE.3. Select the workbook in the Project window.4. Choose Insert➪Module to insert a new module.5. Enter the following into the module:
Sub ShowCubeRoot()Num = InputBox(“Enter a positive number”)MsgBox Num ^ (1/3) & “ is the cuberoot.”
End Sub

www.it-
Chapter 5: VBA Sub and Function Procedures 71This procedure asks the user for a number and thendisplays that number’s cube root in a message box. Figures 5-1 and 5-2 show what happens when you execute this procedure.
Figure5-1:
Usingthe
built-inVBA
InputBoxfunctionto get a
num-ber.
Figure5-2:
Displaying thecube
root ofa numbervia theMsgBox
function.
By the way, ShowCubeRoot is not an example of a good macro. It doesn’t check for errors, so it fails easily. To see what I mean, try clicking the Cancelbutton in the input box or entering a negative number.

www.it-
Executing the Sub procedure directlyThe quickest way to execute this procedure is by doing so directly from theVBA module in which you defined it. Follow these steps:
1. Activate the VBE and select the VBA modulethat contains the procedure.
2. Move the cursor anywhere in the procedure’s code.3. Press F5 (or choose Run➪Run Sub/UserForm).4. Respond to the input box and click OK.
The procedure displays the cube root of thenumber you entered.

www.it-
72 Part II: How VBA Works with Excel
Figure5-3: The
Macrodialog
boxlists
allavail-
able Subprocedur
es.
You can’t use the Run➪Run Sub/UserForm command toexecute a Sub procedure that uses arguments, becauseyou have no way to pass the arguments to the pro-cedure. If the procedure contains one or morearguments, the only way to execute it is to call itfrom another procedure — which must supply theargument(s).
Executing the procedure from the Macro dialog boxMost of the time, you execute Sub procedures fromExcel, not from the VBE. The following stepsdescribe how to execute a macro by using Excel’sMacro dialog box:
1. Activate Excel.Alt+F11 is the express route.
2. Choose Developer➪Code➪Macros (or press Alt+F8).Excel displays the dialog box shown in Figure 5-3.
3. Select the macro.4. Click Run (or double-click the macro’s name in thelist box).
The Macro dialog box doesn’t display Sub procedures that use arguments. That’s because there is no way for you to specify the arguments.

www.it-
Executing amacrobyusing ashortcut keyAnother way to execute a macro is to press its shortcut key.But before you can use this method,you must assign a shortcut key to the macro.

www.it-
Chap
ter 5: VBA Sub and Function Procedures 73You have the opportunity to assign a shortcut key in the Record Macro dialog box when you begin recording a macro. If you create the procedure without using the macro recorder, you can assign ashortcut key (or change an existing shortcut key) by using the following procedure:
1. Choose Developer➪Code➪Macros.2. Select the Sub procedure name from the list box.
In this example, the procedure is named ShowCubeRoot.3. Click the Options button.
Excel displays the dialog box shown in Figure 5-4.4. Click the Shortcut Key option and enter a letter in the box labeled
Ctrl.The letter you enter corresponds to the key combination you want to use for executing the macro. For example, if you enter the lowercase letter c, you can then execute the macro by pressing Ctrl+C. If you enter an uppercase letter, you need to add the Shift key to the keycombina- tion. For example, if you enter C, you canexecute the macro by pressing Ctrl+Shift+C.
5. Click OK or Cancel to close the Macro Options dialog box.
Figure5-4: The
MacroOptionsdialog
boxletsyou
set options for your macros.

www.it-
After you’ve assigned a shortcut key, you can pressthat key combination to execute the macro. A shortcut keys doesn’t work if it’s assigned to a macro that uses an argument.
The shortcut keys you assign to macros override Excel’s built-in shortcut keys. For example, if you assign Ctrl+C to a macro, you can’t use this shortcut key to copy data in your workbook. This isusually not a big deal because Excel almost always provides other ways to execute commands.

www.it-
74 Part II: How VBA Works with Excel
Executing the procedure from abutton or shapeSometimes you might like the idea of assigning the macro to a button (or any other shape) on a worksheet. To assign the macro to a button, follow these steps:
1. Activate a worksheet.2. Add a button from the Form Controls group.
To display the Form Controls group, choose Developer➪Controls➪Insert(see Figure 5-5).
Figure5-5: TheRibbon,showing
thecontrol
savailable when
youclick
Inserton theDeveloper tab.
3. Click the Button tool in the Form Controls group.It’s the first button in the first row of controls.
4. Drag in the worksheet to create the button.

www.it-
After you add the button to your worksheet, Excel reads your mind and displays the Assign Macro dialog box shown in Figure 5-6.
5. Select the macro you want to assign to the button.6. Click OK.
After you’ve made the assignment, clicking the button will execute the macro — just like magic.
Note that the Assign Macro dialog box also gives youan opportunity to record a macro (by clicking the Record button). Or click the New button, and Excel will insert an empty Sub procedure with the name youspecify. Most of the time, though, you’ll assign an existing macro to a button.
When you add a button, note that the drop-down box shows two sets of con- trols: Form Controls and ActiveX Controls. These two groups of controls look similar, but they are actually very different. In practice, the Form Controls are easier to use.

www.it-
Chapter 5: VBA Sub and Function Procedures 75
Figure5-6:When
you adda but-ton to
aworkshe
et,Excelauto-
matically
displays
theAssignMacrodia-
log box.
You can also assign a macro to any other shape or object. For example, assume you’d like to execute a macro when the user clicks a Rectangle object.
1. Add the Rectangle to the worksheet.Insert a rectangle by using the Insert➪Illustrations➪Shapes command.
2. Right-click the rectangle.3. Choose Assign Macro from its shortcut menu.4. Select the macro from the Assign Macro dialog box.5. Click OK.
After performing these steps, clicking the rectangle will execute the assigned macro.

www.it-
Executing the procedure from another procedureYou can also execute a procedure from another procedure. Follow these steps if you want to give this a try:
1. Activate the VBA module that holds the ShowCubeRoot routine.2. Enter this new procedure (either above or below ShowCubeRoot code — it makes no difference):Sub NewSub()
CallShowCubeRoot
End Sub

www.it-
76 Part II: How VBA Works with Excel
3. Execute the NewSub macro.The easiest way to do this is to move the cursor anywhere within the NewSub code and press F5. Notice that this NewSub procedure simply executes the ShowCubeRoot procedure.
By the way, the keyword Call is optional. The statement can consist of only the Sub procedure’s name. I find, however, that using the Call keyword makes it perfectly clear that a procedure is being called.
Executing Function procedures
Functions, unlike Sub procedures, can be executed inonly two ways:
✓ By calling the function from another Sub procedure or Function procedure
✓ By using the function in a worksheet formula
Try this simple function. Enter it into a VBA module:
Function CubeRoot(number) CubeRoot = number ^(1/3)
End Function
This function is pretty wimpy — it merely calculates the cube root of the number passed to it as its argument. It does, however, provide a starting point for understanding functions. It alsoillustrates an important concept about functions:how to return the value. (You do remember that a function returns a value, right?)
Notice that the single line of code that makes up this Function procedure performs a calculation. The result of the math (number to the power of 1⁄3)

www.it-
is assigned to the variable CubeRoot. Not coincidentally, CubeRoot is also the name of the function. To tell the function what value to return, you assign that value to the name of the function.
Calling the function from a Sub procedureBecause you can’t execute a function directly, you must call it from another procedure. Enter the following simple procedure in the same VBA module that contains the CubeRoot function:
Sub CallerSub()Ans = CubeRoot(125)MsgBox Ans
End Sub

www.it-
Chapter 5: VBA Sub and Function Procedures 77When you execute the CallerSub procedure (using any of the methods described earlier in this chapter),Excel displays a message box that contains the valueof the Ans variable, which is 5.
Here’s what’s going on: The CubeRoot function is executed, and it receives an argument of 125. The calculation is performed by the function’s code (using the value passed as an argument), and the function’s returned value is assigned to the Ans variable. The MsgBox function then displays the value of the Ans variable.
Try changing the argument that’s passed to theCubeRoot function and run the CallerSub macroagain. It works just like it should — assumingthat you give the function a valid argument (apositive number).
By the way, the CallerSub procedure could be simplified a bit. The Ans vari- able is not really required, unless your code will use that variablelater on. You could use this single statement to obtain the same result:
MsgBox CubeRoot(125)
Calling a function from a worksheet formulaNow it’s time to call this VBA Function procedure froma worksheet formula. Activate a worksheet in the same workbook that holds the CubeRoot function definition. Then enter the following formula into any cell:
=CubeRoot(1728)
The cell displays 12, which is indeed the cube root of 1,728.

www.it-
As you might expect, you can use a cell reference as the argument for theCubeRoot function. For example, if cell A1 contains a value, you can enter=CubeRoot(A1). In this case, the function returnsthe number obtained by calculating the cube rootof the value in A1.
You can use this function any number of times in theworksheet. As with Excel’s built-in functions, your custom functions also appear in the Insert Function dialog box. Click the Insert Function toolbar button and choose the User Defined category. As shown in Figure 5-7, the Insert Function dialog box lists your very own function.
If you want the Insert Function dialog box to display a description of the func- tion, follow these steps:
1. Choose Developer➪Code➪Macros.Excel displays the Macro dialog box, but CubeRoot doesn’t appear inthe list. (CubeRoot is a Function procedure, and this list shows only Sub procedures.) Don’t fret.
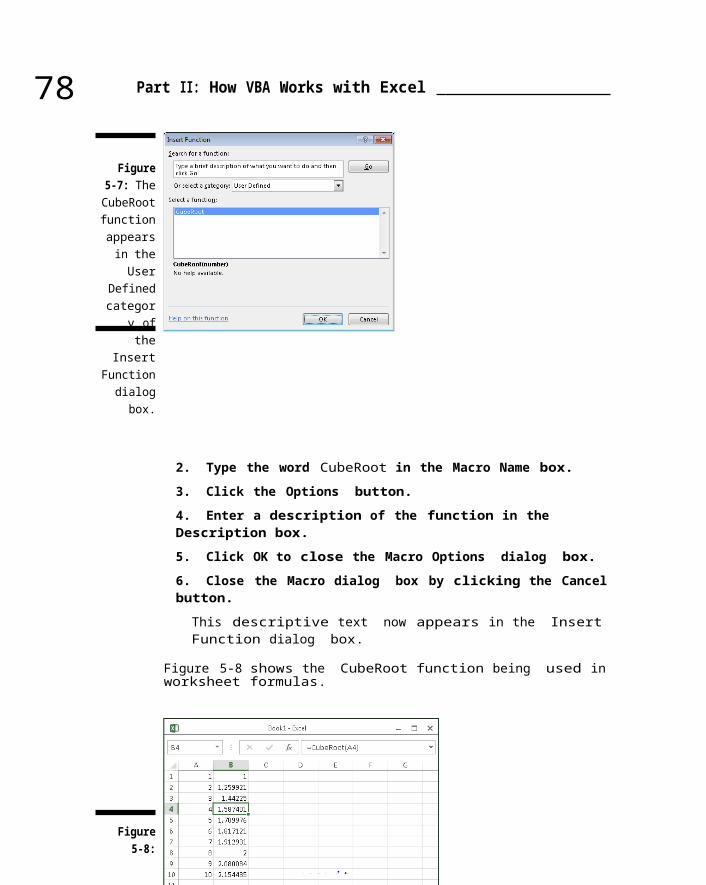
www.it-
78 Part II: How VBA Works with Excel
Figure5-7: TheCubeRootfunctionappearsin theUser
Definedcategor
y ofthe
InsertFunctiondialog
box.
2. Type the word CubeRoot in the Macro Name box.3. Click the Options button.4. Enter a description of the function in the Description box.5. Click OK to close the Macro Options dialog box.6. Close the Macro dialog box by clicking the Cancel button.
This descriptive text now appears in the Insert Function dialog box.
Figure 5-8 shows the CubeRoot function being used in worksheet formulas.
Figure5-8:

www.it-
Usingthe
CubeRoot
function in
formulas.
By now, things may be starting to come together for you. (I wish I’d had this book when I was starting out.) You’ve found out lots about Sub and Function procedures. You start creating macros in Chapter 6, which discusses theins and outs of developing macros by using the Excelmacro recorder. AndChapter 20 reveals even more about Function procedures.

www.it-
Chapter6
Using the Excel MacroRecorder
In This Chapter▶ Recording your actions by using the Excel built-in macro recorder▶ Understanding the types of macros you can record▶ Setting the appropriate options for macro recording
You can use two methods to create an Excel macro:
✓ Record it by using the Excel macro recorder.✓ Write it manually.
This chapter deals specifically with the ins and outs of using the Excel macro recorder. Recording amacro isn’t always the best approach, and some macros simply can’t be recorded, no matter how hard you try. You’ll see, however, that the Excel macro recorder is very useful. Even if your recorded macro isn’t quite what you want, the macro recorder can almost always lead you in the right direction.

www.it-
Is It Live, or Is It VBA?In previous editions of this book, I compared recording a macro to using a tape recorder. However, it occurred to me that tape recorders are rapidly going the way of the dinosaurs. So I modernized this section, and it now com- pares macro recording to making a digital video. This analogy, like the previ- ous one, goes only so far. Table 6-1 compares macro recording with makinga video.

www.it-
80 Part II: How VBA Works with Excel
Table 6-1 Video Recording versus Macro Recording
Video Recorder Excel Macro RecorderWhat equipment isrequired?
A video camera. A computer and a copy of Excel.
What is recorded? Video and audio. Actions taken in Excel.Where is the recording stored?
On a memory card. In a VBA module.
How do you play it back?
Can you edit the recording?
Can you copythe recording?Is the recording accurate?
What if you make a mistake?Can you viewthe recording?
Can you share it with the world?
Canyoumakmoneywittherecording?
Locate the file and press Play.
Yes, if you have the proper video-editing software.Yes, just like copying any otherfile.Depends on the situa- tion and theequipment quality.Rerecord the video(or edit it, if possible).Yes, by opening thefile with appropriate soft- ware.Yes, YouTube is a good option.Yes, if it’s reallygood (editing usually required).

www.it-
Locate the macro in the Macros dialog box and click Run (or useother methods).Yes, if you know what you’re doing.
Yes (no additional equipment required).Depends on how you set things up when you record the macro.
Rerecord themacro (or edit it, if possible).Yes, by opening a module in the VBE.
Yes, post itat your website or blog.Possibly, but you need to doa lot of editing first.
Recording BasicsYou take the following basic steps when recordinga macro. I describe these steps in more detail later in this chapter.
1. Determine what you want the macro to do.2. Get things set up properly.
This step determines how well your macro works.

www.it-
Ch
apter 6: Using the Excel Macro Recorder 813. Determine whether you want cell references in
your macro to be rela- tive or absolute.4. Click the Record Macro button in the left side
of the status bar (or choose Developer➪Code➪Record Macro).Excel displays its Record Macro dialog box.
5. Enter a name, shortcut key, macro location, and description.
Each of these items — with the exception of the name — isoptional.
6. Click OK in the Record Macro dialog box.Excel automatically inserts a VBA module. Fromthis point, Excel converts your actions intoVBA code. It also displays a square Stop Recording button on your status bar.
7. Perform the actions you want recorded by using the mouse or the keyboard.
8. After you’re finished, click the Stop Recording button on the status bar (or choose Developer➪Code➪Stop Recording).Excel stops recording your actions.
9. Test the macro to make sure it works correctly.10. As an option, you might want to clean up the
code by removing extra- neous statements.
The macro recorder is best suited for simple, straightforward macros. For example, you might want a macro that applies formatting to a selected rangeof cells or that sets up row and column headings for a new worksheet.
The macro recorder is for Sub procedures only. You can’t use the macro recorder to create Function procedures.
You may also find the macro recorder helpful fordeveloping more complex macros. Often, I record

www.it-
some actions and then copy the recorded codeinto another, more complex macro. In most cases,you need to edit the recorded code and add somenew VBA statements.
The macro recorder cannot generate code for any of the following tasks, which I describe later in the book:
✓ Performing any type of repetitive looping✓ Performing any type of conditional actions (using an If-Then statement)✓ Assigning values to variables✓ Specifying data types✓ Displaying pop-up messages✓ Displaying custom dialog boxes

www.it-
82 Part II: How VBA Works with Excel
The macro recorder’s limited capability certainly doesn’t diminish its impor- tance. I make the following point throughout the book: Recording your actions is perhaps the best way to master VBA. When in doubt, try recording. Although the result may not be exactly what you want, viewing the recorded code may steeryou in the right direction.
Preparing to RecordBefore you take the big step and turn on the macro recorder, spend a minute or two thinking about what you’re going to do. You record a macro sothat Excel can automatically repeat the actions yourecord, so you’ll want those actions to be accurate.
Ultimately, the success of a recorded macro depends on five factors:
✓ How the workbook is set up while you record the macro✓ What is selected when you start recording✓ Whether you use absolute or relative recording mode✓ The accuracy of your recorded actions✓ The context in which you play back the recorded macro
The importance of these factors becomes crystalclear when I walk you through an example.
Relative or Absolute?When recording your actions, Excel normally recordsabsolute references to cells. (This is the defaultrecording mode.) But quite often, this is the wrongrecording mode. If you use absolute recording mode,Excel records actual

www.it-
cell references. If you use relative recording, Excel records relative references to cells. Keep reading to see the difference.
Recording in absolute modeFollow these steps to record a simple macro in absolute mode. This macro simply enters three month names into a worksheet:
1. Make sure that the Developer➪Code➪ Use Relative References button is not highlighted and then choose Developer➪Code➪Record Macro.
2. Type Absolute as the name for this macro.

www.it-
Chapter 6: Using the Excel Macro Recorder 833. Click OK to begin recording.4. Activate cell B1 and type Jan in that cell.5. Move to cell C1 and type Feb.6. Move to cell D1 and type Mar.7. Click cell B1 to activate it again.8. Stop the macro recorder.9. Press Alt+F11 to activate the VBE.10. Examine the Module1
module.Excel generates the following code:Sub Absolute()‘‘ Absolute Macro‘
Range(“B1”).SelectActiveCell.FormulaR1C1 = “Jan”Range(“C1”).SelectActiveCell.FormulaR1C1 = “Feb”Range(“D1”).SelectActiveCell.FormulaR1C1 = “Mar”Range(“B1”).Select
End Sub
When executed, this macro selects cell B1 and inserts the three month names in the range B1:D1. Then the macro reactivates cell B1.
These same actions occur regardless of which cell isactive when you execute the macro. A macro recorded by using absolute references always produces the same results when it is executed. In this case, the macro always enters the names of the first three months into the range B1:D1.
Recording in relative modeIn some cases, you want your recorded macro to workwith cell locations in a relative manner. You may want the macro to start entering the month names in the

www.it-
active cell. In such a case, you need to use relative recording.
You can change the manner in which Excel records your actions by clicking the Use Relative References button in the Code group in the Developer tab. This button is a toggle button. Whenthe button appears highlighted in a dif- ferent color, the recording mode is relative. When the button appears nor- mally, you are recording in absolute mode.
You can change the recording method at any time,even in the middle of recording.

www.it-
84 Part II: How VBA Works with Excel
To see how relative mode recording works, erase thecells in B1:D1 and then perform the following steps:
1. Activate cell B1.2. Choose Developer➪Code➪Record Macro.3. Name this macro Relative.4. Click OK to begin recording.5. Click the Use Relative References button to change the recording mode to relative.When you click this button, it changes to a different color than the rest of the ribbon.
6. Type Jan in cell B1.7. Move to cell C1 and type Feb.8. Move to cell D1 and type Mar.9. Select cell B1.10. Stop the macro recorder.
Notice that this procedure differs slightly from the previous example. In this example, you activatethe beginning cell before you start recording. This isan important step when you record macros that use the active cell as a base.
This macro always starts entering text in the active cell. Try it. Move the cell pointer to any cell and then execute the Relative macro. The month names are always entered beginning at the active cell.
With the recording mode set to relative, the code that Excel generates is quite different from the code generated in absolute mode:
Sub Relative()‘‘ Relative Macro‘
ActiveCell.FormulaR1C1 = “Jan”ActiveCell.Offset(0, 1).Range(“A1”).SelectActiveCell.FormulaR1C1 = “Feb”
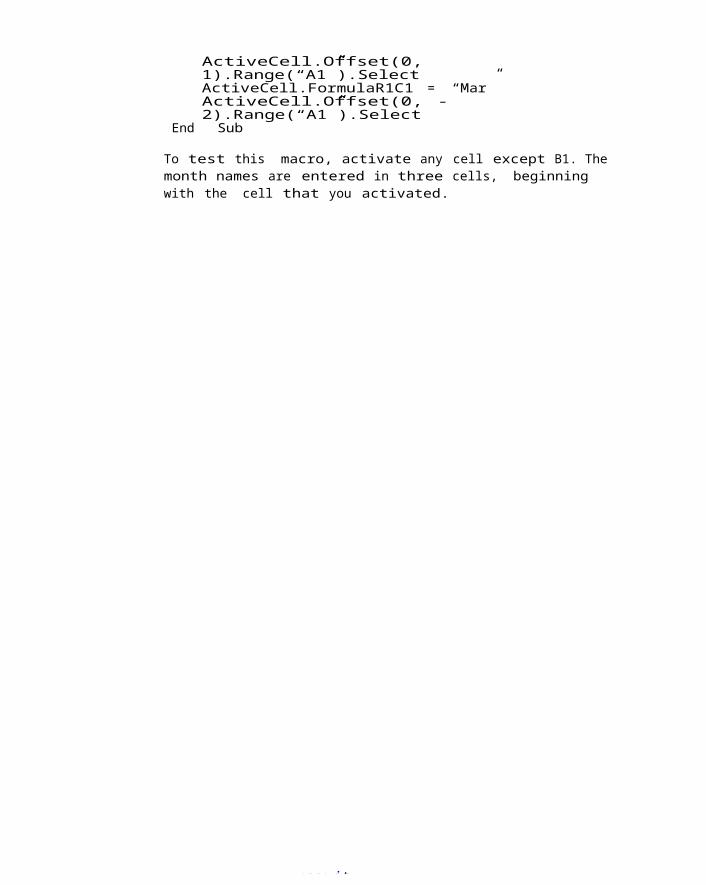
www.it-
ActiveCell.Offset(0, 1).Range(“A1”).SelectActiveCell.FormulaR1C1 = “Mar”ActiveCell.Offset(0, -2).Range(“A1”).Select
End Sub
To test this macro, activate any cell except B1. Themonth names are entered in three cells, beginning with the cell that you activated.

www.it-
Chapter 6: Using the Excel Macro Recorder 85Notice that the code generated by the macro recorder refers to cell A1. This may seem strange because you never used cell A1 during the recording of the macro. This is simply a byproduct of the way the macro recorder works. (I dis- cuss this in moredetail in Chapter 8 where I talk about the Offset method.)
What Gets Recorded?When you turn on the macro recorder, Excel converts your mouse and keyboard actions into valid VBA code. I could probably write several pages describing how Excel does this, but the best way to understand the process is by watchingthe macro recorder in action. (Figure 6-1 shows how my screen looked while I had the macro recorder turned on.)
Follow these steps:
1. Start with a blank workbook.2. Make sure that the Excel window is not maximized.3. Press Alt+F11 to activate the VBE (and make sure
that this program window is not maximized).4. Resize and arrange the Excel window and the
VBE window so that both are visible.For best results, position the Excel window above the VBE window and minimize any other applications that are running.
5. Activate Excel and choose Developer➪Code➪Record Macro.6. Click OK to start the macro recorder.
Excel inserts a new module (named Module1) and starts recording in that module.
7. Activate the VBE program window.

www.it-
8. In the Project Explorer window, double-click Module1 to display that module in the Code window.
Jump back to Excel and play around for a while. Choose various Excel com- mands and watch the codebeing generated in the VBE window. Select cells, enter data, format cells, use the Ribbon commands, create a chart, change column widths, manipulate graphics objects, and so on — go crazy! I guar- antee that you’ll be enlightened as you watch Excel spit out the VBA code before your veryeyes.

www.it-
86 Part II: How VBA Works with Excel
Figure6-1: A
convenient
windowarrange- ment
forwatching
themacro
recorderdo itsthing.
If you happen to have a system with dual monitors, you might find it helpful to keep Excel on one monitor and the VBE window on the other one. That’s whatI normally do.
Recording OptionsWhen recording your actions to create VBA code, youhave several options. Recall that the Developer➪Code➪Record Macro command displays theRecord Macro dialog box before recording begins, as shown in Figure 6-2.

www.it-
Figure6-2: TheRecordMacrodialog
boxprovide
sseveraloptions.

www.it-
Chapter 6: Using the Excel Macro Recorder 87The Record Macro dialog box, shown in Figure 6-2, lets you specify a few aspects of your macro. In the following sections, I describe these options.
Macro nameYou can enter a name for the Sub procedure that you are recording. By default, Excel uses the namesMacro1, Macro2, and so on for each macro you record. I usually just accept the default name. Ifthe macro works cor- rectly and I want to save it,I give it a more descriptive name later by editing the recorded code in the VBE. You, however, may prefer to name the macro upfront — the choice is yours.
Shortcut keyThe Shortcut key option lets you execute the macroby pressing a shortcut key combination. For example, if you enter w (lowercase), you can execute the macro by pressing Ctrl+W. If you enter W (uppercase), the macro comes alive when you press Ctrl+Shift+W.
You can add or change a shortcut key at any time, sothere’s no real reason to set this option whenrecording a macro. For instructions on assigning ashort- cut key to an existing macro, see Chapter 5.
Store Macro InThe Store Macro In option tells Excel where to store the macro that it is recording. By default,Excel puts the recorded macro in a module in the active workbook. If you prefer, you can record it

www.it-
in a new workbook (Excel opens a blank workbook) or in your Personal Macro Workbook.
Your Personal Macro Workbook is a hidden workbook that opens automati- cally when Excel starts. This is a good place to store macros that you’lluse with multiple workbooks. The Personal Macro Workbook is named PERSONAL.XLSB. This file doesn’t exist until you specify it as the location for a recorded macro. If you’ve made any changes to this file, Excel prompts you to save it when you exit.
DescriptionIf you’d like to add some descriptive comments to your macro, use the Description box. You can put anything you like here or nothing at all. As far as I’m concerned, the Description option is a waste of time because it’s just as easy to add comments to the recorded macro in the VBE.
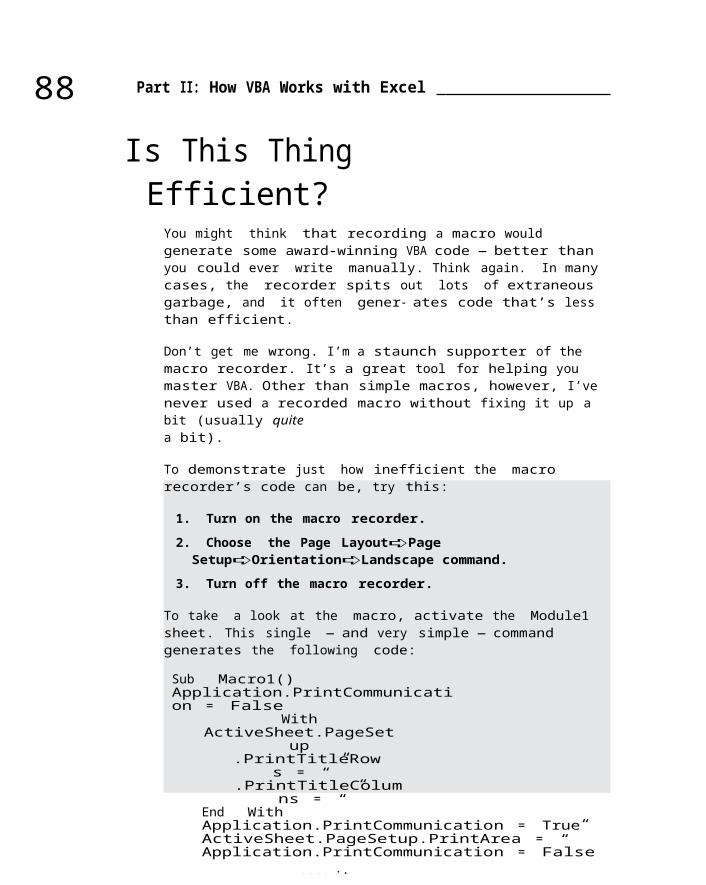
www.it-
88 Part II: How VBA Works with Excel
Is This ThingEfficient?
You might think that recording a macro would generate some award-winning VBA code — better than you could ever write manually. Think again. In many cases, the recorder spits out lots of extraneous garbage, and it often gener- ates code that’s less than efficient.
Don’t get me wrong. I’m a staunch supporter of the macro recorder. It’s a great tool for helping you master VBA. Other than simple macros, however, I’venever used a recorded macro without fixing it up a bit (usually quitea bit).
To demonstrate just how inefficient the macro recorder’s code can be, try this:
1. Turn on the macro recorder.2. Choose the Page Layout➪Page Setup➪Orientation➪Landscape command.
3. Turn off the macro recorder.
To take a look at the macro, activate the Module1sheet. This single — and very simple — command generates the following code:
Sub Macro1() Application.PrintCommunication = False
WithActiveSheet.PageSet
up.PrintTitleRow
s = “”.PrintTitleColum
ns = “”End WithApplication.PrintCommunication = TrueActiveSheet.PageSetup.PrintArea = “”Application.PrintCommunication = False

www.it-
WithActiveSheet.PageSet
up.LeftHeader
= “”.CenterHeader
= “”.RightHeader
= “”.LeftFooter
= “”.CenterFooter
= “”.RightFooter
= “”.LeftMargin = Application.InchesToPoints(0.7).RightMargin = Application.InchesToPoints(0.7).TopMargin = Application.InchesToPoints(0.75).BottomMargin = Application.InchesToPoints(0.75).HeaderMargin = Application.InchesToPoints(0.3).FooterMargin = Application.InchesToPoints(0.3).PrintHeadings =
False

www.it-
Chapter 6: Using the Excel Macro Recorder 89.PrintGridlines = False.PrintComments = xlPrintNoComments.PrintQuality = 600.CenterHorizontally = False.CenterVertically = False.Orientation = xlLandscape.Draft = False.PaperSize = xlPaperLetter.FirstPageNumber = xlAutomatic.Order = xlDownThenOver.BlackAndWhite = False.Zoom = 100.PrintErrors = xlPrintErrorsDisplayed.OddAndEvenPagesHeaderFooter = False.DifferentFirstPageHeaderFooter = False.ScaleWithDocHeaderFooter = True.AlignMarginsHeaderFooter = True.EvenPage.LeftHeader.Text = “”.EvenPage.CenterHeader.Text = “”.EvenPage.RightHeader.Text = “”.EvenPage.LeftFooter.Text = “”.EvenPage.CenterFooter.Text = “”.EvenPage.RightFooter.Text = “”.FirstPage.LeftHeader.Text = “”.FirstPage.CenterHeader.Text = “”.FirstPage.RightHeader.Text = “”.FirstPage.LeftFooter.Text = “”.FirstPage.CenterFooter.Text = “”.FirstPage.RightFooter.Text = “”
End WithApplication.PrintCommunication = True
End Sub
You may be surprised by the amount of code generated by this single com- mand. (I was the firsttime I tried something like this.) Although you changed only one print setting, Excel generated code that sets many other print- related properties.
This is a good example of macro-recording overkill. If you want a macro that just switches the page setup to landscape mode, you can simplify this macro considerably by deleting the extraneous code. This makes the macro a bit faster and a lot easier to read. Here’s how the macro looks after I deleted the irrelevant lines:
Sub Macro1()

www.it-
With ActiveSheet.PageSetup.Orientation = xlLandscape
End WithEnd Sub

www.it-
90 Part II: How VBA Works with Excel
I deleted all the code except the line that setsthe Orientation property. Actually, you can simplify this macro even more because you don’t really need the With-End With construct (I explain more about this construct in Chapter 14):
Sub Macro1()ActiveSheet.PageSetup.Orientation = xlLandscape
End Sub
In this case, the macro changes the Orientation property of the PageSetup object on the active sheet. All other properties are unchanged. By the way, xlLandscape is a built-in constant that makes your code easier to read. This constant has a value of 2, so the following statement works exactly the same (but isn’t as easy to read):
ActiveSheet.PageSetup.Orientation = 2
Stay tuned. I discuss built-in constants in Chapter 7.
Rather than record this macro, you can enter it directly into a VBA module. To do so, you have to know which objects, properties, and methods to use. Although the recorded macro isn’t all that great, by recording it, you real- ize that the PageSetup object is contained in a Worksheet object, and the PageSetup object has an Orientation property. Armed with this knowledge and a quick trip to the Help system (and probablysome experimentation), you can write the macro manually.
This chapter nearly sums it up when it comes to using the macro recorder. The only thing missing is experience. Eventually, you discover which recorded statements you can safely delete. Betteryet, you discover how to modify a recorded macro to make it more useful.

www.it-
Par tIII
ProgrammingConcepts

www.it-
Check out the video instruction for applying Excel functions at www.dummies. com/extras/excelvbaprogramming.
www.it-
In this part . . .✓ Discover the essential elements of
Excel programming: vari- ables, constants, data types, operators, arrays, and so on
✓ Get acquainted with Range objects — you’ll be glad you did✓ Find out why VBA functions (and also
Excel worksheet functions) are important
✓ Discover the essence of programming:decision-making and looping
✓ See how to run code automatically when certain thingsoccur✓ Find out about the different types of
errors and why error handling is important
✓ Know what to do when good code does bad things: Get initiated into the bug extermination club
✓ See lots and lots of examples — some aremainly informative, and many are actuallyuseful
✓ Check out the video instruction for applying Excel functions at
www.dummies.com/extrasexcelvbaprogramming.

B
www.it-
Chapter7
Essential VBA Language ElementsIn This Chapter▶ Knowing when, why, and how to use comments in your code▶ Using variables and constants▶ Telling VBA what type of data you’re using▶ Knowing why you may need to use labels in your procedures
ecause VBA is a real, live programming language, it uses many elements common to all programming languages. In this chapter, I introduce you
to several of these elements: comments, variables,constants, data types, arrays, and a few other goodies. If you’ve programmed with other languages,some of this material will be familiar. If you’re a programming newbie, it’s time to roll up your sleeves and get busy.
Using Comments in Your VBA Code
A comment is the simplest type of VBA statement. Because VBA ignores these statements, they can

www.it-
consist of anything you want. You can insert a comment to remind yourself why you did something or to clarify some particularly elegant code you wrote.
Use comments liberally and extensively to describe what the code does(which isn’t always obvious by reading the code itself). Often, code that makes perfect sense today mystifies you tomorrow. Been there. Done that.
You begin a comment with an apostrophe (‘). VBA ignores any text that follows an apostrophe in a lineof code. You can use a complete line for your commentor insert your comment at the end of a line of code. The following example shows a VBA procedure with four comments:

www.it-
94 Part III: Programming Concepts
Sub FormatCells()‘ Exit if a range is not selected
If TypeName(Selection) <> “Range” ThenMsgBox “Select a
range.”ExitSub
End If‘ Format the cells
With Selection.HorizontalAlignment = xlRight.WrapText = False ‘ no wrap.MergeCells = False ‘ no merged cells
End WithEnd Sub
The “apostrophe indicates a comment” rule has one exception: VBA doesn’t interpret an apostrophe inside a set of quotation marks as a comment indicator. For example, the following statement doesn’t contain a comment, even though it has an apostrophe:
Msg = “Can’t continue”
When you’re writing code, you may want to test a procedure by excluding a particular statement or group of statements. You could delete the statementsand then retype them later. But that’s a waste of time. A better solution is to simply turn those statements into comments by inserting apostrophes. VBA ignores statements beginning with apostrophes when executing a routine. To reactivate those “commented” statements, just remove the apostrophes.
Here’s a quick way to convert a block of statementsto comments. In the VBE, choose View➪Toolbars➪Edit to display the Edit toolbar. To convert a block of statements to comments, select the statements and click the CommentBlock button. To remove the apostrophes, select the statements and click theUncomment Block button.

www.it-
Everyone develops his or her own style of commenting. To be useful, how- ever, comments should convey information that’s not immediately obvious from reading the code.
The following tips can help you make effective use of comments:
✓ Identify yourself as the author. This can be useful when you get promoted and the person whotakes over your job has some questions.
✓ Briefly describe the purpose of each Sub or Function procedure you write.
✓ Use comments to keep track of changes you make toa procedure.

www.it-
Chapter 7: Essential VBA Language Elements 95✓ Use a comment to indicate that you’re using a function or a construct in an unusual or nonstandard manner.
✓ Use comments to describe the variables you use,especially if you don’t use meaningful variable names.
✓ Use a comment to describe any workarounds you develop to overcome bugs in Excel.
✓ Write comments as you develop code, instead ofsaving the task for a final step.
✓ Depending on your work environment, consider adding a joke or two as
a comment. The person who takes over your job when you get promotedmight appreciate the humor.
Using Variables, Constants, and Data Types
VBA’s main purpose is to manipulate data. VBA storesthe data in your com- puter’s memory, and the data may or may not end up on disk. Some data, such as worksheet ranges, resides in objects. Other data isstored in variables that you create.
Understanding variablesA variable is simply a named storage location in your computer’s memory that’s used by a program. You havelots of flexibility in naming your variables, so makethe variable names as descriptive as possible. You assign a valueto a variable by using the equal sign operator. (More aboutthis later in the“Using Assignment Statements” section.)

www.it-
The variable names in these examples appear on boththe left and right sides of the equal signs. Note that the last example uses two variables.
x = 1InterestRate = 0.075LoanPayoffAmount = 243089DataEntered = Falsex = x + 1UserName = “Bob Johnson”Date_Started = #3/14/2013#MyNum = YourNum * 1.25

www.it-
96 Part III: Programming Concepts
VBA enforces a few rules regarding variable names:
✓ You can use letters, numbers, and some punctuation characters, but the first charactermust be a letter.
✓ VBA does not distinguish between uppercase and lowercase letters.✓ You cannot use any spaces, periods, or mathematical operators in a variable name.
✓ You cannot use the following characters in a variable name: #, $, %, &, or !.
✓ Variable names can be no longer than 255 characters. But nobody even gets close to that limit.
To make variable names more readable, programmers often use mixed case(for example, InterestRate) or the underscore character (interest_rate).
VBA has many reserved words that you can’t use for variable names or pro- cedure names. These include words such as Sub, Dim, With, End, Next, and For. If you attempt to use one of these words as a variable, you may get a compile error (which means your code won’t run). So, if an assignment state- ment produces an error message, double-check and make sure that the variable name isn’t a reserved word.
VBA does allow you to create variables with names that match names in Excel’s object model, such as Workbook and Range. But, obviously, using names likethat just increases the possibility of getting confused. Here’s a perfectly valid (but very confusing) macro that declares Range as a variable name and works with a cell named Range, on a worksheet named Range.
Sub RangeConfusion()Dim Range As DoubleRange = Sheets(“Range”).Range(“Range”)MsgBox Range
End Sub

www.it-
So resist the urge to use a variable named Workbook or Range and use some- thing like MyWorkbook or MyRange instead.
What are VBA’s data types?When I talk about data type, I’m referring to themanner in which a program stores data in memory —for example, as integers, real numbers, or strings.Although VBA can take care of these detailsautomatically, it does so at a

www.it-
Chapter 7: Essential VBA Language Elements 97cost. (There’s no free lunch.) Letting VBA handle your data typing resultsin slower execution and inefficient memory use. For small applications, this usually doesn’t present much of a problem. But for large or complex applica- tions, which may be slow or need to conserve every last byte of memory, you need to be on familiar terms with data types.
VBA automatically handles all the data details, which makes life easier for programmers. Not all programming languages provide this luxury. For exam-ple, some languages are strictly typed, which means the programmer must explicitly define the data type for every variable used.
VBA does not require that you declare the variables that you use, but it’s definitely a good practice. You’ll see why later in this chapter.
VBA has a variety of built-in data types. Table 7-1 lists the most common types of data that VBAcan handle.
Table 7-1 VBA’s Built-In Data TypesData Type Bytes Used Range of ValuesByte 1 0 to 255Boolean 2 True or FalseInteger 2 –32,768 to 32,767Long 4 –2,147,483,648 to 2,147,483,647Single 4 –3.40 to –1.40E-45 for negative 1.40E-45 to 3.40 for positive Double 8 –1.79E308 to –4.94E-324 for
negative values;4.94E-324 to 1.79 for positive values
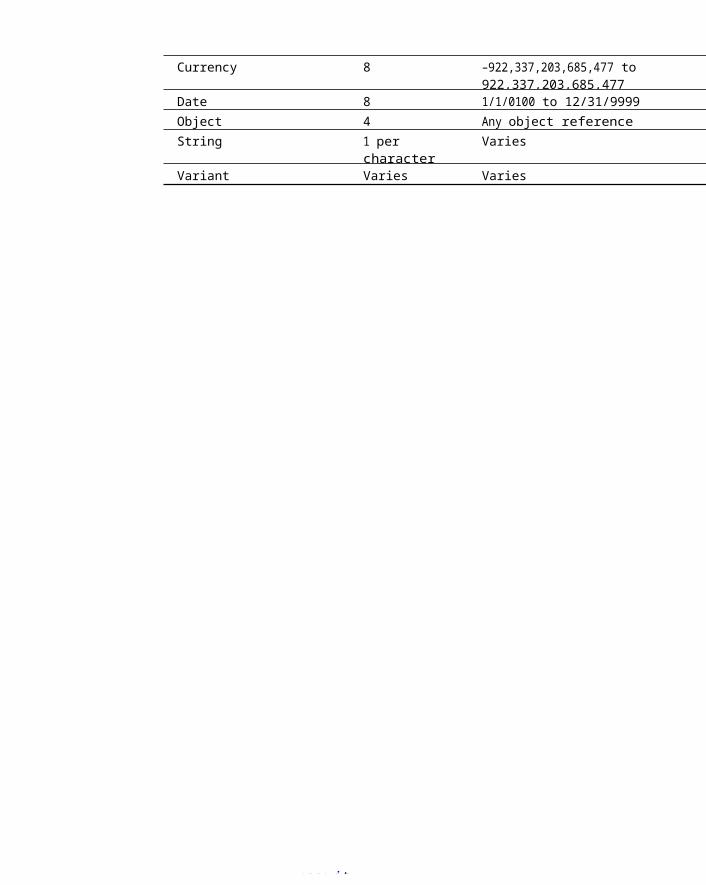
www.it-
Currency 8 –922,337,203,685,477 to922,337,203,685,477
Date 8 1/1/0100 to 12/31/9999Object 4 Any object referenceString 1 per
characterVaries
Variant Varies Varies

www.it-
98 Part III: Programming Concepts
In general, choose the data type that uses the smallest number of bytes but can still handle all the data you want to store in the variable.
An exception to the “smallest number of bytes” rule isLong. Most VBA program- mers use Long instead of Integer because doing so offers a slight performance increase. But for small procedures, you would never notice any difference between Integer and Long data types.
Declaring and scoping variablesIf you read the previous sections, you now know abit about variables and data types. In this section, you discover how to declare a variable as a certain data type.
If you don’t declare the data type for a variable you use in a VBA routine, VBA uses the default data type: Variant. Data stored as a variant acts like a chame- leon; it changes type depending on what you do with it. For example, if a vari- able is a Variant data type and contains a text string that looks like a number (such as “143”), you can use this variable for string manipulations as well as numericcalculations. VBA automatically handles the conversion. Letting VBA handle data types may seem like an easy way out — but remember that you sacrifice speed and memory.
Before you use variables in a procedure, it’s an excellent practice to declare your variables — that is, tell VBA each variable’s data type. Declaring your variables makes your macro run faster and usememory more efficiently. The default data type, Variant, causes VBA to repeatedly perform time-consuming checks and reserve more memory than necessary. If VBA knows a variable’s data type, it

www.it-
doesn’t have to investigate and can reserve just enough memory to store the data.
To force yourself to declare all the variables you use, include these two words as the first statement in your VBA module:
Option Explicit
When this statement is present, you won’t be able to run your code if it con- tains any undeclared variables.
You need to use Option Explicit only once: at the beginning of your module, prior to the declaration of any procedures in the module. Keep in mind that the Option Explicit statement applies only to the module in which it resides. If you have more than one VBA module in a project, you need an Option Explicit statement for each module.

www.it-
Chapter 7: Essential VBA Language Elements 99Suppose that you use an undeclared variable (that is, a Variant) namedCurrentRate. At some point in your routine, you insert the following statement:
CurentRate = .075
The variable name is misspelled (missing an r) and can be very difficult to spot. If you don’t notice it, Excel will interpret it as a different variable, andit will probably cause your routine to give incorrect results. If you use Option Explicit at the beginning of your module (forcing you to declare the CurrentRate variable), Excel generatesan error if it encounters a misspelled variation ofthat variable.
To ensure that the Option Explicit statement is inserted automatically when- ever you insert a new VBA module, turn on the Require Variable Definition option. You find it in the Editor tab of the Options dialog box (in the VBE, choose Tools➪Options). I highly recommend doing so.
Declaring your variables also lets you takeadvantage of a shortcut that can save sometyping. Just type the first two or threecharacters of the variable name and then pressCtrl+Space. The VBE will either complete the entryfor you or — if the choice is ambiguous — show youa list of matching words to select from. In fact,this slick trick works with reserved words andfunctions, too. Figure 7-1 shows an example of howthis works.
Figure7-1:
Pressing
Ctrl+Space displays a list of vari- able names, reserved words, andfunctions.

www.it-
You now know the advantages of dec
laring variables, but how do you do it? The most common way is to use a Dim statement. Here are some examples of variables being declared:
Dim YourName As StringDim January_Inventory As DoubleDim AmountDue As DoubleDim RowNumber As LongDim X

www.it-
100 Part III: Programming Concepts
The first four variables are declared as a specificdata type. The last variable, X, is not declared asa specific data type, so it’s treated as a Variant(it can be anything).
Besides Dim, VBA has three other keywords that are used to declare variables:
✓ Static✓ Public✓ Private
I explain more about the Dim, Static, Public, and Private keywords later on, but first I must cover two other topics that are relevant here: a variable’s scope and a variable’s life.
Recall that a workbook can have any number of VBA modules. And a VBA module can have any number of Sub and Function procedures. A variable’s scope determines which modules and procedures can use the variable. Table 7-2 has the details.
Table 7-2 Variable’s ScopeScope How the Variable Is DeclaredProcedure only By using
a Dim or a Static statement in the pro- cedure that uses the variable
Module only By using a Dim or a Private statement before the first Sub or Functionstatement in the module
All procedures in all modules By using a Publicstatement before the first Sub or Function statement in a module

www.it-
Confused? Keep turning the pages, and you’ll see some examples that will make this stuff crystal clear.
Procedure-only variablesThe lowest level of scope for a variable is at the procedure level. (A procedure is either a Sub or a Function procedure.) Variables declared with this scope can be used only in the procedure in which they are declared. When the pro- cedure ends, the variable no longer exists (it goes to the great big bucket in the sky), and Excel frees up its memory. If you execute the procedure again, the variable comes back to life, but its previous value is lost.

www.it-
Chapter 7: Essential VBA Language Elements
101
Humorous declarationsTopics such as variables, datatypes, declara- tions, andscope can be pretty boring, soI came up with some semi-humorous declaration state-ments for your amusement. Theseare all valid declarations:
Dim King As String, KongAs LongDim Mouthful as Byte Dim Julian As Boolean Dim Unmarried As SingleDim Dewey As Decimal
Dim Trouble As Double Dim WindingRoad As LongDim Blind As DatePublic NuisancePrivate FirstClassStatic Cling, ElectricityDim BaseballCards As New CollectionDim DentalFloss As String
You can probably come up with some others.
The most common way to declare a procedure-only variable is with a Dim statement. Dim doesn’t refer to the mental capacity of the VBA designers. Rather, it’s an old programming term that’s short for dimension, which simply means you are setting aside memory for a particular variable. You usuallyplace Dim statements immediately after the Sub or Function statement and before the procedure’s code.
The following example shows some procedure-only variables declared by using Dim statements:
Sub MySub()Dim x As IntegerDim First As LongDim InterestRate As SingleDim TodaysDate As DateDim UserName As StringDim MyValue
‘ ... [The procedure’s code goes here] ...End Sub

www.it-
Notice that the last Dim statement in thepreceding example doesn’t declare a data type forthe MyValue variable; it declares only the variableitself. The effect is that the variable MyValue is aVariant.
By the way, you can also declare several variables with a single Dim statement, as in the following example:
Dim x As Integer, y As Integer, z As IntegerDim First As Long, Last As Double
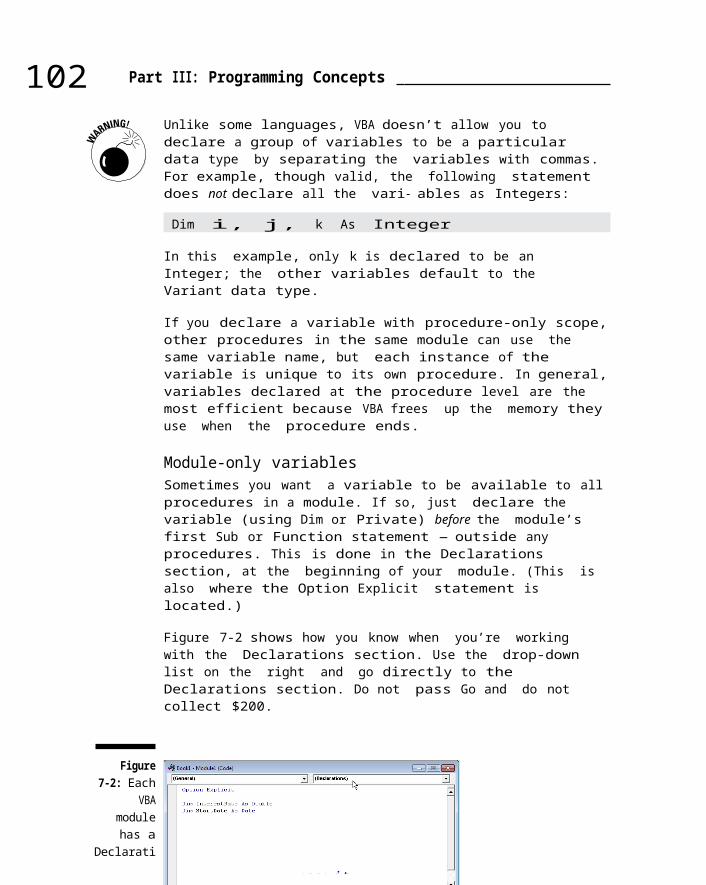
www.it-
102 Part III: Programming Concepts
Unlike some languages, VBA doesn’t allow you to declare a group of variables to be a particular data type by separating the variables with commas.For example, though valid, the following statement does not declare all the vari- ables as Integers:
Dim i, j, k As Integer
In this example, only k is declared to be an Integer; the other variables default to the Variant data type.
If you declare a variable with procedure-only scope,other procedures in the same module can use the same variable name, but each instance of the variable is unique to its own procedure. In general,variables declared at the procedure level are the most efficient because VBA frees up the memory they use when the procedure ends.
Module-only variablesSometimes you want a variable to be available to all procedures in a module. If so, just declare the variable (using Dim or Private) before the module’s first Sub or Function statement — outside any procedures. This is done in the Declarations section, at the beginning of your module. (This is also where the Option Explicit statement is located.)
Figure 7-2 shows how you know when you’re working with the Declarations section. Use the drop-down list on the right and go directly to the Declarations section. Do not pass Go and do not collect $200.
Figure7-2: Each
VBAmodulehas a
Declarati

www.it-
onssection,
whichappearsbeforeany Sub
orFunctionprocedur
es.
As an example, suppose that you want to declare theCurrentValue variable so that it’s available to all the procedures in your module. All you need to do is use the Dim statement in the Declarations section:

www.it-
Chapter 7: Essential VBA Language Elements
103
Dim CurrentValue As Double
With this declaration in place — and in the properplace — the CurrentValue variable can be used from any other procedure within the module, and it retains its value from one procedure to another.
Public variablesIf you need to make a variable available to all the procedures in all yourVBA modules in a workbook, declare the variable at the modulelevel (in theDeclarations section) by using the Public keyword. Here’s an example:
Public CurrentRate As Long
The Public keyword makes the CurrentRate variableavailable to any proce- dure in the workbook — eventhose in other VBA modules. You must insert thisstatement before the first Sub or Functionstatement in a module.
If you would like a variable to be available to modules in other workbooks, you must declare the variable as Public and establish a reference to the work- book that contains the variable declaration.Set up a reference by using the Tools➪References command in VBE. In practice, sharing a variable across workbooks is hardly ever done. In fact, I’ve never done it once in my entire VBA programming career. But I guess it’s nice to know that it can be done, in case it ever comes up as a Jeopardy! question.
Static variablesNormally, when a procedure ends, all the procedure’s variables are reset. Static variables are a special case because they retain their value even when the procedure ends. You declare a static variable at the procedure level. A static variable

www.it-
may be useful if you need to track the number of times you execute a procedure. You can declare a static variable and increment it each time you run the procedure.
As shown in the following example, you declare static variables by using theStatic keyword:
Sub MySub()Static Counter As IntegerDim Msg As StringCounter = Counter + 1Msg = “Number of executions: “ & CounterMsgBox Msg
End Sub

www.it-
104 Part III: Programming Concepts
The code keeps track of the number of times the procedure was executed and displays the number in a message box. The value of the Counter vari- able is not reset when the procedure ends, but it is reset when you close and reopen the workbook.
Even though the value of a variable declared as Staticis retained after a variable ends, that variable is unavailable to other procedures. In the preceding MySub procedure example, the Counter variable and itsvalue are available only within the MySub procedure. In other words, it’s a procedure-level variable.
Life of variablesNothing lives forever, including variables. The scope of a variable not only determines where thatvariable may be used, it also affects under which cir- cumstances the variable is removed from memory.
You can purge all variables from memory by using three methods:
✓ Click the Reset toolbar button (the little blue square button on theStandard toolbar in the VBE).
✓ Click “End” when a runtime error message dialog box shows up.✓ Include an End statement anywhere in your code. This is not the same as an End Sub or EndFunction statement.
Otherwise, only procedure-level variables will be removed from memory when the macro code has completed running. Static variables, module level variables, and global (public) variables all retaintheir values in between runs of your code.
If you use module-level or global-level variables, make sure they have the value you expect them to have. You never know whether one of the situations I just mentioned may have caused your variables to lose their content!

www.it-
Working with constantsA variable’s value may (and usually does) change while your procedure is executing. That’s why they call it a variable. Sometimes you need to refer to a value or string that never changes. In such a case, you need a constant — a named element whose value doesn’t change.
As shown in the following examples, you declare constants by using theConst statement. The declaration statement also gives the constant its value:

www.it-
Chapter 7: Essential VBA Language Elements
105
Const NumQuarters As Integer = 4Const Rate = .0725, Period = 12Const ModName As String = “Budget Macros”Public Const AppName As String = “Budget Application”
Using constants in place of hard-coded values or strings is an excellent pro- gramming practice. For example, if your procedure needs to refer to a specific value (such as an interest rate) several times, it’s better to declare the valueas a constant and refer to its name rather than the value. This makes yourcode more readable and easier to change. And if the interest rate changes, you have to change only one statement rather than several.
Like variables, constants have a scope. Keep these points in mind:
✓ To make a constant available within only a singleprocedure, declare the constant after the procedure’s Sub or Function statement.
✓ To make a constant available to all procedures in a module, declare the constant in the Declarations section for the module.
✓ To make a constant available to all modules in the workbook, use the Public keyword and declare the constant in the Declarations section of any module.
Unlike a variable, the value of a constant does notvary. If you attempt to change the value of a constant in a VBA routine, you get an error. This isn’t too surprising because the value of a constant must remain constant. If you need to change the value of a constant while your code is running, what you really need is a variable.
Pre-made constants

www.it-
Excel and VBA contain many predefined constants, which you can use with- out the need to declare them yourself. The macro recorder usually uses constants rather than actual values. In general, you don’t need to know the value of these constantsto use them. The following simple procedure uses a built-in constant (xlCalculationManual) to change the Calculation property of the Application object.(In other words, this changes the Excel recalculation mode to manual.)
Sub CalcManual()Application.Calculation = xlCalculationManual
End Sub

www.it-
106 Part III: Programming Concepts
I discovered the xlCalculationManual constant by recording a macro while I changed the calculation mode. I also could have looked in the Help system and found this:
NamexlCalculationAutomatic
Value–4105
DescriptionExcel controls recalculation.
xlCalculationManual –4135 Calculation is done when the user requests it.
xlCalculationSemiautomatic 2 Excel controls recalculationbut ignores changes in tables.
So the actual value of the built-in xlCalculationManual constant is –4135. Obviously, it’seasier to use the constant’s name than try to remember such an odd value. As you can see, many ofthe built-in constants are just arbitrary numbers that have special meaning to VBA.
To find the actual value of a built-in constant, use the Immediate window in the VBE and execute a VBA statement such as the following:
? xlCalculationAutomatic
If the Immediate window isn’t visible, press Ctrl+G. The question mark is a shortcut for typingPrint.
Working with stringsExcel can work with both numbers and text, so it should come as no surprise that VBA has this same power. Text is often referred to as a string. You can work with two types of strings in VBA:
✓ Fixed-length strings are declared with a specifiednumber of characters.
The maximum length is 65,526 characters. That’s a lot of characters!As a point of reference, this chapter contains about half that many characters.
✓ Variable-length strings theoretically can hold asmany as two billion characters. If you type five

www.it-
characters per second, it would take you about760 days to bang out two billion characters — assuming you don’t take any breaks to eat or sleep.
When declaring a string variable with a Dim statement, you can specify the maximum length if youknow it (it’s a fixed-length string) or let VBA handleit dynamically (it’s a variable-length string). The following example declares the

www.it-
Chapter 7: Essential VBA Language Elements
107
MyString variable as a string with a maximum lengthof 50 characters. (Use an asterisk to specify thenumber of characters, up to the 65,526 characterlimit.) YourString is also declared as a string,but its length is unspecified:
Dim MyString As String * 50Dim YourString As String
When declaring a fixed-length string that exceeds 999, do not use a comma in the number that specifies the string size. In fact, never use commas when entering a numeric value in VBA. VBA doesn’t like that.
Working with datesAnother data type you may find useful is Date. You can use a string variable to store dates, but then you can’t perform date calculations. Using theDate data type gives your routines greater flexibility. For example, you might need to calculate the number of days between two dates. This would be impossi- ble (or at least extremely challenging) if you used strings to hold your dates.
A variable defined as a Date can hold dates rangingfrom January 1, 0100, to December 31, 9999. That’s a span of nearly 10,000 years and more than enough for even the most aggressive financial forecast. You can also use the Date data type to work with time data (VBA lacks a Time data type).
These examples declare variables and constants as a Date data type:
Dim Today As DateDim StartTime As DateConst FirstDay As Date = #1/1/2013#Const Noon = #12:00:00#

www.it-
In VBA, place dates and times between two hash marks, as shown in the preceding examples.
Date variables display dates according to your system’s short date format, and they display times according to your system’s time format (either 12- or24-hour formatting). The Windows Registry stores these settings, and you can modify them via the Regional and Language Options dialog box in the Windows Control Panel. Therefore, the VBA-displayeddate or time format may vary, depending on the settings for the system on which the application is running.

www.it-
108 Part III: Programming Concepts
When writing VBA code, however, you must use one of the U.S. date formats (such as mm/dd/yyyy). So the following statement assigns a day in October (not November) to the MyDate variable (even if your system is set to use dd/ mm/yyyy for dates):
MyDate = #10/11/2013#
When you display the variable (with the MsgBox function, for example), VBA shows MyDate using your system settings. So if your system uses the dd/mm/ yyyy date format, MyDate will be displayed as 11/10/2013.
Using AssignmentStatements
An assignment statement is a VBA statement that assignsthe result of an expression to a variable or an object. Excel’s Help system defines the term expression as
. . . a combination of keywords, operators, variables, and constantsthat yields a string, number, or object. An expression can be used toperform a calculation, manipulate characters, or test data.
I couldn’t have said it better myself, so I won’t even try.
Much of your work in VBA involves developing (and debugging) expressions. If you know how to create formulas in Excel, you’ll have no trouble creating expressions. With a worksheet formula, Excel displays the result in a cell. A VBA expression, on the other hand, can be assigned to a variable.
Assignment statement examples

www.it-
In the assignment statement examples that follow, the expressions are to the right of the equal sign:
x = 1x = x + 1x = (y * 2) / (z * 2)HouseCost = 375000FileOpen = TrueRange(“TheYear”).Value = 2013

www.it-
Chapter 7: Essential VBA Language Elements
Expressions can be as complex as you need them to be; use the line continuation character (a space followed by an underscore) to make lengthy expressions easier to read.
Often, expressions use functions: VBA’s built-in functions, Excel’s worksheet functions, or functionsthat you develop with VBA. I discuss functions in Chapter 9.
About that equal signAs you can see in the preceding example, VBA uses the equal sign as its assignment operator. You’re probably accustomed to using an equal sign as a mathematical symbol for equality. Therefore, an assignment statement like the following may cause you to raise your eyebrows:
z = z + 1
In what crazy universe is z equal to itself plus 1?Answer: No known uni- verse. In this case, the assignment statement (when executed) increases the value of z by 1. So if z is 12, executing the statement makes z equal to 13.Just remember that an assignment uses the equal sign as an operator, not a symbol of equality.
Smooth operatorsOperators play a major role in VBA. Besides the equal sign operator (discussed in the previous section), VBA provides several other operators. Table 7-3lists these operators. These should be familiar to you because they are the same operators used in worksheet formulas (except for the Mod operator).
Whenwriting anExcel formula,moduloarithmeticisdoneusing the MOD function. For example,the foll

www.it-
owing formula returns 2 (the remainder when you divide 12 by 5):
=MOD(12,5)
In VBA, the Mod operator is used like this (and z has a value of 2):
z = 12 Mod 5
109

www.it-
110 Part III: Programming Concepts
Table 7-3 VBA’s OperatorsFunction Operator SymbolAddition +Multiplication *Division /Subtraction –Exponentiation ^String concatenation &Integer division (the result is always an integer) \Modulo arithmetic (returns the remainder of a division operation)
Mod
The term concatenation is programmer speak for “jointogether.” Thus, if you concatenate strings, youare combining strings to make a new and improvedstring.
As shown in Table 7-4, VBA also provides a full set of logical operators. Of these, Not, And, and Or aremost frequently used. I’ve never seen anyone use the other three logical operators.
Table 7-4 VBA’s LogicalOperatorsOperator What It DoesNot Performs a logicalnegation on an expression.And Performs a logical conjunction on two expressions. Or Performs a logical disjunction on two expressions. XoR Performs a logical exclusion on two expressions. Eqv Performs a logical equivalence on two expressions. Imp Performs a logical implication on two expressions.

www.it-
The precedence order for operators in VBA is exactlythe same as in Excel formulas. Exponentiation has the highest precedence. Multiplication and divi- sion come next, followed by addition and subtraction. You can use parenthe- ses to change the natural precedence order, making whatever’s sandwichedin parentheses come before any operator. Take a look at this code:

www.it-
Chapter 7: Essential VBA Language Elements
111
x =3 y = 2z = x + 5 * y
When this code is executed, what’s the value ofz? If you answered 13, you get a gold star thatproves you understand the concept of operatorprece- dence. If you answered 16, read this: Themultiplication operation (5 * y)is performed first, and that result is added to x. If you answered something other than 13 or 16, Ihave no comment.
By the way, I have more important things to remember than how opera- tor precedence works, soI tend to use parentheses even when they aren’trequired. For example, in real life I would write that last assignment state- ment like this:
z = x + (5 * y)
Don’t be shy about using parentheses even if they aren’t required — espe- cially if doing so makes your code easier to understand. VBA doesn’t care if you use extra parentheses.
Working withArraysMost programming languages support arrays. An array isa group of variables that share a common name. You refer to a specific variable in the array by using the array name and an index number in parentheses.For example, you can define an array of 12 string variables to hold the names of the monthsof the year. If you name the array MonthNames, you can refer to the first ele- ment of the array as

www.it-
MonthNames (1), the second element as MonthNames (2), and so on.
Declaring arraysBefore you can use an array, you must declare it. No exceptions. Unlike normal variables, VBA is very strict about this rule. You declare an array with aDim or Public statement, just as you declare a regular variable. However, you also need to specify the number of elements in the array. You do this by specifying the first index number, the keyword To, and the last index number — all inside parentheses. The following example shows how to declare an array of100 integers:
Dim MyArray(1 To 100) As Integer

www.it-
112 Part III: Programming Concepts
When you declare an array, you can choose to specify only the upper index. If you omit the lowerindex, VBA assumes that it’s 0. Therefore, both of the following statements declare the same 101-element array:
Dim MyArray (0 To 100) As Integer
Dim MyArray (100) As Integer
If you want VBA to assume that 1 (rather than 0) is the lower index for your arrays, include the following statement in the Declarations section of your module:
Option Base 1
This statement forces VBA to use 1 as the first index number for arrays that declare only the upper index. If this statement is present, the following state- ments are identical, both declaring a 100-element array:
Dim MyArray (1 To 100) As Integer
Dim MyArray (100) As Integer
Multidimensional arraysThe arrays created in the previous examples are allone-dimensional arrays. Think of one-dimensional arrays as a single line of values. Arrays you createin VBA can have as many as 60 dimensions — although you rarely need more than two or three dimensions in an array. The following example declares an81-integer array with two dimensions:
Dim MyArray (1 To 9, 1 To 9) As Integer
You can think of this array as occupying a 9 x 9 matrix — perfect for storing all numbers in a Sudoku puzzle.

www.it-
To refer to a specific element in this array, you need to specify two index numbers (similar to its “row” and its “column” in the matrix). The following example shows how you can assign a value to an element in this array:
MyArray (3, 4)= 125
This statement assigns a value to a single element in the array. If you’re think- ing of the array in terms of a 9 x 9 matrix, this assigns 125 to the element located in the third row and fourth column of the matrix.

www.it-
Chapter 7: Essential VBA Language Elements
113
Here’s how to declare a three-dimensional array, with 1,000 elements:
Dim My3DArray (1 To 10, 1 To 10, 1 To 10) As Integer
You can think of a three-dimensional array as a cube. Visualizing an array of more than three dimensions is more difficult. Sorry, I haven’t yet mastered the fourth dimension and beyond.
Dynamic arraysYou can also create dynamic arrays. A dynamic array doesn’t have a preset number of elements. Declare a dynamic array with an empty set of parentheses:
Dim MyArray () As Integer
Before you can use this array, you must use the ReDim statement to tell VBA how many elements the array has. Usually, the number of elements in the array is determined while your code is running. You can use the ReDim state- ment any number of times, changing the array’s size as often as needed. The following example demonstrates how to change the number of elements in a dynamic array. It assumes that the NumElements variable contains a value, which your code calculated.
ReDim MyArray (1 To NumElements)
When you redimension an array by using ReDim, you wipe out any values cur- rently stored in the array elements. You can avoid destroying the old values by using the Preserve keyword. The following example shows how you can preserve an array’s valueswhen you redimension the array:
ReDim Preserve MyArray(1 To NumElements)

www.it-
If MyArray currently has ten elements and you execute the preceding state- ment with NumElements equaling 12, the first ten elements remain intact, and the array has room for two additional elements (up to the number contained in the variable NumElements). If NumElements equals 7 however, the first seven elements are retained but the remaining three elements meet their demise.
The topic of arrays comes up again in Chapter 10, when I discuss looping.

www.it-
114 Part III: Programming Concepts
Using LabelsIn early versions of BASIC, every line of code required a line number. For example, if you had written a BASIC program in the ’70s (dressed, of course, in your bell bottoms), it may have looked something like this:
010: LET X=5020: LET Y=3030: LET Z=X*Y040: PRINT Z050: END
VBA permits the use of such line numbers, and it evenpermits text labels. You don’t typically use a label for each line, but you may occasionally need to usea label. For example, insert a label if you use a GoTostatement (which I discuss in Chapter 10). A label must begin with the first nonblank character in a line and end with a colon.
The information in this chapter becomes clearer asyou read subsequent chapters. If you want to find out more about VBA language elements, I refer you to the VBA Help system. You can find as much detailas you need, or care, to know.

I
www.it-
Chapter8
Working with RangeObjects
In This Chapter▶ Finding out why Range objects are so important▶ Understanding the various ways of referring to ranges▶ Discovering some of the more useful Range object properties▶ Uncovering some of the more useful Range object methods
n this chapter, I dig a bit deeper into Excel’s dungeons and take a closer look at Range objects. Excel is all about cells, and the Rangeobject is a
container for cells. Why do you need to know so much about Range objects? Because much of the programming work you do in Excel focuses on Range objects. You can thank me later.
A Quick ReviewA Range object represents a range contained in a Worksheet object. Range objects, like all other objects, have properties (which you can examine and sometimes change) and methods (which perform actions on the object).
www.it-
A Range object can be as small as a single cell (for example, B4) or as large as every one of the 17,179,869,184 cells in a worksheet (A1:XFD1048576).
When you refer to a Range object, the address is always surrounded by double quotes, like this:
Range(“A1:C5”)
If the range consists of one cell, you still need thequotes:
Range(“K9”)

www.it-
116 Part III: Programming Concepts
If the range happens to have a name (created by using the Formulas➪DefinedNames➪Define Name command in Excel), you can use an expression like this:
Range(“PriceList”)
Unless you tell Excel otherwise by qualifying the range reference, it assumes that you’re referring to a range on the active worksheet. If anything other than a worksheet is active (such as a chart sheet), the range reference fails, and your macro displays an error message and stops running.
As shown in the following example, you can refer to a range outside the active sheet by qualifyingthe range reference with a worksheet name from theactive workbook:
Worksheets(“Sheet1”).Range(“A1:C5”)
If you need to refer to a range in a different workbook (that is, any workbook other than the active workbook), you can use a statement like this:
Workbooks(“Budget.xlsx”).Worksheets(“Sheet1”).Range(“A1:C5”)
A Range object can consist of one or more entire rows or columns. You can refer to an entire row (in this case, row 3) by using syntax like this:
Range(“3:3”)
You can refer to an entire column (the fourth column in this example) like this:
Range(“D:D”)
In Excel, you select noncontiguous ranges by holdingdown the Ctrl key while selecting various ranges with your mouse. Figure 8-1 shows a noncontiguous range selection. You shouldn’t be surprised that VBA also lets you work with noncontiguous ranges. The following expression refers to a two-area

www.it-
noncon- tiguous range. Notice that a comma separates the two areas.
Range(“A1:B8,D9:G16”)
Be aware that some methods and properties cause havoc with noncontiguous ranges. You may have to process each area separately by using a loop.

www.it-
Chapter 8: Working with Range Objects
117
Figure8-1: A
noncon-tiguousrange
selection.
Other Ways to Refer to a RangeThe more you work with VBA, the more you realize thatit’s a fairly well- conceived language and is usuallyquite logical (despite what you may be thinking right now). Often, VBA provides multiple ways to perform an action. You can choose the most appropriate solution for your problem. This sectiondiscusses some of the other ways to refer to a range.
This chapter barely scratches the surface for the Range object’s properties and methods. As you work with VBA, you’ll probably need to access other properties and methods. The Help system is the best place to find out about them, but it’s also a good idea to record your actions and examine the code Excel generates. You’re probably getting tiredof hearing that advice by now, but it really is good advice.
The Cells property

www.it-
Rather than use the VBA Range keyword, you can refer to a range via theCells property.
Notice that I wrote Cells property, not Cells object or even Cells collection. Although Cells may seem like an object (or a collection), it’s really not. Rather, Cells is a property that VBA evaluates. VBA then returns an object (more spe- cifically, a Range object). If this seems strange, don’t worry. Even Microsoft appears to be confused about this issue. In some earlier versions of Excel, the Cells propertywas known as the Cells method. Regardless of what itis, just understand that Cells is a handy way to refer to a range.

www.it-
118 Part III: Programming Concepts
The Cells property takes two arguments: a row numberand a column number. Both of these arguments are numbers, even though we usually refer to columns byusing letters. For example, the following expression refers to cell C2 on Sheet2:
Worksheets(“Sheet2”).Cells(2, 3)
You can also use the Cells property to refer to a multi-cell range. The follow- ing example demonstrates the syntax you use:
Range(Cells(1, 1), Cells(10, 8))
This expression refers to an 80-cell range that extends from cell A1 (row 1, column 1) to cell H10 (row 10, column 8).
The following statements both produce the same result; they enter a valueof 99 into a 10-by-8 range of cells. More specifically,these statements set theValue property of the Range object:
Range(“A1:H10”).Value = 99Range(Cells(1, 1), Cells(10, 8)).Value = 99
The advantage of using the Cells property to refer to ranges becomes appar- ent when you use variables rather than actual numbers as the Cells argu- ments. And things really start to click when you understand looping, which I cover in Chapter 10.
The Offset propertyThe Offset property provides another handy means for referring to ranges. This property, which operates on a Range object and returns another Range object, lets you refer to a cell that is a particular number of rows and col- umns away from another cell.

www.it-
Like the Cells property, the Offset property takes two arguments. The first argument represents the number of rows to offset; the second represents the number of columns to offset.
The following expression refers to a cell one row below cell A1 and two col- umns to the right of cellA1. In other words, this refers to the cell commonly known as C2:
Range(“A1”).Offset(1, 2)

www.it-
Chapter 8: Working with Range Objects
119
The Offset property can also use negative arguments. A negative row offset refers to a row abovethe range. A negative column offset refers to a column to the left of the range. The following example refers to cell A1:
Range(“C2”).Offset(-1, -2)
And, as you may expect, you can use 0 as one or both of the arguments forOffset. The following expression refers to cell A1:
Range(“A1”).Offset(0, 0)
Here’s a statement that inserts the time of day into the cell to the right of the active cell:
ActiveCell.Offset(0,1) = Time
When you record a macro in relative mode, Excel uses the Offset property quite a bit. Refer back to Chapter 6 for an example.
The Offset property is most useful when you use variables rather than actual values for the arguments. In Chapter 10, I present some examples that demon- strate this.
Some Useful Range Object Properties
A Range object has dozens of properties. You canwrite VBA programs non- stop for the next 12months and never use them all. In this section, Ibriefly describe some of the more commonly usedRange properties. For complete details, consultthe Help system in the VBE.

www.it-
Some Range properties are read-only properties, which means that your code can look at their values, but it can’t change them (“look, but don’t touch”). Forexample, every Range object has an Address property, which holds therange’s address. You can access this read-only property, but you can’t change it — which makes perfect sense when you think about it.
By the way, the examples that follow are typically statements rather than complete procedures. If you’d like to try any of these (and you should), create a Sub procedure to do so. Also, many of these statements work prop- erly only if a worksheet is the active sheet.

www.it-
120 Part III: Programming Concepts
The ValuepropertyThe Value property represents the value containedin a cell. It’s a read-write property, so your VBAcode can either read or change the value.
The following statement displays a message boxthat shows the value in cellA1 onSheet1:
MsgBox Worksheets(“Sheet1”).Range(“A1”).Value
It stands to reason that you can read the Valueproperty only for a single-cellRange object. For example, the followingstatement generates an error:
MsgBox Worksheets(“Sheet1”).Range(“A1:C3”).Value
You can, however, change the Value property for arange of any size. The fol- lowing statement entersthe number 123 into each cell in a range:
Worksheets(“Sheet1”).Range(“A1:C3”).Value = 123
Value is the default property for a Range object. Inother words, if you omit a property for a Range,Excel uses its Value property. The followingstatements both enter a value of 75 into cell A1 onthe active worksheet:
Range(“A1”).Value = 75Range(“A1”) = 75
www.it-
Assigning the values in a multi-cell rangeto a variable
I wasn’t being fully truthfulwhen I wrote “you can read theValue property only for asingle- cell Range object.” Infact, you can assign thevalues in a multi-cell range toa variable, as long as thevariable is a variant. That’sbecause a variant can act likean array. Here’s an example:Dim x As Variantx = Range(“A1:C3”).Value
Then you can treat the xvariable as if it were an array.This statement, for example,returns the value in cell B1:MsgBox x(1, 2)

www.it-
Chapter 8: Working with Range Objects
The Text propertyThe Text property returns a string that represents the text as it’s displayed in a cell — the formatted value. The Text property is read-only. For example, suppose that cell A1 contains thevalue 12.3 and is formatted to display two decimalsand a dollar sign ($12.30). The following statement displays a mes- sage box containing $12.30:
MsgBox Worksheets(“Sheet1”).Range(“A1”).Text
But the next statement displays a message box containing 12.3:
MsgBox Worksheets(“Sheet1”).Range(“A1”).Value
If the cell contains a formula, the Text property returns the result of the for- mula. If a cell contains text, then the Text property and the Value property will always return the same thing, because text (unlike a number) can’t be formattedto display differently.
The Count propertyThe Count property returns the number of cells in a range. It counts all cells, not just the nonblankcells. Count is a read-only property, just as you would expect. The following statement accesses a range’s Count property and dis- plays the result (9) in a message box:
MsgBox Range(“A1:C3”).Count
The Column and Row propertiesThe Column property returns the column number of asingle-cell range. Its sidekick, the Row property,
returns therownumberof a single-cell range.Both areread-only properties. Forexample, thefollowingstatementdisplays

www.it-
6 because cell F3 is in the sixth column:
MsgBox Sheets(“Sheet1”).Range(“F3”).Column
The next expression displays 3 because cell F3 is inthe third row:
MsgBox Sheets(“Sheet1”).Range(“F3”).Row
If the Range object consists of more than one cell, the Column property returns the column number of the first column in the range, and the Row propertyreturns the row number of the first row in the range.
121

www.it-
122 Part III: Programming Concepts
Don’t confuse the Column and Row properties with the Columns and Rows properties (discussed earlier in this chapter). The Column and Row properties returna single value. The Columns and Rows properties, on the other hand, return a Range object. What a difference an “s” makes.
The Address propertyAddress, a read-only property, displays the cell address for a Range object as an absolute reference(a dollar sign before the column letter and beforethe row number). The following statement displays the message box shown in Figure 8-2:
MsgBox Range(Cells(1, 1), Cells(5, 5)).Address
Figure8-2: This
mes-sage boxdisplays
theAddressproperty
of a5-by-5 range.
The HasFormula propertyThe HasFormula property (which is read-only) returns True if the single-cell range contains a formula. It returns False if the cell does not havea formula. If the range consists of more than one cell, VBA returns True only if all cells in the range contain a formula, or False if all cells in therange don’t have a formula. The property returns Null if there is a mixture of formulas and non-

www.it-
formulas in the range. Null is kind of a no-man’s land: The answer is neither True nor False; any cell in the range may or may not have a formula.
You need to be careful when you work with properties that can return Null. More specifically, the only data type that can deal with Null is Variant.
For example, assume that cell A1 contains a valueand cell A2 contains a for- mula. The followingstatements generate an error because the rangedoesn’t consist of all formulas or all nonformulas:
Dim FormulaTest As BooleanFormulaTest = Range(“A1:A2”).HasFormula

www.it-
Chapter 8: Working with Range Objects
123
The Boolean data type can handle only True or False. Null causes Excel to complain and display anerror message. To fix this type of situation, thebest thing to do is make sure that the FormulaTest variable is declared as a Variant rather than as a Boolean. The following example uses VBA’s handy TypeName function (along with an If-Then-Else construct) to determine thedata type of the FormulaTest variable. If the range has a mixture of formulas and nonformulas, the message box displays Mixed! Otherwise it displayseither True or False.
Sub CheckForFormulas()Dim FormulaTest As VariantFormulaTest = Range(“A1:A2”).HasFormulaIf TypeName(FormulaTest) = “Null” Then
MsgBox “Mixed!”Else
MsgBox FormulaTestEnd If
End Sub
See Chapter 10 for more about using the If-Then-Else construct.
The Font propertyAs I note earlier in this chapter (see “The Cells property”), a property can return an object. The Font property of a Range object is another example of that concept at work. The Font property returnsa Font object.
A Font object, as you may expect, has many accessible properties. To change some aspect of a range’s font, you must first access the range’s Font object and then manipulate the properties of that object. This may be confusing, but maybe this example will help.

www.it-
The following statement uses the Font property of the Range object to return a Font object. Then the Bold property of the Font object is set to True. Inplain English, this statement makes the cell display in boldface:
Range(“A1”).Font.Bold = True
Truth is, you don’t really need to know that you’re working with a special Font object that’s containedin a Range object. As long as you use the proper syntax, it will work just fine. Often, recording your actions while you record a macro will tell you everything you need to know about the proper syntax.
See Chapter 6 for more information about recording macros.

www.it-
124 Part III: Programming Concepts
A quick and dirtycolor primer
Prior to Excel 2007, Microsoft tried to convince us that 56colors were good enough for a spread- sheet. But things havechanged, and we can use more than 16 million colors in aworkbook.16,777,216 colors tobe exact.Many objects have a Color property, and that property acceptscolor values that range from 0 to16777215. Nobody can remember that many color values, so(fortunately) there’s an easier way to specify colors: use VBA’sRGB function. This function takes advantage of the fact that anyof these16 million colors can be represented by various levels of red,green, and blue. The three arguments in the RGB functioncorrespond to the color’s red, green, and blue components, andeach of these arguments can range from 0 to 255.Note that 256 x 256 x 256 = 16,777,216 — which happens to be thenumber of colors. Don’t you just love it when the math works out?Following are a few examples that use the RGB function tochange a cell’s background color:Range(“A1”).Interior.Color = RGB(0, 0, 0) ‘black Range(“A1”).Interior.Color = RGB(255,0, 0) ‘ pure red Range(“A1”).Interior.Color = RGB(0, 0, 255) ‘ pure blue Range(“A1”).Interior.Color = RGB(200, 89, 18) ‘ orangy-brown Range(“A1”).Interior.Color = RGB(128, 128, 128) ‘ middle gray
What’s the exact value of RGB(128, 128, 128)? This statementwill tell you that it’s 8421504:MsgBox RGB(128, 128, 128)
If you need to use standard colors, you may prefer to use oneof the built-in color constants: vbBlack, vbRed, vbGreen,vbYellow, vbBlue, vbMagenta, vbCyan, or vbWhite. For example, thefollowing statement makes cell A1 yellow:Range(“A1”).Interior.Color = vbYellow

www.it-
Excel 2007 also introduced theme colors. These are the colors thatappear when you use color control such as the Fill Color controlin the Font group of the Home tab. Try recording a macro while youchange colors, and you’ll get something like this:Range(“A1”).Interior.ThemeColor = xlThemeColorAccent4Range(“A1”).Interior.TintAndShade = 0.399975585192419
Yep, two more color-related properties to deal with. Here we havea theme color (the basic color, specified as a built-inconstant), plus a “tint and shade” value that represents howdark or light the color is. TintAndShade values range from –1.0 to+1.0. Positive values of the TintAndShade property make the colorlighter, and negative values make the color darker. When you seta color using the ThemeColor property, the color will change ifyou apply a different document theme (using the PageLayout➪Themes➪Themes command).

www.it-
Chapter 8: Working with Range Objects
The Interior propertyHere’s yet another example of a property that returns an object. A Range object’s Interior property returns an Interior object (strange name,but that’s what it’s called). This type of object referencing works the same way as the Font property(which I describe in the preceding section).
For example, the following statement changes the Color property of theInterior object contained in the Range object:
Range(”A1”).Interior.Color = 8421504
In other words, this statement changes the cell’s background to middle gray. What’s that? You didn’t know that 8421504 is middle gray? For some insights into Excel’s wonderful world of color, see the nearby sidebar “A quick and dirty color primer.”
The Formula propertyThe Formula property represents the formula in a cell. This is a read-write property, so you can access it to either view the formula in a cell or insert a formula into a cell. For example, the following statement enters a SUM formula into cell A13:
Range(“A13”).Formula = “=SUM(A1:A12)”
Notice that the formula is a text string and is
enclosed in quotation marks. If the formula itself
contains quotation marks, things get a bit tricky.
Forexample, let’s say you want to insert this formula by using VBA:
=SUM(A1:A12)&” Stores”
Thisformuladisplaysa value,followedbythe wordStores

www.it-
. To make this for- mula acceptable, you need to replace every quotation mark in the formula with two quotation marks. Otherwise, VBA will get confused and claim that there’s a syntax error (because there is!). So here’s a statement that will enter a formula that contains quotes:
Range(”A13”).Formula = ”=SUM(A1:A12)&”” Stores”””
By the way, you can access a cell’s Formula property even if the cell doesn’t have a formula. If a cell has no formula, the Formula property returns the same as its Value property.
If you need to know whether a cell has a formula, usethe HasFormula property(discussed earlier in this chapter).
125

www.it-
126 Part III: Programming Concepts
Be aware that VBA “speaks” U.S. English. This meansthat in order to put a for- mula in a cell, you mustuse the U.S. syntax. If you use a non-English versionof Excel, read up on the FormulaLocal property.
The NumberFormatpropertyThe NumberFormat property represents the number format (expressed as a text string) of the Range object. This is a read-write property, so your VBA code can either examine the number format or changeit. The following statement changes the number format of column A to a percent with two decimal places:
Columns(“A:A”).NumberFormat = “0.00%”
Follow these steps to see a list of other number formats. Better yet, turn on the macro recorder while you do this:
1. Activate a worksheet.2. Access the Format Cells dialog box by pressing Ctrl+1.3. Click the Number tab.4. Select the Custom category to view and apply
some additional number format strings.
Some Useful Range ObjectMethods
As you know, a VBA method performs an action. A Rangeobject has dozens of methods but, again, you won’tneed most of these. In this section, I point out

www.it-
some of the more commonly used Range objectmethods.
The SelectmethodUse the Select method to select a range of cells.The following statement selects a range on the active worksheet:
Range(“A1:C12”).Select
Before selecting a range, it’s often a good idea touse one additional statement to ensure that thecorrect worksheet is active. For example, if Sheet1contains the range you want to select, use thefollowing statements to select the range:
Sheets(“Sheet1”).ActivateRange(“A1:C12”).Select

www.it-
Chapter 8: Working with Range Objects
127
Contrary to what you may expect, the following statement generates an error if Sheet1 is not already the active sheet. In other words, you mustuse two statements rather than just one: one to activate the sheet and another to select the range.
Sheets(“Sheet1”).Range(“A1:C12”).Select
If you use the GoTo method of the Application object to select a range, you can forget about selecting the correct worksheet first. This statement acti- vates Sheet1 and then selects therange:
Application.Goto Sheets(“Sheet1”).Range(“A1:C12”)
The GoTo method is the VBA equivalent of pressing F5 in Excel, which dis- plays the GoTo dialog box.
The Copy and Paste methodsYou can perform copy and paste operations in VBA byusing the Copy and Paste methods. Note that two different objects come into play. The Copy method isapplicable to the Range object, but the Paste method applies to the Worksheet object. It actuallymakes sense: You copy a range and paste it to a worksheet.
This short macro (courtesy of the macro recorder) copies range A1:A12 and pastes it to the same worksheet, beginning at cell C1:
Sub CopyRange() Range(“A1:A12”).Select Selection.Copy Range(“C1”).Select ActiveSheet.Paste
End Sub

www.it-
Notice that in the preceding example, the ActiveSheet object is used with the Paste method. This is a special version of the Worksheet object that refers to the currently active worksheet. Alsonotice that the macro selects the range before copying it. However, you don’t have to select a range before doing something with it. In fact, the following procedure accomplishes the same task as the preceding example by using a single statement:
Sub CopyRange2()Range(“A1:A12”).Copy
Range(“C1”)End Sub
This procedure takes advantage of the fact that theCopy method can use an argument that corresponds to the destination range for the copy operation. That’s something that you can find out by checking with the Help system.

www.it-
128 Part III: Programming Concepts
The Clear methodThe Clear method deletes the contents of a range, plus all the cell formatting. For example, if you want to zap everything in column D, the following state- ment does the trick:
Columns(“D:D”).Clear
You should be aware of two related methods. The ClearContents method deletes the contents of the range but leaves the formatting intact. The ClearFormats method deletes the formatting in the range but not the cell contents.
The Delete methodClearing a range differs from deleting a range. When you delete a range, Excel shifts the remaining cells around to fill up the range you deleted.
The following example uses the Delete method to delete row 6:
Rows(“6:6”).Delete
When you delete a range that’s not a complete rowor column, Excel needs to know how to shift thecells. (To see how this works, experiment with theExcel Home➪Cells➪Delete command.)
The following statement deletes a range and thenfills the resulting gap by shifting the other cells to the left:
Range(“C6:C10”).Delete xlToLeft
The Delete method uses an argument that indicateshow Excel should shift the remaining cells. In thiscase, I use a built-in constant (xlToLeft) for the argument. I could also use xlUp, another named constant.

I
www.it-
Chapter9
Using VBA andWorksheetFunctio
nsIn This Chapter▶ Using functions to make your VBA expressions more powerful▶ Using the VBA built-in functions▶ Using Excel worksheet functions in your VBA code▶ Writing custom functions
n previous chapters, I allude to the fact that youcan use functions in yourVBA expressions. There are three flavors of
functions: those built into VBA (vanilla), those built into Excel (strawberry), and other functionswrit- ten in VBA (chocolate). I provide a full and tasty explanation in this chapter. Functions can make your VBA code perform some powerful feats, withlittle or no programming effort required. If you likethat idea, this chapter’s for you.
What Is a Function?

www.it-
Except for a few people who think Excel is a wordprocessor, all Excel users incorporate worksheetfunctions in their formulas. The most common work-sheet function is the SUM function, and you havehundreds of others at your disposal.
A function essentially performs a calculation and returns a single value. The SUM function, of course,returns the sum of a range of values. The same holdstrue for functions used in your VBA expressions: Each function does its thing and returns a single value.

www.it-
130 Part III: Programming Concepts
The functions you use in VBA can come from three sources:
✓ Built-in functions provided by VBA✓ Worksheet functions provided by Excel✓ Custom functions that you (or someone else) write, using VBA
The rest of this chapter clarifies the differences and (I hope) convinces you of the value of using functions in your VBA code.
Using Built-In VBAFunctions
VBA provides numerous built-in functions. Some of these functions take argu- ments, and some do not.
VBA function examplesIn this section, I present a few examples of using VBA functions in code. In many of these examples, I use the MsgBox function to display a value in a message box. Yes, MsgBox is a VBA function — a ratherunusual one, but a function nonetheless. This useful function displays a message in a pop-up dialog box and also returns a value. For more details about the MsgBox func- tion, see Chapter 15.
A workbook that contains all the examples is available at this book’s website.
Displaying the system date or timeThe first example uses VBA’s Date function to display the current system date in a message box:

www.it-
Sub ShowDate()MsgBox “Today is:
“ & DateEnd Sub
Notice that the Date function doesn’t use an argument. Unlike worksheet functions, a VBA functionwith no argument doesn’t require an empty set of parentheses. In fact, if you type an empty set of parentheses, the VBE will promptly remove them.
To get the system time, use the Time function. And if you want it all, use theNow function to return both the date and the time.

www.it-
Chapter 9: Using VBA and Worksheet Functions
131
Finding a string lengthThe following procedure uses the VBA Len function, which returns thelength of a text string. The Len function takes one argument: the string. When you execute this procedure, the message box displays your name, and the number of characters in your name (see Figure 9-1).
Sub GetLength()Dim MyName As StringDim StringLength As Integer MyName = Application.UserName StringLength = Len(MyName)MsgBox MyName & “ has “ & StringLength &
“ characters.” End Sub
Figure9-1:
Calculating thelengthof yourname.
Excel also has a LEN function, which you can use in your worksheet formulas. The Excel version and the VBA function work the same.
Displaying the nameof a monthThe following procedure uses the MonthName function, which returns the name of a month. MonthName uses one argument, an integer between 1 and12.

www.it-
Sub ShowMonthName()Dim ThisMonth As LongThisMonth = Month(Date)MsgBox MonthName(ThisMonth)
End Sub
This procedure uses the Month function to getthe current month (as avalue), and this value is assigned to the ThisMonthvariable. The MonthName function then converts thevalue to text. So if you run this procedure inApril, the message box displays the text April.
Actually, the ThisMonth variable isn’t required. You can get the same effect with this expression that uses three VBA functions:
MonthName(Month(Date))
www.it-
132 Part III: Programming Concepts
Here, the current date is passed as an argument to the Month function, which returns a value that is passed as an argument to the MonthName function.
Determining a file sizeThe following Sub procedure displays the size, in bytes, of the Excel execut- able file. It finds thisvalue by using the FileLen function.
Sub GetFileSize()Dim TheFile As StringTheFile = “C:\Program Files (x86)\Microsoft Office\Office15\EXCEL.EXE” MsgBox FileLen(TheFile)
End Sub
Notice that this routine hard codes the filename (that is, it explicitly states the path). This isn’ta good idea. The file might not be on the C drive, or the Excel folder may have a different name. The following statement shows a better approach:
TheFile = Application.Path & “\EXCEL.EXE”
Path is a property of the Application object. It simply returns the name of the folder in which the application (that is, Excel) is installed (without atrailing backslash).
Identifying the type of a selected objectThe following procedure uses the TypeName function,which returns the type of the selection on the worksheet (as a string):
Sub ShowSelectionType() Dim SelType As StringSelType = TypeName(Selection) MsgBox SelType
End Sub
The selection could be a Range, a Picture, a Rectangle, a ChartArea, or any other type of object that can be selected.

www.it-
The TypeName function is very versatile. You can also use this function to determine the data type of a variable.
VBA functions that do more than return a valueA few VBA functions go above and beyond the call of duty. Rather thansimply return a value, these functions have some useful side effects. Table 9-1 lists them.

www.it-
Chapter 9: Using VBA and Worksheet Functions
133
Table 9-1 VBA Functions with Useful Side BenefitsFunction What It DoesMsgBox Displays a handy dialog box containing
a message and buttons. The function returns a code that identifies which button the user clicks. See Chapter 15 for details.
InputBox Displays a simple dialog box that asksthe user for some input. The functionreturns whatever the user entersinto the dialog box. I discuss this inChapter 15.
Shell Executes another program. The functionreturns the task ID (a unique identifier)of the other program (or an error ifthe function can’t start the otherprogram).
Discovering VBA functionsHow do you find out which functions VBA provides? Good question. The best source is the Excel Visual Basic Help system. Another way is to type VBA, followed by a period. You get a list of items, as shown in Figure 9-2. Those with a green icon are functions. If this feature isn’t working, choose theVBE’s Tools➪Options command, click the Editor tab, and place a checkmark nextto Auto List Members.
Figure 9-2: A way to display a list of VBA functions.

www.it-
I compileda partial list of functions, whichI share with youin Table 9-2. Iomitted some of the more specialized or obscure functions.
For completedetails on a particular function, type the functionname into a
VBA module, move the cursor anywhere in the text, and press F1.

www.it-
134 Part III: Programming Concepts
Table 9-2 VBA’s Most Useful Built-In FunctionsFunction What It DoesAbs Returns a number’s absolute value. Array Returns a variant containing an array.Choose Returns a value from a list of items. Chr Converts an ANSI value to a string. CurDir Returns the current path.Date Returns the current system date.DateAdd Returns a date to which a specified
time interval has been added — for example, one month from a particular date.
DateDiff Returns an integer showing the number ofspecified time inter- vals between twodates — for example, the number of monthsbetween now and your birthday.
DatePart Returns an integer containing thespecified part of a given date —
for example, a date’s day of the year. DateSerial Converts a date to a serial number. DateValue Converts a string to a date.Day Returns the day of the month from a date value.Dir Returns the name of a file or directory that matches a pattern. Err Returns the error number of an error condition.

www.it-
Error Returns the error message that corresponds to an error number. Exp Returns the base of the natural logarithm (e) raised to a power. FileLen Returns the number of bytes in a file.Fix Returns a number’s integer portion.Format Displays an expression in a particular format. GetSetting Returns a value from the Windows registry. Hour Returns the hours portion of a time.InputBox Displays a box to prompt a user for input.InStr Returns the position of a string within another string.InStrRev Returns the position of a string within
another, from the end of a string.Int Returns the integer portion of a number. IsArrayReturns True if a variable is an array. IsDate Returns Trueif an expression is a date.IsEmpty Returns True if a variable has not been initialized.

www.it-
Chapter 9: Using VBA and Worksheet Functions
135
Function What It DoesIsError Returns True if an expression is an errorvalue.IsMissing Returns True if an optional argument
was not passed to a procedure.IsNull Returns True if an expression contains no valid data. IsNumeric Returns True if an expression can be evaluated as a number. LBound Returns the smallest subscript for a dimension of an array. LCase Returns a string converted to lowercase.Left Returns a specified numberof characters from the left of a string. Len Returns the number of characters in a string.Mid Returns a specified number of characters from a string. Minute Returns the minutes portion of a time value.Month Returns the month from a date value.MsgBox Displays a message box and(optionally) returns a value. Now Returns the current system date and time.Replace Replaces a substring ina string with another substring. RGB Returns a numeric RGB value representing a color.Right Returns a specified number of characters from the right of a string. Rnd Returns a random number between 0 and 1.Second Returns the seconds portion of a time value. Shell Runs an executable program.

www.it-
Space Returns a string witha specified number of spaces. Split Splits a string into parts, using a delimiting character. Sqr Returnsa number’s square root.String Returns a repeating character or string. Time Returns the current system time.Timer Returns the number of seconds since midnight.TimeSerial Returns the time for a specified hour, minute, and second. TimeValue Converts a string to a time serial number.Trim Returns a string without leading or trailing spaces. TypeName Returns a string that describes a variable’s data type.UBound Returns the largest available subscript for an array’s dimension. UCase Converts a string to uppercase.Val Returns the numbers contained in a string. Weekday Returns a number representing a day of the week. Year Returns the year from a date value.

www.it-
136 Part III: Programming Concepts
Using WorksheetFunctions in VBAAlthough VBA offers a decent assortment of built-infunctions, you might not always find exactly what you need. Fortunately, you can also use mostof Excel’s worksheet functions in your VBA procedures. The only worksheet functions that you cannot use are those that have an equivalent VBA function.
VBA makes Excel’s worksheet functions available throughthe WorksheetFunction object, which is contained in the Application object. Here’s an example ofhow you can use Excel’s SUM function in a VBA statement:
Total = Application.WorksheetFunction.Sum(Range(“A1:A12”))
You can omit the Application part or the WorksheetFunction part of the expression. In either case, VBA will figure out what you’re doing. In other words, these three expressions all work exactly the same:
Total =
Application.WorksheetFunction.Sum(Range(“A1:
A12”)) Total =
WorksheetFunction.Sum(Range(“A1:A12”))
Total = Application.Sum(Range(“A1:A12”))
My personal preference is to use the WorksheetFunction part just to make it perfectly clear that the code is using an Excel function.

www.it-
Worksheet function examplesIn this section, I demonstrate how to use worksheet functions in your VBAexpressions.
Finding the maximum value in a rangeHere’s an example that shows how to use Excel’s MAX worksheet function in a VBA procedure. This procedure displays the maximum value in column A onthe active worksheet (see Figure 9-3):
Sub ShowMax()Dim TheMax As DoubleTheMax = WorksheetFunction.MAX(Range(“A:A”))MsgBox TheMax
End Sub

www.it-
Chapter 9: Using VBA and Worksheet Functions
137
Figure9-3:
Using aworkshe
etfunctio
n inyour VBAcode.
You can use the MIN function to get the smallestvalue in a range. And, as you might expect, you canuse other worksheet functions in a similar manner.For example, you can use the LARGE function todetermine the kth-largest valuein a range. The following expression demonstrates this:
SecondHighest = WorksheetFunction.LARGE(Range(“A:A”),2)
Notice that the LARGE function uses two arguments; the second argument represents the k-th part — 2 in this case (the second-largest value).
Calculating a mortgage paymentThe next example uses the PMT worksheet function to calculate a mortgage payment. I use three variablesto store the data that’s passed to the Pmt func- tion as arguments. A message box displays the calculated payment.

www.it-
Sub PmtCalc()Dim IntRate As Double Dim LoanAmtAs Double Dim Periods As Integer IntRate= 0.0825 / 12Periods = 30 * 12LoanAmt = 150000MsgBox WorksheetFunction.PMT(IntRate,
Periods, -LoanAmt) End Sub

www.it-
138 Part III: Programming Concepts
Figure9-4: Therange,named
PriceList,
contains
pricesfor
parts.
As the following statement shows, you can also insert the values directly as the function arguments:
MsgBox WorksheetFunction.PMT(0.0825 /12, 360, -150000)
However, using variables to store the parameters makes the code easier to read and modify, if necessary.
Using a lookup functionThe following example uses VBA’s InputBox and MsgBox functions, plus Excel’s VLOOKUP function. It prompts for a part number and then gets the price from a lookup table. In Figure 9-4, range A1:B13 is named PriceList.
Sub GetPrice()Dim PartNum As VariantDim Price As DoublePartNum = InputBox(“Enter the Part Number”) Sheets(“Prices”).ActivatePrice = WorksheetFunction.VLOOKUP(PartNum, Range(“PriceList”), 2, False) MsgBox PartNum & “ costs “ & Price
End Sub
You can download this workbook from the book’s website.
The procedure starts this way:
1. VBA’s InputBox function asks the user for a part number.

www.it-
2. This statement assigns the part number the user enters for the
PartNum variable.

www.it-
Chapter 9: Using VBA and Worksheet Functions
3. The next statement activates the Prices worksheet, just in case it’s not already the active sheet.
4. The code uses the VLOOKUP function to find the part number in the table.Notice that the arguments you use in this statement are the same as those you would use with the function in a worksheet formula.This statement assigns the result of the function to the Price variable.
5. The code displays the price for the part via theMsgBox function.
This procedure doesn’t have any error handling, and it fails miserably if you enter a nonexistent part number. (Try it.) If this were an actual application that’s used in an actual business, you would want to add some statements that deal with errors more gracefully. I discuss error handling inChapter 12.
Entering worksheet functionsYou can’t use the Excel Paste Function dialog box to insert a worksheet func- tion into a VBA module. Instead, enter such functions the old-fashioned way: by hand. However, you can use the Paste Function dialog box to identify the function you want to use and find out about its arguments.
You can also take advantage of the VBE’s Auto List Members option, which displays a drop-down list of all worksheet functions. Just type Application. WorksheetFunction, followed by a period. Then you’ll see an list of the func- tion you can use, as shown in Figure 9-5. If this feature isn’t working, choosethe VBE’s Tools➪Options command, click the Editor tab, and place a check- mark next to Auto List Members.
139

www.it-
Figure9-5:Getting alistof
worksheet
functions that
you canuse in
your VBAcode.

www.it-
140 Part III: Programming Concepts
More about using worksheet functionsNewcomers to VBA often confuse VBA’s built-in functions and Excel’s work- book functions. A good rule to remember is that VBA doesn’t try to reinventthe wheel. For the most part, VBA doesn’t duplicate Excel worksheet functions.
For most worksheet functions that are unavailable as methods of the WorksheetFunction object, you canuse an equivalent VBA built-in operator or function. For example, the MOD worksheet function isnot available in the WorksheetFunction object because VBA has an equivalent, its built-in Mod operator.
Bottom line? If you need to use a function, first determine whether VBA has something that meets your needs. If not, check out the worksheet functions. Ifall else fails, you may be able to write a custom function by using VBA.
Using CustomFunctionsI’ve covered VBA functions and Excel worksheet functions. The third category of functions you can use in your VBA procedures is custom functions. A custom function (also known as a User Defined Function, or UDF) is one you develop yourself by using (what else?) VBA. To use a custom function, you must define it in the workbook in which you use it — or else define the functions in an add-in (see Chapter 21).
Here’s an example of defining a simple Function procedure and then using it in a VBA Sub procedure:

www.it-
Function MultiplyTwo(num1, num2) As DoubleMultiplyTwo = num1 * num2
End Function
Sub ShowResult()Dim n1 As Double, n2 As DoubleDim Result As Doublen1 = 123n2 = 544Result = MultiplyTwo(n1, n2)MsgBox Result
End Sub
The custom function MultiplyTwo has two arguments. The ShowResult Sub procedure uses this Function procedure by passing two arguments to it (in parentheses). The ShowResult procedure then displays a message box show- ing the value returnedby the MultiplyTwo function.
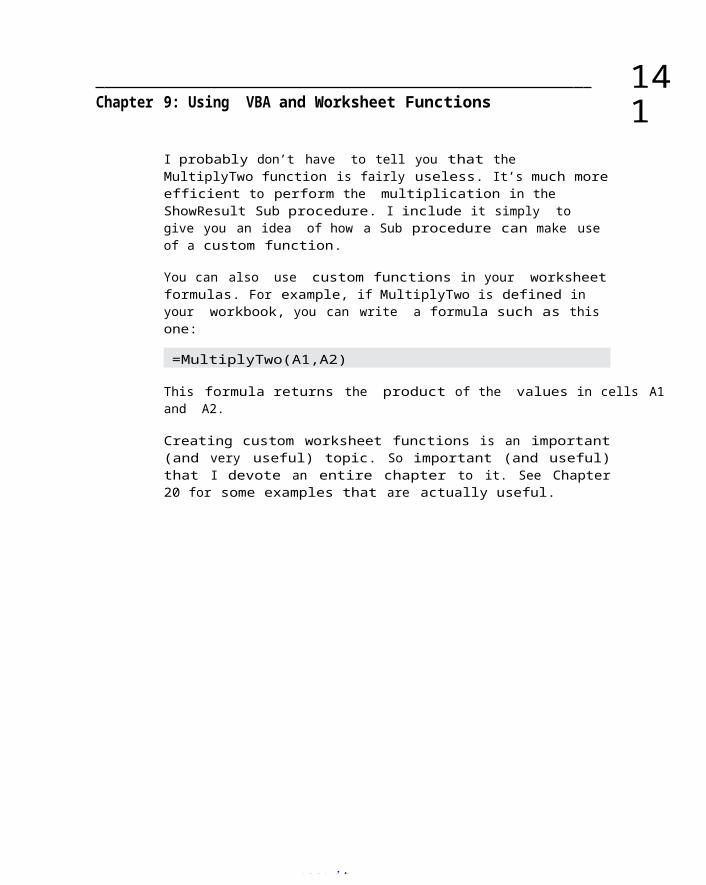
www.it-
Chapter 9: Using VBA and Worksheet Functions
141
I probably don’t have to tell you that the MultiplyTwo function is fairly useless. It’s much moreefficient to perform the multiplication in the ShowResult Sub procedure. I include it simply to give you an idea of how a Sub procedure can make use of a custom function.
You can also use custom functions in your worksheetformulas. For example, if MultiplyTwo is defined in your workbook, you can write a formula such as this one:
=MultiplyTwo(A1,A2)
This formula returns the product of the values in cells A1 and A2.
Creating custom worksheet functions is an important(and very useful) topic. So important (and useful)that I devote an entire chapter to it. See Chapter20 for some examples that are actually useful.

142 Part III: Programming Concepts

www.it-ebooks.info

S
www.it-
Chapter10
Controlling ProgramFlow and Making
DecisionsIn This Chapter▶ Discovering methods for controlling the flow of your VBA routines▶ Finding out about the dreaded GoTo statement▶ Using If-Then and Select Case structures▶ Performing looping in your procedures
ome VBA procedures start at the code’s beginning and progress line by line to the end, never deviating from this top-to-bottom program flow.
Macros that you record always work like this. In many cases, however, you need to control the flow of your code by skipping over some statements, executing some statements multiple times, and testing conditions to deter- mine what the procedure does next. Hang on to your hat and enjoythe ride, because you’re about to discover the essence of programming.
Going with the Flow, Dude

www.it-
Some programming newbies can’t understand how a dumb computer can make intelligent decisions. The secret is in several programming constructs that most programming languages support. Table 10-1 provides a quick summary of these constructs. (I explain all of these later in this chapter.)

www.it-
144 Part III: Programming Concepts
Table 10-1 Programming Constructs forMaking DecisionsConstruct How ItWorksGoTo statement Jumps toa particular statement.If-Then structure Does somethingif something else is true.Select Case Does any of severalthings, depending on something’s value. For-Next loopExecutes a series of statements a specified number oftimes. Do-While loop Does something aslong as something else remains true.Do-Until loop Does something untilsomething else becomes true.
The GoTo StatementA GoTo statement offers the most straightforward means for changing a pro- gram’s flow. The GoTo statement simply transfers program execution to a new statement, which is preceded by a label.
Your VBA routines can contain as many labels as you like. A label is just a text string followed by a colon.
The following procedure shows how a GoTo statement works:
SubCheckUser()
UserName = InputBox(“Enter Your Name: “)If UserName <> “Steve Ballmer” Then GoToWrongNameMsgBox (“Welcome Steve...”)
‘ ...[Morecode here] ...
Exit Sub

www.it-
WrongName:
MsgBox “Sorry. Only Steve Ballmer can run this.”
EndSub
The procedure uses the InputBox function to get theuser’s name. Then a decision is made: If the user enters a name other than Steve Ballmer, the pro- gram flow jumps to the WrongName label, displays an apologetic message, and the procedure ends. On theother hand, if Mr. Ballmer runs this macro and uses his real name, the procedure displays a welcome message and then executes some additional code (not shown in the example).
Notice that the Exit Sub statement ends the procedure before the second MsgBox function has a chance to work. Without that Exit Sub statement, both MsgBox statements would be executed.

www.it-
Chapter 10: Controlling Program Flow and Making Decisions
145
What is structured programming? Does it matter?
If you hang around withprogrammers, sooner or lateryou hear the term structuredprogram- ming. This term hasbeen around for decades, andprogrammers generally agreethat struc- tured programs aresuperior to unstructuredprograms. So, what isstructured programming? And canyou do that using VBA?The basic premise ofstructured programming is thata routine or code segmentshould have only one entrypoint and one exit point. Inother words, a block of codeshould be a stand-alone unit. Aprogram cannot jump into themiddle of this unit, nor can itexit at any point except thesingle exit point. When youwrite structured code, yourprogram progresses in anorderly
manner and is easy to follow —unlike a program that jumpsaround in a haphazard fashion.This pretty much rules outusing the GoTo statement.In general, a structuredprogram is easier to read andunderstand. More important,it’s also easier to modify whenthe need arises.VBA is indeed a structuredlanguage. It offers standardstructured constructs such asIf-Then- Else, For-Next loops,Do-Until loops, Do-While loops,and Select Case structures.Furthermore, it fully supportsmodule code constructions. Ifyou’re new to programming, youshould try to develop goodstructure-programming habitsearly on. End of lecture.
This simple routine works, but VBA provides severalbetter (and more struc- tured) alternatives than GoTo. In general, you should use GoTo only when you have no other way to perform an action. In real life, the only time youmust use a GoTo statement is for trapping errors. (I cover this in Chapter 12.)

www.it-
By the way, I present the CheckUser procedure to demonstrate the GoTo statement. It is not intended to demonstrate an effective security technique!
Many hard-core programming types have a deep-seatedhatred for GoTo state- ments because using them tends to result in difficult-to-read (and difficult-to- maintain) “spaghetti code.” Therefore, you should never admit that you use GoTo statements when talking with other programmers.
Decisions, DecisionsAs in many other aspects of life, effective decision-making is the key to success in writing Excel macros.If this book has the effect I intend, you’ll soon share my philosophy that a successful Excel application boils down to making decisions and acting upon them.
In this section, I discuss two programming structures that can empower your VBA procedures with some impressive decision-making capabilities: If-Then and Select Case.

www.it-
146 Part III: Programming Concepts
The If-Then structureOkay, I’ll come right out and say it: If-Then is VBA’s most important control structure. You’ll probably use this command on a daily basis (at least I do).
Use the If-Then structure when you want to executeone or more statements conditionally. The optionalElse clause, if included, lets you execute one or more statements if the condition you’re testing isnot true. Here’s the simple CheckUser procedure I presented earlier, recoded to use the If-Then-Elsestructure:
Sub CheckUser2()UserName = InputBox(”Enter Your Name: ”)If UserName = ”Steve Ballmer” Then
MsgBox (”Welcome Steve...”)' ...[More code here] ...
ElseMsgBox ”Sorry. Only Steve Ballmer can run this.”
End IfEnd Sub
You would probably agree that this version is much easier to follow.
A workbook that contains this section’s examples can be downloaded from this book’s website.
If-Then examplesThe following routine demonstrates the If-Thenstructure without the optional Else clause:
Sub GreetMe()If Time < 0.5 Then MsgBox “Good Morning”
End Sub
The GreetMe procedure uses VBA’s Time function to get the system time.If the current time is less than .5 (in other words, before noon), the routine displays a friendly greeting. If Time is greater than or equal to .5, the routine ends and nothing happens.

www.it-
To display a different greeting if Time is greater than or equal to .5, you can add another If-Then statement after the first one:
Sub GreetMe2()If Time < 0.5 Then MsgBox “Good Morning”If Time >= 0.5 Then MsgBox “Good Afternoon”
End Sub

www.it-
Chapter 10: Controlling Program Flow and Making Decisions
147
Notice that I used >= (greater than or equal to) forthe second If-Then state- ment. This ensures that the entire day is covered. Had I used > (greater than), then no message would appear if this procedure were executed at precisely12:00 noon. That’s pretty unlikely, but with an important program like this, we don’t want to takeany chances.
An If-Then-Else exampleAnother approach to the preceding problem uses theElse clause. Here’s the same routine recoded to usethe If-Then-Else structure:
Sub GreetMe3()If Time < 0.5 Then MsgBox “Good Morning” Else _MsgBox “Good Afternoon”
End Sub
Notice that I use the line continuation character (underscore) in the preced- ing example. The If-Then-Else statement is actually a single statement. VBA provides a slightly different way of coding If-Then-Else constructs that use an End If statement. Therefore, the GreetMe procedure can be rewritten as
Sub GreetMe4()If Time < 0.5 Then
MsgBox “Good Morning”Else
MsgBox “GoodAfternoon”
End IfEnd Sub
In fact, you can insert any number of statements under the If part, and any number of statements under the Else part. I prefer to use this syntax because it’s easier to read and makes the statements shorter.

www.it-
What if you need to expand the GreetMe routine to handle three conditions: morning, afternoon, and evening? You have two options: Use three If-Then statements or use a nested If-Then-Else structure. Nesting means placingan If-Then-Else structure within another If-Then-Else structure. The first approach, using threeIf-Then statements, is simplest:
Sub GreetMe5()Dim Msg As StringIf Time < 0.5 Then Msg = “Morning”If Time >= 0.5 And Time < 0.75 Then Msg = “Afternoon”If Time >= 0.75 Then Msg = “Evening”MsgBox “Good “ & Msg
End Sub

www.it-
148 Part III: Programming Concepts
I added a new twist by using a variable. The Msg variable gets a differenttext value, depending on the time of day. The MsgBoxstatement displays the greeting: Good Morning, GoodAfternoon, or Good Evening.
The following routine performs the same action but uses an If-Then-End If structure:
SubGreetMe6()
Dim Msg As StringIf Time < 0.5 Then
Msg =“Morning”
End IfIf Time >= 0.5 And Time < 0.75 Then
Msg =“Afternoon”
End IfIf Time >= 0.75 Then
Msg =“Evening”
End IfMsgBox “Good “ & Msg
End Sub
Using ElseIfIn the previous examples, every statement in the routine is executed — even in the morning. A slightly more efficient structure would exit the routine as soon as a condition is found to be true. In the morning, for example, the pro- cedure should display the Good Morning message and then exit — without evaluating the other superfluous conditions.
With a tiny routine like this, you don’t have toworry about execution speed. But for largerapplications in which speed is critical, you shouldknow about another syntax for the If-Thenstructure.
Here’s how you can rewrite the GreetMe routine by using this syntax:

www.it-
SubGreetMe7()Dim Msg As StringIf Time < 0.5 Then
Msg =“Morning”
ElseIf Time >= 0.5 And Time < 0.75 ThenMsg =
“Afternoon”Else
Msg =“Evening”
End IfMsgBox “Good “ & Msg
End Sub
When a condition is true, VBA executes the conditional statements, and the If structure ends. In other words, VBA doesn’t waste time evaluating the extraneous conditions, which makes this procedure a bit more efficient than the previous examples. The trade-off (there are always trade-offs) is that the code is more difficult to understand. (Of course, you already knew that.)

www.it-
Chapter 10: Controlling Program Flow and Making Decisions
149
Another If-Then exampleHere’s another example that uses the simple form ofthe If-Then structure. This procedure prompts the user for a quantity and then displays the appro- priate discount, based on the quantity the user enters:
Sub ShowDiscount()Dim Quantity As IntegerDim Discount As DoubleQuantity = InputBox(“Enter Quantity:”)If Quantity > 0 Then Discount = 0.1If Quantity >= 25 Then Discount = 0.15If Quantity >= 50 Then Discount = 0.2If Quantity >= 75 Then Discount = 0.25MsgBox “Discount: “ & Discount
End Sub
Notice that each If-Then statement in this routineis executed, and the value for Discount can changeas the statements are executed. However, the rou- tine ultimately displays the correct value for Discount because I put theIf-Then statements in order of ascending Discount values.
The following procedure performs the same tasks by using the alternative ElseIf syntax. In this case, the routine ends immediately after executing the statements for a true condition.
Sub ShowDiscount2()Dim Quantity As IntegerDim Discount As DoubleQuantity = InputBox(“Enter Quantity: “)If Quantity > 0 And Quantity < 25 ThenDiscount = 0.1
ElseIf Quantity >= 25 And Quantity < 50 ThenDiscount = 0.15
ElseIf Quantity >= 50 And Quantity < 75 ThenDiscount = 0.2
ElseIf Quantity >= 75 ThenDiscount = 0.25
End IfMsgBox “Discount: “ & Discount
End Sub

www.it-
Personally, I find these multiple If-Then structures rather cumbersome. I generally use the If-Then structure for only simple binary decisions.When a decision involves three or more choices, the Select Case structure offers a simpler, more efficient approach.

150 Part III: Programming Concepts
The Select Case structureThe Select Case structure is useful for decisions involving three or more options (although it also works with two options, providing an alternative tothe If-Then-Else structure).
The examples in this section are available at this book’s website.
A Select Case exampleThe following example shows how to use the Select Case structure. This also shows another way to codethe examples presented in the previous section:
Sub ShowDiscount3()Dim Quantity As IntegerDim Discount As DoubleQuantity = InputBox(“Enter Quantity: “)Select Case Quantity
Case 0 To24Discount =
0.1Case 25To 49Discount =
0.15Case 50To 74Discount =
0.2Case Is>= 75Discount =
0.25End SelectMsgBox “Discount: “ & Discount
End Sub
In this example, the Quantity variable is being evaluated. The routine checks for four different cases (0–24, 25–49, 50–74, and 75 or greater).
Any number of statements can follow each Case statement, and they all are executed if the case is true. If you use only one statement, as in this

example, you can put the statement on the same line as the Case keyword, preceded by a colon — the VBA statement separator character. In my opinion, this makes the code more compact and a bit clearer. Here’s how the routine looks, using this format:
Sub ShowDiscount4 ()Dim Quantity As IntegerDim Discount As DoubleQuantity = InputBox(“Enter Quantity: “)Select Case Quantity
Case 0 To 24: Discount = 0.1Case 25 To 49:Discount = 0.15
Case 50 To 74: Discount = 0.2Case Is >= 75:Discount = 0.25
End SelectMsgBox “Discount: “ & Discount
End Sub
www.it-ebooks.info

www.it-
Chapter 10: Controlling Program Flow and Making Decisions
151
When VBA executes a Select Case structure, the structure is exited as soon asVBA finds a true case and executes the statements for that case.
A nested Select Case exampleAs demonstrated in the following example, you can nest Select Case struc- tures. This routine examines the active cell and displays a message describ- ing the cell’s contents. Notice that the procedure has three Select Case structures, and each has its own End Select statement.
Sub CheckCell()Dim Msg AsString
Select Case IsEmpty(ActiveCell)CaseTrueMsg = “is blank.”CaseElse
Select CaseActiveCell.HasFormulaCase True
Msg = “has aformula”
Case ElseSelect Case
IsNumeric(ActiveCell)CaseTrue
Msg = “has anumber”
CaseElseMsg = “hastext”
EndSelect
End SelectEnd Select
MsgBox “Cell “ &ActiveCell.Address & “ “ & Msg
End Sub
The logic goes something like this:

www.it-
1. Find out whether the cell is empty.2. If it’s not empty, see whether it contains a formula.3. If there’s no formula, find out whether it contains a numeric value or text.
When the routine ends, the Msg variable contains astring that describes the cell’s contents. As shown in Figure 10-1, the MsgBox function displays that message.
You can nest Select Case structures as deeply as you need to, but make sure that each Select Case statement has a corresponding End Select statement.

www.it-
152 Part III: Programming Concepts
Figure10-1: A
messagedisplayed bythe
CheckCell
procedure.
If you’re still not convinced that indenting code isworth the effort, the previ- ous listing serves as a good example. The indentations really help to make the nesting levels clear (at least I think so).If you don’t believe me, take a look at the same procedure without any indentation:
Sub CheckCell() Dim Msg As StringSelect Case IsEmpty(ActiveCell) Case TrueMsg = “is blank.” CaseElseSelect Case ActiveCell.HasFormulaCase TrueMsg = “has a formula”Case ElseSelect Case IsNumeric(ActiveCell)Case TrueMsg = “has a number”Case ElseMsg = “has text”End SelectEnd Select

www.it-
End SelectMsgBox “Cell “ & ActiveCell.Address & “ “ & MsgEnd Sub
Fairly incomprehensible, eh?

www.it-
Chapter 10: Controlling Program Flow and Making Decisions
Knocking Your Code fora Loop
The term looping refers to repeating a block of VBA statements numerous times. Why use loops? I can think of a few reasons. Your code can . . .
✓ Loop through a range of cells, working with eachcell individually.✓ Loop through all open workbooks (the Workbookscollection) and do something with each one.
✓ Loop through all worksheets in a workbook (the Worksheets collection)
and do something witheach one.
✓ Loop through all the elements in an array.✓ Loop through all characters in a cell.✓ Loop through all charts on a worksheet (the ChartObjects collection)
and do something witheach chart.
✓ Loop through other things that I haven’t thought of.
VBA supports several types of loops, and the examples that follow demon- strate a few ways thatyou can use them.
For-Next loops The examples in this section are all available at
this book’s website.
The simplest type of loop is a For-Next loop. The looping is controlled by acounter variable, which starts at one value and stops at another value. The statements between the
ForstatementandtheNext statementarethestate- mentsthat getrepeatedin theloop. To seehowthis works,keep reading.

www.it-
A For-Next exampleThe following example uses a For-Next loop to sum the first 1,000 positive integers. The Total variable starts out as zero. Then the looping occurs. The variable Cnt is the loop counter. It starts out as 1 and is incremented by 1 each time through the loop. The loop ends when Cnt is 1,000.
This example has only one statement inside of the loop. This statement adds the value of Cnt to the Total variable. When the loop finishes, a MsgBox displays the summed integers.
153

www.it-
154 Part III: Programming Concepts
Sub AddNumbers()Dim Total As DoubleDim Cnt As IntegerTotal = 0For Cnt = 1 To 1000
Total = Total + CntNext CntMsgBox Total
End Sub
Because the loop counter is a normal variable, you can write code to change its value within the blockof code between the For and the Next statements. This, however, is a very bad practice. Changing the counter within the loop can have unpredictable results. Take special precautions to ensure that your code does not change the value of the loop counter.
For-Next examples with a StepYou can use a Step value to skip some counter valuesin a For-Next loop. Here’s the previous example, rewritten to sum only the odd integers between1 and 1,000:
Sub AddOddNumbers()Dim Total As DoubleDim Cnt As IntegerTotal = 0For Cnt = 1 To 1000 Step 2
Total = Total+ Cnt
Next CntMsgBox Total
End Sub
This time, Cnt starts out as 1 and then takes on values of 3, 5, 7, and so on. The Step value determines how the counter is incremented. Notice that the upper loop value (1000) is not actually used because the highest value of Cnt will be 999.
Here’s another example that uses a Step value of 3. This procedure works with the active sheet, and applies light gray shading to every third row, from row 1 to row 100.

www.it-
Sub ShadeEveryThirdRow() Dim i As LongFor i = 1 To 100 Step 3
Rows(i).Interior.Color = RGB(200, 200, 200)
Next iEnd Sub
Figure 10-2 shows the result of running this macro.

www.it-
Chapter 10: Controlling Program Flow and Making Decisions
155
Figure10-2:
Using aloop to
applybackgrou
ndshading
to rows.
A For-Next example with an Exit For statementA For-Next loop can also include one or more Exit Forstatements within the loop. When VBA encounters thisstatement, the loop terminates immediately.
The following example, available on the book’s website, demonstrates theExit For statement. This routine is a Function procedure, intended to beused in a worksheet formula. The function accepts one argument (a variable named Str) and returns the characters to the left of the first numeric digit. For example, if the argument is “KBR98Z,” the function returns “KBR.”
Function TextPart(Str) TextPart = “”For i = 1 To Len(Str)
If IsNumeric(Mid(Str, i, 1)) ThenExit For
ElseTextPart = TextPart & Mid(Str, i, 1)
End If

www.it-
Next iEnd Function
The For-Next loop starts with 1 and ends with the number that represents the number of characters inthe string. The code uses VBA’s Mid function to extract a single character within the loop. If a numeric character is found, the Exit For statement is executed, and the loop ends prematurely. If the charac- ter is not numeric, it is appended to the returned value (which is the same as the function’s name). The only time the loop will examine every character isif the string passed as the argument contains no numeric characters.

www.it-
156 Part III: Programming Concepts
How fast are loops?You might be curious about how fast VBA can run through If-Thenloops. Do some systems run code significantly faster thanothers? A few years ago, I posted the following VBA procedure atmy website and asked others to post their result.Sub TimeTest()‘100 million random numbers, tests, and math operationsDim x As LongDim StartTime As SingleDim i As Longx = 0StartTime = TimerFor i = 1 To 100000000If Rnd <= 0.5 Then x = x + 1
Else x = x - 1Next iMsgBox Timer - StartTime & “ seconds”
End SubThe code loops 100 million times and performs some operationsinside the loop: It generates a random number, does an If-Thencomparison, and performs a mathematical operation. When the loopis finished, the elapsed time is displayed in a message box. Mysystem ran through this loop in 8.03 seconds. About 150 othersposted their results, and times ranged from about 2 seconds upto about 30 seconds. In other words, some computers are about 15times faster than others. That’s good to know.You can download a workbook that contains this codefrom this book’s website.But the real question is, how long would it take me to do this task manually?I wrote 0 on a piece of paper, and I flipped a coin. If it cameup heads, I added one to my tally. If it came up tails, I sub-tracted 1. I did this ten times, and it took me 42 seconds. So,one time through my “loop” took 4.2 seconds. Using thisinformation, I calculated that it would take me 13.3 years toperform this task100 million times — but only if I work nonstop. The conclusion: Mycomputer is about 52.3 million times faster than I am.
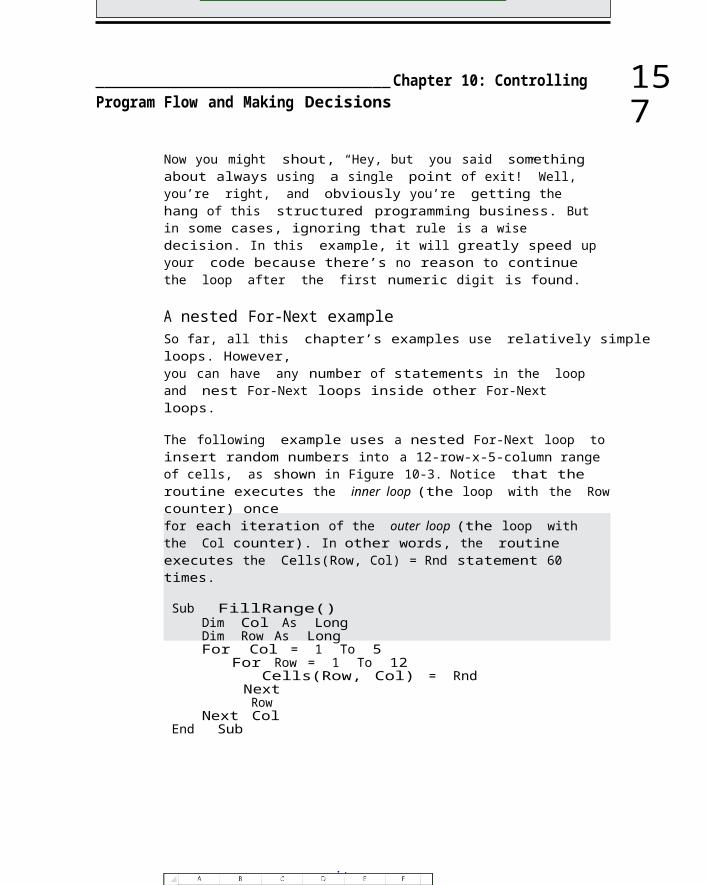
www.it-
Chapter 10: Controlling Program Flow and Making Decisions
157
Now you might shout, “Hey, but you said something about always using a single point of exit!” Well, you’re right, and obviously you’re getting the hang of this structured programming business. But in some cases, ignoring that rule is a wise decision. In this example, it will greatly speed up your code because there’s no reason to continue the loop after the first numeric digit is found.
A nested For-Next exampleSo far, all this chapter’s examples use relatively simple loops. However,you can have any number of statements in the loop and nest For-Next loops inside other For-Next loops.
The following example uses a nested For-Next loop toinsert random numbers into a 12-row-x-5-column range of cells, as shown in Figure 10-3. Notice that the routine executes the inner loop (the loop with the Rowcounter) oncefor each iteration of the outer loop (the loop with the Col counter). In other words, the routine executes the Cells(Row, Col) = Rnd statement 60 times.
Sub FillRange()Dim Col As LongDim Row As LongFor Col = 1 To 5
For Row = 1 To 12Cells(Row, Col) = Rnd
NextRow
Next ColEnd Sub

www.it-
Figure10-3:Thesecellswere
filledby
using anested
For-Nextloop.

www.it-
158 Part III: Programming Concepts
The next example uses nested For-Next loops to initialize a three-dimensional array with the value 100. This routine executes the statement in the middle of all the loops (the assignment statement) 1,000 times (10 * 10 * 10), each time with a differentcombination of values for i, j, and k:
Sub NestedLoops()Dim MyArray(10, 10, 10)Dim i As IntegerDim j As IntegerDim k As IntegerFor i = 1 To 10
For j = 1To 10For k = 1
To 10MyArray(i, j, k) = 100
Nextk
Nextj
Next i‘ Other statements go here
End Sub
Refer to Chapter 7 for information about arrays.
Here’s a final example that uses nested For-Nextloops, with a Step value. This procedure createsa checkerboard (or chessboard, if you prefer) bychanging the background color of alternatingcells. See Figure 10-4.
Figure10-4:Using

www.it-
loops tocreate
achecker-
boardpattern.

www.it-
Chapter 10: Controlling Program Flow and Making Decisions
159
The Row counter loops from 1 to 8. An If-Then construct determines which nested For-Next structure to use. For odd-numbered rows, the Col counter begins with 2. For even-numbered rows, the Col counter begins with 1. Both loops use a Step value of 2, so alternate cells are affected.
Sub MakeCheckerboard()Dim Row As Integer, Col As IntegerFor Row = 1 To 8
If WorksheetFunction.IsOdd(Row) ThenFor Col = 2 To 8 Step 2
Cells(Row, Col).Interior.Color = 255Next Col
ElseFor Col = 1 To 8 Step 2
Cells(Row, Col).Interior.Color = 255Next Col
End IfNext Row
End Sub
Do-While loopVBA supports another type of looping structure known as a Do-While loop. Unlike a For-Next loop, a Do-While loop continues until a specified conditionis met.
The following example uses a Do-While loop. This routine uses the active cell as a starting point and then travels down the column, multiplying eachcell’s value by 2. The loop continues until the routine encounters an empty cell.
Sub DoWhileDemo()Do While ActiveCell.Value <> Empty
ActiveCell.Value = ActiveCell.Value * 2ActiveCell.Offset(1, 0).Select
LoopEnd Sub

www.it-
Do-Until loopThe Do-Until loop structure is similar to the Do-While structure. The two structures differ in their handling of the tested condition. A program contin-ues to execute a Do-While loop while the condition remains true. In a Do-Until loop, the program executes the loop until the condition is true.

www.it-
160 Part III: Programming Concepts
The following example is the same one presented for the Do-While loop but recoded to use a Do-Untilloop:
Sub DoUntilDemo()Do Until IsEmpty(ActiveCell.Value)
ActiveCell.Value = ActiveCell.Value * 2ActiveCell.Offset(1, 0).Select
LoopEnd Sub
Using For Each-Next LoopsWith
CollectionsVBA supports yet another type of looping — looping through each object in a collection of objects. Recall that a collection consists of a number of objects of the same type. For example, Excel has a collection of all open workbooks (the Workbooks collection), and each workbook has a collection of work- sheets (the Worksheets collection).
The examples in this section are all available at thisbook’s website.
When you need to loop through each object in a collection, use the For Each- Next structure. The following example loops through each worksheet in the active workbook and deletes the worksheet if it’s empty:
Sub DeleteEmptySheets()Dim WkSht As WorksheetApplication.DisplayAlerts = FalseFor Each WkSht In ActiveWorkbook.Worksheets
If WorksheetFunction.CountA(WkSht.Cells) =0 Then
WkSht.Delete

www.it-
EndIf
Next WkShtApplication.DisplayAlerts = True
End Sub
In this example, the variable WkSht is an object variable that representseach worksheet in the workbook. Nothing is special about the variable nameWkSht — you can use any variable name that you like.
The code loops through each worksheet and determines an empty sheet by counting the nonblankcells. If that count is zero, the sheet is empty, and it’s deleted. Notice that I turn off the DisplayAlerts setting while the loop is doing its thing. Without that statement, Excel pops up a warning every time a sheet is about to be deleted.

www.it-
Chapter 10: Controlling Program Flow and Making Decisions
161
Here’s another For Each-Next example. This procedureuses a loop to hide all worksheets in the active workbook, except the active sheet.
Sub HideSheets()Dim Sht As WorksheetFor Each Sht In ActiveWorkbook.Worksheets
If Sht.Name <> ActiveSheet.Name ThenSht.Visible = xlSheetHidden
End IfNext Sht
End Sub
The HideSheets procedure checks the sheet name. If it’s not the same as the active sheet’s name, then the sheet is hidden. Notice that the Visible property isn’t Boolean. This property can actually take on any of three values, and Excel provides three built-in constants. If you’re curious about the third possibility, check the Help system.
What gets hidden must eventually get unhidden, so here’s a macro that unhides all worksheets in the active workbook:
Sub UnhideSheets()Dim Sht As WorksheetFor Each Sht In ActiveWorkbook.Worksheets
Sht.Visible = xlSheetVisibleNext Sht
End Sub
Not surprisingly, you can create nested For Each-Next loops. The CountBold procedure loops through every cell in the used range on each worksheet in every open workbook and displays a count of the number of cells that are formatted as bold:
Sub CountBold()Dim WBook As WorkbookDim WSheet As WorksheetDim Cell As RangeDim cnt As LongFor Each WBook In Workbooks
For Each WSheet In WBook.WorksheetsFor Each Cell In WSheet.UsedRange
If Cell.Font.Bold = True Then cnt = cnt + 1

www.it-
Next CellNext WSheet
Next WBookMsgBox cnt & “ bold cells found”
End Sub

162 Part III: Programming Concepts

www.it-ebooks.info

Y
www.it-
Chapter11
Automatic Proceduresand Events
In This Chapter▶ Knowing the event types that can trigger an execution▶ Finding out where to place your event-handler VBA code▶ Executing a macro when a workbook is opened or closed▶ Executing a macro when a workbook or worksheet is activated
ou have a number of ways to execute a VBA Sub procedure. One way is to arrange for the Sub to be executed automatically. In this chapter, I
cover the ins and outs of this potentially useful feature, explaining how to set things up so that a macro is executed automatically when a particular event occurs. (No, this chapter is not about capital punishment.)
Preparing for the Big EventWhat types of events am I talking about here? Good question. An event is basically something that happens in Excel. Following are a few examples of the types of events that Excel can recognize:
www.it-
✓ A workbook is opened or closed.✓ A window is activated or deactivated.✓ A worksheet is activated or deactivated.✓ Data is entered into a cell or the cell is edited.✓ A workbook is saved.✓ An object, such as a button, is clicked.✓ A particular key or key combination is pressed.✓ A particular time of day occurs.✓ An error occurs.
Most Excel programmers never need to worry about most of the events in this list. You should, however, at least know that these events exist because

www.it-
164 Part III: Programming Concepts
they may come in handy someday. In this chapter, I discuss the most com- monly used events. To simplifythings, I talk about two types of events: work- book events and worksheet events.
Table 11-1 lists some of the more useful workbook-related events. If, for some reason, you need to seethe complete list of workbook-related events, you’llfind it in the Help system.
Table 11-1 Workbook Events Event
When It’s Triggered Activate The workbook is activated. BeforeClose The workbook is closed. BeforePrint The workbook is printed. BeforeSave The workbook is saved.Deactivate The workbook is deactivated. NewSheet A new sheet is added to the workbook. Open The workbook is opened. SheetActivate A sheet in the workbook is activated.SheetBeforeDoubleClick A cell in the workbook is double-clicked. SheetBeforeRightClick A cell in the workbook is right-clicked. SheetChange A change is made to a cell in the workbook. SheetDeactivate A sheet in the workbook is deactivated. SheetSelectionChange The selection is changed.WindowActivate The workbook window is activated. WindowDeactivate The workbook window is deactivated.

www.it-
Table 11-2 lists some useful worksheet-related events.
Table 11-2 Worksheet Events Event
When It’s Triggered Activate The worksheet is activated.BeforeDoubleClick A cell in the worksheet is double-clicked.BeforeRightClick A cellin the worksheet is right-clicked. Change A change is made to a cell in the worksheet. DeactivateThe worksheet is deactivated. SelectionChange The selection is changed.

www.it-
Chapter 11: Automatic Procedures and Events
Are events useful?At this point, you may be wondering how these eventscan be useful. Here’s a quick example.
Suppose you have a workbook in which you enter values in column A. Your boss, a very compulsive person, tells you that he needs to know exactly when each number was entered. Entering data is an event: a WorksheetChange event. You can write a macrothat responds to this event. That macro kicks in when- ever the worksheet is changed. If the change was made in column A, the macro puts the date and time in column B, next to the data point that was entered.
In case you’re curious, here’s what such a macro would look like. Probably a lot simpler than you thought it would be, eh?
Private Sub Worksheet_Change(ByVal Target As Range) If Target.Column = 1 Then
Target.Offset(0, 1) = NowEnd If
End Sub
By the way, macros that respond to events are verypicky about where they are stored. For example, this Worksheet_Change macro must be in the Code module for that worksheet. Put it somewhere else, and it won’t work. More about this later (see “Where Does the VBA Code Go?”).
165
Just because your workbook contains procedures that respond to events doesn’t guarantee that those procedures will actually run. As you know, it’s possible to open a workbook with macros disabled. In such a case, all macros (even procedures that respond to events) are turned off. Keep this fact in mind when you create workbooks that rely on event-handler procedures.
www.it-
Programming event-handler proceduresA VBA procedure that executes in response to an event is called an event- handler procedure. These are always Sub procedures (as opposed to Function procedures). Writing these event-handlers is relatively straightforward after you understand how the process works.
Creating event-handler procedures boils down to a few steps:
1. Identify the event you want to trigger the procedure.2. Press Alt+F11 to activate the Visual Basic Editor.3. In the VBE Project Window, double-click the appropriate object listed under Microsoft Excel Objects.

www.it-
166 Part III: Programming Concepts
For workbook-related events, the object is ThisWorkbook. For a work- sheet-related event, the object is a Worksheet object (such as Sheet1).
4. In the Code window for the object, write the event-handler procedure that is executed when theevent occurs.This procedure will have a special name that identifies it as an event- handler procedure.
These steps become clearer as you progress through the chapter. Trust me.
Where Does the VBA Code Go?It’s very important to understand where your event-handler procedures go. They must reside in the Code window of an Object module. They do not go ina standard VBA module. If you put your event-handlerprocedure in the wrong place, it simply won’t work. And you won’t see any error messages either.
Figure 11-1 shows the VBE window with one project displayed in the Project window. (Refer to Chapter 3 for some background on the VBE.) Notice that the VBA project for Book1 is fully expanded and consistsof several objects:
✓ One object for each worksheet in the workbook (in this case, three Sheet objects)
✓ An object labeled ThisWorkbook✓ A VBA module that I inserted manually by
using the Insert➪Module command

www.it-
Figure11-1: TheProjectwindowdis-playsitemsfor asingle
project.

www.it-
Chapter 11: Automatic Procedures and Events
Double-clicking any of these objects displays the code associated with the item, if any.
The event-handler procedures that you write go intothe Code window for the ThisWorkbook item (forworkbook-related events) or one of the Sheetobjects (for worksheet-related events).
In Figure 11-1, the Code window for the Sheet1 object is displayed, and it happens to have a single event-handler procedure defined. Notice thetwo drop-down controls at the top of the Code module? Keep reading to find out why those are useful.
Writing an Event-Handler Procedure
The VBE helps you out when you’re ready to write an event-handler proce- dure; it displays a list ofall events for the selected object.
At the top of each Code window, you find two drop-down lists:
✓ The Object drop-down list (the one on the left)✓ The Procedure drop-down list (the one on the right)
By default, the Object drop-down list in the Code
window displays General. If you’re writing an
event-handler for the ThisWorkbook object, you
need toclick ThisWorkbook in the Project window and then choose Workbook fromthe Object drop-down (it’s the only other choice).
Ifyou’rewritinganevent-handlerforaSheetobject,youneedtoclickth

www.it-
e specific Sheet in the Project window and thenchoose Worksheet from the Object drop-down(again, the only other choice).
After you’ve made your choice from the Object drop-down list, then you can choose the event from the Procedure drop-down list. Figure 11-2 shows some of the choices for a workbook-related event.
When you select an event from the list, VBE automatically starts creating an event-handler procedure for you. This is a very useful feature, because it tells you exactly what the proper arguments are.
Here’s a little quirk. When you first select Workbook from the Object list, VBE always assumes that you want to create an event-handler procedure for the Open event and creates it for you. If you’re actually creating a Workbook_ Open procedure, that’sfine. But if you’re creating a different event-procedure, you need to delete the empty Workbook_Open Sub that was created.
167

www.it-
168 Part III: Programming Concepts
Figure11-2:
Choosingan
eventin theCode
windowfor the
This-Workbookobject.
VBE’s help goes only so far, however. It writes the Sub statement and theEnd Sub statement. Writing the VBA code that goes between these two state- ments is your job.
You don’t really have to use those two drop-downs, but it makes your job easier because the name of the event-handler procedure is critically impor- tant. If you don’t get the name exactly right, it won’t work. Plus, some event- handler procedures useone or more arguments in the Sub statement. There’sno way you can remember what those arguments are. For example, if you select SheetActivate from the event list for a Workbook object, VBE writes the following Sub statement:
Private Sub Workbook_SheetActivate(ByValSh As Object)
In this case, Sh is the argument passed to the procedure and is a variable that represents the sheet in the activated workbook. Examples in this chapter clarify this point.

www.it-
Introductory ExamplesIn this section, I provide a few examples so that you can get the hang of this event-handling business.
The Open event for a workbookOne of the most commonly used events is the Workbook Open event. Assume that you have a workbook that you use every day. The Workbook_Open procedure in this example is executed every time theworkbook is opened.

www.it-
Chapter 11: Automatic Procedures and Events
169
The procedure checks the day of the week; if it’s Friday, the code displays a reminder message for you.
To create the procedure that is executed whenever the Workbook Open event occurs, follow these steps:
1. Open the workbook.Any workbook will do.
2. Press Alt+F11 to activate the VBE.3. Locate the workbook in the Project window.4. Double-click the project name to display its items, if necessary.5. Double-click the ThisWorkbook item.
The VBE displays an empty Code window for the ThisWorkbook object.
6. In the Code window, select Workbook from the Object (left) drop- down list.The VBE enters the beginning and ending statements for a Workbook_ Open procedure.
7. Enter the following statements, so the complete event-procedure looks like this:Private Sub
Workbook_Open() Dim Msg As StringIf Weekday(Now) = 6 Then
Msg = “Today is Friday. Don’t forget to “Msg = Msg & “submit the TPS Report!”MsgBox Msg
End IfEnd Sub
The Code window should look like Figure 11-3.
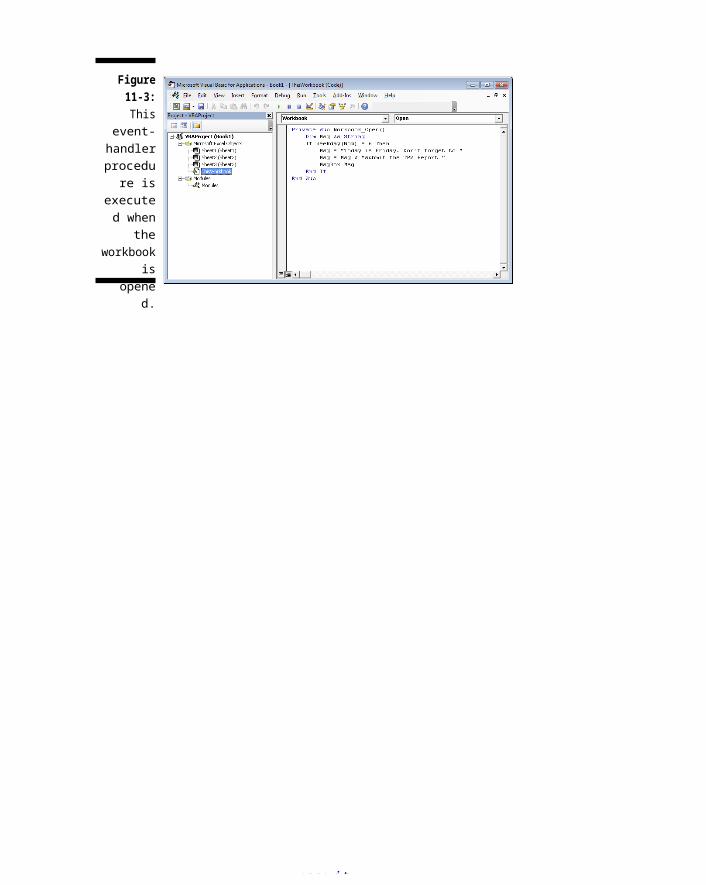
www.it-
Figure11-3:This
event-handlerprocedu
re isexecuted when
theworkbook
isopene
d.

www.it-
170 Part III: Programming Concepts
Workbook_Open is executed automatically whenever theworkbook is opened. It uses VBA’s WeekDay function to determine the day of the week. If it’s Friday (day 6), a message box reminds the user to submit a report. If it’s not Friday, nothing happens.
If today isn’t Friday, you might have a hard time testing this procedure. You can just change the 6to correspond to today’s actual day number.
And, of course, you can modify this procedure anyway you like. For example, the following versiondisplays a message every time the workbook isopened. This gets annoying after a while, trust me.
Private Sub Workbook_Open()Msg = “This is Frank’s cool workbook!”MsgBox Msg
End Sub
A Workbook_Open procedure can do almost anything. These event-handlers are often used for the following:
✓ Displaying welcome messages (such as in Frank’s cool workbook)✓ Opening other workbooks✓ Activating a particular worksheet in the workbook✓ Setting up custom shortcut menus
Here’s a final example of a Workbook_Open procedurethat uses the GetSetting and SaveSetting functions to keep track of how many times the workbook has been opened. The SaveSetting functionwrites a value to the Windows registry, and the GetSetting function retrieves that value (see theHelp system for details).
The following example retrieves the count from the registry, increments it, and then saves it back to the registry. It also tells the user the value of Cnt that corresponds to the number of times the workbook has been opened. See Figure 11-4.
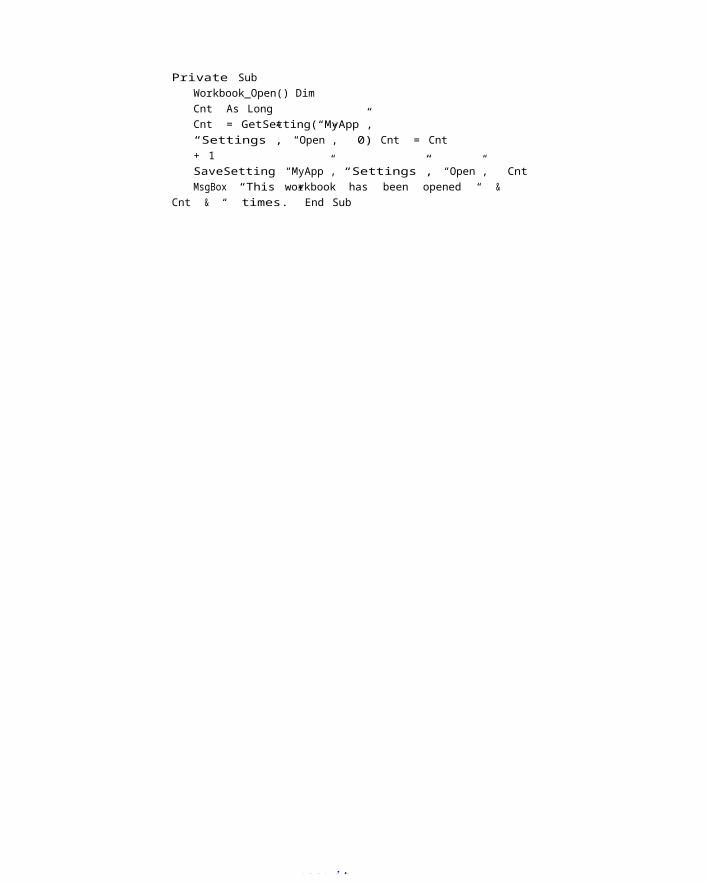
www.it-
Private Sub Workbook_Open() DimCnt As LongCnt = GetSetting(“MyApp”, “Settings”, “Open”, 0) Cnt = Cnt + 1SaveSetting “MyApp”, “Settings”, “Open”, CntMsgBox “This workbook has been opened “ &
Cnt & “ times.” End Sub

www.it-
Chapter 11: Automatic Procedures and Events
171
Figure11-4:
Using aWorkbook_ Openevent-
handlerto keeptrackof how
manytimes aworkbook
hasbeen
opened.
The BeforeClose event for a workbookHere’s an example of the Workbook_BeforeClose event-handler procedure, which is executed automatically immediately before the workbook is closed. This procedure is located in the Code window for a ThisWorkbook object:
Private Sub Workbook_BeforeClose(Cancel As Boolean) Dim Msg As StringDim Ans As IntegerDim FName As StringMsg = “Would you like to make a backup of this file?”Ans = MsgBox(Msg, vbYesNo)If Ans = vbYes Then
FName = “F:\BACKUP\” & ThisWorkbook.NameThisWorkbook.SaveCopyAs FName
End IfEnd Sub

www.it-
This routine uses a message box to ask the user whether he would like to make a backup copy of the workbook. If the answer is yes, the code uses the SaveCopyAs method to save a backup copy of the fileon drive F. If you adapt this procedure for your own use, you will need to change the drive and path.
Excel programmers often use a Workbook_BeforeClose procedure to clean up after themselves. For example, if you use a Workbook_Open procedure to change some settings when you open a workbook (hiding the status bar, for example), it’s only appropriate that you return the settings to theiroriginal state when you close the workbook. You canperform this electronic house- keeping with a Workbook_BeforeClose procedure.
There is an unfortunate caveat with theWorkbook_BeforeClose event. If you close Excel andany open file has been changed since the last save,Excel will show its usual “Do you want to save yourchanges” message box. Clickingthe Cancel button cancels the entire closing process. But the Workbook_ BeforeClose event willhave been executed anyway.
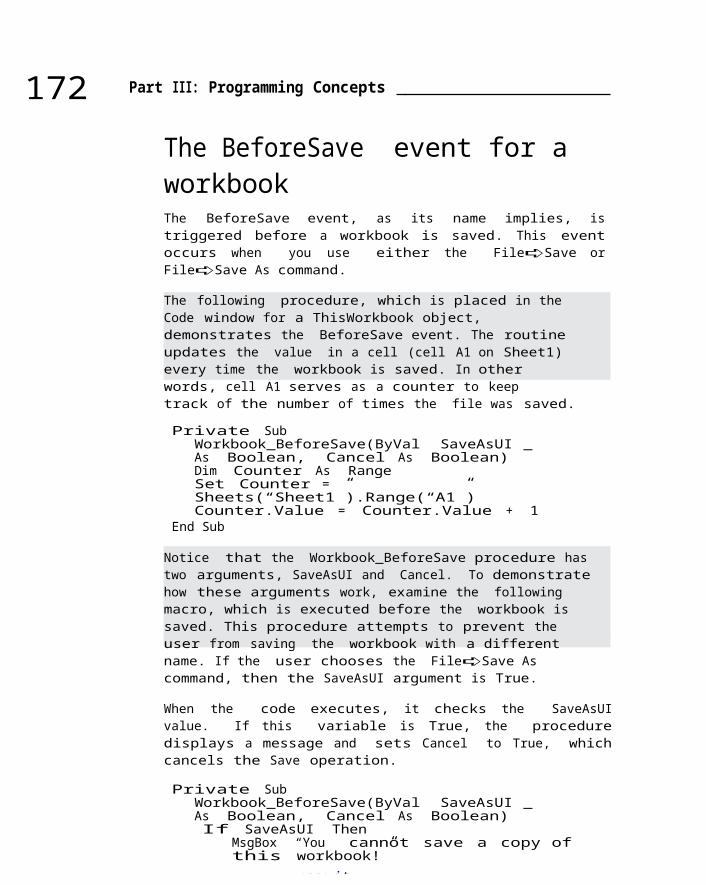
www.it-
172 Part III: Programming Concepts
The BeforeSave event for a workbookThe BeforeSave event, as its name implies, istriggered before a workbook is saved. This eventoccurs when you use either the File➪Save orFile➪Save As command.
The following procedure, which is placed in the Code window for a ThisWorkbook object, demonstrates the BeforeSave event. The routine updates the value in a cell (cell A1 on Sheet1) every time the workbook is saved. In other words, cell A1 serves as a counter to keep track of the number of times the file was saved.
Private Sub Workbook_BeforeSave(ByVal SaveAsUI _As Boolean, Cancel As Boolean)Dim Counter As RangeSet Counter = Sheets(“Sheet1”).Range(“A1”)Counter.Value = Counter.Value + 1
End Sub
Notice that the Workbook_BeforeSave procedure has two arguments, SaveAsUI and Cancel. To demonstratehow these arguments work, examine the following macro, which is executed before the workbook is saved. This procedure attempts to prevent the user from saving the workbook with a different name. If the user chooses the File➪Save As command, then the SaveAsUI argument is True.
When the code executes, it checks the SaveAsUIvalue. If this variable is True, the proceduredisplays a message and sets Cancel to True, whichcancels the Save operation.
Private Sub Workbook_BeforeSave(ByVal SaveAsUI _As Boolean, Cancel As Boolean)If SaveAsUI Then
MsgBox “You cannot save a copy of this workbook!”

www.it-
Cancel =True
End IfEnd Sub
Keep in mind that this procedure won’t really prevent anyone from savinga copy with a different name. If someone really wants to do it, they can just open the workbook with macros disabled. When macros are disabled, event- handler procedures are also disabled, whichmakes sense because they are, after all, macros.

www.it-
Chapter 11: Automatic Procedures and Events
Examples of Activation Events
Another category of events consists of activating and deactivating objects —specifically, sheets and workbooks.
Activate and deactivate events in a sheetExcel can detect when a particular sheet is activated or deactivated and execute a macro wheneither of these events occurs. These event-handler procedures go in the Code window for the Sheet object.
You can quickly access a sheet’s code window by right-clicking the sheet’s tab and selecting View Code.
The following example shows a simple procedure thatis executed whenever a particular sheet isactivated. This code simply pops up a message boxthat displays the name of the active sheet:
Private Sub Worksheet_Activate()MsgBox “You just activated “ &
ActiveSheet.NameEnd Sub
Here’s another example that activates cell A1 whenever the sheet is activated:
Private Sub Worksheet_Activate()Range(“A1”).Activate
End Sub
Althoughthecodein these twoproceduresis about as simpleas it gets, event-
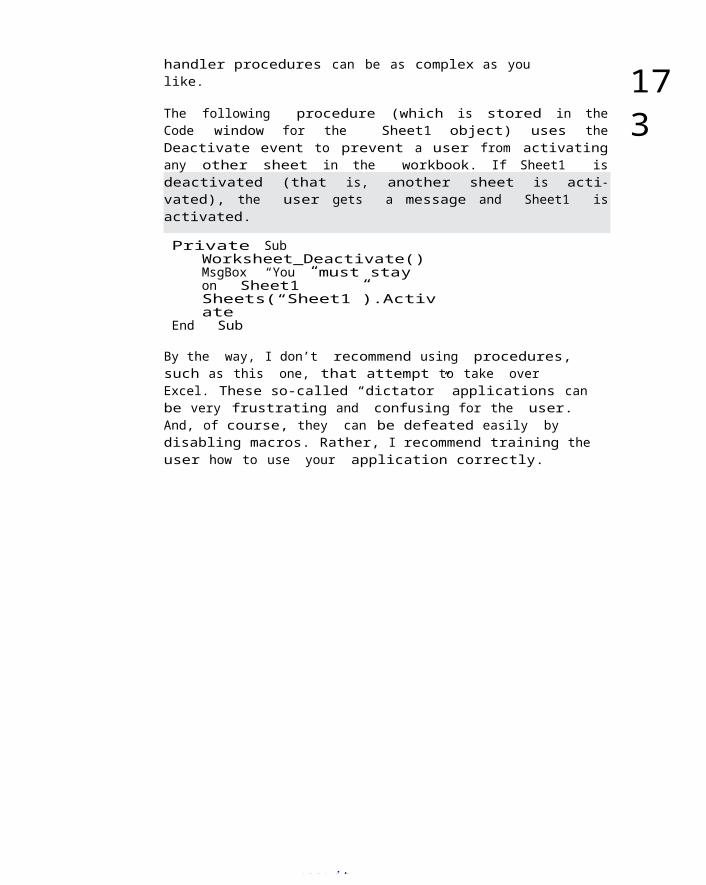
www.it-
handler procedures can be as complex as you like.
The following procedure (which is stored in theCode window for the Sheet1 object) uses theDeactivate event to prevent a user from activatingany other sheet in the workbook. If Sheet1 isdeactivated (that is, another sheet is acti-vated), the user gets a message and Sheet1 isactivated.
Private Sub Worksheet_Deactivate() MsgBox “You must stay on Sheet1” Sheets(“Sheet1”).Activate
End Sub
By the way, I don’t recommend using procedures, such as this one, that attempt to take over Excel. These so-called “dictator” applications can be very frustrating and confusing for the user. And, of course, they can be defeated easily by disabling macros. Rather, I recommend training theuser how to use your application correctly.
173

www.it-
174 Part III: Programming Concepts
Activate and deactivate events in a workbookThe previous examples use events associated with a specific worksheet. The ThisWorkbook object also handles events that deal with sheet activation anddeactivation. The following procedure, which is stored in the Code window for the ThisWorkbook object, is executed when any sheet in the workbook is activated. The code displays a message with the name of the activated sheet.
Private Sub Workbook_SheetActivate(ByValSh As Object) MsgBox Sh.Name
End Sub
The Workbook_SheetActivate procedure uses the Sh argument. Sh is a vari- able that represents the active Sheet object. The message box displays the Sheet object’s Name property.
The next example is contained in a ThisWorkbook Code window. It consists of two event-handler procedures:
✓ Workbook_SheetDeactivate: Executed when any sheetin the workbook is deactivated. It stores the sheet that is deactivated in an object vari- able. (The Set keyword creates an object variable.)
✓ Workbook_SheetActivate: Executed when any sheet in the workbook is activated. It checks the type of sheet that is activated (using the TypeName function). If the sheet is a chart sheet, the user gets a message (see Figure11-5). When the OK button in the message box is clicked, the previoussheet (which is stored in the OldSheet variable) is reactivated.

www.it-
Figure11-5:
When achartsheet
isactivate
d, theuser
sees amessage
like this.

www.it-
Chapter 11: Automatic Procedures and Events
A workbook that contains this code is available at this book’s website.
Dim OldSheet As Object
Private Sub Workbook_SheetDeactivate(ByValSh As Object) Set OldSheet = Sh
End Sub
Private Sub Workbook_SheetActivate(ByVal Sh As Object) Dim Msg As StringIf TypeName(Sh) = “Chart” Then
Msg = “This chart contains “Msg = Msg & ActiveChart.SeriesCollection(1).Points.CountMsg = Msg & “ data points.” & vbNewLineMsg = Msg & “Click OK to return to “ & OldSheet.NameMsgBox MsgOldSheet.Activate
End IfEnd Sub
Workbook activation eventsExcel also recognizes the event that occurs when you activate or deactivate a particular workbook. The following code, which is contained in the Code window for the ThisWorkbook object, is executed whenever the workbook is activated. The procedure simply maximizes the workbook’s window.
Private Sub Workbook_Activate() ActiveWindow.WindowState = xlMaximized
End Sub
An example of Workbook_Deactivate code appears next.This procedure is executed when a workbook is deactivated. This procedure copies the selected range whenever the workbook is deactivated. It might be useful if you’re copying data from lots of different areas and pasting them to a dif- ferent workbook. When this event-procedure is in
place,youcanselecttherange to be copied, activate the other workbook,selectthe destination,andpressCtrl+V (orEnter)to pastethe copieddata.

www.it-
Private Sub Workbook_Deactivate() ThisWorkbook.Windows(1).RangeSelection.Copy
End Sub
Simple as it is, this procedure required some experimentation before I got it to work correctly. First I tried this:
Selection.Copy
175

www.it-
176 Part III: Programming Concepts
This statement didn’t work as I had intended. It copied the range from the second workbook (the oneI activated after deactivating the first workbook).That’s because the second workbook became the active workbook after the deactivation event occurred.
This statement didn’t work either. In fact, it gave mea runtime error:
ThisWorkbook.ActiveSheet.Selection.Copy
I eventually remembered the RangeSelection property of a Window object, and that one did the trick.
Other Worksheet-Related Events
In the preceding section, I present examples for worksheet activation and deac- tivation events. In this section, I discuss three additional events that occur in worksheets: double-clicking a cell, right-clicking a cell, and changing a cell.
The BeforeDoubleClick eventYou can set up a VBA procedure to be executed when the user double-clicks a cell. In the following example (which is stored in the Code window for a Sheet object), double-clicking a cell in that sheetmakes the cell bold (if it’s not bold) or not bold (if it is bold):
Private Sub Worksheet_BeforeDoubleClick _(ByVal Target As Excel.Range, Cancel As Boolean)Target.Font.Bold = Not Target.Font.BoldCancel = True

www.it-
End Sub
The Worksheet_BeforeDoubleClick procedure has twoarguments: Target and Cancel. Target represents thecell (a Range object) that was double-clicked. IfCancel is set to True, the default double-clickaction doesn’t occur.
The default action for double-clicking a cell is to put Excel into cell edit mode. I didn’t want that tohappen, so I set Cancel to True.
The BeforeRightClick eventThe BeforeRightClick event is similar to the BeforeDoubleClick event, except that it consists ofright-clicking a cell. The following procedure checks to see whether the cell that was right-clicked contains a numeric value. If so, the code displays the Format Number dialog box and sets theCancel argument

www.it-
Chapter 11: Automatic Procedures and Events
177
to True (avoiding the normal shortcut menu display). If the cell does not contain a numeric value, nothing special happens — the shortcut menu is displayed as usual.
Private Sub Worksheet_BeforeRightClick _(ByVal Target As Excel.Range, Cancel As Boolean)If IsNumeric(Target) And Not IsEmpty(Target)
Then Application.CommandBars.ExecuteMso (“NumberFormatsDialog”) Cancel = True
End IfEnd Sub
Notice that the code, which is available on this book’s website, makes an additional check to see if the cell is not empty. This is because VBA considersempty cells to be numeric. Don’t ask me why; it just does.
The Change eventThe Change event occurs whenever any cell on the worksheet is changed. In the following example, the Worksheet_Change procedure effectively prevents a user from entering a nonnumeric value into cell A1. This code is stored in the Code window for a Sheet object.
Private Sub Worksheet_Change(ByVal Target As Range) If Target.Address = “$A$1” Then
If Not IsNumeric(Target) ThenMsgBox “Enter a number in cell A1.”Range(“A1”).ClearContentsRange(“A1”).Activate
EndIf
End IfEnd Sub
The single argument for the Worksheet_Change procedure (Target) represents the range that was changed. The first statement sees whether the

www.it-
cell’s address is $A$1. If so, the code uses the IsNumeric function to determine whether the cell contains a numeric value. If not, a message appears, andthe cell’s value is erased. Cell A1 is then activated — useful if the cell pointer moved to a different cell after the entry was made. If the change occurs in any cell except A1, nothing happens.
Why not use data validation?You may be familiar with the Data➪Data Tools➪Data Validation command. This handy featuremakes it easy to ensure that only data of the proper type is entered into a particular cell or range. Although the Data➪Data Tools➪Data Validation command is useful, it’s definitely not foolproof.

www.it-
178 Part III: Programming Concepts
Try adding data validation to a cell. For example, you can set it up so the cell accepts only a numerical value. It works fine — until you copy another cell and paste it to the data validation cell. Pasting removes the data validation. It’s as if it was never there. The severity of this flaw depends on your applica- tion. In the next section,I describe how to use the Change event to provide for better validating.
Pasting wipes out data validation because Excel considers validation a format for a cell. Therefore,it is in the same classification as font size, color, or other similar attributes. When you paste a cell, you are replacing the formats in the targetcell with those of the source cell. Unfortunately, those formats also include your validation rules.
Preventing data validation from being destroyedThe procedure in this section demonstrates how to prevent users from copy- ing data and wiping out data validation rules. This example assumes that the worksheet has a range named InputArea, and thisinput area contains data validation rules (set up by using the Data➪Data Tools➪Data Validation com- mand). The range can have any validation rules you want.
A workbook that contains this code is available at this book’s website:
Private Sub Worksheet_Change(ByVal Target As Range) Dim VT As Long‘Do all cells in the validation range‘still have validation? On Error Resume NextVT = Range(“InputRange”).Validation.TypeIf Err.Number <> 0 Then
Application.UndoMsgBox “Your last operation was canceled.” & _“It would have deleted data validation rules.”, vbCritical
End If

www.it-
End Sub
The procedure is executed whenever a cell is changed. It checks the valida- tion type of the range (named InputRange) that is supposed to containthe data validation rules. If the VT variable contains an error, then one or more cells in the InputRange no longer have data validation (the user probably copied some data over it). If that’s the case, the code executes the Undo method of the Application object and reverses theuser’s action. Then it displays a message box, as shown in Figure 11-6.
The net effect? It’s impossible to wipe out the validation rules by copying data. When Excel is broken, sometimes you can use VBA to fix it.

www.it-
Chapter 11: Automatic Procedures and Events
179
Figure11-6:
Performing datavalida-
tionwith anevent
procedure.
Events Not Associated with Objects
The events that I discuss previously in this chapter are associated with either a workbook object or a worksheet object. In this section, I discuss two types of events that are not associated with objects: time and keypresses.
Because time and keypresses aren’t associated with a particular object such as a workbook or a worksheet, you program these events in a normal VBA module (unlike the other events discussed in this chapter).
The OnTime event

www.it-
The OnTime event occurs when a particular time of day occurs. The follow- ing example demonstrates how to get Excel to execute a procedure when the 3:00 p.m. event occurs. In this case, a robot voicetells you to wake up, accompanied by a message box:
Sub SetAlarm()Application.OnTime 0.625, “DisplayAlarm”
End Sub
Sub DisplayAlarm()Application.Speech.Speak (“Hey, wake up”)MsgBox “ It’s time for your afternoon break!”
End Sub
In this example, I use the OnTime method of the Application object. This method takes two arguments: the time (0.625 or 3:00 p.m.) and the name of the Sub procedure to execute when the time event occurs (DisplayAlarm).

180 Part III: Programming Concepts
This procedure is quite useful if you tend to getso wrapped up in your work that you forget aboutmeetings and appointments. Just set an OnTimeevent to remind yourself.
Most people (this author included) find it difficult to think of time in terms of the Excel numbering system. Therefore, you may want to use the VBA TimeValue function to represent the time. TimeValue converts a string that looks like a time into a value that Excel can handle. The following statement shows an easier way to program an event for 3:00 p.m.:
Application.OnTime TimeValue(“3:00:00 pm”), “DisplayAlarm”
If you want to schedule an event relative to the current time (for example, 20 minutes from now), youcan use a statement like this:
Application.OnTime Now + TimeValue(“00:20:00”), “DisplayAlarm”
You can also use the OnTime method to run a VBA procedure on a particular day. You must make sure that your computer keeps running and that the workbook with the procedure is kept open. The following statement runs the DisplayAlarm procedureat 5:00 p.m. on December 31, 2013:
Application.OnTime DateValue(“12/31/2013 5:00 pm”), “DisplayAlarm”
This particular code line could come in handy to warn you that you need to go home and get ready for the New Year’s Eve festivities.
Here’s another example that uses the OnTime event. Executing the UpdateClock procedures writes the time to cell A1 and also programs another event five seconds later. This event reruns the UpdateClock proce- dure. The net effect is that cell A1 is updated with the current time every five seconds. To stop the events, execute the StopClockprocedure (which can- cels the event). Note that

NextTick is a module-level variable that stores thetime for the next event.
Dim NextTick As Date
Sub UpdateClock()‘ Updates cell A1 with the current time
ThisWorkbook.Sheets(1).Range(“A1”) = Time‘ Set up the next event five seconds from now
NextTick = Now + TimeValue(“00:00:05”)Application.OnTime NextTick, “UpdateClock”
End Sub
Sub StopClock()‘ Cancels the OnTime event (stops the clock)
On Error Resume NextApplication.OnTime NextTick, “UpdateClock”, , False
End Sub
www.it-ebooks.info

www.it-
Chapter 11: Automatic Procedures and Events
181
Figure11-7: Myanalogclock
application.
The OnTime event persists even after the workbook is closed. In other words, if you close the workbookwithout running the StopClock procedure, the work- book will reopen itself in five seconds (assuming that Excel is still running). To prevent this, use a Workbook_BeforeClose event procedure that contains the following statement:
Call StopClock
The OnTime method has two additional arguments. If you plan to use this method, you should refer to the online help for complete details.
If you’d like to see a rather complicated application, download a copy of my analog clock workbook, shown in Figure 11-7. The clock face is actually a chart, and the chart is updated everysecond to display the time of day. Useless, but fun.
Keypress eventsWhile you work, Excel constantly monitors what you type. Because of this, you can set up a keystroke or a key combination to execute a procedure.
Here’s an example that reassigns the PgDn and PgUp keys:
Sub Setup_OnKey()

www.it-
Application.OnKey “{PgDn}”, “PgDn_Sub”Application.OnKey “{PgUp}”, “PgUp_Sub”
End Sub

www.it-
182 Part III: Programming Concepts
Sub PgDn_Sub()
On Error Resume NextActiveCell.Offset(1, 0).Activate
End Sub
Sub PgUp_Sub()On Error Resume NextActiveCell.Offset(-1, 0).Activate
End Sub
After setting up the OnKey events by executing the Setup_OnKey procedure, pressing PgDn moves you down one row. Pressing PgUp moves you up one row.
Notice that the key codes are enclosed in braces, not in parentheses. For a complete list of keyboard codes, consult the Help system. Search for OnKey.
In this example, I use On Error Resume Next to ignore any errors that are gen- erated. For example,if the active cell is in the first row, trying to move up one row causes an error that can safely be ignored. And if a chart sheet is active, there is noactive cell.
By executing the following routine, you cancel the OnKey events:
Sub Cancel_OnKey() Application.OnKey “{PgDn}” Application.OnKey “{PgUp}”
End Sub
Using an empty string as the second argument for theOnKey method does not cancel the OnKey event. Rather,it causes Excel to simply ignore the keystroke. Forexample, the following statement tells Excel toignore Alt+F4. The percent sign represents the Altkey:
Application.OnKey “%{F4}”, “”
www.it-
Although you can use the OnKey method to assign ashortcut key for executing a macro, you should usethe Macro Options dialog box for this task. Formore details, see Chapter 5.
If you close the workbook that contains the code and leave Excel open, the OnKey method will not be reset. As a consequence, pressing the shortcut keywill cause Excel to automatically open the file withthe macro. To preventthis from happening, you should include code in yourWorkbook_BeforeClose event code (shown earlier inthis chapter) to reset the Onkey event.

T
www.it-
Chapter12
Error-HandlingTechniques
In This Chapter▶ Understanding the difference between programming errors and run-time errors▶ Trapping and handling run-time errors▶ Using the VBA on Error and Resume statements▶ Finding out how you can use an error to your advantage
o err is human. To anticipate errors is divine. When working with VBA, you should be aware of two broad classes of errors: programming errors
and run-time errors. This chapter is all about run-time errors. I cover pro- gramming errors, also known as bugs, in Chapter 13.
A well-written program handles errors the way FredAstaire danced: grace- fully. Fortunately, VBAincludes several tools to help you identifyerrors — and then handle them gracefully.
Types of ErrorsIf you’ve tried any of the examples in this book, you have probably encoun- tered one or more error

www.it-
messages. Some of these errors result from bad VBA code. For example, you may spell a keyword incorrectly or type a statement with the wrong syntax. If you make such an error, you won’t even beable to execute the procedure until you correct it.
This chapter does not deal with those types of errors. Instead, I discuss run- time errors — the errors that occur while Excel executes your VBA code. More specifically, this chapter covers the following fascinating topics:
✓ Identifying errors✓ Doing something about the errors that occur✓ Recovering from errors✓ Creating intentional errors (Yes, sometimes an error can be a good thing.)

www.it-
184 Part III: Programming Concepts
The ultimate goal of error handling is to write code that avoids displaying Excel’s error messagesas much as possible. In other words, you want to anticipate potential errors and deal with them before Excel has a chance to rear its ugly head with a (usually) less-than-informative error message.
An Erroneous ExampleTo get things started, I developed a short and simple VBA macro. A macro this simple couldn’t produce any errors, right?
Activate the VBE, insert a module, and enter the following code:
Sub EnterSquareRoot() Dim NumAs Double
‘ Prompt for a valueNum = InputBox(“Enter a value”)
‘ Insert the square rootActiveCell.Value = Sqr(Num)
End Sub
As shown in Figure 12-1, this procedure asks theuser for a value. It then per- forms a magicalcalculation and enters the square root of thatvalue into the active cell.
Figure12-1:The
InputBoxfunctiondisplay
s adialog
box that

www.it-
askstheuserfor a
value.
You can execute this procedure directly from the VBE by pressing F5. Alternatively, you may want to adda button to a worksheet (use Developer➪ Controls➪Insert and select the Form controls buttonto do this) and then assign the macro to the button.(Excel prompts you for the macro to assign.) Then you can run the procedure by simply clicking the button.

Chapter 12: Error-Handling Techniques
The macro’s not quite perfectExecute the code a couple of times to try it out. Itworks pretty well, doesn’t it? Now try entering anegative number when you are prompted for a value.Oops. Trying to calculate the square root of anegative number is illegal on this planet.
Excel responds to the request to calculate the square root of a negative number by displaying the run-time error message shown in Figure 12-2. For now, just click the End button. If you click the Debug button, Excel suspends the macro, so you can use the debugging tools to help track down the error. (I describe the debugging tools in Chapter 13.)
185
Figure12-2:Excel
displays thiserror
messagewhenthe
procedure
attempts to
calculate thesquareroot of
anegativenumber.

Most folks don’t find the Excel error messages (for example, Invalid procedure call or argument) particularly helpful. To improve the procedure, you need to anticipate this error and handle it more gracefully. In other words, you need to add some error-handling code.
Here’s a modified version of EnterSquareRoot:
Sub EnterSquareRoot2() Dim Num As Double
‘ Prompt for a valueNum = InputBox(“Enter a value”)
‘ Make sure the number is nonnegativeIf Num < 0 Then
MsgBox “You must enter a positive number.”Exit Sub
End If
‘ Insert the square rootActiveCell.Value = Sqr(Num)
End Sub
www.it-ebooks.info

www.it-
186 Part III: Programming Concepts
An If-Then structure checks the value contained in the Num variable. If Num is less than 0, the procedure displays a message box containing information that humans can actually understand. Then the procedure ends with the Exit Sub statement, so the run-time error never has a chance to occur.
The macro is still not perfectSo the modified EnterSquareRoot procedure is perfect, right? Not really. Try entering text rather than a value. Or click the Cancel button inthe input box. Both of these actions generate an error (Type mismatch). This simple little procedure needs still more error-handling code.
The following modified code uses the IsNumeric function to make sure that Num contains a numeric value. If the user doesn’t enter a number, the proce- dure displays a message and then stops. Also, notice that the Num variableis now declared as a Variant. If it were declared asa Double, the code would generate an unhandlederror if the user entered a nonnumeric value intothe input box.
Sub EnterSquareRoot3() Dim Num As Variant
‘ Prompt for a valueNum = InputBox(“Enter a value”)
‘ Make sure Num is a numberIf Not IsNumeric(Num) Then
MsgBox “You must enter a number.”ExitSub
End If
‘ Make sure the number is nonnegativeIf Num < 0 Then

www.it-
MsgBox “You must enter a positive number.”ExitSub
End If
‘ Insert the square rootActiveCell.Value = Sqr(Num)
End Sub
Is the macro perfect yet?Now this code is absolutely perfect, right? Not quite. Try running the proce- dure while the active sheet is a chart sheet. Yikes, another run-time error; this time it’s the dreaded Number 91 (see Figure 12-3). This error occurs because thereis no active cell when a chart sheet is active, or when some- thing other than a range is selected.

www.it-
Chapter 12: Error-Handling Techniques
187
Figure12-3:
Runningthe
procedure whena chart
isselecte
dgenerates thiserror.
The following listing uses the TypeName function to make sure that the selec- tion is a range. If anything other than a range is selected, this procedure dis- plays a message and then exits:
Sub EnterSquareRoot4() Dim Num As Variant
‘ Make sure a worksheet is activeIf TypeName(Selection) <> “Range” Then
MsgBox “Select a cell for the result.”Exit Sub
End If
‘ Prompt for a valueNum = InputBox(“Enter a value”)
‘ Make sure Num is a numberIf Not IsNumeric(Num) Then
MsgBox “You must enter a number.”Exit Sub
End If
‘ Make sure the number is nonnegativeIf Num < 0 Then
MsgBox “You must enter a positive number.”Exit Sub
End If
‘ Insert the square root

www.it-
ActiveCell.Value = Sqr(Num)End Sub
Giving up on perfectionBy now, this procedure simply must be perfect. Think again, pal.

188 Part III: Programming Concepts
Protect the worksheet (using the Review➪Changes➪Protect Sheet command) and then run the code. Yep, a protected worksheet generatesyet another error. And I probably haven’t thought of all the other errors that can occur. Keep reading for another way to deal with errors — even those you can’t anticipate.
Handling ErrorsAnother Way
How can you identify and handle every possible error? Often, you can’t. Fortunately, VBA provides another way to deal with errors.
Revisiting the EnterSquareRoot procedureExamine the following code. I modified the routinefrom the previous sec- tion by adding an all-purpose On Error statement to trap all errors and then checking to see whether the InputBox was cancelled.
SubEnterSquareRoot5() Dim NumAs VariantDim Msg AsString
‘ Set up error handlingOn Error GoTo BadEntry
‘ Prompt for a valueNum = InputBox(“Enter a value”)
‘ Exit if cancelledIf Num = “” Then Exit Sub
‘ Insert the squareroot

ActiveCell.Value = Sqr(Num) Exit Sub
BadEntry:Msg = “An error occurred.” & vbNewLine & vbNewLineMsg = Msg & “Make sure a range is selected, “Msg = Msg & “the sheet is not protected, “Msg = Msg & “and you enter a nonnegative value.”MsgBox Msg, vbCritical
End Sub
www.it-ebooks.info

www.it-
Chapter 12: Error-Handling Techniques
189
On Error not working?If an On Error statement isn’t working as adver- tised, you need to change one of your settings.1 . Activate the VBE .2 . Choose the Tools➪Options command .3 . Click the General tab of the Options dialog box .
4 . Make sure that the Break On All Errors set- ting is deselected .
If this setting is selected,Excel essentially ignores anyOn Error statements. Younormally want to keep the ErrorTrapping options set to BreakOn Unhandled Errors.
This routine traps any type of run-time error. Aftertrapping a run-time error, the revised EnterSquareRoot procedure displays the message box shown in Figure 12-4. This message box describes the most likely causes for the error.
Figure12-4: A
run-timeerror in
theprocedur
egenerates this
semi-helpfulerror
message.
www.it-
About the On Error statementUsing an On Error statement in your VBA code lets you bypass Excel’s built- in error handling and useyour own error-handling code. In the previous example, a run-time error causes macro execution to jump to the statement labeled BadEntry. As a result, you avoid Excel’s unfriendly error messages, and you can display your own (friendlier, I hope) message to the user.
Notice that the example uses an Exit Sub statementright before the BadEntry label. This statement is necessary because you don’t want to execute the error-handling code if an error does not occur.

www.it-
190 Part III: Programming Concepts
Handling Errors: The DetailsYou can use the On Error statement in three ways, as shown in Table 12-1.
Table 12-1 Using the On ErrorStatementSyntax What It DoesOn Error GoTo label After executing this
statement, VBA resumes execution atthe specified line. You must includea colon after the label so that VBArecognizes it as a label.
On Error GoTo 0 After executing thisstatement, VBA resumes its normalerror-checking behavior. Use thisstatement after using one of theother On Error statements, or whenyou want to remove error handling inyour procedure.
On Error Resume Next After executing thisstatement, VBA simply ignores allerrors and resumes execution withthe next statement.
Resuming after an errorIn some cases, you simply want the routine to end gracefully when an error occurs. For example, you may display a message describing the error and then exit the procedure. (The EnterSquareRoot5 example uses this tech- nique.) In other cases, you want to recover from the error, if possible.
To recover from an error, you must use a Resume statement. This clears the error condition and lets you continue execution at some location. You

www.it-
can use the Resume statement in three ways, as shown in Table 12-2.
Table 12-2 Using the Resume StatementSyntax What It DoesResume Execution resumes with the statement that caused the error.
Use this if your error-handling code corrects the problem, and it’s okay to continue.
Resume Next Execution resumes with the statementimmediately following
the statement that caused the error. This essentially ignores the error.
Resume label Execution resumes at the label you specify.

www.it-
Chapter 12: Error-Handling Techniques
191
The following example uses a Resume statement after an erroroccurs:
Sub EnterSquareRoot6() Dim Num As Variant Dim Msg As String Dim Ans As Integer
TryAgain:‘ Set up error handling
On Error GoTo BadEntry
‘ Prompt for a valueNum = InputBox(“Enter a value”)If Num = “” Then Exit Sub
‘ Insert the square rootActiveCell.Value = Sqr(Num)
Exit Sub
BadEntry:Msg = Err.Number & “: “ & Error(Err.Number)Msg = Msg & vbNewLine & vbNewLineMsg = Msg & “Make sure a range is selected,“Msg = Msg & “the sheet is not protected, “Msg = Msg & “and you enter a nonnegative value.”Msg = Msg & vbNewLine & vbNewLine & “Try again?”Ans = MsgBox(Msg, vbYesNo + vbCritical)If Ans = vbYes Then Resume TryAgain
End Sub
This procedure has another label: TryAgain. If an error occurs, execution continues at the BadEntry label, and the code displays the message shown in Figure 12-5. If the user responds by clicking Yes, the Resume statement kicks in, and execution jumps back to the TryAgain label. If the user clicks No, the procedure ends.
Notice that the error message also includes theerror number, along with the “official” errordescription. I threw that in because I write about

www.it-
it later in the section “Identifying specificerrors.”
Figure12-5: If
anerror
occurs, theusercan
decidewhetherto tryagain.

www.it-
192 Part III: Programming Concepts
Remember that the Resume statement clears the error condition before con- tinuing. To see what I mean, try substituting the following statement for the second-to-last statement in the preceding example:
If Ans = vbYes Then GoTo TryAgain
The code doesn’t work correctly if you use GoTo rather than Resume. To demonstrate, enter a negative number: You get the error prompt. Click Yesto try again and then enter another negative number. This second error is not trapped because the original error condition was not cleared.
This example is available on this book’s website.
Error handling in a nutshellTo help you keep all this error-handling businessstraight, I’ve prepared a quick-and-dirty summary.A block of error-handling code has the following characteristics:
✓ It begins immediately after the label specified in the On Error statement.✓ It should be reached by your macro only if an error occurs. This means that you must use a statement such as Exit Sub or Exit Function immedi- ately before the label.
✓ It may require a Resume statement. If you choose not to abort the pro- cedure when an error occurs, you must execute a Resume statement before returning to the main code.
Knowing when to ignore errorsIn some cases, it’s perfectly okay to ignore errors. That’s when the On ErrorResume Next statement comes into play.

www.it-
The following example loops through each cell in theselected range and con- verts the value to itssquare root. This procedure generates an errormessage if any cell in the selection contains anegative number or text:
Sub SelectionSqrt() Dim cell As RangeIf TypeName(Selection) <> “Range” Then Exit SubFor Each cell In Selection
cell.Value = Sqr(cell.Value)Next cell
End Sub

www.it-
Chapter 12: Error-Handling Techniques
193
In this case, you may want to simply skip any cell that contains a value you can’t convert to a square root. You can create all sorts of error-checking capabilities by using If-Then structures, but you can devise a better (and sim- pler) solution by simply ignoring the errors that occur.
The following routine accomplishes this by using the On Error Resume Next statement:
Sub SelectionSqrt() Dim cell As RangeIf TypeName(Selection) <> “Range” Then Exit SubOn Error Resume NextFor Each cell In Selection
cell.Value = Sqr(cell.Value)Next cell
End Sub
In general, you can use an On Error Resume Next statement if you consider the errors harmless or inconsequential to your task.
Identifying specific errorsAll errors are not created equal. Some are serious,and some are less serious. Although you may ignore errors you consider inconsequential, you mustdeal with other, more serious errors. In some cases, you need to identify the specific error that occurred.
Every type of error has an official number. When an error occurs, Excel stores the error number in an Error object named Err. This object’s Number property contains the error number, and its Description property containsa description of the error. For example, the following statement displays the error number, a colon, and a description of the error:
www.it-
MsgBox Err.Number & “: “ & Err.Description
Figure 12-5, earlier in this chapter, shows an example of this. Keep in mind, however, that the Excel error messages are not always very useful — but you already know that.
The following procedure demonstrates how to determine which error occurred. In this case, you can safely ignore errors caused by trying to get thesquare root of a nonpositive number (that is, error 5) or errors caused by tryingto get the square root of a nonnumeric value (error 13). On the other hand, you need to inform the user if the worksheet is protected and the selection contains one or more locked cells. (Otherwise, the user may think the macro

www.it-
194 Part III: Programming Concepts
worked when it really didn’t.) Attempting to writeto a locked cell in a pro- tected worksheet causeserror 1004.
Sub SelectionSqrt() Dim cell As RangeDim ErrMsg As
StringIf TypeName(Selection) <> “Range” Then Exit SubOn Error GoTo ErrorHandlerFor Each cell In
Selection cell.Value = Sqr(cell.Value)
Next cellExit Sub
ErrorHandler:Select Case Err.Number
Case 5 ‘Negative numberResumeNext
Case 13 ‘Type mismatchResumeNext
Case 1004 ‘Locked cell, protected sheetMsgBox “Cell is locked. Try again.”, vbCritical,cell.AddressExitSub
Case ElseErrMsg =
Error(Err.Number)MsgBox “ERROR: “ & ErrMsg, vbCritical, cell.AddressExitSub
End SelectEnd Sub
When a run-time error occurs, execution jumps to the code beginning at the ErrorHandler label. The Select Case structure (I discuss that structure in Chapter 10) tests for three common error numbers. If the error number is 5 or 13, execution

www.it-
resumes at the next statement. (In other words, the error is ignored.) But if the error number is 1004, the routine advises the user and then ends.The last case, a catchall for unanticipated errors, traps all other errors and displays the actual error message.
AnIntentional
ErrorSometimes you can use an error to your advantage. For example, suppose you have a macro that works only if a particular workbook is open. How can you determine whether that workbook is open? One way is to write code that loops through the Workbooks collection checking to determine if the workbook you’re interested in is in that collection.
Here’s an easier way: a general-purpose function thataccepts one argument(a workbook name) and returns True if the workbook is open, False if it’s not.

www.it-
Chapter 12: Error-Handling Techniques
195
Here’s the function:
Function WorkbookIsOpen(book As String) As BooleanDim WBName As StringOn Error GoTo NotOpenWBName = Workbooks(book).NameWorkbookIsOpen = TrueExit Function
NotOpen:WorkbookIsOpen = False
End Function
This function takes advantage of the fact that Excel generates an error if you refer to a workbookthat is not open. For example, the following statement generates an error if a workbook named MyBook.xlsx is not open:
WBName = Workbooks(“MyBook.xlsx”).Name
In the WorkbookIsOpen function, the On Error statement tells VBA to resume the macro at the NotOpen statement if an error occurs. Therefore, anerror means that the workbook is not open, and thefunction returns False. If the workbook is open, no error occurs, and the function returns True.
Here’s another variation on the WorkbookIsOpen function. This version uses On Error Resume Next to ignore the error. But the code checks Err’s Number property. If Err.Number is 0, no error occurred, andthe workbook is open. If Err.Number is anything else,it means that an error occurred (and the work- bookis not open).
Function WorkbookIsOpen(book) As BooleanDim WBName As StringOn Error Resume NextWBName = Workbooks(book).NameIf Err.Number = 0 Then WorkbookIsOpen = True _Else WorkbookIsOpen =
FalseEnd Function
The following example demonstrates how to use this function in a Sub procedure:

www.it-
Sub UpdatePrices()If Not WorkbookIsOpen(“Prices.xlsx”) Then
MsgBox “Please open the Prices workbook first!”Exit Sub
End If‘ [Other code goes here]End Sub

www.it-
196 Part III: Programming Concepts
The UpdatePrices procedure (which must be in the same workbook as WorkbookIsOpen) calls the WorkbookIsOpen function and passes the work- book name (Prices.xlsx) as an argument. The WorkbookIsOpen function returns either True or False. Therefore, if the workbook is not open, theprocedure informs the user of that fact. If the workbook is open, the macro continues.
Error handling can be a tricky proposition — after all, many different errors can occur, and you can’tanticipate all of them. In general, you should traperrors and correct the situation before Excel intervenes, if possible. Writing effective error-trapping code requires a thorough knowledge of Exceland a clear understanding of how the VBA error handling works. Subsequent chap- ters contain more examples of error handling.

I
www.it-
Chapter13
Bug ExterminationTechniques
In This Chapter▶ Defining a bug and why you should squash it▶ Recognizing types of program bugs you may encounter▶ Using techniques for debugging your code▶ Using the VBA built-in debugging tools
f the word bugs conjures up an image of a cartoon rabbit, this chapter can set you straight. Simply put, a bug is an error in your programming.Here
I cover the topic of programming bugs — how to identify them and how to wipe them off the face ofyour module.
Species of BugsWelcome to Entomology 101. The term program bug, as you probably know, refers to a problem with software. Inother words, if software doesn’t perform as expected, it has a bug. Fact is, all major software programs have bugs — lots of bugs. Excel itself has hundreds (if not thousands) of bugs. Fortunately, the vast majority of these bugs are relatively

www.it-
obscure and appear in only very specific circumstances.
When you write nontrivial VBA programs, your code probably will have bugs. This is a fact of life and not necessarily a reflection of your programming ability. The bugs may fall into any of the following categories:
✓ Logic flaws in your code: You can often avoid these bugs by carefully thinking through the problem your program addresses.
✓ Incorrect context bugs: This type of bug surfaceswhen you attempt
to do something at the wrong time. For example, your code may try towrite data to cells in the active sheet when the active sheet is actually a chart sheet (which has no cells).
✓ Extreme-case bugs: These bugs rear their ugly heads when you encoun- ter data you didn’t anticipate, such as very large or very small numbers.

www.it-
198 Part III: Programming Concepts
✓ Wrong data-type bugs: This type of bug occurs when you try to process data of the wrong type, such as attempting to take the square root of atext string.
✓ Wrong version bugs: This type of bug involves incompatibilities between different Excel versions. For example, you may develop a workbookwith Excel 2013 and then find out that the workbook doesn’t work with Excel2003. You can usually avoid such problems by not using version-specific features. Often, the easiest approach is to develop your applicationby using the lowest version number of Excel thatusers might have. In all cases, however, you should test your work on all versions you expect it will be used with.
✓ Beyond-your-control bugs: These are the most frustrating. An example occurs when Microsoft upgrades Excel and makes a minor, undocumented change that causes your macro to bomb. Even security updates have been known to cause problems.
Debugging is the process of identifying andcorrecting bugs in your program. Developingdebugging skills takes time, so don’t be discouragedif this process is difficult at first.
It’s important to understand the distinction between bugs and syntax errors. A syntax error is a language error. For example, you might misspell a keyword, omit the Next statement in a For-Next loop, or have a mismatched parenthesis. Before you can even execute the procedure, you must correct thesesyntax errors. A program bug is much subtler. You can execute the routine, but it doesn’t perform as expected.
Identifying BugsBefore you can do any debugging, you must determine whether a bug actually exists. You can tell that your macro contains a bug if it doesn’t work the way it should. (Gee, this book is just filled with

www.it-
insight, isn’t it?) Usually, but not always, you can easily discern this.
A bug often (but not always) becomes apparent when Excel displays a run-time error message. Figure 13-1 shows an example. Notice that this error message includes a button labeled Debug. More about this later in the “About the Debugger” section.
A key fact known to all programmers is that bugs often appear when you least expect them. For example, just because your macro works fine with onedata set doesn’t mean you can assume it will work equally as well with all data sets.

www.it-
Chapter 13: Bug Extermination Techniques
199
Figure13-1: An
errormessage
like thisoftenmeansthat
your VBAcodecon-
tains abug.
The best debugging approach is to start with thorough testing, under a vari- ety of real-life conditions. And because any workbook changes made by your VBA code cannot be undone, it is always a good idea to use a backup copy of the workbook that you use for testing. I usually copy some files into a tempo- rary folder and use those files for mytesting.
DebuggingTechniques
In this section, I discuss the four most common methods for debugging ExcelVBA code:
✓ Examining the code✓ Inserting MsgBox functions at various locations in your code✓ Inserting Debug.Print statements✓ Using the Excel built-in debugging tools

www.it-
Examining your codePerhaps the most straightforward debugging technique is simply taking a close look at your code to see whether you can find the problem. Thismethod, of course, requires knowledge and experience. In other words, you have to know what you’re doing. If you’re lucky, the error jumps right out, and you slap your forehead and say, “Doh!” When the forehead pain dimin- ishes, you can fix the problem.
Notice I said, “If you’re lucky.” That’s because often you discover errors when you have been working on your program for eight hours straight,it is2 a.m., and you are running on caffeine and willpower. At times like that, you are lucky if you can even see your code, let alone find the bugs. Thus, don’tbe surprised if simply examining your code isn’t enough to make you find and expunge all the bugs it contains.

www.it-
200 Part III: Programming Concepts
Using the MsgBox functionA common problem in many programs involves one or more variables not taking on the values you expect.In such cases, monitoring the variable(s) while yourcode runs is a helpful debugging technique. One way to do this is by inserting temporary MsgBox functions into your routine. For example, if you havea variable named CellCount, you can insert the following statement:
MsgBox CellCount
When you execute the routine, the MsgBox function
displays CellCount’s value. It’s often helpful to
display the values of two or more variables in the
messagebox. The following statement displays the current value of two variables: LoopIndex (1) andCellCount (72), separated by a space.
MsgBox LoopIndex & “ “ & CellCount
Notice that I combine the two variables with the concatenation operator (&) and insert a space character between them. Otherwise, the message box strings the two values together, making them look like a single value. You can also use the built-in constant, vbNewLine, in place of the space character. vbNewLine inserts a line-feed break, which displays the text on a new line. The following statement displays three variables, each on a separate line (see Figure 13-2):
MsgBox LoopIndex & vbNewLine & CellCount & vbNewLine & MyVal
Figure13-2:
Using amessage

www.it-
box todisplay
thevalue
ofthree
variables.
This technique isn’t limited to monitoring variables. You can use a message box to display allsorts of useful information while your code is running. For example, if your code loops through a series of sheets, the following state- ment displays the name and type of the active sheet:
MsgBox ActiveSheet.Name & “ “ & TypeName(ActiveSheet)

www.it-
Chapter 13: Bug Extermination Techniques
201
If your message box shows something unexpected, hit Ctrl+Break, and you see a dialog box that tells you, “Code execution has been interrupted.” As shown in Figure 13-3, you have four choices:
✓ Click the Continue button, and the code continues executing.✓ Click the End button, and execution stops.✓ Click the Debug button, and the VBE goes into
Debug mode (which is explained a bit later in the section “About the Debugger”).
✓ Click the Help button, and a help screen tells you that you pressed
Ctrl+Break. In other words, it’s not very helpful.
Figure13-3:
PressingCtrl+Break haltsexecutio
n ofyour
code andgives
you somechoices.
Feel free to use MsgBox functions frequently when youdebug your code. Just make sure that you remove them after you identify and correct the problem.
Inserting Debug.Print statementsAs an alternative to using MsgBox functions in your code, you can insert one or more temporary Debug.Print statements. Use these statements to print the value of one or more variables in the Immediate window. Here’s an example that displays thevalue of three variables:
Debug.Print LoopIndex, CellCount, MyVal
www.it-
Notice that the variables are separated with c
ommas. You can display as many variables as you like with a single Debug.Print statement.
Debug.Print sends output to the Immediate window even if that window is hidden. If VBE’s Immediate window is not visible, press Ctrl+G.
Unlike MsgBox, Debug.Print statements do not halt your code. So you’ll need to keep an eye on the Immediate window to see what’s going on.

www.it-
202 Part III: Programming Concepts
After you’ve debugged your code, be sure to remove all the Debug.Print statements. Even big companies like Microsoft occasionally forget to remove their Debug.Print statements. In several previous versions of Excel, every time the Analysis ToolPak add-in was opened, you’d see several strange mes- sages in the Immediate window (see Figure 13-4). Thatproblem was finally fixed in Excel 2007.
Figure13-4:
Even pro-fessiona
lprogramme
rssometimes forget
toremovetheir
Debug.Print
statements.
Using the VBA debuggerThe Excel designers are intimately familiar with the concept of bugs. con- sequently, Excel includes a set of debugging tools that can help you correct problems in your VBA code. The VBA debugger is the topic of the next section.
About the DebuggerIn this section, I discuss the gory details of using the Excel debugging tools. These tools are much more powerful than the techniques I discuss
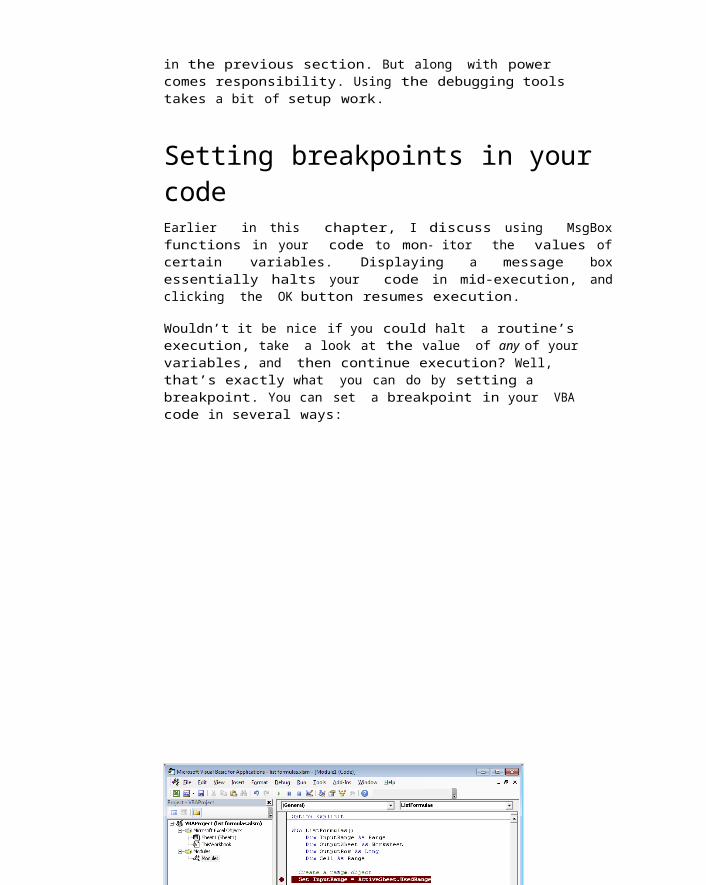
www.it-
in the previous section. But along with power comes responsibility. Using the debugging tools takes a bit of setup work.
Setting breakpoints in your codeEarlier in this chapter, I discuss using MsgBoxfunctions in your code to mon- itor the values ofcertain variables. Displaying a message boxessentially halts your code in mid-execution, andclicking the OK button resumes execution.
Wouldn’t it be nice if you could halt a routine’s execution, take a look at the value of any of your variables, and then continue execution? Well, that’s exactly what you can do by setting a breakpoint. You can set a breakpoint in your VBA code in several ways:

www.it-
Chapter 13: Bug Extermination Techniques
✓ Move the cursor to the statement at which you want execution to stop;then press F9.
✓ Click in the gray margin to the left of the statement at which you want execution to stop.
✓ Position the insertion point in the statement at which you want execution to stop. Then use the Debug➪Toggle Breakpoint command.
✓ Right-click a statement and choose Toggle➪Breakpoint from the short- cut menu.
The results of setting a breakpoint are shown inFigure 13-5. Excel highlights the line to remind youthat you set a breakpoint there; it also insertsa large dot in the gray margin.
When you execute the procedure, Excel goes into Break mode before the line with the breakpoint is executed. In Break mode, the word [break] is displayed in the VBE title bar. To get out of Break mode and continue execution, press F5 or click the Run Sub/UserForm button in the VBE toolbar. See “stepping through your code” later in this chapter to find out more.
To quickly remove a breakpoint, click the large dotin the gray margin or move the cursor to thehighlighted line and press F9. To remove allbreakpoints in the module, press Ctrl+Shift+F9.
Figure 13-5: The high- lighted statement marks

www.it-
abreakpoint inthis
procedure.
203

www.it-
204 Part III: Programming Concepts
VBA also has a keyword, which you can insert as a statement, that forcesBreak mode:
Stop
When your code reaches the Stop keyword, VBA enters Break mode.
What is Break mode? You can think of it as a state of suspended animation. Your VBA code stops running, and the current statement is highlighted in bright yellow. In Break mode, you can
✓ Type VBA statements in the Immediate window. (See the next section for details.)
✓ Press F8 to step through your code one line at a time to check various things while the program is paused.
✓ Move the mouse pointer over a variable to display its value in a small pop-up window.
✓ Skip the next statement(s) and continue execution there (or even go back a couple of statements).
✓ Edit a statement and then continue.
Figure 13-6 shows some debugging action. A breakpointis set (notice the big dot), and I’m using the F8 key to step through the code line by line (notice the arrow that points to the current statement). I used the Immediate window to check a few things, the mouse pointer is hovering over the OutputRow variable, and the VBE displays its current value.
Using the Immediate windowThe Immediate window may not be visible in the VBE. You can display theVBE’s Immediate window at any time by pressing Ctrl+G.
In Break mode, the Immediate window is particularlyuseful for finding the current value of any variable in your program. For example, if you want to know the current value of a variable named

www.it-
CellCount, enter the following in the Immediate window and press Enter:
Print CellCount
You can save a few milliseconds by using a question mark in place of the word Print, like this:
? CellCount
The Immediate window lets you do other things besidescheck variable values. For example, you can changethe value of a variable, activate a different sheet,or even open a new workbook. Just make sure thatthe command you enter is a valid VBA statement.

www.it-
Chapter 13: Bug Extermination Techniques
Figure13-6: Atypical
scene inBreakmode.
You can also use the Immediate window when Excel is not in Break mode. I often use the Immediate windowto test small code snippets (whatever I can cram on a single line) before incorporating them into myprocedures.
Stepping through your codeWhile in Break mode, you can also step through yourcode line by line. One statement is executed each time you press F8. Throughout this line-by-line execution of your code, you can activate the Immediate window at any time to check the status of your variables.
You can use your mouse to change which statementVBA will execute next. If you put your mousepointer in the gray margin to the left of thecurrently highlighted statement (which willusually be yellow), your pointer changes
toa right-pointingarrow.Simplydragyourmouse tothe statement you wa

www.it-
nt done next and watch that statement turn yellow.
Using the Watch windowIn some cases, you may want to know whether a certain variable or expression takes on a particular value. For example, suppose that a procedure loops through 1,000 cells. You notice thata problem occurs during the 900th iteration of the loop. Well, you could insert a breakpoint in the loop, but that would
205

www.it-
206 Part III: Programming Concepts
mean responding to 899 prompts before the code finally gets to the iteration you want to see (andthat gets boring real fast). A more efficient solution involves setting a watch expression.
For example, you can create a watch expression that puts the procedure into Break mode whenever acertain variable takes on a specific value — for example, Counter=900. To create a watch expression,choose Debug➪Add Watch to display the Add Watch dialog box. See Figure 13-7.
Figure13-7:
The AddWatch
dia- logbox
letsyou
specifya
condition thatcauses
abreak.
The Add Watch dialog box has three parts:
✓ Expression: Enter a valid VBA expression or avariable here. For example,
Counter=900 or just Counter.✓ Context: Select the procedure and the module
you want to watch. Note that you can select All Procedures and All Modules.
✓ Watch Type: Select the type of watch by clicking an option button. Your choice here depends on the expression you enter. The first choice, WatchExpression, does not cause a break; it simply displays the expression’s value when a break occurs.
Execute your procedure after setting up your watchexpression(s). Things run normally until your watch

www.it-
expression is satisfied (based on the Watch Type you specified). When that happens, Excelenters Break mode (you did set the Watch Type to “Break When Value Is True,” didn’t you?). From there, you canstep through the code or usethe Immediate window to debug your code.
When you create a watch, VBE displays the Watches window shown in Figure13-8. This window displays the value of all watches that you’ve defined.In this figure,the value of Counter hit 900, which caused Excel toenter Break mode.
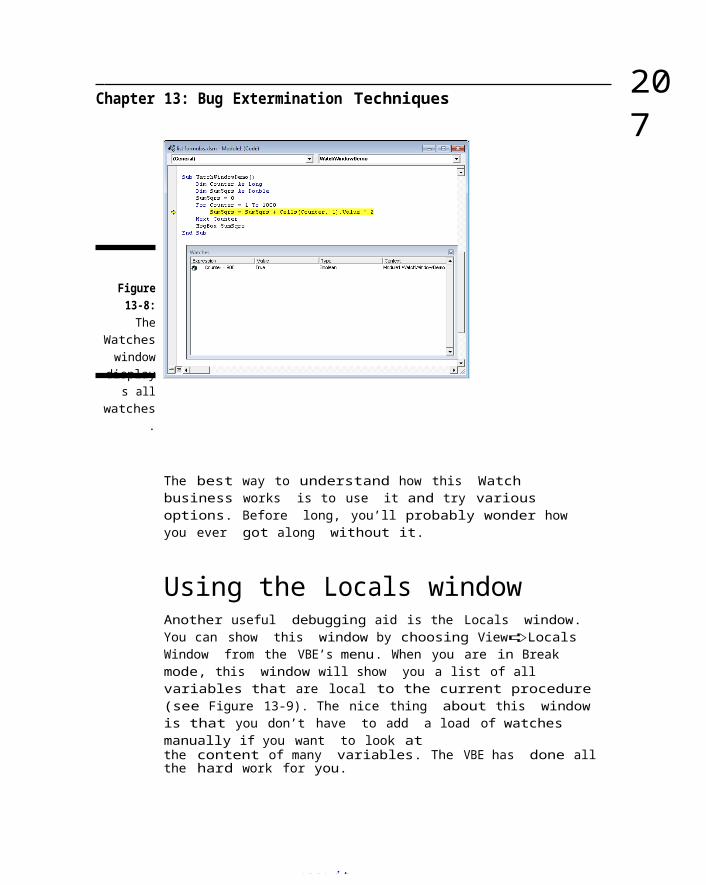
www.it-
Chapter 13: Bug Extermination Techniques
Figure13-8:The
Watcheswindow
displays all
watches.
The best way to understand how this Watch business works is to use it and try various options. Before long, you’ll probably wonder how you ever got along without it.
Using the Locals windowAnother useful debugging aid is the Locals window. You can show this window by choosing View➪Locals Window from the VBE’s menu. When you are in Break mode, this window will show you a list of all variables that are local to the current procedure (see Figure 13-9). The nice thing about this window is that you don’t have to add a load of watches manually if you want to look atthe content of many variables. The VBE has done all the hard work for you.
207

www.it-
Figure13-9:The
Localswindow
displays
alllocal
variablesand
theirconten
t.

www.it-
208 Part III: Programming Concepts
Bug Reduction TipsI can’t tell you how to completely eliminate bugs inyour VBA programs. Finding bugs in software can be aprofession by itself, but I can provide a few tips to help you keep those bugs to a minimum:
✓ Use an Option Explicit statement at thebeginning of your modules.
This statement requires you to define the data type for every variableyou use. This creates a bit more work for you, butyou avoid the common error of misspelling a variable name. And it has a nice side benefit: Your routines run a bit faster.
✓ Format your code with indentation. Using indentations helps delineate different code segments. If your program has several nested For-Nextloops, for example, consistent indentation helps you keep track of them all.
✓ Be careful with the On Error Resume Next statement. As I discuss in Chapter 12, this statement causes Excel to ignore any errors and continue executing the routine. In some cases, using this statement causes Excel to ignore errors that it shouldn’t ignore. Your code may have bugs, and you may not even realize it.
✓ Use lots of comments. Nothing is more frustratingthan revisiting code you wrote six months ago and not having a clue as to how it works. By adding a few comments to describe your logic, youcan save lots of time down the road.
✓ Keep your Sub and Function procedures simple. Bywriting your code in small modules, each ofwhich has a single, well-defined purpose, yousimplify the debugging process.
✓ Use the macro recorder to help identifyproperties and methods. When I can’t remember thename or the syntax of a property or method, Ioften simply record a macro and look at therecorded code.
✓ Understand Excel’s debugger. Although it can be abit daunting at first, the Excel debugger is a

www.it-
useful tool. Invest some time and get to know it.
Debugging code is not one of my favorite activities (it ranks right up there with getting audited by the IRS), but it’s a necessary evil that goes along with programming. As you gain more experience with VBA, you spend less time debugging and, when you have to debug, are more efficient at doing so.

M
www.it-
Chapter14
VBA ProgrammingExamples
In This Chapter▶ Exploring VBA examples▶ Making your VBA code run as fast as possible
y philosophy for figuring out how to write Excel macros places heavy emphasis on examples. I find that a good example often communicates
a concept much better than a lengthy description of the underlying theory. Because you’re reading this book, you probably agree with me. This chapterpresents several examples that demonstrate common VBA techniques.
I organize these examples into the following categories:
✓ Working with ranges✓ Changing Excel settings✓ Working with charts✓ Speeding up your VBA code
Although you may be able to use some of the examples directly, in most cases you must adapt them to your own needs.

www.it-
Working with RangesMost of your VBA programming probably involvesworksheet ranges. (For a refresher course on Rangeobjects, refer to Chapter 8.) When you work withRange objects, keep the following points in mind:
✓ Your VBA doesn’t need to select a range to work withit.✓ If your code does select a range, its worksheetmust be active.✓ The macro recorder doesn’t always generate the most efficient code.
Often, you can create your macro by using the recorder and then editthe code to make it more efficient.

www.it-
210 Part III: Programming Concepts
✓ It’s often a good idea to use named ranges in your VBA code. For example, using Range(“Total”) is better than using Range(“D45”). In the lattercase, if you add a row above row 45, you need to modify the macro so that it uses the correct range address (D46). Note that you name a range of cells by choosing Formulas➪Defined Names➪Define Name.
✓ When running a macro that works on the currentrange selection, the user might select entire columns or rows. In most cases, you don’t want to loop through every cell in the selection (that could take a long time). Your macro should create a subset of the selection consisting of only the nonblank cells.
✓ Excel allows multiple selections. For example,you can select a range, press Ctrl, and selectanother range with your mouse. Your code cantest for a multiple selection and takeappropriate actions.
The examples in this section, which are available at this book’s website, demonstrate these points.
If you prefer to enter these examples yourself, press Alt+F11 to activate the VBE. Then insert a VBA module and type the code. Make sure that the workbook is set up properly. For instance, if the example uses two sheets named Sheet1 and Sheet2, make sure that the workbook has sheets with thosenames.
Copying a rangeCopying a range ranks right up there as one of the most favorite Excel activities of all time. When youturn on the macro recorder and copy a range from A1:A5 to B1:B5, you get this VBA macro:
Sub CopyRange() Range(“A1:A5”).Select Selection.Copy Range(“B1”).Select ActiveSheet.Paste

www.it-
Application.CutCopyMode = False
End Sub
Notice the last statement. This statement was generated by pressing Esc, which cancels the marching ants display that appears in the worksheet when you copy a range.
This macro works fine, but you can copy a range more efficiently than this. You can produce the same result with the following one-line macro, which doesn’t select any cells (and also doesn’t require setting CutCopyMode to False):
Sub CopyRange2()Range(“A1:A5”).Copy Range(“B1”)
End Sub

www.it-
Chapter 14: VBA Programming Examples
211
This procedure takes advantage of the fact that the Copy method can use an argument that specifies the destination. I found that by consulting the VBA Help system. This example also demonstrates that the macro recorder doesn’t always generate the most efficient code.
Copying a variable-sized rangeIn many cases, you need to copy a range of cells but don’t know the exact row and column dimensions. For example, you might have a workbookthat tracks weekly sales. The number of rows changes as you add new data.
Figure 14-1 shows a range on a worksheet. Thisrange consists of several rows, and the numberof rows will change from day to day. Because youdon’t know the exact range address at any giventime, you need a way to write code that doesn’tuse a range address.
Figure14-1:This
rangecan
consistof any
num- berof rows.

www.it-
The following macro demonstrates how to copy this range from Sheet1 to Sheet2 (beginning at cell A1).It uses the CurrentRegion property, which returnsa Range object that corresponds to the block of cells around a par- ticular cell. In this case, that cell is A1.
Sub CopyCurrentRegion() Range(“A1”).CurrentRegion.Copy Sheets(“Sheet2”).Select Range(“A1”).Select ActiveSheet.Paste Sheets(“Sheet1”).Select Application.CutCopyMode = False
End Sub
Using the CurrentRegion property is equivalent to choosing Home➪Editing➪Find & Select➪GoTo Special (which displays the GoTo Special dialog

www.it-
212 Part III: Programming Concepts
box) and choosing the Current Region option. To seehow this works, record your actions while issuingthat command. Generally, the CurrentRegion con-sists of a rectangular block of cells surrounded byone or more blank rows or columns.
You can make this macro even more efficient by not selecting the destina- tion. The following macro takes advantage of the fact that the Copy method can use an argument for the destination range:
Sub CopyCurrentRegion2() Range(“A1”).CurrentRegion.Copy _
Sheets(“Sheet2”).Range(“A1”) End Sub
It’s even a bit easier if the data is in the form ofa table (created in Excel using Insert➪Tables➪Table). The table has a name (suchas Table1) and expands automatically when new data is added.
Sub CopyTable()Range(“Table1”).Copy Sheets(“Sheet2”).Range(“A1”)
End Sub
If you try this, you’ll find that the header row in the table is not copied because the name Table1 does not include that row. If you need to include the header row, change the table reference to
Range(“Table1[#All]”)
Selecting to the end of a row or columnYou’re probably in the habit of using key combinations such as Ctrl+Shift+ Right Arrow and Ctrl+Shift+Down Arrow to select a range that consists of everything from the active cell to theend of a row or a column. Not surprisingly, you can

www.it-
write macros that perform these types of selections.
You can use the CurrentRegion property to select an entire block of cells. But what if you want to select, say, one column from a block of cells? Fortunately, VBA can accommodate this type of action. The following VBA procedure selects the range beginning at the active cell and extending down to the cell just above the first blank cell inthe column. After selecting the range, youcan do whatever you want with it — copy it, move it, format it, and so on.
Sub SelectDown()Range(ActiveCell, ActiveCell.End(xlDown)).Select
End Sub

www.it-
Chapter 14: VBA Programming Examples
213
You can make this type of selection manually: Selectthe first cell, hold down the Shift key, press End, and then press Down Arrow.
This example uses the End method of the ActiveCellobject, which returns a Range object. The Endmethod takes one argument, which can be any of thefollowing constants:
✓ xlUp✓ xlDown✓ xlToLeft✓ xlToRight
Keep in mind that it’s not necessary to select a range before doing something with it. The following macro applies bold formatting to a variable-sized (single column) range without selecting the range:
Sub MakeBold()Range(ActiveCell, ActiveCell.End(xlDown)) _
.Font.Bold =True
End Sub
Selecting a row or columnThe following procedure demonstrates how to select the column that contains the active cell. It uses the EntireColumn property, which returns aRange object that consists of a full column:
Sub SelectColumn() ActiveCell.EntireColumn.Select
End Sub
As you may expect, VBA also offers an EntireRow property, which returns aRange object that consists of an entire row.

www.it-
Moving a rangeYou move a range by cutting it to the Clipboard andthen pasting it in another area. If you record youractions while performing a move operation, the macro recorder generates code like the following:

www.it-
214 Part III: Programming Concepts
Sub MoveRange() Range(“A1:C6”).Select Selection.Cut Range(“A10”).Select ActiveSheet.Paste
End Sub
As with the copying example earlier in this chapter, this is not the most efficient way to move a range of cells. In fact, you can move a range with a single VBA statement, as follows:
Sub MoveRange2()Range(“A1:C6”).Cut Range(“A10”)
End Sub
This macro takes advantage of the fact that the Cut method can use an argument that specifies thedestination. Notice also that the range was not selected. The cell pointer remains in its originalposition.
Looping through a range efficientlyMany macros perform an operation on each cell in a range, or they might perform selected actions based on each cell’s content. These macros usually include a For-Next loop that processes each cell inthe range.
The following example demonstrates how to loop through a range of cells. In this case, the range is the current selection. An object variable named Cell refers to the cell being processed. Within theFor Each-Next loop, the single statement evaluates the cell and applies bold formatting if the cell contains a positive value.
Sub ProcessCells()Dim Cell As Range

www.it-
For Each Cell In SelectionIf Cell.Value > 0 Then Cell.Font.Bold = True
Next CellEnd Sub
This example works, but what if the user’s selection consists of an entire column or row? This is not uncommon because Excel lets you perform operations on entire columns or rows. In such a case, the macro seems to take forever because it loops through each cell (all 1,048,576 of them) in the column — even the blank cells. To make the macro more efficient, you need a way to process onlythe nonblank cells.

www.it-
Chapter 14: VBA Programming Examples
215
The following routine does just that by using the SpecialCells method. (Refer to the VBA Help system for specific details about its arguments.) This routine uses the Set keyword to create two new Rangeobjects: the selection’s subset that consists of cells with constants and the selection’s subset that consistsof cells with formulas. The routine processes each of these subsets, with the net effect of skipping all blank cells. Pretty slick, eh?
Sub SkipBlanks()Dim ConstantCells As RangeDim FormulaCells As RangeDim cell As Range
‘ Ignore errorsOn Error Resume Next
‘ Process the constantsSet ConstantCells = Selection _.SpecialCells(xlCo
nstants)For Each cell In ConstantCells
If cell.Value> 0 Thencell.Font.Bold = True
End IfNext cell
‘ Process the formulasSet FormulaCells = Selection _
.SpecialCells(xlFormulas)
For Each cell In FormulaCellsIf cell.Value
> 0 Thencell.Font.Bold = True
End IfNext cell
End Sub
The SkipBlanks procedure works equally fast, regardless of what you select. For example, you canselect the range, all columns in the range, all rows in the range, or even the entire worksheet. It’s a vast improvement over the ProcessCells procedure presented earlier in this section.

www.it-
Notice that I use the following statement in this code:
On Error Resume Next
This statement tells Excel to ignore any errors that occur and simply process the next statement (see Chapter 12 for a discussion of error handling). This statement is necessary because the SpecialCells method produces an error if no cells qualify.

www.it-
216 Part III: Programming Concepts
Using the SpecialCells method is equivalent to choosing the Home➪ Editing➪Find & Select➪GoTo Special command and selecting the Constants optionor the Formulas option. To get a feel for how this works, record your actions while you issue that command and select various options.
Looping through arange efficiently (Part II)And now, the sequel. This section demonstrates another way of processing cells in an efficient manner. This method takes advantage of the UsedRange property — which returns a Range object that consists only of the used area of the worksheet. It also uses the Intersect method, which returns a Range object that consists of cellsthat two ranges have in common.
Here’s a variation of the SkipBlanks procedure from the previous section:
Sub SkipBlanks2()Dim WorkRange As RangeDim cell As RangeSet WorkRange = Intersect(Selection, ActiveSheet.UsedRange) For Each cell In WorkRange
If cell.Value > 0 Then cell.Font.Bold= True
End IfNext cell
End Sub
The WorkRange object variable consists of cells thatare common to the user’s selection, and the worksheet’s used range. Therefore, if an entire column is selected, WorkRange contains only the cells that are in that column and also within the

www.it-
used area of the worksheet. It’s fast and efficient, with no time wasted on processing cells that are outside of the worksheet’s used area.
Prompting for a cell valueAs shown in Figure 14-2, you can use VBA’s InputBox function to get a value from the user. Then you can insert that value into a cell. The following proce- dure demonstrates how to ask the user for a value and place the value in cell A1 of the active worksheet, using only one statement:
Sub GetValue()Range(“A1”).Value = InputBox( _
“Enter the value for cell A1”)End Sub

www.it-
Chapter 14: VBA Programming Examples
217
Figure14-2: Usethe VBA
InputBoxfunctionto get a
valuefrom the
user.
If you try this example, you’ll find that clicking the Cancel button in the InputBox erases the current value in cell A1. Erasing the user’s dataisn’t a very good programming practice. Clicking Cancel should do nothing at all.
The following macro demonstrates a better approach:using a variable (x) to store the value entered bythe user. If the value is not empty (that is, the user didn’t click Cancel), the value of x is placed into cell A1. Otherwise, nothing happens.
Sub GetValue2()Dim x as Variantx = InputBox(“Enter the value for cell A1”)If x <> “” Then Range(“A1”).Value = x
End Sub
The variable x is defined as a Variant data type because it could be a number or an empty string (if the user clicks Cancel).
Determining the selection type
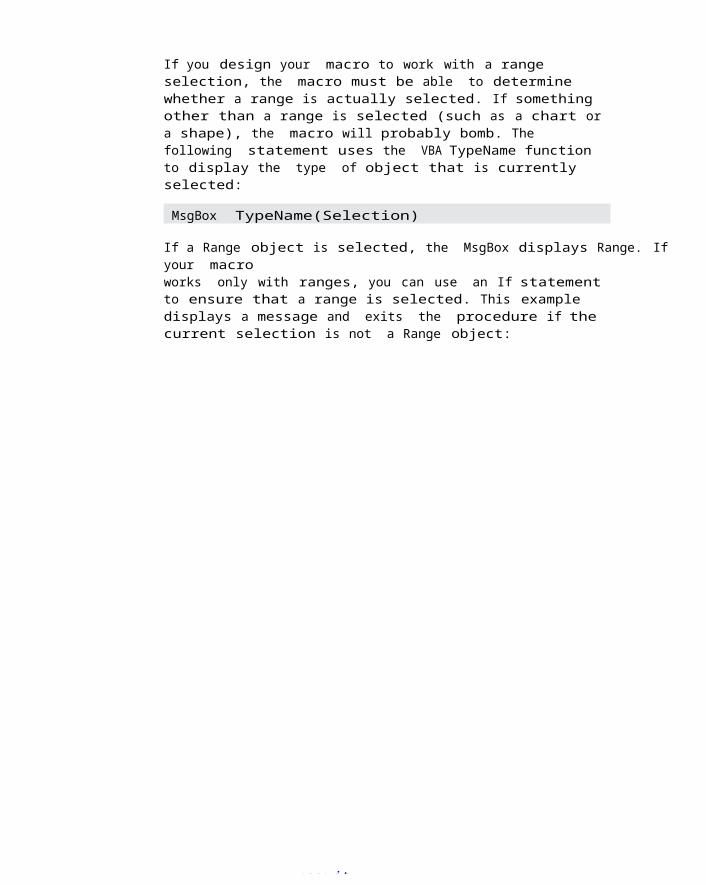
www.it-
If you design your macro to work with a range selection, the macro must be able to determine whether a range is actually selected. If something other than a range is selected (such as a chart or a shape), the macro will probably bomb. The following statement uses the VBA TypeName function to display the type of object that is currently selected:
MsgBox TypeName(Selection)
If a Range object is selected, the MsgBox displays Range. If your macroworks only with ranges, you can use an If statementto ensure that a range is selected. This example displays a message and exits the procedure if thecurrent selection is not a Range object:

www.it-
218 Part III: Programming Concepts
Sub CheckSelection()If TypeName(Selection) <> “Range” Then
MsgBox “Select arange.”
ExitSub
End If‘ ... [Other statements go here]End Sub
Identifying a multiple selectionAs you know, Excel allows multiple selections by pressing Ctrl while choosing objects or ranges. This can cause problems with some macros. For example, you can’t copy a multiple selection that consists of nonadjacent cells. If you attempt to do so, Excel scolds you with the message shown in Figure 14-3.
Figure14-3:Excel
doesn’tlike itif youtry tocopy a
multipleselecti
on.
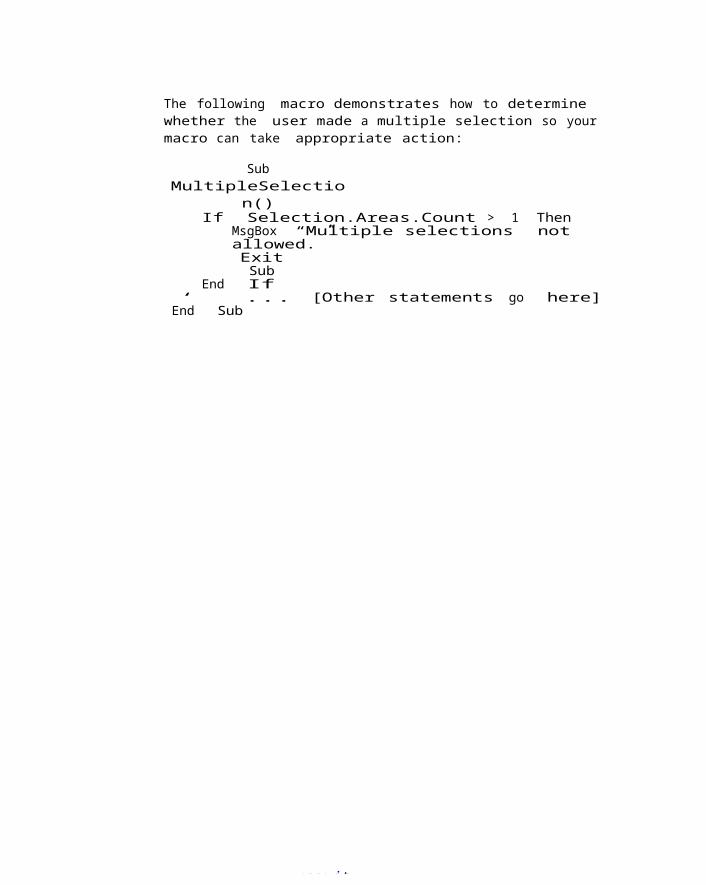
www.it-
The following macro demonstrates how to determine whether the user made a multiple selection so your macro can take appropriate action:
SubMultipleSelectio
n()If Selection.Areas.Count > 1 Then
MsgBox “Multiple selections not allowed.”ExitSub
End If‘ ... [Other statements go here]End Sub

www.it-
Chapter 14: VBA Programming Examples
219
This example uses the Areas method, which returns a collection of all ranges in the selection. The Count property returns the number of objects in the collection.
Changing Excel SettingsSome of the most useful macros are simple procedures that change one or more of Excel’s settings. For example, if you find yourself making frequent trips to the Excel Options dialog box to change a setting, that’s a good candidate for a simple time-saving macro.
This section presents two examples that show youhow to change settings in Excel. You can apply thegeneral principles demonstrated by these examplesto other operations that change settings.
Changing Boolean settingsLike a light switch, a Boolean setting is either on oroff. For example, you might want to create a macro that turns the worksheet page break display on andoff. After you print or preview a worksheet, Excel displays dashed linesto indicate the page breaks. Some people (author included) find these dashed lines very annoying. Unfortunately, the only way to get rid of the page break display is to open the Excel Options dialog box, click the Advanced tab, and scroll down until you find the Show Page Breaks check box. If you turn on the macro recorder when you change that option,Excel generates the following code:
ActiveSheet.DisplayPageBreaks = False

www.it-
On the other hand, if page breaks are not visible when you record the macro, Excel generates the following code:
ActiveSheet.DisplayPageBreaks = True
This may lead you to conclude that you need two macros: one to turn on the page break display and one to turn it off. Not true. The following procedure uses the Not operator, which turns True to False and False to True. Executing the TogglePageBreaks procedure is a simple way to toggle the page break display from True to False and from False to True:
Sub TogglePageBreaks()On Error Resume NextActiveSheet.DisplayPageBreaks = Not _ActiveSheet.DisplayPageBreaks
End Sub

www.it-
220 Part III: Programming Concepts
The first statement tells Excel about any errors. For example, a chart sheet doesn’t display page breaks, so if you execute the macro when a chart sheet is active, you won’t see an error message.
You can use this technique to toggle any settingsthat have Boolean (True orFalse)values.
Changing non-BooleansettingsYou can use a Select Case structure for non-Boolean settings. This example toggles thecalculation mode between manual and automatic anddisplays a message indicating the current mode:
Sub ToggleCalcMode()Select Case Application.Calculation
CasexlManual
Application.Calculation =xlCalculationAutomatic
MsgBox “Automatic Calculation Mode” Case xlAutomatic
Application.Calculation = xlCalculationManualMsgBox “Manual
Calculation Mode” End SelectEnd Sub
You can adapt this technique for changing othernon-Boolean settings.
Working withCharts

www.it-
Charts are jam-packed with different objects, somanipulating charts withVBA can be a bit of achallenge.
I fired up Excel 2013, entered some numbers inA1:A3, and selected thatrange. Then I turned on the macro recorder andcreated a basic column chart with three datapoints. I deleted the chart’s gridlines andchanged the chart’s title. Here’s the macro thatwas recorded:
Sub Macro1()‘ Recorded by Excel 2013
ActiveSheet.Shapes.AddChart2(201, xlColumnClustered).Select ActiveChart.SetSourceData Source:=Range(“Sheet1!$A$1:$A$3”) ActiveChart.SetElement (msoElementPrimaryValueGridLinesNone) ActiveChart.ChartTitle.SelectActiveChart.ChartTitle.Text =
“This is my chart” End Sub

www.it-
Chapter 14: VBA Programming Examples
221
I was actually kind of surprised to see this code, because I’d never heard of the AddChart2 method. As it turns out, AddChart2 is new to Excel 2013. If you record that same macro in Excel 2010, you get this code:
Sub Macro1()Recorded by Excel 2010ActiveSheet.Shapes.AddChart.Select ActiveChart.ChartType = xlColumnClustered ActiveChart.SetSourceData Source:=Range(“Sheet1!$A$1:$A$3”) ActiveChart.Axes(xlValue).MajorGridlines.Select Selection.DeleteActiveChart.SetElement (msoElementChartTitleAboveChart) ActiveChart.ChartTitle.Text = “This ismy chart”
End Sub
What does it all mean? It means that the macro recorded in Excel 2013 will not work in Excel 2010. But the macro recorded in Excel 2010 will work in Excel2013. In other words, the Excel 2010 macro exhibits forward compatibility. The Excel 2013 macro is not backward compatible.
A typical Excel 2013 user would probably know nothing about macro compatibility as it relates to chart creation. But if you share your macro with someone who uses an earlier version, you’ll find outabout it quickly. Bottom line? If you rely on the macro-recorder for chart-related macros, make surethat you test the macros will all versions of Excelthat will be running the macros.
AddChart versus AddChart2Here’s the official syntax for the AddChart method (which is compatible withExcel 2007 and later):

www.it-
.AddChart(Type, Left, Top, Width, Height)
Here’s the syntax for the AddChart2 method (which is compatible only withExcel 2013):
.AddChart2 (Style, XlChartType, Left, Top, Width, Height, NewLayout)
As you can see, the AddChart2 method takes several additional arguments — arguments that specify the style, chart type, and layout. The AddChart method,on the other hand, simply creates an empty chart. The specifics for the chart must be provided in additional statements.
Examining the recorded code does reveal a fewthings that may be helpful in writing your ownchart-related macros. If you’re curious, here’s ahand-crafted version of that macro that creates achart from the selected range:

www.it-
222 Part III: Programming Concepts
Sub CreateAChart()Dim ChartData As Range Dim ChartShape As Shape Dim NewChart As Chart
‘ Create object variablesSet ChartData = ActiveWindow.RangeSelection Set ChartShape = ActiveSheet.Shapes.AddChart Set NewChart = ChartShape.Chart
With NewChart.ChartType = xlColumnClustered.SetSourceData Source:=Range(ChartData.Address).SetElement (msoElementLegendRight).SetElement (msoElementChartTitleAboveChart).ChartTitle.Text = “This
is my chart” End WithEnd Sub
The macro is compatible with Excel 2007 and later. Thechart that’s createdis a clustered column chart with a legend and a title. This basic chart-creating macro can be customized easily. One way to do it is to record youractions while you modify the chart and then use the recorded code to guide you.
By the way, I discuss the With End-With construct later in this chapter. It’s a handy way to save some typing and make your code easier to read.
If you need to write VBA macros that manipulate charts, you must understand some terminology. An embedded chart on a worksheet is a ChartObject object.You can activate a ChartObject much like you activate a sheet. The following statement activates the ChartObject named Chart 1:
ActiveSheet.ChartObjects(“Chart 1”).Activate

www.it-
After you activate the chart, you can refer to it in your VBA code as the ActiveChart. If the chart is on a separate chart sheet, it becomes the active chart as soon as you activate that chart sheet.
A ChartObject is also a Shape, which can be a bit confusing. In fact, when your VBA code creates a chart, it starts by adding a new Shape. You can also activate a chart by selecting the Shape object that holds the chart:
ActiveSheet.Shapes(“Chart 1”).Select
I prefer to use the ChartObject object in my code, just to make it perfectly clear that I’m working with a chart.
When you click an embedded chart, Excel actually selects an object insidethe ChartObject object. You can select the ChartObject itself by pressing Ctrl while clicking the embedded chart.

www.it-
Chapter 14: VBA Programming Examples
Modifying the chart typeHere’s a confusing statement for you: A ChartObject object acts as a container for a Chart object. Read that a few times, and it might actually make sense.
To modify a chart with VBA, you don’t have to activate the chart. Rather, the Chart method can return the chart contained in the ChartObject. Areyou thoroughly confused yet? The following two procedures have the sameeffect — they change the chart named Chart 1 to an area chart. The first procedure activates thechart first and then works with the active chart. The second procedure doesn’t activate the chart. Rather it uses the Chart property to return the Chart object contained in the ChartObject object.
Sub ModifyChart1() ActiveSheet.ChartObjects(“Chart 1”).Activate ActiveChart.Type = xlArea
End Sub
Sub ModifyChart2()ActiveSheet.ChartObjects(“Chart
1”).Chart.Type = xlAreaEnd Sub
Looping through the ChartObjects collectionThis example changes the chart type of every embedded chart on the active sheet. The procedure uses a For Each-Next loop to cycle through each object in the ChartObjects collection, access the Chart object in each, and change its Type property.
SubChartType()Dim chAs ChartObjectFoEacchInActiveSheet.ChartObjectscht.Chart.Typ= NexchtEndSub
The following macroperformsth

www.it-
e same function but works on all the chart sheets in the active workbook:
Sub ChartType2()Dim cht As ChartFor Each cht In ActiveWorkbook.Charts
cht.Type = xlAreaNext cht
End Sub
223

www.it-
224 Part III: Programming Concepts
Modifying chart propertiesThe following example changes the Legend font for all charts on the active sheet. It uses a For-Nextloop to process all ChartObject objects:
Sub LegendMod()Dim chtObj As ChartObjectFor Each chtObj In ActiveSheet.ChartObjects
WithchtObj.Chart.Legend.F
ont.Name =
“Calibri”.FontStyle =
“Bold”.Size =
12EndWith
Next chtEnd Sub
Note that the Font object is contained in the Legend object, which is contained in the Chartobject, which is contained in the ChartObjectscollection. Now do you understand why it’s called an object hierarchy?
Applying chart formattingThis example applies several different types of formatting to the active chart. I created this macro by recording my actions as I formatted a chart. Then I cleaned up the recorded code by removing irrelevant lines.
Sub ChartMods() ActiveChart.Type = xlArea ActiveChart.ChartArea.Font.Name = “Calibri” ActiveChart.ChartArea.Font.FontStyle = “Regular” ActiveChart.ChartArea.Font.Size = 9

www.it-
ActiveChart.PlotArea.Interior.ColorIndex = xlNone ActiveChart.Axes(xlValue).TickLabels.Font.Bold = True ActiveChart.Axes(xlCategory).TickLabels.Font.Bold = _
True
ActiveChart.Legend.Position = xlBottomEnd Sub
You must activate a chart before executing the ChartMods macro. Activate an embedded chart by clicking it. To activate a chart on a chart sheet,activate the chart sheet.
To ensure that a chart is selected, you can add a statement to determine ifa chart is active. Here’s the modified macro, whichdisplays a message (and ends) if a chart is not activated:

www.it-
Chapter 14: VBA Programming Examples
225
Sub ChartMods2()If ActiveChart Is Nothing Then
MsgBox “Activate a chart.”Exit Sub
End IfActiveChart.Type = xlAreaActiveChart.ChartArea.Font.Name = “Calibri”ActiveChart.ChartArea.Font.FontStyle = “Regular”ActiveChart.ChartArea.Font.Size = 9ActiveChart.PlotArea.Interior.ColorIndex = xlNoneActiveChart.Axes(xlValue).TickLabels.Font.Bold = TrueActiveChart.Axes(xlCategory).TickLabels.Font.Bold = _
TrueActiveChart.Legend.Position = xlBottom
End Sub
Here’s another version that uses the With-End Withconstruct to save some typing and make the code abit clearer. Once again, I’m getting ahead of myself. Flip ahead a few pages to read about the With End-With structure.
Sub ChartMods3()If ActiveChart Is Nothing Then
MsgBox “Activate a chart.”Exit Sub
End IfWith ActiveChart.Type = xlArea.ChartArea.Font.Name = “Calibri”.ChartArea.Font.FontStyle = “Regular”.ChartArea.Font.Size = 9.PlotArea.Interior.ColorIndex = xlNone.Axes(xlValue).TickLabels.Font.Bold = True.Axes(xlCategory).TickLabels.Font.Bold = True.Legend.Position = xlBottom
End WithEnd Sub
When it comes to using VBA to work with charts, this short section barely scratched the surface. There’s a lot more to it, of course, but at least this basic introduction will get you headed in the right direction.
www.it-
VBA SpeedTipsVBA is fast, but it’s not always fast enough. (Computer programs are never fast enough.) This section presents some programming examples you can use to speed up your macros.

www.it-
226 Part III: Programming Concepts
Turning off screen updatingWhen executing a macro, you can sit back and watch all the on-screen action that occurs in the macro. Although doing this can be instructive, after getting the macro working properly, it’s often annoying and can slow down the course of your macro considerably. Fortunately, you can disable the screen updating that normally occurs when you execute a macro. To turn off screen updating, use the following statement:
Application.ScreenUpdating = False
If you want the user to see what’s happening at any point during the macro, use the following statement to turn screen updating back on:
Application.ScreenUpdating = True
To demonstrate the difference in speed, execute this simple macro, which fills a range with numbers:
Sub FillRange()Dim r as Long, c As LongDim Number as LongNumber = 0For r = 1 To 50
For c = 1To 50Number = Number
+ 1Cells(r,c).Select
Cells(r, c).Value = NumberNextc
Next rEnd Sub
You see each cell being selected, and the value being entered into the cells. Now insert the following statement at the beginning of the procedure and execute it again:
Application.ScreenUpdating = False

www.it-
The range is filled up much faster, and you don’t see the end result until the macro is finished running and screen updating is (automatically) set to True.
When debugging code, sometimes program execution ends somewhere in the middle, without having turned Screen updating back on (and yes, this happens to me, too). This sometimes causes Excel’s application window to become totally unresponsive. The way out ofthis frozen state is simple: Go back to the VBE and execute the following statement in the Immediate window:
Application.ScreenUpdating = True
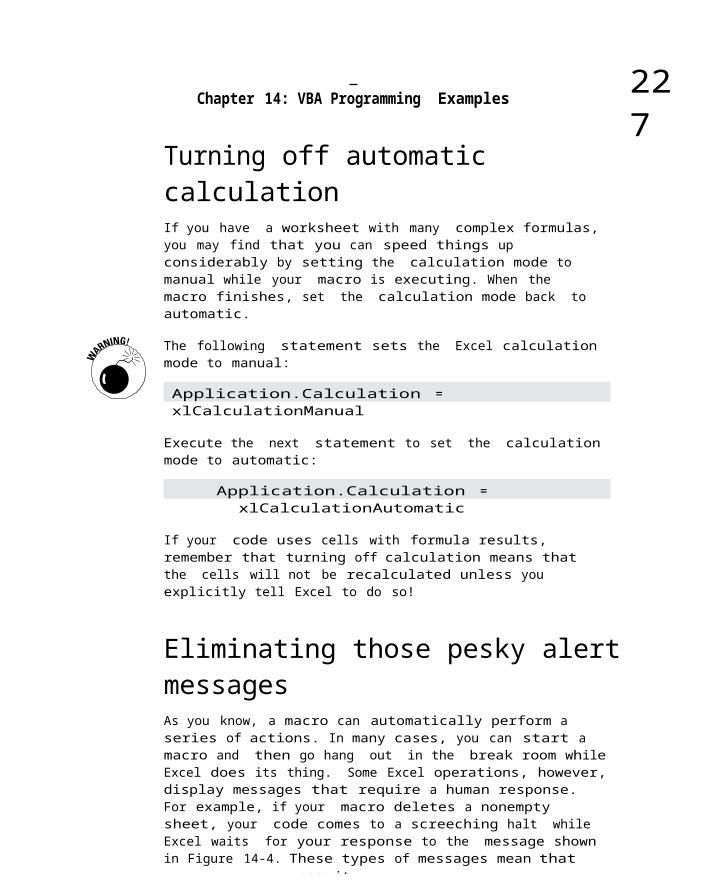
www.it-
Chapter 14: VBA Programming Examples
Turning off automatic calculationIf you have a worksheet with many complex formulas,you may find that you can speed things up considerably by setting the calculation mode to manual while your macro is executing. When the macro finishes, set the calculation mode back to automatic.
The following statement sets the Excel calculation mode to manual:
Application.Calculation = xlCalculationManual
Execute the next statement to set the calculation mode to automatic:
Application.Calculation =xlCalculationAutomatic
227
If your code uses cells with formula results, remember that turning off calculation means that the cells will not be recalculated unless you explicitly tell Excel to do so!
Eliminating those pesky alert messagesAs you know, a macro can automatically perform a series of actions. In many cases, you can start a macro and then go hang out in the break room whileExcel does its thing. Some Excel operations, however,display messages that require a human response. For example, if your macro deletes a nonempty sheet, your code comes to a screeching halt while Excel waits for your response to the message shown in Figure 14-4. These types of messages mean that

www.it-
you can’t leave Excel unattended while it executes your macro — unless you know the secret trick.
Figure14-4:
Youcan
instruct
Exceltonot
displaythesetypes
ofalertswhilerun-
ning amacro.

www.it-
228 Part III: Programming Concepts
The secret trick: To avoid these alert messages, insert the following VBAstatement in your macro:
Application.DisplayAlerts = False
Excel executes the default operation for these types of messages. In the case of deleting a sheet,the default operation is Delete (which is just whatyou want to happen). If you’re not sure what the default operation is, perform a test and see what happens.
When the procedure ends, Excel automatically resets the DisplayAlerts property to True (its normal state). If you need to turn the alerts back on before the procedure ends, use this statement:
Application.DisplayAlerts = True
Simplifying object referencesAs you probably already know, references to objects can become very lengthy. For example, a fully qualified reference to a Range object may look like this:
Workbooks(“MyBook.xlsx”).Worksheets(“Sheet1”) _
.Range(“InterestRate”)
If your macro frequently uses this range, you maywant to create an object variable by using the Set command. For example, the following statement assigns this Range object to an object variable named Rate:
Set Rate = Workbooks(“MyBook.xlsx”) _.Worksheets(“Sheet1”).Range(“InterestRate”)
After defining this object variable, you can use the variable Rate rather than the lengthy

www.it-
reference. For example, you can change the value ofthe cell named InterestRate:
Rate.Value = .085
This is much easier to type (and understand) than the following statement:
Workbooks(“MyBook.xlsx”).Worksheets(“Sheet1”). _ Range(“InterestRate”) = .085
In addition to simplifying your coding, using object variables also speeds up your macros considerably. After creating object variables, I’veseen some macros execute twice as fast as before.

www.it-
Chapter 14: VBA Programming Examples
Declaring variable typesYou don’t usually have to worry about the type of data you assign to a variable. Excel handles all the details for you behind the scenes. For example, if you have a variable named MyVar, you can assign a number of any type to that variable. You can even assign a text string to it later in the procedure.
But if you want your procedures to execute as fast as possible (and avoid some potentially nasty problems), tell Excel what type of data will be assigned to each of your variables. This is known asdeclaring a variable’s type. (Referto Chapter 7 for complete details.) Get into the habit of declaring all variables that you use.
In general, you should use the data type that requires the smallest number of bytes yet can still handle all the data assigned to it. When VBA works with data, execution speed depends on the number of bytes VBA has atits disposal. In other words, the fewer bytes data uses, the faster VBA can access and manipulate the data. An exception to this is the Integer data type. If speed is critical, use the Long data type instead.
If you use an object variable (as described in the preceding section), you can declare the variable asa particular object type. Here’s an example:
Dim Rate as RangeSet Rate = Workbooks(“MyBook.xlsx”) _.Worksheets(“Sheet1”).Range(“In
terestRate”)
Using the With-End With structure
Do youneed to set a numberof properties foran object? Yourcode runs fasterif youuse the With-EndWithstructure. An additiona

www.it-
l benefit is that your code may be easier to read.
The following code does not use With-End With:
Selection.HorizontalAlignment = xlCenter Selection.VerticalAlignment = xlCenter Selection.WrapText= True Selection.Orientation = 0Selection.ShrinkToFit = FalseSelection.MergeCells = False
Here’s the same code, rewritten to use With-End With:
229

www.it-
230 Part III: Programming Concepts
With Selection.HorizontalAlignment = xlCenter.VerticalAlignment = xlCenter.WrapText = True.Orientation = 0.ShrinkToFit = False.MergeCells = False
End With
If this structure seems familiar to you, it’s probably because the macro recorder uses With-End With whenever it can. And I presented other examples earlier in this chapter.
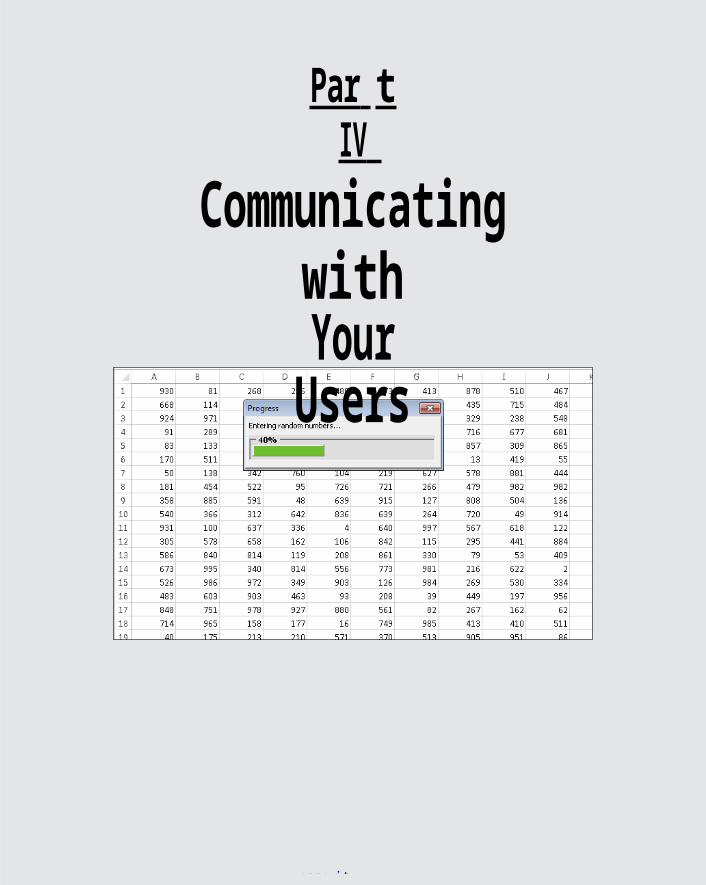
www.it-
Par tIV
CommunicatingwithYourUsers

www.it-
Supplement your understanding of presentations with this article online at Dummies.comwww.dummies.com/extras/excelvbaprogramming.

www.it-
In this part . . .✓ Save time in various ways by using
built-in custom dialog box alternatives✓ Discover how to develop custom dialog boxes (also known as
UserForms)✓ Work with dialog box controls, such as
buttons, list boxes, and check boxes✓ Find out lots of useful tips and tricks
for creating custom dialog boxes✓ Modify Excel’s user interface to make
it easier to run your macros✓ Supplement your understanding of
presentations with this article onlineat Dummies.com: www.dummies.com/ extras/excelvbaprogramming.
Y
www.it-
Chapter15
Simple DialogBoxes
In This Chapter▶ Saving time by using any of several alternatives to UserForms▶ Using the InputBox and MsgBox functions to get information from the user▶ Getting a filename and path from the user▶ Getting a folder name from the user▶ Writing VBA code to execute Ribbon commands that display Excel built-in dialog boxes
ou can’t use Excel very long without being exposed to dialog boxes. They seem to pop upall the time. Excel — like most Windows
programs — uses dialog boxes to obtain information, clarify commands,and display messages. If you develop VBA macros, you can create your own dialog boxes that work just like those built into Excel. Those custom dialog boxes are called UserForms in VBA.
This chapter doesn’t tell you anything aboutcreating UserForms. Rather, it describes sometechniques you might be able to use in place ofUserForms. Chapters 16 through 18, however, docover UserForms.

www.it-
UserForm AlternativesSome of the VBA macros you create behave the same every time you execute them. For example, you may develop a macro that enters a list of your employees into a worksheet range. This macro always produces the same result and requires no additional user input.
You might develop other macros, however, that behave differently under various circumstances or that offer the user options. In such cases, the macro may benefit from a custom dialog box. A custom dialog box provides a simple means for getting information from the user. Your macro thenuses that information to determine what it should do.

www.it-
234 Part IV: Communicating with Your Users
UserForms can be quite useful, but creating them takes time. Before I cover the topic of creating UserForms in the next chapter, you need to know about some potentially timesaving alternatives.
VBA lets you display several different types of dialog boxes that you can sometimes use in place ofa UserForm. You can customize these built-in dialog boxes in some ways, but they certainly don’t offer the options available in a UserForm. In some cases, however, they’re just what the doctor ordered.
In this chapter, you read about
✓ The MsgBox function✓ The InputBox function✓ The GetOpenFilename method✓ The GetSaveAsFilename method✓ The FileDialog method
I also describe how to use VBA to display some of the Excel built-in dialog boxes — the dialog boxes that Excel uses to get information from you.
The MsgBox FunctionYou’re probably already familiar with the VBA MsgBox function — I useit quite a bit in the examples throughout this book. The MsgBox function, which accepts the arguments shown in Table 15-1, is handy for displaying information and getting simple user input. It’s able to get user input because it’s a function. A function, as you recall, returns a value. In the case of the MsgBox function, it uses a dialog box to get the value that it returns. Keep reading to see exactly how it works.
Here’s a simplified version of the syntax for the MsgBox function:
MsgBox(prompt[, buttons][, title])

www.it-
Table 15-1 MsgBox Function ArgumentsArgument What It AffectsPrompt The text Excel displays in the messageboxButtons A number that specifies which buttons(along with what icon)
appear in the messagebox (optional)
Title The text that appears in the message box’s title bar (optional)

www.it-
Chapter 15: Simple Dialog Boxes
Displaying a simple message boxYou can use the MsgBox function in two ways:
✓ To simply show a message to the user. In thiscase, you don’t care about the result returned by the function.
✓ To get a response from the user. In this case, you do care about the result returned by the function. The result depends on the button that the user clicks.
If you use the MsgBox function by itself, don’t include parentheses around the arguments. The following example simply displays a message and does not return a result. When the message is displayed, the code stops until the user clicks OK.
Sub MsgBoxDemo()MsgBox “Click OK to begin printing.”Sheets(“Results”).PrintOut
End Sub
Figure 15-1 shows how this message box looks. In this case, printing commences when the user clicks OK. Notice that there is no way to cancel the printing? The next section describes how to fix that.
235
Figure15-1: Asimplemessa
gebox.
Getting a response from a messagebox

www.it-
If you display a message box that has more than
just an OK button, you’ll probably want to know which button the user clicks. You’re in luck. The MsgBox function can return a value that representswhich button is clicked. You can assign the resultof the MsgBox function to a variable.
In the following code, I use some built-in constants (which I describe later inTable 15-2) that make it easy to work with the values returned by MsgBox:
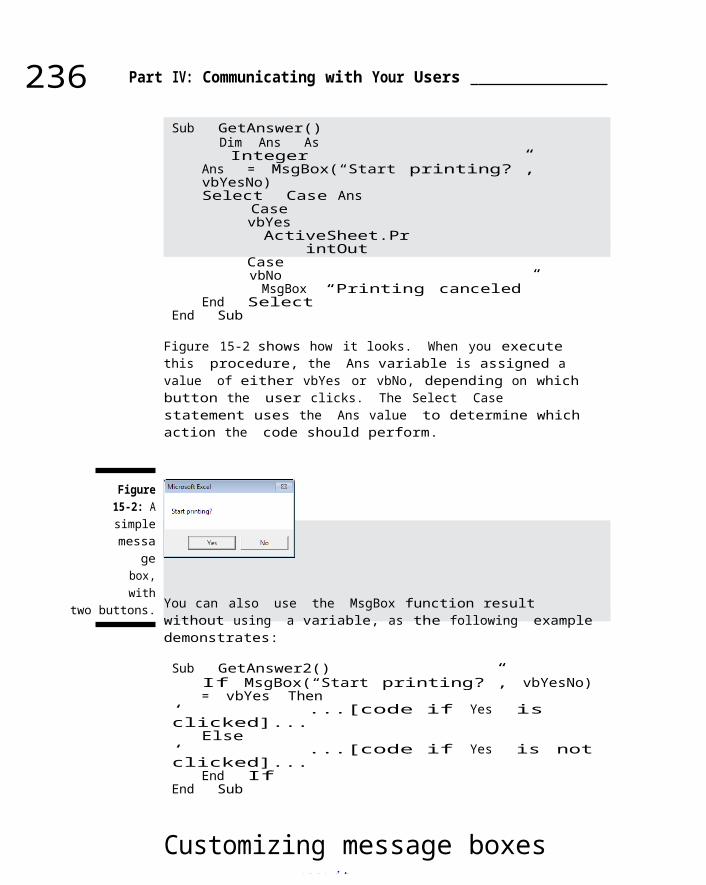
www.it-
236 Part IV: Communicating with Your Users
Sub GetAnswer()Dim Ans AsInteger
Ans = MsgBox(“Start printing?”, vbYesNo)Select Case Ans
CasevbYesActiveSheet.Pr
intOutCasevbNoMsgBox “Printing canceled”
End SelectEnd Sub
Figure 15-2 shows how it looks. When you execute this procedure, the Ans variable is assigned a value of either vbYes or vbNo, depending on which button the user clicks. The Select Case statement uses the Ans value to determine which action the code should perform.
Figure15-2: Asimplemessa
gebox,with
two buttons. You can also use the MsgBox function result without using a variable, as the following example demonstrates:
Sub GetAnswer2()If MsgBox(“Start printing?”, vbYesNo) = vbYes Then
‘ ...[code if Yes is clicked]...
Else‘ ...[code if Yes is not clicked]...
End IfEnd Sub
Customizing message boxes

www.it-
The flexibility of the buttonsargument makesit easy to customize yourmessage boxes.You can choose which buttons to display, determine whether an iconappears, and decide which button is the default (the default buttonis “clicked” if the user presses Enter).
Table 15-2 lists some ofthe built-in constants youcan use for the buttons argument. If you prefer, you can use the value rather than aconstant (butI think using the built-in constants is a lot easier).

www.it-
Chapter 15: Simple Dialog Boxes
237
Table 15-2 Constants Used in the MsgBox FunctionConstant Value What It DoesvbOKOnly 0 Displays OK button only.vbOKCancel 1 Displays OK and Cancel buttons.vbAbortRetryIgnore 2 Displays Abort, Retry, and Ignore buttons.vbYesNoCancel 3 Displays Yes, No, and Cancel buttons.vbYesNo 4 Displays Yes and No buttons.vbRetryCancel 5 Displays Retry and Cancel buttons.vbCritical 16 Displays Critical Message icon.vbQuestion 32 Displays Warning Query icon.vbExclamation 48 Displays Warning Message icon.vbInformation 64 Displays Information Message icon.vbDefaultButton1 0 First button is default.vbDefaultButton2 256 Second button is default.vbDefaultButton3 512 Third button is default.vbDefaultButton4 768 Fourth button is default.
To use more than one of these constants as an argument, just connect them with a + operator. For example, to display a message box with Yes and No buttons and an exclamation icon, use the following expression as the second MsgBox argument:
vbYesNo + vbExclamation
Or, if you prefer to make your code less understandable, use a value of 52 (that is, 4 + 48).
The following example uses a combination of constants to display a message box with a Yes buttonand a No button (vbYesNo) as well as a question markicon (vbQuestion). The constant vbDefaultButton2 designates the second button (No) as the default button — that is, the button that is clicked if theuser presses Enter. For simplicity, I assign these constants to the Config variable and then use
www.it-
Config as the second argument in the MsgBox function:
Sub GetAnswer3()Dim Config As IntegerDim Ans As IntegerConfig = vbYesNo + vbQuestion + vbDefaultButton2Ans = MsgBox(“Process the monthly report?”, Config)If Ans = vbYes Then RunReport
End Sub

www.it-
238 Part IV: Communicating with Your Users
Figure 15-3 shows the message box Excel displays whenyou execute the GetAnswer3 procedure. If the user clicks the Yes button, the routine executes the procedure named RunReport (which is not shown). If the user clicks the No button (or presses Enter), the routine ends with no action. Because I omitted the title argument in the MsgBox function, Excel uses the defaulttitle, Microsoft Excel.
Figure15-3: The
MsgBoxfunction’
sbuttonsargumentdetermines whatappearsin themes-sagebox.
The following routine provides another example of using the MsgBox function:
Sub GetAnswer4()Dim Msg As String, Title As StringDim Config As Integer, Ans As IntegerMsg = “Do you want to process the monthly report?”Msg = Msg & vbNewLine & vbNewLineMsg = Msg & “Processing the monthly report will “Msg = Msg & “take approximately 15 minutes. It “Msg = Msg & “will generate a 30-page report for “Msg = Msg & “all sales offices for the current “Msg = Msg & “month.”Title = “XYZ Marketing Company”Config = vbYesNo + vbQuestion

www.it-
Ans = MsgBox(Msg, Config, Title)If Ans = vbYes Then RunReport
End Sub
This example demonstrates an efficient way to specifya longer message ina message box. I use a variable (Msg) and the concatenation operator (&) to build the message ina series of statements. The vbNewLine constant inserts a line break character that starts a new line (use it twice to insert a blank line). I also use the title argument to display a different titlein the messagebox. Figure 15-4 shows the message box Excel displayswhen you execute this procedure.

www.it-
Chapter 15: Simple Dialog Boxes
239
Figure 15-4:
This dialog
box,displayed by the
MsgBoxfunction
,displays
atitle,
anicon,andtwo
buttons.
Previous examples have used constants (such as vbYes and vbNo) for the return value of a MsgBox function. Besides these two constants, Table 15-3lists a few others.
Table 15-3 Constants Used as Return Values for the MsgBox Function
Constant Value What It MeansvbOK 1 User clicked OK.vbCancel 2 User clicked Cancel.vbAbort 3 User clicked Abort.vbRetry 4 User clicked Retry.vbIgnore 5 User clicked Ignore.vbYes 6 User clicked Yes.

www.it-
vbNo 7 User clicked No.
And that’s pretty much all you need to know about the MsgBox function. Use message boxes with caution, though. There’s usually no reason to display message boxes that serve no purpose. For example, people tend to get annoyed when they seea message box every day that reads, “Good morning,thanks for loading the Budget Projection workbook.”

www.it-
240 Part IV: Communicating with Your Users
The InputBox FunctionThe VBA InputBox function is useful for obtaining a single piece of information typed by the user. That information could be a value, a text string, or evena range address. This is a good alternative to developing a UserForm when you need to get only one value.
InputBox syntaxHere’s a simplified version of the syntax for the InputBox function:
InputBox(prompt[, title][, default])
The InputBox function accepts the arguments listed in Table 15-4.
Table 15-4 InputBox Function ArgumentsArgument What It AffectsPrompt The text displayed in the input boxTitle The text displayedin the input box’s title bar (optional) Default The default value for the user’s input (optional)
An InputBox exampleHere’s a statement showing how you can use the InputBox function:
TheName = InputBox(“What is your name?”, “Greetings”)

www.it-
When you execute this VBA statement, Excel displays the dialog box shownin Figure 15-5. Notice that this example uses only the first two arguments and does not supply a default value. When the user enters a value and clicks OK, the routine assigns the value to the variable TheName.
Figure15-5: TheInputBoxfunctiondisplays
thisdialog
box.

www.it-
Chapter 15: Simple Dialog Boxes
241
The following example uses the third argument and provides a default value. The default value is the username stored by Excel (the Application object’s UserName property).
Sub GetName()Dim TheName As StringTheName = InputBox(“What is your name?”, _
“Greetings”,Application.UserName)
End Sub
The InputBox always displays a Cancel button. If the user clicks Cancel, theInputBox function returns an empty string.
VBA’s InputBox function always returns a string, so if you need to get a value, your code will need to do some additional checking. The following example uses the InputBox function to get a number. It usesthe IsNumeric function to check whether the stringis a number. If the string does contain a number, allis fine. If the user’s entry cannot be interpreted as a number, the code displays a message box.
Sub AddSheets()Dim Prompt As StringDim Caption As StringDim DefValue As IntegerDim NumSheets As String
Prompt = “How many sheets do you want to add?” Caption = “Tell me...”DefValue = 1NumSheets = InputBox(Prompt, Caption, DefValue)
If NumSheets = “” Then Exit Sub ‘CanceledIf IsNumeric(NumSheets) Then
If NumSheets > 0 Then Sheets.Add Count:=NumSheets
ElseMsgBox “Invalid number”
End IfEnd Sub
Figure 15-6 shows the dialog box that this routine produces.

www.it-
Figure15-6:
Anotherexample
ofusingthe
InputBox
function.
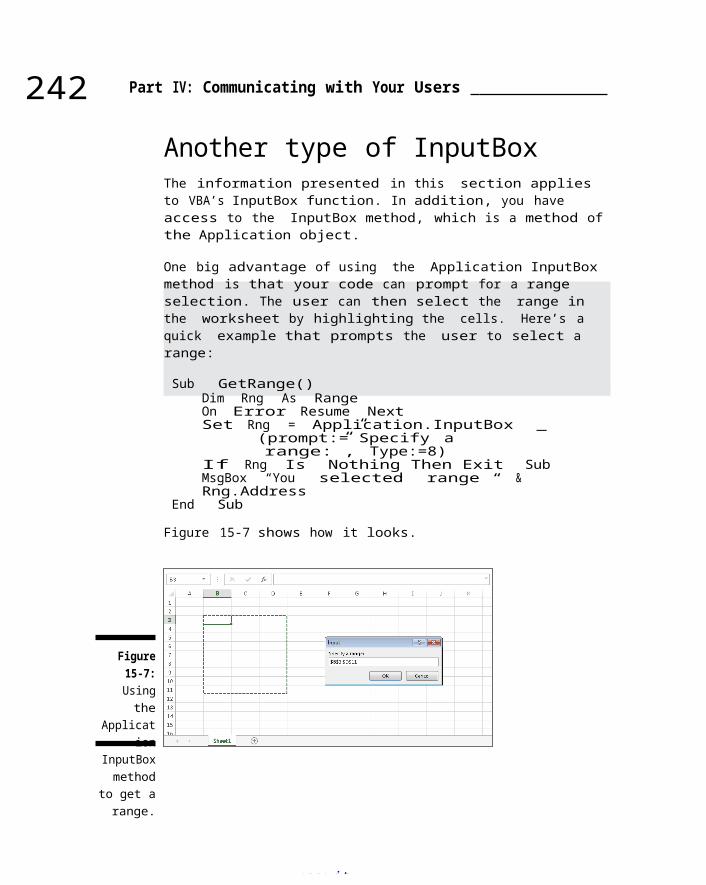
www.it-
242 Part IV: Communicating with Your Users
Another type of InputBoxThe information presented in this section applies to VBA’s InputBox function. In addition, you have access to the InputBox method, which is a method of the Application object.
One big advantage of using the Application InputBox method is that your code can prompt for a range selection. The user can then select the range in the worksheet by highlighting the cells. Here’s a quick example that prompts the user to select a range:
Sub GetRange()Dim Rng As RangeOn Error Resume NextSet Rng = Application.InputBox _
(prompt:=”Specify arange:”, Type:=8)
If Rng Is Nothing Then Exit SubMsgBox “You selected range “ & Rng.Address
End Sub
Figure 15-7 shows how it looks.
Figure15-7:Usingthe
Application
InputBoxmethod
to get arange.

www.it-
In this simple example, the code tells the user the address of the range that was selected. In real life, your code would actually do something useful with the selected range. A nice thing aboutthis example is that Excel takes care of the error handling. If you enter something that’s not a range, Excel tells you about it and lets you try again.
The Application.InputBox method is similar to VBA’s InputBox function, but it also has some differences. Check the Help system for complete details.

www.it-
Chapter 15: Simple Dialog Boxes
The GetOpenFilename MethodIf your VBA procedure needs to ask the user for a filename, you could use the InputBox function and let the user do some typing. An input box usually isn’t the best tool for this job, however, because most users find it difficult to remember paths, backslashes, filenames, and file extensions. In other words, it’s far too easy to make a typographical error when typing a filename.
For a better solution to this problem, use the GetOpenFilename method of the Application object, which ensures that your code gets its hands on a valid filename, including its complete path. The GetOpenFilename method displays the familiar Open dialog box (a dead ringer for the dialog box Excel displays when you choose File➪Open).
The GetOpenFilename method doesn’t actually openthe specified file. This method simply returns theuser-selected filename as a string. Then you canwrite code to do whatever you want with thefilename.
The syntax for the GetOpenFilename methodThe official syntax for the GetOpenFilename method isas follows:
object.GetOpenFilename ([fileFilter], [filterIndex], [title],[buttonText], [multiSelect])
The GetOpenFilename method takes the optional arguments shown inTable 15-5.
Table 15-GetOpenFilenameMethod ArgumentsArgument WhaIt Does
FileFilter
Determinethetypeoffilethaappear thedialog (forexample,*.TXT). canspecifyseveraldiffe

www.it-
rent filters from which the user canchoose.
FilterIndex Determines which of the file filters thedialog box displays by default.
Title Specifies the captionfor the dialog box’s title bar. ButtonText Ignored (used only for the Macintosh version of Excel). MultiSelect If True, the user can select multiple files.
243

www.it-
244 Part IV: Communicating with Your Users
A GetOpenFilename exampleThe fileFilter argument determines what appears inthe dialog box’s Files of Type drop-down list. This argument consists of pairs of file filter strings followed by the wild card file filter specification, with commas separating each part and pair. If omitted, this argument defaults to the following:
All Files (*.*), *.*
Notice that this string consists of two parts, separated by a comma:
All Files (*.*)
and
*.*
The first part of this string is the text displayed in the Files of Type drop-down list. The second part determines which files the dialog box displays. Forexample, *.* means all files.
The code in the following example brings up a dialog box that asks the user for a filename. The procedure defines five file filters. Notice that I use the VBA line continuation sequence to set up the Filter variable; doing so helps simplify this rather complicated argument.
Sub GetImportFileName () Dim Finfo As StringDim FilterIndex As IntegerDim Title As StringDim FileName As Variant
‘ Set up list of file filtersFInfo = “Text Files (*.txt),*.txt,” & _
“Lotus Files (*.prn),*.prn,” & _

www.it-
“Comma Separated Files (*.csv),*.csv,” & _“ASCII Files (*.asc),*.asc,” &_“All Files (*.*),*.*”
‘ Display *.* by defaultFilterIndex = 5
‘ Set the dialog box captionTitle = “Select a File to Import”

www.it-
Chapter 15: Simple Dialog Boxes
245
‘ Get the filenameFileName = Application.GetOpenFilename (FInfo, _
FilterIndex,Title)
‘ Handle return info from dialog boxIf FileName = False Then
MsgBox “No file was selected.”Else
MsgBox “You selected “ & FileNameEnd If
End Sub
Figure 15-8 shows the dialog box Excel displays when you execute this procedure. The appearance may vary, depending on the version of Windows you use.
In a real application, you would do something more meaningful with the filename. For example, you mightwant to open it by using a statement such as this:
Workbooks.Open FileName
Notice that the FileName variable is declared as a Variant data type. If the user clicks Cancel, thatvariable contains a Boolean value (False). Otherwise, FileName is a string. Therefore, using a Variant data type handles both possibilities.
By the way, the dialog box may look different, depending on which version ofWindows you use.
Figure15-8:The
GetOpenFilenam
emethod
display
www.it-
s acustomiz- abledialog
box andreturns
theselecte
dfile’spathand
name.It does
notopenthe
file.

www.it-
246 Part IV: Communicating with Your Users
The GetSaveAsFilenameMethod
The Excel GetSaveAsFilename method works just like the GetOpenFilename method, but it displays the Excel Save As dialog box rather than its Open dialogbox. The GetSaveAsFilename method gets a path and filename fromthe user but doesn’t do anything with that information. It’s up to you to write code that actually saves the file.
The syntax for this method follows:
object.GetSaveAsFilename ([InitialFilename], [FileFilter], [FilterIndex],[Title], [ButtonText])
The GetSaveAsFilename method takes Table 15-6’s arguments, all of which are optional.
Table 15-6 GetSaveAsFilename Method ArgumentsArgument What It DoesInitialFileName Specifies a default filename that appears in the File Name box. FileFilter Determines the types of files Excel displays in the dialog box
(for example, *.TXT). You can specify several different filters from which theuser can choose.
FilterIndex Determines which of the file filters Excel displays by default. Title Defines a caption for the dialog box’s title bar.

www.it-
Getting a Folder NameSometimes, you don’t need to get a filename; you justneed to get a folder name. If that’s the case, the FileDialog object is just what the doctor ordered.
The following procedure displays a dialog box that allows the user to select a directory. The selected directory name (or “Canceled”) is then displayed by using the MsgBox function.
Sub GetAFolder()With
Application.FileDialog(msoFileDialogFolderPicker)
.InitialFileName = Application.DefaultFilePath & “\”.Title = “Please select a location for the backup”.ShowIf .SelectedItems.Count = 0 Then
MsgBox“Canceled”
Else

www.it-
Chapter 15: Simple Dialog Boxes
247
MsgBox .SelectedItems(1) End If
End WithEnd Sub
The FileDialog object lets you specify the starting directoryby specifyinga value for the InitialFileName property. In this case, the code uses Excel’s default file path as the starting directory.
Displaying Excel’s Built-inDialog Boxes
One way to look at VBA is that it’s a tool that lets you mimic Excel commands. For example, consider this VBA statement:
Range(“A1:A12”).Name = “MonthNames”
Executing this VBA statement has the same effect as choosing Formulas➪ Defined Names➪Define Name to display the New Name dialog box, then typing MonthNames in the Name box and A1:A12 in the Refersto box, and clicking OK.
When you execute the VBA statement, the New Name dialog box does not appear. This is almost alwayswhat you want to happen; you don’t want dialog boxes flashing across the screen while your macro executes.
In some cases, however, you may want your code to display one of Excel’s many built-in dialog boxes and let the user make the choices in the dialog box. You can do this by using VBA to execute a Ribbon command. Here’s an example that displays the New Name dialog box. The address in the Refers to box represents the

www.it-
range that’s selected when the command is executed (see Figure 15-9).
Application.CommandBars.ExecuteMso “NameDefine”
Your VBA code can’t get any information from the dialog box. For example, if you execute the code to display the New Name dialog box, your code can’t getthe name entered by the user, or the range that’s being named.
Figure15-9:
Displaying one ofExcel’sdialog
boxes byusingVBA.

www.it-
248 Part IV: Communicating with Your Users
The ExecuteMso is a method of the CommandBars object and accepts one argument, an idMso parameter that represents a Ribbon control. Unfortunately, these parameters are not listed in the Help system. And because the Ribbon hasn’t been around forever, code that uses the ExecuteMso method is not compatible with versions prior to Excel 2007.
Here’s another example of using the ExecuteMso method. This statement, when executed, displays the Font tab of the Format Cells dialog box:
Application.CommandBars.ExecuteMso “FormatCellsFontDialog”
If you try to display a built-in dialog box in an incorrect context, Excel displays an error message. For example, here’s a statement that displays the Format Number dialog box:
Application.CommandBars.ExecuteMso “NumberFormatsDialog”
If you execute this statement when it’s not appropriate (for example, a Shape is selected), Excel displays an error message because that dialogbox is appropriate only for worksheet cells.
Excel has thousands of commands. How can you find the name of the one you need? One way is to use theCustomize Ribbon tab of the Excel Options dialog box. The quick way to get there is to right-click on any Ribbon control and choose Customize The Ribbon from the shortcut menu. Virtually every command available in Excel is listed in the left panel. Find the command you need, hover your mouse over it, and you’ll see its secret command name in the tooltip (it’s the part in parenthesis). Figure 15-10 shows an example.

www.it-
Figure15-10:Usingthe
Customize
Ribbonpanel
toidentif
y acommandname.

A
Chapter16
UserFormBasics
In This Chapter▶ Finding out when to use UserForms▶ Understanding UserForm objects▶ Displaying a UserForm▶ Creating a UserForm that works with a useful macro
UserForm is useful if your VBA macro needs to pause and get some information from a user. For example, your macro may have some
options that can be specified in a UserForm. If only a few pieces of information are required (for example, a Yes/No answer or a text string), one of the techniques I describe in Chapter 15 may do the job. But if you need to obtain more information, you must create a UserForm. In this chapter, I introduce you to UserForms. You’ll be pleased to maketheir acquaintance.
Knowing When to Use a UserForm

This section describes a situation in which a UserForm is useful. The following macro changes the text in each cell in the selection to uppercase letters. It does this by using the VBA built-in UCase function.
Sub ChangeCase()Dim WorkRange As Range
‘ Exit if a range is not selected
If TypeName(Selection) <> “Range” Then Exit Sub
‘ Process only text cells, no formulas
On Error Resume NextSet WorkRange = Selection.SpecialCells_
(xlCellTypeConstants, xlCellTypeConstants)
For Each cell In WorkRangecell.Value =
UCase(cell.Value)Next cell
End Sub
www.it-ebooks.info

www.it-
250 Part IV: Communicating with Your Users
You can make this macro even more useful. For example, it would be nice if the macro could also change the text in the cells to either lowercase or proper case (capitalizing the first letter in each word). One approach is to create two additional macros — one for lowercase and one for proper case. Another approach is to modify the macro to handle the other options. If you use the second approach, you need some method of asking the user which type of change to make to the cells.
The solution is to display a dialog box like the one shown in Figure 16-1. You create this dialog box on aUserForm in the VBE and display it by using a VBA macro. In the next section, I provide step-by-step instructions for creatingthis dialog box. Before I get into that, I set the stage with some introductory material.
Figure16-1: Youcan getinforma-
tionfrom theuser bydisplayi
ng aUserForm
.
In VBA, the official name for a dialog box is a UserForm. But a UserForm is really an object that contains what’s commonly known as a dialog box. This distinction isn’t important, so I tend to use these terms interchangeably.

www.it-
Creating UserForms: An Overview
When creating a UserForm, you usually take the following general steps:
1. Determine how the dialog box will be used and atwhat point it will be displayed in your VBA macro.
2. Press Alt+F11 to activate the VBE and insert a new UserForm object.
A UserForm object holds a single UserForm.3. Add controls to the UserForm.Controls include items such as text boxes, buttons, check boxes, and list boxes.
4. Use the Properties window to modify the properties for the controls or for the UserForm itself.

www.it-
Chapter 16: UserForm Basics
5. Write event-handler procedures for the controls (for example, a macro that executes when the user clicks a button in the dialog box).These procedures are stored in the Code window for the UserForm object.
6. Write a procedure (stored in a VBA module) thatdisplays the dialog box to the user.
Don’t worry if some of these steps seem foreign. Iprovide more details in the following sections,along with step-by-step instructions forcreating a UserForm.
When you are designing a UserForm, you are creatingwhat developers call the Graphical User Interface(GUI) to your application. GUI also stands for Gaming Under the Influence, but that’s not relevant here.
Take some time to consider what your form shouldlook like and how your users are likely to want tointeract with the elements on the UserForm. Try toguide them through the steps they need to takeon the form by carefully considering thearrangement and wording of the controls. Likemost things VBA-related, the more you do it, theeasier it gets.
Working with UserFormsEach dialog box that you create is stored in its own UserForm object — one dialog box per UserForm. You create and access these UserForms in the Visual Basic Editor.
Inserting a new UserFormInsert a UserForm object with the following steps:
1. Activate theVBEby pressing Alt+F11.2. Selecttheworkbook in theProject window.3. ChooseInsert➪serForm.TheVBEinsertsnewUserF
www.it-
orm object, which contains an empty dialog box.
Figure 16-2 shows a UserForm — an empty dialog box. Your job, if you choose to accept it, is toadd some controls to this UserForm.
251

www.it-
252 Part IV: Communicating with Your Users
Figure16-2: A
newUserFor
mobject
.
Adding controls to a UserFormWhen you activate a UserForm, the VBE displays the Toolbox in a floating window, as shown in Figure 16-2. You use the tools in the Toolbox to add controls to your UserForm. If, for some reason, theToolbox doesn’t appear when you activate your UserForm, choose View➪Toolbox.
To add a control, just click the desired control inthe Toolbox and drag it into the dialog box to create the control. After you add a control, you can move and resize it by using standard techniques.
Table 16-1 lists the various tools, as well as their capabilities. To determine which tool is which, hover your mouse pointer over the control and read the small pop-up description.

www.it-
Table 16-1 Toolbox ControlsControl What It DoesLabel Shows text.TextBox Allows the user to enter text. ComboBox Displays a drop-down list. ListBox Displays a list of items.CheckBox Useful for on/off or yes/no options.OptionButton Used in groups of two or more; allows
the user to select one of several options.
ToggleButton A button that is either on or off.

www.it-
Chapter 16: UserForm Basics
253
Control What It DoesFrame A container for other controls. CommandButton A clickable button.TabStrip Displays tabs.MultiPage A tabbed container for other objects. ScrollBar A draggable bar.SpinButton A clickable button often used for changing a value. Image Holds an image.RefEdit Allows the user to select a range.
Changing properties for a UserForm controlEvery control you add to a UserForm has a number of properties that determine how the control looks orbehaves. In addition, the UserForm itself also hasits own set of properties. You can change these properties with the aptly named Properties window.Figure 16-3 shows the Properties window when a CommandButton control is selected.
The Properties window appears when you press F4, and the properties shown in this window depend on what is selected. If you select a different control, the properties change to those appropriate for that control. To hide the Properties window and get it out of the way, click

www.it-
the Close button in its title bar. Pressing F4 willalways bring it back when you need it.
Properties for controls include the following:
✓ Name✓ Width✓ Height✓ Value✓ Caption
Each control has its own set of properties (although many controls have some common properties). To change a property using the Properties window:
1. Make sure that the correct control is selected in the UserForm.2. Make sure the Properties window is visible (press F4 if it’s not).3. In the Properties window, click on the property that you wantto change.

www.it-
254 Part IV: Communicating with Your Users
4. Make the change in the right portion of the Properties window.
If you select the UserForm itself (not a control on the UserForm), you can use the Properties window toadjust UserForm properties.
Figure16-3:
Use thePropert
ieswindows
tochange
thepropert
iesof
UserForm
controls.
Chapter 17 tells you everything you need to know about working with dialog box controls.
Some of the UserForm properties serve as default settings for new controls you drag onto the UserForm. For example, if you change the Font property for the UserForm itself, controls that youadd will use that same font. Controls that are already on the UserForm are not affected.
Viewing the UserForm Code windowEvery UserForm object has a Code module that holds the VBA code (the event-handler

www.it-
procedures) executed when the user works with the dialogbox. To view theCode module, press F7. The Code window is empty until youadd some procedures. Press Shift+F7 to return to the dialog box.
Here’s another way to switch between the Code window and the UserForm display: Use theView Code and View Object buttons in the Project window’s title bar. Or right-click the UserForm and choose View Code. If you’re viewing code, double-click the UserForm name in the Project window to return to the UserForm.

www.it-
Chapter 16: UserForm Basics
Displaying a UserFormYou display a UserForm by using the UserForm’s Show method in a VBAprocedure.
The macro that displays the dialog box must be in aVBA module — not in theCode window for the UserForm.
The following procedure displays the dialog box named UserForm1:
Sub ShowDialogBox() UserForm1.Show
‘ Other statements can go hereEnd Sub
When Excel displays the dialog box, the ShowDialogBox macro halts until the user closes the dialog box. Then VBA executes any remaining statements in the procedure. Most of the time, you won’t have any more code in the procedure. As you later see, you put your event-handler procedures in the Code window for the UserForm. These procedures kick in when the user works with the controls on the UserForm.
Using information from a UserFormThe VBE provides a name for each control you add to a UserForm. The control’s name corresponds to its Name property. Use this name to refer to a particular control in your code. For example, if youadd a CheckBox control to a UserForm named UserForm1, the CheckBox control is named CheckBox1
by default. Youcanuse the Properties boxto makethiscontrol appearwitha check mark. Or,youcanwrite code to do it:
UserForm1.CheckBox1.Value True

www.it-
Most of the time, you write the code for a UserForm in the UserForm’s code module. If that’s the case, you can omit the UserForm object qualifier and write the statement like this:
CheckBox1.Value = True
Your VBA code can also check various properties ofthe controls and take appropriate actions. The following statement executes a macro named PrintReport if the check box (named CheckBox1) is checked:
If CheckBox1.Value = True Then Call PrintReport
I discuss this topic in detail in Chapter 17.
255

www.it-
256 Part IV: Communicating with Your Users
It’s usually a good idea to change the default name the VBE has given to your controls to something moremeaningful. You might consider naming the check box I just described “cbxPrintReport.” Note that I precede the name with a three-letter prefix (for “checkbox”), indicating the type of control. It is amatter of taste whether you think doing so is a goodpractice.
A UserFormExampleThis section’s UserForm example is an enhanced version of the ChangeCase macro from the beginning of the chapter. Recall that the original version ofthis macro changes the text in the selected cells to uppercase. This modified version uses a UserFormto ask the user which type of change to make: uppercase, lowercase, or proper case.
This dialog box needs to obtain one piece of information from the user: the type of change to make to the text. Because the user has three choices, your best bet is a dialog box with three OptionButton controls. The dialog box also needs two more buttons: an OK button and a Cancel button.Clickingthe OK button runs the code that does the work. Clicking the Cancel button causes the macro to finish without doing anything.
This workbook is available at the book’s website. However, you get more out of this exercise if you follow the steps provided here and create it yourself.
Creating the UserForm
www.it-
These steps create the UserForm. Start with an empty workbook.
1. Press Alt+F11 to activate the VBE.2. If multiple projects are in the Project window,select the project that corresponds to the workbook you’re using.
3. Choose Insert➪UserForm.The VBE inserts a new UserForm object with an empty dialog box.
4. Press F4 to display the Properties window.5. In the Properties window, change the dialog box’sCaption property toChange Case.
6. The dialog box is a bit too large, so you may want to click it and use the handles (on the right and bottom sides) to make it smaller.Step 6 can also be done after you positionall the controls in the dialog box.

www.it-
Chapter 16: UserForm Basics
Adding the CommandButtonsReady to add two CommandButtons — OK and Cancel — to the dialog box? Follow along:
1. Make sure that the Toolbox is displayed; if it isn’t, choose View➪Toolbox.2. If the Properties window isn’t visible, press F4to display it.3. In the Toolbox, drag a CommandButton into the
dialog box to create a button.As you see in the Properties box, the buttonhas a default name and caption: CommandButton1.
4. Make sure that the CommandButton is selected; thenactivate the
Properties window and change thefollowing properties:
Property Change
To Name
OKButton Caption
OK
Default True5. Add a second CommandButton object to the UserForm
and change the following properties:Property Change To
Name
CancelButton Caption
Cancel
Cancel True6. Adjust the size and position of the controls so
your dialog box looks something like Figure 16-4.
257

www.it-
Figure16-4:The
UserForm with
twoCommandButtoncontro
ls.

www.it-
258 Part IV: Communicating with Your Users
Adding theOptionButtonsIn this section, you add three OptionButtons to thedialog box. Before adding the OptionButtons, you adda Frame object that contains the OptionButtons.The Frame isn’t necessary, but it makes the dialogbox look more professional.
1. In the Toolbox, click the Frame tool and drag it into the dialog box.
This step creates a frame to hold the options buttons.
2. Use the Properties window to change the frame’s caption to Options.3. In the Toolbox, click the OptionButton tool and
drag it into the dialog box (within the Frame).Doing this creates an OptionButton control.
4. Select the OptionButton and use the Properties window to change the following properties:
Property Change
To Name
OptionUpper Caption
Upper Case Accelerator
U
ValueTrue
Setting the Value property to True makes this OptionButton the default.
5. Add another OptionButton and use the Properties window to change the following properties:
Property Change
To Name
OptionLower Caption

www.it-
Lower Case Accelerator
L
6. Add a third OptionButton and use the Propertieswindow to change the following properties:
Property Change To
Name
OptionProper Caption
Proper Case Accelerator
P
7. Adjust the size and position of the OptionButtons, Frame, and dialog box.
Your UserForm should look something like Figure 16-5.

www.it-
Chapter 16: UserForm Basics
259
If you’d like a sneak preview to see what the UserForm looks like when it’s displayed, press F5.None of the controls are working yet, so you needto click the red “X” in the title bar to close the dialog box.
Figure16-5:
This isthe
UserFormafteraddingthreeOptionButtoncon-trolsinside
aFramecontrol.
The Accelerator property determines which letter inthe caption is underlined — and more importantly, it determines what Alt-key combination selects thatcontrol. For example, you can select the Lower Case option by pressing Alt+L because the L is underlined. Accelerator keys are optional, but someusers prefer to use the keyboard to navigate dialogboxes.
You may wonder why the OptionButtons have accelerator keys but the CommandButtons go without. Generally, OK and Cancel buttons never have accelerator keys because they can be accessed from the keyboard. Pressing Enter is equivalent to clicking OK because the control’s Default propertyis True. Pressing Esc is equivalent to clicking Cancel because the control’sCancel property is True.
Adding event-handler procedures

www.it-
Now it’s time to make the UserForm actually do
something. Here’s how to add an event-handler procedure for the Cancel and OK buttons:
1. Double-click the Cancel button.VBE activates the Code window for the UserForm and inserts an empty procedure:Private Sub
CancelButton_Click() End
Sub

260 Part IV: Communicating with Your Users
The procedure named CancelButton_Click is executed when the Cancel button is clicked, butonly when the dialog box is displayed. In otherwords, clicking the Cancel button when you’re designing the dialog box won’t execute the procedure. Because the Cancel button’s Cancel property is set to True, pressing Esc also triggers the CancelButton_ Click procedure.
2. Insert the following statement inside the procedure (before the End
Sub statement):Unload UserForm1
This statement closes the UserForm (and removes it from memory)when the Cancel button is clicked.
3. Press Shift+F7 to return to the UserForm.4. Double-click the OK button.
VBE activates the code window for the UserForm and inserts an emptySub procedure called OKButton_Click.When the UserForm is displayed, clicking OK executes this procedure. Because this button has its Default property set to True, pressingEnter also executes the OKButton_Click procedure.
5. Enter the following code so the procedure looks like this:
Private Sub OKButton_Click() Dim WorkRange As Range Dim cell As Range
‘ Process only text cells, no formulas
On Error ResumeNext
Set WorkRange =Selection.SpecialCells _(xlCellTypeConstants, xlCellTypeConstants)

‘ Upper caseIf OptionUpperThen
For Each cell In
WorkRangeUCase(cell.Value)
End If
‘ Lower caseIf OptionLowerThen WorkRange
cell.Value =
LCase(cell.Value)
End If
‘ Proper caseIf OptionProper WorkRange
cell.Va Application
Nextcell
Nextcell
WorksheetFunction.Proper(cell.Value)
www.it-ebooks.info

www.it-
Chapter 16: UserForm Basics
261
Next cellEnd IfUnload UserForm1
End Sub
The preceding code is an enhanced version of the original ChangeCase macro that I present at the beginning of the chapter. The macro consists of three separate blocks of code. This code uses three If-Then structures; each onehas a For Each-Next loop. Only one block is executed, determined by which OptionButton the userselects. The last statement unloads (closes) the dialog box after the work is finished.
Here’s something kind of odd. Notice that VBA has a UCase function and an LCase function, but it doesn’t have a function to convert text to proper case. Therefore, I use Excel’s PROPER worksheet function (preceded by Application.WorksheetFunction) to do the proper case conversion.
Another option is to use the VBA StrConv function, with a second argument of vbProperCase. (See the Help system for details.) The StrConv function is not available in all Excel versions, so I use the PROPER worksheet function instead. It’s worth noting that the StrConv beats the PROPER function at converting to proper case. Excel’s PROPER function always capitalizes the letter that followsan apostrophe. So the word can’t becomes Can’T. StrConv doesn’t do that.
Creating a macro to display the dialog box

www.it-
We’re almost finished with this project. The only thing missing is a way to display the dialog box. Follow these steps to create the procedure that makes the dialog box appear:
1. In the VBE window, choose Insert➪Module.The VBE adds an empty VBA module (named Module1)
to the project.2. Enter the
following code:Sub ChangeCase()
If TypeName(Selection) = “Range” ThenUserForm1.Show
ElseMsgBox “Select a range.”, vbCritical
End IfEnd Sub
This procedure is simple. It checks to make sure that a range is selected. If so, the dialog box isdisplayed (using the Show method). The user then interacts with the dialog box, and the code stored in the UserForm’s Code pane is executed. Ifa range is not selected, the user sees a MsgBox with the text “Select a range.”

www.it-
262 Part IV: Communicating with Your Users
Making the macro availableAt this point, everything should be working properly. But you still need an easy way to execute the macro. Assign a shortcut key (Ctrl+Shift+C) that executes the ChangeCase macro:
1. Activate the Excel window via Alt+F11.2. Choose Developer➪Code➪Macros or press Alt+F8.3. In the Macros dialog box, select the ChangeCase macro.4. Click the Options button.
Excel displays its Macro Options dialog box.5. Enter an uppercase C for the Shortcut key.
See Figure 16-6.6. Enter a description of the macro in the Description field.7. Click OK.8. Click Cancel when you return to the Macro dialog box.
Figure16-6:
Assign ashortcut
key toexecute
theChangeCase
macro.
After you perform this operation, pressing Ctrl+Shift+C executes theChangeCase macro, which displays the UserForm if a range is selected.
You can also make this macro available from the Quick Access toolbar. Right-click the Quick Access toolbar and choose Customize Quick Access

www.it-
Toolbar. The Excel Optionsdialog box appears, andyou’ll find the ChangeCase macro listedunder Macros(see Figure 16-7).

www.it-
Chapter 16: UserForm Basics
Figure16-7:
Addingthe
ChangeChasemacro
to theQuick
Accesstoolbar
.
Testing the macroFinally, you need to test the macro and dialog box to make sure they work properly:
1. Activate a worksheet (any worksheet in any workbook).2. Select some cells that contain text.
You can even select entire rows or columns.3. Press Ctrl+Shift+C.
The UserForm appears. Figure 16-8 shows how it should look.
4. Make your choice and click OK.If you did everything correctly, the macro makesthe specified change to the text in the selected cells.
If you test this procedure when only one cell is selected, you’ll find that all the cells on the
worksheetare processed.Thatbehaviorisa byproductofusing

www.it-
the SpecialCells method. If you’d prefer to be able to process just one cell, change the first block of code to this:
If Selection.Count = 1 ThenSet WorkRange = Selection
ElseSet WorkRange =
Selection.SpecialCells _(xlCellTypeConstants,xlCellTypeConstants)
End If
263

www.it-
264 Part IV: Communicating with Your Users
Figure 16-9 shows the worksheet after converting thetext to uppercase. Notice that the formula in cell B15 and the date in cell B16 were not changed. The macro, as you recall, works only with cells that contain text.
As long as the workbook is open, you can execute themacro from any other workbook. If you close theworkbook that contains your macro, Ctrl+Shift+C nolonger has any function.
If the macro doesn’t work properly, double-check thepreceding steps to locate and correct the error. Don’t be alarmed; debugging is a normal part of developing macros. As a last resort, download the completed workbook from this book’s website and tryto figure out where you went wrong.
Figure16-8: TheUserForm
is inaction.

www.it-
Figure16-9:The
texthas
beenconverte
d toupperca
se.

A
www.it-
Chapter17
Using UserFormControls
In This Chapter▶ Understanding each type of dialog box control▶ Changing each control’s properties▶ Working with dialog box controls
user responds to a custom dialog box (also known as a UserForm) by using the various controls (buttons, edit boxes, option buttons, and
so on) that the dialog box contains. Your VBA codethen makes use of these responses to determinewhich actions to take. You have quite a fewcontrols at your disposal, and this chapter tellsyou about them.
If you worked through the hands-on example in Chapter16, you already have some experience with UserForm controls. This chapter fills in some of the gaps.
Getting Started with DialogBox Controls
www.it-
In this section, I tell you how to add controlsto a UserForm, give them meaningful names, and adjust some of their properties.
Before you can do any of these things, you must havea UserForm, which you get by choosing Insert➪UserForm in the VBE. When you add a UserForm, make sure that the correct project is selected in the Project window (if more than one project is available).
Adding controlsOddly enough, the VBE doesn’t have menu commands that let you add controls to a dialog box. You mustuse the floating Toolbox, which I describe in Chapter 16, to add controls. Normally, the Toolbox pops up automatically when you activate a UserForm in the VBE. If it doesn’t, you can display the Toolbox by choosing View➪Toolbox.

www.it-
266 Part IV: Communicating with Your Users
Follow along to add a control to the UserForm:
1. Click the Toolbox tool that corresponds to the control you want to add.2. Click in the UserForm and drag to size and position the control.Alternatively, you can simply drag a control from the Toolbox to the UserForm to create a control with the default dimensions. Figure 17-1 shows a UserForm that contains a few controls: Two OptionButtons (inside of a Frame), a ComboBox, a CheckBox, a ScrollBar, and a CommandButton.
Figure17-1: A
UserFormwith a
fewcontrolsadded.
A UserForm may contain vertical and horizontal grid lines, which help align the controls you add. When you add or move a control, it snaps to the grid. If you don’t like this feature, you can turn off the grids by following these steps:
1. Choose Tools➪Options in the VBE.2. In the Options dialog box, select the General tab.3. Set your desired options in the Form Grid Settingssection.

www.it-
Introducing control propertiesEvery control that you add to a UserForm has propertiesthat determinehow the control looks and behaves. You can change a control’s properties at the following two times:
✓ At design time — when you’re designing the UserForm. You do so manually, usingthe Properties window.
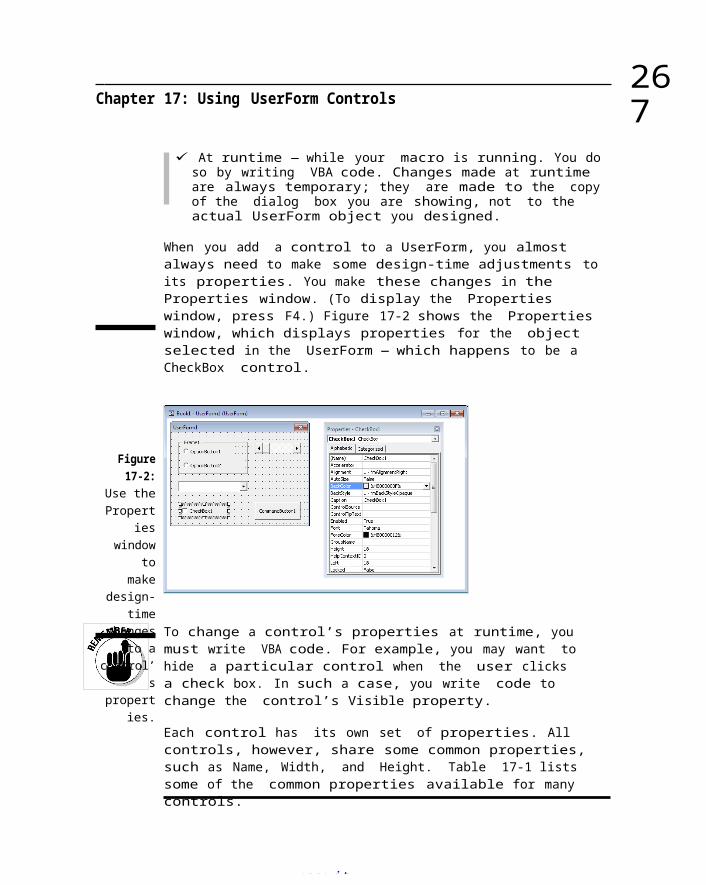
www.it-
Chapter 17: Using UserForm Controls
267
✓ At runtime — while your macro is running. You doso by writing VBA code. Changes made at runtime are always temporary; they are made to the copyof the dialog box you are showing, not to the actual UserForm object you designed.
When you add a control to a UserForm, you almost always need to make some design-time adjustments to its properties. You make these changes in the Properties window. (To display the Properties window, press F4.) Figure 17-2 shows the Properties window, which displays properties for the object selected in the UserForm — which happens to be a CheckBox control.
Figure17-2:
Use thePropert
ieswindow
tomake
design-time
changesto a
control’s
properties.
To change a control’s properties at runtime, you must write VBA code. For example, you may want to hide a particular control when the user clicks a check box. In such a case, you write code to change the control’s Visible property.
Each control has its own set of properties. All controls, however, share some common properties, such as Name, Width, and Height. Table 17-1 lists some of the common properties available for many controls.

www.it-
Table 17-1 Common Control Properties
Property What It AffectsAccelerator The letter underlined in the control’s
caption. The user presses this key in conjunction with the Alt key to select the control.
AutoSize If True, the control resizes itself automatically based on the text in its caption.
(continued)

www.it-
268 Part IV: Communicating with Your Users
Table 17-1 (continued)Property What It AffectsBackColor The control’s background color.BackStyle The background style (transparent or opaque). Caption The text that appears on the control.Left and Top Values that determine the control’s position.Name The control’s name. By default, a
control’s name is based on the controltype. You can change the name to anyvalid name, but each control’s namemust be unique within the dialog box.
Picture A graphics image to display. The image can be from a graphics file, oryou can select the Picture property and paste an image that you copied to the Clipboard.
Value The control’s value.Visible If False, the control is hidden.Width and Height Values that determine the control’s width and height.
When you select a control, that control’s properties appear in the Properties window. To change a property, just select it in the Properties window and make the change. Some properties give you some help. For example, if you need to change the TextAlign property, the Properties window displays a drop-down list that contains all valid property values, as shown in Figure 17-3.

www.it-
Figure17-3:
Changesome
properties by
selecting from
adrop-down
list ofvalid
property
values.

www.it-
Chapter 17: Using UserForm Controls
Dialog Box Controls: The Details
In the following sections, I introduce you to each type of control you can use in custom dialog boxes and discuss some of the more useful properties. I don’t discuss every property for every control because that would require a book that’s about four times as thick (and it would be a very boring book).
The Help system for controls and properties is thorough. To find complete details for a particular property, select the property in the Properties window and press F1.
All the examples in this section are available on this book’s website.
CheckBox controlA CheckBox control is useful for getting a binary choice: yes or no, true or false, on or off, and so on. Figure 17-4 shows some examples of CheckBox controls.
269
Figure17-4:
CheckBox
Controls
dialogbox.
The following is a description of a CheckBox control’s most useful properties:
✓ Accelerator: A character that lets the user change the value of the control by

www.it-
using the
keyboard. For example, if the accelerator isA, pressing Alt+A changes the value of the CheckBox control (from checked to unchecked, or from unchecked to checked). In the example shownhere, I use numbers for the accelerators (Alt+1,Alt+2, and so on).
✓ ControlSource: The address of a worksheet cell that’s linked to the CheckBox. The cell displays TRUE if the control is checked or FALSE if the control is not checked. This is optional. Most ofthe time a CheckBox is not linked to a cell.
✓ Value: If True, the CheckBox has a checkmark. If False, it does not have a checkmark.
Don’t confuse CheckBox controls with OptionButton controls. They look kind of similar, but they are used for different purposes.

www.it-
270 Part IV: Communicating with Your Users
ComboBox controlA ComboBox control is similar to a ListBox control (described later in the “ListBox control” section).A ComboBox, however, is a drop-down control. Anotherdifference is that the user may be allowed to entera value that does not appear in the list of items.Figure 17-5 shows two ComboBox controls. The controlon the right (for the year) is being used, so it has dropped down to display its list of options.
Figure17-5:
ComboBox
Controls
dialogbox.
The following is a description of some useful ComboBox control properties:
✓ ControlSource: A cell that stores the value selected in the ComboBox.✓ ListRows: The number of items to display when the list drops down.✓ ListStyle: The appearance of the list items.✓ RowSource: A range address that contains the
list of items displayed in the ComboBox.✓ Style: Determines whether the control acts like a drop-down list or a
ComboBox. A drop-down list doesn’t allow the user to enter a new value.
✓ Value: The text of the item selected by the userand displayed in the
ComboBox.
If your list of items is not in a worksheet, you canadd items to a ComboBox control by using the AddItem method. More information on this method is in Chapter 18.

www.it-
CommandButton controlCommandButton is just a common clickable button. It is of no use unless you provide an event-handler procedure to execute when the button is clicked. Figure 17-6 shows a dialog box withnine CommandButtons.Two of these buttons feature a clipart image (specified by copying the clipart and then pasting itinto the Picture field in the Properties window).

www.it-
Chapter 17: Using UserForm Controls
Figure17-6:
CommandButtoncontro
ls.
When a CommandButton is clicked, it executes an event-handler procedure with a name that consistsof the CommandButton’s name, an underscore, and the word Click. For example, if a CommandButton is named MyButton, clicking it executes the macro named MyButton_Click. This macro is stored in the Code window for the UserForm.
The following is a description of some useful CommandButton control properties:
✓ Cancel: If True, pressing Esc executes the macroattached to the button.
Only one of the form’s buttons should have this option set to True.
✓ Default: If True, pressing Enter executes the macro attached to the button. Again: Just one button should have this option setto True.
Frame controlA Frame control encloses other controls. You do so either for aesthetic purposes or to logically groupa set of controls. A frame is particularly useful when the dialog box contains more than one set of OptionButton controls. (See “OptionButton control,”later in this chapter.)
The following listdescribessomeusefulFrame controlproperties:

www.it-
✓ BorderStyle: The frame’s appearance.✓ Caption: The text displayed at the top of the
frame. The caption can be an empty string if youdon’t want the control to display a caption.
Image controlAn Image control displays an image. You may want to use an Image control to display your company’s logoin a dialog box. Figure 17-7 shows a dialog box with an Image control that displays a photo of a cute little kitten.
271

www.it-
272 Part IV: Communicating with Your Users
Figure17-7:
AnImage
control
displays a
photo.
The following list describes the most useful Image control properties:
✓ Picture: The graphics imagethat is displayed.
✓ PictureSizeMode: How the picture is displayed if the control size does not match the image size.
When you click the Picture property, you are prompted for a filename. However, the graphics image(after it’s retrieved) is stored in the workbook. That way, if you distribute your workbook to someoneelse, you don’t have to include a copy of the graphics file.
Rather than retrieve the image from a file, you can also copy and paste. Excel’s clipart collection is agreat source of images. Use Insert➪Illustrations➪Online Pictures and choose an image to place in your worksheet. Select the imageand press Ctrl+C to copy it to the Clipboard. Then activate your UserForm, click the Image control, andselect the Picture property in the Properties box.Press Ctrl+V to paste the copied image. You can then delete the clipart image in the worksheet.

www.it-
Some graphics images are very large and can make your workbook size increase dramatically. For best results, use an image that’s as small as possible.
Label controlA Label control simply displays text in your dialogbox. Figure 17-8 shows a few Label controls. As you can see, you have a great deal of control over the formatting of a Label control.
ListBox controlThe ListBox control presents a list of items from which the user can choose one or more. Figure 17-9 shows a dialog box with two ListBox controls.

www.it-
Chapter 17: Using UserForm Controls
Figure17-8:Label
controlscan takeon lots
ofdifferent looks.
Figure17-9:
ListBox
controls.
ListBox controls are very flexible. For example, you can specify a worksheet range that holds the ListBox items, and the range can consist of multiple columns. Or you can fill the ListBox with items by using VBA code.
If a ListBox isn’t tall enough to display all the items in the list, a scrollbar appears so the user can scroll down to see more items.
The following list is a description of the most usefulListBox control properties:
✓ ControlSource: A cell that storesthevalue selectedin theListBox.✓ IntegralHeight:This

www.it-
is True if the ListBox height adjusts automatically
to display full lines of text when the list is scrolled vertically. If False, theListBox may display partial lines of text when itis scrolled vertically. Note that when this property is True, the actual height of your ListBox may be slightly different, when your UserForm is shown, from what you had set it originally. In other words, the height may adjust to ensure that the last entry is entirely visible.
✓ ListStyle: The appearance of the list items.✓ MultiSelect: Determines whether the user can select multiple items from the list.
✓ RowSource: A range address that contains the list of items displayed in the ListBox.
✓ Value: The text of the selected item in the ListBox.
273

www.it-
274 Part IV: Communicating with Your Users
If the ListBox has its MultiSelect property set to1 or 2, then the user can select multiple items in the ListBox. In such a case, you cannot specifya ControlSource; you need to write a macro that determines which items are selected. Chapter 18 demonstrates how to do so.
MultiPage controlA MultiPage control lets you create tabbed dialog boxes, like the Format Cells dialog box (the one that appears when you press Ctrl+1 in Excel). Figure 17-10 shows an example of a custom dialog box that uses a MultiPage control. This particular control has three pages, or tabs.
Figure17-10:Use a
MultiPage
controlto
createa
tabbeddialog
box.
Descriptions of the most useful MultiPagecontrol properties follow:
✓ Style: Determines the appearance of the control. The tabs can appear normally (on the top), on the left, as buttons, or hidden (no tabs — your VBA code determines which page is displayed).
✓ Value: Determines which page or tab is displayed. A Value of 0 displays the first page, a Value of 1 displays the second page, and so on.
By default, a MultiPage control has two pages. Toadd pages, right-click a tab and select New Pagefrom the resulting Context menu.

www.it-
OptionButton controlOptionButtonsare useful whenthe user needsto select from
a small number of items. OptionButtons are alwaysused in groups of at least two. Figure 17-11 showstwo sets of OptionButtons, and each set iscontained in a frame.

www.it-
Chapter 17: Using UserForm Controls
275
Figure17-11:
Two setsof
OptionButton
controls, eachcontain
edin a
Framecontrol.
The following is a description of the most useful OptionButton control properties:
✓ Accelerator: A letter that lets the user select the option by using the keyboard. For example, if the accelerator for an option button is C, then pressing Alt+C selects the control.
✓ GroupName: A name that identifies an option button as being associated with other option buttons with the same GroupName property.
✓ ControlSource: The worksheet cell that’s linked to the option button.
The cell displays TRUE if the control is selected or FALSE if the controlis not selected.
✓ Value: If True, the OptionButton is selected. IfFalse, the OptionButton is not selected.
If your dialog box contains more than one set of OptionButtons, you must change the GroupName propertyfor all OptionButtons in a particular set. Otherwise, all OptionButtons become part of the sameset. Alternatively, you can enclose each set of OptionButtons in a Frame control, which

www.it-
automatically groups the OptionButtons in the frame.
RefEdit controlThe RefEdit control is used when you need to letthe user select a range in a worksheet. Figure 17-12 shows a UserForm with two RefEdit controls. ItsValue property holds the address of the selectedrange (as a text string).
Figure17-12:
TwoRefEdit
controls.

www.it-
276 Part IV: Communicating with Your Users
The RefEdit control sometimes causes trouble on more complex UserForms. For best results, do not place a RefEdit control inside a Frame or MultiPagecontrol.
ScrollBar controlWhen you add a ScrollBar control, you can make it horizontal or vertical. The ScrollBar control is similar to a SpinButton control (described later).The difference is that the user can drag the ScrollBar’s button to change the control’s value inlarger increments. Another difference is that when you click the up button on a vertical ScrollBar, the value decreases — which isa bit counter-intuitive. So, a ScrollBar is not always a good substitute for aSpinButton.
Figure 17-13 shows a ScrollBar control, with a horizontal orientation. ItsValue property is displayed in a Label control, placed below the ScrollBar.
Figure17-13: AScrollBa
rcontrol,
with aLabelcon-trolbelow
it.
The following is a description of the most useful properties of a ScrollBar control:
✓ Value: The control’s current value.✓ Min: The control’s minimum value.✓ Max: The control’s maximum value.✓ ControlSource: The worksheet cell that displays the control’s value.
www.it-
✓ SmallChange: The amount that the control’s valueis changed by aclick.✓ LargeChange:
The amount that the control’s value is changed by clicking either side of the button.
The ScrollBar control is most usefulfor specifying a value that extends across a wide range of possiblevalues.

www.it-
Chapter 17: Using UserForm Controls
SpinButton controlThe SpinButton control lets the user select a value by clicking the control, which has two arrows (one to increase the value and the other to decrease the value). As with a ScrollBar control, a SpinButton can be oriented either horizontally or vertically. Figure 17-14 shows a dialog box that uses two vertically oriented SpinButton controls. Each control is linked to the Label control on the right (by using VBA procedures).
277
Figure17-14:
SpinButton
controls. The following descriptions explain the most useful
properties of a SpinButton control:
✓ Value: The control’s current value.✓ Min: The control’s minimum value.✓ Max: The control’s maximum value.✓ ControlSource: The worksheet cell that displays the control’s value.✓ SmallChange: The amount that the control’s value is changed by a click.
Usually this property is set to 1, but you can make it anyvalue.
If you use a ControlSource for a SpinButton, you should understand that the worksheet is recalculated every time the control’s value is changed. Therefore, if the user changes the value from 0 to 12, the worksheet is calculated 12 times.If your worksheet takes a long time to calculate, you may want to avoid using a ControlSource to store the value.

www.it-
TabStrip controlA TabStrip control is similar to a MultiPagecontrol, but it’s not as easy to use. In fact,I’m not sure why this control is even included.You can pretty much ignore it and use theMultiPage control instead.

www.it-
278 Part IV: Communicating with Your Users
TextBox controlA TextBox control lets the user enter text. Figure 17-15 shows a dialog box with two TextBox controls.
Figure17-15:TextBo
xcontro
ls. The following is a description of the most useful TextBox control properties:
✓ AutoSize: If True, the control adjusts its size automatically, depending on the amount of text.
✓ ControlSource: The address of a cell that contains the text in the
TextBox.✓ IntegralHeight: If True, the TextBox height adjusts automatically to display full lines of text when the list is scrolled vertically. If False, the TextBox may display partial lines oftext when it is scrolled vertically.
✓ MaxLength: The maximum number of characters allowed in the
TextBox. If 0, the number of characters is unlimited.
✓ MultiLine: If True, the TextBox can display more than one line of text.✓ TextAlign: Determines how the text is aligned in the TextBox.✓ WordWrap: Determines whether the control allows word wrap.

www.it-
✓ ScrollBars: Determines the type ofscrollbars for the control: horizontal, vertical, both, or none.
When you add a TextBox control, its WordWrap property is set to True, and its MultiLine property is setto False. The net effect? Wordwrap doesn’t work! So, if you want the wordsto wrap in a TextBox control, make sure that you set the MultiLine property to True.

www.it-
Chapter 17: Using UserForm Controls
ToggleButton controlA ToggleButton control has two states: on and off. Clicking the button toggles between these two states, and the button changes its appearance whenclicked. Its value is either True (pressed) or False(not pressed). Figure 17-16 shows a dialog box with four ToggleButton controls. The top two are pressed.
279
Figure17-16:ToggleButtoncontro
ls.I never ever use ToggleButton controls. I prefer to use CheckBox controls.
Working with Dialog Box ControlsIn this section, I discuss how to work with dialog box controls in a UserForm object.
Moving and resizing controlsAfter you place a control in a dialog box, you can move it and resize it by using standard mouse techniques. Or for precise control, you can use the Properties window to enter a value for the control’s Height, Width, Left, or Top property.
You can select multiple controls by Ctrl+clicking thecontrols. Or you can click and drag to “lasso” a group of controls. When multiple controls are selected, the Properties window displays only the

www.it-
properties common to all selected controls. You can change those common properties, and the change willbe made to all controls you selected, which is much quicker than doing them one at a time.
A control can hide another control; in other words,you can stack one control on top of another. Unless you have a good reason for doing so, make surethat you do not overlap controls.

www.it-
280 Part IV: Communicating with Your Users
Aligning and spacing controlsThe Format menu in the VBE window provides several commands to help you precisely align and space the controls in a dialog box. Before you use these commands, select the controls you want to work with. These commands work just as you might expect, so I don’t explain them here. Figure 17-17 shows a dialog box with several CheckBox controls that are about to be aligned.
Figure17-17:
Use theFormat➪
Aligncom-
mand tochange
thealignme
ntof
UserForm
controls.
When you select multiple controls, the last selectedcontrol appearswith white handles rather than the normal black handles. The control with the white handles is the basis for aligning or resizing the other selected controls when you use the Format menu.
Accommodating keyboard usersMany users (including yours truly) prefer to navigate through a dialog box by using the

www.it-
keyboard: Pressing Tab orShift+Tab cycles throughthe controls, while pressing a hot key instantly activates a particular control.
To make sure that your dialog box works properly for keyboard users, you must be mindful of two issues:
✓ Tab order✓ Acceleratorkeys

www.it-
Chapter 17: Using UserForm Controls
Changing the tab orderThe tab order determines the order in which the controls are activated when the user presses Tab or Shift+Tab. It also determines which control has the initial focus — that is, which control is the active control when the dialogbox first appears. For example, if a user is entering text into a TextBox, the TextBox has the focus. If the user clicks an OptionButton, the OptionButton has the focus. The first control in the tab order has the focus when Excel first displays a dialog box.
To set the control tab order, choose View➪Tab Order. You can also right- click the dialog box and choose Tab Order from the shortcut menu. In eithercase, Excel displays the Tab Order dialog box shownin Figure 17-18.
281
Figure17-18:
The TabOrder
dialogbox.
The Tab Order dialog box lists all the controls in the UserForm. The tab order in the UserForm corresponds to the order of the items in the list.To change the tab order of a control, select it inthe list and then click the Move Up or Move Down buttons. You can choose more than one control (click while pressing Shift or Ctrl) and move them all at one time.
Rather than use the Tab Order dialog box, you can set a control’s position in the tab order by usingthe Properties window. The first control in the tab order has a TabIndex property of 0. If you want

www.it-
to remove a control fro
m the tab order, set its TabStop property to False.
Some controls (such as Frame or MultiPage controls) act as containers for other controls. The controls inside a container control have their own tab order. To set the tab order for a group of OptionButtons inside a Frame control, select the Frame control before you choose the View➪Tab Order command.
Setting hot keysNormally, you want to assign an accelerator key, orhot key, to dialog box controls. You do so by enteringa letter for the Accelerator property in the Properties window. If a control doesn’t have an Accelerator property (a TextBox, for example), you can still allow direct keyboard access to it by using a Label control. That is, assign an accelerator key to the Label and put the Label directly before the TextBox in the tab order.
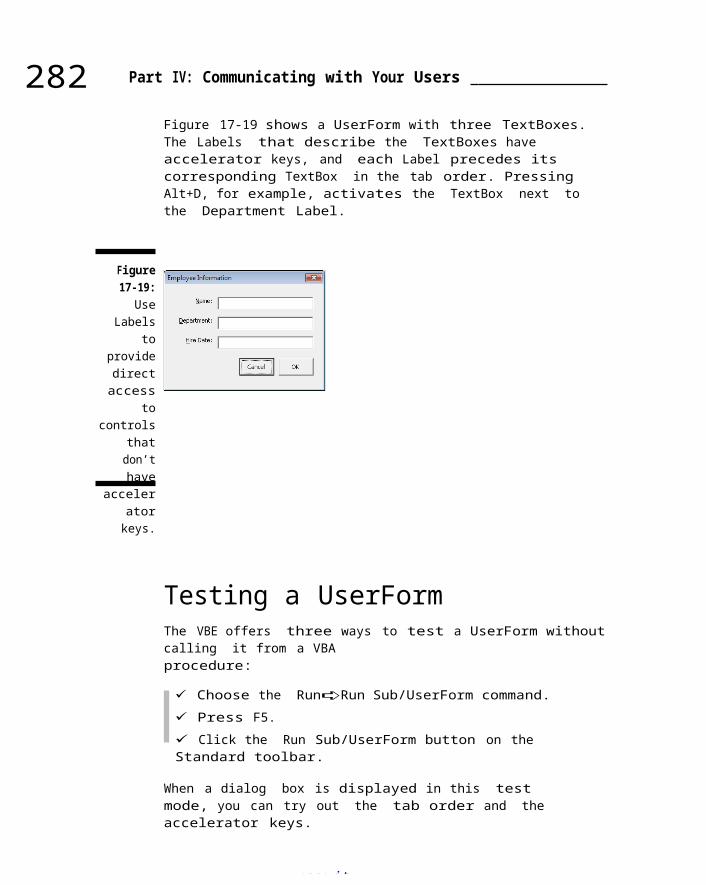
www.it-
282 Part IV: Communicating with Your Users
Figure 17-19 shows a UserForm with three TextBoxes. The Labels that describe the TextBoxes have accelerator keys, and each Label precedes its corresponding TextBox in the tab order. Pressing Alt+D, for example, activates the TextBox next to the Department Label.
Figure17-19:
UseLabels
toprovidedirectaccess
tocontrols
thatdon’thave
acceleratorkeys.
Testing a UserFormThe VBE offers three ways to test a UserForm without calling it from a VBAprocedure:
✓ Choose the Run➪Run Sub/UserForm command.✓ Press F5.✓ Click the Run Sub/UserForm button on the Standard toolbar.
When a dialog box is displayed in this test mode, you can try out the tab order and the accelerator keys.

www.it-
Dialog Box AestheticsDialog boxes can look good, bad, or somewhere in between. A good-looking dialog box is easy on the eye, has nicely sized and aligned controls, and its function is perfectly clear to the user. Bad-looking dialog boxes confuse the user, have misaligned controls, and give the impression thatthe developer didn’t have a plan (or a clue).
Try to limit the number of controls on your form. Ifyou do need many controls (a rule of thumb: more than 10 controls), consider using a MultiPage control to split the task the user has to do into logical (and smaller) steps.
A good rule to follow is to try to make your dialog boxes look like the Excel built-in dialog boxes. As you gain more experience with dialog box construction, you can duplicate almost all the features of the Excel dialog boxes.

T
www.it-
Chapter18
UserForm Techniques andTricks
In This Chapter▶ Using a custom dialog box in your application▶ Creating a dialog box: a hands-on example
he previous chapters show you how to insert a UserForm (which contains a custom dialog box), add controls to the UserForm, and adjust some
of the control’s properties. These skills, however, won’t do you much good unless you understand how to make use of UserForms in your VBA code. This chapter provides these missing details and presents some useful techniques and tricks in the process.
Using Dialog BoxesWhen you use a custom dialog box in your application, you normally writeVBA code that does the following:
✓ Initializes the UserForm controls. For example,you may write code that sets the default values for the controls.
✓ Displays the dialog box by using the UserFormobject’s Show method.

www.it-
✓ Responds to the events that occur for the various controls — such as clicking a CommandButton.
✓ Validates the information provided by the user (if the user did not cancel the dialog box). This step is not always necessary.
✓ Takes some action with the information provided by the user (if the information is valid).

www.it-
284 Part IV: Communicating with Your Users
A UserForm ExampleThis example demonstrates the five points I describein the preceding section. In this example, you use a dialog box to get two pieces of information: a person’s name and sex. The dialog box uses a TextBoxcontrol to get the name, and it uses three OptionButtons to get the sex (Male, Female, or Unknown). The information collected in the dialog box is then sent to the next blank row in a worksheet.
Creating the dialog boxFigure 18-1 shows the finished UserForm for thisexample. For best results, start with a newworkbook with only one worksheet in it. Then followthese steps:
1. Press Alt+F11 to activate the VBE.2. In the Project window, select the empty workbook and chooseInsert➪UserForm.An empty UserForm is added to the project.
3. Change the UserForm’s Caption property to Get Nameand Sex.
If the Properties window isn’t visible, press F4.
Figure18-1:This
dialogbox

www.it-
asksthe
userto
entera Name
andchoosea Sex.

www.it-
Chapter 18: UserForm Techniques and Tricks
This dialog box haseight controls:
✓ A Label. I modified the following properties forthis control:
Property Value Accelerator N Caption Name TabIndex 0
✓ A TextBox. I modified the following properties for this control:
Property Value Name TextName TabIndex 1
✓ A Frame object. I modified the following properties for this control:
Property Value Caption Sex TabIndex 2
✓ An OptionButton. I modified the following properties for this control:
Property Value Accelerator M Caption MaleName OptionMaleTabIndex 0
✓ Another OptionButton. I modified the following properties for this control:
Property Value Accelerator
F Caption FemaleName OptionFemaleTabIndex 1
✓ AnotherOptionButton.Imodifi

www.it-
ed the following properties for this control:Property ValueAccelerator UCaption UnknownName OptionUnknownTabIndex 2Value True
285

www.it-
286 Part IV: Communicating with Your Users
✓ A CommandButton. I modified the following properties for this control:
Property Value Caption Enter Default TrueName EnterButtonTabIndex b
✓ Another CommandButton. I modified the following properties for this control:Property Value Caption Close Cancel TrueName CloseButtonTabIndex 4
If you’re following along on your computer (andyou should be), take a few minutes to create thisUserForm by using the preceding information. Makesure to create the Frame object before addingthe OptionButtons to it.
In some cases, you may find copying an existing control easier than creating a new one. To copy a control, press Ctrl while you drag the control.
If you prefer to cut to the chase, you can download the example from this book’s website.
Writing code to displaythe dialog boxAfter you’ve added the controls to the UserForm, your next step is to develop some VBA code to display this dialog box:

www.it-
1. In the VBE window, choose Insert➪Module to inserta VBA module.2. Enter the following macro:
Sub GetData() UserForm1.Show
End Sub
This short procedure uses the UserForm object’s Show method to display the dialog box.
Making the macroavailableThe next set of steps gives the user an easy wayto execute the procedure:

www.it-
Chapter 18: UserForm Techniques and Tricks
1. Activate Excel.2. Choose Developer➪Controls➪Insert and click the Button icon in the
Form Controls section.3. Drag in the worksheet to create the button.
The Assign Macro dialog box appears.4. Assign the GetData macro to the button.5. Edit the button’s caption so that it reads Data Entry.
If you want to get really fancy, you can add an icon to your Quick Access toolbar. Then clicking the iconruns the GetData macro. To set this up, right- clickyour Quick Access toolbar and choose Customize QuickAccess Toolbar, which displays the Quick Access Toolbar tab of the Excel Options dialog box. In the Choose Commands From drop-down menu, select Macros. Then select the GetData macro and click Add. If you like, you can click the Modify button and change the icon. You can also make the Quick Access Toolbar icon visible only when the appropriate workbook is activated. Before you add the macro, use the drop-down control at the top-right of the Excel Options dialog box to specify the workbook name, rather than For All Documents (Default).
Trying out your dialog boxFollow these steps to test your dialog box:
1. Click the Data Entry button on the worksheet. Or click the Quick
Access toolbar icon if you set one up.The dialog box appears, as shown in Figure 18-2.
287
Figure 18-2: Executing the GetData procedure displays the dialog box.

www.it-
2. Enter some text into the edit box.3. Click Enter or Close.Nothing happens — which
is understandable because you haven’t created any procedures yet.

288 Part IV: Communicating with Your Users
4. Click the “X” button in the dialog box’s title bar to get rid of the dialog box.
Adding event-handler proceduresIn this section, I explain how to write the procedures that handle the events that occur when the dialog box is displayed.
1. Press Alt+F11 to activate the VBE and then make sure that the
UserForm is displayed.2. Double-click the Close button on the UserForm.
The VBE activates the Code window for the UserForm and provides an empty procedure namedCloseButton_Click.
3. Modify the procedure as follows:Private Sub
CloseButton_Click() Unload UserForm1
End Sub
This procedure, which is executed when the user clicks the Close button, simply unloads the dialog box from memory.
4. Press Shift+F7 to redisplayUserForm1.
5. Double-click the Enter button and enter the following procedure:
Private Sub EnterButton_Click()Dim NextRow As Long
‘ Make sure Sheet1 is activeSheets(“Sheet1”).Activate
‘ Determine the next empty rowNextRow = Application.WorksheetFunction. _
CountA(Range(“A:A”)) + 1

‘ Transfer the nameCells(NextRow, 1) = TextName.Text
‘ Transfer the sexIf OptionMale Then Cells(NextRow, 2) = “Male”If OptionFemale Then Cells(NextRow, 2) = “Female”If OptionUnknown Then Cells(NextRow, 2) =
“Unknown”
‘ Clear the controls for the next entry
TextName.Text= “”
OptionUnknown =True
TextName.SetFocus
End Sub
www.it-ebooks.info
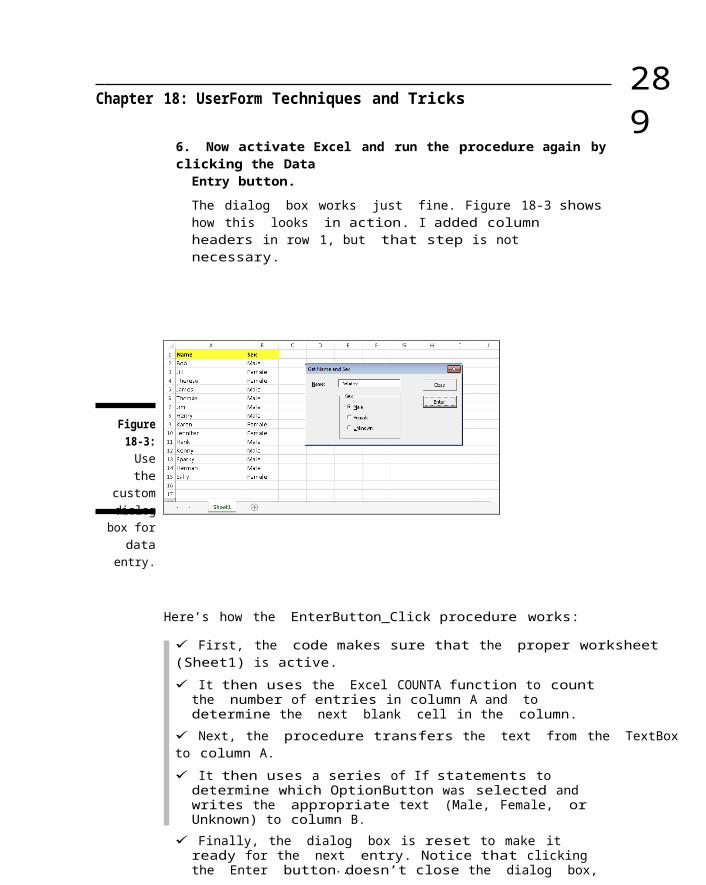
www.it-
Chapter 18: UserForm Techniques and Tricks
6. Now activate Excel and run the procedure again byclicking the Data
Entry button.The dialog box works just fine. Figure 18-3 showshow this looks in action. I added column headers in row 1, but that step is not necessary.
289
Figure18-3:Usethe
customdialog
box fordata
entry.
Here’s how the EnterButton_Click procedure works:
✓ First, the code makes sure that the proper worksheet (Sheet1) is active.✓ It then uses the Excel COUNTA function to count
the number of entries in column A and to determine the next blank cell in the column.
✓ Next, the procedure transfers the text from the TextBox to column A.✓ It then uses a series of If statements to determine which OptionButton was selected and writes the appropriate text (Male, Female, or Unknown) to column B.
✓ Finally, the dialog box is reset to make it ready for the next entry. Notice that clicking the Enter button doesn’t close the dialog box,

www.it-
because the user will probably want to enter more data. To end data entry, click the Close button.
Validating the dataPlay around with this routine some more, and you find that the macro has a small problem: It doesn’tensure that the user actually enters a name into the TextBox. The following code — which is inserted in the EnterButton_Click procedure before the text is transferred to the worksheet — ensures thatthe user enters some text in the TextBox. If the TextBox is empty, a message appears, and the routine stops. The dialog box remains open, however, so the user can correct the problem.

www.it-
290 Part IV: Communicating with Your Users
‘ Make sure a nameis entered
If TextName.Text = “” ThenMsgBox “You must enter
a name.”ExitSub
End If
Now the dialog box worksAfter making these modifications, you find that the dialog box works flawlessly. In real life, you’d probably need to collect more information than just name and sex. However, the same basic principles apply. You just have to deal with more UserForm controls.
One more thing to remember: If the data doesn’t begin in row 1 or if the data area contains any blank rows, the counting for the NextRow variable will be wrong. The COUNTA function is counting the number of cells in column A,and the assumption is that there are no blank cellsabove the last name in the column. Here’s another way of determining the next empty row:
NextRow = Cells(Rows.Count,1).End(xlUp).Row + 1
The statement simulates activating the last cell in column A, pressing End, pressing Up Arrow, and then moving down one row. If you do that manually, the cell pointer will be in the next empty cell in column A — even if the data area doesn’t begin in row 1 and contains blank rows.
More UserForm ExamplesI could probably fill an entire book with interesting and useful tips for working with custom

www.it-
dialog boxes, but this book has a limited number of pages, so I wrap it up with a few more examples.
A ListBox exampleListBoxes are useful controls, but working with them can be a bit tricky. Before displaying a dialog box that uses a ListBox, fill the ListBox with items.Then when the dialog box is closed, you need to determine which item(s) the user selected.
When dealing with ListBoxes, you need to know about the following properties and methods:

www.it-
Chapter 18: UserForm Techniques and Tricks
291
✓ AddItem: You use this method to add an item to a ListBox.✓ ListCount: This property returns the number of items in the ListBox.✓ ListIndex: This property returns the index number of the selected item or sets the item that’s selected (single selections only). The first item has a ListIndex of 0 (not 1).
✓ MultiSelect: This property determines whether the user can select more than one item from the ListBox.
✓ RemoveAllItems: Use this method to remove all items from aListBox.✓ Selected: This property returns an array indicating selected items
(applicable only when multipleselections are allowed).
✓ Value: This property returns the selected item in a ListBox.
Most of the methods and properties that work with ListBoxes also work with ComboBoxes. So after you’ve figured out how to handle ListBoxes, you can transfer that knowledge to your work with ComboBoxes.
Filling a ListBoxFor best results, start with an empty workbook. The example in this section assumes the following:
✓ You’ve added a UserForm.✓ The UserForm contains a ListBox control named ListBox1.✓ The UserForm has a CommandButton named OKButton.✓ The UserForm has a CommandButton named CancelButton, which has the following event-handler procedure:Private Sub
CancelButton_Click()Unload UserForm1
End Sub
www.it-
The following procedure is stored in the Initialize procedure for theUserForm:
1. Select your UserForm and press F7 to activate its Code window.
The VBE displays the Code window for your form andis ready for you to input the code for the Initialize event.
2. Using the Procedure drop-down list at the top of the Code window, choose Initialize.

www.it-
292 Part IV: Communicating with Your Users
3. Add the initialization code for the form:Sub UserForm_Initialize()‘ Fill the list box
WithListBox1
.AddItem“January”.AddItem
“February”.AddItem“March”.AddItem“April”.AddItem
“May”.AddItem“June”.AddItem“July”.AddItem“August”.AddItem
“September”.AddItem“October”.AddItem“November”.AddItem“December”
EndWith
‘ Select the first list itemListBox1.ListInd
ex = 0End Sub
This initialization routine runs automaticallywhenever your UserFormis loaded. So when you use the Show method forthe UserForm, the code is executed and yourListBox is populated with 12 items, each addedvia the AddItem method.
4. Insert a VBA module and type a short Sub procedure to display the dialog box:Sub
ShowList()UserForm1.Show
End Sub

www.it-
Determining the selected itemThe preceding code merely displays a dialog box with a ListBox filled with month names. What’s missing is a procedure to determine which item in the ListBox is selected.
Add the following to theOKButton_Click procedure:
Private Sub OKButton_Click() Dim Msg As StringMsg = “You selected item # “ Msg = Msg & ListBox1.ListIndex Msg= Msg & vbNewLineMsg = Msg & ListBox1.ValueMsgBox MsgUnload UserForm1
End Sub

www.it-
Chapter 18: UserForm Techniques and Tricks
293
This procedure displays a message box with the selected item number and the selected item.
If no item in the ListBox is selected, the ListIndexproperty returns –1. However, this will never be thecase for this particular ListBox, because code in the UserForm_Initialize procedure selected the first item. It’s impossibleto unselect an item without selecting another item.So, there will always be a selected item, if the userdoesn’t actually select a month.
Figure 18-4 shows how this looks.
Figure18-4:
Determining
whichitem in
a ListBoxis
selected.
The first item in a ListBox has a ListIndex of 0, not 1 (as you might expect). This is always the case, even if you use an Option Base 1 statement to change the default lower bound for arrays.
This example is available at this book’s website.
Determining multiple selections

www.it-
If your ListBox is set up so the user can select more than one item, you find that the ListIndex property returns only the last item selected. To determine all selected items, you need to use the Selected property, which contains an array.
To allow multiple selections in a ListBox, set the MultiSelect property to either1 or 2. You can do so at design time by using the Properties window or at runtime by using a VBA statement such as this:
UserForm1.ListBox1.MultiSelect = 1
The MultiSelect property has three possible settings. The meaning of each is shown in Table 18-1.

294 Part IV: Communicating with Your Users
Table 18-1 Settings for the MultiSelect propertyValue VBA Constant Meaning0 fmMultiSelectSingle Only a single item can be selected.1 fmMultiSelectMulti Clicking an item or pressing the spac
bar selects or deselects an item i2 fmMultiSelectExtended Items are added to or removed from
selection set by holding down the Shifor Ctrl key as you click items.
The following procedure displays a message box that lists all selected items in a ListBox. Figure 18-5 shows an example.
Figure18-5:
Determining theselected items
ina
ListBoxallowsmultipl
eselecti
ons.
Private Sub OKButton_Click() Dim Msg As StringDim i As IntegerDim Counter As IntegerMsg = “You selected:” & vbNewLineFor i = 0 To ListBox1.ListCount - 1

IfListBox1.Selected(i
) ThenCounter = Counter + 1Msg = Msg & ListBox1.List(i) & vbNewLine
EndIf
Next iIf Counter = 0 Then Msg = Msg & “(nothing)”MsgBox MsgUnload UserForm1
End Sub
www.it-ebooks.info

www.it-
Chapter 18: UserForm Techniques and Tricks
This routine uses a For-Next loop to cycle through each item in the ListBox. Notice that the loop starts with item 0 (the first item) and ends with the last item (determined by the value of the ListCount property minus 1). If an item’s Selected property is True, it means that the list item was selected. The code also uses a variable (Counter) to keep track of how many items are selected. An If-Then statement modifies the message if nothing is selected.
This example is available at this book’s website.
Selecting a rangeIn some cases, you may want the user to select a range while a dialog box is displayed. An example ofthis type of range selection occurs in the Create Table dialog box, which is displayed when you choose Home➪Insert➪ Tables➪Table. The Create Table dialog box has a range selector control thatcontains Excel’s guess regarding the range to be converted — but you can use this control to change the range by selecting cells in the worksheet.
To allow a range selection in your dialog box, add a RefEdit control. The following example displays a dialog box with the current region’s range addressdisplayed in a RefEdit control, as shown in Figure 18-6. The current region is the block of nonempty cells that contains the active cell. The user can accept or change this range. When the user clicks OK, the procedure makes the range bold.
295

www.it-
Figure18-6:This
dialogbox
letstheuser
selecta
range.

www.it-
296 Part IV: Communicating with Your Users
This example assumes the following:
✓ You have a UserForm named UserForm1.✓ The UserForm contains a CommandButton control named OKButton.✓ The UserForm contains a CommandButton control named CancelButton.✓ The UserForm contains a RefEdit control named RefEdit1.
The code is stored in a VBA module and shown here. This code does two things: initializes the dialog box by assigning the current region’s address to the RefEdit control and displays the UserForm.
Sub BoldCells()‘ Exit if worksheet is not active
If TypeName(ActiveSheet) <> “Worksheet” Then Exit Sub
‘ Select the current regionActiveCell.CurrentRegion.Select
‘ Initialize RefEdit controlUserForm1.RefEdit1.Text = Selection.Address
‘ Show dialogUserForm1.Show
End Sub
The following procedure is executed when the OKbutton is clicked. This procedure does somesimple error checking to make sure that therange specified in the RefEdit control is valid.
Private Sub OKButton_Click() On Error GoTo BadRange Range(RefEdit1.Text).Font.Bold = True Unload UserForm1Exit Sub
BadRange:MsgBox “The specified range is not valid.”
End Sub
If an error occurs (most likely an invalid range specification in the RefEdit control), the code

www.it-
jumps to the BadRange label, and a message box is displayed. The dialog box remains open so the user can select another range.
If getting a user selected range is the only functionperformed by your UserForm, you can simplify things by using the Application InputBox method. See Chapter 15.

www.it-
Chapter 18: UserForm Techniques and Tricks
Using multiple sets of OptionButtonsFigure 18-7 shows a custom dialog box with three setsof OptionButtons. If your UserForm contains more thanone set of OptionButtons, make sure that each set of OptionButtons works as a group. You can do so in either of two ways:
✓ Enclose each set of OptionButtons in a Frame control. This approach is the easiest and also makes the dialog box look more organized.It’s easier to add the Frame before adding the OptionButtons. You can, however, also dragexisting OptionButtons into a Frame.
✓ Make sure that each set of OptionButtons has a unique GroupName property (which you specify in the Properties box). If the OptionButtons are ina Frame, you don’t have to be concerned with the GroupName property.
297
Figure 18-7:Thi
s dialogbox
containsthree
sets ofOptionButton
controls.
Only one OptionButton in a group can have a value of True. To specify a default option for a set of OptionButtons, just set the Value property for the default item to True. You can do this directly in theProperties box or by using VBA code:
UserForm1.OptionButton1.Value = True

www.it-
This example is available at this book’s websi
te. It also has code that displays the selected options when the user clicks OK.
Using a SpinButton and a TextBoxA SpinButton control lets the user specify a number by clicking arrows. This control consists only of arrows (no text), so you usually want a method to
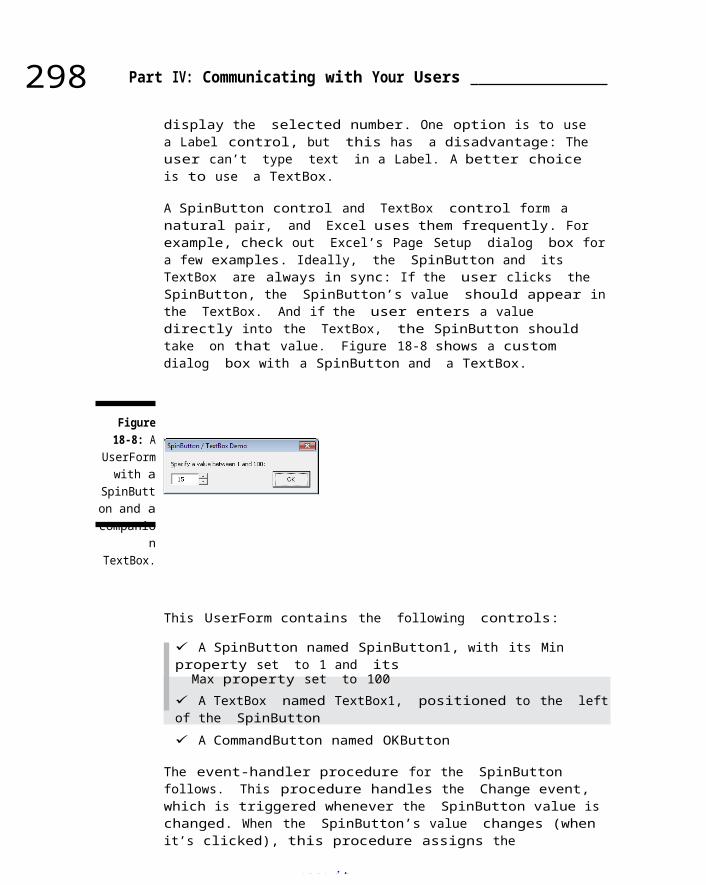
www.it-
298 Part IV: Communicating with Your Users
display the selected number. One option is to use a Label control, but this has a disadvantage: The user can’t type text in a Label. A better choice is to use a TextBox.
A SpinButton control and TextBox control form a natural pair, and Excel uses them frequently. For example, check out Excel’s Page Setup dialog box fora few examples. Ideally, the SpinButton and its TextBox are always in sync: If the user clicks the SpinButton, the SpinButton’s value should appear inthe TextBox. And if the user enters a value directly into the TextBox, the SpinButton should take on that value. Figure 18-8 shows a custom dialog box with a SpinButton and a TextBox.
Figure18-8: A
UserFormwith a
SpinButton and acompanio
nTextBox.
This UserForm contains the following controls:
✓ A SpinButton named SpinButton1, with its Min property set to 1 and its
Max property set to 100✓ A TextBox named TextBox1, positioned to the left of the SpinButton✓ A CommandButton named OKButton
The event-handler procedure for the SpinButton follows. This procedure handles the Change event, which is triggered whenever the SpinButton value is changed. When the SpinButton’s value changes (when it’s clicked), this procedure assigns the

www.it-
SpinButton’s value to the TextBox. To create this procedure, double-click the SpinButton to activate the Code window for the UserForm. Then enter this code:
Private Sub SpinButton1_Change() TextBox1.Text = SpinButton1.Value
End Sub
The event-handler for the TextBox, which is listed next, is a bit more complicated. To create this procedure, double-click the TextBox to activate the Code window for the UserForm. This procedure is executed whenever the user changes the text in the TextBox.

www.it-
Chapter 18: UserForm Techniques and Tricks
299
Private Sub TextBox1_Change() Dim NewVal As Integer
NewVal = Val(TextBox1.Text)If NewVal >= SpinButton1.Min And _
NewVal <= SpinButton1.Max Then _SpinButton1.Value = NewVal
End Sub
This procedure uses a variable, which stores the text in the TextBox (converted to a value with the Val function). It then checks to ensure that the value is within the proper range. If so, the SpinButton is set to the value in the TextBox. The net effect is that the SpinButton’s value is always equal to the value in the TextBox (assuming that the SpinButton’s value is in the proper range).
If you use F8 to single-step through the code in debugging mode, you will notice that when the line SpinButton1.Value = NewVal is executed, the change event of the SpinButton immediately fires. In turn, the SpinButton1_Change event sets the value of TextBox1. Luckily, this in turn does not fire the TextBox1_Change event, because its value is not actually changed by the SpinButton1_Change event. Butyou can imagine this effect can cause surprising results in your UserForm. Confused? Just remember that if your code changes the Value of a control, the Change event of that control will fire.
This example is available at this book’s website. It also has a few other bells and whistles that you may find useful.
Using a UserForm as a progress indicator
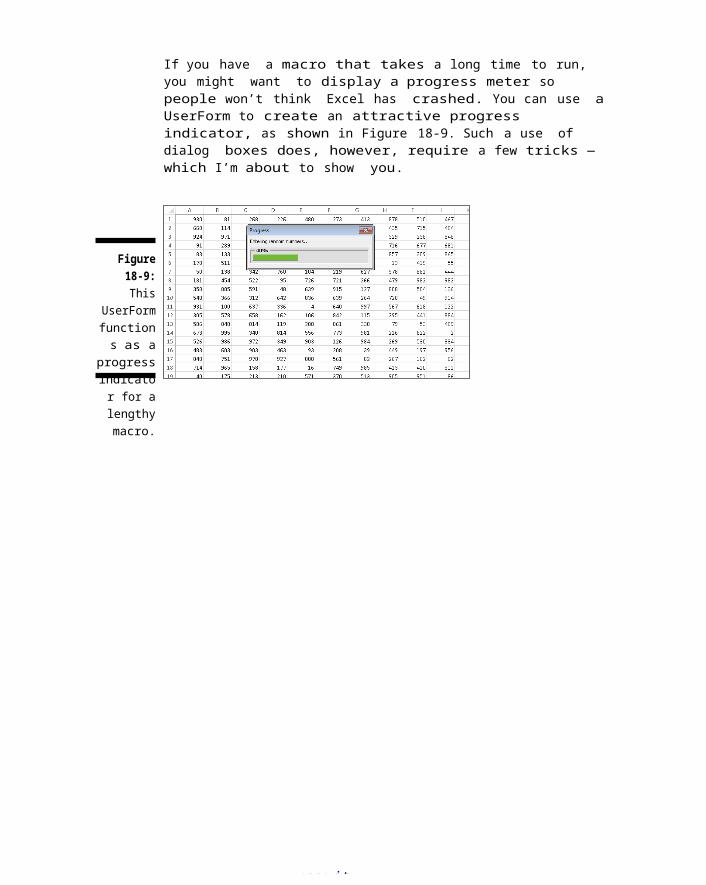
www.it-
If you have a macro that takes a long time to run, you might want to display a progress meter so people won’t think Excel has crashed. You can use aUserForm to create an attractive progress indicator, as shown in Figure 18-9. Such a use of dialog boxes does, however, require a few tricks — which I’m about to show you.
Figure18-9:This
UserFormfunctions as a
progressindicator for alengthymacro.

www.it-
300 Part IV: Communicating with Your Users
Creating the progress indicator dialog boxThe first step is to create your UserForm. In this example, the dialog box displays the progress while a macro inserts random numbers into 100 columns and 1,000 rows of the active worksheet. To create the dialog box, follow these steps:
1. Activate the VBE and insert a new UserForm.2. Change the UserForm’s caption to Progress.3. Add a Frame object and set the following properties:
Property ValueCaption 0%Name FrameProgress SpecialEffect 2 — fmSpecialEffectSunken Width 204Height 28
4. Add a Label object inside the Frame and set the following properties:
Property ValueName LabelProgress BackColor &H000000FF& (red) Caption (no caption)SpecialEffect 1 — fmSpecialEffectRaisedWidth 20Height 13Top 5Left 2
5. Add another Label above the frame and change its caption to Entering random numbers. . .The UserForm should resemble Figure 18-10.

www.it-
Figure18-10:
Theprogre
ssindicat
orUserFor
m.

www.it-
Chapter 18: UserForm Techniques and Tricks
301
The proceduresThis example uses two procedures and a
module level variable.
✓ The module level variable. Located in a VBA module. This variable holds the copy of the UserForm:Dim ProgressIndicator as UserForm1
✓ EnterRandomNumbers. It does all the work and is executed when the UserForm is shown. Notice that it calls the UpdateProgress procedure, which updates the progress indicator in the dialog box:Sub EnterRandomNumbers ()‘ Inserts random numbers on the active worksheet
Dim Counter As LongDim RowMax As Long, ColMax As LongDim r As Long, c As LongDim PctDone As Single
‘ Create a copy of the form in a variable
Set ProgressIndicator = New UserForm1
‘ Show ProgressIndicator in modeless state
ProgressIndicator.Show vbModelessIf TypeName(ActiveSheet) <> “Worksheet” Then
Unload ProgressIndicatorExit Sub
End If
‘ Enter the random numbersCells.ClearCounter = 1RowMax = 200ColMax = 50For r = 1 To RowMax
For c = 1 To ColMaxCells(r, c) =Int(Rnd * 1000)Counter =
Counter + 1Next cPctDone = Counter / (RowMax * ColMax)Call UpdateProgress(PctDone)

www.it-
Next rUnload ProgressIndicatorSet ProgressIndicator = Nothing
End Sub

www.it-
302 Part IV: Communicating with Your Users
✓ UpdateProgress. This procedure accepts one argument and updates the progress indicator in the dialog box:Sub
UpdateProgress(pct) With ProgressIndicator
.FrameProgress.Caption = Format(pct, “0%”).LabelProgress.Width = pct * (.FrameProgress _
.Width -10)
EndWith
‘ The DoEvents statement is responsible for the form
updating
DoEvents
End Sub
How this example worksWhen the EnterRandomNumbers procedure is executed,it loads a copy of UserForm1 into the module variable named ProgressIndicator. Then it sets the width of the LabelProgress label to 0 and displays the UserForm in modeless state (so the code will continue to run).
The EnterRandomNumber procedure checks the activesheet. If it’s not a worksheet, the UserForm (ProgressIndicator) is closed, and the procedureends with no action. If the active sheet is a worksheet, the procedure does the following:
1. Erases all cells on the active worksheet.2. Loops through the rows and columns (specified by the RowMax and
ColMax variables) and inserts a random number.3. Increments the Counter variable and calculates the percentage completed (which is stored in the PctDone variable).

www.it-
4. Calls the UpdateProgress procedure, which displays the percentage completed by changing the width of the LabelProgress label and updating the caption of the frame control.
5. Last, the UserForm is unloaded.
Using a progress indicator will, of course, make yourmacro run a bit slower because the code is doing additional work updating the UserForm. If speed is absolutely critical, think twice about using a progress indicator.
If you adapt this technique for your own use, you need to figure out how to determine the macro’s progress, which varies depending on your macro. Then call the UpdateProgress procedure at periodic intervals while your macro is executing.

www.it-
Chapter 18: UserForm Techniques and Tricks
This example is available at this book’s website.
Creating a modeless tabbed dialog boxTabbed dialog boxes are useful because they let you present information in small, organized chunks.Excel’s Format Cells dialog box (which is displayed when you right-click a cell and choose Format Cells)is a good example. The dialog box in this example uses three tabs to help organize some of Excel’s display options.
Creating your own tabbed dialog boxes is relativelyeasy, thanks to the MultiPage control. Figure 18-11 shows a custom dialog box that uses a MultiPage control with three pages, or tabs. When the user clicks a tab, a new page is activated, and only the controls on that page are displayed.
303
Figure 18-11: The three tabs of a MultiPage control.

www.it-
Notice that this is a modele
ss dialog box. In other words, the user can keep itdisplayed while working. Each of the controls has animmediate effect, so there is no need to have an OK button. Here’s the procedure that displays the UserForm so it stays on top:
Sub ShowDialog() UserForm1.Show vbModeless
End Sub

www.it-
304 Part IV: Communicating with Your Users
Modeless UserForms work a bit differently in Excel 2013, due to the single document interface (every workbook displays in its own separate window). With previous versions of Excel, a modeless UserForm stays on top regardless of which workbook is active.In Excel 2013, a modeless UserForm only stays on top of the workbook window that was active when the UserForm was displayed.
Keep the following points in mind when using the MultiPage control to create a tabbed dialog box:
✓ Use only one MultiPage control per dialog box.✓ Make sure to use the MultiPage control, not the TabStrip control. TheTabStrip control is more difficult to use.
✓ To make some controls (such as OK, Cancel, or Close buttons) visible at all times, place thesecontrols outside the MultiPage control.
✓ Right-click a tab on the MultiPage control to display a shortcut menu that lets you add, remove, rename, or move a tab.
✓ At design time, click a tab to activate the page. After it is activated, add other controlsto the page by using normal procedures.
✓ To select the MultiPage control itself (rather than a page on the control), click the border of the MultiPage control. Keep your eye on the Properties window, which displays the name and type of the selected control. You can also select the MultiPage control by selecting its name from the drop-down list in the Properties window.
✓ You can change the look of the MultiPage control by changing the Style and TabOrientation properties.
✓ The Value property of a MultiPage control determines which page is displayed. For example, if you write code to set the Value property to 0, the first page of the MultiPage control is displayed.
This example is available at this book’s website.

www.it-
Displaying a chart in a UserFormIf you need to display a chart in a UserForm, you find that Excel doesn’t provide any direct way to do so. Therefore, you need to get creative. This section describes a technique that lets you display one or more charts in a UserForm.
Figure 18-12 shows an example that displays three charts. The UserFormhas an Image control. The trick is to use VBA code to save the chart as a GIF file and then specify that file as the Image control’s Picture property (which loads the image from your disk). The Previous and Next buttons switch the displayed chart.

www.it-
Chapter 18: UserForm Techniques and Tricks
Figure 18-12:
Displaying achartin a
UserForm.
In this example, which is also available on this book’s website, the threecharts are on a sheet named Charts. The Previous andNext buttons determine which chart to display, and this chart number is stored as a Public variable named ChartNum, which is accessible to all procedures. A procedure named UpdateChart, which is listed here, does the actual work.
Private Sub UpdateChart()Dim CurrentChart As ChartDim Fname As String
Set CurrentChart = _ Sheets(“Charts”).ChartObjects(ChartNum).Chart
CurrentChart.Parent.Width = 300CurrentChart.Parent.Height = 150
‘ Save chart as GIFFname = ThisWorkbook.Path & “\temp.gif”CurrentChart.Export FileName:=Fname, FilterName:=”GIF”
‘ Show the chartImage1.Picture = LoadPicture(Fname)
End Sub
This procedure determines a name for the savedchart and then uses the Export method to export
theGIFfile.Finally,itusestheVBALoadPicturefunctiontospecifythePicturepropertyoftheImageobject.

www.it-
A Dialog Box ChecklistI wrap up this chapter with a checklist for use when creating dialog boxes:
✓ Are the controls aligned with each other?✓ Are similar controls the same size?
305

www.it-
306 Part IV: Communicating with Your Users
✓ Are controls evenly spaced?✓ Does the dialog box have an appropriate caption?✓ Is the dialog box overwhelming? If so, you may
want to use a series of dialog boxes or dividethem over a MultiPage control.
✓ Can the user access every control with an accelerator key?✓ Are any accelerator keys duplicated?✓ Are the controls grouped logically, by function?✓ Is the tab order set correctly? The user should be able to tab through the dialog box and access the controls sequentially.
✓ If you plan to store the dialog box in an add-in, did you test it thoroughly after creating the add-in?
✓ Will your VBA code take appropriate action if the user cancels the dialog box, presses Esc, oruses the Close button?
✓ Does the text contain any misspellings?Unfortunately, the Excel spell checker doesn’twork with UserForms, so you’re on your own whenit comes to spelling.
✓ Will your dialog box fit on the screen in thelowest resolution to be used (usually 1024×768mode)? In other words, if you develop your dialogbox by using a high-resolution video mode, yourdialog box may be too big
to fit on a lowerresolution screen.
✓ Do all TextBox controls have the appropriate validation setting? If you intend to use the WordWrap property, is the MultiLine property also set to True?
✓ Do all ScrollBars and SpinButtons allow valid values only?✓ Do all ListBoxes have their MultiSelect property set properly?
The best way to master custom dialog boxes is by creating dialog boxes — lots of them. Start simply and experiment with the controls and their properties. And don’t forget about the Help

www.it-
system; it’s your best source for details about every control and property.
B
www.it-
Chapter19
Accessing Your Macrosthrough the User
InterfaceIn This Chapter▶ Getting a sneak peek into customizing the Ribbon using XML▶ Adding items to a right-click menu▶ Adding a button to the Quick Access toolbar (manually)▶ Customizing the Ribbon (manually)
efore Office 2007, there was no such thing as a Ribbon. Back then, people used drop-down menus and toolbars. Now, the Ribbon is the
user interface for Microsoft Office.
You might expect to be able to create custom Ribboncommands using VBA. The bad news is that you can’t use VBA to modify the Ribbon. The good news is thatyou’re not completely out of luck. This chapter describes some of the ways to work with Excel’s user interface.
Ribbon CustomizationThis section describes ways to customize the Ribbon. You can modify the Ribbon manually, but you

www.it-
cannot make changes to the Ribbon by using VBA. Sad,but true. For example, if you write an application and you’d like to add a few new buttons to the Ribbon, you need to program those changes outside of Excel, using something called RibbonX.
Customizing the Ribbon manuallyIt’s very easy to make changes to the Ribbon manually, but you must beusing Excel 2010 or Excel 2013. If you use Excel 2007, you should just skip this section because it doesn’t apply to you.

www.it-
308 Part IV: Communicating with Your Users
You can customize the Ribbon in these ways:
✓ Tabs • Add a new custom tab. • Delete custom tabs. • Add a new group to tab. • Change the order of thetabs. • Change the name of a tab. • Hide built-in tabs.
✓ Groups • Add new custom groups. • Add commands to a custom group. • Remove commands from custom groups. • Remove groups from a tab. • Move a group to a different tab. • Change the order of thegroups within a tab. • Change the name of a group.
That’s a fairly comprehensive list of customization options, but there are some actions that you cannot do (no matter how hard youtry):
✓ You cannot remove built-in tabs — but you can hidethem.✓ You cannot remove commands from built-in groups.✓ You cannot change the order of commands in a built-in group.

www.it-
You make manual changes to the Ribbon in the Customize Ribbon panel of the Excel Options dialog box (see Figure 19-1). The quickest way todisplay this dialog box is to right-click anywhere inthe Ribbon and chooseCustomize The Ribbon.
The process of customizing the Ribbon is very similar to customizing the Quick Access toolbar, which is described later in this chapter. The only difference is that you need to decide where to put the command within the Ribbon. The generalprocedure is
1. Use the drop-down list on the left (labeled ChooseCommands From)
to display various groups of commands.2. Locate the command in the list box on the left andselect it.3. Use the drop-down list on the right (labeled Customize The Ribbon) to choose a group of tabs.

www.it-
Chapter 19: Accessing Your Macros through the User Interface
Main tabs refer to the tabs that are always visible; Tool tabs refer to the context tabs that appear when a particular object is selected.
4. In the list box on the right, select the tab and the group where you would like to put the command.You’ll need to click the “plus sign” controls toexpand the hierarchical lists.
5. Click the Add button to add the selected commandfrom the left to the group on the right.
309
Figure19-1: TheCustomize Ribbontab of
theExcel
Optionsdia- log
box.Keep in mind that you can use the New Tab button to create a new tab, and the New Group button to create a new group within a tab. New tabs and groups are given generic names, so you’ll probably want to give them more meaningful names. Use the Rename button to rename the selected tab or group. You can also rename built-in tabs and groups.
Figure 19-2 shows a custom group (named Text To Speech) that I added to the View tab. This group

www.it-
h as five commands.
Figure19-2:
The Viewtab,
afteraddinga newgroupnamed
Text ToSpeech.

www.it-
310 Part IV: Communicating with Your Users
Although you cannot remove a built-in tab, you can hide the tab by unchecking the check box next to its name.
Adding a macro to the RibbonFortunately, you can also add macros to the Ribbon. Follow the instructions in the previous section, but in Step 1 choose Macros from the drop-down list on the left. All of the currently available macros are listed, ready to be added to the Ribbon. You just need to decide on a tab and group for the macro.
If you customize the Ribbon to include a macro, the macro command in the Ribbon is visible even when theworkbook that contains the macro is not open. Clicking the command will open the workbook that contains the macro.
If you add a button to the Ribbon that executes a macro, that Ribbon modification applies to your copy of Excel only. The Ribbon modifications are notpart of the workbook. In other words, if you give your workbook to a colleague, the Ribbon customizations you made will not appear on the colleague’s system.
Customizing the Ribbon with XMLIn some situations, you may want to modify the Ribbon automatically, whena workbook or add-in is opened. Doing so makes it easy for the user to access your macro. It also eliminates the need for the user to modify the Ribbon manually by using the Excel Options dialog box.

www.it-
Making automatic changes to the Ribbon can be done with Excel 2007 and later versions, but it’s not a simple task. Modifying the Ribbon involves writing XML code in a text editor, copying that XML file intothe workbook file, editing a bunch of XML files (which also are stashed away inside the new Excel file format, which in reality is nothing more than azipped container of individual files), and then writing VBA procedures to handle the clicking of the controls you put in the XML file.
Fortunately, software is available to assist you with customizing the Ribbon —but you still need to be on familiar terms with XML.
You can download a sample file from this book’s website, which contains this customization. If you’dlike to create it yourself, follow these steps exactly:
1. Create a new Excel workbook.2. Save the workbook and name it ribbon modification.xlsm.3. Close the workbook.

Chapter 19: Accessing Your Macros through the User Interface
311
Get the softwareIf you’d like to follow alongwith the Ribbon customizationexample, you need to down-load a small program calledCustom UI Editor for MicrosoftOffice. This free programgreatly simplifies theprocess of customizing theRibbon in Microsoft Officeapplications. Using thissoftware still requires a lotof work, but it’s a lot easierthan doing it manually.The download location tendsto change, so you should justsearch the web for “Custom UI
Editor for Microsoft Office” tofind the software. It’s a smalldownload, and it’s free.Explaining all the intricatedetails involved incustomizing the Ribbon iswell beyond the scope of thisbook. However, I walk youthrough a quick example thatdemonstrates the stepsrequired to add a new Ribbongroup to the Home tab. The newRibbon group is named Excel VBA ForDummies, and it contains onebutton, labeled Click Me.Clicking that button runs a VBAmacro named ShowMessage.
4. Launch the Custom UI Editor for Microsoft Office.If you don’t have this software, you need to find it and install it. Refer to the sidebar, “Get the software,” earlier in this chapter.
5. In the Custom UI Editor, choose File➪Open and find the workbook you saved in Step 2.
6. Choose Insert➪Office 2007 Custom UI Part.Choose this command even if you’re using Excel 2010 or Excel 2013.
7. Type the following code into the code panel (named customUI.xml)displayed in the Custom UI Editor (see Figure 19-3):<customUI xmlns=’http://schemas.microsoft.com/
office/2006/01/customui’><ribbon><tabs>

<tab idMso=’TabHome’><group id=’Group1’ label=’Excel VBA For Dummies’>
<buttonid=’Button1’label=’Click Me’size=’large’onAction=’ShowMessage’imageMso=’FileStartWorkflow’ />
</group></tab></tabs></ribbon></customUI>
8. Click the Validate buttonin the toolbar.
If the code has any syntax errors, you will geta message that describes the problem. If any errors are identified, you must correct them.
www.it-ebooks.info

www.it-
312 Part IV: Communicating with Your Users
Figure19-3:
RibbonXcodedis-
playedin theCustom
UIEditor.
9. Click the Generate Callback button.The Custom UI Editor creates a VBA Sub procedurethat is executed when the button is clicked (see Figure 19-4). This procedure is not actuallyinserted into the workbook, so you need to copy it for later use (or memorize it if you have a good memory).
Figure19-4: The
VBAcallback
procedure that is executed by clicking the Ribbonbut- ton.

www.it-
10. Go back to the customUI.xml module and choose File➪Save (or click the Save icon in thetoolbar).
11. Close the file by using the File➪Close command.12. Open the workbook in Excel; click theHome tab.
You should see the newRibbon groupand Ribbon button. But it doesn’t work yet.
13. Press Alt+F11 to activate the VBE.14. Insert a
new VBA module and
paste (or type) the callback procedure that was generated in Step 9; add a MsgBox statement, so you’ll know if the procedure is actually being executed.

www.it-
Chapter 19: Accessing Your Macros through the User Interface
313
The procedure isSub ShowMessage(control As IRibbonControl)
MsgBox “Congrats. You found the new ribbon command.” End Sub
15. Press Alt+F11 to jump back to Excel; click the new button on the
Ribbon.If all goes well, you’ll see the MsgBox shown in Figure 19-5.
Figure19-5:Proofthat
addinga newRibbon
commandusing
XMLis
actually
possible.
In the Custom UI Editor, when you chooseInsert➪Office 2007 Custom UI Part, you insert a UIpart for Excel 2007. The Custom UI Editor also has anoption to insert a UI part for Excel 2010 (and atsome point, probably an option to insert a UI partfor Office 2013). For maximum compatibility, use theExcel 2007

www.it-
Custom UI Part.
You only need to insert a UI part for Excel 2010 (or Excel 2013) if you use features that are unique to Excel 2010 or (Excel 2013). You can also have a UI part for each version, but that’s rarely necessary.
As I was writing this, the schema for an Office 2013 custom UI part was not yet available.
You probably realize that making Ribbon modification using XML is not exactly intuitive. Evenwith a good tool to help (such as the Custom UI Editor), you still need to understand XML. If that sounds appealing to you, search the web or find a book devoted exclusively to customizing the Ribbon interface in Microsoft Office. This isn’t one of them.

www.it-
314 Part IV: Communicating with Your Users
Adding a button to the Quick Accesstoolbar
If you create a macro that youuse frequently, you may want toadd a new button to the QuickAccess toolbar. Doing so iseasy, but you must do itmanually. The Quick Accesstoolbar is intended to becustomized by end users only —not programmers. Here’s how todo it:1 . Right-click the Quick Accesstoolbar and select CustomizeQuick Access toolbar todisplay the Quick Accesstoolbar tab of the ExcelOptions dialog box .
2 . In the drop-down boxlabeled Choose
Commands From, select Macros .3 . Select your macrofrom the list .4 . Click the Add button, andthe macro is added to theQuick Access toolbar list onthe right .
5 . If you like, click theModify button to changethe icon and (optionally)the display name .
When you click a macro buttonon the Quick Access toolbar,the workbook that containsthe macro is opened (if it’snot already open). And themacro can be executed whenany workbook is open.You’ll also find an option todisplay the Quick Accesstoolbar button only when aparticular workbook is open.Before you add the macro, usethe drop-down control at thetop-right of the Excel Optionsdialog box and specify theworkbook name, rather than ForAll Documents (Default).If you have macros that areuseful for many differentworkbooks, storing them inyour Personal Macro Workbook isa good idea.
Because this XML stuff is way too complex for the beginner VBA programmer, the remainder of this chapter focuses on UI customization that uses the old method (VBA only). It’s not as slick as the Ribbon, but it’s a lot easier, and it still provides quick access to your macros.

www.it-
Customizing Shortcut MenusBefore Excel 2007, VBA programmers used the CommandBar object for creating custom menus, custom toolbars, and custom shortcut (right-click) menus.
Beginning with Excel 2007, the CommandBar object is in a rather odd position. If you write code to customize a menu or a toolbar, Excel intercepts that code and ignores many of your commands. Instead of displaying your well-thought-out interface enhancement, Excel 2007 (and later versions) simply dumps your customized menus and toolbars into a catchall Ribbon tab named Add-Ins.
Menu and toolbar customizations end up in the Add-Ins➪Menu Commandsor the Add-Ins➪Custom Toolbars group. But customizing right-click shortcut

www.it-
Chapter 19: Accessing Your Macros through the User Interface
315
menus (which also uses the CommandBar object) stillworks as it always has. That’s what I cover in the sections that follow.
Commanding the CommandBars collectionExcel supports three types of CommandBars, differentiated by their Type property. For shortcut menus, you’re interested in type 2, also known by its built-in constant name, msoBarTypePopup.
Listing all shortcut menusThe procedure listed here uses the CommandBars collection. It displays, in a worksheet, the names of all shortcut menus — CommandBars that have a Type property of 2 (msoBarTypePopup). For each CommandBar, the procedure lists its Index and Name.
Sub ShowShortcutMenusName() Dim Row As LongDim cbar As CommandBarRow = 1For Each cbar In Application.CommandBars
If cbar.Type = msoBarTypePopup ThenCells(Row, 1) = cbar.IndexCells(Row, 2) = cbar.NameRow = Row + 1
End IfNext cbar
End Sub
Figure 19-6 shows a portion of the result of running this procedure (using Excel 2013), which is available at this book’s website. For example, you see that the shortcut menu named Ply has an index of 42. That oddly named shortcut menu appears when

www.it-
you right-click a sheet tab. You might expect Ply tobe named Worksheet Tabs, but that one (CommandBar 36) displays a list of worksheet names.
Referring to CommandBarsIn theory, you can refer to a particular CommandBar by using its Index property or its Name property. Ifyou refer to Figure 19-6 you see that the Cell right-click menu has an Index of 10 or 39. This is because the content of the Cell right-click menu differs when Excel is in a different state. Number 10 is the one you get when Excel is in Normal view mode, number 39 shows when you are in Page Break Preview mode. You can refer to the shortcut menu ineither of two ways:

www.it-
316 Part IV: Communicating with Your Users
Application.CommandBars(10)
or
Application.CommandBars(“Cell”)
Figure19-6: A
VBAmacro
produced
thislist
of allshort-
cutmenu
names.
You might think that referring to CommandBars by using their Index property is better. Wrong! The problem is that the index numbers change with eachversion of Excel. If you write code to add a new itemto CommandBar 10, the code will fail in Excel 2010. In that version of Excel, the index number for the Cell right-click menu was 36. So, forget about referring to CommandBars by using index numbers, andrefer to them by name.
You can display a built-in, right-click menu using VBA (no right-clicking required!). The following

www.it-
statement, for example, causes the Cell right-click menu to display:
Application.Commandbars(“Cell”).ShowPopup
Referring to controls in a CommandBarA CommandBar object contains Control objects, whichare buttons, menus, or menu items. The following procedure displays the Caption property for the first Control in the Cell’s right-click menu:

www.it-
Chapter 19: Accessing Your Macros through the User Interface
317
Sub ShowCaption()MsgBox Application.CommandBars(“Cell”). _
Controls(1).CaptionEnd Sub
When you execute this procedure, you see the message box shown in Figure 19-7. The ampersand is used to indicate the underlined letter in the text — the keystroke that will execute the menu item.
Figure19-7:
Displaying theCaption
propertyfor a
control. In some cases, Control objects on a shortcut menucontain other Control objects. For example, the Sort control on the Cell right-click menu containsother controls.
Each control has a Name and an Id property. You can access a control by using either of these properties (locating a control by its Id is slightly more complex though):
Sub AccessControlByName()MsgBox CommandBars(“Cell”).Controls(“Copy”).Caption
End Sub
Sub AccessControlById()MsgBox CommandBars(“Cell”).FindControl(ID:=19).Caption
End Sub
Don’t use the Caption property to access a control if you are writing code that may be used by users with a different language version of Excel. The Caption

www.it-
is language-specific, so your code will fail on those users’ systems. Instead, use the FindControl method in conjunction with the Id of the control (which is language-independent). Luckily, the CommandBar names are not internationalized.
Properties of CommandBar controlsCommandBar controls have a number of properties that determine how the controls look and work. Thislist contains some of the more useful properties for CommandBar controls:

318 Part IV: Communicating with Your Users
✓ Caption: The text displayed for the control. If the control shows only an image, the Caption appears when you move the mouse over the control.
✓ FaceID: A number that represents a graphics image displayed next to the control’s text.
✓ BeginGroup: True if a separator bar appears before the control.✓ OnAction: The name of a VBA macro that executes
when the user clicks the control.✓ BuiltIn: True if the control is an Excel built-in control.✓ Enabled: True if the control
can be clicked.✓ Visible: True if the control is visible. Many of
the shortcut menus contain hidden controls.✓ ToolTipText: Text that appears when the user moves the mouse pointer over the control.
The ShowShortcutMenuItems procedure lists all the first-level controls on every shortcut menu. In addition, it identifies hidden controls by placing their Captions in angle brackets.
Sub ShowShortcutMenuItems()Dim Row As Long, Col As LongDim Cbar As CommandBarDim Ctl As CommandBarControlRow = 1Application.ScreenUpdating = FalseFor Each Cbar In Application.CommandBars
If Cbar.Type =msoBarTypePopup Then
Cells(Row, 1) = Cbar.IndexCells(Row, 2) = Cbar.NameCol = 3For Each Ctl In Cbar.Controls
IfCtl.Visible
ThenCells(Row, Col) = Ctl.Caption
ElseCells(Row, Col) = “<” & Ctl.Caption & “>”EndIf
Col = Col+ 1

Next CtlRow = Row +
1EndIf
Next CbarEnd Sub
Figure 19-8 shows a portion of the output when theprocedure is run using Excel 2013 (it will be different for Excel 2010). It’s not exactly the most fascinating reading, but you might find it informative — or at least a bit interesting.
www.it-ebooks.info

www.it-
Chapter 19: Accessing Your Macros through the User Interface
The ShowShortcutMenuItems procedure is available at this book’s website. If you run the macro, you can see that many of the shortcut menus contain hidden controls.
Figure19-8:
Listingall top-
levelcontrol
s inall
shortcut
menus.
319
This has been a quick and dirty overview of CommandBars. There’s a lot more to CommandBars, of course, but this is as far as I take it in this book. The next section provides some examples that may help clear up any confusion you have.
With the introduction of the new Ribbon user interface, a lot has changed. For amateur developers, some of the changes are for the better, and some for the worse. The possibilities

www.it-
for gaining control over the user interface by using just VBA are now very limited.
VBA Shortcut Menu ExamplesThis section contains a few examples of using VBA to manipulate the Excel right-click menus — commonly known as shortcut menus. These examples give you an idea of the types of things you can do,and they can all be modified to suit your needs.

www.it-
320 Part IV: Communicating with Your Users
Resetting all built-in, right-click menusThe following procedure resets all built-in toolbarsto their original state:
Sub ResetAll()Dim cbar As CommandBarFor Each cbar In Application.CommandBars
If cbar.Type = msoBarTypePopup Thencbar.Reset
cbar.Enabled =True
EndIf
Next cbarEnd Sub
This procedure will have no effect unless someone hasexecuted some VBAcode that adds items, removes items, or disables shortcut menus.
Adding a new item to theCell shortcut menuIn Chapter 16, I describe the Change Case utility. You can enhance that utility a bit by making it available from the Cell shortcut menu.
This example is available at this book’s website.
The AddToShortcut procedure adds a new menu item to the Cell shortcut menu. Recall that Excel has two Cell shortcut menus. This procedure modifies the normal right-click menu, but not the right-click menu that appears in Page Break Preview mode.
Sub AddToShortCut()Dim Bar As CommandBarDim NewControl As CommandBarButtonDeleteFromShortcut
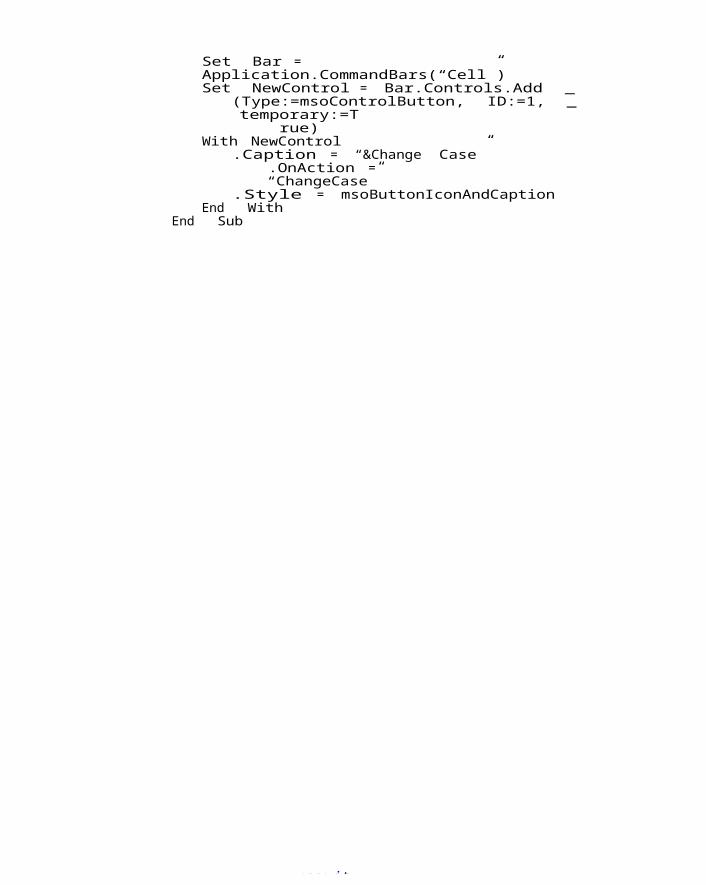
www.it-
Set Bar = Application.CommandBars(“Cell”)Set NewControl = Bar.Controls.Add _
(Type:=msoControlButton, ID:=1, _temporary:=T
rue)With NewControl
.Caption = “&Change Case”.OnAction =“ChangeCase”
.Style = msoButtonIconAndCaptionEnd With
End Sub

www.it-
Chapter 19: Accessing Your Macros through the User Interface
321
What’s different in Excel 2013?If you’ve used VBA to work withshortcut menus in previousversions of Excel, you need tobe aware of a significantchange.In the past, if your codemodified a shortcut menu, thatmodification was in effect forall workbooks. For example, ifyou added a new item to theCell right-click menu, thatnew item would appear whenyou right-clicked a cell inany workbook (plus, otherworkbooks that you open). Inother words, shortcut menumodifications were at theapplication level.Excel 2013 uses a singledocument interface, and thataffects shortcut menus. Changesthat you make to shortcutmenus affect only the activeworkbook window. When youexecute the code that modifiesthe shortcut menu, theshortcut menu for windowsother than the
active window will not bechanged. This is a radicaldeparture from how thingsworked in previous versions.And another twist: If the useropens a workbook (or creates anew workbook) when the activewindow displays the modifiedshortcut menu, then the newworkbook will also display themodified shortcut menu. Inother words, new windowsdisplay the same shortcutmenus as the window that wasactive when the new window wasopened.Bottom line: In the past,if you opened a workbook oradd-in that modifiedshortcut menus, you could beassured that the modifiedshortcut menus would beavailable in all workbooks.With Excel 2013, you no longerhave that assurance.
When you modify a shortcut menu, that modificationremains in effect until you restart Excel. In otherwords, modified shortcut menus don’t reset themselves when you close the workbook that contains the VBA code. Therefore, if you write code to modify a shortcut menu, you almost always

www.it-
write code to reverse the effect of your modification.
The DeleteFromShortcut procedure removes the new menu item from theCell shortcut menu.
Sub DeleteFromShortcut() On ErrorResume Next Application.CommandBars(“Cell”).Controls _(“&Change Case”).Delete
End Sub
Figure 19-9 shows the new menu item displayed after
right-clicking a cell. The first actual command
after the declaration of a couple of variables
callsthe DeleteFromShortcut procedure. This statement ensures that only one Change Case menu item appearson the shortcut Cell menu. Try commenting out thatline (put an apostrophe at the start of the line) and running the procedure a few times — now don’t get carried away! Right-click a cell, and you can seemultiple instances of the Change Case menu item. Get rid of all the entries by running DeleteFromShortcut multiple times (once for each extra menu item).

www.it-
322 Part IV: Communicating with Your Users
Figure19-9:TheCell
shortcut
menushowin
g acustom
menuitem:Chang
eCase.
Finally, you need a way to add the shortcut menu item when the workbook is opened and to delete the menu item when the workbook is closed. Doing this iseasy . . . if you’ve read Chapter 11. Just add these two event procedures to the ThisWorkbook code module:
Private Sub Workbook_Open() Call AddToShortCut
End Sub
Private Sub Workbook_BeforeClose(Cancel As Boolean) Call DeleteFromShortcut
End Sub

www.it-
The Workbook_Open procedure is executed when theworkbook is opened, and the Workbook_BeforeCloseprocedure is executed before the workbook isclosed. Just what the doctor ordered.
Disabling a shortcut menuIf you’re so inclined, you can disable an entire shortcut menu. For example, you can make it so thatright-clicking a cell does not display the normal shortcut menu. The following procedure, which is executed automatically when the workbook is opened, disables the Cell shortcut menu:

www.it-
Chapter 19: Accessing Your Macros through the User Interface
323
Private Sub Workbook_Open() Application.CommandBars(“Cell”).Enabled = False
End Sub
And here’s its companion procedure that enables the shortcut menu when the workbook is closed.
Private Sub Workbook_BeforeClose(Cancel As Boolean) Application.CommandBars(“Cell”).Enabled = True
End Sub
Both of these procedures must be in the Code modulefor the ThisWorkbook object.
Creating a Custom ToolbarIf you check out all the CommandBars available, you may have noticed one called Built-In Menus. This CommandBar contains all the old Excel 2003 menu commands. Figure 19-10 shows part of this giant pop-up menu. All the old commands are there, but they aren’t arranged very well.
Figure19-10:
Displaying the
Built-InMenus

www.it-
shortcut menu.
In this example, I present a VBA procedure that (kind of) re-creates the old Excel 2003 menu bar. It creates a new CommandBar and then copies the con- trols from the Built-In Menus CommandBar.
Sub MakeOldMenus()Dim cb As CommandBarDim cbc As CommandBarControl

www.it-
324 Part IV: Communicating with Your Users
Dim OldMenu As CommandBar
‘ Delete it, if it exists On Error Resume Next Application.CommandBars(“Old Menus”).Delete On Error GoTo 0
‘ Create an old-style toolbar‘ Set the last argument to False for a more compact menu
Set OldMenu = Application.CommandBars.Add(“Old Menus”, , True)
‘ Copy the controls from Excel’s “Built-in Menus” shortcut menu
With CommandBars(“Built-inMenus”)
.Controls(“&File”).CopyOldMenu
.Controls(“&Edit”).CopyOldMenu
.Controls(“&View”).CopyOldMenu
.Controls(“&Insert”).Copy OldMenu
.Controls(“F&ormat”).Copy OldMenu
.Controls(“&Tools”).CopyOldMenu
.Controls(“&Data”).CopyOldMenu
.Controls(“&Window”).Copy OldMenu
.Controls(“&Help”).CopyOldMenu
End With
‘ Make it visible. It appears in the Add-Ins tabApplication.CommandBars(“Old Menus”).Visible = True
End Sub
Figure 19-11 shows the result of running the MakeOldMenus procedure. Notice that it appears in the Custom Toolbars group of the Add-Ins tab. Thismenu is, after all, a toolbar. It just looks like a menu.

www.it-
Figure19-11: Atoolbar
,pretending tobe theExcel2003menu
system.

www.it-
Chapter 19: Accessing Your Macros through the User Interface
The new CommandBar is named Old Menus. The procedure starts by deleting that toolbar, if it already exists. Then code copies the “top level” controls from the CommandBar named Built-In Menus to the Old Menus CommandBar. A new CommandBar is hidden by default, so the final statement makes it visible.
The new “menu” system isn’t perfect. A few of the commands don’t work. You’ll also notice that the recent files on the File menu show only placeholders. To get rid of the toolbar, right-click it and choose Delete Custom Toolbar.
This example is available on this book’s website.
325

326 Part IV: Communicating with Your Users

www.it-ebooks.info

www.it-
Par tV
Putting It AllTogether

www.it-
Get advice for finding items online at Dummies.com: www.dummies.com/extras/excelvbaprogramming.

www.it-
In this part . . .✓ Find out why you might want to create
custom worksheet functions✓ Make your custom functions work just
like Excel’s built-in functions✓ Discover all about Excel add-ins✓ Create simple add-ins✓ Get advice for finding items online at
Dummies.com: www. dummies.com/extras/excelvbaprogramming.

F
www.it-
Chapter20
Creating WorksheetFunctions —
and Living to Tell about It
In This Chapter▶ Knowing why custom worksheet functions are so useful▶ Exploring functions that use various types of arguments▶ Understanding the Insert Function dialog box
or many macro mavens, VBA’s main attraction is the capability to create custom worksheet functions — functions that look, work, and feel just
like those that Microsoft built into Excel. A custom function offers the added advantage of working exactly how you want it to (because you wrote it). Iintroduce custom functions in Chapter 5. In this chapter, I get down to the nitty-gritty and describe some tricks of the trade.
Why Create Custom Functions?You are undoubtedly familiar with Excel’s worksheet functions — even Excel novices know how to use

www.it-
common worksheet functions, such as SUM, AVERAGE, and IF. By my count, Excel 2013 contains more than 450 predefined worksheet functions. And if that’s not enough, you can create functions by using VBA.
With all the functions available in Excel and VBA, you may wonder why you would ever need to create functions. The answer: to simplify your work. With abit of planning, custom functions are very useful inworksheet formulas and VBA procedures. Often, for example, you can significantly shorten a formula by creating a custom function. After all, shorter formulas are more readable and easier to work with.

www.it-
330 Part V: Putting It All Together
What custom worksheet functions can’t do
As you develop customfunctions for use in yourworksheet formulas, it’simportant that you understanda key point. VBA worksheetFunction procedures areessentially passive. For example,code within a Functionprocedure cannot manipulateranges, change formatting, ordo many of the other thingsthat are possible with a Subprocedure. An example may help.It might be useful to createa function that changes thecolor of text in a cell basedon the cell’s value. Try asyou might, however, you can’twrite such a function. Italways returns an error value.Just remember this: Afunction used in a worksheetformula returns a value — itdoes not perform actions withobjects.
That said, there are a fewexceptions to this rule. Forexample, here’s a Functionprocedure that changes thetext in a cell comment:Function ChangeComment(cell, NewText)
cell.Comment.Text NewTextEnd Function
And here’s a formula that usesthe function. It works only ifcell A1 already has a comment.When the formula is calculated,the comment is changed.=ChangeComment(A1,”Comment changed!”)
I’m not sure if this is anoversight or a feature. Butit’s a rare example of a VBAfunction that changessomething in a worksheet.
Understanding VBA Function Basics
A VBA function is a procedure that’s stored in a VBA module. You can use these functions in other VBA procedures or in your worksheet formulas. Custom functions cannot be created with the macro
www.it-
recorder, although the macro recorder can help you identify relevant properties and methods.
A module can contain any number of functions. You canuse a custom function in a formula just as if it were a built-in function. If the function is defined in a different workbook, however, you must precede the function name with the workbook name. For example, assume you developed a function called DiscountPrice (which takes one argument), and the function is stored in a workbook named pricing.xlsm.
To use this function in the pricing.xlsm workbook, enter a formula such as this:
=DiscountPrice(A1)
If you want to use this function in a different workbook, enter a formula such as this (and make sure the pricing.xlsm file is open):
=pricing.xlsm!DiscountPrice(A1)

www.it-
Chapter 20: Creating Worksheet Functions —and Living to Tell about It
If the custom function is stored in an add-in, youdon’t need to precede the function name with the workbook name. I discuss add-ins in Chapter 21.
Custom functions appear in the Insert Function dialog box, in the User Defined category. Pressing Shift+F3 is one way to display the Insert Function dialog box.
Writing FunctionsRemember that a function’s name acts like avariable. The final value of this variable is thevalue returned by the function. To demonstrate,examine the following function, which returns theuser’s first name:
Function FirstName()Dim FullName As StringDim FirstSpace As IntegerFullName = Application.UserNameFirstSpace = InStr(FullName, “ “)If FirstSpace = 0 Then
FirstName = FullNameElse
FirstName = Left(FullName, FirstSpace - 1)
End IfEnd Function
This function starts by assigning the UserName property of the Application object to a variable named FullName. Next, it uses the VBA InStr functionto locate the position of the first space in the name. If there is no space, FirstSpace is equal to 0, and FirstName is equal to the entire name. If FullName does have a space, the Left function extracts the text to the left of the space and assigns it to FirstName.
Notice that FirstName is the name of the function and is also used as a variable name in the function. The final value of FirstName is the value that’s returned by the function. Several
intermediatecalculationsmaybe going on in the function,but the function alwaysreturns the lastvalue assigned to
www.it-
the variable that is the same as the function’s name.
All the examples in this chapter are available at this book’s website.
Working with Function Arguments
To work with functions, you need to understand howto work with arguments. An argument is not adisagreement between variables. Rather, it’sinformation that is passed to the function andthen used by the function to do its thing.
331

www.it-
332 Part V: Putting It All Together
The following points apply to the arguments for Excel worksheet functions and custom VBA functions:
✓ Arguments can be cell references, variables (including arrays), constants, literal values, or expressions.
✓ Some functions have no arguments.✓ Some functions have a fixed number of required arguments.✓ Some functions have a combination of required andoptional arguments.
FunctionExamples
The examples in this section demonstrate how to work with various types of arguments.
A function with no argumentSome functions don’t use any arguments. For example, Excel has a fewbuilt-in worksheet functions that don’t use arguments. These include RAND, TODAY, and NOW.
Here’s an example of a custom function with no arguments. The following function returns the UserName property of the Application object. This name appears in the General tab of the Excel Options dialog box. This simple but useful example shows the only way you can get the user’s name to appear ina worksheet cell:
Function User()‘ Returns the name of the current user
User = Application.UserNameEnd Function

www.it-
When you enter the following formula into a worksheet cell, the cell displays the current user’s name:
=User()
As with the Excel built-in functions, you must include a set of empty parentheses when using a function with no arguments. Otherwise, Excel tries to interpret the function as a named range.

www.it-
Chapter 20: Creating Worksheet Functions —and Living to Tell about It
A function with one argumentThe single-argument function in this section is designed for sales managers who need to calculate the commissions earned by their salespeople. The commission rate depends on the monthly sales volume; those who sell more earn a higher commission rate. The function returns the commission amount based on the monthly sales (which is the function’s only argument — a required argument). The calculations in this example are based on Table 20-1.
Table 20-1 Commission Ratesby SalesMonthly Sales Commission Rate$0–$9,999 8.0%$10,000–$19,999 10.5%$20,000–$39,999 12.0%$40,000+ 14.0%
You can use several approaches to calculatecommissions for sales amounts entered into aworksheet. You could write a lengthy worksheetformula such as this:
=IF(AND(A1>=0,A1<=9999.99),A1*0.08,IF(AND(A1>=10000, A1<=19999.99),A1*0.105,IF(AND(A1>=20000,A1<=39999.99), A1*0.12,IF(A1>=40000,A1*0.14,0))))
A couple reasons make this a bad approach. First, the formula is overly complex. Second, the values are hard-coded into the formula, making
theformuladifficul

www.it-
t to modify if the commission structure changes.
A better approach is to create a table of commission values and use aLOOKUP table function to compute the commissions:
=VLOOKUP(A1,Table,2)*A1
Another approach, which doesn’t require a table of commissions, is to create a custom function:
Function Commission(Sales)‘ Calculates sales commissions
Const Tier1 As Double = 0.08Const Tier2 As Double = 0.105
333
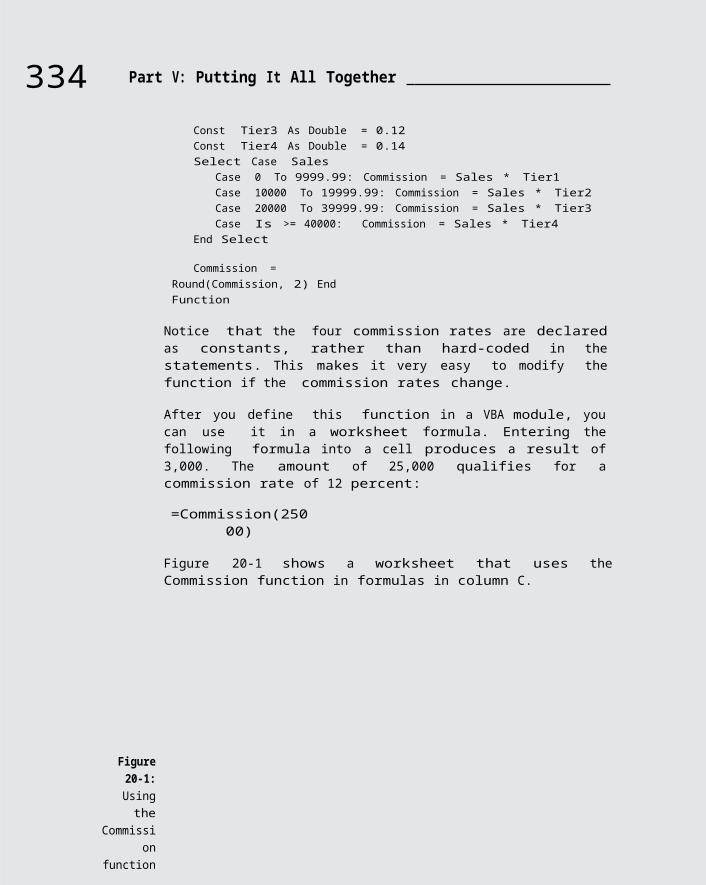
www.it-
334 Part V: Putting It All Together
Const Tier3 As Double = 0.12Const Tier4 As Double = 0.14Select Case Sales
Case 0 To 9999.99: Commission = Sales * Tier1Case 10000 To 19999.99: Commission = Sales * Tier2Case 20000 To 39999.99: Commission = Sales * Tier3Case Is >= 40000: Commission = Sales * Tier4
End Select
Commission = Round(Commission, 2) End Function
Notice that the four commission rates are declaredas constants, rather than hard-coded in thestatements. This makes it very easy to modify thefunction if the commission rates change.
After you define this function in a VBA module, youcan use it in a worksheet formula. Entering thefollowing formula into a cell produces a result of3,000. The amount of 25,000 qualifies for acommission rate of 12 percent:
=Commission(25000)
Figure 20-1 shows a worksheet that uses theCommission function in formulas in column C.
Figure20-1:Usingthe
Commission
function

www.it-
in aworkshee
t.
A function with two argumentsThe next example builds on the preceding one. Imagine that the sales manager implements a new policy to reward long-term employees: The total commission paid increases by 1 percent for every year the salesperson has been with the company.

www.it-
Chapter 20: Creating Worksheet Functions —and Living to Tell about It
335
I modified the custom Commission function (defined in the preceding section) so that it takes two arguments, both of which are required arguments. Call this new function Commission2:
Function Commission2(Sales, Years)‘ Calculates sales commissions based on years in service
Const Tier1 As Double = 0.08Const Tier2 As Double = 0.105Const Tier3 As Double = 0.12Const Tier4 As Double = 0.14Select Case Sales
Case 0 To 9999.99: Commission2 = Sales * Tier1Case 10000 To 19999.99: Commission2 = Sales * Tier2Case 20000 To 39999.99: Commission2 = Sales * Tier3Case Is >= 40000: Commission2 = Sales * Tier4
End SelectCommission2 = Commission2 + (Commission2 *Years / 100) Commission2 = Round(Commission2, 2)
End Function
I simply added the second argument (Years) to the Function statement and included an additional computation that adjusts the commission before exiting the function. This additional computation multiplies the original commission by the number of years in services, divides by 100, and then adds the result to the original computation.
Here’s an example of how you can write a formula by using this function. (It assumes that the sales amount is in cell A1; cell B1 specifies the number of years the salesperson has worked.)
=Commission2(A1,B1)
Figure 20-2 shows a worksheet that uses the Commission2 function.

www.it-
Figure20-2:Usingthe
Commission 2
function, whichtakestwo
arguments.

www.it-
336 Part V: Putting It All Together
A function with a range argumentUsing a worksheet range as an argument is not at all tricky; Excel takes care of the behind-the-scenes details.
Here’s a simple, but useful, function that concatenates the contents of a range. It takes two arguments: InRange (the worksheet range to be concatenated), and Delim (one or more delimiter characters, to be inserted between each cell).
Function JoinText(InRange, Delim) Dim Cell As RangeFor Each Cell In InRange
JoinText = JoinText &Cell.Value & Delim
Next CellJoinText = Left(JoinText, Len(JoinText) - Len(Delim))
End Function
It uses a For Each-Next construct to loop through each cell in the range. It concatenates the cell contents, followed by the Delim character(s). The final statement removes the final delimiter.
Figure 20-3 shows an example. The second argument is atwo character string(a comma, followed by a space).
Figure20-3:Usingthe
JoinTextfunction

www.it-
toconcaten
atecells.
Here’s another example of a function that uses arange argument. Assume that you want to calculatethe average of the five largest values in a rangenamed Data. Excel doesn’t have a function that cando this, so you would probably write a formula:
=(LARGE(Data,1)+LARGE(Data,2)+LARGE(Data,3)+ LARGE(Data,4)+LARGE(Data,5))/5
This formula uses Excel’s LARGE function, which returns the nth largest value in a range. The formula adds the five largest values in the range named

www.it-
Chapter 20: Creating Worksheet Functions —and Living to Tell about It
337
Data and then divides the result by 5. The formulaworks fine, but it’s rather unwieldy. And what if you decide that you need to compute the average ofthe top six values? You would need to rewrite the formula — and make sure that you update all copiesof the formula.
Wouldn’t this be easier if Excel had a function named TopAvg? Then you could compute the average by using the following (nonexistent) function:
=TopAvg(Data,5)
This example shows a case in which a custom functioncan make things much easier for you. The following custom VBA function, named TopAvg, returns the average of the N largest values in a range:
Function TopAvg(InRange, N)‘ Returns the average of the highest N values in InRange
Dim Sum As DoubleDim i As LongSum = 0For i = 1 To N
Sum = Sum + WorksheetFunction.Large(InRange, i)Next iTopAvg = Sum
/ N End Function
This function takes two arguments: InRange (which is a worksheet range) and N (the number of values to average). It starts by initializing the Sum variableto 0. It then uses a For-Next loop to calculate the sum of the N largest valuesin the range. Note that I use the Excel LARGE function within the loop. Finally, TopAvg is assignedthe value of the Sum divided by N.
You can use all Excel worksheet functions in your VBAprocedures except those that have equivalents in VBA.For example, VBA has a Rnd function that returns a

www.it-
random number. Therefore, you can’t use the Excel RAND function in a VBA procedure.
A function with an optional argumentMany Excel built-in worksheet functions use optionalarguments. An example is the LEFT function, which returns characters from the left side of a string. Its official syntax follows:
LEFT(text[,num_chars])
The first argument is required, but the second(in square brackets) is optional. If you omit the optional argument, Excel assumes a value of1. Therefore, the following formulas return thesame result:

www.it-
338 Part V: Putting It All Together
=LEFT(A1,1)=LEFT(A1)
The custom functions you develop in VBA also can have optional arguments. You specify an optional argument by preceding the argument’s name with the keyword Optional. The argument’s name is then followed by an equal sign and the default value. Ifthe optional argument is missing, the code uses the default value.
One caveat: If you use optional arguments, they must always be last in the argument list.
The following example shows a custom function that uses an optional argument:
Function DrawOne(InRange, Optional Recalc =0)‘ Chooses one cell at random from a range
Randomize‘ Make function volatile if Recalcis 1
If Recalc = 1 Then Application.Volatile True
‘ Determine a random cellDrawOne = InRange(Int((InRange.Count) * Rnd + 1))
End Function
Debugging custom functionsDebugging a Functionprocedure can be a bit morechallenging than debugging aSub procedure. If you develop afunction for use in worksheetformulas, you find that an errorin the Function proceduresimply results in an errordisplay in the formula cell(usually #VALUE!). In other
words, you don’treceive the normalrun-time errormessage that helpsyou locate theoffending statement.You can chooseamong threemethods fordebugging customfunctions:

www.it-
✓ Place MsgBox functionsat strategic locations tomonitor the value ofspecific variables.Fortunately, message boxesin Function procedures popup when you
execute the procedure. Makesure that only one formulain the worksheet uses yourfunction, or the messageboxes appear for eachformula that’s evaluated —which could get veryannoying. ✓ Test the procedure bycalling it from a Subprocedure. Run-time errorsappear normally in a pop-upwindow, and you can eithercorrect the problem (if youknow it) or jump right intothe debugger.
✓ Set a breakpoint in thefunction and then use theExcel debugger to stepthrough the function. Youcan then access all theusual debugging tools. Referto Chapter 13 to find outabout the debugger.

www.it-
Chapter 20: Creating Worksheet Functions —and Living to Tell about It
339
This function randomly chooses one cell from an input range. The range passed as an argument is actually an array (I explain arrays in Chapter 7), and the function selects one item from the array at random. If the second argument is 1, the selected value changes whenever the worksheet is recalculated. (The function is made volatile.) If the second argument is 0 (or is omitted), the functionis not recalculated unless one of the cells in theinput range is modified.
I use the Randomize statement to ensure that a different random number “seed” is chosen each time the workbook is opened. Without this statement, thesame random numbers are generated each time the workbook is opened.
You can use this function for choosing lottery numbers, selecting a winner from a list of names, and so on.
WrapperFunctions
This section contains some relatively simple custom worksheet functions that are also very useful. I call these “wrapper” functions because they consist of code that’s wrapped around intrinsic VBA elements. In other words, they allow you to use VBA functions in worksheet formulas.
Earlier in this chapter, I presented a wrapper function:
Function User()‘ Returns the name of the current user
User =Application.UserName
End Function

www.it-
This function, in essence, lets your formulas access the UserName property of the Application object.
The remainder of this section contains some additional wrapper functions.
The NumberFormat functionThis function simply displays the number format fora cell. It can be useful if you need to ensure thata group of cells all have the same number format.
Function NumberFormat(Cell)‘ Returns the cell’s number format
NumberFormat = Cell(1).NumberFormatEnd Function

www.it-
340 Part V: Putting It All Together
Notice the use of Cell (1)? If a multicell range is used as an argument, only the first cell is used.
You can easily write similar functions that return acell’s text color, background color, font, and so on.
The ExtractElement functionThis is easily my favorite wrapper function. It returns a substring from a text string that contains multiple elements, separated by a separator character. For example, this formula returns cow, which is the third element in a stringthat uses a space as a separator. The arguments, of course, could be cell references.
=ExtractElement(“dog horse cow cat”, 3, “ “)
Here’s the code, which is a wrapper for VBA’s Split function:
Function ExtractElement(Txt, n, Sep)‘ Returns the nth element of a text string, wherethe‘ elements are separated by a specified separator character
ExtractElement = Split(Application.Trim(Txt), Sep)(n - 1)End Function
Figure 20-4 shows the ExtractElement function used inworksheet formulas.
Figure20-4:Usingthe
ExtractElementfunctio

www.it-
n toreturn
anelementfrom a
string.
The SayIt functionThis simple function is a wrapper for the Speak method of the Application. Speech object. It uses a synthesized voice to “speak” the argument.

www.it-
Chapter 20: Creating Worksheet Functions —and Living to Tell about It
341
Function SayIt(txt)‘ Speaks the argument
Application.Speech.Speak txt, TrueEnd Function
Here’s an example:
=IF(C10>10000,SayIt(“Over budget”),”OK”)
The formula checks cell C10. If the value is greater than 10,000, the function speaks the text:“Over budget.” If the value is less than 10,000, the function displays the text OK (and doesn’t say anything).
Use sparingly. If you use this function more than one time, it can be very confusing. Also, remember that this function is evaluated each time the worksheet is calculated, so the voice may get very annoying if you’re making many changes. This functionis probably more suited for amusement purposes.
The IsLike functionVBA’s Like operator is a very flexible way to compare text strings. Check itout in the VBA Help system. This function brings thatpower to your worksheet formulas:
Function IsLike(text, pattern)‘ Returns true if the first argument islike the second
IsLike = text Like patternEnd Function
Functions That Return an ArrayArray formulas are one of Excel’s most powerful features. If you’re familiar with array formulas, you’ll be happy to know that you can create VBA functions that return an array.
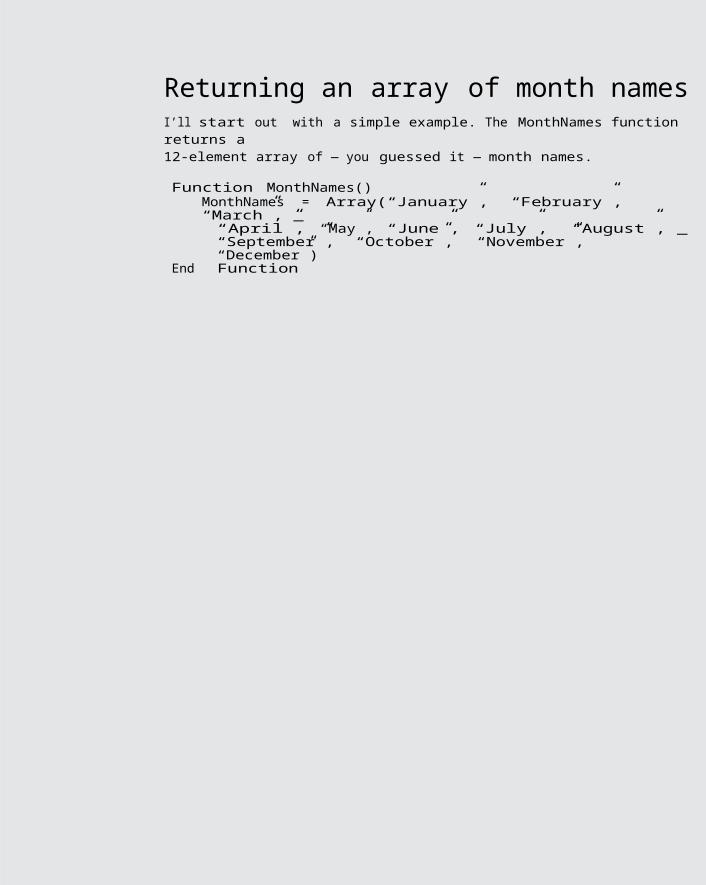
www.it-
Returning an array of month namesI’ll start out with a simple example. The MonthNames function returns a12-element array of — you guessed it — month names.
Function MonthNames()MonthNames = Array(“January”, “February”, “March”, _“April”, “May”, “June”, “July”, “August”, _“September”, “October”, “November”, “December”)
End Function

www.it-
342 Part V: Putting It All Together
To use the MonthNames function in a worksheet, you must enter it as a12-cell array formula. For example, select range A1:L1 and enter =Month Names(). Then use Ctrl+Shift+Enter to enter the array formula in all 12 selected cells. Figure 20-5 shows the result.
Figure20-5:Usingthe
MonthNamesfuncti
onto return a
12-element
array.
If you want the month names to display in acolumn, select 12 cells in a column and usethis array formula (don’t forget to enter itby using Ctrl+Shift+Enter):
=TRANSPOSE(MonthNames())
You can also pick out a single month from the array. Here’s a formula (not an array formula) that displays the fourth element of the array — April.
=INDEX(MonthNames(),4)
Returning asorted list

www.it-
Suppose that you have a list of names you want toshow in sorted order in another range of cells.Wouldn’t it be nice to have a worksheet functiondo that for you?
The custom function in this section does just that: It takes a single-column range of cells as its argument and then returns an array of those cells sorted. Figure 20-6 shows how it works. Range A2:A13 contains some names. Range C2:C13 contains this multi-cell array formula. (Remember, the formula must be entered by pressing Ctrl+Shift+Enter.)
=Sorted(A2:A13)
Here’s the code for theSorted function:
Function Sorted(Rng As Range) Dim SortedData() As Variant Dim Cell As Range

www.it-
Chapter 20: Creating Worksheet Functions —and Living to Tell about It
343
Dim Temp As Variant, i As Long, j As LongDim NonEmpty As Long
‘ Transfer data to SortedDataFor Each Cell In Rng
If Not IsEmpty(Cell) ThenNonEmpty = NonEmpty + 1ReDim Preserve SortedData(1 To NonEmpty)SortedData(NonEmpty) = Cell.Value
End IfNext Cell
‘ Sort the arrayFor i = 1 To NonEmpty
For j = i + 1 To NonEmptyIf SortedData(i) > SortedData(j) Then
Temp =SortedData(j)SortedData(j) = SortedData(i)SortedData(i)
= TempEnd If
Next jNext i
‘ Transpose the array and return itSorted = Application.Transpose(SortedData)
End Function
The Sorted function starts by creating an array named SortedData. This array contains all the nonblank values in the argument range. Next, the SortedData array is sorted, using a bubble sort algorithm. Because the array is a horizontal array,it must be transposed before it is returned by the function.
The Sorted Function works with a range of any size, aslong as it’s in a single column or row. If the unsorteddata is in a row, your formula needs to use Excel’s TRANSPOSE function to display the sorted data horizontally. For example:
=TRANSPOSE(Sorted(A16:L16))

www.it-
Figure20-6:
Using acus- tomfunction
toreturn
asorted
range.

www.it-
344 Part V: Putting It All Together
Using the Insert Function Dialog Box
The Excel Insert Function dialog box is a handy tool that lets you choose a worksheet function from a list and prompts you for the function’s arguments. And, as I note earlier in this chapter, your customworksheet functions also appear in the Insert Function dialog box. Custom functions appear in theUser Defined category.
Function procedures defined with the Private keyword do not appear in the Insert Function dialog box. Therefore, if you write a Function procedure that’s designed to be used only by other VBA procedures (but not in formulas), you should declare the function as Private.
Displaying the function’s descriptionThe Insert Function dialog box displays a description of each built-in function. But, as youcan see in Figure 20-7, a custom function displaysthe following text as its description: No help available.
To display a meaningful description of your custom function in the InsertFunction dialog box, perform a few additional (nonintuitive) steps:
1. Activate a worksheet in the workbook that contains the custom function.2. Choose Developer➪Code➪Macros (or press Alt+F8).
The Macro dialog box appears.3. In the Macro Name field, type the function’s name.

www.it-
Note that the function does not appear in the list of macros; you must type the name.
Figure20-7: Bydefault, the
InsertFunctiondialog
boxdoesnot
providea
descriptionfor
customfunctio
ns.

www.it-
Chapter 20: Creating Worksheet Functions —and Living to Tell about It
345
4. Click the Options button.The Macro Options dialog box appears.
5. In the Description field, type a description of the function.6. Click OK.7. Click Cancel.
Now the Insert Function dialog box displays the description for your function;see Figure 20-8.
Figure20-8: Thecustom
functionnow dis-plays adescript
ion. Custom functions, by default, are listed in the User Defined category. To adda function to a different category, you need to use VBA. This statement, when executed, adds the TopAvg function to the Math & Trig category (which is category #3):
Application.MacroOptions Macro:=”TopAvg”, Category:=3
Check the Help system for other category numbers. And remember, you need to execute this statement only one time. After you execute it (and save the workbook), the category number is permanently assigned to the function.

www.it-
ArgumentdescriptionsWhen you access a built-in function
from the Insert Function dialog box, the Function Arguments dialog box displays a description of each argument. (See Figure 20-9.) In the past, it was not possible to add argument descriptions. But, beginning with Excel 2010, Microsoft finally implemented this feature. You provide argument descriptions by using the MacroOptions method. Here’san example that adds descriptions for the arguments used by the TopAvg function:

www.it-
346 Part V: Putting It All Together
Sub AddArgumentDescriptions() Application.MacroOptions Macro:=”TopAvg”, _
ArgumentDescriptions:= _
Array(“Range that contains the values”, _“Number of values to average”)
End Sub
You need to execute this procedure only one time.After you execute it, the argument descriptionsare stored in the workbook and are associatedwith the function.
Notice that the argument descriptions appear asarguments for the Array function. You must use the Array function even if you’re assigning a description for a function that has only one argument.
Figure20-9: Bydefault,
theFunctionArguments dialog
boxdisplaysFunctionargumentdescriptions forbuilt-infunctions only.
This chapter provides lots of information about creating custom worksheet functions. Use these examples as models when you create functions for your own work. As usual, the online help provides additional details. Turn to Chapter 21 if you want to find out how to make your custom functions more accessible by storing them in an add-in.

O
www.it-
Chapter21
Creating ExcelAdd-Ins
In This Chapter▶ Using add-ins: What a concept!▶ Knowing why you might want to create your own add-ins▶ Creating custom add-ins
ne of the slickest features of Excel — at least in my mind — is the capability to create add-ins. In this chapter, I explain why I like this
feature and show you how to create add-ins by using only the tools built into Excel.
Okay . . . So What’s an Add-In?
Glad you asked. An Excel add-in is something you add to enhance Excel’s functionality. Some add-ins provide new worksheet functions you can use in formulas; other add-ins provide new commands or utilities. If the add-in is designed properly, the new features blend in well with the original

www.it-
interface so they appear to be part of the program.
Excel ships with several add-ins, including the Analysis ToolPak and Solver. You can also get Excel add-ins from third-party suppliers or as shareware.My Power Utility Pak is an example of an add-in (it adds about 70 new features to Excel, plus a slew of new worksheet functions).
Any knowledgeable user can create add-ins, but VBA programming skills are required. An Excel add-in is basically a different form of an XLSM workbook file. More specifically, an add-in is a normal XLSM workbook with the following differences:
✓ The IsAddin property of the Workbook object is True.✓ The workbook window is hidden and can’t be unhidden by using the
View➪Window➪Unhide command.✓ The workbook is not a member of the Workbooks collection. Rather, it’s in the AddIns collection.
www.it-
348 Part V: Putting It All Together
You can convert any workbook file into an add-in, butnot all workbooks are good candidates. Because add-ins are always hidden, you can’t display worksheets or chart sheets contained in an add-in. However, you can access an add-in’s VBA Sub and Function procedures and display dialog boxes contained on UserForms.
Excel add-ins usually have an XLAM file extension to distinguish them from XLSM worksheet files. Pre-2007 versions of Excel created add-ins with an XLA extension.
Why Create Add-Ins?You might decide to convert your Excel applicationinto an add-in for any of the following reasons:
✓ Make it more difficult to access your code: When you distribute an application as an add-in (and you protect its VBA project), casual users can’tview the sheets in the workbook. If you use proprietary techniques in your VBA code, you can make it more difficult for others to copy the code. Excel’s protection features aren’t perfect, though, and password- cracking utilities are available.
✓ Avoid confusion: If a user loads your applicationas an add-in, the file is invisible and therefore less likely to confuse novice users or get in the way. Unlike a hidden workbook, the contents of an add-in can’t be revealed.
✓ Simplify access to worksheet functions: Custom worksheet functions that you store in an add-indon’t require the workbook name qualifier. Forexample, if you store a custom function named MOVAVG in a workbook named NEWFUNC.XLSM, you must use syntax like the following to use this function in a different workbook:=NEWFUNC.XLSM!MOVAVG(A1:A50)

www.it-
But if this function is stored in an add-in file that’s open, you can usemuch simpler syntax because you don’t need to include the file reference:=MOVAVG(A1:A50)
✓ Provide easier access for users: After youidentify the location of your add-in, itappears in the Add-Ins dialog box, with afriendly name and a description of what itdoes. The user can easily enable or disableyour add-in.
✓ Gain better control over loading: Add-ins can be opened automatically when Excel starts, regardless of the directory in which they are stored.
✓ Avoid displaying prompts when unloading: When an add-in is closed, the user never sees the dialog box prompt asking if you want to save changes in the file.

www.it-
Chapter 21: Creating Excel Add-Ins
Working with Add-InsYou load and unload add-ins by using the Add-Ins dialog box. To display this dialog box, choose File➪Options➪Add-Ins. Then select Excel Add-Ins from the drop-down list at the bottom of this dialog screen and click Go. Or, take the fast track and choose Developer➪Add-Ins➪Add-Ins. But the easiest method is to just press Alt+TI (the old Excel 2003 keyboard shortcut).
Any of these methods displays the Add-Ins dialog boxshown in Figure 21-1. The list box contains the names of all add-ins that Excel knows about. In thislist, checkmarks identify any currently open add-ins. You can open and close add-ins from the Add-Insdialog box by selecting or deselecting the check boxes.
To add a new add-in to the list, click Browse and then locate the XLAM file.
349
Figure21-1:
The Add-Ins
dialogbox
listsall theadd-ins
knownto
Excel.
You can also open most add-in files (as if they wereworkbook files) by choosing the File➪Open command.An add-in opened in this manner does not appear inthe Add-Ins dialog box. In addition, if the add-inwas opened by using the Open command, you can’tclose it by choosing File➪Close. You can remove the
www.it-
add-in only by exiting and restart
ing Excel or by writing a macro to close the add-in.
When you open an add-in, you may or may not notice anything different. In many cases, however, the Ribbon changes in some way — Excel displays either anew tab or one or more new groups on an existing tab. For example, opening the Analysis ToolPak add-in gives you a new item on the Data tab: Analysis➪Data Analysis. If the add-in contains only custom worksheet functions, the new functionsappear in the Insert Function dialog box, and you’ll see no change to Excel’s user interface.

www.it-
350 Part V: Putting It All Together
Add-In BasicsAlthough you can convert any workbook to an add-in, not all workbooks benefit from this conversion. A workbook with no macros makes a completely useless add-in. In fact, the only types of workbooks that benefit from being converted to an add-in are thosewith macros. For example, a workbook that consists of general-purpose macros (Sub and Function procedures) makes an ideal add-in.
Creating an add-in isn’t difficult, but it does require a bit of extra work. Use the following steps to create an add-in from a normal workbook file:
1. Develop your application and make sure that everything works properly.Don’t forget to include a method for executing the macro or macros. You might want to define ashortcut key or customize the user interface insome way (see Chapter 19). If the add-in consists only of functions, there’s no need to include a method to execute them because they will appear in the Insert Function dialog box.
2. Test the application by executing it when a different workbook is active.Doing so simulates the application’s behavior when it’s used as an add-in becausean add-in is never the active workbook.
3. Activate the VBE and select the workbook in theProject window; choose Tools➪VBAProject Properties and click the Protection tab; select the Lock Project for Viewing check box and enter a password (twice); click OK.This step is necessary only if you want to prevent others from viewing or modifying your macros or UserForms.
4. Choose Developer➪Document Panel and click OK todisplay the

www.it-
Standard Properties panel.Excel displays its Document Properties pane below the Ribbon.
5. In the Document Properties pane, enter a brief descriptive title in the
Title field and a longer description in the Comments field.Steps 4 and 5 are not required but make the add-in easier to use, because the descriptions you enter appear in the Add-Ins dialog box when your add-in is selected.
6. Choose File➪Save As.7. In the Save As dialog box, select Excel add-in (*.xlam) from the Save as Type drop-down list.

www.it-
Chapter 21: Creating Excel Add-Ins
351
8. Specify the folder that will store the add-in.Excel proposes its default add-ins folder (named AddIns), but you can save the file in any folder you like.
9. Click Save.
A copy of your workbook is converted to an add-in and saved with an XLAMextension. Your original workbook remains open.
An Add-InExampleIn this section, I discuss the basic steps involved in creating a useful add-in. The example is based on the Change Case text conversion utility that I describe in Chapter 16.
The XLSM version of this example is available at thisbook’s website. You can create an add-in from this workbook.
Setting up the workbookThe workbook consists of one blank worksheet, a VBAmodule, and a UserForm. In Chapter 19, I describe how to add code that adds a new menu item on the Cell right-click shortcut menu.
The original version of the utility included options for uppercase, lowercase, and proper case.For the add-in version, I added two new options to the UserForm, so it has the same options as the built-in tool in Microsoft Word:
✓ Sentence Case: Makes the first letter uppercase, and all other letters lowercase.

www.it-
✓ Toggle Case: All uppercase characters are converted to lowercase, and vice versa.
Figure 21-2 shows UserForm1. The five OptionButtoncontrols are inside a Frame control. In addition, the UserForm has a Cancel button (named CancelButton) and an OK button (named OKButton).
The code executed when the Cancel button is clicked is very simple. This procedure unloads the UserForm with no action:
Private Sub CancelButton_Click()Unload UserForm1
End Sub

www.it-
352 Part V: Putting It All Together
Figure21-2:The
UserForm forthe
ChangeCase add-in.
The code that’s executed when the OK button is clicked follows. This code does all the work:
Private Sub OKButton_Click() Dim TextCells As Range Dim cell As RangeDim Text As StringDim i As Long
‘ Create an object withjust text constants
On Error ResumeNext
Set TextCells = Selection.SpecialCells(xlConstants, xlTextValues)
‘ Turn offscreen updatingApplication.ScreenUpdatin
g = False
‘ Loop throughthe cells
For Each cell In TextCells Text = cell.Value Select Case TrueCase OptionLower
‘lowercase cell.Value= LCase(cell.Value)Case OptionUpper
‘UPPERCASE

www.it-
cell.Value = UCase(cell.Value) Case OptionProper ‘Proper Case
cell.Value = WorksheetFunction.Proper(cell.Value) Case OptionSentence ‘Sentence case
Text =UCase(Left(cell.Value,
1))Text = Text & LCase(Mid(cell.Value, 2, Len(cell.Value)))cell.Value =
TextCase OptionToggle
‘tOGGLE CASE For i = 1To Len(Text)If Mid(Text, i, 1) Like “[A-Z]” Then
Mid(Text, i, 1) = LCase(Mid(Text, i, 1)) Else
Mid(Text, i, 1) = UCase(Mid(Text, i, 1)) End If
Nexti
cell.Value =Text

www.it-
Chapter 21: Creating Excel Add-Ins
353
NextEnd Select
‘ Unload the dialog boxUnload UserForm1
End Sub
In addition to the two new options, this versionof the Change Case utility differs from the version in Chapter 16 in two other ways:
✓ I use the SpecialCells method to create anobject variable that consists of the cells inthe selection that contain a text constant(not a formula). This technique makes theroutine run a bit faster if the selectioncontains many formula cells. See Chapter 14 formore information on this technique.
✓ I added the Change Case menu item to the Row and the Column shortcut menus. So now, you can execute the utility by right-clicking a range selection, a complete row selection, or a complete column selection.
Testing the workbookTest the add-in before converting this workbook. To simulate what happens when the workbook is an add-in, you should test the workbook when a different workbook is active. Remember, an add-in isnever the active sheet or workbook, so testing it when a different workbook is open may help you identify some potential errors.
1. Open a new workbook and enter information into some cells.
For testing purposes, enter various types of information, including text, values, and formulas. Or just open an existing workbook and use it for your tests — remember that any changes to the workbook cannot be undone, so you may want to use a copy.
2. Select one or more cells (or entire rows and columns).

www.it-
3. Execute the ChangeCase macro by choosing the new Change Case command from your Cell (or Row or Column) right-click menu.
If the Change Case command doesn’t appear on your right-click menu, the most likely reason is that you did not enable macros when you opened the change case.xlsm workbook. Close the workbook and then reopen it — and make sure that you enable macros.

www.it-
354 Part V: Putting It All Together
Adding descriptive informationI recommend entering a description of your add-in, but this isn’t required.
1. Activate the change case.xlsm workbook.2. Choose Developer➪Modify➪Document Panel.
Excel displays the Document Properties panel above the Formula bar. See Figure 21-3.
3. Enter a title for the add-in in the Title field.This text appears in the list of add-ins in the Add-Ins dialog box. For this example, enter Change Case.
4. In the Comments field, enter a description.This information appears at the bottom of the Add-Ins dialog box when the add-in is selected. For this example, enter Changes the case of textin selected cells. Access this utility by using the right-click shortcut menu.
5. Click the Close button (X) in the upper-right corner of the DocumentPanel.
Figure21-3:
Use theDocumen
tPropert
iespanel

www.it-
toenter
descriptive
information
aboutyour
add-in.
Protecting the VBA codeIf you want to add a password to prevent others from viewing the VBA code, follow these steps:

www.it-
Chapter 21: Creating Excel Add-Ins
1. Activate the VBE and select the change case.xlsmworkbook in the
Projectwindow.
2. Choose Tools➪VBAProject Properties and click theProtection tab on the dialog box that appears.
3. Select the Lock Project for Viewing check box and enter a password(twice).
4. Click OK.5. Save the workbook by choosing File➪Save from
the VBE’s menu or by going back to the Excel window and choosing File➪Save.
Creating the add-inAt this point, you’ve tested the change case.xlsm file, and it’s working correctly. Thenext step is to create the add-in:
1. If needed, reactivate Excel.2. Activate the change case.xlsm workbook and choose File➪Save As.
Excel displays its Save Asdialog box.
3. In the Save as Type drop-down menu, select Add-In(*.xlam).4. Specify the location and click Save.
A new add-in file (with an XLAM extension) iscreated, and the originalXLSM version remainsopen.
Opening the add-in
Toavoid confusion,closethe XLSMworkbookbeforeopen

www.it-
ing the add-in that you created from that workbook.
Open the add-in with these steps:
1. Choose Developer➪Add-Ins➪Add-Ins (or press Alt+TI).
Excel displays the Add-Insdialog box.
2. Click the Browse button.3. Locate and select the add-in you just created.4. Click OK to close the Browse dialog box.
After you find your new add-in, the Add-Ins dialogbox lists the add-in. As shown in Figure 21-4, theAdd-Ins dialog box also displays the descriptiveinformation you provided in the DocumentProperties panel.
355

www.it-
356 Part V: Putting It All Together
5. Make sure that the Add-Ins dialog box has a checkmark for your new add-in.
6. Click OK to close the dialog box.Excel opens the add-in, and you can now use it with all your workbooks. As long as it remains checked in the Add-Ins dialog box, the add-in will be opened every time you start Excel.
Figure21-4:
The Add-Ins
dialogbox hasthe newadd-in
selected.Distributing the add-inIf you’re in a generous mood, you can distribute this add-in to other Excel users simply by giving them a copy of the XLAM file (they don’t need the XLSM version). When they open the add-in, the new Change Case command appears on the shortcut menu when they select a range, one or more rows, or oneor more columns. If you locked the VBA project with a password, others cannot view your macro code (unless they know the password).
Modifying the add-inAn add-in can be edited just like any other workbook.You can edit the XLAMfile directly (you do not need to work with the original XLSM version):

www.it-
1. Open your XLAM file if it’s not already open.2. Activate the VBE.3. Double-click the project’s name in the Project window.
If you protected the code, you are prompted forthe password.

www.it-
Chapter 21: Creating Excel Add-Ins
4. Enter your password and click OK.5. Make your changes to the code.6. Save the file from the VBE by choosing File➪Save.
If you create an add-in that stores information ina worksheet, you must set the workbook’s IsAddIn property to False to view the workbook. You do thisin the Property window when the ThisWorkbook object is selected (seeFigure 21-5). After you’ve made your changes to the workbook, make sure that you set the IsAddIn property back to True before you save the file.
357
Figure21-5:
Makingan add-in notan add-
in. You now know how to work with add-ins and why you might want to create your own add-ins.

358 Part V: Putting It All Together

www.it-ebooks.info

www.it-
Part VI

www.it-
Enjoy an additional Office 2013 Part of Tens chapter onlineat Dummies.com:www.dummies.com.

www.it-
In thispart . . .
✓ Discover the answers to common VBA questions✓ Expand your knowledge with ten Excel resources.✓ Find out what you should and shouldn’t to in Excel VBA.✓ Enjoy an additional Office 2013 Part of Tens chapter online at
Dummies.com: www.dummies.com.

T
www.it-
Chapter22
Ten VBA Questions (and Answers)In This Chapter▶ Storing worksheet function procedures▶ Limiting the macro recorder▶ Speeding up your VBA code▶ Declaring variables explicitly▶ Using the VBA line continuation character
he following ten questions (and answers) address some of the most common issues askedby VBA newcomers.
I created a custom VBA function. When I try to use it in a formula, the formula displays #NAME?. What’s wrong?
It’s possible that you spelled the function incorrectly. But it’s more likely that you put your function code in the wrong location. VBA code for worksheet functions must be in a standard VBA module, not in a module for a sheet or in ThisWorkbook. In the VBE, use Insert➪Module to insert a standard module. Then cut and paste your code to the new VBA module.
www.it-
This is a very common mistake, because a Sheet module looks exactly like a standard VBA module. Resist the temptation to put your code there. Spend four seconds and choose Insert➪Module.
Can I use the VBA macro recorder to record all my macros?
Only if your macros are very simple. Normally, you use it only to record simple macros or as a starting point for a more complex macro. The macro recorder can’t record macros that use variables, looping, or any other type of program flow constructs. In addition, you cannot record a Functionprocedure in the VBA macro recorder.

www.it-
362 Part VI: The Part of Tens
Many people eventually realize that the macro recorder is most useful as a way to identify properties and methods that are relevant to their task.
How can I prevent others from viewing my VBA code?
1. Activate your project in the VBE and choose Tools➪xxxxx Properties.
The xxxxx corresponds to the name of your VBA project.
2. In the dialog box that appears, click the Protection tab and select Lock
Project for Viewing.3. Enter a password (twice) and click OK.4. Save your workbook.
Doing so prevents casual users from viewing your code, but password protection is certainly not 100 percent secure. Password-cracking utilities exist.
What’s the VBA code for increasing or decreasing the number of rows and columns in a worksheet?
No such code exists. The number of rows and columnsis fixed and cannot be changed. However, if you opena workbook that has been created by usingan earlier Excel version (before Excel 2007), the text Compatibility Mode appears in the title bar. This notice indicates that this workbook is limitedto the old 256-x-65536 cell grid. You can get out of this mode (and thus get the new, bigger cell grid) by saving the file as a normal (XLSX or XLSM) workbook and then closing and reopening this new file.
You can, however, hide unwanted rows and columns. For example, you can hide all but the first 10 rows and 10 columns, giving you a 100-cell worksheet.

www.it-
When I refer to a worksheet in my VBA code, I get a “subscript out of range” error. I’m not using any subscripts. What gives?
Like many VBA error messages, this one isn’t very informative. This error occurs if you attempt to access an element in a collection that doesn’t exist. For example, this statement generates the error if the active workbook doesn’t contain a sheet named Fido:
Set X = ActiveWorkbook.Sheets(“Fido”)
In your case, the workbook that you think is open is probably not open (so it’s not in the Workbooks collection). Or, maybe you misspelled the workbook name.
www.it-
Chapter 22: Ten VBA Questions (and Answers)
363
Is there a VBA command that selects a range from the active cell to the last entry in a column or a row? (In other words, how can a macro accomplish the same thing as Ctrl+Shift+↓ or Ctrl+Shift+→?)
Here’s the VBA equivalent for Ctrl+Shift+↓:
Range(ActiveCell, ActiveCell.End(xlDown)).Select
For the other directions, use the constants xlToLeft, xlToRight, or xlUp rather than xlDown.
How can I make my VBA code run as fast as possible?
Here are a few tips:
✓ Be sure to declare all your variables as a specific data type. (Use Option Explicit in eachmodule’s Declarations section to force yourself to declare all variables.)
✓ If you reference an object (such as a range) more than once, create an object variable using the Set keyword.✓ Use the With-End With construct
whenever possible.✓ If your macro writes data to a worksheet and
you have lots of complex formulas, set the calculation mode to Manual while the macro runs(but make sure you do a calculation when you need to use the results!).
✓ If your macro writes information to a worksheet, turn off screen updating by using Application.ScreenUpdating = False.
Don’t forget to reinstate these last two settings to their starting value when your macro is finished.
How can I display multiline messages in a message box?
The easiest way is to build your message in a string variable, using the vbNewLine constant to

www.it-
indicate where you want your line breaks to occur. The following is a quick example:
Msg = “You selected the following:” & vbNewLineMsg = Msg & UserAnsMsgBox Msg

www.it-
364 Part VI: The Part of Tens
I wrote some code that deletes worksheets. How can I avoid showingExcel’s warning prompt?
Insert this statement before the code that deletesthe worksheets:
Application.DisplayAlerts = False
Why can’t I get the VBA line-continuation character (underscore) to work?
The line-continuation sequence is actually two characters: a space followed by an underscore. Be sure to use both characters and press Enter after the underscore.

T
www.it-
Chapter23
(Almost) Ten ExcelResources
In This Chapter▶ Using the VBA Help system▶ Getting assistance from Microsoft▶ Finding help online
his book is only an introduction to Excel VBA programming. If you hunger for more information, feel free to feed on the list of additional
resources I’ve compiled here. You can discover new techniques, communicate with other Excel users, download useful files, ask questions, and lots more.
Most of these resources are online services or Internet resources, which tend to change frequently. The descriptions are accurate at the time I’m writingthis, but I can’t guarantee that this information will remain current. That’s how the Internet works.
The VBA Help System
www.it-
I hope you’ve already discovered VBA’s Help system. I find this reference source particularly useful for identifying objects, properties, and methods. It’s readily available, it’s free, and (for the most part) it’s accurate. So use it.
If you use Excel 2013, be aware that VBA Help is entirely online. That means you must have an Internet connection to access the Help system.
Microsoft Product SupportMicrosoft offers a wide variety of technical support options (some for free, others for a fee).To access Microsoft’s support services, go here:
http://support.microsoft.com

www.it-
366 Part VI: The Part of Tens
And don’t forget about Microsoft’s Office site, which has lots of material related to Excel:
http://office.microsoft.com
Another great resource is the Microsoft DeveloperNetwork site (MSDN). It has lots and lots of information aimed at the developer (yes, that is you!). Here is a link to the main site, where you can search for Excel-related information:
http://msdn.microsoft.com
Internet WebsitesSeveral websites contain Excel-related material. A good place to start your web surfing is my very own site, which is named The Spreadsheet Page. After youget there, you can check out my material and then visit my Resources section, which leads you to dozens of other Excel-related sites. The URL for my site is
http://spreadsheetpage.com
Excel BlogsYou can find literally millions of blogs (short for weblogs) on the web. A blog is basically a frequently updated diary about a particular topic. Quite a few blogs are devoted exclusively to Excel. I maintain a list of Excel blogs at my site:
http://spreadsheetpage.com/index.php/excelfeeds

www.it-
Chapter 23: (Almost) Ten Excel Resources
GoogleWhen I have a question about any topic (including Excel programming), my first line of attack is Google — currently the world’s most popular search site:
www.google.com
Enter a few key search terms (along with the wordExcel or VBA) and see what Google finds. I get an answer about 90 percent of the time.
BingBing is Microsoft’s answer to the Google search site. Some people prefer it over Google; others don’t. If you haven’t tried it, the URL is
http://bing.com
Local User GroupsMany larger communities and universities have an Excel user group that meets periodically. If you can find a user group in your area, check it out. These groups are often an excellent source for contacts and sharing ideas.
My Other BooksSorry, but I couldn’t resist the opportunity for ablatant plug. To take VBA programming to the next level, check out my Excel 2010 Power Programming with VBA orExcel 2013 Power Programming with VBA (both published by Wiley).
367

368 Part VI: The Part of Tens

www.it-ebooks.info

I
www.it-
Chapter24
Ten VBA Do’s andDon’ts
In This Chapter▶ Discovering five VBA-related things you should do▶ Discovering five VBA-related things you should not do
f you’re reading this final chapter, you’ve probably read most of the content of this book and are familiar with Excel VBA. Or, maybe you just
skipped to the end because you wanted to see whether the butler actually did it.
This chapter gives you some advice you should take into account when you start developing your own VBA solutions. Following these guidelines is no panacea to keep you out of (programming) trouble, but following them can help you avoid pitfalls that others have stumbled over.
Do Declare All VariablesHow convenient it is: Simply start typing your VBA code without having to go through the tedious chore of declaring each and every variable you
www.it-
want to use. Although Excel allows you to use undeclared variables, doing so is simply asking for trouble.
The first commandment of VBA programming
should be this: Thou shalt declare
every variable.
If you lack self-discipline, add “Option Explicit” at the top of your modules. That way, your code won’teven run if it includes one or more undeclared variables. Not declaring all variables has only one advantage: You save a few seconds of time. But usingundeclared variables will eventually come back to haunt you. And I guarantee that it will take you more than a few seconds to figure out the problem.
www.it-
370 Part VI: The Part of Tens
Don’t Confuse Passwords withSecurity
You spent months creating a killer Excel app, with some amazing macros. You’re ready to release it to the world, but you don’t want others to see your incredible macro programming. Just password-protectthe VBA Project and you’re safe, right? Wrong.
Using a VBA password can keep most casual users from viewing your code. But if someone really wants to check it, he’ll figure out how to crack the password.
Bottom line? If you absolutely, positively need tokeep your code a secret, Excel isn’t the best choice for a development platform.
Do Clean Up Your CodeAfter your app is working to your satisfaction, you should clean it up. Code housekeeping tasks include the following:
✓ Make sure every variable is declared.✓ Make sure all the lines are indented properly, so the code structure is apparent.
✓ Remove any debugging aids, such as MsgBox statements of Debug.Print statements.
✓ Rename any poorly named variables. For example, if you use the variable MyVariable, there’s a pretty good chance that you can make the variable name more descriptive. You’ll thank yourself later.
✓ If you’re like me, your modules probably have a few “test” procedures that you wrote while trying to figure something out. They’ve served their purpose, so delete them.

www.it-
✓ Add comments so you’ll understand how the code works when you revisit it six months from now.
✓ Make sure everything is spelled correctly — especially text inUserForms and message boxes.
✓ Check for redundant code. If you have two or more procedures that have identical blocks ofcode, consider creating a new procedure that other procedures can call.

www.it-
Chapter 24: Ten VBA Do’s and Don’ts
Don’t Put Everything in One Procedure
Want to make an unintelligible program? An efficient way to accomplish that is by putting all your code inside one nice big procedure. If you ever revisit this program again to make changes to it, you’re bound to make mistakes and introduce some fine-looking bugs in there.
Do you see the problem? The solution is modular code. Split your program into smaller chunks, whereeach chunk is designed to perform a specific task. After you pick up this habit, you’ll find that writingbug-free code is easier than ever.
Do Consider Other SoftwareExcel is an amazingly versatile program, but it’s not suitable for everything. When you’re ready to undertake a new project, take some time and consider all your options. To paraphrase an old saying, “When all you know is Excel VBA, everything looks like a VBA macro.”
Don’t Assume That EveryoneEnables Macros
As you know, Excel allows you to open a workbook with its macros disabled. In fact, it’s almost as if the designers of recent versions of Excel want users to disable macros.
Enabling macros when you open a workbook from an unknown source is not a good idea, of course. So
you needtoknowyourusers.Insomecorporateenvironments,all M

www.it-
icrosoft Office macros are disabled, and the user has no choice in the matter.
One thing to consider is adding a digital signatureto the workbooks that you distribute to others. That way, the user can be assured that it actuallycomes from you, and that it hasn’t been altered. Consult the Help system for more information about digital signatures.
371

www.it-
372 Part VI: The Part of Tens
Do Get in the Habit of Experimenting
When I work on a large-scale Excel project, I usuallyspend a significant amount of time writing small VBA “experiments.” For example, if I’m trying to find outabout a new object, method, or property, I’ll just write a simple Sub procedure and play around with it until I’m satisfied that I have a thorough understanding of how it works — and the potential problems.
Setting up simple experiments is almost always muchmore efficient than incorporating a new idea into your existing code without the understanding of what those experiments bring.
Don’t Assume That Your Code WillWork with Other Excel Versions
Currently, at least five different versions of Excelare commonly used around the world. When you createan Excel app, you have absolutely no guarantee thatit will work flawlessly in older versions or in newerversions. In some cases, the incompatibilities willbe obvious (for example, if your code refers to cellXDY877322, you know that it won’t work in versions prior to Excel2007 because those versions used a smaller worksheet grid). But you’ll also find that things that should work with an earlier version don’t work.

www.it-
Excel includes a handy compatibility checker (chooseFile➪Info➪Check For Issues➪Check Compatibility), but it only checks the workbook and ignores the VBAcode. The only way to be sure that your applicationworks with versions other than the one you createdit with is to test it on those versions.
Do Keep Your Users in MindExcel apps fall into two main categories: those that you develop for yourself and those that you develop for others to use. If you develop apps for others, your job is much more difficult because youcan’t make the same types of assumptions. For example, you can be more lax with error handling if you’re the only user. If an error crops up, you’ll have a pretty good idea of where to look so you canfix it. If someone else is using your app and the same error appears, they’ll be out of luck. And whenworking with your own application, you can usually get by without instructions.

www.it-
Chapter 24: Ten VBA Do’s and Don’ts
You need to understand the skill level of those whowill be using your workbooks and try to anticipateproblems that they might have. Try to picture yourself as a new user of your application and identify all areas that may cause confusion or problems.
Don’t Forget About BackupsNothing is more discouraging than a hard drive crash without a backup. If you’re working on an important project, ask yourself a simple question:If my computer dies tonight, what will I have lost?If your answer is more than a few hours of work, then you need to take a close look at your data backup procedure. You do have a data backup procedure, right?
373

374 Part VI: The Part of Tens

www.it-ebooks.info

Characters•- (Subtraction
AccessControlByName procedure, 317
And operator, 110 apostrophe ('), 93–94& (concatenation Activate worksheet
event,arguments. See names ofoperator), 110,
200164 specific arguments
( ) (parenthesis), 111
ActiveX Controls group, 74
Array function, 134* (asterisk), 107 Add Watch dialog
box, 206arrays
* (Multiplication operator),
AddArgumentDescriptions
declaring, 111–112110 procedure, 346 defined, 111
*.* (wild card file filter
AddAWorkbook procedure,
dynamic, 113specification), 244–245
62 functions that return. (dot) operator,
57AddChart methods, month names,
341–342/ (Division operator), 110
220–221 sorted lists, 342–343: (statement
separatoradd-ins multidimensional,
112–113character), 150 creating, 350–351, 355
treating variables as, 120\ (Integer
divisiondefined, 347 Assign Macro dialog
box, 74operator), 110 descriptive information,
assignment statements^ (Exponentiation adding, 354 defined, 108
operator), 110 distributing, 356 equal sign operator, 109+ (Addition
operator), 110loading/unloading,349
examples of, 108–109= (equal sign), 95,
109modifying, 356–357 asterisk (*), 107
’ (apostrophe), 93–94
opening, 355–356 Auto Data Tips option,, (comma), 107, 201 password-
protectingOptions dialog box,“ “ (double
quotes), 56, 115code, 354–355 VBE, 49
reasons for creating, 348
Auto Indent setting,setting up
workbook, 351Options dialog box,testing workbook,
353VBE, 49
Abs function, 134Absolute Referencesmode,
44, 82–83accelerator keys (hot keys),
281–282Accelerator property
XLSM workbookfiles
versus,347–348
Add-Ins dialog box, 349AddItem method, 291Addition operator (+), 110
Auto List Members option,
Options dialog box, VBE, 48
Auto Quick Infooption,Optionsdialog box,
overview, 267 AddToShortcut procedure,
VBE, 99setting hot keys, 281
320 automatic calculation,AddTwo function, 16 turning on/off,
226
www.it-
Index
• Special
AccessControlById procedure,317
alert messages, eliminating,
227–228, 364
• A •

www.it-
376 Excel VBA Programming For Dummies, 3rd Edition
automating defined, 12frequently performed tasks, 13repetitive
operations, 13AutoSize property,267, 278
• B•
BackColor property,268,
300BackStyle property, 268 backups, 373BeforeClose
workbook event, 164, 171
BeforeDoubleClick worksheet event,164, 176
BeforePrint workbook event, 164
BeforeRightClick worksheet event, 164, 176–177
BeforeSave workbook event, 164, 172
BeginGroup property, 318Bing,367
BoldCells procedure, 296Boolean data type, 97,
122–123
Boolean settings,219–220BorderStyle property,271Break mode, 203–207Break On
Unhandled Errorssetting, Options dialogbox, VBE, 51
breakpointsdebuggin
g customworksheet functions,338
removing, 203 setting,202–205
BuiltIn property,318

www.it-
buttons. See also controls,
UserFormadding to Quick Access toolbar, 287, 314creatingcustom, 13
executing Sub procedures from, 74
Buttons argument, 234ButtonText argument, 243Byte data type, 97
• C •CalcManual procedure, 105Call keyword, 76CallerSub procedure, 76–77Cancel argument, 172Cancel property, 271, 286CancelButton_Clic
k procedure, 259–260,291, 351
Cancel_OnKey procedure,
182Caption propertyCommandBar object,
316–318CommandButton control,
286Frame control,
271, 285,300
Label control,285, 300
OptionButton control, 285 overview, 268
Cell object, 58Cell shortcut menu
adding items to, 320–322 deleting items from,
321–322 disabling, 322–323
Cells property advantage of,118 arguments, 118 defined, 117referring to multi-cell range, 118
Change worksheet event data validationpasting and, 177–178 preventing destructionof validation
rules,178–179

www.it-
overview, 164, 178–179ChangeCase procedure,
249, 261–263, 351–354ChangeComment function,
330ChangeValue procedure,
60–61ChartMods procedures,
224–225ChartObject object,
222–223ChartObjects collection, 223charts
applying formatting,224–225 creating, 221–222
displaying in UserForms,304–305 embedded,
222 looping throughChartObjects collection, 223macro compatibility,220–221
modifying properties of,224modifying type of, 223
Charts collection, 55–56ChartType procedures, 223CheckBox control, 252, 269CheckCell procedure,
151–152CheckSelection procedure,
218CheckUser procedures,
144–146Choose function, 134Chr function, 134 cleaning code up, 370Clear method, 128ClearRange procedure, 61 clipart collection, 272CloseButton_Click
procedure, 288Code Colors option,
Options dialog box, VBE, 50
www.it-
Index
377
Code windows, VBE creating modules, 40–41 entering code intomodules
by copying, 46 directly, 41–44using macrorecorder,
44–46event-handler procedures,
166–167Full Module View,49 minimizing/maximizing,
39–40Object drop-down list, 167 overview,34–35Procedure drop-down list,
167–168switching among, 40 tiling, 40viewing for UserForms,
254 collectionscommonly used, 55For Each-Next loops with,
160–161,223methods
of, 62overview,16
Color property,124–125 colorscell background, 124text and background, 50 theme, 124
Column property,121–122 columnshiding unwanted, 362selecting, 213selecting to end of, 212–
213, 363ComboBox control, 252, 270 comma (,),107, 201CommandBar objects controlsproperties of,317–319 referring to, 316–317
listing all menus, 315 overview, 314–315re-creating
Excel 2003 menu bar, 323–325
referring to, 315–316
CommandButton control,253, 257,270–271, 286 commands,
custom, 13 commentsconverting statements to
when testing, 94overview, 93–95 reducing bugs with, 208 using effectively, 94–95Commission functions,333–335
Compatibility Mode, 362 concatenation, defined, 43,
110concatenation operator(&), 110, 200 constants.
See also namesof specific constants actual
value of, 106 declaring, 104–105 predefined, 105–106 scope of, 105context bugs, 197 controls, UserFormadding, 252–253, 257–259,
265–266 aligning,280changing properties of,
253–254, 257–259CheckBox, 252, 269ComboBox, 252, 270CommandButton, 253,
257, 270–271, 286 controls, UserForm
(continued)Frame
example of, 285OptionButtons in, 297 overview, 253, 271 progressindicator dialogbox, 300
tab order, 281Image, 253, 271–272,

www.it-
304–305Label, 252, 272–273,
281–282, 285, 300 limiting number of, 282 list of, 252–253
ListBoxdetermining
multipleselections,293–295
determining
selectedite
m, 292–293 example of, 290–295 filling,291–292 methods of, 291MultiSelect property, 306 overview, 252, 272–274
properties of, 291
moving,279MultiPage,253, 274,
303–304 naming, 255–256OptionButton examples of, 258, 285 overview, 252, 274–275 using multiple sets of,297
properties of
changing,266–268
common, 267–268
RefEdit, 253,275–276,
295–296resizing,279ScrollBar, 253, 276, 306 selecting multiple,
279–280spacing,280SpinButton,253, 277,
297–299, 306 stacking, 279TabStrip, 253,277, 303TextBox, 252,278, 285,
297–299, 306

www.it-
ToggleButton,252,279ControlSource
property,269–270,
273–
278Copy method, 127CopyCurr
entRegion procedures, 211–212
copyingenteringcodeby,46ranges,127,210–211tables,212UserForm controls, 286 variable-sizedranges,21
1–212

CopyOne procedure, 61CopyRange procedures, 210CopyTable procedure, 212Count property, 121COUNTA function, 289–290CountBold procedure, 161CountBooks procedure,
60–61Create Table dialogbox,
Date function, 134DateAdd function, 134DateDiff function, 134DatePart function, 134DateSerial function, 134DateValue function, 134Day function, 134Deactivate
workbook event, 164
Deactivate worksheet
declarations, defined, 40Default argument, 240Default property, 271, 286Default to Full
Module View option, Optionsdialog box, VBE,49
Delete method, 128DeleteEmptySh
eets procedure,160
DeleteFromShoCut method, 214 techniques for dialog boxes, custom. Seeexamining code,
199also UserForms
inserting Debug.Print
GetOpenFilename methodstatements, 201–
202arguments, 243
data tips, 49 datatypesbuilt-in,97 choosing, 98declaring variables as,
98–102,
using MsgBox function,200–201
types of bugs,197–198VBA
debuggerLocals window,207 settingbreakpoints,
example of, 244–245GetSaveAsFilename method, 246
InputBox function arguments, 240examples of, 240–242
MsgBox function UserForms, 289–290 If-Then structure 235–236data-type bugs, 198 ElseIf condition,
148overview, 233–234
date and time calculations
examples of, 146–147,
selecting directory names,Date variables,
107–108149 246
displaying system date or
If-Then-Else structure,
UserForms versus, 234time, 130 147–148 dialog boxes, displayingdisplaying the
name ofoverview, 144, 146 built-in, 247–
248month, 131–132 overview, 145 Dim statements, 99,Month function,
135Select Case structure
101–103month names, 131–132,
examples of, 150–151
Dir function, 134341–342 nested, 151–152 DisplayAlarm
procedure,Date data type, 97, overview, 144 179
www.it-
378 Excel VBA Programming For Dummies, 3rd Edition
• D •

Division operator ( / ), 110Docking tab,
Options dialog box, VBE, 52
docking windows, 52 dot (.) operator, 57Double data type, 97double quotes (" "), 56, 115
Enabled property, 318End method, 213EnterButton_Clic
k procedure,288–289
EnterRandomNumbers procedure, 301–302
EnterSquareRoot procedures, 184–188,
BeforeSave workbook event, 172
defined,165Open workbookevent,
168–171
placement of,166–167programming,165–166
dynamic arrays, 113 361–362. See also error-
activation events,handling
techniques174–176
error numbers, 193–194
BeforeClose event, 171Error Trapping
setting,BeforeSave event, 172Editor Format tab,
OptionsOptions dialog box,
event-handlerdialog box, VBE VBE, 51 procedures,
165–168Code Colors option, 50
error-handling techniques
list of, 164Font option, 50 adding error-
handlingOpen event, 168–171Margin Indicator
Barcode to procedures,
worksheetoption, 51 185–187 activation
events, 173Size setting, 51 On Error Resume Next
BeforeDoubleClickEditor tab,
Options dialogstatement, 192–193
event, 176box, VBE On Error
statementsBeforeRightClickevent,Auto Data Tips
option, 49adding to procedures,
176–177Auto Indent setting, 49
188–189 Change event, 177–179Auto List Members settings for, 189 event-handler
option, 48 syntax options, 190
procedures, 165–167Auto Quick Info
option,identifying specific errors,
list of, 16448–49 193–194 Excel 2003 menu
bar,Auto Syntax Check option,
intentional errors,
323–32547–48 194–196 Excel blogs, 366
Default to Full Module
Resume statements,
Excel Macro-EnabledView option, 49 190–192 Workbook (XLSM)
Drag-and-Drop Text types of errors, 183–184
extension, 27–28,Editing option,
49event-handler procedures
347–348Procedure Separator
activation events Excel settingsoption, 50 workbook, 174–176 Boolean, 219–220
Require Variable worksheet, 173 non-Boolean, 220Declaration option,
adding to UserForms,
Excel versions, 18–19, 37248, 99 259–261 Exit For statements, 155,ElseIf condition,
148BeforeClose workbook
157embedded charts, event, 171 Exp function, 134
www.it-
Index
379
• E •

Exponentiation operator
(^), 110ExtractElement function,
340
• F •
FormulaLocal property, 126 formulas, executing
Function procedures from, 77–78
Date, 130, 134DateAdd, 134DateDiff, 134DatePart, 134DateSerial, 134DateValue, 134Day, 134
file size, determining, 132
modifying chart Err, 134FileDialog object, 246–247
properties, 224 Error, 134FileFilter argument, 243, 246
nested, 157–159 Exp, 134FileLen function, 134
overview, 144 FileLen, 132, 134FillRange procedure,
157with Step value, 154–155
Fix, 134FilterIndex argument,
Frame control Format, 134243, 246 example of, 285 GetSetting, 134
FirstName function, 331
OptionButtons in, 297
Hour, 134Fix function, 134 overview, 253, 271 InputBox, 133,
134fixed-length strings,
progress indicatordialog
InStr, 134106–107 box, 300 InStrRev, 134
fixed-width fonts, 50
tab order, 281 Int, 134fmMultiSelectExtended
fully qualified references,
IsArray, 134constant, 294 57–58 IsDate, 134
fmMultiSelectMulti Function procedures.See
IsEmpty, 134constant, 294 also names of specific IsError, 135
fmMultiSelectSingle functions IsMissing, 135constant, 294 defined, 40 IsNull, 135
focus, UserForm controls,
executing IsNumeric, 135281 overview, 76 LBound, 135
folders, designating as
from Sub procedures,
LCase, 135trusted locations, 30
76–77 Left, 135Font objects, 123 from worksheet Len, 131, 135Font option, Options dialog
formulas, 77–78 listing, 133box, VBE, 50 keeping simple, 208 Mid, 135
Font property, 123 limits of, 330 Minute, 135fonts naming, 69 Month, 135fixed-width, 50 overview, 16 MonthName,
131–132size setting, 51 Sub procedures versus,
MsgBox, 133, 135For Each-Next loops 67–68 Now, 135
with collections, 160–161,
functions. See also names of
Replace, 135223 specific functions RGB, 135
efficiency, 214–216 built-in Right, 135Form Controls group, 74
Abs, 134 Rnd, 135Format function, 134
Array, 134 Second, 135FormatCells procedure, 94
checking for, 139 Shell, 133, 135Forms node, Choose, 134 Space, 135
www.it-
380 Excel VBA Programming For Dummies, 3rd Edition
window, VBE,37
Formula property,125–126
Chr, 134CurDir, 134
Split, 135Sqr, 135

String, 135 GetData procedure, If-Then-Else Time, 130, 135 GetFileSize
procedure, 132147–148
Timer, 135 GetImportFileName overview, 144, 146TimeSerial, 135 procedure, 244–
245If-Then-Else structure,TimeValue, 135 GetLength
procedure, 131147–148
Trim, 135 GetName procedure, 241
Image control, 253,271–272,TypeName, 132, 135 GetOpenFilename
method304–305
UBound, 135 arguments, 243 Immediate window, VBEUCase, 135 example of, 244–245 debugging, 204–205
Val, 135 GetPrice procedure,
determining actual valueWeekday, 135 138–139 of constants,
106Year, 135 GetRange procedure,242
hiding/revealing, 35custom, 14, 140–141 GetSaveAsFilename overview, 34–36
defined, 129, 330 method, 246 Imp operator, 110Insert Function dialog box
GetSetting function,134
indentationdescription of argument,
GetValue procedures,
automatic, 49345–346 216–217 reducing bugs
with, 208description of function,
global (public) variables,
Index property, 316344–345 103 InitialFileName argument,worksheet Google, 367 246
LARGE, 137 GoTo method, 127 InputBox functionlisting, 139 GreetMe procedures, arguments, 240MAX, 136 146–148 examples of, 240–
242MIN, 137 GroupName property,275,
overview, 133–134PMT, 137–138 297 InputBox method,
242SUM, 136 GuessName procedure,
InRange argument,VLOOKUP, 138–139 42–44 336–337worksheet, custom Insert Function
dialog boxarguments, 331–339 • H • limits of, 330 HasFormula
property,77–78
#NAME error message, 122–123 description of
argument,361 Height property, 268, 300
345–346reasons for creating, 329 Help system description of
function,that return arrays, VBA, 63–64, 365 344–345341–343 VBE, 36 InStr function,
134, 331wrapper, 339–341 HideSheets procedure, 161
InStrRev function, 134writing, 331 hot keys
(accelerator Int function, 134
281–282 Integer data type,97Hour function, 134 Integer division
www.it-
Index
381
debugging,338
worksheet formulas,
• G •General tab,
Options dialog box, VBE, 51
GetAFolder procedure,
246–247
GetAnswer procedures,
235–238 • I •Id property, 317If-Then structure ElseIf condition, 148 examples of, 146–147, 149

www.it-
( \ ), 110
IntegralHeight property,
273, 278
IntelliSense, 48Interior objects, 125Interior property, 125

www.it-
382 Excel VBA Programming For Dummies, 3rd Edition
• J •• L•
Label control,252, 272–273,
281–282, 285,300 labels, code, 114, 144LARGE function,137, 336LargeChangeproperty, 276LBoundfunction, 135LCase function, 135, 261 left function, 135, 337–338Left property,268, 300LegendMod procedure, 224 lenfunction, 131, 135Likeoperator,341 linenumbers, 114line-continuation
characters, 42, 109, 364
ListBox control determining multipleselect
ions, 293–295 determining selecteditem,292–293
example
of, 290–295 filling,291–292 methods of, 291MultiSelect property, 306 overview, 252, 272–274 properties of, 291ListCountproperty, 291ListIndexproperty,291, 293

Invalid procedure ListRows property, Record Macro or argument error
ListStyle property, 270, 273
Description box, 87message, 185,
191local user groups, 367
Macro name box, 87IsArray function,
134Locals window, 207 overview, 86–87
IsDate function, 134
logic flaws, 197 Shortcut key option, 87IsEmpty function,
134logical operators, 110
Store Macro In option, 87IsError function,
135Long data type, 97–98
relative mode, 83–85IsLike function,
341LOOKUP table function, 333
viewing code, 85–86IsMissing
function, 135loops Macro Settings
tab, TrustIsNull function, 135
Do-Until, 144, 159–160
Center dialog box, 5IsNumeric
function, 135Do-While, 144, 159 Macro1 procedure,
88–90For Each-Next MacroOptions method, 345with collections, macros
160–161, 223 absolute references, 82–83JoinText function,
336efficiency, 214–216
For-Next
accessingre-creating Excel
examples of, 153–154
menu bar, 323–325with Exit For Ribbon
www.it-
155, 157 modifying chartproperties, 224 nested, 157–159 overview, 144with Step value, 154–155 reasons for using, 153 speed of, 156
• M •Macro dialog box, executing
Sub procedures from, 70, 72
Macro name box, RecordMacro dialog box, 87
Macro Options dialog box, 73
macro recorder absolute mode, 82–83 entering code using, 44–46 identifying properties andmethods, 208
inefficiency of, 88–90 limits of, 81–82, 361–362 overview, 79–82 preparing to record,
79–82
307–314 shortcut menucustomization,
314–323 creating macro-drivenapplicatio
ns, 14 defined, 12 describing, 87enabling/disabling,5–6,
29, 371extra statements, 26,
89–90inefficiency of, 88–90 modifying, 27 naming, 87preparing to record,
22–23, 79–82 recording, 23–24,80–81 relative references, 83–85saving workbooks thatcontain,
27–28 security, 28–30shortcut keys, assigning,
87 speeding upby declaring variable types, 229
by eliminating alert
messages, 227–228

www.it-
Index
383
by simplifyingobject references, 228tips
for, 363by turning off automatic calculation, 226
by turning offscreen updating, 226
by using With-End With structure, 229–230
storing, 87 testing, 24viewing code, 25–27,
85–86
MakeBold procedure, 213MakeCheckerbo
ard procedure,159
MakeOldMenus procedure,
323–325Margin Indicator
Bar option, Options dialog box, VBE, 51
MAX function, 136Max property, 276–277, 298
MaxLength property, 278 menu barre-creating Excel2003,
323–325VBE, 34–35methods. See also
names of specific methods
arguments, 61–62 automatically listing, 65 collection, 62overview, 17,58–59 referring to,18Microsoft Developer
Network (MSDN), 366
Microsoft Excel Objects node, Project window, VBE, 37
Microsoft Office support,
366Microsoft product support,
365Mid function, 135, 155MIN function, 137Min property, 276–277, 298
Minute function, 135MOD function, 109Mod operator, 109–110ModifyChart procedures,
223module-only scope, 100 module-only variables,
102–103 modules,VBAadding, 37 advantage of,371 character limit, 40–41 creating, 40–41 defined, 330entering code into bycopying, 46 directly,41–44using macro recorder,44–46 overview, 15–
16 removing, 38Modules node, Project
window, VBE, 37modulo arithmetic, 109–110Month function, 135MonthNames function,
341–342 mortgage payment
calculations, 137MoveRange procedures,
214MSDN (Microsoft Developer
Network), 366MsgBox function arguments, 234 constants, 236–237, 239 customizing, 236–238 debugging, 200–201, 338 displaying multilinemessages, 363
displaying results, 60 displaying simple, 235 getting responses,
235–236 overview, 133, 135

www.it-
MsgBoxDemo procedure,
235
msoBarTypePopupconstant,315
multidimensional arrays,
112–113MultiLine property,278, 306MultiPage control, 253, 274,
303–304Mul
tipleSelecti
on procedure,218
Multiplication operator (*),110
MultiplyTwo function,140–141
MultiSelect argument, 243MultiSelect property,
273–274, 291,293–294, 306
MySub procedure, 101, 103
• N •N argument, 337#NAME error message, 361Name property, 268,
285–286, 300, 317NameAndTime procedure modifying, 27preparing to record, 22–23 recording, 23–24running in other workbooks,30
testing, 24
viewing code,25–27
NestedLoops procedure,158
NewSheet workbook event,164
NewSub macro, 75–76Not operator, 110Now function, 135Null returns, 122NumberFormat function,
339–340NumberFormat property,
126

www.it-
384 Excel VBA Programming For Dummies, 3rd Edition
• O•
Object Browser tool, VBE,
64–65
Object data type, 97Object variable or
With block variable not set error message, 186–187
objectsactive, 17collections of, 16, 55 as containers, 16 events, 62–63Excel as an object, 16, 54 exporting, 38hierarchy of, 16, 54–55, 57 importing, 39methods of arguments, 61–62 collection, 62 defined, 18 overview,58–59overview, 16–18, 53 properties ofchanging, 60–61 defined, 17
objectsproperties of (continued) displaying, 60 overview, 58–59referring to navigating throughhierarchy, 57 overview, 17, 56simplifying references,57–5
8, 228
Office Compatibility Pack,
19
Offset property, 118–119OKButton_Click procedure,
260–261,292, 294, 296,352–353
On ErrorResume Next statement, 192–193,

www.it-
208,215
On Error statements adding to procedures,
188–189 settings for,189 syntax options, 190
OnActionproperty, 318OnKey method,
181–182Open workbookevent, 164,
168–171operators. See also
names of specific operators
list of,110 logical,110Mod, 109–110
order ofprecedence,110–111
Option Explicitstatement,48, 98–99,208, 369
OptionButton control examples of, 258, 285 overview, 252, 274–275 using multiple sets of,297Options dialog box, VBE Docking tab, 52Editor Format tabCode Colors option, 50Font option, 50
Margin IndicatorBar option, 51
Size setting, 51Editor tabAuto Data Tips option,49
Auto Indent setting, 49Auto List Members option, 48
Auto Quick Info option,48–49
Auto Syntax Check option,47–48
Default to Full ModuleView option,
49Drag-and-Drop
TextEditing
option, 49

www.it-
Procedure Separator option, 50Require Variable
Declaration option,48, 99General tab, 51
Or operator, 110
• P •page breaks, turning on/
off, 219 parenthesis(( )), 111 passwords
add-ins, 354–355security and, 370VBE projects, 36, 362
Paste method, 127Path property, 132Personal Macro Workbook,
storing macros in, 30,87
PgDn_Sub procedure,181–182
PgUp_Sub procedure, 182Picture property, 268, 272PictureSizeMode property,
272PMT function, 137–138PmtCalc procedure, 137Private statements, 102Procedure Separator
option, Options dialog box, VBE, 50
procedure-only variables,100–102
ProcessCells procedure,214
program flow controlDo-Until loops, 144,159–160Do-While loops, 144, 159
For Each-Next loops with collections, 160–161

www.it-
Index
385
For-Next loops examples of, 153–154 with Exit Forstatement,155, 157 nested, 157–159 overview, 144with Step value,
154–155GoTo statements, 144–145If-Then structure ElseIf condition, 148 examples of, 146–147,149If-Then-Elsestructure,
147–148 overview, 144, 146overview, 143–144Select Case structure examples of, 150–151 nested,151–152 overview, 144
progress indicator functionality, 299–302
Project window (Project
Explorer window), VBE
adding modules, 37 exporting objects, 38 hiding/revealing, 35 importing objects, 39 overview, 25–26, 34–37 removing modules, 38projects, VBE, 36Prompt argument, 234, 240PROPER
worksheetfunction,261
properties. See also names of specific properties
automatically listing, 65 changing, 60–61displaying, 60overview, 17, 58–59 referring to, 17public (global) variables,
103Public statements, 103
• Q •Quick Access toolbar, adding
buttons to, 287,314
quotation marks, 56, 115
• R •Range objects
copying ranges, 210–211 copying variable-sizedranges, 211–212
defined, 115 determiningselection
type, 217–218 identifying multipleselection, 218–219
looping through ranges,214–216 methods
of Clear, 128Copy, 127Delete, 128Paste, 127Select, 126–127moving ranges, 213–214 overview, 209–210 promptingfor cell value,216–217 properties
ofAddress, 122Column, 121–122Count, 121Font, 123Formula, 125–126HasFormula, 122–123Interior, 125NumberFormat, 126 overview, 119Row, 121–122Text, 121

www.it-
Value,120
referringto
overview, 115–116
viaCellsproperty,117–118viaOffsetproperty,118–119
selecting noncontiguous ranges, 116–117
selecting row or column,
213selecting toend of row or column, 212–213
size of, 115RangeConfusion procedure,
96read-only properties, 119
Record Macro dialog boxDescription
box, 87Macro name box,87 overview, 23–24, 86–87Shortcut keyoption, 87
Store Macro In option, 87ReDim statement, 113 redo function,VBE, 42RefEdit control, 253,
275–276, 295–296
Relative References mode,23, 82–85
RemoveAllItems method, 291Replace function, 135Require Variable
Declaration option, Options dialog box, VBE, 48, 99ResetAll
procedure, 320Resume statements,
190–192RGB function, 124, 135Ribbon customization automatically with XML,
310–314Custom UIEditor forMicrosoftOffice,
311–313 manuallyby adding macros, 310

www.it-
with groups, 308–309 with tabs, 308–310

Right function, 135 right-
Select method, 126–127SelectColumn
Shell function, 133, 135 shortcut (right-click) menuSee shortcut
menuSelectDown procedure, 212
adding items to, 320–322customization Selected property,
291CommandBar objectsRnd function, 135 selecting controls, properties of,routines, defined,
41determining selection
317–319Row property, 121–122
type, 217–218 controls, referring to,rows directory names,
246–247316–317
EntireRow property, 213
to end of row or column,
referring to, 315–316hiding unwanted,
362212–213, 363 deleting items
from,ListRows property,270
identifying multiple
321–322Row property, 121–122
selection, 218–219
disabling menus, 322–323RowSource
property,identifying selected
listing all menus, 315–316270, 273 object, 132 overview, 314–315
selecting, 213 noncontiguous ranges,
resetting all built-in, 320selecting to end
of,116–117 Shortcut key
option,212–213, 363 ranges, 126–127 Record Macro dialogShadeEveryThirdRow row or column, 213 box, 87
procedure, 154–155
SelectionChange worksheet
shortcut keys, assigning,RowSource property,
270,event, 164 23, 44, 73, 87
273 SelectionSqrt procedure,
Show method, 255Run Sub/UserForm 192–194 ShowCaption
procedure,command, 70–72 Sentence Case option,
317351–352 ShowCubeRoot
procedure,• S • separator
SaveAsUI argument, 172
Setup_OnKey procedure,
ShowDialog procedure, 303SayIt function,
340–341181–182 ShowDialogBox
procedure,screen updating, turning
ShadeEveryThirdRow 255on/off, 226 procedure, 154–
155ShowDiscount procedures,ScrollBar control,
253, 276,shapes, executing Sub
149–150306 procedures from,
75ShowList procedure, 292ScrollBars
property, 278SheetActivate workbook
ShowMax procedure,136Second function,
135event, 164 ShowMessage
procedure,security SheetBeforeDoubleClick
68, 313checking settings,5
workbook event, 164
ShowMonthNamemacros, 28–30 SheetBeforeRightClic
kprocedure, 131
passwords workbook event, 164
ShowSelectionTypeadd-ins, 354–355 SheetChange
workbookprocedure, 132
limits of, 370 event, 164 ShowShortcutMenuItemsVBE projects, 36,
362SheetDeactivate workbook
procedure, 318–319Select Case
structureevent, 164 ShowShortcutMenusN
ameexamples of, 150–151
Sheets collection, 55–56
procedure, 315nested, 151–152 SheetSelectionChang
eShowValue procedure, 60overview, 144 workbook event,
164Single data type, 97
www.it-
386 Excel VBA Programming For Dummies, 3rd Edition
SetAlarm procedure, 179
ShowDate procedure, 130

Size setting, Options dialog box, VBE, 51
structured programming, defined, 145
Text property, 121TextAlign 215–216
SmallChange Sub procedures.
See alsonames of
TextBox control, 252, 278,
285, 306276–277 procedures TextBox1_ChangeSorted function, 342–343
defined, 40 procedure, 299Space function, 135 executing TextPart
function, 155Speak method, 340–341
from another procedure,
ThemeColor property, 124SpecialCells
method,75–76 ThisMonth
variable, 131215–216, 353 from buttons, 74 Time function, 135SpecialEffect property, 300
directly, 70–72 Timer function, 135SpinButton control,
253,from Macro dialog box,
TimeSerial function, 135277, 306 70, 72 TimeTest procedure, 156SpinButton1_Change overview, 69–71 TimeValue function, 135procedure, 298 from shapes, 75 TintAndShade property,Split function, 135 using shortcut
key, 70,124
Spreadsheet Page, 366
72–73 Title argument, 234, 240,Sqr function, 135 Function
procedures,243, 246
Standard toolbar, VBE,
executing from, 76–77
Toggle Case option,34–35 Function
procedures351–352
statement separator
versus, 67–68 ToggleButton control,character (:),
150identifying, 27 252, 279
statements keeping simple, 208
ToggleCalcModebreak up lengthy lines, 42
naming, 69 procedure, 220converting to comments
overview, 16 TogglePageBreakswhen testing, 94
Subscript out of range error
procedure, 219defined, 42 message, 362 toolbars, VBE, 34–
35Static statements, 103–104
Subtraction operator (-),
ToolTipText property, 318static variables,
103–104110 Top property,
268, 300Step value, 154–155 SUM formula, 125, 129
TopAvg function, 337Stop keyword, 204 SUM function, 136 Trim function, 135
StopClock procedure,
syntax errors, 198 Trust Center dialog box,180–181 syntax-checking
feature,5–6, 28
Store Macro In option,
47–48 trusted locations, 30Record Macro Type mismatch
www.it-
Index
387
box, 87StrConv function, 261 strictly-typed languages, 97String data type, 97, 106–
107String function, 135strings
determining length of, 131 fixed-length, 106–107 variable-length, 106
• T •Tab Order dialog box, 281TabIndex property, 285–286TabOrientation property,
304TabStrip control, 253, 277,
303TenByTen procedure,
44–46

www.it-
message, 186
Type property, 315TypeName function, 135
• U •UBound function, 135UCase function, 135,261

UDFs (User DefinedFunctions). See
ListBox, 252, 272–274,
testing, 263–264,287–288 writing, functions moving, 279 modeless tabbed, 303–304undo function, VBE,
42MultiPage, 253, 274,
progress indicatorUnhideSheets
procedure,303–304 functionality,
299–302161 OptionButton, 252,258,
range selectionUpdateChart procedure,
274–275, 285, 297 functionality, 295–296305 properties of,
changing,testing, 282
UpdateClock procedure,
266–268 using informationfrom,180 properties of,
common,255–256
UpdatePrices procedure,
267–268 viewing Code window for,195–196 RefEdit, 253, 275–
276,254
UpdateProgress procedure,
295–296 when to use, 249–250302 resizing, 279 UserName property,
User Defined category,
ScrollBar, 253, 276, 306
331–332Insert Function dialog
selecting multiple,box, 77–78 279–280
User Defined Functions
spacing, 280(UDFs). See functions
SpinButton, 253, 277,
Val function, 135User function, 332, 339
297–299, 306 Value propertyUserForm_Initialize stacking, 279 CheckBox control,
269procedure, 292 TabStrip, 253, 277, 303 ComboBox control,
270UserForms TextBox, 252, 278,285, ListBox control,
273, 291adding, 265 297–299, 306 MultiPage control,274,aesthetics of, 282 ToggleButton, 252,
279 304charts, displayingin,
creating, 284–285 OptionButton control,304–305 checklist for,
305–306 275, 285, 297controls example of, 256 overview, 60, 120,
268adding, 252–253, overview, 250–251 ScrollBar control,276257–259, 265–266 custom dialog
boxes SpinButton control, 277aligning, 280 versus, 234 variable-length strings, 106changing
properties of,data validation, 289–290 variables
253–254, 257–259 displaying, 255, 261 declaring, 98–102,
229, 369CheckBox, 252, 269 event-handler procedures, defined, 95
checklist for, 305–306
adding, life of, 104ComboBox, 252, 270 259–261, 288–289 naming, 95–96CommandButton, 253, grid, turning on/off, 265 257, 270–271, 286 inserting, 251–252 purging all from
memory,copying, 286 keyboard functionality 104
Frame, 253, 271, 281, 285,
hot keys, setting, scope of
297, 300 281–282 module only, 100,Image, 253, 271–272,
overview, 280 102–103304–305 tab order,
changing, 281 overview, 100Label, 252, 272–273,
macro for displaying procedure only,
100–102281–282, 285, 300 making available, public, 103limiting number 262–263, 286–287 static, 103–104
www.it-
388 Excel VBA Programming For Dummies, 3rd Edition
• V •
treating as arrays, 120

www.it-
Index
389
Variant data type, 97–98,
120, 122,245
VBA (VisualBasic forApplications
) advantages of, 14–15 capabilities ofautomating frequently performedtasks, 13automating repetitive operations, 13creating custom add-ins,14creating custom buttons,13creatingcustom
commands,13 creating
customfunctions,
14creating macro-driven applications, 14inserting text, 13 overview, 12components of
collections, 16 methods, 17 modules, 15–16 objects, 16–18 procedures, 16 properties, 17 variables, 17disadvantages of, 15 overview, 11vbAbort constant, 239vbAbortRetryIgnore
constant, 237 vbCancel constant, 239 vbCritical constant, 237 vbDefaultButton constants,
237VBE (Visual Basic Editor)activating, 33–34
Code windowscreating modules, 40–41 entering code bycopying, 46
entering code directly,41–44entering code using macrorecorder, 44–46minimizing/maximizing,39–40 overview, 34–35 switching among, 40 tiling, 40components ofCode windows, 34–35Immediate window,34–36menu bar, 34–35 overview, 34Project window, 34–35 shortcut menus, 35 toolbars, 34–35new features of, 36Options dialog box
Docking tab, 52Editor Format tab, 50–51Editor tab, 47–50General tab, 51Project window adding modules, 37 exporting objects, 38 importing objects, 39 overview, 34–37 removing modules, 38undo and redo functions,42
vbExclamation constant,237
vbIgnore constant, 239 vbInformation constant,
237vbNewLine constant,
200, 238vbNo constant, 239 vbOK constant, 239 vbOKCancel constant, 237 vbOKOnly constant, 237 vbProperCase argument,

www.it-
261vbQuestion constant, 237
vbRetryconstant, 239vbRetryCancel constant,
237vbYes constant, 239 vbYesNoconstant, 237 vbYesNoCancel constant,
237version bugs, 198Visible property, 268, 318Visual Basic Editor. See
VBEVisual Basic for
Applications.See VBA VLOOKUP function,
138–139
• W •watch expressions,206Watches window, 205–207 websitesBing, 367Excel blogs, 366Google, 367
MicrosoftDeveloperNetwork, 366MicrosoftOffice, 366Microsoftproduct
support, 365sample files for book, 8Spreadsheet Page, 366 technical updates for
book, 8Weekday function, 135Width property, 268, 300 wild card file filter
specification (*.*),244–245
WindowActivate workbook event,164
WindowDeactivate workbook event, 164
With End-With construct,222, 225, 229–230
WordWrap property, 278,306
www.it-
390 Excel VBA Programming For Dummies, 3rd Edition
workbookevents
activation events,174–176BeforeClose event,171BeforeSave event, 172 event-handler procedures,
165–168 listof, 164Open event, 168–171Workbook_Acti
vate procedure,175
Workbook_BeforeClose procedure, 171,322–323
Workbook_BeforeSave procedure, 172
Workbook_Deactivate procedure, 175
WorkbookIsOpen functions,
195–196
Workbook_Open procedure, 168–170,322–323Workbooks
collection, 55
Workbook_SheetActivateprocedure,174–175
Workbook_SheetDectivateprocedure,174–175
worksheet eventsactivation events, 173BeforeDoubleClick
event,176
BeforeRightClickevent,
176–177Change event, 177–179 event-handler procedures,
165–167list of, 164
worksheetfunctions. Seefunctions
Worksheet_Activate procedure, 173
Worksheet_ BeforeDoubleClick procedure,176
Worksheet_ BeforeRightClick, 177
Worksheet_Change procedure, 165,177–178
Worksheet_Deactivate procedure, 173
WorksheetFunctionobject,
136Worksheets
collection, 55

www.it-
wrapper functions defined, 339ExtractElement function,
340IsLike function, 341NumberFormat function,
339–340SayIt function, 340–341User function, 339
• X •XLAM extension, 348 xlCalculationManual
constant, 105–106XLSM (Excel Macro-Enabled
Workbook) extension,27–28, 347–348 xlToLeft
constant, 128 xlUp constant, 128XoR operator, 110
• Y •Year function, 135

www.it-
Special Offer: Save
$30.00! Power UtilityPak v7 “The Excel tools
Microsoft forgot”
A $40.00 value — yours for only$10.00
Pro-Quality ToolsPUP v7 is a handy collection of 60 general-purpose Excel utilities, plus 50 new worksheet functions. Download a trial version from the URL at the bot- tom of this page. If you like it, use this coupon tosave $30 on the licensed version.
VBA Source Code Is AvailableYou can also get the complete VBA source files for only $20 more. Learn how the utilities and func- tions were written, and pick up useful tips and pro- gramming techniques in the process. These files are a must-have for all VBA programmers.
YES, I want Power Utility Pak v7Name:
Company:
Address: City: State:
Zip:
Check one:
□ PUP v7 Licensed Version ......................................................................................... $10.00
□ Developer’s Pak: Licensed version ($10) + VBA Source ($20.00).................................. $30.00
Upon receipt of this coupon, you will receive download instructions via e-mail. Please make your e-mail address legible.
E-mail:
Credit Card: Expires:

www.it-
Make check or money order (U.S. funds only) payable to:
JWalk &Associates Inc.
P.O. Box68797
Tucson, AZ 85737(USA)
Download a free 30-day trialversion of PUP from:
http://spreadsheetpage.co
m
PUP v7 is compatible only with Excel 2007 and later. For earlier versions of Excel, use PUP v6.


www.it-ebooks.info

fO
MobileAppsDUM.JvllE~·
There's a Dummies App forThis and ThatWith more than 200 million books in print and over 1,600 unique titles, Dummies is a global leader in how-to information. Nowyou can get the same great Dummies information in an App. With topics such as Wine, Spanish, Digital Photography, Certification, and more, you'll have instant accessto the topics you need to know in a format you can trust.
To get information on all our Dummies apps, visit the following:

www.Dummies.com/go/mobilferom your computer.www.Dummies.com/go/iphone/apps from your phone.
www.it-ebooks.info


