Embed Size (px)
Citation preview
Volume 2 College of Southern Nevada Four Fields: Journal o f Anthropology 2013
EXPLORATIONS INTO PREHISTORIC POTTERY REPLICATION: A PRELIMINARY REPORT
Sally Llull Billings and James LaFleur
ABSTRACT
Artifact replication is a branch of experimental archaeology that attempts to reproduce artifacts found in the archaeological record using, whenever possible, traditional techniques and tools. In this study, the methods for replicating coil and scrape pottery from the American Southwest are explored including collecting and processing local clays, hand building, decorating, and painting several types of vessels, making organic paint, and firing. The use of different types of temper and the effect of environmental conditions, such as temperature and humidity, on the process of hand building a pot will be highlighted.
INTRODUCTION
Clay is one of the most common types of sediment found all over the world; it is plastic
and malleable and is used in a wide variety of applications: as a building material, to make
figurines and jewelry, for plumbing, as early writing tablets, in cosmetics, and lastly, but not
least, to make pottery. Humans have made pottery since the Neolithic in Eurasia (Blandino
2003:11-12) the Archaic in Mexico and Central America (Evans 2013:96), and, in East Asia, as
early as the Paleolithic (Zhushchikhovskaia: 2012). Pottery is one of the main chronological and
cultural diagnostic markers recognized by archaeologists the world over; vessel form, design
Volume 2 College of Southern Nevada Four Fields: Journal o f Anthropology 2013
elements, and function help archaeologists place sites within a cultural and temporal framework,
and also to understand a multitude of issues such as, but not limited to, culture change,
subsistence strategies, and settlement patterns. The archaeological literature abounds with
discussions on the various forms of ceramic wares found in many ancient societies, of the types
of temper used in the paste, of the effects of firing – low oxygen versus high oxygen, reduction
techniques, etc. - on different types of clays. Ceramics can be either hand-built or thrown on a
wheel. The hand built techniques most often described in the literature include coil and scrape,
paddle and anvil, pinch pots, and molds. Some authors may briefly describe the steps involved in
hand building, however, none come close to conveying the time-consuming, complicated process
that each technique entails, nor the incredible skill that is required to produce a viable finished
product.
Producing usable pottery is a skill that can take a long time to perfect, starting with the
acquisition of the proper type of clay and how to process that clay so one can create the right
paste to produce the various wares, to the right types of fuel and temperatures to fire the green
ware. Ceramic replication is an important tool for examining and understanding these processes,
however, there have been relatively few replication studies published in professional literature.
Experimental Archaeology and Replication Studies
Experimental archaeology, which dates to the mid-to-late 19th century, is a branch of
archaeology that seeks to interpret the material culture of the past through scientific
experimentation or replication of said material culture (Callahan 1999:4; Shimada 2005:604).
Experimental studies have included, but are not limited to garbology projects (Rathje and
Murphy 1992), the building of monumental structures found in the archaeological record such as
Stonehenge (Parker Pearson 2011:252), and the construction and sailing of an ancient Viking-
Volume 2 College of Southern Nevada Four Fields: Journal o f Anthropology 2013
type ship (Shimada 2005:603). Experimentation has been an important tool in the advancement
of method and theory, particularly for the early functionalists of the 20th century who used this
approach to develop middle range theories that allowed “…the accurate conversion from
observations on statics [material remains] to statements about dynamics [the past culture]”
(Shimada 2005:604). Experimentation in archaeology can also “…provide certain kinds of data
unobtainable by more conventional studies of artifacts” (Saraydar and Shimada 1973:345). In the
mid 1960’s Don Crabtree and Francoise Bordes demonstrated the utility of an experimental
approach to lithic studies by reproducing stone tools and thus encouraged many future
archaeologists to learn flintknapping (Callahan 1999:4). Flintknapping has been a popular
technique utilized in use wear studies.
Replication studies, as a subdivision of experimental archaeology, entails reproducing the
material culture found in the archaeological record or described in ethnographic accounts using
the methods and materials that would have been available to the peoples whose technologies are
being reproduced (Callahan 1999). Reproducing the material culture of prehistoric peoples can
be problematic due to the absence of documented sources that could shed light on the process of
making both utilitarian and luxury items, and identifying the precise materials required to
produce these items. Replication studies run the gamut from flintknapping and pottery making,
to reproducing whole ancient structures and from the utilitarian to the non-utilitarian. It can
provide insight into form and function, the procurement and preparation of raw materials, and the
challenges and obstacles ancient people faced when attempting to produce the goods they needed
in their everyday lives.
Experimental archaeology has had its share of challenges and criticisms; as early as the
1960’s critics have stated that the evaluation of procedures and results of archaeological

Volume 2 College of Southern Nevada Four Fields: Journal o f Anthropology 2013
experimentation are at best ambiguous due to a fundamental lack of a clear theoretical focus
(Shimada 2005:608). Outram (2008) outlines five deficiencies common to archaeological
experiments: 1) lack of clear aims, 2) insufficient detail on materials and methods, 3)
compromises over authentic materials, 4) inappropriate parameters, and 5) lack of academic
context. Replication of archaeological materials and sites tend to be very susceptible to these
deficiencies particularly when replicators, who are usually amateurs, often lack the academic
background and training necessary for a rigorous scientific approach in their work.
Around the 1980’s the experimental approach waned in the United States but increased in
Europe, where today the practice is an important component of many archaeological studies
(Callahan 1999: 5). Over the past fifteen years or so, experimental archaeology is once again
experiencing resurgence in the U.S., with many colleges and universities developing
experimental programs that are based in sound scientific method (Marsh and Ferguson 2010:3-
4). Carefully designed scientific experiments take into consideration the types of tools and the
raw materials they were made from that were available to prehistoric peoples, and a careful
analysis of the procedures used to produce goods. The results are then scientifically monitored
through testing (Callahan 1994:5).
One notable area in experimental studies focuses on the reproduction of prehistoric
ceramics. Pottery making in the American Southwest has had a long, continuous tradition
beginning in the 8th century A.D. to the present day. Modern Puebloan potters have learned their
craft from parents or grandparents who also learned it from kin who passed down this knowledge
relatively unchanged through the generations. While some innovation in decorating techniques
was developed in the late 1800s in response to a growing demand for native goods by American
and European collectors, the basic techniques for collecting and processing clay and hand-
Volume 2 College of Southern Nevada Four Fields: Journal o f Anthropology 2013
building pots has remained unchanged for well over a thousand years. This has made the process
of replicating archaeologically-based examples more feasible than replicating many other now-
extinct technologies. Through hands-on instruction native potters have shared the knowledge of
pottery making with non-indigenous enthusiasts and scholars (Hayes and Blom 1996; Swink
2004).
Using replicated ceramics in experimentation may be more desirable than using
archaeological sherds. First and foremost, it serves to preserve the archaeological record in that
ancient pot sherds will not be destroyed; replicates are more dispensable. Secondly, using whole
replicated pots rather than archaeological pots sherds allows research into how different technical
choices can affect the performance of ceramic pots (Harry 2010: 43-44)
The emphasis of this study is the replication of Southwestern ceramics in order to better
understand the process of collecting and processing the proper materials, such as clay and
temper, the use of different tools made from locally available materials, and the technique of
hand-building vessels, as well as creating decorated wares and firing. The purpose is not to
generate theoretical statements per se, but to serve as a launching point for further research and
hypothesis-building. Without a fundamental understanding of the steps and challenges involved
in making pottery, the ability to generate new questions to direct future research seems limited.
WHAT IS CLAY?
Clay is difficult to define because it has been used to describe a variety of materials that
differs from one another in both composition and origin. Definitions for clay and clay minerals
can vary depending on who one asks; for geologists “clay mineral” refers to a class of hydrated
Volume 2 College of Southern Nevada Four Fields: Journal o f Anthropology 2013
phyllosilicates, or in other words, a mineral high in silicates (Bergaya and Lagaly 2006:5). It is
the silica in the mineral which gives clay a plastic quality when mixed with water and hardens
when dried or fired. A ceramist may define clay by their firing properties or by their uses
(Shepard 1980:7). In essence, clay is the end result of a weathering process of specific minerals
in rock which produces a conglomerate of various components. Reijnders identifies eleven main
components found in many types of clay that includes clay minerals, quartz, mica, feldspar,
calcium and magnesium-containing associate minerals, iron-containing associate minerals,
titanium oxide-containing associate minerals, and organic materials (2005:237).
Clay minerals are composed of a group of small crystalline particles of one or more
members of a group that are commonly known as clay minerals. Clay minerals are hydrous
aluminum silicate, which in some minerals, can be replaced by iron and magnesium (Murray
2007:7). There are some groups of clay minerals that are relevant to pottery production which
include the kaolinites, the illites, and the smectites or montmorillonites (Bergaya and Lagaly
2006:3-5; Murray 2007:7-15; Reijnders 2005:273-274; Shepard 1980:6-10).
Other mineral components can impact the properties of clay, for instance, the presence of
fine-grained quartz in a kaolin clay may impart an abrasiveness to the clay, while organic matter
may affect color (Murray 2007:2). The presence of soluble salts can cause clay to flocculate,
that is, form lumps, which can create problems in processing the clay for use. Montmorillonite
clay that is high in calcium is more viscous than those that are high in sodium, which makes it
suitable for making pottery.
Plasticity and Texture
Clay plasticity refers to the ability of the material to be molded into a shape without it
breaking when a certain amount of stress or pressure is applied and for the shape to be retained
Volume 2 College of Southern Nevada Four Fields: Journal o f Anthropology 2013
after the pressure is removed (Bergaya and Lagaly 2006:5). Clay particles absorb and retain
water; the particles in clay are surrounded by water which acts as a lubricant that allows mineral
plates to slide across one another (Shepard 1980:15). When water is added to clay, the clay
minerals form a suspension that is composed of particles in a size range between molecules and
grains that is called the colloidal state. Clay colloids attract water molecules to their surface and
form “water hulls” (Shepard 1980:14).
Clay Types Based on Origin and Sources
Raw clay deposits suitable for making pottery can be found in a number of geological
contexts. Alluvial clays are those that have been transported and deposited by water as alluvial
fans, and often contain a high iron content (Swink 2004:19). This type of clay is often found
along river banks or other water courses, as well as within ancient alluvial deposits. This type of
clay often fires at lower temperatures which is typical of prehistoric wares.
Carbonaceous clays are found in shale deposits from sedimentary geological formations
(Swink 2004:19) that has been laid down as ancient seabeds or other bodies of water, and is very
fine-grained. This produces a highly plastic claybody, making it ideal for pottery.
Montmorillonite clays are decomposed volcanic ash and are characterized as very fine-
grained clays that are also found in sedimentary geological formations (Swink 2004:19). This
clay is often ideal for creating slips and also as an additive to other clays to increase plasticity.
Clint Swink, a ceramic replicator from southwestern Colorado, has made replicas of
Mesa Verde plain and painted wares using all three types of the afore-mentioned clays. His
preference is for the carbonaceous clay that is abundantly available on the Colorado Plateau and
which he claims the prehistoric Mesa Verde potters used extensively due to its high degree of
Volume 2 College of Southern Nevada Four Fields: Journal o f Anthropology 2013
plasticity (2004:19). These same potters also used montmorillonites as slips for their painted
wares.
Clay often stands out from the surrounding soils and can be visually identified cursorily
by color and texture. Soils that change color dramatically from one stratum to the next are
frequently clay veins. Another telltale sign of the presence of a clay deposit is the lack of
vegetation growing within the area of the deposit that prevents water penetration from reaching
the roots of plants.
The texture of clay when wet is usually smooth and sometimes unctuous. Carbonaceous
clays, due to the very fine particle size, tend toward an unctuous feel. This can result in a smooth
pottery vessel, which may be why this type of clay may have been favored by Mesa Verde
potters.
MAKING POTTERY
Clay Processing
Preparation of the claybody is a crucial first step before making the paste. If the material
is not properly processed, it can cause the paste to crack during hand-building, drying, and firing.
Only those methods that indigenous potters may have used will be discussed.
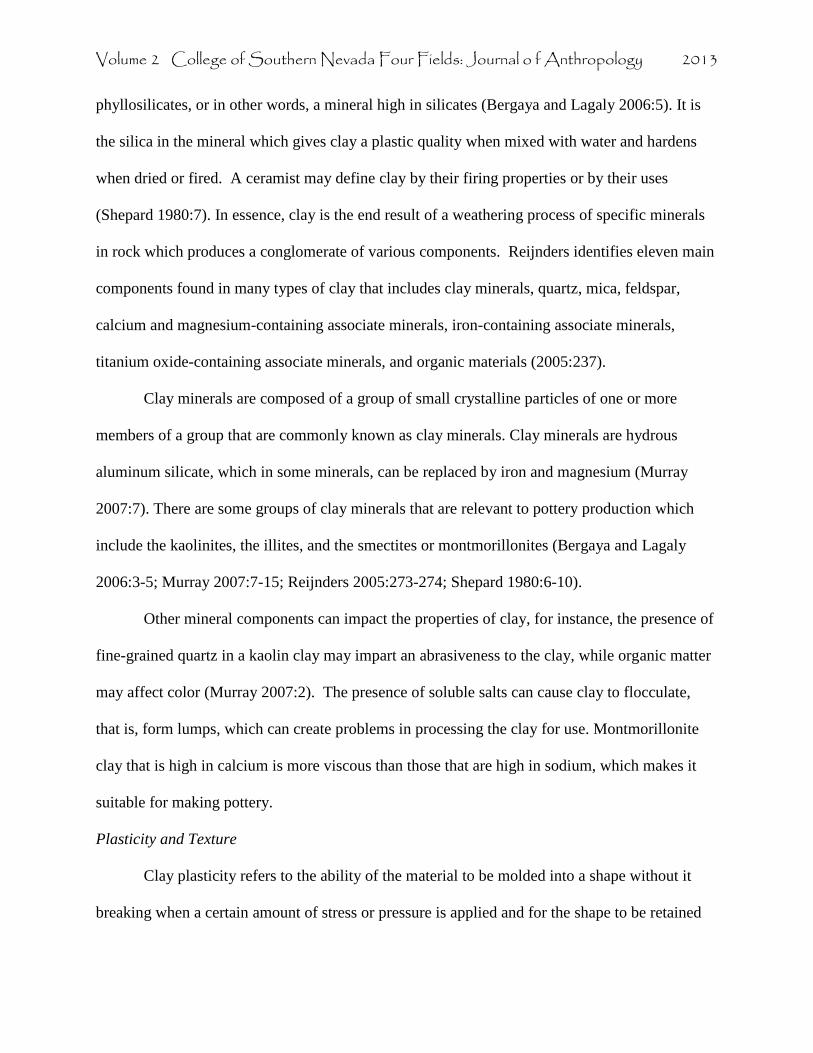
Grinding or slaking the raw clay removes unnecessary particulates such as small rocks
and vegetative matter and reduces the clay and other mineral particles to a fine, uniform size that
aids the preparation of the paste (Blankenship and Blankenship 2008:116; Jamison 2007: 39;
Peterson and Peterson 2009: 39-40; Shepard 1980:51; Swink 2004: 21-22) (Figure 1). These fine
particles will ensure that when the clay is mixed with water, the water will be absorbed and
distributed evenly throughout the paste. In the American Southwest the native peoples used
Volume 2 College of Southern Nevada Four Fields: Journal o f Anthropology 2013
manos and metates made from a number of different materials, including sandstone, basalt, and
quartzite to grind clay (Swink 2004).
Figure 1. Grinding clay
Temper and Plasticity
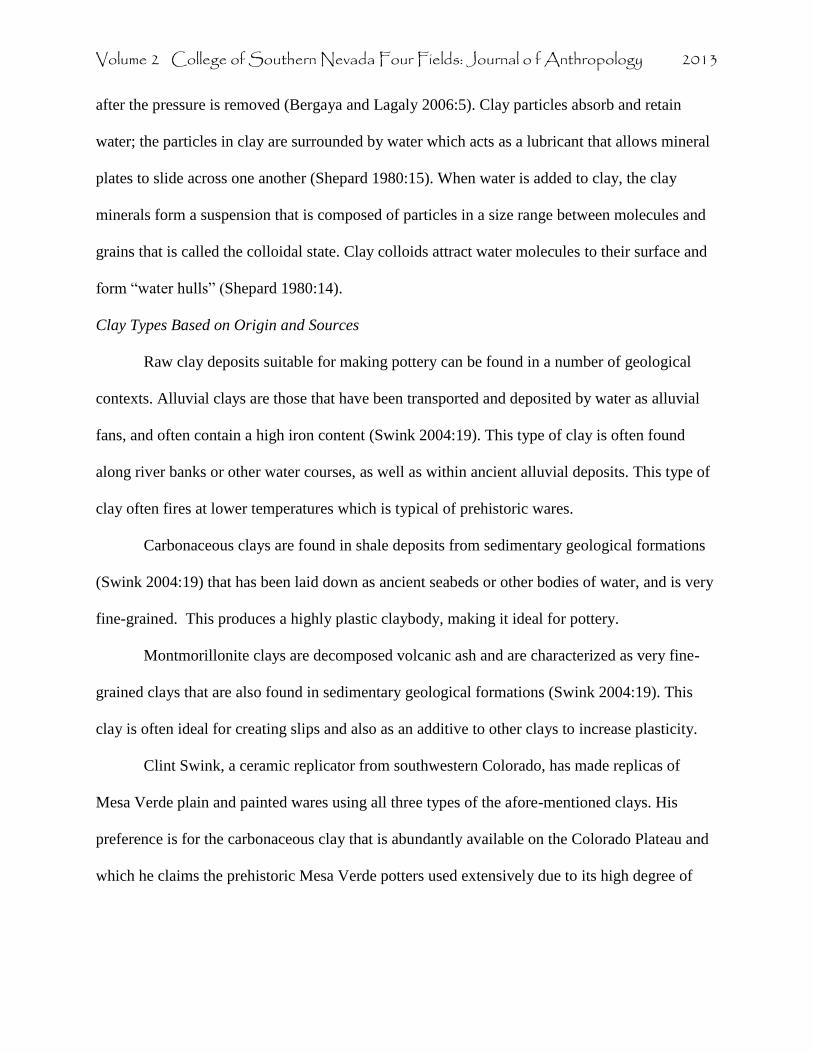
Temper is a nonplastic material that is added to the clay to mitigate shrinkage and prevent
cracking as it dries (Blandino2003:25; Shepard 1980:53; Swink 2004:22-23). Once clay has been
ground, temper is added to the mix (Figure 2). Because clay tends to absorb large quantities of
water, making it plastic and pliable, it shrinks as it dries. Nonplastic additives aid in uniform
drying by creating “escape paths for moisture” (Swink 2004:22).
Volume 2 College of Southern Nevada Four Fields: Journal o f Anthropology 2013
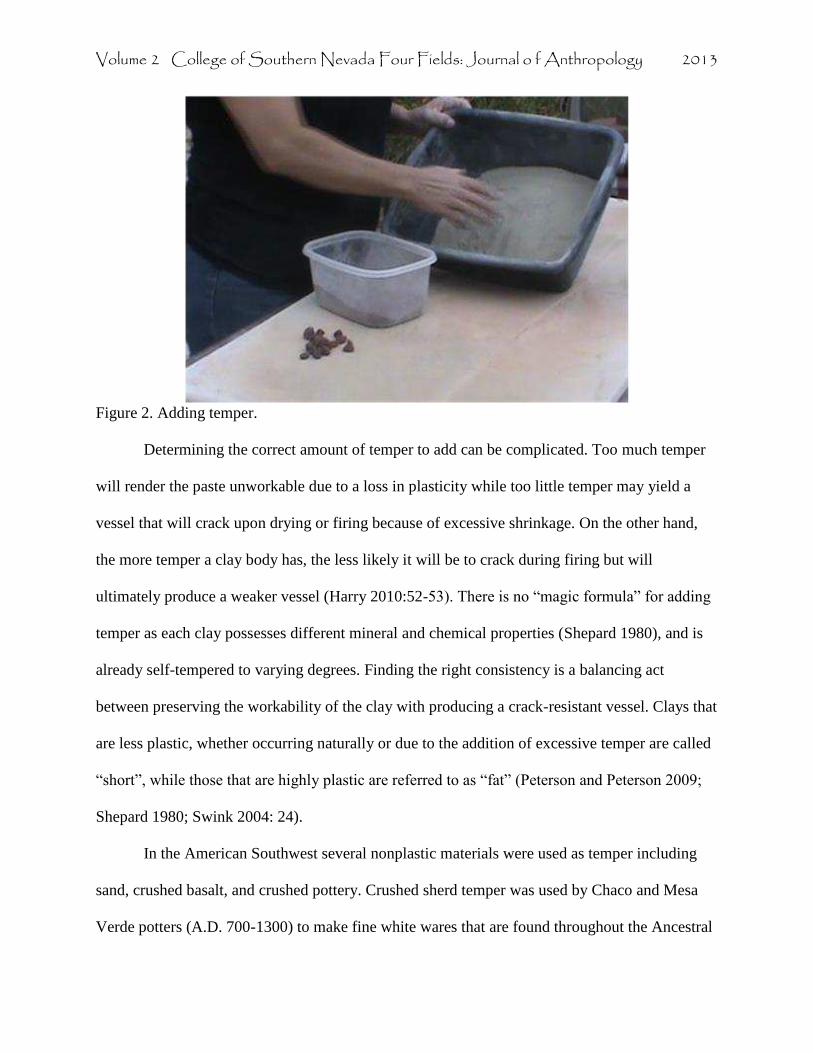
Figure 2. Adding temper.
Determining the correct amount of temper to add can be complicated. Too much temper
will render the paste unworkable due to a loss in plasticity while too little temper may yield a
vessel that will crack upon drying or firing because of excessive shrinkage. On the other hand,
the more temper a clay body has, the less likely it will be to crack during firing but will
ultimately produce a weaker vessel (Harry 2010:52-53). There is no “magic formula” for adding
temper as each clay possesses different mineral and chemical properties (Shepard 1980), and is
already self-tempered to varying degrees. Finding the right consistency is a balancing act
between preserving the workability of the clay with producing a crack-resistant vessel. Clays that
are less plastic, whether occurring naturally or due to the addition of excessive temper are called
“short”, while those that are highly plastic are referred to as “fat” (Peterson and Peterson 2009;
Shepard 1980; Swink 2004: 24).
In the American Southwest several nonplastic materials were used as temper including
sand, crushed basalt, and crushed pottery. Crushed sherd temper was used by Chaco and Mesa
Verde potters (A.D. 700-1300) to make fine white wares that are found throughout the Ancestral
Volume 2 College of Southern Nevada Four Fields: Journal o f Anthropology 2013
Puebloan heartland (Hayes and Blom 1996: 44; Swink 2004). These wares were not used for
cooking as sherd-tempered ceramics did not stand up very well to thermal shock resulting from
repeated heating and cooling (Blinman 2013:64). Shivwits Plain wares dating to Pueblo II times
(A.D. 900-1100) are described as having crushed sherd temper and have been found in the
Moapa Valley (Harry 2005:310; Lyneis 1992:45-49).
Crushed igneous (basalt) rock temper was used extensively in the Four Corners area
during Basketmaker III (A.D. 400-725) (Toll and Wilson 2000:28) and Pueblo III times (A.D.
1150-1300) (Swink 2004:23). This type of temper may have been preferred for cooking vessels
because rock temper confers greater thermal stress resistance, making it ideal to withstanding
repeated heating and cooling (Pierce 2005:134).
Sand temper was widely used in the Great Basin and Mohave Desert, and is found
throughout sites in the Moapa Valley around the Muddy and Virgin Rivers such as Bovine Bluff
(Myhrer and Lyneis 1985:19-25), and Main Ridge (Lyneis 1992:41), although limestone
tempered pottery such as Logandale Gray Ware is predominant at these sites. The abundance of
sand may be a primary motive for its use in pottery. Sand was used extensively in gray wares
from the La Plata and upper San Juan Valley in northwestern New Mexico to produce cooking
vessels (Toll and Wilson 2000:19; Wilson and Blinman 2000:71). The addition of sand temper
consisting of rounded grains tend to produce weaker vessels than using sand (or crushed
sandstone or igneous rock) with angular grains (Blinman 2013). Quartz, feldspar, and mica are
frequently found in sand and are visible when examining cross sections of sand-tempered sherds
under a hand lens.
Fine-grained tempers tend to produce stronger wares than coarse-grained tempers
(Blinman 2013), although coarse-grained tempers may have been preferred for cooking vessels
Volume 2 College of Southern Nevada Four Fields: Journal o f Anthropology 2013
because of greater resistance to thermal shock (Skibo et al 1989:123). Therefore, with the
exception of fine sand, most other tempering agents benefit from grinding prior to adding to the
clay.
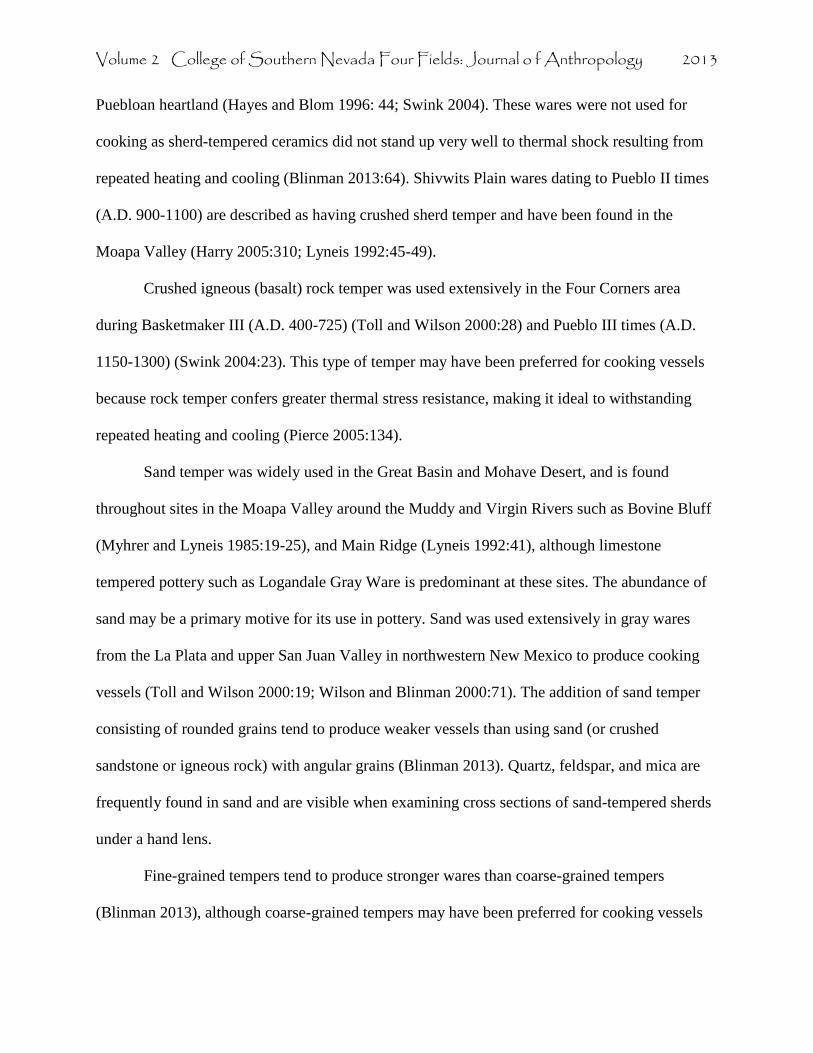
Wedging
Wedging is the process of kneading the tempered clay when water is added to produce a
paste (Blandino 2003:23-25; Jamison and Jamison 2007:39; Peterson and Peterson 2009 39-40;
Shepard 1980: 51-52; Swink 2004: 27-28) (Figure: 3). This is a vital step in the preparation of
the paste; to ignore or neglect this step in any way will result in a substandard paste that is
unusable for making ceramics. The function of wedging is several-fold: it a) increases plasticity,
b) removes air bubbles that create air pockets which weakens the vessel and promotes cracking,
c) distributes water and temper evenly through the mix, d) promotes homogeneity and
consistency of the mixture, and e) removes excess moisture from the paste.
Figure 3. Wedging clay. There is no single method for mixing a clay paste. Among the Ibibio from the Kavango
region of northern southwest Africa and at Multan, Pakistan, clay and temper are hand mixed,
then water is added and the whole is trampled on (Blandino 2003:23; Rice 1987:123). Swink
Volume 2 College of Southern Nevada Four Fields: Journal o f Anthropology 2013
(2004) describes that wedging in the Southwest is done by hand by starting with a rough ball of
clay, holding it in the left hand, and with the right hand lifting a corner of the clay, folding it
inward, and pressing down into the clay while the left hand rotates the clay counterclockwise.
Swink reports doing this at least one-hundred and twenty times to ensure the complete
incorporation and distribution of water and temper into the clay mix, and to remove air bubbles.
Another method is called the “cut and slap” method (Peterson and Peterson 2009:40) whereby a
slab of clay two to three inches thick is thrown down onto a table or other hard surface, then
adding another slab of the same thickness by slapping that onto the first slab, making certain no
air remains between the slabs. Several slabs may be added consecutively to the mass. This
method can be problematic due to the risk of trapping air between the slabs. Occasionally the
combination of two different types of clays may improve plasticity and workability (Tite 1999).
Once the paste has been prepared and wedged, it may be used immediately but ideally
should be stored for a period of time in a sealed container. Swink (2004:24) recommends storing
the clay in several plastic bags and then in a tightly sealed container to “age”. As the clay body
ages, it breaks down into finer particles and increases plasticity. Another benefit of aging clay is
that it allows thorough absorption and distribution of water into the mix, and favors bacterial
action that speeds up the process of breaking down clay particles (Blankenship and Blankenship
2008: 116; Shepard 1980:52). Swink (2004:24) collects pond scum and adds it to the clay body
mix because of the bacterial organisms present in the water. There is little to no reference of
storing clay in the archaeological record although it is possible that pre-mixed clay body could
easily have been stored in ceramic jars, sealed baskets, or in small subsurface pits for later use.
Ceramic jars would have been ideal as they tend to absorb and retain moisture, which is essential
for preserving the mixed clay body. Shepard (1956) mentions the possibility that clay was stored
Volume 2 College of Southern Nevada Four Fields: Journal o f Anthropology 2013
before use by the Aymara of the Andes and the Navajo in the American Southwest, but does not
provide any details of the practice. Rice (1987:119-120) also mentions some ethnographic
examples of aging clay; the Papago potters of Arizona age their clay over the winter while
potters in Chamula, Mexico, age their clay for up to a year. Adding small amounts of acidic
substances may hasten clay aging.
The type of water used is another important variable for the successful mixing of a clay
paste. Groundwater in many areas contains soluble salts, which may present problems when
drying and firing a vessel. Soluble salts create what is called “florescence” or “bloom” (Swink
2004:25) which is the migration of salts to the vessel wall during drying. This creates difficulties
when trying to burnish and slip the vessel because of the powdery finish that collects on the
surface. Water may also contain a high iron content which can cause problems with slipping a
vessel. White slips may yield a pink tone when firing in highly oxidized environments or turn a
dark gray in reduction atmospheres. One of the ways to reduce these problems is by using
rainwater however in Southern Nevada where rainfall is sporadic and unpredictable, using
distilled water is acceptable for replication studies because there is an absence of minerals in the
water.
Hand-Building Pottery
The tools used in pottery making are diverse and can be made from a variety of materials.
Tool types include scrapers for smoothing vessel walls, smooth pebbles for burnishing and
polishing, threads made from agave fibers for cutting, paintbrushes made out of agave fibers for
slipping and painting decorations, a mold called a puki made from an older pottery bowl, a soft
piece of leather or cloth for polishing, a piece of sandstone for sanding and smoothing a dry
vessel, a flake of chert or obsidian, or sharpened bones for use as a cutting tool, organic or
Volume 2 College of Southern Nevada Four Fields: Journal o f Anthropology 2013
mineral paints, and a smooth, flat surface to work on. Scrapers can be made from different
materials such as gourd, broken pot sherds, or even stone flakes.
Coiling is the method used throughout the American Southwest for building a vessel’s
walls. They can be stacked one on top of the other, and pinched and smoothed, overlapped, or
used in a continuous spiral from the vessel base to the rim (Blankenship and Blankenship
2008:117-118; Jamison and Jamison 2007: 43-44; Peterson and Peterson 2009:43-45; Shepard
1980:57-59; Swink 2004: 28). Coiling ensures a certain degree of uniformity in wall thickness
and may offer some compensation when working with less plastic clay. An advantage of
overlapping is that a stronger bond can be applied between coils rather than merely pressing
down on superimposed coils.
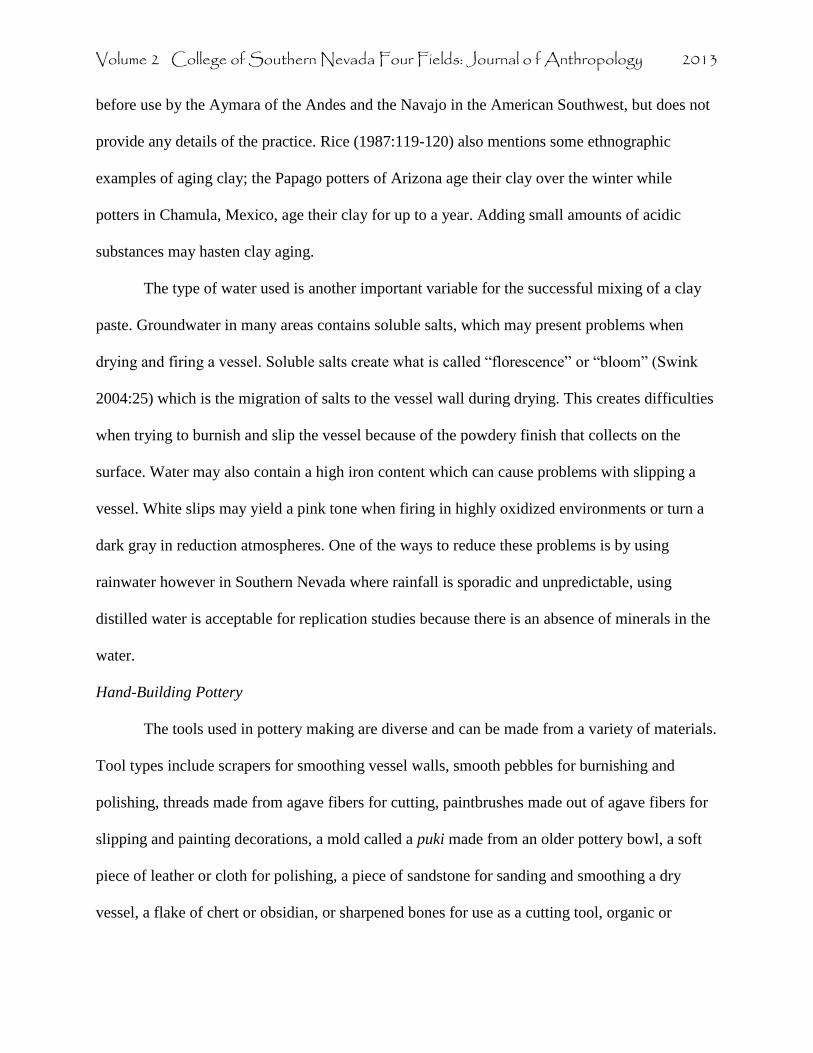
Coils are made by rolling a ball of clay back and forth on a flat surface using both hands
and applying gentle pressure. The roll is lengthened and smoothed by rolling from the middle out
to the sides (Figure 4). During rolling the coil, the ends can form hollow depressions that can
trap air into the mix and should be pinched closed as soon as they form. Swink (2004) refers to
these as “snake mouths”. Swink prefers to use fewer coils because the more numerous the coils,
the weaker the vessel tends to be. In archaeological specimens it is sometimes possible to find
the juncture between coils by touch which feels like a slight bump or ridge on the vessels walls.
Volume 2 College of Southern Nevada Four Fields: Journal o f Anthropology 2013
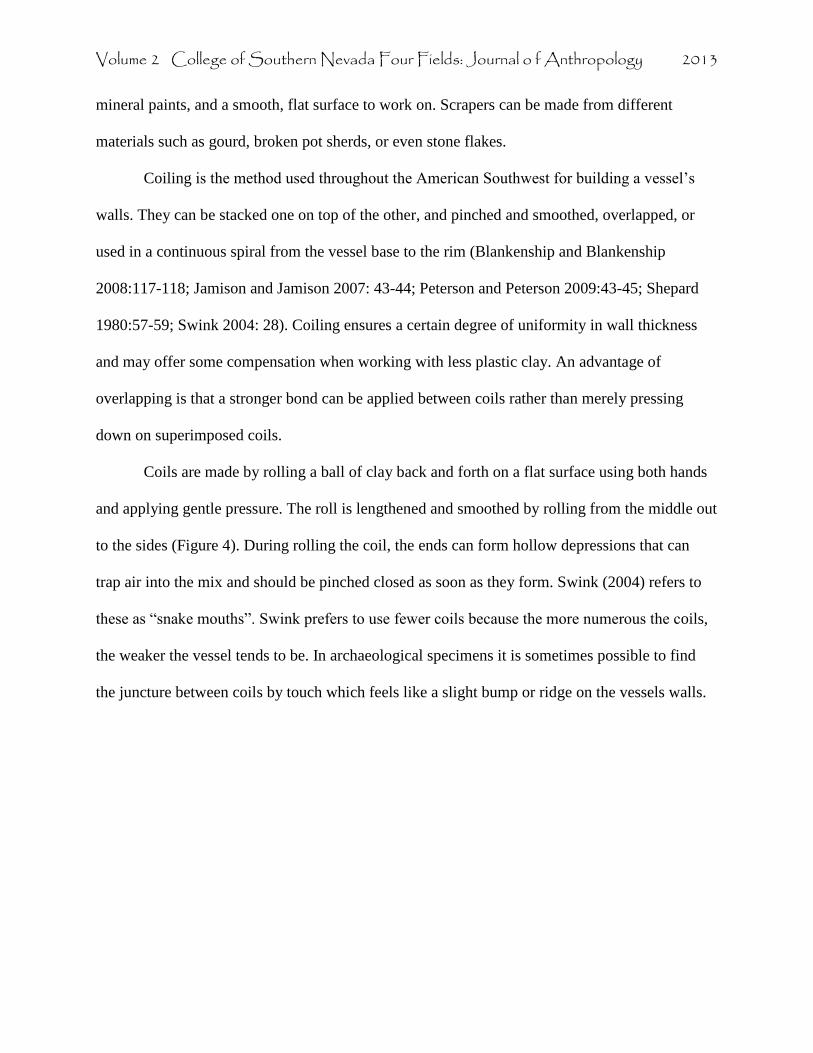
Figure 4. Making a coil. A base is made by either molding clay inside of a puki, or by creating a coiled based
(Blandino 2003: 28; Blankenship and Blankenship 2008: 117; Jamison and Jamison 2007: 43;
Swink 2004: 96). First, a ball of clay is shaped into a disk and is thinned and stretched by
slamming it onto a hard surface (Swink 2004: 96-99) (Figure 5). This helps to eliminate any
trapped air in the clay. To continue stretching the disk, it is thrown toward the individual at an
angle, in much the same way as pizza dough, which stretches the clay in the direction of the
throw. The clay disk is picked up, rotated 90º, and repeated until the desired size and shape is
achieved.
Volume 2 College of Southern Nevada Four Fields: Journal o f Anthropology 2013
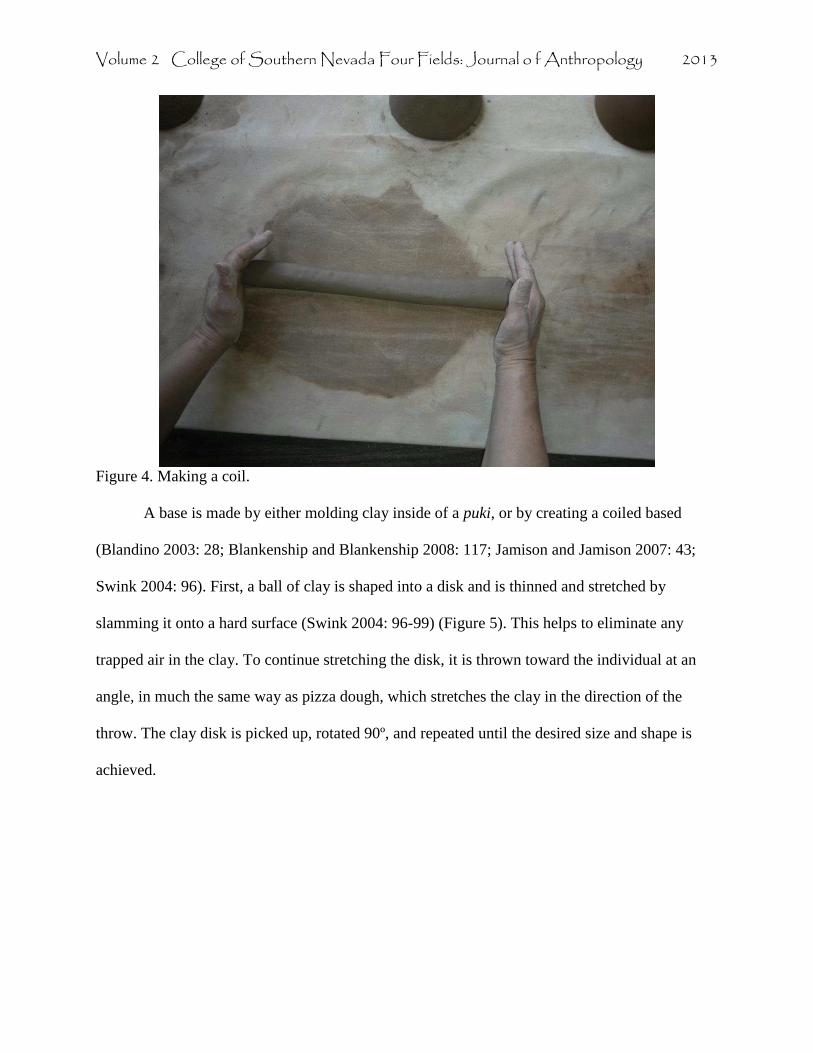
Figure 5. Making the clay disc.
The thickness of the base should range between five and seven millimeters, depending on
the size of the vessel. Once this happens, the clay is carefully centered over the puki and gently
pushed to the bottom with the back of the hand (Figure 6). Uneven thinning of the base can cause
the vessel to crack when firing. The walls are smoothed out using a scraper or hands, the rim is
trimmed so that it is even for attaching the coil and the entire based is turned out upside down
onto a hard surface to set. Inverting the bowl allows the vessel to retain its arched shape and
keeps it from collapsing.

Volume 2 College of Southern Nevada Four Fields: Journal o f Anthropology 2013
Figure 6. Placing the disc in the puki. Minor cracks, which should not be confused with natural stretch marks, can be removed
at this point simply by smoothing over with a finger or by patching it with a thin mixture of clay
and water. The base must be firm enough to support the weight of additional clay so enough time
should be allowed for drying before attaching coils.
The vessel’s walls are built by adding coils to the base. When the base has set sufficiently
it is flipped over and the lip is trimmed and lightly scored using a flake, and moistened with clay
water to ensure that the coil will adhere to the rim (Figure 7). Clay water or “slurry” is preferable
to plain water as the clay particles in the water create a bond with the clay in coils and vessel
walls, enhancing adherence. The base is placed on a piece of broken pottery to help rotate it
while adding the coils.
Volume 2 College of Southern Nevada Four Fields: Journal o f Anthropology 2013
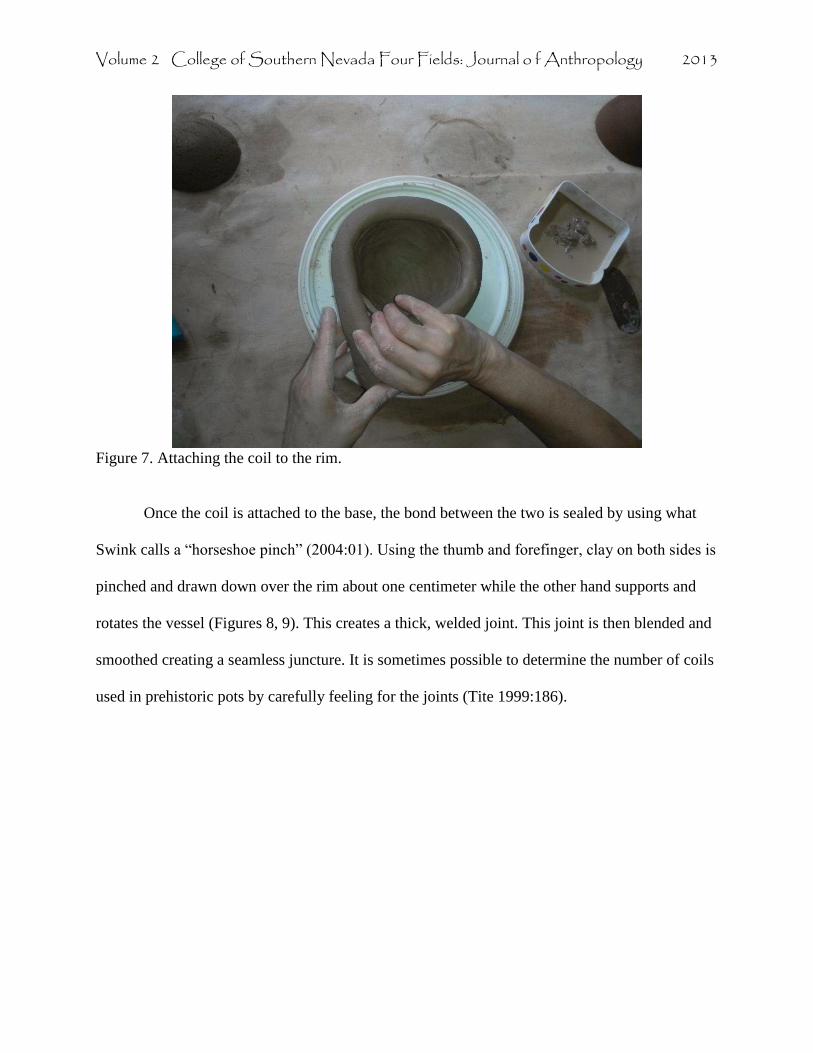
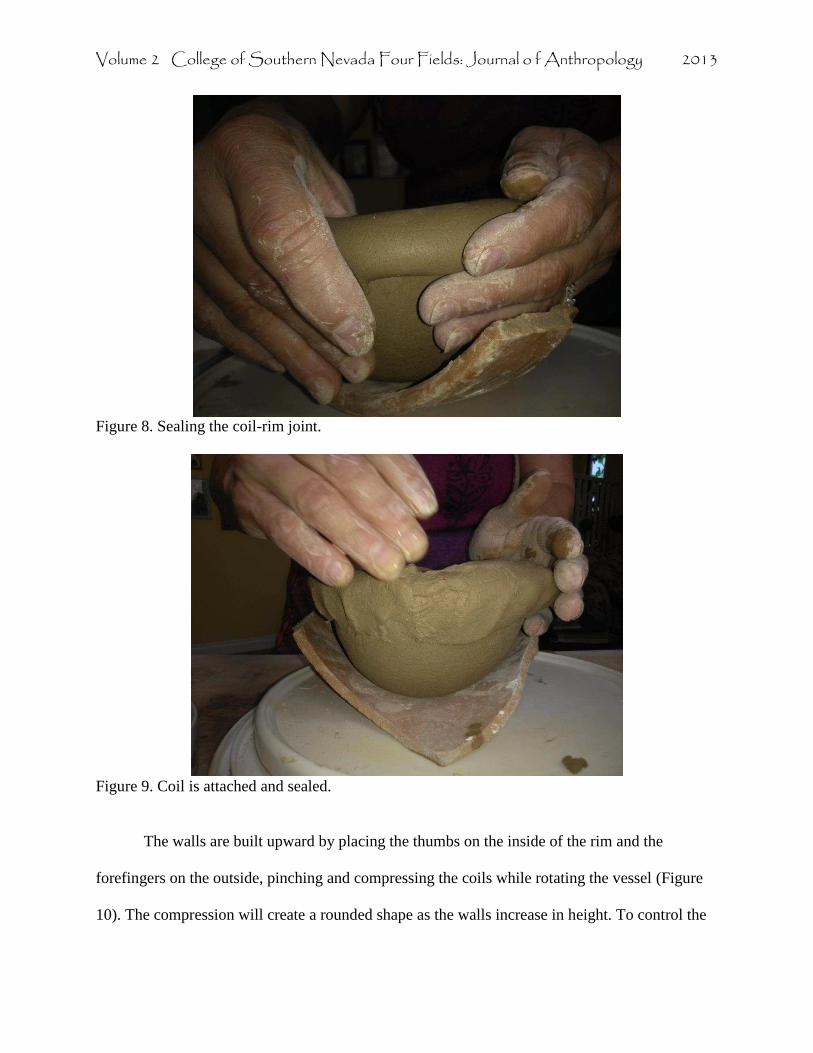
Figure 7. Attaching the coil to the rim. Once the coil is attached to the base, the bond between the two is sealed by using what
Swink calls a “horseshoe pinch” (2004:01). Using the thumb and forefinger, clay on both sides is
pinched and drawn down over the rim about one centimeter while the other hand supports and
rotates the vessel (Figures 8, 9). This creates a thick, welded joint. This joint is then blended and
smoothed creating a seamless juncture. It is sometimes possible to determine the number of coils
used in prehistoric pots by carefully feeling for the joints (Tite 1999:186).
Volume 2 College of Southern Nevada Four Fields: Journal o f Anthropology 2013
Figure 8. Sealing the coil-rim joint.
Figure 9. Coil is attached and sealed. The walls are built upward by placing the thumbs on the inside of the rim and the
forefingers on the outside, pinching and compressing the coils while rotating the vessel (Figure
10). The compression will create a rounded shape as the walls increase in height. To control the
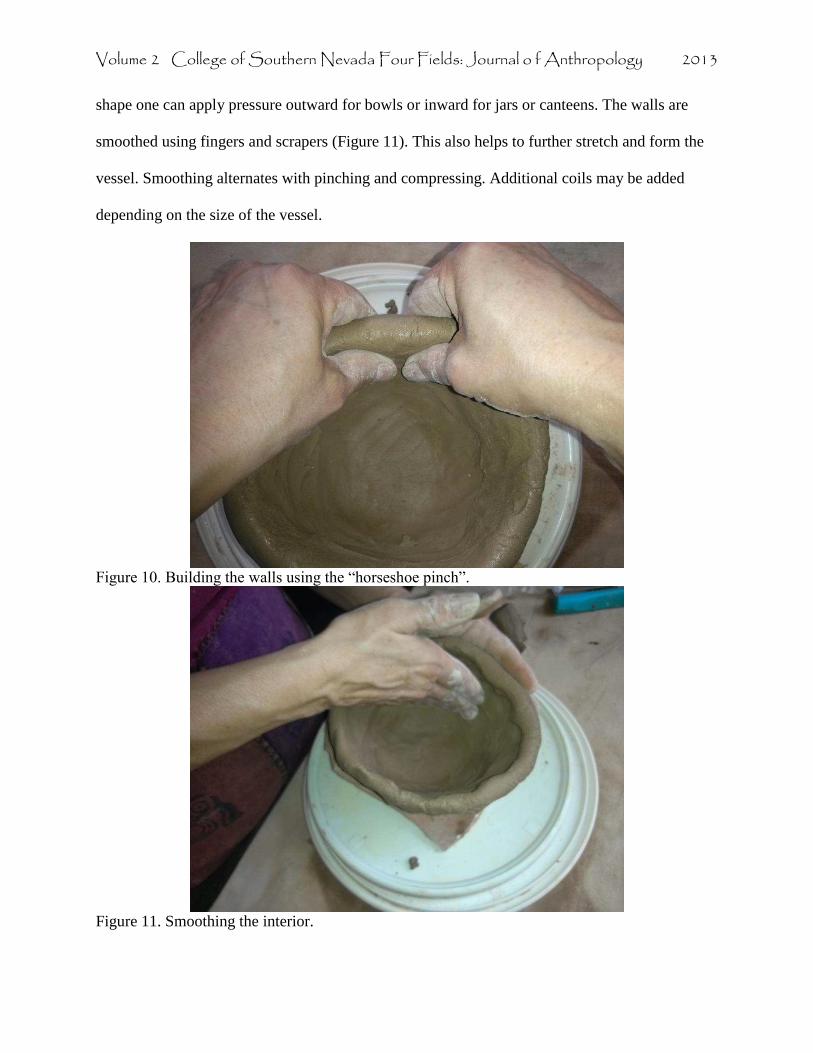
Volume 2 College of Southern Nevada Four Fields: Journal o f Anthropology 2013
shape one can apply pressure outward for bowls or inward for jars or canteens. The walls are
smoothed using fingers and scrapers (Figure 11). This also helps to further stretch and form the
vessel. Smoothing alternates with pinching and compressing. Additional coils may be added
depending on the size of the vessel.
Figure 10. Building the walls using the “horseshoe pinch”.
Figure 11. Smoothing the interior.

Volume 2 College of Southern Nevada Four Fields: Journal o f Anthropology 2013
The final phase of construction is adding the rim. Before making the rim it may be
necessary to trim the lip using an agave thread so that it is relatively even. The rim is made by
gently pinching and smoothing the trimmed lip using a moistened forefinger and thumb to the
desired shape. Sometimes a thin rim coil can be used to create the rim, which was used by
prehistoric Puebloan potters (Swink 2004:106).
Once the vessel dries to a “leather state” where the walls are firm but yield to gentle
pressure without cracking (Jamison and Jamison 2007:43; Shepard 1980:370; Swink 2004) it can
be burnished and polished. When the vessel is dry enough where the clay does not stick to
fingers, a final smoothing can take place using moistened fingers, a smooth cloth, a scraping tool
or a smooth stone. Additional burnishing for luster can take place when the vessel is dry but
slightly damp using a dry, smooth river pebble (Figure 12). The friction of the pebble on the clay
walls physically compresses and aligns the clay particles to create a smooth reflecting surface
(Swink 2004:42). Different clays have different mineral properties that determine the degree of
luster that can be achieved.
Volume 2 College of Southern Nevada Four Fields: Journal o f Anthropology 2013
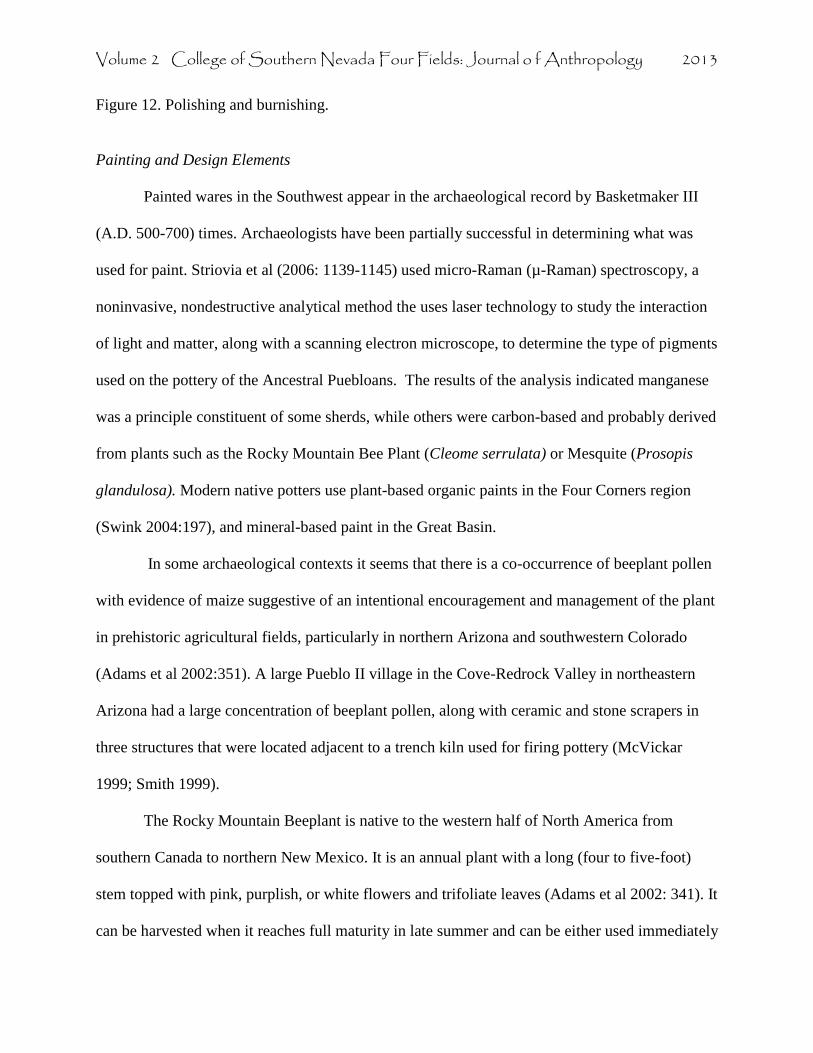
Figure 12. Polishing and burnishing.
Painting and Design Elements
Painted wares in the Southwest appear in the archaeological record by Basketmaker III
(A.D. 500-700) times. Archaeologists have been partially successful in determining what was
used for paint. Striovia et al (2006: 1139-1145) used micro-Raman (µ-Raman) spectroscopy, a
noninvasive, nondestructive analytical method the uses laser technology to study the interaction
of light and matter, along with a scanning electron microscope, to determine the type of pigments
used on the pottery of the Ancestral Puebloans. The results of the analysis indicated manganese
was a principle constituent of some sherds, while others were carbon-based and probably derived
from plants such as the Rocky Mountain Bee Plant (Cleome serrulata) or Mesquite (Prosopis
glandulosa). Modern native potters use plant-based organic paints in the Four Corners region
(Swink 2004:197), and mineral-based paint in the Great Basin.
In some archaeological contexts it seems that there is a co-occurrence of beeplant pollen
with evidence of maize suggestive of an intentional encouragement and management of the plant
in prehistoric agricultural fields, particularly in northern Arizona and southwestern Colorado
(Adams et al 2002:351). A large Pueblo II village in the Cove-Redrock Valley in northeastern
Arizona had a large concentration of beeplant pollen, along with ceramic and stone scrapers in
three structures that were located adjacent to a trench kiln used for firing pottery (McVickar
1999; Smith 1999).
The Rocky Mountain Beeplant is native to the western half of North America from
southern Canada to northern New Mexico. It is an annual plant with a long (four to five-foot)
stem topped with pink, purplish, or white flowers and trifoliate leaves (Adams et al 2002: 341). It
can be harvested when it reaches full maturity in late summer and can be either used immediately
Volume 2 College of Southern Nevada Four Fields: Journal o f Anthropology 2013
or dried and stored for later use. The plant has long been used as a natural dye, and has medicinal
properties. Why it fires to black on painted surfaces is still unknown. Some attribute the resulting
black color due to the plant itself being high in iron, which when fired, may break down to form
a black reduced oxide of iron and elemental carbon (Blair and Blair 1986:128). Shepard (1980)
and Stewart and Adams (1999) suggest that other mineral elements such as manganese or
hematite, when mixed with the paint, will produce a black paint.
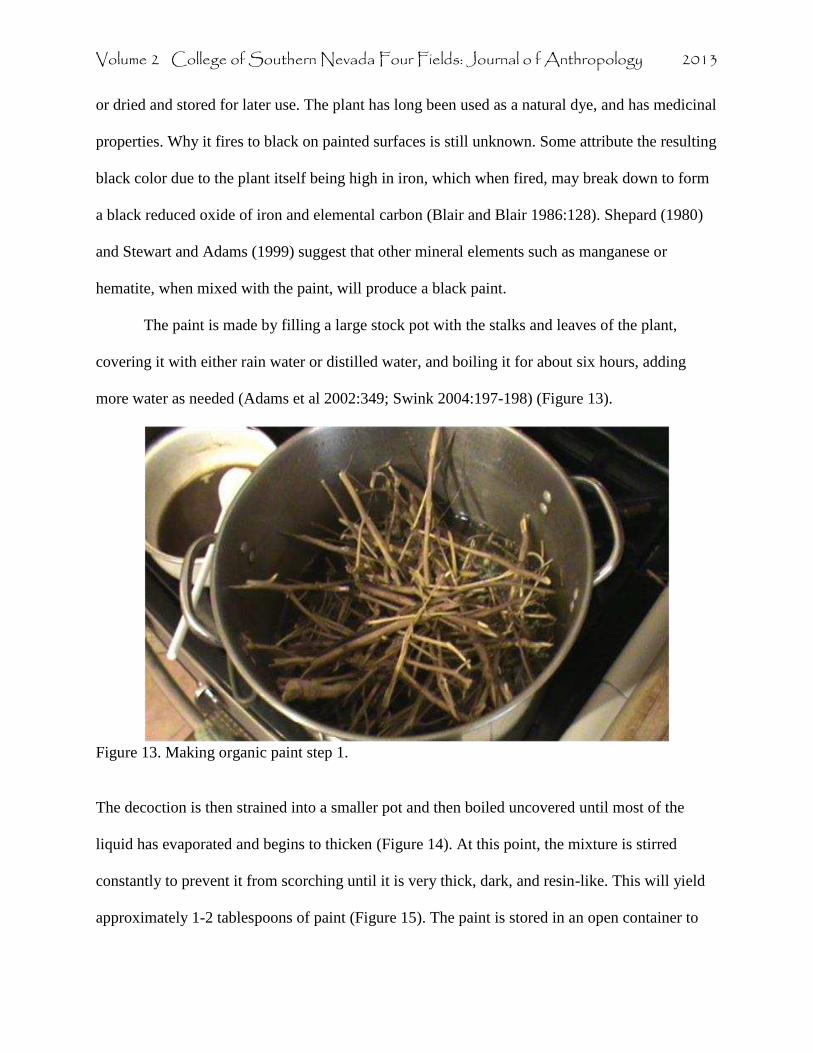
The paint is made by filling a large stock pot with the stalks and leaves of the plant,
covering it with either rain water or distilled water, and boiling it for about six hours, adding
more water as needed (Adams et al 2002:349; Swink 2004:197-198) (Figure 13).
Figure 13. Making organic paint step 1.
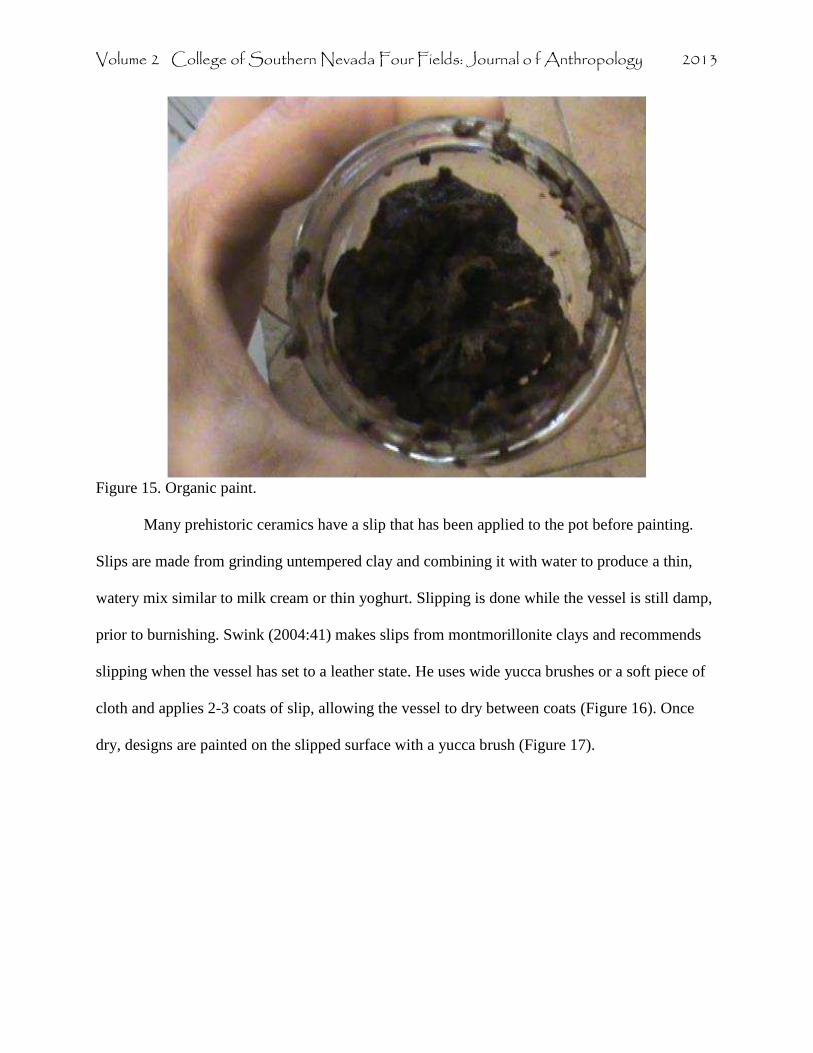
The decoction is then strained into a smaller pot and then boiled uncovered until most of the
liquid has evaporated and begins to thicken (Figure 14). At this point, the mixture is stirred
constantly to prevent it from scorching until it is very thick, dark, and resin-like. This will yield
approximately 1-2 tablespoons of paint (Figure 15). The paint is stored in an open container to

Volume 2 College of Southern Nevada Four Fields: Journal o f Anthropology 2013
prevent decomposition. Once it dries, it become hard and resinous and must be reconstituted with
a little water before it can be used.
Yucca brushes are made by removing the leaf pulp with a flesher of bone, stone, or antler
(Swink 2004: 191-194). Sometimes the leaf is soaked for a few weeks in water to speed up
decomposition of the outer layers, which makes it easier to flesh. The leaf is first pounded to
soften the pulp and then scraped or retted with the flesher until the only thing that remains is the
soft fiber. Brushes of various thicknesses can be made and stored for later use.
Figure 14. Making organic paint step 2.
Volume 2 College of Southern Nevada Four Fields: Journal o f Anthropology 2013
Figure 15. Organic paint.
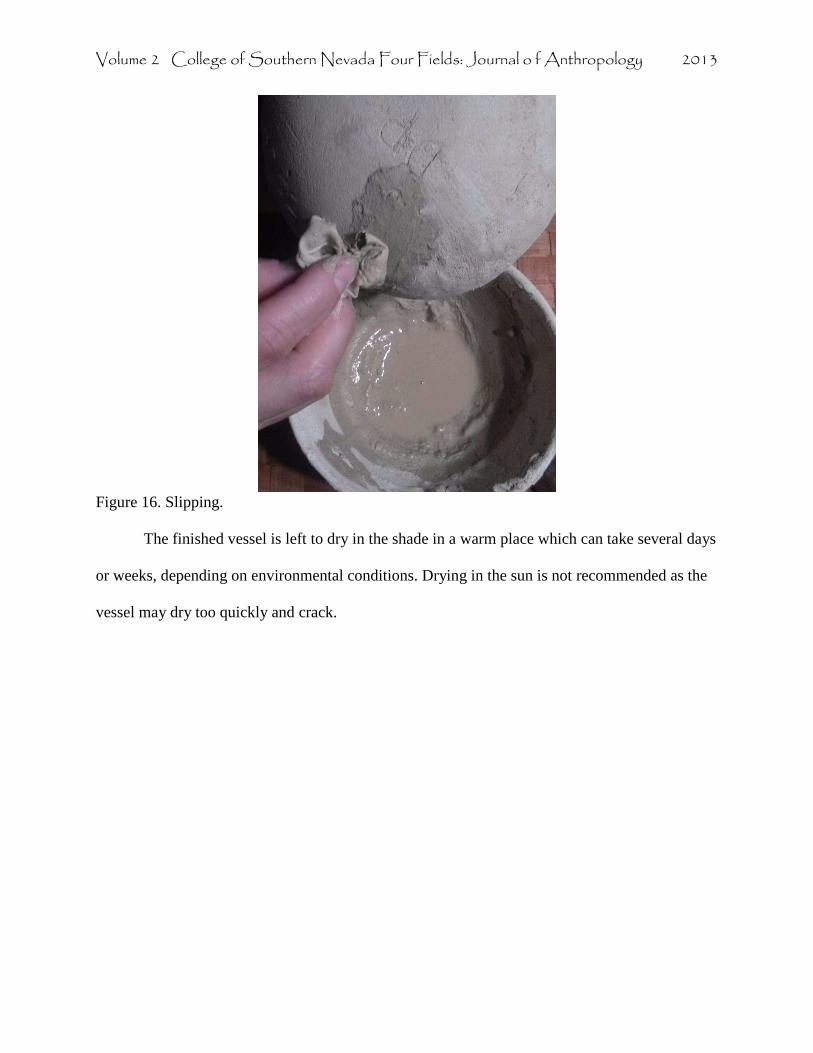
Many prehistoric ceramics have a slip that has been applied to the pot before painting.
Slips are made from grinding untempered clay and combining it with water to produce a thin,
watery mix similar to milk cream or thin yoghurt. Slipping is done while the vessel is still damp,
prior to burnishing. Swink (2004:41) makes slips from montmorillonite clays and recommends
slipping when the vessel has set to a leather state. He uses wide yucca brushes or a soft piece of
cloth and applies 2-3 coats of slip, allowing the vessel to dry between coats (Figure 16). Once
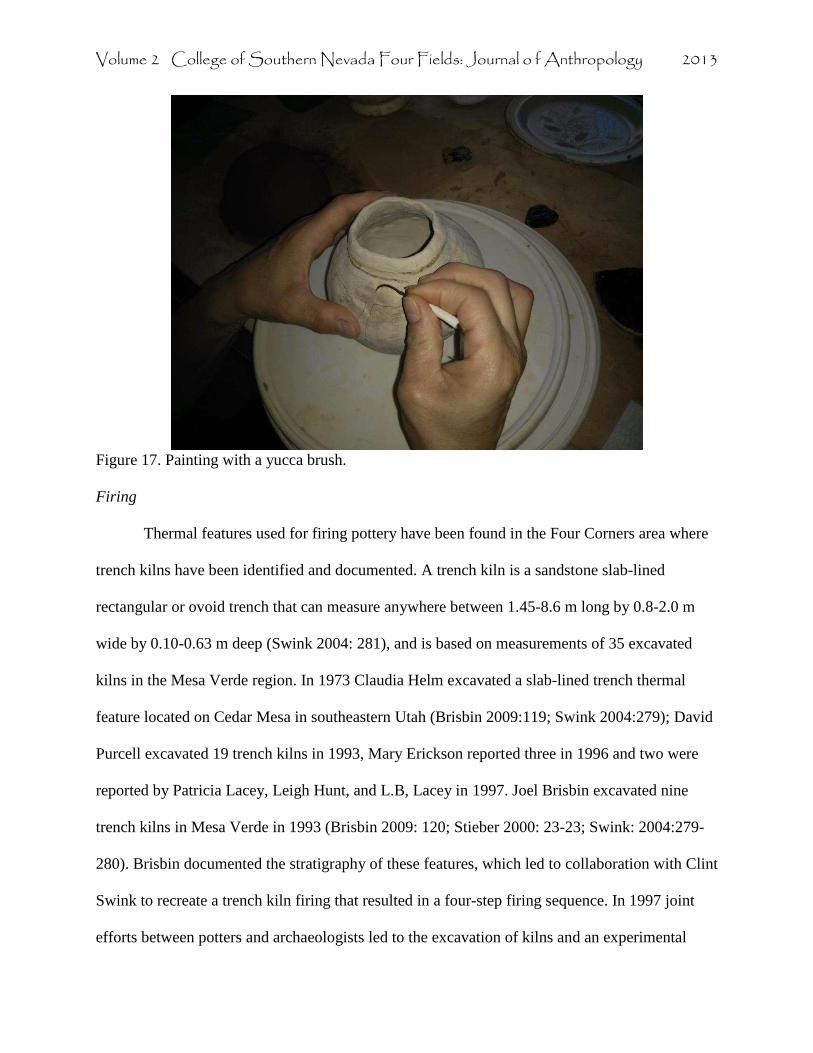
dry, designs are painted on the slipped surface with a yucca brush (Figure 17).
Volume 2 College of Southern Nevada Four Fields: Journal o f Anthropology 2013
Figure 16. Slipping.
The finished vessel is left to dry in the shade in a warm place which can take several days
or weeks, depending on environmental conditions. Drying in the sun is not recommended as the
vessel may dry too quickly and crack.
Volume 2 College of Southern Nevada Four Fields: Journal o f Anthropology 2013
Figure 17. Painting with a yucca brush. Firing
Thermal features used for firing pottery have been found in the Four Corners area where
trench kilns have been identified and documented. A trench kiln is a sandstone slab-lined
rectangular or ovoid trench that can measure anywhere between 1.45-8.6 m long by 0.8-2.0 m
wide by 0.10-0.63 m deep (Swink 2004: 281), and is based on measurements of 35 excavated
kilns in the Mesa Verde region. In 1973 Claudia Helm excavated a slab-lined trench thermal
feature located on Cedar Mesa in southeastern Utah (Brisbin 2009:119; Swink 2004:279); David
Purcell excavated 19 trench kilns in 1993, Mary Erickson reported three in 1996 and two were
reported by Patricia Lacey, Leigh Hunt, and L.B, Lacey in 1997. Joel Brisbin excavated nine
trench kilns in Mesa Verde in 1993 (Brisbin 2009: 120; Stieber 2000: 23-23; Swink: 2004:279-
280). Brisbin documented the stratigraphy of these features, which led to collaboration with Clint
Swink to recreate a trench kiln firing that resulted in a four-step firing sequence. In 1997 joint
efforts between potters and archaeologists led to the excavation of kilns and an experimental

Volume 2 College of Southern Nevada Four Fields: Journal o f Anthropology 2013
firing of an actual kiln on BLM land in Mesa Verde National Park which has been nicknamed
“Camp Kiln” (Swink 2004:279).
Trench kilns appear to have been used in the Four Corners area beginning around AD
970 according to a tree-ring date obtained from a kiln that was recorded by Brisbin in 1993
(Swink 2004:280). Archaeological evidence indicates that kilns were located anywhere between
100 meters to 25 kilometers from the nearest contemporaneous settlements (Swink 2004:280)
and were situated along the edge or below the rim of mesas, or across drainages and parallel to
slopes (Brisbin 2009: 119). The positioning of the kilns made use of air current flow that took
advantage of predictable and steady breezes to feed the fire and helped to maintain consistent
firing temperatures. Kilns are lined by sandstone slabs angled outward at about 30º which may
facilitate air movement. Another motive for the location of the trenches was the availability of
fuel sources. The preferred type of fuel seems to have been a combination of pinyon and juniper
wood due to their high burning temperatures. This has been verified through the analysis of fuel
remains from prehistoric trenches (Swink 2004:282-283). Data gathered from experimental
firings at the Crow Canyon Archaeological Center and at Camp Kiln indicate that approximately
143 kg of fuel were consumed per square meter of kiln.
The analysis of kiln stratigraphy in the Mesa Verde region indicate that the lowest
stratum, the kiln floor, tends to be lightly oxidized sterile soil covered in a dense layer of carbon
(Brisbin 2009:120; Swink 2004:282). Some partially burned wood and ceramic fragments can be
found in this stratum. The next stratum consists of tabular blackened stone above which is a
charcoal/ash layer that can contain pottery. The uppermost stratum consists of soil with little
cultural material.
Volume 2 College of Southern Nevada Four Fields: Journal o f Anthropology 2013
The firing process is a complex activity that entails a number of stages. A primary fire is
initially burned to create an even bed of coals that will provide a heat source below the
greenware vessels. The layer of coals needs to be at least six centimeters deep so as to provide
sufficient heat. Kiln reuse may produce deep layers of carbonaceous material.
Once the fuel has burned down to live coals, sandstone slabs are laid horizontally over
the top of the coal bed with spaces in between to allow heat and air passage. This phase is
referred to as “shelving” (Swink 2004:285). Greenware is laid on the slabs in a single layer and
allowed to heat gradually before building the secondary fire. This serves to drive off any
remaining water, carbonize the organic paint, and reduce iron in the slip, which creates the black
design for painted wares. Broken pottery is placed over the greenware to protect it from burning
embers from the primary fire above (Hayes and Blom 1996; Swink 2004).
The third phase consists of building a secondary fire over the kiln. Long logs are placed
across the kiln to create a crib for the rest of the fuel which is laid perpendicular to the logs. This
creates maximum draft in order to raise fuel temperatures and maintain radiant heat. Tinder and
kindling are then placed on top and ignited. This allows the fire to spread slowly which reduces
thermal shock. Optimum temperatures are reached when the secondary fuel has been reduced to
an open bed of coals 6-10 cm thick. The goal is to generate enough of a high heat to vitrify the
clay, but if the fire is too open the fire will be cold and oxidizing. The ideal temperature to vitrify
clay is between 800-900ºC for 30-45 minutes (Swink 2004:293). Heat in excess of 950ºC can
create warping and cracking because the gases that were produced from the combustion of
carbonaceous material in the clay are sealed into the vessel walls.
The fourth and final phase of firing occurs when peak temperatures are reached and the
fuel has burned down to a bed of coals at which point the fire is smothered with a layer of soil.
Volume 2 College of Southern Nevada Four Fields: Journal o f Anthropology 2013
This eliminates the air from the fuel and pottery and halts further oxidation, and allows the
pottery to cool slowly. Timing is crucial; the pottery must be allowed sufficient oxidation in
order to burn off residual carbon on slipped wares leaving them light gray to white, while at the
same time creating a reduction atmosphere so that the carbon in the paint will turn black.
Improper firing or preparation of the clay can result in warping or cracking of the pottery.
Vessels which are oxidized are those that have been exposed to too much air either during
cooling or during firing, and in painted wares can yield yellow to red color designs rather than
black. Oxidation can occur as a result of under-fueling or delayed smothering (Swink 2004:293).
Another effect of under-firing is pottery that is soft and dark. This can happen if too much
secondary fuel is used which can smother the coals nearest the pottery and result in lower
temperatures.
The following research design was developed on the basis of all of the procedures
described in the earlier sections of this paper and is the culmination of over two years of
preparation and study.
RESEARCH DESIGN
As stated earlier, this study was undertaken with the goal to successfully replicate
prehistoric Southwestern pottery for the purpose of better understanding the entire process in
detail, and to gain insight that could lead to future research. In preparation for this I participated
Volume 2 College of Southern Nevada Four Fields: Journal o f Anthropology 2013
in a workshop offered by Clint Swink, an artist with a degree in wildlife biology who currently
lives in southwestern Colorado at the edge of the San Juan National Forest. Swink has over
twenty-five years experience replicating Mesa Verde and Maya pottery. He learned his craft
from a Hopi woman he refers to simply as “Mama”, no doubt in order to maintain her privacy
(Swink 2004:5; personal communication 2011).
Swink has collaborated with archaeologists on a number of projects, including the
excavation of an actual Anasazi trench kiln and the subsequent experimental firing of replicated
pottery in that kiln in partnership with the Bureau of Land Management (Swink 2004). In 1994
he was invited by the National Park Service to conduct an Anasazi pottery firing on Mesa Verde
as a demonstration at the 69th annual Pecos Conference. Among his many achievements he has
reproduced Mesa Verde pottery that is currently on display at the Chapin Museum in Mesa
Verde National Park, and for the White House. Many archaeologists have taken his pottery
workshop, among them Margaret Lyneis, emeritus professor at the University of Nevada, Las
Vegas (personal communication 2011), and Karen Harry, also a professor at UNLV.
In an attempt to be as authentic as possible, I made several scrapers out of coconut shell
which are lightweight and easy to use. Since agave is widespread in my area, I was able to
fashion brushes out of agave fibers. A good working surface was made by stretching canvas over
a flat board however indigenous people may have used flat stones such as sandstone as a
working surface. One of the advantages of using a stretched canvas top is that it can be
moistened so that the rim of the vessel remains moist while the body is firming up in preparation
for attaching coils. Among the variety of tools I used I also had some obsidian flakes and bifaces,
some marine shell, the edges of which were ground and smoothed, and some squash gourd
scrapers. Finally, I was given some Rocky Mountain Bee Plant by Dr. Karen Harry which I made
Volume 2 College of Southern Nevada Four Fields: Journal o f Anthropology 2013
into an organic paint and also made paint brushes from Yucca harrimaniea, or the narrow-leafed
yucca that grows in my front yard. I went on many clay procuring expeditions which is described
in the next section. I also made a sandstone-lined trench kiln in my backyard that measures
121.92 cm by 76.2 cm, and is 30.48 cm deep.
Clay samples
The raw clay used in this study was collected from several locations throughout Southern
Nevada and from the Arizona Strip. A total of five samples were collected and processed:
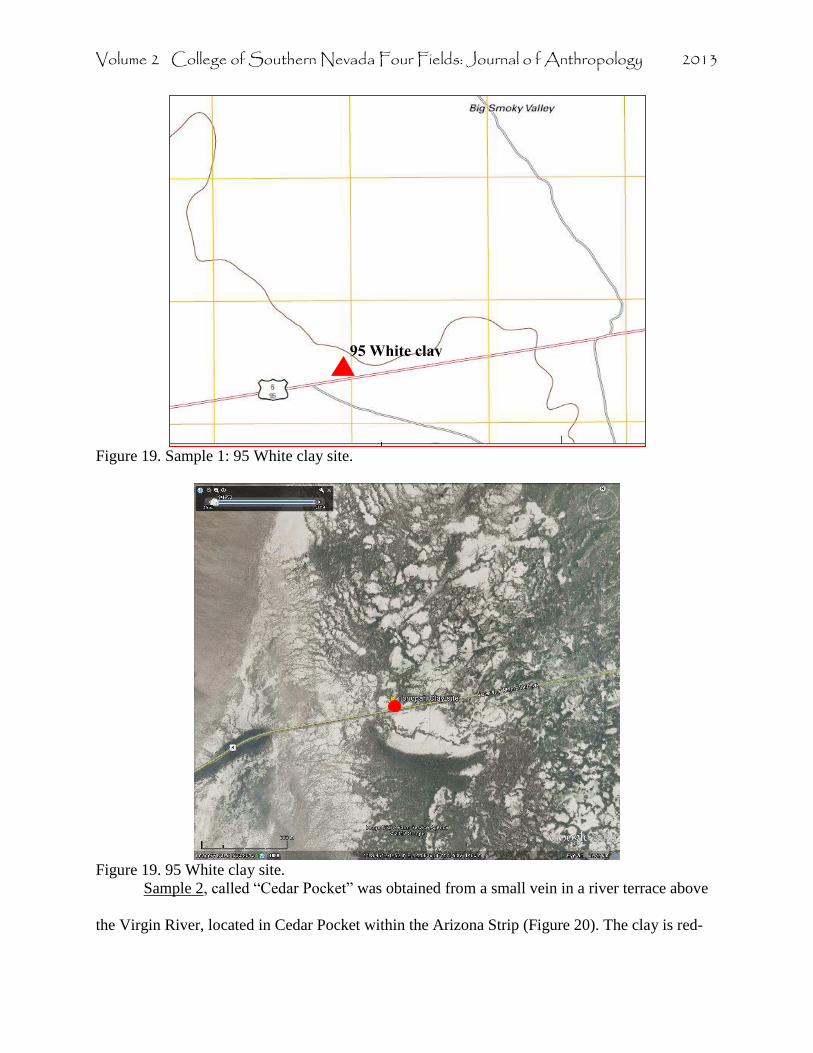
Sample 1, called “95 White” was collected along the State Highway 95 corridor,
approximately 19.1 miles northwest of Tonopah, Nevada (Figure 18). This locus is centered
within a cluster of geological associations, including the Youngston-Playas association, the
Gynelle-Cyrac association, and Zaba very gravelly loam (USDA Natural Resources
Conservation Service 2013), all of which are characterized by alluvial or lacustrine landforms
consisting of silty-clay loams (Figure 18, 19). This clay is fine-grained and white to yellowish-
white in color. The texture of this sample when wet is satiny to unctuous, an indication that the
clay is of good quality and highly plastic.
Volume 2 College of Southern Nevada Four Fields: Journal o f Anthropology 2013
Figure 19. Sample 1: 95 White clay site.
Figure 19. 95 White clay site.
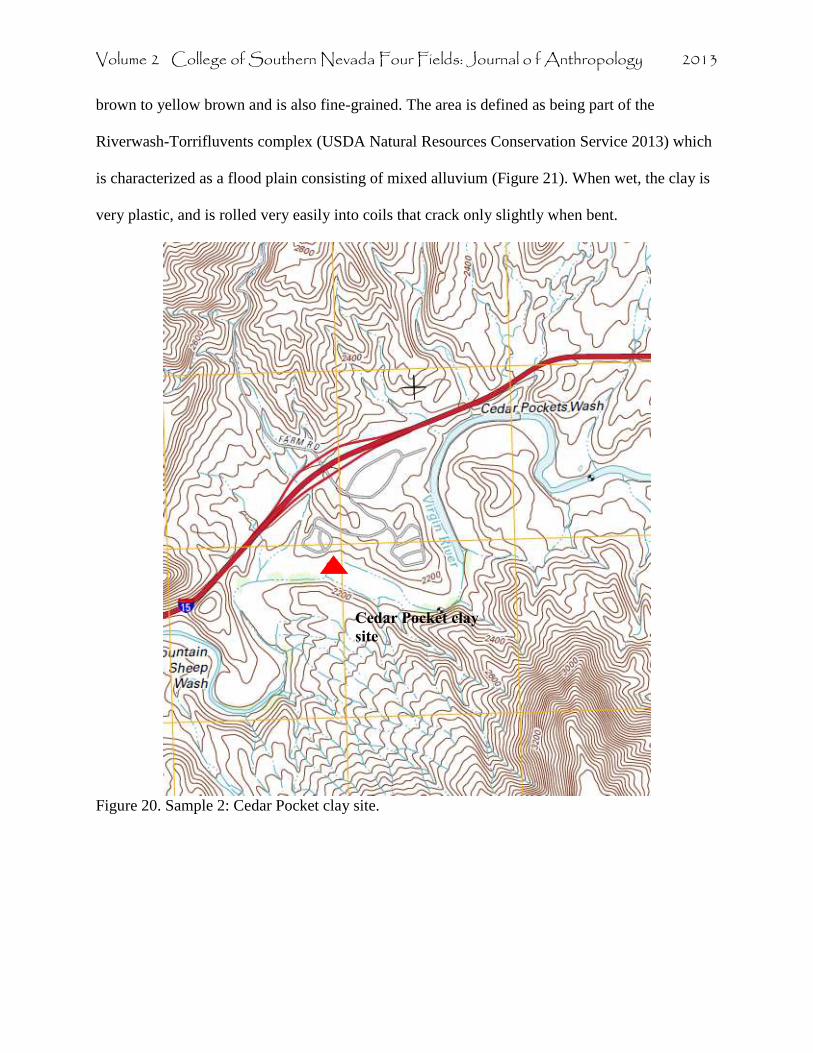
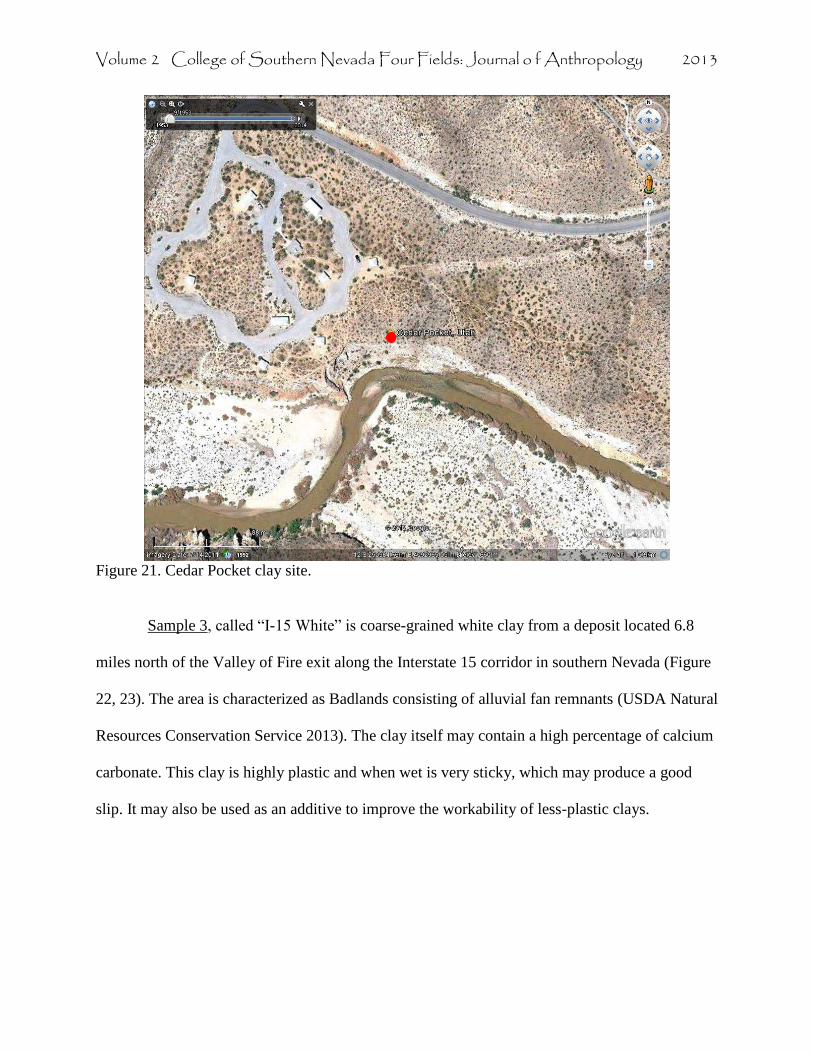
Sample 2, called “Cedar Pocket” was obtained from a small vein in a river terrace above
the Virgin River, located in Cedar Pocket within the Arizona Strip (Figure 20). The clay is red-
95 White clay site
Volume 2 College of Southern Nevada Four Fields: Journal o f Anthropology 2013
brown to yellow brown and is also fine-grained. The area is defined as being part of the
Riverwash-Torrifluvents complex (USDA Natural Resources Conservation Service 2013) which
is characterized as a flood plain consisting of mixed alluvium (Figure 21). When wet, the clay is
very plastic, and is rolled very easily into coils that crack only slightly when bent.
Figure 20. Sample 2: Cedar Pocket clay site.
Cedar Pocket clay site
Volume 2 College of Southern Nevada Four Fields: Journal o f Anthropology 2013
Figure 21. Cedar Pocket clay site.
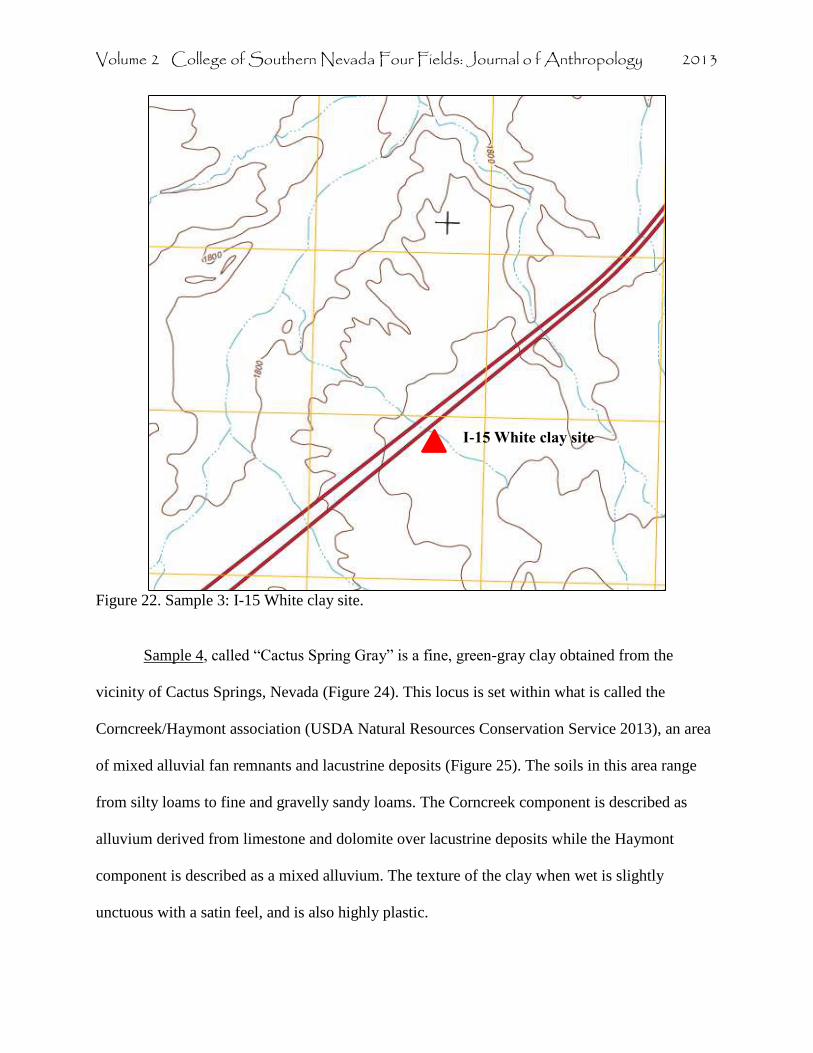
Sample 3, called “I-15 White” is coarse-grained white clay from a deposit located 6.8
miles north of the Valley of Fire exit along the Interstate 15 corridor in southern Nevada (Figure
22, 23). The area is characterized as Badlands consisting of alluvial fan remnants (USDA Natural
Resources Conservation Service 2013). The clay itself may contain a high percentage of calcium
carbonate. This clay is highly plastic and when wet is very sticky, which may produce a good
slip. It may also be used as an additive to improve the workability of less-plastic clays.
Volume 2 College of Southern Nevada Four Fields: Journal o f Anthropology 2013
Figure 22. Sample 3: I-15 White clay site.
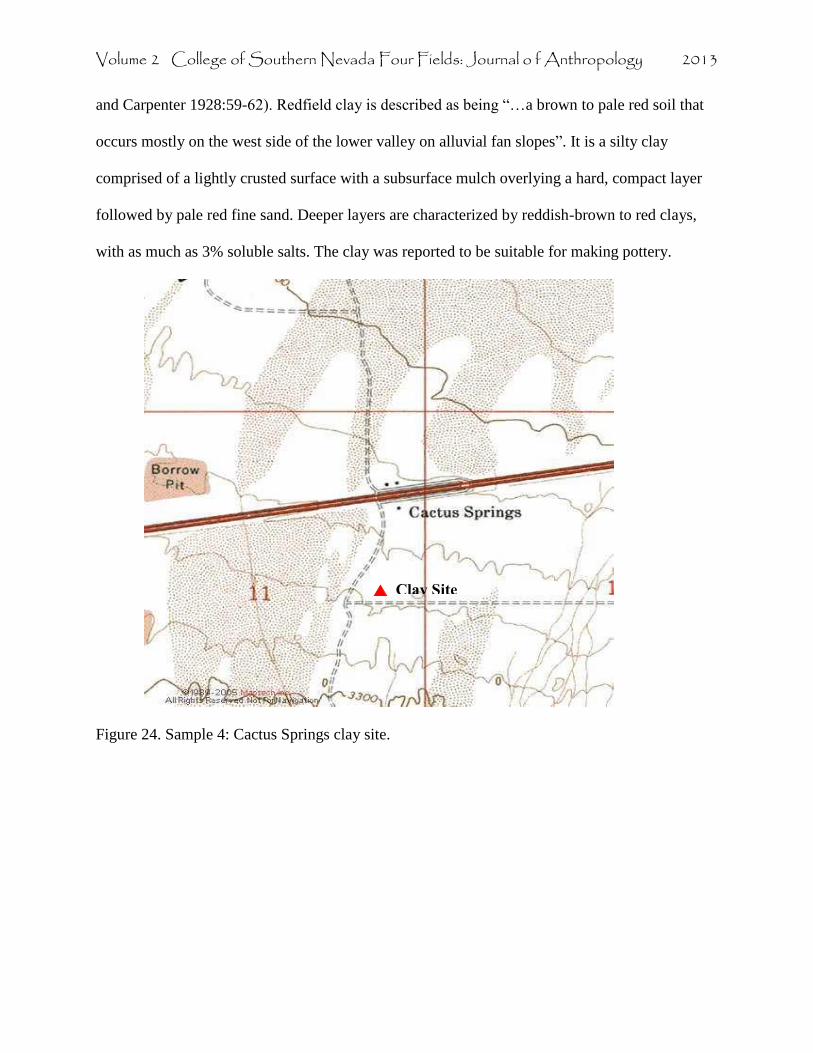
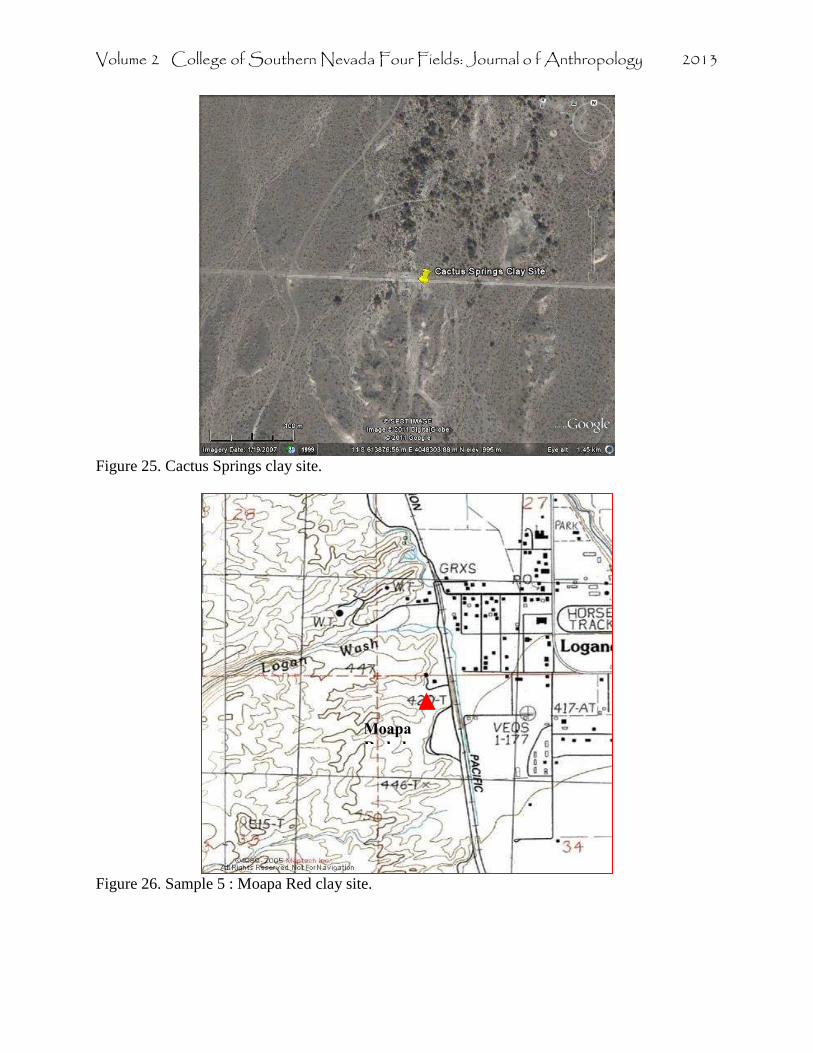
Sample 4, called “Cactus Spring Gray” is a fine, green-gray clay obtained from the
vicinity of Cactus Springs, Nevada (Figure 24). This locus is set within what is called the
Corncreek/Haymont association (USDA Natural Resources Conservation Service 2013), an area
of mixed alluvial fan remnants and lacustrine deposits (Figure 25). The soils in this area range
from silty loams to fine and gravelly sandy loams. The Corncreek component is described as
alluvium derived from limestone and dolomite over lacustrine deposits while the Haymont
component is described as a mixed alluvium. The texture of the clay when wet is slightly
unctuous with a satin feel, and is also highly plastic.
I-15 White clay site
Volume 2 College of Southern Nevada Four Fields: Journal o f Anthropology 2013
Figure 23. I-15 White clay site.
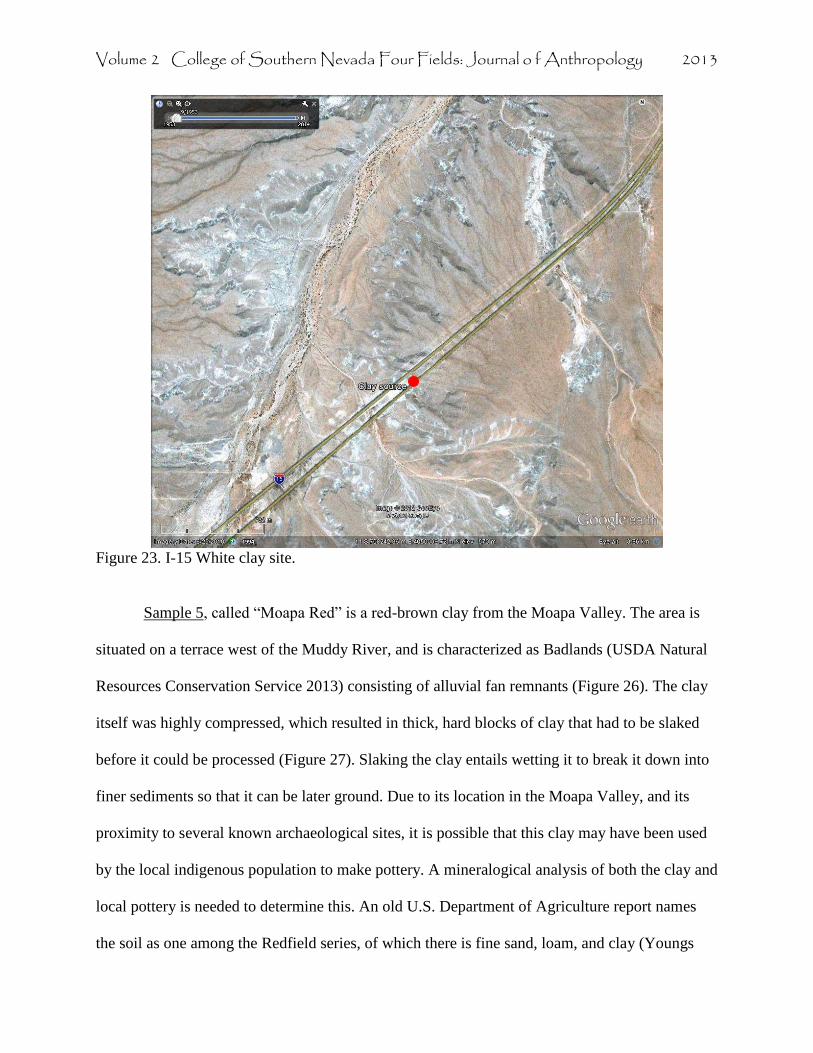
Sample 5, called “Moapa Red” is a red-brown clay from the Moapa Valley. The area is
situated on a terrace west of the Muddy River, and is characterized as Badlands (USDA Natural
Resources Conservation Service 2013) consisting of alluvial fan remnants (Figure 26). The clay
itself was highly compressed, which resulted in thick, hard blocks of clay that had to be slaked
before it could be processed (Figure 27). Slaking the clay entails wetting it to break it down into
finer sediments so that it can be later ground. Due to its location in the Moapa Valley, and its
proximity to several known archaeological sites, it is possible that this clay may have been used
by the local indigenous population to make pottery. A mineralogical analysis of both the clay and
local pottery is needed to determine this. An old U.S. Department of Agriculture report names
the soil as one among the Redfield series, of which there is fine sand, loam, and clay (Youngs
Volume 2 College of Southern Nevada Four Fields: Journal o f Anthropology 2013
and Carpenter 1928:59-62). Redfield clay is described as being “…a brown to pale red soil that
occurs mostly on the west side of the lower valley on alluvial fan slopes”. It is a silty clay
comprised of a lightly crusted surface with a subsurface mulch overlying a hard, compact layer
followed by pale red fine sand. Deeper layers are characterized by reddish-brown to red clays,
with as much as 3% soluble salts. The clay was reported to be suitable for making pottery.
Figure 24. Sample 4: Cactus Springs clay site.
Clay Site
Volume 2 College of Southern Nevada Four Fields: Journal o f Anthropology 2013
Figure 25. Cactus Springs clay site.
Figure 26. Sample 5 : Moapa Red clay site.
Moapa Red clay
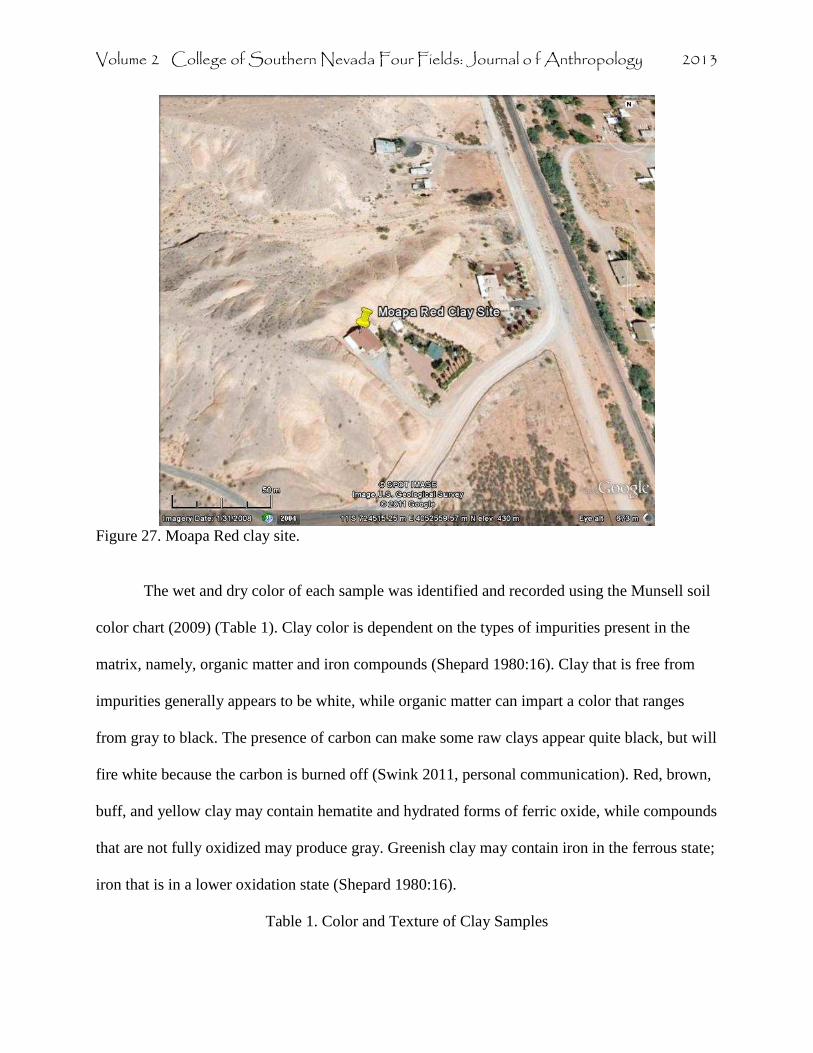
Volume 2 College of Southern Nevada Four Fields: Journal o f Anthropology 2013
Figure 27. Moapa Red clay site. The wet and dry color of each sample was identified and recorded using the Munsell soil
color chart (2009) (Table 1). Clay color is dependent on the types of impurities present in the
matrix, namely, organic matter and iron compounds (Shepard 1980:16). Clay that is free from
impurities generally appears to be white, while organic matter can impart a color that ranges
from gray to black. The presence of carbon can make some raw clays appear quite black, but will
fire white because the carbon is burned off (Swink 2011, personal communication). Red, brown,
buff, and yellow clay may contain hematite and hydrated forms of ferric oxide, while compounds
that are not fully oxidized may produce gray. Greenish clay may contain iron in the ferrous state;
iron that is in a lower oxidation state (Shepard 1980:16).
Table 1. Color and Texture of Clay Samples
Volume 2 College of Southern Nevada Four Fields: Journal o f Anthropology 2013
Sample # Texture Munsell Color Observed Color
Dry Wet Dry Wet
1 fine, silty sticky, unctuous 2.5 Y 8/1 10 YR 6/3 buff
2 fine, silty grainy, unctuous 5 YR 4/4 5 YR 6/6 brown/red-brown
3 coarse, grainy grainy, sticky N/9 N/ 9.5 white
4 grainy grainy, satin Grey 1 7/10Y 5 Y 5/2 green-grey
5 grainy satin 7.5 YR 6/3 7.5 YR 5/4 red/red-brown
A sandstone slab was used as a metate and several river cobbles were used as manos to
grind each sample to a size that was less than one millimeter in diameter. Each sample was sifted
through a fine, food-grade screen with a one-millimeter mesh. The sample from the Moapa
Valley had to be soaked before grinding (Sample 5) because the compression of the terrace from
where the clay was obtained made the material rock-hard and extremely difficult to grind. By
adding enough water to moisten the clay and storing it in a sealed plastic tub for several days, it
began to break down into a finer, more workable state. The moist clay was then set out to dry in
the sun before grinding.
The method used to determine the amount of natural tempering present in each clay
sample and the amount of additional temper to add to each sample has been described by Clint
Swink (personal communication, 2011). This entailed preparing several clay discs without added
temper, each measuring approximately 7.5 cm in diameter by 1.4-1.6 cm in thickness (Figure
28). A five-centimeter line is etched across the disc. When the disc is completely dry, the line is
re-measured and the resulting number is divided by the original measurement (5 cm) (Table 2).
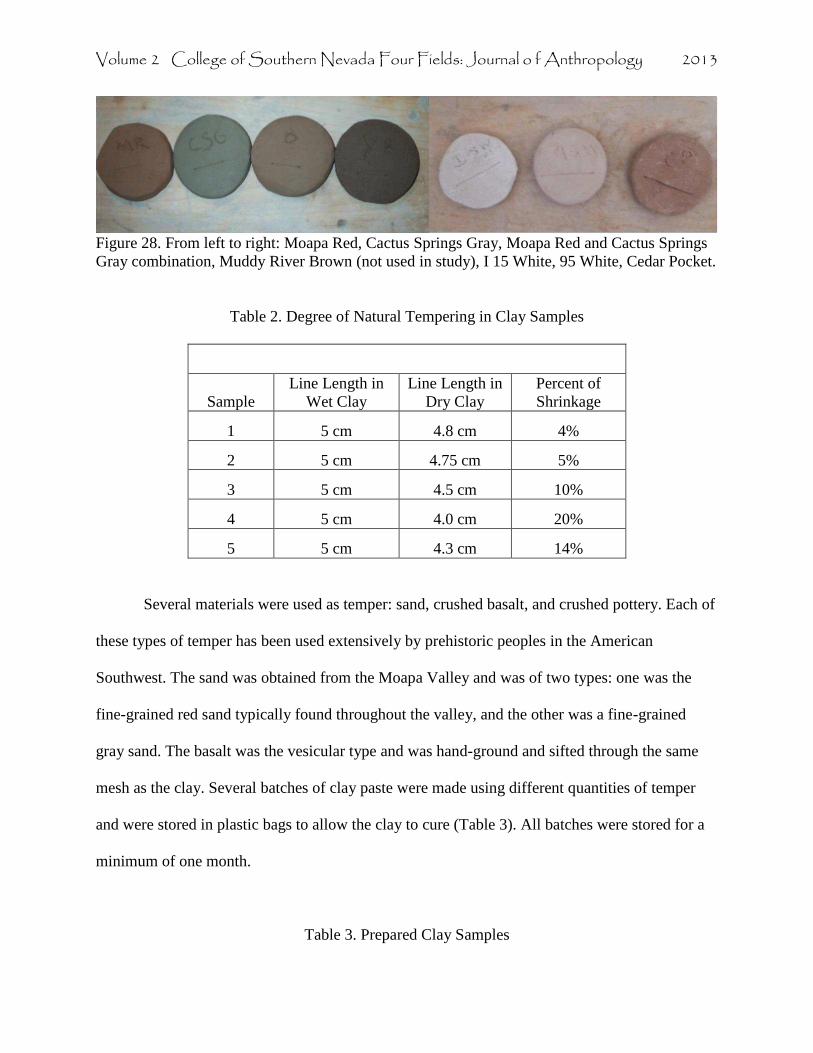
Volume 2 College of Southern Nevada Four Fields: Journal o f Anthropology 2013
Figure 28. From left to right: Moapa Red, Cactus Springs Gray, Moapa Red and Cactus Springs Gray combination, Muddy River Brown (not used in study), I 15 White, 95 White, Cedar Pocket.
Table 2. Degree of Natural Tempering in Clay Samples
Sample Line Length in
Wet Clay Line Length in
Dry Clay Percent of Shrinkage
1 5 cm 4.8 cm 4%
2 5 cm 4.75 cm 5%
3 5 cm 4.5 cm 10%
4 5 cm 4.0 cm 20%
5 5 cm 4.3 cm 14%
Several materials were used as temper: sand, crushed basalt, and crushed pottery. Each of
these types of temper has been used extensively by prehistoric peoples in the American
Southwest. The sand was obtained from the Moapa Valley and was of two types: one was the
fine-grained red sand typically found throughout the valley, and the other was a fine-grained
gray sand. The basalt was the vesicular type and was hand-ground and sifted through the same
mesh as the clay. Several batches of clay paste were made using different quantities of temper
and were stored in plastic bags to allow the clay to cure (Table 3). All batches were stored for a
minimum of one month.
Table 3. Prepared Clay Samples
Volume 2 College of Southern Nevada Four Fields: Journal o f Anthropology 2013
Batch # Date Clay Type Quantity Color Temper Quantity
1 9/2011 Moapa Red 90% Red-brown Sand 10% 2 2/12/2012 Moapa Red 80% Red-brown Sand 20% 3 2/17/2012 Cactus Spring Gray 80% Green-gray Sand 20% 4 2/27/2012 Moapa Red 60% Red-brown Sherd 40% 5 3/2/12 Moapa Red 80% Red-brown Basalt 20% 6 3/11/12 Cactus Spring Gray 80% Green-gray Basalt 20% 7 6/11/2012 I-15 White 90% White Sand 10% 8 7/11/2012 Cedar Pocket 90% Red-brown Sand 10% 9 7/12/2012 95 White 90% Buff-white Sand 10%
For sand and basalt-tempered pastes no more than 20% temper was used so that the paste
would remain plastic. Sherd-tempered pastes required a larger quantity of temper. According to
Swink (2004:23) Mesa Verde white wares were tempered with crushed sherd, and he
recommends using twice as much crushed sherd temper as basalt or sand temper.
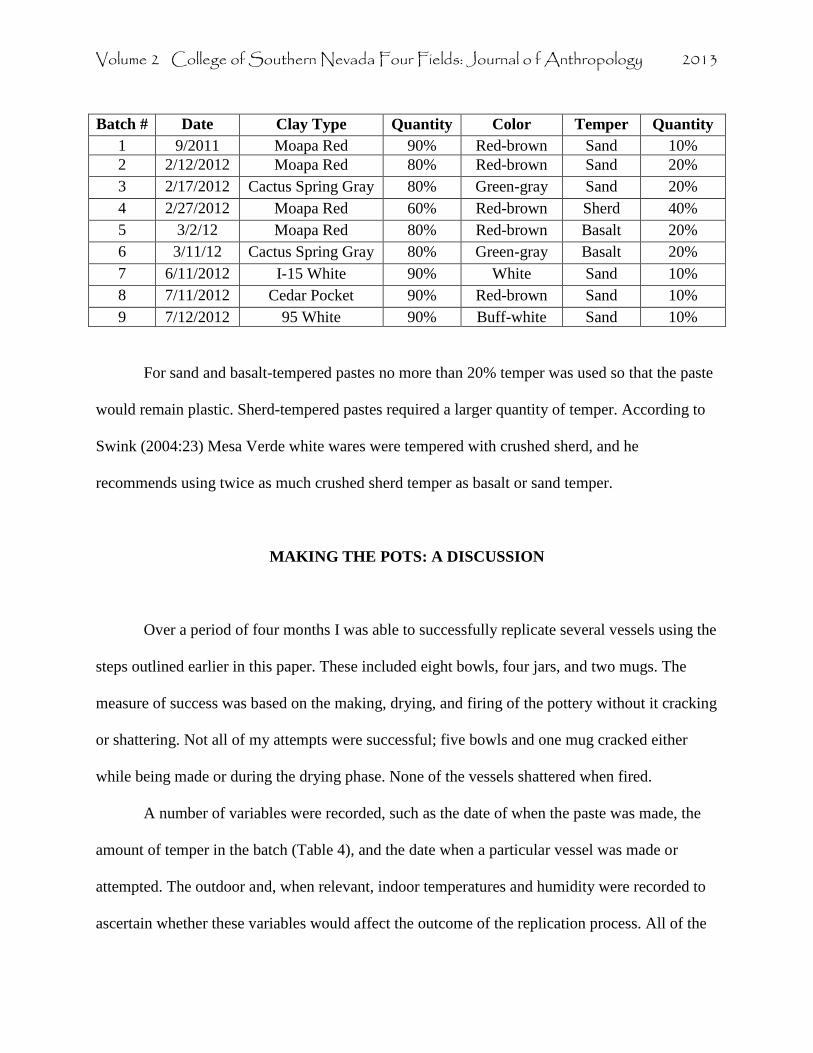
MAKING THE POTS: A DISCUSSION
Over a period of four months I was able to successfully replicate several vessels using the
steps outlined earlier in this paper. These included eight bowls, four jars, and two mugs. The
measure of success was based on the making, drying, and firing of the pottery without it cracking
or shattering. Not all of my attempts were successful; five bowls and one mug cracked either
while being made or during the drying phase. None of the vessels shattered when fired.
A number of variables were recorded, such as the date of when the paste was made, the
amount of temper in the batch (Table 4), and the date when a particular vessel was made or
attempted. The outdoor and, when relevant, indoor temperatures and humidity were recorded to
ascertain whether these variables would affect the outcome of the replication process. All of the
Volume 2 College of Southern Nevada Four Fields: Journal o f Anthropology 2013
batches of paste had been stored for no less than six weeks; one batch had been stored for seven
months.
Table 4. Vessels by Clay Type, Temper, and Percentage of Added Temper
Vessel No. Clay Type
Temper Type
Temper Percent
1 Cactus Spring Gray Sand 10% 2 Cactus Spring Gray Sand 10% 3 Moapa Red Sand 20% 4 Moapa Red Sherd 40% 5 Moapa Red Sand 20% 6 Moapa Red Sherd 40% 7 Moapa Red Sand 20% 8 Moapa Red Sand 20% 9 Moapa Red Sand 20% 10 Cactus Spring Gray Sand 20% 11 Cactus Spring Gray Sand 20% 12 Cactus Spring Gray Sand 20% 13 Cactus Spring Gray Sand 20%
14 Moapa Red and Cactus Spring Gray Sand 20%
15 Cactus Spring Gray Basalt 20%
16 Moapa Red and I 15 White Sand 15%
17 95 White Sand 10% 18 Cedar Pocket Sand 10% 19 95 White Sand 10% 20 Cedar Pocket Sand 10%
Of all of the vessels that were attempted, a jar and a mug made from the Cactus Springs
Gray clay, with a 10% sand temper, were the most successful (Table 5). This paste had been
stored for seven months. Less successful were vessels that had a higher percentage of temper.
One Moapa Red batch had 20% sand temper and another batch had 40% crushed sherd temper.
Of the sand-tempered vessels only two bowls and one mug was successfully made, while the
Volume 2 College of Southern Nevada Four Fields: Journal o f Anthropology 2013
sherd-tempered batch did not successfully yield a bowl. All of these pastes were moderately
plastic and cracked a lot while being manipulated and shaped.
A similar result was achieved with the Cactus Springs Gray batch made with 20% sand
temper. Of two bowls, one was successful as was a jar however, a mug cracked before being
completed. Another batch of Cactus Springs Gray had 20% crushed basalt temper and
successfully yielded one bowl but the paste itself was only moderately plastic and cracked
repeatedly while being made.
The batches made from the Cedar Pockets and the 95 White samples yielded more
successful results. Both batches were sand-tempered with 10% sand. All were highly plastic and
cracked little while being formed and had an unctuous feel while wet. Each yielded a bowl and a
jar. One of the bowls made from the 95 White clay batch did ultimately crack, but this was due
to human error rather than to the properties of the paste.
Another two bowls were produced by combining different pastes. One was made with a
paste that was 50% Moapa Red with 20% sand temper and 50% Cactus Springs Gray also with
20% sand temper. This successfully yielded a bowl however the amount of cracking was high
and the plasticity only moderate. The second bowl was made from a paste that was 70% Moapa
Red with 20% sand temper and 30% I-15 White with 10% sand temper. The end result was a
more plastic paste with very little cracking.
Three of the vessels were painted. Two of them were slipped with the I-15 White which
was too sticky to use as a paste. Of the two, one of them was a bowl made from the Cactus
Spring Gray with 10% sand temper batch and was further decorated by painting with the organic
paint I had made and the other was a jar made from the Cedar Pocket with 10% sand temper
Volume 2 College of Southern Nevada Four Fields: Journal o f Anthropology 2013
batch that was slipped but not painted. The third vessel, a jar made from the 95 White batch of
clay with sand temper was painted.
Firing the pottery produced mixed results; while none of the vessels shattered and all
emerged more or less whole from the firing, the end product in many cases was less than ideal
(Figure 29-38). There were problems controlling the temperature of the fire. A pyrometer with
two thermocouples was used to measure the temperature. One of the thermocouple leads was not
fire resistant and melted during the firing. The other was fire resistant however the temperature
readings were not reliable. At one point the temperature registered 450ºC but was the reading
was taken after the fire had been smothered.
No Type Temp Humidity Plasticity (L/M/H)*
Cracking (when drying)
(L/M/H)** Slip Painted Success
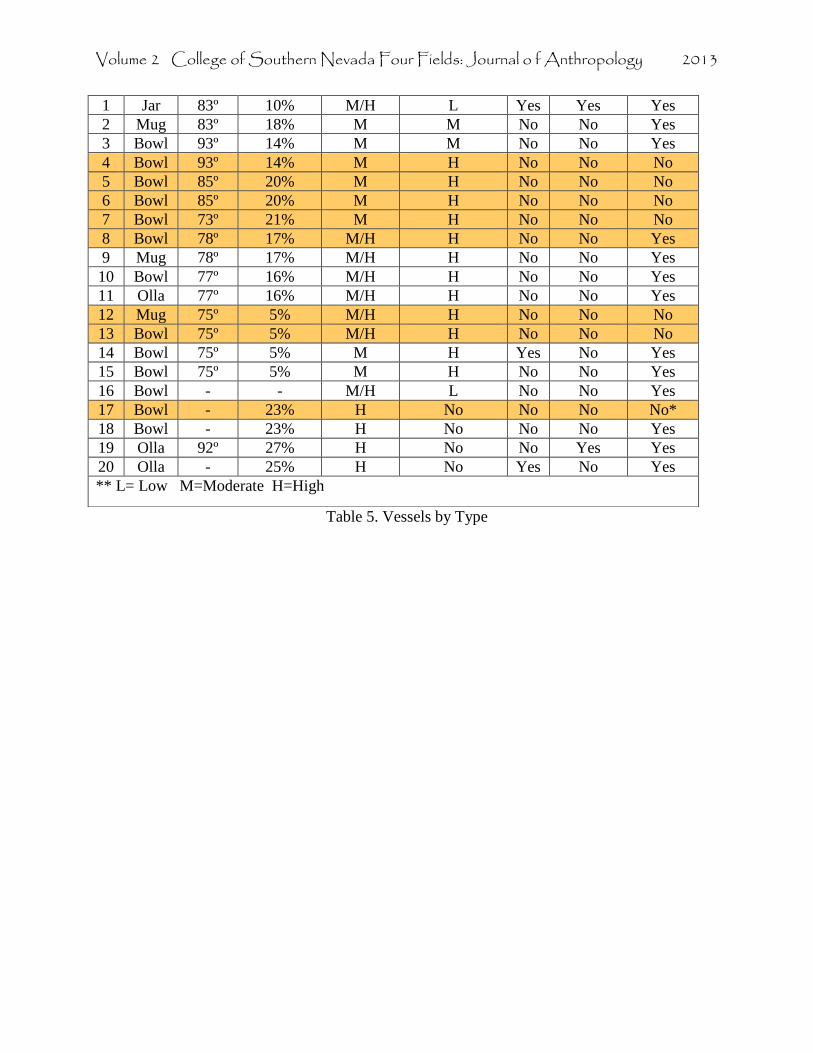
Volume 2 College of Southern Nevada Four Fields: Journal o f Anthropology 2013
Table 5. Vessels by Type
1 Jar 83º 10% M/H L Yes Yes Yes 2 Mug 83º 18% M M No No Yes 3 Bowl 93º 14% M M No No Yes 4 Bowl 93º 14% M H No No No 5 Bowl 85º 20% M H No No No 6 Bowl 85º 20% M H No No No 7 Bowl 73º 21% M H No No No 8 Bowl 78º 17% M/H H No No Yes 9 Mug 78º 17% M/H H No No Yes 10 Bowl 77º 16% M/H H No No Yes 11 Olla 77º 16% M/H H No No Yes 12 Mug 75º 5% M/H H No No No 13 Bowl 75º 5% M/H H No No No 14 Bowl 75º 5% M H Yes No Yes 15 Bowl 75º 5% M H No No Yes 16 Bowl - - M/H L No No Yes 17 Bowl - 23% H No No No No* 18 Bowl - 23% H No No No Yes 19 Olla 92º 27% H No No Yes Yes 20 Olla - 25% H No Yes No Yes ** L= Low M=Moderate H=High

Volume 2 College of Southern Nevada Four Fields: Journal o f Anthropology 2013
Figures 29-32. Top: Primary fire. Bottom: Shelving
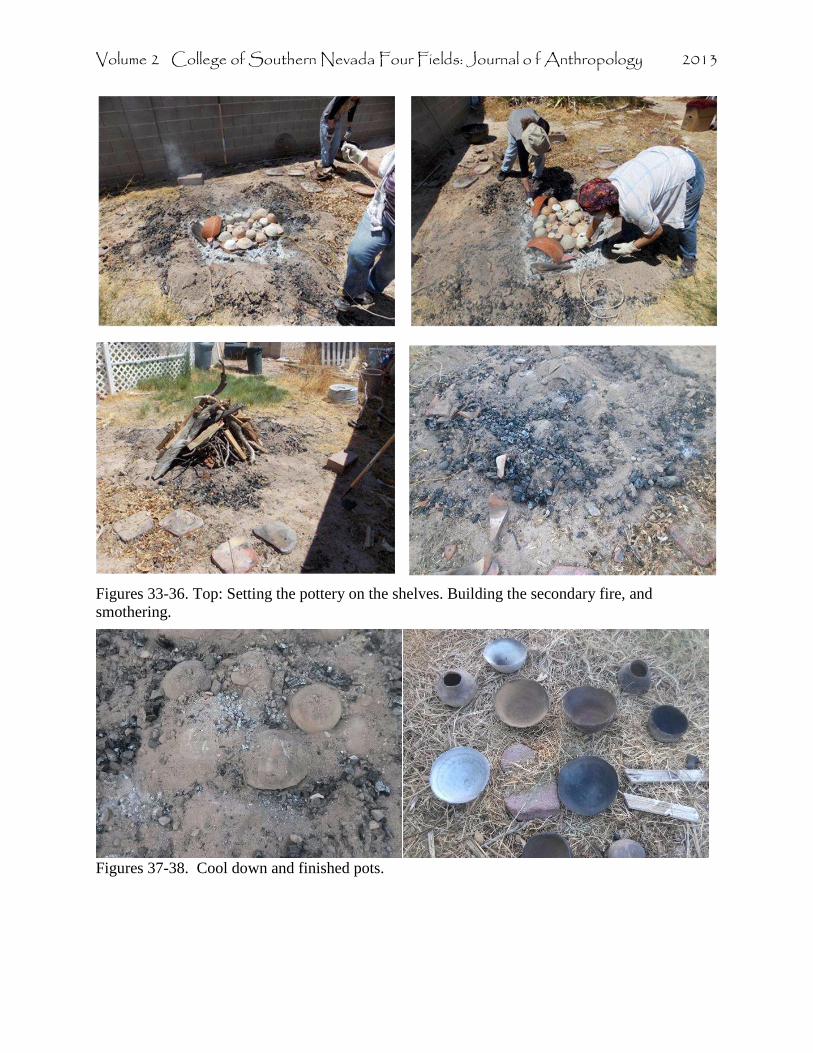
Volume 2 College of Southern Nevada Four Fields: Journal o f Anthropology 2013
Figures 33-36. Top: Setting the pottery on the shelves. Building the secondary fire, and smothering.
Figures 37-38. Cool down and finished pots.
Volume 2 College of Southern Nevada Four Fields: Journal o f Anthropology 2013
A closer look at each individual vessel after firing has provided some interesting insights
into the firing process:
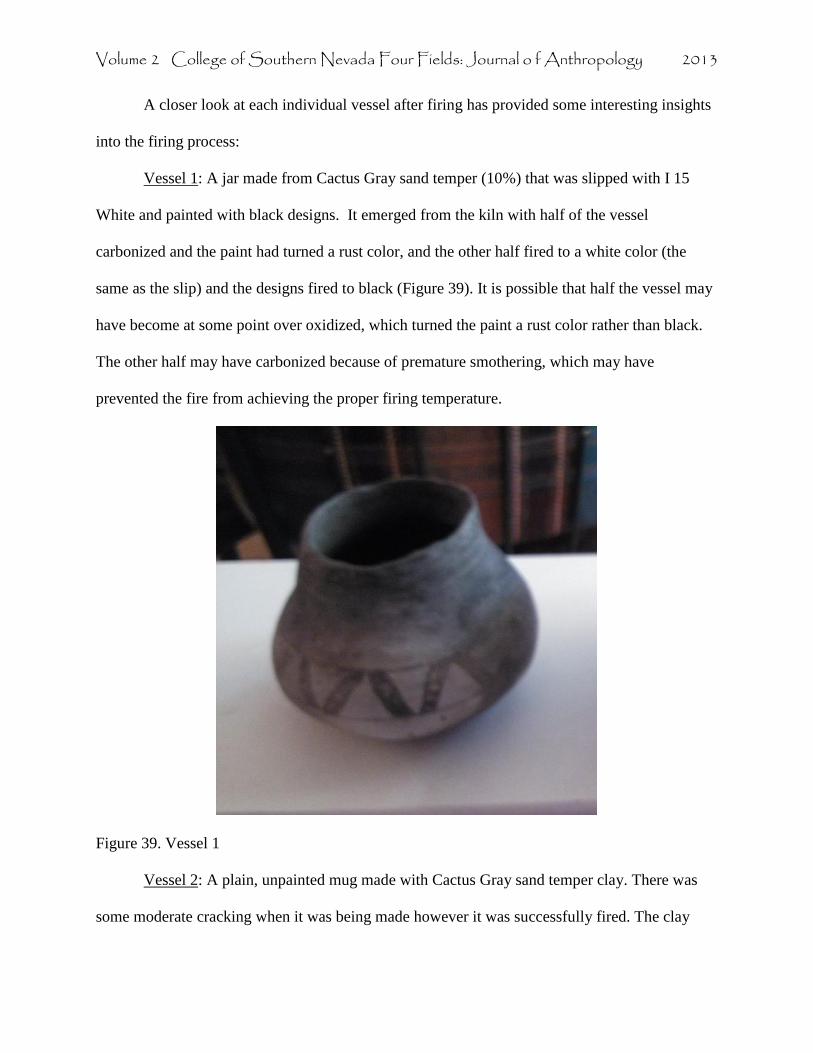
Vessel 1: A jar made from Cactus Gray sand temper (10%) that was slipped with I 15
White and painted with black designs. It emerged from the kiln with half of the vessel
carbonized and the paint had turned a rust color, and the other half fired to a white color (the
same as the slip) and the designs fired to black (Figure 39). It is possible that half the vessel may
have become at some point over oxidized, which turned the paint a rust color rather than black.
The other half may have carbonized because of premature smothering, which may have
prevented the fire from achieving the proper firing temperature.
Figure 39. Vessel 1 Vessel 2: A plain, unpainted mug made with Cactus Gray sand temper clay. There was
some moderate cracking when it was being made however it was successfully fired. The clay
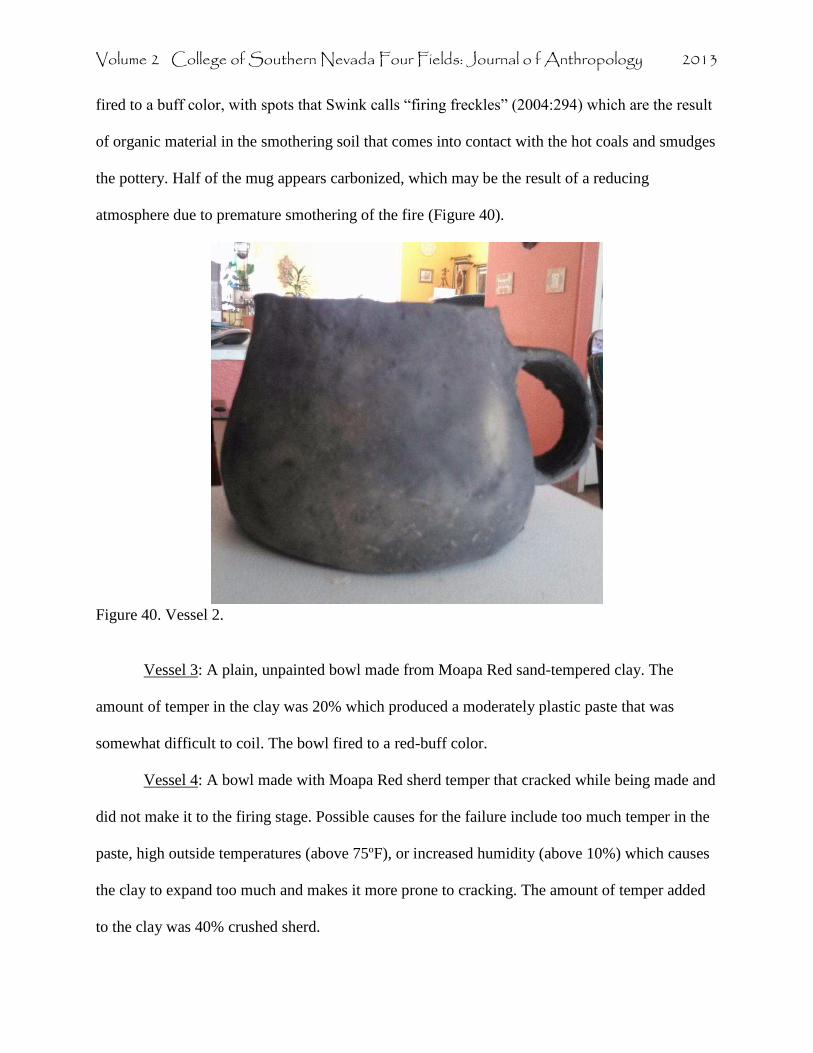
Volume 2 College of Southern Nevada Four Fields: Journal o f Anthropology 2013
fired to a buff color, with spots that Swink calls “firing freckles” (2004:294) which are the result
of organic material in the smothering soil that comes into contact with the hot coals and smudges
the pottery. Half of the mug appears carbonized, which may be the result of a reducing
atmosphere due to premature smothering of the fire (Figure 40).
Figure 40. Vessel 2. Vessel 3: A plain, unpainted bowl made from Moapa Red sand-tempered clay. The
amount of temper in the clay was 20% which produced a moderately plastic paste that was
somewhat difficult to coil. The bowl fired to a red-buff color.
Vessel 4: A bowl made with Moapa Red sherd temper that cracked while being made and
did not make it to the firing stage. Possible causes for the failure include too much temper in the
paste, high outside temperatures (above 75ºF), or increased humidity (above 10%) which causes
the clay to expand too much and makes it more prone to cracking. The amount of temper added
to the clay was 40% crushed sherd.
Volume 2 College of Southern Nevada Four Fields: Journal o f Anthropology 2013
Vessel 5: A bowl made with Moapa Red sand temper that cracked while being made and
did not make it to the firing stage. Possible causes for the failure include too much temper in the
paste, high external temperatures (above 75ºF), or increased humidity (above 10%) which causes
the clay to expand too much and makes it more prone to cracking. The amount of temper added
to the clay was 20% sand.
Vessel 6: A bowl made with Moapa Red sherd temper that cracked while being made and
did not make it to the firing stage. Possible causes for the failure include too much temper in the
paste, high external temperatures (above 75ºF), or increased humidity (above 10%) which causes
the clay to expand too much and makes it more prone to cracking. The amount of temper added
to the clay was 40% crushed sherd.
Vessel 7: A bowl made with Moapa Red sand temper that cracked while being made and
did not make it to the firing stage. Possible causes for the failure include too much temper in the
paste, or increased humidity (above 10%) which causes the clay to expand too much and makes
it more prone to cracking. On this day the outside humidity registered at 21%. The amount of
temper added to the clay was 20% sand.
Vessel 8: A plain, unpainted bowl made from Moapa Red sand-tempered clay. The
amount of temper in the clay was 20% which produced a moderately high plastic paste that was
difficult to coil, possibly due to the outside temperature which registered 78ºF on that day. The
outside humidity was 17%. The bowl fired to a red-buff color.
Vessel 9: A mug made with Moapa Red sand temper. The plasticity of the clay was
moderate to high, yet it cracked quite a bit while being made. This may have been due to external
temperatures which registered 78ºF on that day, or it could have been the amount of added
temper, which was 20% sand. After firing the color turned a red/buff with a lot of smudging on
Volume 2 College of Southern Nevada Four Fields: Journal o f Anthropology 2013
one half. This may be the result of over-oxidation because the fire did not achieve an adequate
temperature to completely fire the vessel.
Vessel 10: A plain, unpainted bowl made from Cactus Springs Gray sand-tempered clay.
The amount of temper in the clay was 20% which produced a moderately high plastic paste that
was difficult to coil, possibly due to the outside temperature which registered 77ºF on that day.
The outside humidity was 16%. The bowl fired to a buff color.
Vessel 11: a wide mouth jar made with Cactus Springs Gray clay of moderately high
plasticity that cracked frequently while being made. The outside temperature was 77ºF and the
humidity was 16% on that day. The jar was painted with black designs on the outside surface. It
fired to a buff color on the inside but the outside appears carbonized probably due to a reduced
atmosphere. The black designs fired to a rust color and in some places black color.
Vessel 12: A mug made with Cactus Springs Gray clay that cracked while being made
and did not make it to the firing stage. Possible causes for the failure include too much temper in
the paste. The amount of temper added was 20% sand.
Vessel 13: A bowl made with Cactus Springs Gray clay that cracked while being made
and did not make it to the firing stage. Possible causes for the failure include too much temper in
the paste. The amount of temper added was 20% sand.
Vessel 14: A bowl made from a combination of two different clays: 50% Cactus Springs
Gray with sand temper and 50% Moapa Red with sand temper. The amount of temper in both
clays was 20%. The bowl was slipped inside and out with 15 White clay. This combination
produced a moderately plastic paste that cracked a lot while being made for unknown reasons.
The bowl fired to a white/light gray color.
Volume 2 College of Southern Nevada Four Fields: Journal o f Anthropology 2013
Vessel 15: A plain, unpainted bowl made from Cactus Springs Gray basalt-tempered
clay. The amount of temper in the clay was 20% which produced a moderately plastic paste that
was difficult to coil, for unknown reasons. The bowl fired to a buff color.
Vessel 16: A plain, unpainted bowl made from a combination of two clays: 70% Moapa
Red sand-tempered and 30% I 15 sand-tempered. The amount of temper was 15% and yielded a
moderately high plastic paste that coiled easily with little cracking. The bowl fired to a red/buff
color.
Vessel 17: A bowl made with 95 White sand temper that cracked while being made. The
cause for the failure was human error; not enough time was allowed for the preform to set so that
clay coils could be added without stressing the base and collapsing. The properties of this clay
were very good for making pottery; it was highly plastic with an unctuous feel that did not crack
while I stretched out the base. It might have made a fine pot had it not been rushed.
Vessel 18: A bowl made with Cedar Pocket sand-tempered clay. The amount of added
temper was 10% which resulted in a highly plastic, unctuous feeling paste that was easily coiled
and did not crack at all while being made. The bowl fired to a red-orange color on the inside,
while on the outside much of it turned a dark brown from premature smothering. In places it
appeared the same red-orange color as the exterior.
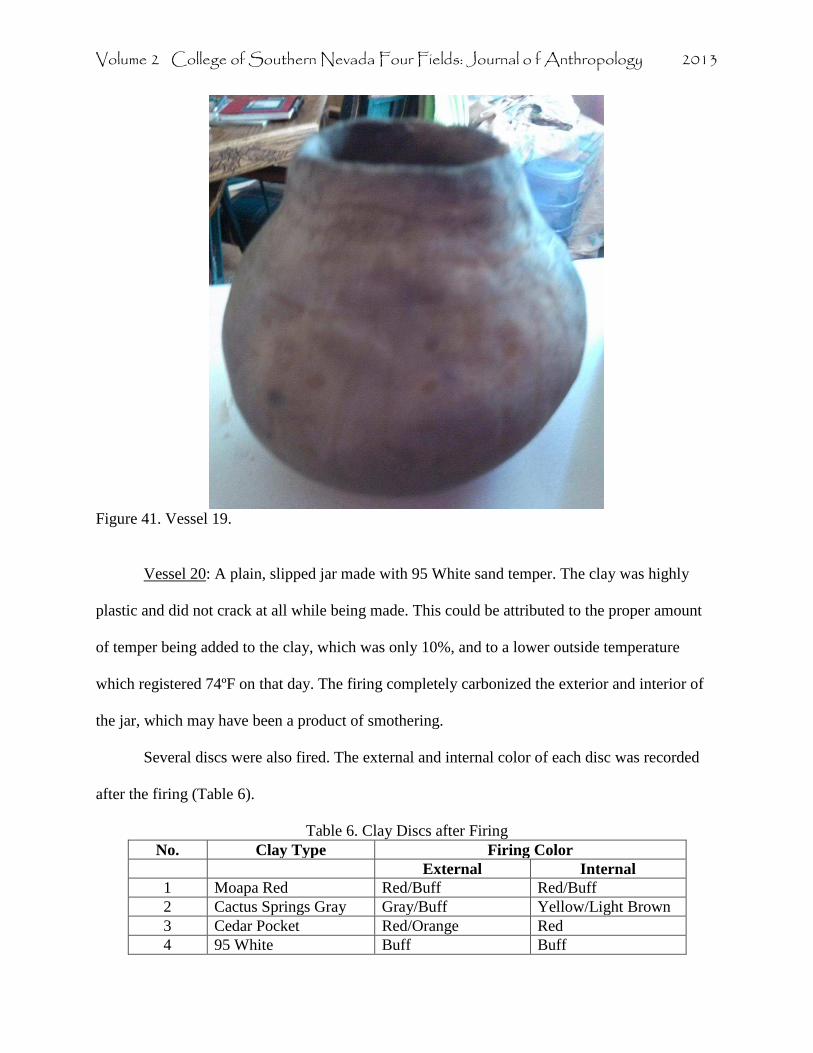
Vessel 19: A painted jar made with 95 White sand temper. The clay was highly plastic
and did not crack at all while being made. This could be attributed to the proper amount of
temper being added to the clay, which was only 10%, and to a lower outside temperature which
registered 74ºF on that day. After firing the clay turned a buff color but the paint turned a rust
color which may be an indication of over-oxidation during firing (Figure 41).
Volume 2 College of Southern Nevada Four Fields: Journal o f Anthropology 2013
Figure 41. Vessel 19. Vessel 20: A plain, slipped jar made with 95 White sand temper. The clay was highly
plastic and did not crack at all while being made. This could be attributed to the proper amount
of temper being added to the clay, which was only 10%, and to a lower outside temperature
which registered 74ºF on that day. The firing completely carbonized the exterior and interior of
the jar, which may have been a product of smothering.
Several discs were also fired. The external and internal color of each disc was recorded
after the firing (Table 6).
Table 6. Clay Discs after Firing No. Clay Type Firing Color
External Internal 1 Moapa Red Red/Buff Red/Buff 2 Cactus Springs Gray Gray/Buff Yellow/Light Brown 3 Cedar Pocket Red/Orange Red 4 95 White Buff Buff
Volume 2 College of Southern Nevada Four Fields: Journal o f Anthropology 2013
Several adjustments must be made for future firings such as better assessment of the
amount of fuel needed for primary and secondary fires, allowing the green ware to slowly heat
before adding the secondary fuel, and allowing the secondary fire to reach the optimal
temperature of 900ºC before smothering the fire. The results of this firing seem to indicate that a
combination of factors including excessive oxidation and premature smothering that increased
the time the vessels were subjected to a reductive atmosphere may have produced vessels that
seemed to be both carbonized and under fired simultaneously.
Spectographic and X-Ray Diffraction Analysis of the Clay Samples
An attempt to determine the types of clays that were suitable for making pottery was one
of the initial questions posed by this study. Five clay samples were submitted to the University
of Nevada’s Geosciences Environmental Soil Analysis laboratory for spectrographic and x-ray
diffraction analysis. Spectographic analysis is a method for determining the chemical
composition of materials by subjecting the atoms of the material being analyzed to different
types of excitation, including high temperature, strong electrical fields, or bombardment by
electrons (Shepard 1980:143). The electrons are knocked from inner orbits to outer orbits, and
back again, releasing energy in the form of light that can be viewed with a spectroscope. X-ray
diffraction is a means of studying the atomic structure of materials (Shepard 1980:146). Crystals
form three-dimensional gratings or diffractions that can be interpreted in terms of the atomic
arrangement of the crystal.
The samples that were submitted for analysis were the Moapa Red, Cactus Springs Gray,
I-15 White, Cedar Pocket, and 95 White clays. A preliminary report based on the x-ray
diffraction analysis yielded the following results:
Volume 2 College of Southern Nevada Four Fields: Journal o f Anthropology 2013
Sample 1: 95 White mineral constituents include quartz, calcite, K feldspar (sanidine),
illite, merlinoite, and aluminum hydroxide.
Sample 2: Cedar Pocket mineral constituents include quartz, calcite, K feldspar dolomite,
illite, muskovite, and K feldspar (sanidine).
Sample 3: I-15 White mineral constituents include dolomite, quartz, gypsum, and some
illite.
Sample 4: Cactus Springs Gray mineral constituents include quartz, albite (plagioclase),
illite, muscovite, and gypsum.
Sample 5: Moapa Red mineral constituents include coarse grained quartz, illite, and
chlorite.
The spectographic analysis results were inconclusive but did imply that all samples had
relatively high percentages of silicon, aluminum, iron, and calcium. The samples will have to be
resubmitted for a more in-depth analysis at a later date. The mineral constituents and elements
present in each sample are compatible with the definition of clay minerals presented earlier in
this paper. In essence, all of the clay samples have properties that make them suitable for
making pottery. This is particularly relevant because of the implication that the prehistoric
peoples of the region had access to the necessary resources for pottery production. To confirm
this it will be necessary to identify and sample more sources of local clay, submit them for
analysis, and compare them to the pottery that has been recovered from archaeological sites in
Southern Nevada.
FUTURE RESEARCH
Volume 2 College of Southern Nevada Four Fields: Journal o f Anthropology 2013
The replication of coil and scrape-style pottery has become the foundation for future
research in prehistoric ceramic technology. The entire process, from identifying and sampling
local clays, to processing and making a paste, as well as the frustrations and successes of
reproducing pottery, and last, but not least, firing the pots in a traditional manner, generated a
number of important questions:
1. Was pottery making a planned, seasonal activity or was it more informal? What
season was optimal for making and firing pottery?
2. Trench kilns have not been identified in Southern Nevada so how was pottery fired in
this region? Agave roasting pits are abundant and it is possible that some of these
features could have been used as kilns. More research in this area may reveal
important information pertinent to ceramic technology and firing.
3. What were the sources of organic paint in Southern Nevada? Was organic paint
imported or were local sources available? If so, what types of plants or other organic
materials were used to make paint?
4. What impact, if any, did sources of local clay have on settlement patterns or seasonal
rounds?
5. How do replicated vessels compare to archaeological specimens in terms of heat and
stress resistance? Does the choice of temper determine the type of ware produced?
Learning how to make pottery has been an eye-opening experience for me and has
created new possibilities for research and experimentation. Before becoming engaged in this
sometimes rewarding, often frustrating activity, I now look at pottery with a deeper
understanding of the challenges that native peoples had to overcome in order to produce the
diverse wares that were used in their everyday lives. My respect for these people has increased a
Volume 2 College of Southern Nevada Four Fields: Journal o f Anthropology 2013
thousand fold and I hope to honor them by continuing to learn about this ancient tradition and
perfect the skills I have been taught so that I can pass this knowledge on to future generations.
ACKNOWELDGEMENTS
This work would not have been possible without the support and help I have gotten from
so many people over the last few years. Students from the College of Southern Nevada and from
the University of Nevada, Las Vegas have been enthusiastic supporters and have helped in
various stages of the pottery making process. Thanks to James LaFleur, Katie Hoffman, Michael
Denman, and Thomas Wambacht for accompanying me on several clay hunting expeditions over
the years and for getting very dirty and sometimes even wet. Thanks to Krysan Williams,
Courtney Causey, and Sandy Paytaryan for the back-breaking work of grinding clay and making
pastes. Thanks to Kara Osborne, Nancy O’Connor, Laura Lindersmith, Sean Magann, James
LaFleur, David Crane, and Michael Denman for the long, lazy afternoons in my living room and
in my backyard making some very interesting vessels (not all of them made it into the fire!).
James LaFleur, Mike Denman, Sean Magann, Krysan Williams, Sandy Paytaryan, and Courtney
Causey all helped to collect firewood, dig my backyard trench kiln, and fire the pottery; thank
you from the bottom of my heart! Samantha Rubinson and Rayette Martin from the Southern
Nevada State Historic Preservation Office very generously donated their time and effort in
helping me prepare clay for a workshop at the Nevada State Museum. Dr. Kevin Rafferty, my
fearless leader at CSN, has been unstinting in his support and encouragement for my work and
made it possible for me to purchase some very important tools needed in my research. A very
special thanks to Greg Seymour and Dr. Margaret Lyneis who pointed me in the right direction
Volume 2 College of Southern Nevada Four Fields: Journal o f Anthropology 2013
when I was lost and who very enthusiastically supported me in my efforts to learn how to make
pottery. A very deeply felt gratitude goes to my husband, Paul Billings, who has been my rock
through all of this; he’s had to put up with clay dust and muddy hand prints throughout the house
and patio, finished and unfinished pots all over the house, with my tools lying around and clay
clogging up the sink. I wouldn’t have been able to do this without his support. Last, but not least,
to my teacher, my mentor, and my friend, Clint Swink, and his wife Rickie: thank you for
opening my eyes to a new world of possibility, for sharing your knowledge and opening your
home to me, for setting my feet upon the path of learning that will undoubtedly continue for the
rest of my career. I only hope that I can reach out to others and pass on your legacy and that of
the people who came before you with as much skill, patience, and humility as you have shown
me.
Volume 2 College of Southern Nevada Four Fields: Journal o f Anthropology 2013
WORKS CITED
Adams, Karen R., Joe D. Stewart, and Stuart J. Baldwin 2002 Pottery Paint and Other Uses of Rocky Mountain Beeweed (Cleome serrulata Pursh) in The Southwestern United States: Ethnographic Data, Archaeological Record, and Elemental Composition. In Kiva 67(4):339-362. Bergaya, F. and G. Lagaly 2006 General Introduction: Clays, Clay Minerals, and Clay Science. In Handbook of Clay Science, Volume 1 of Developments in Clay Science. Oxford, U.K. Blair, Mary Ellen, and Laurence R. Blair
1986 Margaret Tafoya, a Tewa Potter's Heritage and Legacy. Schiffer Publishing Ltd., West Chester, Pennsylvania.
Blankenship, Bart and Robin Blankenship
2008 Earth Knack: Stone Age Skills for the 21st Century. Gibbs and Smith, Salt Lake City.
Blandino, Betty 2003 Coiled Pottery. A&C Black Publishers, London. Blinman, Eric 2013 Cooking with Style (and Function). In El Palacio 118(1):61-64. Brisbin, Joel
2009 Pottery Trench Kilns: Fire in the Hole. In A Century of Archaeological Research at Mesa Verde National Park. Papers of the Mesa Verde Museum Association pp. 119-124.
Volume 2 College of Southern Nevada Four Fields: Journal o f Anthropology 2013
Callahan, Eric
1999 What is Experimental Archaeology? In Primitive Technology: A Book of Earth Skills, edited by David Wescott, pp. 4-11. Gibbs Smith, publisher, Layton, Utah.
Evans, Susan Toby 2013 Ancient Mexico & Central America. Thames & Hudson, London. Harry, Karen G.
2005 Ceramic Specialization and Agricultural Marginality: Do Ethnographic Models Explain the Development of Specialized Pottery Production in The Prehistoric American Southwest? In American Antiquity 70:295-319.
2010 Understanding Ceramic Manufacturing Technology: The Role of Experimental Archaeology. In Designing Experimental Research in Archaeology: Examining Technology through Production and Use, edited by Jeffrey R. Ferguson, pp. 39-89. University Press of Colorado, Boulder, Colorado.
Hayes, Allan and John Blom 1996 Southwestern Pottery: Anasazi to Zuni. Northland Publishing, Flagstaff. Jamison, Linda
2007 Primitive Process Pottery. In Primitive Skills and Crafts: An Outdoorsman’s Guide to Shelters, Tools, Weapons, Tracking, Survival, and More, edited by Richard and Linda Jamison, pp. 35-5. Skyhorse Publishing, Inc., New York, N.Y.
Lyneis, Margaret M.
1992 The Main Ridge Community at Lost City: Virgin Anasazi Architecture, Ceramics, and Burials. University of Utah Anthropological Papers No. 117, University of Utah Press.
Marsh, Erik J. and Jeffrey R. Ferguson
2010 Introduction. In Designing Experimental Research in Archaeology: Examining Technology through Production and Use, edited by Jeffrey R. Ferguson, pp. 1-38. University Press of Colorado, Boulder, Colorado.
McVickar, Janet
1999 Analysis of Plant Macrofossils. In Anasazi Community Development in Cove and Redrock Valley: Archaeological Excavations along the N33 Road in Apache County, Arizona, Vol. II, edited by Paul E Reed and Kathy Niles Hensler, pp. 809-850. Navajo Nation Archaeology Department Report No. 33. Window Rock, Arizona
Murray, H. H.
Volume 2 College of Southern Nevada Four Fields: Journal o f Anthropology 2013
2007 Applied Clay Mineralogy: Occurrences, Processing, and Application of Kaolins, Bentonites, Palygorskite-Sepiolite, and Common Clays. Developments in Clay Science, Volume 2. Elsevier Science, Amsterdam. Myhrer, Keith and Margaret M. Lyneis 1985 The Bovine Bluff Site: An Early Puebloan Site in the Upper Moapa Valley. Contributions to the Study of Cultural Resources, Technical Report #15, edited by Thomas F. Zale. Submitted to the Bureau of Land Management, Reno. Outram, Alan K. 2008 Introduction to Experimental Archaeology. In World Archaeology 40(1):1-6. Parker Pearson, Mike
2011 Stonehenge- A New Understanding: Solving the Mysteries of the Greatest Stone Age Monument. The Experiment LLC, New York, NY.
Peterson, Susan and Jan Peterson 2009 Working with Clay. Laurence King Publishing, Upper Saddle River, New Jersey. Pierce, Christopher
2005 Reverse Engineering the Ceramic Cooking Pot: Cost and Performance Properties of Plain and Textured Vessels. In Journal of Archaeological Method and Theory, vol. 12 number 2pp 117-156.
Rathje, William and Cullen Murphy 1992 Rubbish! The Archaeology of Garbage. HarperCollins, New York. Reijnders, Anton
2005 The Ceramic Process: A Manual and Source of Inspiration for Ceramic Art and Design. University of Pennsylvania Press
Rice, Prudence
1987 Pottery Analysis: A Sourcebook. University of Chicago Press, Chicago and London.
Saraydar, Stephen C. and Izumo Shimada 1973 Experimental Archaeology: A New Outlook. In American Antiquity 38:344-350. Shepard, Anna O.
1980 Ceramics for the Archeologist. Originally published 1956, Publication 609, Carnegie Institution of Washington, Washington, D.C.
Shimada, Izumo
2005 Experimental Archaeology. In Archaeological Methods, Volume I, edited by Herbert D.G. Maschner and Christopher Chippindale, pp. 603-642. Rowman & Littlefield, Inc., Oxford.
Volume 2 College of Southern Nevada Four Fields: Journal o f Anthropology 2013
Skibo, James M., Michael B. Schiffer, and Kenneth C. Reid 1989 Organic-Tempered Pottery: An Experimental Study. In American Antiquity 54(1):122-146. Smith, Susan J.
1999 Pollen Analysis. In Anasazi Community Development in Cove and Redrock Valley: Archaeological Excavations along the N33 Road in Apache County, Arizona, Vol. II, edited by Paul E Reed and Kathy Niles Hensler, pp. 851-869. Navajo Nation Archaeology Department Report No. 33. Window Rock, Arizona.
Stieber, Tamar 2000 Obsessed with Old Technology. In American Archaeology 4(2):23-25 Stewart, Joe D., and Karen R. Adams
1999 Evaluating Visual Criteria for Identifying Carbon- and Iron- Based Pottery Paints from the Four Corners Region Using SEM-EDS. In American Antiquity 64:675-696.
Striovia, Jana, Cristiana Lofrumento, Angela Zoppi, and Emilio Mario Castelucci
2006 Prehistoric Anasazi ceramics studied by micro-Raman spectroscopy in Journal of Raman Spectroscopy Volume 37. Wiley InterScience www.interscience.wiley.com DOI: 10.1002/jrs.1577
Swink, Clint
1993 Limited Oxidation Firing of Organic Painted Pottery in Anasazi-Style Trench Ki lns. In Pottery Southwest Volume 20, no. 1,2,3, and 4.
2004 Messages From the High Desert: The Art, Archaeology, and Renaissance of Mesa
Verde Pottery. Redtail Press, Bayfield, Colorado. Tite, M.S.
1999 Pottery Production, Distribution, and Consumption – The Contribution of the Physical Sciences. In Journal of Archaeological Method and Theory, 6(3):181-233.
Toll, H. Wolcott and C. Dean Wilson 2000 Locational, Architectural, and Ceramic Trends in the Basketmaker III Occupation of the La Plata Valley, New Mexico. In Foundations of Anasazi Culture: The Basketmaker Pueblo Transition, edited by Paul F. Reed, pp. 19-43.University of Utah Press. United States Department of Agriculture, Natural Resources Conservation Service
2013 Web Soils Survey. Electronic Document, http://websoilsurvey.nrcs.usda.gov/app/HomePage.htm.
Volume 2 College of Southern Nevada Four Fields: Journal o f Anthropology 2013
Wilson, C. Dean and Eric Blinman 2000 Changing Specialization of White Ware Manufacture in the Northern San Juan Region. In Ceramic Production in the American Southwest, edited by Barbara J. Mills and Patricia L. Crown, pp. 63-114. University of Arizona Press. Youngs, F. O. and E. J. Carpenter 1928 Soil Survey of the Moapa Valley Area, Nevada. Submitted to the U.S. Department of Agriculture, Bureau of Soils. United States Government Printing Office, Washington. Zhushchikhovskaia, Irina S. 2012 The Most Ancient Ceramics: The Course of Technological Innovation. In Anthropology and Archaeology of Eurasia 51(1):62-78


