Embed Size (px)
Citation preview
1
Lec 7 3rd class د. وليد شالل القريشي
EXTRACTION OF TEETH (EXODONTIA)
Extraction of teeth is the most important part of minor oral surgery
and the most common procedures to general dental practitioner
(dentist). Many patients suffer from extractionfobia. Many dentists still
believe that speed is essential when extracting the teeth with
appropriate techniques.
Definition: -
Exodontia is a painless removal of teeth from their bony alveolar socket
with relatively minimal amount of trauma to the investing or surrounding
tissues, so that the wound may heal without postoperative problems.
Basically, we have two methods of extraction:-
1- Intra-alveolar extraction (forceps extraction).
2- Trans-alveolar extraction (surgical extraction).
In forceps extraction which is enough for extraction in most of cases
consist of removing the tooth or root by the use of forceps or elevators
or both. While in trans-alveolar extraction we dissect the tooth or root
form its bony attachment by rising a flap and removal of some of the
bone surrounding the roots, which are then removed by the use of
elevators and/or forceps.
Teeth should not be extracted unless appropriate clinical and
radiographic investigation, a satisfactory diagnosis and treatment plan
have been reached and agreed with the patient.
The extraction is accomplished in two stages.
The first stage, the tooth is separated from the soft tissues
surrounding
the second stage, the tooth is elevated from the socket.
2
Indications of extraction: -
There are many indications for tooth extraction, if conservative
treatment has either failed or is not indicated, a tooth may have to be
extracted. Although the modern dentistry tries and takes all measures to
preserve and maintain teeth in the oral cavity, there are still a variety of
general indications for removing teeth.
1. Severe Periodontal disease .
2. Severe non-restorable carious tooth.
3. Pulp and apical pathology with non-treatable lesion with
endodontic therapy.
4. Teeth in the line of a jaw fracture.
5. Impacted or ectopically present teeth.
6. Supernumery teeth.
7. Teeth involved with cysts or tumors of the jaw.
8. Teeth removed due to orthodontic reasons (for space gaining).
9. Malposed or malpositioned teeth.
10. Teeth removed due to prosthetic considerations.
11. Teeth in the direct field for radiotherapy to the jaws may be
removed prophylactically before radiotherapy.
12. Over-retained deciduous teeth.
13. Teeth removed due to esthetic reasons (severely stained or
fluorosis or attrition).
3
Contra indication of extraction
In general, the contra-indications are subdivided into;
A. Local contra-indications.
B. Systemic contra-indications.
Local contra-indications: - (L.C s)
There are several L.C s to extractions of indicated teeth:-
1- Acute and uncontrolled infection:-
Extraction in the presence of acute and uncontrolled infection may
lead to spread of infection locally or systemically leading to many
complications some of them are dangerous and life threatening (e.g.
cavernous sinus thrombosis, mediastinitis, Ludwig's angina) and acute
periapical abscess and facial abscess especially in medically
compromised patient. In addition to that, limitation of mouth opening
especially in lower wisdom tooth infection.
2- Previous radiotherapy:-
Previous therapeutic radiation in oral and maxillofacial region for
treatment of cancer lead to fibrosis and decreased vascularity of the
tissue or area of extraction and end with a condition in the bone called
osteoradionecrosis
3- Teeth located within area of tumors: -
Especially in vascular lesion or malignant tumor should not be extracted
because extraction may lead to dissemination of the tumor, unhealed
socket and postoperative complications, for example, bleeding
postoperatively and intraoperative.
4
Systemic Contra-Indications:-
Systemic contra-indications preclude extraction because the patient's
systemic health is such that the ability to withstand the surgical work
may be compromised. So extraction should be postponed until the
severity of the problem has been resolved and maybe arranged after
consultation with the physician to perform extraction safely without
complications so caution is advised in the following conditions:-
1- Severe uncontrolled metabolic disease, e.g. uncontrolled
diabetes, thyroid problems, end-stage renal disease.
2- Uncontrolled leukaemia and lymphomas.
3- Severe uncontrolled cardiac disease, e.g. myocardial infarction,
unstable angina pectoris, dysrhythmias.
4- Severe uncontrolled hypertension.
5- Pregnancy.
6- Bleeding disorder e.g. haemophilia, platelet disorder, patient on
anticoagulants.
7- Patients who take a variety of medications e.g. patient on
steroid and immunosuppressive drugs, cancer and
chemotherapy.
8- Uncontrolled epilepsy.
5
Pre-extraction evaluation:-
P.E.E is very valuable and necessary for successful extraction
practice. Hurry and inadequate P.E.E of the case may lead to many
complications for the operator during extraction , in addition to the
postoperative problems to the patient.
P.E.E include:-
1- Clinical preoperative evaluation.
2- Radiological evaluation.
1-Clinical P.E.E also includes:-
A. General evaluation.
B. Local evaluation.
A -General evaluation includes:-
General impression of the patient.
History of general diseases, Nervousness and
orientation
General oral hygiene.
Gingival inflammation, calculus, neglected mouth.
B . Local factors evaluation Includes:-
1. Clinical examination of the tooth.
2. Adjoining structures.
3. Access to the tooth. This includes the mouth opening, location of the
tooth (e.g. buccally malposed, in standing) may present difficulty in
positioning the dental forceps for extraction, so you may remove
such a tooth surgically.
4. Tooth mobility: The mobility of the tooth to be extracted should be
assessed preoperatively, greater than normal mobility is frequently
seen with severe periodontal disease, but sometimes it maybe
because of the underlying pathology like neoplasm
6
5. Condition of the tooth: - e.g.
a) Carious destruction.
b) The presence of large restoration.
c) Presence or absence of the adjoining teeth.
d) Non-vital tooth.
e) State of the supporting tissue.
f) Shape, position, long axis and size of the crown.
g) Attrition.
Good P.E.E resulted from correction of data collected from history,
clinical examination, radiographs and laboratory aids in addition to that
P.E.E need good knowledge and experience in the basic sciences e.g.
anatomy, physiology, pathology.
In general, P.E.E may help you in: -
a) Determine the method of extraction and type of anaesthesia.
b) Reduce the time spend for extraction.
c) Reduce the intra and post-operative crisis and complications.
2- Radiological evaluation: -
Preoperative clinical assessment may be supplemented some times by
preoperative radiographs.
indications for preoperative radiograph are:-
1) History of difficult or unsuccessful extraction.
2) Crown with extensive caries, large restorations, non-vital tooth when
diagnosis is not certain and tooth is malposed.
3) A tooth which is abnormally resistant to forceps extraction.
4) If after clinical examination you decide to remove the tooth surgically.
5) Any tooth which is in close relation to important or vital structures
like neurovascular canal, maxillary sinus, mental nerve, nasal cavity.
7
6) Attrition teeth in elderly patient (maybe associated with
hypercementosis).
7) If a tooth is partially erupted or completely unerupted or retained root.
8) Any tooth which has been subjected to trauma, fracture of the root
and/or alveolar bone maybe present.
9) An isolated maxillary molar especially if it is unopposed and over
erupted. The bony support of such a tooth is often weakened by the
presence of maxillary sinus and this may predispose to certain of oro-
anrtal communication or fracture of the maxillary tuberosity.
10) Whenever, underlying bony pathology is suspected e.g. cystic
lesion, tumor.
11)Any systemic condition which may predispose to dental or alveolar
abnormality like: -
a) Osteitis deformans (Paget's disease), in which the roots are
hypercementosed and ankylosed leading to difficult extraction,
infection of the socket.
b) Cleido-cranial dysostosis, for pseudo-anodontia (multiple
impactions, hooked roots occur, supernumerary teeth).
c) Patient who have received therapeutic irradiation to the jaw
which may have to predispose to osteoradionecrosis.
d) Osteopetrosis (marble bone disease), which cause extraction
very difficult and predispose to chronic osteomyelitis.
A good radiograph and careful interpretation may give or aid the
operator to many factors that may cause difficult extraction, e.g.:-
1- Abnormal number and shape of roots.
2- An unfavourable root pattern.
3- Caries extending to the root mass.
4- Fracture or resorption of the root.
5- Hypercementosis of roots.
6- Ankylosis (there is no space in periodontal ligament), and sclerosis of
the bone.
8
7- Gemination (the development of two teeth from one bud).
8- Impaction.
9- Bony sclerosis and pathological lesions.
Also careful interpretation of the radiograph may also reveal or show
the possibility of the following complications:-
1) Involvement of, and damage to inferior dental nerve and mental nerve
e.g. on extraction of impacted lower third molar
2) The creation of oro-anrtal fistula or or-nasal communication.
3) The retention of intra-bony pathology e.g. cyst.
4) The displacement of root or tooth into maxillary sinus.
5) Fracture of maxillary tuberosity.
PROFESSOR HAFEZ DIAB
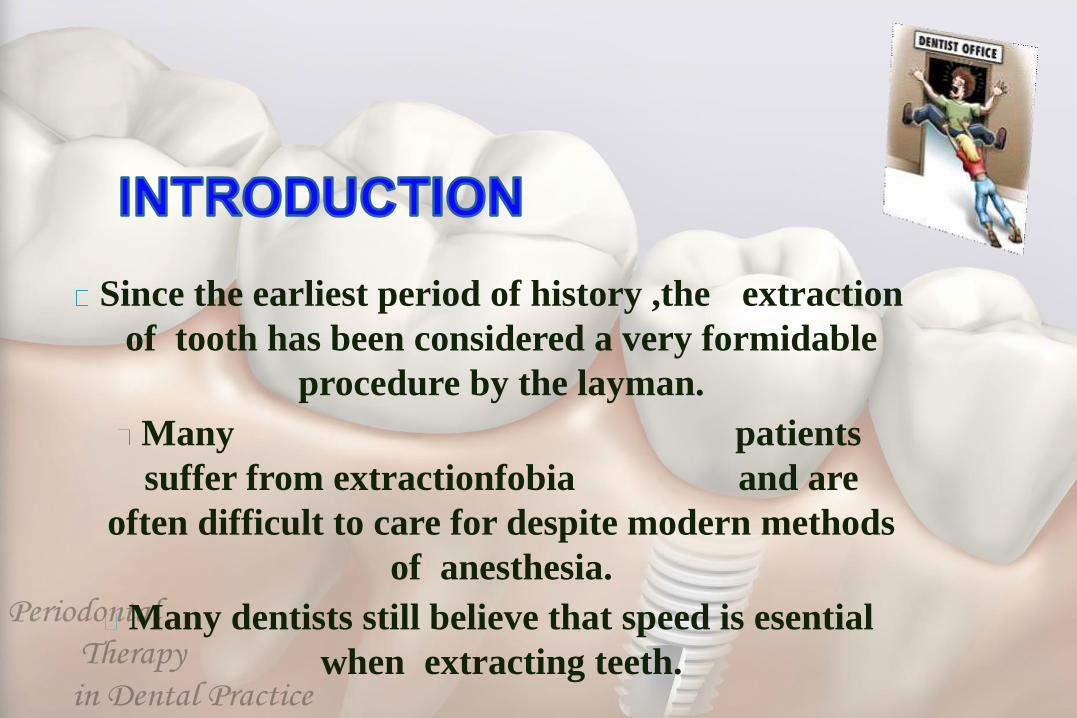
Since the earliest period of history ,the extraction
of tooth has been considered a very formidable
procedure by the layman.
Many patients
suffer from extractionfobia and are
often difficult to care for despite modern methods
of anesthesia.
Many dentists still believe that speed is esential
when extracting teeth.
The painless removal of the whole tooth, or root, with minimal
trauma to the investing tissues, so that the wound heals
uneventfully & no post operative problem is created
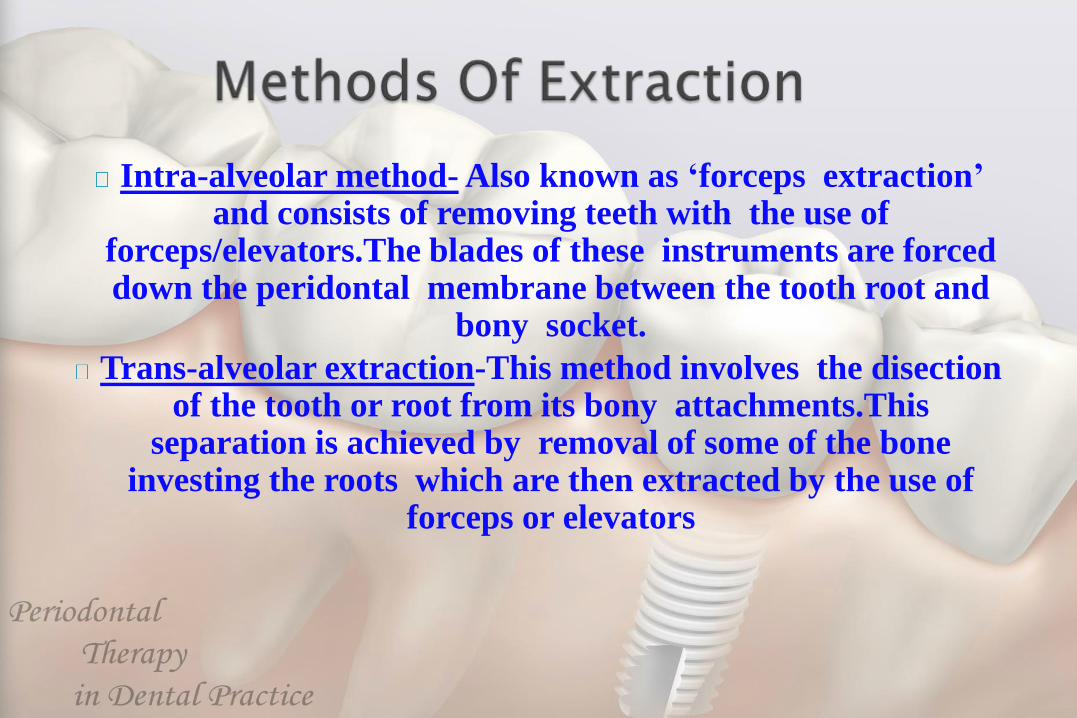
Intra-alveolar method- Also known as ‘forceps extraction’ and consists of removing teeth with the use of
forceps/elevators.The blades of these instruments are forced down the peridontal membrane between the tooth root and
bony socket.
Trans-alveolar extraction-This method involves the disection of the tooth or root from its bony attachments.This
separation is achieved by removal of some of the bone investing the roots which are then extracted by the use of
forceps or elevators
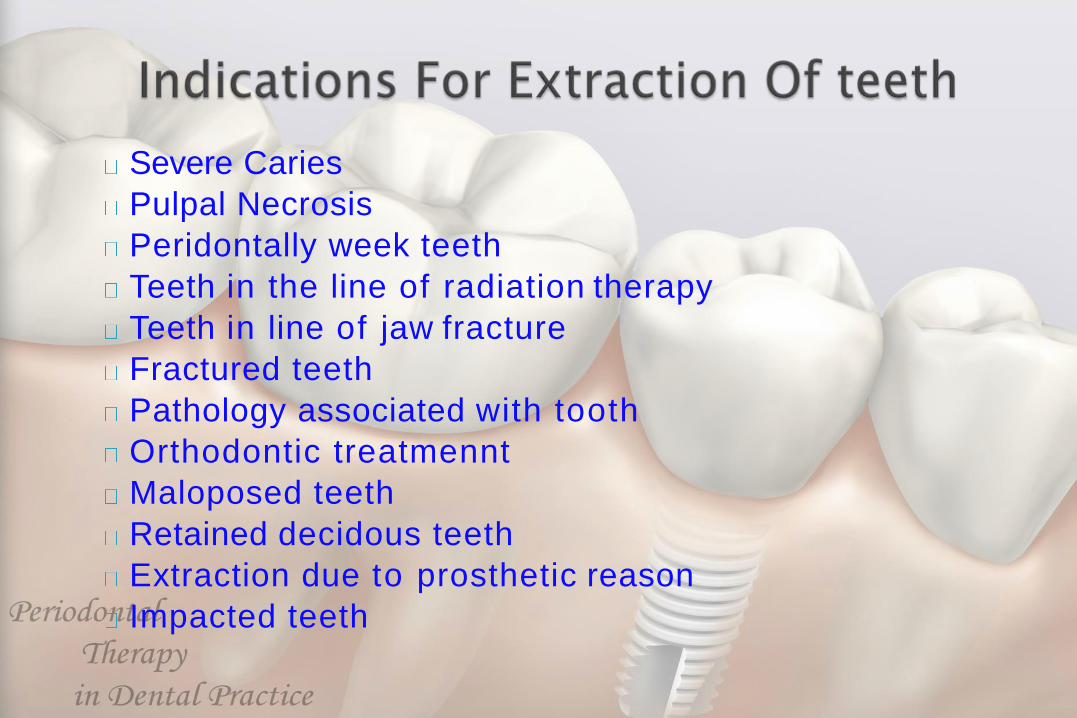
Severe Caries
Pulpal Necrosis
Peridontally week teeth
Teeth in the line of radiation therapy
Teeth in line of jaw fracture
Fractured teeth
Pathology associated with tooth
Orthodontic treatmennt
Maloposed teeth
Retained decidous teeth
Extraction due to prosthetic reason
Impacted teeth
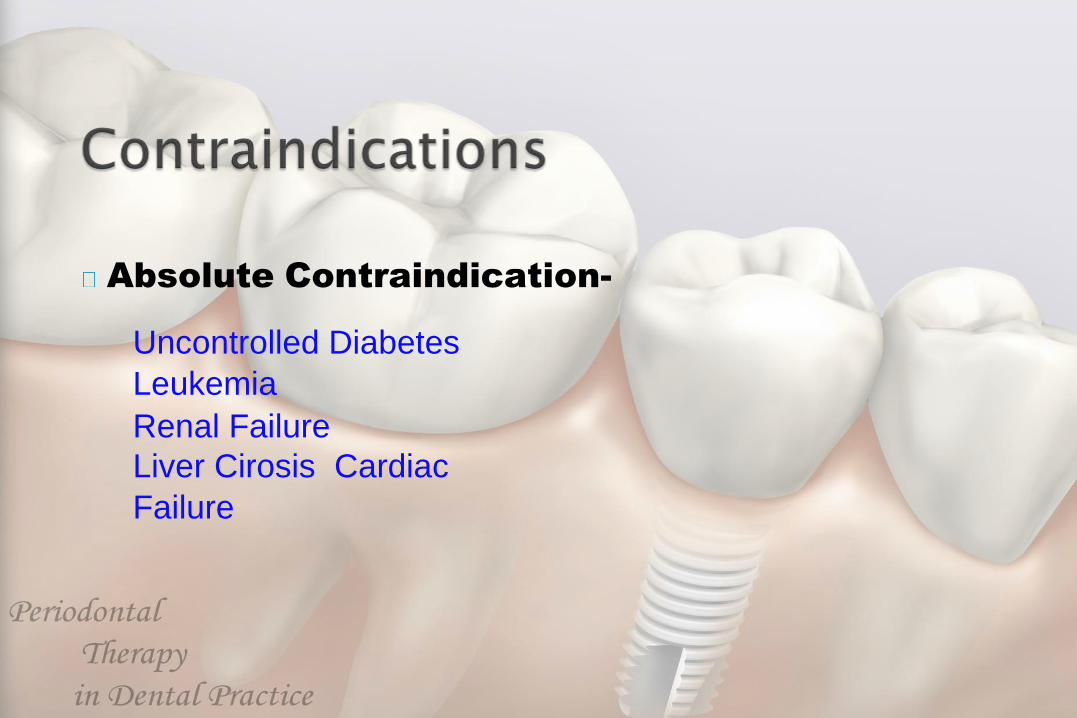
Absolute Contraindication-
Uncontrolled Diabetes
Leukemia
Renal Failure
Liver Cirosis Cardiac
Failure
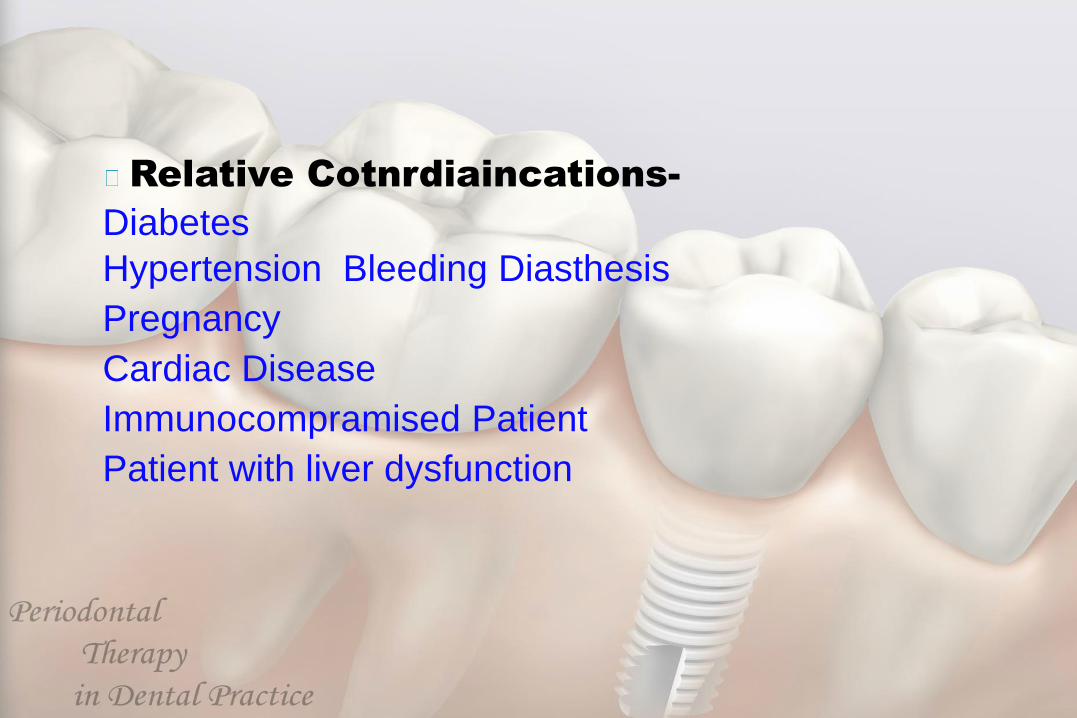
Relative Cotnrdiaincations-
Diabetes
Hypertension Bleeding Diasthesis
Pregnancy
Cardiac Disease
Immunocompramised Patient
Patient with liver dysfunction
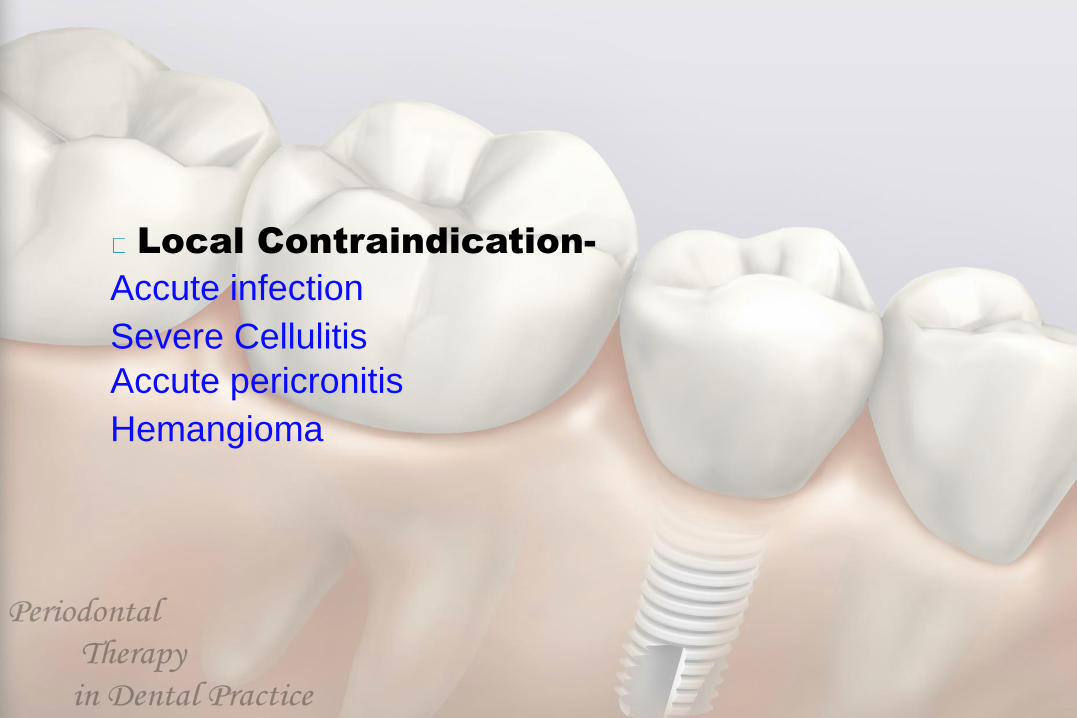
Local Contraindication-
Accute infection
Severe Cellulitis
Accute pericronitis
Hemangioma
Intra Oral Examination- It is the quick examination of
oral cavity- 1st soft tissue &then hard tissue.
Assessment of tooth to be extracted-It is done for long
evidence
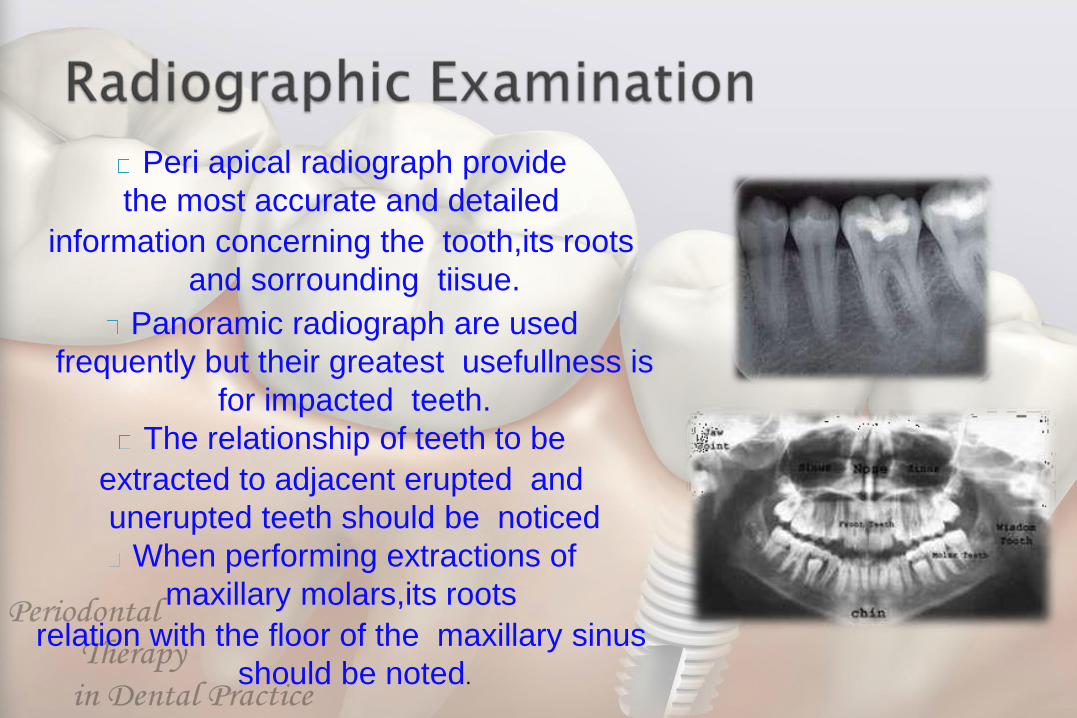
Peri apical radiograph provide
the most accurate and detailed
information concerning the tooth,its roots
and sorrounding tiisue.
Panoramic radiograph are used
frequently but their greatest usefullness is
for impacted teeth.
The relationship of teeth to be
extracted to adjacent erupted and
unerupted teeth should be noticed
When performing extractions of
maxillary molars,its roots
relation with the floor of the maxillary sinus
should be noted.
A peri apical radiograph taken before the
removal of mandibular premolar teeth should
include mental foramen.
The surgeon must know the curvature of root
and degree of root divergence to plan an
extraction.
Surgeon should look for caries extension
to the root.
Teeth with non vital pulp may have cysts &
granulation tissue peri apicallyand these
should be removed at the time of extraction
Bone that is more radiolucent is likely to be
less denser,which makes extraction easier.
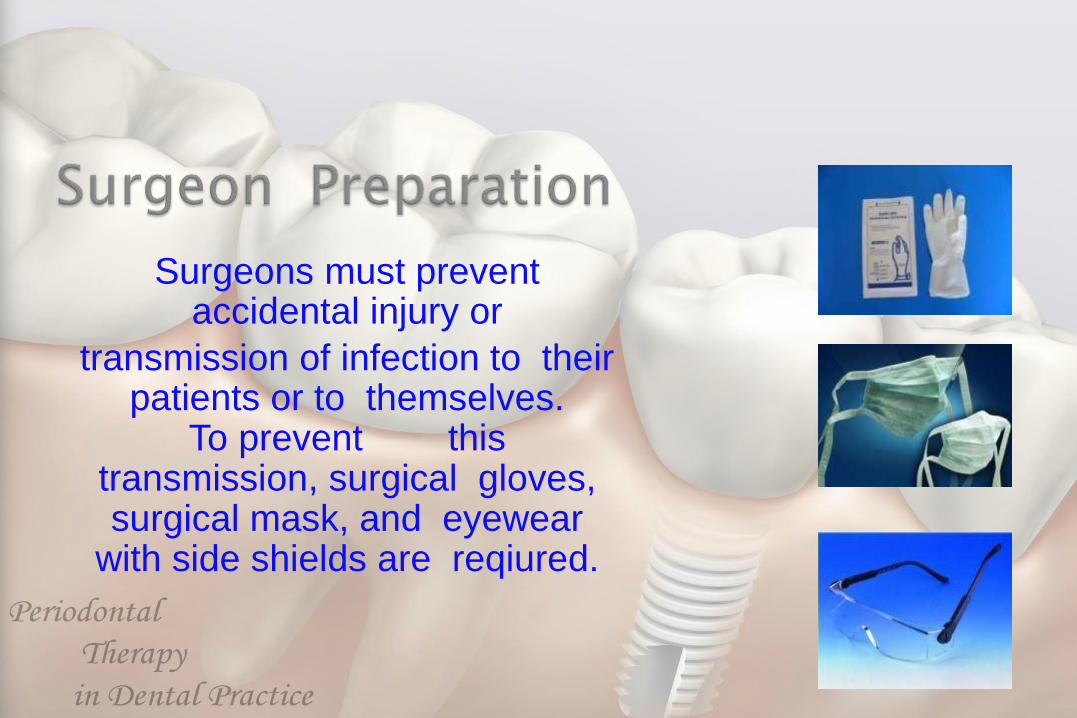
Surgeons must prevent accidental injury or
transmission of infection to their patients or to themselves.
To prevent this transmission, surgical gloves, surgical mask, and eyewear
with side shields are reqiured.
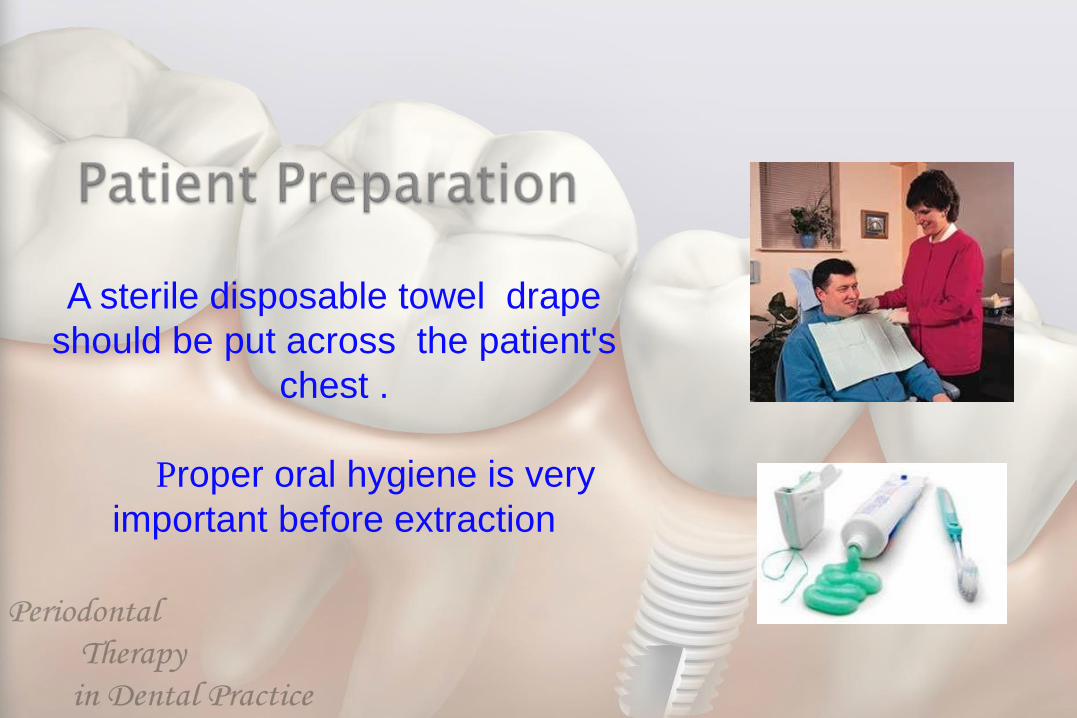
A sterile disposable towel drape
should be put across the patient's
chest .
Proper oral hygiene is very
important before extraction
For a maxillary extraction the chair
should be tipped backward and
maxillary occlusal plane is at 60
degrees to the floor. The height of
the dental chair should be 8cm
below the shoulder level of the
operator.
For the extraction of mandibular
teeth, the patient should be
positioned in a more upright
position the occlusal plane is
parallel to the floor.
The chair should be 16cm
below the level of operators
elbow.
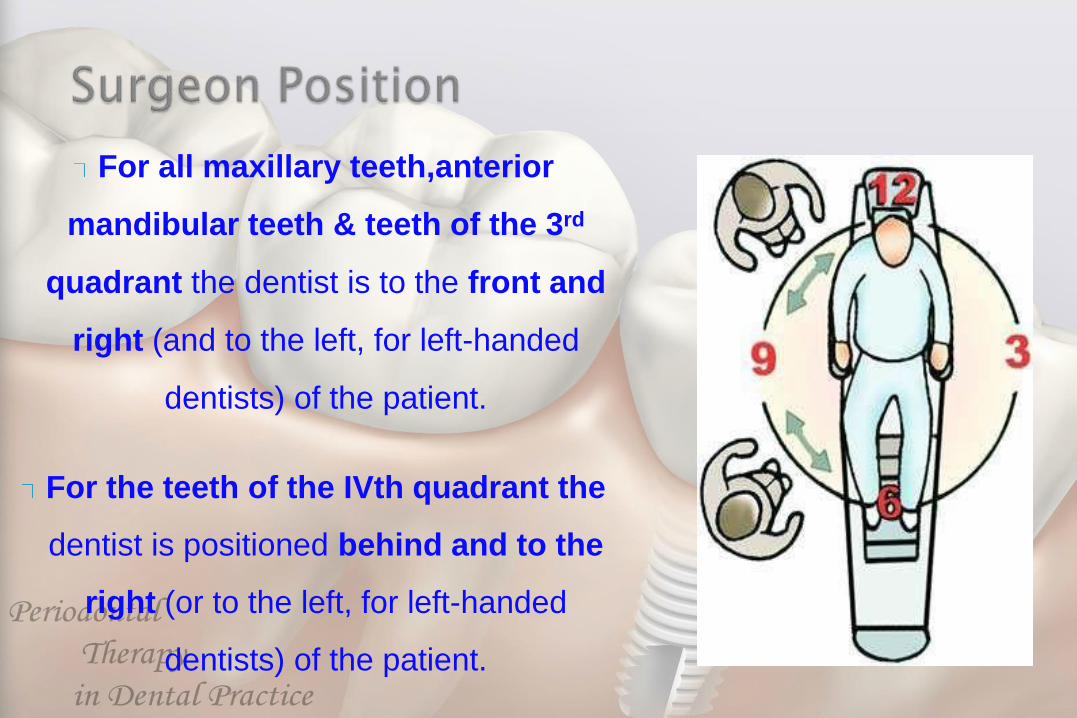
For all maxillary teeth,anterior
mandibular teeth & teeth of the 3rd
quadrant the dentist is to the front and
right (and to the left, for left-handed
dentists) of the patient.
For the teeth of the IVth quadrant the
dentist is positioned behind and to the
right (or to the left, for left-handed
dentists) of the patient.
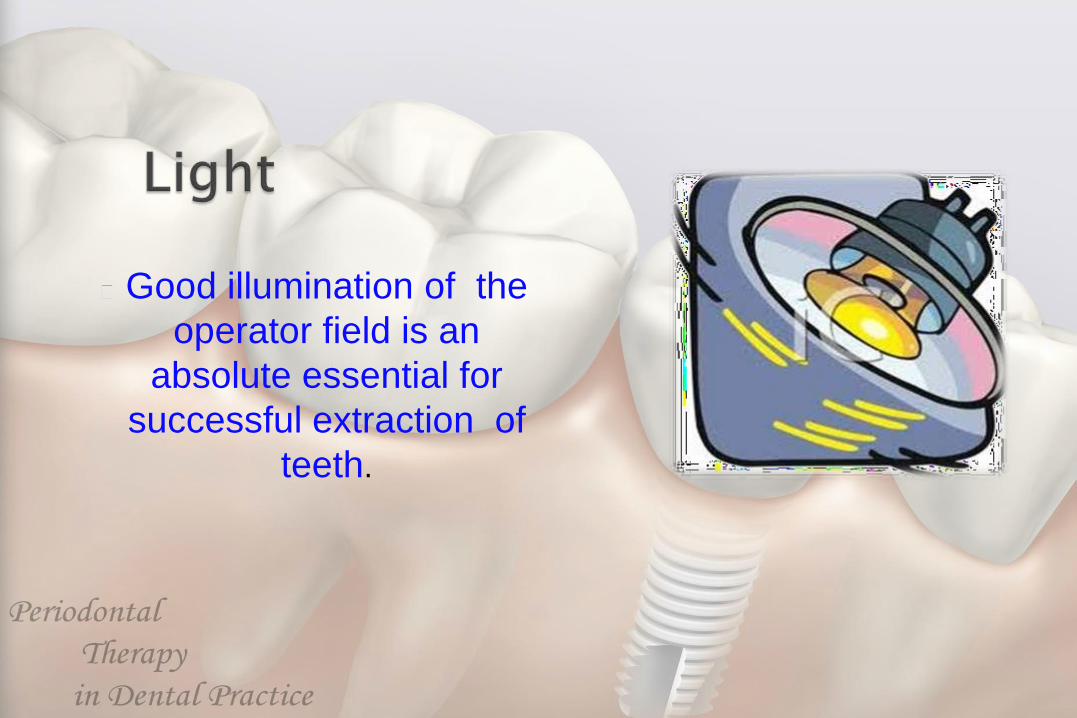
Good illumination of the
operator field is an
absolute essential for
successful extraction of
teeth.
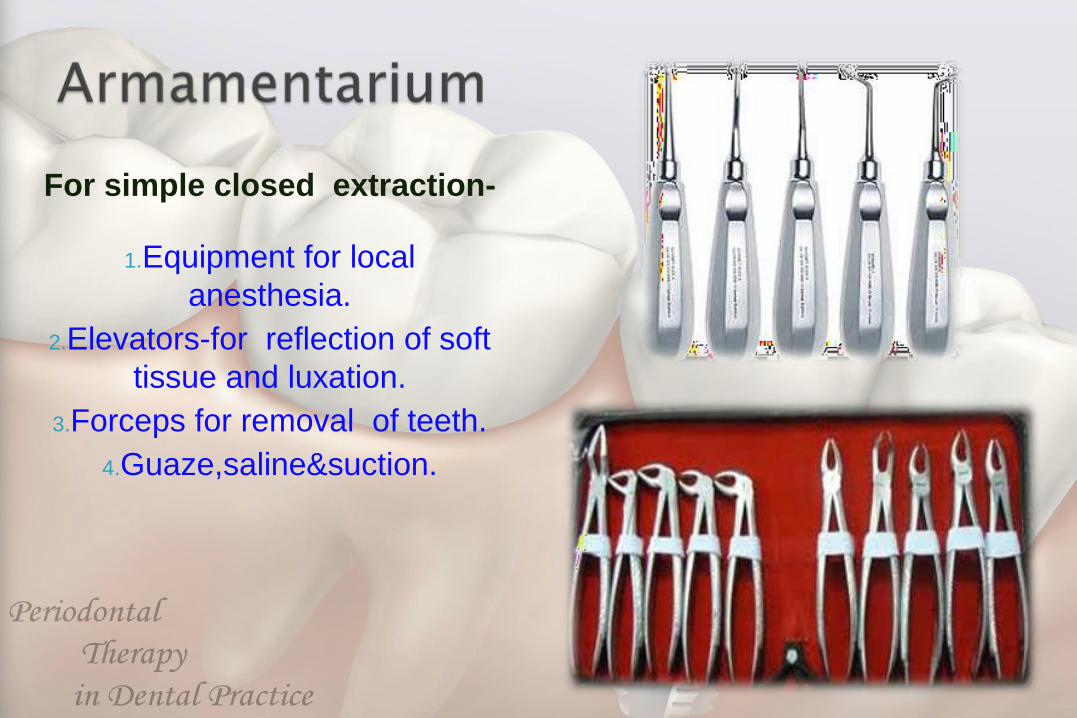
For simple closed extraction-
1.Equipment for local
anesthesia.
2.Elevators-for reflection of soft
tissue and luxation.
3.Forceps for removal of teeth.
4.Guaze,saline&suction.
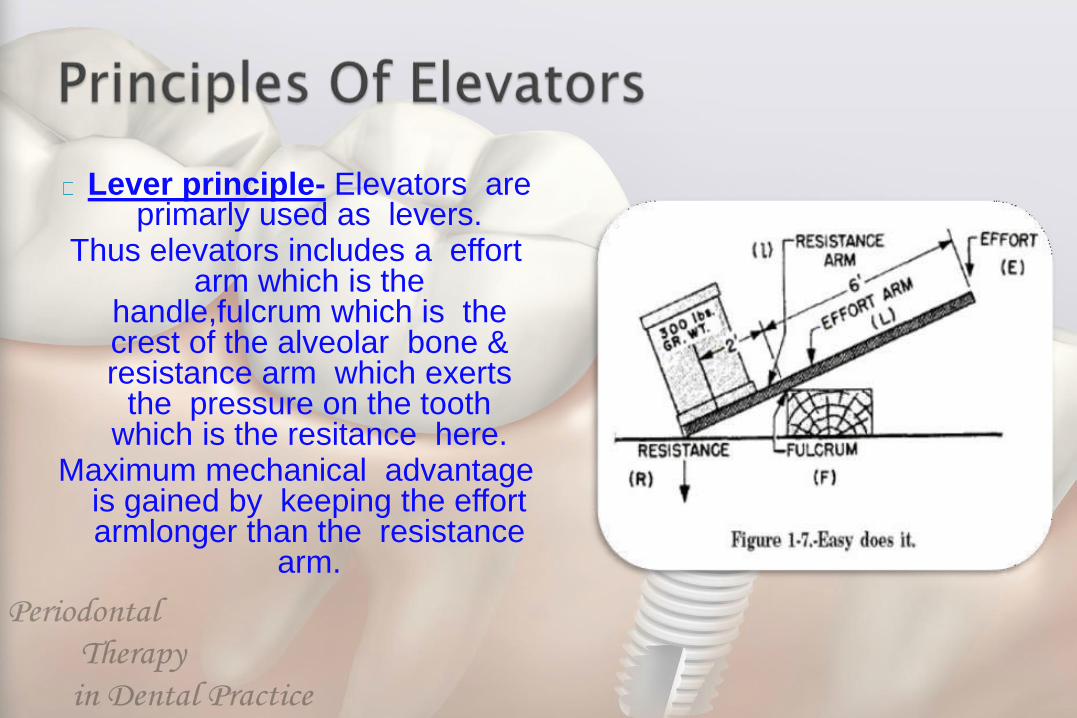
Lever principle- Elevators are primarly used as levers.
Thus elevators includes a effort arm which is the
handle,fulcrum which is the crest of the alveolar bone & resistance arm which exerts
the pressure on the tooth which is the resitance here.
Maximum mechanical advantage is gained by keeping the effort armlonger than the resistance
arm.
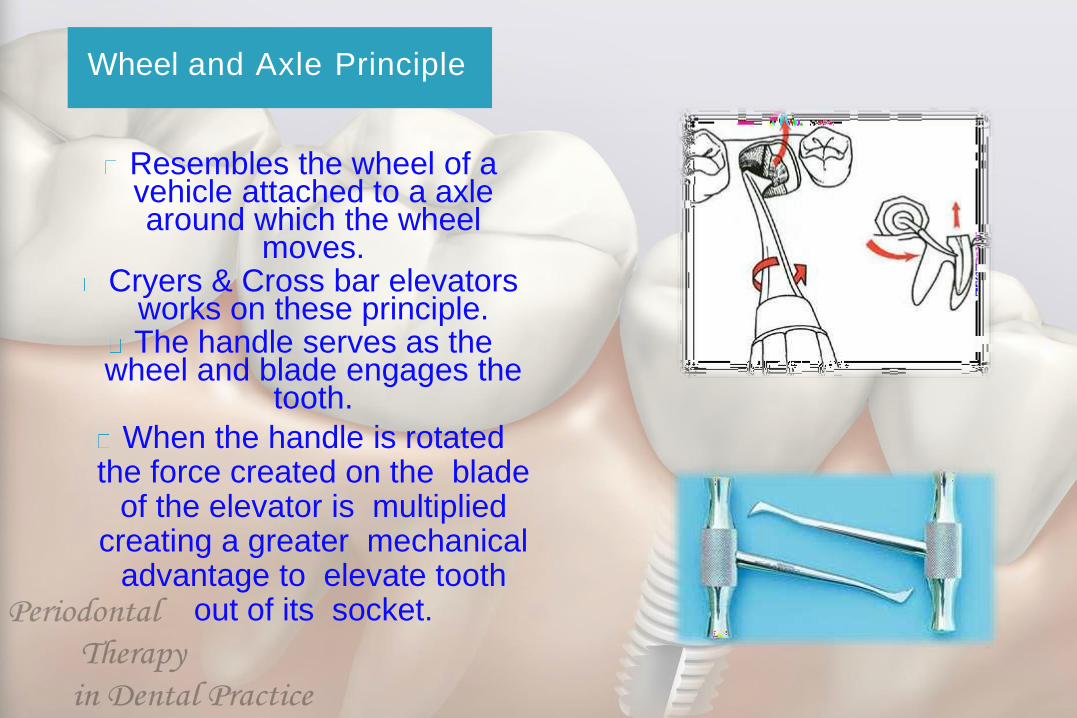
Wheel and Axle Principle
Resembles the wheel of a vehicle attached to a axle around which the wheel
moves.Cryers & Cross bar elevators
works on these principle.The handle serves as the
wheel and blade engages the tooth.
When the handle is rotated the force created on the blade
of the elevator is multiplied creating a greater mechanical
advantage to elevate tooth out of its socket.
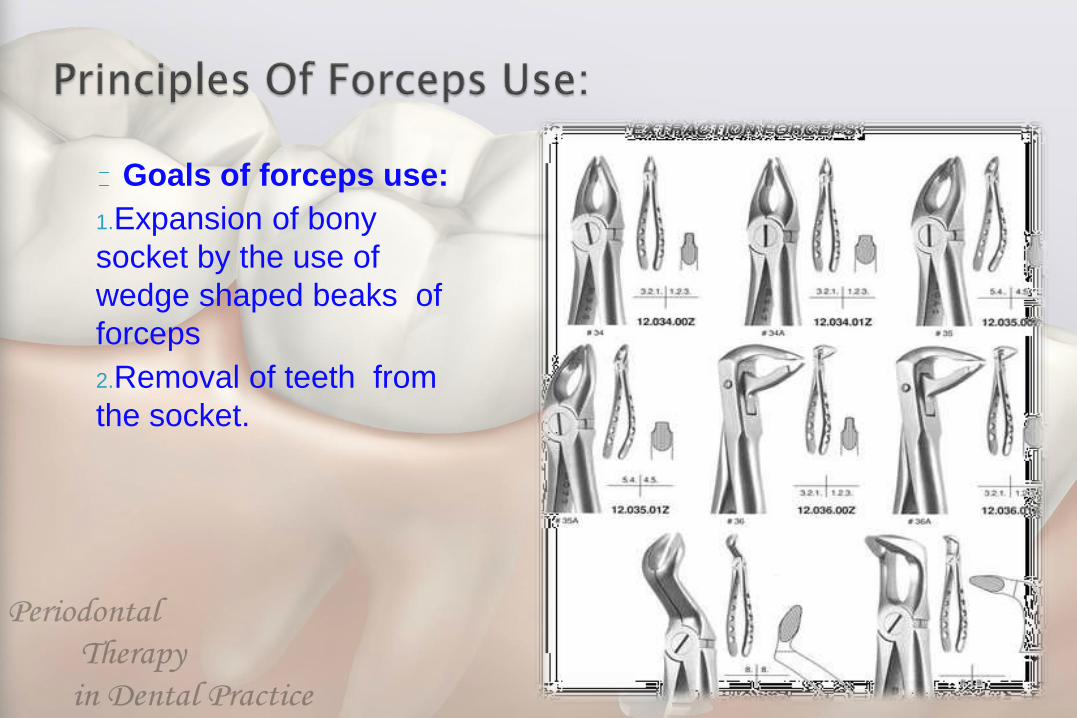
Goals of forceps use:
1.Expansion of bony
socket by the use of
wedge shaped beaks of
forceps
2.Removal of teeth from
the socket.
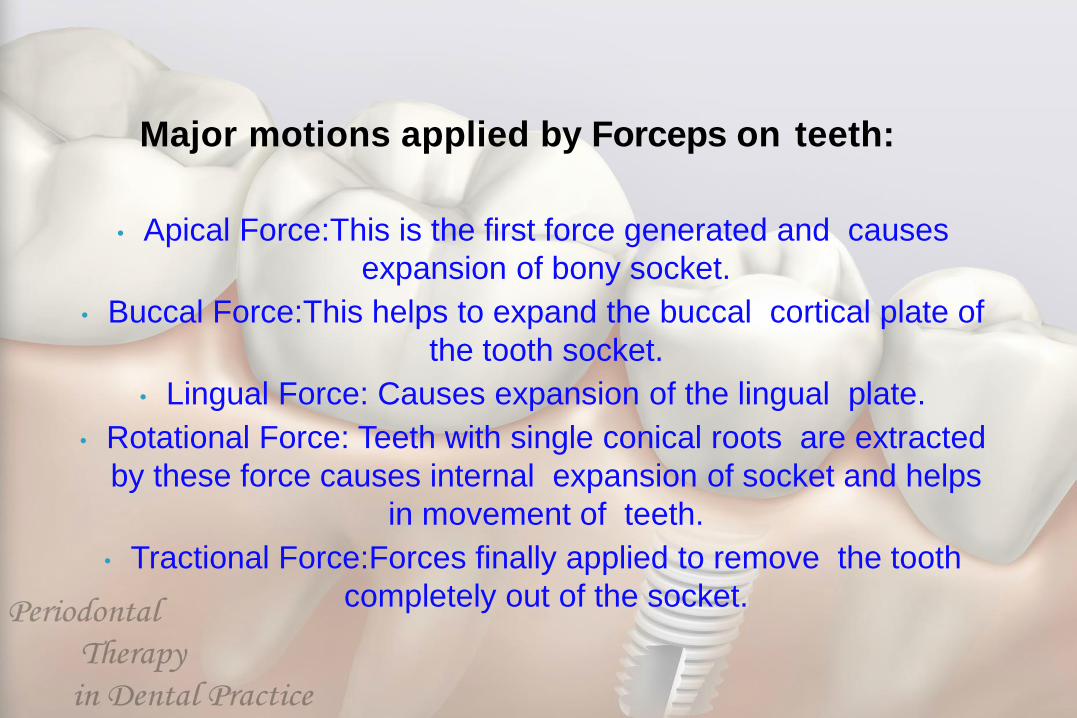
Major motions applied by Forceps on teeth:
• Apical Force:This is the first force generated and causes
expansion of bony socket.
• Buccal Force:This helps to expand the buccal cortical plate of
the tooth socket.
• Lingual Force: Causes expansion of the lingual plate.
• Rotational Force: Teeth with single conical roots are extracted
by these force causes internal expansion of socket and helps
in movement of teeth.
• Tractional Force:Forces finally applied to remove the tooth
completely out of the socket.
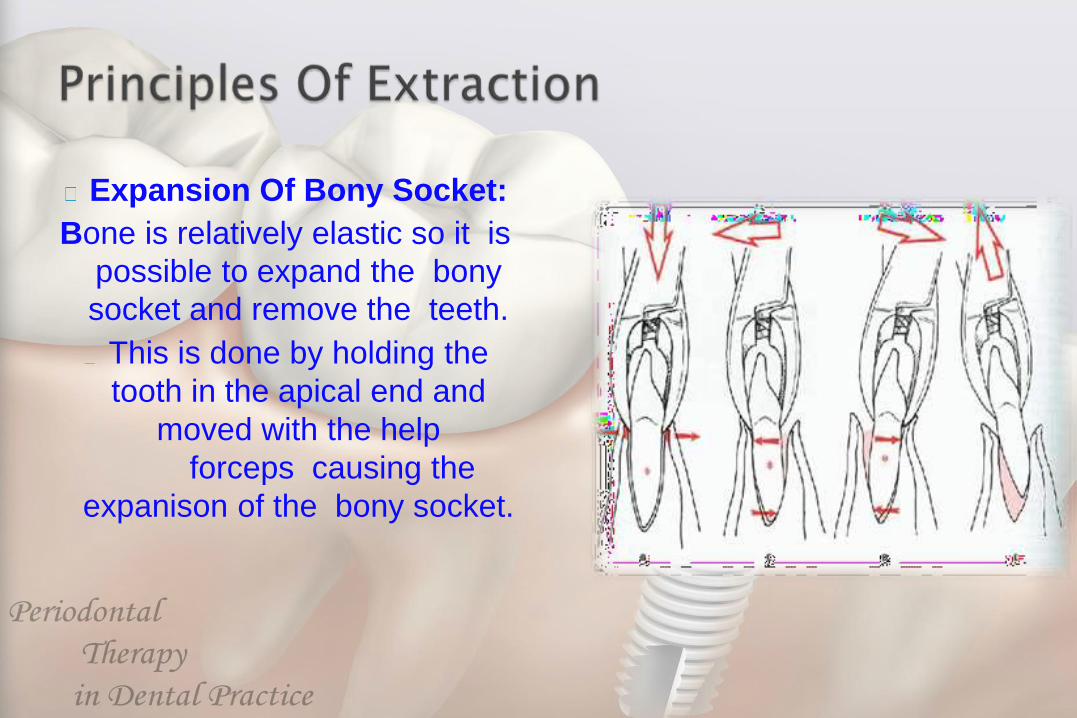
Expansion Of Bony Socket:
Bone is relatively elastic so it is
possible to expand the bony
socket and remove the teeth.
This is done by holding the
tooth in the apical end and
moved with the help
forceps causing the
expanison of the bony socket.
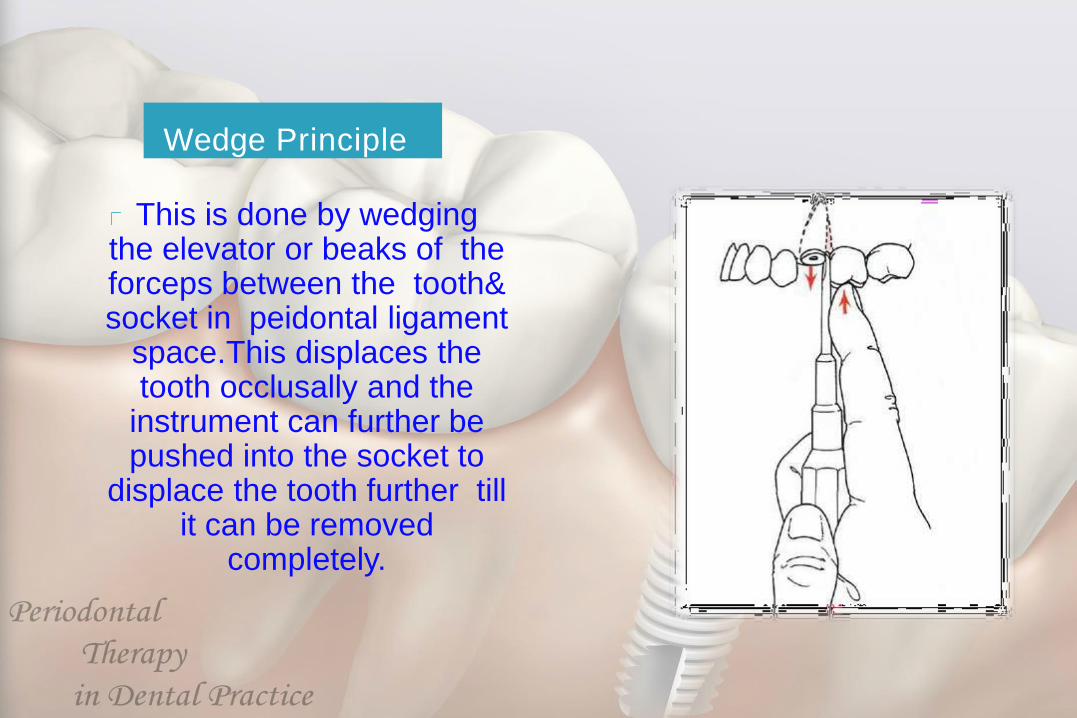
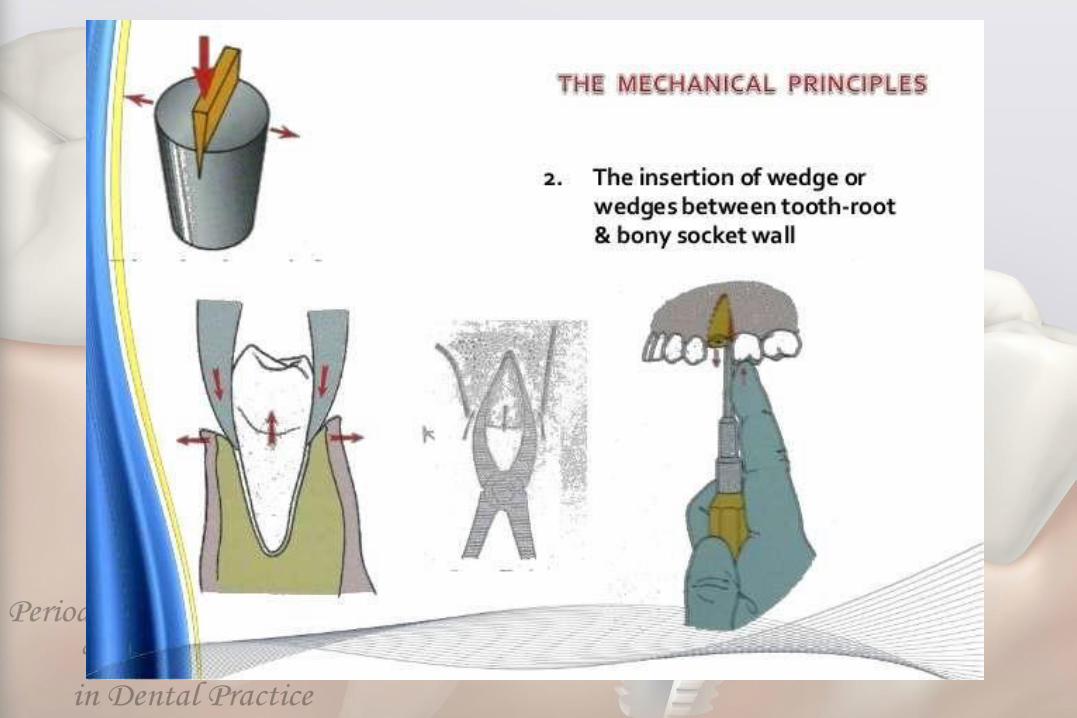
Wedge Principle
This is done by wedging the elevator or beaks of the forceps between the tooth& socket in peidontal ligament
space.This displaces the tooth occlusally and the
instrument can further be pushed into the socket to
displace the tooth further till it can be removed
completely.
3 fundamental requirements
1. Adequate access and visualisation of field of
surgery.
2.An unimpended pathway for removal of tooth.
3.Use of controlled force to luxate and remove
the teeth.
1. Positioning of the patient.
2. Administration of local aneasthesia.
3. Loosening and luxation of soft tissue
attachment from the tooth.
4. Adaptations of forceps to the teeth.
5. Luxation of the teeth by forceps.
6. Removal of teeth.
Loosening of soft tissue attachment around the tooth
• It is done using the periosteal elevator. The
instrument has sharp pointed end and
broader rounded end. The pointed end is
used to begin periosteal reflection and
reflect dental papillae.
• The pointed end is used in a prying motion
to elevate dental papillae between the teeth
or attached gingiva around the tooth.
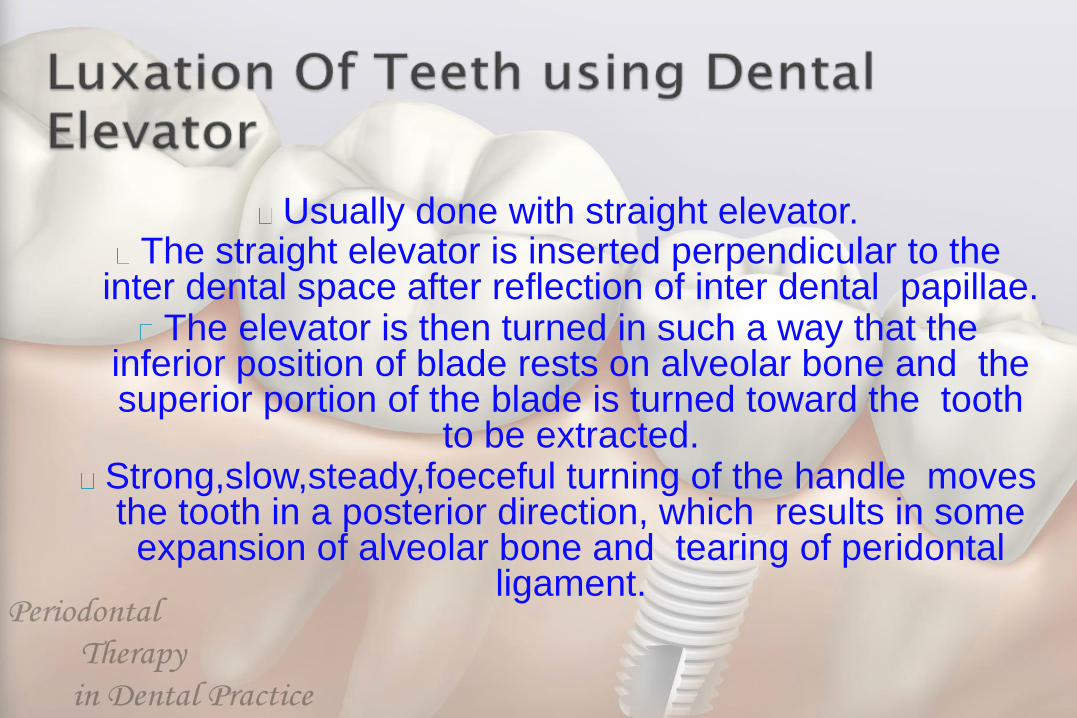
Usually done with straight elevator.The straight elevator is inserted perpendicular to the
inter dental space after reflection of inter dental papillae.The elevator is then turned in such a way that the
inferior position of blade rests on alveolar bone and the superior portion of the blade is turned toward the tooth
to be extracted.Strong,slow,steady,foeceful turning of the handle moves the tooth in a posterior direction, which results in some expansion of alveolar bone and tearing of peridontal
ligament.
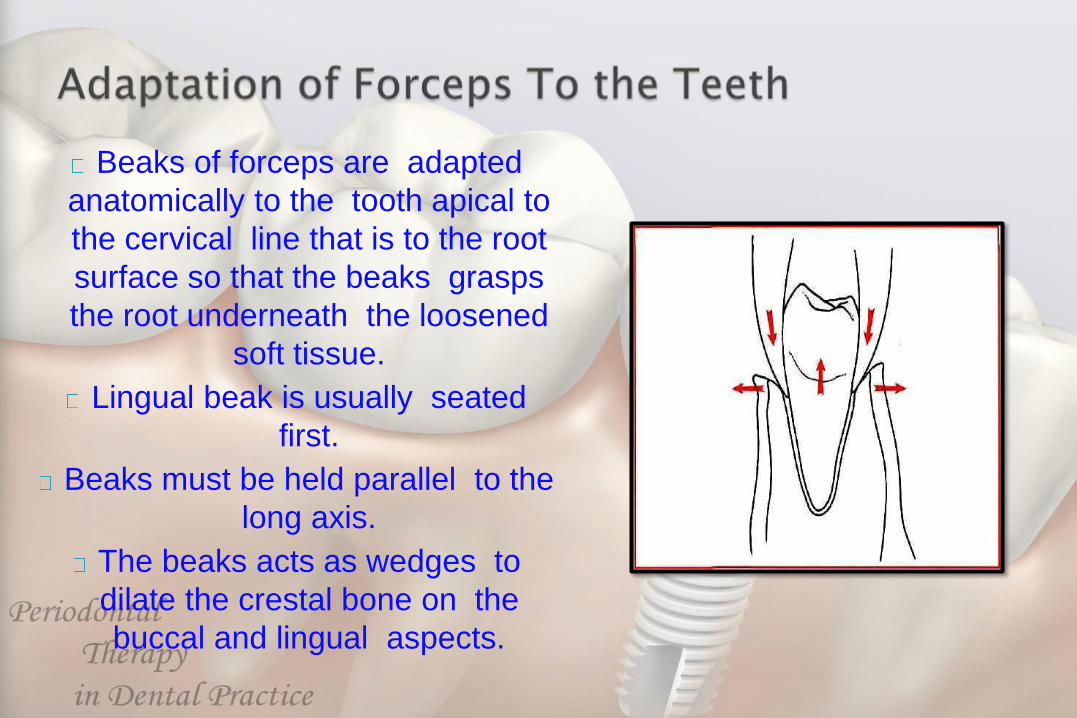
Beaks of forceps are adapted
anatomically to the tooth apical to
the cervical line that is to the root
surface so that the beaks grasps
the root underneath the loosened
soft tissue.
Lingual beak is usually seated
first.
Beaks must be held parallel to the
long axis.
The beaks acts as wedges to
dilate the crestal bone on the
buccal and lingual aspects.
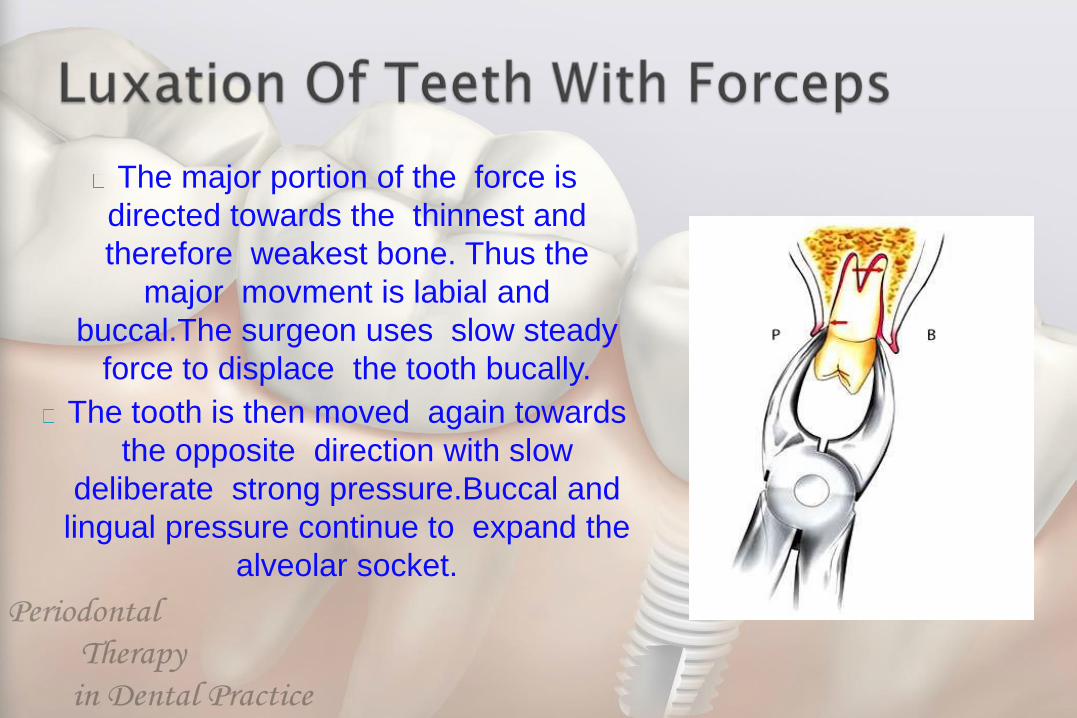
The major portion of the force is
directed towards the thinnest and
therefore weakest bone. Thus the
major movment is labial and
buccal.The surgeon uses slow steady
force to displace the tooth bucally.
The tooth is then moved again towards
the opposite direction with slow
deliberate strong pressure.Buccal and
lingual pressure continue to expand the
alveolar socket.
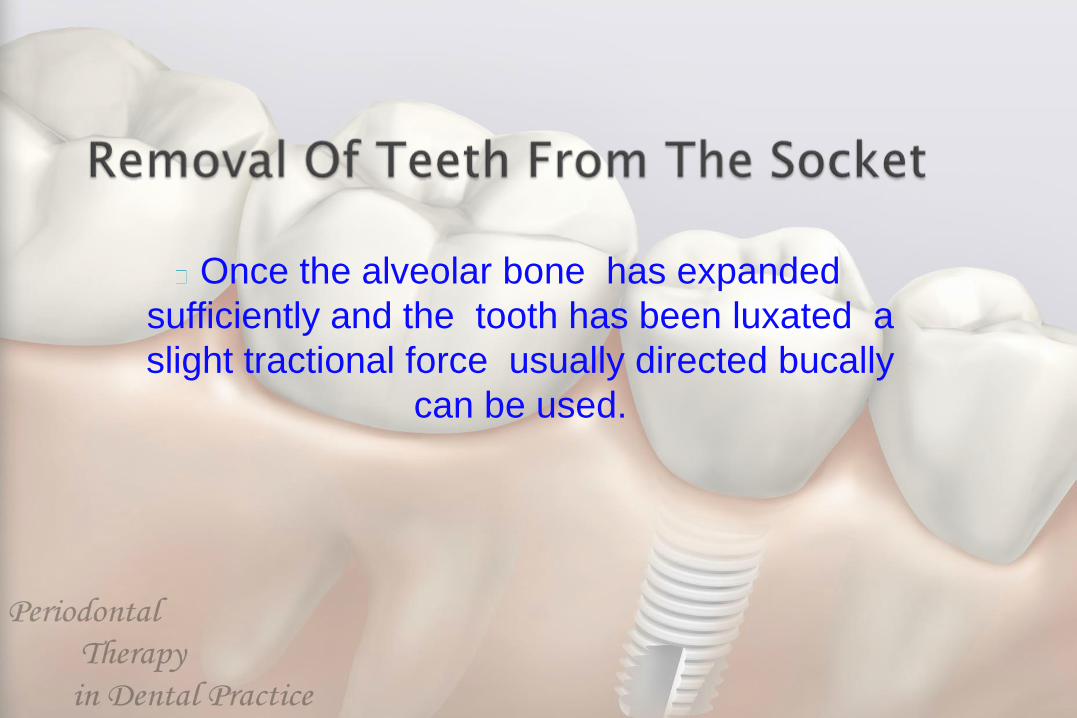
Once the alveolar bone has expanded
sufficiently and the tooth has been luxated a
slight tractional force usually directed bucally
can be used.
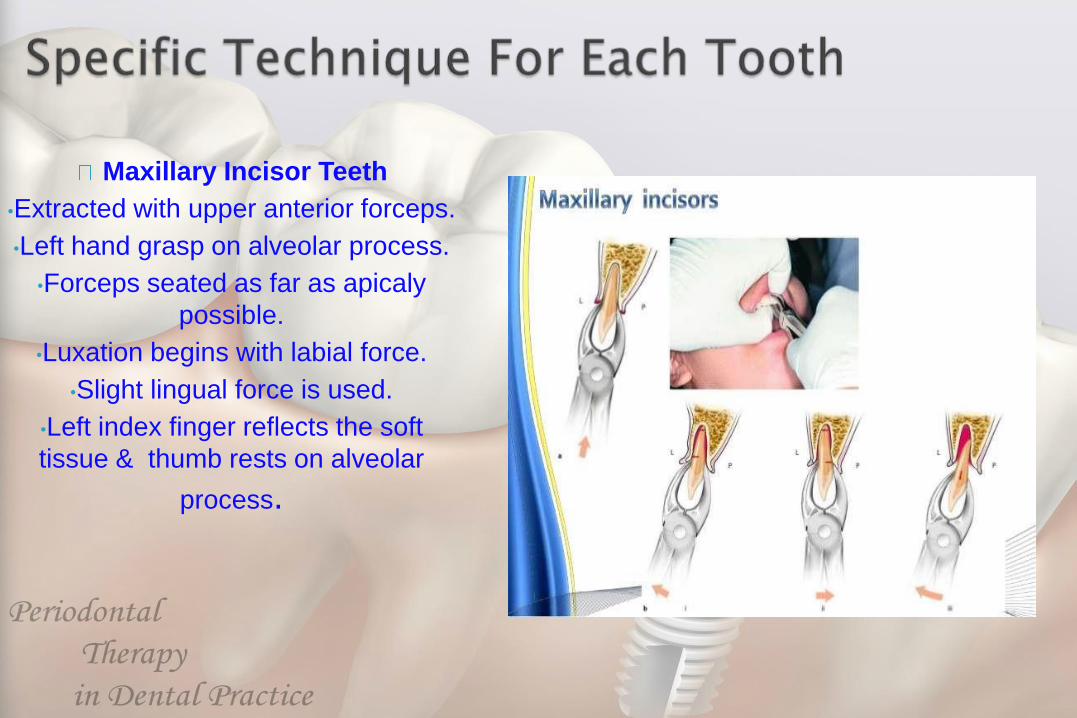
Maxillary Incisor Teeth
•Extracted with upper anterior forceps.
•Left hand grasp on alveolar process.
•Forceps seated as far as apicaly
possible.
•Luxation begins with labial force.
•Slight lingual force is used.
•Left index finger reflects the soft
tissue & thumb rests on alveolar
process.
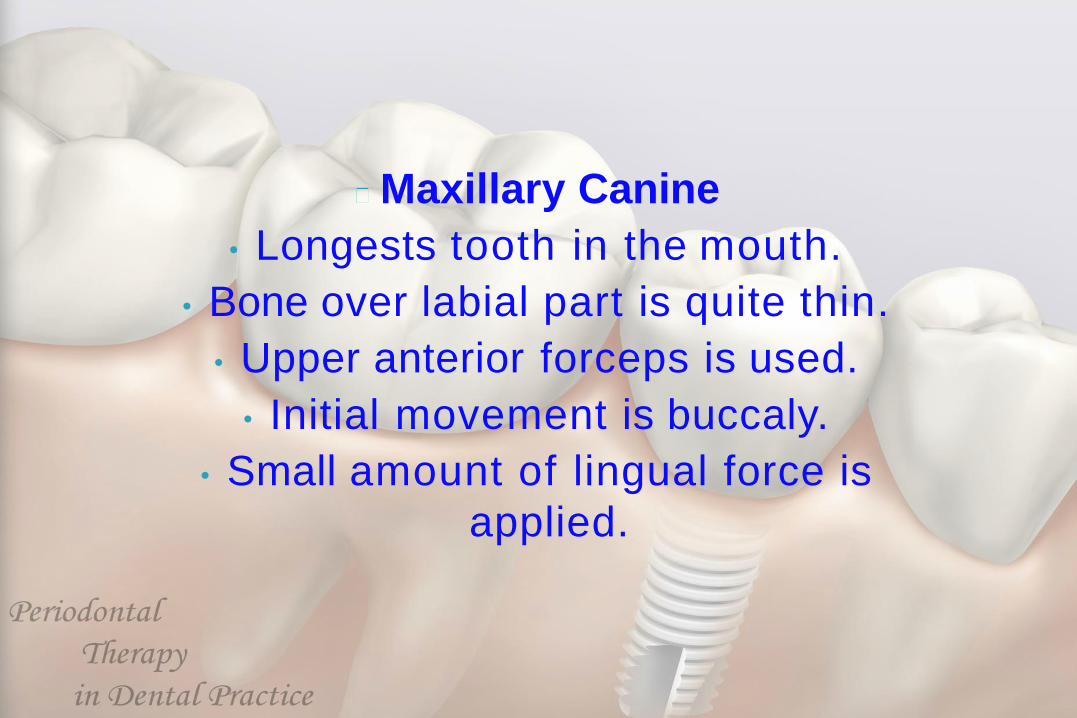
Maxillary Canine
• Longests tooth in the mouth.
• Bone over labial part is quite thin.
• Upper anterior forceps is used.
• Initial movement is buccaly.
• Small amount of lingual force is
applied.
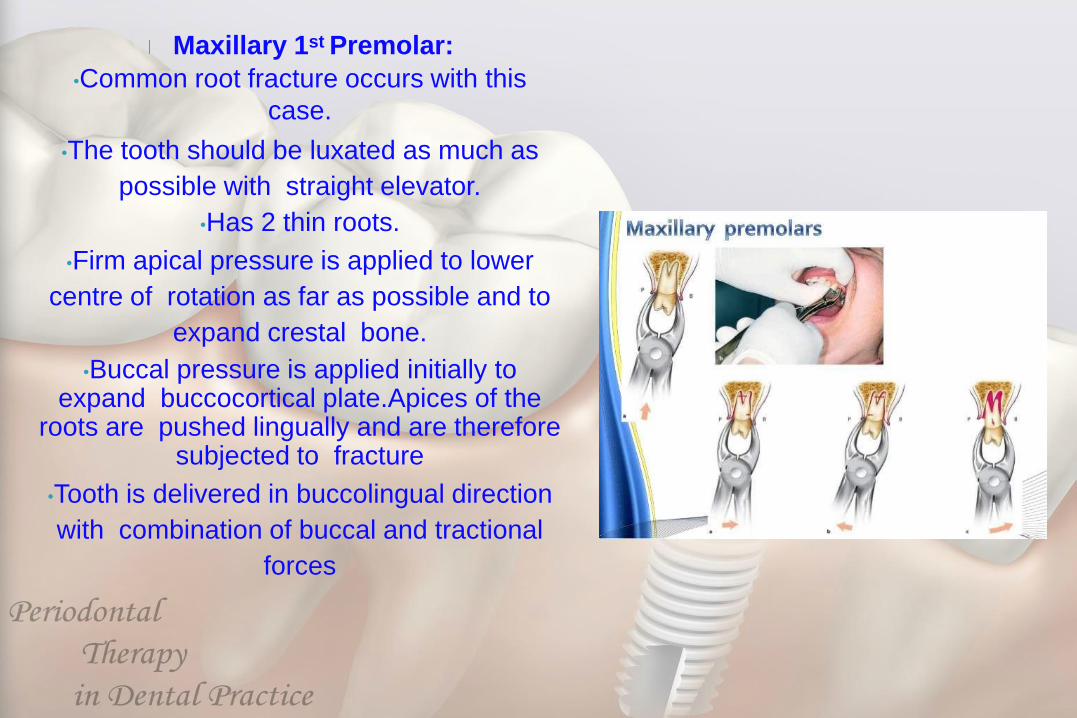
Maxillary 1st Premolar:
•Common root fracture occurs with this
case.
•The tooth should be luxated as much as
possible with straight elevator.
•Has 2 thin roots.
•Firm apical pressure is applied to lower
centre of rotation as far as possible and to
expand crestal bone.
•Buccal pressure is applied initially to expand buccocortical plate.Apices of the
roots are pushed lingually and are therefore subjected to fracture
•Tooth is delivered in buccolingual direction
with combination of buccal and tractional
forces
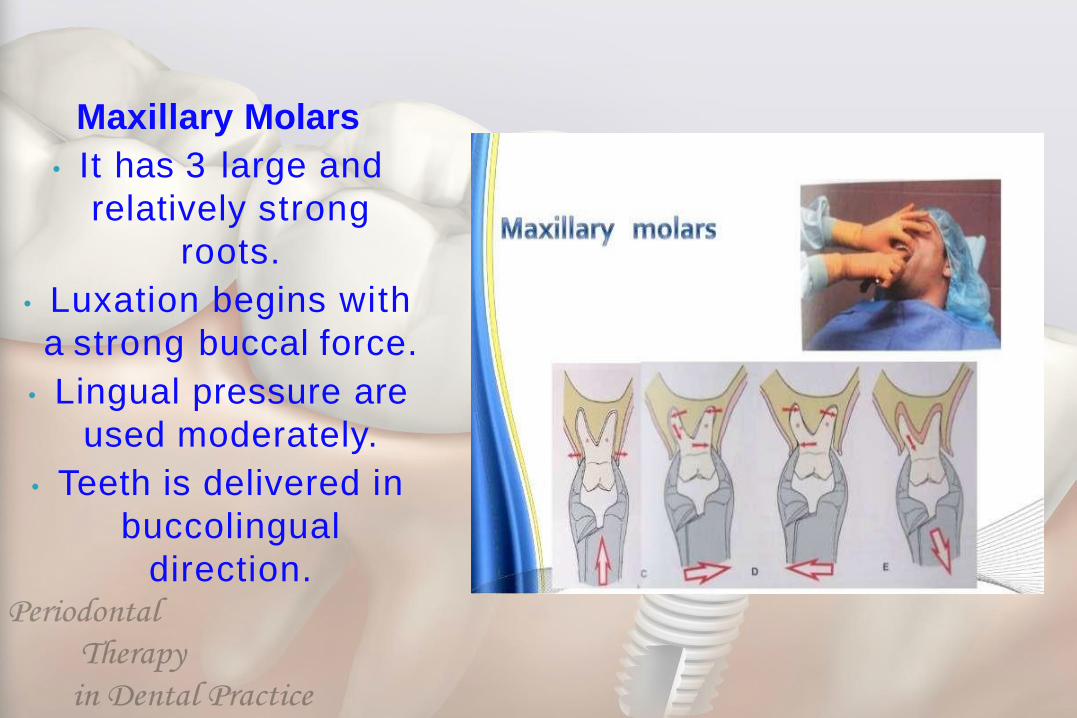
Maxillary Molars
• It has 3 large and
relatively strong
roots.
• Luxation begins with
a strong buccal force.
• Lingual pressure are
used moderately.
• Teeth is delivered in
buccolingual
direction.
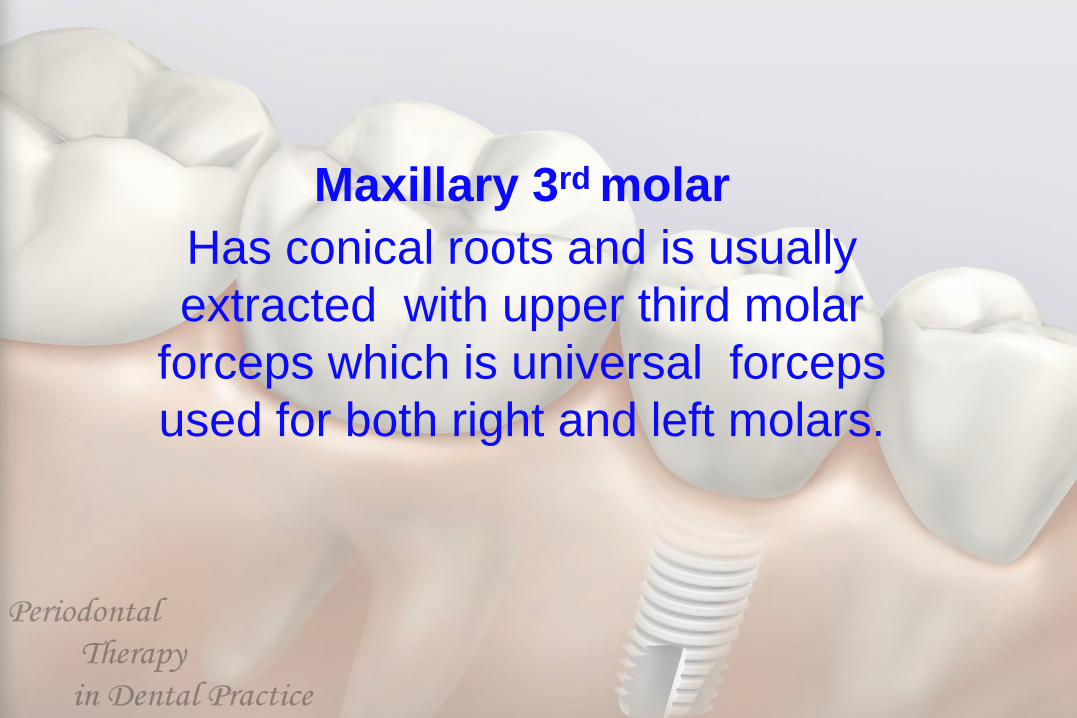
Maxillary 3rd molar
Has conical roots and is usually
extracted with upper third molar
forceps which is universal forceps
used for both right and left molars.
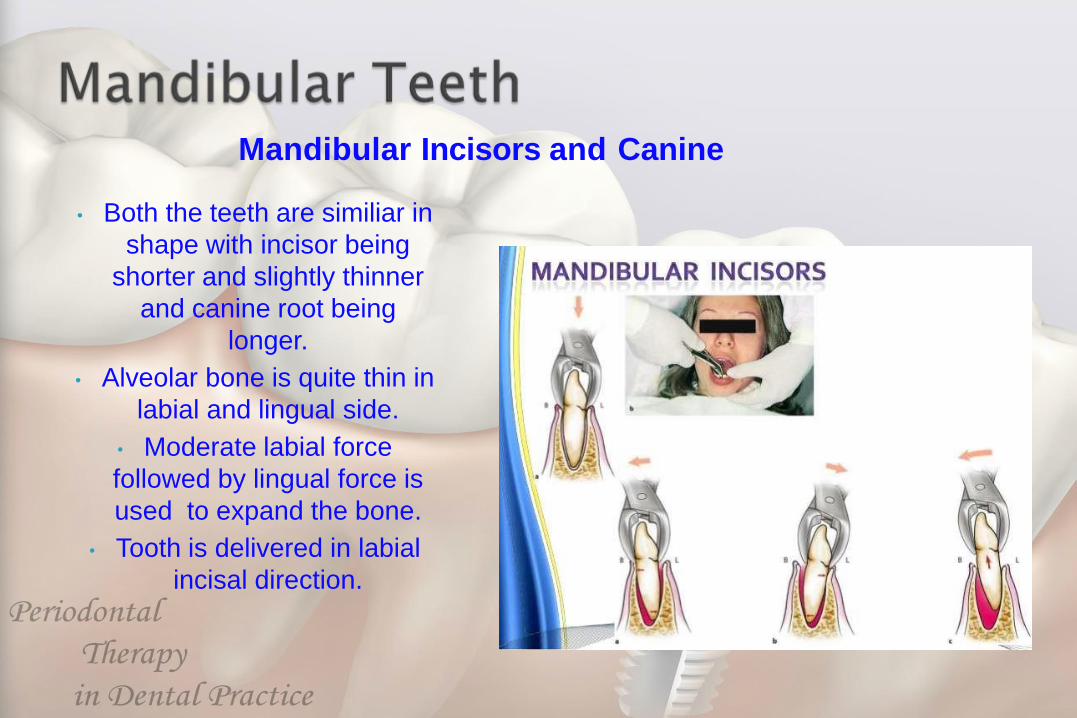
Mandibular Incisors and Canine
• Both the teeth are similiar in
shape with incisor being
shorter and slightly thinner
and canine root being
longer.
• Alveolar bone is quite thin in
labial and lingual side.
• Moderate labial force
followed by lingual force is
used to expand the bone.
• Tooth is delivered in labial
incisal direction.
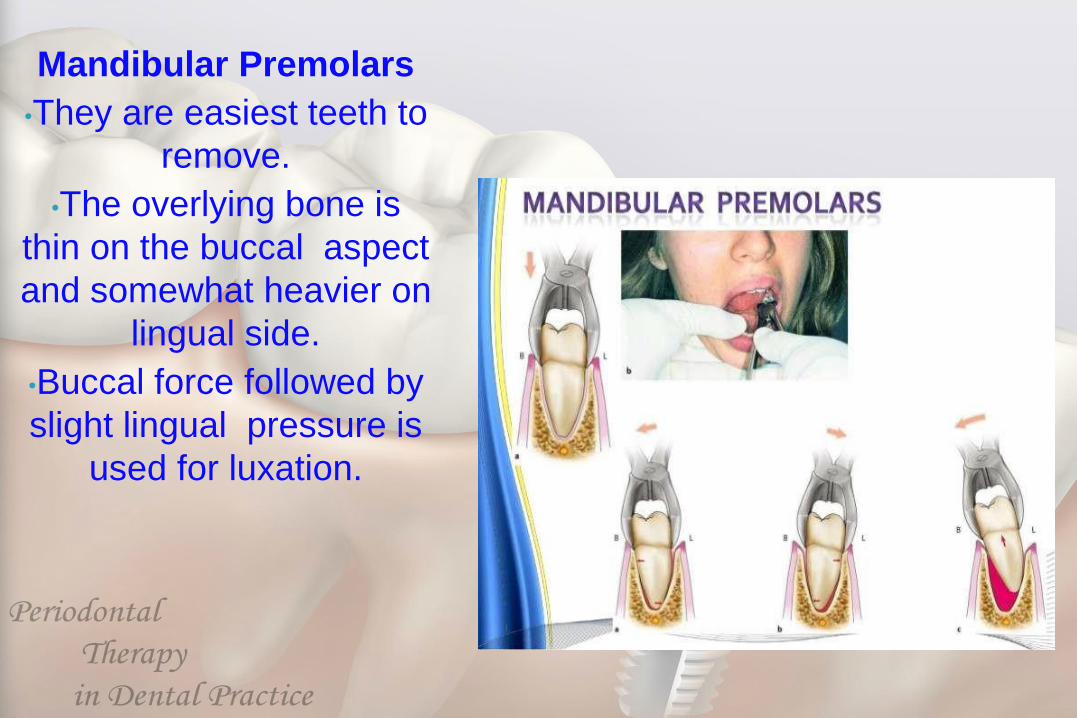
Mandibular Premolars
•They are easiest teeth to
remove.
•The overlying bone is
thin on the buccal aspect
and somewhat heavier on
lingual side.
•Buccal force followed by
slight lingual pressure is
used for luxation.
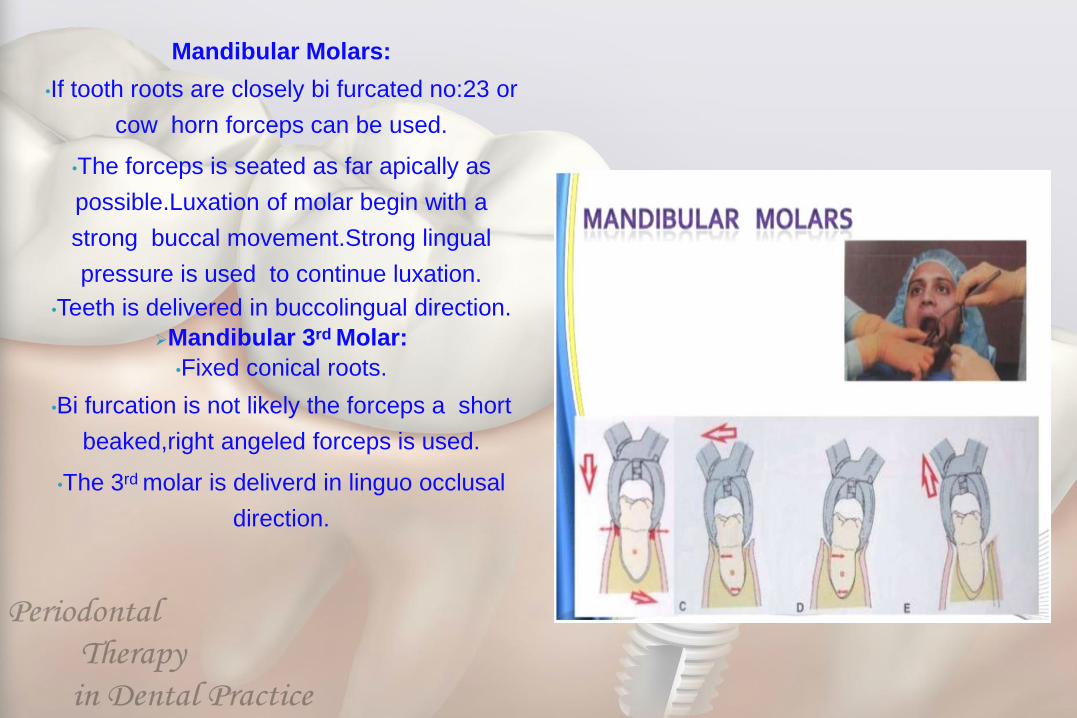
Mandibular Molars:
•If tooth roots are closely bi furcated no:23 or
cow horn forceps can be used.
•The forceps is seated as far apically as
possible.Luxation of molar begin with a
strong buccal movement.Strong lingual
pressure is used to continue luxation.
•Teeth is delivered in buccolingual direction.
Mandibular 3rd Molar:
•Fixed conical roots.
•Bi furcation is not likely the forceps a short
beaked,right angeled forceps is used.
•The 3rd molar is deliverd in linguo occlusal
direction.
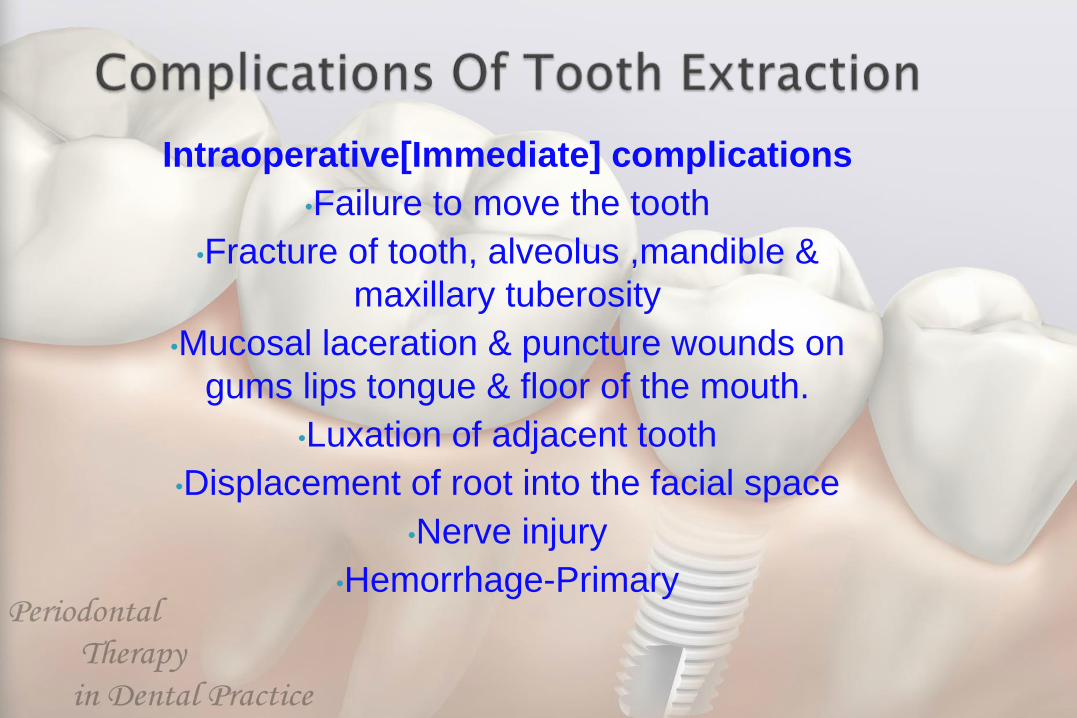
Intraoperative[Immediate] complications
•Failure to move the tooth
•Fracture of tooth, alveolus ,mandible &
maxillary tuberosity
•Mucosal laceration & puncture wounds on
gums lips tongue & floor of the mouth.
•Luxation of adjacent tooth
•Displacement of root into the facial space
•Nerve injury
•Hemorrhage-Primary
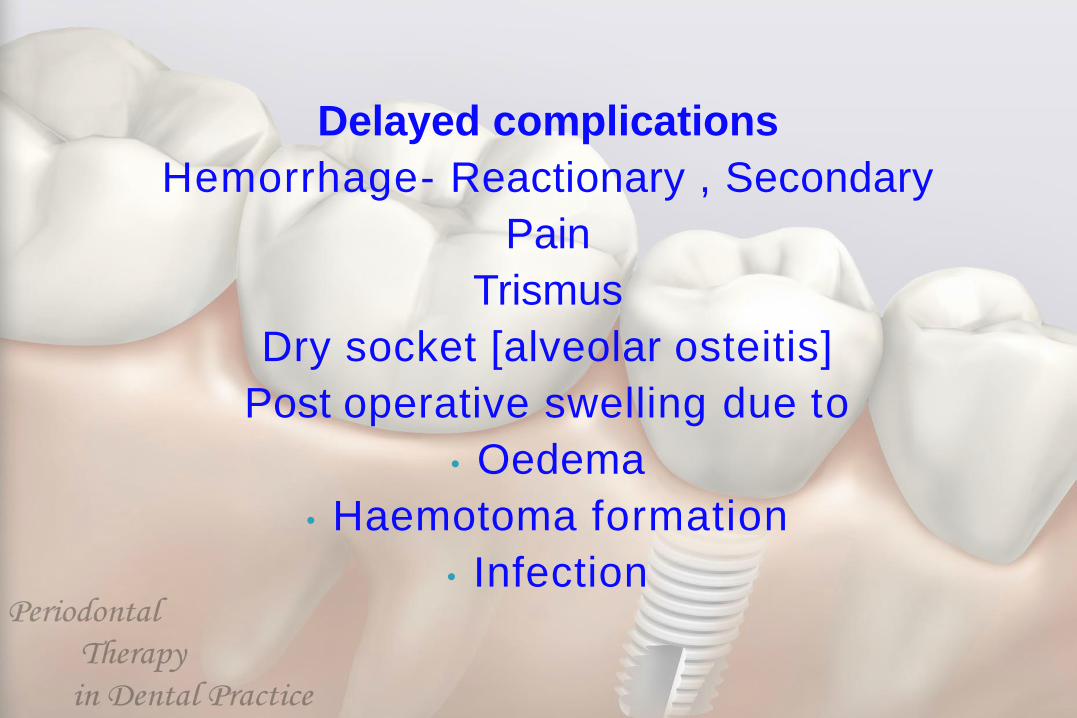
Delayed complications
Hemorrhage- Reactionary , Secondary
Pain
Trismus
Dry socket [alveolar osteitis]
Post operative swelling due to
• Oedema
• Haemotoma formation
• Infection
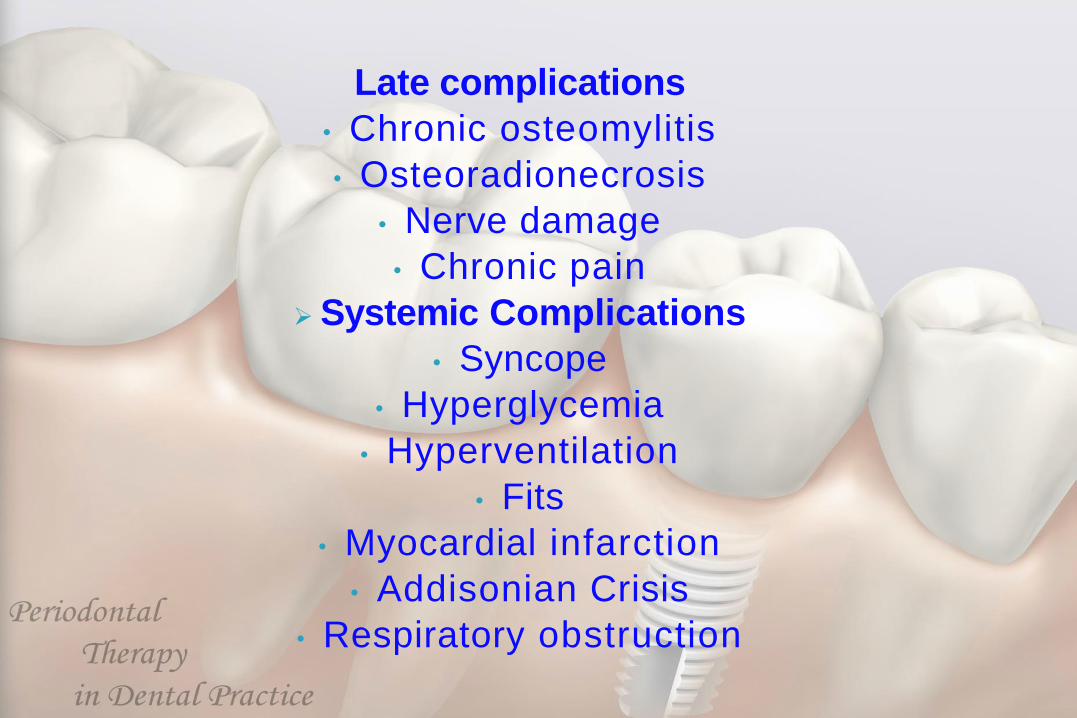
Late complications
• Chronic osteomylitis
• Osteoradionecrosis
• Nerve damage
• Chronic pain
Systemic Complications
• Syncope
• Hyperglycemia
• Hyperventilation
• Fits
• Myocardial infarction
• Addisonian Crisis
• Respiratory obstruction
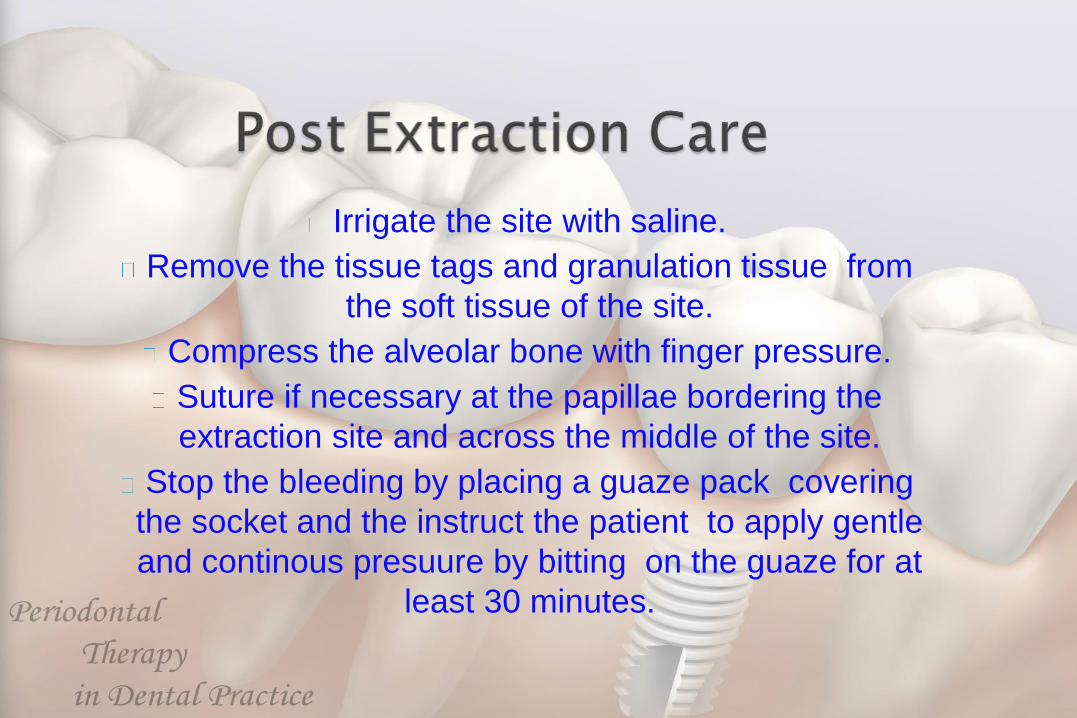
Irrigate the site with saline.
Remove the tissue tags and granulation tissue from
the soft tissue of the site.
Compress the alveolar bone with finger pressure.
Suture if necessary at the papillae bordering the
extraction site and across the middle of the site.
Stop the bleeding by placing a guaze pack covering
the socket and the instruct the patient to apply gentle
and continous presuure by bitting on the guaze for at
least 30 minutes.

Bite firmly the guaze pack over the surgical area for at least 30 mints.
Dont spit or suck as it will promote bleeding.If bleeding continues in home,advice the patient to place a guaze pad or cold wet teabag over the area
and bite firmly for 30 mins.Avoid rubbing the areas with tongue.
Do not smoke for 24 hrs as it may intefere with healing
Do not rinse or brush the tooth for 12 hrs.

After extraction have liquid or soft diet high in
protein.
Drink a large amount of water and fruit juices.
Avoid hot food for the first 24hrs after surgery
Anti inflammatory analgesics should be
preffered.
Warm saline rinses and gentle brushing should
be advised from the next day.

PROFESSOR HAFEZ DIAB
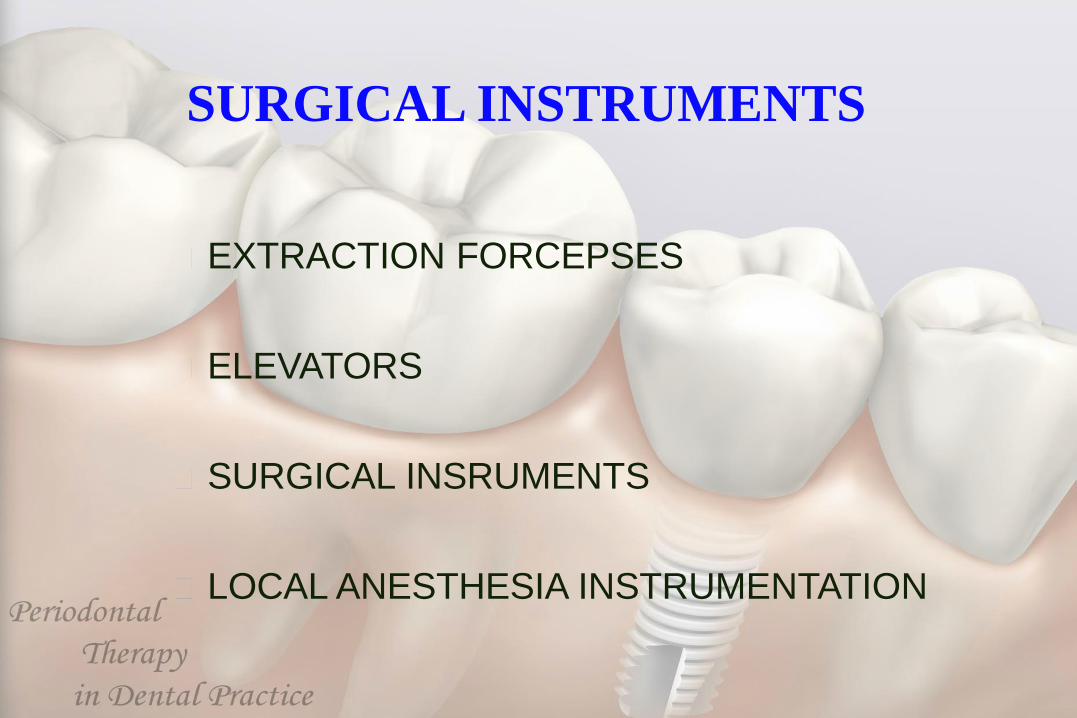
EXTRACTION FORCEPSES
ELEVATORS
SURGICAL INSRUMENTS
LOCAL ANESTHESIA INSTRUMENTATION
SURGICAL INSTRUMENTS
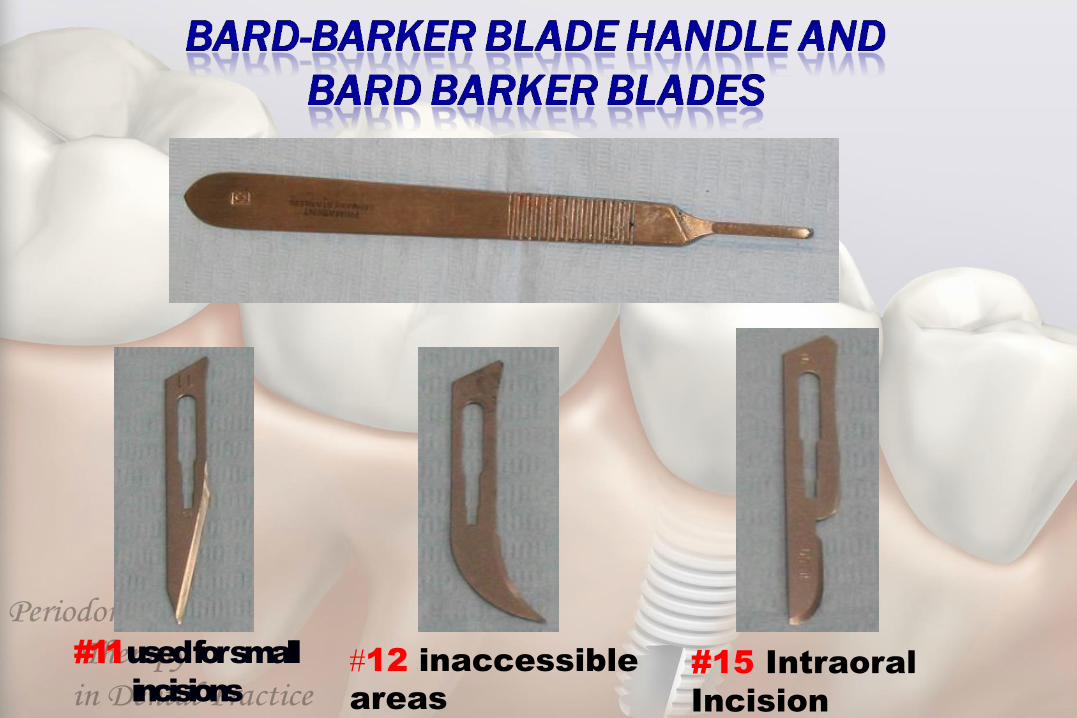
#11used for small
incisions#12 inaccessible
areas#15 Intraoral
Incision
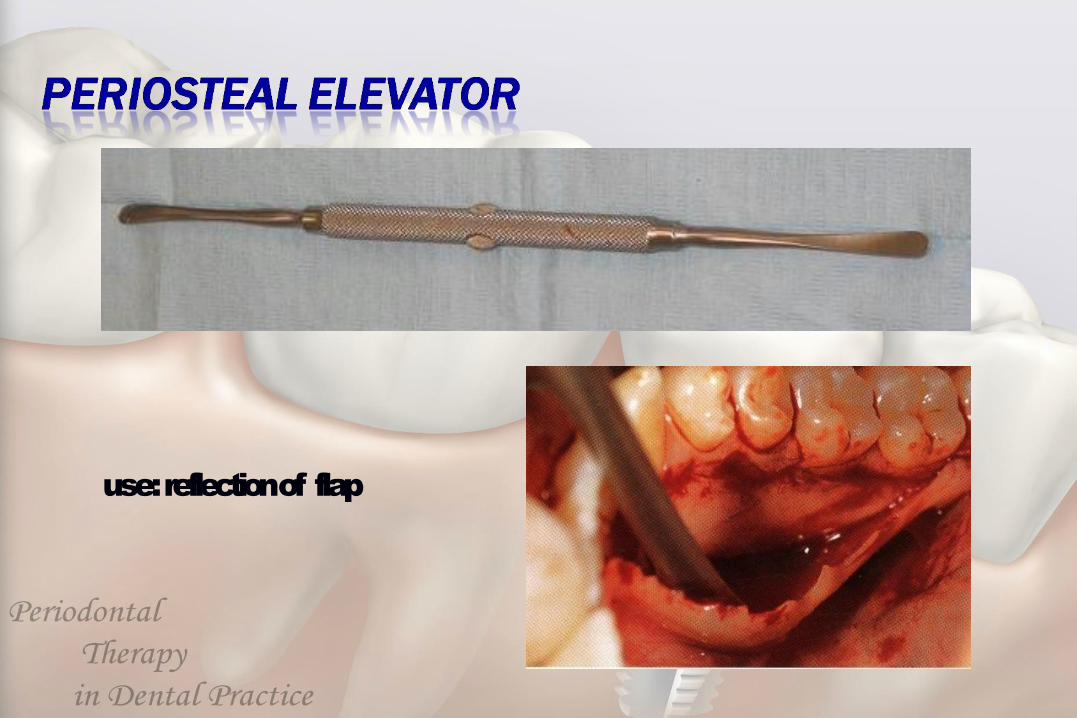
use: reflection of flap
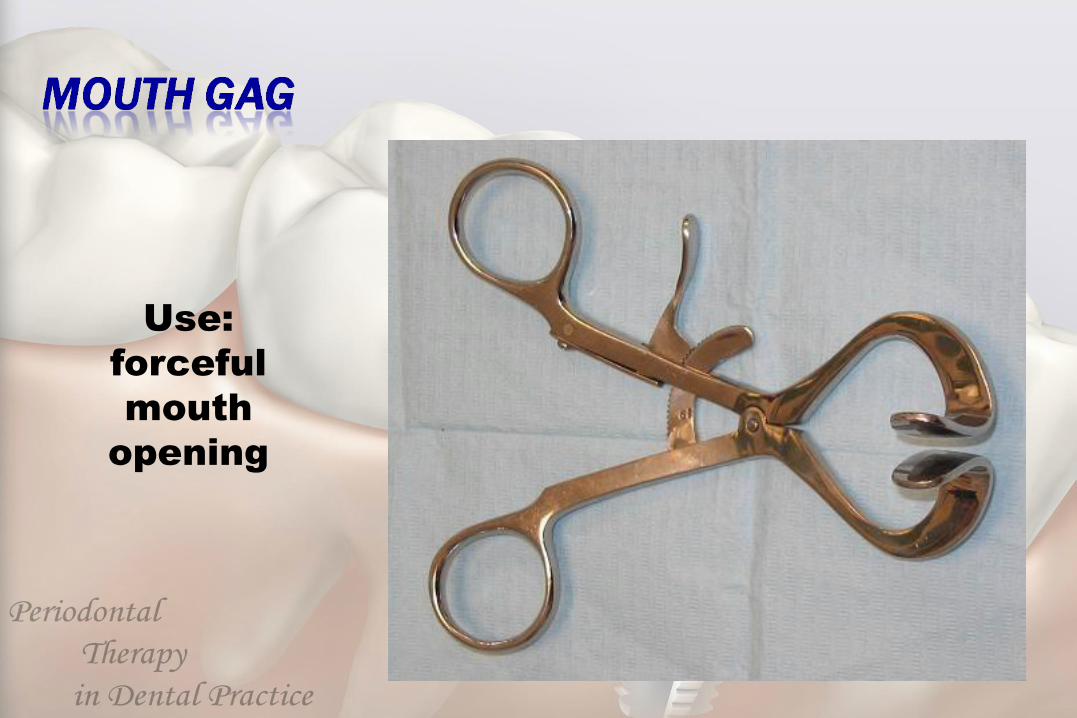
Use:
forceful
mouth
opening
Use:
retraction of
flaps or cheek
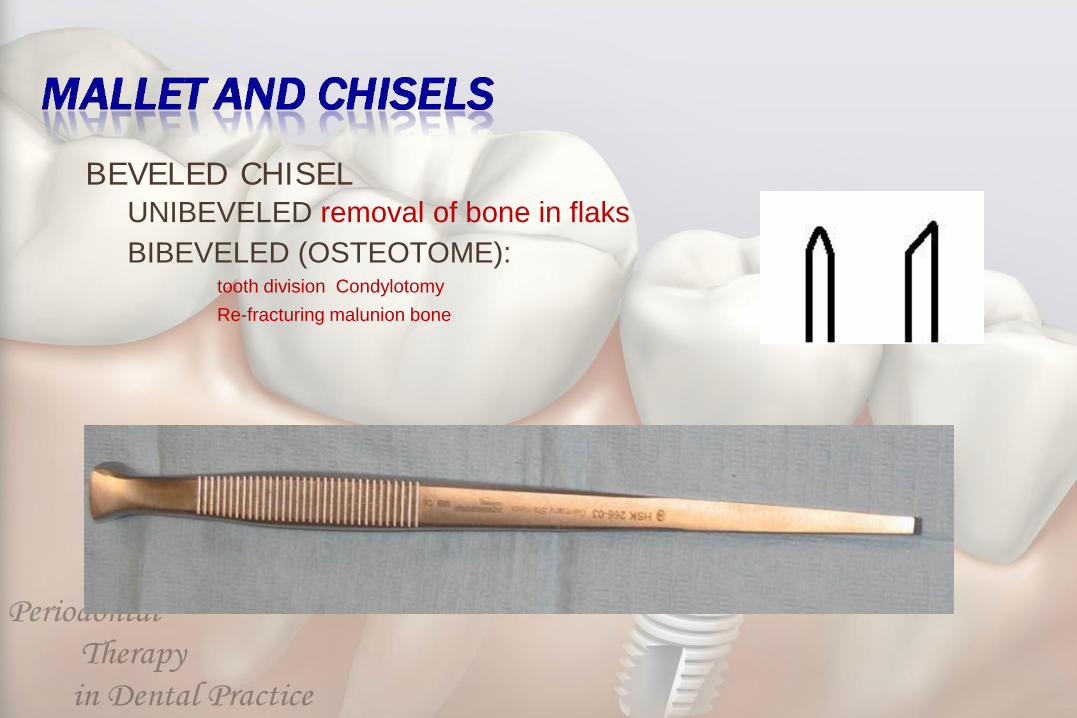
BEVELED CHISEL
UNIBEVELED removal of bone in flaks
BIBEVELED (OSTEOTOME):tooth division Condylotomy
Re-fracturing malunion bone

MALLET
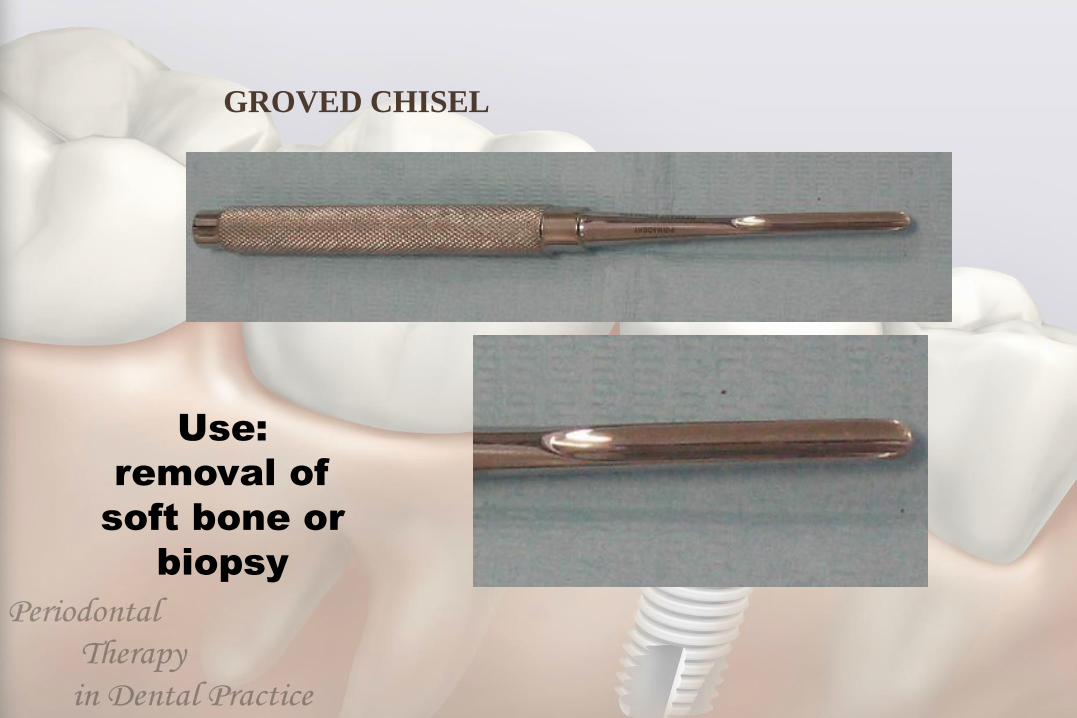
GROVED CHISEL
Use:
removal of
soft bone or
biopsy

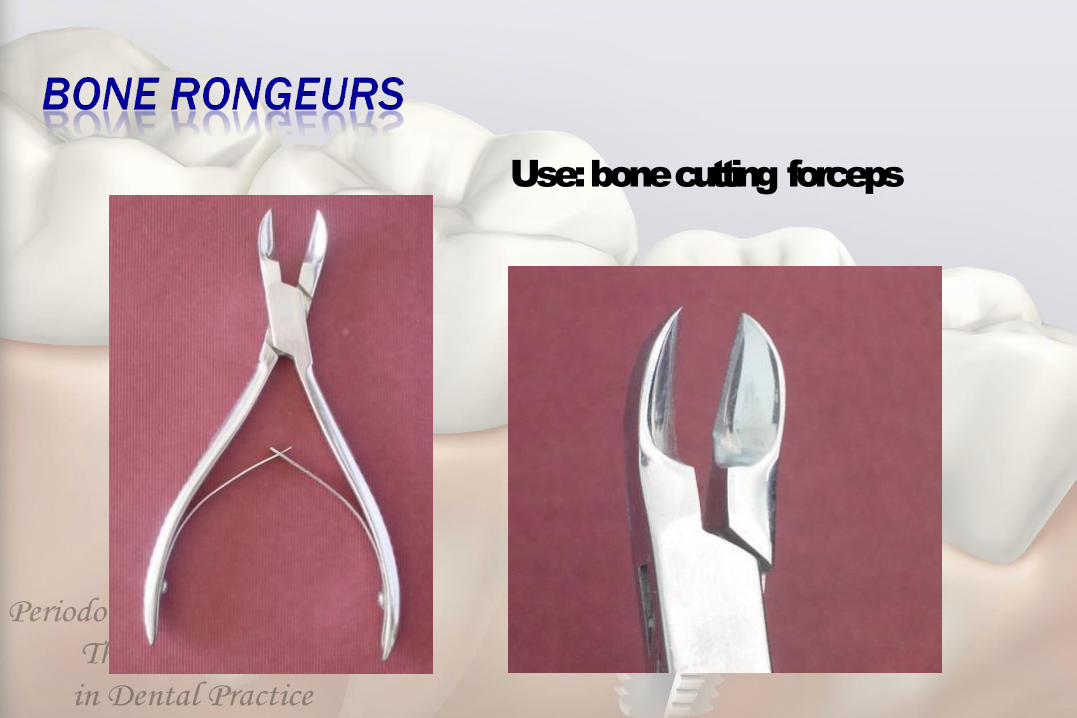
Use: bone cutting forceps
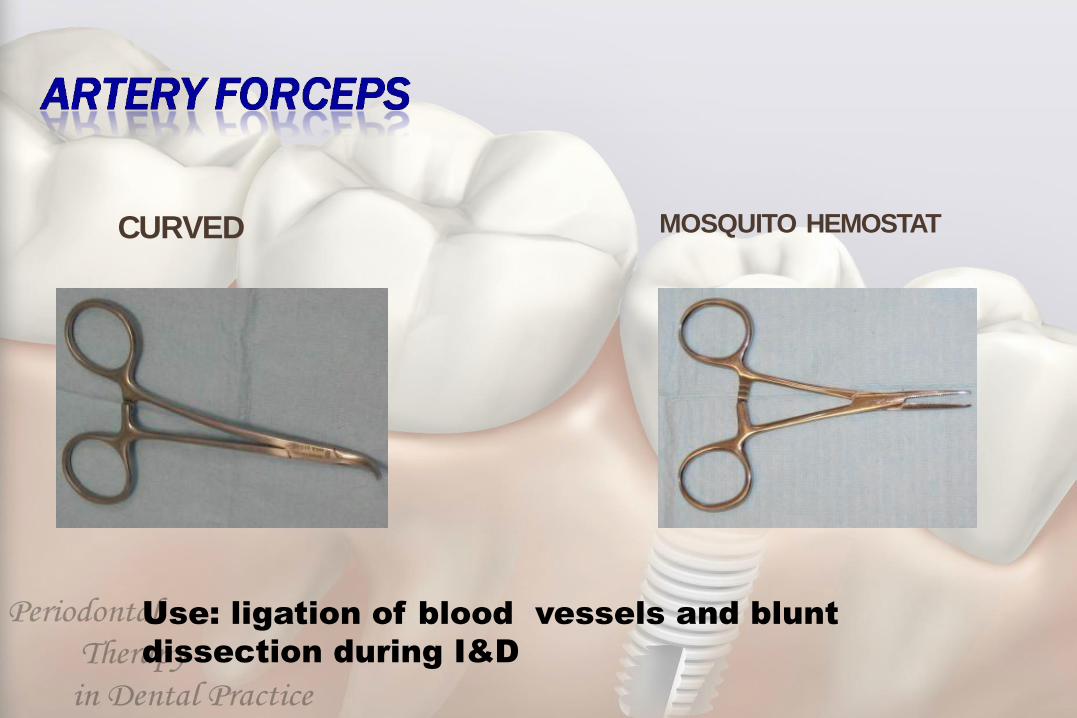
CURVED MOSQUITO HEMOSTAT
Use: ligation of blood vessels and blunt
dissection during I&D
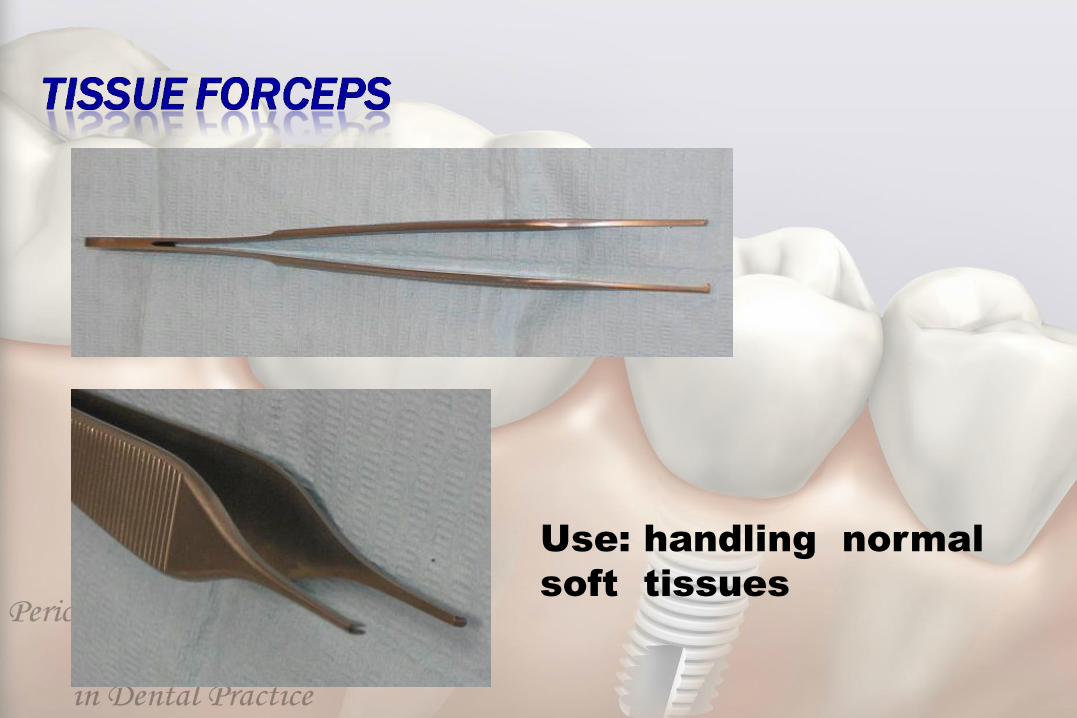
Use: handling normal
soft tissues
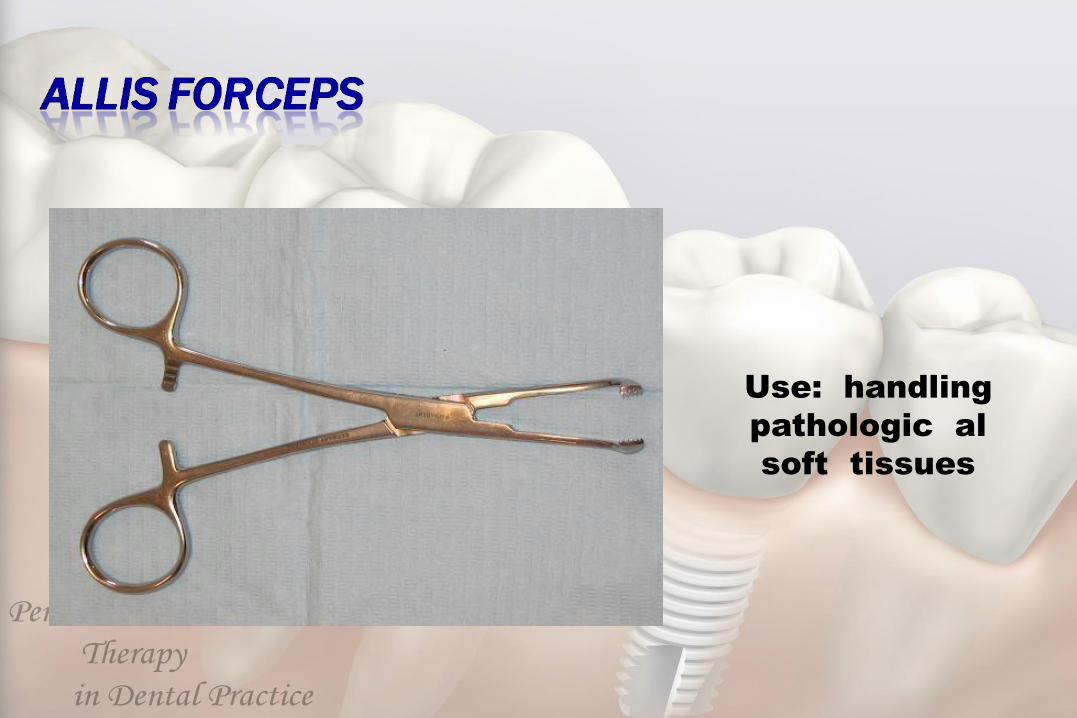
Use: handling
pathologic al
soft tissues
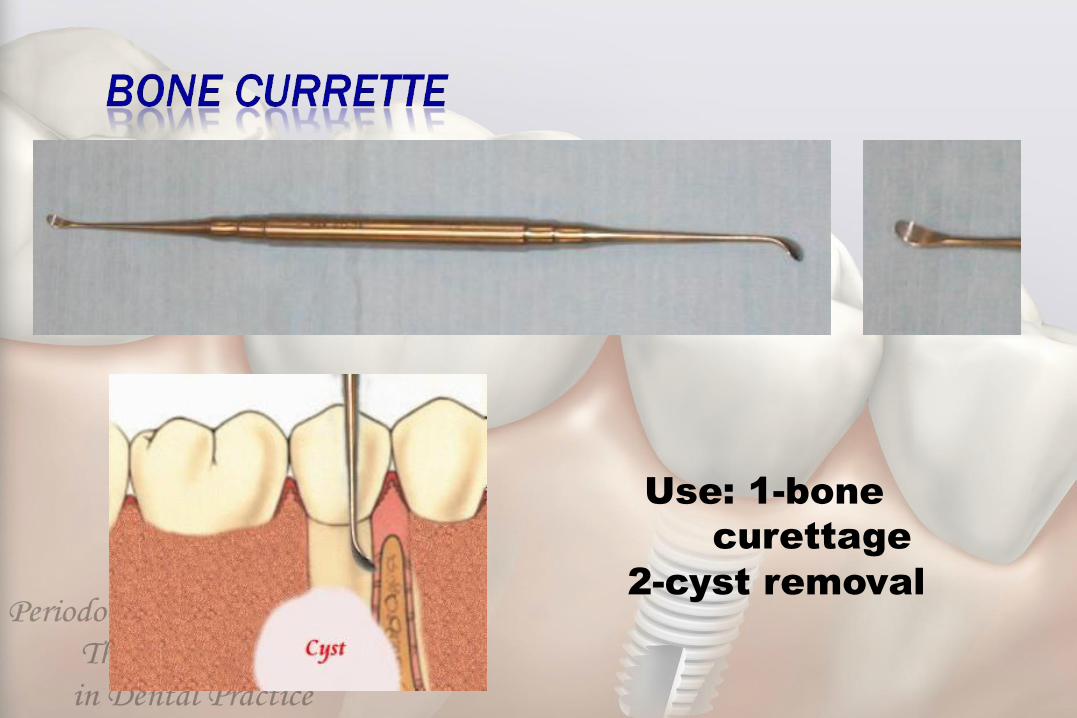
Use: 1-bone
curettage
2-cyst removal
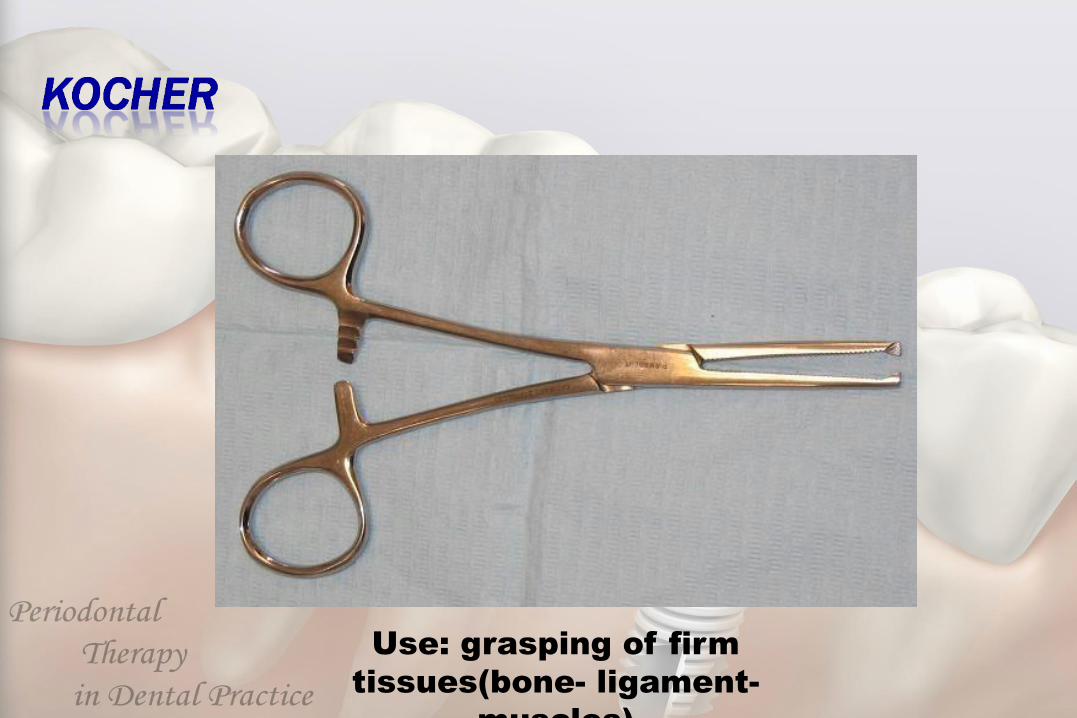
Use: grasping of firm
tissues(bone- ligament-
muscles)
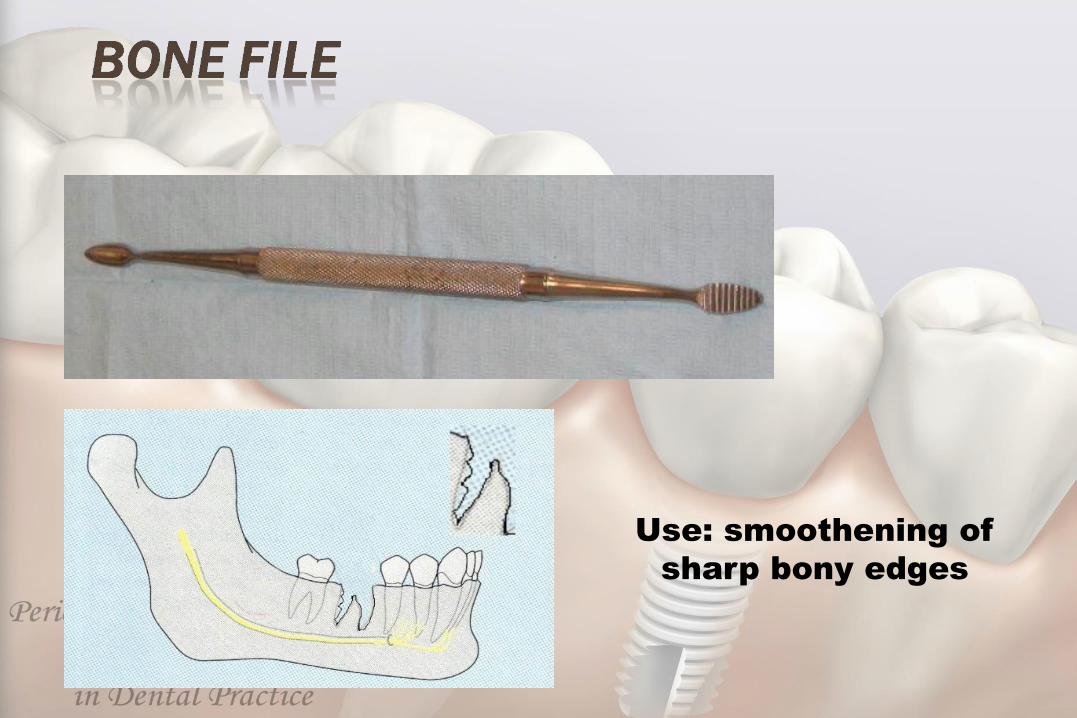
Use: smoothening of
sharp bony edges
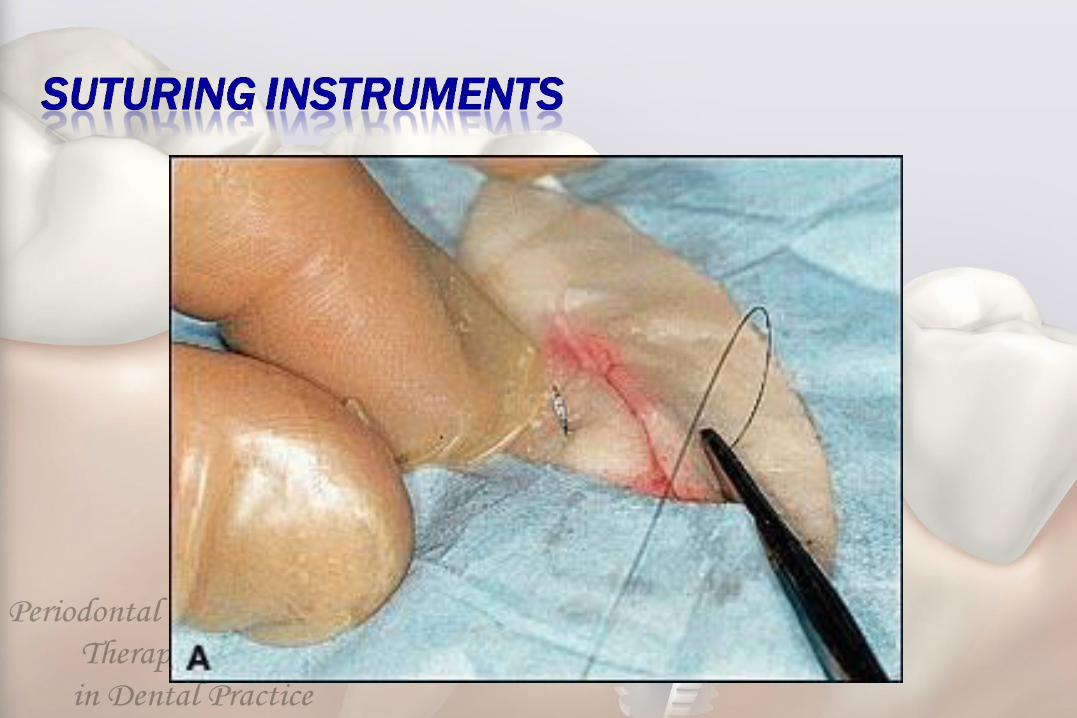
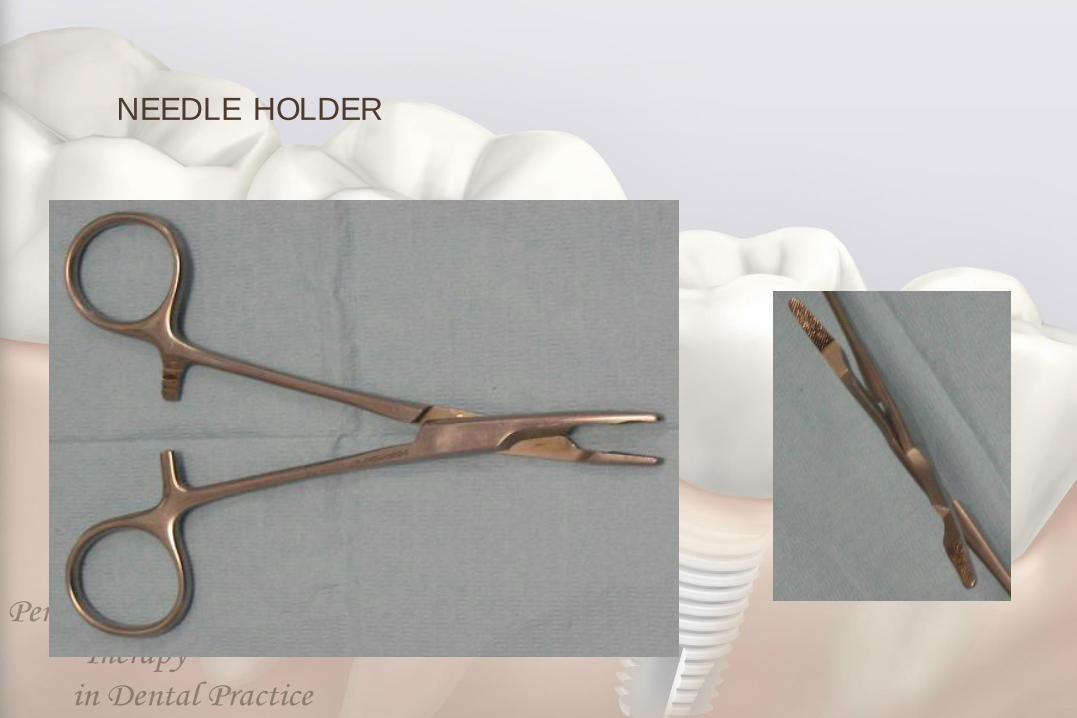
NEEDLE HOLDER
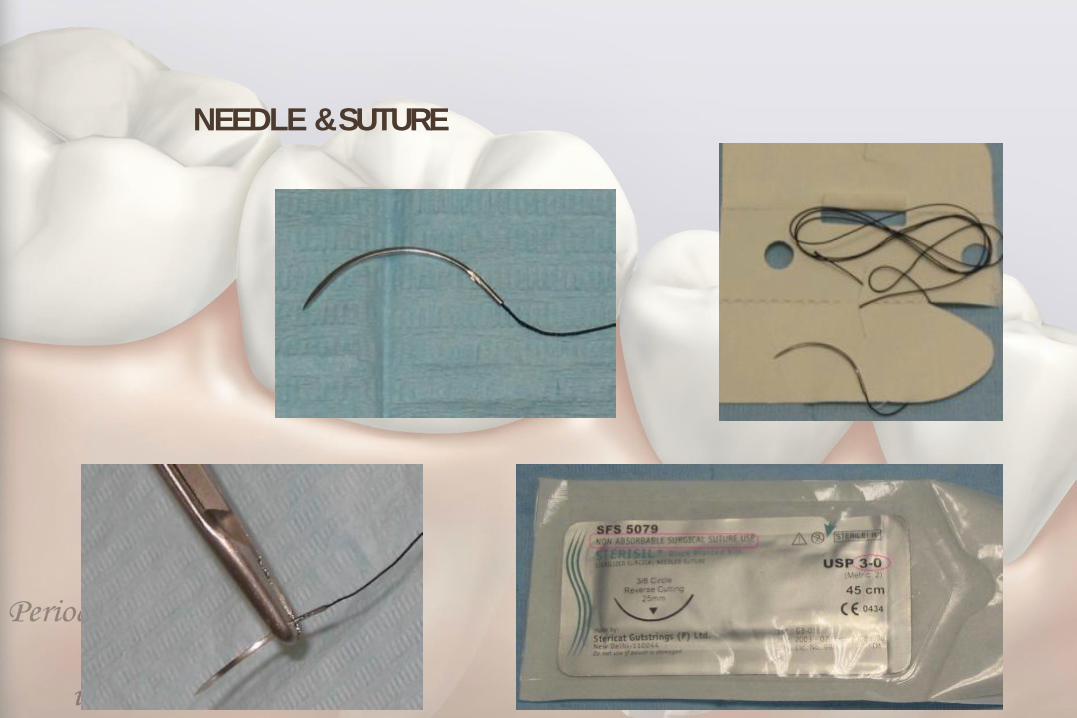
NEEDLE & SUTURE

LOCAL ANAESTHESIA

1
Oral surgery
TYPES OF DENTAL FORCEPS
THE FORCEPS FOR UPPER TEETH
1- The upper straight forceps:-
The blades, joint and handle are in one long straight line. We have two
types, one with broad blades that is we call heavy blades and this is used for
extraction of upper central incisors and upper canines, left and right.
The second type of straight forceps has narrow blades or we call it fine
blades for extraction of upper lateral incisors (left and right) and upper anterior
retained roots.
2- The upper premolar forceps:-
Here we have two bends in the design of the forceps, one where the beaks
(blades) bend in relation to the joint of the forceps to apply the forceps parallel
to long axis of premolar, the 2nd bend or curvature is of the handle to avoid
injury to the lower lip and apposing teeth (mandibular). The upper premolars
teeth has either one root or two roots (one buccal and one palatal), so there is
no difference in the anatomy of the tooth root of the premolar on the buccal and
palatal surface so the two blades of the premolars forceps are mirror image to
each other.
3- The upper molar forceps (full crown upper molar forceps):-
Since upper molar teeth have three roots, two buccal and one palatal, the
blade of palatal side is round to conform or fit on palatal root, while blades on
buccal has pointed tip or projection so it can enter or fit the bifurcation between
the two buccal roots (mesial and distal) on the buccal side of the tooth. So we
have two forceps; one for the right molars and one for the left molars and these
forceps also double bend for the same requirement as mentioned for premolar
teeth.
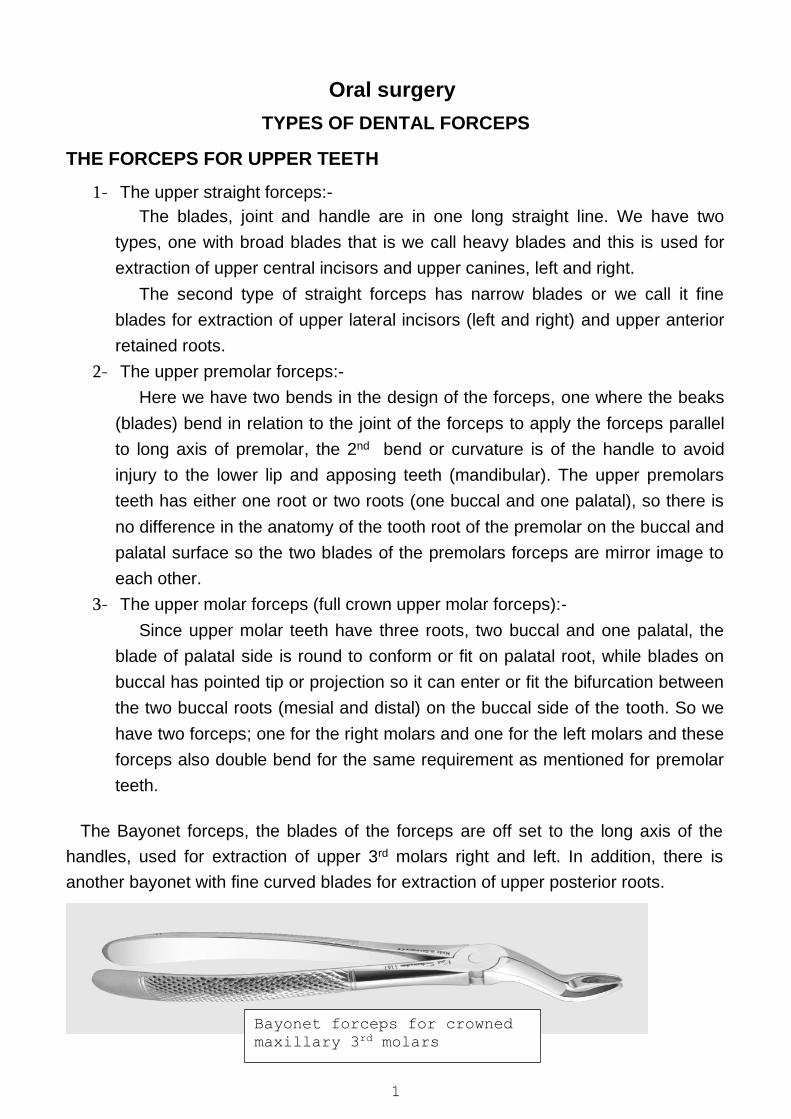
The Bayonet forceps, the blades of the forceps are off set to the long axis of the
handles, used for extraction of upper 3rd molars right and left. In addition, there is
another bayonet with fine curved blades for extraction of upper posterior roots.
Bayonet forceps for crowned
maxillary 3rd molars
2
THE FORCEPS OF LOWER TEETH;-
Here we have the long axis of the blades is in right angle to the long axis of the
handle so the blades can be applied apical to the cemento-enamel junction (on the
root) of the tooth surface parallel to the long axis of the tooth and the handle not to
cause injury to the upper lip. The forceps for the lower teeth are:-
1- Forceps for extraction of lower central and lateral incisors and canine:-
We have fine blades for extraction of the lower central and lateral incisors and
lower anterior retained roots which have fine roots with flattened sides (mesiodistally)
and heavy blades used for extraction of canines.
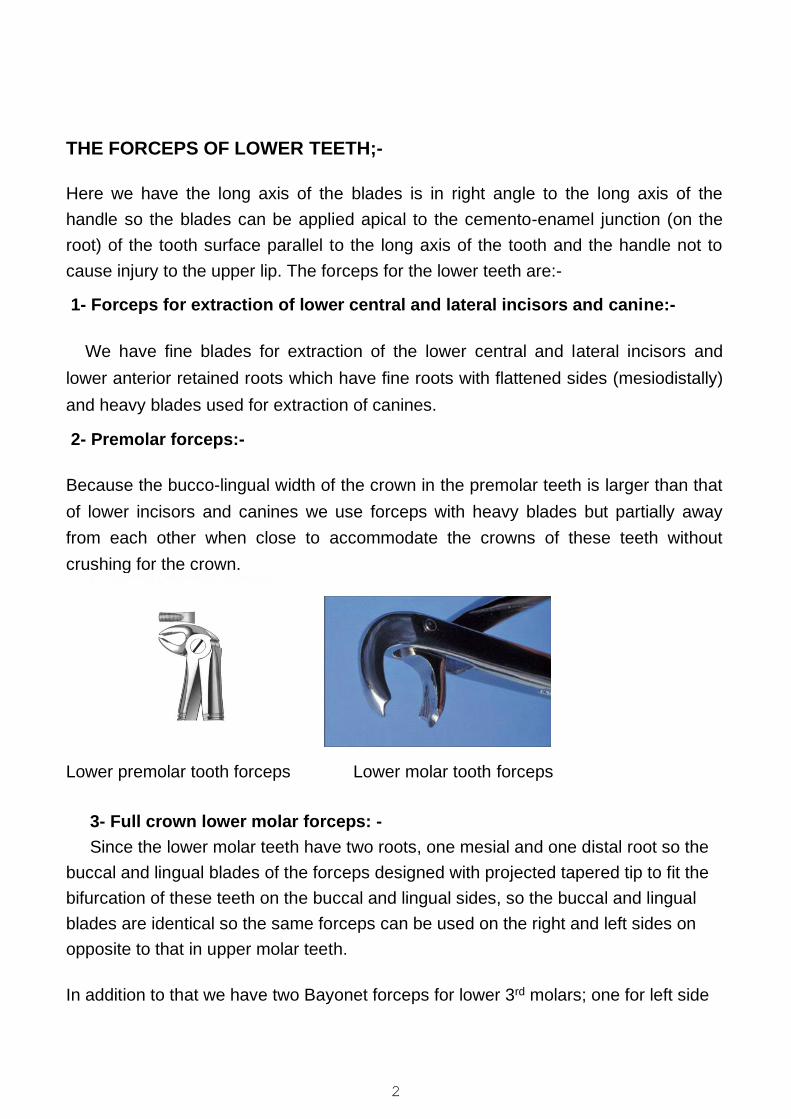
2- Premolar forceps:-
Because the bucco-lingual width of the crown in the premolar teeth is larger than that
of lower incisors and canines we use forceps with heavy blades but partially away
from each other when close to accommodate the crowns of these teeth without
crushing for the crown.
Lower premolar tooth forceps Lower molar tooth forceps
3- Full crown lower molar forceps: -
Since the lower molar teeth have two roots, one mesial and one distal root so the
buccal and lingual blades of the forceps designed with projected tapered tip to fit the
bifurcation of these teeth on the buccal and lingual sides, so the buccal and lingual
blades are identical so the same forceps can be used on the right and left sides on
opposite to that in upper molar teeth.
In addition to that we have two Bayonet forceps for lower 3rd molars; one for left side
3
and the other for right side.
Mechanical principles of extraction:-
The removal of teeth from the alveolar process employs the use of the following mechanical principles:-
I- Expansion of the bony socket:-
This is achieved by using the tooth itself as a dilating instrument, and this is the most
important factor in forceps extraction, and this principle need:-
1- Sufficient tooth substance be present to be firmly grasped by the forceps.
2- The root pattern of the tooth in such that it is possible to dilate the socket to permit
the complete dislocation of the tooth from its socket, e.g. dilacerated, divergent,
converge roots.
3- Nature of the bone, elastic bone especially in young patients is maximal and
decreased with age, older patients usually have denser, more highly calcified bone
that is less likely to provide adequate expansion during extraction of the teeth.
4- Thickness of the bone. Thick bone expansion is less likely to occur by using normal force.
II- The use of a lever and fulcrum
This is used to force a tooth or root out of the socket along the path of least resistance and the principle is the basic factor governing the use of elevators to extract teeth or roots
Ill-The insertion of a wedge or wedges:-
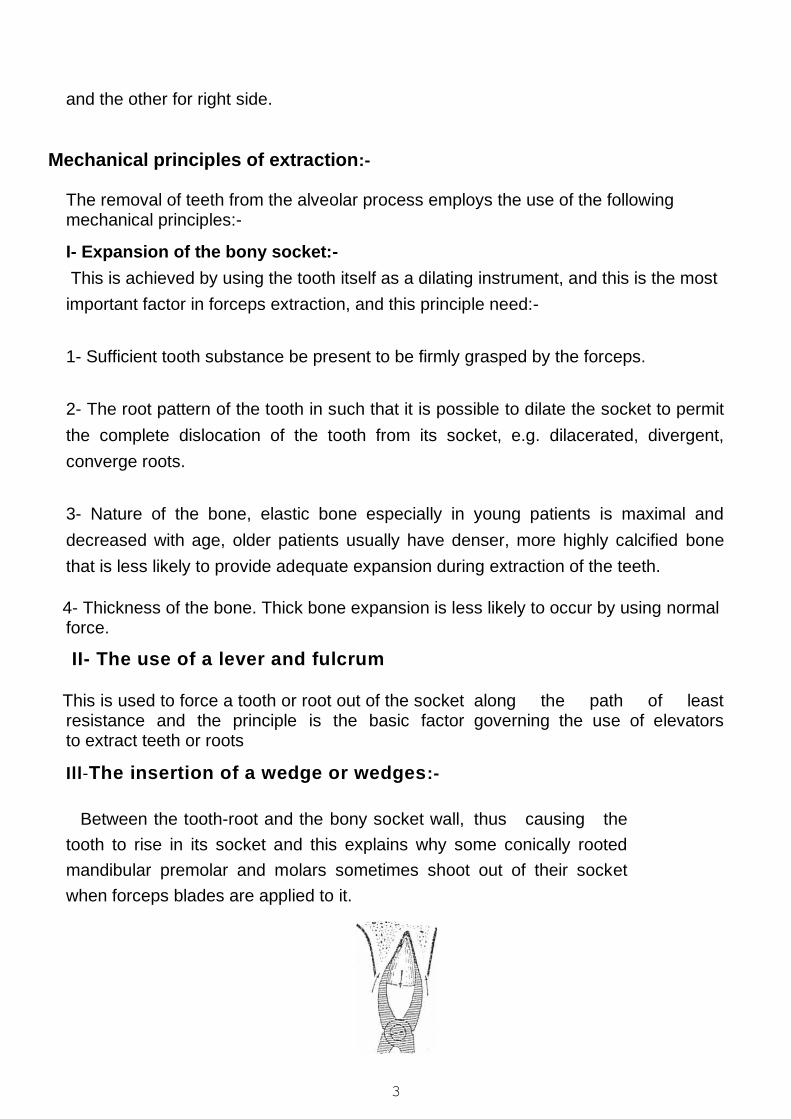
Between the tooth-root and the bony socket wall, thus causing the
tooth to rise in its socket and this explains why some conically rooted
mandibular premolar and molars sometimes shoot out of their socket
when forceps blades are applied to it.
4
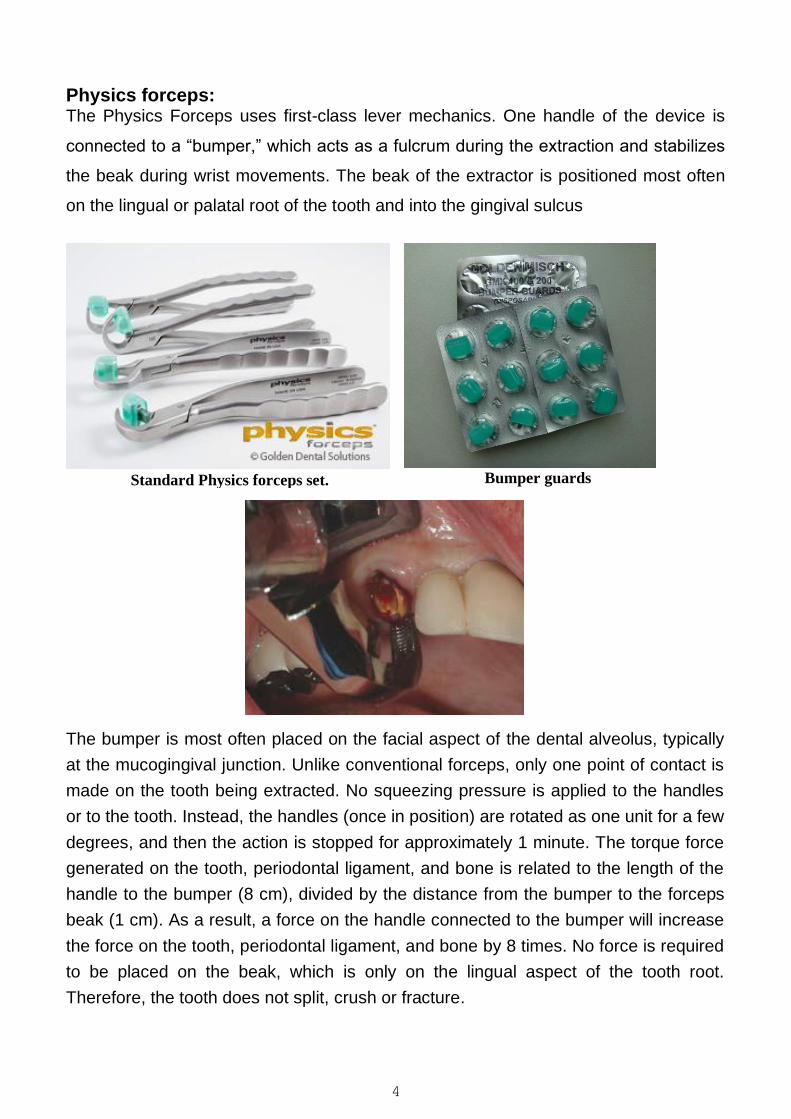
Physics forceps: The Physics Forceps uses first-class lever mechanics. One handle of the device is
connected to a “bumper,” which acts as a fulcrum during the extraction and stabilizes
the beak during wrist movements. The beak of the extractor is positioned most often
on the lingual or palatal root of the tooth and into the gingival sulcus
Standard Physics forceps set.
Bumper guards
The bumper is most often placed on the facial aspect of the dental alveolus, typically
at the mucogingival junction. Unlike conventional forceps, only one point of contact is
made on the tooth being extracted. No squeezing pressure is applied to the handles
or to the tooth. Instead, the handles (once in position) are rotated as one unit for a few
degrees, and then the action is stopped for approximately 1 minute. The torque force
generated on the tooth, periodontal ligament, and bone is related to the length of the
handle to the bumper (8 cm), divided by the distance from the bumper to the forceps
beak (1 cm). As a result, a force on the handle connected to the bumper will increase
the force on the tooth, periodontal ligament, and bone by 8 times. No force is required
to be placed on the beak, which is only on the lingual aspect of the tooth root.
Therefore, the tooth does not split, crush or fracture.
5
Moment of force in physics represents the magnitude of force applied to a
rotational system at a distance from the axis of rotation. The principle of moment is
derived from Archimedes’ operating principles of the lever and is defined as M=rF,
where “F” is the applied force and “r” is the distance from the applied force to the
object. This is referred to as the moment arm. The length of the moment arm (or lever
arm) is the key to the operation of the lever, pulley, and most other simple machines
capable of generating mechanical advantage. This means that if the force applied to
generate work cannot be increased, it is still possible to gain a greater amount of work
by increasing the moment arm of the lever.
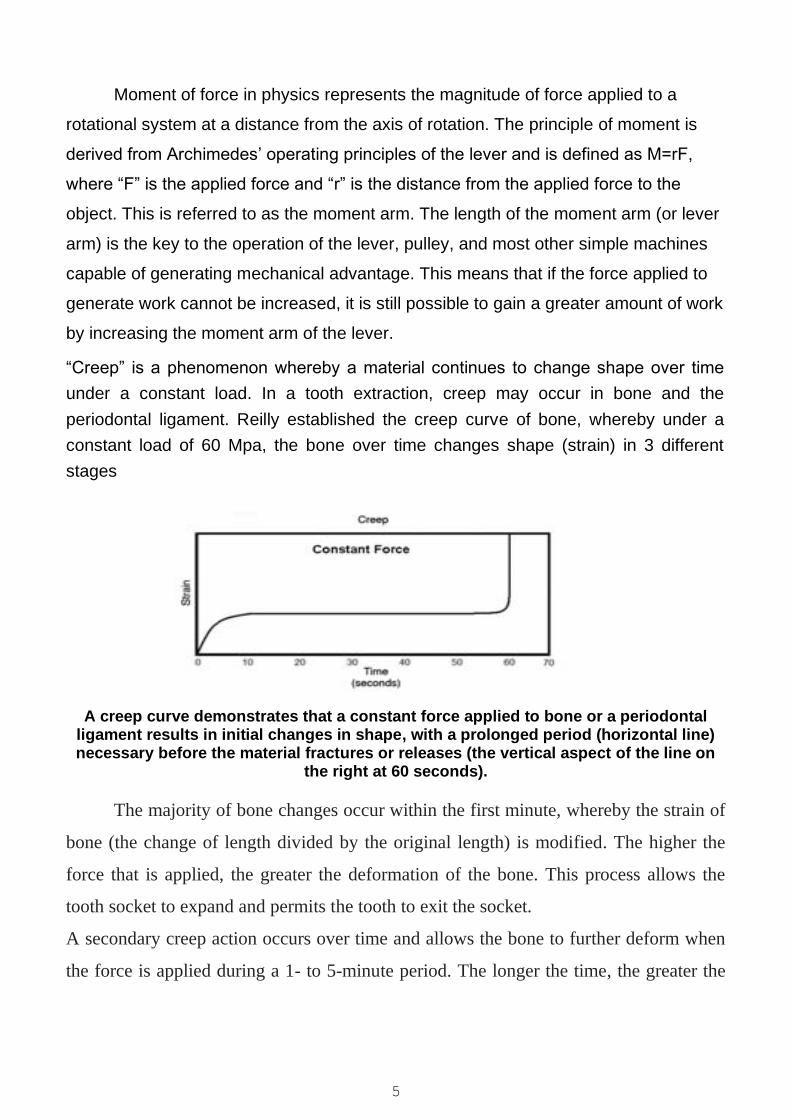
“Creep” is a phenomenon whereby a material continues to change shape over time
under a constant load. In a tooth extraction, creep may occur in bone and the
periodontal ligament. Reilly established the creep curve of bone, whereby under a
constant load of 60 Mpa, the bone over time changes shape (strain) in 3 different
stages
A creep curve demonstrates that a constant force applied to bone or a periodontal ligament results in initial changes in shape, with a prolonged period (horizontal line) necessary before the material fractures or releases (the vertical aspect of the line on
the right at 60 seconds).
The majority of bone changes occur within the first minute, whereby the strain of
bone (the change of length divided by the original length) is modified. The higher the
force that is applied, the greater the deformation of the bone. This process allows the
tooth socket to expand and permits the tooth to exit the socket.
A secondary creep action occurs over time and allows the bone to further deform when
the force is applied during a 1- to 5-minute period. The longer the time, the greater the
6
deformation; however, it expresses only a 10% to 20% difference compared to the
initial one-minute strain. Eventually, the third phase of the curve causes the bone to
fracture if the load is applied over a long time frame, representing creep rupture. A
similar phenomenon occurs in the periodontal complex.
Mechanical forces shift lateral force to a tooth, causing primary movement to the
periodontal ligament and space. A greater force overtime causes a slight additional tooth
movement. Therefore, the creep of the periodontal complex is similar to the creep of the
bone, whereby the constant load weakens the periodontal ligament. Thus, a constant
load on the tooth over time increases the tooth socket dimension and decreases the
strength of the periodontal complex.
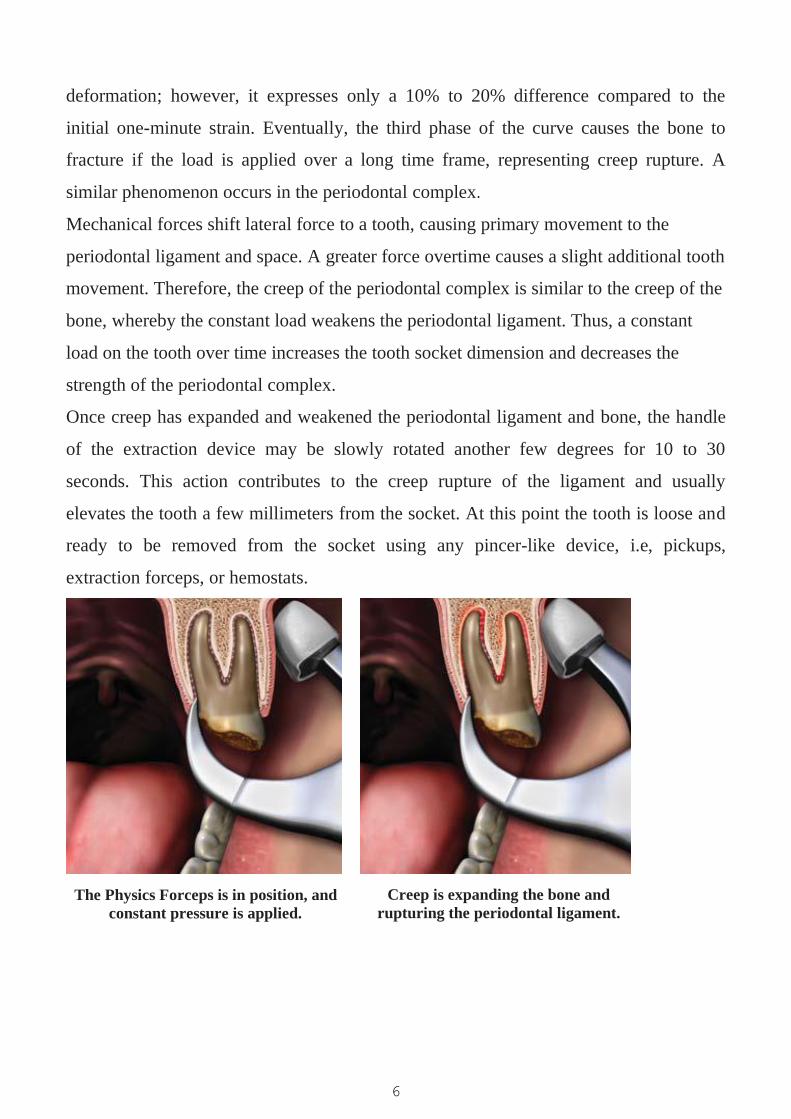
Once creep has expanded and weakened the periodontal ligament and bone, the handle
of the extraction device may be slowly rotated another few degrees for 10 to 30
seconds. This action contributes to the creep rupture of the ligament and usually
elevates the tooth a few millimeters from the socket. At this point the tooth is loose and
ready to be removed from the socket using any pincer-like device, i.e, pickups,
extraction forceps, or hemostats.
The Physics Forceps is in position, and
constant pressure is applied.
Creep is expanding the bone and
rupturing the periodontal ligament.
7
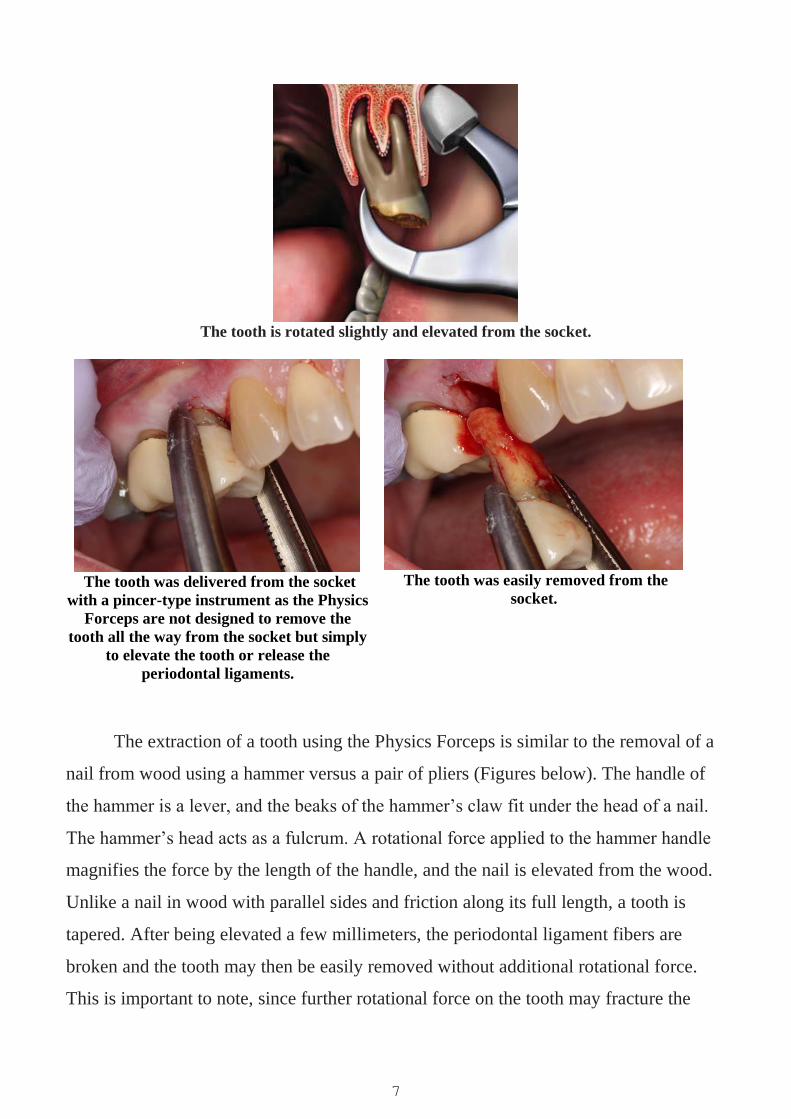
The tooth is rotated slightly and elevated from the socket.
The tooth was delivered from the socket
with a pincer-type instrument as the Physics
Forceps are not designed to remove the
tooth all the way from the socket but simply
to elevate the tooth or release the
periodontal ligaments.
The tooth was easily removed from the
socket.
The extraction of a tooth using the Physics Forceps is similar to the removal of a
nail from wood using a hammer versus a pair of pliers (Figures below). The handle of
the hammer is a lever, and the beaks of the hammer’s claw fit under the head of a nail.
The hammer’s head acts as a fulcrum. A rotational force applied to the hammer handle
magnifies the force by the length of the handle, and the nail is elevated from the wood.
Unlike a nail in wood with parallel sides and friction along its full length, a tooth is
tapered. After being elevated a few millimeters, the periodontal ligament fibers are
broken and the tooth may then be easily removed without additional rotational force.
This is important to note, since further rotational force on the tooth may fracture the
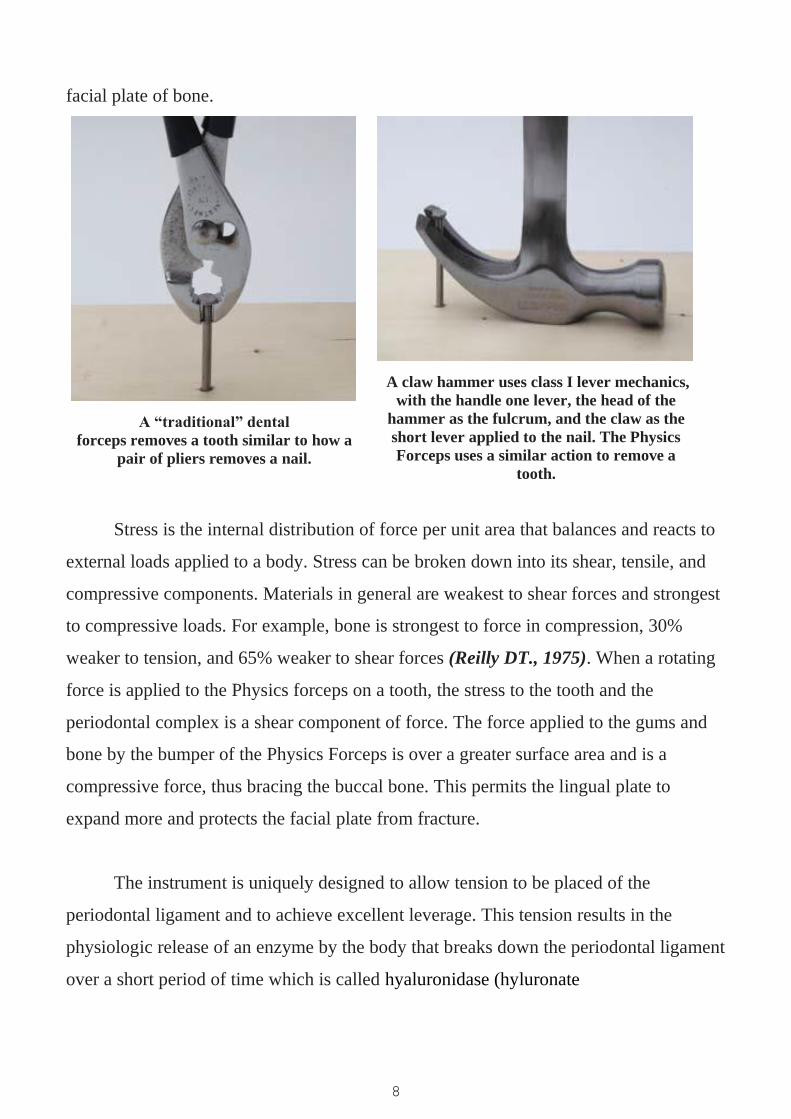
8
facial plate of bone.
A “traditional” dental
forceps removes a tooth similar to how a
pair of pliers removes a nail.
A claw hammer uses class I lever mechanics,
with the handle one lever, the head of the
hammer as the fulcrum, and the claw as the
short lever applied to the nail. The Physics
Forceps uses a similar action to remove a
tooth.
Stress is the internal distribution of force per unit area that balances and reacts to
external loads applied to a body. Stress can be broken down into its shear, tensile, and
compressive components. Materials in general are weakest to shear forces and strongest
to compressive loads. For example, bone is strongest to force in compression, 30%
weaker to tension, and 65% weaker to shear forces (Reilly DT., 1975). When a rotating
force is applied to the Physics forceps on a tooth, the stress to the tooth and the
periodontal complex is a shear component of force. The force applied to the gums and
bone by the bumper of the Physics Forceps is over a greater surface area and is a
compressive force, thus bracing the buccal bone. This permits the lingual plate to
expand more and protects the facial plate from fracture.
The instrument is uniquely designed to allow tension to be placed of the
periodontal ligament and to achieve excellent leverage. This tension results in the
physiologic release of an enzyme by the body that breaks down the periodontal ligament
over a short period of time which is called hyaluronidase (hyluronate
9
glycanohydrolase). This is an enzyme that catalyzes the hydrolysis of the interstitial
barrier, hyaluronan (hyaluronic acid), which is the cement substance (extracellular
matrix) of all human tissues (KUMAR DM., 2015). This process may take 20 seconds or
up to 4 minutes depending on the tooth and surrounding bone structure of the patient.
The clinician must be patient, as the technique will feel like nothing is happening since
none of the usual operator movements are employed. With the breakdown of the
periodontal ligament, the tooth will release or “pop” out of the socket in an upward and
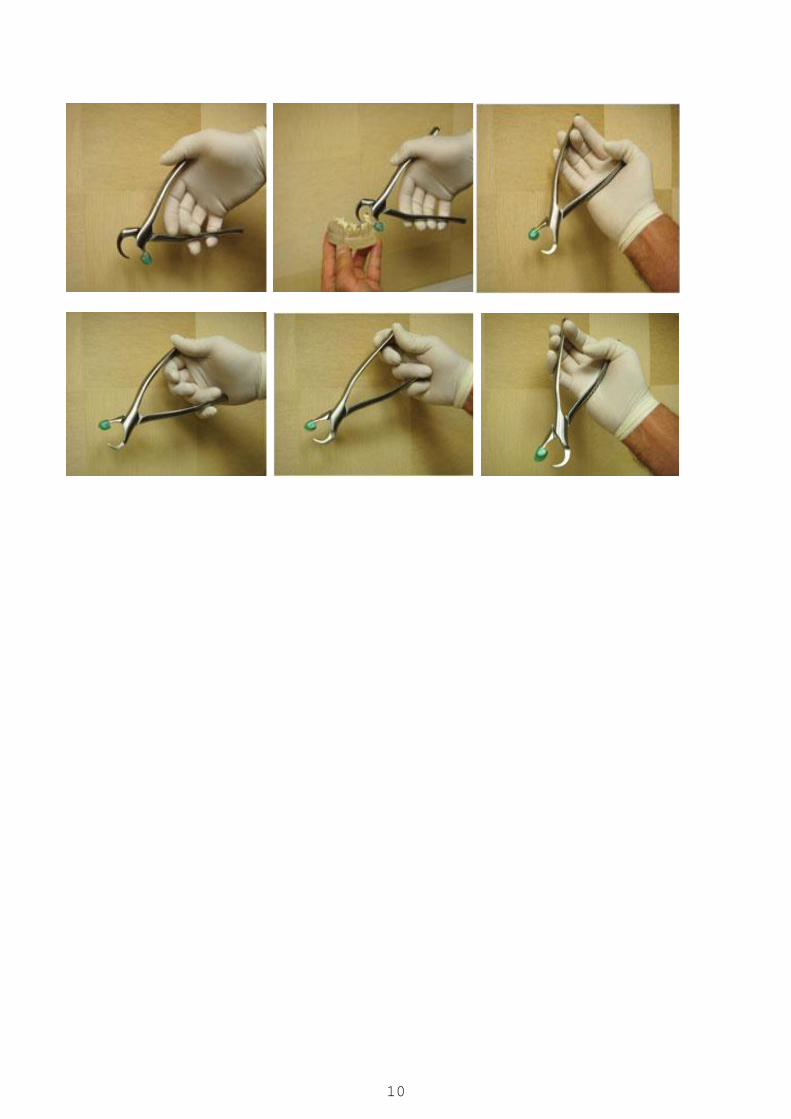
outward motion, mirroring the arch form of the head of the instrument. This innovative
instrument allows tooth dislodgment with little or no pressure, simply utilizing leverage.
The handles are never squeezed like a conventional forceps; rather they are held lightly
in the hand, and the wrist is rotated to simply create tension on the palatal aspect of the
root. There is no forearm, bicep, or shoulder pressure used. The handles simply allow
the beak to engage the root structure without slipping off. During a short time of
constant tension, the root will disengage or pop from the socket incisally and facially.
Although the facial bone may expand slightly, the movement of the tooth out of the
socket is not straight facial, but rather up and out of the socket. This allows for
maintenance of the facial plate of bone, when the instrument is used correctly. One of
the biggest misconceptions of this innovative technique is that it is a “forceps” as the
names implies, when it fact it is a lingual elevator (Kosinski T, Golden R., 2015).
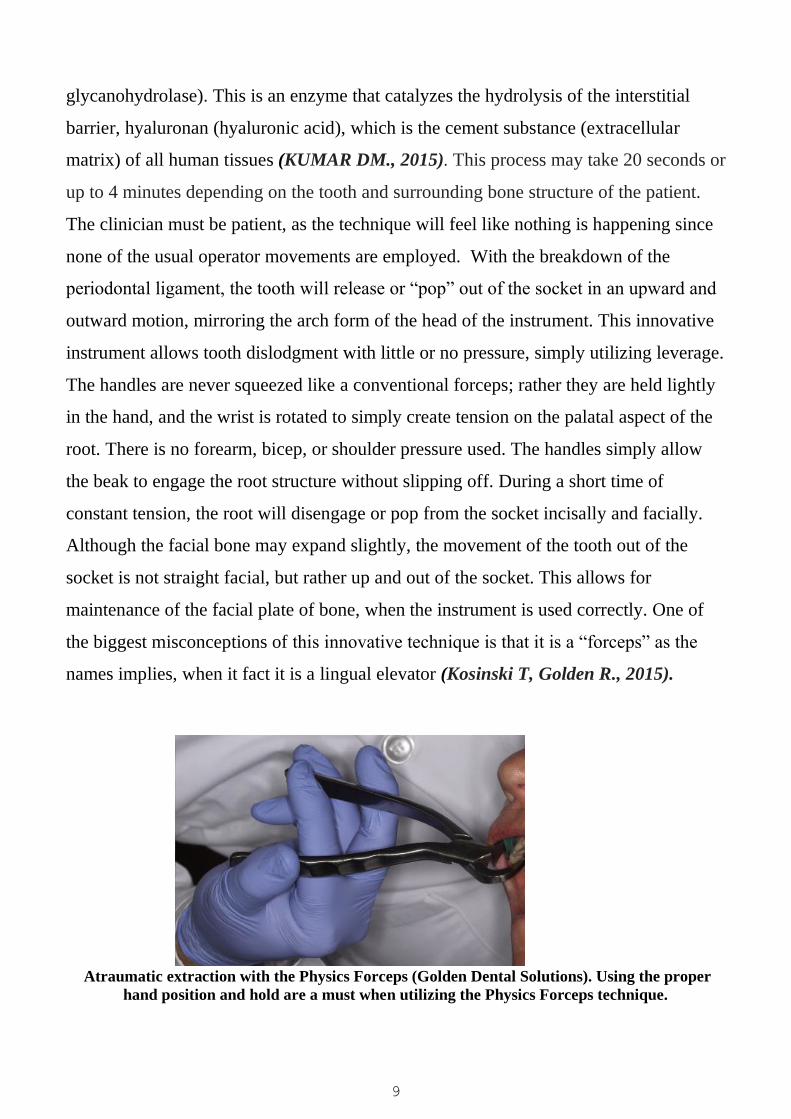
Atraumatic extraction with the Physics Forceps (Golden Dental Solutions). Using the proper
hand position and hold are a must when utilizing the Physics Forceps technique.
10
Elevators
Elevators:-
Are exo-levers, instrument designed to elevate or luxate the teeth or roots from their bony
socket in close or surgical method of extraction to force a tooth or root along the line of
withdrawal.
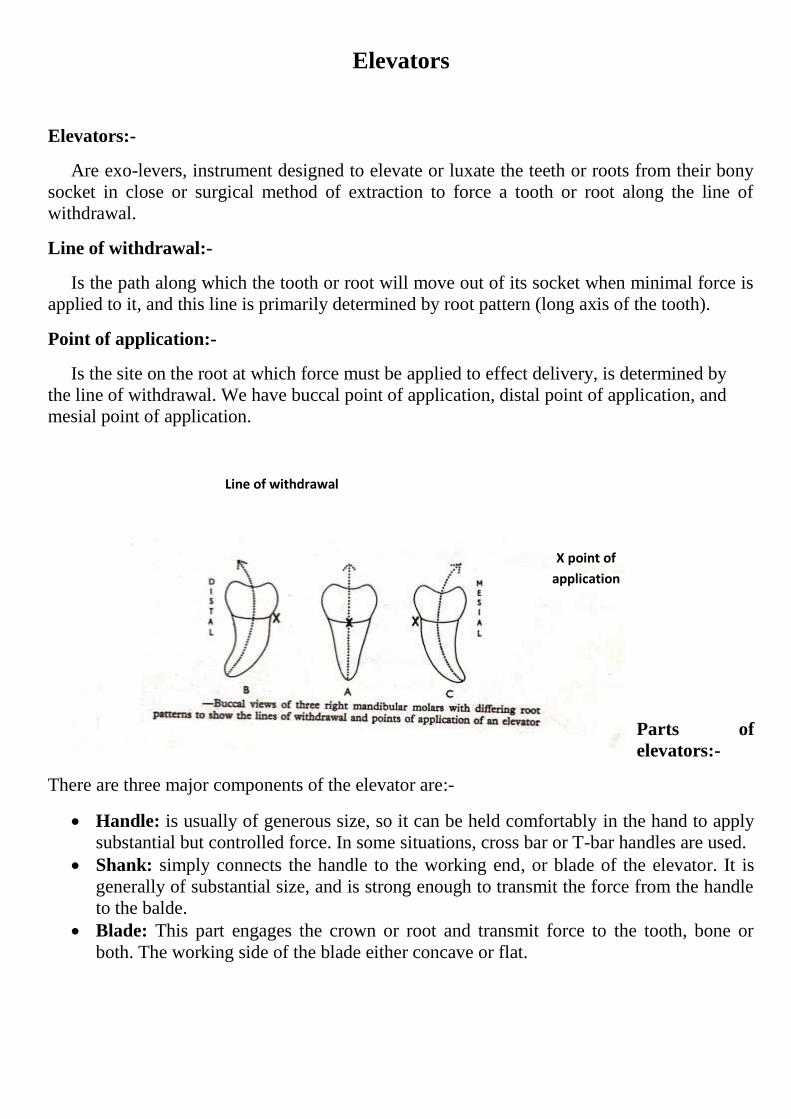
Line of withdrawal:-
Is the path along which the tooth or root will move out of its socket when minimal force is
applied to it, and this line is primarily determined by root pattern (long axis of the tooth).
Point of application:-
Is the site on the root at which force must be applied to effect delivery, is determined by
the line of withdrawal. We have buccal point of application, distal point of application, and
mesial point of application.
Parts of
elevators:-
There are three major components of the elevator are:-
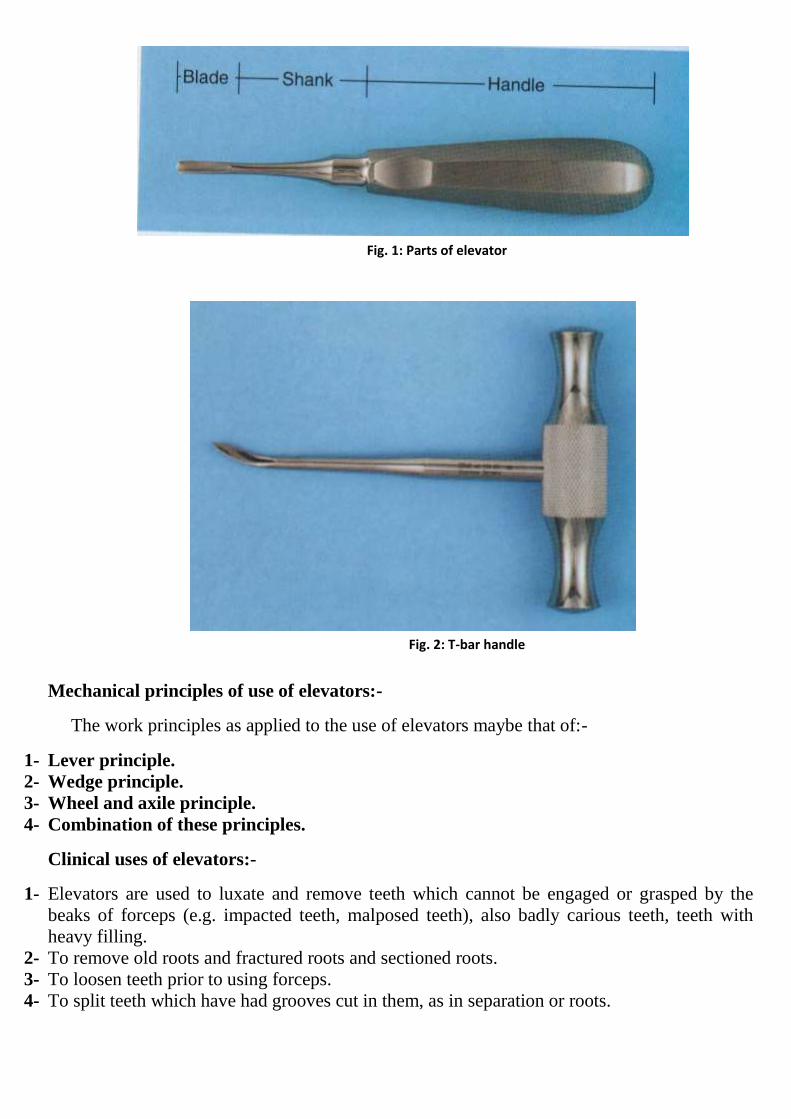
Handle: is usually of generous size, so it can be held comfortably in the hand to apply
substantial but controlled force. In some situations, cross bar or T-bar handles are used.
Shank: simply connects the handle to the working end, or blade of the elevator. It is
generally of substantial size, and is strong enough to transmit the force from the handle
to the balde.
Blade: This part engages the crown or root and transmit force to the tooth, bone or
both. The working side of the blade either concave or flat.
X point of
application
Line of withdrawal
Mechanical principles of use of elevators:-
The work principles as applied to the use of elevators maybe that of:-
1- Lever principle.
2- Wedge principle.
3- Wheel and axile principle.
4- Combination of these principles.
Clinical uses of elevators:-
1- Elevators are used to luxate and remove teeth which cannot be engaged or grasped by the
beaks of forceps (e.g. impacted teeth, malposed teeth), also badly carious teeth, teeth with
heavy filling.
2- To remove old roots and fractured roots and sectioned roots.
3- To loosen teeth prior to using forceps.
4- To split teeth which have had grooves cut in them, as in separation or roots.
Fig. 1: Parts of elevator
Fig. 2: T-bar handle
5- To remove small amounts of bone to create point of application for the beaks of forceps, or
removal of interseptal bone.
6- Any tooth resisting normal extraction force by extracting forceps.
Types of elevators:-
The biggest variation in the type of elevator is in the shape and size of the blade. The three
basic types of elevators are:
(1) the straight type
(2) the triangle or pennant-shape type
(3) the pick type.
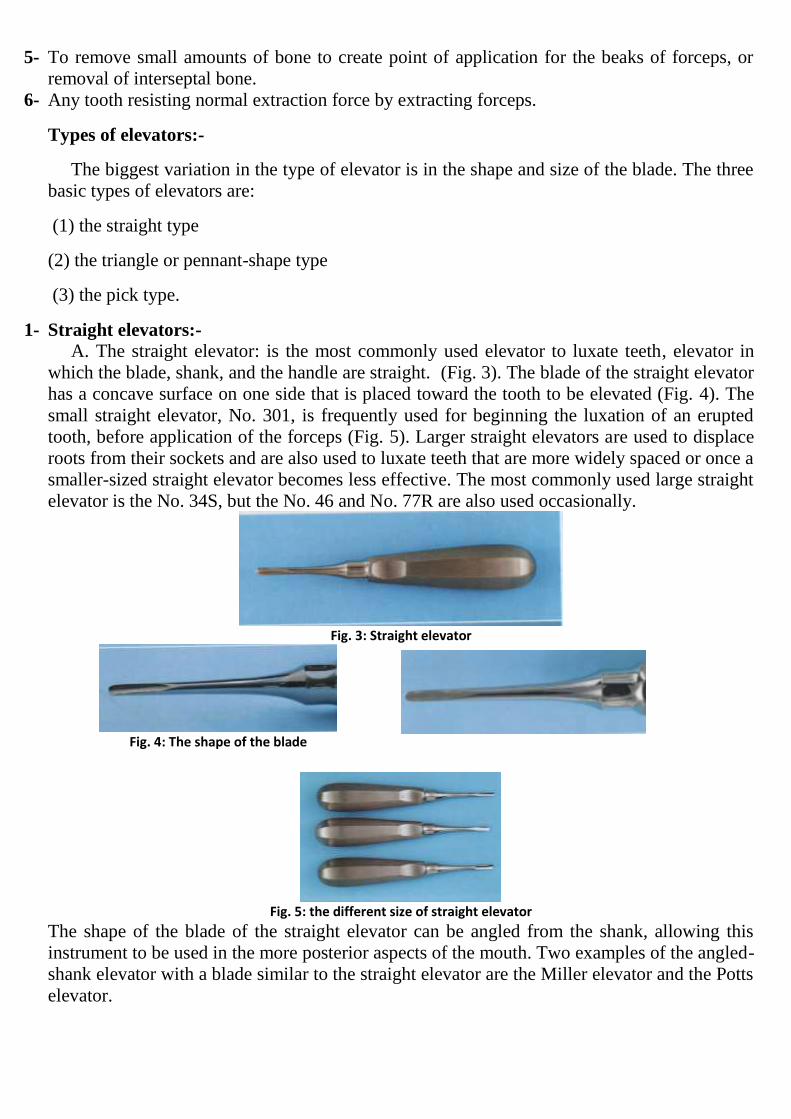
1- Straight elevators:-
A. The straight elevator: is the most commonly used elevator to luxate teeth, elevator in
which the blade, shank, and the handle are straight. (Fig. 3). The blade of the straight elevator
has a concave surface on one side that is placed toward the tooth to be elevated (Fig. 4). The
small straight elevator, No. 301, is frequently used for beginning the luxation of an erupted
tooth, before application of the forceps (Fig. 5). Larger straight elevators are used to displace
roots from their sockets and are also used to luxate teeth that are more widely spaced or once a
smaller-sized straight elevator becomes less effective. The most commonly used large straight
elevator is the No. 34S, but the No. 46 and No. 77R are also used occasionally.
Fig. 3: Straight elevator
Fig. 4: The shape of the blade
Fig. 5: the different size of straight elevator
The shape of the blade of the straight elevator can be angled from the shank, allowing this
instrument to be used in the more posterior aspects of the mouth. Two examples of the angled-
shank elevator with a blade similar to the straight elevator are the Miller elevator and the Potts
elevator.
B. Coupland’s chisel (elevator): It is similar to straight elevator but the working end is sharp and
straight cut, used for chiseling of bone to create point of application or to split of teeth. It’s of
different sizes, size 1, size 2, size 3. Depending on the width of the working end. (fig. 6).
Fig. 6: Coupland's chisel
2- The triangle or pennant-shape type
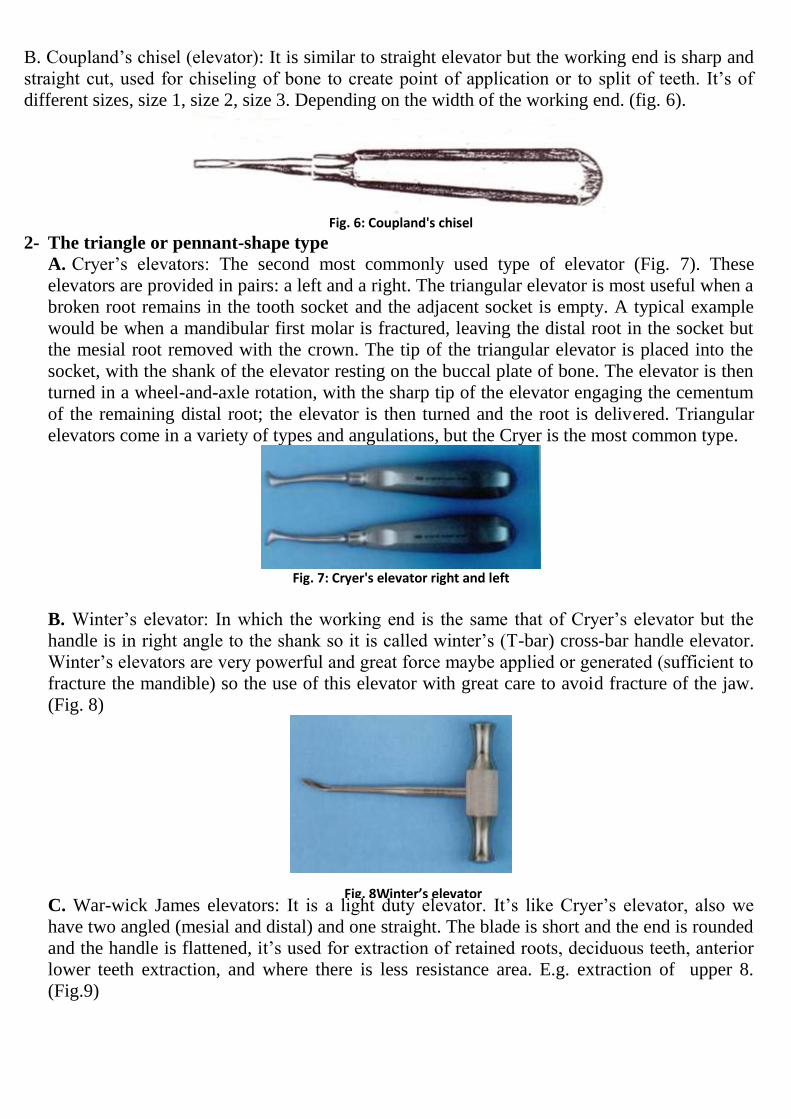
A. Cryer’s elevators: The second most commonly used type of elevator (Fig. 7). These
elevators are provided in pairs: a left and a right. The triangular elevator is most useful when a
broken root remains in the tooth socket and the adjacent socket is empty. A typical example
would be when a mandibular first molar is fractured, leaving the distal root in the socket but
the mesial root removed with the crown. The tip of the triangular elevator is placed into the
socket, with the shank of the elevator resting on the buccal plate of bone. The elevator is then
turned in a wheel-and-axle rotation, with the sharp tip of the elevator engaging the cementum
of the remaining distal root; the elevator is then turned and the root is delivered. Triangular
elevators come in a variety of types and angulations, but the Cryer is the most common type.
Fig. 7: Cryer's elevator right and left
B. Winter’s elevator: In which the working end is the same that of Cryer’s elevator but the
handle is in right angle to the shank so it is called winter’s (T-bar) cross-bar handle elevator.
Winter’s elevators are very powerful and great force maybe applied or generated (sufficient to
fracture the mandible) so the use of this elevator with great care to avoid fracture of the jaw.
(Fig. 8)
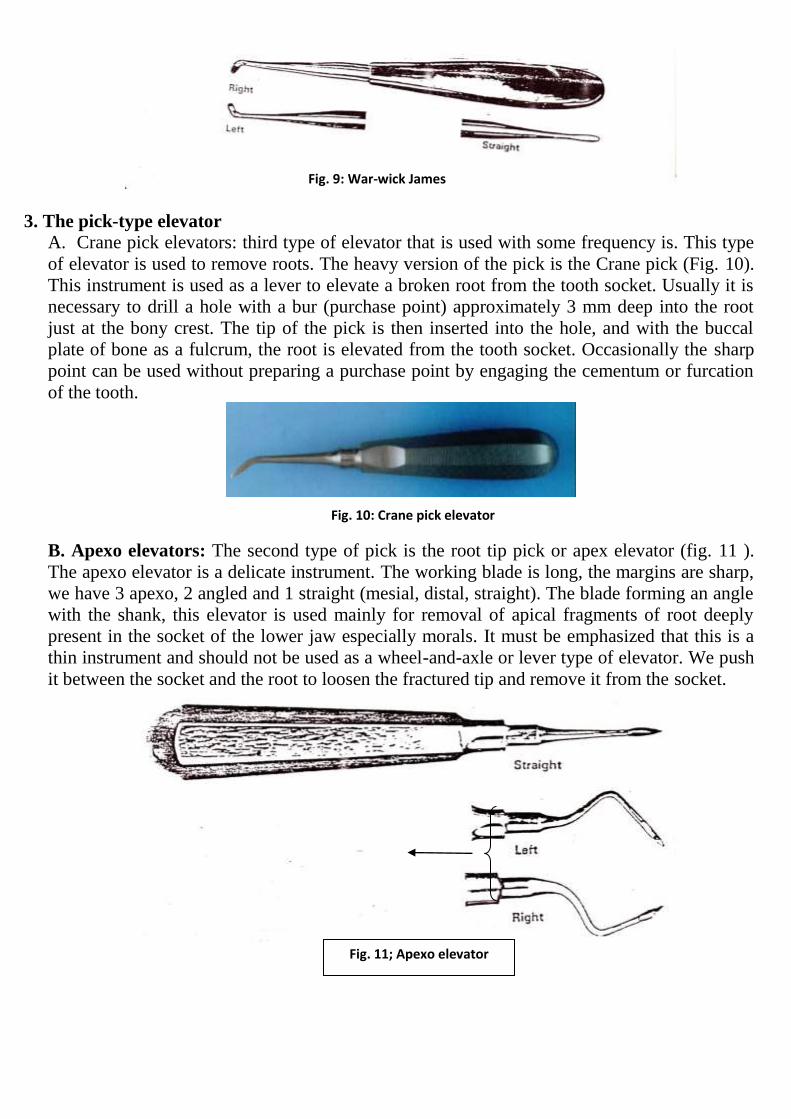
C. War-wick James elevators: It is a light duty elevator. It’s like Cryer’s elevator, also we
have two angled (mesial and distal) and one straight. The blade is short and the end is rounded
and the handle is flattened, it’s used for extraction of retained roots, deciduous teeth, anterior
lower teeth extraction, and where there is less resistance area. E.g. extraction of upper 8.
(Fig.9)
Fig. 8Winter’s elevator
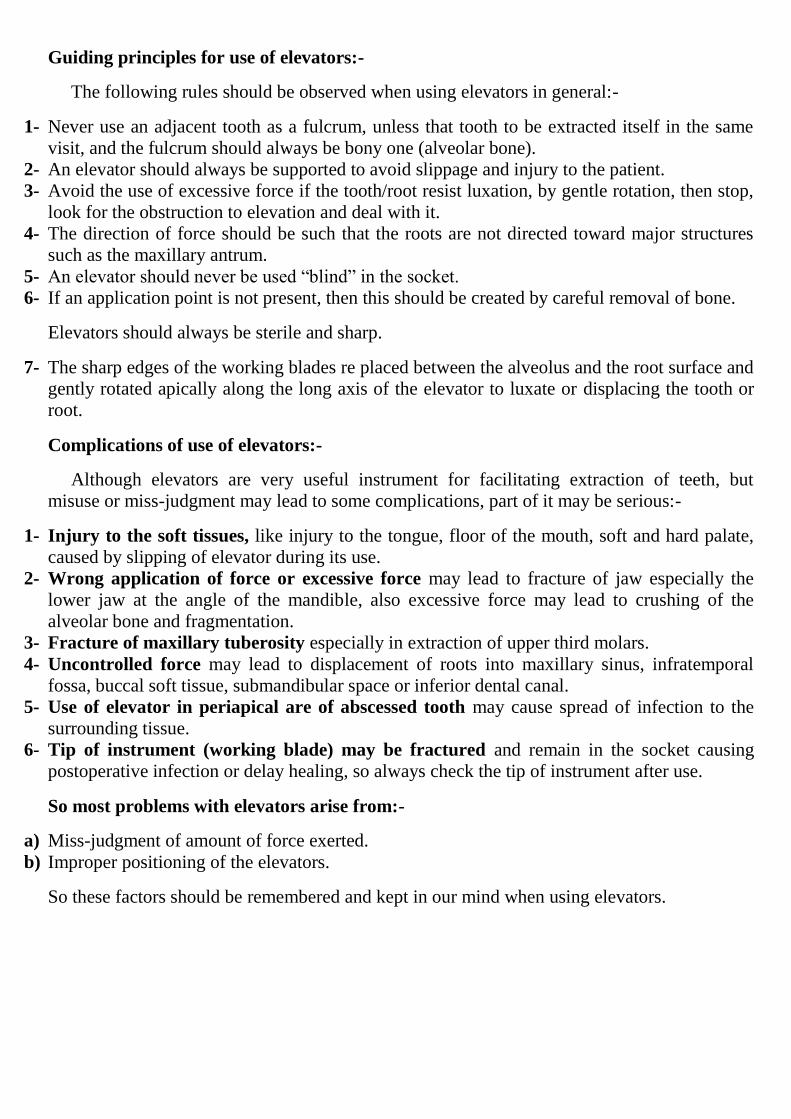
3. The pick-type elevator A. Crane pick elevators: third type of elevator that is used with some frequency is. This type
of elevator is used to remove roots. The heavy version of the pick is the Crane pick (Fig. 10).
This instrument is used as a lever to elevate a broken root from the tooth socket. Usually it is
necessary to drill a hole with a bur (purchase point) approximately 3 mm deep into the root
just at the bony crest. The tip of the pick is then inserted into the hole, and with the buccal
plate of bone as a fulcrum, the root is elevated from the tooth socket. Occasionally the sharp
point can be used without preparing a purchase point by engaging the cementum or furcation
of the tooth.
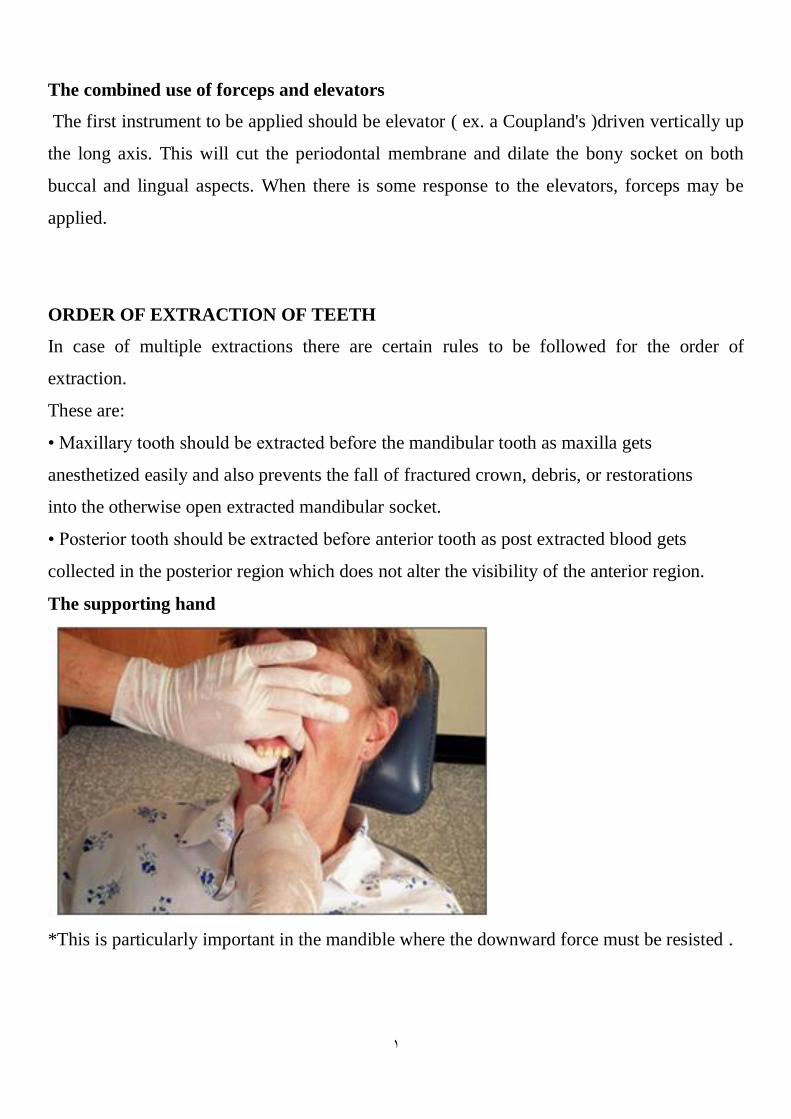
B. Apexo elevators: The second type of pick is the root tip pick or apex elevator (fig. 11 ).
The apexo elevator is a delicate instrument. The working blade is long, the margins are sharp,
we have 3 apexo, 2 angled and 1 straight (mesial, distal, straight). The blade forming an angle
with the shank, this elevator is used mainly for removal of apical fragments of root deeply
present in the socket of the lower jaw especially morals. It must be emphasized that this is a
thin instrument and should not be used as a wheel-and-axle or lever type of elevator. We push
it between the socket and the root to loosen the fractured tip and remove it from the socket.
Fig. 11; Apexo elevator
Fig. 9: War-wick James
Fig. 10: Crane pick elevator
Guiding principles for use of elevators:-
The following rules should be observed when using elevators in general:-
1- Never use an adjacent tooth as a fulcrum, unless that tooth to be extracted itself in the same
visit, and the fulcrum should always be bony one (alveolar bone).
2- An elevator should always be supported to avoid slippage and injury to the patient.
3- Avoid the use of excessive force if the tooth/root resist luxation, by gentle rotation, then stop,
look for the obstruction to elevation and deal with it.
4- The direction of force should be such that the roots are not directed toward major structures
such as the maxillary antrum.
5- An elevator should never be used “blind” in the socket.
6- If an application point is not present, then this should be created by careful removal of bone.
Elevators should always be sterile and sharp.
7- The sharp edges of the working blades re placed between the alveolus and the root surface and
gently rotated apically along the long axis of the elevator to luxate or displacing the tooth or
root.
Complications of use of elevators:-
Although elevators are very useful instrument for facilitating extraction of teeth, but
misuse or miss-judgment may lead to some complications, part of it may be serious:-
1- Injury to the soft tissues, like injury to the tongue, floor of the mouth, soft and hard palate,
caused by slipping of elevator during its use.
2- Wrong application of force or excessive force may lead to fracture of jaw especially the
lower jaw at the angle of the mandible, also excessive force may lead to crushing of the
alveolar bone and fragmentation.
3- Fracture of maxillary tuberosity especially in extraction of upper third molars.
4- Uncontrolled force may lead to displacement of roots into maxillary sinus, infratemporal
fossa, buccal soft tissue, submandibular space or inferior dental canal.
5- Use of elevator in periapical are of abscessed tooth may cause spread of infection to the
surrounding tissue.
6- Tip of instrument (working blade) may be fractured and remain in the socket causing
postoperative infection or delay healing, so always check the tip of instrument after use.
So most problems with elevators arise from:-
a) Miss-judgment of amount of force exerted.
b) Improper positioning of the elevators.
So these factors should be remembered and kept in our mind when using elevators.
1
The combined use of forceps and elevators
The first instrument to be applied should be elevator ( ex. a Coupland's )driven vertically up
the long axis. This will cut the periodontal membrane and dilate the bony socket on both
buccal and lingual aspects. When there is some response to the elevators, forceps may be
applied.
ORDER OF EXTRACTION OF TEETH
In case of multiple extractions there are certain rules to be followed for the order of
extraction.
These are:
• Maxillary tooth should be extracted before the mandibular tooth as maxilla gets
anesthetized easily and also prevents the fall of fractured crown, debris, or restorations
into the otherwise open extracted mandibular socket.
• Posterior tooth should be extracted before anterior tooth as post extracted blood gets
collected in the posterior region which does not alter the visibility of the anterior region.
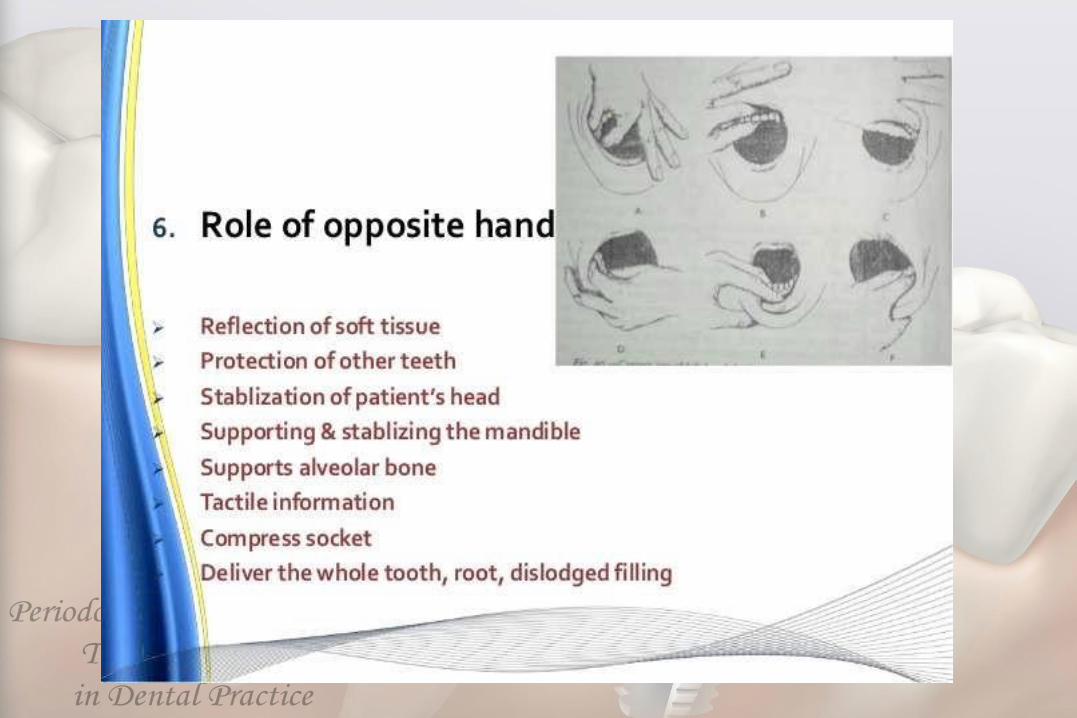
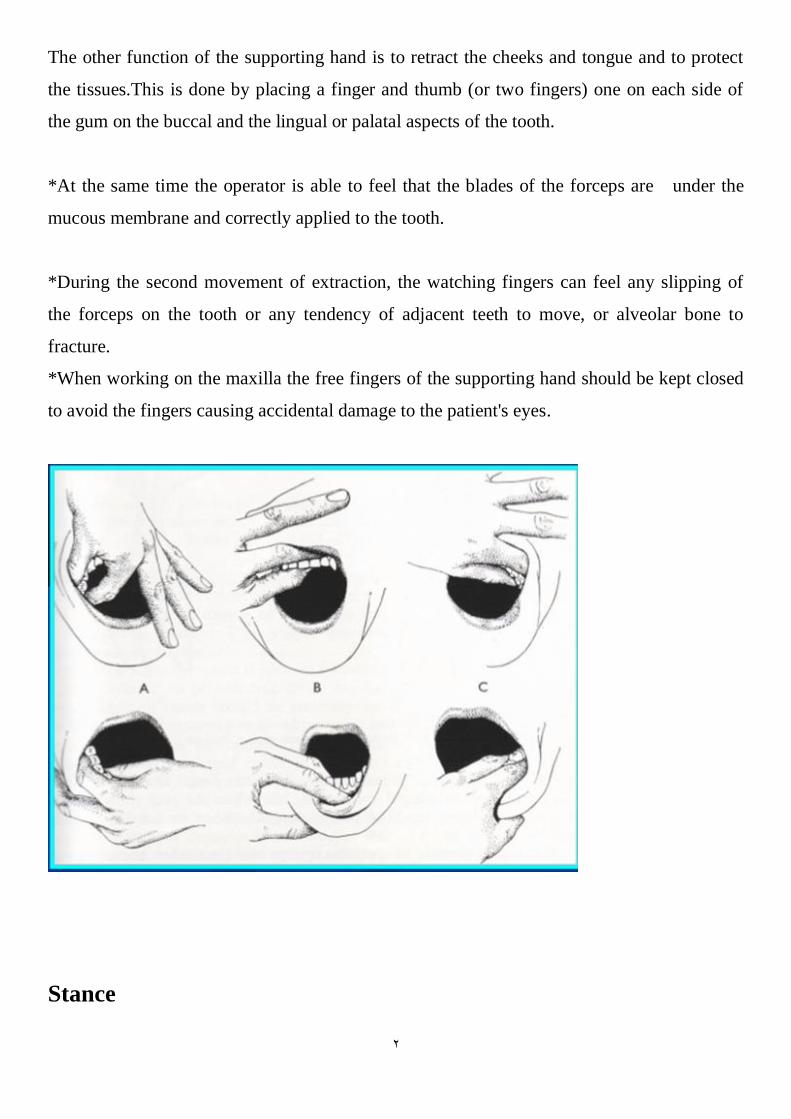
The supporting hand
*This is particularly important in the mandible where the downward force must be resisted .
2
The other function of the supporting hand is to retract the cheeks and tongue and to protect
the tissues.This is done by placing a finger and thumb (or two fingers) one on each side of
the gum on the buccal and the lingual or palatal aspects of the tooth.
*At the same time the operator is able to feel that the blades of the forceps are under the
mucous membrane and correctly applied to the tooth.
*During the second movement of extraction, the watching fingers can feel any slipping of
the forceps on the tooth or any tendency of adjacent teeth to move, or alveolar bone to
fracture.
*When working on the maxilla the free fingers of the supporting hand should be kept closed
to avoid the fingers causing accidental damage to the patient's eyes.
Stance
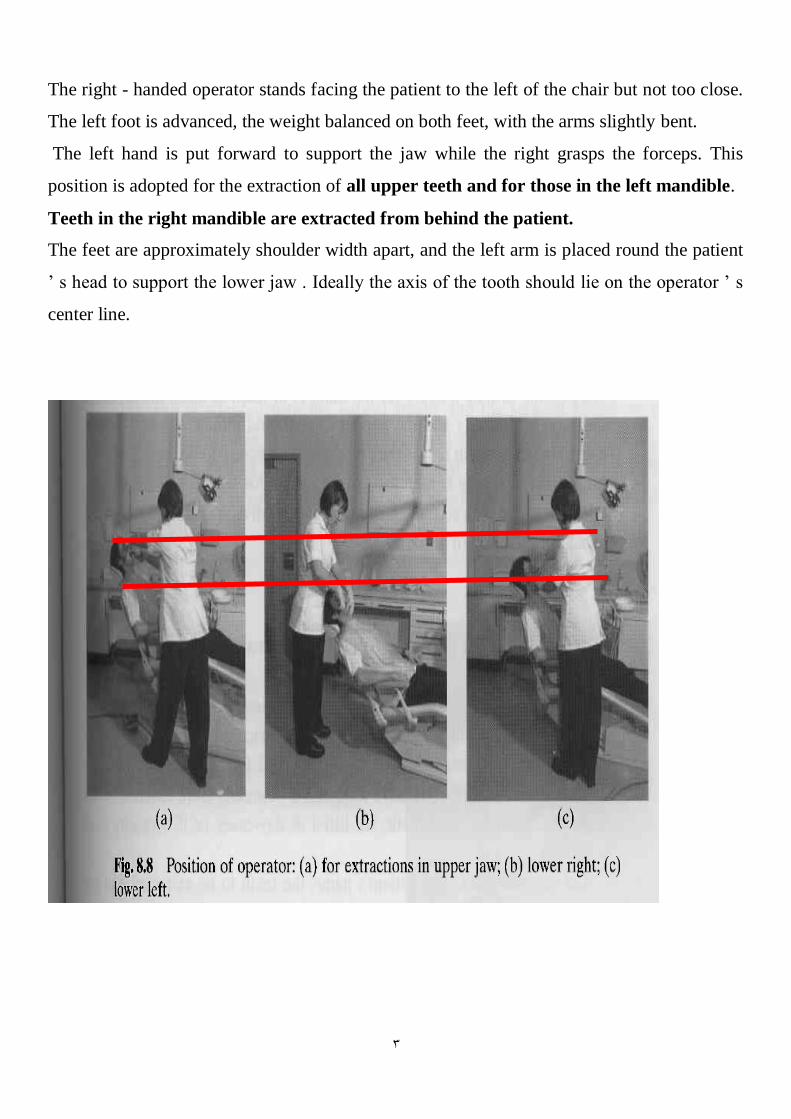
3
The right - handed operator stands facing the patient to the left of the chair but not too close.
The left foot is advanced, the weight balanced on both feet, with the arms slightly bent.
The left hand is put forward to support the jaw while the right grasps the forceps. This
position is adopted for the extraction of all upper teeth and for those in the left mandible.
Teeth in the right mandible are extracted from behind the patient.
The feet are approximately shoulder width apart, and the left arm is placed round the patient
’ s head to support the lower jaw . Ideally the axis of the tooth should lie on the operator ’ s
center line.
4
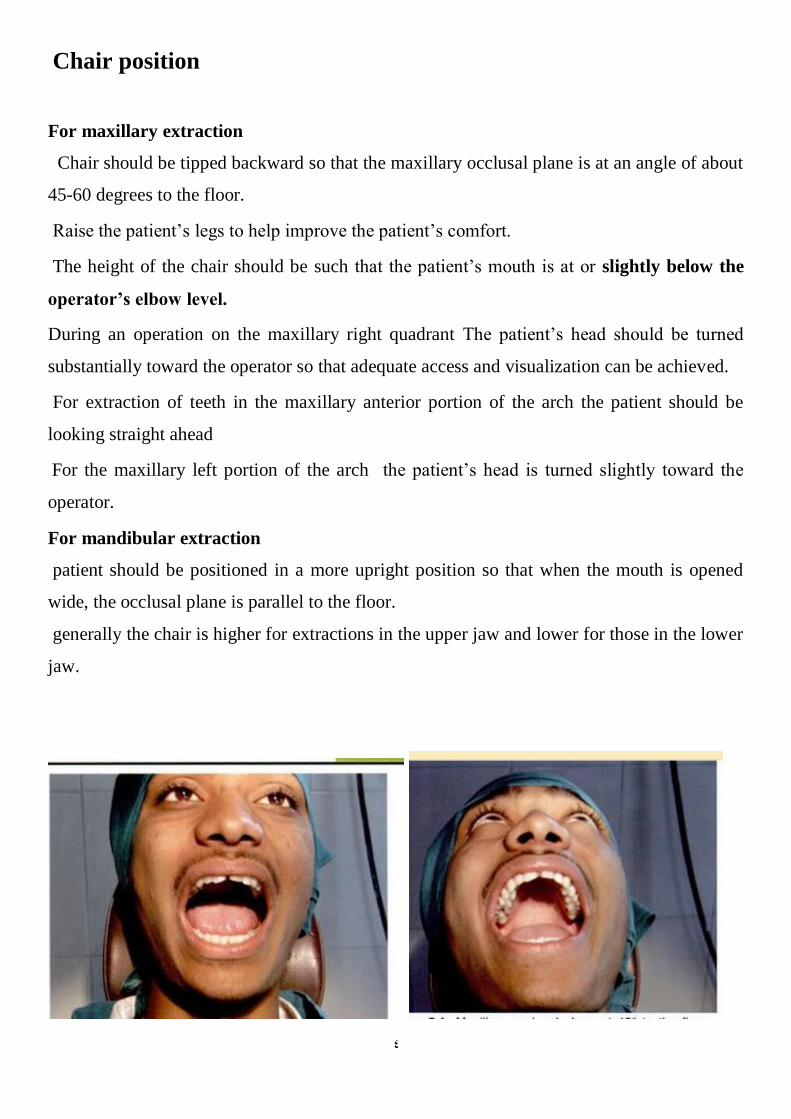
Chair position
For maxillary extraction
Chair should be tipped backward so that the maxillary occlusal plane is at an angle of about
45-60 degrees to the floor.
Raise the patient’s legs to help improve the patient’s comfort.
The height of the chair should be such that the patient’s mouth is at or slightly below the
operator’s elbow level.
During an operation on the maxillary right quadrant The patient’s head should be turned
substantially toward the operator so that adequate access and visualization can be achieved.
For extraction of teeth in the maxillary anterior portion of the arch the patient should be
looking straight ahead
For the maxillary left portion of the arch the patient’s head is turned slightly toward the
operator.
For mandibular extraction
patient should be positioned in a more upright position so that when the mouth is opened
wide, the occlusal plane is parallel to the floor.
generally the chair is higher for extractions in the upper jaw and lower for those in the lower
jaw.
5
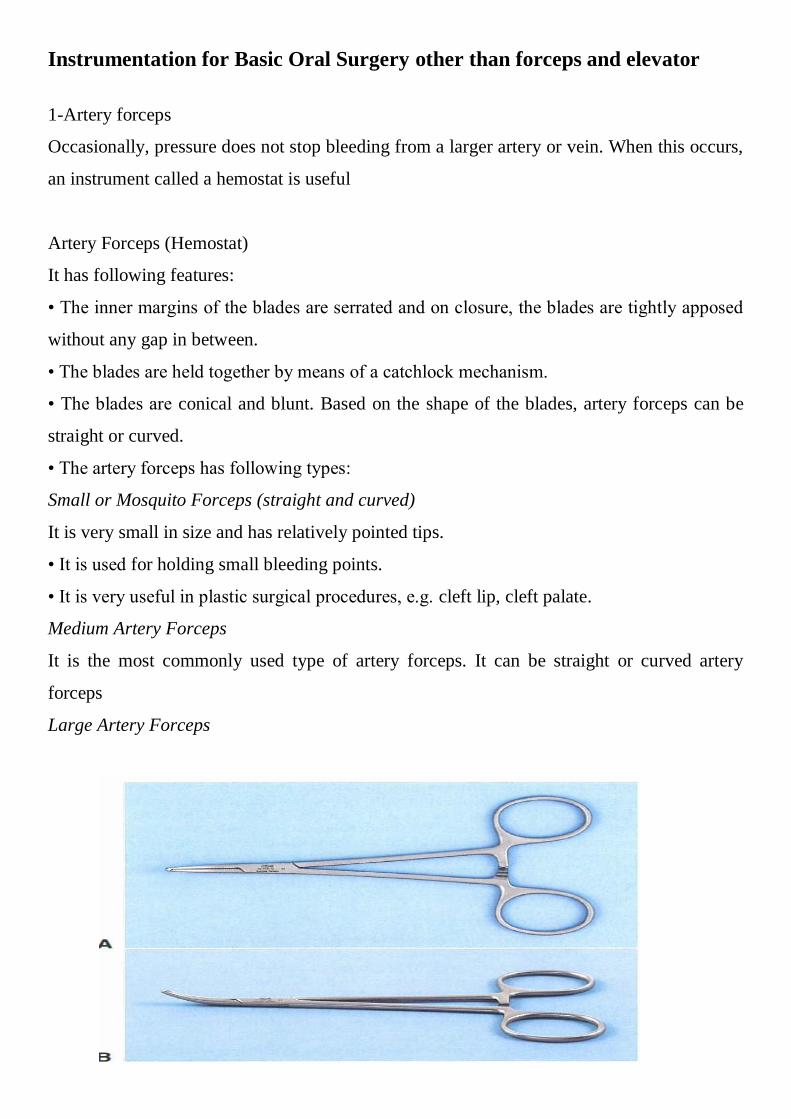
Instrumentation for Basic Oral Surgery other than forceps and elevator
1-Artery forceps
Occasionally, pressure does not stop bleeding from a larger artery or vein. When this occurs,
an instrument called a hemostat is useful
Artery Forceps (Hemostat)
It has following features:
• The inner margins of the blades are serrated and on closure, the blades are tightly apposed
without any gap in between.
• The blades are held together by means of a catchlock mechanism.
• The blades are conical and blunt. Based on the shape of the blades, artery forceps can be
straight or curved.
• The artery forceps has following types:
Small or Mosquito Forceps (straight and curved)
It is very small in size and has relatively pointed tips.
• It is used for holding small bleeding points.
• It is very useful in plastic surgical procedures, e.g. cleft lip, cleft palate.
Medium Artery Forceps
It is the most commonly used type of artery forceps. It can be straight or curved artery
forceps
Large Artery Forceps
6
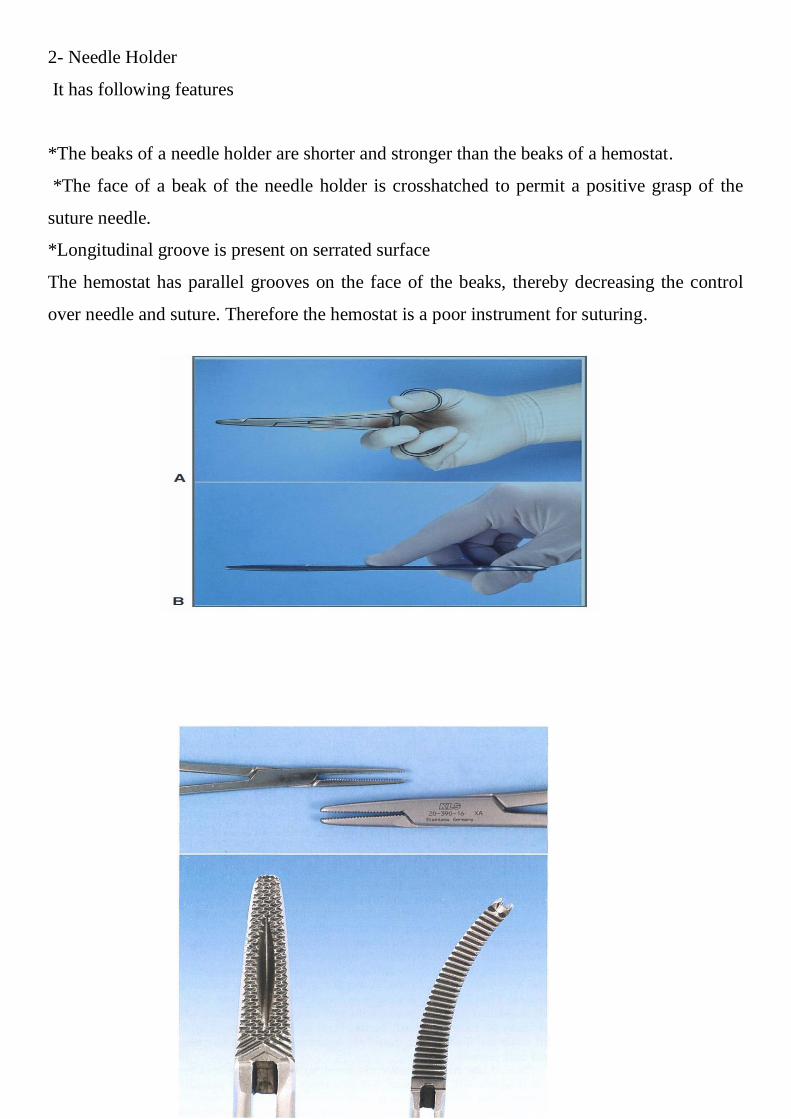
2- Needle Holder
It has following features
*The beaks of a needle holder are shorter and stronger than the beaks of a hemostat.
*The face of a beak of the needle holder is crosshatched to permit a positive grasp of the
suture needle.
*Longitudinal groove is present on serrated surface
The hemostat has parallel grooves on the face of the beaks, thereby decreasing the control
over needle and suture. Therefore the hemostat is a poor instrument for suturing.
7
The needle holder and artery forceps useful in oral surgery to remove granulation tissue
from tooth sockets and to pick up small root tips, pieces of calculus, amalgam, fragments,
and any other small particles that have dropped into the wound or adjacent areas.
3- scalpel and blade
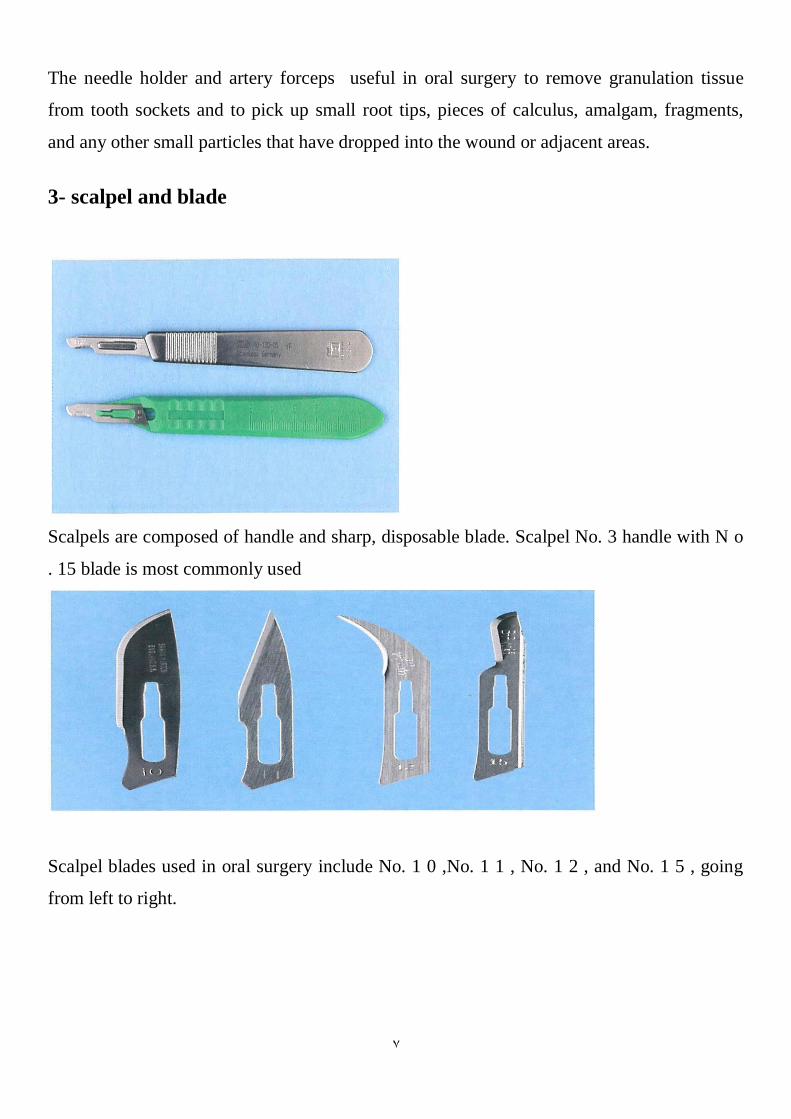
Scalpels are composed of handle and sharp, disposable blade. Scalpel No. 3 handle with N o
. 15 blade is most commonly used
Scalpel blades used in oral surgery include No. 1 0 ,No. 1 1 , No. 1 2 , and No. 1 5 , going
from left to right.
8
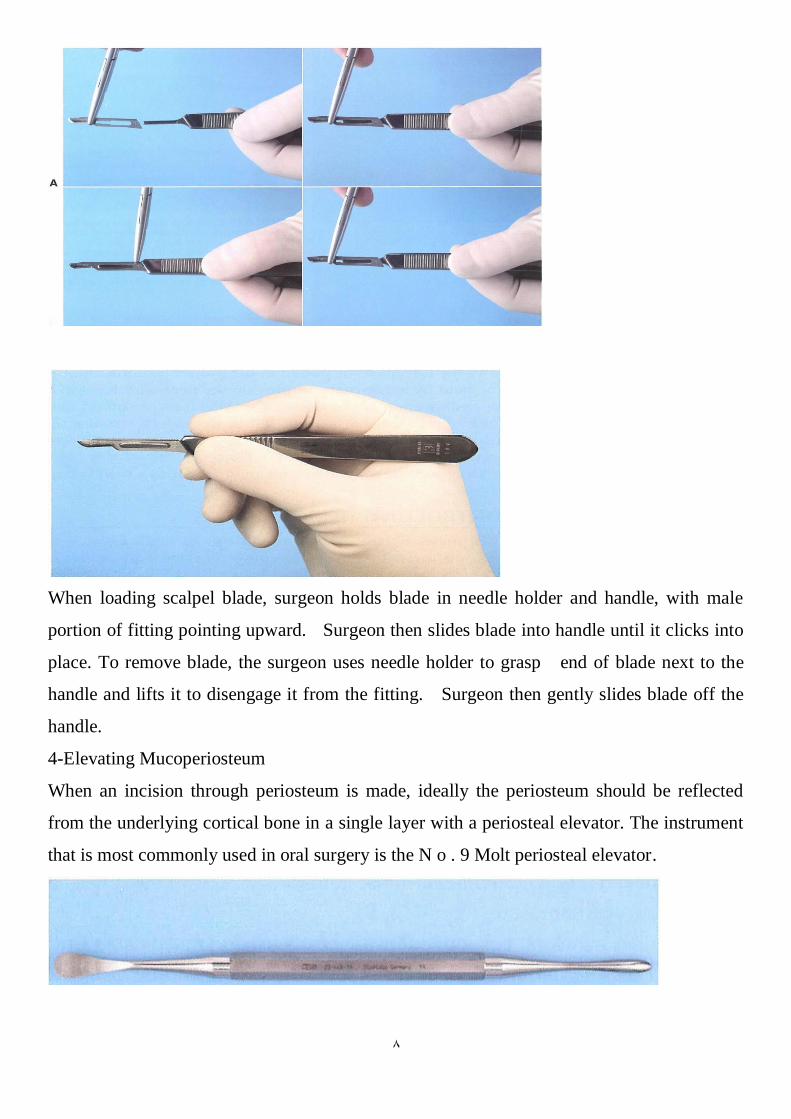
When loading scalpel blade, surgeon holds blade in needle holder and handle, with male
portion of fitting pointing upward. Surgeon then slides blade into handle until it clicks into
place. To remove blade, the surgeon uses needle holder to grasp end of blade next to the
handle and lifts it to disengage it from the fitting. Surgeon then gently slides blade off the
handle.
4-Elevating Mucoperiosteum
When an incision through periosteum is made, ideally the periosteum should be reflected
from the underlying cortical bone in a single layer with a periosteal elevator. The instrument
that is most commonly used in oral surgery is the N o . 9 Molt periosteal elevator.
9
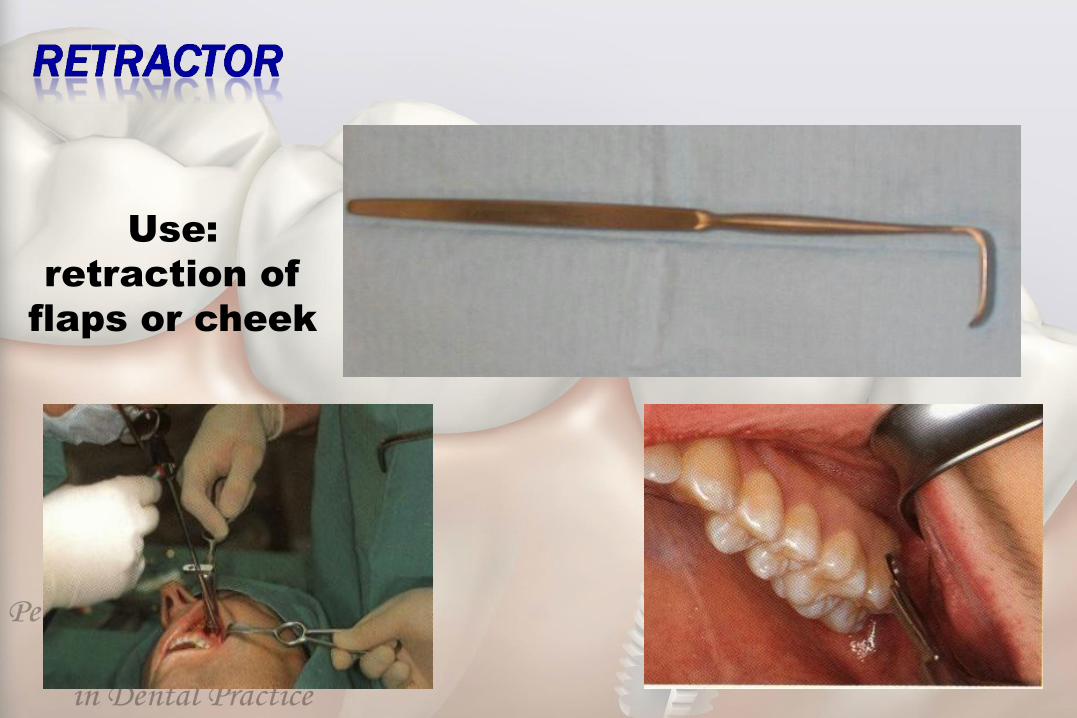
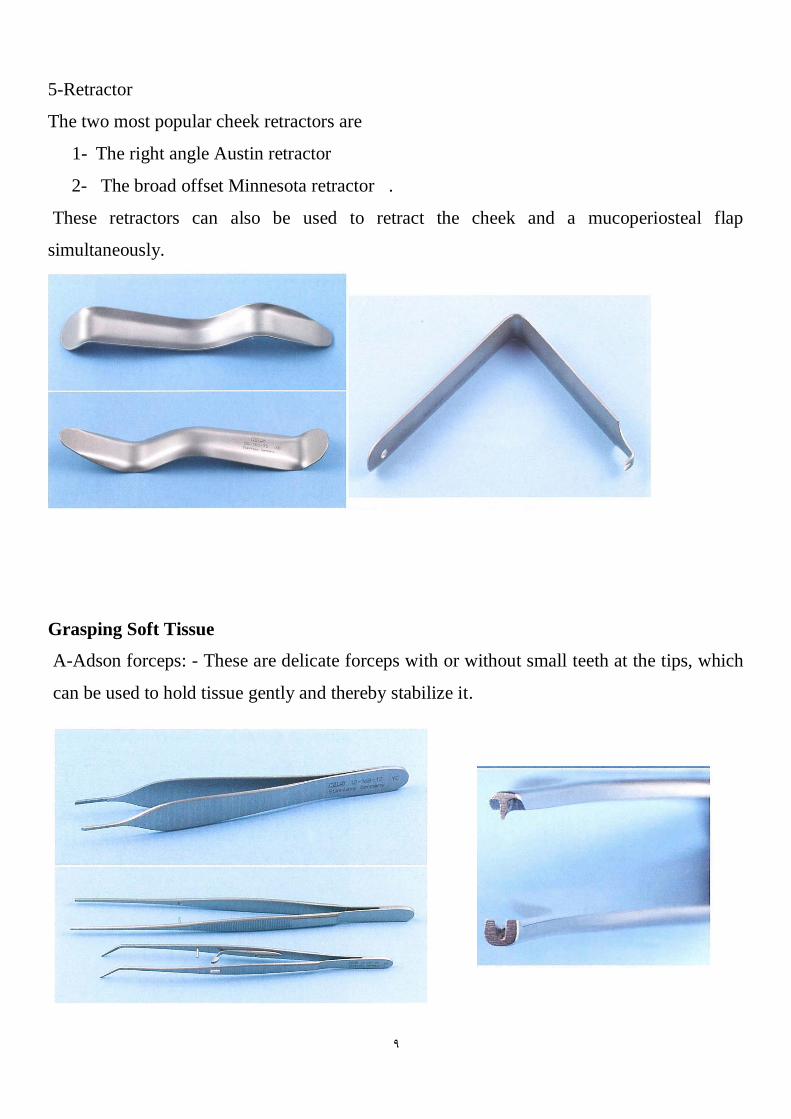
5-Retractor
The two most popular cheek retractors are
1- The right angle Austin retractor
2- The broad offset Minnesota retractor .
These retractors can also be used to retract the cheek and a mucoperiosteal flap
simultaneously.
Grasping Soft Tissue
A-Adson forceps: - These are delicate forceps with or without small teeth at the tips, which
can be used to hold tissue gently and thereby stabilize it.
11
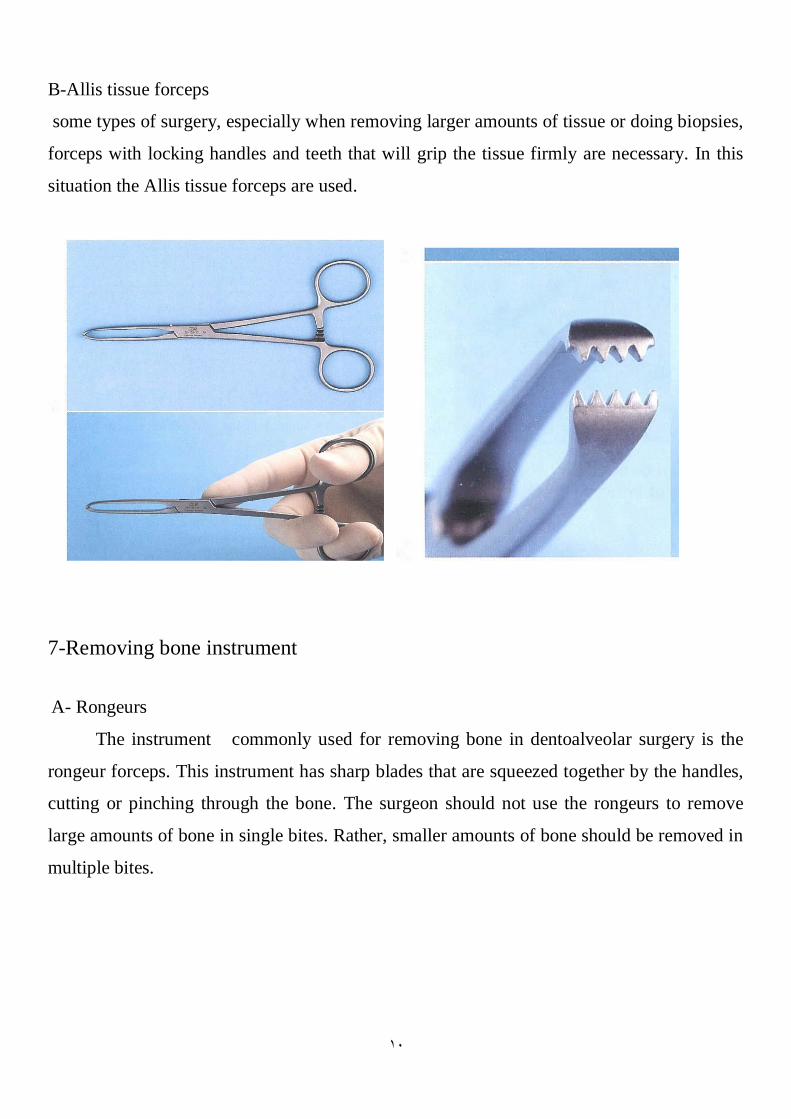
B-Allis tissue forceps
some types of surgery, especially when removing larger amounts of tissue or doing biopsies,
forceps with locking handles and teeth that will grip the tissue firmly are necessary. In this
situation the Allis tissue forceps are used.
7-Removing bone instrument
A- Rongeurs
The instrument commonly used for removing bone in dentoalveolar surgery is the
rongeur forceps. This instrument has sharp blades that are squeezed together by the handles,
cutting or pinching through the bone. The surgeon should not use the rongeurs to remove
large amounts of bone in single bites. Rather, smaller amounts of bone should be removed in
multiple bites.
11
B-Bur and Hand piece
This is the technique that most surgeons use when removing bone for surgical removal
of teeth. High-speed, high torque handpieces with sharp carbide burs remove cortical bone
efficiently. The handpiece must not exhaust air into the operative field, making it unwise to
use typical high-speed turbine drills for routine restorative dentistry. The reason is that the
air exhausted into the wound may be forced into deeper tissue planes and produce tissue
emphysema, a dangerous occurrence.
C-Mallet and Chisel
Occasionally, bone removal is performed using a mallet an chisel

12
D-Bone File
Final smoothing of bone before suturing a mucoperiosteal flap back into position is
usually performed with a small bone file.The bone file cannot be used efficiently for
removal of large amounts of bone; therefore, it is used only for final smoothing.
Scissors
It is used for placing sutures . The scissors are held in the same way as the needle holder.
The two major types of tissue scissors are:
The Iris scissors. It is small, sharp-pointed, delicate tools used for fine work
The Metzenbaum scissors. These scissors can have straight or curved blades also used for
undermining soft tissue and for cutting.
13
Figa.Soft tissue scissors are of two designs: Iris scissors(top) are small, sharp-pointed scissors. Metzenbaum
scissors(bottom) are longer, delicate scissors. Metzenbaum scissors areavailable as either sharp tipped
(shown here) or blunt-tipped.
Postextraction Care of Tooth Socket
After extraction of the tooth, the bottom of the socket is curetted (as long as the tooth is
nonvital) with aperiapical curette, to remove any periapical lesion from the area. Curetting
must be done carefully, because if any remnants of granulation tissue remain in the socket,
there is a chance they will develop into a cyst, because a large percentage contain epithelial
cells.
Afterwards, and only if considered necessary (e.g.,there are sharp bone edges), the alveolar
margin is smoothed using rongeur forceps or a bone file, and then the lingual and buccal
plates are compressed using finger pressure. This is done to restore the expansion of the
socket caused by the extraction, and also for initial control of hemorrhage. Hemostasis is
also aided by the patient applying pressure on gauze placed over the socket for 30–45 min
14
THE TRANSALVEOLAR APPROACH[1]
If it is not possible to remove a tooth (or root) directly from within the socket (what might be
called an intra-alveolar approach), access is made through the side of the alveolus (a
transalveolar approach).
Indications of Transalveolar Extractions
1. Any tooth that is resistant to normal intraalveolar extraction
2. Retained roots or teeth with severe carious destruction that cannot be grasped with
forceps or delivered by an elevator.
3. Impacted teeth
4. Sclerosed, dense and unyielding bone which is resistant to expansion.
5. Hypercementosis and ankylosed teeth.
6. Teeth with anatomic anomalies like dilacerations.
7. Teeth with multiple or unfavorable roots.
8. Any tooth or root close to important structures like maxillary sinus, Mandibular
canal
15
Flap design
There are several principles underlying the design of a mucoperiosteal flap. The flap must:
1. Give adequate access to the site of interest
2. Be designed to maintain a good blood supply
3. be amenable to repair with its margin on sound bone
4. Not risk damage to adjacent structures
5.The vertical releasing incisions always extend to the interdental papilla and never to the
center of the labial or buccal surface of the tooth. This ensures the integrity of the gingiva
proper, because if the incision were to begin at the center of the tooth, contraction after
healing would leave the cervical area of the tooth exposed.
6. A satisfactory surgical field is ensured when the incision extends at least one or two teeth
on either side of the area of bone removal. The fact that the base of the resulting flap is
broader than its free gingival margin ensures the necessary adequate blood supply for the
healing process.
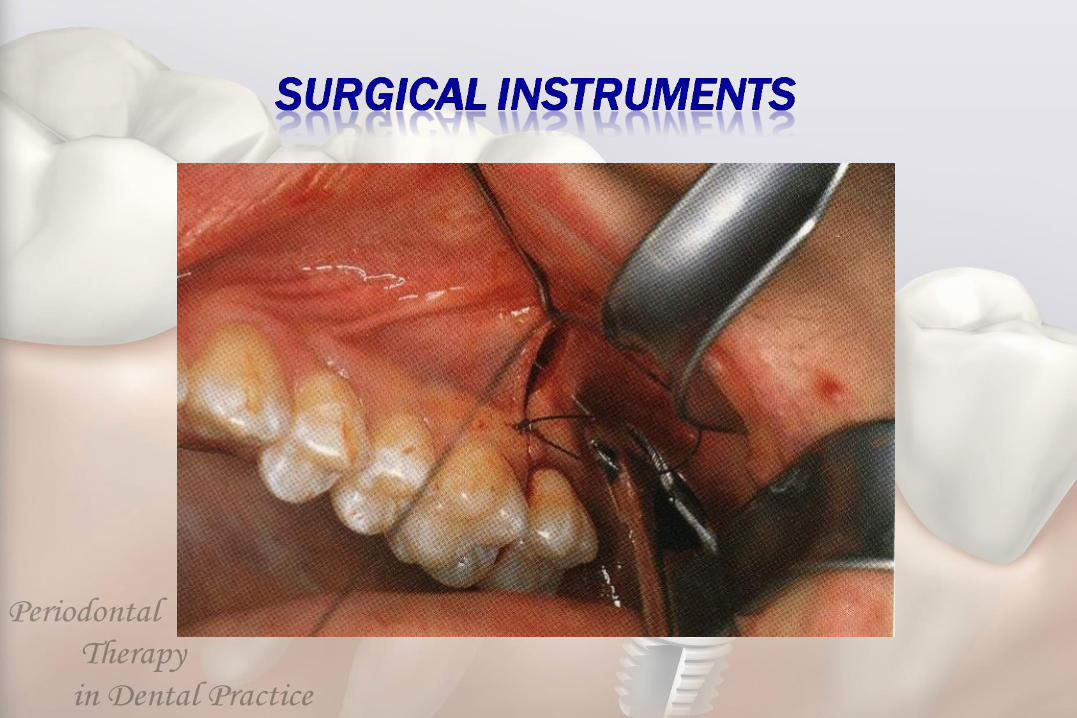
Incision
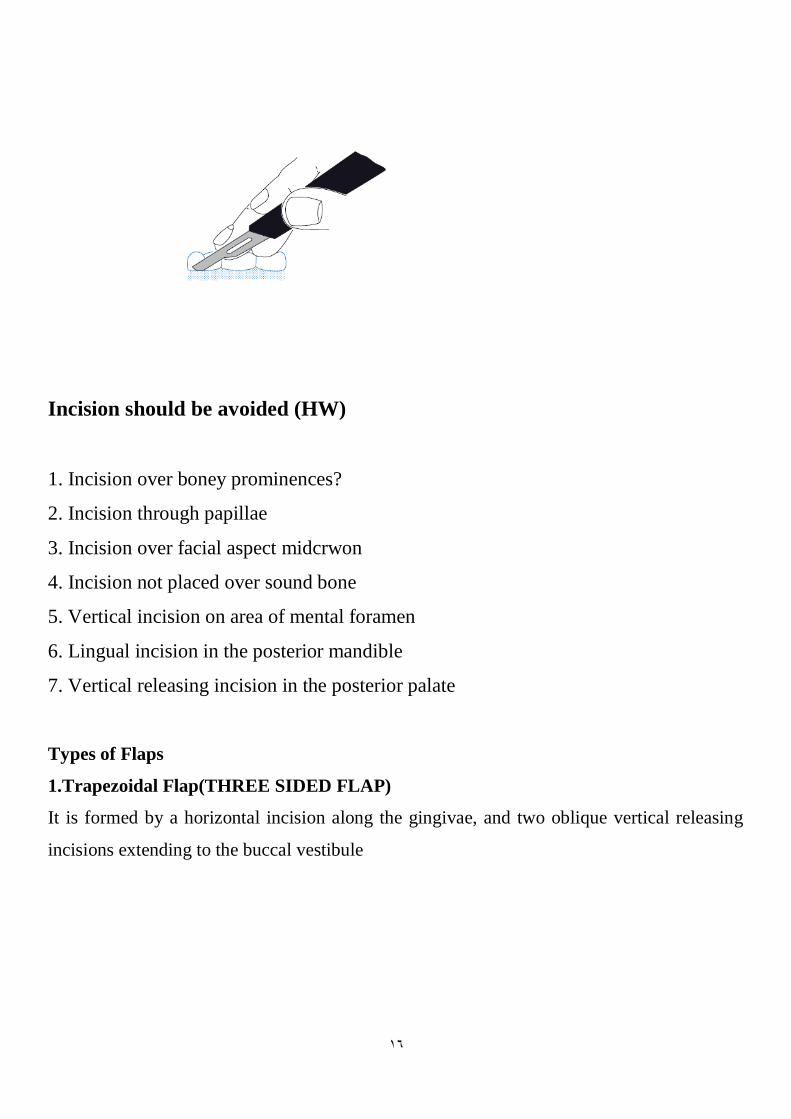
The scalpel is held in a pen - grip and the hand is supported against slipping. The
incision is made with one firm, slow stroke of a sharp blade, which is kept vertical
to the epithelial surface
16
Incision should be avoided (HW)
1. Incision over boney prominences?
2. Incision through papillae
3. Incision over facial aspect midcrwon
4. Incision not placed over sound bone
5. Vertical incision on area of mental foramen
6. Lingual incision in the posterior mandible
7. Vertical releasing incision in the posterior palate
Types of Flaps
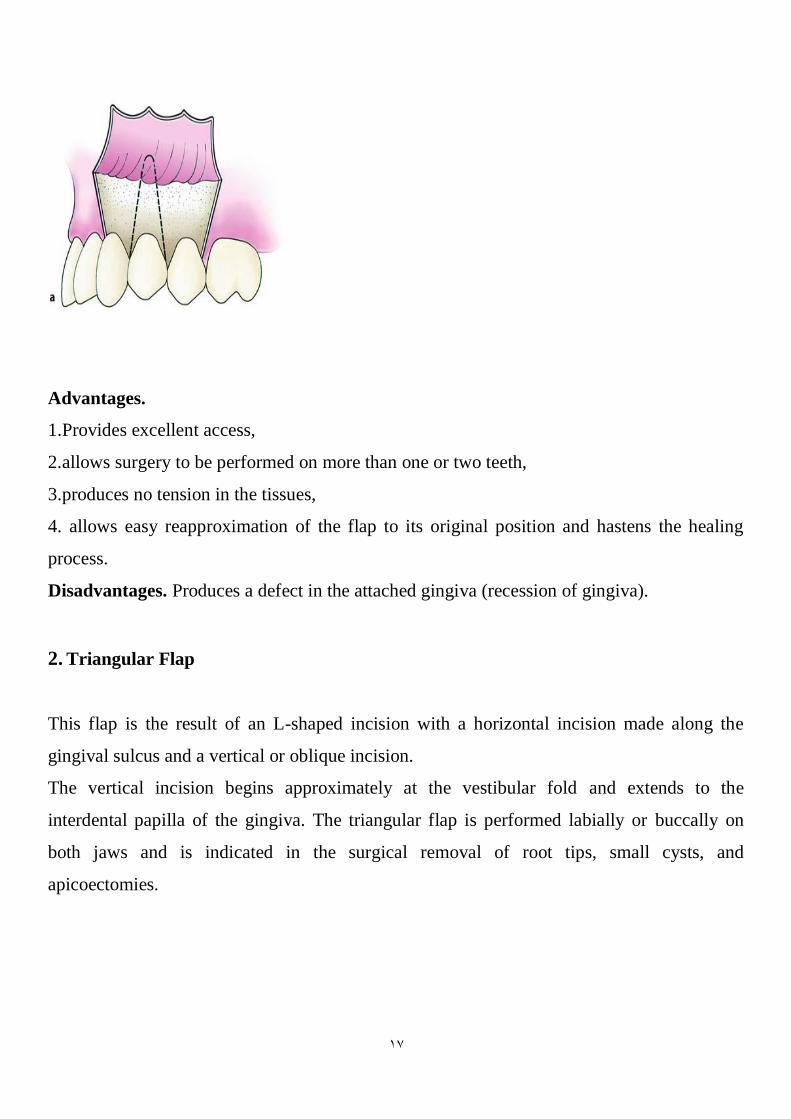
1.Trapezoidal Flap(THREE SIDED FLAP)
It is formed by a horizontal incision along the gingivae, and two oblique vertical releasing
incisions extending to the buccal vestibule
17
Advantages.
1.Provides excellent access,
2.allows surgery to be performed on more than one or two teeth,
3.produces no tension in the tissues,
4. allows easy reapproximation of the flap to its original position and hastens the healing
process.
Disadvantages. Produces a defect in the attached gingiva (recession of gingiva).
2. Triangular Flap
This flap is the result of an L-shaped incision with a horizontal incision made along the
gingival sulcus and a vertical or oblique incision.
The vertical incision begins approximately at the vestibular fold and extends to the
interdental papilla of the gingiva. The triangular flap is performed labially or buccally on
both jaws and is indicated in the surgical removal of root tips, small cysts, and
apicoectomies.
18
Advantages. Ensures an adequate blood supply, satisfactory visualization, very good
stability and reapproximation; it is easily modified with a small releasing incision, or an
additional vertical incision, or even lengthening of the horizontal incision.
Disadvantages. Limited access to long roots, tensions created when the flap is held with a
retractor, and it causes a defect in the attached gingiva.
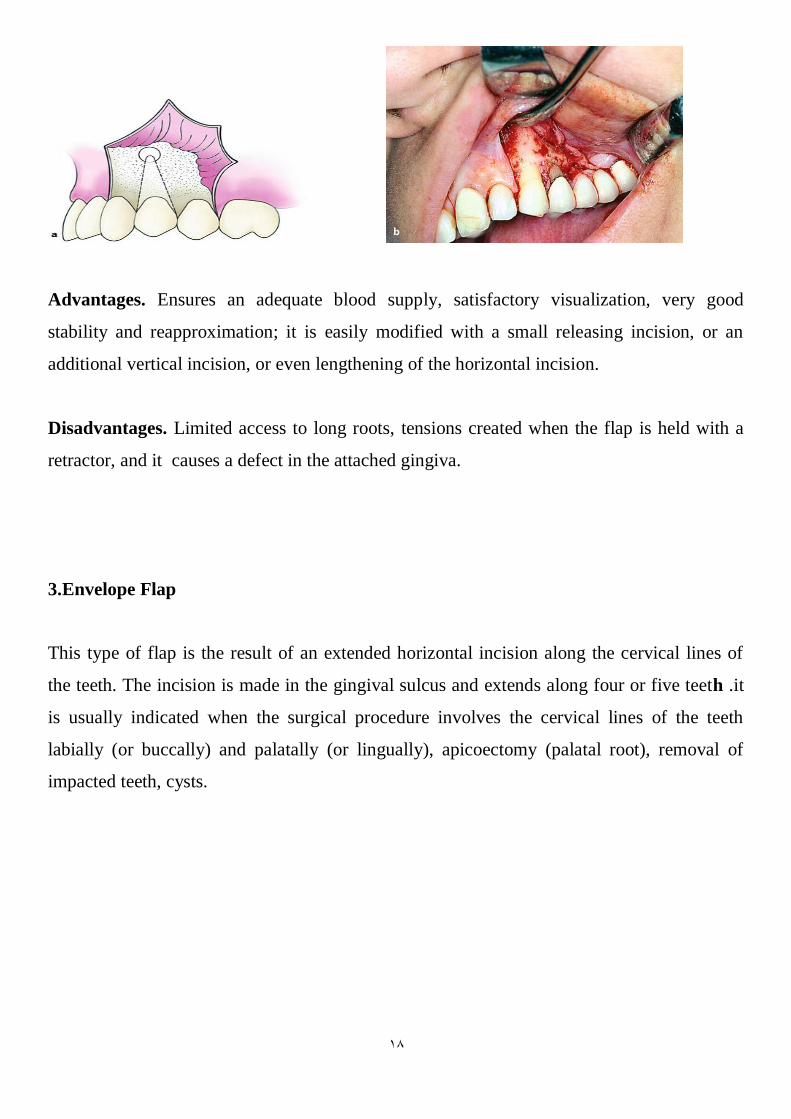
3.Envelope Flap
This type of flap is the result of an extended horizontal incision along the cervical lines of
the teeth. The incision is made in the gingival sulcus and extends along four or five teeth .it
is usually indicated when the surgical procedure involves the cervical lines of the teeth
labially (or buccally) and palatally (or lingually), apicoectomy (palatal root), removal of
impacted teeth, cysts.
19
Advantages. Avoidance of vertical incision and easy reapproximation to original position.
Disadvantages.
Difficult reflection (mainly palatally),
great tension with a risk of the ends tearing,
limited visualization in apicoectomies,
limited access,
possibility of injury of palatal vessels and nerves,
defect of attached gingiva.
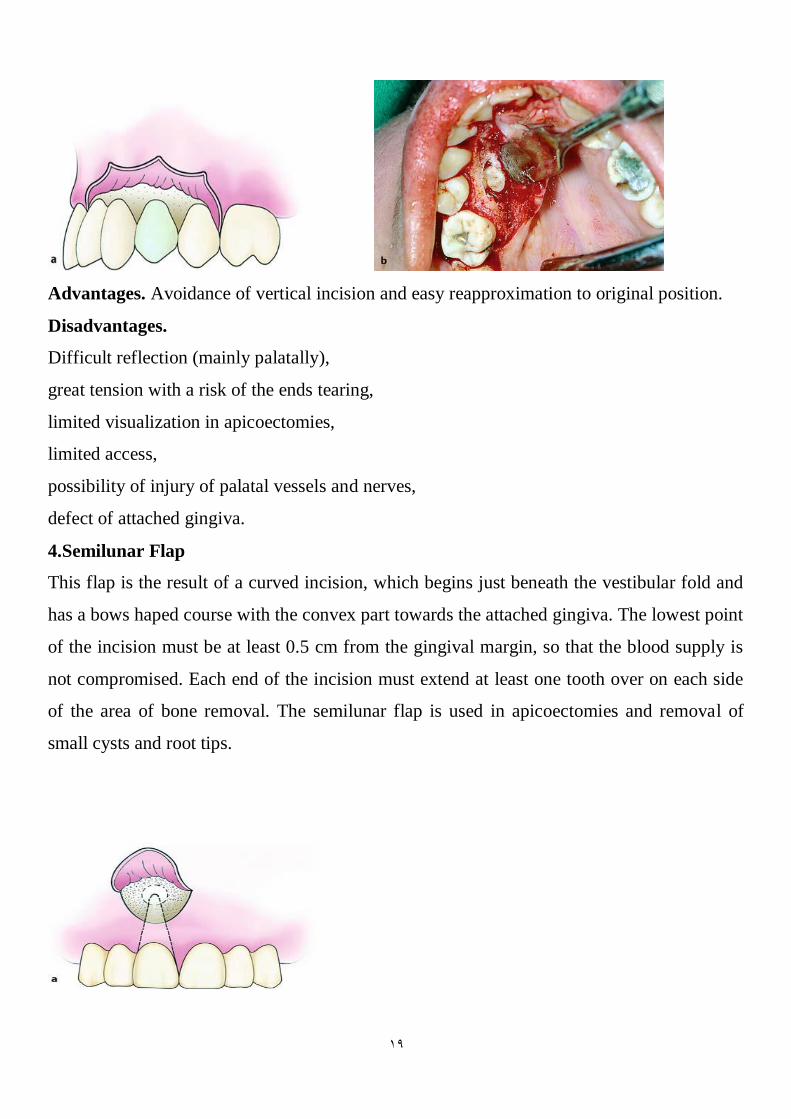
4.Semilunar Flap
This flap is the result of a curved incision, which begins just beneath the vestibular fold and
has a bows haped course with the convex part towards the attached gingiva. The lowest point
of the incision must be at least 0.5 cm from the gingival margin, so that the blood supply is
not compromised. Each end of the incision must extend at least one tooth over on each side
of the area of bone removal. The semilunar flap is used in apicoectomies and removal of
small cysts and root tips.
21
Advantages. Avoidance of vertical incision and easy reapproximation to original position.
Disadvantages. Difficult reflection (mainly palatally),
great tension with a risk of the ends tearing,
limited visualization in apicoectomies,
limited access,
possibility of injury of palatal vessels and nerves,
defect of attached gingiva
Postoperative Instructions
� Analgesia: Take a painkiller .
� Edema: After the surgical procedure, the extraoral placement of cold compresses (ice pack
wrapped in a towel) over the surgical area is recommended.This should last for 10–15 min at
a time, and be repeated every half hour, for at least 4–6 h.
� Bleeding: The patient must bite firmly on gauze placed over the wound for 30–45 min. In
case bleeding continues, another gauze is placed over the wound for a further hour.
� Antibiotics: These are prescribed only if the patient has certain medical conditions or
inflammation
� Diet: The patient’s diet on the day of the surgical procedure must consist of cold, liquid
foods (pudding,yogurt,milk, cold soup, orange juice, etc.).
� Oral hygiene: Rinsing the mouth is not allowed for the first 24 h. After this, the mouth
may be rinsed with warm or salt water, three times a day for 3–4 days. The teeth should be
brushed with a toothbrush and flossed, but the patient should avoid the area of surgery.
� Removal of sutures: If sutures were placed on the wound, the patient must have the
removed a week later

21


