Embed Size (px)
Citation preview
Table of Contents
Introduction 3
Prerequisites 3
Limitations 3
Basic Workflow 3
Best Practices 4
GCP Objects and Terms 4
Infoblox vNIOS for GCP Use Cases 4
The DNS and RPZ Services Use Case 5
The Fault Tolerance and Disaster Recovery Use Case 5
DHCP Service for On-Premises Clients 5
The Maximum Availability Use Case 5
Install GCP Command Line Tools 5
GCloud CLI 5
GSUTIL 6
Prepare your GCP Environment 6
Create VPCs 6
Create Firewall Rules 9
Create Outbound Rules 9
Create Inbound Rules 11
Infoblox vNIOS for GCP Image 13
Download vNIOS for GCP Image 13
Upload Infoblox vNIOS for GCP Image File 15
Create Bucket 15
Upload Image File to Bucket 18
Create Infoblox vNIOS for GCP Custom Image 19
Infoblox Deployment Guide: Infoblox vNIOS for Google Cloud Platform (GCP) (June 2022)1
Deploy Infoblox vNIOS for GCP Instance 21
Configure Instance Size and Image 21
Configure User Data 24
Configure Network Interface(s) 25
Single Network Interface (NIOS 8.6) 25
Two Network Interfaces 27
Shared VPC (NIOS 8.6) 31
Connecting to Infoblox vNIOS for GCP Instance 33
Virtual Serial Port 33
SSH 36
Grid Manager 37
Troubleshooting 38
Additional Resources 38
Infoblox Deployment Guide: Infoblox vNIOS for Google Cloud Platform (GCP) (June 2022)2
IntroductionInfoblox vNIOS for Google Cloud Platform (GCP) is a virtualized Infoblox appliance designed for deployment asa virtual machine (VM) instance in Google Cloud Platform.
Infoblox vNIOS for GCP enables you to deploy robust, manageable, and cost effective Infoblox appliances inthe Google Cloud. Infoblox NIOS is the underlying software running on Infoblox appliances and provides corenetwork services and a framework for integrating all the components of the modular Infoblox solution. Itprovides integrated, secure, and easy-to-manage DNS (Domain Name System), IPAM (IP addressmanagement), DHCP (Dynamic Host Configuration Protocol) and other services.
Infoblox vNIOS for GCP appliances can either be joined to an existing on-premises or hybrid/multi cloud grid, orthe entire grid can run in GCP. The vNIOS appliance can be configured as a primary DNS server for your GCPVPCs. You can also use Infoblox Cloud Network Automation with vNIOS for GCP to improve visibility of cloudresources and increase the flexibility of your cloud environment.
PrerequisitesThe following are prerequisites for deploying an Infoblox vNIOS for GCP appliance:
● Valid subscription in GCP.● Appropriate permissions in GCP to create a VM instance and other required resources.● Infoblox Support account at https://support.infoblox.com.● Understanding of basic networking concepts and tools, including public and private IP addressing,
DNS, Secure Shell (SSH), and command line/terminal applications.
LimitationsThe following general limitations apply for Infoblox vNIOS for GCP appliances:
● Only provides the LAN1 and MGMT (not enabled by default) interfaces.
● No High Availability (HA) support.
● No native GCP support for Anycast with NIOS.
● DHCP can be served for on-prem clients only, not for clients running in GCP.
Basic WorkflowThe following bullet points provide a basic outline of steps that an administrator new to GCP may follow whencreating an Infoblox vNIOS VM:
● Install GCloud CLI and gsutil.
● Navigate to GCP: https://console.cloud.google.com/.
● Create one or two new VPCs and Subnets (NIOS 8.5 and 8.4 require two network interfaces, each in aseparate VPC. Starting with NIOS 8.6, you can deploy one or two network interfaces).
● Upload image file and Create custom image.
● Launch your Infoblox vNIOS for GCP appliance using the custom image.
● Once the Infoblox vNIOS for GCP appliance has successfully deployed, verify its IP configuration.
● Connect to the Infoblox vNIOS for GCP appliance and begin using it.
Infoblox Deployment Guide: Infoblox vNIOS for Google Cloud Platform (GCP) (June 2022)3
Best Practices● For maximum availability, Infoblox appliances should be deployed across as many different Availability
Zones and Regions as needed.
● Promptly change the default admin password in NIOS.
● Use Name Server Groups to simplify name server assignments for DNS configurations.
GCP Objects and TermsBefore implementing Infoblox vNIOS for GCP, an administrator should understand common terms or objectsavailable in GCP related to the implementation of vNIOS. The following are common objects and terms:
● VPC: Virtual Private Clouds provide network functionality for Compute Engine and other resources.Networks and subnets are found within VPCs.
● Shared VPC: Shared VPCs allow resources from multiple projects to connect to a central VPCnetwork, providing connectivity between all resources using private IP addresses.
● Persistent Disk: Block storage used for virtual machine instance disks.
● Cloud Storage: Object storage with options suitable for many use-cases.
● Instance Availability Policies: Used to control a VM’s maintenance or restart behavior.
● GCloud CLI: A CLI tool installed locally that enables you to script operations and to create andmanage services and resources in GCP.
● GSUTIL: A CLI tool for managing Google Storage resources.
● Instance: A virtual machine (VM) deployed in GCP.
● Compute Engine: Infrastructure as a Service (IaaS) offering on Google Cloud that provides VMs andother compute workloads.
● Bucket: Basic organizational containers that hold data and objects in Google Cloud storage.
● Region: A collection of datacenters in a specific geographic area where you can choose to hostresources.
● Zone: Often referred to as an Availability Zone. An isolated location within a Region. Some resources,such as VM instances are zonal, meaning they are contained in a single zone. Other resources,including subnets span multiple zones in a region.
● Cloud Interconnect: A highly available, low latency connection between your on-premises networkand Google Cloud. Can also connect through a partner service provider.
Source: https://cloud.google.com/docs/
Infoblox vNIOS for GCP Use CasesThe following are common use cases for the Infoblox vNIOS for GCP appliance:
● Providing DNS and RPZ/DNS Firewall services from within the Google Cloud for GCP, on-prem, andother cloud-based clients.
● Expanding services to the GCP cloud for additional fault tolerance and disaster recovery (DR)purposes.
● Providing services with maximum availability across multiple zones and regions.
Infoblox Deployment Guide: Infoblox vNIOS for Google Cloud Platform (GCP) (June 2022)4
The DNS and RPZ Services Use CaseIn this use case, DNS and RPZ services are hosted in GCP. This enables you to distribute enterprise DNSservices for clients operating in GCP, on-prem, and across the Internet. One or more Infoblox vNIOS for GCPappliances are deployed in GCP across as many different zones and regions as feasible. These appliances canalso be integrated with an existing Grid, either on-prem or in the cloud. Clients are then updated to use yourInfoblox vNIOS for GCP appliance(s) for DNS resolution, providing them with your enterprise DNS and RPZservices.
The Fault Tolerance and Disaster Recovery Use CaseThis use case is for Fault Tolerance and Disaster Recovery. In case of failure in the Primary Datacenter (poweroutage, network outage, or other critical failure) an Infoblox vNIOS for GCP appliance enabled as a Grid MasterCandidate (GMC) can be promoted to the Grid Master role so that Grid services can continue to operate. DNSservices can also be redirected to servers operating in GCP, possibly without even requiring any manualintervention and helping ensure that business continues to function.
DHCP Service for On-Premises ClientsA vNIOS appliance running on GCP can provide DHCP service for your on-premises clients. This DHCPappliance can serve as your primary DHCP server or be configured as part of a failover pair with a NIOS DHCPserver running on-premises for a hybrid, survivable solution. Two vNIOS appliances, each running in GCPcould also be configured for DHCP failover for highly available, fault tolerant DHCP services. Using a vNIOSappliance running on GCP for DHCP requires using DHCP Relay or IP Helper on your router or layer 3 switchto send DHCP traffic from your on-premises network to your GCP VPC.
The Maximum Availability Use CaseIn many cases, it can be a challenge to implement services in a way that maximizes availability across adistributed environment in a secure manner and without deploying more resources than are required. Onemethod for accomplishing this may be by leveraging a ‘shared services VPC Network’ where critical services,including your Infoblox servers, operate from. VPC Network Peering can be used to connect other VPCNetworks to the management VPC Network.
This allows for seamless communications between those VPC Networks and the shared services VPCNetwork, without allowing connectivity between the other subnets. Traditional routing and/or VPN’s can also beused to allow connectivity into the shared services VPC Network for VPC Networks which cannot leverage VPCNetwork Peering, or even from networks outside of GCP.
Install GCP Command Line ToolsUploading and creating the custom image used to deploy vNIOS in GCP requires the use of GCP commandline tools. This section describes how to install these tools prior to starting deployment.
GCloud CLIOne tool that is required is the GCloud CLI. The steps to install the GCloud CLI will vary depending onyour operating system. Visit https://cloud.google.com/sdk/gcloud/ for installation instructions and todownload the installer for your operating system.
Infoblox Deployment Guide: Infoblox vNIOS for Google Cloud Platform (GCP) (June 2022)5
Make sure to install the GCloud CLI before proceeding through this guide. Once installed, run the commandgcloud auth login to login and start your session. This will open a browser window. Follow the prompts tocomplete the login process.
GSUTILAnother tool that is optional here is the GSUTIL (Google Storage Utilities), an open-source projectavailable on GitHub. This command line tool is used to interact with GCP storage objects and buckets.The project page can be found at https://github.com/GoogleCloudPlatform/gsutil/.
Installation instructions will vary depending on your operating system version and can be found athttps://cloud.google.com/storage/docs/gsutil_install.
For additional references and usage information, visit https://cloud.google.com/storage/docs/gsutil.
Prepare your GCP EnvironmentOnce you install the necessary tools and login to your GCP account, you are ready to begin setup of resourcessuch as the VPC networks and Firewall rules. These will be required before you can deploy and use any virtualmachines.
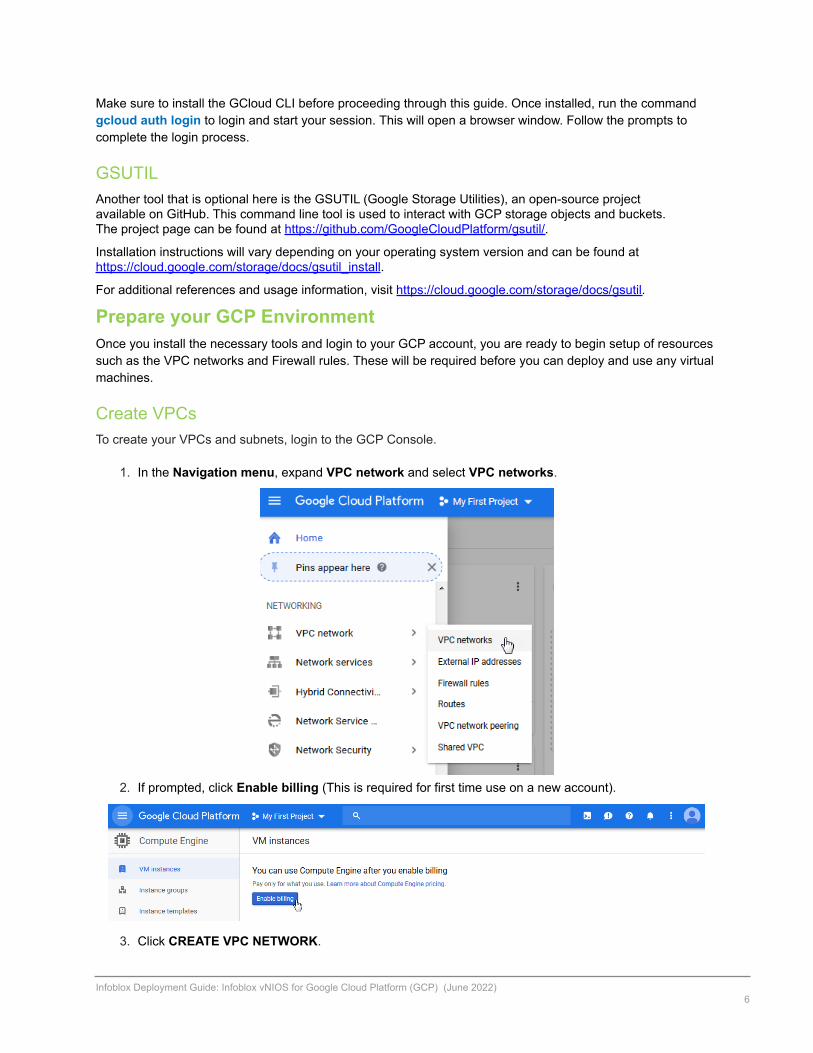
Create VPCsTo create your VPCs and subnets, login to the GCP Console.
1. In the Navigation menu, expand VPC network and select VPC networks.
2. If prompted, click Enable billing (This is required for first time use on a new account).
3. Click CREATE VPC NETWORK.
Infoblox Deployment Guide: Infoblox vNIOS for Google Cloud Platform (GCP) (June 2022)6
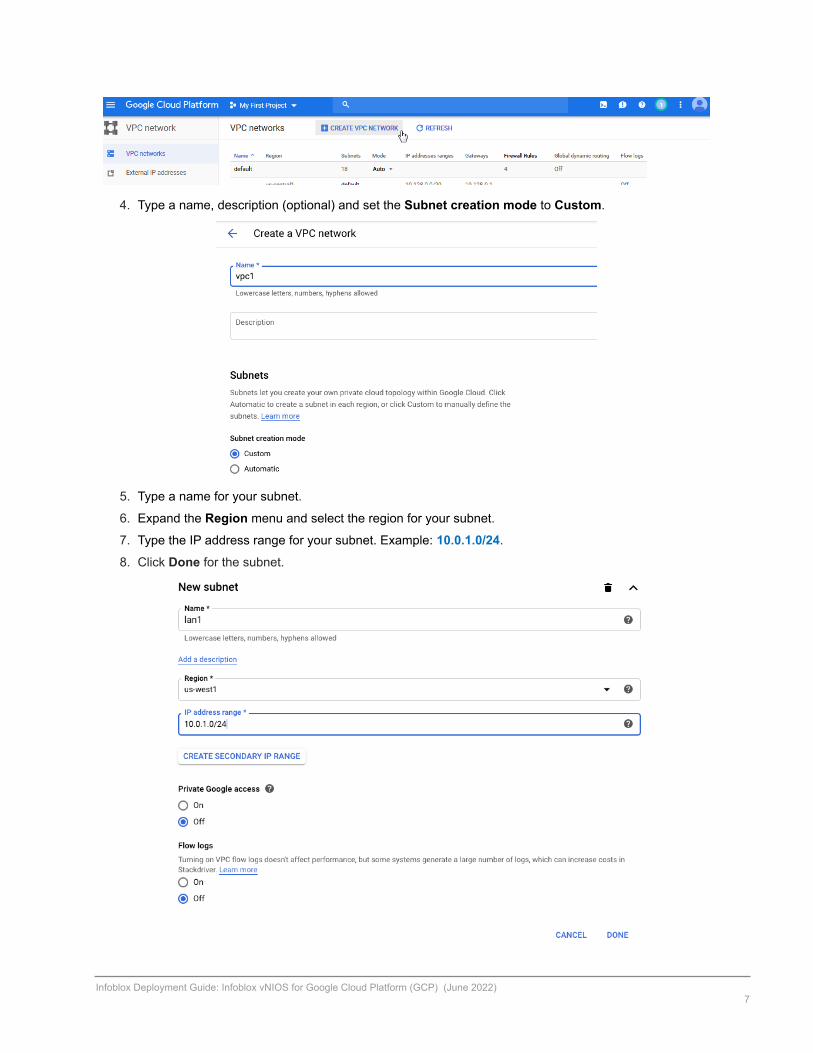
4. Type a name, description (optional) and set the Subnet creation mode to Custom.
5. Type a name for your subnet.
6. Expand the Region menu and select the region for your subnet.
7. Type the IP address range for your subnet. Example: 10.0.1.0/24.
8. Click Done for the subnet.
Infoblox Deployment Guide: Infoblox vNIOS for Google Cloud Platform (GCP) (June 2022)7
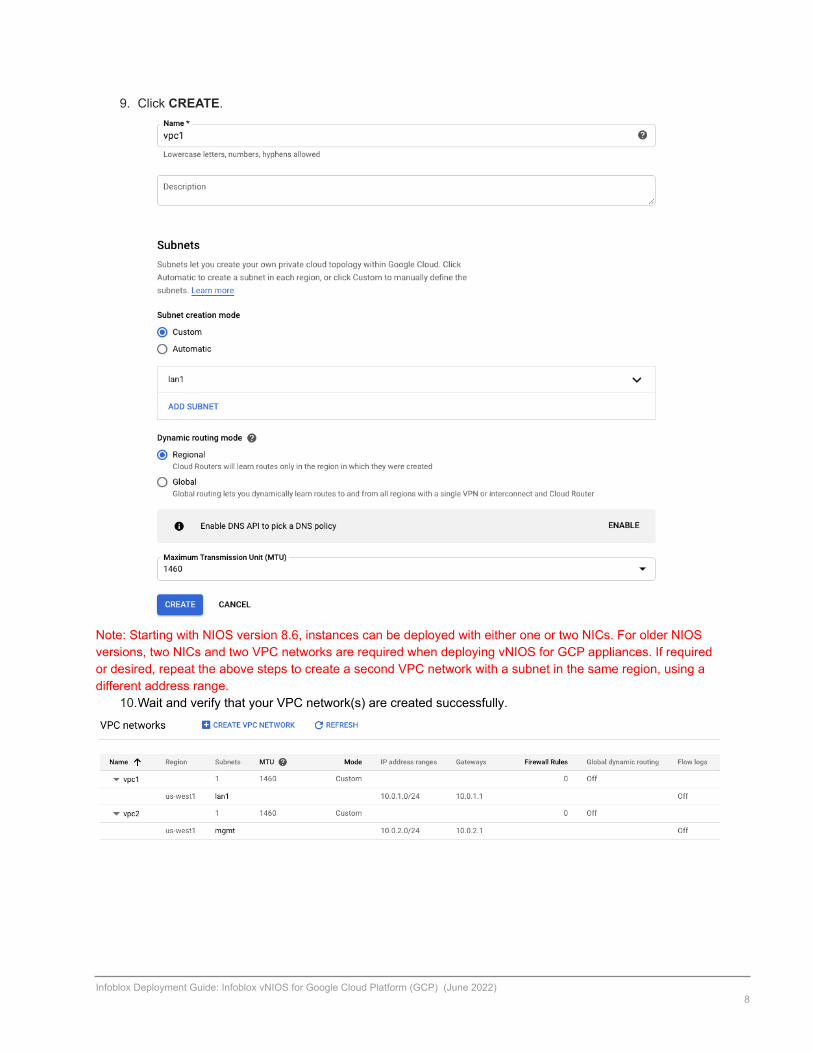
9. Click CREATE.
Note: Starting with NIOS version 8.6, instances can be deployed with either one or two NICs. For older NIOSversions, two NICs and two VPC networks are required when deploying vNIOS for GCP appliances. If requiredor desired, repeat the above steps to create a second VPC network with a subnet in the same region, using adifferent address range.
10.Wait and verify that your VPC network(s) are created successfully.
Infoblox Deployment Guide: Infoblox vNIOS for Google Cloud Platform (GCP) (June 2022)8
Create Firewall RulesThe firewall rules are used to control network access into and out of your VPC networks. In this example, wewalk through the steps to create a rule to allow all egress (outbound) traffic from your Infoblox vNIOS for GCPinstance and a rule to allow ingress (inbound) traffic on specific ports.
Note: Examples shown here are overly permissive, allowing traffic from any IP, and are for example purposeonly. Use best practices in your environment, allowing only the minimal traffic necessary.
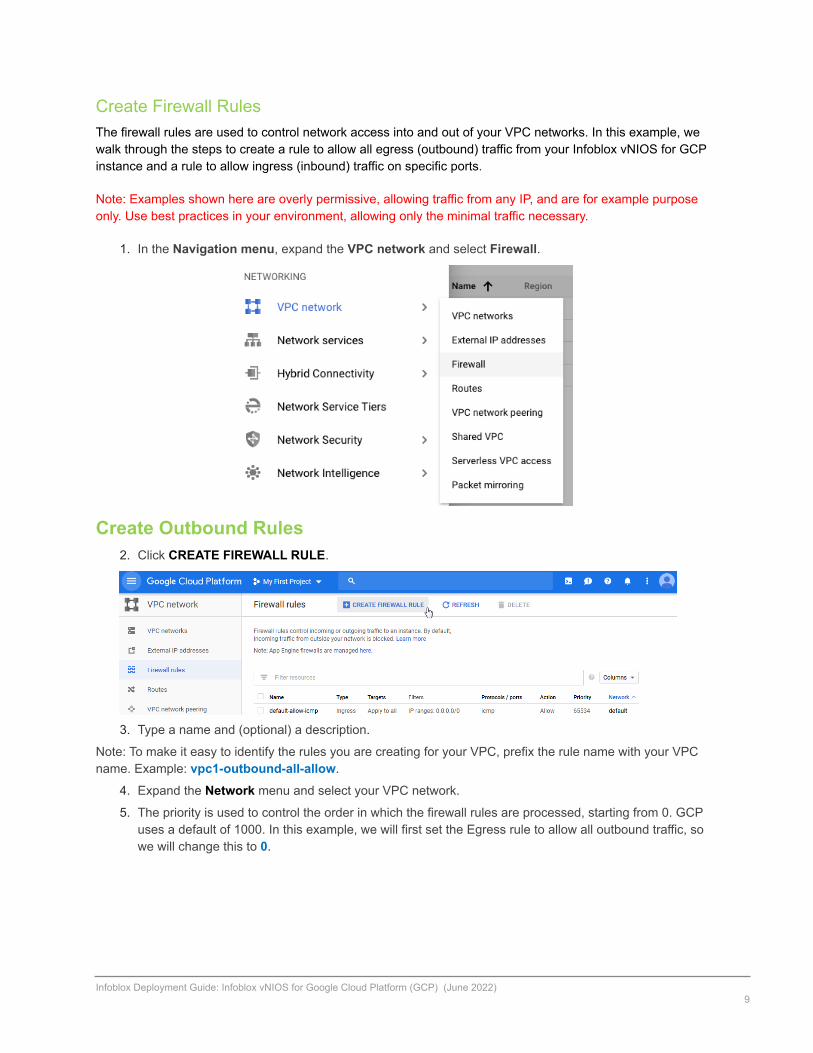
1. In the Navigation menu, expand the VPC network and select Firewall.
Create Outbound Rules2. Click CREATE FIREWALL RULE.
3. Type a name and (optional) a description.
Note: To make it easy to identify the rules you are creating for your VPC, prefix the rule name with your VPCname. Example: vpc1-outbound-all-allow.
4. Expand the Network menu and select your VPC network.
5. The priority is used to control the order in which the firewall rules are processed, starting from 0. GCPuses a default of 1000. In this example, we will first set the Egress rule to allow all outbound traffic, sowe will change this to 0.
Infoblox Deployment Guide: Infoblox vNIOS for Google Cloud Platform (GCP) (June 2022)9
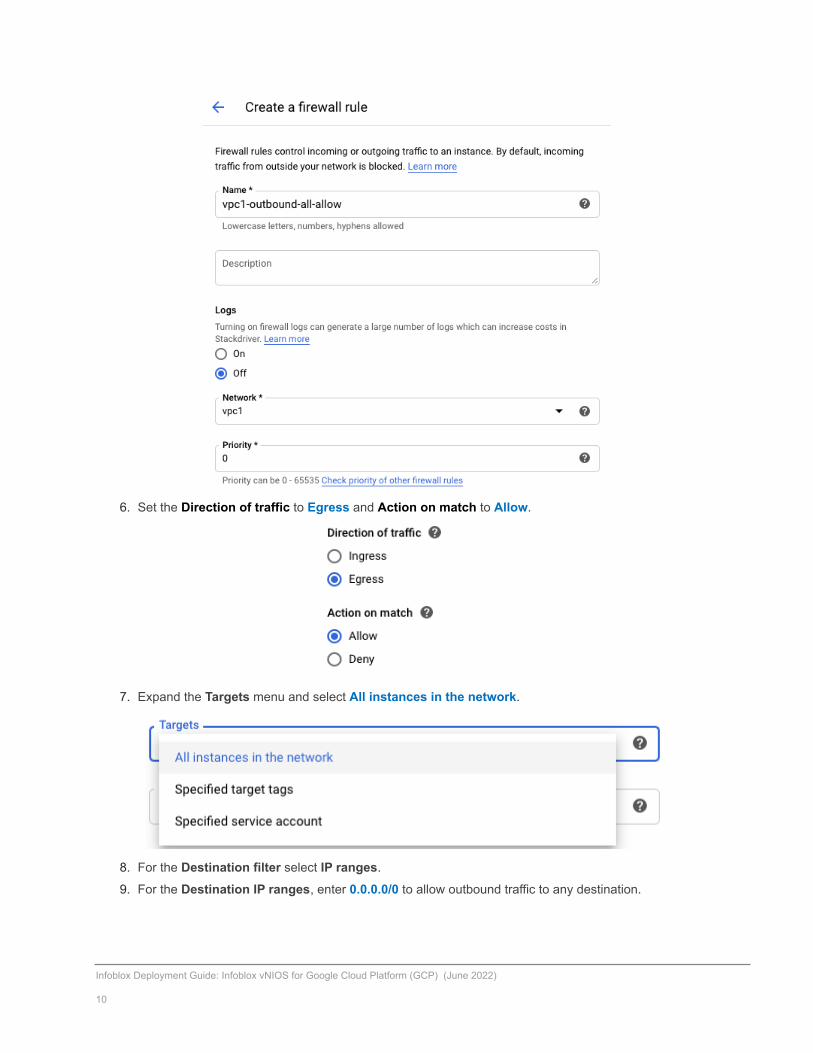
6. Set the Direction of traffic to Egress and Action on match to Allow.
7. Expand the Targets menu and select All instances in the network.
8. For the Destination filter select IP ranges.
9. For the Destination IP ranges, enter 0.0.0.0/0 to allow outbound traffic to any destination.
Infoblox Deployment Guide: Infoblox vNIOS for Google Cloud Platform (GCP) (June 2022)
10
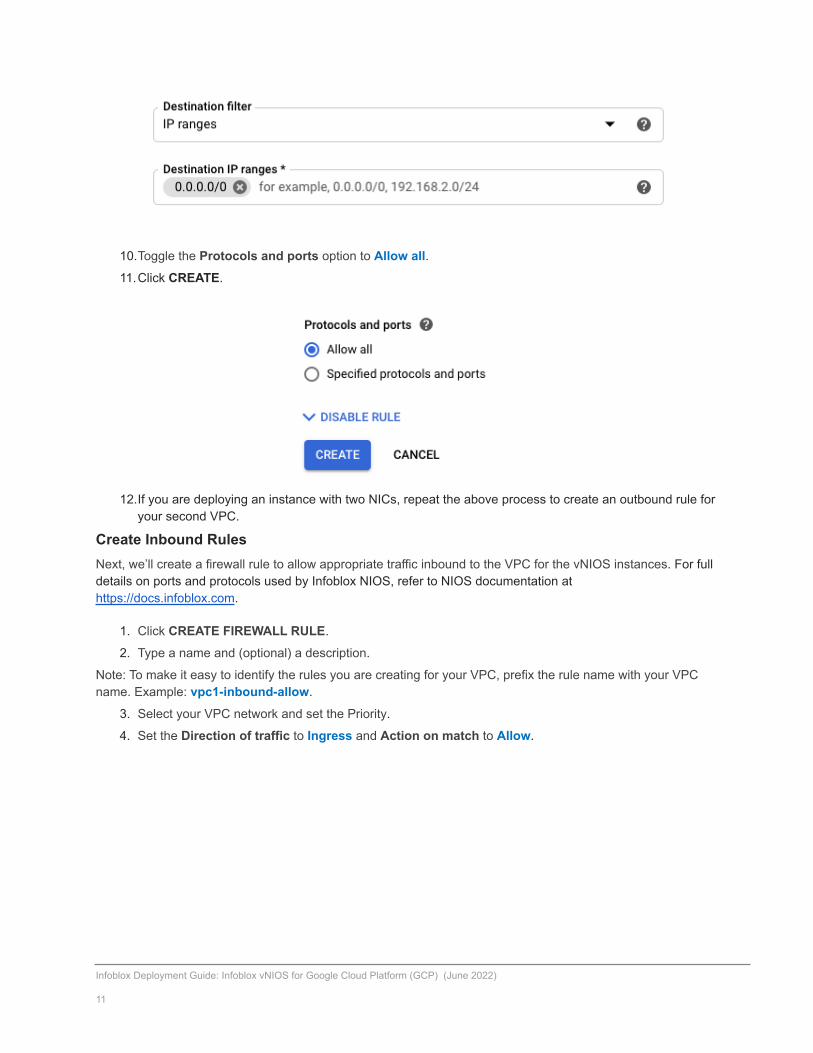
10.Toggle the Protocols and ports option to Allow all.11.Click CREATE.
12.If you are deploying an instance with two NICs, repeat the above process to create an outbound rule foryour second VPC.
Create Inbound RulesNext, we’ll create a firewall rule to allow appropriate traffic inbound to the VPC for the vNIOS instances. For fulldetails on ports and protocols used by Infoblox NIOS, refer to NIOS documentation athttps://docs.infoblox.com.
1. Click CREATE FIREWALL RULE.
2. Type a name and (optional) a description.
Note: To make it easy to identify the rules you are creating for your VPC, prefix the rule name with your VPCname. Example: vpc1-inbound-allow.
3. Select your VPC network and set the Priority.
4. Set the Direction of traffic to Ingress and Action on match to Allow.
Infoblox Deployment Guide: Infoblox vNIOS for Google Cloud Platform (GCP) (June 2022)
11

5. Expand the Targets menu and select All instances in the network.
6. Expand the Source filter menu and select IP ranges.
7. For the Source IP ranges, enter 0.0.0.0/0 to allow traffic from anywhere.
Note: For security of production environments, limit the source IP ranges.
Infoblox Deployment Guide: Infoblox vNIOS for Google Cloud Platform (GCP) (June 2022)
12
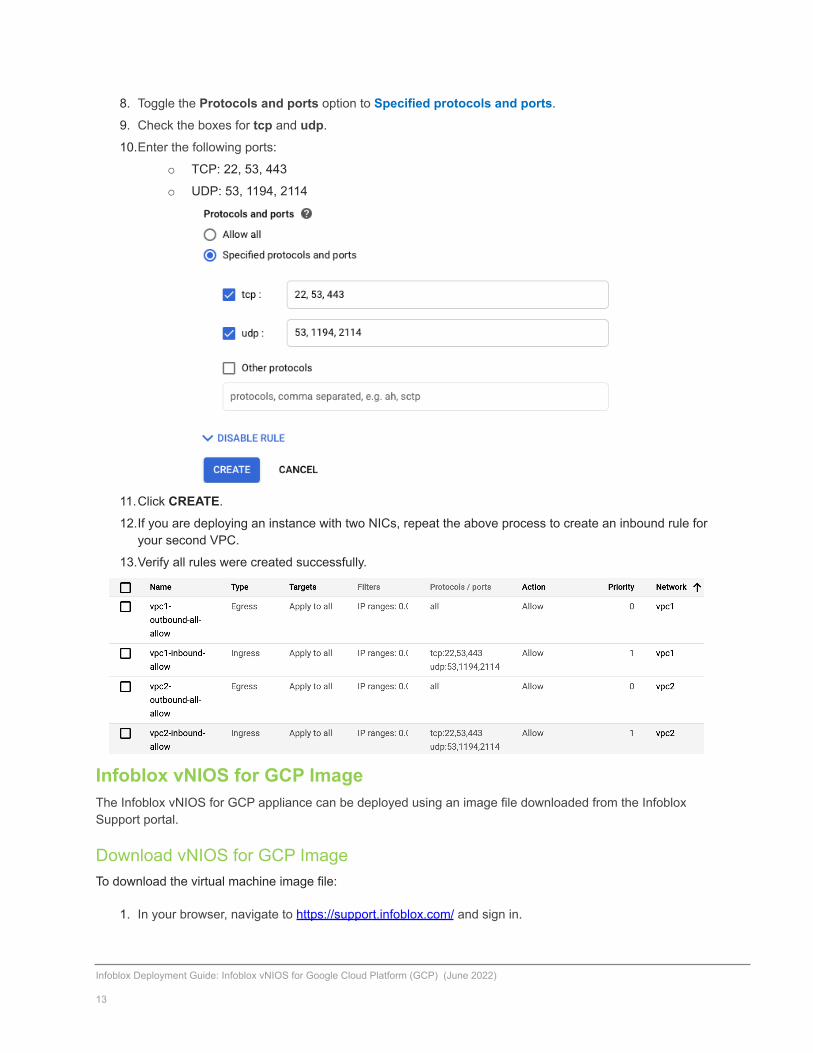
8. Toggle the Protocols and ports option to Specified protocols and ports.
9. Check the boxes for tcp and udp.
10.Enter the following ports:
o TCP: 22, 53, 443
o UDP: 53, 1194, 2114
11.Click CREATE.
12.If you are deploying an instance with two NICs, repeat the above process to create an inbound rule foryour second VPC.
13.Verify all rules were created successfully.
Infoblox vNIOS for GCP ImageThe Infoblox vNIOS for GCP appliance can be deployed using an image file downloaded from the InfobloxSupport portal.
Download vNIOS for GCP ImageTo download the virtual machine image file:
1. In your browser, navigate to https://support.infoblox.com/ and sign in.
Infoblox Deployment Guide: Infoblox vNIOS for Google Cloud Platform (GCP) (June 2022)
13

2. Click on Downloads.
3. Expand the Infoblox Software menu and select NIOS/vNIOS.
4. Expand the Select Version menu and select the desired version.
5. Scroll down to and expand the vNIOS for GCP option.
Infoblox Deployment Guide: Infoblox vNIOS for Google Cloud Platform (GCP) (June 2022)
14
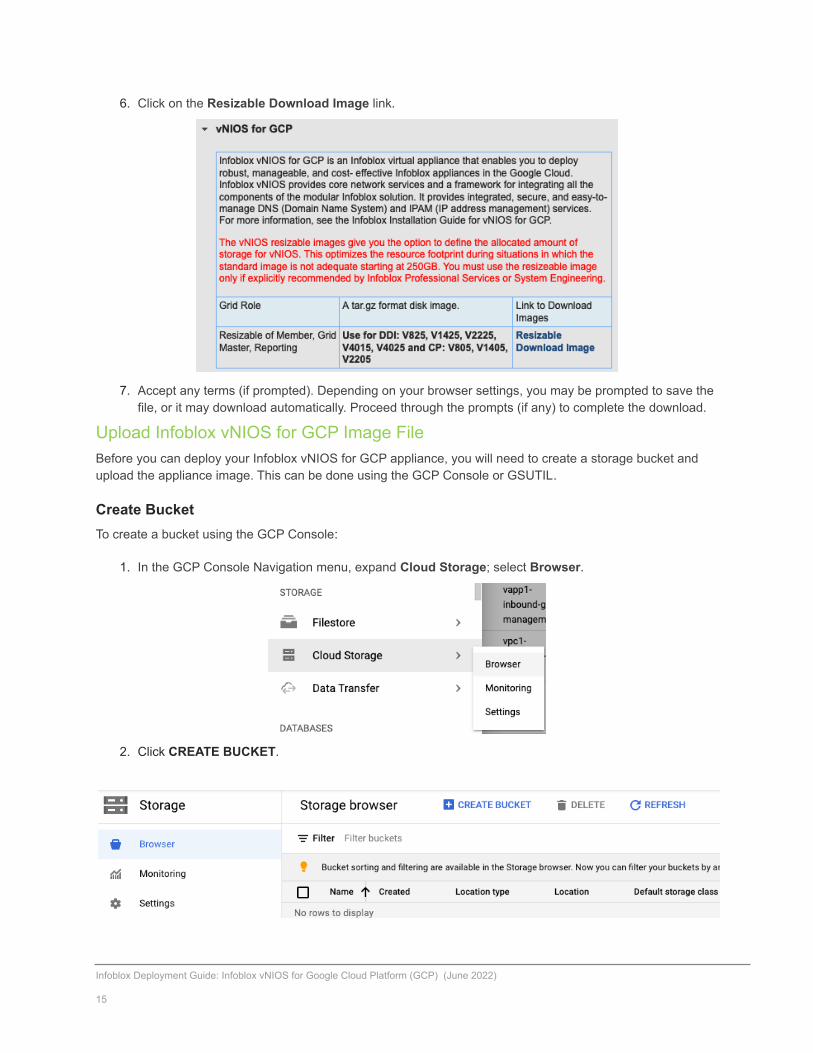
6. Click on the Resizable Download Image link.
7. Accept any terms (if prompted). Depending on your browser settings, you may be prompted to save thefile, or it may download automatically. Proceed through the prompts (if any) to complete the download.
Upload Infoblox vNIOS for GCP Image FileBefore you can deploy your Infoblox vNIOS for GCP appliance, you will need to create a storage bucket andupload the appliance image. This can be done using the GCP Console or GSUTIL.
Create BucketTo create a bucket using the GCP Console:
1. In the GCP Console Navigation menu, expand Cloud Storage; select Browser.
2. Click CREATE BUCKET.
Infoblox Deployment Guide: Infoblox vNIOS for Google Cloud Platform (GCP) (June 2022)
15
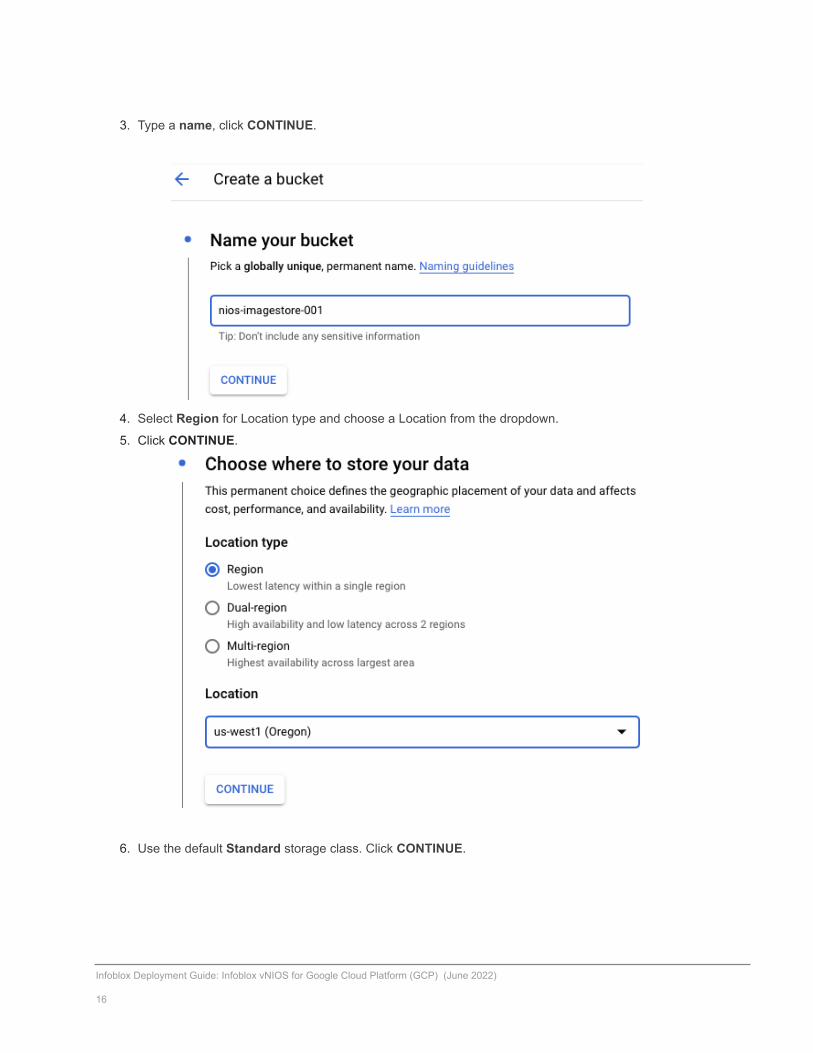
3. Type a name, click CONTINUE.
4. Select Region for Location type and choose a Location from the dropdown.
5. Click CONTINUE.
6. Use the default Standard storage class. Click CONTINUE.
Infoblox Deployment Guide: Infoblox vNIOS for Google Cloud Platform (GCP) (June 2022)
16
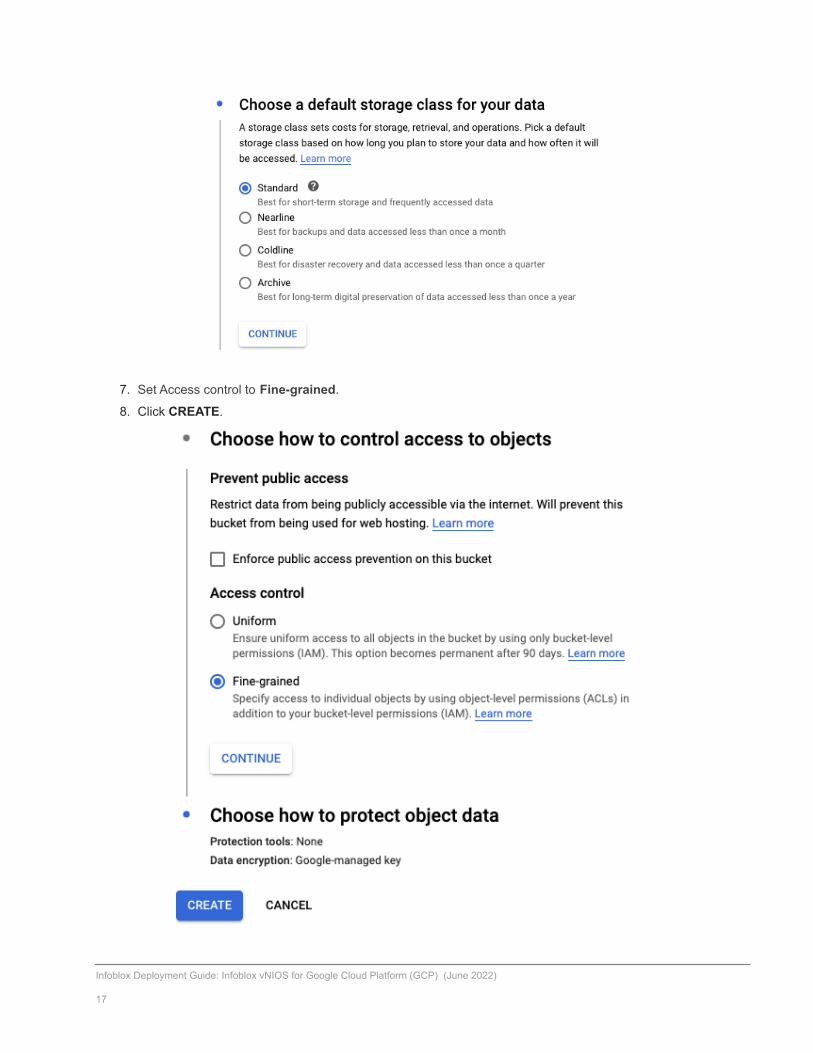
7. Set Access control to Fine-grained.
8. Click CREATE.
Infoblox Deployment Guide: Infoblox vNIOS for Google Cloud Platform (GCP) (June 2022)
17
To create a bucket using the GSUTIL, use the following command examples:Note: This is optional and not required if you used the console method.
1. If not already logged in, first authenticate using the GCloud CLI:
gcloud auth login2. Use the following example to create a bucket:
gsutil mb -c <class> -l <location> gs://<unique_bucket_name>3. In the above example:
a. <class>: Replace this string with the class you want to use for your bucket. Available classesinclude multi-regional, regional, nearline and coldline. If in doubt, you can omit this option andit will default to Standard Storage, which is equivalent to either multi-regional or regional(depending on the location where your bucket is created).
b. <location>: Specify the location where you want your bucket to be created in. If this option isomitted, the default location (US) is used.
c. <unique_bucket_name>: Replace this value with the name that you want to use for yourbucket. This must be a unique name not only within your account but throughout GCP.
Additional information regarding buckets and GSUTIL can be found athttps://cloud.google.com/storage/docs/gsutil/commands/mbUpload Image File to BucketOnce the bucket creation completes, your new bucket will be open in the browser.
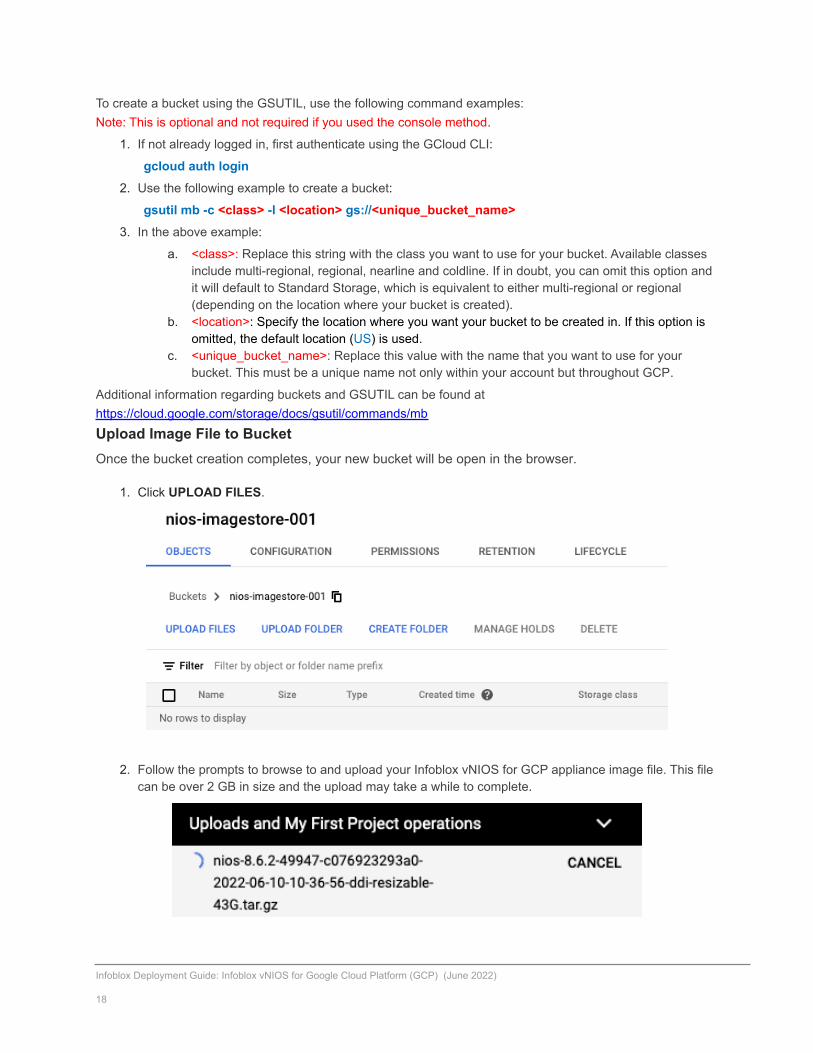
1. Click UPLOAD FILES.
2. Follow the prompts to browse to and upload your Infoblox vNIOS for GCP appliance image file. This filecan be over 2 GB in size and the upload may take a while to complete.
Infoblox Deployment Guide: Infoblox vNIOS for Google Cloud Platform (GCP) (June 2022)
18
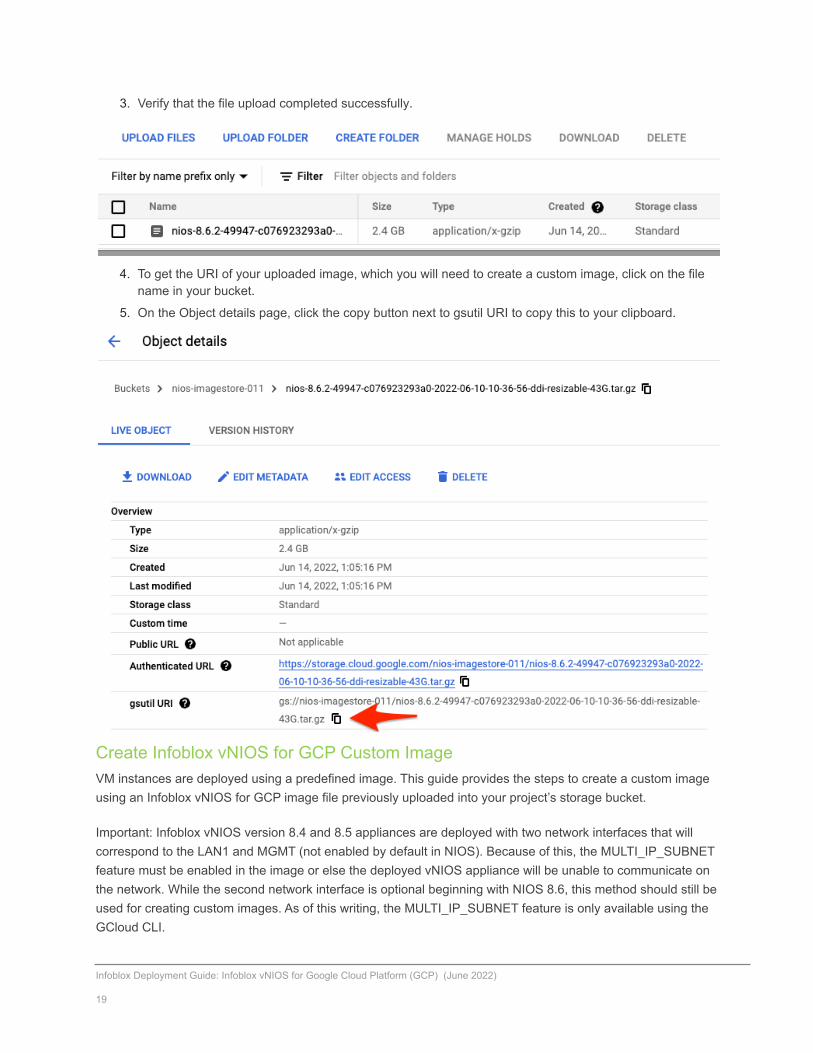
3. Verify that the file upload completed successfully.
4. To get the URI of your uploaded image, which you will need to create a custom image, click on the filename in your bucket.
5. On the Object details page, click the copy button next to gsutil URI to copy this to your clipboard.
Create Infoblox vNIOS for GCP Custom ImageVM instances are deployed using a predefined image. This guide provides the steps to create a custom imageusing an Infoblox vNIOS for GCP image file previously uploaded into your project’s storage bucket.
Important: Infoblox vNIOS version 8.4 and 8.5 appliances are deployed with two network interfaces that willcorrespond to the LAN1 and MGMT (not enabled by default in NIOS). Because of this, the MULTI_IP_SUBNETfeature must be enabled in the image or else the deployed vNIOS appliance will be unable to communicate onthe network. While the second network interface is optional beginning with NIOS 8.6, this method should still beused for creating custom images. As of this writing, the MULTI_IP_SUBNET feature is only available using theGCloud CLI.
Infoblox Deployment Guide: Infoblox vNIOS for Google Cloud Platform (GCP) (June 2022)
19
For more information regarding the deployment of virtual machines with multiple network interfaces in GCP,refer to https://cloud.google.com/vpc/docs/create-use-multiple-interfaces.
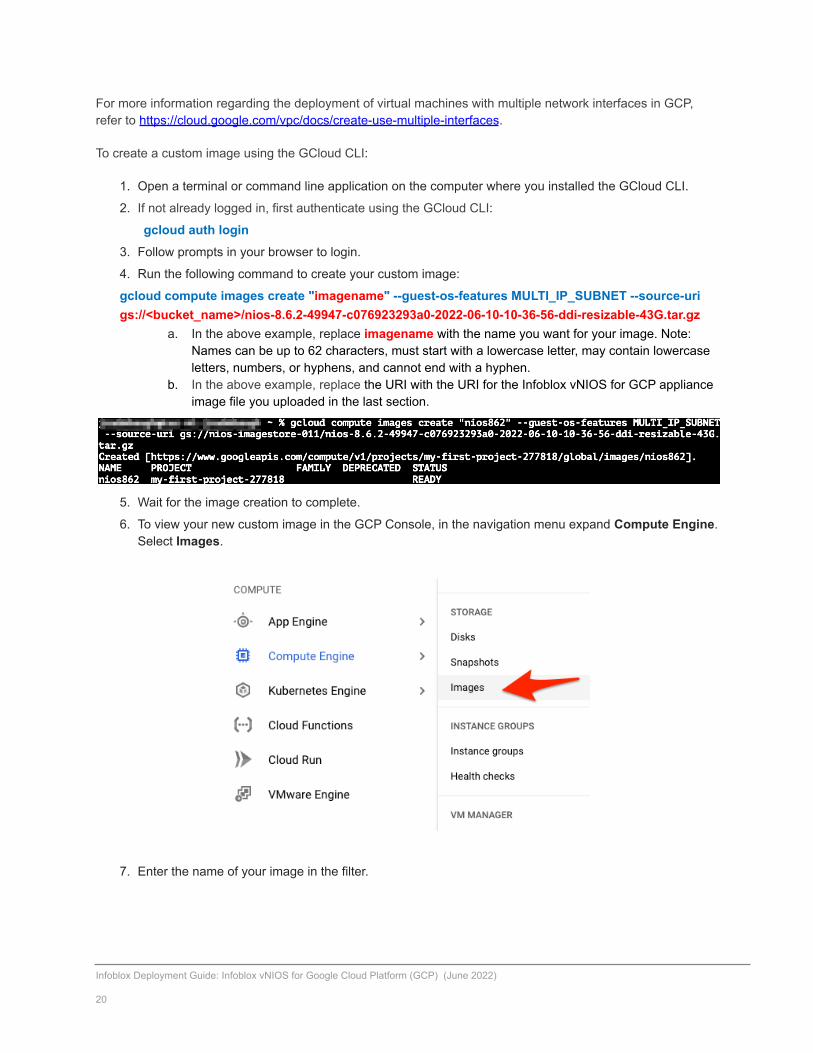
To create a custom image using the GCloud CLI:
1. Open a terminal or command line application on the computer where you installed the GCloud CLI.
2. If not already logged in, first authenticate using the GCloud CLI:
gcloud auth login3. Follow prompts in your browser to login.
4. Run the following command to create your custom image:
gcloud compute images create "imagename" --guest-os-features MULTI_IP_SUBNET --source-urigs://<bucket_name>/nios-8.6.2-49947-c076923293a0-2022-06-10-10-36-56-ddi-resizable-43G.tar.gz
a. In the above example, replace imagename with the name you want for your image. Note:Names can be up to 62 characters, must start with a lowercase letter, may contain lowercaseletters, numbers, or hyphens, and cannot end with a hyphen.
b. In the above example, replace the URI with the URI for the Infoblox vNIOS for GCP applianceimage file you uploaded in the last section.
5. Wait for the image creation to complete.
6. To view your new custom image in the GCP Console, in the navigation menu expand Compute Engine.Select Images.
7. Enter the name of your image in the filter.
Infoblox Deployment Guide: Infoblox vNIOS for Google Cloud Platform (GCP) (June 2022)
20
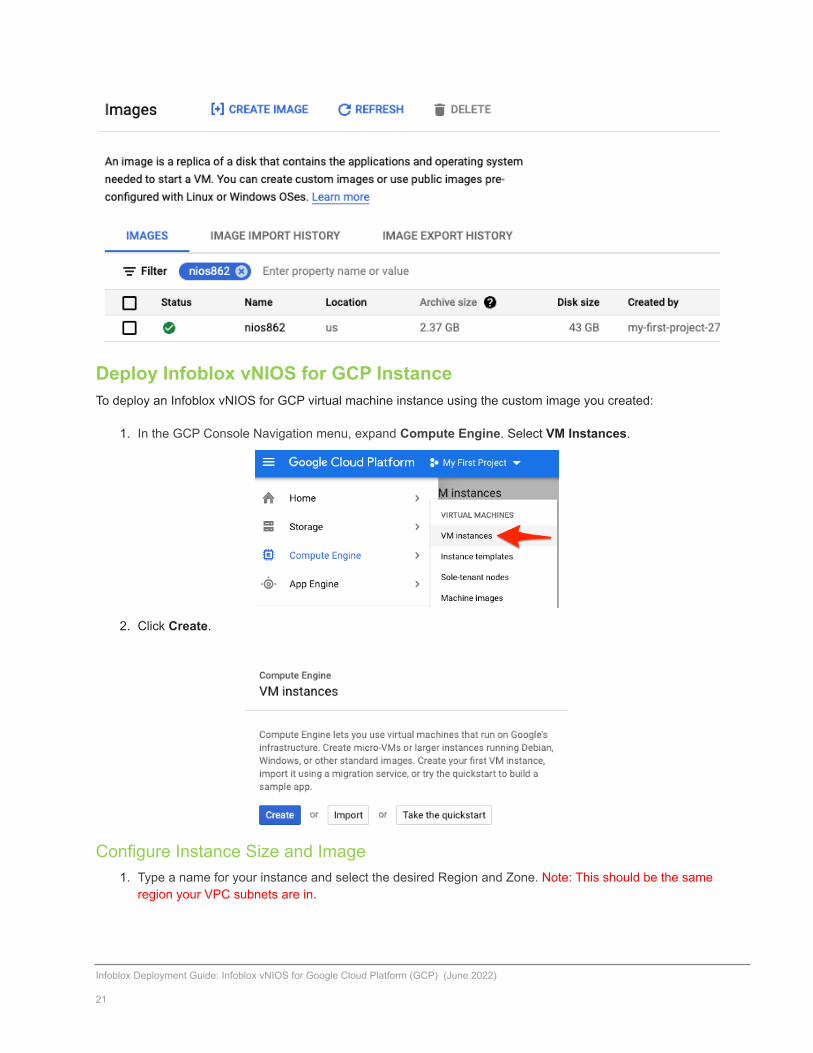
Deploy Infoblox vNIOS for GCP InstanceTo deploy an Infoblox vNIOS for GCP virtual machine instance using the custom image you created:
1. In the GCP Console Navigation menu, expand Compute Engine. Select VM Instances.
2. Click Create.
Configure Instance Size and Image1. Type a name for your instance and select the desired Region and Zone. Note: This should be the same
region your VPC subnets are in.
Infoblox Deployment Guide: Infoblox vNIOS for Google Cloud Platform (GCP) (June 2022)
21
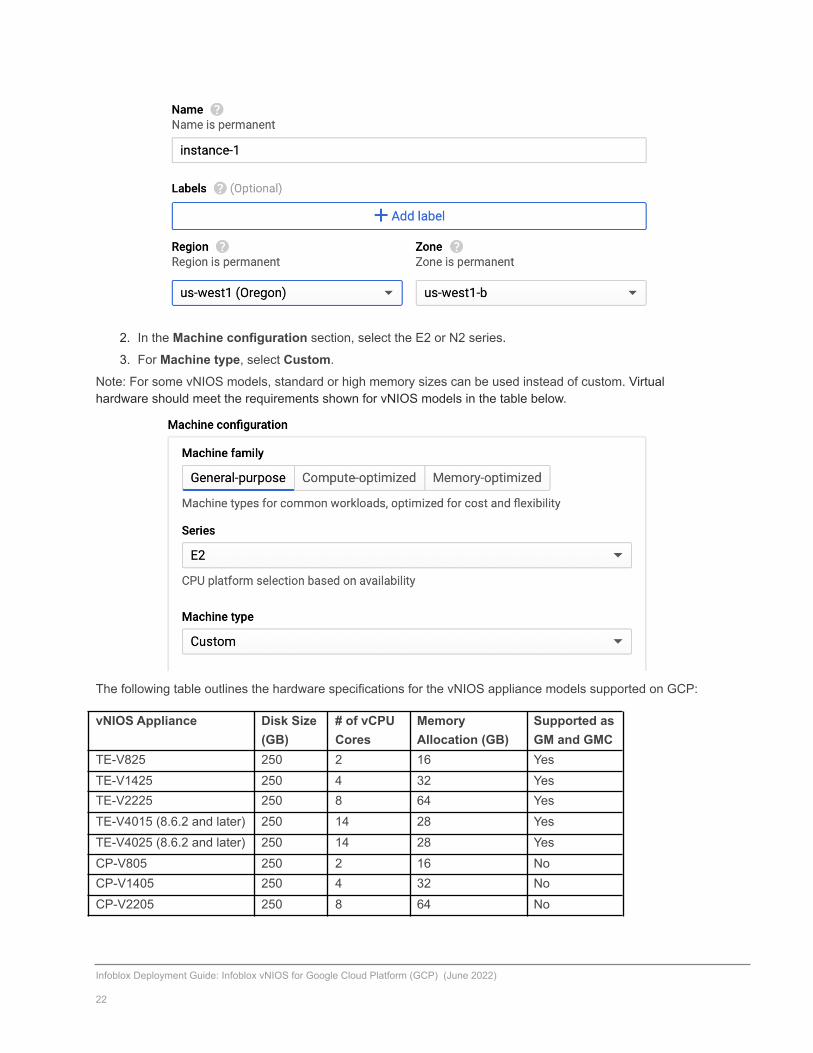
2. In the Machine configuration section, select the E2 or N2 series.
3. For Machine type, select Custom.
Note: For some vNIOS models, standard or high memory sizes can be used instead of custom. Virtualhardware should meet the requirements shown for vNIOS models in the table below.
The following table outlines the hardware specifications for the vNIOS appliance models supported on GCP:
vNIOS Appliance Disk Size(GB)
# of vCPUCores
MemoryAllocation (GB)
Supported asGM and GMC
TE-V825 250 2 16 YesTE-V1425 250 4 32 YesTE-V2225 250 8 64 YesTE-V4015 (8.6.2 and later) 250 14 28 YesTE-V4025 (8.6.2 and later) 250 14 28 YesCP-V805 250 2 16 NoCP-V1405 250 4 32 NoCP-V2205 250 8 64 No
Infoblox Deployment Guide: Infoblox vNIOS for Google Cloud Platform (GCP) (June 2022)
22
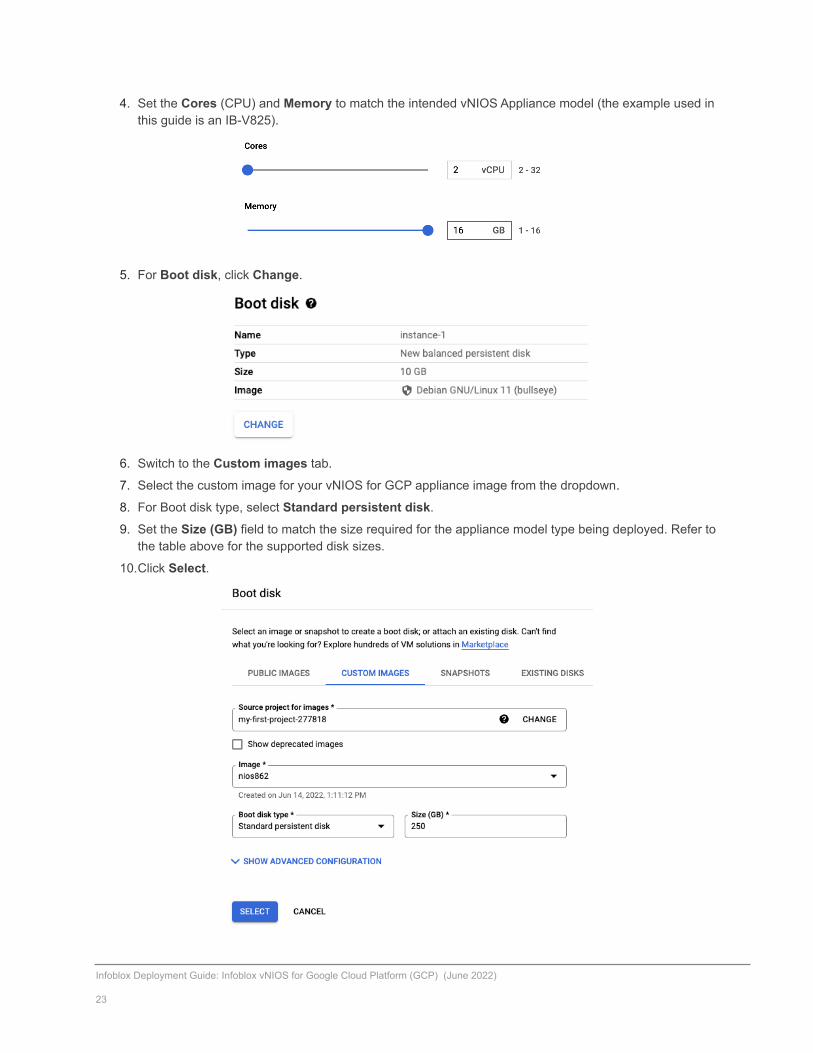
4. Set the Cores (CPU) and Memory to match the intended vNIOS Appliance model (the example used inthis guide is an IB-V825).
5. For Boot disk, click Change.
6. Switch to the Custom images tab.
7. Select the custom image for your vNIOS for GCP appliance image from the dropdown.
8. For Boot disk type, select Standard persistent disk.
9. Set the Size (GB) field to match the size required for the appliance model type being deployed. Refer tothe table above for the supported disk sizes.
10.Click Select.
Infoblox Deployment Guide: Infoblox vNIOS for Google Cloud Platform (GCP) (June 2022)
23
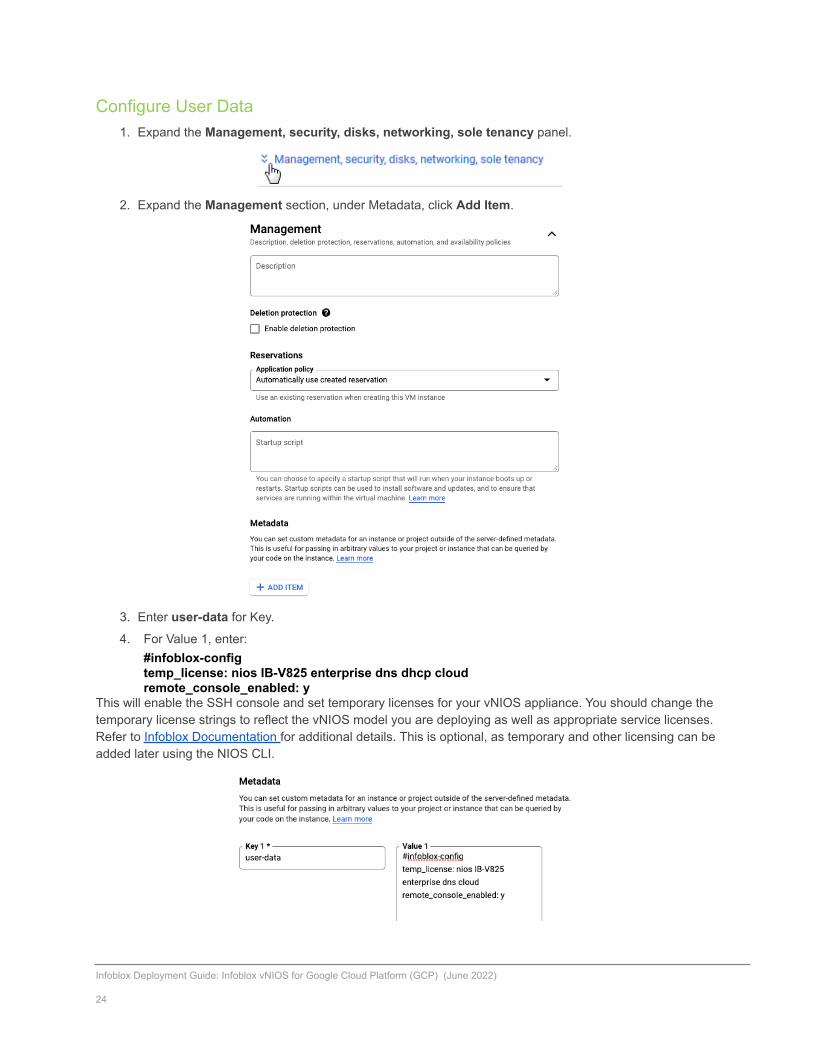
Configure User Data1. Expand the Management, security, disks, networking, sole tenancy panel.
2. Expand the Management section, under Metadata, click Add Item.
3. Enter user-data for Key.
4. For Value 1, enter:#infoblox-configtemp_license: nios IB-V825 enterprise dns dhcp cloudremote_console_enabled: y
This will enable the SSH console and set temporary licenses for your vNIOS appliance. You should change thetemporary license strings to reflect the vNIOS model you are deploying as well as appropriate service licenses.Refer to Infoblox Documentation for additional details. This is optional, as temporary and other licensing can beadded later using the NIOS CLI.
Infoblox Deployment Guide: Infoblox vNIOS for Google Cloud Platform (GCP) (June 2022)
24
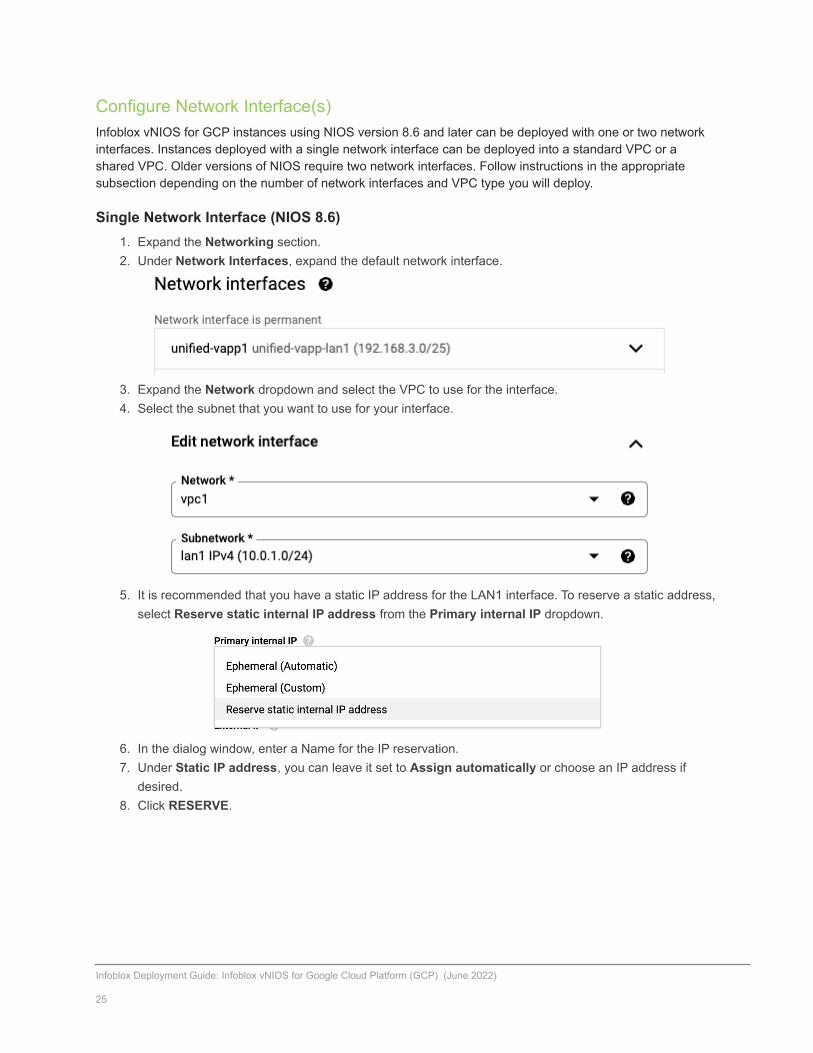
Configure Network Interface(s)Infoblox vNIOS for GCP instances using NIOS version 8.6 and later can be deployed with one or two networkinterfaces. Instances deployed with a single network interface can be deployed into a standard VPC or ashared VPC. Older versions of NIOS require two network interfaces. Follow instructions in the appropriatesubsection depending on the number of network interfaces and VPC type you will deploy.
Single Network Interface (NIOS 8.6)1. Expand the Networking section.2. Under Network Interfaces, expand the default network interface.
3. Expand the Network dropdown and select the VPC to use for the interface.4. Select the subnet that you want to use for your interface.
5. It is recommended that you have a static IP address for the LAN1 interface. To reserve a static address,select Reserve static internal IP address from the Primary internal IP dropdown.
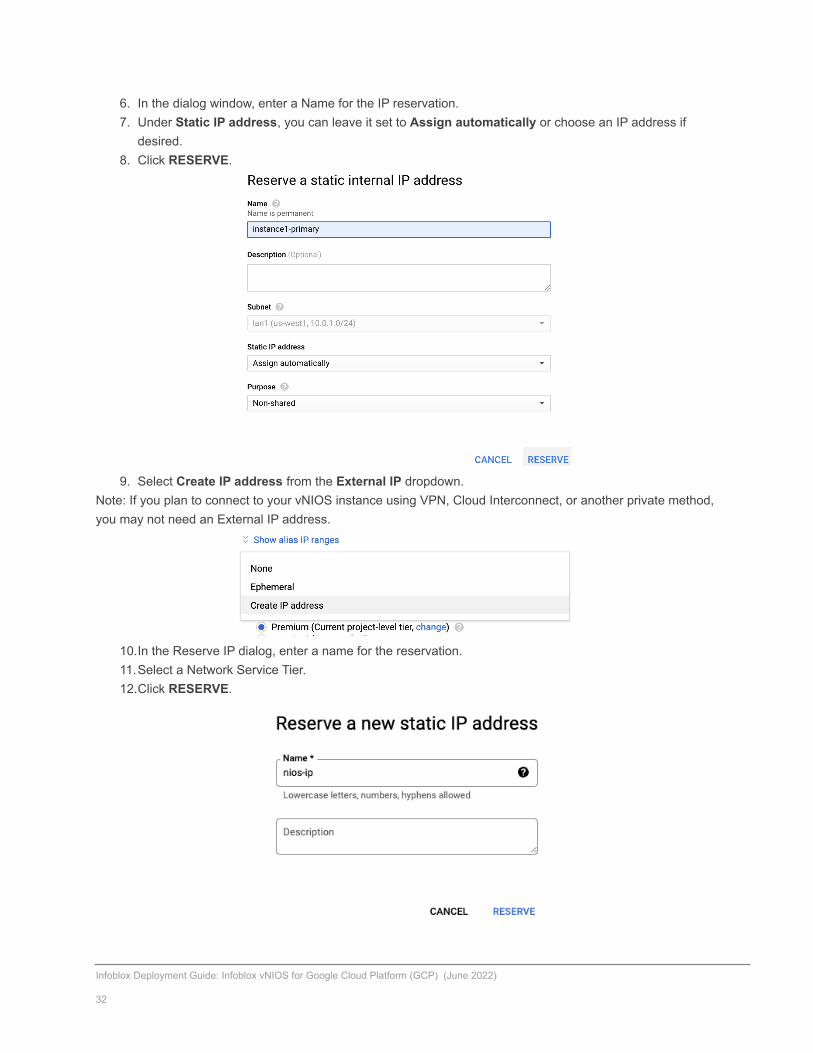
6. In the dialog window, enter a Name for the IP reservation.7. Under Static IP address, you can leave it set to Assign automatically or choose an IP address if
desired.8. Click RESERVE.
Infoblox Deployment Guide: Infoblox vNIOS for Google Cloud Platform (GCP) (June 2022)
25

9. Select Create IP address from the External IP dropdown.Note: If you plan to connect to your vNIOS instance using VPN, Cloud Interconnect, or another private method,you may not need an External IP address.
10.In the Reserve IP dialog, enter a name for the reservation.11.Select a Network Service Tier.12.Click RESERVE.
Infoblox Deployment Guide: Infoblox vNIOS for Google Cloud Platform (GCP) (June 2022)
26
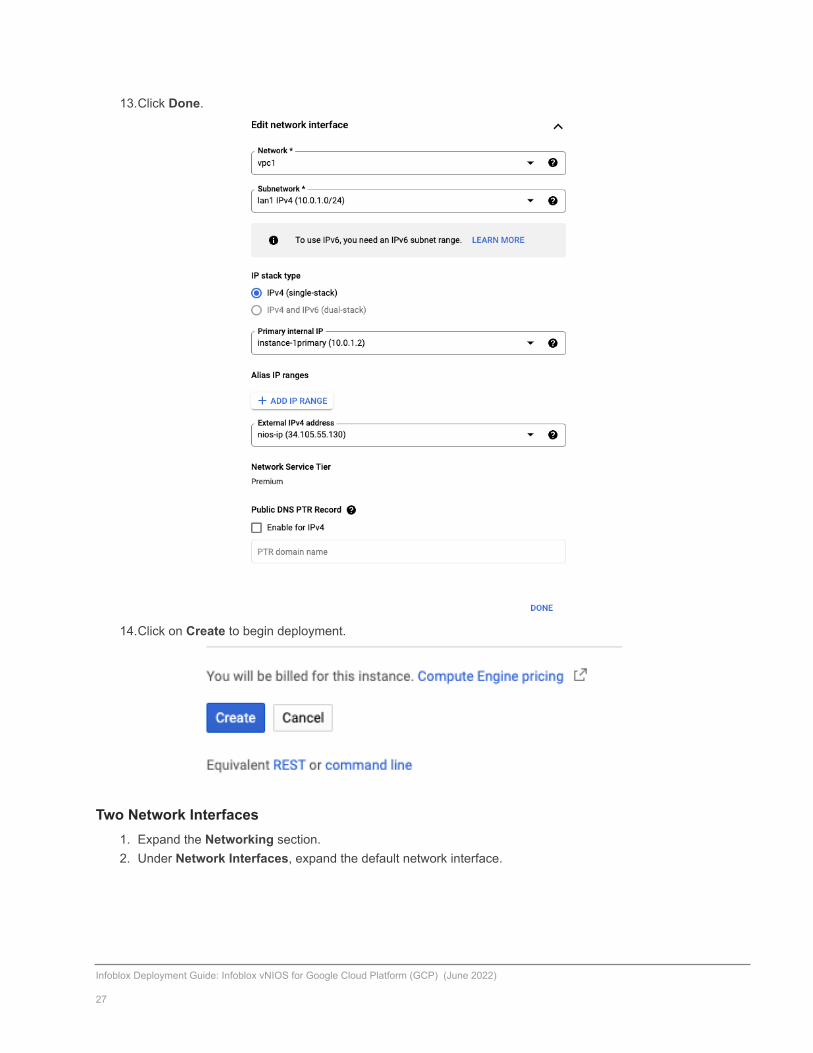
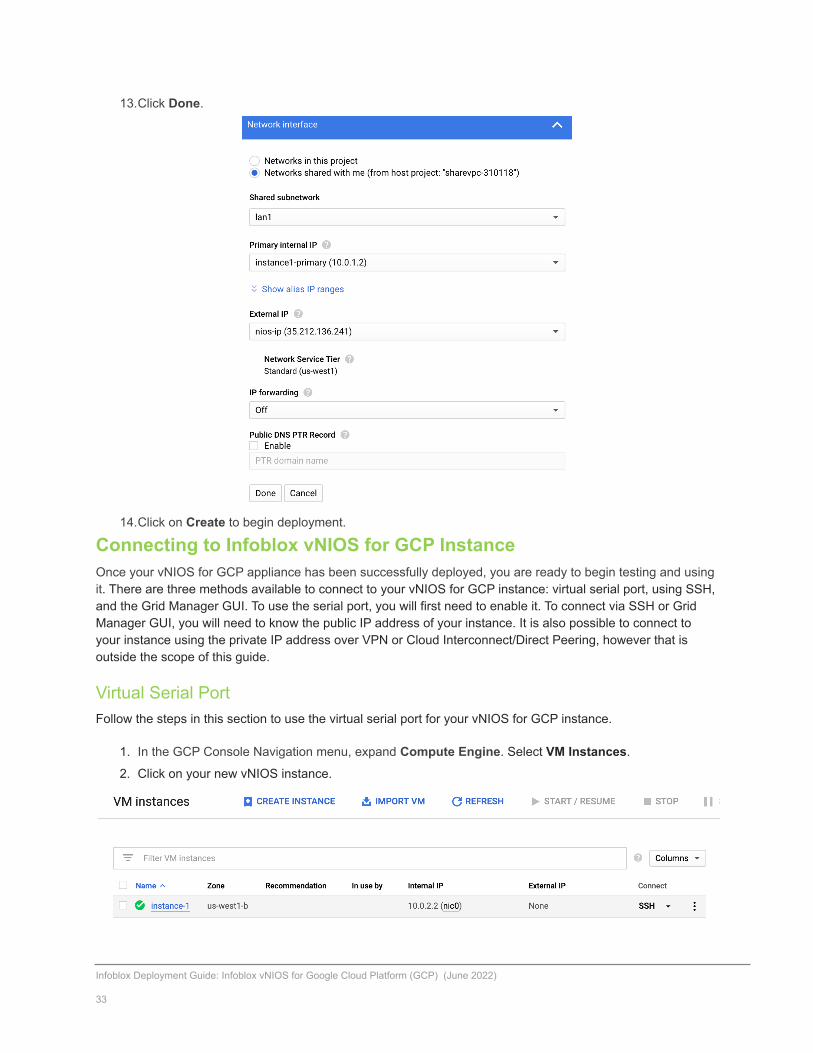
13.Click Done.
14.Click on Create to begin deployment.
Two Network Interfaces1. Expand the Networking section.2. Under Network Interfaces, expand the default network interface.
Infoblox Deployment Guide: Infoblox vNIOS for Google Cloud Platform (GCP) (June 2022)
27
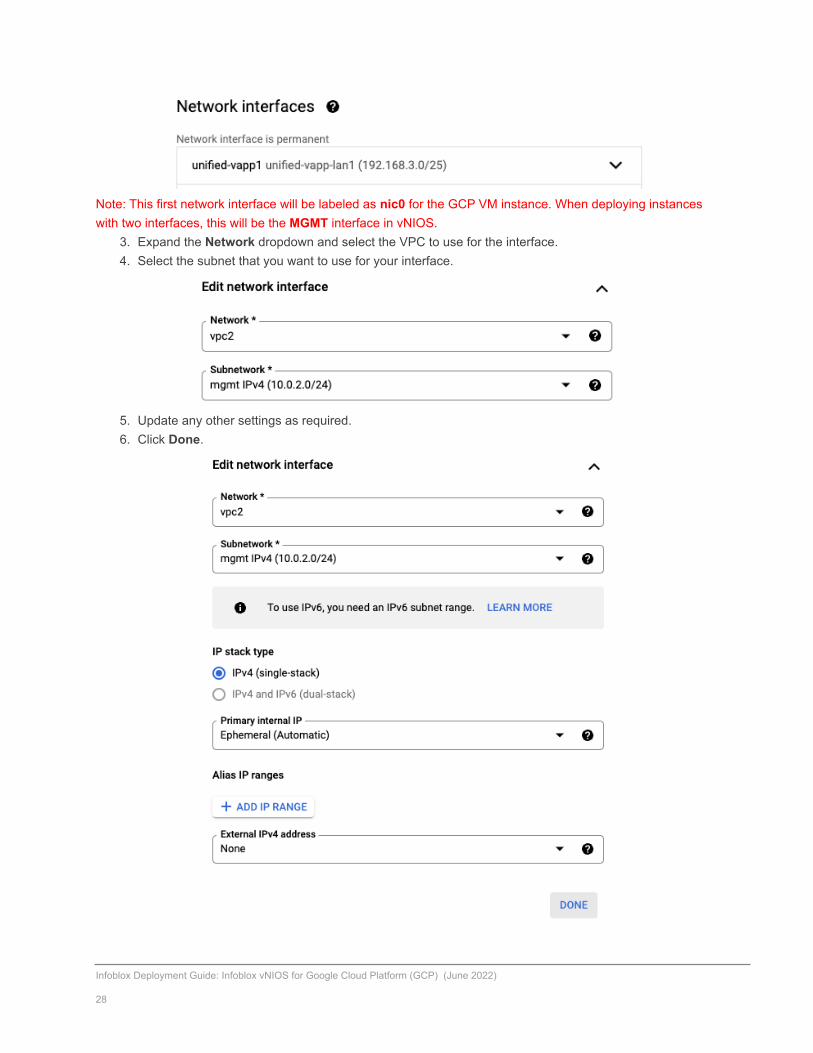
Note: This first network interface will be labeled as nic0 for the GCP VM instance. When deploying instanceswith two interfaces, this will be the MGMT interface in vNIOS.
3. Expand the Network dropdown and select the VPC to use for the interface.4. Select the subnet that you want to use for your interface.
5. Update any other settings as required.6. Click Done.
Infoblox Deployment Guide: Infoblox vNIOS for Google Cloud Platform (GCP) (June 2022)
28
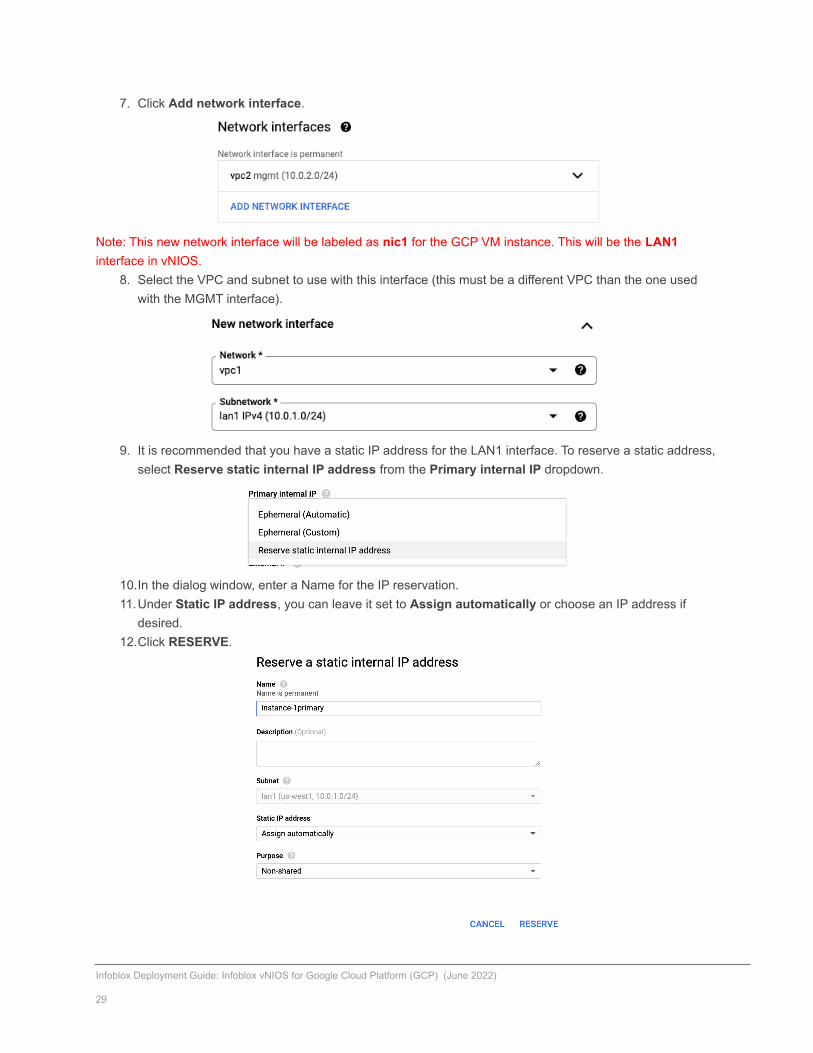
7. Click Add network interface.
Note: This new network interface will be labeled as nic1 for the GCP VM instance. This will be the LAN1interface in vNIOS.
8. Select the VPC and subnet to use with this interface (this must be a different VPC than the one usedwith the MGMT interface).
9. It is recommended that you have a static IP address for the LAN1 interface. To reserve a static address,select Reserve static internal IP address from the Primary internal IP dropdown.
10.In the dialog window, enter a Name for the IP reservation.11.Under Static IP address, you can leave it set to Assign automatically or choose an IP address if
desired.12.Click RESERVE.
Infoblox Deployment Guide: Infoblox vNIOS for Google Cloud Platform (GCP) (June 2022)
29
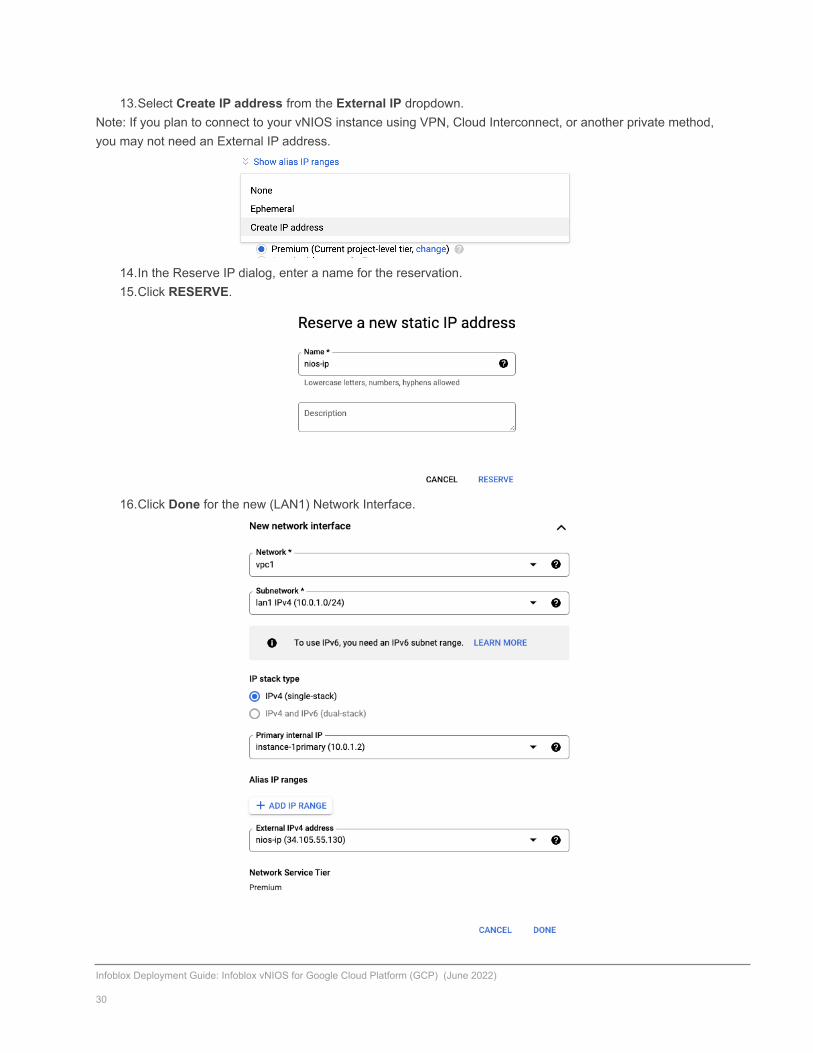
13.Select Create IP address from the External IP dropdown.Note: If you plan to connect to your vNIOS instance using VPN, Cloud Interconnect, or another private method,you may not need an External IP address.
14.In the Reserve IP dialog, enter a name for the reservation.15.Click RESERVE.
16.Click Done for the new (LAN1) Network Interface.
Infoblox Deployment Guide: Infoblox vNIOS for Google Cloud Platform (GCP) (June 2022)
30

You should now have two network interfaces for the VM, as shown below.
17.Click Create to create the VM.Shared VPC (NIOS 8.6)When deploying a vNIOS for GCP instance with a single network interface, you can connect your instance to aShared VPC network, provided from a host project. For additional information on GCP shared VPC, refer tohttps://cloud.google.com/vpc/docs/shared-vpc.
1. Expand the Networking section.2. Under Network Interfaces, expand the default network interface.
3. Select Networks shared with me.4. Select the Shared subnetwork that you want to use for your interface.
5. It is recommended that you have a static IP address for the LAN1 interface. To reserve a static address,select Reserve static internal IP address from the Primary internal IP dropdown.
Infoblox Deployment Guide: Infoblox vNIOS for Google Cloud Platform (GCP) (June 2022)
31
6. In the dialog window, enter a Name for the IP reservation.7. Under Static IP address, you can leave it set to Assign automatically or choose an IP address if
desired.8. Click RESERVE.
9. Select Create IP address from the External IP dropdown.Note: If you plan to connect to your vNIOS instance using VPN, Cloud Interconnect, or another private method,you may not need an External IP address.
10.In the Reserve IP dialog, enter a name for the reservation.11.Select a Network Service Tier.12.Click RESERVE.
Infoblox Deployment Guide: Infoblox vNIOS for Google Cloud Platform (GCP) (June 2022)
32
13.Click Done.
14.Click on Create to begin deployment.
Connecting to Infoblox vNIOS for GCP InstanceOnce your vNIOS for GCP appliance has been successfully deployed, you are ready to begin testing and usingit. There are three methods available to connect to your vNIOS for GCP instance: virtual serial port, using SSH,and the Grid Manager GUI. To use the serial port, you will first need to enable it. To connect via SSH or GridManager GUI, you will need to know the public IP address of your instance. It is also possible to connect toyour instance using the private IP address over VPN or Cloud Interconnect/Direct Peering, however that isoutside the scope of this guide.
Virtual Serial PortFollow the steps in this section to use the virtual serial port for your vNIOS for GCP instance.
1. In the GCP Console Navigation menu, expand Compute Engine. Select VM Instances.
2. Click on your new vNIOS instance.
Infoblox Deployment Guide: Infoblox vNIOS for Google Cloud Platform (GCP) (June 2022)
33
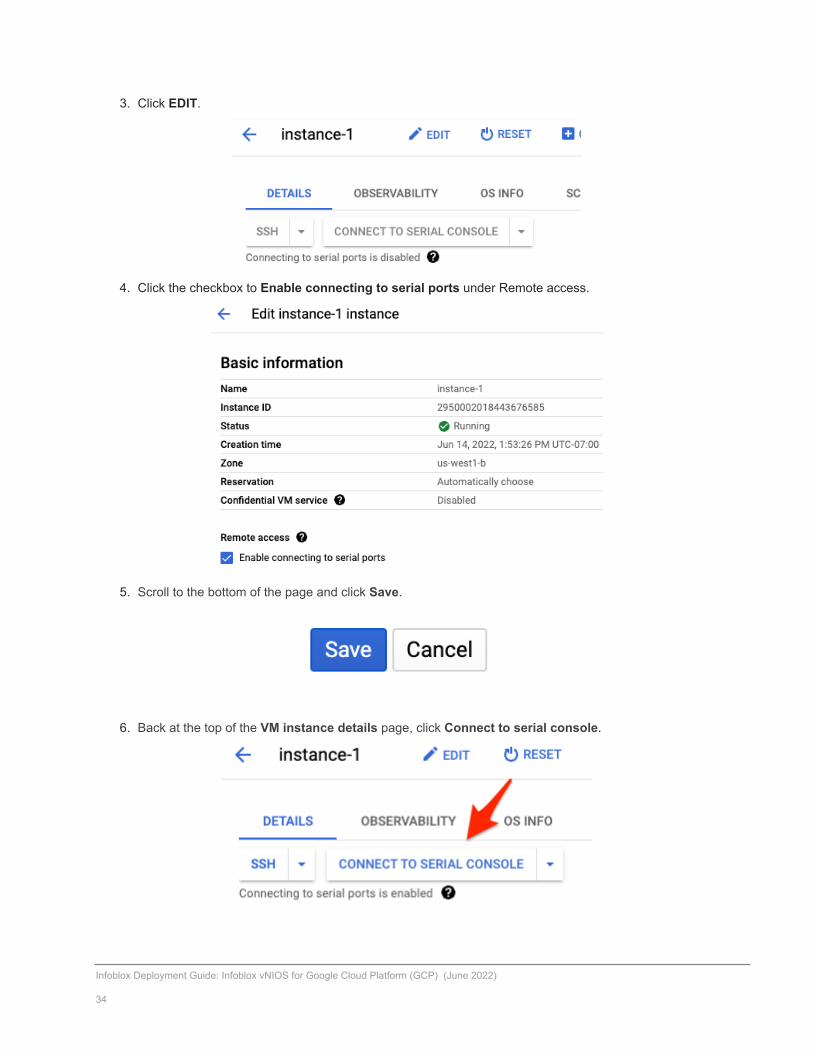
3. Click EDIT.
4. Click the checkbox to Enable connecting to serial ports under Remote access.
5. Scroll to the bottom of the page and click Save.
6. Back at the top of the VM instance details page, click Connect to serial console.
Infoblox Deployment Guide: Infoblox vNIOS for Google Cloud Platform (GCP) (June 2022)
34
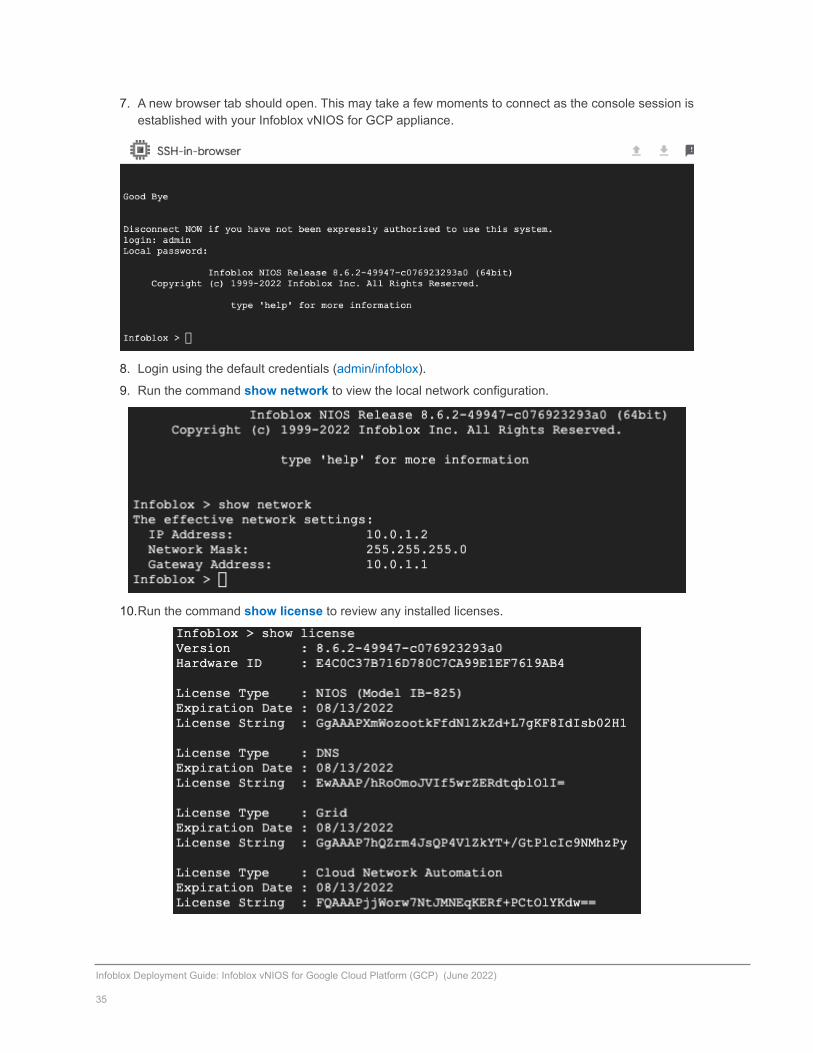
7. A new browser tab should open. This may take a few moments to connect as the console session isestablished with your Infoblox vNIOS for GCP appliance.
8. Login using the default credentials (admin/infoblox).
9. Run the command show network to view the local network configuration.
10.Run the command show license to review any installed licenses.
Infoblox Deployment Guide: Infoblox vNIOS for Google Cloud Platform (GCP) (June 2022)
35
11.You can use the set temp_license command to install additional temporary licenses if needed. Note:This is not needed if you set the temporary licenses in user-data during VM creation.
12.For additional information on using the NIOS CLI, refer to https://docs.infoblox.com.
13.When you are done using the serial console, use the command exit, and then close the browser tab.
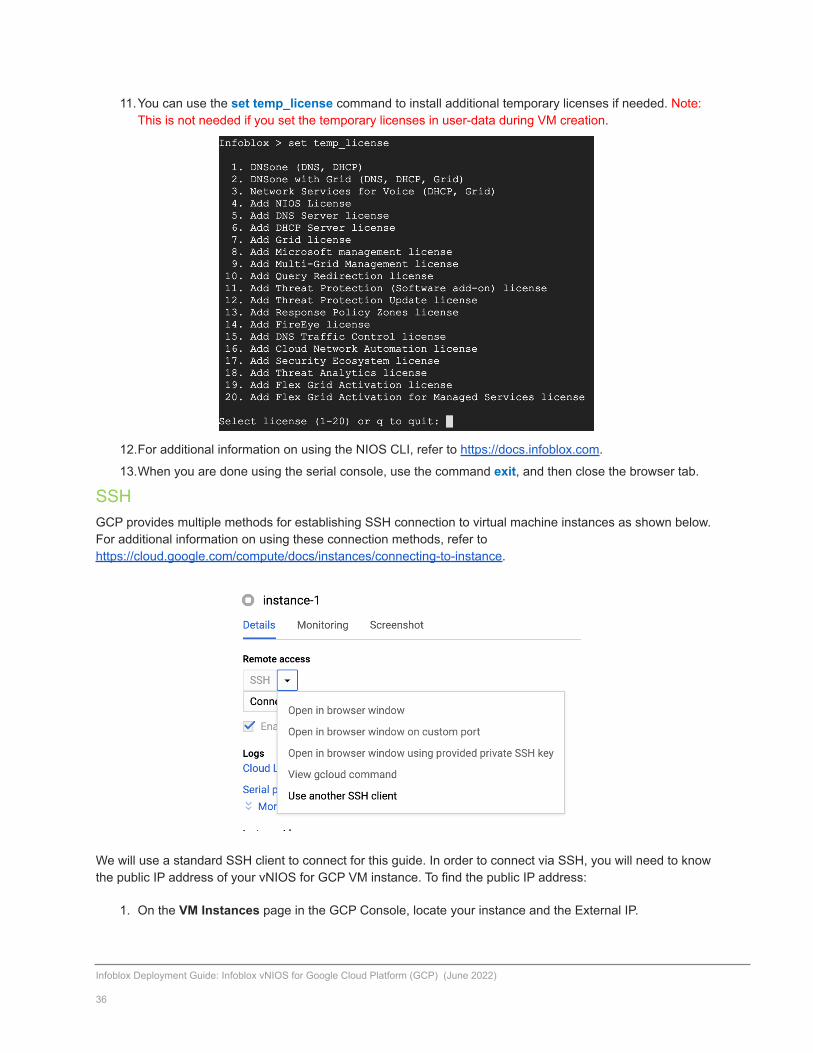
SSHGCP provides multiple methods for establishing SSH connection to virtual machine instances as shown below.For additional information on using these connection methods, refer tohttps://cloud.google.com/compute/docs/instances/connecting-to-instance.
We will use a standard SSH client to connect for this guide. In order to connect via SSH, you will need to knowthe public IP address of your vNIOS for GCP VM instance. To find the public IP address:
1. On the VM Instances page in the GCP Console, locate your instance and the External IP.
Infoblox Deployment Guide: Infoblox vNIOS for Google Cloud Platform (GCP) (June 2022)
36

2. Click the copy icon to copy the external IP address.
Once you have the public IP address, you are ready to connect via SSH.
3. Open a PowerShell or Terminal window on your computer (Putty or other SSH clients can also beused).
4. Enter the command ssh admin@<ip_address> to start the SSH connection (use the public IP addressof your vNIOS instance).
5. When prompted, type yes to add the IP address to your known_hosts file.6. Enter the password (default is infoblox)
Grid Manager1. Open a web browser on your computer.2. Navigate to https://<ip_address> (use the public IP address of your vNIOS instance).
Infoblox Deployment Guide: Infoblox vNIOS for Google Cloud Platform (GCP) (June 2022)
37

Note: By default, NIOS uses a self-signed certificate. Warnings about the connection being insecure are to beexpected and might require that you add an exception before being able to connect.
3. Login with the username admin and the password specified during deployment.4. Accept the Infoblox End-User License Agreement.5. Read and make a selection for the Infoblox Customer Experience Improvement Program.
TroubleshootingIf you are unable to connect to your vNIOS for GCP appliance, the first thing to check is that it started upsuccessfully. The easiest way to do this is through the logs from the Serial port 1 (console).
To check the Serial port logs:
1. On the VM instance details page, click on the Serial port 1 (console) link.
2. The Serial port viewer will be displayed and show a history of input/output.
3. Review for any errors.
a. If you see a Fatal error during Infoblox startup message, the system is unable to load allrequired resources. The most common cause for this is not attaching the required secondnetwork interface when using a version that requires it. To recover from this error, delete theVM and create a new one, making sure to use two network interfaces for the VM.
b. If you see the system successfully started up and is sitting at the login prompt, then the issueis external from the appliance. You will need to verify all network settings and firewall rules inyour GCP environment.
Additional Resources● Deployment Guide: Infoblox vDiscovery for Google Cloud Platform:
https://insights.infoblox.com/resources-deployment-guides/infoblox-deployment-guide-infoblox-vdiscovery-for-gcp-google-cloud-platform.
● Infoblox NIOS and vNIOS Documentation: https://docs.infoblox.com.
● GCP Compute Engine Documentation: https://cloud.google.com/compute/docs.
● GCP Virtual Private Cloud Documentation: https://cloud.google.com/vpc/docs.
Infoblox Deployment Guide: Infoblox vNIOS for Google Cloud Platform (GCP) (June 2022)
38

39


