Embed Size (px)
Citation preview
Πανεπιστήμιο Πειραιώς – Τμήμα Πληροφορικής
Πρόγραμμα Μεταπτυχιακών Σπουδών
«Προηγμένα Συστήματα Πληροφορικής»
Μεταπτυχιακή Διατριβή
Τίτλος Διατριβής (Ελληνικά) Έξυπνο Σύστημα Διαχείρισης Λειτουργιών
Πανεπιστημίου και Ηλεκτρονικής Μάθησης
(Αγγλικά)
Intelligent University and E-Learning Function Management
System
Ονοματεπώνυμο Φοιτητή ΝΙΚΟΛΑΟΣ ΜΗΝΑΪΔΗΣ
Πατρώνυμο ΣΑΒΒΑΣ ΜΗΝΑΪΔΗΣ
Αριθμός Μητρώου ΜΠΣΠ/ 17047
Επιβλέπων ΘΕΜΙΣΤΟΚΛΗΣ ΠΑΝΑΓΙΩΤΟΠΟΥΛΟΣ, ΚΑΘΗΓΗΤΗΣ
Ημερομηνία Παράδοσης ΝΟΕΜΒΡΙΟΣ 2019
«Μεταπτυχιακή Διατριβή» ΝΙΚΟΛΑΟΣ ΜΗΝΑΪΔΗΣ
Intelligent University and E-Learning Function Management System Σελίδα 2
Τριμελής Εξεταστική Επιτροπή
(υπογραφή)
(υπογραφή) (υπογραφή)
ΘΕΜΙΣΤΟΚΛΗΣ
ΠΑΝΑΓΙΩΤΟΠΟΥΛΟΣ
ΚΑΘΗΓΗΤΗΣ
ΧΡΗΣΤΟΣ ΔΟΥΛΗΓΕΡΗΣ
ΚΑΘΗΓΗΤΗΣ
ΔΗΜΗΤΡΗΣ
ΑΠΟΣΤΟΛΟΥ
ΑΝΑΠΛΗΡΩΤΗΣ
ΚΑΘΗΓΗΤΗΣ
«Μεταπτυχιακή Διατριβή» ΝΙΚΟΛΑΟΣ ΜΗΝΑΪΔΗΣ
Intelligent University and E-Learning Function Management System Σελίδα 3
Contents: Abstract ................................................................................................................................ 4 Περίληψη .............................................................................................................................. 4 Summary .............................................................................................................................. 5 E class Application Overview ................................................................................................ 6 Users: ................................................................................................................................... 6 Sys-Admin: ........................................................................................................................... 6 Web-Admin (Secretariat): ...................................................................................................... 6 Teacher: ............................................................................................................................... 6 Student: ................................................................................................................................ 6 Intelligent tools: ..................................................................................................................... 6 1)Quizzes ............................................................................................................................. 6 2)Skills-Lessons………………………………………………………………………………..7 Overview of Sys-Admin User profile: ..................................................................................... 7 Overview of Web-Admin (Secretariat) User profile: .............................................................. 39 Overview of Teacher User profile: ....................................................................................... 52 Overview of Student User profile: ........................................................................................ 68 Intelligent tools: ................................................................................................................... 77 1)Quizzes ........................................................................................................................... 77 2)Skills-Lessons .................................................................................................................. 77 General Settings/Configurations: ......................................................................................... 84 Application properties .......................................................................................................... 84 Navigation Menu……………………………………………………………………………...85 Breadcrumbs ...................................................................................................................... 86 Globalization attributes…………………………………………………………………….…86 Static application files .......................................................................................................... 87 List of values……………………………………………………………………………………..…...87 Plugins installed .................................................................................................................. 88 Security attributes…………………………………………………………………………………….88 Authedication scheme ......................................................................................................... 89 Authorization schemes……………………………………………………………………………....90 Theme………………………………………………………………………………………………….92 Database: ........................................................................................................................... 92 Tables/Sequences .............................................................................................................. 92 Triggers: ............................................................................................................................. 96 Insert Users: ....................................................................................................................... 99 For the quiz ....................................................................................................................... 100 Installation instructions……………………………………………………………………………..102 Backup of Database: ......................................................................................................... 102 Passwords used for the local Installation: .......................................................................... 103 Conclusion ........................................................................................................................ 103 Bibliography - Oracle Apex Documentation………………………………………………………104
«Μεταπτυχιακή Διατριβή» ΝΙΚΟΛΑΟΣ ΜΗΝΑΪΔΗΣ
Intelligent University and E-Learning Function Management System Σελίδα 4
Abstract
An intelligent system to manage the proper functionality of a university. It contains four different group of users: Student, Teacher, Secretariat and System Administrator. It provides different functionalities to each group, based on their roles. The system provides functionalities such as useful reports (they can be filtered /manipulated), charts, managing assignments/submissions and also taking relevant quizzes. The intelligent functionalities of the system, are implemented in the Student/Teacher role, regarding the choice of skills, lessons and also in taking quizzes. The application was built on Oracle 11gR2 Express Edition and using the Oracle Apex Framework 5.1. The aim of the dissertation was to develop a specific University tool that combines features of the already existing ones with Intelligent E-class functionalities and show the major advantages of the development combination of Oracle and Oracle Apex in comparison to other current development ways.
Περίληψη
Ένα έξυπνο σύστημα για τη διαχείριση της σωστής λειτουργίας ενός πανεπιστημίου. Περιέχει τέσσερις διαφορετικές ομάδες χρηστών: Φοιτητής, Δάσκαλος, Γραμματεία και Διαχειριστής Συστήματος. Παρέχει διαφορετικές λειτουργίες σε κάθε ομάδα, με βάση τους ρόλους τους. Το σύστημα παρέχει λειτουργίες όπως χρήσιμες αναφορές (μπορούν να φιλτραριστούν / διαχειριστούν), διαγράμματα, διαχείριση αναθέσεων / υποβολών και επίσης λήψη συναφών κουίζ. Οι έξυπνες λειτουργίες του συστήματος υλοποιούνται στον ρόλο των Φοιτητών / Δασκάλων, όσον αφορά την επιλογή των δεξιοτήτων, τα μαθήματα αλλά και τη λήψη κουίζ. Η εφαρμογή βασίστηκε στην Oracle 11gR2 Express Edition και χρησιμοποιεί το Oracle Apex Framework 5.1. Σκοπός της διατριβής ήταν να αναπτύξει ένα συγκεκριμένο πανεπιστημιακό εργαλείο που συνδυάζει χαρακτηριστικά των ήδη υπαρχόντων με έξυπνες λειτουργίες E-class και να παρουσιάσει τα σημαντικά πλεονεκτήματα του αναπτυξιακού συνδυασμού των Oracle και Oracle Apex σε σύγκριση με άλλους τρέχοντες τρόπους υλοποίησης.
«Μεταπτυχιακή Διατριβή» ΝΙΚΟΛΑΟΣ ΜΗΝΑΪΔΗΣ
Intelligent University and E-Learning Function Management System Σελίδα 5
Summary
An intelligent system to manage the proper functionality of a university. It contains four different group of users: Student, Teacher, Secretariat and System Administrator. It provides different functionalities to each group, based on their roles. The system provides functionalities such as useful reports (they can be filtered /manipulated), charts, managing assignments/submissions and also taking relevant quizzes. The intelligent functionalities of the system, are implemented in the Student/Teacher role, regarding the choice of skills, lessons and also in taking quizzes. The application was built on Oracle 11gR2 Express Edition and using the Oracle Apex Framework 5.1. The Apex Framework will be analyzed later on the way it works.
The System Administrator (or else SysAdmin) in the superuser of the system. He has both access to the database and application. He has the capability to view and edit the code and processes and also install new plugins and upgrade the application.
The Secretariat user (or else WebAdmin) is a master user for each University department and represents its secretariat office. He has a lot of privileges such as adding new department users, lessons, grades, announcements etc. The basic limitation is that it has power over only its own department.
The Teacher user, represents a teacher of the university. He has the privileges to manage the courses he is responsible for. Some of his capabilities are to make lesson announcements, upload assignments, download student submissions and grade them. He has also the capability to edit his profile with skills, languages and education.
The Student user represents every Student in the University. He belongs in a specific department and can enroll to lessons he chooses. He can view announcements, create personal events, edit his profile, upload his submissions etc. He has also the capability to take quizzes and proceed accordingly based on his level.
The Apex Framework will be analyzed later on the way it works.
«Μεταπτυχιακή Διατριβή» ΝΙΚΟΛΑΟΣ ΜΗΝΑΪΔΗΣ
Intelligent University and E-Learning Function Management System Σελίδα 6
E class Application Overview
Users:
Sys-Admin:
The System Administrator of the environment.
Full Access to Database (the regarding schema)
Full Access to Front End functionalities and theming
All other functionalities that the other roles have
Authorization Scheme: Sys Admin
Web-Admin (Secretariat):
The user group for Secretariat users of each Department of the University.
Ability to create/manage Lessons.
Ability to create/manage Events/Announcements
Ability to create Department Users
Access to several Reports/Charts
Teacher:
The teacher user group for each teacher in the University.
Ability to manage a lesson
Ability to add assignments to a lesson
Ability to create/manage Events/Announcements
Access to several Reports/Charts
Ability to add skills in the profile
Student:
The student user group for each student in the University.
Ability to create/manage Events
Access to several Reports/Charts
Ability to enrol to lessons
Ability to add skills in the profile
Ability to take quizzes
Ability to submit Assignments
Intelligent tools:
1)Quizzes
Each student has the ability to take quizzes. Each quiz has questions with multiple choices. When the quiz is submitted, a regarding report is produced showing results, both successful and failed. In case of failure, helpful messages appear and also helpful charts are produced in order to help the student understand his mistakes and progress better next time. In case of success, the report is updated accordingly and also the next level quiz is unlocked and appears to the student. There are currently 3 quiz levels. Also if the user succeeds with less than 3 failures in the first quiz, then he increases his Rank from 1 to 2 and will be able to take the quiz Quiz2_Rank2 (which is more difficult) ,otherwise if his failed tries are 3 or above his next quiz will be an easier one and his rank remains 1.

«Μεταπτυχιακή Διατριβή» ΝΙΚΟΛΑΟΣ ΜΗΝΑΪΔΗΣ
Intelligent University and E-Learning Function Management System Σελίδα 7
2)Skills – Lessons
Each student has the ability to add an approved skill to his profile. When his profile is updated, then all the lessons that he can enrol are being ordered suitably to his skills. Also, a regarding grid-report appears showing suggested lessons based on his skills. Moreover, in his profile page the system suggests skills to add based on the same business area of skills that he already added.
Overview of Sys-Admin User profile:
Test user: MINAID - 1230 Login page:
The user enters the username and password. Authentication used: apex_authentication.login( p_username => :P11_USERNAME, p_password => :P11_PASSWORD );

«Μεταπτυχιακή Διατριβή» ΝΙΚΟΛΑΟΣ ΜΗΝΑΪΔΗΣ
Intelligent University and E-Learning Function Management System Σελίδα 8
The Home Screen:
It shows the Username and the Date (this is an advanced installed module explained later on), the current time, a welcome message and a Carousel with regarding University Photos. Above there is a notification icon, a Profile icon and a logout icon, each one redirecting to the right page. At the left, there is the Navigation Menu for each functionality-page available for the Sys Admin user. At the backend design of the page:
«Μεταπτυχιακή Διατριβή» ΝΙΚΟΛΑΟΣ ΜΗΝΑΪΔΗΣ
Intelligent University and E-Learning Function Management System Σελίδα 9
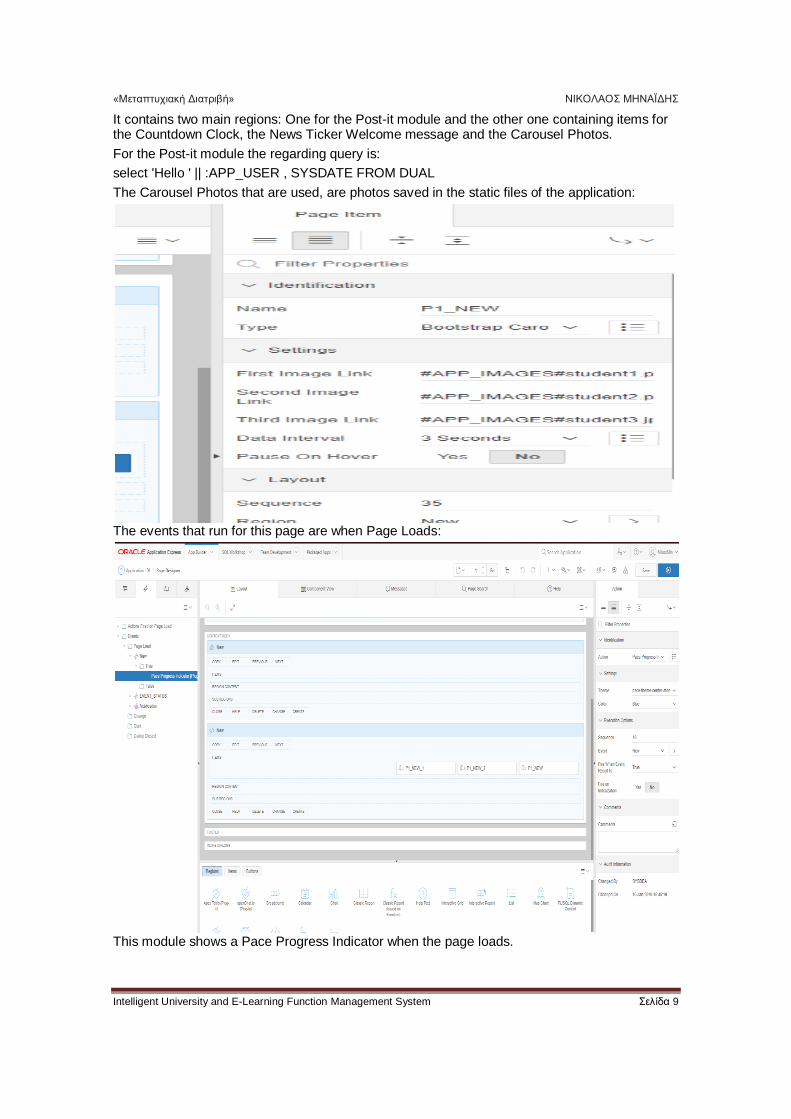
It contains two main regions: One for the Post-it module and the other one containing items for the Countdown Clock, the News Ticker Welcome message and the Carousel Photos.
For the Post-it module the regarding query is:
select 'Hello ' || :APP_USER , SYSDATE FROM DUAL
The Carousel Photos that are used, are photos saved in the static files of the application:
The events that run for this page are when Page Loads:
This module shows a Pace Progress Indicator when the page loads.
«Μεταπτυχιακή Διατριβή» ΝΙΚΟΛΑΟΣ ΜΗΝΑΪΔΗΣ
Intelligent University and E-Learning Function Management System Σελίδα 10
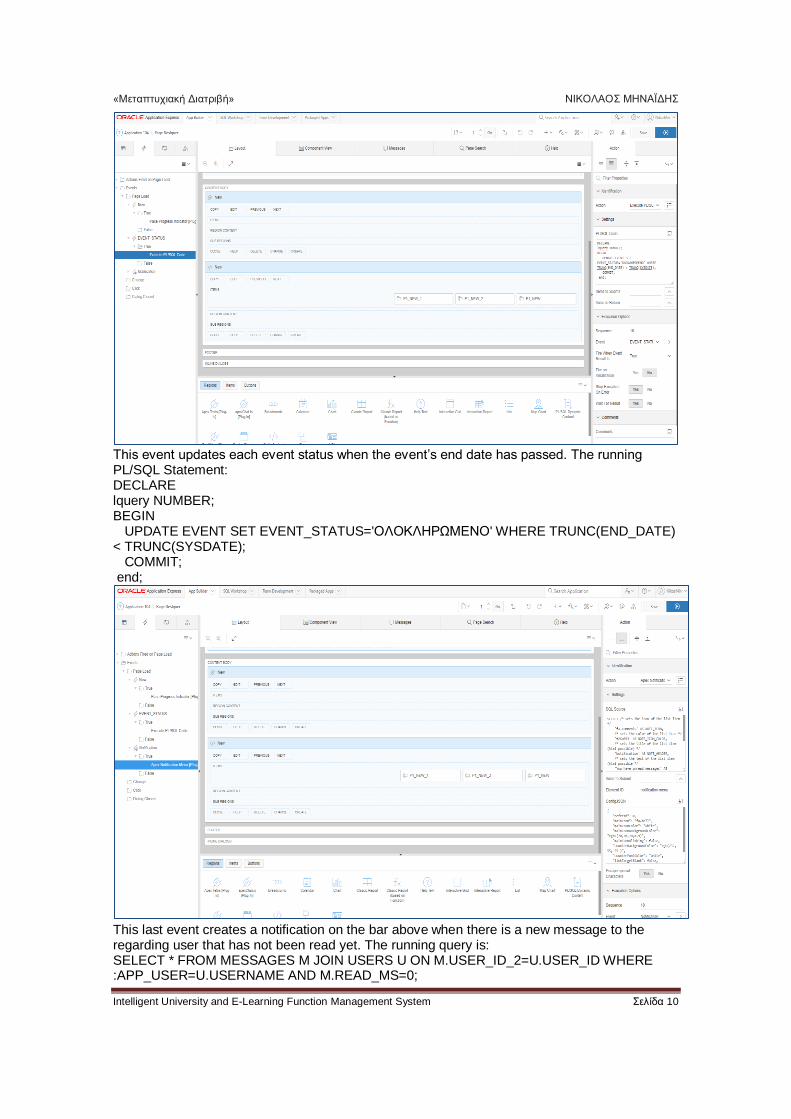
This event updates each event status when the event’s end date has passed. The running PL/SQL Statement: DECLARE lquery NUMBER; BEGIN UPDATE EVENT SET EVENT_STATUS='ΟΛΟΚΛΗΡΩΜΕΝΟ' WHERE TRUNC(END_DATE) < TRUNC(SYSDATE); COMMIT; end;
This last event creates a notification on the bar above when there is a new message to the regarding user that has not been read yet. The running query is: SELECT * FROM MESSAGES M JOIN USERS U ON M.USER_ID_2=U.USER_ID WHERE :APP_USER=U.USERNAME AND M.READ_MS=0;
«Μεταπτυχιακή Διατριβή» ΝΙΚΟΛΑΟΣ ΜΗΝΑΪΔΗΣ
Intelligent University and E-Learning Function Management System Σελίδα 11
For the visualization of the notification:
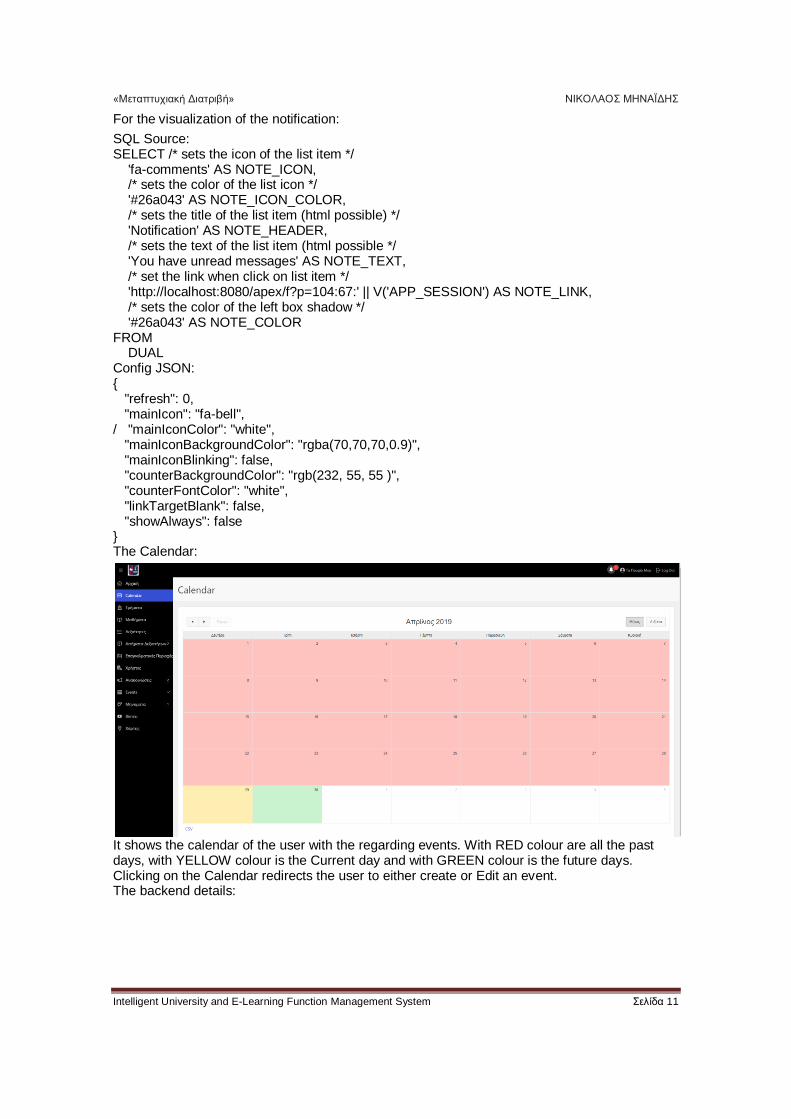
SQL Source: SELECT /* sets the icon of the list item */ 'fa-comments' AS NOTE_ICON, /* sets the color of the list icon */ '#26a043' AS NOTE_ICON_COLOR, /* sets the title of the list item (html possible) */ 'Notification' AS NOTE_HEADER, /* sets the text of the list item (html possible */ 'You have unread messages' AS NOTE_TEXT, /* set the link when click on list item */ 'http://localhost:8080/apex/f?p=104:67:' || V('APP_SESSION') AS NOTE_LINK, /* sets the color of the left box shadow */ '#26a043' AS NOTE_COLOR FROM DUAL Config JSON: { "refresh": 0, "mainIcon": "fa-bell", / "mainIconColor": "white", "mainIconBackgroundColor": "rgba(70,70,70,0.9)", "mainIconBlinking": false, "counterBackgroundColor": "rgb(232, 55, 55 )", "counterFontColor": "white", "linkTargetBlank": false, "showAlways": false } The Calendar:
It shows the calendar of the user with the regarding events. With RED colour are all the past days, with YELLOW colour is the Current day and with GREEN colour is the future days. Clicking on the Calendar redirects the user to either create or Edit an event. The backend details:

«Μεταπτυχιακή Διατριβή» ΝΙΚΟΛΑΟΣ ΜΗΝΑΪΔΗΣ
Intelligent University and E-Learning Function Management System Σελίδα 12
The running query for the calendar is: select EVENT.EVENT_NAME as EVENT_NAME, EVENT.START_DATE as START_DATE, EVENT.END_DATE as END_DATE, EVENT.EVENT_STATUS as EVENT_STATUS from USERS USERS, USER_EVENTS USER_EVENTS, EVENT EVENT where EVENT.EVENT_ID=USER_EVENTS.EVENT_ID and USER_EVENTS.USER_ID=USERS.USER_ID and :APP_USER=USERS.USERNAME and USER_EVENTS.IS_ACCEPTED='ΝΑΙ' The running events of the calendar Page are the Notification and the Pace Progress Indicator (same as in the Home Page)
«Μεταπτυχιακή Διατριβή» ΝΙΚΟΛΑΟΣ ΜΗΝΑΪΔΗΣ
Intelligent University and E-Learning Function Management System Σελίδα 13
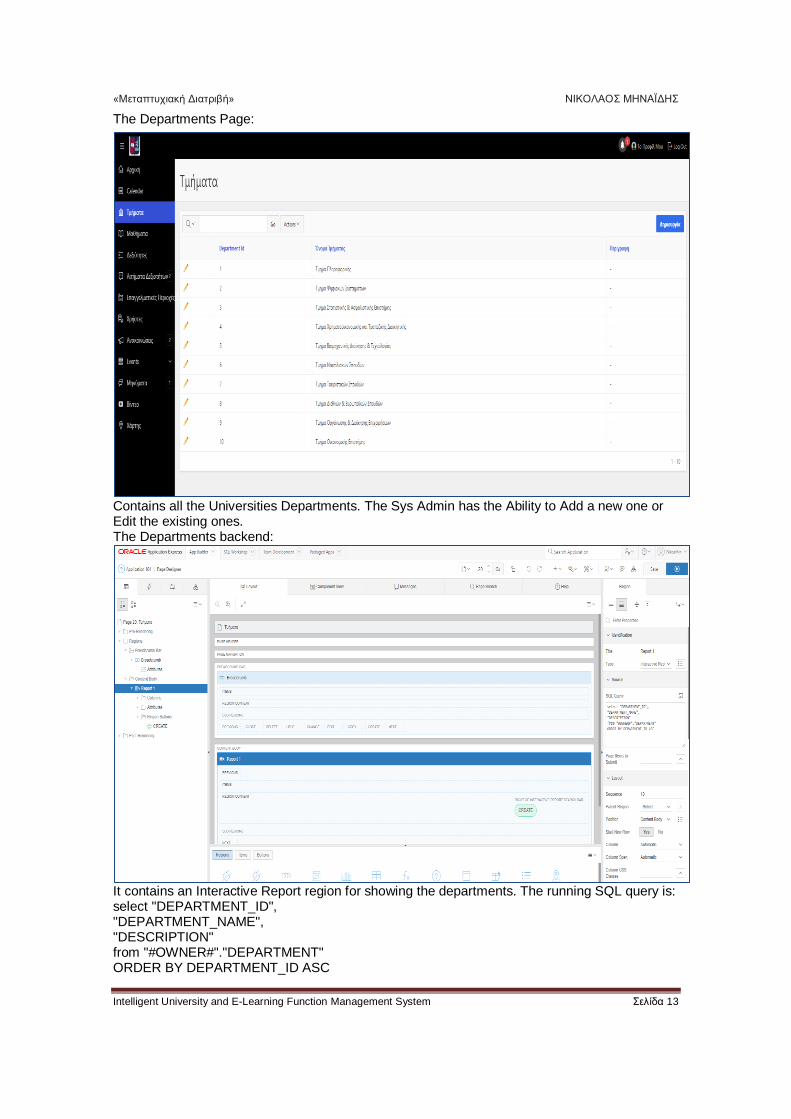
The Departments Page:
Contains all the Universities Departments. The Sys Admin has the Ability to Add a new one or Edit the existing ones. The Departments backend:
It contains an Interactive Report region for showing the departments. The running SQL query is: select "DEPARTMENT_ID", "DEPARTMENT_NAME", "DESCRIPTION" from "#OWNER#"."DEPARTMENT" ORDER BY DEPARTMENT_ID ASC
«Μεταπτυχιακή Διατριβή» ΝΙΚΟΛΑΟΣ ΜΗΝΑΪΔΗΣ
Intelligent University and E-Learning Function Management System Σελίδα 14
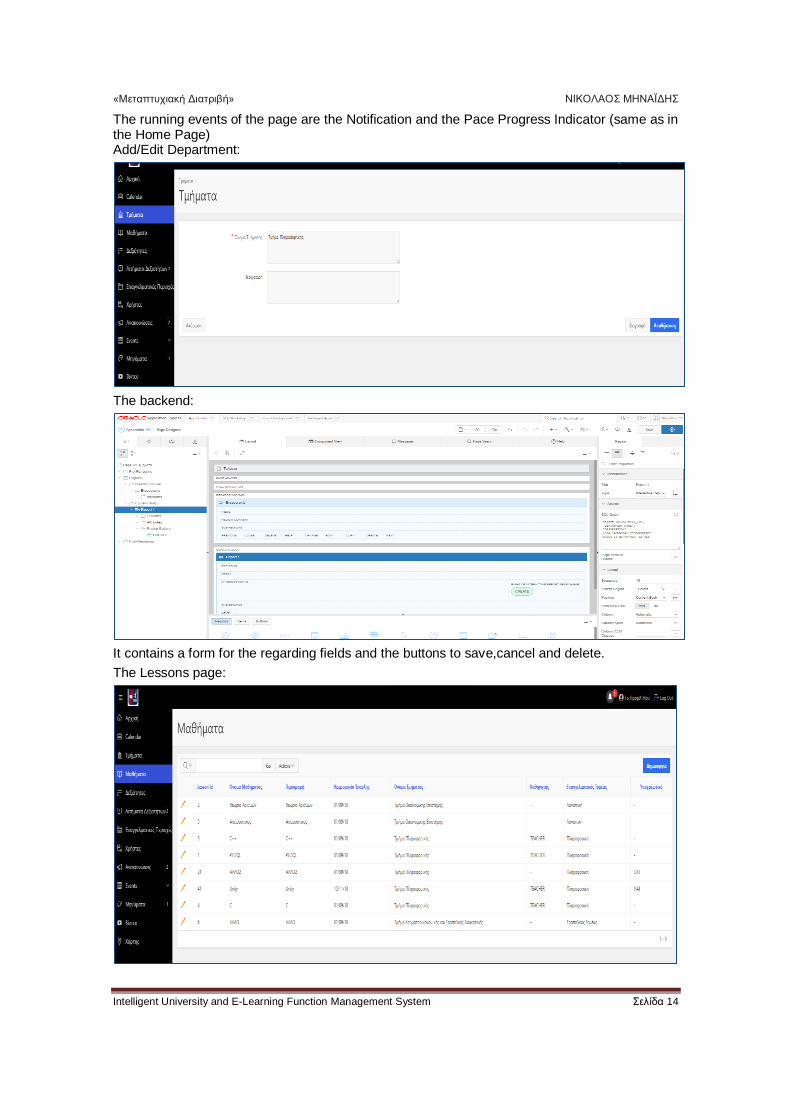
The running events of the page are the Notification and the Pace Progress Indicator (same as in the Home Page) Add/Edit Department:
The backend:
It contains a form for the regarding fields and the buttons to save,cancel and delete.
The Lessons page:
«Μεταπτυχιακή Διατριβή» ΝΙΚΟΛΑΟΣ ΜΗΝΑΪΔΗΣ
Intelligent University and E-Learning Function Management System Σελίδα 15
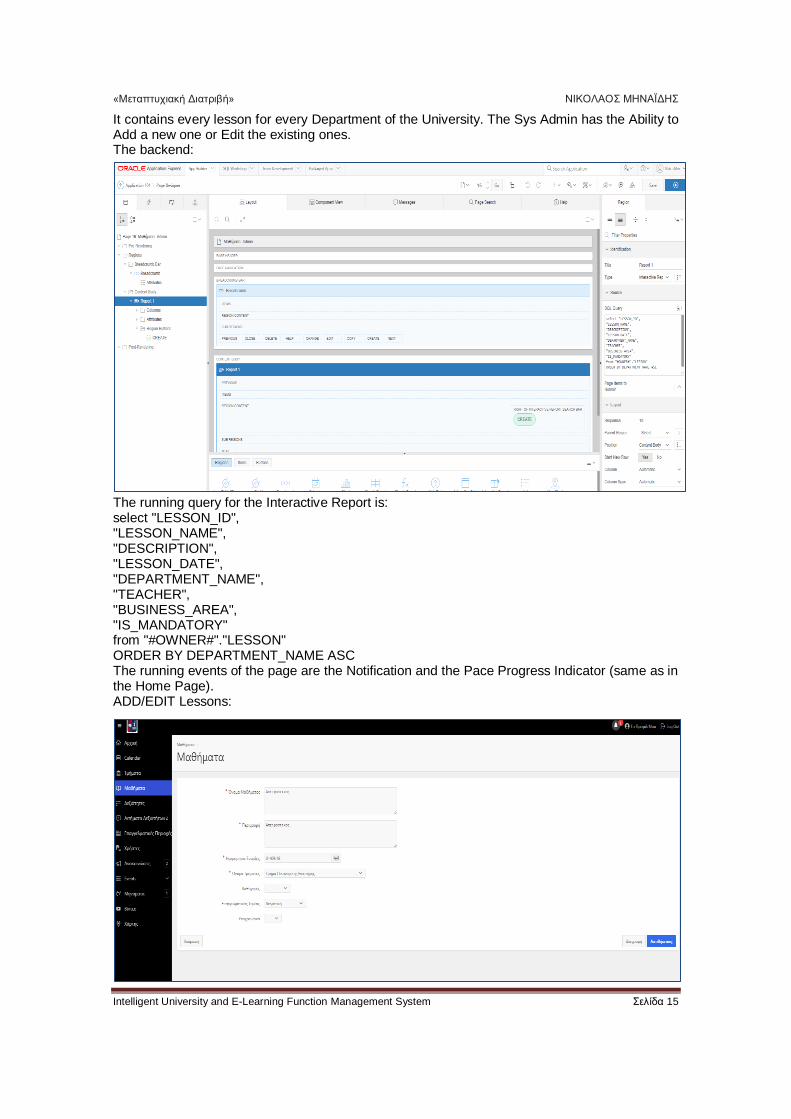
It contains every lesson for every Department of the University. The Sys Admin has the Ability to Add a new one or Edit the existing ones. The backend:
The running query for the Interactive Report is: select "LESSON_ID", "LESSON_NAME", "DESCRIPTION", "LESSON_DATE", "DEPARTMENT_NAME", "TEACHER", "BUSINESS_AREA", "IS_MANDATORY" from "#OWNER#"."LESSON" ORDER BY DEPARTMENT_NAME ASC The running events of the page are the Notification and the Pace Progress Indicator (same as in the Home Page). ADD/EDIT Lessons:
«Μεταπτυχιακή Διατριβή» ΝΙΚΟΛΑΟΣ ΜΗΝΑΪΔΗΣ
Intelligent University and E-Learning Function Management System Σελίδα 16
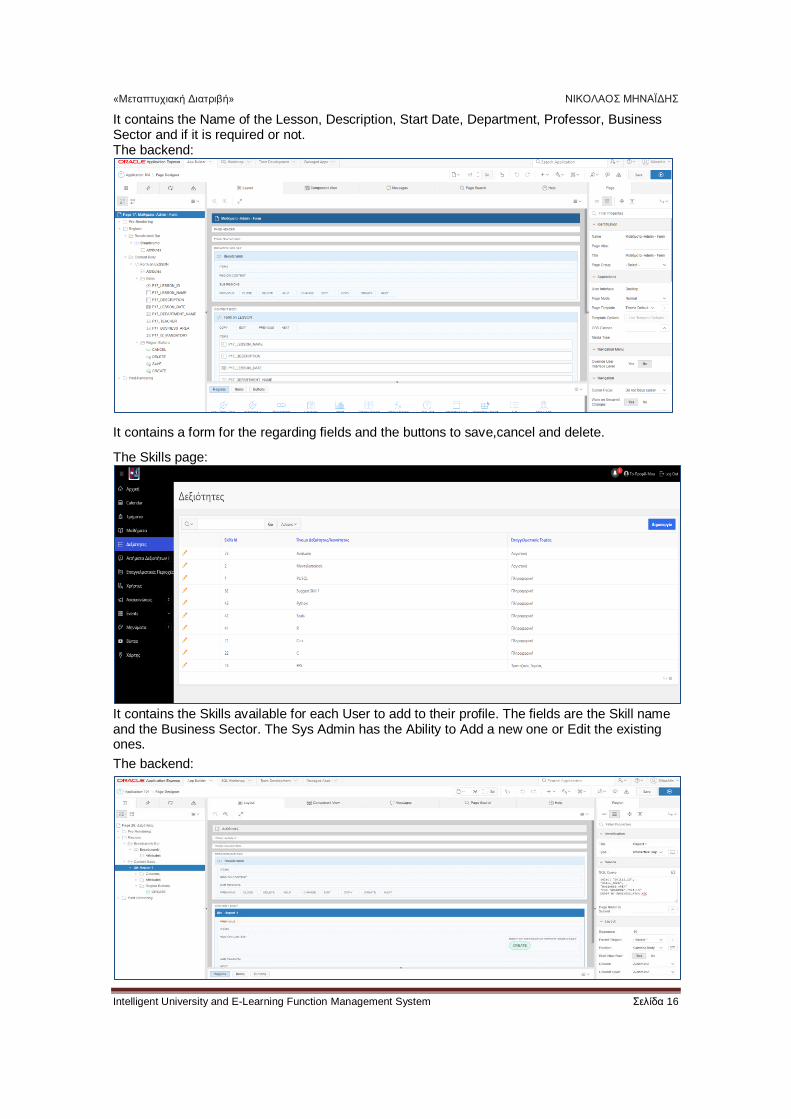
It contains the Name of the Lesson, Description, Start Date, Department, Professor, Business Sector and if it is required or not. The backend:
It contains a form for the regarding fields and the buttons to save,cancel and delete.
The Skills page:
It contains the Skills available for each User to add to their profile. The fields are the Skill name and the Business Sector. The Sys Admin has the Ability to Add a new one or Edit the existing ones.
The backend:
«Μεταπτυχιακή Διατριβή» ΝΙΚΟΛΑΟΣ ΜΗΝΑΪΔΗΣ
Intelligent University and E-Learning Function Management System Σελίδα 17
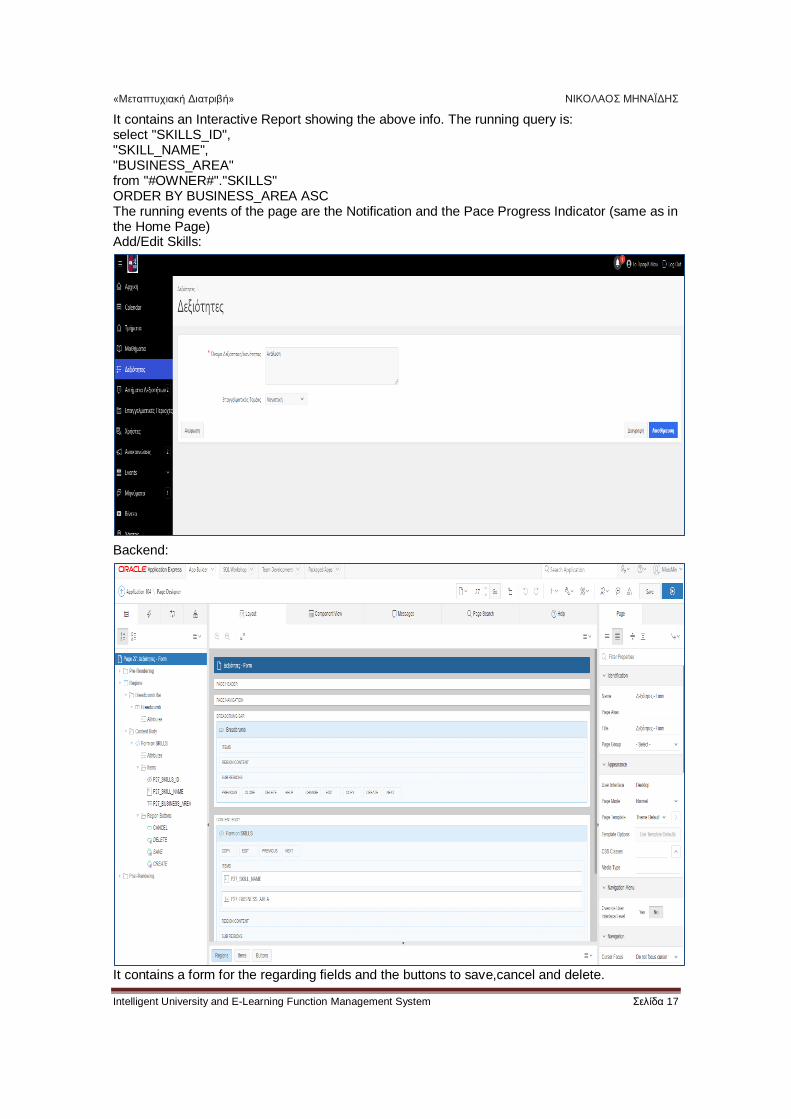
It contains an Interactive Report showing the above info. The running query is: select "SKILLS_ID", "SKILL_NAME", "BUSINESS_AREA" from "#OWNER#"."SKILLS" ORDER BY BUSINESS_AREA ASC The running events of the page are the Notification and the Pace Progress Indicator (same as in the Home Page) Add/Edit Skills:
Backend:
It contains a form for the regarding fields and the buttons to save,cancel and delete.
«Μεταπτυχιακή Διατριβή» ΝΙΚΟΛΑΟΣ ΜΗΝΑΪΔΗΣ
Intelligent University and E-Learning Function Management System Σελίδα 18
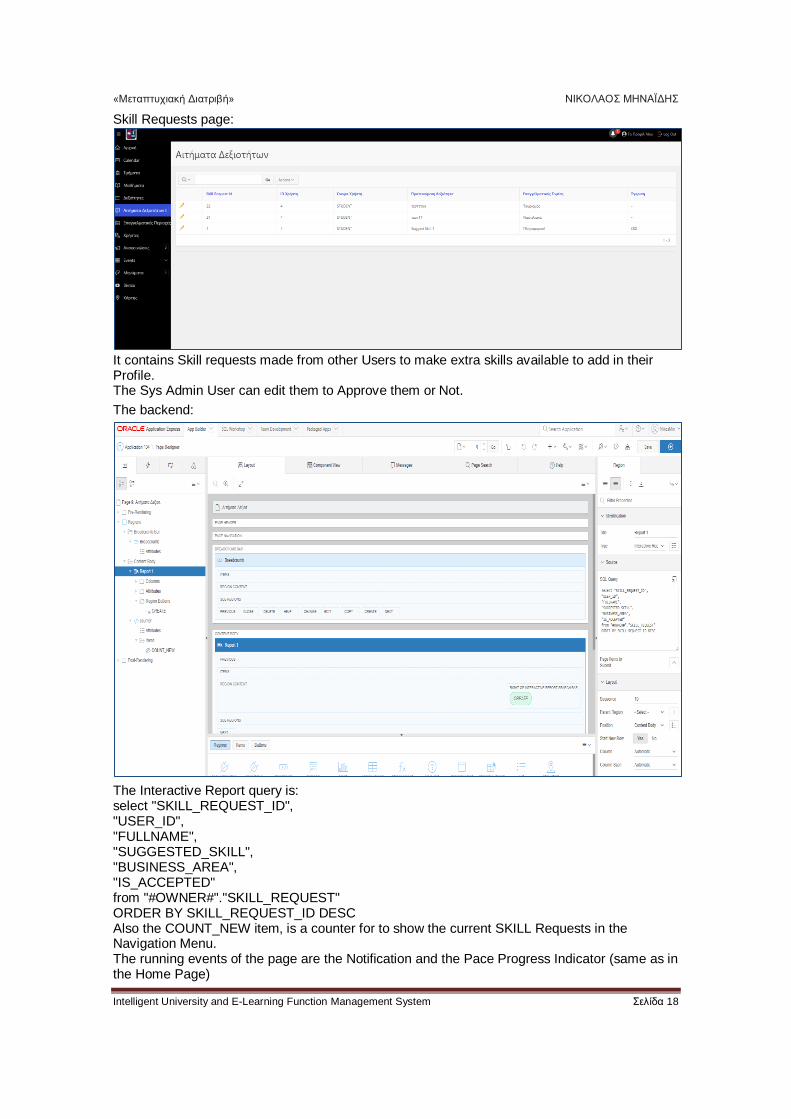
Skill Requests page:
It contains Skill requests made from other Users to make extra skills available to add in their Profile. The Sys Admin User can edit them to Approve them or Not.
The backend:
The Interactive Report query is: select "SKILL_REQUEST_ID", "USER_ID", "FULLNAME", "SUGGESTED_SKILL", "BUSINESS_AREA", "IS_ACCEPTED" from "#OWNER#"."SKILL_REQUEST" ORDER BY SKILL_REQUEST_ID DESC Also the COUNT_NEW item, is a counter for to show the current SKILL Requests in the Navigation Menu. The running events of the page are the Notification and the Pace Progress Indicator (same as in the Home Page)
«Μεταπτυχιακή Διατριβή» ΝΙΚΟΛΑΟΣ ΜΗΝΑΪΔΗΣ
Intelligent University and E-Learning Function Management System Σελίδα 19
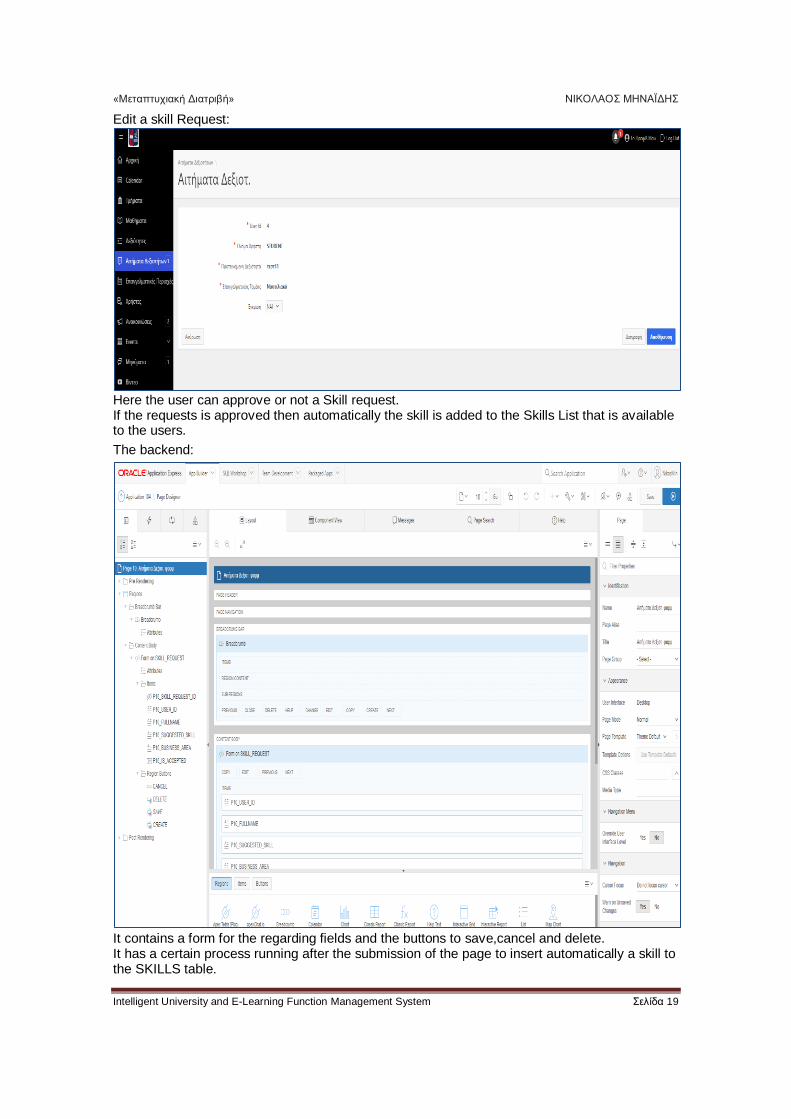
Edit a skill Request:
Here the user can approve or not a Skill request. If the requests is approved then automatically the skill is added to the Skills List that is available to the users.
The backend:
It contains a form for the regarding fields and the buttons to save,cancel and delete. It has a certain process running after the submission of the page to insert automatically a skill to the SKILLS table.
«Μεταπτυχιακή Διατριβή» ΝΙΚΟΛΑΟΣ ΜΗΝΑΪΔΗΣ
Intelligent University and E-Learning Function Management System Σελίδα 20
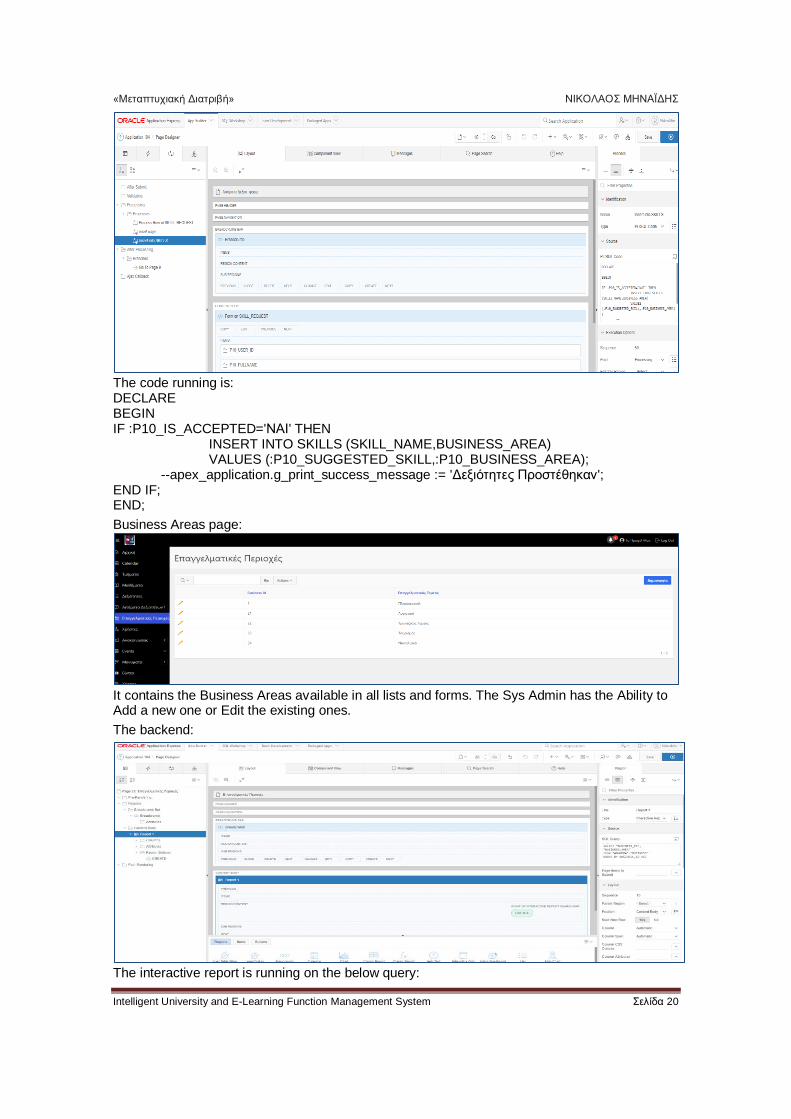
The code running is: DECLARE BEGIN IF :P10_IS_ACCEPTED='ΝΑΙ' THEN INSERT INTO SKILLS (SKILL_NAME,BUSINESS_AREA) VALUES (:P10_SUGGESTED_SKILL,:P10_BUSINESS_AREA); --apex_application.g_print_success_message := 'Δεξιότητες Προστέθηκαν'; END IF; END;
Business Areas page:
It contains the Business Areas available in all lists and forms. The Sys Admin has the Ability to Add a new one or Edit the existing ones.
The backend:
The interactive report is running on the below query:
«Μεταπτυχιακή Διατριβή» ΝΙΚΟΛΑΟΣ ΜΗΝΑΪΔΗΣ
Intelligent University and E-Learning Function Management System Σελίδα 21
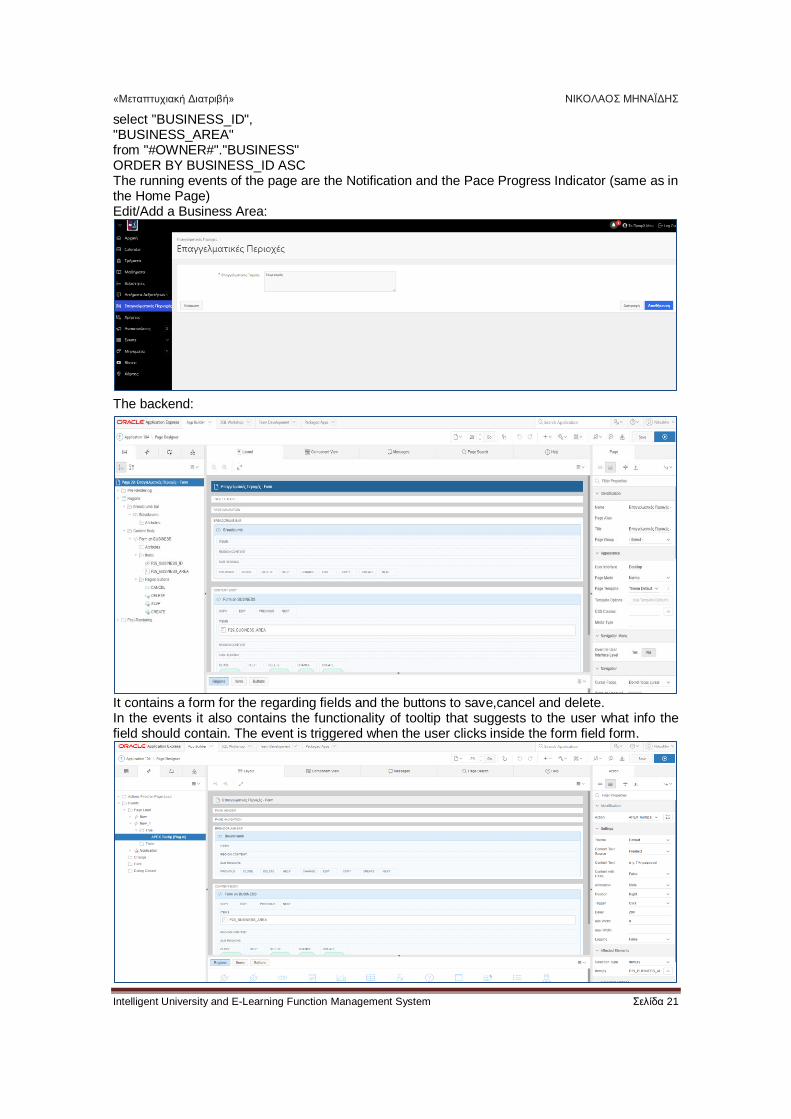
select "BUSINESS_ID", "BUSINESS_AREA" from "#OWNER#"."BUSINESS" ORDER BY BUSINESS_ID ASC The running events of the page are the Notification and the Pace Progress Indicator (same as in the Home Page) Edit/Add a Business Area:
The backend:
It contains a form for the regarding fields and the buttons to save,cancel and delete. In the events it also contains the functionality of tooltip that suggests to the user what info the field should contain. The event is triggered when the user clicks inside the form field form.
«Μεταπτυχιακή Διατριβή» ΝΙΚΟΛΑΟΣ ΜΗΝΑΪΔΗΣ
Intelligent University and E-Learning Function Management System Σελίδα 22
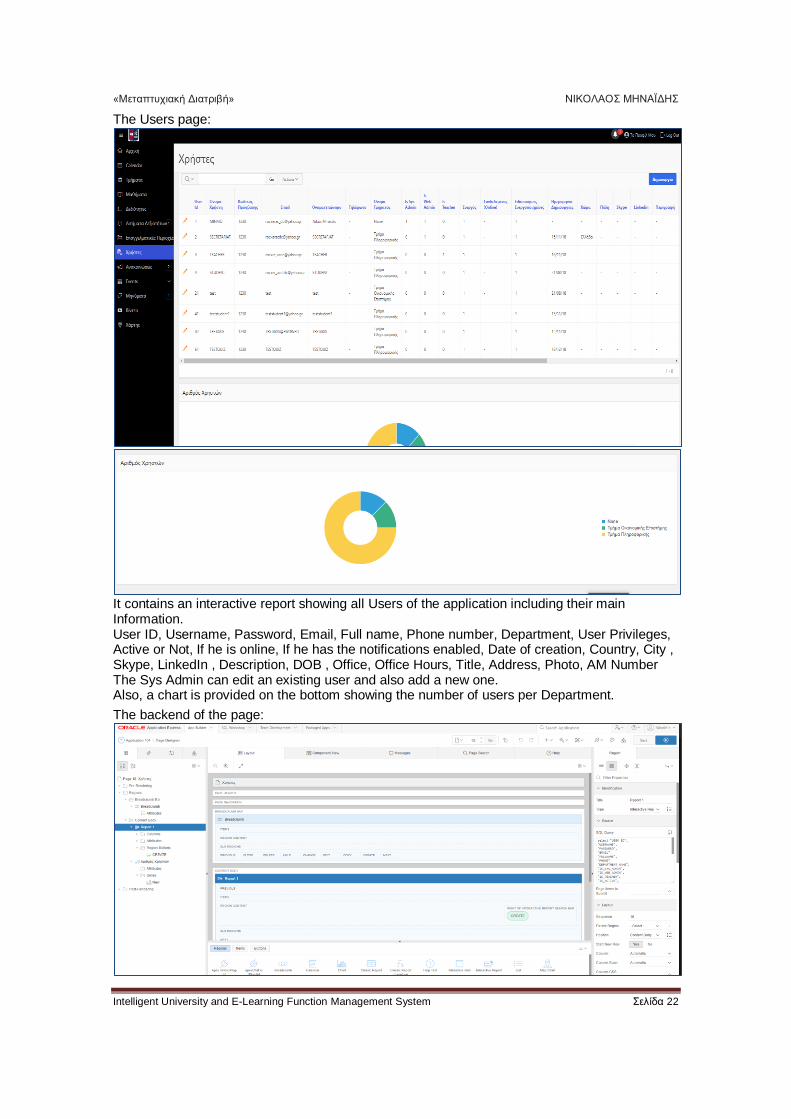
The Users page:
It contains an interactive report showing all Users of the application including their main Information. User ID, Username, Password, Email, Full name, Phone number, Department, User Privileges, Active or Not, If he is online, If he has the notifications enabled, Date of creation, Country, City , Skype, LinkedIn , Description, DOB , Office, Office Hours, Title, Address, Photo, AM Number The Sys Admin can edit an existing user and also add a new one. Also, a chart is provided on the bottom showing the number of users per Department.
The backend of the page:
«Μεταπτυχιακή Διατριβή» ΝΙΚΟΛΑΟΣ ΜΗΝΑΪΔΗΣ
Intelligent University and E-Learning Function Management System Σελίδα 23
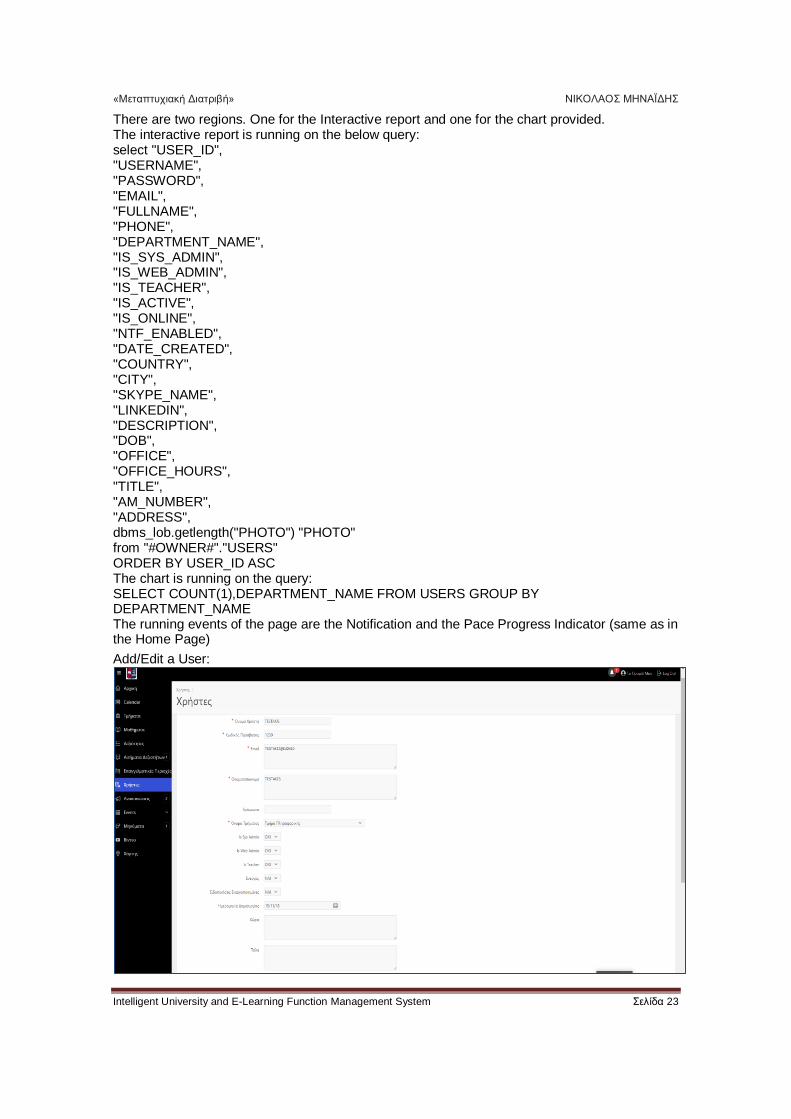
There are two regions. One for the Interactive report and one for the chart provided. The interactive report is running on the below query: select "USER_ID", "USERNAME", "PASSWORD", "EMAIL", "FULLNAME", "PHONE", "DEPARTMENT_NAME", "IS_SYS_ADMIN", "IS_WEB_ADMIN", "IS_TEACHER", "IS_ACTIVE", "IS_ONLINE", "NTF_ENABLED", "DATE_CREATED", "COUNTRY", "CITY", "SKYPE_NAME", "LINKEDIN", "DESCRIPTION", "DOB", "OFFICE", "OFFICE_HOURS", "TITLE", "AM_NUMBER", "ADDRESS", dbms_lob.getlength("PHOTO") "PHOTO" from "#OWNER#"."USERS" ORDER BY USER_ID ASC The chart is running on the query: SELECT COUNT(1),DEPARTMENT_NAME FROM USERS GROUP BY DEPARTMENT_NAME The running events of the page are the Notification and the Pace Progress Indicator (same as in the Home Page)
Add/Edit a User:
«Μεταπτυχιακή Διατριβή» ΝΙΚΟΛΑΟΣ ΜΗΝΑΪΔΗΣ
Intelligent University and E-Learning Function Management System Σελίδα 24
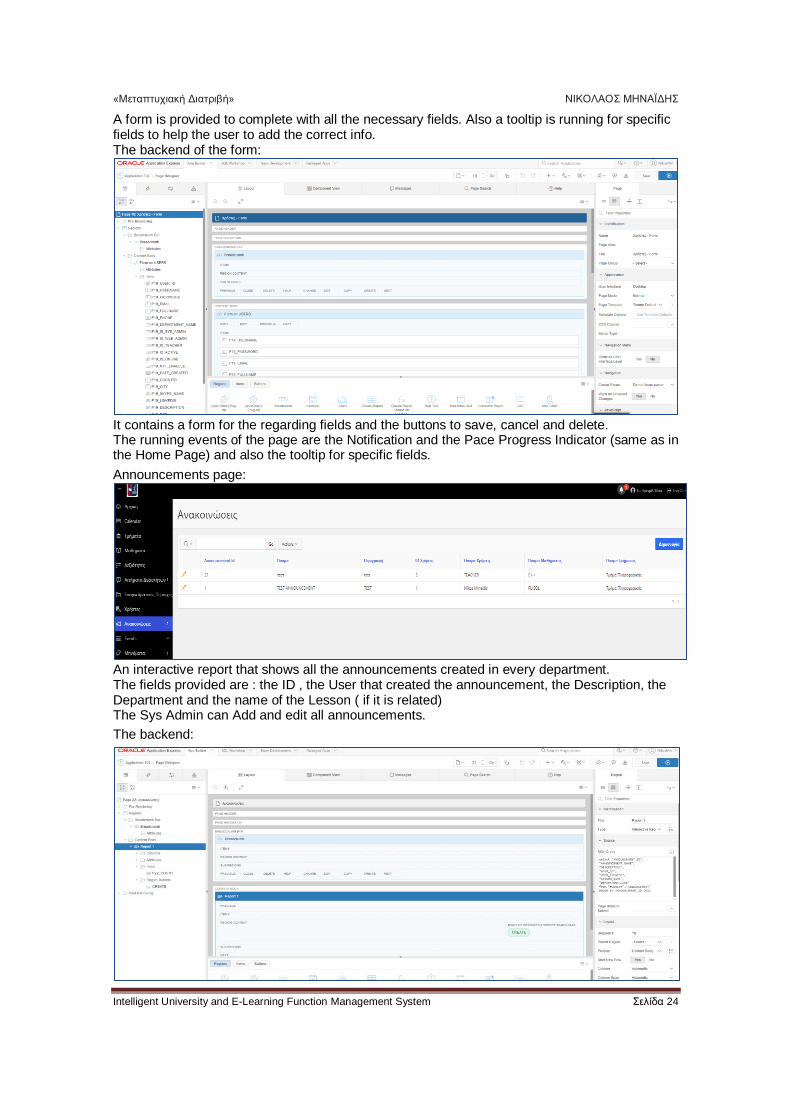
A form is provided to complete with all the necessary fields. Also a tooltip is running for specific fields to help the user to add the correct info. The backend of the form:
It contains a form for the regarding fields and the buttons to save, cancel and delete. The running events of the page are the Notification and the Pace Progress Indicator (same as in the Home Page) and also the tooltip for specific fields.
Announcements page:
An interactive report that shows all the announcements created in every department. The fields provided are : the ID , the User that created the announcement, the Description, the Department and the name of the Lesson ( if it is related) The Sys Admin can Add and edit all announcements.
The backend:
«Μεταπτυχιακή Διατριβή» ΝΙΚΟΛΑΟΣ ΜΗΝΑΪΔΗΣ
Intelligent University and E-Learning Function Management System Σελίδα 25
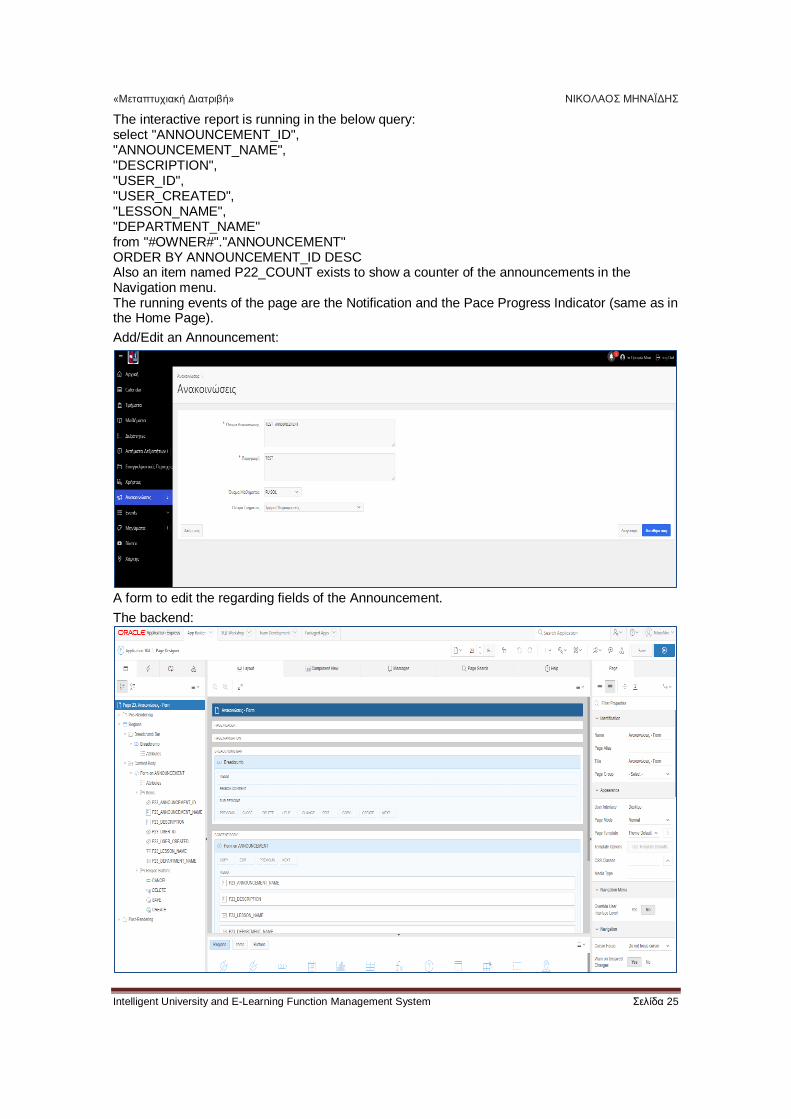
The interactive report is running in the below query: select "ANNOUNCEMENT_ID", "ANNOUNCEMENT_NAME", "DESCRIPTION", "USER_ID", "USER_CREATED", "LESSON_NAME", "DEPARTMENT_NAME" from "#OWNER#"."ANNOUNCEMENT" ORDER BY ANNOUNCEMENT_ID DESC Also an item named P22_COUNT exists to show a counter of the announcements in the Navigation menu. The running events of the page are the Notification and the Pace Progress Indicator (same as in the Home Page).
Add/Edit an Announcement:
A form to edit the regarding fields of the Announcement.
The backend:
«Μεταπτυχιακή Διατριβή» ΝΙΚΟΛΑΟΣ ΜΗΝΑΪΔΗΣ
Intelligent University and E-Learning Function Management System Σελίδα 26
It contains a form for the regarding fields and the buttons to save, cancel and delete. The running events of the page are the Notification and the Pace Progress Indicator (same as in the Home Page).
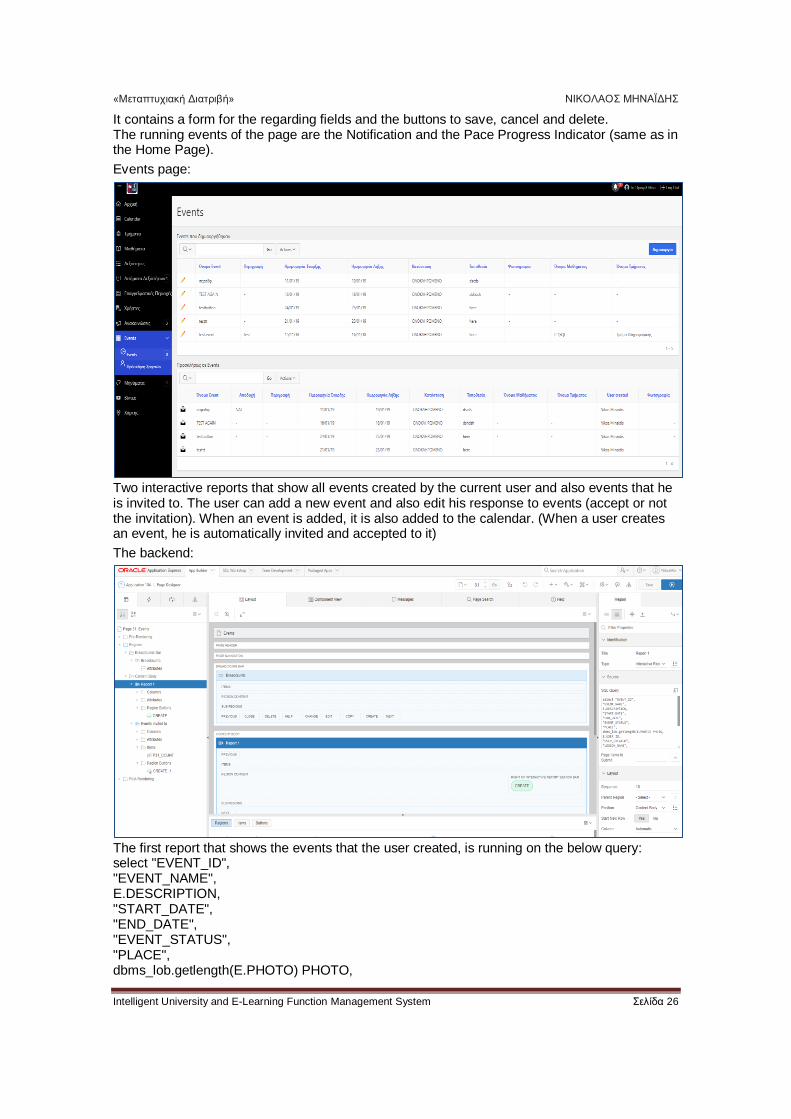
Events page:
Two interactive reports that show all events created by the current user and also events that he is invited to. The user can add a new event and also edit his response to events (accept or not the invitation). When an event is added, it is also added to the calendar. (When a user creates an event, he is automatically invited and accepted to it)
The backend:
The first report that shows the events that the user created, is running on the below query: select "EVENT_ID", "EVENT_NAME", E.DESCRIPTION, "START_DATE", "END_DATE", "EVENT_STATUS", "PLACE", dbms_lob.getlength(E.PHOTO) PHOTO,
«Μεταπτυχιακή Διατριβή» ΝΙΚΟΛΑΟΣ ΜΗΝΑΪΔΗΣ
Intelligent University and E-Learning Function Management System Σελίδα 27
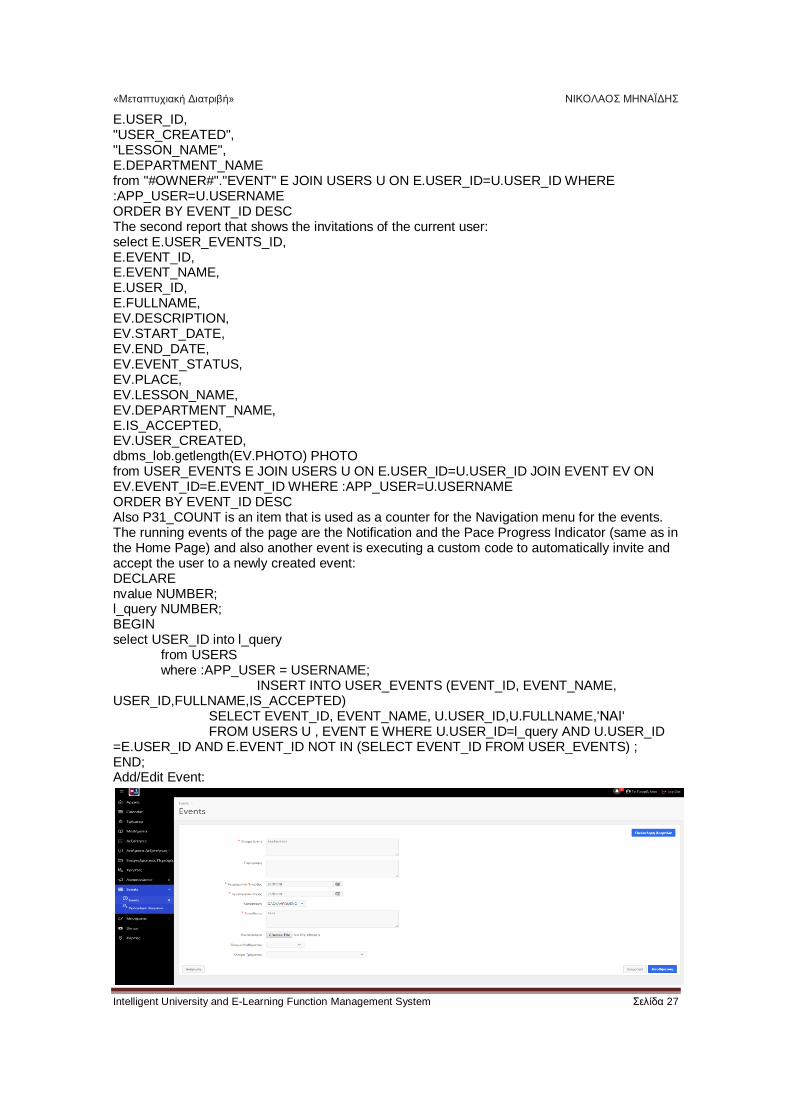
E.USER_ID, "USER_CREATED", "LESSON_NAME", E.DEPARTMENT_NAME from "#OWNER#"."EVENT" E JOIN USERS U ON E.USER_ID=U.USER_ID WHERE :APP_USER=U.USERNAME ORDER BY EVENT_ID DESC The second report that shows the invitations of the current user: select E.USER_EVENTS_ID, E.EVENT_ID, E.EVENT_NAME, E.USER_ID, E.FULLNAME, EV.DESCRIPTION, EV.START_DATE, EV.END_DATE, EV.EVENT_STATUS, EV.PLACE, EV.LESSON_NAME, EV.DEPARTMENT_NAME, E.IS_ACCEPTED, EV.USER_CREATED, dbms_lob.getlength(EV.PHOTO) PHOTO from USER_EVENTS E JOIN USERS U ON E.USER_ID=U.USER_ID JOIN EVENT EV ON EV.EVENT_ID=E.EVENT_ID WHERE :APP_USER=U.USERNAME ORDER BY EVENT_ID DESC Also P31_COUNT is an item that is used as a counter for the Navigation menu for the events. The running events of the page are the Notification and the Pace Progress Indicator (same as in the Home Page) and also another event is executing a custom code to automatically invite and accept the user to a newly created event: DECLARE nvalue NUMBER; l_query NUMBER; BEGIN select USER_ID into l_query from USERS where :APP_USER = USERNAME; INSERT INTO USER_EVENTS (EVENT_ID, EVENT_NAME, USER_ID,FULLNAME,IS_ACCEPTED) SELECT EVENT_ID, EVENT_NAME, U.USER_ID,U.FULLNAME,'ΝΑΙ' FROM USERS U , EVENT E WHERE U.USER_ID=l_query AND U.USER_ID =E.USER_ID AND E.EVENT_ID NOT IN (SELECT EVENT_ID FROM USER_EVENTS) ; END; Add/Edit Event:
«Μεταπτυχιακή Διατριβή» ΝΙΚΟΛΑΟΣ ΜΗΝΑΪΔΗΣ
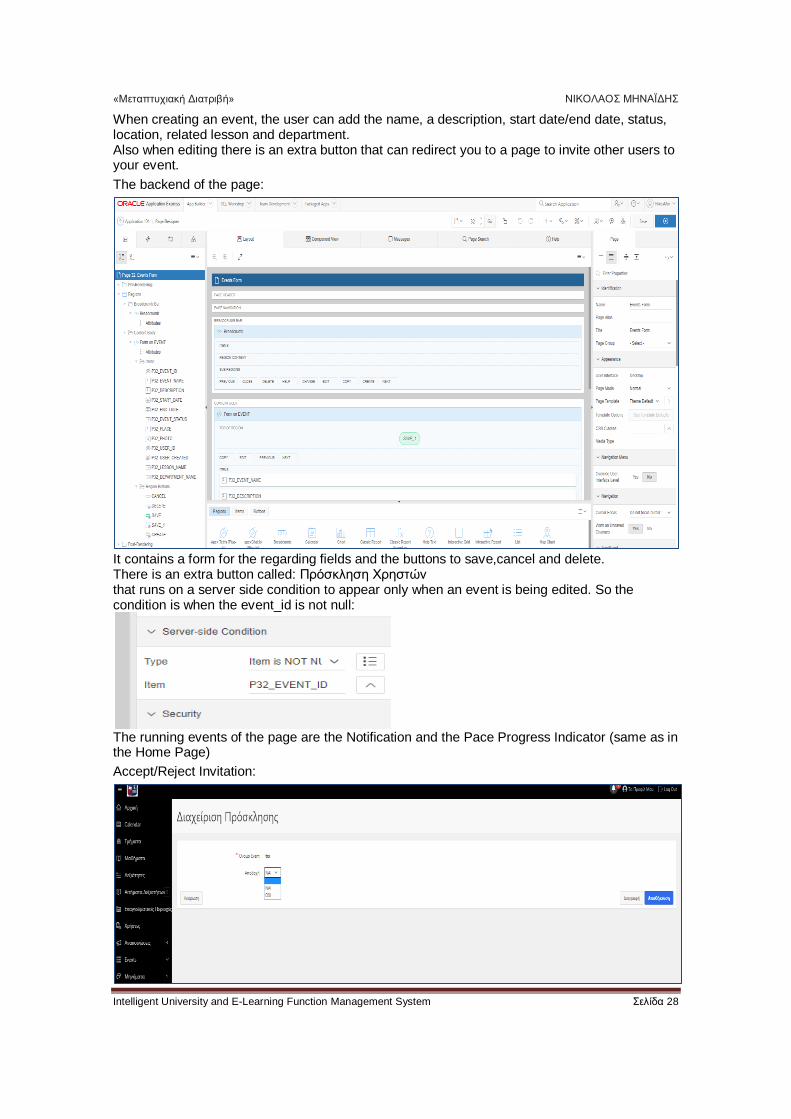
Intelligent University and E-Learning Function Management System Σελίδα 28
When creating an event, the user can add the name, a description, start date/end date, status, location, related lesson and department. Also when editing there is an extra button that can redirect you to a page to invite other users to your event.
The backend of the page:
It contains a form for the regarding fields and the buttons to save,cancel and delete. There is an extra button called: Πρόσκληση Χρηστών that runs on a server side condition to appear only when an event is being edited. So the condition is when the event_id is not null:
The running events of the page are the Notification and the Pace Progress Indicator (same as in the Home Page)
Accept/Reject Invitation:
«Μεταπτυχιακή Διατριβή» ΝΙΚΟΛΑΟΣ ΜΗΝΑΪΔΗΣ
Intelligent University and E-Learning Function Management System Σελίδα 29
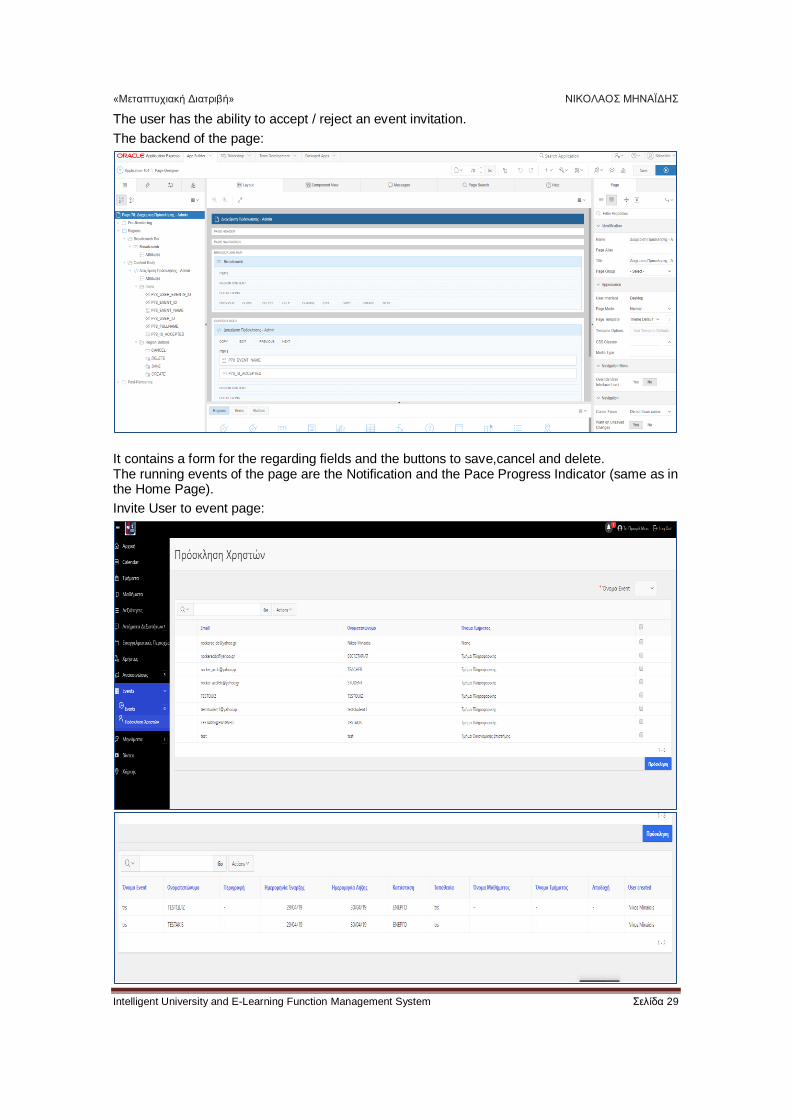
The user has the ability to accept / reject an event invitation.
The backend of the page:
It contains a form for the regarding fields and the buttons to save,cancel and delete. The running events of the page are the Notification and the Pace Progress Indicator (same as in the Home Page).
Invite User to event page:
«Μεταπτυχιακή Διατριβή» ΝΙΚΟΛΑΟΣ ΜΗΝΑΪΔΗΣ
Intelligent University and E-Learning Function Management System Σελίδα 30
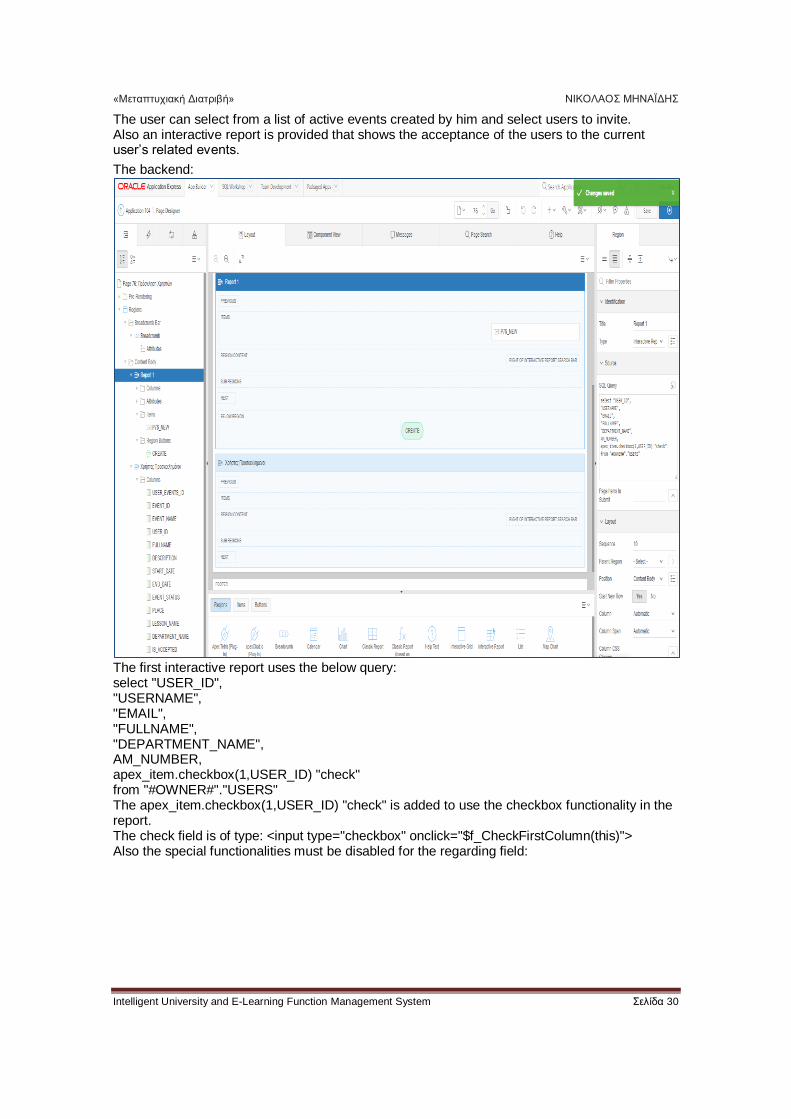
The user can select from a list of active events created by him and select users to invite. Also an interactive report is provided that shows the acceptance of the users to the current user’s related events.
The backend:
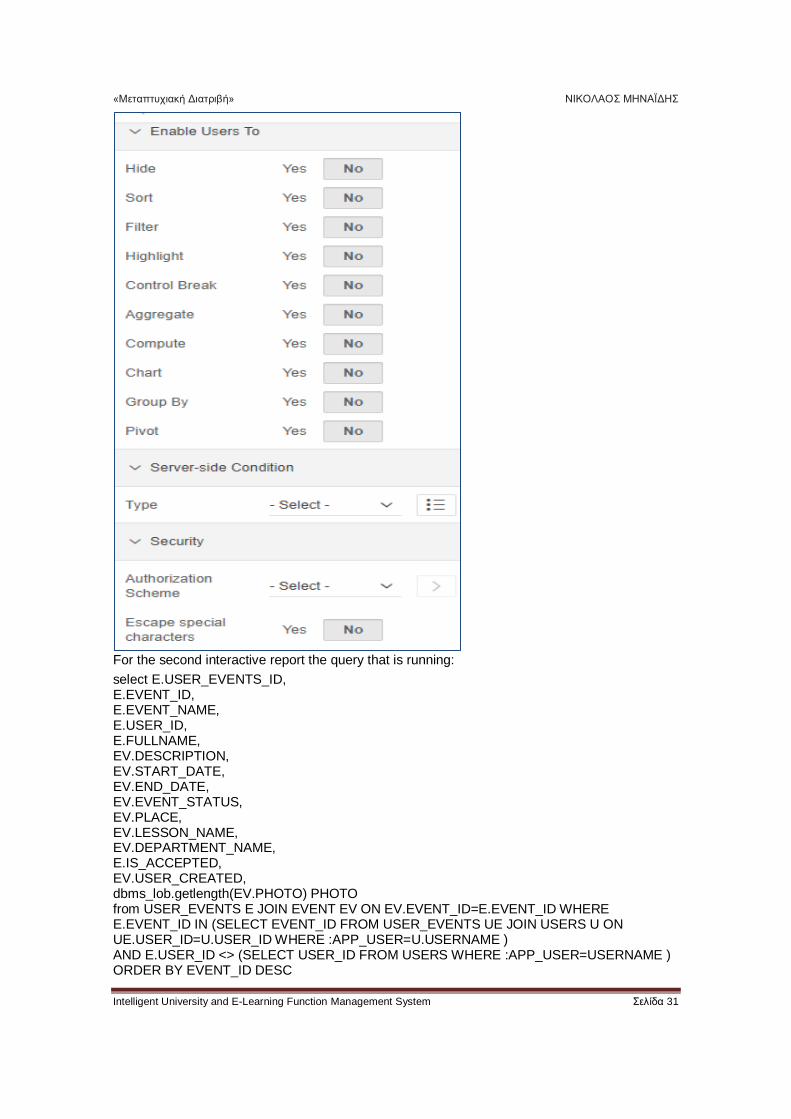
The first interactive report uses the below query: select "USER_ID", "USERNAME", "EMAIL", "FULLNAME", "DEPARTMENT_NAME", AM_NUMBER, apex_item.checkbox(1,USER_ID) "check" from "#OWNER#"."USERS" The apex_item.checkbox(1,USER_ID) "check" is added to use the checkbox functionality in the report. The check field is of type: <input type="checkbox" onclick="$f_CheckFirstColumn(this)"> Also the special functionalities must be disabled for the regarding field:
«Μεταπτυχιακή Διατριβή» ΝΙΚΟΛΑΟΣ ΜΗΝΑΪΔΗΣ
Intelligent University and E-Learning Function Management System Σελίδα 31
For the second interactive report the query that is running:
select E.USER_EVENTS_ID, E.EVENT_ID, E.EVENT_NAME, E.USER_ID, E.FULLNAME, EV.DESCRIPTION, EV.START_DATE, EV.END_DATE, EV.EVENT_STATUS, EV.PLACE, EV.LESSON_NAME, EV.DEPARTMENT_NAME, E.IS_ACCEPTED, EV.USER_CREATED, dbms_lob.getlength(EV.PHOTO) PHOTO from USER_EVENTS E JOIN EVENT EV ON EV.EVENT_ID=E.EVENT_ID WHERE E.EVENT_ID IN (SELECT EVENT_ID FROM USER_EVENTS UE JOIN USERS U ON UE.USER_ID=U.USER_ID WHERE :APP_USER=U.USERNAME ) AND E.USER_ID <> (SELECT USER_ID FROM USERS WHERE :APP_USER=USERNAME ) ORDER BY EVENT_ID DESC
«Μεταπτυχιακή Διατριβή» ΝΙΚΟΛΑΟΣ ΜΗΝΑΪΔΗΣ
Intelligent University and E-Learning Function Management System Σελίδα 32
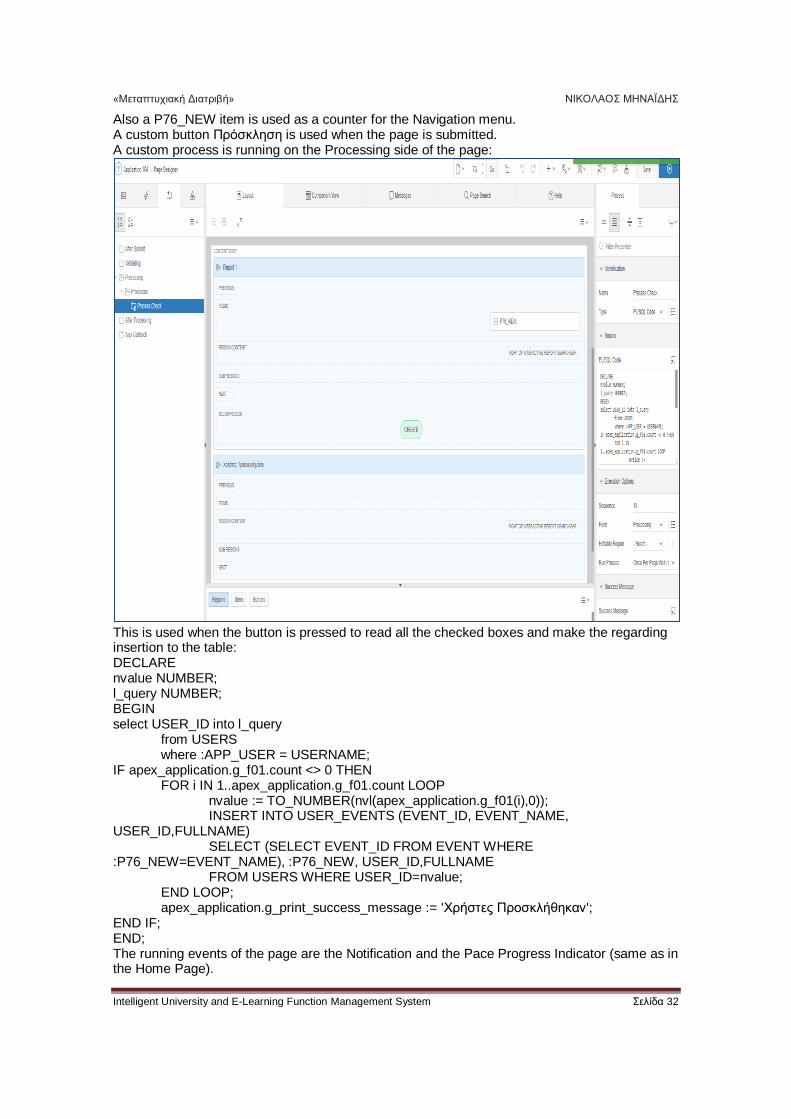
Also a P76_NEW item is used as a counter for the Navigation menu. A custom button Πρόσκληση is used when the page is submitted. A custom process is running on the Processing side of the page:
This is used when the button is pressed to read all the checked boxes and make the regarding insertion to the table: DECLARE nvalue NUMBER; l_query NUMBER; BEGIN select USER_ID into l_query from USERS where :APP_USER = USERNAME; IF apex_application.g_f01.count <> 0 THEN FOR i IN 1..apex_application.g_f01.count LOOP nvalue := TO_NUMBER(nvl(apex_application.g_f01(i),0)); INSERT INTO USER_EVENTS (EVENT_ID, EVENT_NAME, USER_ID,FULLNAME) SELECT (SELECT EVENT_ID FROM EVENT WHERE :P76_NEW=EVENT_NAME), :P76_NEW, USER_ID,FULLNAME FROM USERS WHERE USER_ID=nvalue; END LOOP; apex_application.g_print_success_message := 'Χρήστες Προσκλήθηκαν'; END IF; END; The running events of the page are the Notification and the Pace Progress Indicator (same as in the Home Page).
«Μεταπτυχιακή Διατριβή» ΝΙΚΟΛΑΟΣ ΜΗΝΑΪΔΗΣ
Intelligent University and E-Learning Function Management System Σελίδα 33
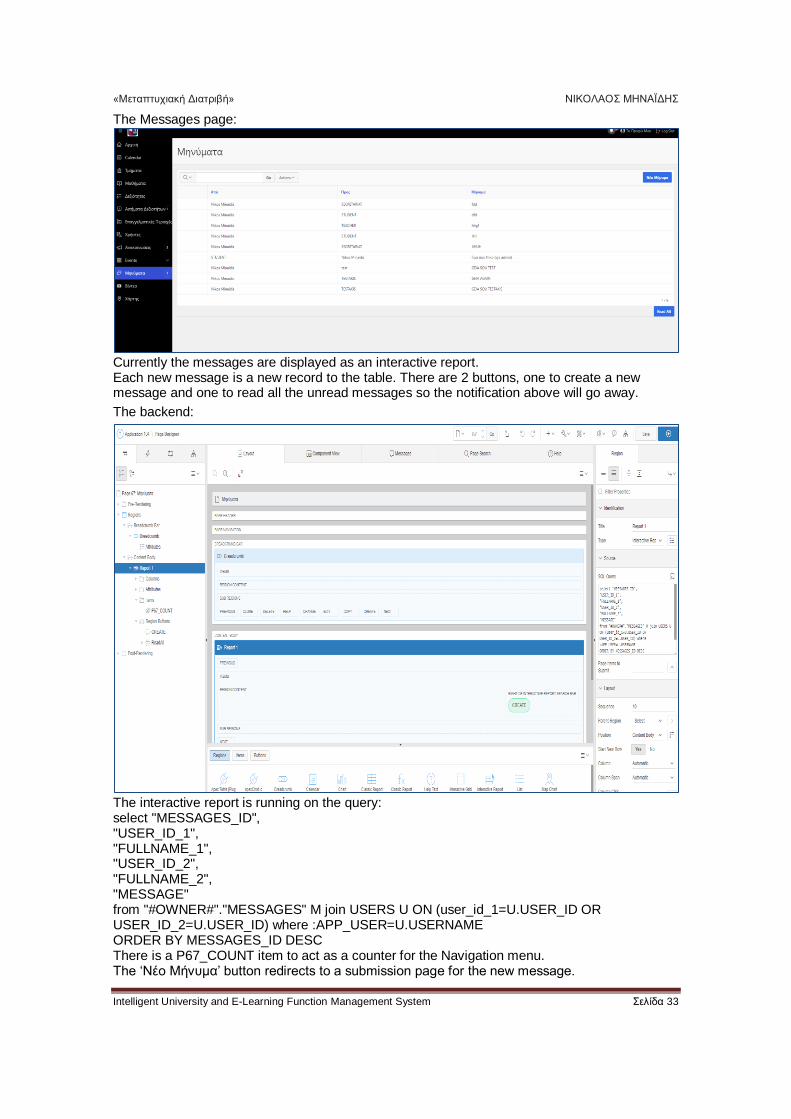
The Messages page:
Currently the messages are displayed as an interactive report. Each new message is a new record to the table. There are 2 buttons, one to create a new message and one to read all the unread messages so the notification above will go away.
The backend:
The interactive report is running on the query: select "MESSAGES_ID", "USER_ID_1", "FULLNAME_1", "USER_ID_2", "FULLNAME_2", "MESSAGE" from "#OWNER#"."MESSAGES" M join USERS U ON (user_id_1=U.USER_ID OR USER_ID_2=U.USER_ID) where :APP_USER=U.USERNAME ORDER BY MESSAGES_ID DESC There is a P67_COUNT item to act as a counter for the Navigation menu. The ‘Νέο Μήνυμα’ button redirects to a submission page for the new message.
«Μεταπτυχιακή Διατριβή» ΝΙΚΟΛΑΟΣ ΜΗΝΑΪΔΗΣ
Intelligent University and E-Learning Function Management System Σελίδα 34
The Read All button submits the page to read all the messages. The running events of the page are the Notification and the Pace Progress Indicator (same as in the Home Page). Another event is triggered when the Read All button is pressed: It executes the below PL/SQL code to update the regarding table BEGIN UPDATE MESSAGES SET READ_MS=1 WHERE USER_ID_2 IN (SELECT USER_ID FROM USERS WHERE :APP_USER=USERNAME); COMMIT; END;
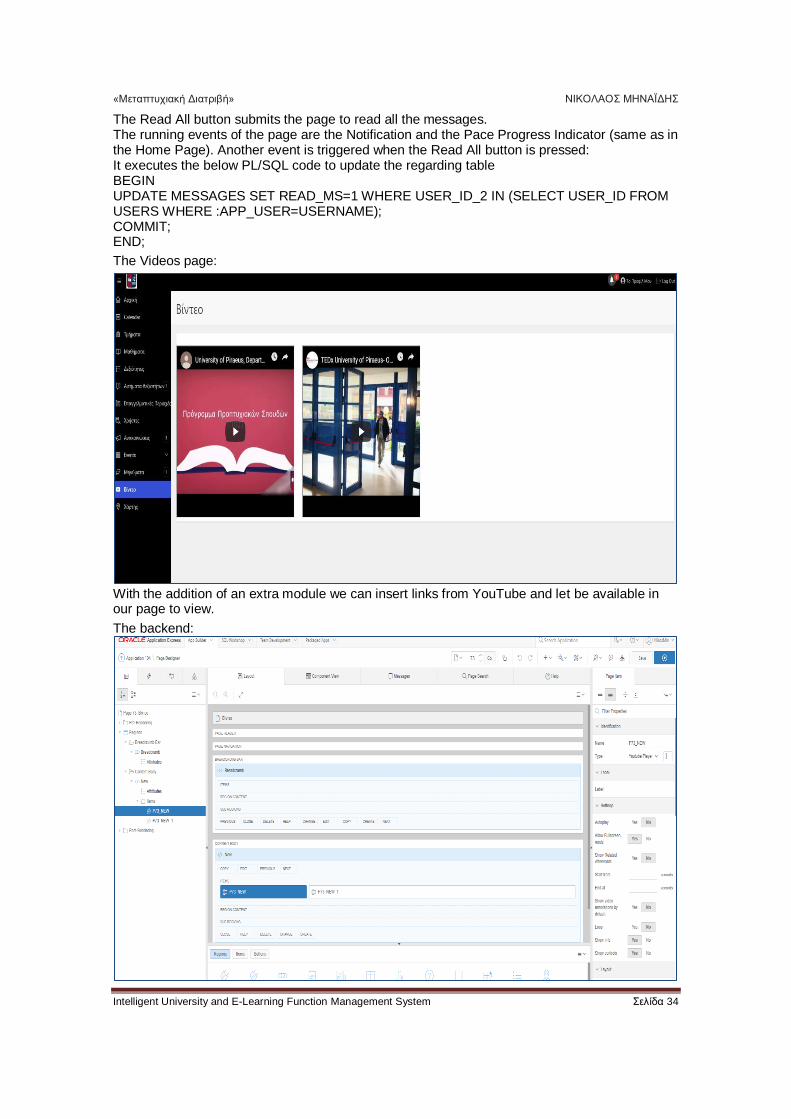
The Videos page:
With the addition of an extra module we can insert links from YouTube and let be available in our page to view.
The backend:
«Μεταπτυχιακή Διατριβή» ΝΙΚΟΛΑΟΣ ΜΗΝΑΪΔΗΣ
Intelligent University and E-Learning Function Management System Σελίδα 35
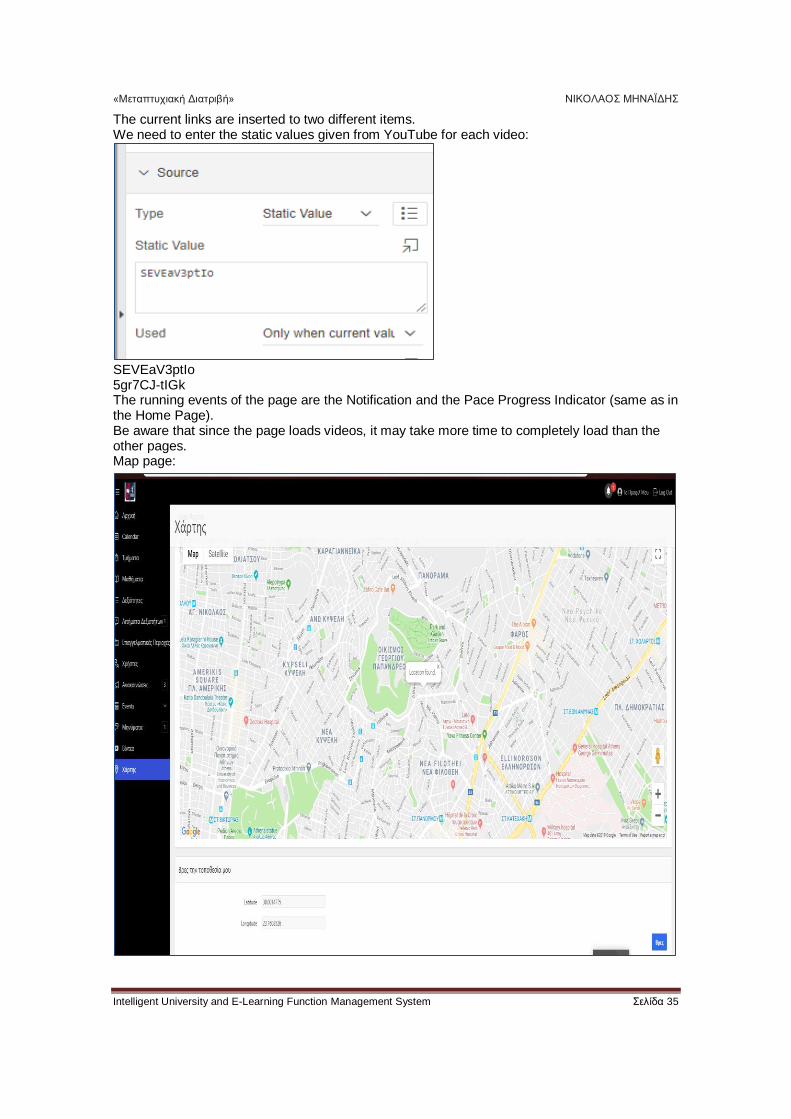
The current links are inserted to two different items. We need to enter the static values given from YouTube for each video:
SEVEaV3ptIo 5gr7CJ-tIGk The running events of the page are the Notification and the Pace Progress Indicator (same as in the Home Page). Be aware that since the page loads videos, it may take more time to completely load than the other pages. Map page:
«Μεταπτυχιακή Διατριβή» ΝΙΚΟΛΑΟΣ ΜΗΝΑΪΔΗΣ
Intelligent University and E-Learning Function Management System Σελίδα 36
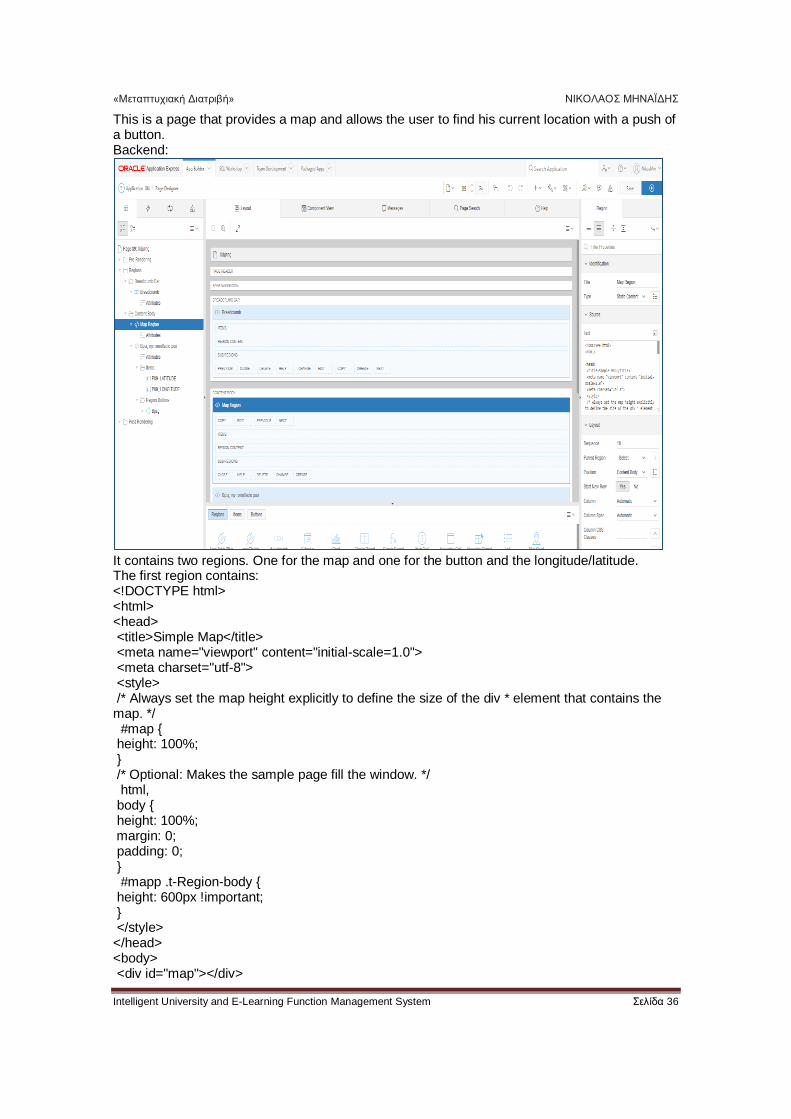
This is a page that provides a map and allows the user to find his current location with a push of a button. Backend:
It contains two regions. One for the map and one for the button and the longitude/latitude. The first region contains: <!DOCTYPE html> <html> <head> <title>Simple Map</title> <meta name="viewport" content="initial-scale=1.0"> <meta charset="utf-8"> <style> /* Always set the map height explicitly to define the size of the div * element that contains the map. */ #map { height: 100%; } /* Optional: Makes the sample page fill the window. */ html, body { height: 100%; margin: 0; padding: 0; } #mapp .t-Region-body { height: 600px !important; } </style> </head> <body> <div id="map"></div>
«Μεταπτυχιακή Διατριβή» ΝΙΚΟΛΑΟΣ ΜΗΝΑΪΔΗΣ
Intelligent University and E-Learning Function Management System Σελίδα 37
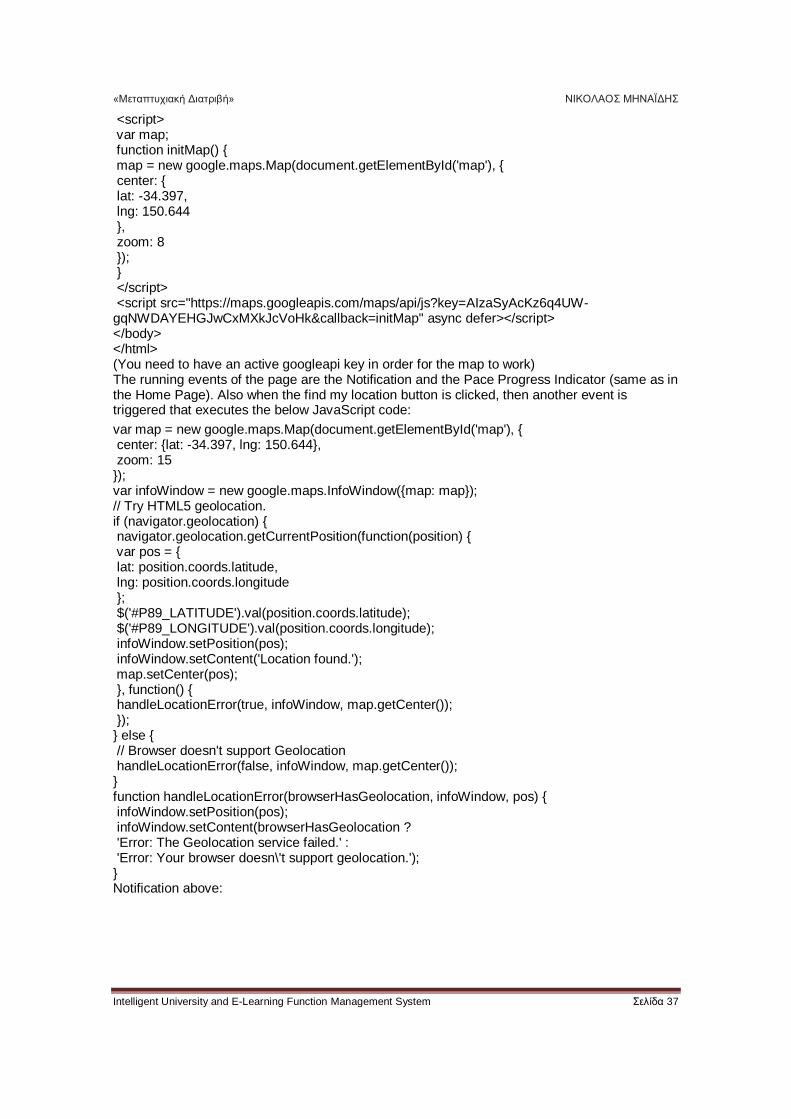
<script> var map; function initMap() { map = new google.maps.Map(document.getElementById('map'), { center: { lat: -34.397, lng: 150.644 }, zoom: 8 }); } </script> <script src="https://maps.googleapis.com/maps/api/js?key=AIzaSyAcKz6q4UW-gqNWDAYEHGJwCxMXkJcVoHk&callback=initMap" async defer></script> </body> </html> (You need to have an active googleapi key in order for the map to work) The running events of the page are the Notification and the Pace Progress Indicator (same as in the Home Page). Also when the find my location button is clicked, then another event is triggered that executes the below JavaScript code:
var map = new google.maps.Map(document.getElementById('map'), { center: {lat: -34.397, lng: 150.644}, zoom: 15 }); var infoWindow = new google.maps.InfoWindow({map: map}); // Try HTML5 geolocation. if (navigator.geolocation) { navigator.geolocation.getCurrentPosition(function(position) { var pos = { lat: position.coords.latitude, lng: position.coords.longitude }; $('#P89_LATITUDE').val(position.coords.latitude); $('#P89_LONGITUDE').val(position.coords.longitude); infoWindow.setPosition(pos); infoWindow.setContent('Location found.'); map.setCenter(pos); }, function() { handleLocationError(true, infoWindow, map.getCenter()); }); } else { // Browser doesn't support Geolocation handleLocationError(false, infoWindow, map.getCenter()); } function handleLocationError(browserHasGeolocation, infoWindow, pos) { infoWindow.setPosition(pos); infoWindow.setContent(browserHasGeolocation ? 'Error: The Geolocation service failed.' : 'Error: Your browser doesn\'t support geolocation.'); } Notification above:
«Μεταπτυχιακή Διατριβή» ΝΙΚΟΛΑΟΣ ΜΗΝΑΪΔΗΣ
Intelligent University and E-Learning Function Management System Σελίδα 38
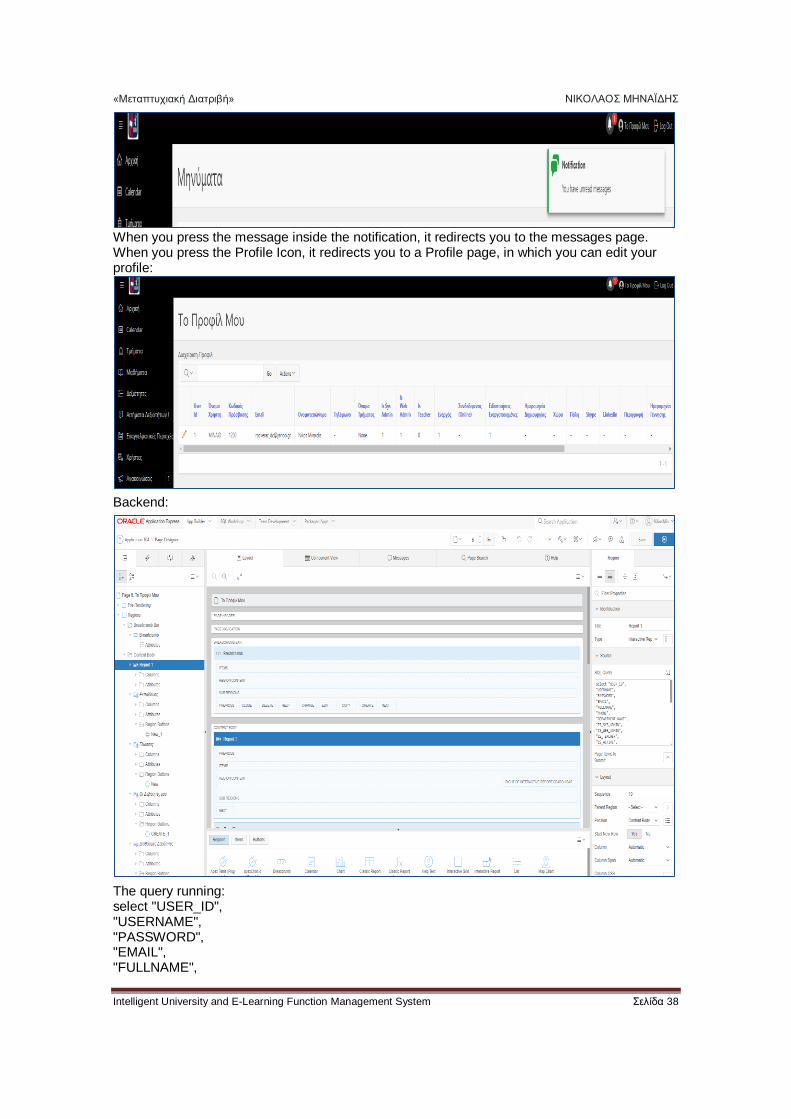
When you press the message inside the notification, it redirects you to the messages page. When you press the Profile Icon, it redirects you to a Profile page, in which you can edit your profile:
Backend:
The query running: select "USER_ID", "USERNAME", "PASSWORD", "EMAIL", "FULLNAME",
«Μεταπτυχιακή Διατριβή» ΝΙΚΟΛΑΟΣ ΜΗΝΑΪΔΗΣ
Intelligent University and E-Learning Function Management System Σελίδα 39
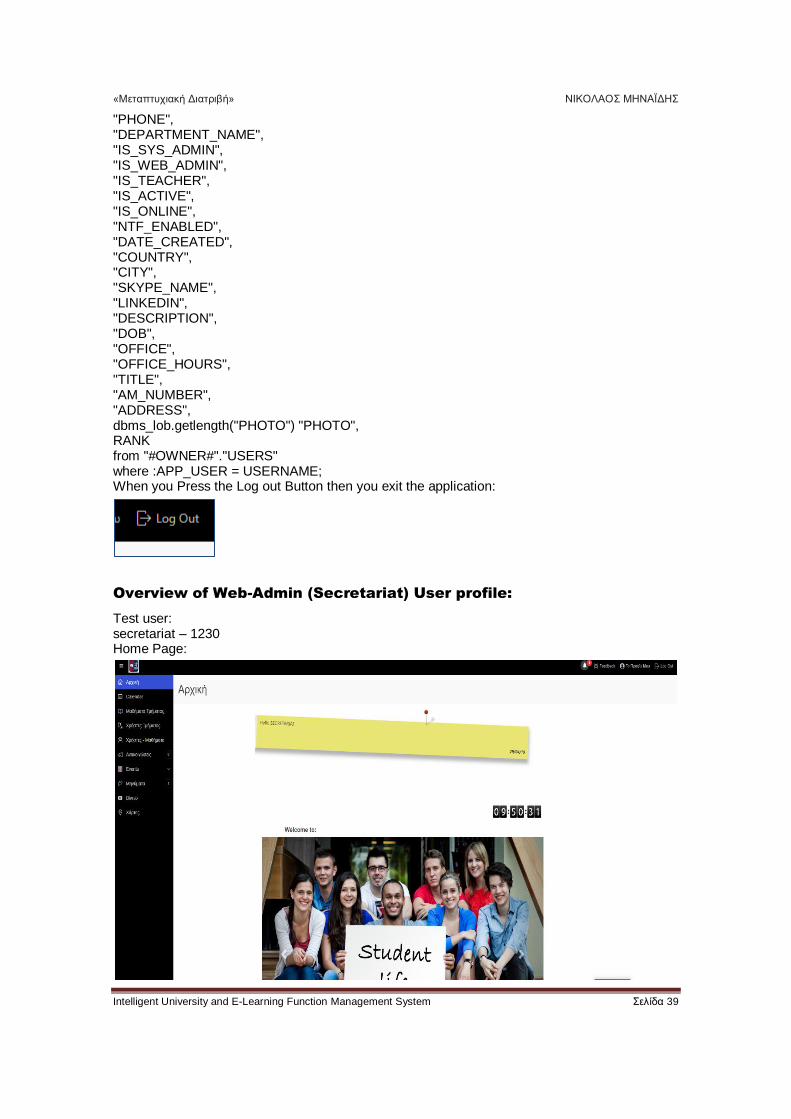
"PHONE", "DEPARTMENT_NAME", "IS_SYS_ADMIN", "IS_WEB_ADMIN", "IS_TEACHER", "IS_ACTIVE", "IS_ONLINE", "NTF_ENABLED", "DATE_CREATED", "COUNTRY", "CITY", "SKYPE_NAME", "LINKEDIN", "DESCRIPTION", "DOB", "OFFICE", "OFFICE_HOURS", "TITLE", "AM_NUMBER", "ADDRESS", dbms_lob.getlength("PHOTO") "PHOTO", RANK from "#OWNER#"."USERS" where :APP_USER = USERNAME; When you Press the Log out Button then you exit the application:
Overview of Web-Admin (Secretariat) User profile:
Test user: secretariat – 1230 Home Page:
«Μεταπτυχιακή Διατριβή» ΝΙΚΟΛΑΟΣ ΜΗΝΑΪΔΗΣ
Intelligent University and E-Learning Function Management System Σελίδα 40
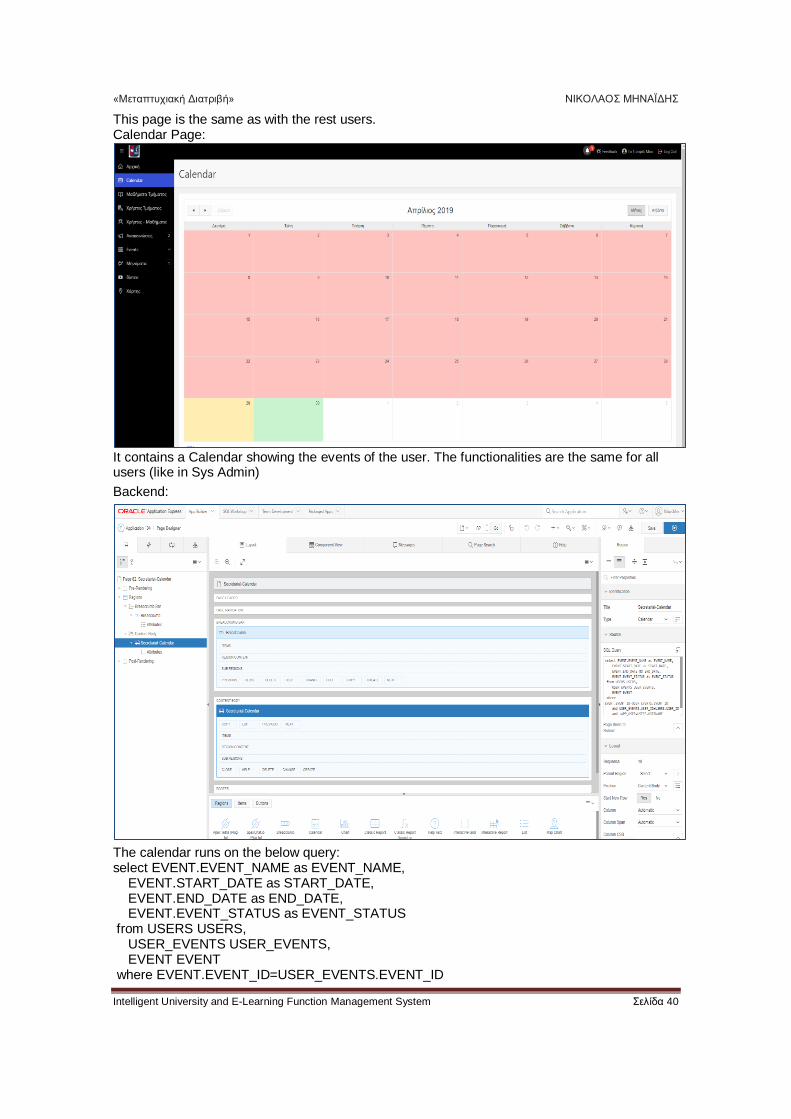
This page is the same as with the rest users. Calendar Page:
It contains a Calendar showing the events of the user. The functionalities are the same for all users (like in Sys Admin)
Backend:
The calendar runs on the below query: select EVENT.EVENT_NAME as EVENT_NAME, EVENT.START_DATE as START_DATE, EVENT.END_DATE as END_DATE, EVENT.EVENT_STATUS as EVENT_STATUS from USERS USERS, USER_EVENTS USER_EVENTS, EVENT EVENT where EVENT.EVENT_ID=USER_EVENTS.EVENT_ID
«Μεταπτυχιακή Διατριβή» ΝΙΚΟΛΑΟΣ ΜΗΝΑΪΔΗΣ
Intelligent University and E-Learning Function Management System Σελίδα 41
and USER_EVENTS.USER_ID=USERS.USER_ID and :APP_USER=USERS.USERNAME and USER_EVENTS.IS_ACCEPTED='ΝΑΙ' The running events of the page are the Notification and the Pace Progress Indicator (same as in the Home Page).
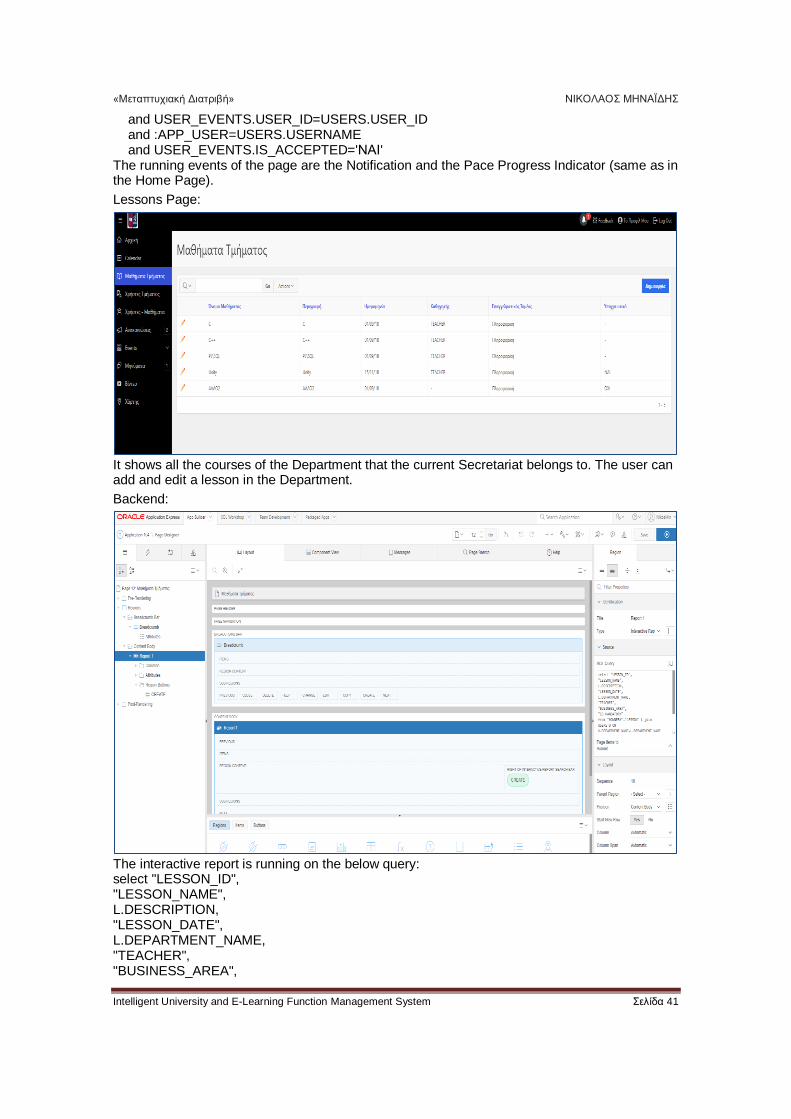
Lessons Page:
It shows all the courses of the Department that the current Secretariat belongs to. The user can add and edit a lesson in the Department.
Backend:
The interactive report is running on the below query: select "LESSON_ID", "LESSON_NAME", L.DESCRIPTION, "LESSON_DATE", L.DEPARTMENT_NAME, "TEACHER", "BUSINESS_AREA",
«Μεταπτυχιακή Διατριβή» ΝΙΚΟΛΑΟΣ ΜΗΝΑΪΔΗΣ
Intelligent University and E-Learning Function Management System Σελίδα 42
"IS_MANDATORY" from "#OWNER#"."LESSON" L join USERS U ON U.DEPARTMENT_NAME=L.DEPARTMENT_NAME WHERE :APP_USER=USERNAME ORDER BY L.LESSON_NAME ASC The running events of the page are the Notification and the Pace Progress Indicator (same as in the Home Page).
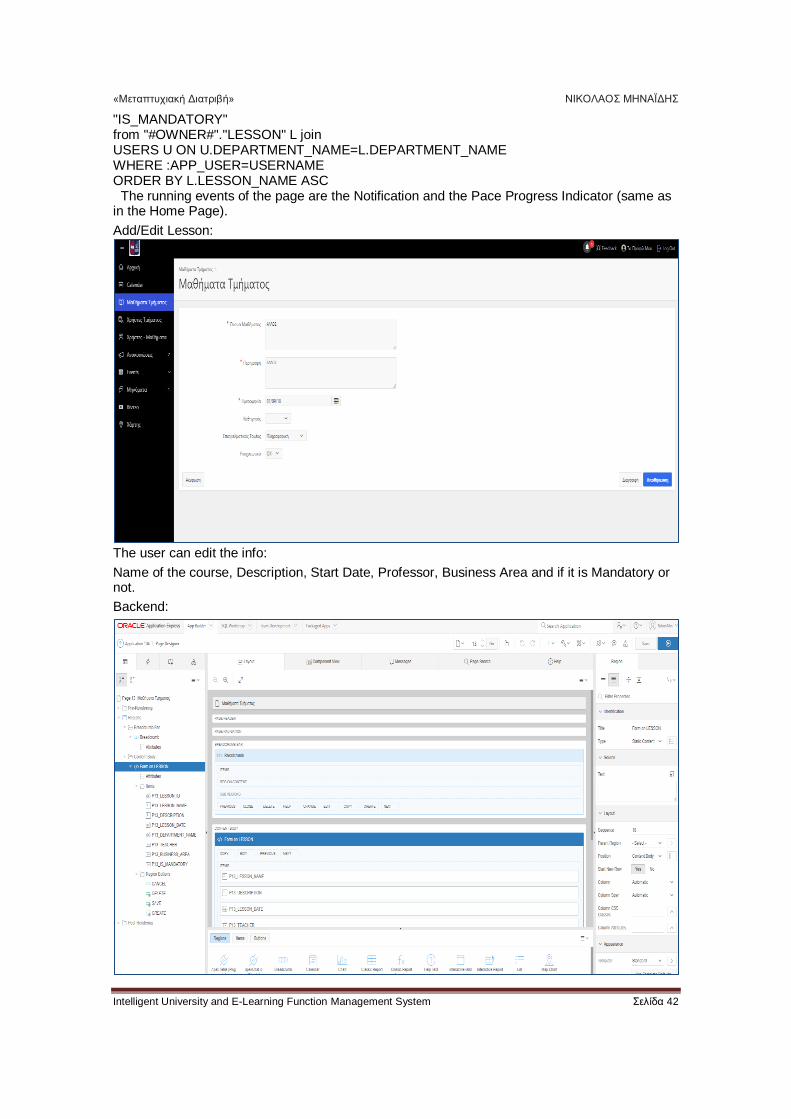
Add/Edit Lesson:
The user can edit the info:
Name of the course, Description, Start Date, Professor, Business Area and if it is Mandatory or not.
Backend:
«Μεταπτυχιακή Διατριβή» ΝΙΚΟΛΑΟΣ ΜΗΝΑΪΔΗΣ
Intelligent University and E-Learning Function Management System Σελίδα 43
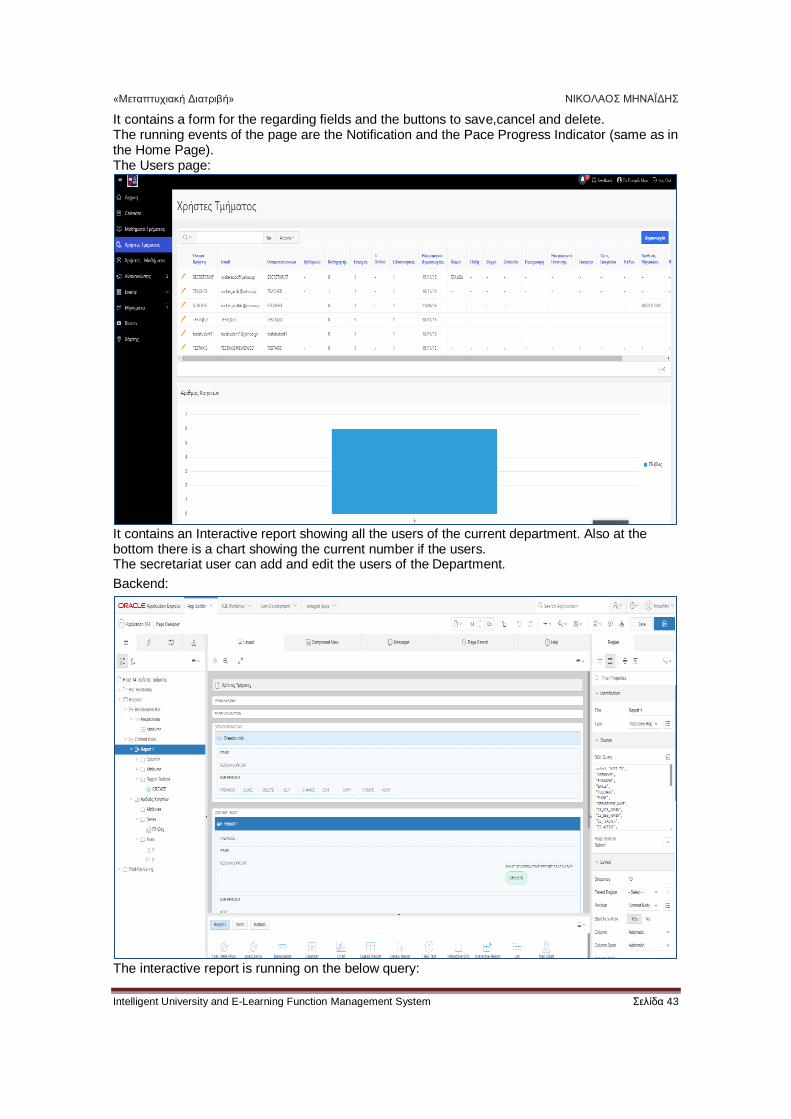
It contains a form for the regarding fields and the buttons to save,cancel and delete. The running events of the page are the Notification and the Pace Progress Indicator (same as in the Home Page). The Users page:
It contains an Interactive report showing all the users of the current department. Also at the bottom there is a chart showing the current number if the users. The secretariat user can add and edit the users of the Department.
Backend:
The interactive report is running on the below query:
«Μεταπτυχιακή Διατριβή» ΝΙΚΟΛΑΟΣ ΜΗΝΑΪΔΗΣ
Intelligent University and E-Learning Function Management System Σελίδα 44
select "USER_ID", "USERNAME", "PASSWORD", "EMAIL", "FULLNAME", "PHONE", "DEPARTMENT_NAME", "IS_SYS_ADMIN", "IS_WEB_ADMIN", "IS_TEACHER", "IS_ACTIVE", "IS_ONLINE", "NTF_ENABLED", "DATE_CREATED", "COUNTRY", "CITY", "SKYPE_NAME", "LINKEDIN", "DESCRIPTION", "DOB", "OFFICE", "OFFICE_HOURS", "TITLE", "AM_NUMBER", dbms_lob.getlength("PHOTO") "PHOTO", "ADDRESS" from "#OWNER#"."USERS" WHERE DEPARTMENT_NAME IN (SELECT DEPARTMENT_NAME FROM USERS WHERE :APP_USER=USERNAME) The chart: select count(1) AS USERS_NO from USERS WHERE DEPARTMENT_NAME IN (SELECT DEPARTMENT_NAME FROM USERS WHERE :APP_USER=USERNAME) The running events of the page are the Notification and the Pace Progress Indicator (same as in the Home Page).
Add/Edit User:
«Μεταπτυχιακή Διατριβή» ΝΙΚΟΛΑΟΣ ΜΗΝΑΪΔΗΣ
Intelligent University and E-Learning Function Management System Σελίδα 45
A form to submit with the user’s info. Backend:
It contains a form for the regarding fields and the buttons to save,cancel and delete. The running events of the page are the Notification and the Pace Progress Indicator (same as in the Home Page). It also contains tooltip to help the user insert the correct info (it triggers when the users clicks inside the regarding boxes of the form).
Users-Lessons Page:
«Μεταπτυχιακή Διατριβή» ΝΙΚΟΛΑΟΣ ΜΗΝΑΪΔΗΣ
Intelligent University and E-Learning Function Management System Σελίδα 46
It contains an Interactive report showing each user and the regarding lessons he has enrolled to and also their grades. Also at the bottom a chart is provide with the number of students for each lesson. The secretariat user can edit the enrolments and also add a grade to the student for a lesson.
The backend of the page:
The interactive report runs on the below query: select "LESSON_STUDENT_ID", LS.STUDENT_NAME, LS.AM_NUMBER, "LESSON_NAME", "GRADE" from "#OWNER#"."LESSON_STUDENT" LS join USERS U ON LS.STUDENT_NAME=U.FULLNAME WHERE U.DEPARTMENT_NAME IN (SELECT DEPARTMENT_NAME FROM USERS WHERE :APP_USER=USERNAME) ORDER BY LESSON_NAME ASC The chart: select count(1),LESSON_NAME from LESSON_STUDENT LS join USERS U ON LS.STUDENT_NAME=U.FULLNAME WHERE U.DEPARTMENT_NAME IN (SELECT DEPARTMENT_NAME FROM USERS WHERE :APP_USER=USERNAME) GROUP BY LESSON_NAME The running events of the page are the Notification and the Pace Progress Indicator (same as in the Home Page). Edit:
«Μεταπτυχιακή Διατριβή» ΝΙΚΟΛΑΟΣ ΜΗΝΑΪΔΗΣ
Intelligent University and E-Learning Function Management System Σελίδα 47
An example of how a record can be edited. Backend:
It contains a form for the regarding fields and the buttons to save,cancel and delete. It also has a computation that gets the Full name of the student that it muches the AM Number. (The computation runs after the submission of the page) SELECT FULLNAME FROM USERS WHERE :P25_AM_NUMBER=AM_NUMBER The running events of the page are the Notification and the Pace Progress Indicator (same as in the Home Page).
Announcements page:
It contains an interactive report showing the related announcements of the current user. (For the current department) The secretariat user can edit and add new announcements.
«Μεταπτυχιακή Διατριβή» ΝΙΚΟΛΑΟΣ ΜΗΝΑΪΔΗΣ
Intelligent University and E-Learning Function Management System Σελίδα 48
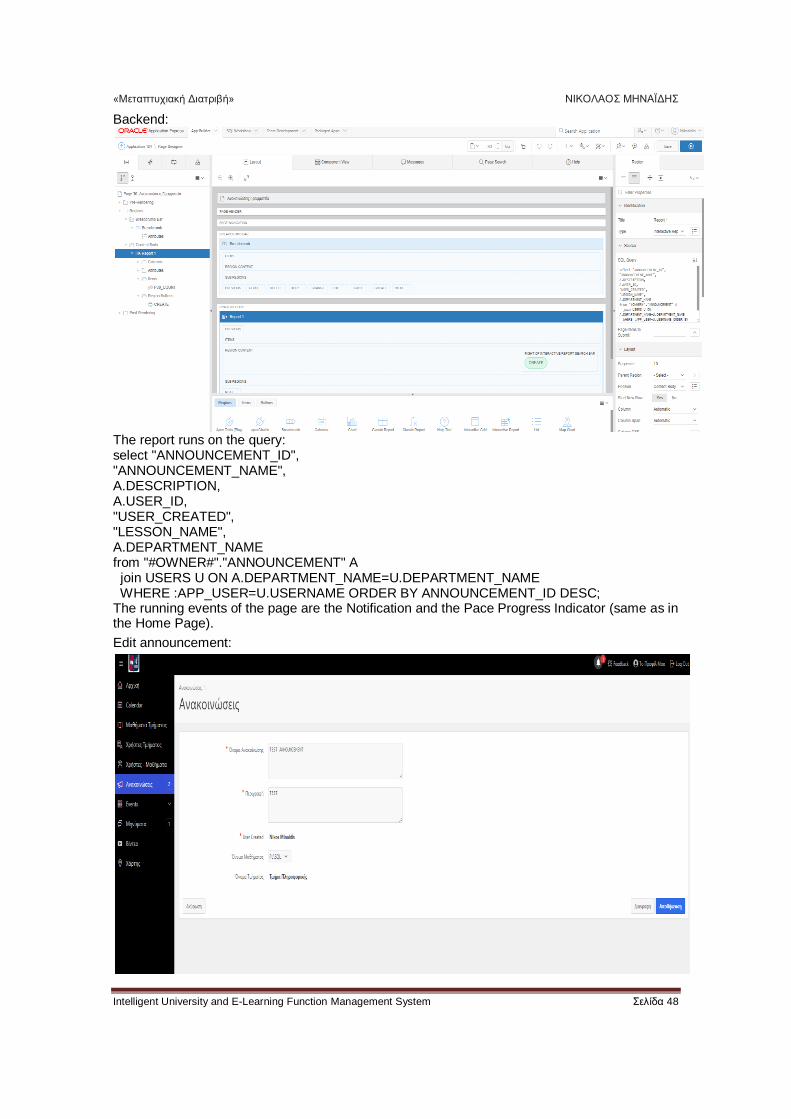
Backend:
The report runs on the query: select "ANNOUNCEMENT_ID", "ANNOUNCEMENT_NAME", A.DESCRIPTION, A.USER_ID, "USER_CREATED", "LESSON_NAME", A.DEPARTMENT_NAME from "#OWNER#"."ANNOUNCEMENT" A join USERS U ON A.DEPARTMENT_NAME=U.DEPARTMENT_NAME WHERE :APP_USER=U.USERNAME ORDER BY ANNOUNCEMENT_ID DESC; The running events of the page are the Notification and the Pace Progress Indicator (same as in the Home Page).
Edit announcement:
«Μεταπτυχιακή Διατριβή» ΝΙΚΟΛΑΟΣ ΜΗΝΑΪΔΗΣ
Intelligent University and E-Learning Function Management System Σελίδα 49
Backend:
It contains a form for the regarding fields and the buttons to save,cancel and delete. The running events of the page are the Notification and the Pace Progress Indicator (same as in the Home Page).
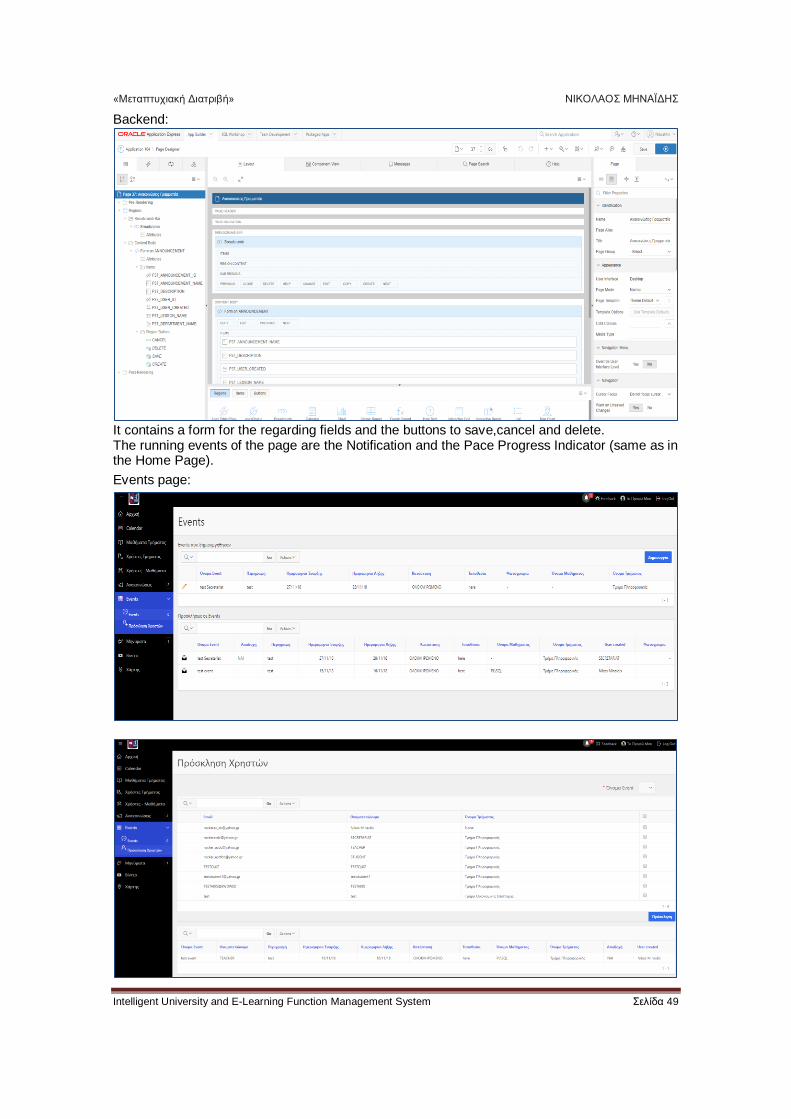
Events page:
«Μεταπτυχιακή Διατριβή» ΝΙΚΟΛΑΟΣ ΜΗΝΑΪΔΗΣ
Intelligent University and E-Learning Function Management System Σελίδα 50
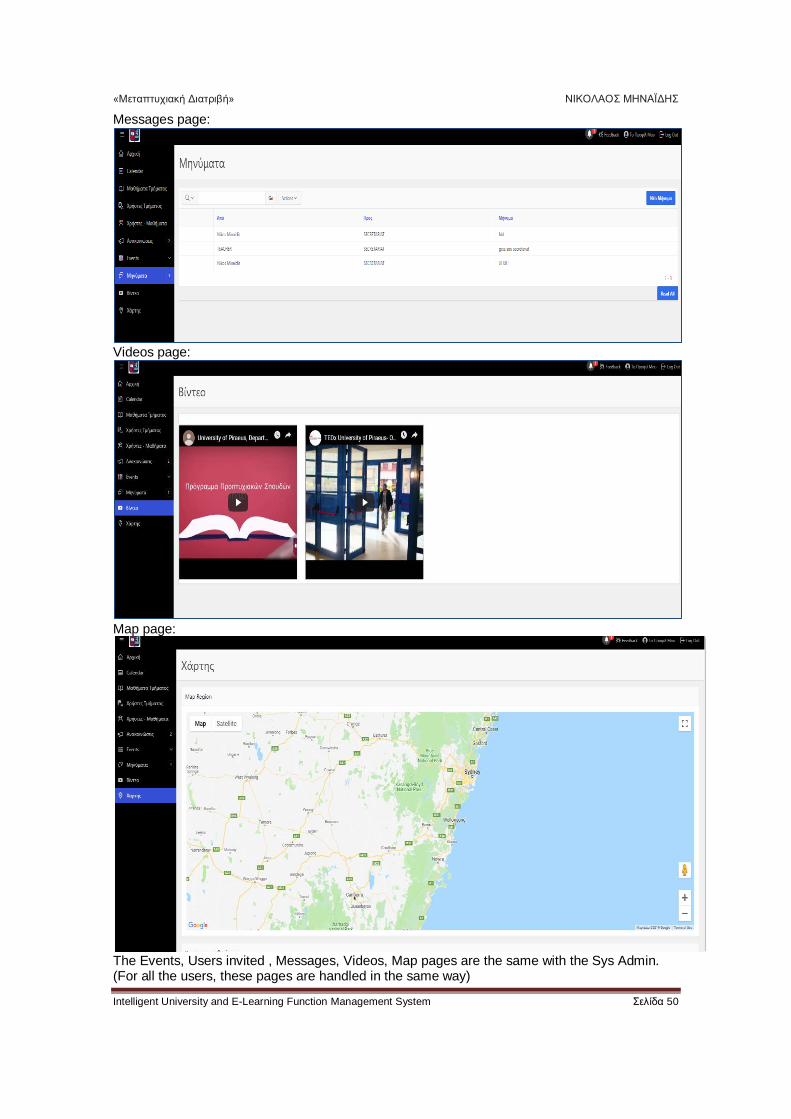
Messages page:
Videos page:
Map page:
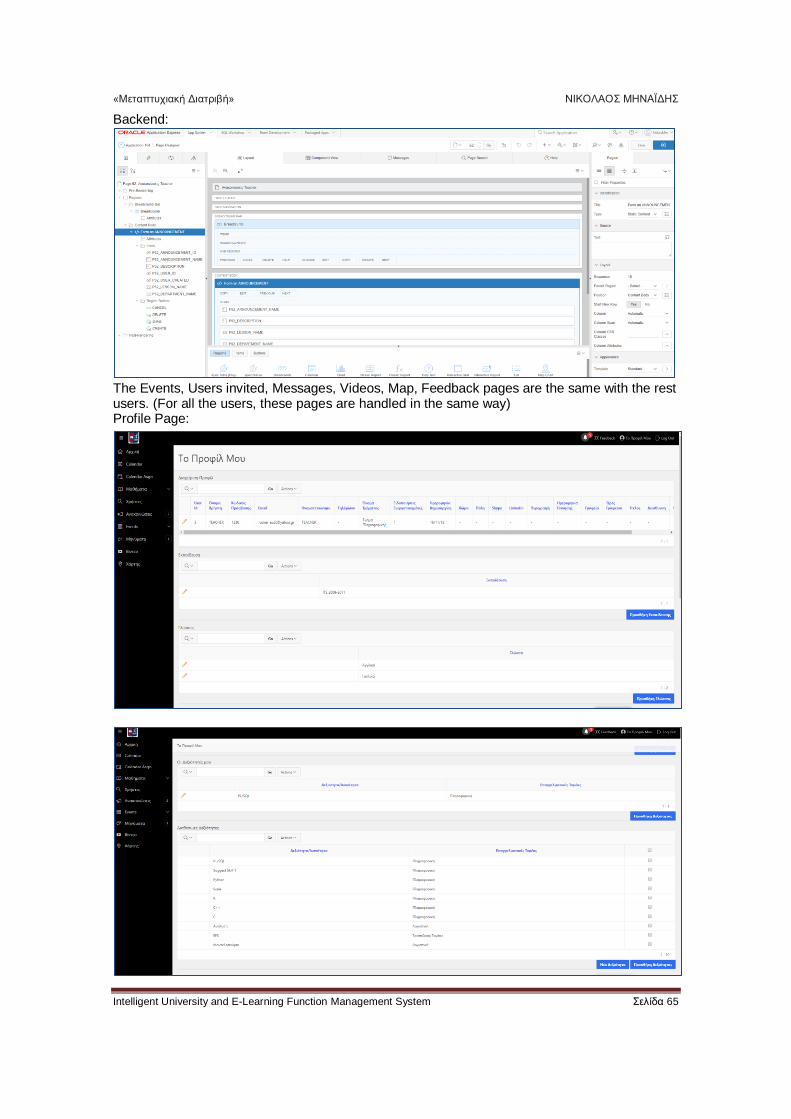
The Events, Users invited , Messages, Videos, Map pages are the same with the Sys Admin. (For all the users, these pages are handled in the same way)
«Μεταπτυχιακή Διατριβή» ΝΙΚΟΛΑΟΣ ΜΗΝΑΪΔΗΣ
Intelligent University and E-Learning Function Management System Σελίδα 51
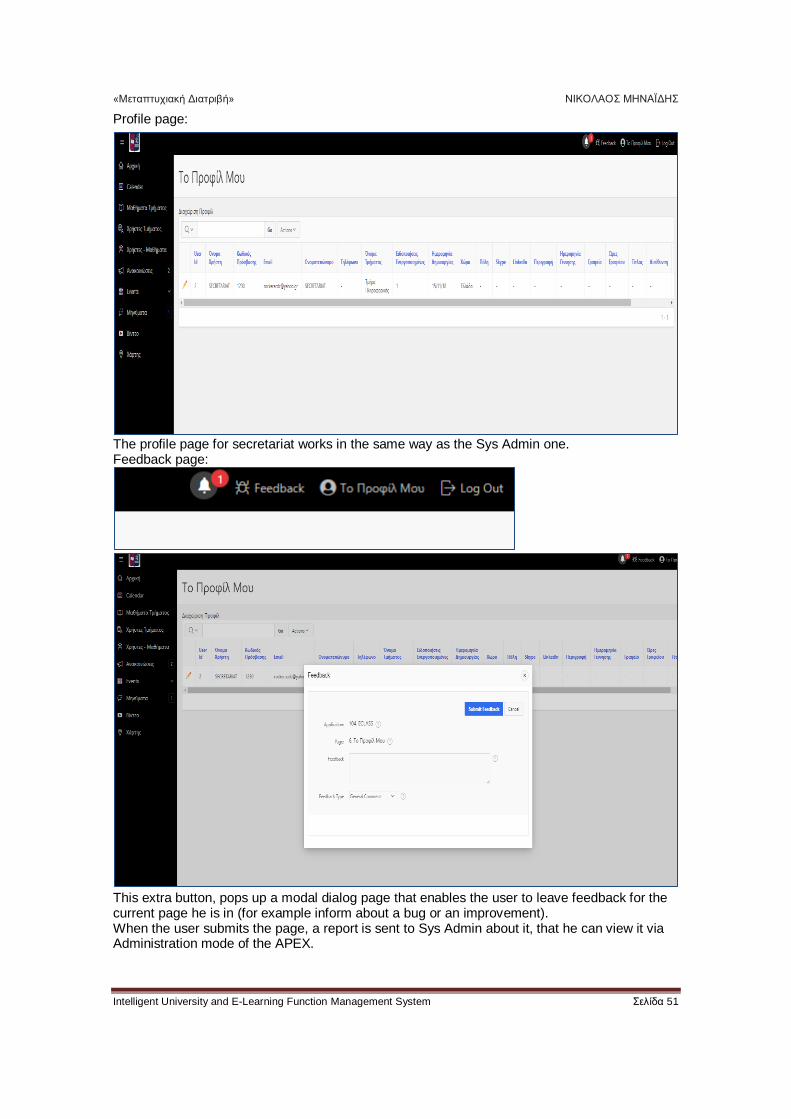
Profile page:
The profile page for secretariat works in the same way as the Sys Admin one. Feedback page:
This extra button, pops up a modal dialog page that enables the user to leave feedback for the current page he is in (for example inform about a bug or an improvement). When the user submits the page, a report is sent to Sys Admin about it, that he can view it via Administration mode of the APEX.
«Μεταπτυχιακή Διατριβή» ΝΙΚΟΛΑΟΣ ΜΗΝΑΪΔΗΣ
Intelligent University and E-Learning Function Management System Σελίδα 52
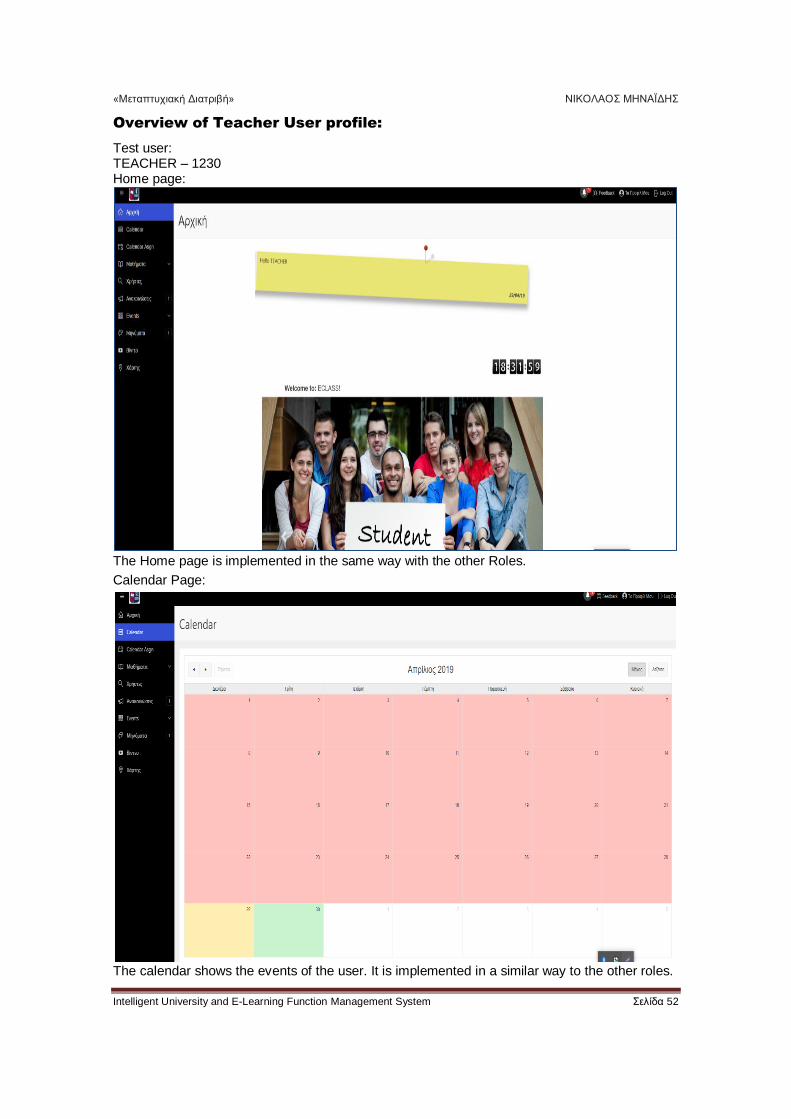
Overview of Teacher User profile:
Test user: TEACHER – 1230 Home page:
The Home page is implemented in the same way with the other Roles.
Calendar Page:
The calendar shows the events of the user. It is implemented in a similar way to the other roles.
«Μεταπτυχιακή Διατριβή» ΝΙΚΟΛΑΟΣ ΜΗΝΑΪΔΗΣ
Intelligent University and E-Learning Function Management System Σελίδα 53
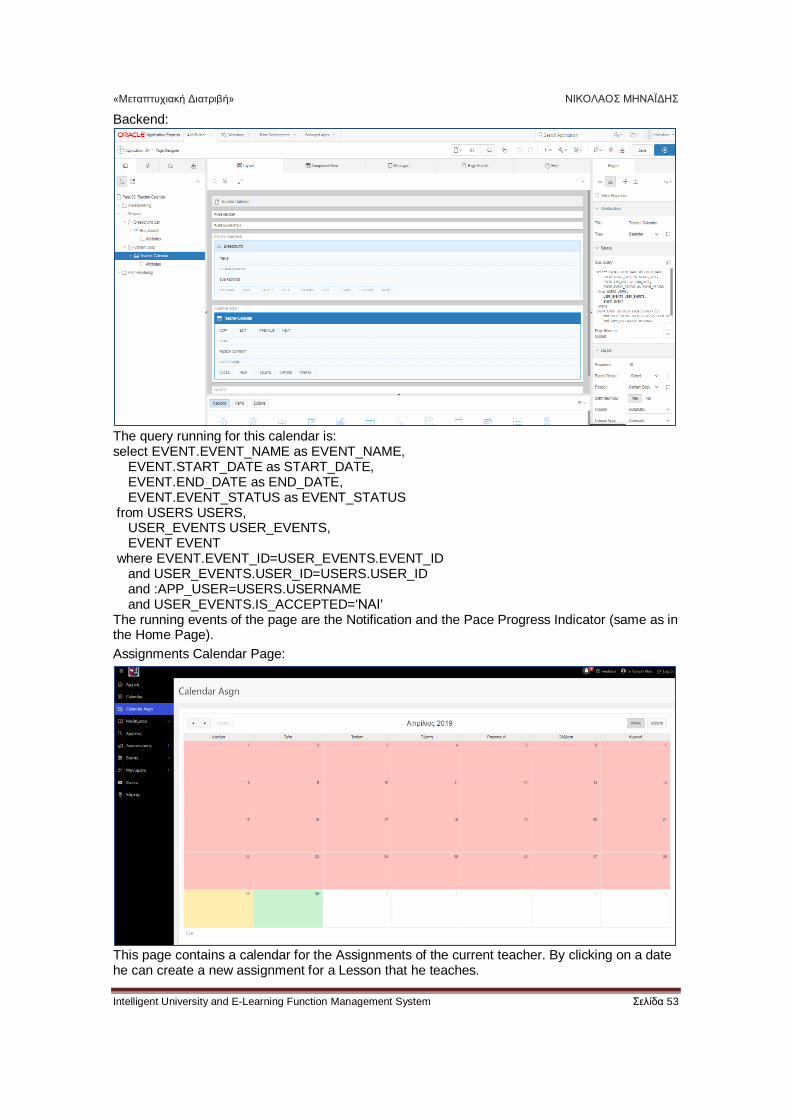
Backend:
The query running for this calendar is: select EVENT.EVENT_NAME as EVENT_NAME, EVENT.START_DATE as START_DATE, EVENT.END_DATE as END_DATE, EVENT.EVENT_STATUS as EVENT_STATUS from USERS USERS, USER_EVENTS USER_EVENTS, EVENT EVENT where EVENT.EVENT_ID=USER_EVENTS.EVENT_ID and USER_EVENTS.USER_ID=USERS.USER_ID and :APP_USER=USERS.USERNAME and USER_EVENTS.IS_ACCEPTED='ΝΑΙ' The running events of the page are the Notification and the Pace Progress Indicator (same as in the Home Page).
Assignments Calendar Page:
This page contains a calendar for the Assignments of the current teacher. By clicking on a date he can create a new assignment for a Lesson that he teaches.
«Μεταπτυχιακή Διατριβή» ΝΙΚΟΛΑΟΣ ΜΗΝΑΪΔΗΣ
Intelligent University and E-Learning Function Management System Σελίδα 54
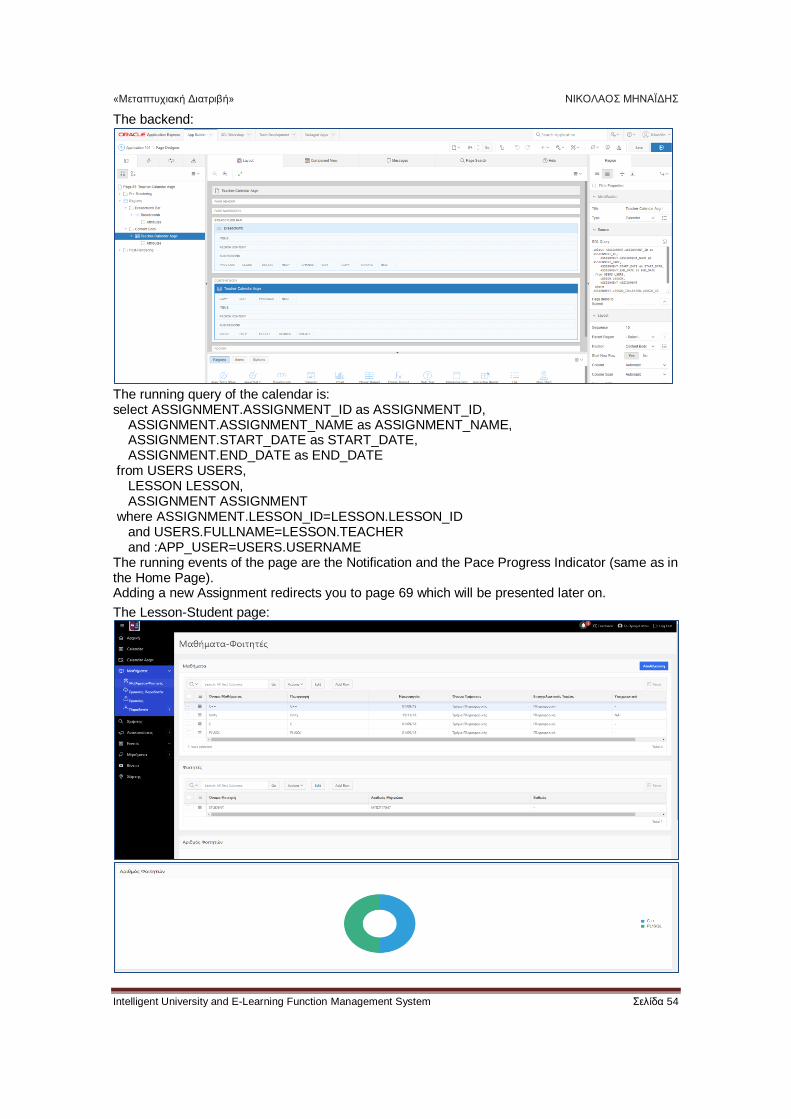
The backend:
The running query of the calendar is: select ASSIGNMENT.ASSIGNMENT_ID as ASSIGNMENT_ID, ASSIGNMENT.ASSIGNMENT_NAME as ASSIGNMENT_NAME, ASSIGNMENT.START_DATE as START_DATE, ASSIGNMENT.END_DATE as END_DATE from USERS USERS, LESSON LESSON, ASSIGNMENT ASSIGNMENT where ASSIGNMENT.LESSON_ID=LESSON.LESSON_ID and USERS.FULLNAME=LESSON.TEACHER and :APP_USER=USERS.USERNAME The running events of the page are the Notification and the Pace Progress Indicator (same as in the Home Page). Adding a new Assignment redirects you to page 69 which will be presented later on.
The Lesson-Student page:
«Μεταπτυχιακή Διατριβή» ΝΙΚΟΛΑΟΣ ΜΗΝΑΪΔΗΣ
Intelligent University and E-Learning Function Management System Σελίδα 55
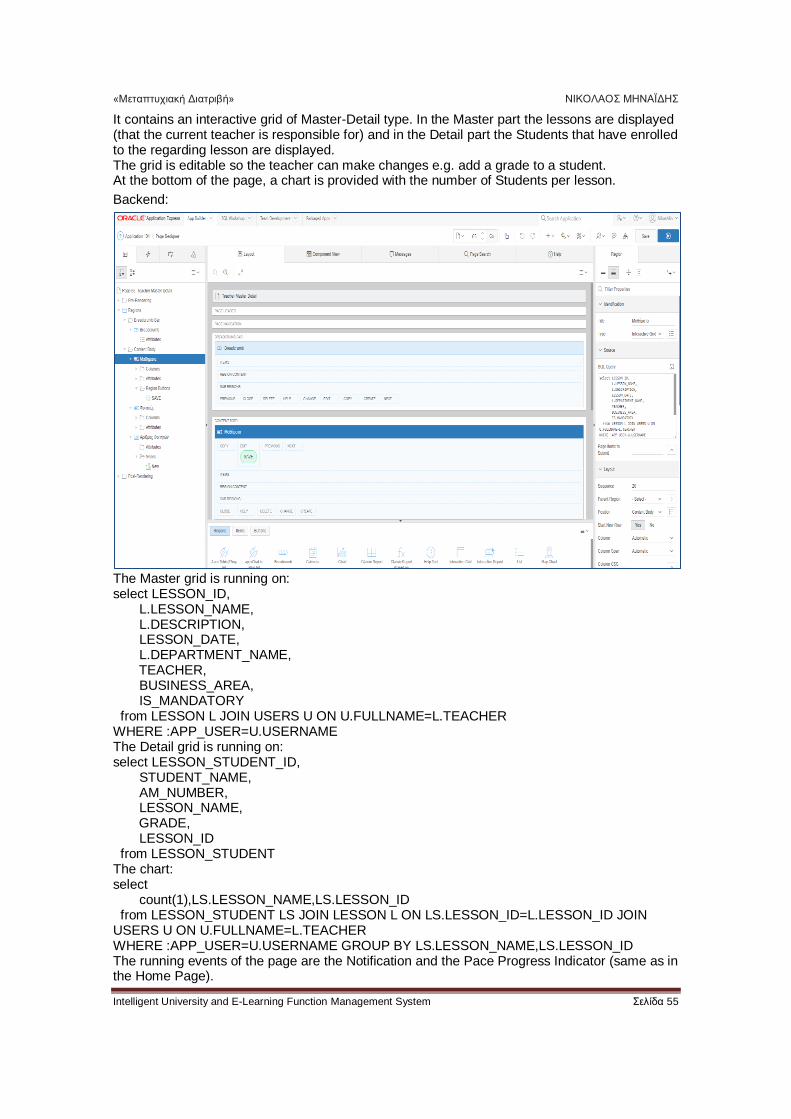
It contains an interactive grid of Master-Detail type. In the Master part the lessons are displayed (that the current teacher is responsible for) and in the Detail part the Students that have enrolled to the regarding lesson are displayed. The grid is editable so the teacher can make changes e.g. add a grade to a student. At the bottom of the page, a chart is provided with the number of Students per lesson.
Backend:
The Master grid is running on: select LESSON_ID, L.LESSON_NAME, L.DESCRIPTION, LESSON_DATE, L.DEPARTMENT_NAME, TEACHER, BUSINESS_AREA, IS_MANDATORY from LESSON L JOIN USERS U ON U.FULLNAME=L.TEACHER WHERE :APP_USER=U.USERNAME The Detail grid is running on: select LESSON_STUDENT_ID, STUDENT_NAME, AM_NUMBER, LESSON_NAME, GRADE, LESSON_ID from LESSON_STUDENT The chart: select count(1),LS.LESSON_NAME,LS.LESSON_ID from LESSON_STUDENT LS JOIN LESSON L ON LS.LESSON_ID=L.LESSON_ID JOIN USERS U ON U.FULLNAME=L.TEACHER WHERE :APP_USER=U.USERNAME GROUP BY LS.LESSON_NAME,LS.LESSON_ID The running events of the page are the Notification and the Pace Progress Indicator (same as in the Home Page).
«Μεταπτυχιακή Διατριβή» ΝΙΚΟΛΑΟΣ ΜΗΝΑΪΔΗΣ
Intelligent University and E-Learning Function Management System Σελίδα 56
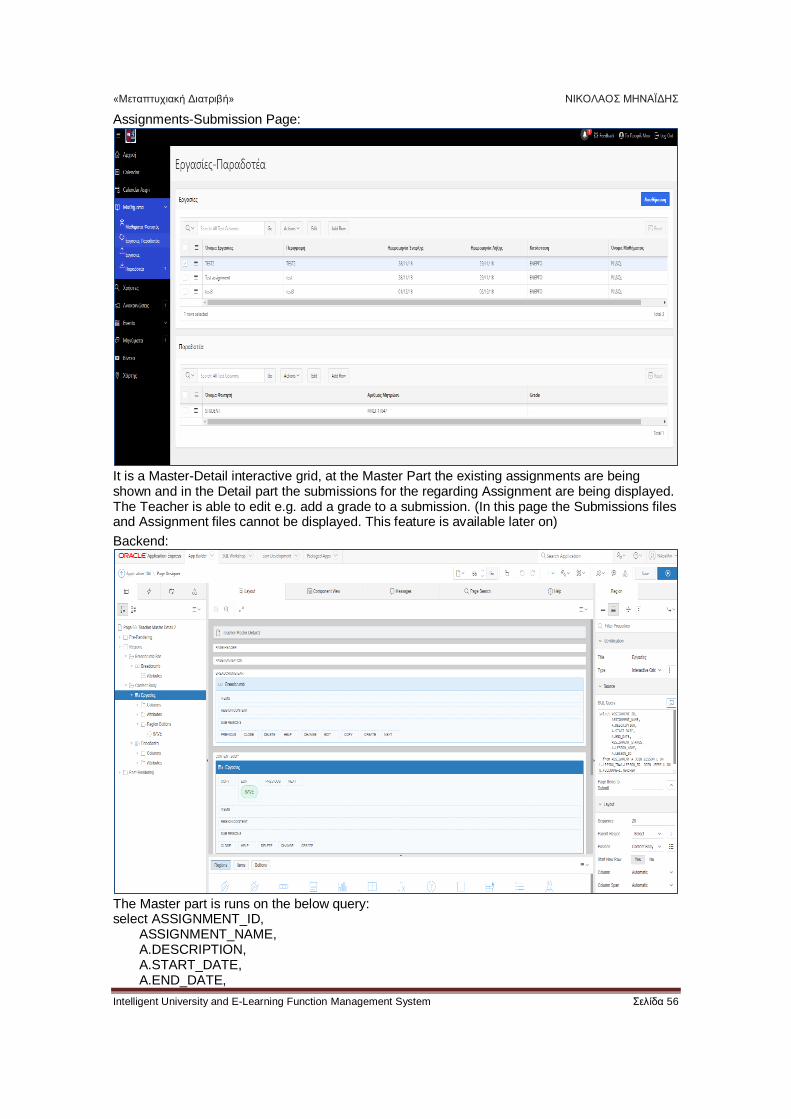
Assignments-Submission Page:
It is a Master-Detail interactive grid, at the Master Part the existing assignments are being shown and in the Detail part the submissions for the regarding Assignment are being displayed. The Teacher is able to edit e.g. add a grade to a submission. (In this page the Submissions files and Assignment files cannot be displayed. This feature is available later on)
Backend:
The Master part is runs on the below query: select ASSIGNMENT_ID, ASSIGNMENT_NAME, A.DESCRIPTION, A.START_DATE, A.END_DATE,
«Μεταπτυχιακή Διατριβή» ΝΙΚΟΛΑΟΣ ΜΗΝΑΪΔΗΣ
Intelligent University and E-Learning Function Management System Σελίδα 57
ASSIGNMENT_STATUS, A.LESSON_NAME, A.LESSON_ID from ASSIGNMENT A JOIN LESSON L ON L.LESSON_ID=A.LESSON_ID JOIN USERS U ON U.FULLNAME=L.TEACHER WHERE :APP_USER=U.USERNAME The Detail part runs on: select SUBMISSION_ID, ASSIGNMENT_ID, ASSIGNMENT_NAME, STUDENT_NAME, AM_NUMBER, FILE_SUBMITTED, GRADE from SUBMISSION The running events of the page are the Notification and the Pace Progress Indicator (same as in the Home Page).
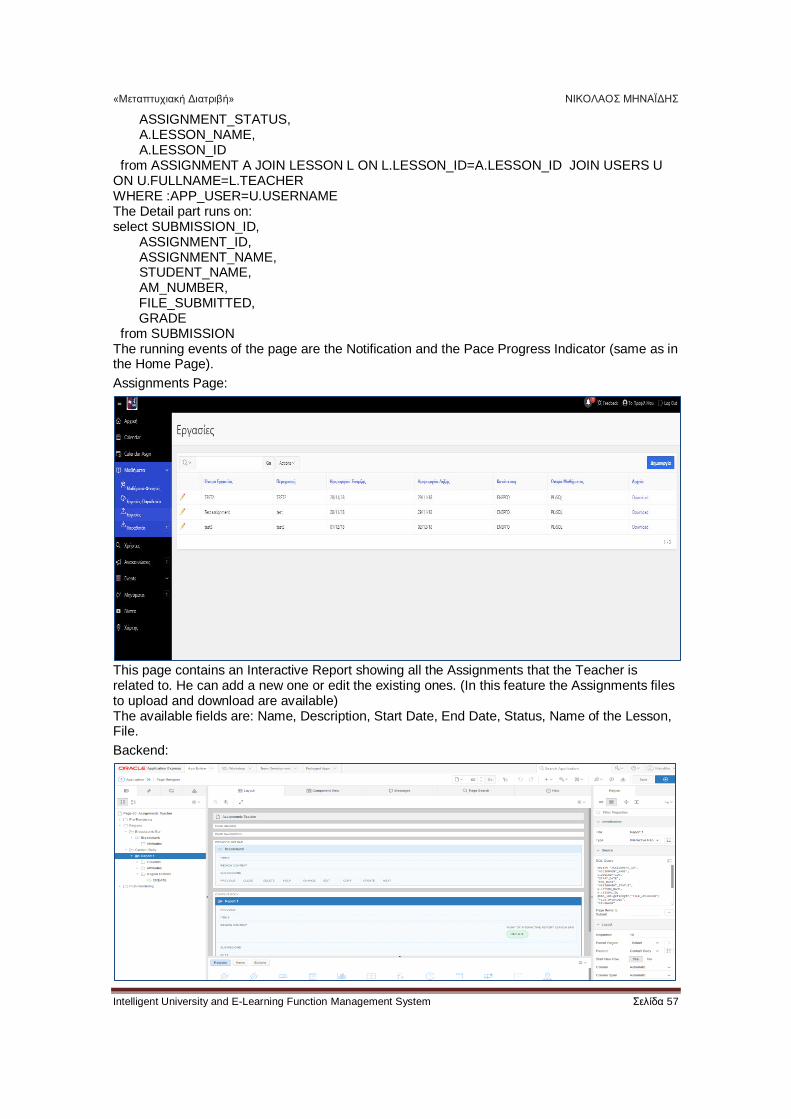
Assignments Page:
This page contains an Interactive Report showing all the Assignments that the Teacher is related to. He can add a new one or edit the existing ones. (In this feature the Assignments files to upload and download are available) The available fields are: Name, Description, Start Date, End Date, Status, Name of the Lesson, File.
Backend:
«Μεταπτυχιακή Διατριβή» ΝΙΚΟΛΑΟΣ ΜΗΝΑΪΔΗΣ
Intelligent University and E-Learning Function Management System Σελίδα 58
The report runs on: select "ASSIGNMENT_ID", "ASSIGNMENT_NAME", A.DESCRIPTION, "START_DATE", "END_DATE", "ASSIGNMENT_STATUS", A.LESSON_NAME, A.LESSON_ID, dbms_lob.getlength("FILE_UPLOADED") "FILE_UPLOADED", "FILENAME" from "#OWNER#"."ASSIGNMENT" A JOIN LESSON L ON L.LESSON_ID=A.LESSON_ID JOIN USERS U ON U.FULLNAME=L.TEACHER WHERE :APP_USER=U.USERNAME ORDER BY ASSIGNMENT_STATUS ASC The difference with the other fields in order to download the file, is that we are using a BLOB type of field in the report:
The running events of the page are the Notification and the Pace Progress Indicator (same as in the Home Page).
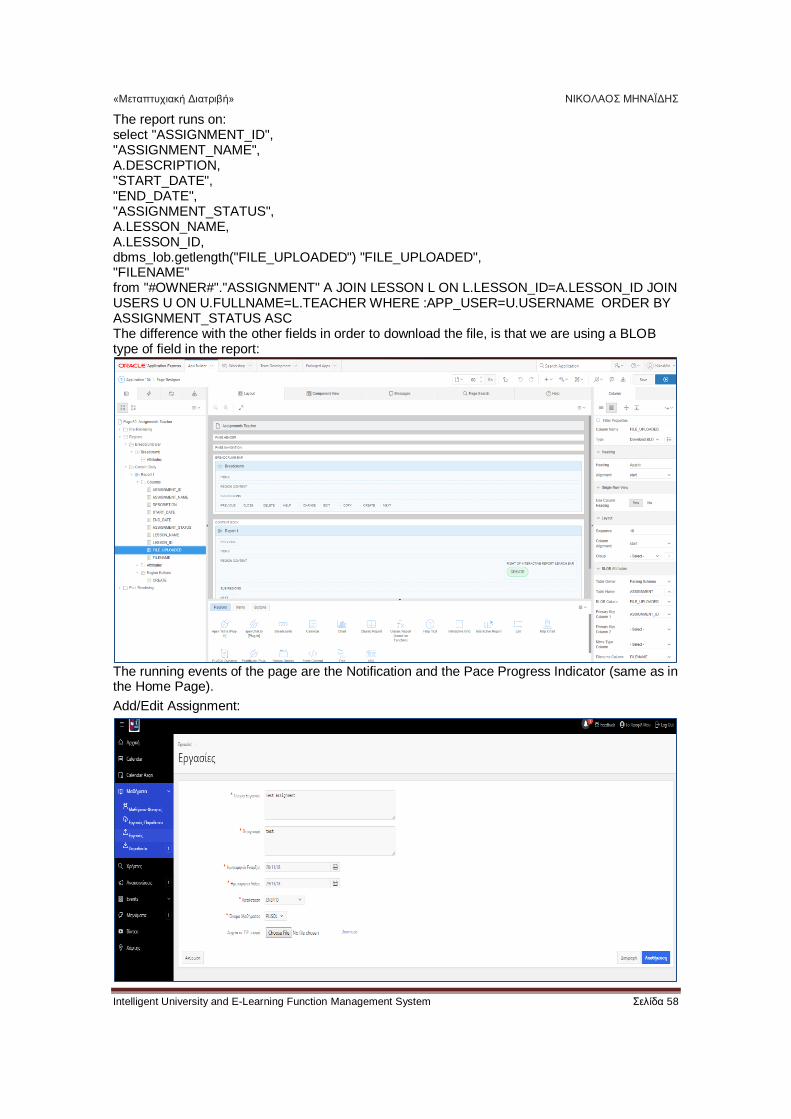
Add/Edit Assignment:
«Μεταπτυχιακή Διατριβή» ΝΙΚΟΛΑΟΣ ΜΗΝΑΪΔΗΣ
Intelligent University and E-Learning Function Management System Σελίδα 59
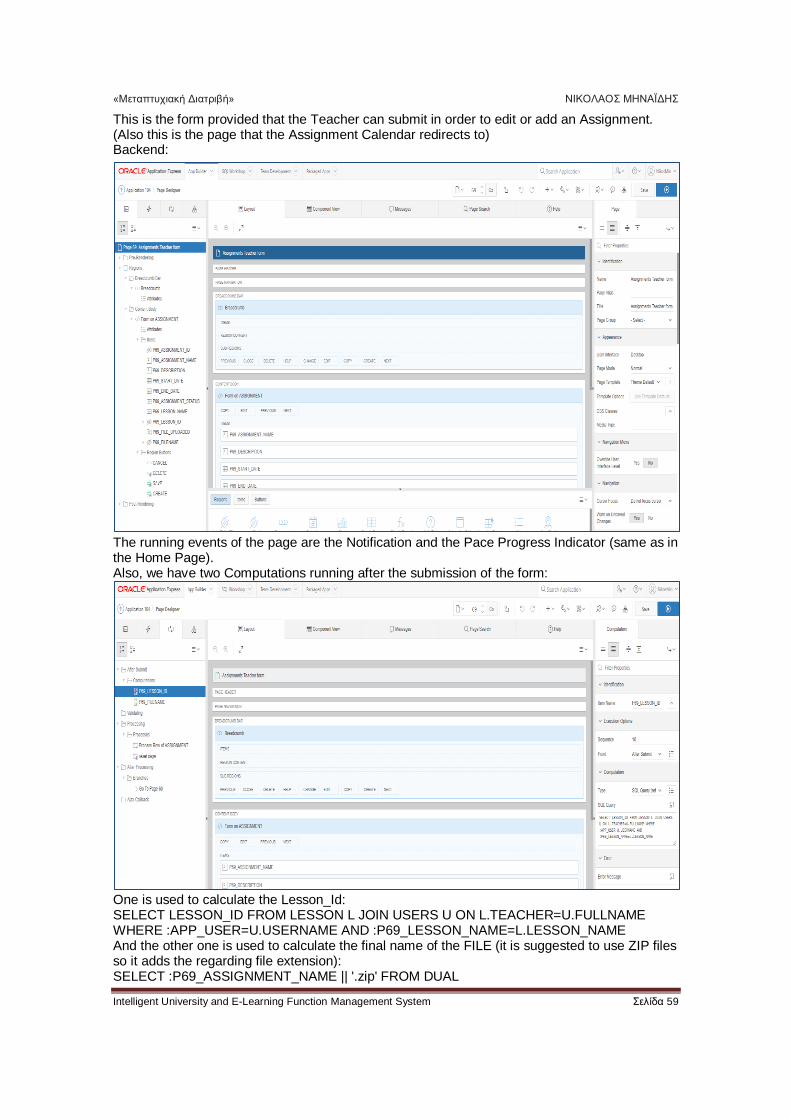
This is the form provided that the Teacher can submit in order to edit or add an Assignment. (Also this is the page that the Assignment Calendar redirects to) Backend:
The running events of the page are the Notification and the Pace Progress Indicator (same as in the Home Page). Also, we have two Computations running after the submission of the form:
One is used to calculate the Lesson_Id: SELECT LESSON_ID FROM LESSON L JOIN USERS U ON L.TEACHER=U.FULLNAME WHERE :APP_USER=U.USERNAME AND :P69_LESSON_NAME=L.LESSON_NAME And the other one is used to calculate the final name of the FILE (it is suggested to use ZIP files so it adds the regarding file extension): SELECT :P69_ASSIGNMENT_NAME || '.zip' FROM DUAL
«Μεταπτυχιακή Διατριβή» ΝΙΚΟΛΑΟΣ ΜΗΝΑΪΔΗΣ
Intelligent University and E-Learning Function Management System Σελίδα 60
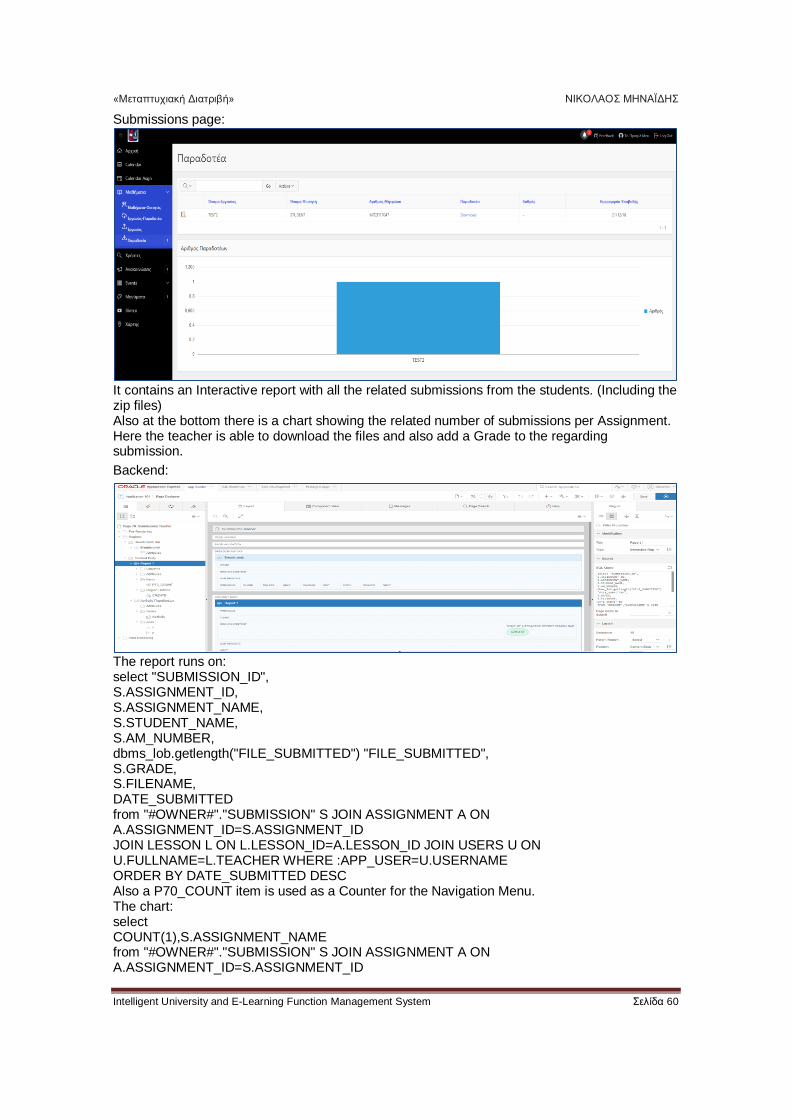
Submissions page:
It contains an Interactive report with all the related submissions from the students. (Including the zip files) Also at the bottom there is a chart showing the related number of submissions per Assignment. Here the teacher is able to download the files and also add a Grade to the regarding submission.
Backend:
The report runs on: select "SUBMISSION_ID", S.ASSIGNMENT_ID, S.ASSIGNMENT_NAME, S.STUDENT_NAME, S.AM_NUMBER, dbms_lob.getlength("FILE_SUBMITTED") "FILE_SUBMITTED", S.GRADE, S.FILENAME, DATE_SUBMITTED from "#OWNER#"."SUBMISSION" S JOIN ASSIGNMENT A ON A.ASSIGNMENT_ID=S.ASSIGNMENT_ID JOIN LESSON L ON L.LESSON_ID=A.LESSON_ID JOIN USERS U ON U.FULLNAME=L.TEACHER WHERE :APP_USER=U.USERNAME ORDER BY DATE_SUBMITTED DESC Also a P70_COUNT item is used as a Counter for the Navigation Menu. The chart: select COUNT(1),S.ASSIGNMENT_NAME from "#OWNER#"."SUBMISSION" S JOIN ASSIGNMENT A ON A.ASSIGNMENT_ID=S.ASSIGNMENT_ID
«Μεταπτυχιακή Διατριβή» ΝΙΚΟΛΑΟΣ ΜΗΝΑΪΔΗΣ
Intelligent University and E-Learning Function Management System Σελίδα 61
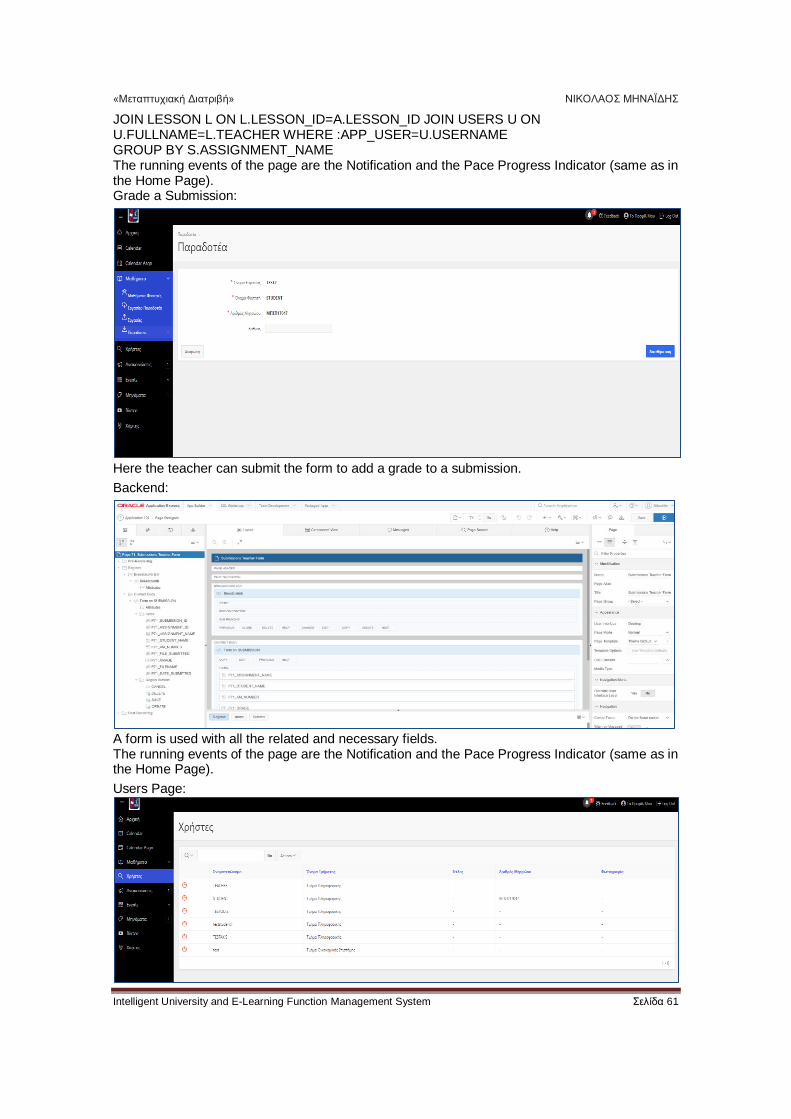
JOIN LESSON L ON L.LESSON_ID=A.LESSON_ID JOIN USERS U ON U.FULLNAME=L.TEACHER WHERE :APP_USER=U.USERNAME GROUP BY S.ASSIGNMENT_NAME The running events of the page are the Notification and the Pace Progress Indicator (same as in the Home Page). Grade a Submission:
Here the teacher can submit the form to add a grade to a submission.
Backend:
A form is used with all the related and necessary fields. The running events of the page are the Notification and the Pace Progress Indicator (same as in the Home Page).
Users Page:
«Μεταπτυχιακή Διατριβή» ΝΙΚΟΛΑΟΣ ΜΗΝΑΪΔΗΣ
Intelligent University and E-Learning Function Management System Σελίδα 62
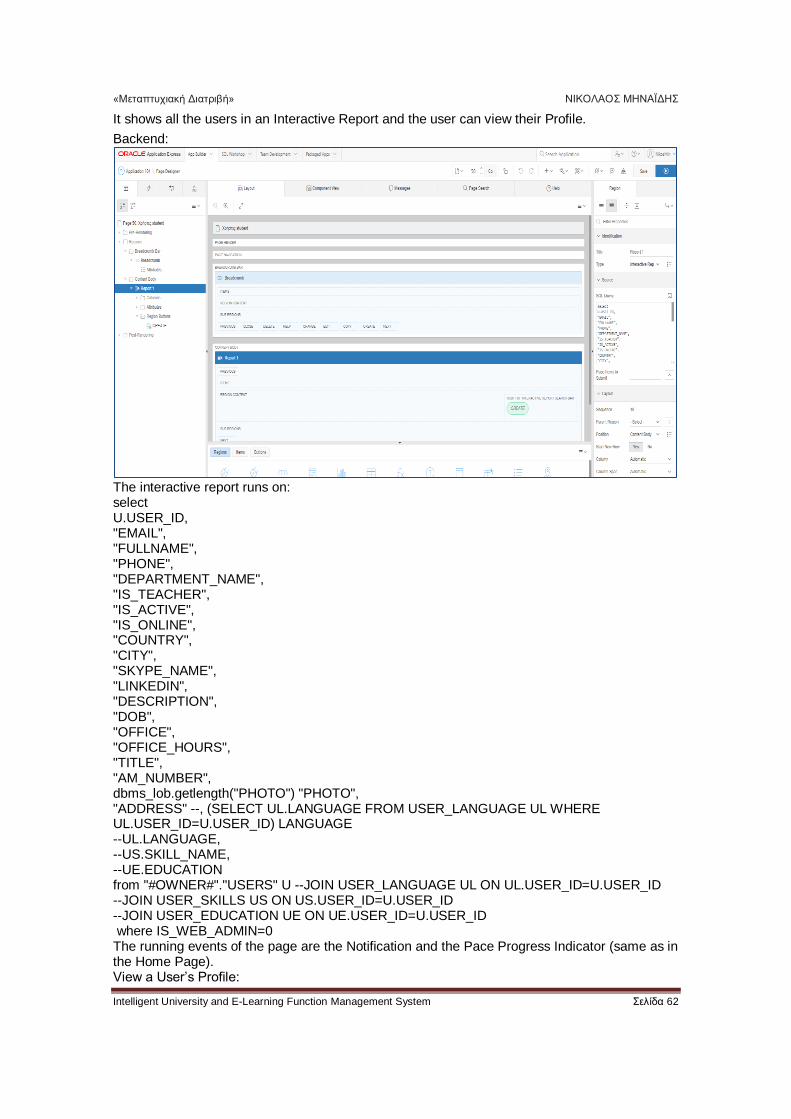
It shows all the users in an Interactive Report and the user can view their Profile.
Backend:
The interactive report runs on: select U.USER_ID, "EMAIL", "FULLNAME", "PHONE", "DEPARTMENT_NAME", "IS_TEACHER", "IS_ACTIVE", "IS_ONLINE", "COUNTRY", "CITY", "SKYPE_NAME", "LINKEDIN", "DESCRIPTION", "DOB", "OFFICE", "OFFICE_HOURS", "TITLE", "AM_NUMBER", dbms_lob.getlength("PHOTO") "PHOTO", "ADDRESS" --, (SELECT UL.LANGUAGE FROM USER_LANGUAGE UL WHERE UL.USER_ID=U.USER_ID) LANGUAGE --UL.LANGUAGE, --US.SKILL_NAME, --UE.EDUCATION from "#OWNER#"."USERS" U --JOIN USER_LANGUAGE UL ON UL.USER_ID=U.USER_ID --JOIN USER_SKILLS US ON US.USER_ID=U.USER_ID --JOIN USER_EDUCATION UE ON UE.USER_ID=U.USER_ID where IS_WEB_ADMIN=0 The running events of the page are the Notification and the Pace Progress Indicator (same as in the Home Page). View a User’s Profile:
«Μεταπτυχιακή Διατριβή» ΝΙΚΟΛΑΟΣ ΜΗΝΑΪΔΗΣ
Intelligent University and E-Learning Function Management System Σελίδα 63
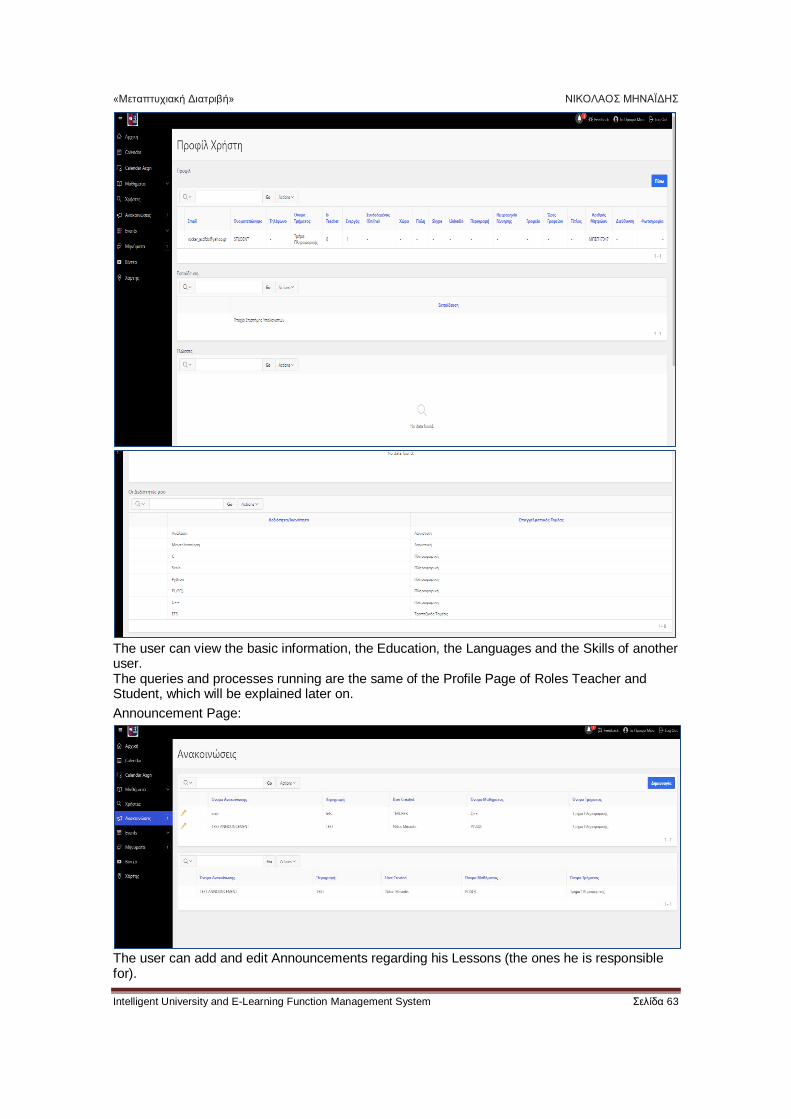
The user can view the basic information, the Education, the Languages and the Skills of another user. The queries and processes running are the same of the Profile Page of Roles Teacher and Student, which will be explained later on.
Announcement Page:
The user can add and edit Announcements regarding his Lessons (the ones he is responsible for).
«Μεταπτυχιακή Διατριβή» ΝΙΚΟΛΑΟΣ ΜΗΝΑΪΔΗΣ
Intelligent University and E-Learning Function Management System Σελίδα 64
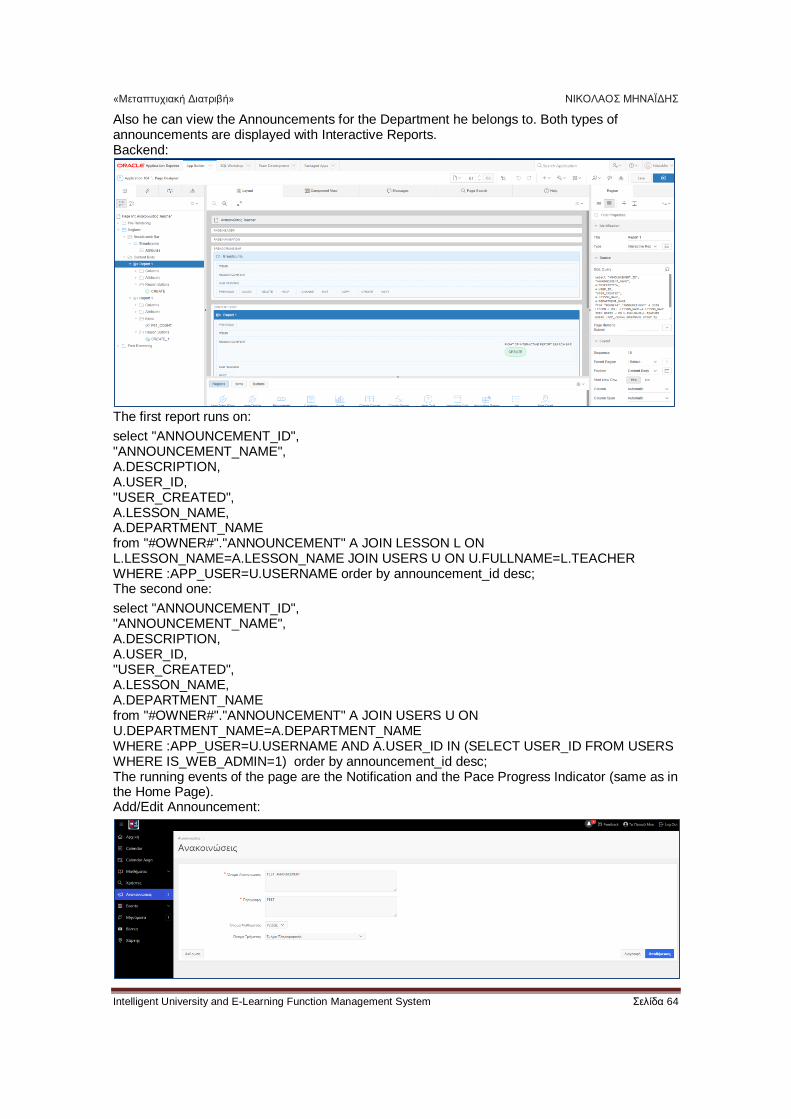
Also he can view the Announcements for the Department he belongs to. Both types of announcements are displayed with Interactive Reports. Backend:
The first report runs on:
select "ANNOUNCEMENT_ID", "ANNOUNCEMENT_NAME", A.DESCRIPTION, A.USER_ID, "USER_CREATED", A.LESSON_NAME, A.DEPARTMENT_NAME from "#OWNER#"."ANNOUNCEMENT" A JOIN LESSON L ON L.LESSON_NAME=A.LESSON_NAME JOIN USERS U ON U.FULLNAME=L.TEACHER WHERE :APP_USER=U.USERNAME order by announcement_id desc; The second one:
select "ANNOUNCEMENT_ID", "ANNOUNCEMENT_NAME", A.DESCRIPTION, A.USER_ID, "USER_CREATED", A.LESSON_NAME, A.DEPARTMENT_NAME from "#OWNER#"."ANNOUNCEMENT" A JOIN USERS U ON U.DEPARTMENT_NAME=A.DEPARTMENT_NAME WHERE :APP_USER=U.USERNAME AND A.USER_ID IN (SELECT USER_ID FROM USERS WHERE IS_WEB_ADMIN=1) order by announcement_id desc; The running events of the page are the Notification and the Pace Progress Indicator (same as in the Home Page). Add/Edit Announcement:
«Μεταπτυχιακή Διατριβή» ΝΙΚΟΛΑΟΣ ΜΗΝΑΪΔΗΣ
Intelligent University and E-Learning Function Management System Σελίδα 65
Backend:
The Events, Users invited, Messages, Videos, Map, Feedback pages are the same with the rest users. (For all the users, these pages are handled in the same way) Profile Page:
«Μεταπτυχιακή Διατριβή» ΝΙΚΟΛΑΟΣ ΜΗΝΑΪΔΗΣ
Intelligent University and E-Learning Function Management System Σελίδα 66
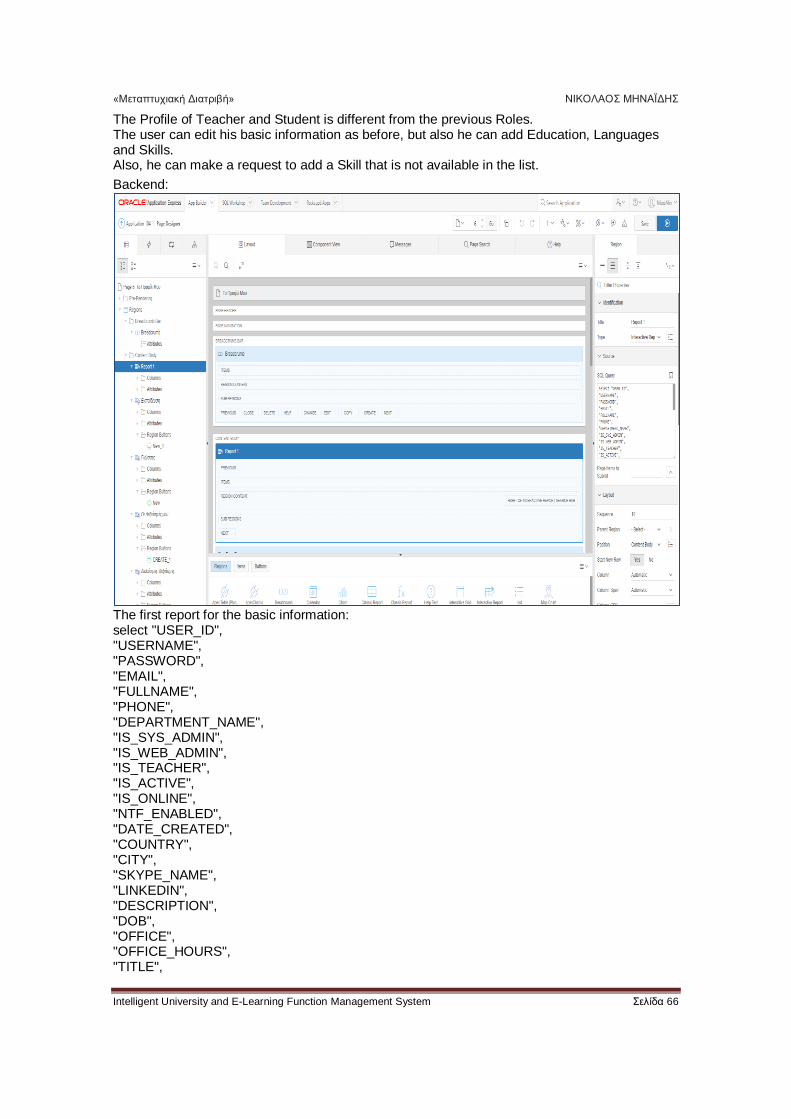
The Profile of Teacher and Student is different from the previous Roles. The user can edit his basic information as before, but also he can add Education, Languages and Skills. Also, he can make a request to add a Skill that is not available in the list.
Backend:
The first report for the basic information: select "USER_ID", "USERNAME", "PASSWORD", "EMAIL", "FULLNAME", "PHONE", "DEPARTMENT_NAME", "IS_SYS_ADMIN", "IS_WEB_ADMIN", "IS_TEACHER", "IS_ACTIVE", "IS_ONLINE", "NTF_ENABLED", "DATE_CREATED", "COUNTRY", "CITY", "SKYPE_NAME", "LINKEDIN", "DESCRIPTION", "DOB", "OFFICE", "OFFICE_HOURS", "TITLE",
«Μεταπτυχιακή Διατριβή» ΝΙΚΟΛΑΟΣ ΜΗΝΑΪΔΗΣ
Intelligent University and E-Learning Function Management System Σελίδα 67
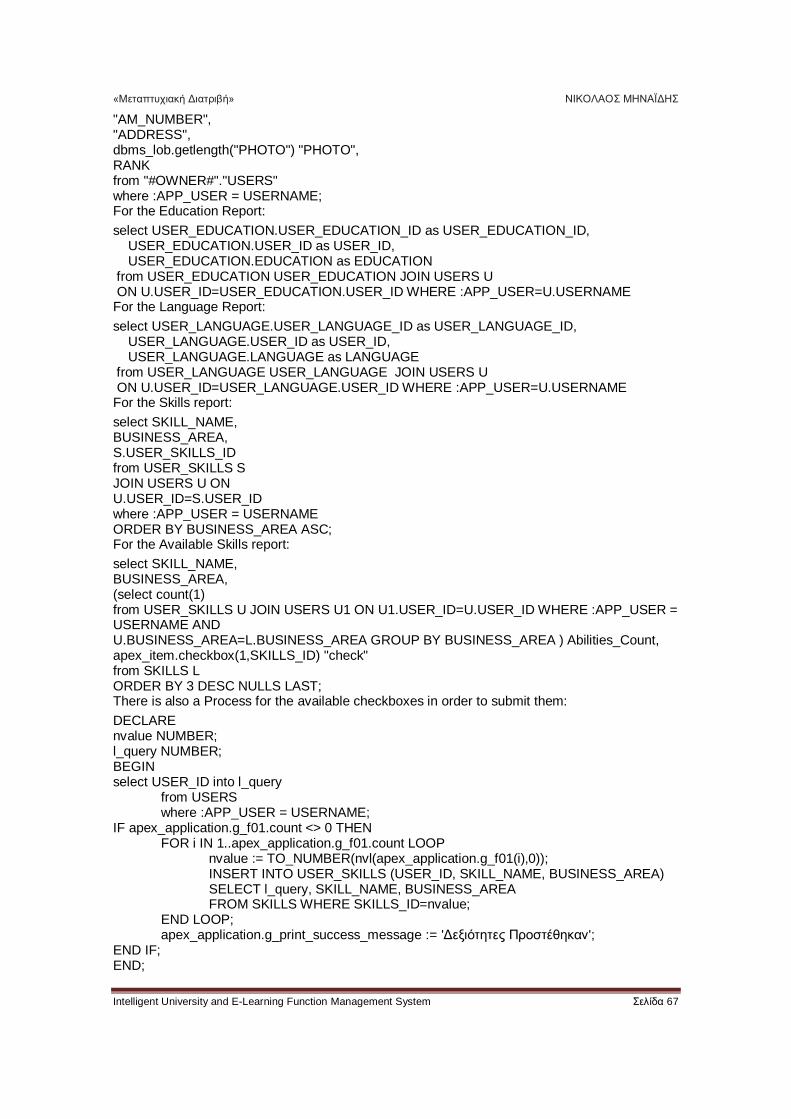
"AM_NUMBER", "ADDRESS", dbms_lob.getlength("PHOTO") "PHOTO", RANK from "#OWNER#"."USERS" where :APP_USER = USERNAME; For the Education Report:
select USER_EDUCATION.USER_EDUCATION_ID as USER_EDUCATION_ID, USER_EDUCATION.USER_ID as USER_ID, USER_EDUCATION.EDUCATION as EDUCATION from USER_EDUCATION USER_EDUCATION JOIN USERS U ON U.USER_ID=USER_EDUCATION.USER_ID WHERE :APP_USER=U.USERNAME For the Language Report:
select USER_LANGUAGE.USER_LANGUAGE_ID as USER_LANGUAGE_ID, USER_LANGUAGE.USER_ID as USER_ID, USER_LANGUAGE.LANGUAGE as LANGUAGE from USER_LANGUAGE USER_LANGUAGE JOIN USERS U ON U.USER_ID=USER_LANGUAGE.USER_ID WHERE :APP_USER=U.USERNAME For the Skills report:
select SKILL_NAME, BUSINESS_AREA, S.USER_SKILLS_ID from USER_SKILLS S JOIN USERS U ON U.USER_ID=S.USER_ID where :APP_USER = USERNAME ORDER BY BUSINESS_AREA ASC; For the Available Skills report:
select SKILL_NAME, BUSINESS_AREA, (select count(1) from USER_SKILLS U JOIN USERS U1 ON U1.USER_ID=U.USER_ID WHERE :APP_USER = USERNAME AND U.BUSINESS_AREA=L.BUSINESS_AREA GROUP BY BUSINESS_AREA ) Abilities_Count, apex_item.checkbox(1,SKILLS_ID) "check" from SKILLS L ORDER BY 3 DESC NULLS LAST; There is also a Process for the available checkboxes in order to submit them:
DECLARE nvalue NUMBER; l_query NUMBER; BEGIN select USER_ID into l_query from USERS where :APP_USER = USERNAME; IF apex_application.g_f01.count <> 0 THEN FOR i IN 1..apex_application.g_f01.count LOOP nvalue := TO_NUMBER(nvl(apex_application.g_f01(i),0)); INSERT INTO USER_SKILLS (USER_ID, SKILL_NAME, BUSINESS_AREA) SELECT l_query, SKILL_NAME, BUSINESS_AREA FROM SKILLS WHERE SKILLS_ID=nvalue; END LOOP; apex_application.g_print_success_message := 'Δεξιότητες Προστέθηκαν'; END IF; END;
«Μεταπτυχιακή Διατριβή» ΝΙΚΟΛΑΟΣ ΜΗΝΑΪΔΗΣ
Intelligent University and E-Learning Function Management System Σελίδα 68
The running events of the page are the Notification and the Pace Progress Indicator (same as in the Home Page).
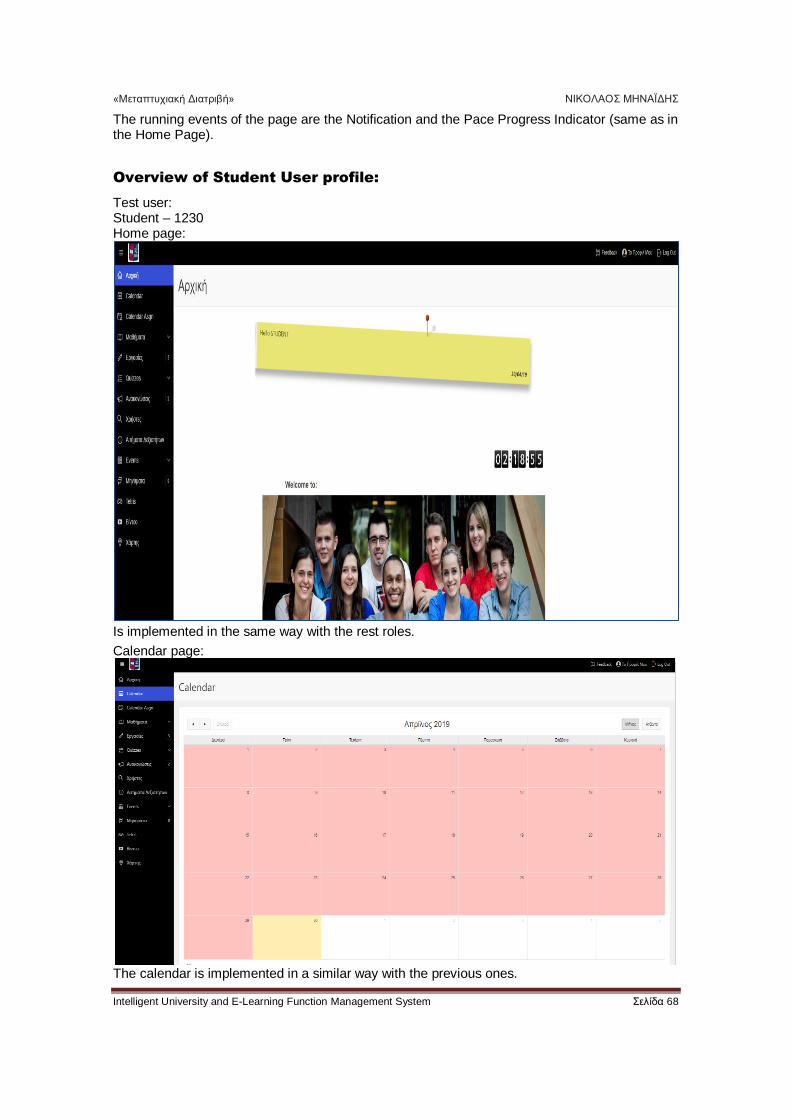
Overview of Student User profile:
Test user: Student – 1230 Home page:
Is implemented in the same way with the rest roles.
Calendar page:
The calendar is implemented in a similar way with the previous ones.
«Μεταπτυχιακή Διατριβή» ΝΙΚΟΛΑΟΣ ΜΗΝΑΪΔΗΣ
Intelligent University and E-Learning Function Management System Σελίδα 69
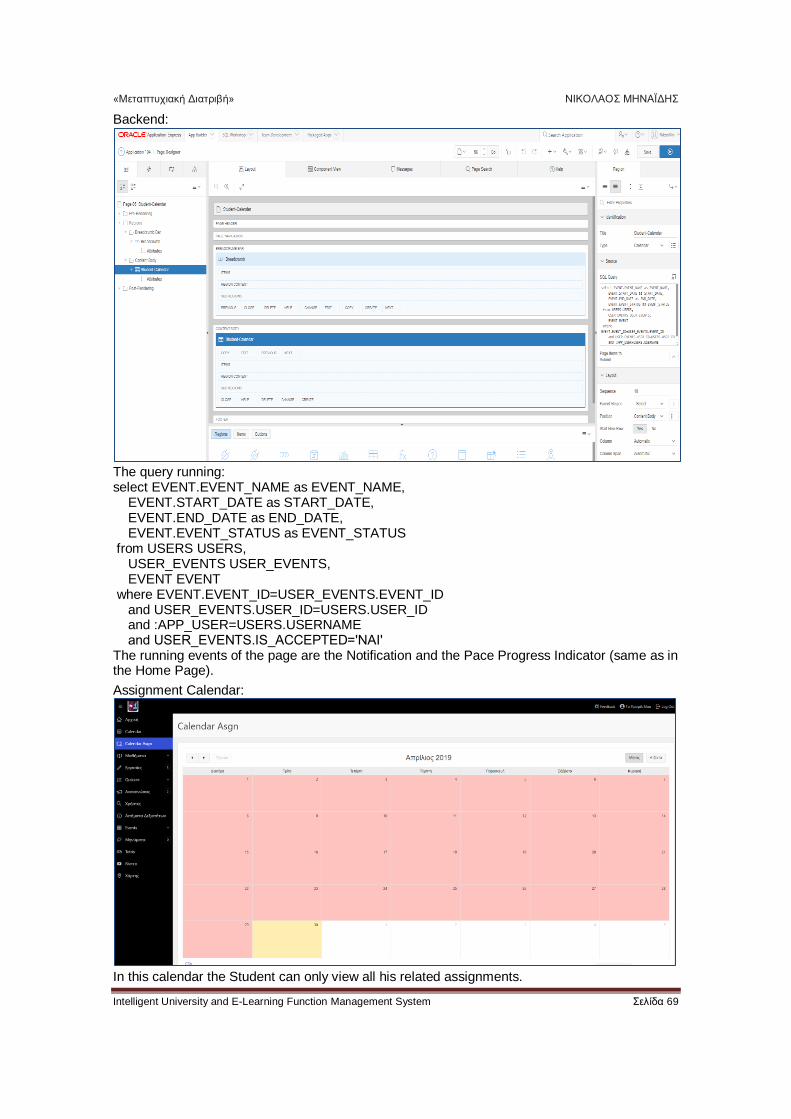
Backend:
The query running: select EVENT.EVENT_NAME as EVENT_NAME, EVENT.START_DATE as START_DATE, EVENT.END_DATE as END_DATE, EVENT.EVENT_STATUS as EVENT_STATUS from USERS USERS, USER_EVENTS USER_EVENTS, EVENT EVENT where EVENT.EVENT_ID=USER_EVENTS.EVENT_ID and USER_EVENTS.USER_ID=USERS.USER_ID and :APP_USER=USERS.USERNAME and USER_EVENTS.IS_ACCEPTED='ΝΑΙ' The running events of the page are the Notification and the Pace Progress Indicator (same as in the Home Page).
Assignment Calendar:
In this calendar the Student can only view all his related assignments.
«Μεταπτυχιακή Διατριβή» ΝΙΚΟΛΑΟΣ ΜΗΝΑΪΔΗΣ
Intelligent University and E-Learning Function Management System Σελίδα 70
Backend:
The query that it runs on: select ASSIGNMENT.ASSIGNMENT_ID as ASSIGNMENT_ID, ASSIGNMENT.ASSIGNMENT_NAME as ASSIGNMENT_NAME, ASSIGNMENT.START_DATE as START_DATE, ASSIGNMENT.END_DATE as END_DATE from USERS USERS, LESSON_STUDENT LESSON_STUDENT, ASSIGNMENT ASSIGNMENT where ASSIGNMENT.LESSON_ID=LESSON_STUDENT.LESSON_ID and LESSON_STUDENT.AM_NUMBER=USERS.AM_NUMBER and :APP_USER=USERS.USERNAME The running events of the page are the Notification and the Pace Progress Indicator (same as in the Home Page).
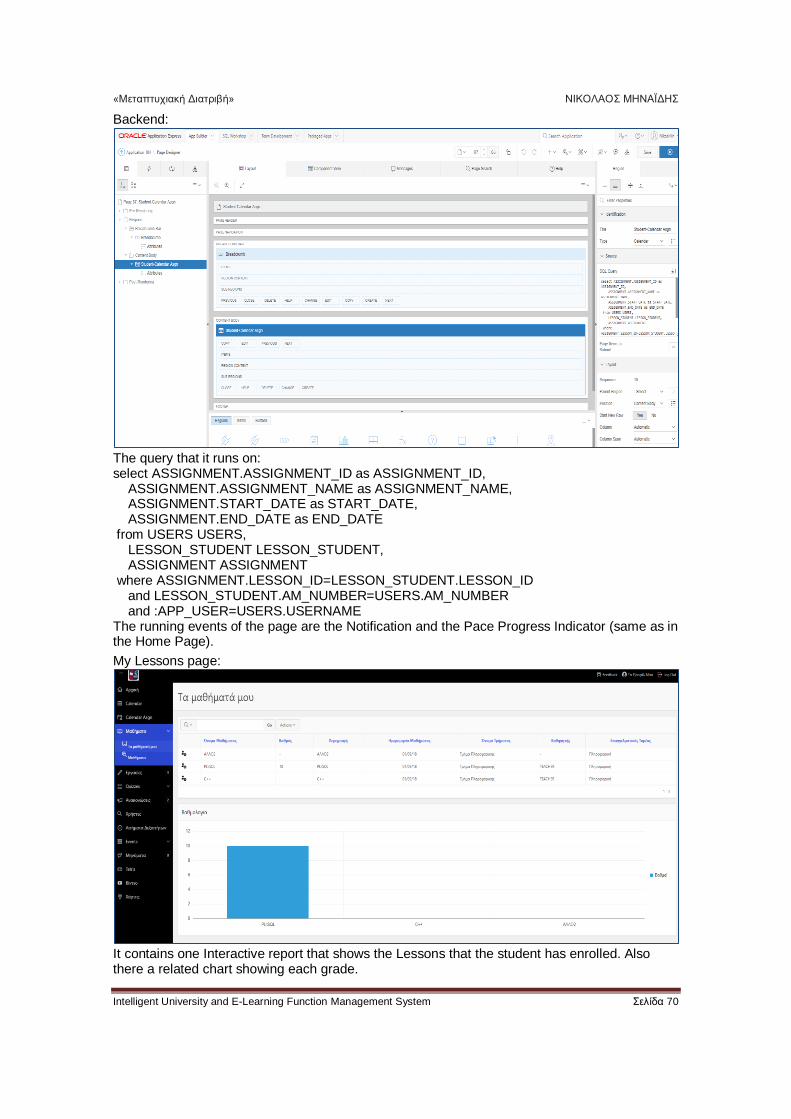
My Lessons page:
It contains one Interactive report that shows the Lessons that the student has enrolled. Also there a related chart showing each grade.

«Μεταπτυχιακή Διατριβή» ΝΙΚΟΛΑΟΣ ΜΗΝΑΪΔΗΣ
Intelligent University and E-Learning Function Management System Σελίδα 71
In this page the Student can unenroll from a lesson. Backend:
The report runs on: select "LESSON_STUDENT_ID", "STUDENT_NAME", LS.AM_NUMBER, LS.LESSON_NAME, "GRADE", L.DESCRIPTION,L.LESSON_DATE,L.DEPARTMENT_NAME,L.TEACHER, L.BUSINESS_AREA from "#OWNER#"."LESSON_STUDENT" LS JOIN USERS U ON U.FULLNAME=LS.STUDENT_NAME join LESSON L ON L.LESSON_NAME=LS.LESSON_NAME WHERE :APP_USER=U.USERNAME AND LS.AM_NUMBER=U.AM_NUMBER ORDER BY LESSON_DATE DESC; The chart: select GRADE,L.LESSON_NAME from "#OWNER#"."LESSON_STUDENT" LS JOIN USERS U ON U.FULLNAME=LS.STUDENT_NAME join LESSON L ON L.LESSON_NAME=LS.LESSON_NAME WHERE :APP_USER=U.USERNAME AND LS.AM_NUMBER=U.AM_NUMBER ORDER BY L.LESSON_ID; The running events of the page are the Notification and the Pace Progress Indicator (same as in the Home Page). The Lessons page:
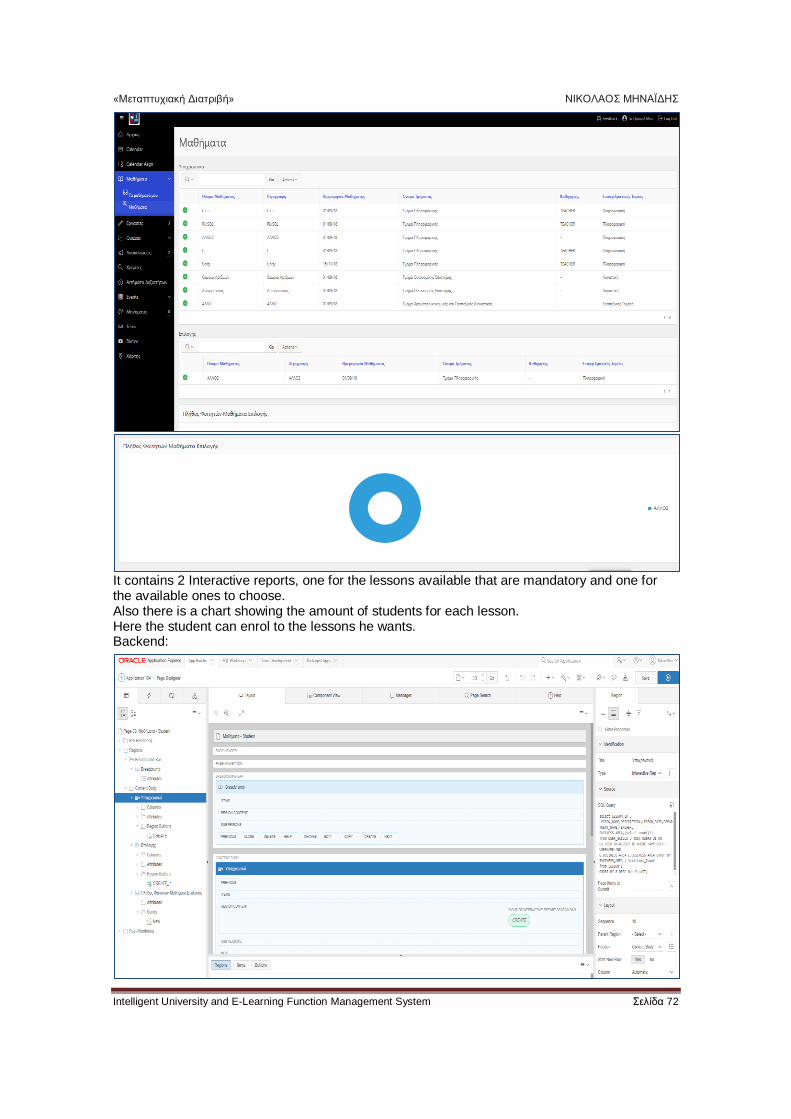
«Μεταπτυχιακή Διατριβή» ΝΙΚΟΛΑΟΣ ΜΗΝΑΪΔΗΣ
Intelligent University and E-Learning Function Management System Σελίδα 72
It contains 2 Interactive reports, one for the lessons available that are mandatory and one for the available ones to choose. Also there is a chart showing the amount of students for each lesson. Here the student can enrol to the lessons he wants. Backend:
«Μεταπτυχιακή Διατριβή» ΝΙΚΟΛΑΟΣ ΜΗΝΑΪΔΗΣ
Intelligent University and E-Learning Function Management System Σελίδα 73
The first report runs on: select LESSON_ID , LESSON_NAME,DESCRIPTION,LESSON_DATE,DEPARTMENT_NAME,TEACHER, BUSINESS_AREA,(select count(1) from USER_SKILLS U JOIN USERS U1 ON U1.USER_ID=U.USER_ID WHERE :APP_USER = USERNAME AND U.BUSINESS_AREA=L.BUSINESS_AREA GROUP BY BUSINESS_AREA ) Abilities_Count from LESSON L ORDER BY 8 DESC NULLS LAST;
The second report: select LESSON_ID , LESSON_NAME,DESCRIPTION,LESSON_DATE,DEPARTMENT_NAME,TEACHER, BUSINESS_AREA,(select count(1) from USER_SKILLS U JOIN USERS U1 ON U1.USER_ID=U.USER_ID WHERE :APP_USER = USERNAME AND U.BUSINESS_AREA=L.BUSINESS_AREA GROUP BY BUSINESS_AREA ) Abilities_Count from LESSON L where IS_MANDATORY='ΟΧΙ' ORDER BY 8 DESC NULLS LAST;
The chart: select count(1), LS.LESSON_ID,LS.LESSON_NAME from LESSON L JOIN LESSON_STUDENT LS ON LS.LESSON_ID = L.LESSON_ID where IS_MANDATORY='ΟΧΙ' GROUP BY LS.LESSON_ID,LS.LESSON_NAME The running events of the page are the Notification and the Pace Progress Indicator (same as in the Home Page).
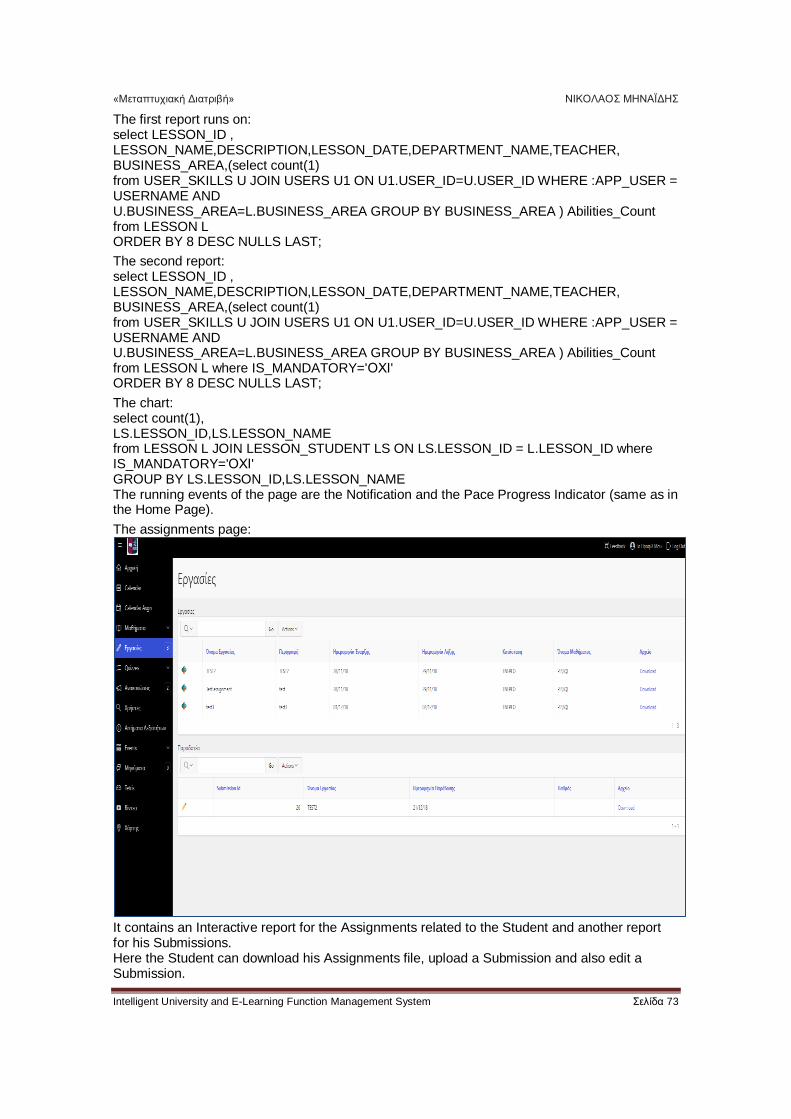
The assignments page:
It contains an Interactive report for the Assignments related to the Student and another report for his Submissions. Here the Student can download his Assignments file, upload a Submission and also edit a Submission.
«Μεταπτυχιακή Διατριβή» ΝΙΚΟΛΑΟΣ ΜΗΝΑΪΔΗΣ
Intelligent University and E-Learning Function Management System Σελίδα 74
Backend:
The first reports runs on: select "ASSIGNMENT_ID", "ASSIGNMENT_NAME", A.DESCRIPTION, "START_DATE", "END_DATE", "ASSIGNMENT_STATUS", A.LESSON_NAME, A.LESSON_ID, dbms_lob.getlength("FILE_UPLOADED") "FILE_UPLOADED", "FILENAME" from "#OWNER#"."ASSIGNMENT" A JOIN LESSON_STUDENT LS ON LS.LESSON_NAME=A.LESSON_NAME JOIN USERS U ON U.AM_NUMBER=LS.AM_NUMBER WHERE :APP_USER=U.USERNAME order by end_date asc;
The second one: select SUBMISSION_ID, ASSIGNMENT_ID, ASSIGNMENT_NAME, STUDENT_NAME, S.AM_NUMBER, DATE_SUBMITTED, FILENAME, GRADE, dbms_lob.getlength("FILE_SUBMITTED") FILE_SUBMITTED from SUBMISSION S JOIN USERS U ON U.AM_NUMBER=S.AM_NUMBER WHERE :APP_USER=U.USERNAME order by DATE_SUBMITTED DESC; There is also a P57_COUNT item to act as a counter for the Navigation menu. The running events of the page are the Notification and the Pace Progress Indicator (same as in the Home Page). The quizzes pages will be explained in the intelligent features section.
«Μεταπτυχιακή Διατριβή» ΝΙΚΟΛΑΟΣ ΜΗΝΑΪΔΗΣ
Intelligent University and E-Learning Function Management System Σελίδα 75
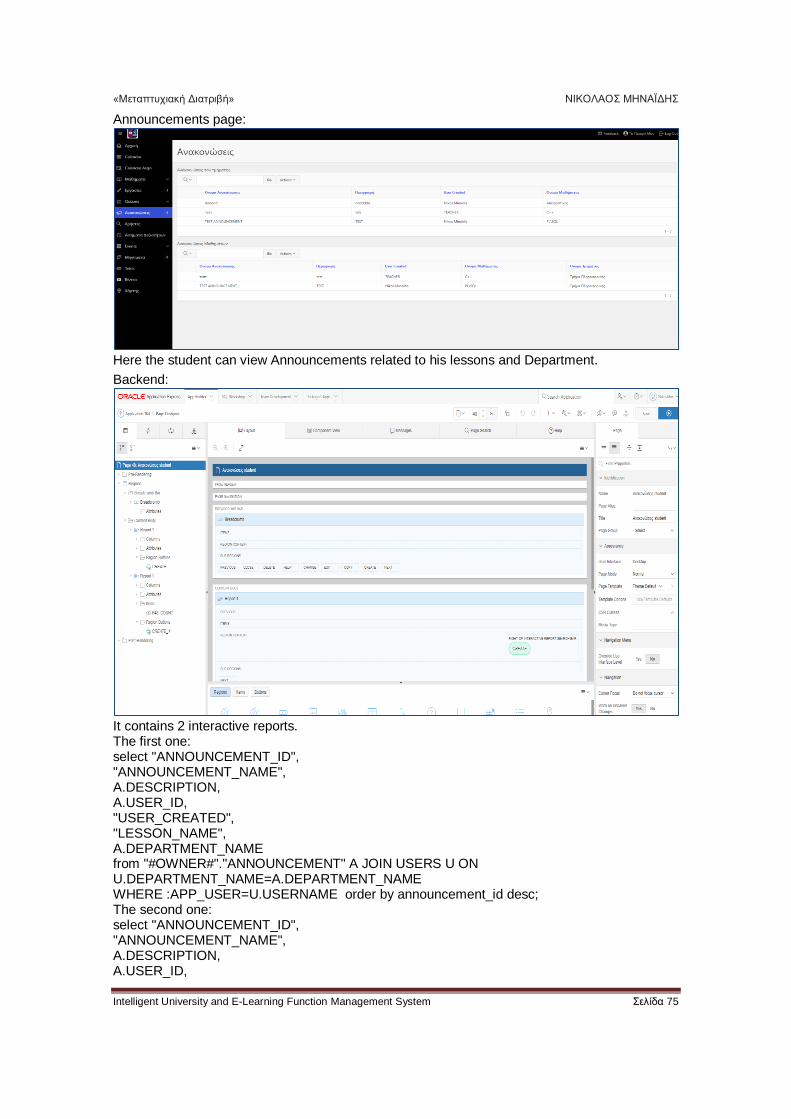
Announcements page:
Here the student can view Announcements related to his lessons and Department.
Backend:
It contains 2 interactive reports. The first one: select "ANNOUNCEMENT_ID", "ANNOUNCEMENT_NAME", A.DESCRIPTION, A.USER_ID, "USER_CREATED", "LESSON_NAME", A.DEPARTMENT_NAME from "#OWNER#"."ANNOUNCEMENT" A JOIN USERS U ON U.DEPARTMENT_NAME=A.DEPARTMENT_NAME WHERE :APP_USER=U.USERNAME order by announcement_id desc; The second one: select "ANNOUNCEMENT_ID", "ANNOUNCEMENT_NAME", A.DESCRIPTION, A.USER_ID,

«Μεταπτυχιακή Διατριβή» ΝΙΚΟΛΑΟΣ ΜΗΝΑΪΔΗΣ
Intelligent University and E-Learning Function Management System Σελίδα 76
"USER_CREATED", A.LESSON_NAME, A.DEPARTMENT_NAME from "#OWNER#"."ANNOUNCEMENT" A JOIN LESSON_STUDENT LS ON LS.LESSON_NAME=A.LESSON_NAME JOIN USERS U ON U.AM_NUMBER=LS.AM_NUMBER WHERE :APP_USER=U.USERNAME order by announcement_id desc; There is also an item P48_COUNT for the counter of the Navigation menu. The running events of the page are the Notification and the Pace Progress Indicator (same as in the Home Page).
The Skill requests page:
Here the student can see his already made Skill requests. He can create a new one or delete a previous one. (The same page has been added to the Teacher role).
Backend:
«Μεταπτυχιακή Διατριβή» ΝΙΚΟΛΑΟΣ ΜΗΝΑΪΔΗΣ
Intelligent University and E-Learning Function Management System Σελίδα 77
The report runs on: select "SKILL_REQUEST_ID", S.USER_ID, S.FULLNAME, "SUGGESTED_SKILL", "BUSINESS_AREA", "IS_ACCEPTED" from "#OWNER#"."SKILL_REQUEST" S JOIN USERS U ON U.USER_ID=S.USER_ID WHERE :APP_USER=U.USERNAME order by skill_request_id desc; The running events of the page are the Notification and the Pace Progress Indicator (same as in the Home Page).
Tetris page:
A game page for the student to pass his time. It is implemented with a custom module. The pages Events, Users Invited, Messages, Map, Videos, Profile, Feedback, and Users are in the same implementation with the Teacher Role that were explained previously.
Intelligent tools:
1)Quizzes
Each student has the ability to take quizzes. Each quiz has questions with multiple choices. When the quiz is submitted, a regarding report is produced showing results, both successful and failed. In case of failure, helpful messages appear and also helpful charts are produced in order to help the student understand his mistakes and progress better next time. In case of success, the report is updated accordingly and also the next level quiz is unlocked and appears to the student. There are currently 3 quiz levels. Also if the user succeeds with less than 3 failures in the first quiz, then he increases his Rank from 1 to 2 and will be able to take the quiz Quiz2_Rank2 (which is more difficult) ,otherwise if his failed tries are 3 or above his next quiz will be an easier one and his rank remains 1.
2)Skills – Lessons
Each student has the ability to add an approved skill to his profile. When his profile is updated, then all the lessons that he can enrol are being ordered suitably to his skills. Also, a regarding grid-report appears showing suggested lessons based on his skills.
«Μεταπτυχιακή Διατριβή» ΝΙΚΟΛΑΟΣ ΜΗΝΑΪΔΗΣ
Intelligent University and E-Learning Function Management System Σελίδα 78
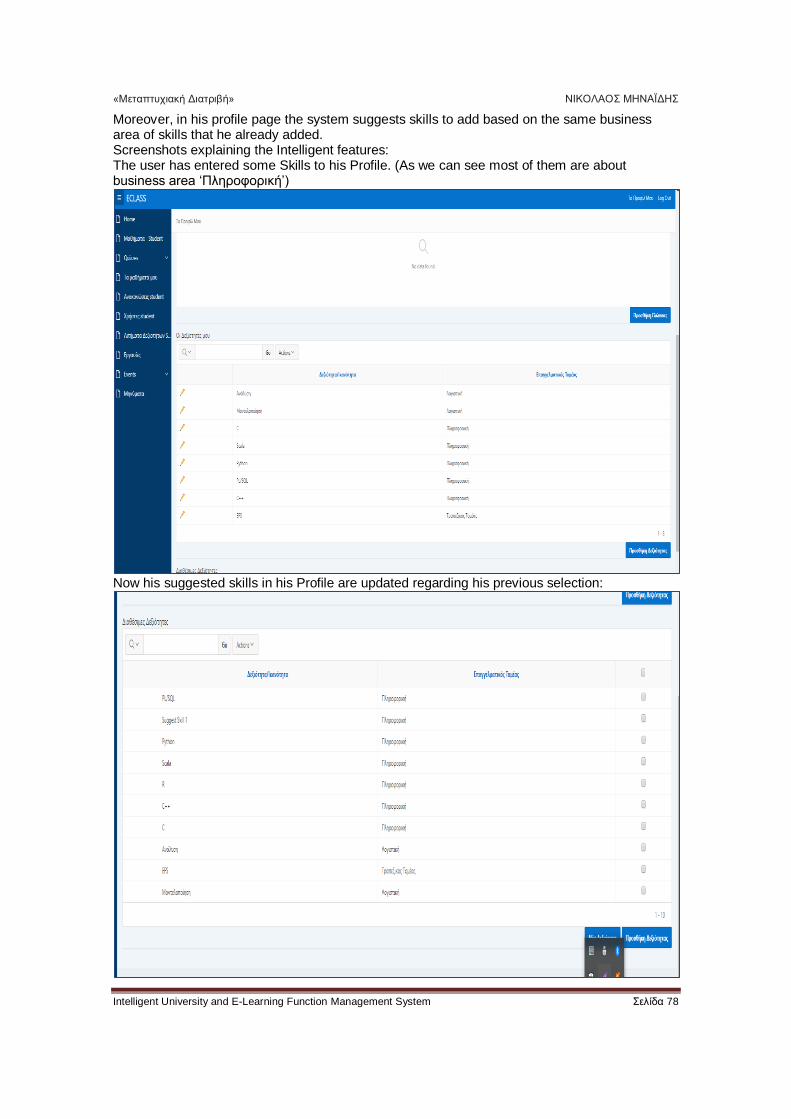
Moreover, in his profile page the system suggests skills to add based on the same business area of skills that he already added. Screenshots explaining the Intelligent features: The user has entered some Skills to his Profile. (As we can see most of them are about business area ‘Πληροφορική’)
Now his suggested skills in his Profile are updated regarding his previous selection:
«Μεταπτυχιακή Διατριβή» ΝΙΚΟΛΑΟΣ ΜΗΝΑΪΔΗΣ
Intelligent University and E-Learning Function Management System Σελίδα 79
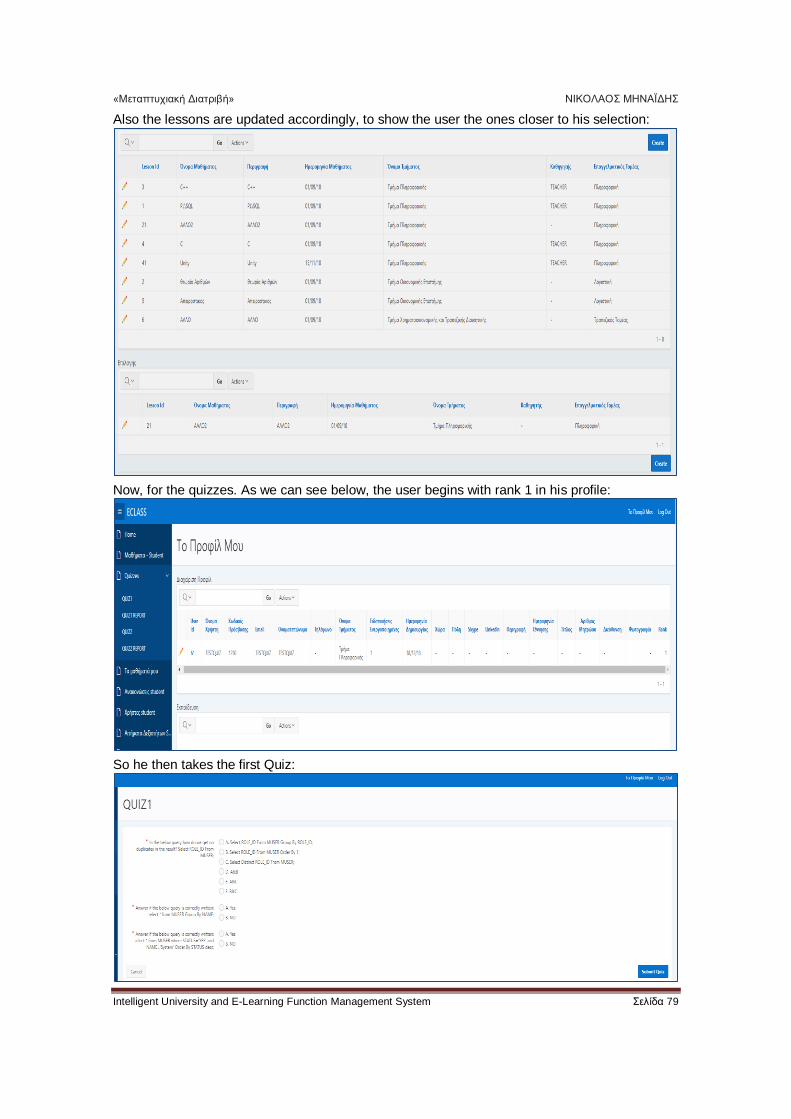
Also the lessons are updated accordingly, to show the user the ones closer to his selection:
Now, for the quizzes. As we can see below, the user begins with rank 1 in his profile:
So he then takes the first Quiz:
«Μεταπτυχιακή Διατριβή» ΝΙΚΟΛΑΟΣ ΜΗΝΑΪΔΗΣ
Intelligent University and E-Learning Function Management System Σελίδα 80
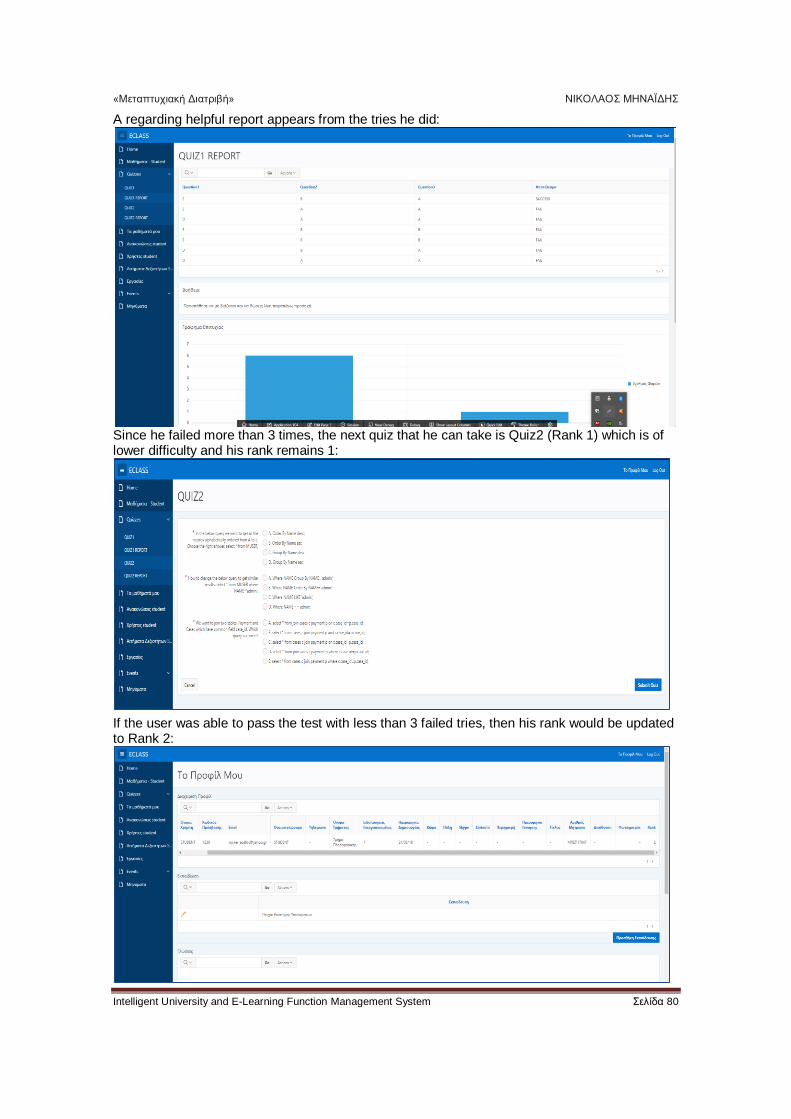
A regarding helpful report appears from the tries he did:
Since he failed more than 3 times, the next quiz that he can take is Quiz2 (Rank 1) which is of lower difficulty and his rank remains 1:
If the user was able to pass the test with less than 3 failed tries, then his rank would be updated to Rank 2:
«Μεταπτυχιακή Διατριβή» ΝΙΚΟΛΑΟΣ ΜΗΝΑΪΔΗΣ
Intelligent University and E-Learning Function Management System Σελίδα 81
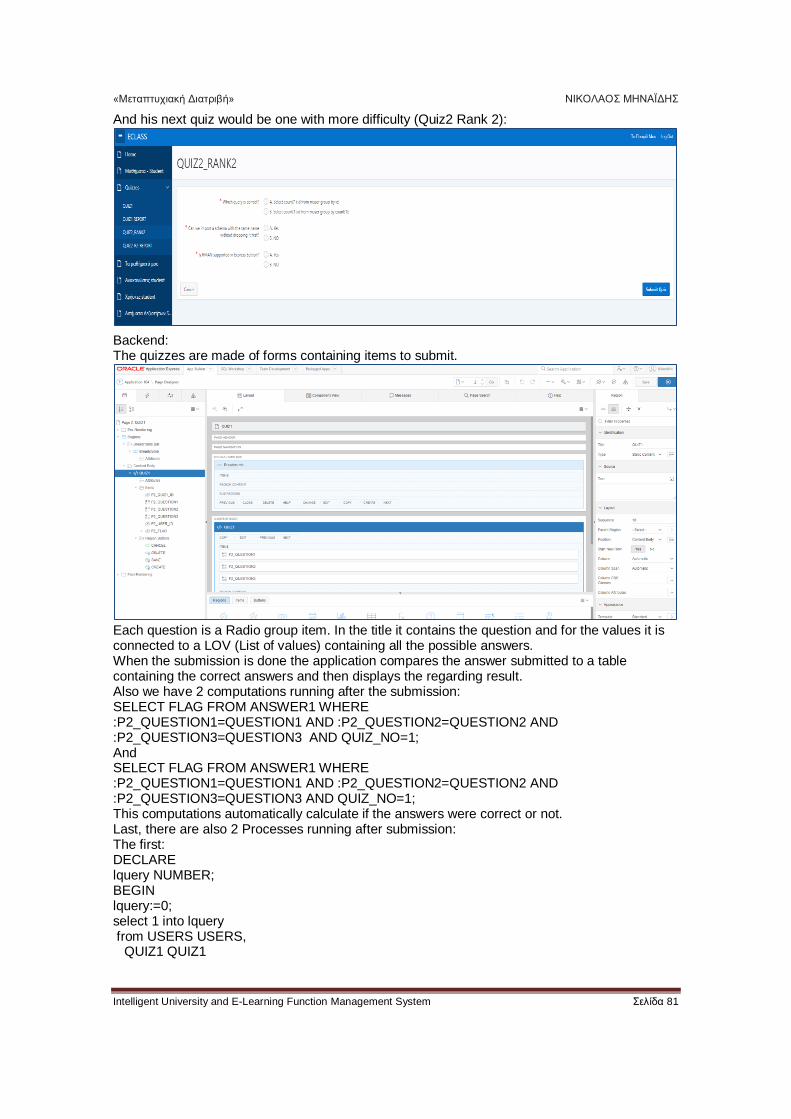
And his next quiz would be one with more difficulty (Quiz2 Rank 2):
Backend: The quizzes are made of forms containing items to submit.
Each question is a Radio group item. In the title it contains the question and for the values it is connected to a LOV (List of values) containing all the possible answers. When the submission is done the application compares the answer submitted to a table containing the correct answers and then displays the regarding result. Also we have 2 computations running after the submission: SELECT FLAG FROM ANSWER1 WHERE :P2_QUESTION1=QUESTION1 AND :P2_QUESTION2=QUESTION2 AND :P2_QUESTION3=QUESTION3 AND QUIZ_NO=1; And SELECT FLAG FROM ANSWER1 WHERE :P2_QUESTION1=QUESTION1 AND :P2_QUESTION2=QUESTION2 AND :P2_QUESTION3=QUESTION3 AND QUIZ_NO=1; This computations automatically calculate if the answers were correct or not. Last, there are also 2 Processes running after submission: The first: DECLARE lquery NUMBER; BEGIN lquery:=0; select 1 into lquery from USERS USERS, QUIZ1 QUIZ1
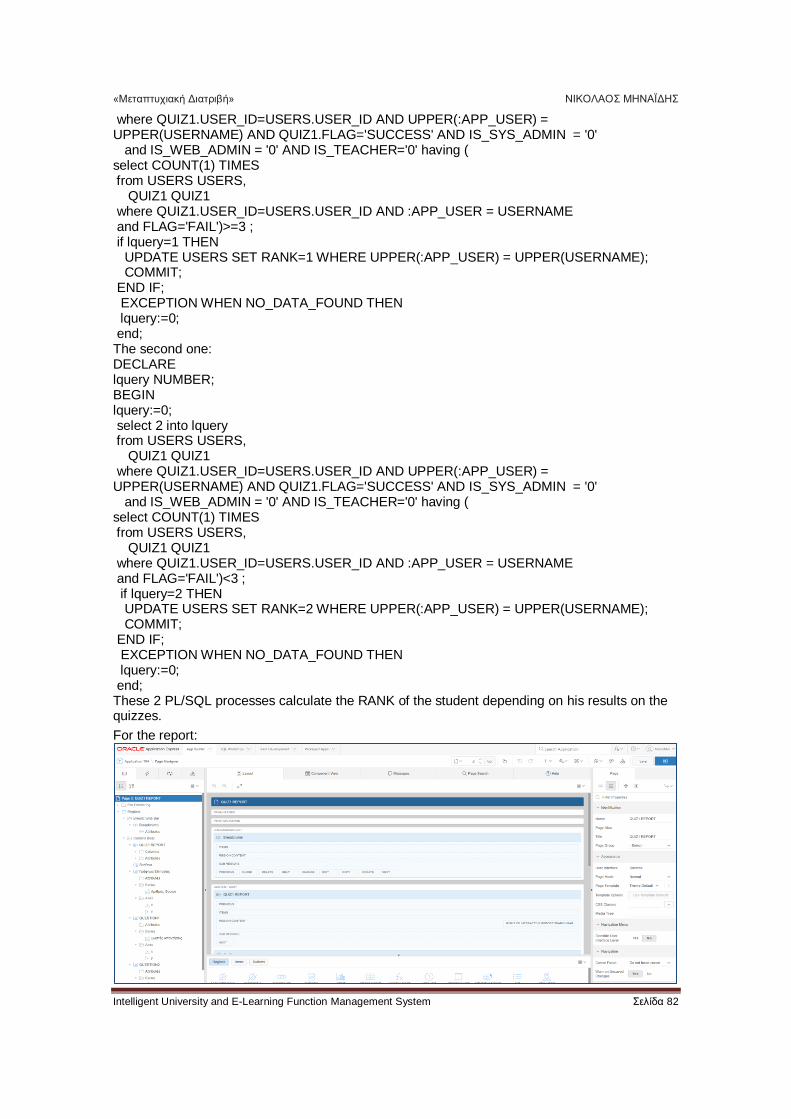
«Μεταπτυχιακή Διατριβή» ΝΙΚΟΛΑΟΣ ΜΗΝΑΪΔΗΣ
Intelligent University and E-Learning Function Management System Σελίδα 82
where QUIZ1.USER_ID=USERS.USER_ID AND UPPER(:APP_USER) = UPPER(USERNAME) AND QUIZ1.FLAG='SUCCESS' AND IS_SYS_ADMIN = '0' and IS_WEB_ADMIN = '0' AND IS_TEACHER='0' having ( select COUNT(1) TIMES from USERS USERS, QUIZ1 QUIZ1 where QUIZ1.USER_ID=USERS.USER_ID AND :APP_USER = USERNAME and FLAG='FAIL')>=3 ; if lquery=1 THEN UPDATE USERS SET RANK=1 WHERE UPPER(:APP_USER) = UPPER(USERNAME); COMMIT; END IF; EXCEPTION WHEN NO_DATA_FOUND THEN lquery:=0; end; The second one: DECLARE lquery NUMBER; BEGIN lquery:=0; select 2 into lquery from USERS USERS, QUIZ1 QUIZ1 where QUIZ1.USER_ID=USERS.USER_ID AND UPPER(:APP_USER) = UPPER(USERNAME) AND QUIZ1.FLAG='SUCCESS' AND IS_SYS_ADMIN = '0' and IS_WEB_ADMIN = '0' AND IS_TEACHER='0' having ( select COUNT(1) TIMES from USERS USERS, QUIZ1 QUIZ1 where QUIZ1.USER_ID=USERS.USER_ID AND :APP_USER = USERNAME and FLAG='FAIL')<3 ; if lquery=2 THEN UPDATE USERS SET RANK=2 WHERE UPPER(:APP_USER) = UPPER(USERNAME); COMMIT; END IF; EXCEPTION WHEN NO_DATA_FOUND THEN lquery:=0; end; These 2 PL/SQL processes calculate the RANK of the student depending on his results on the quizzes.
For the report:
«Μεταπτυχιακή Διατριβή» ΝΙΚΟΛΑΟΣ ΜΗΝΑΪΔΗΣ
Intelligent University and E-Learning Function Management System Σελίδα 83
The first Interactive report runs on: select QUIZ1.QUIZ1_ID as QUIZ1_ID, QUIZ1.QUESTION1 as QUESTION1, QUIZ1.QUESTION2 as QUESTION2, QUIZ1.QUESTION3 as QUESTION3, QUIZ1.FLAG as FLAG from USERS USERS, QUIZ1 QUIZ1 where QUIZ1.USER_ID=USERS.USER_ID AND :APP_USER = USERNAME; The chart: select COUNT(1) TIMES,flag from USERS USERS, QUIZ1 QUIZ1 where QUIZ1.USER_ID=USERS.USER_ID AND :APP_USER = USERNAME GROUP BY FLAG; Question1 chart: select COUNT(1) TIMES,QUIZ1.QUESTION1 AS QUESTION1 from USERS USERS, QUIZ1 QUIZ1 , ANSWER1 A where QUIZ1.USER_ID=USERS.USER_ID AND :APP_USER = USERNAME AND A.QUESTION1=QUIZ1.QUESTION1 AND A.QUIZ_NO='1' GROUP BY QUIZ1.QUESTION1; Question2 chart: select COUNT(1) TIMES,QUIZ1.QUESTION2 AS QUESTION2 from USERS USERS, QUIZ1 QUIZ1 , ANSWER1 A where QUIZ1.USER_ID=USERS.USER_ID AND :APP_USER = USERNAME AND A.QUESTION2=QUIZ1.QUESTION2 AND A.QUIZ_NO='1' GROUP BY QUIZ1.QUESTION2; Question3 chart: select COUNT(1) TIMES,QUIZ1.QUESTION3 AS QUESTION3 from USERS USERS, QUIZ1 QUIZ1 , ANSWER1 A where QUIZ1.USER_ID=USERS.USER_ID AND :APP_USER = USERNAME AND A.QUESTION3=QUIZ1.QUESTION3 AND A.QUIZ_NO='1' GROUP BY QUIZ1.QUESTION3; 2) Query to calculate and show in the most suitable order the available Lessons: select LESSON_ID , LESSON_NAME,DESCRIPTION,LESSON_DATE,DEPARTMENT_NAME,TEACHER, BUSINESS_AREA,(select count(1) from USER_SKILLS U JOIN USERS U1 ON U1.USER_ID=U.USER_ID WHERE :APP_USER = USERNAME AND U.BUSINESS_AREA=L.BUSINESS_AREA GROUP BY BUSINESS_AREA ) Abilities_Count from LESSON L where IS_MANDATORY='ΟΧΙ' ORDER BY 8 DESC NULLS LAST; Query to calculate and show in the most suitable order the available Skills: select SKILL_NAME, BUSINESS_AREA, (select count(1) from USER_SKILLS U JOIN USERS U1 ON U1.USER_ID=U.USER_ID WHERE :APP_USER = USERNAME AND U.BUSINESS_AREA=L.BUSINESS_AREA GROUP BY BUSINESS_AREA ) Abilities_Count, apex_item.checkbox(1,SKILLS_ID) "check"
«Μεταπτυχιακή Διατριβή» ΝΙΚΟΛΑΟΣ ΜΗΝΑΪΔΗΣ
Intelligent University and E-Learning Function Management System Σελίδα 84
from SKILLS L ORDER BY 3 DESC NULLS LAST;
General Settings/Configurations:
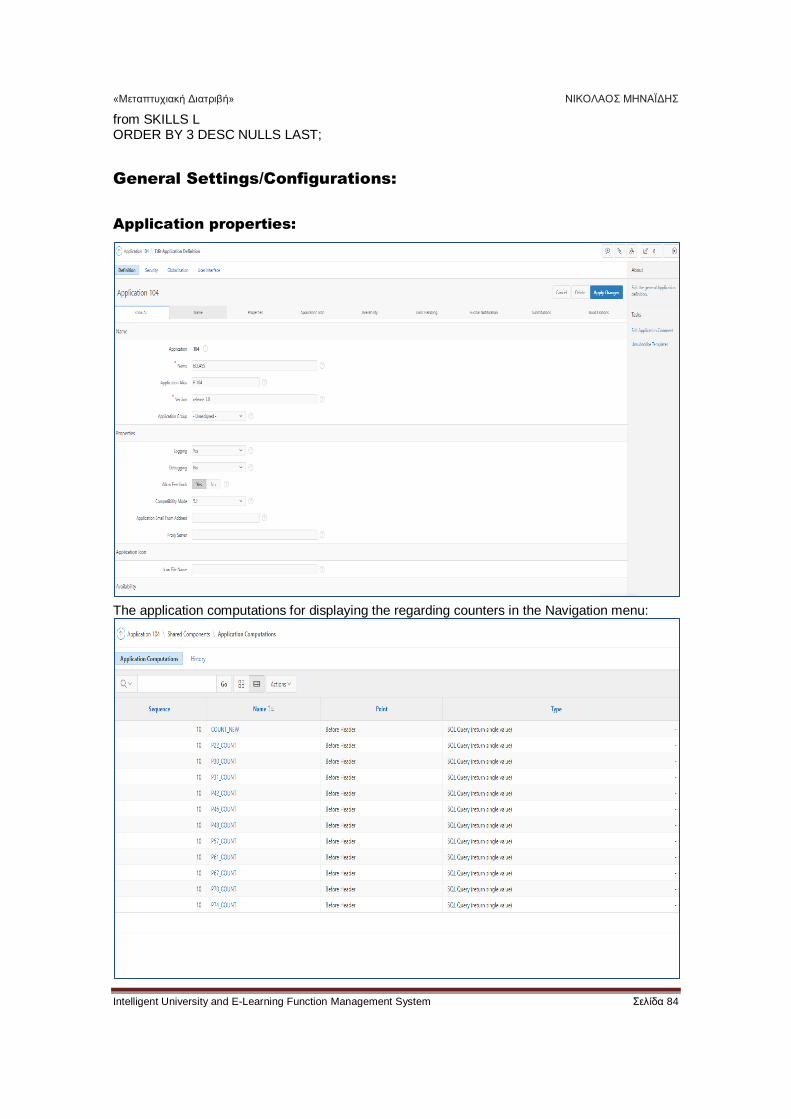
Application properties:
The application computations for displaying the regarding counters in the Navigation menu:

«Μεταπτυχιακή Διατριβή» ΝΙΚΟΛΑΟΣ ΜΗΝΑΪΔΗΣ
Intelligent University and E-Learning Function Management System Σελίδα 85
An example computation:
select count(ANNOUNCEMENT_ID) from ANNOUNCEMENT
Navigation menu:
«Μεταπτυχιακή Διατριβή» ΝΙΚΟΛΑΟΣ ΜΗΝΑΪΔΗΣ
Intelligent University and E-Learning Function Management System Σελίδα 86
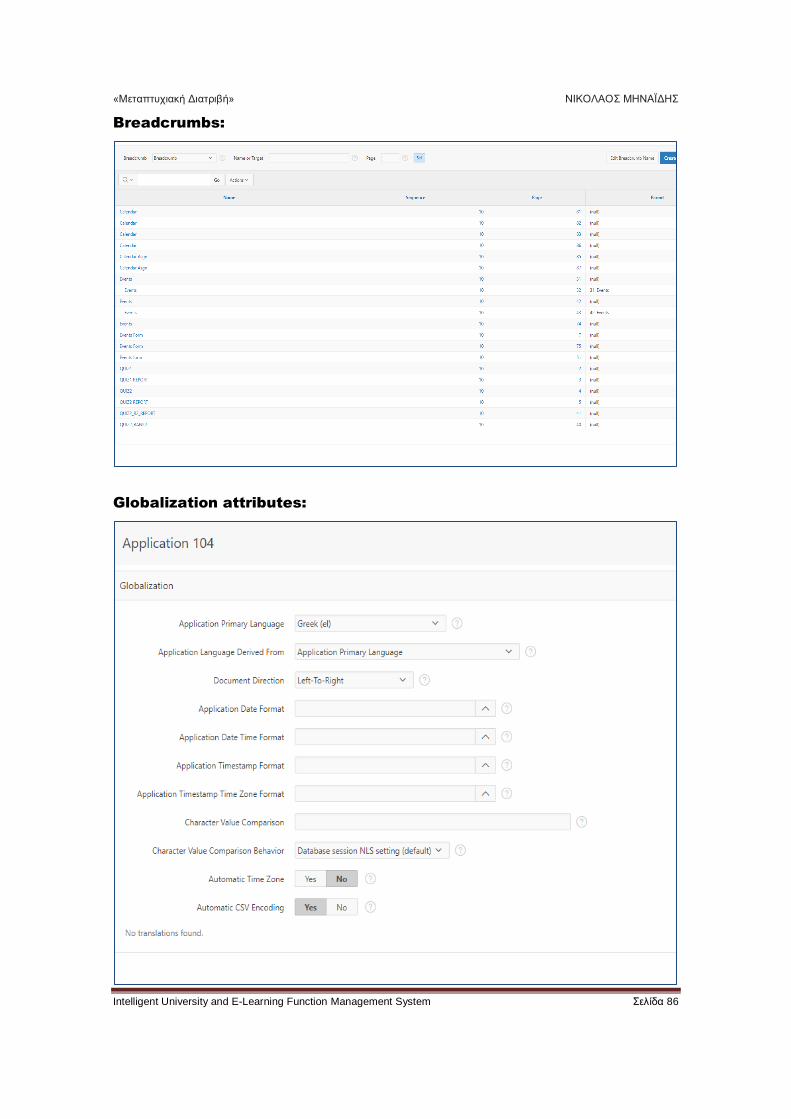
Breadcrumbs:
Globalization attributes:
«Μεταπτυχιακή Διατριβή» ΝΙΚΟΛΑΟΣ ΜΗΝΑΪΔΗΣ
Intelligent University and E-Learning Function Management System Σελίδα 87
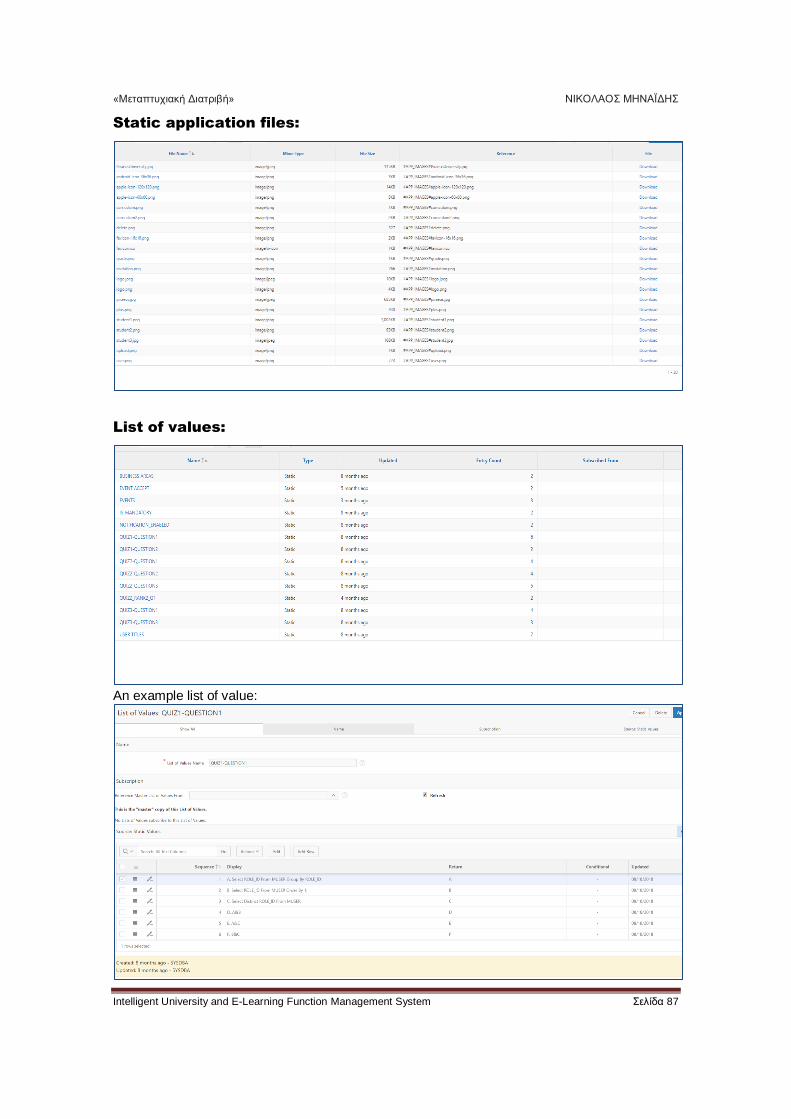
Static application files:
List of values:
An example list of value:
«Μεταπτυχιακή Διατριβή» ΝΙΚΟΛΑΟΣ ΜΗΝΑΪΔΗΣ
Intelligent University and E-Learning Function Management System Σελίδα 88
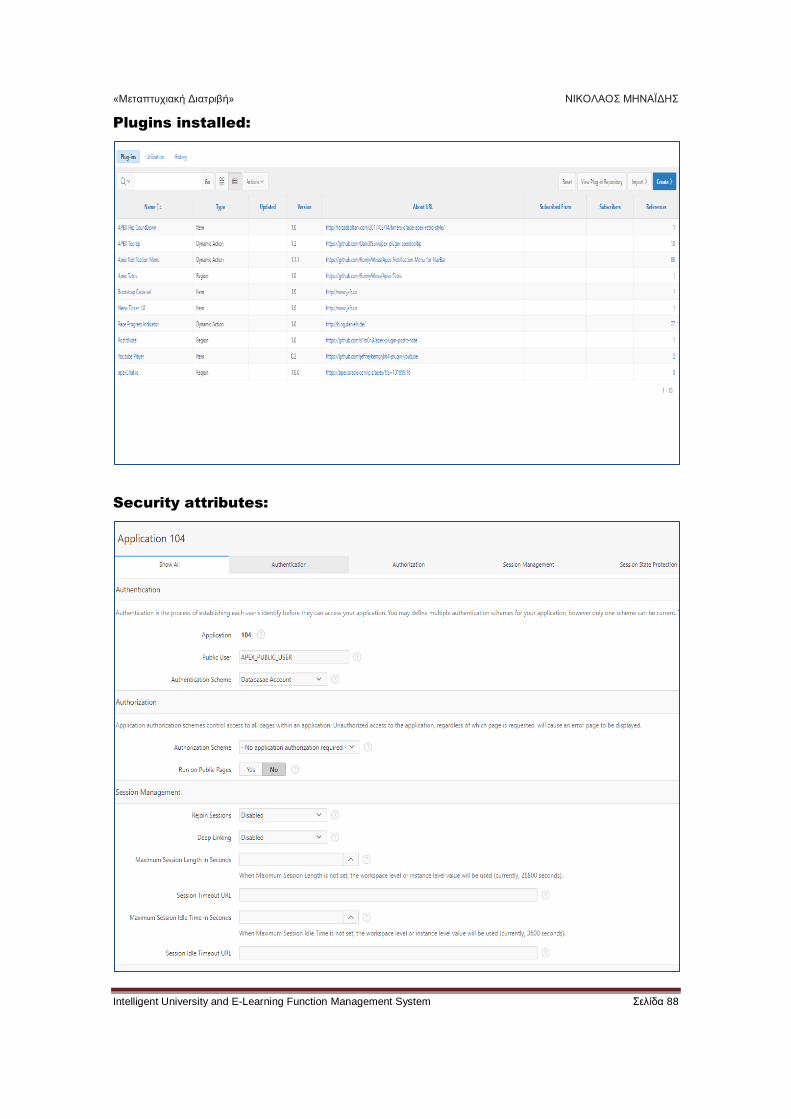
Plugins installed:
Security attributes:
«Μεταπτυχιακή Διατριβή» ΝΙΚΟΛΑΟΣ ΜΗΝΑΪΔΗΣ
Intelligent University and E-Learning Function Management System Σελίδα 89
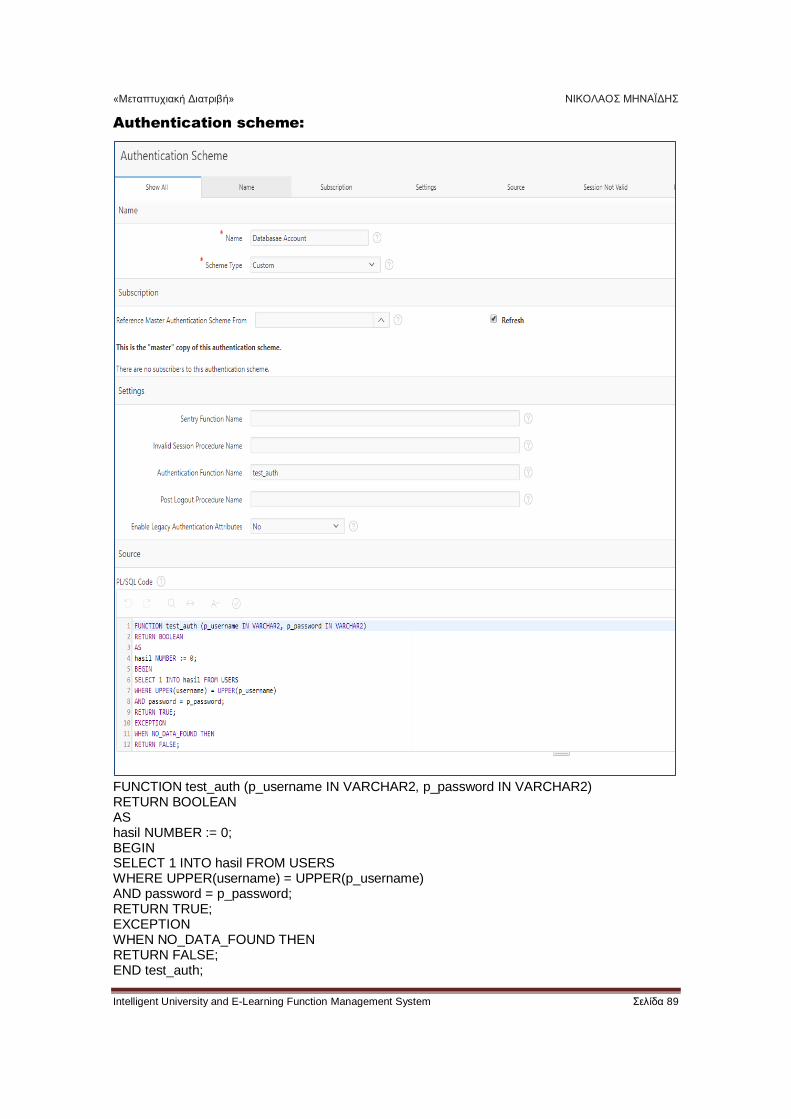
Authentication scheme:
FUNCTION test_auth (p_username IN VARCHAR2, p_password IN VARCHAR2) RETURN BOOLEAN AS hasil NUMBER := 0; BEGIN SELECT 1 INTO hasil FROM USERS WHERE UPPER(username) = UPPER(p_username) AND password = p_password; RETURN TRUE; EXCEPTION WHEN NO_DATA_FOUND THEN RETURN FALSE; END test_auth;
«Μεταπτυχιακή Διατριβή» ΝΙΚΟΛΑΟΣ ΜΗΝΑΪΔΗΣ
Intelligent University and E-Learning Function Management System Σελίδα 90
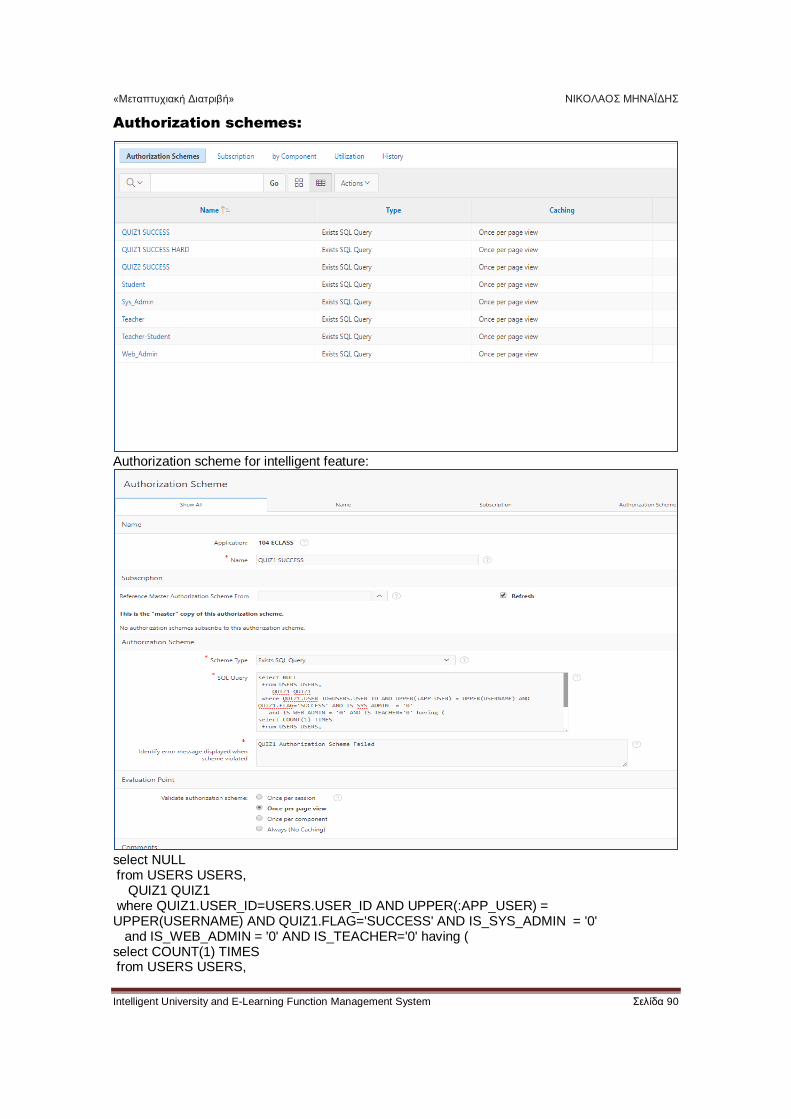
Authorization schemes:
Authorization scheme for intelligent feature:
select NULL from USERS USERS, QUIZ1 QUIZ1 where QUIZ1.USER_ID=USERS.USER_ID AND UPPER(:APP_USER) = UPPER(USERNAME) AND QUIZ1.FLAG='SUCCESS' AND IS_SYS_ADMIN = '0' and IS_WEB_ADMIN = '0' AND IS_TEACHER='0' having ( select COUNT(1) TIMES from USERS USERS,
«Μεταπτυχιακή Διατριβή» ΝΙΚΟΛΑΟΣ ΜΗΝΑΪΔΗΣ
Intelligent University and E-Learning Function Management System Σελίδα 91
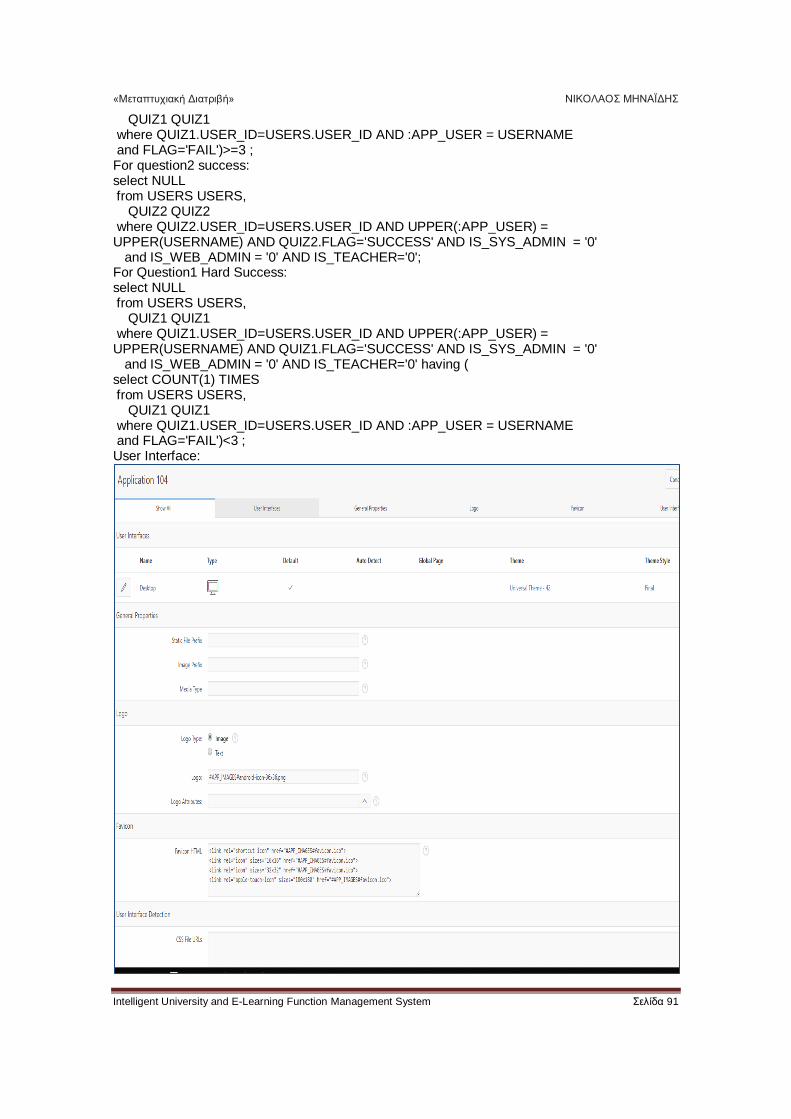
QUIZ1 QUIZ1 where QUIZ1.USER_ID=USERS.USER_ID AND :APP_USER = USERNAME and FLAG='FAIL')>=3 ; For question2 success: select NULL from USERS USERS, QUIZ2 QUIZ2 where QUIZ2.USER_ID=USERS.USER_ID AND UPPER(:APP_USER) = UPPER(USERNAME) AND QUIZ2.FLAG='SUCCESS' AND IS_SYS_ADMIN = '0' and IS_WEB_ADMIN = '0' AND IS_TEACHER='0'; For Question1 Hard Success: select NULL from USERS USERS, QUIZ1 QUIZ1 where QUIZ1.USER_ID=USERS.USER_ID AND UPPER(:APP_USER) = UPPER(USERNAME) AND QUIZ1.FLAG='SUCCESS' AND IS_SYS_ADMIN = '0' and IS_WEB_ADMIN = '0' AND IS_TEACHER='0' having ( select COUNT(1) TIMES from USERS USERS, QUIZ1 QUIZ1 where QUIZ1.USER_ID=USERS.USER_ID AND :APP_USER = USERNAME and FLAG='FAIL')<3 ; User Interface:
«Μεταπτυχιακή Διατριβή» ΝΙΚΟΛΑΟΣ ΜΗΝΑΪΔΗΣ
Intelligent University and E-Learning Function Management System Σελίδα 92
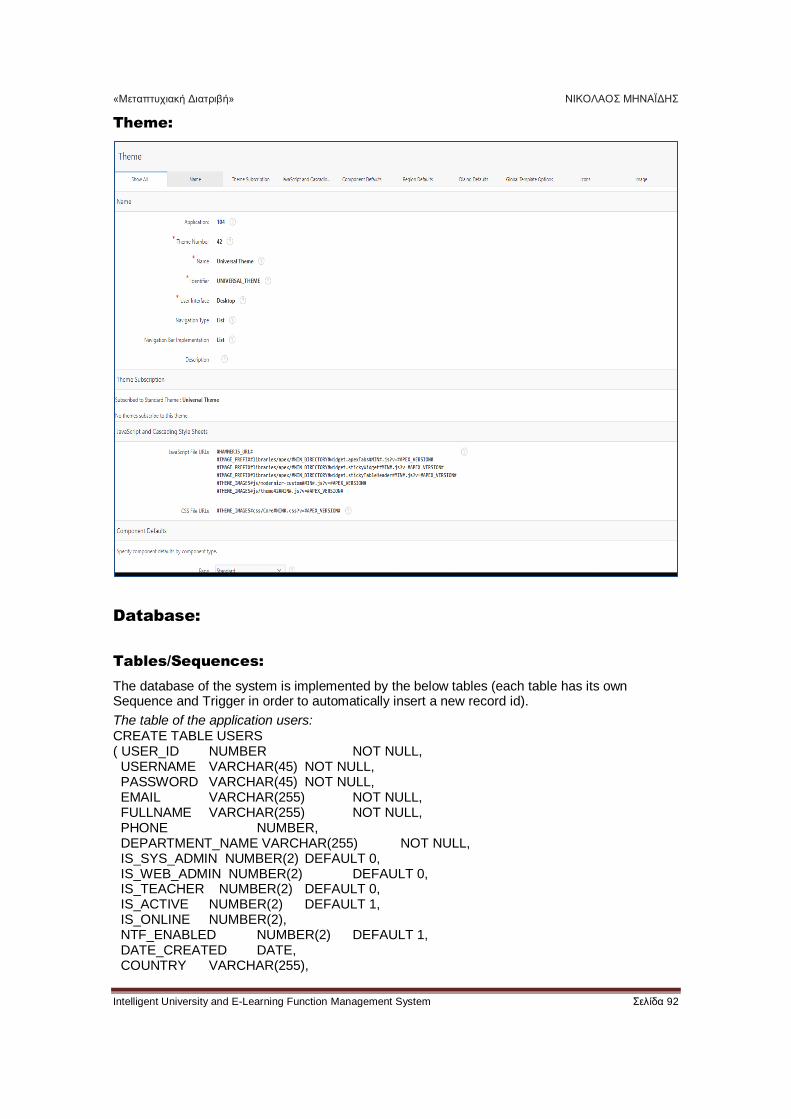
Theme:
Database:
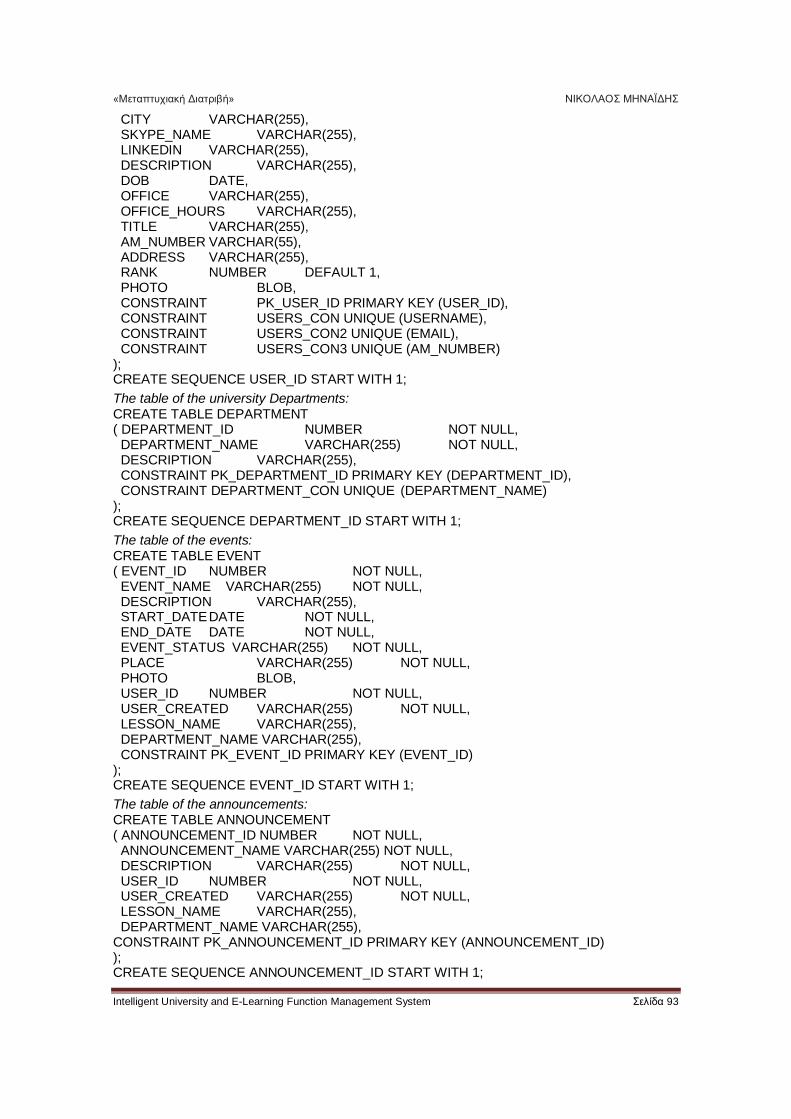
Tables/Sequences:
The database of the system is implemented by the below tables (each table has its own Sequence and Trigger in order to automatically insert a new record id).
The table of the application users: CREATE TABLE USERS ( USER_ID NUMBER NOT NULL, USERNAME VARCHAR(45) NOT NULL, PASSWORD VARCHAR(45) NOT NULL, EMAIL VARCHAR(255) NOT NULL, FULLNAME VARCHAR(255) NOT NULL, PHONE NUMBER, DEPARTMENT_NAME VARCHAR(255) NOT NULL, IS_SYS_ADMIN NUMBER(2) DEFAULT 0, IS_WEB_ADMIN NUMBER(2) DEFAULT 0, IS_TEACHER NUMBER(2) DEFAULT 0, IS_ACTIVE NUMBER(2) DEFAULT 1, IS_ONLINE NUMBER(2), NTF_ENABLED NUMBER(2) DEFAULT 1, DATE_CREATED DATE, COUNTRY VARCHAR(255),
«Μεταπτυχιακή Διατριβή» ΝΙΚΟΛΑΟΣ ΜΗΝΑΪΔΗΣ
Intelligent University and E-Learning Function Management System Σελίδα 93
CITY VARCHAR(255), SKYPE_NAME VARCHAR(255), LINKEDIN VARCHAR(255), DESCRIPTION VARCHAR(255), DOB DATE, OFFICE VARCHAR(255), OFFICE_HOURS VARCHAR(255), TITLE VARCHAR(255), AM_NUMBER VARCHAR(55), ADDRESS VARCHAR(255), RANK NUMBER DEFAULT 1, PHOTO BLOB, CONSTRAINT PK_USER_ID PRIMARY KEY (USER_ID), CONSTRAINT USERS_CON UNIQUE (USERNAME), CONSTRAINT USERS_CON2 UNIQUE (EMAIL), CONSTRAINT USERS_CON3 UNIQUE (AM_NUMBER) ); CREATE SEQUENCE USER_ID START WITH 1;
The table of the university Departments: CREATE TABLE DEPARTMENT ( DEPARTMENT_ID NUMBER NOT NULL, DEPARTMENT_NAME VARCHAR(255) NOT NULL, DESCRIPTION VARCHAR(255), CONSTRAINT PK_DEPARTMENT_ID PRIMARY KEY (DEPARTMENT_ID), CONSTRAINT DEPARTMENT_CON UNIQUE (DEPARTMENT_NAME) ); CREATE SEQUENCE DEPARTMENT_ID START WITH 1;
The table of the events: CREATE TABLE EVENT ( EVENT_ID NUMBER NOT NULL, EVENT_NAME VARCHAR(255) NOT NULL, DESCRIPTION VARCHAR(255), START_DATE DATE NOT NULL, END_DATE DATE NOT NULL, EVENT_STATUS VARCHAR(255) NOT NULL, PLACE VARCHAR(255) NOT NULL, PHOTO BLOB, USER_ID NUMBER NOT NULL, USER_CREATED VARCHAR(255) NOT NULL, LESSON_NAME VARCHAR(255), DEPARTMENT_NAME VARCHAR(255), CONSTRAINT PK_EVENT_ID PRIMARY KEY (EVENT_ID) ); CREATE SEQUENCE EVENT_ID START WITH 1;
The table of the announcements: CREATE TABLE ANNOUNCEMENT ( ANNOUNCEMENT_ID NUMBER NOT NULL, ANNOUNCEMENT_NAME VARCHAR(255) NOT NULL, DESCRIPTION VARCHAR(255) NOT NULL, USER_ID NUMBER NOT NULL, USER_CREATED VARCHAR(255) NOT NULL, LESSON_NAME VARCHAR(255), DEPARTMENT_NAME VARCHAR(255), CONSTRAINT PK_ANNOUNCEMENT_ID PRIMARY KEY (ANNOUNCEMENT_ID) ); CREATE SEQUENCE ANNOUNCEMENT_ID START WITH 1;
«Μεταπτυχιακή Διατριβή» ΝΙΚΟΛΑΟΣ ΜΗΝΑΪΔΗΣ
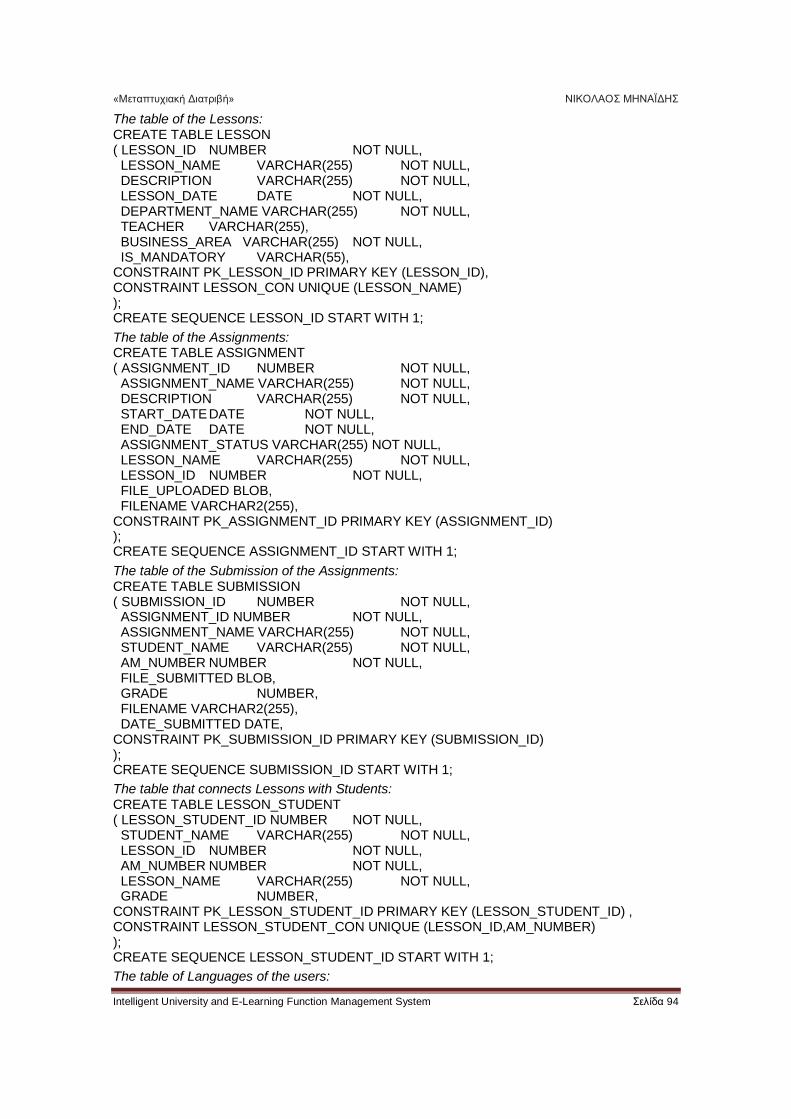
Intelligent University and E-Learning Function Management System Σελίδα 94
The table of the Lessons: CREATE TABLE LESSON ( LESSON_ID NUMBER NOT NULL, LESSON_NAME VARCHAR(255) NOT NULL, DESCRIPTION VARCHAR(255) NOT NULL, LESSON_DATE DATE NOT NULL, DEPARTMENT_NAME VARCHAR(255) NOT NULL, TEACHER VARCHAR(255), BUSINESS_AREA VARCHAR(255) NOT NULL, IS_MANDATORY VARCHAR(55), CONSTRAINT PK_LESSON_ID PRIMARY KEY (LESSON_ID), CONSTRAINT LESSON_CON UNIQUE (LESSON_NAME) ); CREATE SEQUENCE LESSON_ID START WITH 1;
The table of the Assignments: CREATE TABLE ASSIGNMENT ( ASSIGNMENT_ID NUMBER NOT NULL, ASSIGNMENT_NAME VARCHAR(255) NOT NULL, DESCRIPTION VARCHAR(255) NOT NULL, START_DATE DATE NOT NULL, END_DATE DATE NOT NULL, ASSIGNMENT_STATUS VARCHAR(255) NOT NULL, LESSON_NAME VARCHAR(255) NOT NULL, LESSON_ID NUMBER NOT NULL, FILE_UPLOADED BLOB, FILENAME VARCHAR2(255), CONSTRAINT PK_ASSIGNMENT_ID PRIMARY KEY (ASSIGNMENT_ID) ); CREATE SEQUENCE ASSIGNMENT_ID START WITH 1;
The table of the Submission of the Assignments: CREATE TABLE SUBMISSION ( SUBMISSION_ID NUMBER NOT NULL, ASSIGNMENT_ID NUMBER NOT NULL, ASSIGNMENT_NAME VARCHAR(255) NOT NULL, STUDENT_NAME VARCHAR(255) NOT NULL, AM_NUMBER NUMBER NOT NULL, FILE_SUBMITTED BLOB, GRADE NUMBER, FILENAME VARCHAR2(255), DATE_SUBMITTED DATE, CONSTRAINT PK_SUBMISSION_ID PRIMARY KEY (SUBMISSION_ID) ); CREATE SEQUENCE SUBMISSION_ID START WITH 1;
The table that connects Lessons with Students: CREATE TABLE LESSON_STUDENT ( LESSON_STUDENT_ID NUMBER NOT NULL, STUDENT_NAME VARCHAR(255) NOT NULL, LESSON_ID NUMBER NOT NULL, AM_NUMBER NUMBER NOT NULL, LESSON_NAME VARCHAR(255) NOT NULL, GRADE NUMBER, CONSTRAINT PK_LESSON_STUDENT_ID PRIMARY KEY (LESSON_STUDENT_ID) , CONSTRAINT LESSON_STUDENT_CON UNIQUE (LESSON_ID,AM_NUMBER) ); CREATE SEQUENCE LESSON_STUDENT_ID START WITH 1;
The table of Languages of the users:
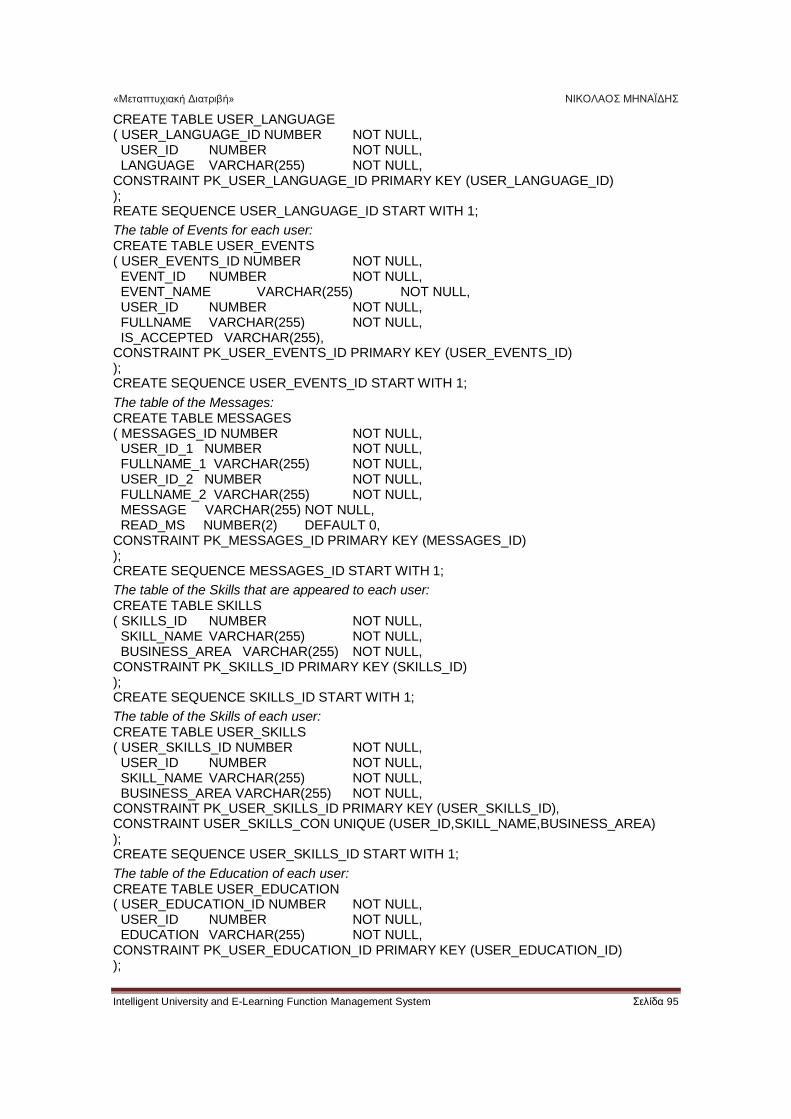
«Μεταπτυχιακή Διατριβή» ΝΙΚΟΛΑΟΣ ΜΗΝΑΪΔΗΣ
Intelligent University and E-Learning Function Management System Σελίδα 95
CREATE TABLE USER_LANGUAGE ( USER_LANGUAGE_ID NUMBER NOT NULL, USER_ID NUMBER NOT NULL, LANGUAGE VARCHAR(255) NOT NULL, CONSTRAINT PK_USER_LANGUAGE_ID PRIMARY KEY (USER_LANGUAGE_ID) ); REATE SEQUENCE USER_LANGUAGE_ID START WITH 1;
The table of Events for each user: CREATE TABLE USER_EVENTS ( USER_EVENTS_ID NUMBER NOT NULL, EVENT_ID NUMBER NOT NULL, EVENT_NAME VARCHAR(255) NOT NULL, USER_ID NUMBER NOT NULL, FULLNAME VARCHAR(255) NOT NULL, IS_ACCEPTED VARCHAR(255), CONSTRAINT PK_USER_EVENTS_ID PRIMARY KEY (USER_EVENTS_ID) ); CREATE SEQUENCE USER_EVENTS_ID START WITH 1;
The table of the Messages: CREATE TABLE MESSAGES ( MESSAGES_ID NUMBER NOT NULL, USER_ID_1 NUMBER NOT NULL, FULLNAME_1 VARCHAR(255) NOT NULL, USER_ID_2 NUMBER NOT NULL, FULLNAME_2 VARCHAR(255) NOT NULL, MESSAGE VARCHAR(255) NOT NULL, READ_MS NUMBER(2) DEFAULT 0, CONSTRAINT PK_MESSAGES_ID PRIMARY KEY (MESSAGES_ID) ); CREATE SEQUENCE MESSAGES_ID START WITH 1;
The table of the Skills that are appeared to each user: CREATE TABLE SKILLS ( SKILLS_ID NUMBER NOT NULL, SKILL_NAME VARCHAR(255) NOT NULL, BUSINESS_AREA VARCHAR(255) NOT NULL, CONSTRAINT PK_SKILLS_ID PRIMARY KEY (SKILLS_ID) ); CREATE SEQUENCE SKILLS_ID START WITH 1;
The table of the Skills of each user: CREATE TABLE USER_SKILLS ( USER_SKILLS_ID NUMBER NOT NULL, USER_ID NUMBER NOT NULL, SKILL_NAME VARCHAR(255) NOT NULL, BUSINESS_AREA VARCHAR(255) NOT NULL, CONSTRAINT PK_USER_SKILLS_ID PRIMARY KEY (USER_SKILLS_ID), CONSTRAINT USER_SKILLS_CON UNIQUE (USER_ID,SKILL_NAME,BUSINESS_AREA) ); CREATE SEQUENCE USER_SKILLS_ID START WITH 1;
The table of the Education of each user: CREATE TABLE USER_EDUCATION ( USER_EDUCATION_ID NUMBER NOT NULL, USER_ID NUMBER NOT NULL, EDUCATION VARCHAR(255) NOT NULL, CONSTRAINT PK_USER_EDUCATION_ID PRIMARY KEY (USER_EDUCATION_ID) );
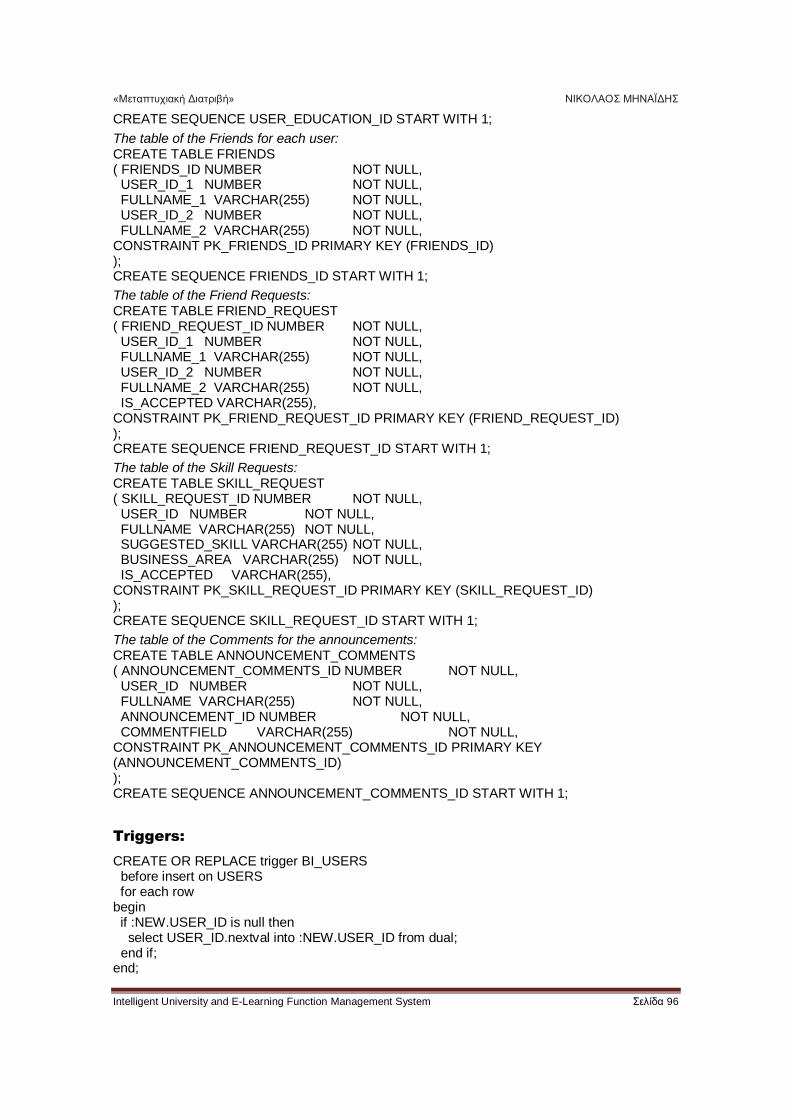
«Μεταπτυχιακή Διατριβή» ΝΙΚΟΛΑΟΣ ΜΗΝΑΪΔΗΣ
Intelligent University and E-Learning Function Management System Σελίδα 96
CREATE SEQUENCE USER_EDUCATION_ID START WITH 1;
The table of the Friends for each user: CREATE TABLE FRIENDS ( FRIENDS_ID NUMBER NOT NULL, USER_ID_1 NUMBER NOT NULL, FULLNAME_1 VARCHAR(255) NOT NULL, USER_ID_2 NUMBER NOT NULL, FULLNAME_2 VARCHAR(255) NOT NULL, CONSTRAINT PK_FRIENDS_ID PRIMARY KEY (FRIENDS_ID) ); CREATE SEQUENCE FRIENDS_ID START WITH 1;
The table of the Friend Requests: CREATE TABLE FRIEND_REQUEST ( FRIEND_REQUEST_ID NUMBER NOT NULL, USER_ID_1 NUMBER NOT NULL, FULLNAME_1 VARCHAR(255) NOT NULL, USER_ID_2 NUMBER NOT NULL, FULLNAME_2 VARCHAR(255) NOT NULL, IS_ACCEPTED VARCHAR(255), CONSTRAINT PK_FRIEND_REQUEST_ID PRIMARY KEY (FRIEND_REQUEST_ID) ); CREATE SEQUENCE FRIEND_REQUEST_ID START WITH 1;
The table of the Skill Requests: CREATE TABLE SKILL_REQUEST ( SKILL_REQUEST_ID NUMBER NOT NULL, USER_ID NUMBER NOT NULL, FULLNAME VARCHAR(255) NOT NULL, SUGGESTED_SKILL VARCHAR(255) NOT NULL, BUSINESS_AREA VARCHAR(255) NOT NULL, IS_ACCEPTED VARCHAR(255), CONSTRAINT PK_SKILL_REQUEST_ID PRIMARY KEY (SKILL_REQUEST_ID) ); CREATE SEQUENCE SKILL_REQUEST_ID START WITH 1;
The table of the Comments for the announcements: CREATE TABLE ANNOUNCEMENT_COMMENTS ( ANNOUNCEMENT_COMMENTS_ID NUMBER NOT NULL, USER_ID NUMBER NOT NULL, FULLNAME VARCHAR(255) NOT NULL, ANNOUNCEMENT_ID NUMBER NOT NULL, COMMENTFIELD VARCHAR(255) NOT NULL, CONSTRAINT PK_ANNOUNCEMENT_COMMENTS_ID PRIMARY KEY (ANNOUNCEMENT_COMMENTS_ID) ); CREATE SEQUENCE ANNOUNCEMENT_COMMENTS_ID START WITH 1;
Triggers:
CREATE OR REPLACE trigger BI_USERS before insert on USERS for each row begin if :NEW.USER_ID is null then select USER_ID.nextval into :NEW.USER_ID from dual; end if; end;

«Μεταπτυχιακή Διατριβή» ΝΙΚΟΛΑΟΣ ΜΗΝΑΪΔΗΣ
Intelligent University and E-Learning Function Management System Σελίδα 97
/ CREATE OR REPLACE trigger BI_DEPARTMENT before insert on DEPARTMENT for each row begin if :NEW.DEPARTMENT_ID is null then select DEPARTMENT_ID.nextval into :NEW.DEPARTMENT_ID from dual; end if; end; / CREATE OR REPLACE trigger BI_EVENT before insert on EVENT for each row begin if :NEW.EVENT_ID is null then select EVENT_ID.nextval into :NEW.EVENT_ID from dual; end if; end; / CREATE OR REPLACE trigger BI_ANNOUNCEMENT before insert on ANNOUNCEMENT for each row begin if :NEW.ANNOUNCEMENT_ID is null then select ANNOUNCEMENT_ID.nextval into :NEW.ANNOUNCEMENT_ID from dual; end if; end; / CREATE OR REPLACE trigger BI_LESSON before insert on LESSON for each row begin if :NEW.LESSON_ID is null then select LESSON_ID.nextval into :NEW.LESSON_ID from dual; end if; end; / CREATE OR REPLACE trigger BI_ASSIGNMENT before insert on ASSIGNMENT for each row begin if :NEW.ASSIGNMENT_ID is null then select ASSIGNMENT_ID.nextval into :NEW.ASSIGNMENT_ID from dual; end if; end; / CREATE OR REPLACE trigger BI_SUBMISSION before insert on SUBMISSION for each row begin if :NEW.SUBMISSION_ID is null then select SUBMISSION_ID.nextval into :NEW.SUBMISSION_ID from dual; end if; end; / CREATE OR REPLACE trigger BI_LESSON_STUDENT before insert on LESSON_STUDENT
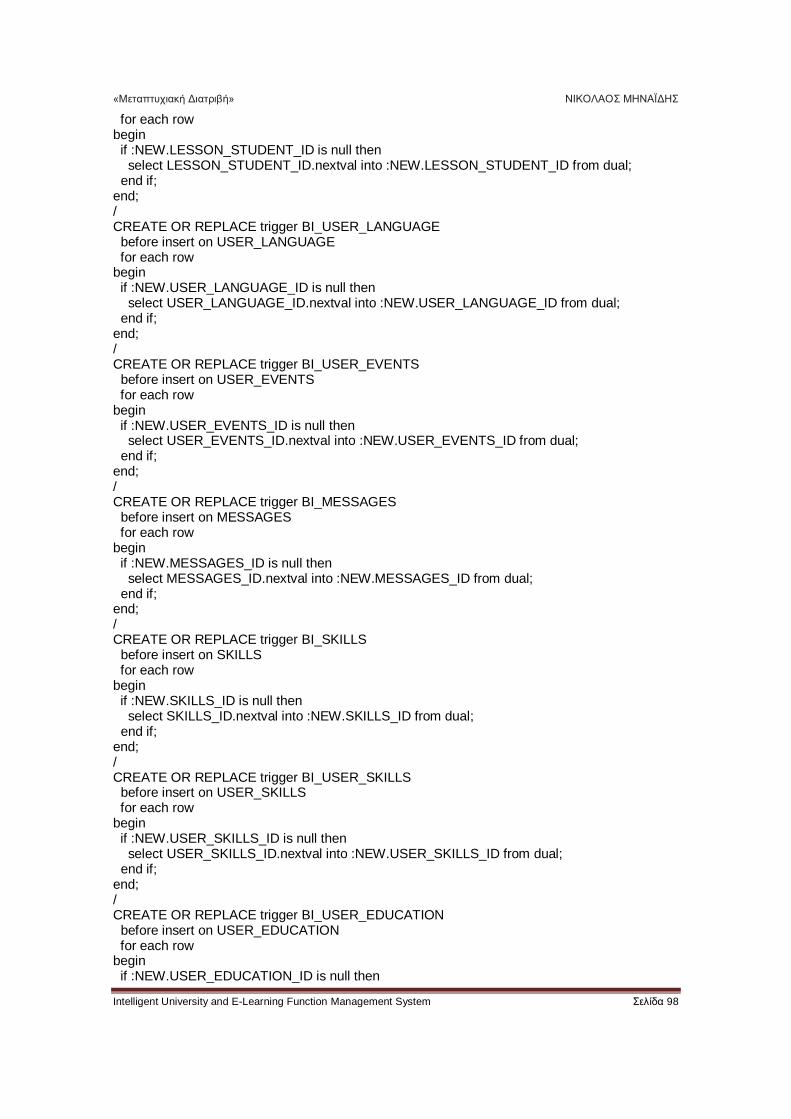
«Μεταπτυχιακή Διατριβή» ΝΙΚΟΛΑΟΣ ΜΗΝΑΪΔΗΣ
Intelligent University and E-Learning Function Management System Σελίδα 98
for each row begin if :NEW.LESSON_STUDENT_ID is null then select LESSON_STUDENT_ID.nextval into :NEW.LESSON_STUDENT_ID from dual; end if; end; / CREATE OR REPLACE trigger BI_USER_LANGUAGE before insert on USER_LANGUAGE for each row begin if :NEW.USER_LANGUAGE_ID is null then select USER_LANGUAGE_ID.nextval into :NEW.USER_LANGUAGE_ID from dual; end if; end; / CREATE OR REPLACE trigger BI_USER_EVENTS before insert on USER_EVENTS for each row begin if :NEW.USER_EVENTS_ID is null then select USER_EVENTS_ID.nextval into :NEW.USER_EVENTS_ID from dual; end if; end; / CREATE OR REPLACE trigger BI_MESSAGES before insert on MESSAGES for each row begin if :NEW.MESSAGES_ID is null then select MESSAGES_ID.nextval into :NEW.MESSAGES_ID from dual; end if; end; / CREATE OR REPLACE trigger BI_SKILLS before insert on SKILLS for each row begin if :NEW.SKILLS_ID is null then select SKILLS_ID.nextval into :NEW.SKILLS_ID from dual; end if; end; / CREATE OR REPLACE trigger BI_USER_SKILLS before insert on USER_SKILLS for each row begin if :NEW.USER_SKILLS_ID is null then select USER_SKILLS_ID.nextval into :NEW.USER_SKILLS_ID from dual; end if; end; / CREATE OR REPLACE trigger BI_USER_EDUCATION before insert on USER_EDUCATION for each row begin if :NEW.USER_EDUCATION_ID is null then
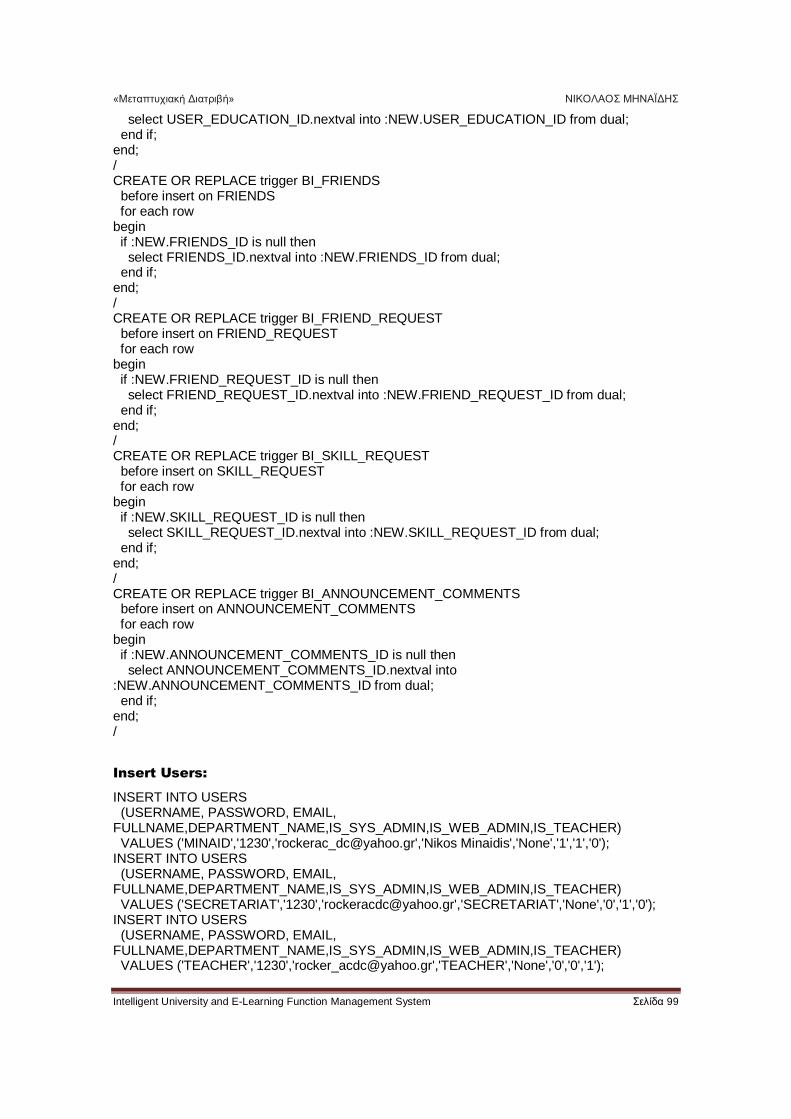
«Μεταπτυχιακή Διατριβή» ΝΙΚΟΛΑΟΣ ΜΗΝΑΪΔΗΣ
Intelligent University and E-Learning Function Management System Σελίδα 99
select USER_EDUCATION_ID.nextval into :NEW.USER_EDUCATION_ID from dual; end if; end; / CREATE OR REPLACE trigger BI_FRIENDS before insert on FRIENDS for each row begin if :NEW.FRIENDS_ID is null then select FRIENDS_ID.nextval into :NEW.FRIENDS_ID from dual; end if; end; / CREATE OR REPLACE trigger BI_FRIEND_REQUEST before insert on FRIEND_REQUEST for each row begin if :NEW.FRIEND_REQUEST_ID is null then select FRIEND_REQUEST_ID.nextval into :NEW.FRIEND_REQUEST_ID from dual; end if; end; / CREATE OR REPLACE trigger BI_SKILL_REQUEST before insert on SKILL_REQUEST for each row begin if :NEW.SKILL_REQUEST_ID is null then select SKILL_REQUEST_ID.nextval into :NEW.SKILL_REQUEST_ID from dual; end if; end; / CREATE OR REPLACE trigger BI_ANNOUNCEMENT_COMMENTS before insert on ANNOUNCEMENT_COMMENTS for each row begin if :NEW.ANNOUNCEMENT_COMMENTS_ID is null then select ANNOUNCEMENT_COMMENTS_ID.nextval into :NEW.ANNOUNCEMENT_COMMENTS_ID from dual; end if; end; /
Insert Users:
INSERT INTO USERS (USERNAME, PASSWORD, EMAIL, FULLNAME,DEPARTMENT_NAME,IS_SYS_ADMIN,IS_WEB_ADMIN,IS_TEACHER) VALUES ('MINAID','1230','[email protected]','Nikos Minaidis','None','1','1','0'); INSERT INTO USERS (USERNAME, PASSWORD, EMAIL, FULLNAME,DEPARTMENT_NAME,IS_SYS_ADMIN,IS_WEB_ADMIN,IS_TEACHER) VALUES ('SECRETARIAT','1230','[email protected]','SECRETARIAT','None','0','1','0'); INSERT INTO USERS (USERNAME, PASSWORD, EMAIL, FULLNAME,DEPARTMENT_NAME,IS_SYS_ADMIN,IS_WEB_ADMIN,IS_TEACHER) VALUES ('TEACHER','1230','[email protected]','TEACHER','None','0','0','1');
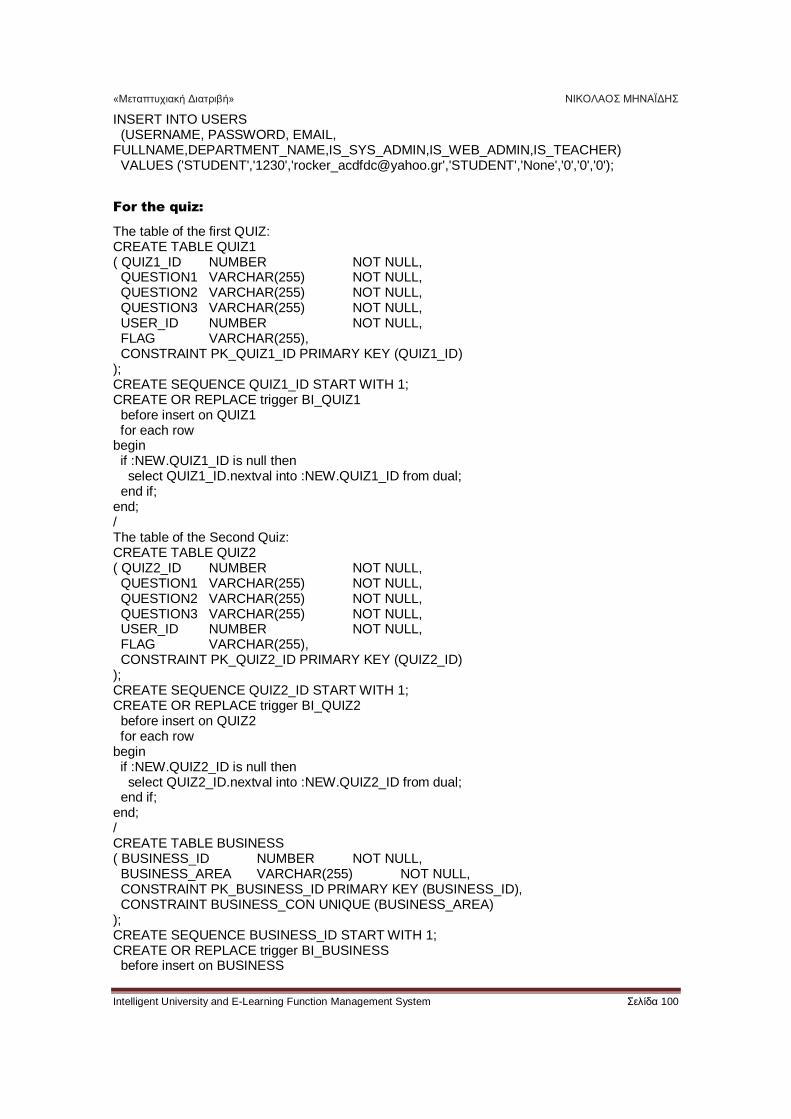
«Μεταπτυχιακή Διατριβή» ΝΙΚΟΛΑΟΣ ΜΗΝΑΪΔΗΣ
Intelligent University and E-Learning Function Management System Σελίδα 100
INSERT INTO USERS (USERNAME, PASSWORD, EMAIL, FULLNAME,DEPARTMENT_NAME,IS_SYS_ADMIN,IS_WEB_ADMIN,IS_TEACHER) VALUES ('STUDENT','1230','[email protected]','STUDENT','None','0','0','0');
For the quiz:
The table of the first QUIZ: CREATE TABLE QUIZ1 ( QUIZ1_ID NUMBER NOT NULL, QUESTION1 VARCHAR(255) NOT NULL, QUESTION2 VARCHAR(255) NOT NULL, QUESTION3 VARCHAR(255) NOT NULL, USER_ID NUMBER NOT NULL, FLAG VARCHAR(255), CONSTRAINT PK_QUIZ1_ID PRIMARY KEY (QUIZ1_ID) ); CREATE SEQUENCE QUIZ1_ID START WITH 1; CREATE OR REPLACE trigger BI_QUIZ1 before insert on QUIZ1 for each row begin if :NEW.QUIZ1_ID is null then select QUIZ1_ID.nextval into :NEW.QUIZ1_ID from dual; end if; end; / The table of the Second Quiz: CREATE TABLE QUIZ2 ( QUIZ2_ID NUMBER NOT NULL, QUESTION1 VARCHAR(255) NOT NULL, QUESTION2 VARCHAR(255) NOT NULL, QUESTION3 VARCHAR(255) NOT NULL, USER_ID NUMBER NOT NULL, FLAG VARCHAR(255), CONSTRAINT PK_QUIZ2_ID PRIMARY KEY (QUIZ2_ID) ); CREATE SEQUENCE QUIZ2_ID START WITH 1; CREATE OR REPLACE trigger BI_QUIZ2 before insert on QUIZ2 for each row begin if :NEW.QUIZ2_ID is null then select QUIZ2_ID.nextval into :NEW.QUIZ2_ID from dual; end if; end; / CREATE TABLE BUSINESS ( BUSINESS_ID NUMBER NOT NULL, BUSINESS_AREA VARCHAR(255) NOT NULL, CONSTRAINT PK_BUSINESS_ID PRIMARY KEY (BUSINESS_ID), CONSTRAINT BUSINESS_CON UNIQUE (BUSINESS_AREA) ); CREATE SEQUENCE BUSINESS_ID START WITH 1; CREATE OR REPLACE trigger BI_BUSINESS before insert on BUSINESS
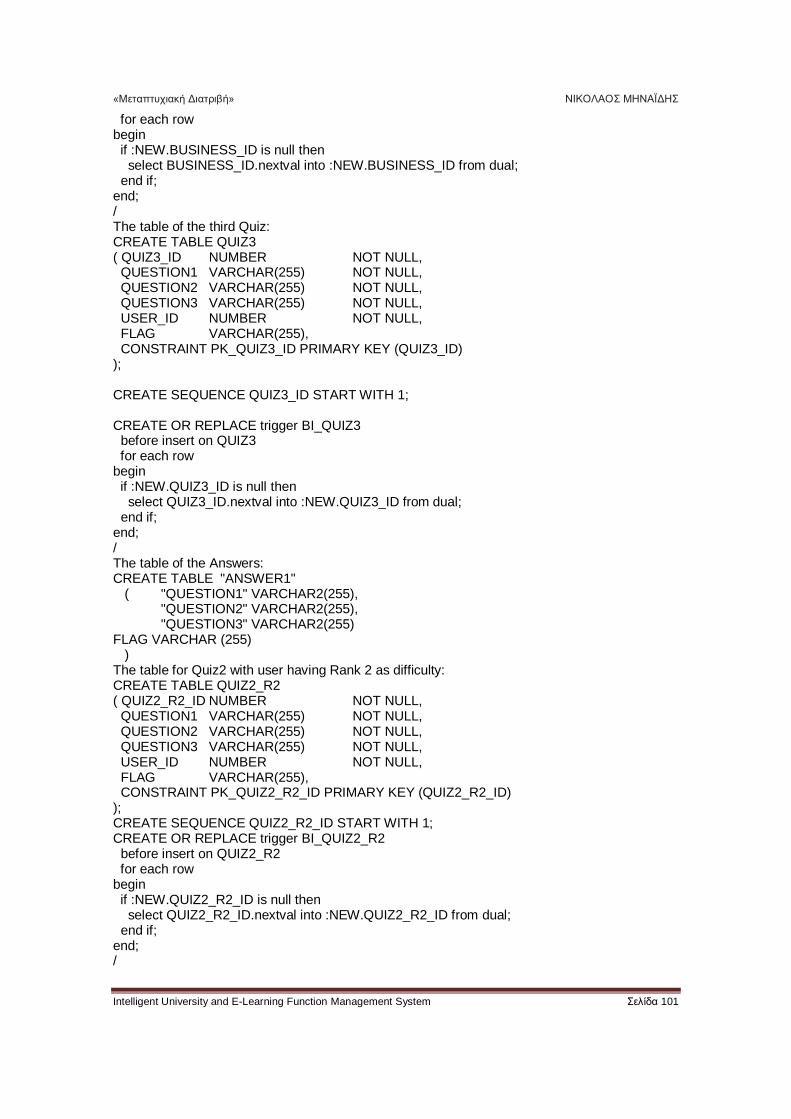
«Μεταπτυχιακή Διατριβή» ΝΙΚΟΛΑΟΣ ΜΗΝΑΪΔΗΣ
Intelligent University and E-Learning Function Management System Σελίδα 101
for each row begin if :NEW.BUSINESS_ID is null then select BUSINESS_ID.nextval into :NEW.BUSINESS_ID from dual; end if; end; / The table of the third Quiz: CREATE TABLE QUIZ3 ( QUIZ3_ID NUMBER NOT NULL, QUESTION1 VARCHAR(255) NOT NULL, QUESTION2 VARCHAR(255) NOT NULL, QUESTION3 VARCHAR(255) NOT NULL, USER_ID NUMBER NOT NULL, FLAG VARCHAR(255), CONSTRAINT PK_QUIZ3_ID PRIMARY KEY (QUIZ3_ID) ); CREATE SEQUENCE QUIZ3_ID START WITH 1; CREATE OR REPLACE trigger BI_QUIZ3 before insert on QUIZ3 for each row begin if :NEW.QUIZ3_ID is null then select QUIZ3_ID.nextval into :NEW.QUIZ3_ID from dual; end if; end; / The table of the Answers: CREATE TABLE "ANSWER1" ( "QUESTION1" VARCHAR2(255), "QUESTION2" VARCHAR2(255), "QUESTION3" VARCHAR2(255) FLAG VARCHAR (255) ) The table for Quiz2 with user having Rank 2 as difficulty: CREATE TABLE QUIZ2_R2 ( QUIZ2_R2_ID NUMBER NOT NULL, QUESTION1 VARCHAR(255) NOT NULL, QUESTION2 VARCHAR(255) NOT NULL, QUESTION3 VARCHAR(255) NOT NULL, USER_ID NUMBER NOT NULL, FLAG VARCHAR(255), CONSTRAINT PK_QUIZ2_R2_ID PRIMARY KEY (QUIZ2_R2_ID) ); CREATE SEQUENCE QUIZ2_R2_ID START WITH 1; CREATE OR REPLACE trigger BI_QUIZ2_R2 before insert on QUIZ2_R2 for each row begin if :NEW.QUIZ2_R2_ID is null then select QUIZ2_R2_ID.nextval into :NEW.QUIZ2_R2_ID from dual; end if; end; /
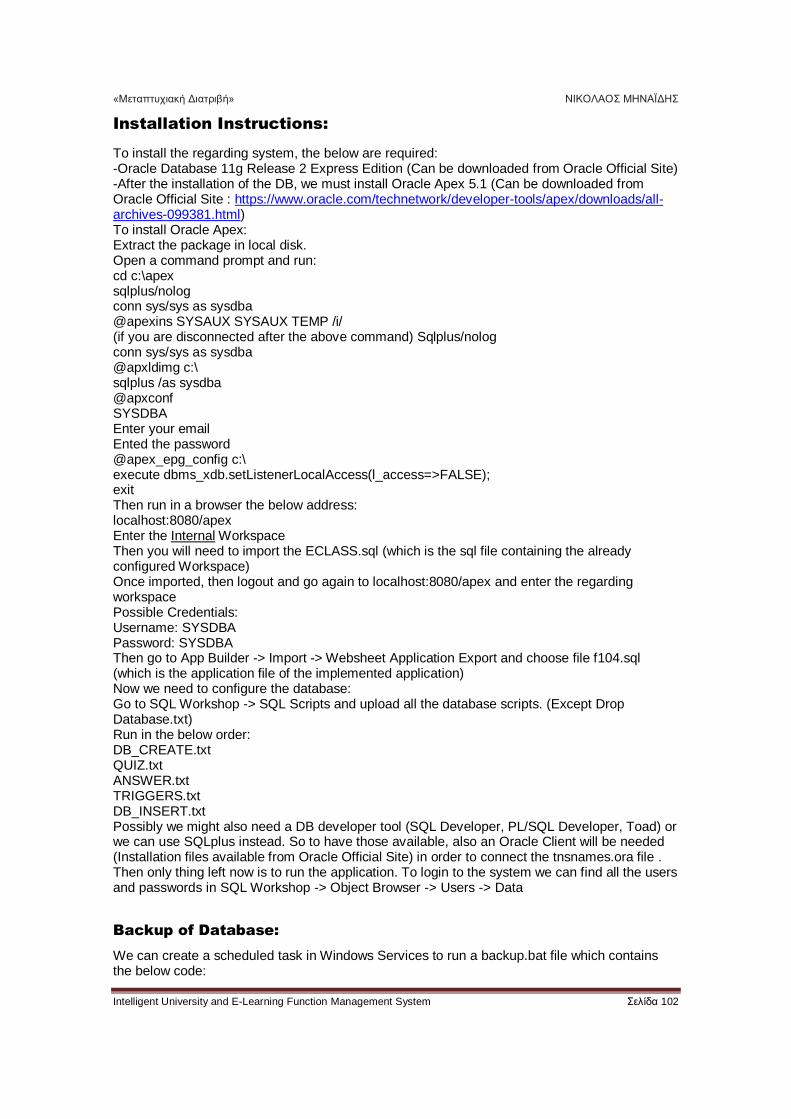
«Μεταπτυχιακή Διατριβή» ΝΙΚΟΛΑΟΣ ΜΗΝΑΪΔΗΣ
Intelligent University and E-Learning Function Management System Σελίδα 102
Installation Instructions:
To install the regarding system, the below are required: -Oracle Database 11g Release 2 Express Edition (Can be downloaded from Oracle Official Site) -After the installation of the DB, we must install Oracle Apex 5.1 (Can be downloaded from Oracle Official Site : https://www.oracle.com/technetwork/developer-tools/apex/downloads/all-archives-099381.html) To install Oracle Apex: Extract the package in local disk. Open a command prompt and run: cd c:\apex sqlplus/nolog conn sys/sys as sysdba @apexins SYSAUX SYSAUX TEMP /i/ (if you are disconnected after the above command) Sqlplus/nolog conn sys/sys as sysdba @apxldimg c:\ sqlplus /as sysdba @apxconf SYSDBA Enter your email Ented the password @apex_epg_config c:\ execute dbms_xdb.setListenerLocalAccess(l_access=>FALSE); exit Then run in a browser the below address: localhost:8080/apex Enter the Internal Workspace Then you will need to import the ECLASS.sql (which is the sql file containing the already configured Workspace) Once imported, then logout and go again to localhost:8080/apex and enter the regarding workspace Possible Credentials: Username: SYSDBA Password: SYSDBA Then go to App Builder -> Import -> Websheet Application Export and choose file f104.sql (which is the application file of the implemented application) Now we need to configure the database: Go to SQL Workshop -> SQL Scripts and upload all the database scripts. (Except Drop Database.txt) Run in the below order: DB_CREATE.txt QUIZ.txt ANSWER.txt TRIGGERS.txt DB_INSERT.txt Possibly we might also need a DB developer tool (SQL Developer, PL/SQL Developer, Toad) or we can use SQLplus instead. So to have those available, also an Oracle Client will be needed (Installation files available from Oracle Official Site) in order to connect the tnsnames.ora file . Then only thing left now is to run the application. To login to the system we can find all the users and passwords in SQL Workshop -> Object Browser -> Users -> Data
Backup of Database:
We can create a scheduled task in Windows Services to run a backup.bat file which contains the below code:
«Μεταπτυχιακή Διατριβή» ΝΙΚΟΛΑΟΣ ΜΗΝΑΪΔΗΣ
Intelligent University and E-Learning Function Management System Σελίδα 103
exp ECLASS/SYSDBA@XE file=C:\database_backup\daily_backup To backup the database schema.
Passwords used for the local Installation:
INTERNAL (workspace) SYSDBA Nmin1230@# ECLASS (WORKSPACE) ECLASS (SCHEMA) ECLASS (PASSWORD) ADMINISTRATOR: SYSDBA SYSDBA1
Conclusion
This system to can be used effectively to manage a big part of the functionalities of a University, since it covers all the related roles that take part in it. It is very easy to use and can be maintained with no expert experience required. It was implemented in Oracle 11gR2 Express Edition and Oracle Apex 5.1, but it can easily be upgraded to a newest version that also supports new modules and the newest JQuery version. The most recent versions that can be upgraded are Oracle 18c and Oracle Apex 19.1, so the application can evolve accordingly. A major advantage of the upgrade that will make a difference is the proper administration of the database, since the current one is an Express Edition and several DBA functionalities are not supported (e.g. RMAN) which is a limitation for future use.
It can also be easily parameterized and change to the owner’s will on a high level end (meaning User Interface changes like theme and new pages). As far as, the rest processes are concerned, the main requirement is for someone to know basic concepts of PL/SQL.
Based on the specific dissertation, which aimed to develop a specific University tool that combines features of the already existing ones with Intelligent E-class functionalities, it can be concluded that it can serve the purpose that it was based on and can be easily maintained and evolve. Also, it can be concluded that the combination of Oracle and Oracle Apex framework can favor the development of a system of that size in matters of development time and effort in comparison with other several development ways that exist currently.
«Μεταπτυχιακή Διατριβή» ΝΙΚΟΛΑΟΣ ΜΗΝΑΪΔΗΣ
Intelligent University and E-Learning Function Management System Σελίδα 104
Bibliography - Oracle Apex Documentation
Introduction to Oracle APEX
Oracle Application Express (Oracle APEX), is a code web application development tool for the Oracle Database. Application Express enables you to design, develop and deploy beautiful, responsive, database-driven applications, either on-premises or in the cloud. Using Application Express you can build a wide variety of applications from the most simplistic form and report on a table, to very complex multi-lingual applications that interfaces with numerous back end systems, such as the Oracle Store. Oracle APEX is a fully supported no-cost feature of Oracle Database. This means that if you have Oracle Database, you already have Oracle APEX. Oracle Application Express is a hosted declarative development environment for developing and deploying database-centric web applications. Thanks to built-in features such as user interface themes, navigational controls, form handlers, and flexible reports, Oracle Application Express accelerates the application development process. The Application Express engine renders applications in real time from data stored in database tables. When you create or extend an application, Oracle Application Express creates or modifies metadata stored in database tables. When the application is run, the Application Express engine then reads the metadata and displays the application. To provide stateful behavior within an application, Oracle Application Express transparently manages session state in the database. Application developers can get and set session state using simple substitutions and standard SQL bind variable syntax. Oracle Application Express installs with your Oracle database and consists of data in tables and PL/SQL code. Whether you run the Oracle Application Express development environment or run an application built using Oracle Application Express, the process is the same. Your browser sends a URL request that is translated into the appropriate Oracle Application Express PL/SQL call. After the database processes the PL/SQL, the results are relayed back to your browser as HTML. This cycle happens each time you either request or submit a page. Oracle Application Express does not use a dedicated database connection. Instead, each request is made through a new database session, consuming minimal CPU resources. Application session state is managed in the database tables by the Application Express engine. Behind the scenes, the Application Express engine renders and processes pages. The Application Express engine also performs these tasks:
Session state management
Authentication services
Authorization services
Page flow control
Validation processing When you install Oracle Application Express, you can install two different environments: Runtime environment. In a runtime environment users can run applications but cannot modify them. Select this option for production implementations.
Full development environment. In a full development environment, users can develop, modify, run, and delete Application Express applications. This option provides complete access to the Oracle Application Express environment described in this document. Basic Concepts of Oracle Apex: Workspace: When you sign in to Oracle Application Express, the Workspace home page appears. Use the Workspace home page to access key development components including App Builder, SQL Workshop, Team Development, and the App Gallery. Each Oracle Application Express development instance can contain multiple workspaces. A workspace is a virtual private database which enables multiple users to work within the same Oracle Application Express installation while keeping their objects, data and applications private. App Builder: Developers use App Builder to create and manage applications and application pages.
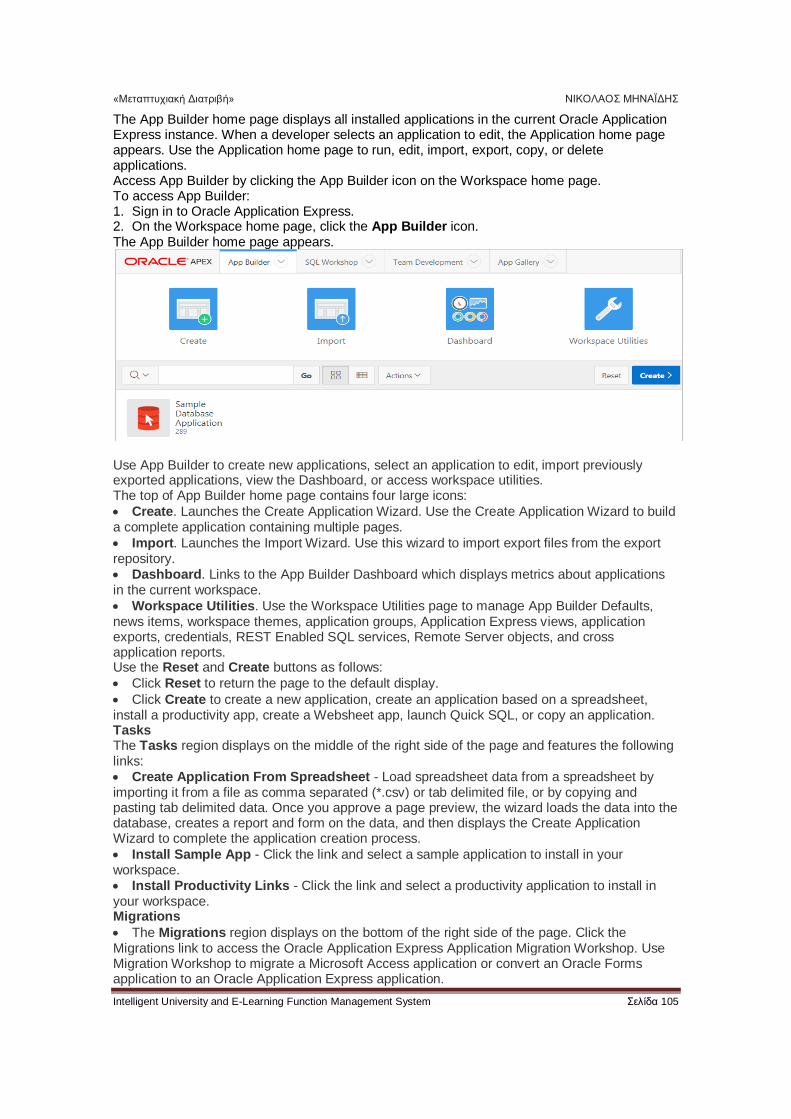
«Μεταπτυχιακή Διατριβή» ΝΙΚΟΛΑΟΣ ΜΗΝΑΪΔΗΣ
Intelligent University and E-Learning Function Management System Σελίδα 105
The App Builder home page displays all installed applications in the current Oracle Application Express instance. When a developer selects an application to edit, the Application home page appears. Use the Application home page to run, edit, import, export, copy, or delete applications. Access App Builder by clicking the App Builder icon on the Workspace home page. To access App Builder: 1. Sign in to Oracle Application Express. 2. On the Workspace home page, click the App Builder icon. The App Builder home page appears.
Use App Builder to create new applications, select an application to edit, import previously exported applications, view the Dashboard, or access workspace utilities. The top of App Builder home page contains four large icons:
Create. Launches the Create Application Wizard. Use the Create Application Wizard to build a complete application containing multiple pages.
Import. Launches the Import Wizard. Use this wizard to import export files from the export repository. Dashboard. Links to the App Builder Dashboard which displays metrics about applications in the current workspace.
Workspace Utilities. Use the Workspace Utilities page to manage App Builder Defaults, news items, workspace themes, application groups, Application Express views, application exports, credentials, REST Enabled SQL services, Remote Server objects, and cross application reports. Use the Reset and Create buttons as follows:
Click Reset to return the page to the default display.
Click Create to create a new application, create an application based on a spreadsheet, install a productivity app, create a Websheet app, launch Quick SQL, or copy an application. Tasks The Tasks region displays on the middle of the right side of the page and features the following links: Create Application From Spreadsheet - Load spreadsheet data from a spreadsheet by importing it from a file as comma separated (*.csv) or tab delimited file, or by copying and pasting tab delimited data. Once you approve a page preview, the wizard loads the data into the database, creates a report and form on the data, and then displays the Create Application Wizard to complete the application creation process.
Install Sample App - Click the link and select a sample application to install in your workspace. Install Productivity Links - Click the link and select a productivity application to install in your workspace. Migrations
The Migrations region displays on the bottom of the right side of the page. Click the Migrations link to access the Oracle Application Express Application Migration Workshop. Use Migration Workshop to migrate a Microsoft Access application or convert an Oracle Forms application to an Oracle Application Express application.
«Μεταπτυχιακή Διατριβή» ΝΙΚΟΛΑΟΣ ΜΗΝΑΪΔΗΣ
Intelligent University and E-Learning Function Management System Σελίδα 106
Application Home Page Icons
Run Application submits the home page in the current application to the Application Express engine to render viewable HTML.
Supporting Objects links to the Supporting Objects page. Use Supporting Objects to define database object installation scripts that are invoked when importing an application. You can also define deinstallation scripts to drop objects when deleting an application.
Shared Components links to the Shared Components page. Shared components can display or be applied on any page within the application.
Utilities links to the Utilities page. Use this page to monitor developer activity, view dashboards, run Advisor, and view numerous other reports. Export/Import links you to the Export/Import Wizard. Use this wizard to import and export an entire application and related files such as cascading style sheets, images, static files, script files, themes, user interface defaults, and workspace users. Clicking the Create Page button launches a wizard that walks you through creating a page in an application. What is an Oracle Application Express Application? An Oracle Application Express application is an HTML interface that exists on top of database objects such as tables or procedures. You create both database applications and Websheet applications using the Create Application Wizard. The main difference between these two types of applications is the intended audience. While database applications are primarily developed by application developers, Websheet applications are often created by end users with no development experience. What Is an Application Page? A page is the basic building block of an application. Every application consists of one or multiple pages. Each page can have buttons and fields (called items) which are grouped into containers called regions. Pages can include application logic (or processes). You can branch from one page to the next using conditional navigation; perform calculations (called computations); perform validations (such as edit checks); and display reports, calendars, and charts. You view and edit a page in Page Designer. What is the Difference Between a Database and Websheet Application? An Oracle Application Express application enables developers to manage and display data stored in an Oracle database. You build an application using App Builder. Using App Builder you can create two different types of applications: Database applications and Websheet applications. About Database Applications A database application is a collection of pages linked together using navigation menus, tabs, buttons, or hypertext links. Application pages share a common session state and authentication. To create a database application, an application developer runs wizards to declaratively assemble pages and navigation. Individual pages are organized using containers called regions. Regions can contain text, custom PL/SQL, reports, charts, maps, calendars, web service content, or forms. Forms are made up of fields (called items) which can be selected from the multitude of built-in types (such as text fields, text areas, radio groups, select lists, check boxes, date pickers, and popup list of values). Developers can also create their own custom item types using plug-ins. Session state (or application context) is transparently managed and the user interface presentation is separated from the application logic enabling developers to manage the look and feel of an application by simply selecting a different theme. About Websheet Applications Websheet applications enable end users to manage structured and unstructured data without developer assistance. Page sections contain unstructured data which can be edited using a WYSIWYG editor. Data Grids enable users to manage structured data without the need for writing SQL. Using runtime dialog boxes, users can add columns, rename columns, and validations. Each page and row of data grid data can be annotated with files, tags, notes, and links. Pages can contain sections, reports, and data grids and everything can be linked together using navigation. All information is searchable and completely controlled by the end-user.
«Μεταπτυχιακή Διατριβή» ΝΙΚΟΛΑΟΣ ΜΗΝΑΪΔΗΣ
Intelligent University and E-Learning Function Management System Σελίδα 107
About the Create Application Wizard When you run the Create Application Wizard, the wizard prompts you to choose the type of application you want to create. Options include:
New Application. Create a fully functional database application based on tables you select or by providing a valid SQL. You can add pages that include various components including calendars, cards, charts, dashboards, forms, interactive grids, master detail or editable grids, and reports. Add application-level features such as an Application About page, role-based user authentication, end user activity reports, configuration options to enable or disable specific functionality, a feedback mechanism to gather end users comment, and a Customize button to enable end users to choose their own theme style
From a Spreadsheet. Load spreadsheet data from a spreadsheet by importing it from a file as comma separated (*.csv) or tab delimited file, or by copying and pasting tab delimited data. Once you approve a page preview, the wizard loads the data into the database, creates a report and form on the data, and then displays the Create Application Wizard to complete the application creation process. App Gallery. Links to the App Gallery. The App Gallery include a set of business productivity and sample applications which can be installed with just a few clicks. Productivity apps are fully developed point-solutions designed to provide real functionality, such as project management, surveys, shared calendars, and tracking applications. Productivity applications can be installed, run and removed. By default they are 'locked' and are fully supported. Once unlocked, the application is no longer supported but it can be updated to meet specific requirements. Sample apps are not a complete applications but instead contains code snippets or sample code. Sample applications are available for installation in a workspace and are editable by default. Websheet. Websheet applications enable users to build data centric applications without any SQL programming knowledge. Websheet applications are simplified applications that support pages, data grids, and reports. By creating These applications are very easy to build and are designed to support community contributions.
Quick SQL. Generate the SQL required to create a relational data model from an indented text document. Quick SQL is designed to reduce the time and effort required to create SQL tables, triggers, and index structures. Copy Application. Create a copy of an existing application. About Creating a New Database Application Use the Create Application Wizard to design and quickly create Oracle Application Express applications. Creating a new database application with the Create Application Wizard is a multiple step process. Once you specify the application name and appearance, you add pages. Database applications can contain multiple pages that include various components such as calendars, cards, charts, dashboards, forms, interactive grids, master detail or editable grids, and reports. Once created, you can edit the page names, alter the page order, and delete them. Features provide application-level functionality and can only be added once per application. Available features include an Application About page, role-based user authentication, end user activity reports, configuration options to enable or disable specific functionality, a feedback mechanism to gather end users comment, and a Customize button to enable end users to choose their own theme style. Then, you configure Settings. Settings are used in the generation of the application and include the application ID, the database schema, Advanced Settings (such as the application definition, security, and globalization attributes), and application authentication. After you create an application using the Create Application Wizard, you can modify pages and add additional pages using the Create Page Wizard. Available Page Types Table 6-1 Create Application Wizard - Available Page Types
Page Type Description To Learn More
Blank Create a blank page as a placeholder. Once you create the application, you can create
See online Help when creating this page.

«Μεταπτυχιακή Διατριβή» ΝΙΚΟΛΑΟΣ ΜΗΝΑΪΔΗΣ
Intelligent University and E-Learning Function Management System Σελίδα 108
Page Type Description To Learn More
regions on the page in Page Designer.
Calendar Generates a calendar with monthly, weekly, and daily views.
See "Creating Calendars"
Cards Create a page which displays cards. See online Help when creating this page.
Chart Create a page which displays either an area, bar, line, or pie chart.
See "Creating Charts"
Dashboard Create a dashboard page with multiple charts. See online Help when creating this page.
Form Create a page containing a form which enables end users to maintain data. Select the table on which to build the form and specify whether or not to include a report.
See "Developing Forms"
Interactive Grid
Create a page which displays as an interactive grid (similar to a spreadsheet). Functionally, an interactive grid includes most customization capabilities available in interactive reports plus the ability to rearrange the report interactively using the mouse. You choose a table or view on which to build the interactive grid, or provide valid SQL statement which returns distinct columns. You also specify whether or not it is editable. In an editable interactive grid, users can also add to, modify, and refresh the data set directly on the page.
See "Managing Interactive Grids"
Master Detail Create a master detail form that enables users to query, insert, update, and delete values from two related tables or views. You choose the tables on which to build the master and detail regions. Master Detail options include:
Side by Side - Create a single page master detail utilizing side by side layout and report regions with modal edit windows. The left side contains a master list to navigate to the master record. The right side contains the selected master record and the associated detail report.
Stacked - Creates a single page master detail with editable interactive grids. Users select a row in the master grid to update the detail grids.
See "Managing Master Detail Forms"
Report Creates a page that contains the formatted result of a SQL query. You choose a table on which to build a report, or provide a custom SQL SELECT statement or a PL/SQL function returning a SQL SELECT statement. You then
See "Creating an Interactive or Classic Report Using the Create Application Wizard"
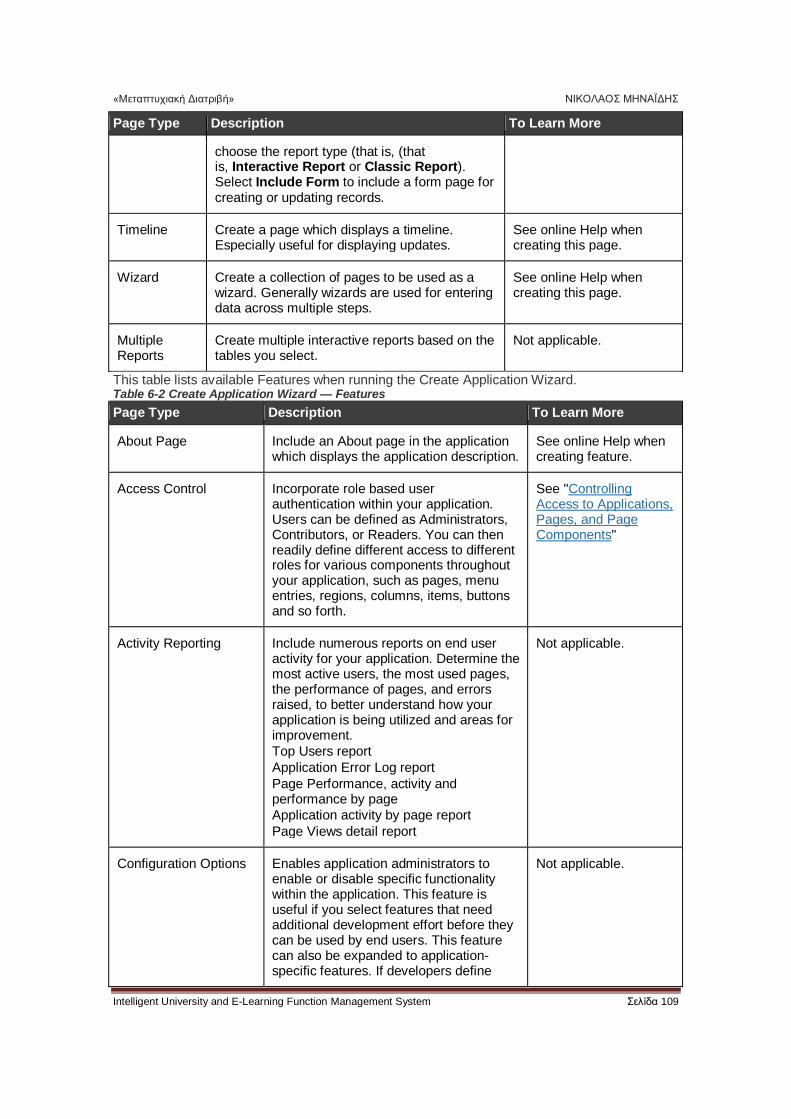
«Μεταπτυχιακή Διατριβή» ΝΙΚΟΛΑΟΣ ΜΗΝΑΪΔΗΣ
Intelligent University and E-Learning Function Management System Σελίδα 109
Page Type Description To Learn More
choose the report type (that is, (that is, Interactive Report or Classic Report). Select Include Form to include a form page for creating or updating records.
Timeline Create a page which displays a timeline. Especially useful for displaying updates.
See online Help when creating this page.
Wizard Create a collection of pages to be used as a wizard. Generally wizards are used for entering data across multiple steps.
See online Help when creating this page.
Multiple Reports
Create multiple interactive reports based on the tables you select.
Not applicable.
This table lists available Features when running the Create Application Wizard. Table 6-2 Create Application Wizard — Features
Page Type Description To Learn More
About Page Include an About page in the application which displays the application description.
See online Help when creating feature.
Access Control Incorporate role based user authentication within your application. Users can be defined as Administrators, Contributors, or Readers. You can then readily define different access to different roles for various components throughout your application, such as pages, menu entries, regions, columns, items, buttons and so forth.
See "Controlling Access to Applications, Pages, and Page Components"
Activity Reporting Include numerous reports on end user activity for your application. Determine the most active users, the most used pages, the performance of pages, and errors raised, to better understand how your application is being utilized and areas for improvement.
Top Users report
Application Error Log report
Page Performance, activity and performance by page
Application activity by page report
Page Views detail report
Not applicable.
Configuration Options Enables application administrators to enable or disable specific functionality within the application. This feature is useful if you select features that need additional development effort before they can be used by end users. This feature can also be expanded to application-specific features. If developers define
Not applicable.
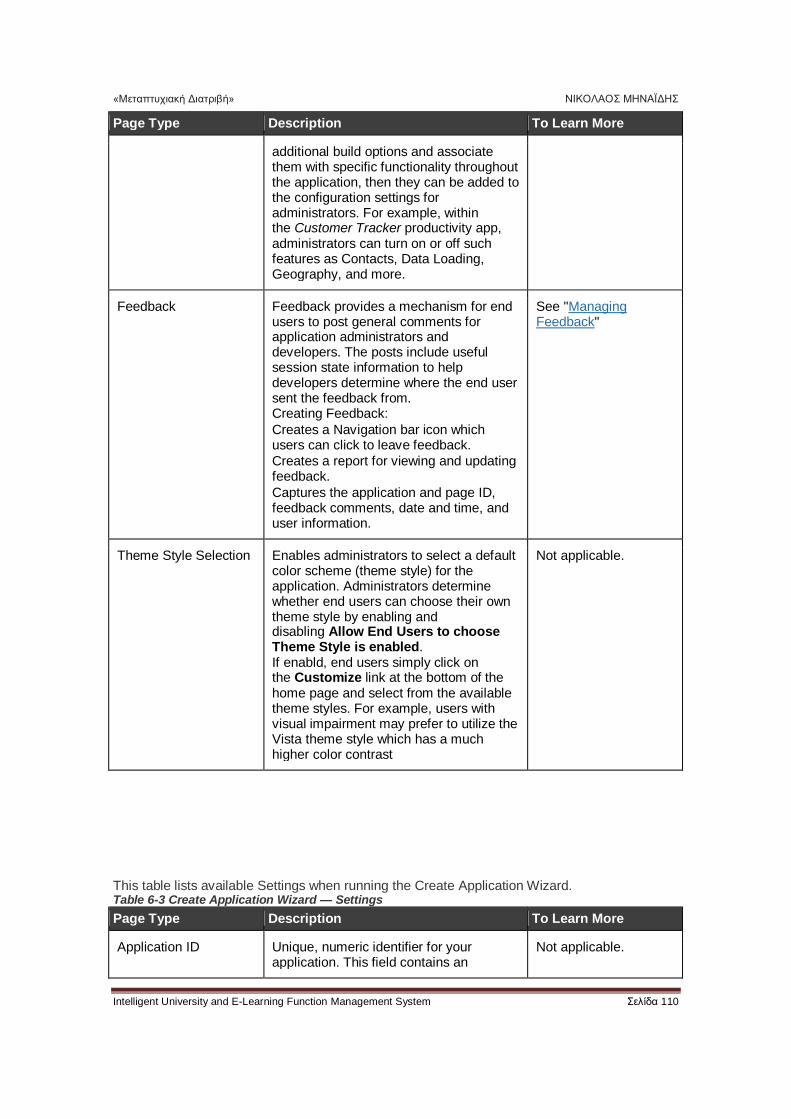
«Μεταπτυχιακή Διατριβή» ΝΙΚΟΛΑΟΣ ΜΗΝΑΪΔΗΣ
Intelligent University and E-Learning Function Management System Σελίδα 110
Page Type Description To Learn More
additional build options and associate them with specific functionality throughout the application, then they can be added to the configuration settings for administrators. For example, within the Customer Tracker productivity app, administrators can turn on or off such features as Contacts, Data Loading, Geography, and more.
Feedback Feedback provides a mechanism for end users to post general comments for application administrators and developers. The posts include useful session state information to help developers determine where the end user sent the feedback from. Creating Feedback:
Creates a Navigation bar icon which users can click to leave feedback.
Creates a report for viewing and updating feedback.
Captures the application and page ID, feedback comments, date and time, and user information.
See "Managing Feedback"
Theme Style Selection Enables administrators to select a default color scheme (theme style) for the application. Administrators determine whether end users can choose their own theme style by enabling and disabling Allow End Users to choose Theme Style is enabled. If enabld, end users simply click on the Customize link at the bottom of the home page and select from the available theme styles. For example, users with visual impairment may prefer to utilize the Vista theme style which has a much higher color contrast
Not applicable.
This table lists available Settings when running the Create Application Wizard. Table 6-3 Create Application Wizard — Settings
Page Type Description To Learn More
Application ID Unique, numeric identifier for your application. This field contains an
Not applicable.
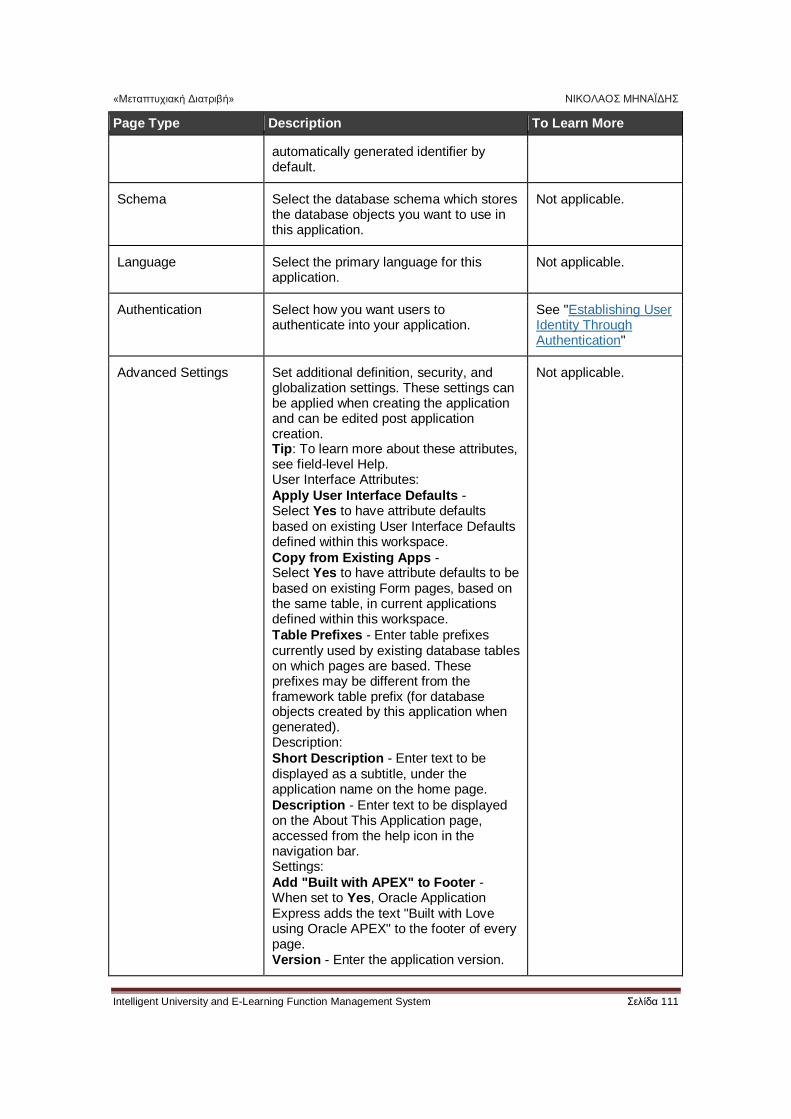
«Μεταπτυχιακή Διατριβή» ΝΙΚΟΛΑΟΣ ΜΗΝΑΪΔΗΣ
Intelligent University and E-Learning Function Management System Σελίδα 111
Page Type Description To Learn More
automatically generated identifier by default.
Schema Select the database schema which stores the database objects you want to use in this application.
Not applicable.
Language Select the primary language for this application.
Not applicable.
Authentication Select how you want users to authenticate into your application.
See "Establishing User Identity Through Authentication"
Advanced Settings Set additional definition, security, and globalization settings. These settings can be applied when creating the application and can be edited post application creation. Tip: To learn more about these attributes, see field-level Help. User Interface Attributes:
Apply User Interface Defaults - Select Yes to have attribute defaults based on existing User Interface Defaults defined within this workspace.
Copy from Existing Apps - Select Yes to have attribute defaults to be based on existing Form pages, based on the same table, in current applications defined within this workspace.
Table Prefixes - Enter table prefixes currently used by existing database tables on which pages are based. These prefixes may be different from the framework table prefix (for database objects created by this application when generated). Description:
Short Description - Enter text to be displayed as a subtitle, under the application name on the home page.
Description - Enter text to be displayed on the About This Application page, accessed from the help icon in the navigation bar. Settings:
Add "Built with APEX" to Footer - When set to Yes, Oracle Application Express adds the text "Built with Love using Oracle APEX" to the footer of every page.
Version - Enter the application version.
Not applicable.
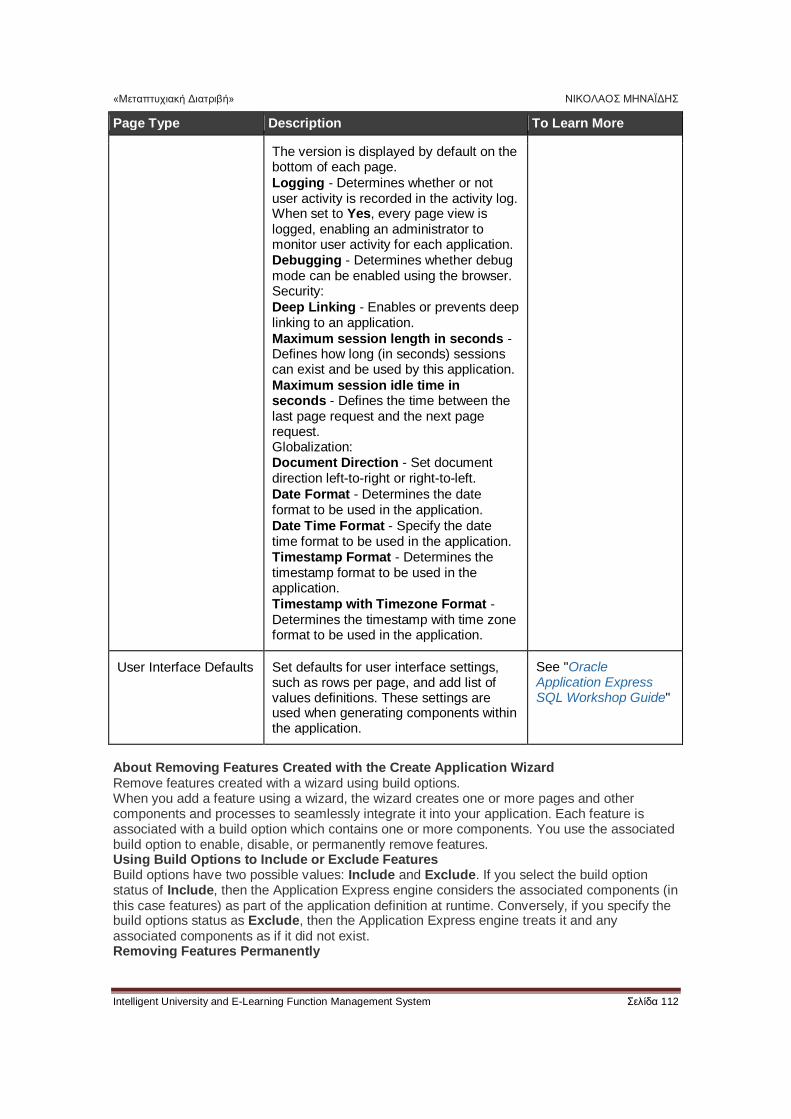
«Μεταπτυχιακή Διατριβή» ΝΙΚΟΛΑΟΣ ΜΗΝΑΪΔΗΣ
Intelligent University and E-Learning Function Management System Σελίδα 112
Page Type Description To Learn More
The version is displayed by default on the bottom of each page.
Logging - Determines whether or not user activity is recorded in the activity log. When set to Yes, every page view is logged, enabling an administrator to monitor user activity for each application.
Debugging - Determines whether debug mode can be enabled using the browser. Security:
Deep Linking - Enables or prevents deep linking to an application.
Maximum session length in seconds - Defines how long (in seconds) sessions can exist and be used by this application.
Maximum session idle time in seconds - Defines the time between the last page request and the next page request. Globalization:
Document Direction - Set document direction left-to-right or right-to-left.
Date Format - Determines the date format to be used in the application.
Date Time Format - Specify the date time format to be used in the application.
Timestamp Format - Determines the timestamp format to be used in the application.
Timestamp with Timezone Format - Determines the timestamp with time zone format to be used in the application.
User Interface Defaults Set defaults for user interface settings, such as rows per page, and add list of values definitions. These settings are used when generating components within the application.
See "Oracle Application Express SQL Workshop Guide"
About Removing Features Created with the Create Application Wizard Remove features created with a wizard using build options. When you add a feature using a wizard, the wizard creates one or more pages and other components and processes to seamlessly integrate it into your application. Each feature is associated with a build option which contains one or more components. You use the associated build option to enable, disable, or permanently remove features. Using Build Options to Include or Exclude Features Build options have two possible values: Include and Exclude. If you select the build option status of Include, then the Application Express engine considers the associated components (in this case features) as part of the application definition at runtime. Conversely, if you specify the build options status as Exclude, then the Application Express engine treats it and any associated components as if it did not exist. Removing Features Permanently
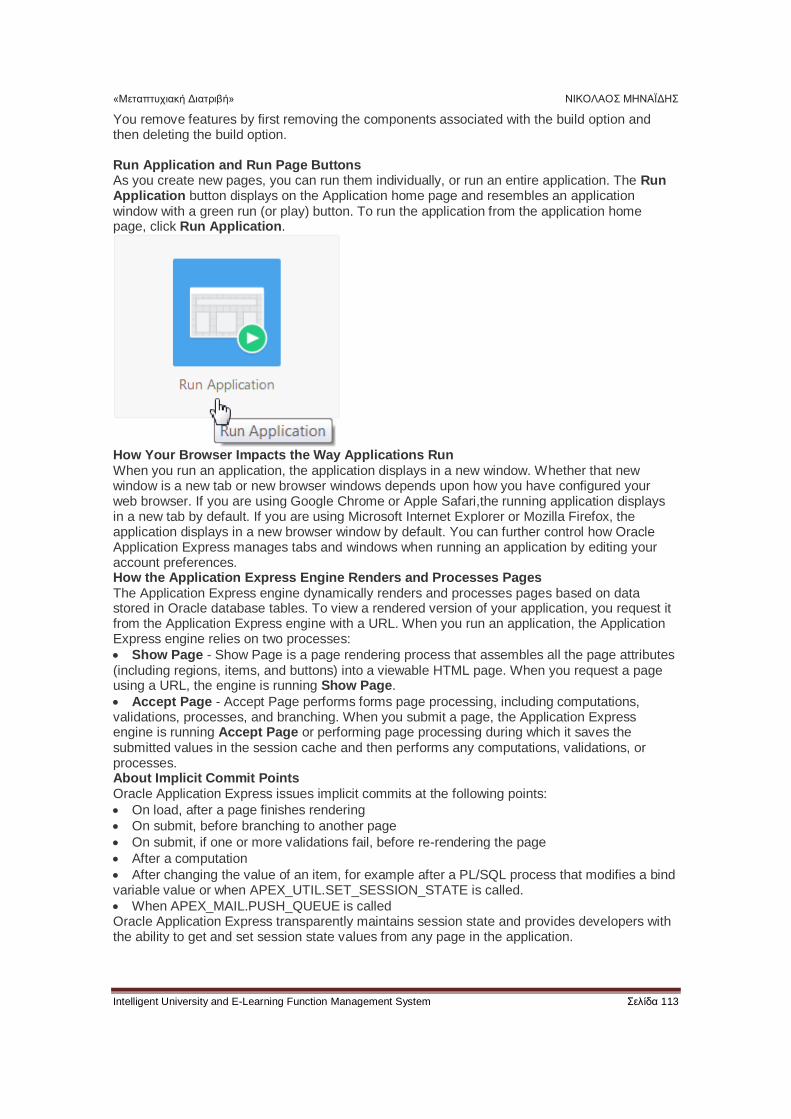
«Μεταπτυχιακή Διατριβή» ΝΙΚΟΛΑΟΣ ΜΗΝΑΪΔΗΣ
Intelligent University and E-Learning Function Management System Σελίδα 113
You remove features by first removing the components associated with the build option and then deleting the build option. Run Application and Run Page Buttons As you create new pages, you can run them individually, or run an entire application. The Run Application button displays on the Application home page and resembles an application window with a green run (or play) button. To run the application from the application home page, click Run Application.
How Your Browser Impacts the Way Applications Run When you run an application, the application displays in a new window. Whether that new window is a new tab or new browser windows depends upon how you have configured your web browser. If you are using Google Chrome or Apple Safari,the running application displays in a new tab by default. If you are using Microsoft Internet Explorer or Mozilla Firefox, the application displays in a new browser window by default. You can further control how Oracle Application Express manages tabs and windows when running an application by editing your account preferences. How the Application Express Engine Renders and Processes Pages The Application Express engine dynamically renders and processes pages based on data stored in Oracle database tables. To view a rendered version of your application, you request it from the Application Express engine with a URL. When you run an application, the Application Express engine relies on two processes:
Show Page - Show Page is a page rendering process that assembles all the page attributes (including regions, items, and buttons) into a viewable HTML page. When you request a page using a URL, the engine is running Show Page.
Accept Page - Accept Page performs forms page processing, including computations, validations, processes, and branching. When you submit a page, the Application Express engine is running Accept Page or performing page processing during which it saves the submitted values in the session cache and then performs any computations, validations, or processes. About Implicit Commit Points Oracle Application Express issues implicit commits at the following points:
On load, after a page finishes rendering
On submit, before branching to another page
On submit, if one or more validations fail, before re-rendering the page
After a computation
After changing the value of an item, for example after a PL/SQL process that modifies a bind variable value or when APEX_UTIL.SET_SESSION_STATE is called.
When APEX_MAIL.PUSH_QUEUE is called Oracle Application Express transparently maintains session state and provides developers with the ability to get and set session state values from any page in the application.
«Μεταπτυχιακή Διατριβή» ΝΙΚΟΛΑΟΣ ΜΗΝΑΪΔΗΣ
Intelligent University and E-Learning Function Management System Σελίδα 114
What is Session State? Session state enables developers to store and retrieve values for a user as the user navigates between different application pages.
About Session IDs A session ID is a unique number assigned a specific user for the duration of that user's visit (session)
What Is a Session? A session is a logical construct that establishes persistence (or stateful behavior) across page views. Each session is assigned a unique identifier. The Application Express engine uses this identifier (or session ID) to store and retrieve an application's working set of data (or session state) before and after each page view. Parent topic: App Builder Concepts What is Session State? Session state enables developers to store and retrieve values for a user as the user navigates between different application pages. Hypertext Transfer Protocol (HTTP), the protocol over which HTML pages are most often delivered, is a stateless protocol. A web browser is only connected to the server for as long as it takes to download a complete page. Each page request is treated by the server as an independent event, unrelated to any page requests that happened previously or that may occur in the future. To access form values entered on one page on a subsequent page, the values must be stored as session state. Oracle Application Express transparently maintains session state and provides developers with the ability to get and set session state values from any page in the application. Parent topic: Understanding Session State Management About Session IDs A session ID is a unique number assigned a specific user for the duration of that user's visit (session) The Application Express engine establishes the identity of the user for each page request and the session ID to fetch session state from the database. The most visible location of the session ID is in the URL for a page request. The session ID displays as the third parameter in the URL, for example:
http://apex.somewhere.com/pls/apex/f?p=4350:1:220883407765693447
In this example, the session ID is 220883407765693447. Another visible location is in the page's HTML POST data and indirectly in the contents of a session cookie. This cookie is sent by the Application Express engine during authentication and is maintained for the life of the application (or browser) session. Oracle Application Express assigns new session IDs during authentication processing, records the authenticated user's identity with the session ID, and continually checks the session ID in each page request's URL or POST data with the session cookie and the session record in the database. These checks provide users with flexibility and security. While the session ID is the key to session state, the session cookie and the session record safeguard the integrity of the session ID and the authentication status of the user. About the Application Page URL The URL for each application page indicates the location of Oracle Application Express and identifies the address of Oracle Application Express, the application ID, page number, and session ID. Consider the following example:
http://apex.somewhere.com/pls/apex/f?p=4350:1:220883407765693447
This example indicates:
http: is the scheme.
apex.somewhere.com is the domain name of the server. It can also include a port number or an IP address.
pls is the indicator to use the mod_plsql cartridge (if applicable)
apex is the Database Access Descriptor (DAD) name. The DAD describes how HTTP Server connects to the database server so that it can fulfill an HTTP request. The default value is apex.
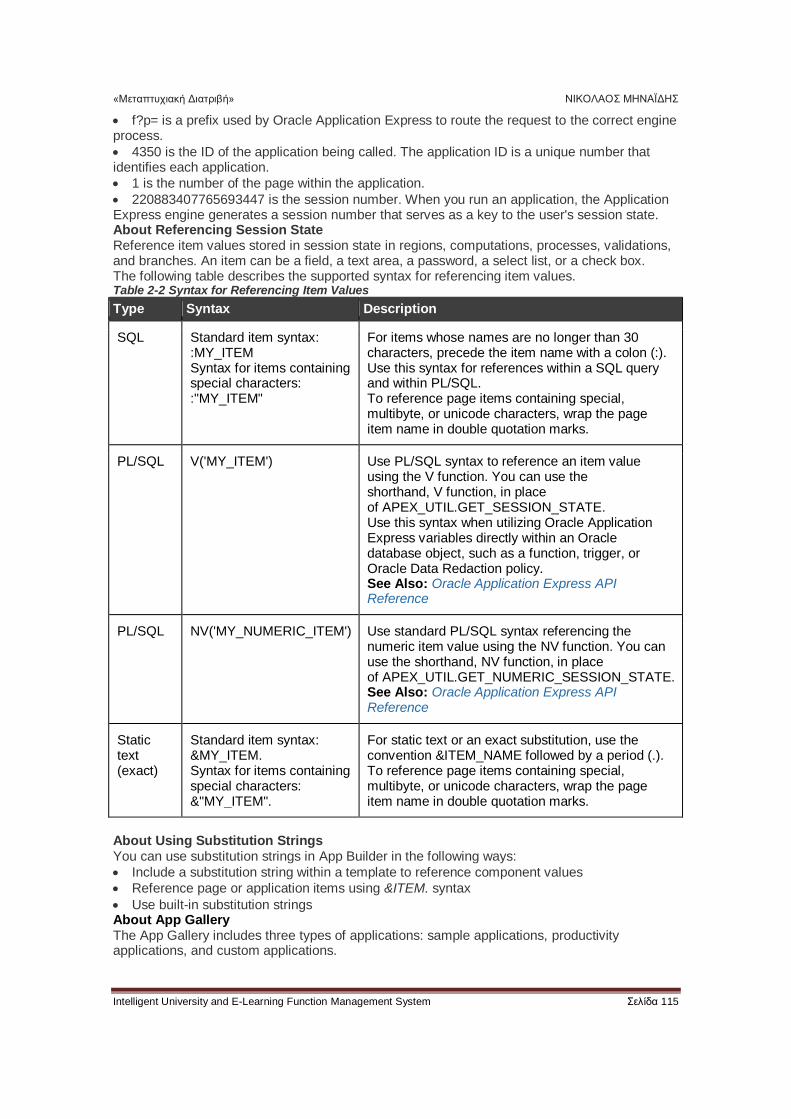
«Μεταπτυχιακή Διατριβή» ΝΙΚΟΛΑΟΣ ΜΗΝΑΪΔΗΣ
Intelligent University and E-Learning Function Management System Σελίδα 115
f?p= is a prefix used by Oracle Application Express to route the request to the correct engine process.
4350 is the ID of the application being called. The application ID is a unique number that identifies each application.
1 is the number of the page within the application.
220883407765693447 is the session number. When you run an application, the Application Express engine generates a session number that serves as a key to the user's session state. About Referencing Session State Reference item values stored in session state in regions, computations, processes, validations, and branches. An item can be a field, a text area, a password, a select list, or a check box. The following table describes the supported syntax for referencing item values. Table 2-2 Syntax for Referencing Item Values
Type Syntax Description
SQL Standard item syntax: :MY_ITEM Syntax for items containing special characters: :"MY_ITEM"
For items whose names are no longer than 30 characters, precede the item name with a colon (:). Use this syntax for references within a SQL query and within PL/SQL. To reference page items containing special, multibyte, or unicode characters, wrap the page item name in double quotation marks.
PL/SQL V('MY_ITEM') Use PL/SQL syntax to reference an item value using the V function. You can use the shorthand, V function, in place of APEX_UTIL.GET_SESSION_STATE. Use this syntax when utilizing Oracle Application Express variables directly within an Oracle database object, such as a function, trigger, or Oracle Data Redaction policy. See Also: Oracle Application Express API Reference
PL/SQL NV('MY_NUMERIC_ITEM') Use standard PL/SQL syntax referencing the numeric item value using the NV function. You can use the shorthand, NV function, in place of APEX_UTIL.GET_NUMERIC_SESSION_STATE. See Also: Oracle Application Express API Reference
Static text (exact)
Standard item syntax: &MY_ITEM. Syntax for items containing special characters: &"MY_ITEM".
For static text or an exact substitution, use the convention &ITEM_NAME followed by a period (.). To reference page items containing special, multibyte, or unicode characters, wrap the page item name in double quotation marks.
About Using Substitution Strings You can use substitution strings in App Builder in the following ways:
Include a substitution string within a template to reference component values
Reference page or application items using &ITEM. syntax
Use built-in substitution strings About App Gallery The App Gallery includes three types of applications: sample applications, productivity applications, and custom applications.
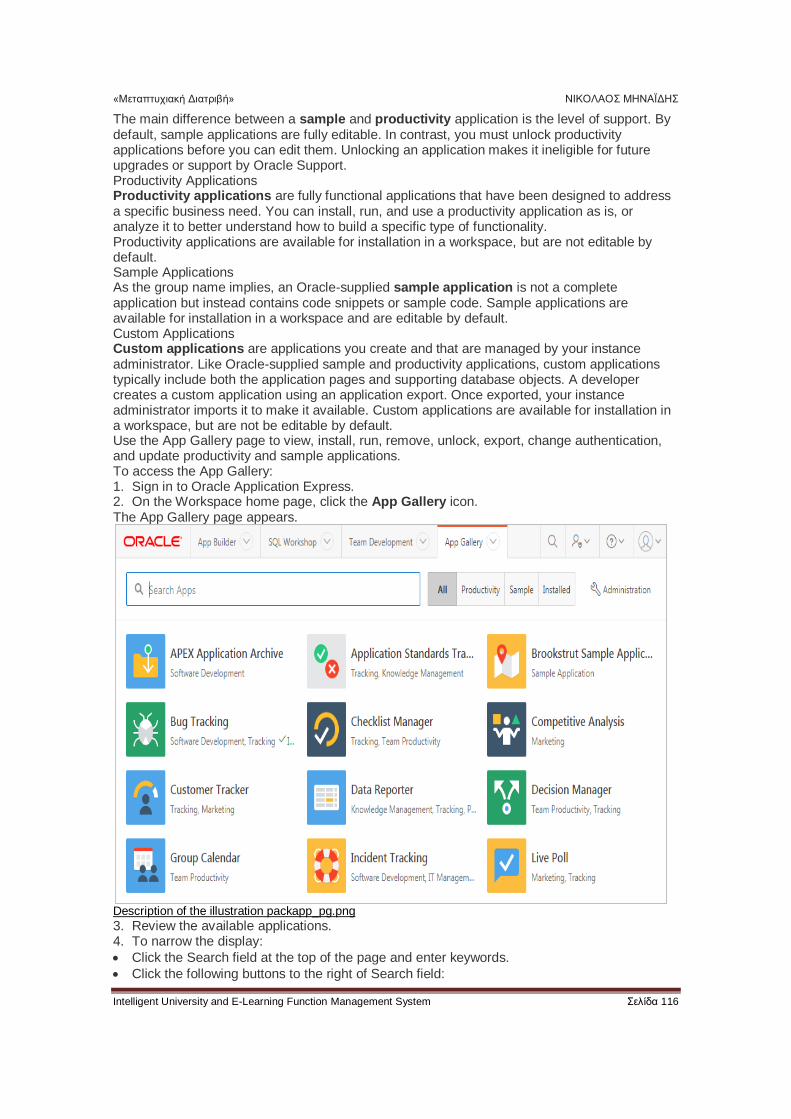
«Μεταπτυχιακή Διατριβή» ΝΙΚΟΛΑΟΣ ΜΗΝΑΪΔΗΣ
Intelligent University and E-Learning Function Management System Σελίδα 116
The main difference between a sample and productivity application is the level of support. By default, sample applications are fully editable. In contrast, you must unlock productivity applications before you can edit them. Unlocking an application makes it ineligible for future upgrades or support by Oracle Support. Productivity Applications Productivity applications are fully functional applications that have been designed to address a specific business need. You can install, run, and use a productivity application as is, or analyze it to better understand how to build a specific type of functionality. Productivity applications are available for installation in a workspace, but are not editable by default. Sample Applications As the group name implies, an Oracle-supplied sample application is not a complete application but instead contains code snippets or sample code. Sample applications are available for installation in a workspace and are editable by default. Custom Applications Custom applications are applications you create and that are managed by your instance administrator. Like Oracle-supplied sample and productivity applications, custom applications typically include both the application pages and supporting database objects. A developer creates a custom application using an application export. Once exported, your instance administrator imports it to make it available. Custom applications are available for installation in a workspace, but are not be editable by default. Use the App Gallery page to view, install, run, remove, unlock, export, change authentication, and update productivity and sample applications. To access the App Gallery: 1. Sign in to Oracle Application Express. 2. On the Workspace home page, click the App Gallery icon. The App Gallery page appears.
Description of the illustration packapp_pg.png
3. Review the available applications. 4. To narrow the display:
Click the Search field at the top of the page and enter keywords.
Click the following buttons to the right of Search field:
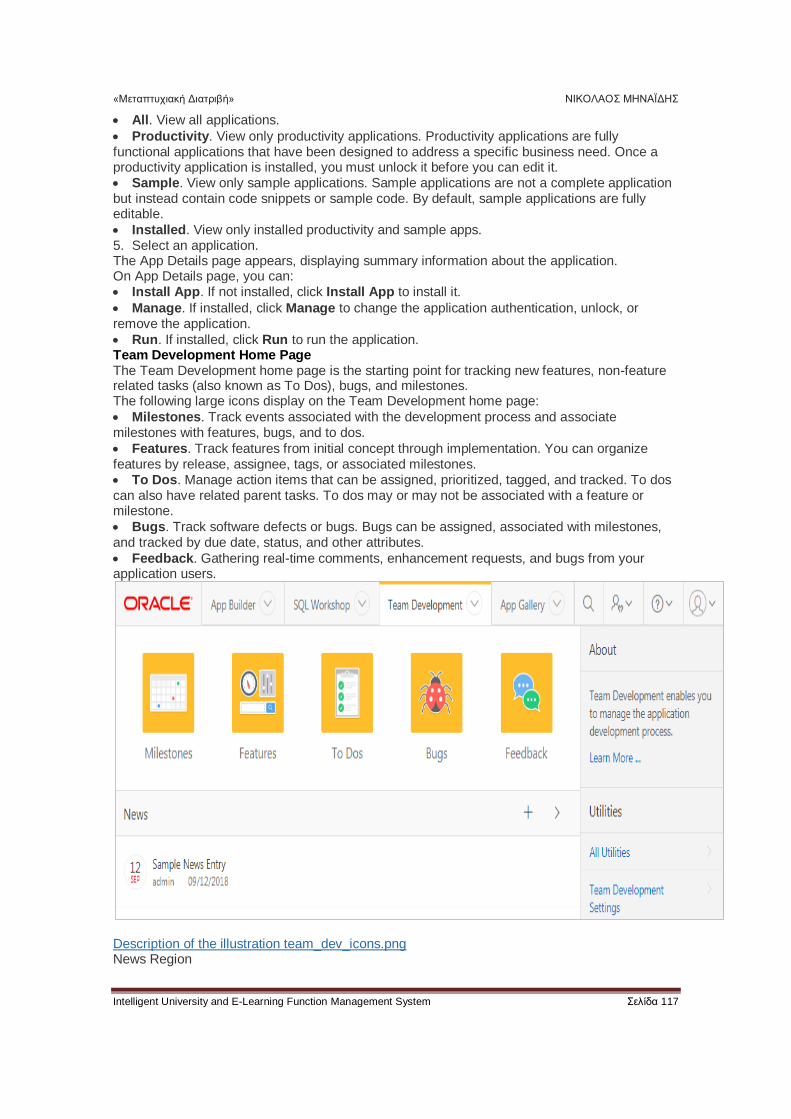
«Μεταπτυχιακή Διατριβή» ΝΙΚΟΛΑΟΣ ΜΗΝΑΪΔΗΣ
Intelligent University and E-Learning Function Management System Σελίδα 117
All. View all applications.
Productivity. View only productivity applications. Productivity applications are fully functional applications that have been designed to address a specific business need. Once a productivity application is installed, you must unlock it before you can edit it. Sample. View only sample applications. Sample applications are not a complete application but instead contain code snippets or sample code. By default, sample applications are fully editable.
Installed. View only installed productivity and sample apps. 5. Select an application. The App Details page appears, displaying summary information about the application. On App Details page, you can: Install App. If not installed, click Install App to install it.
Manage. If installed, click Manage to change the application authentication, unlock, or remove the application.
Run. If installed, click Run to run the application. Team Development Home Page The Team Development home page is the starting point for tracking new features, non-feature related tasks (also known as To Dos), bugs, and milestones. The following large icons display on the Team Development home page:
Milestones. Track events associated with the development process and associate milestones with features, bugs, and to dos.
Features. Track features from initial concept through implementation. You can organize features by release, assignee, tags, or associated milestones. To Dos. Manage action items that can be assigned, prioritized, tagged, and tracked. To dos can also have related parent tasks. To dos may or may not be associated with a feature or milestone.
Bugs. Track software defects or bugs. Bugs can be assigned, associated with milestones, and tracked by due date, status, and other attributes.
Feedback. Gathering real-time comments, enhancement requests, and bugs from your application users.
Description of the illustration team_dev_icons.png News Region
«Μεταπτυχιακή Διατριβή» ΝΙΚΟΛΑΟΣ ΜΗΝΑΪΔΗΣ
Intelligent University and E-Learning Function Management System Σελίδα 118
Use the News region to communicate with other developers. You can add new or view news entries posted by other workspace users. News displays on the Application Express home page, the Team Development home page, and the News page. Utilities Region The Utilities region displays on the right side of the page and offers quick access to Team Development Utilities page. To access the Utilities page, click All Utilities or click a specific link. Summary Regions The bottom of the Team Development home page features the following summary regions: Milestones. Provides a summary of the number of days to the final release milestone.
Bugs. Provides a summary of closed bugs.
Features. Lists a percentage of features that are functionally complete.
To Dos. Lists a percentage of completed To Dos.
Feedback. Displays recent feedback entries.
Team Development Summary. Lists the total number of features, to dos, milestones, bugs, and feedback entries.
Tags. Displays a weighted list of all the tags associated with all Team Development components. Click the hyperlinks to link to a search page displaying all components with the selected tag. You can use the Tags summary to better manage Team Development components. To populate this summary, edit the Team Development component (that is, feature, To Do task, bug, and feedback entry and update the Tags field. About Feedback Adding Feedback enables application administrators and developers to gather real-time comments, enhancement requests, and bugs from application users. Feedback enhances communication between the user community and the application owners. Feedback provides a mechanism for end users to post general comments for application administrators and developers. The posts include useful session state information to help developers determine where the end user sent the feedback from. Providing such an easy feedback loop enhances communication between the user community and the application owners, which leads to greatly improved end user satisfaction. Creating Feedback:
Adds a Feedback navigation bar icon in the running application which users can click to leave feedback.
Creates an report for viewing and updating feedback.
Captures the application and page ID, feedback comments, date and time, and user information. Understanding Websheet Properties Authentication Use Authentication properties to select an authentication scheme for this Websheet. Table 5-4 Authentication
Attribute Descriptions
Authentication
Select the way users of the application are authenticated. To change the authentication scheme, click Edit Authentication. The following list displays:
Application Express Account - Authenticate using developer account username and password.
Single Sign-On - Authenticate using Oracle Application Server Single Sign-On. This must be configured for the Application Express instance.
LDAP - Authenticate using an LDAP directory. Specify additional parameters on this page to configure this.
Custom - Provide your own code for authentication and session management tasks. See "Controlling Websheet Access."
Logout URL
Specify a URL to become this application's Logout URL attribute. This attribute is referenced in logout links as follows: &LOGOUT_URL.
«Μεταπτυχιακή Διατριβή» ΝΙΚΟΛΑΟΣ ΜΗΝΑΪΔΗΣ
Intelligent University and E-Learning Function Management System Σελίδα 119
Attribute Descriptions
If the application uses built-in session verification, you may use "wwv_flow_custom_auth_std.ws_logout?p_websheet_app_id=&WS_APP_ID.&p_next_url=ws?p=&WS_APP_ID.:home" to invoke a built-in logout procedure.
Type Type of session cookie used. You can use this attribute to share the same Application Express session between multiple applications in a workspace. With session sharing, you can seamlessly navigate between applications without logging in multiple times.
Application (No Sharing): The session cookie is specific to this application. Sessions are not shared with other applications.
Workspace Sharing: The session is shared with other applications of this workspace, if these also set Cookie Type to Workspace Sharing.
Custom: Define custom session cookie attributes.
Cookie Name
Name for the session cookie, which is required to identify an Application Express session and the session ID in the URL. If no value for the session cookie name is specified, Application Express picks a default value.
Cookie Path
Path attribute for the session cookie.
Cookie Domain
Domain attribute for the session cookie.
Secure Options include: Yes - Allow the session management cookie to be sent from the browser only
when the protocol is HTTPS.
No - Allow the session management cookie to be sent from the browser when the protocol is HTTP or HTTPS.
Websheet Websheet properties control general Websheet application behavior. Table 5-1 Websheet Properties
Attribute Descriptions
Name Identifies the name of the application. This name displays within the breadcrumb when the application is running.
Status Identifies the status of the application.
Home Page Select the home page for this Websheet. This is the first page a user sees when running the Websheet.
Application Date Format Determines the date format to be used in the application. This date format is used to alter the NLS_DATE_FORMAT database session setting before showing or submitting any page in the application. This value can be a literal string containing a valid Oracle date format mask or an item reference using substitution syntax. If no value is specified, the default date format is derived from the database session at runtime.
«Μεταπτυχιακή Διατριβή» ΝΙΚΟΛΑΟΣ ΜΗΝΑΪΔΗΣ
Intelligent University and E-Learning Function Management System Σελίδα 120
Attribute Descriptions
Default Application Language
Identifies the default language of the application. Users are able to change their language preference from within the application. This language list is determined by the translated versions of Application Express which are installed.
Default Application Territory
Identifies the default territory of the application, which controls attributes like date language and numeric characters. Users are able to change their territory preference from within the application.
Show Reset Password Controls the display of the Reset Password link on the Login page. This link enables users to reset their passwords. This option works only if the application is using Application Express Account authentication.
Websheet Email From Address
Determines the email address to use as the from address in the Websheet. This from email address is used when sending email from a data grid or report email download in the Websheet.
Logo Use Logo properties to create a logo for a Websheet application. This logo displays at the top of the Websheet. Table 5-3 Logo
Attribute Descriptions
Logo Type Select the type of logo being used for the application.
Logo Enter a full text string to use as application logo.
Authorization Authorization properties control who can log in to a Websheet application. Table 5-5 Authorization
Attribute Descriptions
Access Control List Type If authentication is Application Express Account, choose whether authorization is determined by the role in the Application Express workspace, or if authorization is determined by the access control list. For all authentication types other than Application Express Account, authorization is always determined by the access control List.
Allow Public Access Options include:
Yes - Enable users to run the application in a read-only mode without requiring users to log in.
No - All users must log in to run the application.
Configuring Globalization Attributes Edit attributes on the Edit Globalization Attributes to configure application globalization options. In App Builder you can develop applications that can run concurrently in different languages. A single application can be translated to support different languages. Use the attributes on the Edit Globalization Attributes page to specify globalization options such as the primary application language and defaults for date format, time format, timestamp format, time zone format, and CSV encoding.
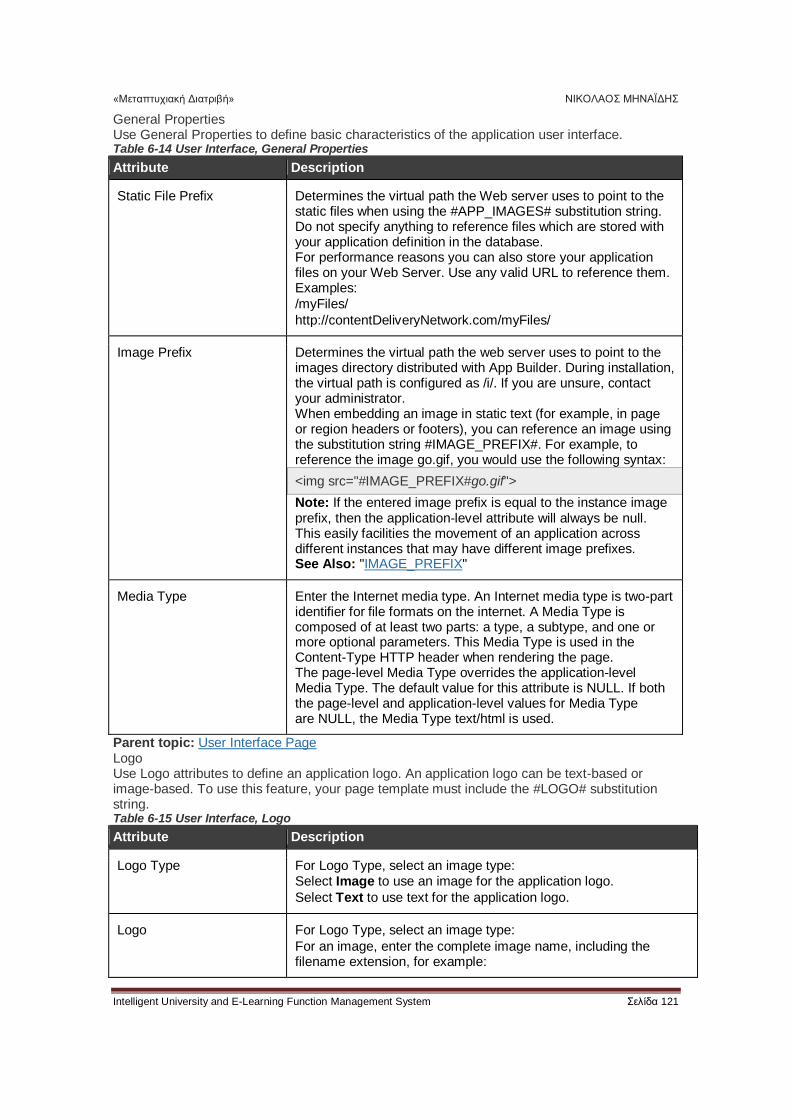
«Μεταπτυχιακή Διατριβή» ΝΙΚΟΛΑΟΣ ΜΗΝΑΪΔΗΣ
Intelligent University and E-Learning Function Management System Σελίδα 121
General Properties Use General Properties to define basic characteristics of the application user interface. Table 6-14 User Interface, General Properties
Attribute Description
Static File Prefix Determines the virtual path the Web server uses to point to the static files when using the #APP_IMAGES# substitution string. Do not specify anything to reference files which are stored with your application definition in the database. For performance reasons you can also store your application files on your Web Server. Use any valid URL to reference them. Examples:
/myFiles/
http://contentDeliveryNetwork.com/myFiles/
Image Prefix Determines the virtual path the web server uses to point to the images directory distributed with App Builder. During installation, the virtual path is configured as /i/. If you are unsure, contact your administrator. When embedding an image in static text (for example, in page or region headers or footers), you can reference an image using the substitution string #IMAGE_PREFIX#. For example, to reference the image go.gif, you would use the following syntax:
<img src="#IMAGE_PREFIX#go.gif">
Note: If the entered image prefix is equal to the instance image prefix, then the application-level attribute will always be null. This easily facilities the movement of an application across different instances that may have different image prefixes. See Also: "IMAGE_PREFIX"
Media Type Enter the Internet media type. An Internet media type is two-part identifier for file formats on the internet. A Media Type is composed of at least two parts: a type, a subtype, and one or more optional parameters. This Media Type is used in the Content-Type HTTP header when rendering the page. The page-level Media Type overrides the application-level Media Type. The default value for this attribute is NULL. If both the page-level and application-level values for Media Type are NULL, the Media Type text/html is used.
Parent topic: User Interface Page Logo Use Logo attributes to define an application logo. An application logo can be text-based or image-based. To use this feature, your page template must include the #LOGO# substitution string. Table 6-15 User Interface, Logo
Attribute Description
Logo Type For Logo Type, select an image type: Select Image to use an image for the application logo.
Select Text to use text for the application logo.
Logo For Logo Type, select an image type:
For an image, enter the complete image name, including the filename extension, for example:
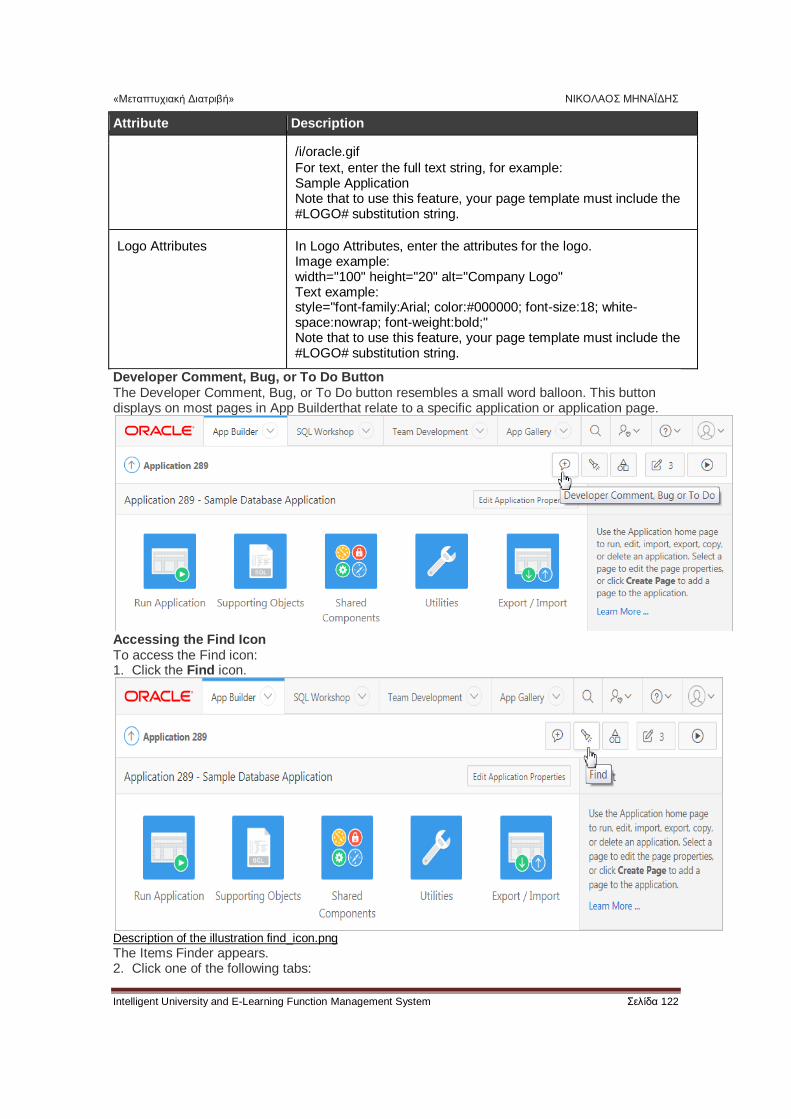
«Μεταπτυχιακή Διατριβή» ΝΙΚΟΛΑΟΣ ΜΗΝΑΪΔΗΣ
Intelligent University and E-Learning Function Management System Σελίδα 122
Attribute Description
/i/oracle.gif
For text, enter the full text string, for example: Sample Application Note that to use this feature, your page template must include the #LOGO# substitution string.
Logo Attributes In Logo Attributes, enter the attributes for the logo. Image example: width="100" height="20" alt="Company Logo" Text example: style="font-family:Arial; color:#000000; font-size:18; white-space:nowrap; font-weight:bold;" Note that to use this feature, your page template must include the #LOGO# substitution string.
Developer Comment, Bug, or To Do Button The Developer Comment, Bug, or To Do button resembles a small word balloon. This button displays on most pages in App Builderthat relate to a specific application or application page.
Accessing the Find Icon To access the Find icon: 1. Click the Find icon.
Description of the illustration find_icon.png The Items Finder appears. 2. Click one of the following tabs:
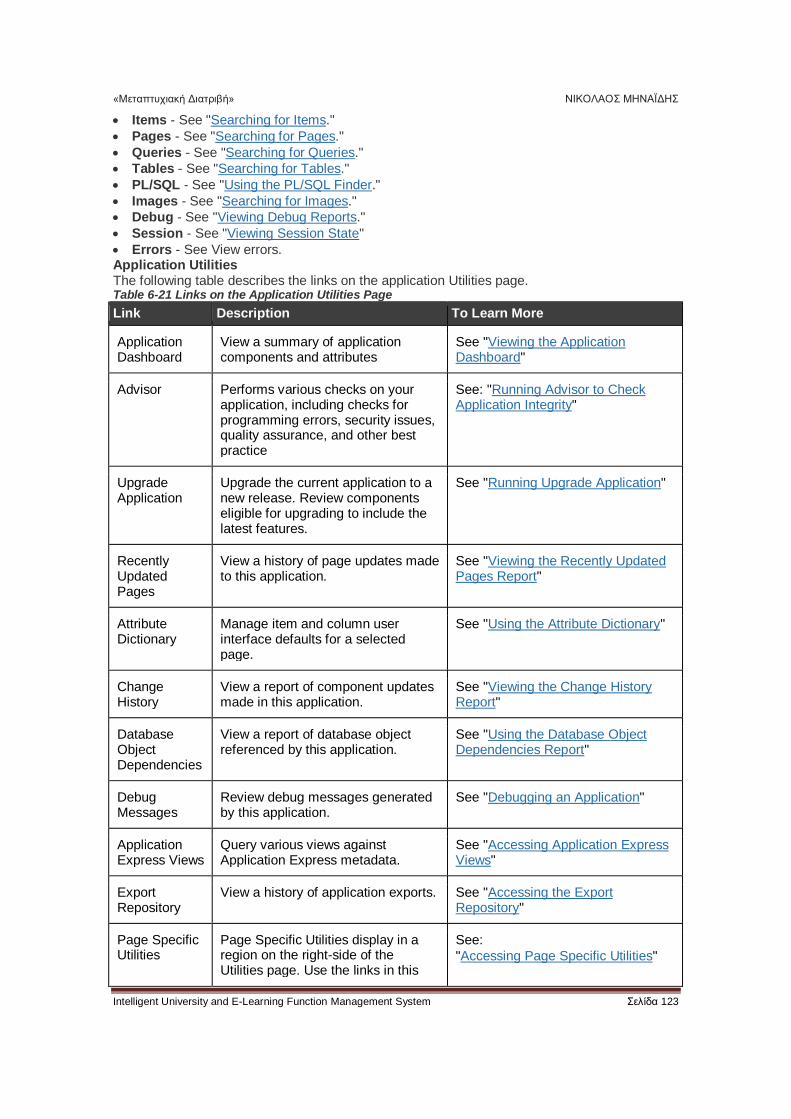
«Μεταπτυχιακή Διατριβή» ΝΙΚΟΛΑΟΣ ΜΗΝΑΪΔΗΣ
Intelligent University and E-Learning Function Management System Σελίδα 123
Items - See "Searching for Items."
Pages - See "Searching for Pages."
Queries - See "Searching for Queries."
Tables - See "Searching for Tables."
PL/SQL - See "Using the PL/SQL Finder."
Images - See "Searching for Images."
Debug - See "Viewing Debug Reports."
Session - See "Viewing Session State"
Errors - See View errors. Application Utilities The following table describes the links on the application Utilities page. Table 6-21 Links on the Application Utilities Page
Link Description To Learn More
Application Dashboard
View a summary of application components and attributes
See "Viewing the Application Dashboard"
Advisor Performs various checks on your application, including checks for programming errors, security issues, quality assurance, and other best practice
See: "Running Advisor to Check Application Integrity"
Upgrade Application
Upgrade the current application to a new release. Review components eligible for upgrading to include the latest features.
See "Running Upgrade Application"
Recently Updated Pages
View a history of page updates made to this application.
See "Viewing the Recently Updated Pages Report"
Attribute Dictionary
Manage item and column user interface defaults for a selected page.
See "Using the Attribute Dictionary"
Change History
View a report of component updates made in this application.
See "Viewing the Change History Report"
Database Object Dependencies
View a report of database object referenced by this application.
See "Using the Database Object Dependencies Report"
Debug Messages
Review debug messages generated by this application.
See "Debugging an Application"
Application Express Views
Query various views against Application Express metadata.
See "Accessing Application Express Views"
Export Repository
View a history of application exports. See "Accessing the Export Repository"
Page Specific Utilities
Page Specific Utilities display in a region on the right-side of the Utilities page. Use the links in this
See:
"Accessing Page Specific Utilities"

«Μεταπτυχιακή Διατριβή» ΝΙΚΟΛΑΟΣ ΜΗΝΑΪΔΗΣ
Intelligent University and E-Learning Function Management System Σελίδα 124
Link Description To Learn More
region to access Cross Page Utilities and Page Groups as well as access handy utilities for managing regions, buttons, items, computations, validations, process, dynamic actions, and branches.
"Accessing Cross Page Utilities"
Interactive Report Utilities
Interactive Report Utilities display in a region on the lower right-side of the Utilities page. Click Saved Reports to delete saved interactive reports in the current application. Click Subscriptions to manage interactive report subscriptions.
See "Using Interactive Report Utilities"
Adding a New Page to an Application Add a new page by running the Create Page Wizard from the Application home page. To create a new page: 1. On the Workspace home page, click App Builder. 2. Select an application. The Application home page appears. 3. Click the Create Page button. The Create Page Wizard appears.
Description of the illustration create_page_wizard.png
4. For Create a Page: a. User Interface - Select a user interface for the page.
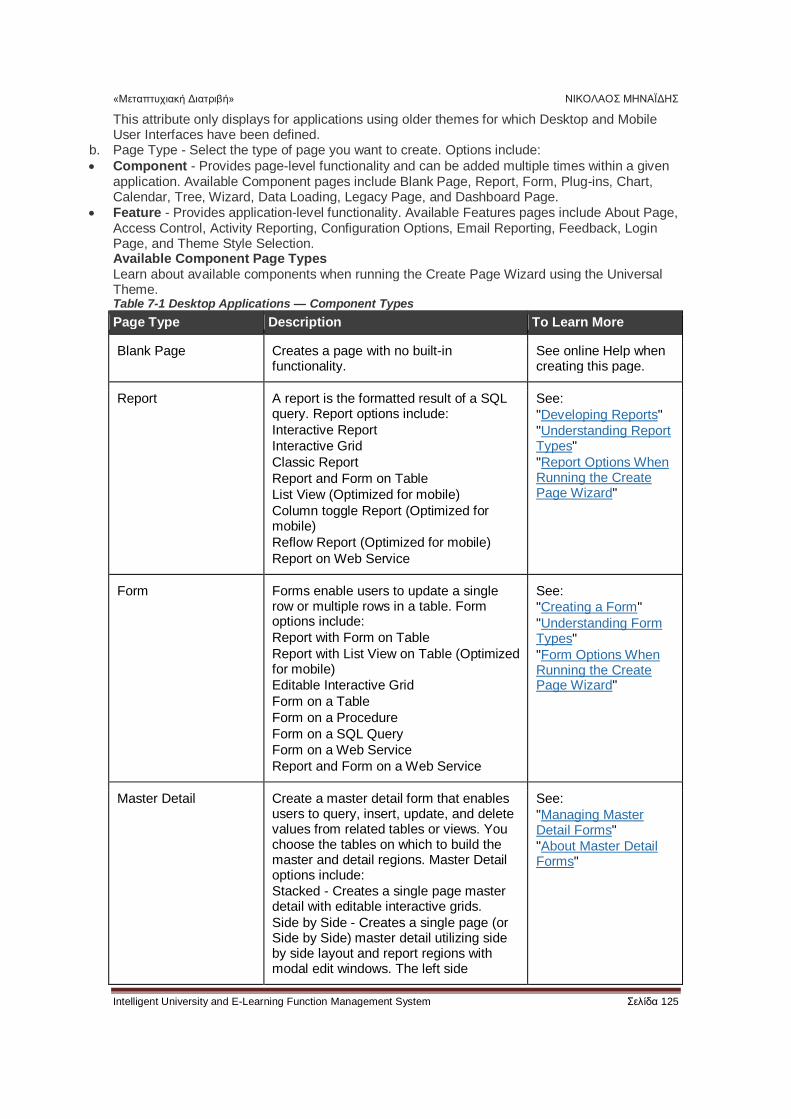
«Μεταπτυχιακή Διατριβή» ΝΙΚΟΛΑΟΣ ΜΗΝΑΪΔΗΣ
Intelligent University and E-Learning Function Management System Σελίδα 125
This attribute only displays for applications using older themes for which Desktop and Mobile User Interfaces have been defined.
b. Page Type - Select the type of page you want to create. Options include:
Component - Provides page-level functionality and can be added multiple times within a given application. Available Component pages include Blank Page, Report, Form, Plug-ins, Chart, Calendar, Tree, Wizard, Data Loading, Legacy Page, and Dashboard Page.
Feature - Provides application-level functionality. Available Features pages include About Page, Access Control, Activity Reporting, Configuration Options, Email Reporting, Feedback, Login Page, and Theme Style Selection. Available Component Page Types Learn about available components when running the Create Page Wizard using the Universal Theme. Table 7-1 Desktop Applications — Component Types
Page Type Description To Learn More
Blank Page Creates a page with no built-in functionality.
See online Help when creating this page.
Report A report is the formatted result of a SQL query. Report options include:
Interactive Report
Interactive Grid
Classic Report
Report and Form on Table
List View (Optimized for mobile)
Column toggle Report (Optimized for mobile)
Reflow Report (Optimized for mobile)
Report on Web Service
See:
"Developing Reports"
"Understanding Report Types"
"Report Options When Running the Create Page Wizard"
Form Forms enable users to update a single row or multiple rows in a table. Form options include:
Report with Form on Table
Report with List View on Table (Optimized for mobile)
Editable Interactive Grid
Form on a Table
Form on a Procedure
Form on a SQL Query
Form on a Web Service
Report and Form on a Web Service
See:
"Creating a Form"
"Understanding Form Types"
"Form Options When Running the Create Page Wizard"
Master Detail Create a master detail form that enables users to query, insert, update, and delete values from related tables or views. You choose the tables on which to build the master and detail regions. Master Detail options include:
Stacked - Creates a single page master detail with editable interactive grids.
Side by Side - Creates a single page (or Side by Side) master detail utilizing side by side layout and report regions with modal edit windows. The left side
See:
"Managing Master Detail Forms"
"About Master Detail Forms"
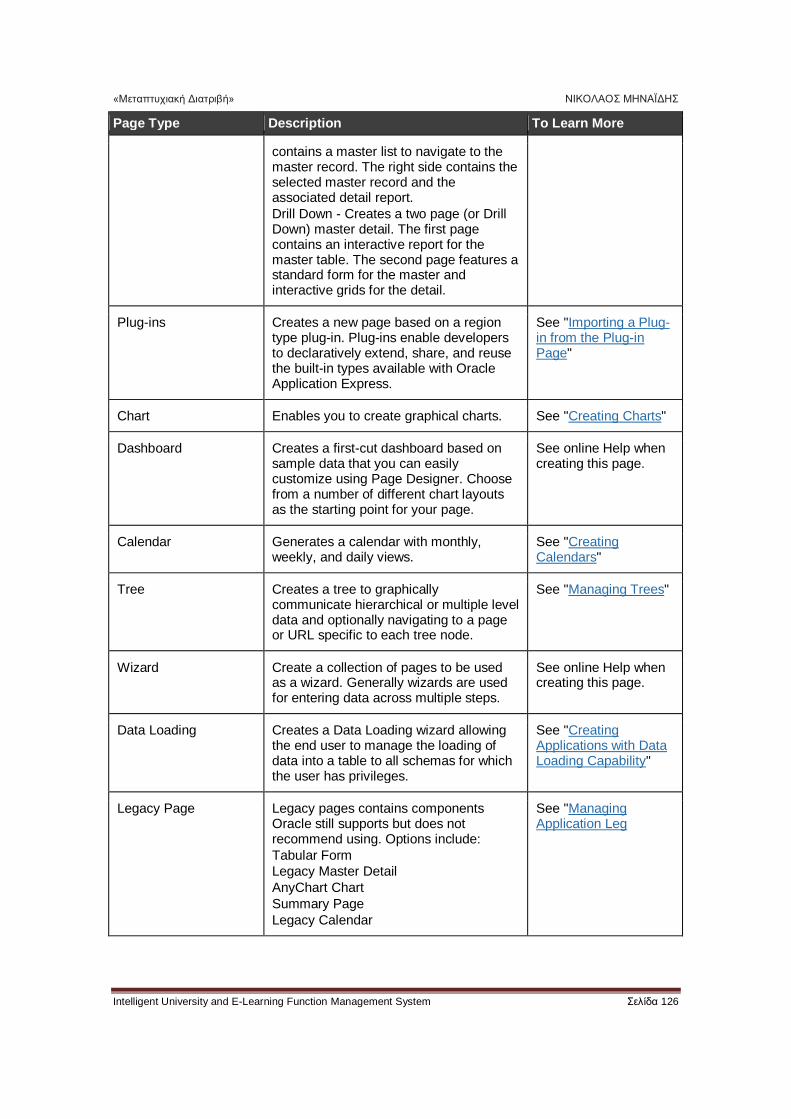
«Μεταπτυχιακή Διατριβή» ΝΙΚΟΛΑΟΣ ΜΗΝΑΪΔΗΣ
Intelligent University and E-Learning Function Management System Σελίδα 126
Page Type Description To Learn More
contains a master list to navigate to the master record. The right side contains the selected master record and the associated detail report.
Drill Down - Creates a two page (or Drill Down) master detail. The first page contains an interactive report for the master table. The second page features a standard form for the master and interactive grids for the detail.
Plug-ins Creates a new page based on a region type plug-in. Plug-ins enable developers to declaratively extend, share, and reuse the built-in types available with Oracle Application Express.
See "Importing a Plug-in from the Plug-in Page"
Chart Enables you to create graphical charts. See "Creating Charts"
Dashboard Creates a first-cut dashboard based on sample data that you can easily customize using Page Designer. Choose from a number of different chart layouts as the starting point for your page.
See online Help when creating this page.
Calendar Generates a calendar with monthly, weekly, and daily views.
See "Creating Calendars"
Tree Creates a tree to graphically communicate hierarchical or multiple level data and optionally navigating to a page or URL specific to each tree node.
See "Managing Trees"
Wizard Create a collection of pages to be used as a wizard. Generally wizards are used for entering data across multiple steps.
See online Help when creating this page.
Data Loading Creates a Data Loading wizard allowing the end user to manage the loading of data into a table to all schemas for which the user has privileges.
See "Creating Applications with Data Loading Capability"
Legacy Page Legacy pages contains components Oracle still supports but does not recommend using. Options include:
Tabular Form
Legacy Master Detail
AnyChart Chart
Summary Page
Legacy Calendar
See "Managing Application Leg
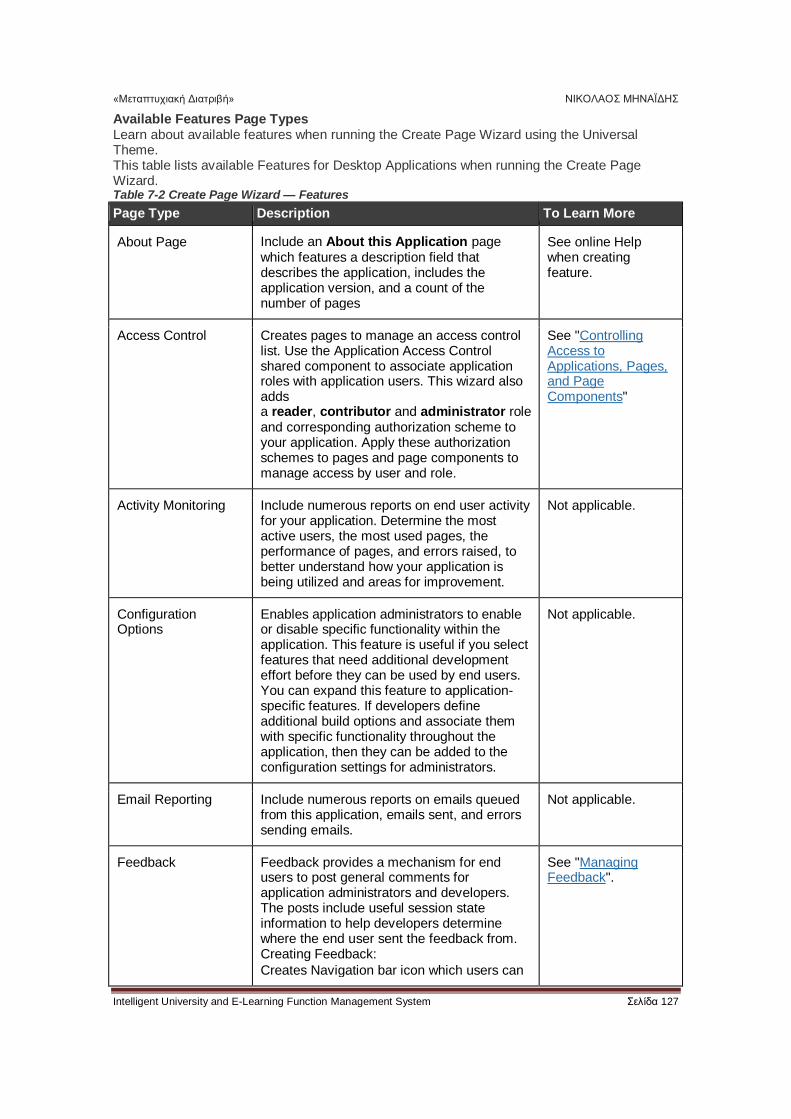
«Μεταπτυχιακή Διατριβή» ΝΙΚΟΛΑΟΣ ΜΗΝΑΪΔΗΣ
Intelligent University and E-Learning Function Management System Σελίδα 127
Available Features Page Types Learn about available features when running the Create Page Wizard using the Universal Theme. This table lists available Features for Desktop Applications when running the Create Page Wizard. Table 7-2 Create Page Wizard — Features
Page Type Description To Learn More
About Page Include an About this Application page which features a description field that describes the application, includes the application version, and a count of the number of pages
See online Help when creating feature.
Access Control Creates pages to manage an access control list. Use the Application Access Control shared component to associate application roles with application users. This wizard also adds a reader, contributor and administrator role and corresponding authorization scheme to your application. Apply these authorization schemes to pages and page components to manage access by user and role.
See "Controlling Access to Applications, Pages, and Page Components"
Activity Monitoring Include numerous reports on end user activity for your application. Determine the most active users, the most used pages, the performance of pages, and errors raised, to better understand how your application is being utilized and areas for improvement.
Not applicable.
Configuration Options
Enables application administrators to enable or disable specific functionality within the application. This feature is useful if you select features that need additional development effort before they can be used by end users. You can expand this feature to application-specific features. If developers define additional build options and associate them with specific functionality throughout the application, then they can be added to the configuration settings for administrators.
Not applicable.
Email Reporting Include numerous reports on emails queued from this application, emails sent, and errors sending emails.
Not applicable.
Feedback Feedback provides a mechanism for end users to post general comments for application administrators and developers. The posts include useful session state information to help developers determine where the end user sent the feedback from. Creating Feedback:
Creates Navigation bar icon which users can
See "Managing Feedback".
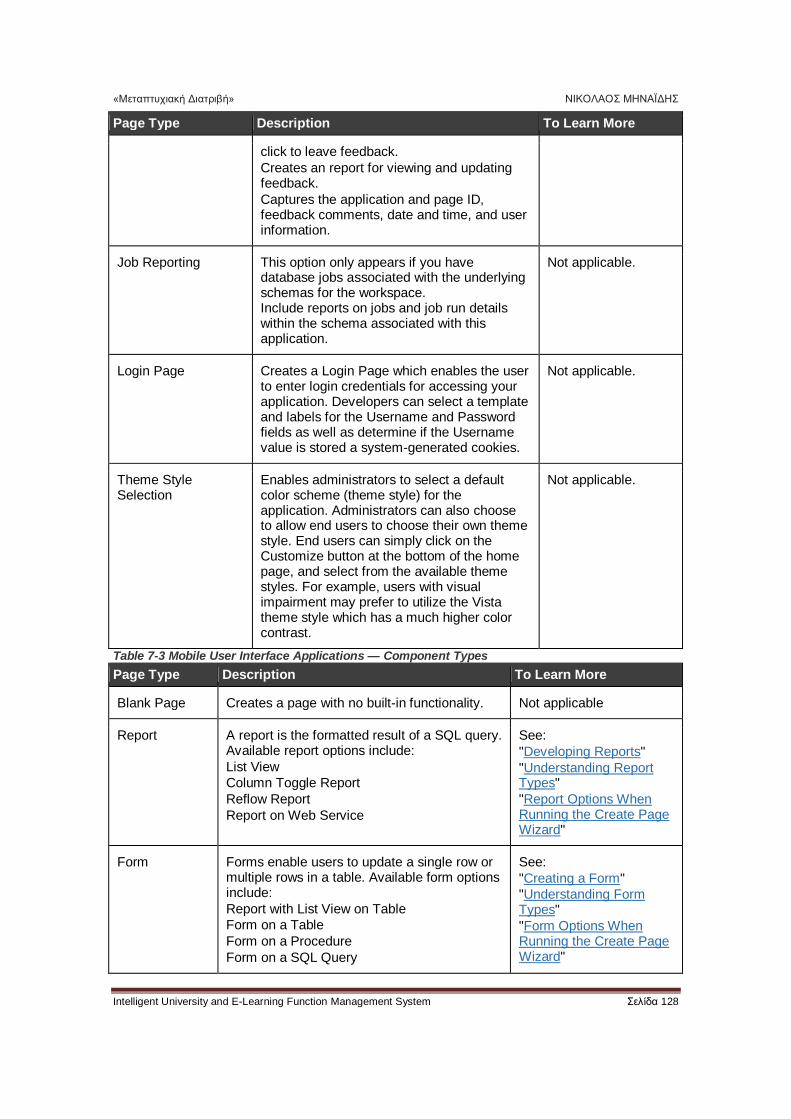
«Μεταπτυχιακή Διατριβή» ΝΙΚΟΛΑΟΣ ΜΗΝΑΪΔΗΣ
Intelligent University and E-Learning Function Management System Σελίδα 128
Page Type Description To Learn More
click to leave feedback.
Creates an report for viewing and updating feedback.
Captures the application and page ID, feedback comments, date and time, and user information.
Job Reporting This option only appears if you have database jobs associated with the underlying schemas for the workspace. Include reports on jobs and job run details within the schema associated with this application.
Not applicable.
Login Page Creates a Login Page which enables the user to enter login credentials for accessing your application. Developers can select a template and labels for the Username and Password fields as well as determine if the Username value is stored a system-generated cookies.
Not applicable.
Theme Style Selection
Enables administrators to select a default color scheme (theme style) for the application. Administrators can also choose to allow end users to choose their own theme style. End users can simply click on the Customize button at the bottom of the home page, and select from the available theme styles. For example, users with visual impairment may prefer to utilize the Vista theme style which has a much higher color contrast.
Not applicable.
Table 7-3 Mobile User Interface Applications — Component Types
Page Type Description To Learn More
Blank Page Creates a page with no built-in functionality. Not applicable
Report A report is the formatted result of a SQL query. Available report options include:
List View
Column Toggle Report
Reflow Report
Report on Web Service
See:
"Developing Reports"
"Understanding Report Types"
"Report Options When Running the Create Page Wizard"
Form Forms enable users to update a single row or multiple rows in a table. Available form options include:
Report with List View on Table
Form on a Table
Form on a Procedure
Form on a SQL Query
See:
"Creating a Form"
"Understanding Form Types"
"Form Options When Running the Create Page Wizard"
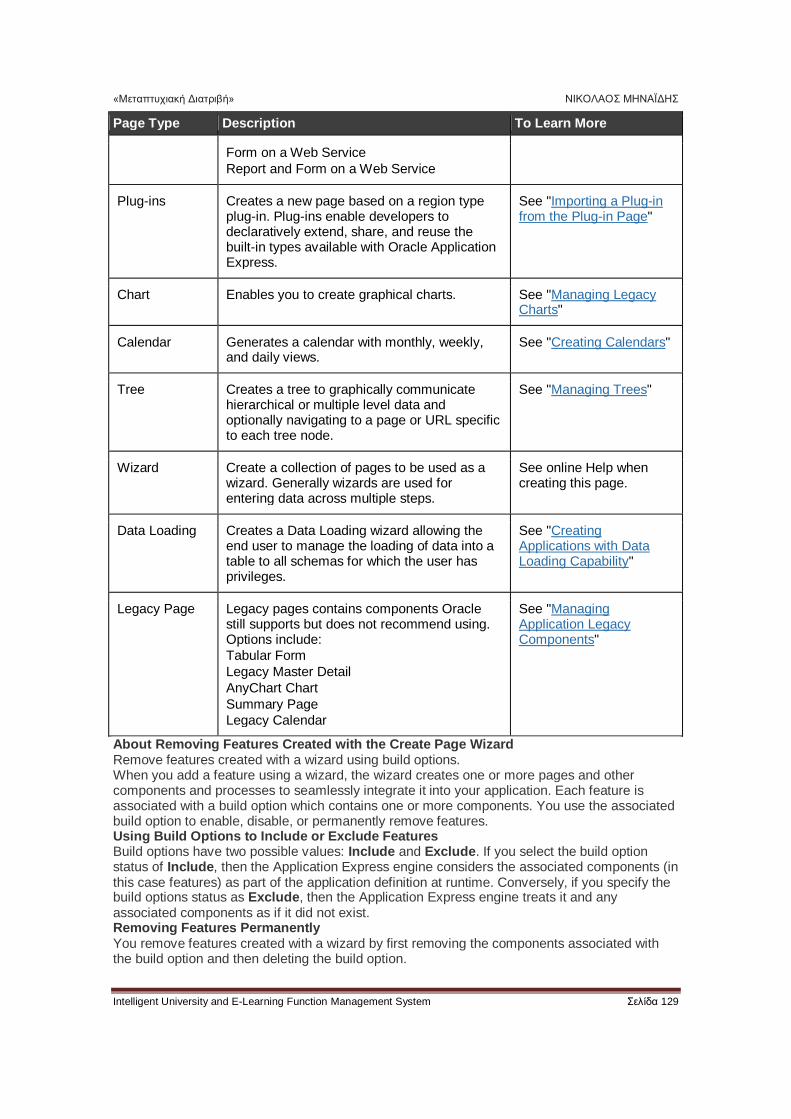
«Μεταπτυχιακή Διατριβή» ΝΙΚΟΛΑΟΣ ΜΗΝΑΪΔΗΣ
Intelligent University and E-Learning Function Management System Σελίδα 129
Page Type Description To Learn More
Form on a Web Service
Report and Form on a Web Service
Plug-ins Creates a new page based on a region type plug-in. Plug-ins enable developers to declaratively extend, share, and reuse the built-in types available with Oracle Application Express.
See "Importing a Plug-in from the Plug-in Page"
Chart Enables you to create graphical charts. See "Managing Legacy Charts"
Calendar Generates a calendar with monthly, weekly, and daily views.
See "Creating Calendars"
Tree Creates a tree to graphically communicate hierarchical or multiple level data and optionally navigating to a page or URL specific to each tree node.
See "Managing Trees"
Wizard Create a collection of pages to be used as a wizard. Generally wizards are used for entering data across multiple steps.
See online Help when creating this page.
Data Loading Creates a Data Loading wizard allowing the end user to manage the loading of data into a table to all schemas for which the user has privileges.
See "Creating Applications with Data Loading Capability"
Legacy Page Legacy pages contains components Oracle still supports but does not recommend using. Options include:
Tabular Form
Legacy Master Detail
AnyChart Chart
Summary Page
Legacy Calendar
See "Managing Application Legacy Components"
About Removing Features Created with the Create Page Wizard Remove features created with a wizard using build options. When you add a feature using a wizard, the wizard creates one or more pages and other components and processes to seamlessly integrate it into your application. Each feature is associated with a build option which contains one or more components. You use the associated build option to enable, disable, or permanently remove features. Using Build Options to Include or Exclude Features Build options have two possible values: Include and Exclude. If you select the build option status of Include, then the Application Express engine considers the associated components (in this case features) as part of the application definition at runtime. Conversely, if you specify the build options status as Exclude, then the Application Express engine treats it and any associated components as if it did not exist. Removing Features Permanently You remove features created with a wizard by first removing the components associated with the build option and then deleting the build option.
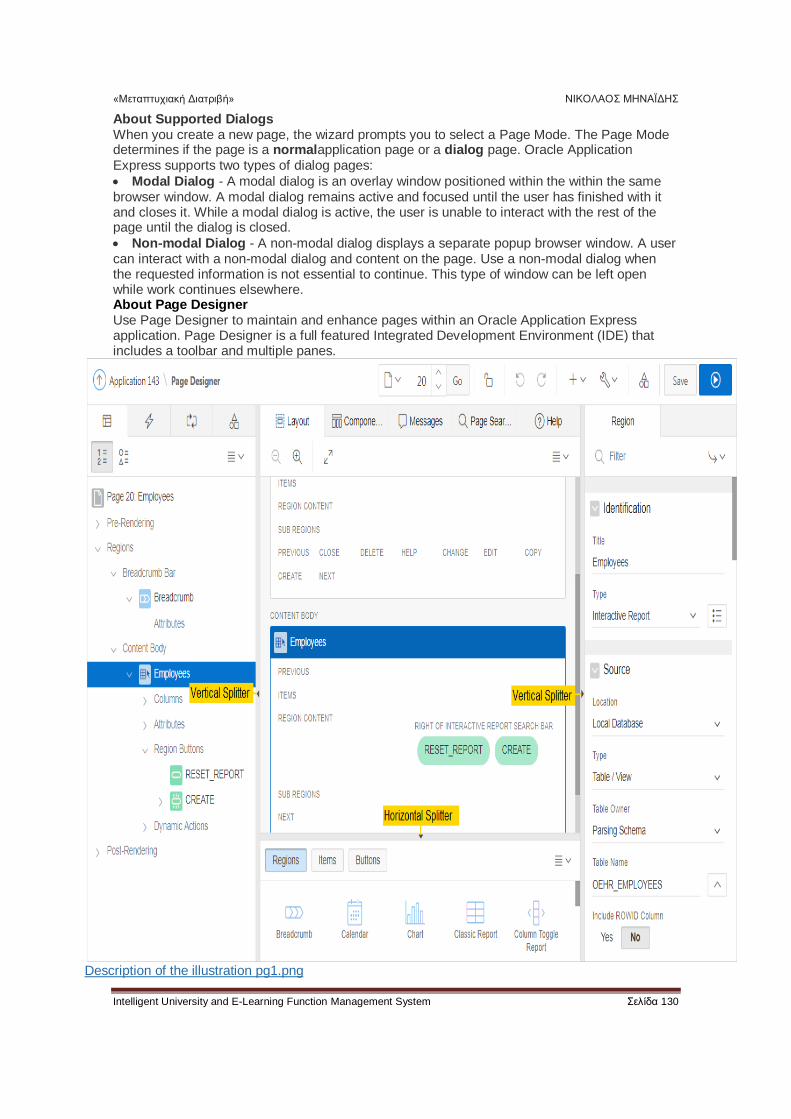
«Μεταπτυχιακή Διατριβή» ΝΙΚΟΛΑΟΣ ΜΗΝΑΪΔΗΣ
Intelligent University and E-Learning Function Management System Σελίδα 130
About Supported Dialogs When you create a new page, the wizard prompts you to select a Page Mode. The Page Mode determines if the page is a normalapplication page or a dialog page. Oracle Application Express supports two types of dialog pages:
Modal Dialog - A modal dialog is an overlay window positioned within the within the same browser window. A modal dialog remains active and focused until the user has finished with it and closes it. While a modal dialog is active, the user is unable to interact with the rest of the page until the dialog is closed.
Non-modal Dialog - A non-modal dialog displays a separate popup browser window. A user can interact with a non-modal dialog and content on the page. Use a non-modal dialog when the requested information is not essential to continue. This type of window can be left open while work continues elsewhere. About Page Designer Use Page Designer to maintain and enhance pages within an Oracle Application Express application. Page Designer is a full featured Integrated Development Environment (IDE) that includes a toolbar and multiple panes.
Description of the illustration pg1.png
«Μεταπτυχιακή Διατριβή» ΝΙΚΟΛΑΟΣ ΜΗΝΑΪΔΗΣ
Intelligent University and E-Learning Function Management System Σελίδα 131
The Page Designer window is divided into three main panes:
Left Pane - Includes four tabs that display as a tree: Rendering, Dynamic Actions, Processing, and Shared Components.
Central Pane - Includes five tabs: Layout, Component View, Messages, Page Search, and Help. Right Pane - Displays the Property Editor. Use the Property Editor to update attributes for the selected component. When you select multiple components, the Property Editor only displays common attributes. Updating a common attribute updates that attribute for all of the selected components. You can adjust the size of each pane by selecting and dragging the horizontal and vertical splitters. To expand or collapse each pane, click the small triangle labeled Collapse in the center of each splitter. The Runtime Developer toolbar contains of the following controls: Home links to the Workspace home page. See "Understanding the Workspace Home Page."
Application links to the Application home page. See "Understanding the App Builder Home Page."
Edit Page displays the currently running page ID.
Session links you to session state information for the current page. See "Viewing Session State."
View Debug displays the Debug reports. See "Viewing Session State."
Debug toggles the page between Debug and No Debug mode. See "Utilizing Debug Mode."
Page Info:
Show Layout Columns toggles between Show Layout Columns and Hide Layout Columns. This option only applies if a layout is used and that layout supports showing layout columns and the page has more than one column.
Show Page Timing displays the Page Performance Timing dialog. Click Copy to copy the data in table form and then paste it into another application. Click Clear to remove the current timing events. Quick Edit enables developers to enter either Quick Edit mode or access Live Template Options.
Access Quick Edit Mode - Click Quick Edit and then select the desired component to instantly access the component in Page Designer. Press ESCAPE or click outside a component to exit quick edit mode.
Edit Live Template Options - Click Quick Edit and then move the mouse over the component for which you want to modify template options and click the Wrench icon in the upper right corner. See "Using Quick Edit to Modify Live Template Options." Theme Roller enables developers to easily customize the appearance of an application by selecting colors from color picker and setting values. Only displays for themes supporting Theme Roller. See "Using Theme Styles and Theme Roller."
Developer Toolbar Options displays on the far right and resembles a mechanical gear. Clicking Developer Toolbar Options to customize how the Runtime Developer Toolbar displays. Available controls include: Auto Hide
Show Icons Only
Display Position (Top, Left, Bottom, Right) About JavaScript Error Detection If a page has one or more JavaScript errors, a red error button displays on the left side of the Runtime Developer toolbar. If you have enabled Auto Hide, the Runtime Developer toolbar displays indicating the error. Click the red error button to view an alert dialog which explains you should view the Browser console. The red error button persists until error has been resolved, the Browser console is cleared, and you refresh the page. Report Types:

«Μεταπτυχιακή Διατριβή» ΝΙΚΟΛΑΟΣ ΜΗΝΑΪΔΗΣ
Intelligent University and E-Learning Function Management System Σελίδα 132
Interactive Grid An interactive grid presents users a set of data in a searchable, customizable report. Functionally, an interactive grid includes most customization capabilities available in interactive reports plus the ability to rearrange the report interactively using the mouse and keyboard. Users can lock, hide, filter, freeze, highlight, sort individual columns, and create control breaks on specific columns using the Actions and Column Heading menus. Advanced users can also define breaks and aggregations against columns. Users can also directly customize the appearance of an interactive grid. Users can use the mouse and keyboard to resize the width of a column and drag and drop columns into different places in the grid. Once customized, the report can be saved as either a private or public report. Both the Create Application Wizard and Create Page Wizard support the creation of interactive grids. The following is an example of an interactive grid.
Description of the illustration rpt_ig.png Editable Interactive Grid Developers have the option of making an interactive grid editable. In an editable interactive grid, users can also add to, modify, and refresh the data set directly on the page. Editable interactive grids include additional controls. A Row Actions menu displays at the start of each row and enables users to add, edit, and refresh rows. Edit, Save, and Add Row buttons also display to the right of the Actions menu. The following is an example of an editable interactive grid.
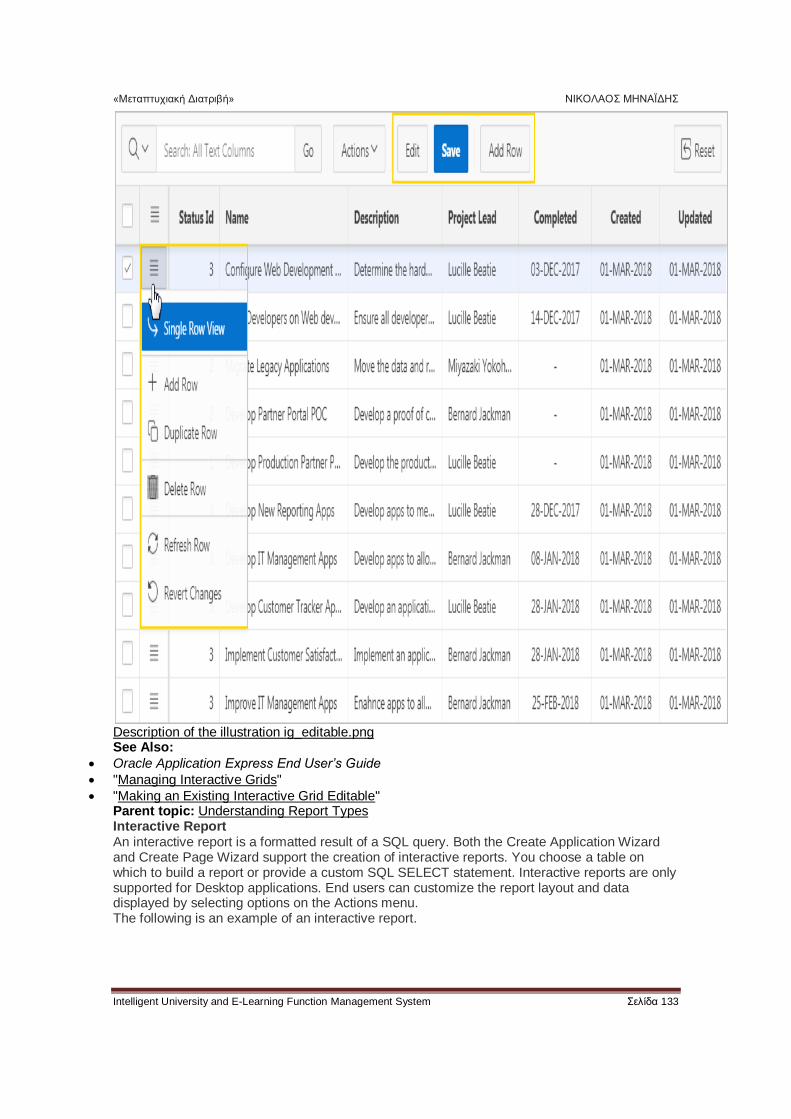
«Μεταπτυχιακή Διατριβή» ΝΙΚΟΛΑΟΣ ΜΗΝΑΪΔΗΣ
Intelligent University and E-Learning Function Management System Σελίδα 133
Description of the illustration ig_editable.png See Also:
Oracle Application Express End User’s Guide
"Managing Interactive Grids"
"Making an Existing Interactive Grid Editable" Parent topic: Understanding Report Types Interactive Report An interactive report is a formatted result of a SQL query. Both the Create Application Wizard and Create Page Wizard support the creation of interactive reports. You choose a table on which to build a report or provide a custom SQL SELECT statement. Interactive reports are only supported for Desktop applications. End users can customize the report layout and data displayed by selecting options on the Actions menu. The following is an example of an interactive report.
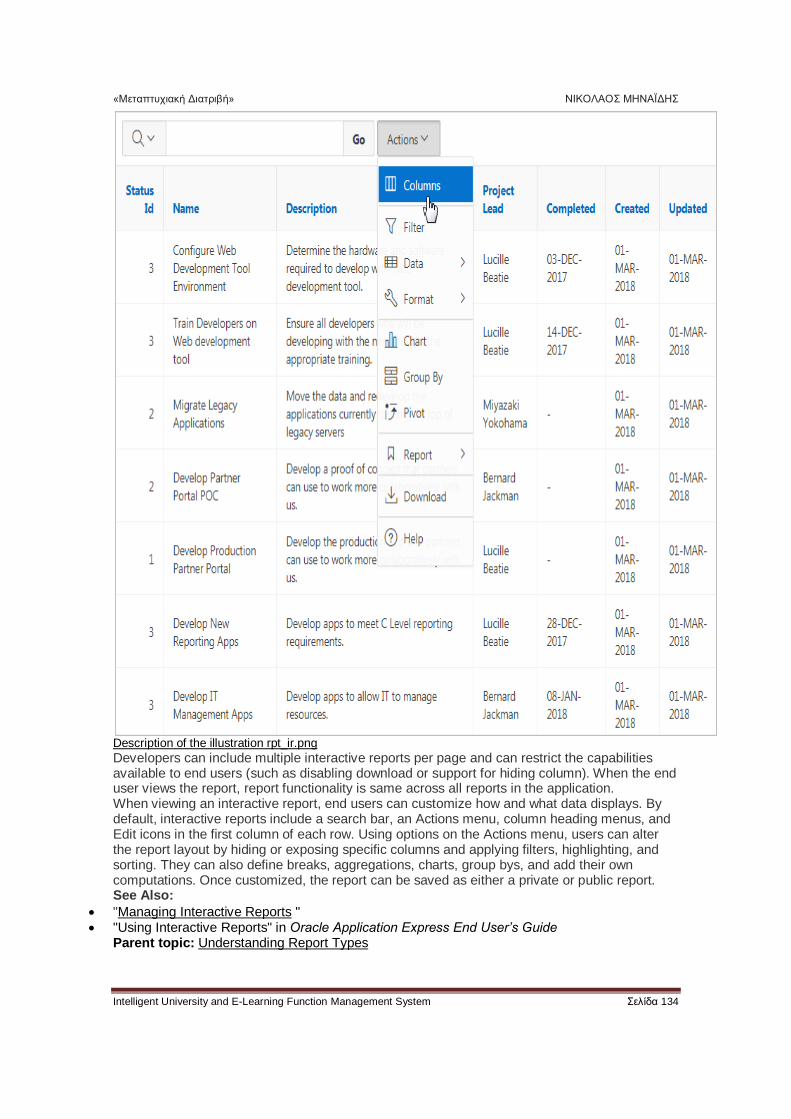
«Μεταπτυχιακή Διατριβή» ΝΙΚΟΛΑΟΣ ΜΗΝΑΪΔΗΣ
Intelligent University and E-Learning Function Management System Σελίδα 134
Description of the illustration rpt_ir.png Developers can include multiple interactive reports per page and can restrict the capabilities available to end users (such as disabling download or support for hiding column). When the end user views the report, report functionality is same across all reports in the application. When viewing an interactive report, end users can customize how and what data displays. By default, interactive reports include a search bar, an Actions menu, column heading menus, and Edit icons in the first column of each row. Using options on the Actions menu, users can alter the report layout by hiding or exposing specific columns and applying filters, highlighting, and sorting. They can also define breaks, aggregations, charts, group bys, and add their own computations. Once customized, the report can be saved as either a private or public report. See Also:
"Managing Interactive Reports " "Using Interactive Reports" in Oracle Application Express End User’s Guide
Parent topic: Understanding Report Types
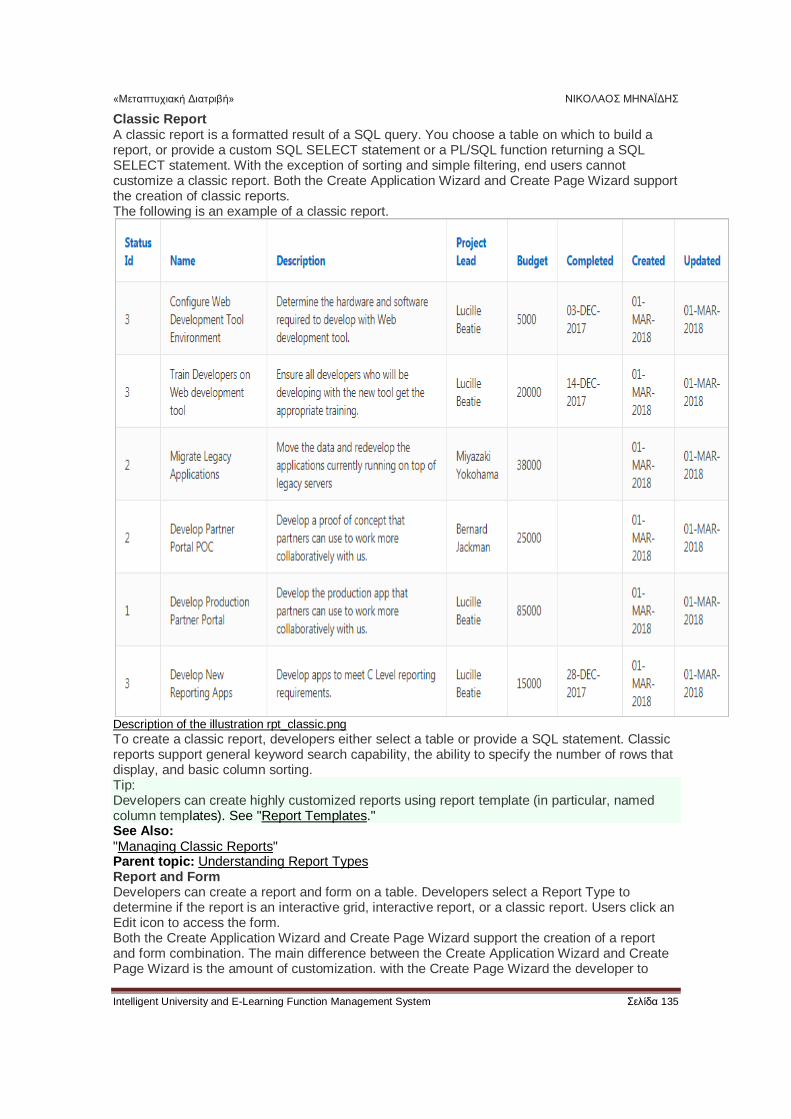
«Μεταπτυχιακή Διατριβή» ΝΙΚΟΛΑΟΣ ΜΗΝΑΪΔΗΣ
Intelligent University and E-Learning Function Management System Σελίδα 135
Classic Report A classic report is a formatted result of a SQL query. You choose a table on which to build a report, or provide a custom SQL SELECT statement or a PL/SQL function returning a SQL SELECT statement. With the exception of sorting and simple filtering, end users cannot customize a classic report. Both the Create Application Wizard and Create Page Wizard support the creation of classic reports. The following is an example of a classic report.
Description of the illustration rpt_classic.png To create a classic report, developers either select a table or provide a SQL statement. Classic reports support general keyword search capability, the ability to specify the number of rows that display, and basic column sorting. Tip: Developers can create highly customized reports using report template (in particular, named column templates). See "Report Templates." See Also: "Managing Classic Reports" Parent topic: Understanding Report Types Report and Form Developers can create a report and form on a table. Developers select a Report Type to determine if the report is an interactive grid, interactive report, or a classic report. Users click an Edit icon to access the form. Both the Create Application Wizard and Create Page Wizard support the creation of a report and form combination. The main difference between the Create Application Wizard and Create Page Wizard is the amount of customization. with the Create Page Wizard the developer to
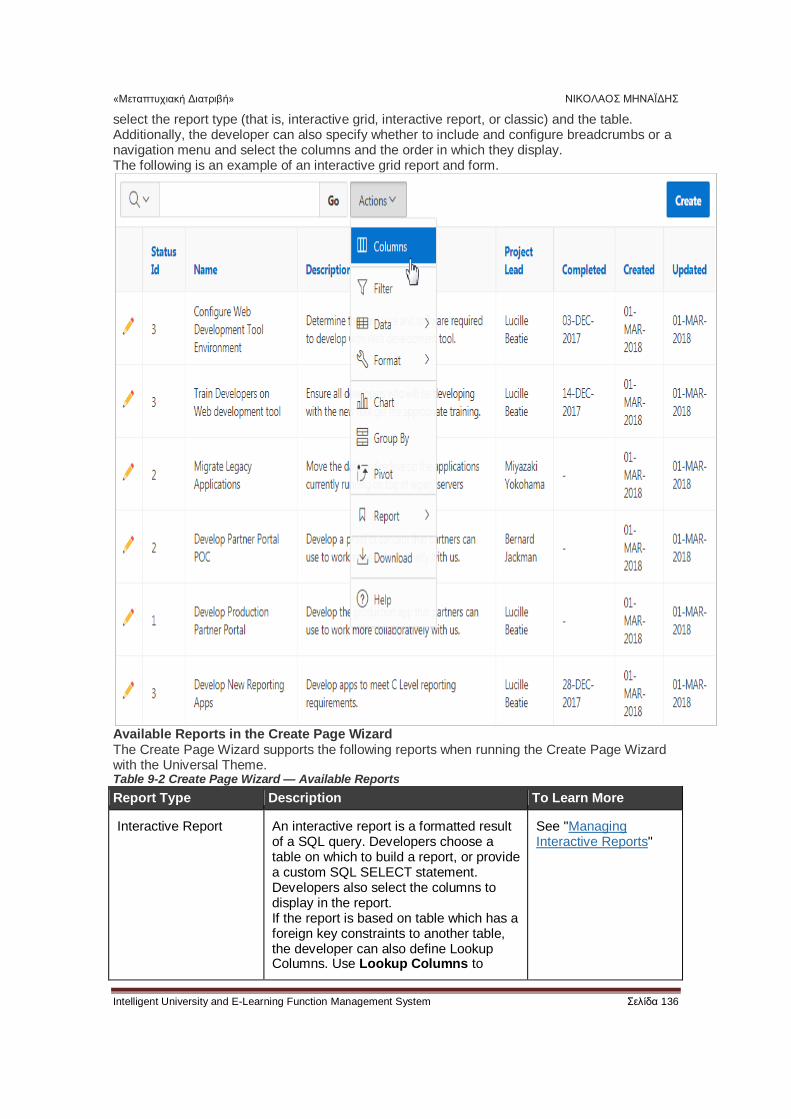
«Μεταπτυχιακή Διατριβή» ΝΙΚΟΛΑΟΣ ΜΗΝΑΪΔΗΣ
Intelligent University and E-Learning Function Management System Σελίδα 136
select the report type (that is, interactive grid, interactive report, or classic) and the table. Additionally, the developer can also specify whether to include and configure breadcrumbs or a navigation menu and select the columns and the order in which they display. The following is an example of an interactive grid report and form.
Available Reports in the Create Page Wizard The Create Page Wizard supports the following reports when running the Create Page Wizard with the Universal Theme. Table 9-2 Create Page Wizard — Available Reports
Report Type Description To Learn More
Interactive Report An interactive report is a formatted result of a SQL query. Developers choose a table on which to build a report, or provide a custom SQL SELECT statement. Developers also select the columns to display in the report. If the report is based on table which has a foreign key constraints to another table, the developer can also define Lookup Columns. Use Lookup Columns to
See "Managing Interactive Reports"
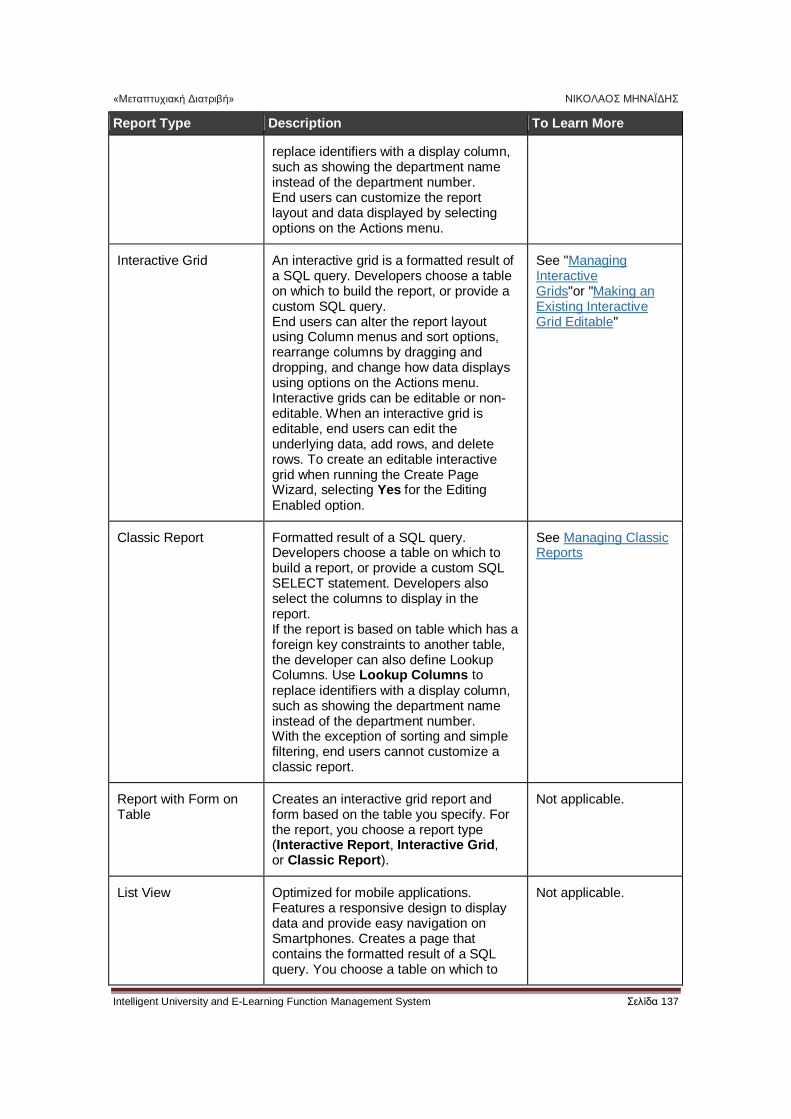
«Μεταπτυχιακή Διατριβή» ΝΙΚΟΛΑΟΣ ΜΗΝΑΪΔΗΣ
Intelligent University and E-Learning Function Management System Σελίδα 137
Report Type Description To Learn More
replace identifiers with a display column, such as showing the department name instead of the department number. End users can customize the report layout and data displayed by selecting options on the Actions menu.
Interactive Grid An interactive grid is a formatted result of a SQL query. Developers choose a table on which to build the report, or provide a custom SQL query. End users can alter the report layout using Column menus and sort options, rearrange columns by dragging and dropping, and change how data displays using options on the Actions menu. Interactive grids can be editable or non-editable. When an interactive grid is editable, end users can edit the underlying data, add rows, and delete rows. To create an editable interactive grid when running the Create Page Wizard, selecting Yes for the Editing Enabled option.
See "Managing Interactive Grids"or "Making an Existing Interactive Grid Editable"
Classic Report Formatted result of a SQL query. Developers choose a table on which to build a report, or provide a custom SQL SELECT statement. Developers also select the columns to display in the report. If the report is based on table which has a foreign key constraints to another table, the developer can also define Lookup Columns. Use Lookup Columns to replace identifiers with a display column, such as showing the department name instead of the department number. With the exception of sorting and simple filtering, end users cannot customize a classic report.
See Managing Classic Reports
Report with Form on Table
Creates an interactive grid report and form based on the table you specify. For the report, you choose a report type (Interactive Report, Interactive Grid, or Classic Report).
Not applicable.
List View Optimized for mobile applications. Features a responsive design to display data and provide easy navigation on Smartphones. Creates a page that contains the formatted result of a SQL query. You choose a table on which to
Not applicable.
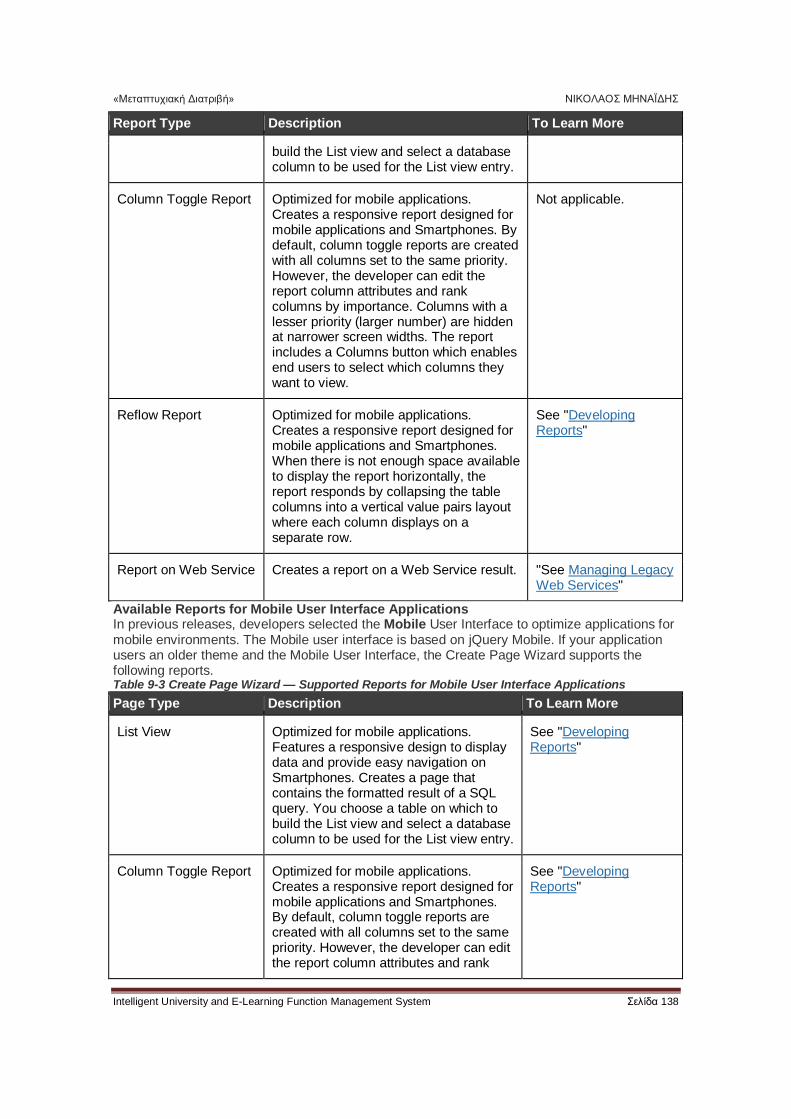
«Μεταπτυχιακή Διατριβή» ΝΙΚΟΛΑΟΣ ΜΗΝΑΪΔΗΣ
Intelligent University and E-Learning Function Management System Σελίδα 138
Report Type Description To Learn More
build the List view and select a database column to be used for the List view entry.
Column Toggle Report Optimized for mobile applications. Creates a responsive report designed for mobile applications and Smartphones. By default, column toggle reports are created with all columns set to the same priority. However, the developer can edit the report column attributes and rank columns by importance. Columns with a lesser priority (larger number) are hidden at narrower screen widths. The report includes a Columns button which enables end users to select which columns they want to view.
Not applicable.
Reflow Report Optimized for mobile applications. Creates a responsive report designed for mobile applications and Smartphones. When there is not enough space available to display the report horizontally, the report responds by collapsing the table columns into a vertical value pairs layout where each column displays on a separate row.
See "Developing Reports"
Report on Web Service Creates a report on a Web Service result. "See Managing Legacy Web Services"
Available Reports for Mobile User Interface Applications In previous releases, developers selected the Mobile User Interface to optimize applications for mobile environments. The Mobile user interface is based on jQuery Mobile. If your application users an older theme and the Mobile User Interface, the Create Page Wizard supports the following reports. Table 9-3 Create Page Wizard — Supported Reports for Mobile User Interface Applications
Page Type Description To Learn More
List View Optimized for mobile applications. Features a responsive design to display data and provide easy navigation on Smartphones. Creates a page that contains the formatted result of a SQL query. You choose a table on which to build the List view and select a database column to be used for the List view entry.
See "Developing Reports"
Column Toggle Report Optimized for mobile applications. Creates a responsive report designed for mobile applications and Smartphones. By default, column toggle reports are created with all columns set to the same priority. However, the developer can edit the report column attributes and rank
See "Developing Reports"

«Μεταπτυχιακή Διατριβή» ΝΙΚΟΛΑΟΣ ΜΗΝΑΪΔΗΣ
Intelligent University and E-Learning Function Management System Σελίδα 139
Page Type Description To Learn More
columns by importance. Columns with a lesser priority displays at narrower widths. The report includes a Columns button which enables end users to select which columns they want to view.
Reflow Report Optimized for mobile applications. Creates a responsive report designed for mobile applications and Smartphones. When there is not enough space available to display the report horizontally, the report responds by collapsing the table columns into a vertical value pairs layout where each column displays on a separate row.
See "Developing Reports"
Report on Web Service Creates a report on a Web Service result.
See "Managing Legacy Web Services"
Editable Interactive Grid An interactive grid presents users with a set of data in a searchable, customizable report. In an editable interactive grid, users can also add to, modify, and refresh the data set directly on the page. Functionally, an interactive grid includes most customization capabilities available in interactive reports plus the ability to rearrange the report interactively using the mouse. The following is an example of an editable interactive grid.
Description of the illustration form_ig.png See Also: "Using an Editable Interactive Grid" in Oracle Application Express End User’s Guide Parent topic: Understanding Form Types
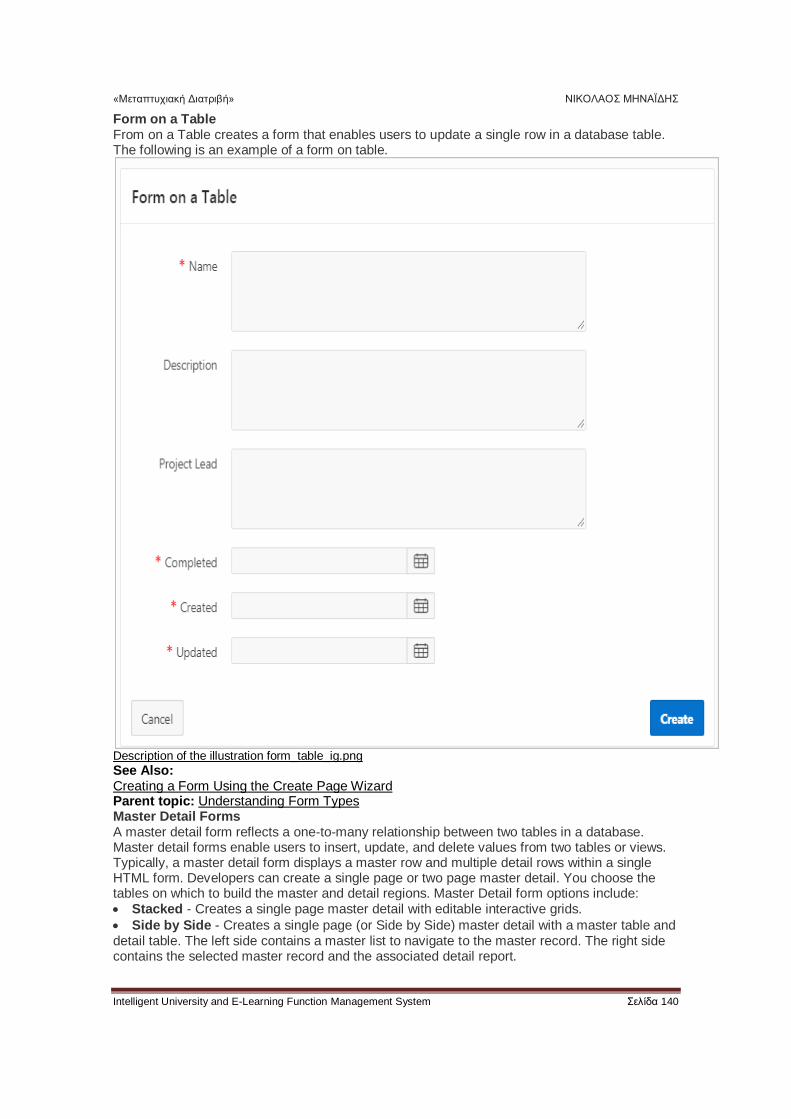
«Μεταπτυχιακή Διατριβή» ΝΙΚΟΛΑΟΣ ΜΗΝΑΪΔΗΣ
Intelligent University and E-Learning Function Management System Σελίδα 140
Form on a Table From on a Table creates a form that enables users to update a single row in a database table. The following is an example of a form on table.
Description of the illustration form_table_ig.png See Also: Creating a Form Using the Create Page Wizard Parent topic: Understanding Form Types Master Detail Forms A master detail form reflects a one-to-many relationship between two tables in a database. Master detail forms enable users to insert, update, and delete values from two tables or views. Typically, a master detail form displays a master row and multiple detail rows within a single HTML form. Developers can create a single page or two page master detail. You choose the tables on which to build the master and detail regions. Master Detail form options include: Stacked - Creates a single page master detail with editable interactive grids.
Side by Side - Creates a single page (or Side by Side) master detail with a master table and detail table. The left side contains a master list to navigate to the master record. The right side contains the selected master record and the associated detail report.
«Μεταπτυχιακή Διατριβή» ΝΙΚΟΛΑΟΣ ΜΗΝΑΪΔΗΣ
Intelligent University and E-Learning Function Management System Σελίδα 141
Drill Down - Creates a two page (or Drill Down) master detail. The first page contains an interactive report for the master table. The second page features a standard form for the master and interactive grid for the detail. a. form type:
Report with Form on Table
Report with List View on Table (Optimized for mobile apps)
Editable Interactive Grid
Form on a Table
Form on a Procedure
Form on a SQL Query
Form on Web Service
Form on a SQL Query
Form on a Web Service
Report and Form on Web Service About Oracle JET Oracle JET (JavaScript Extension Toolkit) is a collection of open source JavaScript libraries with a set of Oracle contributed JavaScript libraries. Oracle JET is targeted at intermediate and advanced JavaScript developers and provides a rich set of UI components that can be easily integrated into Oracle Application Express. Oracle JET is a modular toolkit which enables developers to use as much or as little of the features that they desire. How Oracle JET is integrated with Oracle Application Express Currently Oracle Application Express integrates some parts of Oracle JET , primarily with Chart region types, and Text field with Autocomplete item types. Note: Although Oracle JET provides two-way data binding (using knockout.js), currently Oracle Application Express does not natively utilize this aspect of the toolkit. Oracle JET uses a module loader (RequireJS) to only load modules that are required for specific functionality to work. This means that you do not have to load the entire Oracle JET library for certain functionality and also enables each module to define it’s own dependencies. At runtime, when a module is requested, the module loader looks at the module being requested for any dependencies to other modules. If there are any dependencies, these will also be loaded. Module loader can however result in a large number of additional resources being individually loaded at runtime, which can have a negative performance impact. For this reason, Oracle Application Express makes use of the RequireJS Optimization Tool, which:
provides a way to determine all the dependencies for modules either at design time or as part of a standard build process
bundles them up into one combined, minified file RequireJS Optimization Tool is loaded at runtime to avoid the need for all the additional requests. Find the list of the bundles used for Chart and Text field with Autocomplete native types.
jetCommonBundle.min.js
inputSearchBundle.min.js
chartBundle.min.js jetCommonBundle.min.js Note: You can utilize the Common bundle jetCommonBundle.min.js in your plug-ins. This Common Bundle gets included on any Oracle Application Express page as soon as a file is included with your plug-in, which defines the [require jet]prefix. This means that any module your plug-in uses that is already included in the common bundle does not need to be refetched by requireJS.
Directory: /images/libraries/apex/minified/
Included when: When a JavaScript file is requested that defines itself as requiring JET, by using the [require jet] prefix in Oracle Application Express, and the page is not in Debug mode When debugging, the bundle is not loaded and requireJS loads all the individual resources separately. inputSearchBundle.min.js
«Μεταπτυχιακή Διατριβή» ΝΙΚΟΛΑΟΣ ΜΗΝΑΪΔΗΣ
Intelligent University and E-Learning Function Management System Σελίδα 142
Directory: /images/libraries/apex/minified/
Included when: A Text Field with Autocomplete item is included on a page, and the page is not in debug mode. When debugging, the bundle is not loaded and requireJS loads all the individual resources separately. chartBundle.min.js
Directory: /images/libraries/apex/minified/
Included when: A JET chart is included on a page (for example, when a Chart region, or Interactive Grid region is added to a page), and the page is not in debug mode. When debugging, the bundle is not loaded and requireJS loads all the individual resources separately. About Supported Calendars App Builder supports two types of calendars: Calendar and Legacy Calendar. Calendar is based on the FullCalendar jQuery library and can only be customized through CSS. Legacy Calendar is template-based and may be deprecated in the future release. Tip: In previous releases Legacy Calendar was referred to as Calendar (Template), Classic calendar, Easy calendar, and SQL calendar). Both Calendar and Legacy Calendar enable you to create a calendar based on a table or SQL query you provide. During the creation process, you are prompted to select a date column and display column. Because it offers a better user interface and numerous additional features, Oracle recommends converting all legacy calendars to the latest calendar. Calendar The Calendar option supports:
Rendering calendar events on multiple views (Month, Week, Day, or List).
Rendering of duration and non-duration based events.
Ability to modify the start and end dates by dragging and dropping events on different dates. Drag and drop is only supported for local data sources, that is, database objects in the referenced database schema and not on external data sources such as a Google calendar.
Ability to change the duration by resizing the length of the events, by changing the end date.
Ability to Edit or Adding new events on calendar using forms by cllicking either on events or empty calendar cell.
Rendering events from external sources using web service calls or Google Calendar feeds.
Ability to render events titles on single or multiple lines.
Using different CSS classes, developer can choose different styles for different type of events.
Ability to download events in PDF printable format
Support of multiple formats for sharing events (iCal, CSV, XML).
Ability to add tooltip on Month/Week/Day views to make it easier for users to have a quick look at details of each event. Legacy Calendar Legacy Calendars option supports:
Creation of one legacy calendar per page.
Rendering of start date only.
Look and feel defined by templates.
Modification of start date by dragging and dropping events.
Calendars that include daily, weekly, and monthly views.
The date column determines the days on the calendar which contains entries.
The display column defines a specific row which displays the calendar. About Map Chart Support Map chart support in Oracle Application Express is based on the AnyChart AnyMap Interactive Maps Component. AnyMap is a flexible Macromedia Flash-based solution that enables developers to visualize geographical related data. Map charts are rendered by a browser and require Flash Player 9 or later. For more information about AnyChart, go to http://www.anychart.com
«Μεταπτυχιακή Διατριβή» ΝΙΚΟΛΑΟΣ ΜΗΝΑΪΔΗΣ
Intelligent University and E-Learning Function Management System Σελίδα 143
AnyChart stores map data in files with a *.amap extension, and supports 300 map files for the United States of America, Europe, Asia, Europe, Africa, Oceania, North America, and South America. To render a desired map, you select the map source in the wizard (for example, Germany) and the map XML automatically references the desired map source .amap file, germany.amap. To browse through the available maps, see "Map Reference" in AnyChart User's Guide: http://6.anychart.com/products/anymap/docs/ About Supported Charts App Builder supports two types of charts: Charts (based on the Oracle JavaScript Extension Toolkit (Oracle JET) Data Visualizations) and AnyChart Charts. App Builder supports the following charts: Chart - Chart support in Oracle Application Express is based on the Oracle JET Data Visualizations. Oracle JET empowers developers by providing a modular open source toolkit based on modern JavaScript, CSS3, and HTML5 design and development principles. The Oracle JET data visualization components include customizable charts, gauges, and other components that you can use to present flat or hierarchical data in a graphical display for data analysis. Each Oracle JET visualization supports animation, accessibility, responsive layout, internationalization, test automation, and a range of inter activity features. The charts provide dozens of different ways to visualize a data set, including bar, line, area, range, combination, scatter, bubble, polar, radar, pie, donut, funnel, and stock charts.. See Also: "Working with Data Visualizations" in JavaScript Extension Toolkit (JET) Developing Applications with Oracle JET.
AnyChart Chart - AnyChart chart support is based on a third party charting solution provided by AnyChart. This is a flexible Flash and JavaScript (HTML5) based solution that enables developers to create animated and compact interactive charts. AnyChart charts have been categorized as a legacy component and may be deprecated in the future release. About Themes Themes are collections of templates that enable developers to define the layout and style of an entire application. Themes provide developers with a complete set of templates that accommodate every UI pattern that may be needed in an application. Templates are organized first by template type and then by template class. Template types include page, region, report, list, button, label, and popup list of values (LOV). Each template type has a number of template classes. A template class defines the purpose of a template within a template type. For example, a region template can be classified as a form region template, a report region template, and so on. These classifications enable Oracle Application Express to map templates among themes, making it easy to quickly change the entire look and feel of an application. Administrators can add themes to the theme repository as follows: Workspace Themes - Workspace administrators can create themes that are available to all developers within the workspace. See "Managing Workspace Themes."
Public Themes - Instance administrators can create public themes by adding them to the Oracle Application Express Administration Services. Once added, these public themes are available to all developers across all workspaces in an instance. See "Managing Public Themes" in Oracle Application Express Administration Guide. About Responsive Design and the Universal Theme Universal Theme - 42 (Universal Theme) enables developers to build modern web applications without requiring extensive knowledge of HTML, CSS, or JavaScript About Responsive Design Responsive design enables you to design web pages so that the layout fits the available space regardless of the device on which page displays (for example, a desktop computer, laptop computer, tablet, or smartphone). By implementing a responsive design, the user gets the same full experience as they would on larger screens. On smart phones and tablets, the layout can adjusts to the size of the specific device. During this resizing process, elements shift position, re-size, or become hidden. The goal of responsive design is to present all essential content in a user friendly way for all possible screen sizes. Keep in mind, that responsive design is not just a matter of picking the correct set
«Μεταπτυχιακή Διατριβή» ΝΙΚΟΛΑΟΣ ΜΗΝΑΪΔΗΣ
Intelligent University and E-Learning Function Management System Σελίδα 144
of templates. As the application developer, you are responsible for using the templates and the available components to design a page that is truly responsive. The Universal Theme is an example of a responsive user interface theme. About the Universal Theme When you create a new application, the Create Application Wizard uses the Universal Theme. Key advantages of the Universal Theme include:
Responsive Design - Designed to work just as well on small screen devices (such as smartphones and tablets) as it does on larger screen devices (including laptops and desktops). The UI components in Universal Theme work across varying screen resolutions while maintaining the same or similar functionality. In addition, Universal Theme takes full advantage of ultra high screen resolutions by utilizing vector graphics where possible, and relying upon CSS3 features for UI styling.
Versatile User Interface - Provides all the components and building blocks necessary to build practically any type of business application user interface. To browse all of the components provided with Universal Theme go to the Universal Themeapplication at https://apex.oracle.com/ut and select Components.
Easy Customization - Effortlessly customize and fully control the look and feel of your applications without becoming an expert in UI design, HTML, CSS, or JavaScript. Using Theme Roller and Template Options, you can easily customize your application to fit your company's brand and customize the look and feel of various components using Template Options. The Universal Theme includes support for theme styles. A theme style is a CSS style sheet that is added to the base CSS. Developers can change the appearance of an application by altering the theme style using the Theme Roller utility. About Migrating Existing Mobile Applications to the Universal Theme jQuery Mobile and the jQuery Mobile User Interface used in previous releases have been desupported. If you have an existing mobile application that uses the jQuery Mobile User Interface, you should migrate your existing application to the Universal Theme. About Theme Styles A theme style defines a CSS style sheet that is added to the base CSS to alter the look and feel of an application. Newer themes such as Universal Theme - 42 can have a base CSS file plus the theme style CSS file. The theme style CSS file are referenced in the page template using the #THEME_STYLE_CSS# substitution string. The Application Express engine replaces this substitution string with the CSS file references defined in the theme style attributes. Use theme styles to customize themes, to switch to a different color scheme, apply a flat look, or make a theme responsive. A theme can have multiple theme styles with one style set as active. You can modify a theme style CSS file using Theme Roller. Once defined, developers can select a theme style by:
Editing the Theme Styles attribute when running the Create Application Wizard. See "Understanding Page Types, Features, and Settings."
Editing the User Interface. See "Editing a Theme Style from the User Interface Page."
Accessing the Create/Edit Theme page. See "Editing a Theme" and "Creating a Theme Style." About Template Options Template options enable developers to declaratively apply CSS modifiers to the templates they have chosen for pages, regions, reports, lists, breadcrumbs, items and buttons. A CSS modifier is a reference to a CSS class defined in a CSS style sheet. CSS modifiers enable a developer to use the same HTML markup but present it in a variety of different styles simply by applying a CSS. Template options reduce the need to have a large number of nearly identical templates defined in a theme in order to achieve different styles for button colors, region widths, font settings, item label markup, and so on. Examples of how developers can use template options include:
Applying different colors or accents
Applying different spacing and padding
Rendering buttons in different styles, with and without icons
Displaying form fields with different alignments.
«Μεταπτυχιακή Διατριβή» ΝΙΚΟΛΑΟΣ ΜΗΝΑΪΔΗΣ
Intelligent University and E-Learning Function Management System Σελίδα 145
Without template options, applying these variations would require a large number of nearly identical templates, or in-depth knowledge of CSS. Components that support template options include: pages; regions; classic reports; breadcrumbs; lists; items and labels; and buttons. Parent topic: Understanding Template Options About Default Template Options Developers can select template options that are not part of a template option group to be the default for a template. App Builderautomatically applies default template options by rendering the component that references the template. Default template options are not written to an actual component. Instead, a #DEFAULT# substitution string is defined for the component, thus enabling developers to centrally modify the template option defaults. Developers can choose not to use the template option defaults, which removes the #DEFAULT# substitution string from the component. If template option defaults are disabled, then developers can selectively apply available template options to a component. All template options that are selected directly when editing the component are written to the component's metadata, represented by their corresponding CSS classes string. At runtime, the selected template options and default template option are part of the default are combined with the component's CSS classes string and applied to the component. Parent topic: Understanding Template Options About Template Option Groups and Presets Developers can define the purpose of related template options by creating template option groups. Examples of template option groups include Button Size, Button Style, List Examples, List Style, and Form Label Position. When developers create a template option group, they can specify a template option preset at the template-level. For example, suppose you have a button template that has the template options Large and Small. If you define Small as the preset, then any new button referencing the template would automatically have the template option Small applied to it when is it created. Template options that are part of a group are optional unless a present is defined at the template-level. About Theme Subscriptions Subscribing to a master theme enables the theme to be upgraded during future Oracle Application Express releases. Developers subscribe to a theme when: Running the Create Application Wizard. When a developer runs the Create Application Wizard and selects a built-in theme, the theme is automatically subscribed to a master theme. As an alternative to using a built-in theme, the Create Application Wizard provides the option to copy a theme from an existing application. When copying a theme from an existing applications, developers can choose if they wish to have this theme be subscribed to. See "Understanding Page Types, Features, and Settings."
Creating a new theme from the Theme repository. When you create a new theme the associated application automatically subscribes to it. See "Creating a Theme." Once an application subscribes to a master theme only the default templates can be changed. All theme attributes, subscribed template options, and subscribed templates are set to read-only. In other words, only the default templates can be changed. The advantage of subscribing to a master theme is that the theme can be upgraded during future Oracle Application Express releases. When a theme is subscribed to, developers cannot modify the theme or template metadata when they access it from the theme or template edit pages. Parent topic: Understanding Theme Subscriptions About Modifying a Theme Subscription To modify a template without breaking a subscription to the master theme, a developer can create a local copy of the template in their workspace. Local template copies are not subscribed to and are therefore editable. You can take the same approach with theme styles. You can create a local copy of a theme style and then add it to a subscribed theme. Theme styles created locally are editable but will be excluded from theme refreshes. About Exporting and Importing Themes You export a theme in the same way you export any related application files. Exporting a theme from one development instance to another involves the following steps: 1. Create an application using the theme. See "Creating Database Applications."
«Μεταπτυχιακή Διατριβή» ΝΙΚΟΛΑΟΣ ΜΗΝΑΪΔΗΣ
Intelligent University and E-Learning Function Management System Σελίδα 146
2. Export the theme. See "Exporting Themes." 3. Import the exported file into the target Oracle Application Express instance. See "Importing Export Files." 4. Install the exported file from the Export Repository. See "Installing Export Files." About Cascading Style Sheets A Cascading Style Sheet (CSS) provides a way to control the style of a web page without changing its structure. When used properly, a CSS separates visual attributes such as color, margins, and fonts from the structure of the HTML document. Oracle Application Express includes themes that contain templates that reference their own CSS. The style rules defined in each CSS for a particular theme also determine the way reports and regions display. When using built-in themes, you can find the theme specific CSS files in the following locations:
/i/themes/theme_xx /i/themes/theme_xx/css
Theme specific image can be found in the following locations:
/i/themes/theme_xx /i/themes/theme_xx/images
Where xx is the theme number. Theme specific CSS files include the Oracle Application Express version number to preserve backward compatibility for imported applications using older versions of a theme. See Also: "Using Custom Cascading Style Sheets" Parent topic: Creating Custom Themes About Calling the JavaScript File from the Page Template In Oracle Application Express, you can reference a .js file in the page template. This approach makes all the JavaScript in that file accessible to the application. This is the most efficient approach since a .js file loads on the first page view of your application and is then cached by the browser. See Also: "JavaScript" Parent topic: Creating Custom Themes About Using Escaping Syntax in Substitution Strings Developers can append an exclamation mark (!) followed by a predefined filter name to substitution strings to escape special characters in the substitution value. Output escaping is an important security technique to avoid Cross Site Scripting (XSS) attacks in the browser. Selecting a Default Page Template This section describes how to select a default page template. You can specify a default page template in two ways:
Select a default page template within a specific theme.
Select a specific page template on a page-by-page basis. By default, the Application Express engine uses the Page template specified on the Themes page. Using Custom Cascading Style Sheets Upload or reference a cascading style sheet. A cascading style sheet (CSS) enables a developer to control the style of a web page without changing its structure. When used properly, a CSS separates visual attributes such as color, margins, and fonts from the structure of the HTML document. Oracle Application Express includes themes that contain templates that reference their own CSS. The style rules defined in each CSS for a particular theme also determine the way reports and regions display. About Uploading Cascading Style Sheets You can upload files (including CSS files) for use by a specific application or all applications within a workspace. To learn more, see "Managing Static Application Files" and "Managing Static Application Files." About Page Layout in Oracle Application Express The Application Express engine renders pages by combining templates with application components defined by the developer and data in the database.
«Μεταπτυχιακή Διατριβή» ΝΙΚΟΛΑΟΣ ΜΗΝΑΪΔΗΣ
Intelligent University and E-Learning Function Management System Σελίδα 147
The overall framework (or structure of a page) is determined by the page template. For example, the page template controls if a page uses tabs and a navigation bar. It can also define if a page includes a bar on the left side that serves as a placeholder for navigation or secondary content. Finally, a page template can include definitions of region positions, which enable precise control over placement of regions using HTML tables or style sheet definitions. The page template itself is composed of HTML combined with substitution strings, which are substituted with the appropriate components at runtime. As a developer, you add content to a page by creating a region. A region is an area of a page that serves as a container for content. Each region contains a different type of content such as HTML, a report, a form, a chart, a list, a breadcrumb, PL/SQL, a tree, a URL, or a calendar. You position a region either relative to other regions (that is, based on its sequence number and column), or by using a region position defined in the page template. The style of the region is also controlled by the region template. Like the page template, the region template defines the structure of the area that the region takes up on a page. It defines if the region title is displayed and where it is displayed relative to the main content or the body. A region can also define absolute positions for buttons. Optimizing a Page for Printing You can optimize a page for printing by creating a specific Printer Friendly template and selecting that template on the Create/Edit Theme page. Generally, a Printer Friendly template optimizes a page for printing. For example, a Printer Friendly template might:
Not display tabs or navigation bars
Display items as text instead of as form elements If the theme you select does not include a printer friendly template, you can create a Printer Friendly template by creating a new page template. Creating a Global Page to Display Components on Every Page A global page functions as a master page. A global page (previously referred to as Page 0) functions as a master page. Developers can create a separate Global page for each user interface. The Application Express engine renders all components you add to a Global page on every page within your application. You can further control whether the Application Express engine renders a component or runs a computation, validation, or process by defining conditions. About Regions Each page in an Oracle Application Express application contains one or more regions. A region is a area on a page that serves as a container for content. Each page can have any number of regions. You control the appearance of a region through a specific region template. The region template controls the look of the region, the size, determines whether there is a border or a background color, and what type of fonts display. A region template also determines the standard placement for any buttons placed in region positions. You can use regions to group page controls (such as items or buttons). You can create simple regions that do not generate additional HTML, or create elaborate regions that frame content within HTML tables or images. Regions display in sequence in the page template body or can be placed explicitly into region positions. The page structure can be defined using HTML tables or more commonly today using DIV tags. About Incorporating Content from Other Web Sites To incorporate content from other servers, you can create a region based on a URL to display content. Typically, pages in an application are based on data stored in an Oracle database. For example, suppose you wanted to reference the current Oracle stock price. You could create a region of type URL based on a URL. For example:
http://quote.yahoo.com/q?d=b&s=ORCL
You could then create an item called STOCK_SYMBOL and base your region on a stock price entered by the user. For example:
http://quote.yahoo.com/q?d=b&s=&STOCK_SYMBOL.
«Μεταπτυχιακή Διατριβή» ΝΙΚΟΛΑΟΣ ΜΗΝΑΪΔΗΣ
Intelligent University and E-Learning Function Management System Σελίδα 148
Sometimes (as is the case with the previous example) the HTML returned to the region is more than is needed. To restrict the HTML displayed, you can use the following region attributes:
URL (discard until but not including this text)
URL (discard after and including this text) Tip: The previous example may require that you set the Proxy Server application attribute. If you do not set the Proxy Server application attribute, you get an error message. Oracle Application Express uses the Oracle utl_http.request_pieces function to obtain the HTML generated from the given URL. See "Editing Application Attributes." Developers can also use the Region attribute Inclusion Mode to control how Oracle Application Express retrieves and displays the content. Options include:
IFrame - The browser displays the remote content in an HTML iframe. Oracle Application Express does not have to fetch this content into the database for display. Inline (escape special characters) - Causes the database to load the remote content at page rendering time. It then displays the fetched data inline, at the position of the region. Special HTML characters in the content are escaped, to prevent cross site scripting.
Inline (no escaping) - This mode is similar to Inline (escape special characters) except the HTML characters are not escaped. Developers should only use this mode if the remote content is always safe. About Managing Images To reference an image within an application, you must upload it to the static file repository. During the upload process, you specify whether the file is available to all applications or just a specific application. Rendering HTML Using Custom PL/SQL If you must generate specific HTML content not handled by Oracle Application Express forms, reports, and charts, you can use the PL/SQL region type. To generate HTML in this type of region, you need to use the PL/SQL Web Toolkit. You can reference session state using bind variable syntax. Keep in mind that when you generate HTML in this way, you do not get the same consistency and control provided with templates. To give you more control over HTML dynamically generated within a region, you can use PL/SQL. For example, to print the current date, you could create a region with the following source:
htp.p(TO_CHAR(SYSDATE,'Day Month DD, YYYY'));
This next example accesses tables:
DECLARE l_max_sal NUMBER; BEGIN SELECT max(sal) INTO l_max_sal FROM emp; htp.p('The maximum salary is: '||TO_CHAR(l_max_sal,'999,999.00')); END;
Managing Database Application Controls Developers can create and manage a variety of database application page controls, including page-level items, dynamic actions, buttons, and trees.
Managing Page-Level Items An item is part of an HTML form. Examples of page-level item include a check box, a date picker, plain text, a file browse field, a popup list of values, a select list, a text area, and so on.
Managing Dynamic Actions Dynamic actions enable developers to define complex client-side behavior declaratively without the need for JavaScript.
Managing Buttons You can use buttons to direct users to a specific page or URL, or to post or process information (for example, by creating Create, Cancel, Next, Previous, or Delete buttons). You can also configure buttons to display conditionally or warn users of unsaved changes.
«Μεταπτυχιακή Διατριβή» ΝΙΚΟΛΑΟΣ ΜΗΝΑΪΔΗΣ
Intelligent University and E-Learning Function Management System Σελίδα 149
Managing Trees Trees to display hierarchical information in a clear, easy-to-use format. You can create a tree control using a SQL query.
About Incorporating JavaScript into an Application Oracle Application Express includes multiple built-in interfaces especially designed for adding JavaScript. Understanding Page-Level Items An item is part of an HTML form such as a check box, date picker, display as text, file browse field, popup list of values, select list, or a text area. When defining an item, developers must follow defined naming conventions and follow specific rules when referencing item values stored in session state.
About the Differences Between Page Items and Application Items Page items are placed on a page and have associated user interface properties and Application items are not associated with a page.
About Item Naming Conventions When creating an item name, developers must follow very specific item naming conventions.
Referencing Item Values You can reference item values stored in session state in regions, computations, processes, validation, and branches.
About Referencing Items Using JavaScript When you reference an item, the best approach is to reference by ID.
Working with Multiple Select List Item Learn how to handle values returned from a multiple select list item. Parent topic: Managing Page-Level Items About the Differences Between Page Items and Application Items Page items are placed on a page and have associated user interface properties and Application items are not associated with a page. There are two types of items: page items and application items. Page items are placed on a page and have associated user interface properties, such as Display Only, Label and Label Template. Examples of page-level items include a check box, date picker, display as text, file browse field, popup list of values, select list, or a text area. In contrast Application items are not associated with a page and therefore have no user interface properties. You can use an application item as a global variable. See Also: "Managing Application-Level Items" Parent topic: Understanding Page-Level Items About Item Naming Conventions When creating an item name, developers must follow very specific item naming conventions. When specifying an item name, remember the following rules. Item names must:
Be unique within an application.
Not include quotation marks.
Begin with a letter or a number, and subsequent characters can be letters, numbers, or underscore characters.
Be case-insensitive.
Should not exceed 30 characters. Items longer than 30 characters cannot be referenced using bind variable syntax. See "Referencing Session State Using Bind Variable Syntax."
Cannot contain letters outside the base ASCII character set. As a best practice Oracle recommends including the page number when naming items. By default, wizards prefix page item names with P<page no>_<item name> (for example, P1_NAME). Parent topic: Understanding Page-Level Items Referencing Item Values You can reference item values stored in session state in regions, computations, processes, validation, and branches. Table 14-2 describes the supported syntax for referencing item values. Table 14-2 Syntax for Referencing Item Values
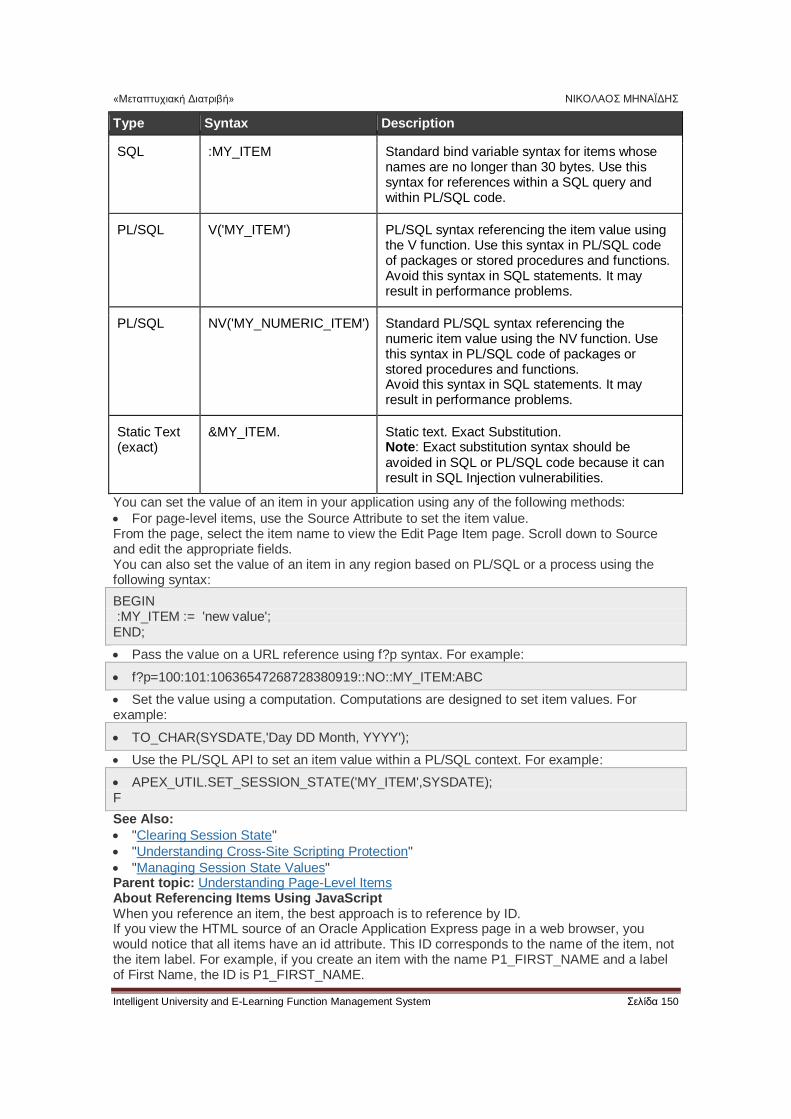
«Μεταπτυχιακή Διατριβή» ΝΙΚΟΛΑΟΣ ΜΗΝΑΪΔΗΣ
Intelligent University and E-Learning Function Management System Σελίδα 150
Type Syntax Description
SQL :MY_ITEM Standard bind variable syntax for items whose names are no longer than 30 bytes. Use this syntax for references within a SQL query and within PL/SQL code.
PL/SQL V('MY_ITEM') PL/SQL syntax referencing the item value using the V function. Use this syntax in PL/SQL code of packages or stored procedures and functions. Avoid this syntax in SQL statements. It may result in performance problems.
PL/SQL NV('MY_NUMERIC_ITEM') Standard PL/SQL syntax referencing the numeric item value using the NV function. Use this syntax in PL/SQL code of packages or stored procedures and functions. Avoid this syntax in SQL statements. It may result in performance problems.
Static Text (exact)
&MY_ITEM. Static text. Exact Substitution. Note: Exact substitution syntax should be avoided in SQL or PL/SQL code because it can result in SQL Injection vulnerabilities.
You can set the value of an item in your application using any of the following methods:
For page-level items, use the Source Attribute to set the item value. From the page, select the item name to view the Edit Page Item page. Scroll down to Source and edit the appropriate fields. You can also set the value of an item in any region based on PL/SQL or a process using the following syntax:
BEGIN :MY_ITEM := 'new value'; END;
Pass the value on a URL reference using f?p syntax. For example:
f?p=100:101:10636547268728380919::NO::MY_ITEM:ABC
Set the value using a computation. Computations are designed to set item values. For example:
TO_CHAR(SYSDATE,'Day DD Month, YYYY');
Use the PL/SQL API to set an item value within a PL/SQL context. For example:
APEX_UTIL.SET_SESSION_STATE('MY_ITEM',SYSDATE); F
See Also:
"Clearing Session State"
"Understanding Cross-Site Scripting Protection"
"Managing Session State Values" Parent topic: Understanding Page-Level Items About Referencing Items Using JavaScript When you reference an item, the best approach is to reference by ID. If you view the HTML source of an Oracle Application Express page in a web browser, you would notice that all items have an id attribute. This ID corresponds to the name of the item, not the item label. For example, if you create an item with the name P1_FIRST_NAME and a label of First Name, the ID is P1_FIRST_NAME.
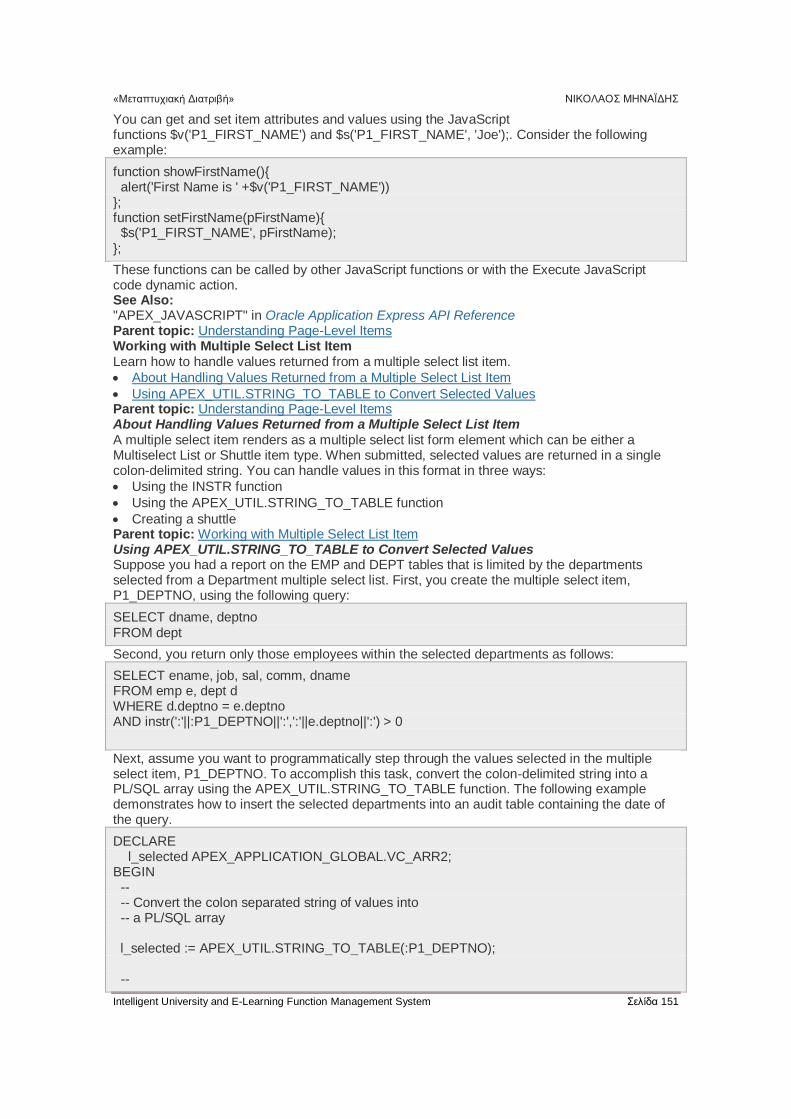
«Μεταπτυχιακή Διατριβή» ΝΙΚΟΛΑΟΣ ΜΗΝΑΪΔΗΣ
Intelligent University and E-Learning Function Management System Σελίδα 151
You can get and set item attributes and values using the JavaScript functions $v('P1_FIRST_NAME') and $s('P1_FIRST_NAME', 'Joe');. Consider the following example:
function showFirstName(){ alert('First Name is ' +$v('P1_FIRST_NAME')) }; function setFirstName(pFirstName){ $s('P1_FIRST_NAME', pFirstName); };
These functions can be called by other JavaScript functions or with the Execute JavaScript code dynamic action. See Also: "APEX_JAVASCRIPT" in Oracle Application Express API Reference Parent topic: Understanding Page-Level Items Working with Multiple Select List Item Learn how to handle values returned from a multiple select list item.
About Handling Values Returned from a Multiple Select List Item
Using APEX_UTIL.STRING_TO_TABLE to Convert Selected Values Parent topic: Understanding Page-Level Items About Handling Values Returned from a Multiple Select List Item A multiple select item renders as a multiple select list form element which can be either a Multiselect List or Shuttle item type. When submitted, selected values are returned in a single colon-delimited string. You can handle values in this format in three ways:
Using the INSTR function
Using the APEX_UTIL.STRING_TO_TABLE function
Creating a shuttle Parent topic: Working with Multiple Select List Item Using APEX_UTIL.STRING_TO_TABLE to Convert Selected Values Suppose you had a report on the EMP and DEPT tables that is limited by the departments selected from a Department multiple select list. First, you create the multiple select item, P1_DEPTNO, using the following query:
SELECT dname, deptno FROM dept
Second, you return only those employees within the selected departments as follows:
SELECT ename, job, sal, comm, dname FROM emp e, dept d WHERE d.deptno = e.deptno AND instr(':'||:P1_DEPTNO||':',':'||e.deptno||':') > 0
Next, assume you want to programmatically step through the values selected in the multiple select item, P1_DEPTNO. To accomplish this task, convert the colon-delimited string into a PL/SQL array using the APEX_UTIL.STRING_TO_TABLE function. The following example demonstrates how to insert the selected departments into an audit table containing the date of the query.
DECLARE l_selected APEX_APPLICATION_GLOBAL.VC_ARR2; BEGIN -- -- Convert the colon separated string of values into -- a PL/SQL array l_selected := APEX_UTIL.STRING_TO_TABLE(:P1_DEPTNO); --
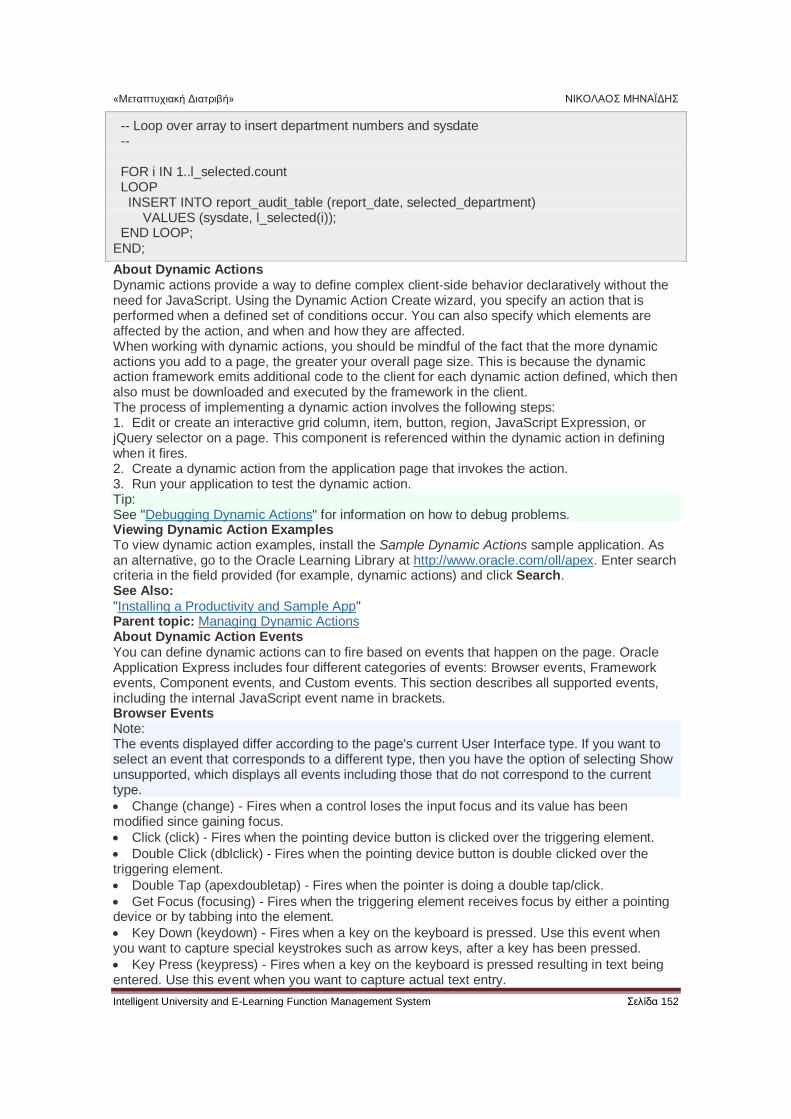
«Μεταπτυχιακή Διατριβή» ΝΙΚΟΛΑΟΣ ΜΗΝΑΪΔΗΣ
Intelligent University and E-Learning Function Management System Σελίδα 152
-- Loop over array to insert department numbers and sysdate -- FOR i IN 1..l_selected.count LOOP INSERT INTO report_audit_table (report_date, selected_department) VALUES (sysdate, l_selected(i)); END LOOP; END;
About Dynamic Actions Dynamic actions provide a way to define complex client-side behavior declaratively without the need for JavaScript. Using the Dynamic Action Create wizard, you specify an action that is performed when a defined set of conditions occur. You can also specify which elements are affected by the action, and when and how they are affected. When working with dynamic actions, you should be mindful of the fact that the more dynamic actions you add to a page, the greater your overall page size. This is because the dynamic action framework emits additional code to the client for each dynamic action defined, which then also must be downloaded and executed by the framework in the client. The process of implementing a dynamic action involves the following steps: 1. Edit or create an interactive grid column, item, button, region, JavaScript Expression, or jQuery selector on a page. This component is referenced within the dynamic action in defining when it fires. 2. Create a dynamic action from the application page that invokes the action. 3. Run your application to test the dynamic action. Tip: See "Debugging Dynamic Actions" for information on how to debug problems. Viewing Dynamic Action Examples To view dynamic action examples, install the Sample Dynamic Actions sample application. As an alternative, go to the Oracle Learning Library at http://www.oracle.com/oll/apex. Enter search criteria in the field provided (for example, dynamic actions) and click Search. See Also: "Installing a Productivity and Sample App" Parent topic: Managing Dynamic Actions About Dynamic Action Events You can define dynamic actions can to fire based on events that happen on the page. Oracle Application Express includes four different categories of events: Browser events, Framework events, Component events, and Custom events. This section describes all supported events, including the internal JavaScript event name in brackets. Browser Events Note: The events displayed differ according to the page's current User Interface type. If you want to select an event that corresponds to a different type, then you have the option of selecting Show unsupported, which displays all events including those that do not correspond to the current type.
Change (change) - Fires when a control loses the input focus and its value has been modified since gaining focus.
Click (click) - Fires when the pointing device button is clicked over the triggering element.
Double Click (dblclick) - Fires when the pointing device button is double clicked over the triggering element.
Double Tap (apexdoubletap) - Fires when the pointer is doing a double tap/click.
Get Focus (focusing) - Fires when the triggering element receives focus by either a pointing device or by tabbing into the element.
Key Down (keydown) - Fires when a key on the keyboard is pressed. Use this event when you want to capture special keystrokes such as arrow keys, after a key has been pressed.
Key Press (keypress) - Fires when a key on the keyboard is pressed resulting in text being entered. Use this event when you want to capture actual text entry.
«Μεταπτυχιακή Διατριβή» ΝΙΚΟΛΑΟΣ ΜΗΝΑΪΔΗΣ
Intelligent University and E-Learning Function Management System Σελίδα 153
Key Release (keyup) - Fires when a key on the keyboard is released. Use this event when you want to capture special keystrokes such as arrow keys, after a key has been released.
Lose Focus (focusout) - Fires when the triggering element loses focus either by the pointing device or by tabbing out of the element.
Mouse Button Press (mousedown) - Fires when the pointing device button is pressed over the triggering element.
Mouse Button Release (mouseup) - Fires when the pointing device button is released over the triggering element.
Mouse Enter (mouseenter) - Fires once when the pointing device is moved into the triggering element.
Mouse Leave (mouseleave) - Fires once when the pointing device is moved away from the triggering element.
Mouse Move (mousemove) - Fires when the pointing device is moved while it is over the triggering element.
Pan (apexpan) - Fires when the pointer is down, then moved in a horizontal direction.
Page Load ready – Fires when the page loads.
Page Unload (unload) - Fires when a page is unloaded.
Press (apexpress) - Fires when the pointer is down for greater than 250ms.
Resize (resize) - Fires when the browser window is resized.
Resource Load (load) - When the triggering element is the window element (using a JavaScript Expression value of window in the When attributes), the event fires when the browser finishes loading all content within a document, including window, frames, objects and images. For other elements, this event can only be used for elements associated with a URL: images, scripts, frames, iframes.
Scroll (scroll) - Fires when a scrollable triggering element is scrolled. This could be the browser window (using a JavaScript Expression value of window in the When attributes), scrollable frames or elements with the overflow CSS property set to scroll (or auto when the element's explicit height is less than the height of its contents).
Select (select) - Fires when a user selects some text in a text field.
Swipe (apexswipe) - Fires when the pointer is moving fast in a horizontal direction.
Tap (apextap) - Fires when the pointer is doing a small tap click. Framework Events
After Refresh (apexafterrefresh) - Fires after the triggering element has been refreshed. The event is only valid for triggering elements that perform Partial Page Refresh and fire this event. The native components that support this are Interactive Reports, Classic Reports, Charts, List View and all item types with cascading LOV support. Plug-ins might support this event as well.
Before Page Submit (apexbeforepagesubmit) - Fires before a page being submitted.
Before Refresh (apexbeforerefresh) - Fires before the triggering element has been refreshed. The event is only valid for triggering elements that perform Partial Page Refresh and fire this event. The native components that support this are Interactive Reports, Classic Reports, Charts, List View and all item types with cascading LOV support. Plug-ins might support this event as well.
Dialog Closed (apexafterclosedialog) - Fires when an Application Express dialog is closed. This event only fires when the dialog is closed using the 'Close Dialog' page process, or the 'Close Dialog' dynamic action. Component Events These events are available when there is a component (either an item, region, or dynamic action) available to your application that triggers a custom event. These events appear in the following format Event name [Component Name], for example the Change Order event triggered by the Shuttle native item type appears as Change Order [Shuttle]. Component events are either triggered from native components shipped with Oracle Application Express, or from plug-in components you have installed into your application.
Events triggered by native components:
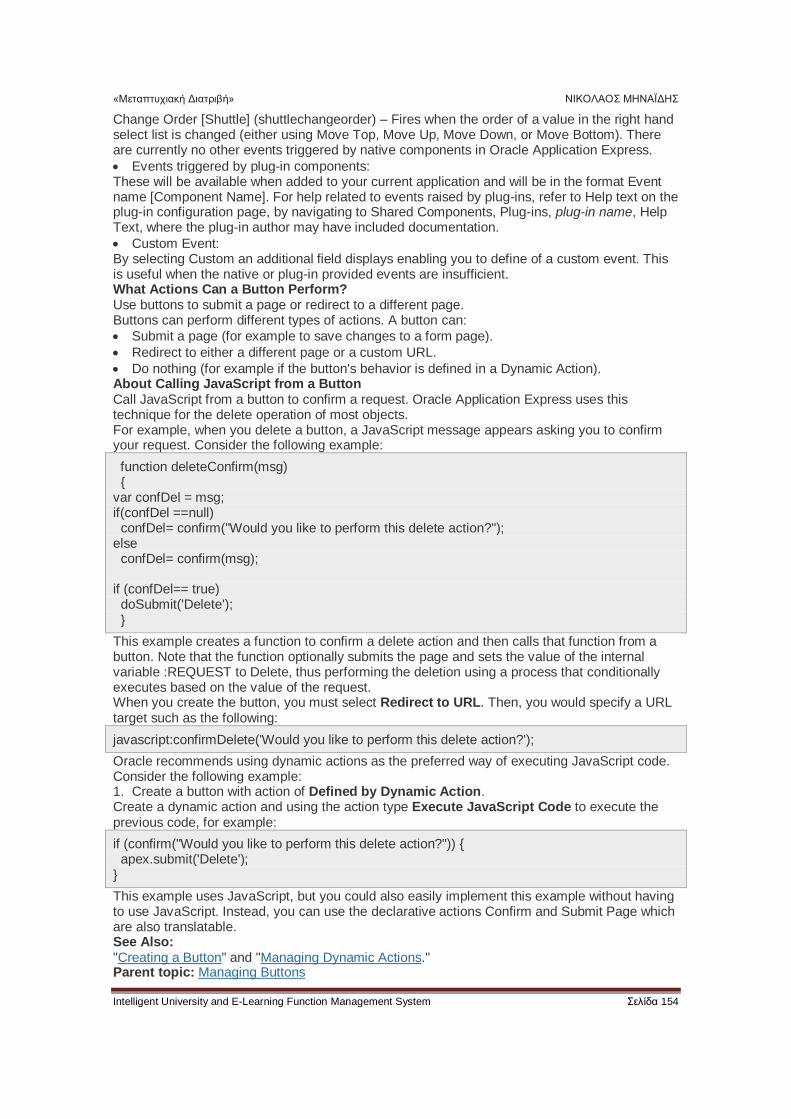
«Μεταπτυχιακή Διατριβή» ΝΙΚΟΛΑΟΣ ΜΗΝΑΪΔΗΣ
Intelligent University and E-Learning Function Management System Σελίδα 154
Change Order [Shuttle] (shuttlechangeorder) – Fires when the order of a value in the right hand select list is changed (either using Move Top, Move Up, Move Down, or Move Bottom). There are currently no other events triggered by native components in Oracle Application Express.
Events triggered by plug-in components: These will be available when added to your current application and will be in the format Event name [Component Name]. For help related to events raised by plug-ins, refer to Help text on the plug-in configuration page, by navigating to Shared Components, Plug-ins, plug-in name, Help Text, where the plug-in author may have included documentation.
Custom Event: By selecting Custom an additional field displays enabling you to define of a custom event. This is useful when the native or plug-in provided events are insufficient. What Actions Can a Button Perform? Use buttons to submit a page or redirect to a different page. Buttons can perform different types of actions. A button can:
Submit a page (for example to save changes to a form page).
Redirect to either a different page or a custom URL.
Do nothing (for example if the button's behavior is defined in a Dynamic Action). About Calling JavaScript from a Button Call JavaScript from a button to confirm a request. Oracle Application Express uses this technique for the delete operation of most objects. For example, when you delete a button, a JavaScript message appears asking you to confirm your request. Consider the following example:
function deleteConfirm(msg) { var confDel = msg; if(confDel ==null) confDel= confirm("Would you like to perform this delete action?"); else confDel= confirm(msg); if (confDel== true) doSubmit('Delete'); }
This example creates a function to confirm a delete action and then calls that function from a button. Note that the function optionally submits the page and sets the value of the internal variable :REQUEST to Delete, thus performing the deletion using a process that conditionally executes based on the value of the request. When you create the button, you must select Redirect to URL. Then, you would specify a URL target such as the following:
javascript:confirmDelete('Would you like to perform this delete action?');
Oracle recommends using dynamic actions as the preferred way of executing JavaScript code. Consider the following example: 1. Create a button with action of Defined by Dynamic Action. Create a dynamic action and using the action type Execute JavaScript Code to execute the previous code, for example:
if (confirm("Would you like to perform this delete action?")) { apex.submit('Delete'); }
This example uses JavaScript, but you could also easily implement this example without having to use JavaScript. Instead, you can use the declarative actions Confirm and Submit Page which are also translatable. See Also: "Creating a Button" and "Managing Dynamic Actions." Parent topic: Managing Buttons
«Μεταπτυχιακή Διατριβή» ΝΙΚΟΛΑΟΣ ΜΗΝΑΪΔΗΣ
Intelligent University and E-Learning Function Management System Σελίδα 155
About Incorporating JavaScript into an Application Oracle Application Express includes multiple built-in interfaces especially designed for adding JavaScript. Adding JavaScript to a web application is a great way to add features that mimic those found in client/server applications without sacrificing all the benefits of web deployment. Remember that JavaScript is not appropriate for data intensive validations. For example, to verify that a name is contained within a large database table, you must pull down every record to the client, creating a huge HTML document. In general, complex operations are much better suited for server-side Application Express validations instead of JavaScript. To learn more, see the JavaScript discussion for the appropriate control or component. Adding Navigation Create application navigation controls including tabs, navigation menus, breadcrumbs, navigation bar entries, and branches When you build a database application, you can include different types of navigation controls. However, available navigation options depend upon the application theme. Common navigation controls include tabs, lists (including navigation menus), breadcrumbs, navigation bar entries, and branches. About Using Lists as Navigation You can add navigation to your application by creating a list (or a shared collection of links). You add a list to a page by creating a region and specifying the region type as List. You control the appearance of a list through list templates. For example, you can create static list that functions as navigation using the template Vertical Unordered List with Bullets. Newer themes, such as Universal Theme - 42, support the creation of navigation menus and navigation bars. Navigation menus are lists that render at the top of the page (similar to tabs) or display as a side bar. A navigation bar displays with a list template in the #NAVIGATION_BAR# position on your page template. The Sample Database Application includes a navigation menu and a navigation bar. About Tabs Tabs are an effective way to navigate users between pages of an application. The ability to include tabs in your application depends upon your application theme. Older themes, such as such as Theme 26 - Productivity Applications, include tab-based navigation. Newer themes, such a Universal Theme - 42, include list-based navigation menus. An application can have pages with no tabs, one level of tabs, and two levels of tabs. Standard tabs enable you to display only one level of tabs. To display two levels of tabs, you define both Parent tabs and Standard tabs. Tip: As an alternative to tabs, you can use lists to display tab controls. List templates provide greater control over HTML generation. App Builder includes two different types of tabs:
Standard tabs An application having only one level of tabs uses a standard tab set. A standard tab can have a one-to-one relationship with a page and is associated with a specific page and page number. You can use standard tabs to link users to a specific page.
Parent tabs Parent tabs can control the display of standard tab sets and can be current for many pages. Clicking a parent tab displays the corresponding standard tab, with the default page as the current page. Parent tabs give users another level of navigation and a context (or sense of place) within the application. You can use parent tabs to link users to a specific URL associated with a specific page. You can group tabs into collections called a tab set. Each tab must be part of a tab set. What Are Breadcrumbs? A breadcrumb is a hierarchical list of links that indicates where the user is within the application from a hierarchical perspective. Users can click a specific breadcrumb link to instantly view the page. You use breadcrumbs as a second level of navigation at the top of each page, complementing other user interface elements such as tabs and lists.
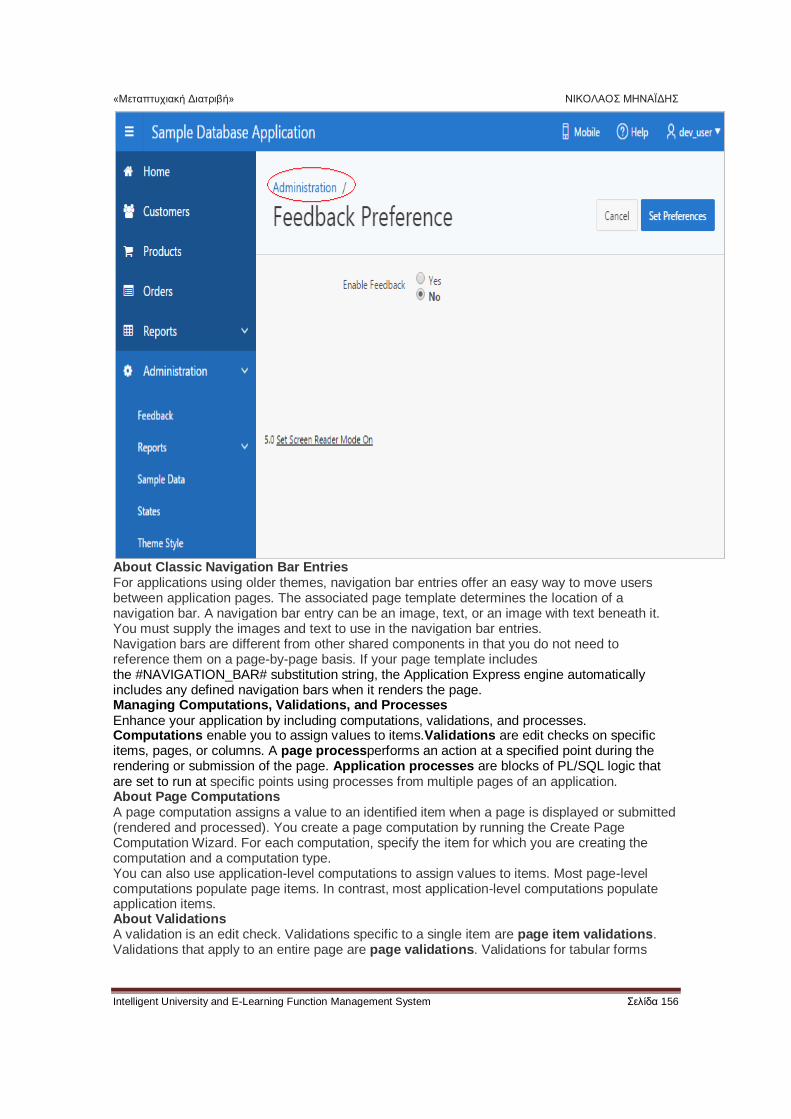
«Μεταπτυχιακή Διατριβή» ΝΙΚΟΛΑΟΣ ΜΗΝΑΪΔΗΣ
Intelligent University and E-Learning Function Management System Σελίδα 156
About Classic Navigation Bar Entries For applications using older themes, navigation bar entries offer an easy way to move users between application pages. The associated page template determines the location of a navigation bar. A navigation bar entry can be an image, text, or an image with text beneath it. You must supply the images and text to use in the navigation bar entries. Navigation bars are different from other shared components in that you do not need to reference them on a page-by-page basis. If your page template includes the #NAVIGATION_BAR# substitution string, the Application Express engine automatically includes any defined navigation bars when it renders the page. Managing Computations, Validations, and Processes Enhance your application by including computations, validations, and processes. Computations enable you to assign values to items.Validations are edit checks on specific items, pages, or columns. A page processperforms an action at a specified point during the rendering or submission of the page. Application processes are blocks of PL/SQL logic that are set to run at specific points using processes from multiple pages of an application. About Page Computations A page computation assigns a value to an identified item when a page is displayed or submitted (rendered and processed). You create a page computation by running the Create Page Computation Wizard. For each computation, specify the item for which you are creating the computation and a computation type. You can also use application-level computations to assign values to items. Most page-level computations populate page items. In contrast, most application-level computations populate application items. About Validations A validation is an edit check. Validations specific to a single item are page item validations. Validations that apply to an entire page are page validations. Validations for tabular forms
«Μεταπτυχιακή Διατριβή» ΝΙΚΟΛΑΟΣ ΜΗΝΑΪΔΗΣ
Intelligent University and E-Learning Function Management System Σελίδα 157
specific to a single column are column level validations. Validations for tabular forms that do not apply to a single column are tabular form row validations. You can define a validation declaratively by selecting a validation method. You enter the actual validation edit check in the Validation Messages field. Be aware that if a validation fails, subsequent page processes or computations do not occur. Also remember that the validation you enter must be consistent with the validation type you selected. About Determining When Validations Execute When creating a validation, the Always Execute attribute determines if validations execute when a page is submitted. Use this attribute for buttons or certain page items that submit a page. The Always Execute attribute has two options: Yes - The validation always executes independent of validation settings for buttons or items on a page. For example, select Yes if your validation is a security check which determines if the current user is allowed to modify or delete the current record. This ensures the validation executes for any operation and prevents unprivileged users from modifying data.
No - The validation only executes if the button or item used to submit the page has the Execute Validations attributes set to Yes. For example, it is not useful to verify that an item be numeric and display an error message if the user is simply deleting a record. In that example, the validations should only execute when the user clicks the Create or Apply Changes buttons. To accomplish this behavior:
For the validation, set Always Execute to No
For the Create and Apply Changes buttons, set Execute Validations to Yes.
For the Delete button, set Execute Validations to No to avoid unnecessary validations. About Defining How Validation Error Messages Display You can choose to have validation error messages display inline (that is, on the page where the validation is performed) or on a separate error page. You define how a validation error message displays by configuring the following validation attributes: 1. Error Message - Enter the error message text in this field. 2. Display Location - Select where the error message displays for this validation. Validation error messages display on a separate error page, or inline with the existing page. Inline error messages display underneath the Associated Item label and/or in a Notification area, defined as part of the page template. Tip: From Component View, this attribute is named Error Message display location. Options include:
Inline with Field and in Notification - Error displays inline within the field label and within a notification area (defined as part of the page template).
Inline with Field - Error displays inline within the field label.
Inline in Notification - Error displays inline within a notification area (defined as part of the page template).
On Error Page - Displays the error on a separate error page. To create a hard error that stops all processing (including validations), you must display the error on an error page. 3. Associated Item (or Column) - Select the item (or column) where this validation error message displays. If you select an item and the Error message display location includes Inline with Field, the error message displays underneath the label of the specified item. If the Error message display location does not include Inline with Field, this attribute has no impact on the display of the error message. See Also: "Editing a Validation" Parent topic: Understanding Validations Processing Validations Conditionally You can control when and if a validation is performed by configuring the following Conditions attributes:
«Μεταπτυχιακή Διατριβή» ΝΙΚΟΛΑΟΣ ΜΗΝΑΪΔΗΣ
Intelligent University and E-Learning Function Management System Σελίδα 158
1. When Button Pressed - If you want this page processing component to execute only when the specified button is clicked, select a button from the list. You can incorporate this button condition with other conditions to further refine when this page processing component executes. If no button is pressed, other conditions are evaluated before performing the validation. 2. Execution Scope - Applicable only to tabular forms. Specify the execution scope:
For Created and Modified Rows - The validation executes only for created and modified rows in your tabular form. All Submitted Rows - The validation executes for every submitted row. 3. Condition Type - Select a condition type from the list that must be met in order for this component to be rendered or processed. To view a list of options, click the Help tab. See Also:
"Editing a Validation"
"Understanding Conditional Rendering and Processing" Parent topic: Understanding Validations About Altering the Go to Error Link If you define an associated item, Oracle Application Express renders a Go to Error link in the Notification display location next to the corresponding error message. When clicked, the user's focus is set to the associated item. You can alter the Go to Error text to change the default text or to translate it into a language that is not translated by default with Oracle Application Express. In either case, define a text message called APEX.GO_TO_ERROR with the text and language of your choice. Additionally, you can disable this functionality and remove the Go to Error link by setting the text of the APEX.GO_TO_ERROR text message to just a single space. See Also: "Translating Messages Used Internally by Oracle Application Express" Parent topic: Understanding Validations What Happens When a Validation Fails? If a page is submitted and some of the validations fail, Oracle Application Express redisplays the existing page with all inline validation errors. While displaying inline errors, Oracle Application Express does not execute computations, application processes, or page processes (for example, Automated Row Fetch) which are defined to execute during Page Rendering (in other words, all "On Load %" display points). The one exception is if the computations and processes use the condition type Inline Validation Errors Displayed. The reason for skipping these computations and processes is that any of they could potentially alter the data entered by the user. For example, an Automated Row Fetch process would fetch and overwrite the modified data with the values from the database when the user actually wants to get the entered data in order to fix the validation error. If a computation is skipped, the following displays in the debug output:
Do not perform computation because inline validation errors found.
If an application or page process is skipped, the following displays in the debug output:
Skip because inline validation errors found.
About Page Processes A page process performs an action at a specified point during the rendering or submission of the page. For example, you can create a page process to execute logic or to make a call to the Application Express engine. A page process is a unit of logic that runs when a specific event occurs, such as loading or submitting a page. From a functional perspective, there is no difference between page-level and application-level processes. The difference between these two process types is where the process is defined, that is at the page-level or at the application level. About Branches A branch is an instruction to go to a specific page, procedure, or URL. For example, you can branch from page 1 to page 2 after page 1 is submitted. When you create a branch, you specify a Branch Point and Branch Type.
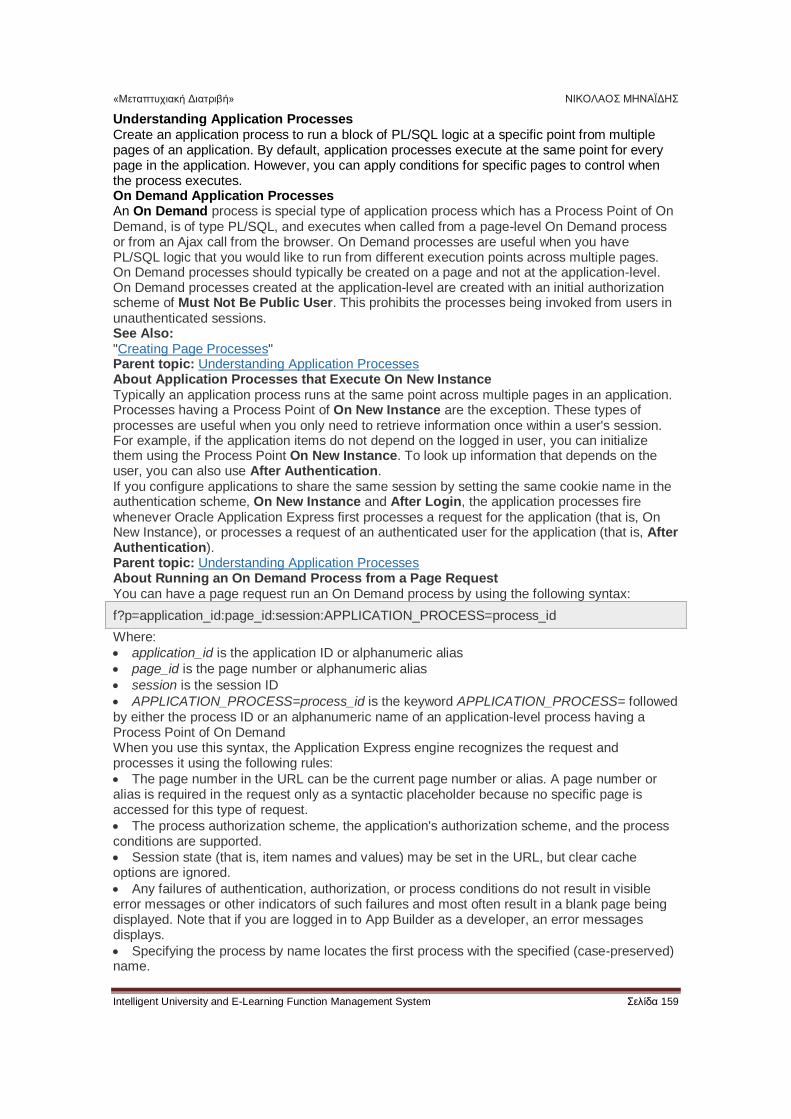
«Μεταπτυχιακή Διατριβή» ΝΙΚΟΛΑΟΣ ΜΗΝΑΪΔΗΣ
Intelligent University and E-Learning Function Management System Σελίδα 159
Understanding Application Processes Create an application process to run a block of PL/SQL logic at a specific point from multiple pages of an application. By default, application processes execute at the same point for every page in the application. However, you can apply conditions for specific pages to control when the process executes. On Demand Application Processes An On Demand process is special type of application process which has a Process Point of On Demand, is of type PL/SQL, and executes when called from a page-level On Demand process or from an Ajax call from the browser. On Demand processes are useful when you have PL/SQL logic that you would like to run from different execution points across multiple pages. On Demand processes should typically be created on a page and not at the application-level. On Demand processes created at the application-level are created with an initial authorization scheme of Must Not Be Public User. This prohibits the processes being invoked from users in unauthenticated sessions. See Also: "Creating Page Processes" Parent topic: Understanding Application Processes About Application Processes that Execute On New Instance Typically an application process runs at the same point across multiple pages in an application. Processes having a Process Point of On New Instance are the exception. These types of processes are useful when you only need to retrieve information once within a user's session. For example, if the application items do not depend on the logged in user, you can initialize them using the Process Point On New Instance. To look up information that depends on the user, you can also use After Authentication. If you configure applications to share the same session by setting the same cookie name in the authentication scheme, On New Instance and After Login, the application processes fire whenever Oracle Application Express first processes a request for the application (that is, On New Instance), or processes a request of an authenticated user for the application (that is, After Authentication). Parent topic: Understanding Application Processes About Running an On Demand Process from a Page Request You can have a page request run an On Demand process by using the following syntax:
f?p=application_id:page_id:session:APPLICATION_PROCESS=process_id
Where:
application_id is the application ID or alphanumeric alias
page_id is the page number or alphanumeric alias
session is the session ID
APPLICATION_PROCESS=process_id is the keyword APPLICATION_PROCESS= followed by either the process ID or an alphanumeric name of an application-level process having a Process Point of On Demand When you use this syntax, the Application Express engine recognizes the request and processes it using the following rules:
The page number in the URL can be the current page number or alias. A page number or alias is required in the request only as a syntactic placeholder because no specific page is accessed for this type of request.
The process authorization scheme, the application's authorization scheme, and the process conditions are supported.
Session state (that is, item names and values) may be set in the URL, but clear cache options are ignored.
Any failures of authentication, authorization, or process conditions do not result in visible error messages or other indicators of such failures and most often result in a blank page being displayed. Note that if you are logged in to App Builder as a developer, an error messages displays.
Specifying the process by name locates the first process with the specified (case-preserved) name.
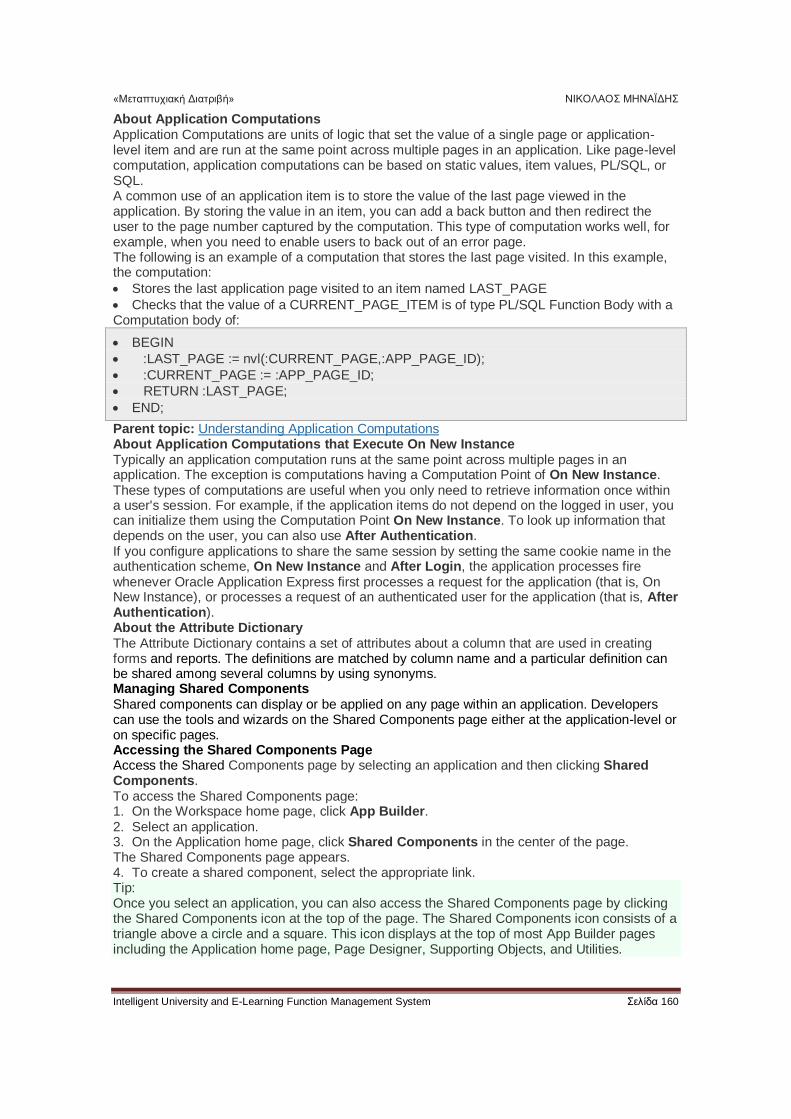
«Μεταπτυχιακή Διατριβή» ΝΙΚΟΛΑΟΣ ΜΗΝΑΪΔΗΣ
Intelligent University and E-Learning Function Management System Σελίδα 160
About Application Computations Application Computations are units of logic that set the value of a single page or application-level item and are run at the same point across multiple pages in an application. Like page-level computation, application computations can be based on static values, item values, PL/SQL, or SQL. A common use of an application item is to store the value of the last page viewed in the application. By storing the value in an item, you can add a back button and then redirect the user to the page number captured by the computation. This type of computation works well, for example, when you need to enable users to back out of an error page. The following is an example of a computation that stores the last page visited. In this example, the computation:
Stores the last application page visited to an item named LAST_PAGE
Checks that the value of a CURRENT_PAGE_ITEM is of type PL/SQL Function Body with a Computation body of:
BEGIN
:LAST_PAGE := nvl(:CURRENT_PAGE,:APP_PAGE_ID);
:CURRENT_PAGE := :APP_PAGE_ID;
RETURN :LAST_PAGE;
END;
Parent topic: Understanding Application Computations About Application Computations that Execute On New Instance Typically an application computation runs at the same point across multiple pages in an application. The exception is computations having a Computation Point of On New Instance. These types of computations are useful when you only need to retrieve information once within a user's session. For example, if the application items do not depend on the logged in user, you can initialize them using the Computation Point On New Instance. To look up information that depends on the user, you can also use After Authentication. If you configure applications to share the same session by setting the same cookie name in the authentication scheme, On New Instance and After Login, the application processes fire whenever Oracle Application Express first processes a request for the application (that is, On New Instance), or processes a request of an authenticated user for the application (that is, After Authentication). About the Attribute Dictionary The Attribute Dictionary contains a set of attributes about a column that are used in creating forms and reports. The definitions are matched by column name and a particular definition can be shared among several columns by using synonyms. Managing Shared Components Shared components can display or be applied on any page within an application. Developers can use the tools and wizards on the Shared Components page either at the application-level or on specific pages. Accessing the Shared Components Page Access the Shared Components page by selecting an application and then clicking Shared Components. To access the Shared Components page: 1. On the Workspace home page, click App Builder. 2. Select an application. 3. On the Application home page, click Shared Components in the center of the page. The Shared Components page appears. 4. To create a shared component, select the appropriate link. Tip: Once you select an application, you can also access the Shared Components page by clicking the Shared Components icon at the top of the page. The Shared Components icon consists of a triangle above a circle and a square. This icon displays at the top of most App Builder pages including the Application home page, Page Designer, Supporting Objects, and Utilities.
«Μεταπτυχιακή Διατριβή» ΝΙΚΟΛΑΟΣ ΜΗΝΑΪΔΗΣ
Intelligent University and E-Learning Function Management System Σελίδα 161
Shared Components Page Use the tools and wizards on the Shared Components page either at the application-level or on specific pages. The Shared Components page is divided into regions.
Application Logic
Security
Other Components
Navigation
User Interface
Files
Data Sources
Reports
Globalization
Tasks Region
Workspace Objects Region Parent topic: Managing Shared Components Application Logic The following table describes the links under Application Logic on the Shared Components page. Table 17-1 Application Logic Links on the Shared Components Page
Link Description
Application Definition Attributes
Links to the Edit Application Definition page. Use this page to edit attributes for an application. Attributes are grouped into four categories: Definition, Security, Globalization, and User Interface. See Also: "Managing Application Attributes"
Application Items Application-level items do not display, but are used as global variables to the application. Commonly, you set the value of a page-level item using an application or page computations. . See Also: "Managing Application-Level Items"
Application Processes Use application processes to run PL/SQL logic:
At specific points for each page in an application
As defined by the conditions under which the process is set to execute
Upon the creation of a new session Note that On Demand processes execute only when called from a page-level On Demand process or when called using Ajax from the browser. See Also: "Understanding Application Processes"
Application Settings Application Settings enable developers to define application level configuration options. See Also: "Managing Application Settings"
Application Computations Use application-level computations to assign values to application and page-level items for each page displayed or upon the creation of a new application session. You can also create an application-level computation and execute it conditionally on multiple pages. See Also: "Understanding Application Computations"
Build Options Use build options to conditionally display or process specific
«Μεταπτυχιακή Διατριβή» ΝΙΚΟΛΑΟΣ ΜΗΝΑΪΔΗΣ
Intelligent University and E-Learning Function Management System Σελίδα 162
Link Description
functionality within an application. You can use build options to control which features of an application are turned on for each application deployment. See Also: "Using Build Options to Control Configuration".
Parent topic: Shared Components Page Security The following table describes the links under Security on the Shared Components page. Table 17-2 Security Links on the Shared Components Page
Link Description
Security Attributes Use the Edit Security Attributes page to configure general security attributes for all pages within an application. See Also: "Configuring Security Attributes"
Authentication Schemes Authentication is the process of establishing each user's identity before they can access your application. Authentication may require a user to enter a user name and password or may involve verification of a user's identity or use of a secure key. See Also: "Establishing User Identity Through Authentication"
Authorization Schemes Authorization restricts user access to specific controls or components based on predefined user privileges. See Also: "Providing Security Through Authorization"
Session State Protection Session State Protection is a built-in functionality that prevents hackers from tampering with the URLs within your application. URL tampering can adversely affect program logic, session state contents, and information privacy. See Also: "Preventing URL Tampering"
Web Credentials Web Credentials to connect to REST Enabled SQL or other external REST services. Oracle Application Express stores these securely stores and encrypts these credentials for use by Oracle Application Express components. Credentials cannot be retrieved back in clear text. See Also: "Managing Web Credentials"
Application Access Control Manage application access control roles and user role assignments. See Also: "Managing Roles and User Assignments"
Parent topic: Shared Components Page Other Components The following table describes the links under Other Components on the Shared Components page. Table 17-3 Other Component Links on the Shared Components Page
Link Description
List of Values A list of values (LOV) is a static or dynamic set of values used to display a popup list of values, select list, check box, or radio group. See Also: "Creating Lists of Values at the Application-Level"
«Μεταπτυχιακή Διατριβή» ΝΙΚΟΛΑΟΣ ΜΗΝΑΪΔΗΣ
Intelligent University and E-Learning Function Management System Σελίδα 163
Link Description
Plug-ins App Builder includes built-in item types, region types, dynamic actions, and processes. Use plug-ins to add new declarative types in to your application. See Also: "Implementing Plug-ins"
Component Settings Use Component Settings to set application-level values for built-in Oracle Application Express components and installed plug-ins. See Also: "Managing Component Settings"
Shortcuts Use shortcuts to avoid repetitive coding of HTML or PL/SQL functions. You can create a shortcut to define a page control such as a button, HTML text, a PL/SQL procedure, or HTML. Once you define a shortcut, it is stored in a central repository so you can reference it from various locations within your application. See Also: "Using Shortcuts"
Email Templates Create templates to define the HTML format and Plain Text formats for the emails you wish to send from an application. See Also: "Managing Email Templates"
Parent topic: Shared Components Page Navigation The following table describes the links under Navigation on the Shared Components page. Table 17-4 Navigation Links on the Shared Components Page
Link Description
Lists A list is a shared collection of links. You control the appearance of a list through list templates. Each list element has a display condition that enables you to control when it displays. See Also: "Creating Lists"
Navigation Menu A navigation menu is a list links that enables users to navigate the pages in an application. Navigation menus are only supported in applications using the Universal Theme - 42. See Also: "Managing Navigation Menus"
Tabs Note: Tabs only appear if the associated application uses an older theme. In new themes, Tabs have been replaced with Navigation Menu. Tabs are an effective way to navigate users between pages in an application. You can create two types of tabs: standard tabs or parent tabs. A standard tab set is associated with a specific page and page number. A parent tab set functions as a container to hold a group of standard tabs. See Also: "Creating Tabs"
Breadcrumbs Breadcrumbs provide users with hierarchical navigation. A breadcrumb is a hierarchical list of links that display using templates. You can display a breadcrumb as a list of links or as a breadcrumb path. See Also: "Creating Breadcrumbs"
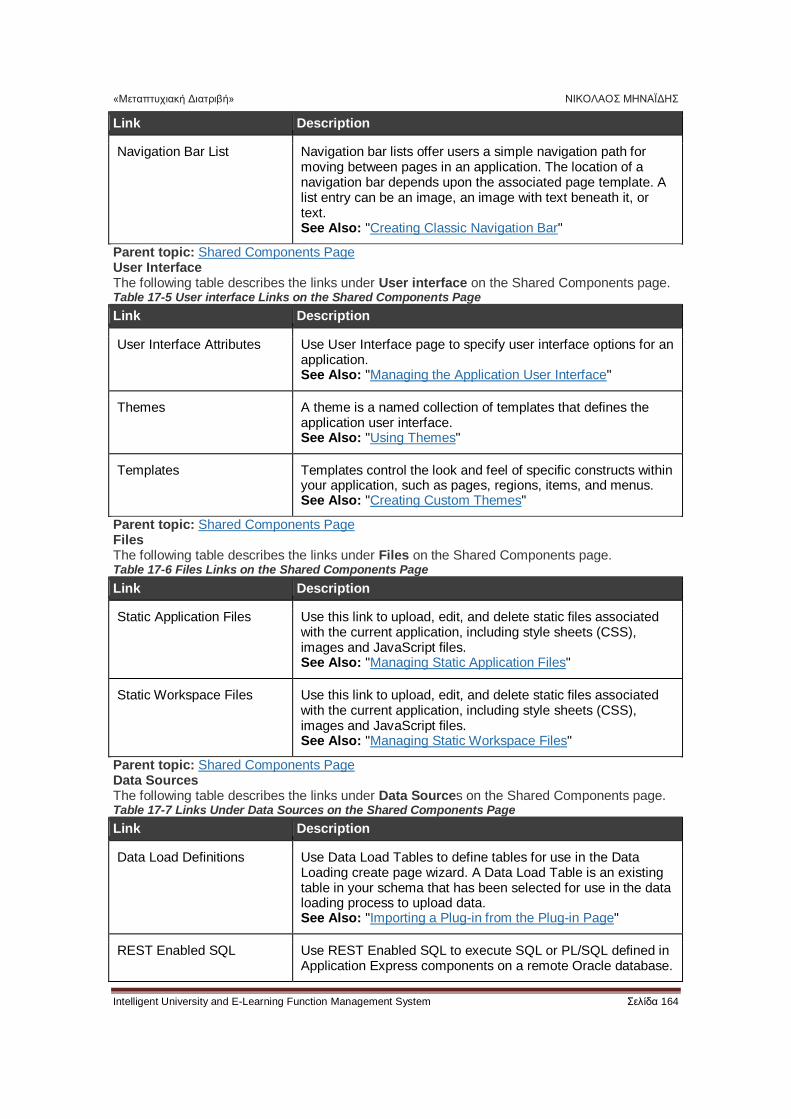
«Μεταπτυχιακή Διατριβή» ΝΙΚΟΛΑΟΣ ΜΗΝΑΪΔΗΣ
Intelligent University and E-Learning Function Management System Σελίδα 164
Link Description
Navigation Bar List Navigation bar lists offer users a simple navigation path for moving between pages in an application. The location of a navigation bar depends upon the associated page template. A list entry can be an image, an image with text beneath it, or text. See Also: "Creating Classic Navigation Bar"
Parent topic: Shared Components Page User Interface The following table describes the links under User interface on the Shared Components page. Table 17-5 User interface Links on the Shared Components Page
Link Description
User Interface Attributes Use User Interface page to specify user interface options for an application. See Also: "Managing the Application User Interface"
Themes A theme is a named collection of templates that defines the application user interface. See Also: "Using Themes"
Templates Templates control the look and feel of specific constructs within your application, such as pages, regions, items, and menus. See Also: "Creating Custom Themes"
Parent topic: Shared Components Page Files The following table describes the links under Files on the Shared Components page. Table 17-6 Files Links on the Shared Components Page
Link Description
Static Application Files Use this link to upload, edit, and delete static files associated with the current application, including style sheets (CSS), images and JavaScript files. See Also: "Managing Static Application Files"
Static Workspace Files Use this link to upload, edit, and delete static files associated with the current application, including style sheets (CSS), images and JavaScript files. See Also: "Managing Static Workspace Files"
Parent topic: Shared Components Page Data Sources The following table describes the links under Data Sources on the Shared Components page. Table 17-7 Links Under Data Sources on the Shared Components Page
Link Description
Data Load Definitions Use Data Load Tables to define tables for use in the Data Loading create page wizard. A Data Load Table is an existing table in your schema that has been selected for use in the data loading process to upload data. See Also: "Importing a Plug-in from the Plug-in Page"
REST Enabled SQL Use REST Enabled SQL to execute SQL or PL/SQL defined in Application Express components on a remote Oracle database.
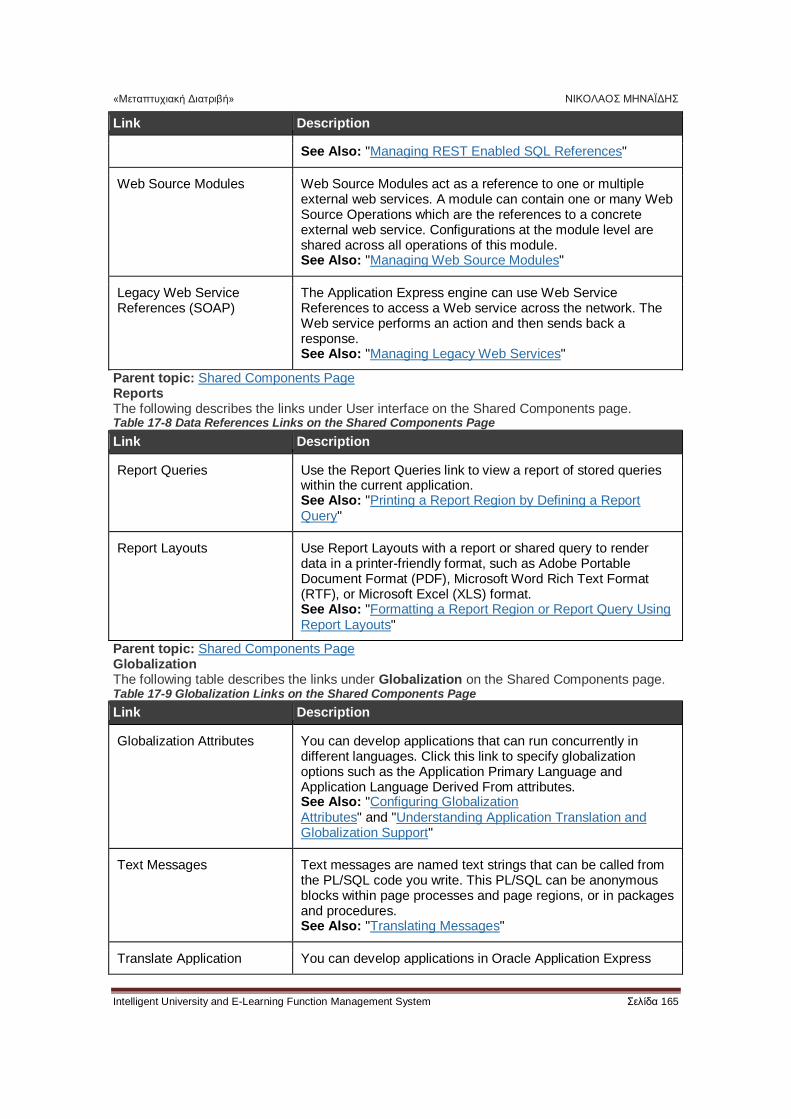
«Μεταπτυχιακή Διατριβή» ΝΙΚΟΛΑΟΣ ΜΗΝΑΪΔΗΣ
Intelligent University and E-Learning Function Management System Σελίδα 165
Link Description
See Also: "Managing REST Enabled SQL References"
Web Source Modules Web Source Modules act as a reference to one or multiple external web services. A module can contain one or many Web Source Operations which are the references to a concrete external web service. Configurations at the module level are shared across all operations of this module. See Also: "Managing Web Source Modules"
Legacy Web Service References (SOAP)
The Application Express engine can use Web Service References to access a Web service across the network. The Web service performs an action and then sends back a response. See Also: "Managing Legacy Web Services"
Parent topic: Shared Components Page Reports The following describes the links under User interface on the Shared Components page. Table 17-8 Data References Links on the Shared Components Page
Link Description
Report Queries Use the Report Queries link to view a report of stored queries within the current application. See Also: "Printing a Report Region by Defining a Report Query"
Report Layouts Use Report Layouts with a report or shared query to render data in a printer-friendly format, such as Adobe Portable Document Format (PDF), Microsoft Word Rich Text Format (RTF), or Microsoft Excel (XLS) format. See Also: "Formatting a Report Region or Report Query Using Report Layouts"
Parent topic: Shared Components Page Globalization The following table describes the links under Globalization on the Shared Components page. Table 17-9 Globalization Links on the Shared Components Page
Link Description
Globalization Attributes You can develop applications that can run concurrently in different languages. Click this link to specify globalization options such as the Application Primary Language and Application Language Derived From attributes. See Also: "Configuring Globalization Attributes" and "Understanding Application Translation and Globalization Support"
Text Messages Text messages are named text strings that can be called from the PL/SQL code you write. This PL/SQL can be anonymous blocks within page processes and page regions, or in packages and procedures. See Also: "Translating Messages"
Translate Application You can develop applications in Oracle Application Express
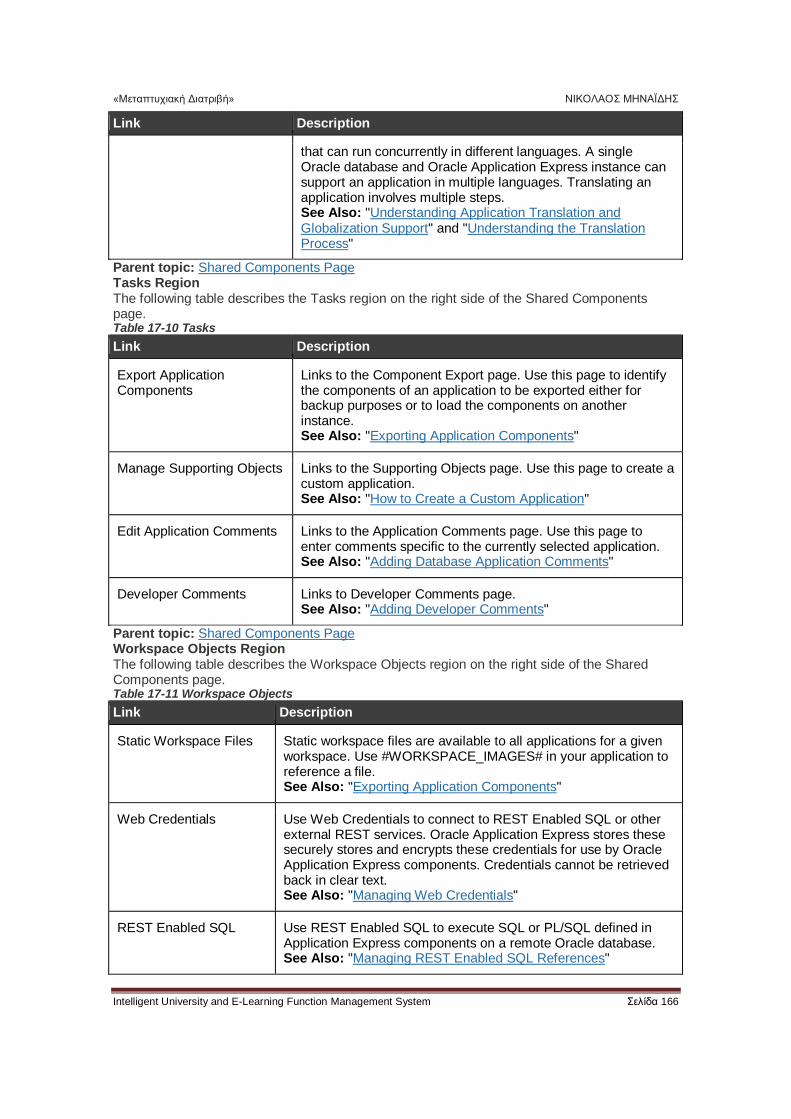
«Μεταπτυχιακή Διατριβή» ΝΙΚΟΛΑΟΣ ΜΗΝΑΪΔΗΣ
Intelligent University and E-Learning Function Management System Σελίδα 166
Link Description
that can run concurrently in different languages. A single Oracle database and Oracle Application Express instance can support an application in multiple languages. Translating an application involves multiple steps. See Also: "Understanding Application Translation and Globalization Support" and "Understanding the Translation Process"
Parent topic: Shared Components Page Tasks Region The following table describes the Tasks region on the right side of the Shared Components page. Table 17-10 Tasks
Link Description
Export Application Components
Links to the Component Export page. Use this page to identify the components of an application to be exported either for backup purposes or to load the components on another instance. See Also: "Exporting Application Components"
Manage Supporting Objects Links to the Supporting Objects page. Use this page to create a custom application. See Also: "How to Create a Custom Application"
Edit Application Comments Links to the Application Comments page. Use this page to enter comments specific to the currently selected application. See Also: "Adding Database Application Comments"
Developer Comments Links to Developer Comments page. See Also: "Adding Developer Comments"
Parent topic: Shared Components Page Workspace Objects Region The following table describes the Workspace Objects region on the right side of the Shared Components page. Table 17-11 Workspace Objects
Link Description
Static Workspace Files Static workspace files are available to all applications for a given workspace. Use #WORKSPACE_IMAGES# in your application to reference a file. See Also: "Exporting Application Components"
Web Credentials Use Web Credentials to connect to REST Enabled SQL or other external REST services. Oracle Application Express stores these securely stores and encrypts these credentials for use by Oracle Application Express components. Credentials cannot be retrieved back in clear text. See Also: "Managing Web Credentials"
REST Enabled SQL Use REST Enabled SQL to execute SQL or PL/SQL defined in Application Express components on a remote Oracle database. See Also: "Managing REST Enabled SQL References"
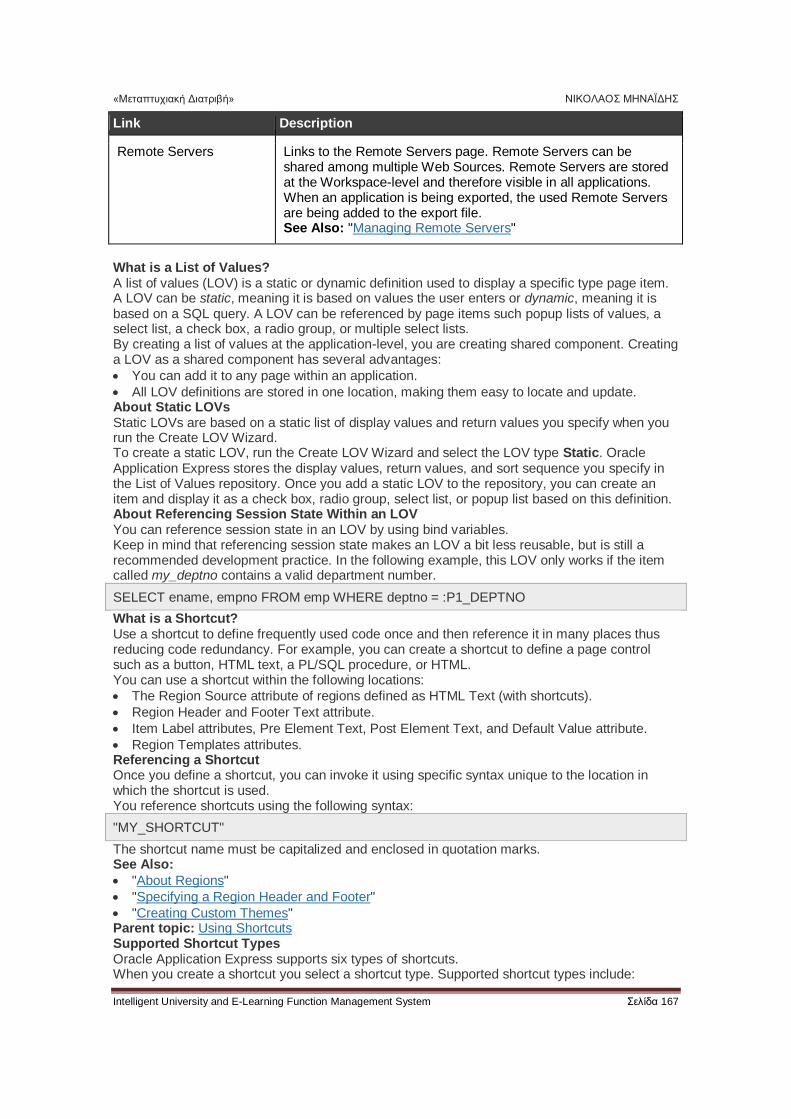
«Μεταπτυχιακή Διατριβή» ΝΙΚΟΛΑΟΣ ΜΗΝΑΪΔΗΣ
Intelligent University and E-Learning Function Management System Σελίδα 167
Link Description
Remote Servers Links to the Remote Servers page. Remote Servers can be shared among multiple Web Sources. Remote Servers are stored at the Workspace-level and therefore visible in all applications. When an application is being exported, the used Remote Servers are being added to the export file. See Also: "Managing Remote Servers"
What is a List of Values? A list of values (LOV) is a static or dynamic definition used to display a specific type page item. A LOV can be static, meaning it is based on values the user enters or dynamic, meaning it is based on a SQL query. A LOV can be referenced by page items such popup lists of values, a select list, a check box, a radio group, or multiple select lists. By creating a list of values at the application-level, you are creating shared component. Creating a LOV as a shared component has several advantages:
You can add it to any page within an application.
All LOV definitions are stored in one location, making them easy to locate and update. About Static LOVs Static LOVs are based on a static list of display values and return values you specify when you run the Create LOV Wizard. To create a static LOV, run the Create LOV Wizard and select the LOV type Static. Oracle Application Express stores the display values, return values, and sort sequence you specify in the List of Values repository. Once you add a static LOV to the repository, you can create an item and display it as a check box, radio group, select list, or popup list based on this definition. About Referencing Session State Within an LOV You can reference session state in an LOV by using bind variables. Keep in mind that referencing session state makes an LOV a bit less reusable, but is still a recommended development practice. In the following example, this LOV only works if the item called my_deptno contains a valid department number.
SELECT ename, empno FROM emp WHERE deptno = :P1_DEPTNO
What is a Shortcut? Use a shortcut to define frequently used code once and then reference it in many places thus reducing code redundancy. For example, you can create a shortcut to define a page control such as a button, HTML text, a PL/SQL procedure, or HTML. You can use a shortcut within the following locations:
The Region Source attribute of regions defined as HTML Text (with shortcuts).
Region Header and Footer Text attribute.
Item Label attributes, Pre Element Text, Post Element Text, and Default Value attribute.
Region Templates attributes. Referencing a Shortcut Once you define a shortcut, you can invoke it using specific syntax unique to the location in which the shortcut is used. You reference shortcuts using the following syntax:
"MY_SHORTCUT"
The shortcut name must be capitalized and enclosed in quotation marks. See Also:
"About Regions"
"Specifying a Region Header and Footer"
"Creating Custom Themes" Parent topic: Using Shortcuts Supported Shortcut Types Oracle Application Express supports six types of shortcuts. When you create a shortcut you select a shortcut type. Supported shortcut types include:
«Μεταπτυχιακή Διατριβή» ΝΙΚΟΛΑΟΣ ΜΗΝΑΪΔΗΣ
Intelligent University and E-Learning Function Management System Σελίδα 168
PL/SQL Function Body
HTML Text
HTML Text with Escaped Special Characters
Image
Text with JavaScript Escaped Single Quotes
Message
Message with JavaScript Escaped Special Quotes Text with JavaScript Escaped Single Quotes Use this type of shortcut to reference a shortcut inside of a JavaScript literal string. This shortcut defines a text string. When the shortcut is referenced, it escapes the single quotation marks required for JavaScript. Message Use this type of shortcut to reference a translatable message at runtime. Since this shortcut does not have a shortcut body, the name of the shortcut must match the corresponding message name. At runtime, the name of the shortcut expands to the text of the translatable message for the current language. Message with JavaScript Escaped Single Quotes Use this type of shortcut to reference a shortcut inside of JavaScript literal string and reference a translatable message at runtime. About Best Practices to Improve Performance Improve performance by using bind variables and including a #TIMING# substitution string in the region footer. For applications having a large number of concurrent users, maintaining optimal performance is critical. Best practices to consider include:
Use bind variables within your application whenever possible. You can reference session state values using bind variable syntax in SQL queries and application logic such as PL/SQL executed from processes and validations. Accessing session state using bind variables is the most efficient way to reference session state.
Include a #TIMING# substitution string in the region footer so that you can view the timing of each region. Identifying Performance Issues Consider the following key strategies to help identify and resolve performance issues with your Oracle Application Express application.
About Troubleshooting Slow Running Applications
Diagnosing Performance Issues
About Debugging Problematic SQL Queries
About Addressing Slow Queries Parent topic: Managing Application Performance About Troubleshooting Slow Running Applications The first step in troubleshooting a slow running application is to determine the location of the bottleneck. You can evaluate application performance by reviewing the time it takes for the database to return a specific page request or submission. If this time is shorter than the time it takes to render the page on the user's browser, then other components are likely causing the perception that the application is slow. As a best practice, always check all of the components involved including client machines, the network, the middle-tier, the database, and disk and storage devices. Regarding the database, check the System Global Area (SGA), CPU utilization, locks, and database parameters. It is also important to determine if anything else is running within the database such as legacy applications, data warehouse, batch programs, and database jobs. The majority of the time, performance issues with Oracle Application Express applications are due to developer-authored SQL and PL/SQL. You should utilize standard database performance tuning techniques to address these issues. Performance issues are rarely related to a bug with Oracle Application Express or the Oracle database. See Also: Oracle Database Performance Tuning Guide Parent topic: Identifying Performance Issues
«Μεταπτυχιακή Διατριβή» ΝΙΚΟΛΑΟΣ ΜΗΝΑΪΔΗΣ
Intelligent University and E-Learning Function Management System Σελίδα 169
Diagnosing Performance Issues To diagnose performance issues, follow these steps: 1. Identify the time window. 2. Isolate the largest consumers of database time. 3. Identify the Oracle Application Express workspace and application. 4. Correlate the offending SQL with a specific location within the application. Once you have identified the slow running pages, you should run the application in debug mode to identify the specific components consuming the most time. Parent topic: Identifying Performance Issues About Debugging Problematic SQL Queries If your query does not seem to be running correctly, try running it in SQL*Plus, SQL Developer, or in SQL Commands. Any of these approaches will test your query outside the context of your application, making it easier to define the problem. Parent topic: Identifying Performance Issues About Addressing Slow Queries For optimized queries that still take more than a second to process, consider implementing a progress bar and preventing multiple page submissions. Users expect instant results and often resubmit a page if it does not return immediately. Unless managed properly, each page submission instigates a new session in the database and continues until completion. Multiple page submissions often degrade performance and may lead to database locks. This is especially true with interactive reports. As an alternative approach, try using Oracle Application Express collections to hold query results. By using collections, expensive and time consuming queries are only executed once for each user rather than each time they perform pagination or create a filter. Tip: You control whether end users may submit the same page more than once by configuring the page attribute, Advanced, Enable duplicate page submissions. About Publishing the Database Application URL Once you deploy your application, load the data, and create users, you can publish your production URL. You can determine the production URL for your application by either: Selecting the application on the Application home page and right-clicking the Run button. Then, select Copy link address or Copy link location depending on your browser.
Running the application and then copying the URL. The Run button gets its value from the Home link attribute on the Edit Security Attributes page. This link is only referenced by this icon and by applications that do not use the Oracle Application Express Login API. Consider the following example:
http://apex.somewhere.com/pls/apex/f?p=11563:1:3397731373043366363
Where:
apex.somewhere.com is the URL of the server.
pls is the indicator to use the mod_plsql cartridge.
apex is the database access descriptor (DAD) name. The DAD describes how Oracle HTTP Server connects to the database server so that it can fulfill an HTTP request. The default value is apex.
f?p= is a prefix used by Oracle Application Express.
11563 is the application being called.
1 is the page within the application to be displayed.
3397731373043366363 is the session number. To run this example, a user would use the URL:
http://apex.somewhere.com/pls/apex/f?p=11563:1
Tip: When users log in, they receive unique session numbers. This number displays after :home in the URL. Do not include the session number as part of the URL. When another user tries to run a URL containing a session ID, an error displays.
«Μεταπτυχιακή Διατριβή» ΝΙΚΟΛΑΟΣ ΜΗΝΑΪΔΗΣ
Intelligent University and E-Learning Function Management System Σελίδα 170
About Publishing the Websheet Application URL Once you complete your Websheet application, you can publish your production URL. You can determine the URL to your Websheet application by running the application and copying the URL. Consider the following example:
http://apex.somewhere.com/pls/apex/ws?p=123:home
Where:
apex.somewhere.com is the URL of the server.
pls is the indicator to use the mod_plsql cartridge.
apex is the database access descriptor (DAD) name. The DAD describes how Oracle HTTP Server connects to the database server so that it can fulfill an HTTP request. The default value is apex.
ws?p= is a prefix used by Oracle Application Express to link to a Websheet application.
123 is the Websheet application being called.
home is the home page alias defined as Home Page on the Application Properties page. To run this example application, you would use the URL:
http://apex.somewhere.com/pls/apex/ws?p=123:home
Tip: When users log in, they receive unique session numbers. This number displays after :home in the URL. Do not include the session number as part of the URL. When another user tries to run a URL containing a session ID, an error displays. About the Export Process Exporting an application from Oracle Application Express is very straightforward process and produces a readable script file with a .SQL extension. You can run this SQL script in any Oracle Application Express environment which is the same release or later than the environment from which you are exporting. For example, an application exported from Oracle Application Express release 4.0 can be imported into an environment running Oracle Application Express release 4.0, 4.1, or 4.2 or a later release. However, you cannot export an application to an earlier Oracle Application Express release (for example, an application exported from Application Express release 4.2 cannot be imported into an environment running Application Express 4.1 or earlier). An application export includes the application definition, supporting objects, and shared components (including plug-ins, images, CSS files, JavaScript files and other files which must be managed independently). Instead of exporting complete applications you can also choose to export specific components, such as a page. This also creates a SQL script file. There are limitations when importing components into a different environments. As a best practice, Oracle recommends you export complete applications rather than individual components. If you wish to export an application and there are components, such as pages that are not yet ready for testing, Oracle recommends you use Build Options to include or exclude various application components. See Also:
"Exporting an Application"
"Exporting Application Components"
"Using Build Options to Control Configuration" Parent topic: Exporting an Application and Application Components About The Export Page You export an application definition and all associated files using the following tabs at the top of the Export page: Export, Workspace, Applications, Websheet, Themes, Plug-ins, User Interface Defaults, and Feedback.
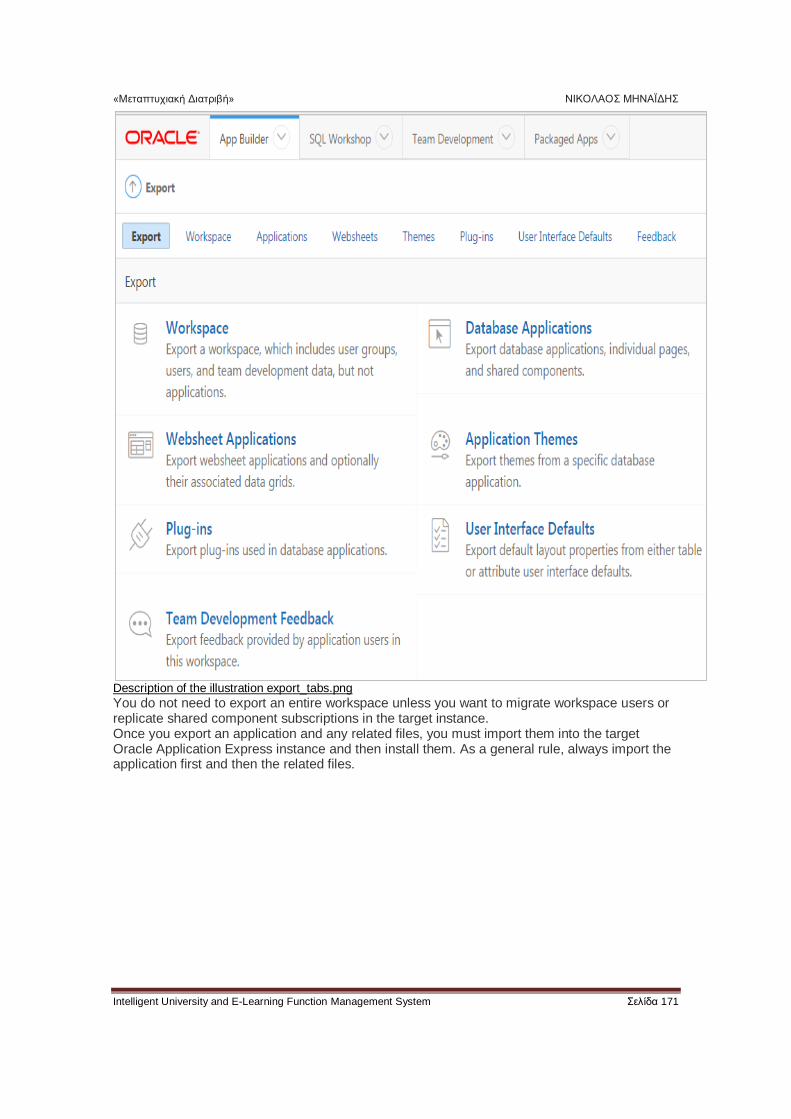
«Μεταπτυχιακή Διατριβή» ΝΙΚΟΛΑΟΣ ΜΗΝΑΪΔΗΣ
Intelligent University and E-Learning Function Management System Σελίδα 171
Description of the illustration export_tabs.png You do not need to export an entire workspace unless you want to migrate workspace users or replicate shared component subscriptions in the target instance. Once you export an application and any related files, you must import them into the target Oracle Application Express instance and then install them. As a general rule, always import the application first and then the related files.


