Embed Size (px)
Citation preview
MarkVision Professional 11.2.1
User's Guide
© 2009All rights reserved.

Edition noticeOctober 2009
The following paragraph does not apply to any country where such provisions are inconsistent with local law: THIS PUBLICATION IS PROVIDED“AS IS” WITHOUT WARRANTY OF ANY KIND, EITHER EXPRESS OR IMPLIED, INCLUDING, BUT NOT LIMITED TO, THE IMPLIED WARRANTIES OFMERCHANTABILITY OR FITNESS FOR A PARTICULAR PURPOSE. Some states do not allow disclaimer of express or implied warranties in certaintransactions; therefore, this statement may not apply to you.
This publication could include technical inaccuracies or typographical errors. Changes are periodically made to the information herein; thesechanges will be incorporated in later editions. Improvements or changes in the products or the programs described may be made at any time.
© 2009All rights reserved.
UNITED STATES GOVERNMENT RIGHTSThis software and any accompanying documentation provided under this agreement are commercial computer software and documentationdeveloped exclusively at private expense.
ContentsEdition notice......................................................................................2
Introducing MarkVision Professional...........................................13What is MarkVision Professional?..................................................................................................................................13
What can MarkVision Professional do?........................................................................................................................13
What's new in MarkVision Professional 11.2.1?........................................................................................................13
Understanding MarkVision components....................................................................................................................14Understanding MarkVision terminology................................................................................................................................ 14MarkVision Client ........................................................................................................................................................................... 14MarkVision Messenger.................................................................................................................................................................. 15MarkVision Web Server................................................................................................................................................................. 15MarkVision Server ........................................................................................................................................................................... 15
Understanding system requirements..........................................16Computer RAM and processor requirements...........................................................................................................16
MarkVision Client requirements.....................................................................................................................................16
MarkVision Server requirements....................................................................................................................................16
Supported operating systems........................................................................................................................................16
Supported Web browsers ................................................................................................................................................17
Java Virtual Machine recommendations.....................................................................................................................17
Increasing RAM available to the MVP Client..............................................................................................................18
Increasing RAM available to the MVP Server.............................................................................................................19
Installing MarkVision Professional................................................21Before installing...................................................................................................................................................................21
Minimizing network traffic .......................................................................................................................................................... 21Selecting installation components........................................................................................................................................... 21Downloading MarkVision Professional................................................................................................................................... 22
Installing MarkVision Professional.................................................................................................................................22Installing for Windows .................................................................................................................................................................. 22Installing for Mac............................................................................................................................................................................. 22Installing for HP-UX........................................................................................................................................................................ 23Installing for IBM AIX ..................................................................................................................................................................... 24Installing for Red Hat Enterprise and SUSE Linux Enterprise .......................................................................................... 24Installing for Sun Solaris SPARC................................................................................................................................................. 25Upgrading from a previous version of MVP.......................................................................................................................... 25
Importing and exporting MarkVision Server settings............................................................................................26
Contents
3
Moving the MarkVision Server........................................................................................................................................27Starting and stopping MarkVision Server for Windows.................................................................................................... 27Starting and stopping the MarkVision Server for Mac ...................................................................................................... 27Starting and stopping MarkVision Server for UNIX ............................................................................................................ 27Starting and stopping MarkVision Web service for UNIX................................................................................................. 27Moving the MarkVision Server ................................................................................................................................................... 28
Using MarkVision Professional......................................................29Getting started.....................................................................................................................................................................29
Starting the MarkVision Client Application in Windows .................................................................................................. 29Starting the MarkVision Client Application in Mac OS X .................................................................................................. 29Starting the MarkVision Client Application in UNIX or Linux.......................................................................................... 29Accessing the MarkVision Web Client .................................................................................................................................... 30Selecting a server............................................................................................................................................................................ 30Using the MarkVision Setup wizard ......................................................................................................................................... 30
Understanding Home screen navigation....................................................................................................................31Navigating from the Home screen ........................................................................................................................................... 31Using the All Tasks list ................................................................................................................................................................... 32Results area ....................................................................................................................................................................................... 39Using Quick Find ............................................................................................................................................................................. 39Using the Folders tab .................................................................................................................................................................... 40Accessibility ...................................................................................................................................................................................... 40Multi-select........................................................................................................................................................................................ 40
Configuring MarkVision Professional...........................................41Discovering devices............................................................................................................................................................41
Adding or removing devices ...................................................................................................................................................... 41Creating discovery profiles.......................................................................................................................................................... 41Discovering devices ....................................................................................................................................................................... 41Including and excluding devices .............................................................................................................................................. 42Saving and loading include or exclude lists.......................................................................................................................... 42Configuring advanced device discovery................................................................................................................................ 42Importing and exporting discovery profiles ......................................................................................................................... 43Scheduling device discovery ...................................................................................................................................................... 43Naming devices............................................................................................................................................................................... 43Adding devices ................................................................................................................................................................................ 44Viewing device discovery results .............................................................................................................................................. 44Removing devices from the server........................................................................................................................................... 44
Organizing devices with filters and folders................................................................................................................45Creating folders ............................................................................................................................................................................... 45Using filters ....................................................................................................................................................................................... 46
Contents
4
Using security features in MarkVision Professional 11.2.1.......49Overview.................................................................................................................................................................................49
Understanding the basics.................................................................................................................................................50Authentication and Authorization ........................................................................................................................................... 50Groups ................................................................................................................................................................................................ 50Access Controls................................................................................................................................................................................ 51Security Templates......................................................................................................................................................................... 51
Configuring building blocks............................................................................................................................................52Creating or editing a device password (advanced)............................................................................................................ 52Creating a PIN................................................................................................................................................................................... 52Managing multiple PIN setups................................................................................................................................................... 53Using internal accounts................................................................................................................................................................ 53Using Kerberos authentication (advanced) .......................................................................................................................... 54Configuring LDAP settings (advanced) .................................................................................................................................. 55Configuring LDAP + GSSAPI settings ...................................................................................................................................... 58Using NTLM authentication ........................................................................................................................................................ 60
Securing access....................................................................................................................................................................61Using backup passwords ............................................................................................................................................................. 61Setting login restrictions.............................................................................................................................................................. 61Using a password or PIN to control function access.......................................................................................................... 62Using a security template to control function access ....................................................................................................... 63
Scenarios.................................................................................................................................................................................64Scenario: Printer in a public place............................................................................................................................................. 64Scenario: Standalone or small office........................................................................................................................................ 65Scenario: Network running Active Directory ........................................................................................................................ 66
Managing certificates and other settings...................................................................................................................68Managing certificates.................................................................................................................................................................... 68Installing CA Certificates for multiple devices...................................................................................................................... 69Setting certificate defaults .......................................................................................................................................................... 70Viewing basic certificate information...................................................................................................................................... 70Signing certificates......................................................................................................................................................................... 71Importing certificate stores (SSL) .............................................................................................................................................. 72Entering a password to access a secured device ................................................................................................................ 72Creating, editing, or deleting a device password (basic) ................................................................................................. 72Adding a password to the device password list .................................................................................................................. 73Editing a password from the device password list ............................................................................................................. 73Deleting a password from the device password list .......................................................................................................... 73Using a device policy to set device passwords .................................................................................................................... 74Configuring advanced credentials ........................................................................................................................................... 74Setting a communication password........................................................................................................................................ 75Changing on-board security for a device............................................................................................................................... 75Configuring menu lockout .......................................................................................................................................................... 76
Contents
5
Configuring confidential printing............................................................................................................................................. 76Configuring security audit log settings .................................................................................................................................. 77Configuring 802.1x authentication .......................................................................................................................................... 77Setting up SNMP ............................................................................................................................................................................. 78
Creating accounts and groups.......................................................................................................................................79Creating user accounts and groups ......................................................................................................................................... 79Creating an administrator account .......................................................................................................................................... 79Creating user accounts ................................................................................................................................................................. 80Creating a user group.................................................................................................................................................................... 80Editing an existing user account or group ............................................................................................................................ 80Removing an existing user account or group ...................................................................................................................... 81Assigning privileges....................................................................................................................................................................... 81Configuring active session expiration..................................................................................................................................... 81Configuring account password expiration............................................................................................................................ 82
Securing communication with the MarkVision Server...........................................................................................82Using secure communication .................................................................................................................................................... 82Using LDAP to authenticate user access ................................................................................................................................ 82Setting server communication security.................................................................................................................................. 84Setting the server communication security password ..................................................................................................... 85Setting the server communication security level ............................................................................................................... 85Selecting server-to-client security ............................................................................................................................................ 86Disabling or securing remote management of a device.................................................................................................. 86Synchronizing device communication passwords............................................................................................................. 88Securing printer communication through lockdown ....................................................................................................... 88Viewing encrypted hard disk drives......................................................................................................................................... 89
Managing devices.............................................................................90Finding and organizing devices.....................................................................................................................................90
Finding devices................................................................................................................................................................................ 90Creating folders and filters .......................................................................................................................................................... 91Using filters to populate folders automatically ................................................................................................................... 91Creating maps.................................................................................................................................................................................. 91
Creating custom views and tables................................................................................................................................92Creating a custom view................................................................................................................................................................ 92Editing a custom view................................................................................................................................................................... 92Creating a custom table ............................................................................................................................................................... 92Viewing and editing a custom table ........................................................................................................................................ 93Exporting a custom table............................................................................................................................................................. 93
Gathering information about printers and print jobs............................................................................................94Collecting information about print jobs ................................................................................................................................ 94Enabling Job Statistics .................................................................................................................................................................. 94Collecting information about printers .................................................................................................................................... 95Enabling Printer Inventory .......................................................................................................................................................... 95
Contents
6
Using the Remote Operator Panel on MFPs..............................................................................................................96Accessing the Remote Operator Panel ................................................................................................................................... 96
Managing destinations......................................................................................................................................................97Adding or editing destinations.................................................................................................................................................. 97Creating or editing destinations for device policies .......................................................................................................... 98Removing destinations................................................................................................................................................................. 98
Understanding device policies.......................................................................................................................................99Using device policies ..................................................................................................................................................................... 99Creating a device policy ............................................................................................................................................................... 99Applying a device policy .............................................................................................................................................................. 99Checking device policy conformance ...................................................................................................................................100Scheduling device policies........................................................................................................................................................100
Downloading generic files.............................................................................................................................................100
Managing resources.........................................................................................................................................................101Uploading resource files to MarkVision Server ..................................................................................................................101Removing resource files from the MarkVision Server......................................................................................................101Downloading resource files to selected devices ...............................................................................................................101Installing and removing plug-ins............................................................................................................................................102
Managing bookmarks......................................................................................................................................................103Using bookmarks ..........................................................................................................................................................................103Creating bookmark folders .......................................................................................................................................................103Creating a new bookmark .........................................................................................................................................................103Saving bookmarks ........................................................................................................................................................................104Loading existing bookmarks ....................................................................................................................................................104Deleting bookmarks ....................................................................................................................................................................105Changing bookmark folder properties .................................................................................................................................105
Wireless.................................................................................................................................................................................106Supporting wireless print servers ...........................................................................................................................................106Creating a WLAN device policy................................................................................................................................................106Configuring wireless settings for multiple devices ..........................................................................................................107
Using print queues...........................................................................................................................................................107Managing queues.........................................................................................................................................................................107Configuring the MarkVision Server for Windows..............................................................................................................107Creating print queues .................................................................................................................................................................108Removing print queues ..............................................................................................................................................................109Windows XP administrator accounts without passwords .............................................................................................109
Configuring TCP/IP port access settings...................................................................................................................110
Formatting storage devices..........................................................................................................................................110
Upgrading print server firmware.................................................................................................................................110
Scheduling tasks................................................................................................................................................................111
Viewing diagnostic information for a device..........................................................................................................111
Checking printer status...................................................................................................................................................112
Contents
7
Viewing the Embedded Web Server for a device..................................................................................................112
Changing printer settings..............................................................................................................................................112
Monitoring printer supplies..........................................................................................................................................112
Setting color print permissions....................................................................................................................................113
Managing embedded solutions in MarkVisionProfessional.....................................................................................114
Understanding embedded solutions and solution descriptors.......................................................................114
Viewing installed solutions............................................................................................................................................114
Installing embedded solutions....................................................................................................................................115Step 1: Installing the solution descriptor .............................................................................................................................115Step 2: Installing an embedded solution .............................................................................................................................116
Uninstalling Embedded Solutions..............................................................................................................................116Step 1: Uninstalling an embedded solution .......................................................................................................................116Step 2: Uninstalling the solution descriptor .......................................................................................................................116
Configuring the Embedded Solutions Framework...............................................................................................117
Configuring solutions......................................................................................................................................................118
Licensing embedded solutions....................................................................................................................................118Installing or upgrading a license.............................................................................................................................................118Obtaining host IDs........................................................................................................................................................................119
Starting a solution.............................................................................................................................................................119
Stopping a solution..........................................................................................................................................................119
Viewing embedded solutions features.....................................................................................................................120
Importing and exporting solutions............................................................................................................................120
Creating an embedded solution device policy......................................................................................................120
Filtering for devices that support embedded solutions.....................................................................................121
Using the Advanced filter to find devices that support embedded solutions...........................................121
Using custom tables with embedded solutions....................................................................................................121
Using MarkVision Messenger.......................................................123What can MarkVision Messenger do?........................................................................................................................123
How are actions and events related?.........................................................................................................................123
Understanding events.....................................................................................................................................................123Device Status Alert event type.................................................................................................................................................123Printer folder alerts event type ................................................................................................................................................123Selecting devices to monitor....................................................................................................................................................124Delaying event notifications.....................................................................................................................................................124
Creating an action in MarkVision Messenger.........................................................................................................124Sending an SMTP e-mail.............................................................................................................................................................124
Contents
8
Setting up an SMTP mail server...............................................................................................................................................125Executing a command line on a remote host server .......................................................................................................125Setting up the Tivoli event adapter .......................................................................................................................................125Triggering a command line with an action .........................................................................................................................126Previewing the steps ...................................................................................................................................................................126Step 1: Naming the action .........................................................................................................................................................126Step 2: Setting user access ........................................................................................................................................................127Step 3: Selecting the event type..............................................................................................................................................127Step 4: Selecting the events that trigger the action ........................................................................................................127Step 5: Choosing a method of device selection ................................................................................................................128Step 6: Selecting a command...................................................................................................................................................128Step 7: Composing a command ..............................................................................................................................................128Step 8: Selecting a filter ..............................................................................................................................................................129Step 9: Verifying action information......................................................................................................................................130
Managing actions.............................................................................................................................................................130Enabling an action........................................................................................................................................................................130Disabling an action ......................................................................................................................................................................130Modifying an action.....................................................................................................................................................................130Deleting an action ........................................................................................................................................................................131Viewing action information ......................................................................................................................................................131Setting or changing user data..................................................................................................................................................131Frequently created actions .......................................................................................................................................................132
Using filters with actions................................................................................................................................................134Using simple filters.......................................................................................................................................................................134Using the “Trigger on Active” filter.........................................................................................................................................134Using the “Trigger on Either Active or Clear” filter ...........................................................................................................134Using custom filters .....................................................................................................................................................................134
Troubleshooting.............................................................................136Problems with user accounts and account groups..............................................................................................136
Did a message appear indicating an error reading accounts or passwords during log on?.............................136User has forgotten their password.........................................................................................................................................137
Problems with network devices..................................................................................................................................137MarkVision is unable to discover a network device or “Device not responding” appears.................................137Printer information is incorrect................................................................................................................................................138Printer icons do not appear ......................................................................................................................................................138Printers are missing from folders ............................................................................................................................................139“Error resetting device” message appears...........................................................................................................................139
Problems with MarkVision Web Client......................................................................................................................139Why can't I access MarkVision Web Client in Windows Vista?......................................................................................139Why does MarkVision Web Client crash when opened in Internet Explorer 6? .....................................................140
Problems with MarkVision Messenger......................................................................................................................140MarkVision Messenger is not sending e-mail notifications ...........................................................................................140
Contents
9
Why can't I access MarkVision Messenger? .........................................................................................................................140MarkVision Messenger does not work with Apache installed......................................................................................141
Problems with actions.....................................................................................................................................................141Cannot create a new action ......................................................................................................................................................141An action is unavailable..............................................................................................................................................................141Action does not work or produces unexpected results..................................................................................................141Action list is empty.......................................................................................................................................................................141No private actions listed.............................................................................................................................................................142
Miscellaneous problems.................................................................................................................................................142The client and server cannot communicate .......................................................................................................................142How do I increase the JVM maximum heap memory?....................................................................................................142No folders appear .........................................................................................................................................................................143Cannot enter characters in printers in a different language.........................................................................................143Cannot send files to a device using Generic File Download .........................................................................................143Cannot send files to network devices using Resource Management........................................................................144Cannot enter a PIN using the Operator Panel task ...........................................................................................................144Cannot enter a PIN or password in RHEL 5.0 ......................................................................................................................144
Frequently asked questions.........................................................145What devices are supported by this version of MarkVision?.............................................................................145
Can I install MVP 11.2.1 over a previous version of MarkVision?.....................................................................145
I have plug-ins installed with my previous version. Is the functionality of those plug-insincluded in this release?............................................................................................................................................145
How can I speed up device discovery?......................................................................................................................145
How do the MarkVision Web Client and Client Application differ?................................................................146
Why are some devices unavailable?...........................................................................................................................146
How do I back up my MVP Server settings and configuration?.......................................................................147
Where is the README file?.............................................................................................................................................147
Where are the Release Notes?......................................................................................................................................147
How do I create and apply a filter to a folder?........................................................................................................148
What is MarkVision Messenger?..................................................................................................................................149
Is there support for IPX or Tivoli?................................................................................................................................149
How do I get to the server after installation?..........................................................................................................150
How do I discover devices?...........................................................................................................................................150
How do I create actions?................................................................................................................................................151
How do I change the MarkVision Web Server port?.............................................................................................152
Uninstalling MarkVision Professional.........................................154Uninstalling for Windows and Mac OS X..................................................................................................................154
Uninstalling from Windows ......................................................................................................................................................154
Contents
10
Uninstalling from Mac OS X ......................................................................................................................................................154
Uninstalling for UNIX and Linux..................................................................................................................................154Uninstalling MarkVision Professional ....................................................................................................................................154Removing shared directories....................................................................................................................................................155
Appendix..........................................................................................156
Notices..............................................................................................158
Glossary of Security Terms...........................................................159
Index.................................................................................................160
Contents
11

12
Introducing MarkVision Professional
What is MarkVision Professional?MarkVisionTM Professional (MVP) is a Web-enabled device management utility designed for IT professionals. MVPworks as a client-server application. The server discovers and communicates with devices on the network andprovides information about them to a client. The client displays device information and provides a user interface tomanage those devices. Each instance of the MarkVision Server can manage thousands of devices at any one time.
Built-in security provisions prevent unauthorized access to devices on the network. Authorized users can use theMarkVision Web Client to access MVP's management options by connecting to the MarkVision Server from asupported Web browser.
Customize MVP to see only the device information that you select. Quickly and efficiently locate specific devices onthe network with Quick Find or Discovery Profiles. Use Folders and Filters to group devices based on single or multiplecharacteristics (such as color capability, input capacity, and speed) or conditions (such as cover open, low toner, lowpaper, and paper jam).
What can MarkVision Professional do?This guide is written for administrators. To complete these tasks successfully, you should have a working knowledgeof your network hardware and software.
MarkVision Professional lets administrators:
• Troubleshoot and fix network printing issues before they are disruptive.
• Perform printer and print server maintenance and routine updates remotely.
• Diagnose and fix printing problems using Quick Find to locate a specific device on the network.
• Use extensive Filters to find and group devices based on one or more characteristics (such as color capability ormultifunction capabilities) or conditions (such as cover open or paper jam).
• Configure settings on multiple devices simultaneously with customizable device policies.
• Schedule time-intensive activities, such as company-wide device discovery or updating print server firmwarewhen network use is at a minimum.
• Prevent unauthorized access to devices on the network.
• Download plug-ins for additional device support at runtime.
• View or print customizable reports (custom tables) on selected printers.
• Remotely view or (when supported) manipulate printer operator panels.
What's new in MarkVision Professional 11.2.1?Several new features and enhancements provide even greater control of your network devices:
Introducing MarkVision Professional
13
Expanded device supportMVP 11.2.1 supports more devices than ever before. MVP 11.2.1 natively incorporates functionality of service packsand other functional support for the same devices as MVP 11.2, including devices previously supported throughplug-ins. As a means of providing device support, MVP 11.2.1 offers new functionality for next-generation devices,while carrying forward the same functionality found in MVP 11.2 for both new and existing devices, depending onthe individual device capabilities. For a complete list of supported devices, see the Release Notes.
Expanded operating system and browser supportMVP 11.2.1 includes support for newer operating systems, including Mac OS X 10.5 and Windows Server 2008, as wellas support for Internet Explorer 8.
Incorporation of previous plug-insMVP 11.2.1 natively supports service packs and functional plug-ins designed for MVP 11.2. See the Release Notes fordetails.
Understanding MarkVision components
Understanding MarkVision terminologyWithin this document:• Printers and print servers are sometimes simply called devices.
• MarkVision Client is referred to as either MarkVision Client Application or MarkVision Web Client, depending onthe context and how it is launched.
• MarkVision Client Application refers to MarkVision Client as a standalone application installed locally on a userworkstation.
• MarkVision Web Client refers to MarkVision Client when it is accessed through a Web browser.
MarkVision ClientMarkVision Client Application—The standalone application can be installed locally on a user workstation.
MarkVision Web Client—The browser-based client is a Java applet version of the client that can be accessed througha supported Web browser by way of the following URL: http://<yourserver>/markvision. If the MarkVisionServer is not the default server on the machine, access the client through a supported Web browser by way of thefollowing URL http://<yourserver>:9180/markvision.
The MarkVision Application and MarkVision Web Client are essentially the same program. All folders, filters, devices,and so on that are managed by the MarkVision Server are available to users of either the application or Web client.The two versions are functionally equivalent.
The only differences between the application client and the Web client are:
• The application does not require the installation of the browser plug-in; and
• the web client requires a Web browser and loads more slowly.
Introducing MarkVision Professional
14
Notes:
• Enable the Web browser to support Sun’s Java Runtime Environment (JRE) by installing the Java plug-in. InWindows environments, the plug-in is provided and the user will automatically be prompted to install it the firsttime they run the MarkVision Web Client.
• For information on the Java plug-in software and to download available versions of the plug-in for UNIX andother platforms, visit http://java.sun.com.
MarkVision MessengerMarkVision Messenger works with MVP to provide e-mail notification or command line execution when conditionson a network printer (such as Paper Tray Missing or Toner Low) trigger a pre-defined event. MarkVision Messengeris a service that runs inside the MarkVision Server. To use this service, the user creates actions using a browser-basedinterface. Users can open MarkVision Messenger from the Action menu in the MVP application, or by visiting the URLhttp://<yourserver>:9180/messenger or https://<yourserver>:8443/messenger by way of aWeb browser.
MarkVision Web ServerThe MarkVision Web Server supports the browser-based component of MarkVision Web Client and MarkVisionMessenger. The MarkVision Web Server is automatically installed with the MarkVision Server. The MarkVision WebServer uses the standard HTTP port (80) if it is selected as the default server during installation. Otherwise, it acceptsHTTP requests on a non-standard port (9180), and HTTPS requests at TCP port 8443.
MarkVision ServerThe MarkVision Server is the engine that powers MVP. The MarkVision Server is the single point of contact betweenan instance of the MarkVision Client and all of the devices that MVP manages. The first time a client requestsinformation, the MarkVision Server gathers the new information from the device and stores it in a cache. Eachsubsequent request for the same information is then retrieved from the cache. This eliminates the complexity oftalking to a wide variety of network devices. Client programs only need to send a single protocol to the server, whichknows how to communicate with the devices. At least one MarkVision Server must exist on a network. While it ispossible to install multiple instances of the MarkVision Server on a network, a client can only connect with one serverat a time.
One exception to this architecture is that, for devices that implement remote operator panel support using VNC, theMarkVision Client will establish a remote operator panel session directly with the printer.
Introducing MarkVision Professional
15

Understanding system requirements
Computer RAM and processor requirements
RAM• 512MB required
• 1GB recommended
Note: At least 2GB of RAM is required when installing the MarkVision Server on Windows Vista. An even higher amountmay be necessary in some situations when more than 2,000 devices are used—for example, when viewing complexcustom tables.
Processor speed• 1.8GHz or greater
MarkVision Client requirementsThe following are minimum requirements for running MarkVision Client. These requirements should be satisfiedbefore installing MVP.
• Windows Server 2008, Windows 2003 Server SP2 (32-bit), Windows XP SP3 (32-bit), Windows 2000, Mac OS X 10.5,or a supported UNIX client or Linux operating system
• 100MB available hard disk space
• Internet or TCP/IP connection
• If using the MarkVision Web Client, a supported Web browser.
MarkVision Server requirementsThe following are minimum requirements for running MarkVision Server. These requirements should be satisfiedbefore installing MarkVision Professional.
• Windows 2000, Windows 2003 Server SP2 (32-bit), Windows Server 2008, Mac OS X server 10.5, or a supportedUNIX server system
• 500MB available hard disk drive space
• Internet or TCP/IP connection
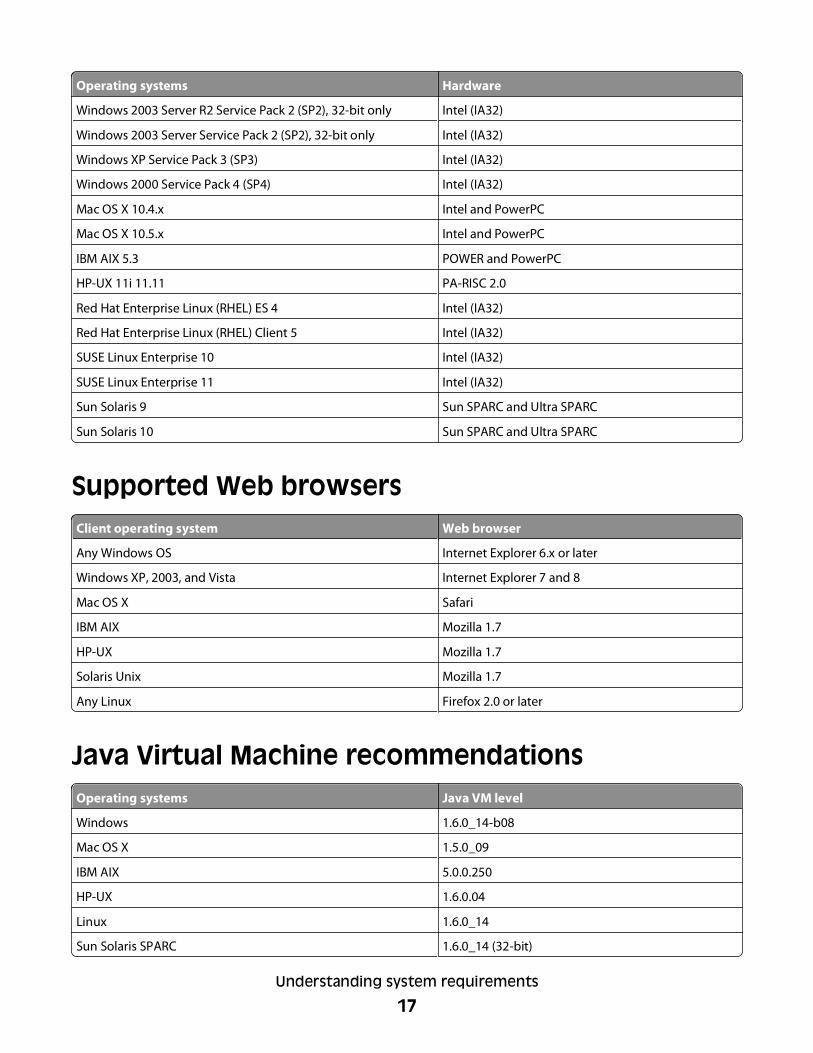
Supported operating systemsOperating systems Hardware
Windows 2008 Server (Enterprise Edition) Intel (IA32)
Windows Vista Business Intel (IA32)
Windows Vista Enterprise Intel (IA32)
Understanding system requirements
16
Operating systems Hardware
Windows 2003 Server R2 Service Pack 2 (SP2), 32-bit only Intel (IA32)
Windows 2003 Server Service Pack 2 (SP2), 32-bit only Intel (IA32)
Windows XP Service Pack 3 (SP3) Intel (IA32)
Windows 2000 Service Pack 4 (SP4) Intel (IA32)
Mac OS X 10.4.x Intel and PowerPC
Mac OS X 10.5.x Intel and PowerPC
IBM AIX 5.3 POWER and PowerPC
HP-UX 11i 11.11 PA-RISC 2.0
Red Hat Enterprise Linux (RHEL) ES 4 Intel (IA32)
Red Hat Enterprise Linux (RHEL) Client 5 Intel (IA32)
SUSE Linux Enterprise 10 Intel (IA32)
SUSE Linux Enterprise 11 Intel (IA32)
Sun Solaris 9 Sun SPARC and Ultra SPARC
Sun Solaris 10 Sun SPARC and Ultra SPARC
Supported Web browsersClient operating system Web browser
Any Windows OS Internet Explorer 6.x or later
Windows XP, 2003, and Vista Internet Explorer 7 and 8
Mac OS X Safari
IBM AIX Mozilla 1.7
HP-UX Mozilla 1.7
Solaris Unix Mozilla 1.7
Any Linux Firefox 2.0 or later
Java Virtual Machine recommendationsOperating systems Java VM level
Windows 1.6.0_14-b08
Mac OS X 1.5.0_09
IBM AIX 5.0.0.250
HP-UX 1.6.0.04
Linux 1.6.0_14
Sun Solaris SPARC 1.6.0_14 (32-bit)
Understanding system requirements
17
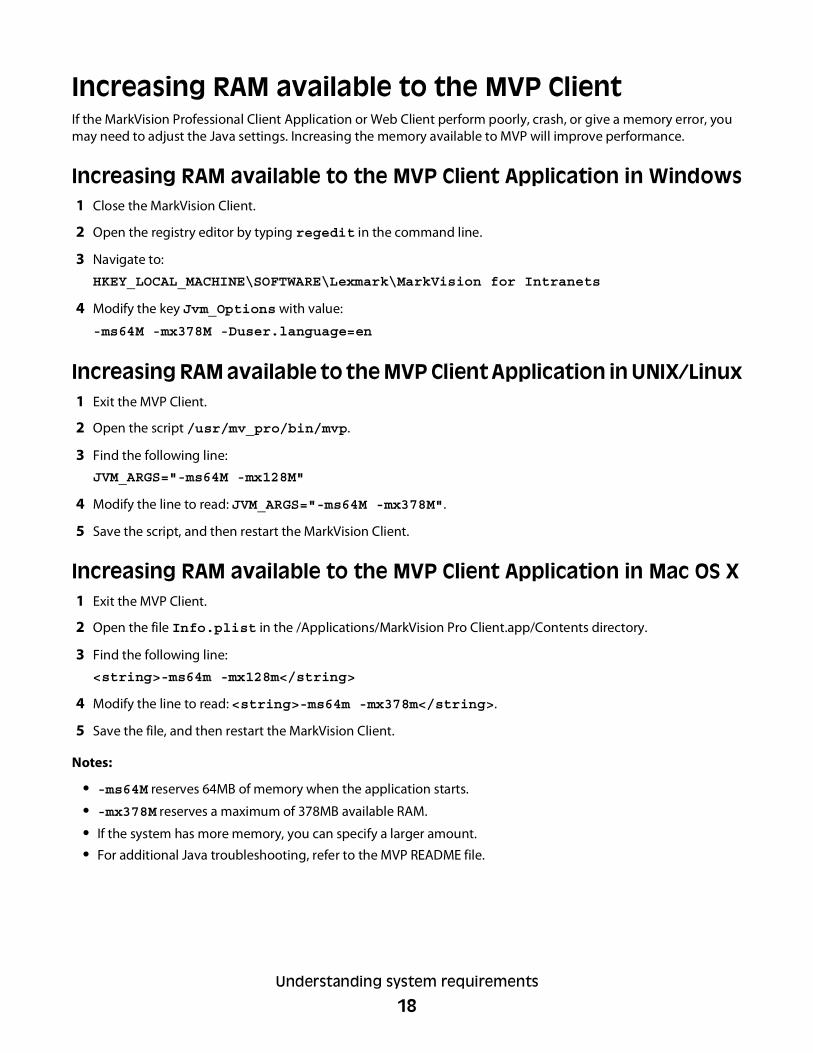
Increasing RAM available to the MVP ClientIf the MarkVision Professional Client Application or Web Client perform poorly, crash, or give a memory error, youmay need to adjust the Java settings. Increasing the memory available to MVP will improve performance.
Increasing RAM available to the MVP Client Application in Windows1 Close the MarkVision Client.
2 Open the registry editor by typing regedit in the command line.
3 Navigate to:
HKEY_LOCAL_MACHINE\SOFTWARE\Lexmark\MarkVision for Intranets
4 Modify the key Jvm_Options with value:
-ms64M -mx378M -Duser.language=en
Increasing RAM available to the MVP Client Application in UNIX/Linux1 Exit the MVP Client.
2 Open the script /usr/mv_pro/bin/mvp.
3 Find the following line:
JVM_ARGS="-ms64M -mx128M"
4 Modify the line to read: JVM_ARGS="-ms64M -mx378M".
5 Save the script, and then restart the MarkVision Client.
Increasing RAM available to the MVP Client Application in Mac OS X1 Exit the MVP Client.
2 Open the file Info.plist in the /Applications/MarkVision Pro Client.app/Contents directory.
3 Find the following line:
<string>-ms64m -mx128m</string>
4 Modify the line to read: <string>-ms64m -mx378m</string>.
5 Save the file, and then restart the MarkVision Client.
Notes:
• -ms64M reserves 64MB of memory when the application starts.
• -mx378M reserves a maximum of 378MB available RAM.
• If the system has more memory, you can specify a larger amount.
• For additional Java troubleshooting, refer to the MVP README file.
Understanding system requirements
18
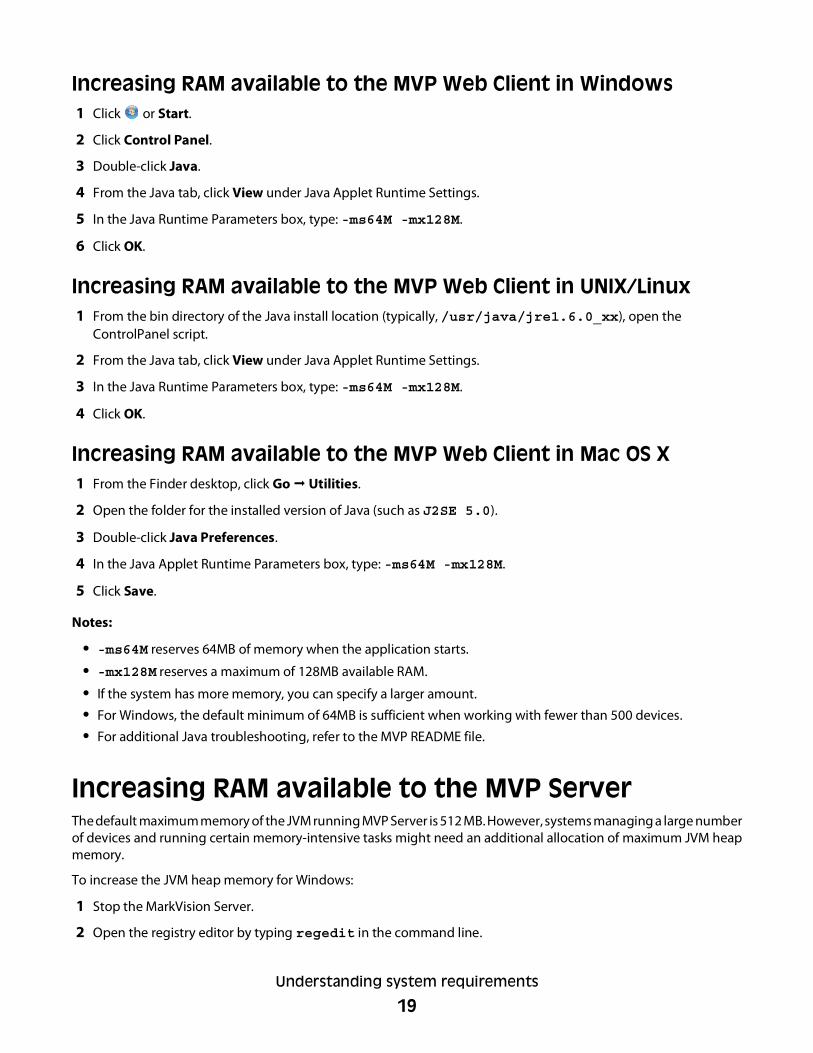
Increasing RAM available to the MVP Web Client in Windows1 Click or Start.
2 Click Control Panel.
3 Double-click Java.
4 From the Java tab, click View under Java Applet Runtime Settings.
5 In the Java Runtime Parameters box, type: -ms64M -mx128M.
6 Click OK.
Increasing RAM available to the MVP Web Client in UNIX/Linux1 From the bin directory of the Java install location (typically, /usr/java/jre1.6.0_xx), open the
ControlPanel script.
2 From the Java tab, click View under Java Applet Runtime Settings.
3 In the Java Runtime Parameters box, type: -ms64M -mx128M.
4 Click OK.
Increasing RAM available to the MVP Web Client in Mac OS X1 From the Finder desktop, click Go Utilities.
2 Open the folder for the installed version of Java (such as J2SE 5.0).
3 Double-click Java Preferences.
4 In the Java Applet Runtime Parameters box, type: -ms64M -mx128M.
5 Click Save.
Notes:
• -ms64M reserves 64MB of memory when the application starts.
• -mx128M reserves a maximum of 128MB available RAM.
• If the system has more memory, you can specify a larger amount.
• For Windows, the default minimum of 64MB is sufficient when working with fewer than 500 devices.
• For additional Java troubleshooting, refer to the MVP README file.
Increasing RAM available to the MVP ServerThe default maximum memory of the JVM running MVP Server is 512 MB. However, systems managing a large numberof devices and running certain memory-intensive tasks might need an additional allocation of maximum JVM heapmemory.
To increase the JVM heap memory for Windows:
1 Stop the MarkVision Server.
2 Open the registry editor by typing regedit in the command line.
Understanding system requirements
19
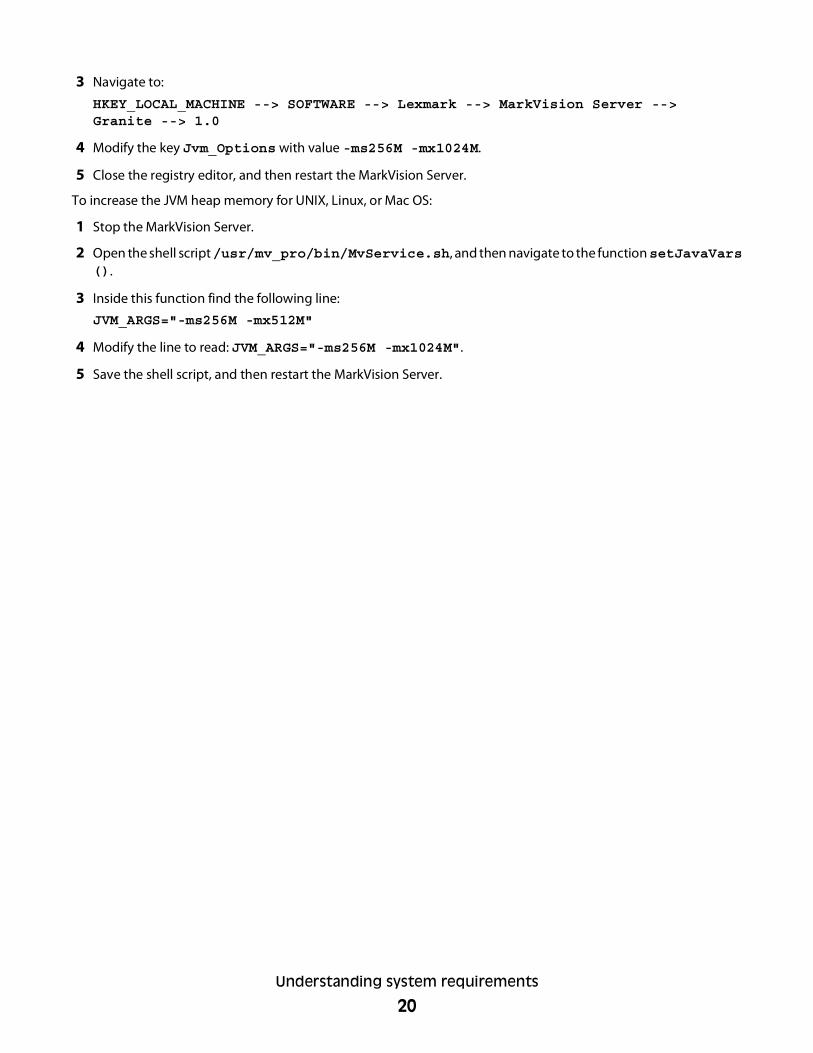
3 Navigate to:
HKEY_LOCAL_MACHINE --> SOFTWARE --> Lexmark --> MarkVision Server -->Granite --> 1.0
4 Modify the key Jvm_Options with value -ms256M -mx1024M.
5 Close the registry editor, and then restart the MarkVision Server.
To increase the JVM heap memory for UNIX, Linux, or Mac OS:
1 Stop the MarkVision Server.
2 Open the shell script /usr/mv_pro/bin/MvService.sh, and then navigate to the function setJavaVars().
3 Inside this function find the following line:
JVM_ARGS="-ms256M -mx512M"
4 Modify the line to read: JVM_ARGS="-ms256M -mx1024M".
5 Save the shell script, and then restart the MarkVision Server.
Understanding system requirements
20

Installing MarkVision Professional
Before installing
Minimizing network trafficMVP lets you choose where to install components. To minimize network traffic and improve performance, install theMarkVision Server on a host that provides high-speed access to users and to the devices you want to monitor. If yourdevices are distributed across a local area network (LAN) or wide area network (WAN), network traffic increases asusers try to access them.
Selecting installation componentsWhile installing the MarkVision components, a dialog appears that shows the hierarchy in which the differentcomponents can be installed.
Note: For Windows-based operating systems, you must select the parent branches in the hierarchy to include anyitems located in a sub-branch.
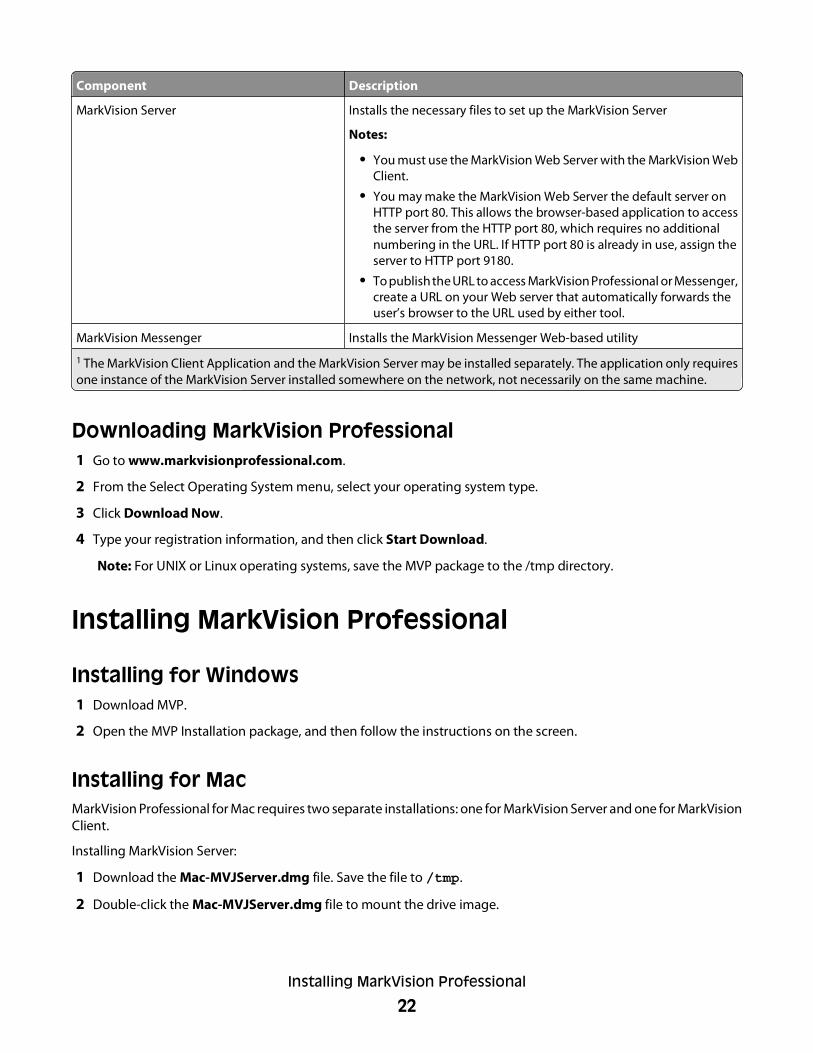
Component Description
MarkVision Client Application1 Installs the primary application that is used to manage your devices
Note: The MarkVision Client Application does not require theinstallation of Sun’s Java Runtime Environment (JRE) Plug-in.
MarkVision Web Client1 Installs a version of the MarkVision Client, which can be accessedthrough a Web browser
Notes:
• In order to run the Web Client, you must first enable your Webbrowser to support Sun’s Java Runtime Environment (JRE) byinstalling the Java Plug-in.
• The MarkVision installation process is operating system specific.Install one of the following smaller versions of the Web browser ona local machine: Windows Web package, Mac OS X Web package,or UNIX Web package.
1 The MarkVision Client Application and the MarkVision Server may be installed separately. The application only requiresone instance of the MarkVision Server installed somewhere on the network, not necessarily on the same machine.
Installing MarkVision Professional
21
Component Description
MarkVision Server Installs the necessary files to set up the MarkVision Server
Notes:
• You must use the MarkVision Web Server with the MarkVision WebClient.
• You may make the MarkVision Web Server the default server onHTTP port 80. This allows the browser-based application to accessthe server from the HTTP port 80, which requires no additionalnumbering in the URL. If HTTP port 80 is already in use, assign theserver to HTTP port 9180.
• To publish the URL to access MarkVision Professional or Messenger,create a URL on your Web server that automatically forwards theuser’s browser to the URL used by either tool.
MarkVision Messenger Installs the MarkVision Messenger Web-based utility
1 The MarkVision Client Application and the MarkVision Server may be installed separately. The application only requiresone instance of the MarkVision Server installed somewhere on the network, not necessarily on the same machine.
Downloading MarkVision Professional1 Go to www.markvisionprofessional.com.
2 From the Select Operating System menu, select your operating system type.
3 Click Download Now.
4 Type your registration information, and then click Start Download.
Note: For UNIX or Linux operating systems, save the MVP package to the /tmp directory.
Installing MarkVision Professional
Installing for Windows1 Download MVP.
2 Open the MVP Installation package, and then follow the instructions on the screen.
Installing for MacMarkVision Professional for Mac requires two separate installations: one for MarkVision Server and one for MarkVisionClient.
Installing MarkVision Server:
1 Download the Mac-MVJServer.dmg file. Save the file to /tmp.
2 Double-click the Mac-MVJServer.dmg file to mount the drive image.
Installing MarkVision Professional
22
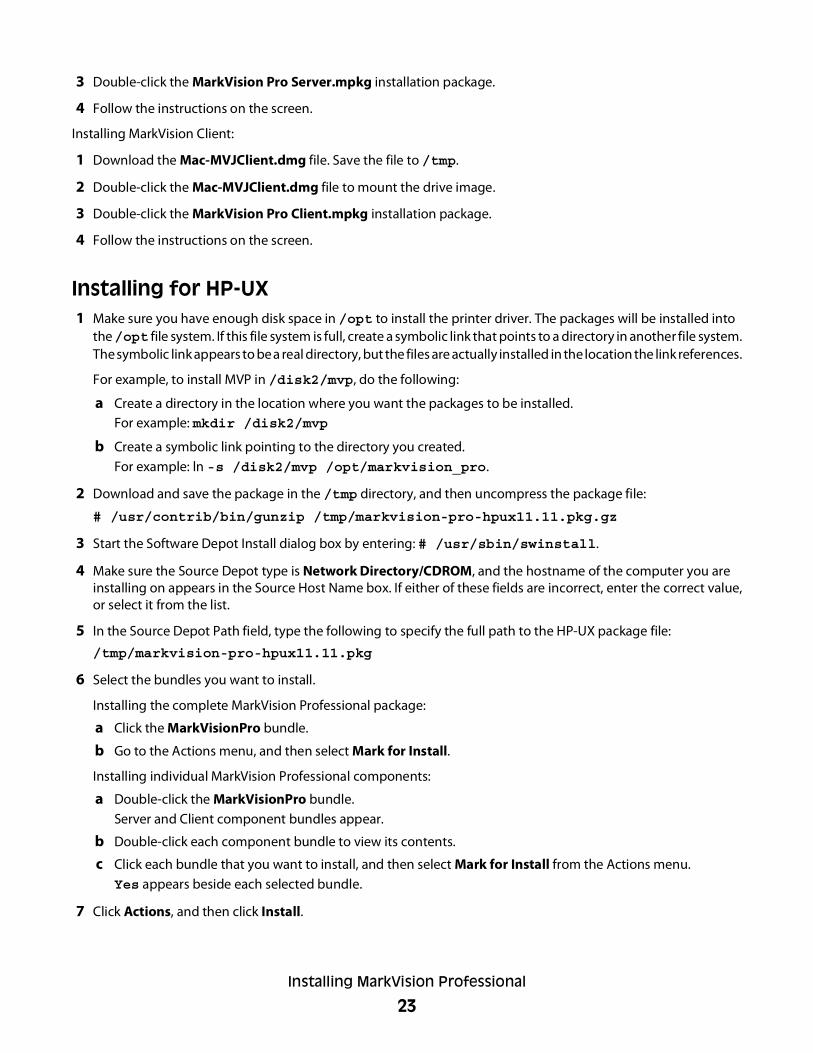
3 Double-click the MarkVision Pro Server.mpkg installation package.
4 Follow the instructions on the screen.
Installing MarkVision Client:
1 Download the Mac-MVJClient.dmg file. Save the file to /tmp.
2 Double-click the Mac-MVJClient.dmg file to mount the drive image.
3 Double-click the MarkVision Pro Client.mpkg installation package.
4 Follow the instructions on the screen.
Installing for HP-UX1 Make sure you have enough disk space in /opt to install the printer driver. The packages will be installed into
the /opt file system. If this file system is full, create a symbolic link that points to a directory in another file system.The symbolic link appears to be a real directory, but the files are actually installed in the location the link references.
For example, to install MVP in /disk2/mvp, do the following:
a Create a directory in the location where you want the packages to be installed.For example: mkdir /disk2/mvp
b Create a symbolic link pointing to the directory you created.For example: ln -s /disk2/mvp /opt/markvision_pro.
2 Download and save the package in the /tmp directory, and then uncompress the package file:
# /usr/contrib/bin/gunzip /tmp/markvision-pro-hpux11.11.pkg.gz
3 Start the Software Depot Install dialog box by entering: # /usr/sbin/swinstall.
4 Make sure the Source Depot type is Network Directory/CDROM, and the hostname of the computer you areinstalling on appears in the Source Host Name box. If either of these fields are incorrect, enter the correct value,or select it from the list.
5 In the Source Depot Path field, type the following to specify the full path to the HP-UX package file:
/tmp/markvision-pro-hpux11.11.pkg
6 Select the bundles you want to install.
Installing the complete MarkVision Professional package:
a Click the MarkVisionPro bundle.
b Go to the Actions menu, and then select Mark for Install.
Installing individual MarkVision Professional components:
a Double-click the MarkVisionPro bundle.Server and Client component bundles appear.
b Double-click each component bundle to view its contents.
c Click each bundle that you want to install, and then select Mark for Install from the Actions menu.Yes appears beside each selected bundle.
7 Click Actions, and then click Install.
Installing MarkVision Professional
23
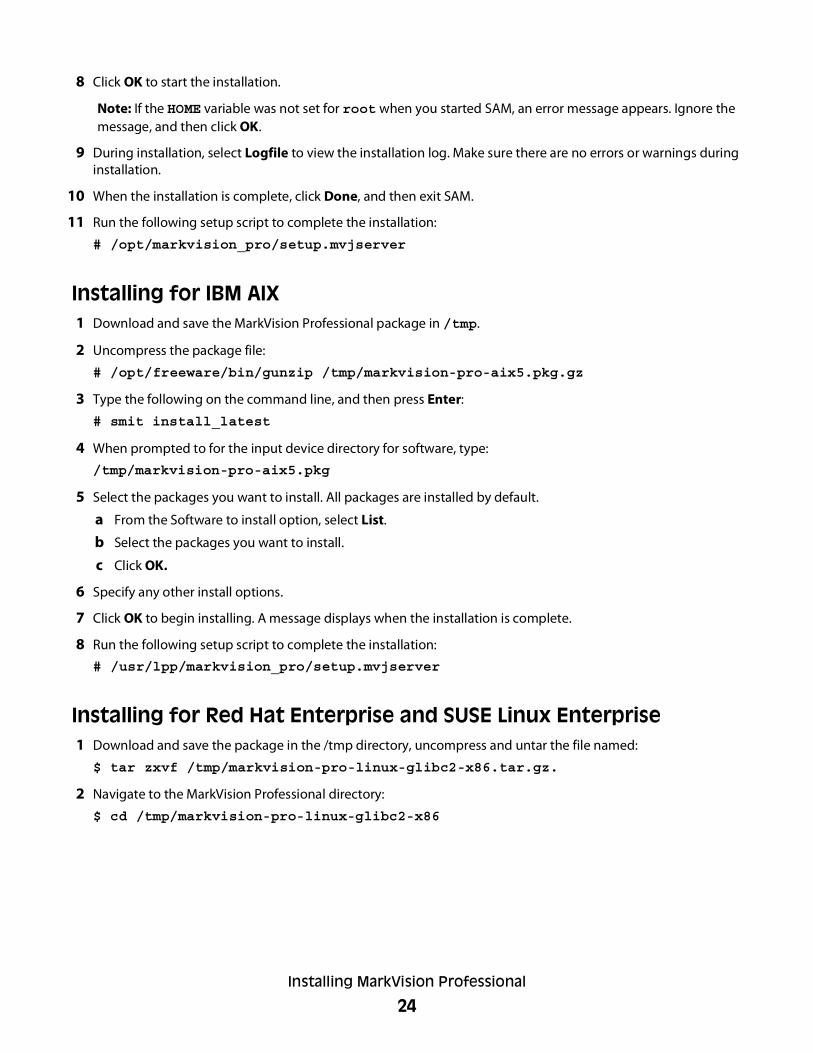
8 Click OK to start the installation.
Note: If the HOME variable was not set for root when you started SAM, an error message appears. Ignore themessage, and then click OK.
9 During installation, select Logfile to view the installation log. Make sure there are no errors or warnings duringinstallation.
10 When the installation is complete, click Done, and then exit SAM.
11 Run the following setup script to complete the installation:
# /opt/markvision_pro/setup.mvjserver
Installing for IBM AIX1 Download and save the MarkVision Professional package in /tmp.
2 Uncompress the package file:
# /opt/freeware/bin/gunzip /tmp/markvision-pro-aix5.pkg.gz
3 Type the following on the command line, and then press Enter:
# smit install_latest
4 When prompted to for the input device directory for software, type:
/tmp/markvision-pro-aix5.pkg
5 Select the packages you want to install. All packages are installed by default.
a From the Software to install option, select List.
b Select the packages you want to install.
c Click OK.
6 Specify any other install options.
7 Click OK to begin installing. A message displays when the installation is complete.
8 Run the following setup script to complete the installation:
# /usr/lpp/markvision_pro/setup.mvjserver
Installing for Red Hat Enterprise and SUSE Linux Enterprise1 Download and save the package in the /tmp directory, uncompress and untar the file named:
$ tar zxvf /tmp/markvision-pro-linux-glibc2-x86.tar.gz.
2 Navigate to the MarkVision Professional directory:
$ cd /tmp/markvision-pro-linux-glibc2-x86
Installing MarkVision Professional
24
3 Install the complete MarkVision Professional package or select the component bundles you want to install.
• To install the complete MVP package, issue the command:# rpm -ivh *.rpm
• To install individual MVP components, specify the file name of the MVP component that you want to install.For example, to install only the MarkVision Server, issue one of these commands:# rpm -ivh markvision-pro-MVJserver-*.i386.rpm
# rpm -ivh markvision-pro-MVJclient-*.i386.rpm
4 Type /usr/local/markvision_pro/setup.mvjserver in the command line, and then answer anyquestions that appear.
Installing for Sun Solaris SPARC1 Set the NONABI_SCRIPTS environment variable to TRUE.
2 Download and save the package in the /tmp directory, and then uncompress the package file:
# gunzip /tmp/markvision-pro-solaris8-10.pkg.gz
3 Start the package installation program:
# pkgadd -d /tmp/markvision-pro-solaris8-10.pkg
4 Install the complete MarkVision Professional package or select the component bundles you want to install. Youmust install all the packages in the same location.• If you want to install the complete MVP package, type all, and then press Enter.
• If you want to install component bundles, type each bundle number separated by a comma, and then pressEnter (For example: 1,2,3,4).
5 Follow the prompts, and then answer any questions that appear on the screen.
a To accept the defaults, press Enter.
b To answer yes/no questions, type y, n, or ?, and then press Enter.A message appears when installation is successful.
c Type q to quit.
6 If the NONABI_SCRIPTS was not set to TRUE, type /opt/markvision_pro/setup.mvjserver on thecommand line, and then answer any questions that appear.
Upgrading from a previous version of MVPIf you are upgrading from MarkVision Professional 10.0 or later, install MVP 11.2.1 directly over the old version.MarkVision itself will migrate any existing settings/configurations to the new version the next time it runs.
Notes:
• Certain plug-ins, such as special product requests from previous releases, may not be supported by MVP 11.2.1.
• Before upgrading from a previous version, compare the list of plug-ins installed on your system against the listof plugins for MVP 11.2.1 listed in the Release Notes. Select Software Update (Manage PlugIns) from the AllTasks list on the MarkVision Professional Home screen to see a list of plug-ins currently installed on the MVPServer.
• Contact your system support person if any of your plug-ins appear not to be supported by MVP 11.2.1.
Installing MarkVision Professional
25
Importing and exporting MarkVision Server settingsThese tasks import and export only folder and filter settings for the MarkVision Server. The following settings willnot be imported or exported:• Administrative Settings
• Discovery Profiles
• Device Policies
• Schedule
• Custom Tables/Views
• User Accounts and Groups
• Global Passwords
• Plug-Ins
• Solution
• Descriptors
• Application Links
• Devices (currently discovered and managed)
Note: To save the types of data listed above, either check the documentation for each type to see if import or exportoptions are provided (for example, the Device Discovery Profiles task provides Import and Export buttons fordiscovery profiles), or use the inclusive backup procedure described in “Moving the MarkVision Server” to back upall MarkVision Server data and settings.
Importing MarkVision Server settings1 From the MarkVision Professional Home screen, select Import Server Settings from the All Tasks list.
2 Click Browse to find the appropriate server settings file.
3 Click Import.
Exporting MarkVision Server settings1 From the MarkVision Professional Home screen, select Export Server Settings from the All Tasks list.
2 Browse to the export location.
3 Name the file.
4 Click Export.
Installing MarkVision Professional
26
Moving the MarkVision ServerAs newer hardware becomes available, it may become necessary to move the MarkVision Professional Server toanother machine, or import settings from one instance of the MarkVision Server to another server. Since MVP isextremely customizable, you may not want to repeat the process of creating folders, filters, and rediscovering devices.MVP provides the option of either moving an entire MarkVision Server or exporting specific settings for folderconfiguration and MarkVision Messenger actions to a file to be imported on another server.
Starting and stopping MarkVision Server for Windows
Windows 2000
1 Go to Control Panel Administrative Tools Services MarkVision Server.
2 Click Start/Stop.
Note: You can use the same process to start or stop the MarkVision Web service.
Windows Vista, Windows XP, and Windows 2003 Server
1 Go to Control Panel Performance and Maintenance Administrative Tools Services MarkVisionServer.
2 Click Start/Stop.
Note: You can use the same process to start or stop the MarkVision Web service.
Starting and stopping the MarkVision Server for Mac• Go to Finder Utilities MarkVision Pro Server Control.app.
• Click Start/Stop Server.
Note: You can use the same process to start or stop the MarkVision Web service.
Starting and stopping MarkVision Server for UNIX• To start the MarkVision Server type: /usr/mv_pro/bin/MvService start.
• To stop the MarkVision Server type: /usr/mv_pro/bin/MvService stop.
Starting and stopping MarkVision Web service for UNIX• To start the MarkVision Web service type: /usr/mv_pro/bin/MvWebService start.
• To stop the MarkVision Web service type: /usr/mv_pro/bin/MvWebService stop.
Installing MarkVision Professional
27

Moving the MarkVision ServerCreate a backup of MVP customized data and then integrate the data onto a new machine:
1 From the original machine, stop the MarkVision Server.
2 Back up the directories in which the customized data files are stored.
• In Windows, the default directories are:C:\Program Files\Printer\MarkVision Server\granite\data
C:\Program Files\Printer\MarkVision Server\granite\plugins
C:\Program Files\Printer\MarkVision Server\mvp-tomcat\webapps\ROOT\~plugins
• For Macintosh and UNIX, the default directories are:/var/spool/markvision/data
/var/spool/markvision/plugins
/usr/mv_pro/mvweb/www/webapps/ROOT/~plugins
3 Install the MarkVision Server on the new machine.
4 Stop the MarkVision Server.
5 Replace the data, plugins and ~plugins directories saved during step 2 into the same locations on the newmachine.
6 Restart the MarkVision Server.
Note: The listed files do not contain settings for window and frame sizes or positional information.
Installing MarkVision Professional
28
Using MarkVision Professional
Getting startedAccess MarkVision Client through the Markvision Client Application or the MarkVision Web Client.
Starting the MarkVision Client Application in Windows1 Click or Start.
2 Click Programs or All Programs Printer MarkVision Professional MarkVision Professional.
Starting the MarkVision Client Application in Mac OS X1 From the Finder desktop, click Go Applications.
2 Double-click MarkVision Pro Client.
Starting the MarkVision Client Application in UNIX or LinuxThe MarkVision Client Application is installed locally. You can open it from the command line, or by clicking theMarkVision Professional icon.
To open the MarkVision Client from the command line:
1 Start an X-Window Terminal or xterm.
2 Type: /usr/bin/mvp in the command line, and then press Enter.
3 Set the DISPLAY environment variable.
Korn (ksh) and Bourne (sh) shell usersType the following commands in the command line:
• DISPLAY=hostname:0.0
• export DISPLAY
C shell usersWhere hostname is the name of your workstation, type the following commands in the command line:
• setenv DISPLAY disphost:0.0
4 If you are running the MarkVision Professional UNIX Client on a different host computer than your X Windowsserver, make sure the remote host has permission to access your screen.
If the MVP UNIX Client is running on the host flora, type xhost + flora in the command line.
5 Type mvp in the command line, and then press Enter.
Using MarkVision Professional
29
To open using the MarkVision Professional icon on UNIX systems:
1 From the CDE panel, click the Printer subpanel.
2 Click MarkVision Professional.
To open using the MarkVision Professional icon on Linux systems:
1 On Gnome and KDE, click Applications System Tools.
2 Click MarkVision Professional.
Accessing the MarkVision Web ClientAfter the MarkVision Web Server is configured, access MarkVision Web Client through a Web browser.
For example, to start the MarkVision Web Client on a Web server whose IP address is 190.168.112.21, typehttp://190.168.112.21:9180/markvision in the address field of your Web browser.
Selecting a serverAfter opening MVP for the first time, you must select a server. Select a server based on the server status. For example,if there are multiple instances of the MarkVision Server on the network, and multiple clients are active, select asupported server that has the least number of connections. This provides faster access to MVP.
1 Enter the computer/hostname or IP address of the machine running the MarkVision Server, or click Browse tolocate it.
Notes:
• You may enter localhost if your MVP Server is running on your local computer.
• By default, the version of each MarkVision Server is displayed. You may only connect a MarkVision Clientversion 11.2.1 to a MarkVision Server version 11.2.1.
2 Click Connect.
Using the MarkVision Setup wizardThe MarkVision Setup wizard will run the first time a client connects to the MarkVision Server, as well as eachsubsequent time until you select Do not show me this setup window again. It is recommended that you go throughthe Setup wizard at least once and, if you are unsure, accept its default settings.
Device DiscoveryCreate device profiles and find printers and print servers on a network.
Folder SetupOrganize and manage multiple devices using folders. Using folders allows for quick identification of devices withina subset of the entire list of devices being managed. Use preconfigured MarkVision folders or configure folders.
Custom Tables / Custom ViewsPresent device information through customized or preset tables and views.
Using MarkVision Professional
30
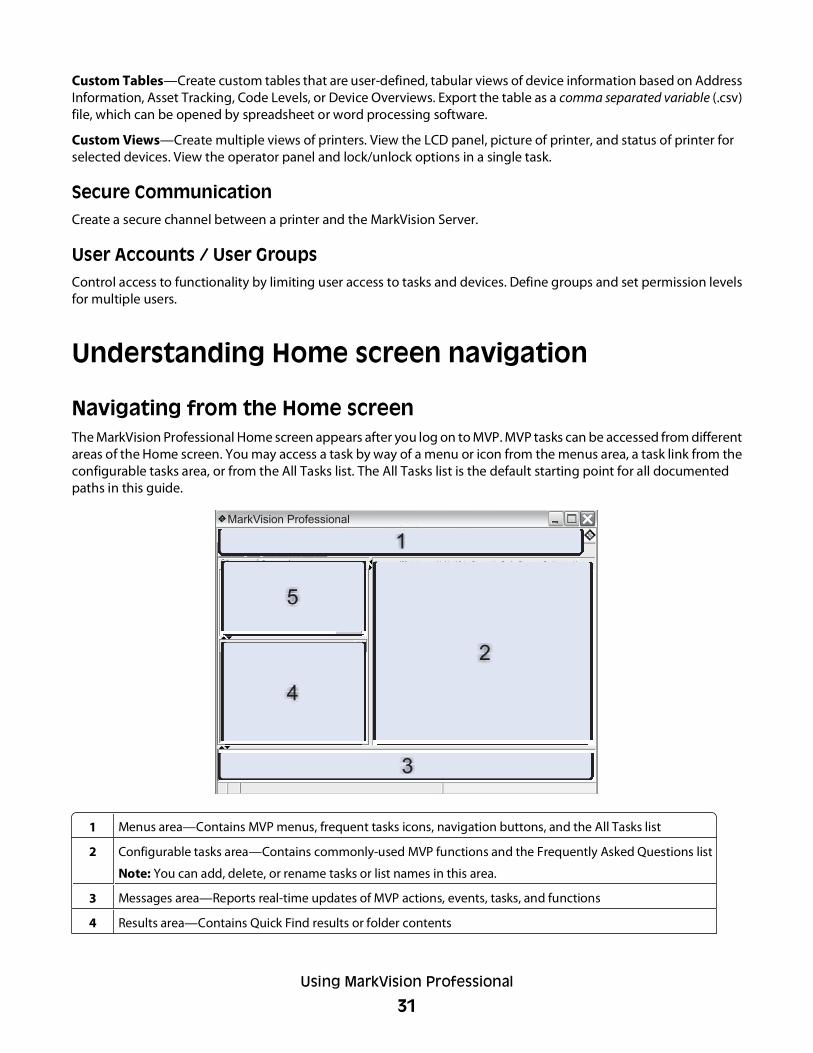
Custom Tables—Create custom tables that are user-defined, tabular views of device information based on AddressInformation, Asset Tracking, Code Levels, or Device Overviews. Export the table as a comma separated variable (.csv)file, which can be opened by spreadsheet or word processing software.
Custom Views—Create multiple views of printers. View the LCD panel, picture of printer, and status of printer forselected devices. View the operator panel and lock/unlock options in a single task.
Secure CommunicationCreate a secure channel between a printer and the MarkVision Server.
User Accounts / User GroupsControl access to functionality by limiting user access to tasks and devices. Define groups and set permission levelsfor multiple users.
Understanding Home screen navigation
Navigating from the Home screenThe MarkVision Professional Home screen appears after you log on to MVP. MVP tasks can be accessed from differentareas of the Home screen. You may access a task by way of a menu or icon from the menus area, a task link from theconfigurable tasks area, or from the All Tasks list. The All Tasks list is the default starting point for all documentedpaths in this guide.
1 Menus area—Contains MVP menus, frequent tasks icons, navigation buttons, and the All Tasks list
2 Configurable tasks area—Contains commonly-used MVP functions and the Frequently Asked Questions list
Note: You can add, delete, or rename tasks or list names in this area.
3 Messages area—Reports real-time updates of MVP actions, events, tasks, and functions
4 Results area—Contains Quick Find results or folder contents
Using MarkVision Professional
31
5 Quick Find or Folders area—Contains a search tool or folders
Using the All Tasks listThe All Tasks list is available from the menus area of the MarkVision Professional Home screen.
Task name Task function
802.1x Configure 802.1x authentication settings for a selected device.
About View MVP version information.
Add Devices Search networks and add devices.
Address Information View network identification information about devices
Administrative Settings Configure MVP server-level settings and change settings for devicediscovery, naming, and communication.
AppleTalk View or modify AppleTalk network settings.
Application Links Configure external applications to launch from MVP.
Asset Tracking View information with device inventory relevance for selecteddevices.
Bookmark Management Create, save, and edit printer bookmarks in a printer permanentmemory.
Code Levels View firmware code levels for selected devices.
Color Samples Print color samples and conversion tables for settings such as sRGBDisplay, US CMYK, and Euro CMYK, among others.
Configuration Page View select settings for a device (including scanner configurationand paper prompt settings, among many others.) Users can alsosave an XML-based list of these settings.
Configure Configure settings for certain forms printers.
Configure Top-of-Form Unit Configure settings for the Top-of-Form Unit on certain formsprinters. The Top-of-Form Unit sets the first line of print oncontinuous forms and cut forms.
Contact Name and Location Set the contact name and location for the person responsible fora device.
Create Windows Print Objects Create a Windows print object (queue) or a remote host computer.
Custom Background Image Load an image to use in the background on the home screen ofthe device.
Custom Media - Custom Paper Name View or modify custom paper names.
Custom Media - Custom Paper Type View or modify custom paper type settings.
Custom Media - Paper Loading View or modify paper loading settings.
Custom Media - Paper Texture View or modify custom texture settings.
Custom Media - Paper Type Bin View or modify custom paper bin settings.
Custom Media - Paper Weight View or modify custom paper weight settings.
Using MarkVision Professional
32
Task name Task function
Custom Tables - Create/Manage Configure and export tables of device information.
Custom Views - Create/Manage Create custom views with multiple pieces of information.
Delete Security Audit Log Delete the Security Audit Log, which tracks security-related eventson a selected device.
Device Discovery Profiles Create discovery profiles to search attached networks and adddiscovered devices to MVP.
Device Discovery Results Display device discovery results based on specific discoveryprofiles.
Device Overview View a table of general information about selected devices.
Device Policies - Apply Apply created policies to selected devices to enforce settings.
Device Policy - Check Device Conformance Determine if selected devices are conforming to device policies.
Device Policies - Create/Manage Manage a list of device policies to quickly configure or edit devicesettings (such as print quality), or enforce those settings.
Diagnostics Page View and/or save a list of diagnostics settings for a selected device.
Displayed Information Specify the information displayed in the General Settings menu ona supported device.
Drivers and Utilities (On the Web) Open the driver and utilities Web page.
Email Alert Setup Create and manage e-mail alerts for selected devices.
Email Destinations Create and manage e-mail destinations for selected devices.
Embedded Solutions - Features View a table of information about the Embedded Solutionsframework settings, license settings (if applicable), and settings forinstalled solutions on selected devices.
Embedded Solutions - Framework Management Manage settings for the Embedded Solutions framework onselected devices.
Embedded Solutions - Get Host ID Retrieve the Host ID from selected devices fro deliver to a licenseprovider in order to generate a solution license.
Embedded Solutions - Solutions Management Manage Embedded Solutions on selected devices: install, remove,and license solutions and manage their settings.
Emulators View emulator (printer language interpreters) settings for selectedprinters.
Event Log View and/or save a list of events that have taken place on a selecteddevice. This list includes such events as firmware updates andpaper jams, among others.
Export Server Settings Export MVP Server settings to a file that can imported to anotherserver or used to back up an existing server filter or folder.
Fax (Printer) View or modify a printer fax settings.
Fax Destinations Create and manage fax destinations for selected devices.
Note: This task applies only to older devices. For most currentdevices with fax capability, the Fax Settings task is appropriate.
Using MarkVision Professional
33
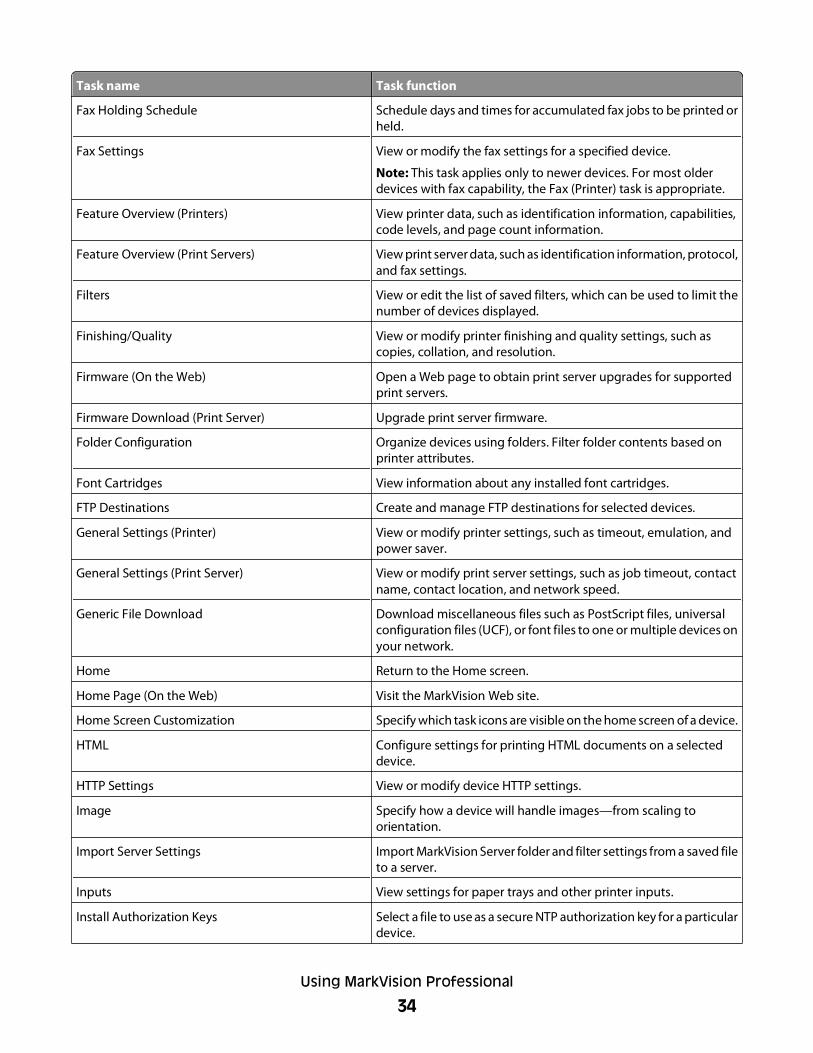
Task name Task function
Fax Holding Schedule Schedule days and times for accumulated fax jobs to be printed orheld.
Fax Settings View or modify the fax settings for a specified device.
Note: This task applies only to newer devices. For most olderdevices with fax capability, the Fax (Printer) task is appropriate.
Feature Overview (Printers) View printer data, such as identification information, capabilities,code levels, and page count information.
Feature Overview (Print Servers) View print server data, such as identification information, protocol,and fax settings.
Filters View or edit the list of saved filters, which can be used to limit thenumber of devices displayed.
Finishing/Quality View or modify printer finishing and quality settings, such ascopies, collation, and resolution.
Firmware (On the Web) Open a Web page to obtain print server upgrades for supportedprint servers.
Firmware Download (Print Server) Upgrade print server firmware.
Folder Configuration Organize devices using folders. Filter folder contents based onprinter attributes.
Font Cartridges View information about any installed font cartridges.
FTP Destinations Create and manage FTP destinations for selected devices.
General Settings (Printer) View or modify printer settings, such as timeout, emulation, andpower saver.
General Settings (Print Server) View or modify print server settings, such as job timeout, contactname, contact location, and network speed.
Generic File Download Download miscellaneous files such as PostScript files, universalconfiguration files (UCF), or font files to one or multiple devices onyour network.
Home Return to the Home screen.
Home Page (On the Web) Visit the MarkVision Web site.
Home Screen Customization Specify which task icons are visible on the home screen of a device.
HTML Configure settings for printing HTML documents on a selecteddevice.
HTTP Settings View or modify device HTTP settings.
Image Specify how a device will handle images—from scaling toorientation.
Import Server Settings Import MarkVision Server folder and filter settings from a saved fileto a server.
Inputs View settings for paper trays and other printer inputs.
Install Authorization Keys Select a file to use as a secure NTP authorization key for a particulardevice.
Using MarkVision Professional
34
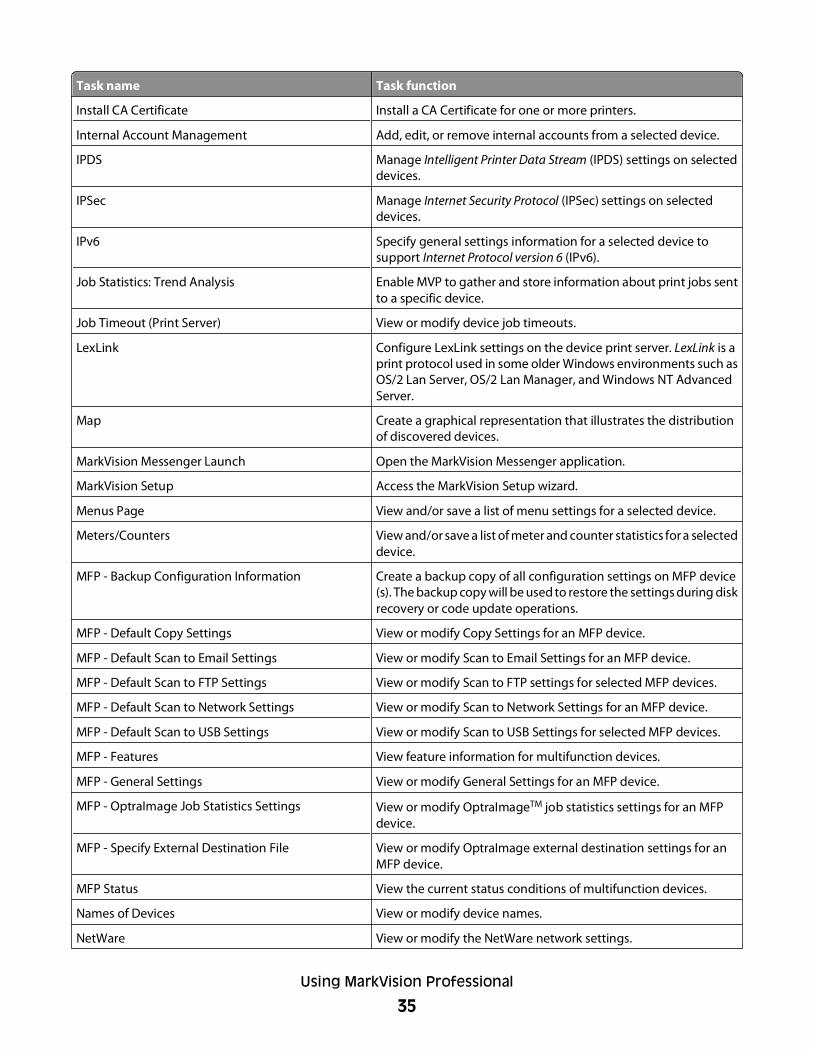
Task name Task function
Install CA Certificate Install a CA Certificate for one or more printers.
Internal Account Management Add, edit, or remove internal accounts from a selected device.
IPDS Manage Intelligent Printer Data Stream (IPDS) settings on selecteddevices.
IPSec Manage Internet Security Protocol (IPSec) settings on selecteddevices.
IPv6 Specify general settings information for a selected device tosupport Internet Protocol version 6 (IPv6).
Job Statistics: Trend Analysis Enable MVP to gather and store information about print jobs sentto a specific device.
Job Timeout (Print Server) View or modify device job timeouts.
LexLink Configure LexLink settings on the device print server. LexLink is aprint protocol used in some older Windows environments such asOS/2 Lan Server, OS/2 Lan Manager, and Windows NT AdvancedServer.
Map Create a graphical representation that illustrates the distributionof discovered devices.
MarkVision Messenger Launch Open the MarkVision Messenger application.
MarkVision Setup Access the MarkVision Setup wizard.
Menus Page View and/or save a list of menu settings for a selected device.
Meters/Counters View and/or save a list of meter and counter statistics for a selecteddevice.
MFP - Backup Configuration Information Create a backup copy of all configuration settings on MFP device(s). The backup copy will be used to restore the settings during diskrecovery or code update operations.
MFP - Default Copy Settings View or modify Copy Settings for an MFP device.
MFP - Default Scan to Email Settings View or modify Scan to Email Settings for an MFP device.
MFP - Default Scan to FTP Settings View or modify Scan to FTP settings for selected MFP devices.
MFP - Default Scan to Network Settings View or modify Scan to Network Settings for an MFP device.
MFP - Default Scan to USB Settings View or modify Scan to USB Settings for selected MFP devices.
MFP - Features View feature information for multifunction devices.
MFP - General Settings View or modify General Settings for an MFP device.
MFP - OptraImage Job Statistics Settings View or modify OptraImageTM job statistics settings for an MFPdevice.
MFP - Specify External Destination File View or modify OptraImage external destination settings for anMFP device.
MFP Status View the current status conditions of multifunction devices.
Names of Devices View or modify device names.
NetWare View or modify the NetWare network settings.
Using MarkVision Professional
35
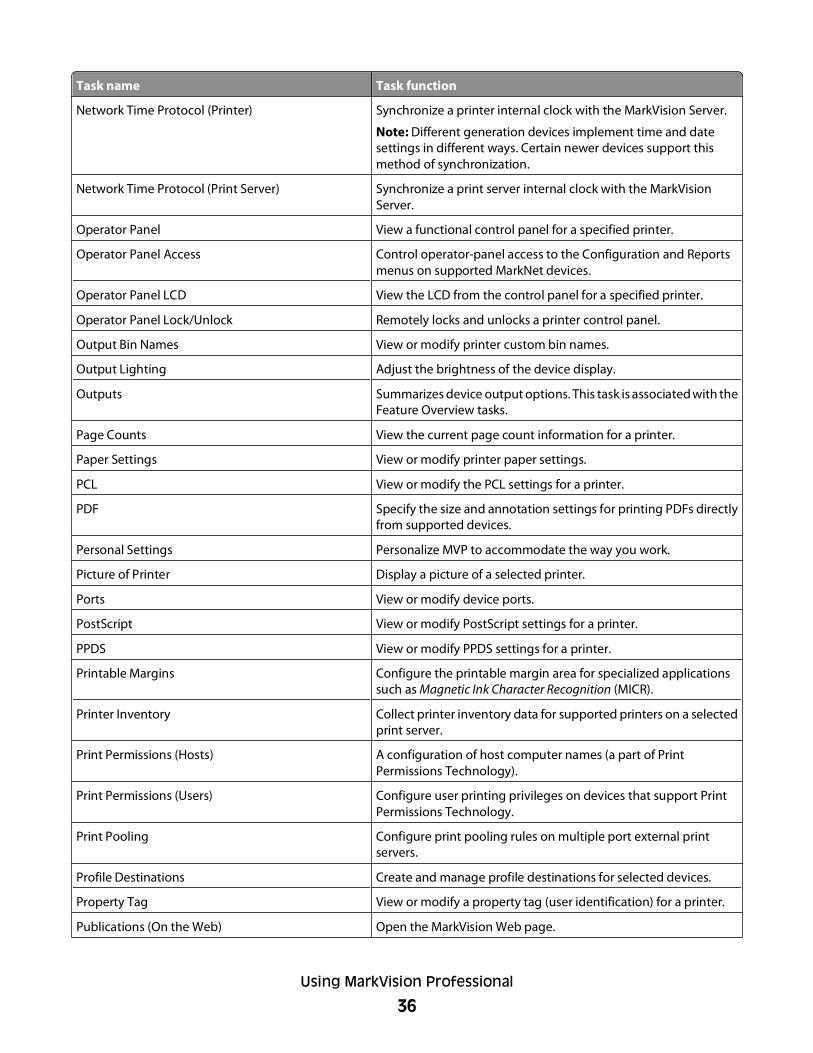
Task name Task function
Network Time Protocol (Printer) Synchronize a printer internal clock with the MarkVision Server.
Note: Different generation devices implement time and datesettings in different ways. Certain newer devices support thismethod of synchronization.
Network Time Protocol (Print Server) Synchronize a print server internal clock with the MarkVisionServer.
Operator Panel View a functional control panel for a specified printer.
Operator Panel Access Control operator-panel access to the Configuration and Reportsmenus on supported MarkNet devices.
Operator Panel LCD View the LCD from the control panel for a specified printer.
Operator Panel Lock/Unlock Remotely locks and unlocks a printer control panel.
Output Bin Names View or modify printer custom bin names.
Output Lighting Adjust the brightness of the device display.
Outputs Summarizes device output options. This task is associated with theFeature Overview tasks.
Page Counts View the current page count information for a printer.
Paper Settings View or modify printer paper settings.
PCL View or modify the PCL settings for a printer.
PDF Specify the size and annotation settings for printing PDFs directlyfrom supported devices.
Personal Settings Personalize MVP to accommodate the way you work.
Picture of Printer Display a picture of a selected printer.
Ports View or modify device ports.
PostScript View or modify PostScript settings for a printer.
PPDS View or modify PPDS settings for a printer.
Printable Margins Configure the printable margin area for specialized applicationssuch as Magnetic Ink Character Recognition (MICR).
Printer Inventory Collect printer inventory data for supported printers on a selectedprint server.
Print Permissions (Hosts) A configuration of host computer names (a part of PrintPermissions Technology).
Print Permissions (Users) Configure user printing privileges on devices that support PrintPermissions Technology.
Print Pooling Configure print pooling rules on multiple port external printservers.
Profile Destinations Create and manage profile destinations for selected devices.
Property Tag View or modify a property tag (user identification) for a printer.
Publications (On the Web) Open the MarkVision Web page.
Using MarkVision Professional
36

Task name Task function
Refresh Devices Refresh cached information for selected printer and/or print serverdevices.
Registration (On the Web) Open the MVP registration Web page.
Remove Devices (Advanced) Remove one or more devices from the list of devices managed byMVP. Use the Remove Printer icon or the Delete key shortcut.
Remove Windows Print Objects Removes Windows print objects (queues) from remote hostcomputers.
Reset Reset a specified printer or print server.
Resource Management Download fonts and overlays to printers.
Schedule Power Saver Specify when devices should enter Power Saver mode and whenthey should wake up.
Scheduling Specify times to automatically initiate certain tasks.
Security - Access Controls Set access controls for a selected device.
Security - Advanced Credentials Specify the User ID, Password, PIN, and Realm for the MarkVisionServer.
Security Audit Log Configure Audit Log settings to monitor security-related events ona particular device.
Security - Backup Password Set a master password for selected devices.
Security - Basic Credentials Maintain a list of device passwords on the MarkVision Server.
Security - Certificate Defaults Configure default settings for security certificates.
Security - Certificate Management Manage security certificates for selected devices.
Security - Communication Password Synchronize a server communication password for one or moredevices.
Security - Confidential Print Setup Configure the Max Invalid PIN and Job Expiration settings forconfidential print jobs on a device.
Security - Enter Device Password Enter a password to gain access to a password protected devicefor the duration of the current client session.
Security - Internal Accounts Configure internal accounts for a selected device.
Security - Kerberos (Advanced) Set up a Kerberos building block for a selected device.
Security - Kerberos (Basic) Import, view, or modify Kerberos Setup.
Kerberos—A computer network authentication protocol thatallows the user and the server to verify each other.
Security - Kerberos Setup (Basic) Specify the default Kerberos Realm for users.
Security - LDAP (Advanced) Set up an LDAP building block for a selected device.
Security - LDAP (Basic) View or modify LDAP Settings for an MFP device.
LDAP—A network authentication protocol that runs over TCP/IP.
Using MarkVision Professional
37
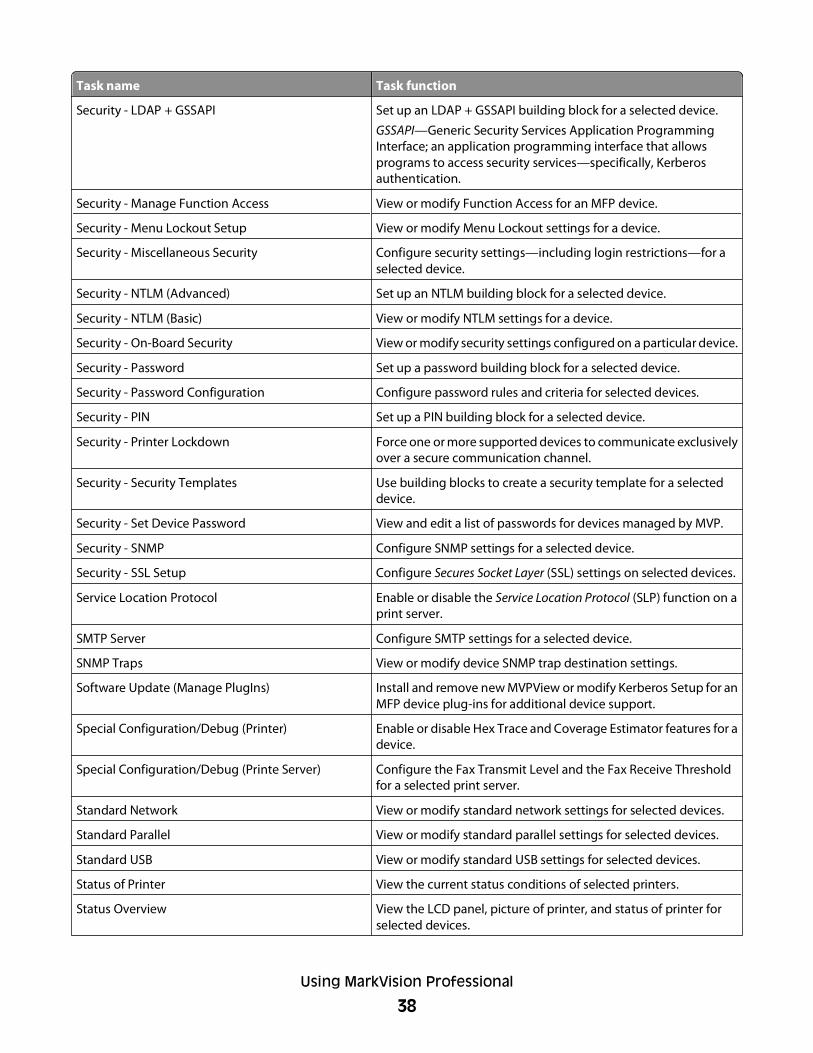
Task name Task function
Security - LDAP + GSSAPI Set up an LDAP + GSSAPI building block for a selected device.
GSSAPI—Generic Security Services Application ProgrammingInterface; an application programming interface that allowsprograms to access security services—specifically, Kerberosauthentication.
Security - Manage Function Access View or modify Function Access for an MFP device.
Security - Menu Lockout Setup View or modify Menu Lockout settings for a device.
Security - Miscellaneous Security Configure security settings—including login restrictions—for aselected device.
Security - NTLM (Advanced) Set up an NTLM building block for a selected device.
Security - NTLM (Basic) View or modify NTLM settings for a device.
Security - On-Board Security View or modify security settings configured on a particular device.
Security - Password Set up a password building block for a selected device.
Security - Password Configuration Configure password rules and criteria for selected devices.
Security - PIN Set up a PIN building block for a selected device.
Security - Printer Lockdown Force one or more supported devices to communicate exclusivelyover a secure communication channel.
Security - Security Templates Use building blocks to create a security template for a selecteddevice.
Security - Set Device Password View and edit a list of passwords for devices managed by MVP.
Security - SNMP Configure SNMP settings for a selected device.
Security - SSL Setup Configure Secures Socket Layer (SSL) settings on selected devices.
Service Location Protocol Enable or disable the Service Location Protocol (SLP) function on aprint server.
SMTP Server Configure SMTP settings for a selected device.
SNMP Traps View or modify device SNMP trap destination settings.
Software Update (Manage PlugIns) Install and remove new MVPView or modify Kerberos Setup for anMFP device plug-ins for additional device support.
Special Configuration/Debug (Printer) Enable or disable Hex Trace and Coverage Estimator features for adevice.
Special Configuration/Debug (Printe Server) Configure the Fax Transmit Level and the Fax Receive Thresholdfor a selected print server.
Standard Network View or modify standard network settings for selected devices.
Standard Parallel View or modify standard parallel settings for selected devices.
Standard USB View or modify standard USB settings for selected devices.
Status of Printer View the current status conditions of selected printers.
Status Overview View the LCD panel, picture of printer, and status of printer forselected devices.
Using MarkVision Professional
38
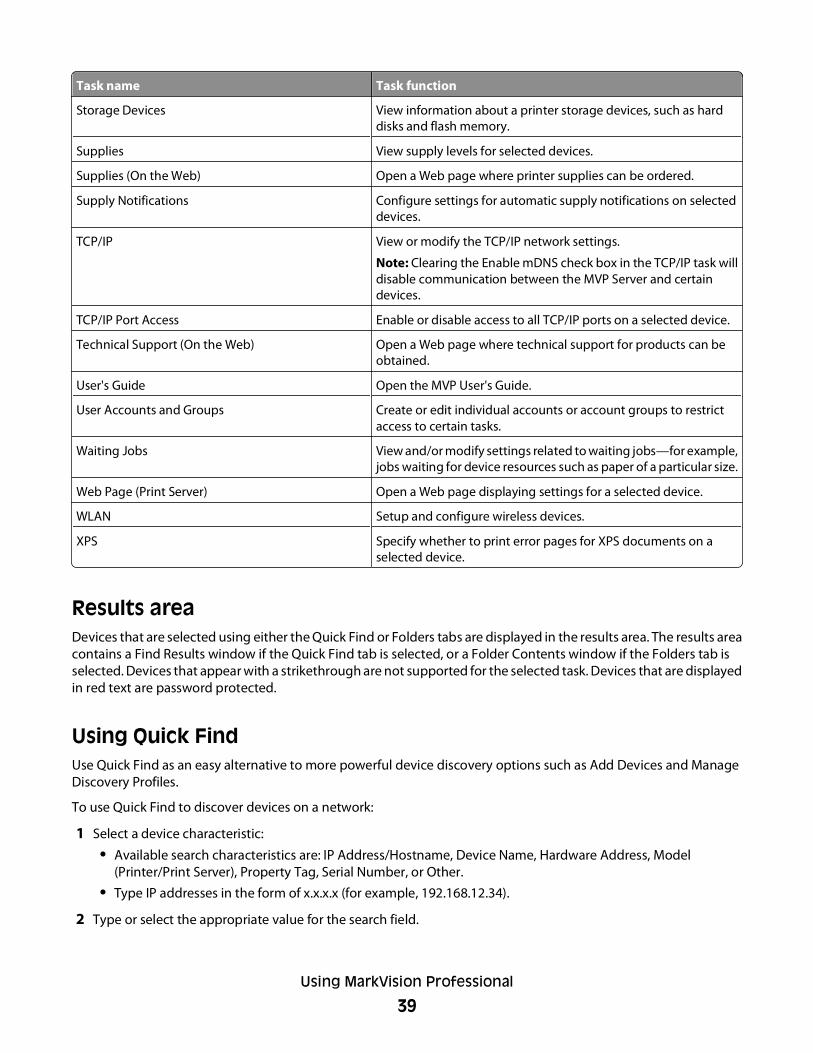
Task name Task function
Storage Devices View information about a printer storage devices, such as harddisks and flash memory.
Supplies View supply levels for selected devices.
Supplies (On the Web) Open a Web page where printer supplies can be ordered.
Supply Notifications Configure settings for automatic supply notifications on selecteddevices.
TCP/IP View or modify the TCP/IP network settings.
Note: Clearing the Enable mDNS check box in the TCP/IP task willdisable communication between the MVP Server and certaindevices.
TCP/IP Port Access Enable or disable access to all TCP/IP ports on a selected device.
Technical Support (On the Web) Open a Web page where technical support for products can beobtained.
User's Guide Open the MVP User's Guide.
User Accounts and Groups Create or edit individual accounts or account groups to restrictaccess to certain tasks.
Waiting Jobs View and/or modify settings related to waiting jobs—for example,jobs waiting for device resources such as paper of a particular size.
Web Page (Print Server) Open a Web page displaying settings for a selected device.
WLAN Setup and configure wireless devices.
XPS Specify whether to print error pages for XPS documents on aselected device.
Results areaDevices that are selected using either the Quick Find or Folders tabs are displayed in the results area. The results areacontains a Find Results window if the Quick Find tab is selected, or a Folder Contents window if the Folders tab isselected. Devices that appear with a strikethrough are not supported for the selected task. Devices that are displayedin red text are password protected.
Using Quick FindUse Quick Find as an easy alternative to more powerful device discovery options such as Add Devices and ManageDiscovery Profiles.
To use Quick Find to discover devices on a network:
1 Select a device characteristic:
• Available search characteristics are: IP Address/Hostname, Device Name, Hardware Address, Model(Printer/Print Server), Property Tag, Serial Number, or Other.
• Type IP addresses in the form of x.x.x.x (for example, 192.168.12.34).
2 Type or select the appropriate value for the search field.
Using MarkVision Professional
39
3 Click Find.
4 Click Stop to terminate the current discovery operation.
Note: Most of the Quick Find search options are performed only on devices already managed by the MarkVisionServer. An exception is the IP Address/Hostname option, which also searches the network for matching addresses.
Changing SNMP Community namesChange the read or write access privileges associated with Quick Find with Simple Network Management Protocol(SNMP) community names. SNMP is used by network management systems to monitor network-attached devicesfor conditions that warrant administrative attention.
1 From the MarkVision Professional Home screen, select Administrative Settings from the All Tasks list.
2 Click the Quick Find tab.
3 Type the new community name in the appropriate box to change the default value.
Note: The default value for the Read and Write boxes is public. The community names are case-sensitive.
4 Click OK.
Note: This changes the MVP community name, not the print server community name. To change the print servername, refer to your print server documentation. Additionally, the MVP task TCP/IP may be used.
Using the Folders tabThis area displays folders that have been configured using the Folder Configuration task and/or the MarkVision Setupwizard. Discovered devices are saved here.
AccessibilityMVP offers alternative keyboard navigation in accordance with industry standards. The user interface andtask-oriented dialogs allow navigation exclusively through keyboard commands.
• Use the Alt key to activate mnemonic (underlined character) options in the Task bar menus.
• Use accelerator key combinations to invoke menu items without navigating the menus.
• Navigate between sections of a dialog box using either the F6 function key or the Tab key.
• Use the Delete key to remove selected device(s) from the server list of managed devices.
• Use the Alt key in combination with the left or right arrow to cycle through recently selected tasks.
• Use the keypad + and - keys to expand or collapse selected nodes of a device policy.
• Use the F5 key to refresh the current task.
Multi-selectWhen you are presented with a list of items, such as printers, you can select more than one using the Control or Shiftkey. This lets you edit an attribute for all the selected devices at one time.
Using MarkVision Professional
40
Configuring MarkVision Professional
Discovering devices
Adding or removing devicesMVP lets you search a network for printers and print servers. You can schedule and configure discoveries to suit yourneeds. Once devices are discovered, their locations are stored on the MarkVision Server and they populate the AllDevices folder.
To discover devices, use the Device Discovery Profiles task or the Add Devices task from the All Tasks list, or use QuickFind from the MarkVision Professional Home screen. Discovery profiles define the range of devices that you want todiscover, and the configuration of the discovery operation. You can create multiple device profiles, for different setsof devices. Each profile can be saved and reused for future discoveries.
Creating discovery profiles1 From the MarkVision Professional Home screen, select Device Discovery Profiles from the All Tasks list.
2 Click New, and then type a name for the profile.
3 Click Add to add devices to the Include list.
4 Select the type of address, and then enter the range from which the devices will be included. Specify one or moreof the following:
TCP/IP address, subnet, orhostname
Type the IP addresses in the dot notation form of x.x.x.x (for example,192.168.12.34).
TCP/IP address range Type the TCP/IP address range, beginning with the From box and ending with theTo box.
IPX Type the eight-digit hexadecimal network number on which the print server resides(for example, 000C2194). If the print server resides on the same network as theMarkVision Server, type 00000000 (zeros) for the network number.
Note: If you do not know the network number of your print server, you can find iton the print server setup page, under the NetWare settings.
5 Click OK to return the Device Discovery Profiles screen.
The address or address range is now listed under the Include tab.
6 Click Apply.
Discovering devices1 From the MarkVision Professional Home screen, select Device Discovery Profiles from the All Tasks list.
2 Select a profile from the Device Discovery Profiles dialog.
3 Click Start.
Configuring MarkVision Professional
41
MVP communicates with the devices included in the selected profile.
Notes:
• To stop a discovery at any time, click Stop.
• The Stop button enables you to cancel the Discovery operation that was last started.
• Performing a discovery that includes all of the devices on a network, requires a large amount of CPU usage.This could dramatically slow the MarkVision Server.
Including and excluding devicesWhen creating a discovery profile, you can include or exclude devices in a device range.
1 From the MarkVision Professional Home screen, select Device Discovery Profiles from the All Tasks list.
2 Select a discovery profile from the list.
3 Select the Include or Exclude tab.
4 Click Add or Load.
5 Type the address or address range in the text box, and then click OK.
6 Click Apply, and then click Close.
Saving and loading include or exclude lists1 From the MarkVision Professional Home screen, select Device Discovery Profiles from the All Tasks list.
2 Select a discovery profile from the list.
3 Select the Include or Exclude tab.
4 Do one of the following:
• To save existing device ranges, click Save. Browse to the desired location, and then click Save.
• to load an existing .List file containing device ranges, click Load. Browse to find the file, and then clickOpen.
Note: Include and exclude lists are ASCII, space-delimited text files whose entries must use the followingformat: protocol address read-community-name write-community-name (For example: IP19.59.3.11/24 public public).
5 If loading an include or exclude list, click Start to begin discovery on those devices.
Configuring advanced device discovery1 From the MarkVision Professional Home screen, select Device Discovery Profiles from the All Tasks list.
2 Click the Advanced tab from the Device Discovery Profiles main window to configure advanced device discoveryfeatures. The following are features that may be customized for an advanced device discovery profile:
3 Click Close.
Configuring MarkVision Professional
42

Importing and exporting discovery profiles
Importing a discovery profile
1 From the MarkVision Professional Home screen, select Device Discovery Profiles.
2 Click Import.
3 Browse to the discovery profile .xml file.
4 Click Import.
5 Select the new profile from the list, and then click Start to discover devices using the profile.
Note: Click Stop to terminate the discovery operation at any point during discovery.
6 Click Close.
Exporting a discovery profileUsers may export discovery profiles on the MarkVision Server to XML files. These XML files may be imported to thesame MVP server or other MVP servers.
1 From the MarkVision Professional Home screen, select Device Discovery Profiles.
2 Click Export.
3 Type a name for the discovery profile .xml file, and browse to a location to save it.
4 Click Export.
5 Click Close.
Scheduling device discoverySchedule device discoveries on a regular basis to ensure that the MVP devices list is always current. If the devicediscoveries are network-intensive, schedule device discovery for times when network traffic is minimal.
Note: A device discovery profile must be defined before a task can be scheduled for a profile.
1 From the MarkVision Professional Home screen, select Scheduling from the All Tasks list.
2 Click Add to launch the Add Schedule Wizard.
3 Select Device Discovery: Add Devices.
4 Type a description of the event in the text box, and then click Next.
5 Choose a start date and time from the Start time area.
6 Select a frequency from the “Repeat this event area,” and then click Next.
7 Select a discovery profile, and then click Finish.
The task appears in the All Scheduled Events box.
Naming devicesIf a custom name is not defined, MVP will name devices according to the first attribute listed under the Device NamingRules tab from the Administrative Settings task of the All Tasks list.
Configuring MarkVision Professional
43
To customize a device name:
1 From the MarkVision Professional Home screen, select Names of Devices from the All Tasks list.
2 Select the device.
3 Type a custom name.
4 Click Apply.
Adding devicesTo discover individual or small groups of devices without creating a profile, use the Add Devices task.
1 Select Add Devices from the All Tasks menu.
2 Select device(s) from the list of devices on the dialog, or click Add to enter a new device address, and then clickOK.
3 Select the Advanced tab to reset additional discovery settings.
Note: You can save any new groups of devices that you establish with the Add Devices task as a new discoveryprofile by clicking Save as Profile.
4 Click Start to begin the discovery.
Note: You can also select the Exclude tab to select devices from an existing profile that you do not want toinclude in the discovery.
5 Click Stop to terminate the current discovery operation.
Viewing device discovery resultsAfter you have performed a device discovery, you can view the discovery results.
1 From the MarkVision Professional Home screen, select Device Discovery Results.
The discovery results contain a series of log entries detailing the discovery.
2 To export the results, click Export.
3 Browse to the location that you want to save the results, and then click Save.
Removing devices from the serverTo disassociate devices with a network, remove them from the server's list of managed devices. You may change anyassociated discovery profiles to ensure the devices are not discovered the next time the profile executes. There aremultiple methods for removing devices from the server:
• Select the Remove Selected Devices from the server icon.
• Execute the Delete key shortcut to remove selected device(s).
• Use the Remove Devices (Advanced) task to remove all devices or devices associated with a particular discoveryprofile.
Configuring MarkVision Professional
44
To remove devices using the Remove Devices (Advanced) task:
1 From the MarkVision Professional Home screen, select the Remove Devices (Advanced) task from the All Taskslist.
2 Specify whether to remove all devices or devices associated with a discovery profile.
3 To remove devices associated with a discovery profile, select the profile from the drop-down list.
4 Click Remove to remove all specified devices from the MarkVision Server.
Organizing devices with filters and folders
Creating foldersCreate folders to organize and group devices. When possible, create folders based on static conditions or options tosave network resources on larger printer networks.
Notes:
• The All Devices default root folder cannot be deleted. Any user-created folders are listed below the All Devicesfolder.
• When organizing a large number of printers based on frequently changing criteria (such as paper jams), werecommend that you use filters rather than folders. Continuously updating and repopulating folders candramatically slow your system.
• The MarkVision Setup wizard (invoked from the MarkVision Setup task) creates a number of default standardfolders built with commonly-used filter conditions.
• Folders based on dynamic conditions—especially when heavily nested—can consume a large amount ofprocessing bandwidth on the MarkVision Server.
1 From the MarkVision Professional Home screen, select Folder Configuration from the All Tasks list.
2 Select All Devices to create a folder under the root folder, or select a different parent folder.
3 Click New from the Folder window.
4 Type a name for the new folder in the Name box.
5 Add devices to the folder.
Adding devices manuallyUse manual selection to add a small number of devices.
a Select the Manual Selection tab.
b Select the device(s) by clicking the check box to the left.
c Click Apply to add the device(s) to the folder.
Configuring MarkVision Professional
45
Adding devices with filtersUse filters to manage a large number of devices. A filter limits the number of devices visible in a folder to onlythose with specified characteristics. Select multiple filter characteristics for an increasingly narrow selection.
a To add devices through the use of filters, select the Filter tab.
b Configure a filter.
6 Click Apply.
Using filters
Filter overviewLimit the number of devices visible in a list or folder to only those with specified characteristics with the Filter task.Filters can have multiple criteria, allowing for specific device selection. After a folder is created a filter may be appliedto it, or a saved filter may be loaded for use. A folder with no filter contains all the devices of its parent folder. Foldersare hierarchical by nature. A folder may contain at most all of the devices in its parent folder. Filters applied to thefolder will limit the number of devices further.
There are two types of filters:
• Basic—Choose one or more common device characteristics as filter criteria.
• Advanced—Create multiple filter criteria which may require specification in the Value box.
The following are Advanced filter criteria:
– All conditions must be met—Every device must meet every criterion displayed by the filter.
– At least one condition must be met—Devices must meet only one condition displayed by the filter.
– Device Type—Specify which devices to include in the filter. Choose Printer, Print Server, or Any.
Basic filter exampleJohn is in charge of maintaining the printers in his company. He would like to know which ones need attention nowor in the near future. John does the following:
1 John selects Printer from the Device Type list, because he is only interested in printers.
2 From the Select Filter Type list, he selects Status.
3 He then selects the All Errors and All Warnings check boxes.
4 John selects At least one condition must be met.
5 In the Name field, he changes the default name to My Errors and Warnings.
6 John clicks Apply to create and save the filter.
After John applies the filter to a folder, that folder contains only printers displaying an error or warning state. He canthen select another MVP task such as Status of Printer from the All Tasks list to view the new folder see which printersare currently exhibiting errors or warnings.
Configuring MarkVision Professional
46
Advanced filter example 1Mary would like to create and save a filter that only displays monochrome printers with a firmware code level of1.10.17. To accomplish this, she creates the following Advanced filter:
1 Mary selects Printer from the Device Type list, because she is only interested in finding printers.
2 She then selects the following filter criteria:
Parameter Operation Value
Color Equal To Monochrome
3 She clicks New to create another filter criterion, and then selects the following from the Parameter and Operationlist boxes. She must manually type in the firmware code (1.10.17).
Parameter Operation Value
Printer Firmware Code Equal To 1.10.17
4 Because Mary's printers need to meet both conditions, she selects All conditions must be met from the dialog.
5 Mary clicks Save Filter As to save the filter.
6 In the Name field, she changes the default name to Firmware code check.
After Mary applies the filter to a folder, the folder contains only monochrome printers with a firmware code equalto 1.10.17.
Advanced filter example 2John would like to create a filter that displays only printers whose black cartridge has 50 percent remaining printcapacity or less.
1 John selects Printer from the Device Type list.
2 Next, John selects the following filter criteria:
Parameter Operation Value
Cartridge Levels, Black Percentage Less Than or Equal To 50
3 John clicks Save Filter As to save the filter.
4 In the Name field, he changes the default name to Black cartridge check.
After John applies the filter to a folder, the folder contains only printers containing a black cartridge with 50percent or less remaining print capacity.
Advanced filter example 3Jane would like to filter devices by conformance with specific created device policies. To create a Device PolicyConformance filter, Jane does the following:
1 Jane selects the parameter Policy Conformance.
The value will be one of the device policies on the MarkVision Server (unless no policies have been created yet).
2 Next, Jane selects either Is in conformance with or Is not in conformance with for the operation.
Configuring MarkVision Professional
47
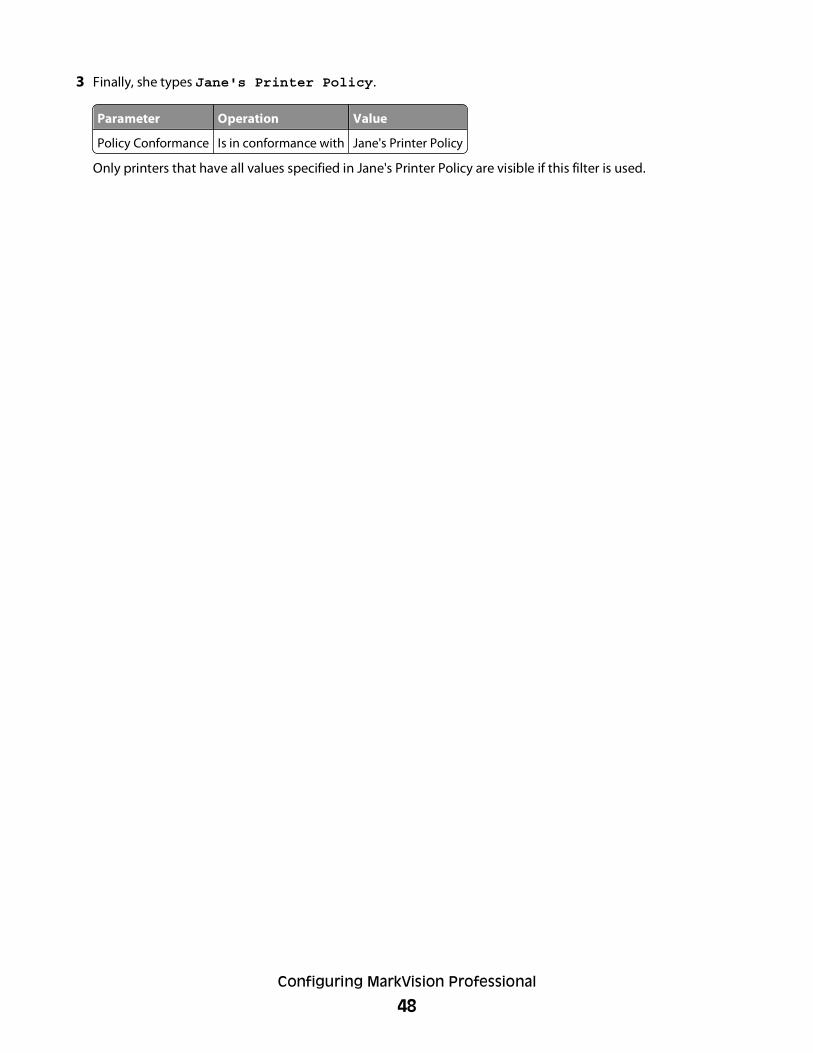
3 Finally, she types Jane's Printer Policy.
Parameter Operation Value
Policy Conformance Is in conformance with Jane's Printer Policy
Only printers that have all values specified in Jane's Printer Policy are visible if this filter is used.
Configuring MarkVision Professional
48
Using security features in MarkVisionProfessional 11.2.1
OverviewThe latest suite of security features available in MarkVision Professional (MVP) 11.2.1 represents an evolution inkeeping document outputs safe and confidential in today's busy environments. Incorporating traditionalcomponents such as authentication and group permissions, administrators can use MVP Security Templates tocontrol access to the devices that produce, store, and transmit sensitive documents. Security templates are aninnovative new tool developed to enable administrators to build secure, flexible profiles that provide end users thefunctionality they require, while limiting access to sensitive printer functions or outputs to only those users holdingappropriate credentials. Utilizing soft configuration features alone or in conjunction with physical security such asCommon Access Cards, the printer will no longer be a weak link in the document security chain.
MVP supports many generations of networked print devices. Different generations of devices implement differentmechanisms to allow administrators to protect their devices from unauthorized use of host management softwaresuch as MVP. The security and authentication capabilities of networked print devices may be roughly categorizedinto three levels:
• Basic—For these devices, use the Security - Basic Credentials task to store a list multiple device passwords in theMarkVision Server. MVP will attempt to use the passwords stored in that list to authenticate password-protecteddevices until it finds a match. It will enable access to the device if a match is found; otherwise, the name of thedevice will be displayed in red.
• Intermediate—For these devices, use the Security - Communication Password task to store a singlecommunication password for each MarkVision Server. The Communication Password will be used to authenticateagainst device Advanced Passwords. Use the Administrative Settings task to configure the security level used byMarkVision Professional. Use the Synchronize with Server option on the Security - Communication Password taskto ensure that one or more devices are communicating securely using the same password as your MarkVisionServer. Use the Security - Printer Lockdown task to force these devices to communicate securely with hostmanagement software such as MVP.
• Advanced—For next-generation devices that support Building Blocks and the RemoteManagement AccessControl, use the Security - Advanced Credentials task to store a single set of authentication credentials for eachMarkVision Server. MVP will use these credentials to authenticate against these devices. These devices do notsupport the MarkVision Communication Password or Printer Lockdown mechanisms, and are unaffected by theSecurity Level set in the MVP Administrative Settings task.
Using security features in MarkVision Professional 11.2.1
49

Understanding the basicsSecuring a printer using MVP involves combining one or more components—Authentication, Authorization, andGroups—to define who is allowed to use the printer, and which functions those users are allowed to access.
Before configuring printer security, it can be helpful to create a plan that identifies who the users will be and whatthey will need to do. Items to consider might include the location of the printer and whether non-authorized personshave access to that area, sensitive documents that will be sent to or stored on the printer, and the information securitypolicies of your organization.
Authentication and AuthorizationAuthentication is the method by which a system securely identifies a user (that is, who you are).
Authorization specifies which functions are available to a user who has been authenticated by the system. This setof authorized functions is also referred to as “permissions.”
MVP handles authentication and authorization using one or more of the following, also referred to as BuildingBlocks:• PIN
• Password
• Internal accounts
• LDAP
• LDAP+GSSAPI
• Kerberos 5
• NTLM
Some Building Blocks, such as Password or PIN, can be used alone to provide low-level security, by simply limitingaccess to a printer—or specific functions of a printer—to anyone who knows the correct code. This type of securitymight be appropriate in a situation in which a printer is located in the lobby or other public area of a business, sothat only employees who know the password or PIN are able to use the printer. Because anyone who enters thecorrect password or PIN receives the same privileges and users can not be individually identified, passwords and PINsare considered less secure than other building blocks that require a user to be identified, or both identified andauthorized.
GroupsAdministrators can designate up to 32 groups to be used in association with either the Internal accounts orLDAP/LDAP+GSSAPI building blocks. For the purposes of MVP security, groups are used to identify sets of usersneeding access to similar functions. For example, in Company A, employees in the warehouse do not need to printin color, but those in sales and marketing use color every day. In this scenario, it makes sense to create a “Warehouse”group, and a “Sales and Marketing” group.
Using security features in MarkVision Professional 11.2.1
50
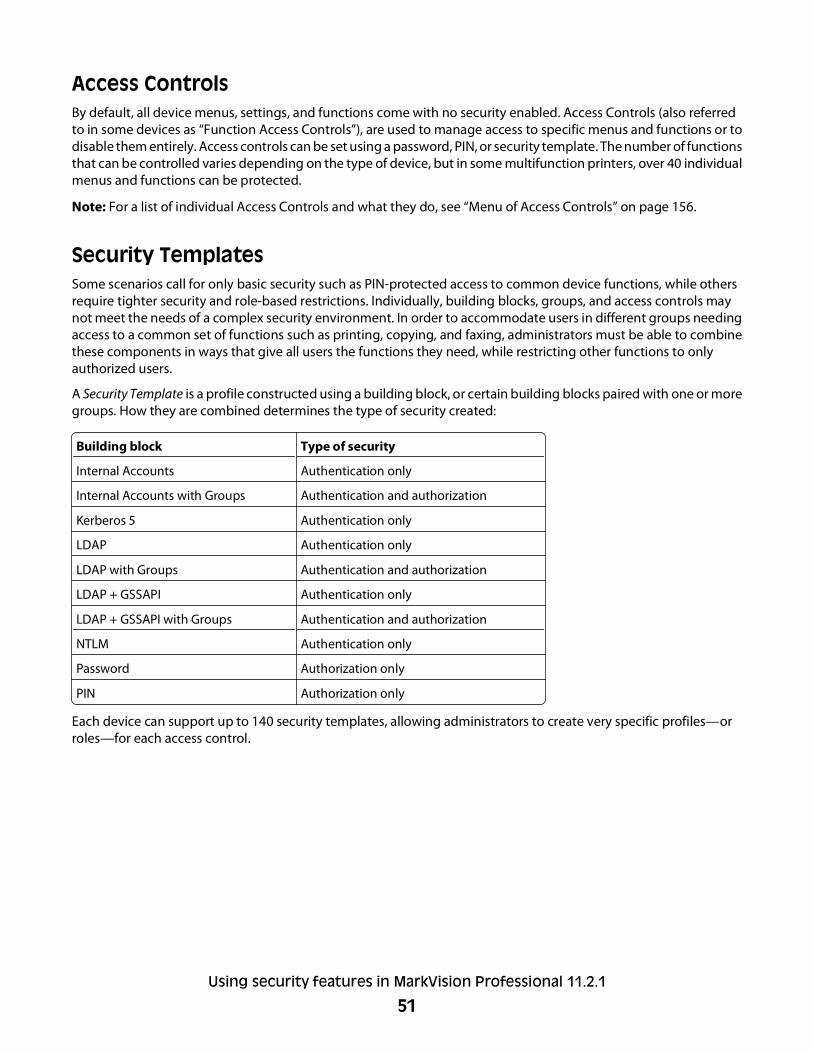
Access ControlsBy default, all device menus, settings, and functions come with no security enabled. Access Controls (also referredto in some devices as “Function Access Controls”), are used to manage access to specific menus and functions or todisable them entirely. Access controls can be set using a password, PIN, or security template. The number of functionsthat can be controlled varies depending on the type of device, but in some multifunction printers, over 40 individualmenus and functions can be protected.
Note: For a list of individual Access Controls and what they do, see “Menu of Access Controls” on page 156.
Security TemplatesSome scenarios call for only basic security such as PIN-protected access to common device functions, while othersrequire tighter security and role-based restrictions. Individually, building blocks, groups, and access controls maynot meet the needs of a complex security environment. In order to accommodate users in different groups needingaccess to a common set of functions such as printing, copying, and faxing, administrators must be able to combinethese components in ways that give all users the functions they need, while restricting other functions to onlyauthorized users.
A Security Template is a profile constructed using a building block, or certain building blocks paired with one or moregroups. How they are combined determines the type of security created:
Building block Type of security
Internal Accounts Authentication only
Internal Accounts with Groups Authentication and authorization
Kerberos 5 Authentication only
LDAP Authentication only
LDAP with Groups Authentication and authorization
LDAP + GSSAPI Authentication only
LDAP + GSSAPI with Groups Authentication and authorization
NTLM Authentication only
Password Authorization only
PIN Authorization only
Each device can support up to 140 security templates, allowing administrators to create very specific profiles—orroles—for each access control.
Using security features in MarkVision Professional 11.2.1
51
Configuring building blocks
Creating or editing a device password (advanced)MarkVision Professional allows administrators to set up a combined total of up to 250 user-level andadministrator-level passwords on each supported device. Each password must be between 8 and 128 UTF-8characters, and it must be identified by a unique name (example: “IT Manager's Password”). The unique name shouldbe between 1 to 128 UTF-8 characters.
1 From the MarkVision Professional Home screen, select Security - Password from the All Tasks list.
2 Select a device.
Note: When a device managed by MVP is not supported by a specific task, its name will appear with a black linethrough it in the Quick Find or Folders tabs. Password-protected network devices are displayed in red. Enter thedevice password to gain access to the device.
3 Add or edit a password for the device:
• Click Add to create a new device password.
• Select a password from the list and click Edit to edit an existing device password.
Notes:
– Select the Admin Password box to create an administrator-level password. If an activity is secured by anadministrator-level password, then only that password will grant access to the activity. Administrator-levelpasswords also override any normal password. If an activity is protected by a normal password, then anyadministrator-level password will also grant access.
– To delete a password, select a password from the list and then click Delete. Clicking Delete All will deleteall passwords on the list, whether they are selected or not.
Creating a PINTypically, Personal Identification Numbers (PINs) are used to control access to specific device menus or to a deviceitself. On certain devices, however, MarkVision Professional allows administrators to create a combined total of 250user-level and administrator-level PINs that control specific activities, such as scanning or copying. These PINs canlater be used to create security templates that control specific function access.
1 From the MarkVision Professional Home screen, select Security - PIN from the All Tasks list.
2 Select devices using the Quick Find or Folders tabs.
Use Ctrl + click and Shift + click to select multiple devices.
Note: When a device managed by MVP is not supported by a specific task, its name will appear with a black linethrough it in the Quick Find or Folders tabs. Password-protected network devices are displayed in red. Enter thedevice password to gain access to the device.
3 Click Add.
4 Type the name of the PIN configuration in the Name box. Each PIN must have a unique name consisting of 1-128UTF-8 characters (example: “Copy Lockout PIN”).
Using security features in MarkVision Professional 11.2.1
52
5 Type a four-digit PIN in the appropriate box, and then re-enter the PIN to confirm it.
Note: The indicator light changes to green when the two PIN numbers are identical. When the PIN numbers donot match, the indicator light remains red.
6 Select Admin PIN if the PIN will be used as the Administrator PIN.
Note: If an activity is secured by a specific Administrator PIN, then only that PIN will grant access to it.
7 Click OK.
Managing multiple PIN setups1 From the MarkVision Professional Home screen, select Security - PIN from the All Tasks list.
2 Select devices using the Quick Find or Folders tabs.
Use Ctrl + click and Shift + click to select multiple devices.
Notes:
• When a device managed by MVP is not supported by a specific task, its name will appear with a black linethrough it in the Quick Find or Folders tabs. Password-protected network devices are displayed in red. Enterthe device password to gain access to the device.
• To apply settings to multiple devices, use the Device Policies tasks in MVP. See the MVP User's Guide for moreinformation about using Device Policies.
3 Select a PIN setup from the list and click Edit.
4 Edit the name or the PIN as necessary and click OK.
Note: The indicator light changes to green when the two PIN numbers are identical. When the PIN numbers donot match, the indicator light remains red.
5 To delete a PIN setup, select it from the list and click Delete.
Note: Clicking Delete All will delete all currently saved PIN setups.
Using internal accountsMVP administrators can configure one internal account building block per supported device. Each internal accountcan include a maximum of 32 user groups and 250 user accounts. The internal accounts building block can be usedin a security template only after each user's group membership has been defined.
Each security template that uses the internal accounts building block must define the user groups that can accessthe function(s) protected by the template. Any user who is a member of the groups included in the security templatecan access any function controlled by that security template.
Defining user groupsBefore creating new internal accounts for a device in MVP, an administrator should first define at least one user group.To define user groups:
1 From the MarkVision Professional Home screen, select Security - Internal Accounts from the All Tasks list.
2 Select a device.
Using security features in MarkVision Professional 11.2.1
53
3 Click Setup Groups.
4 Enter names for up to 32 user groups.
Note: Group names have a 128-character limit.
Creating internal accountsTo create an internal account:
1 From the MarkVision Professional Home screen, select Security - Internal Accounts from the All Tasks list.
2 Select a device.
3 Click Add.
Enter information into the necessary fields (required fields are in italics):
• Account Name—Type the user's account name (example: “Jack Smith”). You may use up to 128 UTF-8characters.
• User ID—Type an ID for the account (example: “jsmith”). You may use up to 128 UTF-8 characters.
• Password—Type a password of between 8 and 128 characters.
• Re-enter Password—Type the password entered in the field above. The indicator light changes to greenwhen the two passwords are identical. When the passwords do not match, the indicator light remains red.
• E-mail—Type the user's e-mail address (example: “[email protected]”).
• Groups—Select the groups to which the account belongs. Hold down the Ctrl key to select multiple groupsfor the account.
4 Click OK.
Note: Clicking Reset will cancel all changes before applying them.
Specifying settings for internal accountsSettings selected in the Internal Accounts Settings section will determine the information an administrator mustsubmit when creating a new internal account, as well as the information a user must submit when authenticating.
• Require password—Select this box to make the password a required field when creating new internal accounts.
• Require e-mail address—Select this box to make the e-mail address a required field when creating new internalaccounts.
• Required user credentials—Select either User ID or User ID and Password to specify the information a usermust submit when authenticating.
Using Kerberos authentication (advanced)MVP administrators can store only one Kerberos configuration file (krb5.conf) on a supported device. However, thekrb5.conf file can apply to multiple realms and Kerberos Domain Controllers (KDCs). An administrator must thusanticipate all of the different types of authentication requests that the Kerberos server might receive, and thenconfigure the krb5.conf file to handle all such requests.
Using security features in MarkVision Professional 11.2.1
54
Notes:
• Because only one krb5.conf file is used, uploading or re-submitting a simple Kerberos file will overwrite theconfiguration file.
• The krb5.conf file can specify a default realm. However, if a realm is not specified in the configuration file, thenthe first realm specified will be used as the default realm for authentication.
Creating a simple Kerberos configuration file
1 From the MarkVision Professional Home screen, select Security - Kerberos (Advanced) from the All Tasks list.
2 Select devices using the Quick Find or Folders tabs.
Use Ctrl + click and Shift + click to select multiple devices.
Note: When a device managed by MVP is not supported by a specific task, its name will appear with a black linethrough it in the Quick Find or Folders tabs. Password-protected network devices are displayed in red. Enter thedevice password to gain access to the device.
3 Type the KDC (Kerberos Domain Controller) address in the KDC Address field.
4 Type the number of the port used by the Kerberos server in the KDC Port field.
Note: UDP 88 is the default Kerberos service port.
5 Type the realm used by the Kerberos server in the Realm field
6 Click Apply to save the information as a krb5.conf file on the selected device, or click Undo to reset the fields andstart again.
Uploading a Kerberos configuration file
1 From the MarkVision Professional Home screen, select Security - Kerberos (Advanced) from the All Tasks list.
2 Select devices using the Quick Find or Folders tabs.
Use Ctrl + click and Shift + click to select multiple devices.
Note: When a device managed by MVP is not supported by a specific task, its name will appear with a black linethrough it in the Quick Find or Folders tabs. Password-protected network devices are displayed in red. Enter thedevice password to gain access to the device.
3 Click Browse to find the krb5.conf file, then click Add.
4 Click Apply to upload the krb5.conf file to the selected device, or click Undo to reset the field and search for anew configuration file.
Notes:
• Click Delete to remove the Kerberos configuration file from the selected device.
• Click View to view the Kerberos configuration file for the selected device.
• Click Test Setup to verify that the Kerberos configuration file for the selected device is functional.
Configuring LDAP settings (advanced)Lightweight Directory Access Protocol (LDAP) is a standards-based, cross-platform, extensible protocol that runsdirectly on top of TCP/IP and is used to access specialized databases called directories. Its strength is that it can interactwith many different kinds of databases, making it more flexible than many other authentication methods.
Using security features in MarkVision Professional 11.2.1
55
Notes:
• MVP allows administrators to store a maximum of five unique LDAP configurations on a supported device. Eachconfiguration must have a unique name.
• Administrators can create up to 32 user-defined groups that apply to each unique LDAP configuration.
• An LDAP building block cannot be deleted if it is being used as part of a security template.
To add a new LDAP setup
1 From the MarkVision Professional Home screen, select Security - LDAP from the All Tasks list.
2 Select devices using the Quick Find or Folders tabs.
Use Ctrl + click and Shift + click to select multiple devices.
Note: When a device managed by MVP is not supported by a specific task, its name will appear with a black linethrough it in the Quick Find or Folders tabs. Password-protected network devices are displayed in red. Enter thedevice password to gain access to the device.
3 Click Add.
4 Enter the appropriate information in the LDAP Configuration dialog:
• Setup Name—This name will be used to identify each particular LDAP Server Setup when creating securitytemplates.
• Server Address—Enter the IP Address or the Host Name of the LDAP Directory Server where theauthentication will be performed.
• Server Port—The port used by the local computer to communicate with the LDAP Directory Server. Thedefault LDAP port is 389.
• Use SSL/TLS—Select SSL (Secure Sockets Layer), TLS (Transport Layer Security), or None.
• Userid Attribute—Enter the name of the attribute that uniquely identifies users. For example, type cn oruserid, where cn stands for “common name.” A user-defined attribute name is also acceptable in this field.
• Mail Attribute—Enter the attribute name of the user's e-mail address.
• Full Name Attribute—Enter the attribute name of the user's full name.
Note: The Mail Attribute and Full Name Attribute fields are available only on MFPs.
• Search Base—The Search Base (sometimes called the Distinguished Name, or DN) is the node in the LDAPDirectory Server where user accounts exist. Multiple search bases may be entered, separated by semi-colons.
Notes:
– A Search Base consists of multiple attributes—such as cn (common name), ou (organizational unit), o(organization), c (country), or dc (domain)—separated by commas.
– For LDAP v3 and later, the Search Base field can be left blank, although it will cause searches to takeconsiderably longer.
• Search Timeout—Enter a value of from 5 to 30 seconds.
• Required User Input—Select either User ID or User ID and Password to specify which credentials a usermust provide when attempting to access a function protected by the LDAP building block.
• Anonymous LDAP Bind—If selected, MVP will bind with the LDAP server anonymously, and the MFPDistinguished Name and MFP Password fields will be grayed out.
• MFP Distinguished Name—Enter the distinguished name of the print server(s).
Using security features in MarkVision Professional 11.2.1
56
• MFP Password—Enter the password for the print server(s).
Note: You should include values in the “MFP Distinguished Name” and “MFP Password” fields if the LDAPserver does not allow anonymous binds. The device will bind to the LDAP server using these credentials sothat it can search the LDAP directory.
• Person—Click to select or clear. When selected, the “person” object class is used to search user accounts. Ifthe server uses different object classes, specify them in the “Custom Object Class” field below.
• Custom Object Class—Click to select or clear; the MVP administrator can define up to three custom searchobject classes.
Note: If you are unsure about the object classes that the LDAP server uses, type an asterisk (*) in the fieldto conduct a wildcard search for all available object classes.
• Configure Groups—MVP administrators can restrict access to specific groups by entering identifiers for thosegroups (such as the group's common name). Up to 32 groups may be specified.
Notes:
– The Group search base should be specified first (Example: ou=empgroup,dc=orange,dc=com).– The shortname for the group can be user-defined (Example: “staff”).– The Group Identifier is the group's Common Name (cn) (Example: cn=staff).
5 Click OK to save changes, or click Reset to return to previous values.
To edit an existing LDAP setup
1 From the MarkVision Professional Home screen, select Security - LDAP from the All Tasks list.
2 Select devices using the Quick Find or Folders tabs.
Use Ctrl + click and Shift + click to select multiple devices.
Note: When a device managed by MVP is not supported by a specific task, its name will appear with a black linethrough it in the Quick Find or Folders tabs. Password-protected network devices are displayed in red. Enter thedevice password to gain access to the device.
3 Select a setup from the list.
4 Click Edit.
5 Make any changes in the LDAP Configuration dialog.
6 Click OK to save changes, or click Reset to return to previous values.
To delete an existing LDAP setup
1 From the MarkVision Professional Home screen, select Security - LDAP from the All Tasks list.
2 Select devices using the Quick Find or Folders tabs.
Use Ctrl + click and Shift + click to select multiple devices.
Note: When a device managed by MVP is not supported by a specific task, its name will appear with a black linethrough it in the Quick Find or Folders tabs. Password-protected network devices are displayed in red. Enter thedevice password to gain access to the device.
3 Select a setup from the list.
Using security features in MarkVision Professional 11.2.1
57
4 Click Delete.
5 Click Yes.
Note: Click Delete All to delete all LDAP + GSSAPI setups in the list.
To validate an existing LDAP setup
1 From the MarkVision Professional Home screen, select Security - LDAP from the All Tasks list.
2 Select devices using the Quick Find or Folders tabs.
Use Ctrl + click and Shift + click to select multiple devices.
Note: When a device managed by MVP is not supported by a specific task, its name will appear with a black linethrough it in the Quick Find or Folders tabs. Password-protected network devices are displayed in red. Enter thedevice password to gain access to the device.
3 Select a setup from the list.
4 Click Test Setup.
Configuring LDAP + GSSAPI settingsSome MVP administrators may prefer authentication to an LDAP server using GSSAPI (Generic Security ServicesApplication Programming Interface) instead of simple LDAP authentication because the transmission is alwayssecure. Instead of authenticating directly with the LDAP server, the user will first authenticate with a Kerberos serverto obtain a Kerberos “ticket.” This ticket is then presented to the LDAP server using the GSSAPI protocol for access.
Notes:
• MVP allows administrators to store a maximum of five unique LDAP + GSSAPI configurations on a supporteddevice. Each configuration must have a unique name.
• Administrators can create up to 32 user-defined groups that apply to each unique LDAP + GSSAPI configuration.
• An LDAP + GSSAPI building block cannot be deleted if it is being used as part of a security template.
To add a new LDAP + GSSAPI setup
1 From the MarkVision Professional Home screen, select Security - LDAP + GSSAPI from the All Tasks list.
2 Select devices using the Quick Find or Folders tabs.
Use Ctrl + click and Shift + click to select multiple devices.
Note: When a device managed by MVP is not supported by a specific task, its name will appear with a black linethrough it in the Quick Find or Folders tabs. Password-protected network devices are displayed in red. Enter thedevice password to gain access to the device.
3 Click Add.
4 Enter the appropriate information in the LDAP Configuration dialog:
• Setup Name—This name will be used to identify each particular LDAP Server Setup when creating securitytemplates.
• Server Address—Enter the IP Address or the Host Name of the LDAP Directory Server where theauthentication will be performed.
• Server Port—The port used by the local computer to communicate with the LDAP Directory Server. Thedefault LDAP port is 389.
Using security features in MarkVision Professional 11.2.1
58
• Use SSL/TLS—Select SSL (Secure Sockets Layer), TLS (Transport Layer Security), or None.
• Userid Attribute—Enter the name of the attribute that uniquely identifies users. For example, type cn oruserid, where cn stands for “common name.” A user-defined attribute name is also acceptable in this field.
• Mail Attribute—Enter the attribute name of the user's e-mail address.
• Full Name Attribute—Enter the attribute name of the user's full name.
Note: The Mail Attribute and Full Name Attribute fields are available only on MFPs.
• Search Base—The Search Base (sometimes called the Distinguished Name, or DN) is the node in the LDAPDirectory Server where user accounts exist. Multiple search bases may be entered, separated by semi-colons.
Note: A Search Base consists of multiple attributes—such as cn (common name), ou (organizational unit),o (organization), c (country), or dc (domain)—separated by commas.
• Search Timeout—Enter a value of from 5 to 30 seconds.
• MFP Distinguished Name—Enter the distinguished name of the print server(s).
• MFP Password—Enter the password for the print server(s).
• Person—Click to select or clear. When selected, the “person” object class is used to search user accounts. Ifthe server uses different object classes, specify them in the “Custom Object Class” field below.
• Custom Object Class—Click to select or clear; the MVP administrator can define up to three custom searchobject classes.
Note: If you are unsure about the object classes that the LDAP server uses, type an asterisk (*) in the fieldto conduct a wildcard search for all available object classes.
• Configure Groups—MVP administrators can restrict access to specific groups by entering identifiers for thosegroups (such as the group's common name). Up to 32 groups may be specified.
Notes:
– The Group search base should be specified first (Example: ou=empgroup,dc=orange,dc=com).– The shortname for the group can be user-defined (Example: “staff”).– The Group Identifier is the group's Common Name (cn) (Example: cn=staff).
5 Click OK to save changes, or click Reset to return to previous values.
To edit an existing LDAP + GSSAPI setup
1 From the MarkVision Professional Home screen, select Security-LDAP + GSSAPI from the All Tasks list.
2 Select devices using the Quick Find or Folders tabs.
Use Ctrl + click to select multiple devices.
Note: When a device managed by MVP is not supported by a specific task, its name will appear with a black linethrough it in the Quick Find or Folders tabs. Password-protected network devices are displayed in red. Enter thedevice password to gain access to the device.
3 Select a setup from the list.
4 Click Edit.
5 Make any changes in the LDAP Configuration dialog.
6 Click OK to save changes, or click Reset to return to previous values.
Using security features in MarkVision Professional 11.2.1
59
To delete an existing LDAP + GSSAPI setup
1 From the MarkVision Professional Home screen, select Security-LDAP + GSSAPI from the All Tasks list.
2 Select devices using the Quick Find or Folders tabs.
Use Ctrl + click to select multiple devices.
Note: When a device managed by MVP is not supported by a specific task, its name will appear with a black linethrough it in the Quick Find or Folders tabs. Password-protected network devices are displayed in red. Enter thedevice password to gain access to the device.
3 Select a setup from the list.
4 Click Delete.
5 Click Yes.
Note: Click Delete All to delete all LDAP + GSSAPI setups in the list.
Using NTLM authenticationNTLM (Windows NT LAN Manager) is Microsoft's solution for enabling authentication without requiring thetransmission of a user's password across a network in clear text. Instead of comparing the user's actual password, theNTLM server and the client generate and compare three encrypted strings based on the user's password.
An MVP administrator can store only one NTLM configuration on a supported device because each device can onlybe registered to a single NT domain.
Notes:
• Because the information in the NTLM configuration file is confidential, an MVP administrator must access, andmake changes to, the full NTLM configuration from the Embedded Web Server (EWS) page for a supported device.MVP allows changes only to the address of the default user domain for the NTLM server.
• Open the Embedded Web Server home screen using the secure version of the page (by typing the IP address ofthe device into the address bar of the Web browser, beginning “https://”), rather than an unsecured browsingwindow. If you do not connect to the Embedded Web Server using HTTPS, you will not be able to register yourdevice with an NT domain.
• The NTLM building block can be used in a security template only after a supported device has registered withthe NTLM domain.
• The NTLM building block cannot be deleted or unregistered if it is being used as part of a security template.
Specifying the default user domain for the NTLM server
1 From the MarkVision Professional Home screen, select Security - NTLM from the All Tasks list.
2 Select devices using the Quick Find or Folders tabs.
Use Ctrl + click and Shift + click to select multiple devices.
Note: When a device managed by MVP is not supported by a specific task, its name will appear with a black linethrough it in the Quick Find or Folders tabs. Password-protected network devices are displayed in red. Enter thedevice password to gain access to the device.
3 Type the default user domain in the Default User Domain field. This is the default NT domain used when MVPattempts to authenticate users.
4 Click Apply to save the new default user domain.
Using security features in MarkVision Professional 11.2.1
60
Securing access
Using backup passwordsIn certain situations (such as an authentication server crash), an administrator may need to alter or remove a device’ssecurity configuration so that the device can be serviced. A backup password allows an administrator to access theSecurity Menu for a supported device, regardless of the building block used to secure it. If, for example, the securitymenu for a device requires LDAP authentication to grant access, a backup password will override the requirementfor LDAP authentication.
1 From the MarkVision Professional Home screen, select Security - Backup Password from the All Tasks list.
2 Select a device using the Quick Find or Folders tabs.
Note: When a device managed by MVP is not supported by a specific task, its name will appear with a black linethrough it in the Quick Find or Folders tabs. Password-protected network devices are displayed in red. Enter thedevice password to gain access to the device.
3 Select Use Backup Password.
4 Enter a password in the text box, and then re-enter the password in the box below it.
Note: The indicator light changes to green when the two passwords are identical. When the passwords do notmatch, the indicator light remains red.
5 Click Apply.
Notes:
• The Backup Password option is disabled by default because it creates a security vulnerability.
• To erase an existing backup password, clear the Use Backup Password box, and then enter an empty string inthe Password field and click Submit.
Setting login restrictionsMany organizations establish login restrictions for information assets such as workstations and servers. MVPadministrators should verify that printer login restrictions also comply with organizational security policies.
1 From the MarkVision Professional Home screen, select Security - Miscellaneous Security from the All Tasks list.
2 Select a device using the Quick Find or Folders tabs.
Note: When a device managed by MVP is not supported by a specific task, its name will appear with a black linethrough it in the Quick Find or Folders tabs. Password-protected network devices are displayed in red. Enter thedevice password to gain access to the device.
3 Enter the appropriate login restrictions:
• Security Reset Jumper—The Security Reset Jumper is a hardware jumper located on the motherboard ofcertain devices. Administrators can use MVP to specify the effect of using this jumper.
– No Effect—Removes access to all security menus—use with caution
Warning—Potential Damage: If “No Effect” is chosen and the password (or other applicablecredential) is lost, you will not be able to access the security menus. To regain access to the securitymenus, a service call will be required to replace the device RIP card (motherboard).
– Access controls = “No security”—Removes security only from function access controls
Using security features in MarkVision Professional 11.2.1
61
– Reset factory security defaults—Returns all security settings to default values
• LDAP Certificate Verification—Specify whether the device will request LDAP certificates.
– Allow—The device will request a certificate. If no certificate is provided, the session proceeds normally.If a bad certificate is provided, it will be ignored and the will proceed normally.
– Demand—The device will request a certificate. If no certificate or a bad certificate is provided, the sessionis terminated immediately.
– Never—The device will not request a certificate.
– Try—The device will request a certificate. If no certificate is provided, the session proceeds normally. If abad certificate is provided, the session is terminated immediately.
• Minimum Pin Length—Specify the length of login PINs (Range: 4-16 numbers).
• Panel Login Timeout—Specify how long a user may be logged in before being automatically logged off.
• Remote Login Timeout—Specify how long a user may be logged in remotely before being automaticallylogged off.
• Login failures—Specify the number of times a user can attempt login before being locked out.
• Failure time frame—Specify the amount of time before lockout takes place.
• Lockout time—Specify the duration of lockout.
4 Click Apply to save changes, or Reset to restore default values.
Using a password or PIN to control function accessEach Access Control (or Function Access Control), can be set to require No Security (the default), or to use any of theselections available in the drop-down list for that function. For simple authorization-level security (in which individualusers are not authenticated), administrators can control access to specific device functions using a password or PIN.Only one method of security can be assigned to each Access Control.
All users who enter the correct password or PIN receive the same privileges. For that reason, passwords and PINs areconsidered less secure than other forms of authentication.
Note: To help prevent unauthorized access, users are encouraged to securely end each session by selecting Logout on the printer control panel.
1 From the MarkVision Professional Home screen, select Security - Access Controls from the All Tasks list.
2 Select a device using the Quick Find or Folders tabs.
Note: When a device managed by MVP is not supported by a specific task, its name will appear with a black linethrough it in the Quick Find or Folders tabs. Password-protected network devices are displayed in red. Enter thedevice password to gain access to the device.
3 Select an available password or PIN from the drop-down lists.
Note: For more information about creating passwords, see “Creating or editing a device password (advanced)”on page 52. For more information about creating PINs, see “Creating a PIN” on page 52.
4 Click Apply.
From that point on, users will have to enter the appropriate password or PIN to access the protected functionson the selected device(s).
Using security features in MarkVision Professional 11.2.1
62
Using a security template to control function accessMarkVision Professional allows administrators to use security templates to control access to various functions ondevices that support advanced security. Configuring access controls using security templates is a three-step process:
Step 1: Create a building blockMVP supports seven building blocks: Password, PIN, Internal Accounts, Kerberos, NTLM, LDAP, and LDAP + GSSAPI.Building blocks are the fundamental elements used to create security templates. The steps below describe how tocreate an internal account building block, but any of the other six building blocks could just as easily be used.
1 From the MarkVision Professional Home screen, select Security - Internal Accounts from the All Tasks list.
2 Select devices using the Quick Find or Folders tabs.
Use Ctrl + click and Shift + click to select multiple devices.
Note: When a device managed by MVP is not supported by a specific task, its name will appear with a black linethrough it in the Quick Find or Folders tabs. Password-protected network devices are displayed in red. Enter thedevice password to gain access to the device.
3 Click Add.
4 Enter the appropriate information to create the account. If no groups are listed, you will need to create at leastone group to associate with the new internal account. See “Creating user accounts and groups” on page 79 formore information on creating a new group.
5 Click OK.
Step 2: Create a security templateOnce configured, one or two building blocks can be combined with a unique name of up to 128 characters to createa security template. Each device can support up to 140 security templates. Though the names of security templatesmust be different from one another, building blocks and security templates can share a namė.
1 From the MarkVision Professional Home screen, select Security - Security Templates from the All Tasks list.
2 Select devices using the Quick Find or Folders tabs.
Use Ctrl + click and Shift + click to select multiple devices.
Note: When a device managed by MVP is not supported by a specific task, its name will appear with a black linethrough it in the Quick Find or Folders tabs. Password-protected network devices are displayed in red. Enter thedevice password to gain access to the device.
3 Click Add.
4 Type a name for the security template, and then choose the appropriate building block from the AuthenticationSetup and Authorization Setup lists.
5 Select groups as necessary from the Groups list.
6 Click OK.
Using security features in MarkVision Professional 11.2.1
63

Step 3: Configure access control for the device(s)The final step in is to apply the security template, which will secure access to various functions on a device.
1 From the MarkVision Professional Home screen, select Security - Access Controls from the All Tasks list.
2 Select devices using the Quick Find or Folders tabs.
Use Ctrl + click and Shift + click to select multiple devices.
Note: When a device managed by MVP is not supported by a specific task, its name will appear with a black linethrough it in the Quick Find or Folders tabs. Password-protected network devices are displayed in red. Enter thedevice password to gain access to the device.
3 Select the newly created security template from any of the available function access drop-down lists, and thenclick Apply.
Users will now be required to enter the appropriate credentials in order to gain access to a function controlledby the security template.
Note: The function access drop-down lists become text fields when you apply a security template to multipledevices at the same time. In that case, you must type the name of the security template into each of the relevantfunction access text fields.
Scenarios
Scenario: Printer in a public placeIf your printer is located in a public space such as a lobby, and you wish to prevent the general public from using it,a password or PIN can provide simple protection right at the device. Administrators can assign a single password orPIN for all authorized users of the device, or separate codes to protect individual functions. The key to remember isthat anyone who knows a password or PIN can access any functions protected by that code.
1 From the MarkVision Professional Home screen, select Security - Access Controls from the All Tasks list.
2 Select a device using the Quick Find or Folders tabs.
Note: When a device managed by MVP is not supported by a specific task, its name will appear with a black linethrough it in the Quick Find or Folders tabs. Password-protected network devices are displayed in red. Enter thedevice password to gain access to the device.
3 Select an available password or PIN from the drop-down lists.
Note: For more information about creating passwords, see “Creating or editing a device password (advanced)”on page 52. For more information about creating PINs, see “Creating a PIN” on page 52.
4 Click Apply.
From that point on, users will have to enter the appropriate password or PIN to access the protected functionson the selected device(s).
Using security features in MarkVision Professional 11.2.1
64
Scenario: Standalone or small officeIf you do not use an authentication server to grant users access to devices, Internal Accounts can be created andstored on devices for authentication, authorization, or both.
Step One: Set up individual user accounts
1 From the MarkVision Professional Home screen, select Security - Internal Accounts from the All Tasks list.
2 Select devices using the Quick Find or Folders tabs.
Use Ctrl + click and Shift + click to select multiple devices.
3 Click Setup Groups, and configure as needed.
For more information on configuring individual user accounts, see “Using internal accounts” on page 53.
Step 2: Create a security templateOnce configured, one or two building blocks can be combined with a unique name of up to 128 characters to createa security template. Each device can support up to 140 security templates. Though the names of security templatesmust be different from one another, building blocks and security templates can share a namė.
1 From the MarkVision Professional Home screen, select Security - Security Templates from the All Tasks list.
2 Select devices using the Quick Find or Folders tabs.
Use Ctrl + click and Shift + click to select multiple devices.
3 Click Add.
4 Type a name for the security template, and then choose the appropriate building block from the AuthenticationSetup and Authorization Setup lists.
Note: It can be helpful to use a descriptive name, such as ”Administrator _ Only”, or“Common _ Functions _ Template.”
5 Select groups as necessary from the Groups list.
6 Click OK.
Step 3: Configure access control for the device(s)The final step in is to apply the security template, which will secure access to various functions on a device.
1 From the MarkVision Professional Home screen, select Security - Access Controls from the All Tasks list.
2 Select devices using the Quick Find or Folders tabs.
Use Ctrl + click and Shift + click to select multiple devices.
3 Select the newly created security template from any of the available function access drop-down lists, and thenclick Apply.
Users will now be required to enter the appropriate credentials in order to gain access to a function controlledby the security template.
Note: The function access drop-down lists become text fields when you apply a security template to multipledevices at the same time. In that case, you must type the name of the security template into each of the relevantfunction access text fields.
Using security features in MarkVision Professional 11.2.1
65
Scenario: Network running Active DirectoryOn networks running Active Directory, administrators can use the LDAP+GSSAPI capabilities of MVP to takeadvantage of authentication and authorization services already deployed on the network. User credentials and groupdesignations can be pulled from the existing network, making access to the printer as seamless as other networkservices.
Step 1: Collect information about the networkBefore configuring MVP to integrate with Active Directory, you will need to know the following:
1 Kerberos configuration information:
• Character encoding (used for passwords)
• Location of the Kerberos file on the network (if importing a krb5.conf file)
• If creating a Simple Kerberos Setup:
– The IP address or hostname of the Key Distribution Center (KDC)
– The KDC port (the default KDC port is 88)
– The name of the Realm (or domain) where the KDC is located
Note: In Windows Active Directory environments, the Kerberos Realm is the same as the Windowsdomain name, such as company.com.
• The Kerberos username and password assigned to the printer
2 LDAP server information:
• The IP address or hostname of the LDAP server
Note: In Windows Active Directory enviornments, the Kerberos KDC and LDAP servers are on the samemachine—the Domain Controller.
• The LDAP server port (the default port is 389)
• A list of up to three object classes stored on the LDAP server, which will be searched for user credentials duringauthentication. This is optional only when the “Person” object class is not selected. Because “person” is thedefault object class for Windows AD user accounts, you will have to use the “Custom” object class to specifyother object classes defined on the server.
• A list of up to 32 groups stored on the LDAP server that will be used to authorize user access to printer functions
Step 2: Configure Kerberos setup
1 From the MarkVision Professional Home screen, select Security - Kerberos (Advanced) from the All Tasks list.
2 Select devices using the Quick Find or Folders tabs.
Use Ctrl + click and Shift + click to select multiple devices.
Note: When a device managed by MVP is not supported by a specific task, its name will appear with a black linethrough it in the Quick Find or Folders tabs. Password-protected network devices are displayed in red. Enter thedevice password to gain access to the device.
3 Configure Kerberos settings using the information gathered in step 1.
For more information on configuring Kerberos, see “Using Kerberos authentication (advanced)” on page 54.
Using security features in MarkVision Professional 11.2.1
66
Step 3: Configure LDAP+GSSAPI Settings
1 From the MarkVision Professional Home screen, select Security - LDAP + GSSAPI from the All Tasks list.
2 Select devices using the Quick Find or Folders tabs.
Use Ctrl + click and Shift + click to select multiple devices.
3 Click Add.
4 Configure LDAP+GSSAPI settings using the information gathered in step 1.
For more information on configuring LDAP+GSSAPI, see“Configuring LDAP + GSSAPI settings” on page 58.
Step 4: Create a security template
1 From the MarkVision Professional Home screen, select Security - Security Templates from the All Tasks list.
2 Select devices using the Quick Find or Folders tabs.
Use Ctrl + click and Shift + click to select multiple devices.
3 Click Add.
4 Type a name for the security template, and then choose the appropriate building block from the AuthenticationSetup and Authorization Setup lists.
Note: It can be helpful to use a descriptive name, such as ”Administrator _ Only”, or“Common _ Functions _ Template.”
5 Select groups as necessary from the Groups list.
6 Click OK.
Step 5: Assign security templates to access controls
1 From the MarkVision Professional Home screen, select Security - Access Controls from the All Tasks list.
2 Select devices using the Quick Find or Folders tabs.
Use Ctrl + click and Shift + click to select multiple devices.
3 Select the newly created security template from any of the available function access drop-down lists, and thenclick Apply.
Users will now be required to enter the appropriate credentials in order to gain access to a function controlledby the security template.
Note: The function access drop-down lists become text fields when you apply a security template to multipledevices at the same time. In that case, you must type the name of the security template into each of the relevantfunction access text fields.
Using security features in MarkVision Professional 11.2.1
67
Managing certificates and other settingsUsing certificates, devices can identify themselves on a network. Using public-key cryptography, certificates allowdevices to establish secure and encrypted connections with printing hosts and authentication servers.
Devices are shipped with default certificates designed to suit all purposes. However, an organization's security policiesmay require that new certificates be installed, especially if devices are communicating with hosts on externalnetworks.
Managing certificatesMVP allows administrators to create, update, and manage the certificates on a supported device.
Creating a new certificate
1 From the MarkVision Professional Home screen, select Security - Certificate Management from the All Taskslist.
2 Select devices using the Quick Find or Folders tabs.
Use Ctrl + click and Shift + click to select multiple devices.
Note: When a device managed by MVP is not supported by a specific task, its name will appear with a black linethrough it in the Quick Find or Folders tabs. Password-protected network devices are displayed in red. Enter thedevice password to gain access to the device.
3 Click New.
4 Enter values in the appropriate fields:
• Friendly Name—Type a name for the certificate (64-character maximum).
• Common Name—Type a name for the device (128-character maximum).
Note: Leave this field blank to use the domain name for the device.
• Organization Name—Type the name of the company or organization issuing the certificate (128-charactermaximum).
• Unit Name—Type the name of the unit within the company or organization issuing the certificate(128-character maximum).
• Country Name—Type the country location for the company or organization issuing the certificate(2-character maximum).
• Province Name—Type the name of the province where the company or organization issuing the certificateis located (128-character maximum).
• City Name—Type the name of the city where the company or organization issuing the certificate is located(128-character maximum).
• Subject Alternate Name—Type the alternate name and prefix that conforms to RFC 2459. For example, enteran IP address using the format IP:1.2.3.4, or a DNS address using the format DNS:ldap.company.com. Leavethis field blank to use the IPv4 address (128-character maximum).
Using security features in MarkVision Professional 11.2.1
68
Viewing a certificate
1 From the MarkVision Professional Home screen, select Security - Certificate Management from the All Taskslist.
2 Select devices using the Quick Find or Folders tabs.
Use Ctrl + click and Shift + click to select multiple devices.
Note: When a device managed by MVP is not supported by a specific task, its name will appear with a black linethrough it in the Quick Find or Folders tabs. Password-protected network devices are displayed in red. Enter thedevice password to gain access to the device.
3 Select a certificate from the list.
4 The details of the certificate are displayed in the Certificate Details window.
Deleting a certificate
1 From the MarkVision Professional Home screen, select Security - Certificate Management from the All Taskslist.
2 Select devices using the Quick Find or Folders tabs.
Use Ctrl + click and Shift + click to select multiple devices.
Note: When a device managed by MVP is not supported by a specific task, its name will appear with a black linethrough it in the Quick Find or Folders tabs. Password-protected network devices are displayed in red. Enter thedevice password to gain access to the device.
3 Select a certificate from the list.
4 Click Delete.
5 Click Yes.
Installing CA Certificates for multiple devicesThe CA (or certificate authority) certificates on a device help it to identify the authenticity of other hosts. When asigned certificate is presented to a device, the device checks whether the signing authority for the certificate—itsCA certificate—is installed.
1 From the MarkVision Professional Home screen, select Install CA Certificate from the All Tasks list.
2 Select the device(s).
3 Browse to the CA Certificate location.
4 Click Apply.
Notes:
• If more than one device is selected for this task, the CA Certificate is applied to all selected devices andoverwrites any existing certificates.
• Only one CA certificate at a time can be installed on Basic- and Intermediate-level devices. Installing new CAcertificates on these devices overwrites any existing certificates. Advanced-level devices support multipleCA certificates. See “Overview” on page 49 for more information about the three types of devices supportedby MVP.
Using security features in MarkVision Professional 11.2.1
69
Setting certificate defaultsMarkVision Professional allows administrators to set default values for certificates generated for a supported device.The values entered here will be present in all new certificates generated in the Security-Certificate Management task,even though those fields will remain blank on-screen.
1 From the MarkVision Professional Home screen, select Security - Certificate Defaults from the All Tasks list.
2 Select devices using the Quick Find or Folders tabs.
Use Ctrl + click and Shift + click to select multiple devices.
Note: When a device managed by MVP is not supported by a specific task, its name will appear with a black linethrough it in the Quick Find or Folders tabs. Password-protected network devices are displayed in red. Enter thedevice password to gain access to the device.
3 Enter values in the appropriate fields:• Common Name—Type a name for the device (128-character maximum).
Note: Leave this field blank to use the domain name for the device.
• Organization Name—Type the name of the company or organization issuing the certificate.
• Unit Name—Type the name of the unit within the company or organization issuing the certificate.
• Country Name—Type the country location for the company or organization issuing the certificate(2-character maximum).
• Province Name—Type the name of the province where the company or organization issuing the certificateis located.
• City Name—Type the name of the city where the company or organization issuing the certificate is located.
• Subject Alternate Name—Type the alternate name and prefix that conforms to RFC 2459. For example, enteran IP address using the format IP:1.2.3.4, or a DNS address using the format DNS:ldap.company.com. Leavethis field blank to use the IPv4 address.
Note: All fields accept a maximum of 128 characters, except where noted.
Viewing basic certificate informationTo view basic information about the certificates stored on a device or group of devices:
1 From the MarkVision Professional Home screen, select Security - Certificate Management from the All Taskslist.
2 Select devices using the Quick Find or Folders tabs.
Use Ctrl + click and Shift + click to select multiple devices.
Note: When a device managed by MVP is not supported by a specific task, its name will appear with a black linethrough it in the Quick Find or Folders tabs. Password-protected network devices are displayed in red. Enter thedevice password to gain access to the device.
3 The Device Certificates table displays basic certificate information for the selected device(s):
• Friendly Name—This is a user-defined name for the certificate.
• Common Name—This is a user-defined name for the printer.
Using security features in MarkVision Professional 11.2.1
70
• Issuer Common Name—If a certificate is signed, this field will display the CA information for the certificate;if it is not signed, this field will display the Common Name.
• Device Name—This is the name of the device as displayed in the MVP device list.
Note: MVP displays the Device Name field because the same certificate could be stored on multiple devices.Because it manages settings for only one device, the Embedded Web Server does not display the DeviceName field.
Signing certificatesIf a device is required to communicate securely across different domains, the security provided by normal (unsigned)certificates may not be adequate. Unsigned certificates may thus need to be signed by a certificate authority (CA).CA-signed certificates are considered genuine and are required while communicating securely with unknown hosts.
1 From the MarkVision Professional Home screen, select Security - Certificate Management from the All Taskslist.
2 Select devices using the Quick Find or Folders tabs.
Use Ctrl + click and Shift + click to select multiple devices.
Note: When a device managed by MVP is not supported by a specific task, its name will appear with a black linethrough it in the Quick Find or Folders tabs. Password-protected network devices are displayed in red. Enter thedevice password to gain access to the device.
3 Select a certificate from the list, and then click Download Signing Request.
4 Browse to find a location to save the .csr file, and then click Save.
Note: The .csr file contains the device certificate information in hashed form, minus the private key. This file mustbe submitted to a CA, which will generate a signature of the file by encrypting the info contained in the file. TheCA also appends its public key to the signature, and may include other information such as the CA name, a uniqueserial number, issue date, and validity period. The signature file must be in PEM format.
5 Once you have received a valid PEM file from the CA, repeat steps 1 and 2 to return to the Security - CertificateManagement task.
6 Select the same certificate from step 3 above, and then click Install new signature.
7 Browse to find the new PEM file, and then click Add.
Note: If the public key of the signed certificate does not match the private key of the selected device certificate,an error message will be displayed and the signature will not be installed.
Using security features in MarkVision Professional 11.2.1
71
Importing certificate stores (SSL)For communication to occur via the SSL (Secure Sockets Layer), a print server must first have a certificate registeredfor each socket using SSL. A socket is the combination of an IP address and a port.
To upload a new SSL certificate store to a device:
1 From the MarkVision Professional Home screen, select Security - SSL Setup from the All Tasks list.
2 Select devices using the Quick Find or Folders tabs.
Use Ctrl + click and Shift + click to select multiple devices.
Note: When a device managed by MVP is not supported by a specific task, its name will appear with a black linethrough it in the Quick Find or Folders tabs. Password-protected network devices are displayed in red. Enter thedevice password to gain access to the device.
3 Click Browse to find the appropriate certificate store, then click Import.
4 Click Apply to upload the certificate store to the device.
Notes:
• Clicking List Certificates will display a list of certificates available on a device.
• Clicking Delete Certificates will delete all SSL certificates from a device.
Entering a password to access a secured deviceFor older-generation devices, you can enter the device password to gain access to the device in MarkVision by usingthe procedure described below. For more sophisticated devices, you will need to update the MarkVision Serverauthentication settings to match those on the device.
1 From the MarkVision Professional Home screen, select Security - Enter Device Password from the All Tasks list.
2 Select a device.
3 Type the device password.
4 Click Apply.
Creating, editing, or deleting a device password (basic)1 From the MarkVision Professional Home screen, select Security - Set Device Password from the All Tasks list.
2 Select a device using the Quick Find or Folders tabs.
Note: When a device managed by MVP is not supported by a specific task, its name will appear with a black linethrough it in the Quick Find or Folders tabs. Password-protected network devices are displayed in red. Enter thedevice password to gain access to the device.
3 Edit the Current Password box accordingly.
• To create a new device password, delete any text from the Current Password text box, and then proceed tothe next step.
• To change an existing device password, type the device password.
4 Type the new password in the New Password box.
Using security features in MarkVision Professional 11.2.1
72

5 Confirm the password by typing it again.
The indicator light to the right of the text box turns green when the two passwords match.
Note: To delete an existing device password, simply remove any text from the New Password and Confirm NewPassword text boxes.
6 Click Apply.
Adding a password to the device password listMVP will attempt to use the passwords stored in the device password list to authenticate password-protected devicesuntil it finds a match. It will enable access to the device if a match is found; otherwise, the name of the device will bedisplayed in red.
1 From the MarkVision Professional Home screen, select Security - Basic Credentials from the All Tasks list.
2 Click Add.
3 Type a new password.
4 Click OK.
Editing a password from the device password list1 From the MarkVision Professional Home screen, select Security - Basic Credentials from the All Tasks list.
2 Select a device using the Quick Find or Folders tabs.
Note: When a device managed by MVP is not supported by a specific task, its name will appear with a black linethrough it in the Quick Find or Folders tabs. Password-protected network devices are displayed in red. Enter thedevice password to gain access to the device.
3 Click Edit.
4 Type a new password.
5 Confirm the changed password.
6 Click OK.
Deleting a password from the device password list1 From the MarkVision Professional Home screen, select Security - Basic Credentials from the All Tasks list.
2 Select a device using the Quick Find or Folders tabs.
Note: When a device managed by MVP is not supported by a specific task, its name will appear with a black linethrough it in the Quick Find or Folders tabs. Password-protected network devices are displayed in red. Enter thedevice password to gain access to the device.
3 Select the password(s) to delete.
4 Click Remove.
5 Click Yes.
Note: Click Remove All to delete all passwords from the list.
Using security features in MarkVision Professional 11.2.1
73
Using a device policy to set device passwords1 From the MarkVision Professional Home screen, select Device Policies - Create/Manage from the All Tasks list.
2 Click New.
3 Select For Any Print Server, and then click Continue.
4 Enter a name for the policy.
5 Expand the Security folder.
6 Select the Password check box.
7 Enter the current password, followed by a colon and the new password. (For example: veronica:betty.)
Notes:
• To set a password for devices with no current password, enter a colon followed by the new password.
• To clear a current password, enter the current password followed by a colon.
• Because MVP uses the colon as a delimiter, device passwords must not contain colons.
8 Click Apply, and then click Close.
The new device policy can now be applied to devices using the Device Policies - Apply task.
Note: The password will not be changed for any device with a current password that does not match the currentpassword entered.
Configuring advanced credentialsMarkVision Professional allows users to store multiple security credentials on the MVP Server to be used later whenauthenticating to supported devices. The Security - Advanced Credentials task allows users to store authenticationcredentials on the MarkVision Server. These credentials allow the MarkVision Server to create and assign a securitytemplate to the RemoteManagement access control, thereby securely authenticating to sophisticatednext-generation devices that have protected remote management. Only one set of authentication credentials canbe stored per MarkVision Server.
1 From the MarkVision Professional Home screen, select Security - Advanced Credentials from the All Tasks list.
2 Enter the User ID, Password, PIN, and Kerberos Realm to be stored on the MVP Server.
Note: The indicator light changes to green when the two passwords are identical. When the passwords do notmatch, the indicator light remains red.
3 Click Apply.
Using security features in MarkVision Professional 11.2.1
74
Setting a communication passwordA communication password helps establish a secure connection between a device and the MarkVision server. It ispossible to communicate securely even if the device does not use a password; however, if a password is set for adevice, it must match the server password in order to establish a secure channel.
1 From the MarkVision Professional Home screen, select Security - Communication Password from the All Taskslist.
2 Select devices using the Quick Find or Folders tabs.
Use Ctrl + click and Shift + click to select multiple devices.
Note: When a device managed by MVP is not supported by a specific task, its name will appear with a black linethrough it in the Quick Find or Folders tabs. Password-protected network devices are displayed in red. Enter thedevice password to gain access to the device.
3 Click Synchronize with Server.
4 Click Yes.
Note: Click the check box if you want to change the server communication password before synchronizing.
5 Click OK.
Note: Click Remove password to cancel the device password.
Changing on-board security for a deviceThis function allows MVP administrators to make changes to select security settings on supported devices. This willoverride any previous changes made to the settings on the device itself.
1 From the MarkVision Professional Home screen, select Security - On-Board Security from the All Tasks list.
2 Select devices using the Quick Find or Folders tabs.
Use Ctrl + click and Shift + click to select multiple devices.
Note: When a device managed by MVP is not supported by a specific task, its name will appear with a black linethrough it in the Quick Find or Folders tabs. Password-protected network devices are displayed in red. Enter thedevice password to gain access to the device.
3 Select an authentication method. The choices include Internal, Kerberos 5, LDAP, LDAP + GSSAPI, and NTLM.
4 Set the amount of delay in seconds (between 1-900) before a user is logged out of a device automatically.
5 Enter a value for the Scan to PC Port Range. This is a setting for MVP administrators who have a port-blockingfirewall between an MFP and its users. A valid entry consists of two port numbers separated by a colon.
6 Click Apply to save changes, or click Undo to clear all fields and start over.
Using security features in MarkVision Professional 11.2.1
75
Configuring menu lockoutAdministrators can use MVP to PIN-protect the Paper, Reports, Settings, and Network menus on supported devices.
1 From the MarkVision Professional Home screen, select Security - Menu Lockout Setup from the All Tasks list.
2 Select a device using the Quick Find or Folders tabs.
Note: When a device managed by MVP is not supported by a specific task, its name will appear with a black linethrough it in the Quick Find or Folders tabs. Password-protected network devices are displayed in red. Enter thedevice password to gain access to the device.
3 Select or deselect menus to protect in the Password Protect section
4 Type a PIN number in the Enter PIN text box, and then re-type it in the Re-enter PIN text box.
Notes:
• PINs should use only numbers between 0-9 and should be four characters long.
• The indicator light will change to green when the two PINs match; it will remain red if the PINs do not match.
5 Click Apply to save changes, or click Undo to cancel changes and start over.
Configuring confidential printingUsers printing confidential or sensitive information may opt to use the confidential print option, which allows printjobs to be PIN-protect so that they remain in the print queue until the user enters a PIN on the operator panel of thedevice. MarkVision Professional enables administrators to configure the settings for confidential print option.
1 From the MarkVision Professional Home screen, select Security - Confidential Print Setup from the All Taskslist.
2 Select devices using the Quick Find or Folders tabs.
Use Ctrl + click and Shift + click to select multiple devices.
Note: When a device managed by MVP is not supported by a specific task, its name will appear with a black linethrough it in the Quick Find or Folders tabs. Password-protected network devices are displayed in red. Enter thedevice password to gain access to the device.
3 Select an option for Max Invalid PIN:
• Select Off to allow users to enter an incorrect PIN as many times as they choose.
• Select a value of between 2 and 10 to specify the number of times users can enter an incorrect PIN beforebeing locked out.
4 Select an option for Job Expiration:
• Select Off to allow unprinted confidential print jobs to remain in the print queue indefinitely.
• Select a value of 1 hour, 4 hours, 24 hours, or 1 week to specify the amount of time that an unprintedconfidential print job will remain in the print queue before being automatically deleted.
5 Click Apply to save changes, or click Undo to reset both fields.
Using security features in MarkVision Professional 11.2.1
76
Configuring security audit log settingsThe security audit log allows administrators to monitor security-related events on a device including, among others,user authorization failures, successful administrator authentication, or Kerberos files being uploaded to a device. Thisis an especially important feature for environments where highly confidential or sensitive information is handled.
1 From the MarkVision Professional Home screen, select Security Audit Log from the All Tasks list.
2 Select devices using the Quick Find or Folders tabs.
Use Ctrl + click to select multiple devices.
Note: When a device managed by MVP is not supported by a specific task, its name will appear with a black linethrough it in the Quick Find or Folders tabs. Password-protected network devices are displayed in red. Enter thedevice password to gain access to the device.
3 Enter or adjust values in the appropriate fields.
4 Click Apply to save changes to the security audit log settings, or click Undo to reset the fields and start over.
Note: The security audit log for a device can be viewed and deleted on the Embedded Web Server (EWS) page foreach device. You can launch the EWS page for a device using the Web Page (Print Server) task in the All Tasks list.
Configuring 802.1x authenticationThough normally associated with wireless network connections, 802.1x authentication is also used on wired networksto create port-based connections.
Note: If using digital certificates to establish a secure connection to the authentication server, you must configurethem on the printer before changing 802.1x authentication settings. For more information on configuring digitalcertificates, see “Managing certificates” on page 68.
1 From the MarkVision Professional Home screen, select 802.1x from the All Tasks list.
2 Select devices using the Quick Find or Folders tabs.
Use Ctrl + click and Shift + click to select multiple devices.
Note: When a device managed by MVP is not supported by a specific task, its name will appear with a black linethrough it in the Quick Find or Folders tabs. Password-protected network devices are displayed in red. Enter thedevice password to gain access to the device.
3 Adjust the settings as necessary:
• Select the Active check box to enable 802.1x authentication.
• Type the login name and password the printer will use to log in to the authentication server.
• Select the Validate Server Certificate check box to require verification of the security certificate on theauthenticating server.
Note: Server certificate validation is integral to TLS (Transport Layer Security), PEAP (Protected ExtensibleAuthentication Protocol), and TTLS (Tunneled Transport Security Layer).
• From the 802.1x Device Certificate list, choose the digital certificate you want to use. If only one certificatehas been installed, Default will be the only choice listed.
4 Under Allowable Authentication Mechanisms, choose which authentication protocols the printer will recognizeby clicking the check box next to each applicable protocol.
Using security features in MarkVision Professional 11.2.1
77
5 From the TTLS Authentication Method list, choose which authentication method will be accepted through thesecure tunnel created between the authentication server and the printer.
6 Click Apply to save the changes, or Undo to restore the default settings.
Note: Changes to these settings will cause the print server to reset.
Setting up SNMPSimple Network Management Protocol (SNMP) is used in network management systems to monitor network-attached devices for conditions that warrant administrative attention. The Embedded Web Server allowsadministrators to configure settings for SNMP versions 1 through 3.
SNMP Version 1, 2c
1 From the MarkVision Professional Home screen, select Security - SNMP from the All Tasks list.
2 Select devices using the Quick Find or Folders tabs.
Use Ctrl + click and Shift + click to select multiple devices.
Note: When a device managed by MVP is not supported by a specific task, its name will appear with a black linethrough it in the Quick Find or Folders tabs. Password-protected network devices are displayed in red. Enter thedevice password to gain access to the device.
3 In the SNMP V1/V2c Enabled field, select Yes.
4 Type a name to be used for the SNMP Community identifier (the default community name is public).
5 To facilitate the automatic installation of device drivers and other printing applications, select Yes in the EnablePPM Mib (Printer Port Monitor MIB) field.
6 Click Apply to finalize changes, or Undo to restore default values.
SNMP Version 3
1 From the MarkVision Professional Home screen, select Security - SNMP from the All Tasks list.
2 Select devices using the Quick Find or Folders tabs.
Use Ctrl + click and Shift + click to select multiple devices.
3 In the SNMP Version 3 field, select the Yes check box.
4 To allow remote installation and configuration changes as well as device monitoring, type an SNMPPv3Read/Write (R/W) User name and Password in the appropriate fields.
5 To allow device monitoring only, type an SNMPv3 Read Only (R/O) User name and Password in the appropriatefields.
6 From the SNMPv3 Minimum Authentication Level list, select Authentication, No Privacy; Authentication,Privacy; or No Authentication, No Privacy.
7 From the SNMPv3 Authentication Hash list, select MD5 or SHA1.
8 From the SNMPv3 Privacy Algorithm list, select DES, AES-128, AES-192, or AES-256.
9 Click Apply to save changes, or Undo to restore default values.
Using security features in MarkVision Professional 11.2.1
78
Setting SNMP TrapsAfter configuring SNMP Version 1, 2c or SNMP Version 3, you can further customize which alerts are sent to thenetwork management system by designating SNMP “traps”, or events that trigger an alert message.
1 From the MarkVision Professional Home screen, select SNMP Traps from the All Tasks list.
2 Select devices using the Quick Find or Folders tabs.
Use Ctrl + click and Shift + click to select multiple devices.
3 Click Add.
4 From the IP Address list, click one of the blank IP address entries (shown as 0.0.0.0).
5 Click the check box next to each condition that should generate an alert.
6 Click Apply to save changes, or Cancel to clear all fields.
Creating accounts and groups
Creating user accounts and groupsCreate and manage user accounts and account groups with the User Accounts and Groups task.
Accounts and account groups:
• Define user access to the devices that MVP manages.
• Limit user access to specific tasks.
• Organize accounts into account groups.
• Distribute a range of privileges across a number of accounts.
Note: Adding accounts is not required, but creating an administrator account ensures the security of your devices.
Creating an administrator accountTo create an administrator account with full privileges, you must also create at least one user account. MVP willprompt you to create a user account after an administrator account is completed.
1 From the MarkVision Professional Home screen, select User Accounts and Groups from the All Tasks list.
2 From the User Accounts tab, click Add.
3 Type an administrator account name and password.
Administrator accounts require an authentic user ID and password specific to MVP.
4 Confirm the password by typing it again.
The indicator light to the right of the text box turns green when the two passwords match.
5 Click Finish, then the Creating a User Account dialog appears.
Note: At this time you must create at least one user account or the administrator account will be canceled.
Using security features in MarkVision Professional 11.2.1
79
Creating user accounts1 From the MarkVision Professional Home screen, select User Accounts and Groups from the All Tasks list.
2 From the User Accounts tab, click Add.
3 Type an account name and password.
Notes:
• User account passwords may be verified through the LDAP server if it is configured. Otherwise, they areauthenticated locally.
• For user authentication with LDAP, account names should correspond to an existing account listed on theLDAP server unless it is an administrator account.
4 Confirm the password by typing it again.
The indicator light to the right of the text box turns green when the two passwords match.
5 Click Next.
6 Select the privileges that will be available to the account from the Available Privileges window.
7 Click the > button to add or the < button to remove the selected privileges, and then click Next.
Note: Click the >> button to add all privileges or the << button to remove all privileges.
8 Select the device folders that will be available to the user.
9 Click Next or Finish.
Creating a user groupAssigning users to groups ensures that accounts are configured uniformly. Task privileges assigned to the groupswill be available to all users in the group.
1 From the MarkVision Professional Home screen, select User Accounts and Groups from the All Tasks list.
2 From the User Groups tab, click Add.
3 Enter a group name.
4 Select the user accounts that belong to this group.
5 Click Next.
6 Select the privileges that will be available to the account from the Available Privileges window.
7 Click the > button to add or the < button to remove the selected privileges, and then click Next.
Note: Click the >> button to add all privileges or the << button to remove all privileges.
8 Select the device folders that will be available to the user.
9 Click Next or Finish.
Editing an existing user account or group1 From the MarkVision Professional Home screen, select User Accounts and Groups from the All Tasks list.
2 From the User Accounts or User Groups area, select an account or group, and then click Edit.
Using security features in MarkVision Professional 11.2.1
80
3 From the User Accounts area type the account name and password, or from the User Groups area, select or clearthe check box next to the user name to add or remove the user from a group.
4 Click Next.
5 Select the privileges that will be available to the account from the Available Privileges window.
6 Click the > button to add or the < button to remove the selected privileges, and then click Next.
Note: Click the >> button to add all privileges or the << button to remove all privileges.
7 Select the device folders that will be available to the user.
8 Click Next or Finish.
Removing an existing user account or groupTo remove a user account or group:
1 From the MarkVision Professional Home screen, select User Accounts and Groups from the All Tasks list.
2 Select the account or group that you want to remove, and then click Remove.
Note: If prompted, specify Yes to Remove the account or group.
3 If the Confirm Account and Group Deletion setting is enabled under Personal Settings task, type your user accountand password into the confirmation prompt, and then click OK. If a password is not required, click OK.
Note: Removing groups may affect user access rights. You cannot recover a group once it has been removed.
Assigning privilegesAn administrator account must exist before MVP user accounts can be created. The administrator is authorized toperform all MVP tasks on all devices. If no accounts are created, all MVP users have authorization to perform all tasks.For non-administrator accounts, user privileges and accessible devices are either defined by the parameters specifiedwhen the user account was created, or the group assigned to the user.
Configuring active session expirationIf active session expiration has been enabled, and a MarkVision Client session remains idle for a specified period oftime, a dialog appears prompting the user to re-enter their password to regain access to the application. Activesession expiration helps to prevent unauthorized users from accessing a MarkVision Client that is left unattended.
1 From the MarkVision Professional Home screen, select Administrative Settings from the All Tasks list.
2 From the Intervals tab of the dialog, specify the active session expiration interval in minutes.
To remove active session expiration, select Never from the “Active session expiration interval (minutes)” area.
3 Click OK.
Using security features in MarkVision Professional 11.2.1
81
Configuring account password expirationTo reduce the likelihood of compromised passwords, administrators can set a password expiration interval for useraccounts. After a specified amount of time, a user account password will become invalid, forcing users to changetheir MVP passwords. Account password expiration applies to all users with the exception of the administrator, unlessLDAP Server authentication has been enabled. If LDAP Server authentication is enabled, account password expirationwill not be enabled, and password security will depend on the existing password security and network protocols.
Note: To eliminate the need for the administrator to change each user account password for every expiration interval,make the Change Password task available to all users.
1 From the MarkVision Professional Home screen, select Administrative Settings from the All Tasks list.
2 From the Intervals section of the dialog, specify the account password expiration interval in days.
To remove the password expiration interval, select Never.
3 Click Apply, and then click OK.
Securing communication with the MarkVision Server
Using secure communicationMVP allows secure communication between the MarkVision Server and network devices that support the samesecurity protocol. Administrators can communicate with, configure, control, and retrieve information from secureddevices on the network. Secure communication reduces the threat of compromised user credentials or devicecommands. The total security with which the devices and the server communicate is determined by the security levelsetting for the MarkVision Server in conjunction with the communication security setting applied to the device.
Communication security tasks are:
• Administrative Settings—Specifies the Server-to-Device Security level and establishes a MarkVision Serverpassword.
• Communication Password—Synchronizes a device communication password and a server communicationpassword to open a secure communication channel.
Note: Secure communication is limited to configuration commands between the host computer and the device.• Printer Lockdown—Restricts printer access.
Notes:
– You must set a communication password before a printer can be locked down.
– The Printer Lockdown task is not available on devices that support building blocks and security templates.
Using LDAP to authenticate user accessMVP administrators can use the company LDAP server to authenticate user IDs and passwords. This eliminates theneed for users to maintain separate MVP logon IDs and passwords.
Using security features in MarkVision Professional 11.2.1
82
When enabling LDAP server authentication, administrators have three modes of LDAP authentication. The followingauthentication mechanisms bind to the LDAP server in increasing order of security:
• Anonymous LDAP Bind—Binds to LDAP server without a password
• Simple LDAP Bind—Binds to LDAP server with credentials in cleartext, or by using an encrypted channel (if anSSL certificate is supplied)
• Kerberos—Authenticates to a Kerberos KDC
Make sure that the administrator password is defined before proceeding with LDAP Server authentication setup.LDAP Server authentication is only accessible through the Master Administrator account. LDAP authentication worksfor all user accounts with the exception of the Master Administrator account. The Master Administrator account musthave a unique MVP password.
Creating a user account using simple LDAP authentication
1 From the MarkVision Professional Home screen, select User Accounts and Groups from the All Tasks list.
2 Click Add.
3 Type the existing network log on for the user ID in the Account Name box.
Note: This ID must match the user ID which exists in the LDAP database.
4 Leave the password field blank.
Note: No password entry is required or permitted because LDAP will be used for authentication when the userlogs on.
5 Click the Authenticate using LDAP Server/Kerberos KDC box to select it, then select Simple LDAP Bind fromthe Authentication Mechanism drop-down list.
6 Click Next.
7 Enter the information for the LDAP server in the LDAP Settings text boxes:
• LDAP Server Address—Enter the IP Address or the Host Name of the LDAP Directory Server where theauthentication will be performed.
• Port Number—The port used by the local computer to communicate with the LDAP Directory Server. Thedefault LDAP port is 389.
• Search Base—The Search Base (sometimes called the Distinguished Name, or DN) is the node in the LDAPDirectory Server where user accounts exist.
Note: A Search Base consists of multiple attributes—such as cn (common name), ou (organizational unit),o (organization), c (country), or dc (domain)—separated by commas.
• User Attributes—Enter a value of cn, userid, or userdefined, where cn stands for “common name.”
• Distinguished Name—Enter the distinguished name of the LDAP Account for the MVP Server. Typicalexamples include ou (organizational unit) and o (organization name), where o could be a company's nameand ou could be a certain group of employees at the company (example: o=Acme, ou=managers).
• Password and Confirm Password—The indicator light changes to green when the two passwords areidentical. If the passwords do not match, the indicator light remains red.
8 To use SSL, click the Use SSL box to select it, and then type the Certificate Store password in the text box.
Note: MVP administrators can make their Certificate Store password protected by entering a password beforeimporting the first trusted certificate.
9 Click Next.
Using security features in MarkVision Professional 11.2.1
83
10 Select a certificate from the list, or click Import to import a new certificate.
11 Click Finish.
12 Have the user access MVP and enter their user ID and password that they use for the company local network. TheMarkVision Server will access the company LDAP server directory service and authenticate the user login througha simple bind protected by SSL.
Creating a user account using secure LDAP authentication
1 From the MarkVision Professional Home screen, select User Accounts and Groups from the All Tasks list.
2 Click Add.
3 Type the existing network log on for the user ID in the Account Name box.
Note: This ID must match the user ID which exists in the LDAP database.
4 Leave the password field blank.
Note: No password entry is required or permitted because LDAP will be used for authentication when the userlogs on.
5 Click the Authenticate using LDAP Server/Kerberos KDC box to select it, then select Secure from theAuthentication Mechanism drop-down list.
6 Click Next.
7 Enter the information for the Kerberos server in the Kerberos Settings text boxes:
• KDC IP/HostName—Enter the Hostname or IP address of the Kerberos Server (Kerberos Key DistributionCenter).
• Realm—Enter the Kerberos Realm or a domain name that includes all of the components that are used toidentify the domain on your network; for example, camelot.ap.england.com.
• User Name—Enter the user name of the LDAP Account for the MVP Server.
Note: When using Kerberos LDAP authentication, an associated MarkVision Server account may be necessarydepending on the Kerberos configuration. For information on MarkVision Server accounts for Kerberos, seethe Kerberos documentation.
• Password and Confirm Password—The indicator light changes to green when the two passwords areidentical. If the passwords do not match, the indicator light remains red.
8 Click Finish.
Setting server communication securitySetting server communication security involves:
• Establishing a communication security password for the server
• Turning server-to-device security on or off
Use the “Administrative Settings” task in the All Tasks list on the MVP Home screen to set the server communicationsecurity password and server-to-device security.
Using security features in MarkVision Professional 11.2.1
84
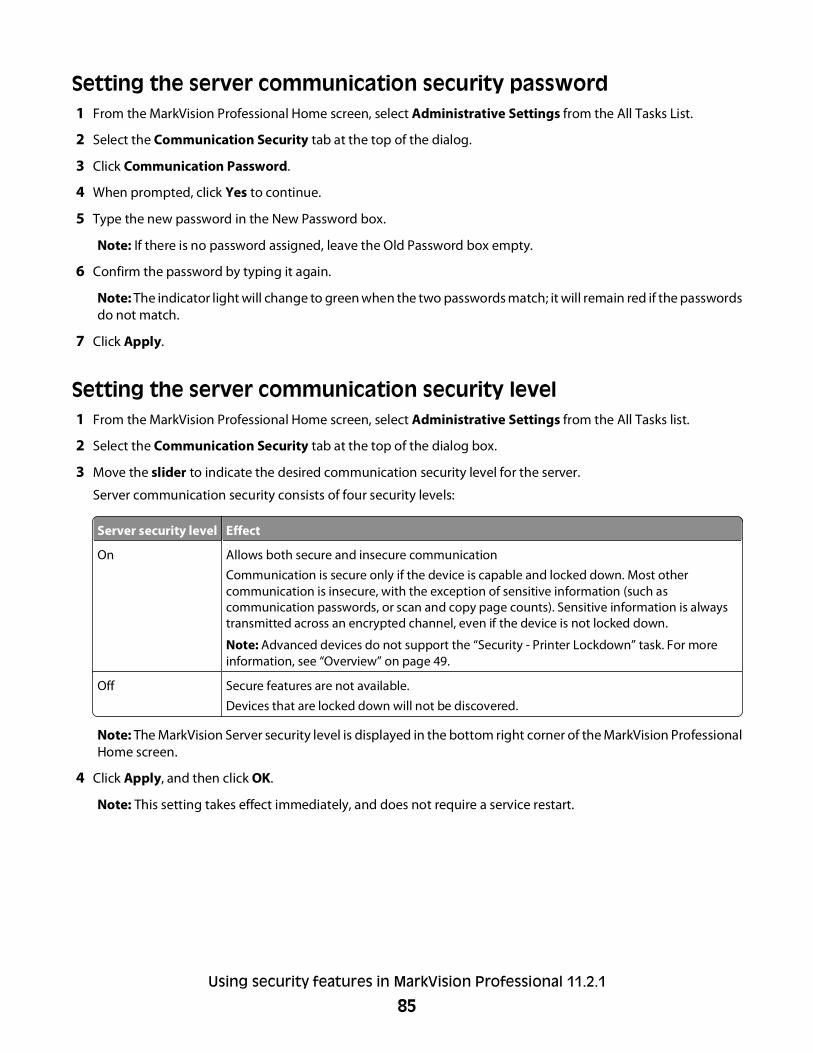
Setting the server communication security password1 From the MarkVision Professional Home screen, select Administrative Settings from the All Tasks List.
2 Select the Communication Security tab at the top of the dialog.
3 Click Communication Password.
4 When prompted, click Yes to continue.
5 Type the new password in the New Password box.
Note: If there is no password assigned, leave the Old Password box empty.
6 Confirm the password by typing it again.
Note: The indicator light will change to green when the two passwords match; it will remain red if the passwordsdo not match.
7 Click Apply.
Setting the server communication security level1 From the MarkVision Professional Home screen, select Administrative Settings from the All Tasks list.
2 Select the Communication Security tab at the top of the dialog box.
3 Move the slider to indicate the desired communication security level for the server.
Server communication security consists of four security levels:
Server security level Effect
On Allows both secure and insecure communication
Communication is secure only if the device is capable and locked down. Most othercommunication is insecure, with the exception of sensitive information (such ascommunication passwords, or scan and copy page counts). Sensitive information is alwaystransmitted across an encrypted channel, even if the device is not locked down.
Note: Advanced devices do not support the “Security - Printer Lockdown” task. For moreinformation, see “Overview” on page 49.
Off Secure features are not available.
Devices that are locked down will not be discovered.
Note: The MarkVision Server security level is displayed in the bottom right corner of the MarkVision ProfessionalHome screen.
4 Click Apply, and then click OK.
Note: This setting takes effect immediately, and does not require a service restart.
Using security features in MarkVision Professional 11.2.1
85
Selecting server-to-client securityThe Communication Security tab on the Administrative Settings Dialog provides an administrator with the optionto use SSL for communication between the MarkVision Server and MarkVision Client.
1 From the MarkVision Professional Home screen, select Administrative Settings from the All Task list.
2 Click the Communication Security tab at the top of the dialog.
3 Select the Use SSL for Server-Client Communications check box to enable SSL communication.
4 Click Apply, and then click OK.
Note: SSL will be used the next time a client connects to the MarkVision Server. The current session will not be affected.
Disabling or securing remote management of a deviceMarkVision Professional allows administrators to secure or disable remote management on certain newer devices.Securing remote management on a device requires that a security template be applied to the Remote Managementaccess control.
For users creating a new security template, setting up an access control to disable remote management is a three-stepprocess. For instructions on disabling remote management completely, skip to “Step 3: Configure RemoteManagement access control for the device(s).”
Note: Disabling remote management effectively ends communication between a selected device and the MVPServer. Though the device will appear in the device list following discovery, MVP may not be able to determine itscapabilities and/or characteristics because the device itself will prevent such data from being read.
Step 1: Create a building blockMVP supports seven building blocks: Password, PIN, Internal Accounts, Kerberos, NTLM, LDAP, and LDAP + GSSAPI.Building blocks are the fundamental elements used to create security templates. The steps below describe how tocreate a PIN building block, but any of the other six building blocks could just as easily be used.
1 From the MarkVision Professional Home screen, select Security - PIN from the All Tasks list.
2 Select devices using the Quick Find or Folders tabs.
Use Ctrl + click and Shift + click to select multiple devices.
Note: When a device managed by MVP is not supported by a specific task, its name will appear with a black linethrough it in the Quick Find or Folders tabs. Password-protected network devices are displayed in red. Enter thedevice password to gain access to the device.
3 Click Add.
4 Enter a name and PIN in the PIN Setup dialog.
5 Click OK.
Using security features in MarkVision Professional 11.2.1
86
Step 2: Create a security templateOnce configured, one or two building blocks can be combined with a unique name of up to 128 characters to createa security template. Each device can support up to 140 security templates. Though the names of security templatesmust be different from one another, building blocks and security templates can share a namė.
1 From the MarkVision Professional Home screen, select Security - Security Templates from the All Tasks list.
2 Select devices using the Quick Find or Folders tabs.
Use Ctrl + click and Shift + click to select multiple devices.
Note: When a device managed by MVP is not supported by a specific task, its name will appear with a black linethrough it in the Quick Find or Folders tabs. Password-protected network devices are displayed in red. Enter thedevice password to gain access to the device.
3 Click Add.
4 Type a name for the security template, and then choose the appropriate building block from the AuthenticationSetup list.
5 Click OK.
Step 3: Configure Remote Management access control for the device(s)The final step in limiting access to devices from the MVP Server is to apply a security template to the RemoteManagement access control, or to disable it altogether.
Note: This disables only remote host software management (MarkVision Professional), not the Embedded Web Serverfor the device.
1 From the MarkVision Professional Home screen, select Security - Access Controls from the All Tasks list.
2 Select devices using the Quick Find or Folders tabs.
Use Ctrl + click and Shift + click to select multiple devices.
Notes:
• When a device managed by MVP is not supported by a specific task, its name will appear with a black linethrough it in the Quick Find or Folders tabs. Password-protected network devices are displayed in red. Enterthe device password to gain access to the device.
• The same security template must be installed on each of the selected devices in order to disable RemoteManagement on more than one device at the same time.
3 Select the newly created security template from the Remote Management drop-down list, and then clickApply.
Note: To disable remote management for the device, select Disabled from the Remote Management drop-downlist, and then click Apply.
Using security features in MarkVision Professional 11.2.1
87
Synchronizing device communication passwordsFor MVP to manage devices securely, the passwords must match between the server and each managed device.Synchronizing a device password sets the communication password for the device to the same password that is usedby the server.
Note: The password is set via an encrypted data channel.
1 From the MarkVision Professional Home screen, select Security - Communication Password from the All Taskslist.
2 Select devices using the Quick Find or Folders tabs.
Use Ctrl + click and Shift + click to select multiple devices.
Note: When a device managed by MVP is not supported by a specific task, its name will appear with a black linethrough it in the Quick Find or Folders tabs. Password-protected network devices are displayed in red. Enter thedevice password to gain access to the device.
3 Synchronize or remove the device password.
• To synchronize the device communication password with the MarkVision Server:a Click Synchronize with Server.b Click Yes.
• To synchronize the device communication password with a new server password:a Click Synchronize with Server.b From the “Confirm Synchronize with Server” dialog, click the check box to confirm synchronization.c Click Yes.d Type the old server communication password.e Type a new server communication password.f Type the new password again to confirm it.g Click OK, and then click Yes.
• To remove the device communication password:a Click Remove Password.b Make sure the device is not locked down.
Note: Devices that are not capable of secure communication are displayed with a black line through them inthe results area.
Securing printer communication through lockdownThe Printer Lockdown task lets a user force one or more supported devices to communicate exclusively over a securechannel. This enables a firewall on the device, turning off most network ports such as HTTP, SNMP, and FTP. Onlysecure ports will remain open. The Printer Lockdown task is not available on devices that support building blocksand security templates.
1 From the MarkVision Professional Home screen, select Security - Printer Lockdown from the All Tasks list.
2 Select devices using the Quick Find or Folders tabs.
Use Ctrl + click and Shift + click to select multiple devices.
Note: When a device managed by MVP is not supported by a specific task, its name will appear with a black linethrough it in the Quick Find or Folders tabs. Password-protected network devices are displayed in red. Enter thedevice password to gain access to the device.
Using security features in MarkVision Professional 11.2.1
88
3 Select the Lockdown check box to lock down the device.
To remove lockdown from a device, clear the Lockdown check box.
Note: The Generic File Download and Printer Resource tasks will not be available when the Printer Lockdown optionis enabled.
Viewing encrypted hard disk drivesSome supported devices contain encrypted hard disk drives to protect information stored on the devices. MVP allowsinformation retrieval from hard disk drives without interfering with device security. If the device has an encryptedhard disk drive and is communicating over a secure channel, an administrator can use the Storage Devices task toview the drive. As a precaution, if the hard disk drive is encrypted and the device is not communicating securely, thetask will not display the hard disk drive information. Although MVP is able to view encrypted hard disk drives, MVPwill not allow a user to change the encryption for the device.
Using security features in MarkVision Professional 11.2.1
89
Managing devices
Finding and organizing devices
Finding devicesThere are numerous ways to find devices managed by MVP. You can search for one device using specific criteria, ormultiple devices using a variety of methods to find devices managed by MVP. After MVP recognizes a device usingone of those methods, that device can later be found by other device attributes, such as a serial number or propertytag.
Here are some suggested methods for finding one or more printers in MVP:
Searching by printer features when managing a small number of printers
1 From the MarkVision Professional Home screen, select the Feature Overview (Printers) or Feature Overview(Print Servers) from the All Tasks list.
2 Click the Folders tab, and view the folder that contains the printers you want to choose from.
3 Select one or more devices.
4 You can then scan the various features columns.
5 Click any tab to sort the printers according to the criteria you want.
Using Quick Find when managing a large number of printers
1 From the MarkVision Professional Home screen, select the Quick Find tab.
2 Select Other from the “Select a field to search” list.
3 Click Find Parameters.
4 Configure the filter to find the feature.
5 Click OK, and then click Find.
Devices on the MarkVision Server appear.
Managing devices
90
Creating folders and filtersMarkVision gives you several ways to see all the printers available to you at a glance.
• Use the Folder Configuration task to create custom folders to organize your printers. If the printers are on a smallnetwork, only one folder may be needed. However, if the printers are distributed across a large network, they canbe organized in multiple folders.
For example, if the printers are concentrated on a small network within a single building, create folders for eachfloor or type of printer. For larger printer networks, create a folder hierarchy that includes subfolders identifyingprinters by geographical location or subnet.
• Apply filter criteria to the folders to automatically populate folder contents or to find a specific printer.
For example, create a folder named Color, and then select the appropriate filter criteria to show only color printers.MVP applies the filter and adds only color printers to that folder. The same printer can appear in more than onefolder. For example, a color printer with a duplex unit would appear in both the Color folder and the Duplexfolder.
Using filters to populate folders automatically1 From the MarkVision Professional Home screen, select Folder Configuration from the All Tasks list.
2 Select a parent folder.
3 Skip to step 4 to configure a filter for an existing folder that will not be renamed. To create a new folder or renamean existing folder:
• Click New to create a new folder within the parent folder.
• Type a new name in the Name box to rename an existing folder.
4 Select the Filter tab, and then select filter criteria, or select the Manual Selection tab, and then select devices toadd to the folder.
5 Click Apply.
Creating mapsCreate a graphic of the distribution of selected printers on a map background. The type of map you create dependson the structure of your organization. You can create an original image or develop a graphic using a scanned imagesuch as an area map or building plan. Save the image in JPEG or GIF format.
If your organization has one location with just a few printers, your map could be a simple line drawing or a scannedplan of your building with icons marking the printer locations. If you are responsible for many printers in variousgeographies, you might create maps that correspond with the hierarchy of the printer folders. For example, youcould create a folder for the state where a group of printers are located. Within that folder, create a subfolder for thecity. Additional subfolders could contain printers grouped by the building or floor number. Create a correspondingmap for each folder.
1 From the MarkVision Professional Home screen, select Map from the All Tasks list.
2 Select a folder.
3 Click the Map icon in the lower part of the window.
Managing devices
91
4 Select a map background from the list, or click Browse to find a graphic.
5 Arrange the device icons on the map image, and then click Apply.
Note: A yellow border around a device icon indicates that the device is in a warning state. A red border indicatesan error state.
Creating custom views and tables
Creating a custom view1 From the MarkVision Professional Home screen, select Custom Views - Create/Manage from the All Tasks list.
2 Click New.
3 Give the custom view a name.
4 Add printer attributes to this view by clicking the New Component icon next to the Name field.
As you select the attributes, blocks indicating the size of the data appear in the window below.
5 Arrange the blocks so that each one can be easily viewed.
6 Click Apply.
Notes:
• Once created, custom views are available from the All Tasks list, listed by their custom names.
• You can also access custom views by clicking View Custom Views, and then selecting the custom view fromthe list.
Editing a custom view1 From the MarkVision Professional Home screen, select Custom Views - Create/Manage from the All Tasks list.
2 Select a custom view.
3 Change the custom view.
4 Click Apply.
Creating a custom tableThe Custom Tables task provides an easy interface with which to view reports of device information. Although MVPdoes not provide a specific report writer, many reporting functions can be accomplished using custom tables. Customtables can be sorted by any column and you can customize the appearance of tables by moving columns and changingthe sort column and then saving your preferences. After it has been configured, a custom table can be exported toa comma-separated values (.csv) file, which can be opened by spreadsheet or word processing software. The PrinterInventory and Job Statistics: Trend Analysis tasks can also be used to populate databases.
1 From the MarkVision Professional Home screen, select Custom Tables - Create/Manage from the All Tasks list.
2 Click New.
3 Name the table.
Managing devices
92
4 From the Available Columns box, select the items to be included in the table.
5 Click > to move the selected items into the Columns In Use box.
6 Arrange the columns using the up and down arrows.
For example, to make Duplex Option the first table column, move it to the first position in the Columns In Usebox.
7 Select how to sort the rows of the table.
For example, if you select Color from the “Sort Custom Table By” list, and then click Ascending, the table lists colorprinters first.
8 Click Apply.
Note: Select the check box next to Frequent Task to associate a unique icon with the custom table. The iconappears as a frequent task icon in the menus area of the MarkVision Professional Home screen.
Viewing and editing a custom table1 From the MarkVision Professional Home screen, select the previously named custom table from the All Tasks list.
2 The custom table appears:
• To print the custom table, click Print.
• To export the custom table, click Export.
3 To customize a custom table while viewing it:
a Reorganize columns by dragging them.
b Click a column heading to sort by that column.
c Right-click the table to save the changes or reset to the default column and sort order.
Notes:
• These changes do not change the table settings managed in each specific Custom Tables task; these areunique to each user account. To change the default column and sort order, use the Custom Tables task.
• A convenient way to design custom tables is to keep the Custom Tables - Create/Manage task open whiletesting the table task. Make changes to the column content or order, click Apply, and then context-switchto the table task and press F5 to pick up the table changes.
Exporting a custom table1 From the MarkVision Professional Home screen, select the custom table from the All Tasks list.
2 Select devices using the Quick Find or Folders tabs.
Use Ctrl + click and Shift + click to select multiple devices.
3 Click Export.
4 Type a name for the file that will contain the data from the custom table, and select the location where the filewill be saved.
5 Click Export.
Note: The data from the custom table is exported to a comma-separated values (.csv) file, which can be opened byspreadsheet or word processing software.
Managing devices
93
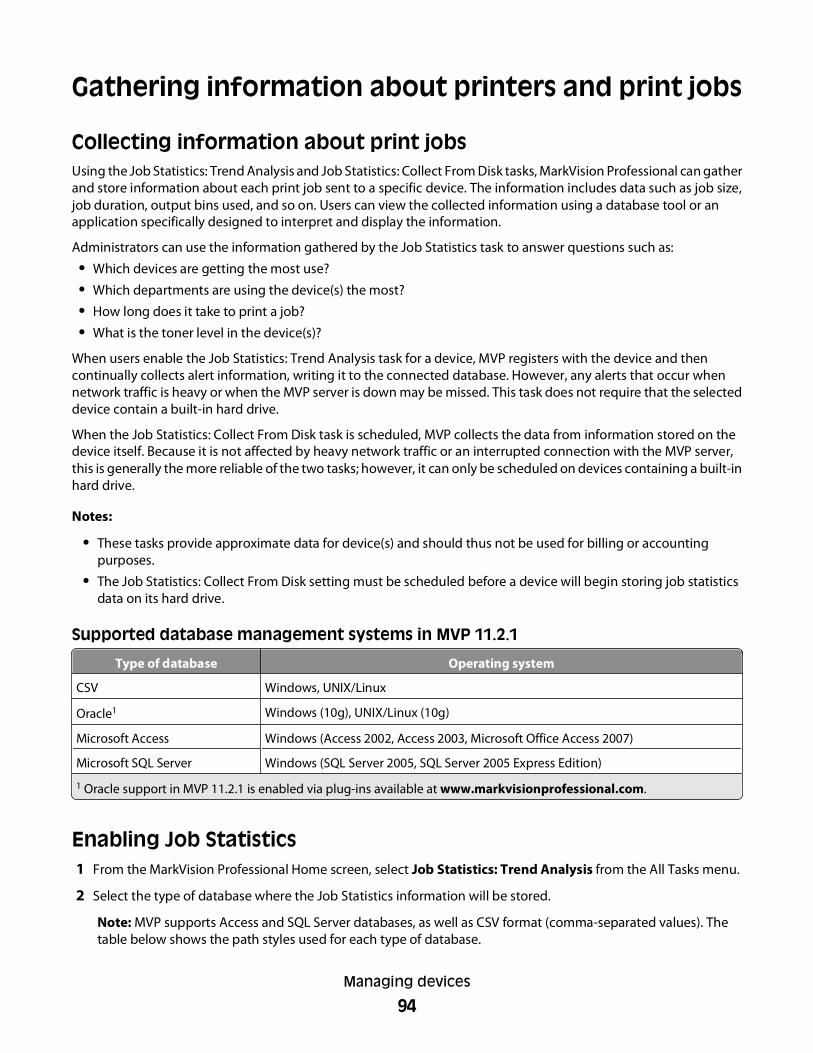
Gathering information about printers and print jobs
Collecting information about print jobsUsing the Job Statistics: Trend Analysis and Job Statistics: Collect From Disk tasks, MarkVision Professional can gatherand store information about each print job sent to a specific device. The information includes data such as job size,job duration, output bins used, and so on. Users can view the collected information using a database tool or anapplication specifically designed to interpret and display the information.
Administrators can use the information gathered by the Job Statistics task to answer questions such as:
• Which devices are getting the most use?
• Which departments are using the device(s) the most?
• How long does it take to print a job?
• What is the toner level in the device(s)?
When users enable the Job Statistics: Trend Analysis task for a device, MVP registers with the device and thencontinually collects alert information, writing it to the connected database. However, any alerts that occur whennetwork traffic is heavy or when the MVP server is down may be missed. This task does not require that the selecteddevice contain a built-in hard drive.
When the Job Statistics: Collect From Disk task is scheduled, MVP collects the data from information stored on thedevice itself. Because it is not affected by heavy network traffic or an interrupted connection with the MVP server,this is generally the more reliable of the two tasks; however, it can only be scheduled on devices containing a built-inhard drive.
Notes:
• These tasks provide approximate data for device(s) and should thus not be used for billing or accountingpurposes.
• The Job Statistics: Collect From Disk setting must be scheduled before a device will begin storing job statisticsdata on its hard drive.
Supported database management systems in MVP 11.2.1
Type of database Operating system
CSV Windows, UNIX/Linux
Oracle1 Windows (10g), UNIX/Linux (10g)
Microsoft Access Windows (Access 2002, Access 2003, Microsoft Office Access 2007)
Microsoft SQL Server Windows (SQL Server 2005, SQL Server 2005 Express Edition)
1 Oracle support in MVP 11.2.1 is enabled via plug-ins available at www.markvisionprofessional.com.
Enabling Job Statistics1 From the MarkVision Professional Home screen, select Job Statistics: Trend Analysis from the All Tasks menu.
2 Select the type of database where the Job Statistics information will be stored.
Note: MVP supports Access and SQL Server databases, as well as CSV format (comma-separated values). Thetable below shows the path styles used for each type of database.
Managing devices
94
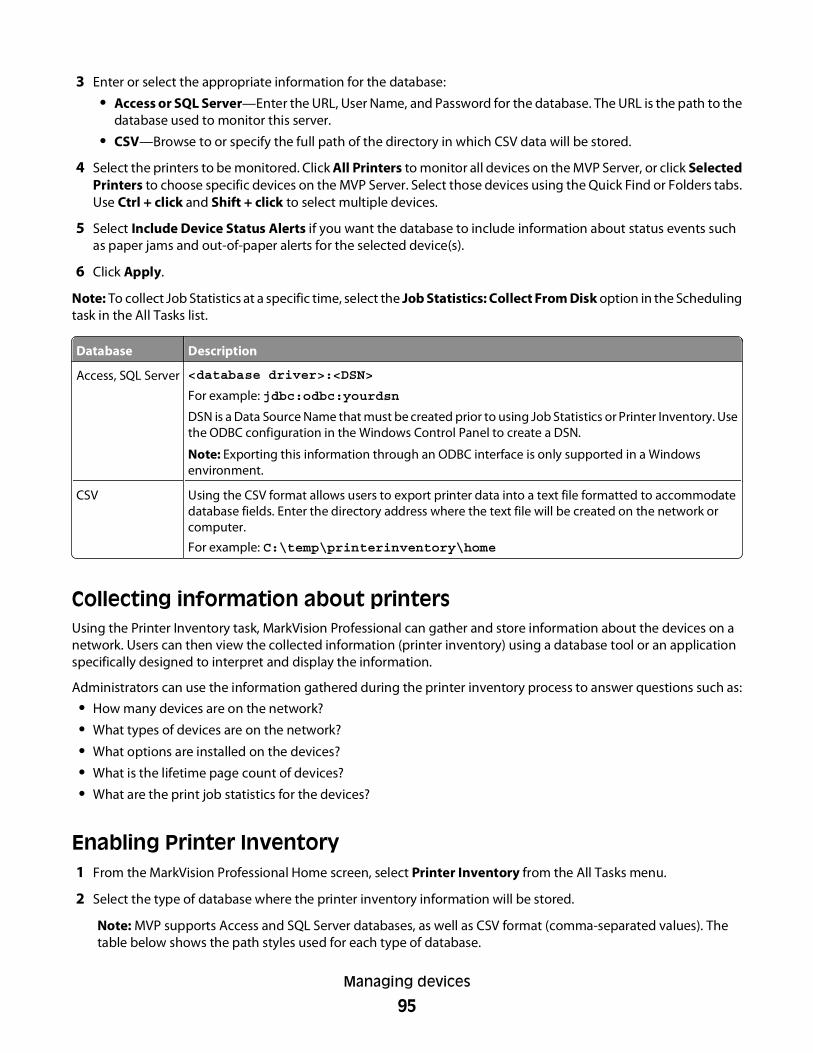
3 Enter or select the appropriate information for the database:
• Access or SQL Server—Enter the URL, User Name, and Password for the database. The URL is the path to thedatabase used to monitor this server.
• CSV—Browse to or specify the full path of the directory in which CSV data will be stored.
4 Select the printers to be monitored. Click All Printers to monitor all devices on the MVP Server, or click SelectedPrinters to choose specific devices on the MVP Server. Select those devices using the Quick Find or Folders tabs.Use Ctrl + click and Shift + click to select multiple devices.
5 Select Include Device Status Alerts if you want the database to include information about status events suchas paper jams and out-of-paper alerts for the selected device(s).
6 Click Apply.
Note: To collect Job Statistics at a specific time, select the Job Statistics: Collect From Disk option in the Schedulingtask in the All Tasks list.
Database Description
Access, SQL Server <database driver>:<DSN>
For example: jdbc:odbc:yourdsn
DSN is a Data Source Name that must be created prior to using Job Statistics or Printer Inventory. Usethe ODBC configuration in the Windows Control Panel to create a DSN.
Note: Exporting this information through an ODBC interface is only supported in a Windowsenvironment.
CSV Using the CSV format allows users to export printer data into a text file formatted to accommodatedatabase fields. Enter the directory address where the text file will be created on the network orcomputer.
For example: C:\temp\printerinventory\home
Collecting information about printersUsing the Printer Inventory task, MarkVision Professional can gather and store information about the devices on anetwork. Users can then view the collected information (printer inventory) using a database tool or an applicationspecifically designed to interpret and display the information.
Administrators can use the information gathered during the printer inventory process to answer questions such as:• How many devices are on the network?
• What types of devices are on the network?
• What options are installed on the devices?
• What is the lifetime page count of devices?
• What are the print job statistics for the devices?
Enabling Printer Inventory1 From the MarkVision Professional Home screen, select Printer Inventory from the All Tasks menu.
2 Select the type of database where the printer inventory information will be stored.
Note: MVP supports Access and SQL Server databases, as well as CSV format (comma-separated values). Thetable below shows the path styles used for each type of database.
Managing devices
95
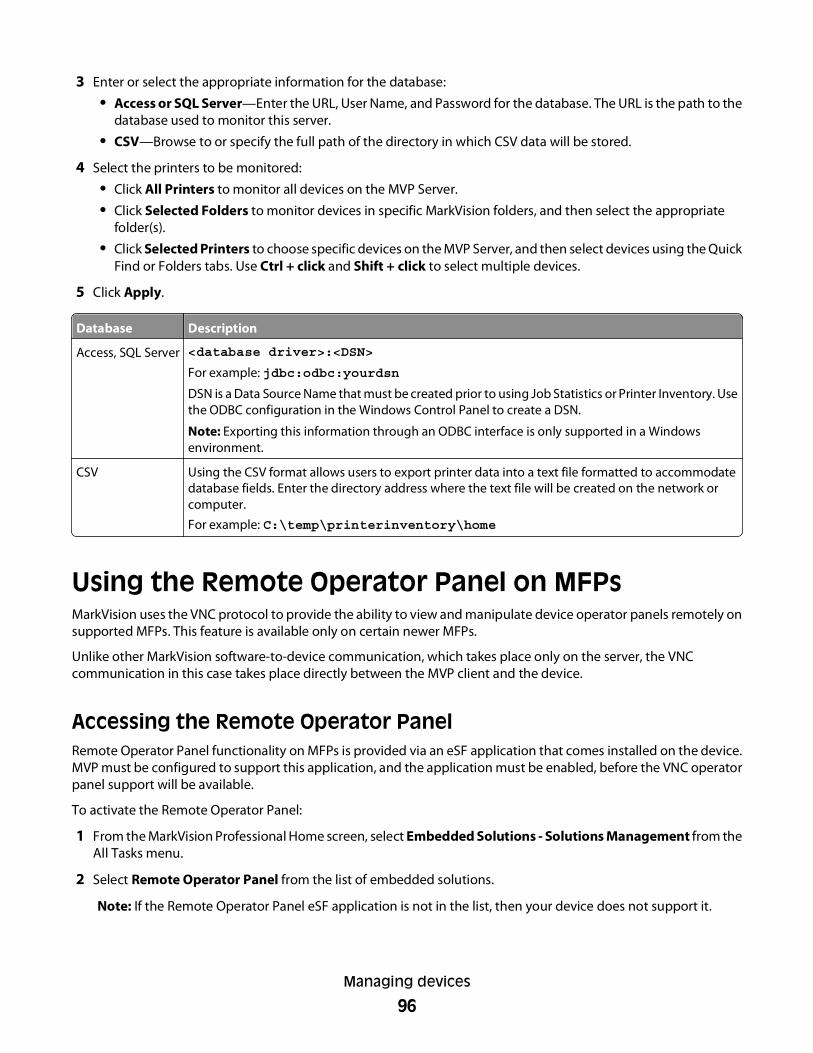
3 Enter or select the appropriate information for the database:
• Access or SQL Server—Enter the URL, User Name, and Password for the database. The URL is the path to thedatabase used to monitor this server.
• CSV—Browse to or specify the full path of the directory in which CSV data will be stored.
4 Select the printers to be monitored:
• Click All Printers to monitor all devices on the MVP Server.
• Click Selected Folders to monitor devices in specific MarkVision folders, and then select the appropriatefolder(s).
• Click Selected Printers to choose specific devices on the MVP Server, and then select devices using the QuickFind or Folders tabs. Use Ctrl + click and Shift + click to select multiple devices.
5 Click Apply.
Database Description
Access, SQL Server <database driver>:<DSN>
For example: jdbc:odbc:yourdsn
DSN is a Data Source Name that must be created prior to using Job Statistics or Printer Inventory. Usethe ODBC configuration in the Windows Control Panel to create a DSN.
Note: Exporting this information through an ODBC interface is only supported in a Windowsenvironment.
CSV Using the CSV format allows users to export printer data into a text file formatted to accommodatedatabase fields. Enter the directory address where the text file will be created on the network orcomputer.
For example: C:\temp\printerinventory\home
Using the Remote Operator Panel on MFPsMarkVision uses the VNC protocol to provide the ability to view and manipulate device operator panels remotely onsupported MFPs. This feature is available only on certain newer MFPs.
Unlike other MarkVision software-to-device communication, which takes place only on the server, the VNCcommunication in this case takes place directly between the MVP client and the device.
Accessing the Remote Operator PanelRemote Operator Panel functionality on MFPs is provided via an eSF application that comes installed on the device.MVP must be configured to support this application, and the application must be enabled, before the VNC operatorpanel support will be available.
To activate the Remote Operator Panel:
1 From the MarkVision Professional Home screen, select Embedded Solutions - Solutions Management from theAll Tasks menu.
2 Select Remote Operator Panel from the list of embedded solutions.
Note: If the Remote Operator Panel eSF application is not in the list, then your device does not support it.
Managing devices
96

3 Click Fetch Descriptor(s).
This installs the descriptor onto the MarkVision server.
Using the Remote Operator Panel
1 Select the device using the Quick Find or Folders tabs.
2 From the MarkVision Professional Home screen, select Operator Panel from the All Tasks menu.
3 Click Launch VNC Applet.
The Remote Operator Panel will open in a new browser window.
Note: If a VNC Authentication Page opens, click Click here to continue to access the Remote Operator Panel.
Managing destinations
Adding or editing destinationsMarkVision Professional’s destination management tasks provide the ability to more accurately manage thedestinations to which the devices on your network send information. MVP provides a destination management taskso you can easily add or edit specific destinations for each protocol that your network devices use to transmitinformation.
1 From the MarkVision Professional Home screen, select one of the three destination management tasks from theAll Tasks list.
Task Name Fields
Fax Destinations Fax Name, Fax number, Shortcut (If applicable)
E-mail Destinations Name, E-mail address, Format, Content, Color, Resolution, Shortcut (If applicable)
FTP Destinations Name, Server, Login, Password, Password confirmation, Path and filename, Format, Content,Color, Resolution, Shortcut (If applicable)
2 Select the devices that have destination types that you want to manage.
A table will appear on the right side of the screen displaying the existing destinations. If the selected devices haveno current destinations, the table will be empty.
3 Select a destination.
4 Click Add or Edit.
5 Type the information in the dialog, and then click OK.
6 Click Apply.
The new or edited destinations are updated for the selected devices.
Note: MVP does not support Add or Edit for profile destinations. You can only remove profile destinations inMVP.
Managing devices
97
Creating or editing destinations for device policiesYou can set specific destinations for print servers through the Device Policies task. To set destinations for print servers:
1 From the MarkVision Professional Home screen, select the Device Policies - Create/Manage from the All Taskslist.
2 Either create a new print server policy or edit an existing policy.
Note: When policies containing destinations are applied to devices that already contain destinations, the existingdevice destinations are deleted.
3 In the New Policy dialog, click For Any Print Server or Based On A Specific Device.
If you click Based On A Specific Device, select a print server from the Device Selection for New Policy dialog.
4 Expand the MFP folder.
5 Expand the Destinations folder.
Note: Add at least one destination to remove the warning icon, or the information will not be saved.
6 Click the check box next to the destination type that you want to edit, and then click Edit.
7 Edit the destination list accordingly.
8 Click Close to close the Destination Management dialog.
Removing destinations1 From the MarkVision Professional Home screen, select one of the four destination management tasks from the
All Tasks list:
• Email Destinations
• Fax Destinations
• FTP Destinations
• Profile Destinations
2 Select the devices with destination types you want to manage.
A table appears on the right side of the screen displaying the existing destinations. The table is empty if theselected devices have no destinations.
3 Select the destination(s) to remove.
4 Click Remove to remove the selected destinations, or select Remove All to remove all destinations.
Managing devices
98
Understanding device policies
Using device policies
Reasons to create a device policy• To enforce a standard configuration across a set of devices.
For example, Power Saver is set to Off and Printer Timeout set to 20 for all printers.
• To use multiple configurations for a device.
For example, create one device policy to set Toner Saver on with a low resolution for draft printing. Create anotherdevice policy where Toner Saver is set to off with high resolution for final document printing.
Tasks associated with device policies• Device Policies - Create/Manage—Create, edit, or remove a policy.
• Device Policies - Apply—Apply a policy to one or more specified devices.
• Device Policies - Check Conformance—Determine if selected devices are conforming to device policies.
• Scheduling—Specify days and times to automatically apply a policy or perform a conformance check.
Creating a device policy1 From the MarkVision Professional Home screen, select Device Policies - Create/Manage from the All Tasks list.
2 Click New to create a new device policy, or click Copy to copy the settings of an existing device policy.
3 If you selected New, select one of the following options:
• For Any Printer (empty printer policy)
• For Any Print Server (empty print server policy)
• Based On A Specific Device (policy derived from the actual settings of a known device)
4 Type a policy name.
5 Select or change settings, and then click OK.
6 Click Apply to save the policy.
Applying a device policyA device policy must be created before it can be applied.
1 From the MarkVision Professional Home screen, select Device Policies – Apply from the All Tasks menu.
2 From the device list, select the devices to update.
3 Select a device policy from the Device Policies list, and then click Apply Policy.
Managing devices
99
Checking device policy conformanceThe Device Policies - Check Conformance task displays selected device settings in comparison with its applied devicepolicy.
1 From the MarkVision Professional Home screen, select Device Policies - Check Conformance from the All Taskslist.
2 Select the device you want to check for policy conformance.
3 Select a policy from the Device Policies list.
4 Click Check Device Conformance.
Results of the conformance check will appear in the field beneath the Check Device Conformance button.
Note: To see a side-by-side comparison of device settings and policy settings, with differences highlighted in red,right-click any difference noted in the policy conformance results (displayed in red), and then click Details.
Scheduling device policiesSchedule policy applications to multiple devices to provide updates such as daily default resets or deviceconformance.
1 From the MarkVision Professional Home screen, select Scheduling from the All Tasks list.
2 Click Add.
3 Select Device Policy: Check Conformance or Device Policy: Apply, and then click Next.
4 Schedule a date and time for the update, and then click Next.
5 Select a device policy from the Device policy box, and then click Next.
Note: You may select Apply policy automatically if devices are out of conformance.
6 Select discovered devices from the device folders window, or use the Quick Find feature to locate new devicesand place them in the Selected Printers window using the > button.
7 Click Finish.
Downloading generic filesMarkVision Professional allows users to download miscellaneous files from the MarkVision Server to one or moredevices on a network, allowing the instant distribution of various file types including universal configuration files(UCF), to any devices that MVP manages. Use the Schedule task to automate file downloads at predetermined times.
1 From the MarkVision Professional Home screen, select Generic File Download from the All Tasks list.
2 Select the file(s) to download from the list of available files on the MarkVision Server.
To add files (if necessary) from another location, click Load, and then browse for the file(s).
3 Click the > button to move the files to the file table.
4 Select a file location from the Target Location list.
Click Remove to remove the selected file(s) from the list.
5 Specify the directory name in the Remote Directory column.
Managing devices
100
6 Click Next, and then select the device(s).
7 Click Finish to download the selected file(s).
Note: The Generic File Download and Printer Resource tasks will not be available when the Printer Lockdown optionis enabled.
Managing resourcesUse the Resource Management task to upload resources files such as fonts and overlays to the MarkVision Server.Distribute these files to network devices equipped with hard disks or Flash SIMMs. Resource Management is capableof handling complex formatting for fonts and overlays.
The following fonts and types are supported: PCL Bitmap (SFP), True Type (TTF), Type 1 (PFB). The following overlaysare supported: PCLXL, PS, and PCL5.
Uploading resource files to MarkVision Server1 From the MarkVision Professional Home screen, select Resource Management from the All Tasks list.
2 From the Resources folder, select the folder of the font or overlay type.
3 Click Upload to browse for the resource file(s).
Note: To upload multiple files simultaneously, use Ctrl + click to select multiple files.
4 Click Load to load the file into the appropriate Resource Management folder.
5 Click Close.
Removing resource files from the MarkVision Server1 From the MarkVision Professional Home screen, select Resource Management from the All Tasks list.
2 On the left side of the dialog, select the folder that contains the file(s) that you want to remove.
3 Select files for removal from the Resource Management table.
You can select multiple files using Ctrl + click.
4 Click Remove.
5 To remove all files listed in the table, click Select All, and then click Remove.
Downloading resource files to selected devices1 From the MarkVision Professional Home screen, select Resource Management from the All Tasks list.
2 Select the folder that contains the file(s) to distribute to selected devices.
3 Select the file(s) to distribute to the devices.
Select multiple files by using Ctrl + click.
4 Click Send to Printer.
The Send to Printer Wizard opens.
Managing devices
101
5 Select the device(s) with hard disks or existing device folders.
If necessary, use a filter to find supported devices.
6 Use the > button to transfer the printers with a hard disk to the Selected Printers window.
Note: Only printers with a hard disk may be selected.
7 Click Next.
8 Select the device(s) with flash memory or existing device folders.
If necessary, use a filter to find supported devices.
9 Use the > button to transfer printers with flash memory to the Selected Printers window.
Note: Only printers with flash SIMM memory may be selected.
10 Click Finish to begin the download.
Installing and removing plug-insDownload and install new MVP plug-ins on a MarkVision Server for added device or functional support. The plug-insmay contain downloadable client components. Relevant client information downloads to your workstation whenyou log in to the MarkVision Server.
1 From the MarkVision Professional Home screen, select Software Update (Manage PlugIns) from the All Taskslist.
A dialog appears, listing installed plug-ins.
Note: Select a plug-in, and then click Remove to uninstall it. The plug-is removed from the server and the client.The uninstall script on the server and the client determines if a restart is necessary.
2 If no plug-ins are listed, download updates from the MarkVision Professional Web site atwww.markvisionprofessional.com.
3 Click Install New.
A dialog appears.
4 Select and install a plug-in from the directory.
5 The MVP message window (located at the bottom of the MarkVision Professional Home screen) announces theplug-in(s) installation status:
• If the selected plug-in has previously been installed, you will be informed that the plug-in is already installed.
• If the selected plug-in is older than the one that is currently installed, the current plug-in will need to beuninstalled before the older version can be installed.
• If an earlier version of the selected plug-in is already installed, you may upgrade the existing plug-in.
After a plug-in has been installed on the server, the MVP Client receives information on the plug-in versions that havebeen installed and details on which plug-ins contain downloadable client components. If new client componentsare available, the client determines if the server and client are compatible and then automatically downloads theclient component of any plug-ins that it does not already have.
Note: If the client and server are not compatible because the client contains a component that the server does nothave, a warning message is issued and any incompatible client components are removed.
Managing devices
102
Managing bookmarks
Using bookmarksThe Bookmark Management task lets the user create and save printer bookmarks in the permanent memory of aprinter. A printer bookmark is a link to a document that is stored on a Web server or the Internet. When a bookmarkis called from the BOOKMARKS menu on a the operator panel of a supported printer, the document the bookmarkpoints to is printed. Bookmarks also store important information about how document(s) are to be printed.
Existing bookmarks may also be loaded into the Bookmark Management task to be organized in folders and thendistributed to supported printers across the network. Multiple bookmarks can then be saved as a configuration fileallowing the distribution of bookmark sets to devices with a single action.
Use the Bookmark Management task to:
• Protect a bookmark or folder with a Personal Identification Number (PIN).
• Load bookmarks from a printer using an IP address or host name.
• Set or change bookmark properties including: name, URL, and available print settings such as duplex, orientation,and copies.
Note: When you are adjusting the print attributes of a bookmark, the Multi-page Printing (N-UP) setting behaves asfollows:• If the device is set to print multiple pages on a single sheet of paper, a 1-UP setting in MarkVision Professional
will not overwrite the printer settings.
• However, if the device is set to print 1-UP, a multi-page N-UP setting in MarkVision Professional will overwrite theprinter settings.
Creating bookmark foldersThe BOOKMARKS default root folder stores all bookmarks and bookmark folders.
1 From the MarkVision Professional Home screen, select Bookmark Management from the All Tasks list.
2 Click the Add a folder icon at the top of the Bookmark Management dialog.
3 Type a folder name up to 25 characters in length.
Notes:
• To enable optional access protection for the bookmark folder, assign a four-digit numeric PIN number to thefolder. After a PIN is established, PIN entry is required to access the folder contents.
• The root BOOKMARKS folder cannot be PIN protected.
4 Click OK.
5 Click Close to exit the Bookmark Management dialog.
Creating a new bookmark1 From the MarkVision Professional Home screen, select Bookmark Management from the All Tasks list.
2 Select a folder location for the bookmark.
Managing devices
103
3 Click the Add a bookmark icon located at the top of the Bookmark Management window.
The Bookmark Properties dialog opens.
4 Under the Bookmarks tab, enter the bookmark name and the URL location for the corresponding document.
You may assign a four-digit numerical PIN to the bookmark. PIN entry will be required to print the bookmark.
5 Verify that the settings listed under the remaining tabs are appropriate for the document.
6 Click OK to create the bookmark.
7 Click Cancel to stop the bookmark creation.
8 Click Close to exit the Bookmark Management dialog.
Note: When you are adjusting the print attributes of a bookmark, the Multi-page Printing (N-UP) setting behaves asfollows:
• If the device is set to print multiple pages on a single sheet of paper, a 1-UP setting in MarkVision Professionalwill not overwrite the printer settings.
• However, if the device is set to print 1-UP, a multi-page N-UP setting in MarkVision Professional will overwrite theprinter settings.
Saving bookmarksOnce a bookmark or set of bookmarks has been created or loaded, it can be saved to a file that can be stored on acomputer or a printer hard disk drive for future use.
1 From the MarkVision Professional Home screen, select Bookmark Management from the All Tasks list.
Select the folder or bookmark that you want to save. Selecting a folder for this operation will save all foldercontents.
2 Click Save.
• If saving the bookmark(s) to a file, select the To File radio button, and then enter the file path in the spaceprovided or click Browse to find the file location.
• If saving the bookmark(s) to a printer, select the To Printer radio button, and then select either the QuickFind or Folders tab to locate the appropriate printer.
3 Use the > button to add the correct printer(s) to the Selected Printers window.
4 Click OK.
5 Click Close to exit the Bookmark Management dialog.
Loading existing bookmarksBookmarks may be loaded from either an existing file or printer memory. Once the Load Bookmark dialog has beenopened, the option to either Browse for a specific file or select a specific printer is provided.
1 From the MarkVision Professional Home screen, select Bookmark Management from the All Tasks list.
2 Select a folder location for the bookmark.
3 Click Load.
Managing devices
104
The Load Bookmark dialog opens.
• If loading a bookmark from a file, select the From File radio button, then enter the file path in the spaceprovided, or click Browse to find the file location.
• If loading a bookmark from a printer, select the From Printer radio button, then select either the QuickFind or Folders tab to locate the printer.
4 Click OK to load the bookmark.
Click Cancel to stop loading the bookmark.
5 Click Close to exit the Bookmark Management dialog.
Deleting bookmarksThe Bookmark Management task is only an interface through which bookmarks may be manipulated for other devicesand locations. As a result, deleting a folder or bookmark through this process only removes the selected item(s) fromthe interface, not from the saved location of the file.
1 From the MarkVision Professional Home screen, select Bookmark Management from the All Tasks list.
2 Load the folder or bookmark set that contains the bookmark(s) that you want to delete.
3 Select the folder or bookmark that you want to delete.
Note: Selecting a folder for this operation will delete all folder contents.
4 Click the Delete Folder/Bookmark icon at the top of the Bookmark Management dialog.
The Confirm Removal dialog opens.
5 Click Yes to delete the selected items.
6 Click Save confirm the bookmark deletion.
7 Click Close to exit the Bookmark Management dialog.
Changing bookmark folder propertiesUsing Bookmark Management, users can edit characteristics for a bookmark or folder, such as folder name or PINnumber, bookmark name, URL, and PIN access number. This function also allows users to change the Page Layout,Paper, and HTML/PDF print attributes for bookmark documents.
Note: The Bookmark Management task is only an interface through which bookmarks may be manipulated for otherdevices and locations. As a result, any changes to the properties of a folder or bookmark will not be permanent untilthe file is saved.
1 From the MarkVision Professional Home screen, select Bookmark Management from the All Tasks list.
2 Load the folder or bookmark set that contains the bookmark(s) for edit.
3 Select the folder or bookmark.
If the correct bookmark is not already listed, reload it.
4 Click the Modify properties of selected item icon at the top of the Bookmark Management dialog box.
Managing devices
105
5 Edit the appropriate fields.
6 Click OK.
Note: When you are adjusting the print attributes of a bookmark, the Multi-page Printing (N-UP) setting behaves asfollows:
• If the device is set to print multiple pages on a single sheet of paper, a 1-UP setting in MarkVision Professionalwill not overwrite the printer settings.
• However, if the device is set to print 1-UP, a multi-page N-UP setting in MarkVision Professional will overwrite theprinter settings.
Wireless
Supporting wireless print serversMVP offers support for several wireless devices. MVP offers a WLAN task and a WLAN device policy option to:
• Set up and edit wireless settings for supported print servers attached to the network, and then transfer the settingsto the supported devices.
• Support wireless configurations for both Ad Hoc and Infrastructure Basic Service Set (BSS) modes, as well as WEPand WPA-PSK security modes.
Notes:
• See the Release notes for a complete list of the printers and print servers supported by MVP.
• For security modes that utilize CA certificates as part of an authentication mechanism, an additional task calledInstall CA Certificate is available in the All Tasks list to install CA Certificates on devices.
Creating a WLAN device policy1 From the MarkVision Professional Home screen, select Device Policies — Create/Manage from the All Tasks list.
2 Click New.
3 Select For Any Print Server, and then click Continue.
4 From the Print Server Policy area, expand the WLAN folder.
5 Enter the SSID, BSS Type, Channel, and Wireless Security Mode for the device.
For more information on your wireless settings, see your wireless network documentation.
6 Enter the appropriate authentication or encryption information for the wireless security mode that you selectedby expanding the WEP or WPA folders under WLAN.
7 Click Apply.
Managing devices
106
Configuring wireless settings for multiple devicesThe WLAN task provides the ability to configure the wireless settings on multiple devices simultaneously. If multipledevices are selected for use with this task, make sure that only the values that are shared by all of the selected devicesare changed. Some settings are specific to one device and changing them can disrupt wireless communication forthat device.
1 From the MarkVision Professional Home screen, select WLAN from the All Tasks list.
2 Select the device(s).
3 Enter the SSID, BSS Type, Channel, and Wireless Security Mode for the device.
For more information on the wireless settings, see your wireless network documentation.
4 Enter the appropriate authentication or encryption information for the wireless security mode that you selected.Some wireless security modes require certificates to work properly.
5 To install the appropriate certificates, go to the print server Embedded Web Server or use the Install CA Certificatetask.
Note: You can access the Embedded Web Server by clicking Web Page (Print Server) in the All Tasks list on theMVP Home screen.
6 Click Apply.
Using print queues
Managing queuesCreate and remove Windows print objects (queues) on host computers that utilize Windows-based platforms. Queuemanagement utilizes two tasks to manage print objects:
• Create Windows Print Objects—Create Windows print queues on multiple host computers simultaneously.
Note: In order to create print objects on remote host computers (computers on which an instance of theMarkVision Server is not running), the MarkVision Server must first be configured to perform the necessarynetwork operations.
• Remove Windows Print Objects—Remove print queues from host devices.
Configuring the MarkVision Server for WindowsTo create print objects on remote host computers, the MarkVision Server service for Windows must be configuredto run in the context of a valid administrative user ID and password. This allows the MarkVision Server service toperform network operations such as listing the existing print objects and drivers that reside on other computers.
Note: This step only needs to be performed once on each MarkVision server.
1 Click or Start.
2 Click Control Panel.
3 Double-click Administrative Tools.
4 Double-click Services.
5 From Services, right-click MarkVision Server, and then select Properties.
Managing devices
107
6 Click the Log On tab.
7 Click This account.
8 Type the user ID and password for an administrative account.
Creating print queuesTo create print queues on selected computers:
1 From the MarkVision Professional Home screen, select Create Windows Print Objects from the All Tasks list.
2 Select devices using the Quick Find or Folders tabs.
3 Click > to move the printers to the Selected Printers window, and then click Next.
4 In the Domains and Workgroups list, select the domain of the computers you want to create print queues on.
5 In the Server(s) list, select the host servers that you want to create print queues on.
Click > to transfer the computers to the Selected Servers window.
Note: Each domain can list several computers. To create print queues on host computers under differentdomains, repeat steps 4 and 5. Select different domains with each pass until all of the desired host computersare present in the Selected Computers window.
6 Type a network administrator user ID and password.
Notes:
• For each selected computer, you must supply a network administrator user ID and password. This allows MVPto create the print queues on host computer(s).
• If you are using the Windows XP or Windows Vista operating systems, and the network administrator accountdoes not include a password, see “Windows XP administrator accounts without passwords” on page 109.
7 In the queue management wizard, select the printers that you want to create queues for. Locate the printersusing the Quick Find or Folders tabs.
8 Select the type of print object that you want to create on the host computer.
Note: MVP will attempt to locate and match the type of print object that is selected with the appropriate deviceand drivers by name comparison.
9 Click Next.
10 Verify that the print queue information is correct for each host computer in the queue creation table. If the defaultsettings are incorrect, select the table entry, and then modify each of the fields in the dialog box below the table.
11 Click Select to open the Print Driver dialog.
12 Select a driver source.
13 Select a driver from the list, and then click OK.
If the driver is not included in the list:
a Make sure the MarkVision Server radio button is selected as the driver source.
b Click Add, browse to the driver, and then click OK.
c Select the driver from the list, and then click OK.
Managing devices
108
14 To remove a print object from the list to be created, select the table entry that contains the print object you wantto remove, and then click Remove.
15 Click Apply to save any changes, and then click Finish.
Removing print queues1 From the MarkVision Professional Home screen, select Remove Windows Print Objects from the All Tasks list.
2 Select the domain of the host server.
3 Select the host server that contains the print queue.
Use the > button to add the server to the Selected Servers box.
4 Enter a network administrator user ID and password.
5 Click Next.
6 Select the print queue or queues to remove from the list of print objects present on the system.
7 Click Finish.
Windows XP administrator accounts without passwordsIn most cases, when selecting a server using either the Create Windows Print Objects task or the Remove WindowsPrint Objects task, an administrator account user name and password for that specific computer must be entered. Ifthe administrative account that is used to complete this process does not include a password, or if use of anadministrative account without a password is preferred, the following procedure must be completed on the targetcomputer.
1 Click or Start.
2 Click Control Panel.
3 Double-click Administrative Tools.
4 Double-click Local Security Policy.
5 From the Local Policies folder, select Security Options.
6 In the Policy column, double-click Accounts: Limit local account use of blank passwords to console logononly.
7 Change the value to Disabled, and then click OK.
Managing devices
109
Configuring TCP/IP port access settingsYou can enable or disable access to each TCP/IP port.
1 From the MarkVision Professional Home screen, select TCP/IP Port Access from the All Tasks list.
2 Select devices using the Quick Find or Folders tabs.
Use Ctrl + click and Shift + click to select multiple devices.
Note: When a device managed by MVP is not supported by a specific task, its name will appear with a black linethrough it in the Quick Find or Folders tabs. Password-protected network devices are displayed in red. Enter thedevice password to gain access to the device.
3 Enable or disable access to TCP/IP ports as necessary.
Note: The ports marked with double-asterisks control basic device functions, including communication with theMarkVision Server. Use caution when modifying.
4 Click Apply to save changes, or click Undo to cancel changes.
Formatting storage devicesYou can use the Storage Devices task to format a device hard disk or flash memory.
1 From the MarkVision Professional Home screen, select Storage Devices from the All Tasks list.
2 Select the device(s).
3 Click the Format icon for either the hard disk or the flash memory.
Warning—Potential Damage: This action erases all files on the selected storage device.
Upgrading print server firmwareOccasionally, the flash memory for print servers must be updated. For example, Customer Support may recommenda firmware upgrade to solve a network printer problem. Use MVP to flash multiple supported print serverssimultaneously.
1 Download the latest flash files from the MarkVision Professional Web site: www.markvisionprofessional.com.
All supported firmware (flash) files are available free of charge.
2 From the MarkVision Professional Home screen, select the Firmware Download (Print Server) task from the AllTasks list.
3 Select the print servers you want to update.
Note: MVP will associate firmware files by their extension to specific model types.
4 Click New File to add new files to the MVP list of downloadable firmware files (for example, files that you havedownloaded).
5 Click Start to begin the upgrade process.
Warning—Potential Damage: The print server may be damaged if it is turned off or reset during a firmware flash.Use the Scheduling task to perform flash operations at night, on holidays, or at other times when printer traffic isvery light.
Managing devices
110
Scheduling tasksSchedule tasks such as Device Discovery or Generic File Download on a specific day at a specific time. Each task canhave multiple schedules.
Note: Some scheduled events require additional setup before you enter the Scheduling task. For example, beforescheduling a device discovery, you must configure a discovery profile using the Device Discovery task.
1 From the MarkVision Professional Home screen, select Scheduling from the All Tasks list.
2 Click Add.
3 Select an event type to schedule, and then type a description.
4 Click Next.
5 Select a date and time, and then click Next.
Note: Other tabs will allow you to enter parameters specific to this scheduled event such as database type andpolicy name.
6 Click Finish.
The scheduled event appears in the calendar window of the Scheduling task.
Viewing diagnostic information for a deviceThrough its Diagnostics tools, MVP provides users with the ability to view and/or save various diagnostic reports forsupported devices. These reports can aid technical support staff in diagnosing problems with devices.
1 From the MarkVision Professional Home screen, select one of the following tasks from the All Tasks list:
• Menus Page—View and/or save a copy of the menu settings list for a device.
• Meters/Counters—View and/or save a copy of the meters and counters data for a device. Examples includescan activity and supply status, among others.
Note: The Meters/Counters tool provides approximate meter and counter data for a device and should thusnot be used for billing or accounting purposes.
• Configuration Page—View and/or save a copy of the configuration settings list for a device. Examples includesize sensing settings and energy conservation configuration, among others.
• Diagnostics Page—View and/or save a copy of the diagnostic settings list for a device. Examples includepage registration and EP setup, among others.
• Event Log—View and/or save a copy of critical events for a device. Examples include paper jams and firmwareupdates, among others.
Note: Select Summary or Complete to specify the level of detail shown in the Event Log.
2 Select devices using the Quick Find or Folders tabs.
Use Ctrl + click and Shift + click to select multiple devices.
Note: When a device managed by MVP is not supported by a specific task, its name will appear with a black linethrough it in the Quick Find or Folders tabs. Password-protected network devices are displayed in red. Enter thedevice password to gain access to the device.
3 Click Save to save a copy of any of the above diagnostics reports.
The Meters/Counters report is saved as an XML file; the other reports are saved as HTML files.
Managing devices
111
Checking printer statusMVP provides a number of tasks that present a read-only view of printer information in the View and Features menus.In particular, you may wish to select one of the following from the View menu:
• Status of Printer
• Supplies
• MFP Status
• Picture of Printer
• Page Counts
• Operator Panel LCD
• Map
• Custom Tables
• Custom Views
Viewing the Embedded Web Server for a device1 From the MarkVision Professional Home screen, select Web Page (Print Server) from the All Tasks list.
2 Select the appropriate print server, and then click Launch.
If the selected printer supports an Embedded Web Server, it appears in a separate browser window.
Note: Not all print servers support Embedded Web Servers.
Changing printer settingsMarkVision provides a large number of tasks to configure specific types of settings on devices. These are generallyavailable under the Settings menu, organized by category (for example, Network or Printer). You may also selectthese tasks from the All Tasks list.
1 Change printer settings by selecting the item you want to change.
2 Select one or more printers, and then do any of the following:
• Change the settings appropriately.
• Create a device policy to coordinate multiple settings and save them as a unit.
• Apply the policy to one or more devices at a time, or save it for future use.
Monitoring printer suppliesThere are several methods you can use to monitor printer supplies.
• Create a folder to monitor supplies:
1 Select Folder Configuration from the All Tasks list.
2 Create a folder with a filter based on the status criteria you are interested in.For example, create a folder named All Status Errors and Warnings, and configure the filter to display onlythose devices containing status errors or warnings. The folder content dynamically changes as devicescommunicate filter related criteria.
Managing devices
112
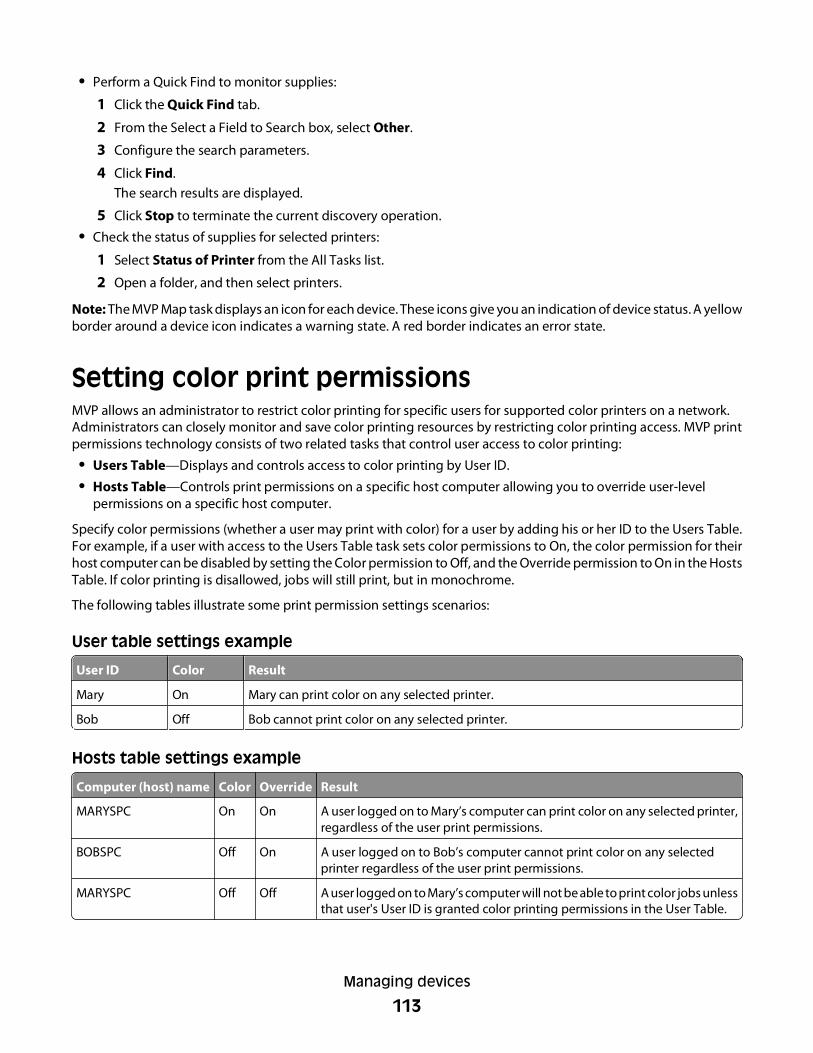
• Perform a Quick Find to monitor supplies:
1 Click the Quick Find tab.
2 From the Select a Field to Search box, select Other.
3 Configure the search parameters.
4 Click Find.The search results are displayed.
5 Click Stop to terminate the current discovery operation.
• Check the status of supplies for selected printers:
1 Select Status of Printer from the All Tasks list.
2 Open a folder, and then select printers.
Note: The MVP Map task displays an icon for each device. These icons give you an indication of device status. A yellowborder around a device icon indicates a warning state. A red border indicates an error state.
Setting color print permissionsMVP allows an administrator to restrict color printing for specific users for supported color printers on a network.Administrators can closely monitor and save color printing resources by restricting color printing access. MVP printpermissions technology consists of two related tasks that control user access to color printing:
• Users Table—Displays and controls access to color printing by User ID.
• Hosts Table—Controls print permissions on a specific host computer allowing you to override user-levelpermissions on a specific host computer.
Specify color permissions (whether a user may print with color) for a user by adding his or her ID to the Users Table.For example, if a user with access to the Users Table task sets color permissions to On, the color permission for theirhost computer can be disabled by setting the Color permission to Off, and the Override permission to On in the HostsTable. If color printing is disallowed, jobs will still print, but in monochrome.
The following tables illustrate some print permission settings scenarios:
User table settings example
User ID Color Result
Mary On Mary can print color on any selected printer.
Bob Off Bob cannot print color on any selected printer.
Hosts table settings example
Computer (host) name Color Override Result
MARYSPC On On A user logged on to Mary’s computer can print color on any selected printer,regardless of the user print permissions.
BOBSPC Off On A user logged on to Bob’s computer cannot print color on any selectedprinter regardless of the user print permissions.
MARYSPC Off Off A user logged on to Mary’s computer will not be able to print color jobs unlessthat user's User ID is granted color printing permissions in the User Table.
Managing devices
113
Managing embedded solutions inMarkVision Professional
Understanding embedded solutions and solutiondescriptorsMVP includes built-in support for many embedded solutions and supports additional solutions by fetching andinstalling solution descriptors. Solution descriptors are XML files that are installed on the MVP Server. They areincluded with each embedded solution and describe to MVP which configurations options are available in eachsolution.
Installing a solution descriptor to the MVP Server is necessary only if you intend to deploy a particular embeddedsolution to other devices. If you do not intend to manage an embedded solution using MVP, it is not necessary toinstall its descriptor file.
MarkVision Professional uses FTP to install eSF applications on devices. If the FTP operation succeeds, MVP will reportthat the application installed successfully. However, though communication with the device via FTP was successful,the actual installation of the eSF application may have failed. This can happen because of a licensing issue or becausea solution is not compatible with a particular device. When using MVP to deploy an eSF application to multiple devices,you should first test the deployment process on a single device to ensure it works correctly.
Viewing installed solutionsTo view all the solutions installed on a device:
1 From the MarkVision Professional Home screen, select Embedded Solutions - Solutions Management from theAll Tasks list.
2 Select the device(s).
If one device is selected, then all solutions installed on that device are listed. If multiple devices are selected, thenthe list of solutions that MVP can manage, including those whose solution descriptors have been installed in MVP,are listed.
Managing embedded solutions in MarkVision Professional
114
Installing embedded solutionsMVP will test files selected for installation to determine if they are not solutions (for example, firmware update files).MVP will display a warning that the file may not be a solution and advise the user that any files sent to the device willbe processed. MVP 11.2.1 will allow the user to either cancel the installation and choose another file, or send the fileto the device(s) anyway.
Step 1: Installing the solution descriptorUse one of the following methods to install a solution descriptor on the MVP Server:
Method one
1 From the MarkVision Professional Home screen, select Embedded Solutions - Solutions Management from theAll Tasks list.
2 Select a device using the Quick Find or Folders tabs.
Note: When a device managed by MVP is not supported by a specific task, its name will appear with a black linethrough it in the Quick Find or Folders tabs. Password-protected network devices are displayed in red. Enter thedevice password to gain access to the device.
3 If the embedded solution you wish to install on the MVP Server is already installed on the device, select theembedded solution from the list.
4 Click Fetch Descriptor(s). This will read the solution descriptor from the device if this method is supported bythe device. If it is not, a dialog will open so that you can browse to the file to be installed.
Method two
1 From the MarkVision Professional Home screen, select Embedded Solutions - Solutions Management from theAll Tasks list.
2 Select a device using the Quick Find or Folders tabs.
Note: When a device managed by MVP is not supported by a specific task, its name will appear with a black linethrough it in the Quick Find or Folders tabs. Password-protected network devices are displayed in red. Enter thedevice password to gain access to the device.
3 Click Manage Descriptors.
4 Click Add.
5 Select a solution descriptor from the Open dialog.
6 Click Open.
Notes:
• The installed solution descriptor appears in the Plug-ins/Solutions on Server box. The solution descriptordetails appear in the Details box.
• If the descriptor file is not valid, MVP will display an error message.
7 Click Close.
Managing embedded solutions in MarkVision Professional
115
Step 2: Installing an embedded solutionAfter the solution descriptor file is installed in MVP, install the associated embedded solution file on the selecteddevice(s):
1 From the MarkVision Professional Home screen, select Embedded Solutions - Solution Management from theAll Tasks list.
2 Find and select the device(s) on which the solution will be installed.
MVP displays the embedded solutions available for deployment on selected device(s) in the configurable area ofthe screen. When solutions which are configurable via MVP are selected, the Solution Specific Actions windowdisplays Import and Export buttons. If a selected solution is not configurable, the Solution Specific Actions windowdisplays a message referring the user to further information.
3 Click Install.
4 Browse to the appropriate folder, and then select the solution file.
Note: Embedded Solutions flash files typically have an .fls extension.
5 Select the solution file, and then click Add.
Uninstalling Embedded Solutions
Step 1: Uninstalling an embedded solutionIf an embedded solution is no longer necessary, uninstall it from the device(s):
1 From the MarkVision Professional Home screen, select Embedded Solutions - Solutions Management from theAll Tasks list.
2 Select the device on which the solution is installed.
3 Select a solution to uninstall.
4 Click Uninstall.
5 Click Yes.
Step 2: Uninstalling the solution descriptorIf an embedded solution is no longer necessary, you can uninstall the solution descriptor, and then uninstall theassociated solution file. However, after a solution descriptor is removed, the associated solution cannot be managedon any devices through MVP. Solution descriptors consume very little memory on the MarkVision Server and do notaffect system performance, so do not remove descriptors unless you are certain you will not need to manage theassociated solution in MVP in the future.
To uninstall a solution descriptor file:
1 From the MarkVision Professional Home screen, select Embedded Solutions - Solutions Management from theAll Tasks list.
2 Click Manage Descriptors.
3 Select the solution descriptor file to be removed from the Plug-ins / Solutions list
Managing embedded solutions in MarkVision Professional
116
4 Click Remove.
5 Click Close.
Configuring the Embedded Solutions FrameworkThe Framework Management task allows the configuration of the Embedded Solutions Framework on enableddevices:
1 From the MarkVision Professional Home screen, select Embedded Solutions - Framework Management fromthe All Tasks menu.
2 Select a device.
3 Enter the appropriate information.
Configuration settingsConfigure framework settings:
• HTTPS Proxy Server—Configure the proxy server IP for embedded solutions using third party software.
• HTTPS Proxy Port—Configure the proxy port.
• No Proxy For—Configure a list of host names for which a proxy server is not required.
Note: When multiple devices are selected, the configuration changes are applied to all selected devices.
Network License settingsNote: Embedded solutions can be licensed either through a license server (a separate computer running alicense server), or they can be licensed on a per-node basis. In the former case, the Network License settingsare relevant, as they configure the eSF framework on the printer to point to the license server. In the latter case,the license info for the solution must be configured in the Manage Solutions task. For more information onlicenses, see “Installing or upgrading a license” on page 118.
Configure network licensing for embedded solutions on the devices:
• Server—Configure the IP address of the license server.
Note: Specify up to three license servers. The server information is optional and is only used for more thanone server.
• Port—Configure the socket port information for the license server.
Note: Each license server should have a corresponding license port.
• Heartbeat Period—Specify in number of minutes the time required to communicate with the server.
• Number of Retries—Specify the maximum number of attempts.
4 Click Apply to save, or click Undo to clear the information.
Managing embedded solutions in MarkVision Professional
117
Configuring solutionsThe Solutions Management task allows you to configure solutions on a single device or on multiple devices at once.Like many tasks in MVP, this works differently if more than one device is selected. If one device is selected, the solutionscurrently installed on that device will be listed. If more than one device is selected, all solutions that the MVP Serverknows—that is, those either supported natively or with a plug-in, or those for which solution descriptors havepreviously been installed—will be listed. Thus, by selecting multiple devices, you can configure the same solutionon more than one printer at once. Attempts to configure solutions not installed on selected devices will result inerrors being reported in MVP's Message Window.
To configure embedded solutions in MVP:
1 From the MarkVision Professional Home screen, select Embedded Solutions - Solutions Management from theAll Tasks list.
2 Select devices using the Quick Find or Folders tabs.
Use Ctrl + click and Shift + click to select multiple devices.
Note: When a device managed by MVP is not supported by a specific task, its name will appear with a black linethrough it in the Quick Find or Folders tabs. Password-protected network devices are displayed in red. Enter thedevice password to gain access to the device.
All installed embedded solutions appear.
3 Select a solution.
Note: The “Solution-specific actions” block will be populated with buttons appropriate to the selected solution(s) on the selected device(s). If no configuration options are available for a single solution the following messageappears: This solution is not configurable using MarkVision Professional. In this caseeither a solution descriptor or a custom plug-in for this solution may be available from the MarkVision ProfessionalWeb site.
4 Click Configure.
The Configure dialog appears.
5 Change the settings as desired, and then click OK to apply the settings to the selected device(s) or click Cancelto exit the dialog.
Licensing embedded solutions
Installing or upgrading a licenseMVP enables license installation for an embedded solution for single or multiple devices. Licensing is restricted todevices that support the Embedded Solutions Framework, or have the embedded solution installed.
1 From the MarkVision Professional Home screen, select Embedded Solutions - Solutions Management from theAll Tasks list.
2 Select the device(s).
All installed solutions appear.
3 Select the solution that requires a license.
4 Click Update License.
Managing embedded solutions in MarkVision Professional
118
5 Select Use a local license file from the Update License dialog.
6 Browse for the appropriate file, and then click Add.
Note: Licensing is solution-specific; some solutions may not require licenses.
7 Click Update License to update or Cancel. A status message appears.
Obtaining host IDsObtain a host ID from the device(s), and then place them in a specified file for use in licensing your eSF applications.The content and format of host IDs are determined by eSF-enabled devices. The Get Host ID task is restricted todevices that support any version of the Embedded Solution Framework.
1 From the MarkVision Professional Home screen, select Embedded Solutions - Get Host ID from the All Tasks list.
2 Select the device(s).
3 Click Browse from the Save Host IDs to File box.
4 Select a file in the Save Host ID dialog, give it a .txt file extension if necessary, and then click Open.
Note: If an existing file is selected, specify whether to overwrite the file.
5 Click Open.
Note: The Host ID file can be viewed with Notepad.
Starting a solutionStart an embedded solution to refresh the values of the solution.
1 From the MarkVision Professional Home screen, select Embedded Solutions - Solutions Management from theAll Tasks menu.
2 Select the device(s).
3 Select one or more solutions from the list.
4 Click Start.
5 Select Yes from the confirmation message.
Stopping a solutionStop an embedded solution to refresh the values of the solution.
1 From the MarkVision Professional Home screen, select Embedded Solutions - Solutions Management from theAll Tasks menu.
2 Select the device(s).
3 Select one or more solutions from the list.
4 Click Stop.
5 Select Yes from the confirmation message.
Managing embedded solutions in MarkVision Professional
119
Viewing embedded solutions featuresTo view the details of an embedded solution such as configuration, licensing, and general information:
1 From the MarkVision Professional Home screen, select Embedded Solutions - Features from the All Tasks list.
2 Select the device.
The features appear in tabular format. Additional tables will appear for every installed solution descriptor. Forselected devices which do not have a particular solution installed, the columns for that solution will be empty.
Importing and exporting solutionsThe settings of some Embedded Solutions can be exported to a file or imported to a device. The Import and Exportbuttons are solution specific, and appear only when they are supported. If Import is supported by a solution, thesolution settings can be imported into a device. Export allows the settings for a device to be saved to a file for importinto the same solution on another device.
1 From the MarkVision Professional Home screen, select Embedded Solutions - Solutions Management from theAll Tasks list.
2 Select the device(s).
3 Select the appropriate solution.
4 Click Import or Export.
a If you clicked Import, browse and select the appropriate .xml file from the Choose file dialog, and then clickAdd.
b If you clicked Export, name the file, and then select Save.
Creating an embedded solution device policyCreate a device policy that is specific to an embedded solution.
1 From the MarkVision Professional Home screen, select Device Policies - Create/Manage from the All Tasks list.
2 Click New.
3 Select For Any Printer from the New Policy dialog, and then click Continue.
4 Type a policy name in the Name box.
Note: You may add comments in the Comment box.
5 Edit the settings for the embedded solutions that are available on the selected device from the EmbeddedSolutions folder.
6 Click Apply.
Managing embedded solutions in MarkVision Professional
120
Filtering for devices that support embeddedsolutions1 From the MarkVision Professional Home screen, select Filters from the All Tasks list.
2 Click New.
3 Type a name in the Name box.
4 Click Basic.
5 Select a type from the Device Type list.
6 Select Embedded Solutions from the Select Filter Type list.
7 Select Yes to filter for devices with embedded solutions.
8 Click Apply, and then click Close.
Using the Advanced filter to find devices thatsupport embedded solutionsCreate an advanced filter to discover devices with a specific embedded solution installed. An Advanced filter can beconfigured to identify devices that support the Embedded Solution Framework with the following parameters: name,state, version, or license.
1 From the MarkVision Professional Home screen, select Filters from the All Tasks list.
2 Click New.
3 Type a name in the Name box.
4 Click Advanced.
5 Select a device type from the Device Type list.
6 Select a parameter type for an embedded solution from the Parameter list.
7 Select an operation type from the Operation list.
8 Select values for the parameter from the Value list.
Note: The available operators and values change depending on the selected parameter.
9 Click Apply, and then click Close.
Using custom tables with embedded solutionsTo view the version of an Embedded Solutions Framework installed on a device:
1 From the MarkVision Professional Home screen, select Custom Tables - Create/Manage from the All Tasks list.
2 Click New.
3 Type a name in the Name box.
Managing embedded solutions in MarkVision Professional
121
4 Select Embedded Solutions Framework Version from the Available Columns box and any other options.
Use Ctrl + click to select multiple items.
5 Use the arrows to move items to the Columns in Use table.
6 Click Apply, and then click Close.
7 MVP adds the custom table name to the All Tasks list.
To view the version of embedded solutions on a device:
1 From the MarkVision Professional Home screen, select the custom table name (created above) from the All Taskslist.
2 Select the device(s).
3 MVP populates the table with data from the selected device(s).
Managing embedded solutions in MarkVision Professional
122
Using MarkVision Messenger
What can MarkVision Messenger do?Use MarkVision Messenger to create actions that perform printer administration tasks in response to printer events.Use the following examples for ideas about how you can use MarkVision Messenger to:• Keep a log of all printer paper jams
• Delay event notifications
• Monitor specific paper trays
• E-mail or page someone when a specific event occurs
• Order supplies
How are actions and events related?Device status events are conditions signaled by messages such as Paper Tray Missing or Toner Low. Folder eventsare signaled when devices enter and/or exit a particular folder.
Actions are associations that specify event-driven commands. Actions can be configured to occur automatically,conditionally, or repeatedly.
MarkVision Messenger allows administrators to create actions that specify commands that are executed whenspecified events such as Paper Low or Paper Tray Missing occur across a set of devices. You can specify whichcommands MarkVision Messenger executes when device status events occur.
Understanding events
Device Status Alert event typeA Device Status Alert is a notification that something has changed at a printer. For example, when a paper tray isremoved from a printer, the printer tells MarkVision Messenger that the tray is missing. This event is represented inMarkVision Messenger by name = Paper Tray Missing and state = ACTIVE. When the tray is replaced,the printer conveys the event to MarkVision Messenger. This event is represented in MarkVision Messenger by name= Paper Tray Missing and state = CLEARED. You can configure the action to respond to an event whenthe state is ACTIVE, when the state is CLEARED, or both. If the action responds to Device Status Alerts, you will beprompted to choose the specific device status alerts that will trigger the action.
Printer folder alerts event typeA folder alert is generated when printers enter and/or exit a specified folder. For example, you can create a folder inMVP that contains printers with a Toner Level less than 10%, and create an action in MarkVision Messenger to notifyyou when printers enter this folder. Each MarkVision Messenger action that responds to printer folder alerts must beassociated with a specific folder. When creating Folder Alerts, you will be prompted to choose a folder.
Using MarkVision Messenger
123
Selecting devices to monitorWhen choosing devices for an action to monitor, there are three choices:
• All Devices on the MarkVision Server—Monitors all devices on the MarkVision Server
• Devices in a Specified Folder—Monitors only a specific folder
• Selected Devices—Monitors a small number of specific devices
Delaying event notificationsYou can set up an action to delay execution of its command until an event has been active for a specified amount oftime.
For example, when an action is created that sends an e-mail notification for a Load Paper or Envelope condition, ane-mail is sent. The e-mail recipient receives the message and checks the printer, only to find that someone else hasloaded the paper. By using the Delay Time option, you can create a filter that will only send a notification if the LoadPaper or Envelope condition has been active for a specified amount of time. Likewise, if the action is triggered by aFolder Alert, you can delay its execution by using the “with a delay of” option.
Creating an action that uses the Delay Time option
1 From the MarkVision Messenger Home screen, click Create New.
2 Enter the appropriate action and command information in the setup screens.
3 Type the filter information. If the action is triggered, a Device Status Alerts:
a From the Filter Type screen, select Trigger on Active.
b From Delay Time, specify how long the action waits before executing the command.
c Click the right arrow button, and then complete the remaining steps.
If the action is triggered by Folder Alerts:
a From the Filter Type screen, select Simple Filter.
b From the “with a delay of” menu, specify how long the action waits before executing the command.
c Click the right arrow, and then complete the remaining steps.
Creating an action in MarkVision MessengerMarkVision Messenger can be configured to send SMTP e-mails when an action is triggered, execute command lineson a remote host or the MarkVision Server, or send status alerts to a Tivoli event server. You must set up the SMTPmail server and Tivoli event adapter before MarkVision Messenger can be configured to send SMTP e-mails or Tivolistatus alerts.
Sending an SMTP e-mailWhen an action is triggered, MarkVision Messenger sends an e-mail to specified addresses. The e-mails are highlycustomizable from within MarkVision Messenger. For example, an action triggered by a Folder Alert event, can sendan e-mail to an administrator when monitored printers enter a Low Toner folder. Configure the e-mail message tolist attributes such as: the printer model, IP address, and the time when it entered the Low Toner folder.
Using MarkVision Messenger
124

Setting up an SMTP mail server1 From the MarkVision Messenger Home screen, click SMTP Setup.
2 Enter the mail server information in the SMTP Mail Server box.
3 Enter the e-mail information in the From box.
4 If SMTP authentication is required, select My server requires me to login to send e-mail, and then type yourSMTP user credentials in the Login and Password fields.
5 Click Done to return to the MarkVision Messenger Home screen.
Note: Messenger can only communicate with SMTP servers that are running on the default TCP 25 port.
Executing a command line on a remote host serverWhen an action is triggered, it executes a command line on a remote host server. In order to execute command lineson a remote host server, the Remote Execution (REXEC) client must connect to a REXEC server on the remote hostserver. You can specify whether to perform commands conditionally or repeatedly, and how to execute them.
The action can execute its command.• Only after a specified delay period:
For example, if the action sends an e-mail message when a printer goes offline, you can delay the execution ofthe command for a specified amount of time. Then, if the printer returns online during the delay period, the e-mail will not be sent.
• After additional conditions have been met.
For example, if the action is triggered by a Paper Tray Missing event, but you only want to execute the commandwhen the event occurs for Tray 3, you can write a custom filter to specify that the action only respond when Tray3 is removed from monitored printers.
Send device status alerts to a Tivoli event serverMarkVision Messenger contains a custom event adapter that integrates with Tivoli's event management console.This event adapter lets administrators use the Tivoli event console to monitor printer events across a range of devicesin real time. In order for Tivoli to display printer events, you must first set up the Tivoli event adapter by creating anaction in MarkVision Messenger.
Setting up the Tivoli event adapterThe Tivoli event adapter lets administrators monitor printer events across a range of devices in real time. In order tosend device status alerts to Tivoli, create an action in MarkVision Messenger.
1 From the MarkVision Messenger Home screen, click Create New.
2 Type a name and description for the adapter, and then click the right arrow.
3 Select Device Status Alerts as the alert type, and then click the right arrow.
4 Select the type of event that will trigger the action from the Event list, and then use the arrow buttons to movethe event to the Selected Events box.
5 Click the right arrow.
6 Choose the method of device selection, and then click the right arrow.
Using MarkVision Messenger
125
7 Select Send Device Status Alerts to a Tivoli Event Server from the dialog, and then click the right arrow.
8 Type the Tivoli configuration settings, and then click the right arrow.
9 Specify the filter settings, and then click the right arrow.
10 A summary of the action is displayed. If you are satisfied with the action, click Yes, and then click the rightarrow to enable the Tivoli event adapter.
Note: After a Tivoli event adapter is created in MarkVision Messenger, configure the Tivoli server for MarkVisionMessenger alerts. Refer to the Tivoli documentation for information about configuring the Tivoli server.
Triggering a command line with an actionWhen triggered, an action executes a command line. For example, to keep a log of offline devices, configure an actionto respond to the "Offline" Device Status Alert. Each time a monitored device goes offline, the specified informationis written to a text file. The information MarkVision Messenger writes to this text file is highly customizable. Forexample, you can specify that the text file lists the device model, page count, and the time at which it went offline.
Previewing the stepsAn action causes a command to execute when an event occurs. MarkVision Messenger prompts for several types ofinformation during action creation.
1 From the MarkVision Messenger Home screen, click Create New.
2 Complete the following steps in the Configure Action dialog:
• Name and describe the action.
• Set user access.
• Select the type of events that will trigger the action.
• Select the events or folders that will trigger the action.
• Select which devices to monitor.
• Select the type of command to execute.
• Compose the command and any parameters for the event(s).
• Select or create a filter for the events.
• Review the action information.
Note: To stop previewing the choices, select Do not display this screen again.
3 Click the right arrow to continue.
Step 1: Naming the actionWhen an action is named, the name appears in the Action list on the MarkVision Messenger Home screen.
1 From the Description Information screen, type a unique name for the action in the Name box.
2 Enter a more detailed description about the action and what it does in the Description field.
3 Enter additional information associated with the action in the Notes field.
4 Click the right arrow at the bottom of the screen to continue.
Using MarkVision Messenger
126
Notes:
• The Name box is limited to 80 characters.
• The Description and Notes boxes are limited to 255 characters and are optional fields.
Step 2: Setting user accessThis screen only appears if user accounts have been created in MVP
1 Select Public to make the action available to all users.
2 Select Private to associate the action only with your account.
Note: A private action does not require a special access password from within MarkVision Messenger. However,since it is associated with the user name used to create it, the action is only accessible to that specific user.
3 Click the right arrow to continue.
Step 3: Selecting the event typeSpecify which type of event the action will monitor:
1 From the Event Type dialog, choose Device Status Alerts or Device Folder Alerts.
2 Click the right arrow at the bottom of the screen to continue.
Step 4: Selecting the events that trigger the actionDepending on the selected event type, specify which folders or Device Status Alerts the action will monitor. If theaction is triggered by a Device Status Alert, add or remove events from the Selected Events list. If the action is triggeredby a Printer Folder Alert, select a folder and then continue to the next step.
If the action is triggered by a Device Status AlertFrom the Events dialog, add an event to the Selected Events list:
1 From the Events dialog, choose whether to sort the events by Type or Severity.
2 Select a category from the Categories list.
3 Select the event and then use the arrows to add or delete events to the Selected Events list:
• Click the left arrow to delete the events from the list.
• Click the right arrow to add events to the list.
• Click the right arrow set to add all events to the list.
• Click the left arrow set to delete all events from the list.
4 Click the right arrow at the bottom of the screen to continue.
If the action is triggered by a Printer Folder Alert
1 Select a folder.
2 Click the right arrow at the bottom of the screen to continue.
Using MarkVision Messenger
127
Step 5: Choosing a method of device selectionSpecify which devices to monitor. MarkVision Messenger provides a list of all available devices capable of producingthe selected events.
1 From the Event Sources dialog, select one of the following settings:
• Monitor All Devices on the MarkVision Server
• Monitor Devices in a Specified Folder
• Monitor Selected Devices
2 If Monitor Selected Devices is specified, select devices to monitor:
• Click Select All to select all devices currently in the Selected Devices list.
• Click Deselect All to remove all devices selections from the Selected Devices list.
3 Click the right arrow at the bottom of the screen to continue.
Step 6: Selecting a command1 Specify in MarkVision Messenger which type of command the action will execute.
From the Command Type dialog, make one of the following choices:
• Send SMTP E-mail
• Execute a command line on a remote host
Note: This option requires the presence of a REXEC server on the remote host.
• Execute a command line on the MarkVision Server
Note: You must be logged in as the MarkVision administrator to select this option.
• Send Device Status Alerts to a Tivoli Event Server
Note: This option is only available if the Device Status Alert option is selected.
2 Click the right arrow at the bottom of the screen to continue.
Step 7: Composing a commandFollow the appropriate instructions below according to the command type you selected in the previous step.
Composing an SMTP e-mail
1 If the SMTP mail server information is not set up, MarkVision Messenger will prompt for the mail server and mailpath information. Type the requested information, and then click the right arrow to continue.
2 Type the recipient's e-mail address in the To box. Separate multiple e-mail addresses with commas.
3 Type optional e-mail addresses in the Cc box. Separate multiple e-mail addresses with commas.
4 Type the purpose of the e-mail in the Subject box.
5 Type an e-mail message in the Body box.
Using MarkVision Messenger
128
6 Add keyword(s) to any text box by:
• Selecting a keyword from the Keywords list, and then clicking right arrow next to the appropriate text box.
• Typing the parameters directly into the text box
7 Click the right arrow at the bottom of the screen to continue.
Executing a command line on a remote host
1 Type the remote host information in the Hostname, Username, and Password boxes.
2 Type the name of an executable command in the Command Path box.
3 Add keyword(s) to the Command Line Parameters box by:
• Selecting a keyword from the Keywords list, and then clicking right arrow beside the command line box.
• Typing the parameters directly into the text box.
4 Click the right arrow at the bottom of the screen to continue.
Executing a command line on the MarkVision Server
1 Type the name of an executable command in the Command Path field.
2 Add keyword(s) to the Command Line Parameters field by:• Selecting a keyword from the Keywords list, and then clicking the right arrow beside the command line box.
• Typing the keyword directly into the text box.
3 Click the right arrow at the bottom of the screen to continue.
Sending Device Status Alerts to a Tivoli serverIf you have not previously entered the Tivoli configuration settings:
1 Type the Tivoli server location.
2 Type the server port.
3 Type the path of your event buffer file.
4 Click the right arrow at the bottom of the screen to continue.
Note: If you have already entered Tivoli server settings, you will be directed to the next step.
Step 8: Selecting a filter1 Select a filter.
If the action is triggered by a Device Status Alert:
• Choose Trigger on Active to set the command to execute only when a condition becomes active.
Note: The execution of the command can be delayed until the condition has been active for a specifiedamount of time.
• Choose Trigger on Either Active or Clear to set the command to execute each time a condition becomesactive or clear.
• Choose Custom to customize and define when the command executes, and then upload an existing scriptfile or write a new one.
Using MarkVision Messenger
129
If the action triggered by a Printer Folder Alert:
• Choose Simple Filter to set the action to execute when a device is added to the folder, removed from thefolder, or both.
Note: The execution of the command can be delayed until the condition has been active for a specifiedamount of time.
• Choose Custom to define when the command executes, and then upload an existing script file or write a newone.
Note: If you selected Custom, click Next, to set up a custom filter.
2 Click the right arrow at the bottom of the screen to continue.
Step 9: Verifying action informationVerify all action information.
1 Review the summary in the text box.
Note: Information cannot be altered from the text box. To make changes, click the left arrow, and change theinformation from the appropriate dialog.
2 Click Yes to enable the action or No to disable the action.
Note: To cancel the creation of an action, click the up arrow to return to the MarkVision Messenger Home screenwithout creating an action.
Managing actions
Enabling an action1 From the MarkVision Messenger Home screen, select an action to enable by selecting the check box to the left
of the action name.
2 Click Enable Selected.
Note: The status of the selected action changes to Enabled.
Disabling an action1 From the MarkVision Messenger Home screen, select an action to disable by deselecting the check box to the left
of the action name.
2 Click Disable Selected.
Note: The status of the selected action changes to Disabled.
Modifying an action1 From the MarkVision Messenger Home screen, click Modify next to an action to select it for changes.
2 Select the portion of the action you want to modify.
Using MarkVision Messenger
130
3 Follow the instructions on the screen.
Notes:
• Each choice defaults to the current setting for the selected action.
• You cannot modify an action that is enabled by another user.
• You cannot modify an action that another user has selected.
Deleting an action1 From the MarkVision Messenger Home screen, select an action to delete by selecting the check box to the left of
the action name.
2 Click Delete Selected.
The selected action is removed from the actions list.
Notes:
• You cannot delete an action that is enabled by another user.
• You cannot delete an action that another user has selected.
Viewing action informationTo display a detailed summary of an action:
1 From the MarkVision Messenger Home screen, click the name of the action.
2 Click Done to return.
Note: You can only view information for one action at a time.
Setting or changing user data1 From the MarkVision Messenger Home screen, click Set User Data.
A list of all available devices and current user data is displayed.
2 Enter the device information in the Data field.
3 Select the device(s) to associate with this data by:• Selecting the check boxes to the left of the device names
• Clicking Select All to select all devices
• Clicking Deselect All to remove all device selections
4 Click Apply to save the changes and refresh the data, or click Done to cancel the changes and return to theMarkVision Messenger Home screen.
Notes:
• User-defined data is user-specific and cannot be viewed or altered by another user.
• The Data field is limited to 80 characters.
Using MarkVision Messenger
131
Frequently created actions
Creating an action to generate reportsAction-generated reports are helpful for tracking information. For example, as an account administrator, you can setup an action to generate a report containing billing and delivery information for all ordered supplies.
To create an action to generate event-specific reports:
1 From the MarkVision Messenger Home screen, click Create New.
2 Type the action information in the setup screens that follow, and then click Next.
3 From the Events screen, select Supplies Alerts from the Categories list.
4 Select events to monitor, and then click > to add them to the Selected Events list.
5 Click Next to continue.
6 Select the device(s) to monitor, and then click Next.
7 Type the command information and keywords in the appropriate boxes.
8 Click Next, and then complete the remaining steps.
Keeping a log of paper jamsYou can create an action to keep a log of device events. For example, you may want to keep a log to determine theaverage time it takes to clear paper jams.
To set up an action to log paper jams:
1 From the MarkVision Messenger Home screen, click Create New.
2 Type the action information in the setup dialogs that follow, and then click the right arrow.
3 From the Event Type dialog, select Printer Device Status Alerts, and then click the right arrow.
4 From the Events dialog, choose Supplies Alert from the Categories list.
5 Select Paper Jam as the event, and then click the right arrow to add it to the Selected Events list.
6 Click the right arrow to continue.
7 Select the device(s) to monitor, and then click the right arrow.
8 Select Execute a Command Line on the MarkVision Server, and then click the right arrow.
Note: Because command lines are run on the MarkVision Server, only the MarkVision administrator may selectthis option.
9 Type the name of an executable command in the Command Path box.
Note: Make sure the command accepts the inserted keywords and writes them to the end of a log file.
10 Select the keywords to appear in the log file, and then click right arrow to add them to the Command LineParameters field.
Note: Make sure the keywords are inserted in the correct order.
11 Click the right arrow to continue.
Using MarkVision Messenger
132

12 From the Select a filter dialog, select Trigger on Either Active or Clear.
Note: This creates two lines in the log file: the times that paper jams occur and the times they are cleared.
13 Click the right arrow, and then complete the remaining steps.
Monitoring device paper traysYou can use a filter to narrow the events that trigger an action. For example, if Tray 2 is configured on all the devicesfor company letterhead, and you want to monitor for Load Paper or Envelope events on Tray 2, a custom filter isnecessary. To write a custom filter to monitor specific paper trays:
1 From the MarkVision Messenger Home screen, click Create New.
2 Type the action information in the setup dialogs that follow, and then click the right arrow.
3 From the Event Type dialog, choose Printer Device Status Alerts, and then click the right arrow.
4 From the Filter Type dialog, choose Custom, and then click the right arrow.
5 In the text box, enter a script that only executes the command when the parameter is Tray 2.
IfThen (EventDataIs("location", "Tray2"))Distribute
6 Click the right arrow, and then complete the remaining steps.
Ordering suppliesIf you have an automated ordering system on your network, set up an action to order supplies for all devices attachedto the server. The action invokes the automated ordering system to order toner for the printer.
1 From the MarkVision Messenger Home screen, click Create New.
2 Enter the action information in the setup screens that follow, and then click the right arrow.
3 From the Event Type screen, choose Printer Device Status Alerts, and then click the right arrow.
4 From the Events screen, choose Supplies Alerts from the Categories: list.
5 Select Supply Low and Supply Empty, and then click the right arrow to add them to the Selected Events list.
6 Click Next to continue.
7 Select the device(s) to monitor, and then click the right arrow.
8 Select Execute a Command Line on the MarkVision Server, and then click the right arrow.
9 Enter the path to the automated ordering system program in the Command Path field.
10 Select the keywords to pass to the automated ordering system, and then click the right arrow to add them tothe Command Line Parameters field.
Note: Make sure you insert the keywords in the correct order.
11 Click the right arrow to continue.
12 From the Filter Type screen, choose Trigger on Active.
13 Under the Delay Time option, type 10, and then select Day(s) from the list box.
14 Click the right arrow, and then complete the remaining steps.
Using MarkVision Messenger
133
Using filters with actions
Using simple filtersThe following are examples of uses for the simple filter:
• Configure an action that executes a command when a device meets filter requirements. For example, create afolder that contains only printers with a page count greater than 10,000. When the page count of a monitoredprinter exceeds 10,000, it is added to the folder.
• Monitor only printers with an installed flash device. For example, if a folder contains only printers with an installedflash device, and a flash device is removed from a monitored printer, it is removed from that folder. The filterautomatically updates the folder when the printer fails to meet the filter requirements.
Use the “with a delay of” option to delay the execution of an action for a specified amount of time after a device isadded or removed from a folder.
Using the “Trigger on Active” filterChoose the “Trigger on Active” filter to set an action to only execute a command when a condition becomes Active.For example, if you are monitoring the Paper Tray Missing event and someone removes a tray from a monitoredprinter, the printer generates a Paper Tray Missing event with a state of Active. The Active state satisfies the conditionof the filter and the specified action is executed. When the paper tray is replaced, the printer generates another PaperTray Missing event with a state of Clear. The Clear state does not satisfy the condition of the filter and the action isnot executed.
Using the “Trigger on Either Active or Clear” filterChoose the “Trigger on Either Active or Clear” filter to set an action to execute each time a condition becomes Activeor Clear. For example, use the filter to keep a log of all printer paper jams to determine the average time it takes toclear a jam. When a paper jam occurs, the printer generates an event with a state of Active. This satisfies the conditionof the filter and executes the action. When the paper jam is cleared, the printer generates another event with a stateof Clear. This event also satisfies the condition of the filter and executes the action. There are now two lines on thelog file, one with the time at which the paper jam occurred and another with the time it was cleared.
Using custom filtersUse a custom filter to define how an action executes. Upload a script file or write a new one. MarkVision Messengerprovides a very simple scripting language to define filters. The following is a complete list of the statements andconditions available for use in a custom filter:
Statements:• While (Condition)
• WaitUntil (Condition)
• IfThen (Condition)
• { StatementList }
• Distribute
Using MarkVision Messenger
134
Conditions:• And (Condition_1...Condition_n)
• Or (Condition_1...Condition_n)
• EventDataIs (key, value)
• SourceDataIs (key, value)
• TimeIsAfter
Scripting example - “Trigger on Active” filterThe following is an example of the script representation of the built-in “Trigger on Active filter”:
IfThen (EventDataIs("state", "ACTIVE"))Distribute
The effect of the EventDataIs condition is to ask the event for the value of the event: state keyword. This keywordcan be inserted into command lines and e-mail messages. The IfThen statement executes the next statement ifthe condition EventDataIs ("state", "ACTIVE") is true. An EventDataIs condition is true if the valueof the keyword (state) matches the given value (ACTIVE). The next statement, Distribute, causes the commandto execute.
Scripting example - “Trigger on Active” filter with a 30 second delayThe following is an example of script used when the “Trigger on Active filter” action is delayed by 30 seconds:
{WaitUntil (TimeIsAfter(30))IfThen(EventDataIs("state", "ACTIVE"))Distribute}
The braces ({}) are used to group statements into a list. They were not needed in the previous example because theIfThen and following statements were treated as a single statement.
The WaitUntil statement causes the script to pause execution until the condition is true. The TimeIsAftercondition checks for true only after the specified number of seconds has passed. If the event is still active after 30seconds, the Distribute statement executes the command.
Scripting example - “Trigger on Either Active or Clear” filterThe following is a script representation of the built-in “Trigger on Either Active or Clear” filter for these circumstances:the Paper Tray Missing event is selected for Tray 3, there is a 20-minute delay before the command is executes, andthe command repeats every 20 minutes if the condition remains Active.
While (And(EventDataIs("state", "ACTIVE"), EventDataIs("location", "Tray 3"))){WaitUntil(TimeIsAfter(1200))IfThen(EventDataIs("state", "ACTIVE"))Distribute}
In this example, And was used to build a compound condition. The While loop is only entered or repeated if theevent is active for Tray 3. The code within the loop is the same as the code for the “Trigger on Active” filter, exceptthe TimeIsAfter condition is set to wait 1200 seconds (20 minutes).
Using MarkVision Messenger
135

Troubleshooting
Problems with user accounts and account groups
Did a message appear indicating an error reading accounts orpasswords during log on?These are possible solutions. Try one or more of the following:
MAKE SURE THE MARKVISION SERVER IS RUNNING
From the Services control panel, verify that the MarkVision Server is running on the Web server.
If the service is not running:
1 Restart the service.
2 Ask the user to log on again.
If the service is running:
1 Log on to MarkVision using the administrator user name and password.
2 Use the User Accounts and Groups task to reconfigure or add the user account.
3 Ask the user to log on again.
ENTER A VALID USER NAME OR PASSWORD
If MarkVision Server is running on the Web server, reset the user password:
1 Click User Accounts and Groups from the All Tasks menu.
2 Select the appropriate account, and then click Edit.
3 Change the password information as necessary.
4 Click Finish.
5 Ask the user to log on again.
LOG ON TO THE CORRECT MARKVISION SERVER
1 Close MVP, and then start it again.
2 Select the correct MarkVision Server from the Select MarkVision Server list, or Browse to find the correctMarkVision Server..
3 Click Connect.
4 Type your Account Name and Password.
5 Click Login.
Troubleshooting
136
THE FILE CONTAINING YOUR ACCOUNT INFORMATION IS CORRUPT
Contact your system administrator.
IS THERE A PROBLEM VERIFYING ACCOUNT INFORMATION WITH THE LDAP SERVER?If LDAP authentication is enabled, verify that all LDAP settings are correct in MVP and on the LDAP server. Useraccount names should be consistent with the account listings in LDAP server directory service.
User has forgotten their passwordReset the user password:
1 Make sure the MarkVision Server is running on the Web server.
2 From the MarkVision Professional Home screen, click User Accounts and Groups from the All Tasks list.
3 Select the appropriate account, and then click Edit.
4 Change the password information as necessary.
5 Click Finish.
6 Ask the user to log on again.
Problems with network devices
MarkVision is unable to discover a network device or “Device notresponding” appears
CHECK THE PRINTER CONNECTIONS
• The power cord is plugged into the printer and a properly grounded electrical outlet.
• Make sure the printer is turned on.
• Make sure other electrical equipment plugged into the outlet is working.
• Make sure the LAN cable is plugged into both the print server and into the LAN.
• Make sure the LAN cable is working properly.
• Turn the printer and the print server off, and then turn them on again.
MAKE SURE THE INTERNAL PRINT SERVER IS PROPERLY INSTALLED AND ENABLED.• Print a setup page for the printer. The print server should appear in the list of attachments on the setup page.
• Make sure the TCP/IP on the print server is activated. The protocol must be active for the print server and MVPto work. From the printer control panel, make sure the protocol is active.
• See your print server documentation for instructions.
Troubleshooting
137

MAKE SURE THE EXTERNAL PRINT SERVER IS WORKING
• Make sure the print server lights are on.
• Print a setup page from the print server.
• Refer to the print server documentation for instructions.
IS THE SNMP COMMUNITY IN MVP THE SAME AS THE ONE SET IN THE PRINT SERVER?• Check the SNMP community name set in MVP.
1 From the MarkVision Professional Home screen, select Administrative Settings from the All Tasks list.
2 Click Quick Find.
3 Verify the community name.This is the MVP community name, not the print server community name.
• Check the SNMP community name set in the print server. For more information, refer to the print serverdocumentation.
IS THE PRINT SERVER COMMUNICATING ON THE NETWORK?1 PING the print server.
2 If the PING works, check the IP address, netmask, and gateway of the print server to make sure they are correct.
3 Turn the printer off, and then PING again to check for duplicate IP addresses.
If the PING does not work, check the setup page you printed to be sure IP is enabled.
4 If TCP/IP is enabled, check the IP address, netmask, and gateway to be sure they are correct.
5 Make sure bridges and routers are functioning correctly.
6 Make sure all the physical connections among the print server, the printer, and the network are working.
IS THE PRINTER ENABLED FOR NPA?Turn the printer and the print server off, and then turn them on again. Turn the printer on first so the print servercan determine whether the printer is enabled for Network Protocol Alliance NPA.
Printer information is incorrectIf MVP displays printer or print server information that appears to be incorrect, refresh the printer and print server.Occasionally, the printer may lose contact with MVP because something happens to the printer. For example, if theprinter is turned off, the information in MVP is not updated until the printer is turned back on.
Printer icons do not appearThese are possible solutions. Try one or more of the following or contact your system administrator:
MAKE SURE THE MARKVISION SERVER IS RUNNING ON THE WEB SERVER
From the Services control panel, verify that the MarkVision Server is running on the Web server. If it is not running,stop and restart service.
Troubleshooting
138
DO THE DEVICES NEED TO BE REDISCOVERED?If the service is running, ask the user to repopulate the folder with printers.
1 Make sure the MarkVision Server is running.
2 Remove the devices for which icons did not appear.
3 Rediscover the devices
Printers are missing from foldersRun another device discovery.
“Error resetting device” message appearsMarkVision Professional uses Multicast DNS (mDNS) to check the status of certain devices. When mDNS is disabledon a device, MVP is unable to communicate with it.
ENABLING MDNS ON A DEVICE
1 From the MarkVision Professional Home screen, select TCP/IP from the All Tasks menu.
2 Select devices using the Quick Find or Folders tabs.
Use Ctrl + click and Shift + click to select multiple devices.
Note: Password-protected network devices are displayed in red. Enter the device password to gain access tothe device.
3 Select the Enable mDNS check box.
4 Click Apply.
Problems with MarkVision Web Client
Why can't I access MarkVision Web Client in Windows Vista?
CHANGE THE PROTECTION SETTINGS FOR INTERNET EXPLORER 71 Click .
2 Click Control Panel.
3 Click Network and Internet.
4 Select the Security tab, then click Local intranet.
5 Click the Enable Protected Mode check box to clear it, then click OK.
6 Click OK to close any Windows dialogs that are open.
7 Close and then restart Internet Explorer.
8 Launch MarkVision Web Client.
Troubleshooting
139
Why does MarkVision Web Client crash when opened in InternetExplorer 6?When running the MarkVision Web Client on Internet Explorer 6, opening MarkVision Messenger or a device Webpage (by selecting Web Page (Print Server) in the All Tasks list on the MarkVision Home Screen) can cause InternetExplorer 6 to crash. To solve this problem:
1 From the Internet Explorer menu, select Tools, then select Internet Options.
2 Click the Advanced tab.
3 From the Settings list, click Enable third-party browser extensions (requires restart).
4 Click OK.
5 Start MarkVision Web Client.
Notes:
• This problem only occurs if Internet Explorer 6 or earlier is set as the default Web browser.
• You can also prevent MarkVision Web Client from crashing in Internet Explorer 6 by first opening a new browserwindow, and then launching MarkVision Web Client.
Problems with MarkVision Messenger
MarkVision Messenger is not sending e-mail notificationsThese are possible solutions. Try one or more of the following:
MAKE SURE THE E-MAIL ADDRESS IS CORRECT
• Verify the e-mail address in the To box of the 'Compose SMTP E-mail” dialog.
• Verify the SMTP mail server and mail path.
MAKE SURE THE MARKVISION WEB SERVER SERVICE IS RUNNING CORRECTLY
• Review the system log.
• Verify that the mail server is running.
• Restart the MarkVision Web Server service to verify that it is running correctly.
Why can't I access MarkVision Messenger?
MAKE SURE THE MARKVISION WEB SERVER SERVICE IS RUNNING
Stop and restart the MarkVision Web Server service to verify that it is running correctly.
RE-ENTER THE MARKVISION MESSENGER URLIf the MarkVision Web Server is not the default Web server, did you add HTTP port 9180 in the address?
Troubleshooting
140
CHECK FIREWALL RULES
HTTP port 80 and/or HTTP 9180 might not be available.
MarkVision Messenger does not work with Apache installed
ALLOW APACHE TO LISTEN ON A DIFFERENT PORT
MarkVision Messenger works on ports 8007 and 8009 by default. If Apache is installed and listens on either of theseports, MarkVision Messenger will not function properly. When installing Apache, check for port availability, andthen assign the appropriate port to MarkVision Messenger.
Problems with actions
Cannot create a new action
THE MARKVISION WEB SERVER SERVICE IS NOT RUNNING CORRECTLY
• Restart the service.
• Ask the user to log in again and attempt to create an action.
An action is unavailable
CANNOT ENABLE, DISABLE, MODIFY, OR DELETE AN ACTION
Another user may have the action selected. Try again later, or contact the user who has the action selected.
Action does not work or produces unexpected resultsIf an action does not work, try one or more of the following solutions:• Make sure that the command line does not contain an error.
• Make sure that the correct device is selected and operating properly.
• Make sure that the correct event is selected. Click the action name to review a detailed summary and verify itsaccuracy.
• Restart the MarkVision Web Server service to verify that it is running correctly.
• Review the system log.
Action list is emptyThese are possible solutions. Try one or more of the following:
MAKE SURE THE ACTIONS ARE PUBLIC
The actions may be listed as private by other users.
Troubleshooting
141
CREATE AN ACTION
Create an action.
MAKE SURE THE MARKVISION WEB SERVER SERVICE IS RUNNING CORRECTLY
Restart the MarkVision Web Server service to verify that it is running correctly.
No private actions listed
ARE ANY ACTIONS ASSOCIATED WITH THE USER NAME?Private actions are associated with individual user names. Only those actions associated with the user name areviewable.
MAKE SURE THE MARKVISION WEB SERVER IS RUNNING
Stop and restart the MarkVision Web Server service to verify that it is running correctly.
Miscellaneous problems
The client and server cannot communicateIf there is a firewall installed on the network, and the MarkVision Client and the MarkVision Server exist on oppositesides of the firewall, the client will not be able to communicate with the server. MVP will stop responding after theinitial request. For the best results, only use an instance of the client that exists inside the firewall.
How do I increase the JVM maximum heap memory?How do I increase the JVM maximum heap memory for systems managing a large number of devices andrunning the Job Statistics: Trend Analysis task?
The default maximum memory of the JVM running MarkVision Server is 512 MB. However, systems managing alarge number of devices and running the Job Statistics: Trend Analysis task might need an additional allocation ofmaximum JVM heap memory.
How do I allocate the maximum JVM heap memory for my operating system?
For Windows operating systems:
1 Stop the MarkVision Server.
2 Open the registry editor by typing regedit in the command line.
3 Navigate to:
'HKEY_LOCAL_MACHINE --> SOFTWARE --> LEXMARK --> MarkVision Server -->Granite --> 1.0'
4 Modify the key 'Jvm_Options' with value '-ms256M -mx1024M'.
5 Close the registry editor, and then restart the MarkVision Server.
Troubleshooting
142
For UNIX, Linux, or Macintosh operating systems:
1 Stop the MarkVision Server.
2 Open the shell script '/usr/mv_pro/bin/MvService.sh', and then navigate to the function'setJavaVars()'.
3 Inside this function find the line the following line:
JVM_ARGS="-ms256M -mx512M"
4 Modify the line to say: JVM_ARGS="-ms256M -mx1024M".
5 Save the shell script, and then restart the MarkVision Server.
No folders appearIf MVP does not display folders, and during log on a message indicates an error reading folders:
MAKE SURE THE MARKVISION SERVER IS RUNNING ON THE WEB SERVER
From the services control panel, verify that the MarkVision Server is running on the Web server. If it is not running,restart the service. If the service is running, ask the user to recreate their folders.
THE FILE THAT STORES YOUR FOLDERS HAS BEEN CORRUPTED.Contact the system administrator.
Cannot enter characters in printers in a different languageIn some situations, a user may need to enter information in a printer in a different language than the MVP client iscurrently using. MVP has some limitations configuring or entering specific characters for devices in a language thatMVP does not support. You must enter the characters manually, without using MVP.
Cannot send files to a device using Generic File DownloadPrinter Lockdown may be enabled. Because the Printer Lockdown task allows communication only over secure ports,it must be disabled to allow access to the FTP port required for Generic File Download.
To disable Printer Lockdown:
1 From the MarkVision Professional Home screen, select Printer Lockdown from the All Tasks list.
2 Select devices using the Quick Find or Folders tabs.
Use Ctrl + click and Shift + click to select multiple devices.
Note: When a device managed by MVP is not supported by a specific task, its name will appear with a black linethrough it in the Quick Find or Folders tabs. Password-protected network devices are displayed in red. Enter thedevice password to gain access to the device.
3 Clear the Lockdown check box to remove lockdown from the device(s).
Troubleshooting
143
Cannot send files to network devices using Resource ManagementPrinter Lockdown may be enabled. Because the Printer Lockdown task allows communication only over secure ports,it must be disabled to allow access to the FTP port required for the Resource Management task.
To disable Printer Lockdown:
1 From the MarkVision Professional Home screen, select Printer Lockdown from the All Tasks list.
2 Select devices using the Quick Find or Folders tabs.
Use Ctrl + click and Shift + click to select multiple devices.
Note: When a device managed by MVP is not supported by a specific task, its name will appear with a black linethrough it in the Quick Find or Folders tabs. Password-protected network devices are displayed in red. Enter thedevice password to gain access to the device.
3 Clear the Lockdown check box to remove lockdown from the device(s).
Cannot enter a PIN using the Operator Panel taskThe operator panel screen will remain black while you are entering a PIN using the Operator Panel task in MVP. Thisis designed to avoid revealing the PIN on screen. The PIN will not register—and the screen will remain black—unlessyou press Enter on your computer keyboard or click on the remote operator panel.
To enter a PIN using the remote operator panel:
1 From the MarkVision Professional Home screen, select Operator Panel from the All Tasks list.
2 Select a device using the Quick Find or Folders tabs.
Note: When a device managed by MVP is not supported by a specific task, its name will appear with a black linethrough it in the Quick Find or Folders tabs. Password-protected network devices are displayed in red. Enter thedevice password to gain access to the device.
3 Select the PIN-protected function.
4 Enter the appropriate PIN and press Enter on your computer keyboard, or click on the remote operator panel.
Cannot enter a PIN or password in RHEL 5.0Because SCIM (Smart Common Input Method) is disabled by default in RHEL (Red Hat Enterprise Linux) 5.0, users mustenable it in order to enter values into password and PIN fields in MVP.
Enabling SCIM in RHEL 5.0
1 From the RHEL desktop, click System Preferences More Preferences SCIM Input Method Setup.
2 From the left pane, expand the FrontEnd menu, and then click Global Setup.
3 In the Options section, clear the Embed Preedit String into Client Window check box.
4 From the left pane, expand the Panel menu, and then click GTK.
5 Clear all check boxes, and then click Apply.
Troubleshooting
144
Frequently asked questions
What devices are supported by this version ofMarkVision?How do I know which devices this version of MVP will support?
For a complete list of supported devices, see the Release Notes available at www.markvisionprofessional.com.
Can I install MVP 11.2.1 over a previous version ofMarkVision?Do I need to uninstall the previous version of MarkVision Professional first?
If you are upgrading from MarkVision Professional 10.0 or later, install MVP 11.2.1 directly over the old version.MarkVision itself will migrate any existing settings/configurations to the new version the next time it runs.
Notes:
• Certain plug-ins, such as special product requests from previous releases, may not be supported by MVP 11.2.1.
• Before upgrading from a previous version, compare the list of plug-ins installed on your system against thelist of plugins for MVP 11.2.1 listed in the Release Notes. Select Software Update (Manage PlugIns) from theAll Tasks list on the MarkVision Professional Home screen to see a list of plug-ins currently installed on theMVP Server.
• Contact your system support person if any of your plug-ins appear not to be supported by MVP 11.2.1.
I have plug-ins installed with my previous version. Isthe functionality of those plug-ins included in thisrelease?Will my plug-ins still work if I upgrade to MVP 11.2.1?
All major functional and device support plug-ins that were released to the public for MarkVision Professional 11.2are incorporated into MarkVision Professional 11.2.1. If you have specific field-fix plug-ins or custom-code plug-ins installed with your version, please check the list of plug-ins included in MarkVision Professional 11.2.1 in theRelease Notes before upgrading. The Release notes are available at www.markvisionprofessional.com.
How can I speed up device discovery?Will limiting the scope of my discovery speed up the process?
The time it MVP takes to discover devices depends on the scope of the discovery. A device discovery spanningmultiple subnets (133.122.0.0) requires more time than a device discovery spanning a single subnet(133.122.123.0).
Frequently asked questions
145

What is the best time to discover devices?
From the Scheduling task, the MarkVision Server allows you to perform network discoveries once, daily, weekly,or monthly. Device discoveries can be scheduled to occur at times when network traffic is not busy. Schedule arecurring device discovery to ensure that the list of devices is current.
Why is my first discovery after a restart slower than later discoveries?
The MarkVision Server is building its memory cache of device information along with the first discovery. Theinformation will already be in cache for the next discovery.
How do the MarkVision Web Client and ClientApplication differ?MarkVision Web Client vs. MarkVision Client Application
The standalone application can be installed locally on a user’s workstation. MarkVision Client files are then copiedonto the user computer during the installation process. The browser-based client is a version of the client that canbe accessed through a supported Web browser They are essentially the same program. All folders, filters, devicesmanaged by the MarkVision Server are available to users of the application and the client if the user has access.
What plug-ins are necessary?
The MarkVision Web Client requires the installation of the Java browser plug-in. Since the MarkVision Web Clientruns through a Web browser, it can access the MarkVision Server from any computer on the network.
Why are some devices unavailable?Why are some devices crossed out?
Devices that are crossed out do not support the selected task. For example, not all printers can report their tonerlevels. When this occurs, the name of the device incapable of the selected task has a line through it.
If a selected device does not support the current task MVP responds in the following way:
• For a single device selection, the message Device Incapable of Task is displayed.
When multiple devices are selected, and one or more of them do not support the current task, either of the followingoccurs:
• For read-only tasks (such as status and toner levels), MVP displays the Device Incapable of Taskmessage in place of the task information for that device. All supported devices have their appropriateinformation displayed.
• For multi-device configuration tasks, MVP warns you that some of the devices will not be affected by the taskbecause they do not support the function or feature that is being configured.
Why are some devices displayed in red?
Devices that are displayed in red text are password protected. In order to gain access to a password protecteddevice, use the Enter Device Password task to access the device for the duration of the session. Access the EnterDevice Password task from the MarkVision Professional Home screen All Tasks list.
An administrator has the option to add a device password to the Manage Global Password list. If a user has accessto the Manage Global Passwords list task, they will in turn have access to every device that MVP manages that hasa password included in the list. Because the Manage Global Passwords list task provides access to valuable devicepasswords, access to the task should be limited to administrative personnel.
Frequently asked questions
146
Are sensitive files displayed when viewing encrypted hard disk drives?
If you use the Storage Devices task to securely view an encrypted hard disk drive, the only information that isavailable is file name, file type, file size, and the date that a file was saved on the hard disk. The contents of anyfiles saved on the hard disk will not be displayed.
How do I back up my MVP Server settings andconfiguration?How do I back up my MVP Server settings and configuration for Windows, Mac, and UNIX operating systems?
You will need to back up the directories where the MVP Server customized data files are stored:• In Windows, the default directories are:
C:\Program Files\Printer\MarkVision Server\granite\data
C:\Program Files\Printer\MarkVision Server\granite\plugins
C:\Program Files\Printer\MarkVision Server\mvp-tomcat\webapps\ROOT\~plugins
• For Macintosh and UNIX, the default directories are:
/var/spool/markvision/data
/var/spool/markvision/plugins
/usr/mv_pro/mvweb/www/webapps/ROOT/~plugins
Where is the README file?Where is the README file for Windows and Macintosh operating systems?
For Macintosh operating systems, access the README file in usr\docs\readme.
For Windows operating systems:
1 Click or Start.
2 Click Programs or All Programs Printer MarkVision Professional MarkVision Professional MarkVision Professional Read Me.
Where is the README file on the MarkVision Web Server?
You can link to the README file at: http://<your server>/markvision, where <your server> is the IPaddress or hostname of the machine that is running the MarkVision Server.
If MarkVision Professional is not the default Web server, change the URL to: http:<your server>//:9180/markvision.
Where are the Release Notes?Where can I find the Release Notes for MVP?
You can find the latest Release Notes for MVP at www.markvisionprofessional.com.
Frequently asked questions
147
How do I create and apply a filter to a folder?Create a filter using the Filters task.
Create a Basic or Advanced filter, and then apply it to a folder.
1 From the MarkVision Professional Home screen, select Filters from the All Tasks list.
Filter Creation dialog appears.
2 Click New.
3 From the Filters dialog, name the filter.
4 Select either Basic or Advanced.
Basic filterSelect the filter conditions. If you select more than one condition, you can specify whether a device must meetany or all conditions in order to be included in the folder.• All—device must meet all conditions
• Any—device must meet at least one condition to be included in the folder
Advanced filter: Example 1Create conditions by selecting a parameter and a logical operation, and then selecting or typing in a value.
For example, to filter out all color printers:
a From the parameter box, select Color.
b From the operation box, select Equal To.
c From the value box, select Monochrome.
As in the Basic filter configuration, if All is selected, a device must meet all conditions. If Any is selected, a devicemust meet at least one condition to be included in the folder. If only one condition is specified, the Any andAll radio buttons are unavailable.
Advanced filter: Example 2To filter in all printers with Job Timeouts greater than or equal to 90 seconds:
a From the parameter box, select Job Timeout.
b From the operation box, select Greater Than Or Equal To.
c Type 90 in the value box.
How do I apply a filter to a folder?
After a filter is created, apply it to a folder using the Folder Configuration task.
1 From the MarkVision Professional Home screen, select Folder Configuration from the All Tasks list.
The folder configuration window appears.
2 Select a folder.
If a filter has previously been applied to the folder, the filter settings appear.
3 Click Apply.
Frequently asked questions
148
Notes:
• Manual selection overrides filters. For example, if the filter Color Equal To Monochrome is applied, and youhave already manually selected various color printers, those manually selected printers remain in the folder.
• If you want to apply a previously created filter, click Load Filter, and then choose the filter.
What is MarkVision Messenger?What does MarkVision Messenger do?
MarkVision Messenger is a browser-based tool that automates responses to printer problems or events. MarkVisionMessenger allows the creation of actions that automate many printer administration tasks. Use the wizard-basedinterface to create actions that track paper jams or send e-mails when specified device conditions occur.
How do I access MarkVision Messenger?
Access MarkVision Messenger from MarkVision Professional or a Web browser.
• To access MarkVision Messenger from MarkVision Professional, select MarkVision Messenger Launch fromthe All Tasks list of the Markvision Professional Home screen.
• To access MarkVision Messenger from a Web browser:
1 Open a Web browser.
2 Type http://<your server>/messenger where <your server> is the IP address or hostnameof the machine that is running the MarkVision Server.
Note: If MarkVision Professional is not the default Web server, the MarkVision Messenger address is:http://<your server>:9180/messenger. The messenger portion of the URL is case-sensitiveand must be lowercase.
Is there support for IPX or Tivoli?Which platforms support IPX?
IPX management support is only available for a MarkVision Server running on a Windows 2003 Server, WindowsXP, Windows 2000, or Windows NT workstation. UNIX Clients can connect to a Windows-based MarkVision Serverto manage printers with the IPX protocol. IPX protocol support must be installed on the Windows 2003 Server,Windows XP, Windows 2000, or Windows NT workstation. If IPX protocol support is not installed, the IPX option isdisabled. The NetWare protocol for the supported print server must be active to be discovered.
Note: Not all devices are available through IPX support.
How can I install IPX?
The easiest way to configure the print server for NetWare jobs in non-NDPS and non-NEPS environments is to usethe Network Printer Utility for NetWare (Interwin). The Network Printer Utility (Interwin) automatically creates allthe necessary NetWare objects (print queue objects, print server objects, and printer objects).
Where can I find additional support for Tivoli?
Contact the place where you purchased the printer.
Frequently asked questions
149
How do I get to the server after installation?How do I access the MarkVision Server from the MarkVision Client Application?
MarkVision Client Application is installed locally and can be launched like other programs installed on the machine.For example, in Windows environments, double-click the MVP icon on the desktop. This version of the client doesnot use a Web browser.
After starting MVP:
1 Type the hostname or IP address of the machine running the MarkVision Server, or click Browse to locate yourserver.
2 Click Connect.
3 If user accounts are enabled, enter the name of a user account and the associated user password.
4 Click Login.
How do I access the MarkVision Server with the MarkVision Web Server?
Since the MarkVision Web Client is browser-based, open a browser and point it to the MVP URL. If MVP is the defaultWeb server, the URL is: http://<your server>, where <your server> is the IP address or hostname of themachine that is running the MarkVision Server. If MarkVision Professional is not your default Web server, the URLis: http://<your server>:9180.
The MarkVision Web Client launches a browser window from which MarkVision Professional runs as a Java applet.In order to run the Web Client, you must enable your browser to support Sun's Java Runtime Environment, byinstalling the Java plug-in. In Windows environments, the plug-in is provided and you are automatically promptedto install it the first time you run the MarkVision Web Client.
How do I discover devices?Device discovery is managed through the use of discovery profiles. During MVP setup, a default device discoveryprofile is typically established. Create a device discovery if a discovery profile was not created during the initial setup.
Can I use the Manage Discovery Profiles task?
After a discovery profile is created, use the Manage Discovery Profiles task to discover devices. Use the DiscoveryProfiles task to discover new devices.
1 From the MarkVision Professional Home screen, select the Device Discovery Profiles task from the All Taskslist.
2 Select the profile from the Discovery Profiles window.
3 Click Start.
4 MVP communicates with the devices included in the selected profile.
Note: Click Stop Discovery, to stop a discovery at any time.
Note: Performing a discovery with the Full Discovery profile, or any profile that includes all of the devices on anetwork, requires a large amount of CPU usage. Running a full discovery can dramatically slow down the MarkVisionServer.
Can I use the Quick Find task to discover devices?
Use the Quick Find task to discover devices and filter a device search for previously discovered devices.
Frequently asked questions
150
Notes:
• While searching by TCP/IP address, discover multiple devices using a wildcard variable. Use a zero (0) or asterisk(*) as a wildcard character when performing a Quick Find based on a network subnet. For example, in orderto find all the printers on the 122 subnet, type in the address value 138.188.122.0. This would find devices withIP addresses of 138.188.122.2, 138.188.122.3, 138.188.122.4, and so on.
• If you enter a TCP/IP address, MVP first checks the list of devices already discovered. If the address is not in thelist, MVP initiates a device discovery to find it.
• IPX discoveries can only be performed using the Device Discovery task.
Can I add devices without creating a profile?
It is possible to discover devices without creating a profile. Use the Add Devices task to discover small groups ofdevices.
To use the Add Devices task:
1 Select Add Devices from the All Tasks menu
2 Select a specific device or devices from the list of existing devices on the screen, and then click OK.
Note: Select the Exclude tab to select devices from an existing profile that you do not want to include in thediscovery.
3 Select the Advanced tab to reset additional discovery settings.
4 Click Start to begin the discovery.
5 Click Stop to terminate the current discovery operation.
Note: Click Save as Profile to save the discovered devices as a discovery profile.
How do I create actions?Creating an action using MarkVision Messenger
The following steps provide an example of how to create an action in MarkVision Messenger. This sample actionsends an e-mail message to a specified address whenever a printer monitored by the MarkVision Server enters aPaper Jam state.
1 From the MarkVision Messenger Home screen, click Create New.
2 Provide action information:
• Type the name of the action (required)
• Type a description of the action (optional)
• Type notes about the action (optional)
3 Click the right arrow icon.
4 Choose whether to make the action private or public, and then click the right arrow icon.
5 Select Device Status Alerts, and then click the right arrow.
6 Choose the event that will trigger the action.
Select Paper Jam from the Events list, and then click the right arrow to add Paper Jam to the Selected Eventsbox.
7 Click the right arrow. Select a method of device selection.
Frequently asked questions
151
8 Click Monitor All Devices on the MarkVision Server, and then click the right arrow.
9 Select the type of command the action will execute. Click Send SMTP E-mail, and then click the right arrow.
10 If you have not entered settings for your SMTP server, type the SMTP mail server information (for example,mailserver.mycompany.com).
11 In the From box, type an e-mail address.
12 Click the right arrow.
13 Compose an e-mail message.
• In the To box, type the e-mail address of the message recipient.
• To carbon copy (Cc) someone, type their e-mail address in the Cc box.
• For this example, type Paper Jam in the Subject box.
• In the Body box, type: There is a paper jam at: $ {source.ipAddress}, model: ${source.model}, and then click the right arrow.
Note: Both source.ipAddress and source.model are keywords. You can select them from theKeywords list, and then move them to the Body box by clicking the right arrow. Thesource.ipAddress keyword contains the TCP/IP network address (if applicable) of the print server towhich the printer is attached. The source.model keyword contains the model name of the printer. Manykeywords are available in MarkVision Messenger. Find a description of each in the Keyword Detail box,under the Keywords list.
14 Select filter type for the action:
• Trigger on Active—Sends an e-mail whenever a printer enters a Paper Jam state
• Trigger on Either Active or Clear—Sends an e-mail whenever a printer enters or exits a Paper Jam state
• Custom—Create a custom filter script
15 Click Trigger on Active, and then click the Next arrow icon.
A summary of the action appears.
16 Click Yes to enable the action.
What are the results of this action?
If a printer monitored by MarkVision Professional enters a Paper Jam state, an e-mail will be sent to the specifiede-mail address. The subject will be "Paper Jam," and the body will be similar to: “There is a paper jam at:123.123.123.123, model: generic printer.” In this example, 123.123.123.123 is the TCP/IP network address of theprint server to which the printer is attached, and generic printer is the model name of the printer.
How do I change the MarkVision Web Server port?Changing from HTTP port 9180 to HTTP port 80
The port upon which the MarkVision Web Server responds to Web requests is configurable. It may becomenecessary to change the port setting to simplify the Web Client URL by changing from HTTP port 9180 to HTTPport 80. Since HTTP port 80 is the standard port for Web browsers, setting the HTTP port to 80 eliminates the needto specify 9180 in the MarkVision URL.
Frequently asked questions
152
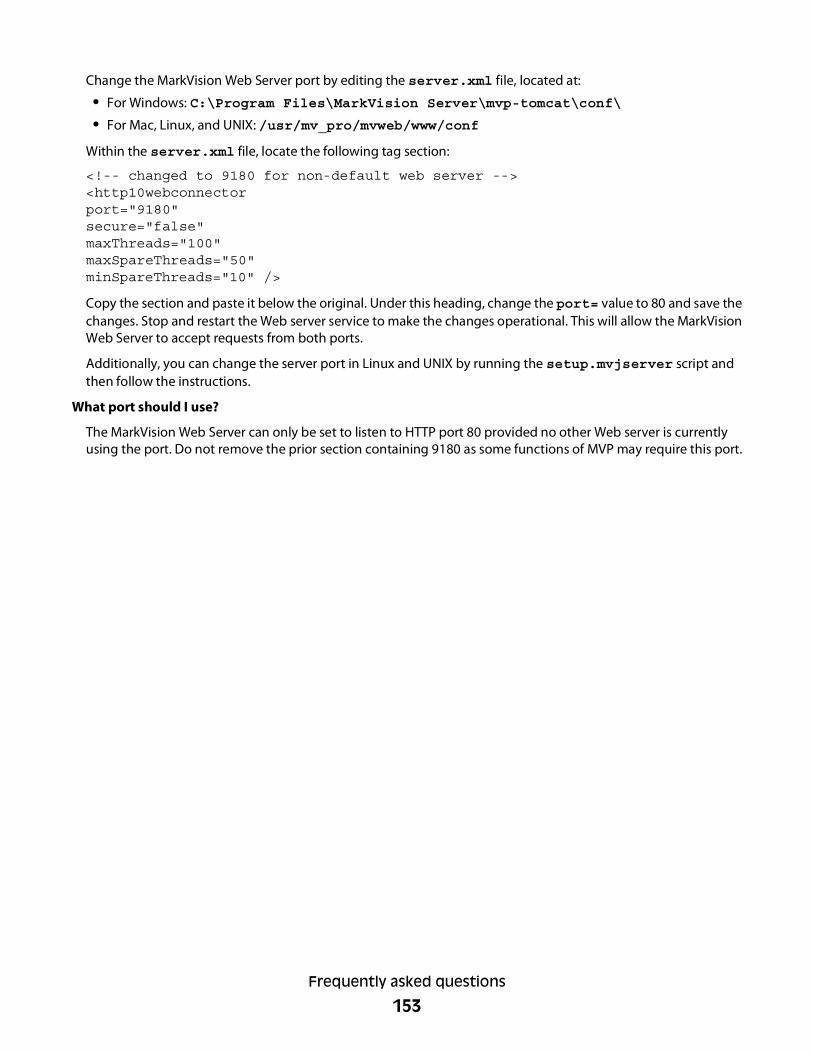
Change the MarkVision Web Server port by editing the server.xml file, located at:
• For Windows: C:\Program Files\MarkVision Server\mvp-tomcat\conf\
• For Mac, Linux, and UNIX: /usr/mv_pro/mvweb/www/conf
Within the server.xml file, locate the following tag section:
<!-- changed to 9180 for non-default web server --><http10webconnectorport="9180"secure="false"maxThreads="100"maxSpareThreads="50"minSpareThreads="10" />
Copy the section and paste it below the original. Under this heading, change the port= value to 80 and save thechanges. Stop and restart the Web server service to make the changes operational. This will allow the MarkVisionWeb Server to accept requests from both ports.
Additionally, you can change the server port in Linux and UNIX by running the setup.mvjserver script andthen follow the instructions.
What port should I use?
The MarkVision Web Server can only be set to listen to HTTP port 80 provided no other Web server is currentlyusing the port. Do not remove the prior section containing 9180 as some functions of MVP may require this port.
Frequently asked questions
153
Uninstalling MarkVision Professional
Uninstalling for Windows and Mac OS X
Uninstalling from Windows1 In Windows XP and earlier, click Start.
2 Click Programs or All Programs Printer Software Uninstall.
3 Follow the instructions on the screen.
Default program file locations• MarkVision Application—C:\Program Files\Printer\MarkVision Professional
• MarkVision Server—C:\Program Files\Printer\MarkVision Server\Granite
Uninstalling from Mac OS X1 Launch Finder.
2 Click Application Utilities MarkVision Pro Uninstall.app.
3 Click the lock image to gain administrator access.
4 Click the Uninstall button.
Default program file locations• MarkVision Application—/Application/Markvision Pro Client.app
• MarkVision Server– /usr/local/markvision_pro
– /Applications/Utilities/MarkVision Pro Server Control.app
• MarkVision Uninstall—/Applications/Utilities/MarkVision Pro Uninstall.app
Uninstalling for UNIX and Linux
Uninstalling MarkVision ProfessionalA system administrator can remove the MarkVision Professional package using the utilities in the table below.
Depending on your operating system, mark the package for removal after you start the program. You can also typethe package names you want to remove on the command line. For more information, see the documentation thatcame with your operating system.
Uninstalling MarkVision Professional
154
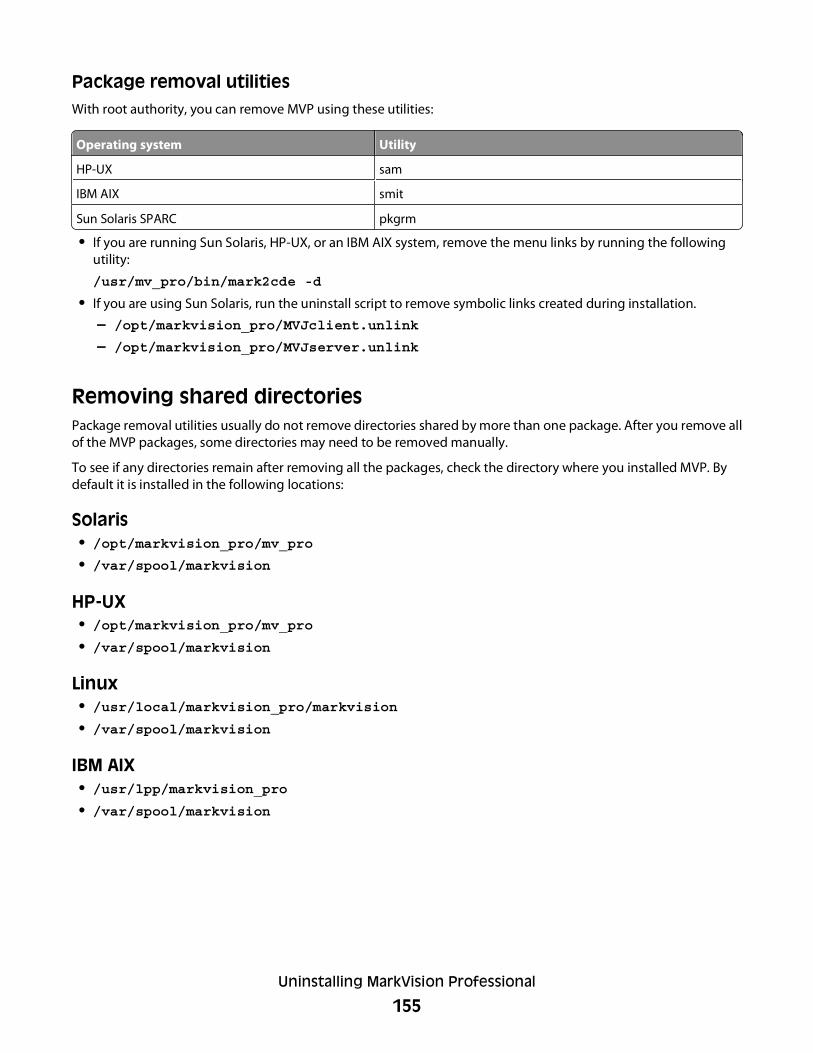
Package removal utilitiesWith root authority, you can remove MVP using these utilities:
Operating system Utility
HP-UX sam
IBM AIX smit
Sun Solaris SPARC pkgrm
• If you are running Sun Solaris, HP-UX, or an IBM AIX system, remove the menu links by running the followingutility:
/usr/mv_pro/bin/mark2cde -d
• If you are using Sun Solaris, run the uninstall script to remove symbolic links created during installation.
– /opt/markvision_pro/MVJclient.unlink
– /opt/markvision_pro/MVJserver.unlink
Removing shared directoriesPackage removal utilities usually do not remove directories shared by more than one package. After you remove allof the MVP packages, some directories may need to be removed manually.
To see if any directories remain after removing all the packages, check the directory where you installed MVP. Bydefault it is installed in the following locations:
Solaris• /opt/markvision_pro/mv_pro
• /var/spool/markvision
HP-UX• /opt/markvision_pro/mv_pro
• /var/spool/markvision
Linux• /usr/local/markvision_pro/markvision
• /var/spool/markvision
IBM AIX• /usr/lpp/markvision_pro
• /var/spool/markvision
Uninstalling MarkVision Professional
155
Appendix
Menu of Access ControlsDepending on device type and installed options, some Access Controls (referred to on some devices as FunctionAccess Controls) may not be available for your device.
Function Access Control What it does
Address Book Controls the ability to perform address book searches in the Scan to Fax and Scanto Email functions
Change Language from HomeScreen
Controls access to the Change Language feature from the printer control panel
Color Dropout Controls the ability to use the Color Dropout feature for scan and copy functions
Configuration Menu Protects access to the Configuration Menu
Copy Color Printing Controls the ability to perform color copy functions. Users who are denied will havetheir copy jobs output in black and white
Copy Function Controls the ability to use the Copy function
Create Bookmarks at the Device Controls the ability to create new bookmarks from the printer control panel
Create Bookmarks Remotely Controls the ability to create new bookmarks from the Bookmark Management taskin the All Tasks list.
Create Profiles Controls the ability to create new profiles
E-mail Function Controls access to the Scan to Email function
eSF Configuration Controls access to the configuration of any installed eSF applications
Fax Function Controls access to the Scan to Fax function
Firmware Updates Controls the ability to update firmware from any source other than a flash drive.Firmware files which are received via FTP, the MVP Server, etc., will be ignored(flushed) when this function is protected.
Flash Drive Color Printing Controls the ability to print color from a flash drive. Users who are denied will havetheir print jobs output in black and white.
Flash Drive Firmware Updates Controls the ability to update firmware from a flash drive
Flash Drive Print Controls the ability to print from a flash drive
Flash Drive Scan Controls the ability to scan documents to a flash drive
FTP Function Controls access to the Scan to FTP function
Held Jobs Access Protects access to the Held Jobs function
Manage Shortcuts at the Device Protects access to the Manage Shortcuts section of the Settings menu on the printercontrol panel
Network Ports/Menu at the Device Protects access to the Network/Ports section of the Settings menu from the printercontrol panel
Appendix
156
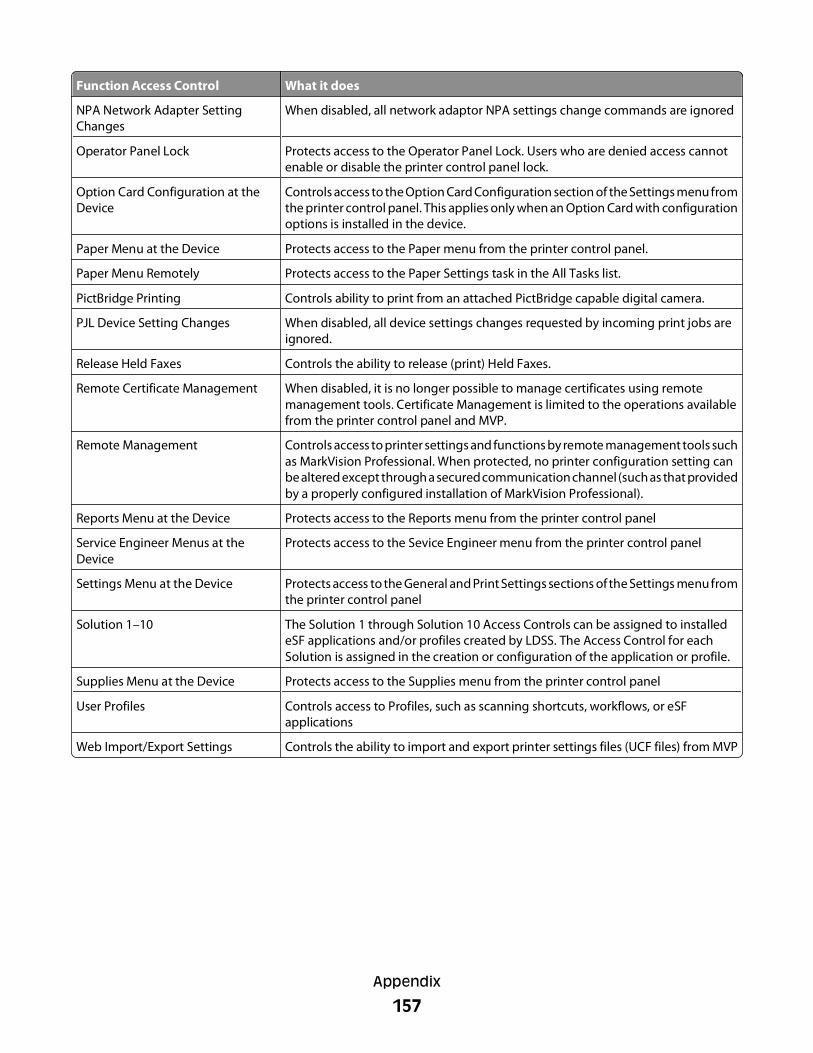
Function Access Control What it does
NPA Network Adapter SettingChanges
When disabled, all network adaptor NPA settings change commands are ignored
Operator Panel Lock Protects access to the Operator Panel Lock. Users who are denied access cannotenable or disable the printer control panel lock.
Option Card Configuration at theDevice
Controls access to the Option Card Configuration section of the Settings menu fromthe printer control panel. This applies only when an Option Card with configurationoptions is installed in the device.
Paper Menu at the Device Protects access to the Paper menu from the printer control panel.
Paper Menu Remotely Protects access to the Paper Settings task in the All Tasks list.
PictBridge Printing Controls ability to print from an attached PictBridge capable digital camera.
PJL Device Setting Changes When disabled, all device settings changes requested by incoming print jobs areignored.
Release Held Faxes Controls the ability to release (print) Held Faxes.
Remote Certificate Management When disabled, it is no longer possible to manage certificates using remotemanagement tools. Certificate Management is limited to the operations availablefrom the printer control panel and MVP.
Remote Management Controls access to printer settings and functions by remote management tools suchas MarkVision Professional. When protected, no printer configuration setting canbe altered except through a secured communication channel (such as that providedby a properly configured installation of MarkVision Professional).
Reports Menu at the Device Protects access to the Reports menu from the printer control panel
Service Engineer Menus at theDevice
Protects access to the Sevice Engineer menu from the printer control panel
Settings Menu at the Device Protects access to the General and Print Settings sections of the Settings menu fromthe printer control panel
Solution 1–10 The Solution 1 through Solution 10 Access Controls can be assigned to installedeSF applications and/or profiles created by LDSS. The Access Control for eachSolution is assigned in the creation or configuration of the application or profile.
Supplies Menu at the Device Protects access to the Supplies menu from the printer control panel
User Profiles Controls access to Profiles, such as scanning shortcuts, workflows, or eSFapplications
Web Import/Export Settings Controls the ability to import and export printer settings files (UCF files) from MVP
Appendix
157
Notices
Licensing noticeThis product contains software developed and copyrighted by Lexmark.
In addition, the product software may contain:
• Software licensed under the provisions of the GNU General Public License version 2 and the GNU Lesser GeneralPublic License version 2.1
• Software licensed under other licenses
Click the title of the document you want to review:
• Third-party licenses
The third-party software covered by these third-party licenses is free software; you can redistribute it and/or modifyit under the terms of the licenses referenced above. These licenses do not provide you any rights to Lexmarkcopyrighted software.
Software source code
This product includes software, JmDNS 0.2, developed and distributed by Arthur van Hoff and Ric Blair and distributedaccording to the GNU Lesser General Public License, v2.1 (http://www.gnu.org/copyleft/lesser.txt). The sourcecodeis available locally at:
— Windows: <install dir>\MarkVision Server\granite\src\jmdns_src.zip
— Linux/Mac: /usr/mv_pro/src/jmdns_src.zip
— Novell: SYS:\LEXMARK\MVPS\SRC\JMDNS_SRC.ZIP
Notices
158
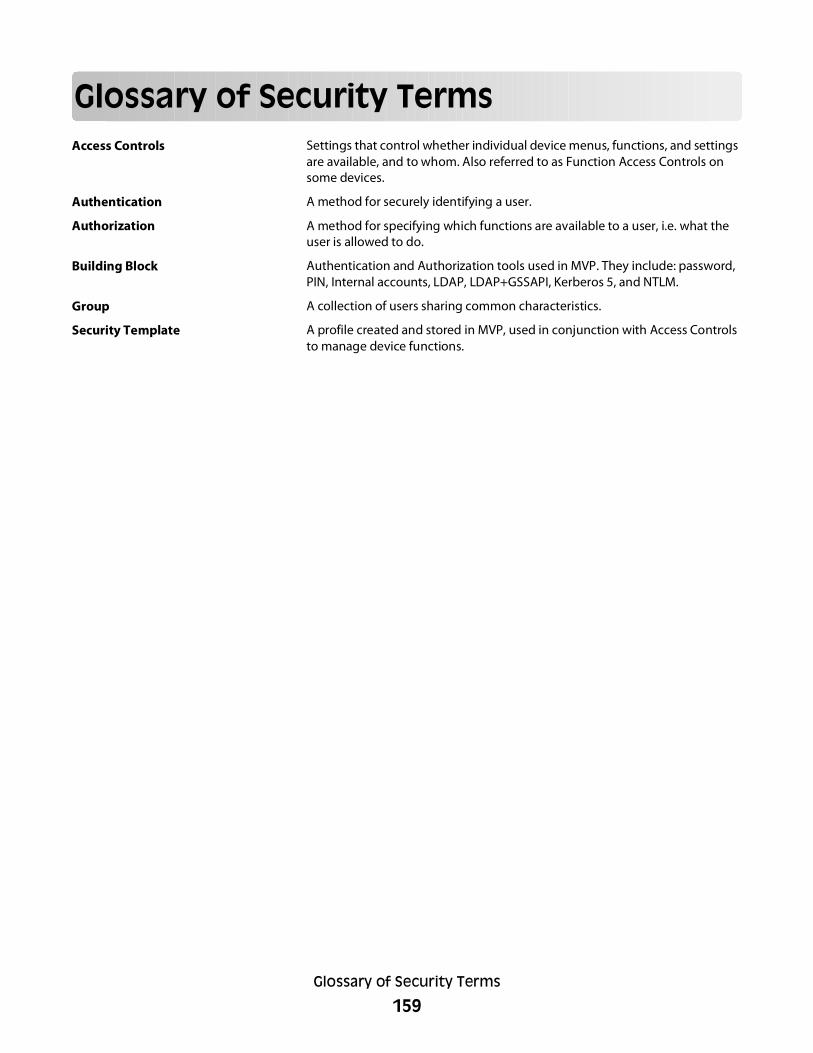
Glossary of Security TermsAccess Controls Settings that control whether individual device menus, functions, and settings
are available, and to whom. Also referred to as Function Access Controls onsome devices.
Authentication A method for securely identifying a user.
Authorization A method for specifying which functions are available to a user, i.e. what theuser is allowed to do.
Building Block Authentication and Authorization tools used in MVP. They include: password,PIN, Internal accounts, LDAP, LDAP+GSSAPI, Kerberos 5, and NTLM.
Group A collection of users sharing common characteristics.
Security Template A profile created and stored in MVP, used in conjunction with Access Controlsto manage device functions.
Glossary of Security Terms
159
IndexNumerics802.1x 77
Aaccess
private 127public 127
Access Controls list of 156managing with PIN or
password 62understanding 51
accessibility 40multi-select 40
accessing MarkVision Messenger 149secured device 72
account creating 79, 80editing 80
account group removing 81
action 141command 128creating 151creating logs 132custom filter 134deleting 131, 141disabling 130, 141enabling 130, 141filter 134folder alert 123MarkVision Messenger 124, 126modifying 130, 141monitoring trays 133naming 126reports, generating 132verifying 130viewing information 131
actions 123active session
expiration 81adding
destinations 97advanced
filter 46advanced credentials 74
alert device status 127printer folder 127
All Tasks list 32Apache 141applying
filter 148applying, scheduled
device policy 100policy conformance 100
authenticating using Kerberos (advanced) 54using LDAP 55using LDAP + GSSAPI 58using NTLM authentication 60
Authentication understanding 50
Authorization understanding 50
Bbackup
MVP Server settings andconfiguration 147
basic filter 46
bookmark 103changing 105creating 103deleting 105loading 104saving 104
bookmark folders creating 103
building blocks adding to security templates 63internal accounts 53Kerberos 54LDAP 55LDAP + GSSAPI 58NTLM authentication 60
CCA Certificates
installing 69CA certificates
signing 71
certificate stores importing for SSL 72
certificates creating new 68deleting 68managing 68setting defaults 70signing 71viewing 68viewing basic information for 70
changing bookmark 105settings, printer 112SNMP community name 39user data 131
checking status, printer 112
collecting information about devices 95about print jobs 94about printers 95
command action 128
command line 128MarkVision Server 126remote server 125
communication security 82
communication password setting 75
components installing 21MarkVision Client 86MarkVision Client
Application 14, 21, 29MarkVision Messenger 15, 21MarkVision
Server 14, 15, 16, 21, 86MarkVision Web Client 14, 21, 30MarkVision Web Server 15
confidential printing configuring 76
configuring embedded solutions 117, 118MarkVision Server 107wireless settings 107
conformance filter 46
Index
160
creating account 79, 80bookmark 103bookmark folders 103custom view 92device policy 99discovery profiles 41filters 91folder 45folders 91group 79map 91print queue 108
creating logs action 132
custom table 92
custom filter action 134
custom table editing 93exporting 93viewing 93
custom tables embedded solutions 121
custom view creating 92editing 92
Ddatabase support in MVP 11.2.1 94DBMS
supported for MVP 11.2.1 94delay
event notification 124deleting
action 131, 141bookmark 105
descriptor file fetching 115installing 115uninstalling 116
destinations adding 97device policies 98editing 97removing 98
device crossed out 146discovering 145, 150discovery 41discovery profile 150
monitoring 127password 82policy 99policy conformance 100red text 146searching 39status alert 123
device discovery advanced 42scheduling 43
device policies destinations 98
device policy applying 99applying, scheduled 100creating 99embedded solutions 120password 74scheduling 100WLAN 106
device status alert 127
devices adding 44collecting information about 95discovering 41monitoring 124naming 43removing 44supported 145
diagnostic reports viewing and saving 111
directories shared 155
disabling action 130, 141
discovering device 145, 150
discovery device 41excluding devices 42include and exclude lists 42including devices 42viewing results 44
discovery profile device 150
discovery profiles 41creating 41exporting 43importing 43
download resource files 101
downloading files 100
EeDiags
viewing and saving reports 111editing
account 80custom table 93custom view 92destinations 97group 80
embedded solutions 114configuring 117, 118custom tables 121device policy 120exporting 120features 120filter 121importing 120installing 115, 116starting 119stopping 119uninstalling 116
Embedded Web Server print server 112
enabling action 130, 141
encrypted hard disk 89
error messages “Error resetting device” 139
event notification delay 124
event type selecting 127
events 123monitoring 125
expiration active session 81
exporting discovery profiles 43embedded solutions 120
e-mail command MarkVision Messenger 128
e-mail notification MarkVision Messenger 15, 124
Ffeature
finding devices 90
Index
161
features embedded solutions 120
Fetch Descriptor(s) 115files
downloading 100filter
action 134advanced 46applying 148basic 46conformance 46embedded solutions 121Trigger on Active 134Trigger on Either Active or
Clear 134using 46
filters 91creating 91
finding devices feature 90Quick Find 90
firewall 142firmware
upgrade 110firmware flashing
print server 110flashing 110folder
creating 45monitoring 127printers missing 139
folder alert action 123
folders creating 91
formatting storage device 110
function access using security templates to
control 63Function Access Controls 51
list of 156
GGeneric File Download
and Printer Lockdown 143unable to send files using 143
getting started Home screen 31MarkVision setup 30
group creating 79
editing 80Groups
understanding 50groups
user 80
Hhard disk
encrypted 89Home screen
All Tasks list 32Find Results 39Folders 40Quick Find 39
Host ID obtaining 119
IIBM AIX
operating system 24icons
printer 138importing
discovery profiles 43embedded solutions 120
installing CA Certificates 69components 21descriptor file 115embedded solutions 115, 116license 118MarkVision 22, 23, 24MarkVision Client
Application 14, 21MarkVision Messenger 21MarkVision Professional 22, 25MarkVision Server 21MarkVision Web Client 21MarkVision Web Server 15plug-in 102upgrading from a previous version
of MVP 25internal accounts
using 53Interwin 149IPX
support 149
JJava
increasing heap memory 19, 142
increasing RAM settings 18plug-in 146
Java Virtual Machine 17Job Statistics
enabling 94JVM 142
increasing default maximummemory 19
increasing default memorysettings 18
KKerberos authentication
advanced 54
Llanguage
unsupported 143LDAP
authenticating with (basic) 82configuring 55server 86
LDAP + GSSAPI 58license
installing 118limiting access to devices 86Linux
HP-UX 154Red Hat Enterprise 24, 154support 16SUSE Enterprise 24, 154
loading bookmark 104
lockdown printer 82, 88
lockout 61login
failure 61restrictions 61
MMac OS X
uninstalling MVP 154Macintosh 27managing
queue 107map
creating 91MarkVision
features 13installing 22, 23, 24
Index
162
starting in Mac OS X 29starting in Windows 29terminology 14uninstalling 154upgrading from a previous
version 25MarkVision 11.2.1
new features andenhancements 13
MarkVision Client 142components 86system requirements 16
MarkVision Client Application accessing 29installing 14, 21
MarkVisionMessenger 123, 124, 132, 134, 140, 141
accessing 149action 124, 126e-mail command 128e-mail notification 15, 124installing 21selecting devices 128
MarkVision Professional downloading 22explanation 13installing 22, 25uninstalling 154
MarkVisionServer 21, 101, 128, 138, 142, 143, 150
command line 126components 86configuring 107installing 21moving 28password 82removing files 101settings, importing and
exporting 26starting 27stopping 27system requirements 16
MarkVision Web Client 30crashing in Internet Explorer
6 140installing 21problems opening in Windows
Vista using Internet Explorer7 139
MarkVision WebServer 140, 141, 142, 150
installing 15MarkVision Web service
starting 27mDNS
enabling 139menu lockout
configuring 76modifying
action 130, 141monitoring
device 127devices 124events 125folder 127supplies 112
monitoring trays action 133
moving MarkVision Server 28
multi-select accessibility 40
MVP Client increasing available RAM for 18
MVP Server backing up settings and
configuration 147increasing available RAM for 19limiting access to devices
from 86
Nnaming
action 126NetWare 149NPA 137NTLM authentication
using 60
Oobtaining
Host ID 119on-board device security
changing 75operating systems 17
HP-UX 23supported 16
Operator Panel task unable to enter a PIN using 144
operator panels accessing remotely 96
ordering supplies 133
OS X support 16
PPassword
unable to enter in RHEL 5.0 144password
adding to device password list 73backup passwords 61creating or editing 72creating or editing (advanced) 52deleting from device password
list 73device 72, 82device policy 74editing from device password
list 73MarkVision Server 82reset 137security 82
password, communication server 84
passwords synchronizing 88
permissions print 113
PIN assigning 52managing multiple setups 53unable to enter in RHEL 5.0 144unable to enter using Operator
Panel task 144plug-in
installing 102Java 146removing 102
plug-ins and upgrading to MVP 11.2.1 145from a previous version of
MVP 145policy
device 99policy conformance
applying, scheduled 100device 100
port 80 1528007 141
Index
163
8009 141port 9180 152port access
TCP/IP 110ports
80 159180 15
print permissions 113
print jobs collecting information about 94
print queue creating 108removing 109
print server Embedded Web Server 112firmware flashing 110refreshing 138wireless 106
printer icons 138lockdown 82refreshing 138
printer folder alert 127
Printer Inventory enabling 95
printers collecting information about 95
printers missing folder 139
private access 127
privileges assigning 81
processor system requirements 16
public access 127
Qqueue
managing 107Quick Find 150
finding devices 90
RRAM
increasing available amount forMVP Server 19
increasing for MVP Client 18
system requirements 16README 147Red Hat Enterprise Linux 24refreshing
print server 138printer 138
Release Notes 147Remote Management
disabling 86securing 86
remote operator panel unable to enter a PIN using 144
remote operator panels accessing 96
remote server command line 125
removing account group 81destinations 98devices 44plug-in 102print queue 109shared directories 155
removing files MarkVision Server 101
reports diagnostics 111
reports, generating action 132
reset password 137
resource files download 101uploading 101
Resource Management and Printer Lockdown 144unable to send files to network
devices using 144RHEL 5.0
unable to enter a PIN or passwordusing 144
Ssaving
bookmark 104Scenario
Active Directory networks 66printer in a public place 64standalone or small office 65using passwords and PINs 64
scheduling device discovery 43
device policy 100task 111
searching device 39
Secure Socket Layer (SSL) 86secured device
accessing 72security
802.1x authentication 77adding password to device
password list 73advanced credentials 74assigning a PIN number 52Authentication 50Authorization 50backup passwords 61communication 82confidential printing 76configuring audit log settings 77deleting password from device
password list 73disabling remote management of
devices 86editing password from device
password list 73groups 50importing SSL certificate
stores 72Kerberos authentication 54LDAP (basic) 82LDAP + GSSAPI authentication 58LDAP authentication 55login restrictions 61managing certificates 68managing multiple PIN setups 53menu lockout 76NTLM authentication 60password 82printer lockdown 88securing remote management of
devices 86security templates 63server 84, 85setting a communication
password 75setting certificate defaults 70SNMP 78using security templates to control
function access 63viewing basic information for
certificates 70security audit log 77
Index
164
Security Templates understanding 51
security templates using to control function
access 63selecting
event type 127selecting devices
MarkVision Messenger 128server
LDAP 86MarkVision Server 15MarkVision Web Server 15password, communication 84security 84, 85selecting 30Tivoli 125, 128
setting user data 131
settings importing and exporting for the
MarkVision Server 26settings, printer
changing 112shared directories
removing 155signing
CA certificates 71certificates 71
simple filters 134SMTP mail server 125SNMP 78SNMP community name
changing 39SNMP community names
verifying 137solutions
viewing 114SSL
importing certificate stores 72starting
embedded solutions 119MarkVision in Mac OS X 29MarkVision in Windows 29MarkVision Server 27
status alert device 123
status, printer checking 112
stopping embedded solutions 119MarkVision Server 27
MarkVision Web service 27storage device
formatting 110Sun Solaris SPARC 25supplies
monitoring 112ordering 133
support IPX 149Tivoli 149
supported operating systems 16
supported devices 145SUSE Linux Enterprise 24synchronizing
passwords 88system requirements
MarkVision Client 16MarkVision Server 16processor 16RAM 16
Ttable
custom 92custom, exporting 93
task scheduling 111
TCP/IP port access enabling and disabling 110
Tivoli server 125, 128support 149Tivoli Plus module 149
Tivoli event server 125Tivoli Plus module 149Trigger on Active
filter 134Trigger on Either Active or Clear
filter 134troubleshooting
MarkVision Web Client 140
Uuninstalling
descriptor file 116embedded solutions 116MarkVision 154
UNIX 27HP-UX 23IBM AIX 24, 154
Sun Solaris SPARC 154support 16
unsupported language 143
upgrade firmware 110
uploading resource files 101
user data changing 131setting 131
using filter 46
Vverifying
action 130SNMP community names 137
viewing action information 131custom table 93solutions 114
VNC using to access remote operator
panels 96
WWeb browsers
supported by MarkVision WebClient 17
Windows support 16uninstalling MarkVision 154
Windows XP WLAN 109
wireless configuring settings 107print server 106
WLAN 107device policy 106Windows XP 109
Index
165


