Embed Size (px)
Citation preview
● ● ● ● ● ● ● ● ● ● ●
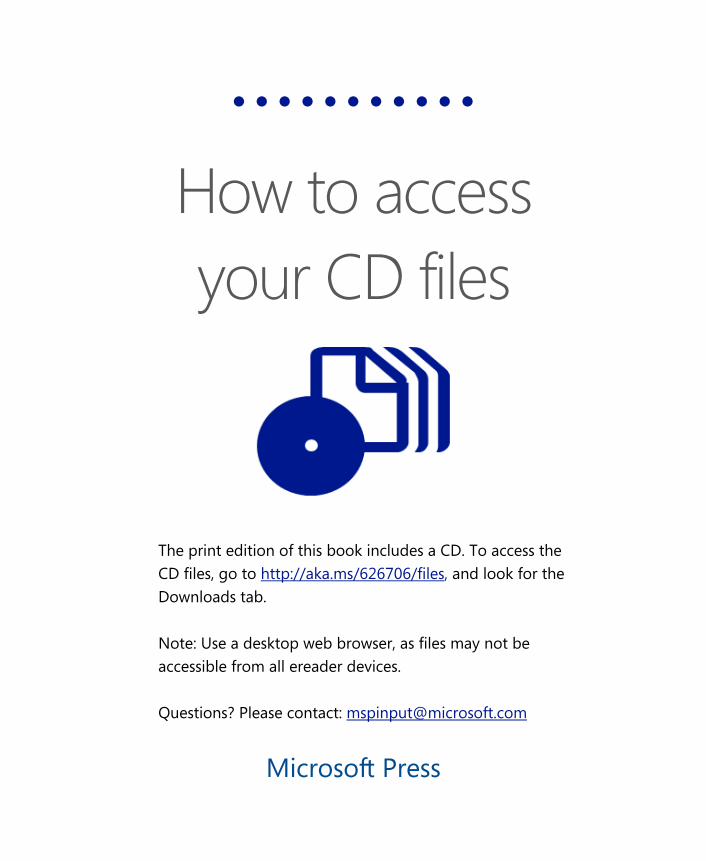
How to access your CD files
Microsoft Press
The print edition of this book includes a CD. To access the CD files, go to http://aka.ms/626706/files, and look for the Downloads tab. Note: Use a desktop web browser, as files may not be accessible from all ereader devices. Questions? Please contact: [email protected]


Microsoft® Visual C#® 2010Step by Step
John Sharp
PUBLISHED BYMicrosoft PressA Division of Microsoft CorporationOne Microsoft WayRedmond, Washington 98052-6399
Copyright © 2010 by John Sharp
All rights reserved. No part of the contents of this book may be reproduced or transmitted in any form or by any means without the written permission of the publisher.
Library of Congress Control Number: 2009939912
Printed and bound in the United States of America.
ISBN: 978-0-7356-2670-6
5 6 7 8 9 10 11 12 13 QGT 7 6 5 4 3 2
Distributed in Canada by H.B. Fenn and Company Ltd.
A CIP catalogue record for this book is available from the British Library.
Microsoft Press books are available through booksellers and distributors worldwide. For further infor mation about international editions, contact your local Microsoft Corporation office or contact Microsoft Press International directly at fax (425) 936-7329. Visit our Web site at www.microsoft.com/mspress. Send comments to [email protected].
Microsoft, Microsoft Press, Excel, IntelliSense, Internet Explorer, Jscript, MS, MSDN, SQL Server, Visual Basic, Visual C#, Visual C++, Visual Studio, Win32, Windows, and Windows Vista are either registered trademarks or trademarks of the Microsoft group of companies. Other product and company names mentioned herein may be the trademarks of their respective owners.
The example companies, organizations, products, domain names, e-mail addresses, logos, people, places, and events depicted herein are fictitious. No association with any real company, organization, product, domain name, e-mail address, logo, person, place, or event is intended or should be inferred.
This book expresses the author’s views and opinions. The information contained in this book is provided without any express, statutory, or implied warranties. Neither the authors, Microsoft Corporation, nor its resellers, or distributors will be held liable for any damages caused or alleged to be caused either directly or indirectly by this book.
Acquisitions Editor: Ben RyanDevelopmental Editor: Devon MusgraveProject Editor: Rosemary CapertonEditorial Production: Waypoint Press, www.waypointpress.comTechnical Reviewer: Per Blomqvist; Technical Review services provided by Content Master, a member of CM Group, Ltd. Cover: Tom Draper Design
Body Part No. X16-81630
[2012-10-12]
iii
Contents at a Glance
Part I Introducing Microsoft Visual C# and Microsoft Visual Studio 2010
1 Welcome to C# . . . . . . . . . . . . . . . . . . . . . . . . . . . . . . . . . . . . . . . . . . 3 2 Working with Variables, Operators, and Expressions . . . . . . . . . 27 3 Writing Methods and Applying Scope . . . . . . . . . . . . . . . . . . . . . 47 4 Using Decision Statements . . . . . . . . . . . . . . . . . . . . . . . . . . . . . . . 73 5 Using Compound Assignment and Iteration Statements . . . . . . 91 6 Managing Errors and Exceptions . . . . . . . . . . . . . . . . . . . . . . . . . 109
Part II Understanding the C# Language 7 Creating and Managing Classes and Objects . . . . . . . . . . . . . . . 129 8 Understanding Values and References . . . . . . . . . . . . . . . . . . . . 151 9 Creating Value Types with Enumerations and Structures . . . . . 173 10 Using Arrays and Collections . . . . . . . . . . . . . . . . . . . . . . . . . . . . . 191 11 Understanding Parameter Arrays . . . . . . . . . . . . . . . . . . . . . . . . . 219 12 Working with Inheritance . . . . . . . . . . . . . . . . . . . . . . . . . . . . . . . 231 13 Creating Interfaces and Defining Abstract Classes . . . . . . . . . . 253 14 Using Garbage Collection and Resource Management . . . . . . . 279
Part III Creating Components 15 Implementing Properties to Access Fields . . . . . . . . . . . . . . . . . 295 16 Using Indexers . . . . . . . . . . . . . . . . . . . . . . . . . . . . . . . . . . . . . . . . . 315 17 Interrupting Program Flow and Handling Events . . . . . . . . . . . 329 18 Introducing Generics . . . . . . . . . . . . . . . . . . . . . . . . . . . . . . . . . . . 353 19 Enumerating Collections . . . . . . . . . . . . . . . . . . . . . . . . . . . . . . . . 381 20 Querying In-Memory Data by Using Query Expressions . . . . . 395 21 Operator Overloading . . . . . . . . . . . . . . . . . . . . . . . . . . . . . . . . . . 419
iv Contents at a Glance
Part IV Building Windows Presentation Foundation Applications
22 Introducing Windows Presentation Foundation . . . . . . . . . . . . 443 23 Gathering User Input . . . . . . . . . . . . . . . . . . . . . . . . . . . . . . . . . . . 477 24 Performing Validation . . . . . . . . . . . . . . . . . . . . . . . . . . . . . . . . . . 509
Part V Managing Data 25 Querying Information in a Database . . . . . . . . . . . . . . . . . . . . . . 535 26 Displaying and Editing Data by Using the Entity
Framework and Data Binding . . . . . . . . . . . . . . . . . . . . . . . . . . . . 565
Part VI Building Professional Solutions with Visual Studio 2010
27 Introducing the Task Parallel Library . . . . . . . . . . . . . . . . . . . . . . 599 28 Performing Parallel Data Access . . . . . . . . . . . . . . . . . . . . . . . . . . 649 29 Creating and Using a Web Service . . . . . . . . . . . . . . . . . . . . . . . . 683
Appendix Interoperating with Dynamic Languages . . . . . . . . . . . . . . . . . . 717
v
Table of ContentsAcknowledgments . . . . . . . . . . . . . . . . . . . . . . . . . . . . . . . . . . . . . . . . . . . . . . . . . xvii
Introduction . . . . . . . . . . . . . . . . . . . . . . . . . . . . . . . . . . . . . . . . . . . . . . . . . . . . . . .xix
Part I Introducing Microsoft Visual C# and Microsoft Visual Studio 2010
1 Welcome to C# . . . . . . . . . . . . . . . . . . . . . . . . . . . . . . . . . . . . . . . . . . 3Beginning Programming with the Visual Studio 2010 Environment . . . . . . . . . . 3
Writing Your First Program . . . . . . . . . . . . . . . . . . . . . . . . . . . . . . . . . . . . . . . . . . . . . 8
Using Namespaces . . . . . . . . . . . . . . . . . . . . . . . . . . . . . . . . . . . . . . . . . . . . . . . . . . . 14
Creating a Graphical Application . . . . . . . . . . . . . . . . . . . . . . . . . . . . . . . . . . . . . . . 17
Chapter 1 Quick Reference . . . . . . . . . . . . . . . . . . . . . . . . . . . . . . . . . . . . . . . . . . . . 26
2 Working with Variables, Operators, and Expressions . . . . . . . . . 27Understanding Statements . . . . . . . . . . . . . . . . . . . . . . . . . . . . . . . . . . . . . . . . . . . . 27
Using Identifiers . . . . . . . . . . . . . . . . . . . . . . . . . . . . . . . . . . . . . . . . . . . . . . . . . . . . . 28
Identifying Keywords . . . . . . . . . . . . . . . . . . . . . . . . . . . . . . . . . . . . . . . . . . . 28
Using Variables . . . . . . . . . . . . . . . . . . . . . . . . . . . . . . . . . . . . . . . . . . . . . . . . . . . . . . 29
Naming Variables . . . . . . . . . . . . . . . . . . . . . . . . . . . . . . . . . . . . . . . . . . . . . . . 30
Declaring Variables . . . . . . . . . . . . . . . . . . . . . . . . . . . . . . . . . . . . . . . . . . . . . 30
Working with Primitive Data Types . . . . . . . . . . . . . . . . . . . . . . . . . . . . . . . . . . . . . 31
Unassigned Local Variables . . . . . . . . . . . . . . . . . . . . . . . . . . . . . . . . . . . . . . 32
Displaying Primitive Data Type Values . . . . . . . . . . . . . . . . . . . . . . . . . . . . . 32
Using Arithmetic Operators . . . . . . . . . . . . . . . . . . . . . . . . . . . . . . . . . . . . . . . . . . . 36
Operators and Types . . . . . . . . . . . . . . . . . . . . . . . . . . . . . . . . . . . . . . . . . . . . 37
Examining Arithmetic Operators . . . . . . . . . . . . . . . . . . . . . . . . . . . . . . . . . . 38
Controlling Precedence . . . . . . . . . . . . . . . . . . . . . . . . . . . . . . . . . . . . . . . . . 41
Using Associativity to Evaluate Expressions . . . . . . . . . . . . . . . . . . . . . . . . 42
Associativity and the Assignment Operator . . . . . . . . . . . . . . . . . . . . . . . . 42
Microsoft is interested in hearing your feedback so we can continually improve our books and learning resources for you. To participate in a brief online survey, please visit:
www.microsoft.com/learning/booksurvey/
What do you think of this book? We want to hear from you!

vi Table of Contents
Incrementing and Decrementing Variables . . . . . . . . . . . . . . . . . . . . . . . . . . . . . . 43
Prefix and Postfix . . . . . . . . . . . . . . . . . . . . . . . . . . . . . . . . . . . . . . . . . . . . . . . 44
Declaring Implicitly Typed Local Variables . . . . . . . . . . . . . . . . . . . . . . . . . . . . . . . 45
Chapter 2 Quick Reference . . . . . . . . . . . . . . . . . . . . . . . . . . . . . . . . . . . . . . . . . . . . 46
3 Writing Methods and Applying Scope . . . . . . . . . . . . . . . . . . . . . 47Creating Methods . . . . . . . . . . . . . . . . . . . . . . . . . . . . . . . . . . . . . . . . . . . . . . . . . . . 47
Declaring a Method . . . . . . . . . . . . . . . . . . . . . . . . . . . . . . . . . . . . . . . . . . . . . 48
Returning Data from a Method . . . . . . . . . . . . . . . . . . . . . . . . . . . . . . . . . . . 49
Calling Methods . . . . . . . . . . . . . . . . . . . . . . . . . . . . . . . . . . . . . . . . . . . . . . . . 51
Specifying the Method Call Syntax . . . . . . . . . . . . . . . . . . . . . . . . . . . . . . . . 51
Applying Scope . . . . . . . . . . . . . . . . . . . . . . . . . . . . . . . . . . . . . . . . . . . . . . . . . . . . . . 53
Defining Local Scope . . . . . . . . . . . . . . . . . . . . . . . . . . . . . . . . . . . . . . . . . . . . 54
Defining Class Scope . . . . . . . . . . . . . . . . . . . . . . . . . . . . . . . . . . . . . . . . . . . . 54
Overloading Methods . . . . . . . . . . . . . . . . . . . . . . . . . . . . . . . . . . . . . . . . . . . 55
Writing Methods . . . . . . . . . . . . . . . . . . . . . . . . . . . . . . . . . . . . . . . . . . . . . . . . . . . . 56
Using Optional Parameters and Named Arguments . . . . . . . . . . . . . . . . . . . . . . 64
Defining Optional Parameters . . . . . . . . . . . . . . . . . . . . . . . . . . . . . . . . . . . . 65
Passing Named Arguments . . . . . . . . . . . . . . . . . . . . . . . . . . . . . . . . . . . . . . 66
Resolving Ambiguities with Optional Parameters and Named Arguments . . . . . . . . . . . . . . . . . . . . . . . . . . . . . . . . . . . . . . . . . . . . . 66
Chapter 3 Quick Reference . . . . . . . . . . . . . . . . . . . . . . . . . . . . . . . . . . . . . . . . . . . . 72
4 Using Decision Statements . . . . . . . . . . . . . . . . . . . . . . . . . . . . . . . 73Declaring Boolean Variables . . . . . . . . . . . . . . . . . . . . . . . . . . . . . . . . . . . . . . . . . . . 73
Using Boolean Operators . . . . . . . . . . . . . . . . . . . . . . . . . . . . . . . . . . . . . . . . . . . . . 74
Understanding Equality and Relational Operators . . . . . . . . . . . . . . . . . . 74
Understanding Conditional Logical Operators . . . . . . . . . . . . . . . . . . . . . . 75
Short-Circuiting . . . . . . . . . . . . . . . . . . . . . . . . . . . . . . . . . . . . . . . . . . . . . . . . 76
Summarizing Operator Precedence and Associativity . . . . . . . . . . . . . . . 76
Using if Statements to Make Decisions . . . . . . . . . . . . . . . . . . . . . . . . . . . . . . . . . 77
Understanding if Statement Syntax . . . . . . . . . . . . . . . . . . . . . . . . . . . . . . . 77
Using Blocks to Group Statements . . . . . . . . . . . . . . . . . . . . . . . . . . . . . . . . 78
Cascading if Statements . . . . . . . . . . . . . . . . . . . . . . . . . . . . . . . . . . . . . . . . . 79
Using switch Statements . . . . . . . . . . . . . . . . . . . . . . . . . . . . . . . . . . . . . . . . . . . . . . 84
Understanding switch Statement Syntax . . . . . . . . . . . . . . . . . . . . . . . . . . . 85
Following the switch Statement Rules . . . . . . . . . . . . . . . . . . . . . . . . . . . . . 86
Chapter 4 Quick Reference . . . . . . . . . . . . . . . . . . . . . . . . . . . . . . . . . . . . . . . . . . . . 89
Table of Contents vii
5 Using Compound Assignment and Iteration Statements . . . . . . 91Using Compound Assignment Operators . . . . . . . . . . . . . . . . . . . . . . . . . . . . . . . 91
Writing while Statements . . . . . . . . . . . . . . . . . . . . . . . . . . . . . . . . . . . . . . . . . . . . . 92
Writing for Statements . . . . . . . . . . . . . . . . . . . . . . . . . . . . . . . . . . . . . . . . . . . . . . . 97
Understanding for Statement Scope . . . . . . . . . . . . . . . . . . . . . . . . . . . . . . 98
Writing do Statements . . . . . . . . . . . . . . . . . . . . . . . . . . . . . . . . . . . . . . . . . . . . . . . . 99
Chapter 5 Quick Reference . . . . . . . . . . . . . . . . . . . . . . . . . . . . . . . . . . . . . . . . . . . 108
6 Managing Errors and Exceptions . . . . . . . . . . . . . . . . . . . . . . . . . 109Coping with Errors . . . . . . . . . . . . . . . . . . . . . . . . . . . . . . . . . . . . . . . . . . . . . . . . . . 109
Trying Code and Catching Exceptions . . . . . . . . . . . . . . . . . . . . . . . . . . . . . . . . . 110
Unhandled Exceptions . . . . . . . . . . . . . . . . . . . . . . . . . . . . . . . . . . . . . . . . . 111
Using Multiple catch Handlers . . . . . . . . . . . . . . . . . . . . . . . . . . . . . . . . . . 112
Catching Multiple Exceptions . . . . . . . . . . . . . . . . . . . . . . . . . . . . . . . . . . . 113
Using Checked and Unchecked Integer Arithmetic . . . . . . . . . . . . . . . . . . . . . . 118
Writing Checked Statements . . . . . . . . . . . . . . . . . . . . . . . . . . . . . . . . . . . . 118
Writing Checked Expressions . . . . . . . . . . . . . . . . . . . . . . . . . . . . . . . . . . . . 119
Throwing Exceptions . . . . . . . . . . . . . . . . . . . . . . . . . . . . . . . . . . . . . . . . . . . . . . . . 121
Using a finally Block . . . . . . . . . . . . . . . . . . . . . . . . . . . . . . . . . . . . . . . . . . . . . . . . . 124
Chapter 6 Quick Reference . . . . . . . . . . . . . . . . . . . . . . . . . . . . . . . . . . . . . . . . . . . 126
Part II Understanding the C# Language
7 Creating and Managing Classes and Objects . . . . . . . . . . . . . . . 129Understanding Classification . . . . . . . . . . . . . . . . . . . . . . . . . . . . . . . . . . . . . . . . . 129
The Purpose of Encapsulation . . . . . . . . . . . . . . . . . . . . . . . . . . . . . . . . . . . . . . . . 130
Defining and Using a Class . . . . . . . . . . . . . . . . . . . . . . . . . . . . . . . . . . . . . . . . . . . 130
Controlling Accessibility . . . . . . . . . . . . . . . . . . . . . . . . . . . . . . . . . . . . . . . . . . . . . 132
Working with Constructors . . . . . . . . . . . . . . . . . . . . . . . . . . . . . . . . . . . . . 133
Overloading Constructors . . . . . . . . . . . . . . . . . . . . . . . . . . . . . . . . . . . . . . 134
Understanding static Methods and Data . . . . . . . . . . . . . . . . . . . . . . . . . . . . . . . 142
Creating a Shared Field . . . . . . . . . . . . . . . . . . . . . . . . . . . . . . . . . . . . . . . . . 143
Creating a static Field by Using the const Keyword . . . . . . . . . . . . . . . . . 144
Static Classes . . . . . . . . . . . . . . . . . . . . . . . . . . . . . . . . . . . . . . . . . . . . . . . . . . 144
Anonymous Classes . . . . . . . . . . . . . . . . . . . . . . . . . . . . . . . . . . . . . . . . . . . . 147
Chapter 7 Quick Reference . . . . . . . . . . . . . . . . . . . . . . . . . . . . . . . . . . . . . . . . . . . 149
viii Table of Contents
8 Understanding Values and References . . . . . . . . . . . . . . . . . . . . 151Copying Value Type Variables and Classes . . . . . . . . . . . . . . . . . . . . . . . . . . . . . 151
Understanding Null Values and Nullable Types . . . . . . . . . . . . . . . . . . . . . . . . . 156
Using Nullable Types . . . . . . . . . . . . . . . . . . . . . . . . . . . . . . . . . . . . . . . . . . . 157
Understanding the Properties of Nullable Types . . . . . . . . . . . . . . . . . . . 158
Using ref and out Parameters . . . . . . . . . . . . . . . . . . . . . . . . . . . . . . . . . . . . . . . . . 159
Creating ref Parameters . . . . . . . . . . . . . . . . . . . . . . . . . . . . . . . . . . . . . . . . 159
Creating out Parameters . . . . . . . . . . . . . . . . . . . . . . . . . . . . . . . . . . . . . . . . 160
How Computer Memory Is Organized . . . . . . . . . . . . . . . . . . . . . . . . . . . . . . . . . 162
Using the Stack and the Heap . . . . . . . . . . . . . . . . . . . . . . . . . . . . . . . . . . . 164
The System.Object Class . . . . . . . . . . . . . . . . . . . . . . . . . . . . . . . . . . . . . . . . . . . . . 165
Boxing . . . . . . . . . . . . . . . . . . . . . . . . . . . . . . . . . . . . . . . . . . . . . . . . . . . . . . . . . . . . 165
Unboxing . . . . . . . . . . . . . . . . . . . . . . . . . . . . . . . . . . . . . . . . . . . . . . . . . . . . . . . . . . 166
Casting Data Safely . . . . . . . . . . . . . . . . . . . . . . . . . . . . . . . . . . . . . . . . . . . . . . . . . 168
The is Operator . . . . . . . . . . . . . . . . . . . . . . . . . . . . . . . . . . . . . . . . . . . . . . . . 168
The as Operator . . . . . . . . . . . . . . . . . . . . . . . . . . . . . . . . . . . . . . . . . . . . . . . 169
Chapter 8 Quick Reference . . . . . . . . . . . . . . . . . . . . . . . . . . . . . . . . . . . . . . . . . . . 171
9 Creating Value Types with Enumerations and Structures . . . . . 173Working with Enumerations . . . . . . . . . . . . . . . . . . . . . . . . . . . . . . . . . . . . . . . . . . 173
Declaring an Enumeration . . . . . . . . . . . . . . . . . . . . . . . . . . . . . . . . . . . . . . 173
Using an Enumeration . . . . . . . . . . . . . . . . . . . . . . . . . . . . . . . . . . . . . . . . . . 174
Choosing Enumeration Literal Values . . . . . . . . . . . . . . . . . . . . . . . . . . . . . 175
Choosing an Enumeration’s Underlying Type . . . . . . . . . . . . . . . . . . . . . . 176
Working with Structures . . . . . . . . . . . . . . . . . . . . . . . . . . . . . . . . . . . . . . . . . . . . . 178
Declaring a Structure . . . . . . . . . . . . . . . . . . . . . . . . . . . . . . . . . . . . . . . . . . . 180
Understanding Structure and Class Differences . . . . . . . . . . . . . . . . . . . . 181
Declaring Structure Variables . . . . . . . . . . . . . . . . . . . . . . . . . . . . . . . . . . . . 182
Understanding Structure Initialization . . . . . . . . . . . . . . . . . . . . . . . . . . . . 183
Copying Structure Variables . . . . . . . . . . . . . . . . . . . . . . . . . . . . . . . . . . . . . 187
Chapter 9 Quick Reference . . . . . . . . . . . . . . . . . . . . . . . . . . . . . . . . . . . . . . . . . . . 190
10 Using Arrays and Collections . . . . . . . . . . . . . . . . . . . . . . . . . . . . . 191What Is an Array? . . . . . . . . . . . . . . . . . . . . . . . . . . . . . . . . . . . . . . . . . . . . . . . . . . . 191
Declaring Array Variables . . . . . . . . . . . . . . . . . . . . . . . . . . . . . . . . . . . . . . . 191
Creating an Array Instance . . . . . . . . . . . . . . . . . . . . . . . . . . . . . . . . . . . . . . 192
Initializing Array Variables . . . . . . . . . . . . . . . . . . . . . . . . . . . . . . . . . . . . . . 193
Table of Contents ix
Creating an Implicitly Typed Array . . . . . . . . . . . . . . . . . . . . . . . . . . . . . . . 194
Accessing an Individual Array Element . . . . . . . . . . . . . . . . . . . . . . . . . . . 195
Iterating Through an Array . . . . . . . . . . . . . . . . . . . . . . . . . . . . . . . . . . . . . . 195
Copying Arrays . . . . . . . . . . . . . . . . . . . . . . . . . . . . . . . . . . . . . . . . . . . . . . . . 197
Using Multidimensional Arrays . . . . . . . . . . . . . . . . . . . . . . . . . . . . . . . . . . 198
Using Arrays to Play Cards . . . . . . . . . . . . . . . . . . . . . . . . . . . . . . . . . . . . . . 199
What Are Collection Classes? . . . . . . . . . . . . . . . . . . . . . . . . . . . . . . . . . . . . . . . . . 206
The ArrayList Collection Class . . . . . . . . . . . . . . . . . . . . . . . . . . . . . . . . . . . 208
The Queue Collection Class . . . . . . . . . . . . . . . . . . . . . . . . . . . . . . . . . . . . . 210
The Stack Collection Class . . . . . . . . . . . . . . . . . . . . . . . . . . . . . . . . . . . . . . 210
The Hashtable Collection Class . . . . . . . . . . . . . . . . . . . . . . . . . . . . . . . . . . 211
The SortedList Collection Class . . . . . . . . . . . . . . . . . . . . . . . . . . . . . . . . . . 213
Using Collection Initializers . . . . . . . . . . . . . . . . . . . . . . . . . . . . . . . . . . . . . 214
Comparing Arrays and Collections . . . . . . . . . . . . . . . . . . . . . . . . . . . . . . . 214
Using Collection Classes to Play Cards . . . . . . . . . . . . . . . . . . . . . . . . . . . . 214
Chapter 10 Quick Reference . . . . . . . . . . . . . . . . . . . . . . . . . . . . . . . . . . . . . . . . . . 218
11 Understanding Parameter Arrays . . . . . . . . . . . . . . . . . . . . . . . . . 219Using Array Arguments . . . . . . . . . . . . . . . . . . . . . . . . . . . . . . . . . . . . . . . . . . . . . . 220
Declaring a params Array . . . . . . . . . . . . . . . . . . . . . . . . . . . . . . . . . . . . . . . 221
Using params object[ ] . . . . . . . . . . . . . . . . . . . . . . . . . . . . . . . . . . . . . . . . 223
Using a params Array . . . . . . . . . . . . . . . . . . . . . . . . . . . . . . . . . . . . . . . . . . 224
Comparing Parameters Arrays and Optional Parameters . . . . . . . . . . . . . . . . . 226
Chapter 11 Quick Reference . . . . . . . . . . . . . . . . . . . . . . . . . . . . . . . . . . . . . . . . . . 229
12 Working with Inheritance . . . . . . . . . . . . . . . . . . . . . . . . . . . . . . . 231What Is Inheritance? . . . . . . . . . . . . . . . . . . . . . . . . . . . . . . . . . . . . . . . . . . . . . . . . 231
Using Inheritance . . . . . . . . . . . . . . . . . . . . . . . . . . . . . . . . . . . . . . . . . . . . . . . . . . . 232
Calling Base Class Constructors . . . . . . . . . . . . . . . . . . . . . . . . . . . . . . . . . . 234
Assigning Classes . . . . . . . . . . . . . . . . . . . . . . . . . . . . . . . . . . . . . . . . . . . . . . 235
Declaring new Methods . . . . . . . . . . . . . . . . . . . . . . . . . . . . . . . . . . . . . . . . 237
Declaring Virtual Methods . . . . . . . . . . . . . . . . . . . . . . . . . . . . . . . . . . . . . . 238
Declaring override Methods . . . . . . . . . . . . . . . . . . . . . . . . . . . . . . . . . . . . . 239
Understanding protected Access . . . . . . . . . . . . . . . . . . . . . . . . . . . . . . . . . 242
Understanding Extension Methods . . . . . . . . . . . . . . . . . . . . . . . . . . . . . . . . . . . 247
Chapter 12 Quick Reference . . . . . . . . . . . . . . . . . . . . . . . . . . . . . . . . . . . . . . . . . . 251
x Table of Contents
13 Creating Interfaces and Defining Abstract Classes . . . . . . . . . . 253Understanding Interfaces . . . . . . . . . . . . . . . . . . . . . . . . . . . . . . . . . . . . . . . . . . . . 253
Defining an Interface . . . . . . . . . . . . . . . . . . . . . . . . . . . . . . . . . . . . . . . . . . . 254
Implementing an Interface . . . . . . . . . . . . . . . . . . . . . . . . . . . . . . . . . . . . . . 255
Referencing a Class Through Its Interface . . . . . . . . . . . . . . . . . . . . . . . . . 256
Working with Multiple Interfaces . . . . . . . . . . . . . . . . . . . . . . . . . . . . . . . . 257
Explicitly Implementing an Interface . . . . . . . . . . . . . . . . . . . . . . . . . . . . . 257
Interface Restrictions . . . . . . . . . . . . . . . . . . . . . . . . . . . . . . . . . . . . . . . . . . . 259
Defining and Using Interfaces . . . . . . . . . . . . . . . . . . . . . . . . . . . . . . . . . . . 259
Abstract Classes . . . . . . . . . . . . . . . . . . . . . . . . . . . . . . . . . . . . . . . . . . . . . . . . . . . . 269
Abstract Methods . . . . . . . . . . . . . . . . . . . . . . . . . . . . . . . . . . . . . . . . . . . . . 270
Sealed Classes . . . . . . . . . . . . . . . . . . . . . . . . . . . . . . . . . . . . . . . . . . . . . . . . . . . . . . 271
Sealed Methods . . . . . . . . . . . . . . . . . . . . . . . . . . . . . . . . . . . . . . . . . . . . . . . 271
Implementing and Using an Abstract Class . . . . . . . . . . . . . . . . . . . . . . . . 272
Chapter 13 Quick Reference . . . . . . . . . . . . . . . . . . . . . . . . . . . . . . . . . . . . . . . . . . 277
14 Using Garbage Collection and Resource Management . . . . . . . 279The Life and Times of an Object . . . . . . . . . . . . . . . . . . . . . . . . . . . . . . . . . . . . . . 279
Writing Destructors . . . . . . . . . . . . . . . . . . . . . . . . . . . . . . . . . . . . . . . . . . . . 280
Why Use the Garbage Collector? . . . . . . . . . . . . . . . . . . . . . . . . . . . . . . . . 282
How Does the Garbage Collector Work? . . . . . . . . . . . . . . . . . . . . . . . . . . 283
Recommendations . . . . . . . . . . . . . . . . . . . . . . . . . . . . . . . . . . . . . . . . . . . . . 284
Resource Management . . . . . . . . . . . . . . . . . . . . . . . . . . . . . . . . . . . . . . . . . . . . . . 284
Disposal Methods . . . . . . . . . . . . . . . . . . . . . . . . . . . . . . . . . . . . . . . . . . . . . 285
Exception-Safe Disposal . . . . . . . . . . . . . . . . . . . . . . . . . . . . . . . . . . . . . . . . 285
The using Statement . . . . . . . . . . . . . . . . . . . . . . . . . . . . . . . . . . . . . . . . . . . 286
Calling the Dispose Method from a Destructor . . . . . . . . . . . . . . . . . . . . 288
Implementing Exception-Safe Disposal . . . . . . . . . . . . . . . . . . . . . . . . . . . . . . . . 289
Chapter 14 Quick Reference . . . . . . . . . . . . . . . . . . . . . . . . . . . . . . . . . . . . . . . . . . 292
Part III Creating Components
15 Implementing Properties to Access Fields . . . . . . . . . . . . . . . . . 295Implementing Encapsulation by Using Methods . . . . . . . . . . . . . . . . . . . . . . . . 296
What Are Properties? . . . . . . . . . . . . . . . . . . . . . . . . . . . . . . . . . . . . . . . . . . . . . . . . 297
Using Properties . . . . . . . . . . . . . . . . . . . . . . . . . . . . . . . . . . . . . . . . . . . . . . . 299
Read-Only Properties . . . . . . . . . . . . . . . . . . . . . . . . . . . . . . . . . . . . . . . . . . 300
Table of Contents xi
Write-Only Properties . . . . . . . . . . . . . . . . . . . . . . . . . . . . . . . . . . . . . . . . . . 300
Property Accessibility . . . . . . . . . . . . . . . . . . . . . . . . . . . . . . . . . . . . . . . . . . 301
Understanding the Property Restrictions . . . . . . . . . . . . . . . . . . . . . . . . . . . . . . 302
Declaring Interface Properties . . . . . . . . . . . . . . . . . . . . . . . . . . . . . . . . . . . . . . . . 304
Using Properties in a Windows Application . . . . . . . . . . . . . . . . . . . . . . . 305
Generating Automatic Properties . . . . . . . . . . . . . . . . . . . . . . . . . . . . . . . . . . . . . 307
Initializing Objects by Using Properties . . . . . . . . . . . . . . . . . . . . . . . . . . . . . . . . 308
Chapter 15 Quick Reference . . . . . . . . . . . . . . . . . . . . . . . . . . . . . . . . . . . . . . . . . . 313
16 Using Indexers . . . . . . . . . . . . . . . . . . . . . . . . . . . . . . . . . . . . . . . . . 315What Is an Indexer? . . . . . . . . . . . . . . . . . . . . . . . . . . . . . . . . . . . . . . . . . . . . . . . . . 315
An Example That Doesn’t Use Indexers . . . . . . . . . . . . . . . . . . . . . . . . . . . 315
The Same Example Using Indexers . . . . . . . . . . . . . . . . . . . . . . . . . . . . . . . 317
Understanding Indexer Accessors . . . . . . . . . . . . . . . . . . . . . . . . . . . . . . . . 319
Comparing Indexers and Arrays . . . . . . . . . . . . . . . . . . . . . . . . . . . . . . . . . 320
Indexers in Interfaces . . . . . . . . . . . . . . . . . . . . . . . . . . . . . . . . . . . . . . . . . . . . . . . . 322
Using Indexers in a Windows Application . . . . . . . . . . . . . . . . . . . . . . . . . . . . . . 323
Chapter 16 Quick Reference . . . . . . . . . . . . . . . . . . . . . . . . . . . . . . . . . . . . . . . . . . 328
17 Interrupting Program Flow and Handling Events . . . . . . . . . . . 329Declaring and Using Delegates . . . . . . . . . . . . . . . . . . . . . . . . . . . . . . . . . . . . . . . 329
The Automated Factory Scenario . . . . . . . . . . . . . . . . . . . . . . . . . . . . . . . . 330
Implementing the Factory Without Using Delegates . . . . . . . . . . . . . . . 330
Implementing the Factory by Using a Delegate . . . . . . . . . . . . . . . . . . . . 331
Using Delegates . . . . . . . . . . . . . . . . . . . . . . . . . . . . . . . . . . . . . . . . . . . . . . . 333
Lambda Expressions and Delegates . . . . . . . . . . . . . . . . . . . . . . . . . . . . . . . . . . . 338
Creating a Method Adapter . . . . . . . . . . . . . . . . . . . . . . . . . . . . . . . . . . . . . 339
Using a Lambda Expression as an Adapter . . . . . . . . . . . . . . . . . . . . . . . . 339
The Form of Lambda Expressions . . . . . . . . . . . . . . . . . . . . . . . . . . . . . . . . 340
Enabling Notifications with Events . . . . . . . . . . . . . . . . . . . . . . . . . . . . . . . . . . . . 342
Declaring an Event . . . . . . . . . . . . . . . . . . . . . . . . . . . . . . . . . . . . . . . . . . . . . 342
Subscribing to an Event . . . . . . . . . . . . . . . . . . . . . . . . . . . . . . . . . . . . . . . . 343
Unsubscribing from an Event . . . . . . . . . . . . . . . . . . . . . . . . . . . . . . . . . . . .344
Raising an Event . . . . . . . . . . . . . . . . . . . . . . . . . . . . . . . . . . . . . . . . . . . . . . .344
Understanding WPF User Interface Events . . . . . . . . . . . . . . . . . . . . . . . . . . . . . 345
Using Events . . . . . . . . . . . . . . . . . . . . . . . . . . . . . . . . . . . . . . . . . . . . . . . . . . 346
Chapter 17 Quick Reference . . . . . . . . . . . . . . . . . . . . . . . . . . . . . . . . . . . . . . . . . . 350
xii Table of Contents
18 Introducing Generics . . . . . . . . . . . . . . . . . . . . . . . . . . . . . . . . . . . 353The Problem with objects . . . . . . . . . . . . . . . . . . . . . . . . . . . . . . . . . . . . . . . . . . . . 353
The Generics Solution . . . . . . . . . . . . . . . . . . . . . . . . . . . . . . . . . . . . . . . . . . . . . . . 355
Generics vs . Generalized Classes . . . . . . . . . . . . . . . . . . . . . . . . . . . . . . . . . 357
Generics and Constraints . . . . . . . . . . . . . . . . . . . . . . . . . . . . . . . . . . . . . . . 358
Creating a Generic Class . . . . . . . . . . . . . . . . . . . . . . . . . . . . . . . . . . . . . . . . . . . . . 358
The Theory of Binary Trees . . . . . . . . . . . . . . . . . . . . . . . . . . . . . . . . . . . . . . 358
Building a Binary Tree Class by Using Generics . . . . . . . . . . . . . . . . . . . . 361
Creating a Generic Method . . . . . . . . . . . . . . . . . . . . . . . . . . . . . . . . . . . . . . . . . . 370
Defining a Generic Method to Build a Binary Tree . . . . . . . . . . . . . . . . . 371
Variance and Generic Interfaces . . . . . . . . . . . . . . . . . . . . . . . . . . . . . . . . . . . . . . 373
Covariant Interfaces . . . . . . . . . . . . . . . . . . . . . . . . . . . . . . . . . . . . . . . . . . . . 375
Contravariant Interfaces . . . . . . . . . . . . . . . . . . . . . . . . . . . . . . . . . . . . . . . . 377
Chapter 18 Quick Reference . . . . . . . . . . . . . . . . . . . . . . . . . . . . . . . . . . . . . . . . . . 379
19 Enumerating Collections . . . . . . . . . . . . . . . . . . . . . . . . . . . . . . . . 381Enumerating the Elements in a Collection . . . . . . . . . . . . . . . . . . . . . . . . . . . . . . 381
Manually Implementing an Enumerator . . . . . . . . . . . . . . . . . . . . . . . . . . 383
Implementing the IEnumerable Interface . . . . . . . . . . . . . . . . . . . . . . . . . 387
Implementing an Enumerator by Using an Iterator . . . . . . . . . . . . . . . . . . . . . . 389
A Simple Iterator . . . . . . . . . . . . . . . . . . . . . . . . . . . . . . . . . . . . . . . . . . . . . . 389
Defining an Enumerator for the Tree<TItem> Class by Using an Iterator . . . . . . . . . . . . . . . . . . . . . . . . . . . . . . . . . . . . . . . . . . . . 391
Chapter 19 Quick Reference . . . . . . . . . . . . . . . . . . . . . . . . . . . . . . . . . . . . . . . . . . 394
20 Querying In-Memory Data by Using Query Expressions . . . . . 395What Is Language Integrated Query? . . . . . . . . . . . . . . . . . . . . . . . . . . . . . . . . . . 395
Using LINQ in a C# Application . . . . . . . . . . . . . . . . . . . . . . . . . . . . . . . . . . . . . . . 396
Selecting Data . . . . . . . . . . . . . . . . . . . . . . . . . . . . . . . . . . . . . . . . . . . . . . . . 398
Filtering Data . . . . . . . . . . . . . . . . . . . . . . . . . . . . . . . . . . . . . . . . . . . . . . . . .400
Ordering, Grouping, and Aggregating Data . . . . . . . . . . . . . . . . . . . . . . . 401
Joining Data . . . . . . . . . . . . . . . . . . . . . . . . . . . . . . . . . . . . . . . . . . . . . . . . . .404
Using Query Operators . . . . . . . . . . . . . . . . . . . . . . . . . . . . . . . . . . . . . . . . . 405
Querying Data in Tree<TItem> Objects . . . . . . . . . . . . . . . . . . . . . . . . . . 407
LINQ and Deferred Evaluation . . . . . . . . . . . . . . . . . . . . . . . . . . . . . . . . . . . 412
Chapter 20 Quick Reference . . . . . . . . . . . . . . . . . . . . . . . . . . . . . . . . . . . . . . . . . . 416
Table of Contents xiii
21 Operator Overloading . . . . . . . . . . . . . . . . . . . . . . . . . . . . . . . . . . 419Understanding Operators . . . . . . . . . . . . . . . . . . . . . . . . . . . . . . . . . . . . . . . . . . . . 419
Operator Constraints . . . . . . . . . . . . . . . . . . . . . . . . . . . . . . . . . . . . . . . . . . . 420
Overloaded Operators . . . . . . . . . . . . . . . . . . . . . . . . . . . . . . . . . . . . . . . . . 420
Creating Symmetric Operators . . . . . . . . . . . . . . . . . . . . . . . . . . . . . . . . . . 422
Understanding Compound Assignment Evaluation . . . . . . . . . . . . . . . . . . . . . . 424
Declaring Increment and Decrement Operators . . . . . . . . . . . . . . . . . . . . . . . . 425
Comparing Operators in Structures and Classes . . . . . . . . . . . . . . . . . . . . . . . . 426
Defining Operator Pairs . . . . . . . . . . . . . . . . . . . . . . . . . . . . . . . . . . . . . . . . . . . . . 426
Implementing Operators . . . . . . . . . . . . . . . . . . . . . . . . . . . . . . . . . . . . . . . . . . . . 427
Understanding Conversion Operators . . . . . . . . . . . . . . . . . . . . . . . . . . . . . . . . . 434
Providing Built-in Conversions . . . . . . . . . . . . . . . . . . . . . . . . . . . . . . . . . . . 434
Implementing User-Defined Conversion Operators . . . . . . . . . . . . . . . . 435
Creating Symmetric Operators, Revisited . . . . . . . . . . . . . . . . . . . . . . . . . 436
Writing Conversion Operators . . . . . . . . . . . . . . . . . . . . . . . . . . . . . . . . . . . 437
Chapter 21 Quick Reference . . . . . . . . . . . . . . . . . . . . . . . . . . . . . . . . . . . . . . . . . .440
Part IV Building Windows Presentation Foundation Applications
22 Introducing Windows Presentation Foundation . . . . . . . . . . . . 443Creating a WPF Application . . . . . . . . . . . . . . . . . . . . . . . . . . . . . . . . . . . . . . . . . . 443
Building the WPF Application . . . . . . . . . . . . . . . . . . . . . . . . . . . . . . . . . . .444
Adding Controls to the Form . . . . . . . . . . . . . . . . . . . . . . . . . . . . . . . . . . . . . . . . . 458
Using WPF Controls . . . . . . . . . . . . . . . . . . . . . . . . . . . . . . . . . . . . . . . . . . . . 458
Changing Properties Dynamically . . . . . . . . . . . . . . . . . . . . . . . . . . . . . . . . 466
Handling Events in a WPF Form . . . . . . . . . . . . . . . . . . . . . . . . . . . . . . . . . . . . . . . 470
Processing Events in Windows Forms . . . . . . . . . . . . . . . . . . . . . . . . . . . . . 471
Chapter 22 Quick Reference . . . . . . . . . . . . . . . . . . . . . . . . . . . . . . . . . . . . . . . . . . 476
23 Gathering User Input . . . . . . . . . . . . . . . . . . . . . . . . . . . . . . . . . . . 477Menu Guidelines and Style . . . . . . . . . . . . . . . . . . . . . . . . . . . . . . . . . . . . . . . . . . . 477
Menus and Menu Events . . . . . . . . . . . . . . . . . . . . . . . . . . . . . . . . . . . . . . . . . . . . . 478
Creating a Menu . . . . . . . . . . . . . . . . . . . . . . . . . . . . . . . . . . . . . . . . . . . . . . 478
Handling Menu Events . . . . . . . . . . . . . . . . . . . . . . . . . . . . . . . . . . . . . . . . . 484
Shortcut Menus . . . . . . . . . . . . . . . . . . . . . . . . . . . . . . . . . . . . . . . . . . . . . . . . . . . . 491
Creating Shortcut Menus . . . . . . . . . . . . . . . . . . . . . . . . . . . . . . . . . . . . . . . 491
xiv Table of Contents
Windows Common Dialog Boxes . . . . . . . . . . . . . . . . . . . . . . . . . . . . . . . . . . . . . 495
Using the SaveFileDialog Class . . . . . . . . . . . . . . . . . . . . . . . . . . . . . . . . . . . 495
Improving Responsiveness in a WPF Application . . . . . . . . . . . . . . . . . . . . . . . . 498
Chapter 23 Quick Reference . . . . . . . . . . . . . . . . . . . . . . . . . . . . . . . . . . . . . . . . . . 508
24 Performing Validation . . . . . . . . . . . . . . . . . . . . . . . . . . . . . . . . . . 509Validating Data . . . . . . . . . . . . . . . . . . . . . . . . . . . . . . . . . . . . . . . . . . . . . . . . . . . . . 509
Strategies for Validating User Input . . . . . . . . . . . . . . . . . . . . . . . . . . . . . . 509
An Example—Order Tickets for Events . . . . . . . . . . . . . . . . . . . . . . . . . . . . . . . . 510
Performing Validation by Using Data Binding . . . . . . . . . . . . . . . . . . . . . 511
Changing the Point at Which Validation Occurs . . . . . . . . . . . . . . . . . . . 527
Chapter 24 Quick Reference . . . . . . . . . . . . . . . . . . . . . . . . . . . . . . . . . . . . . . . . . . 531
Part V Managing Data
25 Querying Information in a Database . . . . . . . . . . . . . . . . . . . . . . 535Querying a Database by Using ADO .NET . . . . . . . . . . . . . . . . . . . . . . . . . . . . . . 535
The Northwind Database . . . . . . . . . . . . . . . . . . . . . . . . . . . . . . . . . . . . . . . 536
Creating the Database . . . . . . . . . . . . . . . . . . . . . . . . . . . . . . . . . . . . . . . . . 536
Using ADO .NET to Query Order Information . . . . . . . . . . . . . . . . . . . . . . 538
Querying a Database by Using LINQ to SQL . . . . . . . . . . . . . . . . . . . . . . . . . . . . 549
Defining an Entity Class . . . . . . . . . . . . . . . . . . . . . . . . . . . . . . . . . . . . . . . . 549
Creating and Running a LINQ to SQL Query . . . . . . . . . . . . . . . . . . . . . . 551
Deferred and Immediate Fetching . . . . . . . . . . . . . . . . . . . . . . . . . . . . . . . 553
Joining Tables and Creating Relationships . . . . . . . . . . . . . . . . . . . . . . . . . 554
Deferred and Immediate Fetching Revisited . . . . . . . . . . . . . . . . . . . . . . . 558
Defining a Custom DataContext Class . . . . . . . . . . . . . . . . . . . . . . . . . . . . 559
Using LINQ to SQL to Query Order Information . . . . . . . . . . . . . . . . . . . 560
Chapter 25 Quick Reference . . . . . . . . . . . . . . . . . . . . . . . . . . . . . . . . . . . . . . . . . . 564
26 Displaying and Editing Data by Using the Entity Framework and Data Binding . . . . . . . . . . . . . . . . . . . . . . . . . . . . 565
Using Data Binding with the Entity Framework . . . . . . . . . . . . . . . . . . . . . . . . . 566
Using Data Binding to Modify Data . . . . . . . . . . . . . . . . . . . . . . . . . . . . . . . . . . . 583
Updating Existing Data . . . . . . . . . . . . . . . . . . . . . . . . . . . . . . . . . . . . . . . . . 583
Handling Conflicting Updates . . . . . . . . . . . . . . . . . . . . . . . . . . . . . . . . . . . 584
Adding and Deleting Data . . . . . . . . . . . . . . . . . . . . . . . . . . . . . . . . . . . . . . 587
Chapter 26 Quick Reference . . . . . . . . . . . . . . . . . . . . . . . . . . . . . . . . . . . . . . . . . . 596
Table of Contents xv
Part VI Building Professional Solutions with Visual Studio 2010
27 Introducing the Task Parallel Library . . . . . . . . . . . . . . . . . . . . . . 599Why Perform Multitasking by Using Parallel Processing? . . . . . . . . . . . . . . . . . 600
The Rise of the Multicore Processor . . . . . . . . . . . . . . . . . . . . . . . . . . . . . . 601
Implementing Multitasking in a Desktop Application . . . . . . . . . . . . . . . . . . . . 602
Tasks, Threads, and the ThreadPool . . . . . . . . . . . . . . . . . . . . . . . . . . . . . 603
Creating, Running, and Controlling Tasks . . . . . . . . . . . . . . . . . . . . . . . . . 604
Using the Task Class to Implement Parallelism . . . . . . . . . . . . . . . . . . . . . 608
Abstracting Tasks by Using the Parallel Class . . . . . . . . . . . . . . . . . . . . . . 617
Returning a Value from a Task . . . . . . . . . . . . . . . . . . . . . . . . . . . . . . . . . . 624
Using Tasks and User Interface Threads Together . . . . . . . . . . . . . . . . . . . . . . . 628
Canceling Tasks and Handling Exceptions . . . . . . . . . . . . . . . . . . . . . . . . . . . . . . 632
The Mechanics of Cooperative Cancellation . . . . . . . . . . . . . . . . . . . . . . . 633
Handling Task Exceptions by Using the AggregateException Class . . . . 641
Using Continuations with Canceled and Faulted Tasks . . . . . . . . . . . . . . 645
Chapter 27 Quick Reference . . . . . . . . . . . . . . . . . . . . . . . . . . . . . . . . . . . . . . . . . . 646
28 Performing Parallel Data Access . . . . . . . . . . . . . . . . . . . . . . . . . . 649Using PLINQ to Parallelize Declarative Data Access . . . . . . . . . . . . . . . . . . . . . . 650
Using PLINQ to Improve Performance While Iterating Through a Collection . . . . . . . . . . . . . . . . . . . . . . . . . . . . . . . . . . . . . . . . . . . . . . . . . . . . 650
Specifying Options for a PLINQ Query . . . . . . . . . . . . . . . . . . . . . . . . . . . 655
Canceling a PLINQ Query . . . . . . . . . . . . . . . . . . . . . . . . . . . . . . . . . . . . . . . 656
Synchronizing Concurrent Imperative Data Access . . . . . . . . . . . . . . . . . . . . . . 656
Locking Data . . . . . . . . . . . . . . . . . . . . . . . . . . . . . . . . . . . . . . . . . . . . . . . . . . 659
Synchronization Primitives in the Task Parallel Library . . . . . . . . . . . . . . 661
Cancellation and the Synchronization Primitives . . . . . . . . . . . . . . . . . . . 668
The Concurrent Collection Classes . . . . . . . . . . . . . . . . . . . . . . . . . . . . . . . 668
Using a Concurrent Collection and a Lock to Implement Thread-Safe Data Access . . . . . . . . . . . . . . . . . . . . . . . . . . . . . . . . . . . . . . . 670
Chapter 28 Quick Reference . . . . . . . . . . . . . . . . . . . . . . . . . . . . . . . . . . . . . . . . . . 681
xvi Table of Contents
29 Creating and Using a Web Service . . . . . . . . . . . . . . . . . . . . . . . . 683What Is a Web Service? . . . . . . . . . . . . . . . . . . . . . . . . . . . . . . . . . . . . . . . . . . . . . . 684
The Role of Windows Communication Foundation . . . . . . . . . . . . . . . . . 684
Web Service Architectures . . . . . . . . . . . . . . . . . . . . . . . . . . . . . . . . . . . . . . . . . . . 684
SOAP Web Services . . . . . . . . . . . . . . . . . . . . . . . . . . . . . . . . . . . . . . . . . . . . 685
REST Web Services . . . . . . . . . . . . . . . . . . . . . . . . . . . . . . . . . . . . . . . . . . . . . 687
Building Web Services . . . . . . . . . . . . . . . . . . . . . . . . . . . . . . . . . . . . . . . . . . . . . . . 688
Creating the ProductInformation SOAP Web Service . . . . . . . . . . . . . . . 689
SOAP Web Services, Clients, and Proxies . . . . . . . . . . . . . . . . . . . . . . . . . . 697
Consuming the ProductInformation SOAP Web Service . . . . . . . . . . . . 698
Creating the ProductDetails REST Web Service . . . . . . . . . . . . . . . . . . . . 704
Consuming the ProductDetails REST Web Service . . . . . . . . . . . . . . . . . . 711
Chapter 29 Quick Reference . . . . . . . . . . . . . . . . . . . . . . . . . . . . . . . . . . . . . . . . . . 715
Appendix
Interoperating with Dynamic Languages . . . . . . . . . . . . . . . . . . 717
Index . . . . . . . . . . . . . . . . . . . . . . . . . . . . . . . . . . . . . . . . . . . . . . . . . . . . . . 727
Microsoft is interested in hearing your feedback so we can continually improve our books and learning resources for you. To participate in a brief online survey, please visit:
www.microsoft.com/learning/booksurvey/
What do you think of this book? We want to hear from you!
xvii
AcknowledgmentsAn oft-repeated fable is that the workmen who paint the Forth Railway Bridge, a large Victorian cantilever structure that spans the Firth of Forth just north of Edinburgh, have a job for life . According to the myth, it takes them several years to paint it from one end to the other, and when they have finished they have to start over again . I am not sure whether this is due to the ferocity of the Scottish weather, or the sensitivity of the paint that is used, although my daughter insists it is simply that the members of Edinburgh City Council have yet to decide on a color scheme that they really like for the bridge . I sometimes feel that this book has similar attributes . No sooner have I completed an edition and seen it published, then Microsoft announces another cool update for Visual Studio and C#, and my friends at Microsoft Press contact me and say, “What are your plans for the next edition?” However, unlike painting the Forth Railway Bridge, working on a new edition of this text is always an enjoyable task with a lot more scope for inventiveness than trying to work out new ways to hold a paint brush . There is always something novel to learn and innovative technology to play with . In this edition, I cover the new features of C# 4 .0 and the .NET Framework 4 .0, which developers will find invaluable for building applications that can take advantage of the increasingly powerful hardware now becoming available . Hence, although this work appears to be a never-ending task, it is always fruitful and pleasurable .
A large part of the enjoyment when working on a project such as this is the opportunity to collaborate with a highly motivated group of talented people within Microsoft Press, the developers at Microsoft working on Visual Studio 2010, and the people who review each chapter and make suggestions for various improvements . I would especially like to single out Rosemary Caperton and Stephen Sagman who have worked tirelessly to keep the project on track, to Per Blomqvist who reviewed (and corrected) each chapter, and to Roger LeBlanc who had the thankless task of copy-editing the manuscript and converting my prose into English . I must also make special mention of Michael Blome who provided me with early access to software and answered the many questions that I had concerning the Task Parallal Library . Several members of Content Master were kept gainfully employed reviewing and testing the code for the exercises—thanks Mike Sumsion, Chris Cully, James Millar, and Louisa Perry . Of course, I must additionally thank Jon Jagger who co-authored the first edition of this book with me back in 2001 .
Last but by no means least, I must thank my family . My wife Diana is a wonderful source of inspiration . When writing Chapter 28 on the Task Parallel Library I had a mental block and

had to ask her how she would explain Barrier methods . She looked at me quizzically, and gave a reply that although anatomically correct if I was in a doctor’s surgery, indicated that either I had not phrased the question very carefully or that she had completely misunder-stood what I was asking! James has now grown up and will soon have to learn what real work entails if he is to keep Diana and myself in the manner to which we would like to become accustomed in our dotage . Francesca has also grown up, and seems to have refined a strategy for getting all she wants without doing anything other than looking at me with wide, bright eyes, and smiling .
Finally, “Up the Gills!”
—John Sharp
xix
IntroductionMicrosoft Visual C# is a powerful but simple language aimed primarily at developers creating applications by using the Microsoft .NET Framework . It inherits many of the best features of C++ and Microsoft Visual Basic, but few of the inconsistencies and anachronisms, resulting in a cleaner and more logical language . C# 1 .0 made its public debut in 2001 . The advent of C# 2 .0 with Visual Studio 2005 saw several important new features added to the language, including Generics, Iterators, and anonymous methods . C# 3 .0 which was released with Visual Studio 2008, added extension methods, lambda expressions, and most famously of all, the Language Integrated Query facility, or LINQ . The latest incarnation of the language, C# 4 .0, provides further enhancements that improve its interoperability with other languages and technologies . These features include support for named and optional arguments, the dynamic type which indicates that the language runtime should implement late binding for an object, and variance which resolves some issues in the way in which generic interfaces are defined . C# 4 .0 takes advantage of the latest version of the .NET Framework, also version 4 .0 . There are many additions to the .NET Framework in this release, but arguably the most significant are the classes and types that constitute the Task Parallel Library (TPL) . Using the TPL, you can now build highly scalable applications that can take full advantage of multi-core processors quickly and easily . The support for Web services and Windows Communication Foundation (WCF) has also been extended; you can now build services that follow the REST model as well as the more traditional SOAP scheme .
The development environment provided by Microsoft Visual Studio 2010 makes all these powerful features easy to use, and the many new wizards and enhancements included in Visual Studio 2010 can greatly improve your productivity as a developer .
Who This Book Is ForThis book assumes that you are a developer who wants to learn the fundamentals of programming with C# by using Visual Studio 2010 and the .NET Framework version 4 .0 . In this book, you will learn the features of the C# language, and then use them to build applica-tions running on the Microsoft Windows operating system . By the time you complete this book, you will have a thorough understanding of C# and will have used it to build Windows Presentation Foundation applications, access Microsoft SQL Server databases by using ADO .NET and LINQ, build responsive and scalable applications by using the TPL, and create REST and SOAP Web services by using WCF .
xx Introduction
Finding Your Best Starting Point in This BookThis book is designed to help you build skills in a number of essential areas . You can use this book if you are new to programming or if you are switching from another programming lan-guage such as C, C++, Java, or Visual Basic . Use the following table to find your best starting point .
If you are Follow these steps
New to object-oriented programming
1. Install the practice files as described in the next section, “Installing and Using the Practice Files .”
2. Work through the chapters in Parts I, II, and III sequentially .
3. Complete Parts IV, V, and VI as your level of experience and interest dictates .
Familiar with procedural programming languages such as C, but new to C#
1. Install the practice files as described in the next section, “Installing and Using the Practice Files .” Skim the first five chapters to get an overview of C# and Visual Studio 2010, and then concentrate on Chapters 6 through 21 .
2. Complete Parts IV, and V, and VI as your level of experience and interest dictates .
Migrating from an object-oriented language such as C++, or Java
1. Install the practice files as described in the next section, “Installing and Using the Practice Files .”
2. Skim the first seven chapters to get an overview of C# and Visual Studio 2010, and then concen-trate on Chapters 8 through 21 .
3. For information about building Windows applications and using a database, read Parts IV and V .
4. For information about building scalable applications and Web services, read Part VI .
Introduction xxi
If you are Follow these steps
Switching from Visual Basic 6
1. Install the practice files as described in the next section, “Installing and Using the Practice Files .”
2. Work through the chapters in Parts I, II, and III sequentially .
3. For information about building Windows applications, read Part IV .
4. For information about accessing a database, read Part V .
5. For information about building scalable applications and Web services, read Part VI .
6. Read the Quick Reference sections at the end of the chapters for information about specific C# and Visual Studio 2010 constructs .
Referencing the book after working through the exercises
1. Use the index or the Table of Contents to find information about particular subjects .
2. Read the Quick Reference sections at the end of each chapter to find a brief review of the syntax and techniques presented in the chapter .
Conventions and Features in This BookThis book presents information using conventions designed to make the information read-able and easy to follow . Before you start, read the following list, which explains conventions you’ll see throughout the book and points out helpful features that you might want to use .
Conventionsn Each exercise is a series of tasks . Each task is presented as a series of numbered steps
(1, 2, and so on). A round bullet (•) indicates an exercise that has only one step.
n Notes labeled “tip” provide additional information or alternative methods for completing a step successfully .
n Notes labeled “important” alert you to information you need to check before continuing .
n Text that you type appears in bold .
xxii Introduction
n A plus sign (+) between two key names means that you must press those keys at the same time . For example, “Press Alt+Tab” means that you hold down the Alt key while you press the Tab key .
Other Featuresn Sidebars throughout the book provide more in-depth information about the exercise .
The sidebars might contain background information, design tips, or features related to the information being discussed .
n Each chapter ends with a Quick Reference section . The Quick Reference section contains quick reminders of how to perform the tasks you learned in the chapter .
Prerelease SoftwareThis book was written and tested against Visual Studio 2010 Beta 2 . We did review and test our examples against the final release of the software . However, you might find minor differ-ences between the production release and the examples, text, and screenshots in this book .
Hardware and Software RequirementsYou’ll need the following hardware and software to complete the practice exercises in this book:
n Microsoft Windows 7 Home Premium, Windows 7 Professional, Windows 7 Enterprise, or Windows 7 Ultimate . The exercises will also run using Microsoft Windows Vista with Service Pack 2 or later .
n Microsoft Visual Studio 2010 Standard, Visual Studio 2010 Professional, or Microsoft Visual C# 2010 Express and Microsoft Visual Web Developer 2010 Express .
n Microsoft SQL Server 2008 Express (this is provided with all editions of Visual Studio 2010, Visual C# 2010 Express, and Visual Web Developer 2010 Express) .
n 1 .6 GHz processor, or faster . Chapters 27 and 28 require a dual-core or better processor .
n 1 GB for x32 processor, 2 GB for an x64 processor, of available, physical RAM .
n Video (1024 ×768 or higher resolution) monitor with at least 256 colors .
n CD-ROM or DVD-ROM drive .
n Microsoft mouse or compatible pointing device
You will also need to have Administrator access to your computer to configure SQL Server 2008 Express Edition .
Introduction xxiii
Code SamplesThe companion CD inside this book contains the code samples that you’ll use as you perform the exercises . By using the code samples, you won’t waste time creating files that aren’t rel-evant to the exercise . The files and the step-by-step instructions in the lessons also let you learn by doing, which is an easy and effective way to acquire and remember new skills .
Installing the Code SamplesFollow these steps to install the code samples and required software on your computer so that you can use them with the exercises .
1. Remove the companion CD from the package inside this book and insert it into your CD-ROM drive .
Note An end user license agreement should open automatically . If this agreement does not appear, open My Computer on the desktop or Start menu, double-click the icon for your CD-ROM drive, and then double-click StartCD .exe .
2. Review the end user license agreement . If you accept the terms, select the accept option and then click Next .
A menu will appear with options related to the book .
3. Click Install Code Samples .
4. Follow the instructions that appear .
The code samples are installed to the following location on your computer:
Documents\Microsoft Press\Visual CSharp Step By Step
Using the Code SamplesEach chapter in this book explains when and how to use any code samples for that chapter . When it’s time to use a code sample, the book will list the instructions for how to open the files .
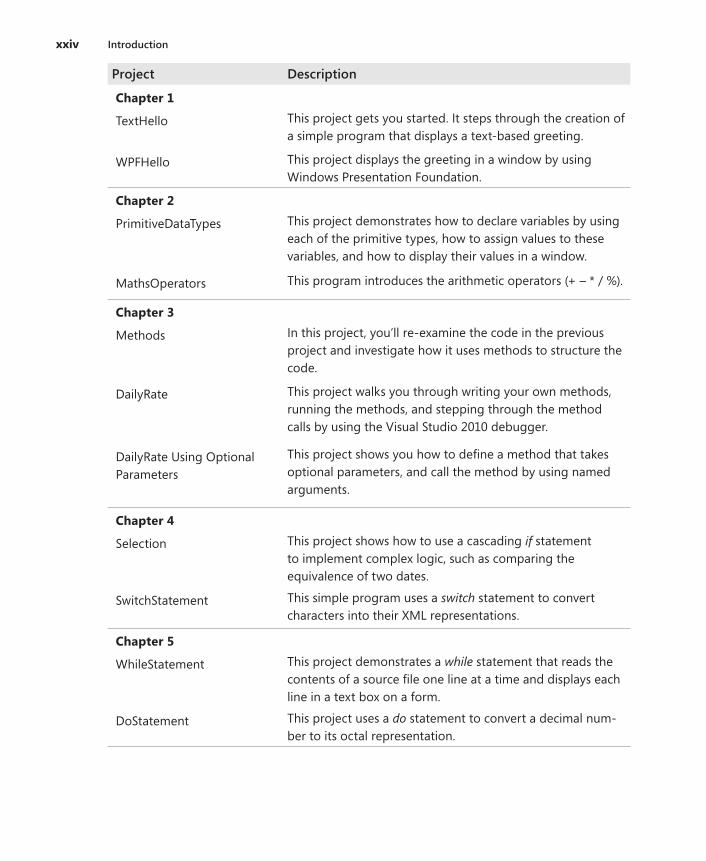
For those of you who like to know all the details, here’s a list of the code sample Visual Studio 2010 projects and solutions, grouped by the folders where you can find them . In many cases, the exercises provide starter files and completed versions of the same projects which you can use as a reference . The completed projects are stored in folders with the suffix “- Complete” .
xxiv Introduction
Project Description
Chapter 1
TextHello This project gets you started . It steps through the creation of a simple program that displays a text-based greeting .
WPFHello This project displays the greeting in a window by using Windows Presentation Foundation .
Chapter 2
PrimitiveDataTypes This project demonstrates how to declare variables by using each of the primitive types, how to assign values to these variables, and how to display their values in a window .
MathsOperators This program introduces the arithmetic operators (+ – * / %) .
Chapter 3
Methods In this project, you’ll re-examine the code in the previous project and investigate how it uses methods to structure the code .
DailyRate This project walks you through writing your own methods, running the methods, and stepping through the method calls by using the Visual Studio 2010 debugger .
DailyRate Using Optional Parameters
This project shows you how to define a method that takes optional parameters, and call the method by using named arguments .
Chapter 4
Selection This project shows how to use a cascading if statement to implement complex logic, such as comparing the equivalence of two dates .
SwitchStatement This simple program uses a switch statement to convert characters into their XML representations .
Chapter 5
WhileStatement This project demonstrates a while statement that reads the contents of a source file one line at a time and displays each line in a text box on a form .
DoStatement This project uses a do statement to convert a decimal num-ber to its octal representation .

Introduction xxv
Project Description
Chapter 6
MathsOperators This project revisits the MathsOperators project from Chapter 2, “Working with Variables, Operators, and Expressions,” and shows how various unhandled exceptions can make the program fail . The try and catch keywords then make the application more robust so that it no longer fails .
Chapter 7
Classes This project covers the basics of defining your own classes, complete with public constructors, methods, and private fields . It also shows how to create class instances by using the new keyword and how to define static methods and fields .
Chapter 8
Parameters This program investigates the difference between value parameters and reference parameters . It demonstrates how to use the ref and out keywords .
Chapter 9
StructsAndEnums This project defines a struct type to represent a calendar date .
Chapter 10
Cards Using Arrays This project shows how to use arrays to model hands of cards in a card game .
Cards Using Collections This project shows how to restructure the card game program to use collections rather than arrays .
Chapter 11
ParamsArrays This project demonstrates how to use the params keyword to create a single method that can accept any number of int arguments .
Chapter 12
Vehicles This project creates a simple hierarchy of vehicle classes by using inheritance . It also demonstrates how to define a virtual method .
ExtensionMethod This project shows how to create an extension method for the int type, providing a method that converts an integer value from base 10 to a different number base .
xxvi Introduction
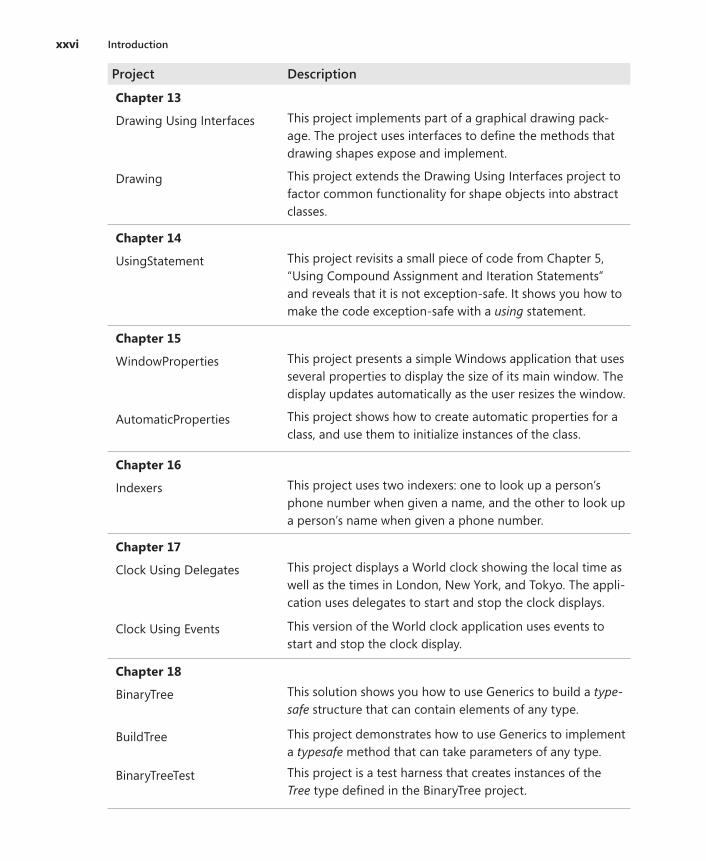
Project Description
Chapter 13
Drawing Using Interfaces This project implements part of a graphical drawing pack-age . The project uses interfaces to define the methods that drawing shapes expose and implement .
Drawing This project extends the Drawing Using Interfaces project to factor common functionality for shape objects into abstract classes .
Chapter 14
UsingStatement This project revisits a small piece of code from Chapter 5, “Using Compound Assignment and Iteration Statements” and reveals that it is not exception-safe . It shows you how to make the code exception-safe with a using statement .
Chapter 15
WindowProperties This project presents a simple Windows application that uses several properties to display the size of its main window . The display updates automatically as the user resizes the window .
AutomaticProperties This project shows how to create automatic properties for a class, and use them to initialize instances of the class .
Chapter 16
Indexers This project uses two indexers: one to look up a person’s phone number when given a name, and the other to look up a person’s name when given a phone number .
Chapter 17
Clock Using Delegates This project displays a World clock showing the local time as well as the times in London, New York, and Tokyo . The appli-cation uses delegates to start and stop the clock displays .
Clock Using Events This version of the World clock application uses events to start and stop the clock display .
Chapter 18
BinaryTree This solution shows you how to use Generics to build a type-safe structure that can contain elements of any type .
BuildTree This project demonstrates how to use Generics to implement a typesafe method that can take parameters of any type .
BinaryTreeTest This project is a test harness that creates instances of the Tree type defined in the BinaryTree project .
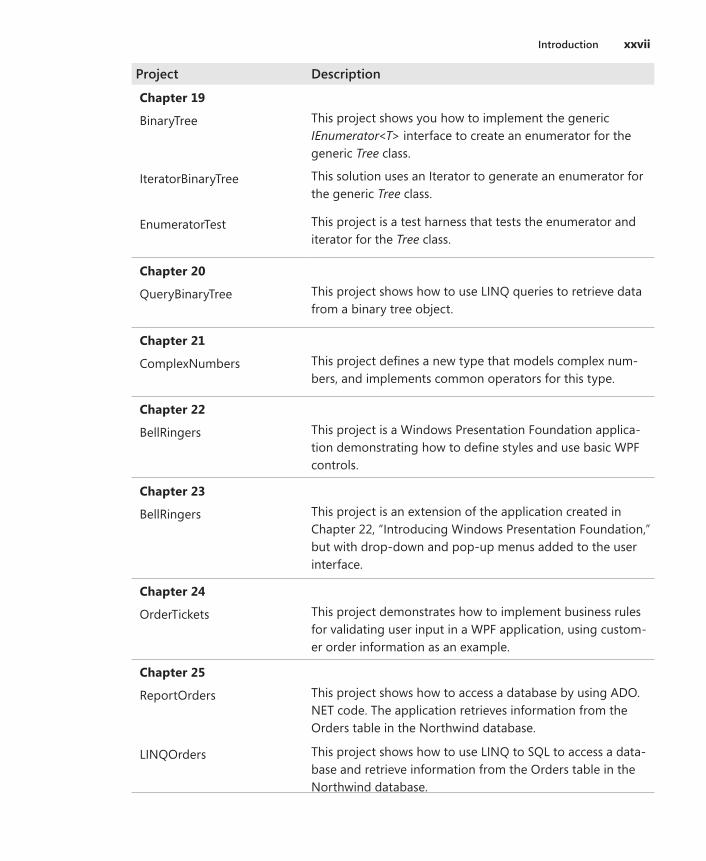
Introduction xxvii
Project Description
Chapter 19
BinaryTree This project shows you how to implement the generic IEnumerator<T> interface to create an enumerator for the generic Tree class .
IteratorBinaryTree This solution uses an Iterator to generate an enumerator for the generic Tree class .
EnumeratorTest This project is a test harness that tests the enumerator and iterator for the Tree class .
Chapter 20
QueryBinaryTree This project shows how to use LINQ queries to retrieve data from a binary tree object .
Chapter 21
ComplexNumbers This project defines a new type that models complex num-bers, and implements common operators for this type .
Chapter 22
BellRingers This project is a Windows Presentation Foundation applica-tion demonstrating how to define styles and use basic WPF controls .
Chapter 23
BellRingers This project is an extension of the application created in Chapter 22, “Introducing Windows Presentation Foundation,” but with drop-down and pop-up menus added to the user interface .
Chapter 24
OrderTickets This project demonstrates how to implement business rules for validating user input in a WPF application, using custom-er order information as an example .
Chapter 25
ReportOrders This project shows how to access a database by using ADO .NET code . The application retrieves information from the Orders table in the Northwind database .
LINQOrders This project shows how to use LINQ to SQL to access a data-base and retrieve information from the Orders table in the Northwind database .
xxviii Introduction
Project Description
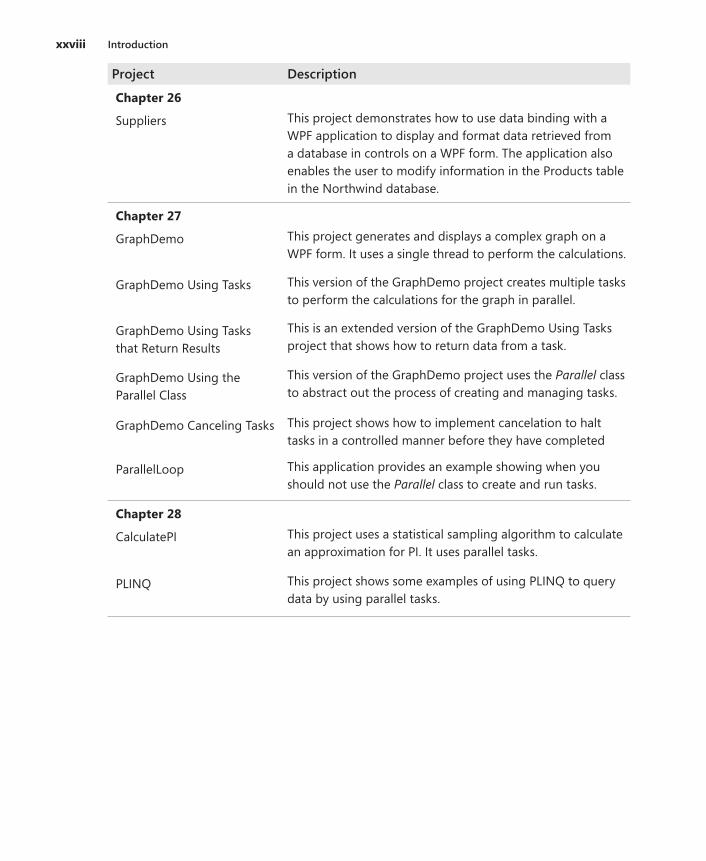
Chapter 26
Suppliers This project demonstrates how to use data binding with a WPF application to display and format data retrieved from a database in controls on a WPF form . The application also enables the user to modify information in the Products table in the Northwind database .
Chapter 27
GraphDemo This project generates and displays a complex graph on a WPF form . It uses a single thread to perform the calculations .
GraphDemo Using Tasks This version of the GraphDemo project creates multiple tasks to perform the calculations for the graph in parallel .
GraphDemo Using Tasks that Return Results
This is an extended version of the GraphDemo Using Tasks project that shows how to return data from a task .
GraphDemo Using the Parallel Class
This version of the GraphDemo project uses the Parallel class to abstract out the process of creating and managing tasks .
GraphDemo Canceling Tasks This project shows how to implement cancelation to halt tasks in a controlled manner before they have completed
ParallelLoop This application provides an example showing when you should not use the Parallel class to create and run tasks .
Chapter 28
CalculatePI This project uses a statistical sampling algorithm to calculate an approximation for PI . It uses parallel tasks .
PLINQ This project shows some examples of using PLINQ to query data by using parallel tasks .
Introduction xxix
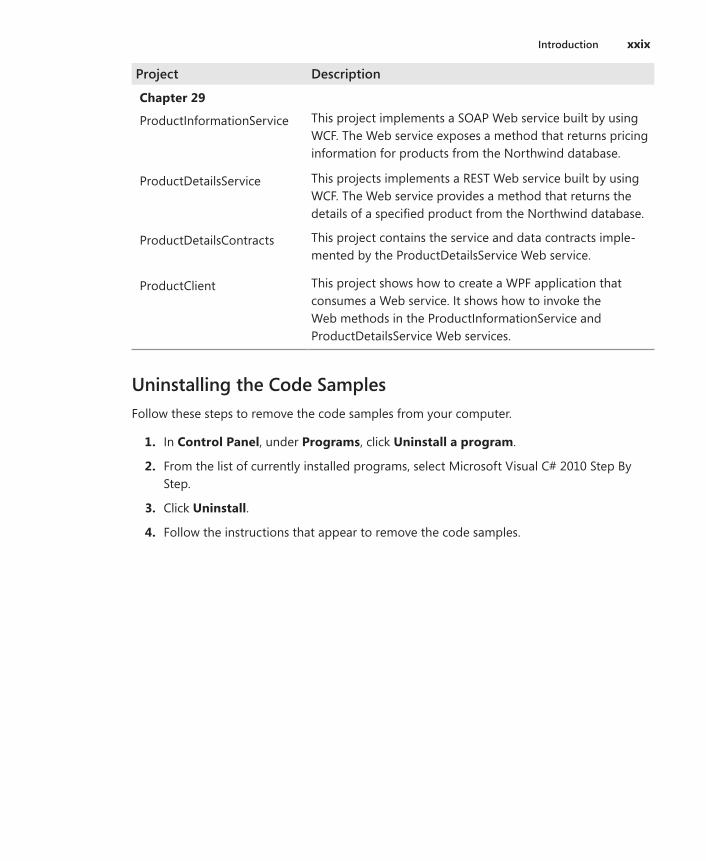
Project Description
Chapter 29
ProductInformationService This project implements a SOAP Web service built by using WCF . The Web service exposes a method that returns pricing information for products from the Northwind database .
ProductDetailsService This projects implements a REST Web service built by using WCF . The Web service provides a method that returns the details of a specified product from the Northwind database .
ProductDetailsContracts This project contains the service and data contracts imple-mented by the ProductDetailsService Web service .
ProductClient This project shows how to create a WPF application that consumes a Web service . It shows how to invoke the Web methods in the ProductInformationService and ProductDetailsService Web services .
Uninstalling the Code SamplesFollow these steps to remove the code samples from your computer .
1. In Control Panel, under Programs, click Uninstall a program .
2. From the list of currently installed programs, select Microsoft Visual C# 2010 Step By Step .
3. Click Uninstall .
4. Follow the instructions that appear to remove the code samples .
xxx Introduction
Find Additional Content OnlineAs new or updated material becomes available that complements your book, it will be posted online on the Microsoft Press Online Developer Tools Web site . The type of material you might find includes updates to book content, articles, links to companion content, errata, sample chapters, and more . This Web site is available at www .microsoft .com/learning/books/online/developer, and is updated periodically .
Digital Content for Digital Book Readers: If you bought a digital-only edition of this book, you can enjoy select content from the print edition’s companion CD. Visit http://www.microsoftpressstore.com/title/9780735626706 to get your downloadable content. This content is always up-to-date and available to all readers.
Support for This BookEvery effort has been made to ensure the accuracy of this book and the contents of the companion CD . As corrections or changes are collected, they will be added to a Microsoft Knowledge Base article .
Microsoft Press provides support for books and companion CDs at the following Web site:
http://www.microsoft.com/learning/support/books/ .
Questions and CommentsIf you have comments, questions, or ideas regarding the book or the companion CD, or questions that are not answered by visiting the sites above, please send them to Microsoft Press via e-mail to
Please note that Microsoft software product support is not offered through the above address .
Microsoft Visual C# 2010 Step by Step
1
Part I
Introducing Microsoft Visual C# and Microsoft Visual Studio 2010
In this part:
Welcome to C# . . . . . . . . . . . . . . . . . . . . . . . . . . . . . . . . . . . . . . . . . . . . . . . . . . . . . . . . 3
Working with Variables, Operators, and Expressions . . . . . . . . . . . . . . . . . . . . . . . 27
Writing Methods and Applying Scope . . . . . . . . . . . . . . . . . . . . . . . . . . . . . . . . . . . 47
Using Decision Statements . . . . . . . . . . . . . . . . . . . . . . . . . . . . . . . . . . . . . . . . . . . . . 73
Using Compound Assignment and Iteration Statements . . . . . . . . . . . . . . . . . . . . 91
Managing Errors and Exceptions . . . . . . . . . . . . . . . . . . . . . . . . . . . . . . . . . . . . . . . 109

3
Chapter 1
Welcome to C#After completing this chapter, you will be able to:
n Use the Microsoft Visual Studio 2010 programming environment.
n Create a C# console application.
n Explain the purpose of namespaces.
n Create a simple graphical C# application.
Microsoft Visual C# is Microsoft’s powerful component-oriented language. C# plays an important role in the architecture of the Microsoft .NET Framework, and some people have compared it to the role that C played in the development of UNIX. If you already know a language such as C, C++, or Java, you’ll find the syntax of C# reassuringly familiar. If you are used to programming in other languages, you should soon be able to pick up the syntax and feel of C#; you just need to learn to put the braces and semicolons in the right place. I hope this is just the book to help you!
In Part I, you’ll learn the fundamentals of C#. You’ll discover how to declare variables and how to use arithmetic operators such as the plus sign (+) and minus sign (–) to manipulate the values in variables. You’ll see how to write methods and pass arguments to methods. You’ll also learn how to use selection statements such as if and iteration statements such as while. Finally, you’ll understand how C# uses exceptions to handle errors in a graceful, easy-to-use manner. These topics form the core of C#, and from this solid foundation, you’ll progress to more advanced features in Part II through Part VI.
BeginningProgrammingwiththeVisualStudio2010Environment
Visual Studio 2010 is a tool-rich programming environment containing the functionality that you need to create large or small C# projects. You can even construct projects that seam-lessly combine modules written by using different programming languages such as C++, Visual Basic, and F#. In the first exercise, you will open the Visual Studio 2010 programming environment and learn how to create a console application.
Note A console application is an application that runs in a command prompt window rather than providing a graphical user interface.
4 Part I Introducing Microsoft Visual C# and Microsoft Visual Studio 2010
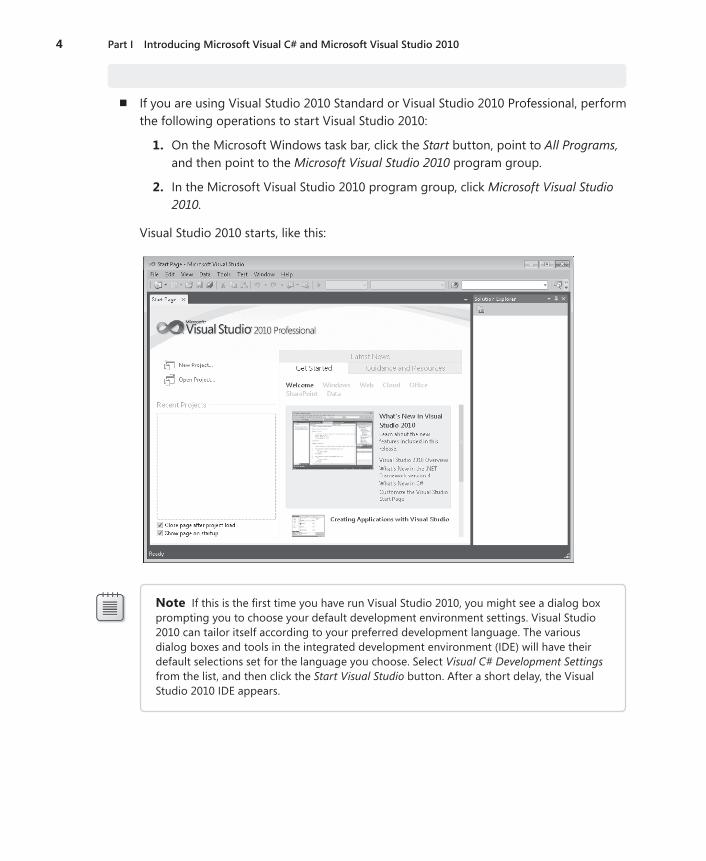
Create a console application in Visual Studio 2010
n If you are using Visual Studio 2010 Standard or Visual Studio 2010 Professional, perform the following operations to start Visual Studio 2010:
1. On the Microsoft Windows task bar, click the Start button, point to All Programs, and then point to the Microsoft Visual Studio 2010 program group.
2. In the Microsoft Visual Studio 2010 program group, click Microsoft Visual Studio 2010.
Visual Studio 2010 starts, like this:
Note If this is the first time you have run Visual Studio 2010, you might see a dialog box prompting you to choose your default development environment settings. Visual Studio 2010 can tailor itself according to your preferred development language. The various dialog boxes and tools in the integrated development environment (IDE) will have their default selections set for the language you choose. Select Visual C# Development Settings from the list, and then click the Start Visual Studio button. After a short delay, the Visual Studio 2010 IDE appears.
Chapter 1 Welcome to C# 5
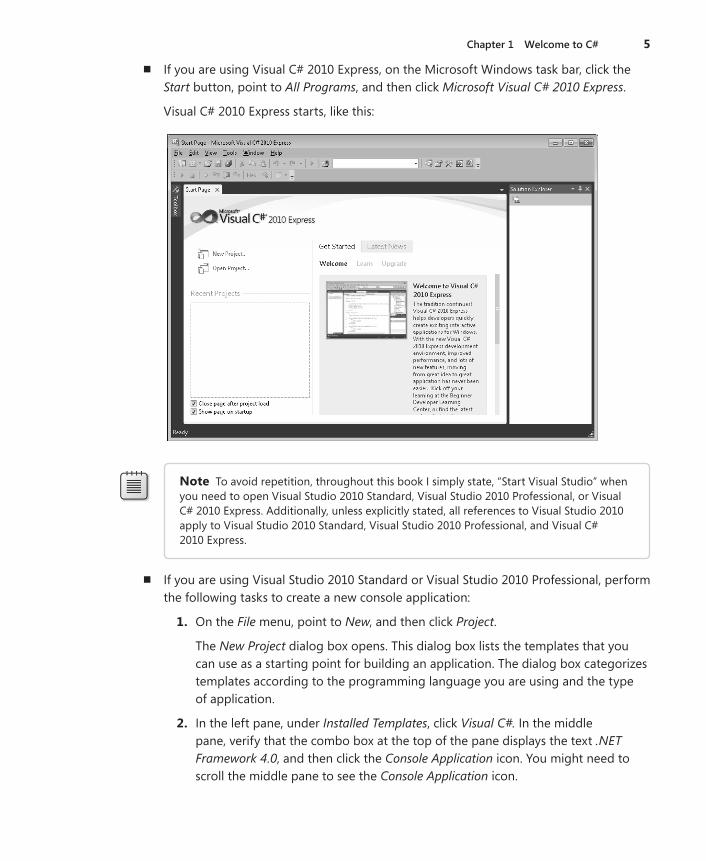
n If you are using Visual C# 2010 Express, on the Microsoft Windows task bar, click the Start button, point to All Programs, and then click Microsoft Visual C# 2010 Express.
Visual C# 2010 Express starts, like this:
Note To avoid repetition, throughout this book I simply state, “Start Visual Studio” when you need to open Visual Studio 2010 Standard, Visual Studio 2010 Professional, or Visual C# 2010 Express. Additionally, unless explicitly stated, all references to Visual Studio 2010 apply to Visual Studio 2010 Standard, Visual Studio 2010 Professional, and Visual C# 2010 Express.
n If you are using Visual Studio 2010 Standard or Visual Studio 2010 Professional, perform the following tasks to create a new console application:
1. On the File menu, point to New, and then click Project.
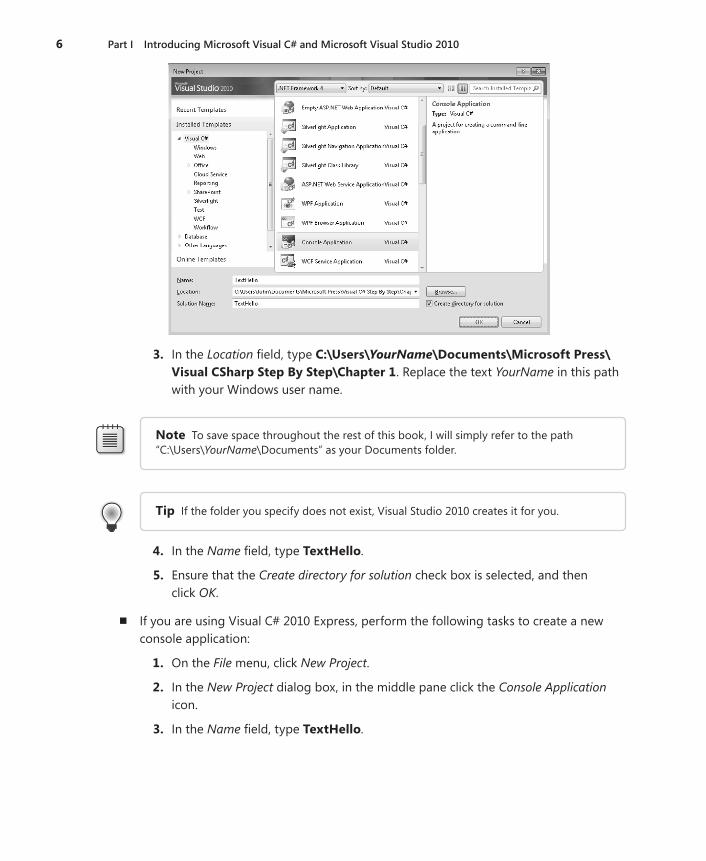
The New Project dialog box opens. This dialog box lists the templates that you can use as a starting point for building an application. The dialog box categorizes templates according to the programming language you are using and the type of application.
2. In the left pane, under Installed Templates, click Visual C#. In the middle pane, verify that the combo box at the top of the pane displays the text .NET Framework 4.0, and then click the Console Application icon. You might need to scroll the middle pane to see the Console Application icon.
6 Part I Introducing Microsoft Visual C# and Microsoft Visual Studio 2010
3. In the Location field, type C:\Users\YourName\Documents\MicrosoftPress\VisualCSharpStepByStep\Chapter1. Replace the text YourName in this path with your Windows user name.
Note To save space throughout the rest of this book, I will simply refer to the path “C:\Users\YourName\Documents” as your Documents folder.
Tip If the folder you specify does not exist, Visual Studio 2010 creates it for you.
4. In the Name field, type TextHello.
5. Ensure that the Create directory for solution check box is selected, and then click OK.
n If you are using Visual C# 2010 Express, perform the following tasks to create a new console application:
1. On the File menu, click New Project.
2. In the New Project dialog box, in the middle pane click the Console Application icon.
3. In the Name field, type TextHello.
Chapter 1 Welcome to C# 7
4. Click OK.
Visual C# 2010 Express saves solutions to the C:\Users\YourName\Documents\Visual Studio\Projects folder by default. You can specify an alternative location when you save the solution.
5. On the File menu, click Save TextHello As.
6. In the Save Project dialog box, in the Location field specify the MicrosoftPress\VisualCSharpStepByStep\Chapter1 folder under your Documents folder.
7. Click Save.
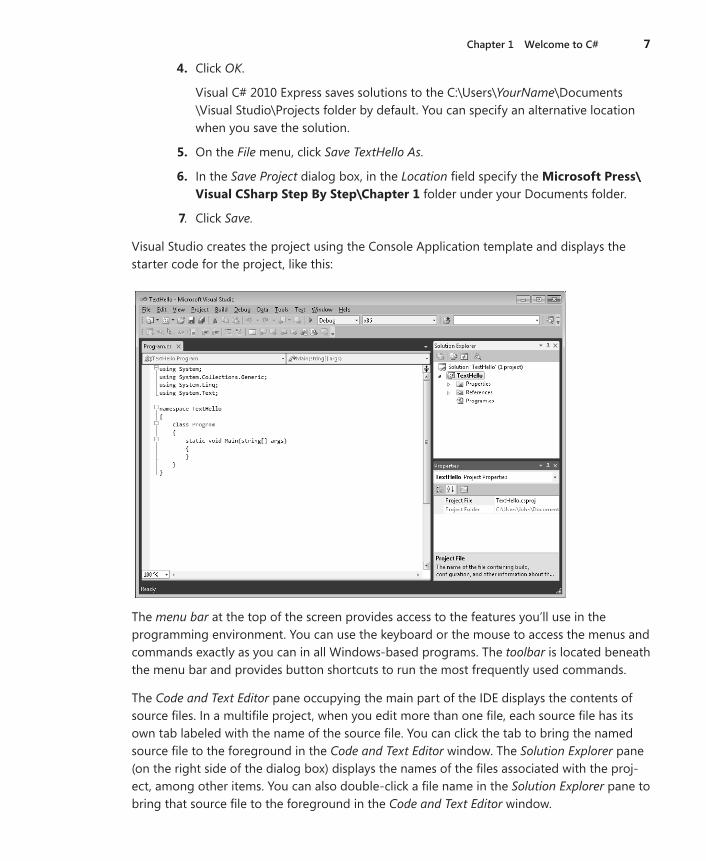
Visual Studio creates the project using the Console Application template and displays the starter code for the project, like this:
The menu bar at the top of the screen provides access to the features you’ll use in the programming environment. You can use the keyboard or the mouse to access the menus and commands exactly as you can in all Windows-based programs. The toolbar is located beneath the menu bar and provides button shortcuts to run the most frequently used commands.
The Code and Text Editor pane occupying the main part of the IDE displays the contents of source files. In a multifile project, when you edit more than one file, each source file has its own tab labeled with the name of the source file. You can click the tab to bring the named source file to the foreground in the Code and Text Editor window. The Solution Explorer pane (on the right side of the dialog box) displays the names of the files associated with the proj-ect, among other items. You can also double-click a file name in the Solution Explorer pane to bring that source file to the foreground in the Code and Text Editor window.
8 Part I Introducing Microsoft Visual C# and Microsoft Visual Studio 2010
Before writing the code, examine the files listed in Solution Explorer, which Visual Studio 2010 has created as part of your project:
n Solution ‘TextHello’ This is the top-level solution file, of which there is one per appli-cation. If you use Windows Explorer to look at your Documents\Microsoft Press\Visual CSharp Step By Step\Chapter 1\TextHello folder, you’ll see that the actual name of this file is TextHello.sln. Each solution file contains references to one or more project files.
n TextHello This is the C# project file. Each project file references one or more files containing the source code and other items for the project. All the source code in a sin-gle project must be written in the same programming language. In Windows Explorer, this file is actually called TextHello.csproj, and it is stored in the \Microsoft Press\Visual CSharp Step By Step\Chapter 1\TextHello\TextHello folder under your Documents folder.
n Properties This is a folder in the TextHello project. If you expand it, you will see that it contains a file called AssemblyInfo.cs. AssemblyInfo.cs is a special file that you can use to add attributes to a program, such as the name of the author, the date the pro-gram was written, and so on. You can specify additional attributes to modify the way in which the program runs. Learning how to use these attributes is outside the scope of this book.
n References This is a folder that contains references to compiled code that your ap-plication can use. When code is compiled, it is converted into an assembly and given a unique name. Developers use assemblies to package useful bits of code they have writ-ten so that they can distribute it to other developers who might want to use the code in their applications. Many of the features that you will be using when writing applications using this book make use of assemblies provided by Microsoft with Visual Studio 2010.
n Program.cs This is a C# source file and is the one currently displayed in the Code and Text Editor window when the project is first created. You will write your code for the console application in this file. It also contains some code that Visual Studio 2010 provides automatically, which you will examine shortly.
WritingYourFirstProgramThe Program.cs file defines a class called Program that contains a method called Main. All methods must be defined inside a class. You will learn more about classes in Chapter 7, “Creating and Managing Classes and Objects.” The Main method is special—it designates the program’s entry point. It must be a static method. (You will look at methods in detail in Chapter 3, “Writing Methods and Applying Scope,” and Chapter 7 describes static methods.)

Chapter 1 Welcome to C# 9
Important C# is a case-sensitive language. You must spell Main with a capital M.
In the following exercises, you write the code to display the message “Hello World” in the console; you build and run your Hello World console application; and you learn how namespaces are used to partition code elements.
Write the code by using Microsoft IntelliSense
1. In the Code and Text Editor window displaying the Program.cs file, place the cursor in the Main method immediately after the opening brace, {, and then press Enter to cre-ate a new line. On the new line, type the word Console, which is the name of a built-in class. As you type the letter C at the start of the word Console, an IntelliSense list appears. This list contains all of the C# keywords and data types that are valid in this context. You can either continue typing or scroll through the list and double-click the Console item with the mouse. Alternatively, after you have typed Con, the IntelliSense list automatically homes in on the Console item and you can press the Tab or Enter key to select it.
Main should look like this:
static void Main(string[] args)
{
Console
}
Note Console is a built-in class that contains the methods for displaying messages on the screen and getting input from the keyboard.
2. Type a period immediately after Console. Another IntelliSense list appears, displaying the methods, properties, and fields of the Console class.
3. Scroll down through the list, select WriteLine, and then press Enter. Alternatively, you can continue typing the characters W, r, i, t, e, L until WriteLine is selected, and then press Enter.
The IntelliSense list closes, and the word WriteLine is added to the source file. Main should now look like this:
static void Main(string[] args)
{
Console.WriteLine
}
4. Type an opening parenthesis, (. Another IntelliSense tip appears.
This tip displays the parameters that the WriteLine method can take. In fact, WriteLine is an overloaded method, meaning that the Console class contains more than one method

10 Part I Introducing Microsoft Visual C# and Microsoft Visual Studio 2010
named WriteLine—it actually provides 19 different versions of this method. Each ver-sion of the WriteLine method can be used to output different types of data. (Chapter 3 describes overloaded methods in more detail.) Main should now look like this:
static void Main(string[] args)
{
Console.WriteLine(
}
Tip You can click the up and down arrows in the tip to scroll through the different overloads of WriteLine.
5. Type a closing parenthesis, ) followed by a semicolon, ;.
Main should now look like this:
static void Main(string[] args)
{
Console.WriteLine();
}
6. Move the cursor, and type the string “HelloWorld”, including the quotation marks, between the left and right parentheses following the WriteLine method.
Main should now look like this:
static void Main(string[] args)
{
Console.WriteLine("Hello World");
}
Tip Get into the habit of typing matched character pairs, such as ( and ) and { and }, before filling in their contents. It’s easy to forget the closing character if you wait until after you’ve entered the contents.
IntelliSense IconsWhen you type a period after the name of a class, IntelliSense displays the name of every member of that class. To the left of each member name is an icon that depicts the type of member. Common icons and their types include the following:
Icon Meaningmethod (discussed in Chapter 3)
property (discussed in Chapter 15, “Implementing Properties to Access Fields”)
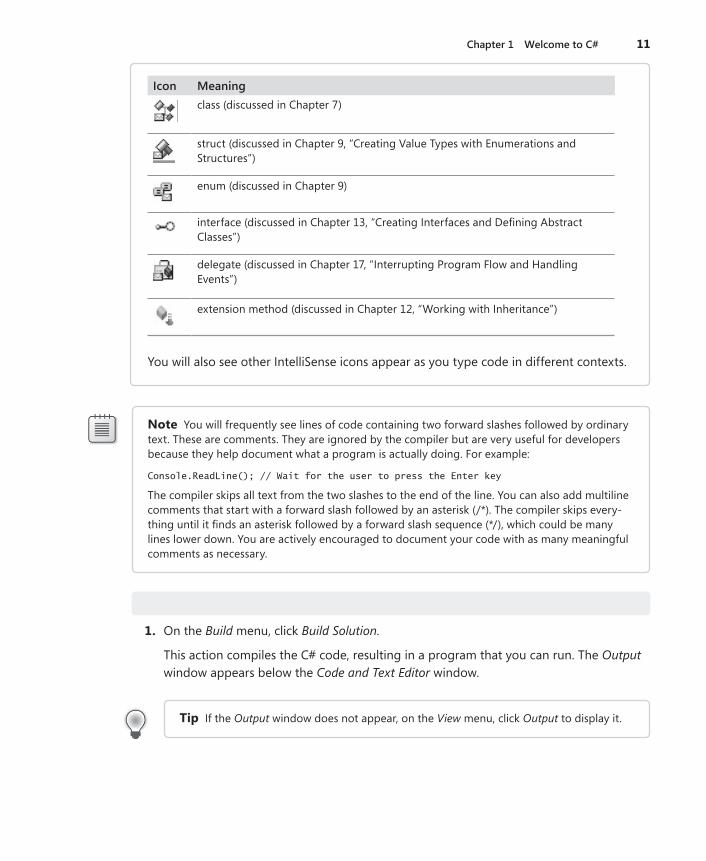
Chapter 1 Welcome to C# 11
Icon Meaningclass (discussed in Chapter 7)
struct (discussed in Chapter 9, “Creating Value Types with Enumerations and Structures”)
enum (discussed in Chapter 9)
interface (discussed in Chapter 13, “Creating Interfaces and Defining Abstract Classes”)
delegate (discussed in Chapter 17, “Interrupting Program Flow and Handling Events”)
extension method (discussed in Chapter 12, “Working with Inheritance”)
You will also see other IntelliSense icons appear as you type code in different contexts.
Note You will frequently see lines of code containing two forward slashes followed by ordinary text. These are comments. They are ignored by the compiler but are very useful for developers because they help document what a program is actually doing. For example:
Console.ReadLine(); // Wait for the user to press the Enter key
The compiler skips all text from the two slashes to the end of the line. You can also add multiline comments that start with a forward slash followed by an asterisk (/*). The compiler skips every-thing until it finds an asterisk followed by a forward slash sequence (*/), which could be many lines lower down. You are actively encouraged to document your code with as many meaningful comments as necessary.
Build and run the console application
1. On the Build menu, click Build Solution.
This action compiles the C# code, resulting in a program that you can run. The Output window appears below the Code and Text Editor window.
Tip If the Output window does not appear, on the View menu, click Output to display it.
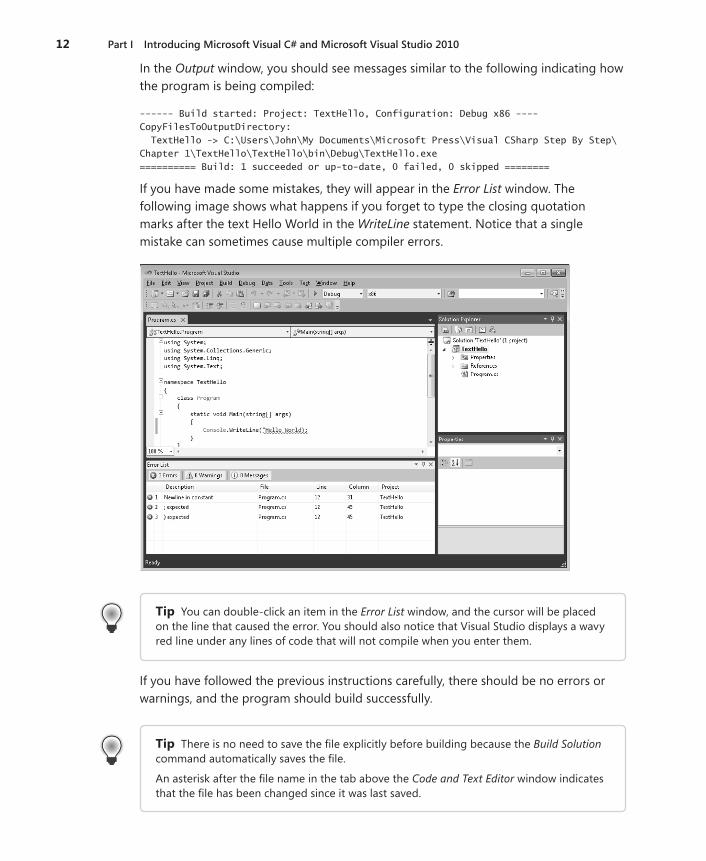
12 Part I Introducing Microsoft Visual C# and Microsoft Visual Studio 2010
In the Output window, you should see messages similar to the following indicating how the program is being compiled:
------ Build started: Project: TextHello, Configuration: Debug x86 ----
CopyFilesToOutputDirectory:
TextHello -> C:\Users\John\My Documents\Microsoft Press\Visual CSharp Step By Step\
Chapter 1\TextHello\TextHello\bin\Debug\TextHello.exe
========== Build: 1 succeeded or up-to-date, 0 failed, 0 skipped ========
If you have made some mistakes, they will appear in the Error List window. The following image shows what happens if you forget to type the closing quotation marks after the text Hello World in the WriteLine statement. Notice that a single mistake can sometimes cause multiple compiler errors.
Tip You can double-click an item in the Error List window, and the cursor will be placed on the line that caused the error. You should also notice that Visual Studio displays a wavy red line under any lines of code that will not compile when you enter them.
If you have followed the previous instructions carefully, there should be no errors or warnings, and the program should build successfully.
Tip There is no need to save the file explicitly before building because the Build Solution command automatically saves the file.
An asterisk after the file name in the tab above the Code and Text Editor window indicates that the file has been changed since it was last saved.
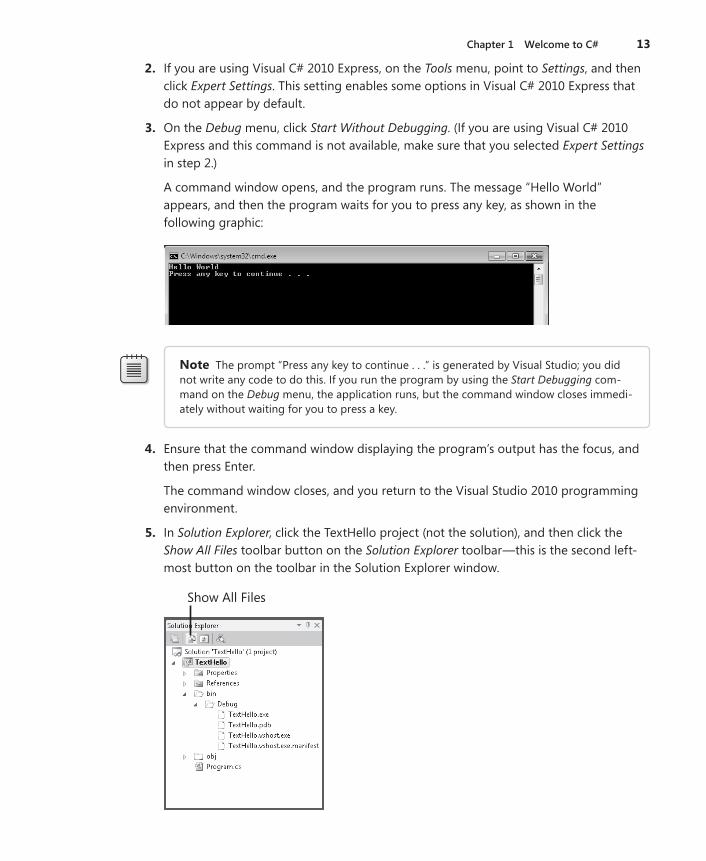
Chapter 1 Welcome to C# 13
2. If you are using Visual C# 2010 Express, on the Tools menu, point to Settings, and then click Expert Settings. This setting enables some options in Visual C# 2010 Express that do not appear by default.
3. On the Debug menu, click Start Without Debugging. (If you are using Visual C# 2010 Express and this command is not available, make sure that you selected Expert Settings in step 2.)
A command window opens, and the program runs. The message “Hello World” appears, and then the program waits for you to press any key, as shown in the following graphic:
Note The prompt “Press any key to continue . . .” is generated by Visual Studio; you did not write any code to do this. If you run the program by using the Start Debugging com-mand on the Debug menu, the application runs, but the command window closes immedi-ately without waiting for you to press a key.
4. Ensure that the command window displaying the program’s output has the focus, and then press Enter.
The command window closes, and you return to the Visual Studio 2010 programming environment.
5. In Solution Explorer, click the TextHello project (not the solution), and then click the Show All Files toolbar button on the Solution Explorer toolbar—this is the second left-most button on the toolbar in the Solution Explorer window.
Show All Files
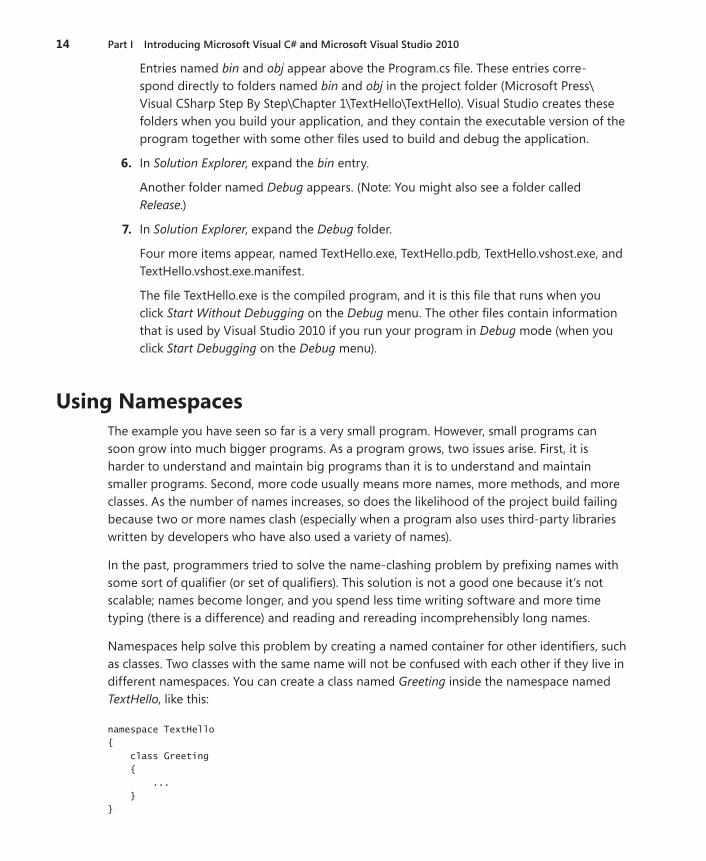
14 Part I Introducing Microsoft Visual C# and Microsoft Visual Studio 2010
Entries named bin and obj appear above the Program.cs file. These entries corre-spond directly to folders named bin and obj in the project folder (Microsoft Press\Visual CSharp Step By Step\Chapter 1\TextHello\TextHello). Visual Studio creates these folders when you build your application, and they contain the executable version of the program together with some other files used to build and debug the application.
6. In Solution Explorer, expand the bin entry.
Another folder named Debug appears. (Note: You might also see a folder called Release.)
7. In Solution Explorer, expand the Debug folder.
Four more items appear, named TextHello.exe, TextHello.pdb, TextHello.vshost.exe, and TextHello.vshost.exe.manifest.
The file TextHello.exe is the compiled program, and it is this file that runs when you click Start Without Debugging on the Debug menu. The other files contain information that is used by Visual Studio 2010 if you run your program in Debug mode (when you click Start Debugging on the Debug menu).
UsingNamespacesThe example you have seen so far is a very small program. However, small programs can soon grow into much bigger programs. As a program grows, two issues arise. First, it is harder to understand and maintain big programs than it is to understand and maintain smaller programs. Second, more code usually means more names, more methods, and more classes. As the number of names increases, so does the likelihood of the project build failing because two or more names clash (especially when a program also uses third-party libraries written by developers who have also used a variety of names).
In the past, programmers tried to solve the name-clashing problem by prefixing names with some sort of qualifier (or set of qualifiers). This solution is not a good one because it’s not scalable; names become longer, and you spend less time writing software and more time typing (there is a difference) and reading and rereading incomprehensibly long names.
Namespaces help solve this problem by creating a named container for other identifiers, such as classes. Two classes with the same name will not be confused with each other if they live in different namespaces. You can create a class named Greeting inside the namespace named TextHello, like this:
namespace TextHello
{
class Greeting
{
...
}
}
Chapter 1 Welcome to C# 15
You can then refer to the Greeting class as TextHello.Greeting in your programs. If another developer also creates a Greeting class in a different namespace, such as NewNamespace, and installs it on your computer, your programs will still work as expected because they are using the TextHello.Greeting class. If you want to refer to the other developer’s Greeting class, you must specify it as NewNamespace.Greeting.
It is good practice to define all your classes in namespaces, and the Visual Studio 2010 environment follows this recommendation by using the name of your project as the top-level namespace. The .NET Framework class library also adheres to this recommendation; every class in the .NET Framework lives inside a namespace. For example, the Console class lives inside the System namespace. This means that its full name is actually System.Console.
Of course, if you had to write the full name of a class every time you used it, the situation would be no better than prefixing qualifiers or even just naming the class with some globally unique name such SystemConsole and not bothering with a namespace. Fortunately, you can solve this problem with a using directive in your programs. If you return to the TextHello program in Visual Studio 2010 and look at the file Program.cs in the Code and Text Editor window, you will notice the following statements at the top of the file:
using System; using System.Collections.Generic; using System.Linq; using System.Text;
A using statement brings a namespace into scope. In subsequent code in the same file, you no longer have to explicitly qualify objects with the namespace to which they belong. The four namespaces shown contain classes that are used so often that Visual Studio 2010 au-tomatically adds these using statements every time you create a new project. You can add further using directives to the top of a source file.
The following exercise demonstrates the concept of namespaces in more depth.
Try longhand names
1. In the Code and Text Editor window displaying the Program.cs file, comment out the first using directive at the top of the file, like this:
//using System;
2. On the Build menu, click Build Solution.
The build fails, and the Error List window displays the following error message:
The name ’Console’ does not exist in the current context.
3. In the Error List window, double-click the error message.
The identifier that caused the error is highlighted in the Program.cs source file.
16 Part I Introducing Microsoft Visual C# and Microsoft Visual Studio 2010
4. In the Code and Text Editor window, edit the Main method to use the fully qualified name System.Console. When you type System, the names of all the items in the System namespace are displayed by IntelliSense.
Main should look like this:
static void Main(string[] args)
{
System.Console.WriteLine("Hello World");
}
5. On the Build menu, click Build Solution.
The build should succeed this time. If it doesn’t, make sure that Main is exactly as it appears in the preceding code, and then try building again.
6. Run the application to make sure it still works by clicking Start Without Debugging on the Debug menu.
Namespaces and AssembliesA using statement simply brings the items in a namespace into scope and frees you from having to fully qualify the names of classes in your code. Classes are compiled into assemblies. An assembly is a file that usually has the .dll file name extension, although strictly speaking, executable programs with the .exe file name extension are also assemblies.
An assembly can contain many classes. The classes that the .NET Framework class li-brary comprises, such as System.Console, are provided in assemblies that are installed on your computer together with Visual Studio. You will find that the .NET Framework class library contains many thousands of classes. If they were all held in the same as-sembly, the assembly would be huge and difficult to maintain. (If Microsoft updated a single method in a single class, it would have to distribute the entire class library to all developers!)
For this reason, the .NET Framework class library is split into a number of assemblies, partitioned by the functional area to which the classes they contain relate. For ex-ample, there is a “core” assembly that contains all the common classes, such as System.Console, and there are further assemblies that contain classes for manipulating da-tabases, accessing Web services, building graphical user interfaces, and so on. If you want to make use of a class in an assembly, you must add to your project a reference to that assembly. You can then add using statements to your code that bring the items in namespaces in that assembly into scope.
You should note that there is not necessarily a 1:1 equivalence between an assembly and a namespace; a single assembly can contain classes for multiple namespaces, and a single namespace can span multiple assemblies. This all sounds very confusing at first, but you will soon get used to it.
Chapter 1 Welcome to C# 17
When you use Visual Studio to create an application, the template you select auto-matically includes references to the appropriate assemblies. For example, in Solution Explorer for the TextHello project, expand the References folder. You will see that a Console application automatically includes references to assemblies called Microsoft.CSharp, System, System.Core, System.Data, System.Data.DataExtensions, System.Xml, and System.Xml.Linq. You can add references for additional assemblies to a project by right-clicking the References folder and clicking Add Reference—you will perform this task in later exercises.
CreatingaGraphicalApplicationSo far, you have used Visual Studio 2010 to create and run a basic Console application. The Visual Studio 2010 programming environment also contains everything you need to create graphical Windows-based applications. You can design the forms-based user interface of a Windows application interactively. Visual Studio 2010 then generates the program state-ments to implement the user interface you’ve designed.
Visual Studio 2010 provides you with two views of a graphical application: the design view and the code view. You use the Code and Text Editor window to modify and maintain the code and logic for a graphical application, and you use the Design View window to lay out your user interface. You can switch between the two views whenever you want.
In the following set of exercises, you’ll learn how to create a graphical application by using Visual Studio 2010. This program will display a simple form containing a text box where you can enter your name and a button that displays a personalized greeting in a message box when you click the button.
Note Visual Studio 2010 provides two templates for building graphical applications—the Windows Forms Application template and the WPF Application template. Windows Forms is a technology that first appeared with the .NET Framework version 1.0. WPF, or Windows Presentation Foundation, is an enhanced technology that first appeared with the .NET Framework version 3.0. It provides many additional features and capabilities over Windows Forms, and you should consider using it in preference to Windows Forms for all new development.
Create a graphical application in Visual Studio 2010
n If you are using Visual Studio 2010 Standard or Visual Studio 2010 Professional, perform the following operations to create a new graphical application:
1. On the File menu, point to New, and then click Project.
The New Project dialog box opens.
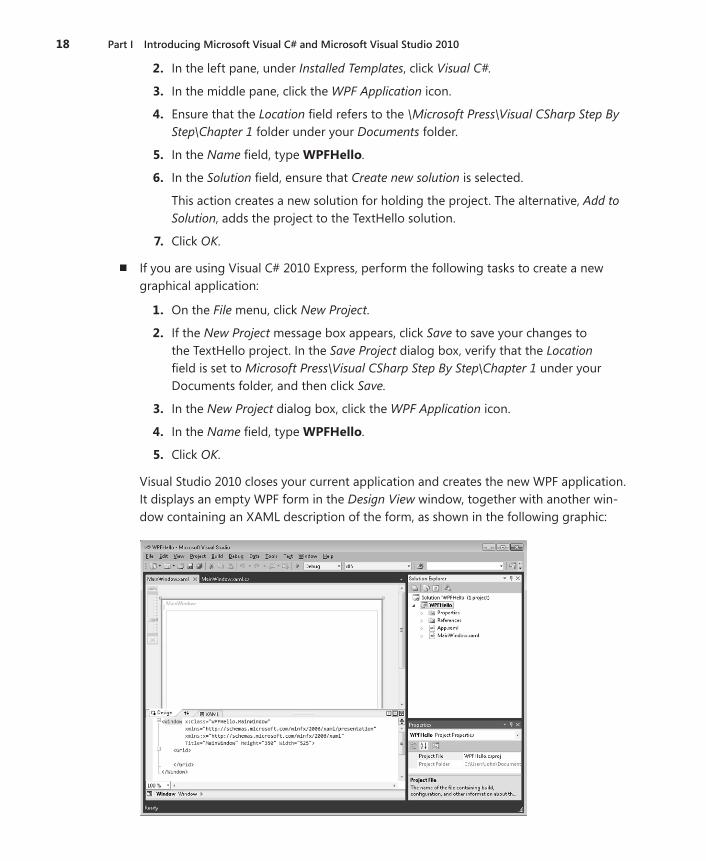
18 Part I Introducing Microsoft Visual C# and Microsoft Visual Studio 2010
2. In the left pane, under Installed Templates, click Visual C#.
3. In the middle pane, click the WPF Application icon.
4. Ensure that the Location field refers to the \Microsoft Press\Visual CSharp Step By Step\Chapter 1 folder under your Documents folder.
5. In the Name field, type WPFHello.
6. In the Solution field, ensure that Create new solution is selected.
This action creates a new solution for holding the project. The alternative, Add to Solution, adds the project to the TextHello solution.
7. Click OK.
n If you are using Visual C# 2010 Express, perform the following tasks to create a new graphical application:
1. On the File menu, click New Project.
2. If the New Project message box appears, click Save to save your changes to the TextHello project. In the Save Project dialog box, verify that the Location field is set to Microsoft Press\Visual CSharp Step By Step\Chapter 1 under your Documents folder, and then click Save.
3. In the New Project dialog box, click the WPF Application icon.
4. In the Name field, type WPFHello.
5. Click OK.
Visual Studio 2010 closes your current application and creates the new WPF application. It displays an empty WPF form in the Design View window, together with another win-dow containing an XAML description of the form, as shown in the following graphic:
Chapter 1 Welcome to C# 19
Tip Close the Output and Error List windows to provide more space for displaying the Design View window.
XAML stands for Extensible Application Markup Language and is an XML-like language used by WPF applications to define the layout of a form and its contents. If you have knowledge of XML, XAML should look familiar. You can actually define a WPF form completely by writing an XAML description if you don’t like using the Design View window of Visual Studio or if you don’t have access to Visual Studio; Microsoft provides a XAML editor called XAMLPad that is installed with the Windows Software Development Kit (SDK).
In the following exercise, you use the Design View window to add three controls to the Windows form and examine some of the C# code automatically generated by Visual Studio 2010 to implement these controls.
Create the user interface
1. Click the Toolbox tab that appears to the left of the form in the Design View window.
The Toolbox appears, partially obscuring the form, and displays the various components and controls that you can place on a Windows form. (If the Toolbox tab is not visible, on the View menu, click Toolbox.) Expand the Common WPF Controls section. This sec-tion displays a list of controls that are used by most WPF applications. The All Controls section displays a more extensive list of controls.
2. In the Common WPF Controls section, click Label, and then drag the label control onto the visible part of the form.
A label control is added to the form (you will move it to its correct location in a moment), and the Toolbox disappears from view.
Tip If you want the Toolbox to remain visible but not to hide any part of the form, click the Auto Hide button to the right in the Toolbox title bar. (It looks like a pin.) The Toolbox appears permanently on the left side of the Visual Studio 2010 window, and the Design View window shrinks to accommodate it. (You might lose a lot of space if you have a low-resolution screen.) Clicking the Auto Hide button once more causes the Toolbox to disappear again.
3. The label control on the form is probably not exactly where you want it. You can click and drag the controls you have added to a form to reposition them. Using this tech-nique, move the label control so that it is positioned toward the upper left corner of the form. (The exact placement is not critical for this application.)
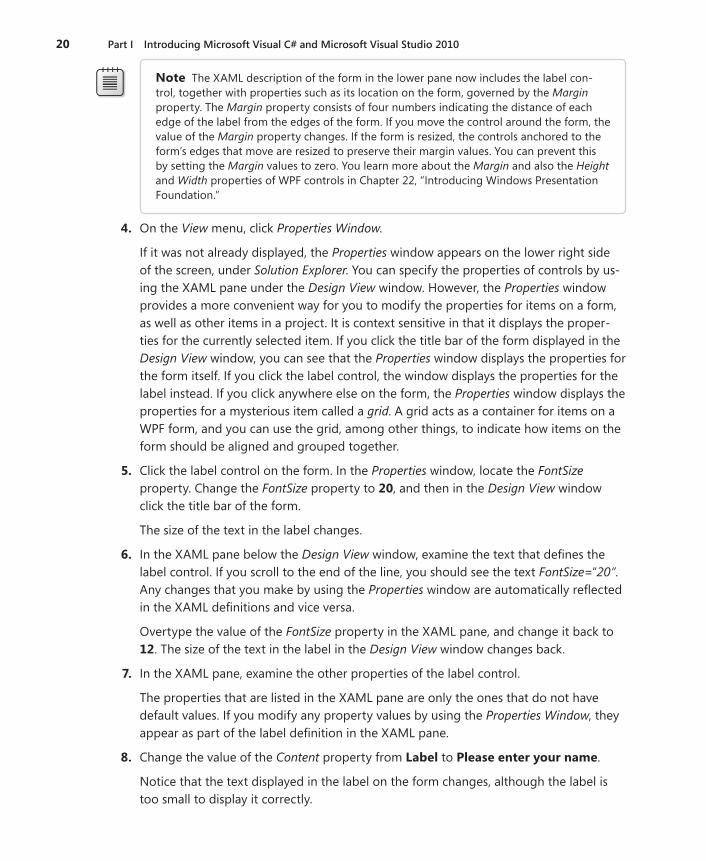
20 Part I Introducing Microsoft Visual C# and Microsoft Visual Studio 2010
Note The XAML description of the form in the lower pane now includes the label con-trol, together with properties such as its location on the form, governed by the Margin property. The Margin property consists of four numbers indicating the distance of each edge of the label from the edges of the form. If you move the control around the form, the value of the Margin property changes. If the form is resized, the controls anchored to the form’s edges that move are resized to preserve their margin values. You can prevent this by setting the Margin values to zero. You learn more about the Margin and also the Height and Width properties of WPF controls in Chapter 22, “Introducing Windows Presentation Foundation.”
4. On the View menu, click Properties Window.
If it was not already displayed, the Properties window appears on the lower right side of the screen, under Solution Explorer. You can specify the properties of controls by us-ing the XAML pane under the Design View window. However, the Properties window provides a more convenient way for you to modify the properties for items on a form, as well as other items in a project. It is context sensitive in that it displays the proper-ties for the currently selected item. If you click the title bar of the form displayed in the Design View window, you can see that the Properties window displays the properties for the form itself. If you click the label control, the window displays the properties for the label instead. If you click anywhere else on the form, the Properties window displays the properties for a mysterious item called a grid. A grid acts as a container for items on a WPF form, and you can use the grid, among other things, to indicate how items on the form should be aligned and grouped together.
5. Click the label control on the form. In the Properties window, locate the FontSize property. Change the FontSize property to 20, and then in the Design View window click the title bar of the form.
The size of the text in the label changes.
6. In the XAML pane below the Design View window, examine the text that defines the label control. If you scroll to the end of the line, you should see the text FontSize=“20”. Any changes that you make by using the Properties window are automatically reflected in the XAML definitions and vice versa.
Overtype the value of the FontSize property in the XAML pane, and change it back to 12. The size of the text in the label in the Design View window changes back.
7. In the XAML pane, examine the other properties of the label control.
The properties that are listed in the XAML pane are only the ones that do not have default values. If you modify any property values by using the Properties Window, they appear as part of the label definition in the XAML pane.
8. Change the value of the Content property from Label to Pleaseenteryourname.
Notice that the text displayed in the label on the form changes, although the label is too small to display it correctly.
Chapter 1 Welcome to C# 21
9. In the Design View window, click the label control. Place the mouse over the right edge of the label control. It should change into a double-headed arrow to indicate that you can use the mouse to resize the control. Click the mouse and drag the right edge of the label control further to the right, until you can see the complete text for the label.
10. Click the form in the Design View window, and then display the Toolbox again.
11. In the Toolbox, click and drag the TextBox control onto the form. Move the text box control so that it is directly underneath the label control.
Tip When you drag a control on a form, alignment indicators appear automatically when the control becomes aligned vertically or horizontally with other controls. This gives you a quick visual cue for making sure that controls are lined up neatly.
12. While the text box control is selected, in the Properties window, change the value of the Name property displayed at the top of the window to userName.
Note You will learn more about naming conventions for controls and variables in Chapter 2, “Working with Variables, Operators, and Expressions.”
13. Display the Toolbox again, and then click and drag a Button control onto the form. Place the button control to the right of the text box control on the form so that the bottom of the button is aligned horizontally with the bottom of the text box.
14. Using the Properties window, change the Name property of the button control to ok. And change the Content property from Button to OK. Verify that the caption of the button control on the form changes.
15. Click the title bar of the MainWindow.xaml form in the Design View window. In the Properties window, change the Title property to Hello.
16. In the Design View window, notice that a resize handle (a small square) appears on the lower right corner of the form when it is selected. Move the mouse pointer over the resize handle. When the pointer changes to a diagonal double-headed arrow, click and drag the pointer to resize the form. Stop dragging and release the mouse button when the spacing around the controls is roughly equal.
Important Click the title bar of the form and not the outline of the grid inside the form before resizing it. If you select the grid, you will modify the layout of the controls on the form but not the size of the form itself.
The form should now look similar to the following figure.
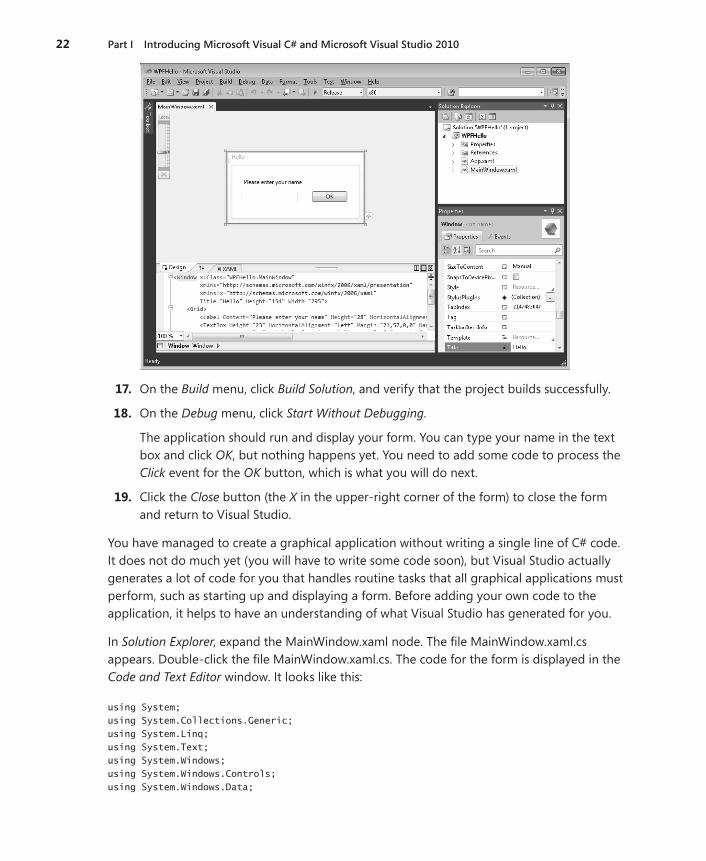
22 Part I Introducing Microsoft Visual C# and Microsoft Visual Studio 2010
17. On the Build menu, click Build Solution, and verify that the project builds successfully.
18. On the Debug menu, click Start Without Debugging.
The application should run and display your form. You can type your name in the text box and click OK, but nothing happens yet. You need to add some code to process the Click event for the OK button, which is what you will do next.
19. Click the Close button (the X in the upper-right corner of the form) to close the form and return to Visual Studio.
You have managed to create a graphical application without writing a single line of C# code. It does not do much yet (you will have to write some code soon), but Visual Studio actually generates a lot of code for you that handles routine tasks that all graphical applications must perform, such as starting up and displaying a form. Before adding your own code to the application, it helps to have an understanding of what Visual Studio has generated for you.
In Solution Explorer, expand the MainWindow.xaml node. The file MainWindow.xaml.cs appears. Double-click the file MainWindow.xaml.cs. The code for the form is displayed in the Code and Text Editor window. It looks like this:
using System;
using System.Collections.Generic;
using System.Linq;
using System.Text;
using System.Windows;
using System.Windows.Controls;
using System.Windows.Data;
Chapter 1 Welcome to C# 23
using System.Windows.Documents;
using System.Windows.Input;
using System.Windows.Media;
using System.Windows.Media.Imaging;
using System.Windows.Navigation;
using System.Windows.Shapes;
namespace WPFHello
{
/// <summary>
/// Interaction logic for MainWindow.xaml
/// </summary>
public partial class MainWindow : Window
{
public MainWindow()
{
InitializeComponent();
}
}
}
In addition to a good number of using statements bringing into scope some namespaces that most WPF applications use, the file contains the definition of a class called MainWindow but not much else. There is a little bit of code for the MainWindow class known as a con-structor that calls a method called InitializeComponent, but that is all. (A constructor is a special method with the same name as the class. It is executed when an instance of the class is created and can contain code to initialize the instance. You will learn about constructors in Chapter 7.) In fact, the application contains a lot more code, but most of it is generated automatically based on the XAML description of the form, and it is hidden from you. This hidden code performs operations such as creating and displaying the form, and creating and positioning the various controls on the form.
The purpose of the code that you can see in this class is so that you can add your own methods to handle the logic for your application, such as determining what happens when the user clicks the OK button.
Tip You can also display the C# code file for a WPF form by right-clicking anywhere in the Design View window and then clicking View Code.
At this point, you might be wondering where the Main method is and how the form gets displayed when the application runs; remember that Main defines the point at which the pro-gram starts. In Solution Explorer, you should notice another source file called App.xaml. If you double-click this file, the XAML description of this item appears. One property in the XAML

24 Part I Introducing Microsoft Visual C# and Microsoft Visual Studio 2010
code is called StartupUri, and it refers to the MainWindow.xaml file as shown in bold in the following code example:
<Application x:Class="WPFHello.App"
xmlns="http://schemas.microsoft.com/winfx/2006/xaml/presentation"
xmlns:x="http://schemas.microsoft.com.winfx/2006/xaml"
StartupUri="MainWindow.xaml">
<Application.Resources>
</Application.Resources>
</Application>
If you click the Design tab at the bottom of the XAML pane, the Design View window for App.xaml appears and displays the text “Intentionally left blank. The document root element is not supported by the visual designer”. This occurs because you cannot use the Design View window to modify the App.xaml file. Click the XAML tab to return to the XAML pane.
If you expand the App.xaml node in Solution Explorer, you will see that there is also an App.xaml.cs file. If you double-click this file, you will find it contains the following code:
using System;
using System.Collections.Generic;
using System.Configuration;
using System.Data;
using System.Linq;
using System.Windows;
namespace WPFHello
{
/// <summary>
/// Interaction logic for App.xaml
/// </summary>
public partial class App : Application
{
}
}
Once again, there are a number of using statements but not a lot else, not even a Main method. In fact, Main is there, but it is also hidden. The code for Main is generated based on the settings in the App.xaml file; in particular, Main will create and display the form specified by the StartupUri property. If you want to display a different form, you edit the App.xaml file.
The time has come to write some code for yourself!
Write the code for the OK button
1. Click the MainWindow.xaml tab above the Code and Text Editor window to display MainWindow in the Design View window.
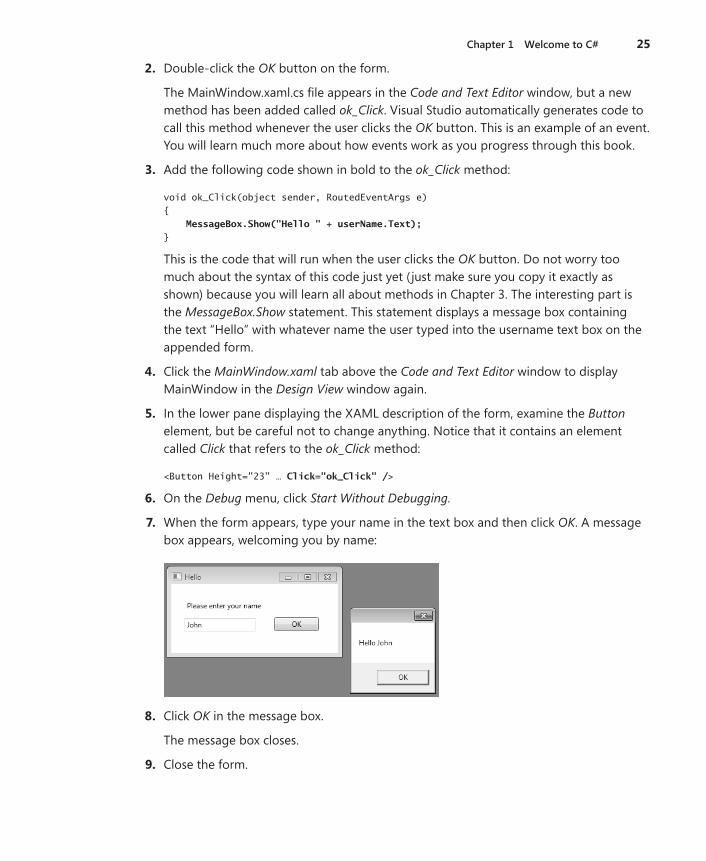
Chapter 1 Welcome to C# 25
2. Double-click the OK button on the form.
The MainWindow.xaml.cs file appears in the Code and Text Editor window, but a new method has been added called ok_Click. Visual Studio automatically generates code to call this method whenever the user clicks the OK button. This is an example of an event. You will learn much more about how events work as you progress through this book.
3. Add the following code shown in bold to the ok_Click method:
void ok_Click(object sender, RoutedEventArgs e)
{
MessageBox.Show("Hello " + userName.Text);
}
This is the code that will run when the user clicks the OK button. Do not worry too much about the syntax of this code just yet ( just make sure you copy it exactly as shown) because you will learn all about methods in Chapter 3. The interesting part is the MessageBox.Show statement. This statement displays a message box containing the text “Hello” with whatever name the user typed into the username text box on the appended form.
4. Click the MainWindow.xaml tab above the Code and Text Editor window to display MainWindow in the Design View window again.
5. In the lower pane displaying the XAML description of the form, examine the Button element, but be careful not to change anything. Notice that it contains an element called Click that refers to the ok_Click method:
<Button Height="23" … Click="ok_Click" />
6. On the Debug menu, click Start Without Debugging.
7. When the form appears, type your name in the text box and then click OK. A message box appears, welcoming you by name:
8. Click OK in the message box.
The message box closes.
9. Close the form.
26 Part I Introducing Microsoft Visual C# and Microsoft Visual Studio 2010
In this chapter, you have seen how to use Visual Studio 2010 to create, build, and run applica-tions. You have created a console application that displays its output in a console window, and you have created a WPF application with a simple graphical user interface.
n If you want to continue to the next chapter
Keep Visual Studio 2010 running, and turn to Chapter 2.
n If you want to exit Visual Studio 2010 now
On the File menu, click Exit. If you see a Save dialog box, click Yes and save the project.
Chapter1QuickReferenceTo Do this
Create a new console application using Visual Studio 2010 Standard or Professional
On the File menu, point to New, and then click Project to open the New Project dialog box. In the left pane, under Installed Templates, click Visual C#. In the middle pane, click Console Application. Specify a directory for the project files in the Location box. Type a name for the project. Click OK.
Create a new console application using Visual C# 2010 Express
On the File menu, click New Project to open the New Project dialog box. For the template, select Console Application. Choose a name for the project. Click OK.
Create a new graphical application using Visual Studio 2010 Standard or Professional
On the File menu, point to New, and then click Project to open the New Project dialog box. In the left pane, under Installed Templates, click Visual C#. In the middle pane, click WPF Application. Specify a directory for the project files in the Location box. Type a name for the project. Click OK.
Create a new graphical application using Visual C# 2010 Express
On the File menu, click New Project to open the New Project dialog box. For the template, select WPF Application. Choose a name for the project. Click OK.
Build the application On the Build menu, click Build Solution.
Run the application On the Debug menu, click Start Without Debugging.
599
Chapter 27
Introducing the Task Parallel LibraryAfter completing the chapter, you will be able to
n Describe the benefits that implementing parallel operations in an application can bring .
n Explain how the Task Parallel Library provides an optimal platform for implementing applications that can take advantage of multiple processor cores .
n Use the Task class to create and run parallel operations in an application .
n Use the Parallel class to parallelize some common programming constructs .
n Use tasks with threads to improve responsiveness and throughput in graphical user interface (GUI) applications .
n Cancel long-running tasks, and handle exceptions raised by parallel operations .
You have now seen how to use Microsoft Visual C# to build applications that provide a graphical user interface and that can manage data held in a database . These are common features of most modern systems . However, as technology has advanced so have the require-ments of users, and the applications that enable them to perform their day-to-day opera-tions need to provide ever-more sophisticated solutions . In the final part of this book, you will look at some of the advanced features introduced with the .NET Framework 4 .0 . In par-ticular, in this chapter you will see how to improve concurrency in an application by using the Task Parallel Library . In the next chapter, you will see how the parallel extensions provided with the .NET Framework can be used in conjunction with Language Integrated Query (LINQ) to improve the throughput of data access operations . And in the final chapter, you will meet Windows Communication Foundation for building distributed solutions that can incorporate services running on multiple computers . As a bonus, the appendix (provided on the CD) de-scribes how to use the Dynamic Language Runtime to build C# applications and components that can interoperate with services built by using other languages that operate outside of the structure provided by the .NET Framework, such as Python and Ruby .
In the bulk of the preceding chapters in this book, you learned how to use C# to write programs that run in a single-threaded manner . By “single-threaded,” I mean that at any one point in time, a program has been executing a single instruction . This might not always be the most efficient approach for an application to take . For example, you saw in Chapter 23, “Gathering User Input,” that if your program is waiting for the user to click a button on a Windows Presentation Foundation (WPF) form, there might be other work that it can per-form while it is waiting . However, if a single-threaded program has to perform a lengthy, pro-cessor-intensive calculation, it cannot respond to the user typing in data on a form or clicking a menu item . To the user, the application appears to have frozen . Only when the calculation
600 Part VI Building Professional Solutions with Visual Studio 2010
has completed does the user interface start responding again . Applications that can perform multiple tasks at the same time can make far better use of the resources available on a com-puter, can run more quickly, and can be more responsive . Additionally, some individual tasks might run more quickly if you can divide them into parallel paths of execution that can run concurrently . In Chapter 23, you saw how WPF can take advantage of threads to improve re-sponsiveness in a graphical user interface . In this chapter, you will learn how to use the Task Parallel Library to implement a more generic form of multitasking in your programs that can apply to computationally intensive applications and not just those concerned with managing user interfaces .
Why Perform Multitasking by Using Parallel Processing?As mentioned in the introduction, there are two principle reasons why you might want to perform multitasking in an application:
n To improve responsiveness You can give the user of an application the impression that the program is performing more than one task at a time by dividing the program up into concurrent threads of execution and allowing each thread to run in turn for a short period of time . This is the conventional co-operative model that many expe-rienced Windows developers are familiar with . However, it is not true multitasking because the processor is shared between threads, and the co-operative nature of this approach requires that the code executed by each thread behaves in an appropriate manner . If one thread dominates the CPU and resources available at the expense of other threads, the advantages of this approach are lost . It is sometimes difficult to write well-behaved applications that follow this model consistently .
n To improve scalability You can improve scalability by making efficient use of the processing resources available and using these resources to reduce the time required to execute parts of an application . A developer can determine which parts of an ap-plication can be performed in parallel and arrange for them to be run concurrently . As more computing resources are added, more tasks can be run in parallel . Until re-cently, this model was suitable only for systems that either had multiple CPUs or were able to spread the processing across different computers networked together . In both cases, you had to use a model that arranged for coordination between parallel tasks . Microsoft provides a specialized version of Windows called High Performance Compute (HPC) Server 2008, which enables an organization to build clusters of servers that can distribute and execute tasks in parallel . Developers can use the Microsoft implemen-tation of the Message Passing Interface (MPI), a well-known language-independent communications protocol, to build applications based on parallel tasks that coordinate and cooperate with each other by sending messages . Solutions based on Windows HPC Server 2008 and MPI are ideal for large-scale, compute-bound engineering and scientific applications, but they are expensive for smaller scale, desktop systems .

Chapter 27 Introducing the Task Parallel Library 601
From these descriptions, you might be tempted to conclude that the most cost-effective way to build multitasking solutions for desktop applications is to use the cooperative multi-threaded approach . However, the multithreaded approach was simply intended as a mecha-nism to provide responsiveness—to enable computers with a single processor to ensure that each task got a fair share of the processor . It is not well-suited for multiprocessor machines because it is not designed to distribute the load across processors and, consequently, does not scale well . While desktop machines with multiple processors were expensive (and con-sequently relatively rare), this was not an issue . However, this situation is changing, as I will briefly explain .
The Rise of the Multicore ProcessorTen years ago, the cost of a decent personal computer was in the range of $500 to $1000 . Today, a decent personal computer still costs about the same, even after ten years of price inflation . The specification of a typical PC these days is likely to include a processor running at a speed of between 2 GHz and 3 GHz, 500 GB of hard disk storage, 4 GB of RAM, high-speed and high-resolution graphics, and a rewritable DVD drive . Ten years ago, the processor speed for a typical machine was between 500 MHz and 1 GHz, 80 GB was a big hard drive, Windows ran quite happily with 256 MB or less of RAM, and rewritable CD drives cost well over $100 . (Rewritable DVD drives were rare and extremely expensive .) This is the joy of tech-nological progress: ever faster and more powerful hardware at cheaper and cheaper prices .
This is not a new trend . In 1965, Gordon E . Moore, co-founder of Intel, wrote a paper titled “Cramming more components onto integrated circuits,” which discussed how the increasing miniaturization of components enabled more transistors to be embedded on a silicon chip, and how the falling costs of production as the technology became more accessible would lead economics to dictate squeezing as many as 65,000 components onto a single chip by 1975 . Moore’s observations lead to the dictum frequently referred to as “Moore’s Law,” which basically states that the number of transistors that can be placed inexpensively on an inte-grated circuit will increase exponentially, doubling approximately every two years . (Actually, Gordon Moore was more optimistic than this initially, postulating that the volume of transis-tors was likely to double every year, but he later modified his calculations .) The ability to pack transistors together led to the ability to pass data between them more quickly . This meant we could expect to see chip manufacturers produce faster and more powerful microprocessors at an almost unrelenting pace, enabling software developers to write ever more complicated software that would run more quickly .
Moore’s Law concerning the miniaturization of electronic components still holds, even after more than 40 years . However, physics has started to intervene . There comes a limit when it is not possible transmit signals between transistors on a single chip any more quickly, no matter how small or densely packed they are . To a software developer, the most noticeable result of
602 Part VI Building Professional Solutions with Visual Studio 2010
this limitation is that processors have stopped getting faster . Six years ago, a fast processor ran at 3 GHz . Today, a fast processor still runs at 3 GHz .
The limit to the speed at which processors can transmit data between components has caused chip companies to look at alternative mechanisms for increasing the amount of work a processor can do . The result is that most modern processors now have two or more proces-sor cores . Effectively, chip manufacturers have put multiple processors on the same chip and added the necessary logic to enable them to communicate and coordinate with each other . Dual-core processors (two cores) and quad-core processors (four cores) are now common . Chips with 8, 16, 32, and 64 cores are available, and the price of these is expected to fall sharply in the near future . So, although processors have stopped speeding up, you can now expect to get more of them on a single chip .
What does this mean to a developer writing C# applications?
In the days before multicore processors, a single-threaded application could be sped up simply by running it on a faster processor . With multicore processors, this is no longer the case . A single-threaded application will run at the same speed on a single-core, dual-core, or quad-core processor that all have the same clock frequency . The difference is that on a dual-core processor, one of the processor cores will be sitting around idle, and on a quad-core processor, three of the cores will be simply ticking over waiting for work . To make the best use of multicore processors, you need to write your applications to take advantage of multitasking .
Implementing Multitasking in a Desktop ApplicationMultitasking is the ability to do more than one thing at the same time . It is one of those concepts that is easy to describe but that, until recently, has been difficult to implement .
In the optimal scenario, an application running on a multicore processor performs as many concurrent tasks as there are processor cores available, keeping each of the cores busy . However, there are many issues you have to consider to implement concurrency, including the following:
n How can you divide an application into a set of concurrent operations?
n How can you arrange for a set of operations to execute concurrently, on multiple processors?
n How can you ensure that you attempt to perform only as many concurrent operations as there are processors available?
n If an operation is blocked (such as while it is waiting for I/O to complete), how can you detect this and arrange for the processor to run a different operation rather than sit idle?
Chapter 27 Introducing the Task Parallel Library 603
n How can you determine when one or more concurrent operations have completed?
n How can you synchronize access to shared data to ensure that two or more concurrent operations do not inadvertently corrupt each other’s data?
To an application developer, the first question is a matter of application design . The remaining questions depend on the programmatic infrastructure—Microsoft provides the Task Parallel Library (TPL) to help address these issues .
In Chapter 28, “Performing Parallel Data Access,” you will see how some query-oriented problems have naturally parallel solutions, and how you can use the ParallelEnumerable type of PLINQ to parallelize query operations . However, sometimes you need a more imperative approach for more generalized situations . The TPL contains a series of types and operations that enable you to more explicitly specify how you want to divide an application into a set of parallel tasks .
Tasks, Threads, and the ThreadPoolThe most important type in the TPL is the Task class . The Task class is an abstraction of a concurrent operation . You create a Task object to run a block of code . You can instantiate multiple Task objects and start them running in parallel if sufficient processors or processor cores are available .
Note From now on, I will use the term “processor” to refer to either a single-core processor or a single processor core on a multicore processor .
Internally, the TPL implements tasks and schedules them for execution by using Thread objects and the ThreadPool class . Multithreading and thread pools have been available with the .NET Framework since version 1 .0, and you can use the Thread class in the System.Threading namespace directly in your code . However, the TPL provides an additional degree of abstraction that enables you to easily distinguish between the degree of parallelization in an application (the tasks) and the units of parallelization (the threads) . On a single-processor computer, these items are usually the same . However, on a computer with multiple proces-sors or with a multicore processor, they are different . If you design a program based directly on threads, you will find that your application might not scale very well; the program will use the number of threads you explicitly create, and the operating system will schedule only that number of threads . This can lead to overloading and poor response time if the number of threads greatly exceeds the number of available processors, or to inefficiency and poor throughput if the number of threads is less than the number of processors .
The TPL optimizes the number of threads required to implement a set of concurrent tasks and schedules them efficiently according to the number of available processors . The TPL uses a set of threads provided by the .NET Framework, called the ThreadPool, and implements
604 Part VI Building Professional Solutions with Visual Studio 2010
a queuing mechanism to distribute the workload across these threads . When a program creates a Task object, the task is added to a global queue . When a thread becomes available, the task is removed from the global queue and is executed by that thread . The ThreadPool implements a number of optimizations and uses a work-stealing algorithm to ensure that threads are scheduled efficiently .
Note The ThreadPool was available in previous editions of the .NET Framework, but it has been enhanced significantly in the .NET Framework 4 .0 to support Tasks .
You should note that the number of threads created by the .NET Framework to handle your tasks is not necessarily the same as the number of processors . Depending on the nature of the workload, one or more processors might be busy performing high-priority work for other applications and services . Consequently, the optimal number of threads for your ap-plication might be less than the number of processors in the machine . Alternatively, one or more threads in an application might be waiting for long-running memory access, I/O, or a network operation to complete, leaving the corresponding processors free . In this case, the optimal number of threads might be more than the number of available processors . The .NET Framework follows an iterative strategy, known as a hill-climbing algorithm, to dynamically determine the ideal number of threads for the current workload .
The important point is that all you have to do in your code is divide your application into tasks that can be run in parallel . The .NET Framework takes responsibility for creating the appropriate number of threads based on the processor architecture and workload of your computer, associating your tasks with these threads and arranging for them to be run ef-ficiently . It does not matter if you divide your work into too many tasks because the .NET Framework will attempt to run only as many concurrent threads as is practical; in fact, you are encouraged to overpartition your work because this will help to ensure that your application scales if you move it onto a computer that has more processors available .
Creating, Running, and Controlling TasksThe Task object and the other types in the TPL reside in the System.Threading.Tasks namespace . You can create Task objects by using the Task constructor . The Task construc-tor is overloaded, but all versions expect you to provide an Action delegate as a parameter . Remember from Chapter 23 that an Action delegate references a method that does not return a value . A task object uses this delegate to run the method when it is scheduled . The following example creates a Task object that uses a delegate to run the method called
Chapter 27 Introducing the Task Parallel Library 605
doWork (you can also use an anonymous method or a lambda expression, as shown by the code in the comments):
Task task = new Task(new Action(doWork));
// Task task = new Task(delegate { this.doWork(); });
// Task task = new Task(() => { this.doWork(); });
...
private void doWork()
{
// The task runs this code when it is started
...
}
Note In many cases, you can let the compiler infer the Action delegate type itself and simply specify the method to run . For example, you can rephrase the first example just shown as follows:
Task task = new Task(doWork);
The delegate inference rules implemented by the compiler apply not just to the Action type, but anywhere you can use a delegate . You will see many more examples throughout the remainder of this book .
The default Action type references a method that takes no parameters . Other overloads of the Task constructor take an Action<object> parameter representing a delegate that refers to a method that takes a single object parameter . These overloads enable you to pass data into the method run by the task . The following code shows an example:
Action<object> action;
action = doWorkWithObject;
object parameterData = ...;
Task task = new Task(action, parameterData);
...
private void doWorkWithObject(object o)
{
...
}
After you create a Task object, you can set it running by using the Start method, like this:
Task task = new Task(...);
task.Start();
The Start method is also overloaded, and you can optionally specify a TaskScheduler object to control the degree of concurrency and other scheduling options . It is recommended that you use the default TaskScheduler object built into the .NET Framework, or you can define your own custom TaskScheduler class if you want to take more control over the way in which tasks are queued and scheduled . The details of how to do this are beyond the scope of
606 Part VI Building Professional Solutions with Visual Studio 2010
this book, but if you require more information look at the description of the TaskScheduler abstract class in the .NET Framework Class Library documentation provided with Visual Studio .
You can obtain a reference to the default TaskScheduler object by using the static Default property of the TaskScheduler class . The TaskScheduler class also provides the static Current property, which returns a reference to the TaskScheduler object currently used . (This TaskScheduler object is used if you do not explicitly specify a scheduler .) A task can provide hints to the default TaskScheduler about how to schedule and run the task if you specify a value from the TaskCreationOptions enumeration in the Task constructor . For more informa-tion about the TaskCreationOptions enumeration, consult the documentation describing the .NET Framework Class Library provided with Visual Studio .
When the method run by the task completes, the task finishes, and the thread used to run the task can be recycled to execute another task .
Normally, the scheduler arranges to perform tasks in parallel wherever possible, but you can also arrange for tasks to be scheduled serially by creating a continuation . You create a contin-uation by calling the ContinueWith method of a Task object . When the action performed by the Task object completes, the scheduler automatically creates a new Task object to run the action specified by the ContinueWith method . The method specified by the continuation ex-pects a Task parameter, and the scheduler passes in a reference to the task that completed to the method . The value returned by ContinueWith is a reference to the new Task object . The following code example creates a Task object that runs the doWork method and specifies a continuation that runs the doMoreWork method in a new task when the first task completes:
Task task = new Task(doWork);
task.Start();
Task newTask = task.ContinueWith(doMoreWork);
...
private void doWork()
{
// The task runs this code when it is started
...
}
...
private void doMoreWork(Task task)
{
// The continuation runs this code when doWork completes
...
}
The ContinueWith method is heavily overloaded, and you can provide a number of parameters that specify additional items, such as the TaskScheduler to use and a TaskContinuationOptions value . The TaskContinuationOptions type is an enumeration that
Chapter 27 Introducing the Task Parallel Library 607
contains a superset of the values in the TaskCreationOptions enumeration . The additional values available include
n NotOnCanceled and OnlyOnCanceled The NotOnCanceled option specifies that the continuation should run only if the previous action completes and is not canceled, and the OnlyOnCanceled option specifies that the continuation should run only if the previ-ous action is canceled . The section “Canceling Tasks and Handling Exceptions” later in this chapter describes how to cancel a task .
n NotOnFaulted and OnlyOnFaulted The NotOnFaulted option indicates that the continuation should run only if the previous action completes and does not throw an unhandled exception . The OnlyOnFaulted option causes the continuation to run only if the previous action throws an unhandled exception . The section “Canceling Tasks and Handling Exceptions” provides more information on how to manage exceptions in a task .
n NotOnRanToCompletion and OnlyOnRanToCompletion The NotOnRanToCompletion option specifies that the continuation should run only if the previous action does not complete successfully; it must either be canceled or throw an exception . OnlyOnRanToCompletion causes the continuation to run only if the previous action completes successfully .
The following code example shows how to add a continuation to a task that runs only if the initial action does not throw an unhandled exception:
Task task = new Task(doWork);
task.ContinueWith(doMoreWork, TaskContinuationOptions.NotOnFaulted);
task.Start();
If you commonly use the same set of TaskCreationOptions values and the same TaskScheduler object, you can use a TaskFactory object to create and run a task in a single step . The con-structor for the TaskFactory class enables you to specify the task scheduler, task creation options, and task continuation options that tasks constructed by this factory should use . The TaskFactory class provides the StartNew method to create and run a Task object . Like the Start method of the Task class, the StartNew method is overloaded, but all of them expect a reference to a method that the task should run .
The following code shows an example that creates and runs two tasks using the same task factory:
TaskScheduler scheduler = TaskScheduler.Current;
TaskFactory taskFactory = new TaskFactory(scheduler, TaskCreationOptions.None,
TaskContinuationOptions.NotOnFaulted);
Task task = taskFactory.StartNew(doWork);
Task task2 = taskFactory.StartNew(doMoreWork);
608 Part VI Building Professional Solutions with Visual Studio 2010
Even if you do not currently specify any particular task creation options and you use the default task scheduler, you should still consider using a TaskFactory object; it ensures con-sistency, and you will have less code to modify to ensure that all tasks run in the same man-ner if you need to customize this process in the future . The Task class exposes the default TaskFactory used by the TPL through the static Factory property . You can use it like this:
Task task = Task.Factory.StartNew(doWork);
A common requirement of applications that invoke operations in parallel is to synchronize tasks . The Task class provides the Wait method, which implements a simple task coordination method . It enables you to suspend execution of the current thread until the specified task completes, like this:
task2.Wait(); // Wait at this point until task2 completes
You can wait for a set of tasks by using the static WaitAll, and WaitAny methods of the Task class . Both methods take a params array containing a set of Task objects . The WaitAll method waits until all specified tasks have completed, and WaitAny stops until at least one of the specified tasks has finished . You use them like this:
Task.WaitAll(task, task2); // Wait for both task and task2 to complete
Task.WaitAny(task, task2); // Wait for either of task or task2 to complete
Using the Task Class to Implement ParallelismIn the next exercise, you will use the Task class to parallelize processor-intensive code in an application, and you will see how this parallelization reduces the time taken for the applica-tion to run by spreading the computations across multiple processor cores .
The application, called GraphDemo, comprises a WPF form that uses an Image control to display a graph . The application plots the points for the graph by performing a complex calculation .
Note The exercises in this chapter are intended to run on a computer with a multicore processor . If you have only a single-core CPU, you will not observe the same effects . Also, you should not start any additional programs or services between exercises because these might affect the results that you see .
Chapter 27 Introducing the Task Parallel Library 609
Examine and run the GraphDemo single-threaded application
1. Start Microsoft Visual Studio 2010 if it is not already running .
2. Open the GraphDemo solution, located in the \Microsoft Press\Visual CSharp Step By Step\Chapter 27\GraphDemo folder in your Documents folder .
3. In Solution Explorer, in the GraphDemo project, double-click the file GraphWindow .xaml to display the form in the Design View window .
The form contains the following controls:
n An Image control called graphImage . This image control displays the graph rendered by the application .
n A Button control called plotButton . The user clicks this button to generate the data for the graph and display it in the graphImage control .
n A Label control called duration . The application displays the time taken to generate and render the data for the graph in this label .
4. In Solution Explorer, expand GraphWindow .xaml, and then double-click GraphWindow .xaml .cs to display the code for the form in the Code and Text Editor window .
The form uses a System.Windows.Media.Imaging.WriteableBitmap object called graphBitmap to render the graph . The variables pixelWidth and pixelHeight specify the horizontal and vertical resolution, respectively, for the WriteableBitmap object; the variables dpiX and dpiY specify the horizontal and vertical density, respectively, of the image in dots per inch:
public partial class GraphWindow : Window
{
private static long availableMemorySize = 0;
private int pixelWidth = 0;
private int pixelHeight = 0;
private double dpiX = 96.0;
private double dpiY = 96.0;
private WriteableBitmap graphBitmap = null;
…
}
5. Examine the GraphWindow constructor . It looks like this:
public GraphWindow()
{
InitializeComponent();
PerformanceCounter memCounter = new PerformanceCounter("Memory", "Available
Bytes");
availableMemorySize = Convert.ToUInt64(memCounter.NextValue());
this.pixelWidth = (int)availablePhysicalMemory / 20000;
if (this.pixelWidth < 0 || this.pixelWidth > 15000)
this.pixelWidth = 15000;
610 Part VI Building Professional Solutions with Visual Studio 2010
this.pixelHeight = (int)availablePhysicalMemory / 40000;
if (this.pixelHeight < 0 || this.pixelHeight > 7500)
this.pixelHeight = 7500;
}
To avoid presenting you with code that exhausts the memory available on your computer and generates OutOfMemory exceptions, this application creates a PerformanceCounter object to query the amount of available physical memory on the computer . It then uses this information to determine appropriate values for the pixel-Width and pixelHeight variables . The more available memory you have on your com-puter, the bigger the values generated for pixelWidth and pixelHeight (subject to the limits of 15,000 and 7500 for each of these variables, respectively) and the more you will see the benefits of using the TPL as the exercises in this chapter proceed . However, if you find that the application still generates OutOfMemory exceptions, increase the divisors (20,000 and 40,000) used for generating the values of pixelWidth and pixelHeight .
If you have a lot of memory, the values calculated for pixelWidth and pixelHeight might overflow . In this case, they will contain negative values and the application will fail with an exception later on . The code in the constructor checks this case and sets the pixelWidth and pixelHeight fields to a pair of useful values that enable the application to run correctly in this situation .
6. Examine the code for the plotButton_Click method:
private void plotButton_Click(object sender, RoutedEventArgs e)
{
if (graphBitmap == null)
{
graphBitmap = new WriteableBitmap(pixelWidth, pixelHeight, dpiX, dpiY,
PixelFormats.Gray8, null);
}
int bytesPerPixel = (graphBitmap.Format.BitsPerPixel + 7) / 8;
int stride = bytesPerPixel * graphBitmap.PixelWidth;
int dataSize = stride * graphBitmap.PixelHeight;
byte [] data = new byte[dataSize];
Stopwatch watch = Stopwatch.StartNew();
generateGraphData(data);
duration.Content = string.Format("Duration (ms): {0}", watch.ElapsedMilliseconds);
graphBitmap.WritePixels(
new Int32Rect(0, 0, graphBitmap.PixelWidth, graphBitmap.PixelHeight),
data, stride, 0);
graphImage.Source = graphBitmap;
}
Chapter 27 Introducing the Task Parallel Library 611
This method runs when the user clicks the plotButton button . The code instantiates the graphBitmap object if it has not already been created by the user clicking the plotButton button previously, and it specifies that each pixel represents a shade of gray, with 8 bits per pixel . This method uses the following variables and methods:
n The bytesPerPixel variable calculates the number of bytes required to hold each pixel . (The WriteableBitmap type supports a range of pixel formats, with up to 128 bits per pixel for full-color images .)
n The stride variable contains the vertical distance, in bytes, between adjacent pixels in the WriteableBitmap object .
n The dataSize variable calculates the number of bytes required to hold the data for the WriteableBitmap object . This variable is used to initialize the data array with the appropriate size .
n The data byte array holds the data for the graph .
n The watch variable is a System.Diagnostics.Stopwatch object . The StopWatch type is useful for timing operations . The static StartNew method of the StopWatch type creates a new instance of a StopWatch object and starts it running . You can query the running time of a StopWatch object by examining the ElapsedMilliseconds property .
n The generateGraphData method populates the data array with the data for the graph to be displayed by the WriteableBitmap object . You will examine this method in the next step .
n The WritePixels method of the WriteableBitmap class copies the data from a byte array to a bitmap for rendering . This method takes an Int32Rect parameter that specifies the area in the WriteableBitmap object to populate, the data to be used to copy to the WriteableBitmap object, the vertical distance between adjacent pixels in the WriteableBitmap object, and an offset into the WriteableBitmap object to start writing the data to .
Note You can use the WritePixels method to selectively overwrite information in a WriteableBitmap object . In this example, the code overwrites the entire contents . For more information about the WriteableBitmap class, consult the .NET Framework Class Library documentation installed with Visual Studio 2010 .
n The Source property of an Image control specifies the data that the Image control should render . This example sets the Source property to the WriteableBitmap object .
612 Part VI Building Professional Solutions with Visual Studio 2010
7. Examine the code for the generateGraphData method:
private void generateGraphData(byte[] data)
{
int a = pixelWidth / 2;
int b = a * a;
int c = pixelHeight / 2;
for (int x = 0; x < a; x ++)
{
int s = x * x;
double p = Math.Sqrt(b - s);
for (double i = -p; i < p; i += 3)
{
double r = Math.Sqrt(s + i * i) / a;
double q = (r - 1) * Math.Sin(24 * r);
double y = i / 3 + (q * c);
plotXY(data, (int)(-x + (pixelWidth / 2)), (int)(y + (pixelHeight / 2)));
plotXY(data, (int)(x + (pixelWidth / 2)), (int)(y + (pixelHeight / 2)));
}
}
}
This method performs a series of calculations to plot the points for a rather complex graph . (The actual calculation is unimportant—it just generates a graph that looks at-tractive!) As it calculates each point, it calls the plotXY method to set the appropriate bytes in the data array that correspond to these points . The points for the graph are reflected around the X axis, so the plotXY method is called twice for each calculation: once for the positive value of the X coordinate, and once for the negative value .
8. Examine the plotXY method:
private void plotXY(byte[] data, int x, int y)
{
data[x + y * pixelWidth] = 0xFF;
}
This is a simple method that sets the appropriate byte in the data array that corre-sponds to X and Y coordinates passed in as parameters . The value 0xFF indicates that the corresponding pixel should be set to white when the graph is rendered . Any pixels left unset are displayed as black .
9. On the Debug menu, click Start Without Debugging to build and run the application .
10. When the Graph Demo window appears, click Plot Graph, and wait .
Please be patient . The application takes several seconds to generate and display the graph . The following image shows the graph . Note the value in the Duration (ms) label in the following figure . In this case, the application took 4478 milliseconds (ms) to plot the graph .
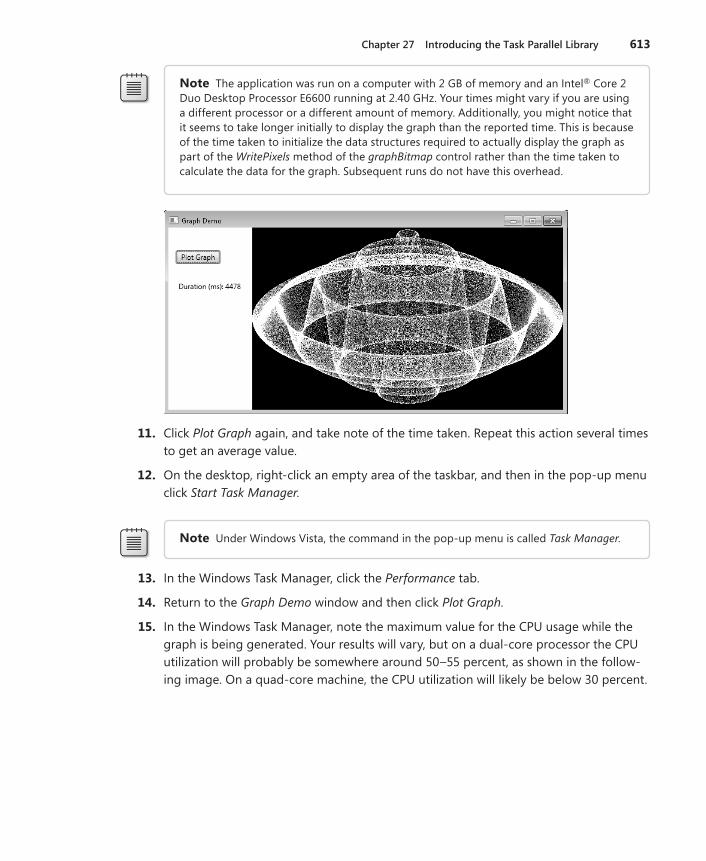
Chapter 27 Introducing the Task Parallel Library 613
Note The application was run on a computer with 2 GB of memory and an Intel® Core 2 Duo Desktop Processor E6600 running at 2 .40 GHz . Your times might vary if you are using a different processor or a different amount of memory . Additionally, you might notice that it seems to take longer initially to display the graph than the reported time . This is because of the time taken to initialize the data structures required to actually display the graph as part of the WritePixels method of the graphBitmap control rather than the time taken to calculate the data for the graph . Subsequent runs do not have this overhead .
11. Click Plot Graph again, and take note of the time taken . Repeat this action several times to get an average value .
12. On the desktop, right-click an empty area of the taskbar, and then in the pop-up menu click Start Task Manager .
Note Under Windows Vista, the command in the pop-up menu is called Task Manager .
13. In the Windows Task Manager, click the Performance tab .
14. Return to the Graph Demo window and then click Plot Graph .
15. In the Windows Task Manager, note the maximum value for the CPU usage while the graph is being generated . Your results will vary, but on a dual-core processor the CPU utilization will probably be somewhere around 50–55 percent, as shown in the follow-ing image . On a quad-core machine, the CPU utilization will likely be below 30 percent .

614 Part VI Building Professional Solutions with Visual Studio 2010
16. Return to the Graph Demo window, and click Plot Graph again . Note the value for the CPU usage in the Windows Task Manager . Repeat this action several times to get an average value .
17. Close the Graph Demo window, and minimize the Windows Task Manager .
You now have a baseline for the time the application takes to perform its calculations . However, it is clear from the CPU usage displayed by the Windows Task Manager that the application is not making full use of the processing resources available . On a dual-core ma-chine, it is using just over half of the CPU power, and on a quad-core machine it is employing a little over a quarter of the CPU . This phenomenon occurs because the application is single-threaded, and in a Windows application, a single thread can occupy only a single core on a multicore processor . To spread the load over all the available cores, you need to divide the application into tasks and arrange for each task to be executed by a separate thread running on a different core .
Modify the GraphDemo application to use parallel threads
1. Return to the Visual Studio 2010, and display the GraphWindow .xaml .cs file in the Code and Text Editor window if it is not already open .
2. Examine the generateGraphData method .
Chapter 27 Introducing the Task Parallel Library 615
If you think about it carefully, the purpose of this method is to populate the items in the data array . It iterates through the array by using the outer for loop based on the x loop control variable, highlighted in bold here:
private void generateGraphData(byte[] data)
{
int a = pixelWidth / 2;
int b = a * a;
int c = pixelHeight / 2;
for (int x = 0; x < a; x ++)
{
int s = x * x;
double p = Math.Sqrt(b - s);
for (double i = -p; i < p; i += 3)
{
double r = Math.Sqrt(s + i * i) / a;
double q = (r - 1) * Math.Sin(24 * r);
double y = i / 3 + (q * c);
plotXY(data, (int)(-x + (pixelWidth / 2)), (int)(y + (pixelHeight / 2)));
plotXY(data, (int)(x + (pixelWidth / 2)), (int)(y + (pixelHeight / 2)));
}
}
}
The calculation performed by one iteration of this loop is independent of the calcula-tions performed by the other iterations . Therefore, it makes sense to partition the work performed by this loop and run different iterations on a separate processor .
3. Modify the definition of the generateGraphData method to take two additional int pa-rameters called partitionStart and partitionEnd, as shown in bold here:
private void generateGraphData(byte[] data, int partitionStart, int partitionEnd)
{
...
}
4. In the generateGraphData method, change the outer for loop to iterate between the values of partitionStart and partitionEnd, as shown in bold here:
private void generateGraphData(byte[] data, int partitionStart, int partitionEnd)
{
...
for (int x = partitionStart; x < partitionEnd; x ++)
{
...
}
}
616 Part VI Building Professional Solutions with Visual Studio 2010
5. In the Code and Text Editor window, add the following using statement to the list at the top of the GraphWindow .xaml .cs file:
using System.Threading.Tasks;
6. In the plotButton_Click method, comment out the statement that calls the generateGraphData method and add the statement shown next in bold that creates a Task object by using the default TaskFactory object and starts it running:
...
Stopwatch watch = Stopwatch.StartNew();
// generateGraphData(data);
Task first = Task.Factory.StartNew(() => generateGraphData(data, 0, pixelWidth / 4));
...
The task runs the code specified by the lambda expression . The values for the partitionStart and partitionEnd parameters indicate that the Task object calculates the data for the first half of the graph . (The data for the complete graph consists of points plotted for the values between 0 and pixelWidth / 2 .)
7. Add another statement that creates and runs a second Task object on another thread, as shown in bold here:
...
Task first = Task.Factory.StartNew(() => generateGraphData(data, 0, pixelWidth / 4));
Task second = Task.Factory.StartNew(() => generateGraphData(data, pixelWidth / 4,
pixelWidth / 2));
...
This Task object invokes the generateGraph method and calculates the data for the values between pixelWidth / 4 and pixelWidth / 2 .
8. Add the following statement that waits for both Task objects to complete their work before continuing:
Task.WaitAll(first, second);
9. On the Debug menu, click Start Without Debugging to build and run the application .
10. Display the Windows Task Manager, and click the Performance tab if it is not currently displayed .
11. Return to the Graph Demo window, and click Plot Graph . In the Windows Task Manager, note the maximum value for the CPU usage while the graph is being generated . When the graph appears in the Graph Demo window, record the time taken to generate the graph . Repeat this action several times to get an average value .
12. Close the Graph Demo window, and minimize the Windows Task Manager .
This time you should see that the application runs significantly quicker than previ-ously . On my computer, the time dropped to 2682 milliseconds—a reduction in time of about 40 percent . Additionally, you should see that the application uses more cores of
Chapter 27 Introducing the Task Parallel Library 617
the CPU . On a dual-core machine, the CPU usage peaked at 100 percent . If you have a quad-core computer, the CPU utilization will not be as high . This is because two of the cores will not be occupied . To rectify this and reduce the time further, add two further Task objects and divide the work into four chunks in the plotButton_Click method, as shown in bold here:
...
Task first = Task.Factory.StartNew(() => generateGraphData(data, 0, pixelWidth / 8));
Task second = Task.Factory.StartNew(() => generateGraphData(data, pixelWidth / 8,
pixelWidth / 4));
Task third = Task.Factory.StartNew(() => generateGraphData(data, pixelWidth / 4,
pixelWidth * 3 / 8));
Task fourth = Task.Factory.StartNew(() => generateGraphData(data, pixelWidth * 3 / 8,
pixelWidth / 2));
Task.WaitAll(first, second, third, fourth);
...
If you have only a dual-core processor, you can still try this modification, and you should still notice a beneficial effect on the time . This is primarily because of efficiencies in the TPL and the algorithms in the .NET Framework optimizing the way in which the threads for each task are scheduled .
Abstracting Tasks by Using the Parallel ClassBy using the Task class, you have complete control over the number of tasks your applica-tion creates . However, you had to modify the design of the application to accommodate the use of Task objects . You also had to add code to synchronize operations; the applica-tion can render the graph only when all the tasks have completed . In a complex application, synchronization of tasks can become a nontrivial process and it is easy to make mistakes .
The Parallel class in the TPL enables you to parallelize some common programming constructs without requiring that you redesign an application . Internally, the Parallel class creates its own set of Task objects, and it synchronizes these tasks automatically when they have completed . The Parallel class is located in the System.Threading.Tasks namespace and provides a small set of static methods you can use to indicate that code should be run in parallel if possible . These methods are as follows:
n Parallel .For You can use this method in place of a C# for statement . It defines a loop in which iterations can run in parallel by using tasks . This method is heavily overloaded (there are nine variations), but the general principle is the same for each; you specify a start value, an end value, and a reference to a method that takes an integer parameter . The method is executed for every value between the start value and one below the end value specified, and the parameter is populated with an integer that specifies the current value . For example, consider the following simple for loop that performs each iteration in sequence:

618 Part VI Building Professional Solutions with Visual Studio 2010
for (int x = 0; x < 100; x++)
{
// Perform loop processing
}
Depending on the processing performed by the body of the loop, you might be able to replace this loop with a Parallel.For construct that can perform iterations in parallel, like this:
Parallel.For(0, 100, performLoopProcessing);
...
private void performLoopProcessing(int x)
{
// Perform loop processing
}
The overloads of the Parallel.For method enable you to provide local data that is private to each thread, specify various options for creating the tasks run by the For method, and create a ParallelLoopState object that can be used to pass state informa-tion to other concurrent iterations of the loop . (Using a ParallelLoopState object is described later in this chapter .)
n Parallel .ForEach<T> You can use this method in place of a C# foreach statement . Like the For method, ForEach defines a loop in which iterations can run in parallel . You specify a collection that implements the IEnumerable<T> generic interface and a refer-ence to a method that takes a single parameter of type T . The method is executed for each item in the collection, and the item is passed as the parameter to the method . Overloads are available that enable you to provide private local thread data and specify options for creating the tasks run by the ForEach method .
n Parallel .Invoke You can use this method to execute a set of parameterless method calls as parallel tasks . You specify a list of delegated method calls (or lambda expres-sions) that take no parameters and do not return values . Each method call can be run on a separate thread, in any order . For example, the following code makes a series of method calls:
doWork();
doMoreWork();
doYetMoreWork();
You can replace these statements with the following code, which invokes these meth-ods by using a series of tasks:
Parallel.Invoke(
doWork,
doMoreWork,
doYetMoreWork
);
You should bear in mind that the .NET Framework determines the actual degree of parallelism appropriate for the environment and workload of the computer . For example, if
Chapter 27 Introducing the Task Parallel Library 619
you use Parallel.For to implement a loop that performs 1000 iterations, the .NET Framework does not necessarily create 1000 concurrent tasks (unless you have an exceptionally power-ful processor with 1000 cores) . Instead, the .NET Framework creates what it considers to be the optimal number of tasks that balances the available resources against the requirement to keep the processors occupied . A single task might perform multiple iterations, and the tasks coordinate with each other to determine which iterations each task will perform . An impor-tant consequence of this is that you cannot guarantee the order in which the iterations are executed, so you must ensure there are no dependencies between iterations; otherwise, you might get unexpected results, as you will see later in this chapter .
In the next exercise, you will return to the original version of the GraphData application and use the Parallel class to perform operations concurrently .
Use the Parallel class to parallelize operations in the GraphData application
1. Using Visual Studio 2010, open the GraphDemo solution, located in the \Microsoft Press\Visual CSharp Step By Step\Chapter 27\GraphDemo Using the Parallel Class folder in your Documents folder .
This is a copy of the original GraphDemo application . It does not use tasks yet .
2. In Solution Explorer, in the GraphDemo project, expand the GraphWindow .xaml node, and then double-click GraphWindow .xaml .cs to display the code for the form in the Code and Text Editor window .
3. Add the following using statement to the list at the top of the file:
using System.Threading.Tasks;
4. Locate the generateGraphData method . It looks like this:
private void generateGraphData(byte[] data)
{
int a = pixelWidth / 2;
int b = a * a;
int c = pixelHeight / 2;
for (int x = 0; x < a; x++)
{
int s = x * x;
double p = Math.Sqrt(b - s);
for (double i = -p; i < p; i += 3)
{
double r = Math.Sqrt(s + i * i) / a;
double q = (r - 1) * Math.Sin(24 * r);
double y = i / 3 + (q * c);
plotXY(data, (int)(-x + (pixelWidth / 2)), (int)(y + (pixelHeight / 2)));
plotXY(data, (int)(x + (pixelWidth / 2)), (int)(y + (pixelHeight / 2)));
}
}
}
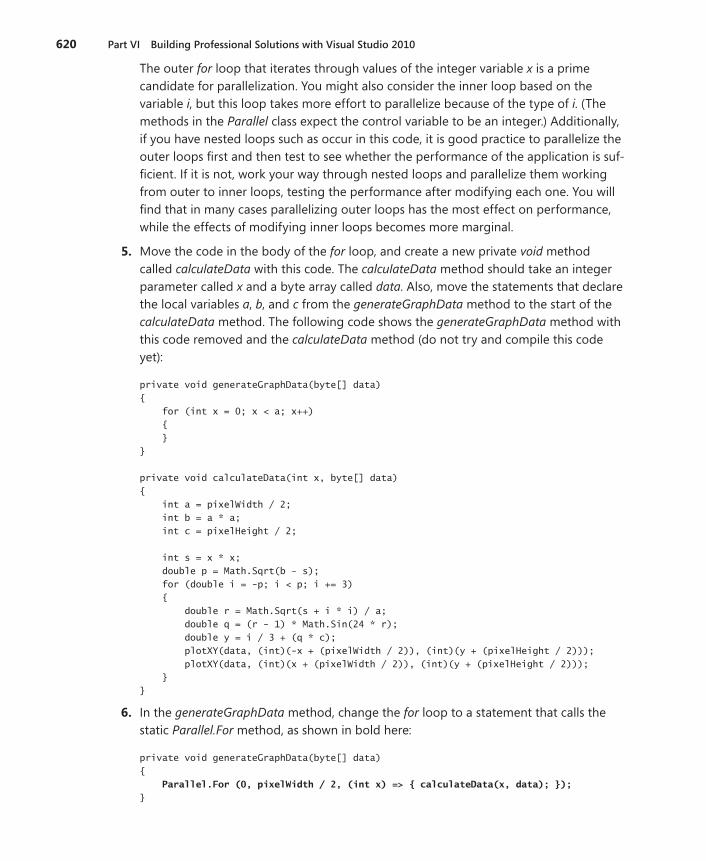
620 Part VI Building Professional Solutions with Visual Studio 2010
The outer for loop that iterates through values of the integer variable x is a prime candidate for parallelization . You might also consider the inner loop based on the variable i, but this loop takes more effort to parallelize because of the type of i . (The methods in the Parallel class expect the control variable to be an integer .) Additionally, if you have nested loops such as occur in this code, it is good practice to parallelize the outer loops first and then test to see whether the performance of the application is suf-ficient . If it is not, work your way through nested loops and parallelize them working from outer to inner loops, testing the performance after modifying each one . You will find that in many cases parallelizing outer loops has the most effect on performance, while the effects of modifying inner loops becomes more marginal .
5. Move the code in the body of the for loop, and create a new private void method called calculateData with this code . The calculateData method should take an integer parameter called x and a byte array called data . Also, move the statements that declare the local variables a, b, and c from the generateGraphData method to the start of the calculateData method . The following code shows the generateGraphData method with this code removed and the calculateData method (do not try and compile this code yet):
private void generateGraphData(byte[] data)
{
for (int x = 0; x < a; x++)
{
}
}
private void calculateData(int x, byte[] data)
{
int a = pixelWidth / 2;
int b = a * a;
int c = pixelHeight / 2;
int s = x * x;
double p = Math.Sqrt(b - s);
for (double i = -p; i < p; i += 3)
{
double r = Math.Sqrt(s + i * i) / a;
double q = (r - 1) * Math.Sin(24 * r);
double y = i / 3 + (q * c);
plotXY(data, (int)(-x + (pixelWidth / 2)), (int)(y + (pixelHeight / 2)));
plotXY(data, (int)(x + (pixelWidth / 2)), (int)(y + (pixelHeight / 2)));
}
}
6. In the generateGraphData method, change the for loop to a statement that calls the static Parallel.For method, as shown in bold here:
private void generateGraphData(byte[] data)
{
Parallel.For (0, pixelWidth / 2, (int x) => { calculateData(x, data); });
}
Chapter 27 Introducing the Task Parallel Library 621
This code is the parallel equivalent of the original for loop . It iterates through the val-ues from 0 to pixelWidth / 2 – 1 inclusive . Each invocation runs by using a task . (Each task might run more than one iteration .) The Parallel.For method finishes only when all the tasks it has created complete their work . Remember that the Parallel.For method expects the final parameter to be a method that takes a single integer parameter . It calls this method passing the current loop index as the parameter . In this example, the calculateData method does not match the required signature because it takes two pa-rameters: an integer and a byte array . For this reason, the code uses a lambda expres-sion to define an anonymous method that has the appropriate signature and that acts as an adapter that calls the calculateData method with the correct parameters .
7. On the Debug menu, click Start Without Debugging to build and run the application .
8. Display the Windows Task Manager, and click the Performance tab if it is not currently displayed .
9. Return to the Graph Demo window, and click Plot Graph . In the Windows Task Manager, note the maximum value for the CPU usage while the graph is being generated . When the graph appears in the Graph Demo window, record the time taken to generate the graph . Repeat this action several times to get an average value .
10. Close the Graph Demo window, and minimize the Windows Task Manager .
You should notice that the application runs at a comparable speed to the previous version that used Task objects (and possibly slightly faster, depending on the number of CPUs you have available), and that the CPU usage peaks at 100 percent .
When Not to Use the Parallel ClassYou should be aware that despite appearances and the best efforts of the Visual Studio development team at Microsoft, the Parallel class is not magic; you cannot use it without due consideration and just expect your applications to suddenly run significantly faster and produce the same results . The purpose of the Parallel class is to parallelize compute-bound, independent areas of your code .
The key phrases in the previous paragraph are compute-bound and independent . If your code is not compute-bound, parallelizing it might not improve performance . The next exercise shows you that you should be careful in how you determine when to use the Parallel.Invoke construct to perform method calls in parallel .
Determine when to use Parallel .Invoke
1. Return to Visual Studio 2010, and display the GraphWindow .xaml .cs file in the Code and Text Editor window if it is not already open .
2. Examine the calculateData method .
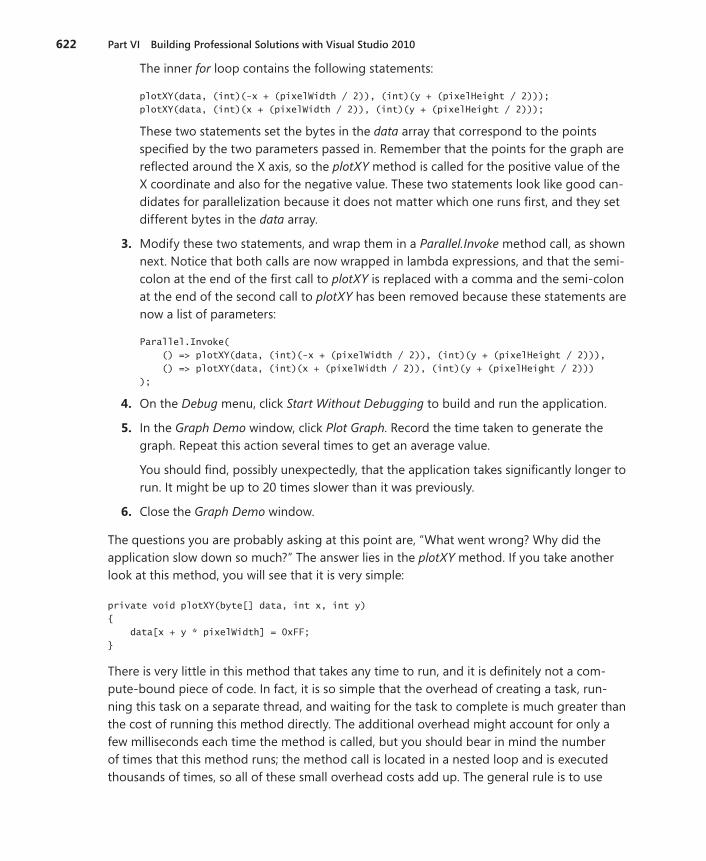
622 Part VI Building Professional Solutions with Visual Studio 2010
The inner for loop contains the following statements:
plotXY(data, (int)(-x + (pixelWidth / 2)), (int)(y + (pixelHeight / 2)));
plotXY(data, (int)(x + (pixelWidth / 2)), (int)(y + (pixelHeight / 2)));
These two statements set the bytes in the data array that correspond to the points specified by the two parameters passed in . Remember that the points for the graph are reflected around the X axis, so the plotXY method is called for the positive value of the X coordinate and also for the negative value . These two statements look like good can-didates for parallelization because it does not matter which one runs first, and they set different bytes in the data array .
3. Modify these two statements, and wrap them in a Parallel.Invoke method call, as shown next . Notice that both calls are now wrapped in lambda expressions, and that the semi-colon at the end of the first call to plotXY is replaced with a comma and the semi-colon at the end of the second call to plotXY has been removed because these statements are now a list of parameters:
Parallel.Invoke(
() => plotXY(data, (int)(-x + (pixelWidth / 2)), (int)(y + (pixelHeight / 2))),
() => plotXY(data, (int)(x + (pixelWidth / 2)), (int)(y + (pixelHeight / 2)))
);
4. On the Debug menu, click Start Without Debugging to build and run the application .
5. In the Graph Demo window, click Plot Graph . Record the time taken to generate the graph . Repeat this action several times to get an average value .
You should find, possibly unexpectedly, that the application takes significantly longer to run . It might be up to 20 times slower than it was previously .
6. Close the Graph Demo window .
The questions you are probably asking at this point are, “What went wrong? Why did the application slow down so much?” The answer lies in the plotXY method . If you take another look at this method, you will see that it is very simple:
private void plotXY(byte[] data, int x, int y)
{
data[x + y * pixelWidth] = 0xFF;
}
There is very little in this method that takes any time to run, and it is definitely not a com-pute-bound piece of code . In fact, it is so simple that the overhead of creating a task, run-ning this task on a separate thread, and waiting for the task to complete is much greater than the cost of running this method directly . The additional overhead might account for only a few milliseconds each time the method is called, but you should bear in mind the number of times that this method runs; the method call is located in a nested loop and is executed thousands of times, so all of these small overhead costs add up . The general rule is to use
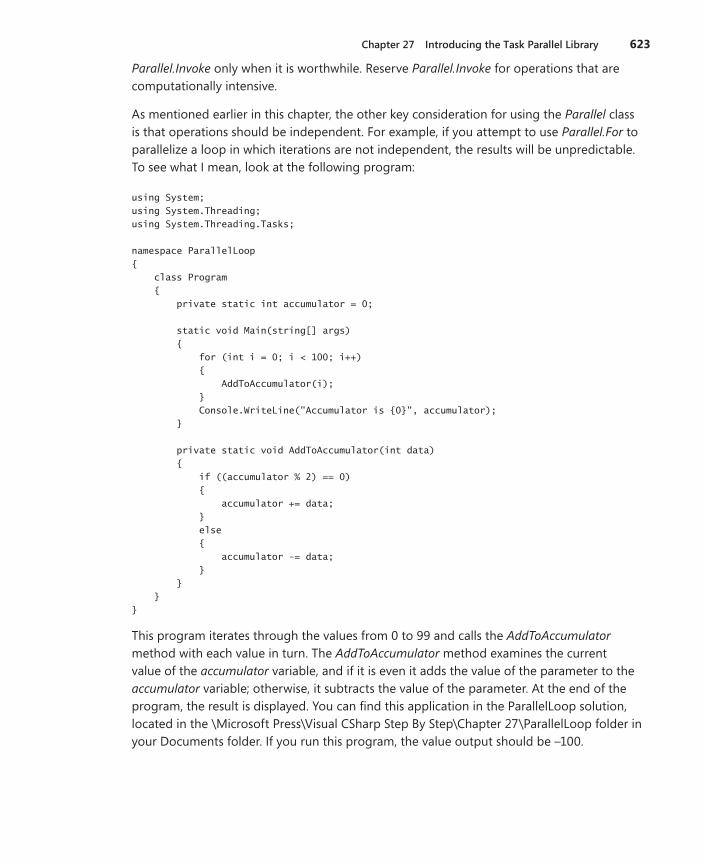
Chapter 27 Introducing the Task Parallel Library 623
Parallel.Invoke only when it is worthwhile . Reserve Parallel.Invoke for operations that are computationally intensive .
As mentioned earlier in this chapter, the other key consideration for using the Parallel class is that operations should be independent . For example, if you attempt to use Parallel.For to parallelize a loop in which iterations are not independent, the results will be unpredictable . To see what I mean, look at the following program:
using System;
using System.Threading;
using System.Threading.Tasks;
namespace ParallelLoop
{
class Program
{
private static int accumulator = 0;
static void Main(string[] args)
{
for (int i = 0; i < 100; i++)
{
AddToAccumulator(i);
}
Console.WriteLine("Accumulator is {0}", accumulator);
}
private static void AddToAccumulator(int data)
{
if ((accumulator % 2) == 0)
{
accumulator += data;
}
else
{
accumulator -= data;
}
}
}
}
This program iterates through the values from 0 to 99 and calls the AddToAccumulator method with each value in turn . The AddToAccumulator method examines the current value of the accumulator variable, and if it is even it adds the value of the parameter to the accumulator variable; otherwise, it subtracts the value of the parameter . At the end of the program, the result is displayed . You can find this application in the ParallelLoop solution, located in the \Microsoft Press\Visual CSharp Step By Step\Chapter 27\ParallelLoop folder in your Documents folder . If you run this program, the value output should be –100 .

624 Part VI Building Professional Solutions with Visual Studio 2010
To increase the degree of parallelism in this simple application, you might be tempted to replace the for loop in the Main method with Parallel.For, like this:
static void Main(string[] args)
{
Parallel.For (0, 100, AddToAccumulator);
Console.WriteLine("Accumulator is {0}", accumulator);
}
However, there is no guarantee that the tasks created to run the various invocations of the AddToAccumulator method will execute in any specific sequence . (The code is also not thread-safe because multiple threads running the tasks might attempt to modify the ac-cumulator variable concurrently .) The value calculated by the AddToAccumulator method depends on the sequence being maintained, so the result of this modification is that the application might now generate different values each time it runs . In this simple case, you might not actually see any difference in the value calculated because the AddToAccumulator method runs very quickly and the .NET Framework might elect to run each invocation se-quentially by using the same thread . However, if you make the following change shown in bold to the AddToAccumulator method, you will get different results:
private static void AddToAccumulator(int data)
{
if ((accumulator % 2) == 0)
{
accumulator += data;
Thread.Sleep(10); // wait for 10 milliseconds
}
else
{
accumulator -= data;
}
}
The Thread.Sleep method simply causes the current thread to wait for the specified period of time . This modification simulates the thread, performing additional processing and affects the way in which the .NET Framework schedules the tasks, which now run on different threads resulting in a different sequence .
The general rule is to use Parallel.For and Parallel.ForEach only if you can guarantee that each iteration of the loop is independent, and test your code thoroughly . A similar consideration applies to Parallel.Invoke; use this construct to make method calls only if they are indepen-dent and the application does not depend on them being run in a particular sequence .
Returning a Value from a Task So far, all the examples you have seen use a Task object to run code that performs a piece of work but does not return a value . However, you might also want to run a method that
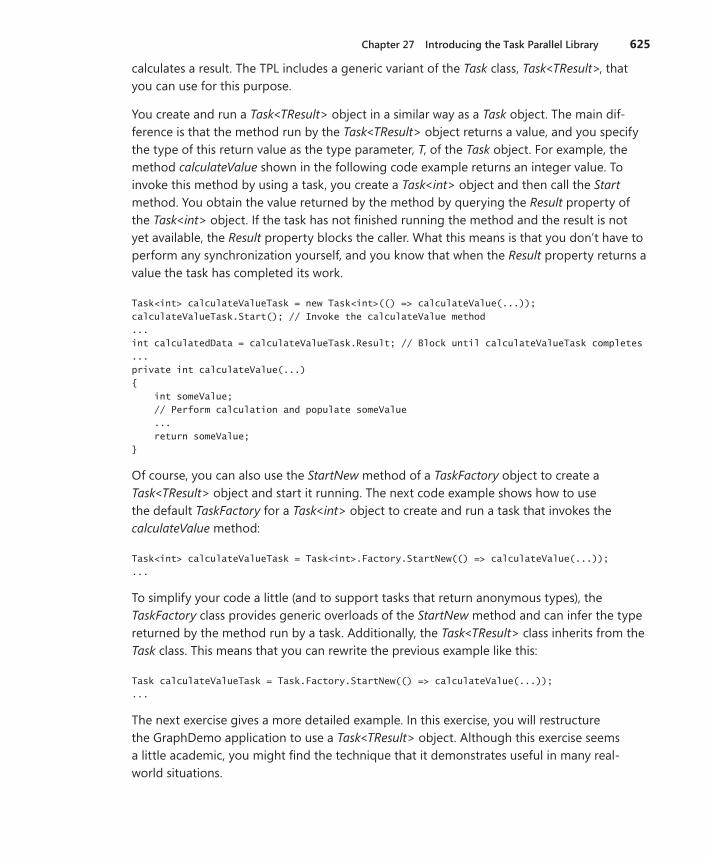
Chapter 27 Introducing the Task Parallel Library 625
calculates a result . The TPL includes a generic variant of the Task class, Task<TResult>, that you can use for this purpose .
You create and run a Task<TResult> object in a similar way as a Task object . The main dif-ference is that the method run by the Task<TResult> object returns a value, and you specify the type of this return value as the type parameter, T, of the Task object . For example, the method calculateValue shown in the following code example returns an integer value . To invoke this method by using a task, you create a Task<int> object and then call the Start method . You obtain the value returned by the method by querying the Result property of the Task<int> object . If the task has not finished running the method and the result is not yet available, the Result property blocks the caller . What this means is that you don’t have to perform any synchronization yourself, and you know that when the Result property returns a value the task has completed its work .
Task<int> calculateValueTask = new Task<int>(() => calculateValue(...));
calculateValueTask.Start(); // Invoke the calculateValue method
...
int calculatedData = calculateValueTask.Result; // Block until calculateValueTask completes
...
private int calculateValue(...)
{
int someValue;
// Perform calculation and populate someValue
...
return someValue;
}
Of course, you can also use the StartNew method of a TaskFactory object to create a Task<TResult> object and start it running . The next code example shows how to use the default TaskFactory for a Task<int> object to create and run a task that invokes the calculateValue method:
Task<int> calculateValueTask = Task<int>.Factory.StartNew(() => calculateValue(...));
...
To simplify your code a little (and to support tasks that return anonymous types), the TaskFactory class provides generic overloads of the StartNew method and can infer the type returned by the method run by a task . Additionally, the Task<TResult> class inherits from the Task class . This means that you can rewrite the previous example like this:
Task calculateValueTask = Task.Factory.StartNew(() => calculateValue(...));
...
The next exercise gives a more detailed example . In this exercise, you will restructure the GraphDemo application to use a Task<TResult> object . Although this exercise seems a little academic, you might find the technique that it demonstrates useful in many real-world situations .
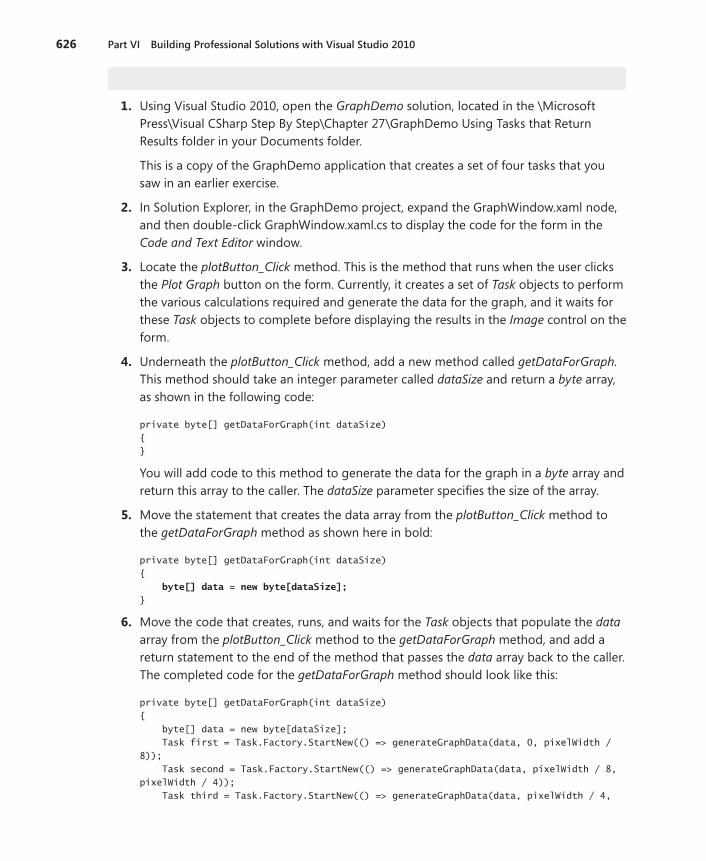
626 Part VI Building Professional Solutions with Visual Studio 2010
Modify the GraphDemo application to use a Task<TResult> object
1. Using Visual Studio 2010, open the GraphDemo solution, located in the \Microsoft Press\Visual CSharp Step By Step\Chapter 27\GraphDemo Using Tasks that Return Results folder in your Documents folder .
This is a copy of the GraphDemo application that creates a set of four tasks that you saw in an earlier exercise .
2. In Solution Explorer, in the GraphDemo project, expand the GraphWindow .xaml node, and then double-click GraphWindow .xaml .cs to display the code for the form in the Code and Text Editor window .
3. Locate the plotButton_Click method . This is the method that runs when the user clicks the Plot Graph button on the form . Currently, it creates a set of Task objects to perform the various calculations required and generate the data for the graph, and it waits for these Task objects to complete before displaying the results in the Image control on the form .
4. Underneath the plotButton_Click method, add a new method called getDataForGraph . This method should take an integer parameter called dataSize and return a byte array, as shown in the following code:
private byte[] getDataForGraph(int dataSize)
{
}
You will add code to this method to generate the data for the graph in a byte array and return this array to the caller . The dataSize parameter specifies the size of the array .
5. Move the statement that creates the data array from the plotButton_Click method to the getDataForGraph method as shown here in bold:
private byte[] getDataForGraph(int dataSize)
{
byte[] data = new byte[dataSize];
}
6. Move the code that creates, runs, and waits for the Task objects that populate the data array from the plotButton_Click method to the getDataForGraph method, and add a return statement to the end of the method that passes the data array back to the caller . The completed code for the getDataForGraph method should look like this:
private byte[] getDataForGraph(int dataSize)
{
byte[] data = new byte[dataSize];
Task first = Task.Factory.StartNew(() => generateGraphData(data, 0, pixelWidth /
8));
Task second = Task.Factory.StartNew(() => generateGraphData(data, pixelWidth / 8,
pixelWidth / 4));
Task third = Task.Factory.StartNew(() => generateGraphData(data, pixelWidth / 4,
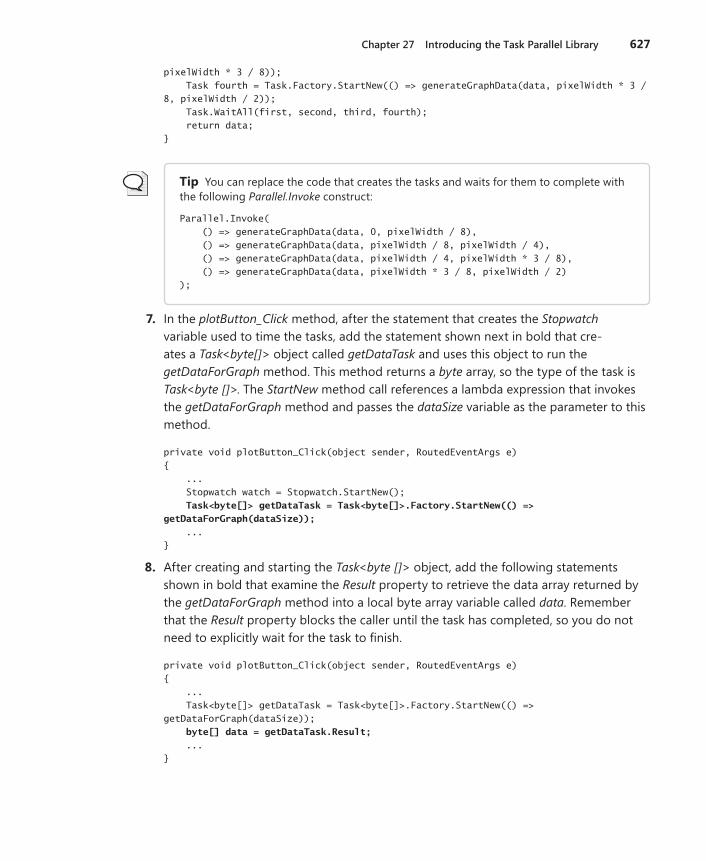
Chapter 27 Introducing the Task Parallel Library 627
pixelWidth * 3 / 8));
Task fourth = Task.Factory.StartNew(() => generateGraphData(data, pixelWidth * 3 /
8, pixelWidth / 2));
Task.WaitAll(first, second, third, fourth);
return data;
}
Tip You can replace the code that creates the tasks and waits for them to complete with the following Parallel.Invoke construct:
Parallel.Invoke(
() => generateGraphData(data, 0, pixelWidth / 8),
() => generateGraphData(data, pixelWidth / 8, pixelWidth / 4),
() => generateGraphData(data, pixelWidth / 4, pixelWidth * 3 / 8),
() => generateGraphData(data, pixelWidth * 3 / 8, pixelWidth / 2)
);
7. In the plotButton_Click method, after the statement that creates the Stopwatch variable used to time the tasks, add the statement shown next in bold that cre-ates a Task<byte[]> object called getDataTask and uses this object to run the getDataForGraph method . This method returns a byte array, so the type of the task is Task<byte []> . The StartNew method call references a lambda expression that invokes the getDataForGraph method and passes the dataSize variable as the parameter to this method .
private void plotButton_Click(object sender, RoutedEventArgs e)
{
...
Stopwatch watch = Stopwatch.StartNew();
Task<byte[]> getDataTask = Task<byte[]>.Factory.StartNew(() =>
getDataForGraph(dataSize));
...
}
8. After creating and starting the Task<byte []> object, add the following statements shown in bold that examine the Result property to retrieve the data array returned by the getDataForGraph method into a local byte array variable called data . Remember that the Result property blocks the caller until the task has completed, so you do not need to explicitly wait for the task to finish .
private void plotButton_Click(object sender, RoutedEventArgs e)
{
...
Task<byte[]> getDataTask = Task<byte[]>.Factory.StartNew(() =>
getDataForGraph(dataSize));
byte[] data = getDataTask.Result;
...
}
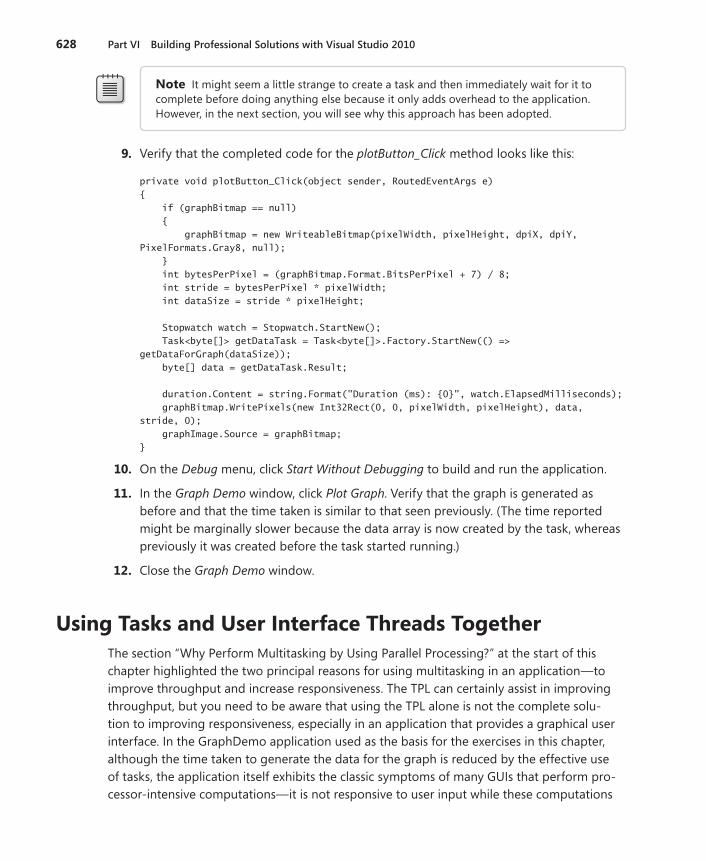
628 Part VI Building Professional Solutions with Visual Studio 2010
Note It might seem a little strange to create a task and then immediately wait for it to complete before doing anything else because it only adds overhead to the application . However, in the next section, you will see why this approach has been adopted .
9. Verify that the completed code for the plotButton_Click method looks like this:
private void plotButton_Click(object sender, RoutedEventArgs e)
{
if (graphBitmap == null)
{
graphBitmap = new WriteableBitmap(pixelWidth, pixelHeight, dpiX, dpiY,
PixelFormats.Gray8, null);
}
int bytesPerPixel = (graphBitmap.Format.BitsPerPixel + 7) / 8;
int stride = bytesPerPixel * pixelWidth;
int dataSize = stride * pixelHeight;
Stopwatch watch = Stopwatch.StartNew();
Task<byte[]> getDataTask = Task<byte[]>.Factory.StartNew(() =>
getDataForGraph(dataSize));
byte[] data = getDataTask.Result;
duration.Content = string.Format("Duration (ms): {0}", watch.ElapsedMilliseconds);
graphBitmap.WritePixels(new Int32Rect(0, 0, pixelWidth, pixelHeight), data,
stride, 0);
graphImage.Source = graphBitmap;
}
10. On the Debug menu, click Start Without Debugging to build and run the application .
11. In the Graph Demo window, click Plot Graph . Verify that the graph is generated as before and that the time taken is similar to that seen previously . (The time reported might be marginally slower because the data array is now created by the task, whereas previously it was created before the task started running .)
12. Close the Graph Demo window .
Using Tasks and User Interface Threads TogetherThe section “Why Perform Multitasking by Using Parallel Processing?” at the start of this chapter highlighted the two principal reasons for using multitasking in an application—to improve throughput and increase responsiveness . The TPL can certainly assist in improving throughput, but you need to be aware that using the TPL alone is not the complete solu-tion to improving responsiveness, especially in an application that provides a graphical user interface . In the GraphDemo application used as the basis for the exercises in this chapter, although the time taken to generate the data for the graph is reduced by the effective use of tasks, the application itself exhibits the classic symptoms of many GUIs that perform pro-cessor-intensive computations—it is not responsive to user input while these computations
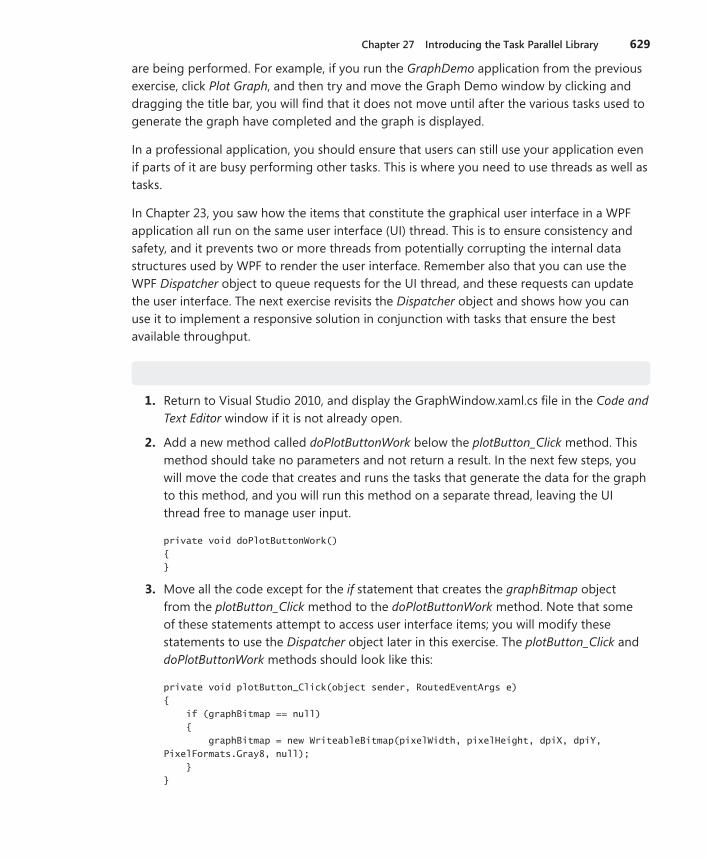
Chapter 27 Introducing the Task Parallel Library 629
are being performed . For example, if you run the GraphDemo application from the previous exercise, click Plot Graph, and then try and move the Graph Demo window by clicking and dragging the title bar, you will find that it does not move until after the various tasks used to generate the graph have completed and the graph is displayed .
In a professional application, you should ensure that users can still use your application even if parts of it are busy performing other tasks . This is where you need to use threads as well as tasks .
In Chapter 23, you saw how the items that constitute the graphical user interface in a WPF application all run on the same user interface (UI) thread . This is to ensure consistency and safety, and it prevents two or more threads from potentially corrupting the internal data structures used by WPF to render the user interface . Remember also that you can use the WPF Dispatcher object to queue requests for the UI thread, and these requests can update the user interface . The next exercise revisits the Dispatcher object and shows how you can use it to implement a responsive solution in conjunction with tasks that ensure the best available throughput .
Improve responsiveness in the GraphDemo application
1. Return to Visual Studio 2010, and display the GraphWindow .xaml .cs file in the Code and Text Editor window if it is not already open .
2. Add a new method called doPlotButtonWork below the plotButton_Click method . This method should take no parameters and not return a result . In the next few steps, you will move the code that creates and runs the tasks that generate the data for the graph to this method, and you will run this method on a separate thread, leaving the UI thread free to manage user input .
private void doPlotButtonWork()
{
}
3. Move all the code except for the if statement that creates the graphBitmap object from the plotButton_Click method to the doPlotButtonWork method . Note that some of these statements attempt to access user interface items; you will modify these statements to use the Dispatcher object later in this exercise . The plotButton_Click and doPlotButtonWork methods should look like this:
private void plotButton_Click(object sender, RoutedEventArgs e)
{
if (graphBitmap == null)
{
graphBitmap = new WriteableBitmap(pixelWidth, pixelHeight, dpiX, dpiY,
PixelFormats.Gray8, null);
}
}

630 Part VI Building Professional Solutions with Visual Studio 2010
private void doPlotButtonWork()
{
int bytesPerPixel = (graphBitmap.Format.BitsPerPixel + 7) / 8;
int stride = bytesPerPixel * pixelWidth;
int dataSize = stride * pixelHeight;
Stopwatch watch = Stopwatch.StartNew();
Task<byte[]> getDataTask = Task<byte[]>.Factory.StartNew(() =>
getDataForGraph(dataSize));
byte[] data = getDataTask.Result;
duration.Content = string.Format("Duration (ms): {0}", watch.ElapsedMilliseconds);
graphBitmap.WritePixels(new Int32Rect(0, 0, pixelWidth, pixelHeight), data,
stride, 0);
graphImage.Source = graphBitmap;
}
4. In the plotButton_Click method, after the if block, create an Action delegate called doPlotButtonWorkAction that references the doPlotButtonWork method, as shown here in bold:
private void plotButton_Click(object sender, RoutedEventArgs e)
{
...
Action doPlotButtonWorkAction = new Action(doPlotButtonWork);
}
5. Call the BeginInvoke method on the doPlotButtonWorkAction delegate . The BeginInvoke method of the Action type executes the method associated with the delegate (in this case, the doPlotButtonWork method) on a new thread .
Note The Action type also provides the Invoke method, which runs the delegated meth-od on the current thread . This behavior is not what we want in this case because it blocks the user interface and prevents it from being able to respond while the method is running .
The BeginInvoke method takes parameters you can use to arrange notification when the method finishes, as well as any data to pass to the delegated method . In this ex-ample, you do not need to be notified when the method completes and the method does not take any parameters, so specify a null value for these parameters as shown in bold here:
private void plotButton_Click(object sender, RoutedEventArgs e)
{
...
Action doPlotButtonWorkAction = new Action(doPlotButtonWork);
doPlotButtonWorkAction.BeginInvoke(null, null);
}
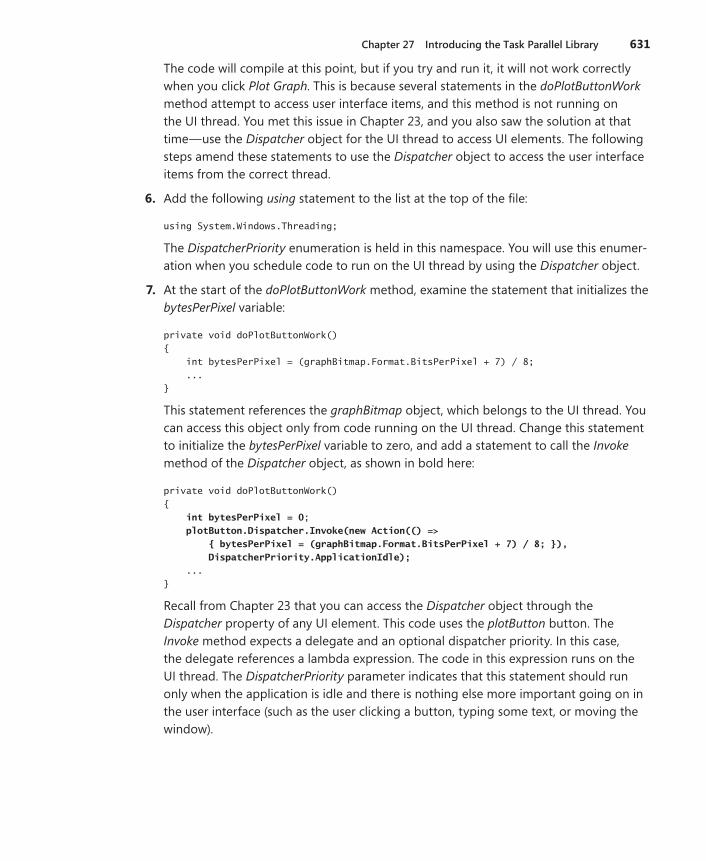
Chapter 27 Introducing the Task Parallel Library 631
The code will compile at this point, but if you try and run it, it will not work correctly when you click Plot Graph . This is because several statements in the doPlotButtonWork method attempt to access user interface items, and this method is not running on the UI thread . You met this issue in Chapter 23, and you also saw the solution at that time—use the Dispatcher object for the UI thread to access UI elements . The following steps amend these statements to use the Dispatcher object to access the user interface items from the correct thread .
6. Add the following using statement to the list at the top of the file:
using System.Windows.Threading;
The DispatcherPriority enumeration is held in this namespace . You will use this enumer-ation when you schedule code to run on the UI thread by using the Dispatcher object .
7. At the start of the doPlotButtonWork method, examine the statement that initializes the bytesPerPixel variable:
private void doPlotButtonWork()
{
int bytesPerPixel = (graphBitmap.Format.BitsPerPixel + 7) / 8;
...
}
This statement references the graphBitmap object, which belongs to the UI thread . You can access this object only from code running on the UI thread . Change this statement to initialize the bytesPerPixel variable to zero, and add a statement to call the Invoke method of the Dispatcher object, as shown in bold here:
private void doPlotButtonWork()
{
int bytesPerPixel = 0;
plotButton.Dispatcher.Invoke(new Action(() =>
{ bytesPerPixel = (graphBitmap.Format.BitsPerPixel + 7) / 8; }),
DispatcherPriority.ApplicationIdle);
...
}
Recall from Chapter 23 that you can access the Dispatcher object through the Dispatcher property of any UI element . This code uses the plotButton button . The Invoke method expects a delegate and an optional dispatcher priority . In this case, the delegate references a lambda expression . The code in this expression runs on the UI thread . The DispatcherPriority parameter indicates that this statement should run only when the application is idle and there is nothing else more important going on in the user interface (such as the user clicking a button, typing some text, or moving the window) .

632 Part VI Building Professional Solutions with Visual Studio 2010
8. Examine the final three statements in the doPlotButtonWork method . They look like this:
private void doPlotButtonWork()
{
...
duration.Content = string.Format("Duration (ms): {0}", watch.ElapsedMilliseconds);
graphBitmap.WritePixels(new Int32Rect(0, 0, pixelWidth, pixelHeight), data,
stride, 0);
graphImage.Source = graphBitmap;
}
These statements reference the duration, graphBitmap, and graphImage objects, which are all part of the user interface . Consequently, you must change these statements to run on the UI thread .
9. Modify these statements, and run them by using the Dispatcher.Invoke method, as shown in bold here:
private void doPlotButtonWork()
{
...
plotButton.Dispatcher.Invoke(new Action(() =>
{
duration.Content = string.Format("Duration (ms): {0}", watch.
ElapsedMilliseconds);
graphBitmap.WritePixels(new Int32Rect(0, 0, pixelWidth, pixelHeight), data,
stride, 0);
graphImage.Source = graphBitmap;
}), DispatcherPriority.ApplicationIdle);
}
This code converts the statements into a lambda expression wrapped in an Action delegate, and then invokes this delegate by using the Dispatcher object .
10. On the Debug menu, click Start Without Debugging to build and run the application .
11. In the Graph Demo window, click Plot Graph and before the graph appears quickly drag the window to another location on the screen . You should find that the window responds immediately and does not wait for the graph to appear first .
12. Close the Graph Demo window .
Canceling Tasks and Handling ExceptionsAnother common requirement of applications that perform long-running operations is the ability to stop those operations if necessary . However, you should not simply abort a task be-cause this could leave the data in your application in an indeterminate state . Instead, the TPL implements a cooperative cancellation strategy . Cooperative cancellation enables a task to
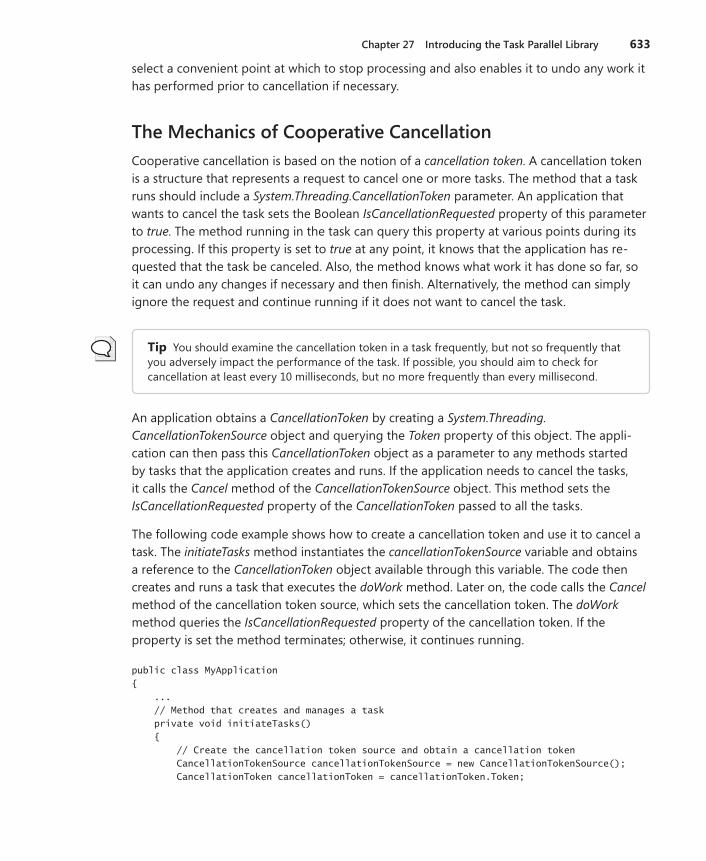
Chapter 27 Introducing the Task Parallel Library 633
select a convenient point at which to stop processing and also enables it to undo any work it has performed prior to cancellation if necessary .
The Mechanics of Cooperative CancellationCooperative cancellation is based on the notion of a cancellation token . A cancellation token is a structure that represents a request to cancel one or more tasks . The method that a task runs should include a System.Threading.CancellationToken parameter . An application that wants to cancel the task sets the Boolean IsCancellationRequested property of this parameter to true . The method running in the task can query this property at various points during its processing . If this property is set to true at any point, it knows that the application has re-quested that the task be canceled . Also, the method knows what work it has done so far, so it can undo any changes if necessary and then finish . Alternatively, the method can simply ignore the request and continue running if it does not want to cancel the task .
Tip You should examine the cancellation token in a task frequently, but not so frequently that you adversely impact the performance of the task . If possible, you should aim to check for cancellation at least every 10 milliseconds, but no more frequently than every millisecond .
An application obtains a CancellationToken by creating a System.Threading.CancellationTokenSource object and querying the Token property of this object . The appli-cation can then pass this CancellationToken object as a parameter to any methods started by tasks that the application creates and runs . If the application needs to cancel the tasks, it calls the Cancel method of the CancellationTokenSource object . This method sets the IsCancellationRequested property of the CancellationToken passed to all the tasks .
The following code example shows how to create a cancellation token and use it to cancel a task . The initiateTasks method instantiates the cancellationTokenSource variable and obtains a reference to the CancellationToken object available through this variable . The code then creates and runs a task that executes the doWork method . Later on, the code calls the Cancel method of the cancellation token source, which sets the cancellation token . The doWork method queries the IsCancellationRequested property of the cancellation token . If the property is set the method terminates; otherwise, it continues running .
public class MyApplication
{
...
// Method that creates and manages a task
private void initiateTasks()
{
// Create the cancellation token source and obtain a cancellation token
CancellationTokenSource cancellationTokenSource = new CancellationTokenSource();
CancellationToken cancellationToken = cancellationToken.Token;
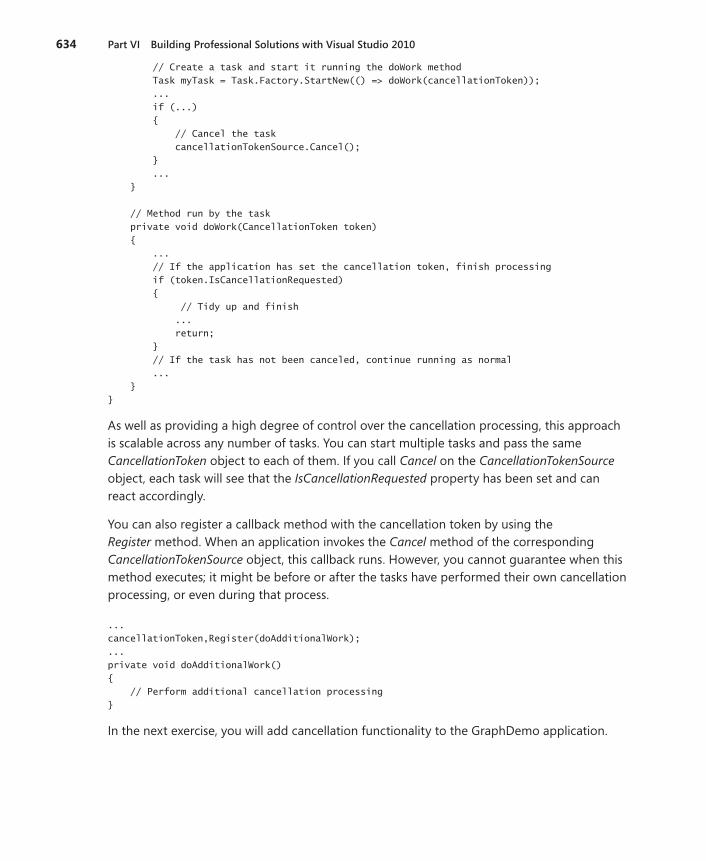
634 Part VI Building Professional Solutions with Visual Studio 2010
// Create a task and start it running the doWork method
Task myTask = Task.Factory.StartNew(() => doWork(cancellationToken));
...
if (...)
{
// Cancel the task
cancellationTokenSource.Cancel();
}
...
}
// Method run by the task
private void doWork(CancellationToken token)
{
...
// If the application has set the cancellation token, finish processing
if (token.IsCancellationRequested)
{
// Tidy up and finish
...
return;
}
// If the task has not been canceled, continue running as normal
...
}
}
As well as providing a high degree of control over the cancellation processing, this approach is scalable across any number of tasks . You can start multiple tasks and pass the same CancellationToken object to each of them . If you call Cancel on the CancellationTokenSource object, each task will see that the IsCancellationRequested property has been set and can react accordingly .
You can also register a callback method with the cancellation token by using the Register method . When an application invokes the Cancel method of the corresponding CancellationTokenSource object, this callback runs . However, you cannot guarantee when this method executes; it might be before or after the tasks have performed their own cancellation processing, or even during that process .
...
cancellationToken,Register(doAdditionalWork);
...
private void doAdditionalWork()
{
// Perform additional cancellation processing
}
In the next exercise, you will add cancellation functionality to the GraphDemo application .
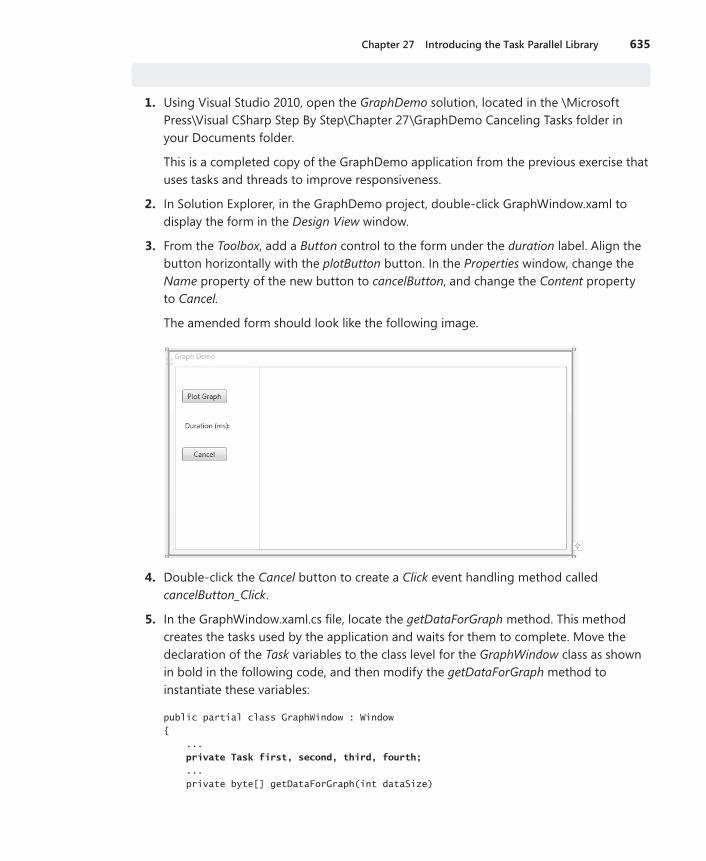
Chapter 27 Introducing the Task Parallel Library 635
Add cancellation functionality to the GraphDemo application
1. Using Visual Studio 2010, open the GraphDemo solution, located in the \Microsoft Press\Visual CSharp Step By Step\Chapter 27\GraphDemo Canceling Tasks folder in your Documents folder .
This is a completed copy of the GraphDemo application from the previous exercise that uses tasks and threads to improve responsiveness .
2. In Solution Explorer, in the GraphDemo project, double-click GraphWindow .xaml to display the form in the Design View window .
3. From the Toolbox, add a Button control to the form under the duration label . Align the button horizontally with the plotButton button . In the Properties window, change the Name property of the new button to cancelButton, and change the Content property to Cancel .
The amended form should look like the following image .
4. Double-click the Cancel button to create a Click event handling method called cancelButton_Click .
5. In the GraphWindow .xaml .cs file, locate the getDataForGraph method . This method creates the tasks used by the application and waits for them to complete . Move the declaration of the Task variables to the class level for the GraphWindow class as shown in bold in the following code, and then modify the getDataForGraph method to instantiate these variables:
public partial class GraphWindow : Window
{
...
private Task first, second, third, fourth;
...
private byte[] getDataForGraph(int dataSize)
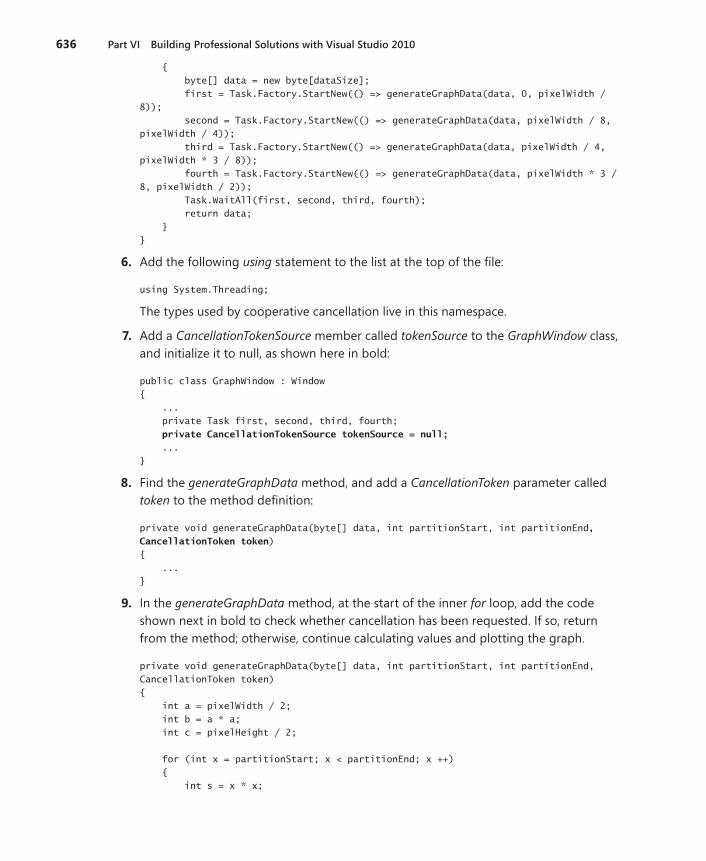
636 Part VI Building Professional Solutions with Visual Studio 2010
{
byte[] data = new byte[dataSize];
first = Task.Factory.StartNew(() => generateGraphData(data, 0, pixelWidth /
8));
second = Task.Factory.StartNew(() => generateGraphData(data, pixelWidth / 8,
pixelWidth / 4));
third = Task.Factory.StartNew(() => generateGraphData(data, pixelWidth / 4,
pixelWidth * 3 / 8));
fourth = Task.Factory.StartNew(() => generateGraphData(data, pixelWidth * 3 /
8, pixelWidth / 2));
Task.WaitAll(first, second, third, fourth);
return data;
}
}
6. Add the following using statement to the list at the top of the file:
using System.Threading;
The types used by cooperative cancellation live in this namespace .
7. Add a CancellationTokenSource member called tokenSource to the GraphWindow class, and initialize it to null, as shown here in bold:
public class GraphWindow : Window
{
...
private Task first, second, third, fourth;
private CancellationTokenSource tokenSource = null;
...
}
8. Find the generateGraphData method, and add a CancellationToken parameter called token to the method definition:
private void generateGraphData(byte[] data, int partitionStart, int partitionEnd,
CancellationToken token)
{
...
}
9. In the generateGraphData method, at the start of the inner for loop, add the code shown next in bold to check whether cancellation has been requested . If so, return from the method; otherwise, continue calculating values and plotting the graph .
private void generateGraphData(byte[] data, int partitionStart, int partitionEnd,
CancellationToken token)
{
int a = pixelWidth / 2;
int b = a * a;
int c = pixelHeight / 2;
for (int x = partitionStart; x < partitionEnd; x ++)
{
int s = x * x;
Chapter 27 Introducing the Task Parallel Library 637
double p = Math.Sqrt(b - s);
for (double i = -p; i < p; i += 3)
{
if (token.IsCancellationRequested)
{
return;
}
double r = Math.Sqrt(s + i * i) / a;
double q = (r - 1) * Math.Sin(24 * r);
double y = i / 3 + (q * c);
plotXY(data, (int)(-x + (pixelWidth / 2)), (int)(y + (pixelHeight / 2)));
plotXY(data, (int)(x + (pixelWidth / 2)), (int)(y + (pixelHeight / 2)));
}
}
}
10. In the getDataForGraph method, add the following statements shown in bold that in-stantiate the tokenSource variable and retrieve the CancellationToken object into a vari-able called token:
private byte[] getDataForGraph(int dataSize)
{
byte[] data = new byte[dataSize];
tokenSource = new CancellationTokenSource();
CancellationToken token = tokenSource.Token;
...
}
11. Modify the statements that create and run the four tasks, and pass the token variable as the final parameter to the generateGraphData method:
first = Task.Factory.StartNew(() => generateGraphData(data, 0, pixelWidth / 8,
token));
second = Task.Factory.StartNew(() => generateGraphData(data, pixelWidth / 8,
pixelWidth / 4, token));
third = Task.Factory.StartNew(() => generateGraphData(data, pixelWidth / 4, pixelWidth
* 3 / 8, token));
fourth = Task.Factory.StartNew(() => generateGraphData(data, pixelWidth * 3 / 8,
pixelWidth / 2, token));
12. In the cancelButton_Click method, add the code shown here in bold:
private void cancelButton_Click(object sender, RoutedEventArgs e)
{
if (tokenSource != null)
{
tokenSource.Cancel();
}
}
This code checks that the tokenSource variable has been instantiated; if it has been, the code invokes the Cancel method on this variable .
13. On the Debug menu, click Start Without Debugging to build and run the application .
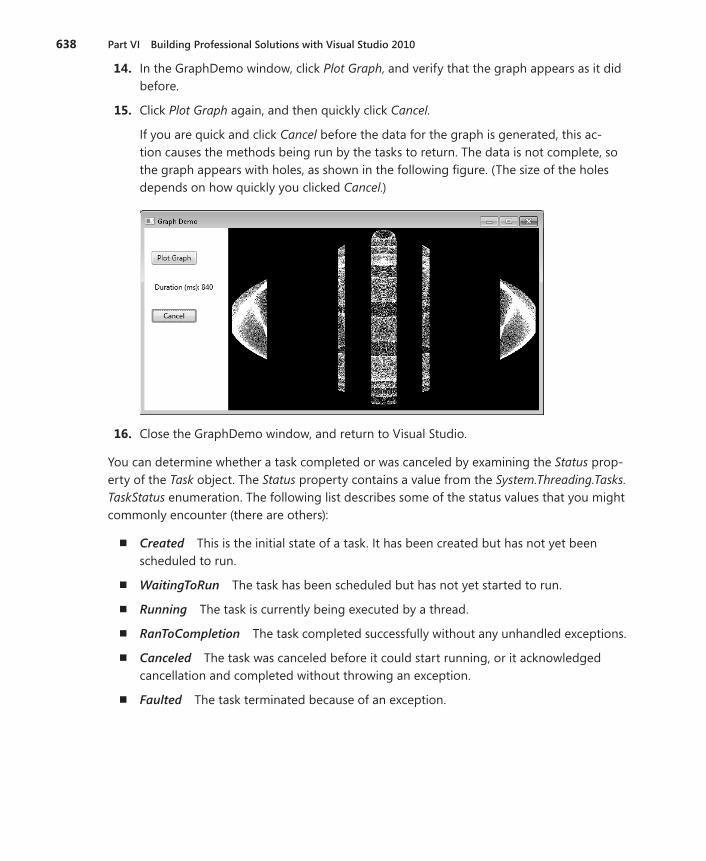
638 Part VI Building Professional Solutions with Visual Studio 2010
14. In the GraphDemo window, click Plot Graph, and verify that the graph appears as it did before .
15. Click Plot Graph again, and then quickly click Cancel .
If you are quick and click Cancel before the data for the graph is generated, this ac-tion causes the methods being run by the tasks to return . The data is not complete, so the graph appears with holes, as shown in the following figure . (The size of the holes depends on how quickly you clicked Cancel .)
16. Close the GraphDemo window, and return to Visual Studio .
You can determine whether a task completed or was canceled by examining the Status prop-erty of the Task object . The Status property contains a value from the System.Threading.Tasks.TaskStatus enumeration . The following list describes some of the status values that you might commonly encounter (there are others):
n Created This is the initial state of a task . It has been created but has not yet been scheduled to run .
n WaitingToRun The task has been scheduled but has not yet started to run .
n Running The task is currently being executed by a thread .
n RanToCompletion The task completed successfully without any unhandled exceptions .
n Canceled The task was canceled before it could start running, or it acknowledged cancellation and completed without throwing an exception .
n Faulted The task terminated because of an exception .
Chapter 27 Introducing the Task Parallel Library 639
In the next exercise, you will attempt to report the status of each task so that you can see when they have completed or have been canceled .
Canceling a Parallel For or ForEach LoopThe Parallel.For and Parallel.ForEach methods don’t provide you with direct access to the Task objects that have been created . Indeed, you don’t even know how many tasks are running—the .NET Framework uses its own heuristics to work out the optimal num-ber to use based on the resources available and the current workload of the computer .
If you want to stop the Parallel.For or Parallel.ForEach method early, you must use a ParallelLoopState object . The method you specify as the body of the loop must include an additional ParallelLoopState parameter . The TPL creates a ParallelLoopState object and passes it as this parameter into the method . The TPL uses this object to hold infor-mation about each method invocation . The method can call the Stop method of this object to indicate that the TPL should not attempt to perform any iterations beyond those that have already started and finished . The following example shows the Parallel.For method calling the doLoopWork method for each iteration . The doLoopWork meth-od examines the iteration variable; if it is greater than 600, the method calls the Stop method of the ParallelLoopState parameter . This causes the Parallel.For method to stop running further iterations of the loop . (Iterations currently running might continue to completion .)
Note Remember that the iterations in a Parallel.For loop are not run in a specific sequence . Consequently, canceling the loop when the iteration variable has the value 600 does not guarantee that the previous 599 iterations have already run . Equally, some iterations with values greater than 600 might already have completed .
Parallel.For(0, 1000, doLoopWork);
...
private void doLoopWork(int i, ParallelLoopState p)
{
...
if (i > 600)
{
p.Stop();
}
}
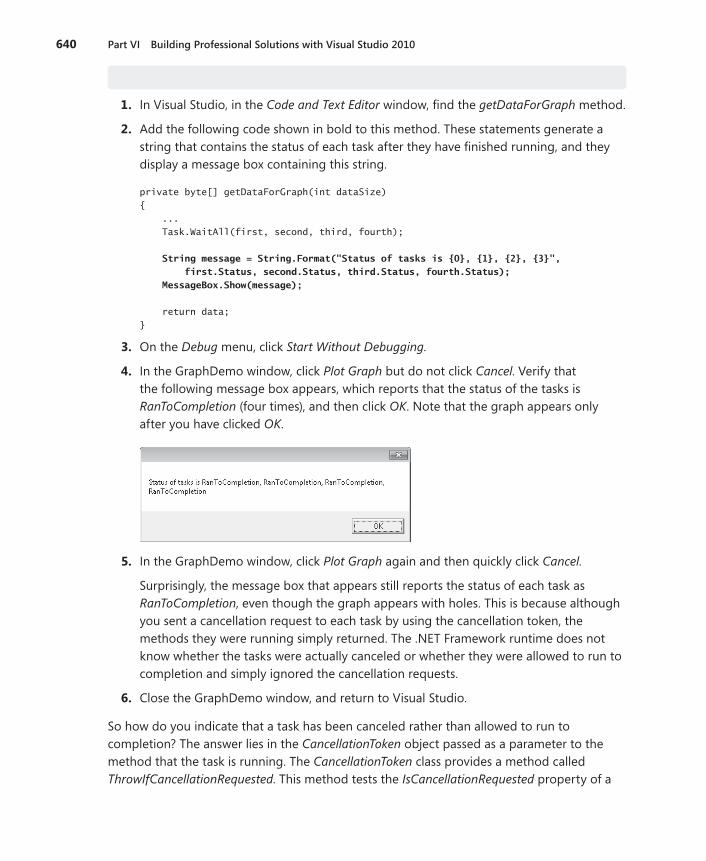
640 Part VI Building Professional Solutions with Visual Studio 2010
Display the status of each task
1. In Visual Studio, in the Code and Text Editor window, find the getDataForGraph method .
2. Add the following code shown in bold to this method . These statements generate a string that contains the status of each task after they have finished running, and they display a message box containing this string .
private byte[] getDataForGraph(int dataSize)
{
...
Task.WaitAll(first, second, third, fourth);
String message = String.Format("Status of tasks is {0}, {1}, {2}, {3}",
first.Status, second.Status, third.Status, fourth.Status);
MessageBox.Show(message);
return data;
}
3. On the Debug menu, click Start Without Debugging .
4. In the GraphDemo window, click Plot Graph but do not click Cancel . Verify that the following message box appears, which reports that the status of the tasks is RanToCompletion (four times), and then click OK . Note that the graph appears only after you have clicked OK .
5. In the GraphDemo window, click Plot Graph again and then quickly click Cancel .
Surprisingly, the message box that appears still reports the status of each task as RanToCompletion, even though the graph appears with holes . This is because although you sent a cancellation request to each task by using the cancellation token, the methods they were running simply returned . The .NET Framework runtime does not know whether the tasks were actually canceled or whether they were allowed to run to completion and simply ignored the cancellation requests .
6. Close the GraphDemo window, and return to Visual Studio .
So how do you indicate that a task has been canceled rather than allowed to run to completion? The answer lies in the CancellationToken object passed as a parameter to the method that the task is running . The CancellationToken class provides a method called ThrowIfCancellationRequested . This method tests the IsCancellationRequested property of a
Chapter 27 Introducing the Task Parallel Library 641
cancellation token; if it is true, the method throws an OperationCanceledException exception and aborts the method that the task is running .
The application that started the thread should be prepared to catch and handle this exception, but this leads to another question . If a task terminates by throwing an ex-ception, it actually reverts to the Faulted state . This is true, even if the exception is an OperationCanceledException exception . A task enters the Canceled state only if it is canceled without throwing an exception . So how does a task throw an OperationCanceledException without it being treated as an exception?
The answer lies in the task itself . For a task to recognize that an OperationCanceledException is the result of canceling the task in a controlled manner and not just an exception caused by other circumstances, it has to know that the operation has actually been canceled . It can do this only if it can examine the cancellation token . You passed this token as a parameter to the method run by the task, but the task does not actually look at any of these para-meters . (It considers them to be the business of the method and is not concerned with them .) Instead, you specify the cancellation token when you create the task, either as a parameter to the Task constructor or as a parameter to the StartNew method of the TaskFactory object you are using to create and run tasks . The following code shows an example based on the GraphDemo application . Notice how the token parameter is passed to the generateGraph-Data method (as before), but also as a separate parameter to the StartNew method:
Task first = null;
tokenSource = new CancellationTokenSource();
CancellationToken token = tokenSource.Token;
...
first = Task.Factory.StartNew(() => generateGraphData(data, 0, pixelWidth / 8, token),
token);
Now when the method being run by the task throws an OperationCanceledException excep-tion, the infrastructure behind the task examines the CancellationToken . If it indicates that the task has been canceled, the infrastructure handles the OperationCanceledException excep-tion, acknowledges the cancelation, and sets the status of the task to Canceled . The infra-structure then throws a TaskCanceledException, which your application should be prepared to catch . This is what you will do in the next exercise, but before you do that you need to learn a little more about how tasks raise exceptions and how you should handle them .
Handling Task Exceptions by Using the AggregateException ClassYou have seen throughout this book that exception handling is an important element in any commercial application . The exception handling constructs you have met so far are straight-forward to use, and if you use them carefully it is a simple matter to trap an exception and determine which piece of code raised it . However, when you start dividing work into multiple
642 Part VI Building Professional Solutions with Visual Studio 2010
concurrent tasks, tracking and handling exceptions becomes a more complex problem . The issue is that different tasks might each generate their own exceptions, and you need a way to catch and handle multiple exceptions that might be thrown concurrently . This is where the AggregateException class comes in .
An AggregateException acts as a wrapper for a collection of exceptions . Each of the exceptions in the collection might be thrown by different tasks . In your application, you can catch the AggregateException exception and then iterate through this collection and perform any necessary processing . To help you, the AggregateException class provides the Handle method . The Handle method takes a Func<Exception, bool> delegate that references a meth-od . The referenced method takes an Exception object as its parameter and returns a Boolean value . When you call Handle, the referenced method runs for each exception in the collection in the AggregateException object . The referenced method can examine the exception and take the appropriate action . If the referenced method handles the exception, it should return true . If not, it should return false . When the Handle method completes, any unhandled excep-tions are bundled together into a new AggregateException and this exception is thrown; a subsequent outer exception handler can then catch this exception and process it .
In the next exercise, you will see how to catch an AggregateException and use it to handle the TaskCanceledException exception thrown when a task is canceled .
Acknowledge cancellation, and handle the AggregateException exception
1. In Visual Studio, display the GraphWindow .xaml file in the Design View window .
2. From the Toolbox, add a Label control to the form underneath the cancelButton button . Align the left edge of the Label control with the left edge of the cancelButton button .
3. Using the Properties window, change the Name property of the Label control to status, and remove the value in the Content property .
4. Return to the Code and Text Editor window displaying the GraphWindow .xaml .cs file, and add the following method below the getDataForGraph method:
private bool handleException(Exception e)
{
if (e is TaskCanceledException)
{
plotButton.Dispatcher.Invoke(new Action(() =>
{
status.Content = "Tasks Canceled";
}), DispatcherPriority.ApplicationIdle);
return true;
}
else
{
return false;
}
}
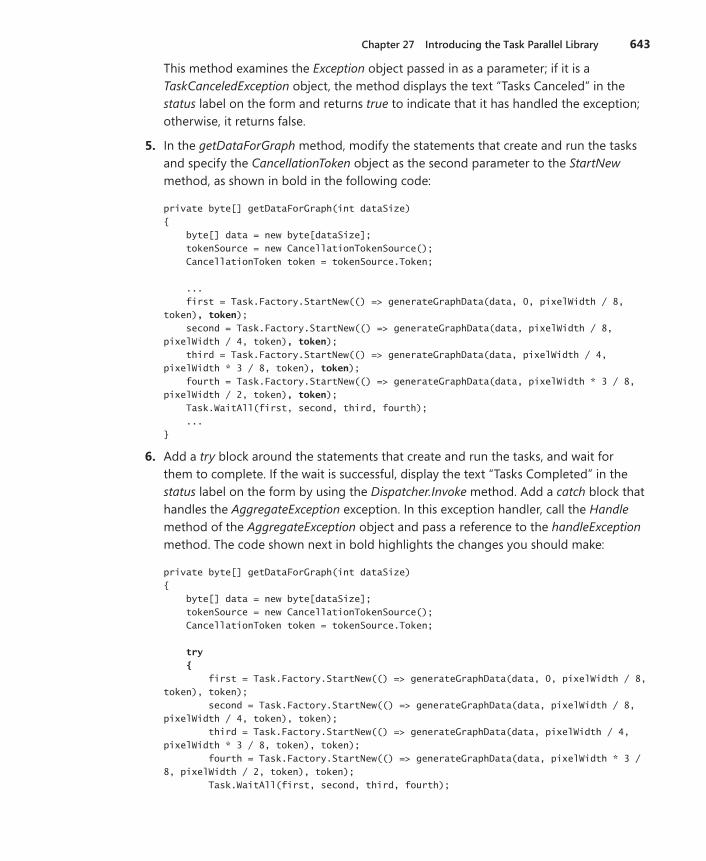
Chapter 27 Introducing the Task Parallel Library 643
This method examines the Exception object passed in as a parameter; if it is a TaskCanceledException object, the method displays the text “Tasks Canceled” in the status label on the form and returns true to indicate that it has handled the exception; otherwise, it returns false .
5. In the getDataForGraph method, modify the statements that create and run the tasks and specify the CancellationToken object as the second parameter to the StartNew method, as shown in bold in the following code:
private byte[] getDataForGraph(int dataSize)
{
byte[] data = new byte[dataSize];
tokenSource = new CancellationTokenSource();
CancellationToken token = tokenSource.Token;
...
first = Task.Factory.StartNew(() => generateGraphData(data, 0, pixelWidth / 8,
token), token);
second = Task.Factory.StartNew(() => generateGraphData(data, pixelWidth / 8,
pixelWidth / 4, token), token);
third = Task.Factory.StartNew(() => generateGraphData(data, pixelWidth / 4,
pixelWidth * 3 / 8, token), token);
fourth = Task.Factory.StartNew(() => generateGraphData(data, pixelWidth * 3 / 8,
pixelWidth / 2, token), token);
Task.WaitAll(first, second, third, fourth);
...
}
6. Add a try block around the statements that create and run the tasks, and wait for them to complete . If the wait is successful, display the text “Tasks Completed” in the status label on the form by using the Dispatcher.Invoke method . Add a catch block that handles the AggregateException exception . In this exception handler, call the Handle method of the AggregateException object and pass a reference to the handleException method . The code shown next in bold highlights the changes you should make:
private byte[] getDataForGraph(int dataSize)
{
byte[] data = new byte[dataSize];
tokenSource = new CancellationTokenSource();
CancellationToken token = tokenSource.Token;
try
{
first = Task.Factory.StartNew(() => generateGraphData(data, 0, pixelWidth / 8,
token), token);
second = Task.Factory.StartNew(() => generateGraphData(data, pixelWidth / 8,
pixelWidth / 4, token), token);
third = Task.Factory.StartNew(() => generateGraphData(data, pixelWidth / 4,
pixelWidth * 3 / 8, token), token);
fourth = Task.Factory.StartNew(() => generateGraphData(data, pixelWidth * 3 /
8, pixelWidth / 2, token), token);
Task.WaitAll(first, second, third, fourth);
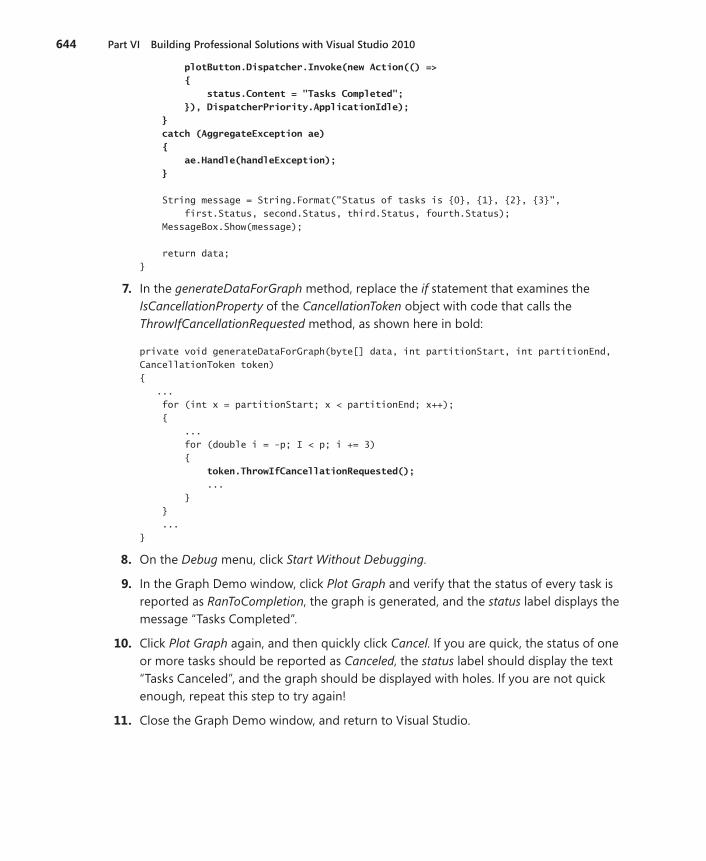
644 Part VI Building Professional Solutions with Visual Studio 2010
plotButton.Dispatcher.Invoke(new Action(() =>
{
status.Content = "Tasks Completed";
}), DispatcherPriority.ApplicationIdle);
}
catch (AggregateException ae)
{
ae.Handle(handleException);
}
String message = String.Format("Status of tasks is {0}, {1}, {2}, {3}",
first.Status, second.Status, third.Status, fourth.Status);
MessageBox.Show(message);
return data;
}
7. In the generateDataForGraph method, replace the if statement that examines the IsCancellationProperty of the CancellationToken object with code that calls the ThrowIfCancellationRequested method, as shown here in bold:
private void generateDataForGraph(byte[] data, int partitionStart, int partitionEnd,
CancellationToken token)
{
...
for (int x = partitionStart; x < partitionEnd; x++);
{
...
for (double i = -p; I < p; i += 3)
{
token.ThrowIfCancellationRequested();
...
}
}
...
}
8. On the Debug menu, click Start Without Debugging .
9. In the Graph Demo window, click Plot Graph and verify that the status of every task is reported as RanToCompletion, the graph is generated, and the status label displays the message “Tasks Completed” .
10. Click Plot Graph again, and then quickly click Cancel . If you are quick, the status of one or more tasks should be reported as Canceled, the status label should display the text “Tasks Canceled”, and the graph should be displayed with holes . If you are not quick enough, repeat this step to try again!
11. Close the Graph Demo window, and return to Visual Studio .
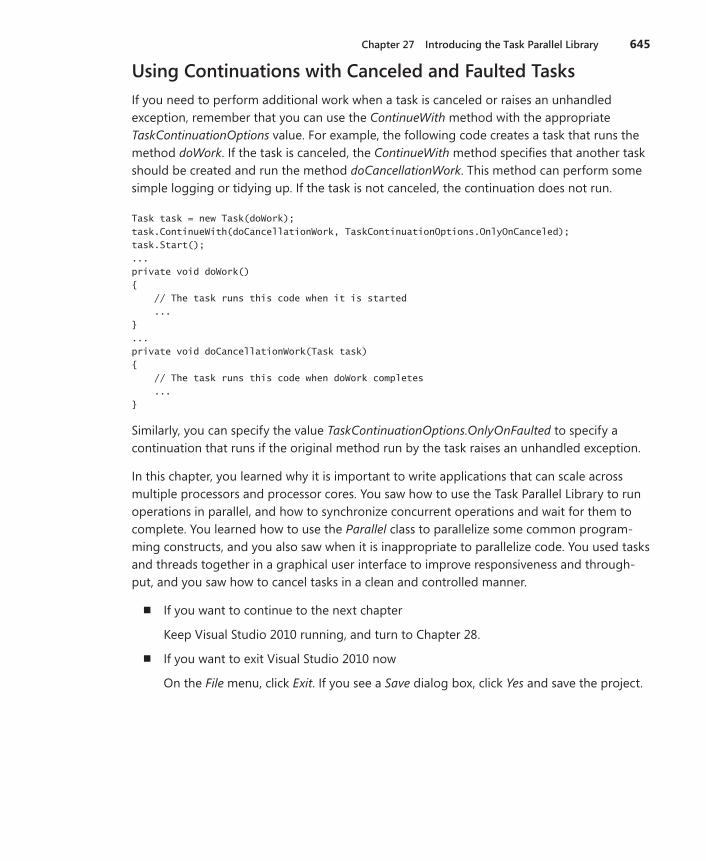
Chapter 27 Introducing the Task Parallel Library 645
Using Continuations with Canceled and Faulted TasksIf you need to perform additional work when a task is canceled or raises an unhandled exception, remember that you can use the ContinueWith method with the appropriate TaskContinuationOptions value . For example, the following code creates a task that runs the method doWork . If the task is canceled, the ContinueWith method specifies that another task should be created and run the method doCancellationWork . This method can perform some simple logging or tidying up . If the task is not canceled, the continuation does not run .
Task task = new Task(doWork);
task.ContinueWith(doCancellationWork, TaskContinuationOptions.OnlyOnCanceled);
task.Start();
...
private void doWork()
{
// The task runs this code when it is started
...
}
...
private void doCancellationWork(Task task)
{
// The task runs this code when doWork completes
...
}
Similarly, you can specify the value TaskContinuationOptions.OnlyOnFaulted to specify a continuation that runs if the original method run by the task raises an unhandled exception .
In this chapter, you learned why it is important to write applications that can scale across multiple processors and processor cores . You saw how to use the Task Parallel Library to run operations in parallel, and how to synchronize concurrent operations and wait for them to complete . You learned how to use the Parallel class to parallelize some common program-ming constructs, and you also saw when it is inappropriate to parallelize code . You used tasks and threads together in a graphical user interface to improve responsiveness and through-put, and you saw how to cancel tasks in a clean and controlled manner .
n If you want to continue to the next chapter
Keep Visual Studio 2010 running, and turn to Chapter 28 .
n If you want to exit Visual Studio 2010 now
On the File menu, click Exit . If you see a Save dialog box, click Yes and save the project .
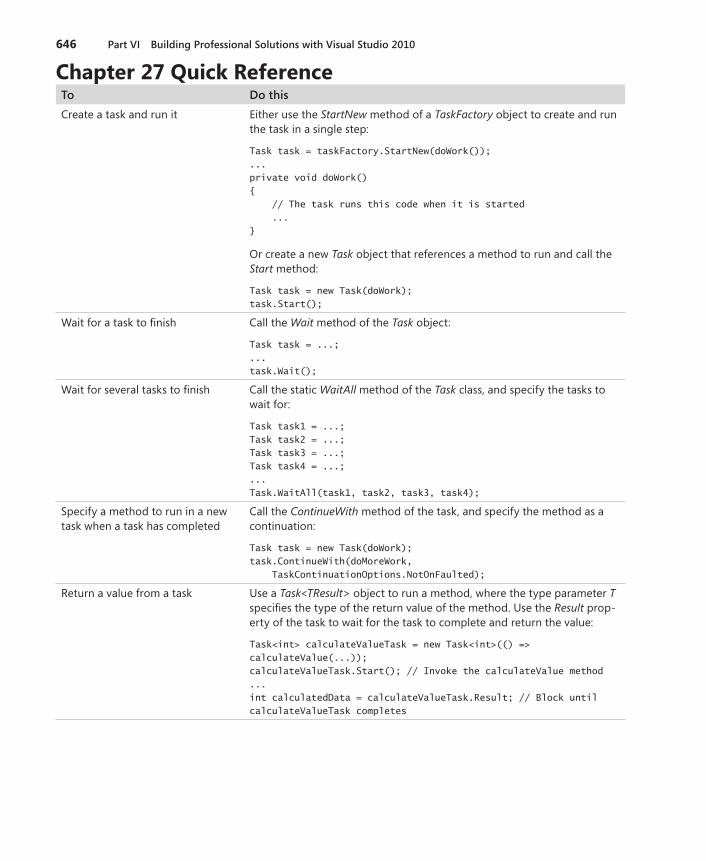
646 Part VI Building Professional Solutions with Visual Studio 2010
Chapter 27 Quick ReferenceTo Do this
Create a task and run it Either use the StartNew method of a TaskFactory object to create and run the task in a single step:
Task task = taskFactory.StartNew(doWork());
...
private void doWork()
{
// The task runs this code when it is started
...
}
Or create a new Task object that references a method to run and call the Start method:
Task task = new Task(doWork);
task.Start();
Wait for a task to finish Call the Wait method of the Task object:
Task task = ...;
...
task.Wait();
Wait for several tasks to finish Call the static WaitAll method of the Task class, and specify the tasks to wait for:
Task task1 = ...;
Task task2 = ...;
Task task3 = ...;
Task task4 = ...;
...
Task.WaitAll(task1, task2, task3, task4);
Specify a method to run in a new task when a task has completed
Call the ContinueWith method of the task, and specify the method as a continuation:
Task task = new Task(doWork);
task.ContinueWith(doMoreWork,
TaskContinuationOptions.NotOnFaulted);
Return a value from a task Use a Task<TResult> object to run a method, where the type parameter T specifies the type of the return value of the method . Use the Result prop-erty of the task to wait for the task to complete and return the value:
Task<int> calculateValueTask = new Task<int>(() =>
calculateValue(...));
calculateValueTask.Start(); // Invoke the calculateValue method
...
int calculatedData = calculateValueTask.Result; // Block until
calculateValueTask completes
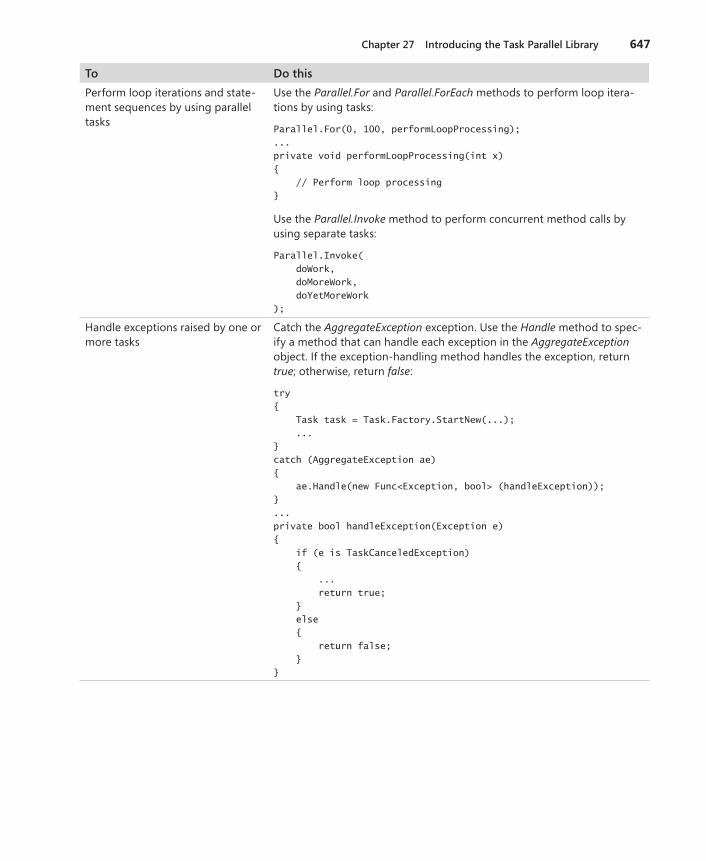
Chapter 27 Introducing the Task Parallel Library 647
To Do this
Perform loop iterations and state-ment sequences by using parallel tasks
Use the Parallel.For and Parallel.ForEach methods to perform loop itera-tions by using tasks:
Parallel.For(0, 100, performLoopProcessing);
...
private void performLoopProcessing(int x)
{
// Perform loop processing
}
Use the Parallel.Invoke method to perform concurrent method calls by using separate tasks:
Parallel.Invoke(
doWork,
doMoreWork,
doYetMoreWork
);
Handle exceptions raised by one or more tasks
Catch the AggregateException exception . Use the Handle method to spec-ify a method that can handle each exception in the AggregateException object . If the exception-handling method handles the exception, return true; otherwise, return false:
try
{
Task task = Task.Factory.StartNew(...);
...
}
catch (AggregateException ae)
{
ae.Handle(new Func<Exception, bool> (handleException));
}
...
private bool handleException(Exception e)
{
if (e is TaskCanceledException)
{
...
return true;
}
else
{
return false;
}
}
648 Part VI Building Professional Solutions with Visual Studio 2010
To Do this
Support cancellation in a task Implement cooperative cancellation by creating a CancellationTokenSource object and using a CancellationToken pa-rameter in the method run by the task . In the task method, call the ThrowIfCancellationRequested method of the CancellationToken param-eter to throw an OperationCanceledException exception and terminate the task:
private void generateGraphData(..., CancellationToken token)
{
...
token.ThrowIfCancellationRequested();
...
}
727
Index
Symbols–= compound assignment
operator, 92, 332, 344+= compound assignment
operator, 92, 331, 343? modifier, 157, 171, 174–– operator, 44, 425* operator, 36, 170*= operator, 92/= operator, 92%= operator, 37, 92++ operator, 43, 425
AAbout Box windows template,
488about event methods, 488–489abstract classes, 232, 253,
269–271creating, 272–274, 277
abstract keyword, 270, 276, 277abstract methods, 270–271, 277access, protected, 242accessibility
of fields and methods, 132–133
of properties, 301access keys for menu items, 480accessors, get and set, 298Action delegates, 604–605
creating, 508invoking, 632
Action type, 630add_Click method, 472AddCount method, 664AddExtension property, 496addition operator, 36
precedence of, 41, 77Add method, 208, 214, 217, 587<Add New Event> command,
476AddObject method, 596AddParticipant method, 666addValues method, 50, 52Add Window command, 457Administrator privileges, for
exercises, 535–537
ADO .NET, 535connecting to databases with,
564LINQ to SQL and, 549querying databases with,
535–548, 564ADO .NET class library, 535ADO .NET Entity Data Model
template, 566, 569, 596ADO .NET Entity Framework,
566–583AggregateException class,
642–644Handle method, 642
AggregateException exceptions, 647
AggregateException handler, 642–644
anchor points of controls, 447–448
AND (&) operator, 316anonymous classes, 147–148anonymous methods, 341anonymous types in arrays,
194–195, 197APIs, 300App .config (application
configuration) file, 8, 573connection strings, storing in,
572, 573ApplicationException exceptions,
517Application objects, 457application programming
interfaces, 330applications
building, 26multitasking in, 602–628parallelization in, 603responsiveness of, 498–507running, 26
Application .xaml .cs files, 24App .xaml files, code in, 24ArgumentException class, 220ArgumentException exceptions,
205, 225argumentList, 51ArgumentOutOfRangeException
class, 121arguments
in methods, 52modifying, 159–162named, ambiguities with,
66–71
omitting, 66passing to methods, 159positional, 66
arithmetic operations, 36–43results type, 37
arithmetic operatorschecked and unchecked, 119precedence, 41–42using, 38–41
array arguments, 220–226array elements
accessing, 195, 218types of, 192
array indexes, 195, 218integer types for, 201
array instancescopying, 197–198creating, 192–193, 218
ArrayList class, 208–209, 217number of elements in, 209
arrays, 191–206associative, 212card playing application,
199–206cells in, 198vs . collections, 214copying, 197–198implicitly typed, 194–195initializing elements of, 218inserting elements, 208of int variables, 207iterating through, 195–197,
218keys arrays, 212, 213length of, 218multidimensional, 198–199of objects, 207params arrays, 219–220removing elements from, 208resizing, 208size of, 192–193zero-length arrays, 223
array variablesdeclaring, 191–192, 218initializing, 193–194naming conventions, 192
as operator, 169, 236AsOrdered method, 655AsParallel method, 650, 681
specifying, 652assemblies, 361
definition of, 16namespaces and, 16uses of, 8
728
AssemblyInfo .cs files, 8assignment operator (=), 31,
74, 91precedence and associativity
of, 42, 77assignment operators,
compound, 91–98assignment statements, 91
for anonymous classes, 148Association attribute, 555associative arrays, 212associativity, 42
of assignment operator, 42of Boolean operators, 76–77
asterisk (*) operator, 36at (@) symbol, 542attributes, class, 523automatic properties, 307, 310
Bbackground threads
access to controls, 508copying data to, 502–504for long-running operations,
499–502performing operations on,
508BackgroundWorker class, 504backslash (\), 88Barrier class, 666–667Barrier constructors, specifying
delegates for, 667Barrier objects, 681base class constructors, calling,
234–235, 251base classes, 232–234 . See
also inheritancepreventing class use as, 271–
272, 277protected class members of,
242base keyword, 234, 239BeginInvoke method, 630BellRingers project, 444–476
application GUI, 444binary operators, 419binary trees
building using generics, 361creating generic classes, 371datum, 358enumerators, 383iComparable interface, 362
inserting a node, 362node, 358sorting data, 359subtrees, 358theory of, 358TreeEnumerator class, 383walking, 384
Binding elements, for associating control properties with control properties, 513
BindingExpression classHasError property, 529–530,
532UpdateSource method, 529
BindingExpression objects, 532creating, 529
Binding objects, 526BindingOperations class
GetBinding method, 526binding paths, 519binding sources, 518
specifying, 531, 577Binding.ValidationRules
elements, 532child elements, 516
bin folder, 13Black.Hole method, 223BlockingCollection<T> class, 669BlockingCollection<T> objects,
670blocking mechanisms of
synchronization primitives, 663–665
blocks of statements, 78–79braces in, 98
bool data type, 32, 74Boolean expressions
creating, 89declaring, 73–74in if statements, 78in while statements, 93
Boolean operators, 74–77precedence and associativity,
76–77short-circuiting, 76
Boolean variables, declaring, 89bool keyword, 89bound objects, references to,
526bound properties,
BindingExpression object of, 532
boxing, 165–166braces
in class definitions, 130for grouping statements,
78–79, 93, 98Breakpoints icon, 103break statements, 85
for breaking out of loops, 99fall-through, preventing, 86in switch statements, 87
Build Solution command, 11, 12ButtonBase class, 345Button class, 345button controls
adding, 21anchoring, 447Click event handlers, 471–474mouse over behaviors,
456–457Width and Height properties,
449Button.Resources property,
451–452
CC#
case-sensitivity, 9COM interoperability, 64compiling code, 11IntelliSense and, 9layout style, 28matched character pairs, 10role in .NET, 3
calculateClick method, 52–53callback methods, registering,
634camelCase, 30, 133
for method names, 48CanBeNull parameter, 550Canceled task state, 638, 641CancelEventArgs class, 475cancellation, 632–645
of PLINQ queries, 656synchronization primitives
and, 668CancellationToken objects, 633
specifying, 643, 656ThrowIfCancellationRequested
method, 640–641cancellation tokens, 633
creating, 633–634examining, 641
AssemblyInfo.cs files
729
cancellation tokens (continued)specifying, 668, 681for wait operations, 668
CancellationTokenSource objects Cancel method, 668
cascading if statements, 79–80, 84
case, use in identifier names, 30case keyword, 85case labels, 85
fall-through and, 86rules of use, 86
casting data, 167–171, 175catch handlers, 110
multiple, 112–113order of execution, 114syntax of, 111writing, 117, 126
catch keyword, 110cells in arrays, 198Change Data Source dialog box,
569–570change tracking, 584character codes, 102characters, reading streams of,
95char data type, 32, 542check box controls, 458
adding, 460initializing, 476IsChecked property, 473
checked expressions, 119–120checked keyword, 126, checked statements, 118Choose Data Source dialog box,
569–570Circle class, 130–131
NumCircles field, 143–144C# keywords . See also keywords
IntelliSense lists of, 9 .NET equivalents, 179
Class attribute, 445classes, 129
abstract classes, 232, 269–274accessibility of fields and
methods, 132–142anonymous classes, 147–148in assemblies, 16attributes of, 523base classes, 232–234body of, 131classification and, 129–130
collection classes, 206–217, 668–670
constructors for, 133–134 . See also constructors
declaring, 149defining, 130–132definition of, 132derived classes, 232–234encapsulation in, 130generic classes, 358–370inheriting from interfaces,
255–256instances of, assigning, 131interfaces, implementing,
261–266method keyword
combinations, 276modeling entities with,
513–515with multiple interfaces, 257naming conventions, 133new, adding, 243partial classes, 136referencing through
interfaces, 256–257sealed classes, 232, 271–277static classes, 144–145vs . structures, 181–182,
188–190testing, 266–269
class hierarchies, defining, 242–247
classification, 129–130inheritance and, 231–232
class keyword, 130, 149class libraries, 361class members drop-down list
box, 34class methods, 144class scope, defining, 54–55class types, copying, 151–156clear_Click method, 471clearName_Click method, 492Click event handlers, 471–474
for menu items, 485–487Click events, 25, 345Clone method, 198Closing event handler, 474–476CLS (Common Language
Specification), 30code . See also execution flow
compiled, 8, 14compiling, 11
compute-bound, 621–623error-handling, separating
out, 110exception safe, 289–292refactoring, 60, 270trying, 110–117in WPF forms, viewing, 476
Code and Text Editor pane, 7keywords in, 29
code duplication, 269–270code views, 17collection classes, 206–217
ArrayList class, 208–209card playing implentation,
214–217Queue class, 210SortedList class, 213Stack class, 210–211thread-safe, 668–670
Collection Editor: Items dialog box, 480, 481
collection initializers, 214collections
vs . arrays, 214counting number of rows, 406enumerable, 381enumerating elements,
381–389GetEnumerator methods, 382IEnumerable interface, 382iterating through, 218,
650–655iterators, 389join operator, 407limiting number of items in,
669–670number of items in, 218producers and consumers of,
669thread-safe, 678–679of unordered items, 669
Collect method, 283Colors enumeration, 268Column attribute, 550, 564combo box controls, 458
adding, 460populating, 476
Command class, 542Command objects, 542command prompt windows,
opening, 538CommandText property, 542,
564
CommandText property
730
commenting out a block of code, 414
comments, 11multiline comments, 11
common dialog boxes, 495–498modal, 496SaveFileDialog class, 495–498
Common Dialog classes, 94Common Language
Specification (CLS), 30Compare method, 84, 377CompareTo method, 362comparing strings, 378comparing two objects, 377compiled code, 14
references to, 8compiler
comments and, 11method call resolution, 66–71,226–228
compiler errors, 12–13compiling code, 11, 14complex numbers, 428Complex objects, 432Component Object
Model (COM) and C# interoperability, 64
CompositeType class, 691compound addition operator,
108compound assignment
operators, 91–92, 424compound subtraction
operator, 108computer memory . See memoryConcurrency Mode property,
585ConcurrentBag<T> class, 669,
678–679overhead of, 679
ConcurrentDictionary<TKey, TValue> class, 669
concurrent imperative data access, 656–680
ConcurrentQueue<T> class, 669ConcurrentStack<T> class, 669concurrent tasks
synchronizing access to resources, 659
unpredictable performance of, 656–659
concurrent threads, 600 . See also multitasking; threads
conditional AND operator, precedence and associativity of, 77
conditional logical operators, 75short-circuiting, 76
conditional OR operator, precedence and associativity of, 77
Connection class, 539connection pooling, 547Connection Properties dialog
box, 569–570Connection property, 564ConnectionString property, 540,
564connection strings, 559, 562,
564building, 540for DataContext constructor,
551–552storing, 572
Console Application icon, 5, 6console applications
assembly references in, 16creating, 8–14, 26definition of, 3Visual Studio-created files,
8–9Console Application template, 7Console class, 9Console.WriteLine method, 186,
219, 224calling, 137–138
Console.Write method, 58const keyword, 144constraints, with generics, 358constructed types, 357constructors, 133–134
base class constructors, 234–235
calling, 149declaring, 149default, 133–134, 135definition of, 23initializing fields with, 139initializing objects with, 279order of definition, 135overloading, 134–135private, 134shortcut menu code in,
493–494for structures, 183, 185writing, 137–140
consumers, 669Content property, 20, 459, 469ContextMenu elements, 491
adding, 508ContextMenu property, 494context menus . See shortcut
menuscontinuations, 606–608, 645,
646Continue button (Debug
toolbar), 63continue statements, 100ContinueWith method, 606, 645,
646contravariance, 377Control class Setter elements,
456controls
adding to forms, 459–461, 476aligning, 460alignment indicators, 21anchor points, 447Content property, 469displaying, 40focus, validation and, 509,
518, 527IsChecked property, 476layout properties of, 461–464Name property, 452properties, modifying, 20properties, setting, 449, 476removing from forms, 459repositioning, 19resetting to default values,
466–470resizing, 21Resources elements, 452style of, 451–457, 464–466TargetType attribute, 454–456text properties, 457ToolTip property of, 532WPF controls, 458–459z-order of, 451
conversion operators, 434, 435writing, 437
ConvertBack method, 523, 524converter classes, 578
creating, 523–525for data binding, 522
converter methods, 522–523creating, 523–525
Convert method, 578
commenting out a block of code
731
cooperative cancellation, 632–637
copyingreference and value type
variables, 189structure variables, 187
Copy method, 198CopyTo method, 197CountdownEvent objects, 681Count method, 403Count property, 209, 218covariance, 376covarient interfaces, 375C# project files, 8CreateDatabase method, 551Created task state, 638CREATE TABLE statements, 549CreateXXX method, 587, 596cross-checking data, 509–510cross-platform interoperability,
685C# source file (Program .cs), 8 .csproj suffix, 33CurrentCount property, 663cursors (current set of rows),
544
Ddangling references, 282data
aggregating, 401counting number of rows, 406Count method, 403Distinct method, 406encapsulation of, 130filtering, 400GroupBy method, 402Grouping, 401group operator, 406joining, 404locking, 659–661Max method, 403Min method, 403OrderBy, 402OrderByDescending, 402orderby operator, 406querying, 395–417selecting, 398ThenByDescending, 402validation of, 509–532
data accessconcurrent imperative,
656–680
thread-safe, 670–682database applications
data bindings, establishing, 579–582
retrieving information, 579–582
user interface for, 574–579database connections
closing, 545–547, 553connection pooling, 547creating, 569–570logic for, 572opening, 540
database queriesADO .NET for, 564deferred, 557–558immediate evaluation of,
553–554iterating through, 552LINQ to Entities for, 582–583LINQ to SQL for, 564
databasesaccess errors, 539adding and deleting data,
587–594, 596concurrent connections, 547connecting to, 538–540, 564creating, 536–538data type mapping, 550disconnecting from, 545–547entity data models, 565fetching and displaying data,
543–544, 551–553granting access to, 567–568locked data, 544mapping layer, 565new, creating, 551null values in, 547–548, 550,
564prompting users for
information, 541–543, 562querying, 541–543querying, with ADO .NET,
535–548querying, with LINQ to SQL,
549–564 referential integrity errors,
588saving changes to, 584–586,
594–596saving user information, 562updating data, 583–596 Windows Authentication
access, 540, 541
database tablesColumn attribute, 550deleting rows in, 588, 596entity classes, relationships
between, 551–552entity data models for,
568–572joining, 554–558many-to-one relationships,
555–556modifying information in, 596new, creating, 551null values in, 550one-to-many relationships,
556–558primary keys, 550querying, 541–543retrieving data from, 579–582retrieving single rows, 553Table attribute, 550underlying type of columns,
550data binding
binding control properties to control properties, 513, 525–526, 531
binding control properties to object properties, 531
binding controls to class properties, 515
binding sources, 518, 531binding WPF controls to data
sources, 580converter classes, 522–525Entity Framework, using with,
579–582existing data, updating with,
583–584fetching and displaying data
with, 579–583modifying data with, 583–596for validation, 511–527
DataContext classes, 551–552accessing database tables
with, 562–564custom, 559–560
DataContext objects, 551–553creating, 564
DataContext property, 577, 596of parent controls, 580
DataContract attribute, 691DataLoadOptions class
LoadWith method, 558DataMember attribute, 691
DataMember attribute
732
data provider classes for ADO .NET, 539
data providers, 535–536data sets, partitioning, 650data sources, joining, 654DataTemplate, 576data types
bool data type, 32, 74char data type, 32, 542data type mapping, 550DateTime data type, 81, 84decimal data type, 31double data type, 31of enumerations, 176 float data type, 31IntelliSense lists of, 9long data type, 31operators and, 37–38primitive data types, 31–36,
86, 118Queue data type, 354thread-safe, 678
data validation, 509–532dateCompare method, 81, 82DatePicker controls
adding, 460default shortcut menu for, 492
dates, comparing, 80–83, 84DateTime data type, 81, 84DateTimePicker controls, 458
SelectedDate property, 81DbType parameter, 550Debug folder, 13debugger
stepping through methods with, 61–63
variables, checking values in, 62–63
Debug toolbar, 61displaying, 61, 72
decimal data type, 31declaration statements, 30–31decrement operators, 425
–– operator, 44++ operator, 92
default constructors, 133–135in static classes, 144structures and, 181, 184–185writing, 138
DefaultExt property, 496default keyword, 85deferred fetching, 553–554,
558–559defining operator pairs, 426
Definite Assignment Rule, 32Delegate class, 506delegates, 329
advantages, 332attaching to events, 345calling automatically, 342declaring, 331defining, 331DoWorkEventHandler
delegate, 504initializing with a single,
specific method, 331invoking, 332lambda expressions, 338matching shapes, 331scenario for using, 330using, 333
DeleteObject method, 589, 596delimiters, 88Dequeue method, 354derived classes, 232–234 . See
also inheritancebase class constructors,
calling, 234–235, 251creating, 251
deserialization, 691design views, 17Design View window, 19
cached information in, 579working in, 19–22WPF forms in, 445
desktop applications . See also applications
multitasking in, 602–628destructors
calling, 292Dispose method, calling from,
288–289recommendations on, 284timing of execution, 283writing, 280–282, 292
detach.sql script, 567dialog boxes, common,
495–498dictionaries, creating, 669Dictionary class, 356DictionaryEntry class, 212, 213Dictionary<TKey, TValue>
collection class, thread-safe version, 669
Dispatcher.Invoke method, 632Dispatcher objects, 505–507
Invoke method, 506
responsiveness, improving with, 629, 631–632
DispatcherPriority enumeration, 507, 631
disposal methods, 285exception-safe, 285–286,
289–292writing, 292
Dispose method, 287calling from destructors,
288–289Distinct method, 406DivideByZeroException
exceptions, 123division operator, 36
precedence of, 41 .dll file name extension, 16DockPanel controls, adding,
479, 508documenting code, 11Document Outline window,
39–40documents, definition of, 477Documents folder, 6do statements, 99–108
stepping through, 103–107syntax of, 99
dot notation, 134dot operator ( .), 280double data type, 31double.Parse method, 58double quotation marks (“), 88DoWork event, subscribing to,
504DoWorkEventHandler delegates,
504drawingCanvas_
MouseLeftButtonDown method, 267
drawingCanvas_MouseRightButtonDown method, 268
DrawingPadWindow class, 267Drawing project, 260–262dual-core processors, 602duplication in code, 269–270DynamicResource keyword, 454
EElementName tag, 531else keyword, 77, 78encapsulation, 130, 146
golden rule, 296
data provider classes for ADO.NET
733
encapsulation (continued)public fields, 297violations of, 242
Enqueue method, 354Enterprise Services, 684EnterReadLock method, 665EnterWriteLock method, 665entities
adding, 587deleting, 588modeling, 129
entity classescode for, 572creating, with Entity
Framework, 596database tables, relationships
between, 551–552defining, 549–551, 560–562,
564EntityCollection<Product>
property, 577generation of, 571inheritance from, 572modifying properties of,
571–572naming conventions, 556table relationships, defining
in, 554–555EntityCollection<Product>
property, 577, 580entity data models, 565
generating, 568–572Entity Data Model Wizard,
569–571Entity Framework, 565
adding and deleting data with, 587–588, 596
application user interfaces, creating, 574–579
data binding, using with, 566–583
entity classes, creating, 596fetching and displaying data,
579–582LoadProperty<T> method, 581mapping layer and, 565optimistic concurrency,
584–585retrieving data from tables
with, 581updating data with, 583–596
EntityObject class Concurrency Mode property, 585
entity objects
binding properties of controls to, 566–583
displaying data from, 596modifying, 583
EntityRef<TEntity> types, 555–556
EntitySet<Product> types, 556EntitySet<TEntity> types,
555–556enumerable collections, 381enumerating collections, 381enumerations, 173–178
converting to strings, 522declaring, 173–174, 176–178,
190integer values for, 175literal names, 174literal values, 175nullable versions of, 174syntax of, 173–174underlying type of, 176using, 174–175
enumeration variables, 174assigning to values, 190converting to strings, 174declaring, 190mathematical operations on,
177–178enumerator objects, 382enumerators
Current property, 382iterators, 389manually implementing, 383MoveNext method, 382Reset method, 382yield keyword, 390
enum keyword, 173, 190enum types, 173–178equality (==) operator, 74
precedence and associativity of, 77
Equal method, 431equal sign (=) operator, 42 . See
also assignment operator (=)
Equals method, 432error information, displaying,
518–519, 532Error List window, 12errors
dealing with, 109exceptions . See exceptionsmarking of, 12text descriptions of, 111
errorStyle style, 525
escape character (\), 88EventArgs argument, 346event handlers
for about events, 488for Closing events, 474–476for menu actions, 508long-running, simulating,
498–499for new events, 485–486for save events, 487–488testing, 489–490in WPF applications, 470–476
event methods, 471for menu items, 508naming, 472removing, 472writing, 476
events, 342–344attaching delegates, 345declaring, 342EventArgs argument, 346menu events, handling,
484–491null checks, 344raising, 344sender argument, 346sources, 342subscribers, 342subscribing, 343vs . triggers, 456unsubscribing, 344using a single method, 346waiting for, 661, 681WPF user interface, 345
event sources, 342Example class, 289exception handling, 110
for tasks, 641–644Exception inheritance hierarchy,
113catching, 126,
exception objects, 121examining, 111–112, 642–643
exceptions, 109AggregateException
exceptions, 647ApplicationException
exceptions, 517ArgumentException
exceptions, 205, 225catching, 110–117, 126catching all, 123, 124, 126DivideByZeroException
exceptions, 123 examining, 111–112
exceptions
734
exceptions (continued)execution flow and, 111, 113,
124FormatException exceptions,
110, 111 handler execution order, 114handling, 110inheritance hierarchies, 113InvalidCastException
exceptions, 167InvalidOperationException
exceptions, 122, 501, 553NotImplementedException
exceptions, 202, 263NullReferenceException
exceptions, 344 OperationCanceledException
exceptions, 641, 668OptimisticConcurrency-
Exception exceptions, 586, 587
OutOfMemoryException exceptions, 164, 199
OverflowException exceptions, 111, 118, 120
SqlException exceptions, 539–540, 562
throwing, 121–126unhandled, 111–112, 115,
124–125UpdateException exceptions,
588to validation rules, detecting,
516–519viewing code causing, 116
exception safe code, 289–292ExceptionValidationRule
elements, 516exclusive locks, 661ExecuteReader method, 543
calling, 564overloading of, 548
executionmultitasking, 602–628parallel processing, 600–601,
608–617, 676–678single-threaded, 599
execution flow, exceptions and, 111, 113, 124
Exit command, Click event handler for, 486
ExitReadLock method, 665ExitWriteLock method, 665
expressions, comparing values of, 89
Extensible Application Markup Language (XAML), 19–20, 445
extensible programming frameworks, building, 253
extension methods, 247–251creating, 248–250Single method, 553syntax of, 248
Extract Method command, 60
FF5 key, 63F10 key, 62F11 key, 62failures . See errors; exceptionsfall-through, stopping, 86Faulted task state, 638, 641fetching, 543–545
deferred, 553–554, 558immediate, 558with SqlDataReader objects,
564fields, 54–55, 129
definition of, 131inheritance of, 234–235initializing, 133, 139, 140naming conventions, 133shared fields, 143–144static and nonstatic, 143–144 .
See also static fieldsFileInfo class, 94
OpenText method, 95fileName parameter, 500FileName property, 496file names, asterisks by, 12files, closing, 96finalization, 284
order of, 283, 284Finalize method, compiler-
generated, 282finally blocks, 124–126
database connection close statements in, 545
disposal methods in, 285–286execution flow and, 125
firehose cursors, 544first-in, first-out (FIFO)
mechanisms, 210float data type, 31
floating-point arithmetic, 119focus of controls, validation and,
509, 518, 527FontFamily property, 457FontSize property, 20, 457FontWeight property, 457foreach statements, 196, 381
for database queries, 553, 556–558
iterating arrays with, 204iterating database queries
with, 552iterating database tables with,
563iterating param arrays with,
225iterating zero-length arrays
with, 223FormatException catch handler,
110–113, 120FormatException exceptions,
110, 111Format method, 186format strings, 60forms . See also WPF forms
resize handles, 21for statements, 97–99, 108
iterating arrays with, 196omitting parts of, 97–98scope of, 98–99syntax of, 97
forward slash (/) operator, 36freachable queue, 284F type suffix, 34fully qualified names, 15Func<T> generic type, 506
Ggarbage collection, 156–157,
280destructors, 280–282guarantees of, 282–283invoking, 283, 292timing of, 283
garbage collector, functionality of, 283–284
GC classCollect method, 283SuppressFinalize method, 289
generalized class, 357Generate Method Stub Wizard,
57–60, 72
exceptions (continued)
735
generic classes, 358–370generic interfaces
contravariant, 377covariant, 375variance, 373–379
generic methods, 370–373constraints, 371parameters, 371
generics, 355–380binary trees, 358binary trees, building, 361constraints, 358creating, 358–370multiple type parameters, 356purpose, 353type parameters, 356vs . generalized classes, 357
geometric algorithm, 670–672get accessors, 299
for database queries, 555–556GetBinding method, 526get blocks, 298GetEnumerator method, 382GetInt32 method, 544GetPosition method, 267GetString method, 544GetTable<TEntity> method, 552GetXXX methods, 544, 564global methods, 48goto statements, 87graphical applications
creating, 17–26views of, 17
Grid controls, in WPF forms, 40Grid panels, 446
controls, placing, 447in WPF applications, 446
GridView controls, display characteristics, 578
GroupBox controls, 469adding, 460
GroupBy method, 402group operator, 406
HHandle method, 642, 647HasError property, 529
testing, 530Hashtable class, 215Hashtable object, SortedList
collection objects in, 215HasValue property, 158Header attribute, 480
heap memory, 163–164allocations from, 279returning memory to, 280
hiding methods, 237–238High Performance Compute
(HPC) Server 2008, 600hill-climbing algorithm, 604HorizontalAlignment property,
447–448Hungarian notation, 30Hypertext Transfer Protocol
(HTTP), 684
IIColor interface, 260–261
implementing, 261–266IComparable interface, 255, 362identifiers, 28–29
naming, 237–238overloaded, 55–65reserved, 28scope of, 54
IDisposable interface, 287IDraw interface, 260–261
implementing, 261–266IEnumerable interface, 382, 549
implementing, 387IEnumerable objects, joining,
654if statements, 77–84, 89
block statements, 78–79Boolean expressions in, 78cascading, 79–80, 84syntax, 77–78writing, 80–83
image controls, adding, 449–451
Image.Source property, 450Implement Interface Explicitly
command, 262–263implicitly typed variables, 45–46increment (++) operator, 44,
92, 425indexers, 315–322
accessors, 319vs . arrays, 320calling, 326in combined read/write
context, 319defining, 318example with and without,
315
explicit interface implementation syntax, 323
in interfaces, 322operators with ints, 316syntax, 315virtual implementations, 322in a Windows application, 323writing, 324
inequality (!=) operator, 74inheritance, 231–232
abstract classes and, 269–271base class constructors,
calling, 234–235, 251classes, assigning, 235–236class hierarchy, creating,
242–247implementing, 274–276implicitly public, 233menu items, 483new method, declaring,
237–238override methods,declaring,
239–240protected access, 242using, 232–247virtual methods, declaring,
238–239, 251InitialDirectory property, 496initialization
of array variables, 193–194of derived classes, 234–235of fields, 133, 139, 140 of structures, 183–184
InitializeComponent method, 23INotifyPropertyChanged
interface, 572INotifyPropertyChanging
interface, 572input validation, 509–510Insert method, 208, 366instance methods
definition of, 140writing and calling, 140–142
instancesof classes, assigning, 131of WPF forms, 489
instnwnd.sql script, 538, 549, 567
Int32.Parse method, 37int arguments, summing,
224–226integer arithmetic, checked and
unchecked, 118–120, 126
integer arithmetic, checked and unchecked
736
integer arithmetic algorithm, 102
integer division, 39integers, converting string
values to, 40, 46, integer types, enumerations
based on, 176IntelliSense, 9–10
icons, 10, 11tips, scrolling through, 10
interface keyword, 254, 272, 277interface properties, 304interfaces, 253–269
declaring, 277defining, 254–255, 260–261explicitly implemented,
257–259implementing, 255–256,
261–266, 277inheriting from, 253, 255–256method keyword
combinations, 276multiple, 257naming conventions, 255referencing classes through,
256–257restrictions of, 259rules for use, 255
int.MaxValue property, 118int.MinValue property, 118int parameters, passing, 154int.Parse method, 40, 110, 116,
179int type, 31
fixed size of, 118int? type, 158int values
arithmetic operations on, 38–41
minimums, finding, 220–221int variable type, 31InvalidCastException exceptions,
167InvalidOperationException catch
handler, 123InvalidOperationException
exceptions, 122, 501, 553invariant interfaces, 375Invoke method, 506–508
calling, 505IProducerConsumerCollection<T>
class, 669IsChecked property, 473, 476
nullability, 504
IsDBNull method, 548, 564is operator, 168–169IsPrimaryKey parameter, 550IsSynchronizedWithCurrentItem
property, 576, 577IsThreeState property (CheckBox
control), 458ItemsSource property, 577ItemTemplate property, 577iteration statements, 91iterators, 389IValueConverter interface,
522–523ConvertBack method, 524–525Convert method, 524
JJavaScript Object Notation
(JSON), 688Join method, 404
parameters, 404joins, 404, 554–558
of data sources, 654JSON (JavaScript Object
Notation), 688
Kkey presses, examining,
588–589Key property, 213keys arrays, 212
sorted, 213key/value pairs, 356
as anonymous types, 214in Hashtables, 212in SortedLists, 213
keywords, 28–29abstract keyword, 270, 276,
277base keyword, 234, 239bool keyword, 89case keyword, 85catch keyword, 110checked keyword, 126class keyword, 130, 149const keyword, 144default keyword, 85DynamicResource keyword,
454else keyword, 77, 78enum keyword, 173, 190get and set keywords, 298
IntelliSense lists of, 9interface keyword, 254, 272,
277lock keyword, 659 method keyword
combinations, 276 .NET equivalents, 179new keyword, 131, 218, 238,
276object keyword, 165out keyword, 160–161, 376override keyword, 239, 240,
272, 276params keyword, 219, 221,
222partial keyword, 136private keyword, 132, 145,
242, 276protected keyword, 242, 276public keyword, 132, 242, 276ref keyword, 159return keyword, 49sealed keyword, 271, 272, 276,
277set keyword, 298static keyword, 143, 145, 149StaticResource keyword, 454string keyword, 152struct keyword, 180, 190this keyword, 139–140, 146,
248try keyword, 110unchecked keyword, 118–119unsafe keyword, 170var keyword, 45, 148virtual keyword, 239, 240, 251,
272, 276void keyword, 48, 49, 51yield keyword, 390
Knuth, Donald E ., 358
Llabel controls
adding, 19, 459properties, modifying, 20
Lambda Calculus, 340lambda expressions
and delegates, 338–342for anonymous delegates,
501, 507anonymous methods, 341as adapters, 339body, 341
integer arithmetic algorithm
737
lambda expressions (continued)forms, 340method parameters specified
as, 553syntax, 340variables, 341
Language Integrated Query (LINQ), 395
All method, 407Any method, 407BinaryTree objects, 407deferred evaluation, 412defining an enumerable
collection, 412equi-joins, 407extension methods, 412filtering data, 400generic vs . nongeneric
methods, 415Intersect method, 407joining data, 404Join method, 404OrderBy method, 401query operators, 405selecting data, 398Select method, 398Skip method, 407Take method, 407Union method, 407using, 396Where method, 401
last-in, first-out (LIFO) mechanisms, 210–211
layout panels, 446z-order of controls, 451
left-shift (<<) operator, 316Length property, 195–196, 218LINQ . See Language Integrated
Query (LINQ)LINQ queries, 649
parallelizing, 651–655, 681LINQ to Entities, 566
querying data with, 573–574LINQ to SQL, 535, 549–564
DataContext class, custom, 559–560
data type mapping, 561deferred fetching, 553–554,
558–559extensions to, 565joins, 554–558new databases and tables,
creating, 551
querying databases with, 551–553, 560–564
table relationships, 554–558list box controls, 459
adding, 461populating, 476
List<Object> objects, 378List<T> generic collection class,
378ListView controls
for accepting user input, 590display options, 578View element, 577
LoadProperty<T> method, 581LoadWith method, 558–559local scope, defining, 54Locals window, 104–106local variables, 54
displaying information about, 104
locking, 659–661 . See also synchronization primitives
overhead of, 661serializing method calls with,
679–680lock keyword, 659lock statements, 659–661, 681logical operators
logical AND operator (&&), 75, 89
logical OR operator (||), 75, 89 short-circuiting, 76
long data type, 31long-running operations
canceling, 632–645dividing into parallel tasks,
614–617measuring processing time,
612–614parallelizing with Parallel
class, 619–621responsiveness, improving
with Dispatcher object, 629–632
long-running tasksexecuting on multiple threads,
499–502simulating, 498–499
looping statements, 108breaking out of, 99continuing, 100do statements, 99–107for statements, 97–99
while statements, 92–96, 97–99
loopsindependent iterations, 624parallelizing, 618–621, 623,
647LostFocus event, 509
MMain method, 8
for console applications, 9for graphical applications,
23–24MainWindow class, 23MainWindow constructors,
shortcut menu code in, 493–494
MainWindow .xaml .cs file, code for, 22–23
ManualResetEventSlim class, 661–682
ManualResetEventSlim objects, 681
Margin property, 20, 447–448, 479
MARS (multiple active result sets), 545
matched character pairs, 10Math class, 131
Sqrt method, 141, 143Math.PI field, 131MathsOperators program code,
39–41memory
allocation for new objects, 279–280
for arrays, 191for class types, 151for Hashtables, 212heap memory, 163–164, 279,
280organization of, 162–164reclaiming, 279 . See
also garbage collectionstack memory, 163–164, 178,
669for value types, 151for variables of class types,
131Menu controls, 477, 478
adding, 479, 508MenuItem elements, 480
Menu controls
738
menu events, handling, 484–491
MenuItem_Click methods, 485MenuItem elements, 480, 481
Header attribute, 480nested, 483
MenuItem objects, 508menu items
about items, 488–489access keys for, 480child items, 481Click events, 485–487naming, 481, 485text styling, 483types of, 483–484WPF controls as, 484
menus, 477–478cascading, 483creating, 478–484, 508DockPanel controls, adding
to, 479separator bars in, 481, 508shortcut menus, 491–494
MergeOption property, 584MessageBox.Show statement, 25Message Passing Interface
(MPI), 600Message property, 111, 117method adapters, 339method calls
examining, 52–53memory required for, 163optional paramters vs .
parameter lists, 227–229parallelizing, 618parentheses in, 51serializing, 679–680syntax of, 51–53
method completion, notification of, 630
methodName, 48, 51methods, 129
abstract methods, 270–271anonymous methods, 341arguments, 52 . See
also argumentsbodies of, 47calling, 51, 53, 72constructors, 134–135creating, 47–53declaring, 48–49, 72encapsulation of, 130event methods, 471examining, 50–51exiting, 49
extension methods, 247–251global, 48hard-coded values for, 468hiding, 237–238implementations of, 239–241in interfaces, 254–255keyword combinations for,
276length of, 51naming, 47, 133optional parameters for,
65–66, 68–72, 226overloaded methods, 9overloading, 55–56, 219override methods, 239–240overriding, 272parameter arrays and, 227,
229returning data from, 49–51,
72return types, 48, 72scope of, 54–55sealed methods, 271–272sharing information between,
54–55statements in, 27static (noninstance) methods,
142 . See also static methodsstepping in and out of, 61–63,
72virtual methods, 238–239,
240–241wizard generation of, 57–60writing, 56–63
method signatures, 237Microsoft Message Queue
(MSMQ), 684Microsoft .NET Framework . See
.NET FrameworkMicrosoft SQL Server 2008
Express, 535 . See also SQL Server
Microsoft Visual C# . See C#Microsoft.Win32 namespace,
495Microsoft Windows
Presentation Foundation . See WPF applications
Min method, 220, 221minus sign (–) operator, 36modal dialog boxes, 496Monitor class, 660Moore, Gordon E ., 601Moore’s Law, 601
MouseButtonEventArgs parameter, 267
MoveNext method, 382MPI (Message Passing
Interface), 600 MSMQ (Microsoft Message
Queue), 684 multicore processors, 601–602multidimensional arrays,
198–199params keyword and, 221
multiline comments, 11multiple active result sets
(MARS), 545multiplication operator, 36
precedence of, 41, 77multitasking
considerations for, 602–603definition of, 602implementing, 602–628reasons for, 600–601
mutlithreaded approach, 600–601
Nname-clashing problems, 14“The name ’Console’ does not
exist in the current context” error, 15
named arguments, 66ambiguities with, 66–71
named parameters, 72passing, 66
Name parameter, 550Name property, 21, 452namespaces, 14–17
assemblies and, 16bringing into scope, 15
naming conventionsfor array variables, 192for entity classes, 556for fields and methods, 133for identifiers, 237–238for interfaces, 255for nonpublic identifiers, 133
narrowing conversions, 435 .NET common language
runtime, 330 .NET Framework, 330
hill-climbing algorithm, 604LINQ extensions, 650mutlithreading, 603parallelism, determining, 604,
617–619, 624, 639
menu events, handling,
739
.NET Framework (continued)synchronization primitives,
660TaskScheduler object, 605thread pools, 603–604
.NET Framework class libraryclasses in, 16namespaces in, 15
.NET Framework Remoting, 684 <New Event Handler>
command, 472, 485, 492new keyword, 131, 218, 238, 276
for anonymous classes, 147for array instances, 192for constructors, 149
newline character (‘\n’), 95new method, declaring, 237–238new operator, functionality of,
279–280New Project dialog box, 5, 6Next method of SystemRandom,
193nondefault constructors, 134nonpublic identifiers, 133Northwind database, 536
creating, 536–538detaching from user instance,
567–568Orders table, 560–562resetting, 538Suppliers application, 575,
582–584, 595–596Suppliers table, 554
Northwind Traders, 536notification of method
completion, 630NotImplementedException
exceptions, 202, 263NotOnCanceled option, 607NotOnFaulted option, 607NotOnRanToCompletion option,
607NOT (~) operator, 316NOT operator (!), 74nullable types, 156–159
properties of, 158–159Value property, 158–159
nullable values, 122nullable variables
assigning expressions to, 158testing, 157updating, 159
NullReferenceException exceptions, 344
null values, 156–159, 171in databases, 547, 548, 564in database table columns,
550numbers, converting to strings,
100–103NumCircles field, 143–144
OOASIS (Organization for the
Advancement of Structured Information Standards), 686
ObjectContext class, 572Refresh method, 584
ObjectContext objectscaching of data, 583change tracking, 584
objectCount field, 145Object.Finalize method,
overriding, 281–282object initializers, 310object keyword, 165ObjectQuery<T> objects,
database queries based on, 582–583
objectsassigning, 235–236binding to properties of, 531creating, 131, 137–140,
279–280definition of, 132destruction of, 280, 282–283disadvantages, 353initializing using properties,
308life of, 279–284locking, 659–661member access, 280in memory, updating,
583–584memory for, 163reachable and unreachable,
284references to, 280referencing through
interfcaes, 256ObjectSet collections
AddObject method, 596DeleteObject method, 596deleting entities from, 588
ObjectSet<T> collection class, 576
ObjectStateEntry class, 586
object type, 59, 207obj folder, 13octal notation, converting
numbers to, 100–103okayClick method, 345ok_Click method, 25OnlyOnCanceled option, 607OnlyOnFaulted option, 607OnlyOnRanToCompletion
option, 607Open dialog box, 94Open File dialog box, 498OpenFileDialog class, 94, 495openFileDialogFileOk method,
94openFileDialog objects, 94Open method, calling, 564OpenText method, 95operands, 36OperationCanceledException
exceptions, 641, 668OperationContract attribute,
691operations, independent,
623–624operations, long-running
canceling, 632–645dividing into parallel tasks,
614–617measuring processing time,
612–614parallelizing with Parallel
class, 619–621responsiveness, improving
with Dispatcher object, 629–632
operators, 419–440-- operator, 44, 425-= operator, 92, 332, 344+ operator, 419++ operator, 43, 44, 92, 425+= operator, 92, 331, 343*= operator, 92/= operator, 92addition operator, 36, 41, 77AND (&) operator, 316arithmetic operators, 38–42,
119as operator, 169, 236assignment operator (=), 31,
42, 74, 77, 91–98associativity and, 42, 419asterisk (*) operator, 36, 170binary operators, 419
operators
740
operators (continued)bitwise, 317Boolean operators, 74–77comparing in structures and
classes, 426complex numbers, 428compound addition operator,
108compound assignment
operators, 91–92, 424compound subtraction
operator, 108conditional logical operators,
75–77constraints, 420conversion operators, 434,
435, 437data types and, 37–38decrement operators, 44, 92,
425division operator, 36, 41dot operator ( .), 280, 420equality (==) operator, 74, 77,
431forward slash (/) operator, 36fundamentals, 419–424group operator, 406implementing, 427–433increment (++) operator, 43,
44, 92, 425inequality (!=) operator, 74is operator, 168–169join operator, 407language interoperability, 424left-shift (<<) operator, 316logical AND operator (&&),
75, 89logical OR operator (||), 75, 89 multiplication operator, 36,
41, 77, 419multiplicity, 420new operator, 279–280NOT (~) operator, 316NOT operator (!), 74operands, 420operator pairs, 426operator+, 423OR (|) operator, 316orderby operator, 406overloading, 420percent sign (%) operator,
37, 92postfix forms, 44–45precedence, 41–42, 419
prefix forms, 44–45primary operators, 76public operators, 421query operators, 405relational operators, 74, 77remainder (modulus) operator,
37short-circuiting, 76simulating [ ], 420static operators, 421symmetric operators, 422, 436unary operators, 44, 76, 419user-defined conversion, 435XOR (̂ ) operator, 316
optimistic concurrency, 584–585OptimisticConcurrencyException
exceptions, 586, 587OptimisticConcurrencyException
handler, 594, 596optional parameters, 64–65
ambiguities with, 66–71defining, 65–66, 68–69, 72vs . parameter arrays, 226–229
OrderByDescending method, 402
OrderBy method, 401orderby operator, 406Organization for the
Advancement of Structured Information Standards (OASIS), 686
original implementations (of methods), 239–241
OR (|) operator, 316OtherKey parameter, 555out keyword, 160–161, 376out modifier, params arrays and,
222OutOfMemoryException
exceptions, 164multidimensional arrays and,
199out parameters, 159–162Output icon, 103, 104Output window (Visual Studio
2010), 11overflow checking, 118, 119OverflowException handler, 120OverflowException exceptions,
111, 118, 120overloaded methods, 9, 55–56overloading, 219
ambiguous, 222constructors, 134–135
optional parameters and, 64–65
override keyword, 239, 240, 272, 276
override methods, declaring, 239–240
overriding methods, 239sealed methods and, 271–272
OverwritePrompt property, 496
Ppanel controls
DockPanel controls, 479, 481, 508
Grid panels, 446, 447layout panels, 446StackPanels, 446, 460, 476WrapPanels, 446z-order, 451
paralellization of LINQ queries, 650–656
Parallel classabstracting tasks with,
617–624for independent operations,
621, 623–624Parallel.ForEach<T> method,
618Parallel.For method, 617, 618,
620–621, 624, 639, 647Parallel.Invoke method, 618,
621–624, 627when to use, 621
ParallelEnumerable objects, 655Parallel.For construct, 657–658Parallel.ForEach method, 647
canceling, 639when to use, 624
Parallel.ForEach<T> method, 618
Parallel.For method, 617, 618, 620–621, 647
canceling, 639when to use, 624
Parallel.Invoke method, 618, 627when to use, 621–624
Parallel LINQ, 649–655ParallelLoopState objects, 618,
639parallel operations
scheduling, 656unpredictable performance
of, 656–659
operators (continued)
741
parallel processing, 676–678benefits of, 600–601implementing with Task class,
608–617ParallelQuery class
AsOrdered method, 655WithCancellation method,
656, 681WithExecutionMode method,
655ParallelQuery objects, 650, 654parallel tasks, 600, 647parameter arrays, 219, 221–222
declaring, 221–222vs . optional parameters,
226–229type object, 223, 229writing, 224–226
parameterList, 48parameters
aliases to arguments, 159–160default values for, 65–66method types, 152named, 72naming, 59optional, 64–65, 72optional, ambiguities with,
66–71optional, defining, 65–66passing, 66 reference types, 152–156, 159types of, specifying, 48
params arrays . See parameter arrays
params keyword, 219, 221overloading methods and,
222params methods, priority of,
222params object [], 223parentheses
in Boolean expressions, 75, 93in if statements, 78operator precedence and, 41
Parse method, 53, 101partial classes, 136partial interfaces, 136partial keyword, 136partial structs, 136ParticipantCount property, 666ParticipantsRemaining property,
666partitioning data, 650PascalCase naming scheme, 133
Pass.Value method, 154–155Password parameter, 541Path tag, 531percent sign (%) operator, 37performance
of concurrent collection classes, 670
improving with PLINQ, 650–655
suspending and resuming threads and, 660
pessimistic concurrency, 585physical memory . See also
memoryquerying amount of, 610
Plain Old XML (POX), 688PLINQ (Parallel LINQ), 649
improving performance with, 650–655
PLINQ queriescancellation of, 681parallelism options for,
655–656plus sign (+) operator, 36pointers, 169–170polymorphic methods, rules for
use, 240polymorphism
testing, 246virtual methods and, 240–241
pop-up menus . See shortcut menus
postfix form, operators, 44–45POX (Plain Old XML), 688precedence, 419
of Boolean operators, 76–77controlling, 41–42overriding, 46
prefix form, operators, 44–45Press any key to continue
prompt, 13primary keys, database tables,
550primary operators, precedence
and associativity of, 76primitive data types, 31–36
displaying values of, 32–33fixed size of, 118switch statements on, 86using in code, 33–34
private fields, 132–133, 242, 298adding, 139
private keyword, 132, 145, 242, 276
private methods, 132–133private qualifier, 58private static fields, writing, 145PrivilegeLevel enumeration, 521
adding, 520problem reporting, configuring,
115processors
multicore, 601–602quad-core, 602spinning, 651
producers, 669Program class, 8Program .cs file, 8program entry points, 8ProgressChanged event, 504project attributes, adding, 8project files, 8project properties, setting, 118projects, searching in, 34properties, 297–314
accessibility, 301automatic, 307, 310binding to control properties,
525–526, 531binding to object properties,
531declarations, 298declaration syntax, 297explicit implementations, 305get and set keywords, 298get block, 297initializing objects, 308interface, 304object initializers, 310private, 301protected, 301public, 298, 301read context, 299read-only, 300read/write context, 299reasons for defining, 307restrictions, 302security, 301set block, 297static, 300using, 299using appropriately, 303virtual implementations, 304Windows applications, 305write context, 299write-only, 300
Properties folder, 8
Properties folder

742
Properties window, 449displaying, 20
property declaration syntax, 297
protected access, 242protected class members, access
to, 242protected keyword, 242, 276pseudorandom number
generator, 193public fields, 132–133, 242public identifiers, naming
conventions for, 133public keyword, 132, 242, 276public methods, 132–133public operators, 421public/private naming
conventions, 298public properties, 298public static methods, writing,
146
Qquad-core processors, 602querying data, 395–417query operators, 405question mark (?) modifier for
nullable values, 157Queue class, 210Queue data type, 354queues, 353
creating, 669Queue<T> class, thread-safe
version, 669Quick Find command, 34
Rradio button controls, 469
adding, 461initializing, 476mutually exclusive, 461, 476
RanToCompletion task state, 638reader.ReadLine method, 95ReaderWriterLockSlim class,
665–682reading resources, 665–666ReadLine method, 58read locks, 661, 665Read method, 543readonly fields, 200read-only properties, 300
recursive data structures, 358refactoring code, 60, 270reference parameters
out and ref modifiers for, 162using, 153–156
references, adding, 16References folder, 8reference types, 151
arrays . See arraysdestructors for, 281heap, creation in, 163Object class, 165
reference variables, 280copying, 171, 189initializing, 156–157null values, 157
referential integrity errors, 588ref keyword, 159ref modifier, params arrays and,
222ref parameters, 159–162
passing arguments to, 171Refresh method, 584, 596
calling, 586RefreshMode enumeration, 586Register method, 634relational databases . See
also databasesnull values in, 547
relational operations, 401relational operators, 74
precedence and associativity of, 77
Release folder, 14Release method, 681remainder (modulus) operator,
37validity of, 38
Remove method, 208RemoveParticipant method, 666Representational State Transfer
(REST), 684, 688requests to Dispatcher object,
505–507resize handles, 21Reset method, 466–470
calling, 486resource management, 284–289
database connections, 545multitasking and, 600releasing resources, 292
resource pools, access control, 663–664
resources
reading, 665–666writing to, 665–666
Resources elements, 452responsiveness, application
improving, 600 . See also multitasking
improving with Dispatcher object, 629–632
threads and, 498–507, 507REST model, 684, 688result = clause, 51Result property, 646results, return order of, 655result text box, 117return keyword, 49return statements, 49–50, 141
fall-through, preventing with, 86
returnType, 48RoutedEventArgs object, 345RoutedEventHandler, 345Run as administrator command,
536run method, 56Running task state, 638runtime, query parallelization,
655Run To Cursor command, 61,
103RunWorkerAsync method, 504RunWorkerCompleted event,
504
SsaveChanges_Click method, 594SaveChanges method, 587
calling, 583–584, 596failure of, 584
save event handlers, 487Save File dialog box, 496, 497SaveFileDialog class, 495–498,
508save operations, status bar
updates on, 505–507scalability, improving, 600 . See
also multitaskingscope
applying, 53–56defining, 54of for statements, 98–99of static resources, 454of styles, 453
ScreenTips
Properties window
743
in debugger, 62ScreenTips (continued)
for variables, 31sealed classes, 232, 271–277
creating, 277sealed keyword, 271, 272, 276,
277sealed methods, 271–272security, hard coding user
names and passwords and, 541
SelectedDate property, 81nullability, 504
Select method, 398type parameters, 399
semantics, 27semaphores, 661SemaphoreSlim class, 663–682SemaphoreSlim objects, 681semicolons
in do statements, 99in for statements, 98syntax rules for, 27
Separator elements, 481, 508serialization, 691
of method calls, 679–680ServiceContract attribute, 691set accessors, 298, 299
for database queries, 555–556set keyword, 298Setter elements, 456Shape class, 273shared fields, 143–144shared resources, exclusive
access to, 681Shift+F11 (Step Out), 62short-circuiting, 76shortcut menus, 491–494
adding in code, 493–494associating with forms and
controls, 493–494, 508creating, 491–495, 508creating dynamically, 508for DatePicker controls, 492dissassociating from WPF
forms, 494for text box controls, 491–492
Show All Files command (Solution Explorer), 13
ShowDialog method, 489, 496, 592
showDoubleValue method, 36showFloatValue method, 34showIntValue method, 35
showResult method, 50, 53SignalAndWait method, 666Simple Object Access Protocol .
See SOAP (Simple Object Access Protocol), 684
Single method, 553single quotation marks (‘), 88single-threaded execution, 599 .
See also multithreadingsingle-threaded operations,
672–676Sleep method, 499 .sln suffix, 33SOAP (Simple Object Access
Protocol), 684–688role, 685security, 686talking, methods, 697Web services, 685
Solution Explorer, accessing code in, 34
Solution Explorer pane, 7solution files
file names, 33top-level, 8
SortedList class, 213SortedList collection objects in
Hashtables, 215sorting data with binary trees,
359source code, 8source files, viewing, 7Source property, 611spinning, 651, 660
threads, 661SpinWait operations, 651Split method, 653sqlcmd utility, 537SqlCommand objects, creating,
542, 564SQL Configuration Manager
tool, 537SqlConnection objects, creating,
539, 564SqlConnectionStringBuilder class,
540SqlConnectionStringBuilder
objects, 540, 562SqlDataReader class, 543, 544SqlDataReader objects, 543
closing, 545creating, 564fetching data with, 564reading data with, 544
SqlException exceptions, 539–540, 562
SQL injection attacks, 543SqlParameter objects, 542–543SQL SELECT statements, 546,
553SQL Server
logging in, 537multiple active result sets, 545starting, 537
SQL Server authentication, 541SQL Server databases . See
also databasesgranting access to, 567–568
SQL Server Express user instance, 567
SQL UPDATE commands, 583–584
Sqrt method, 141, 142declaration of, 143
square brackets in array declarations, 191
Stack class, 210–211stack memory, 163–164
pushing, popping, and querying items on, 669
strucures on, 178StackPanel controls, 446, 476
adding, 460Stack<T> class, thread-safe
version, 669Start Debugging command, 13Start method, 501, 605StartNew method, 625, 646StartupUri property, 24–25, 457Start Without Debugging
command, 13StateEntries property, 586statements, 27–28
running iterations of, 108 . See also looping statements
semantics, 27syntax, 27
statement sequences, performing, 647
static classes, 144–145, 248static fields, 143–144
const keyword for, 144declaring, 149writing, 145
static keyword, 143, 145, 149static methods, 142–148
calling, 149declaring, 149
static methods
744
static methods (continued)extension methods, 248writing, 146
static operators, 421static properties, 300StaticResource keyword, 454static resources, scoping rules,
454static variables, 144status bar, displaying save
operation status in, 505–507StatusBar controls, adding, 505Status property, 638Step Into button (Debug
toolbar), 61–63Step Out button (Debug
toolbar), 62–63Step Over button (Debug
toolbar), 62–63stepping into methods, 61–63stepping out of methods, 61–63StopWatch type, 611Storage parameter, 555StreamWriter objects, creating,
487StringBuilder objects, 473, 474String class Split method, 653String.Format method, 473, 578string keyword, 152strings
appending to other strings, 92converting enumerations to,
174–175converting to enumerations,
522definition of, 34format strings, 60formatting arguments as, 186splitting into arrays, 653
string types, 32, 152, 474string values
concatenating, 37, 40converting to integers, 46, converting to int values, 101
string variables, storing data in, 101
struct keyword, 180, 190StructsAndEnums namespace,
176structure constructors, 183structures, 178–190
arrays of, 194vs . classes, 181–182, 188–190declaring, 180
inheritance hierarchy for, 232inheriting from interfaces,
255–256initialization of, 183–187instance fields in, 181–182operators for, 180private fields in, 180sealed nature of, 271types of, 178–179using, 184–187
structure types, declaring, 190structure variables
copying, 187declaring, 182, 190initializing, 190nullable versions of, 182
Style property, 452styles
scope of, 453of WPF form controls, 451–
457, 464–466Style tags TargetType attribute,
454–456<Style.Triggers> element, 456subscribers, 342subtraction operator, 36
precedence of, 41switch statements, 84–89
break statements in, 87fall-through rules, 86–87rules of use, 86–87syntax, 85writing, 87–89
symmetric operators, 422, 436synchronization of threads, 666,
681synchronization primitives
cancellation and, 668in TPL, 661–667
synchronized access, 659syntax rules, 27
for identifiers, 28for statements, 27
System.Array class, 195System.Collections.Concurrent
namespace, 668System.Collections.Generic
namespace, 377System.Collections.IEnumerable
interface, 381System.Collections namespace,
206System.ComponentModel
namespace, 504
System.Data.Linq assembly, 560System.Data namespace, 539System.Data.Objects.
DataClasses.EntityObject class, 572
System.Data.Objects.DataClasses.StructuralObject class, 572
System.Data.SqlClient namespace, 539
SystemException inheritance hierarchy, 113
System.GC.Collect method, 283, 292
System.IComparable interface, 362
System.Math class Sqrt method, 141
System.Object class, 165classes derived from, 233–234
System.Random class, 193System.Runtime.Serialization
namespace, 691System.ServiceModel
namespace, 691System.ServiceModel.Web
namespace, 691System.Threading.
CancellationToken parameter, 633
System.Threading.Monitor class, 660
System.Threading namespace, 603
synchronization primitives in, 660
System.Threading.Tasks namespace, 604, 617
System.ValueType class, 232System.Windows.Data
namespace, 523System.Windows namespace,
443
TTable attribute, 550, 564Table collections, 553, 558
creating, 564tables . See database tablesTable<TEntity> collections as
public members, 559Table<TEntity> types, 552TargetType attribute, 454–456
static methods (continued)

745
Task<byte[]> objects, creating, 627
Task class, 603parallelism, implementing
with, 608–617WaitAll method, 646Wait method, 608
Task constructors, 604–605overloads of, 605
TaskContinuationOptions type, 606–607, 645
TaskCreationOptions enumeration, 606
TaskFactory class, 607–608TaskFactory objects, 607–608
StartNew method, 625, 646Task objects
ContinueWith method, 606creating, 604–605, 616, 646multiple, 603running, 605–606Start method, 646Status property, 638Wait method, 646
Task Parallel Library . See TPL (Task Parallel Library)
tasks, 603–604aborting, 632abstracting, 617–624canceling, 632–645cancellation tokens, 633continuations of, 606–608,
645, 646coordinating, 649creating, running, controlling,
604–608, 646exceptions handling, 641–644,
647parallel, 600, 647returning values from, 624–
628, 646scheduling, 606–607status of, 638, 640, 644synchronizing, 608, 615–617user interface threads and,
628–632waiting for, 616, 646
Tasks, 507TaskScheduler class, 606TaskScheduler objects, 605Task<TResult> objects, 625–628,
646TEntity type parameter, 552TestIfTrue method, 651
text box controlsadding, 21, 455, 459–460binding to class properties,
515–518default shortcut menu for, 491shortcut menu for, 491–492
text boxesclearing, 101displaying items in, 34–35
text editing, shortcut menu for, 491
Text property, setting, 34–35TextReader class, 95
disposal method of, 285text strings . See also strings
converting to integers, 40ThenByDescending method, 402ThenBy method, 402theory of binary trees, 358ThisKey parameter, 555this keyword, 139–140, 146, 248
with indexers, 318Thread class, 499
Start method, 501thread-local storage (TLS), 661Thread objects, 603
creating new, 501referencing methods in, 508
ThreadPool class, 603thread pools, 603threads, 603–604
background threads, 502–504blocking, 663–664concurrent, 600definition of, 283, 499halting execution of, 666–667locking data, 659–661multiple, 499–500object access restrictions, 502optimal number of, 604parallel, 614–617reading resources, 665resource pools, accessing,
663–664scheduling, 603–604sleeping, 659–660spinning the processor, 660suspending, 661–662synchronizing, 651, 666, 681waiting for events, 661–662wrapper for, 504writing to resources, 665
thread-safe collection classes, 668–670
Thread.Sleep method, 624Thread.SpinWait method, 660ThreadStatic attribute, 661ThrowIfCancellationRequested
method, 640–641throw statements, 126,
fall-through, preventing with, 86
writing, 122Ticket Ordering application
binding text box control to class property, 515–518
converter class and methods, creating, 523–525
displaying number of tickets, 512–514
examining, 511–512privilege level and number of
tickets, validating, 520–522TicketOrder class with
validation logic, 514–515tilde (~) modifier, 281, 292Title property, 21, 496TKey, 357ToArray method, for retrieving
data, 553–554, 558ToList method, for retrieving
data, 553–554, 558–559Toolbox
All Controls section, 19Common WPF Controls
section, 19displaying, 19
ToolTip property, error messages as, 518–519, 532
top-level namespaces, 15top-level solution files, 8ToString method, 41, 175, 185
implementation of, 238–239of structures, 178–179
TPL (Task Parallel Library), 603cancellation strategy, 632–645locking techniques, 661Parallel class, 617–624synchronization primitives in,
661–667Task class, 603 . See also Task
classthread-safe collection classes
and interfaces, 668thread scheduling, 603–604
TResult type parameter, 399triggers, 456
triggers
746
try blocks, 110writing, 116
try/catch statement blocks, writing, 114–118
try keyword, 110TSource type parameter, 399TValue, 357type checking, inheritance and,
235type parameters, 356
out keyword, 376types, extending, 248type-specific versions of a
generic class, 357“Type ‘typename’ already
defines a member called X with the same parameter types” error, 65
Uunary operators, 44, 419
precedence and associativity of, 76
unassigned variables, 32, 73unboxing, 166–168unchecked block statements,
119unchecked expressions, 119unchecked keyword, 118–119underscores, syntax rules for,
28, 30unhandled exceptions, 111–112,
123catching, 124–125reporting, 115
unsafe code, 170unsafe keyword, 170UpdateException exceptions,
588UpdateException handler,
594–595update operations, database
conflicting updates, 584–587, 596
performing, 583–584UpdateSource method, 529
calling, 532UpdateSourceTrigger property,
528defering validation with, 532
Use dynamic ports property, 690user data, validation of, 509–532
User ID parameter, 541user input
key presses, 588–589responsiveness to, 628–629
user instance of SQL Server Express, 567
detaching from, 567–568user interfaces, Microsoft
guidelines for, 478user interface threads
copying data from, 502–505running methods on behalf of
other threads, 505–507tasks and, 628–632
using directives, 286using statements, 15, 16
data connection close statements in, 546
for resource management, 286–288
syntax of, 286writing, 289–292
utility methods, 142
VValidateNames property, 496validation
with data binding, 511–532explicit, 528–531input validation, 509–510programmatic control of, 532testing, 526–527, 530–531timing of, 518, 527–531
Validation.HasError propertydetecting changes to, 532trigger for, 518
validation rules, 510adding, 511–518exceptions to, detecting,
518–519specifying, 516
ValidationRules elements, 516ValueConversion attribute, 523value parameters
out and ref modifiers for, 162using, 153–156
Value property, 158, 159values
boxing, 165–166comparing, 89returning from tasks, 625–628unboxing, 166–168
values arrays, 212value types, 171
copying, 151–156destruction of, 279nullable, 157–158numerations, 173–178stack, creation in, 163structures, 178–190
value type variables, 299copying, 171, 189
variables, 29–31assigning values to, 31checking values in debugger,
62–63of class types, 131copying contents into
reference types, 153declaring, 46, decrementing, 43–44, 46, 92,
108implicitly typed, 45–46, 148incrementing, 43–44, 46, 92,
108initializing, 53initializing to same value, 46, in methods, 53naming, 29, 30naming conventions, 30qualifying as parameters,
139–140scope of, 53ScreenTips on, 31types of, inferring, 45unassigned, 32, 73value of, changing, 46values assigned to, 45value types, 171, 189, 299
variadic methods, 219Variant type, 45var keyword, 45
for implicitly typed variables, 148
VerticalAlignment property, 447–448
View Code command, 33, 476virtual keyword, 239, 240, 251,
272, 276virtual methods
declaring, 238–239, 251polymorphism and, 240–241
virtual property implementations, 304
try blocks
747
Visual C# 2010 Express, 4 . See also Visual Studio 2010
console applications, creating, 6–8
default development environment settings, 5
graphical applications, creating, 18
save location, specifying, 539starting, 4
Visual Studio 2010auto-generated code, 22–23Code and Text Editor pane, 7coding error display, 12default development
environment settings, 4Entity Framework, 565 . See
also Entity FrameworkError List window, 12files created by, 8–9menu bar, 7Output window, 11programming environment,
3–8Solution Explorer pane, 7starting, 4toolbar, 7
Visual Studio 2010 Professional, 4 . See also Visual Studio 2010
console applications, creating, 5–6
graphical applications, creating, 17
Visual Studio 2010 Standard, 4 . See also Visual Studio 2010
console applications, creating, 5–6
graphical applications, creating, 17
Visual Studio Just-In-Time Debugger dialog box, 115
void keyword, 48, 49, 51
WWaitAll method, 608, 646WaitAny method, 608WaitingToRun task state, 638Wait method, 608, 646, 661,
681wait operations
cancellation tokens for, 668CurrentCount property, 663
WCF (Windows Communication Foundation), 684
Web methods, 685Web service architectures, 684Web services, 683–716
addressing, 687architectures, 684building, 688consuming, 711creating using REST, 704creating using SOAP, 689defined, 684invoking, 711load balancing, 687nonfunctional requirements,
686policy, 687Representational State
Transfer (REST), 684, 687routing, 687security, 686Service .svc file, 695Simple Object Access Protocol
(SOAP), 684, 685SOAP vs . REST, 688Web .config file, 695Web methods, 685Web Services Description
Language (WSDL), 686Windows Communication
Foundation, 684WS-Addressing specification,
687WS-Policy specification, 687WS-Security specification, 686
Web Services Description Language (WSDL), 686
Where method, 401while statements, 92–96, 108
syntax of, 92–93termination of, 93writing, 93–96
white space, 28widening conversions, 434Window_Closing method,
474–476Window_Loaded method, 579window resources, adding to
shortcut menus, 491Window.Resources element,
453–454, 515Windows Authentication for
database access, 540, 541
Windows common dialog boxes, 495–498
Windows Communication Foundation (WCF), 684
Windows Forms, 17Windows Forms Application
template, 17Windows Open dialog box,
displaying, 94Windows Presentation
Foundation (WPF), 17 . See also WPF applications; WPF controls; WPF forms
WithCancellation method, 656, 681
WithDegreeOfParallelism method, 655
WithExecutionMode method, 655
workload, optimal number of threads for, 604
WPF applicationsanchor points of controls,
447–448background images, adding,
449–451building, 444–458Closing events, 474–476code, viewing, 476controls, adding, 458–470controls, resetting to default
values, 466–470creating, 443–445, 476database information,
displaying in, 574–579events, handling, 470–476,
476forms, adding, 457functionality of, 457–460Grid panels, 446layout panels, 446long-running event handlers,
simulating, 498–499menu controls, 477–508properties, changing
dynamically, 466–470properties, setting, 476responsiveness, improving,
498–507style for controls, 451–457text properties, 457thread safety, 502
WPF applications
748
WPF applications (continued)updating and reloading forms,
471validation rules, 510XAML definition of, 445
WPF Application template, 17, 445, 476
WPF cache, refreshing, 579WPF controls . See also controls
binding to data sources, 580displaying entity data in, 596as menu items, 484shortcut menus for, 491
WPF forms, 457code, displaying, 23displaying, 489, 592Document Outline window,
39–40instances of, 489shortcut menus,
dissassociating from, 494XAML in, 19–20
WPF user interface events, 345
WPF windows, compiling, 452WrapPanels, 446WrappedInt class, 156WrappedInt objects, passing as
arguments, 154–156WrappedInt variables, declaring,
155WriteableBitmap class, 611WriteableBitmap type, 611WriteLine method, 9, 219
overloading, 55–56overloads of, 224
write locks, 661, 665write-only properties, 300writing to resources, 665–666WS-Addressing specification,
687WSDL (Web Services
Description Language), 686 . See also SOAP (Simple Object Access Protocol)
WS-Policy specification, 687WS-Security specification, 686
WS-* specifications, 687
XXAML (Extensible Application
Markup Language) in WPF forms, 19–20, 445
XML, 684XML namespace declaration,
515XML namespaces, 445xmlns attributes, 445XOR (̂ ) operator, 316
Yyield keyword, 390
ZZIndex property, 451z-order of controls, 451
WPF applications (continued)

About the AuthorJohn Sharp is a principal technologist at Content Master, part of CM Group Ltd, a technical authoring and con-sulting company . An expert on developing applications by using the Microsoft .NET Framework and other tech-nologies, John has produced numerous tutorials, white papers, and presentations on distributed systems, SOA and Web services, the C# language, and interoperability issues . John has helped to develop a large number of courses for Microsoft Training (he co-wrote the first C# programming course for them) and he is also the author of several popular books, including Microsoft Windows Communication Foundation Step by Step .

MS_Visual_C#_2010_SBS.indb 750 7/29/11 3:55 PM