Embed Size (px)
Citation preview

MyQ Kyocera Embedded ManualREVISION 2
MyQEmbedded Terminal 7.1.5MyQServer 7.1.6+August 2018
Copyright © 2006-2018MyQ spol. s r.o.All Rights Reserved


i
Table Of Content
1. About 1
1.1. About this manual 1
1.2. About MyQ Embedded terminal for Kyocera 1
1.2.1. Supported printing devices 1
2. Installation 7
2.1. Remote installation on the MyQWeb interface 7
2.1.1. Preliminary setup on the MyQWeb Interface 7
Uploading the installation package of the embedded terminal 7
Entering the printing device's administrator credentials 8
2.1.2. Installation of the embedded terminal 11
Remote setup of the printing device (Installing the embedded terminal) 11
Installing the terminal on multiple printing devices 17
2.1.3. Updating terminals 19
2.1.4. Settings changed within the installation 19
2.2. Manual installation via USB 21
2.3. Assigning the terminal to the printing device 24
2.4. Selecting languages 25
2.4.1. The default language 25
2.4.2. The user's language 25
2.5. Certificate for secured run of the terminal 25
3. Licenses 27
4. Admin Menu 28
4.1. Entering the Admin menu 29

ii
4.2. Changing the address of the MyQ server 29
4.3. Changing Login Types 31
4.4. Changing Log Level 32
4.5. Wiping Jobs 32
4.6. Clear Config Password 33
4.7. Unlock Panel 33
4.8. Disable Application 33
4.9. Exporting log 34
5. Configuration in the MyQ Terminal Manager 35
5.1. Searching for accessible terminals 35
5.2. Setting configuration password 36
5.3. Setting up the terminal 38
5.3.1. Common Settings 38
Server address or DNS Name 38
Configuration Password 39
Local Administration PIN 39
Exporting log 39
5.3.2. Login 39
Multi-login Options 39
Login by PIN 40
Login by User Name 40
Login by ID Card 40
ID Card Reader Type 40
FeliCa Card Reader Parameters 40
iii
5.3.3. No-Login Operations 40
Scan 40
Copy 41
Fax 41
Start Screen 41
Emergency Mode 42
5.3.4. GUI Skin 42
5.3.5. User Session 42
Idle Logout 42
Copy/Scan Screen Type 43
5.3.6. Server Certificate Upload 43
5.3.7. Guest Account 44
Guest Login 46
Login name 46
Login Password 46
Guest Screen 46
6. Personalization 47
6.1. Changing logo 47
6.2. Changing themes 49
7. Terminal Actions 51
7.1. Terminal action nodes 52
7.1.1. Available action nodes 52
Print all 52
My Jobs 53

iv
Managing jobs on the My Jobs screen: 54
Easy Scan 56
Easy Copy 56
Easy Fax 56
Application 56
Application List 56
Unlock Panel 56
Panel Copy 56
Panel Scan 56
Panel Fax 57
Panel Box 57
Panel USB 57
ID Card Registration 57
Report Problem 57
Edit Account 58
Recharge Credit 58
Folder 58
Fax Box 59
Custom Box 59
7.1.2. Default actions 59
7.2. Managing terminal actions on the MyQWeb Interface 60
7.2.1. Adding new action nodes 61
Adding new action nodes on the list of nodes 61
Adding a new action node to the terminal's home screen 61

v
Adding a new node to a folder 62
Adding new action nodes on the terminal screen preview 62
7.2.2. Editing action nodes 63
General settings 64
Printers 64
Rights 65
Destinations and parameters 65
7.2.3. Changing the layout of the nodes on the screen 65
7.2.4. Deleting action nodes 66
Deleting action nodes from the list 66
Deleting action nodes from the terminal screen preview 67
7.2.5. Restoring the original layout 67
7.3. Basic settings of the Easy Scan action 67
7.3.1. Setting destinations 68
Common settings 68
Available destinations 70
7.3.2. Scanning to FTP 79
7.3.3. Scanning to FAX server 81
7.3.4. Scanning to OneDrive 82
7.3.5. Scanning to OneDrive for Business 85
1) Setting up access of MyQ to Azure AD 85
2) Creating and setting the OneDrive for Business destination 97
3) Connecting users' accounts to OneDrive for Business 97
7.3.6. Scanning to Google Drive 101

vi
7.3.7. Scanning to Box.com 104
7.3.8. Scanning to Dropbox 107
7.3.9. Scanning to SharePoint Online 110
1) Enabling access to SharePoint 110
2) Creating and setting the SharePoint Online destination 115
3) Connecting users' accounts to SharePoint Online 116
7.3.10. Setting parameters of the Easy Scan feature 118
Predefined parameters 119
Enabling users to change Easy Scan settings on the terminal screen 122
7.4. Advanced settings of the Easy Scan action 124
7.4.1. Attaching a file with metadata of the scan 124
7.4.2. Creating custom parameters 125
Text parameters 127
Password 127
Code book 127
Yes/No parameters 127
MyQ Users 128
External Code Book 128
7.4.3. Creating Code Lists and Codes on the MyQWeb Interface 128
Adding and deleting code lists 129
Adding, importing and deleting codes from a code list 130
7.4.4. Creating external code books 133
To create the external code book 133
7.4.5. Examples of use of the custom parameters 136

vii
Enabling users to select the output folder from a code book 136
Enabling users to select recipients from the list of all MyQ users 138
Enabling users to search recipients via external code books 141
Enabling users to scan to their home folder protected by password 144
Providing additional information in a metadata file 147
7.5. Easy Scan to OCR 149
OCR processing 152
7.6. Easy Copy 153
Printing devices supporting Easy Copy 154
7.6.1. Parameters of Easy Copy 157
7.7. Easy Fax 160
7.7.1. Enabling the Easy Fax action on a printing device properties panel 161
7.7.2. Parameters of Easy Fax 163
7.8. Direct access to another HyPAS application 165
Printing devices supporting Direct access to another HyPAS application 166
8. Credit, Quotas and Projects 170
8.1. Credit 170
8.1.1. Using terminal actions without sufficient credit 171
Print jobs with additional information from the job parser 172
Action taken when a user runs out of credit during copying, scanning or fax-ing 172
8.1.2. Recharging credit 173
8.2. Quotas 175
8.2.1. Using terminal actions when a quota is reached 176

viii
Print jobs with additional information from job parser 176
Action taken when a user reaches a quota with immediate application 177
8.3. Project Accounting 178
8.3.1. Assigning projects to print jobs 179
My Jobs 179
Print All 180
8.3.2. Assigning projects to Easy Copy jobs 180
8.3.3. Assigning projects to Easy Scan jobs 180
8.3.4. Assigning projects on the Panel Copy screen 180
8.3.5. Assigning projects on the Panel Scan screen 180
8.3.6. Assigning projects on the Panel Fax screen 180
9. Device Spool and Offline Login 181
Printing devices supporting Device Spool 181
Printing devices supporting Offline Login 183
9.1. Device Spool 184
Follow me for Device Spool 185
Delegated printing for Device spool 185
9.1.1. Setting up Device Spool in MyQ 186
9.1.2. Print drivers for Device Spool 187
9.1.3. IP filters 188
9.1.4. Print languages supported by Device Spool 188
9.1.5. Features not supported by Device Spool 188
9.2. Offline Login 189
9.2.1. Requirements 190

ix
9.2.2. Offline Login Setup 190
9.2.3. Scanning to email via Panel scan in the Offline mode 191
9.2.4. Offline login via LDAP server credentials 196
10. Accessing the Terminal via the MyQMobile Application 197
11. USB Card Reader Connection 199
Activating Card Authentication Kit (B) 199
12. Update and Uninstallation 201
12.1. Updating the terminal 201
12.2. Uninstalling the terminal 201
13. Appendix I — Overview of changes 203
Revision 2 203
Changes in topics 203
14. Business contact 204

1
1. About1.1. About this manualThis document provides readers with information needed to install and administer a Kyo-cera Embedded terminal. It guides them through the processes of installation and con-figuration of the embedded terminal. Furthermore, it helps them administer the terminalfrom the device operation panel and remotely configure it from the MyQ Web Interfaceand the MyQ Terminal Manager. Significant part of the manual is dedicated to intro-duction of the terminal features and information on their management.
The purpose of this document is to guide you during installation and configuration of theKyocera Embedded terminal and describe its features.
1.2. About MyQ Embedded terminal for KyoceraThe embedded terminal is a software application developed on the Kyocera HyPAS plat-form (Hybrid Platform For Advanced Solutions). It enables simple management of printjobs on a touchscreen display and offers a number of advanced features: multiple loginoptions, scanning and copying by a single touch, credit, quota, project accounting, andmany other. It can communicate with multiple types of USB card readers.
The application can be remotely installed on the MyQWeb Interface or directly uploadedon the device using a USB flash drive. Every embedded terminal requires a valid licenseactivated on the MyQ server.
NOTICE: Kyocera printing devices have to be equipped with either SSD, Harddrive or an SD card to enable the installation of the MyQ embedded terminal.
1.2.1. Supported printing devices
FS, LS Series Color/B&W Device type
FS-3540MFP B&W Multifunction printer
FS-3640MFP B&W Multifunction printer
FS-6525MFP B&W Multifunction printer
FS-6530MFP B&W Multifunction printer
LS-3640MFP B&W Multifunction printer

2
FS, LS Series Color/B&W Device type
FS-C2526MFP Color Multifunction printer
FS-C2626MFP Color Multifunction printer
FS-C8520MFP Color Multifunction printer
FS-C8525MFP Color Multifunction printer
ECOSYS Series Color/B&W Device type
ECOSYSM2640idw B&W Multifunction printer
ECOSYSM3040idn B&W Multifunction printer
ECOSYSM3145idn B&W Multifunction printer
ECOSYSM3540idn B&W Multifunction printer
ECOSYSM3550idn B&W Multifunction printer
ECOSYSM3560idn B&W Multifunction printer
ECOSYSM3645idn B&W Multifunction printer
ECOSYSM3655idn B&W Multifunction printer
ECOSYSM3660idn B&W Multifunction printer
ECOSYSM4028idn B&W Multifunction printer
ECOSYSM4125idn B&W Multifunction printer
ECOSYSM4132idn B&W Multifunction printer
ECOSYSM4226idn B&W Multifunction printer
ECOSYSM4230idn B&W Multifunction printer
ECOSYSM6026cidn Color Multifunction printer
ECOSYSM6035cidn Color Multifunction printer
ECOSYSM6230cidn Color Multifunction printer

3
ECOSYS Series Color/B&W Device type
ECOSYSM6235cidn Color Multifunction printer
ECOSYSM6526cidn Color Multifunction printer
ECOSYSM6535cidn Color Multifunction printer
ECOSYSM6630cidn Color Multifunction printer
ECOSYSM6635cidn Color Multifunction printer
ECOSYSM8024cidn Color Multifunction printer
ECOSYSM8030cidn Color Multifunction printer
ECOSYSM8124cidn Color Multifunction printer
ECOSYSM8130cidn Color Multifunction printer
ECOSYSM8224cidn Color Multifunction printer
ECOSYSM8228cidn Color Multifunction printer
ECOSYS P8060cdn Color Printer
TASKalfa Series Color/B&W Device type
TASKalfa 256i B&W Multifunction printer
TASKalfa 306i B&W Multifunction printer
TASKalfa 206ci Color Multifunction printer
TASKalfa 256ci Color Multifunction printer
TASKalfa 265ci Color Multifunction printer
TASKalfa 266ci Color Multifunction printer
TASKalfa 306ci Color Multifunction printer
TASKalfa 307ci Color Multifunction printer
TASKalfa 350ci Color Multifunction printer
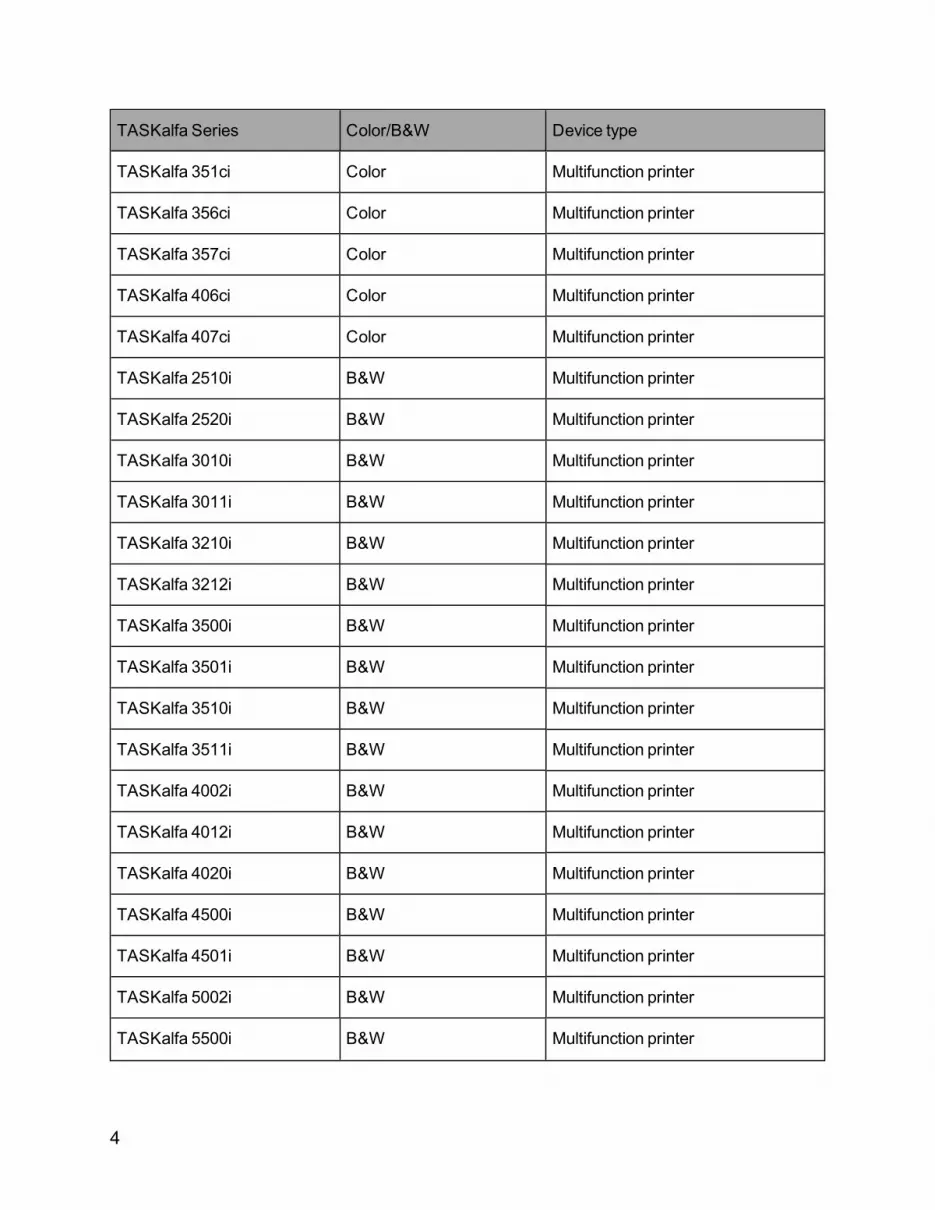
4
TASKalfa Series Color/B&W Device type
TASKalfa 351ci Color Multifunction printer
TASKalfa 356ci Color Multifunction printer
TASKalfa 357ci Color Multifunction printer
TASKalfa 406ci Color Multifunction printer
TASKalfa 407ci Color Multifunction printer
TASKalfa 2510i B&W Multifunction printer
TASKalfa 2520i B&W Multifunction printer
TASKalfa 3010i B&W Multifunction printer
TASKalfa 3011i B&W Multifunction printer
TASKalfa 3210i B&W Multifunction printer
TASKalfa 3212i B&W Multifunction printer
TASKalfa 3500i B&W Multifunction printer
TASKalfa 3501i B&W Multifunction printer
TASKalfa 3510i B&W Multifunction printer
TASKalfa 3511i B&W Multifunction printer
TASKalfa 4002i B&W Multifunction printer
TASKalfa 4012i B&W Multifunction printer
TASKalfa 4020i B&W Multifunction printer
TASKalfa 4500i B&W Multifunction printer
TASKalfa 4501i B&W Multifunction printer
TASKalfa 5002i B&W Multifunction printer
TASKalfa 5500i B&W Multifunction printer

5
TASKalfa Series Color/B&W Device type
TASKalfa 5501i B&W Multifunction printer
TASKalfa 6002i B&W Multifunction printer
TASKalfa 6500i B&W Multifunction printer
TASKalfa 6501i B&W Multifunction printer
TASKalfa 7002i B&W Multifunction printer
TASKalfa 8000i B&W Multifunction printer
TASKalfa 8001i B&W Multifunction printer
TASKalfa 8002i B&W Multifunction printer
TASKalfa 9002i B&W Multifunction printer
TASKalfa 2460ci Color Multifunction printer
TASKalfa 2470ci Color Multifunction printer
TASKalfa 2550ci Color Multifunction printer
TASKalfa 2551ci Color Multifunction printer
TASKalfa 2552ci Color Multifunction printer
TASKalfa 3050ci Color Multifunction printer
TASKalfa 3051ci Color Multifunction printer
TASKalfa 3060ci Color Multifunction printer
TASKalfa 3252ci Color Multifunction printer
TASKalfa 3550ci Color Multifunction printer
TASKalfa 3551ci Color Multifunction printer
TASKalfa 3552ci Color Multifunction printer
TASKalfa 4052ci Color Multifunction printer

6
TASKalfa Series Color/B&W Device type
TASKalfa 4550ci Color Multifunction printer
TASKalfa 4551ci Color Multifunction printer
TASKalfa 5052ci Color Multifunction printer
TASKalfa 5550ci Color Multifunction printer
TASKalfa 5551ci Color Multifunction printer
TASKalfa 6052ci Color Multifunction printer
TASKalfa 6550ci Color Multifunction printer
TASKalfa 6551ci Color Multifunction printer
TASKalfa 7052ci Color Multifunction printer
TASKalfa 7550ci Color Multifunction printer
TASKalfa 7551ci Color Multifunction printer
TASKalfa 8052ci Color Multifunction printer
NOTICE: Some legacy Kyocera printing devices that are not supported by this ver-sion of the terminal can still be used with the MyQ terminal version 5.1. For moreinformation, see 5.1 Kyocera Embedded manual.

7
2. InstallationThis topic describes two ways of installing the terminal: remote installation on the MyQweb interface and manual installation via USB. The remote installation on the MyQWEBinterface is a preferable alternative to installation on the printing device Web User Inter-face — it is much simpler and it allows installing the terminal on a large number ofdevices at the same time. The manual installation can be used in specific cases, wherethe remote installation is not possible.
Furthermore, the topic contains three sections showing how to perform additional ele-mentary setup:
l how to assign terminals to devices
l how to change languages
l how to upload your own SSL certificates
2.1. Remote installation on the MyQ Web interfaceThe easiest way to install the Embedded terminal is remote installation from the MyQWEB interface. This method is very simple and it is preferable especially when you needto install the terminal on a large number of printing devices, since you can install multipledevices in a batch.
2.1.1. Preliminary setup on the MyQ Web InterfaceBefore you proceed with the remote installation of the embedded terminal, you need tomake sure that the terminal package is uploaded and the proper administrator cre-dentials for access to the printing device settings are set on the MyQ server. The two fol-lowing sections show you how to perform the necessary setup.
Uploading the installation package of the embedded terminal
The PKG installation package has to be stored on the MyQ server to be distributed to theprinting devices during installation.
I. On the Printers settings tab, under Embedded terminals installation packages,under Kyocera:, click +Add, and then click Choose File. The Open dialog boxappears.

8
FIGURE 2.1. After clicking +Add, the button is replaced by theChoose file button.
II. In the dialog box, find and select the PKG file, and then click Open . The filereplaces the Choose File button on the Printers settings tab.
FIGURE 2.2. Opening the PKG file
INFO: If you want to delete the file, click the remove button ( ). TheChoose File button reappears. After the file is deleted, you can upload a dif-ferent version of the terminal.
III. Click Save at the bottom of the tab.
Entering the printing device's administrator credentials
Administrator credentials are necessary for accessing the printing device's settings. Ifthey are not entered in MyQ, or are not entered correctly, remote installation fails with the"Invalid credentials" error message displayed in the log.

9
There are two ways of setting the credentials. You can do it globally for all the devicesregistered in MyQ, or individually for every device. If the individual credentials are notset, global ones are used as default.
INFO: The administrator credentials entered in MyQ are the same as those usedto access the printing device's Web User Interface. For information about the print-ing device's administrator credentials, see the device's manual.
a) Global setup
I. Open the Printers settings tab. (Click MyQ, then click Settings, and finally clickPrinters.)
II. On the tab, enter the default administrator user name and default administratorpassword in the corresponding text boxes, and then click Save at the bottom of thetab.
FIGURE 2.3. Entering the default admin credentials
10
b) Local setup
I. Open the Printers main tab. (Click MyQ, and then click Printers.)
II. On the tab, double-click the printing device. The printing device properties panelopens on the right side of screen.
FIGURE 2.4. Opening the printing device properties panel
III. On the panel, enter the administrator user name and administrator password in thecorresponding text boxes, and then click Save.
FIGURE 2.5. Entering the credentials on the properties panel

11
2.1.2. Installation of the embedded terminalAfter you have uploaded the terminal's package and set the administrator credentials asit is described in the previous section, you can proceed with the remote installation of theterminal on the MyQWeb Interface. This section shows you how to install the embeddedterminal on a single device and on multiple devices.
Remote setup of the printing device (Installing the embedded terminal)
I. On the Printers main tab, double-click the printing device. The printing device prop-erties panel opens on the right side of screen. (See FIGURE 2.4 on the previouspage.)
II. On the panel, under Terminal type, select Embedded. Additional settings appear.
FIGURE 2.6. Setting terminal type on the printing device properties panel

12
III. Select one of the login methods and one or more particular login options, and thenclick Save at the bottom of the panel. The Apply new settings dialog boxappears.
You can choose between two types of login: simple login and two steps authen-tication. With the simple login option, you can select up to three methods of loginand with the two step authentication, you can select from two combinations of thelogin methods.
The login options are following:
Login with an ID Card
With the ID Card option selected, users can log in by swiping their ID Card. The IDCard has to be registered on the user account on the terminal.
Login with a PIN
With the PIN option selected, users can log in by entering their MyQ PIN.
Login with a User name and password
With the User name and password option selected, users can log in by enteringtheir MyQ user name and password.
Login with an ID Card and PIN
With the ID Card and PIN option selected, the user has to swipe his ID card, andthen enter the PIN.
Login with an ID card and password
With the ID Card and password option selected, the user has to swipe hisID card, and then enter the password.

13
IV. To install the terminal and change its settings, you need to perform a remote setupof the printing device. In the dialog box, keep the Remote Printer Setup optionselected, and then click OK. The Remote Printer Setup tab opens.
FIGURE 2.7. Applying new settings

14
V. On the tab, keep the Install embedded terminal option selected and click Run onthe bar at the top of the tab.
FIGURE 2.8. Running the remote printer setup on theRemote Printer Setup tab
l Under Network , you can change the MyQ server address setting on theembedded terminal. By default, the terminal communicates with the MyQserver using the server's IP address. If you want to use hostname of theserver instead, select the Hostname:... option. (The hostname is set on theMyQ Network settings tab, under General; for further information, see "Net-work settings tab", under "MyQ® System Settings" in the Basic InstallationGuide).

15
l If you want to receive print jobs only from the MyQ server, keep the Set up IPfilters option under Network selected. With this option selected, a new IP fil-ter is created on the printing device. The filter denies print jobs sent via LPD,Raw and IPP protocols from other than MyQ server IP addresses.
FIGURE 2.9. IP filter created during the setup
The Warning message box with two messages appears. The messages informyou that the printing device will be restarted during the remote setup and that thedevice should be in an idle state.

16
VI. Make sure that the device is not being used at the moment, and then click OK.
FIGURE 2.10. Warningmessage
The Setup completed message bar appears near the top of the tab. If the setupsucceeds, the "Setup completed: successful: 1, failed: 0" message is displayedthere. If it fails, the "Setup completed: successful: 0, failed: 1" message is dis-played there.
FIGURE 2.11. Remote Printer Setup tab after setup
INFO: Click See the log for details to open the Log tab with a list of finishedsetups. To check any of the setups on the list, double-click it (or select it, and thenclick Open on the bar at the top of the tab).
FIGURE 2.12. Opening the detailed information about the setup
FIGURE 2.13. The detailed information about the setup

17
Installing the terminal on multiple printing devices
To install the terminal on multiple printing devices, you can either run remote setup ofdevices selected on the Printers main menu, or run remote setup of a whole group ofdevices.
Installation on a selection of printing devices
To install the terminal on multiple devices, select the devices, click Actions, and thenclick Remote setup. The Remote Printer Setup tab opens with all of the selected print-ers displayed.
FIGURE 2.14. Opening remote setup of the selected devices.

18
Installation on all printing devices from a group
To install the terminal on all devices from a group, right-click the group, and then clickRemote setup on the shortcut menu. The Remote Printer Setup tab opens with allmembers of the group displayed.
FIGURE 2.15. Opening remote setup of a group of devices
FIGURE 2.16. Remote setup of multiple printers

19
2.1.3. Updating terminalsUpdating terminals is identical to installing new terminals. You need to install the newerKyoEmbedded_x.x.x.x_MyQ.pkg application on the terminal or terminals. The olderversion of MyQ Embedded terminal is automatically updated and all its settings are kept.
2.1.4. Settings changed within the installationThe following settings on the printing device Web User Interface are changed within theremote setup of the printing device:
Option Value
JOB_AUTHORIZATION_MODE ON
SERVER_AUTHENICATION_MODE NETWORK
SERVER_HOSTNAME MyQserver address
SERVER_PORTNUMBER PMServer authentication port (Settings > Network)
JOB_ACCOUNTING ON
AUTO_PANEL_RESET OFF
DEACTIVATE_ENERGY_SAVER ON
CERTIFICATE_VERIFICATION
ON, if a custom certificate is installed OFF, if the defaultcertificate is installed
UNKNOWN_ID_JOB ON
SECURE_PROTOCOLS_SSL ON
SECURE_PROTOCOLS_HTTP_SECURITY ON
SECURE_PROTOCOLS_IPP_SECURITY ON
IPP_SECURITY ON

20
Option Value
IPP_SECURITY_PORT 443
IP4_FILTERS MyQserver address | 255.255.255.255 | LPD | IPP | IPPS | | | |RAW_PORT |
SMTP_PROTOCOLS ON
SMTP_SERVER_NAME MyQserver address
SMTP_PORT_NUMBER MyQSTMP port (Settings > Network)
SMTP_AUTHENICATION_PROTOCOL OFF
SMTP_SECURITY
OFF, if Enable only secure connection is disabled inMyQ
STARTTLS, if Enable only secure connection is enabled inMyQ
SMTP_SERVER_TIMEOUT config.ini > [SMTPServer] > timeout
SMTP_EMAIL_SIZE_LIMIT config.ini > [SMTPServer] > maxMessageSize
SMTP_SENDER_ADDRESS [email protected]
SLEEP RULE: NETWORK OFF (On Kyocera devices supporting this setting.)
SLEEP RULE:APPLICATION OFF (On Kyocera devices supporting this setting.)

21
INFO: If the Log debug level messages option is selected on the MyQ WebInterface, on the General settings menu, under Log, before start of the remotesetup, you can see new values of the printing device settings in the remote setuplog.
FIGURE 2.17. To open the extended log, click the raw with "OUT XXXms Plugin" value in the Textfield on the Log tab.
FIGURE 2.18. Information about the new values are displayed in the extended log.
2.2. Manual installation via USBThe second method of installation of the embedded terminal is to upload the installationfile from a USB flash drive and install the application on the printing device systemmenu. This may be convenient if you need to install the terminal to a small number ofdevices to which you have physical access.
WARNING: Most printing devices cannot read flash drives formatted in the NTFSfile system. Therefore, it might be necessary to use a USB flash drive formatted toFAT32.

22
1) Save the KyoEmbedded_x.x.x_MyQ.pkg file to the root directory of a USB Flashdrive.
2) Install the file on the printing device
I. On the device operation panel, press the Systemmenu button (or SystemMenu/Counter button on some devices). The System Menu opens.
II. On the System Menu, find and tap Application (Favorites/Application on somedevices). You are prompted to login as an administrator.
III. Login as the administrator. The Application menu (or Favorites/Applicationmenu) opens.
INFO: If there is a card reader connected to the device and activated (see"USB Card Reader Connection" on page 199), you are asked to use IDcard. In such case, tap Menu at the bottom left corner of screen, and thentap keyboard login. If the Menu button is not displayed, press the SystemMenu button (or System Menu/Counter) on the device operation panel —the terminal screen refreshes with the button displayed.
INFO: In case you are asked to select between the Local login and the Net-work login, select Local before entering the credentials.
INFO: For information about the printing device default password, how toenter the printing device web interface and how to find the particular set-tings, see the printing device manual.
IV. On the Application menu (or Favorites/Application menu), tap Application. TheApplication sub-menu opens.
V. Insert the USB Flash drive with the uploaded installation file, and then tap + (orAdd on some devices) at the upper-right corner of screen. A dialog box appears,informing about the number of applications that can be installed.

23
VI. Tap OK . The Add-Application menu opens with the MyQ Embedded item dis-played.
INFO: In case a different version of the terminal is already installed on thedevice, the Update Program description is displayed next to the applicationname. If you update the terminal, its version is changed but all settings arepreserved.
VII. Select the MyQ Embedded item, tap Install at the bottom-left corner of screen, andthen tap Yes to confirm the installation. The Completed message appears and theAdd - Application menu is empty. You can tap Remove Memory on the bottom ofscreen to safely remove your USB flash drive.
VIII. Back on the Add - Application menu, tap End.
3) Activate the application
I. Back on the Application menu, select the MyQ Embedded item, and then tapMenu at the bottom-left corner. The application menu opens.
II. On the menu, tap Activate, and then tap Yes to confirm the activation. The terminalinitial screen opens after a while.
FIGURE 2.19. Initial screen of the embedded terminal

24
2.3. Assigning the terminal to the printing deviceThe terminal is automatically assigned within the remote installation on the MyQ Webinterface, but if you perform the manual installation instead, you have to assign the ter-minal to the printing device on the device's properties panel on the Printers main tab.
NOTICE: Before manually assigning the terminal, open the terminal Admin menuand enter the IP address of your MyQ Server. For more information, see "AdminMenu" on page 28.
To assign the terminal:
1. On the MyQWeb Interface, open the Printers main tab. (At the top-left corner, clickMyQ, and then click Printers.)
2. On the tab, double-click the Printing device . The device's properties panel openson the right side of screen.
3. On the panel, under Terminal type, select the Embedded terminal type option.
4. Click the arrow on the right side of the Terminal ID combo box, and then select thedisplayed terminal ID. No terminal displayed...
FIGURE 2.20. Assigning the Embedded terminal on the printing device's properties panel
5. Select login methods, and then click Save. In case the Apply new settings dialogbox appears, deselect the Remote Printer Setup option, and then click Ok to sub-mit the changes without remote setup.

25
2.4. Selecting languagesThe language that is selected as the default language on the MyQ server is also used onall embedded terminals. For each user, you can change the language that will be usedon their user sessions on the terminals.
2.4.1. The default languageThe default language of the terminal is the default language set on the General settingstab. For more information, see "General settings tab" under "MyQ® System Settings" inthe Basic Installation Guide.
2.4.2. The user's languageYou can set different default languages for different users on their properties panels onthe Usermain tab. These languages are then used on their user sessions on the embed-ded terminal. For more information, see "Editing user accounts" under "Users" in theBasic Installation Guide.
2.5. Certificate for secured run of the terminal
FIGURE 2.21. Importing a new safety certificate
SSL certificate is a data file that is necessary for secured network communication.
A default MyQ SSL certificate is part of the installation. If you want to use your own cer-tificate, you have to upload it to two places: replace the default certificate in MyQ andimport the certificate in the security settings of the printing device's web interface.

26
INFO: For information about how to replace the MyQ default certificate, see"Security of communication" under "MyQ System Settings" in the Basic Install-ation Guide. For further information about security of communication, see the MyQ6 Security Whitepaper.
INFO: For information about how to enter the printing device's web interface andfind the particular settings, see the device's manual.

27
3. LicensesThe total number of embedded terminals that can run at the same time is equal to thenumber allowed by embedded terminal licenses. If the number of embedded licenses atthe server is exhausted, the terminal is deactivated and cannot be reactivated until thereare any available licenses. Users cannot log in to this terminal.
FIGURE 3.1. Users cannot log in as there are no embedded licenses available on theMyQ server
To regain access to the terminal, you can add a new license or deactivate one of the cur-rently activated terminals, and then reactivate the printing device on the MyQ Web Inter-face.
INFO: Each embedded license includes one-year support. You can extend thesupport period by assigning a support license to the particular main license.
Adding and activating licenses
For information on how to add the embedded terminal licenses, how to activate themand how to extend the support period, see "Licenses" in the Basic Installation Guide.

28
4. Admin MenuFrom the terminal admin menu, you can administrate the terminal and change its set-tings. The following actions are available:
l Change MyQ server
l Change login type
l Change log level
l Wipe jobs
l Clear Config Password
l Unlock Panel
l Disable Application
l Export log
FIGURE 4.1. Adminmenu—on the bar at the top of the screen are from left to right: version of the terminal,Save button andExit button (white cross)

29
4.1. Entering the Admin menuTo enter the admin menu, tap the logo in the upper-left corner of the panel, and thenenter the administrator's PIN. The default admin PIN is 1087.
FIGURE 4.2. Initial screen of the terminal
WARNING: We strictly recommend you to change the admin PIN after the firstinstallation of the terminal. You can do this in the MyQ Terminal Manager (see"Configuration in the MyQ Terminal Manager" on page 35).
4.2. Changing the address of the MyQ serverTo enter the new IP address or hostname of the MyQ server, do the following:
1. On the Admin Menu under Common settings, tap on the Server address setting.The keyboard screen opens.

30
FIGURE 4.3. ChangingMyQ server
2. On the keyboard, type the IP address or the hostname of the server, and then tapOK. The Admin Menu screen reopens with the IP address or the hostname dis-played in the Server address text box.
3. Back on the Admin Menu screen, tap the Save icon near the top-right corner. Thenew value of the setting is saved; you can leave the Admin Menu.
4.INFO: If the connection is successful and MyQ service is running on theserver, the online status is displayed on the Admin Menu screen.
FIGURE 4.4. The status is displayed next to the server IP address or hostname

31
4.3. Changing Login TypesOn this menu, you can select from three login options and change the card reader type. Ifyou select more than one type of login, users can choose between them.
FIGURE 4.5. User login menu
INFO: The terminal offers two steps authentication as a secure alternative tosimple login. This feature can be activated either on the MyQ Web Interface or inthe MyQ Terminal manager. For information about how to set this option on theWeb Interface, see "Remote setup of the printing device (Installing the embeddedterminal)" on page 11. For information about how to set it in the Terminal Managerapplication, see "Login" on page 39.
Selecting the type of login
l With the PIN option selected, users can login by entering their MyQ PIN.
l With the User name option selected, users can login by entering their MyQ username and password.
l With the ID Card option selected, users can login by swiping their ID Card. The IDCard has to be registered to the user's account. You can register it either via the IDCard Registration option on the embedded terminal or directly on the propertiespanel of the user's account on the MyQWeb Interface.

32
Selecting the type of card reader
l The USB (internal) card readers, i.e. card readers connected via USB, are usedon a vast majority of printing devices. For information on the Network (external)card readers, please contact your MyQ support.
4.4. Changing Log LevelOn the Admin Menu screen, under Log Level, you can enable Log Debug Messages.With the Log Debug Messages enabled, the terminal generates additional log inform-ation for troubleshooting (see"Exporting log" on page 34).
FIGURE 4.6. Allowing Log DebugMessages
4.5. Wiping JobsWith the Local Print Spooling feature enabled, print jobs are sent directly to a printingdevice where they wait until they are released by the sending user or until they aredeleted from the device.
To delete the print jobs, do the following:
1. On the Admin Menu (see FIGURE 4.1), tap Wipe jobs . The following windowopens:
FIGURE 4.7. Wipe jobs screen
2. To delete the locally spooled jobs, tap Yes. The Admin Menu reopens.
INFO: For more information about locally spooled jobs, see "Device Spool andOffline Login" on page 181.

33
4.6. Clear Config PasswordIf you have set the remote configuration password in the MyQ Terminal Manager andwant to reset it, do the following:
1. On the Admin Menu (see FIGURE 4.1), tap Clear Config Password . The fol-lowing window opens:
FIGURE 4.8. Clear Config Password screen
2. Confirm by tapping Yes. The Admin Menu reopens.
For information about the configuration password, see "Setting configuration password"on page 36.
4.7. Unlock PanelUnlocks the printing device panel; with the panel unlocked, the printing device's defaultscreen opens and all features of the device are accessible. Pages printed and scannedin this mode are accounted to the *unknown user.
Once the panel is unlocked, the device setup can be accessed by pressing the Systemmenu button (or System menu/Counter button) on the device's operation panel. Whenyou open the device's panel using the Unlock panel button, you are automatically gran-ted administrative rights to all of its settings.
INFO: This way you can access the printing device's Application menu and unin-stall the embedded terminal.
4.8. Disable ApplicationIn case the terminal operations are not accessible, for example when the MyQ server isoffline, you can disable the terminal and unlock default screen of the printing device.This way users can perform basic operations directly on the printing device. The terminalis reactivated after the device is restarted.

34
Disable the terminal
1. On the Admin Menu (see FIGURE 4.1), tap Disable Application. The followingwindow opens:
FIGURE 4.9. Disable Application screen
2. Confirm by tapping Yes. The terminal is disabled and the printing device's defaultscreen opens.
INFO: Alternatively, you can disable the terminal by entering the deactivationcode. Tap the MyQ icon, enter the deactivation code, and then tap OK . If theadmin PIN is shorter than 6 characters, the deactivation code is 999999, oth-erwise it consists of the first four characters of the admin PIN.
Re-enable the terminal
To activate the Embedded terminal application, switch off and then switch on the printingdevice by its main power switch or restart the device on its WEB User interface.
4.9. Exporting logIf you are asked to provide the log from the embedded terminal to MyQ support, you canupload the log file to a USB Flash drive on the menu.
To export the terminal log, insert the USB Flash drive, and then tap Export log on theAdmin Menu (see FIGURE 4.1). The log file is uploaded to the USB.
INFO: You can also remotely export the log using the Terminal Manager applic-ation. For more information, see "Exporting log" on page 39.

35
5. Configuration in the MyQ Terminal ManagerThe MyQ Terminal Manager application provides interface for simple setup of MyQ ter-minals. It is installed within the installation of MyQ. You can open it under Startmenu/Programs/MyQ/MyQ Terminal Manager in Windows 7 and Windows 2008, onthe Apps screen in Windows 8, Windows Server 2012 and on the Start menu in Win-dows 10.
5.1. Searching for accessible terminals1. Under Network Ranges, set the network ranges where you want to search for print-
ing devices, and then click Search . The available terminals are found and dis-played on tabs with names of their manufacturer.
FIGURE 5.1. Initial tab of the Terminal Manager application

36
If the Search all local subnets option is selected, broadcast command is executedon all network subnets to which the MyQ server is connected. In case you want tosearch in other subnets, add their IP ranges in the text boxes below it.
2. Open the Kyocera V5.3+ tab, and then double-click the embedded terminal thatyou want to set up.
FIGURE 5.2. Kyocera V5.3+ tab with discovered embedded terminals
5.2. Setting configuration passwordTo protect terminals from unauthorized remote configuration, you can type a global con-figuration password in the MyQ Terminal Manager. The password that is currently typedin the Terminal Manager applies to all embedded terminals connected to the network,but it is not active and needs to be separately activated on each device. To do so, go tosettings of the particular terminal, select the Set option under Common settings / Con-figuration password and save the settings.
Once the password is activated on a terminal, the remote configuration of that terminal ispossible only if the string that is currently typed in the MyQ Terminal Manager matchesthe string that was typed there at the time the password was activated.

37
Setting the configuration password
1. Type the password in the text box under Configuration Password on the Setuptab.
FIGURE 5.3. The embedded terminals configuration password
2. On the individual settings of each terminal, you can activate the currently typedpassword (see "Setting up the terminal" on the next page).

38
5.3. Setting up the terminalThe terminal settings can be changed on the settings panel on the left side of the Ter-minal Manager dialog box.
FIGURE 5.4. The Terminal Manager application with theKyocera V 5.3+ tab opened
If you change a setting, the Set option on its left side is automatically selected.
To see the setting options of a drop-down menu, click the arrow on the right side of thesetting combo box.
To confirm the changes, click Save at the bottom of the panel
5.3.1. Common Settings
Server address or DNS Name
The IP address or the hostname of the MyQ server.
39
Configuration Password
Here you can activate the global password for remote configuration of the terminal,which is typed on the Setup tab. (see "Setting configuration password" on page 36).
To activate the password, select the Set option.
Local Administration PIN
The PIN for administrator access to the terminal. By default, it is 1087. The input has toconsist of 4 to 16 numeric characters.
Exporting log
In case you are asked to provide the log to MyQ support, you can upload the log file to aselected folder.
To export the terminal log, click Export Log. The Browse for folder dialog box appearsand you can select the folder where the log file is saved.
You can swap between the Normal log level and the Detailed log level.
l By default, the terminal is on the Normal log level.
l With the Detailed log level, the terminal generates additional log information fortroubleshooting.
5.3.2. Login
Multi-login Options
If the Two step authentication option is selected, users have to pass two steps to suc-cessfully log in. You can choose from the following settings:
l Disable — Only one way of login is used each time a user logs in
l Card and PIN — The user swipes his ID card, and then enters the PIN
l Card and Password — The user swipes his ID card, and then enters the Password
INFO: The two step authentication methods (Card and PIN or Card and Pass-word) provide higher level of user login security.

40
Login by PIN
With the PIN option selected, users can log in by entering their MyQ PIN.
Login by User Name
With the User Name option selected, users can log in by entering their MyQ user nameand password.
Login by ID Card
With the ID Card option selected, users can log in by swiping their ID Card. The ID Cardhas to be registered on the user account on the terminal. For more information about con-figuration of card readers, see "USB Card Reader Connection" on page 199.
ID Card Reader Type
The internal type card readers, i.e. card readers connected via USB, are used on a major-ity of printing devices. For information on the external type card readers, please contactyour MyQ support.
FeliCa Card Reader Parameters
For information about FeliCa card readers, please contact your MyQ support.
5.3.3. No-Login OperationsIn this section, you can select from various options of enabling the users to access thefunctions of the printing device without logging in to the terminal.
If you enable at least one of the Scan / Copy / Fax options, the users can access thefunctions either by closing the terminal or directly from the panel of the printing device(depending on the Start Screen setting described below).
By selecting and saving the Shutdown! option in the The Emergency Mode section, youcan remotely disable the embedded terminal.
Below, you can see the detailed descriptions of the settings in this section.
Scan
If enabled, users can use the scan function on the particular printing device screenwithout the need to log in.

41
Copy
Set the behavior of the copy function, that users can use on the particular printing devicescreen after unlocking the panel without logging on the terminal. You can choose fromthe following settings:
l Disable — Users cannot use the copy function
l BW Copy — Users can use only black and white copy function
l Color Copy — Users can use full color copy function
Fax
If enabled, users can use the fax function on the particular printing device screen withoutthe need to log in.
INFO: Pages printed, scanned and faxed in this mode are accounted to *un-known user.
Start Screen
FIGURE 5.5. StandardMyQ user login screen with the close (cross) icon at the top-right corner
If you enable at least one of the Scan / Copy / Fax options above, the initial screen ofthe device can be set to one of the following two modes:

42
l User Login: anonymous access to the No-Login operations is possible via theclose (cross) button at the top-right corner of the screen.
l Device panel: the default screen of the panel is displayed (scan or copy - dependson device's settings). In such case, users can switch to login screen by pressinglogout button, or directly log in by swiping their ID card.
Emergency Mode
Here you can remotely disable the terminal in case of emergency.
l To disable the terminal, select Shutdown!. The terminal shuts down, the printingdevice panel is unlocked and its default screen opens. Users can now run stand-ard device operations without logging in.
l To re-enable the terminal, select Normal operation and restart the device onprinter device's web user interface.
INFO: Pages printed and scanned in the Shutdown! mode are accounted to the*unknown user.
5.3.4. GUI SkinThis setting can be used to upload custom logos to older versions of the MyQ embeddedterminals. Since the version 7.1, the logo is uploaded on the Personalization tab of theMyQWeb Interface (see "Changing logo " on page 47).
INFO: For information on how to download the logo to older terminals via this set-ting, please see the MyQ 6 Kyocera Embedded manual.
5.3.5. User Session
Idle Logout
If a user forgets to logout from device after he or she finishes his/her tasks and the IdleLogout option is activated, MyQ logs him/her out automatically after the idle logout timeset on the MyQWeb Interface expires.
With the Idle Logout setting enabled, MyQ auto logout depends on the Copier oper-ation panel idle time setting on the MyQ server. In this mode, each time a button on the

43
MyQ embedded terminal is tapped, the timeout is prolonged; however, tapping buttonson native panels of the printing device (copy panel, scan panel, etc.) does not prolong it.
If you disable the option, MyQ auto logout depends on the Panel Reset Timer settingthat is set on the printing device's Web UI, under Timer settings. In this mode, everytouch of the device display prolongs the timeout.
FIGURE 5.6. TheCopier operation panel idle time setting can be found on thePrinters settings menu,underGeneral
Copy/Scan Screen Type
You can select the Universal design option to display the copy and scan screens inaccessibility mode. Accessibility mode is a simple format with bigger text and larger but-tons. It is suitable especially for users with lower vision or with limited dexterity.
With the Standard option selected, copy and scan screens are displayed in their defaultmode.
5.3.6. Server Certificate UploadSSL certificate is a data file that is necessary for secured network communication.
A default MyQ SSL certificate is part of the installation. If you want to use your own cer-tificate, you can upload it here. Only one file can be uploaded to the terminal, all pre-vious certificates will be removed.
INFO: For more information about security of network communication, see thelatestMyQ Security Whitepaper.

44
5.3.7. Guest AccountIf you set a guest account here, users can log on the terminal by taping the Guest icon,without providing credentials. All operations are accounted to the corresponding useraccount in MyQ.
FIGURE 5.7. Initial screen with the guest account login icon at the top-corner
The default guest account is the *guest user account. If you do not want to use thedefault one, you can choose any other MyQ user account instead of it.
Before you use any of the MyQ accounts (including the *guest account) as the guestaccount, you have to set its password in MyQ and enter this password in the MyQ Ter-minal Manager:
l On the Users main tab on the MyQ Web Interface, select the MyQ account, clickActions, and then click Set password on the actions menu (or right-click the MyQaccount on the list of user accounts, and then click Set password on the shortcutmenu).

45
FIGURE 5.8. Opening the password setting of the *guest account on theUsersmain tab inMyQ
FIGURE 5.9. Setting password of the *guest account
l In the MyQ Terminal Manager, underGuest Account, you have to enter the samelogin password as the one set in MyQ.
FIGURE 5.10. Entering the Guest Account password
INFO: Different printing devices can use different guest user accounts with dif-ferent rights and separate accounting.

46
Guest Login
Here you can enable or disable the guest login option.
Login name
Here you can enter the name of the user account to be used as a guest account. Thedefault guest user account is *guest.
Login Password
Here you can enter the guest user account password.
Guest Screen
FIGURE 5.11. The Topmenu of theGuest User account
You can select the screen that will be displayed after the guest logs in.

47
6. PersonalizationOn the Personalization settings tab of the MyQ Web Interface, under Terminal per-sonalization, you can customize the overall appearance of the Embedded terminal. Bya few simple steps, you can upload your personal logo or change the color and graph-ical design of the terminal's actions.
To open the Personalization settings tab, click MyQ, then click Settings, and lastly clickPersonalization. The personalization options are described in three following sections.
FIGURE 6.1. The Terminal personalization section of thePersonalization tab
6.1. Changing logoTo change the logo displayed on the login screen of the terminal, do the following:
1. Click +Add next to Custom Logo, and then click Choose file. The Open dialogbox appears.
FIGURE 6.2. Adding the new logo

48
2. In the dialog box, find and select the file with the logo, and then click Open. TheChoose file button on the Personalization tab is replaced with the name of thefile.
FIGURE 6.3. Opening the file with the logo
3. Click Save to confirm the change of the logo. The logo is displayed on the Per-sonalization tab and you are asked to restart the terminal.
FIGURE 6.4. Saving the change of the logo

49
4. Keep the Reset all terminals option selected and click OK . The new logo isuploaded to the terminal.
FIGURE 6.5. Saving the change of the logo
6.2. Changing themesBy installing and setting new themes for the terminal's buttons, you can change the over-all look of the terminal.
The themes are not part of the MyQ installation. To import a new theme to the MyQ sys-tem, you need to download and run its installation file on the MyQ server. You can eitherselect from a variety of free predefined themes made available by MyQ, or ask for a fullycustomized theme.
INFO: For information on how to purchase the customized themes, please ask theMyQ support.
NOTICE: This feature requires SSL communication between the Embedded andthe MyQ server. For information on how to activate it, see "Installation" on page 7.
Installation of MyQ terminal panel themes
Start the installer by double-clicking the theme's executable file, and then follow the dir-ections of the installation wizard. The theme is installed to the MyQ data folder and canbe selected on the MyQWeb Interface.
NOTICE: Do not change the installation folder unless you have changed the MyQdata folder. For more information on the data folder, see "Relocating the datafolder and the jobs folder" under "MyQ Easy Config" in the Basic InstallationGuide.

50
FIGURE 6.6. MyQ theme setup wizard
Selecting the MyQ terminal panel theme
1. On the MyQWeb Interface, open the Personalization settings tab. (Click MyQ,then click Settings, and finally click Personalization.)
2. Under Terminal personalization select the desired theme, and then click Save atthe bottom of the tab.
FIGURE 6.7. Personalization tab
51
7. Terminal Actions
FIGURE 7.1. User home screen with nine terminal actions
This topic discusses basic features of the terminal and shows you how to manage themon the Terminal actions settings tab on the MyQ Web interface. The features are calledactions and can be accessed from action nodes on the terminal.
The action nodes correspond to buttons on the printing device display. On the MyQWebInterface, you can configure layout of the display screen and behavior of each buttonthere. Therefore, you are free to choose any combination of available actions and theirpositions on the screen. The layout is displayed on a WYSIWYG terminal preview andcan be configured there.
Additional layout options are provided by the possibility to create folders and put actionnodes there. Folders can be used to comprise actions of the same type, such as scan-ning to different destinations, or to enable users to access higher number of actions.
User and groups can be given rights to different actions. This way, you can configureindividual home screen for each user or group of users.

52
The action nodes are presented in the following sections:
l Terminal action nodes (Basic description of terminal action nodes and the cor-responding actions)
l Managing terminal actions on the MyQWeb Interface
l Basic Easy Scan settings
l Advanced Easy Scan settings
l Easy Scan to OCR
l Easy Copy
l Easy Fax
l Direct access to other HyPAS applications
INFO: The MyQ Kyocera Embedded terminal supports quasi-parallel user ses-sions: when one user starts printing and logs out of the terminal, another user canlog in and start scanning while the print is still running; similarly, a newly loggeduser can start printing while the scanning job of the previous user is being fin-ished.
7.1. Terminal action nodes
7.1.1. Available action nodes
Print all
Prints all jobs that are waiting in queue in the Ready and Paused states, including jobsdelegated by other users.
Print all jobs after login
As an alternative to the Print All terminal action, you can use the Print all jobs afterlogin feature.
If you enable the Print all jobs after login option on the Printers settings tab, underGen-eral, all user's jobs are printed immediately after he or she logs on an embedded ter-minal. This way, the user does not have to tap the Print all button to print the jobs.

53
FIGURE 7.2. ThePrint all jobs after login option is selected.
My Jobs
Shows all jobs that can be printed on the printing device. Users can manage their ready,favorite and printed jobs here.
FIGURE 7.3. Overview of jobs that are ready to be printed by the logged user

54
l Favorite jobs — Favorite jobs can be displayed by clicking the star icon at theupper-left corner of the screen
l Printed jobs — Printed jobs can be displayed by clicking the clock icon at theupper-left corner of the screen
INFO: Description of the jobs delegated by other users begin with name of theirowner in brackets.
Managing jobs on the My Jobs screen:
FIGURE 7.4. The print jobs management bar at the top of theMy Jobs screen
To display available job management options, select the job from the list on the tab. Theprint jobs management bar opens at the top of the screen. On the bar, you can selectfrom the following options:
PRINT — print selected jobs
EDIT JOBS — open editing options of selected jobs
ADD TO FAVORITES — add selected jobs to favorites (On the Ready jobs tab andon the Printed jobs tab)
DELETE FROM FAVORITES — delete selected jobs from favorites (On the Favoritejobs tab)
DELETE — delete selected jobs
INFO: After you select one job, you can tap additional jobs to add them to theselection. You can select all jobs by tapping the Select All jobs icon .

55
Editing selected print jobs
Users can change properties of their print jobs directly on the Embedded terminal.
l The user has to select the job on the My Jobs screen, and then tap the edit icon (). The Print Options dialog box appears.
FIGURE 7.5. Opening the Print Options screen
l In the dialog box, the user can change number of copies, force black and whiteprint and select from the single-sided/duplex options. After changing the printoptions, he or she can tap PRINT to print the jobs.
FIGURE 7.6. Changing properties of selected print jobs before printing

56
Easy Scan
Scanning by a single touch. After the user taps this action, the page is immediatelyscanned to a predefined folder or email. You can define multiple folders or emails towhich the scanned document is sent, and set the scan parameters in MyQ. For inform-ation about this action, see sections "Basic settings of the Easy Scan action" onpage 67, "Advanced settings of the Easy Scan action" on page 124 and "Easy Scan toOCR" on page 149.
Easy Copy
One tap copying. After the user taps this action, the page is immediately copied. You candefine the copy parameters in MyQ. For information about this action, see "Easy Copy"on page 153.
Easy Fax
Two steps faxing. You can define the fax parameters in MyQ. For information about thisaction, see "Easy Fax" on page 160.
Application
Button for direct access to 3rd party HyPAS applications from MyQ menu. For moreinformation about this action, see "Direct access to another HyPAS application " onpage 165.
Application List
Displays a list of 3rd party HyPAS applications.
Unlock Panel
Unlocks the printing device's panel and opens the default screen.
Panel Copy
Opens the printing device's copy screen.
Panel Scan
Opens the printing device's scan screen.
NOTICE: To enable scanning on the terminal, make sure that your MyQ server isset as the SMTP server on the printing device Web User Interface.

57
Panel Fax
Opens the printing device's fax screen.
Panel Box
Opens the printing device's document box screen.
Panel USB
Shows files stored on USB drive.
ID Card Registration
After tapping this action, the ID Card registration screen opens and the logged user canregister his or her card by swiping it at a card reader.
FIGURE 7.7. ID Card registration screen
Report Problem
This option is related to MyQ Service Module. For more information, see MyQ ServiceModule Manual.

58
Edit Account
By tapping this action, the logged user can open his or her user profile screen, where heor she can change full name, email and default language. After the change is submitted,the database entry is changed and the new values are set. The changes are appliednext time the user logs in.
FIGURE 7.8. User profile screen
Recharge Credit
For information about recharging credit on the terminal, see "Recharging credit" onpage 173.
Folder
Actions can be put into folders. Folders can be used to optimize layout of the terminalscreen or to enable users to access higher number of actions. For example, you canplace multiple Easy Scan actions with different destinations under one Easy Scan folderor leave just a few most important actions on the home screen and place the rest into anadditional actions folder.
INFO: Empty folders are not displayed on the terminal screen. If there is only oneitem in the folder, the item is displayed in place of the folder.
59
Fax Box
By tapping this action, users can access received faxes stored on the printing device'sfax box.
NOTICE: The fax box feature has to be enabled on the printing device.
Custom Box
By tapping this action, users can access the Custom Box of the printing device.
NOTICE: The Custom Box feature has to be available on the printing device.
7.1.2. Default actionsThe default actions are:
l Print Alll My Jobsl Panel Copyl Easy Scan — E-maill Easy Scan — Folderl ID Card Registrationl Panel USBl Easy Copyl Panel Scanl More Actions

60
7.2. Managing terminal actions on the MyQ Web InterfaceAction nodes can be managed on the Terminal Actions settings tab. To open the tab,click the MyQ icon and then click Settings on the MyQmain menu.
FIGURE 7.9. Terminal Actions setting tab with a list of action nodes
You can filter the action nodes available on a particular terminal type by selecting thetype on the Filter for terminal drop-down list box. Unavailable nodes are crossed on thelist of actions and are not displayed on the terminal screen preview.
FIGURE 7.10. Filtering the available terminal actions
INFO: For more information about the MyQ Web Interface, see "MyQ® Web Inter-face" in the MyQ Basic Installation Guide.

61
7.2.1. Adding new action nodesThe action nodes can be added either on the list of actions under Home screen or on thepreview of the terminal screen.
FIGURE 7.11. The two places where the action nodes are displayed: the list of nodes (and folders) and the ter-minal screen preview
Adding new action nodes on the list of nodes
You can add the new nodes either directly to the terminal's home screen or to foldersthat can be accessed from the home screen.
Adding a new action node to the terminal's home screen
FIGURE 7.12. Adding a new action node to be displayed on the home screen
1. Right-click the Home Screen folder, and then point on New sub node in the short-cut menu. A sub-menu with a list of available action nodes opens to the right.
2. On the sub-menu, select the action node. The new action node properties panelopens on the right side of screen.
3. On the panel, you can rename and edit the node. For information about editingoptions, see "Editing action nodes" on page 63. If you do not want to rename or toedit the node, close the properties panel. The action node is displayed on theaction nodes list and on the terminal screen preview.

62
Adding a new node to a folder
1. Right-click the folder to which you want to add the node, and then point on Newsub node in the shortcut menu. A sub-menu with a list of available action nodesopens to the right.
2. On the sub-menu, select the action node. The new action node properties panelopens on the right side of screen.
3. On the panel, you can rename and edit the node. For information about editingoptions, see "Editing action nodes" on the facing page. If you do not want torename or edit the node, close the properties panel. The action node is displayedon the action nodes list and on the terminal screen preview.
FIGURE 7.13. Adding a new action node to a folder
Adding new action nodes on the terminal screen preview
1. Right-click any item on the preview, and then point on New sub node in the short-cut menu. A sub-menu with a list of available action nodes opens to the right.
2. On the sub-menu, select the action node. The new action node properties panelopens on the right side of screen.
3. On the panel, you can rename and edit the node. For information about editingoptions, see "Editing action nodes" on the facing page. If you do not want torename or edit the node, close the properties panel. The action node is displayedon the action nodes list and on the terminal screen preview.

63
FIGURE 7.14. Adding a new action node on the terminal screen preview
INFO: To open a folder and display its content, double-click the folder on the pre-view or select it on the list of action nodes.
NOTICE: The maximal number of nodes on the preview corresponds to the max-imal number of nodes on the terminal screen.
7.2.2. Editing action nodesEach action can be edited on its properties panel. To access the panel, double-click theterminal action node on the list of nodes or on the terminal screen preview (See FIGURE7.11 on page 61.). Once you open the panel, you can swap between up to three settingstabs (depending on the particular action): General settings , Destinations and Para-meters.
FIGURE 7.15. General settings of thePrint All properties panel

64
General settings
Enabled
If you disable the node, it is not displayed on the terminal and cannot be used there.
Title
Here you can change name of the action node. If you do not change it, the default nameis used. Depending on the number of additional languages set on the MyQ Web Inter-face, you can use different names in different languages. The additional languages canbe set on the General tab, which can be opened from the MyQ Settings menu.
INFO: For more information about the additional languages setting, see "Generalsettings tab" under "MyQ® System Settings" in the MyQ Basic Installation Guide.
Printers
Here you can select the printing device, where the action node is available. Due to thissetting, the layout and available features of the embedded terminal can vary dependingon the selection of the printing devices. By default, the action is available on all printingdevices.
FIGURE 7.16. The drop-down box with the list of printing devices and groups of printing devices
To provide an additional printing device or a group of printing devices with accessto the action node:
1. Click the arrow on the right side of the Printers combo box. A drop-down box withthe list of printing devices and groups of printing devices appears.
2. In the drop-down box, select the printing device or the group of printing devices.The printing device or the group of printing devices is added to the selection dis-played in the combo box.
3. Click Save.

65
Rights
Here you can select the users or the groups of users that will see the action node. Due tothis setting, the layout and available features of the embedded terminal can vary depend-ing on user's rights to particular nodes. By default, the right to see the node is given to allusers.
FIGURE 7.17. TheRights combo box with the the list of users and groups of users
To provide an additional user or a group of users with rights to the action node:
1. Click the arrow on the right side of the Rights combo box. A drop-down box withthe list of MyQ users and groups of MyQ users appears.
2. In the drop-down box, select the user or group. The user or the group of users isadded to the selection displayed in the combo box.
3. Click Save.
Styles
Here you can change the graphical style of the terminal action. You can use the fixeddesign (color and icon) of any of the actions predefined within the currently used style.
FIGURE 7.18. Selecting the style for the terminal action
Destinations and parameters
For information about the destinations and parameters of the Easy Scan feature andabout the parameters of the Easy Copy feature, see "Setting parameters of the EasyScan feature" on page 118 and "Easy Copy" on page 153.
7.2.3. Changing the layout of the nodes on the screenTo change the nodes layout, you can either move the action nodes up and down theorder on the list, or move them on the terminal screen preview.

66
FIGURE 7.19. Moving the action node up and down the order
INFO: If there are more than ten action nodes defined on the home screen or inany folder, the surplus action nodes are not displayed on the screen and areignored on the preview.
7.2.4. Deleting action nodesYou can delete the nodes either from the action nodes list or from the terminal screen pre-view. Both actions have the same result — when you delete the node, it disappears fromboth places.
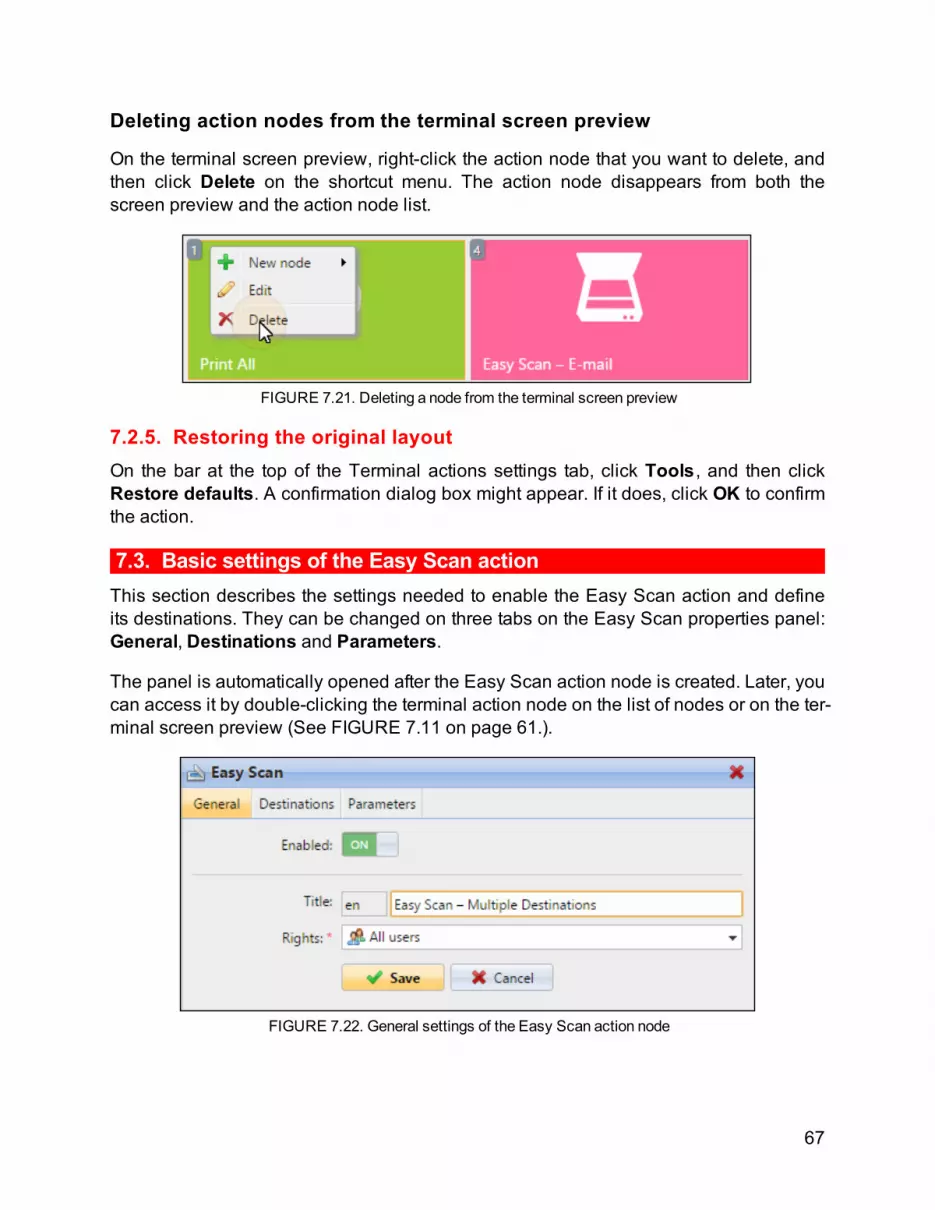
Deleting action nodes from the list
On the list of actions on the Terminal actions settings tab, right-click the action nodethat you want to delete, and then click Delete on the shortcut menu. The action node dis-appears from both the list and the screen preview.
FIGURE 7.20. Deleting a node from the list
67
Deleting action nodes from the terminal screen preview
On the terminal screen preview, right-click the action node that you want to delete, andthen click Delete on the shortcut menu. The action node disappears from both thescreen preview and the action node list.
FIGURE 7.21. Deleting a node from the terminal screen preview
7.2.5. Restoring the original layoutOn the bar at the top of the Terminal actions settings tab, click Tools, and then clickRestore defaults. A confirmation dialog box might appear. If it does, click OK to confirmthe action.
7.3. Basic settings of the Easy Scan actionThis section describes the settings needed to enable the Easy Scan action and defineits destinations. They can be changed on three tabs on the Easy Scan properties panel:General, Destinations and Parameters.
The panel is automatically opened after the Easy Scan action node is created. Later, youcan access it by double-clicking the terminal action node on the list of nodes or on the ter-minal screen preview (See FIGURE 7.11 on page 61.).
FIGURE 7.22. General settings of the Easy Scan action node

68
NOTICE: There are some destinations and parameters that can be selected inMyQ but are not mentioned in this manual. These options are not compatible withthe current version of the terminal. Easy Scan action nodes which contain any ofthem are not displayed on the users' home screens. This way, MyQ users can seeonly those Easy Scan actions that they can actually use.
7.3.1. Setting destinationsOn the Destinations tab, you can define the destinations where the scanned file is sent.
To add a new destination, do the following:
l Click +Add. The Destination panel opens. On the Destination panel, you can setthe destination.
FIGURE 7.23. Adding new destinations
The destination setting options are described below.
Common settings
Type
Here you can select from a number of available destinations where the scan can besent. For information about the destinations, see "Available destinations " on page 70.
69
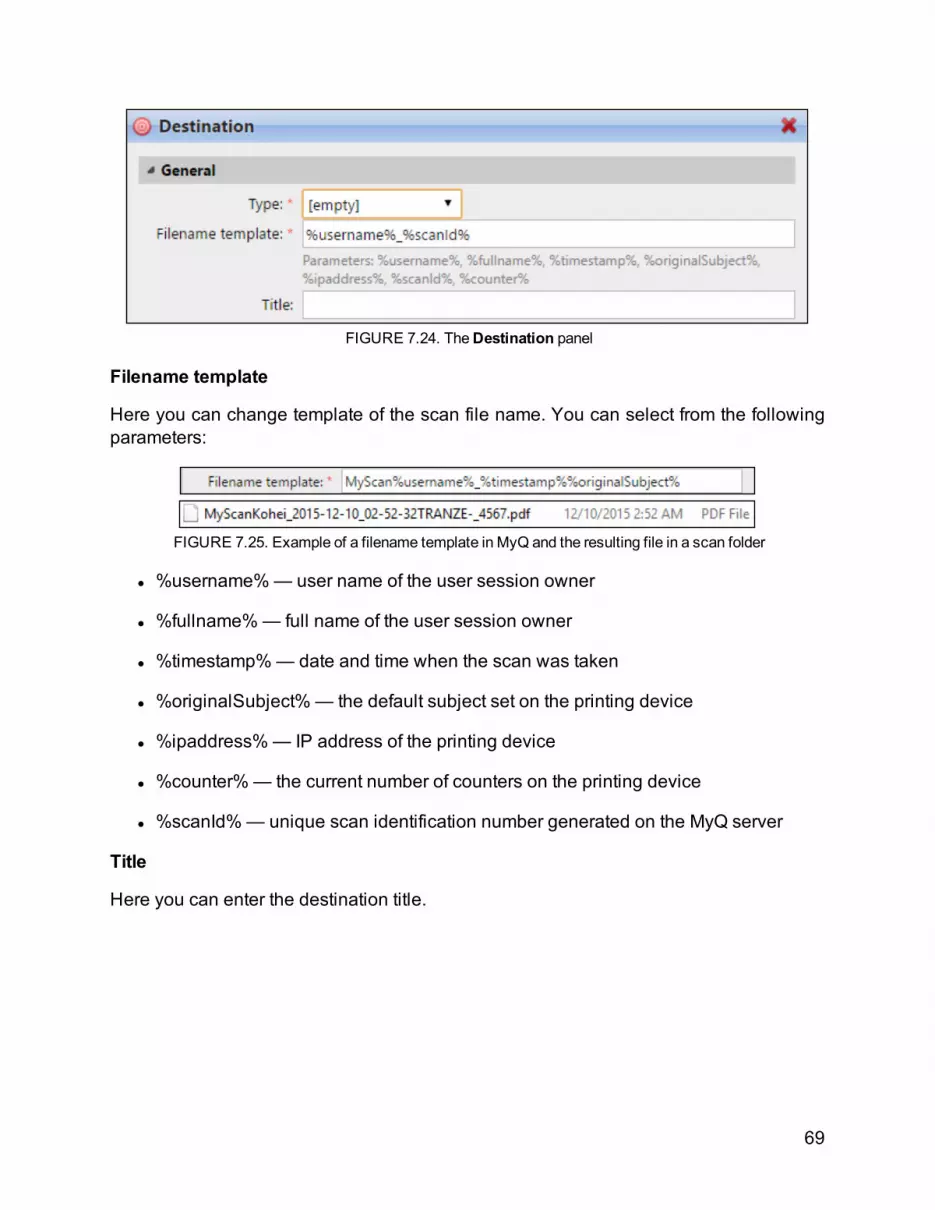
FIGURE 7.24. TheDestination panel
Filename template
Here you can change template of the scan file name. You can select from the followingparameters:
FIGURE 7.25. Example of a filename template in MyQ and the resulting file in a scan folder
l %username%— user name of the user session owner
l %fullname%— full name of the user session owner
l %timestamp%— date and time when the scan was taken
l %originalSubject%— the default subject set on the printing device
l %ipaddress%— IP address of the printing device
l %counter%— the current number of counters on the printing device
l %scanId%— unique scan identification number generated on the MyQ server
Title
Here you can enter the destination title.

70
FIGURE 7.26. The title setting and the resulting destination title
Attach metadata file
If you select this option, MyQ will send an XML file with the scan metadata together withthe scan. For more information about this option, see "Attaching a file with metadata ofthe scan" on page 124.
Available destinations
You can create one or more destinations where the scanned document is sent. Thisway, you can allow users to scan to multiple destinations by just one Easy Scan action.
User's scan storage
Outgoing scan files are stored in the folder set in the Folder or email for storingscanned documents text box on the user properties panel.
FIGURE 7.27. The User's scan storage destination settings

71
INFO: For more information about the user's scan storage folder, see "Scan Man-agement" in the Basic Installation Guide.
The Copy as parameter determines in which way the scan will be stored in the folder:
l If you select the Account the MyQ service is running under option, the rights foraccess to the destination folder have to be provided to the account under which theMyQ service runs.
l If you select the Account of the user making the scan option, MyQ will expectthe folder to be a shared folder on the user's domain account and will use theentered password to access this folder. For more information about this option, see"Enabling users to scan to their home folder protected by password" on page 144.

72
User's email
Scans are sent to the user's primary email address set in the Email text box on the user'sproperties panel on the Users main tab of the MyQWeb Interface.
FIGURE 7.28. The User's email destination settings
Under Parameters, you can define the subject of emails sent to this destination in theSubject text box and the body of these emails in the Message text box. The subject orbody can contain the following parameters:
l %username%— user name of the user session owner
l %fullname%— full name of the user session owner
l %timestamp%— date and time when the scan was taken
l %originalSubject%— the default subject set on the printing device
l %originalBody%— the default body set on the printing device
l %ipaddress%— IP address of the printing device

73
l %counter%— the current number of counters on the printing device
l %scanId%— unique scan identification number generated on the MyQ server
INFO: For more information about the user's email destination, see "Scan Man-agement" in the Basic Installation Guide.
INFO: You can allow users to type the subject and body of the email. To do this,create text parameters and use them in the Subject and Message text boxes. Formore information about custom parameters, see "Creating custom parameters" onpage 125.

74
Scans are sent to the email address specified on this tab (Destinations tab).
FIGURE 7.29. The Email destination settings
Under Parameters, in the Recipient text box, you need to define the recipient or recip-ients of the email.
In addition, you can add recipients of a copy in the Copy text box, recipients of a blindcopy in the Blind copy text box, the subject of the email in the Subject text box and thebody of the email in the Message text box.
INFO: Recipients of the blind copy do not see the email sender address.

75
The text boxes under Parameters can contain the following parameters:
l %username%— user name of the user session owner
l %fullname%— full name of the user session owner
l %timestamp%— date and time when the scan was taken
l %originalSubject%— the default subject set on the printing device
l %originalBody%— the default body set on the printing device
l %ipaddress%— IP address of the printing device
l %counter%— the current number of counters on the printing device
l %scanId%— unique scan identification number generated on the MyQ server
INFO: All scans are sent to the destinations specified here, unlike the scans dir-ected to the User's scan storage and the User's Email destinations, which aresent to the email address or folder defined on the account of the logged user.

76
Folder
Scans are sent to the folder specified on this tab (Destinations tab).
FIGURE 7.30. The Folder destination settings
You can select from the following parameters:
l %username%— user name of the user session owner
l %fullname%— full name of the user session owner
l %timestamp%— date and time when the scan was taken
l %originalSubject%— the default subject set on the printing device
l %ipaddress%— IP address of the printing device
l %counter%— the current number of counters on the printing device
l %scanId%— unique scan identification number generated on the MyQ server

77
In case the destination folder is a shared folder on a certain user's domain account towhich MyQ does not have universal access, you can use the User and Password set-tings to define the user name and password for access to the folder.
INFO: All scans are sent to the destinations specified here, unlike the scans dir-ected to the User's scan storage and the User's Email destinations, which aresent to the email address or folder defined on the account of the logged user.
Secured link
An email with link to to the scannned file is sent to the user's primary email address setin the Email text box on the user's properties panel on the Users main tab of the MyQWeb Interface. Sending scans to this destination works in a similar way as sending themto the User's Email destination — with one important exception: instead of the scannedfile, the email contains a secured link to the file, which is stored on the MyQ server andcan be downloaded via this link.
FIGURE 7.31. The Secured link email destination settings
INFO: For more information about the User's email destination, and also for inform-ation on the email with the secured link, see "Scan Management" in the BasicInstallation Guide.

78
FTP
Scans are sent to an FTP server. For information about this option, see "Scanning toFTP " on the facing page.
Fax server
Scans are sent to a network fax server. For information about this option, see "Scanningto FAX server" on page 81.
Custom destination
Advanced option requiring PHP customization. For further information about this option,please contact MyQ support.
Cloud storage
Users can scan to the following cloud destinations: OneDrive, OneDrive for Business,Google Drive, Dropbox, Box.com and SharePoint Online. For information about theseoptions, see "Scanning to OneDrive" on page 82, "Scanning to OneDrive for Business"on page 85, "Scanning to Google Drive" on page 101"Scanning to Google Drive" onpage 101"Scanning to Dropbox" on page 107, "Scanning to Box.com" on page 104 and"Scanning to SharePoint Online" on page 110.

79
7.3.2. Scanning to FTPScanned documents can be sent to a folder defined on the FTP server.
FIGURE 7.32. Setting the destination for scanning to FTP
Setting the connection:
l Server — enter the IP address or hostname of the FTP server
l Port — enter the port used for FTP protocol, the default port is 21
l Use SSL — select if you want to use secure communication
l User — name of a user with account on the server
l Password — enter the user's password

80
l Destination folder — you can specify the subfolder where the outgoing scan fileswill be stored (optional)
You can use the following parameters when defining the destination folder:
l %username%— user name of the user session owner
l %fullname%— full name of the user session owner
l %timestamp%— date and time when the scan was taken
l %originalSubject%— the default subject set on the printing device
l %ipaddress%— IP address of the printing device
l %scanId%— unique scan identification number generated on the MyQ server
INFO: After you fill the required parameters, you can click Test to test the FTP con-nection. MyQ tries to upload a dummy file named rightsCheck.dat to the defineddestination folder under the defined user name and password and informs youabout the result.
FIGURE 7.33. Themessage informing about the test result appears at the top of theDestinationpanel

81
7.3.3. Scanning to FAX serverScanned documents can be sent as emails to a fax server which processes them andsends faxes to appropriate FAX numbers.
FIGURE 7.34. Setting the destination for scanning to FAX
To send the document to the fax server, enter the appropriate email address template inthe Fax address template folder. You can select from the following parameters:
l %username%— name of the user session owner
l %recipient%— recipient of the fax
l %number%— fax number
l %empty%— this parameter ensures that the subject/message is empty; it is usedin very specific cases

82
l %ipaddress%— IP address of the printing device
l %scanId%— unique scan identification number generated on the MyQ server
As the sender, you can select one of the following addresses:
l Default — the sender set on the Scanning&OCR settings tab, under Default set-tings of the email with scan
l Default Sender — the email set on the Network settings tab, underOutgoingSMTP server
l Logged user — name of the user session owner
l Printer contact — the printing device contact email address set on its WEB UserInterface
In addition to the previous settings, you can define the subject of the email with fax in theSubject text box and the body of this email in the Message text box.
7.3.4. Scanning to OneDrive
FIGURE 7.35. Setting the destination for scanning to OneDrive

83
To enable scanning to OneDrive:
1. Select the Cloud Storage option in the Type drop-down list box.
2. Select the OneDrive option in the Type drop-down list box under Parameters, andthen click Save.
If the following two conditions are met, the cloud storage widget is displayed onthe Home screen of the user logged on the MyQWeb Interface:
l There is at least one Easy Scan action with this destination.
l User has rights to see Easy Scan button or is connected to cloud drive.
FIGURE 7.36. The Cloud storage widget displayed on user web interface— before and after connecting toOneDrive
To be able to store the outgoing scan file on OneDrive, the user has to be connected.
To connect to OneDrive, the user has to perform the following actions:
1. Log in to the MyQWeb User Interface with your user account.
2. On the Cloud storage widget, click Connect. The Cloud storage dialog boxappears.

84
3. Click Login to the cloud storage.
FIGURE 7.37. Logging to OneDrive
4. Sign-in to OneDrive and confirm permissions (when asked about the permissions,click Yes).
FIGURE 7.38. Signing in
5. Copy the given code.
6. Paste the code to the MyQ Cloud storage login dialog.
7. Click OK to connect the cloud storage to MyQ. The OneDrive connection statuschanges to Connected.
INFO: The user stays connected to OneDrive even after they log out of the MyQWeb Interface.

85
7.3.5. Scanning to OneDrive for BusinessThe feature has to be enabled in three steps:
l first you have to provide MyQ with access to your Azure AD,(See "1) Setting up access of MyQ to Azure AD" below.)
l then you have to create and set the OneDrive for Business destination,(See "2) Creating and setting the OneDrive for Business destination" on page 97.)
l lastly, users have to connect their MyQ accounts to OneDrive for Business.(See "3) Connecting users' accounts to OneDrive for Business" on page 97.)
1) Setting up access of MyQ to Azure AD
To set up the access, you have to associate your company's Office 365 accounts withAzure AD, create a new Azure AD app registration to be used by MyQ, and enter theAzure AD Application ID and Secret on the External Systems settings tab of the MyQWeb Interface.
A) Associate Office 365 accounts with Azure AD
For information on how to associate the accounts with Azure AD, see the following page:
https://msdn.microsoft.com/en-us/office/office365/howto/setup-development-envir-onment#bk_CreateAzureSubscription
INFO: This is a general setup of the Microsoft Office 365 and Azure AD applic-ations, which is not specifically related to the MyQ product. For further information,contact your Microsoft Support.
B) Create a new Azure AD app registration (It will be used by MyQ)
In Azure AD, you need to create and set a new Azure Active Directory App registration tobe used by the MyQ application. After the registration is created, you have to open its pre-view, copy the Application ID , replace the Reply URL , set required permissions forMicrosoft Graph and for Office 365 SharePoint Online , and in the end, create anaccess key and copy it.
The whole process of creating and setting the App registration is described on the fol-lowing pages.

86
FIGURE 7.39. Opening the App registration tab and creating a new app registration in Microsoft Azure
I. Log on to the Microsoft Azure management portal under any account (user oradmin) from your company's Azure AD.
FIGURE 7.40. Opening theMicrosoft Azuremanagement portal
II. On the menu on the left side of screen, select Azure Active Directory, open theApp registrations tab, and than click +Add. The Create panel with settings of thenew application registration opens to the right. (See FIGURE 7.39 above.)

87
III. Set the registration, and then click Create at the bottom of the panel. After the regis-tration is created, it appears on the list of registrations. Use the following values:
l Name: this name will be used as the name of the OneDrive for Businessscan folder
l Application Type: select theWeb app/API option
l Sign-on URL: IP address or hostname of the MyQ server
FIGURE 7.41. Setting and creating the registration
IV. Select the new registration to open its preview. The preview opens to the right.
FIGURE 7.42. Opening the new registration.

88
V. On the preview, copy the Application ID (The ID will be used by MyQ to accessthe Azure AD.), and then click Settings. The Settings panel opens to the right.
FIGURE 7.43. The Application ID shown on the preview and the opening of the Settings panel
VI. On the Settings panel, under GENERAL , click Reply URLs. The Reply URLspanel opens to the right.
FIGURE 7.44. Opening theReply URLs panel

89
VII. On the panel, first delete the current URL (Right-click the URL, and then clickDelete .), then enter the URL https://helper.myq.cz/, and as the last step, clickSave. The new URL is saved and displayed on the panel.
FIGURE 7.45. Changing theReply URL
VIII. Back on the Settings panel, under API ACCESS , click Required permissions.The Required permissions panel opens to the right.
FIGURE 7.46. Opening theRequired permissions tab

90
IX. On the Required permissions panel, click +Add . The Add API access panelopens to the right.
FIGURE 7.47. Adding a new set of permissions
X. On the panel, click Select an API. The Select an API panel opens to the right.
FIGURE 7.48. Opening the API selection panel
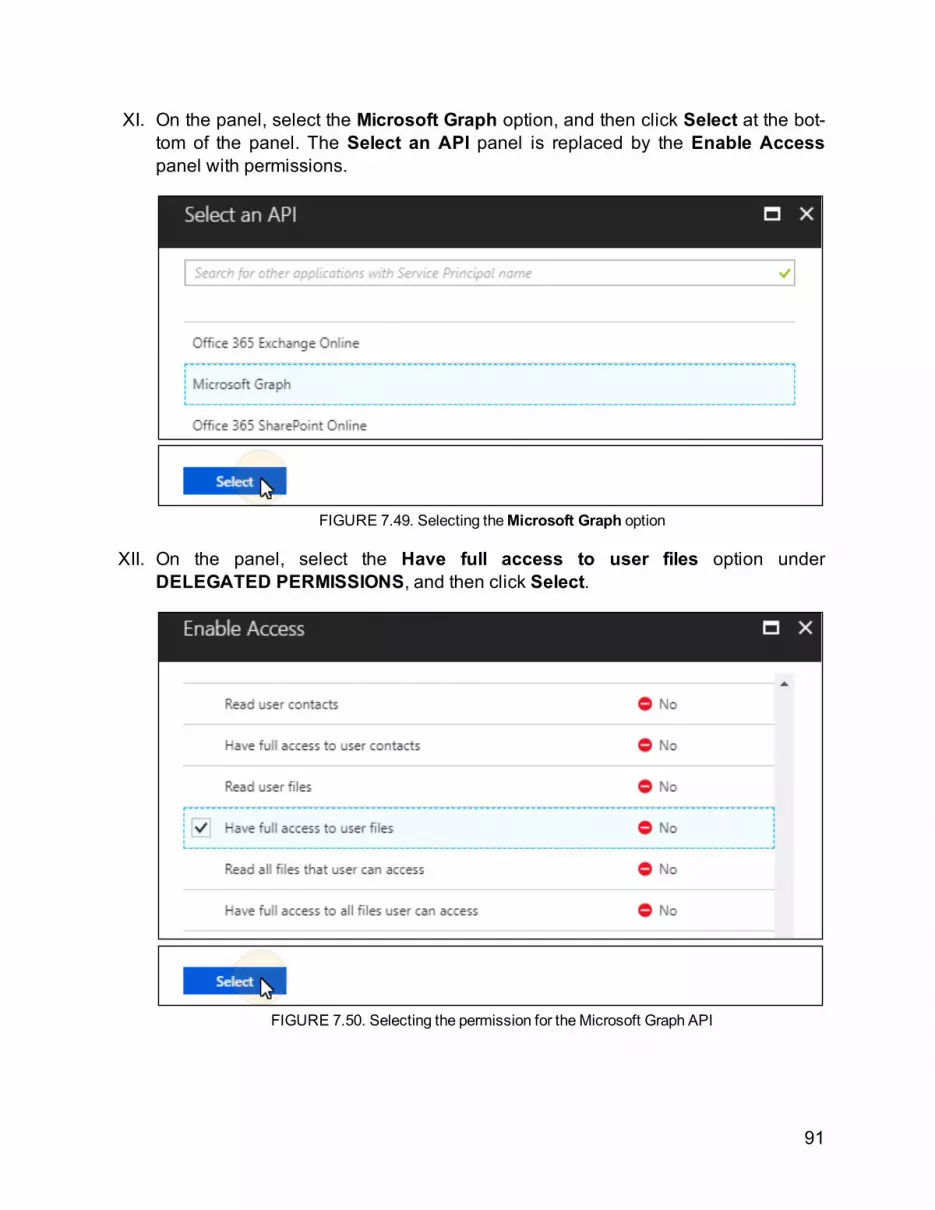
91
XI. On the panel, select the Microsoft Graph option, and then click Select at the bot-tom of the panel. The Select an API panel is replaced by the Enable Accesspanel with permissions.
FIGURE 7.49. Selecting theMicrosoft Graph option
XII. On the panel, select the Have full access to user files option underDELEGATED PERMISSIONS, and then click Select.
FIGURE 7.50. Selecting the permission for theMicrosoft Graph API

92
XIII. Back on Add API access panel, click Done to save the settings and createMicrosoft Graph API permissions set. The new permissions set is created and dis-played on the Required permissions panel.
FIGURE 7.51. Saving the API permissions set
XIV. Back on the Required permissions panel, click +Add . The Add API accesspanel opens to the right.
FIGURE 7.52. Adding a new set of permissions
XV. On the panel, click Select an API. The Select an API panel opens to the right.
FIGURE 7.53. Opening the API selection panel

93
XVI. On the panel, select the Office 365 SharePoint Online option, and then clickSelect at the bottom of the panel. The Select an API panel is replaced by theEnable Access panel with permissions.
FIGURE 7.54. Selecting theOffice 365 SharePoint Online option
XVII. On the panel, under DELEGATED PERMISSIONS , select the Read and writeuser files option and the Read user files option, and then click Select at the bot-tom of the panel. The Enable Access panel is closed.
FIGURE 7.55. Selecting permissions for the Office 365 SharePoint Online API

94
XVIII. Back on Add API access panel, click Done to save the settings and create theOffice 365 SharePoint Online API permissions set. The new permissions set iscreated and displayed on the Required permissions panel.
FIGURE 7.56. Saving the API permissions set
XIX. Back on Settings panel, under API ACCESS, click Keys. The Keys panel opensto the right.
FIGURE 7.57. Opening theKeys panel

95
XX. On the panel, enter any description (for example MyQ) , select one of the expirationoptions (for example Never expires), and than click Save. The key is created andits value is shown.
FIGURE 7.58. Creating the access key
XXI. Copy the value string (It will be used by MyQ to access the Azure AD.).
FIGURE 7.59. Copying the access key value
XXII. Exit the Microsoft Azure management portal.

96
C) On the External Systems settings tab in MyQ, enter the Azure AD Application IDand Secret on and request admin consent
I. Open the External Systems settings tab of the MyQWeb Interface. (At the top-leftcorner, click MyQ, then click Settings, and then click External Systems.)
II. On the tab, under OneDrive Business, enter the Application ID and the Securitykey, and then click Save.
FIGURE 7.60. Setting access to OneDrive for Business on theExternal Systems settings tab

97
2) Creating and setting the OneDrive for Business destination
I. Create a new destination. (See "Setting destinations" on page 68.)
II. On the new destination's properties panel, underGeneral, select the Cloud Stor-age option in the Type drop-down list box.
III. Select the OneDrive for Business option in the Type drop-down list box underParameters, and then click Save.
FIGURE 7.61. Setting the destination for scanning to OneDrive for Business
3) Connecting users' accounts to OneDrive for Business
If the following two conditions are met, the cloud storage widget is displayed onthe Home screen of the user logged on the MyQWeb Interface:
l There is at least one Easy Scan action with this destination.
l User has rights to see Easy Scan button or is connected to cloud drive.
To be able to store the outgoing scan file on OneDrive for Business, the user has to beconnected.

98
To connect to OneDrive for Business, the user has to perform the followingactions:
I. Log in to the MyQWeb User Interface with your user account.
II. On the Cloud storage widget, click Connect . The Cloud storage dialog boxappears.
FIGURE 7.62. The Cloud storage widget on user web interface
III. Click Login to the cloud storage to show the Microsoft online sign in window.
FIGURE 7.63. Logging to OneDrive

99
IV. On the window, click Accept. The MyQ Cloud storage login code appears.
FIGURE 7.64. Accepting the permissions
100
V. Copy the given code.
FIGURE 7.65. TheMyQ Cloud storage login code dialog box
INFO: The displayed login code will not be used within the rest of the con-nection setup process and does not need to be remembered.
VI. Paste the code into the Code: field on the Cloud storage widget, and then clickOK to connect the cloud storage to MyQ. The OneDrive for Business connectionstatus changes to Connected.
FIGURE 7.66. The Cloud storage widget after connecting to OneDrive for Business
INFO: The user stays connected to OneDrive for Business even after they log outof the MyQWeb Interface.

101
7.3.6. Scanning to Google Drive
FIGURE 7.67. Setting the destination for scanning to Google Drive
To enable scanning to Google Drive:
1. Select the Cloud Storage option in the Type drop-down list box.
2. Select the Google Drive option in the Type drop-down list box under Parameters,and then click Save.

102
If the following two conditions are met, the cloud storage widget is displayed onthe Home screen of the user logged on the MyQWeb Interface:
l There is at least one Easy Scan action with this destination.
l User has rights to see Easy Scan button or is connected to cloud drive.
FIGURE 7.68. The Cloud storage widget displayed on user web interface— before and after connecting toGoogle Drive
To be able to store the outgoing scan file on Google Drive, the user has to be connected.
To connect to Google Drive, the user has to perform the following actions:
1. Log in to the MyQWeb User Interface with your user account.
2. On the Cloud storage widget, click Connect. The Cloud storage dialog boxappears.
3. Click Login to the cloud storage.
FIGURE 7.69. Logging to Google Drive

103
4. Sign-in to Google Drive and confirm permissions. (When asked about the per-missions, click Allow).
FIGURE 7.70. Signing in
5. Copy the given code.
6. Paste the code to the Cloud storage login dialog.
7. Click OK to connect the cloud storage to MyQ. The Google Drive connectionstatus changes to Connected.
INFO: The user stays connected to Google Drive even after they log out of theMyQWeb Interface.
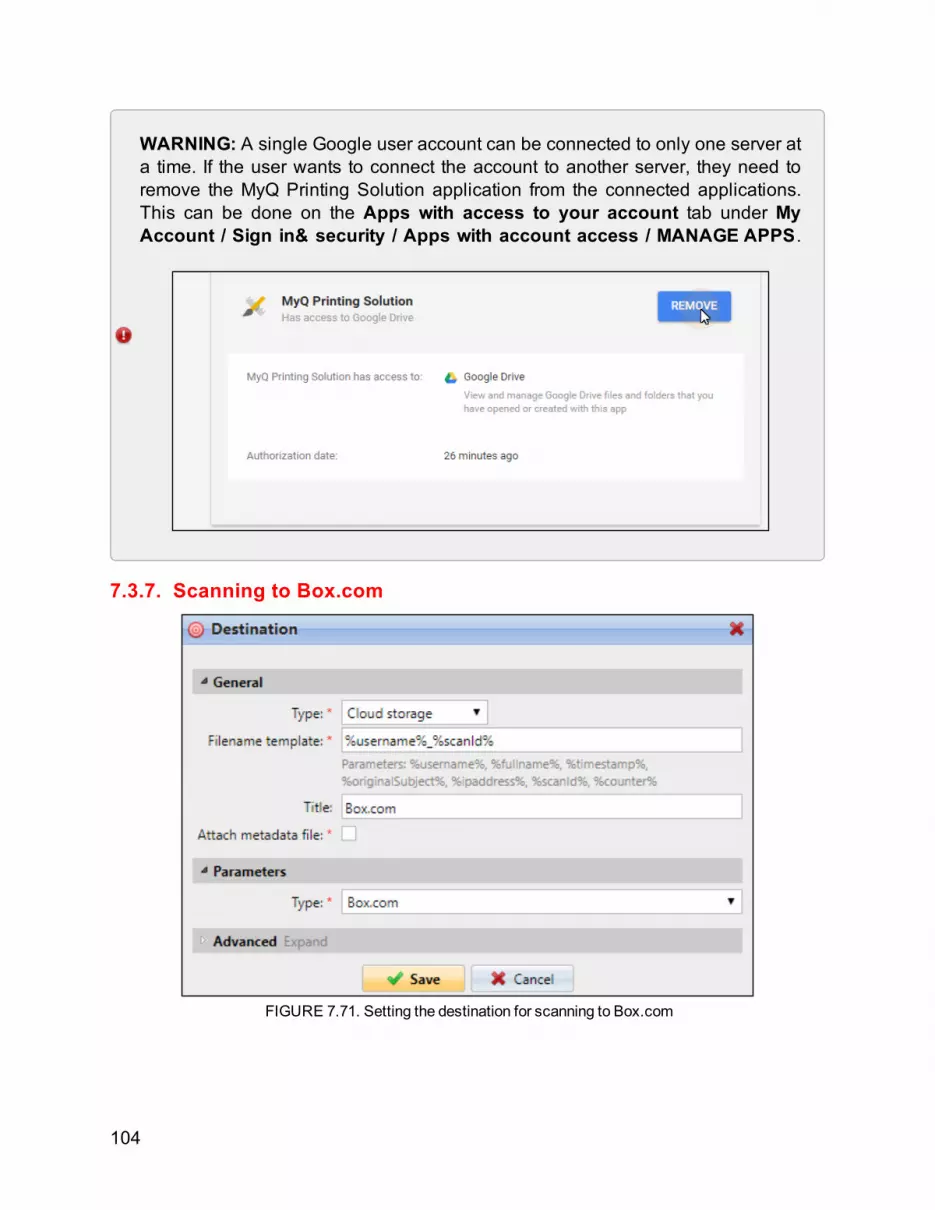
104
WARNING: A single Google user account can be connected to only one server ata time. If the user wants to connect the account to another server, they need toremove the MyQ Printing Solution application from the connected applications.This can be done on the Apps with access to your account tab under MyAccount / Sign in& security / Apps with account access / MANAGE APPS.
7.3.7. Scanning to Box.com
FIGURE 7.71. Setting the destination for scanning to Box.com

105
To enable scanning to Box.com:
1. Select the Cloud Storage option in the Type drop-down list box.
2. Select the Box.com option in the Type drop-down list box under Parameters, andthen click Save.
If the following two conditions are met, the cloud storage widget is displayed onthe Home screen of the user logged on the MyQWeb Interface:
l There is at least one Easy Scan action with this destination.
l User has rights to see Easy Scan button or is connected to cloud drive.
FIGURE 7.72. The Cloud storage widget displayed on user web interface— before and after connecting toBox.com
To be able to store the outgoing scan file on Box.com, the user has to be connected.
To connect to Box.com, the user has to perform the following actions:
1. Log in to the MyQWeb User Interface with your user account.
2. On the Cloud storage widget, click Connect. The Cloud storage dialog boxappears.

106
3. Click Login to the cloud storage. The Api Request Authorization dialog boxappears.
FIGURE 7.73. Logging to Box.com
4. Sign in to Box.com and confirm all permissions.
FIGURE 7.74. Signing in
5. Copy the given code.
6. Paste the code to the Cloud storage login dialog.
7. Click OK to connect the cloud storage to MyQ. The Box.com connection statuschanges to Connected.
INFO: The user stays connected to Box.com even after they log out of the MyQWeb Interface.

107
7.3.8. Scanning to Dropbox
FIGURE 7.75. Setting the destination for scanning to Dropbox
To enable scanning to Dropbox:
1. Select the Cloud Storage option in the Type drop-down list box.
2. Select the Dropbox option in the Type drop-down list box under Parameters, andthen click Save.
108
If the following two conditions are met, the cloud storage widget is displayed onthe Home screen of the user logged on the MyQWeb Interface:
l There is at least one Easy Scan action with this destination.
l User has rights to see Easy Scan button or is connected to cloud drive.
FIGURE 7.76. The Cloud storage widget displayed on user web interface— before and after connecting toDropbox
To be able to store the outgoing scan file on Dropbox, the user has to be connected.
To connect to Dropbox, the user has to perform the following actions:
1. Log in to the MyQWeb User Interface with your user account.
2. On the Cloud storage widget, click Connect. Cloud storage login dialog boxappears.
3. Click Login to the cloud storage. The Api Request Authorization dialog boxappears.
FIGURE 7.77. Logging to Dropbox

109
4. Sign in to Dropbox and confirm all permissions.
FIGURE 7.78. Signing in
5. Copy the given code.
6. Paste the code to the MyQ Cloud storage login dialog.
7. Click OK to connect the cloud storage to MyQ. The Dropbox connection statuschanges to Connected.
INFO: The user stays connected to Dropbox even after they log out of the MyQWeb Interface.

110
7.3.9. Scanning to SharePoint OnlineThe feature has to be enabled in three steps:
l first you have to register the MyQ app in SharePoint,("1) Enabling access to SharePoint" below.)
l then you have to create and set the SharePoint Online destination,("2) Creating and setting the SharePoint Online destination" on page 115.)
l lastly, users have to connect their MyQ accounts to SharePoint.("3) Connecting users' accounts to SharePoint Online" on page 116.)
1) Enabling access to SharePoint
To set up the access, you have to register the MyQ app in SharePoint and enter theSharePoint Application ID and Secret on the External Systems settings tab of theMyQWeb Interface.
A) Register the MyQ app in SharePoint
I. In the Web Browser, enter one of the the following URLs:
l For the root SharePoint site:https://<site_name>.sharepoint.com/_layouts/15/appregnew.aspx(e.g. https://mycompany.sharepoint.com/_layouts/15/appregnew.aspx)
l For a specific SharePoint site (site collection):https://<site_name>.sharepoint.com/sites/<specific_site_name>/_lay-outs/15/appregnew.aspx(e.g. https://mycompany.sharepoint.com/sites/SCANNING/_lay-outs/15/appregnew.aspx)
NOTICE: You need to have admin rights on the specific level (for theSharePoint root site or for the specific site) to be able to access the settings.

111
II. Fill in or generate the fields (see their description below), and then click Create.You are informed that the app identifier has been successfully created.
l Client Id: You can generate it or use your own. Copy its value; it will be usedlater in the registration process.
l Client Secret: You can generate it or use your own. Copy its value; it will beused later in the registration process.
l Title: "MyQ"
l App Domain: "helper.myq.cz"
l Redirect URI: "https://helper.myq.cz/"
FIGURE 7.79. Creating the app identifier
FIGURE 7.80. Information about the successful creation of the app identifier

112
III. In the Web Browser, enter one of the the following URLs:
l For the root SharePoint site:https://<site_name>.sharepoint.com/_layouts/15/appinv.aspx(e.g. https://mycompany.sharepoint.com/_layouts/15/appinv.aspx)
l For a specific SharePoint site (site collection):https://<site_name>.sharepoint.com/sites/<specific_site_name>/_lay-outs/15/appinv.aspx(e.g. https://mycompany.sharepoint.com/sites/SCANNING/_lay-outs/15/appinv.aspx)
IV. Fill in the App ID (the Client Id from step III), and then click Lookup. This shouldfill all fields except for Permission Request XML.
FIGURE 7.81. Searching for the app
FIGURE 7.82. Additional fields are automatically filled in.

113
V. Copy the below string, paste it to the Permission Request XML field, and thenclick Create. You are asked if you trust the MyQ application.
<AppPermissionRequests AllowAppOnlyPolicy="true"><AppPermissionRequest Scope="http://sharepoint/content/sitecollection/web/list"Right="Write" /></AppPermissionRequests>
FIGURE 7.83. Submitting the app's permision request
VI. Make sure that the Documents option is selected under Let it edit or delete doc-uments and list items in the list (It should be selected by default.), and then clickTrust It.
FIGURE 7.84. Allowing theMYQ app to edit and delete documents.
VII. Now you can leave the SharePoint settings and open the MyQ Web Interface to fin-ish the setup.

114
B) On the External Systems settings tab in MyQ, enter the SharePoint Online ClientId, Secret and Site URL
FIGURE 7.85. Setting access to SharePoint Online on theExternal Systems settings tab of theMYQWebInterface
I. Open the External Systems settings tab of the MyQWeb Interface. (At the top-leftcorner, click MyQ, then click Settings, and then click External Systems.)
II. On the tab, under SharePoint Online, enter the Client ID and the Security key(the Client Id and the Client Secret from step from "A) Register the MyQ app inSharePoint" on page 110), and then click Save.

115
2) Creating and setting the SharePoint Online destination
FIGURE 7.86. Setting the destination for scanning to SharePoint Online
I. Create a new destination. (See "Setting destinations" on page 68.)
II. On the new destination's properties panel, underGeneral, select the Cloud Stor-age option in the Type drop-down list box.
III. Select the SharePoint Online option in the Type drop-down list box under Para-meters, and then click Save.

116
3) Connecting users' accounts to SharePoint Online
If the following two conditions are met, the cloud storage widget is displayed onthe Home screen of the user logged on the MyQWeb Interface:
l There is at least one Easy Scan action with this destination.
l User has rights to see Easy Scan button or is connected to cloud drive.
FIGURE 7.87. The Cloud storage widget displayed on user web interface— before and after connecting toSharePoint Online
To be able to store the outgoing scan file on SharePoint Online, the user has to be con-nected.
To connect to SharePoint Online, the user has to perform the following actions:
1. Log in to the MyQWeb User Interface with your user account.
2. On the Cloud storage widget, click Connect. Cloud storage login dialog boxappears.

117
3. Click Login to the cloud storage. The Api Request Authorization dialog boxappears.
FIGURE 7.88. Logging to SharePoint Online
4. Sign in to the office account and confirm all permissions. The MyQ Cloud storagelogin code dialog box appears with the login code displayed inside.
FIGURE 7.89. Signing in to Google account
5. Copy the given code.
6. Paste the code to the MyQ Cloud storage dialog box.
7. Click OK to connect the cloud storage to MyQ. The SharePoint Online connectionstatus changes to Connected.

118
INFO: If the Operation failed error message appears after the code is submitted,it can mean that the application's security key stored on the External Systems set-tings tab of the MyQ Web Interface is incorrect. In such case, the MyQ admin-istrator have to re-enter the key on the tab.
INFO: The user stays connected to SharePoint Online even after they log out ofthe MyQWeb Interface.
7.3.10. Setting parameters of the Easy Scan featureOn the Parameters tab, you can set parameters of the scan file, such as resolution andformat. You can select from a number of options for each parameter.
FIGURE 7.90. Parameters tab on the easy scan action node properties panel
Predefined parameters are described in the Predefined parameters section below; forinformation on creating your own parameters, see "Advanced settings of the Easy Scanaction" on page 124.

119
NOTICE: All parameters are dependent on the particular printing device type.Therefore, some values might not be available.
WARNING: Some parameters (resolution, color) significantly influence size of thescanned file. For example, combination of higher resolution and full color will dra-matically increase the file size.
Predefined parameters
NOTICE:With the Default option selected, values are taken from scan default set-tings of the printing device.
Resolution
Resolution of the outgoing file. You can select from the following options:
l 100 dpil 200 dpil 300 dpil 400 dpil 600 dpil 1200 dpil Default
Color
Color scale of the outgoing file. You can select from the following options:
l Colorl Grayscalel B&W (two tones)l Automaticl Default
Format
Format of the outgoing file. You can select from the following options:
l PDFl JPEG

120
l TIFFl XPSl HCPDFl Default
Duplex
Simplex and Duplex scanning options. You can select from the following options:
l Single Sidedl Duplexl Default
Continuous scan
FIGURE 7.91. Continuous scan terminal screen
With the continuous scan option enabled, scan jobs are not sent until Finish is taped.After clicking Next, the printing device scans another batch of pages. You can selectfrom the following options:
l Disabledl Enabledl Default
Scan separation
If a document with multiple pages is scanned, scanned pages can be stored either sep-arately (each page in a separate file) or all together in one file. You can select from the

121
following options:
l All pages togetherl Separate each pagel Default
Original Image
Determines the way in which the printing device is going to process the scanned page.You can select from the following options:
l Text + Photol Photol Textl Default
Original Orientation
Determines the scanned page orientation in the outgoing file. Position of the paper is rel-ative to the person standing at the printing device. You can select from the followingoptions:
l Top Edge on Top — the page is displayed in a horizontal position (top edge of thepage opposite to the scanning person)
l Top Edge on Left — the page is displayed in a vertical position (top edge of thepage on the left hand side of the scanning person)
l Default
Density
Density of the picture in the outgoing file. The higher it is, the darker the resulting pictureis. You can select from the following options:
l Automaticl Lowestl Lowerl Lowl Normall Highl Higherl Highestl Default

122
Size
Size of the scanned output. It determines the size of the scanning area; therefore itshould correspond to the actual size of the scanned paper. You can select from the fol-lowing options:
l Automaticl A3l A4l A5l A6l B4l B5l B6l Foliol Ledgerl Letterl Legall Defaultl Statement
Mixed size
This parameter enables automatic paper size recognition when different sizes of paperare used during scanning. You can select from the following options:
l On — the Size parameter is ignored and the size of each scanned image is recog-nized by the printing device
l Off — the Size parameter is used to decide the size of the scanned imagel Default
Skip blank pages
With this parameter, you can select to skip blank pages in the scanned document. Youcan select from the following options:
l Defaultl Yesl No
Enabling users to change Easy Scan settings on the terminal screen
You can allow users to change settings of the scan on the terminal screen. To do this,you have to change settings of the particular parameter on the Parameters tab on theEasy Scan action node properties panel.

123
FIGURE 7.92. The Resolution setting can be changed on the terminal screen, other settings are locked.
To allow users to change the scan settings, open the parameter properties panel anddeselect the Prohibit change of value option.
FIGURE 7.93. TheProhibit change of value option is deselected.
INFO: By default, all predefined parameters are locked (the Prohibit change ofvalue option is selected).

124
7.4. Advanced settings of the Easy Scan actionThis section describes settings of advanced options of the Easy Scan action — attach-ing metadata and creating your own scan parameters. These settings are not necessaryfor simple run of the Easy Scan feature, but they can be very useful — for example, youcan enable users to select the scan destination or you can use a DMS software to extractadditional information from the attached metadata file.
7.4.1. Attaching a file with metadata of the scan
FIGURE 7.94. File with metadata of a scan
MyQ can generate a file with metadata concerning basic information about the outgoingscan file and all parameters of the scan. You can create new parameters for additionalinformation to be included in the metadata file. Third party DMS software can be used toextract the information from the metadata file and proceed the scan file. For example, it

125
can store the scan file in different places depending on the values of parameters in themetadata file.
To activate sending of the metadata file, select the Attach metadata file option on theDestination tab of the action node properties panel. The metadata file is sent as a sep-arate file in XML format with the same name as the scanned document. It is saved to thesame folder, or sent to the same destination as the scanned document.
FIGURE 7.95. Selecting theAttach metadata file option on theDestination tab
INFO: For information on setting the scan destination, see "Setting destinations"on page 68
7.4.2. Creating custom parametersThe new parameters can be used in the scan metadata or as parts of file names,addresses, subjects and bodies of emails, also as paths to folders, passwords to foldersetc. These types of parameters can be created: Text, Password, Code Book, Yes/No,MyQ Users and External Code Book.
Adding the parameter
FIGURE 7.96. Parameters tab of the Easy Scan - My Folder action node properties panel

126
1. On the action node properties panel, open the Parameters tab.
2. On the tab, click +Add. The new parameter properties panel opens on the rightside of screen.
3. Set the parameter, and then click Save. For information about parameters settingoptions, see the following section. The new parameter is displayed on the list onthe Parameters tab.
Parameters settings
FIGURE 7.97. Properties panel of a new parameter
l Title: name of the parameter
l Type:o Text: value of the parameter is a text (string) typed by user on the embeddedterminal
o Password: value of the parameter is used as a password to user's account
o Code book: the parameter uses list of values from a predefined code list
o Yes/No: Boolean parameter with two options: Yes, No
o MyQ Users: parameter used for selecting scan recipients from the list of allMyQ users
o External Code Book: parameter used for selecting scan recipients directlyfrom an LDAP server
127
l Required: The parameter value has to be defined. If the parameter does not havea default value, users are not allowed to print before its value is entered in the par-ticular text box on the terminal screen.
l Prohibit change of value: If this option is selected, the parameter cannot bechanged by user on the terminal screen.
l Reference: String that is used as a reference to the parameter. Parameter with theparameterX reference is referred to as%parameterX% in MyQ. For example, thereference of the often used user name parameter is username; the parameter isreferred to as%username%.
l Allowmultiple values: The MyQ users parameter and the External Code Booksparameter allow selecting multiple values. This way, users can send multiple recip-ients of their scan.
l Allow custom values: The MyQ users parameter and the External Code Booksparameter allow users to type their own value.
Text parameters
You can use these parameters in a variety of strings in MyQ: names of files, addresses,subjects or bodies of emails, paths to folders and many other.
Password
This parameter is used together with the Logged user option for the user scan storagedestination. Users type the password to their domain account to access their sharedfolder there. For more information about use of the password, see "Enabling users toscan to their home folder protected by password" on page 144.
Code book
You can predefine a number of code lists with values and use the values as options. Forinformation on how to create the code lists, see "Creating Code Lists and Codes on theMyQ Web Interface" on the next page . For more information about their use, see"Enabling users to select the output folder from a code book" on page 136.
Yes/No parameters
You can use these parameters in the scan metadata file to provide answers on Yes-Noquestions concerning the scan, such as if the scan is private or if it should be archived.

128
INFO: Parameters of this type have the Required option selected by default andcannot be deselected as they always have a value — the default value being No.By selecting the Default value option, you change the default value to Yes.
MyQ Users
This parameter enables selecting scan recipients from the list of all MyQ users. The scanis sent to the recipient primary email set in the Email text box on his or her propertiespanel on the Users main tab of the MyQ Web Interface, or to the folder set in the Folderor email for storing scanned documents text box on the same place. For informationabout how to use this option, see "Enabling users to select recipients from the list of allMyQ users" on page 138.
External Code Book
This parameter enables selecting scan recipients directly from an LDAP server by import-ing the codes from the server. For information on how to create the external code books,see "Creating external code books" on page 133. For more information about their use,see "Enabling users to search recipients via external code books" on page 141.
7.4.3. Creating Code Lists and Codes on the MyQ Web InterfaceOn the Code Books settings tab, you can define your own code lists and add multiplecodes with defined values for each of them. To open the tab, click the MyQ icon and thenclick Settings on the MyQmain menu.
FIGURE 7.98. The Code Books settings tab

129
Adding and deleting code lists
To add a new code list
1. On the Code Books settings tab, click +New code list. A yellow drop-down boxappears.
FIGURE 7.99. Adding a new code list
2. In the drop-down box, enter name of the new code list, and then click OK. The newcode list is added to the list on the Code Books settings tab and its propertiespanel opens on the right side of screen.
FIGURE 7.100. Entering the code list name
FIGURE 7.101. List of code lists with the new item

130
To delete a code list
l Select the code list, and then click Delete on the bar at the top of the Code Bookssettings tab (or right-click the code list, and then click Delete).
FIGURE 7.102. Deleting a code list
Adding, importing and deleting codes from a code list
The codes are added, imported and deleted on the properties panel of the code list.
FIGURE 7.103. The properties panel of the Output Folder code list
To add a new code to an existing code list:
1. Double-click the code list (or right-click the code list, and then click Edit). The codelist's properties panel opens on the right side of screen.
2. On the panel, click +Add. The new code appears.
3. Enter the code name, its description text box (The description will be shown on theterminal.), eventually select the users or the groups of users that will have accessto this code, and then click OK.

131
FIGURE 7.104. Adding a new code to a code list
To import codes from a CSV file
1. Double-click the code list (or right-click the code list, and then click Edit). The codelist properties panel opens on the right side of screen.
2. On the panel, click Tools, and then click Import from CSV file. The Import from aCSV file dialog box appears.
FIGURE 7.105. Importing codes from aCSV file
3. In the dialog box, choose the file, select the column delimiter used in the file, selectthe charset used in the file, eventually select to update existing values or skip theheader line, and then click OK.
FIGURE 7.106. Setting the import

132
INFO:Each line of the CSV file has to consist of either one, two or three columns. Thefirst column contains the code, while the optional second and third columns con-tain the code's description and the users or groups with access to this code.
FIGURE 7.107. Lines of the CSV file
To delete a code from a code list
1. Double-click the code list (or right-click the code list, and then click Edit). The codelist properties panel opens on the right side of screen.
2. Right-click the code that you want to delete. A drop-down box appears.
3. On this drop-down box, click Delete.
FIGURE 7.108. Deleting a code from a code list
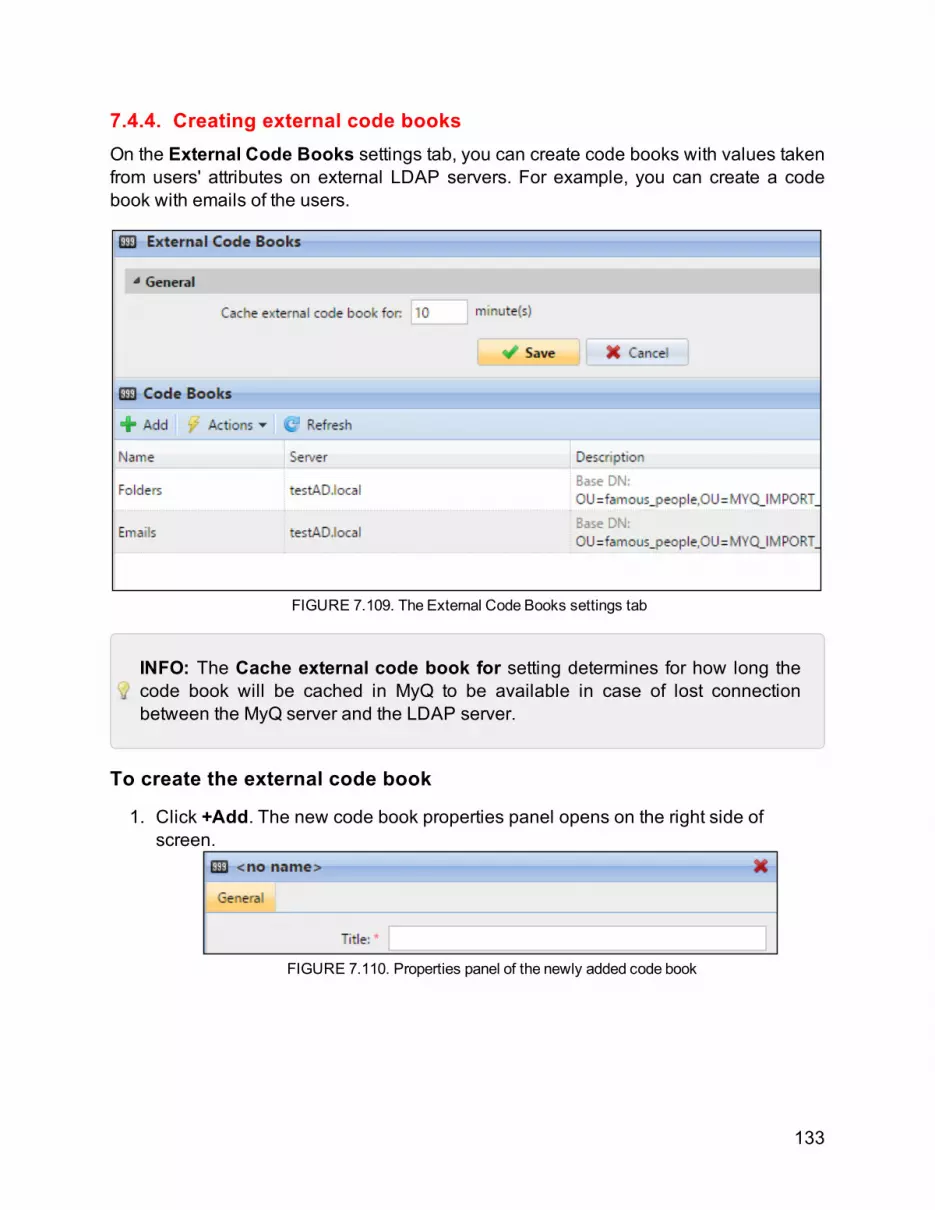
133
7.4.4. Creating external code booksOn the External Code Books settings tab, you can create code books with values takenfrom users' attributes on external LDAP servers. For example, you can create a codebook with emails of the users.
FIGURE 7.109. The External Code Books settings tab
INFO: The Cache external code book for setting determines for how long thecode book will be cached in MyQ to be available in case of lost connectionbetween the MyQ server and the LDAP server.
To create the external code book
1. Click +Add. The new code book properties panel opens on the right side ofscreen.
FIGURE 7.110. Properties panel of the newly added code book

134
2. On the panel, enter the code book title, server, user and password, one or morebase DNs and eventually filter. For information about these settings, see "Settingsof code books" on the facing page.
FIGURE 7.111. Filled details of the code book
3. Under Properties, define the titles and values of the code for each user by enter-ing his or her attributes from the LDAP database. For example, you can enter thecn attribute as the Title and the mail attribute as the Value. This way, each codewill contain the user's email and its title will be the user's full name.
4. Click Save at the bottom at the panel.
INFO: To test the code book and connection to the source LDAP server, right-click the code book, and then click Test . The external code book dialog boxappears. To find a user, you need to enter initial letters of the Title attribute, asMyQ uses prefix query.
FIGURE 7.112. In the dialog box, you can see results of searches for particular items.

135
Settings of code books
General
Title
Name of the code bookServer
The LDAP server from which you want to import the attributesUser
The user name for access to the LDAP domain serverPassword
The password for access to the LDAP domain serverBase DN
Here you can enter the base domain or domains from which you import the attributes.
Click +Add to add a text box for the new base DN, and then enter the domain. You canadd multiple domains this way.Filter
You can filter the import of users by specifying values of attributes. Add the conditions inform:
Attribute=Value. Users with different value of this attribute are not accepted and arefiltered out of the import.
You can use the * symbol to search for substrings. The symbol can be appended fromboth sides. For
example, if you add a cn=*in* condition, only users whose common name attribute con-tains "in" are accepted.
Add one condition per one raw. Users are accepted if they satisfy at least one condition.

136
7.4.5. Examples of use of the custom parameters
Enabling users to select the output folder from a code book
In this example, we will show how to enable users to select the scan destination folderfrom a predefined code book. Let us suppose that we have already created and savedthe Easy Scan action node for this action (see "Adding new action nodes" on page 61)and that we have created a code book named Folders which has names of folders as itsvalues (see "Creating Code Lists and Codes on the MyQ Web Interface" on page 128).The next step is to add and set up a new Code Book parameter and a new Folder des-tination for the Easy Scan action. The parameter is then used as a part of the path to thefolder.
FIGURE 7.113. Users can select the destination on theOutput folder screen of the embedded terminal

137
I) Create and set the Code Book parameter for the output folder
Create a new parameter (see "Creating custom parameters" on page 125) with the fol-lowing settings: select the Code book type, select the predefined code book (in ourexample Folders ), deselect the Prohibit change of value option and enter the ref-erence name of the parameter (in our example folder) in the Reference text box.
FIGURE 7.114. The parameter is set on theParameters tab on the action node properties panel
If you don't want to allow empty value of the parameter, select the Required option sothat users have to enter its value before sending the file.
Optionally, you can select a default value to define the folder where the output files willbe saved, if users don't change it.
INFO:When defining the code book on the Code Books settings menu, you canset a description that differs from the name of the parameter. Users will see thisdescription on the embedded terminal screen.
FIGURE 7.115. Codes and their descriptions

138
II) Create the new Folder destination and use the parameter as a part of its des-tination
Create and set up a new destination (see "Setting destinations" on page 68). For thisdestination, you can use the parameter as any part of the destination path set in theDestination folder text box. To use the parameter, enter its reference name (set on theparameter properties panel under Advanced / Reference, see FIGURE 7.114 on theprevious page) bounded in percentage signs as part of the path.
FIGURE 7.116. The destination set on theDestinations tab contains the%folder% parameter
In our example, we used a parameter with the reference name folder as the folder wherethe files are stored (\\Users\%folder%), but we could have as well created a parameterwith the full path to the folder instead.
Enabling users to select recipients from the list of all MyQ users
In this example, we will show how to enable users to select recipients from the list of allMyQ users. We will create a parameter of the MyQ Users type, and then add two des-tinations — one for emails and one for folders — so that the scan is sent to two places:the recipient’s email and home folder.
FIGURE 7.117. Users can add recipients on theMyQUsers screen of the embedded terminal

139
The destination email is set in the Email text box on the recipient's properties panel onthe Users main tab of the MyQ Web Interface. The destination folder is set in the Folderor email for storing scanned documents text box on the same place.
I) Create and set the MyQ Users parameter for the two destinations
Create the parameter with the following settings: select the MyQ Users type, deselectthe Prohibit change of value option and enter the reference name in the Referencetext box.
If you want to allow users to select multiple recipients, select Allowmultiple values.
If you want to allow users to enter their own value, select Allow custom values.
If you don't want to allow empty value of the parameter, select the Required option sothat users have to enter a value before sending the file.
Optionally, you can select a default value to define the folder where the output files willbe saved, if users don't change it.
FIGURE 7.118. The parameter is set on theParameters tab on the action node properties panel
INFO: For information on how to create and set parameters, see "Creating customparameters" on page 125.
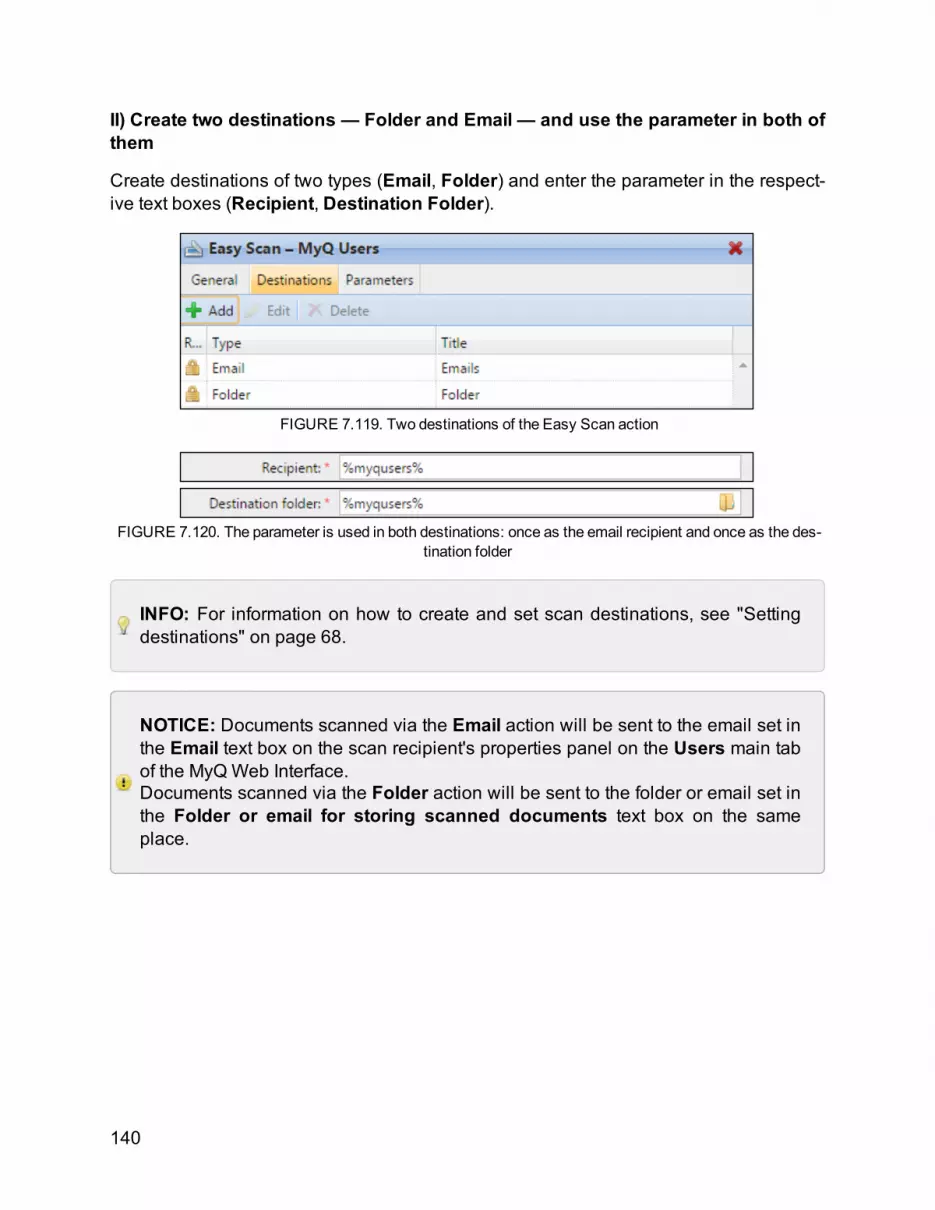
140
II) Create two destinations — Folder and Email — and use the parameter in both ofthem
Create destinations of two types (Email, Folder) and enter the parameter in the respect-ive text boxes (Recipient, Destination Folder).
FIGURE 7.119. Two destinations of the Easy Scan action
FIGURE 7.120. The parameter is used in both destinations: once as the email recipient and once as the des-tination folder
INFO: For information on how to create and set scan destinations, see "Settingdestinations" on page 68.
NOTICE: Documents scanned via the Email action will be sent to the email set inthe Email text box on the scan recipient's properties panel on the Users main tabof the MyQWeb Interface.Documents scanned via the Folder action will be sent to the folder or email set inthe Folder or email for storing scanned documents text box on the sameplace.

141
Enabling users to search recipients via external code books
In this example, we will show how to enable users to search for recipients on LDAP serv-ers via external code books.
FIGURE 7.121. Users can send queries to the LDAP server to find the recipients on LDAP server database
External code books contain two parameters: Title and Value . The value of the Titleparameter is used as an input for search in the LDAP database and the Value parameterdefines the value returned by the database.
For our sake, we will use an external code book with the cn attribute assigned to theTitle parameter and the mail attribute assigned to the Value parameter. For more inform-ation on how to create external code books, see "Creating external code books" onpage 133. We will also create a new parameter and a new folder destination for the fea-ture.
The scanning user types a string to be used in a search query. MyQ sends the query tothe LDAP database to
search for user accounts, whose cn begin with the entered string. The scanning usercan select from the
returned accounts. After he or she selects the account, the value of the mail attribute ofthe account is used as the scan destination.

142
NOTICE: To find the recipient, users need to type initial letters of the value of theattribute assigned to the Title parameter, as MyQ uses prefix query. To find a userwith the cn attribute value Carol Kai, users need to type for example C, Car, Carolor Carol Kai, and then select from the search result.
1) Create and set a new External Code Book parameter for the output folder
Create the parameter with the following settings: select the External Code book type,select the External Code Book that you want to use, deselect the Prohibit change ofvalue option and enter the reference name in the Reference text box.
If you want to allow users to select multiple recipients, select Allowmultiple values.
If you want to allow users to enter their own value, select Allow custom values.
If you don't want to allow empty value of the parameter, select the Required option sothat users have to enter its value before sending the file.
FIGURE 7.122. Properties tab of the External Code Book parameter

143
2) Create a new Email destination and use the parameter as the recepient there
Create a destination of the type Email and enter the parameter in the Recipient text boxthere. For more information on how to create destinations, see "Setting destinations" onpage 68.
FIGURE 7.123. TheRecipient text box on theDestinations tab with the%recipients% parameter
NOTICE: The parameter has to be enclosed in % signs.

144
Enabling users to scan to their home folder protected by password
If you do not want to give MyQ server universal access to users' shared folders, butinstead want to provide each user with separate rights to access his or her shared folderfrom MyQ, you can enable scanning users to enter the password to their LDAP domainaccount to access the shared folder there.
FIGURE 7.124. Users are prompted to type the password to their accounts on the domain before the scan issent.
To be able to access their shared folders, users have to have the LDAP domain definedin MyQ. The information about the domain is taken either from the Authenticationserver setting on the user's properties panel in MyQ, or from the user's MyQ user name(if the name is in the form [email protected]).
During the scanning, after the password is entered and submitted, MyQ takes the nameof the user's domain (either from the Authentication server setting, or from the back partof the user name) and attempts to log on the user's account on this domain (either thewhole user name, or its front part). If the password is correct, MyQ saves the scan in theshared folder, otherwise it displays the error message "Error while delivering a scanX/Y. Unable to write to the folder.".
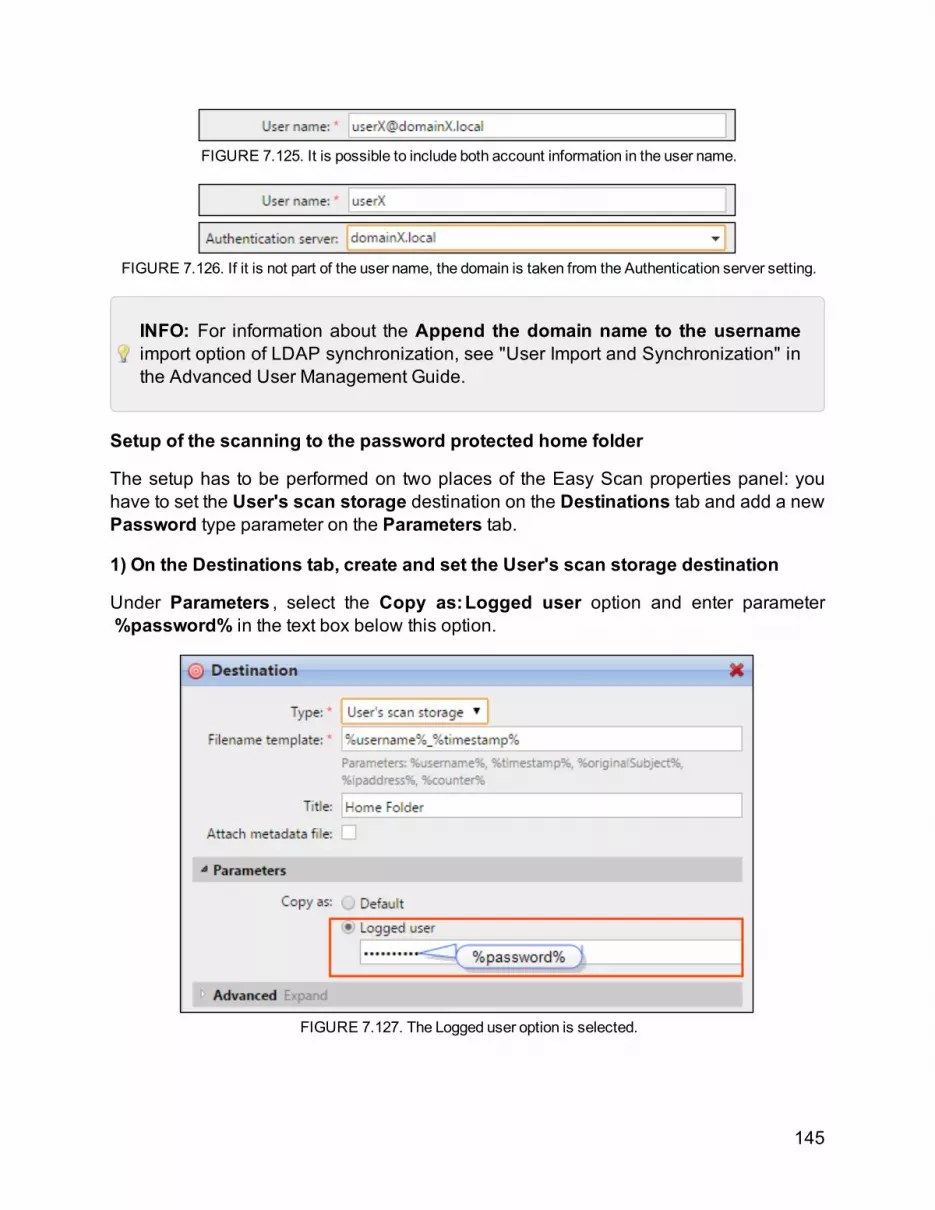
145
FIGURE 7.125. It is possible to include both account information in the user name.
FIGURE 7.126. If it is not part of the user name, the domain is taken from the Authentication server setting.
INFO: For information about the Append the domain name to the usernameimport option of LDAP synchronization, see "User Import and Synchronization" inthe Advanced User Management Guide.
Setup of the scanning to the password protected home folder
The setup has to be performed on two places of the Easy Scan properties panel: youhave to set the User's scan storage destination on the Destinations tab and add a newPassword type parameter on the Parameters tab.
1) On the Destinations tab, create and set the User's scan storage destination
Under Parameters , select the Copy as:Logged user option and enter parameter%password% in the text box below this option.
FIGURE 7.127. The Logged user option is selected.

146
2) On the Parameters tab, create a password parameter for access to sharedfolders on users' accounts
Create a parameter with the following properties:
l Title: Passwordl Type: Passwordl Required: selectedl Reference: password
FIGURE 7.128. Settings of the Password parameter

147
Providing additional information in a metadata file
In this example, we will show how to use parameters for obtaining additional informationabout the scan file or any other data provided by users. The parameter can be of any ofthe following three types: Text, Code Book or Yes/No.
FIGURE 7.129. Options selected by users will be included in the scanmetadata file
As an example, we will create a Yes/No type parameter called Should the scan bearchived?.
I. The parameter title is what is shown on the screen, therefore we name it Shouldthe scan be archived?.
II. As a second step, we select the parameter type — Yes/No. The Required optionis selected by default and cannot be deselected as it always has a value — thedefault value being No. The default value can be changed to Yes by selecting theDefault value option, however we leave it deselected as we want to defaultanswer to be No.
III. We do not have to use the reference as the parameter is not going to be used inany string in MyQ. Therefore, we can Save the parameter settings.

148
FIGURE 7.130. Setting theShould the scan be archived? parameter
The following two figures show two possible values of the Should the scan bearchived? parameter. A DMS software can automatically archive the scans with value 1into a predefined folder.
FIGURE 7.131. No value on the <value/> raw means that the answer was No.
FIGURE 7.132. Value 1 on the same raw means that the answer was Yes.

149
7.5. Easy Scan to OCROptical Character Recognition is a complementary service that converts scanned doc-uments to a searchable and editable format, such as an MS Word document or a search-able PDF. If you want to employ this functionality, you might use either the MyQ OpticalCharacter Recognition (OCR) server, which can be purchased as a part of the MyQ solu-tion, or a third party application.
FIGURE 7.133. Users can select the OCR format before scanning the document
NOTICE: In order not to collide with the MyQ server's OCR feature, the device'sOCR is disabled for the Easy scan action. To use the device's OCR instead, it isnecessary to enable PDF/A on the printing device and set it as the default option.Scan is than searchable if PDF is selected as the default value of the Formatparameter of the Easy Scan action on the MyQ Web Interface. (see "Setting para-meters of the Easy Scan feature" on page 118)
Users can send the scanned file to OCR without using the easy scan feature — just bysending the file to predefined email addresses. However, using the Easy Scan featuresimplifies the process of selecting the right OCR option and sending the file.
To enable using OCR together with Easy Scan, you have to create OCR profiles andenable users to select them on the embedded terminal. By setting the profiles, youdefine the input folders for the OCR software. Name of the profile should be related tothe OCR action defined for this input folder. For example, if you want to convert

150
documents in the folder to DOC format, you can name the profile OCRDOC and instructthe software to convert every document scanned to this profile (stored to the OCRDOCfolder) to Microsoft Word format.
INFO: For more information about using the OCR service in MyQ, see "OpticalCharacter Recognition (OCR)" under "Scan Management" in the Basic Install-ation Guide.
INFO: For information on how to purchase the MyQ OCR server, please contactthe MyQ sales department.
To set up the OCR feature, do the following:
1) Create OCR profiles:
l On the Scanning&OCR settings tab, under OCR, under OCR profiles, click +Add,and then enter the profile name.
FIGURE 7.134. OCR Settings on theScanning&OCR settings tab on theMyQWeb Interface

151
l The OCR profiles are added to values of the Format parameter of the Easy Scanaction.
FIGURE 7.135. TheOCR profiles among other values of the Format parameter
l On the Scanning&OCR settings tab, underOCR working folder, you can changethe folder, where the scanned data are sent. However, we recommend you not tochange the default folder (C:\ProgramData\MyQ\OCR\).
l The OCR folder contains two sub-folders: in and out. In the in folder, the scanneddocuments are stored before being processed. In the out folder, the processed doc-uments are saved by the OCR software and ready to be sent.
FIGURE 7.136. The folders where the documents are stored to be proceed by the OCR software
INFO:MyQ creates the OCR folder first time a file is sent to the particular pro-file.

152
2) Enable users to select the appropriate OCR folder on the embedded terminal
I. On the Easy Scan action node properties panel, on the Parameters tab, on the listof parameters, double-click the Format parameter.
II. Deselect the Prohibit change of value, and then click Save.
FIGURE 7.137. The prohibit change of value option is deselected
OCR processing
The OCR software should listen to the document sub- folders of the in folder(in\OCRDOC, in\OCRTXT,...), process the file sent there, save the converted documentto the out folder and delete the source file from the in\*** folder.
MyQ listens to the out folder, sends the converted file to the destinations defined on theDestinations tab (see "Setting destinations" on page 68) and deletes it from the folder.
WARNING: The file sent to the out folder by the OCR software has to have thesame name as the source file in the in\*** folder. If the name of the converted filediffers from the source file, it is deleted without being sent to the user.

153
7.6. Easy CopyWith the Easy Copy feature, users do not have to go to the often complicated and con-fusing copy screen of the printing device — they can copy directly from the MyQ terminalhome screen by a single touch. Upon tapping the button, MyQ can simply proceed copy-ing using the default settings of the printing device, or it can use different values of theEasy Copy action parameters.
By adding multiple Easy Copy action nodes and giving rights to different users orgroups, you can create a variety of copying options for the selected users and groups(see "Adding new action nodes" on page 61).
FIGURE 7.138. Easy Copy properties panel with specific name and rights
On the Parameters tab, you can select from a number of options for each parameter. Allparameters of the Easy Copy action are described in the Parameters of Easy Copy sec-tion below.
INFO: All parameters are dependent on the particular printing device type. There-fore, some values might not be available.

154
Printing devices supporting Easy Copy
ECOSYS Series Color/B&W Device type
ECOSYSM2640idw B&W Multifunction printer
ECOSYSM3040idn B&W Multifunction printer
ECOSYSM3145idn B&W Multifunction printer
ECOSYSM3540idn B&W Multifunction printer
ECOSYSM3550idn B&W Multifunction printer
ECOSYSM3560idn B&W Multifunction printer
ECOSYSM3645idn B&W Multifunction printer
ECOSYSM3655idn B&W Multifunction printer
ECOSYSM3660idn B&W Multifunction printer
ECOSYSM4125idn Color Multifunction printer
ECOSYSM4132idn Color Multifunction printer
ECOSYSM4226idn B&W Multifunction printer
ECOSYSM4230idn B&W Multifunction printer
ECOSYSM6026cidn Color Multifunction printer
ECOSYSM6035cidn Color Multifunction printer
ECOSYSM6230cidn Color Multifunction printer
ECOSYSM6235cidn Color Multifunction printer
ECOSYSM6526cidn Color Multifunction printer
ECOSYSM6535cidn Color Multifunction printer
ECOSYSM6630cidn Color Multifunction printer
ECOSYSM6635cidn Color Multifunction printer
ECOSYSM8030cidn Color Multifunction printer

155
ECOSYS Series Color/B&W Device type
ECOSYSM8124cidn Color Multifunction printer
ECOSYSM8130cidn Color Multifunction printer
ECOSYSM8224cidn Color Multifunction printer
ECOSYSM8228cidn Color Multifunction printer
TASKalfa Series Color/B&W Device type
TASKalfa 266ci Color Multifunction printer
TASKalfa 306ci Color Multifunction printer
TASKalfa 307ci Color Multifunction printer
TASKalfa 350ci Color Multifunction printer
TASKalfa 351ci Color Multifunction printer
TASKalfa 356ci Color Multifunction printer
TASKalfa 357ci Color Multifunction printer
TASKalfa 406ci Color Multifunction printer
TASKalfa 407ci Color Multifunction printer
TASKalfa 2510i B&W Multifunction printer
TASKalfa 2520i B&W Multifunction printer
TASKalfa 3010i B&W Multifunction printer
TASKalfa 3011i B&W Multifunction printer
TASKalfa 3210i B&W Multifunction printer
TASKalfa 3212i B&W Multifunction printer
TASKalfa 3501i B&W Multifunction printer
TASKalfa 3510i B&W Multifunction printer

156
TASKalfa Series Color/B&W Device type
TASKalfa 3511i B&W Multifunction printer
TASKalfa 4002i B&W Multifunction printer
TASKalfa 4012i B&W Multifunction printer
TASKalfa 4020i B&W Multifunction printer
TASKalfa 4501i B&W Multifunction printer
TASKalfa 5002i B&W Multifunction printer
TASKalfa 5501i B&W Multifunction printer
TASKalfa 6002i B&W Multifunction printer
TASKalfa 6501i B&W Multifunction printer
TASKalfa 7002i B&W Multifunction printer
TASKalfa 8001i B&W Multifunction printer
TASKalfa 8002i B&W Multifunction printer
TASKalfa 9002i B&W Multifunction printer
TASKalfa 2460ci Color Multifunction printer
TASKalfa 2470ci Color Multifunction printer
TASKalfa 2551ci Color Multifunction printer
TASKalfa 2552ci Color Multifunction printer
TASKalfa 3051ci Color Multifunction printer
TASKalfa 3060ci Color Multifunction printer
TASKalfa 3252ci Color Multifunction printer
TASKalfa 3551ci Color Multifunction printer
TASKalfa 3552ci Color Multifunction printer

157
TASKalfa Series Color/B&W Device type
TASKalfa 4052ci Color Multifunction printer
TASKalfa 4551ci Color Multifunction printer
TASKalfa 5052ci Color Multifunction printer
TASKalfa 5551ci Color Multifunction printer
TASKalfa 6052ci Color Multifunction printer
TASKalfa 6551ci Color Multifunction printer
TASKalfa 7052ci Color Multifunction printer
TASKalfa 7551ci Color Multifunction printer
TASKalfa 8052ci Color Multifunction printer
7.6.1. Parameters of Easy Copy
NOTICE:With the Default option selected, values are taken from scan default set-tings of the printing device.
Copies
Predefined number of copies.
Color
Color scale of the outgoing file. You can select from the following options:
l Colorl Grayscalel B&W (two tones)l Automaticl Default

158
Duplex
Simplex and Duplex scanning options. You can select from the following options:
l Single Sidedl Duplexl Default
Original Orientation
Determines the scanned page orientation in the outgoing file. Position of the paper is rel-ative to the person standing at the printing device. You can select from the followingoptions:
l Top Edge on Top — the page is displayed in a horizontal position (top edge of thepage opposite to the scanning person)
l Top Edge on Left — the page is displayed in a vertical position (top edge of thepage on the left hand side of the scanning person)
l Default
Density
Density of the picture in the outgoing file. The higher it is, the darker the resulting pictureis. You can select from the following options:
l Automaticl Lowestl Lowerl Lowl Normall Highl Higherl Highestl Default
Size
Size of the scanned input. It determines the size of the scanning area; therefore it shouldcorrespond to the actual size of the scanned paper. You can select from the followingoptions:
l Automaticl A3l A4l A5

159
l A6l B4l B5l B6l Foliol Ledgerl Letterl Legall Defaultl Statement
Magnification
With this parameter, you can determine the size of the copy. This way, you can make itsmaller or larger than the original file. You can select from the following options:
l Same as originall A3l A4l A5l A6l B4l B5l B6l Foliol Ledgerl Letterl Legall Defaultl Statement
Skip blank pages
With this parameter, you can select to skip blank pages in the copied document. You canselect from the following options:
l Defaultl Yesl No

160
7.7. Easy FaxWith the Easy Fax feature, users can fax their scanned documents in just two steps; allthey need to do is to tap the Easy Fax button on the home screen of the embedded ter-minal, and then type the fax number.
FIGURE 7.139. Easy Fax properties panel
By adding multiple Easy Fax action nodes and giving rights to different users or groups,you can create a variety of faxing options for the selected users and groups (see "Addingnew action nodes" on page 61).
To enable the feature on a printing device, you need to enable the select the Fax moduleoption on its properties panel in MyQ, deactivate and reactivate the device. For inform-ation on how to do this, see "Enabling the Easy Fax action on a printing device prop-erties panel " on the facing page.
On the Parameters tab, you can select from a number of options for each parameter. Allparameters of the Easy Fax action are described in the "Parameters of Easy Fax" onpage 163.
WARNING: This feature is available only on printing devices that are equippedwith a fax module. For information on how to set up faxing on Kyocera printingdevices, see dedicated Kyocera documentation or ask your Kyocera supplier.
INFO: All parameters are dependent on the particular printing device type. There-fore, some values might not be available.
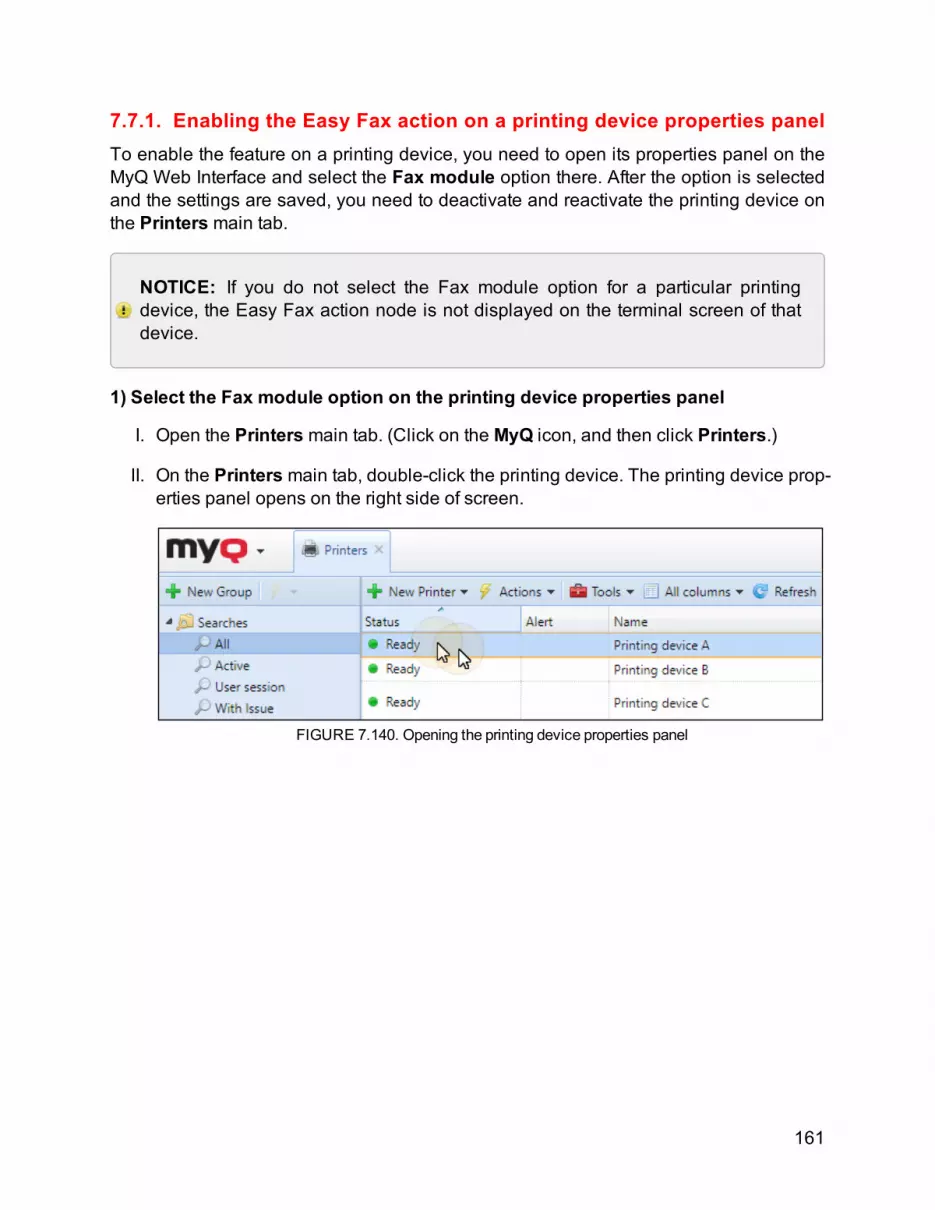
161
7.7.1. Enabling the Easy Fax action on a printing device properties panelTo enable the feature on a printing device, you need to open its properties panel on theMyQ Web Interface and select the Fax module option there. After the option is selectedand the settings are saved, you need to deactivate and reactivate the printing device onthe Printers main tab.
NOTICE: If you do not select the Fax module option for a particular printingdevice, the Easy Fax action node is not displayed on the terminal screen of thatdevice.
1) Select the Fax module option on the printing device properties panel
I. Open the Printers main tab. (Click on the MyQ icon, and then click Printers.)
II. On the Printers main tab, double-click the printing device. The printing device prop-erties panel opens on the right side of screen.
FIGURE 7.140. Opening the printing device properties panel

162
III. On the panel, under General, select the Fax module option, and then click Saveand close the panel.
FIGURE 7.141. Selecting the Fax module option
2) Deactivate and reactivate the printing device
I. On the Printers main menu, right-click the printing device, and then click Deactiv-ate on the shortcut menu. The printing device is deactivated.
FIGURE 7.142. Deactivating the device

163
II. Right-click the printing device again, and then click Activate on the shortcut menu.The printing device is reactivated.
FIGURE 7.143. Reactivating the device
7.7.2. Parameters of Easy Fax
NOTICE:With the Default option selected, values are taken from scan default set-tings of the printing device.
Fax resolution
Resolution of the outgoing fax file. You can select from the following options:
l Finel Super Finel Ultra Finel Default
Duplex
Simplex and Duplex scanning options. You can select from the following options:
l Single Sidedl Duplexl Default

164
Original Image
Determines the way in which the printing device is going to process the scanned page.You can select from the following options:
l Text + Photol Photol Textl Default
Size
Size of the scanned output. It determines the size of the scanning area; therefore itshould correspond to the actual size of the scanned paper. You can select from the fol-lowing options:
l Automaticl A3l A4l A5l A6l B4l B5l B6l Foliol Ledgerl Letterl Legall Defaultl Statement
Original Orientation
Determines the scanned page orientation in the outgoing file. Position of the paper is rel-ative to the person standing at the printing device. You can select from the followingoptions:
l Top Edge on Top — the page is displayed in a horizontal position (top edge of thepage opposite to the scanning person)
l Top Edge on Left — the page is displayed in a vertical position (top edge of thepage on the left hand side of the scanning person)
l Default

165
Density
Density of the picture in the outgoing file. The higher it is, the darker the resulting pictureis. You can select from the following options:
l Automaticl Lowestl Lowerl Lowl Normall Highl Higherl Highestl Default
7.8. Direct access to another HyPAS applicationThe Application terminal action node enables users to directly access a third partyHyPAS application. After creating the action node, type the application title that you wantto be displayed on the screen, set rights and type its reference name (the name shownon the printing device system menu, under Applications) to the Reference text box.
FIGURE 7.144. Setting the direct access action node
NOTICE: The reference has to be exactly the same as the name shown on theapplication list of the device. Bear in mind that the system is case sensitive.

166
Printing devices supporting Direct access to another HyPAS application
ECOSYS Series Color/B&W Device type
ECOSYSM2640idw B&W Multifunction printer
ECOSYSM3040idn B&W Multifunction printer
ECOSYSM3145idn B&W Multifunction printer
ECOSYSM3540idn B&W Multifunction printer
ECOSYSM3550idn B&W Multifunction printer
ECOSYSM3560idn B&W Multifunction printer
ECOSYSM3645idn B&W Multifunction printer
ECOSYSM3655idn B&W Multifunction printer
ECOSYSM3660idn B&W Multifunction printer
ECOSYSM4125idn Color Multifunction printer
ECOSYSM4132idn Color Multifunction printer
ECOSYSM4226idn B&W Multifunction printer
ECOSYSM4230idn B&W Multifunction printer
ECOSYSM6026cidn Color Multifunction printer
ECOSYSM6035cidn Color Multifunction printer
ECOSYSM6230cidn Color Multifunction printer
ECOSYSM6235cidn Color Multifunction printer
ECOSYSM6526cidn Color Multifunction printer
ECOSYSM6535cidn Color Multifunction printer
ECOSYSM6630cidn Color Multifunction printer
ECOSYSM6635cidn Color Multifunction printer
ECOSYSM8030cidn Color Multifunction printer

167
ECOSYS Series Color/B&W Device type
ECOSYSM8124cidn Color Multifunction printer
ECOSYSM8130cidn Color Multifunction printer
ECOSYSM8224cidn Color Multifunction printer
ECOSYSM8228cidn Color Multifunction printer
TASKalfa Series Color/B&W Device type
TASKalfa 266ci Color Multifunction printer
TASKalfa 306ci Color Multifunction printer
TASKalfa 307ci Color Multifunction printer
TASKalfa 350ci Color Multifunction printer
TASKalfa 351ci Color Multifunction printer
TASKalfa 356ci Color Multifunction printer
TASKalfa 357ci Color Multifunction printer
TASKalfa 406ci Color Multifunction printer
TASKalfa 407ci Color Multifunction printer
TASKalfa 2510i B&W Multifunction printer
TASKalfa 2520i B&W Multifunction printer
TASKalfa 3010i B&W Multifunction printer
TASKalfa 3011i B&W Multifunction printer
TASKalfa 3210i B&W Multifunction printer
TASKalfa 3212i B&W Multifunction printer
TASKalfa 3501i B&W Multifunction printer
TASKalfa 3510i B&W Multifunction printer

168
TASKalfa Series Color/B&W Device type
TASKalfa 3511i B&W Multifunction printer
TASKalfa 4002i B&W Multifunction printer
TASKalfa 4012i B&W Multifunction printer
TASKalfa 4020i B&W Multifunction printer
TASKalfa 4501i B&W Multifunction printer
TASKalfa 5002i B&W Multifunction printer
TASKalfa 5501i B&W Multifunction printer
TASKalfa 6002i B&W Multifunction printer
TASKalfa 6501i B&W Multifunction printer
TASKalfa 7002i B&W Multifunction printer
TASKalfa 8001i B&W Multifunction printer
TASKalfa 8002i B&W Multifunction printer
TASKalfa 9002i B&W Multifunction printer
TASKalfa 2460ci Color Multifunction printer
TASKalfa 2470ci Color Multifunction printer
TASKalfa 2551ci Color Multifunction printer
TASKalfa 2552ci Color Multifunction printer
TASKalfa 3051ci Color Multifunction printer
TASKalfa 3060ci Color Multifunction printer
TASKalfa 3252ci Color Multifunction printer
TASKalfa 3551ci Color Multifunction printer
TASKalfa 3552ci Color Multifunction printer

169
TASKalfa Series Color/B&W Device type
TASKalfa 4052ci Color Multifunction printer
TASKalfa 4551ci Color Multifunction printer
TASKalfa 5052ci Color Multifunction printer
TASKalfa 5551ci Color Multifunction printer
TASKalfa 6052ci Color Multifunction printer
TASKalfa 6551ci Color Multifunction printer
TASKalfa 7052ci Color Multifunction printer
TASKalfa 7551ci Color Multifunction printer
TASKalfa 8052ci Color Multifunction printer
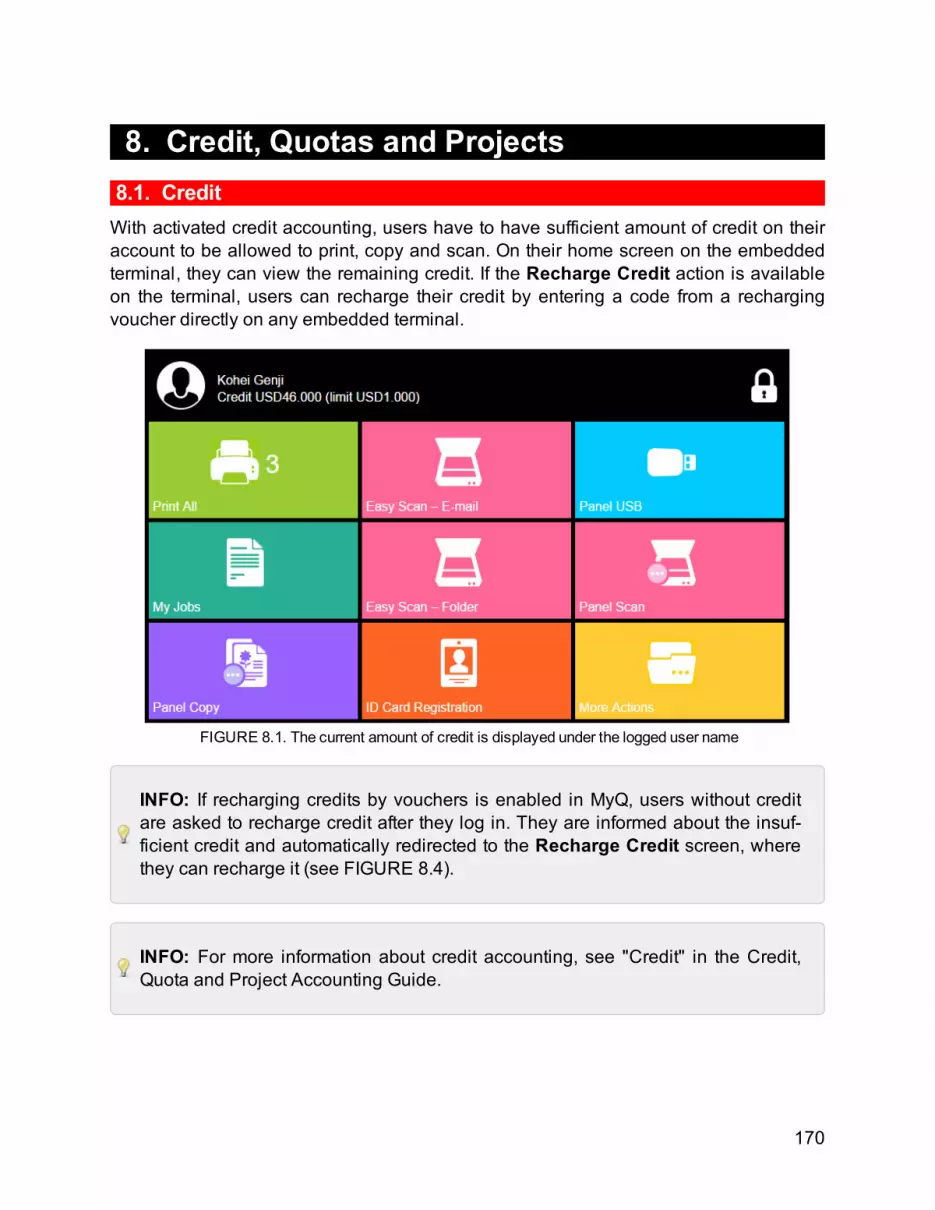
170
8. Credit, Quotas and Projects8.1. CreditWith activated credit accounting, users have to have sufficient amount of credit on theiraccount to be allowed to print, copy and scan. On their home screen on the embeddedterminal, they can view the remaining credit. If the Recharge Credit action is availableon the terminal, users can recharge their credit by entering a code from a rechargingvoucher directly on any embedded terminal.
FIGURE 8.1. The current amount of credit is displayed under the logged user name
INFO: If recharging credits by vouchers is enabled in MyQ, users without creditare asked to recharge credit after they log in. They are informed about the insuf-ficient credit and automatically redirected to the Recharge Credit screen, wherethey can recharge it (see FIGURE 8.4).
INFO: For more information about credit accounting, see "Credit" in the Credit,Quota and Project Accounting Guide.

171
WARNING: For proper functioning of credit accounting, it is necessary to use theMyQ parser to get the print job price before start of printing. For information abouthow to activate the parser, see "Jobs" in MyQ Basic Installation Guide.
8.1.1. Using terminal actions without sufficient creditIf recharging credits by vouchers is enabled in MyQ, users can still see actions to whichthey do not have sufficient credit. However, if they tap the particular action button, theyare immediately redirected to the Recharge Credit screen.
If recharging credits by vouchers is disabled in MyQ and a user does not have sufficientcredit, all actions requiring credit are unavailable and their corresponding buttons aredimmed.
FIGURE 8.2. Print, copy and scan actions on the user's home screen are unavailable due to insufficientcredit.
NOTICE: If a job does not include additional information from job parser, userscan start it as long as their credit is not equal or below 0, although it can bestopped half way through (see the following section).
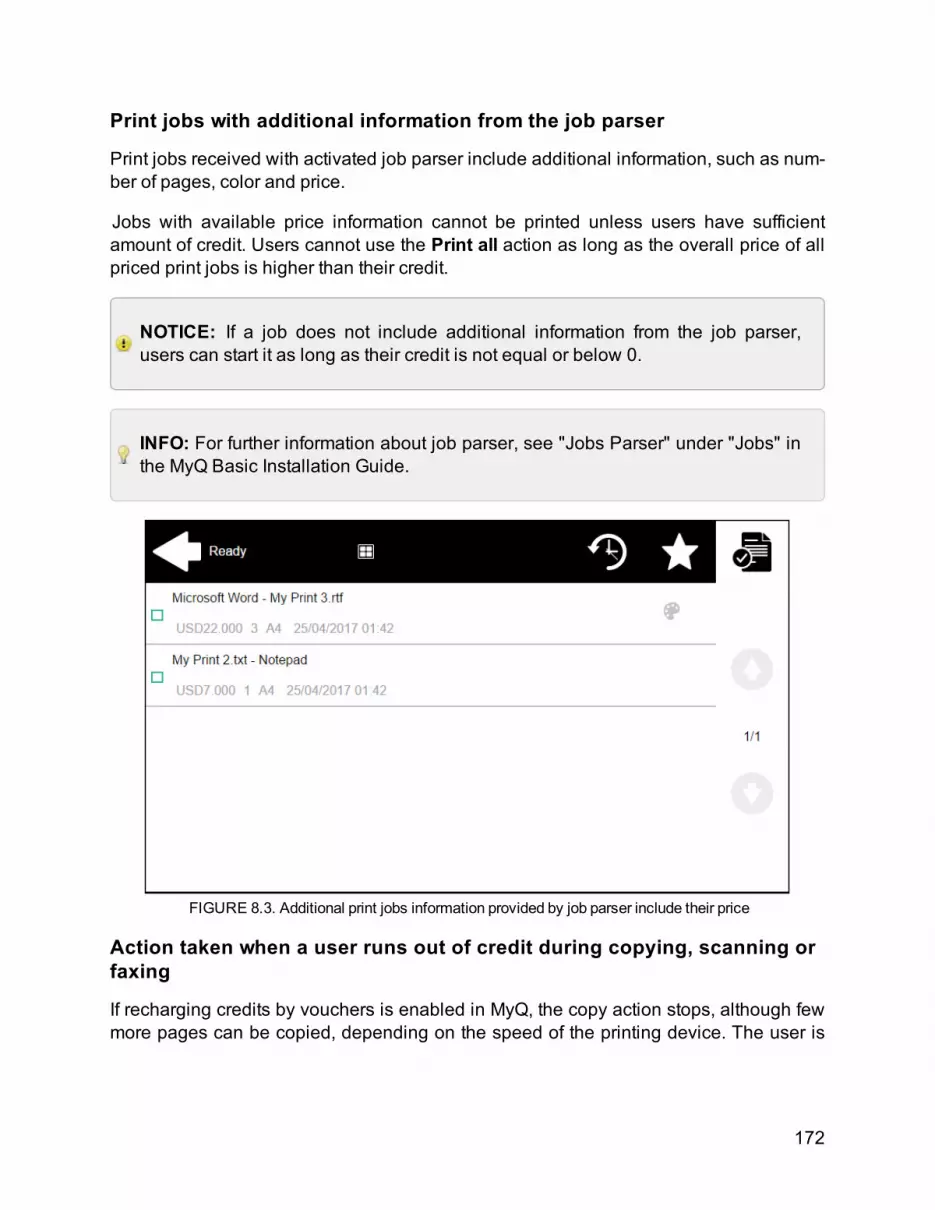
172
Print jobs with additional information from the job parser
Print jobs received with activated job parser include additional information, such as num-ber of pages, color and price.
Jobs with available price information cannot be printed unless users have sufficientamount of credit. Users cannot use the Print all action as long as the overall price of allpriced print jobs is higher than their credit.
NOTICE: If a job does not include additional information from the job parser,users can start it as long as their credit is not equal or below 0.
INFO: For further information about job parser, see "Jobs Parser" under "Jobs" inthe MyQ Basic Installation Guide.
FIGURE 8.3. Additional print jobs information provided by job parser include their price
Action taken when a user runs out of credit during copying, scanning orfaxing
If recharging credits by vouchers is enabled in MyQ, the copy action stops, although fewmore pages can be copied, depending on the speed of the printing device. The user is

173
automatically redirected to the Recharge Credit screen, where they can recharge credit(see "Recharging credit" below).
If recharging credit by vouchers is disabled in MyQ, the copy action stops, although fewmore pages can be printed or copied, depending on speed of the printing device. Afterthis, the user cannot copy anymore.
The first Scan job or Fax job is always finished. After this, the user cannot fax or scananymore.
8.1.2. Recharging creditAfter tapping the Recharge Credit action, the Recharge Credit screen opens and thelogged user can enter a recharge code from their voucher to recharge credit.
FIGURE 8.4. Recharge Credit screen
FIGURE 8.5. Credit voucher with the recharge code displayed near the bottom-right corner

174
INFO: Users can display prices of different configurations of a printed page by tap-ping the 'Coins' icon near the upper-right corner of the screen. (See FIGURE 8.4.)
FIGURE 8.6. Overview of the prices on the terminal screen
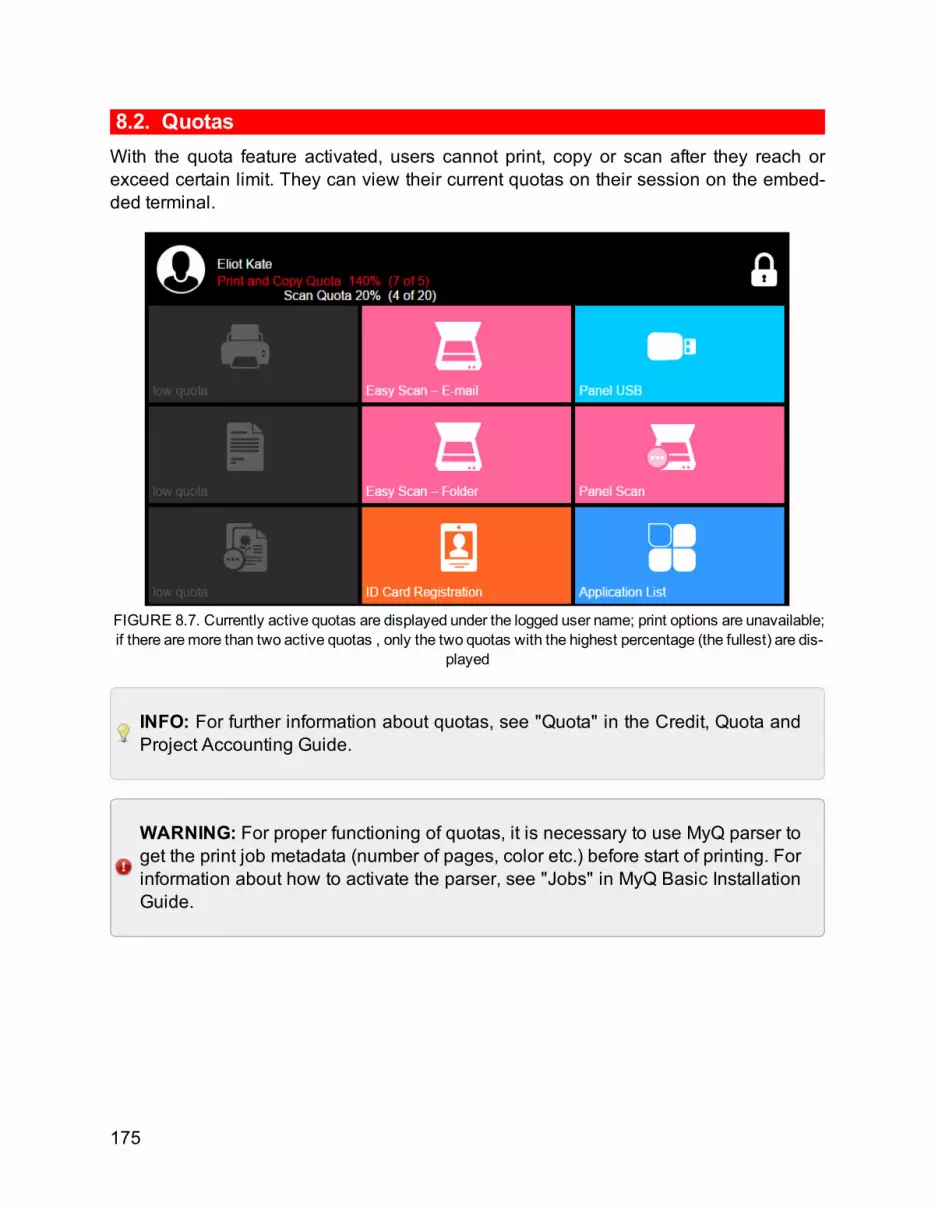
175
8.2. QuotasWith the quota feature activated, users cannot print, copy or scan after they reach orexceed certain limit. They can view their current quotas on their session on the embed-ded terminal.
FIGURE 8.7. Currently active quotas are displayed under the logged user name; print options are unavailable;if there aremore than two active quotas , only the two quotas with the highest percentage (the fullest) are dis-
played
INFO: For further information about quotas, see "Quota" in the Credit, Quota andProject Accounting Guide.
WARNING: For proper functioning of quotas, it is necessary to use MyQ parser toget the print job metadata (number of pages, color etc.) before start of printing. Forinformation about how to activate the parser, see "Jobs" in MyQ Basic InstallationGuide.

176
NOTICE: For the purposes of the quota accounting in MyQ, outcoming fax jobsare considered as scan jobs. Therefore, quotas that apply to scanning in factapply to scanning and faxing altogether. Also, the terminal behaves in the sameway when a scanning and a faxing quota are reached.
8.2.1. Using terminal actions when a quota is reachedBehavior of the embedded terminal depends on the quota settings in MyQ. There arethree options as to what happens when a quota is reached:
l the user can be allowed to finish their current session (process all the pendingtasks)
l automatically logged out after the current job is finished
l immediately logged out with his or her current job stopped.
For further information about setting quotas, see "Adding Quotas and Individual QuotasSettings" under "Quota" in the Credit, Quota and Project Accounting Guide.
FIGURE 8.8. Three options concerning the quota application
NOTICE:Quotas that disable scanning cannot be applied immediately.
INFO: If a job does not include additional information from job parser, users canstart it as long as no quotas disabling print are already reached, although it can bestopped half way through (see the following section).
Print jobs with additional information from job parser
Print jobs received with activated job parser include additional information, such as num-ber of pages, color and price.
Jobs exceeding the quota cannot be printed. Users cannot use the Print all action aslong as the overall size of all of the print jobs is larger than what is allowed by the quota.

177
INFO: For further information about the job parser, see "Jobs Parser" under"Jobs" in the MyQ Basic Installation Guide.
Action taken when a user reaches a quota with immediate application
The current operation stops, although few more pages can be printed or copied, depend-ing on speed of the printing device. This applies to print and copy jobs only (includingcopying from panel).
NOTICE: Scan jobs are always finished before the action is taken.

178
8.3. Project AccountingWith the project accounting feature activated, users can assign projects to print, copyand scan jobs directly on the embedded terminal screen. Apart from embedded ter-minals, projects can be assigned to print jobs in the MyQ Smart Job Manager pop-up win-dow, on the MyQWeb Interface or in the MyQmobile application.
FIGURE 8.9. Names of the assigned projects are displayed under names of the print jobs
INFO: For further information about project accounting, see "Project Accounting"in the Credit, Quota and Project Accounting Guide.

179
8.3.1. Assigning projects to print jobs
My Jobs
If a user wants to print an unassigned job from the My Jobs list, they are immediatelyredirected to the Project selection screen and have to select one of the available pro-jects (or theWithout project option if printing without project is allowed) to be allowed toprint it.
FIGURE 8.10. Users can assign projects on theProject Selection screen
Jobs with assigned projects are immediately printed.
INFO: Jobs that have already been printed can be printed again from the Printedjobs tab ( ). The user is asked if they want to assign a new project to them.
FIGURE 8.11. The Dialog box with the option to assign a new project to selected jobs

180
Print All
If all the jobs waiting in queue have projects already assigned by Smart Job Manager,MyQWEB interface or MyQmobile application, printing starts immediately.
If there are any unassigned jobs, the user is redirected to the Project selection screenimmediately after tapping the Print All button. They have to select one of the availableprojects (or the Without project option if printing without project is allowed) to beallowed to print the jobs. The selected project (or the Without project option) isassigned only to unassigned jobs; all other jobs keep their projects.
8.3.2. Assigning projects to Easy Copy jobsAfter tapping the Easy Copy button, the user is immediately redirected to the Projectselection screen where they need to select the project (or the Without project option)(see FIGURE 8.10).
8.3.3. Assigning projects to Easy Scan jobsAfter tapping the Easy Scan button, the user is immediately redirected to the Projectselection screen where they need to select the project (or the Without project option)before the scan job is started (see FIGURE 8.10).
8.3.4. Assigning projects on the Panel Copy screenAfter tapping the Copy button on the Panel Copy screen, the user is immediately redir-ected to the Project selection screen where they need to select the project (or theWithout project option). The project is then assigned to all jobs copied on the panel(see FIGURE 8.10).
8.3.5. Assigning projects on the Panel Scan screenAfter tapping the Scan button on the Panel Scan screen, the user is immediately redir-ected to the Project selection screen where they need to select the project (or theWithout project option). The project is then assigned to all jobs scanned on the panel(see FIGURE 8.10).
8.3.6. Assigning projects on the Panel Fax screenAfter tapping the Fax button on the Panel Fax screen, the user is immediately redirectedto the Project selection screen where they need to select the project (or the Withoutproject option).
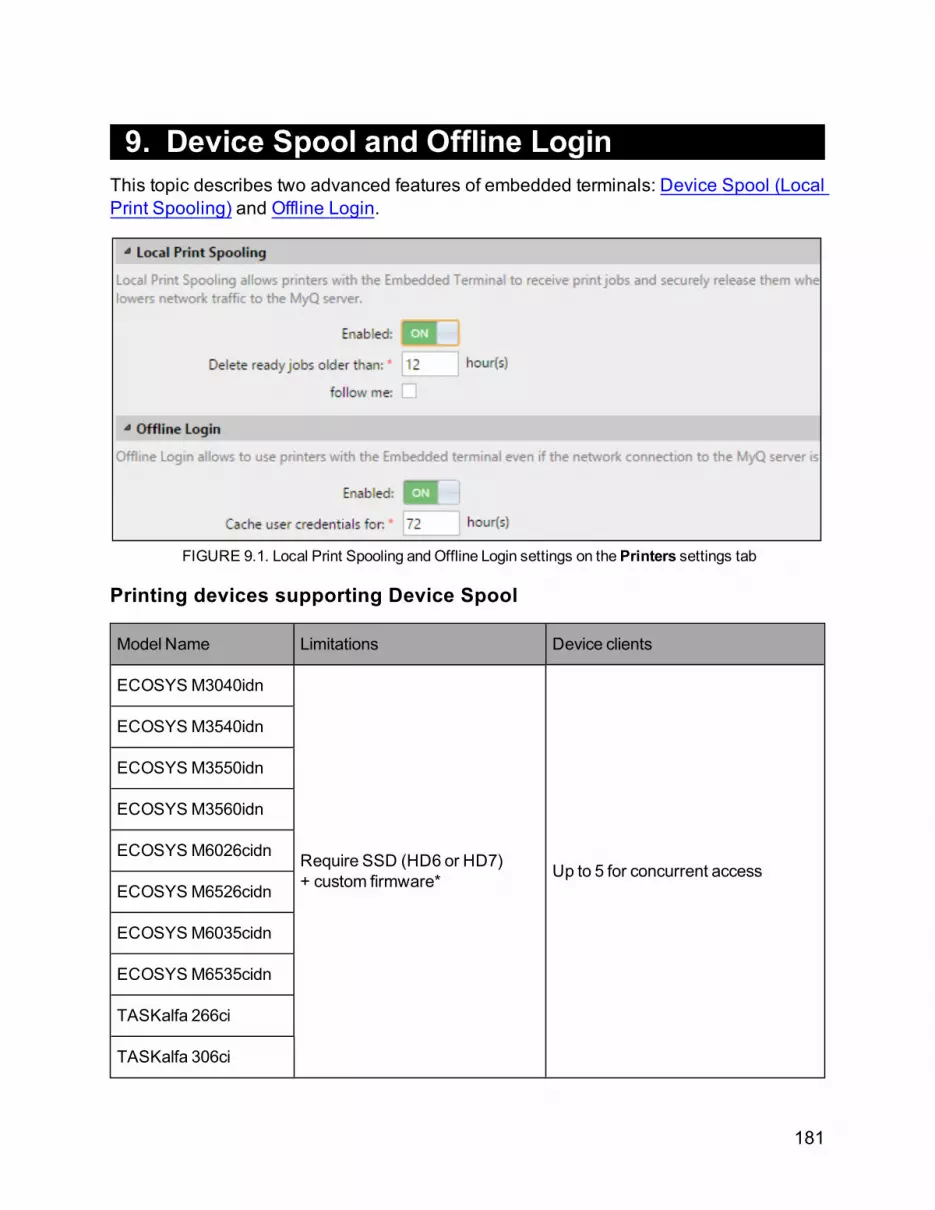
181
9. Device Spool and Offline LoginThis topic describes two advanced features of embedded terminals: Device Spool (LocalPrint Spooling) and Offline Login.
FIGURE 9.1. Local Print Spooling andOffline Login settings on thePrinters settings tab
Printing devices supporting Device Spool
Model Name Limitations Device clients
ECOSYSM3040idn
Require SSD (HD6 or HD7)+ custom firmware* Up to 5 for concurrent access
ECOSYSM3540idn
ECOSYSM3550idn
ECOSYSM3560idn
ECOSYSM6026cidn
ECOSYSM6526cidn
ECOSYSM6035cidn
ECOSYSM6535cidn
TASKalfa 266ci
TASKalfa 306ci

182
*For information about the custom firmware, contact your Kyocera supplier.
Model Name Limitations Device clients
TASKalfa 356ci
HDD is necessary, customFW*might be necessary
Up to 10 for concurrent access
TASKalfa 357ci
TASKalfa 3011i
TASKalfa 3212i
TASKalfa 3511i
TASKalfa 4012i
TASKalfa 7002i
TASKalfa 8002i
TASKalfa 9002i
TASKalfa 2552ci
TASKalfa 3252ci
TASKalfa 7052ci
TASKalfa 8052ci
TASKalfa 3010i
CustomFW* might be necessary
TASKalfa 3501i
TASKalfa 3510i
TASKalfa 4501i
TASKalfa 5501i
TASKalfa 6501i
TASKalfa 8001i
TASKalfa 2551ci
TASKalfa 3051ci

183
Model Name Limitations Device clients
TASKalfa 3551ci
CustomFW*might be necessary
Up to 10 for concurrent access
TASKalfa 4551ci
TASKalfa 5551ci
TASKalfa 6551ci
TASKalfa 7551ci
ECOSYS P8060cdn
TASKalfa 406ci
TASKalfa 407ci
TASKalfa 4002i
TASKalfa 5002i
TASKalfa 6002i
TASKalfa 3552ci
TASKalfa 4052ci
TASKalfa 5052ci
TASKalfa 6052ci
*For information about the custom firmware, contact your Kyocera supplier.
Printing devices supporting Offline Login
The Offline Login feature is supported by all devices that support MyQ embedded ter-minals.
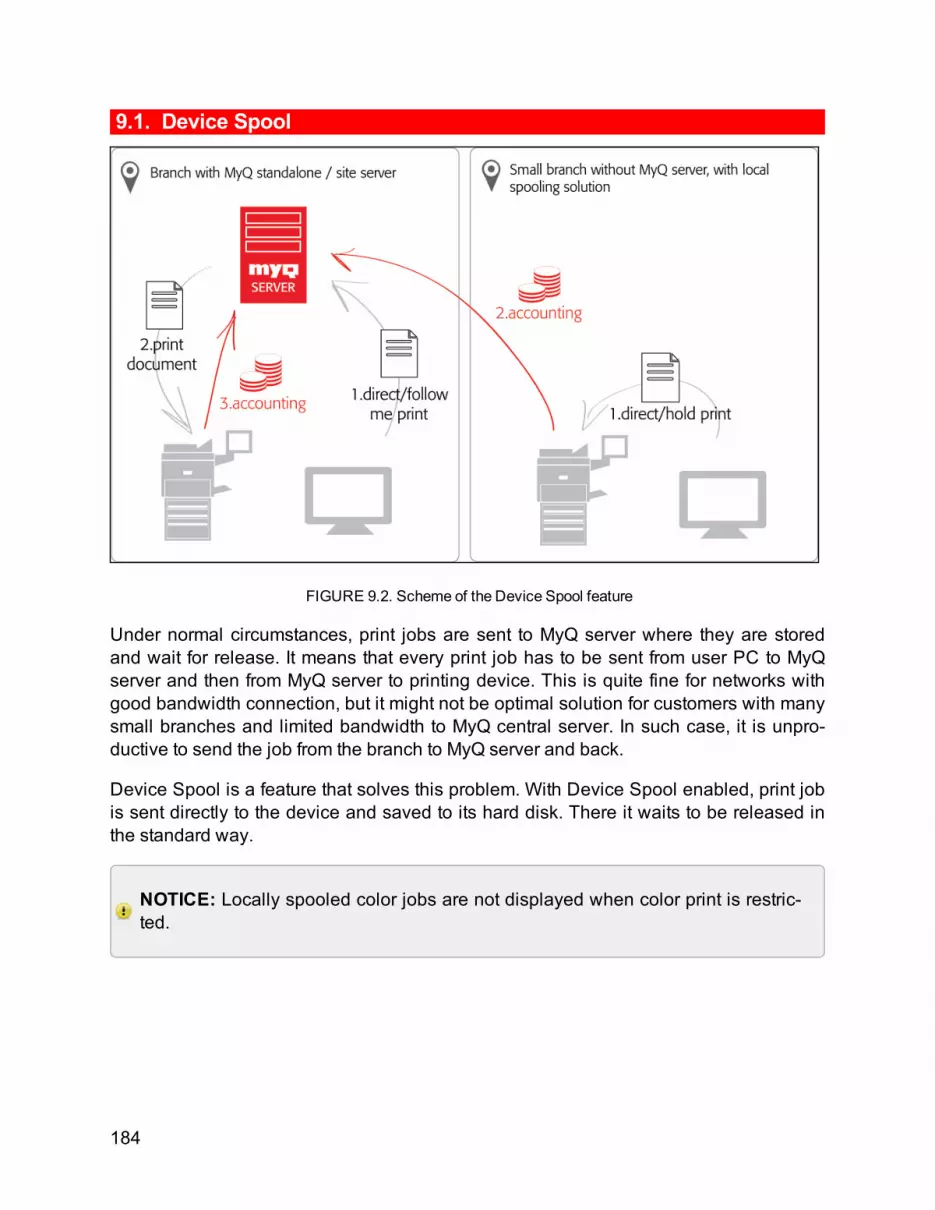
184
9.1. Device Spool
FIGURE 9.2. Scheme of the Device Spool feature
Under normal circumstances, print jobs are sent to MyQ server where they are storedand wait for release. It means that every print job has to be sent from user PC to MyQserver and then from MyQ server to printing device. This is quite fine for networks withgood bandwidth connection, but it might not be optimal solution for customers with manysmall branches and limited bandwidth to MyQ central server. In such case, it is unpro-ductive to send the job from the branch to MyQ server and back.
Device Spool is a feature that solves this problem. With Device Spool enabled, print jobis sent directly to the device and saved to its hard disk. There it waits to be released inthe standard way.
NOTICE: Locally spooled color jobs are not displayed when color print is restric-ted.

185
WARNING:When the printing device is in deep sleep mode, the Device Spool isnot available and an error is shown on Windows spooler.
WARNING: Although it is possible for a user to use both print to server andDevice Spool, we do not recommend this option. It may lead to inconveniencesdue to different priority given to jobs from the two sources. The following problemsappear: jobs are not sorted and printed in the correct order, the terminal displaymight not be correctly refreshed.
Follow me for Device Spool
With the follow me extension activated, jobs sent to one printing device can be printedon any other printing device connected to the same local area network. If there are moremutually connected devices at the branch, the jobs spooled on the devices can beshared between them. In such case, jobs sent to one device are displayed on the list ofprint jobs and can be printed on other devices. Follow me feature is limited to devices onthe same subnet.
WARNING: For the local follow me functionality, it's necessary to have the sametime set on all of the participating devices. The easiest way to do this is to syn-chronize the devices with a time server, such as (time.windows.com, time.n-ist.gov,...). You can do this in the Date/Time settings on the device Web Interface.
Delegated printing for Device spool
The delegated printing feature makes the spooled jobs available to delegates. This way,all delegates of the job sender can print jobs sent via the dedicated delegated printingport 10013. For information on how to set up the port, see "Print drivers for Device Spool" on page 187.
INFO: For more information about the Delegated printing feature, see "Delegatedprinting" under "Methods of Printing" in the Basic Installation guide.

186
9.1.1. Setting up Device Spool in MyQ
FIGURE 9.3. Local print spooling settings on thePrinters settings tab
To open the setup screen, click the MyQ icon, click Settings on the MyQ main menu,and then click Printers on the Settings menu.
On the Printers settings tab, under Local Print Spooling, you can activate the featureand change its settings:
l Enabled — Click to enable or disable the feature
l Delete ready jobs older than — Time after which the spooled jobs are deleted fromthe printing device hard disk
l follow me — Select to activate follow me for Device Spool
To submit the changes, click Save at the bottom of the tab. The Apply new settings dia-log box appears.
Keep the Reset all terminals option selected and click OK. The settings are then dis-tributed to all connected terminals.
FIGURE 9.4. The terminals need to be reset for the settings to be applied

187
9.1.2. Print drivers for Device Spool
FIGURE 9.5. Configuration of the print port for direct print
To enable users to send jobs directly to the printing device and use the Device Spool,you have to create a new print port and set port protocol and port number. When con-figuring the port, use the Raw protocol and one of the three following ports:
l 10010 — Port for direct print. The job is automatically printed after it is received bythe printing device.
l 10011 — Port for secured hold print. The job is spooled by the printer and waitsthere till the user logs in and prints it. It is not possible to print this job on other thanthis particular printing device.

188
l 10012 — Port for Device Spool follow me. The job is spooled by the printingdevice. Once the user logs on any of the devices connected to the same subnet,information about this job is provided and the job is displayed in the list of the avail-able jobs and can be printed.
l 10013 — Port for Device Spool delegated print. Works same as the Device Spoolfollow me, except that the job can be printed by delegates of the sending user.
NOTICE: We recommend you to use Kyocera KX print drivers for setup of theDevice Spool. Other print drivers might not support the feature.
9.1.3. IP filtersTo ensure proper functioning of the offline follow me feature, you have to turn off IP filtersor set a new IP filter which includes all the IP addresses of the printing devices, wherethe follow me jobs can be stored.
9.1.4. Print languages supported by Device SpoolFollowing print languages are supported by Device Spool:
l PCL XLl PCL5cl KPDLl PDF
9.1.5. Features not supported by Device Spooll Project Accountingl Favorite jobsl Job Roaming
WARNING:While the Device Spool feature is enabled, printing devices that sup-port the feature and have an embedded terminal assigned in MyQ cannot beadded to direct queues. On these devices, you can use the direct print option ofDevice Spool instead.

189
9.2. Offline Login
FIGURE 9.6. User home screen with default settings as it is displayed in the offlinemode
Proper operation of MyQ depends on 100% reliable network connection. Problem withconnection can lead to serious problems — users may not be able to start their user ses-sions on printing devices and perform any copy, print or scan operations. The OfflineLogin feature prevents such situation. User information including credentials are cachedat the device and if the server is unavailable, cached data are used for user authen-tication. User can log in and perform all the operations that do not require networkaccess to MyQ server.
When combined with Device Spool, the offline login feature offers a robust backup planfor server outage.
NOTICE: Users' credentials are stored for the period set on the MyQ server (See"Offline Login Setup" on the next page.). Users that have not logged within thisperiod are not able to log in once the device switches to the offline mode.
FIGURE 9.7. Users' credentials are cached for the period set underCache user credentials for

190
9.2.1. Requirementsl UDP broadcasts have to be enabled on the network.
l For optimal run of the Offline Login feature, the SSL only mode should be enabledon server. This mode is activated on the Network settings tab, under Security ofcommunication.
FIGURE 9.8. Changing the security mode on theNetwork settings tab
9.2.2. Offline Login Setup
FIGURE 9.9. Offline login settings on thePrinters settings tab
To open the setup screen, click the MyQ icon, click Settings on the MyQ main menu,and then click Printers on the Settings menu.
On the Printers settings tab, under Offline Login , you can activate the feature andchange its settings:
l Enabled—Click to enable or disable the feature.
l Cache user credentials for— The device remembers the credentials for the settime period; after the period ends, users cannot log in the offline mode anymore.
After you change the settings, the Apply new settings dialog box appears. Keep theReset all terminals option selected and click OK. The settings are then distributed to allconnected terminals.

191
FIGURE 9.10. The terminals need to be reset for the settings to be applied
WARNING: The Send Result Report option on the Notifications/Reports tabon the printing device Web User Interface should be turned off. Otherwise, when aconnection fails during an online session, a report about this event is printed onthe printing device and accounted to the logged user. If the Offline login feature isoff, the printed report is accounted to the *unknown user account.
FIGURE 9.11. Notification/Report Settings tab can be found under Management Settings on the print-ing deviceWebUI.
9.2.3. Scanning to email via Panel scan in the Offline modeYou can enable users to scan to email even when the MyQ server is offline. In suchcase, users can log on to the terminal in the Offline mode and use the Panel scan actionto scan to emails. The terminal remembers the outgoing SMTP server set in MyQ andsends all emails directly to this server.
To enable the feature:
1 ) Change two settings on the Network settings tab of the MyQWeb Interface:
I. On the MyQWeb Interface, open the Network settings tab. (Click the MyQ icon,then click Settings and finally click Network.)

192
II. Under Security of communication, activate the Enable only secure connectionoption.
FIGURE 9.12. Changing the security mode on theNetwork settings tab
III. UnderOutgoing SMTP server, set the Security option of the MyQ server to None.
FIGURE 9.13. Setting theSecurity option on the Network settings tab
2) Change the following settings on the Web User Interface of the printing device:
I. SMTP Server Name has to be set to 127.0.0.1 (localhost). (See FIGURE 9.14below.)
II. SMTP Port has to be set to 10025. (See FIGURE 9.14 below.)
III. Secure Email Connection with SSL/TLS has to be set to None. (See FIGURE9.15 on the facing page.)
FIGURE 9.14. Setting the SMTP Server Name and SMTP Port Number on the printing device's WebUI

193
FIGURE 9.15. Setting the SMTP Security on the printing device's WebUI
3) After the settings are changed, at least one scan needs to be sent from any useraccount in the online mode. After the scan is sent, the offline scanning feature is activ-ated in MyQ.
WARNING: Servers with SSL or StartTLS security cannot be used as the SMTPservers for this feature.
Scanning to email in the Offline mode is supported by the following models:
ECOSYS Series Color/B&W Device type
ECOSYSM2640idw B&W Multifunction printer
ECOSYSM4226idn B&W Multifunction printer
ECOSYSM4230idn B&W Multifunction printer
ECOSYSM4125idn Color Multifunction printer
ECOSYSM4132idn Color Multifunction printer
ECOSYSM8124cidn Color Multifunction printer
ECOSYSM8130cidn Color Multifunction printer
ECOSYSM8224cidn Color Multifunction printer
ECOSYSM8228cidn Color Multifunction printer

194
TASKalfa Series Color/B&W Device type
TASKalfa 356ci Color Multifunction printer
TASKalfa 357ci Color Multifunction printer
TASKalfa 406ci Color Multifunction printer
TASKalfa 407ci Color Multifunction printer
TASKalfa 2510i B&W Multifunction printer
TASKalfa 2520i B&W Multifunction printer
TASKalfa 3010i B&W Multifunction printer
TASKalfa 3011i B&W Multifunction printer
TASKalfa 3212i B&W Multifunction printer
TASKalfa 3500i B&W Multifunction printer
TASKalfa 3501i B&W Multifunction printer
TASKalfa 3510i B&W Multifunction printer
TASKalfa 3511i B&W Multifunction printer
TASKalfa 4002i B&W Multifunction printer
TASKalfa 4012i B&W Multifunction printer
TASKalfa 4020i B&W Multifunction printer
TASKalfa 4500i B&W Multifunction printer
TASKalfa 4501i B&W Multifunction printer
TASKalfa 5002i B&W Multifunction printer
TASKalfa 5500i B&W Multifunction printer
TASKalfa 5501i B&W Multifunction printer
TASKalfa 6002i B&W Multifunction printer

195
TASKalfa Series Color/B&W Device type
TASKalfa 6500i B&W Multifunction printer
TASKalfa 6501i B&W Multifunction printer
TASKalfa 7002i B&W Multifunction printer
TASKalfa 8000i B&W Multifunction printer
TASKalfa 8001i B&W Multifunction printer
TASKalfa 8002i B&W Multifunction printer
TASKalfa 9002i B&W Multifunction printer
TASKalfa 2460ci Color Multifunction printer
TASKalfa 2470ci Color Multifunction printer
TASKalfa 2551ci Color Multifunction printer
TASKalfa 2552ci Color Multifunction printer
TASKalfa 3050ci Color Multifunction printer
TASKalfa 3051ci Color Multifunction printer
TASKalfa 3252ci Color Multifunction printer
TASKalfa 3550ci Color Multifunction printer
TASKalfa 3551ci Color Multifunction printer
TASKalfa 3552ci Color Multifunction printer
TASKalfa 4052ci Color Multifunction printer
TASKalfa 4550ci Color Multifunction printer
TASKalfa 4551ci Color Multifunction printer
TASKalfa 5052ci Color Multifunction printer
TASKalfa 5550ci Color Multifunction printer

196
TASKalfa Series Color/B&W Device type
TASKalfa 5551ci Color Multifunction printer
TASKalfa 6052ci Color Multifunction printer
TASKalfa 6550ci Color Multifunction printer
TASKalfa 6551ci Color Multifunction printer
TASKalfa 7052ci Color Multifunction printer
TASKalfa 7550ci Color Multifunction printer
TASKalfa 7551ci Color Multifunction printer
TASKalfa 8052ci Color Multifunction printer
9.2.4. Offline login via LDAP server credentialsWhen the offline login feature is enabled in a MyQ printing environment where LDAP cre-dentials are used for user authentication, information about the LDAP servers, includingusers' LDAP usernames, are automatically stored on the embedded terminal. In case theconnection to the MyQ server is lost, users can log in via their LDAP credentials in the off-line mode. Their password is verified against the LDAP server.
Requirements of the LDAP credentials offline login option
l The login by user name simple login option has to be selected. This can be seteither on the Admin menu of the embedded terminal (See "Changing Login Types"on page 31.), or in the MyQ Terminal Manager (See "Login" on page 39.).
l The Enable only secure connection option has to be activated on the MyQserver (See "Changing the security mode on the Network settings tab" onpage 190.).
l There must be connection from the printing device to the LDAP server.

197
10. Accessing the Terminal via the MyQ MobileApplication
If you enable printing device management via mobile application in MyQ, users canunlock terminals and release their print jobs on printing devices via the MyQ mobileapplication. The easiest way to log in using the mobile application is to scan a QR code,which is displayed on the embedded touch panel. The QR code includes all necessaryinformation to identify the MFP device and the MyQ server, to which the device is con-nected.
1. On the MyQWeb Interface, open the Mobile Application tab. (At the top-leftcorner, click MyQ, then click Settings, and finally click Mobile Application.)
2. On the Mobile Application tab, underGeneral, set Enabled to ON.
FIGURE 10.1. TheMobile Application settings tab
While the feature is enabled, two small icons are displayed at the top-right corner of theembedded terminal login screen: a keyboard icon and a QR code icon. By tapping thetwo icons, users can switch between the SW keyboard and a QR code with informationabout the MyQ server.

198
FIGURE 10.2. Login Screen with the QR code for setup of theMyQmobile application
INFO: MyQ mobile applications are available for Android and iOS operating sys-tems.

199
11. USB Card Reader ConnectionTo enable use of a USB card reader on a printing device, the Kyocera Card Authentic-ation Kit (B) has to be activated on the printing device. The Kyocera Card AuthenticationKit (B) is an optional plugin for all Kyocera printing devices based on HyPAS tech-nology. If it is enabled and a supported card reader is connected to the USB slot, MyQcan read data acquired by the reader and use them for user identification. For full unlim-ited version of CAK(B) ask your Kyocera supplier.
INFO: You can run the kit in a demo mode with functionality limited to 30 days; thedemo can be executed 3 times on each device.
WARNING: If the CAK(B) is enabled, but no compatible reader is connected tothe USB slot, the ID card reader not connected permanent error message is dis-played on the panel.
Activating Card Authentication Kit (B)
1) Log on the device as the MyQ administrator, open its panel and open its systemmenu
I. On the terminal's login screen, tap the MyQ icon, and then log on as the MyQadministrator (see "Entering the Admin menu" on page 29).

200
II. On the Admin Menu screen, tap the Unlock Panel button. The printing device'sdefault screen opens.
FIGURE 11.1. Unlocking the panel
III. On the upper-left corner of the device physical board, press the Systemmenu but-ton (or System Menu/Counter button on some devices). The System Menuopens.
2) Open the System screen and activate the kit
I. On the System Menu, find and tap System (or System/Network on somedevices). The Systemmenu opens.
II. On the Systemmenu, find and tap Optional Function. The Optional Functionmenu opens.
III. On the Optional Function menu, select CARD AUTHENTICATION KIT and tapActivate at the bottom-left corner of the screen. You are prompted to enter thelicense code for the application.
IV. If you have the CAK(B) license code, enter it and confirm it. If you have no licensecode and just want to check the functionality, select Trial.

201
12. Update and Uninstallation12.1. Updating the terminalUpdating terminals is identical to installing new terminals. You need to install the newerinstallation package (*.pkg) on the terminal or terminals. The older version of MyQEmbedded terminal is automatically updated and all its settings are kept.
To update the Embedded terminal follow these steps:
1. Open the Printers settings tab. (Click the MyQ icon, then click Settings, and finallyclick Printers.)
2. On the tab, under Embedded terminals installation packages / Other brands,remove the Embedded terminal package, and then add the new package.
3. Open the Printers main tab. (Click the MyQ icon, and then click Printers.)
4. Run remote setup of all devices.
12.2. Uninstalling the terminalMyQ can be uninstalled or deactivated on the Application menu of the printing devicepanel. If you choose to deactivate it, you can later reactivate it with its settings restored.The uninstallation (or deactivation) consists of two steps: you have to unlock the paneland then either delete (or deactivate) the MyQ application on the Application menu.
NOTICE: Names of the devices terminal menu items and panel buttons may vary.
1) Log on the device as an administrator, open its panel and open its systemmenu
I. On the terminal's login screen, tap the MyQ icon, and then log on as the MyQadministrator (see "Entering the Admin menu" on page 29)
II. On the Admin Menu screen, tap the Unlock Panel button (see FIGURE 11.1). Theprinting device's default screen opens.
III. At the upper-left corner of the device panel, press the Systemmenu button (or Sys-tem Menu/Counter button on some devices). The System Menu opens.

202
2) Open the Application menu and delete the MyQ application
I. On the System Menu, find and tap Application (or Favorites/Application onsome devices).
II. On the Application menu (or Favorites/Application menu), tap Application. TheApplication sub-menu opens.
III. On the menu, select the MyQ Embedded application, and then tap Menu at thebottom-left corner of screen. The application menu opens.
IV. On the menu, tap Delete, and then tap Yes to confirm the action. The application isdeleted and the MFP Panel default screen opens.
NOTICE: If you want to deactivate the application instead of deleting it, tapDeactivate instead of Delete.

203
13. Appendix I — Overview of changesThis topic shows the changes made during revisions of the guide.
Revision 2
Changes in topics
Terminal Actions
l "7.3.5. Scanning to OneDrive for Business": Updated.

204
14. Business contactMyQ® Manufacturer MyQ® spol. s r.o.
Harfa Office Park, Ceskomoravska 2420/15, 190 93 Prague 9, CzechRepublic
MyQ® Company is registered in the Companies register at the Municipal Courtin Prague, division C, no. 29842
Business information www.myq-solution.com
Technical support [email protected]
Notice MANUFACTURER WILL NOT BE LIABLE FOR ANY LOSS ORDAMAGE CAUSED BY INSTALLATION OR OPERATION OF THESOFTWARE AND HARDWARE PARTS OF THE MyQ®PRINTINGSOLUTION.
This manual, its content, design and structure are protected by copy-right. Copying or other reproduction of all or part of this guide, or anycopyrightable subject matter without the prior written consent ofMyQ® Company is prohibited and can be punishable.
MyQ® is not responsible for information content of this manual, par-ticularly regarding its integrity, currency and commercial occupancy.All thematerial published here is exclusively of informative character.
This manual is subject to change without notification. MyQ® Com-pany is not obliged to make these changes periodically nor announcethem, and is not responsible for currently published information to becompatible with the latest version of theMyQ® printing solution.
Trademarks MyQ® including its logos is registered trademark of MyQ® company.Microsoft Windows,WindowsNT andWindowsServer are registeredtrademarks of Microsoft Corporation. All other brand and productnamesmight be registered trademarks or trademarks of their respect-ive companies.
Any use of trademarks of MyQ® including its logos without the priorwritten consent of MyQ® Company is prohibited. The trademark andproduct name is protected by MyQ® Company and/or its local affil-iates.


