Embed Size (px)
Citation preview

Notebook PCDriver/Utility Setup and Reference
Product Name: Notebook PC Support CD Manual Revision: 1.00 E892 Release Date: Dec 2001
2
Table of Contents
Support CD for Windows ME and XP ......................................................... 4
Autorun Screens for Windows ME and XP ............................................................................. 4
Drivers for Windows ME and XP ............................................................................................. 5
Windows ME Operating System ..................................................................8
Intel INF Update ...................................................................................................................... 8
ATKACPI Driver ...................................................................................................................... 9
VGA Driver ............................................................................................................................ 10
Audio Driver .......................................................................................................................... 12
DirectX 8.0 ............................................................................................................................ 13
LAN Driver ............................................................................................................................. 14
Modem Driver........................................................................................................................ 15
TouchPad .............................................................................................................................. 17
Fast IR Driver ........................................................................................................................ 18
SpeedStep ............................................................................................................................ 19
PC-cillin 2000 ........................................................................................................................ 20
Hotkey Utility (Under ATKACPI Utility) .................................................................................. 25
Windows Flash Utility (Under ATKACPI Utility) ..................................................................... 26
ASUS PC Probe (Under ATKACPI Utility) ............................................................................. 27
Check Mail Utility (Under ATKACPI Utility) ............................................................................ 28
IDESwap Utility (Under ATKACPI Utility) .............................................................................. 29
Power Gear Utility (Under ATKACPI Utility) .......................................................................... 30
Screen Saver Utility ............................................................................................................... 31
3
Windows XP Operating System ................................................................ 33
Intel INF Update .................................................................................................................... 33
ATKACPI Driver .................................................................................................................... 34
VGA Driver ............................................................................................................................ 35
Audio Driver .......................................................................................................................... 37
LAN Driver ............................................................................................................................. 38
TouchPad .............................................................................................................................. 39
Fast IR Driver ........................................................................................................................ 41
Hotkey Utility (Under ATKACPI Utility) .................................................................................. 44
Windows Flash Utility (Under ATKACPI Utility) ..................................................................... 45
ASUS PC Probe (Under ATKACPI Utility) ............................................................................. 46
Check Mail Utility (Under ATKACPI Utility) ............................................................................ 47
Power Gear Utility (Under ATKACPI Utility) .......................................................................... 48
Screen Saver Utility ............................................................................................................... 49
Windows ME and XP Software Reference ............................................... 51
4
Support CD for Windows ME and XPThe Notebook PC you purchased may or may not be preloaded with an operating system. The support CDincluded with this Notebook PC provides all the necessary drivers and utilities in order for you to use yourNotebook PC with Microsoft® Windows® 98/ME/XP (referred to as “Windows” in this User’s Manual).
This Notebook PC offers its customers the choice of a pre-installed operating system such as MicrosoftWindows ME (Millennium Edition) or Windows XP. The choices and languages will depend on theterritory. The levels of hardware and software support may vary depending on the installed operating system.Operating systems not pre-installed on this Notebook PC may produce different results than the ones de-scribed in the provided user’s manuals.
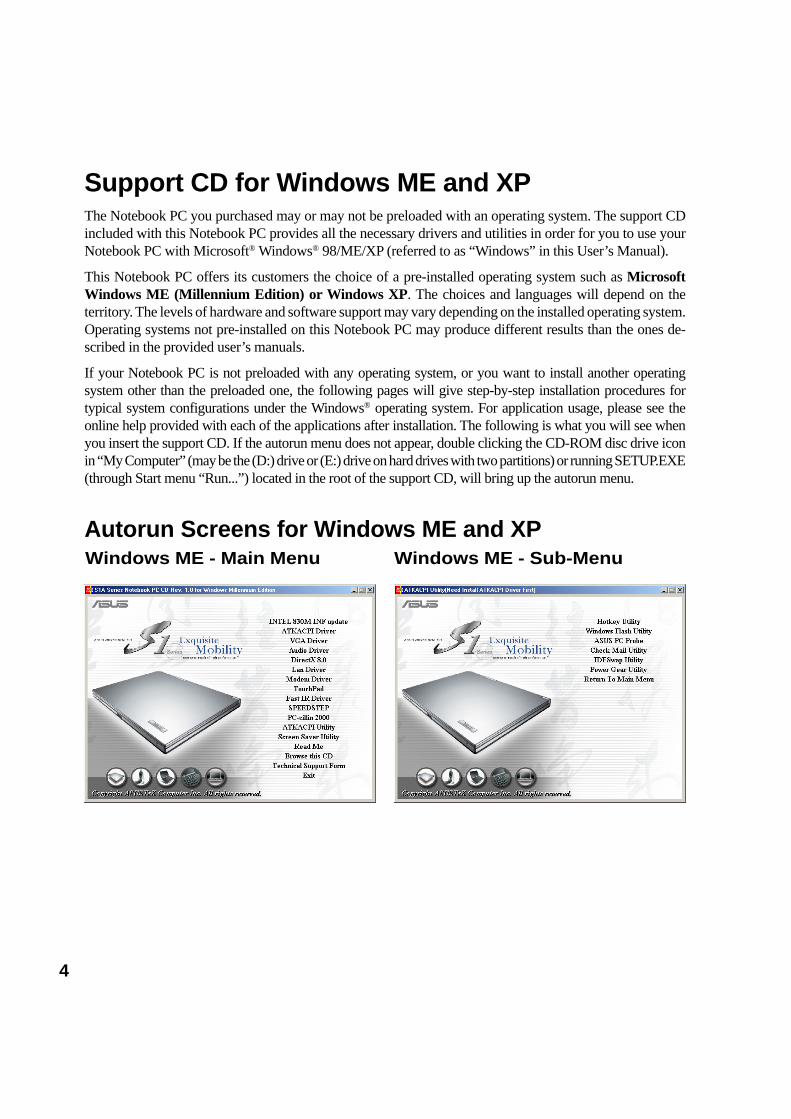
If your Notebook PC is not preloaded with any operating system, or you want to install another operatingsystem other than the preloaded one, the following pages will give step-by-step installation procedures fortypical system configurations under the Windows® operating system. For application usage, please see theonline help provided with each of the applications after installation. The following is what you will see whenyou insert the support CD. If the autorun menu does not appear, double clicking the CD-ROM disc drive iconin “My Computer” (may be the (D:) drive or (E:) drive on hard drives with two partitions) or running SETUP.EXE(through Start menu “Run...”) located in the root of the support CD, will bring up the autorun menu.
Autorun Screens for Windows ME and XPWindows ME - Main Menu Windows ME - Sub-Menu

5
Drivers for Windows ME and XPThe following are descriptions of each autorun menu item. Due to ongoing improvements in the support CD,there may be some differences between this User’s Manual and your support CD. The names in quotationsare the actual driver names displayed in the System Properties of MS Windows. Windows cannot contain allthe device drivers from every manufacturer, with every update; therefore the provided support CD willcontain the best driver for your built-in devices and should be used in place of any Windows default drivers.
Intel 830M INF Update (required) “Intel 828XX” Drivers
Shown under Windows “System devices.” This installs drivers for the Notebook PC’s specific chipset.
ATKACPI Driver (required) “ATK0100 ACPI UTILITY” Driver
Shown under Windows “System devices.” This installs drivers for the Notebook PC’s Advanced Configura-tion and Power Interface (ACPI) for features utilizing power management functions.
VGA Driver (required) “Intel 82830M Graphics Controller - 0 / 1” Driver
Shown under Windows “Display adapters.” This installs display drivers for your operating system in orderto properly use the Notebook PC’s built-in graphics controller and to provide optimal features. Once thedisplay driver is installed, you can change your display’s resolution and color through Display Properties.
Audio Driver (required) “Intel AC’97 Audio Controller - SigmaTel Codec” Driver
Shown under Windows “Sound, video and game controllers.” This installs audio drivers for your operatingsystem in order to properly use the Notebook PC’s built-in sound controller. All audio functions are configuredthrough Windows and help can be located within Windows documentation or Windows help files.
Windows XP - Main Menu Windows XP - Sub-Menu
6
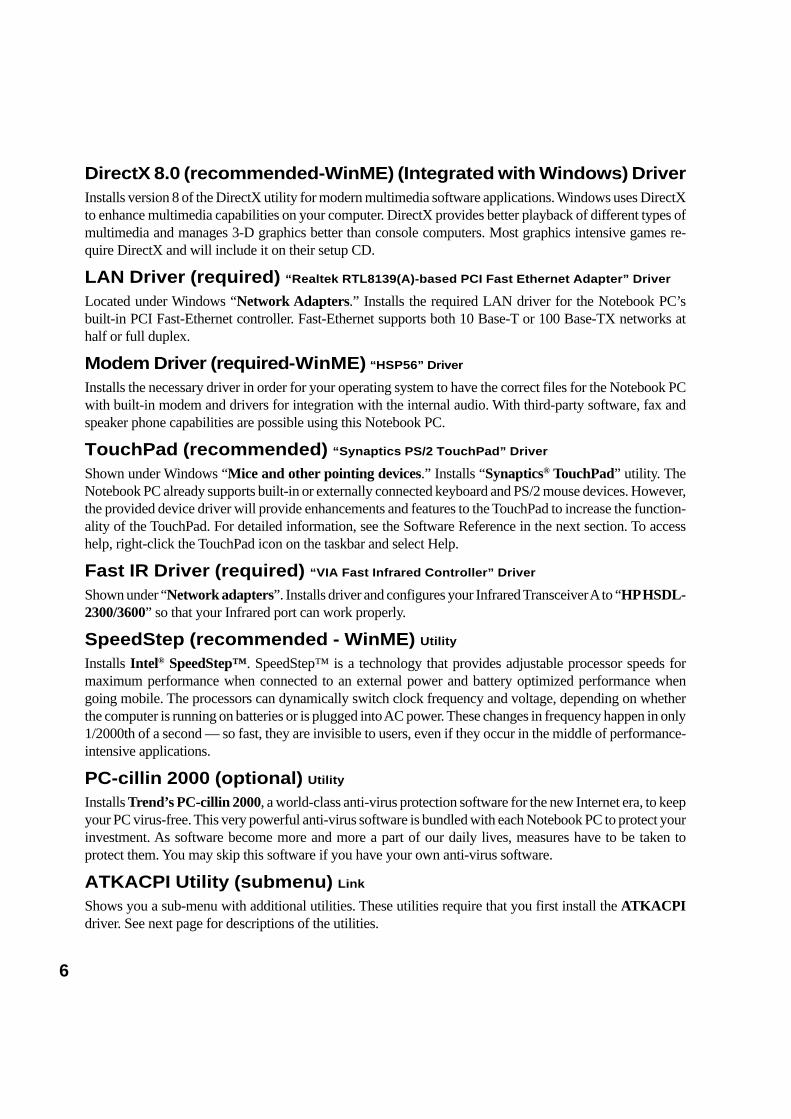
DirectX 8.0 (recommended-WinME) (Integrated with Windows) DriverInstalls version 8 of the DirectX utility for modern multimedia software applications. Windows uses DirectXto enhance multimedia capabilities on your computer. DirectX provides better playback of different types ofmultimedia and manages 3-D graphics better than console computers. Most graphics intensive games re-quire DirectX and will include it on their setup CD.
LAN Driver (required) “Realtek RTL8139(A)-based PCI Fast Ethernet Adapter” Driver
Located under Windows “Network Adapters.” Installs the required LAN driver for the Notebook PC’sbuilt-in PCI Fast-Ethernet controller. Fast-Ethernet supports both 10 Base-T or 100 Base-TX networks athalf or full duplex.
Modem Driver (required-WinME) “HSP56” Driver
Installs the necessary driver in order for your operating system to have the correct files for the Notebook PCwith built-in modem and drivers for integration with the internal audio. With third-party software, fax andspeaker phone capabilities are possible using this Notebook PC.
TouchPad (recommended) “Synaptics PS/2 TouchPad” Driver
Shown under Windows “Mice and other pointing devices.” Installs “Synaptics® TouchPad” utility. TheNotebook PC already supports built-in or externally connected keyboard and PS/2 mouse devices. However,the provided device driver will provide enhancements and features to the TouchPad to increase the function-ality of the TouchPad. For detailed information, see the Software Reference in the next section. To accesshelp, right-click the TouchPad icon on the taskbar and select Help.
Fast IR Driver (required) “VIA Fast Infrared Controller” Driver
Shown under “Network adapters”. Installs driver and configures your Infrared Transceiver A to “HP HSDL-2300/3600” so that your Infrared port can work properly.
SpeedStep (recommended - WinME) Utility
Installs Intel® SpeedStep™. SpeedStep™ is a technology that provides adjustable processor speeds formaximum performance when connected to an external power and battery optimized performance whengoing mobile. The processors can dynamically switch clock frequency and voltage, depending on whetherthe computer is running on batteries or is plugged into AC power. These changes in frequency happen in only1/2000th of a second — so fast, they are invisible to users, even if they occur in the middle of performance-intensive applications.
PC-cillin 2000 (optional) Utility
Installs Trend’s PC-cillin 2000, a world-class anti-virus protection software for the new Internet era, to keepyour PC virus-free. This very powerful anti-virus software is bundled with each Notebook PC to protect yourinvestment. As software become more and more a part of our daily lives, measures have to be taken toprotect them. You may skip this software if you have your own anti-virus software.
ATKACPI Utility (submenu) Link
Shows you a sub-menu with additional utilities. These utilities require that you first install the ATKACPIdriver. See next page for descriptions of the utilities.
7
Read Me TextGives you notes concerning this support CD or the Notebook PC.
Browse this CDShows you the contents of this support CD using Windows Explorer.
Technical Support Form TextOpens up a Technical Support Request Form so that you will understand what kind of information is neededif you run into problems and require technical assistance.
ExitCloses the support CD autorun screen.
ATKACPI Utility (Submenu)Hotkey Utility (required) Utility
Installs Hotkey utility. Hotkey utility is a program designed to intercept key strokes so that key assignmentscan be made to run a program or script. This program cannot be used to change default keys or key combi-nations used by other software, operating systems, or by the Notebook PC’s hardware.
Windows Flash Utility (recommended) Utility
Installs a BIOS update utility for Windows so that you can conveniently update your Notebook PC’s BIOSwithout having to restart your Notebook PC in DOS mode.
ASUS PC Probe (optional) Utility
Installs PC Probe utility to monitor the Notebook PC’s CPU temperature and other resources. This is anoptional software to help you better manage your Notebook PC’s resources.
Check Mail Utility (optional) Utility
Installs ASUS Check Mail Utility to monitor and notify you of incomming email messages waiting in yourMicrosoft® Outlook or Outlook Express Inbox. (This utility may or may not be compatible with other emailapplications.)
IDE Swap Utility (required for AiBox) Utility
This driver is required for Windows ME but not required for Windows 2000. Installs a Plug & Play utility tomonitor the AiBox port and automatically enable the AiBox and module device drivers. This utility is alsoused to disable the drivers when you want to remove the AiBox or eject a module device.
Note: Ejecting a module device requires that you first stop the service and remove the AiBox connector.
Power Gear Utility (optional) Utility
Power Gear is a custom utility designed for this Notebook PC that allows you to use predefined or userdefined values for multi-selectable power saving modes or “gears”. You can “shift” between the “gears”using the taskbar icon or the “Power Gear” key above the keyboard.
8
VIA
INF
Up
date
Windows ME Operating System
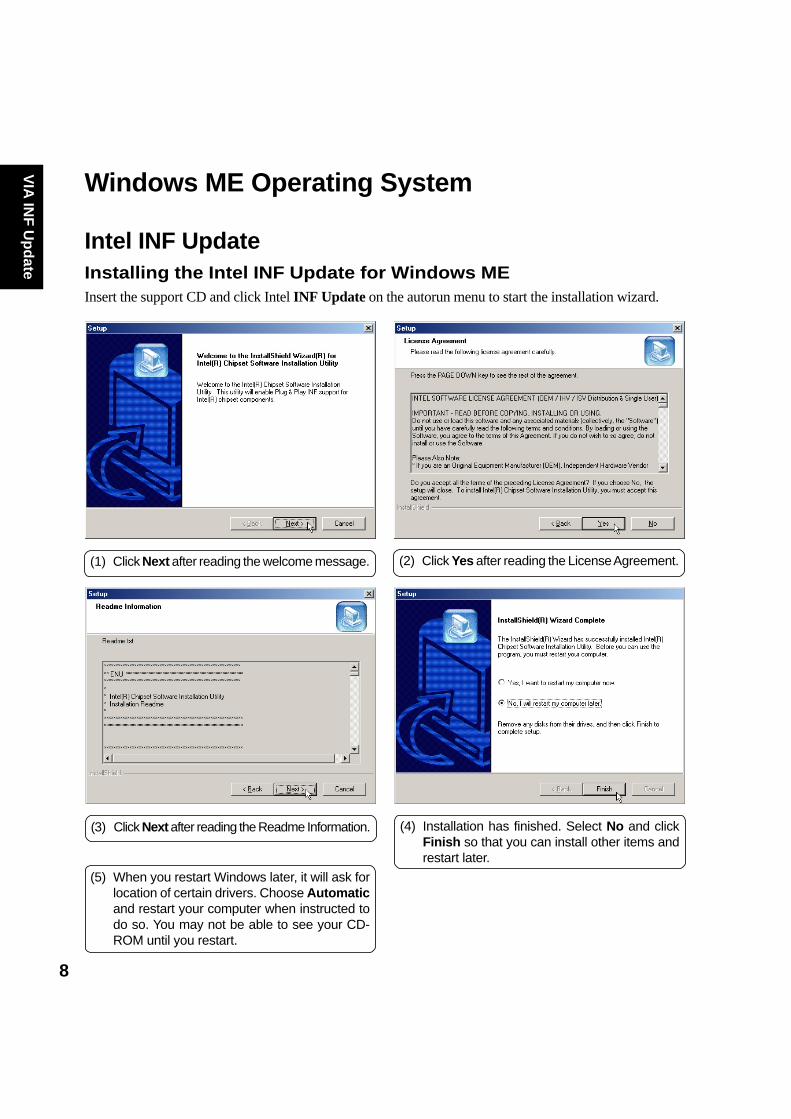
Intel INF UpdateInstalling the Intel INF Update for Windows MEInsert the support CD and click Intel INF Update on the autorun menu to start the installation wizard.
(1) Click Next after reading the welcome message. (2) Click Yes after reading the License Agreement.
(5) When you restart Windows later, it will ask forlocation of certain drivers. Choose Automaticand restart your computer when instructed todo so. You may not be able to see your CD-ROM until you restart.
(3) Click Next after reading the Readme Information. (4) Installation has finished. Select No and clickFinish so that you can install other items andrestart later.
9
AT
KA
CP
I Dri
ver
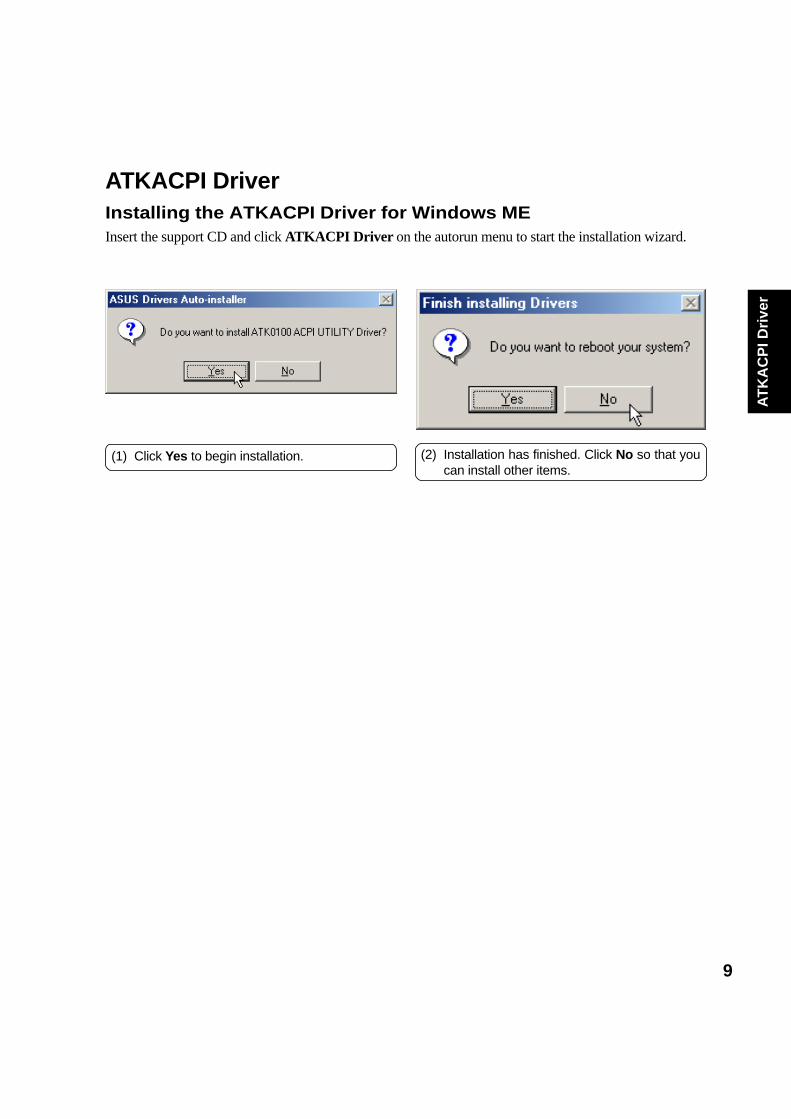
ATKACPI DriverInstalling the ATKACPI Driver for Windows MEInsert the support CD and click ATKACPI Driver on the autorun menu to start the installation wizard.
(1) Click Yes to begin installation. (2) Installation has finished. Click No so that youcan install other items.
10
VG
A D
river
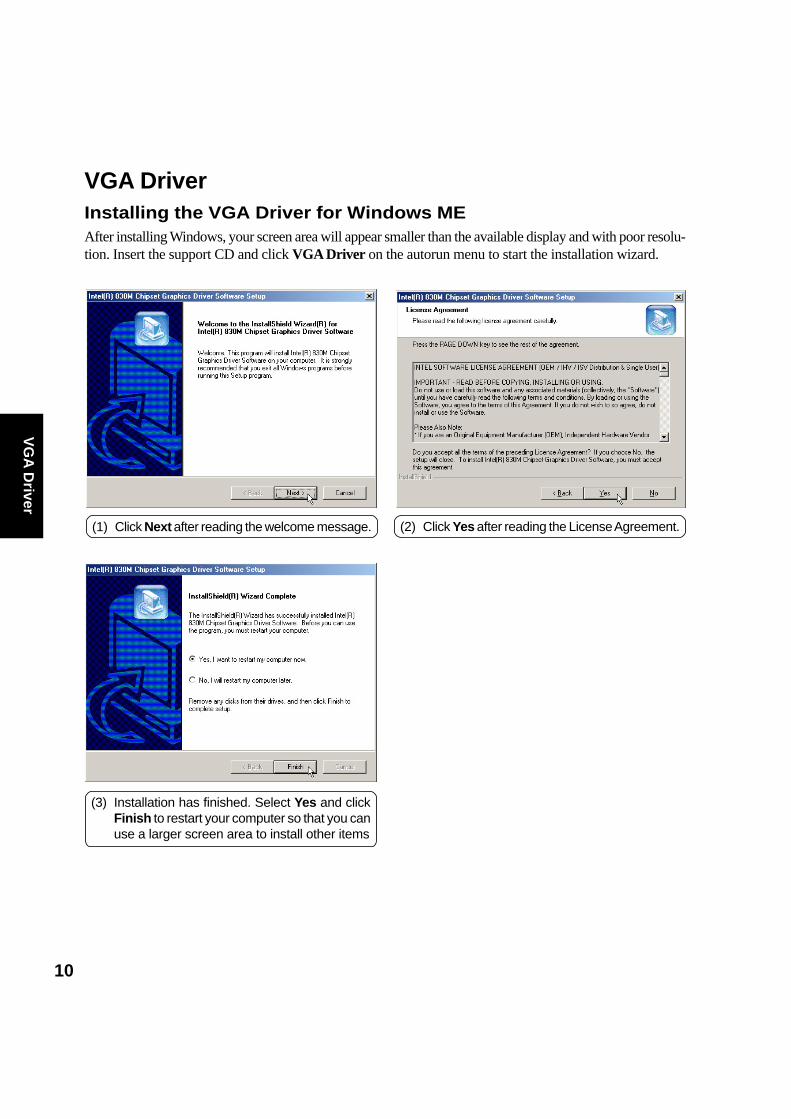
VGA DriverInstalling the VGA Driver for Windows MEAfter installing Windows, your screen area will appear smaller than the available display and with poor resolu-tion. Insert the support CD and click VGA Driver on the autorun menu to start the installation wizard.
(1) Click Next after reading the welcome message.
(3) Installation has finished. Select Yes and clickFinish to restart your computer so that you canuse a larger screen area to install other items
(2) Click Yes after reading the License Agreement.
11
VG
A D
rive
r
(4) You can select “Apply...without restarting?”and “Don’t ask...again” to save time in the fu-ture. Click OK to test your settings.
(5) Click Yes to keep your settings. If you clickNo or are unable to click to Yes, your previ-ous settings will be restored.
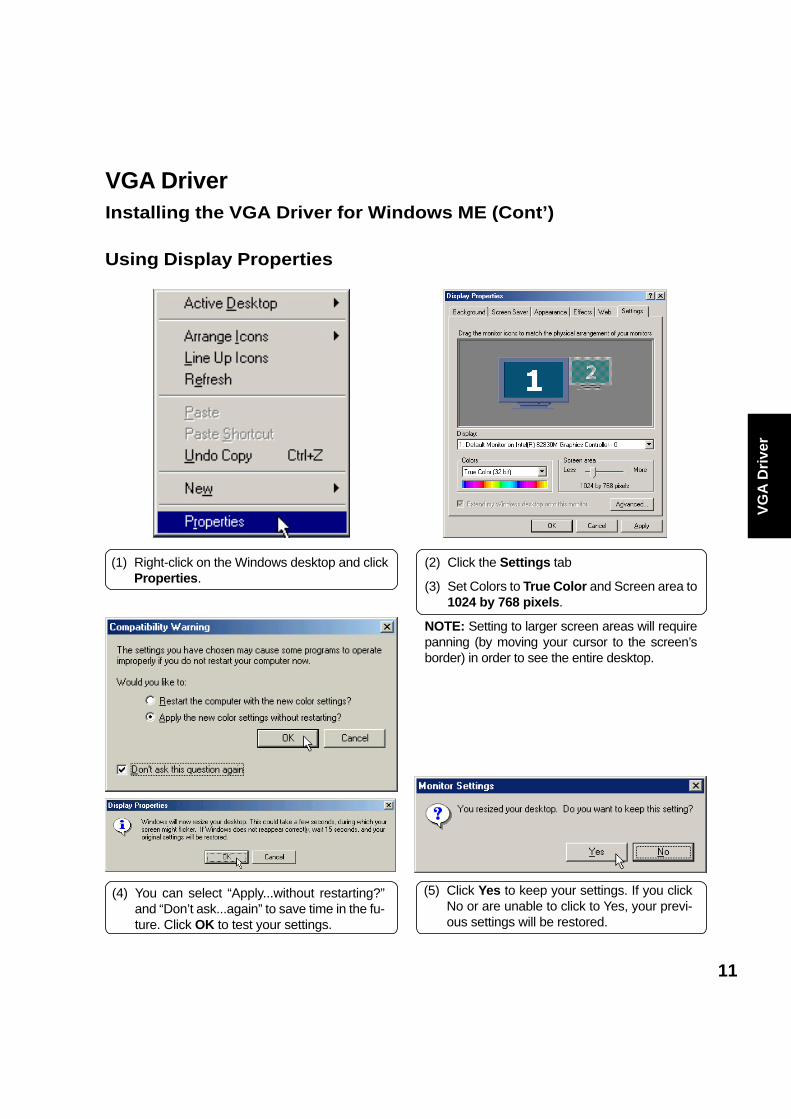
(1) Right-click on the Windows desktop and clickProperties.
(2) Click the Settings tab
(3) Set Colors to True Color and Screen area to1024 by 768 pixels.
NOTE: Setting to larger screen areas will requirepanning (by moving your cursor to the screen’sborder) in order to see the entire desktop.
Using Display Properties
VGA DriverInstalling the VGA Driver for Windows ME (Cont’)
12
Au
dio
Driver
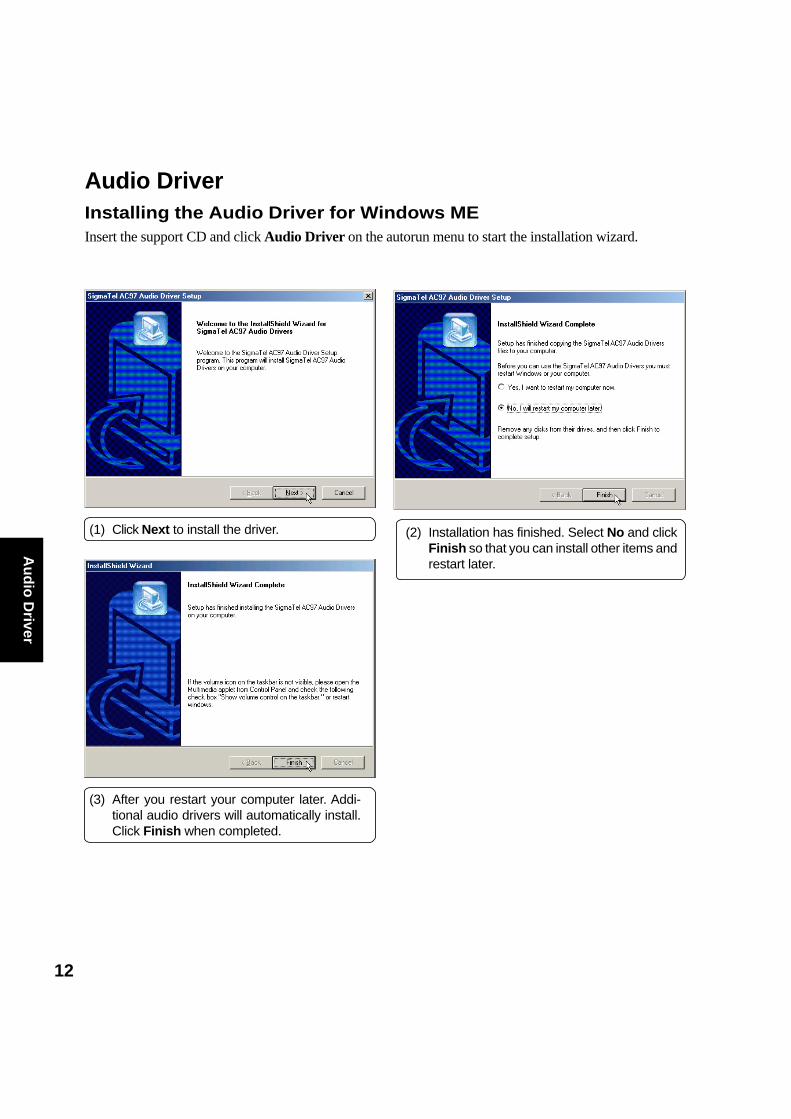
(1) Click Next to install the driver. (2) Installation has finished. Select No and clickFinish so that you can install other items andrestart later.
Audio DriverInstalling the Audio Driver for Windows MEInsert the support CD and click Audio Driver on the autorun menu to start the installation wizard.
(3) After you restart your computer later. Addi-tional audio drivers will automatically install.Click Finish when completed.
13
Dir
ectX
8.0
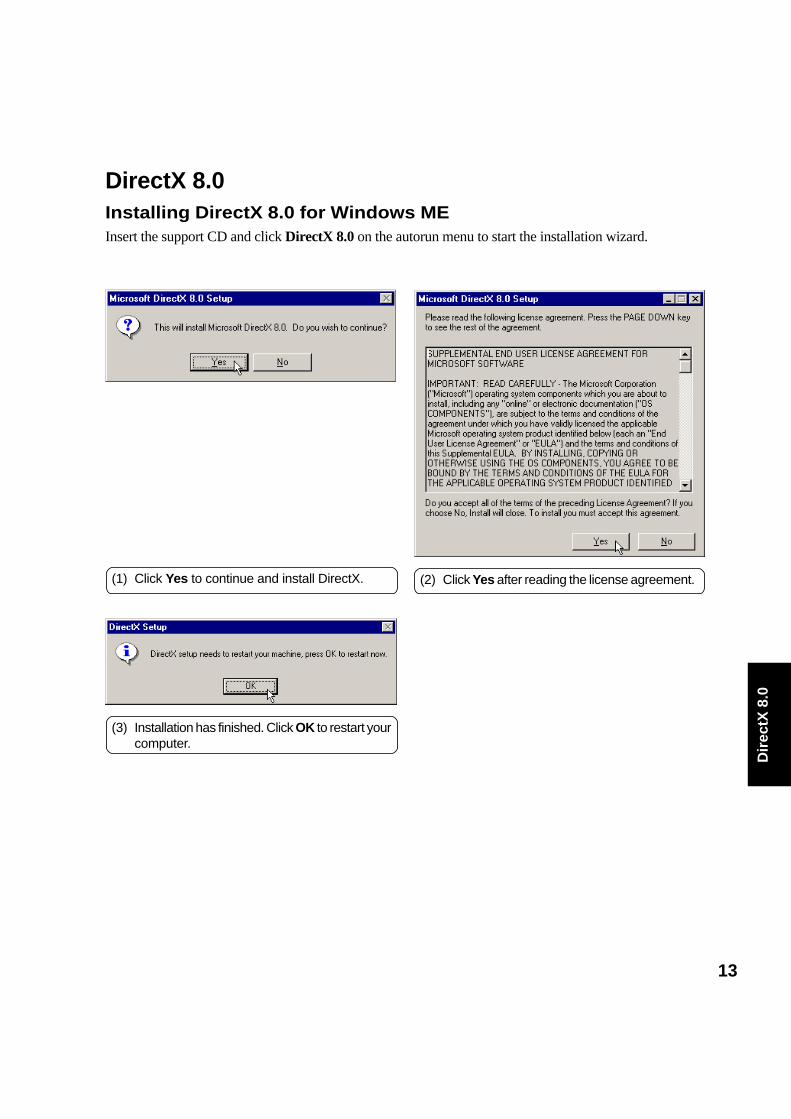
DirectX 8.0Installing DirectX 8.0 for Windows MEInsert the support CD and click DirectX 8.0 on the autorun menu to start the installation wizard.
(1) Click Yes to continue and install DirectX. (2) Click Yes after reading the license agreement.
(3) Installation has finished. Click OK to restart yourcomputer.
14
LA
N D
river
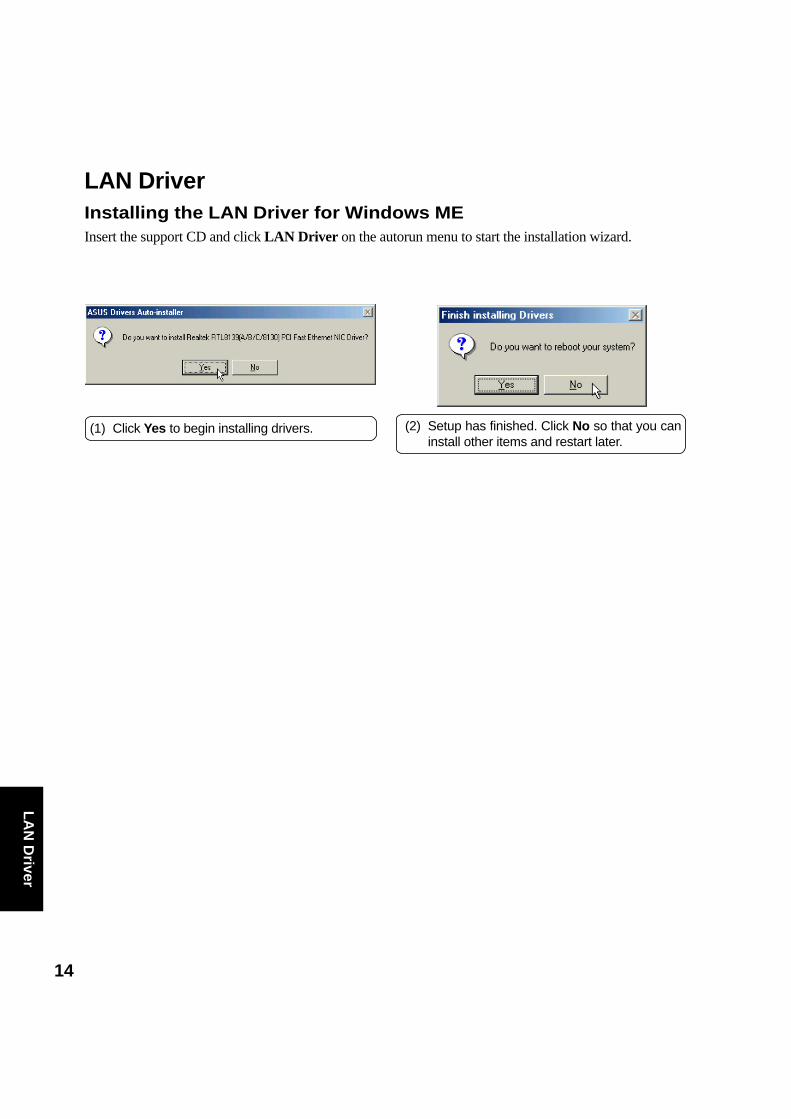
(1) Click Yes to begin installing drivers. (2) Setup has finished. Click No so that you caninstall other items and restart later.
LAN DriverInstalling the LAN Driver for Windows MEInsert the support CD and click LAN Driver on the autorun menu to start the installation wizard.

15
Mo
dem
Dri
verModem Driver
Installing the Modem Driver for Windows MEInsert the support CD and follow the steps below to install the modem driver. There is no installation wizardfor this process.
(3) Click Reinstall Driver.
(1) Right-click “My Computer” and select Properties.
(4) Select “Specify the location...” and click Next.Enter the path “__\modem\ winme” (with theletter of your CD drive) and click Next.
(2) Double-click PCI Communication Device.
16
Mo
dem
Driver
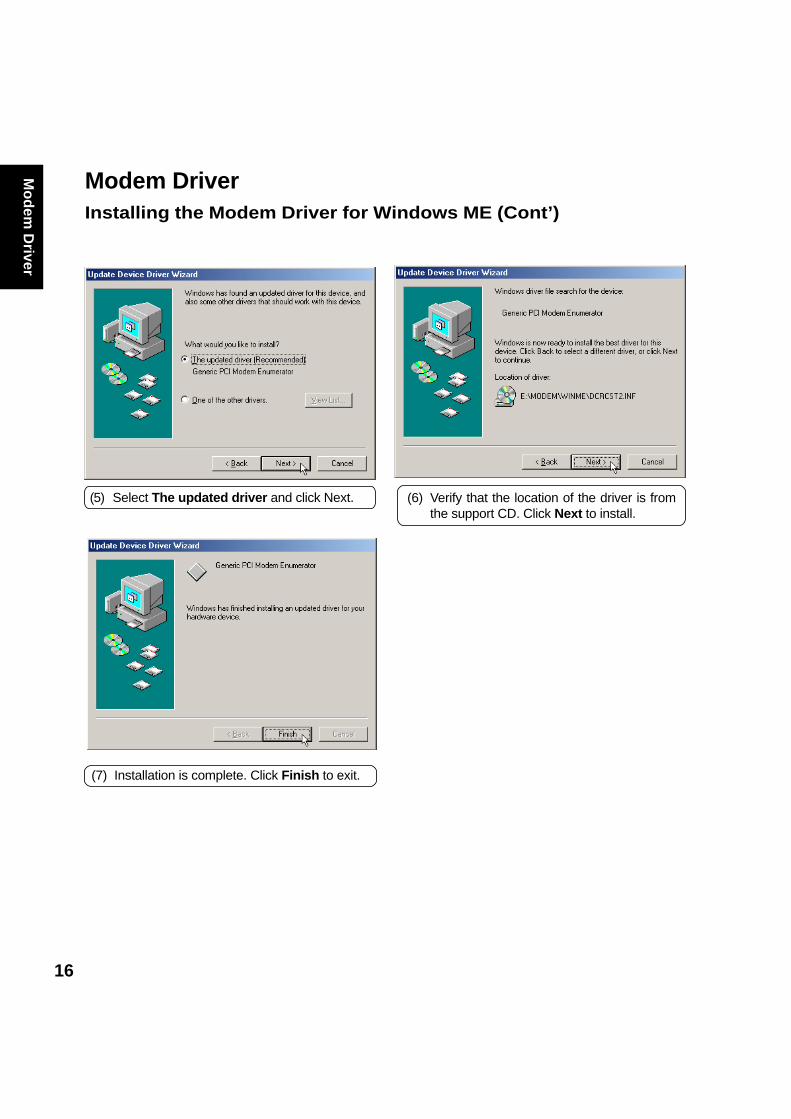
Modem DriverInstalling the Modem Driver for Windows ME (Cont’)
(5) Select The updated driver and click Next.
(7) Installation is complete. Click Finish to exit.
(6) Verify that the location of the driver is fromthe support CD. Click Next to install.
17
Tou
chP
ad
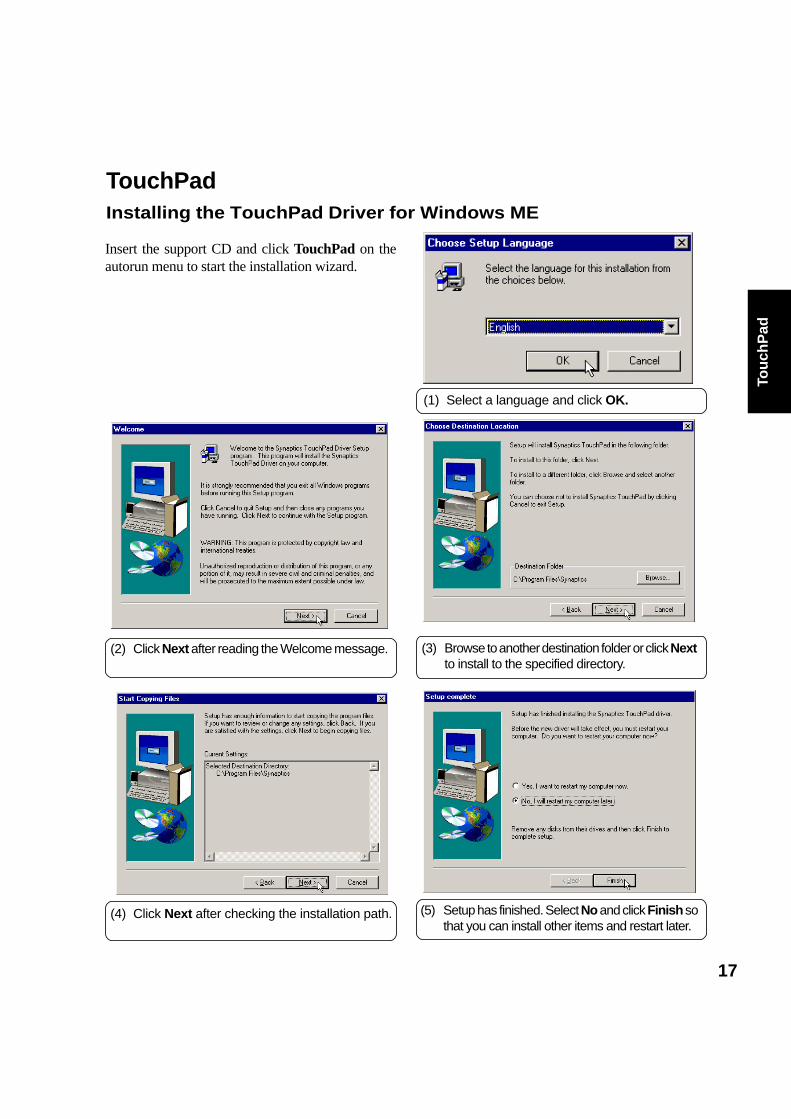
(5) Setup has finished. Select No and click Finish sothat you can install other items and restart later.
TouchPadInstalling the TouchPad Driver for Windows ME
(4) Click Next after checking the installation path.
(3) Browse to another destination folder or click Nextto install to the specified directory.
(2) Click Next after reading the Welcome message.
(1) Select a language and click OK.
Insert the support CD and click TouchPad on theautorun menu to start the installation wizard.
18
Fast IR
Driver
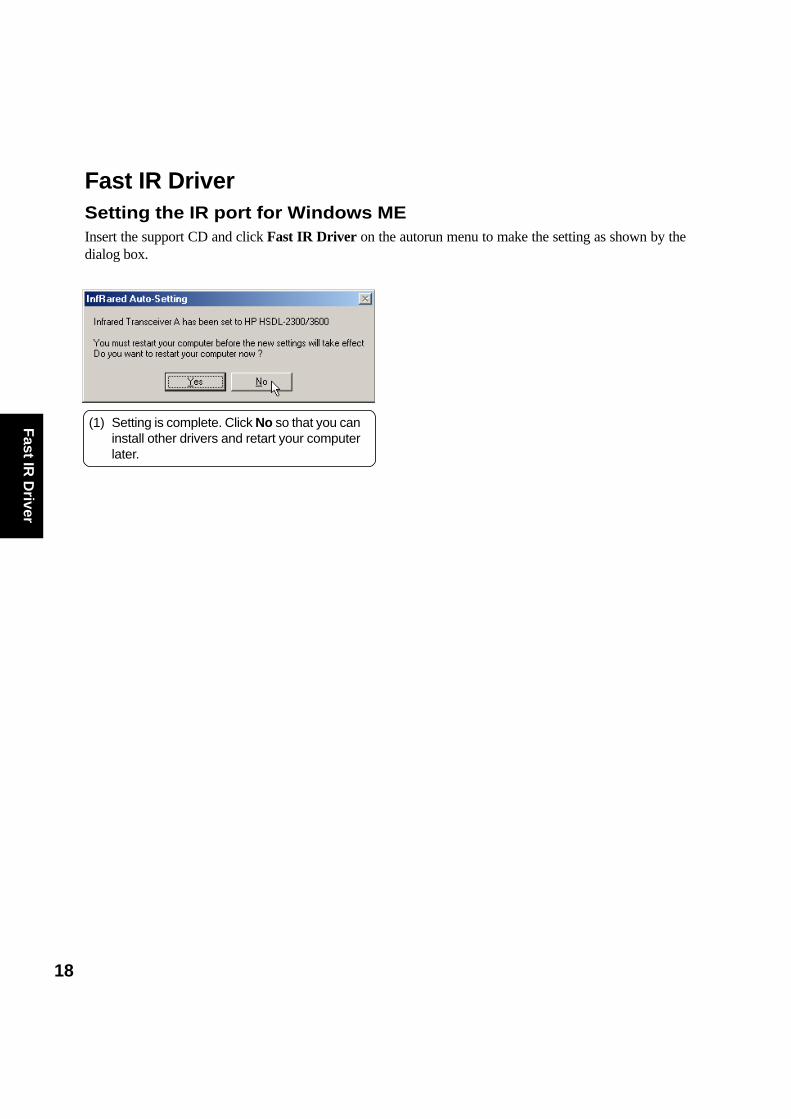
Fast IR DriverSetting the IR port for Windows MEInsert the support CD and click Fast IR Driver on the autorun menu to make the setting as shown by thedialog box.
(1) Setting is complete. Click No so that you caninstall other drivers and retart your computerlater.
19
Sp
eed
Ste
p
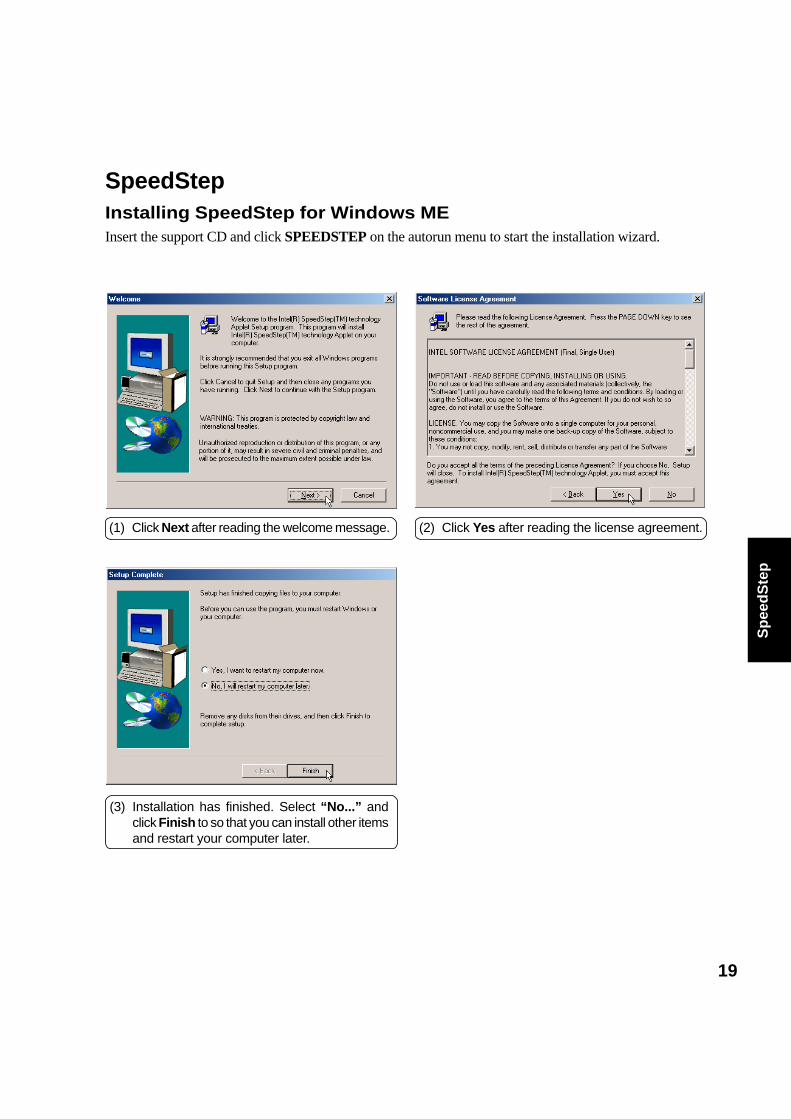
SpeedStepInstalling SpeedStep for Windows MEInsert the support CD and click SPEEDSTEP on the autorun menu to start the installation wizard.
(1) Click Next after reading the welcome message.
(3) Installation has finished. Select “No...” andclick Finish to so that you can install other itemsand restart your computer later.
(2) Click Yes after reading the license agreement.
20
PC
-cillin 2000
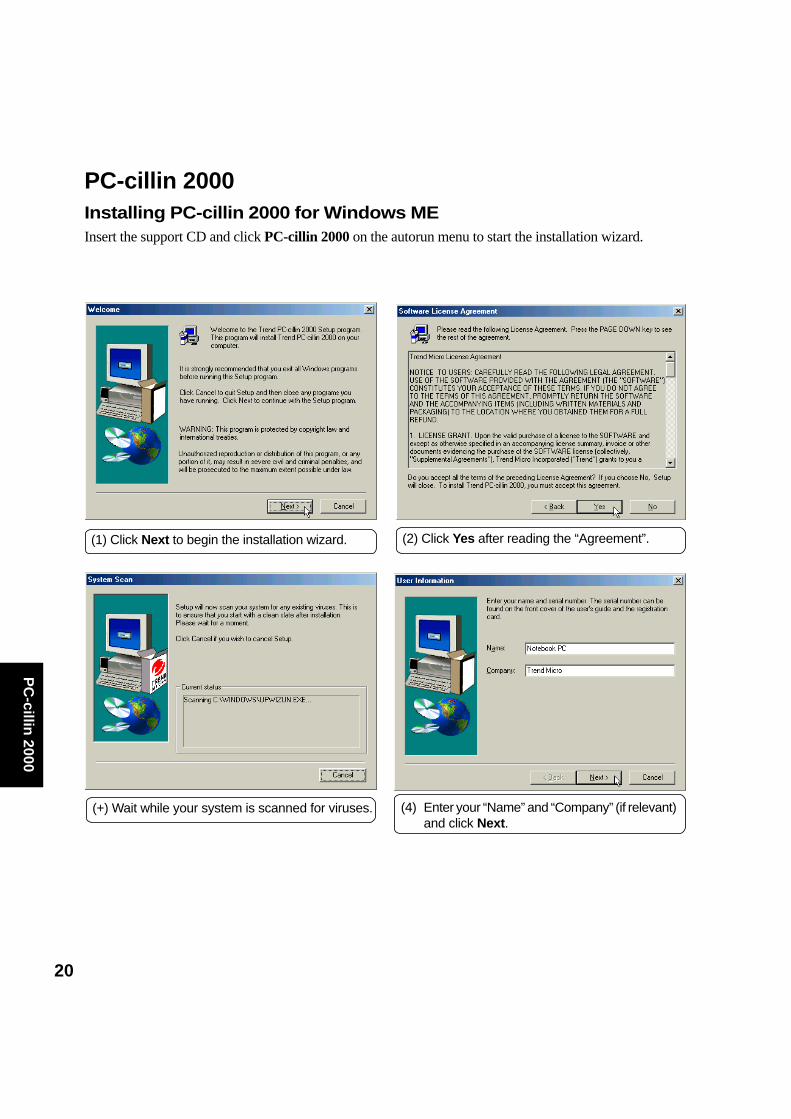
(1) Click Next to begin the installation wizard. (2) Click Yes after reading the “Agreement”.
(4) Enter your “Name” and “Company” (if relevant)and click Next.
(+) Wait while your system is scanned for viruses.
PC-cillin 2000Installing PC-cillin 2000 for Windows MEInsert the support CD and click PC-cillin 2000 on the autorun menu to start the installation wizard.
21
PC
-cill
in 2
000
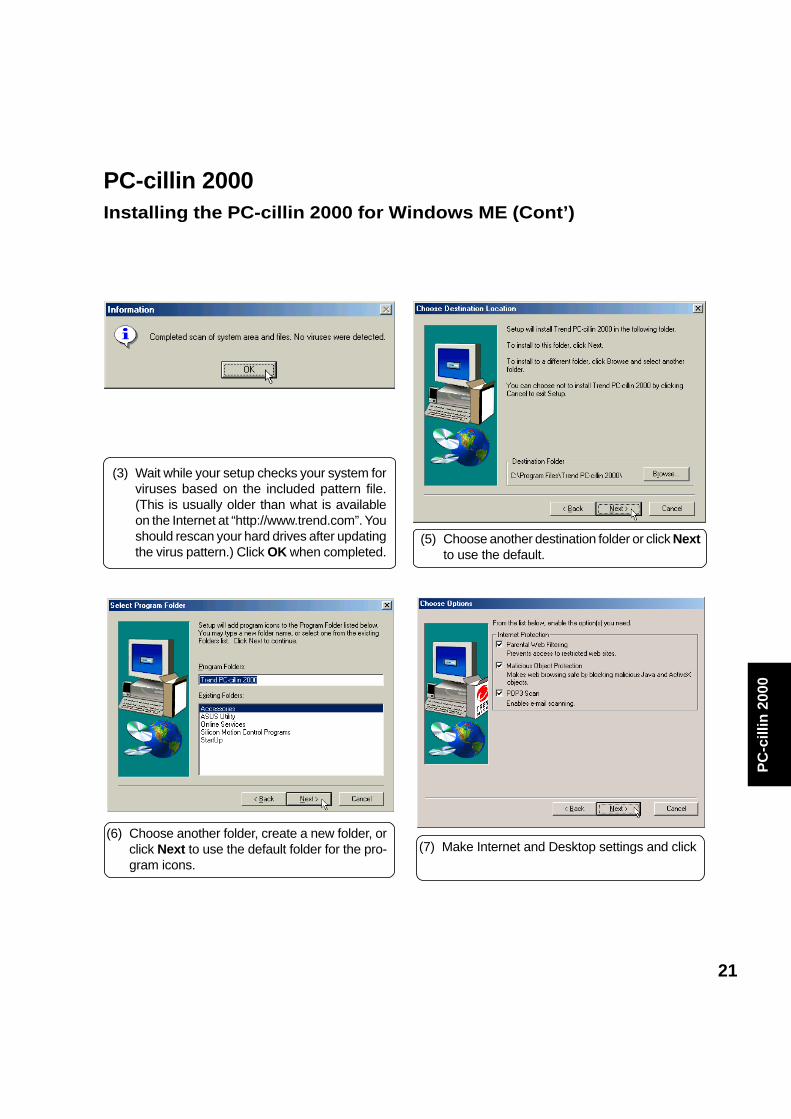
(3) Wait while your setup checks your system forviruses based on the included pattern file.(This is usually older than what is availableon the Internet at “http://www.trend.com”. Youshould rescan your hard drives after updatingthe virus pattern.) Click OK when completed.
(5) Choose another destination folder or click Nextto use the default.
(6) Choose another folder, create a new folder, orclick Next to use the default folder for the pro-gram icons.
(7) Make Internet and Desktop settings and click
PC-cillin 2000Installing the PC-cillin 2000 for Windows ME (Cont’)
22
PC
-cillin 2000
PC-cillin 2000Installing the PC-cillin 2000 for Windows ME (Cont’)
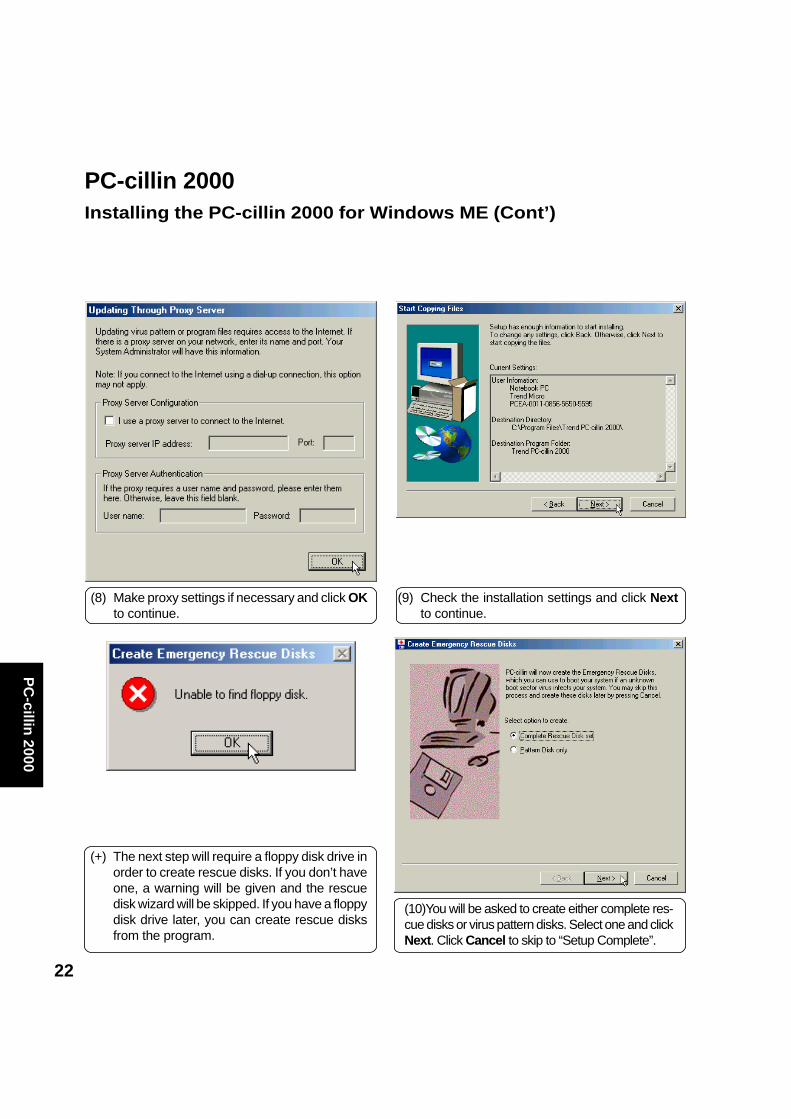
(8) Make proxy settings if necessary and click OKto continue.
(9) Check the installation settings and click Nextto continue.
(10)You will be asked to create either complete res-cue disks or virus pattern disks. Select one and clickNext. Click Cancel to skip to “Setup Complete”.
(+) The next step will require a floppy disk drive inorder to create rescue disks. If you don’t haveone, a warning will be given and the rescuedisk wizard will be skipped. If you have a floppydisk drive later, you can create rescue disksfrom the program.
23
PC
-cill
in 2
000
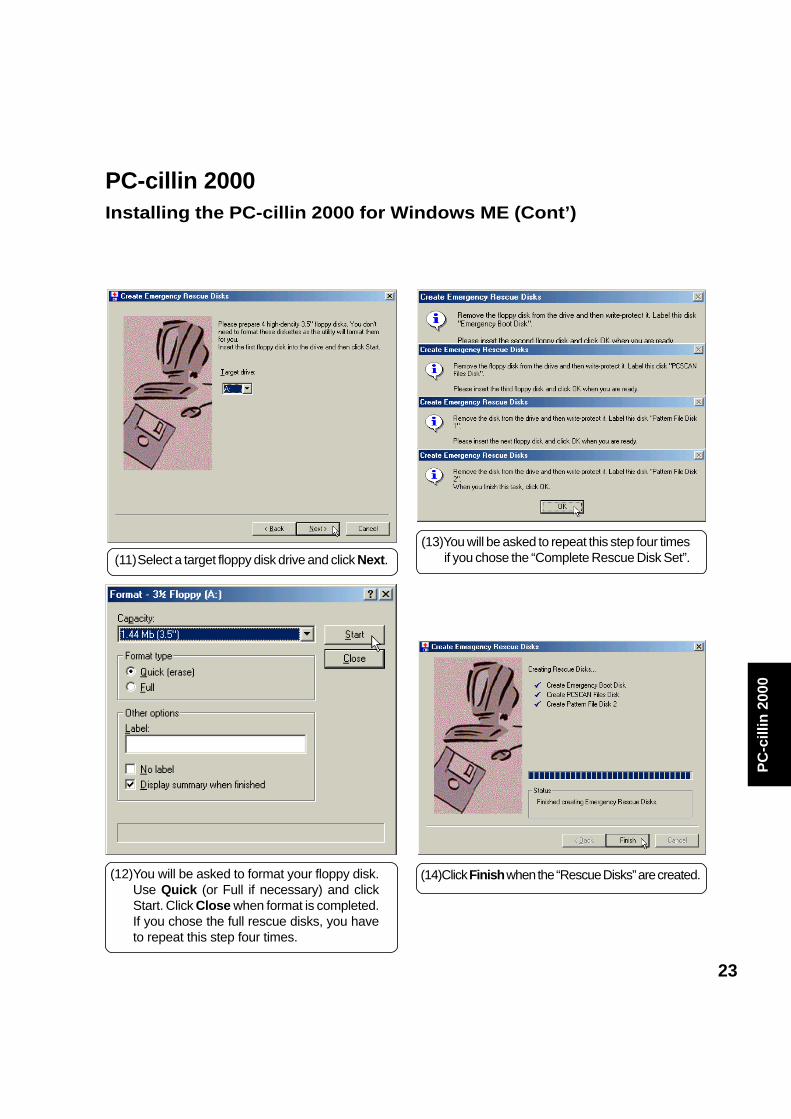
(14)Click Finish when the “Rescue Disks” are created.(12)You will be asked to format your floppy disk.Use Quick (or Full if necessary) and clickStart. Click Close when format is completed.If you chose the full rescue disks, you haveto repeat this step four times.
(11)Select a target floppy disk drive and click Next.
PC-cillin 2000Installing the PC-cillin 2000 for Windows ME (Cont’)
(13)You will be asked to repeat this step four timesif you chose the “Complete Rescue Disk Set”.
24
PC
-cillin 2000
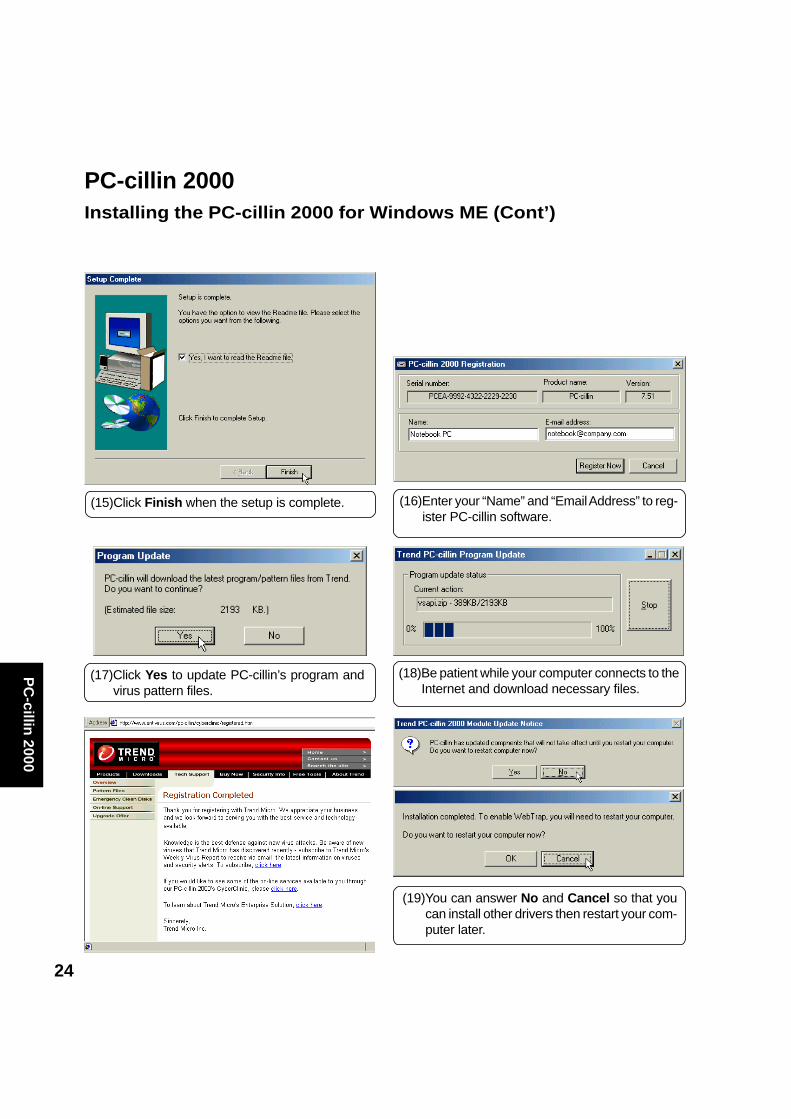
(16)Enter your “Name” and “Email Address” to reg-ister PC-cillin software.
(17)Click Yes to update PC-cillin’s program andvirus pattern files.
(18)Be patient while your computer connects to theInternet and download necessary files.
(19)You can answer No and Cancel so that youcan install other drivers then restart your com-puter later.
PC-cillin 2000Installing the PC-cillin 2000 for Windows ME (Cont’)
(15)Click Finish when the setup is complete.
25
Ho
tkey
Uti
lity
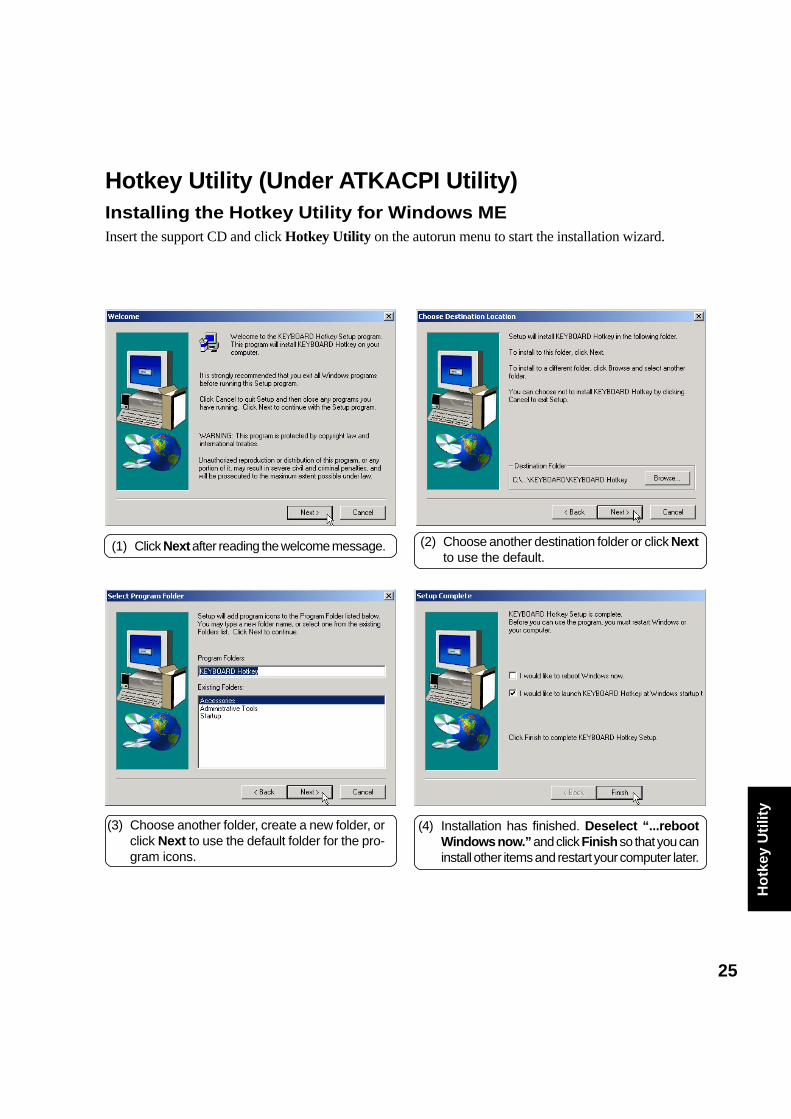
Hotkey Utility (Under ATKACPI Utility)Installing the Hotkey Utility for Windows MEInsert the support CD and click Hotkey Utility on the autorun menu to start the installation wizard.
(1) Click Next after reading the welcome message. (2) Choose another destination folder or click Nextto use the default.
(3) Choose another folder, create a new folder, orclick Next to use the default folder for the pro-gram icons.
(4) Installation has finished. Deselect “...rebootWindows now.” and click Finish so that you caninstall other items and restart your computer later.
26
Flash
Utility
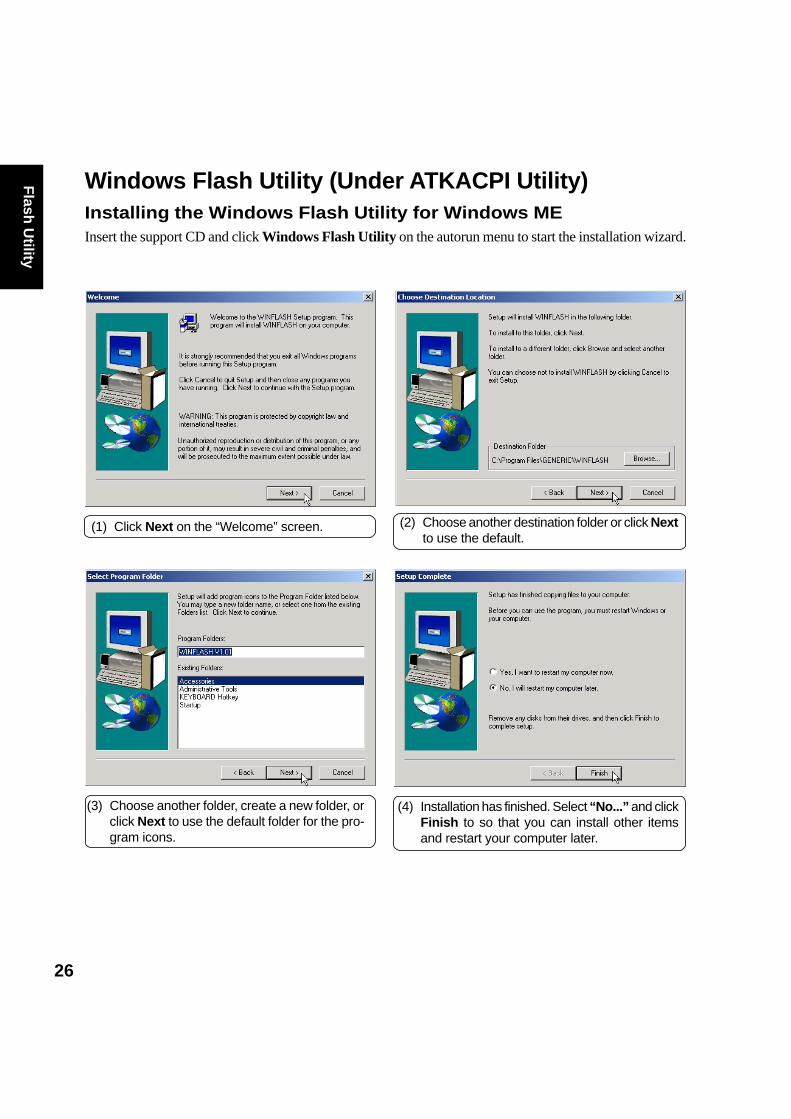
Windows Flash Utility (Under ATKACPI Utility)Installing the Windows Flash Utility for Windows MEInsert the support CD and click Windows Flash Utility on the autorun menu to start the installation wizard.
(1) Click Next on the “Welcome” screen. (2) Choose another destination folder or click Nextto use the default.
(3) Choose another folder, create a new folder, orclick Next to use the default folder for the pro-gram icons.
(4) Installation has finished. Select “No...” and clickFinish to so that you can install other itemsand restart your computer later.
27
AS
US
PC
Pro
be
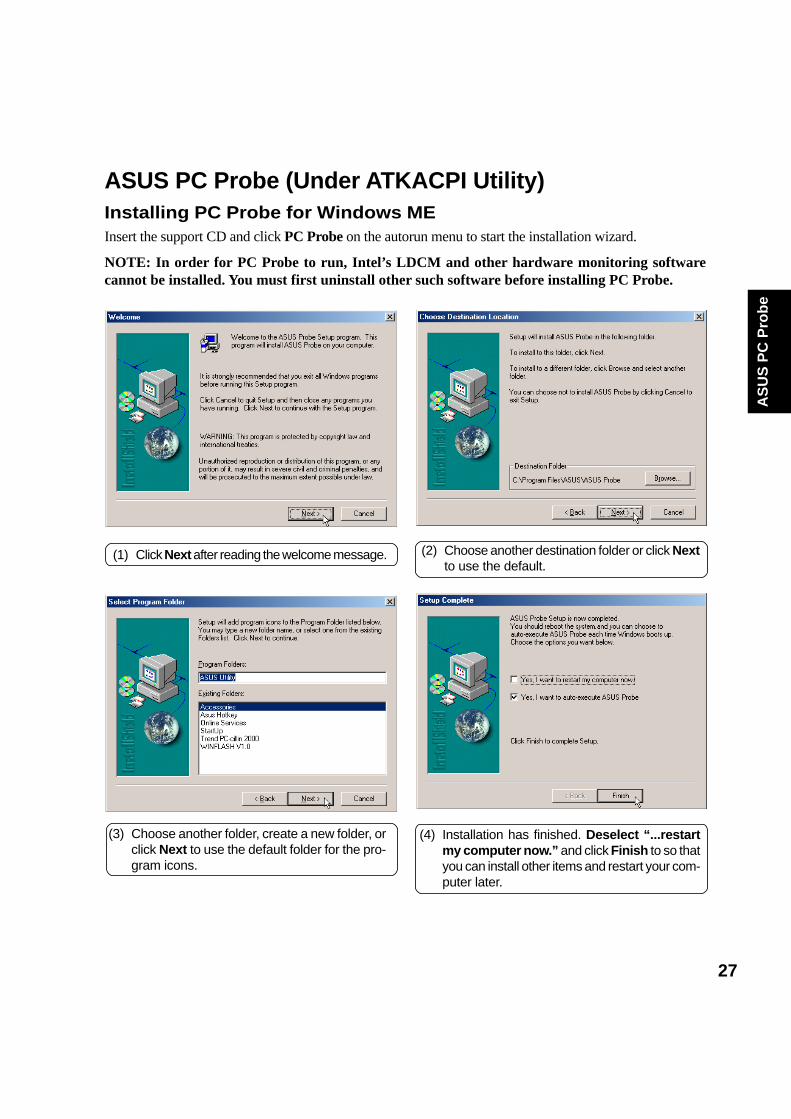
ASUS PC Probe (Under ATKACPI Utility)Installing PC Probe for Windows MEInsert the support CD and click PC Probe on the autorun menu to start the installation wizard.
NOTE: In order for PC Probe to run, Intel’s LDCM and other hardware monitoring softwarecannot be installed. You must first uninstall other such software before installing PC Probe.
(1) Click Next after reading the welcome message. (2) Choose another destination folder or click Nextto use the default.
(3) Choose another folder, create a new folder, orclick Next to use the default folder for the pro-gram icons.
(4) Installation has finished. Deselect “...restartmy computer now.” and click Finish to so thatyou can install other items and restart your com-puter later.
28
Check M
ail Utility
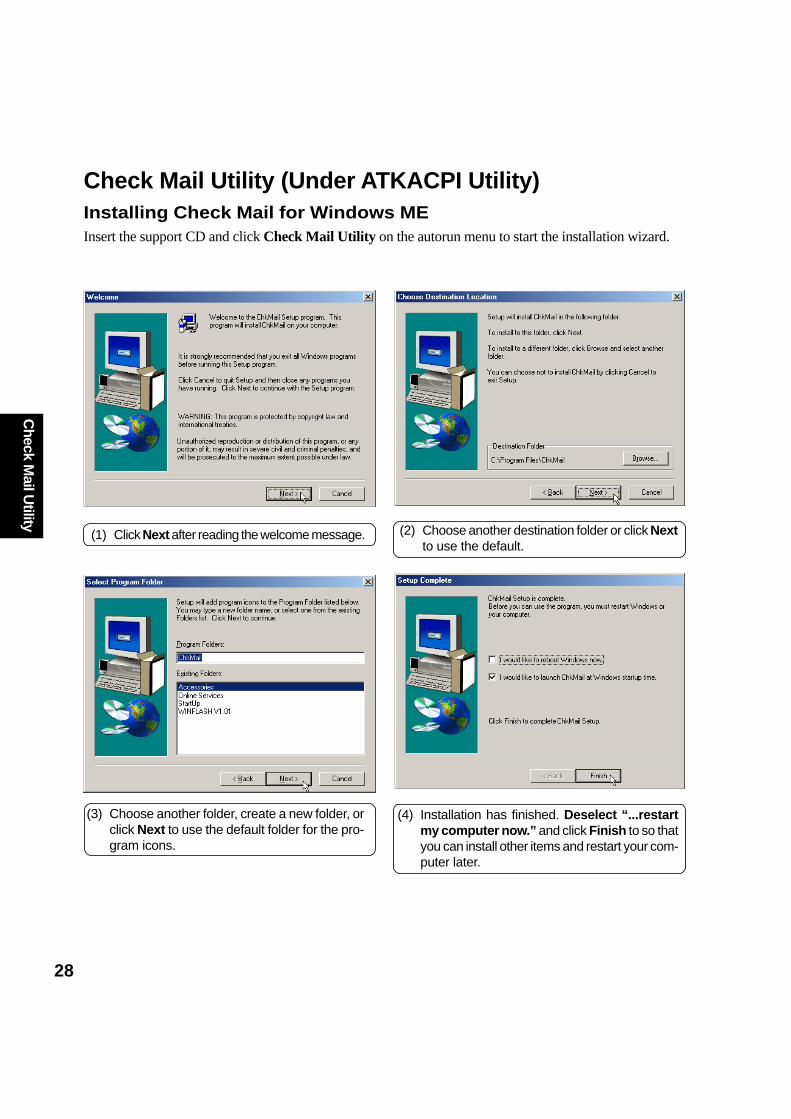
Check Mail Utility (Under ATKACPI Utility)Installing Check Mail for Windows MEInsert the support CD and click Check Mail Utility on the autorun menu to start the installation wizard.
(1) Click Next after reading the welcome message. (2) Choose another destination folder or click Nextto use the default.
(3) Choose another folder, create a new folder, orclick Next to use the default folder for the pro-gram icons.
(4) Installation has finished. Deselect “...restartmy computer now.” and click Finish to so thatyou can install other items and restart your com-puter later.
29
IDE
Sw
ap U
tilit
y
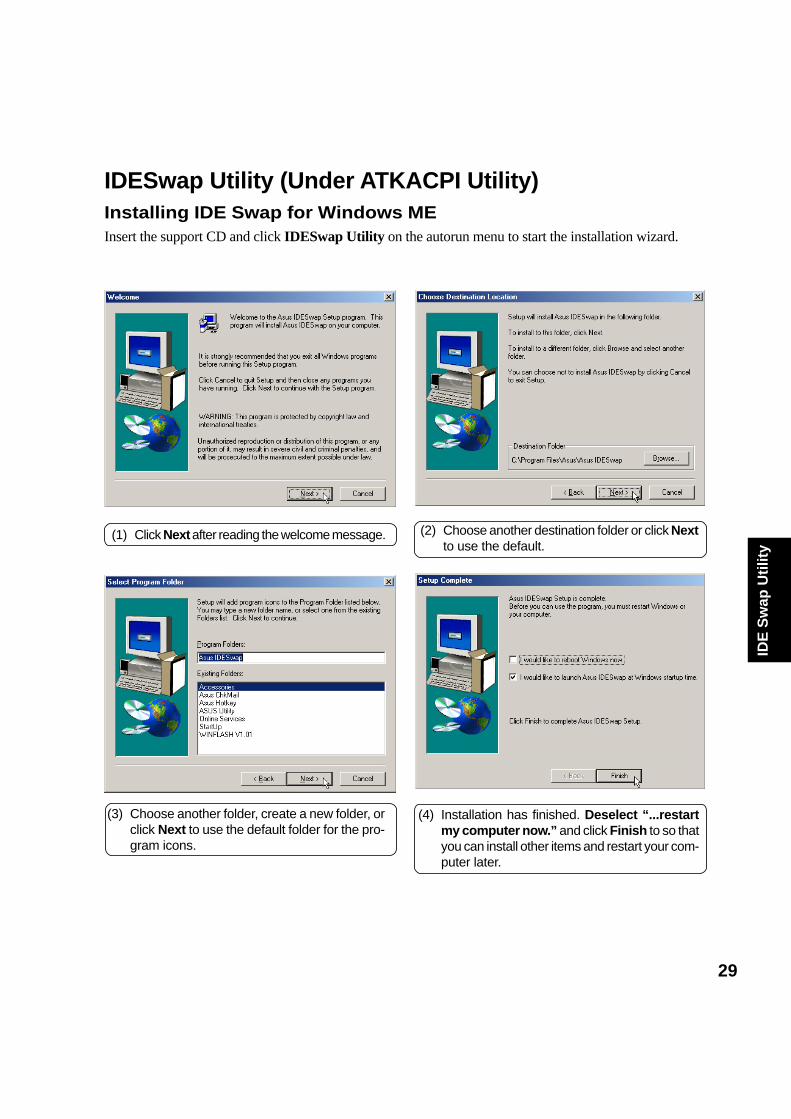
IDESwap Utility (Under ATKACPI Utility)Installing IDE Swap for Windows MEInsert the support CD and click IDESwap Utility on the autorun menu to start the installation wizard.
(1) Click Next after reading the welcome message. (2) Choose another destination folder or click Nextto use the default.
(3) Choose another folder, create a new folder, orclick Next to use the default folder for the pro-gram icons.
(4) Installation has finished. Deselect “...restartmy computer now.” and click Finish to so thatyou can install other items and restart your com-puter later.
30
Pow
er Gear U
tility
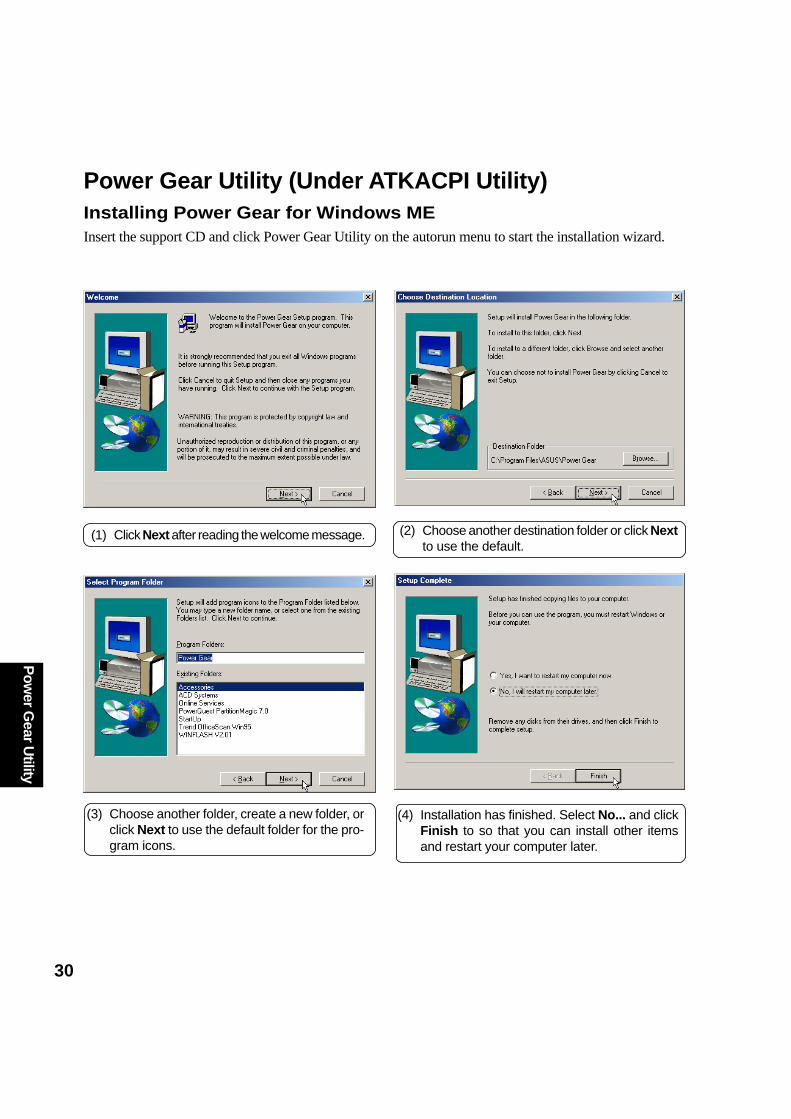
Power Gear Utility (Under ATKACPI Utility)Installing Power Gear for Windows MEInsert the support CD and click Power Gear Utility on the autorun menu to start the installation wizard.
(1) Click Next after reading the welcome message. (2) Choose another destination folder or click Nextto use the default.
(3) Choose another folder, create a new folder, orclick Next to use the default folder for the pro-gram icons.
(4) Installation has finished. Select No... and clickFinish to so that you can install other itemsand restart your computer later.
31
Scr
een
Sav
er
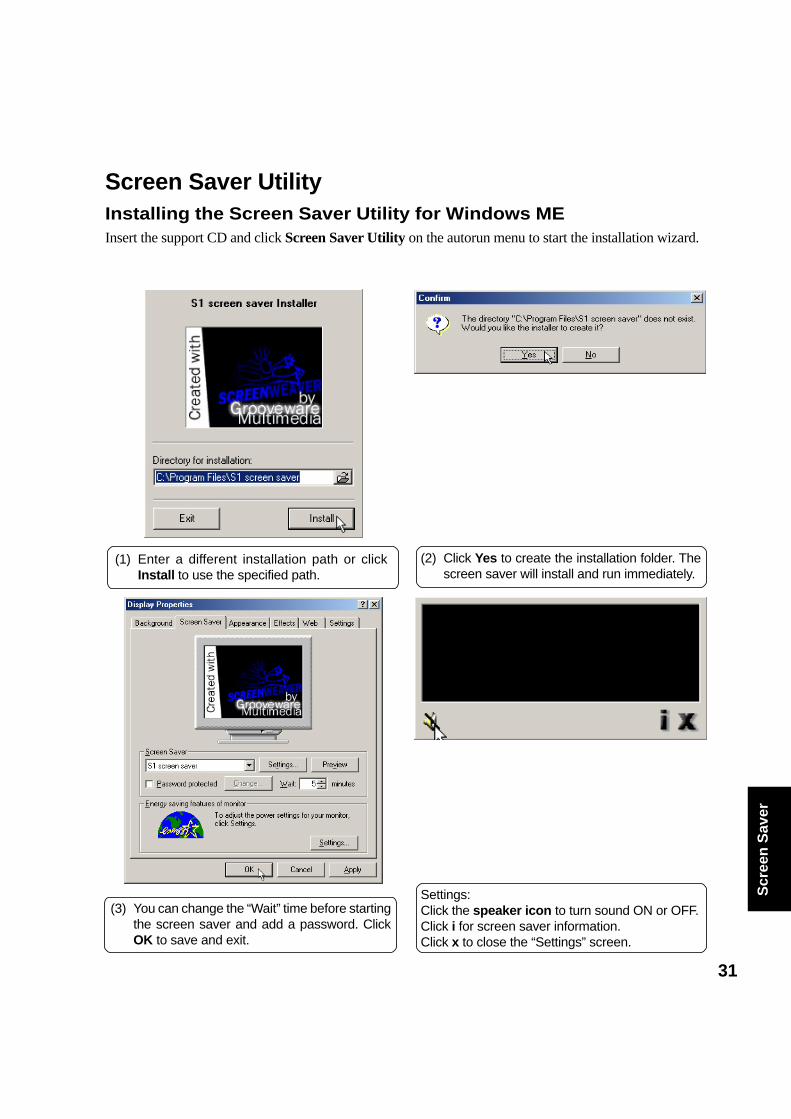
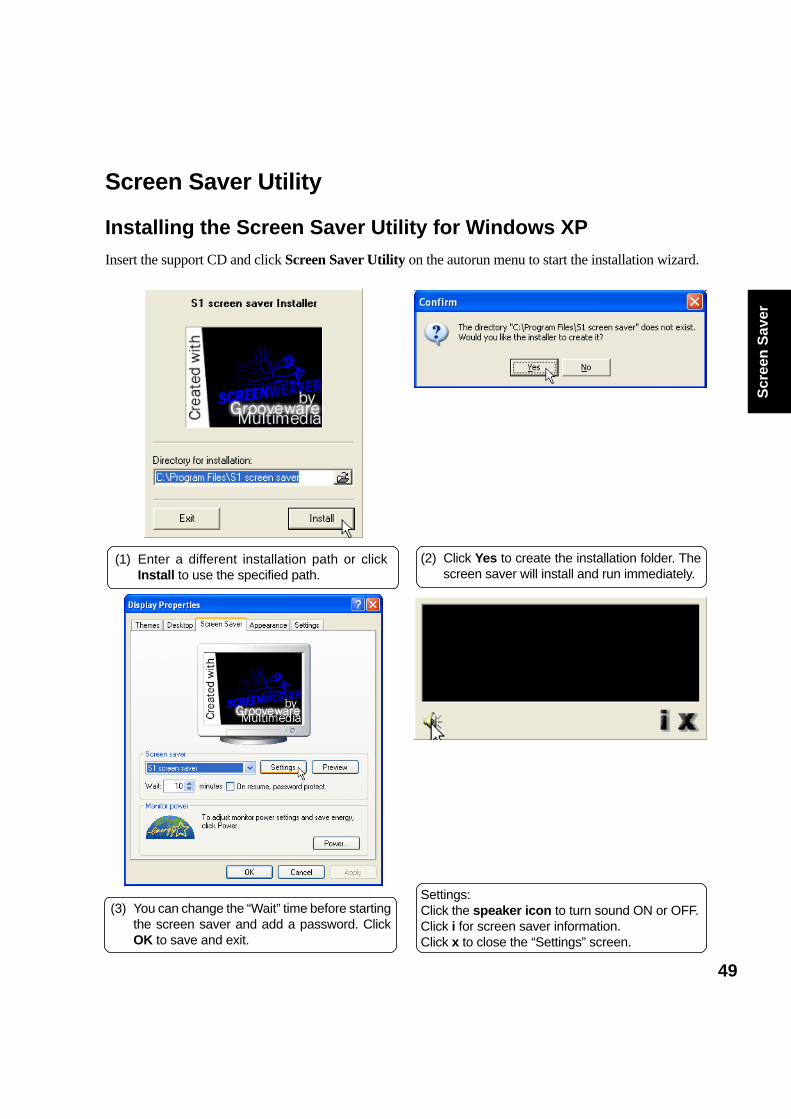
Screen Saver UtilityInstalling the Screen Saver Utility for Windows MEInsert the support CD and click Screen Saver Utility on the autorun menu to start the installation wizard.
(1) Enter a different installation path or clickInstall to use the specified path.
(2) Click Yes to create the installation folder. Thescreen saver will install and run immediately.
(3) You can change the “Wait” time before startingthe screen saver and add a password. ClickOK to save and exit.
Settings:Click the speaker icon to turn sound ON or OFF.Click i for screen saver information.Click x to close the “Settings” screen.

32
Screen
Saver
33
INF
Up
dat
e
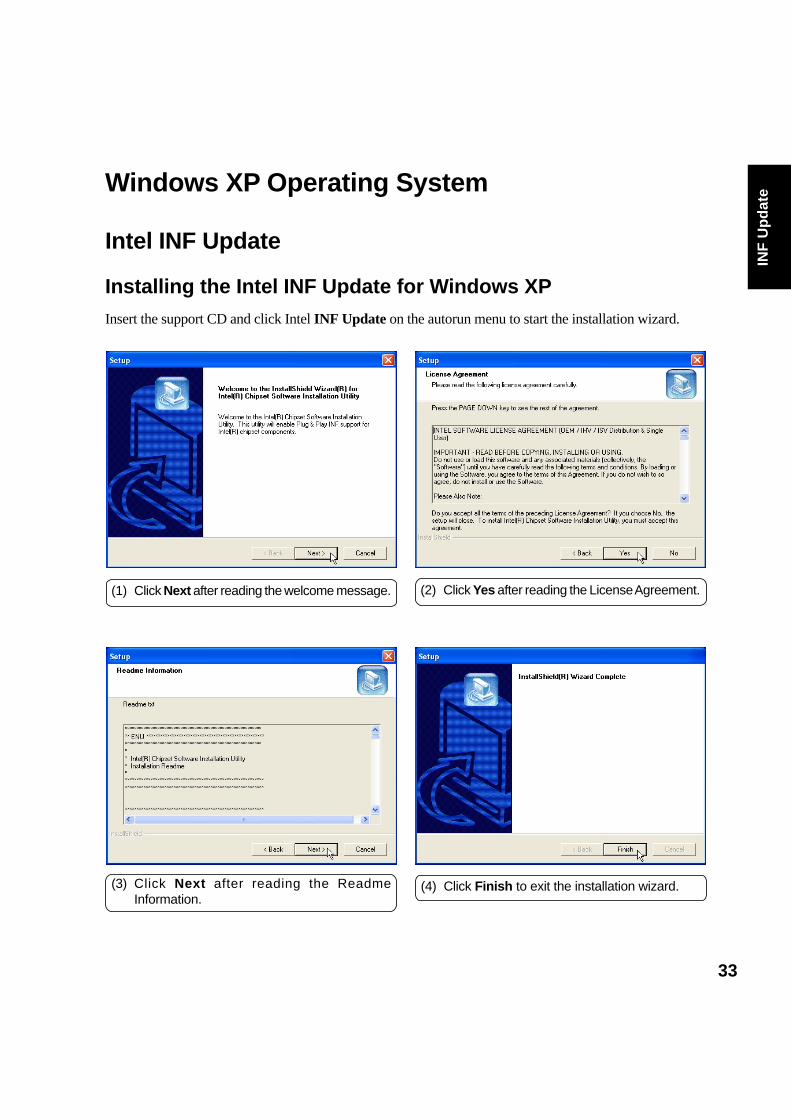
(1) Click Next after reading the welcome message. (2) Click Yes after reading the License Agreement.
(3) Click Next after reading the ReadmeInformation.
(4) Click Finish to exit the installation wizard.
Windows XP Operating System
Intel INF Update
Installing the Intel INF Update for Windows XPInsert the support CD and click Intel INF Update on the autorun menu to start the installation wizard.
34
AT
KA
CP
I
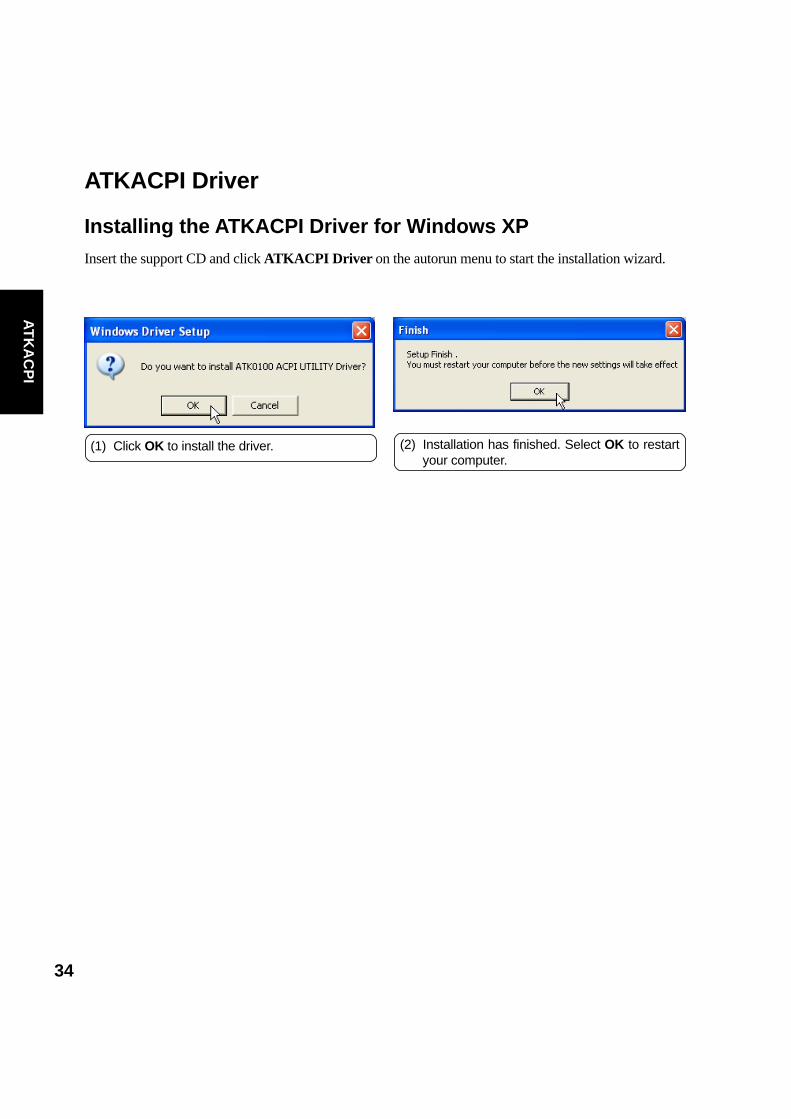
(1) Click OK to install the driver. (2) Installation has finished. Select OK to restartyour computer.
ATKACPI Driver
Installing the ATKACPI Driver for Windows XPInsert the support CD and click ATKACPI Driver on the autorun menu to start the installation wizard.
35
VG
A D
rive
r
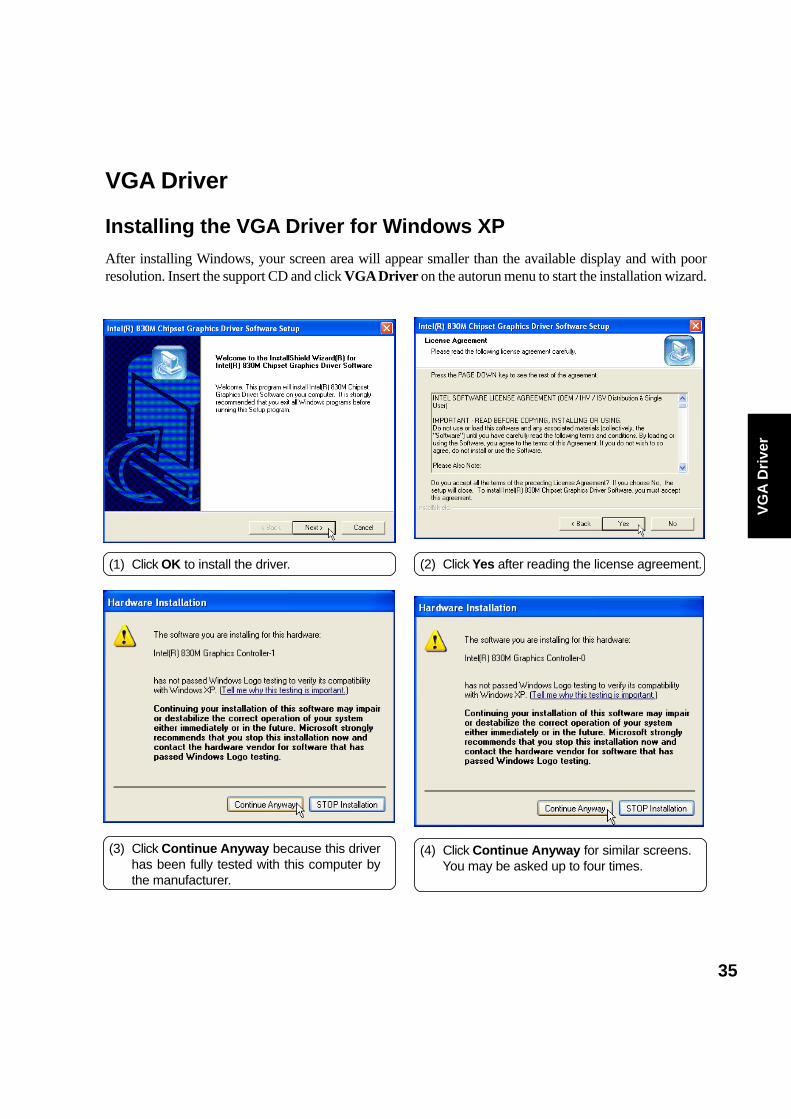
VGA Driver
Installing the VGA Driver for Windows XPAfter installing Windows, your screen area will appear smaller than the available display and with poorresolution. Insert the support CD and click VGA Driver on the autorun menu to start the installation wizard.
(1) Click OK to install the driver. (2) Click Yes after reading the license agreement.
(3) Click Continue Anyway because this driverhas been fully tested with this computer bythe manufacturer.
(4) Click Continue Anyway for similar screens.You may be asked up to four times.
36
VG
A D
river
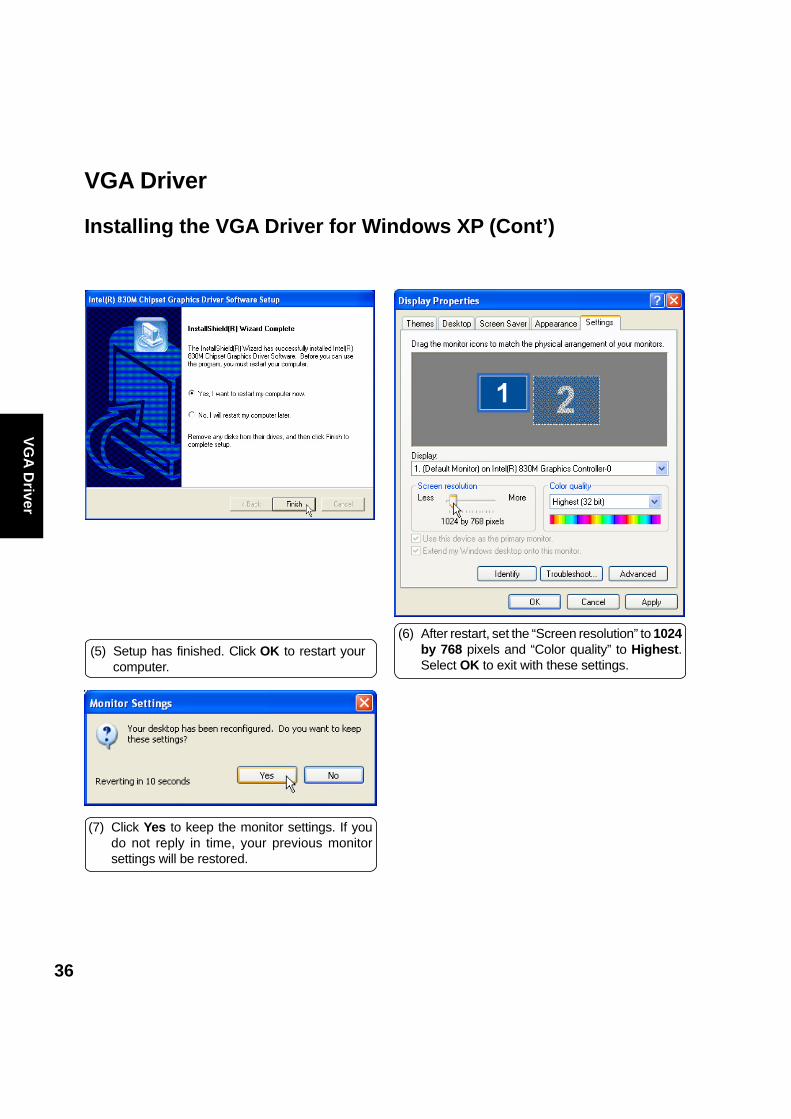
(5) Setup has finished. Click OK to restart yourcomputer.
(6) After restart, set the “Screen resolution” to 1024by 768 pixels and “Color quality” to Highest.Select OK to exit with these settings.
(7) Click Yes to keep the monitor settings. If youdo not reply in time, your previous monitorsettings will be restored.
VGA Driver
Installing the VGA Driver for Windows XP (Cont’)
37
Au
dio
Dri
ver
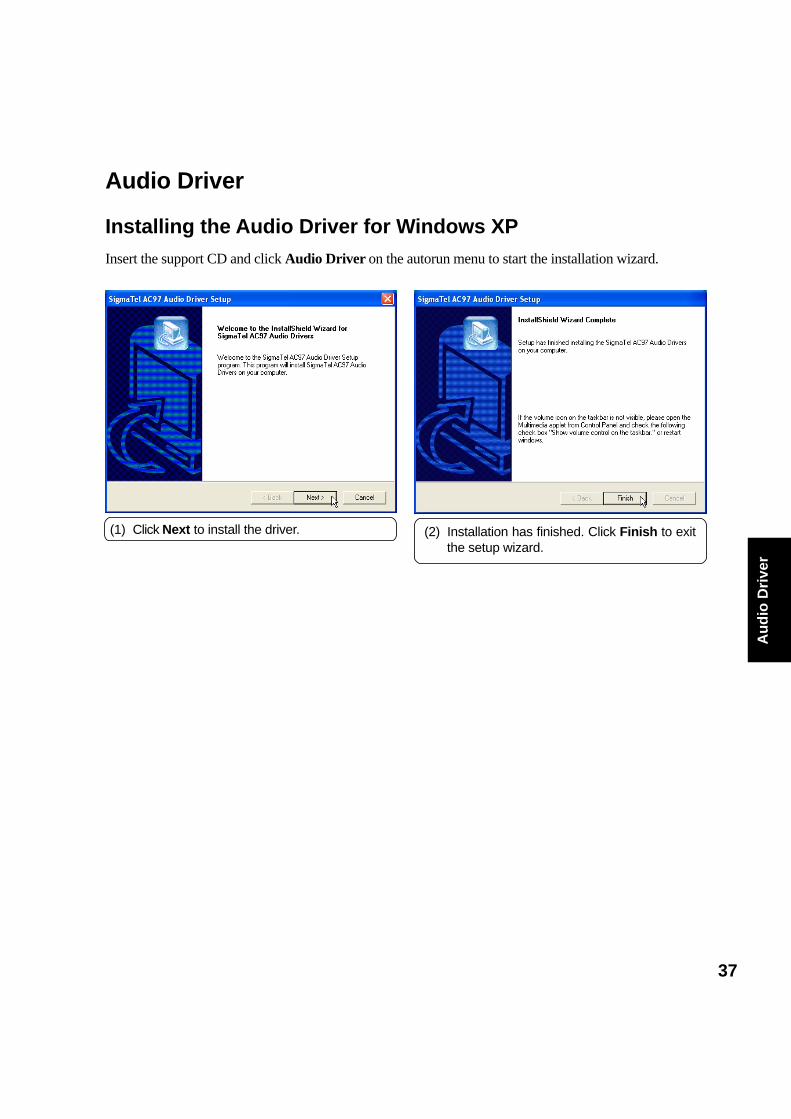
(1) Click Next to install the driver. (2) Installation has finished. Click Finish to exitthe setup wizard.
Audio Driver
Installing the Audio Driver for Windows XPInsert the support CD and click Audio Driver on the autorun menu to start the installation wizard.
38
LA
N D
river
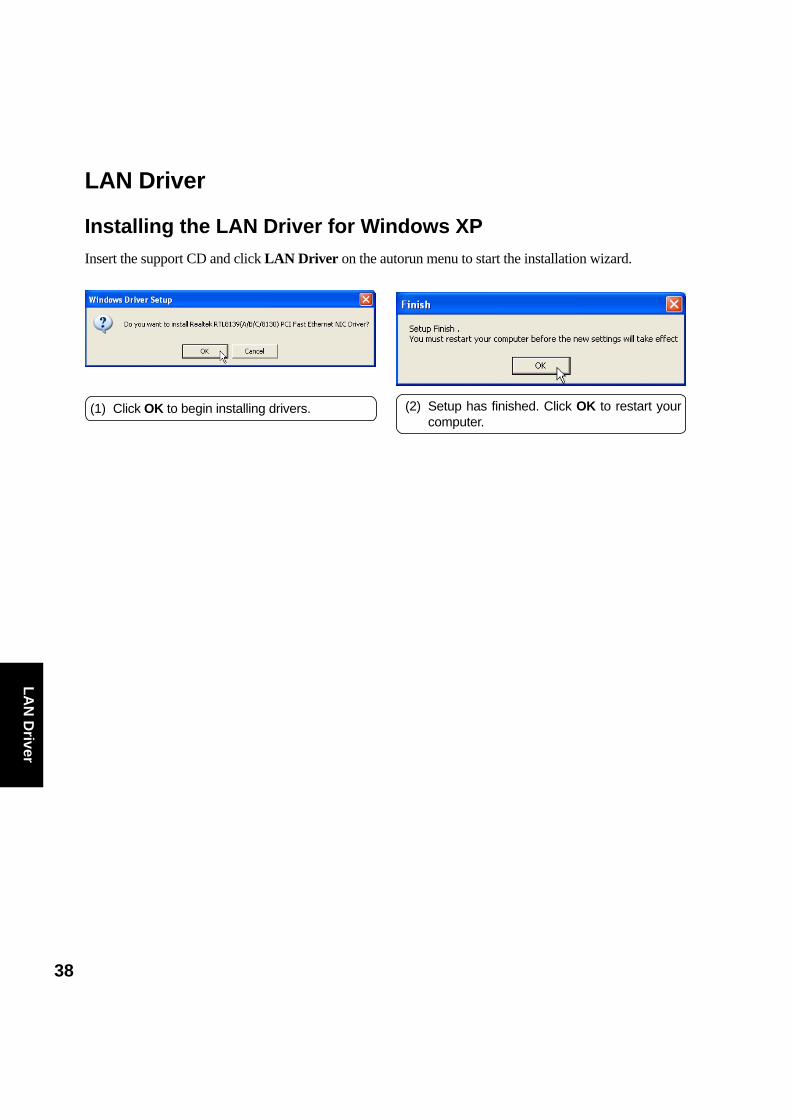
(1) Click OK to begin installing drivers. (2) Setup has finished. Click OK to restart yourcomputer.
LAN Driver
Installing the LAN Driver for Windows XPInsert the support CD and click LAN Driver on the autorun menu to start the installation wizard.
39
Tou
chp
ad
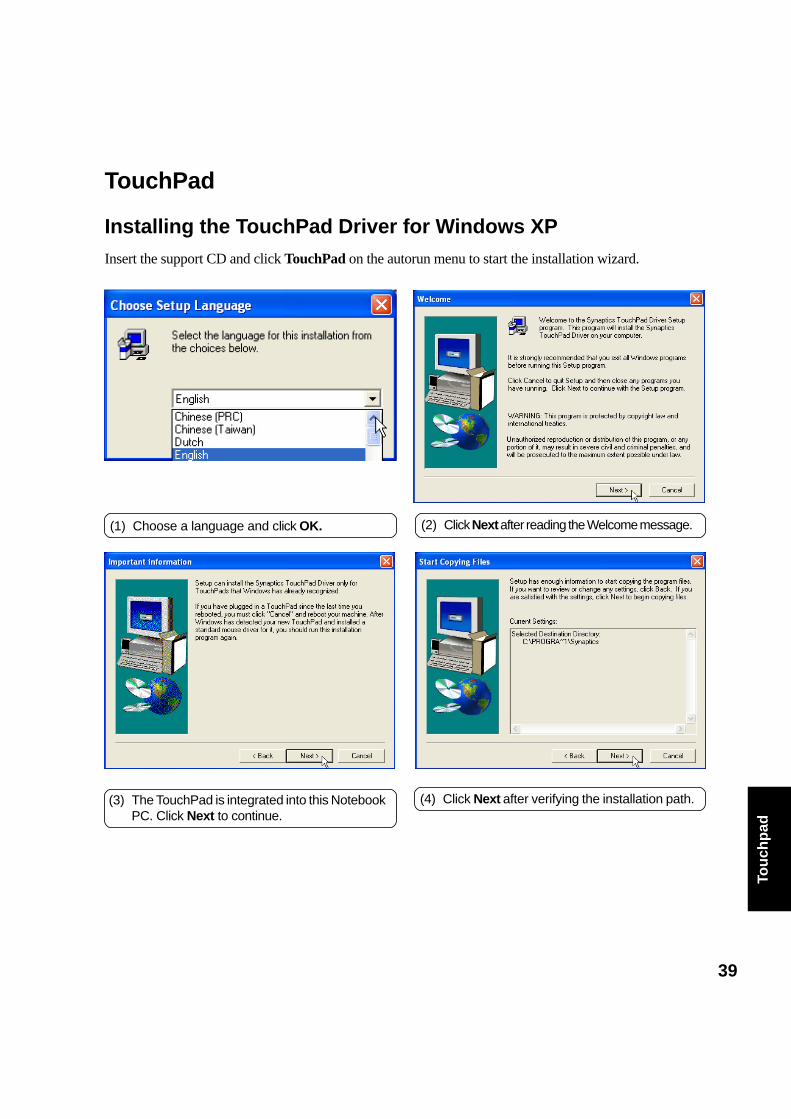
TouchPad
Installing the TouchPad Driver for Windows XPInsert the support CD and click TouchPad on the autorun menu to start the installation wizard.
(1) Choose a language and click OK.
(3) The TouchPad is integrated into this NotebookPC. Click Next to continue.
(4) Click Next after verifying the installation path.
(2) Click Next after reading the Welcome message.
40
Tou
chp
ad
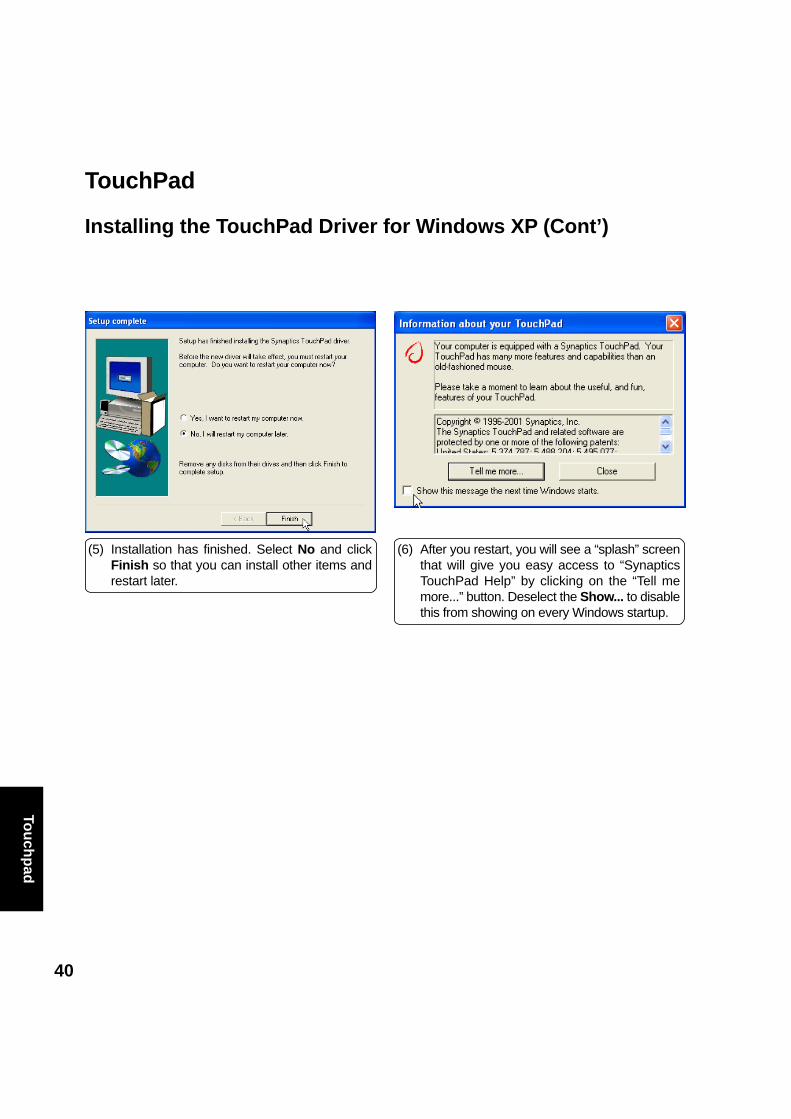
(6) After you restart, you will see a “splash” screenthat will give you easy access to “SynapticsTouchPad Help” by clicking on the “Tell memore...” button. Deselect the Show... to disablethis from showing on every Windows startup.
TouchPad
Installing the TouchPad Driver for Windows XP (Cont’)
(5) Installation has finished. Select No and clickFinish so that you can install other items andrestart later.
41
IR S
etti
ng
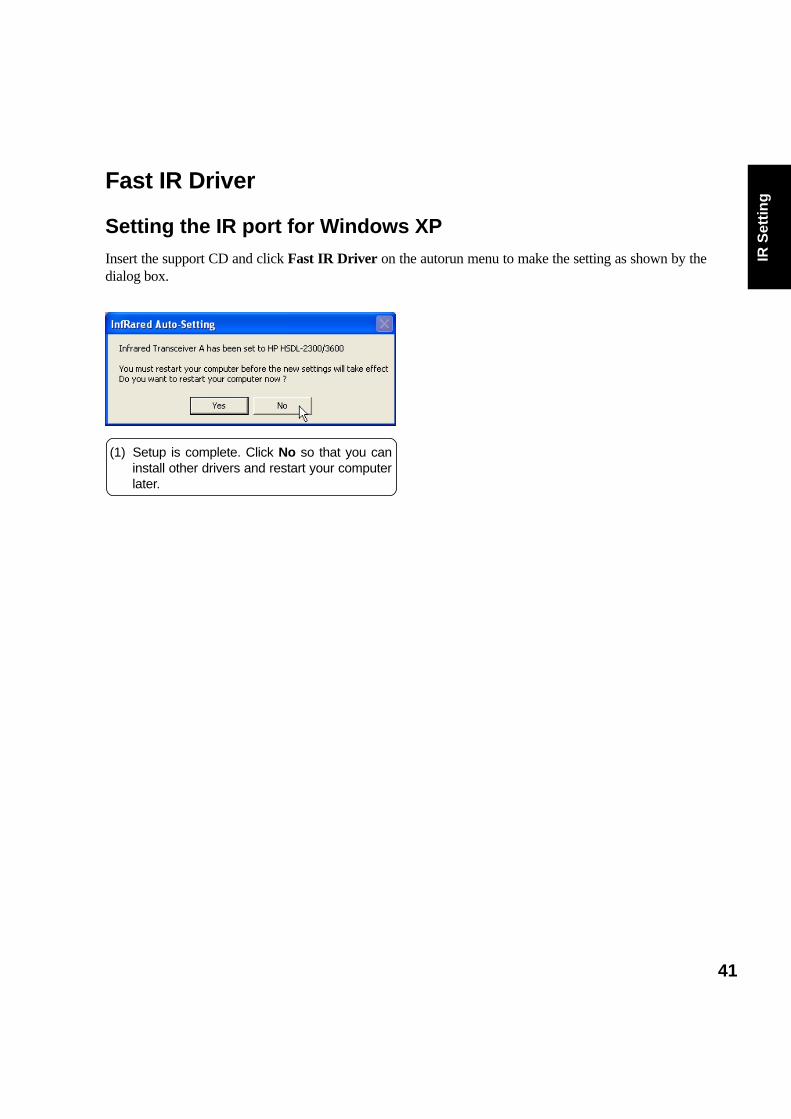
(1) Setup is complete. Click No so that you caninstall other drivers and restart your computerlater.
Fast IR Driver
Setting the IR port for Windows XPInsert the support CD and click Fast IR Driver on the autorun menu to make the setting as shown by thedialog box.
42
PC
-cilllin
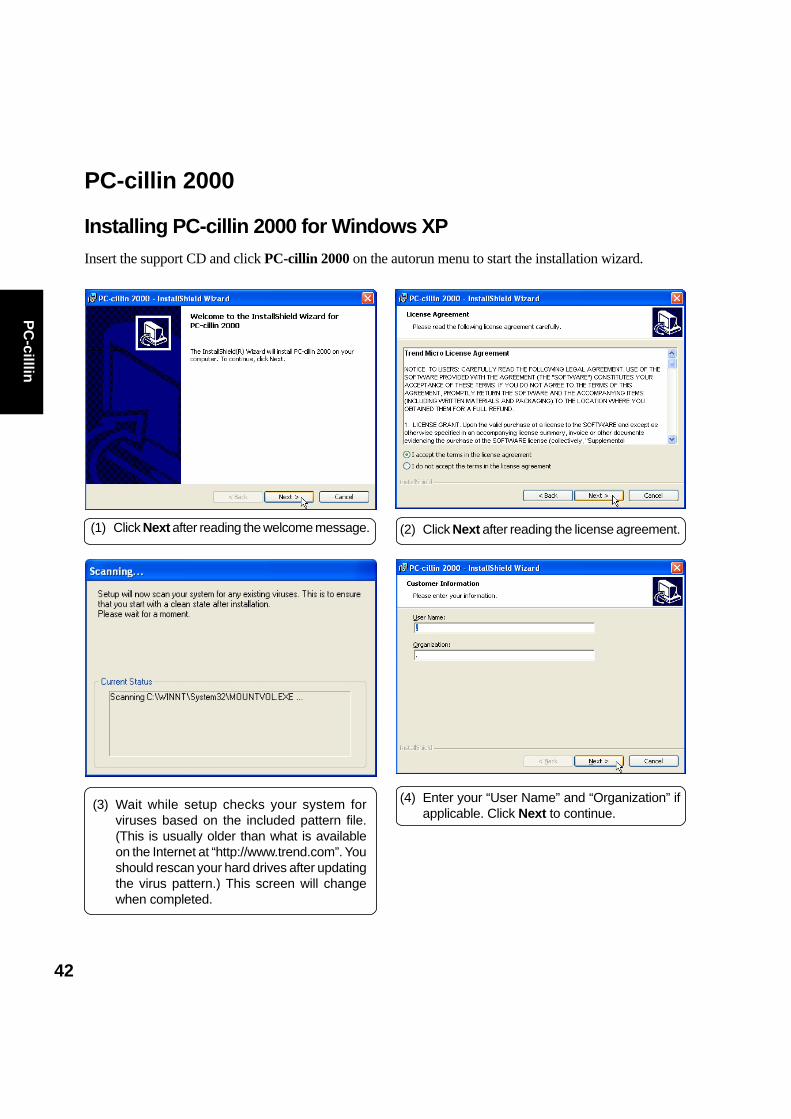
PC-cillin 2000
Installing PC-cillin 2000 for Windows XPInsert the support CD and click PC-cillin 2000 on the autorun menu to start the installation wizard.
(1) Click Next after reading the welcome message. (2) Click Next after reading the license agreement.
(3) Wait while setup checks your system forviruses based on the included pattern file.(This is usually older than what is availableon the Internet at “http://www.trend.com”. Youshould rescan your hard drives after updatingthe virus pattern.) This screen will changewhen completed.
(4) Enter your “User Name” and “Organization” ifapplicable. Click Next to continue.
43
PC
-cill
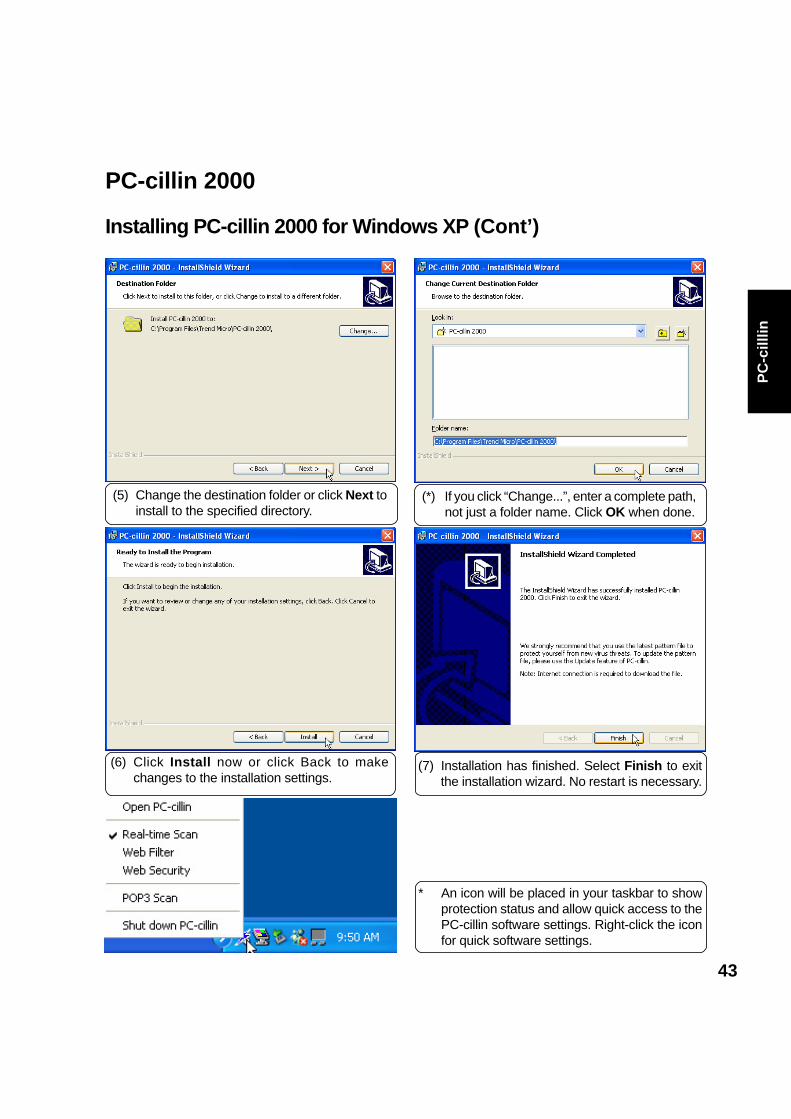
lin(6) Click Install now or click Back to make
changes to the installation settings.(7) Installation has finished. Select Finish to exit
the installation wizard. No restart is necessary.
(*) If you click “Change...”, enter a complete path,not just a folder name. Click OK when done.
* An icon will be placed in your taskbar to showprotection status and allow quick access to thePC-cillin software settings. Right-click the iconfor quick software settings.
PC-cillin 2000
Installing PC-cillin 2000 for Windows XP (Cont’)
(5) Change the destination folder or click Next toinstall to the specified directory.
44
Ho
tkey Utility
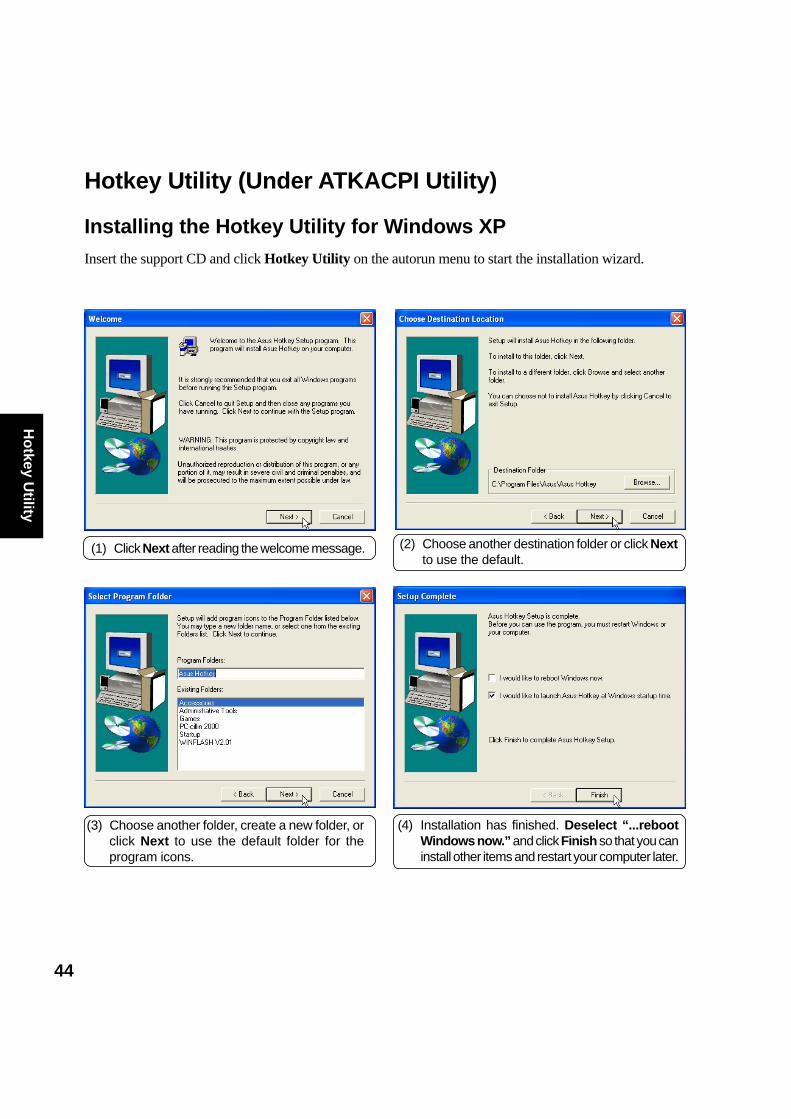
Hotkey Utility (Under ATKACPI Utility)
Installing the Hotkey Utility for Windows XPInsert the support CD and click Hotkey Utility on the autorun menu to start the installation wizard.
(1) Click Next after reading the welcome message. (2) Choose another destination folder or click Nextto use the default.
(3) Choose another folder, create a new folder, orclick Next to use the default folder for theprogram icons.
(4) Installation has finished. Deselect “...rebootWindows now.” and click Finish so that you caninstall other items and restart your computer later.
45
Fla
sh U
tilit
y
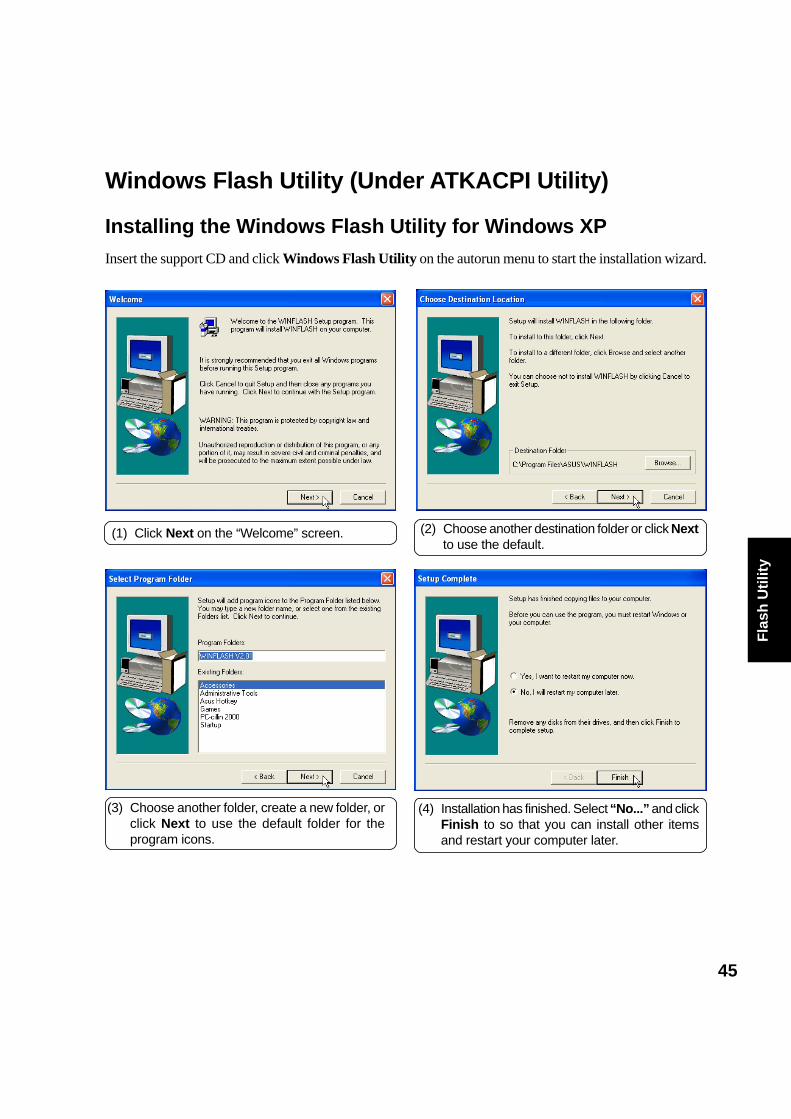
Windows Flash Utility (Under ATKACPI Utility)
Installing the Windows Flash Utility for Windows XPInsert the support CD and click Windows Flash Utility on the autorun menu to start the installation wizard.
(1) Click Next on the “Welcome” screen. (2) Choose another destination folder or click Nextto use the default.
(3) Choose another folder, create a new folder, orclick Next to use the default folder for theprogram icons.
(4) Installation has finished. Select “No...” and clickFinish to so that you can install other itemsand restart your computer later.
46
PC
Pro
be
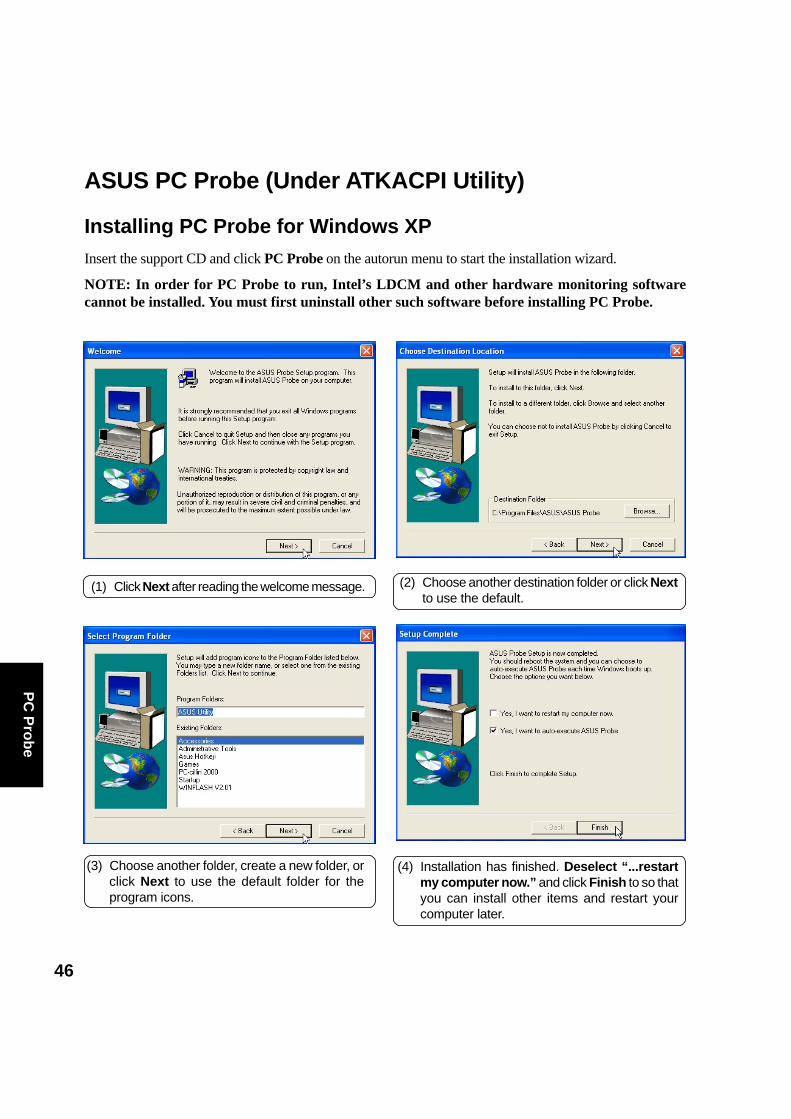
ASUS PC Probe (Under ATKACPI Utility)
Installing PC Probe for Windows XPInsert the support CD and click PC Probe on the autorun menu to start the installation wizard.
NOTE: In order for PC Probe to run, Intel’s LDCM and other hardware monitoring softwarecannot be installed. You must first uninstall other such software before installing PC Probe.
(1) Click Next after reading the welcome message. (2) Choose another destination folder or click Nextto use the default.
(3) Choose another folder, create a new folder, orclick Next to use the default folder for theprogram icons.
(4) Installation has finished. Deselect “...restartmy computer now.” and click Finish to so thatyou can install other items and restart yourcomputer later.
47
Ch
eck
Mai
l
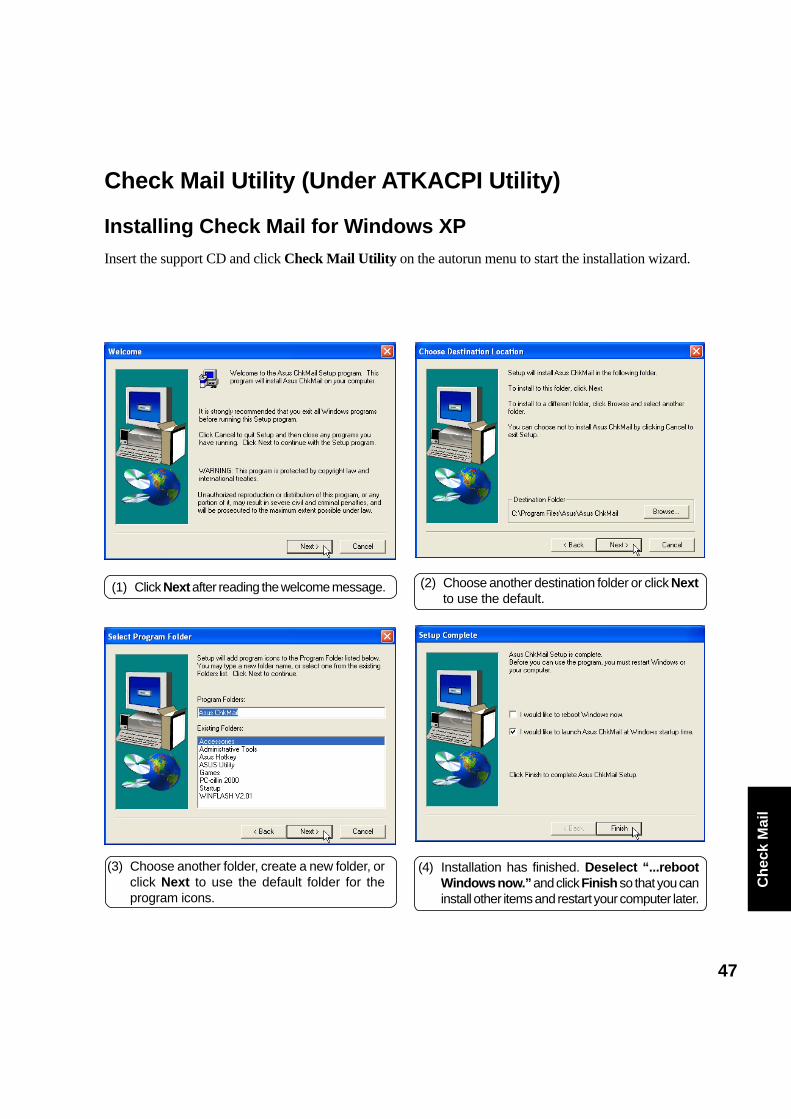
Check Mail Utility (Under ATKACPI Utility)
Installing Check Mail for Windows XPInsert the support CD and click Check Mail Utility on the autorun menu to start the installation wizard.
(1) Click Next after reading the welcome message. (2) Choose another destination folder or click Nextto use the default.
(3) Choose another folder, create a new folder, orclick Next to use the default folder for theprogram icons.
(4) Installation has finished. Deselect “...rebootWindows now.” and click Finish so that you caninstall other items and restart your computer later.
48
Po
wer G
ear
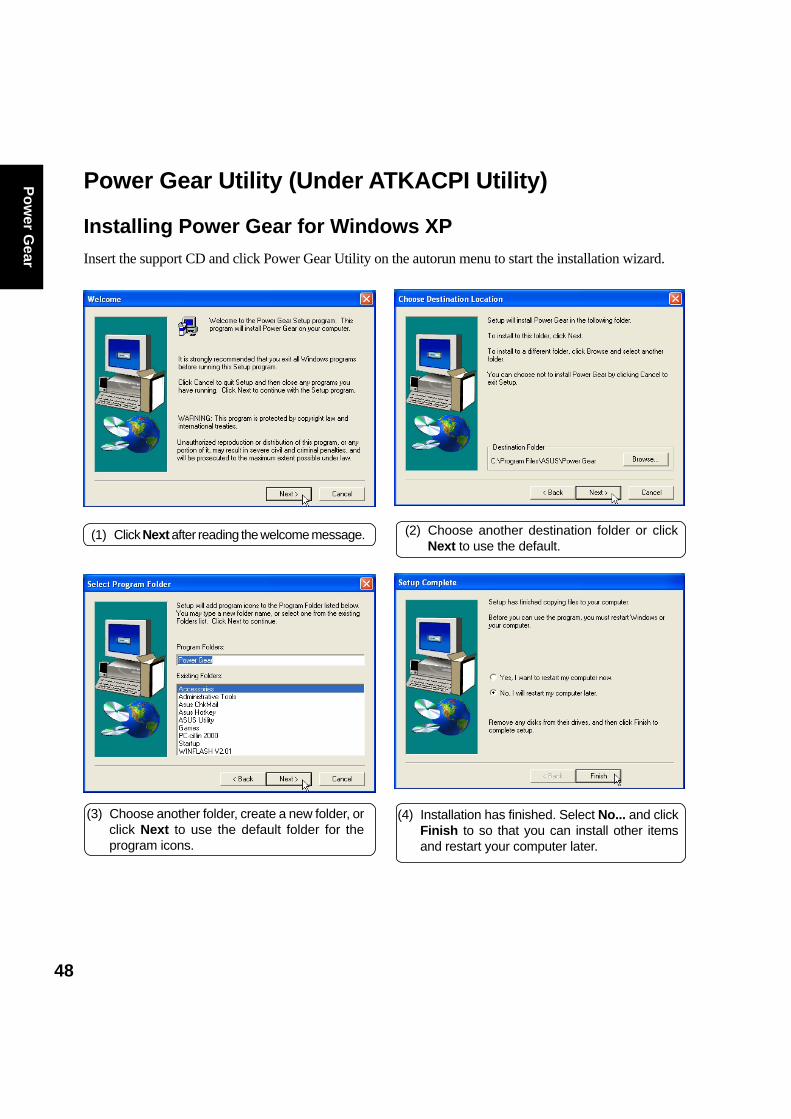
Power Gear Utility (Under ATKACPI Utility)
Installing Power Gear for Windows XPInsert the support CD and click Power Gear Utility on the autorun menu to start the installation wizard.
(1) Click Next after reading the welcome message. (2) Choose another destination folder or clickNext to use the default.
(3) Choose another folder, create a new folder, orclick Next to use the default folder for theprogram icons.
(4) Installation has finished. Select No... and clickFinish to so that you can install other itemsand restart your computer later.
49
Scr
een
Sav
er
Screen Saver Utility
Installing the Screen Saver Utility for Windows XPInsert the support CD and click Screen Saver Utility on the autorun menu to start the installation wizard.
(1) Enter a different installation path or clickInstall to use the specified path.
(2) Click Yes to create the installation folder. Thescreen saver will install and run immediately.
(3) You can change the “Wait” time before startingthe screen saver and add a password. ClickOK to save and exit.
Settings:Click the speaker icon to turn sound ON or OFF.Click i for screen saver information.Click x to close the “Settings” screen.

50
Screen
Saver

Notebook PC
Software Reference
Screens will vary depending on your operating system but the contents should be the same.
52
Table of Contents
VGA Driver .................................................................................................. 55Display Settings for Windows XP .......................................................................................... 56
Display Properties .......................................................................................................... 56
LAN Driver .................................................................................................. 61Joining a Domain or Workgroup (Windows ME) ............................................................. 62Viewing Your Network ..................................................................................................... 63Joining a Domain or Workgroup (Windows XP) ............................................................. 63Viewing Your Network ..................................................................................................... 65
Synaptics TouchPad .................................................................................. 67Overview of Synaptics® TouchPad Features ........................................................................ 68
Tap on the Pad Instead of Pressing the Buttons ............................................................ 68Drag Icons, Windows and Other Objects without Using Buttons ................................... 68Adjust the Overall Touch Sensitivity ............................................................................... 69Customize Buttons and Taps .......................................................................................... 69Prevent Accidental Pointing While Typing ...................................................................... 70Scroll Through A Document without Using Scroll Bars ................................................... 70Zoom In/Out and Pan on Documents ............................................................................. 70Move the Pointer Long Distances .................................................................................. 71Fine Tune the Pointer Movement ................................................................................... 71Accessories .................................................................................................................... 71More About the TouchPad .............................................................................................. 71
Property Pages ..................................................................................................................... 71Scrolling Properties Page ............................................................................................... 72Tap Zones Properties Pages .......................................................................................... 73More Features Properties Page ..................................................................................... 74Button Actions Properties Page ...................................................................................... 75Touch Properties Page ................................................................................................... 76Edge Motion Properties Page ........................................................................................ 77
Frequently Asked Questions ................................................................................................. 78
PC-cillin 2000 .............................................................................................. 81Welcome to PC-cillin ............................................................................................................. 82
What’s New in PC-cillin 2000 ......................................................................................... 83What is a Computer Virus? ............................................................................................. 84Test Virus ........................................................................................................................ 84How Viruses Spread ....................................................................................................... 85Virus Writers ................................................................................................................... 85
53
Hotkey Utility .............................................................................................. 87Hotkey Utility ......................................................................................................................... 88
Buttons ........................................................................................................................... 88Hotkey Actions ................................................................................................................ 89Adding a Program to Run ............................................................................................... 92
Windows Flash Utility (WINFLASH) .......................................................... 93Updating Your BIOS ....................................................................................................... 94Resetting Your BIOS ...................................................................................................... 94
ASUS PC Probe .......................................................................................... 95Welcome to ASUS PC Probe ................................................................................................ 96
Starting ASUS PC Probe ................................................................................................ 96Using ASUS PC Probe Monitoring ................................................................................. 97ASUS PC Probe Task Bar Icon ...................................................................................... 98
Check Mail Utility ....................................................................................... 99Check Mail Quick Setup ...................................................................................................... 100
Check Mail Startup ....................................................................................................... 100Using Windows Start Menu .......................................................................................... 100Using MS Configuration................................................................................................ 100
IDE Swap Utility ........................................................................................ 101IDE Swap Introduction ........................................................................................................ 102
Using the AiBox ............................................................................................................ 102Stopping the AiBox Before Removing (Windows ME) .................................................. 102Stopping the AiBox Before Removing (Windows 2000) ............................................... 103
Power Gear ............................................................................................... 105Benefits of Power Gear ................................................................................................ 106Power Gear Interface ................................................................................................... 106Power Gear Operating Modes ...................................................................................... 107
APPENDIX ................................................................................................. 109Modem Communication Regulations .................................................................................. 109
FCC Regulations .......................................................................................................... 109FCC Part 68 Requirements .......................................................................................... 109Modem Declaration Of Conformity ............................................................................... 110Canadian Department Of Communications (CDOC) .................................................... 110

54

55
VG
A D
rive
rVGA Driver
Topics Covered:
Display Properties and Settings
Screens will vary depending on your operating system but the contents should be the same.
56
VG
A D
river
Display Settings for Windows XP
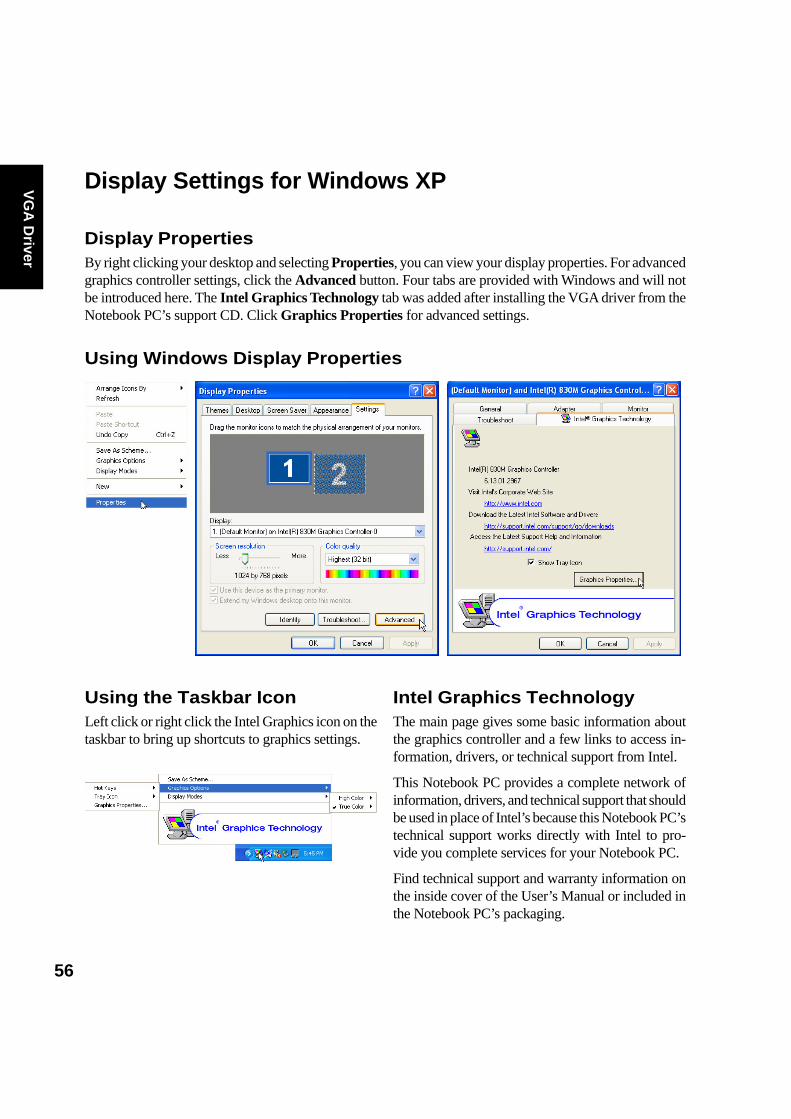
Display PropertiesBy right clicking your desktop and selecting Properties, you can view your display properties. For advancedgraphics controller settings, click the Advanced button. Four tabs are provided with Windows and will notbe introduced here. The Intel Graphics Technology tab was added after installing the VGA driver from theNotebook PC’s support CD. Click Graphics Properties for advanced settings.
Using the Taskbar IconLeft click or right click the Intel Graphics icon on thetaskbar to bring up shortcuts to graphics settings.
Using Windows Display Properties
Intel Graphics TechnologyThe main page gives some basic information aboutthe graphics controller and a few links to access in-formation, drivers, or technical support from Intel.
This Notebook PC provides a complete network ofinformation, drivers, and technical support that shouldbe used in place of Intel’s because this Notebook PC’stechnical support works directly with Intel to pro-vide you complete services for your Notebook PC.
Find technical support and warranty information onthe inside cover of the User’s Manual or included inthe Notebook PC’s packaging.
57
VG
A D
rive
r
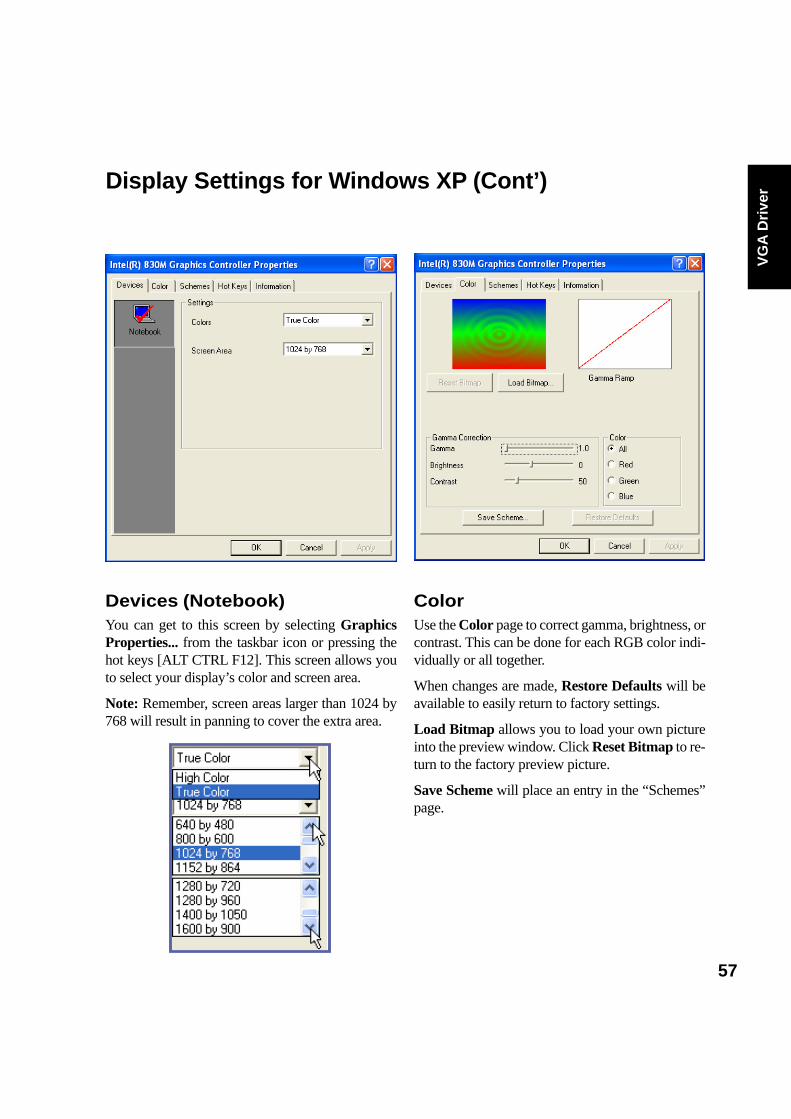
Devices (Notebook)You can get to this screen by selecting GraphicsProperties... from the taskbar icon or pressing thehot keys [ALT CTRL F12]. This screen allows youto select your display’s color and screen area.
Note: Remember, screen areas larger than 1024 by768 will result in panning to cover the extra area.
Display Settings for Windows XP (Cont’)
ColorUse the Color page to correct gamma, brightness, orcontrast. This can be done for each RGB color indi-vidually or all together.
When changes are made, Restore Defaults will beavailable to easily return to factory settings.
Load Bitmap allows you to load your own pictureinto the preview window. Click Reset Bitmap to re-turn to the factory preview picture.
Save Scheme will place an entry in the “Schemes”page.
58
VG
A D
river
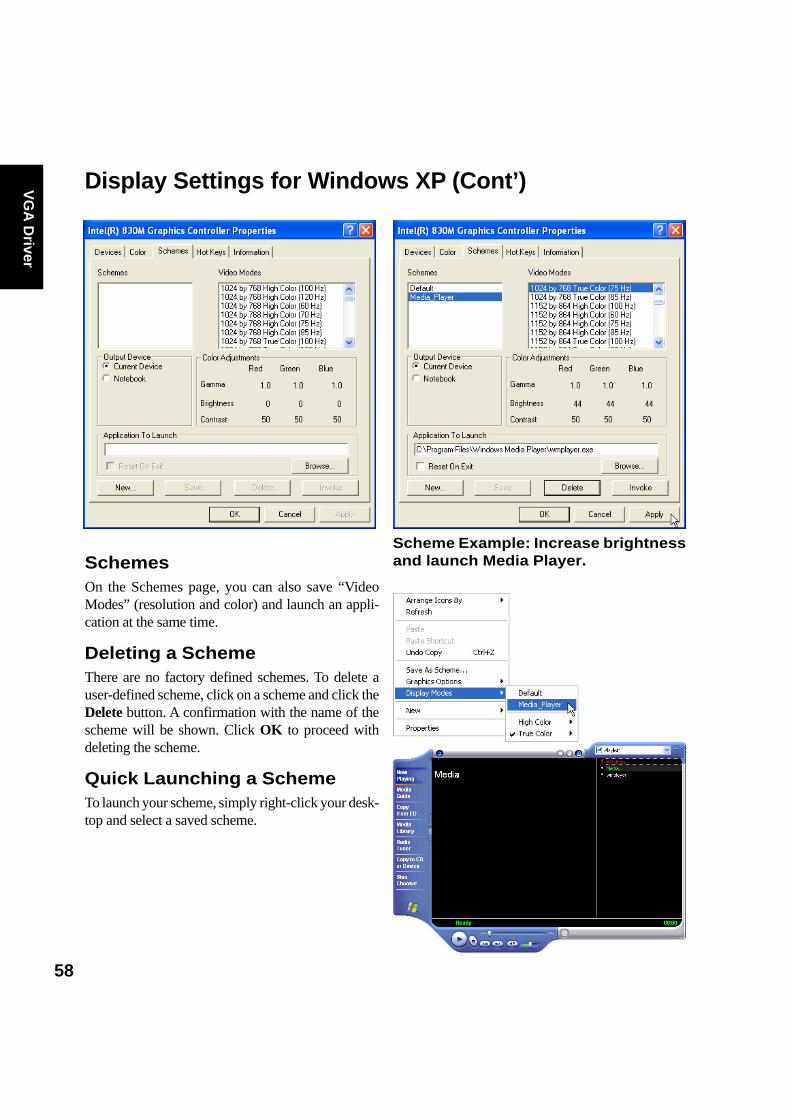
SchemesOn the Schemes page, you can also save “VideoModes” (resolution and color) and launch an appli-cation at the same time.
Deleting a SchemeThere are no factory defined schemes. To delete auser-defined scheme, click on a scheme and click theDelete button. A confirmation with the name of thescheme will be shown. Click OK to proceed withdeleting the scheme.
Quick Launching a SchemeTo launch your scheme, simply right-click your desk-top and select a saved scheme.
Display Settings for Windows XP (Cont’)
Scheme Example: Increase brightnessand launch Media Player.
59
VG
A D
rive
rDisplay Settings for Windows XP (Cont’)
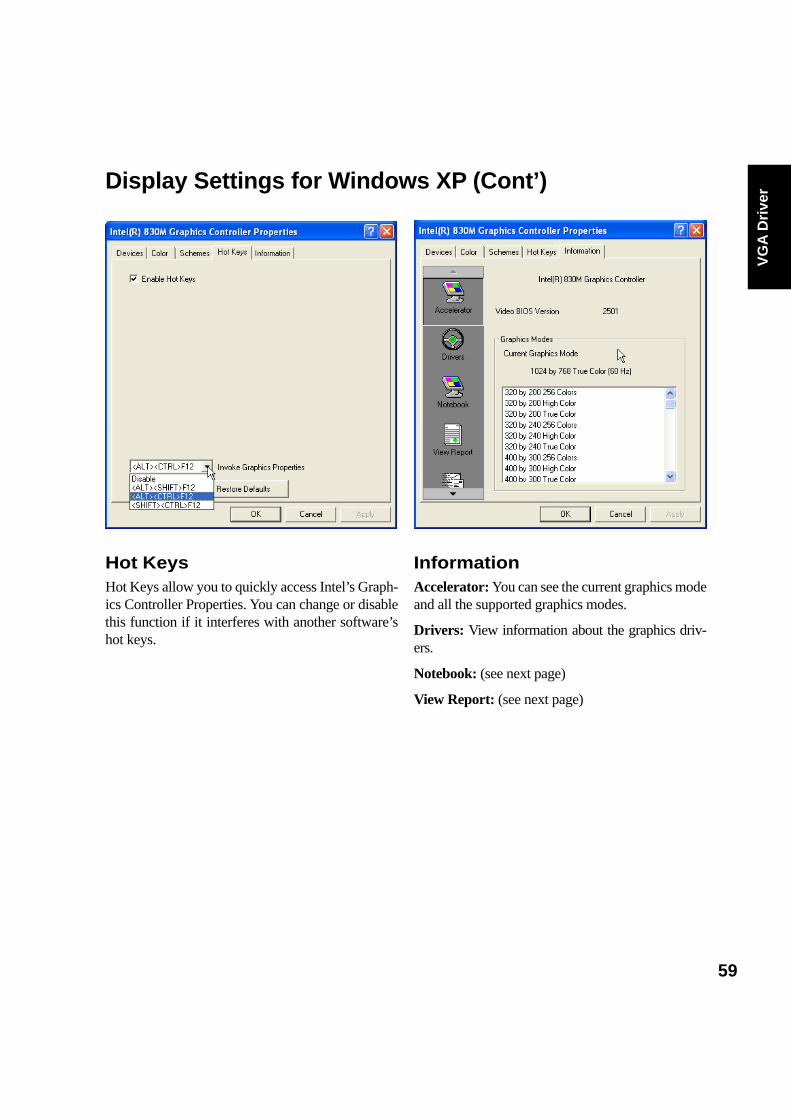
Hot KeysHot Keys allow you to quickly access Intel’s Graph-ics Controller Properties. You can change or disablethis function if it interferes with another software’shot keys.
InformationAccelerator: You can see the current graphics modeand all the supported graphics modes.
Drivers: View information about the graphics driv-ers.
Notebook: (see next page)
View Report: (see next page)
60
VG
A D
river
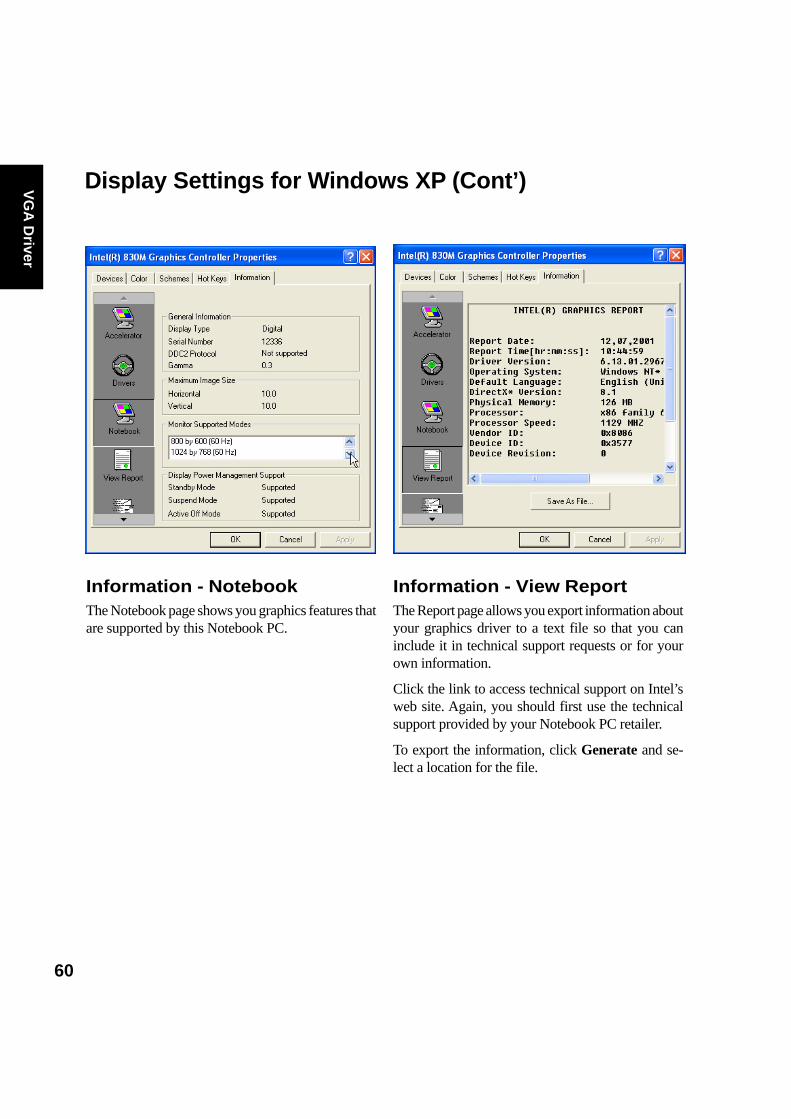
Information - View ReportThe Report page allows you export information aboutyour graphics driver to a text file so that you caninclude it in technical support requests or for yourown information.
Click the link to access technical support on Intel’sweb site. Again, you should first use the technicalsupport provided by your Notebook PC retailer.
To export the information, click Generate and se-lect a location for the file.
Information - NotebookThe Notebook page shows you graphics features thatare supported by this Notebook PC.
Display Settings for Windows XP (Cont’)

61
LA
N S
etti
ng
s
LAN Driver
Topics Covered:
Joining a Domain or Workgroup
Screens will vary depending on your operating system but the contents should be the same.
62
LA
N S
etting
s
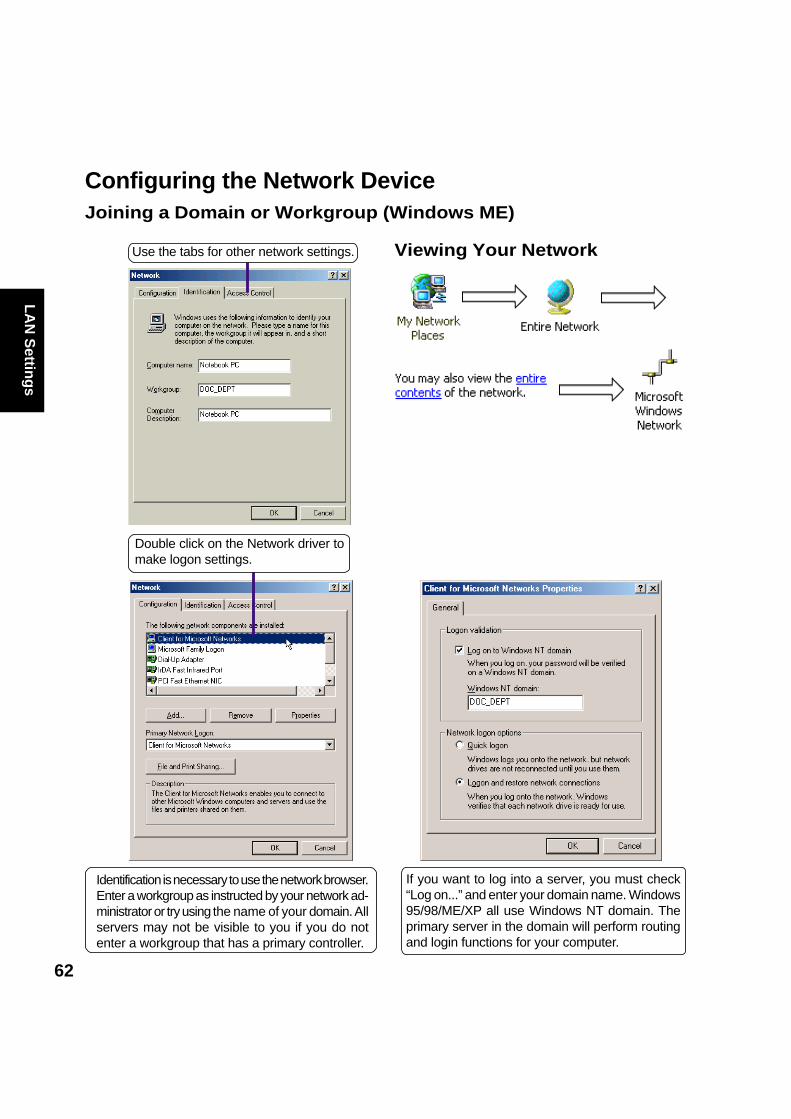
If you want to log into a server, you must check“Log on...” and enter your domain name. Windows95/98/ME/XP all use Windows NT domain. Theprimary server in the domain will perform routingand login functions for your computer.
Identification is necessary to use the network browser.Enter a workgroup as instructed by your network ad-ministrator or try using the name of your domain. Allservers may not be visible to you if you do notenter a workgroup that has a primary controller.
Double click on the Network driver tomake logon settings.
Configuring the Network DeviceJoining a Domain or Workgroup (Windows ME)
Viewing Your NetworkUse the tabs for other network settings.
63
LA
N S
etti
ng
s
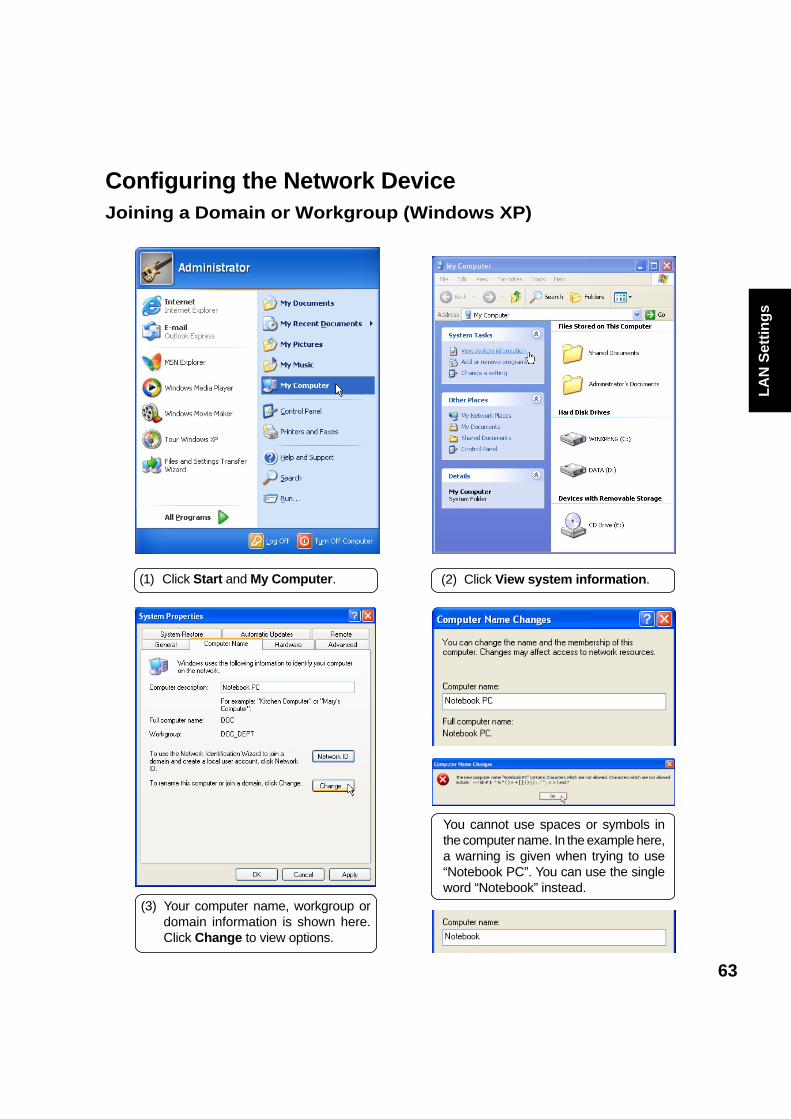
Configuring the Network DeviceJoining a Domain or Workgroup (Windows XP)
(1) Click Start and My Computer. (2) Click View system information.
You cannot use spaces or symbols inthe computer name. In the example here,a warning is given when trying to use“Notebook PC”. You can use the singleword “Notebook” instead.
(3) Your computer name, workgroup ordomain information is shown here.Click Change to view options.
64
LA
N S
etting
s
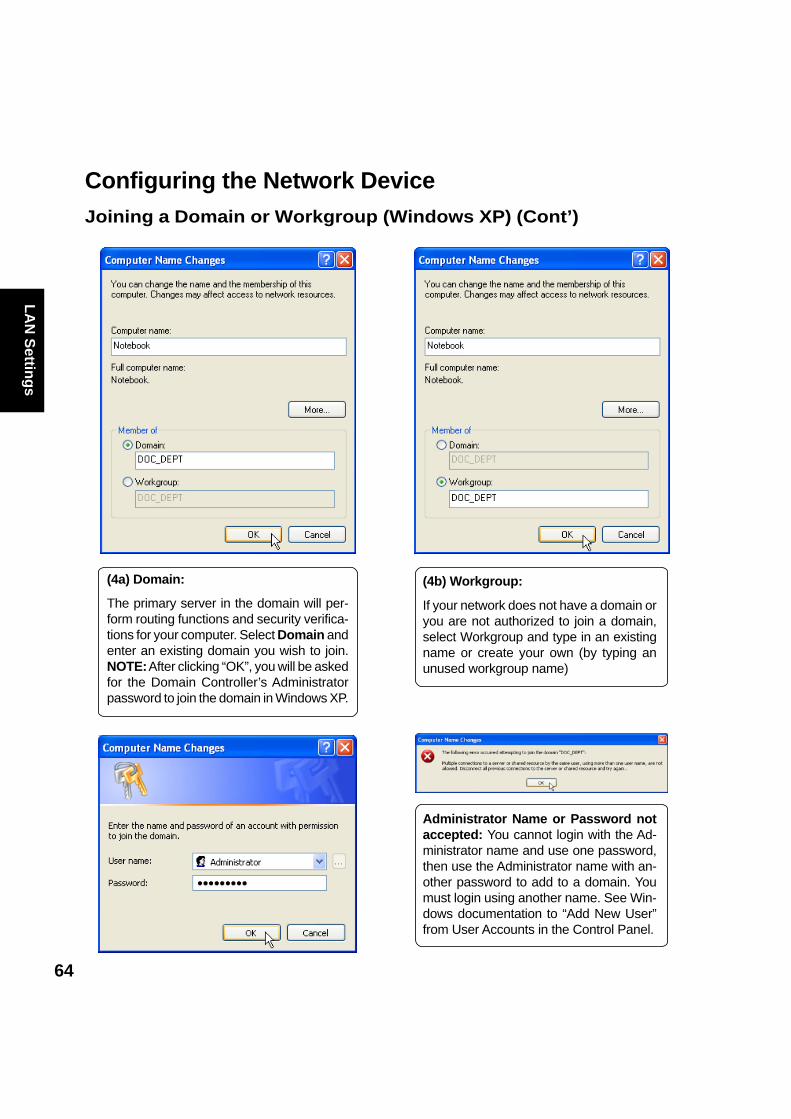
(4a) Domain:
The primary server in the domain will per-form routing functions and security verifica-tions for your computer. Select Domain andenter an existing domain you wish to join.NOTE: After clicking “OK”, you will be askedfor the Domain Controller’s Administratorpassword to join the domain in Windows XP.
Configuring the Network DeviceJoining a Domain or Workgroup (Windows XP) (Cont’)
(4b) Workgroup:
If your network does not have a domain oryou are not authorized to join a domain,select Workgroup and type in an existingname or create your own (by typing anunused workgroup name)
Administrator Name or Password notaccepted: You cannot login with the Ad-ministrator name and use one password,then use the Administrator name with an-other password to add to a domain. Youmust login using another name. See Win-dows documentation to “Add New User”from User Accounts in the Control Panel.
65
LA
N S
etti
ng
s
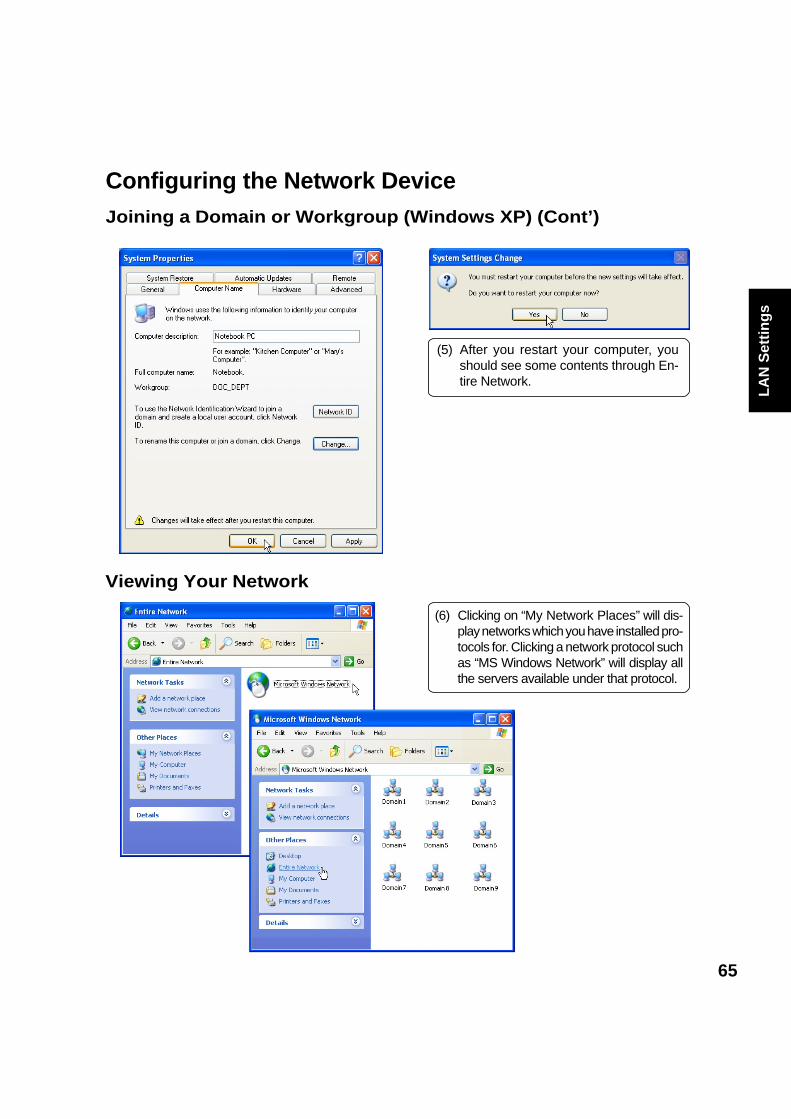
(5) After you restart your computer, youshould see some contents through En-tire Network.
(6) Clicking on “My Network Places” will dis-play networks which you have installed pro-tocols for. Clicking a network protocol suchas “MS Windows Network” will display allthe servers available under that protocol.
Configuring the Network DeviceJoining a Domain or Workgroup (Windows XP) (Cont’)
Viewing Your Network

66
LA
N S
etting
s
67
To
uch
Pad
Synaptics TouchPad
Topics Covered:
Overview of the TouchPad
Scrolling Properties Page
Tap Zones Properties Page
More Features Properties Page
Button Actions Properties Page
Touch Properties Page
Edge Motion Properties Page
Frequently Asked Questions
Screens will vary depending on your operating system but the contents should be the same.
68
Tou
chP
ad
Overview of Synaptics® TouchPad FeaturesYour Synaptics TouchPad is much more powerful than an old-fashioned mouse. In addition to providing allthe features of an ordinary mouse, your TouchPad allows you to:
• Tap on the Pad Instead of Pressing the Buttons• Drag Icons, Windows and Other Objects without Using Buttons• Adjust the Overall Touch Sensitivity• Customize Buttons and Taps• Prevent Accidental Pointing While Typing (also known as Palm Check)• Scroll Through a Document Without Using Scroll Bars• Zoom In/Out and Pan on Documents• Move the Pointer Long Distances• Fine Tune the Pointer Movement
Tap on the Pad Instead of Pressing the ButtonsTapping on the surface of the pad is the same as clicking the left mouse or TouchPad button (i.e. the primaryTouchPad button). Tapping is usually quicker and more convenient than using the button. To double-click,just tap twice. A light, quick tap works best; very hard or very slow taps are less likely to work.
Drag Icons, Windows and Other Objects without Using ButtonsOften, you need to hold the mouse or TouchPad button down while moving the pointer (to move an icon orwindow around the screen, for example). This action is called dragging. Just like clicking and doubleclicking, you can also drag without using the button.
To move or drag an object (equivalent to pressing and holding the left TouchPad button):1) Position the pointer over the object and tap twice, down-up-down, leaving your finger on the Touch-
Pad on the second tap. This action is sometimes called tap-and-a-half.2) Now move the selected object by sliding your finger across the TouchPad surface.3) Lift your finger to drop the object.
Tap-and-a-HalfYou might wonder what happens when you reach the edge of the pad and you are dragging an object. TheSynaptics TouchPad has a feature called Locking Drags. This feature allows you to lift your finger from thepad without ending the drag. You can drag an object across the screen using several finger strokes. To enda Locking Drag action, tap again. The Synaptics TouchPad also has a feature called Edge Motion to helpwith long distance dragging. See Move the Pointer Long Distances for details.
The Tap and Drag and Locking Drags features are located on the Touch Properties Page in the MouseProperties dialog.
69
To
uch
Pad
Adjust the Overall Touch SensitivityYou can control how much finger pressure you must apply before the TouchPad responds by adjusting theTouch Sensitivity slider. This slider is located on the Touch Properties Page in the Mouse Properties dialog.
At higher (more sensitive) Touch Sensitivity settings, the TouchPad recognizes even a very slight touch. Ifyou see undesired or erratic pointer motion, try a lower setting. Lower (less sensitive) settings require afirmer touch to move the pointer. In general, a lighter touch works best.
Customize Buttons and TapsMost TouchPads come with two buttons that work just like traditional mouse buttons. You can customize thebehavior of these buttons.
Tapping on the TouchPad surface also performs the same action as pressing a button. Tapping in the centerof the pad will always produce a left-click (the action of the primary button), but you can configure each ofthe four corners of the TouchPad surface to act as different buttons. These special corner regions are calledtap zones . With four corner tap zones, the center of the TouchPad, and the two physical buttons you can turnyour TouchPad into a seven-button mouse!
A customization example:Suppose you want to use your TouchPad like a three-button mouse. You can configure the left TouchPadbutton to produce middle clicks when pressed. Remember that tapping on the TouchPad will produce leftclicks, and pressing the right TouchPad button will produce right clicks. For additional convenience, youcan configure the top right corner tap zone of the TouchPad to produce right clicks. Looking at the TouchPadsurface in the picture below, taps in the top right corner (the red shaded area) will produce right clicks, buttapping anywhere else on the TouchPad (the solid gray area) produces left clicks.
An Example TouchPadThere are many different actions that you can assign to the buttons and tap zones. The following actions areprovided as built-in features with the Synaptics TouchPad device driver. Additional actions might be avail-able if you have installed any third-party TouchPad Plug-In software.
• Jump to the Start Button. This action causes the pointer to jump to the Start button in the Windowstask bar and automatically opens the Start Menu.
• Jump to the current application’s menu. This action causes the pointer to jump to the leftmost entry inthe application’s window menu (usually the File menu) and automatically pops up the submenu.
• Minimize the current application. This action minimizes the current application’s window. If the currentapplication’s window is already minimized, this action will restore it to its normal size and location.
• Maximize the current application. This action maximizes the current application’s window (expandsit to cover the full screen). If the current application’s window is already maximized, this action willrestore it to its normal size and location.
• Run a program of your choosing. This action allows you to specify the name of any program youwant to run automatically when you click the button or tap in the tap zone.
To customize taps and buttons, go to the Button Actions Properties Page in the Mouse Properties dialog.
70
Tou
chP
ad
Prevent Accidental Pointing While TypingUnintentional pointer movement and accidental taps can be caused by accidentally brushing the surface ofthe TouchPad with your palm or another part of your hand. The results of this contact can be observed as achanging cursor location when typing, causing subsequent text to appear in the wrong place. Or text may“spontaneously” be highlighted and replaced. Most often, this unwanted pointing activity occurs when typ-ing on the keyboard. The TouchPad can detect and prevent accidental and unwanted pointer movementwhile you are typing.
If you see unwanted pointer movement occurring while you are typing, you can adjust the Palm Check sliderlocated on the Touch Properties Page in the Mouse Properties dialog. Move the slider thumb to the righttowards Maximum. Now accidental brushes of your hand on the TouchPad while you are typing are morelikely to be ignored.
On the other hand, in the midst of typing, you might purposefully use the TouchPad to point and click, andsometimes the TouchPad may not seem to respond. In this case, move the slider thumb to the left towardsMinimum. Now pointing during typing is less likely to be interpreted as an accidental brush with the padsurface, and will not be ignored.
Scroll Through A Document without Using Scroll BarsVirtual Scrolling allows you to perform a very common task – scrolling documents – without having tomove the pointer away from your work. By simply sliding your finger up and down the right edge of theTouchPad, the contents of the current window will scroll vertically. Similarly, by sliding your finger left andright along the bottom edge of the TouchPad, the contents will scroll horizontally. You no longer need tolaboriously maneuver the pointer to the small scroll bar elements; you can scroll no matter where the pointerhappens to be.
Virtual Scrolling works with document windows (like word processors and spreadsheets), and it also workswith file lists, font lists, and other scrollable items. As a rule, you can use Virtual Scrolling when you areworking in any window that has a scroll bar.
And Virtual Scrolling does more than just make scrolling more convenient. It also can make scrolling smoother.When you scroll by dragging the scroll thumb with the mouse, many applications do not re-display thedocument window until you release the mouse button. Virtual Scrolling makes navigation through docu-ments easier, because it forces the application to re-display the window contents as you scroll.
How do I use Virtual Scrolling?To customize the Virtual Scrolling feature, go to the Scrolling Properties Page located in the Mouse Proper-ties dialog.
Zoom In/Out and Pan on DocumentsNote that zooming and panning only work in applications that support the Microsoft Intellimouse. WithIntellimouse aware applications, you can zoom and/or pan to quickly maneuver your way through lengthydocuments. To jump to a distant location within your document, zoom out, click on the desired location, thenzoom in. To scroll horizontally and vertically at the same time, simply pan in a diagonal direction!
71
To
uch
Pad
Move the Pointer Long DistancesSuppose you are dragging an object, scrolling at high speed (via Virtual Scrolling! ), or merrily moving thepointer when you suddenly reach the edge of your TouchPad. Don’t despair, the Synaptics TouchPad EdgeMotion feature comes to the rescue! Edge Motion helps with long distance pointer motion. When you reachan edge of the TouchPad, the pointer (or scroll thumb when Virtual Scrolling) continues to move in the samedirection until you lift your finger from the TouchPad or move your finger away from the edge.
Edge Motion speed can be pressure-sensitive or constant. Pressure-sensitive speed means that the harderyou press, the faster the object or pointer moves.
You can configure the Edge Motion feature on the Edge Motion Properties Page in the Mouse Propertiesdialog.
Fine Tune the Pointer MovementThe Synaptics TouchPad has many additional features to help you control the way your pointer moves.Please take a look at the list of additional features.
AccessoriesYour TouchPad is a productivity enhancing tool, designed for serious work. But we think it should also befun. We have included two fun application programs that demonstrate some of the capabilities of the Touch-Pad: Pressure Graph and The Incomparable, Mysterious Synaptics MoodPad.
To run these applications, click once on the Synaptics TouchPad Icon in the Taskbar, go to the Accessoriesmenu and select the desired application.
More About the TouchPadThe TouchPad detects your finger by capacitive sensing (it is not sensitive to heat or applied force). As yourfinger approaches the pad, it alters the electric field in the vicinity of the pad surface. The TouchPad sensoris just a circuit board with a matrix of conductive traces printed on the top surface. A special chip on the backside of the TouchPad continuously measures the capacitance of these traces, and thus can determine thepresence and location of your finger.
To get the most out of your TouchPad, be sure that the TouchPad driver software is installed. If the SynapticsTouchPad driver is properly installed, the Mouse Properties dialog will include several TouchPad tabs alongthe top in addition to the standard mouse tabs.
Property PagesThe property pages allow you to customize TouchPad settings for your Notebook PC. The following pageswill describe each property page with the Synaptics logo. The “Buttons”, “Pointers”, and “Pointer Options”pages come with Windows and should be described in Windows documentation.
72
Tou
chP
ad
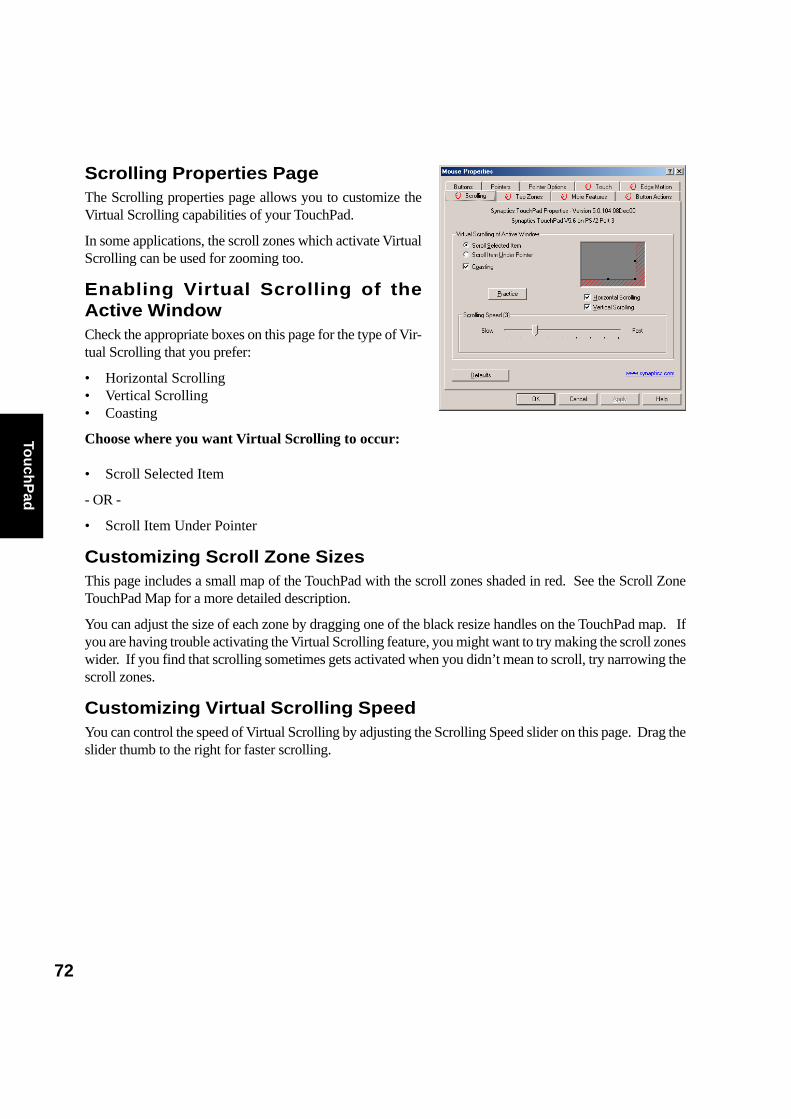
Scrolling Properties PageThe Scrolling properties page allows you to customize theVirtual Scrolling capabilities of your TouchPad.
In some applications, the scroll zones which activate VirtualScrolling can be used for zooming too.
Enabling Virtual Scrolling of theActive WindowCheck the appropriate boxes on this page for the type of Vir-tual Scrolling that you prefer:
• Horizontal Scrolling• Vertical Scrolling• Coasting
Choose where you want Virtual Scrolling to occur:
• Scroll Selected Item
- OR -
• Scroll Item Under Pointer
Customizing Scroll Zone SizesThis page includes a small map of the TouchPad with the scroll zones shaded in red. See the Scroll ZoneTouchPad Map for a more detailed description.
You can adjust the size of each zone by dragging one of the black resize handles on the TouchPad map. Ifyou are having trouble activating the Virtual Scrolling feature, you might want to try making the scroll zoneswider. If you find that scrolling sometimes gets activated when you didn’t mean to scroll, try narrowing thescroll zones.
Customizing Virtual Scrolling SpeedYou can control the speed of Virtual Scrolling by adjusting the Scrolling Speed slider on this page. Drag theslider thumb to the right for faster scrolling.
73
To
uch
Pad
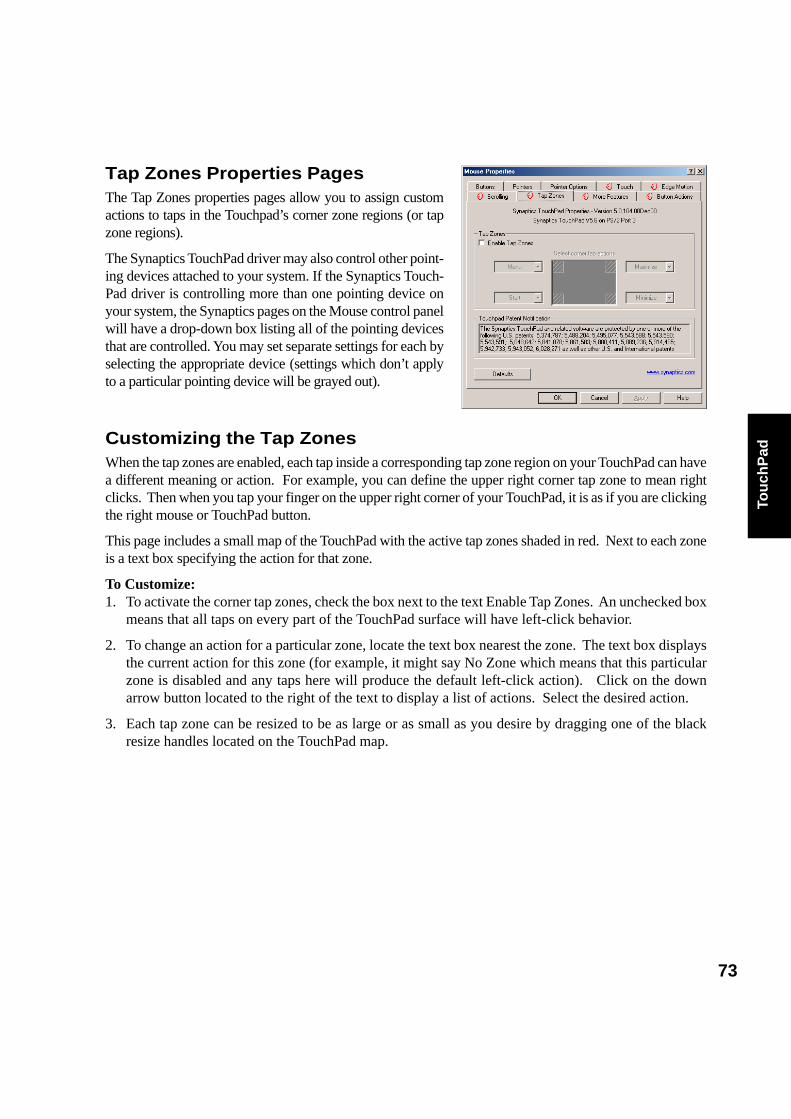
Tap Zones Properties PagesThe Tap Zones properties pages allow you to assign customactions to taps in the Touchpad’s corner zone regions (or tapzone regions).
The Synaptics TouchPad driver may also control other point-ing devices attached to your system. If the Synaptics Touch-Pad driver is controlling more than one pointing device onyour system, the Synaptics pages on the Mouse control panelwill have a drop-down box listing all of the pointing devicesthat are controlled. You may set separate settings for each byselecting the appropriate device (settings which don’t applyto a particular pointing device will be grayed out).
Customizing the Tap ZonesWhen the tap zones are enabled, each tap inside a corresponding tap zone region on your TouchPad can havea different meaning or action. For example, you can define the upper right corner tap zone to mean rightclicks. Then when you tap your finger on the upper right corner of your TouchPad, it is as if you are clickingthe right mouse or TouchPad button.
This page includes a small map of the TouchPad with the active tap zones shaded in red. Next to each zoneis a text box specifying the action for that zone.
To Customize:1. To activate the corner tap zones, check the box next to the text Enable Tap Zones. An unchecked box
means that all taps on every part of the TouchPad surface will have left-click behavior.
2. To change an action for a particular zone, locate the text box nearest the zone. The text box displaysthe current action for this zone (for example, it might say No Zone which means that this particularzone is disabled and any taps here will produce the default left-click action). Click on the downarrow button located to the right of the text to display a list of actions. Select the desired action.
3. Each tap zone can be resized to be as large or as small as you desire by dragging one of the blackresize handles located on the TouchPad map.
74
Tou
chP
ad
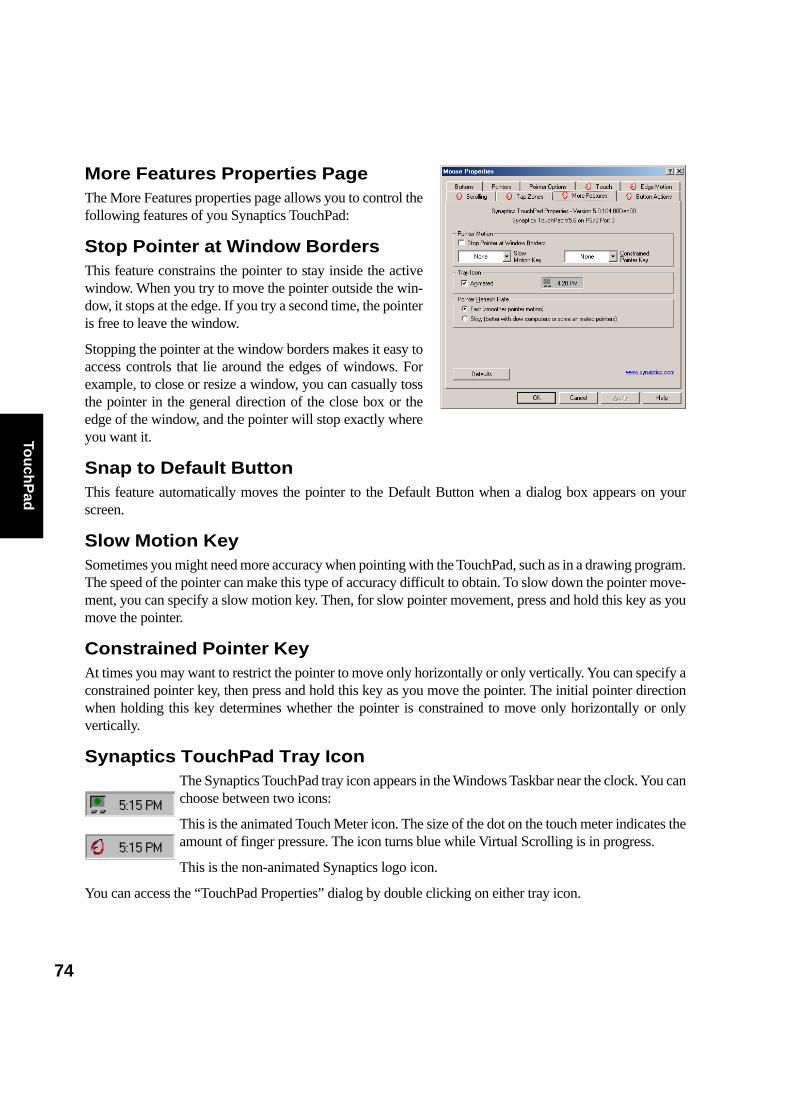
More Features Properties PageThe More Features properties page allows you to control thefollowing features of you Synaptics TouchPad:
Stop Pointer at Window BordersThis feature constrains the pointer to stay inside the activewindow. When you try to move the pointer outside the win-dow, it stops at the edge. If you try a second time, the pointeris free to leave the window.
Stopping the pointer at the window borders makes it easy toaccess controls that lie around the edges of windows. Forexample, to close or resize a window, you can casually tossthe pointer in the general direction of the close box or theedge of the window, and the pointer will stop exactly whereyou want it.
Snap to Default ButtonThis feature automatically moves the pointer to the Default Button when a dialog box appears on yourscreen.
Slow Motion KeySometimes you might need more accuracy when pointing with the TouchPad, such as in a drawing program.The speed of the pointer can make this type of accuracy difficult to obtain. To slow down the pointer move-ment, you can specify a slow motion key. Then, for slow pointer movement, press and hold this key as youmove the pointer.
Constrained Pointer KeyAt times you may want to restrict the pointer to move only horizontally or only vertically. You can specify aconstrained pointer key, then press and hold this key as you move the pointer. The initial pointer directionwhen holding this key determines whether the pointer is constrained to move only horizontally or onlyvertically.
Synaptics TouchPad Tray IconThe Synaptics TouchPad tray icon appears in the Windows Taskbar near the clock. You canchoose between two icons:
This is the animated Touch Meter icon. The size of the dot on the touch meter indicates theamount of finger pressure. The icon turns blue while Virtual Scrolling is in progress.
This is the non-animated Synaptics logo icon.
You can access the “TouchPad Properties” dialog by double clicking on either tray icon.
75
To
uch
Pad
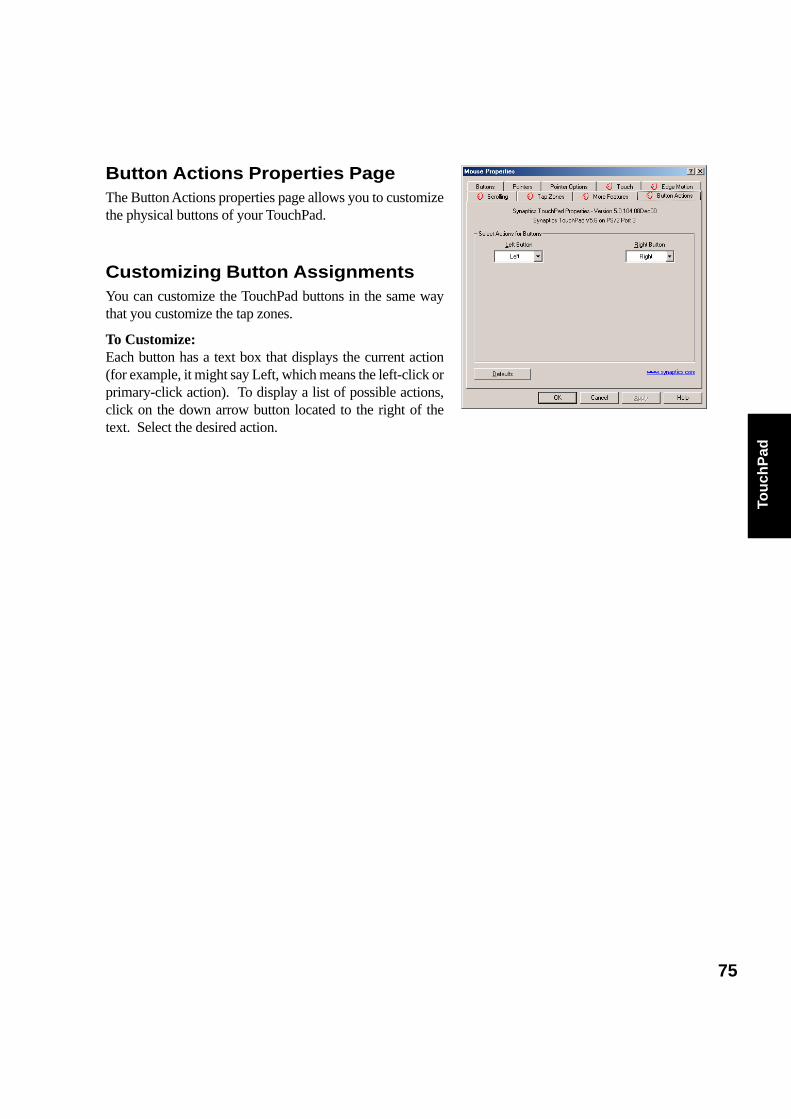
Button Actions Properties PageThe Button Actions properties page allows you to customizethe physical buttons of your TouchPad.
Customizing Button AssignmentsYou can customize the TouchPad buttons in the same waythat you customize the tap zones.
To Customize:Each button has a text box that displays the current action(for example, it might say Left, which means the left-click orprimary-click action). To display a list of possible actions,click on the down arrow button located to the right of thetext. Select the desired action.
76
Tou
chP
ad
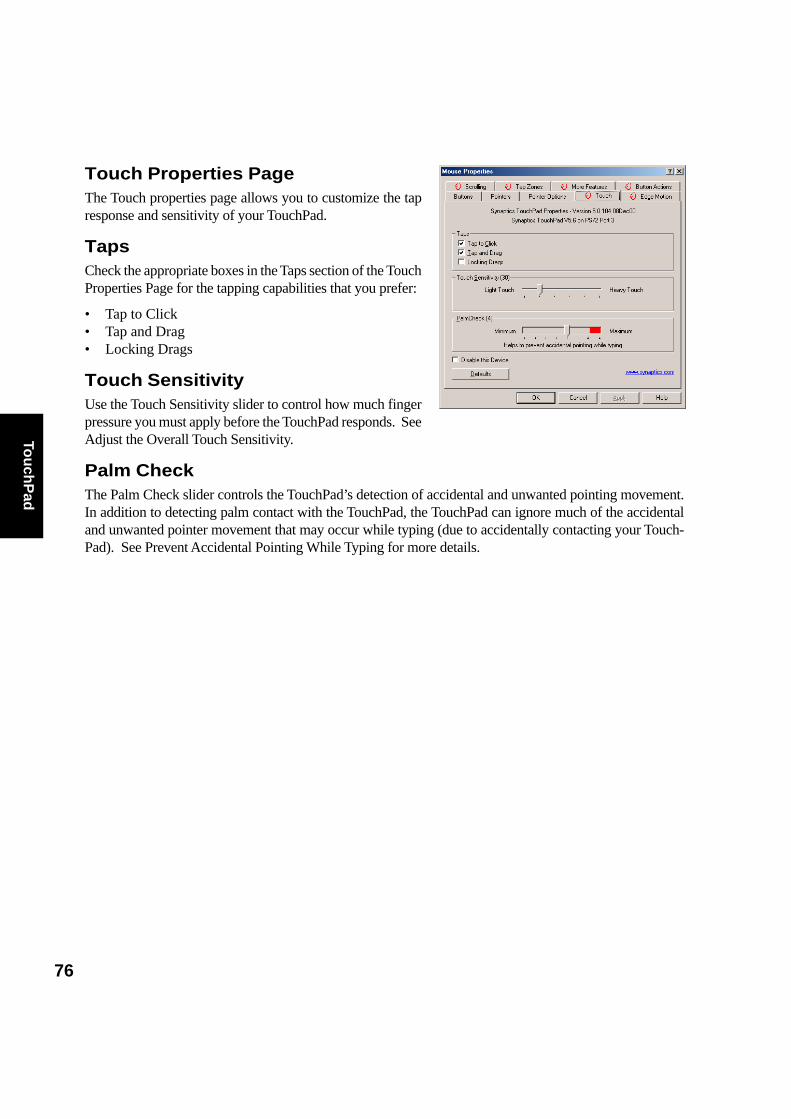
Touch Properties PageThe Touch properties page allows you to customize the tapresponse and sensitivity of your TouchPad.
TapsCheck the appropriate boxes in the Taps section of the TouchProperties Page for the tapping capabilities that you prefer:
• Tap to Click• Tap and Drag• Locking Drags
Touch SensitivityUse the Touch Sensitivity slider to control how much fingerpressure you must apply before the TouchPad responds. SeeAdjust the Overall Touch Sensitivity.
Palm CheckThe Palm Check slider controls the TouchPad’s detection of accidental and unwanted pointing movement.In addition to detecting palm contact with the TouchPad, the TouchPad can ignore much of the accidentaland unwanted pointer movement that may occur while typing (due to accidentally contacting your Touch-Pad). See Prevent Accidental Pointing While Typing for more details.
77
To
uch
Pad
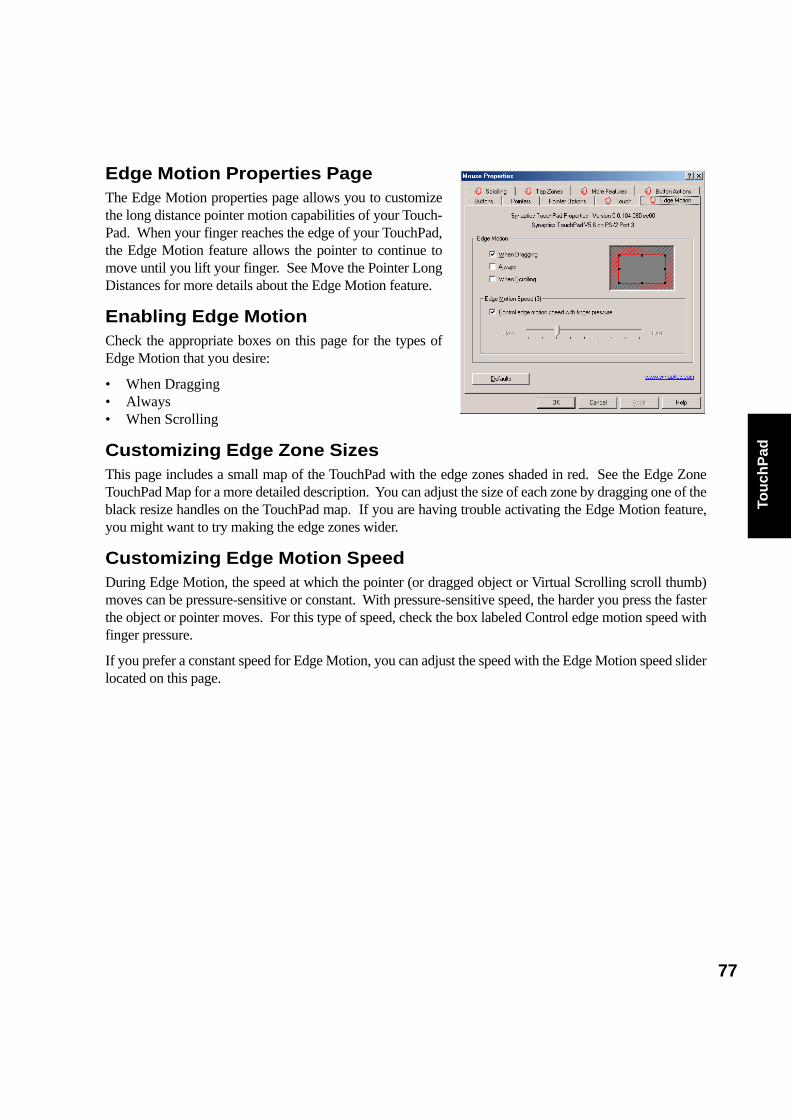
Edge Motion Properties PageThe Edge Motion properties page allows you to customizethe long distance pointer motion capabilities of your Touch-Pad. When your finger reaches the edge of your TouchPad,the Edge Motion feature allows the pointer to continue tomove until you lift your finger. See Move the Pointer LongDistances for more details about the Edge Motion feature.
Enabling Edge MotionCheck the appropriate boxes on this page for the types ofEdge Motion that you desire:
• When Dragging• Always• When Scrolling
Customizing Edge Zone SizesThis page includes a small map of the TouchPad with the edge zones shaded in red. See the Edge ZoneTouchPad Map for a more detailed description. You can adjust the size of each zone by dragging one of theblack resize handles on the TouchPad map. If you are having trouble activating the Edge Motion feature,you might want to try making the edge zones wider.
Customizing Edge Motion SpeedDuring Edge Motion, the speed at which the pointer (or dragged object or Virtual Scrolling scroll thumb)moves can be pressure-sensitive or constant. With pressure-sensitive speed, the harder you press the fasterthe object or pointer moves. For this type of speed, check the box labeled Control edge motion speed withfinger pressure.
If you prefer a constant speed for Edge Motion, you can adjust the speed with the Edge Motion speed sliderlocated on this page.
78
Tou
chP
ad
Frequently Asked QuestionsQ: When I use Virtual Scrolling, the pointer jumps over to the scroll bar, and then jumps back where it
came from when I’m done. Is this normal?
A: Yes.
Q: Why doesn’t the Virtual Scrolling feature work in some windows, even though they have a scroll bar?
A: In order to scroll, Virtual Scrolling must be able to “see” the window’s scroll bar. If the scroll bar ispartially obscured by another window, or partially off the screen, then Virtual Scrolling will notactivate in that window. In general, a window’s scroll bar must be entirely on the screen, and fullyvisible, in order to use Virtual Scrolling in that window. There is an exception to this rule: VirtualScrolling has “special knowledge” about many common types of windows, and can scroll them evenif their scroll bars are not visible on the screen. A very small number of applications use nonstandardscroll bars that might not work reliably with Virtual Scrolling.
Q: Why do some windows scroll smoothly, while others re-display their contents only occasionally as Iscroll?
A: The way a window responds to its scroll bars is entirely up to the application which owns that win-dow. Some applications “smooth-scroll,” while others wait until you release the scroll bar beforeupdating their contents. Virtual Scrolling “knows” about many common applications and windowtypes, and uses this knowledge to “trick” many windows into smooth-scrolling (Microsoft ® Word™ document windows, for example, do not normally smooth-scroll, but they do when you use Vir-tual Scrolling). If Virtual Scrolling does not “know” about a particular type of window, it still ap-proximates smooth-scrolling by causing the window to re-display when your finger slows down orstops. This can help you more accurately scroll to the right place in a document.
Q: Why does the scroll thumb sometimes “jump around” when I scroll, and not go exactly where thepointer is?
A: Again, the application actually has complete control over the way the scroll thumb moves. Dependingupon the window contents, some applications will actually prevent you from moving the scroll thumbto certain locations. Sometimes, the scroll thumb is only “allowed” to come to rest at one or two posi-tions along the scroll bar! In these cases, even if you were to manually drag the scroll thumb with thepointer, you would find that it would “jump” to a final location when you released it. Virtual Scrolling,unfortunately, cannot control how applications manage their scroll bars.
Q: Why doesn’t Virtual Scrolling work properly with Microsoft Internet Explorer?
A: Make sure you are using Internet Explorer version 4.01 or later, and that the Use Smooth Scrollingoption on the Advanced page of the Internet Explorer Properties dialog is NOT checked.

79
To
uch
Pad
Q: When I press and hold the shift key or the control key (CTRL), the pointer movement is either veryslow or restricted to move only horizontally or only vertically. What is happening?
A: The shift keys and the control keys are special and are used for various things, such as selectingmultiple files in Microsoft Windows Explorer or for zooming in and out on a spread sheet in Mi-crosoft Excel. These keys can also be used for special pointer movement, such as for slowing thepointer down or for constraining the pointer to move only horizontally or only vertically. For ex-ample, you can assign the left shift key to be the Slow Motion Key. Then when you press and holdthe left shift key, the pointer motion will be slower than usual. Note that you can still use this shiftkey for other special behaviors! You can still press and hold the left shift key to select multiple filesin Microsoft Windows Explorer, but the pointer motion will also be a bit slower. If you see slow orconstrained pointer movement when pressing shift or CTRL and you want to turn off this specialbehavior, go to the More Features Properties Page in the Mouse Properties dialog and uncheck theappropriate boxes.

80
81
PC
-cill
in 2
000
PC-cillin 2000
Topics Covered:
PC-cillin 2000 Features
What’s New in PC-cillin 2000
Test Virus
What is a Computer Virus?
How Viruses Spread
Virus Writers
Screens will vary depending on your operating system but the contents should be the same.
82
PC
-cillin 2000
Welcome to PC-cillinWelcome to PC-cillin 2000, Trend Micro’s award-winning antivirus software.
Here’s what PC-cillin will do “straight out of the box”:
• Checks for viruses every time you Open, Copy, Move, or Save a file
• Protects against downloading infected files from the Internet or FTP sites
• Guards against malicious Java applets and ActiveX controls while web surfing
• Monitors your Word and Excel sessions for macro viruses, using MacroTrapTM
• Scans and cleans all files on your hard drive every Friday
• Scans all program files for viruses every month Checks all your saved documents for macro viruses.
Here’s what you can do with just the click of a button:
• Scan every file on your system and clean any infected files
• Scan any file from Windows Explorer or My Computer by right-clicking the file icon
• Scan floppy diskettes and clean any infected files
• Check all of your Word and Excel document(s) for macro viruses
• If you use Outlook Express 4.0 or above or Eudora Pro 4.0 or above email clients, scan your emailmessage attachments as they are being downloaded from the POP3 email server.
• Manually scan message attachments in your local Outlook folders
No Limits
Of course, if you’re a person who likes to customize your software, there is no limit to the Scan tasks you canconfigure PC-cillin to perform.
You can “set and forget” as many tasks as you see fit. For each task, you can select the file types you want toscan for viruses, the action PC-cillin will take upon finding a virus (Clean the infected file, Delete it, Quar-antine it, Pass it, or Rename / Deny Access to it), and other program details.
Scan Engine
Viruses are detected using Trend’s 32-bit, multi-threaded scan engine and a process called pattern matching.In addition to catching known viruses, PC-cillin detects and intercepts previously unknown polymorphic, ormutation, viruses.
MacroTrap
Additional layers of protection come from MacroTrap™, Trend’s macro virus scanning engine, which de-tects and removes both known and unknown macro viruses.
83
PC
-cill
in 2
000
What’s New in PC-cillin 2000
PC-cillin 2000 includes the following enhancements over the previous version:
• Windows Support: PC-cillin fully supports Windows. Integration with the Windows installer meansthat you can install PC-cillin while installing other Windows components. PC-cillin is Windowscompliant.
• Antivirus scanning of POP3 mail: If you use Microsoft Outlook Express 4.01 or above or Eudora Pro4.0 or above as your email client, Trend PC-cillin 2000 will scan your email messages as they down-load from the POP3 server. Virus-infected attachments are stopped before they ever reach your com-puter!
• Virus Scanning of Local Outlook Folders: If you use Microsoft Outlook as your email client, TrendPC-cillin 2000 provides on-demand scanning of local folders for virus-infected attachments. TrendPC-cillin will automatically detect an installed copy of Microsoft Outlook on the computer and en-able the user interface elements that permit the use of this feature. Please note that this feature doesnot scan messages stored on a Microsoft Exchange server, but only scans messages in local folders.
• Incremental Virus Pattern Download: No longer do you have to download the entire virus pattern filewhen updating your software. Trend PC-cillin 2000 supports incremental pattern updates wherebyonly the virus patterns that have changed since the last update are downloaded. This greatly reducesthe download time, saving time and expense that you have to spend on Internet connection charges.
• PC-cillin Can Scan Virtually All Media: PC-cillin 2000 can scan the following types of drives inaddition to conventional hard disk drives: CD-ROM, CD-R, CD-RW, PD, FDD, DVD, ZIP andLS120.
• PCSCAN Command Line Scanner Supports Pattern Files Larger Than 1.44 MB: Due to the largenumber of known computer viruses that have been identified, the virus pattern file is now too large tofit on a single 1.44 MB diskette. The emergency rescue disk creation utility can split the virus patternfile over several diskettes. Additionally, the PCSCAN command line scanner supports virus patternfiles that have been spanned over more than one diskette.
84
PC
-cillin 2000
What is a Computer Virus?Simply put, a computer virus is a program that replicates. To do so, it will need to attach itself to otherprogram files (for example, .exe, .com, .dll) and execute whenever the host program executes. Beyondsimple replication, a virus almost always seeks to fulfill another purpose: to cause damage.
Called the damage routine, or payload, the destructive portion of a virus can range from overwriting criticalinformation kept on your hard disk’s partition table to scrambling the numbers in your spreadsheets to justtaunting you with sounds, pictures, or obnoxious effects.
It’s worth bearing in mind, however, that even without a “damage routine,” viruses allowed to run unabatedwill continue to propagate—consuming system memory, disk space, slowing network traffic and generallydegrading performance. Besides, virus code is often buggy and can also be the source of mysterious systemproblems that take weeks to understand. So, whether it was written to be harmful or not, a virus on yoursystem can lead to instability and should not tolerated.
Some viruses, in conjunction with “logic bombs,” do not make their presence known for months. Instead ofcausing damage right away, these viruses do nothing but replicate—until the preordained trigger day orevent when they unleash their damage routines across the network.
To learn more about any particular virus, or about viruses in general, you can access Trend Micro’s onlineVirus Encyclopedia that comes with the program or visit Trend Micro’s web site at: http://www.antivirus.com
Test VirusThe European Institute of Computer Anti-virus Research, along with antivirus vendors, has developed a testfile that can be used in checking your installation and configuration.
The file is not an actual virus; it will cause no harm and it will not replicate. Rather, it is a specially createdfile whose “signature ” has been included in the Trend Micro virus pattern file and as such, can be detectedby the virus engine.
You can download this file from: http://www.antivirus.com/vinfo/testfiles/index.htm!Internet (“http://www.antivirus.com/vinfo/testfiles/index.htm”)
Alternatively, copy the following text into a text editor and then save the file with a *.com extension.
X5O!P%@AP[4\PZX54(P^)7CC)7}$EICAR-STANDARD-ANTIVIRUS-TEST-FILE!$H+H*
You may need to disable real-time scanning before downloading the file. Once on your machine, you can usethe test virus to see for yourself how PC-cillin’s various scanning features work.
85
PC
-cill
in 2
000
How Viruses Spread
There are many ways for a virus to enter your system:
• Email attachments
• World Wide Web (WWW) sites
• FTP traffic from the Internet (file downloads)
• Shared network files & network traffic in general
• Demonstration software
• Pirated software
• Shrink-wrapped, production programs (rare)
• Computer labs
• Electronic bulletin boards (BBS)
• Diskette swapping (using other people’s diskettes for carrying data and programs back and forth)
The most likely virus entry points are email, Internet and network connections, floppy disk drives, andmodems or other serial or parallel port connections. In today’s increasingly interconnected workplace (Inter-net, intranet, shared drives, removable drives, and email), virus outbreaks now can spread faster and widerthan ever before.
Virus WritersIn the typical scenario, it is an individual, working alone, who writes a virus program and then introduces itonto a single computer, network server, or the Internet. Why? Ego, revenge, sabotage, and basic disgruntle-ment have all been cited as motivations. Recently, do-it-yourself “virus kits” have been popping up on theInternet, and macro scripts are becoming both easier to learn and more powerful, putting the capacity toengineer viruses in the hands of nearly everyone. In other words, no single, likely profile exits by which viruswriters can be described or understood.
So whatever the reason one may have for writing a virus, the important thing is to make certain your com-pany is not victimized, that your data you are responsible for is safe, and that precious time is not wastedhunting down (and cleaning up after) viruses.

86

87
Ho
tkey
Uti
lity
Hotkey Utility
Topics Covered:
Hotkey Utility
Buttons
Hotkey Actions
Adding a Program to Run
Screens will vary depending on your operating system but the contents should be the same.
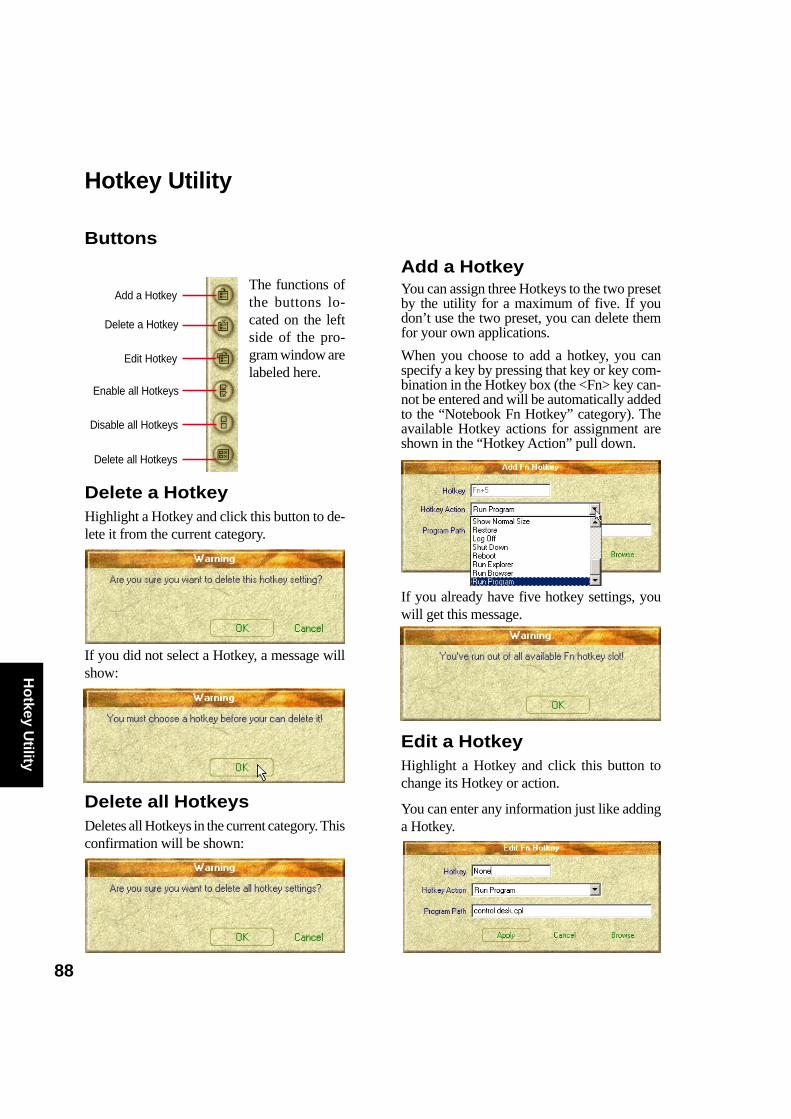
88
Ho
tkey Utility
Delete all HotkeysDeletes all Hotkeys in the current category. Thisconfirmation will be shown:
Hotkey Utility
Buttons
Edit a HotkeyHighlight a Hotkey and click this button tochange its Hotkey or action.
You can enter any information just like addinga Hotkey.
Delete a HotkeyHighlight a Hotkey and click this button to de-lete it from the current category.
Add a HotkeyYou can assign three Hotkeys to the two presetby the utility for a maximum of five. If youdon’t use the two preset, you can delete themfor your own applications.
When you choose to add a hotkey, you canspecify a key by pressing that key or key com-bination in the Hotkey box (the <Fn> key can-not be entered and will be automatically addedto the “Notebook Fn Hotkey” category). Theavailable Hotkey actions for assignment areshown in the “Hotkey Action” pull down.
Add a Hotkey
Delete a Hotkey
Edit Hotkey
Enable all Hotkeys
Disable all Hotkeys
Delete all Hotkeys
If you did not select a Hotkey, a message willshow:
If you already have five hotkey settings, youwill get this message.
The functions ofthe buttons lo-cated on the leftside of the pro-gram window arelabeled here.
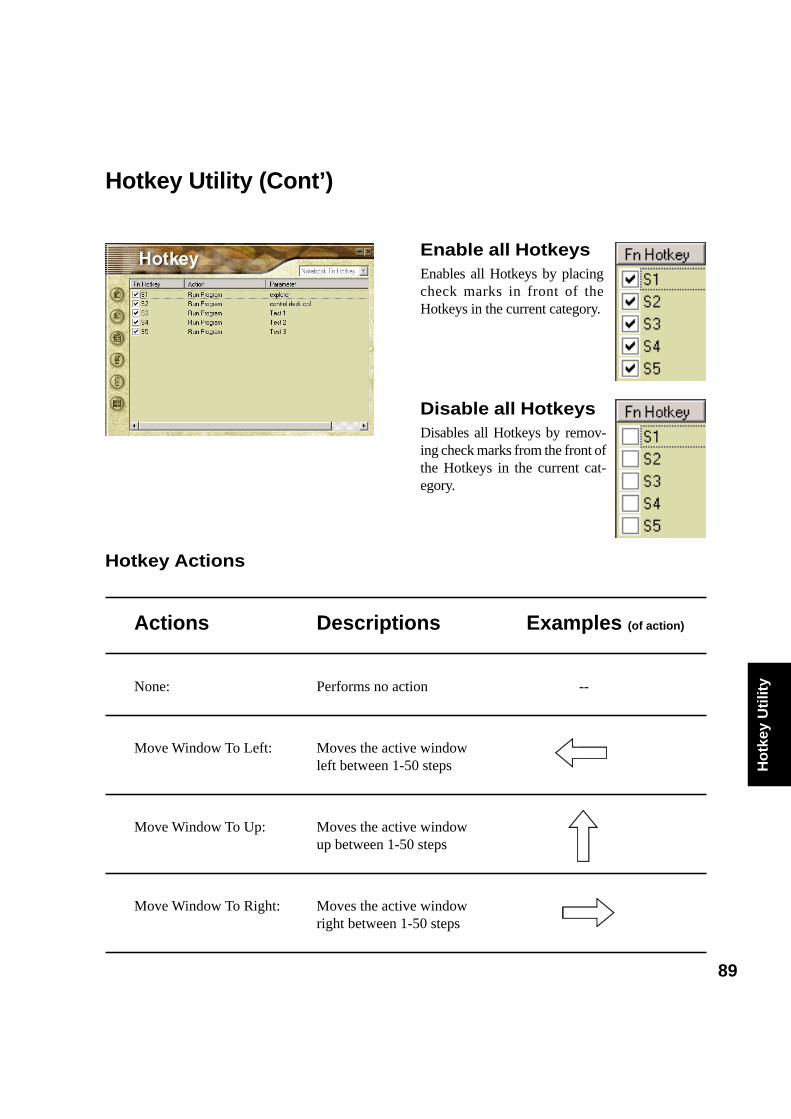
89
Ho
tkey
Uti
lity
Actions Descriptions Examples (of action)
None: Performs no action --
Move Window To Left: Moves the active windowleft between 1-50 steps
Move Window To Up: Moves the active windowup between 1-50 steps
Move Window To Right: Moves the active windowright between 1-50 steps
Disable all HotkeysDisables all Hotkeys by remov-ing check marks from the front ofthe Hotkeys in the current cat-egory.
Hotkey Actions
Enable all HotkeysEnables all Hotkeys by placingcheck marks in front of theHotkeys in the current category.
Hotkey Utility (Cont’)
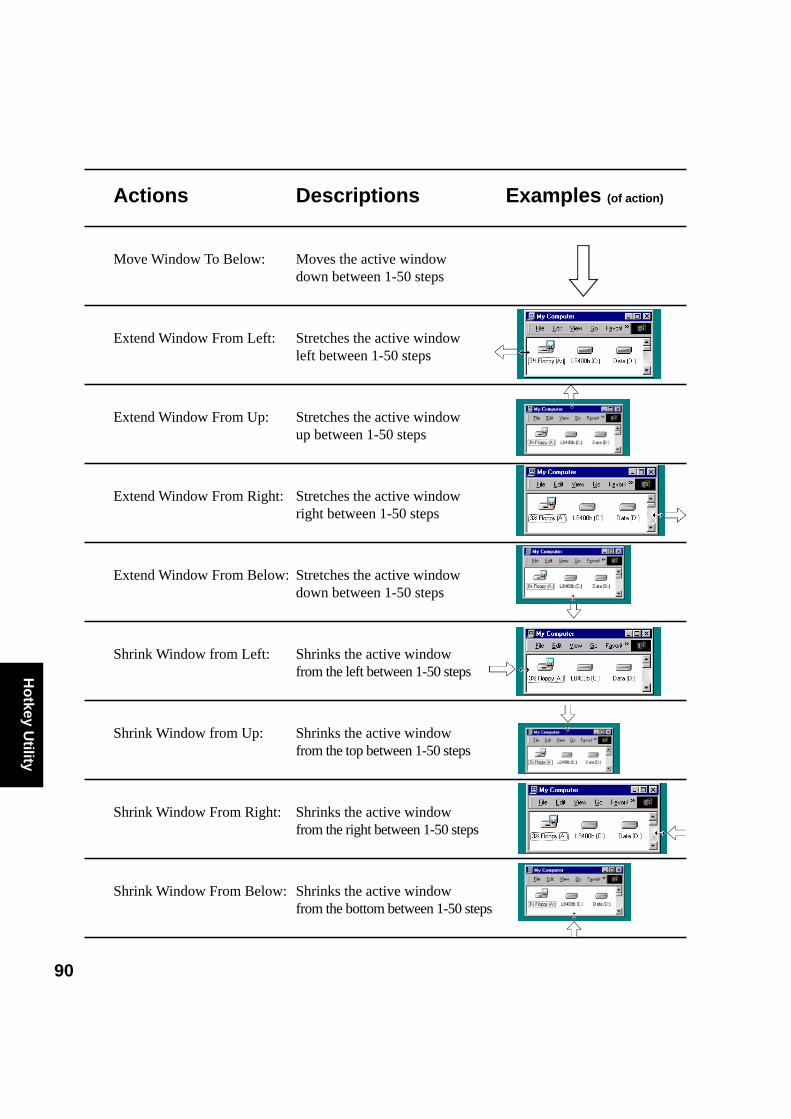
90
Ho
tkey Utility
Actions Descriptions Examples (of action)
Move Window To Below: Moves the active windowdown between 1-50 steps
Extend Window From Left: Stretches the active windowleft between 1-50 steps
Extend Window From Up: Stretches the active windowup between 1-50 steps
Extend Window From Right: Stretches the active windowright between 1-50 steps
Extend Window From Below: Stretches the active windowdown between 1-50 steps
Shrink Window from Left: Shrinks the active windowfrom the left between 1-50 steps
Shrink Window from Up: Shrinks the active windowfrom the top between 1-50 steps
Shrink Window From Right: Shrinks the active windowfrom the right between 1-50 steps
Shrink Window From Below: Shrinks the active windowfrom the bottom between 1-50 steps
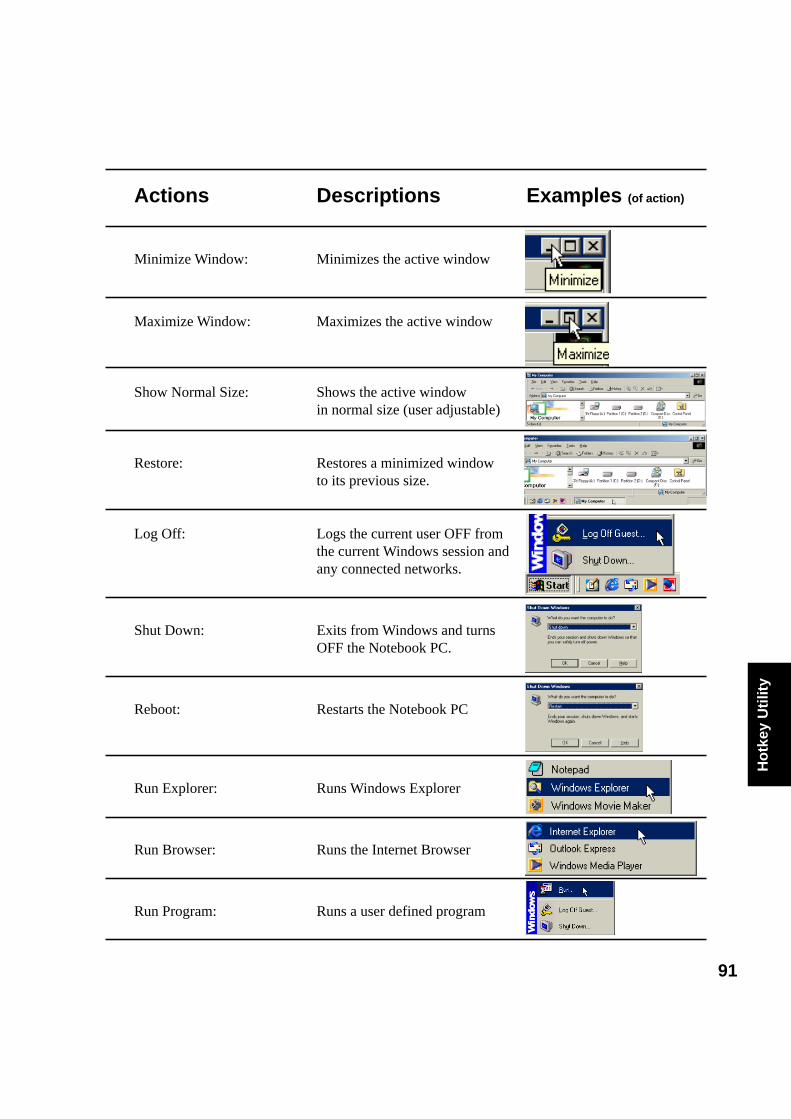
91
Ho
tkey
Uti
lity
Actions Descriptions Examples (of action)
Minimize Window: Minimizes the active window
Maximize Window: Maximizes the active window
Show Normal Size: Shows the active windowin normal size (user adjustable)
Restore: Restores a minimized windowto its previous size.
Log Off: Logs the current user OFF fromthe current Windows session andany connected networks.
Shut Down: Exits from Windows and turnsOFF the Notebook PC.
Reboot: Restarts the Notebook PC
Run Explorer: Runs Windows Explorer
Run Browser: Runs the Internet Browser
Run Program: Runs a user defined program
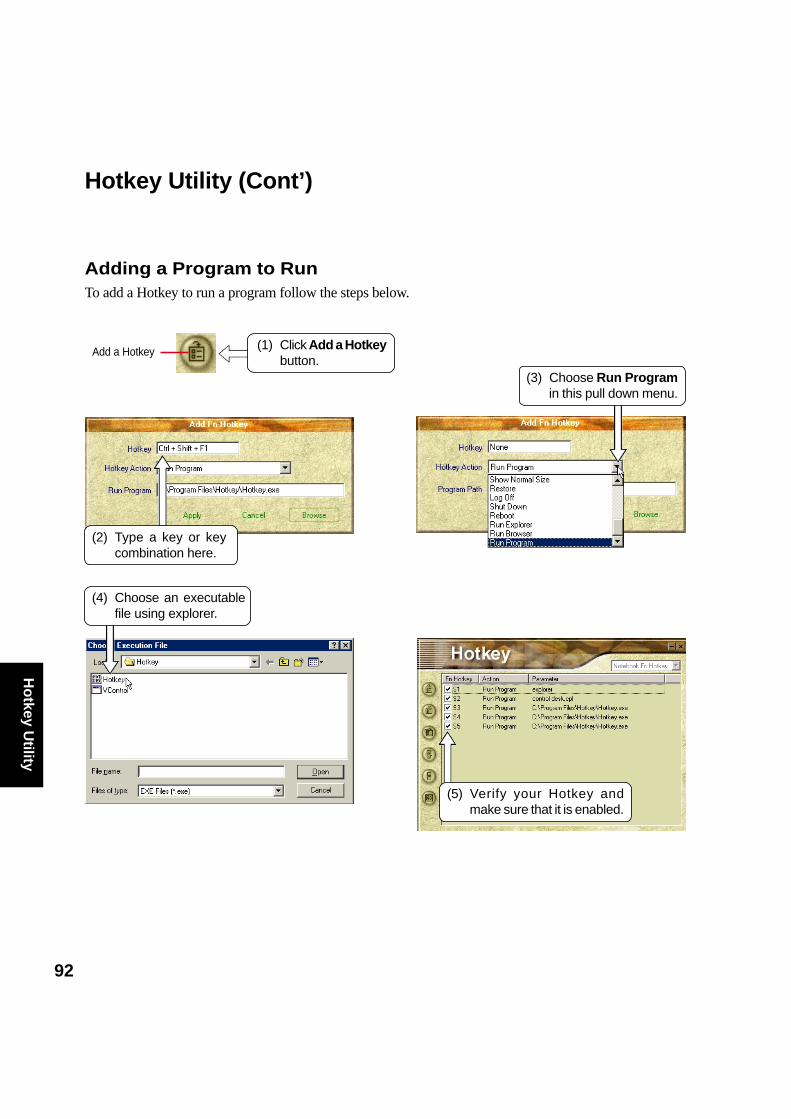
92
Ho
tkey Utility
Hotkey Utility (Cont’)
Adding a Program to RunTo add a Hotkey to run a program follow the steps below.
Add a Hotkey (1) Click Add a Hotkeybutton.
(2) Type a key or keycombination here.
(4) Choose an executablefile using explorer.
(5) Verify your Hotkey andmake sure that it is enabled.
(3) Choose Run Programin this pull down menu.

93
WIN
FL
AS
H
Windows Flash Utility (WINFLASH)
Topics Covered:
Updating Your BIOS
Resetting Your BIOS
Screens will vary depending on your operating system but the contents should be the same.
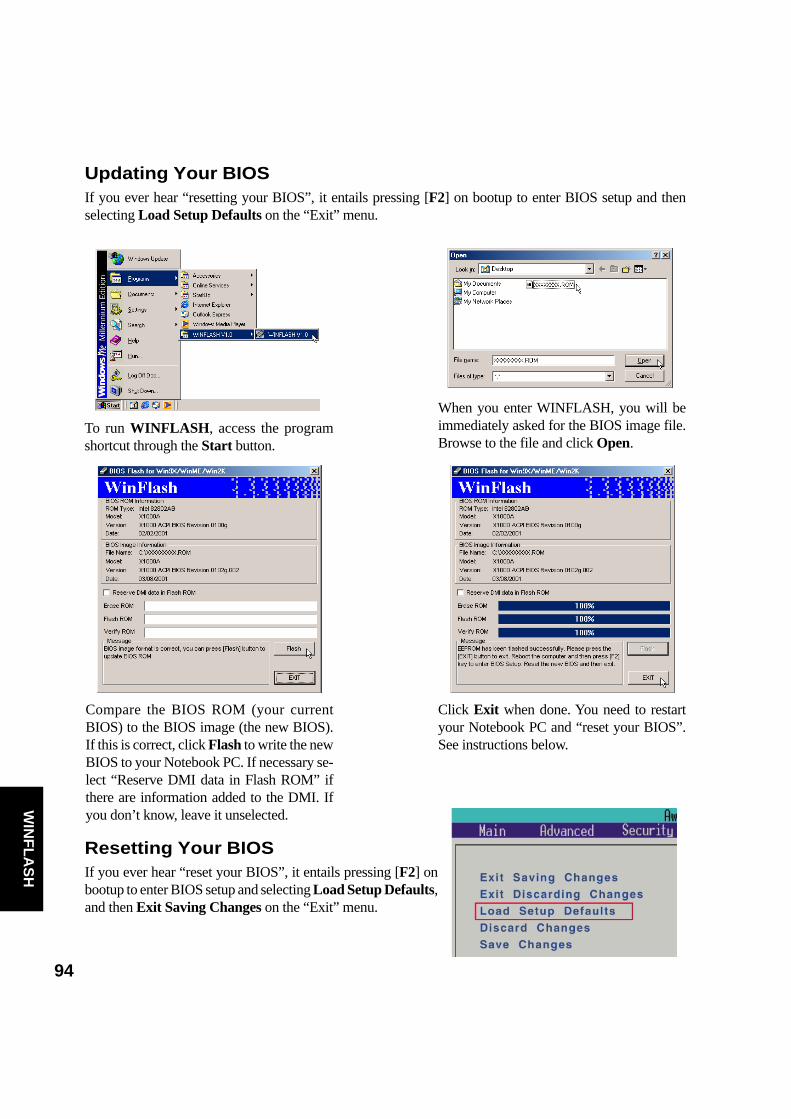
94
WIN
FL
AS
H
Resetting Your BIOSIf you ever hear “reset your BIOS”, it entails pressing [F2] onbootup to enter BIOS setup and selecting Load Setup Defaults,and then Exit Saving Changes on the “Exit” menu.
Updating Your BIOSIf you ever hear “resetting your BIOS”, it entails pressing [F2] on bootup to enter BIOS setup and thenselecting Load Setup Defaults on the “Exit” menu.
To run WINFLASH, access the programshortcut through the Start button.
When you enter WINFLASH, you will beimmediately asked for the BIOS image file.Browse to the file and click Open.
Compare the BIOS ROM (your currentBIOS) to the BIOS image (the new BIOS).If this is correct, click Flash to write the newBIOS to your Notebook PC. If necessary se-lect “Reserve DMI data in Flash ROM” ifthere are information added to the DMI. Ifyou don’t know, leave it unselected.
Click Exit when done. You need to restartyour Notebook PC and “reset your BIOS”.See instructions below.

95
PC
Pro
beASUS PC Probe
Topics Covered:
Starting ASUS PC Probe
Using PC Probe Monitoring
ASUS PC Probe Task Bar Icon
Screens will vary depending on your operating system but the contents should be the same.
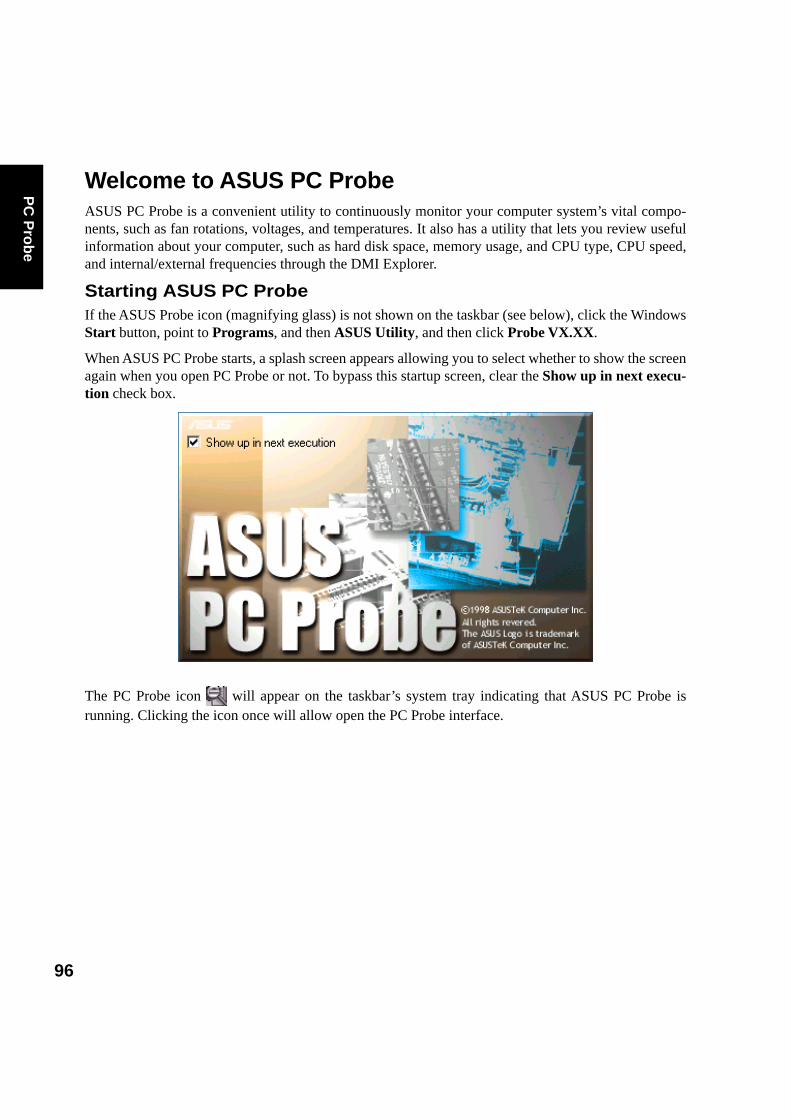
96
PC
Pro
be
Welcome to ASUS PC ProbeASUS PC Probe is a convenient utility to continuously monitor your computer system’s vital compo-nents, such as fan rotations, voltages, and temperatures. It also has a utility that lets you review usefulinformation about your computer, such as hard disk space, memory usage, and CPU type, CPU speed,and internal/external frequencies through the DMI Explorer.
Starting ASUS PC ProbeIf the ASUS Probe icon (magnifying glass) is not shown on the taskbar (see below), click the WindowsStart button, point to Programs, and then ASUS Utility, and then click Probe VX.XX.
When ASUS PC Probe starts, a splash screen appears allowing you to select whether to show the screenagain when you open PC Probe or not. To bypass this startup screen, clear the Show up in next execu-tion check box.
The PC Probe icon will appear on the taskbar’s system tray indicating that ASUS PC Probe isrunning. Clicking the icon once will allow open the PC Probe interface.
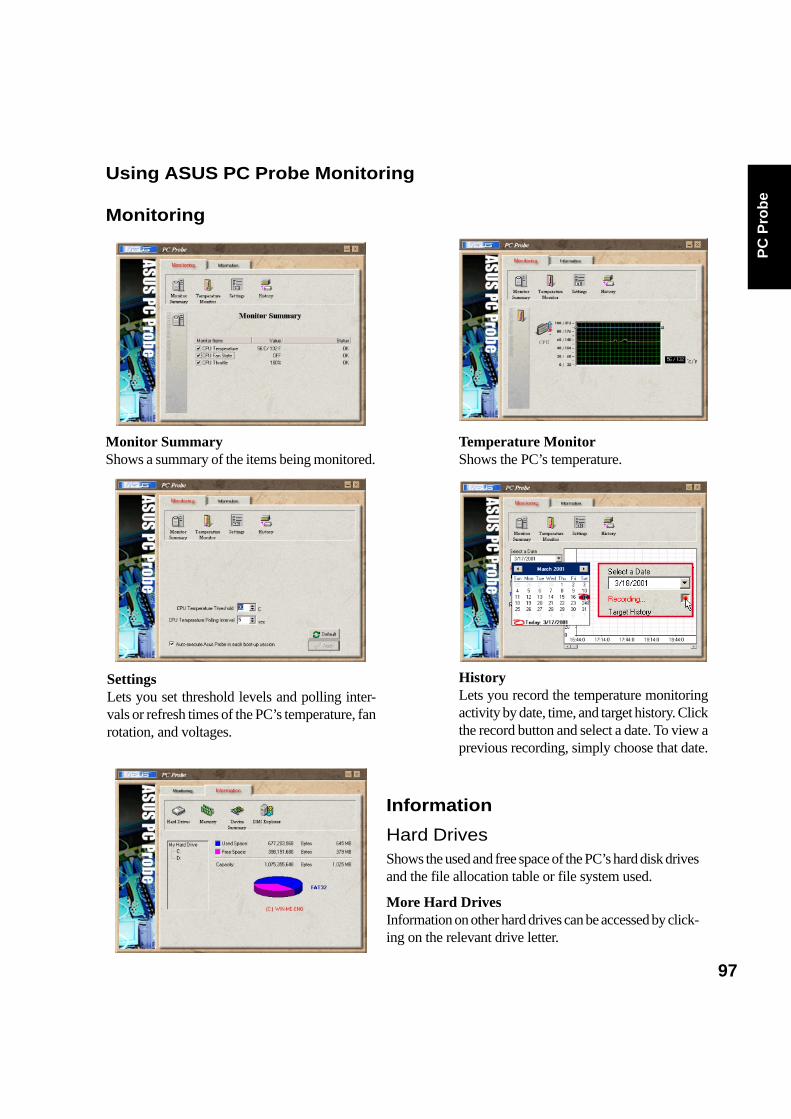
97
PC
Pro
be
Monitor SummaryShows a summary of the items being monitored.
Temperature MonitorShows the PC’s temperature.
SettingsLets you set threshold levels and polling inter-vals or refresh times of the PC’s temperature, fanrotation, and voltages.
HistoryLets you record the temperature monitoringactivity by date, time, and target history. Clickthe record button and select a date. To view aprevious recording, simply choose that date.
Information
Hard DrivesShows the used and free space of the PC’s hard disk drivesand the file allocation table or file system used.
More Hard DrivesInformation on other hard drives can be accessed by click-ing on the relevant drive letter.
Using ASUS PC Probe Monitoring
Monitoring
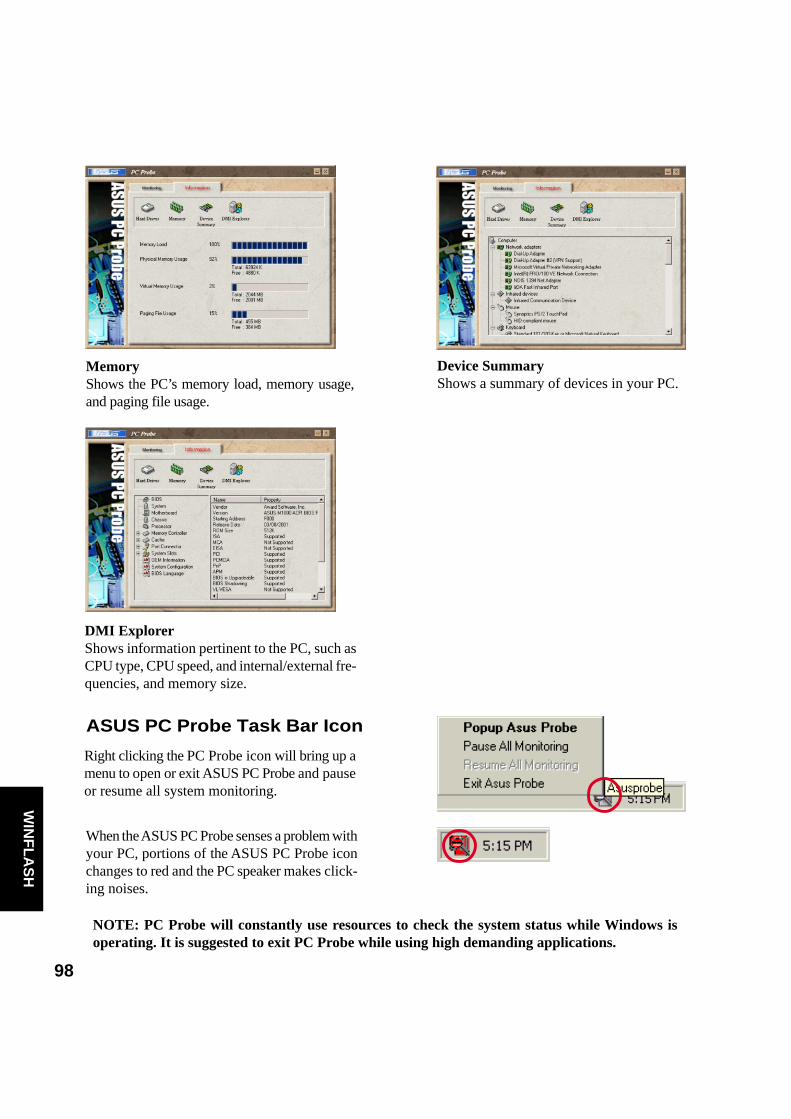
98
WIN
FL
AS
H
Device SummaryShows a summary of devices in your PC.
DMI ExplorerShows information pertinent to the PC, such asCPU type, CPU speed, and internal/external fre-quencies, and memory size.
MemoryShows the PC’s memory load, memory usage,and paging file usage.
ASUS PC Probe Task Bar Icon
Right clicking the PC Probe icon will bring up amenu to open or exit ASUS PC Probe and pauseor resume all system monitoring.
When the ASUS PC Probe senses a problem withyour PC, portions of the ASUS PC Probe iconchanges to red and the PC speaker makes click-ing noises.
NOTE: PC Probe will constantly use resources to check the system status while Windows isoperating. It is suggested to exit PC Probe while using high demanding applications.

99
Che
ck M
ail U
tility
Check Mail Utility
Topics Covered:
Check Mail Quick Setup
Check Mail Startup
Screens will vary depending on your operating system but the contents should be the same.
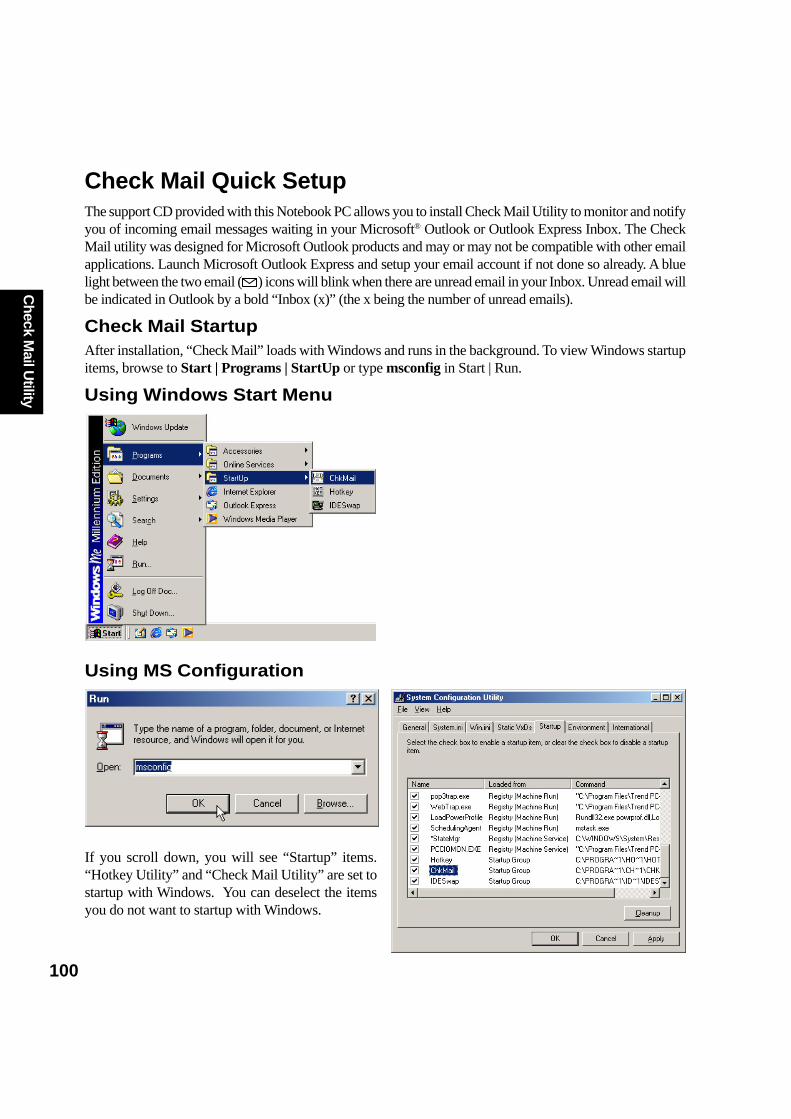
100
Check M
ail Utility
If you scroll down, you will see “Startup” items.“Hotkey Utility” and “Check Mail Utility” are set tostartup with Windows. You can deselect the itemsyou do not want to startup with Windows.
Check Mail Quick SetupThe support CD provided with this Notebook PC allows you to install Check Mail Utility to monitor and notifyyou of incoming email messages waiting in your Microsoft® Outlook or Outlook Express Inbox. The CheckMail utility was designed for Microsoft Outlook products and may or may not be compatible with other emailapplications. Launch Microsoft Outlook Express and setup your email account if not done so already. A bluelight between the two email ( ) icons will blink when there are unread email in your Inbox. Unread email willbe indicated in Outlook by a bold “Inbox (x)” (the x being the number of unread emails).
Check Mail StartupAfter installation, “Check Mail” loads with Windows and runs in the background. To view Windows startupitems, browse to Start | Programs | StartUp or type msconfig in Start | Run.
Using Windows Start Menu
Using MS Configuration

101
IDE
Sw
ap U
tilit
y
IDE Swap Utility
Topics Covered:
IDE Swap Introduction
Using the AiBox
Screens will vary depending on your operating system but the contents should be the same.
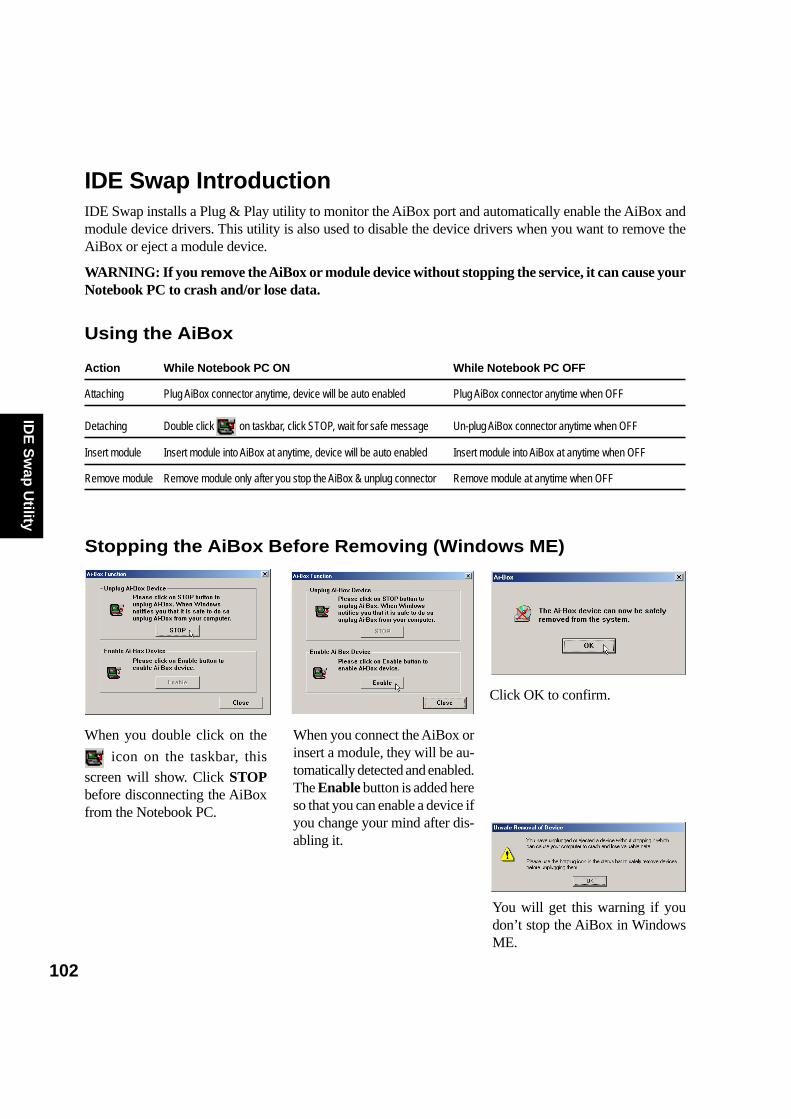
102
IDE
Sw
ap U
tility
IDE Swap IntroductionIDE Swap installs a Plug & Play utility to monitor the AiBox port and automatically enable the AiBox andmodule device drivers. This utility is also used to disable the device drivers when you want to remove theAiBox or eject a module device.
WARNING: If you remove the AiBox or module device without stopping the service, it can cause yourNotebook PC to crash and/or lose data.
Using the AiBox
Action While Notebook PC ON While Notebook PC OFF
Attaching Plug AiBox connector anytime, device will be auto enabled Plug AiBox connector anytime when OFF
Detaching Double click on taskbar, click STOP, wait for safe message Un-plug AiBox connector anytime when OFF
Insert module Insert module into AiBox at anytime, device will be auto enabled Insert module into AiBox at anytime when OFF
Remove module Remove module only after you stop the AiBox & unplug connector Remove module at anytime when OFF
When you connect the AiBox orinsert a module, they will be au-tomatically detected and enabled.The Enable button is added hereso that you can enable a device ifyou change your mind after dis-abling it.
When you double click on the
icon on the taskbar, this
screen will show. Click STOPbefore disconnecting the AiBoxfrom the Notebook PC.
You will get this warning if youdon’t stop the AiBox in WindowsME.
Stopping the AiBox Before Removing (Windows ME)
Click OK to confirm.
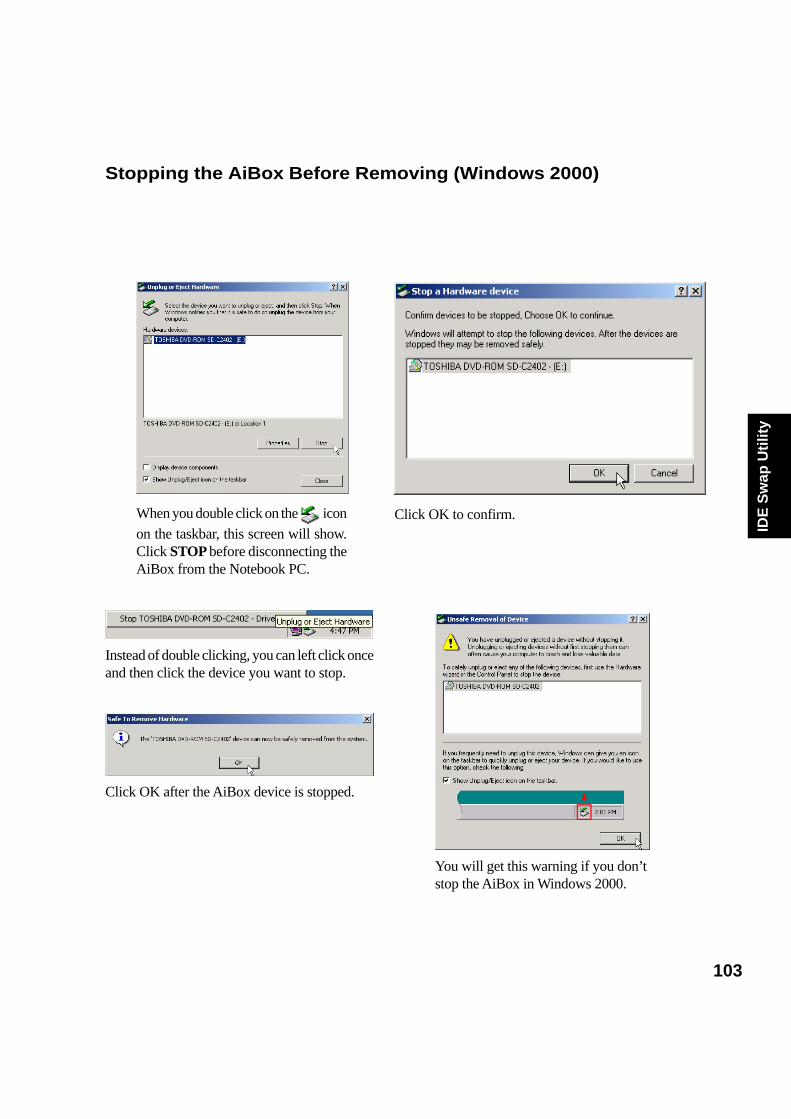
103
IDE
Sw
ap U
tilit
y
Stopping the AiBox Before Removing (Windows 2000)
When you double click on the icon
on the taskbar, this screen will show.Click STOP before disconnecting theAiBox from the Notebook PC.
You will get this warning if you don’tstop the AiBox in Windows 2000.
Click OK to confirm.
Click OK after the AiBox device is stopped.
Instead of double clicking, you can left click onceand then click the device you want to stop.

104
IDE
Sw
ap U
tility

105
Po
wer
Gea
r
Power Gear
Topics Covered:
Benefits of Power Gear
Power Gear Interface
Power Gear Configuration
Screens will vary depending on your operating system but the contents should be the same.
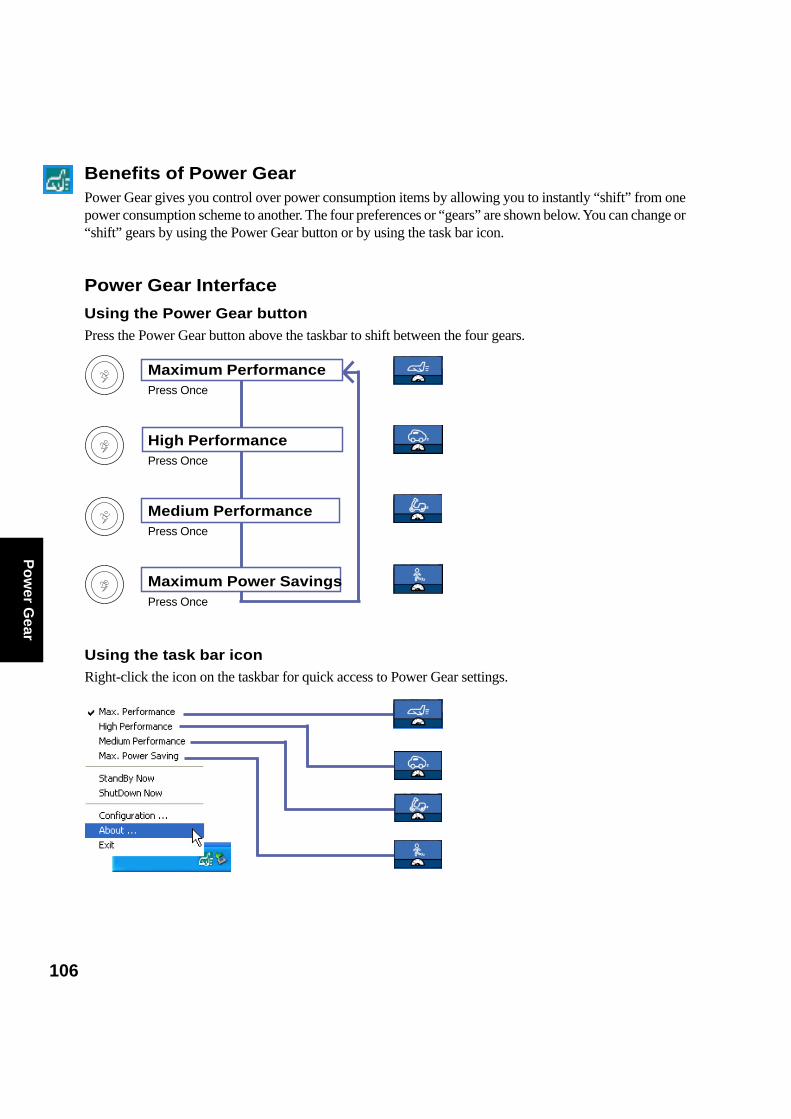
106
Po
wer G
ear
Benefits of Power GearPower Gear gives you control over power consumption items by allowing you to instantly “shift” from onepower consumption scheme to another. The four preferences or “gears” are shown below. You can change or“shift” gears by using the Power Gear button or by using the task bar icon.
Power Gear Interface
Using the Power Gear buttonPress the Power Gear button above the taskbar to shift between the four gears.
Maximum PerformancePress Once
High PerformancePress Once
Medium PerformancePress Once
Maximum Power SavingsPress Once
Using the task bar iconRight-click the icon on the taskbar for quick access to Power Gear settings.
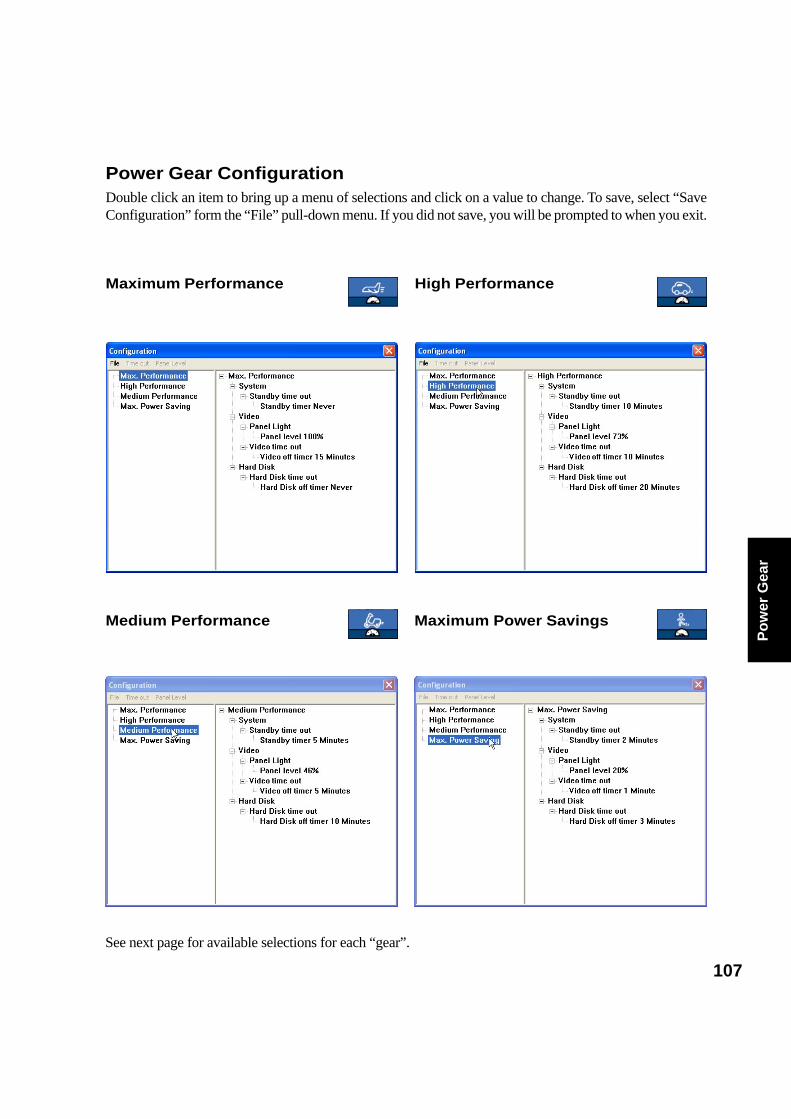
107
Po
wer
Gea
r
Maximum Performance High Performance
Medium Performance Maximum Power Savings
Power Gear ConfigurationDouble click an item to bring up a menu of selections and click on a value to change. To save, select “SaveConfiguration” form the “File” pull-down menu. If you did not save, you will be prompted to when you exit.
See next page for available selections for each “gear”.

108
Po
wer G
ear
System Standby Timer Display Panel Brightness
Display Panel Off Timer Hard Drive Off Timer
Power Gear Configuration (Cont’)

109
Ap
pen
dixAPPENDIX
Modem Communication RegulationsFCC RegulationsThe following statements are provided in accordance with the Federal Communications Commission (FCC)regulations. Please read these statements carefully before installing your modem.
FCC Part 68 RequirementsThis equipment complies with Part 68 of the FCC Rules. On the bottom of this equipment is a label thatcontains, among other information, the FCC Registration Number and Ringer Equivalence Number (REN)for this equipment. If requested, this information must be given to the telephone company.
The REN is used to determine the maximum number of devices connected to your telephone line that willring in response to an incoming call. In most, but not all, areas, the total REN of devices connected to a lineshould not exceed five (5.0). To find out the total permitted in your area, contact your local telephone com-pany.
If your telephone equipment causes harm to the telephone network, the telephone company can discontinueyour service temporarily. If possible, the company will notify you in advance. But if advance notice isn’tpractical, you will be notified as soon as possible. You will be informed of your right to file a complaint withthe FCC.
Your telephone company can make changes in its facilities, equipment, operations, or procedures that couldaffect the operation of your equipment. If so, you will be notified in advance so you can make the changesneeded to maintain uninterrupted service.
If you experience trouble with this equipment, please contact the manufacturer at the address given in thismanual. The telephone company may ask that you disconnect this equipment from the network until theproblem has been corrected or until you are sure that the equipment in is not malfunctioning.
This equipment may not be used on public coin service provided by the telephone company. Connection toparty lines is subject to state tariffs.
110
Ap
pen
dix
Modem Declaration Of ConformityThis equipment has been tested and found to comply with the limits for a Class B digital device, pursuant toPart 15 of the FCC Rules. These limits are designed to provide reasonable protection against harmfulinterference in a residential installation. This equipment generates, uses and can radiate radio frequencyenergy and, if not installed and used in accordance with the instructions, may cause harmful interference toradio communications. However, there is no guarantee that interference will not occur in a particular instal-lation. If this equipment does cause harmful interference to radio and television reception, the user is encour-aged to try to correct the interference by one or more of the following measures:
• Reorient the receiving antenna.• Increase the separation between the equipment and receiver.• Connect the equipment into an outlet on a circuit different from that to which the receiver is con-
nected.• Consult the dealer or an experienced radio/TV technician for help.
WARNING! CHANGES OR MODIFICATIONS NOT EXPRESSLY APPROVED BY THEPARTY RESPONSIBLE FOR COMPLIANCE COULD VOID THE USER’SAUTHORITY TO OPERATE THE EQUIPMENT
Canadian Department Of Communications (CDOC)Notice: The Canadian Department of Communications label identifies certified equipment. Thiscertification means the equipment meets certain telecommunications network requirements.The Department does not guarantee the equipment will operate to the user’s satisfaction.
Before installing this equipment users should ensure that connection to the line is allowed by the localtelecommunications company. The equipment must also be installed using an acceptable method of connec-tion. In some cases, the company’s inside wiring associated with a single line individual service may beextended by means of a telephone extension cord. Compliance with the above conditions may not preventdegradation of service in certain situations.
Repairs to certified equipment should be made by an authorized Canadian maintenance facility designatedby the supplier. Any repairs or alterations made by the user to this equipment, or equipment malfunctions,may give the telecommunications company cause to request the user to disconnect the equipment.
Users should ensure for their own protection that the electrical ground connections of the power utility,telephone lines, and internal metallic water pipe system, if present, are connected together. This precautionmay be particularly important in rural areas.
WARNING! Users should not attempt to make such connections themselves, but should con-tact the appropriate electric inspection authority, or electrician, as appropriate.


