Embed Size (px)
Citation preview
ONLYOFFICE WorkspaceGroupsMailTalkControl PanelDocs
ONLYOFFICE GroupsDocumentsmoduleOverviewDocuments is a module for storing, viewing, editing and sharing documents, images,spreadsheets, presentations, etc. It contains the following sections:
· My documents is a private storage space, each portal member (with the exceptionof guests) has this section where he can upload, import or create documents forpersonal use only;
· Shared with me contains documents that were shared with a portal member byother members;
· Favorites contains documents that were marked as favorites by the current user.Users can hide or show this section in the Common Settings ofthe Documentsmodule. This section is not available for guests;
· Recent contains all the files recently opened in the editor by the current user(excepting encrypted documents and files from third-party clouds). Users can hide orshow this section in the Common Settings of the Documentsmodule. This sectionis not available for guests;
· Private Room is a special section for secure work with documents. This section isonly available in the server version. Work in the Private Room is only availablevia Desktop Editors;
· Common is a common storage space containing files and folders available to allportal members;
· In projects contains folders corresponding to existing projects and represents astorage place for all documents from the 'Projects' module;
· Trash is a section where all deleted files are stored and can be restored orremoved later.
It's also possible to access project documents within the 'Projects' module clicking the'Documents' link at the left-side panel.
Adding/creating documentsTo transfer all your files to the Documentsmodule, you can upload existing documents fromyour computer hard disk drive or integrate your Box.com, Dropbox, Google, OneDrive,SharePoint, Yandex account with the online office.
Uploading files and foldersTo upload a file,
1. open the needed section or folder where you want to upload your files to byselecting corresponding options at the left-side panel,
2. click the button in the left upper corner within the 'Documents' module,3. select the Upload files option from the menu,4. choose the files you want to upload to the online office in the file manager window
and click the Open button.Or simply drag-and-drop a file or several selected files from your computer to the working areato upload documents to your portal even more easily.When connecting to the portal with the Private Room enabled via the DesktopEditors interface, the possibility to upload files into the Private Room using the drag-and-dropmethod is not available.The uploading process will start. If the file format differs from the Office Open XML one, the filewill be converted into the .docx/.xlsx/.pptx format for faster editing. The notification windowwill appear where you can select if you want to save both files (a file in its original format and afile in the Office Open XML format). If you don't need files in an original format on the portal,you can uncheck the Save the file copy in the original format as well box. It'll be taken intoconsideration during the next uploading operations and a converted file will be placed as a newrevision of the original file rather than as a new separate file. It's also possible to enable ordisable the Save the file copy in the original format as well option inthe Documentsmodule Common Settings.If an original file is protected with a password, the password will be required to convert the file.If you click the Convert & Open icon to the right of the uploaded document in the file list, anew window will open where you need to enter a password.If the file with the same name already exists in the folder, a copy of the file will be created bydefault. If you wish to update the version of the existing file, click the Common Settings linkfrom the Settings list on the left side panel and turn on the Update the file version for theexisting file with the same name switcher. This parameter will be applied to all the filesuploaded afterwards.
To upload a folder that contains nested subfolders and documents:1. click the button in the left upper corner,2. select the Upload folder option from the menu,3. choose the folder you want to upload to the online office in the file manager window
and click the Open button.

This can also be done by dragging the necessary folder from the file manager window to theportal working area.When connecting to the portal with the Private Room enabled via the DesktopEditors interface, the possibility to upload folders into the Private Room is not available.To integrate your Google Drive, Box, Dropbox, OneDrive, Nextcloud, ownCloud, SharePoint,OneDrive for Business, kDrive, or Yandex Disk account with the Documentsmodule, use thecorresponding buttons on the left-side menu.Creating new files and foldersYou can also create new files or folders within the 'Documents' module. To do that,
1. open the needed section or folder where you want to create a new file by selectingcorresponding options at the left-side panel
2. click the Create button in the left upper corner and select one of the followingoptions:
o Document to create a new text documento Spreadsheet to create a new spreadsheeto Presentation to create a new presentationo Folder to create a new folder
3. enter a name for your file or folder into the appropriate field and click the icon
Creating CSV filesIntroductionMany of us continue to use spreadsheets for customer databases. It might be enough if youhave five or ten customers, but to make your business grow you need an effective tool,like CRM.This step by step guide will show you how to save an existing spreadsheet as a CSV file.Step 1. Access the DocumentsEnter your ONLYOFFICE portal and click the Documents link.In case you have already logged in to the portal and been using it for some time, to accessthe Documentsmodule, open the drop-down list in the top left corner of the page and selectthe corresponding option.Step 2. Open your spreadsheetTheMy documents folder opens.
Locate your spreadsheet and click the icon to the right or use the Edit option fromthe context menu. The file will open in the new tab.Using filters and sorting your documents will facilitate the search of the necessary spreadsheet.To open the file stored on your hard disk drive, first upload it to Documents clickingthe Upload button in the upper left corner of the page and selecting the Uploadfiles option.You can also start a new spreadsheet right on the portal clicking the Create button in the upperleft corner and selecting the Spreadsheet option from the drop-down list.Step 3. Edit your spreadsheetFor a correct data import you must follow some general rules:
· the first row is a header record containing column/field names;· To add a header record, select the first row with the mouse. Right-click and
follow Insert >> Entire row. An empty row will be inserted above the row youselected. Enter the necessary column/field names.
· the required fields are: First Name and Last Name for importing persons, CompanyName for importing companies;
· To add a new column (eg. if the First Name and the Last Name are indicated in thesame column to separate them or just to add some more information) to yourspreadsheet, select a column before which you want the new column added. Right-click and follow Insert >> Entire column. The new column will be inserted to the leftof the selected one. Enter the necessary values.
· there is one contact record per row.By default, when you work on your document, Spreadsheet Editor automatically saves it each2 seconds preventing the data loss in case of the unexpected program closing. If you need, youcan easily disable the Autosave feature on the 'Advanced Settings' page, but in such case don'tforget to use the icon to save the changes.Step 4. Save your spreadsheet as a CSV fileCSV (comma-separated values) represents a simple file format that is widely supported byvarious applications, e.g. text editors. Such files store tabular data in the plain-text form.To save your spreadsheet as a .csv file, switch to the File tab at the top toolbar, selectthe Download as... option at the left sidebar and choose the CSV format.The Choose CSV Options window will open. Select Unicode (UTF-8) as the Encoding typeand Comma as the Delimiter to separate the values in your file. Otherwise the file could not beloaded to CRM at all or the information will be displayed incorrectly.Click the OK button to start saving your file.By default, the created CSV file will be saved in the Downloads folder on your hard disk drive.Now you can proceed to importing contacts to CRM.
In the same way you can convert any spreadsheet you need to the CSV format.
EditingAdding/creating documentsTo transfer all your files to the Documentsmodule, you can upload existing documents fromyour computer hard disk drive or integrate your Box.com, Dropbox, Google, OneDrive,SharePoint, Yandex account with the online office.Uploading files and foldersTo upload a file,
1. open the needed section or folder where you want to upload your files to byselecting corresponding options at the left-side panel,
2. click the button in the left upper corner within the 'Documents' module,3. select the Upload files option from the menu,4. choose the files you want to upload to the online office in the file manager window
and click the Open button.Or simply drag-and-drop a file or several selected files from your computer to the working areato upload documents to your portal even more easily.When connecting to the portal with the Private Room enabled via the DesktopEditors interface, the possibility to upload files into the Private Room using the drag-and-dropmethod is not available.The uploading process will start. If the file format differs from the Office Open XML one, the filewill be converted into the .docx/.xlsx/.pptx format for faster editing. The notification windowwill appear where you can select if you want to save both files (a file in its original format and afile in the Office Open XML format). If you don't need files in an original format on the portal,you can uncheck the Save the file copy in the original format as well box. It'll be taken intoconsideration during the next uploading operations and a converted file will be placed as a newrevision of the original file rather than as a new separate file. It's also possible to enable ordisable the Save the file copy in the original format as well option inthe Documentsmodule Common Settings.If an original file is protected with a password, the password will be required to convert the file.If you click the Convert & Open icon to the right of the uploaded document in the file list, anew window will open where you need to enter a password.If the file with the same name already exists in the folder, a copy of the file will be created bydefault. If you wish to update the version of the existing file, click the Common Settings linkfrom the Settings list on the left side panel and turn on the Update the file version for the
existing file with the same name switcher. This parameter will be applied to all the filesuploaded afterwards.To upload a folder that contains nested subfolders and documents:
1. click the button in the left upper corner,2. select the Upload folder option from the menu,3. choose the folder you want to upload to the online office in the file manager window
and click the Open button.This can also be done by dragging the necessary folder from the file manager window to theportal working area.When connecting to the portal with the Private Room enabled via the DesktopEditors interface, the possibility to upload folders into the Private Room is not available.To integrate your Google Drive, Box, Dropbox, OneDrive, Nextcloud, ownCloud, SharePoint,OneDrive for Business, kDrive, or Yandex Disk account with the Documentsmodule, use thecorresponding buttons on the left-side menu.Creating new files and foldersYou can also create new files or folders within the 'Documents' module. To do that,
1. open the needed section or folder where you want to create a new file by selectingcorresponding options at the left-side panel
2. click the Create button in the left upper corner and select one of the followingoptions:
· Document to create a new text document· Spreadsheet to create a new spreadsheet· Presentation to create a new presentation· Folder to create a new folder
3. enter a name for your file or folder into the appropriate field and click the icon
Co-editing documents onlineIntroductionWhether you make a contract, or write an article, or translate a text you might need to interactwith people especially at the final stage to specify details or proofread the document. In thiscase the action sequence is more or less similar: sending document - waiting for the result -correcting and editing - sending document - waiting for the result - correcting and editing andso on till the result satisfy both parties.To avoid this continuous procedure and achieve the best result without wasting time onsending and waiting, make use of the Co-editing feature provided by Document Editor. All you
need to do that is to send the link to your document to the needed person and start co-editingthe document commenting and discussing it in real time without installing any program.This guide will show you how it can be done in a few steps.Step 1. Access the DocumentsEnter your portal and click the Documents link.In case you have already logged in to the portal and been using it for some time, to accessthe Documentsmodule, open the drop-down list in the top left corner of the page and selectthe corresponding option.Step 2. Select a document to editTheMy documents folder opens. To locate a necessary document make use of our filter at thetop of the document list.Click the button and specify the necessary filter parameters:
· To filter items by TYPES choose one of the followingoptions: Folders, Documents, Presentations, Spreadsheets, Images,Media, Archives, or All files.
· To filter items by AUTHOR click the User or Group option and choose the necessaryuser or group.TheMy documents section contains your personal files. Filtering by AUTHOR intheMy documents section can be useful if you've previously shared a folder andother users added their files to your shared folder.
· To include subfolders in search click the All subfolders option inthe SEARCH section.
Enter a document title, entirely or partially, in the filter field and press the Enter key to displaythe found item(s).By default, all the files are sorted by Last modified date in descending order (later dates toearly ones). If necessary, you can sort the items by Creationdate, Title, Type, Size or Author opening the Sort by drop-down list to the right ofthe Filter field and choosing the necessary option. To change the sorting orderfrom Descending to Ascending click the icon.To edit a file stored on your hard disk drive, first upload it to Documents clicking the Upload
button in the upper left corner of the page and selecting the Upload files option.You can also create a new document right on the portal clicking the Create button in the upperleft corner and selecting the file type you wish to create from the drop-down list.Step 3. Configure the sharing settingsOnce the document is located click the Share button to the right.
In the opened Sharing Settings window, click the External link access switcher and give fullaccess to the document choosing the Full Access option from the list next to the External linkaccess caption. Use the Shorten option to get a shortened link.
Then select a way you wish to share the link to your document:· Send it via email
Click the icon. If you are already using theMailmodule, a message template willopen in a new tab.In the To: field, enter the email address of the person you need to send the link. You canstart typing the recipient email address or name and choose the needed one from thelist. The contacts stored in your address book that match the entered characters aredisplayed there as you type (i.e. your personal, CRM and portal contacts as well as emailadresses you've already sent emails to).You can add as many recipients as you wish. Select several addresses from the list oneby one or enter multiple new addresses separated by commas. If an email address isentered incorrectly, the address block will be highlighted in red. To edit an address,double click the necessary address block. To delete an address, click the icon.Edit the covering message, if necessary, and click the Send button.· Share it via social networks
Click one of the available social network logos: Facebook or Twitter and access youraccount.
· Share it in another wayUse the Copy option or copy the whole link with the mouse or usingthe Ctrl+A and Ctrl+C key combinations and send it via the instant messenger youuse or any other available way.
Step 4. Start the co-editingTo start co-editing the document all that is necessary is to follow the provided link.To be able to edit the document, the person with the provided link doesn't need to be aregistered user of the current portal or have his/her own. He/she doesn't need to download thedocument or install any additional word processing program.After following the link the invited persons can start editing the document using the OnlineEditor features without any limitations.Document Editor allows to select one of the two available co-editing modes:
· The Fastmode is used by default and shows the changes made by other people inreal time.
· The Strictmode allows to hide other user changes until you click the Save icon tosave your own changes and accept the changes made by others.
Switch to the Collaboration tab, click the Co-editing Mode button at the top toolbar andchoose the necessary mode. Alternatively, you can open the File tab, click the AdvancedSettingsmenu item, select the necessary mode in the Co-editing Mode list and clickthe Apply button.If you have selected the Strictmode, the currently edited text passages are marked withdashed lines of different colors. As soon as one of your co-editors saves his/her changes, youwill see a note in the left upper corner of the top toolbar stating that they have updates. Tosave the changes made click the icon, to get the updates click the icon. The updates willbe highlighted.Step 5. Comment the text passagesIf you or your co-editor need to comment the changes one of you made or just indicate the textpassages to be edited, make use of the Real-time commenting feature.Select a passage you need to add a comment to with the mouse, right-click it and selectthe Add comment option from the context menu. The pop-up window will be opened.Enter your comment text and click the Add button. The commented passage will be highlighted.To edit or remove the comment, just click within the commented passage and usethe or icons respectively. In the Strict co-editing mode, do not forget to save the documentusing the icon to make the comment available for your co-editors.To reply to the comment added by your co-editor, left-click within the commented passage.Click the Add Reply link at the bottom of the opened pop-up window, type in your messageand click the Reply button.Once the issue is solved, click the icon in the upper right corner of the pop-up window.To track the whole history of the comments added to the current document, openthe Comments panel clicking the icon at the leftside bar.Step 6. Discuss the documentTo communicate with your co-editors while editing the document, open the Chat panel clickingthe icon at the leftside bar. All the users who currently edit the document will be listed at thetop of the panel.To start a discussion, just enter your message into the field below and click the Send button.
OrganizingManaging documentsTo quickly find a necessary document make use of the filter at the top of the document list.Click the button and specify the necessary filter parameters:
· To filter items by TYPES choose one of the followingoptions: Folders, Documents, Presentations, Spreadsheets, Images,Media, Archives, or All files.
· To filter items by AUTHOR click the User or Group option and choose the necessaryuser or group.
· To exclude subfolders from search click the No subfolders option inthe SEARCH section.
Enter a document title, entirely or partially, in the filter field and press the Enter key to displaythe found item(s). The search location is displayed above the search results. If necessary, youcan exclude subfolders from search clicking the all subfolders link. If you want to go to thefolder where the found file is located, right-click the file and use the Open location option. Togo to the parent folder that is one level up from the current folder use the arrow.By default, all the files are sorted by Last modified date in descending order (later dates toearly ones). If necessary, you can sort the items by Creationdate, Title, Type, Size or Author opening the Sort by drop-down list to the right ofthe Filter field and choosing the necessary option. To change the sorting orderfrom Descending to Ascending click the icon.Use the buttons on the right to switch between the available displaymodes: Thumbnails view, Common view, and Compact view. Thumbnails are not generated forconnected third-party services.You can perform the following operations with your documents:
· Share several documents at once for the portal users· Copy external link to a file with Read Only permissions for people outside the
portal· Copy the link to a document to clipboard for portal users· Send a file by email· Sign a file with DocuSign· Show version history and restore one of them· Finalize the current version of a file and create a revision for a new one· Block a file for further editing by other users with the corresponding editing rights· Mark a file as favorite· Download a file in the original format to your computer hard disk drive· Download as a file in the selected format to your computer hard disk drive· Move to another section or folder within the Documentsmodule· Copy a file and move the created copy to the selected section of
the Documentsmodule
· Create a copy of a file in the current folder· Rename a file· Delete a file moving it to the Trash section of the Documentsmodule
Group operations with files can be performed using buttons on the top or the contextualmenu. To share, send by email, mark as favorites, download, move, copy, or delete several filesat once,
1. open the needed section of the Documentsmodule clicking the correspondingoption at the left-side panel
2. check the boxes next to the files you want to manage3. click the needed button at the top depending on the operation you want to perform
or right-click one of the selected files and use the contextual menu optionsIf the documents that you want to share have different sharing settings (for example, users canonly view the document X but they have the full access rights to the document Y) you'll seethe Varies status in front of the user name in the 'Sharing Settings' window. You can alwayschange the status for all the selected documents for each separate user selecting the necessaryoption in the drop-down list in front of the user name.Some operations can be performed with a single file only using the contextual menu. Torename, sign with DocuSign, block for co-authors, finalize, view the version history of a file orcopy the link to it (or perform any of the above mentioned operations),
1. open the needed section of the Documentsmodule clicking the correspondingoption at the left-side panel
2. find the needed document and click the icon next to it3. select the corresponding option depending on the operation you want to perform.
To rename a document stored in the Documentsmodule you can also check the box to the leftof the necessary file in the list and press the F2 key. It's also possible to rename a documentfrom the editor interface directly while editing. To do that,
1. click the File tab of the top toolbar and select the Rename... option,2. in a new window that opens, enter the necessary File name and click OK.
Adding documents to FavoritesThe Favorites section contains all files marked as favorites from all sections and folders ofthe Documentsmodule. To add a document to Favorites:
1. open the needed section of the Documentsmodule clicking the correspondingoption at the left-side panel
2. find the needed document and click the icon next to it3. select theMark as favorite option.
The file will be available in the Favorites section and marked with the icon in the file list.

Within the Favorites section, you can use the Open location option in the contextual menu toswitch to the folder which contains this file.To remove an added file from Favorites, use the Remove from Favorites option in thecontextual menu or click the icon next to the file name.To remove several files at once from Favorites, check them in the file list withinthe Favorites section and click the Remove button on the top.You can hide or show again the Favorites section in the Common Settings ofthe Documentsmodule.
Folder permissions hierarchyIf you want to create a complex folder structure with several nesting levels and set differentgroup permissions, it might be useful to know how the permission priority order isimplemented in the Documentsmodule.Basic principlesThere are three levels of priorities in the Documentsmodule (listed in order of increasingimportance):
1. Folder hierarchy: Parent folders and Subfolderso If you do not specify certain permissions on a subfolder, the subfolder
inherits the parent folder permissions.o If some specific permissions on a subfolder are set, permissions on the
subfolder have the higher priority than permissions on its parent folder.2. Profile: Everyone, Groups, User, Admin
o User permissions have the higher priority than group permissions (i.e. youcan assign permissions to an individual user, no matter which permissionshas a group he/she belongs to).
o There is no group hierarchy, all groups are equal (i.e. one group cannot havepriority over another).
Four levels of priority (listed in order of increasing importance):3. Access rights: Full Access, Read Only, Access Denied
o Access Denied access rights have the higher priority than Read Only accessrights.
o Read Only access rights have the higher priority than Full Access accessrights.
o If a user belongs to several groups with different permissions on a folder, theuser has access rights with the higher priority.
When a user is trying to access a shared folder, the permissions is checked in accordance withthe priority order above:
1. if the current folder has permissions that differ from the parent folder permissions,2. which profile-based permissions are specified on the current folder,3. which access rights has the user.
ExamplesExample 1The following example illustrates the scenario when a user belongs to a group with FullAccess permissions on the parent folder and Read Only permissions on the nested folder,while the user has been granted with individual Full Access permissions on the nested folder.The following examples illustrate the scenarios when a user belongs to several groups withdifferent permissions on a folder.Example 2If the first group has Full Access permissions on a folder and the second group has ReadOnly permissions on the same folder, the user who belongs to both the groups at the sametime has permissions with the higher priority (in this case, Read Only).If a user belongs to a group that does not have access to the folder and to a group with ReadOnly access, Access Denied permissions have the higher priority, consequently, the user doesnot have access to the folder.If you want the user to have other access type, you need to provide individual permissions tohim/her.
Example 3If a folder contains several subfolders, you can change permissions on the subfoldersindependently from the parent folder permissions.If one and the same user belongs to several groups with different permissions, his/herpermissions on every nested folder can be different depending on the permissions specified foreach of the groups.
Managing versions and revisionsUsing the 'Documents' module and the 'Documents' section of the 'Projects' module, you mighthave already noticed that there is a number next to the file title that shows the number of fileversions. Want to learn more about file versions and revisions? Read this tip.
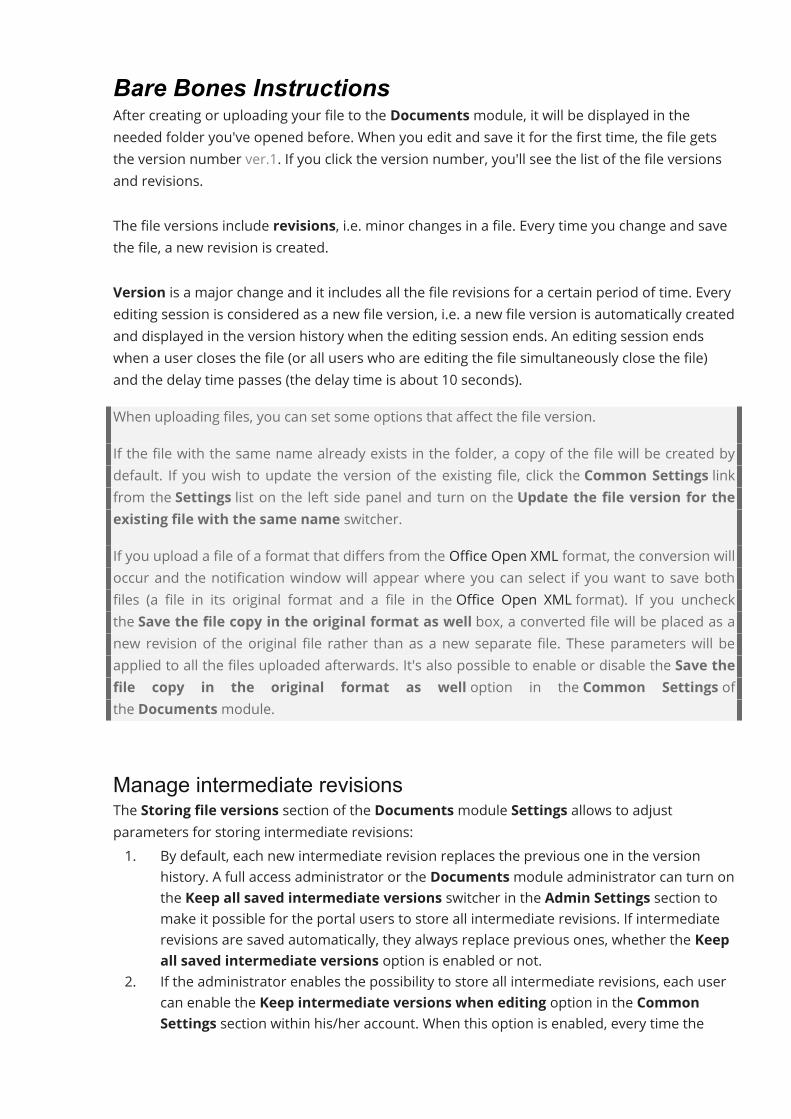
Bare Bones InstructionsAfter creating or uploading your file to the Documentsmodule, it will be displayed in theneeded folder you've opened before. When you edit and save it for the first time, the file getsthe version number ver.1. If you click the version number, you'll see the list of the file versionsand revisions.The file versions include revisions, i.e. minor changes in a file. Every time you change and savethe file, a new revision is created.Version is a major change and it includes all the file revisions for a certain period of time. Everyediting session is considered as a new file version, i.e. a new file version is automatically createdand displayed in the version history when the editing session ends. An editing session endswhen a user closes the file (or all users who are editing the file simultaneously close the file)and the delay time passes (the delay time is about 10 seconds).When uploading files, you can set some options that affect the file version.If the file with the same name already exists in the folder, a copy of the file will be created bydefault. If you wish to update the version of the existing file, click the Common Settings linkfrom the Settings list on the left side panel and turn on the Update the file version for theexisting file with the same name switcher.If you upload a file of a format that differs from the Office Open XML format, the conversion willoccur and the notification window will appear where you can select if you want to save bothfiles (a file in its original format and a file in the Office Open XML format). If you uncheckthe Save the file copy in the original format as well box, a converted file will be placed as anew revision of the original file rather than as a new separate file. These parameters will beapplied to all the files uploaded afterwards. It's also possible to enable or disable the Save thefile copy in the original format as well option in the Common Settings ofthe Documentsmodule.
Manage intermediate revisionsThe Storing file versions section of the Documentsmodule Settings allows to adjustparameters for storing intermediate revisions:1. By default, each new intermediate revision replaces the previous one in the version
history. A full access administrator or the Documentsmodule administrator can turn onthe Keep all saved intermediate versions switcher in the Admin Settings section tomake it possible for the portal users to store all intermediate revisions. If intermediaterevisions are saved automatically, they always replace previous ones, whether the Keepall saved intermediate versions option is enabled or not.
2. If the administrator enables the possibility to store all intermediate revisions, each usercan enable the Keep intermediate versions when editing option in the CommonSettings section within his/her account. When this option is enabled, every time the
user saves the file by using the Ctrl+S key combination or by using the Save icon in theeditor interface, a new intermediate revision is created and displayed in the versionhistory.
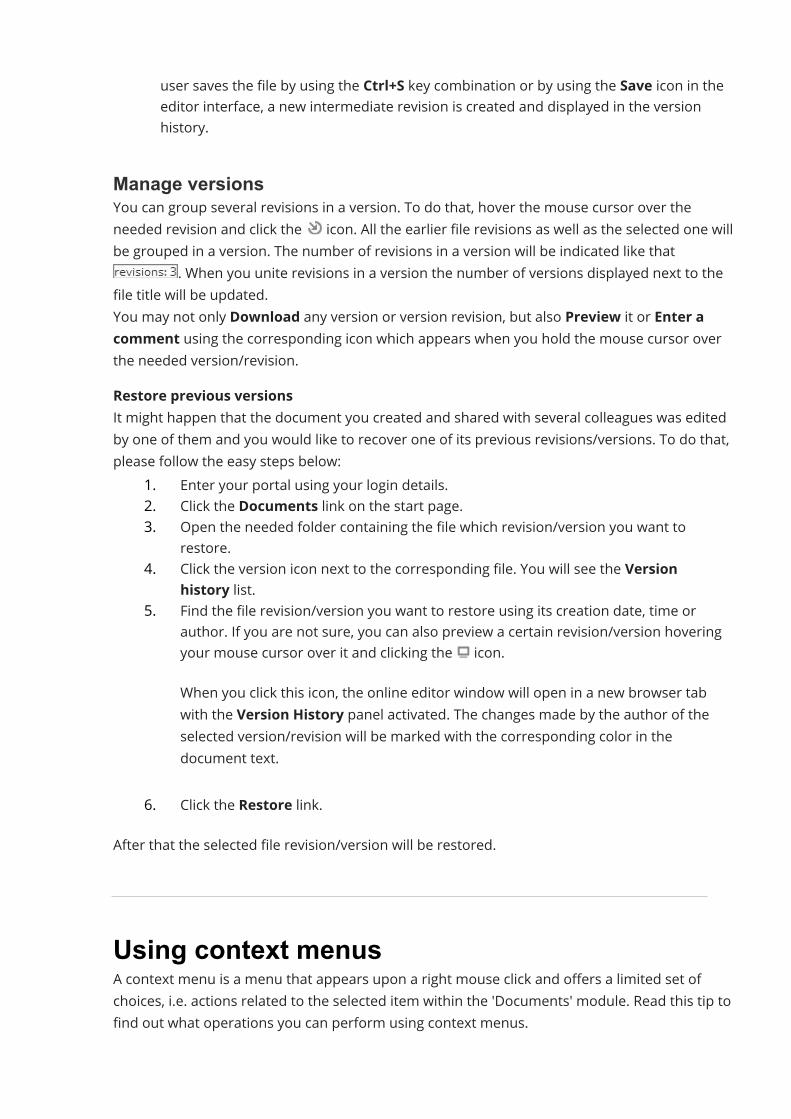
Manage versionsYou can group several revisions in a version. To do that, hover the mouse cursor over theneeded revision and click the icon. All the earlier file revisions as well as the selected one willbe grouped in a version. The number of revisions in a version will be indicated like that
. When you unite revisions in a version the number of versions displayed next to thefile title will be updated.You may not only Download any version or version revision, but also Preview it or Enter acomment using the corresponding icon which appears when you hold the mouse cursor overthe needed version/revision.Restore previous versionsIt might happen that the document you created and shared with several colleagues was editedby one of them and you would like to recover one of its previous revisions/versions. To do that,please follow the easy steps below:
1. Enter your portal using your login details.2. Click the Documents link on the start page.3. Open the needed folder containing the file which revision/version you want to
restore.4. Click the version icon next to the corresponding file. You will see the Version
history list.5. Find the file revision/version you want to restore using its creation date, time or
author. If you are not sure, you can also preview a certain revision/version hoveringyour mouse cursor over it and clicking the icon.When you click this icon, the online editor window will open in a new browser tabwith the Version History panel activated. The changes made by the author of theselected version/revision will be marked with the corresponding color in thedocument text.
6. Click the Restore link.After that the selected file revision/version will be restored.
Using context menusA context menu is a menu that appears upon a right mouse click and offers a limited set ofchoices, i.e. actions related to the selected item within the 'Documents' module. Read this tip tofind out what operations you can perform using context menus.
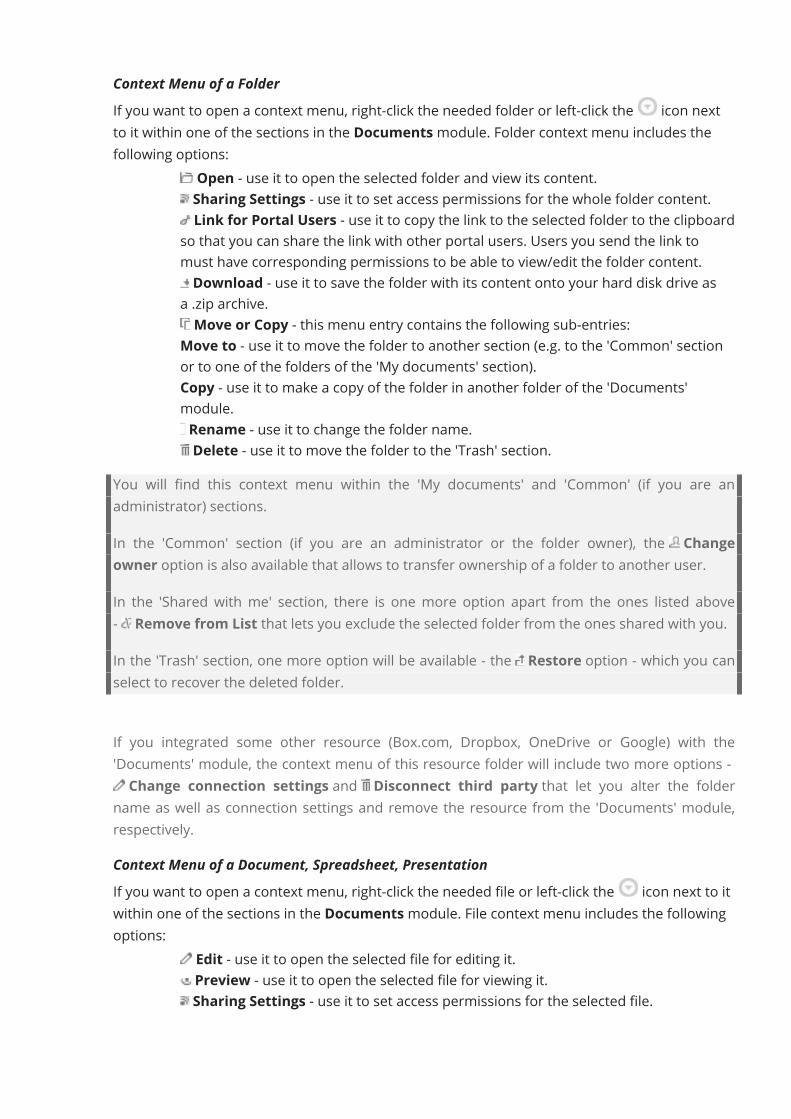
Context Menu of a FolderIf you want to open a context menu, right-click the needed folder or left-click the icon nextto it within one of the sections in the Documentsmodule. Folder context menu includes thefollowing options:
· Open - use it to open the selected folder and view its content.· Sharing Settings - use it to set access permissions for the whole folder content.· Link for Portal Users - use it to copy the link to the selected folder to the clipboard
so that you can share the link with other portal users. Users you send the link tomust have corresponding permissions to be able to view/edit the folder content.
· Download - use it to save the folder with its content onto your hard disk drive asa .zip archive.
· Move or Copy - this menu entry contains the following sub-entries:· Move to - use it to move the folder to another section (e.g. to the 'Common' section
or to one of the folders of the 'My documents' section).· Copy - use it to make a copy of the folder in another folder of the 'Documents'
module.· Rename - use it to change the folder name.· Delete - use it to move the folder to the 'Trash' section.
You will find this context menu within the 'My documents' and 'Common' (if you are anadministrator) sections.In the 'Common' section (if you are an administrator or the folder owner), the Changeowner option is also available that allows to transfer ownership of a folder to another user.In the 'Shared with me' section, there is one more option apart from the ones listed above- Remove from List that lets you exclude the selected folder from the ones shared with you.In the 'Trash' section, one more option will be available - the Restore option - which you canselect to recover the deleted folder.
If you integrated some other resource (Box.com, Dropbox, OneDrive or Google) with the'Documents' module, the context menu of this resource folder will include two more options -Change connection settings and Disconnect third party that let you alter the folder
name as well as connection settings and remove the resource from the 'Documents' module,respectively.Context Menu of a Document, Spreadsheet, PresentationIf you want to open a context menu, right-click the needed file or left-click the icon next to itwithin one of the sections in the Documentsmodule. File context menu includes the followingoptions:
· Edit - use it to open the selected file for editing it.· Preview - use it to open the selected file for viewing it.· Sharing Settings - use it to set access permissions for the selected file.
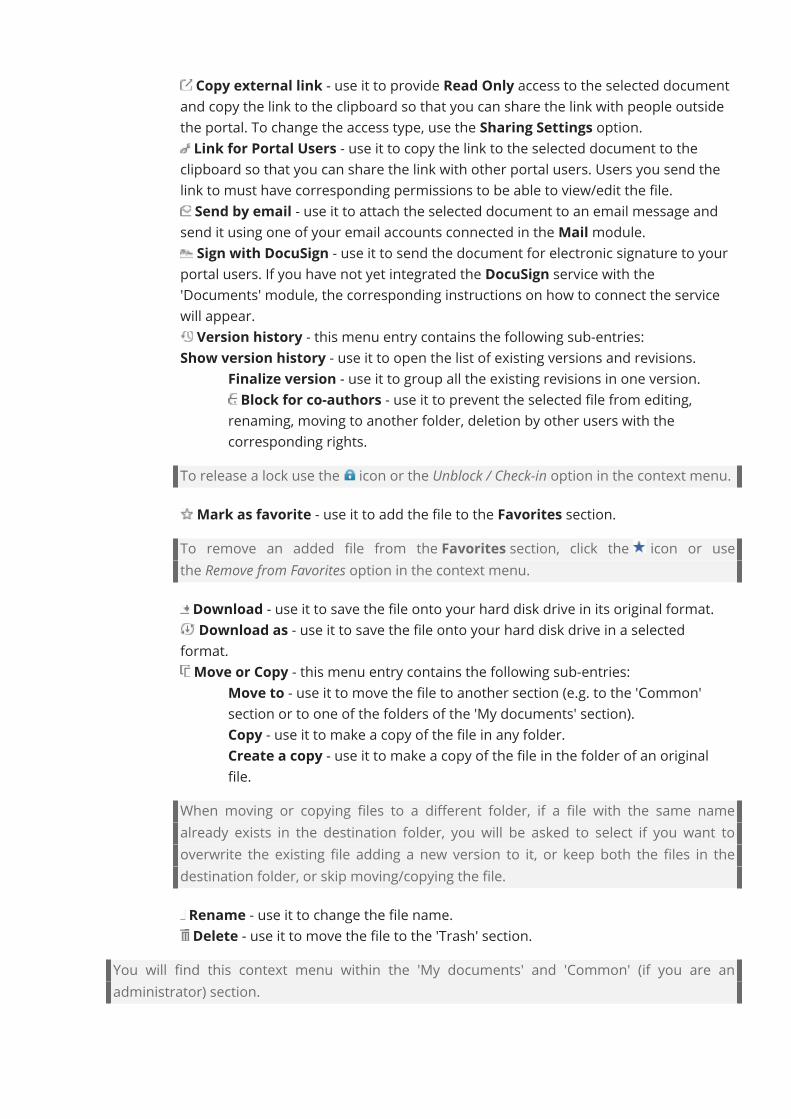
· Copy external link - use it to provide Read Only access to the selected documentand copy the link to the clipboard so that you can share the link with people outsidethe portal. To change the access type, use the Sharing Settings option.
· Link for Portal Users - use it to copy the link to the selected document to theclipboard so that you can share the link with other portal users. Users you send thelink to must have corresponding permissions to be able to view/edit the file.
· Send by email - use it to attach the selected document to an email message andsend it using one of your email accounts connected in theMailmodule.
· Sign with DocuSign - use it to send the document for electronic signature to yourportal users. If you have not yet integrated the DocuSign service with the'Documents' module, the corresponding instructions on how to connect the servicewill appear.
· Version history - this menu entry contains the following sub-entries:· Show version history - use it to open the list of existing versions and revisions.
o Finalize version - use it to group all the existing revisions in one version.o Block for co-authors - use it to prevent the selected file from editing,
renaming, moving to another folder, deletion by other users with thecorresponding rights.
To release a lock use the icon or the Unblock / Check-in option in the context menu.· Mark as favorite - use it to add the file to the Favorites section.
To remove an added file from the Favorites section, click the icon or usethe Remove from Favorites option in the context menu.
· Download - use it to save the file onto your hard disk drive in its original format.· Download as - use it to save the file onto your hard disk drive in a selected
format.· Move or Copy - this menu entry contains the following sub-entries:
o Move to - use it to move the file to another section (e.g. to the 'Common'section or to one of the folders of the 'My documents' section).
o Copy - use it to make a copy of the file in any folder.o Create a copy - use it to make a copy of the file in the folder of an original
file.When moving or copying files to a different folder, if a file with the same namealready exists in the destination folder, you will be asked to select if you want tooverwrite the existing file adding a new version to it, or keep both the files in thedestination folder, or skip moving/copying the file.
· Rename - use it to change the file name.· Delete - use it to move the file to the 'Trash' section.
You will find this context menu within the 'My documents' and 'Common' (if you are anadministrator) section.

If a shared file has been updated by another person who has corresponding access rights, theMark as Read option is also available that allows to remove the new icon next to the
updated file.In the 'Favorites' section, the Open location option is also available that allows to switch tothe folder which contains this file.In the 'Common' section (if you are an administrator or the file owner), the Changeowner option is also available that allows to transfer ownership of a file to another user.In the 'Shared with me' section, there is one more option apart from the ones listed above - it isthe Remove from List option that is used to exclude the selected file from the ones sharedwith you.In the 'Trash' section, one more option will be available - the Restore option - which you canselect to recover the deleted file.
AccessingSharing filesYou can set permissions to the files stored in theMy documents section, so that a particularportal member or a group of them will be able to read or edit your files.A module or full access administrator can define access settings in the Common section. Readmore on the portal administrator/user/guest access rights in the Getting Started:People section.Permission levelsGenerally, there are three main permission levels: editing (read and write), restricted editingand preview (read). In the Documentsmodule, you can set the following permissions on afile:
· Full Access - a user or group will be able to view and edit the document as well asto share this document. All the editing options including review features, form fillingand commenting will be available.
· Restricted Editing: Review, Form Filling, Custom Filter and Comment. Theseaccess rights allow to restrict the users' ability to modify a shared file.
o Review - a user or group will be able to view and change the documentwithout actually editing it. Form filling and commenting will also be available,but all the changes made by a reviewer will be recorded and shown to the fileowner (or a person who has full access to the file) so that he/she will be ableto accept or reject them.
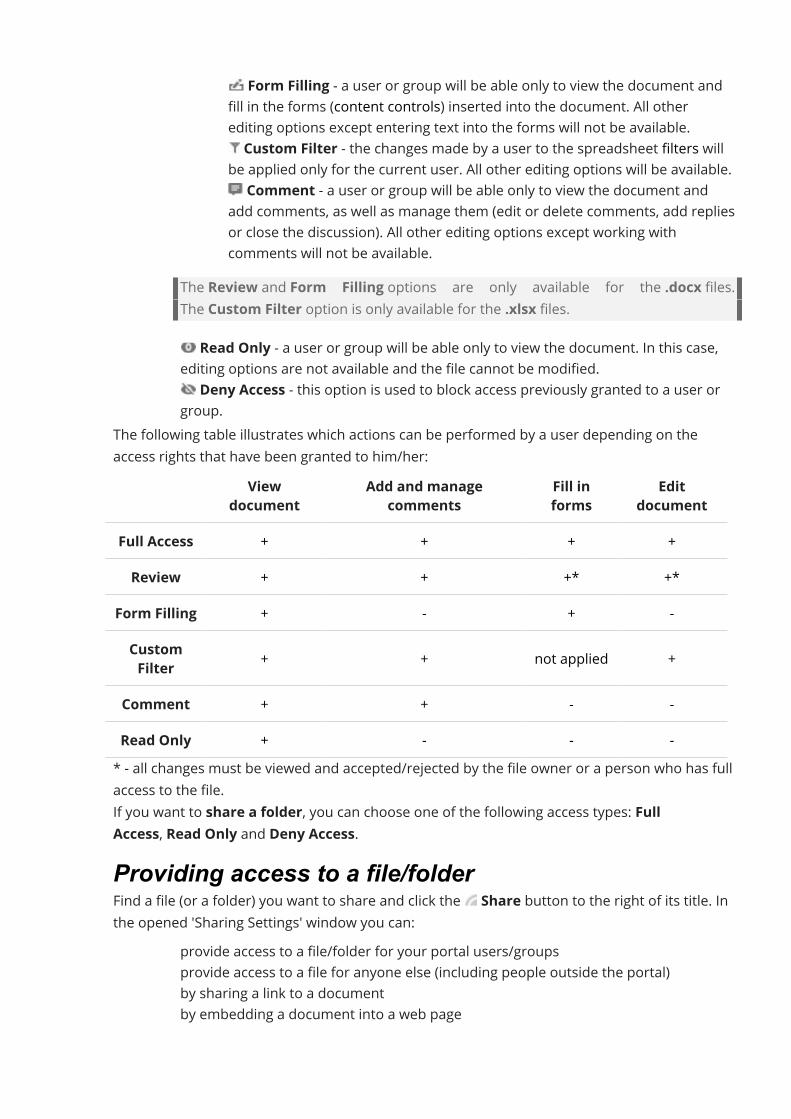
o Form Filling - a user or group will be able only to view the document andfill in the forms (content controls) inserted into the document. All otherediting options except entering text into the forms will not be available.
o Custom Filter - the changes made by a user to the spreadsheet filters willbe applied only for the current user. All other editing options will be available.
o Comment - a user or group will be able only to view the document andadd comments, as well as manage them (edit or delete comments, add repliesor close the discussion). All other editing options except working withcomments will not be available.
The Review and Form Filling options are only available for the .docx files.The Custom Filter option is only available for the .xlsx files.
· Read Only - a user or group will be able only to view the document. In this case,editing options are not available and the file cannot be modified.
· Deny Access - this option is used to block access previously granted to a user orgroup.
The following table illustrates which actions can be performed by a user depending on theaccess rights that have been granted to him/her:
Viewdocument Add and managecomments Fill informs EditdocumentFull Access + + + +Review + + +* +*
Form Filling + - + -CustomFilter + + not applied +Comment + + - -Read Only + - - -* - all changes must be viewed and accepted/rejected by the file owner or a person who has fullaccess to the file.If you want to share a folder, you can choose one of the following access types: FullAccess, Read Only and Deny Access.Providing access to a file/folderFind a file (or a folder) you want to share and click the Share button to the right of its title. Inthe opened 'Sharing Settings' window you can:
· provide access to a file/folder for your portal users/groups· provide access to a file for anyone else (including people outside the portal)· by sharing a link to a document· by embedding a document into a web page
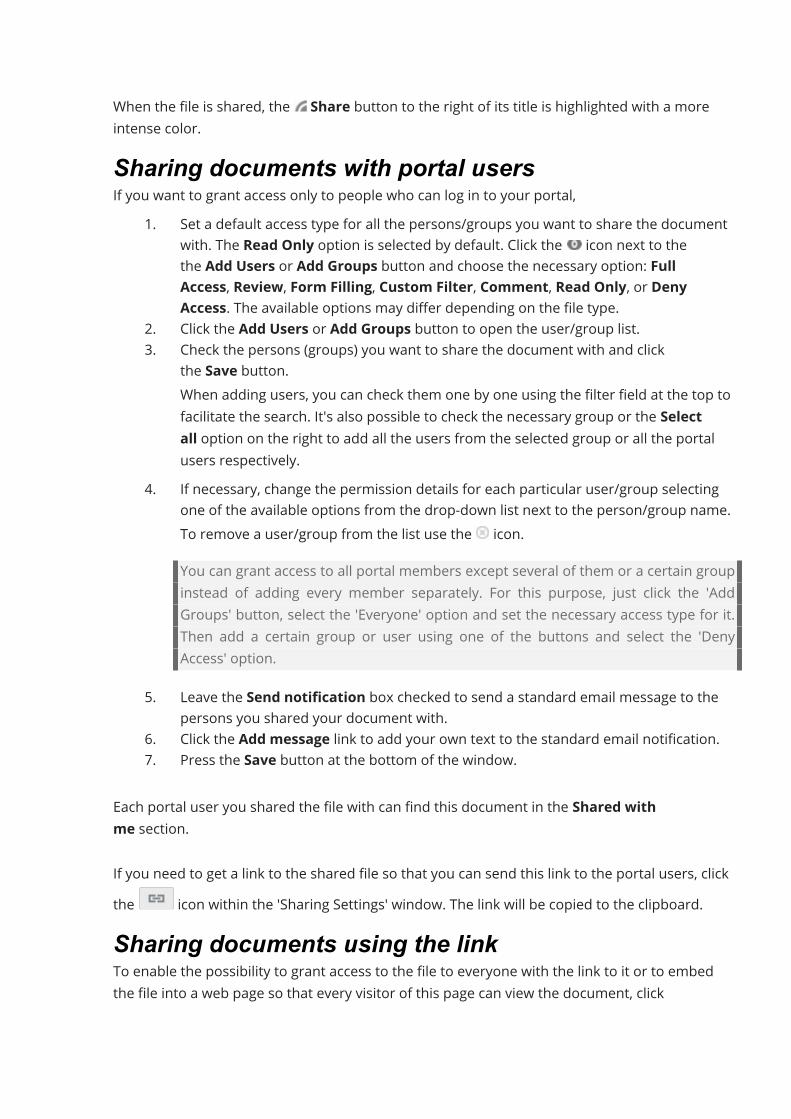
When the file is shared, the Share button to the right of its title is highlighted with a moreintense color.Sharing documents with portal usersIf you want to grant access only to people who can log in to your portal,
1. Set a default access type for all the persons/groups you want to share the documentwith. The Read Only option is selected by default. Click the icon next to thethe Add Users or Add Groups button and choose the necessary option: FullAccess, Review, Form Filling, Custom Filter, Comment, Read Only, or DenyAccess. The available options may differ depending on the file type.
2. Click the Add Users or Add Groups button to open the user/group list.3. Check the persons (groups) you want to share the document with and click
the Save button.When adding users, you can check them one by one using the filter field at the top tofacilitate the search. It's also possible to check the necessary group or the Selectall option on the right to add all the users from the selected group or all the portalusers respectively.
4. If necessary, change the permission details for each particular user/group selectingone of the available options from the drop-down list next to the person/group name.To remove a user/group from the list use the icon.You can grant access to all portal members except several of them or a certain groupinstead of adding every member separately. For this purpose, just click the 'AddGroups' button, select the 'Everyone' option and set the necessary access type for it.Then add a certain group or user using one of the buttons and select the 'DenyAccess' option.
5. Leave the Send notification box checked to send a standard email message to thepersons you shared your document with.
6. Click the Add message link to add your own text to the standard email notification.7. Press the Save button at the bottom of the window.
Each portal user you shared the file with can find this document in the Shared withme section.If you need to get a link to the shared file so that you can send this link to the portal users, clickthe icon within the 'Sharing Settings' window. The link will be copied to the clipboard.Sharing documents using the linkTo enable the possibility to grant access to the file to everyone with the link to it or to embedthe file into a web page so that every visitor of this page can view the document, click
the External link access switcher within the 'Sharing Settings' window - after that the availableparameters will be displayed.If you use the SaaS version, you cannot share non-editable files (images, archives etc.) usingthe external link during the trial period.Sharing the link to the document
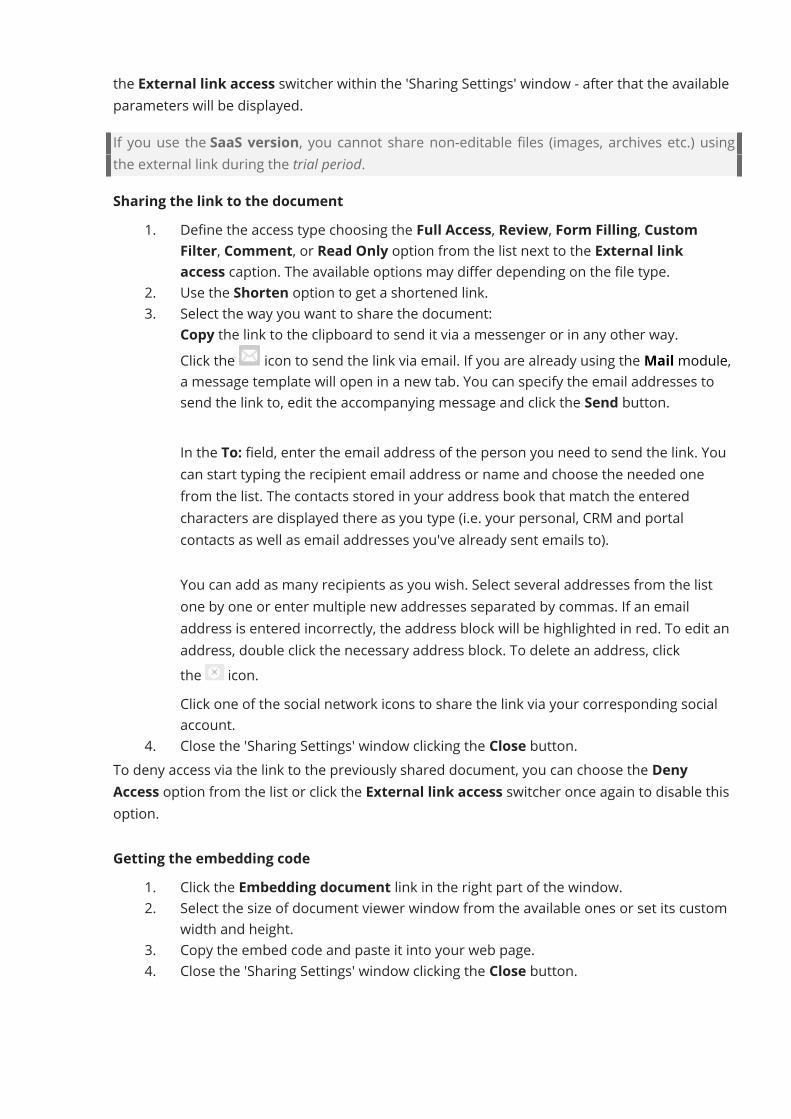
1. Define the access type choosing the Full Access, Review, Form Filling, CustomFilter, Comment, or Read Only option from the list next to the External linkaccess caption. The available options may differ depending on the file type.
2. Use the Shorten option to get a shortened link.3. Select the way you want to share the document:· Copy the link to the clipboard to send it via a messenger or in any other way.· Click the icon to send the link via email. If you are already using theMailmodule,
a message template will open in a new tab. You can specify the email addresses tosend the link to, edit the accompanying message and click the Send button.
In the To: field, enter the email address of the person you need to send the link. Youcan start typing the recipient email address or name and choose the needed onefrom the list. The contacts stored in your address book that match the enteredcharacters are displayed there as you type (i.e. your personal, CRM and portalcontacts as well as email addresses you've already sent emails to).You can add as many recipients as you wish. Select several addresses from the listone by one or enter multiple new addresses separated by commas. If an emailaddress is entered incorrectly, the address block will be highlighted in red. To edit anaddress, double click the necessary address block. To delete an address, clickthe icon.
· Click one of the social network icons to share the link via your corresponding socialaccount.
4. Close the 'Sharing Settings' window clicking the Close button.To deny access via the link to the previously shared document, you can choose the DenyAccess option from the list or click the External link access switcher once again to disable thisoption.Getting the embedding code
1. Click the Embedding document link in the right part of the window.2. Select the size of document viewer window from the available ones or set its custom
width and height.3. Copy the embed code and paste it into your web page.4. Close the 'Sharing Settings' window clicking the Close button.

If you delete the document, switch to the 'Deny Access' option within the 'Sharing Settings'window or switch off the External link access option, web page visitors won't be able to viewthe document.
Sharing text documentsIntroductionWhen working with text documents, you might need to write a text in co-authorship with yourcolleagues, or submit an article for review, or prepare a fillable template, such as a questionary.You can easily share a file with an individual or a group of users and set access permissionsdepending on the tasks each person should accomplish.This guide will show you how to share text documents with other portal users and providedifferent access rights.Step 1. Access the DocumentsEnter your portal and click the Documents link.In case you have already logged in to the portal and been using it for some time, to accessthe Documentsmodule, open the drop-down list in the top left corner of the page and selectthe corresponding option.Step 2. Select a document to shareTheMy documents folder opens. To locate a necessary .docx document make use of our filterat the top of the document list.Click the button and specify the necessary filter parameters:
· Choose the Documents option from the TYPES list to display text documents only.· To filter items by AUTHOR click the User or Group option and choose the necessary
user or group.TheMy documents section contains your personal files. Filtering by AUTHOR intheMy documents section can be useful if you've previously shared a folder andother users added their files to your shared folder.
· To include subfolders in search click the All subfolders option inthe SEARCH section.
Enter a document title, entirely or partially, in the filter field and press the Enter key to displaythe found item(s).By default, all the files are sorted by Last modified date in descending order (later dates toearly ones). If necessary, you can sort the items by Creationdate, Title, Type, Size or Author opening the Sort by drop-down list to the right of
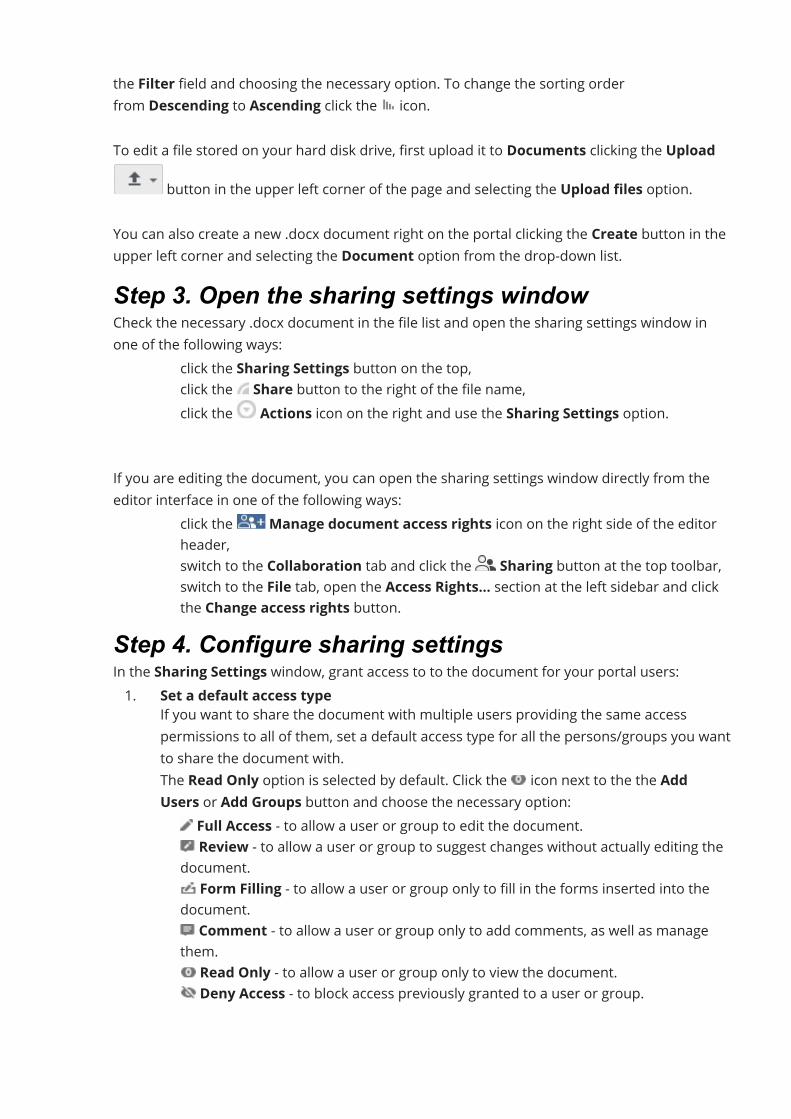
the Filter field and choosing the necessary option. To change the sorting orderfrom Descending to Ascending click the icon.To edit a file stored on your hard disk drive, first upload it to Documents clicking the Upload
button in the upper left corner of the page and selecting the Upload files option.You can also create a new .docx document right on the portal clicking the Create button in theupper left corner and selecting the Document option from the drop-down list.Step 3. Open the sharing settings windowCheck the necessary .docx document in the file list and open the sharing settings window inone of the following ways:
· click the Sharing Settings button on the top,· click the Share button to the right of the file name,· click the Actions icon on the right and use the Sharing Settings option.
If you are editing the document, you can open the sharing settings window directly from theeditor interface in one of the following ways:
· click the Manage document access rights icon on the right side of the editorheader,
· switch to the Collaboration tab and click the Sharing button at the top toolbar,· switch to the File tab, open the Access Rights... section at the left sidebar and click
the Change access rights button.Step 4. Configure sharing settingsIn the Sharing Settings window, grant access to to the document for your portal users:1. Set a default access type
If you want to share the document with multiple users providing the same accesspermissions to all of them, set a default access type for all the persons/groups you wantto share the document with.The Read Only option is selected by default. Click the icon next to the the AddUsers or Add Groups button and choose the necessary option:· Full Access - to allow a user or group to edit the document.· Review - to allow a user or group to suggest changes without actually editing the
document.· Form Filling - to allow a user or group only to fill in the forms inserted into the
document.· Comment - to allow a user or group only to add comments, as well as manage
them.· Read Only - to allow a user or group only to view the document.· Deny Access - to block access previously granted to a user or group.
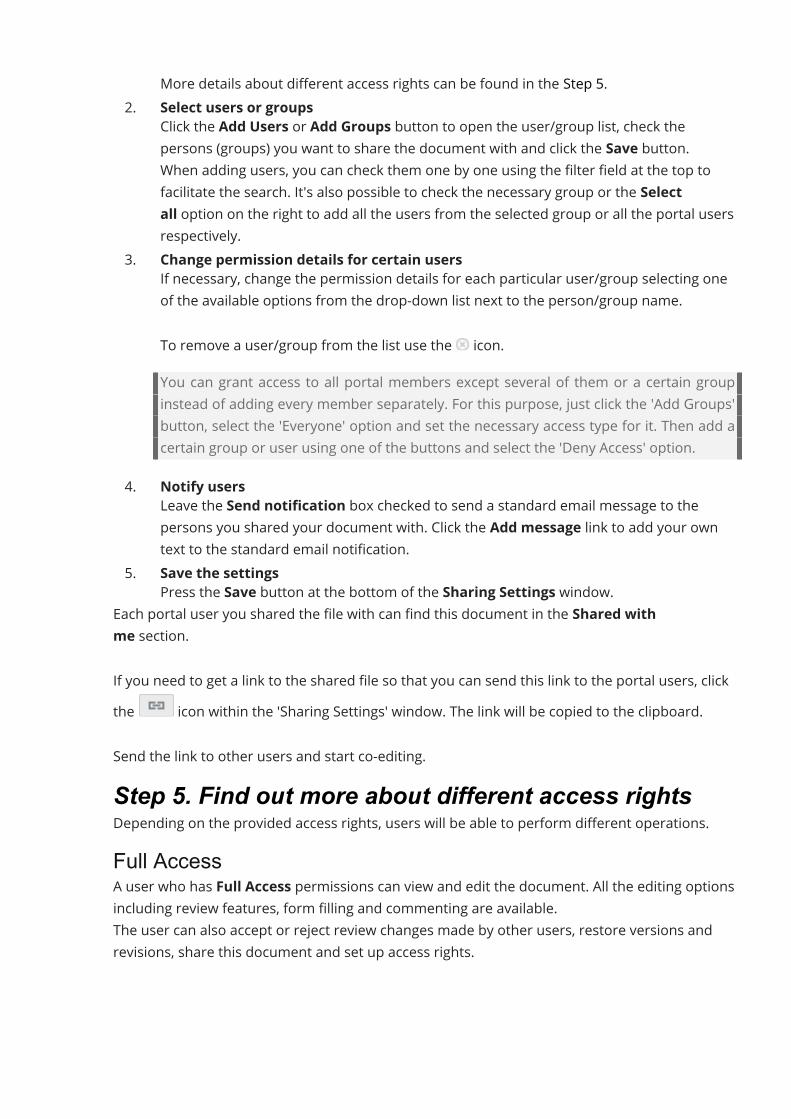
More details about different access rights can be found in the Step 5.2. Select users or groups
Click the Add Users or Add Groups button to open the user/group list, check thepersons (groups) you want to share the document with and click the Save button.When adding users, you can check them one by one using the filter field at the top tofacilitate the search. It's also possible to check the necessary group or the Selectall option on the right to add all the users from the selected group or all the portal usersrespectively.
3. Change permission details for certain usersIf necessary, change the permission details for each particular user/group selecting oneof the available options from the drop-down list next to the person/group name.To remove a user/group from the list use the icon.You can grant access to all portal members except several of them or a certain groupinstead of adding every member separately. For this purpose, just click the 'Add Groups'button, select the 'Everyone' option and set the necessary access type for it. Then add acertain group or user using one of the buttons and select the 'Deny Access' option.
4. Notify usersLeave the Send notification box checked to send a standard email message to thepersons you shared your document with. Click the Add message link to add your owntext to the standard email notification.
5. Save the settingsPress the Save button at the bottom of the Sharing Settings window.
Each portal user you shared the file with can find this document in the Shared withme section.If you need to get a link to the shared file so that you can send this link to the portal users, clickthe icon within the 'Sharing Settings' window. The link will be copied to the clipboard.Send the link to other users and start co-editing.Step 5. Find out more about different access rightsDepending on the provided access rights, users will be able to perform different operations.Full AccessA user who has Full Access permissions can view and edit the document. All the editing optionsincluding review features, form filling and commenting are available.The user can also accept or reject review changes made by other users, restore versions andrevisions, share this document and set up access rights.
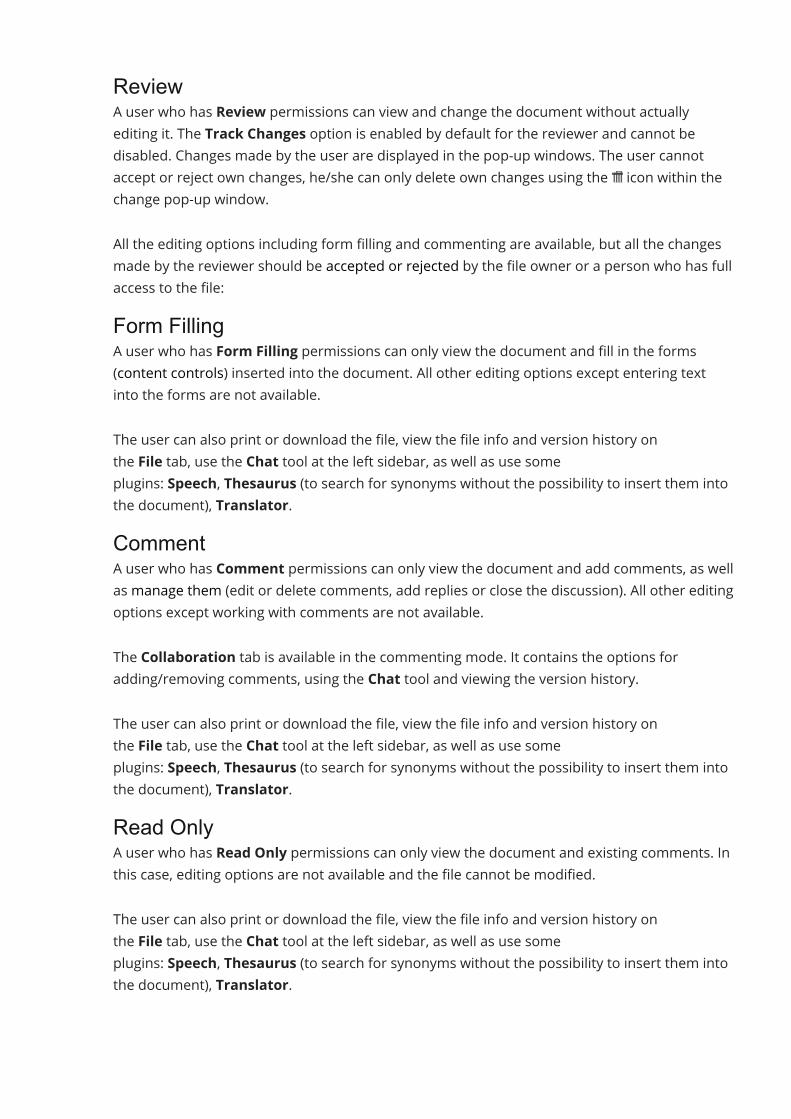
ReviewA user who has Review permissions can view and change the document without actuallyediting it. The Track Changes option is enabled by default for the reviewer and cannot bedisabled. Changes made by the user are displayed in the pop-up windows. The user cannotaccept or reject own changes, he/she can only delete own changes using the icon within thechange pop-up window.All the editing options including form filling and commenting are available, but all the changesmade by the reviewer should be accepted or rejected by the file owner or a person who has fullaccess to the file:Form FillingA user who has Form Filling permissions can only view the document and fill in the forms(content controls) inserted into the document. All other editing options except entering textinto the forms are not available.The user can also print or download the file, view the file info and version history onthe File tab, use the Chat tool at the left sidebar, as well as use someplugins: Speech, Thesaurus (to search for synonyms without the possibility to insert them intothe document), Translator.CommentA user who has Comment permissions can only view the document and add comments, as wellas manage them (edit or delete comments, add replies or close the discussion). All other editingoptions except working with comments are not available.The Collaboration tab is available in the commenting mode. It contains the options foradding/removing comments, using the Chat tool and viewing the version history.The user can also print or download the file, view the file info and version history onthe File tab, use the Chat tool at the left sidebar, as well as use someplugins: Speech, Thesaurus (to search for synonyms without the possibility to insert them intothe document), Translator.Read OnlyA user who has Read Only permissions can only view the document and existing comments. Inthis case, editing options are not available and the file cannot be modified.The user can also print or download the file, view the file info and version history onthe File tab, use the Chat tool at the left sidebar, as well as use someplugins: Speech, Thesaurus (to search for synonyms without the possibility to insert them intothe document), Translator.

Embedding a document into a blogIntroductionWish to complement the information you have posted? Add some documents, spreadsheets orpresentations to your blog/website so that everyone can view it right there withoutdownloading or using any additional viewer? So, embed the document using the featuresprovided by your online office.This guide will show you how to embed a document in a few mouse clicks.Step 1. Access the DocumentsEnter your portal and click the Documents link.In case you have already logged in to the portal and been using it for some time, to accessthe Documentsmodule, open the drop-down list in the top left corner of the page and selectthe corresponding option.Step 2. Select a document to embedTheMy documents folder opens. To locate a necessary document make use of our filter at thetop of the document list.Click the button and specify the necessary filter parameters:
· To filter items by TYPES choose one of the followingoptions: Folders, Documents, Presentations, Spreadsheets, Images,Media, Archives, or All files.
· To filter items by AUTHOR click the User or Group option and choose the necessaryuser or group.TheMy documents section contains your personal files. Filtering by AUTHOR intheMy documents section can be useful if you've previously shared a folder andother users added their files to your shared folder.
· To include subfolders in search click the All subfolders option inthe SEARCH section.
Enter a document title, entirely or partially, in the filter field and press the Enter key to displaythe found item(s).By default, all the files are sorted by Last modified date in descending order (later dates toearly ones). If necessary, you can sort the items by Creationdate, Title, Type, Size or Author opening the Sort by drop-down list to the right ofthe Filter field and choosing the necessary option. To change the sorting orderfrom Descending to Ascending click the icon.To embed a file stored on your hard disk drive, first upload it to Documents clickingthe Upload button in the upper left corner of the page and selecting the Uploadfiles option.
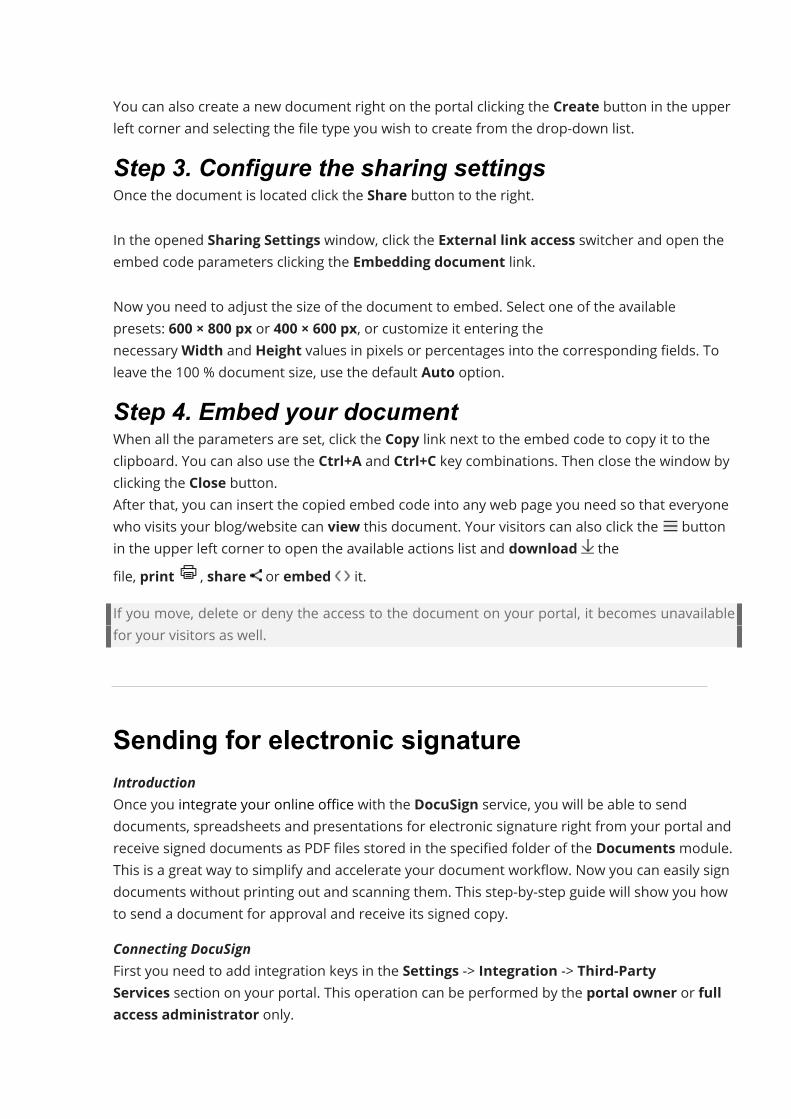
You can also create a new document right on the portal clicking the Create button in the upperleft corner and selecting the file type you wish to create from the drop-down list.Step 3. Configure the sharing settingsOnce the document is located click the Share button to the right.In the opened Sharing Settings window, click the External link access switcher and open theembed code parameters clicking the Embedding document link.Now you need to adjust the size of the document to embed. Select one of the availablepresets: 600 × 800 px or 400 × 600 px, or customize it entering thenecessaryWidth and Height values in pixels or percentages into the corresponding fields. Toleave the 100 % document size, use the default Auto option.Step 4. Embed your documentWhen all the parameters are set, click the Copy link next to the embed code to copy it to theclipboard. You can also use the Ctrl+A and Ctrl+C key combinations. Then close the window byclicking the Close button.After that, you can insert the copied embed code into any web page you need so that everyonewho visits your blog/website can view this document. Your visitors can also click the buttonin the upper left corner to open the available actions list and download thefile, print , share or embed it.If you move, delete or deny the access to the document on your portal, it becomes unavailablefor your visitors as well.
Sending for electronic signatureIntroductionOnce you integrate your online office with the DocuSign service, you will be able to senddocuments, spreadsheets and presentations for electronic signature right from your portal andreceive signed documents as PDF files stored in the specified folder of the Documentsmodule.This is a great way to simplify and accelerate your document workflow. Now you can easily signdocuments without printing out and scanning them. This step-by-step guide will show you howto send a document for approval and receive its signed copy.Connecting DocuSignFirst you need to add integration keys in the Settings -> Integration -> Third-PartyServices section on your portal. This operation can be performed by the portal owner or fullaccess administrator only.
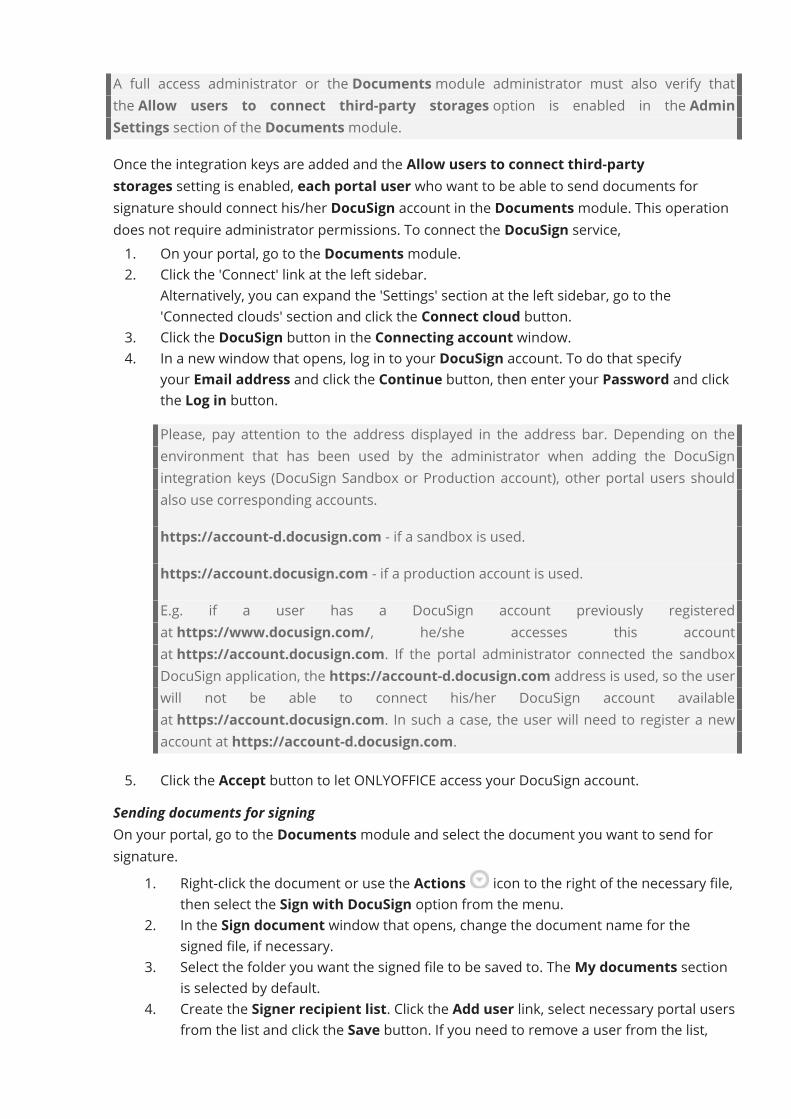
A full access administrator or the Documentsmodule administrator must also verify thatthe Allow users to connect third-party storages option is enabled in the AdminSettings section of the Documentsmodule.Once the integration keys are added and the Allow users to connect third-partystorages setting is enabled, each portal user who want to be able to send documents forsignature should connect his/her DocuSign account in the Documentsmodule. This operationdoes not require administrator permissions. To connect the DocuSign service,1. On your portal, go to the Documentsmodule.2. Click the 'Connect' link at the left sidebar.
Alternatively, you can expand the 'Settings' section at the left sidebar, go to the'Connected clouds' section and click the Connect cloud button.
3. Click the DocuSign button in the Connecting account window.4. In a new window that opens, log in to your DocuSign account. To do that specify
your Email address and click the Continue button, then enter your Password and clickthe Log in button.Please, pay attention to the address displayed in the address bar. Depending on theenvironment that has been used by the administrator when adding the DocuSignintegration keys (DocuSign Sandbox or Production account), other portal users shouldalso use corresponding accounts.https://account-d.docusign.com - if a sandbox is used.https://account.docusign.com - if a production account is used.E.g. if a user has a DocuSign account previously registeredat https://www.docusign.com/, he/she accesses this accountat https://account.docusign.com. If the portal administrator connected the sandboxDocuSign application, the https://account-d.docusign.com address is used, so the userwill not be able to connect his/her DocuSign account availableat https://account.docusign.com. In such a case, the user will need to register a newaccount at https://account-d.docusign.com.
5. Click the Accept button to let ONLYOFFICE access your DocuSign account.Sending documents for signingOn your portal, go to the Documentsmodule and select the document you want to send forsignature.
1. Right-click the document or use the Actions icon to the right of the necessary file,then select the Sign with DocuSign option from the menu.
2. In the Sign document window that opens, change the document name for thesigned file, if necessary.
3. Select the folder you want the signed file to be saved to. TheMy documents sectionis selected by default.
4. Create the Signer recipient list. Click the Add user link, select necessary portal usersfrom the list and click the Save button. If you need to remove a user from the list,
hover the mouse pointer over the user icon so that it turns into the trash icon.Click this icon to delete the user from the recipient list.if you leave the recipient list unchanged (i.e. empty), you'll need to add at least onerecipient from your DocuSign account contacts later to complete the sendingoperation.
5. Click the Add message link to display the text entry field and add an accompanyingmessage for all the recipients.
6. Click the Send button. You will be redirected to your DocuSign account that opens ina new web browser tab.
7. Verify the recipient list and change it, if necessary. To do that click the Otheractions button in the upper right corner and select the Edit Recipients option. Whenthe recipient list is adjusted, click Done.
8. You need to add a particular signature field for each of the recipients. First select therecipient you want to add the signature field for using the list in the upper left corner.In the Standard Fields panel on the left, find the necessary field type. In this case, wewill use the Signature option. Click the selected field and drag to the necessary placein the document where you want the signature to be added. The signature field ismarked with a color that corresponds to the selected recipient. Repeat the operationto add signature fields for all the recipients.
9. Click the Send button in the upper right corner. You will be redirected tothe Documentsmodule of your online office.
Signing documentsEach recipient will receive a notification via email that the document has been sent to him/herfor signing. He or she will not have to create own DocuSign account and connect it to the portalto sign the document. It is sufficient to do the following:
1. Click the Review document button provided in the received email message. Thedocument will open in a new browser tab.
2. Accept the service terms checking the I agree to use electronic records andsignatures box and click the Continue button.In case you want to decline the signing request, click the Other actions button in theupper right corner and select the Decline to Sign option.
3. Click on the Start label, then click on the signature field in the document where yoursignature is required.
4. In a new window that opens, select a preferred signature style or draw yoursignature with the mouse, then click the Adopt and sign button to apply thesignature.
5. Click the Finish button in the upper right corner.If you have already used the DocuSign service before, you will not need to perform some of theactions listed above.
so that other portal users can send files for signature themselves, they must have ownDocuSign account connected to the Documentsmodule in the Settings -> Connectedclouds section.Viewing signed filesOnce all recipients signed the document using DocuSign, you'll receive a notification via emailand/or Talk that the document is completed. If one of the signers declined signing, you will alsoreceive the corresponding notification.you can change the notification settings on your profile page inthe Subscriptions -> Documents section.The signed document will be automatically saved in the specified folder ofthe Documentsmodule as a PDF file.Each recipient will also receive an email with the signed file in the PDF format as an attachment.You can Download it, View or Save to Documents using the Actions menu on the right.
Connecting third-party storagesHow to edit documents from Box inONLYOFFICEYou have a Box account and want to edit your documents using ONLYOFFICE? Follow this step-by-step guide to find out how to edit documents stored in your Box from the Documents portalmodule.This option is available for ONLYOFFICE Workspace/ONLYOFFICE Workspace EnterpriseEdition users only.Cloud users can skip this section and proceed with Connect your Box to ONLYOFFICE step.Creating authorization keysYou will have to setup authorization keys for Box. Follow these steps:
1. Go to Box developers page.2. Sign in to your account.3. Click the Create new app button on the right.4. On a new page that opens, select the Custom app application type and click Next.5. Choose the Standard OAuth 2.0 (User Authentication)method and click Next.6. Enter a unique name for your application in the entry field and click the Create
App button below.
7. Click the View Your App button - you will be redirected to the Configuration page.8. Select the Owner role and click Continue.9. In the OAuth 2.0 Redirect URI section,
enter https://service.onlyoffice.com/oauth2.aspx in the Redirect URI field.10. In the OAuth 2.0 Credentials section, copy or write down the Client ID and Client
secret.11. Save the changes made clicking the Save Changes button in the upper right corner
of the page.Connecting the Box service
1. First of all go to the Settings section. To do that click the icon in the right uppercorner.
2. Switch to the Integration tab.3. Open the Third-Party Services page.4. Click the sliding button right of the Box logo.5. Enter your keys and click the Enable button.
Connect your Box account to ONLYOFFICE1. In the left sidebar of the Documents, just below the text Connect, click on
the Box icon.2. Login to your Box account.3. Allow ONLYOFFICE to connect to your Box by clicking the button. Your Box
documents will be shown in ONLYOFFICE documents as a folder.4. Change the folder‘s name, if necessary.5. If you want the Box documents to be visible for anyone, click theMake
shared checkbox and put into the Common Documents folder. If not checked, yourBox account will only be visible to you.
6. Click Save.Edit your Box documents
1. Locate the Box folder and open it.2. Browse to the file you want to edit and click it.
If necessary, a dialog will tell you that the document will be converted to theOpenOffice XML format for faster viewing and editing.You can choose to keep the original file as well, by checking the Save the file copy inthe original format as well box.
3. Click Convert.4. Click Open when the message appears that your document is successfully converted.
Now you can edit your document (if editable). After editing, you can simply close the documentand the changes will be saved.
How to edit documents from Dropbox inONLYOFFICEYou have a Dropbox account and want to edit your documents using ONLYOFFICE? Follow thisstep-by-step guide to find out how to edit documents stored in your Dropbox from theDocuments portal module.This option is available for ONLYOFFICE Workspace/ONLYOFFICE Workspace EnterpriseEdition users only.Cloud users can skip this section and proceed with Connect your Dropbox account toONLYOFFICE step.Creating authorization keysYou will have to setup authorization keys for Dropbox. Follow these steps:
1. Go to the Dropbox Developers website.2. Click the Create apps button.3. Sign in to your account.4. Next check the Dropbox API radio button.5. Select the following type of access: Full Dropbox - Access to all files and folders in a
user's Dropbox.6. Name your application.7. When creating the first app, you'll also need to check the I agree to Dropbox API
Terms and Conditions box.8. Click the Create app button.9. On your application Settings tab, enter https://service.onlyoffice.com/oauth2.aspx in
the Redirect URIs field and click the Add button.10. Copy or write down App key and App secret which appear on the Settings page.
Connecting the Dropbox service1. First of all go to the Settings section. To do that click the icon in the right upper
corner.2. Switch to the Integration tab.3. Open the Third-Party Services page.4. Click the sliding button right of the Dropbox logo.5. Enter your keys and click the Enable button.
Connect your Dropbox account to ONLYOFFICE1. In the left sidebar of the Documents, just below the text Connect, click on
the Dropbox icon.2. Login to your Dropbox account.3. Allow ONLYOFFICE to connect to your Dropbox account by clicking the button. Your
Dropbox documents will be shown in ONLYOFFICE documents as a folder.4. Change the folder‘s name, if necessary.
5. If you want the Dropbox documents to be visible for anyone, click on theMakeshared checkbox and put into the Common Documents folder box. If not checked,your Dropbox-account will only be visible to you.
6. Click Save.Edit your Dropbox documents
1. Locate the Dropbox folder and open it.2. Browse to the file you want to edit and click it.
If necessary, a dialog will tell you that the document will be converted to theOpenOffice XML format for faster viewing and editing.You can choose to keep the original file as well, by checking the Save the file copy inthe original format as well box.
3. Click Convert.4. Click Open when the message appears that your document is successfully
converted..Now you can edit your document (if editable). After editing, you can simply close the documentand the changes will be saved.
How to edit documents from Google Drive inONLYOFFICEYou have a Google account and want to edit your documents using ONLYOFFICE? Follow thisstep-by-step guide to find out how to edit documents stored in your Google from theDocuments portal module.This option is available for ONLYOFFICE Workspace/ONLYOFFICE Workspace EnterpriseEdition users only.Cloud users can skip this section and proceed with Connect your Google Drive toONLYOFFICE step.Creating authorization keysYou will have to setup authorization keys for Google Drive. Follow these steps:
1. Go to Google Cloud Platform console.2. Sign in to your account.3. Click the navigation menu in the upper left corner and select the IAM &
admin > Service accounts section.4. Click the Create project button.5. Specify the Project name and click Create.6. Click the Create Service Account button.7. Specify the Service account name and click Create.
8. Select the Owner role and click Continue.9. Click the Done button.
10. Click on the project.11. Click the Add key button, select Create key and choose the JSON type and
click Create.12. The .json file that contains the private key will be downloaded to your computer. To
connect the GoogleCloud service, you will need to open this .json file with a texteditor, copy its contents and paste into the json field on the portal.
Connecting the Google Drive service1. First of all go to the Settings section. To do that click the icon in the right upper
corner.2. Switch to the Integration tab.3. Open the Third-Party Services page.4. Click the sliding button right of the Google Drive logo.5. Enter your keys and click the Enable button.
Connect your Google account to ONLYOFFICE1. In the left sidebar of the Documents, just below the text Connect, click on
the Google Drive icon.2. Login to your Google account.3. Allow ONLYOFFICE to connect to your Google Drive by clicking the button. Your
Google Drive documents will be shown in ONLYOFFICE documents as a folder.4. Change the folder‘s name, if necessary.5. If you want the Google Drive documents to be visible for anyone, click theMake
shared checkbox and put into the Common Documents folder. If not checked, yourGoogle Drive account will only be visible to you.
6. Click Save.Edit your Goolge Drive documents
1. Locate the Google Drive folder and open it.2. Browse to the file you want to edit and click it.
If necessary, a dialog will tell you that the document will be converted to theOpenOffice XML format for faster viewing and editing.You can choose to keep the original file as well, by checking the Save the file copy inthe original format as well box.
3. Click Convert.4. Click Open when the message appears that your document is successfully converted.
Now you can edit your document (if editable). After editing, you can simply close the documentand the changes will be saved.
How to edit documents from kDrive inONLYOFFICEYou have a kDrive account and want to edit your documents using ONLYOFFICE? Follow thisstep-by-step guide to find out how to edit documents stored in your kDrive from theDocuments portal module.Connect your kDrive account to ONLYOFFICE
1. In the left sidebar of the Documents, just below the text Connect, click on the kDriveicon.
2. Specify the connection URL, your user name and password and click Save to connectyour kDrive account. Your kDrive documents will be shown in ONLYOFFICEdocuments as a folder.
3. Change the folder‘s name if necessary.4. If you want the kDrive documents to be visible for anyone, click on theMake
shared checkbox and put into the Common Documents folder. If not checked, yourkDrive account will only be visible to you.
5. Click Save.Edit your kDrive documents
1. Locate the kDrive folder and open it.2. Browse to the file you want to edit and click it.
If necessary, a dialog will tell you that the document will be converted to theOpenOffice XML format for faster viewing and editing.You can choose to keep the original file as well, by checking the Save the file copy inthe original format as well box.
3. Click Convert.4. Click Open when the message appears that your document is successfully converted.
Now you can edit your document (if editable). After editing, you can simply close the documentand the changes will be saved.
How to edit documents from Nextcloud inONLYOFFICEYou have a Nextcloud account and want to edit your documents using ONLYOFFICE? Follow thisstep-by-step guide to find out how to edit documents stored in your Nextcloud from theDocuments portal module.
Connect your Nextcloud account to ONLYOFFICE1. In the left sidebar of the Documents, just below the text Connect, click on
the Nextcloud icon.2. Specify the connection URL, your user name and password and click Save to connect
your NextCloud account. Your NextCloud documents will be shown in ONLYOFFICEdocuments as a folder.
3. Change the folder‘s name if necessary.4. If you want the NextCloud documents to be visible for anyone, click on theMake
shared checkbox and put into the Common Documents folder. If not checked, yourNextCloud account will only be visible to you.
5. Click Save.Edit your Nextcloud documents
1. Locate the Nextcloud folder and open it.2. Browse to the file you want to edit and click it.
If necessary, a dialog will tell you that the document will be converted to theOpenOffice XML format for faster viewing and editing.You can choose to keep the original file as well, by checking the Save the file copy inthe original format as well box.
3. Click Convert.4. Click Open when the message appears that your document is successfully converted.
Now you can edit your document (if editable). After editing, you can simply close the documentand the changes will be saved.
How to edit documents from ownCloud inONLYOFFICEYou have a ownCloud account and want to edit your documents using ONLYOFFICE? Follow thisstep-by-step guide to find out how to edit documents stored in your ownCloud from theDocuments portal module.Connect your ownCloud account to ONLYOFFICE
1. In the left sidebar of the Documents, just below the text Connect, click on theownCloud icon.
2. Specify the connection URL, your user name, and password and click Save to connectyour ownCloud account. Your ownCloud documents will be shown in ONLYOFFICEdocuments as a folder.
3. Change the folder‘s name if necessary.

4. If you want the ownCloud documents to be visible for anyone, click on theMakeshared checkbox and put into the Common Documents folder. If not checked, yourownCloud account will only be visible to you.
5. Click Save.Edit your ownCloud documents
1. Locate the ownCloud folder and open it.2. Browse to the file you want to edit and click it.
If necessary, a dialog will tell you that the document will be converted to theOpenOffice XML format for faster viewing and editing.You can choose to keep the original file as well, by checking the Save the file copy inthe original format as well box.
3. Click Convert.4. Click Open when the message appears that your document is successfully converted.
Now you can edit your document (if editable). After editing, you can simply close the documentand the changes will be saved.
How to edit documents from OneDrive inONLYOFFICEYou have a OneDrive account and want to edit your documents using ONLYOFFICE? Follow thisstep-by-step guide to find out how to edit documents stored in your OneDrive from theDocuments portal module.This option is available for ONLYOFFICE Workspace/ONLYOFFICE Workspace EnterpriseEdition users only.Cloud users can skip this section and proceed with Connect your OneDrive toONLYOFFICE step.Creating authorization keysYou will have to setup authorization keys for OneDrive. Follow these steps:
1. Go to Microsoft Azure.2. Sign in to your account.3. Сlick the New registration button at the App registrations page.4. Enter your application Name.5. Enter "https://service.onlyoffice.com/oauth2.aspx" in the Redirect URL field.6. Click the Register button at the bottom of the page;7. Copy or write down the Application (client) ID displayed at the Overview page.8. Switch to the Certificates & secrets section on the left.9. Click the New client secret button.
10. Enter the description and click Add.11. Copy or write down the Client secret displayed in the Value field.
Connecting the OneDrive service1. First of all go to the Settings section. To do that click the icon in the right upper
corner.2. Switch to the Integration tab.3. Open the Third-Party Services page.4. Click the sliding button right of the OneDrive logo.5. Enter your keys and click the Enable button.
Connect your OneDrive to ONLYOFFICE1. In the left sidebar of the Documents, just below the text Connect, click on
the OneDrive icon.2. Login to your Microsoft account.3. Allow ONLYOFFICE to connect to your OneDrive by clicking the button. Your OneDrive
documents will be shown in ONLYOFFICE documents as a folder.4. Change the folder‘s name, if necessary.5. If you want the OneDrive documents to be visible for anyone, click theMake
shared checkbox and put into the Common Documents folder. If not checked, yourOneDrive account will only be visible to you.
6. Click Save.Edit your OneDrive documents
1. Locate the OneDrive folder and open it.2. Browse to the file you want to edit and click it.
If necessary, a dialog will tell you that the document will be converted to theOpenOffice XML format for faster viewing and editing.You can choose to keep the original file as well, by checking the Save the file copy inthe original format as well box.
3. Click Convert.4. Click Open when the message appears that your document is successfully converted.
Now you can edit your document (if editable). After editing, you can simply close the documentand the changes will be saved.
For AdministratorsChanging module settingsThe Settings section at the left sidebar allows to change the Documentsmodule settings. Itcontains several subsections.Common SettingsThis section is available for all users. Guests can also access this section with limitedfunctionality.
· Save the file copy in the original format as well (available for users and guests) - isused when uploading files in formats which differ from .docx/.xlsx/.pptx. When thisoption is enabled, it allows to place a converted file as a new separate file. If thisoption is disabled, a converted file will be placed as a new revision of the original file.
· Display notification when moving the element to the trash (available for usersand guests) - is used to hide or show notifications when moving elements tothe Trash.
· Update the file version for the existing file with the same name (available forusers) - is used when uploading a file with the same name. When this option isenabled, it allows to update the version of the existing file. If this option is disabled, acopy of the file will be created.
· Keep intermediate versions when editing (available for users) - is used to create anew intermediate revision every time the user saves the file by using the Ctrl+S keycombination or by using the Save icon.
· Display Favorites (available for users) - is used to hide or showthe Favorites section.
· Display Recent (available for users) - is used to hide or show the Recent section.Admin SettingsThis section is available for the portal owner, full access administrators orthe Documentsmodule administrators.This section allows to change settings for all portal users:
· Keep all saved intermediate versions is used to make it possible for the portalusers to store all intermediate revisions.
· Allow users to connect third-party storages is used to make it possible for theportal users to connect third-party clouds.
Connected cloudsThis section is available for all users (with the exception of guests) if the Allow users toconnect third-party storages setting is enabled in the Admin Settings section.This sections displays all clouds connected to the user's account and allows to connectother third-party clouds.
Managing company documentationIntroductionCreating a well-organized storage space for your company documentation can help you savetime and considerably increase the productivity and efficiency of the work.The portal offers you a common space to store your company documentation -the Common section and allows you to structure it as you wish: creating folders and settingpermissions for them.This guide will show you how it can be done.Step 1. Access the DocumentsEnter your ONLYOFFICE portal and click the Documents link.In case you have already logged in to the portal and been using it for some time, to accessthe Documentsmodule, open the drop-down list in the top left corner of the page and selectthe corresponding option.Step 2. Create a structureTheMy documents folder opens.The simplest way to structure the company documentation is to organize it by groups creatinga common directory for each company department.Switch to the Common section clicking the corresponding link at the left-side panel. Clickthe Create button in the upper left corner and select the Folder option from the drop-downlist. Enter a name for your folder, for example, a department title, and clickthe Create icon.The folder with the specified name will be created in the Common section. The same way youcan create as many folders as you wish.Step 3. Set permissionsBy default, all the files and folders placed into the Common section are available for all portalusers. To restrict the access you need to set permissions for all the created folders.Click the Access button to the right of the necessary folder or use the Sharing Settings optionfrom the context menu to open the Access Settings window.
First you need to block the Read Only access granted by default to all portal users. Point tothe Everyone line, click the Read Only link and select the Deny Access option from the list.Now to give access to this folder for one of the company departments click the AddGroups button at the top of the window and select the necessary group.To grant full access so that the users of the selected group could not only view the documents,but also create and edit them as well as upload and move files directly to this folder clickthe Read Only link and choose the Full Access option.To apply the changes click the Save button.You can set permissions for several files/folders at once.Mark the items that you want to share with the portal users and click the SharingSettings button. In the opened Access Settings window you'll see all the users and groupswhich have an access to the selected folder items. If you see the Varies link in front of the username, that means that he/she has different access levels to the selected items.In case you want to set the same access permissions to the selected folder items for auser/group of users, click the Varies link and select one of the available access options.To apply the changes click the Save button.Within the Access Settings window, you can also change the folder owner, if necessary. Clickthe owner name, select another user from the list and click the Save button. If several selectedfiles/folders you set permissions for have different owners, it's only possible to change theowner for each item separately. For this purpose, you can right-click the necessary item in thelist and use the Access -> Change owner option from the file/folder context menu. Inthe Change owner window that opens, select another user from the list and clickthe Save button.Step 4. Organize documentsTo place documents to appropriate folders check the box near the necessary documents, clicktheMove to button and select the folder you wish to move your documents in.The document will be placed to the selected folder.It's also possible to upload some new files directly to the created folder entering it and usingthe Upload button in the upper left corner of the page. The rights set to the folder will beapplied to all the documents placed and uploaded to it.
People ModuleOverviewPeople is a module where all portal members as well as group participants are displayed.There can be two types of members on your portal:
· Users - they are portal members who take an active part in portal life and can createtheir own content.
· Guests - they are external users with view-only permissions.Every member has one of the following statuses:
· Active - such portal members are visible in the main list, have already confirmedtheir registration email address, receive email notifications and can collaborate withother portal members.
· Pending - such people were added to the portal or changed their registration emailaddress on their profile page, but haven't confirmed it yet. They can log in to theportal and collaborate with other members, but won't receive any email notifications.If you are using the cloud version, users with the Pending status are included intothe overall active users number on your portal Pricing page.
· Disabled - such portal members were transferred to the list of disabled membersthat can be viewed by selecting the appropriate filter option. They can't log in to theportal any more.The full access administrators can change the portal members' type and status byselecting them in the list and clicking the 'Change Type' or 'Change Status' button atthe top or on their profile page. Please bear in mind that it's impossible to changetype for the administrators.
Editing profileEvery active portal member can edit his own profile. To do that,
1. click the link with your name in the right upper corner2. select the Profile option3. press the Edit Photo button at the bottom of the current profile photo to upload
another one and select the image area that will be displayed as your avatar photo4. click the icon above your photo and select one of the following options depending
on your goal:· Edit - to change personal information displayed on your profile page: first or last
name, registration date, title, location, sex, date of birth, contact details, avatar photo· Change password - to change your password you use to log in to the portal (you can
do that also by clicking the icon next to the current password on your profile page)
Your password must be at least 8 but no more than 30 characters long.· Change email - to change your registration email address (you can do that also by
clicking the icon next to the current email on your profile page)· Edit Photo - to upload another photo and select the image area that will be
displayed as your avatar photo· Delete my profile - to receive instructions per email on how to do that
In case two-factor authentication is enabled in the portal settings, you can also changeyour Primary Mobile Phone. After you click the icon, the information window will open.Press OK. You'll be redirected to another page, where you will be able to specify a differentphone number and press the Enter number button to save it. You'll receive an SMS with averification code to your new mobile phone.The full access administrators can edit not only their own profiles but also other portalmembers' profiles. For this purpose,1. find the needed person in the portal members list and open his/her profile page2. click the icon next to the member's name and select one of the available options(they coincide with the options listed above, the only difference is the Disable option that isused to move the portal member to the list of disabled members who can't log in to the portalany more).Being a portal member, you can also change the portal language within your account. For thispurpose, open your profile page and select one of the available options inthe Language dropdown list. By default, the portal is displayed in the language chosen in thecommon portal settings by a full access administrator.To facilitate your login to the portal, you can use one of your social accounts at Google,Facebook, Twitter, or LinkedIn. To connect it, please
1. open your profile page clicking the link with your name in the right upper corner andselecting the Profile option
2. click the Connect link under the needed social network icon3. enter your email address and password into the corresponding fields within the
opened window4. allow the online office to access your account data pressing the appropriate button
It's also possible to manage your subscriptions within all portal modules on your profile page.To view the whole list of the portal content you are subscribed to, click the Show link next tothe Subscriptions caption. Here you can unsubscribe from the content that isn't interesting toyou any more and change the way you want to be informed about updates selecting one of theavailable notification types: via Talk, email or both.You can also disable or enable back tooltips that appear on the screen to introduce you to thebasic features of each module when you log in for the first time or to inform you of new
features added. Click the Show link next to the Tooltips caption and click the on-off control.The tooltips will be enabled or disabled for all modules at once.
For AdministratorsAdding new portal membersAs a portal owner or full access administrator, you can add new members to the portal.Use invitation linkIf you've created your portal recently and have not yet added users, the Invite users toportal button is available on the left side panel in each portal module. It allows you to quicklyand easily invite new members to your portal so that they could join it:1. click the Invite users to portal button
The invitation link will be copied to the clipboard right away and the InvitationLink window will open allowing you to adjust additional link settings:· check the Add users as guests box to invite people who will have view-only
permissions on your portal (if you want these people to create portal content, leavethis box unchecked). After you change this parameter do not forget to copy therenewed link using the Copy link option.
· you can also Get the shortened link which is more suitable for adding to yourmessage
2. paste the copied link into your invitation message and send it or share the link via socialnetworks using the corresponding icons in the Invitation Link window
The link is valid for 7 days only.
Later you can click the button in the left upper corner within the Peoplemodule and selectthe Invitation Link option to copy the invitation link and open the corresponding window.
Add users manuallyYou can also add portal members manually one by one:
1. click the Create button in the left upper corner within the Peoplemodule2. select the User or Guest option from the dropdown list3. fill in the fields marked with asterisk - first and last name as well as email address.
When creating a user you can specify an existing email address or create a new emailon the domain previously connected in theMailmodule. For a guest you can specifyan existing email address only. To create a new mailbox for a user, click the Create
email on domain link. Enter a user name for the new mailbox in the entry field. Ifyou have several domains connected in theMailmodule select the necessarydomain from the drop-down list.When creating a user/guest it's also possible to create a temporary password so thatthe user/guest can access the portal for the first time (he/she can change thispassword later at his/her profile page). To create a password click the Setpassword link. Once you click this link, the field becomes obligatory. You can enter apassword manually or generate it automatically. The password is validated as youtype, its compliance with the password strength requirements is indicated by color.To generate a new password automatically click the icon. The requirements for thepassword generation and validation are determined by the Password StrengthSettings specified in the portal Security settings.The password must be at least 8 but no more than 30 characters long.The specified email and password can be copied to the clipboard by clicking the Copyemail and password link.You can also select a group (or even several groups) the user/guest will belong to, enterhis/her title and location, upload an avatar photo, etc. The registration date is set to thecurrent date by default, but you can change it clicking within the field.
4. click the Save buttonRight after that the newly added member's profile page opens and an email notification with alink for accessing the portal is sent to him/her. The new portal member gets the pending statustill he/she confirms his/her registration email address. In the portal members list he/she will bemarked with the icon at his/her avatar photo. After the email confirmation the guests getthe icon on their avatar photo and administrators - the icon. The portal owner is markedwith the icon.The link sent in the notification is valid for 7 days only. If the user doesn't manage to completethe registration by following the link in time, you can resend this notification clicking the Sendinvitation once again link on his/her profile page. If there are several users who exceeded thetime limit given for email confirmation, click the button in the left upper corner andselect the Send invitations once again option or select the needed members in the list andclick the Send activation link once again button at the top.Create groupsWhile adding members, you will certainly need to create new groups. To do that,
1. click the Create button in the left upper corner within the Peoplemodule2. select the Group option from the dropdown list3. enter the group Title into the field marked with asterisk
4. assign the group Head by clicking the Choose user link and selecting one of theexisting users/guests or creating a new profile
5. add groupMembers by clicking the Add members link and selecting the existingusers/guests or creating new profiles one by one
6. click the Save button
Importing users from Yahoo or GoogleIntroductionYou have launched the portal in your company and now need to add all your colleagues to thesystem? It can be really a pain to enter their email adresses manually one by one.This guide will show you how to add several users at once using the contact information fromYahoo or Google.Step 1. Access the PeopleEnter your portal and click the People link.In case you have already logged in to the portal and been using it for some time, to accessthe Peoplemodule, open the drop-down list in the top left corner of the page and select thecorresponding option.Step 2. Select a desired sourceClick the button next to the Create button in the upper left corner and select the ImportPeople option or use the Import People button at the left side panel. The Add users to theportal wizard opens.Select a source you wish to use the contact information from: Google or Yahoo clicking thecorresponding button.After you have selected either of these options, you will be asked to grant access to your accountcontact information. You'll need to allow such access in order to continue the importing process.
Step 3. Manage the contacts and start importingAll the available contact information will be displayed within the Add users to theportal wizard.Check the list. Specify the user first and last name if absent.To delete the user from the list use the icon which appears to the right when you point at theuser.
If you wish to add these users as guests check the corresponding Add users as guests boxbelow the user list.When everything is done click the Add to portal button to start adding.The selected users will be added to the portal right away and will receive an email notificationwith a link to your portal.
Importing users from a mail client addressbookIntroductionThe simplest way to add all your colleagues to the portal is to import the contact informationstored in the address book of your mail client.To do that just read this guide and follow the instructions step by step.Step 1. Export data from a mail client to CSV fileOpen your MS Outlook Express.Go to the File section of the main menu and select Export >> Address Book.... Then follow thewizard instructions to export your contacts to a .csv file:
· in the Address Book Export Tool window select the Text File (Comma SeparatedValues) option and click the Export button,
· set the resulting file name and its location and click the Next button,· check the fields you need to export: First Name, Last Name and Email Address,· finally, click the Finish button to start exporting.
Your contact information will be exported in the CSV format to the location you selected.Step 2. Access the PeopleEnter your portal and click the People link.In case you have already logged in to the portal and been using it for some time, to accessthe Peoplemodule, open the drop-down list in the top left corner of the page and select thecorresponding option.Step 3. Load the created CSV file to the portalClick the button next to the Create button in the upper left corner and select the ImportPeople option or use the Import People button at the left side panel. The Add users to theportal wizard opens.
Select the From File option. The File Upload window opens. Browse your hard disk drive forthe created .csv file and click the Open button.The file will be loaded. If you want to replace it, use the Select another source link.Step 4. Verify the .csv file dataIn the Add users to the portal wizard, verify the .csv file settings and set up compliancebetween the .csv file fields and the fields on the portal which are required to add a user.For proper importing you can change the loaded .csv file settings:
· Encoding - Specify the encoding type used while saving your .csv file. The defaulttype is UTF-8.
· Delimiter - Use this drop-down list to select the character used to separate values inyour .csv file. The default delimiter is Comma.
· Text Delimiter - Use this drop-down list to specify the character used to enclose thefields in your .csv file.
If your .csv file has a header row with the field/column names, check the The names of fieldsin first line box - the field names will be displayed in the Fields in file section.Below you can set up compliance between the .csv file fields and the fields on the portal.
· Fields in file - a row of your .csv file containing the column/field names.· Example values - the available file column values. To refresh values use the icon.· Fields on the portal - the portal fields corresponding to the field/column names from
your file.If the field names in the loaded .csv file comply with the obligatory fields which arenecessary to import users to the portal (First Name, Last Name and Email), they will beautomatically selected in the Fields on the portal section. You can also set upcompliance manually selecting the necessary value from the list.
When everything is done click the Go to contact list button below to proceed to the next step.Step 5. Manage the contacts and start importingAll the available contact information will be displayed within the Add users to theportal wizard.Check the list. Specify the user first and last name if absent.To delete the user from the list use the icon which appears to the right when you point at theuser.If you wish to add these users as guests check the corresponding Add users as guests boxbelow the user list.When everything is done click the Add to portal button to start adding.

The selected users will be added to the portal right away and will receive an email notificationwith a link to your portal.
Importing users from a CSV fileIntroductionAre you tired to add the people to the system manually one by one? This guide will show youhow to add several users at once in no time.Following these easy steps you will be able to save your contacts in a .csv file and then addthem to your portal.Step 1. Create a CSV fileIf you have already a .csv file containing the contact information you need to import proceed tothe Step 2.If you store your contact information in a spreadsheet, check it and save to a CSV (CommaSeparated Values) file format, for example using the Documents module.Each spreadsheet row should correspond to a single contact record. The first row can be a headerrecord containing column/field names. Each contact record should contain the following requiredfields: First Name, Last Name and Email.
You can also create a new spreadsheet directly on your portal.Step 2. Access the PeopleEnter your portal and click the People link.In case you have already logged in to the portal and been using it for some time, to accessthe Peoplemodule, open the drop-down list in the top left corner of the page and select thecorresponding option.Step 3. Load the created CSV file to the portalClick the button next to the Create button in the upper left corner and select the ImportPeople option or use the Import People button at the left side panel. The Add users to theportal wizard opens.Select the From File option. The File Upload window opens. Browse your hard disk drive forthe created .csv file and click the Open button.The file will be loaded. If you want to replace it, use the Select another source link.
Step 4. Verify the .csv file dataIn the Add users to the portal wizard, verify the .csv file settings and set up compliancebetween the .csv file fields and the fields on the portal which are required to add a user.For proper importing you can change the loaded .csv file settings:
· Encoding - Specify the encoding type used while saving your .csv file. The defaulttype is UTF-8.
· Delimiter - Use this drop-down list to select the character used to separate values inyour .csv file. The default delimiter is Comma.
· Text Delimiter - Use this drop-down list to specify the character used to enclose thefields in your .csv file.
If your .csv file has a header row with the field/column names, check the The names of fieldsin first line box - the field names will be displayed in the Fields in file section.Below you can set up compliance between the .csv file fields and the fields on the portal.
· Fields in file - a row of your .csv file containing the column/field names.· Example values - the available file column values. To refresh values use the icon.· Fields on the portal - the portal fields corresponding to the field/column names from
your file.If the field names in the loaded .csv file comply with the obligatory fields which arenecessary to import users to the portal (First Name, Last Name and Email), they will beautomatically selected in the Fields on the portal section. You can also set upcompliance manually selecting the necessary value from the list.
When everything is done click the Go to contact list button below to proceed to the next step.Step 5. Manage the contact list and start importingAll the available contact information will be displayed within the Add users to theportal wizard.Check the list. Specify the user first and last name if absent.To delete the user from the list use the icon which appears to the right when you point at theuser.If you wish to add these users as guests check the corresponding Add users as guests boxbelow the user list.When everything is done click the Add to portal button to start adding.The selected users will be added to the portal right away and will receive an email notificationwith a link to your portal.
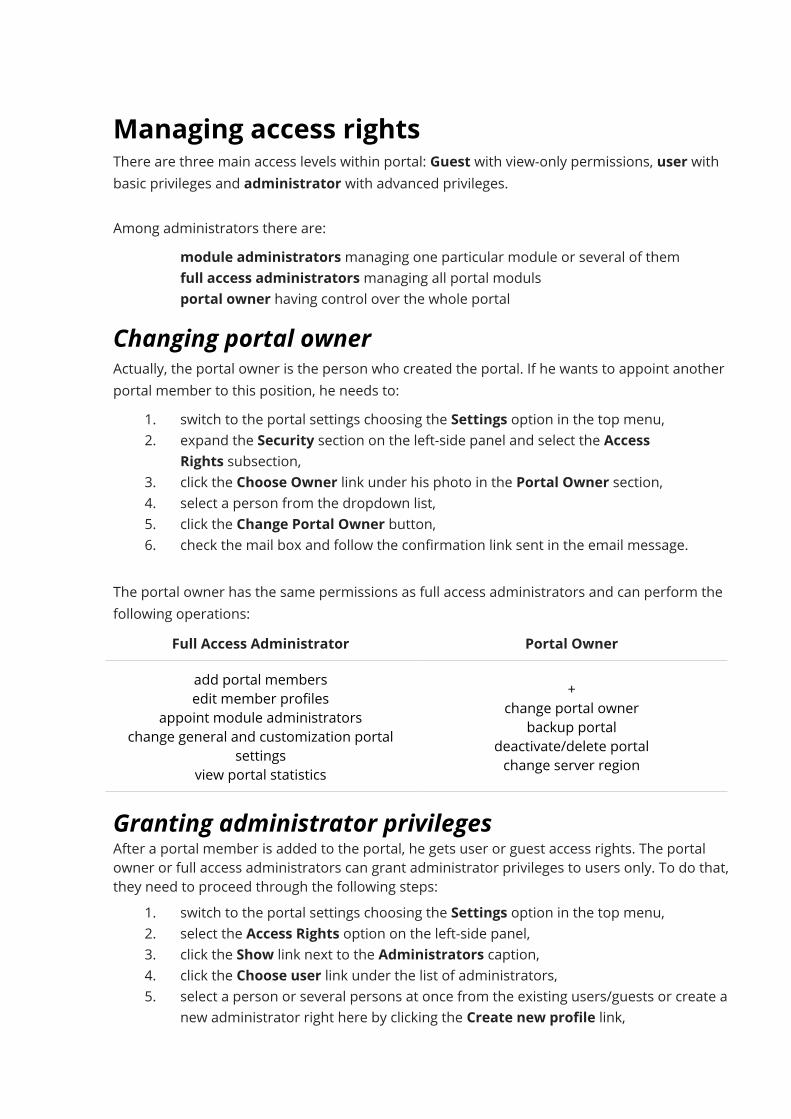
Managing access rightsThere are three main access levels within portal: Guest with view-only permissions, user withbasic privileges and administrator with advanced privileges.Among administrators there are:
· module administratorsmanaging one particular module or several of them· full access administratorsmanaging all portal moduls· portal owner having control over the whole portal
Changing portal ownerActually, the portal owner is the person who created the portal. If he wants to appoint anotherportal member to this position, he needs to:
1. switch to the portal settings choosing the Settings option in the top menu,2. expand the Security section on the left-side panel and select the Access
Rights subsection,3. click the Choose Owner link under his photo in the Portal Owner section,4. select a person from the dropdown list,5. click the Change Portal Owner button,6. check the mail box and follow the confirmation link sent in the email message.
The portal owner has the same permissions as full access administrators and can perform thefollowing operations:
Full Access Administrator Portal Owneradd portal membersedit member profiles
appoint module administratorschange general and customization portal
settingsview portal statistics
+change portal owner
backup portaldeactivate/delete portalchange server region
Granting administrator privilegesAfter a portal member is added to the portal, he gets user or guest access rights. The portalowner or full access administrators can grant administrator privileges to users only. To do that,they need to proceed through the following steps:
1. switch to the portal settings choosing the Settings option in the top menu,2. select the Access Rights option on the left-side panel,3. click the Show link next to the Administrators caption,4. click the Choose user link under the list of administrators,5. select a person or several persons at once from the existing users/guests or create a
new administrator right here by clicking the Create new profile link,
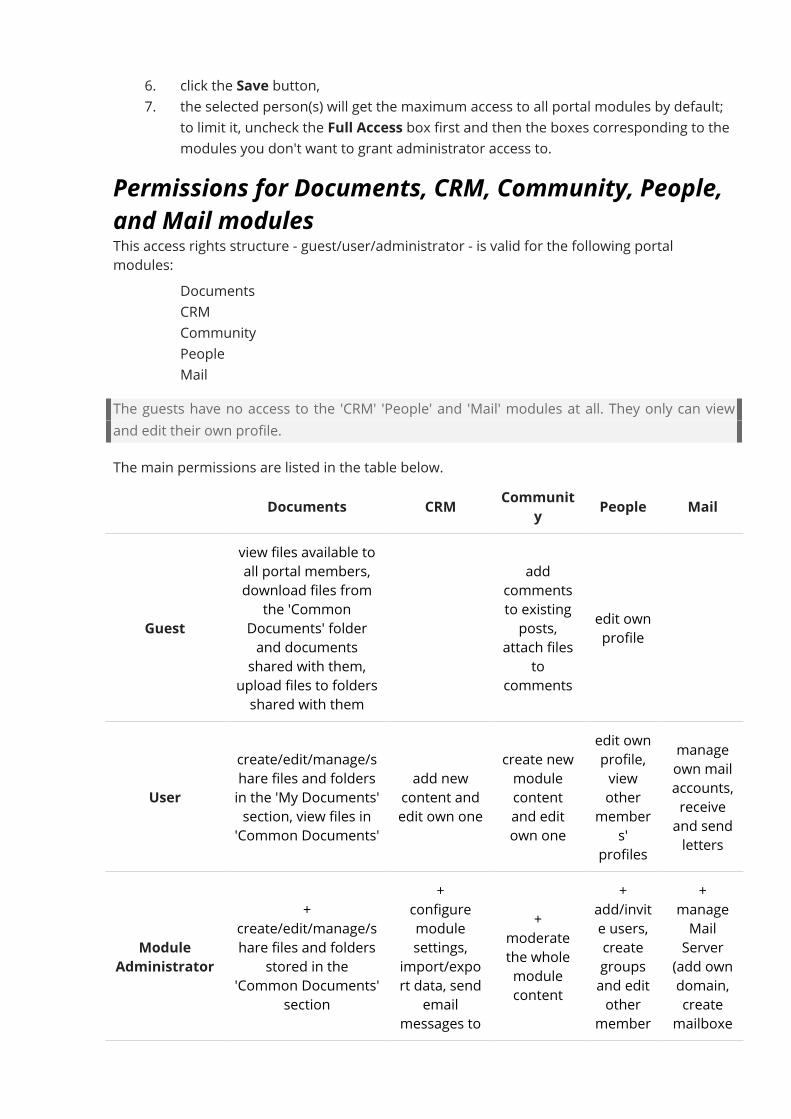
6. click the Save button,7. the selected person(s) will get the maximum access to all portal modules by default;
to limit it, uncheck the Full Access box first and then the boxes corresponding to themodules you don't want to grant administrator access to.
Permissions for Documents, CRM, Community, People,and Mail modulesThis access rights structure - guest/user/administrator - is valid for the following portalmodules:
· Documents· CRM· Community· People· Mail
The guests have no access to the 'CRM' 'People' and 'Mail' modules at all. They only can viewand edit their own profile.The main permissions are listed in the table below.
Documents CRM Community People Mail
Guest
view files available toall portal members,download files from
the 'CommonDocuments' folderand documents
shared with them,upload files to foldersshared with them
addcommentsto existingposts,
attach filesto
comments
edit ownprofile
Usercreate/edit/manage/share files and foldersin the 'My Documents'section, view files in
'Common Documents'
add newcontent andedit own one
create newmodulecontentand editown one
edit ownprofile,viewother
members'
profiles
manageown mailaccounts,receiveand sendletters
ModuleAdministrator
+create/edit/manage/share files and folders
stored in the'Common Documents'
section
+configuremodulesettings,
import/export data, send
emailmessages to
+moderatethe wholemodulecontent
+add/invite users,creategroupsand editother
member
+manageMailServer
(add owndomain,create
mailboxe

CRMcontacts in
bulk,view/edit the
wholemodulecontent
s'profiles
s, mailgroups)and
generalMail
settings
Permissions for Projects moduleThe access rights structure in the Projectsmodule is more complicated and comprises fivelevels:
· guest - an external user with view-only permissions· user - a portal member not participating in any (or in the particular) project· project team member· project manager· module administrator
The main permissions are listed in the table below.Guest/ User Team Member Project Manager ModuleAdministratorview projects
available to all portalmembers or privateones (where he is a
project teammember), leavecomments and
subscribe to tasksand discussions
belonging to projectshe can access
+create/assign/manage
own tasks, creatediscussions,
add/delete own files
+manage project
team, create/edit thewhole project
content, changeproject status, setaccess rights for
team members (forprivate projects only)
+create/edit/deleteany project, appointproject managers,create/edit project
templates
Portal tools - Mail, Talk, Calendar, Feed - are available to all portal users. The guests can useevery tool with the exception of Mail.
Reassigning data when deleting profilesWhat happens to the data without reassigningIf you do not reassign data when deleting disabled users, the related contents created by auser on the portal will also be deleted as follows:
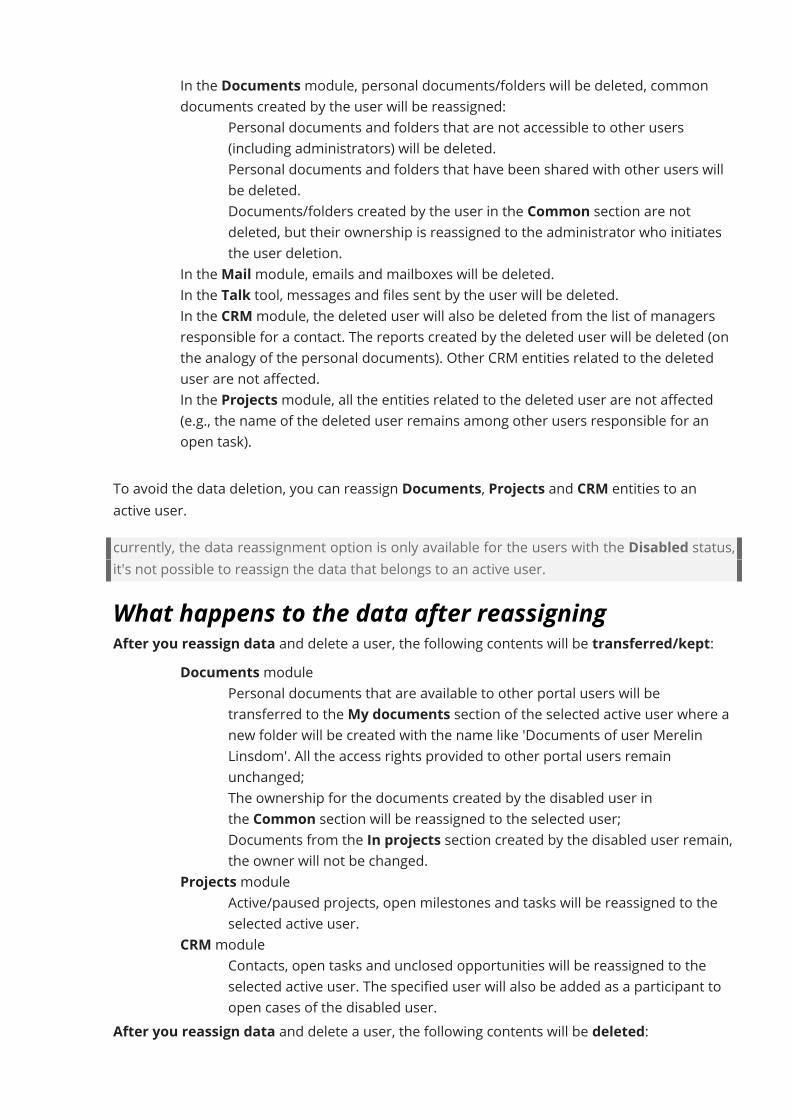
· In the Documentsmodule, personal documents/folders will be deleted, commondocuments created by the user will be reassigned:
o Personal documents and folders that are not accessible to other users(including administrators) will be deleted.
o Personal documents and folders that have been shared with other users willbe deleted.
o Documents/folders created by the user in the Common section are notdeleted, but their ownership is reassigned to the administrator who initiatesthe user deletion.
· In theMailmodule, emails and mailboxes will be deleted.· In the Talk tool, messages and files sent by the user will be deleted.· In the CRMmodule, the deleted user will also be deleted from the list of managers
responsible for a contact. The reports created by the deleted user will be deleted (onthe analogy of the personal documents). Other CRM entities related to the deleteduser are not affected.
· In the Projectsmodule, all the entities related to the deleted user are not affected(e.g., the name of the deleted user remains among other users responsible for anopen task).
To avoid the data deletion, you can reassign Documents, Projects and CRM entities to anactive user.currently, the data reassignment option is only available for the users with the Disabled status,it's not possible to reassign the data that belongs to an active user.
What happens to the data after reassigningAfter you reassign data and delete a user, the following contents will be transferred/kept:
· Documentsmoduleo Personal documents that are available to other portal users will be
transferred to theMy documents section of the selected active user where anew folder will be created with the name like 'Documents of user MerelinLinsdom'. All the access rights provided to other portal users remainunchanged;
o The ownership for the documents created by the disabled user inthe Common section will be reassigned to the selected user;
o Documents from the In projects section created by the disabled user remain,the owner will not be changed.
· Projectsmoduleo Active/paused projects, open milestones and tasks will be reassigned to the
selected active user.· CRMmodule
o Contacts, open tasks and unclosed opportunities will be reassigned to theselected active user. The specified user will also be added as a participant toopen cases of the disabled user.
After you reassign data and delete a user, the following contents will be deleted:
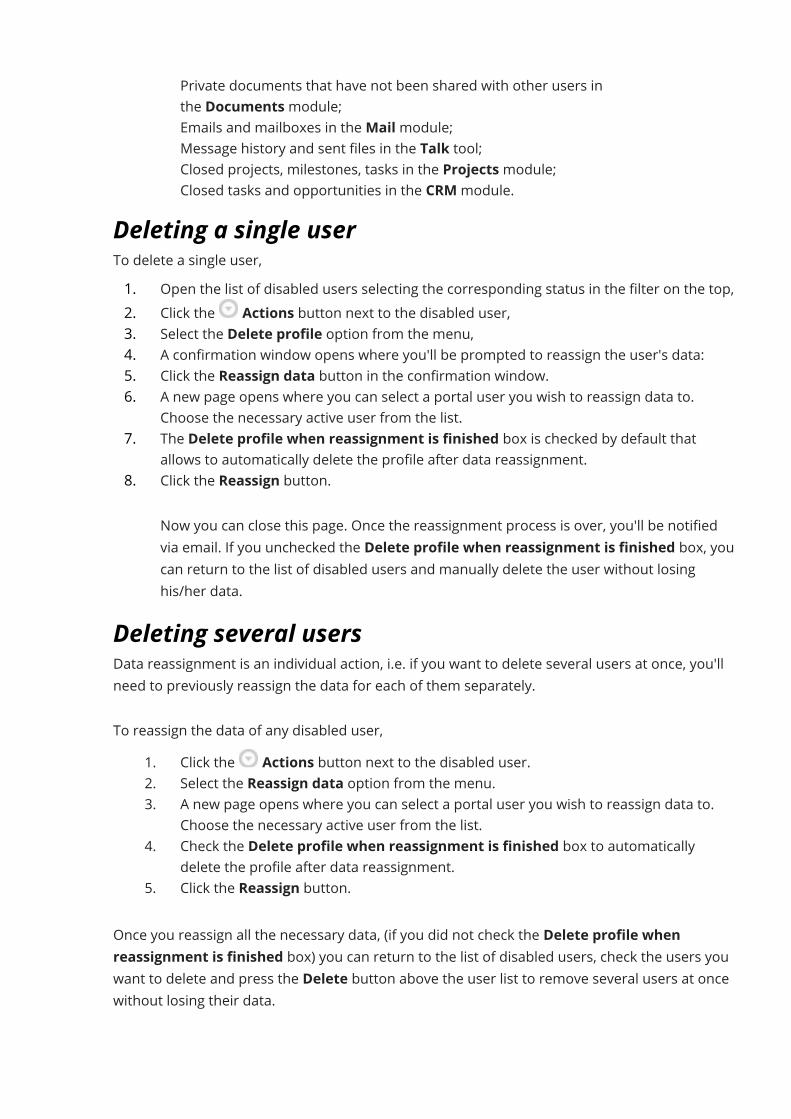
· Private documents that have not been shared with other users inthe Documentsmodule;
· Emails and mailboxes in theMailmodule;· Message history and sent files in the Talk tool;· Closed projects, milestones, tasks in the Projectsmodule;· Closed tasks and opportunities in the CRMmodule.
Deleting a single userTo delete a single user,1. Open the list of disabled users selecting the corresponding status in the filter on the top,2. Click the Actions button next to the disabled user,3. Select the Delete profile option from the menu,4. A confirmation window opens where you'll be prompted to reassign the user's data:5. Click the Reassign data button in the confirmation window.6. A new page opens where you can select a portal user you wish to reassign data to.
Choose the necessary active user from the list.7. The Delete profile when reassignment is finished box is checked by default that
allows to automatically delete the profile after data reassignment.8. Click the Reassign button.
Now you can close this page. Once the reassignment process is over, you'll be notifiedvia email. If you unchecked the Delete profile when reassignment is finished box, youcan return to the list of disabled users and manually delete the user without losinghis/her data.
Deleting several usersData reassignment is an individual action, i.e. if you want to delete several users at once, you'llneed to previously reassign the data for each of them separately.To reassign the data of any disabled user,
1. Click the Actions button next to the disabled user.2. Select the Reassign data option from the menu.3. A new page opens where you can select a portal user you wish to reassign data to.
Choose the necessary active user from the list.4. Check the Delete profile when reassignment is finished box to automatically
delete the profile after data reassignment.5. Click the Reassign button.
Once you reassign all the necessary data, (if you did not check the Delete profile whenreassignment is finished box) you can return to the list of disabled users, check the users youwant to delete and press the Delete button above the user list to remove several users at oncewithout losing their data.
Changing People module settingsBeing a portal owner or full access administrator you can restrict access tothe Peoplemodule for some users or even disable this module, if you don't need it at all. To dothat,1. click the Settings link on the left-side panel,2. select the Portal Access Rights subsection,3. go to the People section,4. check the Users from list radio button,5. select the users you wish to grant access to,
To do that, use one of the available options;· use the Add user link if you wish to grant access to one or more people;· use the Add group link if you wish to grant access to all portal users, or to one or
more groups.Disabling People moduleTo disable the Peoplemodule just switch to theModules & Tools section selecting thecorresponding option on the left-side panel, uncheck the Peoplemodule and clickthe Save button.If the Peoplemodule is disabled, each portal member can access his/her own profile only.
Community ModuleOverviewThe Communitymodule offers you a complete toolset for building a social network inside yourcompany. It lets you communicate and collaborate not only with your project team, but with theentire company. Using the Communitymodule you can:
· create and maintain a corporate blog where any person registered on your portalcan share the interesting information, thoughts and experiences,
· share events: news, orders, announcements with other portal users,· collect other users' opinions creating polls,· discuss issues and share your ideas and knowledge leading the forum discussion,· create, store your bookmarks directly on the portal and share them with other portal
users,· create your own knowledge base using the wiki markup.
To access the Communitymodule from any portal page, use the drop-down list in the top leftcorner of the page and select the corresponding option.
BlogsMaintaining blogThe corporate blog is a diary or journal where any user of the portal can create his own page toshare the interesting information, thoughts and experiences with others.To build a corporate blog,1. click the Create button in the upper left corner and select the blog Post option from the
drop-down list,2. enter a Title for your post,3. type in your post Text,4. format your text using the Formatting Toolbar,
The Formatting Toolbar provides many of most common formatting commands suchas font style, font color, alignment and size. Here you can also:· insert links to some external or internal resources,· add image files,· insert smileys,· create lists.
5. select a part to be shown on the Blogs and Feed pages,

To do that, select the part you wish to hide with the mouse and click the TextCut button. The selected part will be highlighted. In this way only a short snippet ofthe post (not selected) was shown at the blog list and feed pages.
6. enter tags separating them with commas,This helps categorize your post and facilitate the search for the other users.
7. leave the Subscribe to post comments box checked if you wish to be notified about allnew comments added to your post,
8. preview the result clicking the corresponding button below,9. click the Publish button, if you are satisfied with the result.
Your blog post will be published and displayed on the Blogs page. To leave a comment to yourpost or any other posts within your corporate blog, just click the Add comment link below thepost message.If you need to edit a post,
1. open the blog post page clicking its title on the Blogs page,2. click the icon to the right of the post title,3. select the Edit option from the Actions drop-down list,4. make all the changes you need and click the Publish button.
To delete a post, choose the corresponding option from the Actions drop-down list.If you no longer want to receive the notifications about new comments added, unsubscribefrom your post. To do that,
1. open your blog post page clicking its title,2. click the icon to the right of the blog post title.
Decorating postsIt's boring to read posts or comments containing pure plain text only. Let's decorate themadding colors, styles, hyperlinks, images, etc. Formatting your text you can not only make itgood-looking, but also highlight some important points, demonstrate something using images,give a link to an internal or external source.The instructions on how to write your blog post, create an event or start a forum or project-related discussion you can find in the corresponding sections. Reading this tip you can learnhow to decorate them.After entering your text into the text field have a look at the Formatting Toolbar at its top:
Using the tools situated on the Formatting Toolbar you can decorate your text as you wish:
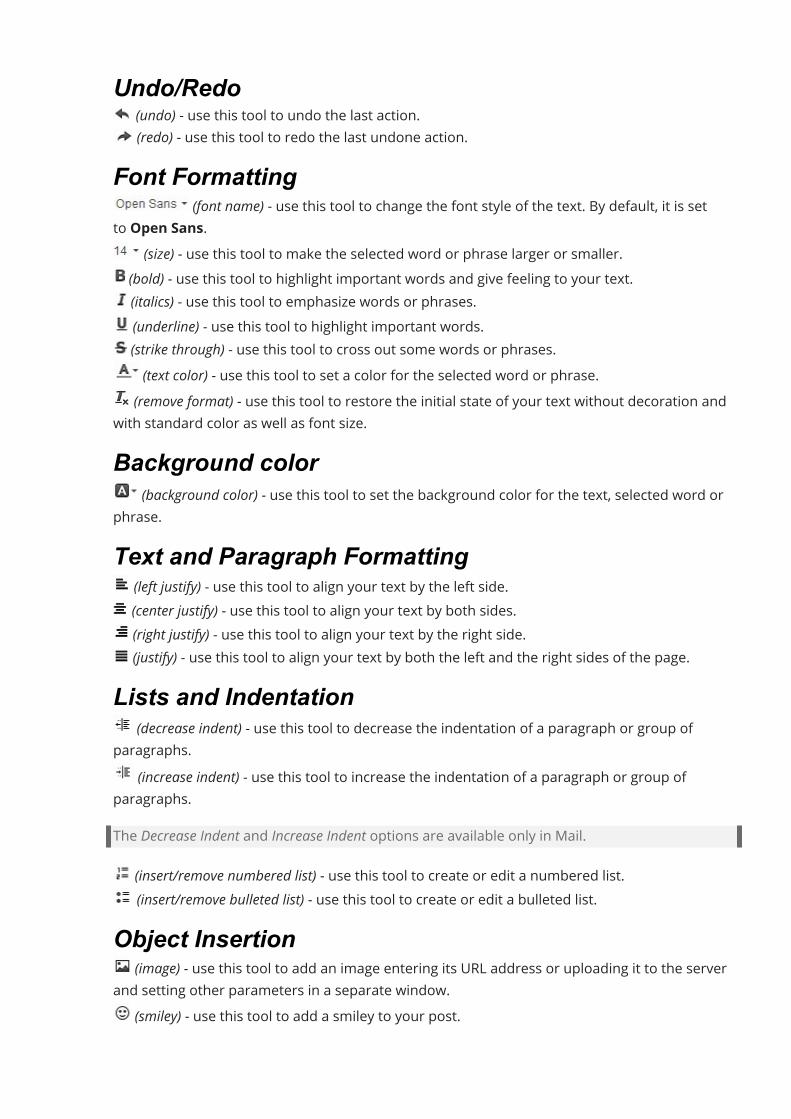
Undo/Redo(undo) - use this tool to undo the last action.(redo) - use this tool to redo the last undone action.
Font Formatting(font name) - use this tool to change the font style of the text. By default, it is set
to Open Sans.(size) - use this tool to make the selected word or phrase larger or smaller.
(bold) - use this tool to highlight important words and give feeling to your text.(italics) - use this tool to emphasize words or phrases.(underline) - use this tool to highlight important words.(strike through) - use this tool to cross out some words or phrases.(text color) - use this tool to set a color for the selected word or phrase.
(remove format) - use this tool to restore the initial state of your text without decoration andwith standard color as well as font size.Background color
(background color) - use this tool to set the background color for the text, selected word orphrase.Text and Paragraph Formatting
(left justify) - use this tool to align your text by the left side.(center justify) - use this tool to align your text by both sides.(right justify) - use this tool to align your text by the right side.(justify) - use this tool to align your text by both the left and the right sides of the page.
Lists and Indentation(decrease indent) - use this tool to decrease the indentation of a paragraph or group of
paragraphs.(increase indent) - use this tool to increase the indentation of a paragraph or group of
paragraphs.The Decrease Indent and Increase Indent options are available only in Mail.
(insert/remove numbered list) - use this tool to create or edit a numbered list.(insert/remove bulleted list) - use this tool to create or edit a bulleted list.
Object Insertion(image) - use this tool to add an image entering its URL address or uploading it to the server
and setting other parameters in a separate window.(smiley) - use this tool to add a smiley to your post.
(block quote) - use this tool to add a quote from another author to your post.The Block Quote option is available in Mail only.Hyperlinks
(link) - use this tool to add a link to an internal or external source.(unlink) - use this tool to delete the inserted link to an internal or external source.
Text Cut(hide from preview) - use this tool to truncate your post, so that only its first part is
displayed on the feed pages and the blog/discussion list page. At the end of the first part ofyour post a link will be placed pointing the reader to the full content of your post.This option is available in blogs and project discussions only.Source
(source) - use this tool to switch to the HTML view of your text with all the relatedHTML tags.
Sharing eventsIf you have some news or announcements you wish to share with other portal users, create anevent.To post your message,1. click the Create button in the upper left corner and select one of the event
types: News, Order, or Announcement from the drop-down list,2. enter a Title for your event,3. type in your event Text,4. format your text using the Formatting Toolbar,5. The Formatting Toolbar provides many of most common formatting commands such
as font style, font color, alignment and size. Here you can also:· insert links to some external or internal resources,· add image files,· insert smileys,· create lists.
1. preview the result clicking the corresponding button below,2. click the Publish button, if you are satisfied with the result.
Your event will be published and displayed on the Events page. To leave a comment to yourevent or any other events shared with you, just click the Add comment link below the eventmessage.All your portal users will be notified about a new event added.If you need to edit an event,
1. open the event page clicking its title on the Events page,2. click the icon to the right of the event title,3. select the Edit option from the Actions drop-down list,4. make all the changes you need and click the Publish button.
To delete an event, choose the corresponding option from the Actions drop-down list.By default you are subscribed to your newly created event and will be notified via Email andTalk once some comments are added. If you no longer want to receive the notifications aboutnew comments added, unsubscribe from your event. To do that,
1. open your event page clicking its title,2. click the icon to the right of the event title.
Adding pollThe best way to collect other users' opinions and find out what they think about some issue isto create a poll.To add a new poll,
1. click the Create button in the upper left corner and select thecorresponding Poll option from the drop-down list,You can add a poll within two Community sections: Events and Forums.
2. enter your Poll Question,3. specify your Poll Choices,
You need to add at least two possible choices. Using the Add poll choice link you canadd up to 15 choices. To delete one of the choices use the icon to the right of theentry field.
4. select a desired Poll Type,· Allow only one choice for this poll question - check this option to give the
participants the possibility to select only one answer.· Allow multiple choices for this poll question - check this option to give the
participants the possibility to select several responses to a single question.5. click the Save button.
The created poll will be added to the Events list or Forums list according to the option youhave selected at the step 1.If you need to edit a poll,
1. open the poll page clicking its title,2. click the icon to the right of the poll title,3. select the Edit option from the Actions drop-down list,4. make all the changes you need and click the Save button.
To delete a poll, choose the corresponding option from the Actions drop-down list.By default you are subscribed to your newly created poll and will be notified via Email andTalk once some comments are added. If you no longer want to receive the notifications aboutnew comments added, unsubscribe from your poll. To do that,
1. open your poll page clicking its title,2. click the icon to the right of the poll title.
ForumsLeading forum discussionIf you need to discuss some issues or just share your ideas and knowledge with other portalusers make use of the Forums section.To organize a portal forum,
1. click the Create button in the upper left corner and select the Forum option fromthe drop-down list,
2. select a desired forum Category,Drop-down the list and select one of the existing categories you wish to add yourforum to or create a new one choosing the Create a new category option from thelist and entering its Title in the corresponding field below;
3. enter a Forum Name,4. provide a short Description of your forum that will be displayed along with its name
on the Forums page,5. click the Create button.
To manage forums,Make use of the Forum Editor clicking the corresponding link in the Settings section at the leftside panel. Here you can:
· edit any forum/category clicking the corresponding link to the right of its title,· delete any forum/category clicking the corresponding link to the right of its title,· relocate the forums within a certain category putting the mouse cursor to the left of
the forum title and dragging it to the desired position without releasing the mousebutton ,
· change the category order putting the mouse cursor to the left of the category titleyou wish to move and dragging it to the desired position without releasing themouse button.
The Forum Creation/Editing option is available for portal and Community administrators only.
To add a new topic to discuss to your forum:1. click the Create button in the upper left corner and select the Topic option from the
drop-down list,2. select a Forum you wish to add a topic to,3. enter a Topic title,4. type in your topicMessage,5. format your text using the Formatting Toolbar,
The Formatting Toolbar provides many of most common formatting commands suchas font style, font color, alignment and size. Here you can also:· insert links to some external or internal resources,· add image files,· insert smileys,· create lists.
6. enter tags separating them with commas,This helps categorize your topic and facilitate the search for the other users.
7. attach a file, if necessary, clicking the corresponding button,8. leave the Subscribe to this topic box checked if you wish to be notified about all new
posts added to your topic,9. preview the result clicking the corresponding button below,
10. click the Publish button, if you are satisfied with the result.Your forum topic will be published and displayed on the selected forum page. To add a post toyour topic or any other topics within your forum, use one of the links below the message:
· Quote - use it to add a quote from the selected message;· Reply - use it to reply to the selected message;· Add new post - use it just to add a new post to the selected topic.
To do that, you can also click the Create New... button in the upper left corner andselect the Post option from the drop-down list.
If you need to edit a topic,1. open the topic page clicking its title,2. click the icon to the right of the topic title,3. select the Edit option from the Actions drop-down list,4. make all the changes you need and click the Save button.
To delete a topic, choose the corresponding option from the Actions drop-down list.Being a portal or Community administrator you can stick or close any topic, just open thetopic list, click the arrow next to the topic title you need and select the necessary option.If you no longer want to receive the notifications about new posts added, unsubscribe fromyour topic. To do that,
1. open your topic page clicking its title,2. click the icon to the right of the topic title.
Making forums more interactiveIntroductionWould you like to make your forum more interactive? Just add a poll. This step by step guidewill show you how to quickly and easily add a poll to your new forum topic.Step 1. Access the CommunityEnter your portal and click the Community link.In case you have already logged in to the portal and been using it for some time, to accessthe Communitymodule, open the drop-down list in the top left corner of the page and selectthe corresponding option.Step 2. Start a pollClick the Create button in the upper left corner and select the Poll option fromthe Forums section of the drop-down list.The Create new poll page will open. Select a forum you wish to add a poll to. Enter your pollquestion, at least two possible choices and choose one of the available poll types:
· Allow only one choice for this poll question - tick this option to give theparticipants the possibility to select only one answer.
· Allow multiple choices for this poll question - tick this option to give theparticipants the possibility to select several responses to a single question.
Using the Add poll choice link you can add up to 15 choices. To delete one of the choices usethe icon to the right of the entry field.Step 3. Make your postTo describe the issue you wish to discuss with other portal users or just add some comments tothe created poll, type in your post in theMessage field and format it using the FormattingToolbar commands.Add some tags in the Tags field separating them with commas. This will help categorize yourtopic and facilitate the search for the other users.Step 4. Add the created pollWhen everything is ready, preview the result using the corresponding button at the bottom ofthe page. If you are satisfied with it, close the preview area and click the Publish button.
The created poll will be added to the selected forum. To access it, switch to the Forums sectionclicking the corresponding link at the left-side panel and select the necessary forum from thelist.
Inserting images in posted messagesIntroductionWant to discuss new product models in the online office forum to select a good one? Or justneed to add some pictures as a reference to enhance your blog story?Read these step by step instructions to insert an image directly into your posted message.Step 1. Select an existing post or create a new oneYou can insert an image while creating or editing any message posted on your portal: news andannouncements, blog story, forum post, comment or project discussion.To edit an item just open it and click the icon to the right of the post title and selectthe Edit option from the drop-down list.Step 2. Insert an image from the webOnce the message is created click with the mouse at the place where you want to insert yourimage and press the Image icon on the Formatting Toolbar.The Image Properties window will open with the Image Info tab activated.Copy and paste the URL of the image you want to insert into the appropriate field. Type inthe Alternative Text which will be displayed in case where the image in not available to thereaders (for example, when the images are turned off in their browser) and adjust the imagesettings:
· Adjust the image size inserting theWidth or Height value. By default the secondparameter will be set automatically preserving the original image aspect. If you needto get the image of a particular size unlock the ratio clicking the button. Keep inmind that in this case the image proportions can get affected and the image might bedistorted.
· Set the Border size in pixels or leave this field empty if you don't want the border tobe inserted.
· Adjust the distance from the top (VSpace) and left (HSpace) edges of the image if youalign it on the left hand margin, or the distance from the top (VSpace) and right(HSpace) edges of the image if you align it on the right hand margin.
· Select one of the image alignment options: Left to align the image on the left handmargin, or Right to align it on the right hand margin.

If you wish to determine the web address to which you will be redirected when the image isclicked, switch to the Link tab. Enter the URL you wish to link the image to and specify thetarget attribute of a link: NewWindow (_blank), Topmost Window (_top), Same Window(_self), or Parent Window (_parent).To adjust the advanced image settings switch to the Advanced tab. Here you can specify:
· Id - the ID of the inserted image.· Language Direction - the language direction from Left to Right (LTR) or from Right
to Left (RTL).· Language Code - the code used to classify the language: de, en, es, fr, it, ru etc.· Long Description URL - the description of the target.· Stylesheet Classes - the CSS class to which the image belongs.· Advisory Title - the advisory information about the target.· Style - the style of the inserted image. It includes all the parameters specified on
the Image Info tab.When all the parameters are set click the OK button to add the image to your message.Step 3. Insert an image from your PCIf you wish to add an image stored on your PC, in the Image Properties window (see the Step2) switch to the Upload tab. Click the Browse... button, find the desired image on your harddisk drive and click the Send it to the Server button.Make sure that your image is in JPEG, PNG, BMP or GIF format and is no larger than 1 MB. Ifnot, the file cannot be sent.Once the image is uploaded to the server, the Image Info tab will open. You will see the link tothe uploaded image displayed in the URL field and its size. If necessary, type in an AlternativeText and adjust the image settings as described above (see the Step 2).When all the parameters are set click the OK button. The image will be inserted into your postat the location where the cursor was placed.In case you need to upload a file larger than 1 Mb you can either attach it to your post usingthe Attach file button (available for project discussions and forum posts) or upload it tothe Documentsmodule and share with your colleagues.Adding bookmarksA bookmark is a link to a web resource that allows you to easily get back to your favorite place.Community allows you to create, store and share your bookmarks with other portal usersdirectly on your portal.To add a bookmark,
1. click the Create button in the upper left corner and select the Bookmark optionfrom the drop-down list,
2. enter the link to the page you want to bookmark in the URL field,3. click the Check URL button,
4. change the bookmark Name, if necessary,5. add/edit a bookmark Description,6. enter tags separating them with commas,
This helps categorize your bookmark and facilitate the search for the other users.7. click the Save button.
The created bookmark will be added to the Bookmarks list.To add a bookmark shared by other users to your Favorites list,
1. find the bookmark you wish to add,Use the links above the Bookmarks list to display theMost Recent bookmarksor, Top of the Day, or the bookmarks added the latestWeek,Month, Year.
2. click the sign to the right of the selected bookmark,3. review the bookmark details,4. click the Add to Favorites button.
To access your Favorites list, explore the Bookmarks list at the left side panel and select thecorresponding option.To remove a bookmark from your Favorites list use the icon to the right of the bookmarktitle.If you need to edit a bookmark,
1. find the bookmark you wish to edit,Use the links above the Bookmarks list to display theMost Recent bookmarksor, Top of the Day, or the bookmarks added the latestWeek,Month, Year.
2. click the Details link below the bookmark title,3. use the Edit link to open the Edit bookmark form,4. make the changes you need and click the Add to Favorites button.
To delete a bookmark use the icon to the right of the bookmark title.By default you are subscribed to your newly created bookmark and will be notified via Emailand Talk once some comments are added. If you no longer want to receive the notificationsabout new comments added, unsubscribe from your bookmark. To do that,
1. open your bookmark description page clicking the Details link below its title,2. click the icon to the right of the bookmark title.
Using WikiWiki is another way to store, organize and share information with other portal users. It allowsyou to create pages, interlink them and group them into categories.To create a new page,1. click the Create button in the upper left corner and select the Page option from the
drop-down list,2. enter a desired Page Title,3. type in the Text of your article,4. edit the text using the Formatting Toolbar.
The Formatting Toolbar provides many of most common formatting commands suchas font style, font color, alignment and size. Here you can also:· add headings;· subscript and superscript some characters;· insert links to internal or external resources;· insert/edit tables;· add different images;· insert local file link;· add horizontal lines;· insert numbered and bulleted lists.
Read theWiki Markup Tips for the text to be displayed correctly on a page, just clickthe corresponding link at the left side panel.
5. Preview the result and publish your article.Your page will be added and displayed on the Wiki Index page.Online office Wiki is a wiki, so any portal user can access any page and edit it, if necessary.To start editing a Wiki page,
1. open your Wiki page clicking its title on the Wiki Index page,2. click the icon to the right of the page title,3. select the Edit page option from the Actions drop-down list,4. make all the changes you need and click the Publish button.
The page version will be changed. To view the whole page history just click the Version # link inthe lower right corner of the page.By default you are subscribed to your newly created page and will be notified via Email andTalk once your page is edited by another user or a comment is added. If you no longer want toreceive the notifications, unsubscribe from your page. To do that,
1. open your Wiki page clicking its title on the Wiki Index page,2. click the icon to the right of the page title.
Creating a knowledge baseIntroductionStore and organize information creating your own database with the online office Wiki. Readthe instructions below to learn how to create and edit wiki pages, attach the pages to acategory and interlink them.Step 1. Access the CommunityEnter your portal and click the Community link.In case you have already logged in to the portal and been using it for some time to accessthe Communitymodule from any portal page, use the drop-down list in the top left corner ofthe page and select the corresponding option.Step 2. Create a new wiki pageClick the Create button in the upper left corner and select the Page option from the drop-downlist.The New Page form will open. Enter a page title and type in your text.If you have an html-formatted text that you would like to transfer to wiki, paste your text intothe text field and switch to the wiki markup mode by clicking theWikitext icon on theformatting toolbar above. The html tags will be changed to wiki markup.Step 3. Format your wiki pageFormatting the wiki page is very simple. The Formatting Toolbar above the Text field providesmany of most common formatting commands:
· add headings using the H1/H2/H3/H4 buttons;· apply one of the font styles: Bold, Italic, Underline and Strike;· subscript and superscript some characters;· insert links to internal or external resources;· add different images;· insert local file link;· add horizontal lines.
If you are not familiar with the wiki structure and markup you can make use of thecommon Text Editor. To activate it click theWikitext button on the Formatting Toolbar.To preview the result click the Preview button below the Text field.Step 4. Add a table of contentsTo add a table of contents to your wiki page, divide your text into sections, subsections andsub-subsections adding the appropriate headings. To do that, highlight the necessary phrasewith the mouse and click the corresponding button on the FormattingToolbar: H1, H2, H3 or H4.
You can also do it manually using the = symbols:H1 - =Section=H2 - ==Subsection==H3 - ===Sub-subsection===H4 - ====Sub-sub-subsection====Then insert@@TOC@@ in the page at the point where you want your table of contents to beadded.If you use the common Text Editor, first use the Format drop-down list to divide your text intosections and then click the Table of Contents button.The table of contents will be generated automatically on the basis of the marked sections.Step 5. Insert an imageFirst of all load the images you wish to insert into the page to the online officeWiki. Clickthe Files link on the left-side panel, then use the Upload File button above the file list. Browseyour hard disk drive for the necessary images and click the Upload button. The image will beloaded and displayed on the Files page.Do NOT forget to save your page using the Publish button before clicking the Files link.
To insert the loaded image into your page, first of all open your wiki page (all the newly createdpages are listed on the New Pages page), click the icon to the right of the page title andchoose the Edit page option from the drop-down list to resume the editing. Then place themouse cursor at the point where you want the image to be inserted and click the Image buttonon the Formatting Toolbar.The following line will be added to the page:[[Image:ImageName]]
Indicate the file name including its extension instead of ImageName. If necessary, set its width(in pixels) typing it after the | symbol.If you use the common Text Editor:
· Place the mouse cursor at the point where you want the image to be inserted.· Click the Insert/Edit Image button to open the Image Properties window.· Click the Upload button next to the Image file name field.· Browse your hard disk drive for the necessary image.· Select the Special Type from the corresponding drop-down list, if necessary. The
available types are: Frame and Thumbnail.
· Align your image to the right, left, or center selecting the corresponding option fromthe Align drop-down list.
· Set the imageWidth. The height will be set respectively conserving the origin aspectratio.
· When everything is ready, click the OK button to apply the selected parameters.The image will be inserted at the point where the mouse cursor is placed.Step 6. Interlink your wiki pagesTo insert the link to another wiki page, place the mouse cursor at the point where you want thelink to be inserted and click the Page Link button.The following structure will be added to the page:[[PageName | Page Description]]Indicate the wiki page name you wish to make reference to instead of PageName and the titleinstead of Page Description which will be displayed on the page.In case you need to add the link to some external resources click the External Link buttonand type in the page URL and the title which will be displayed on the page, like this[[https://www.example.com | web site]].It's also possible to insert the link using the common Text Editor. To do that highlight a singleword or a word combination you wish to add a link to and click the Insert/Edit Link button.Step 7. Attach a wiki page to a categoryYou may attach each wiki page you create to an existing category or create a new one andassign your page to it.To attach a page to an existing category, add the following line at the end of your page:
[[Category: Desired category]]
Indicate the necessary category name instead of Desired category.If you write a name that does not coincide with any of the existing categories, a new categorywith a such name will be automatically created and the page will be assigned to it.
Step 8. Publish your wiki pageWhen everything is ready, preview the result clicking the corresponding button belowthe Text field. If you are satisfied with the result close the preview area and clickthe Publish button to add the newly created page.
The page is created. You can find it using the links on the left-side panel.For more detailed information about the wiki structure and markup refer to the Help page ofthe online officeWiki on the portal.Keeping track of birthdaysBirthdays is a way to keep track of all portal users' birthdays. It allows you to:
· view the users who have their birthdays this day and ten nearest dates,· send your greetings to a person the day of his/her birth clicking the corresponding
button below his/her name in the Nearest dates list,· set/remove a reminder,
By default, you are subscribed to all the birthdays. If you don't want to receive thenotification each time somebody has his/her birthday, unsubscribe fromthem managing your subscriptions on the Profile page.If you wish to be notified about the upcoming birthday of a certain portal user, hoverthe mouse pointer over the necessary user name in the Nearest dates list and clickthe Remind about the birthday link which appears below the user name.
For AdministratorsChanging Community module settingsBy default, all portal users can access the Communitymodule. There are 2 different accesslevels inside it: user/guest and community administrator.Being a user/guest you may perform the following operations:
· view all content;· create/edit/delete your own content: blog posts, news, forum topics, bookmark, Wiki
pages.Being a community administrator you may perform the following operations:
· create and manage forums;· edit/delete all content.
But being a portal owner/full access administrator you can restrict access tothe Community for some users or even disable this module, if you don't need it at all. To dothat,1. click the Settings link at the left-side panel,2. select the Portal Access Rights subsection,3. go to Community section,4. check the Users from list radio button,5. select the users you wish to grant access to,
To do that, use one of the available options;· use the Add user link if you wish to grant access to one or more people;· use the Add group link if you wish to grant access to all portal users, or to one or
more groups.Disabling Community moduleTo disable the Communitymodule, go to the Common section and select theModules &Tools subsection using the corresponding option at the left side panel and uncheckthe Communitymodule. To disable some Community tools only, just uncheck the tools youdon't need and click the Save button.
CRM ModuleOverviewCRM, or Customer Relationship Management, is a strategy used by many companies and aimedat getting more information about their customers' needs and behaviors in order to improvetheir interactions, therefore reducing the company costs and increasing their profitability.CRM is a simple customer relationship management tool which helps achieve these goalsproviding you with:
· a unique place for your customer database,· CRM is a modern alternative to a spreadsheet used by many companies to store their
customers' data. Unlike the spreadsheets CRM offers a multi-user access to the storeddata, moreover it allows you to restrict access to some contacts making them private sothat only the authorized people could view and edit them.
· several ways to add new contacts to your customer database,· Add contacts one by one manually entering the available data, or import your contacts
all at once from a .csv file, or even add contacts automatically creating aWebsiteContact Form.
· a simple way to arrange your contacts,· Divide your contacts into types and add tags. It helps you create special marketing
campaigns, track your contacts and simply facilitate the contact search process.· a great opportunity to keep track of the potential sales,· Create opportunities and link them with projects to organize the work and make the
sale management easier and more effective.· a possibility to bill your customers in seconds,· Make an invoice for products and services provided and send it to your customers
using the contact information stored in your customer database.· an effective way to organize a common event for your customers,· Use cases to plan and keep track of a common event: add tasks to manage your team
work, store all the realated documentation in one place, track the work history.· an easy and convenient way to call your customers right from a web browser,· Use the VoIP functionality to receive incoming calls from your customers and make
outgoing calls right from your portal.To access the CRMmodule from any portal page, use the drop-down list in the top left cornerof the page and select the corresponding option.
ContactsAdding contactsThere's no doubt that it's very important to keep all information about clients in order, so that itcan be quickly accessible and easily updated. The CRMmodule allows you to create your owncustomer database, whether your clients are big companies or single individuals.To add a new contact to your customer database:1. Click the Create button in the upper left corner and select one of two
options: Person or Company.2. Fill in the obligatory fields: First Name and Last Name for persons, Company
Name for companies.3. Select a Contact Type or leave the type not specified.
The portal and CRM administrators can change the default contact types according totheir company needs. Just click the Contact Types link in the Settings >> Contactsettings section. For more details please refer to this article.
4. Enter any other available information: Email, Phone,Web Site/SocialNetworks, Address, Description.To enter some additional information customize user fields. To do that, first of all savethe currently created contact. Otherwise all the entered information will be lost. Thenexpand the Settings >> Other settings section on the left side panel and click the UserFields link.This function is available for portal and CRM administrators only.
5. Select the Currency for this contact from the list of the available ones. The selectedcurrency will be used in the invoices you create for this contact.
6. Add some existing Tags selecting them from the list or create a new one.7. Upload a photo.
To add/change a picture click the Change photo link below the image area. The Choosea profile photo window will open. If you wish to upload a picture from PC clickthe Browse button, locate a desired picture stored on your hard disk drive and double-click it to load.You can upload an image not larger than 200x300 pixels, otherwise resizing will takeplace. The maximum image size cannot exceed 1 MB.If you previously filled the social network user field in the contact profile the imagesfrom the social networks will be displayed in the Choose a profile photo window. Clickthe one you wish to use for a contact.
8. Assign a contact manager.
By default, the contact you create is assigned to you. If you wish to appoint anothermanager for this contact, click the Add user link and select the necessary user. Theselected user will be notified about a new contact assigned to him/her.
9. Make the contact available to other users.By default, the access to the newly created contact is granted to its managers only.Check the Allow access to the company/person for all CRM users box if you wish togrant access to all CRM users i.e. make the contact public. Specify the access typeselecting the necessary option from the drop-down list:· for reading - to allow all users to view this contact (this option is selected by default),· for reading/writing - to allow all users to view and edit this contact.
Public contacts are marked with the icon on their photos.10. Click the Save button or use the Save and Create New Contact button to start creating
a new contact right after saving the current one.To add several contacts at once,Make use of the Import contacts option. This option helps you move all your contacts froma .csv file to CRMmodule without efforts. To do that, just click the button to the right ofthe Create button, select the Import contacts option and follow the step by step instructions.To add contacts automatically,Use theWebsite Contact Form. This option allows you to build a form that you can publish onyour site. Your potential customers will be automatically added to your customer databasewhen they contact you via the online form embedded on your web page. To do that, clicktheWebsite Contact Form link from the Settings list on the left side panel and follow the stepby step instructions.This function is available for portal and CRM administrators only.Once your clients are manually created through the Create new company/person form,imported from a .csv file, or automatically added viaWebsite Contact Form, they will be allincluded in the Contacts list of the CRMmodule.To update the available contact information,
1. select the necessary contact from the Contacts list,2. click the icon to the right of the contact name,3. select the Edit contact option from the drop-down list,4. make all the changes you need and click the Save Changes button.
To delete a contact, choose the corresponding option from the Actions drop-down list.

If an invoice has been made out to a contact, you cannot delete this contact until you delete theassociated invoice.
Adding contacts in bulkIntroductionBuilding a customer database is essential for getting started with your CRM system.The Import contacts feature will facilitate this process allowing you to add several contacts atonce instead of entering them one by one manually.This guide will show you how to transfer your contacts from a CSV file to CRM and restrictaccess to them.Step 1. Prepare your CSV file for importingBefore you start importing you need to prepare a CSV (Comma Separated Values) file.If you already have a CSV file containing the contact information make sure that it meets thefollowing requirements for a correct data import:
· the first row is a header record containing column/field names. The required fieldsare: First Name and Last Name for importing persons, Company Name forcompanies.
· there is one contact record per row;· there are no unnecessary commas in your file;· the selected file contains less than 10000 rows, otherwise it should be divided into
smaller parts.You can also create a CSV file from any spreadsheets using our Documents module.Step 2. Access the CRMEnter your ONLYOFFICE portal and click the CRM link.In case you have already logged in to the portal and been using it for some time, to accessthe CRMmodule from any portal page, use the drop-down list in the top left corner of the pageand select the corresponding option.Step 3. Locate your CSV fileClick the button next to the Create New... button in the upper left corner and selectthe Import contacts option from the drop-down list. The Import Contacts page will open.Click the Select a CSV file link. Browse your computer hard disk drive for the necessary file.Once the file is located click the Open button to load it into the system.
The file will be loaded and displayed in place of the link. To replace it use the Edit link next tothe file name.Step 4. Configure the CSV file settingsFor proper importing you need to set your CSV file settings:
· DelimiterA CSV file uses commas to separate values, however many implementations of CSVimport/export tools allow other delimiters to be used: semicolon, colon, tabulation, space.Use this drop-down list to select the character used to separate values in your CSV file.
· EncodingSpecify the encoding type used while saving your CSV file. The default type is UTF-8.
· Text DelimiterUse this drop-down list to specify the character used to enclose the fields in your CSVfile.
After that select the action which will be performed with the duplicate records in case there aresome. Check the Skip option to import contacts keeping the existing contacts, usethe Overwrite option if you wish to import them overwriting the existing ones or leave thedefault Duplicate option checked if you need to duplicate the coinciding contacts.If your CSV file has a header row with the column titles make sure that the Ignore the first rowwhen importing case is checked.Step 5. Set a desired access levelBy default, the access to the imported contacts will be granted to the current user only.To assign managers to these contacts click the Add user link and select a person from the list.Use the filter field at the top to facilitate the search.To make these contacts public and grant access to all the CRM users, check the Allow all CRMusers access this contact option.When the file is selected and all the parameters are set click the Continue button at the bottomto proceed to the next step.Step 6. Verify the contact information and startimportingBefore importing your customer data you need to verify the available information. You will seethe table with three columns:
· File column - the first row of your CSV file containing the column/field names.· Corresponding CRM field - the CRM field corresponding to the field/column name from
your file if there is one.
If the system does not find any corresponding CRM field automatically, open the drop-down list and select the necessary one manually.
· Value - the available file column value. To verify all the file information use the Nextrecord/Previous record links at the top.
To be able to import persons you need to match at least one column from your file withthe First Name and another with the Last Name fields of the CRM. The same is for thecompany import, you will need to match the Company Name field to be able to import acompany.After you check the customer data click the Start importing contacts button below the contactlist to launch the process.That's all. All the selected contacts will be imported and displayed in the Contacts list.The current version of CRM also allows you to import opportunities and cases stored in a .csvfile. The import process is almost the same. Just click the button next to the CreateNew... button in the upper left corner and use the corresponding option from the drop-downlist.
Keeping contacts up-to-dateIntroductionAn effective well-organized customer database enables you to communicate better with yourcustomers and increase your sales. This guide will show you how to maintain your customerdatabase: arrange and update the available contact information.Step 1. Access the CRMEnter your ONLYOFFICE portal and click the CRM link.In case you have already logged in to the portal and been using it for some time, to accessthe CRMmodule from any portal page, use the drop-down list in the top left corner of the pageand select the corresponding option.Step 2. Filter your database informationYour customer database can include as many contacts as you wish whether your customers arebig companies or single individuals.By default, all the available companies and persons are displayed in the Contacts list. To find anecessary contact make use of our filter at the top of the list.
Click the button and select one of the options:· MANAGER is used to display the contacts assigned to you or to any other CRM user;· CREATION DATE is used to display the contacts with the creation date within the
specified period of time: Last month, Yesterday, Today, This month or anyother custom period;
· ACCESSIBILITY is used to display all public or restricted contacts;· SHOW is used to display all companies or all persons only, or show the
contacts with opportunities;· TEMPERATURE LEVEL is used to display the contacts of a certain temperature level
only. The default levels are: cold, warm or hot;· CONTACT TYPES is used to display the contacts of a certain type only. The default
types are: Client, Competitor, Partner, Supplier;· WITH TAG is used to display the contacts with a specified tag only.
You can also enter a contact name, entirely or partially, in the Filter field and pressthe Enter key to find the necessary one. To facilitate the search use the wildcards:
· use the question mark ? to perform the single-character wildcard search. Forexample, when you use the Sm?th query, it will return results for Smith and Smyth.
· use the asterisk * to perform the multiple-character wildcard search. For example, tosearch for all the words beginning with O, use the O* query
· use the tilde ~ at the end of the word to search for the words similar in spelling.
When the necessary contact is located click its title to open the contact information page.Step 3. Choose a picture for your contactAdding an image for your contact - photos or company logo - makes it easier to recognize yourcontacts. To add/change a picture click the Change photo link below the image area.The Choose a profile photo window will open.If you wish to upload a picture from PC click the Browse button, locate a desired picture storedon your hard disk drive and double-click it to load.You can upload an image not larger than 200x300 pixels, otherwise resizing will take place. Themaximum image size cannot exceed 1 MB.If you previously filled the social network user field in the contact profile the images from thesocial networks will be displayed in the Choose a profile photo window. Click the one you wishto use for a contact.To remove a picture click the Change photo link and in the opened Choose a profilephoto window select the default image.Step 4. Update the existing contact informationThe problem that many companies face with customer database is the outdatedand duplicated information. The improper and incorrect data might cause you to waste timeand money.To update the selected contact information click the icon to the right of the contact nameand select the Edit contact option from the drop-down list.The Edit person/company page will open. Here you can:
· modify the available informationThe available data are: first name, last name, company name, position, email, phone,web site/social network, address, description.
· delete the unnecessary dataUse the icon next to the unnecessary field to delete it.
· set the information priorityUse the icon next to the field to mark it as primary. This information will be displayedin the general contact list.
· enter the additional informationClick the corresponding icon or add the user fields to add some more informationabout your contact.
To save the changes you made click the Save Changes button.
Step 5. Arrange your contactsArranging your contacts into groups will help you create marketing campaigns, track yourcontacts and simply facilitate the contact search process. In order to arrange your contacts youcan divide them into types, set an appropriate temperature level and add tags.To tag your contact click the Add Tag link in the General Information section of the contactprofile page. Select one of the available tags, if present or enter a tag you need and clickthe OK button to confirm it.
If this contact is linked with some other contacts presented in the Contacts list, you will beoffered to add this tag to them as well. Add it to all the linked contacts or to the current oneonly clicking the appropriate button in the opened dialog window.In the same way you can add as many tags as you wish.To delete an unnecessary tag point to it and click the icon that appears to the right.Step 6. Delete your contactsIf you need to remove an old customer from your system, click the icon to the right of thecontact name and select the Delete contact option from the drop-down list.The Delete company/person action cannot be undone.
The selected contact with all the associated information will be removed from your system.
Exporting CRM database and editing it usingspreadsheet editorIntroductionDo you need to export the customer information from your CRM database as a .csv file to editand print it later? You can do it right on the portal. Just follow these easy steps.Step 1. Access the CRMEnter your portal and click the CRM link.In case you have already logged in to the portal and been using it for some time, to accessthe CRMmodule from any portal page, use the drop-down list in the top left corner of the pageand select the corresponding option.
Step 2. Filter your database informationBy default, all the available companies and persons are displayed in the Contacts list. If youwish to export all of them, just proceed to the Step 3. If you need to export certain contacts,please make use of our filter at the top of the page.
Click the button and select one of the options:· MANAGER is used to display the contacts assigned to you or to any other CRM user;· CREATION DATE is used to display the contacts with the specified creation date
within the specified period of time: Last month, Yesterday, Today, This month orany other custom period;
· ACCESSIBILITY is used to display all public or restricted contacts;· SHOW is used to display all companies or all persons only, or show the
contacts with opportunities;· TEMPERATURE LEVEL is used to display the contacts of a certain temperature level
only. The default levels are: cold, warm or hot;· CONTACT TYPES is used to display the contacts of a certain type only. The default
types are: Client, Competitor, Partner, Supplier;· WITH TAG is used to display the contacts with a specified tag only.
You can also use the wildcards to filter your contacts:· use the question mark ? to perform the single-character wildcard search. For
example, when you use the Sm?th query, it will return results for Smith and Smyth.· use the asterisk * to perform the multiple-character wildcard search. For example, to
search for all the words beginning with O, use the O* query· use the tilde ~ at the end of the word to search for the words similar in spelling.
Step 3. Open and edit your contact listWhen the list is built, click the button next to the Create button in the upper left corner andselect the Export current list to CSV-file option from the drop-down list.The contacts.csv file will be automatically saved in theMy Documents folder ofthe Documentsmodule. Click the Open link if you want to edit the list containing all theavailable contact information using the online Spreadsheet Editor. Format the list as you wishusing the Home tab of the Top Toolbar. This tab provides many of most common textformatting commands such as font style, font color, alignment, etc.Step 4. Save your contact listBy default, when you work on your document, Spreadsheet Editor automatically saves it each 2seconds preventing the data loss in case of the unexpected program closing. If you previouslydisabled the Autosave option, you can save the file manually. To do that,
· click the Save icon at the top toolbar, or· use the Ctrl+S key combination, or· switch to the File tab at the top toolbar and select the Save option at the left sidebar.
The contacts.csv file can be found in theMy Documents folder of the Documentsmodule.

To download the resulting file onto your computer hard disk drive,1. switch to the File tab at the top toolbar,2. select the Download as... option at the left sidebar,3. choose one of the available formats depending on your needs: XLSX, PDF, ODS, CSV.
By default, the created file will be saved in the Downloads folder on your hard disk drive.
Performing group operationsWant to save time while managing your contacts within the CRM module? Use group operationsto delete, create new tasks, send an email, add a tag to several contacts at once! Read theinstructions below on how to do that.To perform one of the group operations with your contacts, please follow the easy steps below:
1. Enter your portal using your login details.2. Click the CRM link on the start page. The contacts list will open by default.3. Check the boxes next to the contacts you want to perform an operation with. If you
want to select all the contacts from the list, check the box above the list.4. Click the needed button at the top:
· Send Email to carry out a bulk mailing.· Add Tag to select an existing tag or create a new one and mark the checked
contacts with it.· Create New Task to create several equal tasks linked with different contacts.· Delete to delete the checked contacts from your client database.
After that the operation will be performed with the checked contacts from your contacts list.
Deleting duplicate contactsMaintaining a contact list within the CRM module it might happen that portal users add thesame contact details several times. After finding duplicate contacts, you can eliminate them in afew easy steps. Please see the instructions below.To eliminate duplicate contacts, please follow the easy steps below:
1. Enter your portal using your login details.2. Click the CRM link on the start page.3. The contacts list will open by default.4. Find the duplicate of the original contact in the list using the available filters.5. Click the needed contact to open it.6. Press the icon and select the This is a duplicate option.7. In the opened 'Merge Contacts' window, find the original contact.8. Click the Start Merging Contacts button.
After that the both contact details will be merged under the caption of the original contact.
Assigning tasksThe Tasks section gives you a full overview of coming duties at a glance. Collaborating with aclient you can create tasks for yourself or assign them to other colleagues.To set a task:
1. Click the Create button in the upper left corner and select the Task option.2. Enter a Title for your task.3. Select an appropriate task Category from the drop-down list.
The portal and CRM administrators can change the default task categories accordingto their company needs. Just click the Task Categories link in the Settings >> Othersettings section.
4. Enter a contact you wish to link your task with.5. Set a desired Due date: date and time.
To do that, use one of the available options: Today, 3 days,Week, or select it fromthe calendar, or enter it manually in the following format dd/mm/yyyy.
6. Set a task reminder.By default, you will be informed about your task a day before its due date. If youwant to change the reminder time, open the Alert drop-down list and select one ofthe available options: 5 minutes, 15 minutes, half an hour, an hour, 2 hours, a day. Toswitch the reminder off select the never option from the drop-down list.
7. Select the responsible person you wish to assign this task to from the Assignedto list.By default, the task is assigned to you. To change the responsible person just clickthe link with your name and select the user you need. Leave the Notify box checkedif you wish the responsible person to be notified about the new task assign tohim/her.
8. Enter a short Description.9. Click the Save button.
It's also possible to create a task within an opportunity or a case.1. open an appropriate opportunity/case page clicking its title,2. switch to the Tasks tab below its title,3. click the Create task link if there is no tasks or use the Create button in the upper
left corner and select the Task option,4. fill in the Create new task form,5. click the Save button.
This task will be automatically linked to the selected opportunity/case.To add the same task linked with different contacts make use of the Create New Task groupoperation,
1. open the Contacts list,2. select the contacts you need checking the box to the left,3. click the Create New Task button at the top of the Contacts list,4. fill in the Create new task form,5. click the Save button.
The tasks will be added to the Tasks list.If you need to edit a task,
1. select the task you need from the Tasks list,2. click the icon to the right of the task title,3. select the Edit task option from the Actions drop-down list,4. make all the changes you need and click the Save Changes button.
Once the task is completed close it right in the Tasks list changing its statusfrom Open to Closed. To do that, just click the arrow to the left of the task title andselect the necessary status from the list.To delete a task, choose the corresponding option from the Actions drop-down list.
OpportunitiesManaging opportunitiesAn opportunity is used to keep track of the potential sales, their estimated due date, budgetand success probability and help you manage your sales more easily and effectively.To add an opportunity:
1. Click the Create button in the upper left corner and select the Opportunity option.2. Enter a Title for your opportunity.3. Enter an opportunity Contact - person or company - selecting it from your customer
database.4. Add a short Description.5. Specify your opportunity Budget currency, amount and type.6. Set the Estimated deal due date using the calendar.7. Select a Responsible for your opportunity from the drop-down list.8. Set an opportunity Stage using the drop-down list. The Success probability in
percent will set accordingly.The portal and CRM administrators can change the default opportunity stagesaccording to their company needs. Just click the Opportunity Stages link inthe Settings >> Other settings section.
9. Enter other requested information, if available.To enter some additional information customize user fields. To do that, first of allsave the currently created opportunity. Otherwise all the entered information will belost. Then explore the Settings >> Other settings section on the left side panel andclick the User Fields link.This function is available for portal and CRM administrators only.
10. Restrict access to your opportunity checking the corresponding box.By default, the access to the newly created opportunity is granted to all portal users.Check the Restrict access to the opportunity box and select the users you wish togrant the access to clicking the Add users link. The selected users will be notifiedabout new opportunity added and will be able to view and edit it.
11. Click the Save button or use the Save and Create New Opportunity button to startcreating a new opportunity right after saving the current one.
The created opportunity will be added to the Opportunities list. You can access it either fromthe Opportunities list clicking the corresponding link on the left side panel or clicking the clientname in the Contacts list and switching to the Opportunities tab inside.To organize the work on your opportunity more efficiently you can create a project. To do that,
1. select the opportunity you need in the Opportunities list,2. click the icon to the right of the opportunity title,3. select the Create project option from the drop-down list,4. fill in the form and click the Save button.
Each time your customer relations take a step forward, the opportunity related to this clientgoes to a new stage. To change the opportunity stage,
1. open the opportunity overview page clicking its title,2. select one of the available stages from the corresponding drop-down list.
To edit an opportunity,1. select the opportunity you need in the Opportunities list,2. click the icon to the right of the opportunity title,3. select the Edit opportunity option from the drop-down list,4. make all the changes you need and click the Save Changes button.
To delete an opportunity, choose the corresponding option from the Actions drop-down list.
Tracking potential salesIntroductionAn opportunity is used to keep track of the potential sales, their estimated due date, budgetand success probability and help you manage your sales more easily and effectively.This guide will show you how to create and manage your opportunities.Step 1. Access the CRMEnter your ONLYOFFICE portal and click the CRM link.In case you have already logged in to the portal and been using it for some time, to accessthe CRMmodule from any portal page, use the drop-down list in the top left corner of the pageand select the corresponding option.Step 2. Create an opportunityClick the Create New... button in the upper left corner and select the Opportunity option fromthe drop-down list.It's also possible to import several opportunities at once from a .csv file clicking the button nextto the Create New... button and using the Import opportunities option from the drop-downlist.You will be presented with the Create new opportunity form. Fill in the fields you need:
· enter a Title for your opportunity;· find an opportunity Contact - person or company - in your customer database;· add a short Description;· set the Estimated deal due date using the calendar;· specify your opportunity Budget currency, amount and type;· select a Responsible person for your opportunity from the drop-down list;· set an opportunity Stage using the drop-down list. The Success probability in
percent will set accordingly.If you wish to restrict the access to the created opportunity check the Restrict access box andadd users you wish to grant the access to.Finally, click the Save button at the bottom.The created opportunity will be added to the Opportunities list.Step 3. Change your opportunity stageWhen you create an opportunity you can select one of the available stages from the list. It willhelp you track your sales pipeline. By default, it is set to Initial contact.To go to a new stage select the necessary opportunity from the list and click its title.
To facilitate the search make use of our filter above the opportunity list.
Open the Opportunity at stage list and select the needed one, the success probability valuewill be changed accordingly.Step 4. Add tasksBefore you close an opportunity you need to accomplish some tasks/actions. Creating tasks isan effective way for getting things done on time. You can use them as simple reminders foryourself or to organize your team work on the opportunity.To add a new task switch to the Tasks tab on the selected opportunity page. Click the Createtask link if there is no task or use the Create New... button in the upper left corner and selectthe Task option from the drop-down list. Fill in the form: enter a Title for the task, select one ofthe task categories, set a desired Due date (date and time) and the reminder time usingthe Alert drop-down list, select a responsible person from the Assign to list, add ashort Description.When all the necessary information is specified, click the Save button at the bottom.The created task will be added to the Tasks list of the selected opportunity. Once the task iscompleted close it right in the list opening the drop-down list near the task title and choosingthe Closed option.Step 5. Manage your opportunity participantsWorking on an opportunity you can always add or remove its participants.To add some more participants switch to the Participants tab on the selected opportunitypage, select a necessary contact - person or company - from the existing ones entering it in thesearch field. The selected contact will be added to the Participants list.
To remove a participant from the list, click the icon to the right of the participant you wish toremove and select the Unlink contact option from the drop-down list.Step 6. Store the related documentationTo keep all the documentation related to your opportunity in one place use the Documents tabon the selected opportunity page. Here you can:
· create a new document, spreadsheet or presentation clicking the New File link andselecting the file type from the list;
· edit an existing document clicking the icon which appears to the right of theneeded document if you hover the mouse cursor over its line;
· upload some documents from your hard disk drive clicking the Upload File link;
· download an existing document to your hard disk drive using the icon whichappears to the right of the needed document if you place the mouse cursor on itsline.
Step 7. Track historyAll the completed tasks/actions/activities related to the selected opportunity are displayed andcan be tracked within the Profile tab.Here you can not only view the information about the completed tasks, uploadeddocuments, sent/received correspondence etc. but also add some events related to thisopportunity: note, email, phone call, appointment. Just select an event type from the list, setits date, add a description and click the Add This Event button.To notify other users about the created event click the Add user link and select the desiredusers from the list before adding this event.All the selected users will receive a notification about a new event added.Step 8. Generate reportsTo get a report of the opportunities and assess the managers' productivity, clickthe Reports link on the left-side panel and select the Opportunities by managers report typefrom the list which opens. This report displays the total workload of won and lost opportunitiesfor the specified time period for the selected managers.Now you need to specify what you wish to include to your report configuring the reportparameters:
· set a necessary Time period,· select theManagers whose productivity you wish to assess (you can select all portal
users, or all employees of a certain group, or several users from differentdepartments).
When all the parameters are set, click the Generate Report button.Once the report is generated, click the Open link at the bottom right corner to view the report.The file will open in the Spreadsheet Editor and you will be able to edit it, print or download ifnecessary.You can also generate other types of reports, e.g. Sales forecast, Sales funnel etc. All thegenerated reports are available in the Generated reports list of the Reports section where youcan edit, download or delete them using corresponding icons next to the necessary file.
Step 9. Delete an opportunityTo delete an opportunity locate it in the Opportunities list, click the icon to the right andselect the Delete opportunity option from the drop-down list.Your opportunity with all the related information will be removed from your system.The Delete opportunity action cannot be undone.
Linking an opportunity with a projectIntroductionSometimes working on an opportunity might require the involvement of the whole team of thespecialists. In this case creating a project and linking it with the opportunity will help youcoordinate the work and manage it more efficiently.Follow the instructions below to learn how to link an existing opportunity with a project.Step 1. Access the CRMEnter your ONLYOFFICE portal and click the CRM link.In case you have already logged in to the portal and been using it for some time, to accessthe CRMmodule from any portal page, use the drop-down list in the top left corner of the pageand select the corresponding option.Step 2. Select an opportunity or create a new oneBy default, all the available opportunities are displayed in the Opportunities list. To open it,just click the Opportunities link on the left-side panel.Select the necessary opportunity from the list. To facilitate the search, make use of our filter atthe top of the list.
Click the button and select one of the options:· Responsible is used to display the opportunities assigned to you or to a specified user
only;· Due date is used to display the opportunities with a specified due date;· Participant is used to display the opportunities with a specified participant only;· Contact is used to display the opportunities linked with a specified contact only;· With tag is used to display the opportunities with a specified tag only.· Stage/Stage type list is used to display the opportunities at a certain stage or of a
certain stage type;
You can also use the wildcards to filter your opportunities:· use the question mark ? to perform the single-character wildcard search. For
example, when you use the Sm?th query, it will return results for Smith and Smyth.· use the asterisk * to perform the multiple-character wildcard search. For example, to
search for all the words beginning with O, use the O* query· use the tilde ~ at the end of the word to search for the words similar in spelling.
Step 3. Create a projectWhen the opportunity is located, click the icon to the right and select the Createproject option from the drop-down list.The standard Create new project form will be open. Check the available information andmodify it, if necessary:If you have previously created a template and want to apply it to a new project clickthe Select link under the Select project template caption and choose the necessary template.Use the search field to accelerate the search process.
· change your project Title and its Description,· change a Project Manager,
To do that, open the corresponding drop-down list and select a person you need.Sort all users by group or use the filter field at the top to facilitate the search. Checkthe box near this field if you wish to notify the progect manager by email.
· manage your project Team,Click theManage Team link. In the left part of the form check the users you wish toadd to your team and click the rightwards arrow. To remove an added user, selecthim/her and click the leftwards arrow.When all the users are added, click the Save button. They will be notified by email.
· edit project structure,You can edit project structure adding milestones. Click the Add milestone link, enterthe title, due date and select responsible person. Click the OK button. To edit/delete amilestone or add a task, select the needed milestone and click the icon to theright and select the corresponding option from the drop-down list. If you wish to addtasks without milestone, click the Add task link in the Tasks without milestonesection, enter the task title, set it's due date and responsible person.
· review the contact list,If you add some more participants to your opportunity, they will be automaticallydisplayed on the Contacts tab of the created project.
· enter tags separating them with commas,This helps categorize the project and facilitate the search for the other users.
· check the Save this project as private box,Use this option if you'd like to restrict access to the newly created project. In this casethe project will be available only to the project administrator, the project managerand its members with corresponding rights.
· check the Follow this project box, if you don't plan to participate in this project butneed to keep track of it,
After reviewing all the information click the Save button.The created project will be added to the Projects list of the Projects module.
Organizing casesThe Cases section is aimed to simplify event organization, seminar and meeting arrangementetc. with a group of customers.To plan an event:
1. Click the Create button in the upper left corner and select the Case option.2. Enter a Title for your Case.3. Select your case Participant from the customer database.
You can add as many participants as you wish using the search field. To delete aparticipant added by mistake, use the icon.
4. Add tags, if necessary, clicking the Add tag link and selecting one of the available tagsor creating a new one.
5. Enter other requested information, if available.To enter some additional information customize user fields. To do that, first of allsave the currently created case. Otherwise all the entered information will be lost.Then explore the Settings >> Other settings section on the left side panel and clickthe User Fields link.This function is available for portal and CRM administrators only.
6. Restrict access to your case checking the corresponding box.By default, the access to the newly created case is granted to all portal users. Checkthe Restrict access to the case box and select the users you wish to grant the
access to clicking the Add users link. The selected users will be notified about newcase created and will be able to view and edit it.
7. Click the Save button or use the Save and Create New Case button to start creatinga new case right after saving the current one.
Once a case is created, you can schedule events, assign tasks, manage participants, store therelated documentation.To edit a case,
1. select the case you need in the Cases list,2. click the icon to the right of the case title,3. select the Edit case option from the drop-down list,4. make all the changes you need and click the Save Changes button.
After your case took place you can close it in the system. To do that, just check the box to theleft of the case title.To delete a case, choose the corresponding option from the Actions drop-down list.
Organizing and tracking a common eventIntroductionUsing case is an effective way to organize a common event for your customers. It allows you tocoordinate teamwork, keep all the related documentation organized in one place and track thework process more efficiently.This guide will show you how to use a case in CRM.Step 1. Access the CRMEnter your ONLYOFFICE portal and click the CRM link.In case you have already logged in to the portal and been using it for some time, to accessthe CRMmodule from any portal page, use the drop-down list in the top left corner of the pageand select the corresponding option.Step 2. Create a caseClick the Create New... button in the upper left corner and select the Case option.It's also possible to import several cases at once from a .csv file clicking the button next tothe Create New... button and selecting the Import cases option from the drop-down list. Thisis done the same way as the Contact import.

You will be presented with the Create new case form. Fill in the fields you need: entera Title for your case, add the case Participants - person or company - from your customerdatabase.To define your case and facilite the further search, add some tags clicking the Add tag link andselecting one of the available tags or creating a new one.If you wish to restrict the access to the created case check the Restrict access box and addusers you wish to grant the access to. Check the Notify box if you wish to inform the selectedusers about the created case.Finally, click the Save button at the bottom.The created case will be added to the Cases list.Step 3. Add tasksUsing tasks you will not miss any scheduled appointments or phone call and will be able tomanage the work process. Use them as simple reminders for yourself or to organize your teamwork on the case.To add a new task switch to the Tasks tab on the selected case page. Click the Create task linkif there is no task or use the Create New... button in the upper left corner and selectthe Task option from the drop-down list. Fill in the form: enter a Title for the task, select one ofthe task categories, set a desired Due date (date and time) and the reminder time usingthe Alert drop-down list, select a responsible person from the Assign to list, add ashort Description.When all the necessary information is specified, click the Save button at the bottom.The created task will be added to the Tasks list of the selected case. Once the task is completedclose it right in the list opening the drop-down list near the task title and choosingthe Closed option.Step 4. Manage your event participantsWorking on a case you can always add or remove its participants.To add some more participants switch to the Participants tab on the selected case page, selecta necessary contact - person or company - from the existing ones entering it in the search field.The selected contact will be added to the Participants list.
To remove a participant from the list, click the icon to the right of the participant you wish toremove and select the Unlink contact option from the drop-down list.
Step 5. Store the related documentationTo keep all the documentation related to your case in one place use the Documents tab on theselected case page. Here you can:
· create a new document, spreadsheet or presentation clicking the New File link andselecting the file type from the list;
· edit an existing document clicking the icon which appears to the right of theneeded document if you hover the mouse cursor over its line;
· upload some documents from your hard disk drive clicking the Upload File link;· download an existing document to your hard disk drive using the icon which
appears to the right of the needed document if you place the mouse cursor on itsline.
Step 6. Track historyAll the completed tasks/actions/activities related to the selected case are displayed and can betracked within the Profile tab.Here you can not only view the information about the completed tasks, uploadeddocuments sent/received correspondence etc. but also add some events related to thiscase: note, email, phone call, appointment. Just select an event type from the list, set its date,add a description and click the Add This Event button.To notify other users about your created event click the Add user link and select the desiredusers from the list before adding this event.All the selected users will receive a notification about a new event added.Step 7. Close your caseAfter your case took place you can close it in the system. To do that, click the icon to theright of its title and select the Close case option from the drop-down list.The case status will be changed from Open to Closed.
If you wish to delete the created case, click the icon to the right of its title in the Cases listand select the Delete case option from the drop-down list. Keep in mind that in this case all therelated information (inc. history and documentation) will be deleted and cannot be restoredanymore.
Making invoicesThe Invoices section allows you to create and manage invoices for the products and servicesprovided.To create an invoice:
1. Click the Create button in the upper left corner and select the Invoice option.2. Check your Invoice number.
By default, the invoice number is generated automatically using the INV prefix andthe number in the ####### format starting from 0000001. But you can easilychange it while creating an invoice. To do that, just click the Change format link nextto the Invoice number field. Enter a necessary Prefix and the Start number.If you don't want the invoice number to be generated automatically, uncheckthe automatically generated case. After that you will be able to enter any numberyou need manually.This option is available for portal and CRM administrators only.
3. Set the Invoice date selecting it from the calendar, or entering it manually in thefollowing format dd/mm/yyyy.The Invoice date is the date the invoice is issued.
4. Select a Client you wish to create the invoice for using the search field.The system will use the billing address information stored on your customerdatabase. If necessary, you can change it using the Edit billing address link whichappears below the client name once it is selected.
5. Select a Consignee using the search field.If the Consignee coincides with the Client, just check the coincides with theclient box and add the delivery address using the corresponding link which appearsnext to the Edit billing address link.
6. Link the invoice with one of the available opportunities.7. Set a Due date using one of the available options to the right: Due on receipt, 15
days, 30 days or 45 days, or selecting it from the calendar, or entering it manually inthe following format dd/mm/yyyy.The Due date is the date by which the invoice needs to be paid.
8. Select the Invoice language from the list of the available ones.9. Select the Currency for your invoice. By default, the currency specified in the profile
of the client is used. If the currency is not set in the client's profile, the defaultcurrency specified in the CRM settings is used. If necessary, you can select any othercurrency from the list of the available ones.If you select a currency that differs from the default currency specified in the CRMsettings, the Exchange rate field is also displayed. Set the appropriate conversionrate and click the Save button.
The portal and CRM administrators can change the default currency and setconversion rates for the currencies from the list in the Settings >> Currencysettings section.
10. Enter a PO Number, if available.11. Specify your payment Terms.
If you wish to specify the general terms for all your future invoices, click the Setdefault link below the Terms field, enter your terms and click the Save button.
12. Enter Client Notes, if you want to express your gratitude to a customer for thepurchase and/or to provide a special offer, for example, a 20% discount if the invoiceis paid within 5 days.These notes will be displayed on your invoice and added to the message body if yousend the invoice per ONLYOFFICE Mail.
13. Fill in the Products & Services section.List the services/products you provided for your client. You can select them from thelist, if available, or create right there opening the Select item list and clickingthe Create new item link.Enter the item Quantity and Discount, if applicable.Add the sale Tax or leave this field empty. You can select the tax to apply from thelist, if already available, or create a new one right there opening the Tax list andclicking the Create new tax link.In the same way you can add as many services/products as you need.
14. Check the Subtotal and Total calculated automatically based on the informationprovided above.
15. Click the Add This Invoice button or use the Add and Create New Invoice button tostart creating a new invoice right after saving the current one.
To specify your company information for the invoice, expand the Settings list at the left sidepanel, select the Invoice settings section and click the Organization profile link.This option is available for portal and CRM administrators only.Here you can:
1. enter your company name,2. add your company logo clicking the Change Logo button below the default image,3. set your organization billing address filling in the Address section fields.
All this information will be placed and displayed on your invoices.Once the invoice is created, it will be added to the invoice Drafts. As soon as the invoice is sentto your client, paid or rejected by him/her, you can change its status in the Invoices list.

1. check the invoice you need in the Invoices list,2. click the Change Status button above,3. select the appropriate status: Draft, Billed, Paid or Rejected.
To edit an invoice,You can edit invoices with the Draft status only.
1. select the invoice you need in the Invoices list,2. click the icon to the right of the invoice title,3. select the Edit invoice option from the Actions drop-down list,4. make all the changes you need and click the Save Changes button.
Using the Actions drop-down menu you can also download, print, send, duplicate or delete theselected invoice.
Creating invoices for your clientsIntroductionWhen the sales cycle is completed, you can create an invoice for the products and services youhave provided and send it to the client. CRM allows you to do it quickly and easily. Just fill in thefields of the invoice form and send it as an attachment to your client using Mail.Step 1. Access the CRMEnter your portal and click the CRM link.In case you have already logged in to the portal and been using it for some time, to accessthe CRMmodule from any portal page, use the drop-down list in the top left corner of the pageand select the corresponding option.Step 2. Specify your company informationBefore you start creating an invoice, you need to complete your organization profile.This option is available for CRM and portal administrators only.To do that, expand the Settings section at the left side panel, select the Invoicesettings option, then click the Organization Profile link to open the corresponding page. Onthis page you can:
· Specify your company name.
Go to the Basic Information section, enter the name and click the Save button belowthe field.
· Add your company logo.Go to the Invoice logo section, click the Change Logo button below the default logoimage, select the necessary image file stored on your computer and clickthe Save button below the displayed invoice image. To restore the default image, usethe Restore to Default button.
· Enter your company billing address.Go to the Address section. Fill in all the fields: Address, City, State and Zip Code, selectthe Country from the corresponding drop-down list and click the Save button below theaddress fields
This information will be used for all your future invoices. But you can always change it onthis Organization Profile page.To specify the conditions under which your company will complete a sale, like suitable paymentmethods and details, make use of the Terms field while creating an invoice (refer to the step 5).Step 3. Start creating an invoiceTo start creating an invoice, you may proceed in one of the following ways:
· Click the Create New... button in the upper left corner and select the Invoice option.OR
· Open the Contacts list, select the contact you need to make an invoice for, switch toits Profile page clicking the title and use theMake out an invoice button below thecontact information.
The Create new invoice form will be opened.Step 4. Enter your client informationClick within the Client filter field or start typing your client name to find him/her in yourcustomer database. Once located, click the contact name.Specify the billing address clicking the Add billing address link which appears below thecontact name. If you added it while creating the contact, the available billing addressinformation will be automatically taken from the customer database. If not, enter the requiredinformation: City, Address, State, Zip code, select a Country from the drop-down list and clickthe Save button.If you create the invoice following the second way (at the step 3) the client name and all thecontact information will be displayed automatically.

To specify a Consignee, use the corresponding filter field. Then add the delivery address usingthe Add delivery address link which appears below the consignee name.If the Consignee coincides with the Client just check the coincides with the client box andverify the delivery address clicking the Add delivery address link which appears next tothe Add billing address link in the Client section.To express your gratitude to a customer for the purchase and/or to provide a special offer, forexample, a 20% discount if the invoice is paid within 5 days, make use of the Client notes field.Step 5. Set the general invoice parametersCheck the Invoice number generated automatically. If you have the administrator rights(CRM/full access), you can change the number format clicking the Change format link next tothe Invoice number field and entering the necessary prefix and number format in the fields ofthe opened Change format window.The Invoice Date, i.e. the date the invoice was issued, is set to the current one, by default. Ifnecessary, you can change it selecting it from the calendar, or entering it manually in thefollowing format dd/mm/yyyy.To set the Due date, i.e. the date by which the invoice needs to be paid, use one of theavailable options on the right: Due on receipt, 15 days, 30 days, or 45 days, or select it fromthe calendar, or enter it manually in the following format dd/mm/yyyy.Select a Language for your invoice from the Invoice language drop-down list. If your languageis not yet present in the list of the available ones or the translation to your language is notcomplete, you may contribute to the translation sending your requestat [email protected] a Currency for the invoice. By default, the currency specified in the profile of the clientis used. If the currency is not set in the client's profile, the default currency specified in the CRMsettings is used. If necessary, you can select any other currency from the list of the availableones.If you select a currency that differs from the default currency specified in the CRM settings,the Exchange rate field is also displayed. Set the appropriate conversion rate and clickthe Save button.The portal and CRM administrators can change the default currency and set conversion ratesfor the currencies from the list in the Settings >> Currency settings section.Enter a purchase order number (PO Number), if available, and specify your payment Terms. Ifyou wish to specify the general terms for all your future invoices, click the Set default linkbelow the Terms field, enter your terms and click the Save button.
Step 6. Complete the Products&Services listTo specify the products and services you provided to the client, referto Products&Services section of your invoice. To add an item to your invoice, openthe Item drop-down list and select one of the available items (if you have already createdthe Invoice Item List) or create a new item right there:
1. select the Create new item option from the Item drop-down list,2. fill in the Item name and Price fields,3. click the Create button to add this item to the Invoice Item List.
The Create new item option is available for CRM and portal administrators only.Then specify the current item details:
· Enter the Quantity of the products/services provided.· Check and correct the Price.· Specify the Discount rate, if applied.· Select the Tax, if imposed, from the Tax drop-down list.
You can select one of the available taxes from the list, if the Tax List is alreadycreated, or create a new one right there using the Create new tax, if you have theCRM or portal administrator rights.If the double taxation is applied, use the second Tax field to select the second tax tobe imposed.
· Enter the item Description.Use the Add Line link to add as many products/services to your invoice as you need.Step 7. Save and manage your invoiceWhen all the fields are filled in, check the Invoice Total calculated automatically on the basis ofthe product/service details provided (see the step 6) and click the Add This Invoice button.The saved invoice will be added to the invoice Drafts and displayed in the Invoices tab of theselected contact/opportunity profile. At the Documents tab of the selected contact/opportunityprofile you will find the PDF copy of this invoice. As soon as the invoice is sent to your client,paid or rejected by him/her, you can change its status in the Invoices list.
1. check the invoice you need in the Invoices list,2. click the Change Status button above,3. select the appropriate status: Draft, Billed, Paid or Rejected.
You can also change your invoice status selecting the corresponding option from the Actionsdrop-down list.
Using the same Actionsmenu you can easily perform the following operations:· Show invoice profile to see what your invoice looks like to your client.
· Download the created invoice as a PDF file and save it on your computer hard diskdrive.
· Send by email as an attachment usingMail.· Duplicate invoice to create a new invoice on the basis of the existing one.· Edit invoice with the Draft status.· Delete this invoice.
CallsUsing VoIPThe VoIP feature allows you to receive incoming calls from your customers and make outgoingcalls right from a web browser.To use the IP telephony functionality, you need to sign up for a Twilio account and connect it toyour portal specifying API credentials: Account SID and Auth token. They can be found atthe Twilio Console page in the 'Account Summary' section.The ability to connect a Twilio account is available for portal administrators only.Click the icon at the top of the page to go to your portal settings and open the Integration ->Third-Party Authorization section. Click the switcher next to the Twilio service, specify APIcredentials in the appropriate fields and click the Enable button.Once you connect your Twilio account to the portal, you will be able to add and manage virtualnumbers.To add a virtual number,1. In the CRM module, go to the Settings section on the left-side panel and click the VoIP
Settings option.2. Click the Buy phone number link.3. In the Number purchase window, select the necessary number from the list of the
available ones and press the Buy phone number button.If you already have some phone numbers purchased earlier in your Twilio account, youcan use the Link purchased number option. In a new window, select one of theavailable Twilio virtual numbers and click the Link purchased number button.
When the first number is added to your CRM module, you can use the Buy phonenumber/Link purchased number link above the Virtual numbers and operators list to addsome other numbers.
If you are using a trial Twilio account, you cannot add more than one virtual number. TrialTwilio accounts also have some other restrictions. To use all the capabilities of the service, you'llneed to upgrade your Twilio account.To set up the added virtual number,1. In the Virtual numbers and operators list, select the number you want to set up.2. Click the Outgoing calls switcher to enable the possibility to not only receive incoming
calls but also make outgoing calls using this number.3. Click the Call recording switcher to enable the possibility to record all incoming and
outgoing calls for this number so that you will be able to listen to the necessary callrecording later.
4. Click the arrow to the left of the necessary number to Add operators who should beable to use this virtual number. Check the necessary portal users in the list and clickthe Save button. Once operators are added, the VoIP icon will be available for themon the top of the page.You can also set up Outgoing calls and Call recording for each of the added operatorsseparately using the switchers next to the operator's name. To remove an addedoperator from the virtual number operator list, click the Actions icon to the right ofthe operator's name and select the Delete option.
Use the Actions icon to the right of the necessary virtual number to Edit or Delete thenumber.To start accepting and making calls,
1. Click the VoIP icon on the top of the page. The VoIP client opens in a new window.2. Choose the Online status next to your name.
The Browser option is selected by default, and currently, it is the only available option in thedrop-down list, so you don't need to do anything else. Now you are ready to accept incomingcalls.If you receive an incoming call, you can Answer or Reject it using the corresponding buttonswithin the VoIP window.If a person whose phone number is stored in your CRM customer base calls you, the contactname is displayed in this window. You can click it to open the customer profile in a new browsertab and easily find all the necessary information about the client that can be useful during thephone conversation.To end the call, click the Disconnect button.
The button in the VoIP window allows to view the list of missed calls during the currentsession. If you want to call back to the person who called you, move the mouse cursor over themissed call icon in the list so that it turns into the icon and click it.The operators who have been granted sufficient permissions can make outgoing calls. To makea call,
1. Click the button to open the dial pad.2. Click the icon to open the list of all existing CRM contacts. To facilitate searching
for a contact, you can enter the contact name, entirely or partially, in the search fieldabove the contact list. Select the necessary CRM contact from the list.Alternatively, you can right-click the necessary contact in the complete list ofCompanies/Persons on the Contacts tab and choose theMake a VoIP call option inthe context menu. Currently, you cannot call a contact from his/her profile page.The selected contact phone number will be displayed in the corresponding field.
If the contact profile contains several phone numbers (mobile, work, home), click thearrow in the right part of the phone number field to choose the necessary number.
To remove the number, click the icon.To call to the number that is not stored in your customer base, select the countrycode from the list and enter the phone number using the keypad or your PCkeyboard.
3. Click the Call button.
If you call a contact stored in the CRM module, the link to the contact profile is displayed in thiswindow, so that you can open the profile in a new browser tab.If you make a call to a new number that is not stored in the CRM contacts or if you receive a callfrom such a number, this number will be automatically saved to your CRM contacts as a newcontact. A new Outgoing or Incoming call event is also automatically added to the history forthis contact.All the incoming, outgoing and missed calls are displayed in the Calls section. Clickthe Calls link on the left-side panel to open the call list. It provides the following informationabout calls: date and time, agent (operator name), client (customer name stored in the CRMbase), call duration and cost. If a call has been recorded, click the icon to playback therecording.
Calling your customers directly from CRMIntroductionIn the CRM module, you can not only maintain your customer base, but also organizeinteraction with any client in an effective way. The VoIP feature allows you to receive incomingcalls from your customers and make outgoing calls right from a web browser using virtualnumbers provided by the Twilio service. Incoming calls from new phone numbers that are notstored in your customer base are automatically saved as new CRM contacts. The informationabout phone conversations with customers is automatically added to the communicationhistory of your CRM contacts. You can also use incoming call queue, record calls, receivevoicemail messages, set up your own waiting ringtones.This guide will show you how to add and manage virtual numbers and call your customers rightfrom the CRMmodule.Step 1. Connect your Twilio accountTo use the IP telephony functionality, you need to sign up for a Twilio account and connect it toyour portal specifying API credentials: Account SID and Auth token. They can be found atthe Twilio Console page in the 'Account Summary' section.The ability to connect a Twilio account is available for portal administrators only.Click the icon at the top of the page to go to your portal settings and open the Integration ->Third-Party Services section. Click the switcher next to the Twilio service, specify APIcredentials in the appropriate fields and click the Enable button.Once you connect your Twilio account to the portal, you will be able to add and manage virtualnumbers.Step 2. Add a virtual numberThe ability to add and set up virtual numbers is available for portal and CRM moduleadministrators only.To add a virtual number,1. In the CRM module, go to the Settings section on the left-side panel and click the VoIP
Settings option.2. Click the Buy phone number link.3. In the Number purchase window, select the necessary number from the list of the
available ones and press the Buy phone number button.If you already have some phone numbers purchased earlier in your Twilio account, youcan use the Link purchased number option. In a new window, select one of theavailable Twilio virtual numbers and click the Link purchased number button.
When the first number is added to your CRM module, you can use the Buy phonenumber/Link purchased number link above the Virtual numbers and operators list to addsome other numbers.If you are using a trial Twilio account, you cannot add more than one virtual number. TrialTwilio accounts also have some other restrictions. To use all the capabilities of the service, you'llneed to upgrade your Twilio account.Step 3. Set up the added virtual numberTo set up the added virtual number,1. In the Virtual numbers and operators list, select the number you want to set up.2. Click the Outgoing calls switcher to enable the possibility to not only receive incoming
calls but also make outgoing calls using this number.3. Click the Call recording switcher to enable the possibility to record all incoming and
outgoing calls for this number so that you will be able to listen to the necessary callrecording later.
4. Click the arrow to the left of the necessary number to Add operators who should beable to use this virtual number. Check the necessary portal users in the list and clickthe Save button. Once operators are added, the VoIP icon will be available for themon the top of the page.You can also set up Outgoing calls and Call recording for each of the added operatorsseparately using the switchers next to the operator's name. To remove an addedoperator from the virtual number operator list, click the Actions icon to the right ofthe operator's name and select the Delete option.
Use the Actions icon to the right of the necessary virtual number to Edit or Delete thenumber.When you select the Edit option, the Number setup page opens that allows to change someother parameters in addition to those mentioned above:
· You can specify an Alias for this number that makes it easier to find the number in thelist.
· In the Quick setup section, you can enable or disable Outgoing calls and Callrecording (these settings are the same as the ones available in the Virtual numbersand operators list). Moreover, you can specifyWorking hours when the number isavailable for clients. Click the switcher and set the necessary time in the hh.mm format.
· In the Ringtone setup section, you can playback the default ringtones:o Greeting ringtones - the first greeting that callers hear when they call to this
phone number,o Queue ringtones - music on hold that callers hear when they are placed in the
waiting queue,
o Voice mail ringtones - a message that callers hear when the waiting queuelength or max waiting time is exceeded and the callers are able to leave avoicemail message.
If you have previously added some other ringtones in the VoIP Settings ->Common section, you can select another available ringtone for each category. It's alsopossible to upload necessary ringtones for this virtual number directly from this pageclicking the Upload icon next to the ringtone you want to change.
Click the Update settings button to apply the changes you made. On this page, you can alsomanage the operator list for this virtual phone number.Step 4. Adjust common settings for all numbersGo to the VoIP Settings -> Common section on the left-side panel.General settings section allows to set the following parameters:
· Incoming call queue length - this option allows to select the number of theincoming calls assigned to the currently available operators. If the number ofincoming calls exceeds the specified value, the calls will be redirected to the voicemail service. Choose the necessary quantity from the list: 5, 10, 15
· Waiting timeout - this option allows to select the time during which the customerwill wait for the operator answer. When this time is exceeded, the call will beredirected to the voice mail service. Choose the necessary option from the list: 5, 10,15 minutes.
· Operator pause - this option allows the operator have some time before acceptingcalls again. This can be used to take some notes on the previous call, etc. Choosethe Enabled or Disabled option from the list.
In the Ringtone Setup section, some ringtones are provided, that are used for all of the addedvirtual numbers by default. To display all the available ringtones in each category, clickthe arrow on the left.You can upload your own ringtones in the .mp3 format for each operation. To do that, clickthe Actions icon to the right of the necessary category and select the Add ringtone option.Once your own ringtones are added, you can go to the VoIP Settings -> Numbers page and setup individual ringtones for each virtual number separately. To remove a ringtone, clickthe Actions icon to the right of the audio record you don't need and select the Deleteringtone option.Step 5. Receive and make callsTo start accepting and making calls,
1. Click the VoIP icon on the top of the page. The VoIP client opens in a new window.2. Choose the Online status next to your name.
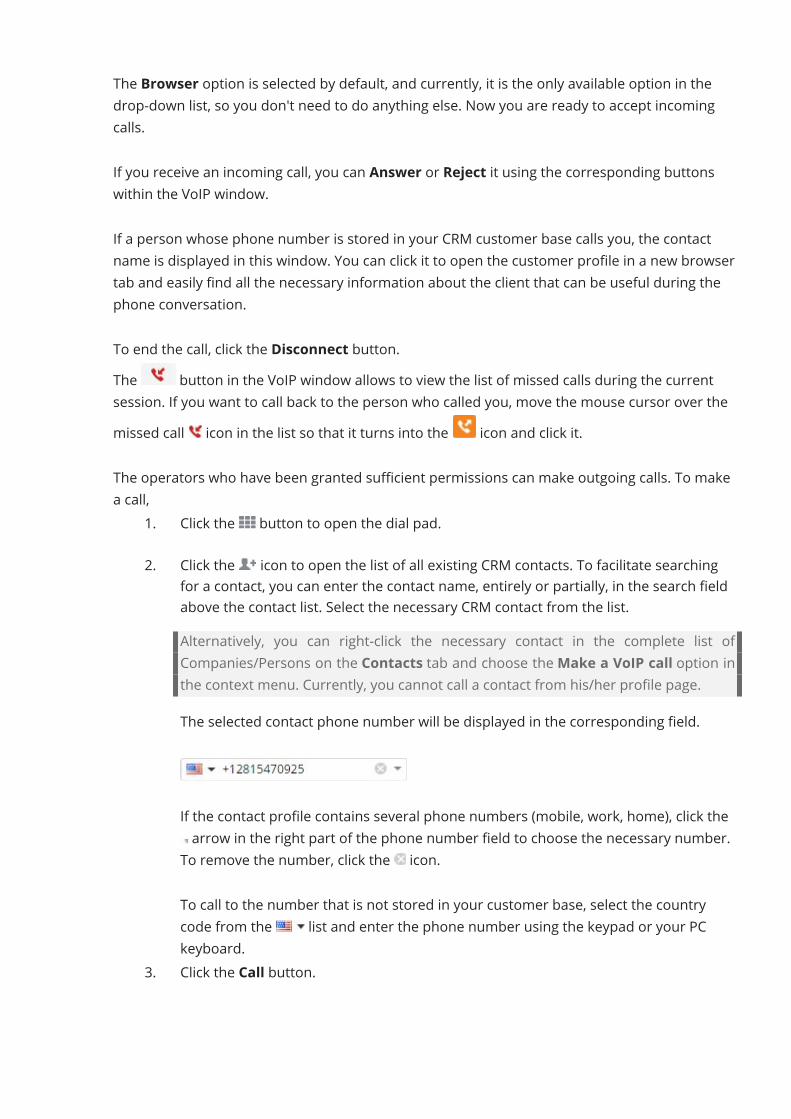
The Browser option is selected by default, and currently, it is the only available option in thedrop-down list, so you don't need to do anything else. Now you are ready to accept incomingcalls.If you receive an incoming call, you can Answer or Reject it using the corresponding buttonswithin the VoIP window.If a person whose phone number is stored in your CRM customer base calls you, the contactname is displayed in this window. You can click it to open the customer profile in a new browsertab and easily find all the necessary information about the client that can be useful during thephone conversation.To end the call, click the Disconnect button.The button in the VoIP window allows to view the list of missed calls during the currentsession. If you want to call back to the person who called you, move the mouse cursor over themissed call icon in the list so that it turns into the icon and click it.The operators who have been granted sufficient permissions can make outgoing calls. To makea call,
1. Click the button to open the dial pad.2. Click the icon to open the list of all existing CRM contacts. To facilitate searching
for a contact, you can enter the contact name, entirely or partially, in the search fieldabove the contact list. Select the necessary CRM contact from the list.Alternatively, you can right-click the necessary contact in the complete list ofCompanies/Persons on the Contacts tab and choose theMake a VoIP call option inthe context menu. Currently, you cannot call a contact from his/her profile page.The selected contact phone number will be displayed in the corresponding field.
If the contact profile contains several phone numbers (mobile, work, home), click thearrow in the right part of the phone number field to choose the necessary number.
To remove the number, click the icon.To call to the number that is not stored in your customer base, select the countrycode from the list and enter the phone number using the keypad or your PCkeyboard.
3. Click the Call button.
If you call a contact stored in the CRM module, the link to the contact profile is displayed in thiswindow, so that you can open the profile in a new browser tab.Step 6. View call listAll the calls are displayed in the Calls section. Click the Calls link on the left-side panel to openthe call list. It provides the following information about calls: date and time, agent (operatorname), client (customer name stored in the CRM base), call duration and cost.The calls can be easily distinguished by type:
· - answered· - missed· - outgoing
If a call has been recorded, click the icon to playback the recording.When someone leaves a voicemail message, the link to the voicemail recording stored in yourTwilio account appears in the Calls section. You can listen to the voicemail message right fromthe Calls page or go to your Twilio account to check all the voicemail recordings.To easily find necessary call, you can use the filter field on the top and filter calls by type, caller(operator name) or date.Calls can be sorted by date, duration and cost selecting the necessary parameter from the listto the right. Click the icon to change the sorting order.Step 7. Add information about calls to the customerbaseIf you make a call to a new number that is not stored in the CRM contacts or if you receive a callfrom such a number, this number will be automatically saved to your CRM contacts as a newcontact.The phone number and the call date and time are specified as the contact first and last name.This phone number is also saved to the contact information. The operator who received ormade the call is appointed as the contact manager.You can edit the automatically saved contact by specifying the necessary data or merging it withan already existing contact. Go to the contact profile, click the Actions icon to the right ofthe contact name and use the Edit person option to change the contact name and specifysome other information, or select the This is a duplicate option to merge this contact withanother one.A new Outgoing or Incoming call event is also automatically added to the history for thiscontact with the indication of the call duration and operator's name.
You can also add your notes about the call to the contact history manually. Select an event typefrom the list, set its date, add a description and click the Add This Event button.
For administratorsExporting all CRM dataDo you want to be on the safe side and backup your CRM data with important information onyour customers, opportunities, tasks, cases as well as contact history? Export all data into CSVfiles and download in a ZIP archive with just one mouse click! See further instructions below.To export your CRM data, please follow the easy steps below:
1. Enter your portal using your login details.2. Click the CRM link on the start page.3. Click the Settings option at the left-side panel then choose Common
settings section.4. Click the Download all data in one ZIP archive button within the 'Export of All Data'
section.You will have to wait several minutes depending on the amount of your data till a ZIP archive isgenerated. After that a link to the created ZIP archive will be displayed under the progress bar.You will also receive an email notification containing a link for you to download the created ZIParchive.
Changing CRM module settingsBy default, all portal users can access the CRMmodule. There are 2 different access levelsinside it: user and CRM administrator.Being a user you may perform the following operations:
· view all content (except private one);· create contact, task, case, opportunity with a possibility to restrict access to them;· edit contact, task, case, opportunity having the corresponding access rights;
Being a CRM administrator you may perform the following operations:· read and moderate all content;· organize mass mailing;
· generate reports;· configure module settings;
o set up the default currency used to calculate the Total amount for all CRMopportunities. This currency is also used to set prices in the Products &Services list,
o export all data to a .csv file,o adjust contact temperature levels,o add new contact types and modify the existing ones,o make a list of products and services to provide which can be included into
your invoices,o make a list of taxes which can be applied and used in your invoices,o create your organization profile: your company name, logo and address
which will be placed to all your invoices,o add virtual numbers and adjust VoIP settings,o customize user fields to add some additional information,o create new categories of history events,o specify task categories,o set opportunity stages,o manage tags within the CRM Module,o create a Website Contact Form
But being a portal owner/full access administrator you can restrict access to the CRM forsome users or even disable this module, if you don't need it at all. To do that,1. click the Settings link at the left-side panel,2. select the Portal Access Rights subsection,3. go to the CRM section,4. check the Users from list radio button,5. select the users you wish to grant access to,
To do that, use one of the available options;· use the Add user link if you wish to grant access to one or more people;· use the Add group link if you wish to grant access to all portal users, or to one or
more groups.To disable the CRMmodule just switch to theModules & Tools subsection ofthe Common portal settings selecting the corresponding option on the left side panel, uncheckthe CRMmodule in theModules section and click the Save button.
Adding user fieldsFound out that you need some more fields to enter additional data concerning your contacts inthe contact list, opportunities you create or cases you organize? It's easy! Just read this tip tolearn how to add user fields.To add a new field, please follow the easy steps below:
1. Enter your portal using your login details.2. Click the CRM link on the start page.3. Click the Settings option at the left-side panel, then choose the Other
settings section and click the User Fields item.4. Open one of the available user field lists clicking the Both Person & Company, Just
for Person, Just for Company, Opportunities or Cases link depending on thesection you want to add a new field to.
5. Click the New Field button.6. A window will open introducing the form you need to fill in: enter a name for the new
field in the Title area and select a field type in the Type drop-down list: text, textarea, select box (i.e. drop-down list), checkbox, title (under which several user fields willbe combined) or date (that will include a calendar).
o In case you selected the Text type, you will also need to set the field sizeentering a number of characters in the 'Size' area.
o In case you selected the Text Area type, you will also need to set the field sizeentering certain numbers in the 'Lines' and 'Columns' areas.
o In case you selected the Select Box type, you will also need to set the choicesadding the needed options.
You can edit the user field 'Title' no matter how many persons or companies alreadyhave it filled out. To do that click the Settings option, then choose the Othersettings section and click the User fields item. Choose the user field that you want toedit, click the icon next to the required user field and select the Edit Field option.In the opened window introduce the new 'Title' and click the Save changes button.
7. Click the Save button.The newly created user field will be added to the corresponding user field list.
Setting opportunity stagesDo you need to change the default opportunity stages according to the business process inyour company? It's not that hard! Just add new stages to the standard ones or change theirorder.The default opportunity stages offered within the CRM module are initialcontact, suspect, application of initial fit criteria, need assessment, qualified
prospect, proposal, negotiations, closure/transaction, unsuccessfully closed. Their detaileddescription can be found on the 'Opportunity Stages' page of the 'Settings' tab. You can edit thedefault opportunity stages changing their title, description, success probability in percent, andstage type or delete them all and add your own stages. See the instructions below.To add a new opportunity stage, please follow the easy steps below:
1. Enter your portal using your login details.2. Click the CRM link on the start page.3. Click the Settings option at the left-side panel, then choose Other settings section
and click the Opportunity Stages item.4. Press the New Stage button.5. A window will open introducing the form you need to fill in. Select a color from the
palette clicking the Change Color link. Enter a title for the new opportunity stage aswell as its description. Set its success probability in percent. Select a stagetype from the available ones: open, successfully closed, unsuccessfully closed.Depending on the chosen stage type, a corresponding mark will be added toopportunities at this stage.
6. Click the Save button.The newly created opportunity stage will be added to the list. Here you can change the order ofexisting stages by dragging them according to their success probability for example.
Adjusting Temperature levelsNeed to specify or even change the default temperature levels you can use to characterize yourpotential customers and navigate through the contact list easier? Read this tip on how to dothat.The default temperature levels offered within the CRM module are cold, warm, hot and meanthe contacts' willingness to purchase your product. You can edit them adding a description toeach level and specifying their meaning or delete them all and add your own temperaturelevels. See the instructions below.To add your own temperature levels, please follow the easy steps below:
1. Enter your portal using your login details.2. Click the CRM link on the start page.3. Click the Settings option at the left-side panel, then choose Contact settings section
and click the Contact Temperature Levels item.4. Press the New temperature level button.5. A new window will open introducing the form you need to fill in. Select a color for
your new temperature level, enter its title, add its description for your colleagues toknow which contacts can be assigned to this level, and press the Save button.
The newly created temperature level will be added to the list. Here you can change the order ofexisting temperature levels by dragging them.
Adjusting Contact typesAre you tired of searching through your contact list? Do you want to specify your contacts moreprecisely? ONLYOFFICE gives you an opportunity to do that! Use one of the default contacttypes or create your own!Are you curious? Read this article to learn more.The Contact types function lets you characterize your contacts in a certain way. There are fourdefault contact types in CRM: Client, Competitor, Partner, Supplier. If four is not enough foryou create as many contact types as you wish. Don't know how to do it? Read the instructionbelow.1. Access your ONLYOFFICE portal.2. Click the CRM link on the start page.3. Expand the Settings option then choose Contact settings section and click the Contact
type item.4. Click the New contact type button.5. In the opened Create new contact type window introduce contact type Title.
6. Click the Save button.You can access the contact list with the necessary contact type right from the Contacttypes page in the Contact settings section clicking the appropriate link with the specifiednumber of contacts.
That's it! The new contact type is created. Easy as pie!
Specifying tasks categoriesNeed to change the default tasks categories according to the processes specific for yourcompany? It's easy! Just add new categories characterizing task goals that aren't covered in thedefault ones.The default tasks categories offered within the CRM module are phonecall, opportunity, demo, email, fax, executioncontrol, lunch, appointment, note, delivery, social networks, expression of gratitude. Youcan edit the default tasks categories changing their icon, title, description or delete some ofthem and add your own categories. See the instructions below.To add a new tasks category, please follow the easy steps below:
1. Enter your portal using your login details.2. Click the CRM link on the start page.3. Click the Settings option, then choose the Other settings section and click the Tasks
Categories item.4. Press the New Category button.5. A window will open introducing the form you need to fill in. Select an icon from the
drop-down list. Enter a title for the new tasks category as well as its description.6. Click the Save button.
The newly created tasks category will be added to the list. Here you can change the order ofexisting categories by dragging them.
Creating a new category of history eventsThe standard history event categories are mail, note, phone call, meeting. Need morecategories for events that are added to history of your contacts, opportunities or cases? It'seasy! Just read this tip to learn how to create new categories.
To add a new category of history events, please follow the easy steps below:1. Enter your portal using your login details.2. Click the CRM link on the start page.3. Click the Settings option at the left-side panel, then choose the Other
settings section and click the History Event Categories item.4. Press the New Category button.5. A window will open introducing the form you need to fill in: select an icon for the new
category, enter its name in the Title field and description.6. Click the Save button.
The newly created history event category will be added to the list.
Using tags within the CRM moduleAdd tags to your contacts, opportunities, cases to classify, group, describe them and facilitatethe search process in this way. Read the instructions below to learn how to manage existingtags and create new ones.To add a new tag, please follow the easy steps below:
1. Enter your portal using your login details.2. Click the CRM link on the start page.3. Click the Settings option at the left-side panel, then choose the Other
settings section and click the Tags item.4. Select the category you want to create a tag for clicking the appropriate link - Both
Person & Company, Opportunities, Cases.5. Press the New Tag button.6. In the opened 'Create New Tag' window, enter the needed tag text into the 'Title' field
and click the Save button.The newly created tag will be added to the corresponding category.You can add a tag to several somehow connected contacts at once. For example if you want toadd a tag to a person you'll be offered to add it also to the related company if it's representedin your contact list. You can apply this function clicking the appropriate button or, if you are notlikely to use it and don't want to see this message again, choose the 'Settings' option, then openthe 'Tags' page and check the 'Do not show the Linking Contacts dialog again' box.

Adding invoice items and taxesThe Invoice option significantly simplifies the cooperation with your clients as long as you havean opportunity to create and send the invoices right from your portal. Read this tip and you'llfind out how to create new invoice items and taxes without a hitch!No doubt, when you start using the Invoice option in portal you'll certainly need to create a listof items which you are going to use while making out an invoice. To add a new item:
1. Enter your portal using your login details.2. Go to the CRMmodule.3. Click the Settings option at the left-side panel, then choose the Invoice
settings section and click the Products & Services item.4. Click the Create first item link if there are no items yet or press the Create
item button.5. In the 'Create new item' page fill out the Stock keeping unit (SKU) field, enter
the Item name and add it's Description. Then set the item Price and choosethe Taxes from the lists if it's necessary. If you want to track the number of items instock, check the Track inventory box and introduce the number of items inthe Stock quantity field.Prices for all items are set in the default currency. If you want to change the defaultcurrency, it can be done in the Settings >> Currency settings section.
6. Press the Save button.Done! The new item will be added to the listProbably, you'll need to add taxes to the item price very often. For that reason it's important foryou to know how to create them. To create a new tax:
1. Enter your portal using your login details.2. Go to the CRMmodule.3. Click the Settings option at the left-side panel, then choose the Invoice
settings section and click the Taxes item.4. Click the Create first tax link if there are no taxes yet or press the Create
tax button.5. In the Create new tax window fill out the tax name it's rate and description.6. Press the Save button.
That's it! The new tax will be added to the list.

Setting up the default currency and exchangeratesThe Default currency is used to calculate the Total amount for all CRM opportunities. Thiscurrency is also used to set prices in the Products & Services list. Read this tip and you'll findout how to change the default currency used in the CRM module and specify exchange rates forother available currencies.To select a default currency:
1. Enter your portal using your login details.2. Go to the CRMmodule.3. Click the Settings option at the left-side panel and choose the Currency
settings section.4. In the Default currency list, select the necessary currency.5. Press the Save button.
Done! The default currency is now selected.If you create invoices for customers from different countries, it will be necessary to specifyexchange rates for some currencies that you use. To add the exchange rate for a currency:
1. Enter your portal using your login details.2. Go to the CRMmodule.3. Click the Settings option at the left-side panel and choose the Currency
settings section.4. In the Currency rate list, select the currency you want to set the exchange rate for.5. Click the Add rate button next to the Currency rate list.6. In the entry field that appears, type in the appropriate exchange rate (see the tips
below to know where the actual exchange rate can be found).7. Press the Save button.
That's it! The exchange rate for the selected currency is specified.
Creating a website contact formWish to gain more prospective customers effortlessly? Just create a website contact form,embed the generated source code into your website and your leads' contact details will beautomatically added to your client database. Read the instructions below on how to do that.To create a website contact form, please follow the easy steps below:
1. Enter your portal using your login details.2. Click the CRM link on the start page.
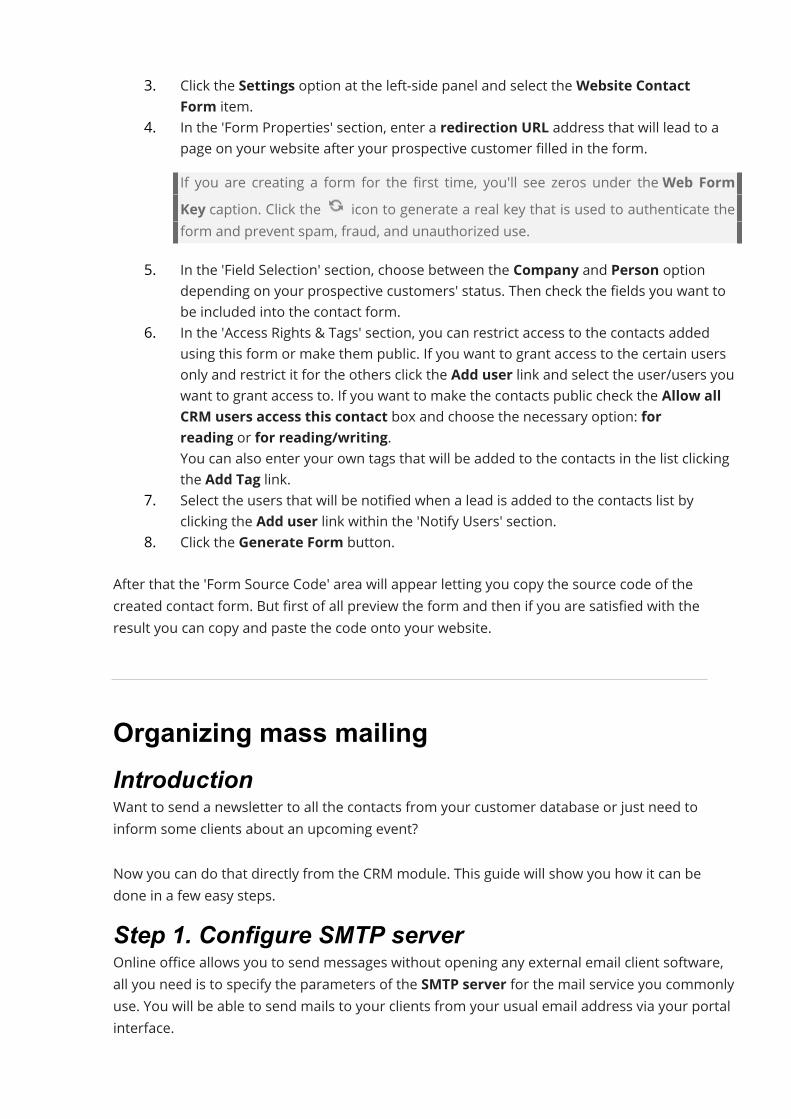
3. Click the Settings option at the left-side panel and select theWebsite ContactForm item.
4. In the 'Form Properties' section, enter a redirection URL address that will lead to apage on your website after your prospective customer filled in the form.If you are creating a form for the first time, you'll see zeros under theWeb FormKey caption. Click the icon to generate a real key that is used to authenticate theform and prevent spam, fraud, and unauthorized use.
5. In the 'Field Selection' section, choose between the Company and Person optiondepending on your prospective customers' status. Then check the fields you want tobe included into the contact form.
6. In the 'Access Rights & Tags' section, you can restrict access to the contacts addedusing this form or make them public. If you want to grant access to the certain usersonly and restrict it for the others click the Add user link and select the user/users youwant to grant access to. If you want to make the contacts public check the Allow allCRM users access this contact box and choose the necessary option: forreading or for reading/writing.You can also enter your own tags that will be added to the contacts in the list clickingthe Add Tag link.
7. Select the users that will be notified when a lead is added to the contacts list byclicking the Add user link within the 'Notify Users' section.
8. Click the Generate Form button.After that the 'Form Source Code' area will appear letting you copy the source code of thecreated contact form. But first of all preview the form and then if you are satisfied with theresult you can copy and paste the code onto your website.
Organizing mass mailingIntroductionWant to send a newsletter to all the contacts from your customer database or just need toinform some clients about an upcoming event?Now you can do that directly from the CRM module. This guide will show you how it can bedone in a few easy steps.Step 1. Configure SMTP serverOnline office allows you to send messages without opening any external email client software,all you need is to specify the parameters of the SMTP server for the mail service you commonlyuse. You will be able to send mails to your clients from your usual email address via your portalinterface.
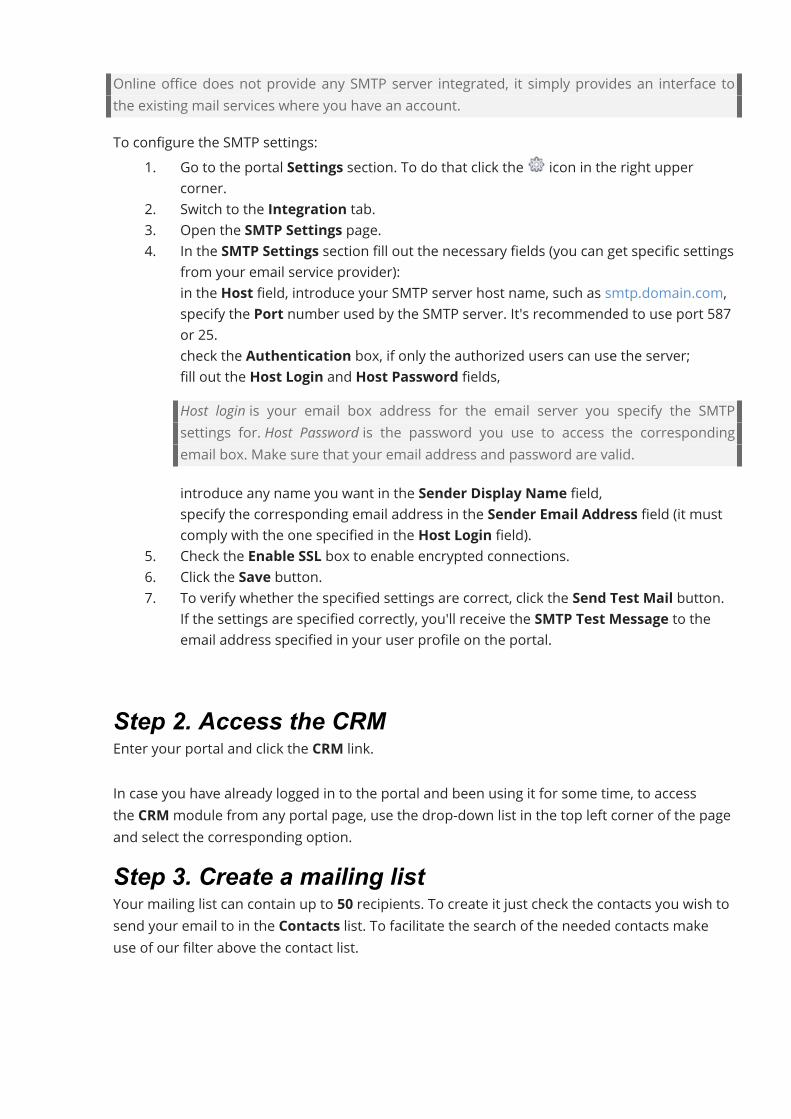
Online office does not provide any SMTP server integrated, it simply provides an interface tothe existing mail services where you have an account.To configure the SMTP settings:
1. Go to the portal Settings section. To do that click the icon in the right uppercorner.
2. Switch to the Integration tab.3. Open the SMTP Settings page.4. In the SMTP Settings section fill out the necessary fields (you can get specific settings
from your email service provider):· in the Host field, introduce your SMTP server host name, such as smtp.domain.com,· specify the Port number used by the SMTP server. It's recommended to use port 587
or 25.· check the Authentication box, if only the authorized users can use the server;· fill out the Host Login and Host Password fields,
Host login is your email box address for the email server you specify the SMTPsettings for. Host Password is the password you use to access the correspondingemail box. Make sure that your email address and password are valid.
· introduce any name you want in the Sender Display Name field,· specify the corresponding email address in the Sender Email Address field (it must
comply with the one specified in the Host Login field).5. Check the Enable SSL box to enable encrypted connections.6. Click the Save button.7. To verify whether the specified settings are correct, click the Send Test Mail button.
If the settings are specified correctly, you'll receive the SMTP Test Message to theemail address specified in your user profile on the portal.
Step 2. Access the CRMEnter your portal and click the CRM link.In case you have already logged in to the portal and been using it for some time, to accessthe CRMmodule from any portal page, use the drop-down list in the top left corner of the pageand select the corresponding option.Step 3. Create a mailing listYour mailing list can contain up to 50 recipients. To create it just check the contacts you wish tosend your email to in the Contacts list. To facilitate the search of the needed contacts makeuse of our filter above the contact list.

Verify that all the selected contacts have the email address specified. If not, to add the addressclick the Actions button to the right, select the Add email option from the drop-down listand enter the necessary address into the field which appears. To confirm it press the Enter key.When all the contacts are selected click the Send Email button above the contact list and selectthe Internal SMTP (50 email recipients maximum) option.If you wish to send emails using an external mailing software select the Generate list forexternal program option from the drop-down list.Step 4. Compose a messageWhen all the settings are configured the Compose Mail page will open.In the From: field you will see the sender name and email address indicated while configuringthe SMTP server. The To: field shows the number of the selected contacts.All you need to do is enter the Subject for your letter and type in your message.The Formatting Toolbar helps you format your text changing font style, font color, alignment,size etc.If you need to add some variables to your message make use of the Personal Tags.If you wish to add the recipient name to the salutation, just place the mouse cursor at the pointwhere you want the variable to be added, then select an appropriate tag from the drop-downlist and click the Add to Letter Body. In our case it will be: FirstName and LastName as wesend our letter to Persons. As a result you will see the following line: Dear $(Person.First Name)$(Person.Last Name),The necessary data will be automatically taken from your CRM customer database.You can also attach a certain file to your message. Click the Show file attachment panel linkbelow the Letter Body field and using the Attach File button browse your hard disk drive forthe necessary file.Check the Store this message in History box to add the corresponding event to theinteraction history of each contact in the mailing list.Step 5. Preview and start mailingTo preview the result click the Next (to preview) button below the the Letter Body field.The "Powered by ONLYOFFICE.com" text watermark will be added to your letter.If you are satisfied with the result click the Send button to start mailing.
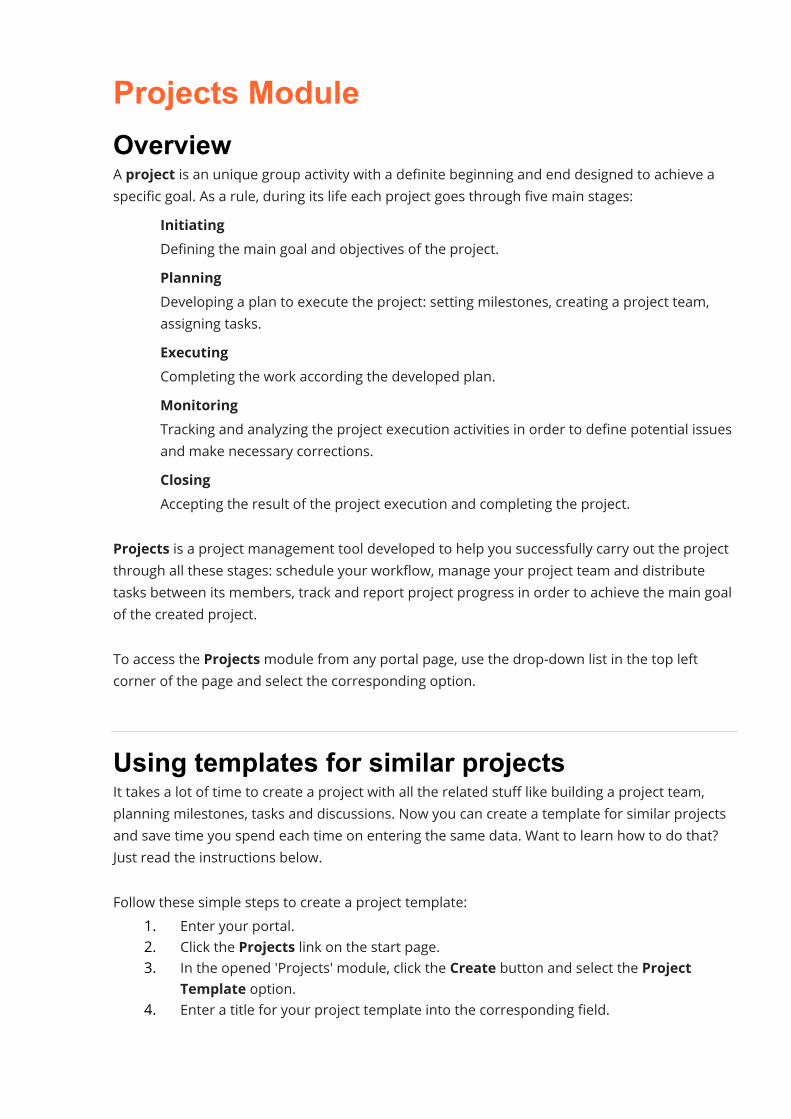
Projects ModuleOverviewA project is an unique group activity with a definite beginning and end designed to achieve aspecific goal. As a rule, during its life each project goes through five main stages:
· InitiatingDefining the main goal and objectives of the project.
· PlanningDeveloping a plan to execute the project: setting milestones, creating a project team,assigning tasks.
· ExecutingCompleting the work according the developed plan.
· MonitoringTracking and analyzing the project execution activities in order to define potential issuesand make necessary corrections.
· ClosingAccepting the result of the project execution and completing the project.
Projects is a project management tool developed to help you successfully carry out the projectthrough all these stages: schedule your workflow, manage your project team and distributetasks between its members, track and report project progress in order to achieve the main goalof the created project.To access the Projectsmodule from any portal page, use the drop-down list in the top leftcorner of the page and select the corresponding option.
Using templates for similar projectsIt takes a lot of time to create a project with all the related stuff like building a project team,planning milestones, tasks and discussions. Now you can create a template for similar projectsand save time you spend each time on entering the same data. Want to learn how to do that?Just read the instructions below.Follow these simple steps to create a project template:
1. Enter your portal.2. Click the Projects link on the start page.3. In the opened 'Projects' module, click the Create button and select the Project
Template option.4. Enter a title for your project template into the corresponding field.
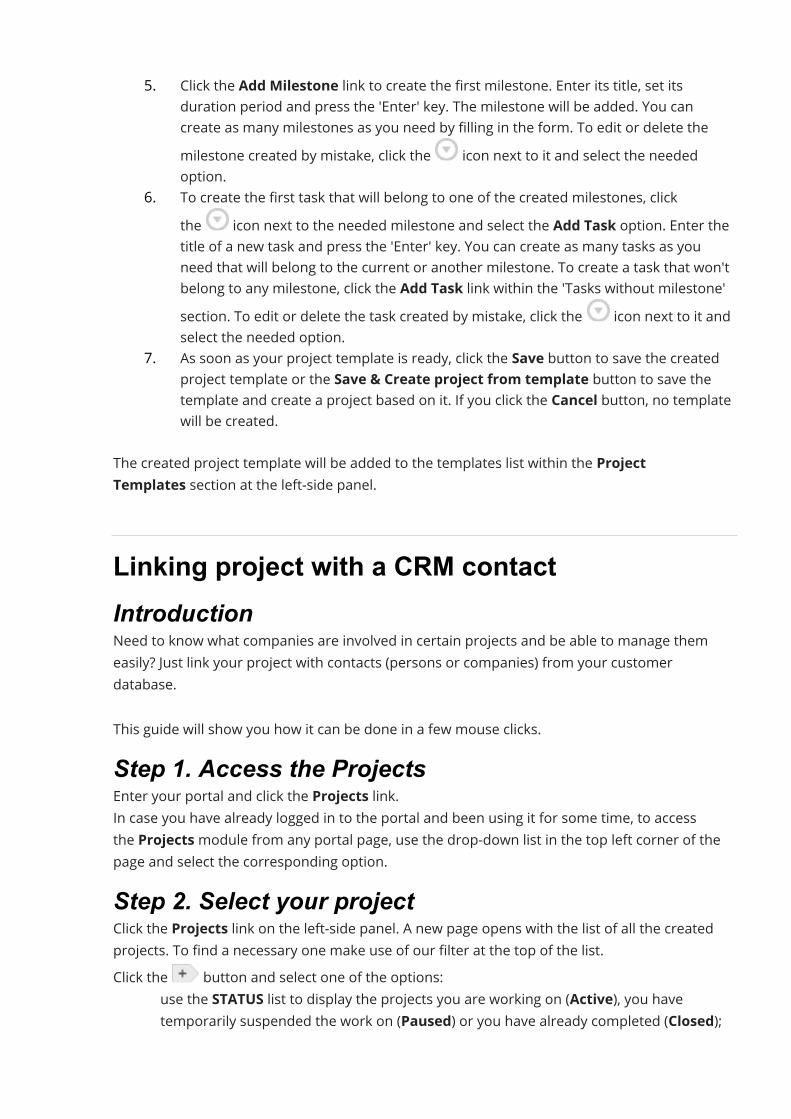
5. Click the Add Milestone link to create the first milestone. Enter its title, set itsduration period and press the 'Enter' key. The milestone will be added. You cancreate as many milestones as you need by filling in the form. To edit or delete themilestone created by mistake, click the icon next to it and select the neededoption.
6. To create the first task that will belong to one of the created milestones, clickthe icon next to the needed milestone and select the Add Task option. Enter thetitle of a new task and press the 'Enter' key. You can create as many tasks as youneed that will belong to the current or another milestone. To create a task that won'tbelong to any milestone, click the Add Task link within the 'Tasks without milestone'section. To edit or delete the task created by mistake, click the icon next to it andselect the needed option.
7. As soon as your project template is ready, click the Save button to save the createdproject template or the Save & Create project from template button to save thetemplate and create a project based on it. If you click the Cancel button, no templatewill be created.
The created project template will be added to the templates list within the ProjectTemplates section at the left-side panel.
Linking project with a CRM contactIntroductionNeed to know what companies are involved in certain projects and be able to manage themeasily? Just link your project with contacts (persons or companies) from your customerdatabase.This guide will show you how it can be done in a few mouse clicks.Step 1. Access the ProjectsEnter your portal and click the Projects link.In case you have already logged in to the portal and been using it for some time, to accessthe Projectsmodule from any portal page, use the drop-down list in the top left corner of thepage and select the corresponding option.Step 2. Select your projectClick the Projects link on the left-side panel. A new page opens with the list of all the createdprojects. To find a necessary one make use of our filter at the top of the list.Click the button and select one of the options:
· use the STATUS list to display the projects you are working on (Active), you havetemporarily suspended the work on (Paused) or you have already completed (Closed);
· use the PROJECT MANAGER list to display the projects managed by you or by acertain user;
· use the TEAM MEMBER list to display the projects you or acertain user or group participate in;
· use the OTHER list to display the projects you don't participate in but keep track of(Followed) or the projects with a specified tag, or the projects without tags;
You can also enter a project title, entirely or partially, in the field and press the Enter key to findthe necessary one.When the project is located, click its title. The project overview page will open.Step 3. Choose CRM contacts to linkSwitch to the Contacts tab. If the contact list is empty, click the Link or add contact link at thecenter.Select a necessary contact - person or company - from the existing ones entering it in thesearch field. If there is no such a contact in your database, the system will offer you to add anew person or a company. Just click the necessary link and fill in the form.The selected contact will be added to the list. In the same way you can link as many contacts asyou wish.To unlink the contact linked by mistake, click the icon to the right of the unnecessary contact.
Step 4. Restrict access to the linked contactsBy default, each project member (except guests) can view the contacts linked with the project.To restrict the access to them for some users, switch to the Team tab.All the project members will be listed in alphabetical order. Find the user you wish to restrictthe access for and click the Contacts link to the right.The same way you can restrict the access for any other user unless he/she does not haveprojects administrator privileges.This function is available for private projects only.
Following projectsWant to keep track of some projects at your portal? Just click a link and you'll receivenotifications about everything new in the needed project by email.Bare Bones InstructionsPerform these simple steps to follow a project:
1. Enter your portal.2. Click the Projects link on the start page.3. In the opened 'Projects' module, click the Projects option on the left-side panel.4. Open the needed project clicking its title in the list.5. Click the icon next to the project title.6. Select the Follow item from the menu.
Now you will receive email notifications about everything new within this project.
Suspending/closing/deleting projectIf you no longer work on your project, you may choose to either suspend or close it changing itsstatus.All the project milestones and tasks should not necessarily be closed for you to be able topause it, but you cannot close a project with the open tasks.To do that,
1. select your project from the Projects list using the filter above.2. click the arrow to the left of the project title.3. select an appropriate status from the drop-down list.
The paused or closed project will be faded and moved to the end of the Projects list. But youcan easily access its milestones and tasks and change its status back to Active anytime.If you wish to delete your project permanently,
1. select your project from the Projects list,2. open the project page clicking its title,3. click the icon to the right of the project title,4. select the Delete option from the drop-down list,5. confirm the operation.
It's also possible to delete several projects at once. To do that check the projects you want todelete in the list and press the Delete button above the project list.If you decide to delete a project, keep in mind that the project with all its tasks, milestones, files,discussions etc. will be lost with no possibility to restore.
Managing your teamOne of the key factor to your project success is your Team. When your project is underway youmight need to add or remove some team members. To do that,
1. Switch to the Team tab on the project page.2. Click theManage Team link.3. Add new users to your team.
To do that, check the users you wish to add to your team from the list and clickthe Save button. Use the filter field at the top to facilitate the search. Check thenecessary group or the Select All option to add the users from the selected group orall the users respectively.
4. Remove members from your team.To do that, uncheck the users you wish to remove from the list or click the icon tothe right of the user you wish to remove and select the Remove the user from theteam option.
5. Click the Save button.
By default, each project team member can view all content inside the selected project:milestones, tasks, documents, discussions and contacts.To restrict the access just select the teammate you wish to set access rights for and click one ofthe links to the right:
· Discussions - disable this option to restrict the access to the project discussions. If thisoption is enabled, a project member can view and comment discussions as well as starta new one.
· Documents - disable this option to restrict the access to the project documents andfiles. If this option is enabled, a project member can view, load and create documents.
· All Tasks - disable this option to restrict the access to all the project tasks. In this casethe project member will be able to access tasks assigned to him/her only. If this option isenabled, a project member can view all tasks and set tasks to other teammates.
· Milestones - disable this option to restrict the access to the project milestones. In thiscase the project member will be able to access milestones with tasks assigned tohim/her only.
· Contacts - disable this option to restrict the access to the CRM contacts linked with thisproject. If this option is enabled, a project member can view the linked contacts and theavailable contact information.
The same way you can set the access rights for each member of your project team unlesshe/she does not have projects administrator privileges.This function is available for private projects only.
Scheduling workflowOnce the project is created, the next step is to schedule the workflow using the milestones. Amilestone is a key point in the progress of a project.To plan a new milestone,
1. Click the Create button in the upper left corner and select theMilestone optionfrom the drop-down list.
2. Specify your milestone Title and enter a short Description, if necessary.3. Select the Project you need to add a milestone to.4. Select the Responsible person you wish to assign the newly created milestone to. By
default, the project manager is selected.5. Set a desired Due Date.
The due date of a milestone is the date by which all the tasks attached to it aresupposed to be done.To set a due date, use one of the available options:Week,Month, Two months, orselect it from the calendar, or enter it manually in the following format dd/mm/yyyy.
6. Check the Key milestone option, if necessary.Use this option if you consider the newly created milestone to be more importantthan others. All the key milestones are marked by the red key icon placed near itstitle
7. If you want to be notified 48 hours before the due date check the correspondingoption.
8. Click the Save button.The created milestone will be added to theMilestones list. The same way as many milestonesas you wish can be added to your project.When all the task are done, you can close the milestone changing its statusfrom Open to Closed in theMilestones list. All you need is to click the arrow to the leftof the milestone title and select the necessary status from the list.If you need to shift a milestone,
1. select the milestone you need from theMilestones list,2. click the icon to the right of the milestone title,3. select the Edit option from the Actions drop-down list,4. make all the changes you need and click the Save Changes button.
To delete a milestone, choose the corresponding option from the Actions drop-down list.
You can also delete several milestones at once instead of deleting them one by one. To do that,check the milestones you want to delete and press the Delete button above the milestone list.
Reattaching tasks to other milestonesDo you need to attach an existing task to another milestone without creating the same taskonce again? Just read the step-by-step instructions below to learn how to do that.Follow these simple steps to attach a task to another milestone:
1. Enter your portal.2. Click the Projects link on the start page.3. In the opened 'Projects' module, the list with the existing tasks will be displayed if
there is at least one open task. You can also click the Tasks option at the left-sidepanel to open the task list.
4. Click the icon next to the needed task and select theMove to milestone option.5. In the opened window, select the needed milestone from the available ones. You can
also select the 'none' option, in this case the task won't belong to any milestone.6. Click theMove to milestone button.
That's all! Now you can find your task under the needed milestone.You can also quickly move several tasks at once from one milestone to another. To do that,check the tasks that belong to the same milestone and press theMove button above the tasklist. In the confirmation window, select a different milestone and press theMove tomilestone button.
TasksAssigning tasksOnce the project is created and the milestone is added, one more step is left. Distribute thetasks among the project team members.To add a task,
1. Click the Create button in the upper left corner and select the Task option from thedrop-down list.
2. Specify your task Title and enter a short Description, if necessary.3. Select the Project you need to add a task to.4. Assign a task to one of the availableMilestones.
Use the none option if you don't want to attach this task to any milestone.5. Select the responsible person you wish to assign this task to from the Assigned
to list.You can assign the task to asmany responsible persons as you wish selecting themfrom the list. To remove a person added by mistake from the list of the responsiblepersons, hover the mouse cursor on his/her name and click the icon which appearsto the left. All the responsible persons will be informed about a new task assigned tothem by email.
6. Set a desired Start Date selecting it from the calendar, or entering it manually in thefollowing format dd/mm/yyyy.
7. Set a desired Due Date using one of the available options: Today, 3 days,Week, orselecting it from the calendar, or entering it manually in the followingformat dd/mm/yyyy.
8. Check the High option to set the task priority.The icon will be added next to the task title in the Tasks list.
9. Click the Save button or use the Save & Create New Task button to save this taskand start creating the new one right away.
The created task will be added to the Tasks list. The same way as many tasks as you wish canbe added to your project.If a task does not have a due date but belongs to a milestone, this task in the list is marked withthe icon and is displayed with the milestone due date.To quickly create a new task on the base of the existing one with all its contents, such asattached documents and subtasks, make use of the Copy feature. You'll be able to create anexact task duplicate or make some minor corrections to it (e.g. select another milestone,responsible person or due date); create similar tasks within the same project or move taskcopies to another project.
1. select the task you need from the Tasks list,2. click the icon to the right of the task title,3. select the Copy option from the Actions drop-down list,4. change the task details, if necessary,5. choose which items you want to be copied checking
the Documents and/or Subtasks box,6. click the Copy button to duplicate the task or use the Replace button to remove the
original task and add the copied one instead of it.If you need to edit a task,
1. select the task you need from the Tasks list,2. click the icon to the right of the task title,3. select the Edit option from the Actions drop-down list,
4. make all the changes you need and click the Save Changes button.You can attach documents to your task. Open the task page and switch to the Documents tabon the top. Here you can:
· create a new document, spreadsheet or presentation clicking the New file link andselecting the file type from the list;
· upload some documents from your hard disk drive clicking the Upload file link;· attach files from the project that your task belongs to.
To manage documents attached to your task, place the mouse cursor over the attacheddocument and use corresponding icons to perform the necessary action:
· open an existing document with the Online Editor clicking the icon;· download an existing document to your hard disk drive clicking the icon;· delete an existing document clicking the icon.
You can also quickly move several tasks at once from one milestone to another. To do that,check the tasks that belong to the same milestone and press theMove button above the tasklist. In the confirmation window, select a different milestone and press theMove tomilestone button.When the task is done, close it right in the Tasks list changing its status from Open to Closed.To do that, just click the arrow to the left of the task title and select the necessary statusfrom the list.If some additional task statuses have been previously created by a full access or the 'Projects'module administrator, it's also possible to assign custom statuses to your tasks.You can also change the status for several tasks at once instead of changing statuses one byone. To do that, check the necessary tasks, press the Change Status button above the task listand select the necessary status.To delete a task, choose the corresponding option from the Actions drop-down list.You can also delete several tasks at once instead of deleting them one by one. To do that, checkthe tasks you want to delete and press the Delete button above the task list.
Viewing all active tasks quicklyDo you want to know the fastest and the easiest way to view all the active tasks assigned toyou? Read this tip and you will learn how to do that.Follow these simple steps to view your active tasks quickly:
1. Enter your portal.
2. Click the Projects link on the start page.3. Click the black arrow next to the Tasks option at the left-side panel and selectMy
Tasks.That's all! You'll see all your open tasks in all the projects.
Linking tasks within your projectIntroductionOnce the tasks are created, you need to determine the order in which they will be completed,i.e. link them creating the task dependencies. Projects allows you to link tasks in two differentways: on the task description page or using the Gantt Chart view.This guide will show you how to determine the dependency relationships between tasks in afew mouse clicks.Step 1. Access the ProjectsEnter your portal and click the Projects link.In case you have already logged in to the portal and been using it for some time, to accessthe Projectsmodule from any portal page, use the drop-down list in the top left corner of thepage and select the corresponding option.Step 2. Select the task to linkClick the Tasks link at the left-side panel. A new page opens with the list of all the created tasks.To find a necessary one make use of our filter at the top of the list or enter a task name,entirely or partially, in the filter field and press the Enter key to display the necessary one.When the task is found, click its title. The task overview page will open.
Step 3. Link the task on its overview pageTo be able to link the task on its overview page you must have the task editing rights that aregranted to full access or project administrator, project manager, task creator, task and subtaskresponsible persons.Switch to the Related tasks section and click the Create new link link. If this link is disabled, itmeans that there are no tasks to link with or you have not enough rights to do it.
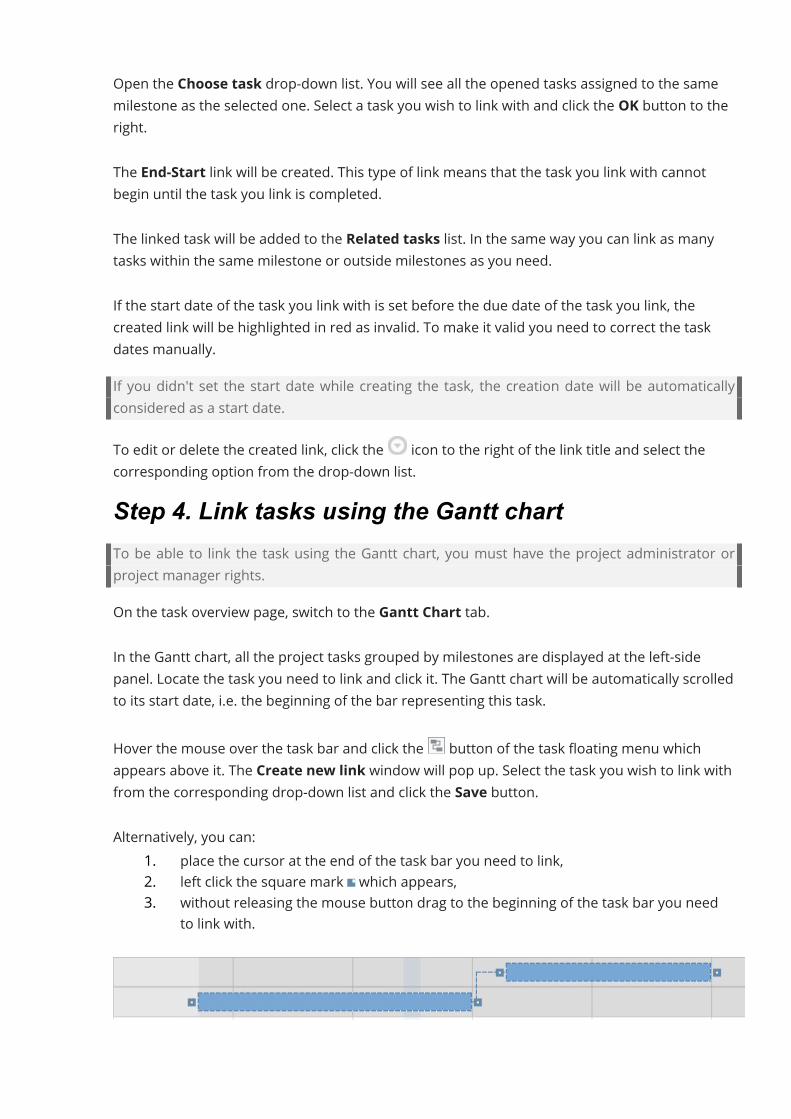
Open the Choose task drop-down list. You will see all the opened tasks assigned to the samemilestone as the selected one. Select a task you wish to link with and click the OK button to theright.The End-Start link will be created. This type of link means that the task you link with cannotbegin until the task you link is completed.The linked task will be added to the Related tasks list. In the same way you can link as manytasks within the same milestone or outside milestones as you need.If the start date of the task you link with is set before the due date of the task you link, thecreated link will be highlighted in red as invalid. To make it valid you need to correct the taskdates manually.If you didn't set the start date while creating the task, the creation date will be automaticallyconsidered as a start date.To edit or delete the created link, click the icon to the right of the link title and select thecorresponding option from the drop-down list.Step 4. Link tasks using the Gantt сhartTo be able to link the task using the Gantt chart, you must have the project administrator orproject manager rights.On the task overview page, switch to the Gantt Chart tab.In the Gantt chart, all the project tasks grouped by milestones are displayed at the left-sidepanel. Locate the task you need to link and click it. The Gantt chart will be automatically scrolledto its start date, i.e. the beginning of the bar representing this task.
Hover the mouse over the task bar and click the button of the task floating menu whichappears above it. The Create new link window will pop up. Select the task you wish to link withfrom the corresponding drop-down list and click the Save button.Alternatively, you can:
1. place the cursor at the end of the task bar you need to link,2. left click the square mark which appears,3. without releasing the mouse button drag to the beginning of the task bar you need
to link with.
The created link will be represented by a blue dashed line. The red dashed line means that thecreated link is invalid. To make it valid, you need to correct the task dates.
Creating subtasksSometimes to complete a task you need to perform several steps or divide it into parts anddistribute them among several persons. Creating subtasks will help you manage your to-do listand stay organized.To create a subtask,1. Open the Tasks list clicking the corresponding option on the left side panel.2. Select a desired task.
To find a necessary task make use of our filter at the top of the list. Click the AddFilter button and select one of the options:
o use the RESPONSIBLE list to display the tasks assigned to you, to acertain user or a group, or the tasks with no responsible;
o use the CREATOR list to display the tasks created by you, or by a certain user;o use the PROJECT list to display the tasks within your projects, or the projects
you don't participate in, or the projects with a specified tag, or theprojects without tags;
o use theMILESTONE list to display all the tasks of the milestones with at leastone task assigned to you, or tasks without milestones, or the ones assigned toa specifiedmilestone;
o use the STATUS list to display the tasks you are working on (open) or you havealready completed (closed);
o use the DUE DATE list to display the tasks with a specified due date;You can also enter a task name, entirely or partially, in the field and pressthe Enter key to find the necessary one.
3. Hover the cursor over the selected task and click the Subtask link which appears to theright of the task title.
4. Specify your subtask Title.5. Select the responsible person you wish to assign this subtask to from
the Responsible list.6. Click the OK button to the right.
The created subtask will be added and displayed below the selected task. The subtask duedate will coincide with the due date of the task you attached the subtask to and can NOT bealtered.You can continue adding subtasks right now using the field below or create other subtasks laterusing the Add subtask option in the Actionsmenu to the right of the task title.
To quickly duplicate an existing subtask within the same task, click the icon to the right ofthe subtask title and select the Copy option from the Actions drop-down list. The copiedsubtask will be added and displayed below the original one.If you need to edit a subtask,
1. select the subtask you need from the list,2. click the icon to the right of the subtask title,3. select the Edit option from the Actions drop-down list,4. make all the changes you need and click the OK button.
When the subtask is completed, close it checking the box to the left of its title.To delete a subtask, choose the corresponding option from the Actions drop-down list.
Using Gantt chartGantt Chart is a bar chart used to illustrate a project schedule and dependency relationshipsbetween tasks.The most simple way to open the Gantt Chart is to click the Gantt Chart link on the left sidepanel.Alternatively, you can open the Gantt Chart proceeding in one of the following ways:1. Select your project from the Projects list.
To find a necessary one make use of our filter at the top of the list clicking the AddFilter button and selecting one of the options:
· use the STATUS list to display the projects you are working on (Active), you havetemporarily suspended the work on (Paused) or you have already completed(Closed);
· use the PROJECT MANAGER list to display the projects managed by you or by acertain user;
· use the TEAM MEMBER list to display the projects you or acertain user or group participate in;
· use the OTHER list to display the projects you don't participate in but keep trackof (Followed), or the projects with a specified tag, or the projects without tags;
You can also enter a project title, entirely or partially, in the field and pressthe Enter key to find the necessary one.
2. Open the project page clicking its title.

3. Switch to the Gantt Chart tab on the project page.OR
1. select a desired task from the Tasks list using the filter above,2. open the task page clicking its title,3. scroll down to the Related Tasks section,4. click theMove to Gantt Chart link.
The Gantt Chart will be opened:Here you can:
· select one or several projects you wish to view the Gantt Chart for,· choose the activity details to display on the left side panel: responsible, start date,
end date, status, priority,· get a panoramic view of all the project activities,· visually judge the project activity status: open/closed, active/overdue,· manage the project milestones and tasks: create, edit, close, reopen, delete etc,· link the tasks within your project to create the task dependencies.
Managing your project using the Gantt chartIntroductionThe Gantt Chart is a great way to build your project schedule and visually judge its progress.Read this guide to learn how to plan milestones, manage tasks and create task dependenciesusing the Gantt chart view.Step 1. Access the ProjectsEnter your portal and click the Projects link.In case you have already logged in to the portal and been using it for some time, to accessthe Projectsmodule from any portal page, use the drop-down list in the top left corner of thepage and select the corresponding option.Step 2. Activate the Gantt Chart viewClick the Gantt Chart link at the left side panel and select the project you need to activate theGantt Chart for. To do that,
1. click the button in the upper left corner,2. check the necessary projects from the drop-down list,3. use the Save button to close the list and display the projects.
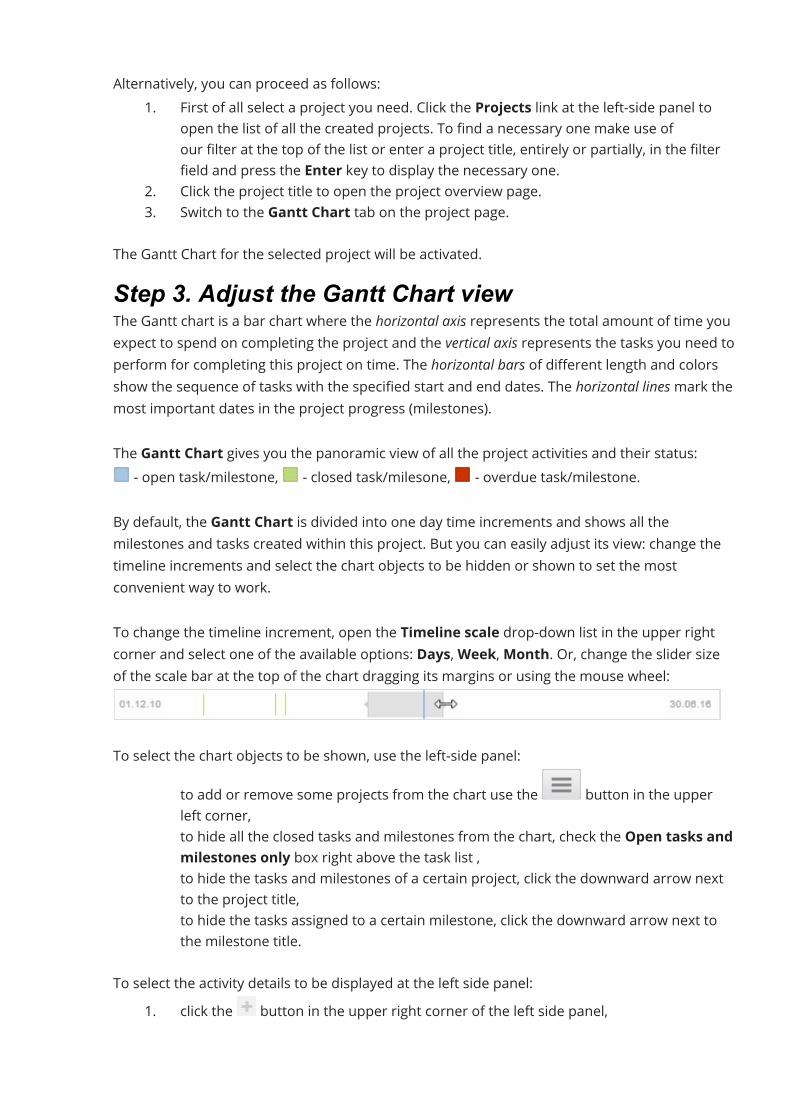
Alternatively, you can proceed as follows:1. First of all select a project you need. Click the Projects link at the left-side panel to
open the list of all the created projects. To find a necessary one make use ofour filter at the top of the list or enter a project title, entirely or partially, in the filterfield and press the Enter key to display the necessary one.
2. Click the project title to open the project overview page.3. Switch to the Gantt Chart tab on the project page.
The Gantt Chart for the selected project will be activated.Step 3. Adjust the Gantt Chart viewThe Gantt chart is a bar chart where the horizontal axis represents the total amount of time youexpect to spend on completing the project and the vertical axis represents the tasks you need toperform for completing this project on time. The horizontal bars of different length and colorsshow the sequence of tasks with the specified start and end dates. The horizontal lines mark themost important dates in the project progress (milestones).The Gantt Chart gives you the panoramic view of all the project activities and their status:
- open task/milestone, - closed task/milesone, - overdue task/milestone.By default, the Gantt Chart is divided into one day time increments and shows all themilestones and tasks created within this project. But you can easily adjust its view: change thetimeline increments and select the chart objects to be hidden or shown to set the mostconvenient way to work.To change the timeline increment, open the Timeline scale drop-down list in the upper rightcorner and select one of the available options: Days,Week,Month. Or, change the slider sizeof the scale bar at the top of the chart dragging its margins or using the mouse wheel:
To select the chart objects to be shown, use the left-side panel:· to add or remove some projects from the chart use the button in the upper
left corner,· to hide all the closed tasks and milestones from the chart, check the Open tasks and
milestones only box right above the task list ,· to hide the tasks and milestones of a certain project, click the downward arrow next
to the project title,· to hide the tasks assigned to a certain milestone, click the downward arrow next to
the milestone title.To select the activity details to be displayed at the left side panel:
1. click the button in the upper right corner of the left side panel,
2. check the details you wish to be shown: Responsible, Start Date, EndDate, Status, Priority,
3. click the Apply button to display the selected details.To hide the the details you don't need at the moment just close the unnecessary tabs using thecross icons.When some detail tabs are activated, you can adjust the left side panel width using the simpledrag-and-drop.Step 4. Plan and manage milestonesTo add a key point in a progress of your project, create a milestone. To do that,
1. Click the Create button in the upper left corner,2. Select theMilestone option from the drop-down list,3. Specify your milestone Title and enter a short Description, if necessary.4. Select the Project you need to add a milestone to.5. Select the Responsible person you wish to assign the newly created milestone to.6. Set a desired Due Date.7. Check the Key milestone option, if necessary.8. To be notified 48 hours before the due date check the corresponding option.9. Click the Save button.
To change a responsible person,1. activate the Responsible tab using the button in the upper right corner of the left
side panel and click the responsible user name to the right of the milestone title atthe left-side panel,orhover the mouse over the milestone shape at the Gantt chart and click the buttonof the milestone floating menu which appears above it,
2. select a necessary user from the drop-down list checking the radiobutton next to it,3. click the OK button to confirm your choice.
To shift a milestone,1. hover the mouse over the milestone shape arrow,2. drag and drop the shape to the necessary date.
To manage your milestones, you can use the milestone floating menu which appears when youhover the mouse over the milestone shape or the context menu activated by a single right-clickof the mouse. You can perform one of the following operations:
· - edit your milestone title,· - assign a responsible user for your milestone,· - delete an unnecessary milestone,· - add task to the selected milestone,
· - fit the milestone shape to your screen,· - close the milestone as soon as all the tasks are completed. To reopen the closed
milestone, use the button.Step 5. Create and manage tasksTo add a new task, you can proceed in one of the following ways:
· click the Create New... button in the upper left corner, select the Task option and fillin the standard Create new task form,
· use the Gantt chart,· hover the mouse over the milestone you wish to assign the task to and click
the button,· or, simply right-click within the Gantt chart area.
If you follow the first way, the task bar with all the specified parameters will be added andassigned to the necessary milestone. If you use the second one, the empty task bar will beadded to the Gantt chart, enter a title for the task and press the Enter key. After that you will beable to edit and manage your task.To assign/change responsible persons,
1. activate the Responsible tab using the button in the upper right corner of the leftside panel and click the No Responsible link to the right of the task title at the left-side panel,orhover the mouse over the task bar at the Gantt chart and click the button of thetask floating menu which appears above it,
2. select necessary users from the drop-down list cheсking the boxes next to them,3. click the OK button to confirm your choice.
You can easily change the task start and end date and the amount of time you expect to spendon completing this task by simple drag-and-drop. Hover the mouse cursor over the task barborder (the left border to change the start date or the right border to change the due date) andwithout releasing the mouse button move it to set the appropriate date.
Using drag-and-drop functionality you can also move your task bar horizontally or vertically:· move it horizontally to change the dates without changing the amount of time,· move it vertically to shift the task to another milestone.
To edit the task title, change its status from Open to Closed and vice-versa, or delete it at alluse the task floating menu which appears when you hover the mouse over the task bar or thecontext menu activated by a single right-click of the mouse.
Step 6. Create task dependenciesTo determine the order of the tasks to be completed, link them. To do that, proceed in one ofthe following ways.
1. Locate the task you need to link at the left-side panel and click it. The Gantt chart willbe automatically scrolled to its start date, i.e. the beginning of the bar representingthis task.
2. Hover the mouse over the task bar and click the button of the task floating menu.3. In the opened Create new link window select the task you wish to link with from the
corresponding drop-down list.4. Click the Save button to create the link and close the window.
Alternatively, you can:1. position the pointer at the end of the task bar you need to link,2. left click the square mark which appears,3. without releasing the mouse button drag to the beginning of the task bar you need
to link with.
The End-Start link will be created. This type of link means that the task you link with cannotbegin until the task you link is completed. It will be represented by a blue dashed line. The reddashed line means that the created link is invalid. To make it valid, you need to correct the taskdates.To delete an invalid/unnecessary link, just right-click it.If you need to link a task, but have no administrator or project manager rights, you can do it onthe task overview page.
Time trackingTracking work time efficientlyIntroductionRegardless of the billing method you use (per hour or per project) tracking time is a greatpossibility to assess the productivity of your team and of each its member and make thenecessary corrections to achieve the best result.This article will show you how to track time and manage your time sheet using the TimeTracking feature offered by Projects.
Step 1. Access the ProjectsEnter your portal and click the Projects link.In case you have already logged in to the portal and been using it for some time, to accessthe Projectsmodule from any portal page, use the drop-down list in the top left corner of thepage and select the corresponding option.Step 2. Get a complete picture of the time spendingClick the Time Tracking link on the left-side panel. You will be presented with the whole list ofthe hours spent on your projects.To see the total time spent on performing a certain task, on achieving a certain milestone, etc.or just to facilitate the monitoring process, make use of the Filter available at the top of thepage. Click the button and select one of the options:
· use the PROJECT list to display the hours spent on your projects or on the projects youdon't participate in, or on the projects with a specified tag/without tags,
· use theMILESTONES list to display the hours spent on the tasks assigned to aspecifiedmilestone,
· use the RESPONSIBLE list to display the hours spent on the tasks assigned to you, to acertain user or a group,
· use the STATUS list to display the hours which are already billed, the hours whichare not billed yet, or the hours which cannot be billed (not chargeable),
· use the TIME PERIOD list to display the hours recorded during the previous week,the previous month, or a specified time period,
You can also enter the hour description, entirely or partially, in the field and press the Enter keyto display the necessary ones.By default, the records are sorted by date in descending order (earlier dates first). If necessary,you can sort them by Time or Description opening the Sort by drop-down list to the right ofthe Filter field and choosing the necessary option. To change the sorting orderfrom Descending to Ascending click the icon.Step 3. Edit the records, if necessaryMaking the changes is an integral part of any process. While tracking time you might need tocorrect some data (time, hours) or complete the description. To do that, click the icon to theright of the record you need to edit and select the Edit option from the drop-down list.The Time Tracking window opens:Here you can check the total time spent on this task and make some changes:change time and date, select another responsible person, modify description.To apply all the changes you made, click the Save Changes button.
To delete the record you don't need anymore, click the icon to the right and selectthe Delete option from the drop-down list.Step 4. Manage billable and not billable hoursThe Billable time is the hours you are paid for spent on client project. It can be billed or notbilled. The Non Billable (Not Chargeable) time is the hours you are not paid for directly spenton performing administrative tasks.Being a project manager or a Projects administrator you can easily set the payment status foreach record/activity: Billed, Not Billed, Not Chargeable.
To do that, click the button to the left of the necessary record/activity and choose thestatus you need from the drop-down list.If you need to set the payment status for several records at once, select the records you needchecking the boxes to the left and use one of the buttons at the top of the list.
You have been paid for the hours you spent on achieving a certain milestone. To quickly changethe status of all the records/activities which belong to the tasks assigned to this milestone, firstof all make use of the Filter. Click the button and select the necessary filter option:'Milestones with my tasks' or 'Other milestones', then choose the milestone you need. All therecords/activities matching this criterion will be displayed. Check all of them clicking the veryfirst checkbox to the left of the list and use the Billed button. The status of all the records will beset to Billed .Step 5. Generate reportsTo get a report of the time spending and assess the productivity, click the Reports link on theleft-side panel and select the Time Tracking report type from the list which opens.Now you need to specify what you wish to include to your report configuring the reportparameters:
· select a Group or a User who's productivity you wish to assess,· specify a Payment Status of the activities you wish to include in your report,· set a necessary Time period,· check the View by user tasks radiobutton if you wish to include the tasks and the
project the user spent time on, or leave the View by user radiobutton checked, if youdon't need any details about the spent time.
When all the parameters are set, click the Generate Report button.
Once the report is generated, click the Open link at the bottom right corner to view the report.The file will open in the Spreadsheet Editor and you will be able to edit it, print or download ifnecessary.
· To print the report, click the Print icon at the top toolbar.· To download the report, switch to the File tab at the top toolbar, select
the Download as... option at the left sidebar and choose the necessary file format.To regularly receive automatic reports by email on certain date and time, create a template.
Automatic time tracking while performing a taskThis tip is aimed at those users who bother their head each time they need to enter time spenton performing a certain task. Now you can use the timer that will automatically calculate howlong you have been working on the task. The only thing you'll have to do is turn on the timerwith one mouse click.Bare Bones InstructionsFollow these simple steps to record time:
1. Enter your portal.2. Click the Projects link on the start page.3. Press the Create button and select the Start/Stop Timer option. Alternatively, you
can find the needed task in the tasks list, click the icon next to it and selectthe Track time option.
4. In the opened window, select the needed project, task, yourself in the 'Responsible'list.
5. Add the description of the time period you will spent on the task.6. Press the button to start the timer.7. After finishing a part of the task or at the end of your workday, click the button.8. Press the Add Time button.
To view the total time spent on a task, open the task page clicking its title in the tasks list andfind the Time Spent caption.To view the description of every period of time spent on a task, click the 'Time Tracking' optionat the left-side panel and enter the needed task title into the filter bar. You'll see all the timeperiods added. To edit or delete one of them, click the icon next to the needed period andselect the corresponding option. Besides on this page you can also mark added time periods as'not billed' and 'billed' or leave the dafault 'not chargeable' option.
DiscussionsLeading discussionOnce the project is underway any sort of problems or outstanding questions may occur. To finda right solution, discuss the issue with your project team.To start a project-related discussion,1. Open the Project you wish to add a discussion to.2. Click the Create button in the upper left corner and select the Discussion option from
the drop-down list.3. Specify your discussion Title.4. Type in your message and edit it using the Formatting Toolbar.5. Use the Text Cut button to select a part you wish to be shown on the Discussions page.
To do that, select the part you wish to hide with the mouse and click the TextCut button. The selected part will be highlighted. In this way only a short snippet of thepost (not selected) was shown at the discussion list and feed pages.
6. Invite people to your discussion.All the project team members will be invited to the discussion automatically and listedbelow the discussion text field. If you need to remove some of them or invite thepersons who don't take part in the project click theManage Subscribers link.· To invite some more people,
Сheck the users you wish to invite to your discussion and click the Save button. Youcan add users from a particular group or all the portal users checking thecorresponding option on the right side of the window.
· To remove a subscriber,Place the mouse cursor over the needed user and click the icon.The people you've selected will be informed about the discussion created and thecomments added to it.
7. add documents to the discussion:· create a new document, spreadsheet or presentation clicking the New file link and
selecting the file type from the list;· upload some documents from your hard disk drive clicking the Upload file link;· attach files from the project that your discussion belongs to.
8. Preview the result and save your discussion.You can always edit the text of your discussion, manage its subscribers and attacheddocuments. To do that,
1. select your discussion from the Discussions list,2. open the discussion page clicking its title (the Comments tab opens by default),3. click the icon to the right of the discussion title,4. select the Edit option from the Actions drop-down list,
5. make all the changes you need and click the Save Changes button.To manage documents attached to your discussion, open the discussion page and switch tothe Documents tab on the top. Place the mouse cursor over the attached document and usecorresponding icons to perform the necessary action:
· open an existing document with the Online Editor clicking the icon;· download an existing document to your hard disk drive clicking the icon;· delete an existing document clicking the icon.
It’s also possible to create a task on the base of the discussion. Open the discussion page, clickthe icon next to the discussion title and use the Create task on discussion option from themenu.To delete a discussion, choose the corresponding option from the Actions drop-down list.If your discussion is no longer relevant, but you don't want to delete it because it contains someimportant information, use the Archive option in the drop-down list on the discussion page. Allthe discussion members will have an access to the discussion and all the files attached butwon't be able to add new comments to it. If you want to resume the discussion, clickthe icon and choose the Open option.
ReportsReporting project progressTo increase the chances for project success, once your project is created you need to constantlymonitor its progress keeping up with what everyone is doing.To do that, make use of the online office Reports system:
1. open the Reports list clicking the corresponding link on the left-side panel,2. select the type of the report you wish to generate from the Reports list,3. configure the available parameters,4. click the Generate Report button.
Once the report is generated, click the Open link at the bottom right corner to view the report.The file will open in the Spreadsheet Editor and you will be able to edit it, print or download ifnecessary.
· To print the report, click the Print icon at the top toolbar.· To download the report, switch to the File tab at the top toolbar, select
the Download as... option at the left sidebar and choose the necessary file format.
All the generated reports can be found in the Generated Reports list (they are only accessibleto the user who generated them). To manage your reports, move the mouse cursor over thenecessary report in the list and use the icons next to the file:
· - to open the report using the Spreadsheet Editor.· - to download the report as the .xlsx file.· - to delete the report.
By default, all the generated reports are stored in theMy Documents section ofthe Documentsmodule. You can choose a certain folder to store project reports. To do that,
1. click the Settings link at the left-side panel,2. select the Common Settings sub-section,3. in the Personal Settings section, click the Choose button next to the Report
Folder field,4. select one of the existing folders within theMy Documents section and click
the OK button.You can set up needed parameters once and regularly receive automatic reports by email oncertain date and time.
Reporting templates with automatic delivery byE-mailAre you tired of generating reports manually? Now you can set up needed parameters onceand regularly receive automatic reports by email on certain date and time. You save lots of timeand keep up with everything new at your portal.Bare Bones InstructionsFollow these simple steps to create a report template:
1. Enter your portal.2. Click the Projects link on the start page.3. In the opened 'Projects' module, click the Reports option at the left-side panel.4. Select the needed report type on the left and configure report parameters on the
right.5. Press the Create Template button.6. In the opened window, enter a title for your report template. If you want to receive
reports created on the basis of this template regularly via email, check the Generatesuch report automatically box. Then specify a certain time period and time of theday when you want to receive reports.
7. Click the Save button to accept the changes you made.

After that you will regularly receive reports on the basis of the created template via email.
For AdministratorsChanging Projects module settingsBy default, all portal users can access the Projectsmodule. There are 5 different access levelsinside it: guest (an external user with view-only permissions), user (a portal user notparticipating in any project), project teammember, project manager and projectadministrator.Being a guest you may perform the following operations:
· view projects available to all portal members or private ones (where he is a projectteam member);
· add comments and subscribe to tasks and discussions belonging to projects he/shecan access.
Being a user you may perform the following operations:· view all content (except private projects);· add comments in discussions;· follow necessary projects;· select a start page in the Projectsmodule;· select a folder to store project reports.
To select a start page,1. click the Settings link at the left-side panel,2. select the Common Settings sub-section,3. In the Personal Settings section, select the necessary start page from the list. The
following options are available: Tasks, Projects, Discussions and Time Tracking. Bydefault, the Tasks option is selected.
Being a project teammember you may perform the following operations:· perform all user operations;· add tasks and assign them to yourself or other team members;· manage tasks created by you/assigned to you;· start new discussions;· add/remove your own files.
Being a project manager you may perform the following operations:· perform team member operations;· add/remove people from project team;· manage tasks, milestones, discussions, comments inside a project;· change project status;· edit project settings;
· set access rights to project team members (for private project only).Being a project administrator you may perform the following operations:
· perform project manager operations;· create/edit/delete projects;· assign project manager;· create and edit project templates;· fully manage all content across all projects (manage team, tasks, milestones etc.);· adjust common settings for the Projectsmodule.
To change common settings of the Projectsmodule,1. click the Settings link at the left-side panel,2. select the Common Settings sub-section,3. set necessary options:· Any user can create a project - by default, this option is disabled. Turn on the
switcher if you want to allow all users to create new projects.· Hide Entities In Paused Projects - by default, this option is enabled. Turn off the
switcher if you want to display entities of the paused projects.But being a portal owner/full access administrator you can restrict access to the Projects forsome users or even disable this module, if you don't need it at all.To restrict access to the Projectsmodule,1. click the Settings link at the left-side panel,2. select the Portal Access Rights sub-section,3. go to Projects section,4. check the Users from list radio button,5. select the users you wish to grant access to,
To do that, use one of the available options;· use the Add user link if you wish to grant access to one or more people;· use the Add group link if you wish to grant access to all portal users, or to one or
more groups.To disable the Projectsmodule just switch to theModules & Tools section selecting thecorresponding option on the left-side panel, uncheck the Projectsmodule and clickthe Save button.
ONLYOFFICE MailOverviewMail is a communication tool designed to manage your correspondence right on the portal.This message management solution helps you work more efficiently, improve businesscommunication and allows you to:
· manage one or several email accounts,· communicate quickly and manage the contacts effectively,· get access to your personal, portal and CRM contact addresses,· organize email addresses in a single place,· create corporate mailboxes,· manage email messages on the portal,· read your messages in one place and respond to all of them,· create and edit email templates to simplify the process of working with similar
messages,· get access to message history, contacts and files through any browser any time,
anywhere,· link a conversation or a single message to existing CRM elements or create new CRM
contacts on the base of conversations,· send invoices from CRM module,· create a signature,· use the Mail autoreply feature,· save attachments to any folder in Documents module,· create, customize and use tags for fast and easy message management,· receive calendar event notifications, accept or decline invitations,· use on-portal notifications when you receive new messages,· create custom folders and apply filters to automatically perform certain actions on
messages.To accessMail just click the icon available at the top of each portal page.
AccountCreating/editing accountTo send, receive and keep your messages in order right on the portal first of all you need to setup an account. To do that,1. click the icon at the top of any portal page,
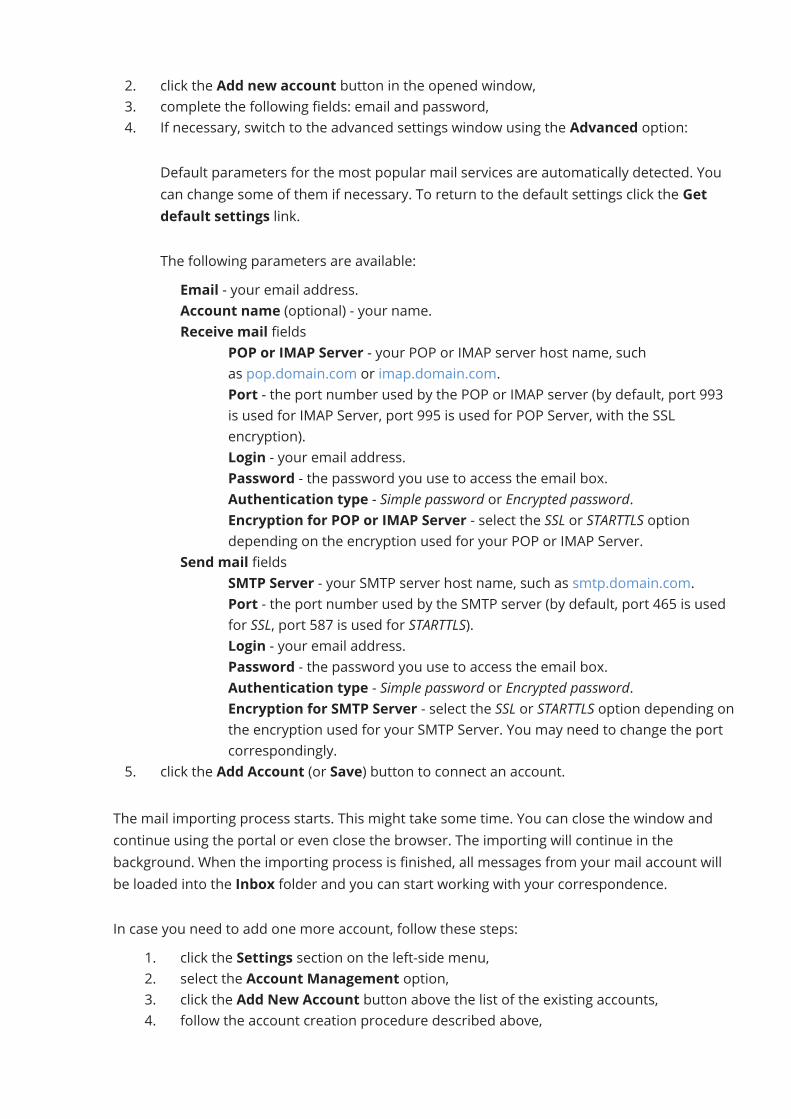
2. click the Add new account button in the opened window,3. complete the following fields: email and password,4. If necessary, switch to the advanced settings window using the Advanced option:
Default parameters for the most popular mail services are automatically detected. Youcan change some of them if necessary. To return to the default settings click the Getdefault settings link.The following parameters are available:· Email - your email address.· Account name (optional) - your name.· Receive mail fields
o POP or IMAP Server - your POP or IMAP server host name, suchas pop.domain.com or imap.domain.com.
o Port - the port number used by the POP or IMAP server (by default, port 993is used for IMAP Server, port 995 is used for POP Server, with the SSLencryption).
o Login - your email address.o Password - the password you use to access the email box.o Authentication type - Simple password or Encrypted password.o Encryption for POP or IMAP Server - select the SSL or STARTTLS option
depending on the encryption used for your POP or IMAP Server.· Send mail fields
o SMTP Server - your SMTP server host name, such as smtp.domain.com.o Port - the port number used by the SMTP server (by default, port 465 is used
for SSL, port 587 is used for STARTTLS).o Login - your email address.o Password - the password you use to access the email box.o Authentication type - Simple password or Encrypted password.o Encryption for SMTP Server - select the SSL or STARTTLS option depending on
the encryption used for your SMTP Server. You may need to change the portcorrespondingly.
5. click the Add Account (or Save) button to connect an account.The mail importing process starts. This might take some time. You can close the window andcontinue using the portal or even close the browser. The importing will continue in thebackground. When the importing process is finished, all messages from your mail account willbe loaded into the Inbox folder and you can start working with your correspondence.In case you need to add one more account, follow these steps:
1. click the Settings section on the left-side menu,2. select the Account Management option,3. click the Add New Account button above the list of the existing accounts,4. follow the account creation procedure described above,
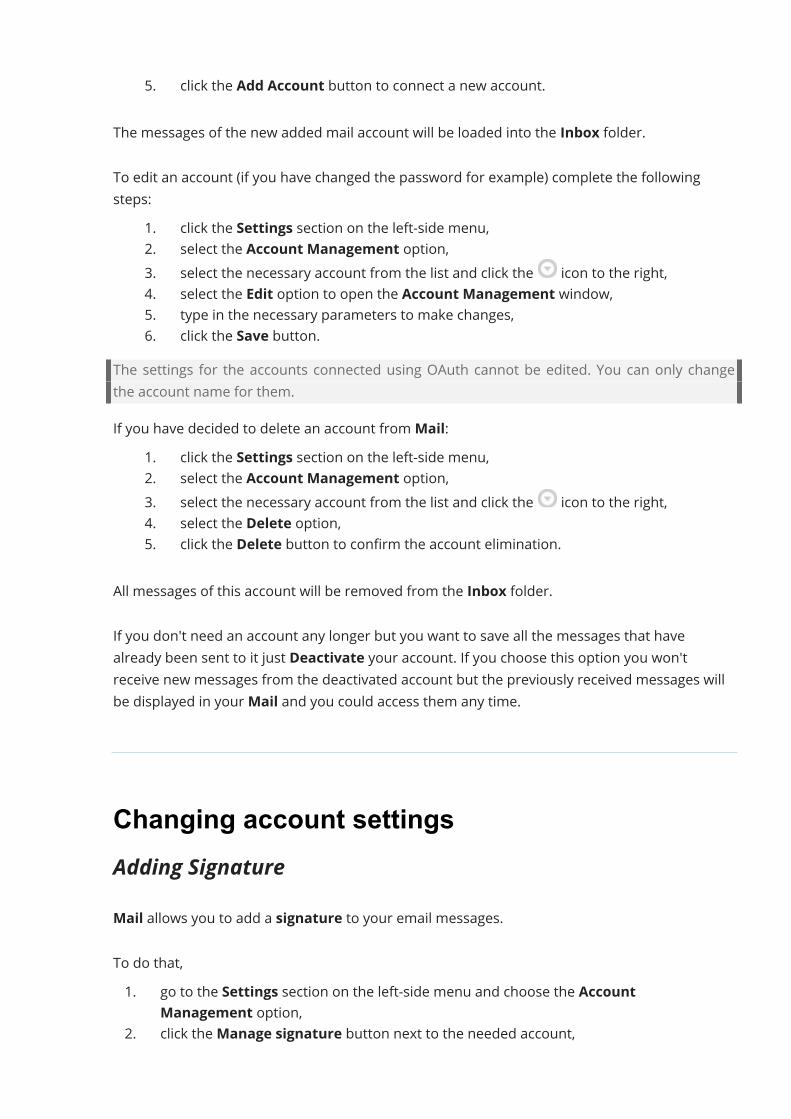
5. click the Add Account button to connect a new account.The messages of the new added mail account will be loaded into the Inbox folder.To edit an account (if you have changed the password for example) complete the followingsteps:
1. click the Settings section on the left-side menu,2. select the Account Management option,3. select the necessary account from the list and click the icon to the right,4. select the Edit option to open the Account Management window,5. type in the necessary parameters to make changes,6. click the Save button.
The settings for the accounts connected using OAuth cannot be edited. You can only changethe account name for them.If you have decided to delete an account fromMail:
1. click the Settings section on the left-side menu,2. select the Account Management option,3. select the necessary account from the list and click the icon to the right,4. select the Delete option,5. click the Delete button to confirm the account elimination.
All messages of this account will be removed from the Inbox folder.If you don't need an account any longer but you want to save all the messages that havealready been sent to it just Deactivate your account. If you choose this option you won'treceive new messages from the deactivated account but the previously received messages willbe displayed in yourMail and you could access them any time.
Changing account settingsAdding SignatureMail allows you to add a signature to your email messages.To do that,1. go to the Settings section on the left-side menu and choose the Account
Management option,2. click theManage signature button next to the needed account,
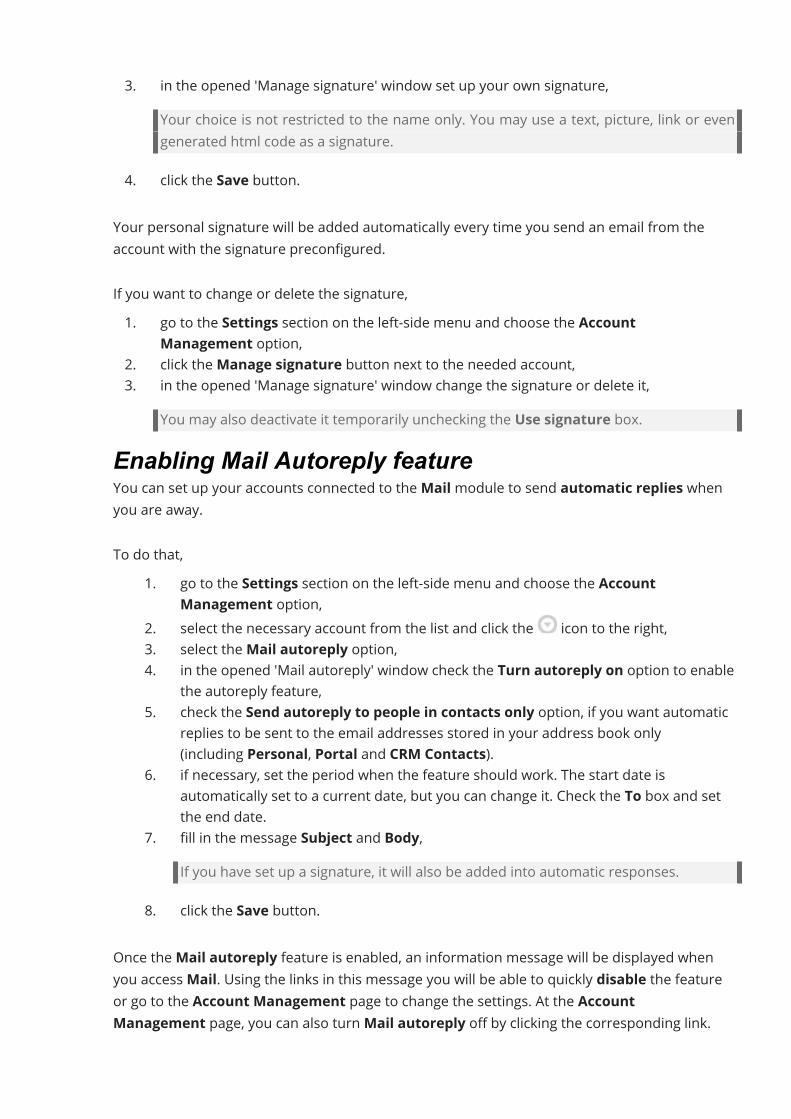
3. in the opened 'Manage signature' window set up your own signature,Your choice is not restricted to the name only. You may use a text, picture, link or evengenerated html code as a signature.
4. click the Save button.Your personal signature will be added automatically every time you send an email from theaccount with the signature preconfigured.If you want to change or delete the signature,1. go to the Settings section on the left-side menu and choose the Account
Management option,2. click theManage signature button next to the needed account,3. in the opened 'Manage signature' window change the signature or delete it,
You may also deactivate it temporarily unchecking the Use signature box.Enabling Mail Autoreply featureYou can set up your accounts connected to theMailmodule to send automatic replies whenyou are away.To do that,
1. go to the Settings section on the left-side menu and choose the AccountManagement option,
2. select the necessary account from the list and click the icon to the right,3. select theMail autoreply option,4. in the opened 'Mail autoreply' window check the Turn autoreply on option to enable
the autoreply feature,5. check the Send autoreply to people in contacts only option, if you want automatic
replies to be sent to the email addresses stored in your address book only(including Personal, Portal and CRM Contacts).
6. if necessary, set the period when the feature should work. The start date isautomatically set to a current date, but you can change it. Check the To box and setthe end date.
7. fill in the message Subject and Body,If you have set up a signature, it will also be added into automatic responses.
8. click the Save button.Once theMail autoreply feature is enabled, an information message will be displayed whenyou accessMail. Using the links in this message you will be able to quickly disable the featureor go to the Account Management page to change the settings. At the AccountManagement page, you can also turnMail autoreply off by clicking the corresponding link.
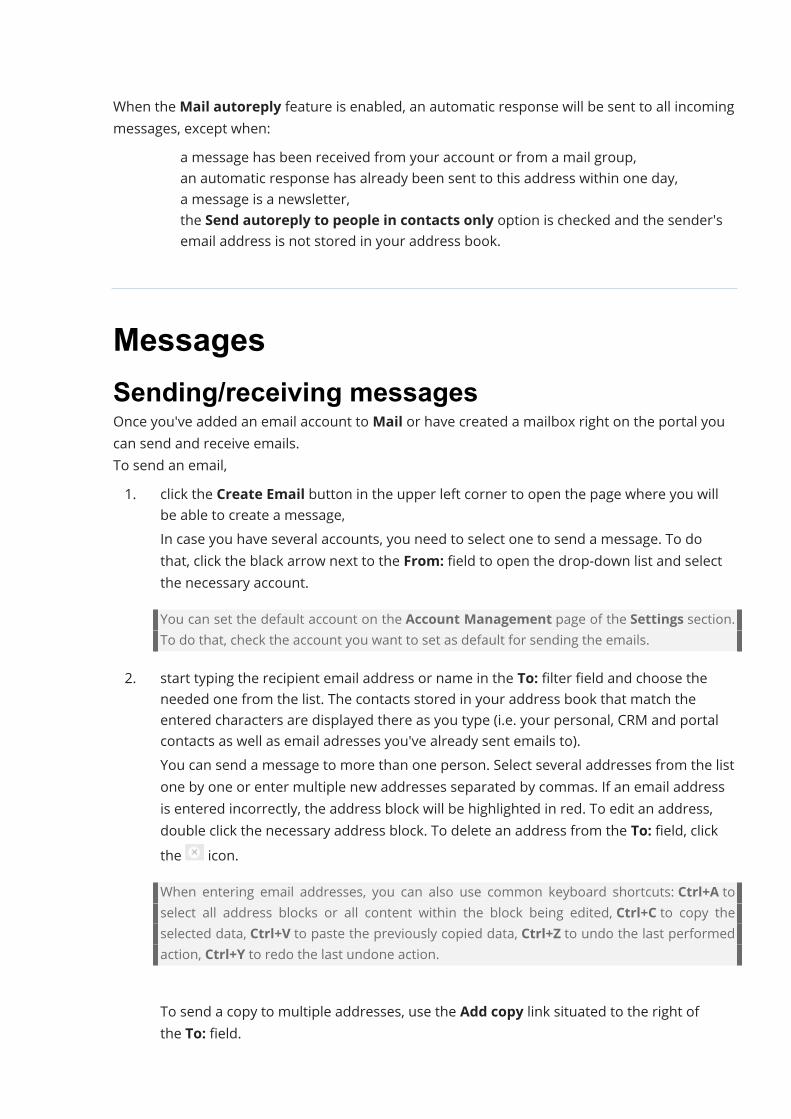
When theMail autoreply feature is enabled, an automatic response will be sent to all incomingmessages, except when:
· a message has been received from your account or from a mail group,· an automatic response has already been sent to this address within one day,· a message is a newsletter,· the Send autoreply to people in contacts only option is checked and the sender's
email address is not stored in your address book.
MessagesSending/receiving messagesOnce you've added an email account toMail or have created a mailbox right on the portal youcan send and receive emails.To send an email,1. click the Create Email button in the upper left corner to open the page where you will
be able to create a message,In case you have several accounts, you need to select one to send a message. To dothat, click the black arrow next to the From: field to open the drop-down list and selectthe necessary account.You can set the default account on the Account Management page of the Settings section.To do that, check the account you want to set as default for sending the emails.
2. start typing the recipient email address or name in the To: filter field and choose theneeded one from the list. The contacts stored in your address book that match theentered characters are displayed there as you type (i.e. your personal, CRM and portalcontacts as well as email adresses you've already sent emails to).You can send a message to more than one person. Select several addresses from the listone by one or enter multiple new addresses separated by commas. If an email addressis entered incorrectly, the address block will be highlighted in red. To edit an address,double click the necessary address block. To delete an address from the To: field, clickthe icon.When entering email addresses, you can also use common keyboard shortcuts: Ctrl+A toselect all address blocks or all content within the block being edited, Ctrl+C to copy theselected data, Ctrl+V to paste the previously copied data, Ctrl+Z to undo the last performedaction, Ctrl+Y to redo the last undone action.
To send a copy to multiple addresses, use the Add copy link situated to the right ofthe To: field.
3. enter a subject of your message in the Subject: field,4. write your message,
To format your message, insert a link or an image use the formatting toolbar locatedabove the message body field. You can change the font type, size, color, backgroundcolor, clear formatting, change the text alignment, increase or decrease indents, insertlists, images, links, smileys, quotes, switch to the HTML view of your text.The mail message editor uses native browser spellchecker to check the spelling whenyou enter the message text. The incorrectly spelt word will be underlined with the redwavy line. If you need to see the word variant suggestions with the correct spelling, clickthe word with the right mouse button holding the Ctrl key on the keyboard.Some browsers have the spellchecker disabled by default. Please see your browserdocumentation to find out how to enable it.The message is automatically saved as a drafts while you are typing.
5. attach files,You can attach documents from your local drive or Documents module to the messageusing the corresponding buttons under the message body field. Remember, that the filesize must not exceed 15 MB and the total size of all files must not exceed 25 MB. Toremove an attachment, click the icon. You can also click the Actions icon to theright of the attachment to Download, View or Delete the file. If your message containsseveral attachments, you can use the Delete All option next to the attachment list toremove all the files at once.If the file size exceedes the allowed limit, you'll be suggested to send the attachment(s) as alink(s) to the needed document(s). In such case all the files you want to send will be savedinMy Documents folder.If you want to send links to some files from the Documentsmodule instead of addingthese files to your message as attachments, use the Attach files fromDocuments option. In a new window that opens, switch betweenthe Documentsmodule sections and folders, check the necessary documents in the list,make sure that the Attach links to files option is selected and click the AttachFiles button. If you have the Read Only access rights to a file from the Shared withme or Common Documents folder, you'll be prompted to copy the file to theMydocuments folder.The links to the selected files will be inserted into your message body. When you clickthe Send button, you will be asked to set up access rights for all the files attached aslinks. When a recipient follow the link from your message, the document will open in theonline viewer or editor depending on the access rights you have specified.
6. if necessary, you can request the delivery report using the icon. At the receiving end,a read-receipt request will be displayed in the message if the client application supportsthis functionality. If the server supports sending delivery receipts, you should alsoreceive a message with a delivery notification.
7. assign a tag,The tags are used to simplify the search and message organization. To assign a tag tothe message, click the Tags button at the top of the message body field and select thenecessary tag or create a new one.
8. click the Send button.To send your message later, click the arrow next to the Save button and choosethe Save draft option. Your message will be saved in the Drafts folder. To access yourdraft, just click the corresponding folder on the left-side menu.To create a template on the base of your message, click the arrow next tothe Save button and choose the Save template option. Your message will be saved inthe Templates folder on the left-side menu.
Managing messages in the Inbox folderIn order to update the Inbox folder, just click the button. All the conversations which youhaven't read yet are displayed next to the Inbox caption or over the icon. If you clickthe icon you'll see the list of new conversations/messages, click the See all link to open themin the inbox. The number of messages in one conversation is displayed next to the name of asender, for example: .If you do not want messages to group into conversations, go to the Settings section on the left-sidemenu, open the Common Settings page and uncheck the Enable Conversations option. If thissetting is disabled, all emails and replies to them are displayed separately in the message list.Searching for, sorting and filtering messagesTo quickly find necessary emails according to the selected criteria, use the Filter field above themessages list.
· to display the conversations according to the selected criteria, click the buttonand select one of the options:Status
o Unread to display the conversations with unread messages;o Read to display the conversations that have been read.
By periodo Last week to display the conversations of last week;o Yesterday to display the conversations of yesterday;o Today to display the conversations of today;o Custom period to display the conversations of the specified period.
Othero Important to display the flagged conversations;o With attachment to display the conversations with attachment only. These
conversations are marked with the icon in the list;o From sender to display the conversations of the specified sender;o To mail address to display the conversations with a specified email address;o With tag to display the conversations with a specified tag only;o With calendar to display the conversations with calendar events only. These
conversations are marked with the icon in the list.· you can also enter the message subject entirely or partially into the Filter field and
press Enter.
To organize the received emails, check the box in the upper left corner above themessage list to select all displayed messages, or click the arrow next to this check box andchoose one of the options to mark the needed group ofconversations: All, Unread, Read, Important,With attachment, None, or manually checksome necessary conversations from different groups. Then choose an appropriate operationusing buttons above the message list:
· Delete - to move the selected conversation(s) to the Trash folder,You can delete all the conversations from the Trash folder in one click. You only needto click the icon which appears when you hold the cursor on the Trash caption.
· Spam - to move the selected conversation(s) to the Spam folder,Remember that it's impossible to restore the conversations deleted fromthe Spam folder.
· Move to - to move the selected conversation(s) to the specified default or customfolder,
· Tags - to assign a selected or created tag to the selected conversation(s),· More - to choose one of the following actions:
o Mark as read - to mark the selected unread conversation(s) as reado Mark as unread - to mark the selected read conversation(s) as unreado Mark as important - to mark the selected conversation(s) as important using
the icon.o Mark as not important - to mark the selected important conversation(s) as
not important. The flag icon will look like this: .You can also use the conversation context menu to perform the desired operation. Check thenecessary conversations, right click the selected area and choose the needed option:Mark asRead/Unread, Spam, Delete. If you choose only one conversation, you'll see the advanced contextmenu. Choose one of the available options: Open, Open in new tab, Reply ReplyAll, Forward, Create Email to Sender,Mark as Read/Unread,Mark as Important/NotImportant, Print, Spam, Delete.
· add a flag to add a visual sign to the conversation,
· use Sort by option to view the conversations in the Inbox folder arranged by date.
Reading & printing messagesTo read an email just click its subject.When the conversation is open, by default, only the last sent or received message is shown. Ifyou want to see all the messages of the conversation, click the Expand all link. If you want tohide them click the Collapse all link. You can pass from one open conversation to anotherusing the Previous and Next links. Using the buttons situated above the message body field orthe drop-down list, you can reply to the message, forward it, open it in a new tab, delete it,print, export it to CRM, mark it as unread, move it to the Spam folder, add a tag, link it with aCRM element, create a new personal or CRM contact on its base.To print all the messages in the conversation, open it, click theMore button on the top and selectthe Print all option. To print a single message from the conversation, click thecorresponding Actions button on the right and select the Print option.Displaying imagesBy default, images sent in a message are disabled for the security reasons. To see the imagesyou need to press the Display images link. If you need to change display options clickthe Always display images from "name of a sender" caption. After you've applied this optionall the images in a message sent by the chosen user will be displayed by default.You can also go to the Settings section on the left-side menu, open the CommonSettings page and use the Always display images from all option to enable or disabledisplaying images in all messages from all senders.Working with attachmentsThe received email may contain attached files. UsingMail you can automatically save those filesto any folder in the Documentsmodule. To do that, you need to set up a folder for theattachments,1. go to the Settings section on the left-side menu and choose the Account
Management option,2. click the icon to the right of the account you want to set up the folder for,3. choose the Folder for Attachments option and then the desired folder,4. click the OK button.
When the folder for attachments is set all the files attached to the future emails will be savedthere.You can easily Unlink or change the attachment folder following the steps described above. Butplease note, if you change the folder all the previously saved attachments won't be transferred to anew folder. The changes will be applied only to new emails.
Using the icon to the right of the attachment you also can:· Download a file to your computer,· View a file in your browser,· Open a file (text file, spreadsheet or presentation) in document editor,· Save a file to Documentsmodule selecting the folder you need.
If a message contains several attachments, you can use the Download All option next to theattachment list to download all the files as a single .zip archive.Creating E-mail templatesIntroductionIf you often send emails of the same type or need to reply to similar messages from time totime, you can speed up the communication process by using the Templates option oftheMailmodule.Use this feature to send any invitation, convocation or confirmation messages, or to respond tothem.Step 1. Access the MailEnter your portal and click the icon available at the top of each portal page.To access theMail, you can also open the drop-down list in the top left corner of the page andselect the corresponding option.Step 2. Create templatesThe portalMail window will open.To create your first email template choose the Templates folder on the left-side menu, thenclick the Compose the first template link.Alternatively, create a new email and save it as a template.To do that, click the Create Email button and fill To, Copy, BBC and Subject fields in, whereapplicable.Then click the Save button at the top of the page, open the drop-down list and select the Savetemplate option or click the Templates button at the top of the page and confirm saving of thetemplate.If you need to use an existing message as a template, choose appropriate email and then selectthe Templates folder from theMove tomenu.
You can also drag-and-drop your email directly to the Templates folder on the left-side menu.Step 3. Edit templatesYou can edit any created template.To do that, choose the Templates folder on the left-side menu and open the email templateyou wish to edit.Enter the text of the message, add a signature, smileys, images or links, and attach documents.You can also mark the template as important or request notification. As soon as the message iscomposed click the Save template button to save it, since templates are not autosaved likedrafts.If you leave the Templates folder without saving you will be prompted to save: clickthe Save / Do not save button or Cancel to continue editing.The same way that you manage your emails, you can delete a template, move it to anotherfolder or add tags.Step 4. Apply templatesTo apply a template click the Create Email button and open the Templates list at the top ofthe page, then choose the required one.Alternatively, select a template, fill in the empty fields and send your email.
When you apply a template, its text is automatically inserted before the text of your message.However if you need to completely replace the text, enable the Completely replace text of theemail when you insert a template option. To do that, select the Common settings section onthe left-side menu and turn the “on/off” switcher on.Step 5. Reassign templatesIf you delete your mailbox, all the messages will be removed from it.However you can reassign your templates and drafts to another account.To do that, switch to the Account Management section on the left-side menu and choose themailbox you wish to delete. Where applicable, select the account which your templates will bereassigned to and tick the Reassign to account box while deleting.Then, all your templates will be moved to the corresponding Templates folder and you cancontinue to use them.
ContactsManaging ContactsMail as an indispensable tool of business communication allows you to carry oncorrespondence with your personal contacts, portal users as well as with CRM contacts. All thecontacts are stored in the address book. To access it, expand the Contacts section on the left-side menu and select the Personal Contacts, Portal Contacts or CRM Contacts list.The Personal Contacts list displays the people you've already sent emails to (they can befiltered by the Frequently contacted parameter) and those who have been added as yourpersonal contacts.
· You can create completely new contacts using the Create contact button on the topof the list or save existing contacts using the Add to contacts option fromthe menu.To add a new personal contact, you can also open an incoming message, clickthe icon to the right and select the Create personal contact option.Fill in the Add to contacts form specifying the person Name, Email, Phone (use theicon to add additional phone numbers or email addresses) and Description and
click Save. Once you have saved some contacts, you can filter them by the Personalcontacts parameter.
· To edit a personal contact click the icon, select the Edit contact option, changethe necessary data and click Save.
· To remove contacts from the list, click the icon and use the Delete option foreach separate contact or check several contacts and click the Delete button on thetop of the list.
Within the Portal Contacts and CRM Contacts lists, you can click the icon and selectthe View contact profile option to open a contact profile. You can also use the Filter todisplay:
· portal contacts which are included into a certain Group,· all CRM companies or all persons only, or the CRM contacts with opportunities,· CRM contacts of a certain temperature level only,· CRM contacts with a specified tag only.
To send an email to a contact,1. select the Personal Contacts, Portal Contacts or CRM Contacts list,2. select the necessary contact from the list,3. click the icon to the right of the selected contact and use the Compose mail option.

Alternatively use the Compose button situated above the contact list to send a messageto the contact(s) you have selected checking the box next to the contact name.
Additional ActionsIntegrating with CRMMail gives you an opportunity to link a conversation or a single message to a CRM element withthe purpose to transfer all the necessary information about the contacts, cases, opportunitiessent by email to your CRM module.There is a difference between linking a conversation and single message to a CRM element. Ifyou link a conversation, all the conversation existing messages and as well as future ones willbe transferred to the CRM module. If you link a single message to a CRM element, only thismessage will be displayed in the CRM module.To link a conversation to a CRM element,
1. choose a conversation and open it,2. сlick theMore button in the upper part of the page and select the Link with
CRM option,3. in the opened Link conversation with CRM window select the element you want to
link your conversation to opening the drop-down list,There are three available options in Mail, they are: Contact, Case and Opportunity.The default option is Contact.
4. enter the name of an element fully or partially,You can link your conversation to several CRM elements at once.If you've added an element by mistake and want to delete it click the icon next toits name.
5. click the Save button.To link a single message to a CRM element,
1. open the required conversation,2. click the desired message,3. click the icon to the right and select the Export to CRM option,4. in the opened Export to CRM window select the element you want to link your
message to opening the drop-down list,5. enter the name of an element fully or partially,
If you've added an element by mistake and want to delete it click the icon next toits name.
6. click the Export button.So that's it! You successfully transferred the necessary emails to the CRM module and since thismoment you can look over your correspondence right on the element description page.On the element description page in the CRM module you also can:
· see not only the messages of the conversation that have already been sent orreceived but the new ones as well;
· open any message by clicking its subject;· open the attached files by clicking the Show files link;· delete a message by clicking the icon next to it.
To unlink a conversation from a CRM element,1. click the icon at the top of any portal page,2. choose the necessary conversation and open it,3. сlick theMore button in the upper part of the page and select the Link with
CRM option,4. in the opened Link conversation with CRM window you'll see all the CRM elements
linked with the conversation. If you want to delete all the linked elements, clickthe Unlink all button and confirm your choice. If you want to delete a certain CRMelement click the icon next to its name and then the Save button.Remember that if you unlink a conversation from a CRM element, new messages won'tbe transferred to the CRM module any longer but all the previously transferredconversation messages will remain on the element description page.If you want todelete the conversation from the element description page delete the messages one byone clicking the icon next to the corresponding message.
To unlink a single message from a CRM element go to the element description page and clickthe icon next to the required message.You can also create a new CRM contact on the base of a conversation. To do that,
1. open the required conversation,2. click any message received from the sender you want to add to CRM contacts,3. click the icon to the right and select the Create new CRM person or Create new
CRM company option,4. in the opened Link conversation with CRM window click the necessary button:
· Create and link - to create a new contact and link the current conversationwith it,
· Just create contact - to create a new contact without linking the currentconversation.
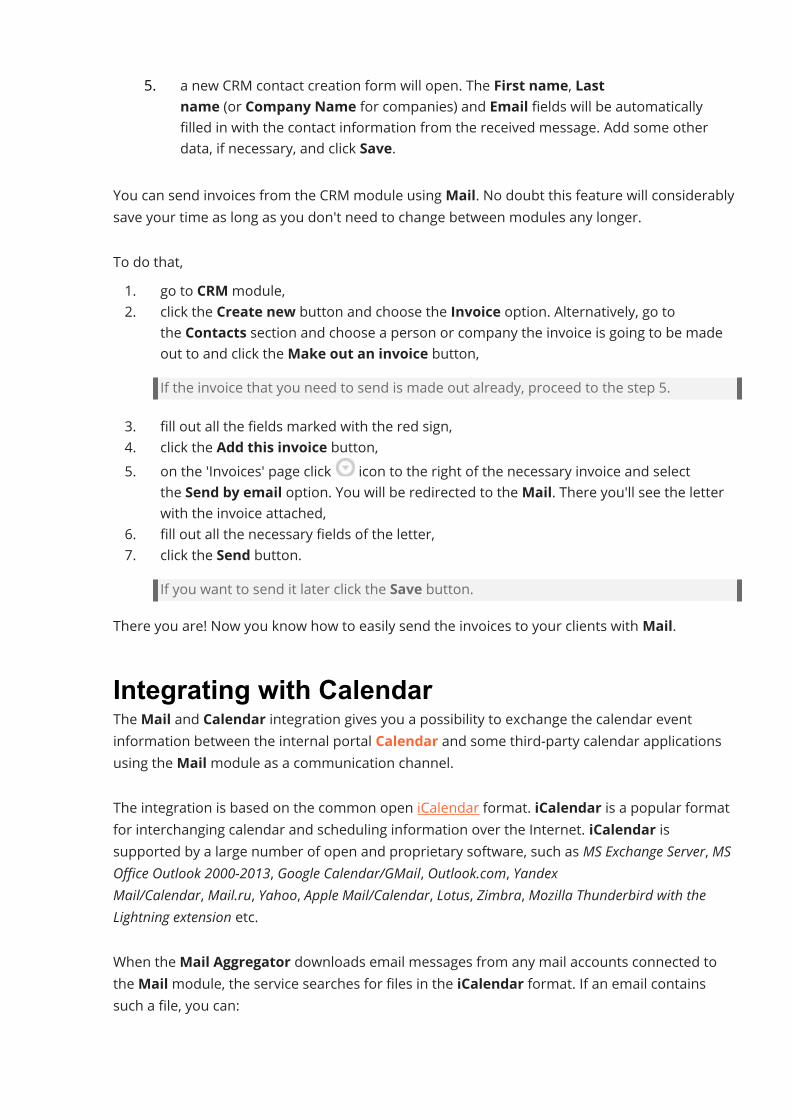
5. a new CRM contact creation form will open. The First name, Lastname (or Company Name for companies) and Email fields will be automaticallyfilled in with the contact information from the received message. Add some otherdata, if necessary, and click Save.
You can send invoices from the CRM module usingMail. No doubt this feature will considerablysave your time as long as you don't need to change between modules any longer.To do that,1. go to CRMmodule,2. click the Create new button and choose the Invoice option. Alternatively, go to
the Contacts section and choose a person or company the invoice is going to be madeout to and click theMake out an invoice button,If the invoice that you need to send is made out already, proceed to the step 5.
3. fill out all the fields marked with the red sign,4. click the Add this invoice button,5. on the 'Invoices' page click icon to the right of the necessary invoice and select
the Send by email option. You will be redirected to theMail. There you'll see the letterwith the invoice attached,
6. fill out all the necessary fields of the letter,7. click the Send button.
If you want to send it later click the Save button.There you are! Now you know how to easily send the invoices to your clients withMail.
Integrating with CalendarTheMail and Calendar integration gives you a possibility to exchange the calendar eventinformation between the internal portal Calendar and some third-party calendar applicationsusing theMailmodule as a communication channel.The integration is based on the common open iCalendar format. iCalendar is a popular formatfor interchanging calendar and scheduling information over the Internet. iCalendar issupported by a large number of open and proprietary software, such as MS Exchange Server, MSOffice Outlook 2000-2013, Google Calendar/GMail, Outlook.com, YandexMail/Calendar, Mail.ru, Yahoo, Apple Mail/Calendar, Lotus, Zimbra, Mozilla Thunderbird with theLightning extension etc.When theMail Aggregator downloads email messages from any mail accounts connected totheMailmodule, the service searches for files in the iCalendar format. If an email containssuch a file, you can:
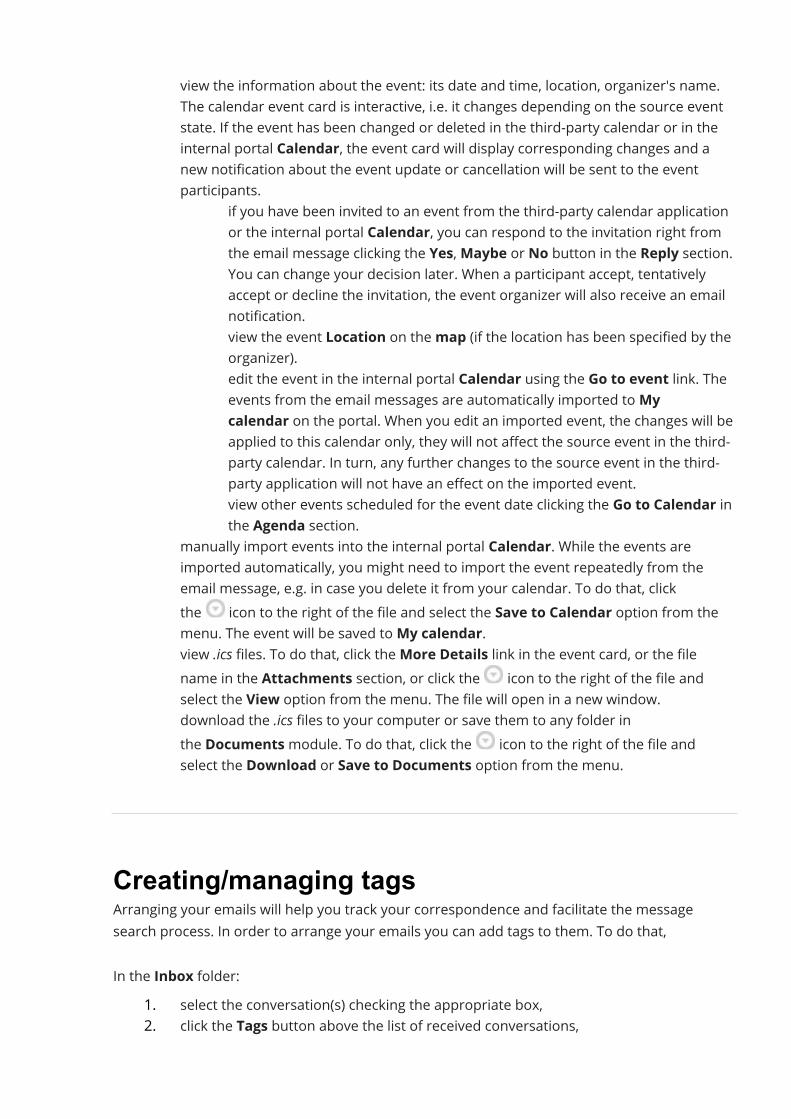
· view the information about the event: its date and time, location, organizer's name.The calendar event card is interactive, i.e. it changes depending on the source eventstate. If the event has been changed or deleted in the third-party calendar or in theinternal portal Calendar, the event card will display corresponding changes and anew notification about the event update or cancellation will be sent to the eventparticipants.
o if you have been invited to an event from the third-party calendar applicationor the internal portal Calendar, you can respond to the invitation right fromthe email message clicking the Yes,Maybe or No button in the Reply section.You can change your decision later. When a participant accept, tentativelyaccept or decline the invitation, the event organizer will also receive an emailnotification.
o view the event Location on themap (if the location has been specified by theorganizer).
o edit the event in the internal portal Calendar using the Go to event link. Theevents from the email messages are automatically imported toMycalendar on the portal. When you edit an imported event, the changes will beapplied to this calendar only, they will not affect the source event in the third-party calendar. In turn, any further changes to the source event in the third-party application will not have an effect on the imported event.
o view other events scheduled for the event date clicking the Go to Calendar inthe Agenda section.
· manually import events into the internal portal Calendar. While the events areimported automatically, you might need to import the event repeatedly from theemail message, e.g. in case you delete it from your calendar. To do that, clickthe icon to the right of the file and select the Save to Calendar option from themenu. The event will be saved toMy calendar.
· view .ics files. To do that, click theMore Details link in the event card, or the filename in the Attachments section, or click the icon to the right of the file andselect the View option from the menu. The file will open in a new window.
· download the .ics files to your computer or save them to any folder inthe Documentsmodule. To do that, click the icon to the right of the file andselect the Download or Save to Documents option from the menu.
Creating/managing tagsArranging your emails will help you track your correspondence and facilitate the messagesearch process. In order to arrange your emails you can add tags to them. To do that,In the Inbox folder:
1. select the conversation(s) checking the appropriate box,2. click the Tags button above the list of received conversations,

3. select the tag from the list or create a new one.While reading a message:
1. open the necessary conversation,2. click the Tags button above the message body field,3. if necessary, check theMark all sender(s) mail option to automatically add the
selected tag to all messages received later from the sender(s) of the current message,4. select the tag from the list or create a new one.
While composing a message:1. click the Create Email button,2. click the Tags button situated above the From: field,3. select the tag from the list or create a new one.
The added tag is always visible next to the conversation subject in the Inbox folder and in theopened conversation window in the Tags field under the Date field.You can access the tagged conversations using the links available in the left-side menu underthe Spam folder. Clicking the name of the necessary tag you will open the list of conversationswith the specified tag name.To edit a tag:
1. click the Settings section on the left-side menu,2. select the Tag Management option to open the list of tags,3. select the necessary tag from the list and click the icon to the right,4. select the Edit option,5. make all the changes you need: for example, change the tag color, name, or specify
necessary email address(es) in theMark all messages from section to automaticallyadd this tag to all messages received later from the specified email address. To addone more email address, use the icon, to remove the added email address, usethe icon.
6. click the Save button.At the Tag Management page, you can also create new tags using the Create New Tag button.
To delete a tag, choose the corresponding option from the Actions drop-down list.
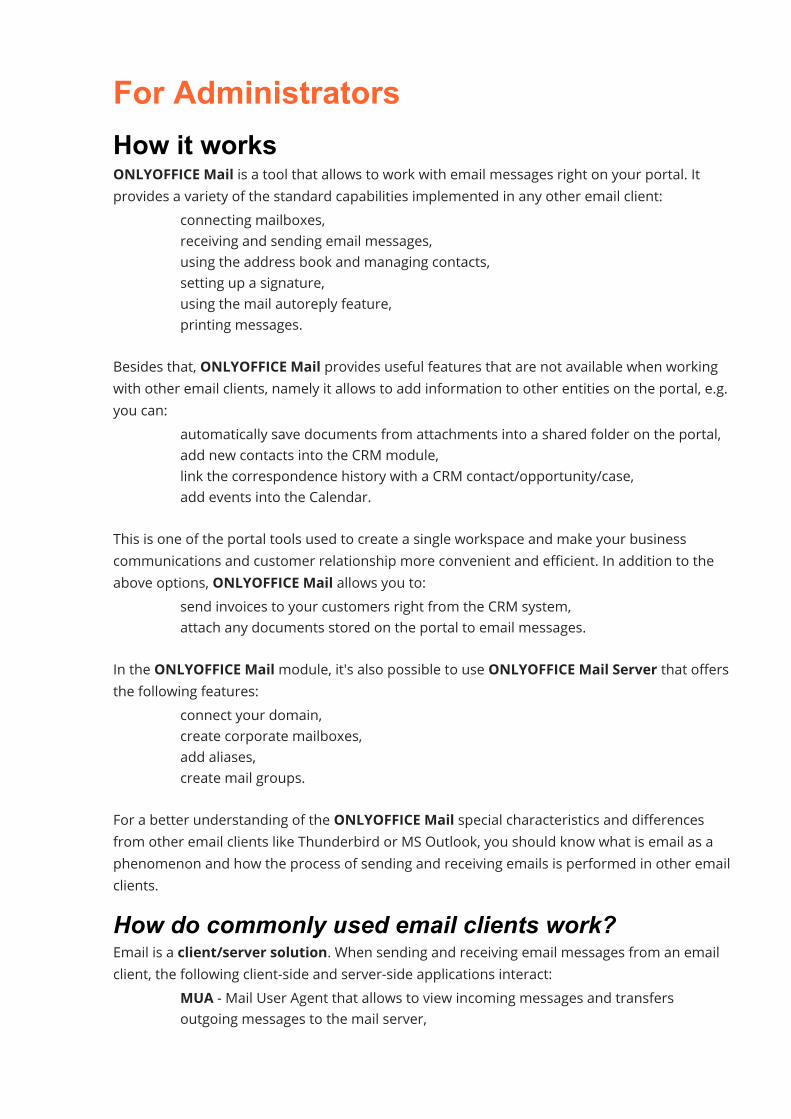
For AdministratorsHow it worksONLYOFFICE Mail is a tool that allows to work with email messages right on your portal. Itprovides a variety of the standard capabilities implemented in any other email client:
· connecting mailboxes,· receiving and sending email messages,· using the address book and managing contacts,· setting up a signature,· using the mail autoreply feature,· printing messages.
Besides that, ONLYOFFICE Mail provides useful features that are not available when workingwith other email clients, namely it allows to add information to other entities on the portal, e.g.you can:
· automatically save documents from attachments into a shared folder on the portal,· add new contacts into the CRM module,· link the correspondence history with a CRM contact/opportunity/case,· add events into the Calendar.
This is one of the portal tools used to create a single workspace and make your businesscommunications and customer relationship more convenient and efficient. In addition to theabove options, ONLYOFFICE Mail allows you to:
· send invoices to your customers right from the CRM system,· attach any documents stored on the portal to email messages.
In the ONLYOFFICE Mailmodule, it's also possible to use ONLYOFFICE Mail Server that offersthe following features:
· connect your domain,· create corporate mailboxes,· add aliases,· create mail groups.
For a better understanding of the ONLYOFFICE Mail special characteristics and differencesfrom other email clients like Thunderbird or MS Outlook, you should know what is email as aphenomenon and how the process of sending and receiving emails is performed in other emailclients.How do commonly used email clients work?Email is a client/server solution. When sending and receiving email messages from an emailclient, the following client-side and server-side applications interact:
· MUA - Mail User Agent that allows to view incoming messages and transfersoutgoing messages to the mail server,
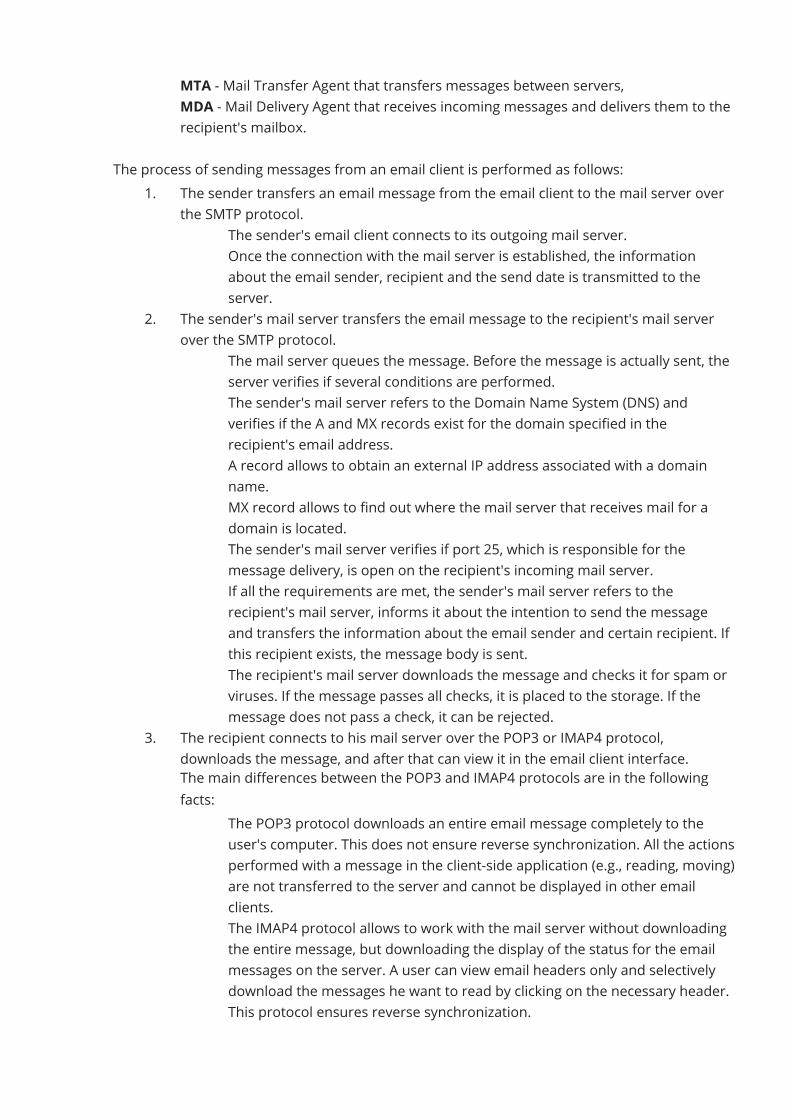
· MTA - Mail Transfer Agent that transfers messages between servers,· MDA - Mail Delivery Agent that receives incoming messages and delivers them to the
recipient's mailbox.The process of sending messages from an email client is performed as follows:
1. The sender transfers an email message from the email client to the mail server overthe SMTP protocol.
o The sender's email client connects to its outgoing mail server.o Once the connection with the mail server is established, the information
about the email sender, recipient and the send date is transmitted to theserver.
2. The sender's mail server transfers the email message to the recipient's mail serverover the SMTP protocol.
o The mail server queues the message. Before the message is actually sent, theserver verifies if several conditions are performed.
o The sender's mail server refers to the Domain Name System (DNS) andverifies if the A and MX records exist for the domain specified in therecipient's email address.
o A record allows to obtain an external IP address associated with a domainname.
o MX record allows to find out where the mail server that receives mail for adomain is located.
o The sender's mail server verifies if port 25, which is responsible for themessage delivery, is open on the recipient's incoming mail server.
o If all the requirements are met, the sender's mail server refers to therecipient's mail server, informs it about the intention to send the messageand transfers the information about the email sender and certain recipient. Ifthis recipient exists, the message body is sent.
o The recipient's mail server downloads the message and checks it for spam orviruses. If the message passes all checks, it is placed to the storage. If themessage does not pass a check, it can be rejected.
3. The recipient connects to his mail server over the POP3 or IMAP4 protocol,downloads the message, and after that can view it in the email client interface.The main differences between the POP3 and IMAP4 protocols are in the followingfacts:
o The POP3 protocol downloads an entire email message completely to theuser's computer. This does not ensure reverse synchronization. All the actionsperformed with a message in the client-side application (e.g., reading, moving)are not transferred to the server and cannot be displayed in other emailclients.
o The IMAP4 protocol allows to work with the mail server without downloadingthe entire message, but downloading the display of the status for the emailmessages on the server. A user can view email headers only and selectivelydownload the messages he want to read by clicking on the necessary header.This protocol ensures reverse synchronization.
Particulars of the ONLYOFFICE Mail implementationONLYOFFICE Mail includes the following main components:1. Mail Aggregator - a service that collects email messages from other mailboxes.
The following components are also used to ensure the mail aggregator operation:o Own email storage,o The email storage API,o HTTP server that processes the requests to this API. It is also responsible for
sending emails.In the user interface with a set of standard folders, you can connect existing mailboxesspecifying your login, password and settings for connection to a mail server. The mailaggregator will download email messages from the connected mailboxes into thestorage over the protocol used for retrieving email (POP3 or IMAP4) that is specified inthe connection settings. You will be able to view the received messages and send emailsfrom any of the connected mailboxes.The mail aggregator always works with a delay. If there are a lot of users on your portal,a number of settings can be used to ensure that email messages for all user aredelivered in a certain time period. First the aggregator collects new messages, and thencollects all others. It's also possible to collect messages only for the last 30 days, or givepriority to active portal users.None of the actions performed in our client are transferred to the source server, withthe only exception: a sent message is placed to the "Sent" folder on the server.
2. Mail Server - a set of software products that allows to send and receive email messagesfrom the ONLYOFFICE Mail interface using own domain names.The following components are also used to ensure the mail server operation:
o MailServer API - a set of functions for connecting own domain names,creating and setting up mailboxes, aliases and mail groups.
o MailServer WebUI - the Administration page used for the interaction with theMailServer API.
o Mail Aggregator, which is described above.The main differences between ONLYOFFICE Mail and other email programs are in thefollowing facts:
· ONLYOFFICE Mail Server supports the SMTP, IMAP and POP3 protocols, but emailmessages are sent using HTTP server.
· ONLYOFFICE Mail Server does not have own email client. TheMail Aggregator isused for working with ONLYOFFICE Mail Server, like for the interaction with anyother third-party mail server.
This results in some restrictions. For example, it's not possible to implement full-fledgedoperation via the IMAP protocol.
If a mail server has own email client, there are no restrictions on the number of connectionsfrom the same IP address between the client-side and server-side applications, while suchrestrictions always exist when working with third-party clients.As we work with ONLYOFFICE Mail Server using the mail aggregator rather than own emailclient, this restriction may work if there are a lot of users on the portal, because all the users'mailboxes are on the same IP address.
Configuring mail serverFrom now onMail not only aggregates the emails from different email services that you usebut also gives you an opportunity to add a mail server to your domain. So, if you have your owndomain you can easily create and manage corporate mailboxes right on your portal.Only the portal owner and administrator can set up the domains, create, manage and deletecorporate mailboxes.To set up your first domain,
1. click the icon at the top of any portal page (if you haven't created any account yet)and click the Set up domain link or go to the Settings section of theMailmodule,
2. choose theMail Server option and click the Add your own domain button,3. follow the wizard instructions to set up the domain:· enter your domain name in the corresponding field and click the Next button,· prove the domain ownership by adding TXT record to the control panel of your
domain using the information provided in the wizard instruction and clickthe Next button,If you are using the server version, it’s not necessary to perform this step. In thiscase, the wizard includes 4 steps only.
· add theMX record to the control panel of your domain using the informationprovided in the wizard instruction and click the Next button,
· add the SPF record to the control panel of your domain using the informationprovided in the wizard instruction and click the Next button,
· add the DKIM record to the control panel of your domain using the informationprovided in the wizard instruction and click the Complete button.
4. in the appeared window click the OK button.The added domain will be shown on the domains list page. Using the Add your owndomain button you can add as many domains as you need.Using the domain menu you can:
· Check the DNS settings,· Delete domain if you don't need it any more.
If you are using the server version, there is also a possibility to view the connectionsettings that can be used when connecting a mailbox to a third-party mail client.Administrators can view the connection settings using the domain menu at the MailServer settings page. Users who have a mailbox on the domain can view the connectionsettings using the mailbox menu at the Account Management page.Select the Connection settings option from the domain/mailbox menu. The connection settingswill be displayed in a new window. The settings include the following data: Login and password(your mailbox address and password), Server, Port, SSL/TLS for the incoming mail (IMAP server)and outgoing mail (SMTP server).If you see the red notification next to the added domain, it means that some of the DNS recordsare incorrect or that they haven't been updated yet (this process may take from severalminutes to several hours). Wait some time and if the notification remains click the DNSsettings link to learn which DNS record you need to check. Click the Verify button to updatethe DNS settings information. Once updating is over, you can add the first mailbox.In case you don't have your own domain you can use our free default domain. You can find iton theMail server page of the Settings section.To create a new mailbox,1. choose the needed domain (it can be either our domain or yours),2. click the Add new mailbox link,3. in the Create new mailbox window type theMailbox address in the corresponding
field and choose the user you want to create a mailbox for using the Add user link.The Sender name field will be filled in automatically with the information from the userprofile, but you can change the name, if necessary,You can create only two mailboxes for one user for each domain.
4. click the Save button.There is a second way to create a mailbox for our default domain. Go to the AccountManagement page, click the Create Mailbox button and follow the instructiondescribed above.
If you are using the server version, the user will receive a notification about the mailboxcreation. The notification will be sent to the mailbox specified in the user’s profile (if it isactivated) and to the created mailbox. In the Enterprise Edition server version, the notificationwill also contain the information about the connection settings for the third-party mail clients.Using the mailbox menu you can Edit mailbox aliases or Delete a mailbox.
If you are using the server version, there is also a possibility to change a mailbox password.Administrators can change a password for the user’s mailbox using the mailbox menu atthe Mail Server settings page. Users who have a mailbox on the domain can change theirpasswords using the mailbox menu at the Account Management page.Select the Change password option from the mailbox menu and specify a new password. Thepassword generation and validation rules are the same as the ones for the portal accountspasswords (which are specified in the Password Strength Settings section of the portal securitysettings). You can enter a password manually or generate it automatically. The password isvalidated as you type, its compliance with the password strength requirements is indicated bycolor. To generate a new password automatically click the icon. The mailbox address andgenerated password can be copied using the corresponding link below and sent to the user.The automatic portal notification about the password change will be sent to the mailboxspecified in the user’s profile (if it is activated). If the user’s profile mailbox is not activated themessage will be sent to the current mailbox.
Setting up mail serverIntroductionMail Server is an additional feature of theMailmodule used to send and receive emails usingyour own domain names. Connecting mail to your own domain, you will be able to do businesscorrespondence using your own addresses such as your company name.This messaging solution makes email management simple and includes the followingcomponents: mail server, mail server API, web server, WebUI and mail aggregator (2g!) service.In the following guide you will find out how to set up and get started with the portal MailServer.Step 1. Access the MailEnter your portal and click the icon available at the top of each portal page.To access theMail, you can also open the drop-down list in the top left corner of the page andselect the corresponding option.Step 2. Add a domainThe portalMail window will open.Switch to the Settings section on the left-side menu, select theMail Server option and clickthe Add your own domain button.Enter the company domain name in the field and click the Next button.The next step is used to prove your domain ownership. To do that you need to add TXT-recordin the control panel of your own domain.If you are using the server versionIt’s not necessary to prove the domain ownership by adding a TXT record. In this case, the Adddomain wizard includes 4 steps only and you can proceed to adding the MX record right afteryou specify the domain name.Open the control panel of your domain in another browser tab, copy the bold text provided inthe Add domainWizard and paste it into the appropriate fields in your domain DNS settings.The Next button will be locked until the TXT entry appears in the DNS settings. Once the DNSsettings are updated, the next step of the Add domain wizard will be available.As soon as the TXT record is created press the Next button of the Add domain wizard.
The same way you need to add MX-record, SPF-record and DKIM-record in the DNS settings.Just copy the needed information provided in the wizard and pase it into the appropriate fieldsof the control panel of your domain and click the Next button of the wizard.When all records are added press the Complete button.
To verify your domain settings, click the button situated next to the domain name andselect the DNS Settings option from the menu. The domain settings window will open wherethe records are checked.If you see the DNS settings link appearing in red next to the domain name it means that one orseveral DNS records for your domain are incorrect or not updated yet. Go to your domainsettings panel to verify the records. If all is correct please wait till the records are updated assome servers can take up to 24 hours to update DNS information. Use the Verify button inorder to update the information.If you are using the server versionIt's possible to view the connection settings that can be used when connecting a mailbox to athird-party mail client, e.g. Mozilla Thunderbird.Administrators can view the connection settings using the domain menu at the MailServer settings page. Users who have a mailbox on the domain can view the connectionsettings using the mailbox menu at the Accounts Management page.Click the button to the right of the domain/mailbox and select the Connectionsettings option from the domain/mailbox menu. The connection settings will be displayed in anew window. The settings include the following data: Login and password (your mailboxaddress and password), Server, Port, SSL/TLS for the incoming mail (IMAP server) and outgoingmail (SMTP server).Step 3. Add a mailbox, aliases and mail groupYou have set up your domain. Now you can add a first mailbox.To do that click the Add new mailbox link and enter the mailbox address intoMailboxaddress field.Then add a user. Click the Add user link and choose the needed person from the list or find theuser typing his name into the Search field.The Sender name field will be filled in automatically with the information from the user profile,but you can change the name, if necessary.When you finish adding the user, click the Save button to make the settings take effect.
You can create only two different mailboxes for one user.If you are using the server versionThe user will receive a notification about the mailbox creation. The notification will be sent tothe mailbox specified in the user’s profile (if it is activated) and to the created mailbox. In theEnterprise Edition server version, the notification will also contain the information about theconnection settings for the third-party mail clients.To add an alias to the newly created mailbox click the button to the right of the mailboxname and select the Edit mailbox option from the menu. In the opened window enter themailbox alias into the corresponding field and press the Save button. The same way you canadd as many aliases as you need.If you are using the server versionIt's possible to change a mailbox password.Administrators can change a password for the user’s mailbox using the mailbox menu atthe Mail Server settings page. Users who have a mailbox on the domain can change theirpasswords using the mailbox menu at the Accounts Management page.Click the button to the right of the mailbox, select the Change password option from themailbox menu and specify a new password. The password generation and validation rules arethe same as the ones for the portal accounts passwords (which are specified in the PasswordStrength Settings section of the portal security settings). You can enter a password manually orgenerate it automatically. The password is validated as you type, its compliance with thepassword strength requirements is indicated by color. To generate a new passwordautomatically click the icon. The mailbox address and generated password can be copiedusing the corresponding link below and sent to the user. The automatic portal notificationabout the password change will be sent to the mailbox specified in the user’s profile (if it isactivated). If the user’s profile mailbox is not activated the message will be sent to the currentmailbox.
In case you need to group some email addresses under one name you can create a mail group.Click the Add new mail group link situated under the needed domain name.Enter the mail group address and choose mailboxes to be included in the mailgroup. Clickthe Save button to save the changes.The added mailbox will be automatically included into the group. If the mailbox is not includedin any group, it will apear in the not in group list.That's all! Everything is ready to start sending emails using the new domain.
Adding alias and creating mail groupsHave you already set up your first domain on the portal? Do all the portal users have thecorporate mailboxes? If the greater part of the work is done, you're in a right place! Read thisarticle to learn how to create mail groups and aliases.It might happen that a user needs to change his/her original email address without creating anew mailbox. Mail gives an opportunity to add aliases to the mailbox address. To add a newalias:
1. Access the portal using the login details.2. Go to theMail using the corresponding icon in the right upper corner of the page or
the drop-down list in the left upper corner.3. Open the Settings section.4. Go to theMail Server subsection.5. Click the icon next to the mailbox you want to create alias for.6. Choose the Edit mailbox option.7. EnterMailbox alias into the corresponding field of the Edit mailbox window and
click the icon. Add as many aliases as you want following the instruction describedin this step.If you want to delete an alias added by mistake, find it in the list below theMailboxalias field and click the icon.
8. Click the Save button.The user email aliases will be shown on the left-side panel with the email accounts connectedto Mail.Sometimes people who work in one department need to have an access to the same emailcorrespondence. Creating a mail group is a good way to make the certain emails available for acertain group of employees. To create a mail group:
1. Access the portal using the login details.2. Go to theMail using the corresponding icon in the right upper corner of the page or
the drop-down list in the left upper corner.3. Open the Settings section.4. Go to theMail Server subsection.5. Click the Add new mail group link under the needed domain.6. Enter theMail group address into the corresponding field of the Create new mail
group window.7. Click the Add new mailbox link, check the boxes next to the email addresses you
want to add to the group and click the Save button.If you want to delete an email address added by mistake, find it in theMail groupmailboxes list and click the icon.
8. Click the Save button.

From now on all the emails sent to the specified mail group address will be forwarded to thepersonal emails of the group members.
Settings for most popular mail servicesGmail.com
Protocol Server Port Encryption AuthenticationIMAP imap.gmail.com 993 SSLPOP3 pop.googlemail.com 995 SSL
SMTPsmtp.googlemail.com 465 SSLsmtp.googlemail.com 587 TLS/STARTTLS
Yandex.ruProtocol Server Port Encryption AuthenticationIMAP imap.yandex.ru 993 SSLPOP3 pop.yandex.ru 995 SSLSMTP smtp.yandex.ru 465 SSL
Mail.ruProtocol Server Port Encryption AuthenticationIMAP imap.mail.ru 993 SSLPOP3 pop.mail.ru 995 SSLSMTP smtp.mail.ru 465 SSL
Yahoo.comProtocol Server Port Encryption AuthenticationIMAP imap.mail.yahoo.com 993 SSLPOP3 pop.mail.yahoo.com 995 SSL
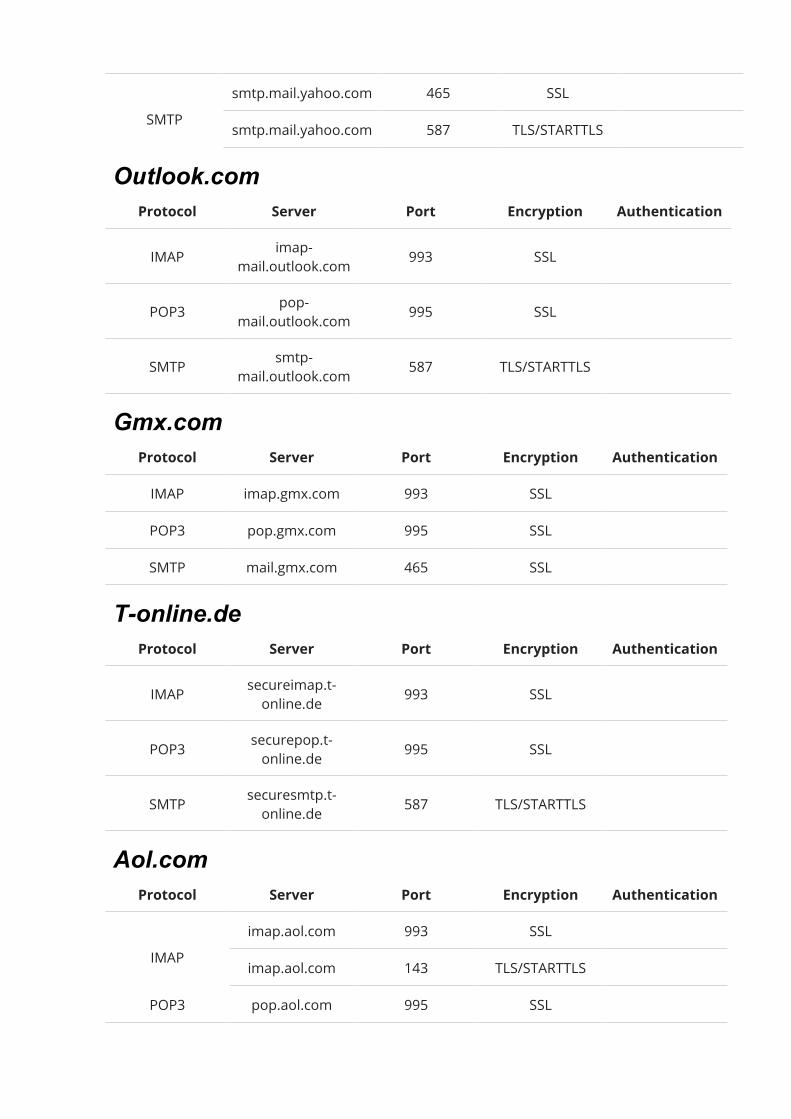
SMTPsmtp.mail.yahoo.com 465 SSLsmtp.mail.yahoo.com 587 TLS/STARTTLS
Outlook.comProtocol Server Port Encryption AuthenticationIMAP imap-
mail.outlook.com 993 SSL
POP3 pop-mail.outlook.com 995 SSL
SMTP smtp-mail.outlook.com 587 TLS/STARTTLS
Gmx.comProtocol Server Port Encryption AuthenticationIMAP imap.gmx.com 993 SSLPOP3 pop.gmx.com 995 SSLSMTP mail.gmx.com 465 SSL
T-online.deProtocol Server Port Encryption AuthenticationIMAP secureimap.t-
online.de 993 SSL
POP3 securepop.t-online.de 995 SSL
SMTP securesmtp.t-online.de 587 TLS/STARTTLS
Aol.comProtocol Server Port Encryption Authentication
IMAPimap.aol.com 993 SSLimap.aol.com 143 TLS/STARTTLS
POP3 pop.aol.com 995 SSL
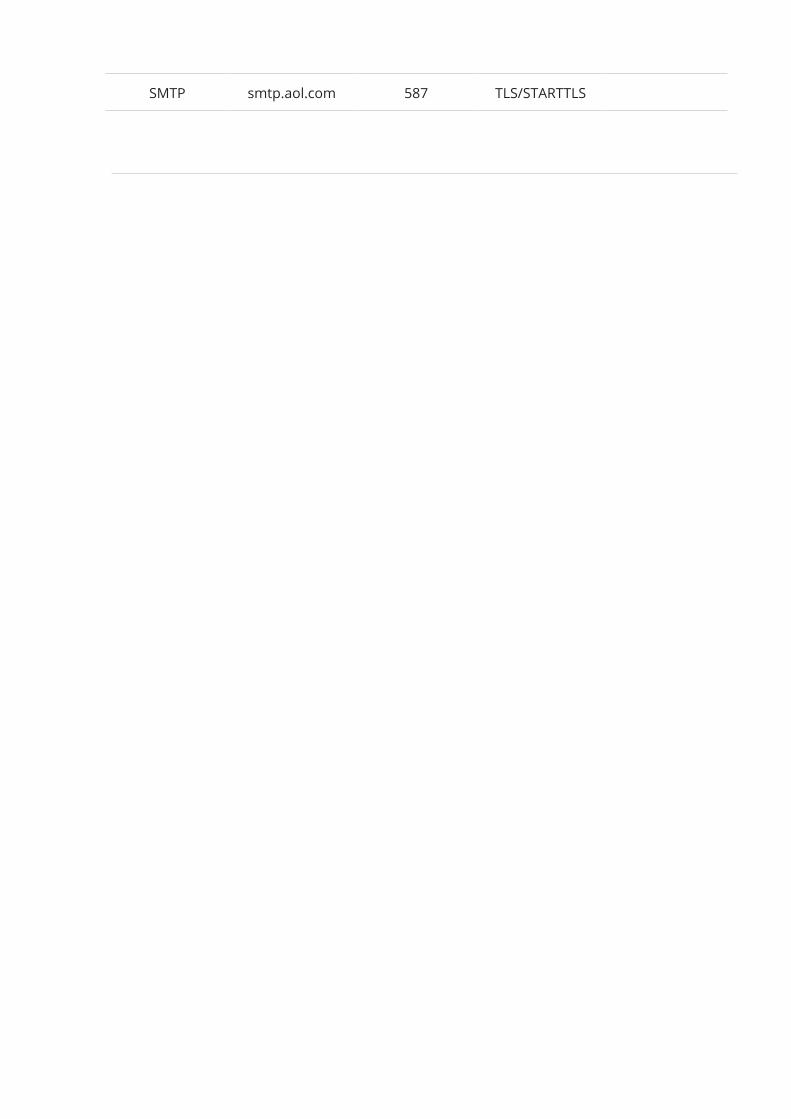
SMTP smtp.aol.com 587 TLS/STARTTLS
Calendar ModuleOverviewCalendar is a built-in scheduling tool that allows you:
· view all your personal and corporate events at a glance,· keep track of your milestones, Projects and CRM tasks, user birthdays,· add different types of events: single events with start and end time, all-day events
that last one or several days, or repeating events,· create and manage to-dos,· do not miss any important date using reminders,· invite guests to your events,· create a personal timetable, or grant access to your calendar to a certain user or a
group,· specify who can only view your calendar, or also edit it and create new events,· export/import calendars, export tasks synchronizing with other calendar apps you
use.
To access the Calendar tool from any portal page, click the icon at the top of the page or usethe drop-down list in the top left corner and select the corresponding option.
EventsCreating eventsYou can add events to your personal calendar in several ways: using the Quick Mode thatallows to add basic information about an event, or switching to the Advanced Mode to specifyall the event details such as a recurrence period, reminder time, guest list etc.Quick Mode
1. left-click within a day you wish to add an event to,2. in a new popup window, enter the event basic information: title, location, time and
select the calendar you wish to add your event to (the description of these options isprovided in the Advanced Mode instruction),
3. click the Save button to add the event to the calendar or use the Details link toswitch to the advanced mode.
Advanced Mode1. to start creating an event in the advanced mode, click the Create button in the upper
left corner and select the Event option,2. enter the event title,3. set the event time:· to create an event that lasts for an entire day or longer, leave the All-day event box
checked and set the start and end dates.Enter the date you need in the From: and To: fields using the keyboard or clicking thecorresponding icon and selecting the necessary date.
· to create an event that occurs at specific time, uncheck the All-day event box andenter a desired start and end time values.
4. set a recurrence period, if you wish to repeat your event on a regular basis,Open the Repeat drop-down list and select one of the available options: everyday, every week, every month, every year. To set a custom recurrence periodselect the corresponding option from the Repeat drop-down list and adjust theavailable settings.
5. set your event reminder,By default, you will be informed about your event added to theMy calendar 15minutes before it occurs. If you want to change the reminder time, openthe Alert drop-down list and select one of the available options: 5 minutes, 15minutes, half an hour, an hour, 2 hours, a day. To switch the reminder off selectthe never option from the drop-down list.Keep in mind that the notification will be sent according to the time zone set for thecalendar you add the event to.
6. if you have several calendars, select the Calendar you wish to add your event tofrom the drop-down list,
7. specify the event Location,8. if you have several email accounts connected in theMailmodule, you can change
the Organizer email address, selecting the necessary one from the list.You will receive notifications about the guest attendance to the selected emailaddress.
9. add a Description for your event,10. invite Guests to your event,
Start typing the guest name or email address and choose the necessary contact fromthe list (your personal, CRM and portal contacts that match the entered charactersare displayed there as you type). If you enter a new email address that is not storedin yourMail contacts, press Enter or click the Ok button on the right to add theguest.
Then you can specify the necessity for the presence of each guest.The Required option is selected by default, but you can change it tothe Optional one.To remove a guest, use the icon.Guests can only view the event. If you want to let another portal user edit the eventand invite other guests, use the Add users link at the bottom of the page, andprovide the user Full access to the event.
11. share your event with other portal users, if necessary,Click the Add users link, check the persons you wish to share your event with andclick the Save button. Use the filter field at the top to facilitate the search. Check thenecessary group or the Select All option to add the users from the selected group orall the users respectively.Then set the access type for each user. The Read Only option is selected by default,but you can grant Full Access so that the user can not only view but also edit theevent.To remove a user, use the icon.
12. click the Save button.If you have added some guests, the Send invitations window will appear. Decide ifyou want to send invitations to guests or not and click the corresponding button.
The added event will be highlighted with the color of the selected calendar.The invited guests will receive email notifications, if you have decided to send them invitations.The guests will be able to accept/decline the invitation choosing the Yes,Maybe or No optionright from the email message as well as from the event preview window in the Calendar. Thedecision can be changed later.To open the event preview window, left-click the event in the calendar. In this window, you canalso view the total number of invited guests and the quantity of guests who haveaccepted/declined the invitation.When a participant accept, tentatively accept or decline the invitation, the event organizer willalso receive an email notification.Editing EventsIf you need to edit an event,1. left-click the event you wish to edit,2. click the Edit button at the bottom of the window,3. make all the changes you need,
Besides the options described above, you can also change your decision concerningyour participation in the event selecting the Yes,Maybe or No radio button inthe Attending section.
4. click the Save button,5. If you have invited some guests to the event, the Sending updates window will appear.
Decide if you want to send notifications about the event change to guests or not andclick the corresponding button.If you have added new guests or removed some of the existing ones, you will besuggested to choose if you want to notify about the change New and RemovedGuests only or Everyone.
To delete an event, left-click it and use the Delete button at the bottom of the window. If youhave invited some guests to the event, the Sending cancellations window will appear. Decideif you want to send notifications about the event cancellation to guests or not and click thecorresponding button.
Creating an all-day eventAn all-day event is an event that lasts an entire day or longer. For example, if you plan aseminar or a training for two days you can select a start and end date and check the All-dayevent feature instead of entering the time.This guide will show you how to create an all-day event in your Calendar.Step 1. Access the CalendarEnter your portal and click the Calendar icon at the top of the page.
Step 2. Add a new eventClick with the left mouse button the necessary day to quickly create a new all-day eventspecifying basic information.
Step 3. Configure your event settingsEnter as many information as you wish about your event. Type in a title. Set start and end datesfor your event in the From: and To: fields respectively using the keyboard or clicking thecorresponding icon and selecting the necessary date.Make sure that the All-day event option is checked.
If you need to invite guests, set a recurrence period, change the reminder settings, share yourevent with colleagues or add a description, you can switch to the advanced mode clickingthe Details link.To publish your event just click the Save button at the bottom of the window. The created eventwill be immediately added to your calendar.Step 4. Edit the created all-day eventThe all-day events are displayed at the top of each day and highlighted with a color associatedwith a calendar the event is added to.To change some all-day event settings proceed as for a single event. Click the all-day event titleand use the Edit button at the bottom of the pop-up window to start editing.To apply the changes you made use the Save button.You can also change the all-day event end date right in your calendar without opening theediting window as described above.Place the mouse cursor at the right boundary of the event box. The cursor will turn into abidirectional arrow. Then, without releasing the mouse button, drag it to change the event enddate.
Step 5. Delete an all-day eventTo delete an all-day event proceed as for a single one. Click the all-day event title and usethe Delete button at the bottom of the pop-up window.The selected event will be removed from your calendar.
Creating a recurring eventA recurring event is an event that repeats on a regular basis: daily, weekly, monthly or yearly.For example, if you have to make a report every Monday, you can add the same event to yourcalendar several times or create this event once and specify how often it occurs usingthe Repeat Event feature.This guide will show you how to make an event recur.Step 1. Access the CalendarEnter your portal and click the Calendar icon at the top of the page.
Step 2. Add a new event or select an existing oneClick the Create New... button in the upper left corner and select the Event option or click withthe left mouse button the day where you wish to create a new event and click the Details link.The Create new event page will open. Fill out the basic information including name, location,date and time, add an event description, if needed.To mark an existing event as recurring click the event title you wish to repeat and usethe Edit button at the bottom of the open window with event details.Step 3. Set the recurrence periodOpen the Repeat drop-down list and select one of the available options: never, everyday, every week, every month, every year.To set a custom recurrence period select the corresponding option from the Repeat drop-down list and adjust the available settings:
· set the start date in the starting with field using the keyboard or selecting theappropriate date from the calendar;
· select the recurrence rule:o by days
use this option if you wish to repeat your event on a daily basis and enter anumber of days you wish to repeat your event by;
o by weeksuse this option if you wish to repeat your event on certain weekday, set thenumber of weeks you wish to repeat your event by and check the appropriateweekdays;
o by monthsuse this option if you wish to repeat your event at monthly intervals, set thenumber of months you wish to repeat your event by and check one of theoptions below:- every X day if you wish to repeat your event on specific date of the month;- every X weekday if you wish to repeat your event on a specific day of theweek based on its position in the month (First, Second, etc);
o by yearsuse this option if you wish to repeat your event on a yearly basis and set thenumber of years you wish to repeat your event by.
· set the end selecting one of the available options:o never
use this option if you do not want the event to stop repeating;o number of times
use this option if you want the event to occur a specific number of times andenter the number of times to repeat your event;
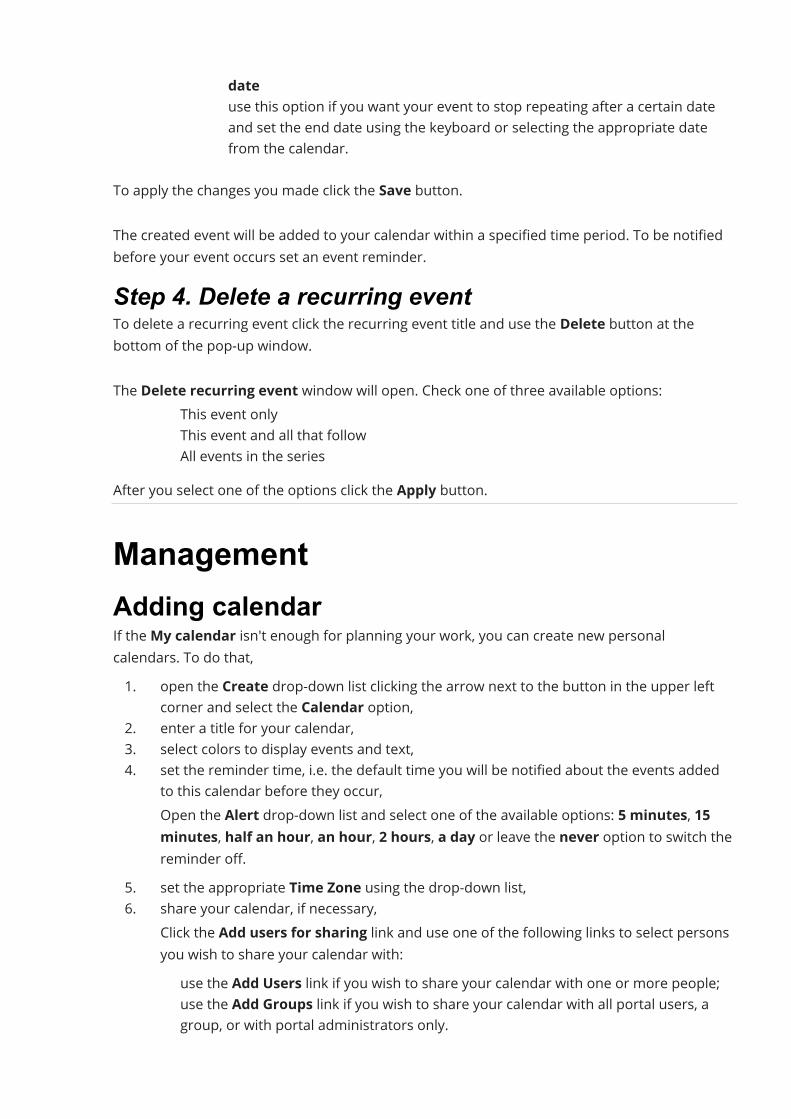
o dateuse this option if you want your event to stop repeating after a certain dateand set the end date using the keyboard or selecting the appropriate datefrom the calendar.
To apply the changes you made click the Save button.The created event will be added to your calendar within a specified time period. To be notifiedbefore your event occurs set an event reminder.Step 4. Delete a recurring eventTo delete a recurring event click the recurring event title and use the Delete button at thebottom of the pop-up window.The Delete recurring event window will open. Check one of three available options:
· This event only· This event and all that follow· All events in the series
After you select one of the options click the Apply button.
ManagementAdding calendarIf theMy calendar isn't enough for planning your work, you can create new personalcalendars. To do that,1. open the Create drop-down list clicking the arrow next to the button in the upper left
corner and select the Calendar option,2. enter a title for your calendar,3. select colors to display events and text,4. set the reminder time, i.e. the default time you will be notified about the events added
to this calendar before they occur,Open the Alert drop-down list and select one of the available options: 5 minutes, 15minutes, half an hour, an hour, 2 hours, a day or leave the never option to switch thereminder off.
5. set the appropriate Time Zone using the drop-down list,6. share your calendar, if necessary,
Click the Add users for sharing link and use one of the following links to select personsyou wish to share your calendar with:· use the Add Users link if you wish to share your calendar with one or more people;· use the Add Groups link if you wish to share your calendar with all portal users, a
group, or with portal administrators only.
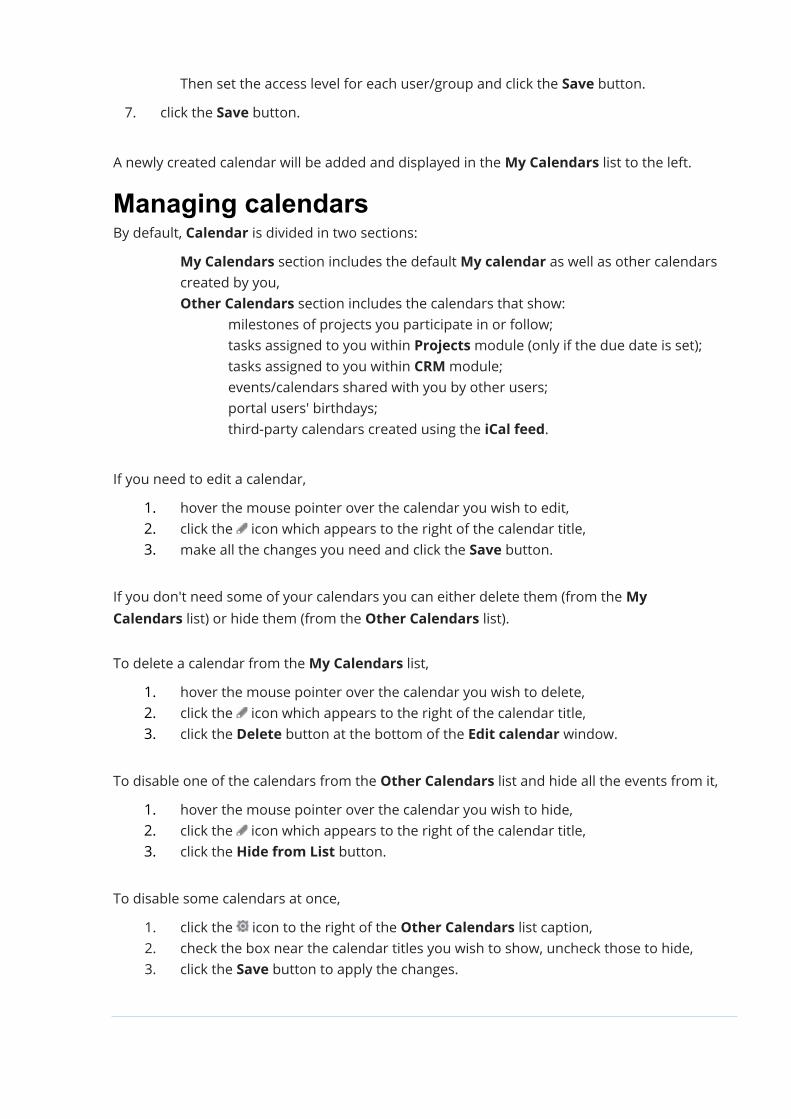
Then set the access level for each user/group and click the Save button.7. click the Save button.
A newly created calendar will be added and displayed in theMy Calendars list to the left.Managing calendarsBy default, Calendar is divided in two sections:
· My Calendars section includes the defaultMy calendar as well as other calendarscreated by you,
· Other Calendars section includes the calendars that show:o milestones of projects you participate in or follow;o tasks assigned to you within Projectsmodule (only if the due date is set);o tasks assigned to you within CRMmodule;o events/calendars shared with you by other users;o portal users' birthdays;o third-party calendars created using the iCal feed.
If you need to edit a calendar,1. hover the mouse pointer over the calendar you wish to edit,2. click the icon which appears to the right of the calendar title,3. make all the changes you need and click the Save button.
If you don't need some of your calendars you can either delete them (from theMyCalendars list) or hide them (from the Other Calendars list).To delete a calendar from theMy Calendars list,
1. hover the mouse pointer over the calendar you wish to delete,2. click the icon which appears to the right of the calendar title,3. click the Delete button at the bottom of the Edit calendar window.
To disable one of the calendars from the Other Calendars list and hide all the events from it,1. hover the mouse pointer over the calendar you wish to hide,2. click the icon which appears to the right of the calendar title,3. click the Hide from List button.
To disable some calendars at once,1. click the icon to the right of the Other Calendars list caption,2. check the box near the calendar titles you wish to show, uncheck those to hide,3. click the Save button to apply the changes.
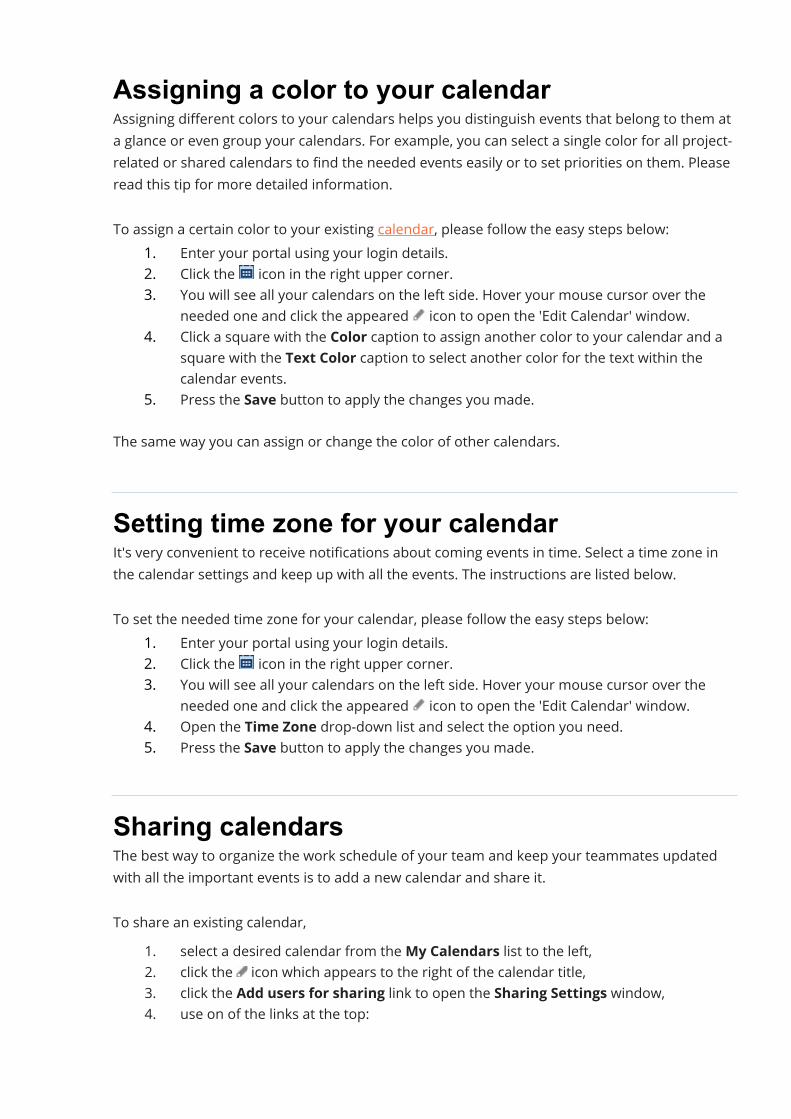
Assigning a color to your calendarAssigning different colors to your calendars helps you distinguish events that belong to them ata glance or even group your calendars. For example, you can select a single color for all project-related or shared calendars to find the needed events easily or to set priorities on them. Pleaseread this tip for more detailed information.To assign a certain color to your existing calendar, please follow the easy steps below:
1. Enter your portal using your login details.2. Click the icon in the right upper corner.3. You will see all your calendars on the left side. Hover your mouse cursor over the
needed one and click the appeared icon to open the 'Edit Calendar' window.4. Click a square with the Color caption to assign another color to your calendar and a
square with the Text Color caption to select another color for the text within thecalendar events.
5. Press the Save button to apply the changes you made.The same way you can assign or change the color of other calendars.
Setting time zone for your calendarIt's very convenient to receive notifications about coming events in time. Select a time zone inthe calendar settings and keep up with all the events. The instructions are listed below.To set the needed time zone for your calendar, please follow the easy steps below:
1. Enter your portal using your login details.2. Click the icon in the right upper corner.3. You will see all your calendars on the left side. Hover your mouse cursor over the
needed one and click the appeared icon to open the 'Edit Calendar' window.4. Open the Time Zone drop-down list and select the option you need.5. Press the Save button to apply the changes you made.
Sharing calendarsThe best way to organize the work schedule of your team and keep your teammates updatedwith all the important events is to add a new calendar and share it.To share an existing calendar,
1. select a desired calendar from theMy Calendars list to the left,2. click the icon which appears to the right of the calendar title,3. click the Add users for sharing link to open the Sharing Settings window,4. use on of the links at the top:
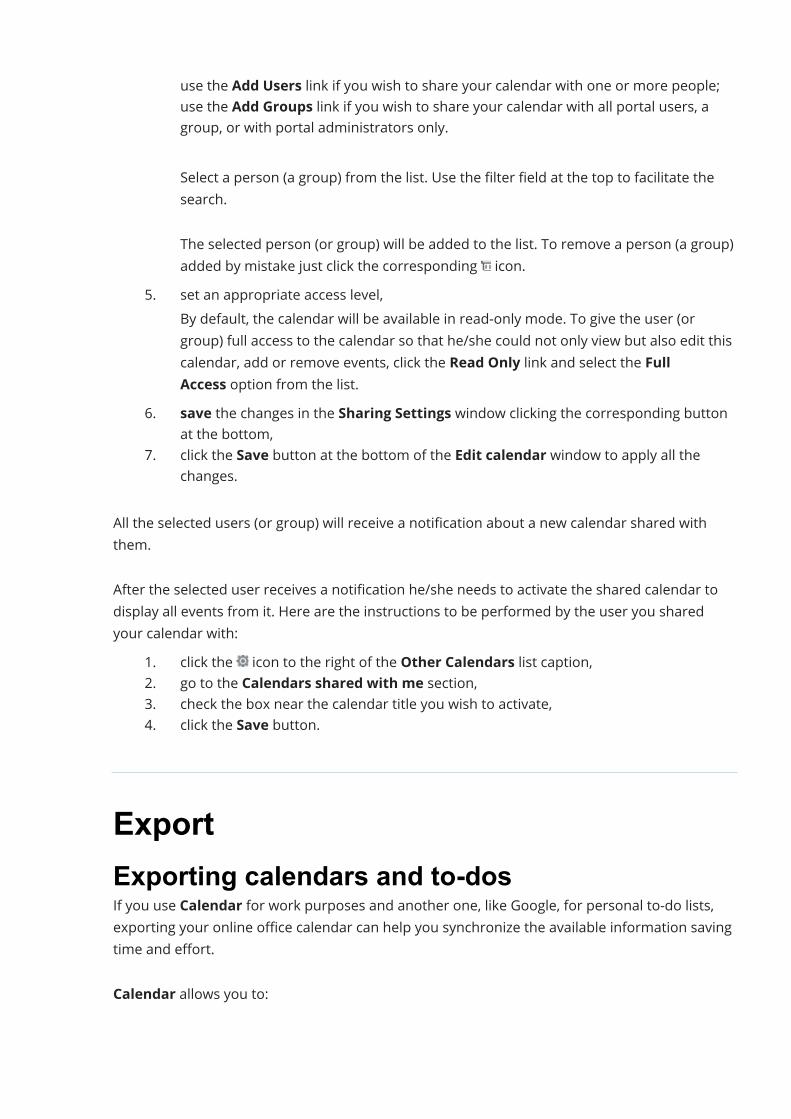
· use the Add Users link if you wish to share your calendar with one or more people;· use the Add Groups link if you wish to share your calendar with all portal users, a
group, or with portal administrators only.
Select a person (a group) from the list. Use the filter field at the top to facilitate thesearch.The selected person (or group) will be added to the list. To remove a person (a group)added by mistake just click the corresponding icon.
5. set an appropriate access level,By default, the calendar will be available in read-only mode. To give the user (orgroup) full access to the calendar so that he/she could not only view but also edit thiscalendar, add or remove events, click the Read Only link and select the FullAccess option from the list.
6. save the changes in the Sharing Settings window clicking the corresponding buttonat the bottom,
7. click the Save button at the bottom of the Edit calendar window to apply all thechanges.
All the selected users (or group) will receive a notification about a new calendar shared withthem.After the selected user receives a notification he/she needs to activate the shared calendar todisplay all events from it. Here are the instructions to be performed by the user you sharedyour calendar with:
1. click the icon to the right of the Other Calendars list caption,2. go to the Calendars shared with me section,3. check the box near the calendar title you wish to activate,4. click the Save button.
ExportExporting calendars and to-dosIf you use Calendar for work purposes and another one, like Google, for personal to-do lists,exporting your online office calendar can help you synchronize the available information savingtime and effort.Calendar allows you to:
· Synchronize the calendar using the CalDAV protocol. This feature is available startingfrom v. 10.0 for calendars from theMy Calendars section only. If a calendar hasbeen created in an earlier portal version, it can be exported using iCal only. Startingfrom v. 10.5, it's also possible to export calendars from the Other Calendars section.
· Export events using the iCal feed link. This feature is available for any online officecalendar from theMy Calendars or Other Calendars section. In this case all thechanges you made in the online office calendar will be automatically available in athird-party calendar but you will be only able to view them. If you wish to edit andupdate them in your third-party calendar your need to save them as a .ics file.
To export your calendar,1. select a calendar to export,
Please note that the possibility to synchronize a calendar using the CalDAV protocolis available starting from v. 10.0 for calendars from theMy Calendars section only.Starting from v. 10.5, it's also possible to export calendars from the OtherCalendars section.
2. hover the mouse pointer over the calendar you wish to export,3. click the icon which appears to the right of the calendar title,4. click the Export and Sync link,5. copy the entire link provided in the CalDAV or iCal section and enter it into any third-
party calendar supporting the CalDAV protocol/iCal format,
For example, to synchronize a calendar with Mozilla Thunderbird usingthe CalDAV protocol, right-click a calendar in the Mozilla Thunderbird calendar list,choose the New calendar option. In a new window that opens, check the On theNetwork radio button and click Next, select the CalDAV option, insert the copiedCalDAV link into the Address field and press Next. Set the new calendar name andcolor and click Finish. When the calendar is created, you'll also need to specify yourcredentials. Specify the login and password you use to access the portal.
If you use Google Calendar, open a drop-down list next to the 'Add Calendar' captionand choose the 'From URL' option. Then paste the copied iCal link into the 'URL ofcalendar' field and save the calendar. Your calendar will be added and displayed inthe 'Other Calendars' list.
ORFollow the iCal link provided to save your calendar into a file in the iCalformat with .ics extension on your hard disk drive. Use the saved file to import the
events from your online office calendar into any third-party calendar providingthe Import feature.If you use Google Calendar, open a drop-down list next to the 'Add Calendar' captionand choose the 'Import' option. Then browse your hard disk drive for the created file,choose the calendar where these events should be saved and click the 'Import'button. All the events from your online office calendar will be imported and displayedwithin the selected Google calendar.
To export your to-dos,1. click the Todo button in the upper right corner to open the To-do panel,2. click the icon on the To-do panel,3. click the Export and Sync option,4. copy the provided CalDAV link clicking the Copy option and enter it into any third-
party calendar supporting the CalDAV protocol,5. close the Export and Sync window.
Export calendar to devicesStarting from v. 10.0 there is the possibility to synchronize calendars from the 'My Calendars'section using the CalDAV protocol. When you synchronize a calendar, all the changes made toexisting events as well as newly created events will be displayed both in the third-party calendarfor which the synchronization is enabled and in the portal web interface.Please note that the synchronization via the CalDAV protocol is supported for new calendarsonly, i.e. for the calendars created after updating the portal to version 10.0. If a calendar hasbeen created in an earlier portal version, the CalDAV synchronization will not work.Starting from v. 10.5, it's also possible to export calendars from the Other Calendars section.The CalDAV calendar is created when trying to get a link for export (Export andSync -> CalDAV). When exporting a calendar to devices, access rights to the calendar andevents remain unchanged (for example, events from the Users' birthdays calendar cannot bechanged, but you can modify events from the shared calendar if you have been granted fullaccess to it).Export a calendar to your Android deviceAndroid devices do not have the built-in support for the CalDAV synchronization. To export acalendar, first you need to install a third-party app on your device, for example, OpenSyncWhen the app is installed, open it.If you are going to export not only calendar events, but also todos, you'll also need toadditionally install the OpenTasks app on your device to be able to export todos. When youlaunch the OpenSync app for the first time, the corresponding notification message appears.Click the Install OpenTasks to install the app.
1. In the OpenSync app, click the Plus button in the lower right corner to add a newaccount.
2. Select the Login with URL and user name option.3. Specify the account settings:
o Base URL - specify your portal address + /caldav/, for example,https://portalname.onlyoffice.com/caldav/o User Name - specify the email address that you use to access the portalo Password - specify the password that you use to access the portal
4. Press Login in the lower right corner.5. Then press Create account.6. In the notification bar, a notification will appear informing that the app requires
permissions. Tap the Request calendar permissions button, then provide thecorresponding permissions by tapping the Allow button.If you are going to export todos, you'll also need to provide permissions forthe OpenTasks app. Tap the Request OpenTasks permissions button, then providethe corresponding permissions by tapping the Allow button. When you launchthe OpenTasks app for the first time, you'll also need to provide permissions via theapp interface.
7. In the OpenSync app, tap the added account (by default the email address is used asthe account name).
8. All calendars from theMy Calendars section of your account that support theCalDAV synchronization will be imported to the device and displayed inthe CalDAV list. Check the calendars that you need to display in the default calendarapp on your device.If you are going to import todos, you'll also need to enable the Todo_calendar bychecking it in the list in the OpenSync app.
9. Open the default calendar app on your device. Refresh the calendar by tapping themenu button in the upper right corner and selecting the Refreshmenu item. Afterthat the events from the exported calendar will be displayed in the default calendaron your device.
If you are going to import todos, open the OpenTasks app and refresh the todo listby tapping the menu button in the upper right corner and selectingthe Refreshmenu item. After that the Todo_calendar will be displayed withinthe OpenTasks app.
Export a calendar to your iOS deviceTo synchronize your portal calendar with a default calendar on your iOS device, please followthe easy steps below:
1. On your iOS device, open the Settingsmenu and go to the Calendar (Passwords andaccounts on iOS 13 and lower) section.
2. Click Add account.3. Select the Other option in the list.4. Select the Add CalDAV account option (located in the Calendars subsection on iOS 13
and lower).
5. Specify the account settings:o Server - specify your portal address + /caldav/, for example,https://portalname.onlyoffice.com/caldav/o User - specify the email address that you use to access your account on the
portalo Password - specify the password that you use to access your account on the
portalThe settings will be verified and saved.
6. Tap the added account and go to the advanced settings.o Tap Advanced.o In the Account URL field the URL address must be specified in the following
form:https://portalname.onlyoffice.com/caldav/[email protected]@portalname.onlyoffice.com/Correct the URL by adding [email protected]@portalname.onlyoffice.com/Where [email protected] is the email address that you use to access youraccount on the portal
o Return to the previous screen and save the settings by tapping Done.After you press the Done button, return to the advanced settings and verify onceagain that the data is specified correctly.
After that the exported calendar will be available in the calendar list and the events from it willbe displayed in the default calendar on your device.
Export a calendar to the Thunderbird applicationTo synchronize your portal calendar with the Mozilla Thunderbird application, please follow theeasy steps below:1. In your portal calendar, copy the CalDAV link:
1. Hover the mouse pointer over the calendar from the "My Calendars" or "OtherCalendars" section you wish to export,
2. Click the icon which appears to the right of the calendar title,3. Click the Export and Sync link in the Edit calendar window,4. Copy the entire link provided in the CalDAV section by clicking the Copy option,
It's also possible to connect the to-do list to the Mozilla Thunderbird. To obtain the linkperform the following actions in your portal calendar:1. Click the Todo button in the upper right corner to open the To-do panel,2. Click the icon on the To-do panel,3. Click the Export and Sync option,4. Copy the provided CalDAV link clicking the Copy option.
2. Create a new calendar in the Mozilla Thunderbird:1. Right-click the calendar list on the left.2. Select the New calendar option from the drop-down menu.3. Select the On the Network option in the Create New Calendar window and
click Next.4. Select the CalDAV option.5. Paste the copied CalDAV link into the Location field and press Next.
The Offline Support option is selected by default. It allows to work with thecalendar when you are in the offline mode.
6. Enter a title and choose a color for the calendar you add. Click Next.7. You'll receive the confirmation that the calendar is created. Click Finish.8. When the calendar is created, you'll also need to specify your credentials. Specify
the login (email address) and password that you use to access your account onthe portal.
To refresh the calendar use the Synchronize button on the top.
Adding a third-party calendar feedWant to view the read-only version of a third-party calendar within Calendar with no need toswitch between them? You can add the iCal feed link of this calendar to Calendar and save your
time and effort tracking all the events from both calendars. Read the instructions below to dothat.To add a third-party calendar feed link to Calendar, please follow the easy steps below:
1. Enter your portal using your login details.2. Click the icon in the right upper corner.3. Press the arrow next to the 'Create' button and select the Import events option.4. In the Import events window, leave the By link option which is selected by default.5. Enter the iCal feed link of a third-party calendar you wish to add.6. Check the Sync with calendar by link box below.7. Enter a title for a new calendar and select colors to display events and text.8. Click the Save button.
A new calendar containing events from the iCal feed will be added and displayed in the OtherCalendars list to the left.To make the events from the added calendar feed visible within Calendar, click the icon nearthe 'Other Calendars' caption, check the box next to the calendar in the opened window andclick 'Save'.
ONLYOFFICE TalkOverviewTalk is an instant messenger that provides a real-time communication between the co-workers.It offers all the traditional features you expect from a messenger: history archiving, file transfer,multi-user chat support, search function, emoticons.As a collaborative tool Talk helps to work together easier and achieve common goals. For aneffective collaboration in addition to the basic functionality Talk offers the following features:
· mailing list to send a message to many people at once,· chat room to create the conference in real time,· notifications to provide you with information about every change at your portal.
To access Talk just click the icon available at the top of each portal page.
Using instant messengerYou can use Talk as a web client.Talk can be accessed right from the portal. To start talking, just click the icon available atanytime at the top of the page. The Talk window opens in a new tab. The messenger interfaceis divided into two sections: contact list formed by the users of your portal organized in groupsto the left, chat window to the right.You may also use themini Chat.Mini Chat is a compact version of Talk, you can access it fromany portal module as well as from the Settings, Feed pages and from your profile page. Toopen a mini version of Talk click the icon available in the left lower corner. After you click theicon you'll see a small window with the names of the users. If you click the name of a user adialog window will open in the right lower corner of the page. If you want to hide theminiChat, click the icon.
Exchanging instant text messagesTo start using Talk and chat with your colleagues instantly:1. click the icon at the top of the page,2. select the user you wish to talk,
The Talk contact list is formed by the users of the portal divided into groups. It isautomatically updated as users are added or removed.If the contact list is very long, you can hide offline users and view the online users only.To do that, click the Settings icon above the contact list and turn on the Hide offlinecontacts switcher. To facilitate the search of your interlocutor, use the FindContact field above the contact list and type in the name of the needed user.
3. type in your message,You can easily change the size of the input field by dragging its top border.If you need to send a file click the Send File icon below the Talkmain area. Selectthe file you need and click the Open button. The file will be sent.
4. click the Send button.You can choose either to use Ctrl+Enter or Enter to send messages. To choose one ofthe two available sending options, click the Settings icon above the contact list andturn on or off the Send messages by Ctrl+Enter switcher.
To activate the pop-up notifications about the newly received messages in your browser, clickthe Settings icon above the contact list and turn on the Notification in a browser switcher.Turn off this switcher if you don't want to receive the pop-up notifications. On the settingspanel, you can also enable or disable sound notifications about events.To search for a certain message in the history, open the conversation with the necessary userand click the Search icon located in the upper right corner - the search field opens. Type inthe text you are searching for and press Enter. The found matches will be highlighted in yellow.Use the Previous and Next buttons to navigate between them.The files you sent via Talk occupy some portal disk space. To free up disk space you canremove these files, but they will no longer be accessible through the links in the history for allthe conversation participants.To delete the files,1. Click the Settings icon above the contact list.2. Click the Delete sent files link.3. In a new window that opens, select which files you want to delete: All files, Files sent morethan a month ago, or Files sent more than a year ago.4. Click the Delete button.
Creating a mailing listAre you tired of typing one and the same message each time selecting a recipient from thecontact list?Follow these easiest steps to create a mailing list and send the message to many people atonce.Step 1. Access the TalkEnter your portal and click the Talk icon available at the top of each portal page.
Step 2. Create a mailing listThe Talk window will open.Press the Create chat room button above the contact list located on the left. In a newwindow that opens, select theMailing option from the Type list. Enter a name for your mailinglist and click the Create button.Select a contact you wish to add to your mailing list and click the button to the right of theuser's name. Or simply drag and drop it to the Talkmain area.To facilitate the search of the necessary user you can use the Find Contact field above thecontact list and type in the user name entirely or partially.
The same way you can add as many recipients as you wish.Step 3. Compose a message for your recipientsWhen all the recipients are selected, type in your message and click the Send button.
If you need to send a file click the Send File button below the Talkmain area. Select the fileyou need and click the Open button. The file will be sent.To display all the recipients click the Total caption on the top. If you want to delete a user fromthe list, move the mouse cursor over his/her name in the mailing list and click the icon.To delete the mailing list use the Remove mailing option in the upper right corner.
Creating a chat room?Create a conference to discuss an issue with many people at once in real time.Follow these easy steps to create a chat room in the Talk and start talking instantly.Step 1. Access the TalkEnter your portal and click the Talk icon available at the top of each portal page.
Step 2. Create a recipient listThe Talk window will open.Press the Create chat room button above the contact list located on the left. In a newwindow that opens, select the Chat room option from the Type list. Enter a name for your chatroom. If you wish to create a persistent room uncheck the Temporary room box and clickthe Create button.Select the user you wish to invite to your discussion and click the button to the right ofhis/her name. Or simply drag and drop it to the Talkmain area. The invitation will be sent tothe selected user. He/she can accept or decline it. Once the invitation is accepted, the user willbe available in the participant list.To facilitate the search of the necessary user you can use the Find Contact field above thecontact list and type in the user name entirely or partially.
The same way you may add as many members of the chat room as you wish.Step 3. Start your conferenceWhen the list is created, type in your message to start the conference and clickthe Send button.To display all the participants click the Total caption on the top. If you want to delete a userfrom the chat room, move the mouse cursor over his/her name in the participant list and clickthe icon.To search for a certain message in the history, click the Search icon located in the upperright corner - the search field opens. Type in the text you are searching for and press Enter.The found matches will be highlighted in yellow. Use the Previous and Next buttons tonavigate between them.If you have created the temporary room this one will be deleted once all the users leave it. Todelete the persistent chat room use the Remove option in the upper right corner.
Receiving portal notificationsPortal notifications are made to provide you with information about every change at yourportal as well as remind you of some event. By default the notifications are received by emailand Talk.To change the notification type,
1. click the link with your name at the very top,2. select the Profile option from the list,3. go to the Subscriptions section,4. click the Show link next to the Subscriptions,5. change the notification type of the needed subscription checking the necessary
option next to the Notify via caption: Email, Talk or Telegram.If you no longer want to receive notifications, you can unsubscribe from them clicking thecorresponding link.
For AdministratorsChanging Talk settingsUsing the Options icon in the upper left corner of the Talk window you can change itssettings as well as remove sent files. After you click the 'Options' icon, the menu with theavailable options will appear:
· Voices of events - turn on this switcher to receive sound notifications about the newmessages.
· Notification in a browser - turn on this switcher to receive the pop-up notifications.· List of contacts joining in groups - turn on this switcher to display contacts joining
in groups.· Hide offline contacts - turn on this switcher to display online contacts only.· Send messages by Ctrl+Enter - turn on this switcher to change the default key
combination used to send messages. When this switcher is turned off, you can sendmessages by pressing Enter.
· Delete sent files - use this link to remove sent files and free up disk space.
Changing mini Chat settingsUsing the Options icon in the lower right corner of themini Chat window you can change itssettings and also perform several operations. After you click the 'Options' icon the window withthe available options will appear.Here are the options:
· Enable sounds - check this option to receive sound notifications about the newmessages,
· Use Ctrl+Enter to send messages - check this option to change the default keycombination used to send messages,
· Minimize all windows when out of focus - check this option if you want to collapse theChat windows when you perform other portal activity,
· Minimize/Expand all mini-chat windows - use this option to collapse or expand allmini-chat windows,
· Close all mini-chat windows - use this option to close all mini-chat windows.TheMinimize/Expand all mini-chat windows and Close all mini-chatwindows options are available when at least one chat window is opened.
Changing attachment sizeDo you need to send a file via Talk but its size exceeds the allowed limit? Since now on youdon't need to worry about it. Just change the allowed file size and use the Talk functionality tothe full.Available only for Server version.Follow these simple steps to change the file size settings:
1. Open the web.appsettings.config file in the portal root folder.2. Add the <add key="web.max-upload-size" value="X"/> setting to
the appSettings section, where X is a file size limit in bytes.3. Restart your ONLYOFFICE portal.
That's it. What could be easier? Starting from now the file size you want to send depends onlyon you.
ONLYOFFICE Control PanelConfiguring all portalsSwitching to HTTPS using Control PanelControl Panel offers you the possibility to quickly and easily switch your portal to the secureHTTPS protocol.This option is not currently available in the installation for Windows.There are two ways to enable HTTPS for your portal via the Control Panel interface:
· If you don't have any SSL certificates, you can generate a new signed certificate withone click. The Control Panel uses the letsencrypt.org service to generate the CA-signed certificates.
· If you have an existing private key generated on your server and a public keycertificate created on its base (self-signed or issued by a Certification Authority), youcan simply upload them in the Control Panel.
To access Control Panel, sign in to your portal and click the 'Control Panel' link on the StartPage. Alternatively, you can go to the portal 'Settings' and click the 'Control Panel' link on theleft-side panel.Generate a new certificateTo generate a new certificate:
1. Open the HTTPS page in the COMMON SETTINGS section on the left sidebar.2. Click the GENERATE AND APPLY button. A popup message box will appear informing
you that the certificate and private key are successfully generated.3. After that your Control Panel and portal will be restarted and become unavailable
during this process. It can take up to 5 minutes. Once the certificate installationprocess is over, your portal will be available over HTTPS.
To remove the installed certificate, use the DELETE button.Upload an existing certificate and private keyTo use an existing .crt certificate and private .key key:1. Open the HTTPS page in the COMMON SETTINGS section on the left sidebar.2. Click the Plus button next to the CRT certificate field and select your .crt certificate to
upload it.3. Click the Plus button next to the HTTPS key field and select your private .key key to
upload it.
Before uploading, please make sure that the private key is not encrypted. If you have apassword-protected .key file, you will need to decrypt it first.
4. Once the .crt and .key files are uploaded, click the APPLY button at the bottom of thepage.
5. After that your Control Panel and portal will be restarted and become unavailableduring this process. It can take up to 5 minutes. Once the certificate installation processis over, your portal will be available over HTTPS. The domain name that your certificatewas issued for is now displayed in the Generated on domain section of the HTTPS pagein the Control Panel.
To remove the installed certificate, use the DELETE button.Using the Control Panel backup/restore featureIntroductionThe Backup/Restore features provided by the Control Panel allow you to backup your portaldata and restore it in the ONLYOFFICE Workspace. To access Control Panel, sign in to yourportal and click the 'Control Panel' icon on the Start Page. Alternatively, you can go to theportal 'Settings' and select the 'Control Panel' link on the left-side panel.Data backupTo create your portal data backup manually, switch to the Backup page in the COMMONSETTINGS section on the left sidebar and use the Data Backup section.
1. select the necessary type and location of the Storage for your backup files:o select the Temporary tab if you wish to download the backup to your local
drive when the backup process is over. You'll be able to do that using the linkthat appears below.
o select the Documents module tab and click the Plus button next to the fieldthat appears below. The Select folder window will open. Set a folder inthe Common Documents section where you wish to store your backup andclick the OK button.
o select the Third-Party Storage tab, choose one of the available third-partystorages and enter the necessary data to access it:
1. The necessary service (Amazon AWS S3, Google Cloud Storage, RackspaceCloud Storage, Selectel Cloud Storage, DropBox, Box.com, OneDrive, GoogleDrive) must be previously connected in the Integration section of the portalsettings. Otherwise the corresponding storages will be disabled and grayed out.2. The third-party account (DropBox, Box.com, OneDrive, Google Drive, YandexDisk and storages connected via the WebDAV protocol, such as Nextcloud or
ownCloud) must be previously connected to the Documents module as well asmake shared and put into the Common Documents section. Otherwise thecorresponding storages will be disabled and grayed out.
When the necessary storage is selected, specify the data to access it in the fields thatappear below:
· For the Amazon AWS S3 service, the following fields are available:o Bucket - unique Amazon bucket name, e.g. my-new-test-bucket-12345.o Region - an AWS region where your Amazon bucket resides, e.g. us-east-2.o Service Url - this is an optional property; change it only if you want to try a
different service endpoint. Leave this field empty to use the default value.o Force Path Style - when true, requests will always use path style addressing.
Leave this field empty, as the Service Url property is not specified.o Use Http - if this property is set to true, the client attempts to use HTTP protocol,
if the target endpoint supports it. By default, this property is set to false. Set itto true or leave this field empty to use the default value.
o Server Side Encryption Method - the server-side encryption algorithm usedwhen storing this object in S3. The possible values are none, aes256, awskms.Leave this field empty to use the default aes256 value.
· For the Google Cloud Storage service, the following field is available: Bucket (uniqueGoogle Cloud bucket name, e.g. test_bucket111419).
· For the Rackspace Cloud Storage service, the following fields are available: Publiccontainer (Rackspace public container URL address), Private container (Rackspaceprivate container URL address) and Region (a region where your Rackspace containersare located).
· For the Selectel Cloud Storage service, the following fields are available: Privatecontainer (Selectel private container name, e.g. test_container) and Publiccontainer (Selectel public container name, e.g. test_container_public).
· For the DropBox, Box.com, OneDrive, Google Drive, Yandex Disk services or storagesconnected via theWebDAV protocol, click the Plus button next to the field that appearsbelow. The Select folder window will open. Set a third-party resource directory locatedin the Common Documents section where you wish to store your backup and clickthe OK button.
· select the Computer file tab if you wish to save the backup on your local drive. Inthe Choose the storage location field that appears below, specify the path to the folderwhere you wish to store your backup.
If you select the Documents module or one of the third-party services connected toit (DropBox, Box.com, OneDrive, Google Drive, Yandex Disk and storages connectedvia the WebDAV protocol), the backup file size affects the overall disk space used onyour portal.
2. check the Include Mail in backup box if you want to backup theMail data as well.This increases the backup process time and backup file size, but if this option is
unchecked, theMail data will be lost after restoring and you'll need to connectaccounts again.The license data will not be included into the backup. After restoring data from thebackup, you will need to upload your license file again.
3. click theMAKE BACKUP button.Once the backup process is completed you'll find the backup .tar.gz file (portal-name_date_time.tar.gz) in the specified folder. If you've selected the Temporary storage, thelink to download the created backup will be available for 24 hours.When encryption is enabled, a newly created backup copy of the data archive willcontain decrypted files. When such a copy is restored, the files will be encrypted on the diskagain.Automatic backupTo automate the backup process, switch to the Backup page in the COMMONSETTINGS section on the left sidebar and use the Automatic backup section:
1. click the Disabled switcher to enable the feature.2. select the necessary Storage for your backup files (the available options are the
same as those described above, except for the Temporary storage which is onlyavailable in the Data Backup section).
3. specify the time interval at which backups should be created: Every day with anindication of the necessary time of the day, Every week with an indication of thenecessary day of the week and time of the day, or Every month with an indication ofthe necessary day of the month and time of the day.
4. set The maximal number of backup copies to be stored selecting the necessaryvalue (from 1 to 30) from the corresponding drop-down list.
5. check the Include Mail in backup box if you want to backup theMail data as well.6. click the SAVE button.
Backups will be created automatically with the specified periodicity.Data restoreDue to the new mechanism of the password encryption, there is no possibility to restore thepassword from the backup using the core.machinekey key which differs from the original one.To ensure correct portal operation, specify the old server key inthe web.appsettings.config and TeamlabSvc.exe.Config files before restoring the backup ona new server.For the Docker version, you canreplace machinekey here /app/onlyoffice/CommunityServer/data/.private/machinekey andrestart the Community Server container.
To restore your portal data from the previously created backup file, switch to the Restore pagein the COMMON SETTINGS section on the left sidebar.
1. select the Source where your backup files are stored:· select the Documents module tab and click the Plus button below. In the Select
file window, choose the necessary backup file stored in the CommonDocuments and click OK.
· select the Third-Party Storage tab, choose the necessary third-party storageand enter the data to access it as well as the necessary backup file URL addressin the Path field.For accounts connected to the Documentsmodule (DropBox, Box.com,OneDrive, Google Drive, Yandex Disk and storages connected via the WebDAVprotocol), click the Plus button below. In the Select file window, choose thenecessary backup file stored in the third-party resource directory located inthe Common Documents sectionand click OK.
· select the Computer file tab, click the Plus button next to the Choose thestorage location field, and browse for the necessary backup file stored on yourlocal drive.Instead of selecting a backup file from a certain Source, you can just clickthe Show the backup list link below the radio buttons to select the necessarybackup file from the backup history (if a backup file was deleted manually fromthe storage, it will not be available in the list). Click the Restore link next to thenecessary backup file. To delete a backup file from the list, click the icon.
2. if necessary, leave the Send notification about portal restore process tousers box checked to notify your portal users;
3. click the RESTORE button.Remember that you will need to upload your license file again when the restoringprocess is complete. This can be done in the Payments section.
Connecting third-party storagesIntroductionBy default, the portal data are stored on the local disk of the machine where ONLYOFFICEWorkspace is installed. You can also connect third-party services and use them as a storage foryour portal data.This can be done in the Storage section available in the Control Panel. To access ControlPanel, sign in to your portal and click the 'Control Panel' icon on the Start Page. Alternatively,you can go to the portal 'Settings' and select the 'Control Panel' link on the left-side panel.You can connect one of the following third-party services and use it as a storage for static data:
1. Google Cloud Storage2. Amazon AWS S33. Rackspace Cloud Storage4. Selectel Cloud Storage
It’s also possible to use a third-party service as a CDN (Content Delivery Network), i.e. as adistributed network that allows to speed up loading your portal data for users.You can connect one of the following third-party services and use it as a CDN:
1. Amazon AWS S32. Selectel Cloud Storage
Connect third-party services in the portal settingsFirst of all, the necessary service (Amazon AWS S3, Google Cloud Storage, Rackspace CloudStorage, or Selectel Cloud Storage) must be connected in the Integration section of the portalsettings. Otherwise the corresponding storages will be disabled and grayed out in the ControlPanel.Once the necessary service is connected in the portal settings, you can connect it in the ControlPanel and use the connected service as a storage or CDN.Connect a third-party service as a StorageTo connect one of the third-party services as a storage, switch to the Storage page inthe COMMON SETTINGS section on the left sidebar and use the Storage section.If you have connected several storages in your portal settings, you can specify the dataindividually for each storage and store your portal data in the selected storage.
1. Select the necessary location of the Storage for your portal data:· the Disk Default option is selected by default. When the Disk Default option
is selected, the CONNECT button is inactive.
· select one of the available third-party storages. Once you select one of thethird-party storages, the CONNECT button becomes active.
2. When the necessary service is selected, specify the data to access it in the fields thatappear below:
· For the Amazon AWS S3 service, the following fields are available:o Bucket - unique Amazon bucket name, e.g. my-new-test-bucket-12345.o Region - an AWS region where your Amazon bucket resides, e.g. us-east-2.o Service Url - this is an optional property; change it only if you want to try a
different service endpoint. Leave this field empty to use the default value.o Force Path Style - when true, requests will always use path style addressing.
Leave this field empty, as the Service Url property is not specified.o Use Http - if this property is set to true, the client attempts to use HTTP
protocol, if the target endpoint supports it. By default, this property is setto false. Set it to true or leave this field empty to use the default value.
o Server Side Encryption Method - the server-side encryption algorithm usedwhen storing this object in S3. The possible values are none, aes256, awskms.Leave this field empty to use the default aes256 value.
· For the Google Cloud Storage service, the following field is available: Bucket (uniqueGoogle Cloud bucket name, e.g. test_bucket111419).
· For the Rackspace Cloud Storage service, the following fields are available: Publiccontainer (Rackspace public container URL address), Private container (Rackspaceprivate container URL address) and Region (a region where your Rackspacecontainers are located).
· For the Selectel Cloud Storage service, the following fields are available: Privatecontainer (Selectel private container name, e.g. test_container) and Publiccontainer (Selectel public container name, e.g. test_container_public).
3. Click the CONNECT button to connect the selected storage and save your settings.Once the storage is connected, the page will be reloaded and the data migration process willstart. This may take some time. When the data migration process is over, the Storage page inthe Control Panel will be loaded with the connected storage selected.The CONNECT button is inactive for the currently selected connected storage. If you changedata in any field for the connected storage or choose a different available storage,the CONNECT button will be active again.Connect a third-party service as a CDNTo connect one of the third-party services as a CDN, switch to the Storage page inthe COMMON SETTINGS section on the left sidebar and use the CDN section.
1. Select the necessary location of the Storage for your portal data:· the Disk Default option is selected by default. When the Disk Default option
is selected, the CONNECT button is inactive.· select one of the available third-party storages. Once you select one of the
third-party storages, the CONNECT button becomes active.
2. When the necessary service is selected, specify the data to access it in the fields thatappear below:
· For the Amazon AWS S3 service, the following fields are available:o Bucket - unique Amazon bucket name, e.g. my-new-test-bucket-12345.o Subdir - i.e. a name of a nested folder within the Amazon bucket,
e.g. testfolder.o Region - an AWS region where your Amazon bucket resides, e.g. us-east-2.o Service Url - this is an optional property; change it only if you want to try a
different service endpoint. Leave this field empty to use the default value.o Force Path Style - when true, requests will always use path style addressing.
Leave this field empty, as the Service Url property is not specified.o Use Http - if this property is set to true, the client attempts to use HTTP
protocol, if the target endpoint supports it. By default, this property is setto false. Set it to true or leave this field empty to use the default value.
o Server Side Encryption Method - the server-side encryption algorithm usedwhen storing this object in S3. The possible values are none, aes256, awskms.Leave this field empty to use the default aes256 value.
· For the Selectel Cloud Storage service, the following fields are available: Publiccontainer (Selectel public container name, e.g. test_container_public) and Subdir, i.e.a name of a nested folder within the Selectel container, e.g. testfolder.
3. Click the CONNECT button to connect the selected storage and save your settings.Once the storage is connected, the page will be reloaded and the data migration process willstart. This may take some time. When the data migration process is over, the Storage page inthe Control Panel will be loaded with the connected storage selected.
Protect data using encryptionIntroductionThe Encrypt data at rest feature provided by the Control Panel allows you to ensure thesecurity of sensitive data on your portal.Encryption is a reversible conversion of information in order to maintain the confidentiality ofthe data stored on disk. Thus, even if intruders managed to gain access to the data stored onthe hard disk, they will not be able to read it, since it is encrypted.Encryption is based on a Encrypt-then-MAC type of encryption (AES-256-CBC + HMAC-SHA256)of the entire body of data within the ONLYOFFICE instance and is compliant with AES-256 international data encryption standard. AES-256 encryption type with CipherMode.CBCsymmetric algorithm are used for enciphering the data on the portal, while SHA256 hashingfunction paired with HMAC message authentication code screening verify the integrity and theauthenticity of the encrypted data.This feature is available only for server versions.Prepare for the encryption processBefore starting the encryption procedure, you must perform some preliminary steps.
1. Sign in to your portal and click the Control Panel icon on the Start Page.Alternatively, you can go to the portal Settings and select the Control Panel link onthe left-side panel.
2. Switch to the Backup section and backup data.3. Disable the Automatic Data Backup feature.4. Select the Local storage option for both Connect storage for static
data and Connect storage as CDN.5. Make sure there is enough space on your hard drive.
After the preliminary preparations are ready, you can proceed to the next step.Encrypt storage
1. Switch to the Storage section in the Control Panel.2. Check the Notify users that the portal will be unavailable checkbox to notify all
active users via email when the encryption process starts.Upon the successful completion of the encryption process, all active users will alsoreceive email notifications. If an error occurs during the encryption process, then alladministrators (regardless of the Notify users option) will receive email notificationsof the unsuccessful encryption process.
3. Click the Encrypt storage button and then OK to launch the encryption process.
The time required to complete the procedure depends on the data volume. All portals will beunavailable during the encryption process. As soon as the encryption is over, the portal datawill be available for work.When encryption is enabled, a newly created backup copy of the data archive willcontain decrypted files. When such a copy is restored, the files will be encrypted on the diskagain.Decrypt storageTo decrypt data on the portal,
1. Switch to the Storage section in the Control Panel.2. Check the Notify users that the portal will be unavailable checkbox to notify all
active users via email when the decryption process starts.Upon the successful completion of the decryption process, all active users will alsoreceive email notifications. If an error occurs during the decryption process, then alladministrators (regardless of the Notify Users option) will receive email notificationsof the unsuccessful decryption process.
3. Click the Decrypt storage button and then OK to launch the decryption process.The time required to complete the procedure depends on the data volume. All portals will beunavailable during the encryption process. As soon as the encryption is over, the portal datawill be available for work.
Navigate faster using Full-Text Search featureIntroductionThe Full-Text Search feature provided by the Control Panel allows you to search for thenecessary string not only among the names of documents, emails etc. but also within theircontent.ONLYOFFICE uses Elasticsearch, an open-source, broadly-distributable and readily-scalablesearch engine. Elsaticsearch is built on top of Lucene, a free and open-source search enginesoftware library, and, therefore, it is excellent for fast full-text search. The documents stored inElasticsearch are distributed across different containers known as shards, which are duplicatedto provide redundant copies of the data in case of hardware failure.Using Elasticsearch not only significantly reduces the time spent searching for a particular fileor a text line but also enhances the search precision.
This feature is available only for server versions.Enabling the Full-Text Search featureTo turn on full-text search within document contents,
1. Sign in to your portal and click the Control Panel icon on the Start Page.Alternatively, you can go to the portal Settings and select the Control Panel link onthe left-side panel.
2. Switch to the Full-Text Search section.3. Check the Search in documents content checkbox and/or Search in mail
messages content to enable the full-text search in the Documentmodule, or intheMailmodule respectively and click Save. The stored files will be indexed in thecorresponding modules.
Since ElasticSerch indexes all stored files, enabling this feature requires at least an equalamount of free disk space as the overall disk space required for all documents, emailsand other content.
Reindex Full-Text SearchIf the file you are looking for is not among the search results (e.g. in the Documents module),and you are sure that it exists, an indexing error might have occurred.To rebuild indexes in a separately selected portal module,
1. Switch to the Full-Text Search section in the Control Panel.2. Click the Reindex button on the right of the necessary module section.
To rebuild all indexes,1. Switch to the Full-Text Search section in the Control Panel.2. Click the Reindex all button.
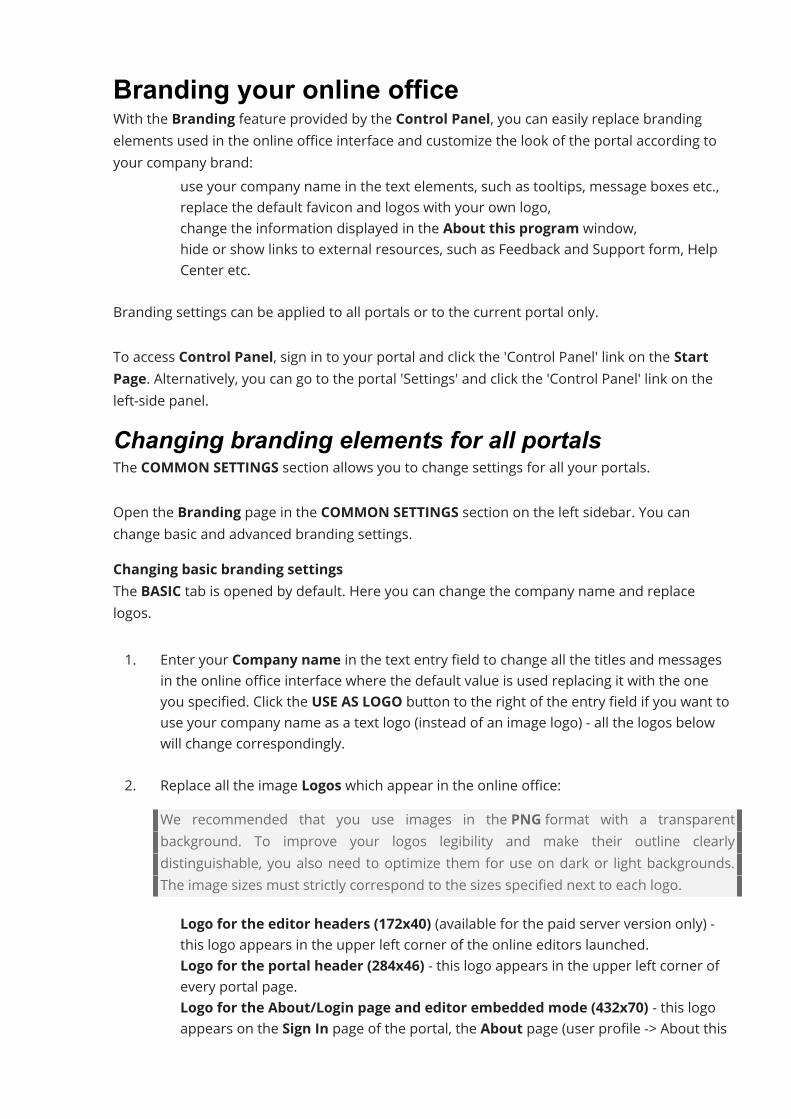
Branding your online officeWith the Branding feature provided by the Control Panel, you can easily replace brandingelements used in the online office interface and customize the look of the portal according toyour company brand:
· use your company name in the text elements, such as tooltips, message boxes etc.,· replace the default favicon and logos with your own logo,· change the information displayed in the About this program window,· hide or show links to external resources, such as Feedback and Support form, Help
Center etc.Branding settings can be applied to all portals or to the current portal only.To access Control Panel, sign in to your portal and click the 'Control Panel' link on the StartPage. Alternatively, you can go to the portal 'Settings' and click the 'Control Panel' link on theleft-side panel.Changing branding elements for all portalsThe COMMON SETTINGS section allows you to change settings for all your portals.Open the Branding page in the COMMON SETTINGS section on the left sidebar. You canchange basic and advanced branding settings.Changing basic branding settingsThe BASIC tab is opened by default. Here you can change the company name and replacelogos.1. Enter your Company name in the text entry field to change all the titles and messages
in the online office interface where the default value is used replacing it with the oneyou specified. Click the USE AS LOGO button to the right of the entry field if you want touse your company name as a text logo (instead of an image logo) - all the logos belowwill change correspondingly.
2. Replace all the image Logos which appear in the online office:We recommended that you use images in the PNG format with a transparentbackground. To improve your logos legibility and make their outline clearlydistinguishable, you also need to optimize them for use on dark or light backgrounds.The image sizes must strictly correspond to the sizes specified next to each logo.· Logo for the editor headers (172x40) (available for the paid server version only) -
this logo appears in the upper left corner of the online editors launched.· Logo for the portal header (284x46) - this logo appears in the upper left corner of
every portal page.· Logo for the About/Login page and editor embedded mode (432x70) - this logo
appears on the Sign In page of the portal, the About page (user profile -> About this
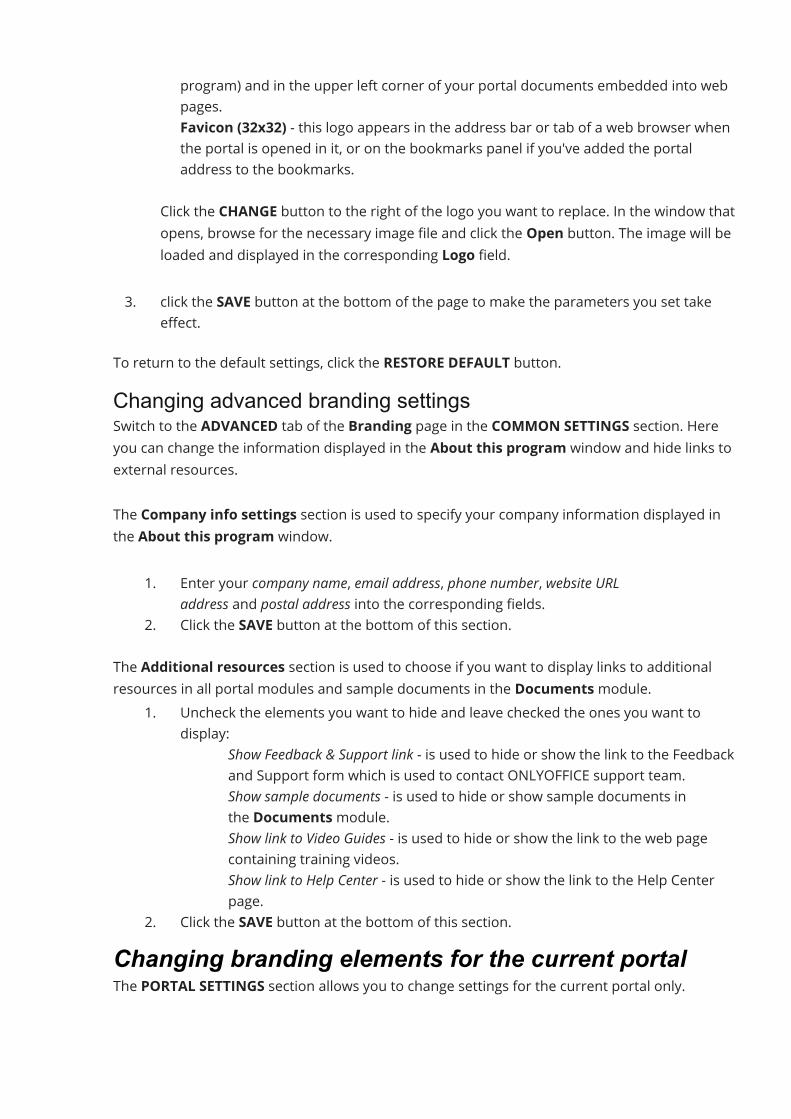
program) and in the upper left corner of your portal documents embedded into webpages.
· Favicon (32x32) - this logo appears in the address bar or tab of a web browser whenthe portal is opened in it, or on the bookmarks panel if you've added the portaladdress to the bookmarks.
Click the CHANGE button to the right of the logo you want to replace. In the window thatopens, browse for the necessary image file and click the Open button. The image will beloaded and displayed in the corresponding Logo field.
3. click the SAVE button at the bottom of the page to make the parameters you set takeeffect.
To return to the default settings, click the RESTORE DEFAULT button.Changing advanced branding settingsSwitch to the ADVANCED tab of the Branding page in the COMMON SETTINGS section. Hereyou can change the information displayed in the About this program window and hide links toexternal resources.The Company info settings section is used to specify your company information displayed inthe About this program window.
1. Enter your company name, email address, phone number, website URLaddress and postal address into the corresponding fields.
2. Click the SAVE button at the bottom of this section.The Additional resources section is used to choose if you want to display links to additionalresources in all portal modules and sample documents in the Documentsmodule.
1. Uncheck the elements you want to hide and leave checked the ones you want todisplay:
· Show Feedback & Support link - is used to hide or show the link to the Feedbackand Support form which is used to contact ONLYOFFICE support team.
· Show sample documents - is used to hide or show sample documents inthe Documentsmodule.
· Show link to Video Guides - is used to hide or show the link to the web pagecontaining training videos.
· Show link to Help Center - is used to hide or show the link to the Help Centerpage.
2. Click the SAVE button at the bottom of this section.Changing branding elements for the current portalThe PORTAL SETTINGS section allows you to change settings for the current portal only.
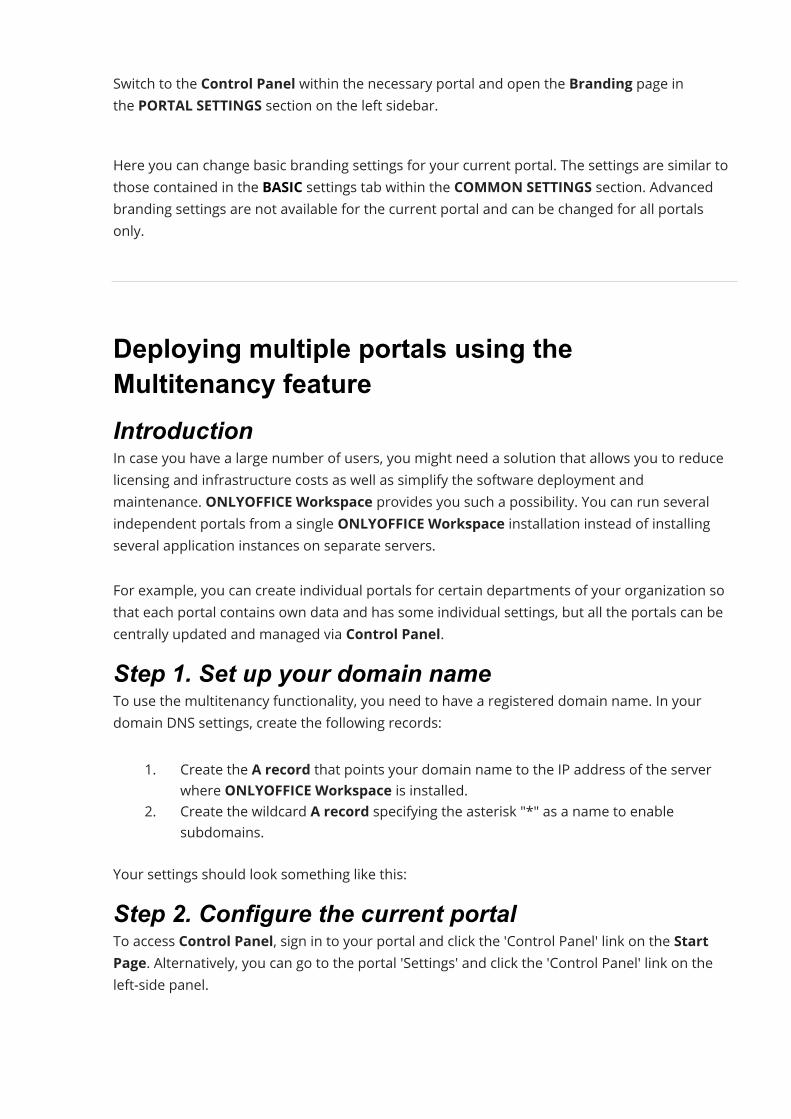
Switch to the Control Panel within the necessary portal and open the Branding page inthe PORTAL SETTINGS section on the left sidebar.
Here you can change basic branding settings for your current portal. The settings are similar tothose contained in the BASIC settings tab within the COMMON SETTINGS section. Advancedbranding settings are not available for the current portal and can be changed for all portalsonly.
Deploying multiple portals using theMultitenancy featureIntroductionIn case you have a large number of users, you might need a solution that allows you to reducelicensing and infrastructure costs as well as simplify the software deployment andmaintenance. ONLYOFFICE Workspace provides you such a possibility. You can run severalindependent portals from a single ONLYOFFICE Workspace installation instead of installingseveral application instances on separate servers.For example, you can create individual portals for certain departments of your organization sothat each portal contains own data and has some individual settings, but all the portals can becentrally updated and managed via Control Panel.Step 1. Set up your domain nameTo use the multitenancy functionality, you need to have a registered domain name. In yourdomain DNS settings, create the following records:
1. Create the A record that points your domain name to the IP address of the serverwhere ONLYOFFICE Workspace is installed.
2. Create the wildcard A record specifying the asterisk "*" as a name to enablesubdomains.
Your settings should look something like this:Step 2. Configure the current portalTo access Control Panel, sign in to your portal and click the 'Control Panel' link on the StartPage. Alternatively, you can go to the portal 'Settings' and click the 'Control Panel' link on theleft-side panel.
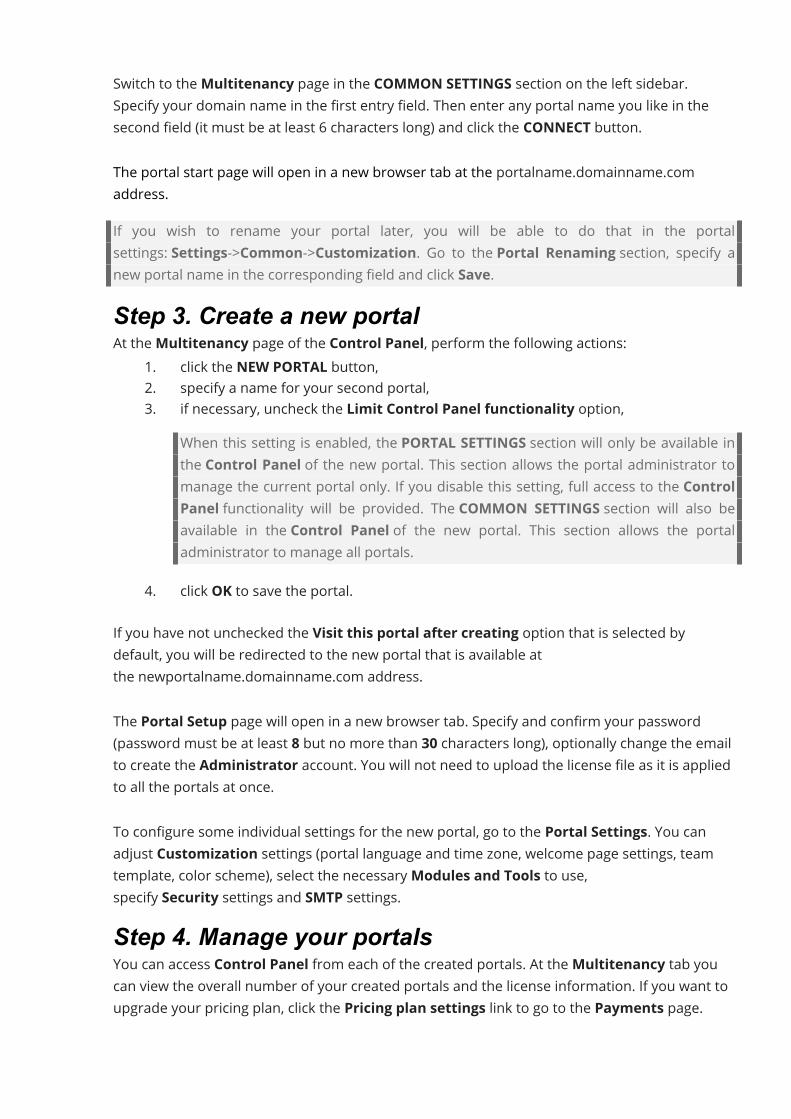
Switch to theMultitenancy page in the COMMON SETTINGS section on the left sidebar.Specify your domain name in the first entry field. Then enter any portal name you like in thesecond field (it must be at least 6 characters long) and click the CONNECT button.The portal start page will open in a new browser tab at the portalname.domainname.comaddress.If you wish to rename your portal later, you will be able to do that in the portalsettings: Settings->Common->Customization. Go to the Portal Renaming section, specify anew portal name in the corresponding field and click Save.Step 3. Create a new portalAt theMultitenancy page of the Control Panel, perform the following actions:
1. click the NEW PORTAL button,2. specify a name for your second portal,3. if necessary, uncheck the Limit Control Panel functionality option,
When this setting is enabled, the PORTAL SETTINGS section will only be available inthe Control Panel of the new portal. This section allows the portal administrator tomanage the current portal only. If you disable this setting, full access to the ControlPanel functionality will be provided. The COMMON SETTINGS section will also beavailable in the Control Panel of the new portal. This section allows the portaladministrator to manage all portals.
4. click OK to save the portal.If you have not unchecked the Visit this portal after creating option that is selected bydefault, you will be redirected to the new portal that is available atthe newportalname.domainname.com address.The Portal Setup page will open in a new browser tab. Specify and confirm your password(password must be at least 8 but no more than 30 characters long), optionally change the emailto create the Administrator account. You will not need to upload the license file as it is appliedto all the portals at once.To configure some individual settings for the new portal, go to the Portal Settings. You canadjust Customization settings (portal language and time zone, welcome page settings, teamtemplate, color scheme), select the necessaryModules and Tools to use,specify Security settings and SMTP settings.Step 4. Manage your portalsYou can access Control Panel from each of the created portals. At theMultitenancy tab youcan view the overall number of your created portals and the license information. If you want toupgrade your pricing plan, click the Pricing plan settings link to go to the Payments page.
All the created portal addresses are also displayed at theMultitenancy tab. You can navigatebetween them clicking the portal you want to go to.
WarningWe strongly recommend that you do not change the domain name if your portal contains databecause this may cause unpredictable consequences.If for some reasons you nevertheless decide to change the domain name, click the EDIT buttonin the Domain settings section. In a new window that opens, set a new domain name andclick OK.After changing the domain name you might also need to reconfigure some settings.
Configuring current portalUsing the Private Room to work on yourdocuments securelyIntroductionThe Private Room is designed to provide a secure environment for document editing and co-authoring.The Private Room is a special section in the Documentsmodule. Work in the Private Room isonly available via ONLYOFFICE Desktop Editors.Documents stored in the Private Room and data transferred during collaboration areencrypted with the AES-256 encryption algorithm to protect your data from unauthorizedaccess.the Private Room functionality is supported in the server version only, startingfrom Community Server v.11.0, Document Server v.5.5.4 and Control Panel v.2.9. Therequired version of Desktop Editors is v.5.6.
Step 1. Enable the Private Room settings in theControl PanelThe Private Room functionality is enabled by default in the Control Panel for the serverversion (the paid version 5.6 of Desktop Editors is also required for working with PrivateRooms).
The full access administrator or portal owner can disable/enable the Private Room inthe Control Panel.To access the Control Panel, sign in to your portal and click the 'Control Panel' icon onthe Start Page. Alternatively, you can go to the Portal Settings and select the ControlPanel link on the left-side panel.Switch to the Private Room page in the PORTAL SETTINGS section of the Control Panel.To disable/enable the Private Room, turn off/on the switcher and clickthe SAVE button. Private Rooms will be available for the current portal only.Step 2. Connect to the ONLYOFFICE cloud viaDesktop EditorsTo start working in Private Rooms, users should install the latest version of the DesktopEditors with the Private Room support (version 5.6 and later).To connect to the ONLYOFFICE cloud:
1. Launch Desktop Editors.2. In the main program window, switch to the Connect to cloud tab at the left sidebar.3. Click the ONLYOFFICE button.4. Specify your web office address in the new window.5. Click the Connect now button.6. On the authorization page, specify the login and password used to access your cloud
office account.You cannot sign in to your account via Desktop Editors using SSO or third-party serviceswhen Private Rooms are enabled.Step 3. Store and manage documents in the PrivateRoomWhen users connected to the ONLYOFFICE cloud via Desktop Editors, they can usethe Private Room section of the Documentsmodule to store documents and collaborate onthem securely.The Private Room of each user contains:
· folders and files created by the current user,· files shared with the current user by other users from the Private Room.
work in the Private Room and documents stored in it are only available when you connect toyour ONLYOFFICE cloud via the Desktop Editors interface.
Within the Private Room, you can:· create folders,· create and upload files (.docx, .xlsx, .pptx),· share documents with other portal users,· co-edit documents.
All documents are encrypted once uploaded or created. All the documents stored inthe Private Room are encrypted and marked with the icon in the file list.Due to the specificity of encryption, there are some restrictions on certain operations inthe Private Room compared with other sections of the Documentsmodule.Uploading1. When uploading files, an existing file with the same name cannot be overwritten.2. You cannot upload files using the drag-and-drop method.3. You cannot upload folders.Copying1. You cannot copy the files.Moving1. You can move the files within the Private Room section only.2. You can move only your own items and cannot move items shared with you by other users.3. When moving files, an existing file with the same name cannot be overwritten.Removing1. Files are removed permanently without passing through the Trash and cannot be restored.Versioning1. You cannot restore previous versions of a file.Sharing1. You can share files with users who have already obtained private and public keys.2. You can share files providing Full Access only.3. You cannot provide access to the file via an external link.Step 4. Share and co-edit documents in the PrivateRoomTo share your files stored in the Private Room with other users:
1. Click the Share button to the right of the necessary document.2. In the Sharing Settings window, click the Add Users button to open the user list,
then check the users you want to share the document with and click Save.you can share the file with users who have already obtained private and public keys.
3. By default, Full Access is provided. If you want to block access previously granted toa user, select the Deny Access option from the drop-down list next to the user name.
4. Click Save at the bottom of the Sharing Settings window.Now you can co-edit the file securely together with other users within the Private Room. Whenyou work on the encrypted file, it is marked with the icon in the editor header.Altering LDAP settingsIf you've just deployed ONLYOFFICE Workspace on your server, the first thing that you need todo is to create accounts for all your company employees. But if it numbers more than 50persons, the process of creating new portal users will take a lot of time. Since now you don'tneed to worry about it, because Control Panel offers you the LDAP Support option whichallows you to import the necessary users and groups from an LDAP Server (e.g. OpenLDAPServer or Microsoft Active Directory) to your portal, literally, in several minutes. The newlycreated users, in turn, don't need to memorize new passwords and logins because they will signin to portal using their credentials stored in your LDAP Server.To access Control Panel, sign in to your portal and click the 'Control Panel' link on the StartPage. Alternatively, you can go to the portal 'Settings' and click the 'Control Panel' link on theleft-side panel.Importing users and groupsBefore you start importingIf you connect to Active Directory which has more than 1000 users, you will need to increasethe AD limit MaxPageSize = 1000 using the ntdsutil.1. In the Control Panel, open the LDAP page in the PORTAL SETTINGS section on the left
sidebar.2. Click the Enable LDAP Authentication switcher and use the Show link next to
the LDAP Settings title to display the parameter form.3. Check the Enable StartTLS box if you want to secure your connections by using
the StartTLS technology (in this case, the default port 389 is used). Check the EnableSSL box if you want to use the SSL protocol (in this case, the port number will change to636 automatically).
4. Fill out the fields necessary for user import (the obligatory fields are marked with anasterisk):WarningPlease note that in case you have already imported some users and changed some ofthe settings (e.g. Server, User Filter, User DN, Group Filter, Group DN), the existingusers and all their data, including documents, emails, etc. not matching these newsettings will be DISABLED. We strongly recommend creating a backup before youchange any settings.
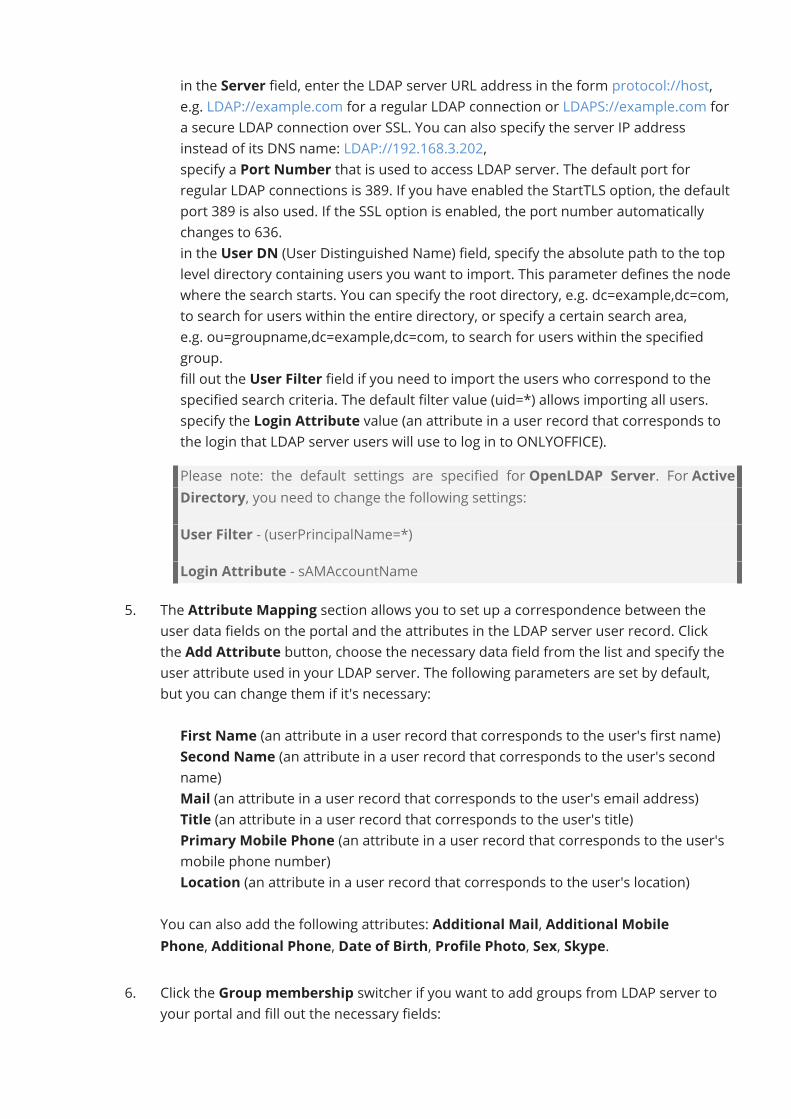
· in the Server field, enter the LDAP server URL address in the form protocol://host,e.g. LDAP://example.com for a regular LDAP connection or LDAPS://example.com fora secure LDAP connection over SSL. You can also specify the server IP addressinstead of its DNS name: LDAP://192.168.3.202,
· specify a Port Number that is used to access LDAP server. The default port forregular LDAP connections is 389. If you have enabled the StartTLS option, the defaultport 389 is also used. If the SSL option is enabled, the port number automaticallychanges to 636.
· in the User DN (User Distinguished Name) field, specify the absolute path to the toplevel directory containing users you want to import. This parameter defines the nodewhere the search starts. You can specify the root directory, e.g. dc=example,dc=com,to search for users within the entire directory, or specify a certain search area,e.g. ou=groupname,dc=example,dc=com, to search for users within the specifiedgroup.
· fill out the User Filter field if you need to import the users who correspond to thespecified search criteria. The default filter value (uid=*) allows importing all users.
· specify the Login Attribute value (an attribute in a user record that corresponds tothe login that LDAP server users will use to log in to ONLYOFFICE).Please note: the default settings are specified for OpenLDAP Server. For ActiveDirectory, you need to change the following settings:User Filter - (userPrincipalName=*)Login Attribute - sAMAccountName
5. The Attribute Mapping section allows you to set up a correspondence between theuser data fields on the portal and the attributes in the LDAP server user record. Clickthe Add Attribute button, choose the necessary data field from the list and specify theuser attribute used in your LDAP server. The following parameters are set by default,but you can change them if it's necessary:· First Name (an attribute in a user record that corresponds to the user's first name)· Second Name (an attribute in a user record that corresponds to the user's second
name)· Mail (an attribute in a user record that corresponds to the user's email address)· Title (an attribute in a user record that corresponds to the user's title)· Primary Mobile Phone (an attribute in a user record that corresponds to the user's
mobile phone number)· Location (an attribute in a user record that corresponds to the user's location)You can also add the following attributes: Additional Mail, Additional MobilePhone, Additional Phone, Date of Birth, Profile Photo, Sex, Skype.
6. Click the Group membership switcher if you want to add groups from LDAP server toyour portal and fill out the necessary fields:
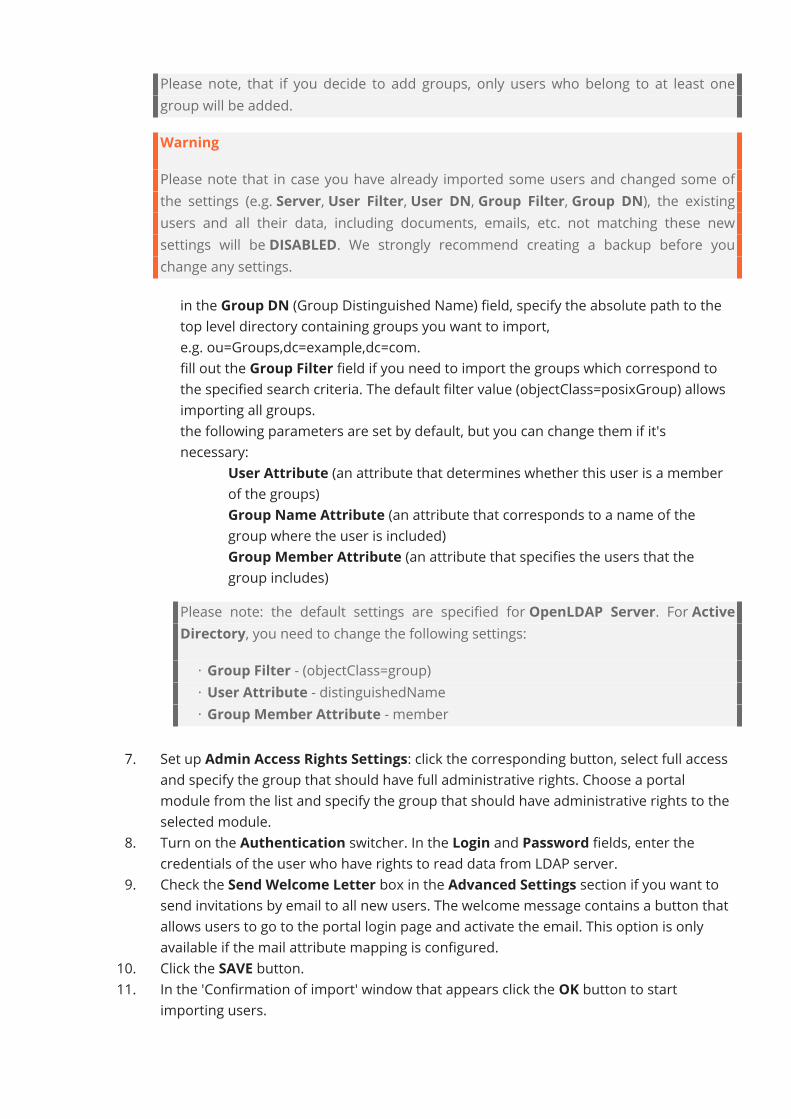
Please note, that if you decide to add groups, only users who belong to at least onegroup will be added.WarningPlease note that in case you have already imported some users and changed some ofthe settings (e.g. Server, User Filter, User DN, Group Filter, Group DN), the existingusers and all their data, including documents, emails, etc. not matching these newsettings will be DISABLED. We strongly recommend creating a backup before youchange any settings.· in the Group DN (Group Distinguished Name) field, specify the absolute path to the
top level directory containing groups you want to import,e.g. ou=Groups,dc=example,dc=com.
· fill out the Group Filter field if you need to import the groups which correspond tothe specified search criteria. The default filter value (objectClass=posixGroup) allowsimporting all groups.
· the following parameters are set by default, but you can change them if it'snecessary:
o User Attribute (an attribute that determines whether this user is a memberof the groups)
o Group Name Attribute (an attribute that corresponds to a name of thegroup where the user is included)
o Group Member Attribute (an attribute that specifies the users that thegroup includes)
Please note: the default settings are specified for OpenLDAP Server. For ActiveDirectory, you need to change the following settings:
· Group Filter - (objectClass=group)· User Attribute - distinguishedName· Group Member Attribute - member
7. Set up Admin Access Rights Settings: click the corresponding button, select full accessand specify the group that should have full administrative rights. Choose a portalmodule from the list and specify the group that should have administrative rights to theselected module.
8. Turn on the Authentication switcher. In the Login and Password fields, enter thecredentials of the user who have rights to read data from LDAP server.
9. Check the Send Welcome Letter box in the Advanced Settings section if you want tosend invitations by email to all new users. The welcome message contains a button thatallows users to go to the portal login page and activate the email. This option is onlyavailable if the mail attribute mapping is configured.
10. Click the SAVE button.11. In the 'Confirmation of import' window that appears click the OK button to start
importing users.
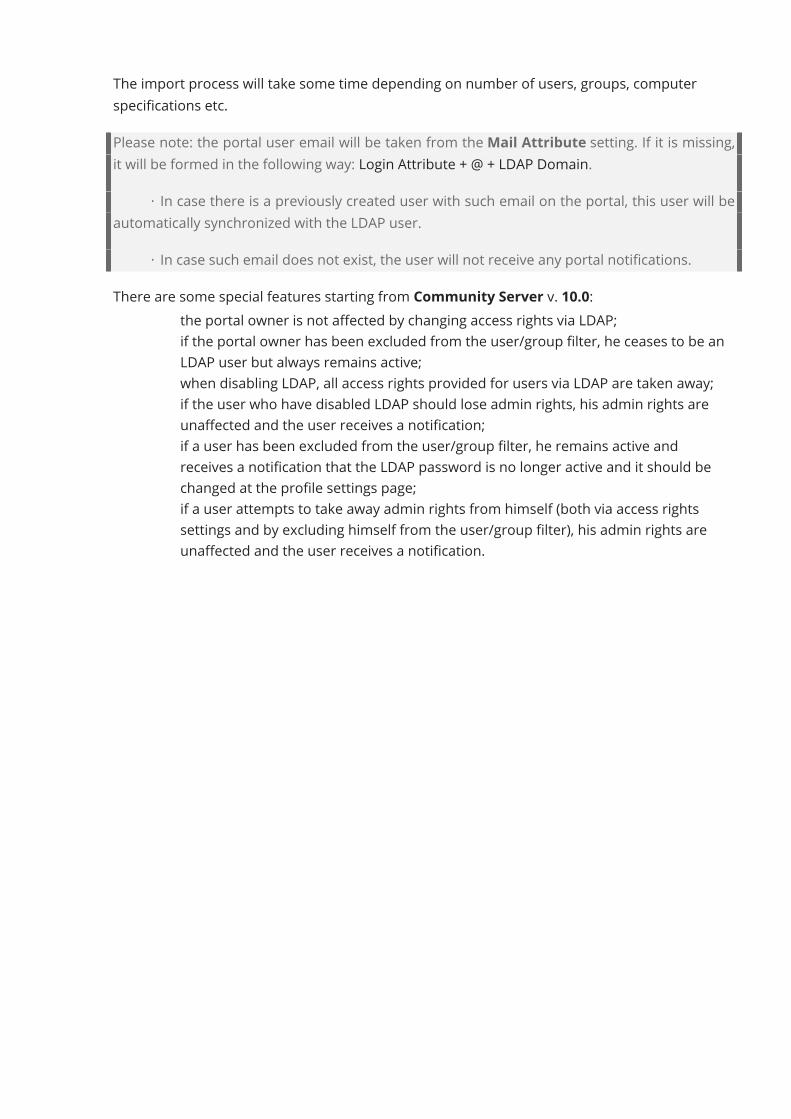
The import process will take some time depending on number of users, groups, computerspecifications etc.Please note: the portal user email will be taken from theMail Attribute setting. If it is missing,it will be formed in the following way: Login Attribute + @ + LDAP Domain.
· In case there is a previously created user with such email on the portal, this user will beautomatically synchronized with the LDAP user.
· In case such email does not exist, the user will not receive any portal notifications.There are some special features starting from Community Server v. 10.0:
· the portal owner is not affected by changing access rights via LDAP;· if the portal owner has been excluded from the user/group filter, he ceases to be an
LDAP user but always remains active;· when disabling LDAP, all access rights provided for users via LDAP are taken away;· if the user who have disabled LDAP should lose admin rights, his admin rights are
unaffected and the user receives a notification;· if a user has been excluded from the user/group filter, he remains active and
receives a notification that the LDAP password is no longer active and it should bechanged at the profile settings page;
· if a user attempts to take away admin rights from himself (both via access rightssettings and by excluding himself from the user/group filter), his admin rights areunaffected and the user receives a notification.
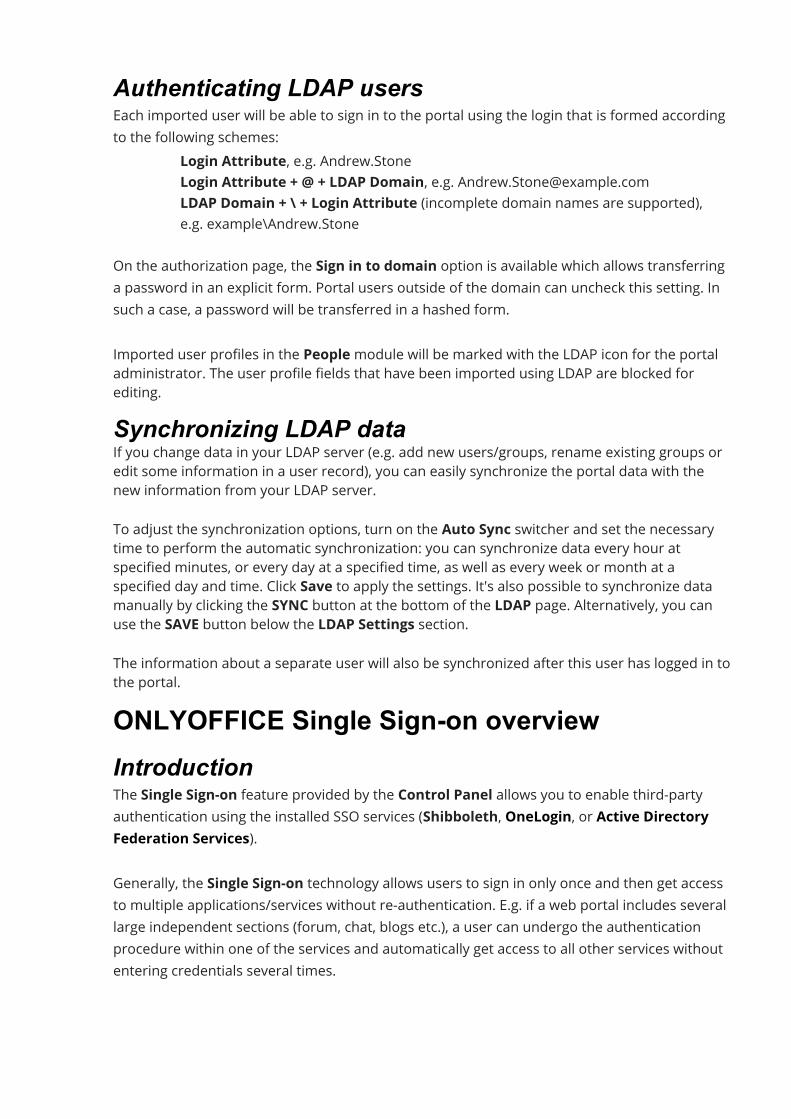
Authenticating LDAP usersEach imported user will be able to sign in to the portal using the login that is formed accordingto the following schemes:
· Login Attribute, e.g. Andrew.Stone· Login Attribute + @ + LDAP Domain, e.g. [email protected]· LDAP Domain + \ + Login Attribute (incomplete domain names are supported),
e.g. example\Andrew.StoneOn the authorization page, the Sign in to domain option is available which allows transferringa password in an explicit form. Portal users outside of the domain can uncheck this setting. Insuch a case, a password will be transferred in a hashed form.Imported user profiles in the Peoplemodule will be marked with the LDAP icon for the portaladministrator. The user profile fields that have been imported using LDAP are blocked forediting.Synchronizing LDAP dataIf you change data in your LDAP server (e.g. add new users/groups, rename existing groups oredit some information in a user record), you can easily synchronize the portal data with thenew information from your LDAP server.To adjust the synchronization options, turn on the Auto Sync switcher and set the necessarytime to perform the automatic synchronization: you can synchronize data every hour atspecified minutes, or every day at a specified time, as well as every week or month at aspecified day and time. Click Save to apply the settings. It's also possible to synchronize datamanually by clicking the SYNC button at the bottom of the LDAP page. Alternatively, you canuse the SAVE button below the LDAP Settings section.The information about a separate user will also be synchronized after this user has logged in tothe portal.ONLYOFFICE Single Sign-on overviewIntroductionThe Single Sign-on feature provided by the Control Panel allows you to enable third-partyauthentication using the installed SSO services (Shibboleth, OneLogin, or Active DirectoryFederation Services).Generally, the Single Sign-on technology allows users to sign in only once and then get accessto multiple applications/services without re-authentication. E.g. if a web portal includes severallarge independent sections (forum, chat, blogs etc.), a user can undergo the authenticationprocedure within one of the services and automatically get access to all other services withoutentering credentials several times.
SSO is always ensured by the joint operation of two applications: an Identity Provider and aService Provider (hereinafter referred to as "IdP" and "SP").ONLYOFFICE SSO implements the SP only. A lot of different providers can act as an IdP, butONLYOFFICE has been tested with the following services only: Shibboleth, OneLogin and AD FS.Using SSO authentication you get the following main benefits:
· Increased convenience. Users obtain a more quick and easy way to access theportal without the necessity to memorize multiple passwords and logins.
· Enhanced security. ONLYOFFICE does not store user passwords in any form, insteadof that it uses the results of the authentication on the Identity Provider side.
· Easy administration. All the necessary user information is transmitted through anauthentication token. If the user information changes on the Identity Provider side, itwill be automatically updated on the portal during the next SSO authentication. If auser profile does not exist on the portal, it will be created automatically when theuser signs in to the portal using the SSO credentials for the first time.
In ONLYOFFICE, SSO authentication is implemented on the base of the secure and commonlyused SAML standard. SAML (Security Assertion Markup Language) is an XML standard thatallows to transmit user authentication/authorization data between an Identity Provider and aService Provider through security tokens which contain assertions.
Enabling SSOTo enable and configure SSO authentication for your portal, you need to perform the followingtwo main steps:
1. Register your Identity Provider at the ONLYOFFICE Control Panel -> SSO page. Theinformation you should specify can be found in your Identity Provider account.If you want to use SSO when connecting ONLYOFFICE Desktop Editors toyour ONLYOFFICE Workspace, disable Private Rooms in the Control Panel.
2. Register ONLYOFFICE as a trusted Service Provider in your Identity Provider account.This procedure differs depending on the selected Identity Provider.
Each portal can only be integrated with one Identity Provider at the same time.Registering your Identity Provider in the ONLYOFFICEService ProviderTo register your IdP in ONLYOFFICE SP, use the ONLYOFFICE SP Settings section ofthe SSO page.
1. On your ONLYOFFICE portal, go to the Control Panel and open the SSO page inthe PORTAL SETTINGS section on the left sidebar.
2. Click the Enable Single Sign-on Authentication switcher.
3. Fill in the required fields in the ONLYOFFICE SP Settings section. The necessaryinformation can be specified in several different ways:
· Enter the URL address to the metadata file. If your IdP metadata is accessiblefrom outside by the link, insert the link into the URL to IdP Metadata XML field andclick the Load data button. When the data is loaded, all the required parameters willbe automatically displayed in the extended form.
· Upload the metadata file. If your IdP provides a metadata file, use the Selectfile button to browse for the file stored on your local machine. When the file isuploaded, all the required parameters will be automatically displayed in theextended form.
· Specify the required parameters manually. If the metadata file is not available,enter the necessary parameters manually. To obtain the necessary values, pleasecontact your IdP administrator.
The following parameters are available:· IdP Entity Id (obligatory field) - the Identity Provider identifier or URL address which
will be used by the Service Provider to unequivocally identify the IdP.example: https://example.com/idp/shibboleth
· where example.com is your SSO service domain name· IdP Single Sign-On Endpoint URL (obligatory field) - the URL used for the single sign-
on on the Identity Provider side. It is the endpoint address in your IdP to which SPsends authentication requests.Set the necessary Binding type selecting one of the corresponding radio buttons.Bindings specify the way in which authentication requests and responses aretransmitted between the IdP and SP over the underlying transport protocol: usingthe HTTP POST or HTTP Redirect binding.
· IdP Single Logout Endpoint URL - the URL used for the single logout on the Serviceprovider side. It is the endpoint address in your IdP to which SP sends logoutrequests/responses.Set the necessary Binding type selecting one of the corresponding radio buttons.Bindings specify the way in which logout requests and responses are transmittedbetween the IdP and SP over the underlying transport protocol: using theHTTP POST or HTTP Redirect binding.
· NameId Format - the NameID parameter allows SP to identify a user. Select one ofthe available formats from the list.
It's possible to customize the button used to login to the portal with the Single Sign-on serviceat the ONLYOFFICE authentication page. You can do it using the Custom login buttoncaption field in the ONLYOFFICE SP Settings section.
You can also add the IdP and SP certificates.IdP Public CertificatesIdP Public Certificates - this section allows you to add the Identity Provider public certificatesused by the SP to verify the requests and responses from the IdP.If you have loaded the IdP metadata, these certificates will be added to the ControlPanel automatically. Otherwise, the certificates can be found in your IdP account. To add acertificate manually, click the Add certificate button. The New Certificate window opens.Enter the certificate in the Public Certificate field and click the OK button.Set additional parameters for certificates checking the corresponding boxes.Specify which signatures of requests/responses sent from IdP to SP should be verified:
· Verify Authentication Response Signature - to verify signatures of the SAMLauthentication responses sent to SP.
· Verify Logout Request Signature - to verify signatures of the SAML logout requestssent to SP.
· Verify Logout Response Signature - to verify signatures of the SAML logoutresponses sent to SP.
Select the necessary algorithm from the Default Signature Verification Algorithm list: rsa-sha1, rsa-sha256 or rsa-sha512.Default settings are used only in cases if the IdP metadata does not specify which algorithmshould be used.You can edit or delete the added certificates using the corresponding link.SP CertificatesSP Certificates - this section allows you to add the Service Provider certificates used to signand encrypt the requests and responses from the SP.If your IdP requires that input data is signed and/or encrypted, create or add correspondingcertificates in this section.Click the Add certificate button. The New Certificate window opens. You can generate a self-signed certificate or add an existing certificate in the Public Certificate field and thecorresponding private key in the Private Key field. In the Use for list, select one of the availableoptions: signing, encrypt, signing and encrypt. When ready, click the OK button.
Depending on the certificate purpose selected in the Use for list when uploading/generatingthe certificate, the certificate additional parameters are specified. The following parametersdefine which requests/responses sent from SP to IdP should be signed:
· Sign Authentication Requests - to have SP sign the SAML authentication requestssent to IdP.
· Sign Logout Requests - to have SP sign the SAML logout requests sent to IdP.· Sign Logout Responses - to have SP sign the SAML logout responses sent to IdP.
If you have selected the encrypt or signing and encrypt option in the Use for list, the DecryptAssertions parameter is also checked. The decryption is performed using thecorresponding Private Key.Select the necessary algorithms from the lists:
· Signing Algorithm: rsa-sha1, rsa-sha256 or rsa-sha512.· Default Decryption Algorithm: aes128-cbc, aes256-cbc or tripledes-cbc.
You can edit or delete the added certificates using the corresponding link.Attribute MappingAttribute Mapping - this section allows you to set the correspondence of the fields in theONLYOFFICE Peoplemodule to the user attributes which will be returned from the IdP. When auser signs in to the ONLYOFFICE SP using the SSO credentials, ONLYOFFICE SP receives therequired attributes and populates the full name and email address fields in the user accountwith the values received from the IdP. If the user does not exist in the People module, it will becreated automatically. If the user information has been changed on the IdP side, it will beupdated in SP as well.The available attributes are:
· First Name (obligatory field) - an attribute in a user record that corresponds to theuser's first name.
· Last Name (obligatory field) - an attribute in a user record that corresponds to theuser's second name.
· Email (obligatory field) - an attribute in a user record that corresponds to the user'semail address.
· Location - an attribute in a user record that corresponds to the user's location.· Title - an attribute in a user record that corresponds to the user's title.· Phone - an attribute in a user record that corresponds to the user's phone number.
Advanced SettingsThe Hide auth page option allows you to hide default authentication page and automaticallyredirect to SSO service.
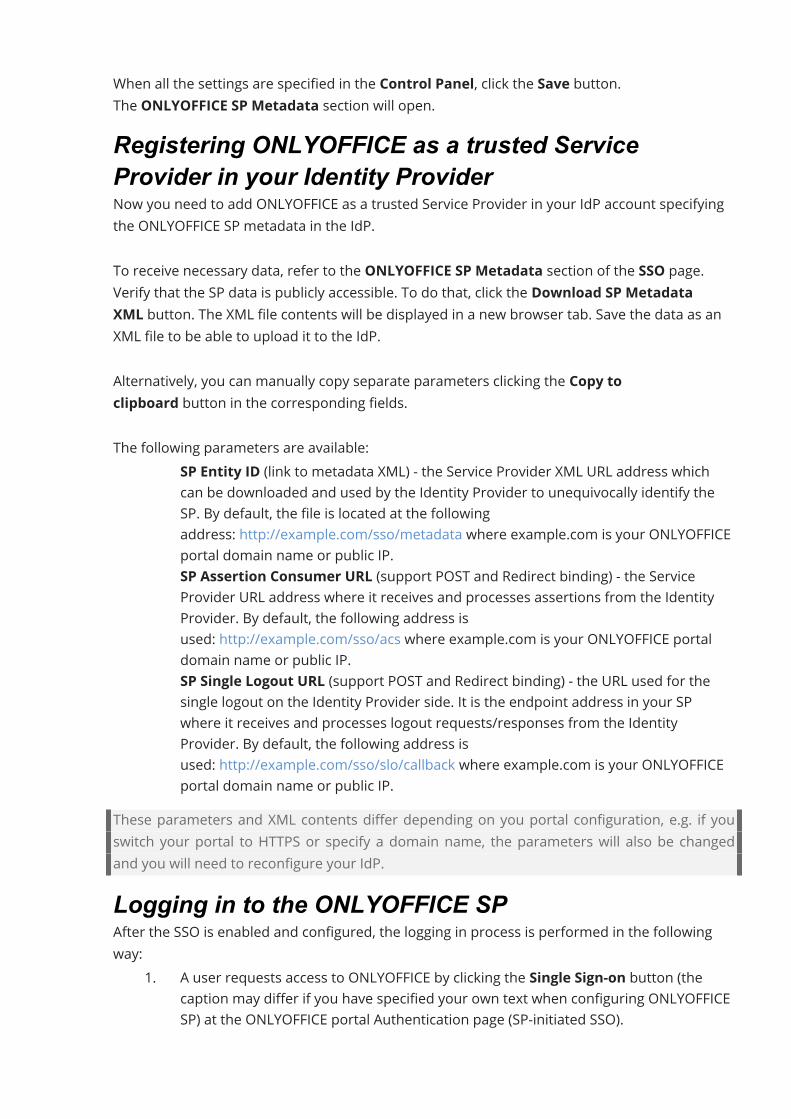
When all the settings are specified in the Control Panel, click the Save button.The ONLYOFFICE SP Metadata section will open.Registering ONLYOFFICE as a trusted ServiceProvider in your Identity ProviderNow you need to add ONLYOFFICE as a trusted Service Provider in your IdP account specifyingthe ONLYOFFICE SP metadata in the IdP.To receive necessary data, refer to the ONLYOFFICE SP Metadata section of the SSO page.Verify that the SP data is publicly accessible. To do that, click the Download SP MetadataXML button. The XML file contents will be displayed in a new browser tab. Save the data as anXML file to be able to upload it to the IdP.Alternatively, you can manually copy separate parameters clicking the Copy toclipboard button in the corresponding fields.The following parameters are available:
· SP Entity ID (link to metadata XML) - the Service Provider XML URL address whichcan be downloaded and used by the Identity Provider to unequivocally identify theSP. By default, the file is located at the followingaddress: http://example.com/sso/metadata where example.com is your ONLYOFFICEportal domain name or public IP.
· SP Assertion Consumer URL (support POST and Redirect binding) - the ServiceProvider URL address where it receives and processes assertions from the IdentityProvider. By default, the following address isused: http://example.com/sso/acs where example.com is your ONLYOFFICE portaldomain name or public IP.
· SP Single Logout URL (support POST and Redirect binding) - the URL used for thesingle logout on the Identity Provider side. It is the endpoint address in your SPwhere it receives and processes logout requests/responses from the IdentityProvider. By default, the following address isused: http://example.com/sso/slo/callback where example.com is your ONLYOFFICEportal domain name or public IP.
These parameters and XML contents differ depending on you portal configuration, e.g. if youswitch your portal to HTTPS or specify a domain name, the parameters will also be changedand you will need to reconfigure your IdP.Logging in to the ONLYOFFICE SPAfter the SSO is enabled and configured, the logging in process is performed in the followingway:
1. A user requests access to ONLYOFFICE by clicking the Single Sign-on button (thecaption may differ if you have specified your own text when configuring ONLYOFFICESP) at the ONLYOFFICE portal Authentication page (SP-initiated SSO).
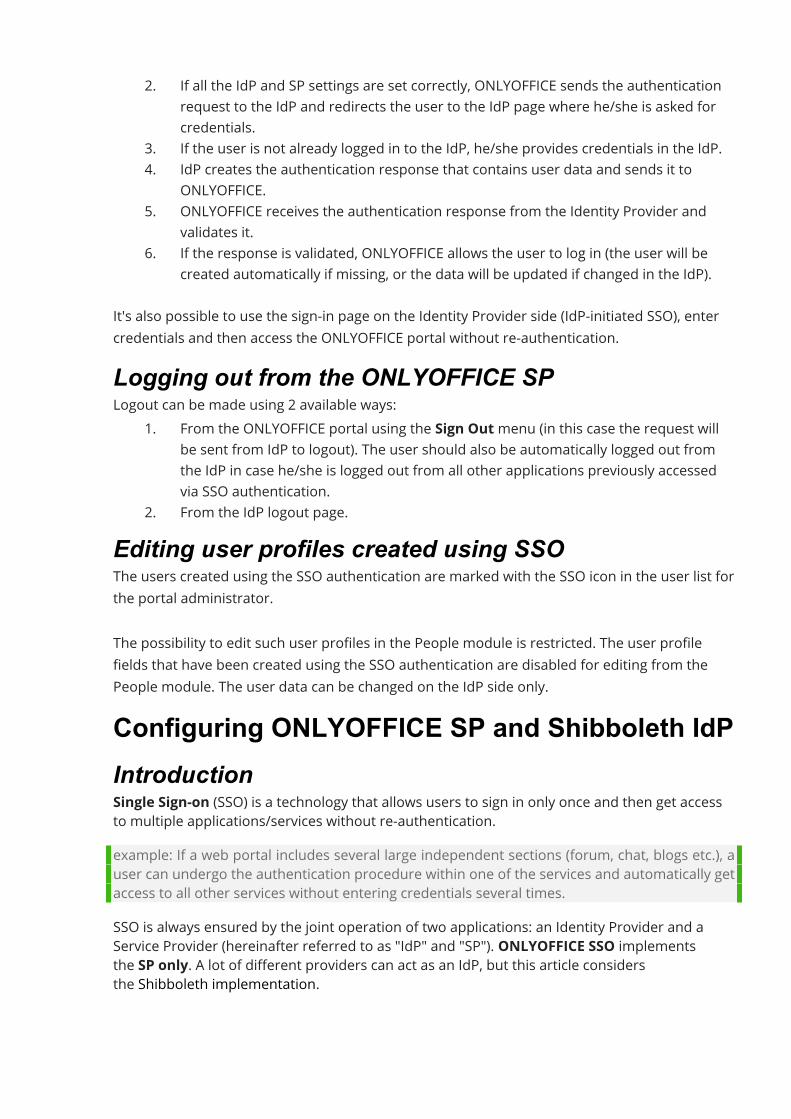
2. If all the IdP and SP settings are set correctly, ONLYOFFICE sends the authenticationrequest to the IdP and redirects the user to the IdP page where he/she is asked forcredentials.
3. If the user is not already logged in to the IdP, he/she provides credentials in the IdP.4. IdP creates the authentication response that contains user data and sends it to
ONLYOFFICE.5. ONLYOFFICE receives the authentication response from the Identity Provider and
validates it.6. If the response is validated, ONLYOFFICE allows the user to log in (the user will be
created automatically if missing, or the data will be updated if changed in the IdP).It's also possible to use the sign-in page on the Identity Provider side (IdP-initiated SSO), entercredentials and then access the ONLYOFFICE portal without re-authentication.Logging out from the ONLYOFFICE SPLogout can be made using 2 available ways:
1. From the ONLYOFFICE portal using the Sign Outmenu (in this case the request willbe sent from IdP to logout). The user should also be automatically logged out fromthe IdP in case he/she is logged out from all other applications previously accessedvia SSO authentication.
2. From the IdP logout page.Editing user profiles created using SSOThe users created using the SSO authentication are marked with the SSO icon in the user list forthe portal administrator.The possibility to edit such user profiles in the People module is restricted. The user profilefields that have been created using the SSO authentication are disabled for editing from thePeople module. The user data can be changed on the IdP side only.Configuring ONLYOFFICE SP and Shibboleth IdPIntroductionSingle Sign-on (SSO) is a technology that allows users to sign in only once and then get accessto multiple applications/services without re-authentication.example: If a web portal includes several large independent sections (forum, chat, blogs etc.), auser can undergo the authentication procedure within one of the services and automatically getaccess to all other services without entering credentials several times.SSO is always ensured by the joint operation of two applications: an Identity Provider and aService Provider (hereinafter referred to as "IdP" and "SP"). ONLYOFFICE SSO implementsthe SP only. A lot of different providers can act as an IdP, but this article considersthe Shibboleth implementation.
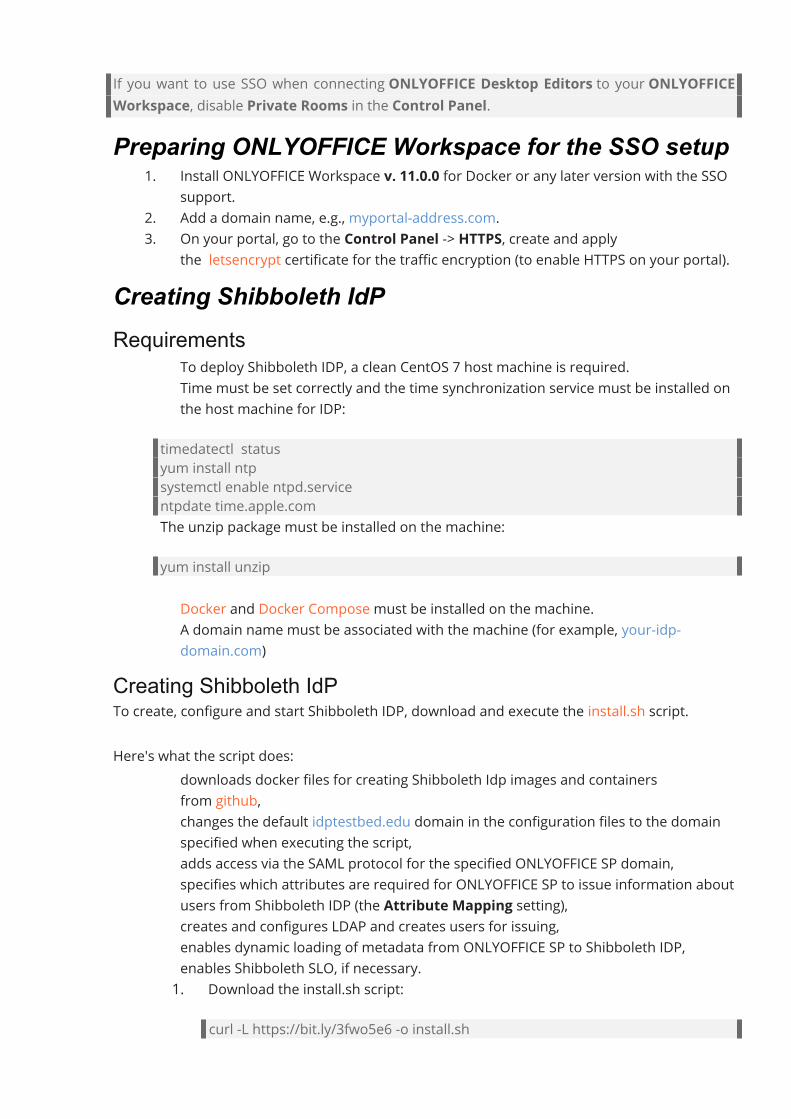
If you want to use SSO when connecting ONLYOFFICE Desktop Editors to your ONLYOFFICEWorkspace, disable Private Rooms in the Control Panel.Preparing ONLYOFFICE Workspace for the SSO setup
1. Install ONLYOFFICE Workspace v. 11.0.0 for Docker or any later version with the SSOsupport.
2. Add a domain name, e.g., myportal-address.com.3. On your portal, go to the Control Panel -> HTTPS, create and apply
the letsencrypt certificate for the traffic encryption (to enable HTTPS on your portal).Creating Shibboleth IdPRequirements
· To deploy Shibboleth IDP, a clean CentOS 7 host machine is required.· Time must be set correctly and the time synchronization service must be installed on
the host machine for IDP:timedatectl statusyum install ntpsystemctl enable ntpd.servicentpdate time.apple.com
· The unzip package must be installed on the machine:yum install unzip· Docker and Docker Compose must be installed on the machine.· A domain name must be associated with the machine (for example, your-idp-
domain.com)Creating Shibboleth IdPTo create, configure and start Shibboleth IDP, download and execute the install.sh script.Here's what the script does:
· downloads docker files for creating Shibboleth Idp images and containersfrom github,
· changes the default idptestbed.edu domain in the configuration files to the domainspecified when executing the script,
· adds access via the SAML protocol for the specified ONLYOFFICE SP domain,· specifies which attributes are required for ONLYOFFICE SP to issue information about
users from Shibboleth IDP (the Attribute Mapping setting),· creates and configures LDAP and creates users for issuing,· enables dynamic loading of metadata from ONLYOFFICE SP to Shibboleth IDP,· enables Shibboleth SLO, if necessary.1. Download the install.sh script:
curl -L https://bit.ly/3fwo5e6 -o install.sh

2. Make the script executable:chmod +x install.sh
3. Execute the script replacing parameters with your own ones:./install.sh -id your-idp-domain.com -sd myportal-address.com --no_sloScript parameters:· -id - a domain name of the current machine for Shibboleth IDP.· -sd - a domain name where ONLYOFFICE SP is deployed.· --no_slo - disables Single Logout in Shibboleth IDP (optional parameter).
4. Wait when Shibboleth IDP starts after executing the script.5. To verify that Shibboleth IDP started correctly, open the https://your-idp-
domain.com/idp/shibboleth link in your browser. An xml file should be displayed.6. Copy the https://{your_idp_domain}/idp/shibboleth link (e.g., https://your-idp-
domain.com/idp/shibboleth) and go to the ONLYOFFICE portal signing in as anadministrator. Open the Control Panel -> SSO page.
Configuring ONLYOFFICE SP1. Make sure that you are signed in as an Administrator to your ONLYOFFICE Control
Panel and click the SSO tab in the PORTAL SETTINGS section on the left sidebar.You can only register one enterprise Identity Provider for your organization on theONLYOFFICE portal.
2. Enable SSO using the Enable Single Sign-on Authentication switcher and paste thelink to the Shibboleth IdP into the URL to Idp Metadata XML field.
3. Press the button with the upward arrow to load the IdP metadata. The ONLYOFFICESP Settings form will be automatically filled in with your data from the ShibbolethIdP.As we disabled SLO when executing the install.sh script by specifying the --no_slo parameter, the IdP Single Logout Endpoint URL field will be empty.
4. Once the IdP metadata is loaded, two certificates will be added in the IdP Publiccertificates section. You'll also see the pop-up window with the following text:'Multiple Idp verification certificates are not supported. Please leave only Primarycertificate'.You need to delete the second certificate in the list and leave the first certificateonly, which is the primary certificate. Use the Delete link next to the second
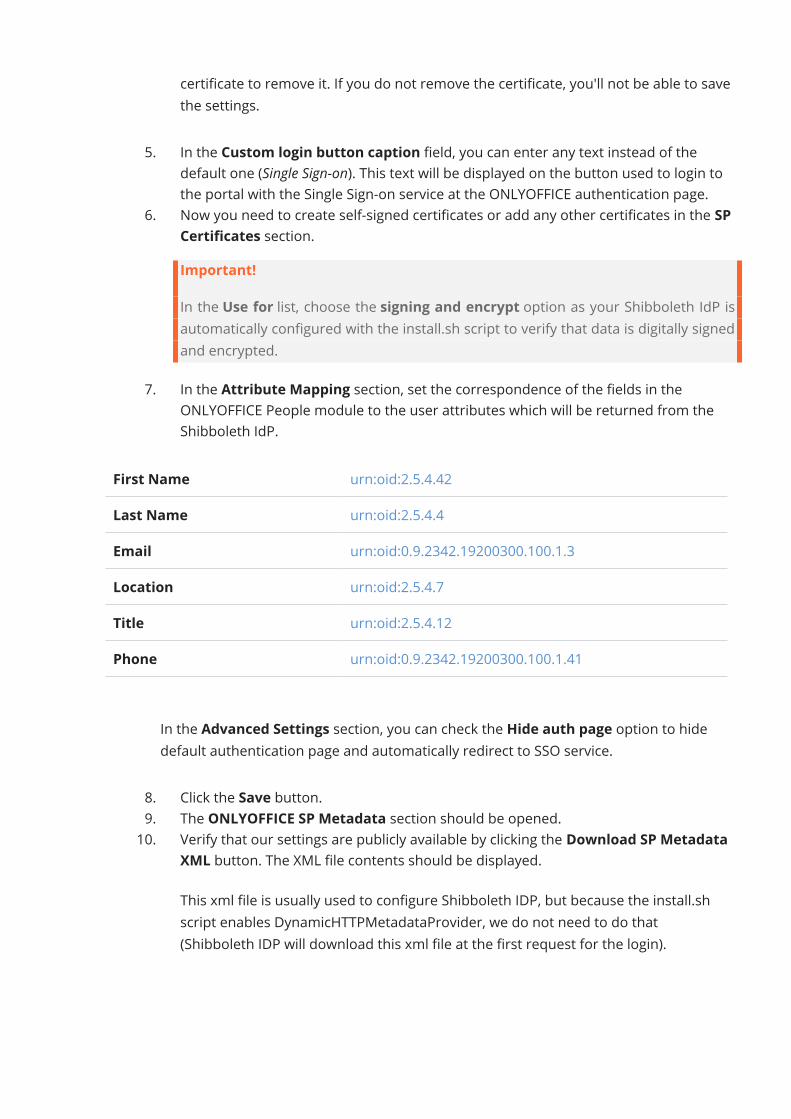
certificate to remove it. If you do not remove the certificate, you'll not be able to savethe settings.
5. In the Custom login button caption field, you can enter any text instead of thedefault one (Single Sign-on). This text will be displayed on the button used to login tothe portal with the Single Sign-on service at the ONLYOFFICE authentication page.
6. Now you need to create self-signed certificates or add any other certificates in the SPCertificates section.Important!In the Use for list, choose the signing and encrypt option as your Shibboleth IdP isautomatically configured with the install.sh script to verify that data is digitally signedand encrypted.
7. In the Attribute Mapping section, set the correspondence of the fields in theONLYOFFICE People module to the user attributes which will be returned from theShibboleth IdP.
First Name urn:oid:2.5.4.42Last Name urn:oid:2.5.4.4Email urn:oid:0.9.2342.19200300.100.1.3Location urn:oid:2.5.4.7Title urn:oid:2.5.4.12Phone urn:oid:0.9.2342.19200300.100.1.41
In the Advanced Settings section, you can check the Hide auth page option to hidedefault authentication page and automatically redirect to SSO service.
8. Click the Save button.9. The ONLYOFFICE SP Metadata section should be opened.
10. Verify that our settings are publicly available by clicking the Download SP MetadataXML button. The XML file contents should be displayed.This xml file is usually used to configure Shibboleth IDP, but because the install.shscript enables DynamicHTTPMetadataProvider, we do not need to do that(Shibboleth IDP will download this xml file at the first request for the login).
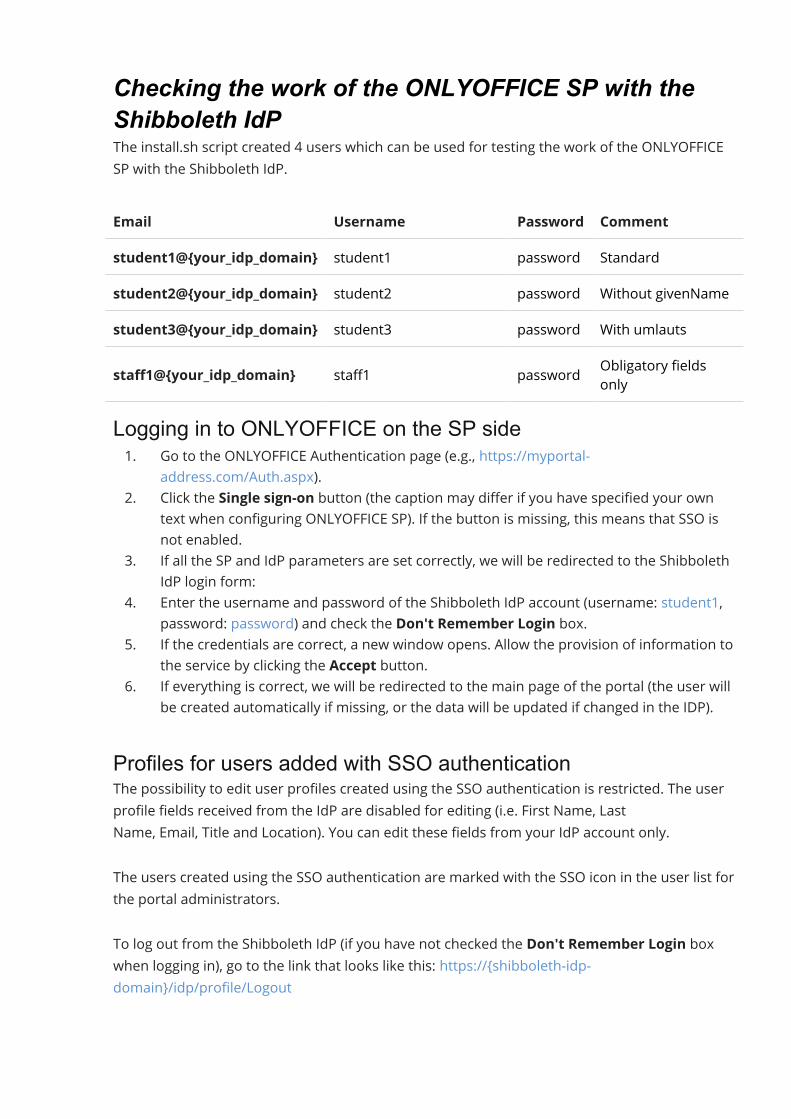
Checking the work of the ONLYOFFICE SP with theShibboleth IdPThe install.sh script created 4 users which can be used for testing the work of the ONLYOFFICESP with the Shibboleth IdP.
Email Username Password Commentstudent1@{your_idp_domain} student1 password Standardstudent2@{your_idp_domain} student2 password Without givenNamestudent3@{your_idp_domain} student3 password With umlautsstaff1@{your_idp_domain} staff1 password Obligatory fields
onlyLogging in to ONLYOFFICE on the SP side1. Go to the ONLYOFFICE Authentication page (e.g., https://myportal-
address.com/Auth.aspx).2. Click the Single sign-on button (the caption may differ if you have specified your own
text when configuring ONLYOFFICE SP). If the button is missing, this means that SSO isnot enabled.
3. If all the SP and IdP parameters are set correctly, we will be redirected to the ShibbolethIdP login form:
4. Enter the username and password of the Shibboleth IdP account (username: student1,password: password) and check the Don't Remember Login box.
5. If the credentials are correct, a new window opens. Allow the provision of information tothe service by clicking the Accept button.
6. If everything is correct, we will be redirected to the main page of the portal (the user willbe created automatically if missing, or the data will be updated if changed in the IDP).
Profiles for users added with SSO authenticationThe possibility to edit user profiles created using the SSO authentication is restricted. The userprofile fields received from the IdP are disabled for editing (i.e. First Name, LastName, Email, Title and Location). You can edit these fields from your IdP account only.The users created using the SSO authentication are marked with the SSO icon in the user list forthe portal administrators.To log out from the Shibboleth IdP (if you have not checked the Don't Remember Login boxwhen logging in), go to the link that looks like this: https://{shibboleth-idp-domain}/idp/profile/Logout
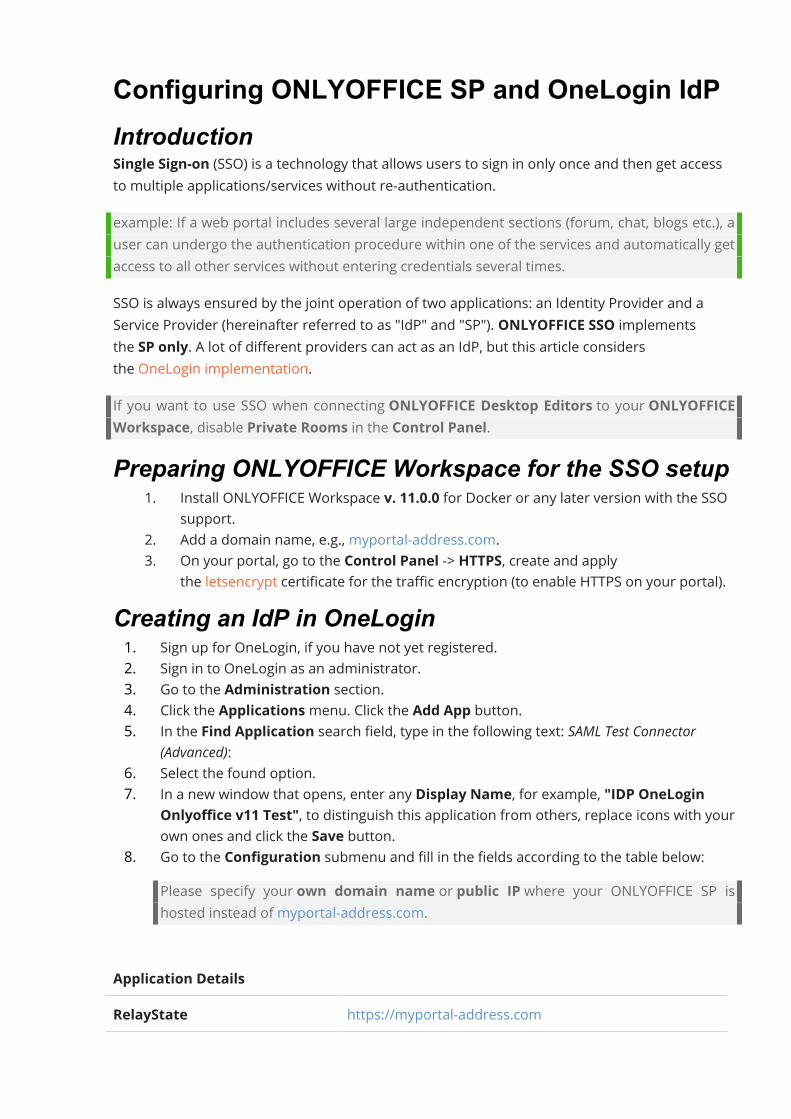
Configuring ONLYOFFICE SP and OneLogin IdPIntroductionSingle Sign-on (SSO) is a technology that allows users to sign in only once and then get accessto multiple applications/services without re-authentication.example: If a web portal includes several large independent sections (forum, chat, blogs etc.), auser can undergo the authentication procedure within one of the services and automatically getaccess to all other services without entering credentials several times.SSO is always ensured by the joint operation of two applications: an Identity Provider and aService Provider (hereinafter referred to as "IdP" and "SP"). ONLYOFFICE SSO implementsthe SP only. A lot of different providers can act as an IdP, but this article considersthe OneLogin implementation.If you want to use SSO when connecting ONLYOFFICE Desktop Editors to your ONLYOFFICEWorkspace, disable Private Rooms in the Control Panel.Preparing ONLYOFFICE Workspace for the SSO setup
1. Install ONLYOFFICE Workspace v. 11.0.0 for Docker or any later version with the SSOsupport.
2. Add a domain name, e.g., myportal-address.com.3. On your portal, go to the Control Panel -> HTTPS, create and apply
the letsencrypt certificate for the traffic encryption (to enable HTTPS on your portal).Creating an IdP in OneLogin1. Sign up for OneLogin, if you have not yet registered.2. Sign in to OneLogin as an administrator.3. Go to the Administration section.4. Click the Applicationsmenu. Click the Add App button.5. In the Find Application search field, type in the following text: SAML Test Connector
(Advanced):6. Select the found option.7. In a new window that opens, enter any Display Name, for example, "IDP OneLogin
Onlyoffice v11 Test", to distinguish this application from others, replace icons with yourown ones and click the Save button.
8. Go to the Configuration submenu and fill in the fields according to the table below:Please specify your own domain name or public IP where your ONLYOFFICE SP ishosted instead of myportal-address.com.
Application DetailsRelayState https://myportal-address.com
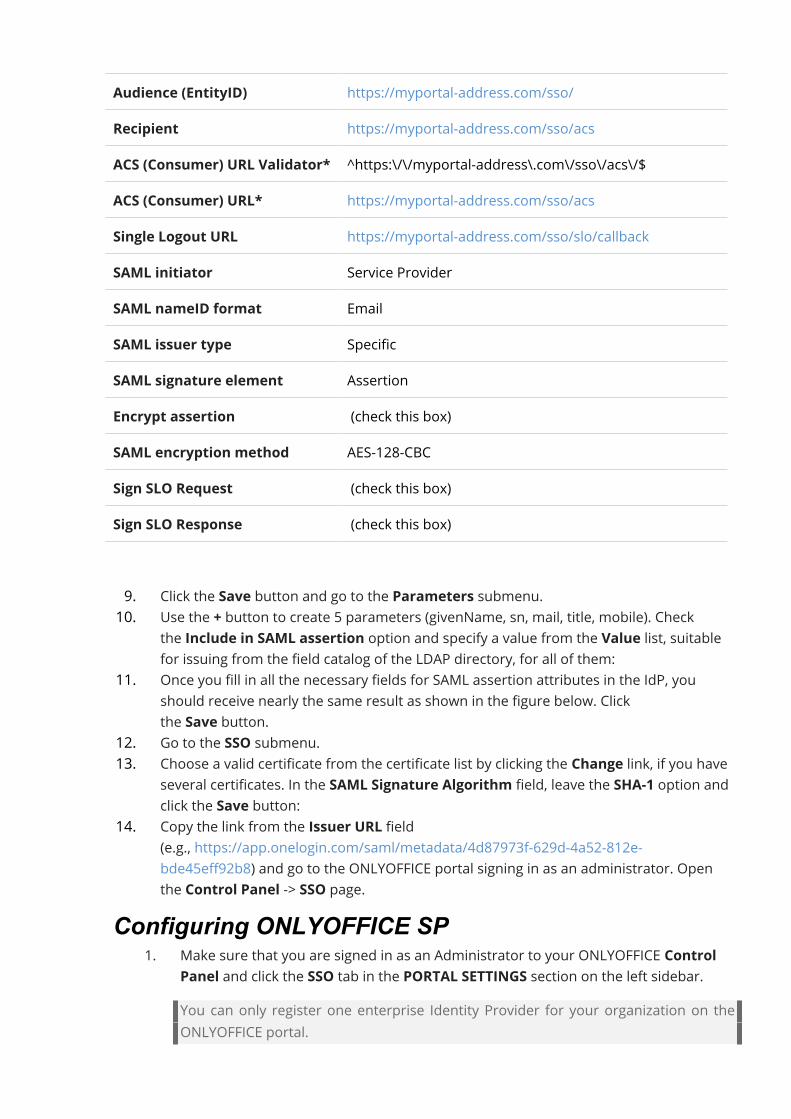
Audience (EntityID) https://myportal-address.com/sso/Recipient https://myportal-address.com/sso/acsACS (Consumer) URL Validator* ^https:\/\/myportal-address\.com\/sso\/acs\/$ACS (Consumer) URL* https://myportal-address.com/sso/acsSingle Logout URL https://myportal-address.com/sso/slo/callbackSAML initiator Service ProviderSAML nameID format EmailSAML issuer type SpecificSAML signature element AssertionEncrypt assertion (check this box)SAML encryption method AES-128-CBCSign SLO Request (check this box)Sign SLO Response (check this box)
9. Click the Save button and go to the Parameters submenu.10. Use the + button to create 5 parameters (givenName, sn, mail, title, mobile). Check
the Include in SAML assertion option and specify a value from the Value list, suitablefor issuing from the field catalog of the LDAP directory, for all of them:
11. Once you fill in all the necessary fields for SAML assertion attributes in the IdP, youshould receive nearly the same result as shown in the figure below. Clickthe Save button.
12. Go to the SSO submenu.13. Choose a valid certificate from the certificate list by clicking the Change link, if you have
several certificates. In the SAML Signature Algorithm field, leave the SHA-1 option andclick the Save button:
14. Copy the link from the Issuer URL field(e.g., https://app.onelogin.com/saml/metadata/4d87973f-629d-4a52-812e-bde45eff92b8) and go to the ONLYOFFICE portal signing in as an administrator. Openthe Control Panel -> SSO page.
Configuring ONLYOFFICE SP1. Make sure that you are signed in as an Administrator to your ONLYOFFICE Control
Panel and click the SSO tab in the PORTAL SETTINGS section on the left sidebar.You can only register one enterprise Identity Provider for your organization on theONLYOFFICE portal.
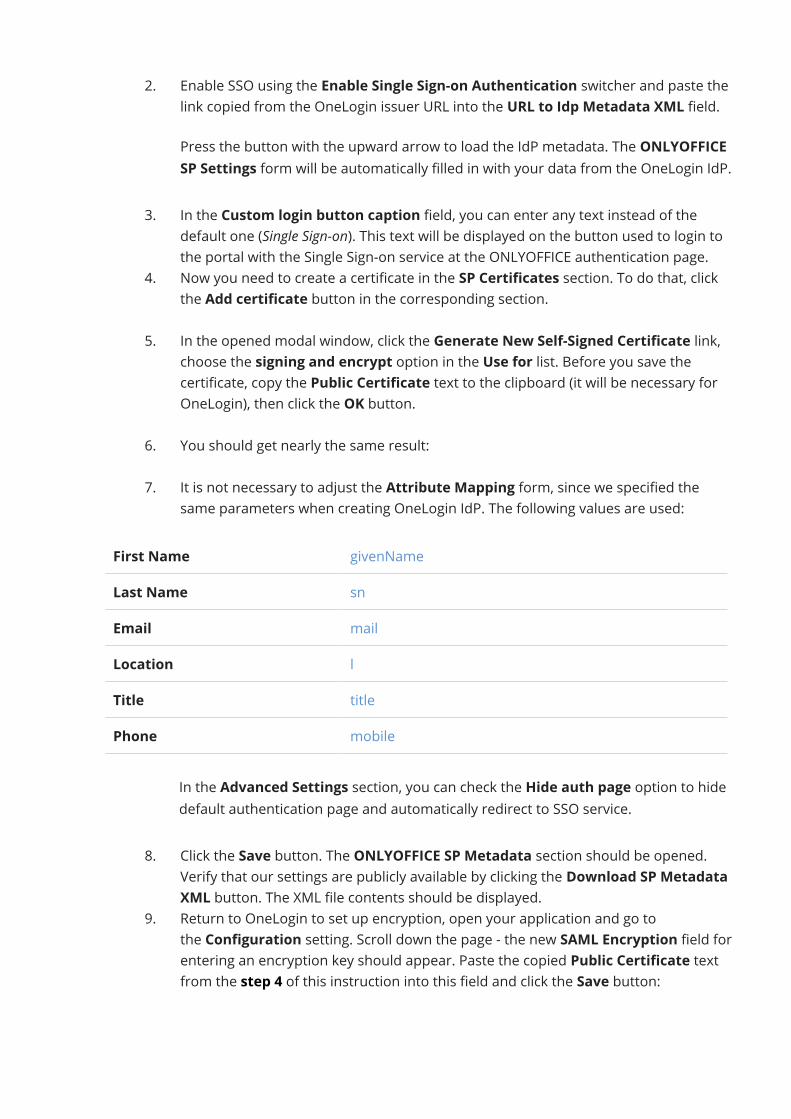
2. Enable SSO using the Enable Single Sign-on Authentication switcher and paste thelink copied from the OneLogin issuer URL into the URL to Idp Metadata XML field.Press the button with the upward arrow to load the IdP metadata. The ONLYOFFICESP Settings form will be automatically filled in with your data from the OneLogin IdP.
3. In the Custom login button caption field, you can enter any text instead of thedefault one (Single Sign-on). This text will be displayed on the button used to login tothe portal with the Single Sign-on service at the ONLYOFFICE authentication page.
4. Now you need to create a certificate in the SP Certificates section. To do that, clickthe Add certificate button in the corresponding section.
5. In the opened modal window, click the Generate New Self-Signed Certificate link,choose the signing and encrypt option in the Use for list. Before you save thecertificate, copy the Public Certificate text to the clipboard (it will be necessary forOneLogin), then click the OK button.
6. You should get nearly the same result:7. It is not necessary to adjust the Attribute Mapping form, since we specified the
same parameters when creating OneLogin IdP. The following values are used:
First Name givenNameLast Name snEmail mailLocation lTitle titlePhone mobile
In the Advanced Settings section, you can check the Hide auth page option to hidedefault authentication page and automatically redirect to SSO service.
8. Click the Save button. The ONLYOFFICE SP Metadata section should be opened.Verify that our settings are publicly available by clicking the Download SP MetadataXML button. The XML file contents should be displayed.
9. Return to OneLogin to set up encryption, open your application and go tothe Configuration setting. Scroll down the page - the new SAML Encryption field forentering an encryption key should appear. Paste the copied Public Certificate textfrom the step 4 of this instruction into this field and click the Save button:

Creating users in OneLogin and giving them access toONLYOFFICETo create users in OneLogin and provide them access to our ONLYOFFICE SP, perform thefollowing steps:
1. go to the OneLogin All Users page signing in as an administrator,2. create a new user or edit an existing one,3. go to the Applications submenu and click the + button,4. select our newly created application from the list and click CONTINUE,5. in a new window that opens add the missing data and click the SAVE button,6. now the user is able to work in ONLYOFFICE SP.
Checking the work of the ONLYOFFICE SP with theOneLogin IdPLogging in to ONLYOFFICE on the SP side1. Go to the ONLYOFFICE Authentication page (e.g., https://myportal-
address.com/Auth.aspx).2. Click the Single sign-on button (the caption may differ if you have specified your own
text when configuring ONLYOFFICE SP). If the button is missing, this means that SSO isnot enabled.
3. If all the SP and IdP parameters are set correctly, we will be redirected to the OneLoginIdP login form:
4. Enter the login and password of the user who has been granted access to theONLYOFFICE SP and click the LOG IN button.
5. If the credentials are correct, we will be redirected to the main page of the portal (theuser will be created automatically if missing, or the data will be updated if changed inthe IDP).
Logging out from ONLYOFFICE SP1. An SSO user can log out from the ONLYOFFICE portal using the Sign Outmenu. The
user should also be automatically logged out from the OneLogin IdP in case he/she islogged out from all other applications that he/she has been granted access to inOneLogin and that he/she previously signed in to.
2. If you signed out successfully, you will be redirected to the portal authentication page.3. If you click the Single Sign-on button once again, you will be redirected to the OneLogin
login page again (this means that you successfully logged out from the portal):
Profiles for users added with SSO authenticationThe possibility to edit user profiles created using the SSO authentication is restricted. The userprofile fields received from the IdP are disabled for editing (i.e. First Name, LastName, Email, Title and Location). You can edit these fields from your IdP account only.
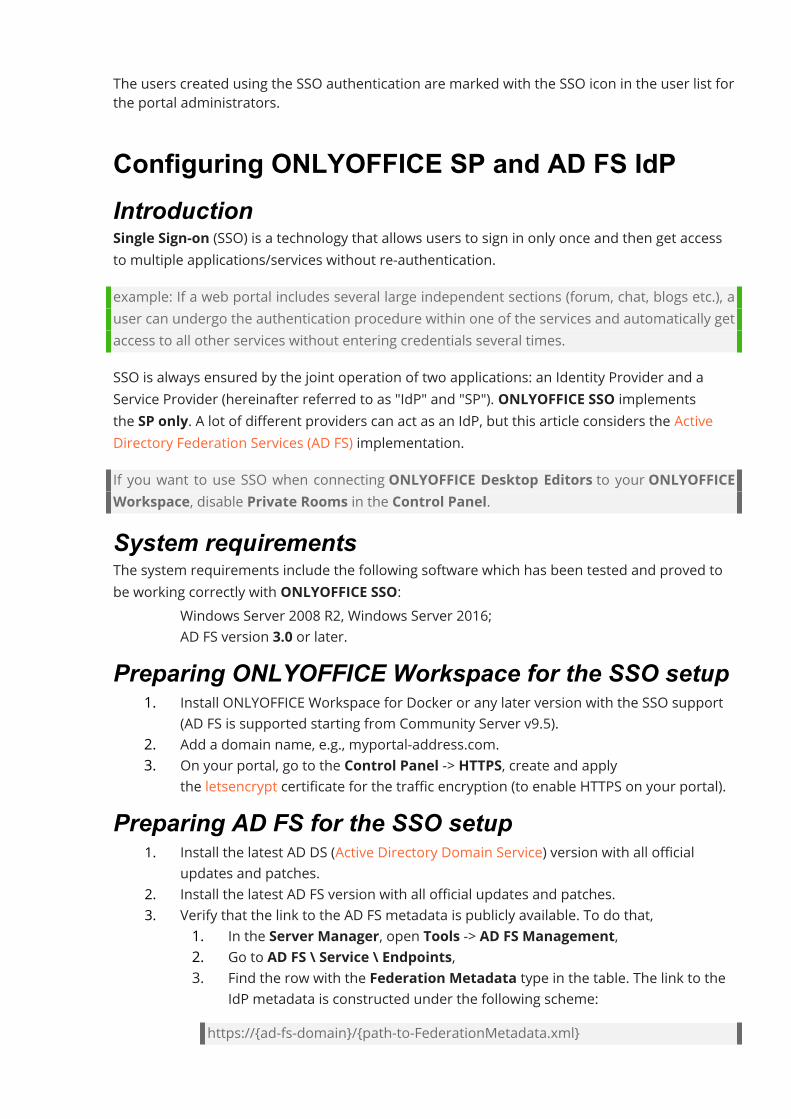
The users created using the SSO authentication are marked with the SSO icon in the user list forthe portal administrators.
Configuring ONLYOFFICE SP and AD FS IdPIntroductionSingle Sign-on (SSO) is a technology that allows users to sign in only once and then get accessto multiple applications/services without re-authentication.example: If a web portal includes several large independent sections (forum, chat, blogs etc.), auser can undergo the authentication procedure within one of the services and automatically getaccess to all other services without entering credentials several times.SSO is always ensured by the joint operation of two applications: an Identity Provider and aService Provider (hereinafter referred to as "IdP" and "SP"). ONLYOFFICE SSO implementsthe SP only. A lot of different providers can act as an IdP, but this article considers the ActiveDirectory Federation Services (AD FS) implementation.If you want to use SSO when connecting ONLYOFFICE Desktop Editors to your ONLYOFFICEWorkspace, disable Private Rooms in the Control Panel.System requirementsThe system requirements include the following software which has been tested and proved tobe working correctly with ONLYOFFICE SSO:
· Windows Server 2008 R2, Windows Server 2016;· AD FS version 3.0 or later.
Preparing ONLYOFFICE Workspace for the SSO setup1. Install ONLYOFFICE Workspace for Docker or any later version with the SSO support
(AD FS is supported starting from Community Server v9.5).2. Add a domain name, e.g., myportal-address.com.3. On your portal, go to the Control Panel -> HTTPS, create and apply
the letsencrypt certificate for the traffic encryption (to enable HTTPS on your portal).Preparing AD FS for the SSO setup
1. Install the latest AD DS (Active Directory Domain Service) version with all officialupdates and patches.
2. Install the latest AD FS version with all official updates and patches.3. Verify that the link to the AD FS metadata is publicly available. To do that,
1. In the Server Manager, open Tools -> AD FS Management,2. Go to AD FS \ Service \ Endpoints,3. Find the row with the Federation Metadata type in the table. The link to the
IdP metadata is constructed under the following scheme:https://{ad-fs-domain}/{path-to-FederationMetadata.xml}
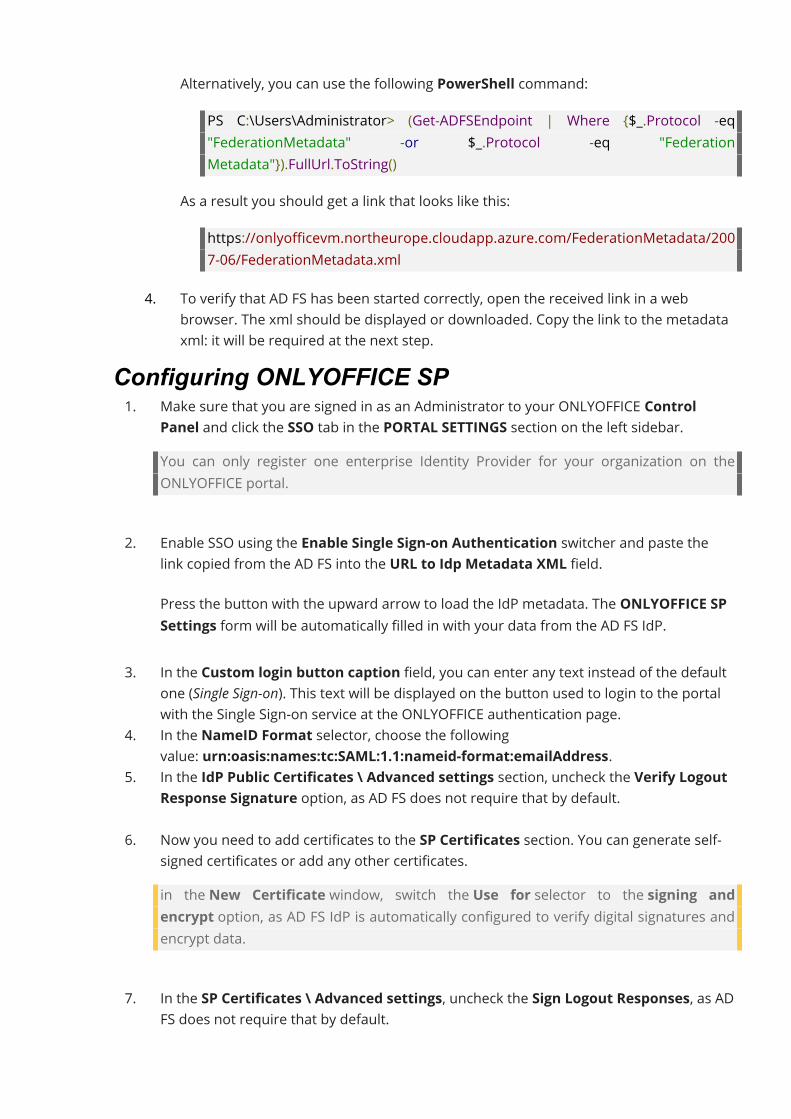
Alternatively, you can use the following PowerShell command:PS C:\Users\Administrator> (Get-ADFSEndpoint | Where {$_.Protocol -eq"FederationMetadata" -or $_.Protocol -eq "FederationMetadata"}).FullUrl.ToString()
As a result you should get a link that looks like this:https://onlyofficevm.northeurope.cloudapp.azure.com/FederationMetadata/2007-06/FederationMetadata.xml
4. To verify that AD FS has been started correctly, open the received link in a webbrowser. The xml should be displayed or downloaded. Copy the link to the metadataxml: it will be required at the next step.
Configuring ONLYOFFICE SP1. Make sure that you are signed in as an Administrator to your ONLYOFFICE Control
Panel and click the SSO tab in the PORTAL SETTINGS section on the left sidebar.You can only register one enterprise Identity Provider for your organization on theONLYOFFICE portal.
2. Enable SSO using the Enable Single Sign-on Authentication switcher and paste thelink copied from the AD FS into the URL to Idp Metadata XML field.Press the button with the upward arrow to load the IdP metadata. The ONLYOFFICE SPSettings form will be automatically filled in with your data from the AD FS IdP.
3. In the Custom login button caption field, you can enter any text instead of the defaultone (Single Sign-on). This text will be displayed on the button used to login to the portalwith the Single Sign-on service at the ONLYOFFICE authentication page.
4. In the NameID Format selector, choose the followingvalue: urn:oasis:names:tc:SAML:1.1:nameid-format:emailAddress.
5. In the IdP Public Certificates \ Advanced settings section, uncheck the Verify LogoutResponse Signature option, as AD FS does not require that by default.
6. Now you need to add certificates to the SP Certificates section. You can generate self-signed certificates or add any other certificates.in the New Certificate window, switch the Use for selector to the signing andencrypt option, as AD FS IdP is automatically configured to verify digital signatures andencrypt data.
7. In the SP Certificates \ Advanced settings, uncheck the Sign Logout Responses, as ADFS does not require that by default.
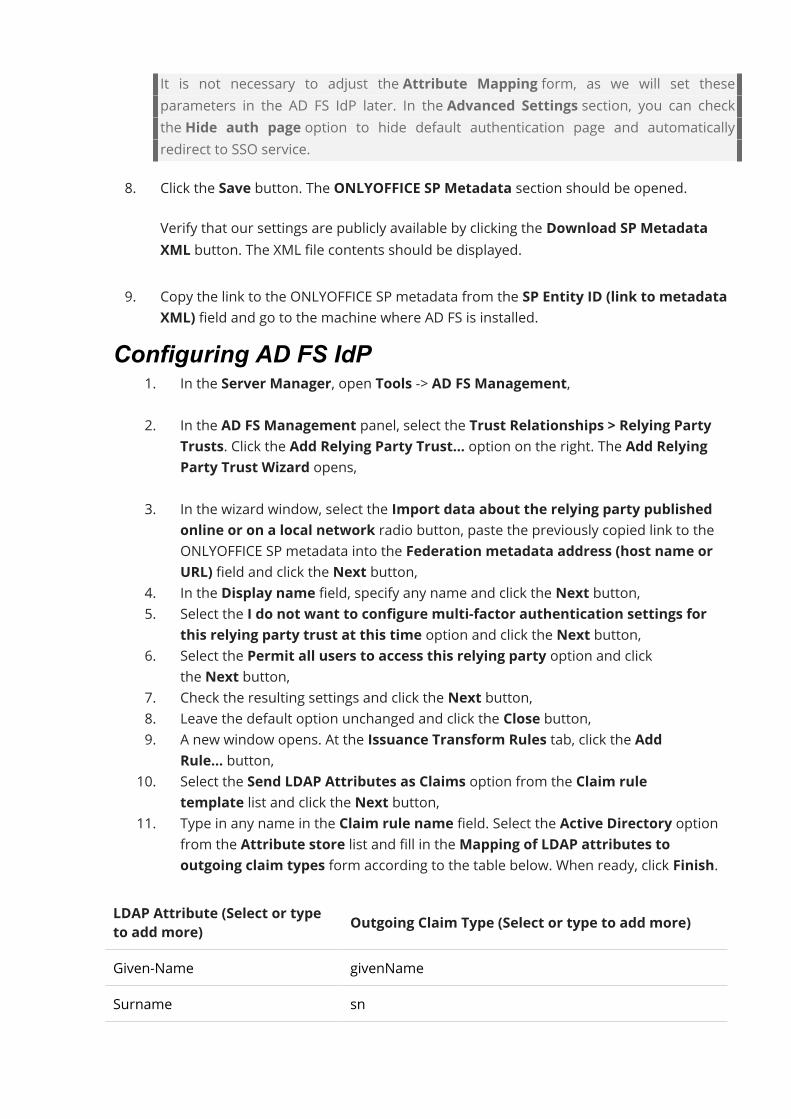
It is not necessary to adjust the Attribute Mapping form, as we will set theseparameters in the AD FS IdP later. In the Advanced Settings section, you can checkthe Hide auth page option to hide default authentication page and automaticallyredirect to SSO service.
8. Click the Save button. The ONLYOFFICE SP Metadata section should be opened.Verify that our settings are publicly available by clicking the Download SP MetadataXML button. The XML file contents should be displayed.
9. Copy the link to the ONLYOFFICE SP metadata from the SP Entity ID (link to metadataXML) field and go to the machine where AD FS is installed.
Configuring AD FS IdP1. In the Server Manager, open Tools -> AD FS Management,2. In the AD FS Management panel, select the Trust Relationships > Relying Party
Trusts. Click the Add Relying Party Trust... option on the right. The Add RelyingParty Trust Wizard opens,
3. In the wizard window, select the Import data about the relying party publishedonline or on a local network radio button, paste the previously copied link to theONLYOFFICE SP metadata into the Federation metadata address (host name orURL) field and click the Next button,
4. In the Display name field, specify any name and click the Next button,5. Select the I do not want to configure multi-factor authentication settings for
this relying party trust at this time option and click the Next button,6. Select the Permit all users to access this relying party option and click
the Next button,7. Check the resulting settings and click the Next button,8. Leave the default option unchanged and click the Close button,9. A new window opens. At the Issuance Transform Rules tab, click the Add
Rule... button,10. Select the Send LDAP Attributes as Claims option from the Claim rule
template list and click the Next button,11. Type in any name in the Claim rule name field. Select the Active Directory option
from the Attribute store list and fill in theMapping of LDAP attributes tooutgoing claim types form according to the table below. When ready, click Finish.
LDAP Attribute (Select or typeto add more) Outgoing Claim Type (Select or type to add more)Given-Name givenNameSurname sn
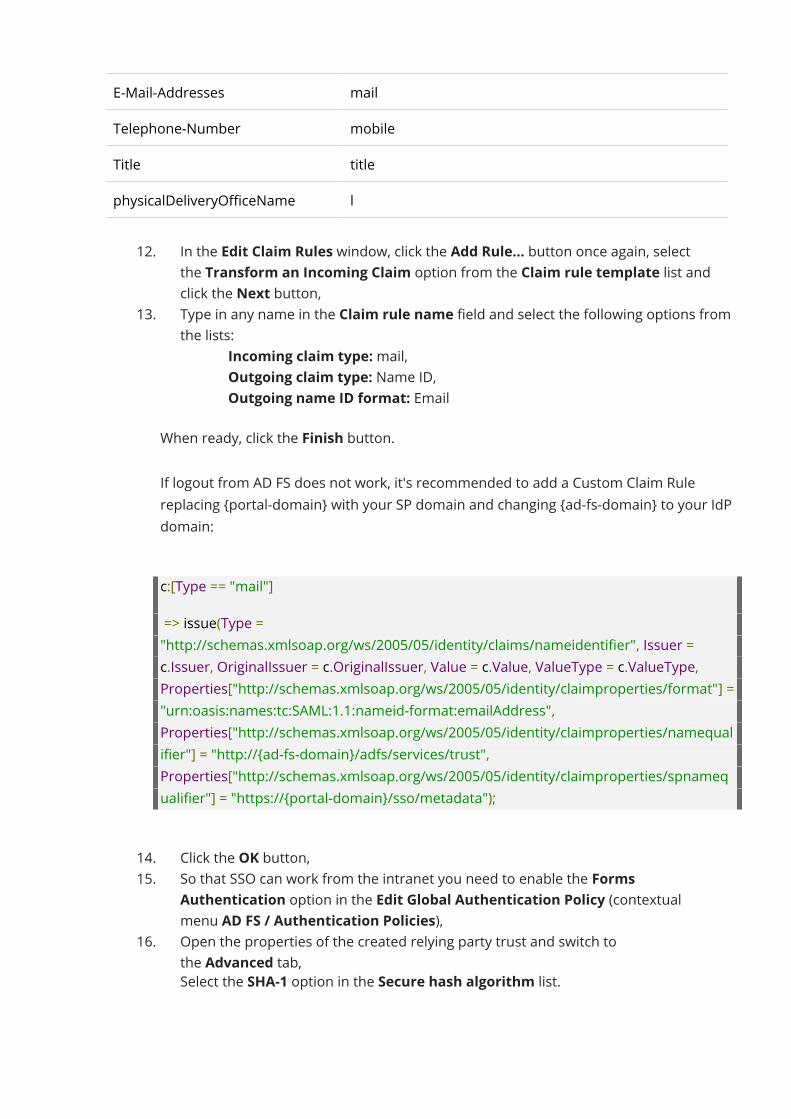
E-Mail-Addresses mailTelephone-Number mobileTitle titlephysicalDeliveryOfficeName l
12. In the Edit Claim Rules window, click the Add Rule... button once again, selectthe Transform an Incoming Claim option from the Claim rule template list andclick the Next button,
13. Type in any name in the Claim rule name field and select the following options fromthe lists:
o Incoming claim type:mail,o Outgoing claim type: Name ID,o Outgoing name ID format: Email
When ready, click the Finish button.If logout from AD FS does not work, it's recommended to add a Custom Claim Rulereplacing {portal-domain} with your SP domain and changing {ad-fs-domain} to your IdPdomain:
c:[Type == "mail"]=> issue(Type ="http://schemas.xmlsoap.org/ws/2005/05/identity/claims/nameidentifier", Issuer =c.Issuer, OriginalIssuer = c.OriginalIssuer, Value = c.Value, ValueType = c.ValueType,Properties["http://schemas.xmlsoap.org/ws/2005/05/identity/claimproperties/format"] ="urn:oasis:names:tc:SAML:1.1:nameid-format:emailAddress",Properties["http://schemas.xmlsoap.org/ws/2005/05/identity/claimproperties/namequalifier"] = "http://{ad-fs-domain}/adfs/services/trust",Properties["http://schemas.xmlsoap.org/ws/2005/05/identity/claimproperties/spnamequalifier"] = "https://{portal-domain}/sso/metadata");
14. Click the OK button,15. So that SSO can work from the intranet you need to enable the Forms
Authentication option in the Edit Global Authentication Policy (contextualmenu AD FS / Authentication Policies),
16. Open the properties of the created relying party trust and switch tothe Advanced tab,Select the SHA-1 option in the Secure hash algorithm list.
Checking the work of the ONLYOFFICE SP with theAD FS IdPLogging in to ONLYOFFICE on the SP side
1. Go to the ONLYOFFICE Authentication page (e.g., https://myportal-address.com/auth.aspx).
2. Click the Single sign-on button (the caption may differ if you have specified your owntext when configuring ONLYOFFICE SP). If the button is missing, this means that SSOis not enabled.
3. If all the SP and IdP parameters are set correctly, we will be redirected to the AD FSIdP login form.
4. Enter the login and password of the AD FS IdP account and click the Sign in button.5. If the credentials are correct, we will be redirected to the main page of the portal (the
user will be created automatically if missing, or the data will be updated if changed inthe IDP).
Profiles for users added with SSO authenticationThe possibility to edit user profiles created using the SSO authentication is restricted. The userprofile fields received from the IdP are disabled for editing (i.e. First Name, LastName, Email, Title and Location). You can edit these fields from your IdP account only.The users created using the SSO authentication are marked with the SSO icon in the user list forthe portal administrators.Branding your online officeWith the Branding feature provided by the Control Panel, you can easily replace brandingelements used in the online office interface and customize the look of the portal according toyour company brand:
· use your company name in the text elements, such as tooltips, message boxes etc.,· replace the default favicon and logos with your own logo,· change the information displayed in the About this program window,· hide or show links to external resources, such as Feedback and Support form, Help
Center etc.Branding settings can be applied to all portals or to the current portal only.To access Control Panel, sign in to your portal and click the 'Control Panel' link on the StartPage. Alternatively, you can go to the portal 'Settings' and click the 'Control Panel' link on theleft-side panel.Changing branding elements for all portalsThe COMMON SETTINGS section allows you to change settings for all your portals.
Open the Branding page in the COMMON SETTINGS section on the left sidebar. You canchange basic and advanced branding settings.Changing basic branding settingsThe BASIC tab is opened by default. Here you can change the company name and replacelogos.1. Enter your Company name in the text entry field to change all the titles and messages
in the online office interface where the default value is used replacing it with the oneyou specified. Click the USE AS LOGO button to the right of the entry field if you want touse your company name as a text logo (instead of an image logo) - all the logos belowwill change correspondingly.
2. Replace all the image Logos which appear in the online office:We recommended that you use images in the PNG format with a transparentbackground. To improve your logos legibility and make their outline clearlydistinguishable, you also need to optimize them for use on dark or light backgrounds.The image sizes must strictly correspond to the sizes specified next to each logo.· Logo for the editor headers (172x40) (available for the paid server version only) -
this logo appears in the upper left corner of the online editors launched.· Logo for the portal header (284x46) - this logo appears in the upper left corner of
every portal page.· Logo for the About/Login page and editor embedded mode (432x70) - this logo
appears on the Sign In page of the portal, the About page (user profile -> About thisprogram) and in the upper left corner of your portal documents embedded into webpages.
· Favicon (32x32) - this logo appears in the address bar or tab of a web browser whenthe portal is opened in it, or on the bookmarks panel if you've added the portaladdress to the bookmarks.
Click the CHANGE button to the right of the logo you want to replace. In the window thatopens, browse for the necessary image file and click the Open button. The image will beloaded and displayed in the corresponding Logo field.
3. click the SAVE button at the bottom of the page to make the parameters you set takeeffect.
To return to the default settings, click the RESTORE DEFAULT button.Changing advanced branding settingsSwitch to the ADVANCED tab of the Branding page in the COMMON SETTINGS section. Hereyou can change the information displayed in the About this program window and hide links toexternal resources.

The Company info settings section is used to specify your company information displayed inthe About this program window.
1. Enter your company name, email address, phone number, website URLaddress and postal address into the corresponding fields.
2. Click the SAVE button at the bottom of this section.The Additional resources section is used to choose if you want to display links to additionalresources in all portal modules and sample documents in the Documentsmodule.
1. Uncheck the elements you want to hide and leave checked the ones you want todisplay:
· Show Feedback & Support link - is used to hide or show the link to the Feedbackand Support form which is used to contact ONLYOFFICE support team.
· Show sample documents - is used to hide or show sample documents inthe Documentsmodule.
· Show link to Video Guides - is used to hide or show the link to the web pagecontaining training videos.
· Show link to Help Center - is used to hide or show the link to the Help Centerpage.
2. Click the SAVE button at the bottom of this section.Changing branding elements for the current portalThe PORTAL SETTINGS section allows you to change settings for the current portal only.Switch to the Control Panel within the necessary portal and open the Branding page inthe PORTAL SETTINGS section on the left sidebar.Here you can change basic branding settings for your current portal. The settings are similar tothose contained in the BASIC settings tab within the COMMON SETTINGS section. Advancedbranding settings are not available for the current portal and can be changed for all portalsonly.
Tracking login historyIntroductionThe Login History section of the Control Panel is used to monitor the latest user login activityincluding successful logins and failed attempts with an indication of reasons.

To access Control Panel, sign in to your portal and click the 'Control Panel' link on the StartPage. Alternatively, you can go to the portal 'Settings' and click the 'Control Panel' link on theleft-side panel.Viewing login historySwitch to the Control Panel within the necessary portal and open the Login History page inthe PORTAL SETTINGS section on the left sidebar.This page displays only the last 20 records. Each record shows which action took place, whoperformed it and when the event occurred. You can also set the period to store the data. Bydefault, it is set to 180 days.To view the detailed statistics for the latest half year click the Download and openreport button. The report will open in an .xlsx spreadsheet (LoginHistory_ReportStartDate-EndDate.xlsx).The file will also be automatically saved to theMy documents section.The login history report includes the following details:user IP address, Browser and Platform which were being used when the registered eventoccurred, Date and time of the event, name of the User who made an attempt to log in/log out,portal Page where the action has been performed, specific Action (for example, Login Fail.Associated Social Account Not Found).The records are sorted chronologically in descending order, but you can easily sort andfilter the data by any parameter or use the search tool to quickly find a specific record.In the Online Users section, you can also view the list of the users who are currently logged inas well as each online user session duration.
Receiving audit trail dataIntroductionThe Audit Trail section of the Control Panel allows you to browse through the list of the latestchanges (creation, modification, deletion etc.) made by users to the entities (tasks,opportunities, files etc.) on your portal.To access Control Panel, sign in to your portal and click the 'Control Panel' link on the StartPage. Alternatively, you can go to the portal 'Settings' and click the 'Control Panel' link on theleft-side panel.
Viewing audit trail dataSwitch to the Control Panel within the necessary portal and open the Audit Trail page inthe PORTAL SETTINGS section on the left sidebar.This feature is currently available for the Common section ofthe Documentsmodule, Projects, CRM and Peoplemodules, as well as for portal settings.This page displays only the last 20 records. Each record shows which action took place, whoperformed it and when the event occurred. You can also set the period to store the data. Bydefault, it is set to 180 days.To view the detailed statistics for the latest half year click the Download and openreport button. The report will open in an .xlsx spreadsheet (AuditTrail_ReportStartDate-EndDate.xlsx).The file will also be automatically saved to theMy documents section.The audit trail report includes the following details:user IP address, Browser and Platform which were being used when the registered eventoccurred, Date and time of the event, name of the User who performed the operation,portal Page where the action has been performed, generic Action Type (forexample, download, attach, updated access), specific Action (for example, Projects [Productdevelopment and promotion]. Tasks [Distribute coupons]. Status Updated:Closed ), Product andModule that the changed entity is referred to.The records are sorted chronologically in descending order, but you can easily sort andfilter the data by any parameter or use the search tool to quickly find a specific record.
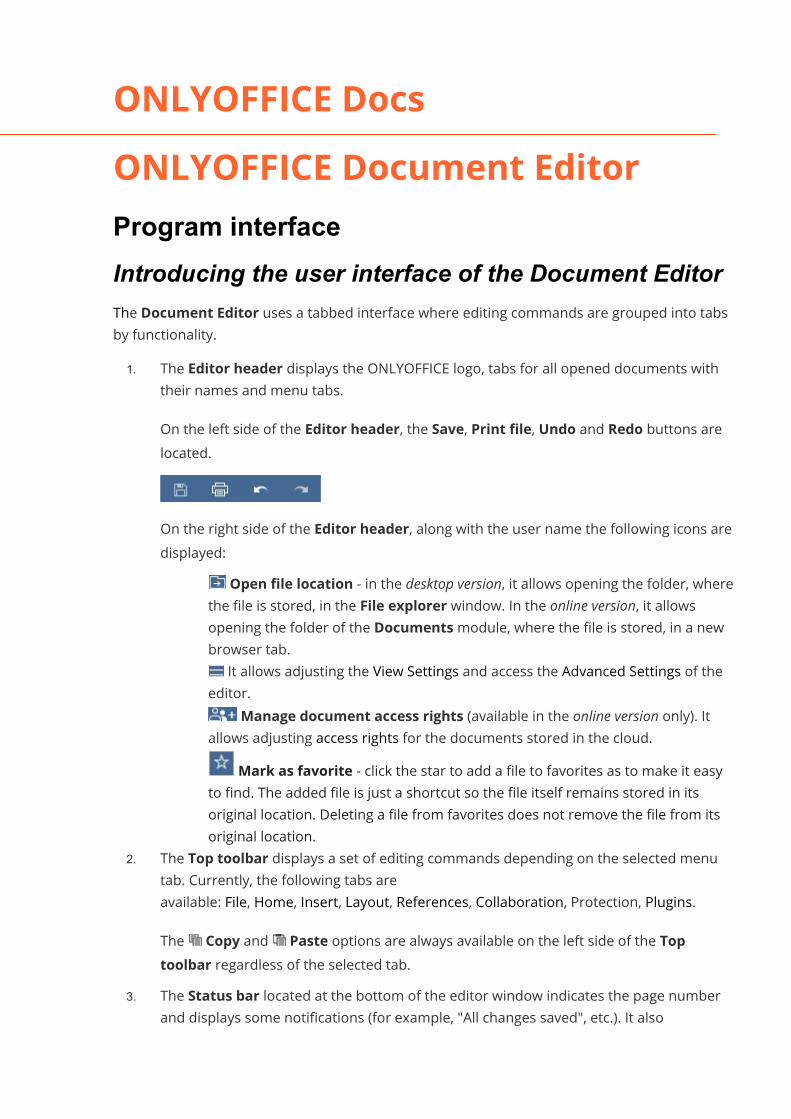
ONLYOFFICE DocsONLYOFFICE Document EditorProgram interfaceIntroducing the user interface of the Document EditorThe Document Editor uses a tabbed interface where editing commands are grouped into tabsby functionality.1. The Editor header displays the ONLYOFFICE logo, tabs for all opened documents with
their names and menu tabs.On the left side of the Editor header, the Save, Print file, Undo and Redo buttons arelocated.
On the right side of the Editor header, along with the user name the following icons aredisplayed:
· Open file location - in the desktop version, it allows opening the folder, wherethe file is stored, in the File explorer window. In the online version, it allowsopening the folder of the Documentsmodule, where the file is stored, in a newbrowser tab.
· It allows adjusting the View Settings and access the Advanced Settings of theeditor.
· Manage document access rights (available in the online version only). Itallows adjusting access rights for the documents stored in the cloud.
· Mark as favorite - click the star to add a file to favorites as to make it easyto find. The added file is just a shortcut so the file itself remains stored in itsoriginal location. Deleting a file from favorites does not remove the file from itsoriginal location.
2. The Top toolbar displays a set of editing commands depending on the selected menutab. Currently, the following tabs areavailable: File, Home, Insert, Layout, References, Collaboration, Protection, Plugins.The Copy and Paste options are always available on the left side of the Toptoolbar regardless of the selected tab.
3. The Status bar located at the bottom of the editor window indicates the page numberand displays some notifications (for example, "All changes saved", etc.). It also
allows setting the text language, enabling spell checking, turning on the track changesmode and adjusting zoom.
4. The Left sidebar contains the following icons:· - allows using the Search and Replace tool,· - allows opening the Comments panel,· - allows going to the Navigation panel and managing headings,· - (available in the online version only) allows opening the Chat panel,· - (available in the online version only) allows to contact our support team,· - (available in the online version only) allows to view the information about the
program.5. Right sidebar sidebar allows adjusting additional parameters of different objects. When
you select a particular object in the text, the corresponding icon is activated onthe Right sidebar. Click this icon to expand the Right sidebar.
6. The horizontal and vertical Rulersmake it possible to align the text and other elementsin the document, set up margins, tab stops and paragraph indents.
7. Working area allows to view document content, enter and edit data.8. Scroll bar on the right allows to scroll up and down multi-page documents.
For your convenience, you can hide some components and display them again when themwhen necessary. To learn more about adjusting view settings, please refer to this page.
File tabThe File tab allows performing some basic operations.With this tab, you can use the following options:
· in the online version: save the current file (in case the Autosave option is disabled), saveit in the required format on the hard disk drive of your computer with the Downloadas option, save a copy of the file in the selected format to the portal documents withthe Save copy as option, print or rename the current file. in the desktop version: save thecurrent file without changing its format and location using the Save option, save itchanging its name, location or format using the Save as option or print the current file.
· protect the file using a password, change or remove the password (available inthe desktop version only);
· create a new document or open a recently edited one (available in the onlineversion only),
· view general information about the document or change some file properties,· manage access rights (available in the online version only),· track version history (available in the online version only),· access the Advanced Settings of the editor,· in the desktop version, open the folder, where the file is stored, in the File
explorer window. In the online version, open the folder of the Documentsmodule,where the file is stored, in a new browser tab.
Home tabThe Home tab appears by default when you open a document. It also allows formating fontsand paragraphs. Some other options are also available here, such asMail Merge and colorschemes.Using this tab, you can:
· adjust the font type, its size and color,· apply font decoration styles,· select a background color for a paragraph,· create bulleted and numbered lists,· change paragraph indents,· set paragraph line spacing,· align your text in a paragraph,· show/hide non-printing characters,· copy/clear text formatting,· change the color scheme,· useMail Merge (available in the online version only),· manage styles.
Insert tabThe Insert tab allows adding some page formatting elements as well as visual objects andcomments.Using this tab, you can:
· insert a blank page,· insert page breaks, section breaks and column breaks,· insert tables, images, charts, shapes,· insert hyperlinks, comments,· insert headers and footers, page numbers, date & time,· insert text boxes and Text Art objects, equations, symbols, drop caps, contentcontrols.
Layout tabThe Layout tab allows changing the appearance of a document: setting up page parametersand defining the arrangement of visual elements.Using this tab, you can:
· adjust pagemargins, orientation and size,· add columns,
· insert page breaks, section breaks and column breaks,· insert line numbers,· align and arrange objects (tables, pictures, charts, shapes),· change the wrapping style and edit wrap boundary,· add a watermark.
References tabThe References tab allows managing different types of references: adding and refreshingtables of contents, creating and editing footnotes, inserting hyperlinks.Using this tab, you can:
· create and automatically update a table of contents,· insert footnotes and endnotes,· insert hyperlinks,· add bookmarks.· add captions,· insert cross-references,· create a table of figures.
Collaboration tabThe Collaboration tab allows collaborating on documents. In the online version, you can sharethe file, select the required co-editing mode, manage comments, track changes made by areviewer, view all versions and revisions. In the commenting mode, you can add and removecomments, navigate between the tracked changes, use the built-in chat and view the versionhistory. In the desktop version, you can manage comments and use the Track Changes feature.Using this tab, you can:
· specify the sharing settings (available in the online version only),· switch between the Strict and Fast co-editing modes (available in the online
version only),· add or remove comments to the document,· enable the Track Changes feature,· choose the changes display mode,· manage the suggested changes,· load a document for comparison (available in the online version only),· open the Chat panel (available in the online version only),· track the version history (available in the online version only).
Plugins tabThe Plugins tab allows accessing the advanced editing features using the available third-partycomponents. This tab also makes it possible to use macros to simplify routine operations.The Settings button allows viewing and managing all the installed plugins as well as addingnew ones.TheMacros button allows you to create and run your own macros. To learn more aboutmacros, please refer to our API Documentation.Currently, the following plugins are available by default:
· Send allows to send the document via email using the default desktop mail client(available in the desktop version only),
· Highlight code allows to highlight syntax of the code selecting the necessarylanguage, style, background color,
· OCR allows to recognize text included into a picture and insert it into the documenttext,
· Photo Editor allows to edit images: crop, flip, rotate them, draw lines and shapes,add icons and text, load a mask and apply filters such as Grayscale, Invert, Sepia,Blur, Sharpen, Emboss, etc.,
· Speech allows to convert the selected text into speech (available in the onlineversion only),
· Thesaurus allows to search for synonyms and antonyms of a word and replace itwith the selected one,
· Translator allows to translate the selected text into other languages,Note: this plugin doesn't work in Internet Explorer.
· YouTube allows to embed YouTube videos into your document,· Mendeley allows to manage research papers and generate bibliographies for scholarly
articles (available in the online version only),· Zotero allows to manage bibliographic data and related research materials (available in
the online version only),· EasyBib helps to find and insert related books, journal articles and websites (available in
the online version only).TheWordpress and EasyBib plugins can be used if you connect the corresponding services inyour portal settings. You can use the following instructions for the server version or for theSaaS version.
Basic operationsCreate a new document or open an existing oneTo create a new documentIn the online editor1. click the File tab on the top toolbar,2. select the Create New option.
In the desktop editor1. in the main program window, select the Documentmenu item from the Create
new section on the left sidebar - a new file will open in a new tab,2. when all the necessary changes are made, click the Save icon in the upper left corner
or switch to the File tab and choose the Save asmenu item.3. in the file manager window, select the file location, specify its name, choose the
required format for saving (DOCX, Document template (DOTX), ODT, OTT, RTF, TXT, PDFor PDFA) and click the Save button.
To open an existing documentIn the desktop editor1. in the main program window, select the Open local filemenu item on the left sidebar,2. choose the required document from the file manager window and click
the Open button.You can also right-click the required document in the file manager window, select the Openwith option and choose the necessary application from the menu. If text documents areassociated with the application you need, you can also open them by double-clicking the filename in the file explorer window.All the directories that you have navigated through using the desktop editor will be displayed inthe Recent folders list so that you can quickly access them afterwards. Click the required folderto select one of the files stored there.To open a recently edited documentIn the online editor1. click the File tab on the top toolbar,2. select the Open Recent... option,3. choose the document you need from the list of recently edited documents.
In the desktop editor1. in the main program window, select the Recent filesmenu item on the left sidebar,
2. choose the document you need from the list of recently edited documents.To open the folder, where the file is stored, in a new browser tab in the online editor in the fileexplorer window in the desktop editor, click the Open file location icon on the right side ofthe editor header. Alternatively, you can switch to the File tab on the top toolbar and selectthe Open file location option.
Copy/paste text passages, undo/redo your actionsUse basic clipboard operationsTo cut, copy and paste text passages and inserted objects (autoshapes, images, charts) in thecurrent document, select the corresponding options from the right-click menu or click the iconslocated on any tab of the top toolbar:
· Cut – select a text fragment or an object and use the Cut option from the right-clickmenu to delete the selected text and send it to the computer clipboard memory. The cuttext can be later inserted to another place in the same document.
· Copy – select a text fragment or an object and use the Copy option from the right-clickmenu, or the Copy icon on the top toolbar to copy the selected text to the computerclipboard memory. The copied text can be later inserted to another place in the samedocument.
· Paste – find the place in your document where you need to paste the previously copiedtext fragment/object and use the the Paste option from the right-click menu, orthe Paste icon on the top toolbar. The copied text/object will be inserted to thecurrent cursor position. The data can be previously copied from the same document.
In the online version, the key combinations below are only used to copy or paste data from/intoanother document or a program. In the desktop version, both corresponding buttons/menuoptions and key combinations can be used for any copy/paste operations:
· Ctrl+X key combination for cutting;· Ctrl+C key combination for copying;· Ctrl+V key combination for pasting.
Note: instead of cutting and pasting text fragments in the same document, you can just selectthe required text passage and drag and drop it to the necessary position.Use the Paste Special featureOnce the copied text is pasted, the Paste Special button appears next to the inserted textpassage. Click this button to select the necessary paste option.When pasting a text paragraph or some text within autoshapes, the following options areavailable:
· Paste - allows pasting the copied text keeping its original formatting.
· Keep text only - allows pasting the text without its original formatting.If you copy a table and paste it into an already existing table, the following options areavailable:
· Overwrite cells - allows replacing the contents of the existing table with the copied data.This option is selected by default.
· Nest table - allows pasting the copied table as a nested table into the selected cell of theexisting table.
· Keep text only - allows pasting the table contents as text values separated by the tabcharacter.
To enable / disable the automatic appearance of the Paste Special button after pasting, go tothe File tab > Advanced Settings... and check / uncheck the Cut, copy and paste checkbox.Undo/redo your actionsTo perform undo/redo operations, click the corresponding icons in the editor header or use thefollowing keyboard shortcuts:
· Undo – use the Undo icon on the left side of the editor header or the Ctrl+Z keycombination to undo the last operation you performed.
· Redo – use the Redo icon on the left part of the editor header or the Ctrl+Y keycombination to redo the last undone operation.
Note: when you co-edit a document in the Fastmode, the possibility to Redo the last undoneoperation is not available.
Change color schemeColor schemes are applied to the whole document. They are used to quickly change theappearance of your document because they define the Theme Colors palette for differentdocument elements (font, background, tables, autoshapes, charts). If you applied some ThemeColors to the document elements and then select a different Color Scheme, the applied colorsin your document will change correspondingly.To change a color scheme, click the downward arrow next to the Change colorscheme icon on the Home tab of the top toolbar and select the required color schemefrom thelist: Office, Grayscale, Apex, Aspect, Civic, Concourse, Equity, Flow, Foundry,Median,Metro,Module, Odulent, Oriel, Origin, Paper, Solstice, Technic, Trek, Urban, Verve. The selectedcolor scheme will be highlighted in the list.
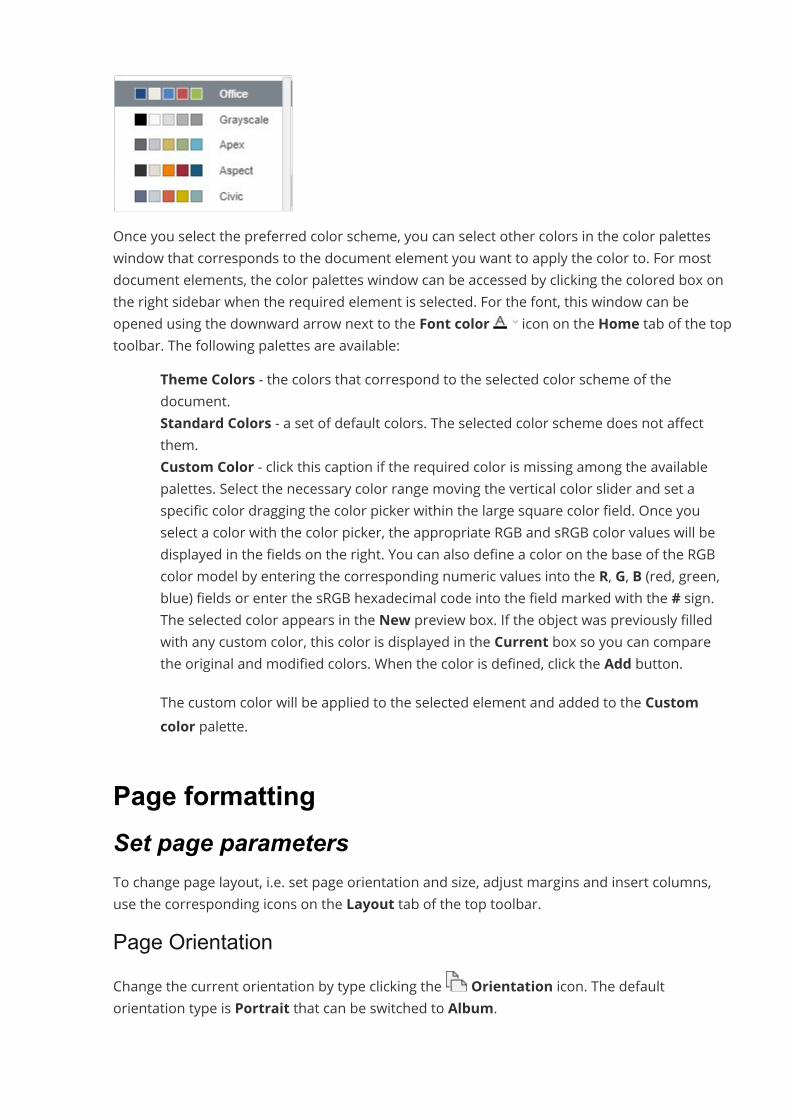
Once you select the preferred color scheme, you can select other colors in the color paletteswindow that corresponds to the document element you want to apply the color to. For mostdocument elements, the color palettes window can be accessed by clicking the colored box onthe right sidebar when the required element is selected. For the font, this window can beopened using the downward arrow next to the Font color icon on the Home tab of the toptoolbar. The following palettes are available:
· Theme Colors - the colors that correspond to the selected color scheme of thedocument.
· Standard Colors - a set of default colors. The selected color scheme does not affectthem.
· Custom Color - click this caption if the required color is missing among the availablepalettes. Select the necessary color range moving the vertical color slider and set aspecific color dragging the color picker within the large square color field. Once youselect a color with the color picker, the appropriate RGB and sRGB color values will bedisplayed in the fields on the right. You can also define a color on the base of the RGBcolor model by entering the corresponding numeric values into the R, G, B (red, green,blue) fields or enter the sRGB hexadecimal code into the field marked with the # sign.The selected color appears in the New preview box. If the object was previously filledwith any custom color, this color is displayed in the Current box so you can comparethe original and modified colors. When the color is defined, click the Add button.The custom color will be applied to the selected element and added to the Customcolor palette.
Page formattingSet page parametersTo change page layout, i.e. set page orientation and size, adjust margins and insert columns,use the corresponding icons on the Layout tab of the top toolbar.Page OrientationChange the current orientation by type clicking the Orientation icon. The defaultorientation type is Portrait that can be switched to Album.
Page SizeChange the default A4 format by clicking the Size icon and selecting the required formatfrom the list. The following preset sizes are available:
· US Letter (21,59cm x 27,94cm)· US Legal (21,59cm x 35,56cm)· A4 (21cm x 29,7cm)· A5 (14,81cm x 20,99cm)· B5 (17,6cm x 25,01cm)· Envelope #10 (10,48cm x 24,13cm)· Envelope DL (11,01cm x 22,01cm)· Tabloid (27,94cm x 43,17cm)· AЗ (29,7cm x 42,01cm)· Tabloid Oversize (30,48cm x 45,71cm)· ROC 16K (19,68cm x 27,3cm)· Envelope Choukei 3 (11,99cm x 23,49cm)· Super B/A3 (33,02cm x 48,25cm)
You can also set a special page size by selecting the Custom Page Size option from the list. ThePage Size window will open where you'll be able to select the required Preset (US Letter, USLegal, A4, A5, B5, Envelope #10, Envelope DL, Tabloid, AЗ, Tabloid Oversize, ROC 16K, EnvelopeChoukei 3, Super B/A3, A0, A1, A2, A6) or set customWidth and Height values. Enter newvalues into the entry fields or adjust the existing values using the arrow buttons. When youfinish, click OK to apply the changes.Page MarginsChange the default margins, i.e. the blank space between the left, right, top and bottom pageedges and the paragraph text, by clicking the Margins icon and selecting one of the availablepresets: Normal, US Normal, Narrow,Moderate,Wide. You can also use the CustomMargins option to set your own values in the Margins window. Enter therequired Top, Bottom, Left and Right page margin values into the entry fields or adjust theexisting values using arrow buttons.Gutter position is used to set up additional space on the left side of the document or at its top.The Gutter option is helpful to make sure that bookbinding does not cover the text. IntheMargins enter the required gutter position into the entry fields and choose where it shouldbe placed in.Note: the Gutter position cannot be used when theMirror margins option is checked.In theMultiple pages drop-down menu, choose theMirror margins option to set up facingpages for double-sided documents. With this option checked, Left and Rightmargins turninto Inside and Outsidemargins respectively.In Orientation drop-down menu choose from Portrait and Landscape options.
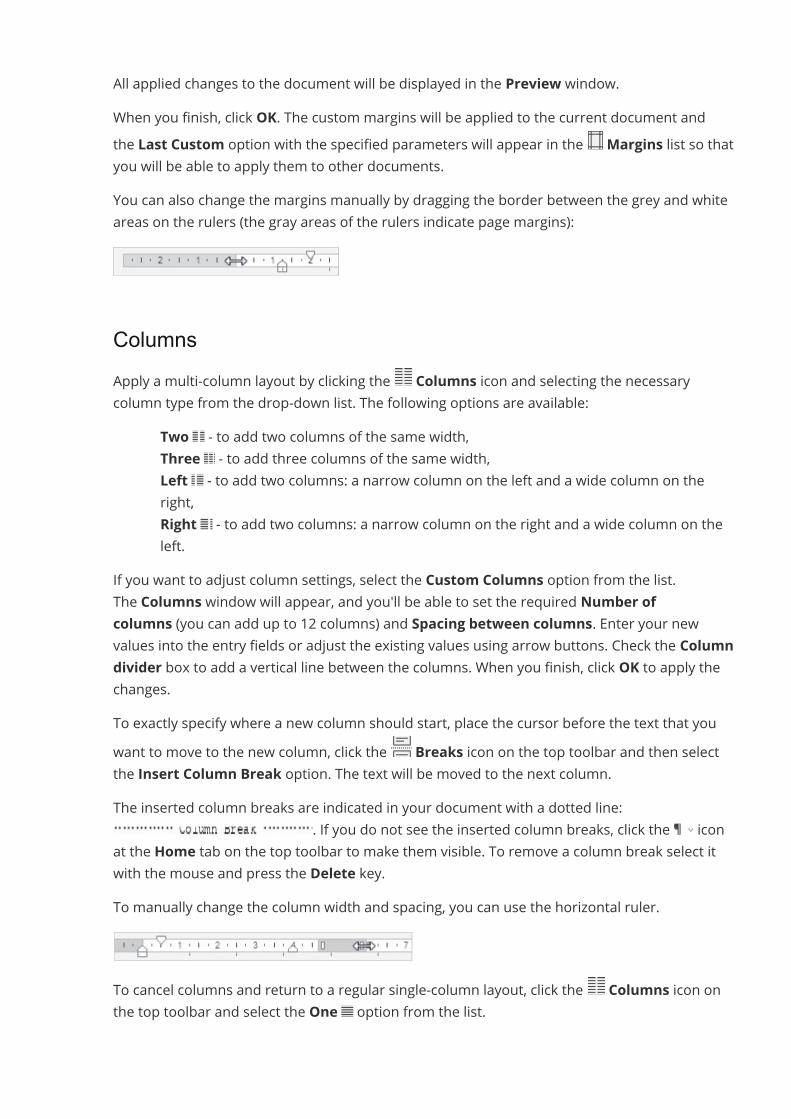
All applied changes to the document will be displayed in the Preview window.When you finish, click OK. The custom margins will be applied to the current document andthe Last Custom option with the specified parameters will appear in the Margins list so thatyou will be able to apply them to other documents.You can also change the margins manually by dragging the border between the grey and whiteareas on the rulers (the gray areas of the rulers indicate page margins):
ColumnsApply a multi-column layout by clicking the Columns icon and selecting the necessarycolumn type from the drop-down list. The following options are available:
· Two - to add two columns of the same width,· Three - to add three columns of the same width,· Left - to add two columns: a narrow column on the left and a wide column on the
right,· Right - to add two columns: a narrow column on the right and a wide column on the
left.If you want to adjust column settings, select the Custom Columns option from the list.The Columns window will appear, and you'll be able to set the required Number ofcolumns (you can add up to 12 columns) and Spacing between columns. Enter your newvalues into the entry fields or adjust the existing values using arrow buttons. Check the Columndivider box to add a vertical line between the columns. When you finish, click OK to apply thechanges.To exactly specify where a new column should start, place the cursor before the text that youwant to move to the new column, click the Breaks icon on the top toolbar and then selectthe Insert Column Break option. The text will be moved to the next column.The inserted column breaks are indicated in your document with a dotted line:
. If you do not see the inserted column breaks, click the iconat the Home tab on the top toolbar to make them visible. To remove a column break select itwith the mouse and press the Delete key.To manually change the column width and spacing, you can use the horizontal ruler.
To cancel columns and return to a regular single-column layout, click the Columns icon onthe top toolbar and select the One option from the list.
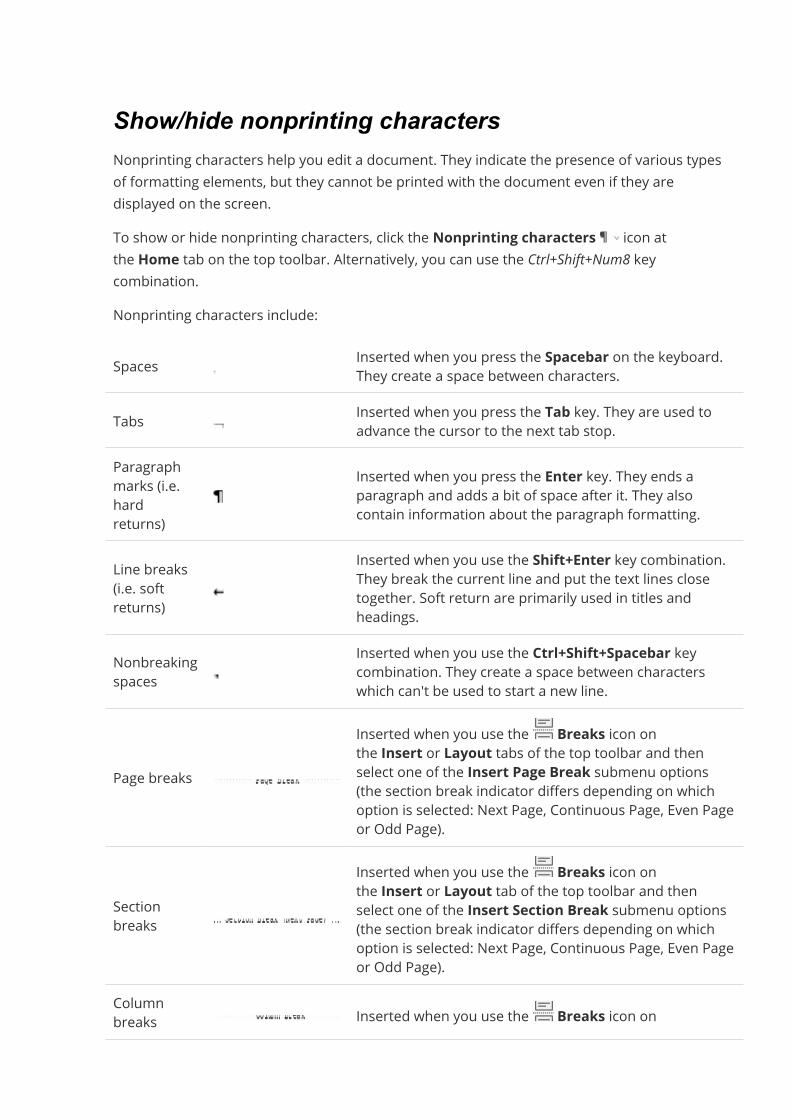
Show/hide nonprinting charactersNonprinting characters help you edit a document. They indicate the presence of various typesof formatting elements, but they cannot be printed with the document even if they aredisplayed on the screen.To show or hide nonprinting characters, click the Nonprinting characters icon atthe Home tab on the top toolbar. Alternatively, you can use the Ctrl+Shift+Num8 keycombination.Nonprinting characters include:
Spaces Inserted when you press the Spacebar on the keyboard.They create a space between characters.
Tabs Inserted when you press the Tab key. They are used toadvance the cursor to the next tab stop.
Paragraphmarks (i.e.hardreturns)
Inserted when you press the Enter key. They ends aparagraph and adds a bit of space after it. They alsocontain information about the paragraph formatting.
Line breaks(i.e. softreturns)
Inserted when you use the Shift+Enter key combination.They break the current line and put the text lines closetogether. Soft return are primarily used in titles andheadings.
Nonbreakingspaces
Inserted when you use the Ctrl+Shift+Spacebar keycombination. They create a space between characterswhich can't be used to start a new line.
Page breaksInserted when you use the Breaks icon onthe Insert or Layout tabs of the top toolbar and thenselect one of the Insert Page Break submenu options(the section break indicator differs depending on whichoption is selected: Next Page, Continuous Page, Even Pageor Odd Page).
Sectionbreaks
Inserted when you use the Breaks icon onthe Insert or Layout tab of the top toolbar and thenselect one of the Insert Section Break submenu options(the section break indicator differs depending on whichoption is selected: Next Page, Continuous Page, Even Pageor Odd Page).
Columnbreaks Inserted when you use the Breaks icon on
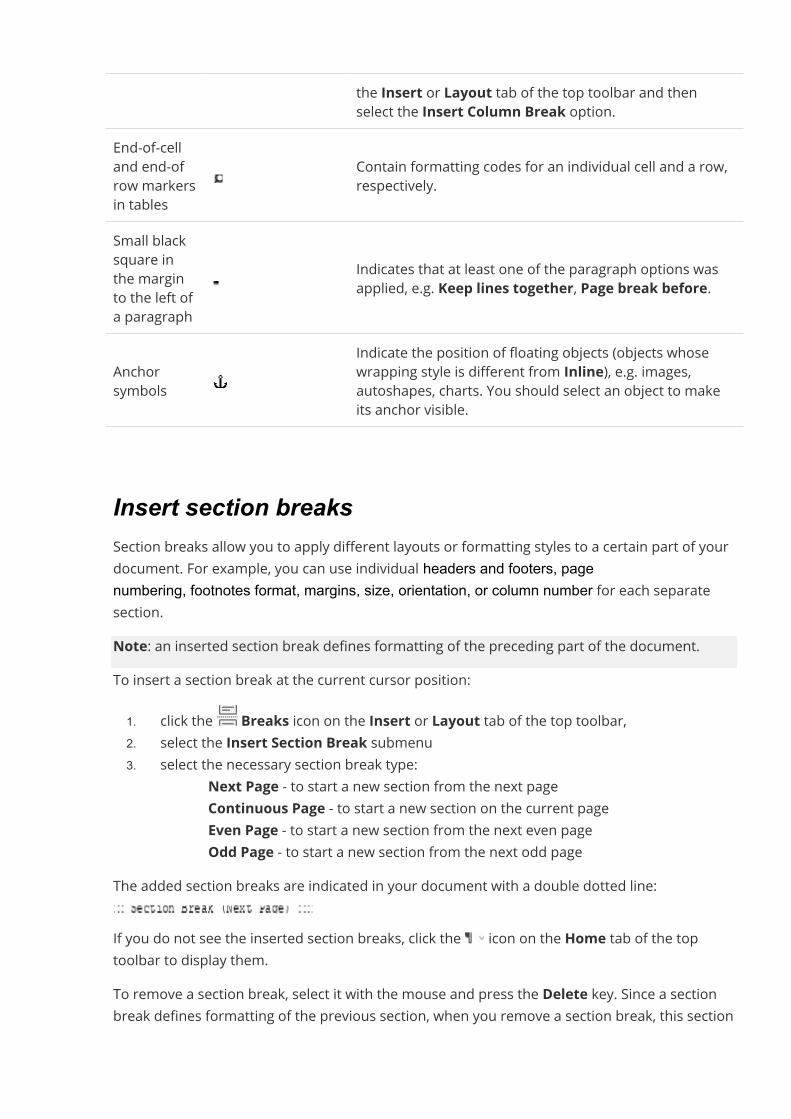
the Insert or Layout tab of the top toolbar and thenselect the Insert Column Break option.
End-of-celland end-ofrow markersin tables
Contain formatting codes for an individual cell and a row,respectively.
Small blacksquare inthe marginto the left ofa paragraph
Indicates that at least one of the paragraph options wasapplied, e.g. Keep lines together, Page break before.
Anchorsymbols
Indicate the position of floating objects (objects whosewrapping style is different from Inline), e.g. images,autoshapes, charts. You should select an object to makeits anchor visible.
Insert section breaksSection breaks allow you to apply different layouts or formatting styles to a certain part of yourdocument. For example, you can use individual headers and footers, pagenumbering, footnotes format, margins, size, orientation, or column number for each separatesection.Note: an inserted section break defines formatting of the preceding part of the document.To insert a section break at the current cursor position:1. click the Breaks icon on the Insert or Layout tab of the top toolbar,2. select the Insert Section Break submenu3. select the necessary section break type:
· Next Page - to start a new section from the next page· Continuous Page - to start a new section on the current page· Even Page - to start a new section from the next even page· Odd Page - to start a new section from the next odd page
The added section breaks are indicated in your document with a double dotted line:
If you do not see the inserted section breaks, click the icon on the Home tab of the toptoolbar to display them.To remove a section break, select it with the mouse and press the Delete key. Since a sectionbreak defines formatting of the previous section, when you remove a section break, this section
formatting will also be deleted. When you delete a section break, the text before and after thebreak is combined into one section. The new combined section will use the formatting from thesection that followed the section break.
Insert headers and footersTo add a new header or footer to your document or edit one that already exists,1. switch to the Insert tab of the top toolbar,2. click the Header/Footer icon on the top toolbar,3. select one of the following options:
· Edit Header to insert or edit the header text.· Edit Footer to insert or edit the footer text.
4. change the current parameters for headers or footers on the right sidebar:· Set the Position of the text: to the top for headers or to the bottom for footers.· Check the Different first page box to apply a different header or footer to the
very first page or in case you don't want to add any header/ footer to it at all.· Use the Different odd and even pages box to add different headers/footer for
odd and even pages.· The Link to Previous option is available in case you've previously
added sections into your document. If not, it will be grayed out. Moreover, thisoption is also unavailable for the very first section (i.e. when a header or footerthat belongs to the first section is selected). By default, this box is checked, sothat the same headers/footers are applied to all the sections. If you select aheader or footer area, you will see that the area is marked with the Same asPrevious label. Uncheck the Link to Previous box to use differentheaders/footers for each section of the document. The Same as Previous labelwill no longer be displayed.
To enter a text or edit the already entered text and adjust the header or footer settings, you canalso double-click anywhere on the top or bottom margin of your document or click with theright mouse button there and select the only menu option - Edit Header or Edit Footer.To switch to the document body, double-click within the working area. The text you use as aheader or footer will be displayed in gray.Insert date and timeTo insert Date and time into your document,1. put the cursor where you want to insert Date and time,2. switch to the Insert tab of the top toolbar,3. click the Date & time icon on the top toolbar,4. in the Date & time window that will appear, specify the following parameters:
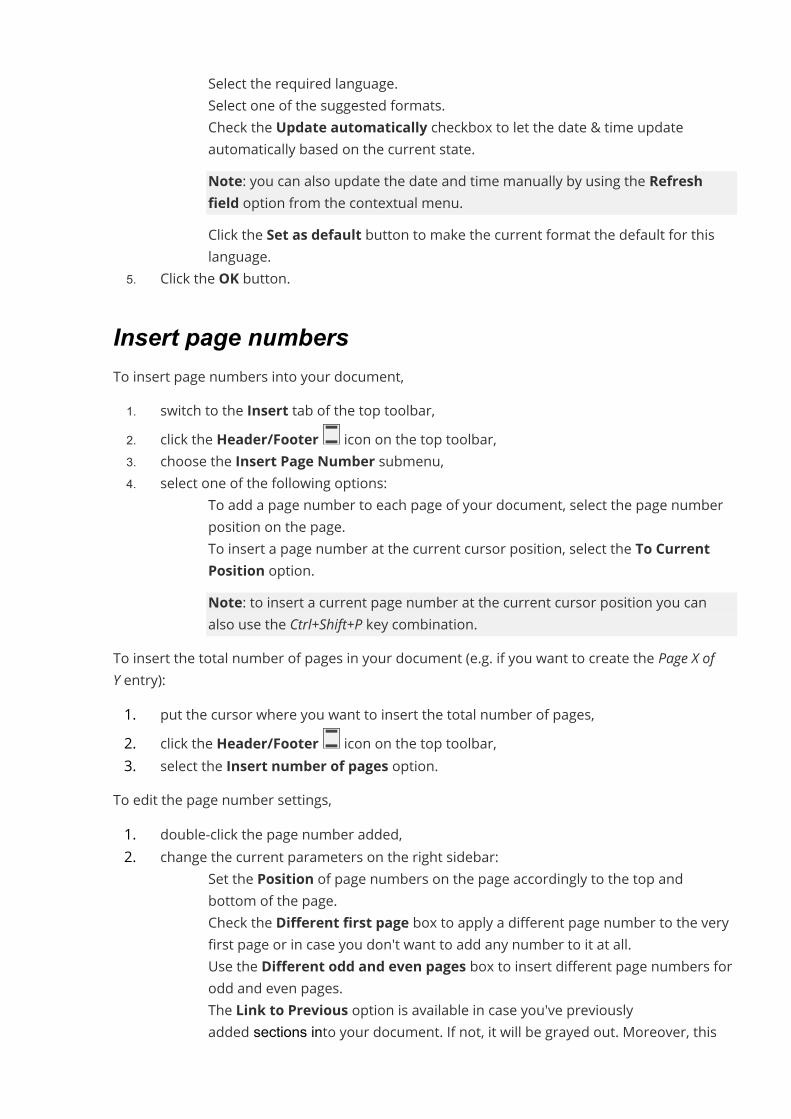
· Select the required language.· Select one of the suggested formats.· Check the Update automatically checkbox to let the date & time update
automatically based on the current state.Note: you can also update the date and time manually by using the Refreshfield option from the contextual menu.
· Click the Set as default button to make the current format the default for thislanguage.
5. Click the OK button.
Insert page numbersTo insert page numbers into your document,1. switch to the Insert tab of the top toolbar,2. click the Header/Footer icon on the top toolbar,3. choose the Insert Page Number submenu,4. select one of the following options:
· To add a page number to each page of your document, select the page numberposition on the page.
· To insert a page number at the current cursor position, select the To CurrentPosition option.Note: to insert a current page number at the current cursor position you canalso use the Ctrl+Shift+P key combination.
To insert the total number of pages in your document (e.g. if you want to create the Page X ofY entry):1. put the cursor where you want to insert the total number of pages,2. click the Header/Footer icon on the top toolbar,3. select the Insert number of pages option.
To edit the page number settings,1. double-click the page number added,2. change the current parameters on the right sidebar:
· Set the Position of page numbers on the page accordingly to the top andbottom of the page.
· Check the Different first page box to apply a different page number to the veryfirst page or in case you don't want to add any number to it at all.
· Use the Different odd and even pages box to insert different page numbers forodd and even pages.
· The Link to Previous option is available in case you've previouslyadded sections into your document. If not, it will be grayed out. Moreover, this

option is also unavailable for the very first section (i.e. when a header or footerthat belongs to the first section is selected). By default, this box is checked, sothat unified numbering is applied to all the sections. If you select a header orfooter area, you will see that the area is marked with the Same asPrevious label. Uncheck the Link to Previous box to use different pagenumbering for each section of the document. The Same as Previous label willno longer be displayed.
· The Page Numbering section allows adjusting page numbering optionsthroughout different sections of the document. The Continue from previoussection option is selected by default and makes it possible to keep continuouspage numbering after a section break. If you want to start page numbering witha specific number in the current section of the document, select the Startat radio button and enter the required starting value in the field on the right.
To return to the document editing, double-click within the working area.
Insert line numbersThe ONLYOFFICE Document Editor can count lines in your document automatically. This feature can be usefulwhen you need to refer to a specific line of the document, e.g. in a legal agreement or a code script. Usethe Line Numbers tool to apply line numbering to the document. Please note that the line numberingsequence is not applied to the text in the objects such as tables, text boxes, charts, headers/footers, etc. Theseobjects are treated as one line.Applying line numbering1. Open the Layout tab located at the top toolbar and click on the Line
Numbers icon.2. Choose the required parameters for a quick set-up in the opened drop-down menu:
· Continuous - each line of the document will be assigned a sequence number.· Restart Each Page - the line numbering sequence will restart on each page of
the document.· Restart Each Section - the line numbering sequence will restart in each section
of the document.· Suppress for Current Paragraph - the current paragraph will be skipped in the
line numbering sequence. To exclude several paragraphs from the sequence,select them via the left-mouse button before applying this parameter.
3. Specify the advanced parameters if needed. Click the Line Numbering Options item inthe Line Numbers drop-down menu. Check the Add line numbering box to apply theline numbering to the document and to access the advanced parameters of the option:
· Start at sets the starting numeric value of the line numbering sequence. Theparameter is set to 1 by default.
· From text specifies the distance between the line numbers and the text. Enterthe required value in cm. The parameter is set to Auto by default.
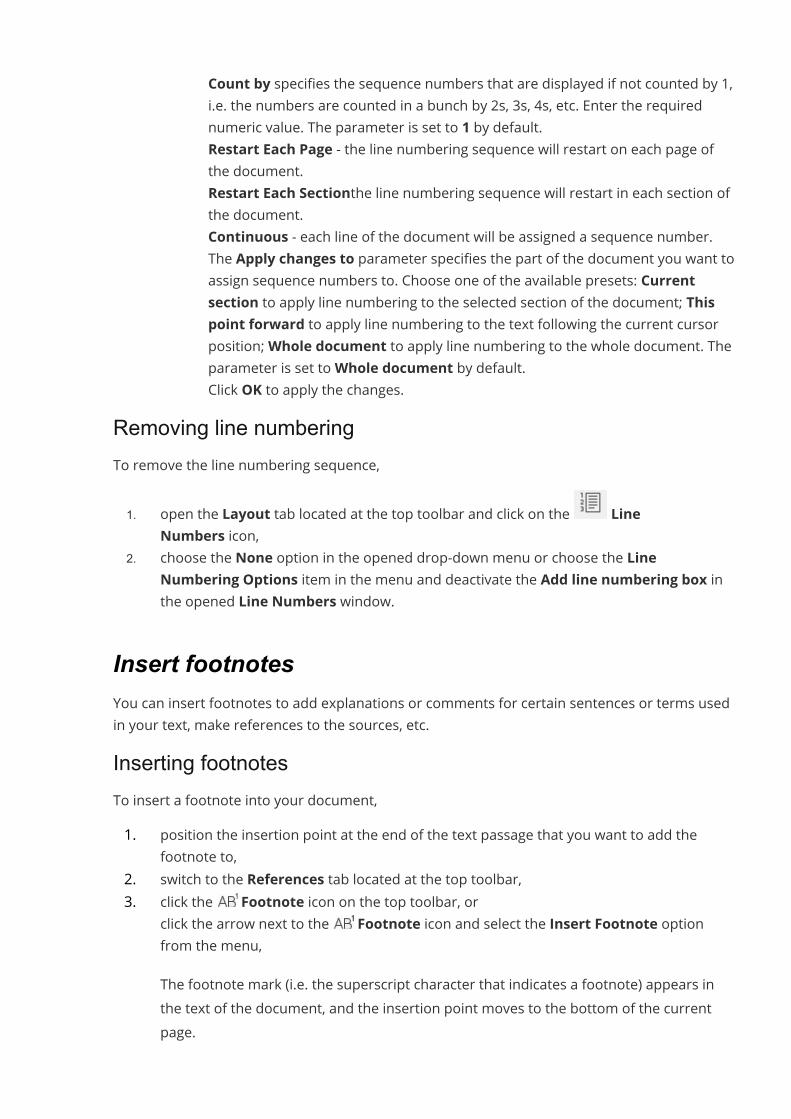
· Count by specifies the sequence numbers that are displayed if not counted by 1,i.e. the numbers are counted in a bunch by 2s, 3s, 4s, etc. Enter the requirednumeric value. The parameter is set to 1 by default.
· Restart Each Page - the line numbering sequence will restart on each page ofthe document.
· Restart Each Sectionthe line numbering sequence will restart in each section ofthe document.
· Continuous - each line of the document will be assigned a sequence number.· The Apply changes to parameter specifies the part of the document you want to
assign sequence numbers to. Choose one of the available presets: Currentsection to apply line numbering to the selected section of the document; Thispoint forward to apply line numbering to the text following the current cursorposition;Whole document to apply line numbering to the whole document. Theparameter is set toWhole document by default.
· Click OK to apply the changes.Removing line numberingTo remove the line numbering sequence,
1. open the Layout tab located at the top toolbar and click on the LineNumbers icon,
2. choose the None option in the opened drop-down menu or choose the LineNumbering Options item in the menu and deactivate the Add line numbering box inthe opened Line Numbers window.
Insert footnotesYou can insert footnotes to add explanations or comments for certain sentences or terms usedin your text, make references to the sources, etc.Inserting footnotesTo insert a footnote into your document,1. position the insertion point at the end of the text passage that you want to add the
footnote to,2. switch to the References tab located at the top toolbar,3. click the Footnote icon on the top toolbar, or
click the arrow next to the Footnote icon and select the Insert Footnote optionfrom the menu,The footnote mark (i.e. the superscript character that indicates a footnote) appears inthe text of the document, and the insertion point moves to the bottom of the currentpage.
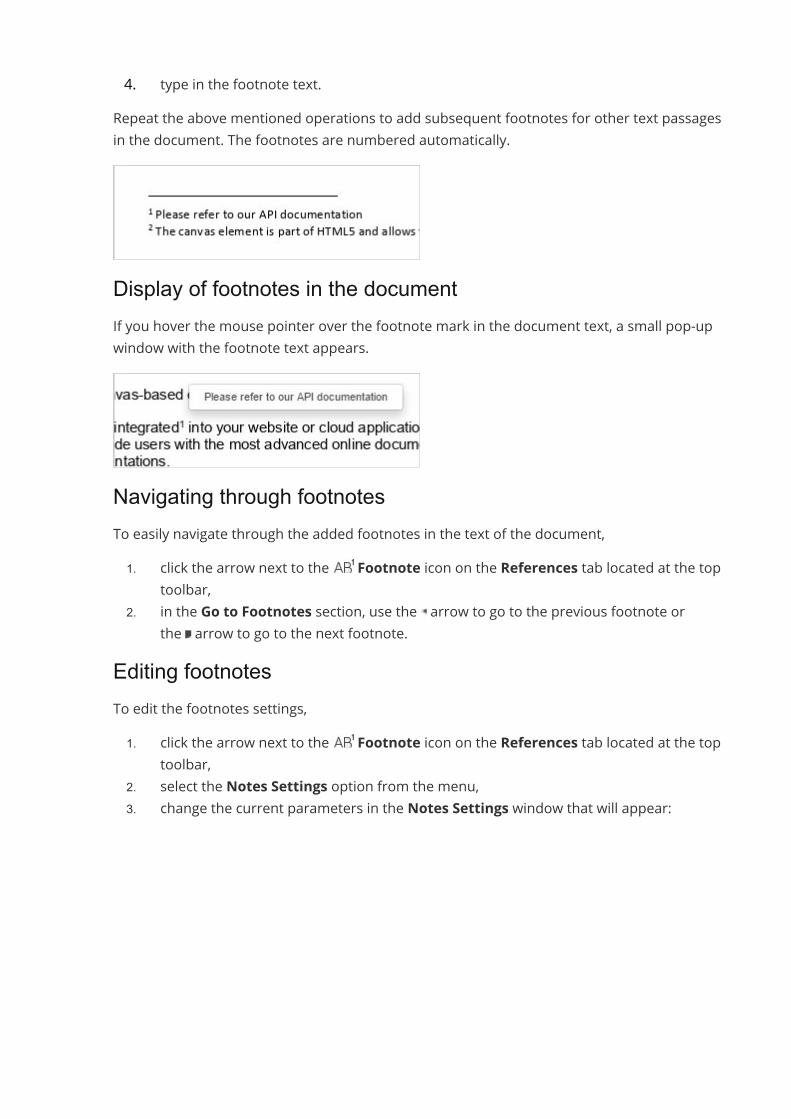
4. type in the footnote text.Repeat the above mentioned operations to add subsequent footnotes for other text passagesin the document. The footnotes are numbered automatically.
Display of footnotes in the documentIf you hover the mouse pointer over the footnote mark in the document text, a small pop-upwindow with the footnote text appears.
Navigating through footnotesTo easily navigate through the added footnotes in the text of the document,1. click the arrow next to the Footnote icon on the References tab located at the top
toolbar,2. in the Go to Footnotes section, use the arrow to go to the previous footnote or
the arrow to go to the next footnote.Editing footnotesTo edit the footnotes settings,1. click the arrow next to the Footnote icon on the References tab located at the top
toolbar,2. select the Notes Settings option from the menu,3. change the current parameters in the Notes Settings window that will appear:
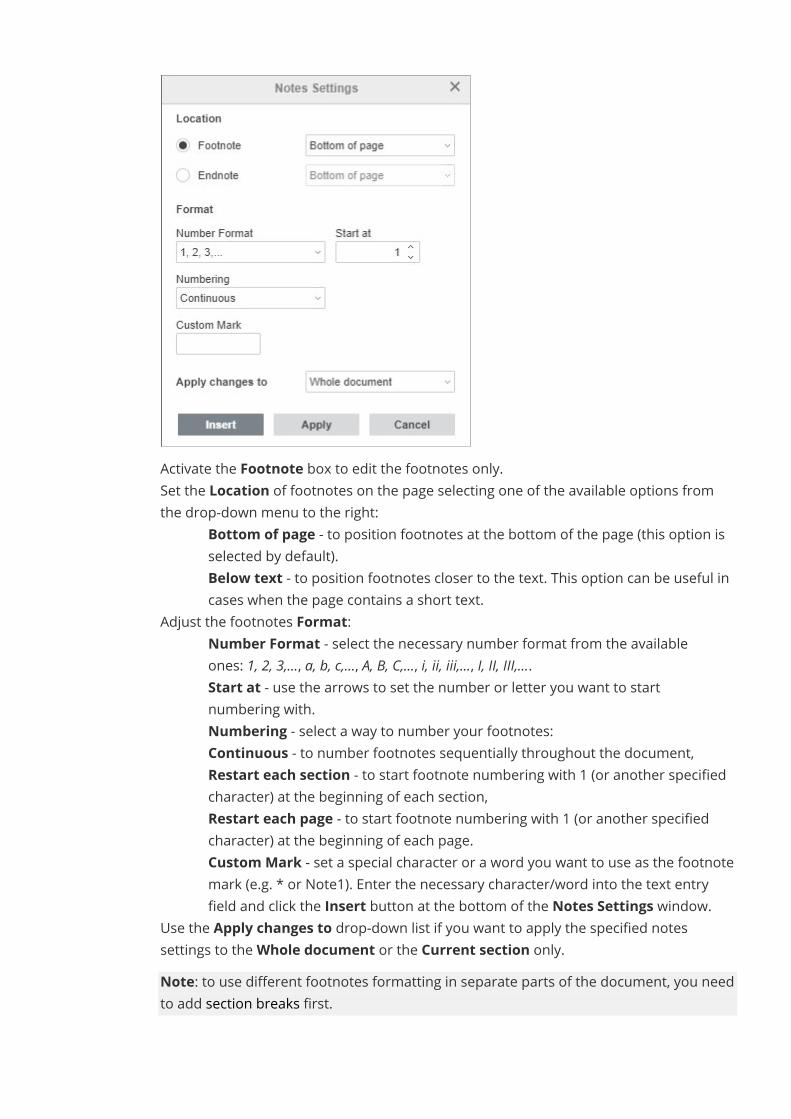
· Activate the Footnote box to edit the footnotes only.· Set the Location of footnotes on the page selecting one of the available options from
the drop-down menu to the right:o Bottom of page - to position footnotes at the bottom of the page (this option is
selected by default).o Below text - to position footnotes closer to the text. This option can be useful in
cases when the page contains a short text.· Adjust the footnotes Format:
o Number Format - select the necessary number format from the availableones: 1, 2, 3,..., a, b, c,..., A, B, C,..., i, ii, iii,..., I, II, III,....
o Start at - use the arrows to set the number or letter you want to startnumbering with.
o Numbering - select a way to number your footnotes:o Continuous - to number footnotes sequentially throughout the document,o Restart each section - to start footnote numbering with 1 (or another specified
character) at the beginning of each section,o Restart each page - to start footnote numbering with 1 (or another specified
character) at the beginning of each page.o Custom Mark - set a special character or a word you want to use as the footnote
mark (e.g. * or Note1). Enter the necessary character/word into the text entryfield and click the Insert button at the bottom of the Notes Settings window.
· Use the Apply changes to drop-down list if you want to apply the specified notessettings to theWhole document or the Current section only.Note: to use different footnotes formatting in separate parts of the document, you needto add section breaks first.
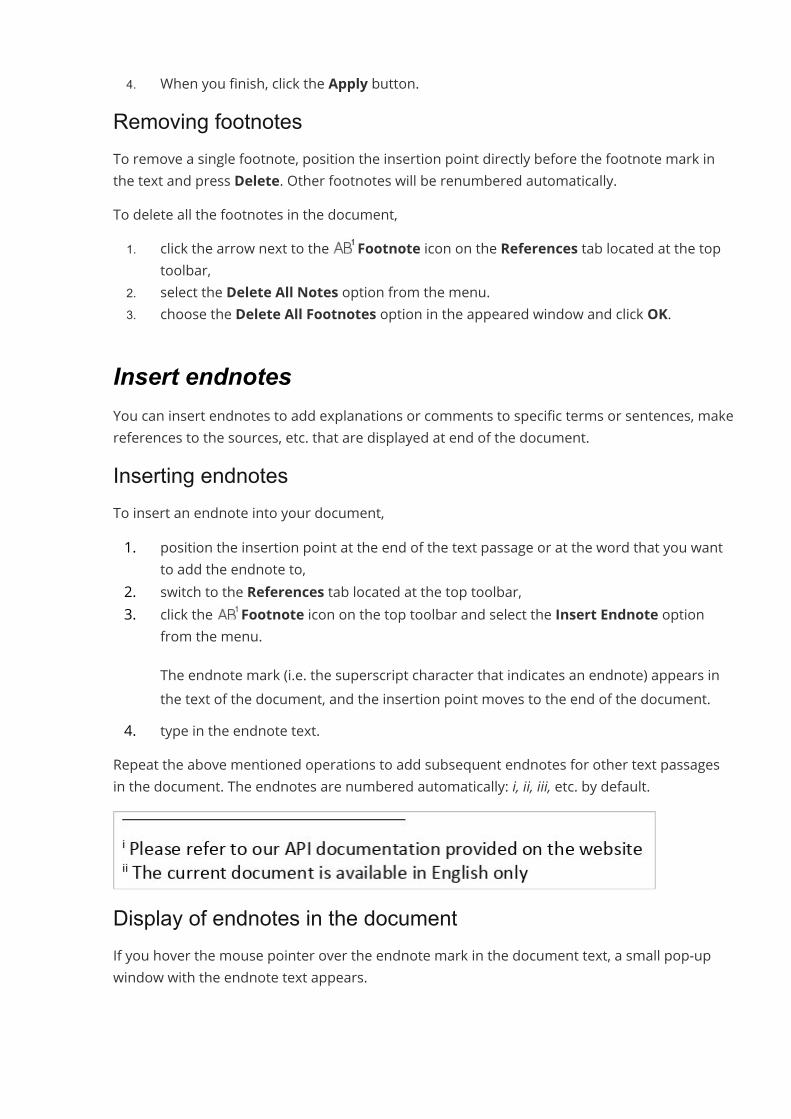
4. When you finish, click the Apply button.Removing footnotesTo remove a single footnote, position the insertion point directly before the footnote mark inthe text and press Delete. Other footnotes will be renumbered automatically.To delete all the footnotes in the document,1. click the arrow next to the Footnote icon on the References tab located at the top
toolbar,2. select the Delete All Notes option from the menu.3. choose the Delete All Footnotes option in the appeared window and click OK.
Insert endnotesYou can insert endnotes to add explanations or comments to specific terms or sentences, makereferences to the sources, etc. that are displayed at end of the document.Inserting endnotesTo insert an endnote into your document,1. position the insertion point at the end of the text passage or at the word that you want
to add the endnote to,2. switch to the References tab located at the top toolbar,3. click the Footnote icon on the top toolbar and select the Insert Endnote option
from the menu.The endnote mark (i.e. the superscript character that indicates an endnote) appears inthe text of the document, and the insertion point moves to the end of the document.
4. type in the endnote text.Repeat the above mentioned operations to add subsequent endnotes for other text passagesin the document. The endnotes are numbered automatically: i, ii, iii, etc. by default.
Display of endnotes in the documentIf you hover the mouse pointer over the endnote mark in the document text, a small pop-upwindow with the endnote text appears.
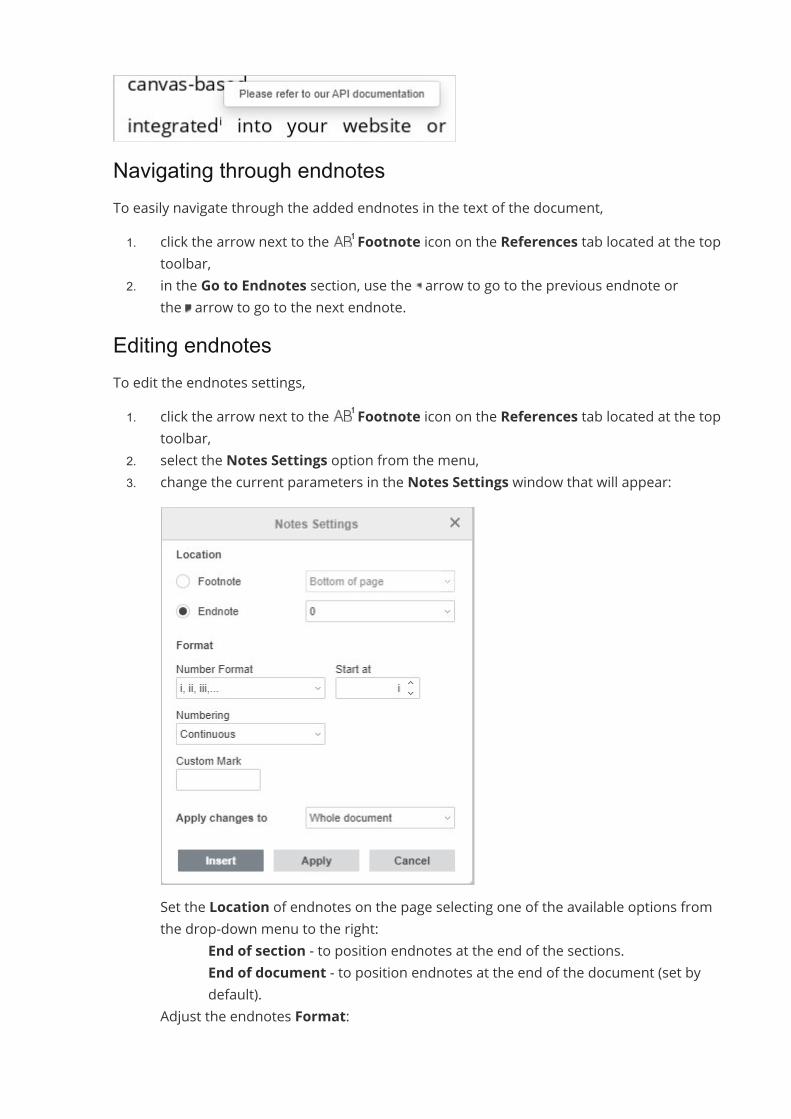
Navigating through endnotesTo easily navigate through the added endnotes in the text of the document,1. click the arrow next to the Footnote icon on the References tab located at the top
toolbar,2. in the Go to Endnotes section, use the arrow to go to the previous endnote or
the arrow to go to the next endnote.Editing endnotesTo edit the endnotes settings,1. click the arrow next to the Footnote icon on the References tab located at the top
toolbar,2. select the Notes Settings option from the menu,3. change the current parameters in the Notes Settings window that will appear:
· Set the Location of endnotes on the page selecting one of the available options fromthe drop-down menu to the right:
o End of section - to position endnotes at the end of the sections.o End of document - to position endnotes at the end of the document (set by
default).· Adjust the endnotes Format:
o Number Format - select the necessary number format from the availableones: 1, 2, 3,..., a, b, c,..., A, B, C,..., i, ii, iii,..., I, II, III,....
o Start at - use the arrows to set the number or letter you want to startnumbering with.
o Numbering - select a way to number your endnotes:§ Continuous - to number endnotes sequentially throughout the
document,§ Restart each section - to start endnote numbering with 1 (or another
specified character) at the beginning of each section,§ Restart each page - to start endnote numbering with 1 (or another
specified character) at the beginning of each page.o Custom Mark - set a special character or a word you want to use as the endnote
mark (e.g. * or Note1). Enter the necessary character/word into the text entryfield and click the Insert button at the bottom of the Notes Settings window.
· Use the Apply changes to drop-down list if you want to apply the specified notessettings to theWhole document or the Current section only.Note: to use different endnotes formatting in separate parts of the document, you needto add section breaks first.
4. When you finish, click the Apply button.Removing endnotesTo remove a single endnote, position the insertion point directly before the endtnote mark inthe text and press Delete. Other endnotes will be renumbered automatically.To delete all the endnotes in the document,1. click the arrow next to the Footnote icon on the References tab located at the top
toolbar,2. select the Delete All Notes option from the menu.3. choose the Delete All Endnotes option in the appeared window and click OK.
Convert footnotes and endnotesThe ONLYOFFICE Document Editor allows you to quickly convert footnotes to endnotes, and vice versa, e.g., ifyou see that some footnotes in the resulting document should be placed in the end. Instead of recreating them asendnotes, use the corresponding tool for effortless conversion.1. Click the arrow next to the Footnote icon on the References tab located at the top toolbar,2. Hover over the Convert all notes menu item and choose one of the options from the list to the right:
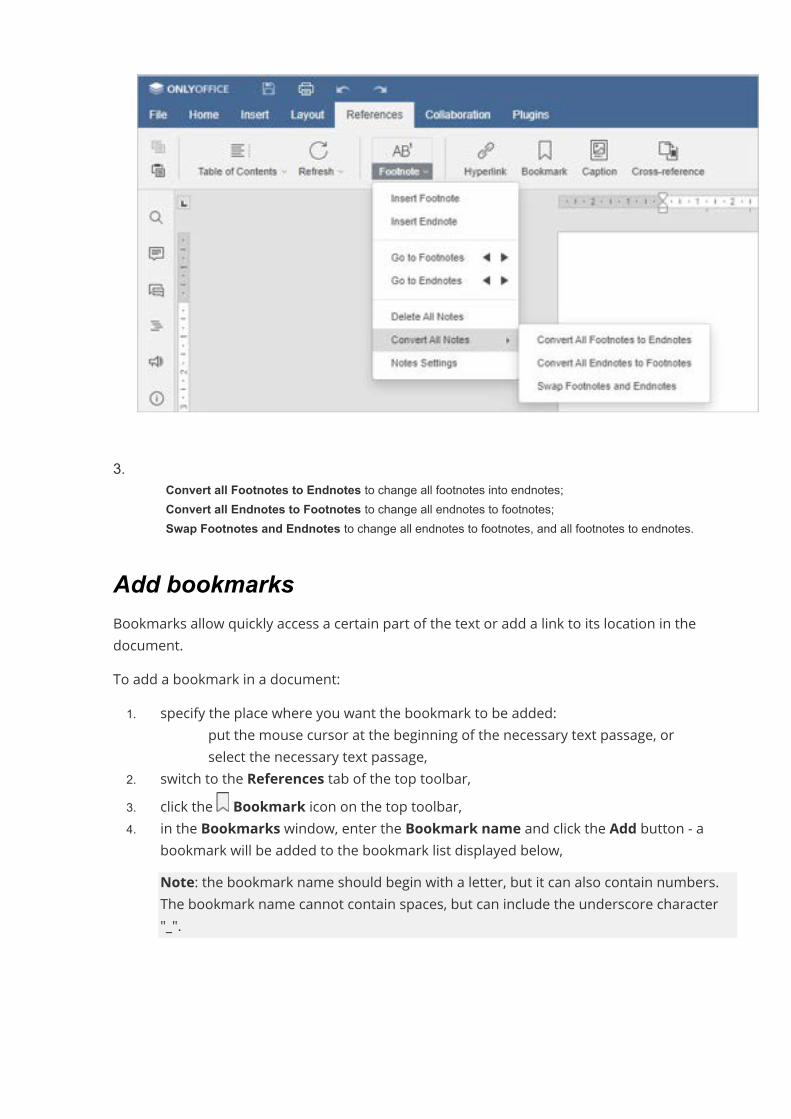
3.· Convert all Footnotes to Endnotes to change all footnotes into endnotes;· Convert all Endnotes to Footnotes to change all endnotes to footnotes;· Swap Footnotes and Endnotes to change all endnotes to footnotes, and all footnotes to endnotes.
Add bookmarksBookmarks allow quickly access a certain part of the text or add a link to its location in thedocument.To add a bookmark in a document:1. specify the place where you want the bookmark to be added:
· put the mouse cursor at the beginning of the necessary text passage, or· select the necessary text passage,
2. switch to the References tab of the top toolbar,3. click the Bookmark icon on the top toolbar,4. in the Bookmarks window, enter the Bookmark name and click the Add button - a
bookmark will be added to the bookmark list displayed below,Note: the bookmark name should begin with a letter, but it can also contain numbers.The bookmark name cannot contain spaces, but can include the underscore character"_".
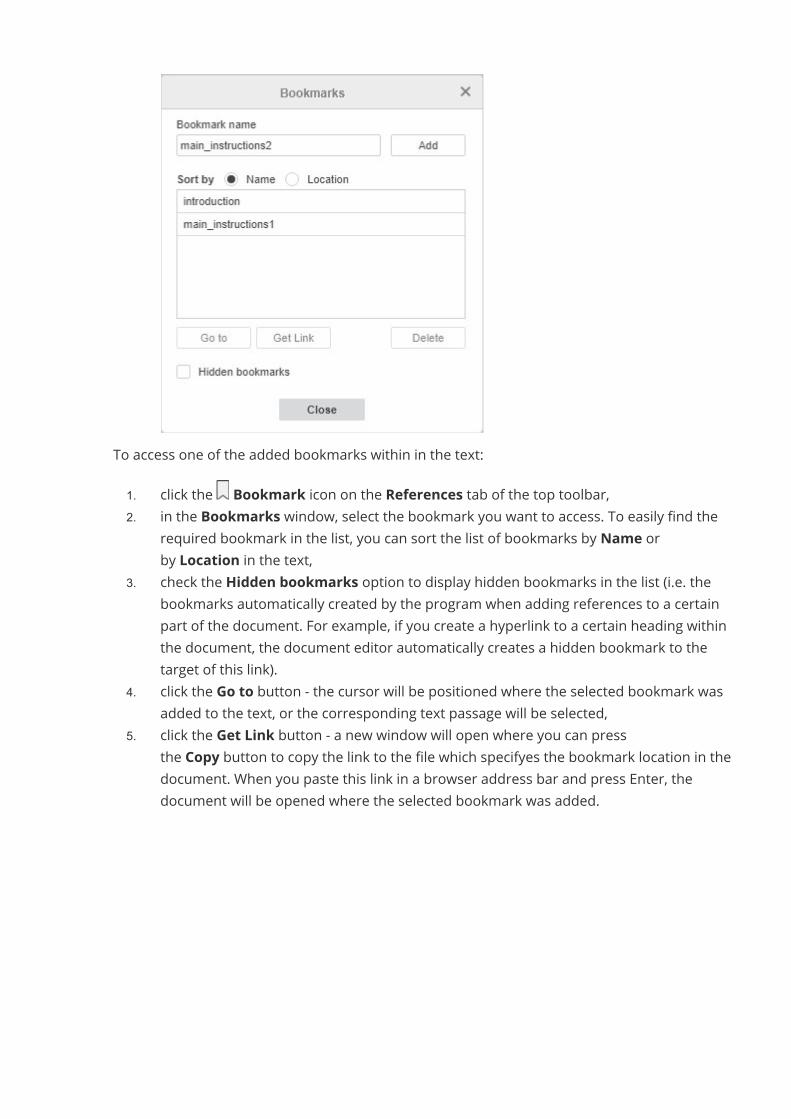
To access one of the added bookmarks within in the text:1. click the Bookmark icon on the References tab of the top toolbar,2. in the Bookmarks window, select the bookmark you want to access. To easily find the
required bookmark in the list, you can sort the list of bookmarks by Name orby Location in the text,
3. check the Hidden bookmarks option to display hidden bookmarks in the list (i.e. thebookmarks automatically created by the program when adding references to a certainpart of the document. For example, if you create a hyperlink to a certain heading withinthe document, the document editor automatically creates a hidden bookmark to thetarget of this link).
4. click the Go to button - the cursor will be positioned where the selected bookmark wasadded to the text, or the corresponding text passage will be selected,
5. click the Get Link button - a new window will open where you can pressthe Copy button to copy the link to the file which specifyes the bookmark location in thedocument. When you paste this link in a browser address bar and press Enter, thedocument will be opened where the selected bookmark was added.
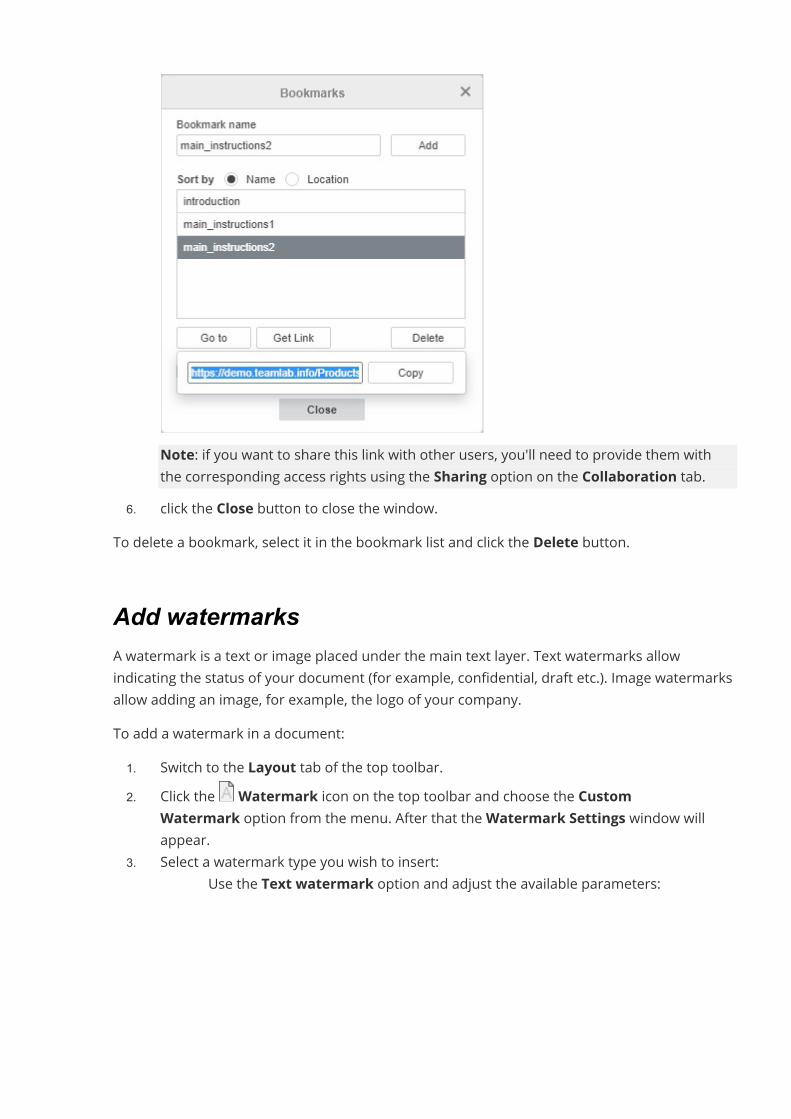
Note: if you want to share this link with other users, you'll need to provide them withthe corresponding access rights using the Sharing option on the Collaboration tab.
6. click the Close button to close the window.To delete a bookmark, select it in the bookmark list and click the Delete button.
Add watermarksA watermark is a text or image placed under the main text layer. Text watermarks allowindicating the status of your document (for example, confidential, draft etc.). Image watermarksallow adding an image, for example, the logo of your company.To add a watermark in a document:1. Switch to the Layout tab of the top toolbar.2. Click the Watermark icon on the top toolbar and choose the Custom
Watermark option from the menu. After that theWatermark Settings window willappear.
3. Select a watermark type you wish to insert:· Use the Text watermark option and adjust the available parameters:

o Language - select one of the available languages from the list,o Text - select one of the available text examples in the selected language. For
English, the following watermark texts areavailable: ASAP, CONFIDENTIAL, COPY, DO NOTCOPY, DRAFT, ORIGINAL, PERSONAL, SAMPLE, TOP SECRET, URGENT.
o Font - select the font name and size from the corresponding drop-down lists.Use the icons on the right to set the font color or apply one of the fontdecoration styles: Bold, Italic, Underline, Strikeout,
o Semitransparent - check this box if you want to apply transparency,o Layout - select the Diagonal or Horizontal option.
· Use the Image watermark option and adjust the available parameters:
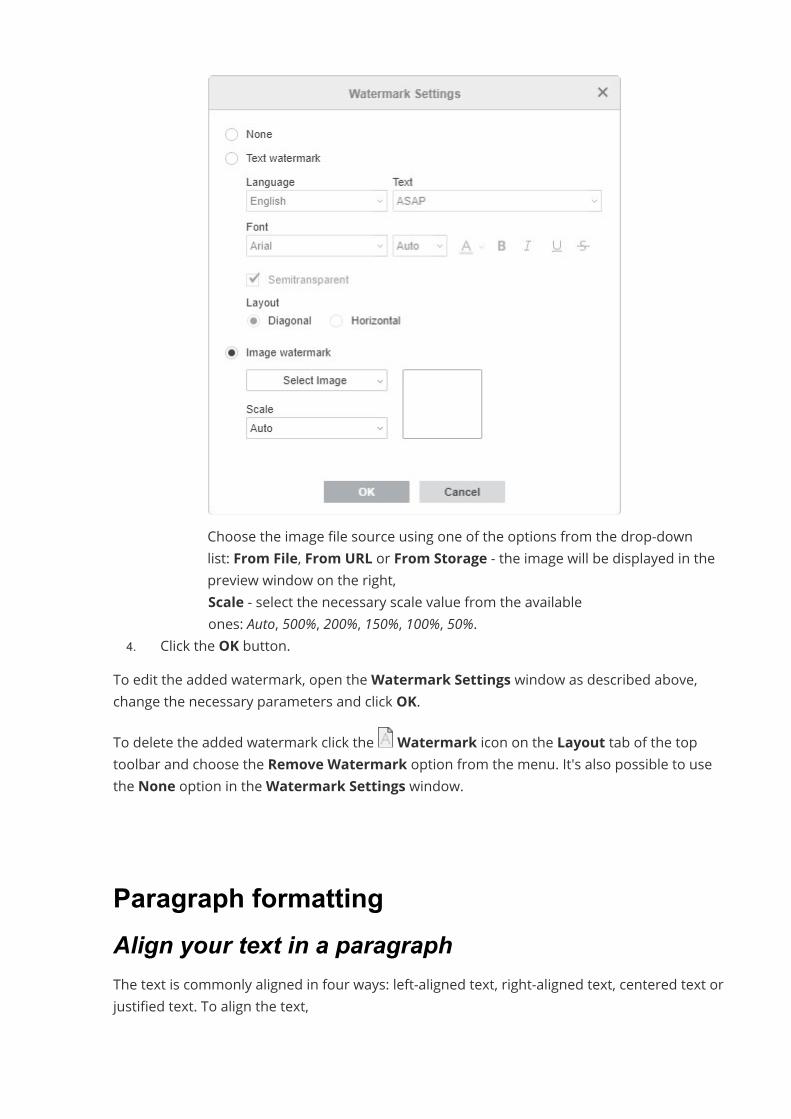
· Choose the image file source using one of the options from the drop-downlist: From File, From URL or From Storage - the image will be displayed in thepreview window on the right,
· Scale - select the necessary scale value from the availableones: Auto, 500%, 200%, 150%, 100%, 50%.
4. Click the OK button.To edit the added watermark, open theWatermark Settings window as described above,change the necessary parameters and click OK.To delete the added watermark click the Watermark icon on the Layout tab of the toptoolbar and choose the Remove Watermark option from the menu. It's also possible to usethe None option in theWatermark Settings window.
Paragraph formattingAlign your text in a paragraphThe text is commonly aligned in four ways: left-aligned text, right-aligned text, centered text orjustified text. To align the text,
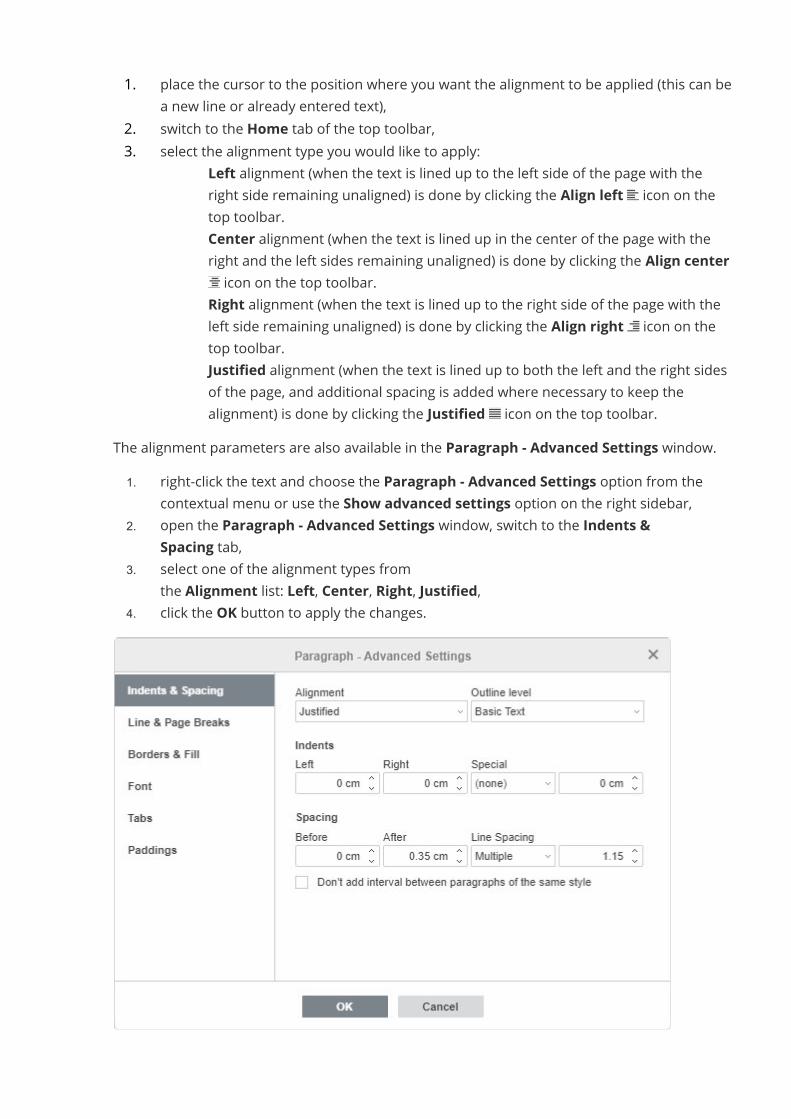
1. place the cursor to the position where you want the alignment to be applied (this can bea new line or already entered text),
2. switch to the Home tab of the top toolbar,3. select the alignment type you would like to apply:
· Left alignment (when the text is lined up to the left side of the page with theright side remaining unaligned) is done by clicking the Align left icon on thetop toolbar.
· Center alignment (when the text is lined up in the center of the page with theright and the left sides remaining unaligned) is done by clicking the Align center
icon on the top toolbar.· Right alignment (when the text is lined up to the right side of the page with the
left side remaining unaligned) is done by clicking the Align right icon on thetop toolbar.
· Justified alignment (when the text is lined up to both the left and the right sidesof the page, and additional spacing is added where necessary to keep thealignment) is done by clicking the Justified icon on the top toolbar.
The alignment parameters are also available in the Paragraph - Advanced Settings window.1. right-click the text and choose the Paragraph - Advanced Settings option from the
contextual menu or use the Show advanced settings option on the right sidebar,2. open the Paragraph - Advanced Settings window, switch to the Indents &
Spacing tab,3. select one of the alignment types from
the Alignment list: Left, Center, Right, Justified,4. click the OK button to apply the changes.
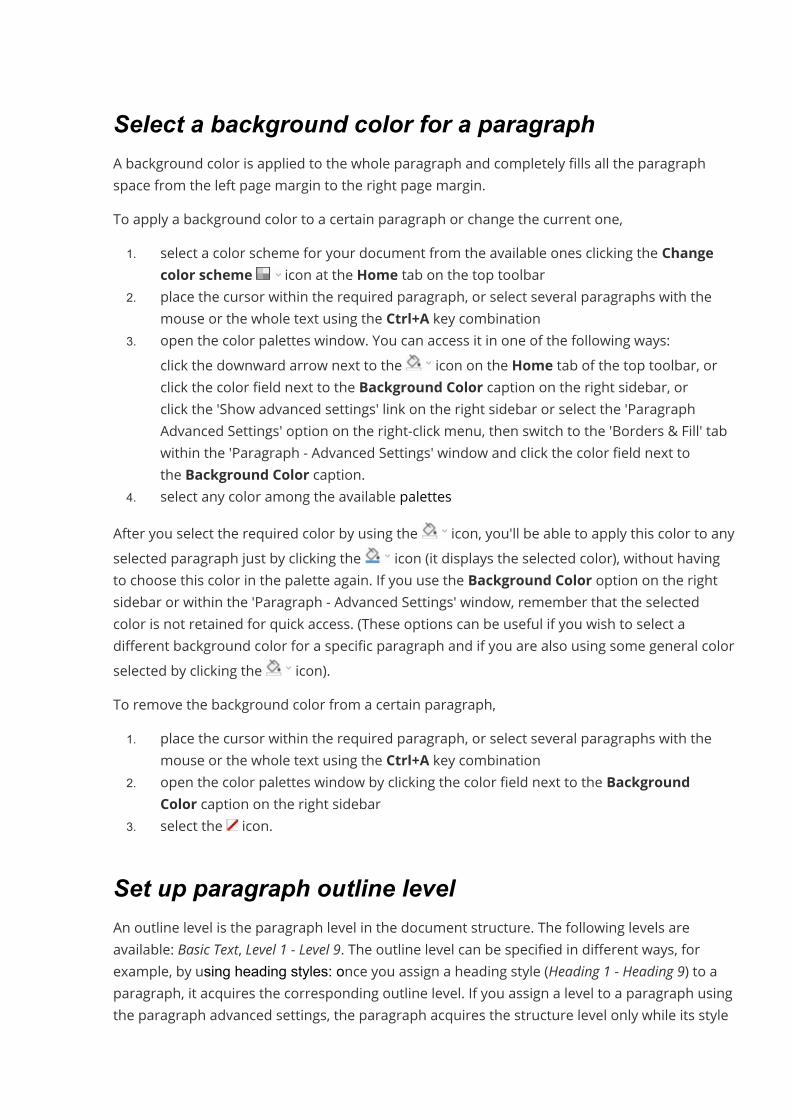
Select a background color for a paragraphA background color is applied to the whole paragraph and completely fills all the paragraphspace from the left page margin to the right page margin.To apply a background color to a certain paragraph or change the current one,1. select a color scheme for your document from the available ones clicking the Change
color scheme icon at the Home tab on the top toolbar2. place the cursor within the required paragraph, or select several paragraphs with the
mouse or the whole text using the Ctrl+A key combination3. open the color palettes window. You can access it in one of the following ways:· click the downward arrow next to the icon on the Home tab of the top toolbar, or· click the color field next to the Background Color caption on the right sidebar, or· click the 'Show advanced settings' link on the right sidebar or select the 'Paragraph
Advanced Settings' option on the right-click menu, then switch to the 'Borders & Fill' tabwithin the 'Paragraph - Advanced Settings' window and click the color field next tothe Background Color caption.
4. select any color among the available palettesAfter you select the required color by using the icon, you'll be able to apply this color to anyselected paragraph just by clicking the icon (it displays the selected color), without havingto choose this color in the palette again. If you use the Background Color option on the rightsidebar or within the 'Paragraph - Advanced Settings' window, remember that the selectedcolor is not retained for quick access. (These options can be useful if you wish to select adifferent background color for a specific paragraph and if you are also using some general colorselected by clicking the icon).To remove the background color from a certain paragraph,1. place the cursor within the required paragraph, or select several paragraphs with the
mouse or the whole text using the Ctrl+A key combination2. open the color palettes window by clicking the color field next to the Background
Color caption on the right sidebar3. select the icon.
Set up paragraph outline levelAn outline level is the paragraph level in the document structure. The following levels areavailable: Basic Text, Level 1 - Level 9. The outline level can be specified in different ways, forexample, by using heading styles: once you assign a heading style (Heading 1 - Heading 9) to aparagraph, it acquires the corresponding outline level. If you assign a level to a paragraph usingthe paragraph advanced settings, the paragraph acquires the structure level only while its style

remains unchanged. The outline level can be also changed in the Navigation panel on the leftusing the contextual menu options.To change a paragraph outline level using the paragraph advanced settings,1. right-click the text and choose the Paragraph Advanced Settings option from the
contextual menu or use the Show advanced settings option on the right sidebar,2. open the Paragraph - Advanced Settings window, switch to the Indents &
Spacing tab,3. select the necessary outline level from the Outline level list.4. click the OK button to apply the changes.
Change paragraph indentsthe Document Editor, you can change the first line offset from the left side of the page as wellas the paragraph offset from the left and right sides of the page.To do that,
· set the necessary parameters on the right sidebar Paragraph settings inthe Indents section:
· Left - set the paragraph offset from the left side of the page specifying the necessarynumeric value,
· Right - set the paragraph offset from the right side of the page specifying thenecessary numeric value,
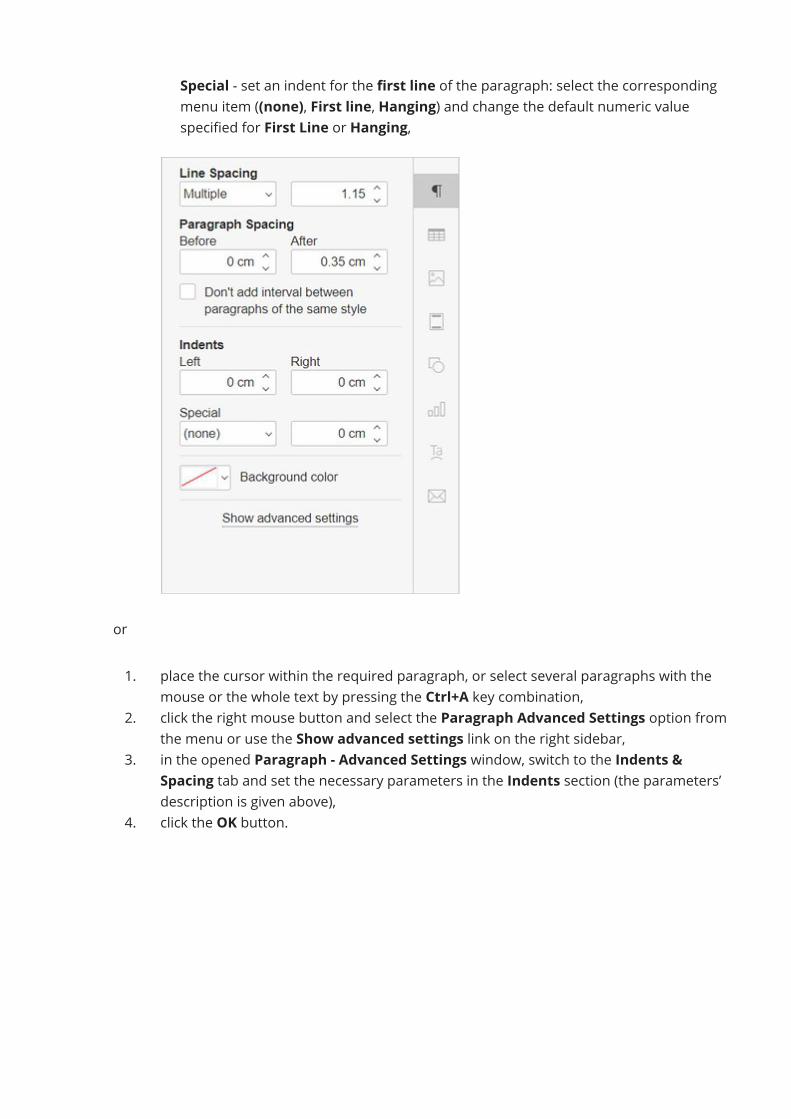
· Special - set an indent for the first line of the paragraph: select the correspondingmenu item ((none), First line, Hanging) and change the default numeric valuespecified for First Line or Hanging,
or1. place the cursor within the required paragraph, or select several paragraphs with the
mouse or the whole text by pressing the Ctrl+A key combination,2. click the right mouse button and select the Paragraph Advanced Settings option from
the menu or use the Show advanced settings link on the right sidebar,3. in the opened Paragraph - Advanced Settings window, switch to the Indents &
Spacing tab and set the necessary parameters in the Indents section (the parameters’description is given above),
4. click the OK button.
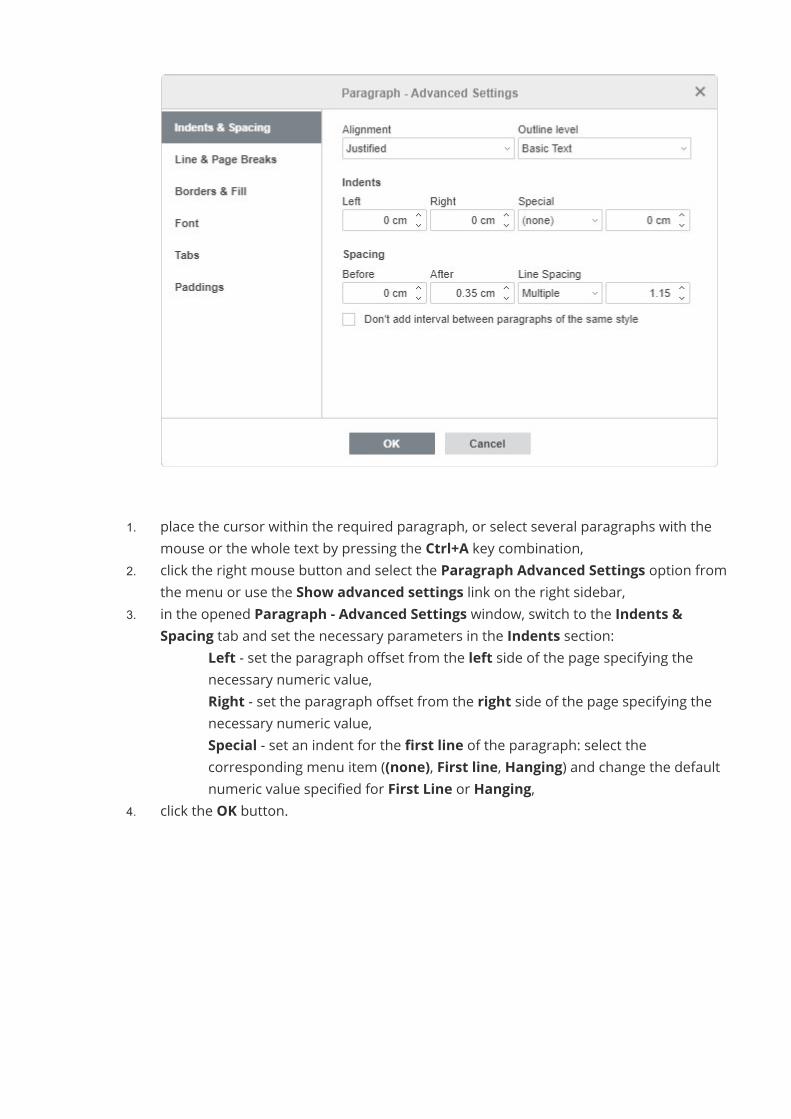
1. place the cursor within the required paragraph, or select several paragraphs with themouse or the whole text by pressing the Ctrl+A key combination,
2. click the right mouse button and select the Paragraph Advanced Settings option fromthe menu or use the Show advanced settings link on the right sidebar,
3. in the opened Paragraph - Advanced Settings window, switch to the Indents &Spacing tab and set the necessary parameters in the Indents section:
· Left - set the paragraph offset from the left side of the page specifying thenecessary numeric value,
· Right - set the paragraph offset from the right side of the page specifying thenecessary numeric value,
· Special - set an indent for the first line of the paragraph: select thecorresponding menu item ((none), First line, Hanging) and change the defaultnumeric value specified for First Line or Hanging,
4. click the OK button.
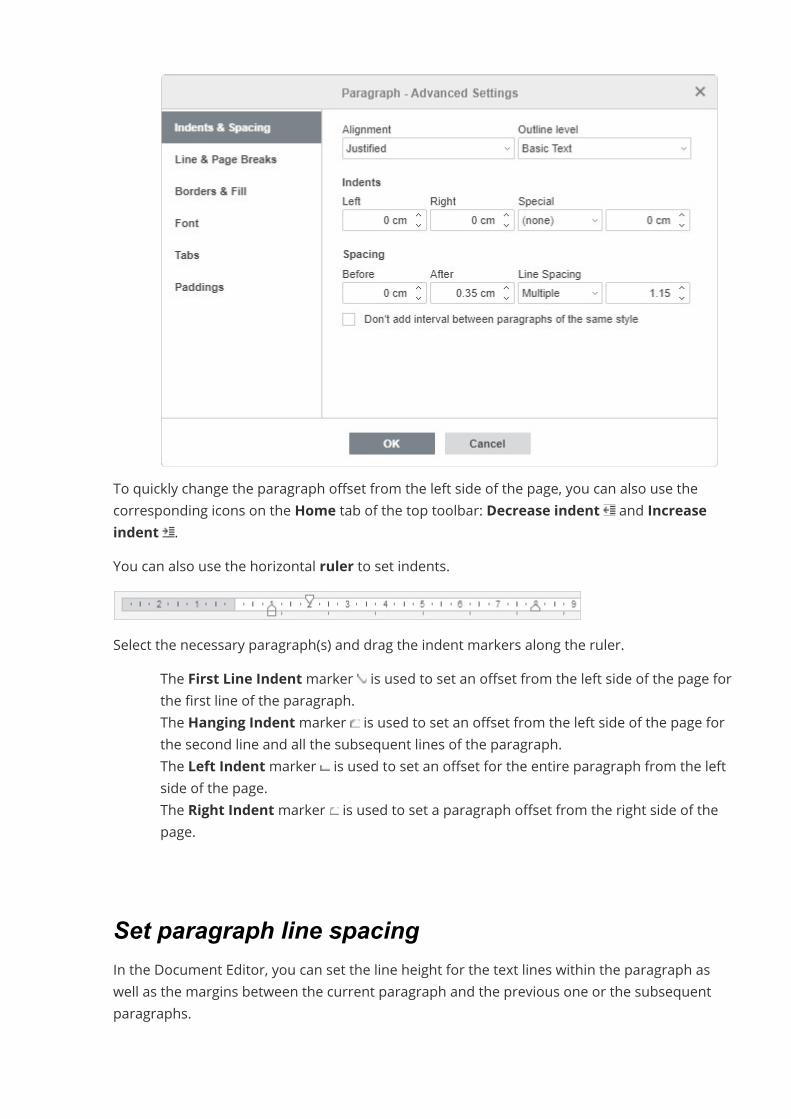
To quickly change the paragraph offset from the left side of the page, you can also use thecorresponding icons on the Home tab of the top toolbar: Decrease indent and Increaseindent .You can also use the horizontal ruler to set indents.
Select the necessary paragraph(s) and drag the indent markers along the ruler.· The First Line Indentmarker is used to set an offset from the left side of the page for
the first line of the paragraph.· The Hanging Indentmarker is used to set an offset from the left side of the page for
the second line and all the subsequent lines of the paragraph.· The Left Indentmarker is used to set an offset for the entire paragraph from the left
side of the page.· The Right Indentmarker is used to set a paragraph offset from the right side of the
page.
Set paragraph line spacingIn the Document Editor, you can set the line height for the text lines within the paragraph aswell as the margins between the current paragraph and the previous one or the subsequentparagraphs.
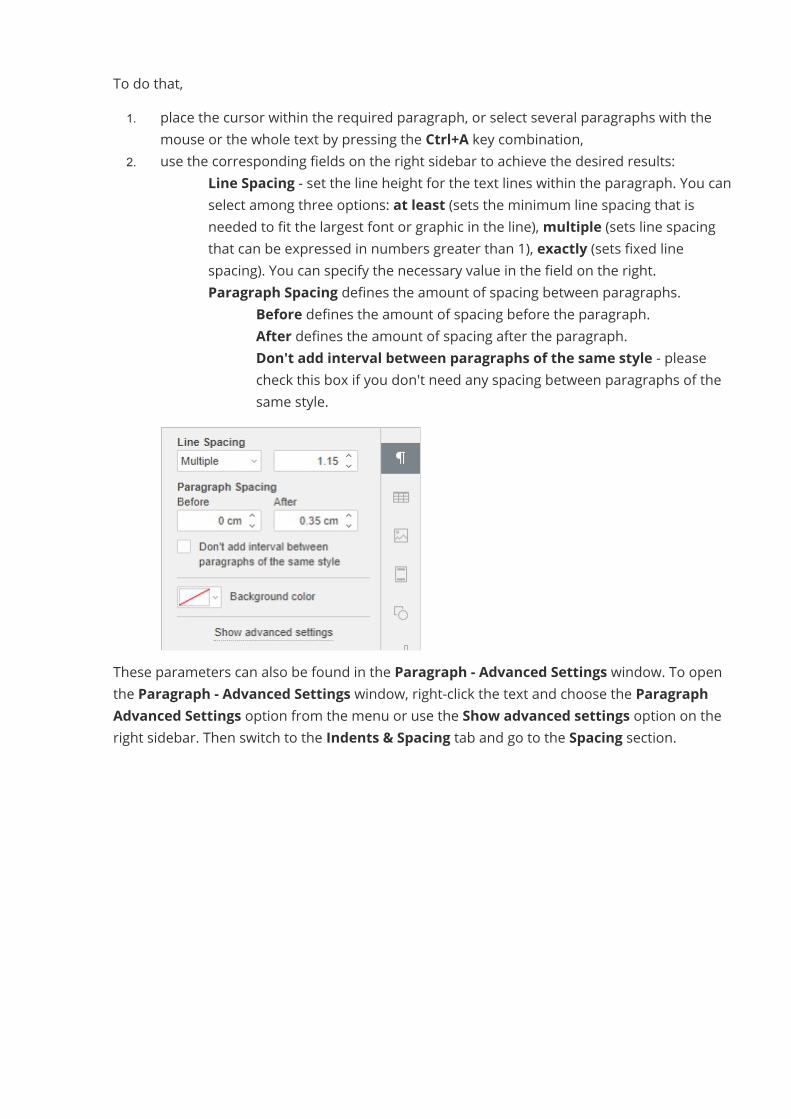
To do that,1. place the cursor within the required paragraph, or select several paragraphs with the
mouse or the whole text by pressing the Ctrl+A key combination,2. use the corresponding fields on the right sidebar to achieve the desired results:
· Line Spacing - set the line height for the text lines within the paragraph. You canselect among three options: at least (sets the minimum line spacing that isneeded to fit the largest font or graphic in the line),multiple (sets line spacingthat can be expressed in numbers greater than 1), exactly (sets fixed linespacing). You can specify the necessary value in the field on the right.
· Paragraph Spacing defines the amount of spacing between paragraphs.o Before defines the amount of spacing before the paragraph.o After defines the amount of spacing after the paragraph.o Don't add interval between paragraphs of the same style - please
check this box if you don't need any spacing between paragraphs of thesame style.
These parameters can also be found in the Paragraph - Advanced Settings window. To openthe Paragraph - Advanced Settings window, right-click the text and choose the ParagraphAdvanced Settings option from the menu or use the Show advanced settings option on theright sidebar. Then switch to the Indents & Spacing tab and go to the Spacing section.
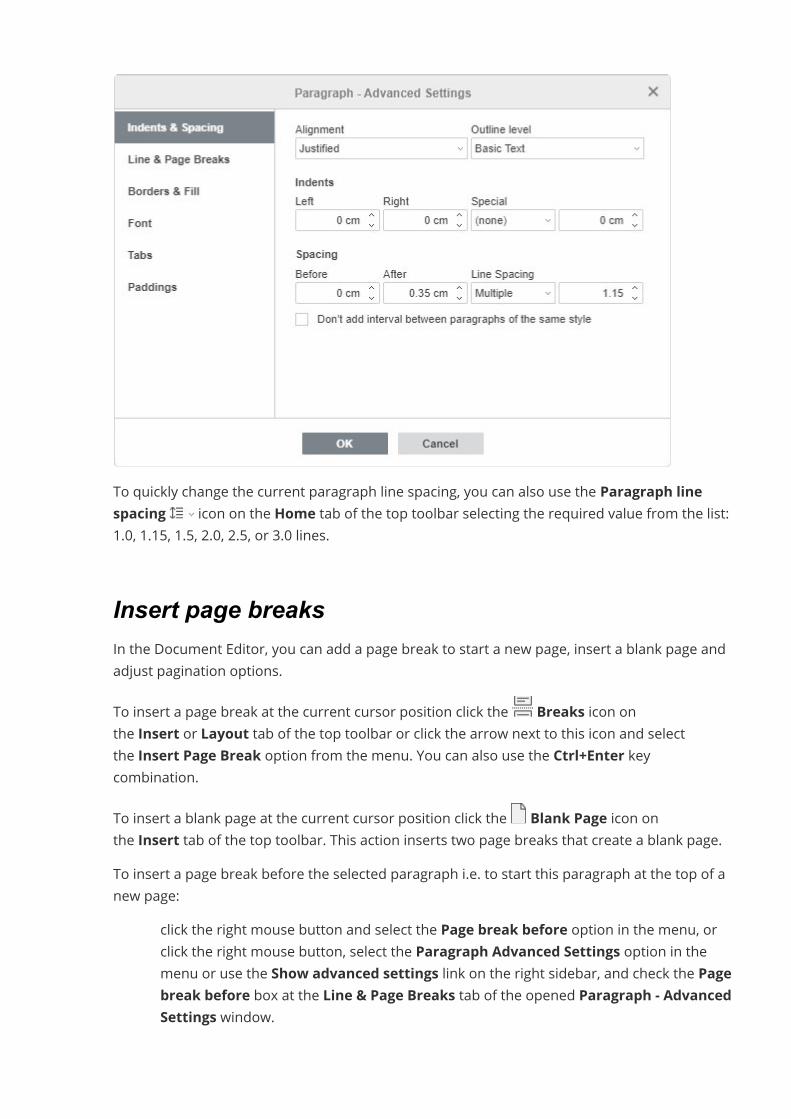
To quickly change the current paragraph line spacing, you can also use the Paragraph linespacing icon on the Home tab of the top toolbar selecting the required value from the list:1.0, 1.15, 1.5, 2.0, 2.5, or 3.0 lines.
Insert page breaksIn the Document Editor, you can add a page break to start a new page, insert a blank page andadjust pagination options.To insert a page break at the current cursor position click the Breaks icon onthe Insert or Layout tab of the top toolbar or click the arrow next to this icon and selectthe Insert Page Break option from the menu. You can also use the Ctrl+Enter keycombination.To insert a blank page at the current cursor position click the Blank Page icon onthe Insert tab of the top toolbar. This action inserts two page breaks that create a blank page.To insert a page break before the selected paragraph i.e. to start this paragraph at the top of anew page:
· click the right mouse button and select the Page break before option in the menu, or· click the right mouse button, select the Paragraph Advanced Settings option in the
menu or use the Show advanced settings link on the right sidebar, and check the Pagebreak before box at the Line & Page Breaks tab of the opened Paragraph - AdvancedSettings window.

To keep lines together so that only whole paragraphs will be moved to the new page (i.e. therewill be no page break between the lines within a single paragraph),
· click the right mouse button and select the Keep lines together option in the menu, or· click the right mouse button, select the Paragraph Advanced Settings option on the
menu or use the Show advanced settings link at the right sidebar, and check the Keeplines together box at the Line & Page Breaks in the opened Paragraph - AdvancedSettings window.
The Line & Page Breaks tab of the Paragraph - Advanced Settings window allows you to settwo more pagination options:
· Keep with next - is used to prevent a page break between the selected paragraph andthe next one.
· Orphan control - is selected by default and used to prevent a single line of theparagraph (the first or last) from appearing at the top or bottom of the page.
Add bordersTo add borders to a paragraph, page, or the whole document,1. place the cursor within the required paragraph, or select several paragraphs with the
mouse or the whole text by pressing the Ctrl+A key combination,2. click the right mouse button and select the Paragraph Advanced Settings option from
the menu or use the Show advanced settings link on the right sidebar,3. switch to the Borders & Fill tab in the opened Paragraph - Advanced Settings window,4. set the needed value for Border Size and select a Border Color,

5. click within the available diagram or use buttons to select borders and apply the chosenstyle to them,
6. click the OK button.
After adding the borders, you can also set paddings i.e. distances betweenthe right, left, top and bottom borders and the paragraph.To set the necessary values, switch to the Paddings tab of the Paragraph - AdvancedSettings window:
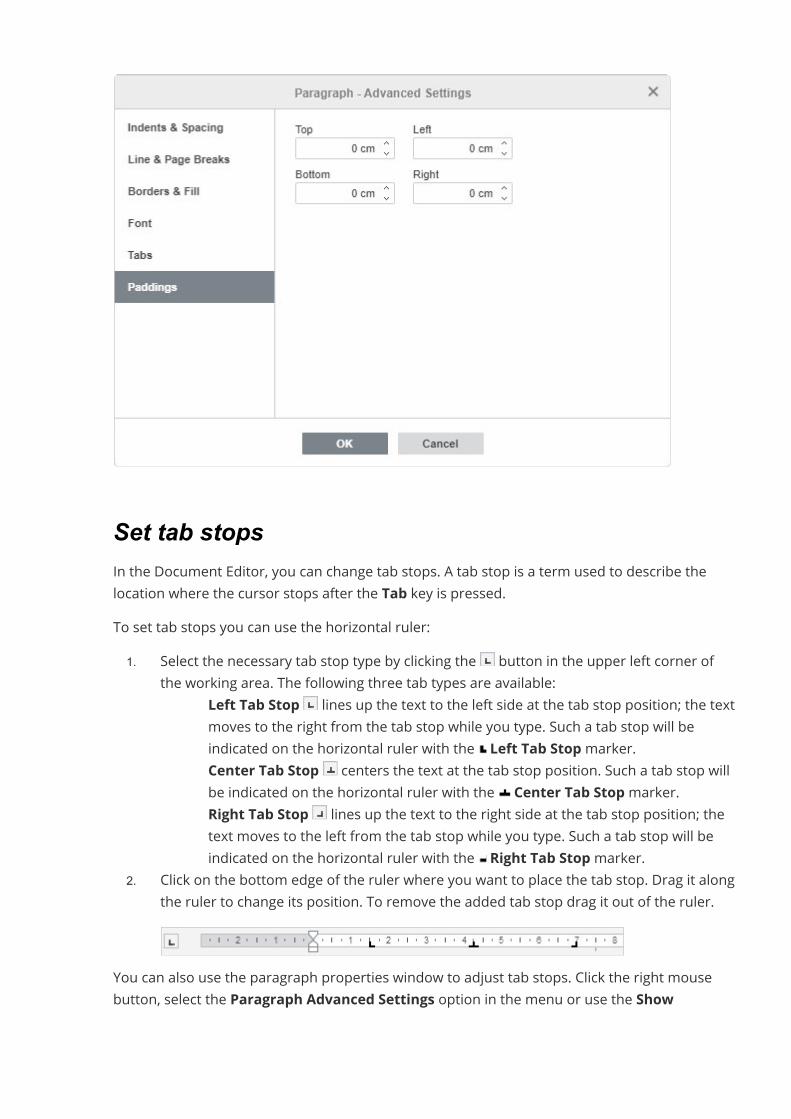
Set tab stopsIn the Document Editor, you can change tab stops. A tab stop is a term used to describe thelocation where the cursor stops after the Tab key is pressed.To set tab stops you can use the horizontal ruler:1. Select the necessary tab stop type by clicking the button in the upper left corner of
the working area. The following three tab types are available:· Left Tab Stop lines up the text to the left side at the tab stop position; the text
moves to the right from the tab stop while you type. Such a tab stop will beindicated on the horizontal ruler with the Left Tab Stopmarker.
· Center Tab Stop centers the text at the tab stop position. Such a tab stop willbe indicated on the horizontal ruler with the Center Tab Stopmarker.
· Right Tab Stop lines up the text to the right side at the tab stop position; thetext moves to the left from the tab stop while you type. Such a tab stop will beindicated on the horizontal ruler with the Right Tab Stopmarker.
2. Click on the bottom edge of the ruler where you want to place the tab stop. Drag it alongthe ruler to change its position. To remove the added tab stop drag it out of the ruler.
You can also use the paragraph properties window to adjust tab stops. Click the right mousebutton, select the Paragraph Advanced Settings option in the menu or use the Show
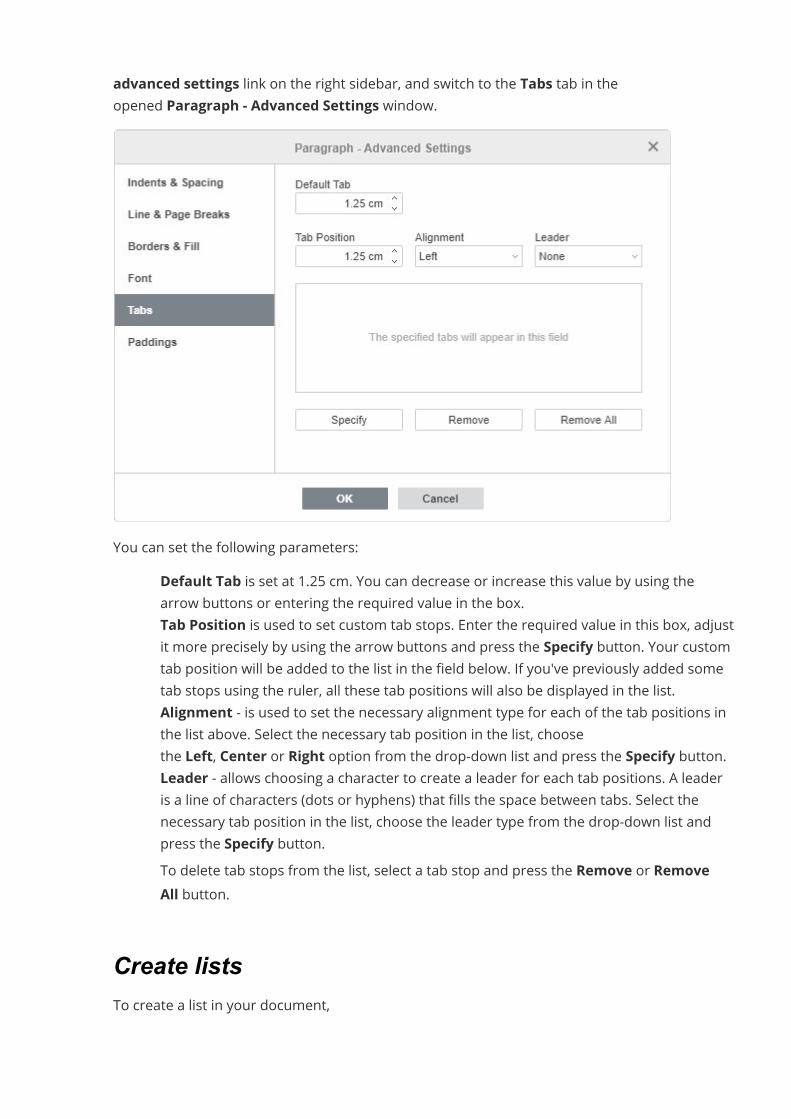
advanced settings link on the right sidebar, and switch to the Tabs tab in theopened Paragraph - Advanced Settings window.
You can set the following parameters:· Default Tab is set at 1.25 cm. You can decrease or increase this value by using the
arrow buttons or entering the required value in the box.· Tab Position is used to set custom tab stops. Enter the required value in this box, adjust
it more precisely by using the arrow buttons and press the Specify button. Your customtab position will be added to the list in the field below. If you've previously added sometab stops using the ruler, all these tab positions will also be displayed in the list.
· Alignment - is used to set the necessary alignment type for each of the tab positions inthe list above. Select the necessary tab position in the list, choosethe Left, Center or Right option from the drop-down list and press the Specify button.
· Leader - allows choosing a character to create a leader for each tab positions. A leaderis a line of characters (dots or hyphens) that fills the space between tabs. Select thenecessary tab position in the list, choose the leader type from the drop-down list andpress the Specify button.
· To delete tab stops from the list, select a tab stop and press the Remove or RemoveAll button.
Create listsTo create a list in your document,

1. place the cursor to the position where a list will be started (this can be a new line or thealready entered text),
2. switch to the Home tab of the top toolbar,3. select the list type you would like to start:
· Unordered list with markers is created using the Bullets icon on the toptoolbar
· Ordered list with digits or letters is created using the Numbering icon onthe top toolbar
Note: click the downward arrow next to the Bullets or Numbering icon to select howthe list is going to look like.
4. each time you press the Enter key at the end of the line, a new ordered or unorderedlist item will appear. To stop that, press the Backspace key and keep on typing commontext paragraphs.
The program also creates numbered lists automatically when you enter digit 1 with a dot or abracket and a space after it: 1., 1). Bulleted lists can be created automatically when you enterthe -, * characters and a space after them.You can also change the text indentation in the lists and their nesting by clicking the Multilevellist , Decrease indent , and Increase indent icons on the Home tab of the top toolbar.To change the list level, click the Numbering , Bullets , orMultilevel list icon andchoose the Change List Level option, or place the cursor at the beginning of the line and pressthe Tab key on a keyboard to move to the next level of the list. Proceed with the list levelneeded.
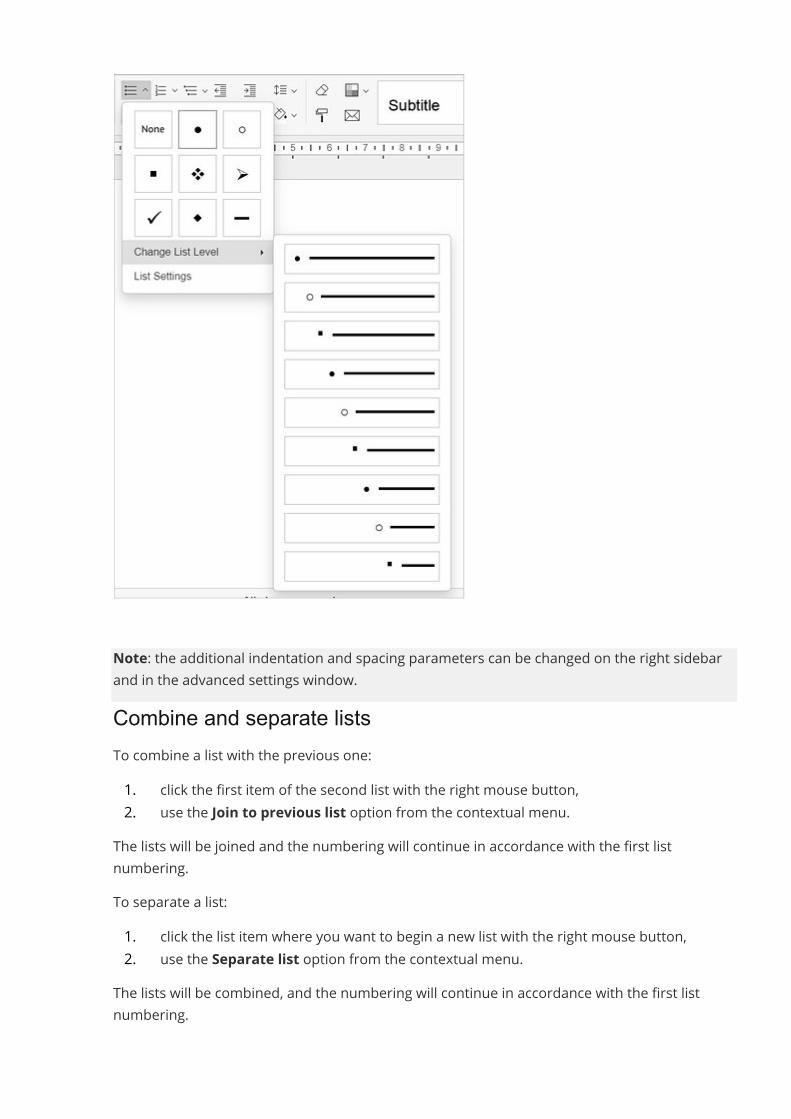
Note: the additional indentation and spacing parameters can be changed on the right sidebarand in the advanced settings window.Combine and separate listsTo combine a list with the previous one:1. click the first item of the second list with the right mouse button,2. use the Join to previous list option from the contextual menu.
The lists will be joined and the numbering will continue in accordance with the first listnumbering.To separate a list:1. click the list item where you want to begin a new list with the right mouse button,2. use the Separate list option from the contextual menu.
The lists will be combined, and the numbering will continue in accordance with the first listnumbering.
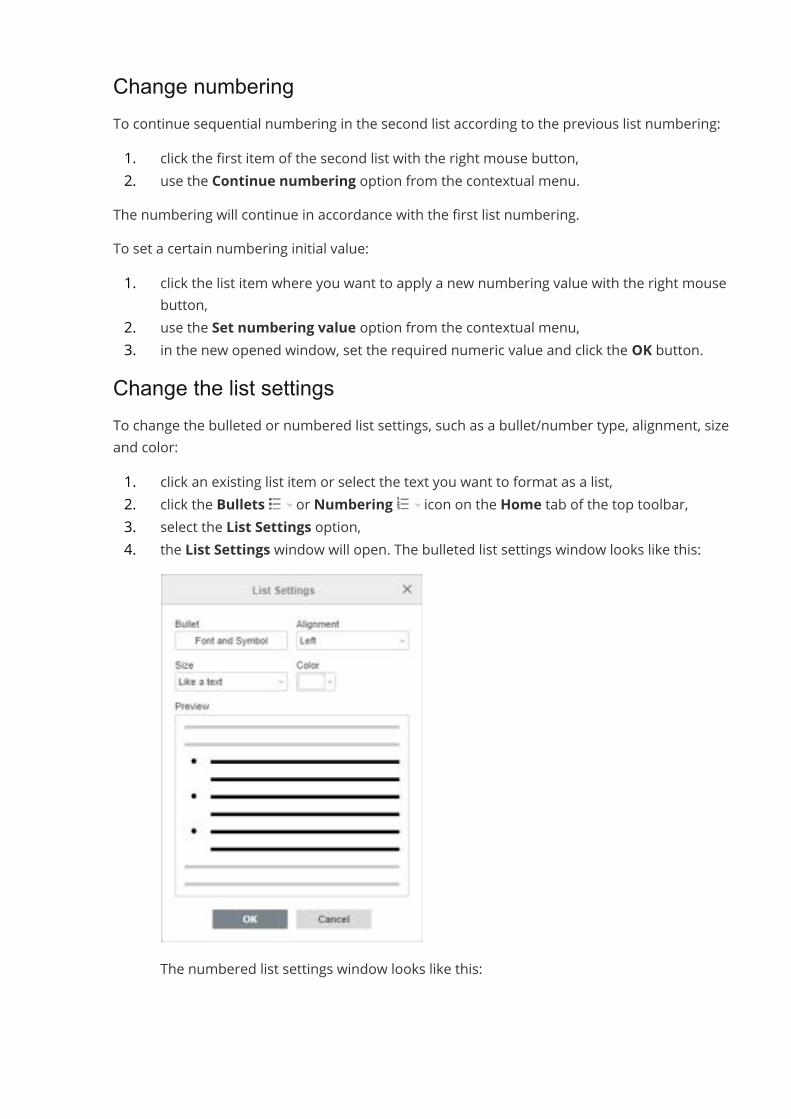
Change numberingTo continue sequential numbering in the second list according to the previous list numbering:1. click the first item of the second list with the right mouse button,2. use the Continue numbering option from the contextual menu.
The numbering will continue in accordance with the first list numbering.To set a certain numbering initial value:1. click the list item where you want to apply a new numbering value with the right mouse
button,2. use the Set numbering value option from the contextual menu,3. in the new opened window, set the required numeric value and click the OK button.Change the list settingsTo change the bulleted or numbered list settings, such as a bullet/number type, alignment, sizeand color:1. click an existing list item or select the text you want to format as a list,2. click the Bullets or Numbering icon on the Home tab of the top toolbar,3. select the List Settings option,4. the List Settings window will open. The bulleted list settings window looks like this:
The numbered list settings window looks like this:
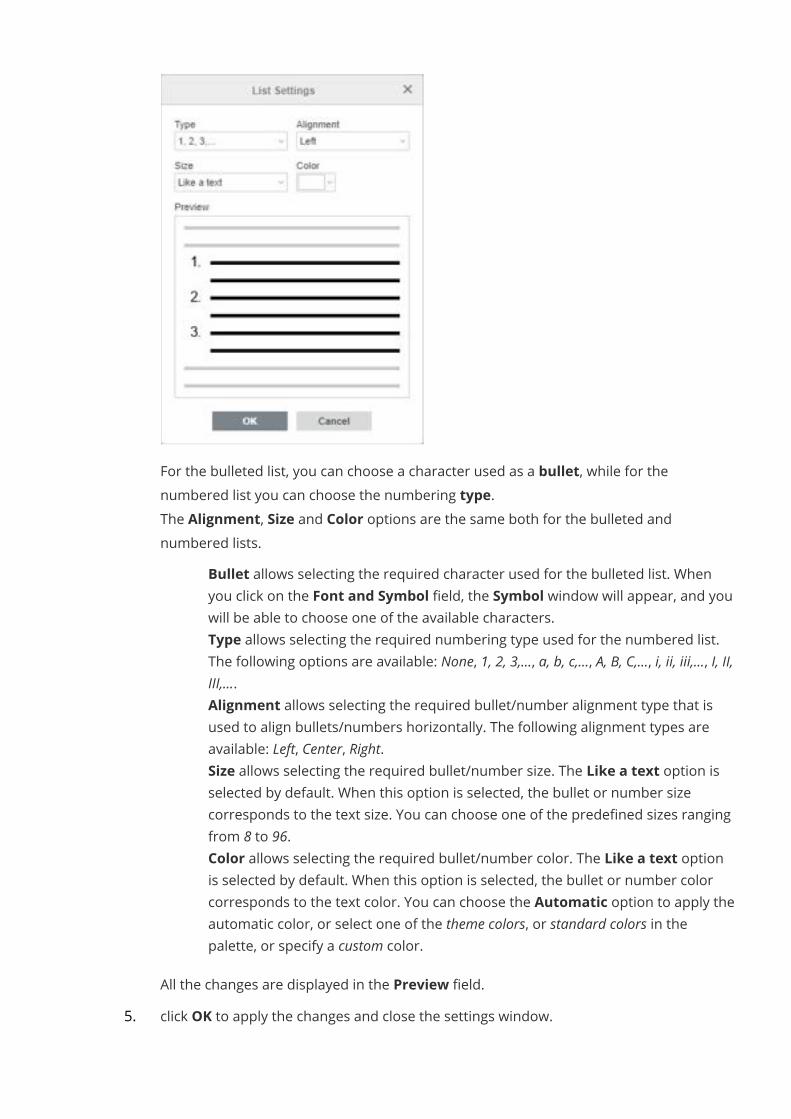
For the bulleted list, you can choose a character used as a bullet, while for thenumbered list you can choose the numbering type.The Alignment, Size and Color options are the same both for the bulleted andnumbered lists.
· Bullet allows selecting the required character used for the bulleted list. Whenyou click on the Font and Symbol field, the Symbol window will appear, and youwill be able to choose one of the available characters.
· Type allows selecting the required numbering type used for the numbered list.The following options are available: None, 1, 2, 3,..., a, b, c,..., A, B, C,..., i, ii, iii,..., I, II,III,....
· Alignment allows selecting the required bullet/number alignment type that isused to align bullets/numbers horizontally. The following alignment types areavailable: Left, Center, Right.
· Size allows selecting the required bullet/number size. The Like a text option isselected by default. When this option is selected, the bullet or number sizecorresponds to the text size. You can choose one of the predefined sizes rangingfrom 8 to 96.
· Color allows selecting the required bullet/number color. The Like a text optionis selected by default. When this option is selected, the bullet or number colorcorresponds to the text color. You can choose the Automatic option to apply theautomatic color, or select one of the theme colors, or standard colors in thepalette, or specify a custom color.
All the changes are displayed in the Preview field.5. click OK to apply the changes and close the settings window.
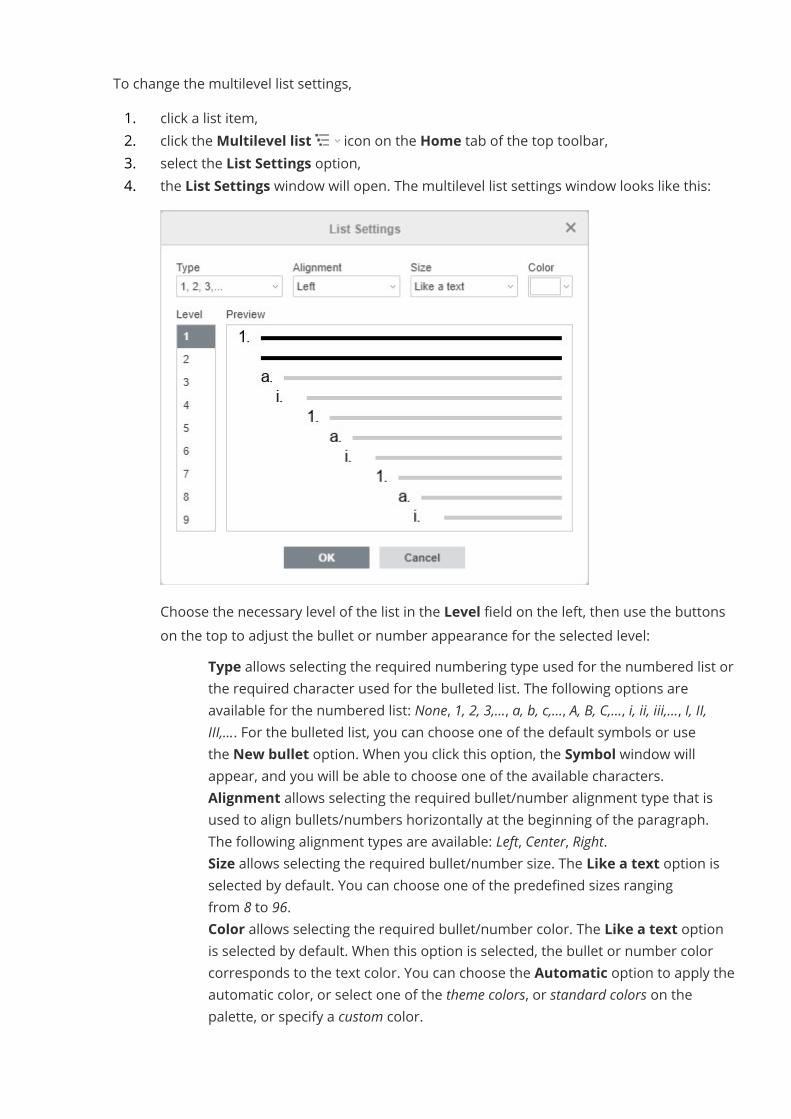
To change the multilevel list settings,1. click a list item,2. click theMultilevel list icon on the Home tab of the top toolbar,3. select the List Settings option,4. the List Settings window will open. The multilevel list settings window looks like this:
Choose the necessary level of the list in the Level field on the left, then use the buttonson the top to adjust the bullet or number appearance for the selected level:
· Type allows selecting the required numbering type used for the numbered list orthe required character used for the bulleted list. The following options areavailable for the numbered list: None, 1, 2, 3,..., a, b, c,..., A, B, C,..., i, ii, iii,..., I, II,III,.... For the bulleted list, you can choose one of the default symbols or usethe New bullet option. When you click this option, the Symbol window willappear, and you will be able to choose one of the available characters.
· Alignment allows selecting the required bullet/number alignment type that isused to align bullets/numbers horizontally at the beginning of the paragraph.The following alignment types are available: Left, Center, Right.
· Size allows selecting the required bullet/number size. The Like a text option isselected by default. You can choose one of the predefined sizes rangingfrom 8 to 96.
· Color allows selecting the required bullet/number color. The Like a text optionis selected by default. When this option is selected, the bullet or number colorcorresponds to the text color. You can choose the Automatic option to apply theautomatic color, or select one of the theme colors, or standard colors on thepalette, or specify a custom color.
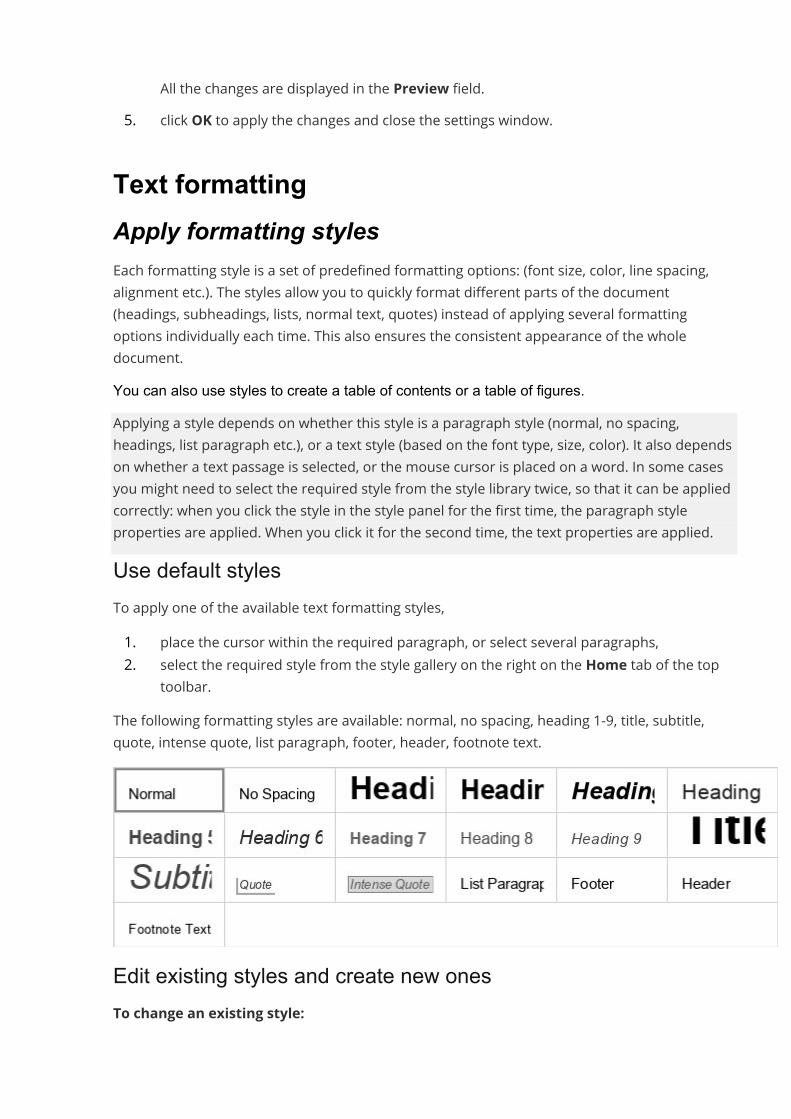
All the changes are displayed in the Preview field.5. click OK to apply the changes and close the settings window.
Text formattingApply formatting stylesEach formatting style is a set of predefined formatting options: (font size, color, line spacing,alignment etc.). The styles allow you to quickly format different parts of the document(headings, subheadings, lists, normal text, quotes) instead of applying several formattingoptions individually each time. This also ensures the consistent appearance of the wholedocument.You can also use styles to create a table of contents or a table of figures.Applying a style depends on whether this style is a paragraph style (normal, no spacing,headings, list paragraph etc.), or a text style (based on the font type, size, color). It also dependson whether a text passage is selected, or the mouse cursor is placed on a word. In some casesyou might need to select the required style from the style library twice, so that it can be appliedcorrectly: when you click the style in the style panel for the first time, the paragraph styleproperties are applied. When you click it for the second time, the text properties are applied.Use default stylesTo apply one of the available text formatting styles,1. place the cursor within the required paragraph, or select several paragraphs,2. select the required style from the style gallery on the right on the Home tab of the top
toolbar.The following formatting styles are available: normal, no spacing, heading 1-9, title, subtitle,quote, intense quote, list paragraph, footer, header, footnote text.
Edit existing styles and create new onesTo change an existing style:

1. Apply the necessary style to a paragraph.2. Select the paragraph text and change all the formatting parameters you need.3. Save the changes made:
· right-click the edited text, select the Formatting as Style option and thenchoose the Update 'StyleName' Style option ('StyleName' corresponds to thestyle you've applied at the step 1),
· or select the edited text passage with the mouse, drop-down the style gallery,right-click the style you want to change and select the Update fromselection option.
Once the style is modified, all the paragraphs in the document formatted with this style willchange their appearance correspondingly.To create a completely new style:1. Format a text passage as you need.2. Select an appropriate way to save the style:
· right-click the edited text, select the Formatting as Style option and thenchoose the Create new Style option,
· or select the edited text passage with the mouse, drop-down the style galleryand click the New style from selection option.
3. Set the new style parameters in the opened Create New Style window:
· Specify the new style name in the text entry field.· Select the desired style for the subsequent paragraph from the Next paragraph
style list. It's also possible to choose the Same as created new style option.· Click the OK button.
The created style will be added to the style gallery.Manage your custom styles:
· To restore the default settings of a certain style you've changed, right-click the style youwant to restore and select the Restore to default option.
· To restore the default settings of all the styles you've changed, right-click any defaultstyle in the style gallery and select the Restore all to default styles option.
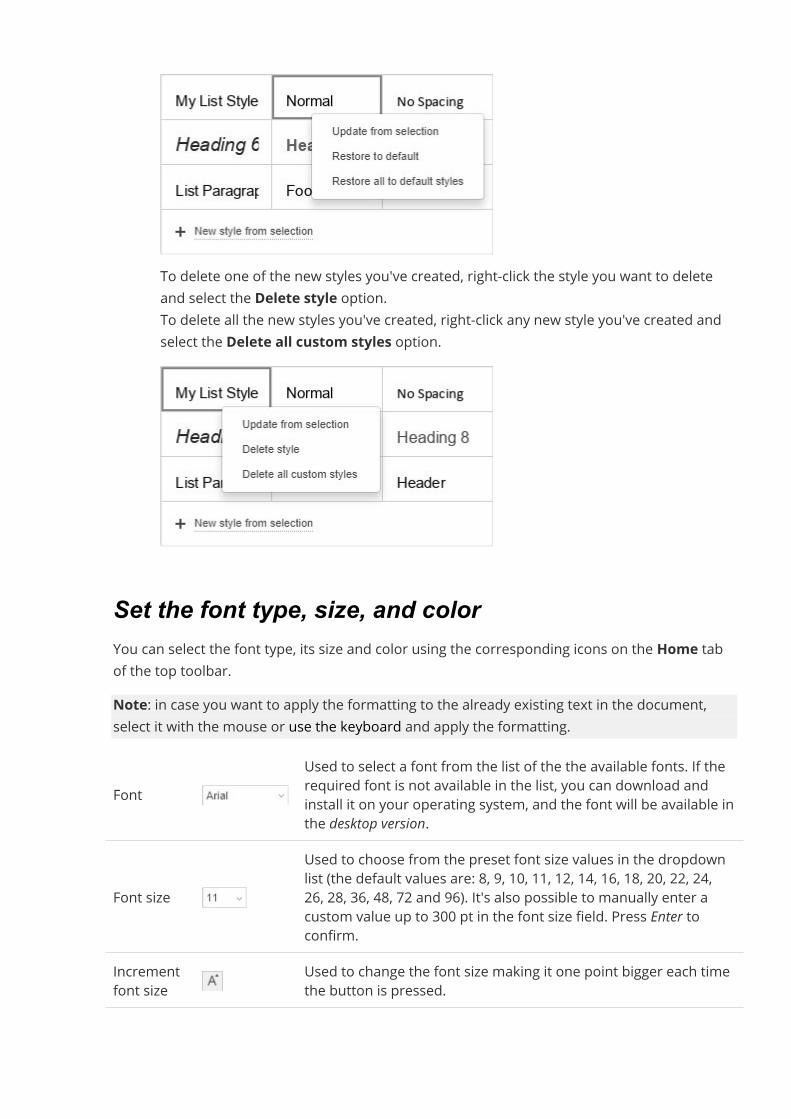
· To delete one of the new styles you've created, right-click the style you want to deleteand select the Delete style option.
· To delete all the new styles you've created, right-click any new style you've created andselect the Delete all custom styles option.
Set the font type, size, and colorYou can select the font type, its size and color using the corresponding icons on the Home tabof the top toolbar.Note: in case you want to apply the formatting to the already existing text in the document,select it with the mouse or use the keyboard and apply the formatting.
FontUsed to select a font from the list of the the available fonts. If therequired font is not available in the list, you can download andinstall it on your operating system, and the font will be available inthe desktop version.
Font sizeUsed to choose from the preset font size values in the dropdownlist (the default values are: 8, 9, 10, 11, 12, 14, 16, 18, 20, 22, 24,26, 28, 36, 48, 72 and 96). It's also possible to manually enter acustom value up to 300 pt in the font size field. Press Enter toconfirm.
Incrementfont size
Used to change the font size making it one point bigger each timethe button is pressed.
Decrementfont size
Used to change the font size making it one point smaller eachtime the button is pressed.
Highlightcolor
Used to mark separate sentences, phrases, words, or evencharacters by adding a color band that imitates the highlighterpen effect throughout the text. You can select the required part ofthe text and click the downward arrow next to the icon to select acolor in the palette (this color set does not depend on theselected Color scheme and includes 16 colors) - the color will beapplied to the selected text. Alternatively, you can first choose ahighlight color and then start selecting the text with the mouse -the mouse pointer will look like this and you'll be able tohighlight several different parts of your text sequentially. To stophighlighting, just click the icon once again. To delete the highlightcolor, choose the No Fill option. The Highlight color is differentfrom the Background color as the latter is applied to thewhole paragraph and completely fills all the paragraph spacefrom the left page margin to the right page margin.
Font color
Used to change the color of the letters/characters in the text. Bydefault, the automatic font color is set in a new blank document. Itis displayed as a black font on the white background. If youchange the background color to black, the font color willautomatically change to white to keep the text clearly visible. Tochoose a different color, click the downward arrow next to theicon and select a color from the available palettes (the colors inthe Theme Colors palette depend on the selected color scheme).After you change the default font color, you can usethe Automatic option in the color palettes window to quicklyrestore the automatic color for the selected text passage.
Apply font decoration stylesYou can apply various font decoration styles using the corresponding icons on the Home tab ofthe top toolbar.Note: in case you want to apply the formatting to the already existing text in the document,select it with the mouse or use the keyboard and apply the formatting.Bold Used to make the font bold giving it a heavier appearance.Italic Used to make the font slightly slanted to the right.Underline Used to make the text underlined with a line going under the letters.Strikeout Used to make the text struck out with a line going through the letters.Superscript Used to make the text smaller placing it in the upper part of the text line, e.g.
as in fractions.
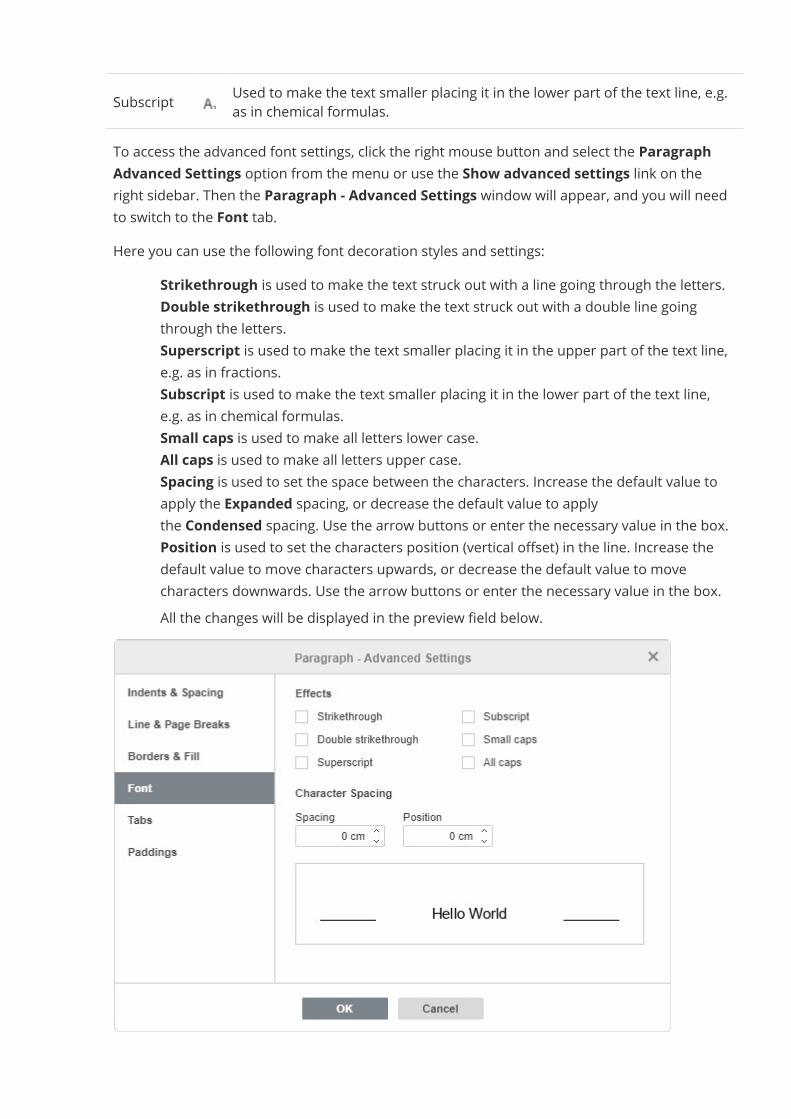
Subscript Used to make the text smaller placing it in the lower part of the text line, e.g.as in chemical formulas.
To access the advanced font settings, click the right mouse button and select the ParagraphAdvanced Settings option from the menu or use the Show advanced settings link on theright sidebar. Then the Paragraph - Advanced Settings window will appear, and you will needto switch to the Font tab.Here you can use the following font decoration styles and settings:
· Strikethrough is used to make the text struck out with a line going through the letters.· Double strikethrough is used to make the text struck out with a double line going
through the letters.· Superscript is used to make the text smaller placing it in the upper part of the text line,
e.g. as in fractions.· Subscript is used to make the text smaller placing it in the lower part of the text line,
e.g. as in chemical formulas.· Small caps is used to make all letters lower case.· All caps is used to make all letters upper case.· Spacing is used to set the space between the characters. Increase the default value to
apply the Expanded spacing, or decrease the default value to applythe Condensed spacing. Use the arrow buttons or enter the necessary value in the box.
· Position is used to set the characters position (vertical offset) in the line. Increase thedefault value to move characters upwards, or decrease the default value to movecharacters downwards. Use the arrow buttons or enter the necessary value in the box.
· All the changes will be displayed in the preview field below.
Copy/clear text formattingTo copy a certain text formatting,1. select the text passage whose formatting you need to copy with the mouse or using the
keyboard,2. click the Copy style icon on the Home tab of the top toolbar (the mouse pointer will
look like this ),3. select the required text passage to apply the same formatting.
To apply the copied formatting to multiple text passages,1. select the text passage whose formatting you need to copy with the mouse or use the
keyboard,2. double-click the Copy style icon on the Home tab of the top toolbar (the mouse
pointer will look like this and the Copy style icon will remain selected: ),3. select the necessary text passages one by one to apply the same formatting to each of
them,4. to exit this mode, click the Copy style icon once again or press the Esc key on the
keyboard.To quickly remove the applied formatting from your text,1. select the text passage whose formatting you want to remove,2. click the Clear style icon on the Home tab of the top toolbar.
Add hyperlinksTo add a hyperlink,1. place the cursor in the text that you want to display as a hyperlink,2. switch to the Insert or References tab of the top toolbar,3. click the Hyperlink icon on the top toolbar,4. after that the Hyperlink Settings window will appear, and you will be able to specify the
hyperlink parameters:· Select a link type you wish to insert:
Use the External Link option and enter a URL in theformat http://www.example.com in the Link to field below if you need to add ahyperlink leading to an external website.
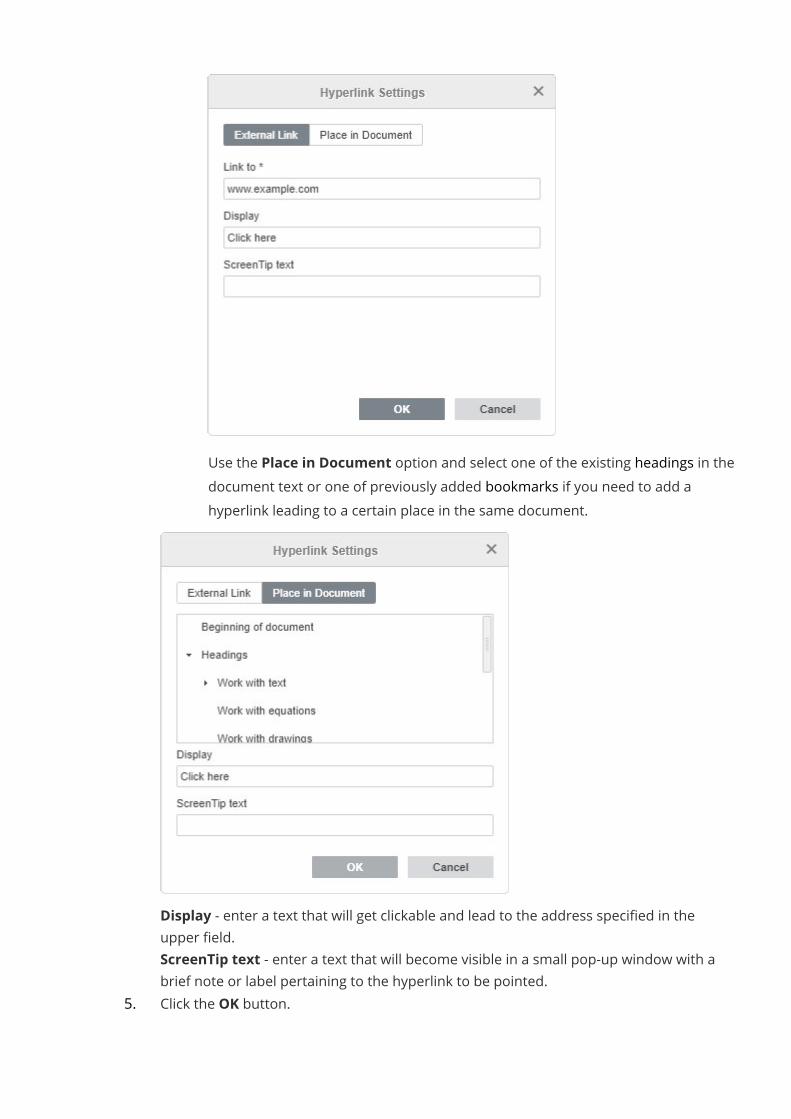
· Use the Place in Document option and select one of the existing headings in thedocument text or one of previously added bookmarks if you need to add ahyperlink leading to a certain place in the same document.
· Display - enter a text that will get clickable and lead to the address specified in theupper field.
· ScreenTip text - enter a text that will become visible in a small pop-up window with abrief note or label pertaining to the hyperlink to be pointed.
5. Click the OK button.
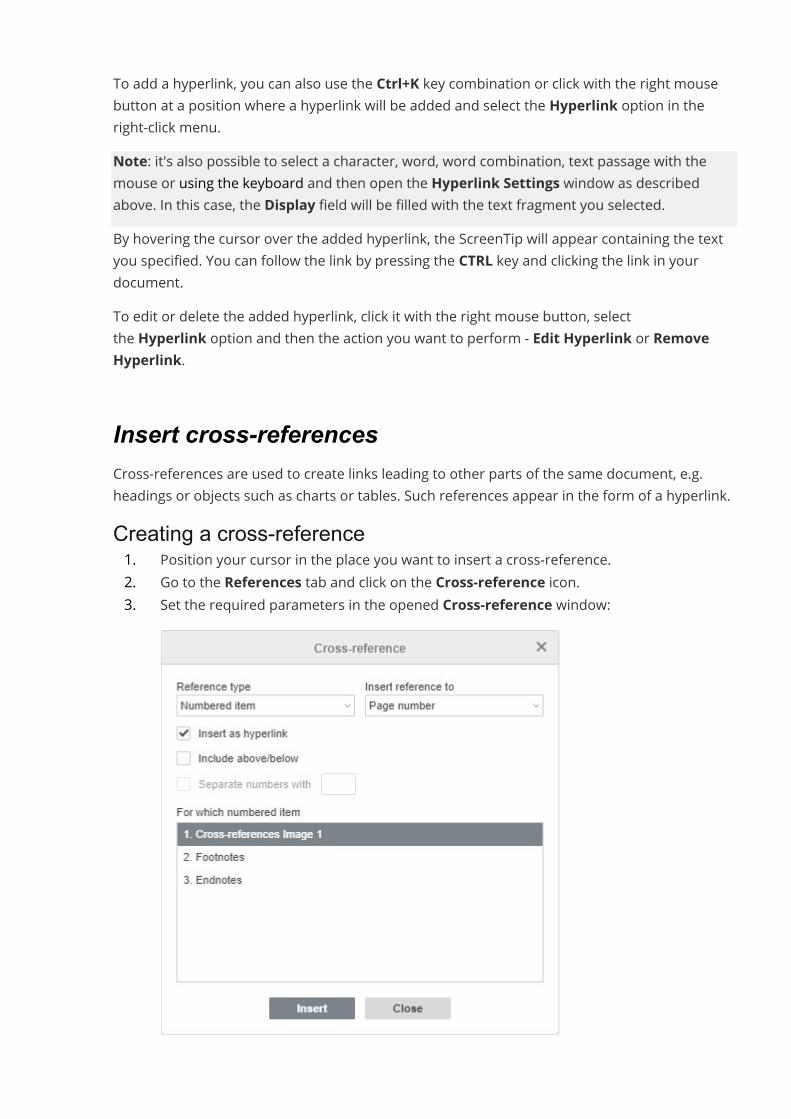
To add a hyperlink, you can also use the Ctrl+K key combination or click with the right mousebutton at a position where a hyperlink will be added and select the Hyperlink option in theright-click menu.Note: it's also possible to select a character, word, word combination, text passage with themouse or using the keyboard and then open the Hyperlink Settings window as describedabove. In this case, the Display field will be filled with the text fragment you selected.By hovering the cursor over the added hyperlink, the ScreenTip will appear containing the textyou specified. You can follow the link by pressing the CTRL key and clicking the link in yourdocument.To edit or delete the added hyperlink, click it with the right mouse button, selectthe Hyperlink option and then the action you want to perform - Edit Hyperlink or RemoveHyperlink.
Insert cross-referencesCross-references are used to create links leading to other parts of the same document, e.g.headings or objects such as charts or tables. Such references appear in the form of a hyperlink.Creating a cross-reference1. Position your cursor in the place you want to insert a cross-reference.2. Go to the References tab and click on the Cross-reference icon.3. Set the required parameters in the opened Cross-reference window:
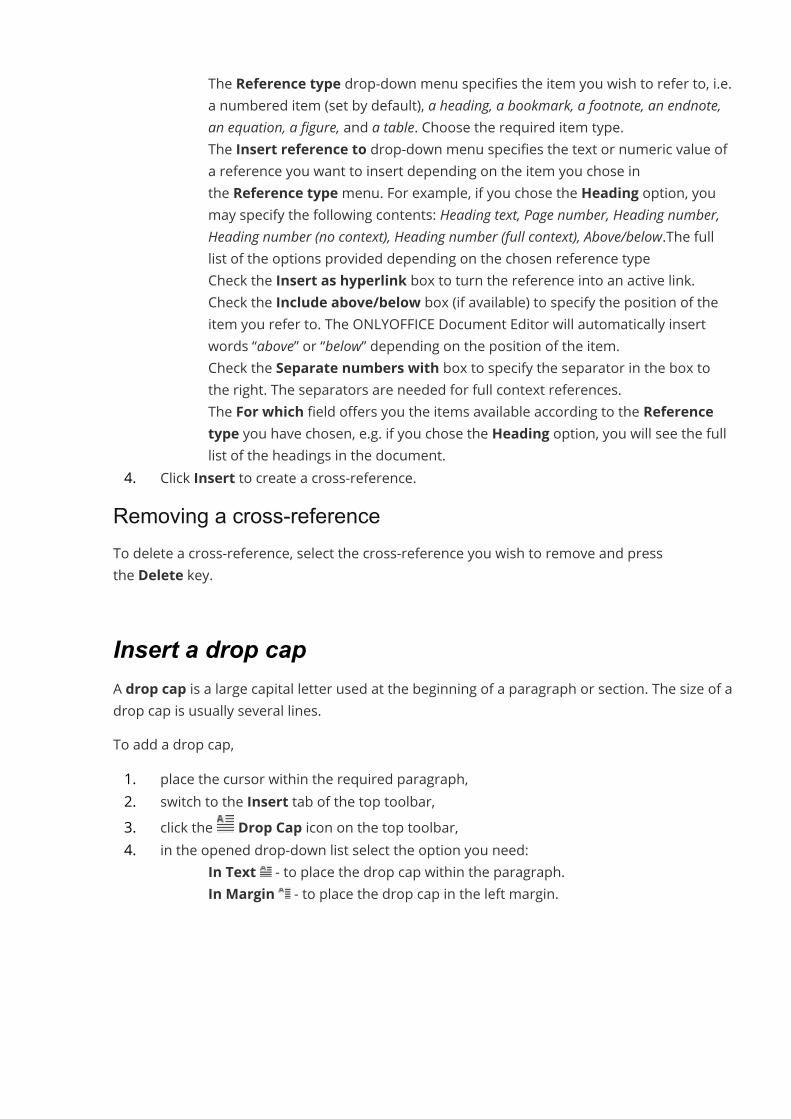
· The Reference type drop-down menu specifies the item you wish to refer to, i.e.a numbered item (set by default), a heading, a bookmark, a footnote, an endnote,an equation, a figure, and a table. Choose the required item type.
· The Insert reference to drop-down menu specifies the text or numeric value ofa reference you want to insert depending on the item you chose inthe Reference typemenu. For example, if you chose the Heading option, youmay specify the following contents: Heading text, Page number, Heading number,Heading number (no context), Heading number (full context), Above/below.The fulllist of the options provided depending on the chosen reference type
· Check the Insert as hyperlink box to turn the reference into an active link.· Check the Include above/below box (if available) to specify the position of the
item you refer to. The ONLYOFFICE Document Editor will automatically insertwords “above” or “below” depending on the position of the item.
· Check the Separate numbers with box to specify the separator in the box tothe right. The separators are needed for full context references.
· The For which field offers you the items available according to the Referencetype you have chosen, e.g. if you chose the Heading option, you will see the fulllist of the headings in the document.
4. Click Insert to create a cross-reference.Removing a cross-referenceTo delete a cross-reference, select the cross-reference you wish to remove and pressthe Delete key.
Insert a drop capA drop cap is a large capital letter used at the beginning of a paragraph or section. The size of adrop cap is usually several lines.To add a drop cap,1. place the cursor within the required paragraph,2. switch to the Insert tab of the top toolbar,3. click the Drop Cap icon on the top toolbar,4. in the opened drop-down list select the option you need:
· In Text - to place the drop cap within the paragraph.· In Margin - to place the drop cap in the left margin.
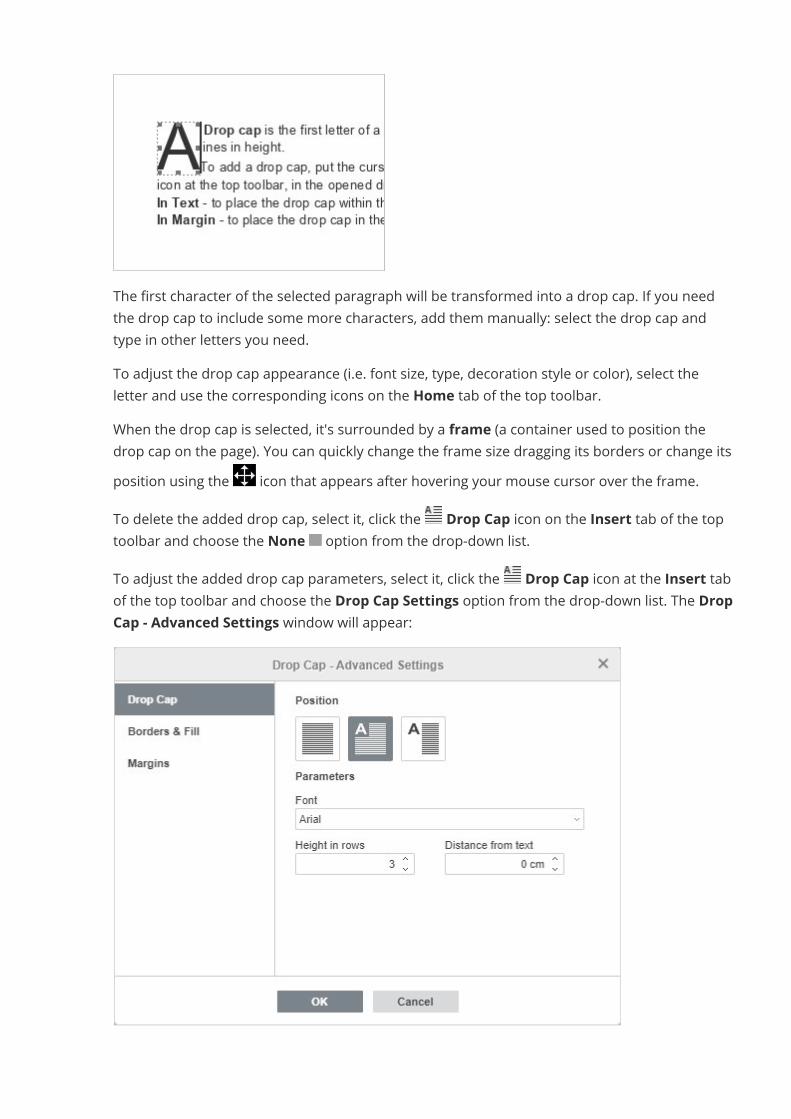
The first character of the selected paragraph will be transformed into a drop cap. If you needthe drop cap to include some more characters, add them manually: select the drop cap andtype in other letters you need.To adjust the drop cap appearance (i.e. font size, type, decoration style or color), select theletter and use the corresponding icons on the Home tab of the top toolbar.When the drop cap is selected, it's surrounded by a frame (a container used to position thedrop cap on the page). You can quickly change the frame size dragging its borders or change itsposition using the icon that appears after hovering your mouse cursor over the frame.To delete the added drop cap, select it, click the Drop Cap icon on the Insert tab of the toptoolbar and choose the None option from the drop-down list.To adjust the added drop cap parameters, select it, click the Drop Cap icon at the Insert tabof the top toolbar and choose the Drop Cap Settings option from the drop-down list. The DropCap - Advanced Settings window will appear:
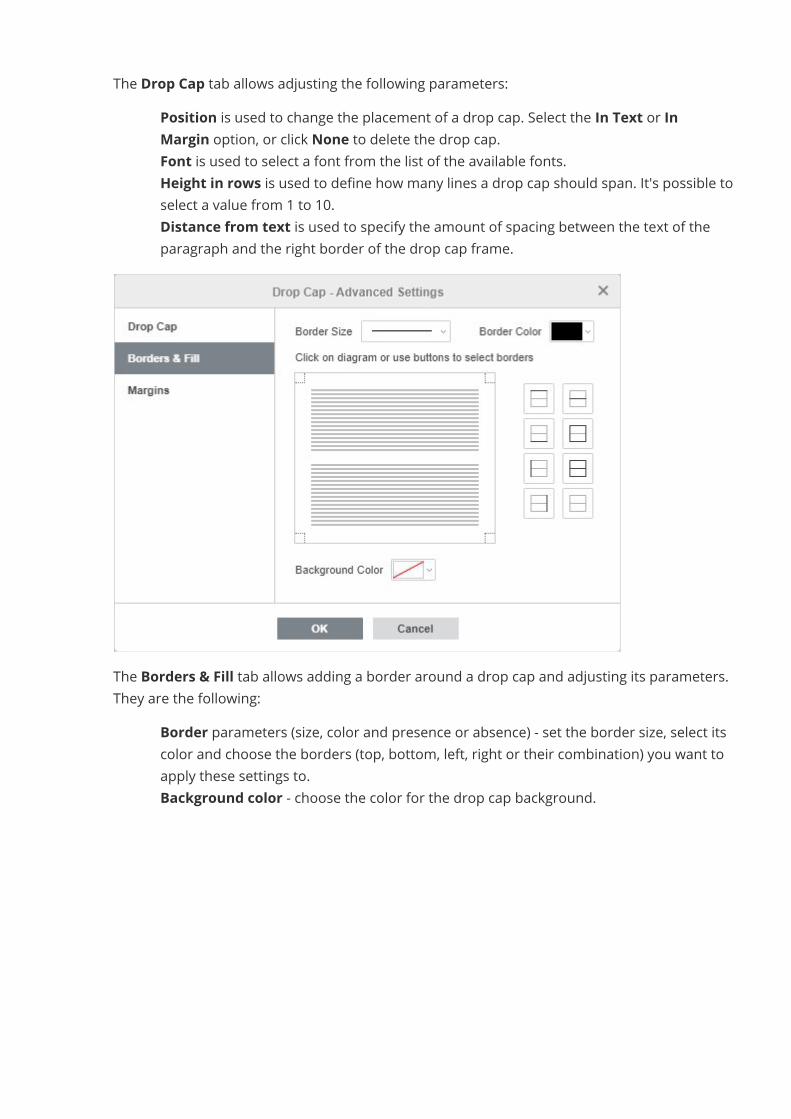
The Drop Cap tab allows adjusting the following parameters:· Position is used to change the placement of a drop cap. Select the In Text or In
Margin option, or click None to delete the drop cap.· Font is used to select a font from the list of the available fonts.· Height in rows is used to define how many lines a drop cap should span. It's possible to
select a value from 1 to 10.· Distance from text is used to specify the amount of spacing between the text of the
paragraph and the right border of the drop cap frame.
The Borders & Fill tab allows adding a border around a drop cap and adjusting its parameters.They are the following:
· Border parameters (size, color and presence or absence) - set the border size, select itscolor and choose the borders (top, bottom, left, right or their combination) you want toapply these settings to.
· Background color - choose the color for the drop cap background.
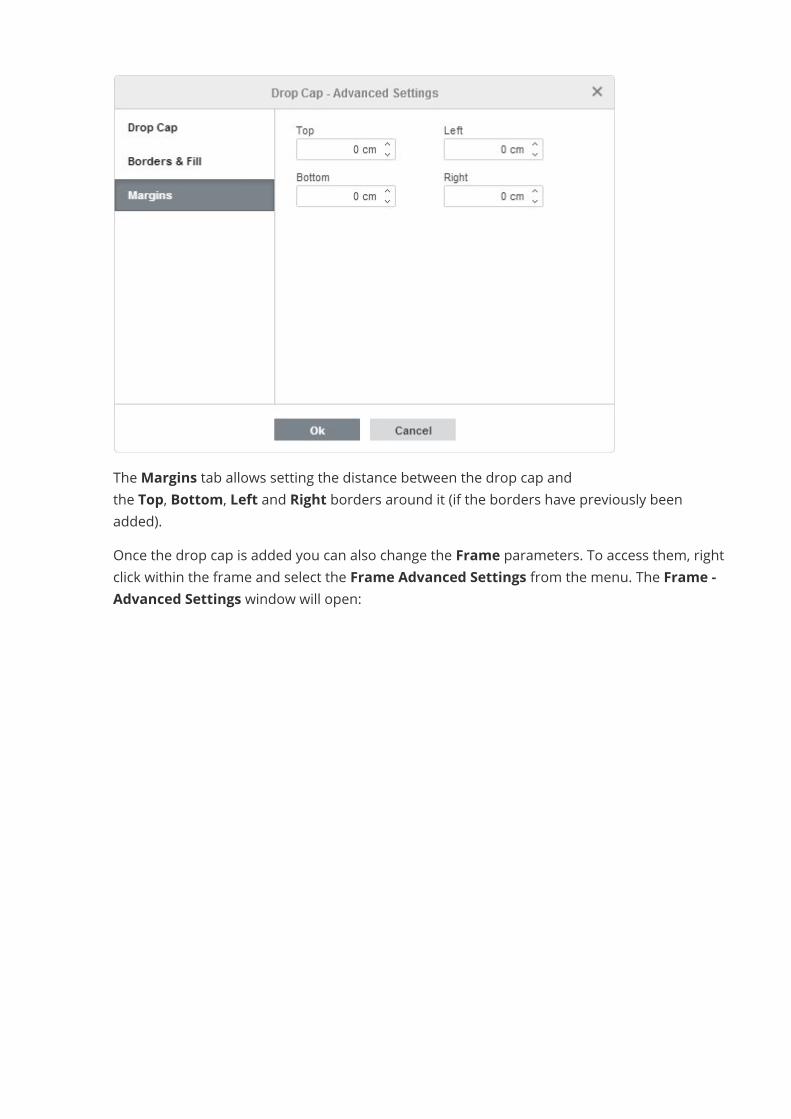
TheMargins tab allows setting the distance between the drop cap andthe Top, Bottom, Left and Right borders around it (if the borders have previously beenadded).Once the drop cap is added you can also change the Frame parameters. To access them, rightclick within the frame and select the Frame Advanced Settings from the menu. The Frame -Advanced Settings window will open:
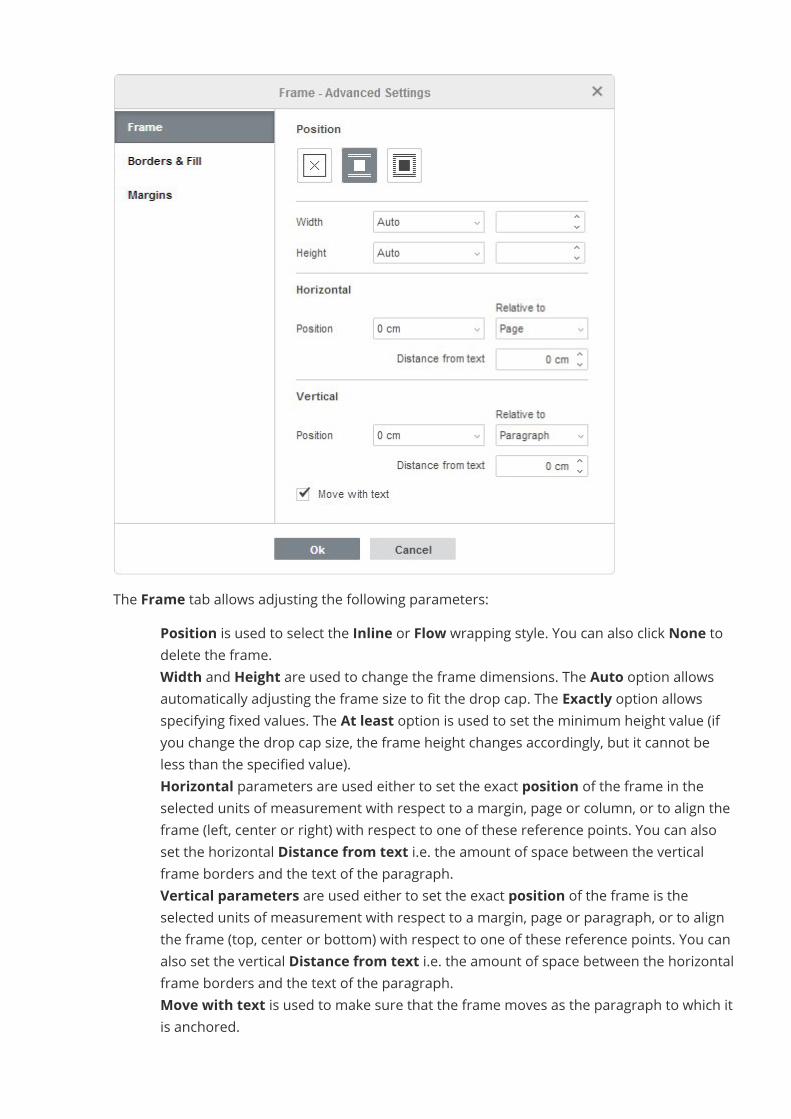
The Frame tab allows adjusting the following parameters:· Position is used to select the Inline or Flow wrapping style. You can also click None to
delete the frame.· Width and Height are used to change the frame dimensions. The Auto option allows
automatically adjusting the frame size to fit the drop cap. The Exactly option allowsspecifying fixed values. The At least option is used to set the minimum height value (ifyou change the drop cap size, the frame height changes accordingly, but it cannot beless than the specified value).
· Horizontal parameters are used either to set the exact position of the frame in theselected units of measurement with respect to a margin, page or column, or to align theframe (left, center or right) with respect to one of these reference points. You can alsoset the horizontal Distance from text i.e. the amount of space between the verticalframe borders and the text of the paragraph.
· Vertical parameters are used either to set the exact position of the frame is theselected units of measurement with respect to a margin, page or paragraph, or to alignthe frame (top, center or bottom) with respect to one of these reference points. You canalso set the vertical Distance from text i.e. the amount of space between the horizontalframe borders and the text of the paragraph.
· Move with text is used to make sure that the frame moves as the paragraph to which itis anchored.
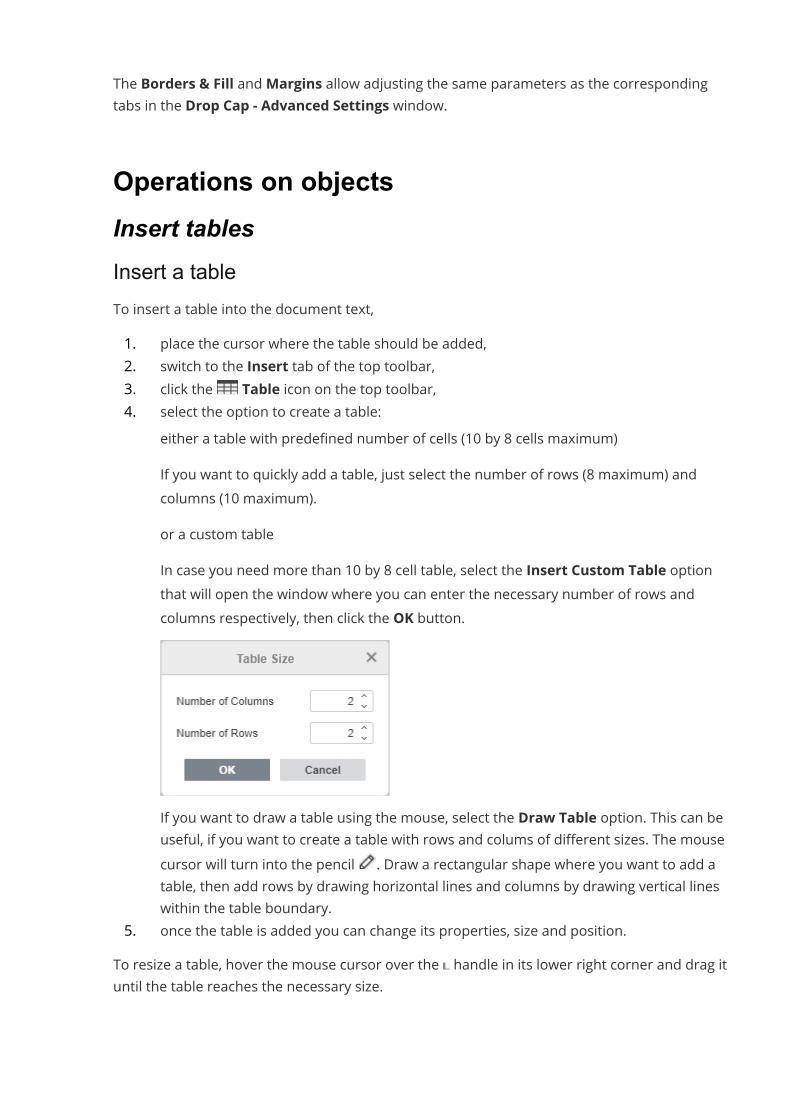
The Borders & Fill andMargins allow adjusting the same parameters as the correspondingtabs in the Drop Cap - Advanced Settings window.
Operations on objectsInsert tablesInsert a tableTo insert a table into the document text,1. place the cursor where the table should be added,2. switch to the Insert tab of the top toolbar,3. click the Table icon on the top toolbar,4. select the option to create a table:· either a table with predefined number of cells (10 by 8 cells maximum)
If you want to quickly add a table, just select the number of rows (8 maximum) andcolumns (10 maximum).
· or a custom tableIn case you need more than 10 by 8 cell table, select the Insert Custom Table optionthat will open the window where you can enter the necessary number of rows andcolumns respectively, then click the OK button.
· If you want to draw a table using the mouse, select the Draw Table option. This can beuseful, if you want to create a table with rows and colums of different sizes. The mousecursor will turn into the pencil . Draw a rectangular shape where you want to add atable, then add rows by drawing horizontal lines and columns by drawing vertical lineswithin the table boundary.
5. once the table is added you can change its properties, size and position.To resize a table, hover the mouse cursor over the handle in its lower right corner and drag ituntil the table reaches the necessary size.
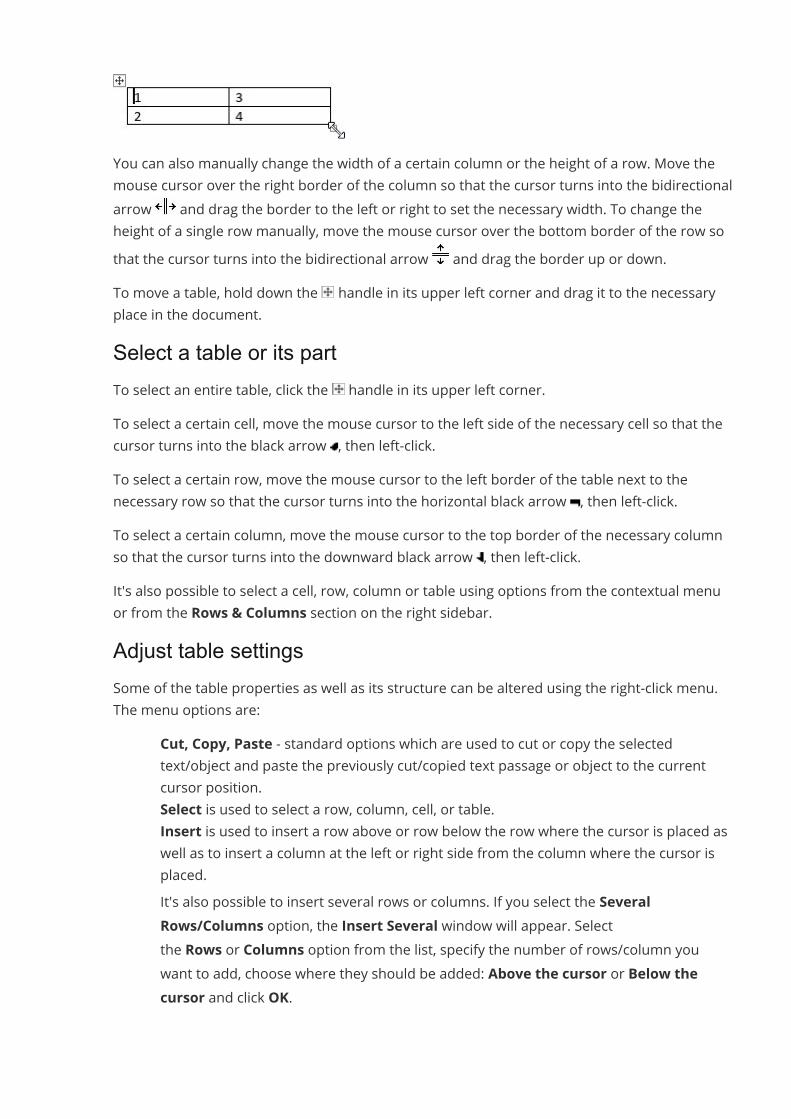
You can also manually change the width of a certain column or the height of a row. Move themouse cursor over the right border of the column so that the cursor turns into the bidirectionalarrow and drag the border to the left or right to set the necessary width. To change theheight of a single row manually, move the mouse cursor over the bottom border of the row sothat the cursor turns into the bidirectional arrow and drag the border up or down.To move a table, hold down the handle in its upper left corner and drag it to the necessaryplace in the document.Select a table or its partTo select an entire table, click the handle in its upper left corner.To select a certain cell, move the mouse cursor to the left side of the necessary cell so that thecursor turns into the black arrow , then left-click.To select a certain row, move the mouse cursor to the left border of the table next to thenecessary row so that the cursor turns into the horizontal black arrow , then left-click.To select a certain column, move the mouse cursor to the top border of the necessary columnso that the cursor turns into the downward black arrow , then left-click.It's also possible to select a cell, row, column or table using options from the contextual menuor from the Rows & Columns section on the right sidebar.Adjust table settingsSome of the table properties as well as its structure can be altered using the right-click menu.The menu options are:
· Cut, Copy, Paste - standard options which are used to cut or copy the selectedtext/object and paste the previously cut/copied text passage or object to the currentcursor position.
· Select is used to select a row, column, cell, or table.· Insert is used to insert a row above or row below the row where the cursor is placed as
well as to insert a column at the left or right side from the column where the cursor isplaced.
· It's also possible to insert several rows or columns. If you select the SeveralRows/Columns option, the Insert Several window will appear. Selectthe Rows or Columns option from the list, specify the number of rows/column youwant to add, choose where they should be added: Above the cursor or Below thecursor and click OK.
· Delete is used to delete a row, column, table or cells. If you select the Cells option,the Delete Cells window will open, where you can select if you want to Shift cellsleft, Delete entire row, or Delete entire column.
· Merge Cells is available if two or more cells are selected and is used to merge them.· It's also possible to merge cells by erasing a boundary between them using the eraser
tool. To do this, click the Table icon on the top toolbar, choose the EraseTable option. The mouse cursor will turn into the eraser . Move the mouse cursorover the border between the cells you want to merge and erase it.
· Split Cell... is used to open a window where you can select the needed number ofcolumns and rows the cell will be split in.
· It's also possible to split a cell by drawing rows or columns using the pencil tool. To dothis, click the Table icon on the top toolbar, choose the Draw Table option. Themouse cursor will turn into the pencil . Draw a horizontal line to create a row or avertical line to create a column.
· Distribute rows is used to adjust the selected cells so that they have the same heightwithout changing the overall table height.
· Distribute columns is used to adjust the selected cells so that they have the samewidth without changing the overall table width.
· Cell Vertical Alignment is used to align the text top, center or bottom in the selectedcell.
· Text Direction - is used to change the text orientation in a cell. You can place the texthorizontally, vertically from top to bottom (Rotate Text Down), or vertically frombottom to top (Rotate Text Up).
· Table Advanced Settings is used to open the 'Table - Advanced Settings' window.· Hyperlink is used to insert a hyperlink.· Paragraph Advanced Settings is used to open the 'Paragraph - Advanced Settings'
window.
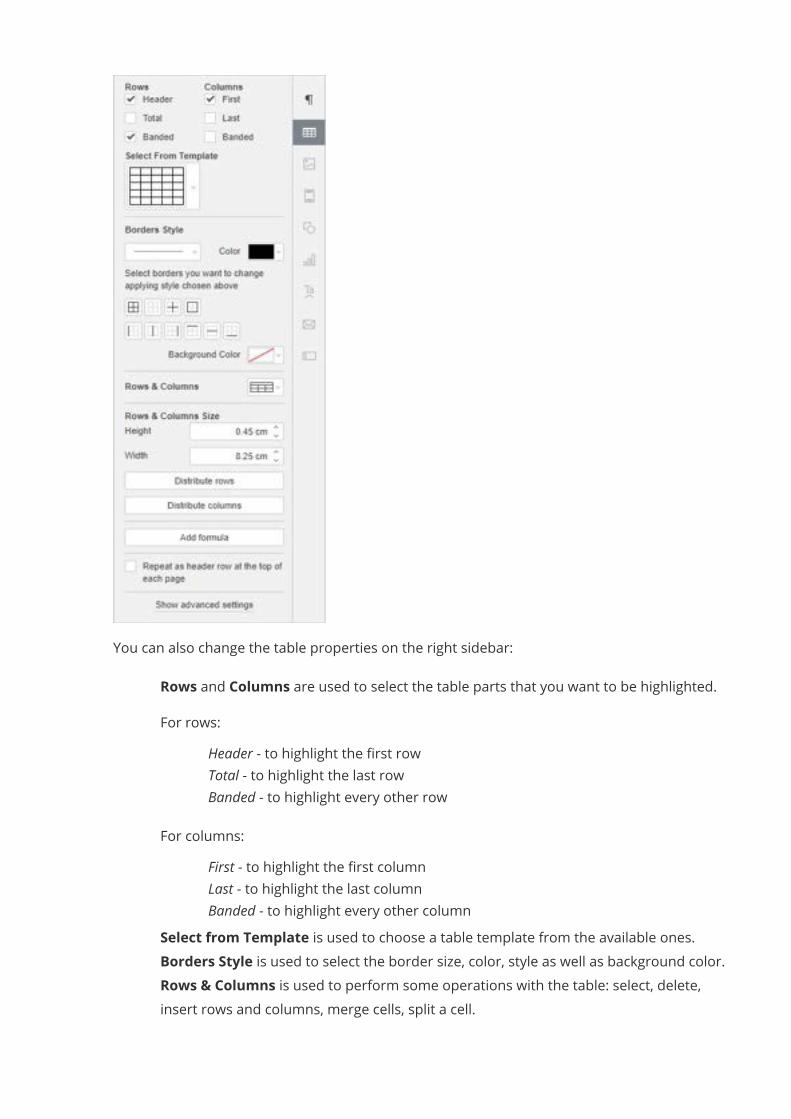
You can also change the table properties on the right sidebar:· Rows and Columns are used to select the table parts that you want to be highlighted.
For rows:· Header - to highlight the first row· Total - to highlight the last row· Banded - to highlight every other row
For columns:· First - to highlight the first column· Last - to highlight the last column· Banded - to highlight every other column
· Select from Template is used to choose a table template from the available ones.· Borders Style is used to select the border size, color, style as well as background color.· Rows & Columns is used to perform some operations with the table: select, delete,
insert rows and columns, merge cells, split a cell.
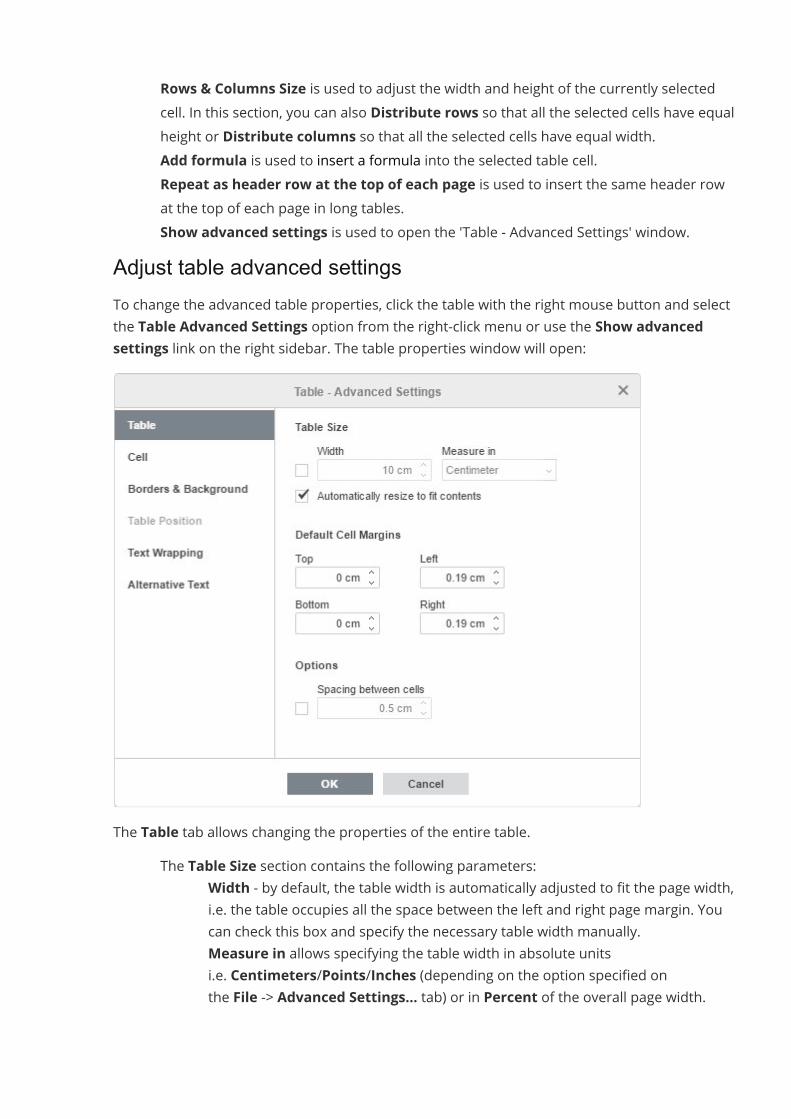
· Rows & Columns Size is used to adjust the width and height of the currently selectedcell. In this section, you can also Distribute rows so that all the selected cells have equalheight or Distribute columns so that all the selected cells have equal width.
· Add formula is used to insert a formula into the selected table cell.· Repeat as header row at the top of each page is used to insert the same header row
at the top of each page in long tables.· Show advanced settings is used to open the 'Table - Advanced Settings' window.
Adjust table advanced settingsTo change the advanced table properties, click the table with the right mouse button and selectthe Table Advanced Settings option from the right-click menu or use the Show advancedsettings link on the right sidebar. The table properties window will open:
The Table tab allows changing the properties of the entire table.· The Table Size section contains the following parameters:
o Width - by default, the table width is automatically adjusted to fit the page width,i.e. the table occupies all the space between the left and right page margin. Youcan check this box and specify the necessary table width manually.
o Measure in allows specifying the table width in absolute unitsi.e. Centimeters/Points/Inches (depending on the option specified onthe File -> Advanced Settings... tab) or in Percent of the overall page width.
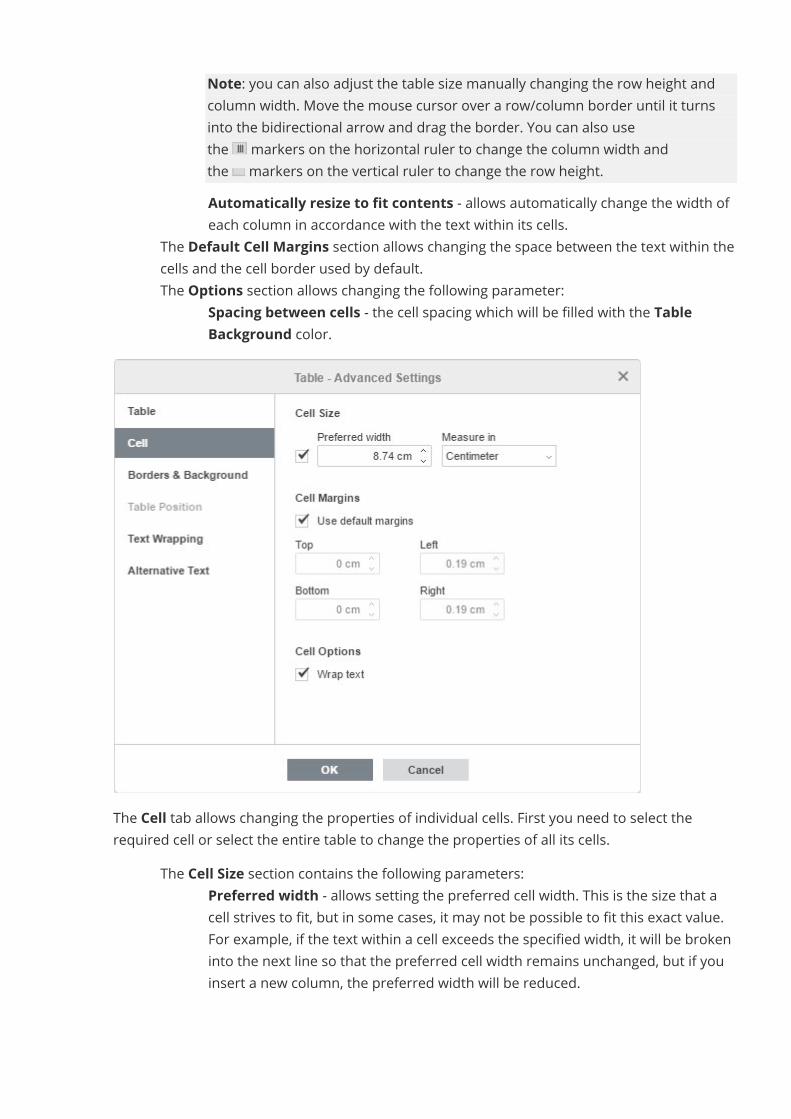
Note: you can also adjust the table size manually changing the row height andcolumn width. Move the mouse cursor over a row/column border until it turnsinto the bidirectional arrow and drag the border. You can also usethe markers on the horizontal ruler to change the column width andthe markers on the vertical ruler to change the row height.
o Automatically resize to fit contents - allows automatically change the width ofeach column in accordance with the text within its cells.
· The Default Cell Margins section allows changing the space between the text within thecells and the cell border used by default.
· The Options section allows changing the following parameter:o Spacing between cells - the cell spacing which will be filled with the Table
Background color.
The Cell tab allows changing the properties of individual cells. First you need to select therequired cell or select the entire table to change the properties of all its cells.
· The Cell Size section contains the following parameters:o Preferred width - allows setting the preferred cell width. This is the size that a
cell strives to fit, but in some cases, it may not be possible to fit this exact value.For example, if the text within a cell exceeds the specified width, it will be brokeninto the next line so that the preferred cell width remains unchanged, but if youinsert a new column, the preferred width will be reduced.
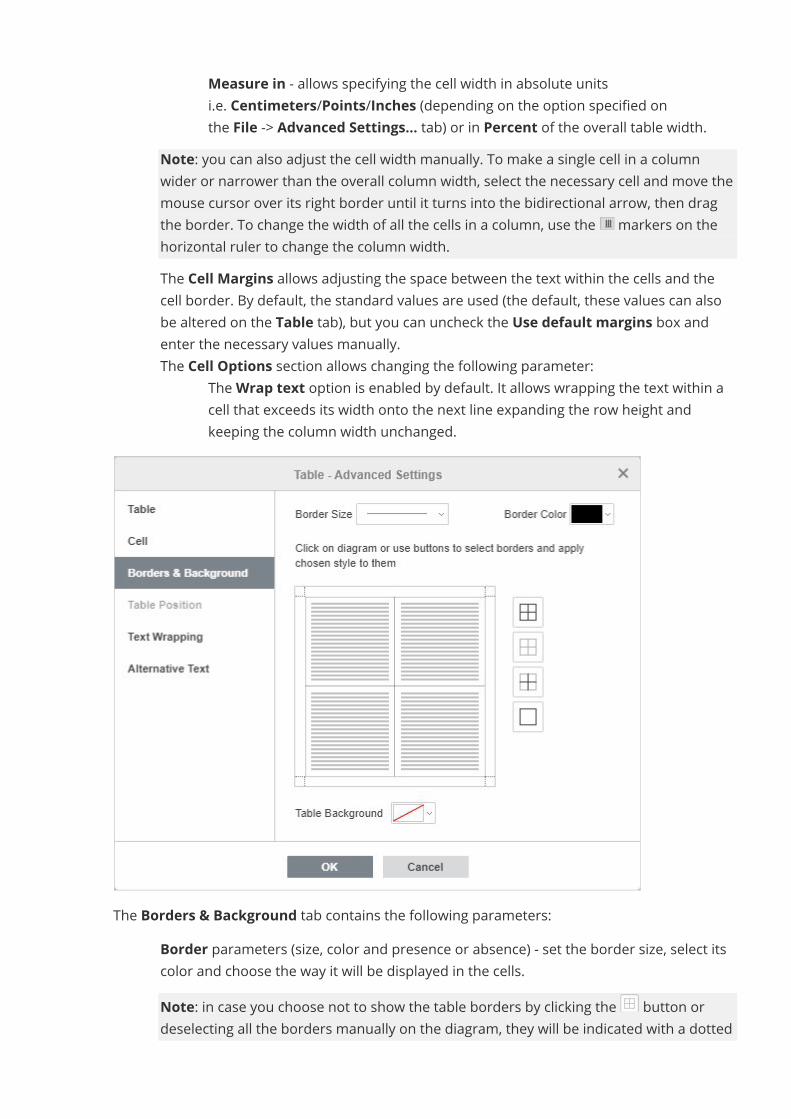
o Measure in - allows specifying the cell width in absolute unitsi.e. Centimeters/Points/Inches (depending on the option specified onthe File -> Advanced Settings... tab) or in Percent of the overall table width.
Note: you can also adjust the cell width manually. To make a single cell in a columnwider or narrower than the overall column width, select the necessary cell and move themouse cursor over its right border until it turns into the bidirectional arrow, then dragthe border. To change the width of all the cells in a column, use the markers on thehorizontal ruler to change the column width.
· The Cell Margins allows adjusting the space between the text within the cells and thecell border. By default, the standard values are used (the default, these values can alsobe altered on the Table tab), but you can uncheck the Use default margins box andenter the necessary values manually.
· The Cell Options section allows changing the following parameter:o TheWrap text option is enabled by default. It allows wrapping the text within a
cell that exceeds its width onto the next line expanding the row height andkeeping the column width unchanged.
The Borders & Background tab contains the following parameters:· Border parameters (size, color and presence or absence) - set the border size, select its
color and choose the way it will be displayed in the cells.Note: in case you choose not to show the table borders by clicking the button ordeselecting all the borders manually on the diagram, they will be indicated with a dotted
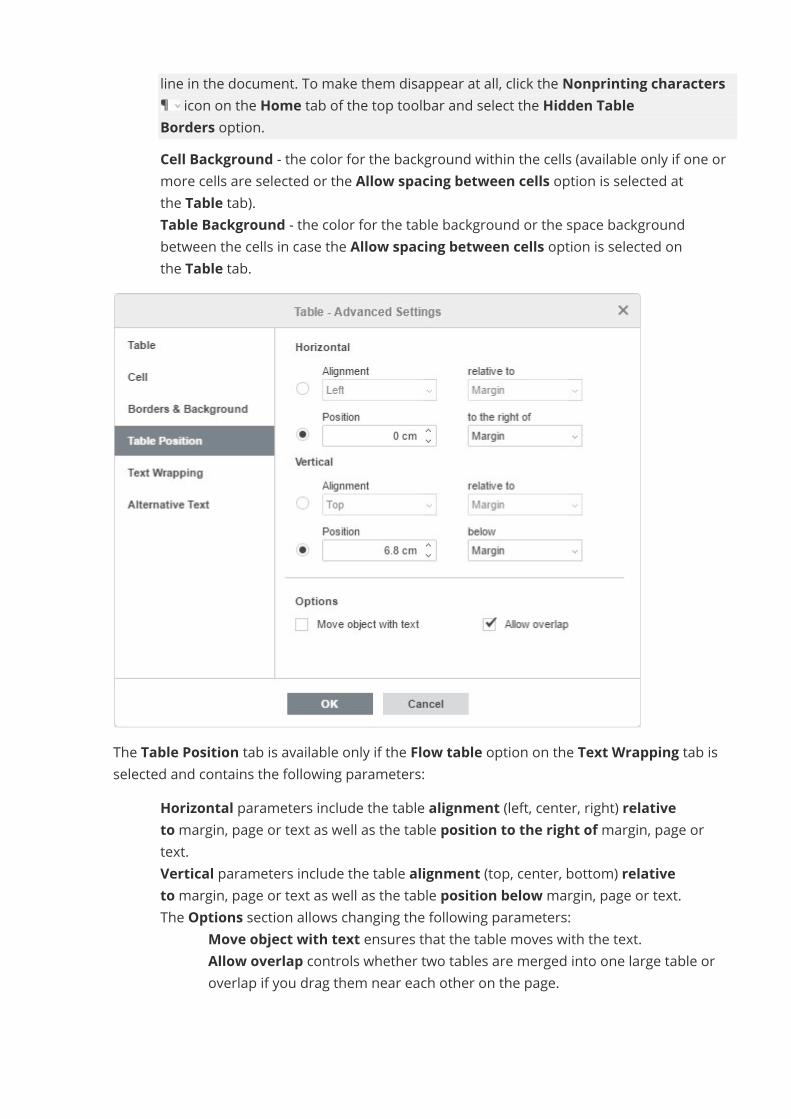
line in the document. To make them disappear at all, click the Nonprinting charactersicon on the Home tab of the top toolbar and select the Hidden Table
Borders option.· Cell Background - the color for the background within the cells (available only if one or
more cells are selected or the Allow spacing between cells option is selected atthe Table tab).
· Table Background - the color for the table background or the space backgroundbetween the cells in case the Allow spacing between cells option is selected onthe Table tab.
The Table Position tab is available only if the Flow table option on the Text Wrapping tab isselected and contains the following parameters:
· Horizontal parameters include the table alignment (left, center, right) relativetomargin, page or text as well as the table position to the right ofmargin, page ortext.
· Vertical parameters include the table alignment (top, center, bottom) relativetomargin, page or text as well as the table position belowmargin, page or text.
· The Options section allows changing the following parameters:o Move object with text ensures that the table moves with the text.o Allow overlap controls whether two tables are merged into one large table or
overlap if you drag them near each other on the page.
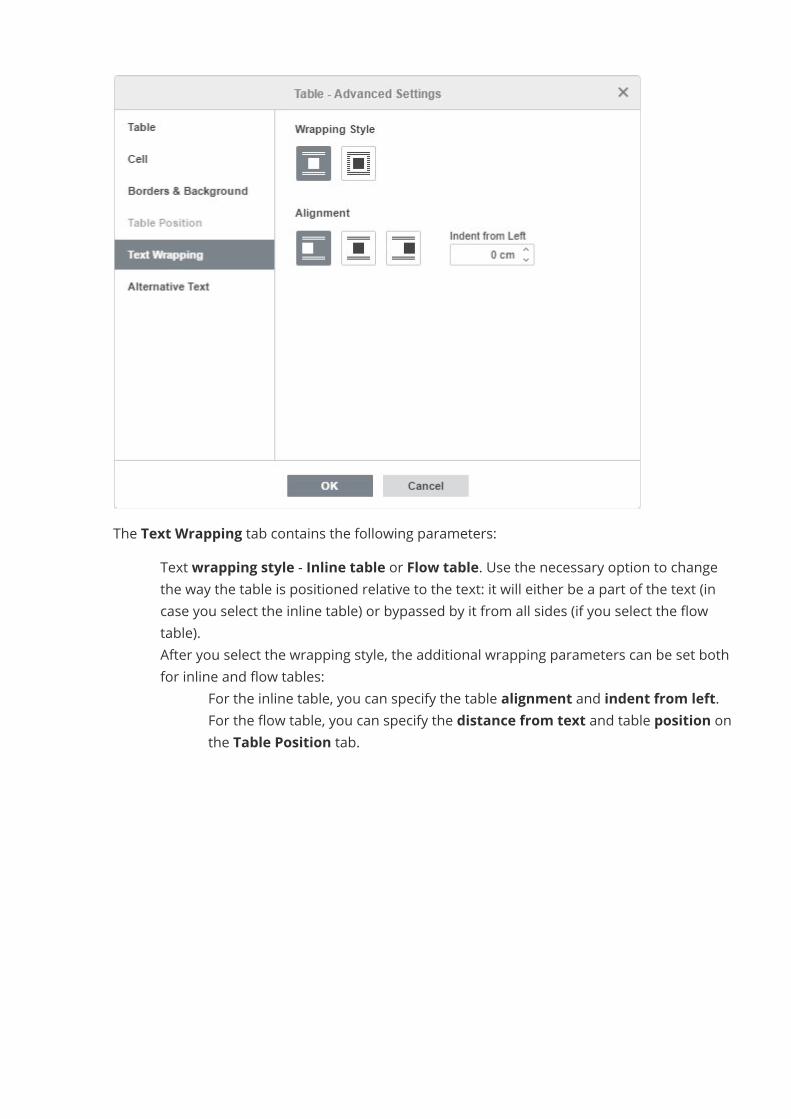
The Text Wrapping tab contains the following parameters:· Text wrapping style - Inline table or Flow table. Use the necessary option to change
the way the table is positioned relative to the text: it will either be a part of the text (incase you select the inline table) or bypassed by it from all sides (if you select the flowtable).
· After you select the wrapping style, the additional wrapping parameters can be set bothfor inline and flow tables:
o For the inline table, you can specify the table alignment and indent from left.o For the flow table, you can specify the distance from text and table position on
the Table Position tab.
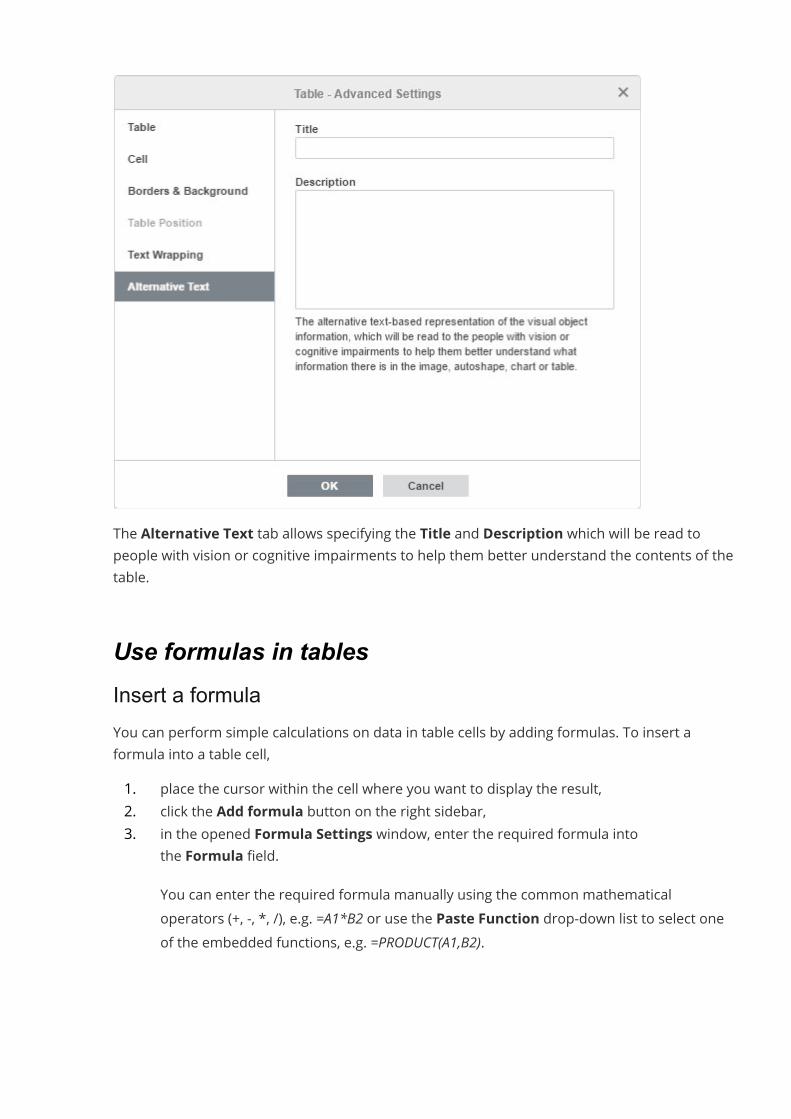
The Alternative Text tab allows specifying the Title and Description which will be read topeople with vision or cognitive impairments to help them better understand the contents of thetable.
Use formulas in tablesInsert a formulaYou can perform simple calculations on data in table cells by adding formulas. To insert aformula into a table cell,1. place the cursor within the cell where you want to display the result,2. click the Add formula button on the right sidebar,3. in the opened Formula Settings window, enter the required formula into
the Formula field.You can enter the required formula manually using the common mathematicaloperators (+, -, *, /), e.g. =A1*B2 or use the Paste Function drop-down list to select oneof the embedded functions, e.g. =PRODUCT(A1,B2).
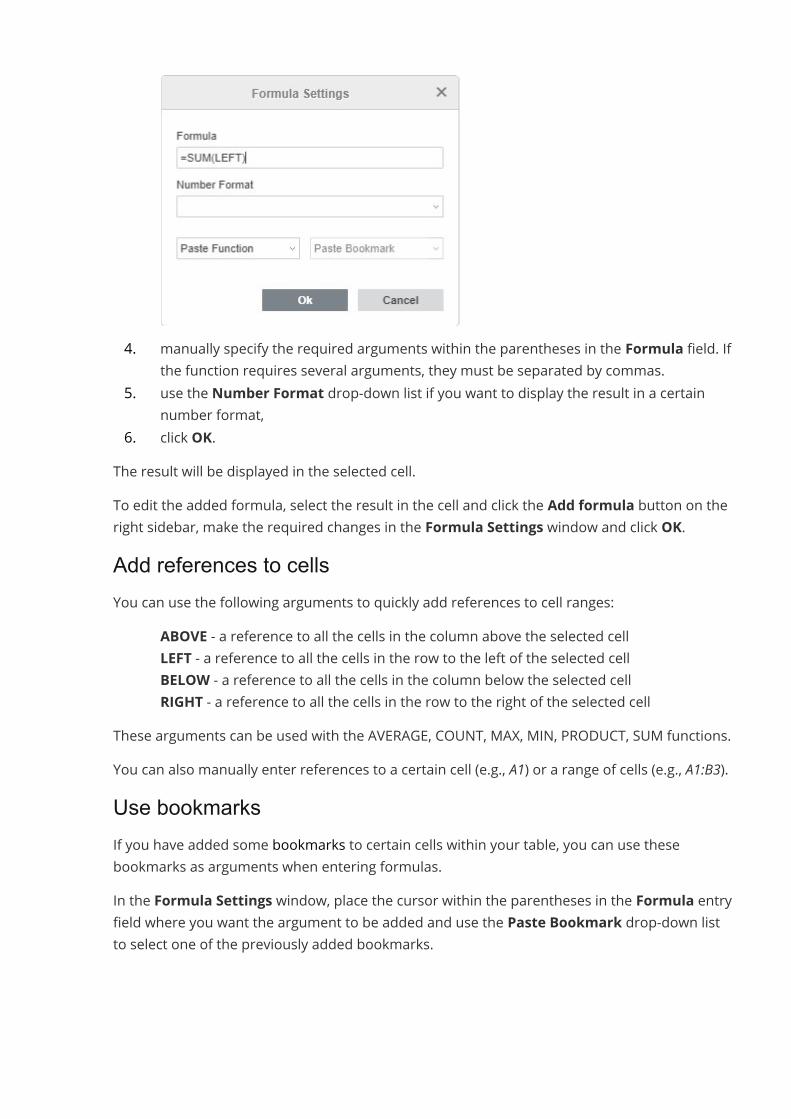
4. manually specify the required arguments within the parentheses in the Formula field. Ifthe function requires several arguments, they must be separated by commas.
5. use the Number Format drop-down list if you want to display the result in a certainnumber format,
6. click OK.The result will be displayed in the selected cell.To edit the added formula, select the result in the cell and click the Add formula button on theright sidebar, make the required changes in the Formula Settings window and click OK.Add references to cellsYou can use the following arguments to quickly add references to cell ranges:
· ABOVE - a reference to all the cells in the column above the selected cell· LEFT - a reference to all the cells in the row to the left of the selected cell· BELOW - a reference to all the cells in the column below the selected cell· RIGHT - a reference to all the cells in the row to the right of the selected cell
These arguments can be used with the AVERAGE, COUNT, MAX, MIN, PRODUCT, SUM functions.You can also manually enter references to a certain cell (e.g., A1) or a range of cells (e.g., A1:B3).Use bookmarksIf you have added some bookmarks to certain cells within your table, you can use thesebookmarks as arguments when entering formulas.In the Formula Settings window, place the cursor within the parentheses in the Formula entryfield where you want the argument to be added and use the Paste Bookmark drop-down listto select one of the previously added bookmarks.
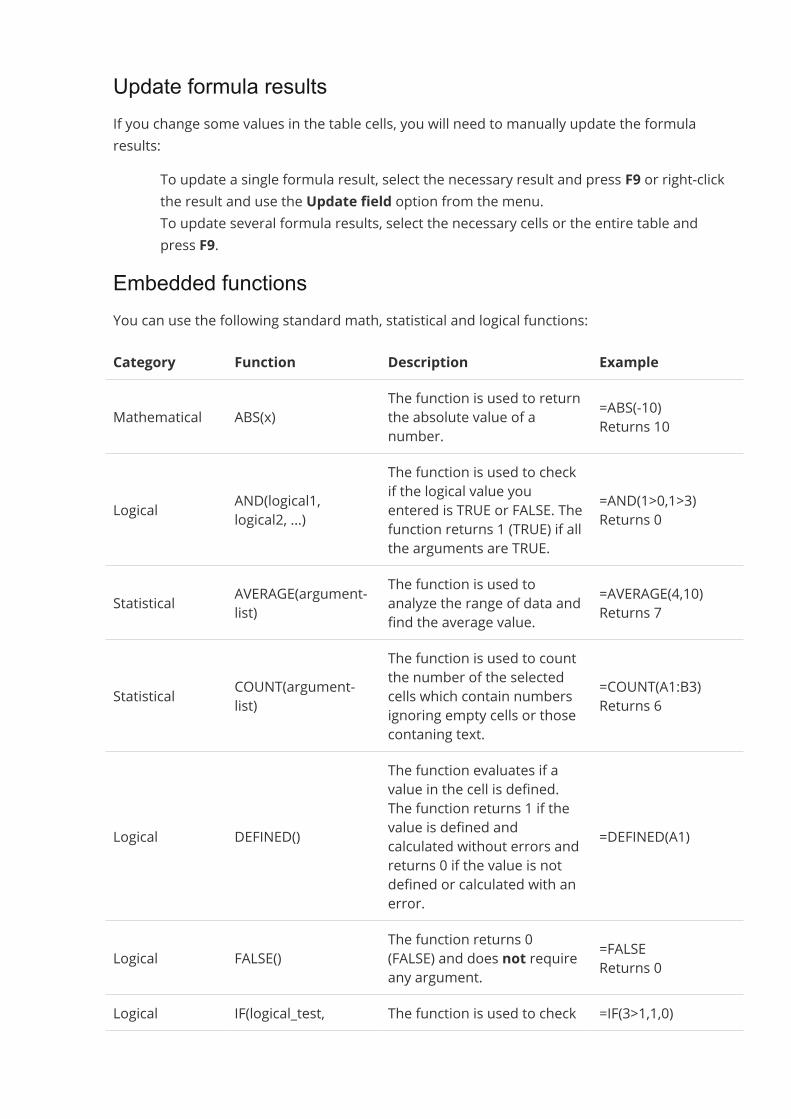
Update formula resultsIf you change some values in the table cells, you will need to manually update the formularesults:
· To update a single formula result, select the necessary result and press F9 or right-clickthe result and use the Update field option from the menu.
· To update several formula results, select the necessary cells or the entire table andpress F9.
Embedded functionsYou can use the following standard math, statistical and logical functions:Category Function Description Example
Mathematical ABS(x)The function is used to returnthe absolute value of anumber.
=ABS(-10)Returns 10
Logical AND(logical1,logical2, ...)
The function is used to checkif the logical value youentered is TRUE or FALSE. Thefunction returns 1 (TRUE) if allthe arguments are TRUE.
=AND(1>0,1>3)Returns 0
Statistical AVERAGE(argument-list)
The function is used toanalyze the range of data andfind the average value.
=AVERAGE(4,10)Returns 7
Statistical COUNT(argument-list)
The function is used to countthe number of the selectedcells which contain numbersignoring empty cells or thosecontaning text.
=COUNT(A1:B3)Returns 6
Logical DEFINED()
The function evaluates if avalue in the cell is defined.The function returns 1 if thevalue is defined andcalculated without errors andreturns 0 if the value is notdefined or calculated with anerror.
=DEFINED(A1)
Logical FALSE()The function returns 0(FALSE) and does not requireany argument.
=FALSEReturns 0
Logical IF(logical_test, The function is used to check =IF(3>1,1,0)
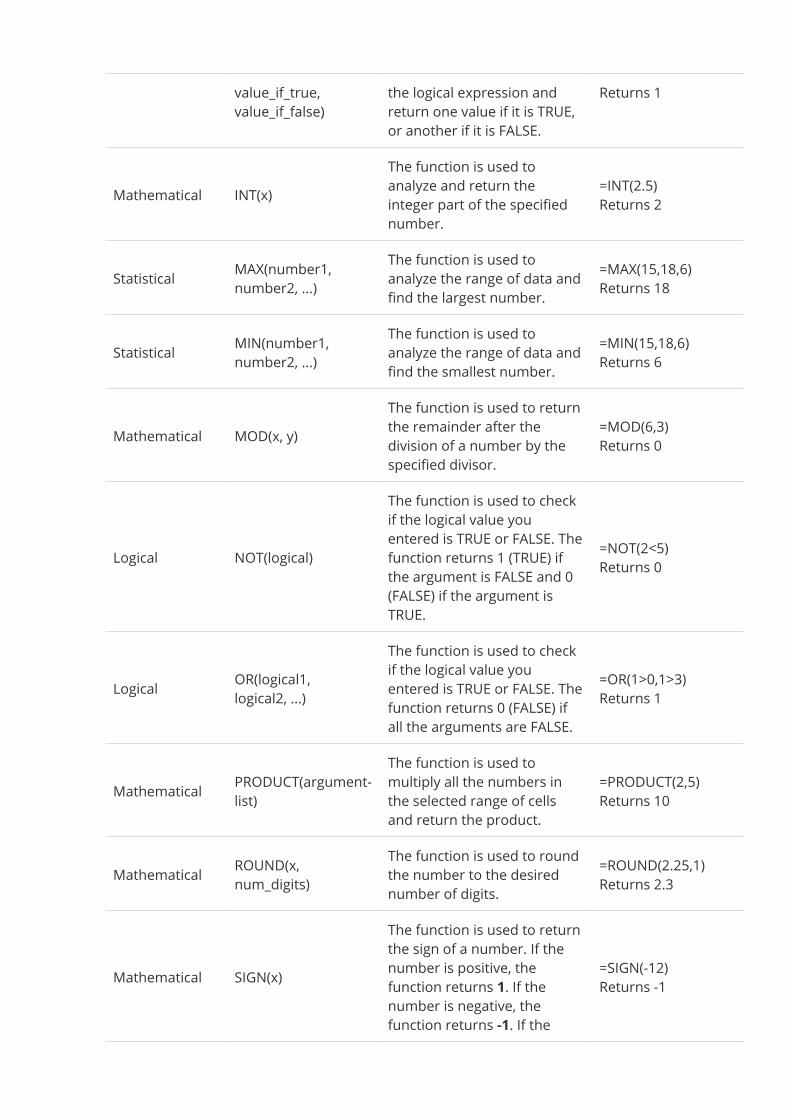
value_if_true,value_if_false)
the logical expression andreturn one value if it is TRUE,or another if it is FALSE.
Returns 1
Mathematical INT(x)The function is used toanalyze and return theinteger part of the specifiednumber.
=INT(2.5)Returns 2
Statistical MAX(number1,number2, ...)
The function is used toanalyze the range of data andfind the largest number.
=MAX(15,18,6)Returns 18
Statistical MIN(number1,number2, ...)
The function is used toanalyze the range of data andfind the smallest number.
=MIN(15,18,6)Returns 6
Mathematical MOD(x, y)The function is used to returnthe remainder after thedivision of a number by thespecified divisor.
=MOD(6,3)Returns 0
Logical NOT(logical)
The function is used to checkif the logical value youentered is TRUE or FALSE. Thefunction returns 1 (TRUE) ifthe argument is FALSE and 0(FALSE) if the argument isTRUE.
=NOT(2<5)Returns 0
Logical OR(logical1,logical2, ...)
The function is used to checkif the logical value youentered is TRUE or FALSE. Thefunction returns 0 (FALSE) ifall the arguments are FALSE.
=OR(1>0,1>3)Returns 1
Mathematical PRODUCT(argument-list)
The function is used tomultiply all the numbers inthe selected range of cellsand return the product.
=PRODUCT(2,5)Returns 10
Mathematical ROUND(x,num_digits)
The function is used to roundthe number to the desirednumber of digits.
=ROUND(2.25,1)Returns 2.3
Mathematical SIGN(x)
The function is used to returnthe sign of a number. If thenumber is positive, thefunction returns 1. If thenumber is negative, thefunction returns -1. If the
=SIGN(-12)Returns -1
number is 0, the functionreturns 0.
Mathematical SUM(argument-list)The function is used to add allthe numbers in the selectedrange of cells and return theresult.
=SUM(5,3,2)Returns 10
Logical TRUE()The function returns 1 (TRUE)and does not require anyargument.
=TRUEReturns 1
Insert imagesIn the Document Editor, you can insert images in the most popular formats into yourdocument. The following image formats are supported: BMP, GIF, JPEG, JPG, PNG.Insert an imageTo insert an image into the document text,1. place the cursor where you want the image to be put,2. switch to the Insert tab of the top toolbar,3. click the Image icon on the top toolbar,4. select one of the following options to load the image:
· the Image from File option will open a standard dialog window for to select afile. Browse your computer hard disk drive for the necessary file and clickthe Open button
· the Image from URL option will open the window where you can enter the webaddress of the requiredimage, and click the OK button
· the Image from Storage option will open the Select data source window. Selectan image stored on your portal and click the OK button
5. once the image is added, you can change its size, properties, and position.
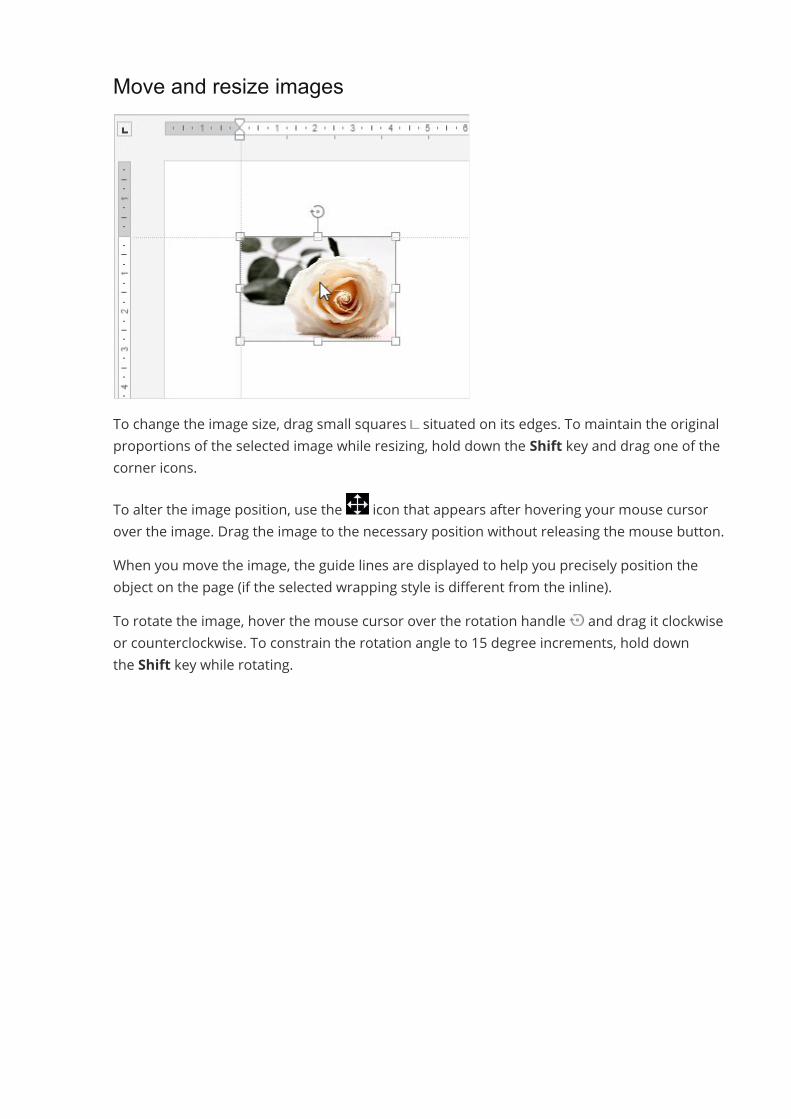
Move and resize images
To change the image size, drag small squares situated on its edges. To maintain the originalproportions of the selected image while resizing, hold down the Shift key and drag one of thecorner icons.To alter the image position, use the icon that appears after hovering your mouse cursorover the image. Drag the image to the necessary position without releasing the mouse button.When you move the image, the guide lines are displayed to help you precisely position theobject on the page (if the selected wrapping style is different from the inline).To rotate the image, hover the mouse cursor over the rotation handle and drag it clockwiseor counterclockwise. To constrain the rotation angle to 15 degree increments, hold downthe Shift key while rotating.
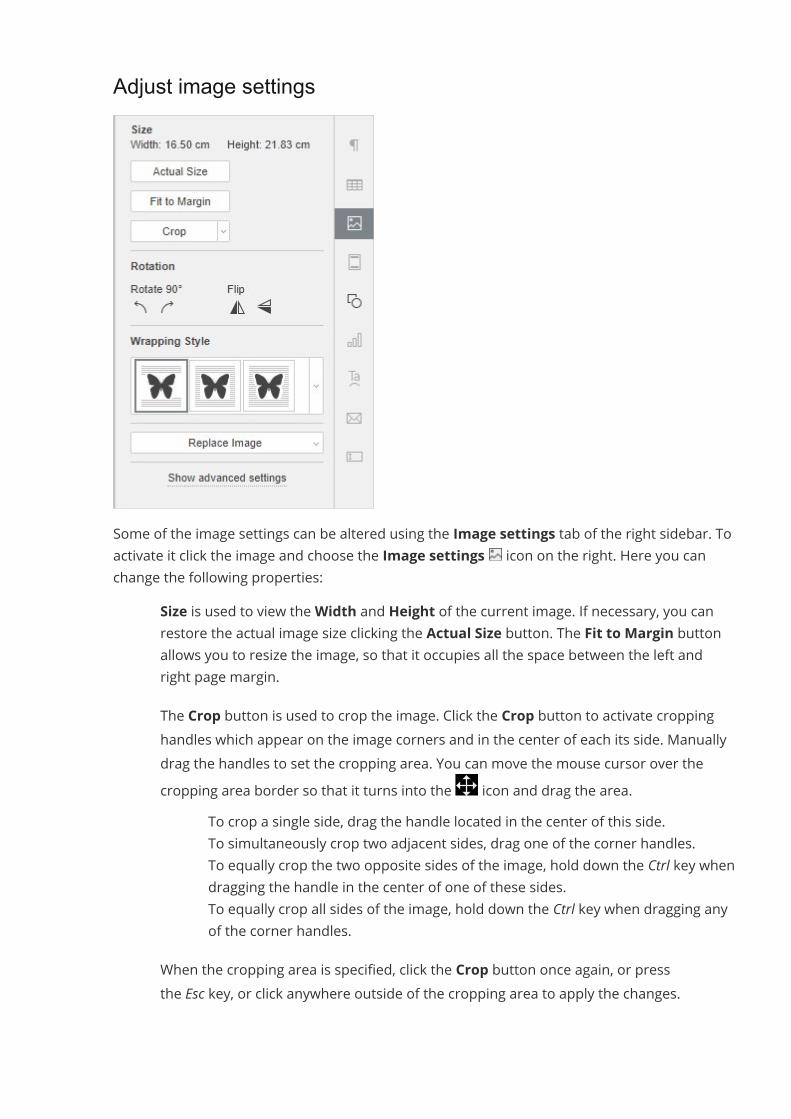
Adjust image settings
Some of the image settings can be altered using the Image settings tab of the right sidebar. Toactivate it click the image and choose the Image settings icon on the right. Here you canchange the following properties:
· Size is used to view theWidth and Height of the current image. If necessary, you canrestore the actual image size clicking the Actual Size button. The Fit to Margin buttonallows you to resize the image, so that it occupies all the space between the left andright page margin.The Crop button is used to crop the image. Click the Crop button to activate croppinghandles which appear on the image corners and in the center of each its side. Manuallydrag the handles to set the cropping area. You can move the mouse cursor over thecropping area border so that it turns into the icon and drag the area.
o To crop a single side, drag the handle located in the center of this side.o To simultaneously crop two adjacent sides, drag one of the corner handles.o To equally crop the two opposite sides of the image, hold down the Ctrl key when
dragging the handle in the center of one of these sides.o To equally crop all sides of the image, hold down the Ctrl key when dragging any
of the corner handles.When the cropping area is specified, click the Crop button once again, or pressthe Esc key, or click anywhere outside of the cropping area to apply the changes.
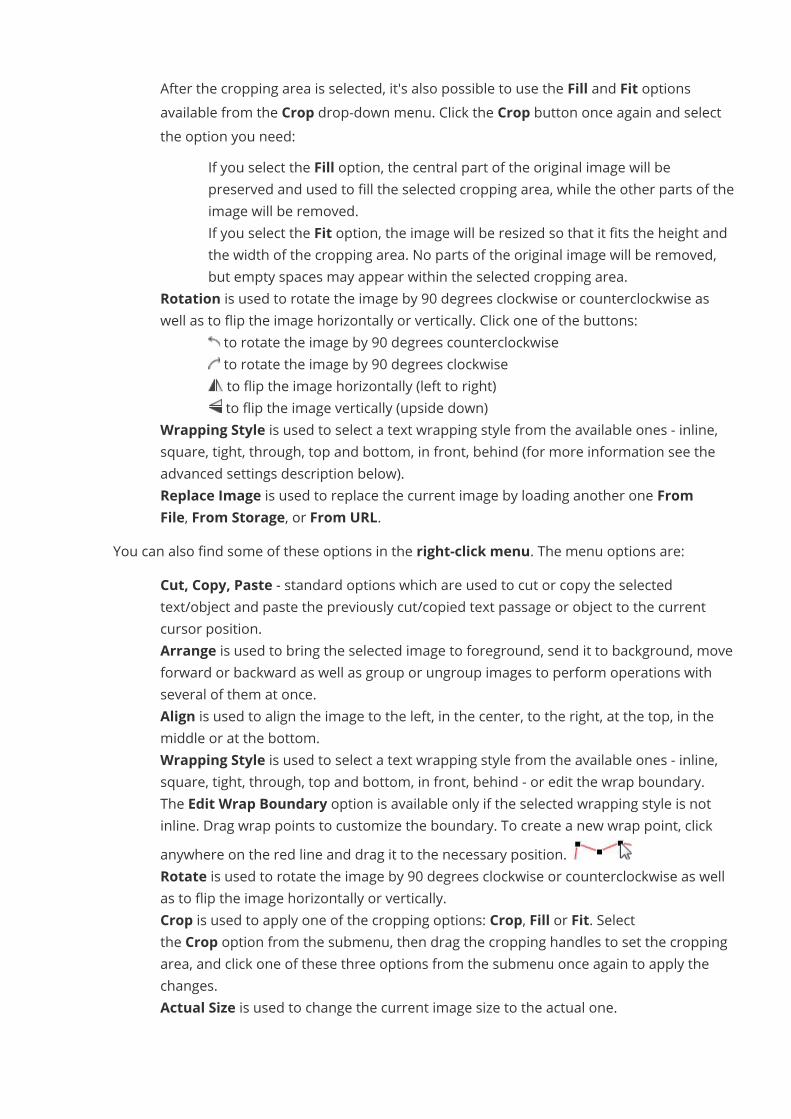
After the cropping area is selected, it's also possible to use the Fill and Fit optionsavailable from the Crop drop-down menu. Click the Crop button once again and selectthe option you need:
o If you select the Fill option, the central part of the original image will bepreserved and used to fill the selected cropping area, while the other parts of theimage will be removed.
o If you select the Fit option, the image will be resized so that it fits the height andthe width of the cropping area. No parts of the original image will be removed,but empty spaces may appear within the selected cropping area.
· Rotation is used to rotate the image by 90 degrees clockwise or counterclockwise aswell as to flip the image horizontally or vertically. Click one of the buttons:
o to rotate the image by 90 degrees counterclockwiseo to rotate the image by 90 degrees clockwiseo to flip the image horizontally (left to right)o to flip the image vertically (upside down)
· Wrapping Style is used to select a text wrapping style from the available ones - inline,square, tight, through, top and bottom, in front, behind (for more information see theadvanced settings description below).
· Replace Image is used to replace the current image by loading another one FromFile, From Storage, or From URL.
You can also find some of these options in the right-click menu. The menu options are:· Cut, Copy, Paste - standard options which are used to cut or copy the selected
text/object and paste the previously cut/copied text passage or object to the currentcursor position.
· Arrange is used to bring the selected image to foreground, send it to background, moveforward or backward as well as group or ungroup images to perform operations withseveral of them at once.
· Align is used to align the image to the left, in the center, to the right, at the top, in themiddle or at the bottom.
· Wrapping Style is used to select a text wrapping style from the available ones - inline,square, tight, through, top and bottom, in front, behind - or edit the wrap boundary.The Edit Wrap Boundary option is available only if the selected wrapping style is notinline. Drag wrap points to customize the boundary. To create a new wrap point, clickanywhere on the red line and drag it to the necessary position.
· Rotate is used to rotate the image by 90 degrees clockwise or counterclockwise as wellas to flip the image horizontally or vertically.
· Crop is used to apply one of the cropping options: Crop, Fill or Fit. Selectthe Crop option from the submenu, then drag the cropping handles to set the croppingarea, and click one of these three options from the submenu once again to apply thechanges.
· Actual Size is used to change the current image size to the actual one.
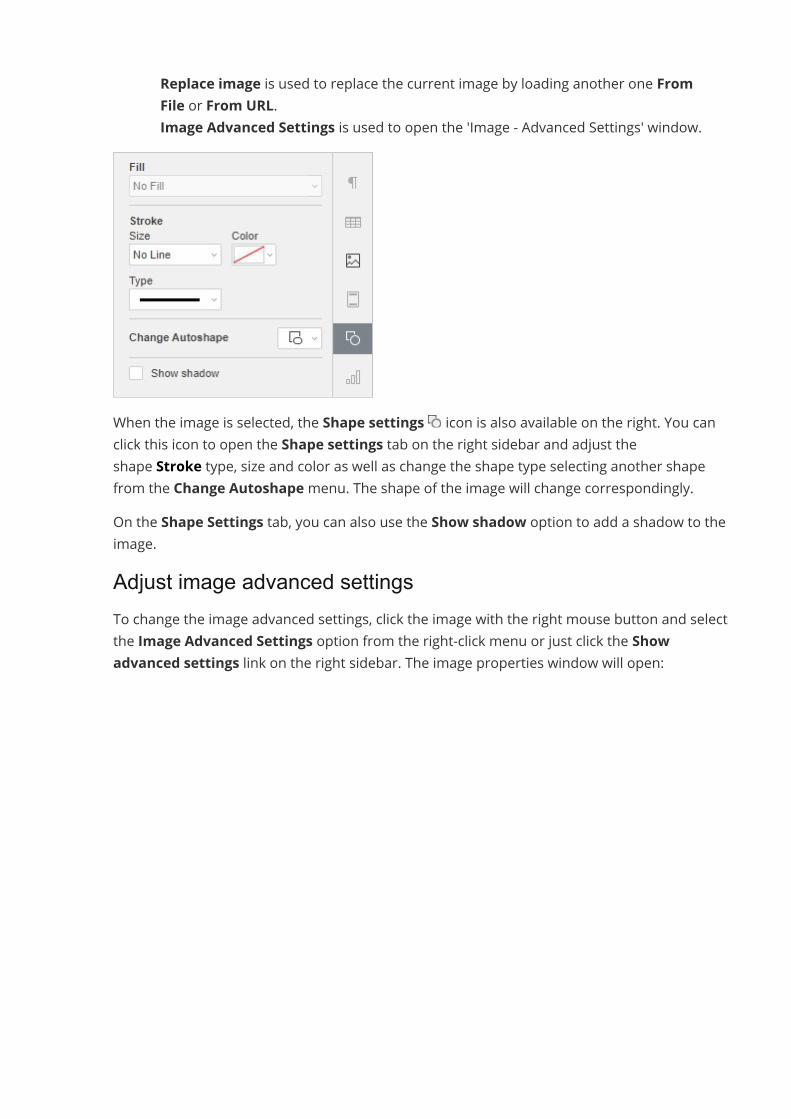
· Replace image is used to replace the current image by loading another one FromFile or From URL.
· Image Advanced Settings is used to open the 'Image - Advanced Settings' window.
When the image is selected, the Shape settings icon is also available on the right. You canclick this icon to open the Shape settings tab on the right sidebar and adjust theshape Stroke type, size and color as well as change the shape type selecting another shapefrom the Change Autoshapemenu. The shape of the image will change correspondingly.On the Shape Settings tab, you can also use the Show shadow option to add a shadow to theimage.Adjust image advanced settingsTo change the image advanced settings, click the image with the right mouse button and selectthe Image Advanced Settings option from the right-click menu or just click the Showadvanced settings link on the right sidebar. The image properties window will open:
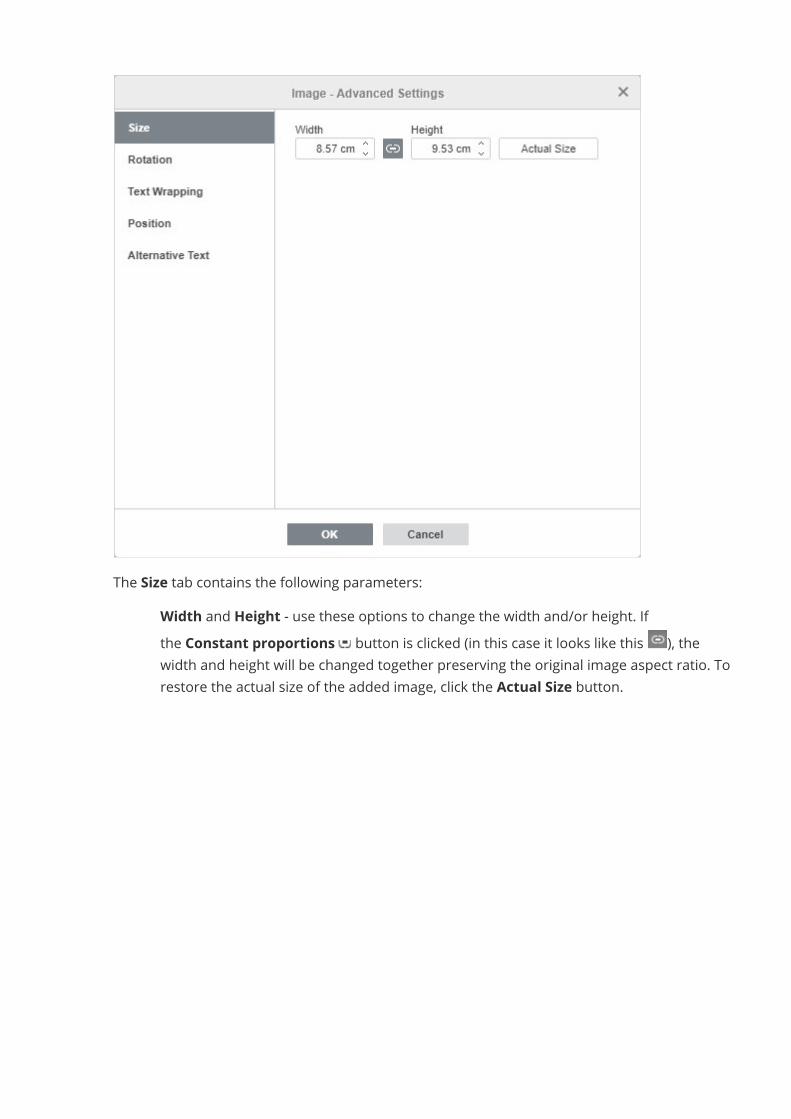
The Size tab contains the following parameters:· Width and Height - use these options to change the width and/or height. If
the Constant proportions button is clicked (in this case it looks like this ), thewidth and height will be changed together preserving the original image aspect ratio. Torestore the actual size of the added image, click the Actual Size button.
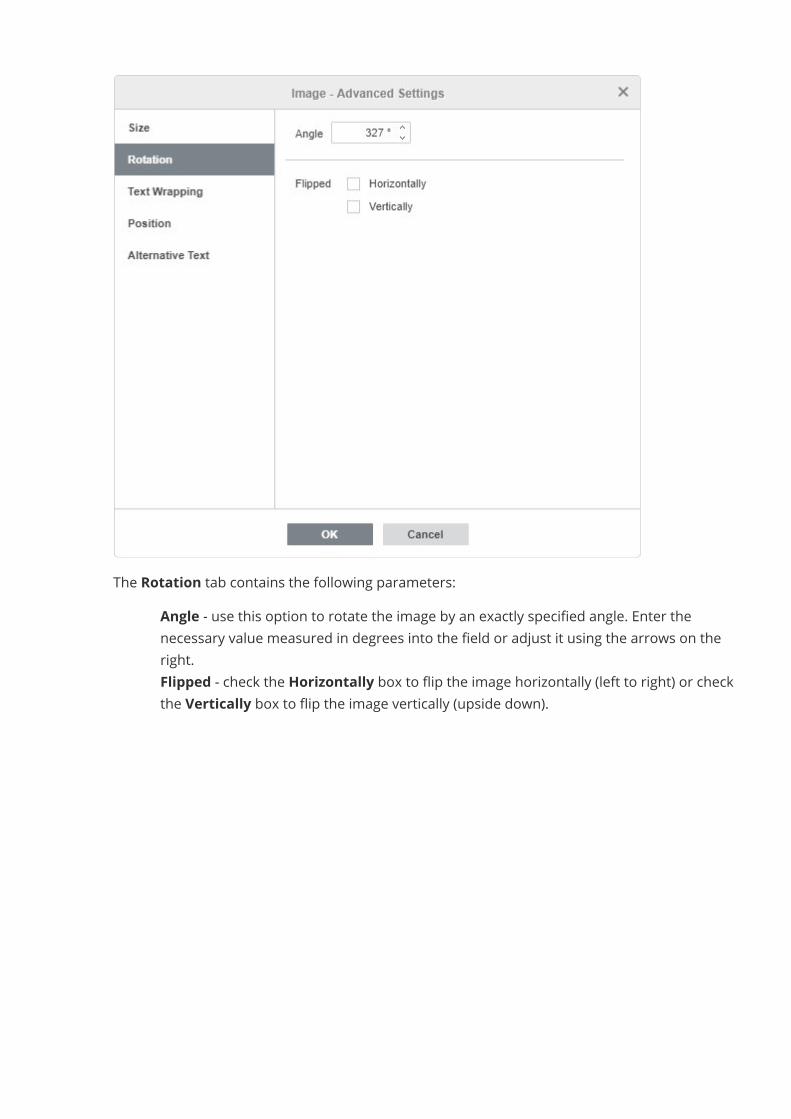
The Rotation tab contains the following parameters:· Angle - use this option to rotate the image by an exactly specified angle. Enter the
necessary value measured in degrees into the field or adjust it using the arrows on theright.
· Flipped - check the Horizontally box to flip the image horizontally (left to right) or checkthe Vertically box to flip the image vertically (upside down).
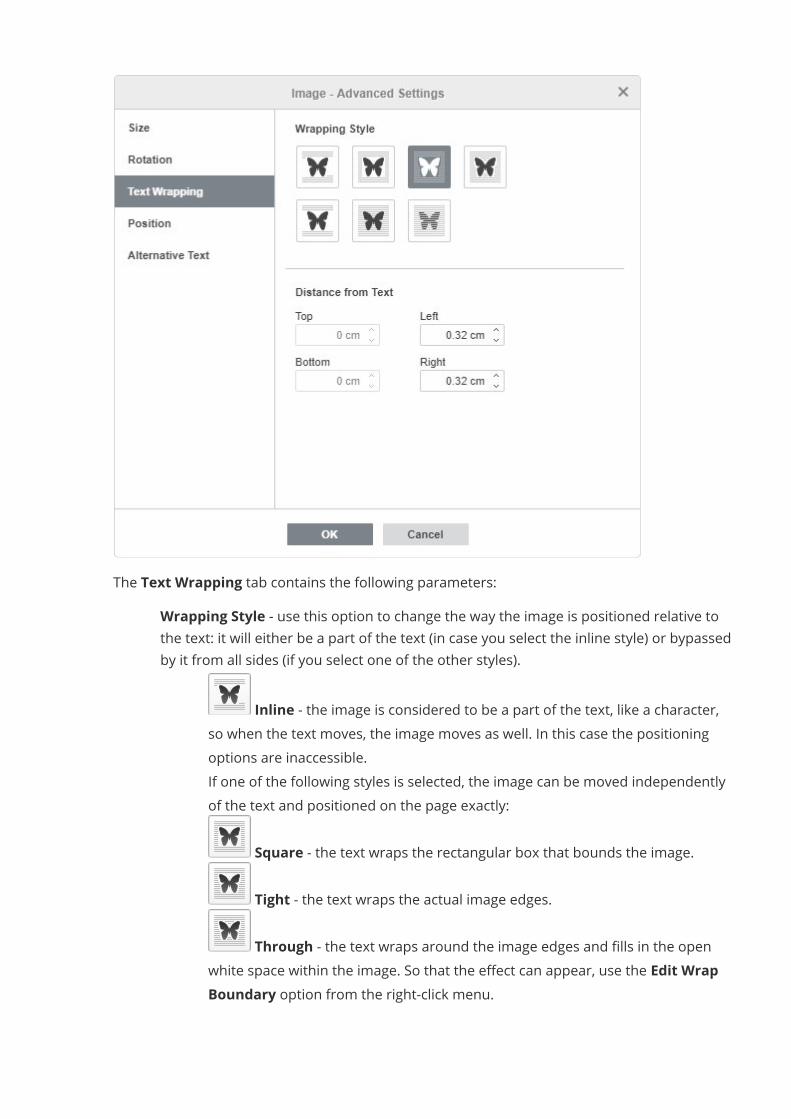
The Text Wrapping tab contains the following parameters:· Wrapping Style - use this option to change the way the image is positioned relative to
the text: it will either be a part of the text (in case you select the inline style) or bypassedby it from all sides (if you select one of the other styles).
o Inline - the image is considered to be a part of the text, like a character,so when the text moves, the image moves as well. In this case the positioningoptions are inaccessible.
o If one of the following styles is selected, the image can be moved independentlyof the text and positioned on the page exactly:
o Square - the text wraps the rectangular box that bounds the image.o Tight - the text wraps the actual image edges.o Through - the text wraps around the image edges and fills in the open
white space within the image. So that the effect can appear, use the Edit WrapBoundary option from the right-click menu.

o Top and bottom - the text is only above and below the image.o In front - the image overlaps the text.o Behind - the text overlaps the image.
If you select the square, tight, through, or top and bottom style, you will be able to set up someadditional parameters - distance from text at all sides (top, bottom, left, right).
The Position tab is available only if you select a wrapping style other than inline. This tabcontains the following parameters that vary depending on the selected wrapping style:
· The Horizontal section allows you to select one of the following three image positioningtypes:
o Alignment (left, center, right) relative to character, column, left margin, margin,page or right margin,
o Absolute Positionmeasured in absolute unitsi.e. Centimeters/Points/Inches (depending on the option specified onthe File -> Advanced Settings... tab) to the right of character, column, leftmargin, margin, page or right margin,
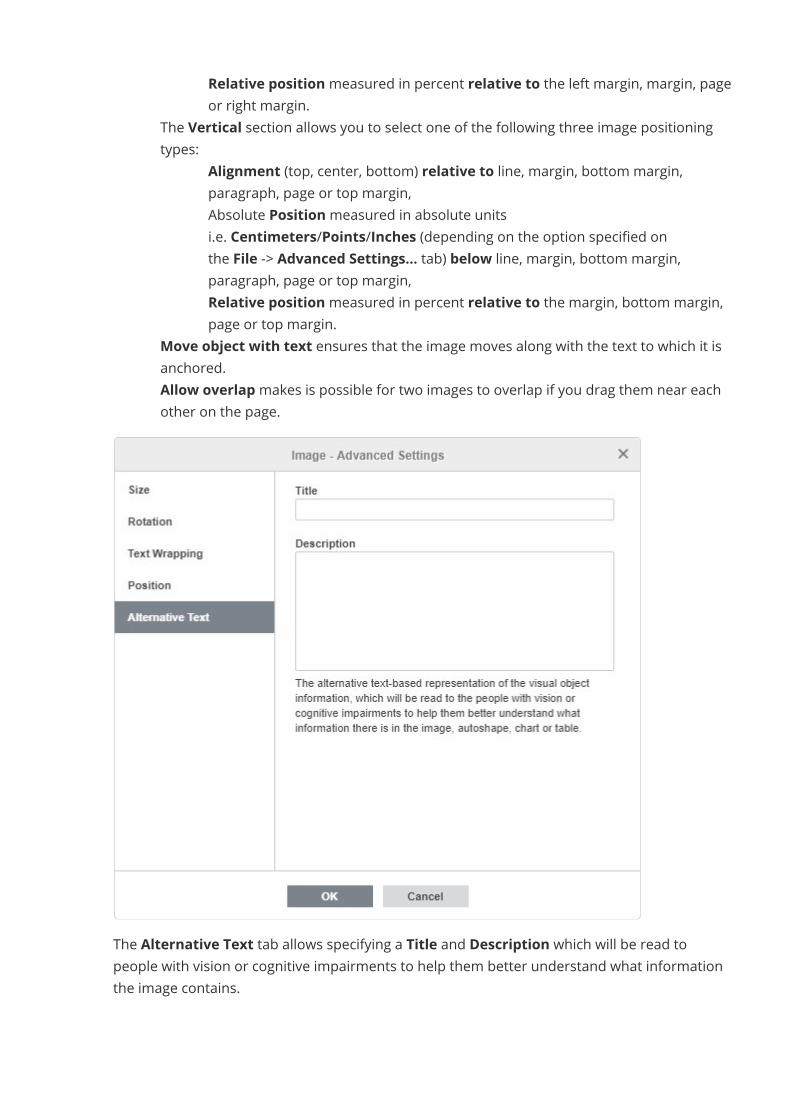
o Relative positionmeasured in percent relative to the left margin, margin, pageor right margin.
· The Vertical section allows you to select one of the following three image positioningtypes:
o Alignment (top, center, bottom) relative to line, margin, bottom margin,paragraph, page or top margin,
o Absolute Positionmeasured in absolute unitsi.e. Centimeters/Points/Inches (depending on the option specified onthe File -> Advanced Settings... tab) below line, margin, bottom margin,paragraph, page or top margin,
o Relative positionmeasured in percent relative to the margin, bottom margin,page or top margin.
· Move object with text ensures that the image moves along with the text to which it isanchored.
· Allow overlapmakes is possible for two images to overlap if you drag them near eachother on the page.
The Alternative Text tab allows specifying a Title and Description which will be read topeople with vision or cognitive impairments to help them better understand what informationthe image contains.
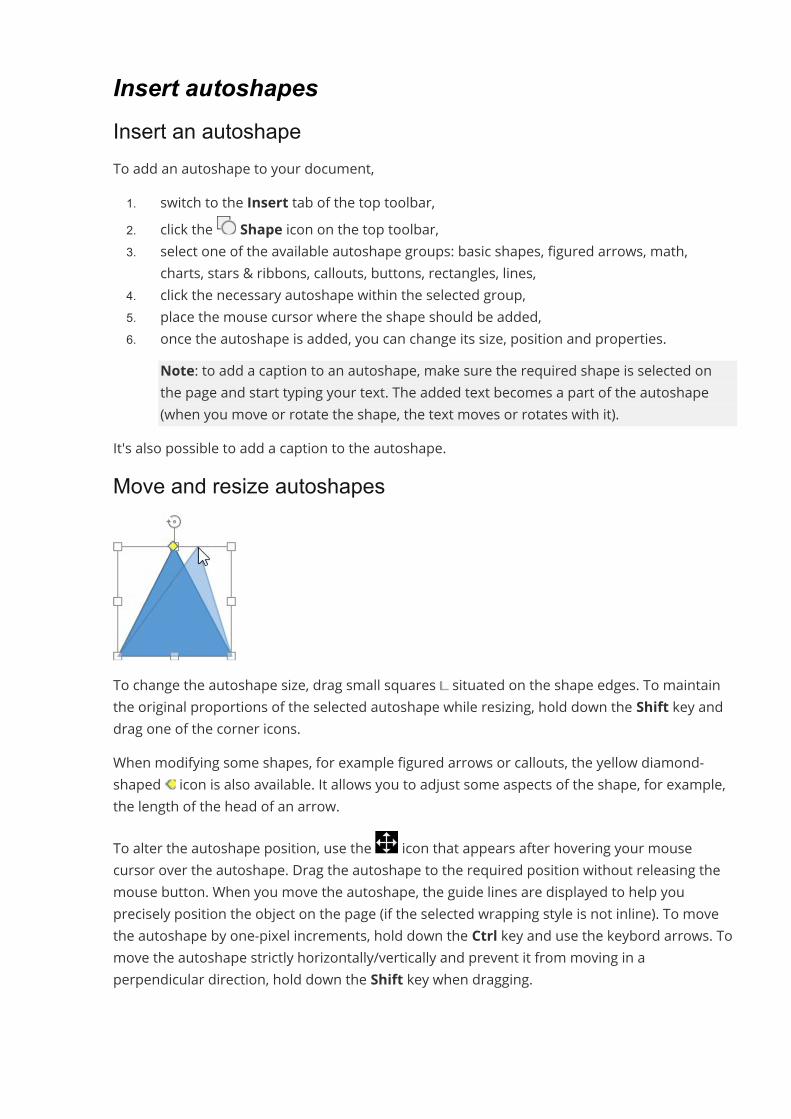
Insert autoshapesInsert an autoshapeTo add an autoshape to your document,1. switch to the Insert tab of the top toolbar,2. click the Shape icon on the top toolbar,3. select one of the available autoshape groups: basic shapes, figured arrows, math,
charts, stars & ribbons, callouts, buttons, rectangles, lines,4. click the necessary autoshape within the selected group,5. place the mouse cursor where the shape should be added,6. once the autoshape is added, you can change its size, position and properties.
Note: to add a caption to an autoshape, make sure the required shape is selected onthe page and start typing your text. The added text becomes a part of the autoshape(when you move or rotate the shape, the text moves or rotates with it).
It's also possible to add a caption to the autoshape.Move and resize autoshapes
To change the autoshape size, drag small squares situated on the shape edges. To maintainthe original proportions of the selected autoshape while resizing, hold down the Shift key anddrag one of the corner icons.When modifying some shapes, for example figured arrows or callouts, the yellow diamond-shaped icon is also available. It allows you to adjust some aspects of the shape, for example,the length of the head of an arrow.To alter the autoshape position, use the icon that appears after hovering your mousecursor over the autoshape. Drag the autoshape to the required position without releasing themouse button. When you move the autoshape, the guide lines are displayed to help youprecisely position the object on the page (if the selected wrapping style is not inline). To movethe autoshape by one-pixel increments, hold down the Ctrl key and use the keybord arrows. Tomove the autoshape strictly horizontally/vertically and prevent it from moving in aperpendicular direction, hold down the Shift key when dragging.
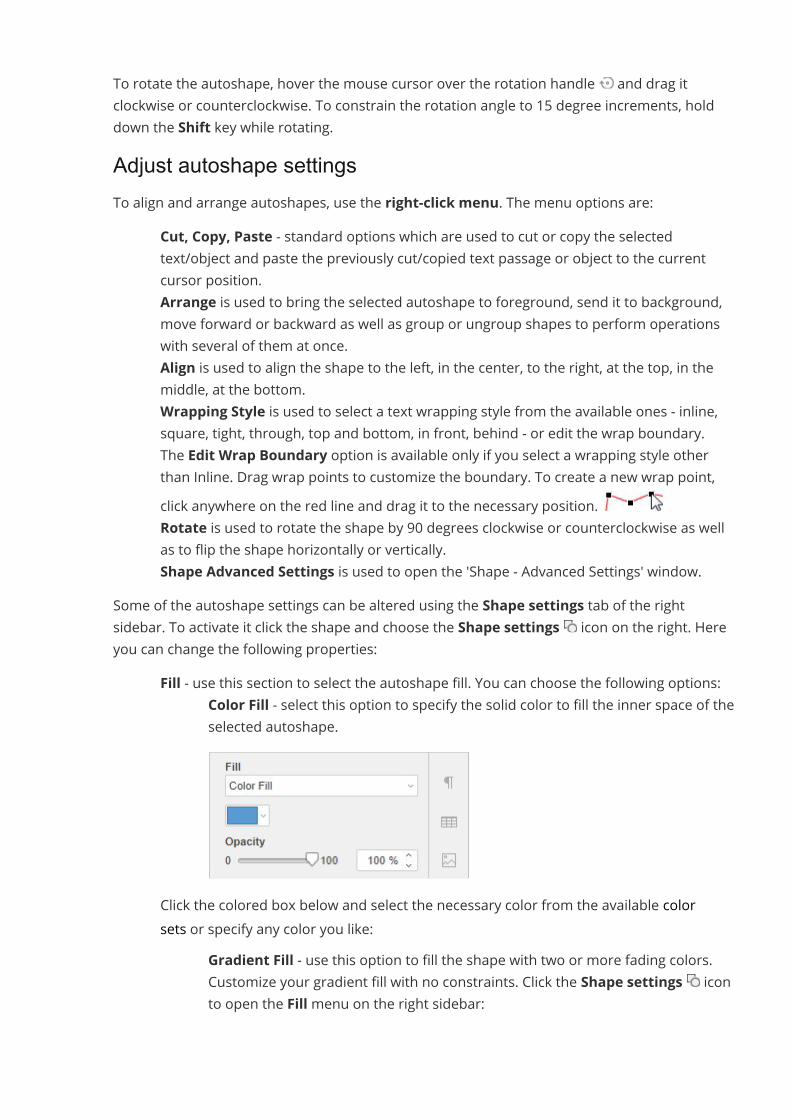
To rotate the autoshape, hover the mouse cursor over the rotation handle and drag itclockwise or counterclockwise. To constrain the rotation angle to 15 degree increments, holddown the Shift key while rotating.Adjust autoshape settingsTo align and arrange autoshapes, use the right-click menu. The menu options are:
· Cut, Copy, Paste - standard options which are used to cut or copy the selectedtext/object and paste the previously cut/copied text passage or object to the currentcursor position.
· Arrange is used to bring the selected autoshape to foreground, send it to background,move forward or backward as well as group or ungroup shapes to perform operationswith several of them at once.
· Align is used to align the shape to the left, in the center, to the right, at the top, in themiddle, at the bottom.
· Wrapping Style is used to select a text wrapping style from the available ones - inline,square, tight, through, top and bottom, in front, behind - or edit the wrap boundary.The Edit Wrap Boundary option is available only if you select a wrapping style otherthan Inline. Drag wrap points to customize the boundary. To create a new wrap point,click anywhere on the red line and drag it to the necessary position.
· Rotate is used to rotate the shape by 90 degrees clockwise or counterclockwise as wellas to flip the shape horizontally or vertically.
· Shape Advanced Settings is used to open the 'Shape - Advanced Settings' window.Some of the autoshape settings can be altered using the Shape settings tab of the rightsidebar. To activate it click the shape and choose the Shape settings icon on the right. Hereyou can change the following properties:
· Fill - use this section to select the autoshape fill. You can choose the following options:o Color Fill - select this option to specify the solid color to fill the inner space of the
selected autoshape.
Click the colored box below and select the necessary color from the available colorsets or specify any color you like:
o Gradient Fill - use this option to fill the shape with two or more fading colors.Customize your gradient fill with no constraints. Click the Shape settings iconto open the Fillmenu on the right sidebar:
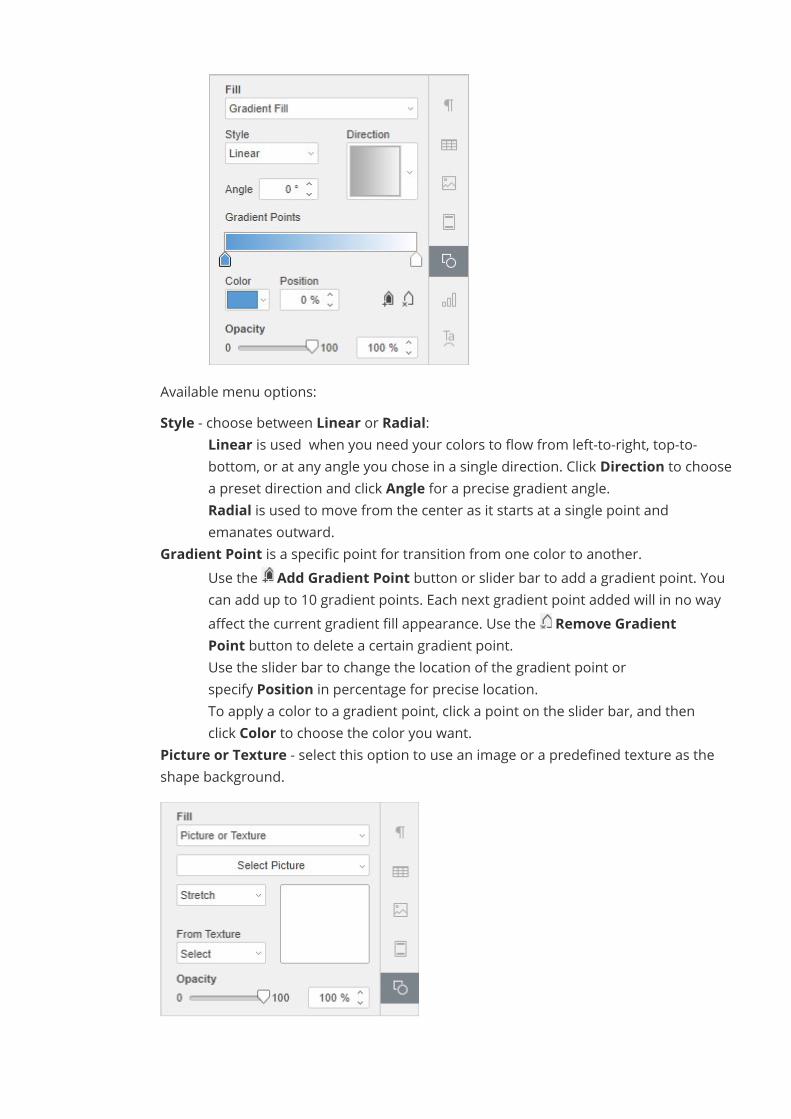
Available menu options:· Style - choose between Linear or Radial:
o Linear is used when you need your colors to flow from left-to-right, top-to-bottom, or at any angle you chose in a single direction. Click Direction to choosea preset direction and click Angle for a precise gradient angle.
o Radial is used to move from the center as it starts at a single point andemanates outward.
· Gradient Point is a specific point for transition from one color to another.o Use the Add Gradient Point button or slider bar to add a gradient point. You
can add up to 10 gradient points. Each next gradient point added will in no wayaffect the current gradient fill appearance. Use the Remove GradientPoint button to delete a certain gradient point.
o Use the slider bar to change the location of the gradient point orspecify Position in percentage for precise location.
o To apply a color to a gradient point, click a point on the slider bar, and thenclick Color to choose the color you want.
· Picture or Texture - select this option to use an image or a predefined texture as theshape background.
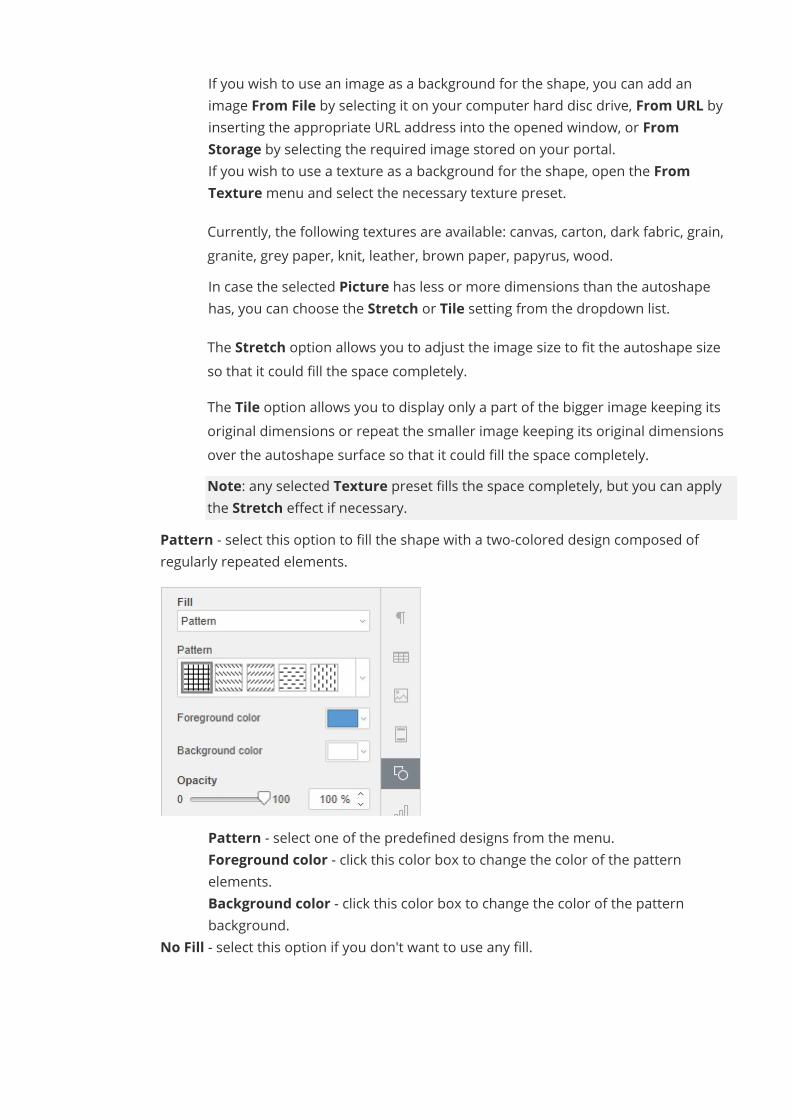
o If you wish to use an image as a background for the shape, you can add animage From File by selecting it on your computer hard disc drive, From URL byinserting the appropriate URL address into the opened window, or FromStorage by selecting the required image stored on your portal.
o If you wish to use a texture as a background for the shape, open the FromTexturemenu and select the necessary texture preset.Currently, the following textures are available: canvas, carton, dark fabric, grain,granite, grey paper, knit, leather, brown paper, papyrus, wood.
o In case the selected Picture has less or more dimensions than the autoshapehas, you can choose the Stretch or Tile setting from the dropdown list.The Stretch option allows you to adjust the image size to fit the autoshape sizeso that it could fill the space completely.The Tile option allows you to display only a part of the bigger image keeping itsoriginal dimensions or repeat the smaller image keeping its original dimensionsover the autoshape surface so that it could fill the space completely.Note: any selected Texture preset fills the space completely, but you can applythe Stretch effect if necessary.
· Pattern - select this option to fill the shape with a two-colored design composed ofregularly repeated elements.
o Pattern - select one of the predefined designs from the menu.o Foreground color - click this color box to change the color of the pattern
elements.o Background color - click this color box to change the color of the pattern
background.· No Fill - select this option if you don't want to use any fill.
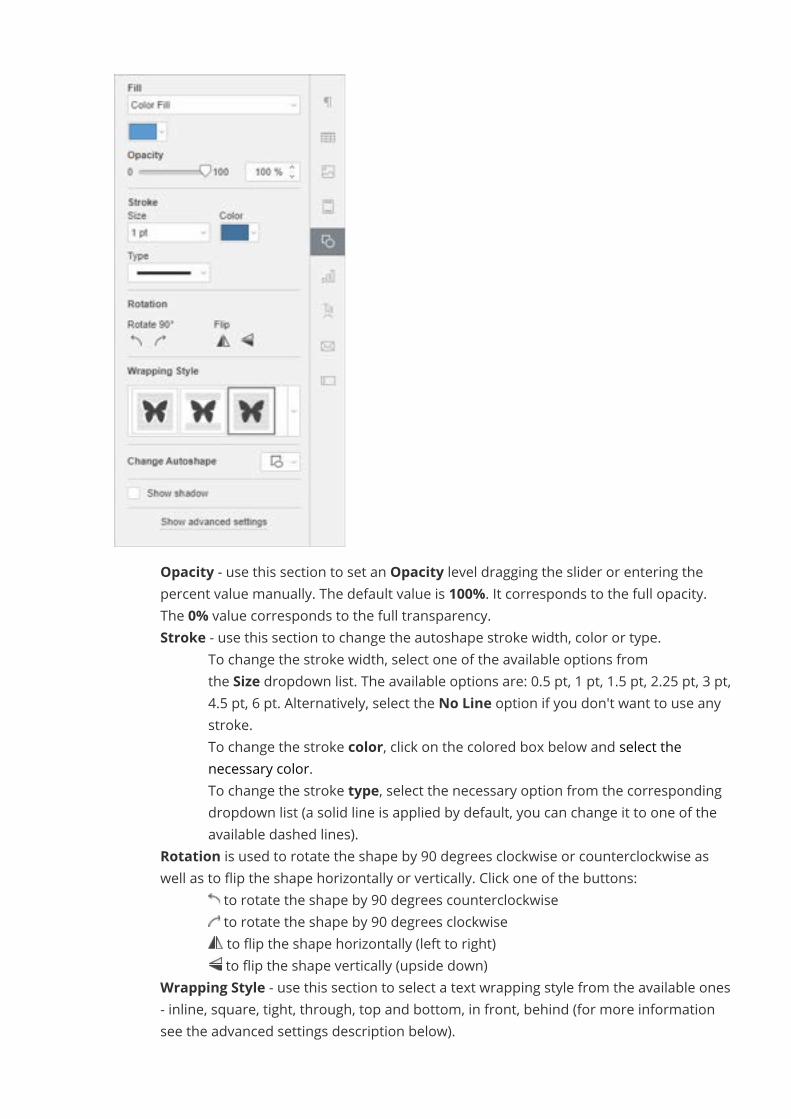
· Opacity - use this section to set an Opacity level dragging the slider or entering thepercent value manually. The default value is 100%. It corresponds to the full opacity.The 0% value corresponds to the full transparency.
· Stroke - use this section to change the autoshape stroke width, color or type.o To change the stroke width, select one of the available options from
the Size dropdown list. The available options are: 0.5 pt, 1 pt, 1.5 pt, 2.25 pt, 3 pt,4.5 pt, 6 pt. Alternatively, select the No Line option if you don't want to use anystroke.
o To change the stroke color, click on the colored box below and select thenecessary color.
o To change the stroke type, select the necessary option from the correspondingdropdown list (a solid line is applied by default, you can change it to one of theavailable dashed lines).
· Rotation is used to rotate the shape by 90 degrees clockwise or counterclockwise aswell as to flip the shape horizontally or vertically. Click one of the buttons:
o to rotate the shape by 90 degrees counterclockwiseo to rotate the shape by 90 degrees clockwiseo to flip the shape horizontally (left to right)o to flip the shape vertically (upside down)
· Wrapping Style - use this section to select a text wrapping style from the available ones- inline, square, tight, through, top and bottom, in front, behind (for more informationsee the advanced settings description below).
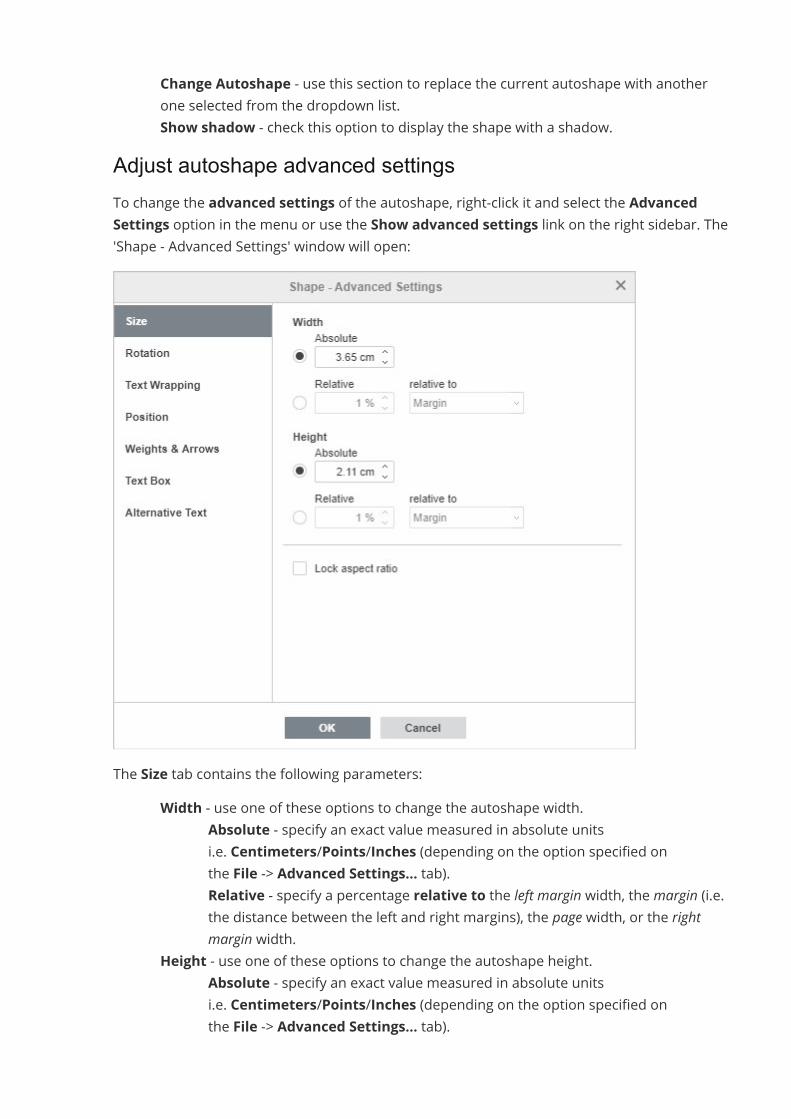
· Change Autoshape - use this section to replace the current autoshape with anotherone selected from the dropdown list.
· Show shadow - check this option to display the shape with a shadow.Adjust autoshape advanced settingsTo change the advanced settings of the autoshape, right-click it and select the AdvancedSettings option in the menu or use the Show advanced settings link on the right sidebar. The'Shape - Advanced Settings' window will open:
The Size tab contains the following parameters:· Width - use one of these options to change the autoshape width.
o Absolute - specify an exact value measured in absolute unitsi.e. Centimeters/Points/Inches (depending on the option specified onthe File -> Advanced Settings... tab).
o Relative - specify a percentage relative to the left margin width, the margin (i.e.the distance between the left and right margins), the page width, or the rightmargin width.
· Height - use one of these options to change the autoshape height.o Absolute - specify an exact value measured in absolute units
i.e. Centimeters/Points/Inches (depending on the option specified onthe File -> Advanced Settings... tab).
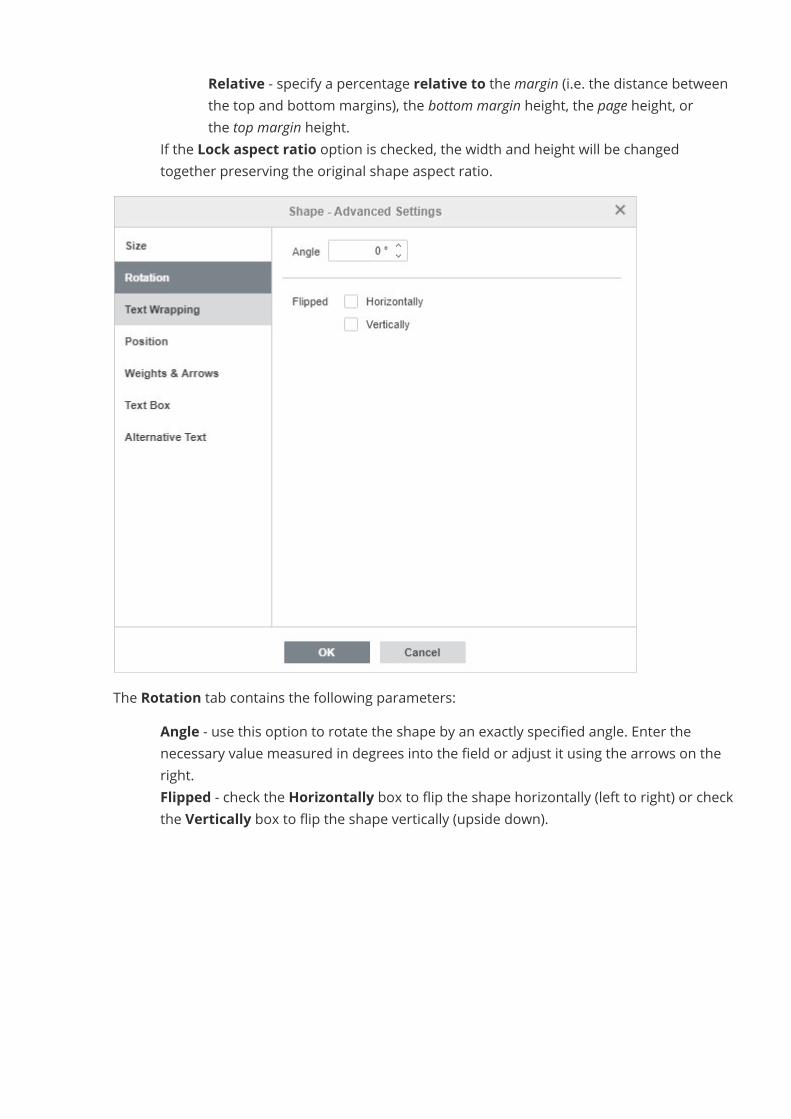
o Relative - specify a percentage relative to the margin (i.e. the distance betweenthe top and bottom margins), the bottom margin height, the page height, orthe top margin height.
· If the Lock aspect ratio option is checked, the width and height will be changedtogether preserving the original shape aspect ratio.
The Rotation tab contains the following parameters:· Angle - use this option to rotate the shape by an exactly specified angle. Enter the
necessary value measured in degrees into the field or adjust it using the arrows on theright.
· Flipped - check the Horizontally box to flip the shape horizontally (left to right) or checkthe Vertically box to flip the shape vertically (upside down).
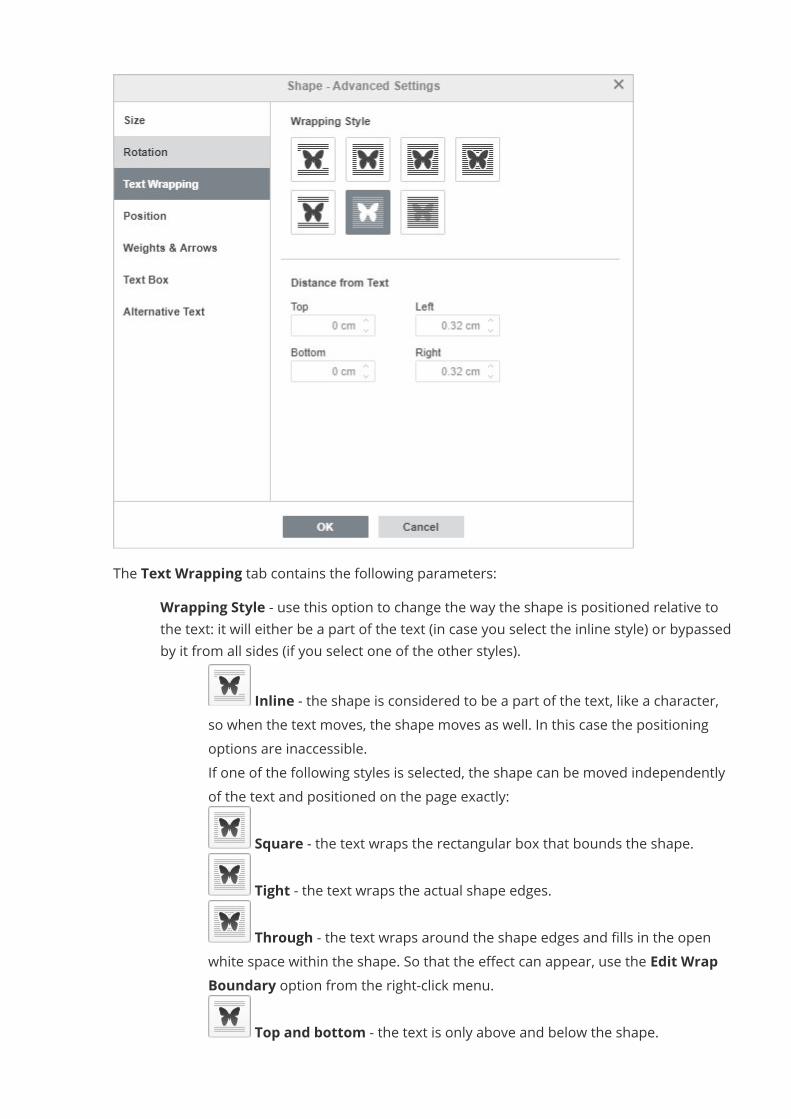
The Text Wrapping tab contains the following parameters:· Wrapping Style - use this option to change the way the shape is positioned relative to
the text: it will either be a part of the text (in case you select the inline style) or bypassedby it from all sides (if you select one of the other styles).
o Inline - the shape is considered to be a part of the text, like a character,so when the text moves, the shape moves as well. In this case the positioningoptions are inaccessible.
o If one of the following styles is selected, the shape can be moved independentlyof the text and positioned on the page exactly:
o Square - the text wraps the rectangular box that bounds the shape.o Tight - the text wraps the actual shape edges.o Through - the text wraps around the shape edges and fills in the open
white space within the shape. So that the effect can appear, use the Edit WrapBoundary option from the right-click menu.
o Top and bottom - the text is only above and below the shape.
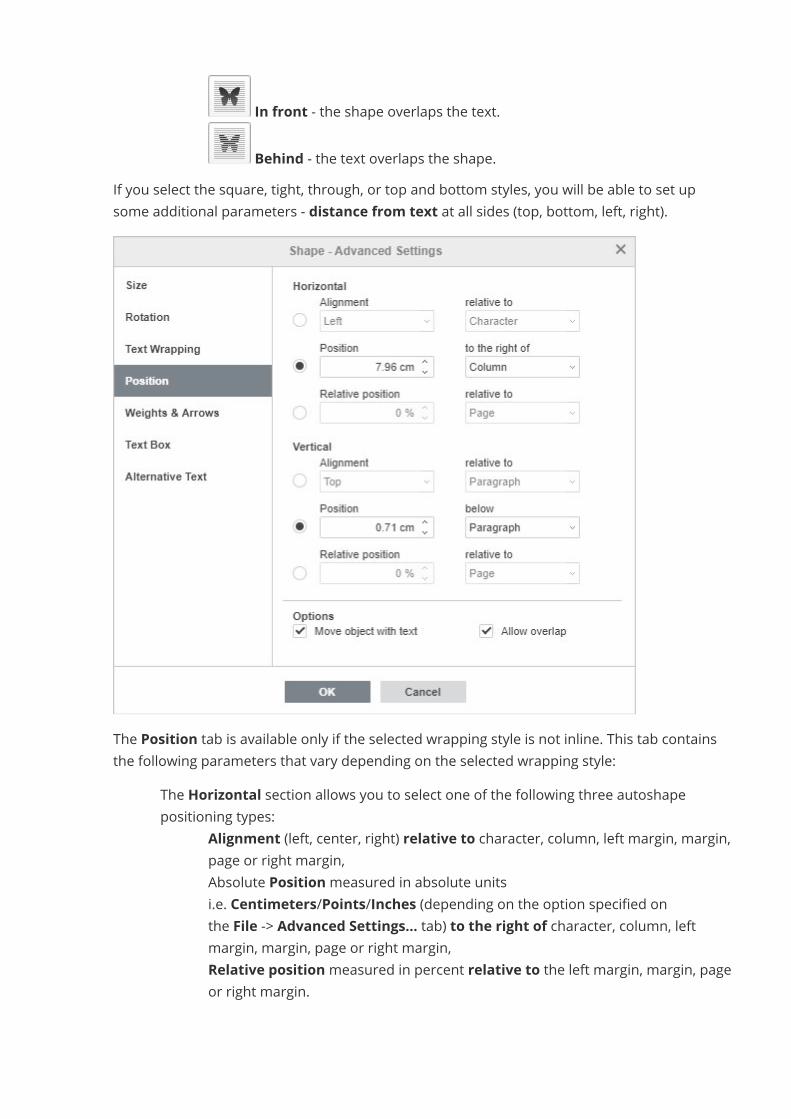
o In front - the shape overlaps the text.o Behind - the text overlaps the shape.
If you select the square, tight, through, or top and bottom styles, you will be able to set upsome additional parameters - distance from text at all sides (top, bottom, left, right).
The Position tab is available only if the selected wrapping style is not inline. This tab containsthe following parameters that vary depending on the selected wrapping style:
· The Horizontal section allows you to select one of the following three autoshapepositioning types:
o Alignment (left, center, right) relative to character, column, left margin, margin,page or right margin,
o Absolute Positionmeasured in absolute unitsi.e. Centimeters/Points/Inches (depending on the option specified onthe File -> Advanced Settings... tab) to the right of character, column, leftmargin, margin, page or right margin,
o Relative positionmeasured in percent relative to the left margin, margin, pageor right margin.
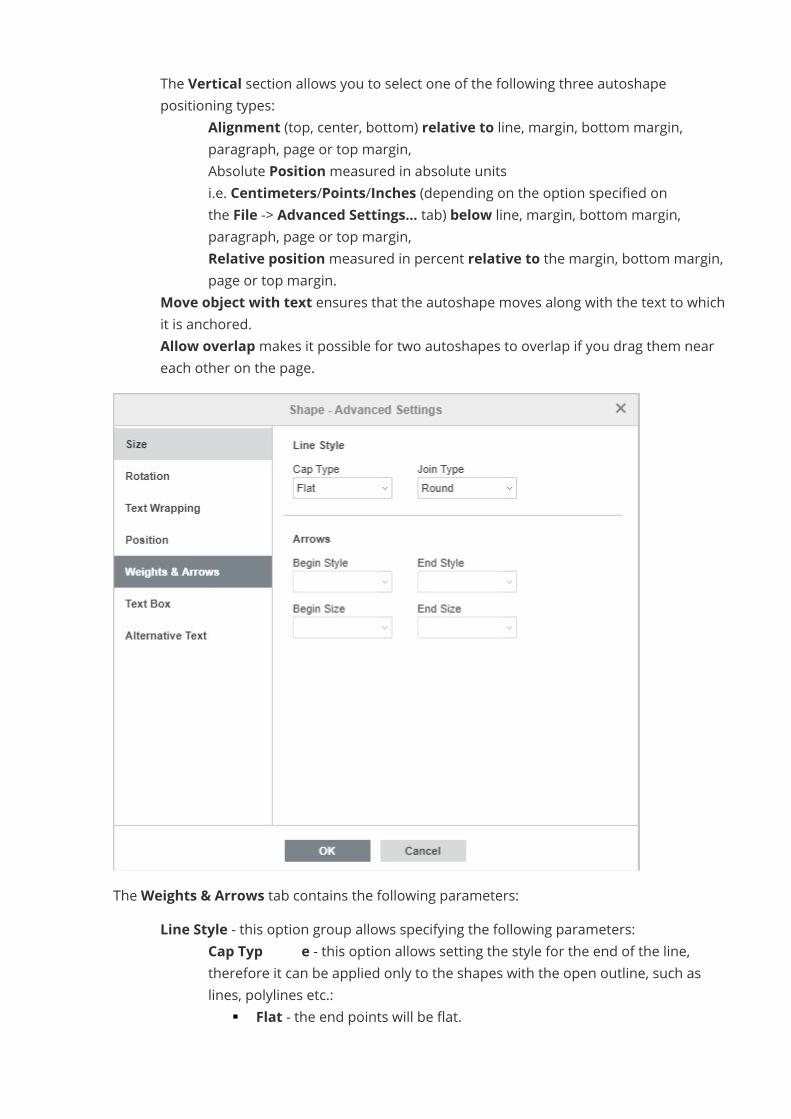
· The Vertical section allows you to select one of the following three autoshapepositioning types:
o Alignment (top, center, bottom) relative to line, margin, bottom margin,paragraph, page or top margin,
o Absolute Positionmeasured in absolute unitsi.e. Centimeters/Points/Inches (depending on the option specified onthe File -> Advanced Settings... tab) below line, margin, bottom margin,paragraph, page or top margin,
o Relative positionmeasured in percent relative to the margin, bottom margin,page or top margin.
· Move object with text ensures that the autoshape moves along with the text to whichit is anchored.
· Allow overlapmakes it possible for two autoshapes to overlap if you drag them neareach other on the page.
TheWeights & Arrows tab contains the following parameters:· Line Style - this option group allows specifying the following parameters:
o Cap Typ e - this option allows setting the style for the end of the line,therefore it can be applied only to the shapes with the open outline, such aslines, polylines etc.:
§ Flat - the end points will be flat.
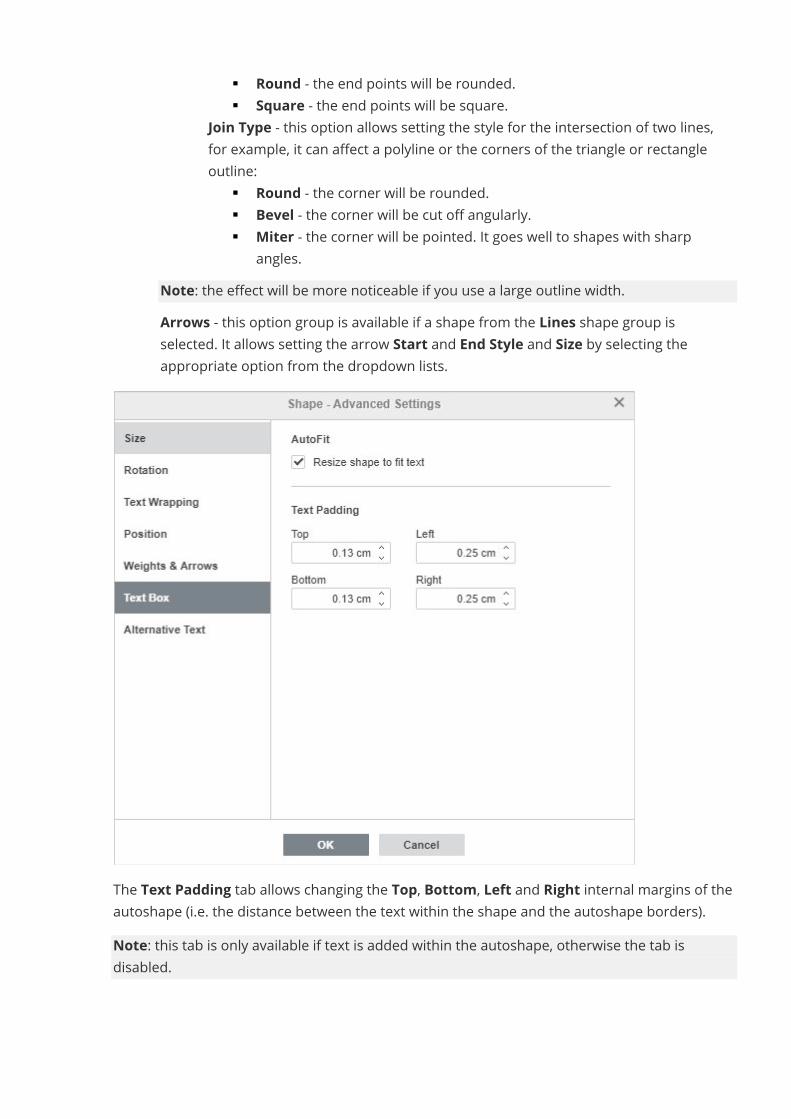
§ Round - the end points will be rounded.§ Square - the end points will be square.
o Join Type - this option allows setting the style for the intersection of two lines,for example, it can affect a polyline or the corners of the triangle or rectangleoutline:
§ Round - the corner will be rounded.§ Bevel - the corner will be cut off angularly.§ Miter - the corner will be pointed. It goes well to shapes with sharp
angles.Note: the effect will be more noticeable if you use a large outline width.
· Arrows - this option group is available if a shape from the Lines shape group isselected. It allows setting the arrow Start and End Style and Size by selecting theappropriate option from the dropdown lists.
The Text Padding tab allows changing the Top, Bottom, Left and Right internal margins of theautoshape (i.e. the distance between the text within the shape and the autoshape borders).Note: this tab is only available if text is added within the autoshape, otherwise the tab isdisabled.
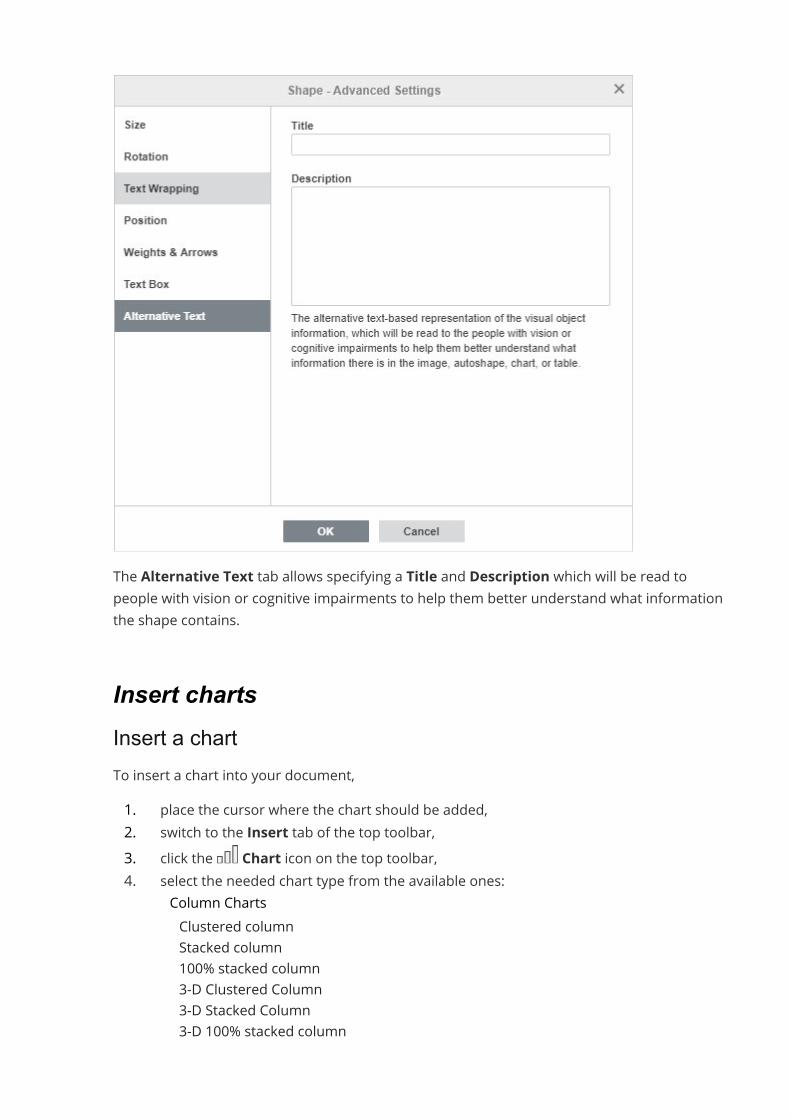
The Alternative Text tab allows specifying a Title and Description which will be read topeople with vision or cognitive impairments to help them better understand what informationthe shape contains.
Insert chartsInsert a chartTo insert a chart into your document,1. place the cursor where the chart should be added,2. switch to the Insert tab of the top toolbar,3. click the Chart icon on the top toolbar,4. select the needed chart type from the available ones:
· Column Chartso Clustered columno Stacked columno 100% stacked columno 3-D Clustered Columno 3-D Stacked Columno 3-D 100% stacked column
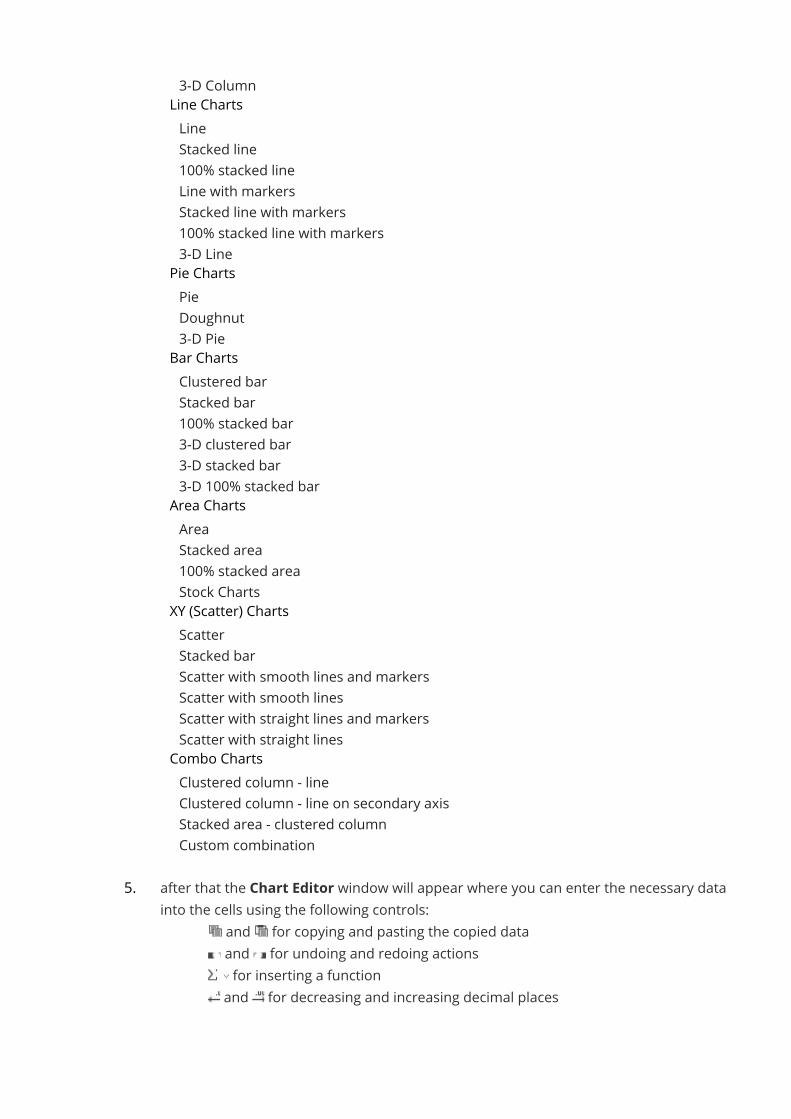
o 3-D Column· Line Chartso Lineo Stacked lineo 100% stacked lineo Line with markerso Stacked line with markerso 100% stacked line with markerso 3-D Line· Pie Chartso Pieo Doughnuto 3-D Pie· Bar Chartso Clustered baro Stacked baro 100% stacked baro 3-D clustered baro 3-D stacked baro 3-D 100% stacked bar· Area Chartso Areao Stacked areao 100% stacked areao Stock Charts· XY (Scatter) Chartso Scattero Stacked baro Scatter with smooth lines and markerso Scatter with smooth lineso Scatter with straight lines and markerso Scatter with straight lines· Combo Chartso Clustered column - lineo Clustered column - line on secondary axiso Stacked area - clustered columno Custom combination
5. after that the Chart Editor window will appear where you can enter the necessary datainto the cells using the following controls:
· and for copying and pasting the copied data· and for undoing and redoing actions· for inserting a function· and for decreasing and increasing decimal places
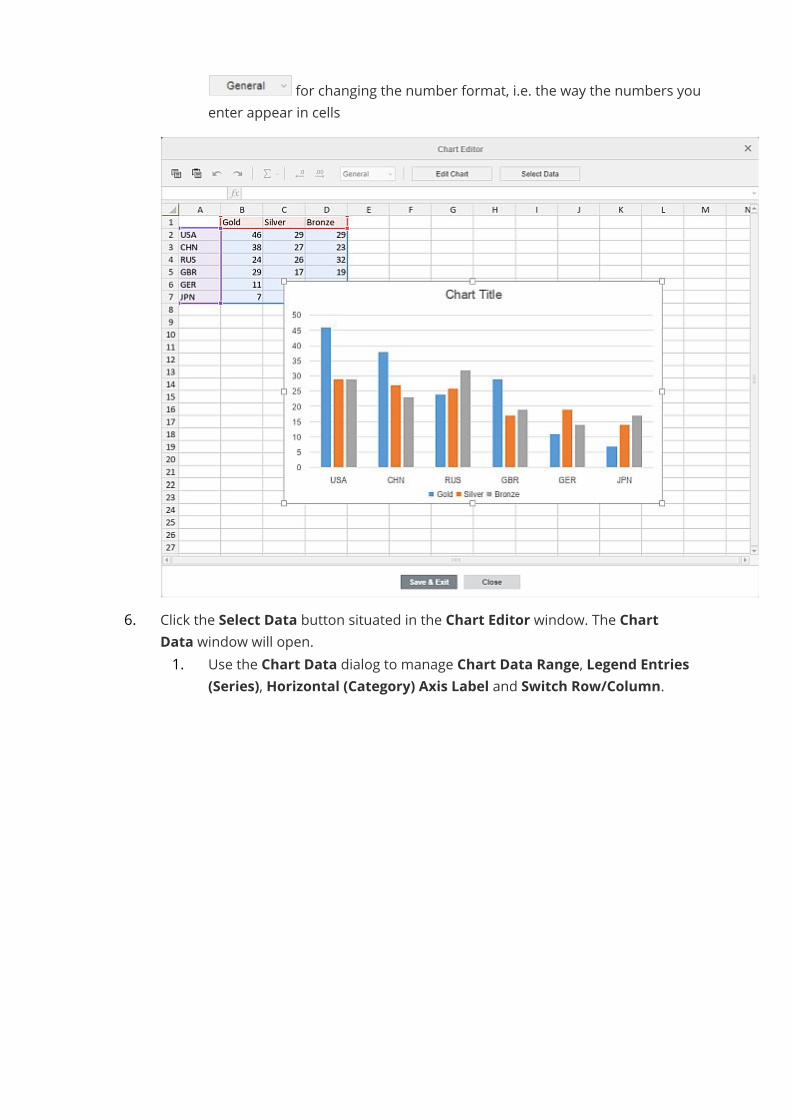
· for changing the number format, i.e. the way the numbers youenter appear in cells
6. Click the Select Data button situated in the Chart Editor window. The ChartData window will open.1. Use the Chart Data dialog to manage Chart Data Range, Legend Entries
(Series), Horizontal (Category) Axis Label and Switch Row/Column.
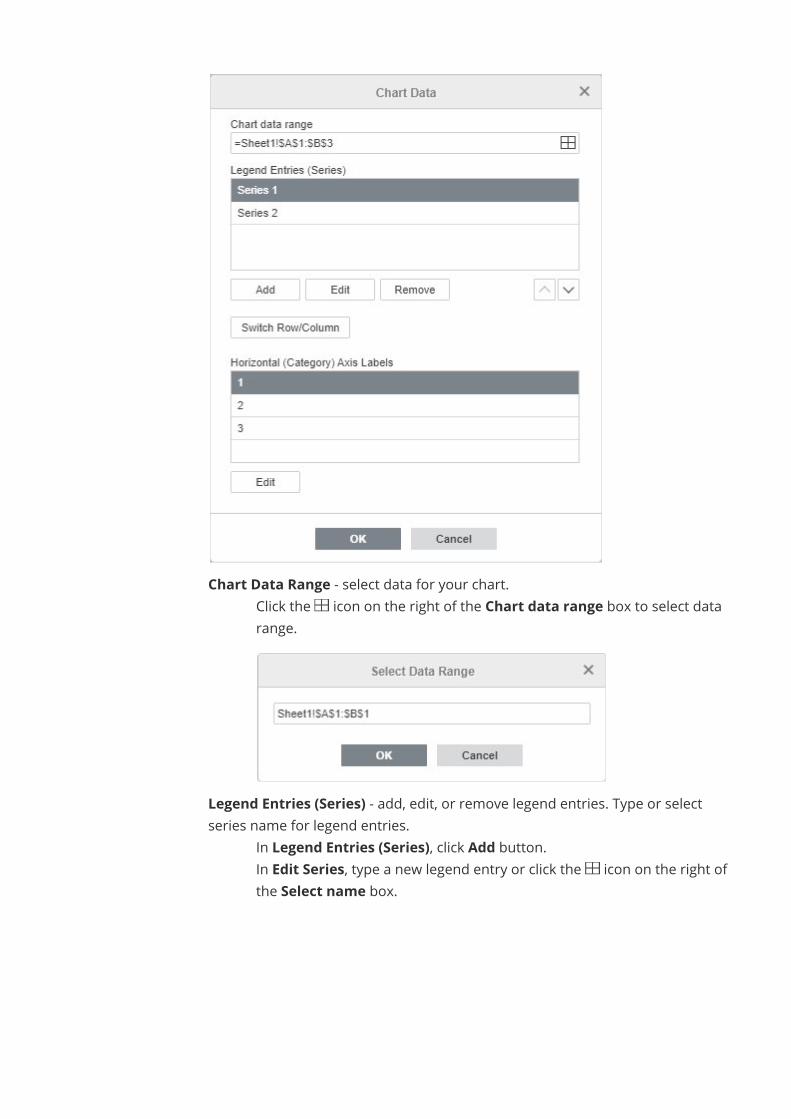
· Chart Data Range - select data for your chart.o Click the icon on the right of the Chart data range box to select data
range.
· Legend Entries (Series) - add, edit, or remove legend entries. Type or selectseries name for legend entries.
o In Legend Entries (Series), click Add button.o In Edit Series, type a new legend entry or click the icon on the right of
the Select name box.
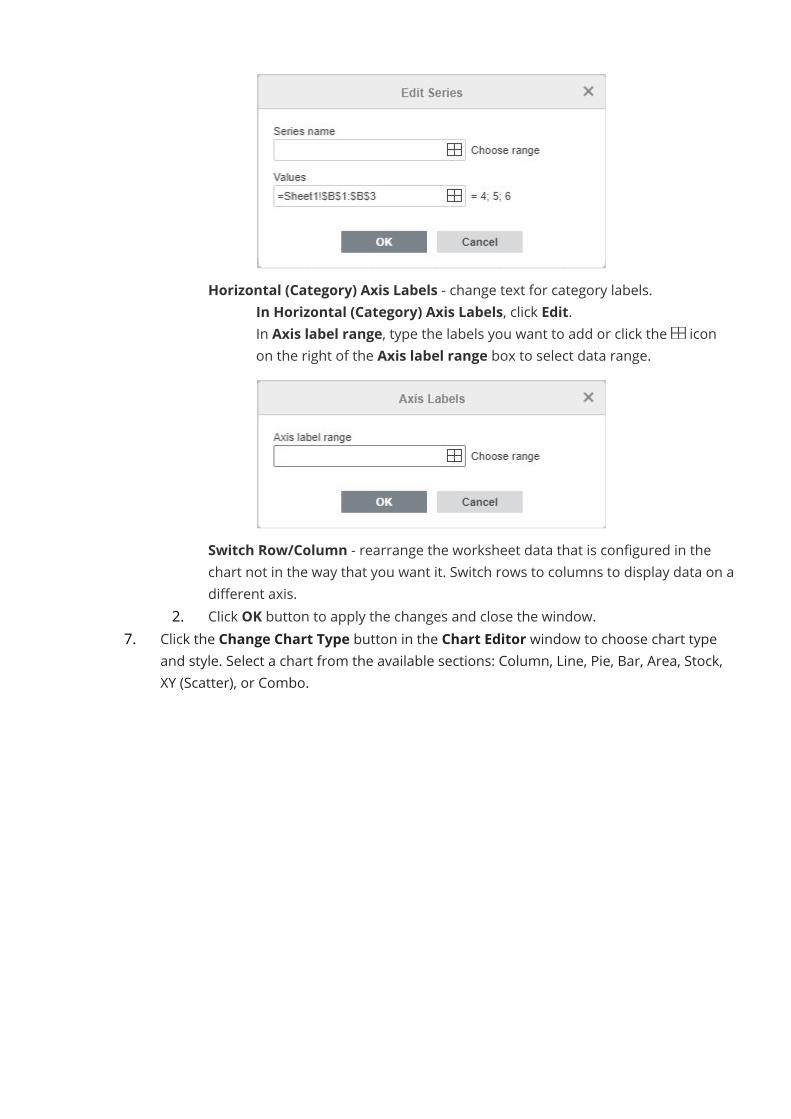
· Horizontal (Category) Axis Labels - change text for category labels.o In Horizontal (Category) Axis Labels, click Edit.o In Axis label range, type the labels you want to add or click the icon
on the right of the Axis label range box to select data range.
· Switch Row/Column - rearrange the worksheet data that is configured in thechart not in the way that you want it. Switch rows to columns to display data on adifferent axis.
2. Click OK button to apply the changes and close the window.7. Click the Change Chart Type button in the Chart Editor window to choose chart type
and style. Select a chart from the available sections: Column, Line, Pie, Bar, Area, Stock,XY (Scatter), or Combo.

When you choose Combo Charts, the Chart Type window lists chart series and allowschoosing the types of charts to combine and selecting data series to place on a seconaryaxis.
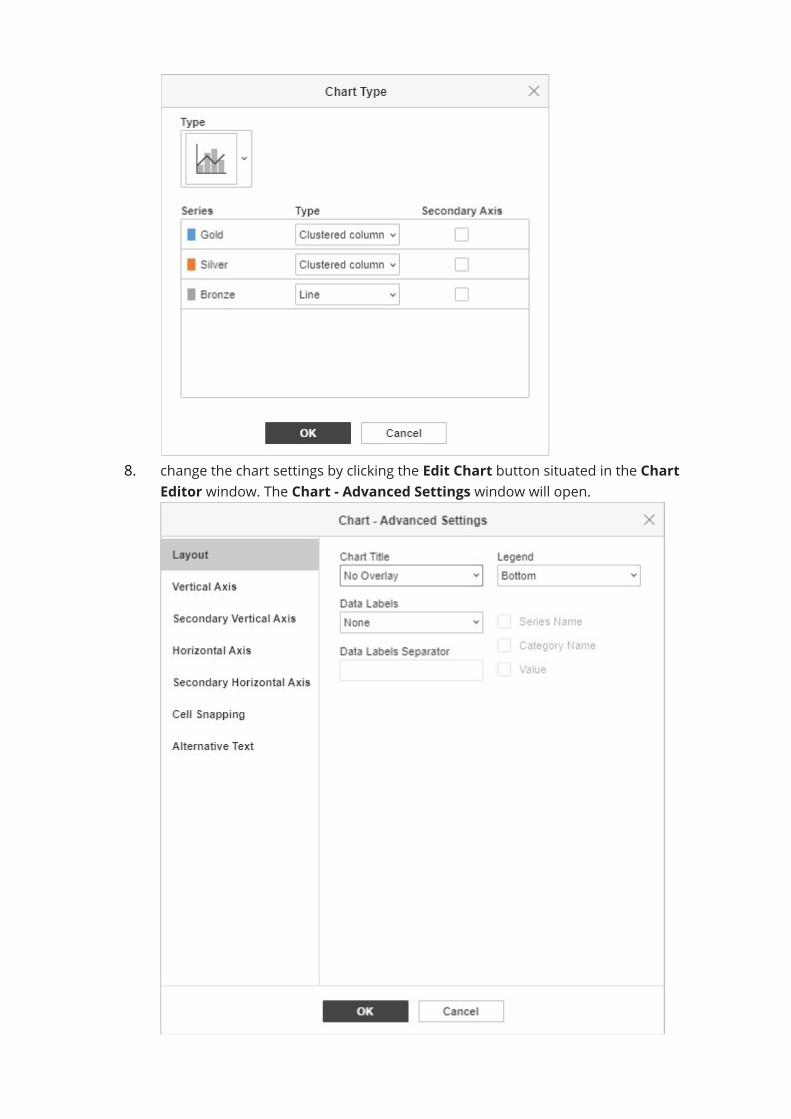
8. change the chart settings by clicking the Edit Chart button situated in the ChartEditor window. The Chart - Advanced Settings window will open.
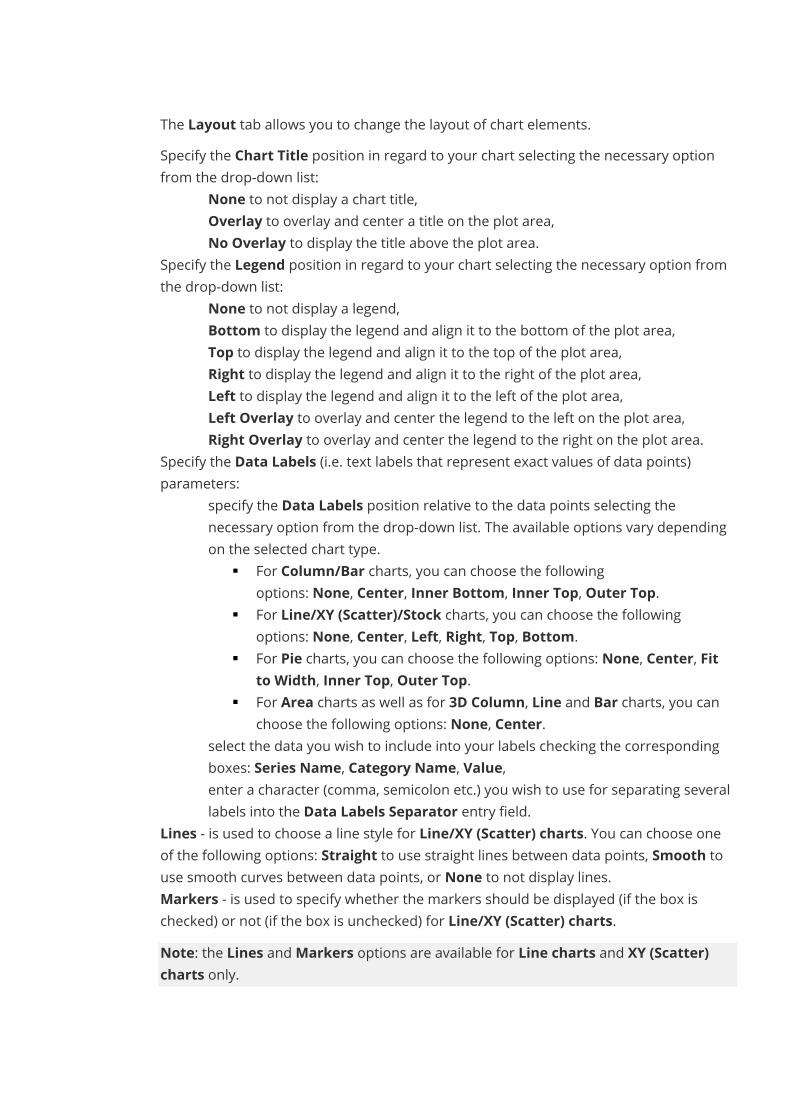
The Layout tab allows you to change the layout of chart elements.· Specify the Chart Title position in regard to your chart selecting the necessary option
from the drop-down list:o None to not display a chart title,o Overlay to overlay and center a title on the plot area,o No Overlay to display the title above the plot area.
· Specify the Legend position in regard to your chart selecting the necessary option fromthe drop-down list:
o None to not display a legend,o Bottom to display the legend and align it to the bottom of the plot area,o Top to display the legend and align it to the top of the plot area,o Right to display the legend and align it to the right of the plot area,o Left to display the legend and align it to the left of the plot area,o Left Overlay to overlay and center the legend to the left on the plot area,o Right Overlay to overlay and center the legend to the right on the plot area.
· Specify the Data Labels (i.e. text labels that represent exact values of data points)parameters:
o specify the Data Labels position relative to the data points selecting thenecessary option from the drop-down list. The available options vary dependingon the selected chart type.
§ For Column/Bar charts, you can choose the followingoptions: None, Center, Inner Bottom, Inner Top, Outer Top.
§ For Line/XY (Scatter)/Stock charts, you can choose the followingoptions: None, Center, Left, Right, Top, Bottom.
§ For Pie charts, you can choose the following options: None, Center, Fitto Width, Inner Top, Outer Top.
§ For Area charts as well as for 3D Column, Line and Bar charts, you canchoose the following options: None, Center.
o select the data you wish to include into your labels checking the correspondingboxes: Series Name, Category Name, Value,
o enter a character (comma, semicolon etc.) you wish to use for separating severallabels into the Data Labels Separator entry field.
· Lines - is used to choose a line style for Line/XY (Scatter) charts. You can choose oneof the following options: Straight to use straight lines between data points, Smooth touse smooth curves between data points, or None to not display lines.
· Markers - is used to specify whether the markers should be displayed (if the box ischecked) or not (if the box is unchecked) for Line/XY (Scatter) charts.Note: the Lines andMarkers options are available for Line charts and XY (Scatter)charts only.
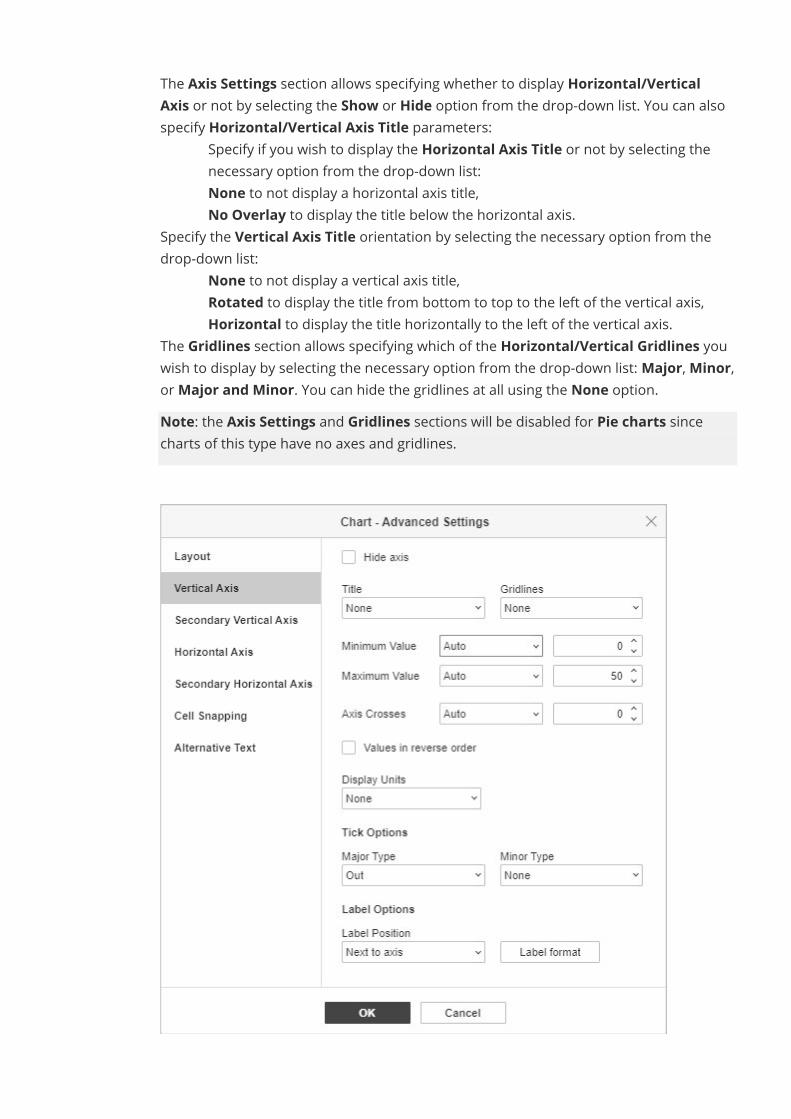
· The Axis Settings section allows specifying whether to display Horizontal/VerticalAxis or not by selecting the Show or Hide option from the drop-down list. You can alsospecify Horizontal/Vertical Axis Title parameters:
o Specify if you wish to display the Horizontal Axis Title or not by selecting thenecessary option from the drop-down list:
o None to not display a horizontal axis title,o No Overlay to display the title below the horizontal axis.
· Specify the Vertical Axis Title orientation by selecting the necessary option from thedrop-down list:
o None to not display a vertical axis title,o Rotated to display the title from bottom to top to the left of the vertical axis,o Horizontal to display the title horizontally to the left of the vertical axis.
· The Gridlines section allows specifying which of the Horizontal/Vertical Gridlines youwish to display by selecting the necessary option from the drop-down list:Major,Minor,orMajor and Minor. You can hide the gridlines at all using the None option.Note: the Axis Settings and Gridlines sections will be disabled for Pie charts sincecharts of this type have no axes and gridlines.
Note: the Vertical/Horizontal Axis tabs will be disabled for Pie charts since charts ofthis type have no axes.The Vertical Axis tab allows you to change the parameters of the vertical axis alsoreferred to as the values axis or y-axis which displays numeric values. Note that thevertical axis will be the category axis which displays text labels for the Bar charts,therefore in this case the Vertical Axis tab options will correspond to the onesdescribed in the next section. For the XY (Scatter) charts, both axes are value axes.
· The Axis Options section allows setting the following parameters:· Minimum Value - is used to specify the lowest value displayed at the
vertical axis start. The Auto option is selected by default, in this case theminimum value is calculated automatically depending on the selecteddata range. You can select the Fixed option from the drop-down list andspecify a different value in the entry field on the right.
· Maximum Value - is used to specify the highest value displayed at thevertical axis end. The Auto option is selected by default, in this case themaximum value is calculated automatically depending on the selecteddata range. You can select the Fixed option from the drop-down list andspecify a different value in the entry field on the right.
· Axis Crosses - is used to specify a point on the vertical axis where thehorizontal axis should cross it. The Auto option is selected by default, inthis case the axes intersection point value is calculated automaticallydepending on the selected data range. You can select the Value optionfrom the drop-down list and specify a different value in the entry field onthe right, or set the axes intersection point at theMinimum/MaximumValue on the vertical axis.
· Display Units - is used to determine the representation of the numericvalues along the vertical axis. This option can be useful if you're workingwith great numbers and wish the values on the axis to be displayed in amore compact and readable way (e.g. you can represent 50 000 as 50 byusing the Thousands display units). Select desired units from the drop-down list: Hundreds, Thousands, 10 000, 100 000,Millions, 10 000000, 100 000 000, Billions, Trillions, or choose the None option to returnto the default units.
· Values in reverse order - is used to display values in the oppositedirection. When the box is unchecked, the lowest value is at the bottomand the highest value is at the top of the axis. When the box is checked,the values are ordered from top to bottom.
· The Tick Options section allows adjusting the appearance of tick marks on thevertical scale. Major tick marks are the larger scale divisions which can havelabels displaying numeric values. Minor tick marks are the scale subdivisionswhich are placed between the major tick marks and have no labels. Tick marksalso define where gridlines can be displayed if the corresponding option is set on
the Layout tab. TheMajor/Minor Type drop-down lists contain the followingplacement options:
· None to not display major/minor tick marks,· Cross to display major/minor tick marks on both sides of the axis,· In to display major/minor tick marks inside the axis,· Out to display major/minor tick marks outside the axis.
· The Label Options section allows adjusting the appearance of major tick marklabels which display values. To specify a Label Position in regard to the verticalaxis, select the necessary option from the drop-down list:
· None to not display tick mark labels,· Low to display tick mark labels to the left of the plot area,· High to display tick mark labels to the right of the plot area,· Next to axis to display tick mark labels next to the axis.· To specify a Label Format click the Label Format button and choose a
category as it deems appropriate.Available label format categories:o Generalo Numbero Scientifico Accountingo Currencyo Dateo Timeo Percentageo Fractiono Texto Custom
Label format options vary depending on the selected category.o Check Linked to source to keep number formatting from the data source in
the chart.
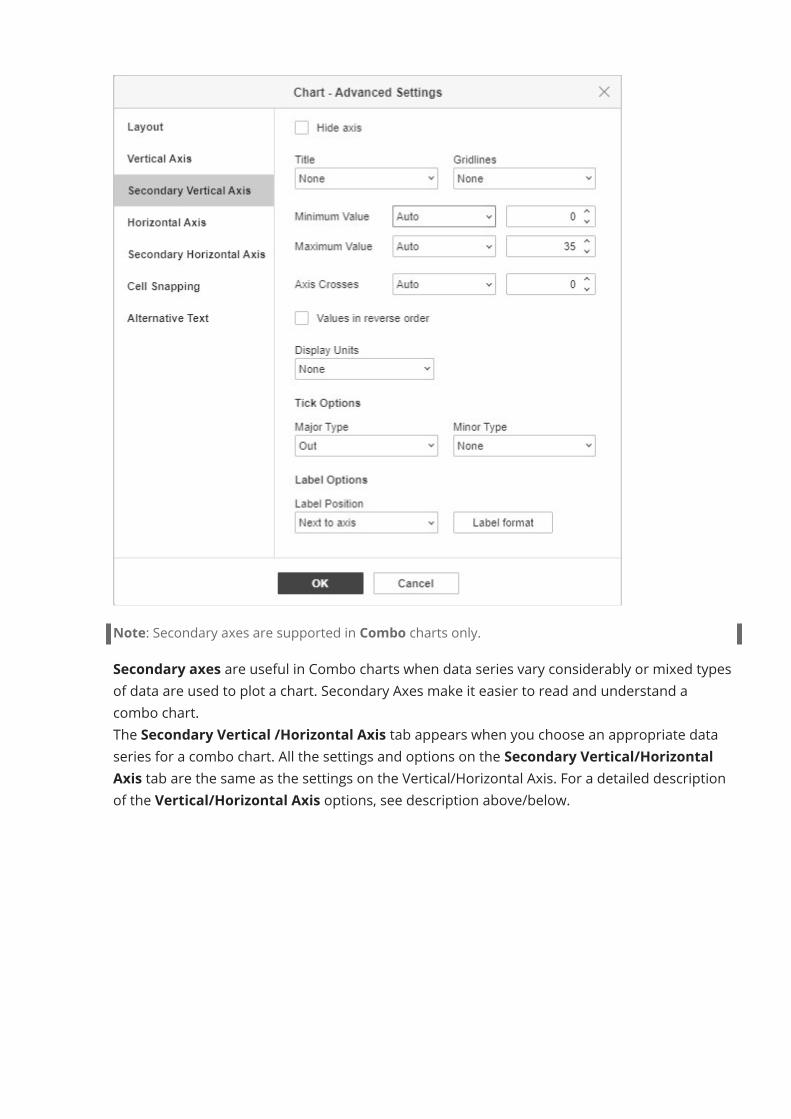
Note: Secondary axes are supported in Combo charts only.Secondary axes are useful in Combo charts when data series vary considerably or mixed typesof data are used to plot a chart. Secondary Axes make it easier to read and understand acombo chart.The Secondary Vertical /Horizontal Axis tab appears when you choose an appropriate dataseries for a combo chart. All the settings and options on the Secondary Vertical/HorizontalAxis tab are the same as the settings on the Vertical/Horizontal Axis. For a detailed descriptionof the Vertical/Horizontal Axis options, see description above/below.
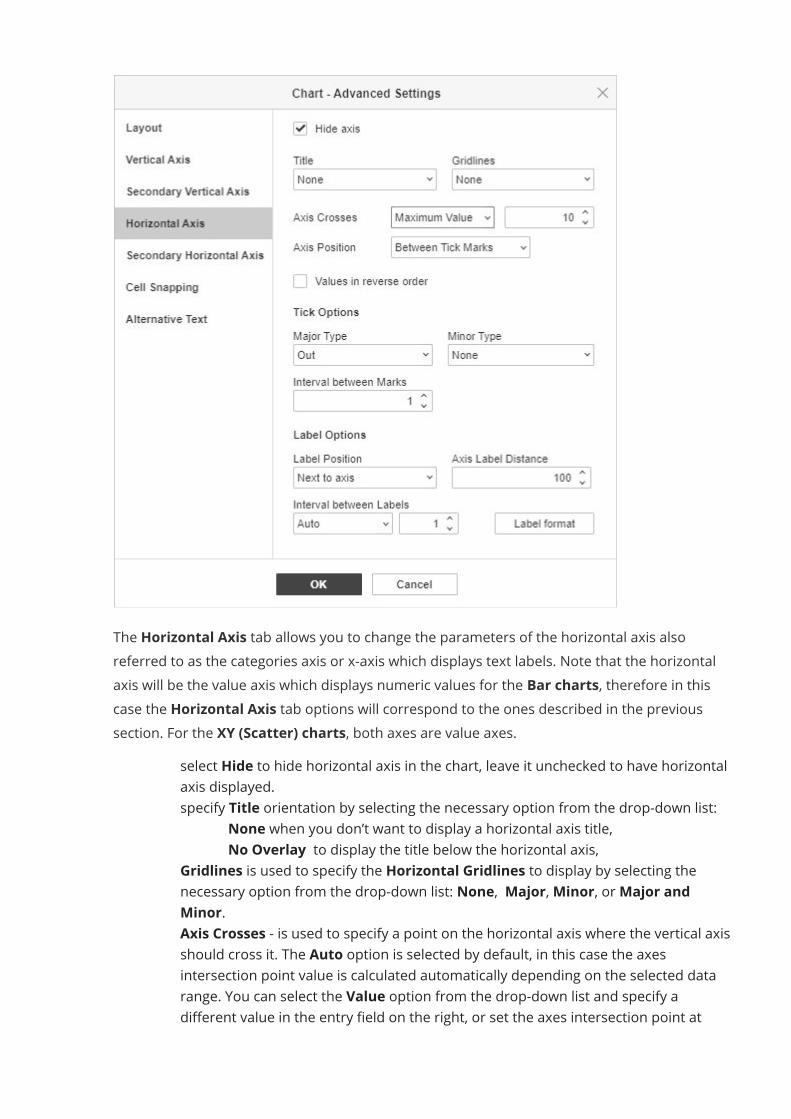
The Horizontal Axis tab allows you to change the parameters of the horizontal axis alsoreferred to as the categories axis or x-axis which displays text labels. Note that the horizontalaxis will be the value axis which displays numeric values for the Bar charts, therefore in thiscase the Horizontal Axis tab options will correspond to the ones described in the previoussection. For the XY (Scatter) charts, both axes are value axes.
· select Hide to hide horizontal axis in the chart, leave it unchecked to have horizontalaxis displayed.
· specify Title orientation by selecting the necessary option from the drop-down list:o None when you don’t want to display a horizontal axis title,o No Overlay to display the title below the horizontal axis,
· Gridlines is used to specify the Horizontal Gridlines to display by selecting thenecessary option from the drop-down list: None, Major,Minor, orMajor andMinor.
· Axis Crosses - is used to specify a point on the horizontal axis where the vertical axisshould cross it. The Auto option is selected by default, in this case the axesintersection point value is calculated automatically depending on the selected datarange. You can select the Value option from the drop-down list and specify adifferent value in the entry field on the right, or set the axes intersection point at
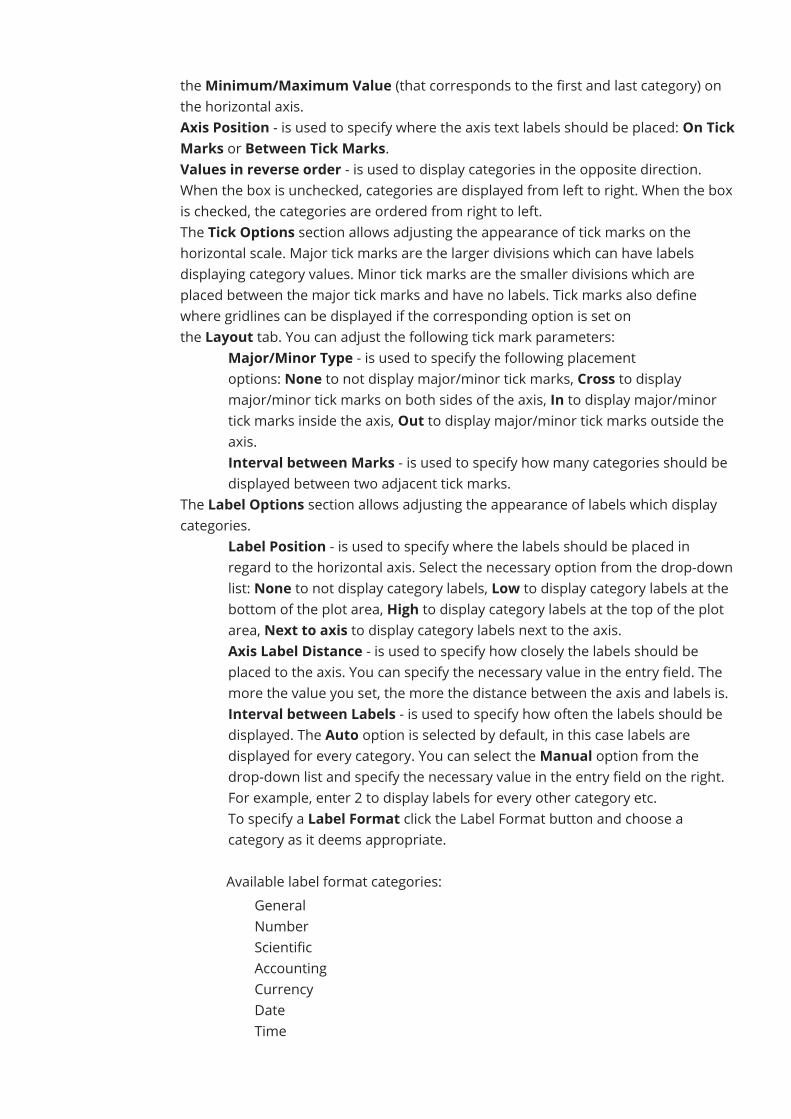
theMinimum/Maximum Value (that corresponds to the first and last category) onthe horizontal axis.
· Axis Position - is used to specify where the axis text labels should be placed: On TickMarks or Between Tick Marks.
· Values in reverse order - is used to display categories in the opposite direction.When the box is unchecked, categories are displayed from left to right. When the boxis checked, the categories are ordered from right to left.
· The Tick Options section allows adjusting the appearance of tick marks on thehorizontal scale. Major tick marks are the larger divisions which can have labelsdisplaying category values. Minor tick marks are the smaller divisions which areplaced between the major tick marks and have no labels. Tick marks also definewhere gridlines can be displayed if the corresponding option is set onthe Layout tab. You can adjust the following tick mark parameters:
o Major/Minor Type - is used to specify the following placementoptions: None to not display major/minor tick marks, Cross to displaymajor/minor tick marks on both sides of the axis, In to display major/minortick marks inside the axis, Out to display major/minor tick marks outside theaxis.
o Interval between Marks - is used to specify how many categories should bedisplayed between two adjacent tick marks.
· The Label Options section allows adjusting the appearance of labels which displaycategories.
o Label Position - is used to specify where the labels should be placed inregard to the horizontal axis. Select the necessary option from the drop-downlist: None to not display category labels, Low to display category labels at thebottom of the plot area, High to display category labels at the top of the plotarea, Next to axis to display category labels next to the axis.
o Axis Label Distance - is used to specify how closely the labels should beplaced to the axis. You can specify the necessary value in the entry field. Themore the value you set, the more the distance between the axis and labels is.
o Interval between Labels - is used to specify how often the labels should bedisplayed. The Auto option is selected by default, in this case labels aredisplayed for every category. You can select theManual option from thedrop-down list and specify the necessary value in the entry field on the right.For example, enter 2 to display labels for every other category etc.
o To specify a Label Format click the Label Format button and choose acategory as it deems appropriate.Available label format categories:o Generalo Numbero Scientifico Accountingo Currencyo Dateo Time
o Percentageo Fractiono Texto Custom
Label format options vary depending on the selected category.o Check Linked to source to keep number formatting from the data source in
the chart.
The Cell Snapping tab contains the following parameters:· Move and size with cells - this option allows you to snap the chart to the cell behind
it. If the cell moves (e.g. if you insert or delete some rows/columns), the chart will bemoved together with the cell. If you increase or decrease the width or height of thecell, the chart will change its size as well.
· Move but don't size with cells - this option allows to snap the chart to the cellbehind it preventing the chart from being resized. If the cell moves, the chart will bemoved together with the cell, but if you change the cell size, the chart dimensionsremain unchanged.

· Don't move or size with cells - this option allows to prevent the chart from beingmoved or resized if the cell position or size was changed.
The Alternative Text tab allows specifying a Title and Description which will be read topeople with vision or cognitive impairments to help them better understand what informationthe chart contains.Move and resize charts
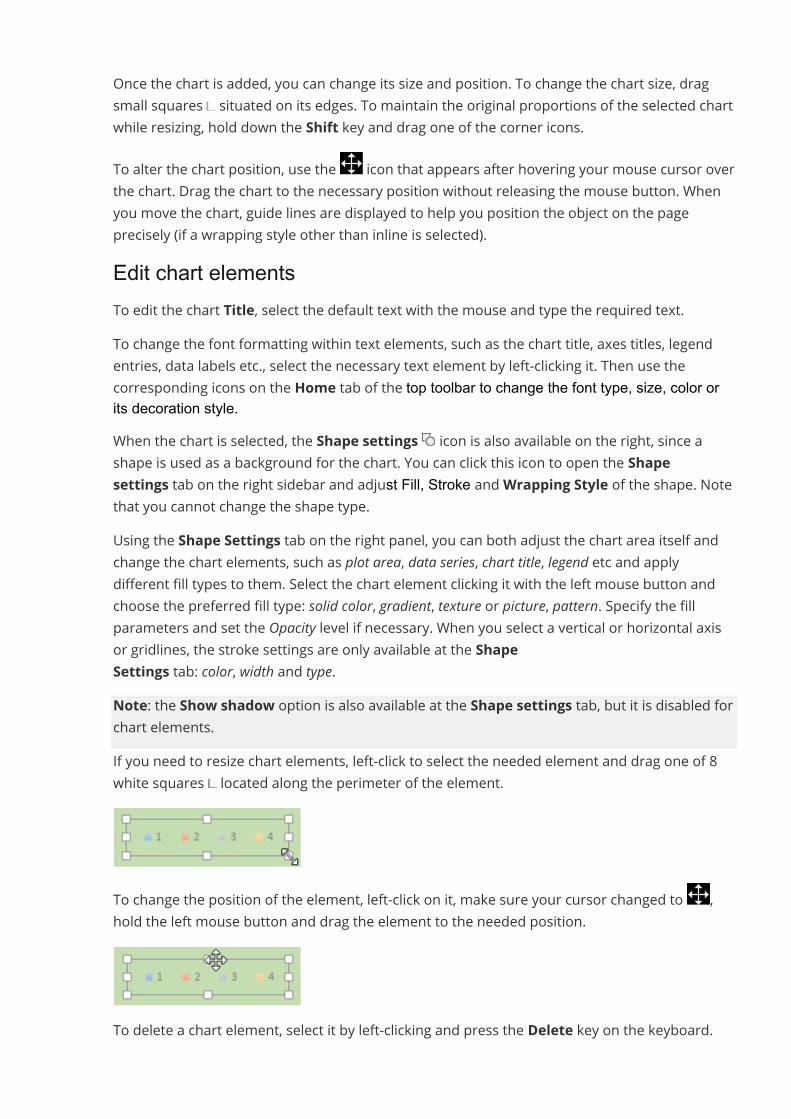
Once the chart is added, you can change its size and position. To change the chart size, dragsmall squares situated on its edges. To maintain the original proportions of the selected chartwhile resizing, hold down the Shift key and drag one of the corner icons.To alter the chart position, use the icon that appears after hovering your mouse cursor overthe chart. Drag the chart to the necessary position without releasing the mouse button. Whenyou move the chart, guide lines are displayed to help you position the object on the pageprecisely (if a wrapping style other than inline is selected).Edit chart elementsTo edit the chart Title, select the default text with the mouse and type the required text.To change the font formatting within text elements, such as the chart title, axes titles, legendentries, data labels etc., select the necessary text element by left-clicking it. Then use thecorresponding icons on the Home tab of the top toolbar to change the font type, size, color orits decoration style.When the chart is selected, the Shape settings icon is also available on the right, since ashape is used as a background for the chart. You can click this icon to open the Shapesettings tab on the right sidebar and adjust Fill, Stroke andWrapping Style of the shape. Notethat you cannot change the shape type.Using the Shape Settings tab on the right panel, you can both adjust the chart area itself andchange the chart elements, such as plot area, data series, chart title, legend etc and applydifferent fill types to them. Select the chart element clicking it with the left mouse button andchoose the preferred fill type: solid color, gradient, texture or picture, pattern. Specify the fillparameters and set the Opacity level if necessary. When you select a vertical or horizontal axisor gridlines, the stroke settings are only available at the ShapeSettings tab: color, width and type.Note: the Show shadow option is also available at the Shape settings tab, but it is disabled forchart elements.If you need to resize chart elements, left-click to select the needed element and drag one of 8white squares located along the perimeter of the element.
To change the position of the element, left-click on it, make sure your cursor changed to ,hold the left mouse button and drag the element to the needed position.
To delete a chart element, select it by left-clicking and press the Delete key on the keyboard.
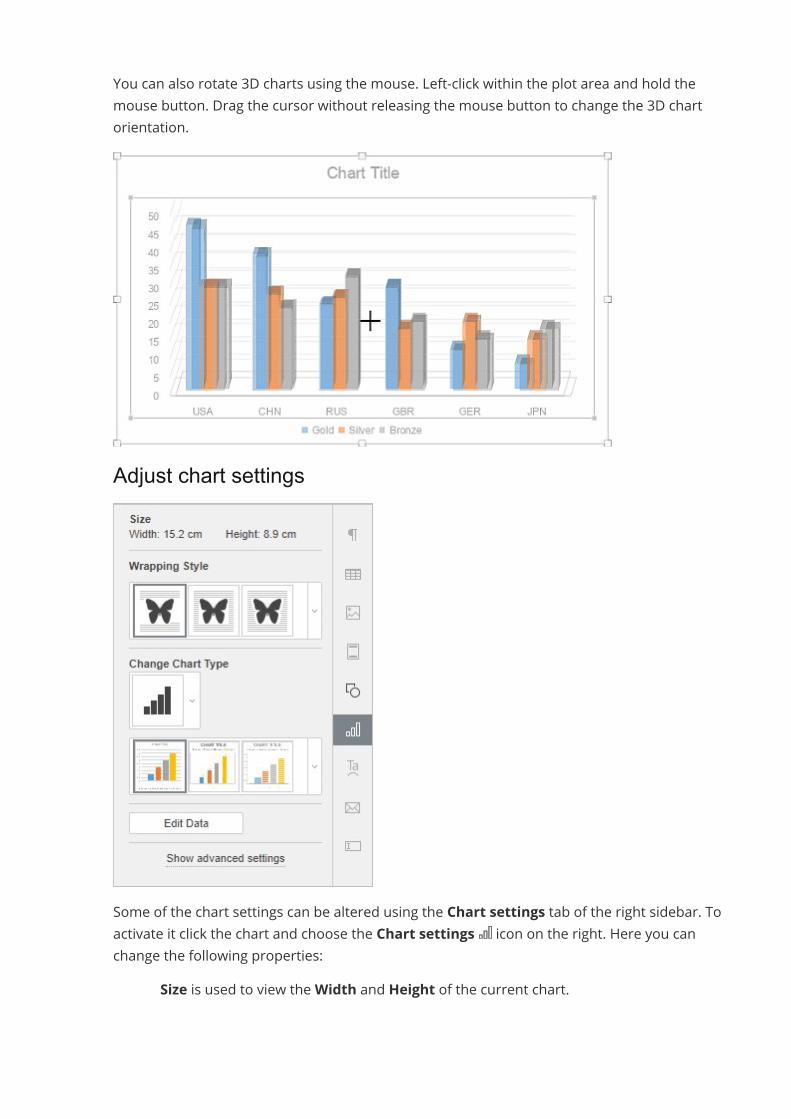
You can also rotate 3D charts using the mouse. Left-click within the plot area and hold themouse button. Drag the cursor without releasing the mouse button to change the 3D chartorientation.
Adjust chart settings
Some of the chart settings can be altered using the Chart settings tab of the right sidebar. Toactivate it click the chart and choose the Chart settings icon on the right. Here you canchange the following properties:
· Size is used to view theWidth and Height of the current chart.
· Wrapping Style is used to select a text wrapping style from the available ones - inline,square, tight, through, top and bottom, in front, behind (for more information see theadvanced settings description below).
· Change Chart Type is used to change the selected chart type and/or style.To select the necessary chart Style, use the second drop-down menu in the ChangeChart Type section.
· Edit Data is used to open the 'Chart Editor' window.Note: to quickly open the 'Chart Editor' window you can also double-click the chart inthe document.
You can also find some of these options in the right-click menu. The menu options are:· Cut, Copy, Paste - standard options which are used to cut or copy the selected
text/object and paste the previously cut/copied text passage or object to the currentcursor position.
· Arrange is used to bring the selected chart to foreground, send it to the background,move forward or backward as well as group or ungroup charts to perform operationswith several of them at once.
· Align is used to align the chart left, center, right, top, middle, bottom.· Wrapping Style is used to select a text wrapping style from the available ones - inline,
square, tight, through, top and bottom, in front, behind. The Edit WrapBoundary option is unavailable for charts.
· Edit Data is used to open the 'Chart Editor' window.· Chart Advanced Settings is used to open the 'Chart - Advanced Settings' window.
To change the chart advanced settings, click the needed chart with the right mouse button andselect Chart Advanced Settings from the right-click menu or just click the Show advancedsettings link on the right sidebar. The chart properties window will open:
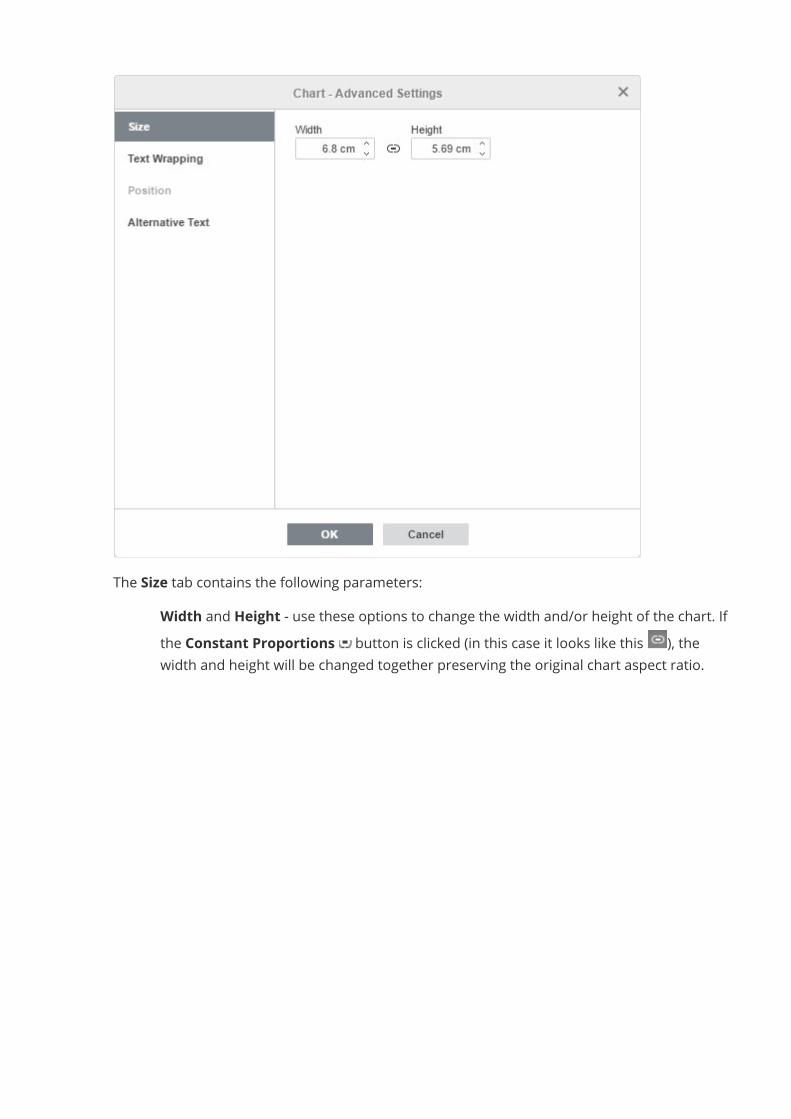
The Size tab contains the following parameters:· Width and Height - use these options to change the width and/or height of the chart. If
the Constant Proportions button is clicked (in this case it looks like this ), thewidth and height will be changed together preserving the original chart aspect ratio.
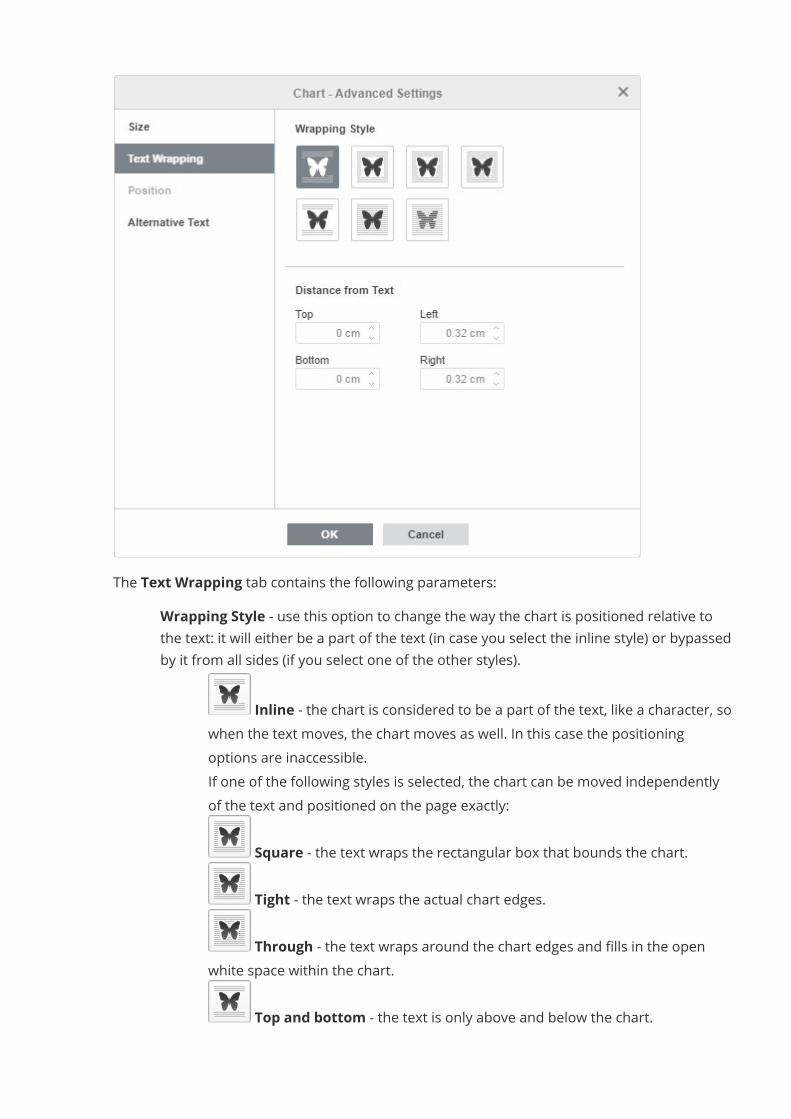
The Text Wrapping tab contains the following parameters:· Wrapping Style - use this option to change the way the chart is positioned relative to
the text: it will either be a part of the text (in case you select the inline style) or bypassedby it from all sides (if you select one of the other styles).
o Inline - the chart is considered to be a part of the text, like a character, sowhen the text moves, the chart moves as well. In this case the positioningoptions are inaccessible.
o If one of the following styles is selected, the chart can be moved independentlyof the text and positioned on the page exactly:
o Square - the text wraps the rectangular box that bounds the chart.o Tight - the text wraps the actual chart edges.o Through - the text wraps around the chart edges and fills in the open
white space within the chart.o Top and bottom - the text is only above and below the chart.
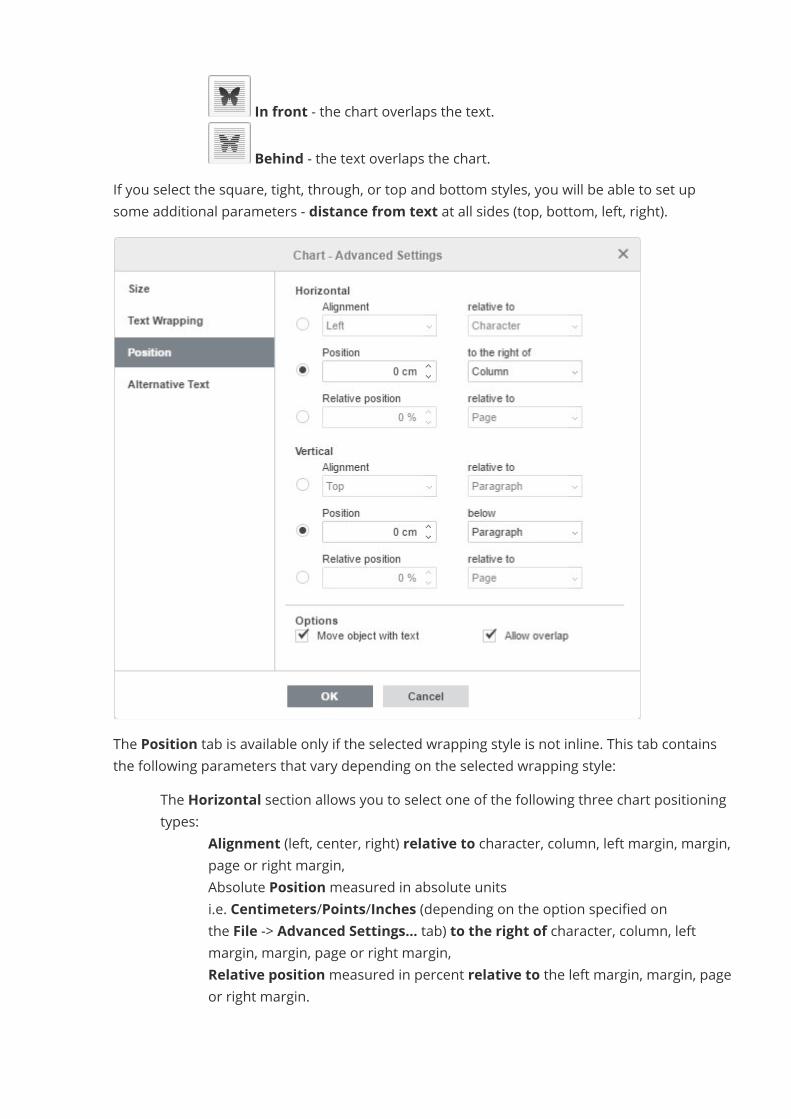
o In front - the chart overlaps the text.o Behind - the text overlaps the chart.
If you select the square, tight, through, or top and bottom styles, you will be able to set upsome additional parameters - distance from text at all sides (top, bottom, left, right).
The Position tab is available only if the selected wrapping style is not inline. This tab containsthe following parameters that vary depending on the selected wrapping style:
· The Horizontal section allows you to select one of the following three chart positioningtypes:
o Alignment (left, center, right) relative to character, column, left margin, margin,page or right margin,
o Absolute Positionmeasured in absolute unitsi.e. Centimeters/Points/Inches (depending on the option specified onthe File -> Advanced Settings... tab) to the right of character, column, leftmargin, margin, page or right margin,
o Relative positionmeasured in percent relative to the left margin, margin, pageor right margin.
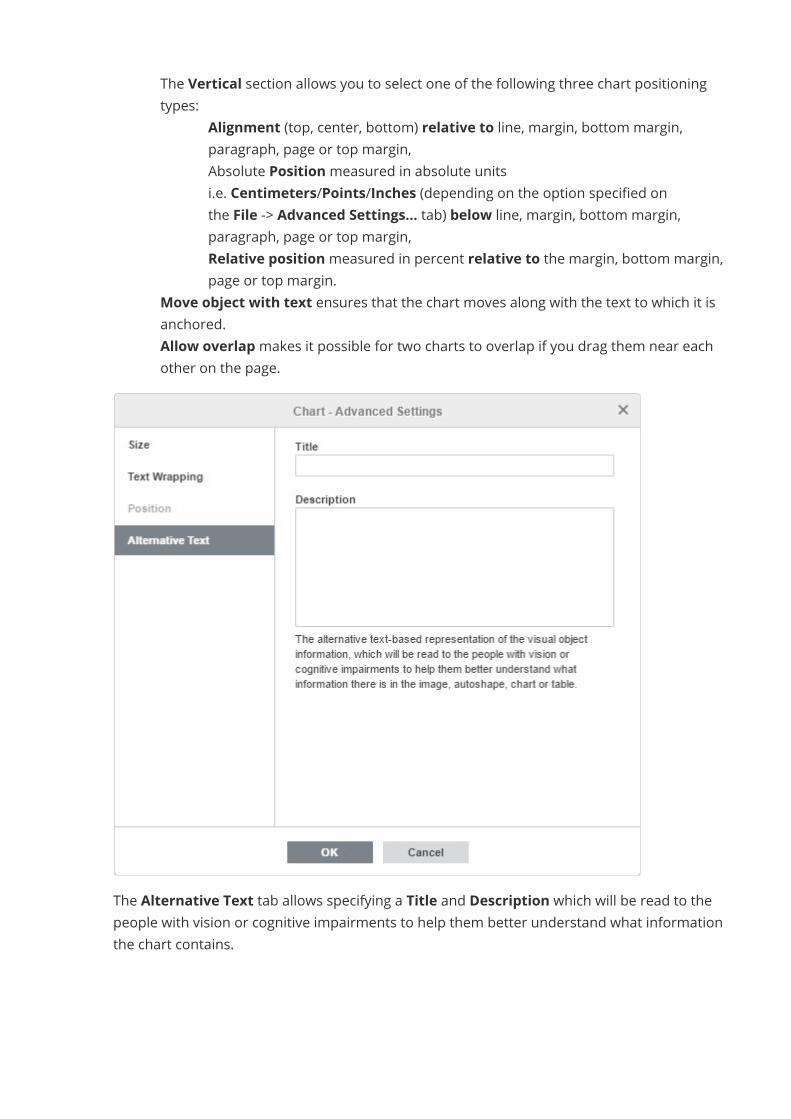
· The Vertical section allows you to select one of the following three chart positioningtypes:
o Alignment (top, center, bottom) relative to line, margin, bottom margin,paragraph, page or top margin,
o Absolute Positionmeasured in absolute unitsi.e. Centimeters/Points/Inches (depending on the option specified onthe File -> Advanced Settings... tab) below line, margin, bottom margin,paragraph, page or top margin,
o Relative positionmeasured in percent relative to the margin, bottom margin,page or top margin.
· Move object with text ensures that the chart moves along with the text to which it isanchored.
· Allow overlapmakes it possible for two charts to overlap if you drag them near eachother on the page.
The Alternative Text tab allows specifying a Title and Description which will be read to thepeople with vision or cognitive impairments to help them better understand what informationthe chart contains.
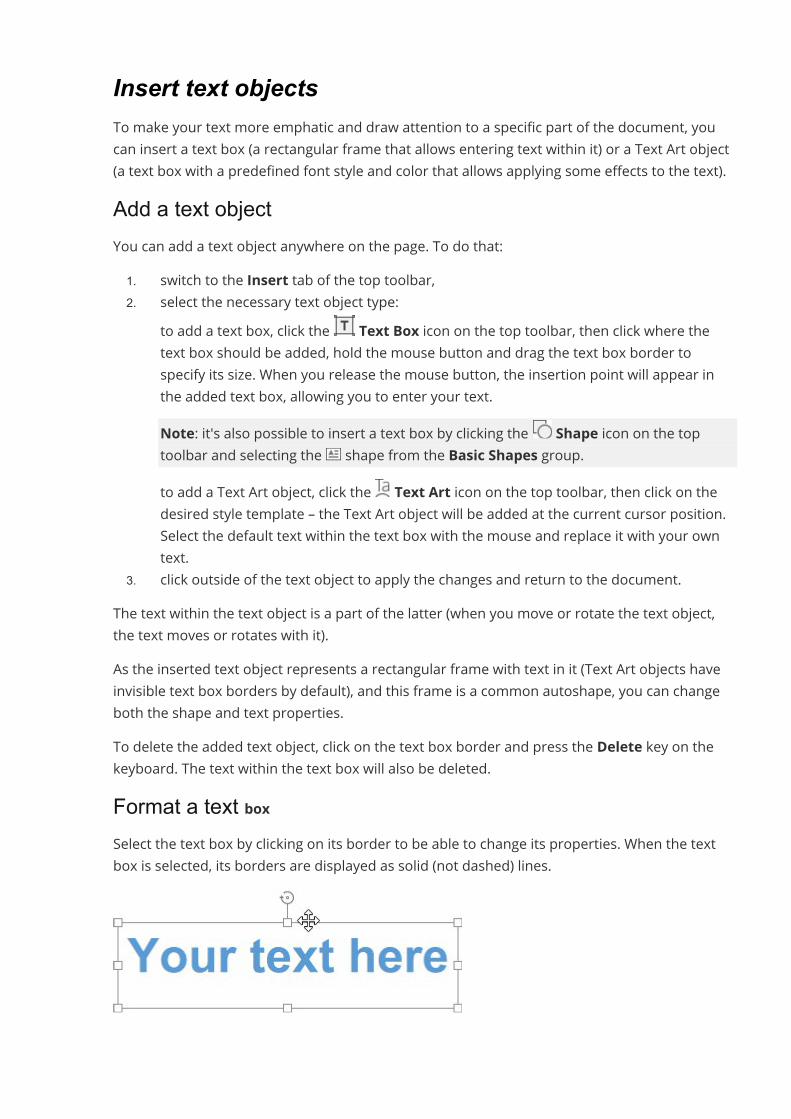
Insert text objectsTo make your text more emphatic and draw attention to a specific part of the document, youcan insert a text box (a rectangular frame that allows entering text within it) or a Text Art object(a text box with a predefined font style and color that allows applying some effects to the text).Add a text objectYou can add a text object anywhere on the page. To do that:1. switch to the Insert tab of the top toolbar,2. select the necessary text object type:· to add a text box, click the Text Box icon on the top toolbar, then click where the
text box should be added, hold the mouse button and drag the text box border tospecify its size. When you release the mouse button, the insertion point will appear inthe added text box, allowing you to enter your text.Note: it's also possible to insert a text box by clicking the Shape icon on the toptoolbar and selecting the shape from the Basic Shapes group.
· to add a Text Art object, click the Text Art icon on the top toolbar, then click on thedesired style template – the Text Art object will be added at the current cursor position.Select the default text within the text box with the mouse and replace it with your owntext.
3. click outside of the text object to apply the changes and return to the document.The text within the text object is a part of the latter (when you move or rotate the text object,the text moves or rotates with it).As the inserted text object represents a rectangular frame with text in it (Text Art objects haveinvisible text box borders by default), and this frame is a common autoshape, you can changeboth the shape and text properties.To delete the added text object, click on the text box border and press the Delete key on thekeyboard. The text within the text box will also be deleted.Format a text boxSelect the text box by clicking on its border to be able to change its properties. When the textbox is selected, its borders are displayed as solid (not dashed) lines.
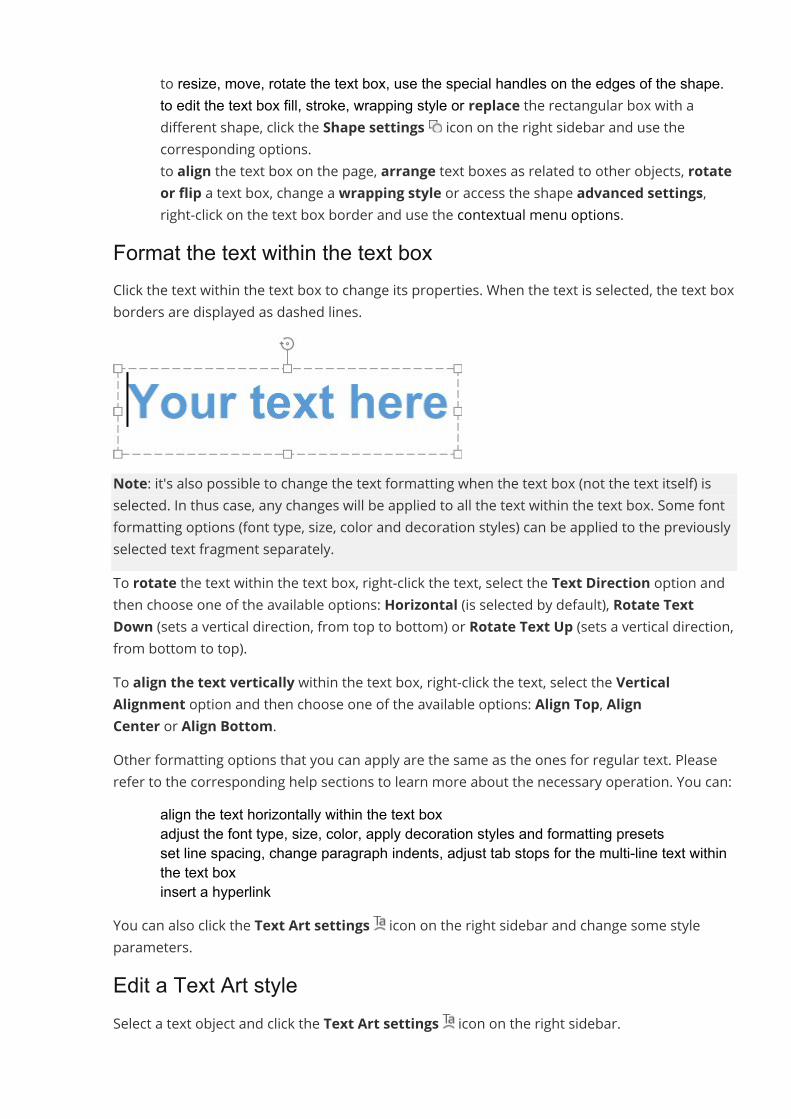
· to resize, move, rotate the text box, use the special handles on the edges of the shape.· to edit the text box fill, stroke, wrapping style or replace the rectangular box with a
different shape, click the Shape settings icon on the right sidebar and use thecorresponding options.
· to align the text box on the page, arrange text boxes as related to other objects, rotateor flip a text box, change a wrapping style or access the shape advanced settings,right-click on the text box border and use the contextual menu options.
Format the text within the text boxClick the text within the text box to change its properties. When the text is selected, the text boxborders are displayed as dashed lines.
Note: it's also possible to change the text formatting when the text box (not the text itself) isselected. In thus case, any changes will be applied to all the text within the text box. Some fontformatting options (font type, size, color and decoration styles) can be applied to the previouslyselected text fragment separately.To rotate the text within the text box, right-click the text, select the Text Direction option andthen choose one of the available options: Horizontal (is selected by default), Rotate TextDown (sets a vertical direction, from top to bottom) or Rotate Text Up (sets a vertical direction,from bottom to top).To align the text vertically within the text box, right-click the text, select the VerticalAlignment option and then choose one of the available options: Align Top, AlignCenter or Align Bottom.Other formatting options that you can apply are the same as the ones for regular text. Pleaserefer to the corresponding help sections to learn more about the necessary operation. You can:
· align the text horizontally within the text box· adjust the font type, size, color, apply decoration styles and formatting presets· set line spacing, change paragraph indents, adjust tab stops for the multi-line text withinthe text box· insert a hyperlink
You can also click the Text Art settings icon on the right sidebar and change some styleparameters.Edit a Text Art styleSelect a text object and click the Text Art settings icon on the right sidebar.
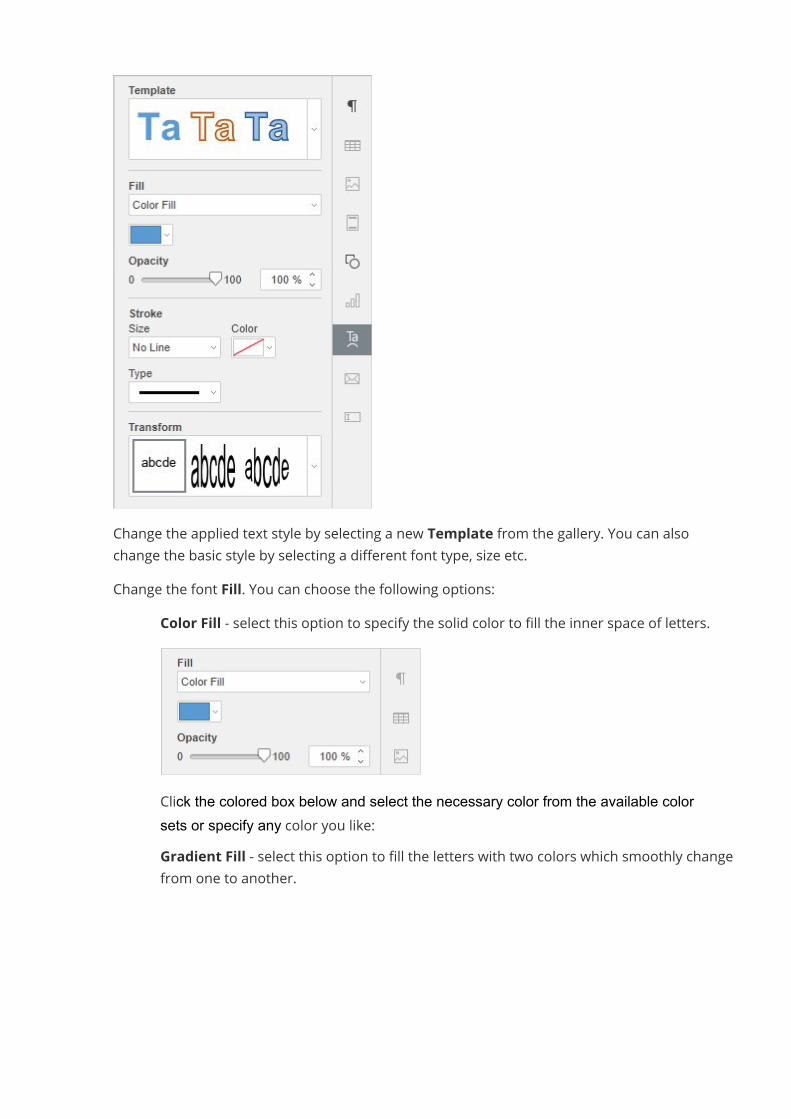
Change the applied text style by selecting a new Template from the gallery. You can alsochange the basic style by selecting a different font type, size etc.Change the font Fill. You can choose the following options:
· Color Fill - select this option to specify the solid color to fill the inner space of letters.
Click the colored box below and select the necessary color from the available colorsets or specify any color you like:
· Gradient Fill - select this option to fill the letters with two colors which smoothly changefrom one to another.
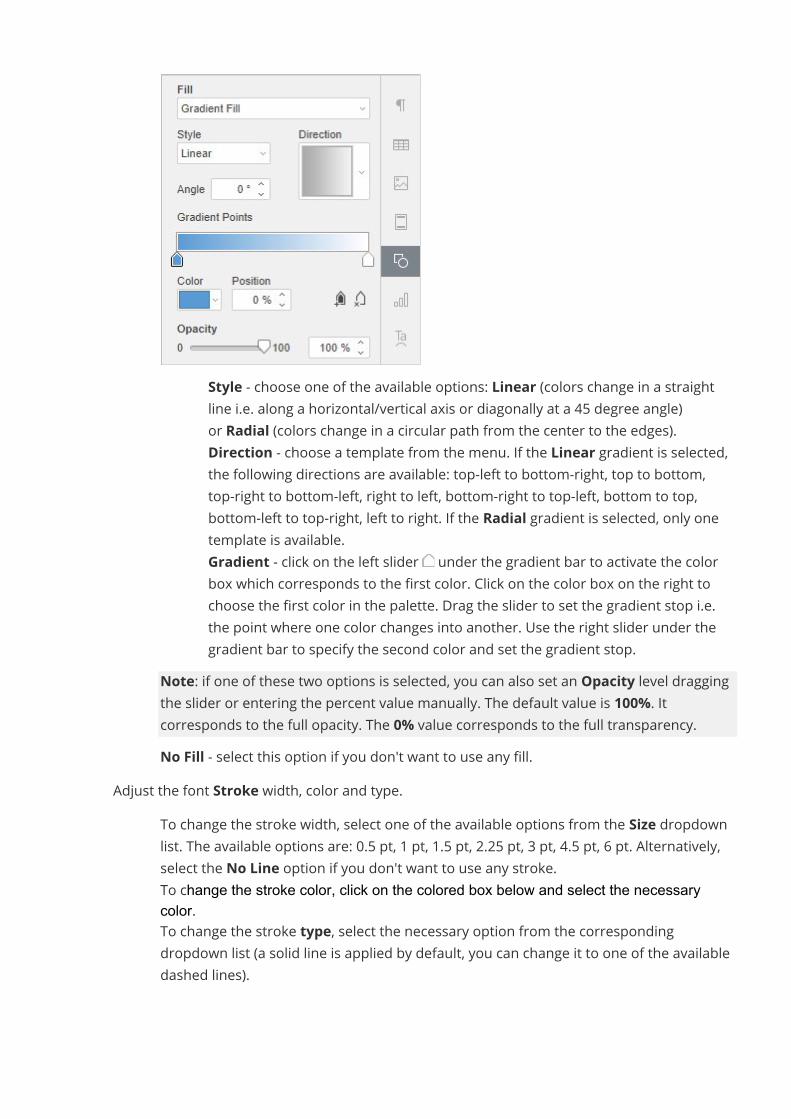
o Style - choose one of the available options: Linear (colors change in a straightline i.e. along a horizontal/vertical axis or diagonally at a 45 degree angle)or Radial (colors change in a circular path from the center to the edges).
o Direction - choose a template from the menu. If the Linear gradient is selected,the following directions are available: top-left to bottom-right, top to bottom,top-right to bottom-left, right to left, bottom-right to top-left, bottom to top,bottom-left to top-right, left to right. If the Radial gradient is selected, only onetemplate is available.
o Gradient - click on the left slider under the gradient bar to activate the colorbox which corresponds to the first color. Click on the color box on the right tochoose the first color in the palette. Drag the slider to set the gradient stop i.e.the point where one color changes into another. Use the right slider under thegradient bar to specify the second color and set the gradient stop.
Note: if one of these two options is selected, you can also set an Opacity level draggingthe slider or entering the percent value manually. The default value is 100%. Itcorresponds to the full opacity. The 0% value corresponds to the full transparency.
· No Fill - select this option if you don't want to use any fill.Adjust the font Stroke width, color and type.
· To change the stroke width, select one of the available options from the Size dropdownlist. The available options are: 0.5 pt, 1 pt, 1.5 pt, 2.25 pt, 3 pt, 4.5 pt, 6 pt. Alternatively,select the No Line option if you don't want to use any stroke.
· To change the stroke color, click on the colored box below and select the necessarycolor.
· To change the stroke type, select the necessary option from the correspondingdropdown list (a solid line is applied by default, you can change it to one of the availabledashed lines).
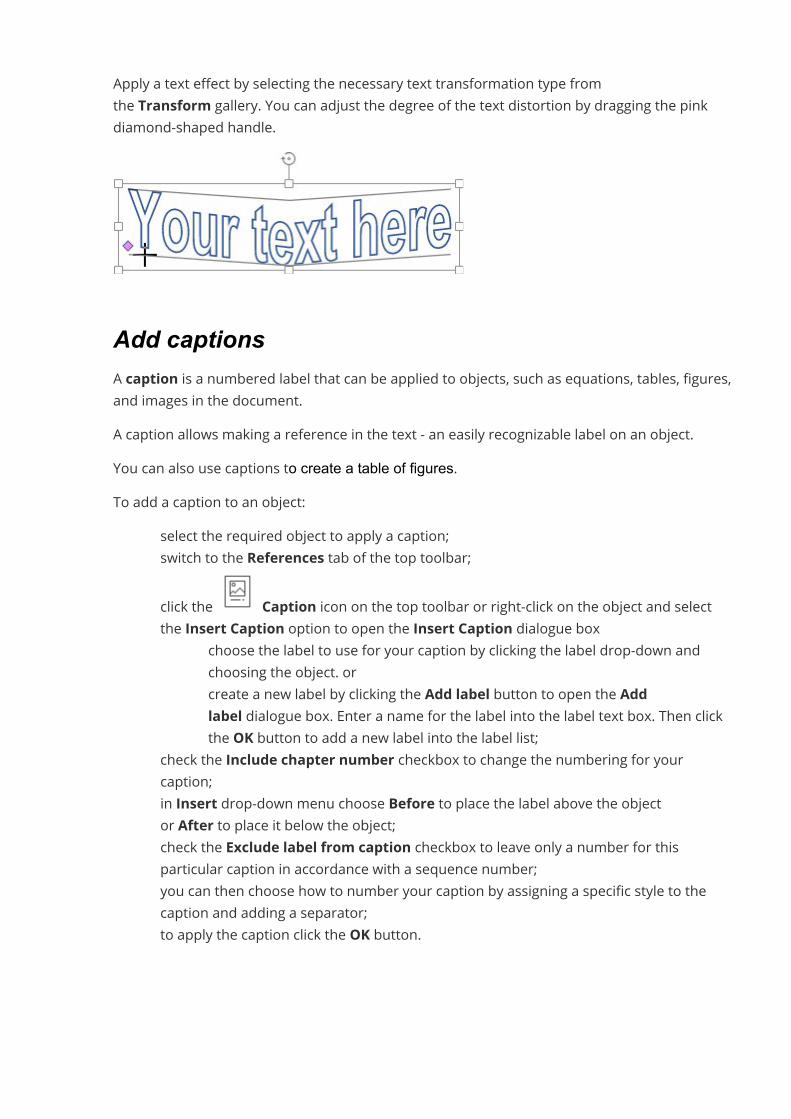
Apply a text effect by selecting the necessary text transformation type fromthe Transform gallery. You can adjust the degree of the text distortion by dragging the pinkdiamond-shaped handle.
Add captionsA caption is a numbered label that can be applied to objects, such as equations, tables, figures,and images in the document.A caption allows making a reference in the text - an easily recognizable label on an object.You can also use captions to create a table of figures.To add a caption to an object:
· select the required object to apply a caption;· switch to the References tab of the top toolbar;
· click the Caption icon on the top toolbar or right-click on the object and selectthe Insert Caption option to open the Insert Caption dialogue box
o choose the label to use for your caption by clicking the label drop-down andchoosing the object. or
o create a new label by clicking the Add label button to open the Addlabel dialogue box. Enter a name for the label into the label text box. Then clickthe OK button to add a new label into the label list;
· check the Include chapter number checkbox to change the numbering for yourcaption;
· in Insert drop-down menu choose Before to place the label above the objector After to place it below the object;
· check the Exclude label from caption checkbox to leave only a number for thisparticular caption in accordance with a sequence number;
· you can then choose how to number your caption by assigning a specific style to thecaption and adding a separator;
· to apply the caption click the OK button.
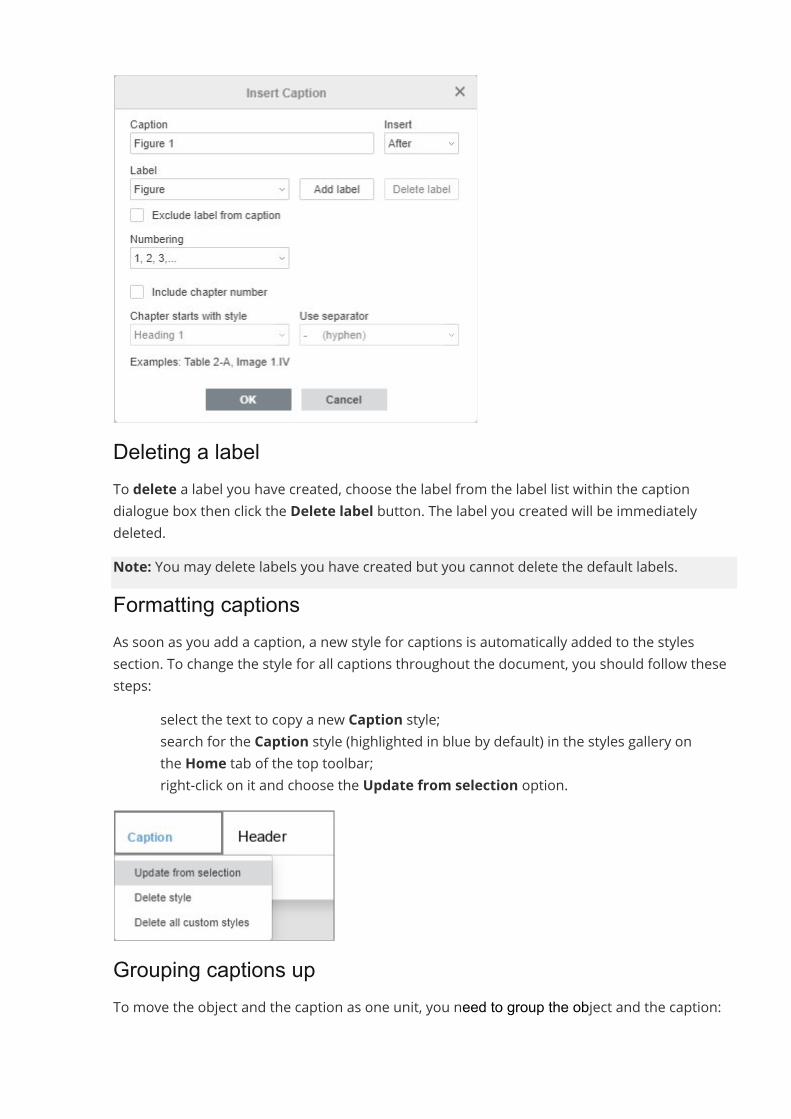
Deleting a labelTo delete a label you have created, choose the label from the label list within the captiondialogue box then click the Delete label button. The label you created will be immediatelydeleted.Note: You may delete labels you have created but you cannot delete the default labels.Formatting captionsAs soon as you add a caption, a new style for captions is automatically added to the stylessection. To change the style for all captions throughout the document, you should follow thesesteps:
· select the text to copy a new Caption style;· search for the Caption style (highlighted in blue by default) in the styles gallery on
the Home tab of the top toolbar;· right-click on it and choose the Update from selection option.
Grouping captions upTo move the object and the caption as one unit, you need to group the object and the caption:
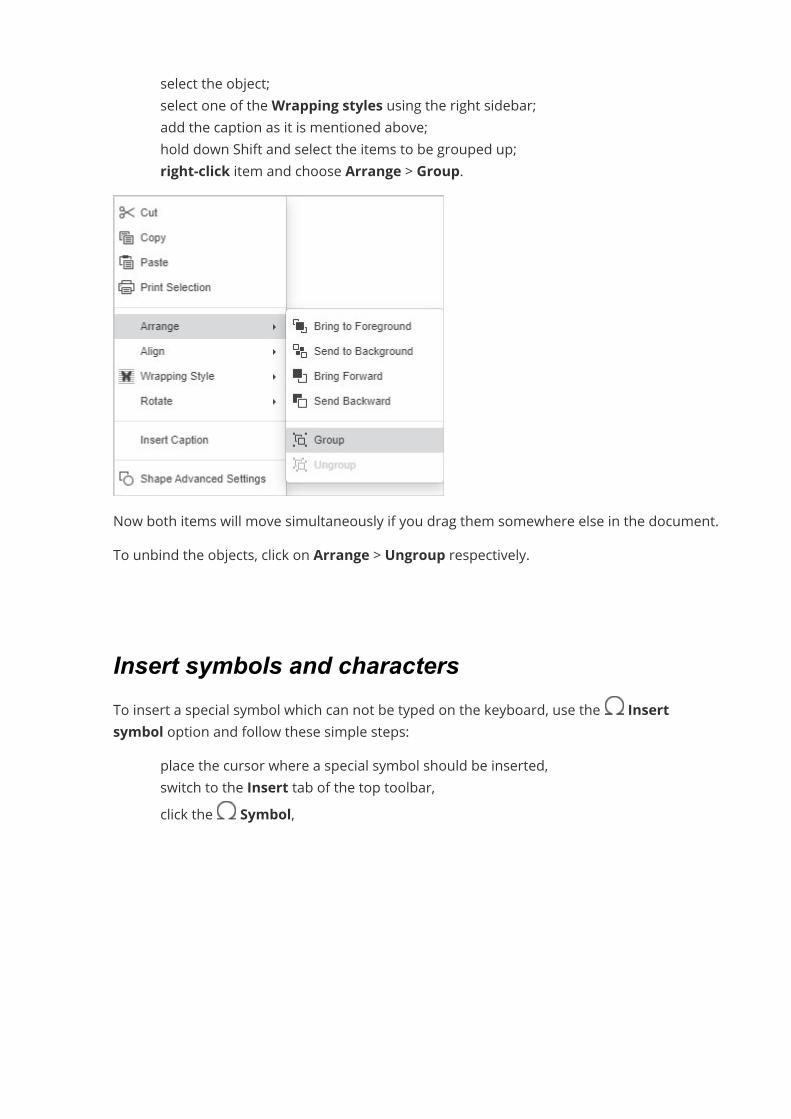
· select the object;· select one of theWrapping styles using the right sidebar;· add the caption as it is mentioned above;· hold down Shift and select the items to be grouped up;· right-click item and choose Arrange > Group.
Now both items will move simultaneously if you drag them somewhere else in the document.To unbind the objects, click on Arrange > Ungroup respectively.
Insert symbols and charactersTo insert a special symbol which can not be typed on the keyboard, use the Insertsymbol option and follow these simple steps:
· place the cursor where a special symbol should be inserted,· switch to the Insert tab of the top toolbar,· click the Symbol,
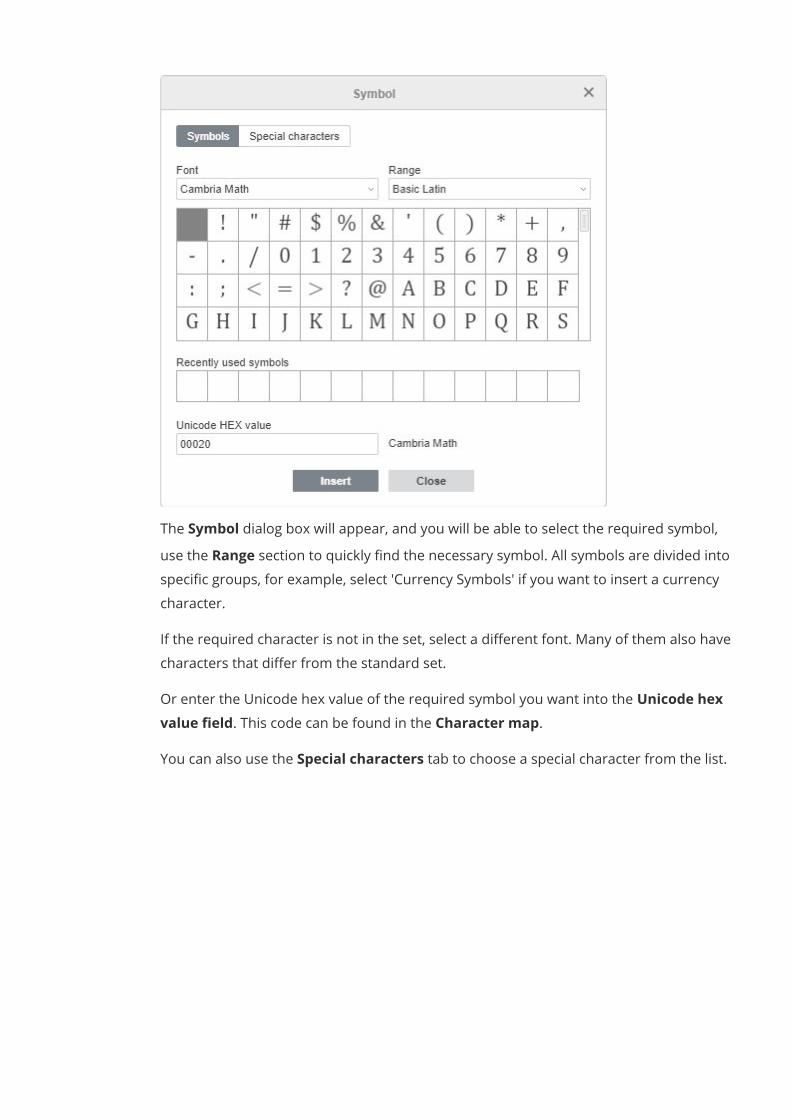
· The Symbol dialog box will appear, and you will be able to select the required symbol,· use the Range section to quickly find the necessary symbol. All symbols are divided into
specific groups, for example, select 'Currency Symbols' if you want to insert a currencycharacter.If the required character is not in the set, select a different font. Many of them also havecharacters that differ from the standard set.Or enter the Unicode hex value of the required symbol you want into the Unicode hexvalue field. This code can be found in the Character map.You can also use the Special characters tab to choose a special character from the list.

The previously used symbols are also displayed in the Recently used symbols field,· click Insert. The selected character will be added to the document.
Insert ASCII symbolsThe ASCII table is also used to add characters.To do this, hold down the ALT key and use the numeric keypad to enter the character code.Note: be sure to use the numeric keypad, not the numbers on the main keyboard. To enablethe numeric keypad, press the Num Lock key.For example, to add a paragraph character (§), press and hold down ALT while typing 789, andthen release the ALT key.Insert symbols using the Unicode tableAdditional characters and symbols can also be found in the Windows symbol table. To open thistable, do of the following:
· in the Search field write 'Character table' and open it,· simultaneously press Win + R, and then in the following window type charmap.exe and
click OK.
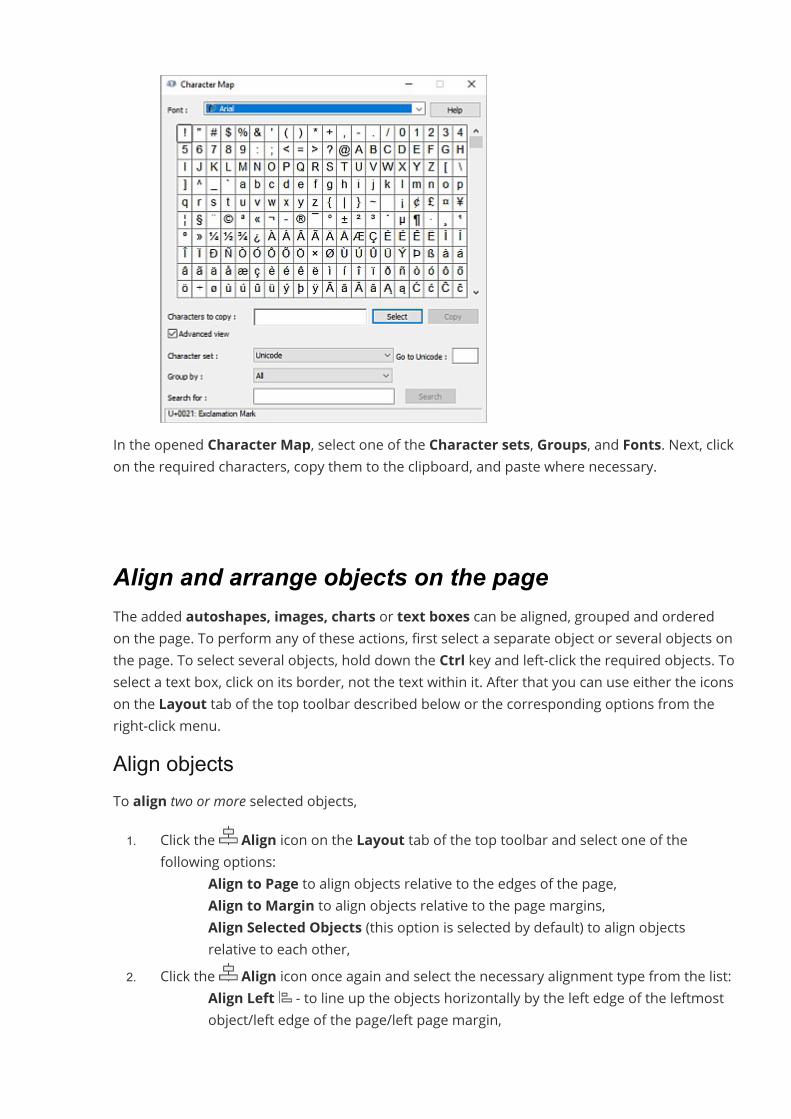
In the opened Character Map, select one of the Character sets, Groups, and Fonts. Next, clickon the required characters, copy them to the clipboard, and paste where necessary.
Align and arrange objects on the pageThe added autoshapes, images, charts or text boxes can be aligned, grouped and orderedon the page. To perform any of these actions, first select a separate object or several objects onthe page. To select several objects, hold down the Ctrl key and left-click the required objects. Toselect a text box, click on its border, not the text within it. After that you can use either the iconson the Layout tab of the top toolbar described below or the corresponding options from theright-click menu.Align objectsTo align two or more selected objects,1. Click the Align icon on the Layout tab of the top toolbar and select one of the
following options:· Align to Page to align objects relative to the edges of the page,· Align to Margin to align objects relative to the page margins,· Align Selected Objects (this option is selected by default) to align objects
relative to each other,2. Click the Align icon once again and select the necessary alignment type from the list:
· Align Left - to line up the objects horizontally by the left edge of the leftmostobject/left edge of the page/left page margin,

· Align Center - to line up the objects horizontally by their centers/center of thepage/center of the space between the left and right page margins,
· Align Right - to line up the objects horizontally by the right edge of therightmost object/right edge of the page/right page margin,
· Align Top - to line up the objects vertically by the top edge of the topmostobject/top edge of the page/top page margin,
· Align Middle - to line up the objects vertically by their middles/middle of thepage/middle of the space between the top and bottom page margins,
· Align Bottom - to line up the objects vertically by the bottom edge of thebottommost object/bottom edge of the page/bottom page margin.
Alternatively, you can right-click the selected objects, choose the Align option from thecontextual menu and then use one of the available alignment options.If you want to align a single object, it can be aligned relative to the edges of the page or to thepage margins. The Align to Margin option is selected by default in this case.Distribute objectsTo distribute three or more selected objects horizontally or vertically so that there is equalspace between them,1. Click the Align icon on the Layout tab of the top toolbar and select one of the
following options:· Align to Page to distribute objects between the edges of the page,· Align to Margin to distribute objects between the page margins,· Align Selected Objects (this option is selected by default) to distribute objects
between two outermost selected objects,2. Click the Align icon once again and select the necessary distribution type from the
list:· Distribute Horizontally - to distribute objects evenly between the leftmost
and rightmost selected objects/left and right edges of the page/left and rightpage margins.
· Distribute Vertically - to distribute objects evenly between the topmost andbottommost selected objects/top and bottom edges of the page/top and bottompage margins.
Alternatively, you can right-click the selected objects, choose the Align option from thecontextual menu and then use one of the available distribution options.Note: the distribution options are disabled if you select less than three objects.Group objectsTo group two or more selected objects or ungroup them, click the arrow next tothe Group icon at the Layout tab on the top toolbar and select the necessary option fromthe list:
· Group - to combine several objects into a group so that they can be simultaneouslyrotated, moved, resized, aligned, arranged, copied, pasted, formatted like a singleobject.
· Ungroup - to ungroup the selected group of the previously combined objects.Alternatively, you can right-click the selected objects, choose the Arrange option from thecontextual menu and then use the Group or Ungroup option.Note: the Group option is disabled if you select less than two objects. The Ungroup option isavailable only when a group of the previously combined objects is selected.Arrange objectsTo arrange objects (i.e. to change their order when several objects overlap each other), you canuse the Bring Forward and Send Backward icons on the Layout tab of the top toolbarand select the required arrangement type from the list.To move the selected object(s) forward, click the arrow next to the Bring Forward icon onthe Layout tab of the top toolbar and select the required arrangement type from the list:
· Bring To Foreground - to move the object(s) in front of all other objects,· Bring Forward - to move the selected object(s) by one level forward as related to
other objects.To move the selected object(s) backward, click the arrow next to the Send Backward iconon the Layout tab of the top toolbar and select the required arrangement type from the list:
· Send To Background - to move the object(s) behind all other objects,· Send Backward - to move the selected object(s) by one level backward as related to
other objects.Alternatively, you can right-click the selected object(s), choose the Arrange option from thecontextual menu and then use one of the available arrangement options.
Change the text wrappingTheWrapping Style option determines the way the object is positioned relative to the text. Youcan change the text wrapping style for inserted objects, such as shapes, images, charts, textboxes or tables.Change text wrapping for shapes, images, charts, text boxesTo change the currently selected wrapping style:1. left-click a separate object to select it. To select a text box, click on its border, not the
text within it.2. open the text wrapping settings:
· switch to the the Layout tab of the top toolbar and click the arrow next to theWrapping icon, or
· right-click the object and select theWrapping Style option from the contextualmenu, or
· right-click the object, select the Advanced Settings option and switch tothe Text Wrapping tab of the object Advanced Settings window.
3. select the necessary wrapping style:· Inline - the object is considered to be a part of the text, like a character, so
when the text moves, the object moves as well. In this case the positioningoptions are inaccessible.
· If one of the following styles is selected, the object can be moved independentlyof the text and precisely positioned on the page:
· Square - the text wraps the rectangular box that bounds the object.· Tight - the text wraps the actual object edges.· Through - the text wraps around the object edges and fills the open white
space within the object. To apply this effect, use the Edit Wrap Boundary optionfrom the right-click menu.
· Top and bottom - the text is only above and below the object.· In front - the object overlaps the text.· Behind - the text overlaps the object.
If you select the Square, Tight, Through, or Top and bottom style, you will be able to set upsome additional parameters - Distance from Text at all sides (top, bottom, left, right). Toaccess these parameters, right-click the object, select the Advanced Settings option and switchto the Text Wrapping tab of the object Advanced Settings window. Set the required valuesand click OK.If you select a wrapping style other than Inline, the Position tab is also available in theobject Advanced Settings window. To learn more on these parameters, please refer to thecorresponding pages with the instructions on how to work with shapes, images or charts.If you select a wrapping style other than Inline, you can also edit the wrap boundaryfor images or shapes. Right-click the object, select theWrapping Style option from thecontextual menu and click the Edit Wrap Boundary option. Drag wrap points to customize theboundary. To create a new wrap point, click anywhere on the red line and drag it to therequired position.Change text wrapping for tablesFor tables, the following two wrapping styles are available: Inline table and Flow table.To change the currently selected wrapping style:1. right-click the table and select the Table Advanced Settings option,2. switch to the Text Wrapping tab of the Table - Advanced Settings window,
3. select one of the following options:· Inline table is used to select the wrapping style when the text is broken by the
table as well as to set the alignment: left, center, right.· Flow table is used to select the wrapping style when the text is wrapped around
the table.Using the Text Wrapping tab of the Table - Advanced Settings window, you can also set upthe following additional parameters:
· For inline tables, you can set the table Alignment type (left, center or right) and Indentfrom left.
· For floating tables, you can set the Distance from text and the table position onthe Table Position tab.
Insert content controlsContent controls are objects containing different types of content, such as text, objects, etc.Depending on the selected content control type, you can collaborate on documents by usingthe available content controls array, or lock the ones that do not need further editing andunlock those that require your colleagues’ input, etc. Content controls are typically used tofacilitate data gathering and processing or to set necessary boundaries for documents editedby other users.ONLYOFFICE Document Editor allows you to insert classic content controls, i.e. they arefully backward compatible with the third-party word processors such as Microsoft Word.Note: the feature to add new content controls is available in the paid version only. In the freeCommunity version, you can edit existing content controls, as well as copy and paste them. Toenable this feature in the desktop version, refer to this article.ONLYOFFICE Document Editor supports the following classic content controls: Plain Text, RichText, Picture, Combo box, Drop-down list, Date, Check box.
· Plain Text is an object containing text that cannot be formatted. Plain text contentcontrols cannot contain more than one paragraph.
· Rich Text is an object containing text that can be formatted. Rich text content controlscan contain several paragraphs, lists, and objects (images, shapes, tables etc.).
· Picture is an object containing a single image.· Combo box is an object containing a drop-down list with a set of choices. It allows
choosing one of the predefined values from the list and edit the selected value ifnecessary.
· Drop-down list is an object containing a drop-down list with a set of choices. It allowschoosing one of the predefined values from the list. The selected value cannot beedited.
· Date is an object containing a calendar that allows choosing a date.
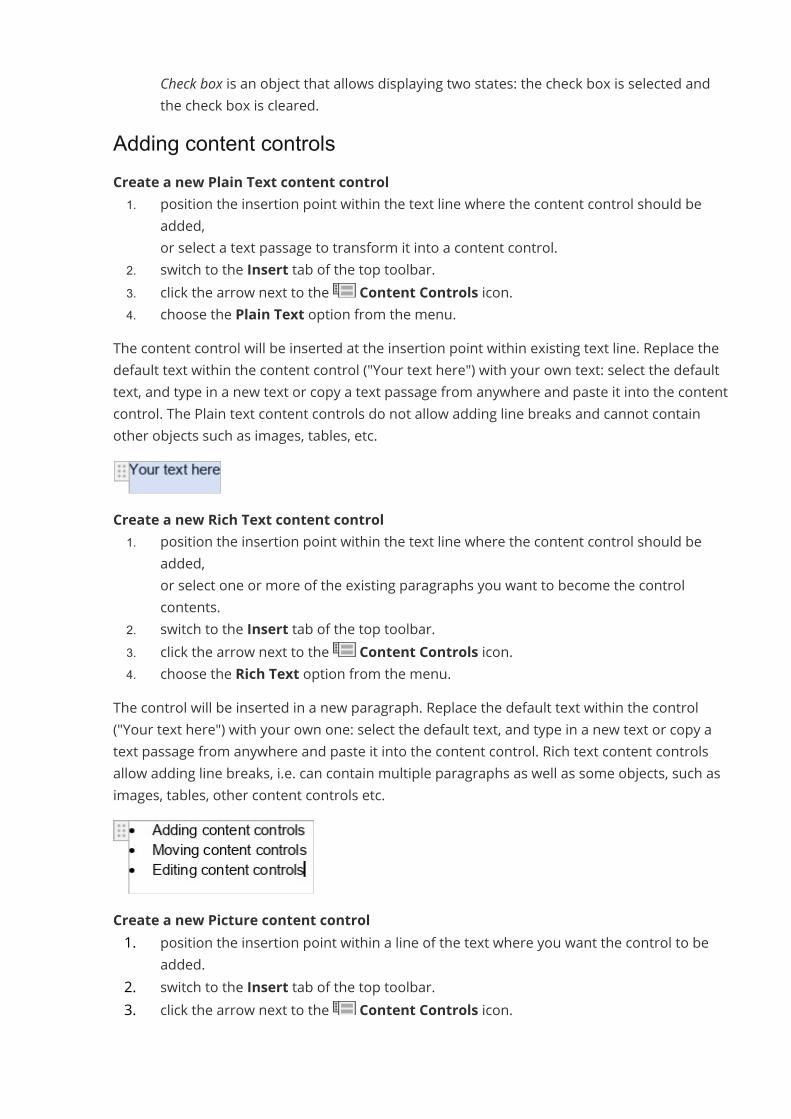
· Check box is an object that allows displaying two states: the check box is selected andthe check box is cleared.
Adding content controlsCreate a new Plain Text content control1. position the insertion point within the text line where the content control should be
added,or select a text passage to transform it into a content control.
2. switch to the Insert tab of the top toolbar.3. click the arrow next to the Content Controls icon.4. choose the Plain Text option from the menu.
The content control will be inserted at the insertion point within existing text line. Replace thedefault text within the content control ("Your text here") with your own text: select the defaulttext, and type in a new text or copy a text passage from anywhere and paste it into the contentcontrol. The Plain text content controls do not allow adding line breaks and cannot containother objects such as images, tables, etc.
Create a new Rich Text content control1. position the insertion point within the text line where the content control should be
added,or select one or more of the existing paragraphs you want to become the controlcontents.
2. switch to the Insert tab of the top toolbar.3. click the arrow next to the Content Controls icon.4. choose the Rich Text option from the menu.
The control will be inserted in a new paragraph. Replace the default text within the control("Your text here") with your own one: select the default text, and type in a new text or copy atext passage from anywhere and paste it into the content control. Rich text content controlsallow adding line breaks, i.e. can contain multiple paragraphs as well as some objects, such asimages, tables, other content controls etc.
Create a new Picture content control1. position the insertion point within a line of the text where you want the control to be
added.2. switch to the Insert tab of the top toolbar.3. click the arrow next to the Content Controls icon.
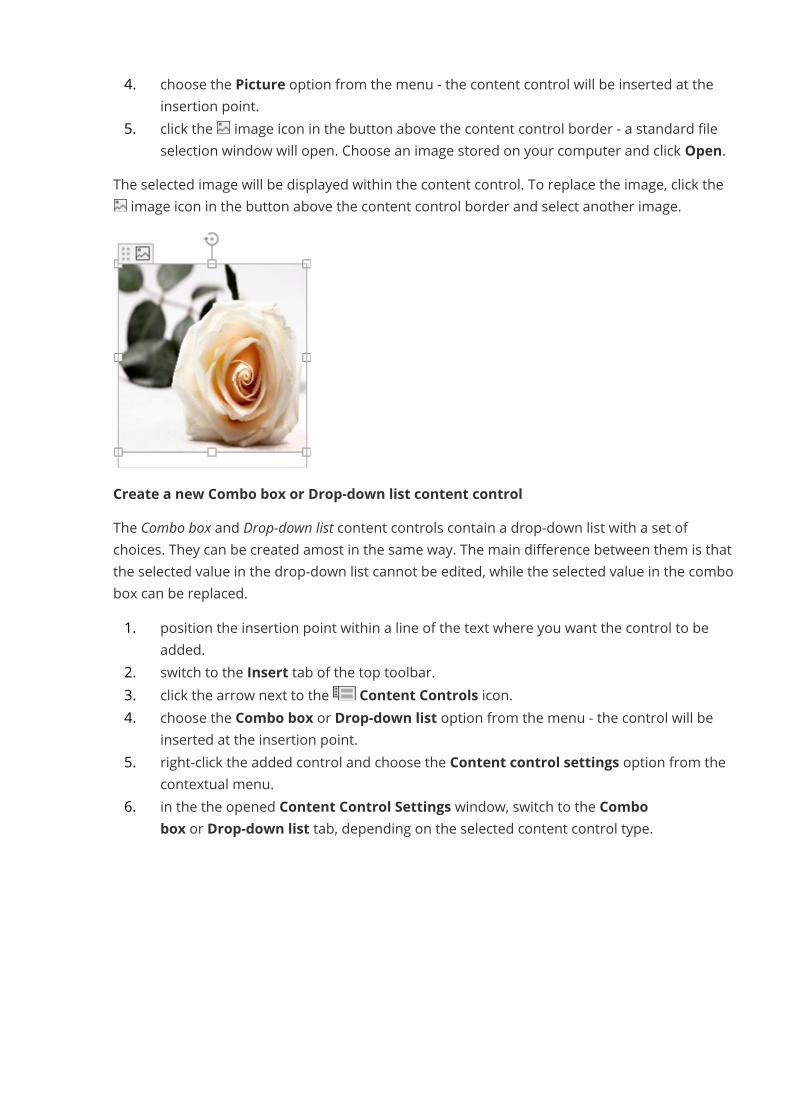
4. choose the Picture option from the menu - the content control will be inserted at theinsertion point.
5. click the image icon in the button above the content control border - a standard fileselection window will open. Choose an image stored on your computer and click Open.
The selected image will be displayed within the content control. To replace the image, click theimage icon in the button above the content control border and select another image.
Create a new Combo box or Drop-down list content controlThe Combo box and Drop-down list content controls contain a drop-down list with a set ofchoices. They can be created amost in the same way. The main difference between them is thatthe selected value in the drop-down list cannot be edited, while the selected value in the combobox can be replaced.1. position the insertion point within a line of the text where you want the control to be
added.2. switch to the Insert tab of the top toolbar.3. click the arrow next to the Content Controls icon.4. choose the Combo box or Drop-down list option from the menu - the control will be
inserted at the insertion point.5. right-click the added control and choose the Content control settings option from the
contextual menu.6. in the the opened Content Control Settings window, switch to the Combo
box or Drop-down list tab, depending on the selected content control type.
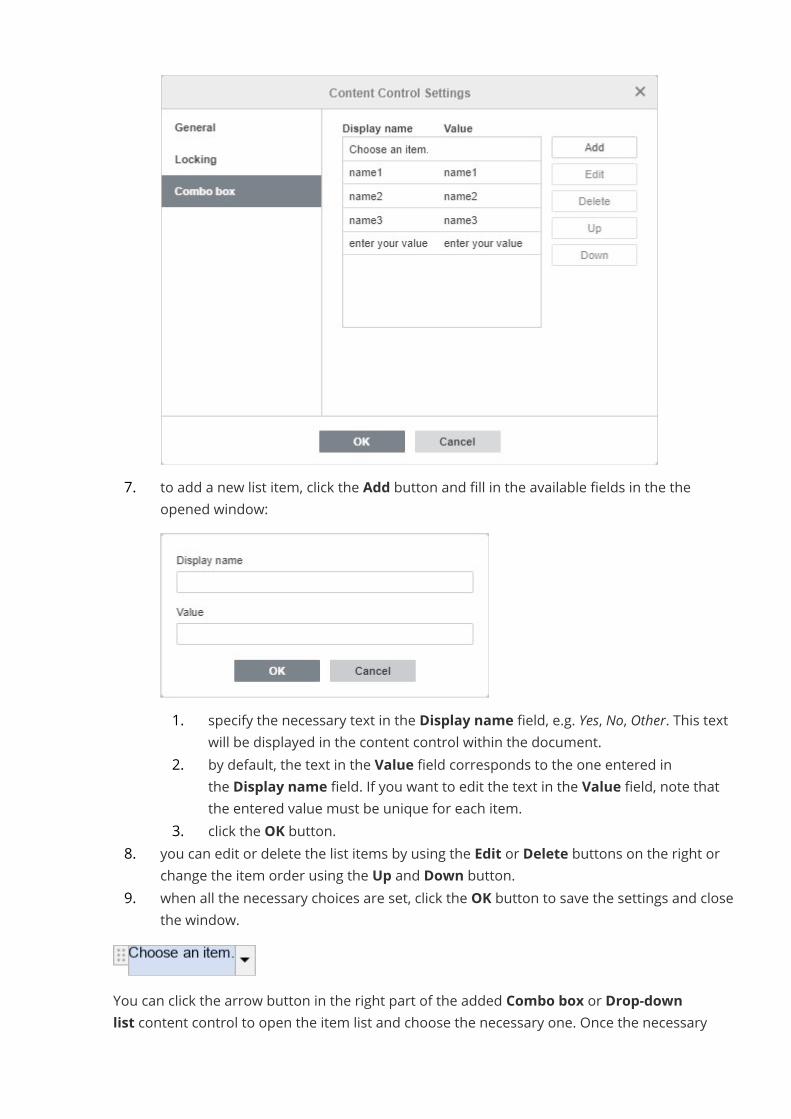
7. to add a new list item, click the Add button and fill in the available fields in the theopened window:
1. specify the necessary text in the Display name field, e.g. Yes, No, Other. This textwill be displayed in the content control within the document.
2. by default, the text in the Value field corresponds to the one entered inthe Display name field. If you want to edit the text in the Value field, note thatthe entered value must be unique for each item.
3. click the OK button.8. you can edit or delete the list items by using the Edit or Delete buttons on the right or
change the item order using the Up and Down button.9. when all the necessary choices are set, click the OK button to save the settings and close
the window.
You can click the arrow button in the right part of the added Combo box or Drop-downlist content control to open the item list and choose the necessary one. Once the necessary
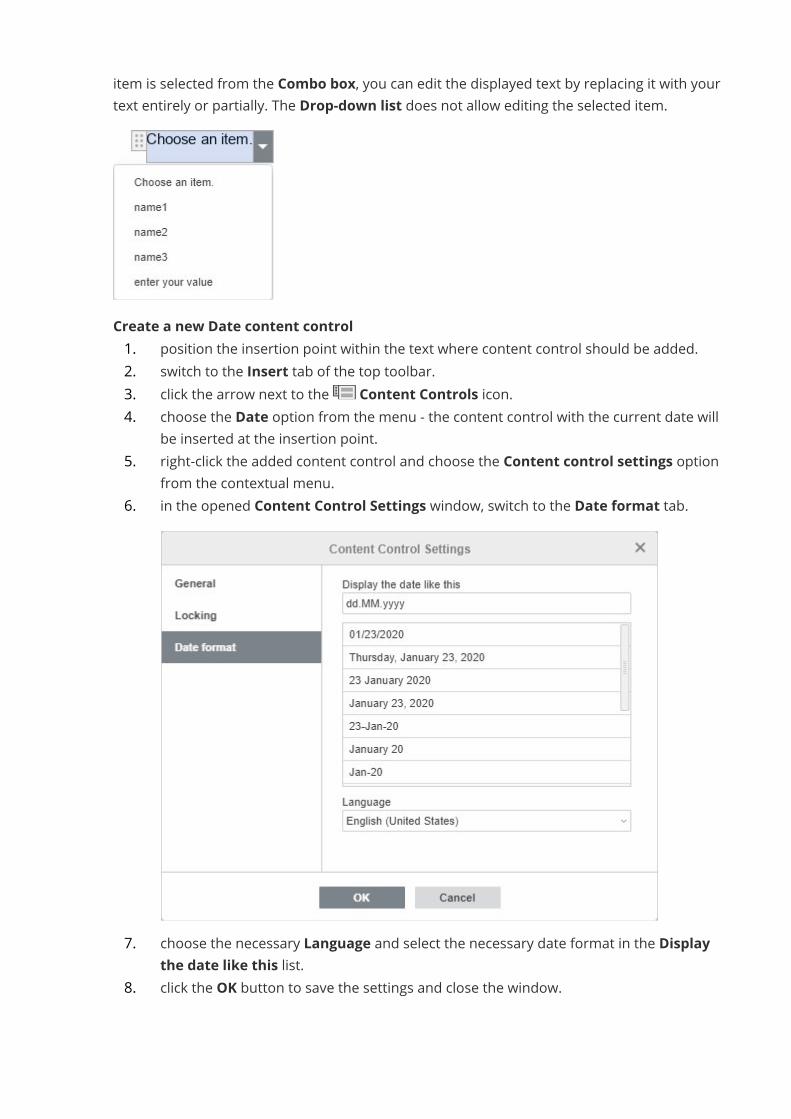
item is selected from the Combo box, you can edit the displayed text by replacing it with yourtext entirely or partially. The Drop-down list does not allow editing the selected item.
Create a new Date content control1. position the insertion point within the text where content control should be added.2. switch to the Insert tab of the top toolbar.3. click the arrow next to the Content Controls icon.4. choose the Date option from the menu - the content control with the current date will
be inserted at the insertion point.5. right-click the added content control and choose the Content control settings option
from the contextual menu.6. in the opened Content Control Settings window, switch to the Date format tab.
7. choose the necessary Language and select the necessary date format in the Displaythe date like this list.
8. click the OK button to save the settings and close the window.
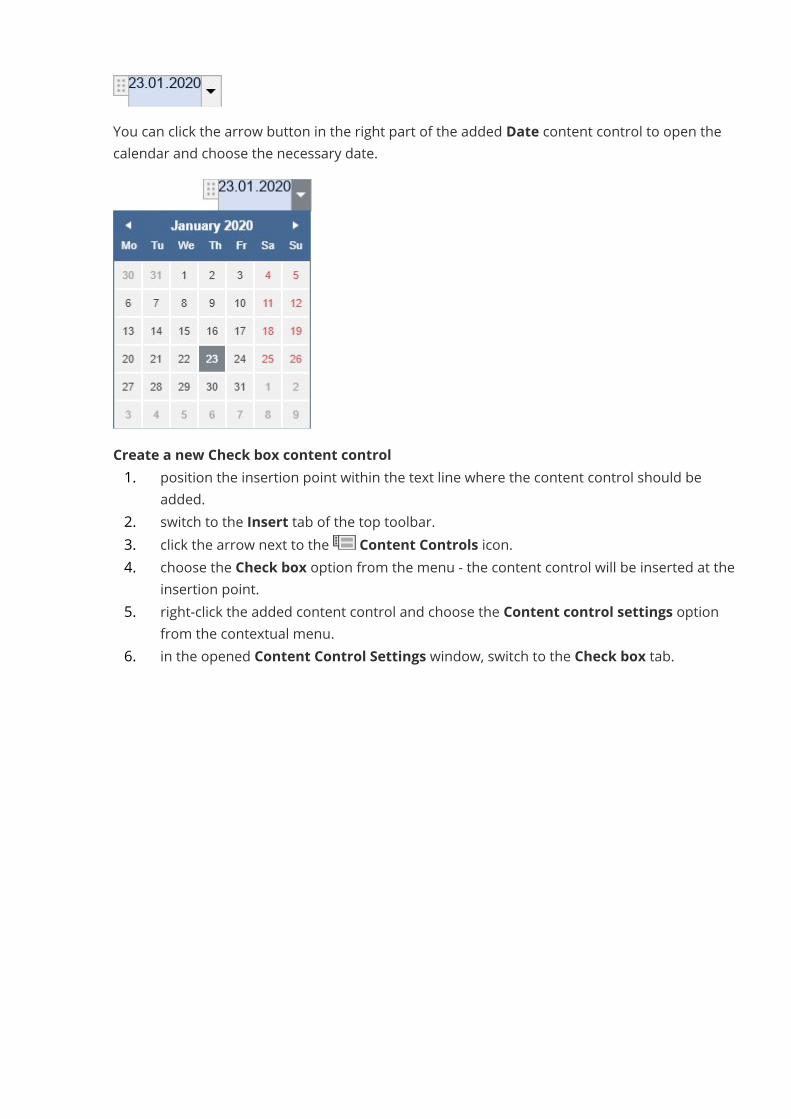
You can click the arrow button in the right part of the added Date content control to open thecalendar and choose the necessary date.
Create a new Check box content control1. position the insertion point within the text line where the content control should be
added.2. switch to the Insert tab of the top toolbar.3. click the arrow next to the Content Controls icon.4. choose the Check box option from the menu - the content control will be inserted at the
insertion point.5. right-click the added content control and choose the Content control settings option
from the contextual menu.6. in the opened Content Control Settings window, switch to the Check box tab.
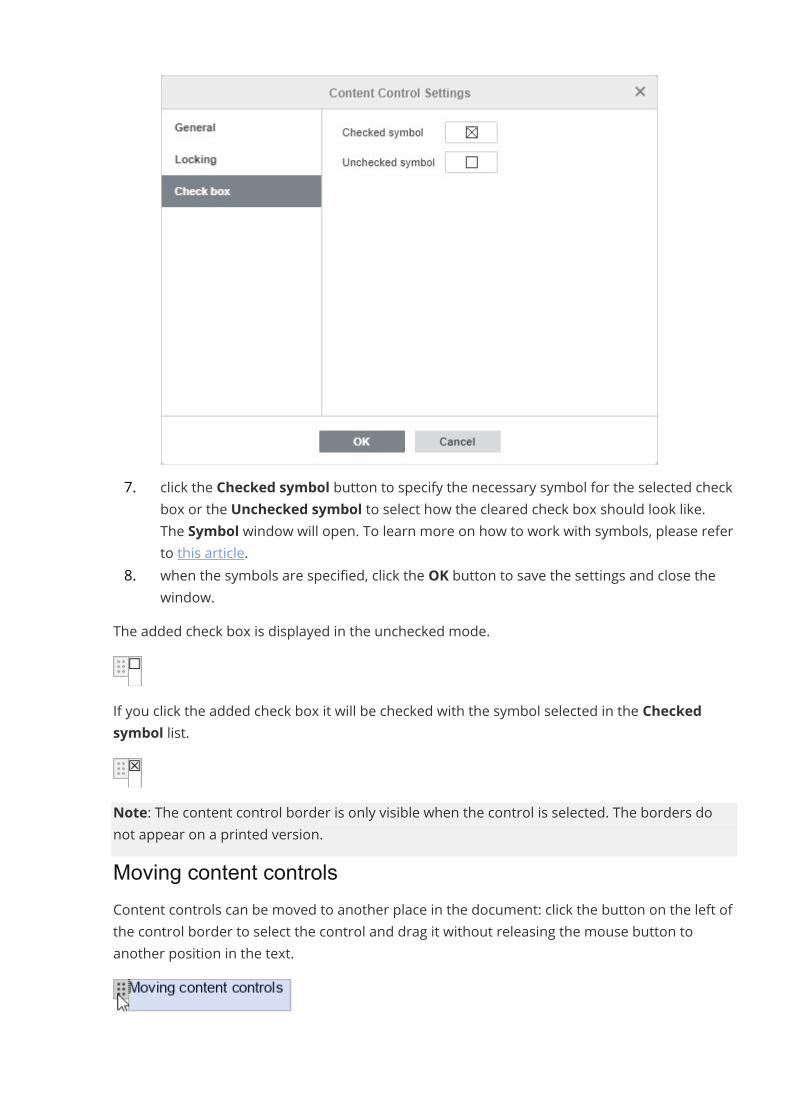
7. click the Checked symbol button to specify the necessary symbol for the selected checkbox or the Unchecked symbol to select how the cleared check box should look like.The Symbol window will open. To learn more on how to work with symbols, please referto this article.
8. when the symbols are specified, click the OK button to save the settings and close thewindow.
The added check box is displayed in the unchecked mode.
If you click the added check box it will be checked with the symbol selected in the Checkedsymbol list.
Note: The content control border is only visible when the control is selected. The borders donot appear on a printed version.Moving content controlsContent controls can be moved to another place in the document: click the button on the left ofthe control border to select the control and drag it without releasing the mouse button toanother position in the text.
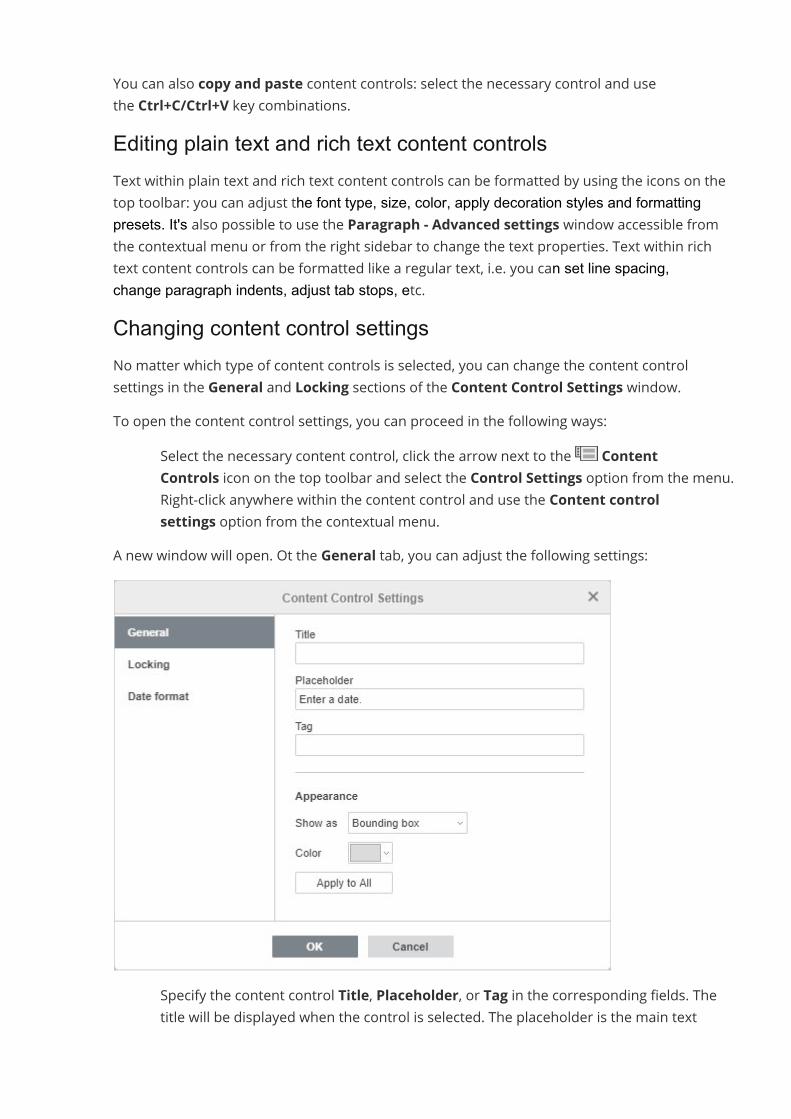
You can also copy and paste content controls: select the necessary control and usethe Ctrl+C/Ctrl+V key combinations.Editing plain text and rich text content controlsText within plain text and rich text content controls can be formatted by using the icons on thetop toolbar: you can adjust the font type, size, color, apply decoration styles and formattingpresets. It's also possible to use the Paragraph - Advanced settings window accessible fromthe contextual menu or from the right sidebar to change the text properties. Text within richtext content controls can be formatted like a regular text, i.e. you can set line spacing,change paragraph indents, adjust tab stops, etc.Changing content control settingsNo matter which type of content controls is selected, you can change the content controlsettings in the General and Locking sections of the Content Control Settings window.To open the content control settings, you can proceed in the following ways:
· Select the necessary content control, click the arrow next to the ContentControls icon on the top toolbar and select the Control Settings option from the menu.
· Right-click anywhere within the content control and use the Content controlsettings option from the contextual menu.
A new window will open. Ot the General tab, you can adjust the following settings:
· Specify the content control Title, Placeholder, or Tag in the corresponding fields. Thetitle will be displayed when the control is selected. The placeholder is the main text
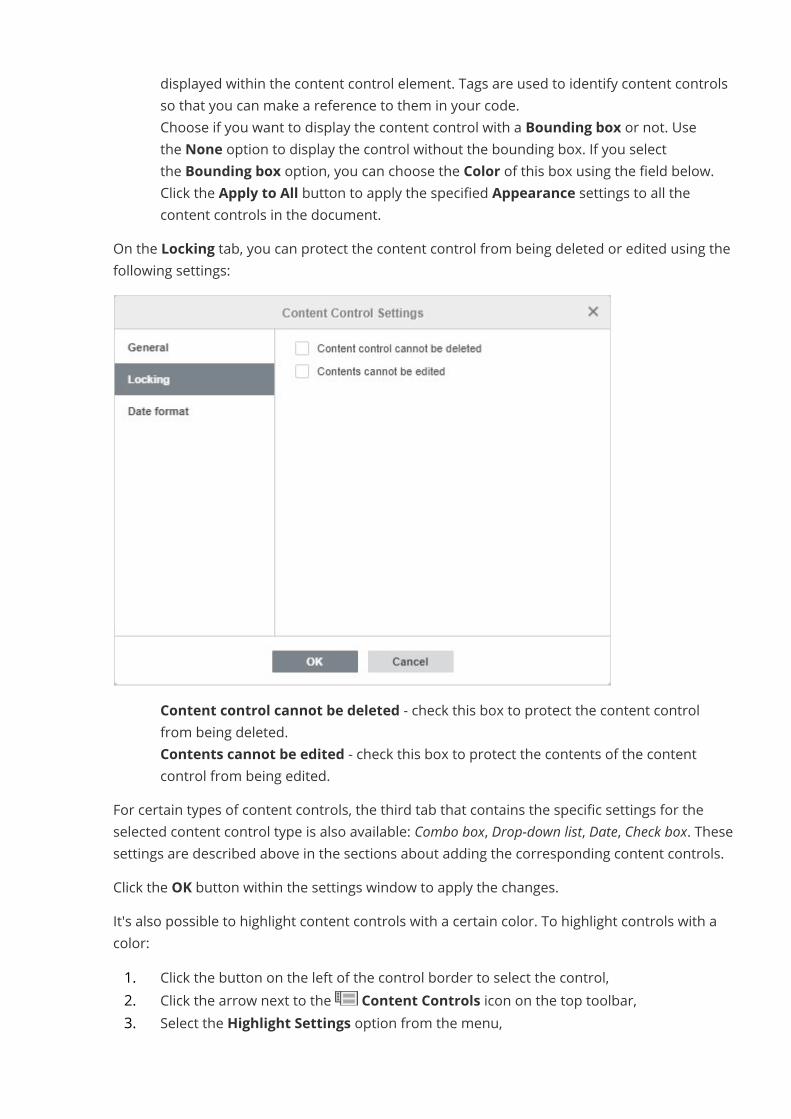
displayed within the content control element. Tags are used to identify content controlsso that you can make a reference to them in your code.
· Choose if you want to display the content control with a Bounding box or not. Usethe None option to display the control without the bounding box. If you selectthe Bounding box option, you can choose the Color of this box using the field below.Click the Apply to All button to apply the specified Appearance settings to all thecontent controls in the document.
On the Locking tab, you can protect the content control from being deleted or edited using thefollowing settings:
· Content control cannot be deleted - check this box to protect the content controlfrom being deleted.
· Contents cannot be edited - check this box to protect the contents of the contentcontrol from being edited.
For certain types of content controls, the third tab that contains the specific settings for theselected content control type is also available: Combo box, Drop-down list, Date, Check box. Thesesettings are described above in the sections about adding the corresponding content controls.Click the OK button within the settings window to apply the changes.It's also possible to highlight content controls with a certain color. To highlight controls with acolor:1. Click the button on the left of the control border to select the control,2. Click the arrow next to the Content Controls icon on the top toolbar,3. Select the Highlight Settings option from the menu,
4. Choose the required color from the available palettes: Theme Colors, StandardColors or specify a new Custom Color. To remove previously applied color highlighting,use the No highlighting option.
The selected highlight options will be applied to all the content controls in the document.Removing content controlsTo remove a content control and leave all its contents, select a content control, then proceed inone of the following ways:
· Click the arrow next to the Content Controls icon on the top toolbar and selectthe Remove content control option from the menu.
· Right-click the content control and use the Remove content control option from thecontextual menu.
To remove a control and all its contents, select the necessary control and press the Delete keyon the keyboard.
Create a Table of ContentsA table of contents contains a list of all the chapters (sections, etc.) in a document and displaysthe numbers of the pages where each chapter begins. It allows easily navigating through amulti-page document and quickly switching to the required part of the text. The table ofcontents is generated automatically on the basis of the document headings formatted usingbuilt-in styles. This makes it easy to update the created table of contents without having to editthe headings and change the page numbers manually if the text of the document has beenchanged.Define the heading structureFormat headingsFirst of all, format the headings in your document using one of the predefined styles. To dothat,1. Select the text you want to include into the table of contents.2. Open the style menu on the right side of the Home tab at the top toolbar.3. Click the required style to be applied. By default, you can use the Heading 1 - Heading
9 styles.Note: if you want to use other styles (e.g. Title, Subtitle etc.) to format headings that willbe included into the table of contents, you will need to adjust the table of contentssettings first (see the corresponding section below).
Manage headings
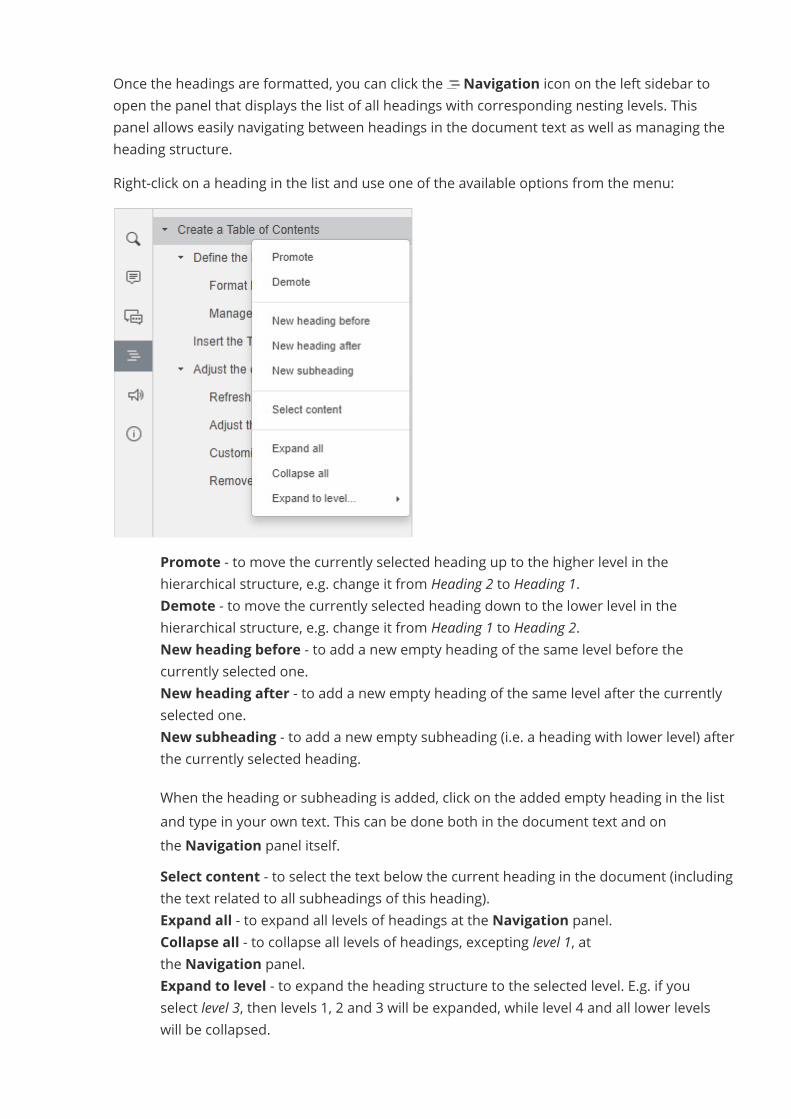
Once the headings are formatted, you can click the Navigation icon on the left sidebar toopen the panel that displays the list of all headings with corresponding nesting levels. Thispanel allows easily navigating between headings in the document text as well as managing theheading structure.Right-click on a heading in the list and use one of the available options from the menu:
· Promote - to move the currently selected heading up to the higher level in thehierarchical structure, e.g. change it from Heading 2 to Heading 1.
· Demote - to move the currently selected heading down to the lower level in thehierarchical structure, e.g. change it from Heading 1 to Heading 2.
· New heading before - to add a new empty heading of the same level before thecurrently selected one.
· New heading after - to add a new empty heading of the same level after the currentlyselected one.
· New subheading - to add a new empty subheading (i.e. a heading with lower level) afterthe currently selected heading.When the heading or subheading is added, click on the added empty heading in the listand type in your own text. This can be done both in the document text and onthe Navigation panel itself.
· Select content - to select the text below the current heading in the document (includingthe text related to all subheadings of this heading).
· Expand all - to expand all levels of headings at the Navigation panel.· Collapse all - to collapse all levels of headings, excepting level 1, at
the Navigation panel.· Expand to level - to expand the heading structure to the selected level. E.g. if you
select level 3, then levels 1, 2 and 3 will be expanded, while level 4 and all lower levelswill be collapsed.
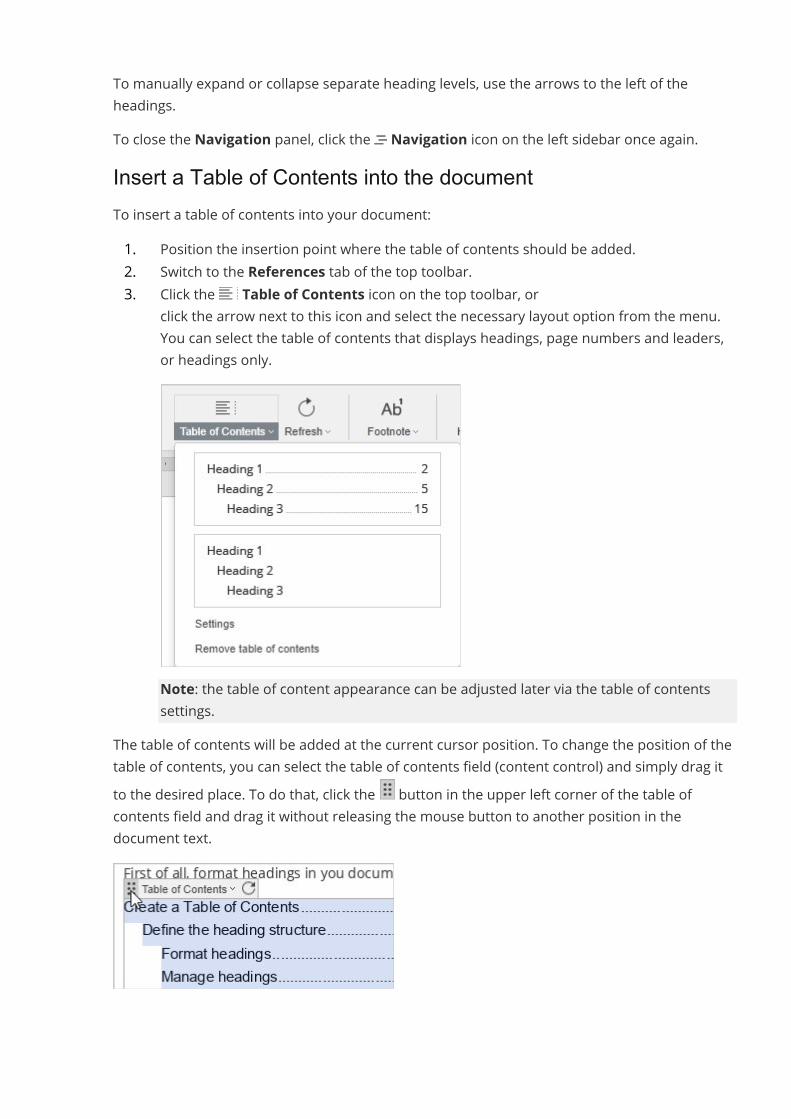
To manually expand or collapse separate heading levels, use the arrows to the left of theheadings.To close the Navigation panel, click the Navigation icon on the left sidebar once again.Insert a Table of Contents into the documentTo insert a table of contents into your document:1. Position the insertion point where the table of contents should be added.2. Switch to the References tab of the top toolbar.3. Click the Table of Contents icon on the top toolbar, or
click the arrow next to this icon and select the necessary layout option from the menu.You can select the table of contents that displays headings, page numbers and leaders,or headings only.
Note: the table of content appearance can be adjusted later via the table of contentssettings.
The table of contents will be added at the current cursor position. To change the position of thetable of contents, you can select the table of contents field (content control) and simply drag itto the desired place. To do that, click the button in the upper left corner of the table ofcontents field and drag it without releasing the mouse button to another position in thedocument text.
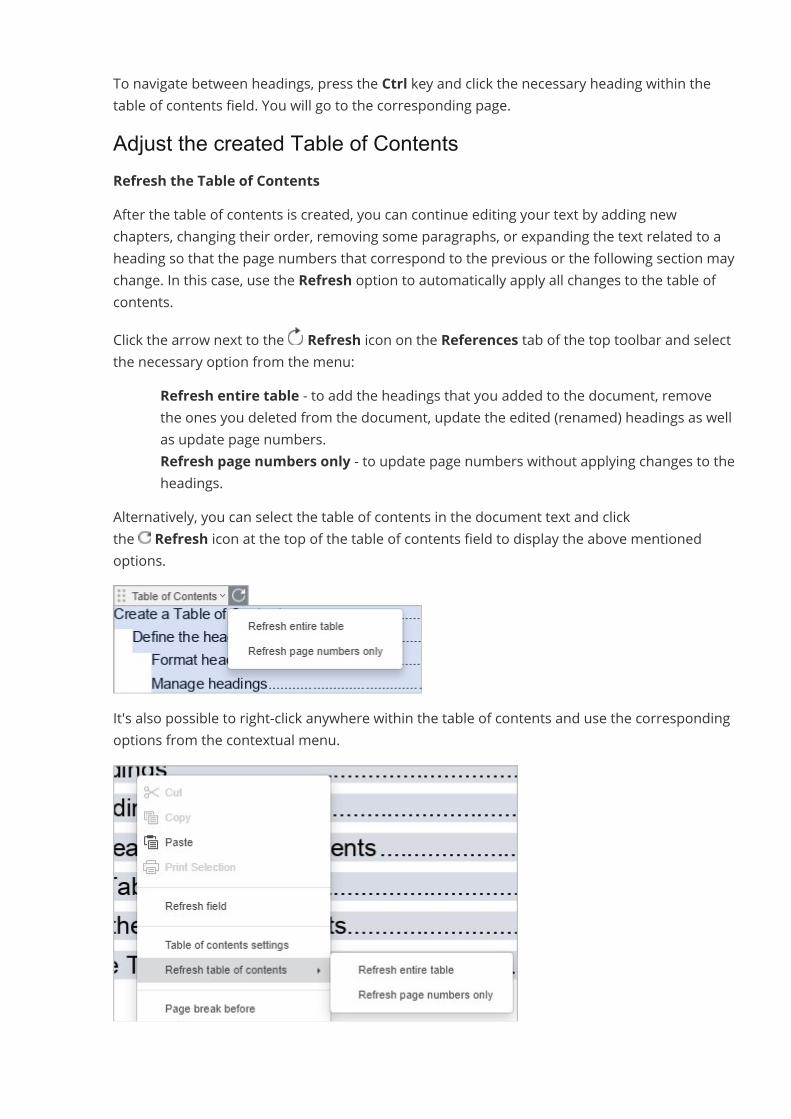
To navigate between headings, press the Ctrl key and click the necessary heading within thetable of contents field. You will go to the corresponding page.Adjust the created Table of ContentsRefresh the Table of ContentsAfter the table of contents is created, you can continue editing your text by adding newchapters, changing their order, removing some paragraphs, or expanding the text related to aheading so that the page numbers that correspond to the previous or the following section maychange. In this case, use the Refresh option to automatically apply all changes to the table ofcontents.Click the arrow next to the Refresh icon on the References tab of the top toolbar and selectthe necessary option from the menu:
· Refresh entire table - to add the headings that you added to the document, removethe ones you deleted from the document, update the edited (renamed) headings as wellas update page numbers.
· Refresh page numbers only - to update page numbers without applying changes to theheadings.
Alternatively, you can select the table of contents in the document text and clickthe Refresh icon at the top of the table of contents field to display the above mentionedoptions.
It's also possible to right-click anywhere within the table of contents and use the correspondingoptions from the contextual menu.
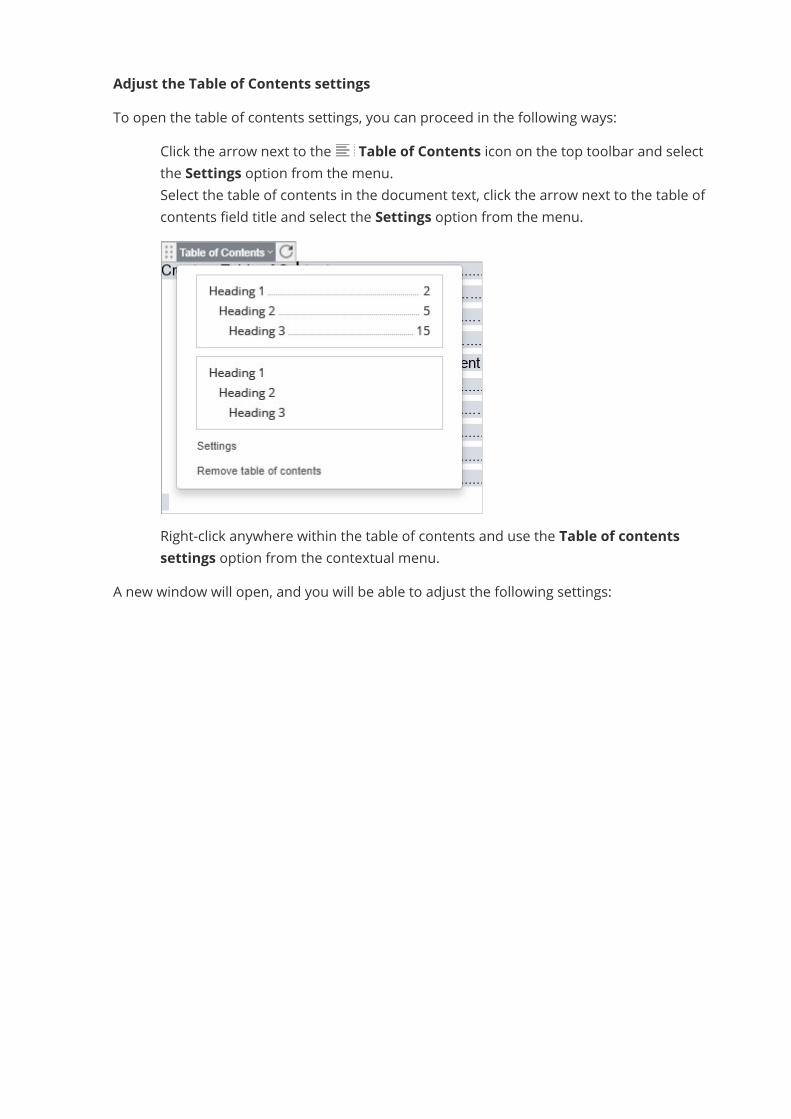
Adjust the Table of Contents settingsTo open the table of contents settings, you can proceed in the following ways:
· Click the arrow next to the Table of Contents icon on the top toolbar and selectthe Settings option from the menu.
· Select the table of contents in the document text, click the arrow next to the table ofcontents field title and select the Settings option from the menu.
· Right-click anywhere within the table of contents and use the Table of contentssettings option from the contextual menu.
A new window will open, and you will be able to adjust the following settings:
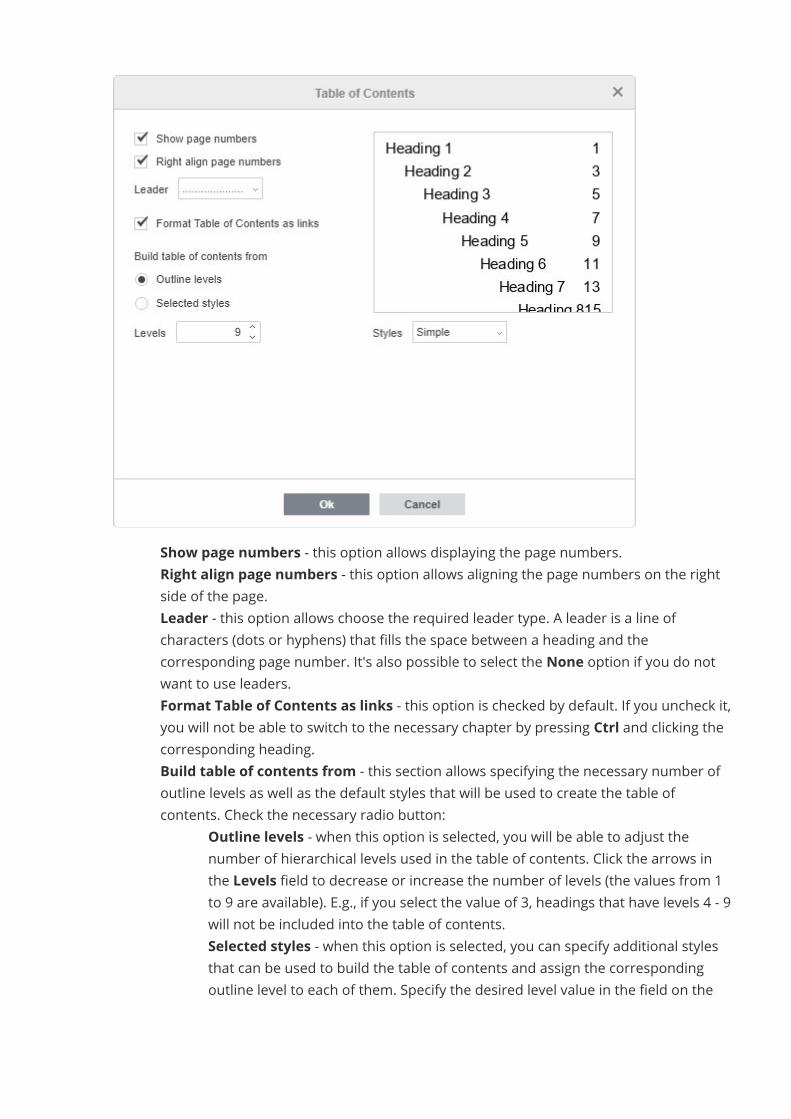
· Show page numbers - this option allows displaying the page numbers.· Right align page numbers - this option allows aligning the page numbers on the right
side of the page.· Leader - this option allows choose the required leader type. A leader is a line of
characters (dots or hyphens) that fills the space between a heading and thecorresponding page number. It's also possible to select the None option if you do notwant to use leaders.
· Format Table of Contents as links - this option is checked by default. If you uncheck it,you will not be able to switch to the necessary chapter by pressing Ctrl and clicking thecorresponding heading.
· Build table of contents from - this section allows specifying the necessary number ofoutline levels as well as the default styles that will be used to create the table ofcontents. Check the necessary radio button:
o Outline levels - when this option is selected, you will be able to adjust thenumber of hierarchical levels used in the table of contents. Click the arrows inthe Levels field to decrease or increase the number of levels (the values from 1to 9 are available). E.g., if you select the value of 3, headings that have levels 4 - 9will not be included into the table of contents.
o Selected styles - when this option is selected, you can specify additional stylesthat can be used to build the table of contents and assign the correspondingoutline level to each of them. Specify the desired level value in the field on the

right of the style. Once you save the settings, you will be able to use this stylewhen creating a table of contents.
· Styles - this options allows selecting the desired appearance of the table of contents.Select the necessary style from the drop-down list. The preview field above displays howthe table of contents should look like.The following four default styles are available: Simple, Standard, Modern, Classic.The Current option is used if you customize the table of contents style.
Click the OK button within the settings window to apply the changes.Customize the Table of Contents styleAfter you apply one of the default table of contents styles within the Table of Contents settingswindow, you can additionally modify this style so that the text within the table of contents fieldlooks like you need.1. Select the text within the table of contents field, e.g. pressing the button in the upper
left corner of the table of contents content control.2. Format table of contents items changing their font type, size, color or applying the font
decoration styles.3. Consequently update styles for items of each level. To update the style, right-click the
formatted item, select the Formatting as Style option from the contextual menu and
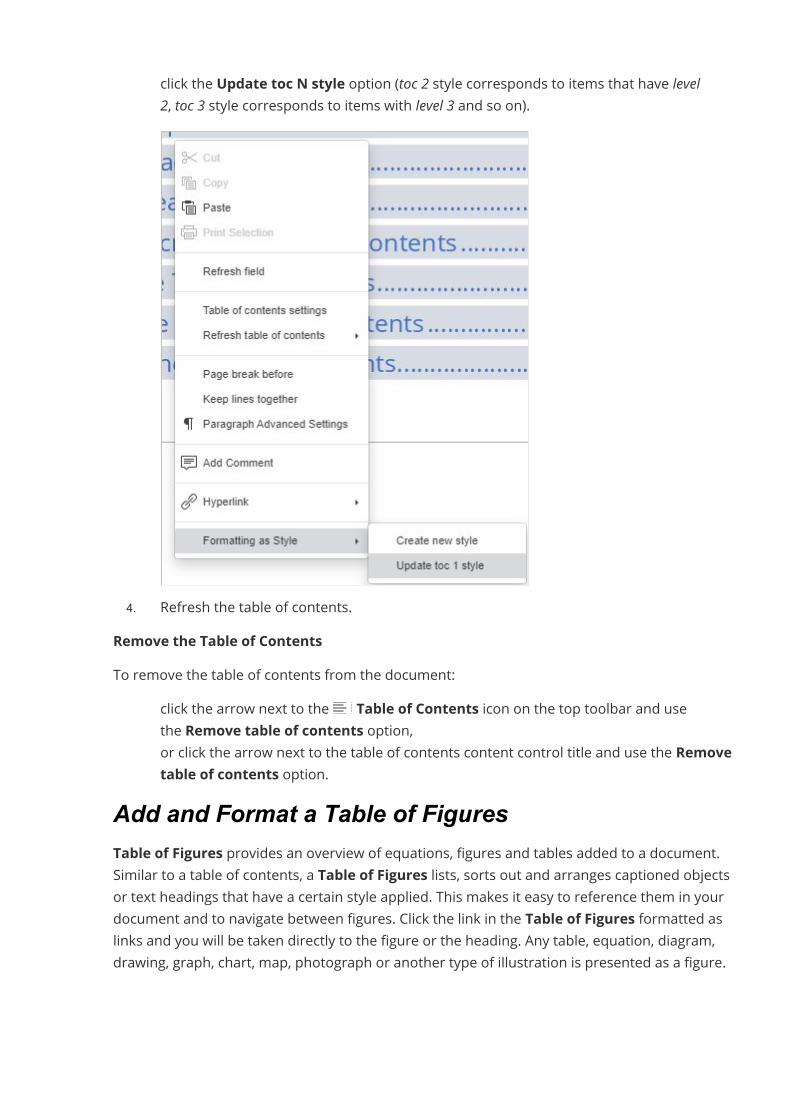
click the Update toc N style option (toc 2 style corresponds to items that have level2, toc 3 style corresponds to items with level 3 and so on).
4. Refresh the table of contents.Remove the Table of ContentsTo remove the table of contents from the document:
· click the arrow next to the Table of Contents icon on the top toolbar and usethe Remove table of contents option,
· or click the arrow next to the table of contents content control title and use the Removetable of contents option.
Add and Format a Table of FiguresTable of Figures provides an overview of equations, figures and tables added to a document.Similar to a table of contents, a Table of Figures lists, sorts out and arranges captioned objectsor text headings that have a certain style applied. This makes it easy to reference them in yourdocument and to navigate between figures. Click the link in the Table of Figures formatted aslinks and you will be taken directly to the figure or the heading. Any table, equation, diagram,drawing, graph, chart, map, photograph or another type of illustration is presented as a figure.
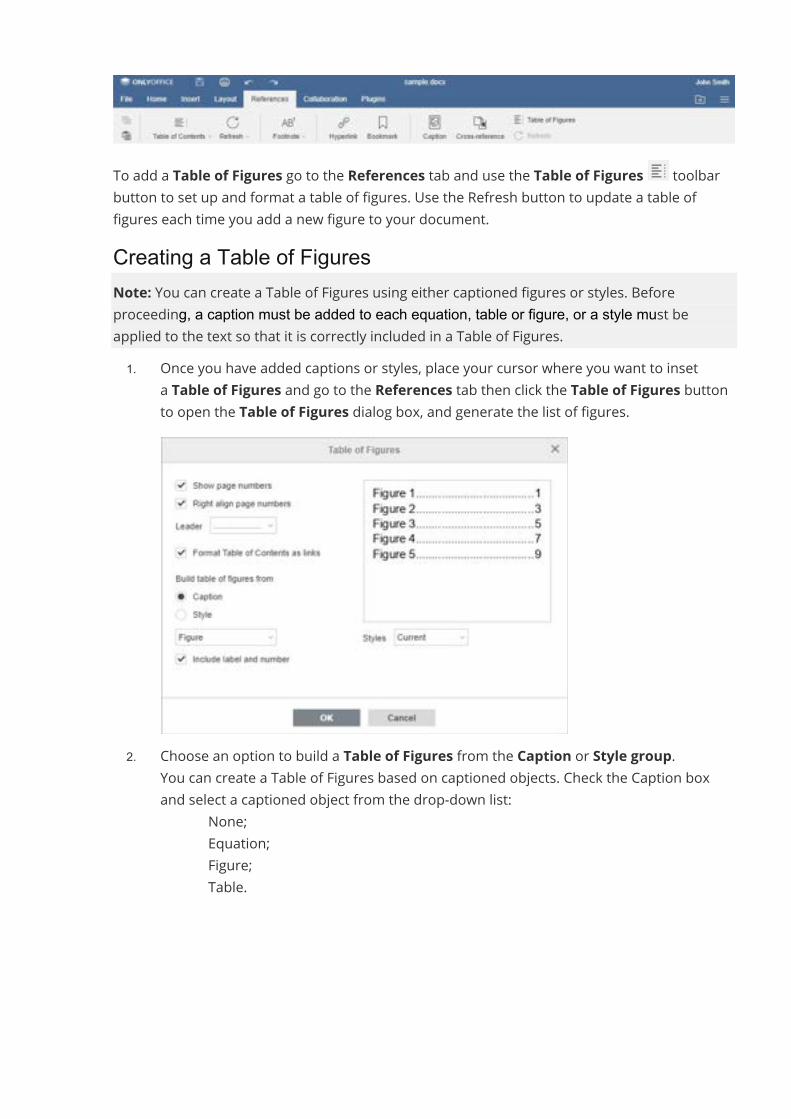
To add a Table of Figures go to the References tab and use the Table of Figures toolbarbutton to set up and format a table of figures. Use the Refresh button to update a table offigures each time you add a new figure to your document.Creating a Table of FiguresNote: You can create a Table of Figures using either captioned figures or styles. Beforeproceeding, a caption must be added to each equation, table or figure, or a style must beapplied to the text so that it is correctly included in a Table of Figures.1. Once you have added captions or styles, place your cursor where you want to inset
a Table of Figures and go to the References tab then click the Table of Figures buttonto open the Table of Figures dialog box, and generate the list of figures.
2. Choose an option to build a Table of Figures from the Caption or Style group.· You can create a Table of Figures based on captioned objects. Check the Caption box
and select a captioned object from the drop-down list:o None;o Equation;o Figure;o Table.
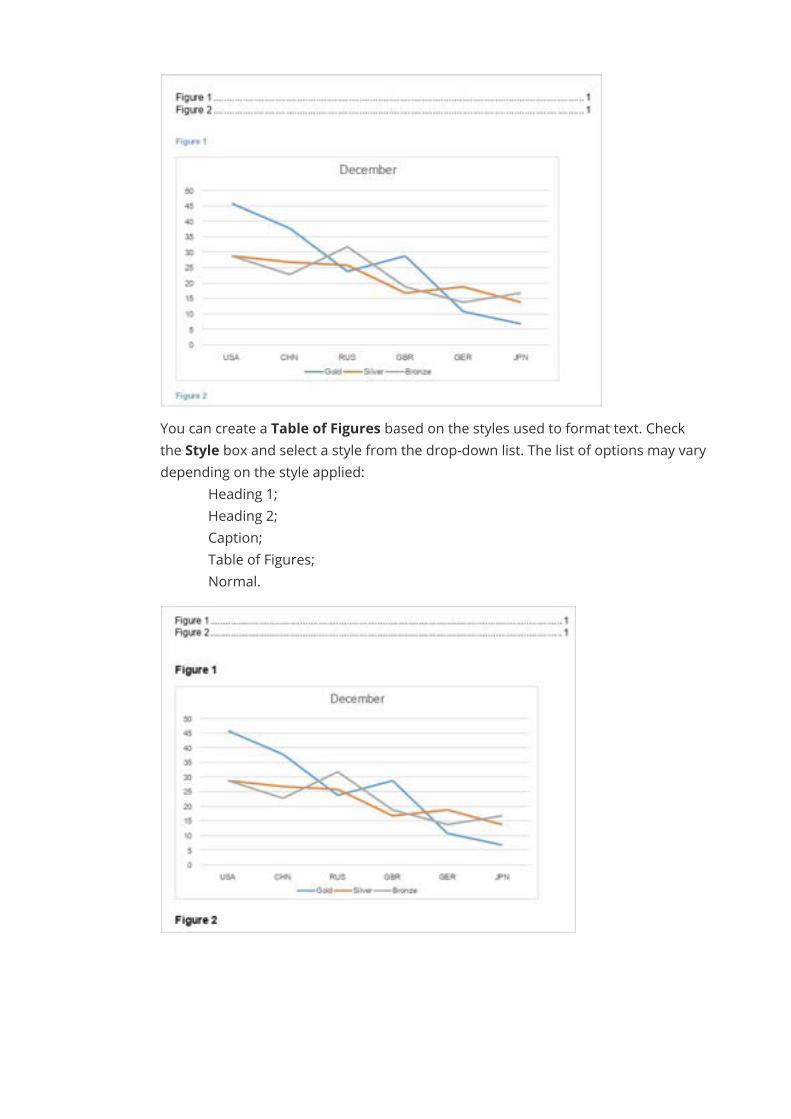
· You can create a Table of Figures based on the styles used to format text. Checkthe Style box and select a style from the drop-down list. The list of options may varydepending on the style applied:
o Heading 1;o Heading 2;o Caption;o Table of Figures;o Normal.
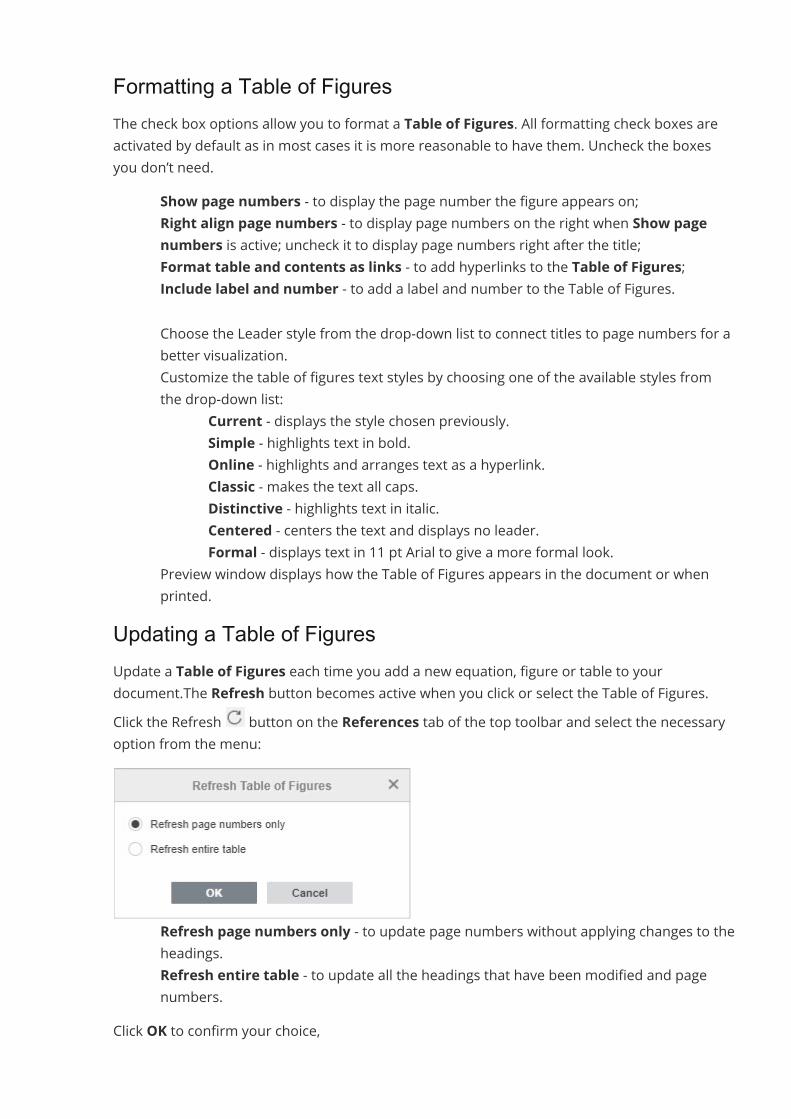
Formatting a Table of FiguresThe check box options allow you to format a Table of Figures. All formatting check boxes areactivated by default as in most cases it is more reasonable to have them. Uncheck the boxesyou don’t need.
Show page numbers - to display the page number the figure appears on;Right align page numbers - to display page numbers on the right when Show pagenumbers is active; uncheck it to display page numbers right after the title;Format table and contents as links - to add hyperlinks to the Table of Figures;Include label and number - to add a label and number to the Table of Figures.
· Choose the Leader style from the drop-down list to connect titles to page numbers for abetter visualization.
· Customize the table of figures text styles by choosing one of the available styles fromthe drop-down list:
o Current - displays the style chosen previously.o Simple - highlights text in bold.o Online - highlights and arranges text as a hyperlink.o Classic - makes the text all caps.o Distinctive - highlights text in italic.o Centered - centers the text and displays no leader.o Formal - displays text in 11 pt Arial to give a more formal look.
· Preview window displays how the Table of Figures appears in the document or whenprinted.
Updating a Table of FiguresUpdate a Table of Figures each time you add a new equation, figure or table to yourdocument.The Refresh button becomes active when you click or select the Table of Figures.Click the Refresh button on the References tab of the top toolbar and select the necessaryoption from the menu:
· Refresh page numbers only - to update page numbers without applying changes to theheadings.
· Refresh entire table - to update all the headings that have been modified and pagenumbers.
Click OK to confirm your choice,
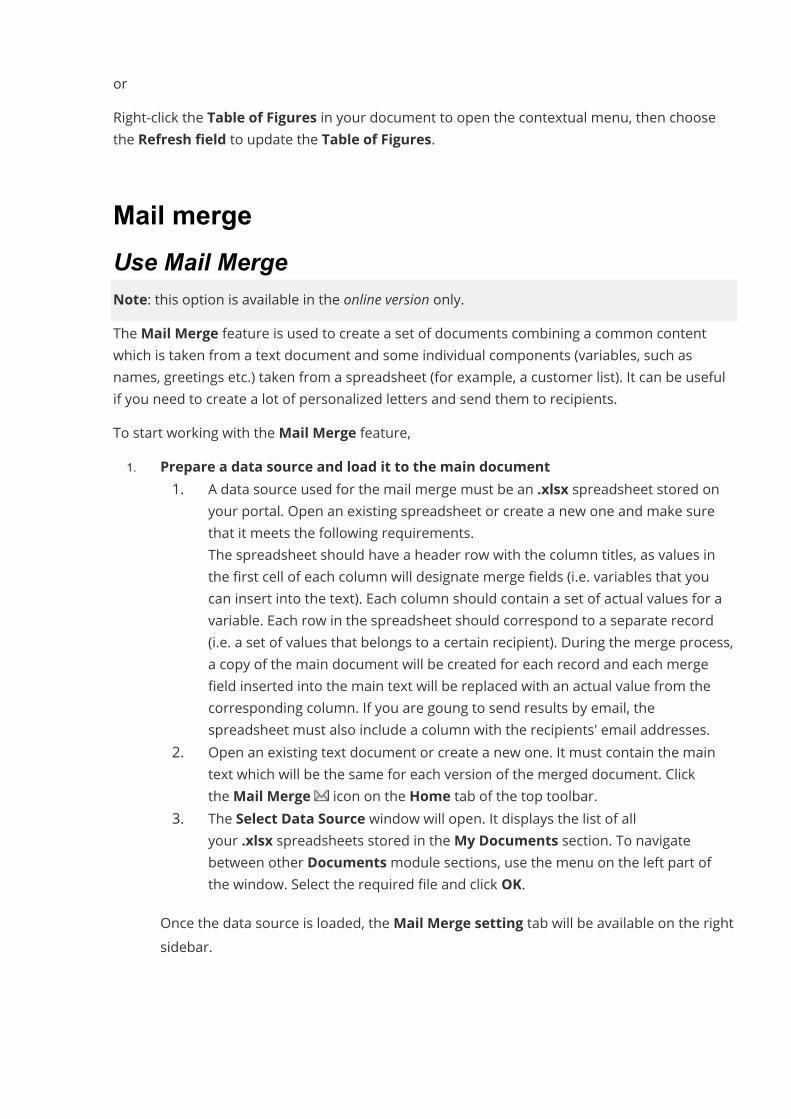
orRight-click the Table of Figures in your document to open the contextual menu, then choosethe Refresh field to update the Table of Figures.
Mail mergeUse Mail MergeNote: this option is available in the online version only.TheMail Merge feature is used to create a set of documents combining a common contentwhich is taken from a text document and some individual components (variables, such asnames, greetings etc.) taken from a spreadsheet (for example, a customer list). It can be usefulif you need to create a lot of personalized letters and send them to recipients.To start working with theMail Merge feature,1. Prepare a data source and load it to the main document
1. A data source used for the mail merge must be an .xlsx spreadsheet stored onyour portal. Open an existing spreadsheet or create a new one and make surethat it meets the following requirements.The spreadsheet should have a header row with the column titles, as values inthe first cell of each column will designate merge fields (i.e. variables that youcan insert into the text). Each column should contain a set of actual values for avariable. Each row in the spreadsheet should correspond to a separate record(i.e. a set of values that belongs to a certain recipient). During the merge process,a copy of the main document will be created for each record and each mergefield inserted into the main text will be replaced with an actual value from thecorresponding column. If you are goung to send results by email, thespreadsheet must also include a column with the recipients' email addresses.
2. Open an existing text document or create a new one. It must contain the maintext which will be the same for each version of the merged document. ClicktheMail Merge icon on the Home tab of the top toolbar.
3. The Select Data Source window will open. It displays the list of allyour .xlsx spreadsheets stored in theMy Documents section. To navigatebetween other Documentsmodule sections, use the menu on the left part ofthe window. Select the required file and click OK.
Once the data source is loaded, theMail Merge setting tab will be available on the rightsidebar.
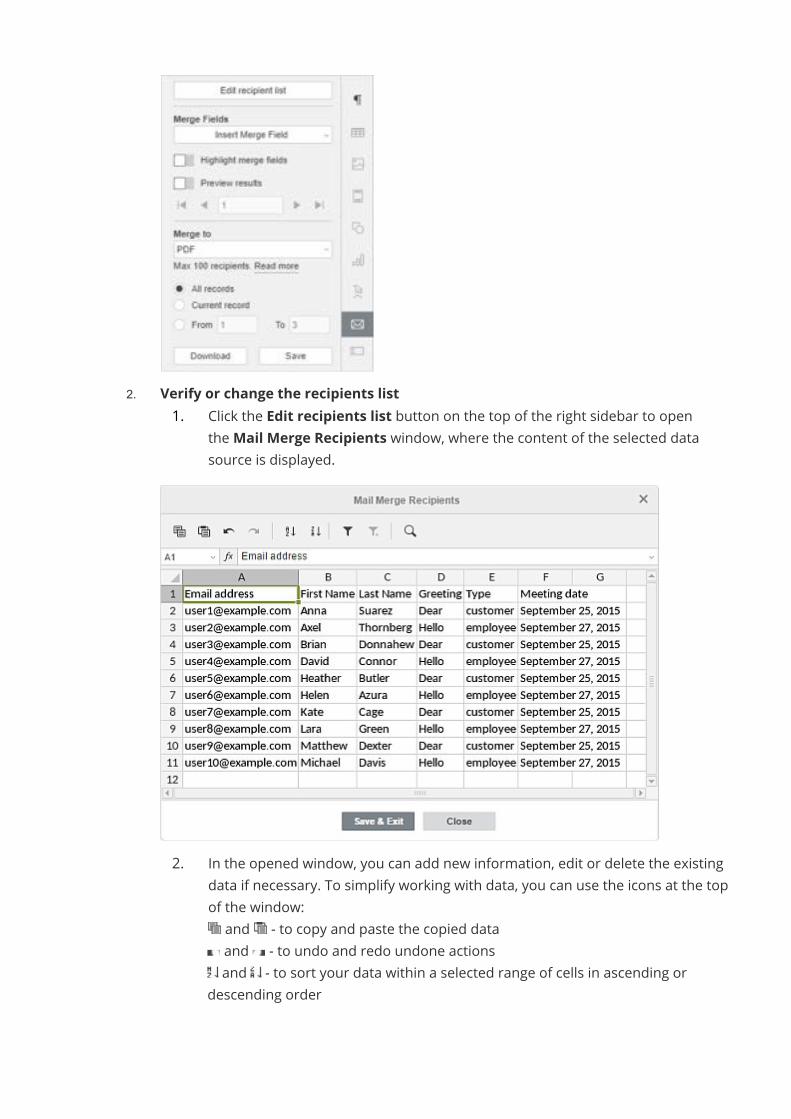
2. Verify or change the recipients list1. Click the Edit recipients list button on the top of the right sidebar to open
theMail Merge Recipients window, where the content of the selected datasource is displayed.
2. In the opened window, you can add new information, edit or delete the existingdata if necessary. To simplify working with data, you can use the icons at the topof the window:
· and - to copy and paste the copied data· and - to undo and redo undone actions· and - to sort your data within a selected range of cells in ascending or
descending order
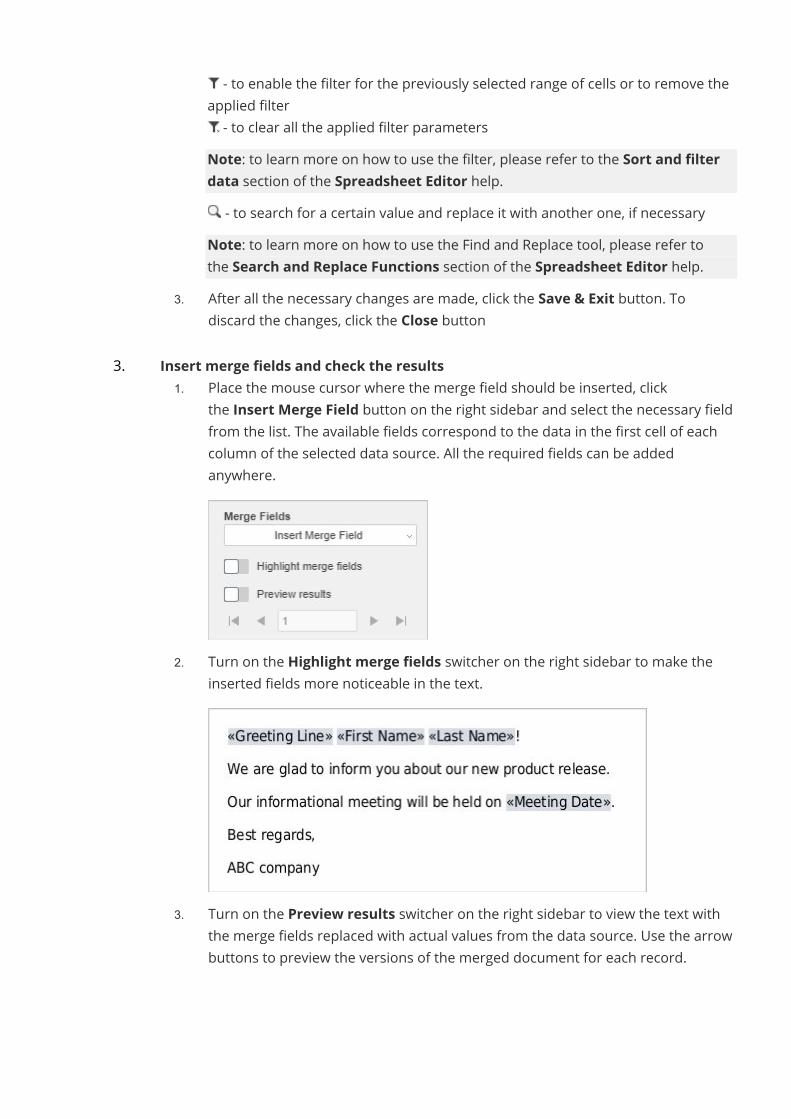
· - to enable the filter for the previously selected range of cells or to remove theapplied filter
· - to clear all the applied filter parametersNote: to learn more on how to use the filter, please refer to the Sort and filterdata section of the Spreadsheet Editor help.
· - to search for a certain value and replace it with another one, if necessaryNote: to learn more on how to use the Find and Replace tool, please refer tothe Search and Replace Functions section of the Spreadsheet Editor help.
3. After all the necessary changes are made, click the Save & Exit button. Todiscard the changes, click the Close button
3. Insert merge fields and check the results1. Place the mouse cursor where the merge field should be inserted, click
the Insert Merge Field button on the right sidebar and select the necessary fieldfrom the list. The available fields correspond to the data in the first cell of eachcolumn of the selected data source. All the required fields can be addedanywhere.
2. Turn on the Highlight merge fields switcher on the right sidebar to make theinserted fields more noticeable in the text.
3. Turn on the Preview results switcher on the right sidebar to view the text withthe merge fields replaced with actual values from the data source. Use the arrowbuttons to preview the versions of the merged document for each record.
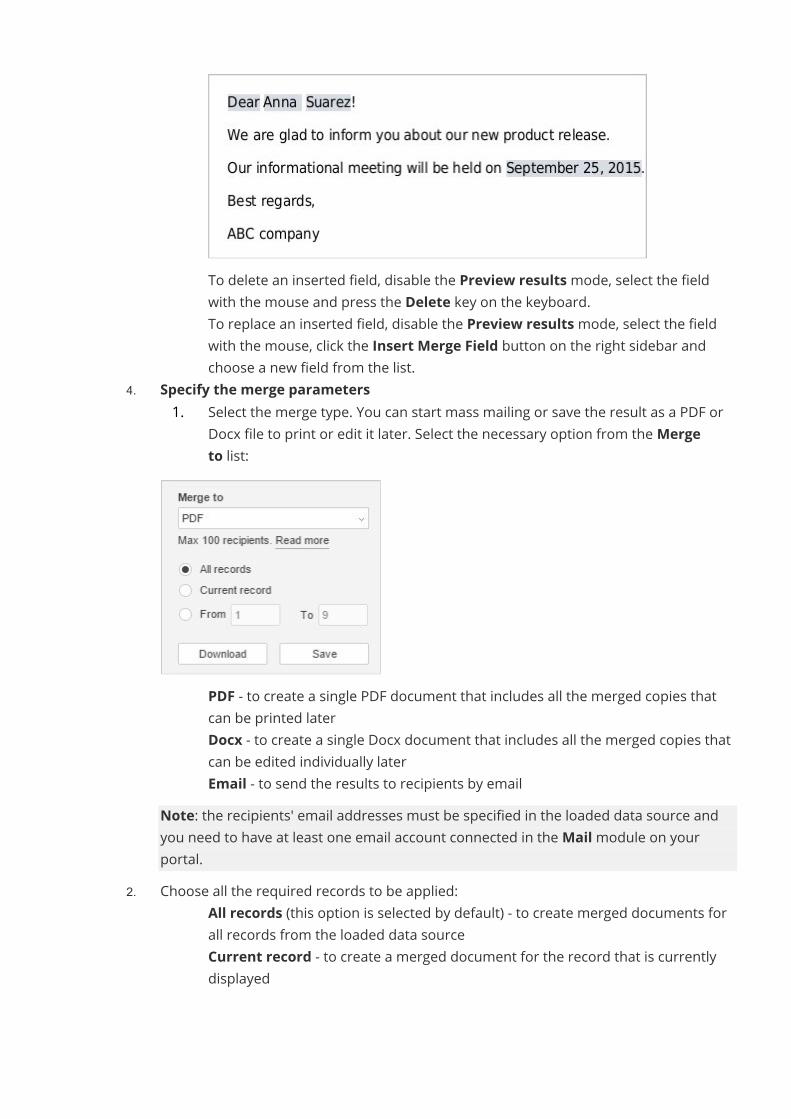
· To delete an inserted field, disable the Preview resultsmode, select the fieldwith the mouse and press the Delete key on the keyboard.
· To replace an inserted field, disable the Preview resultsmode, select the fieldwith the mouse, click the Insert Merge Field button on the right sidebar andchoose a new field from the list.
4. Specify the merge parameters1. Select the merge type. You can start mass mailing or save the result as a PDF or
Docx file to print or edit it later. Select the necessary option from theMergeto list:
· PDF - to create a single PDF document that includes all the merged copies thatcan be printed later
· Docx - to create a single Docx document that includes all the merged copies thatcan be edited individually later
· Email - to send the results to recipients by emailNote: the recipients' email addresses must be specified in the loaded data source andyou need to have at least one email account connected in theMailmodule on yourportal.
2. Choose all the required records to be applied:· All records (this option is selected by default) - to create merged documents for
all records from the loaded data source· Current record - to create a merged document for the record that is currently
displayed
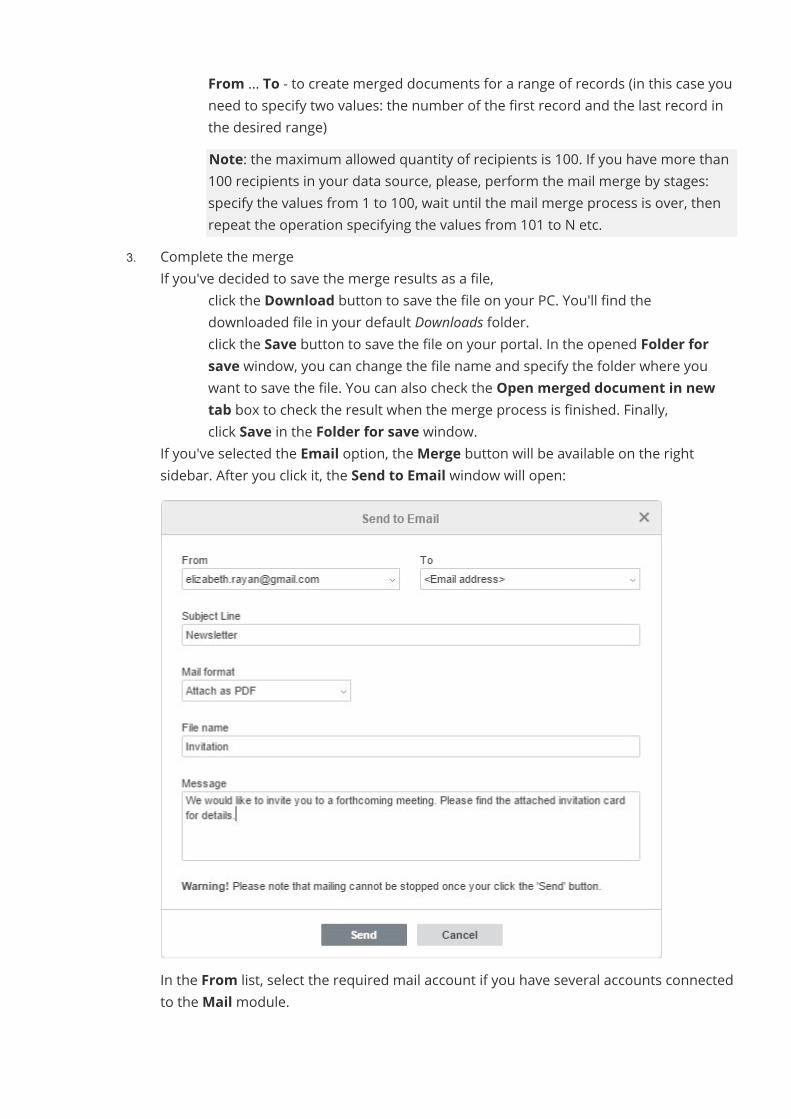
· From ... To - to create merged documents for a range of records (in this case youneed to specify two values: the number of the first record and the last record inthe desired range)Note: the maximum allowed quantity of recipients is 100. If you have more than100 recipients in your data source, please, perform the mail merge by stages:specify the values from 1 to 100, wait until the mail merge process is over, thenrepeat the operation specifying the values from 101 to N etc.
3. Complete the merge· If you've decided to save the merge results as a file,
o click the Download button to save the file on your PC. You'll find thedownloaded file in your default Downloads folder.
o click the Save button to save the file on your portal. In the opened Folder forsave window, you can change the file name and specify the folder where youwant to save the file. You can also check the Open merged document in newtab box to check the result when the merge process is finished. Finally,click Save in the Folder for save window.
· If you've selected the Email option, theMerge button will be available on the rightsidebar. After you click it, the Send to Email window will open:
· In the From list, select the required mail account if you have several accounts connectedto theMailmodule.
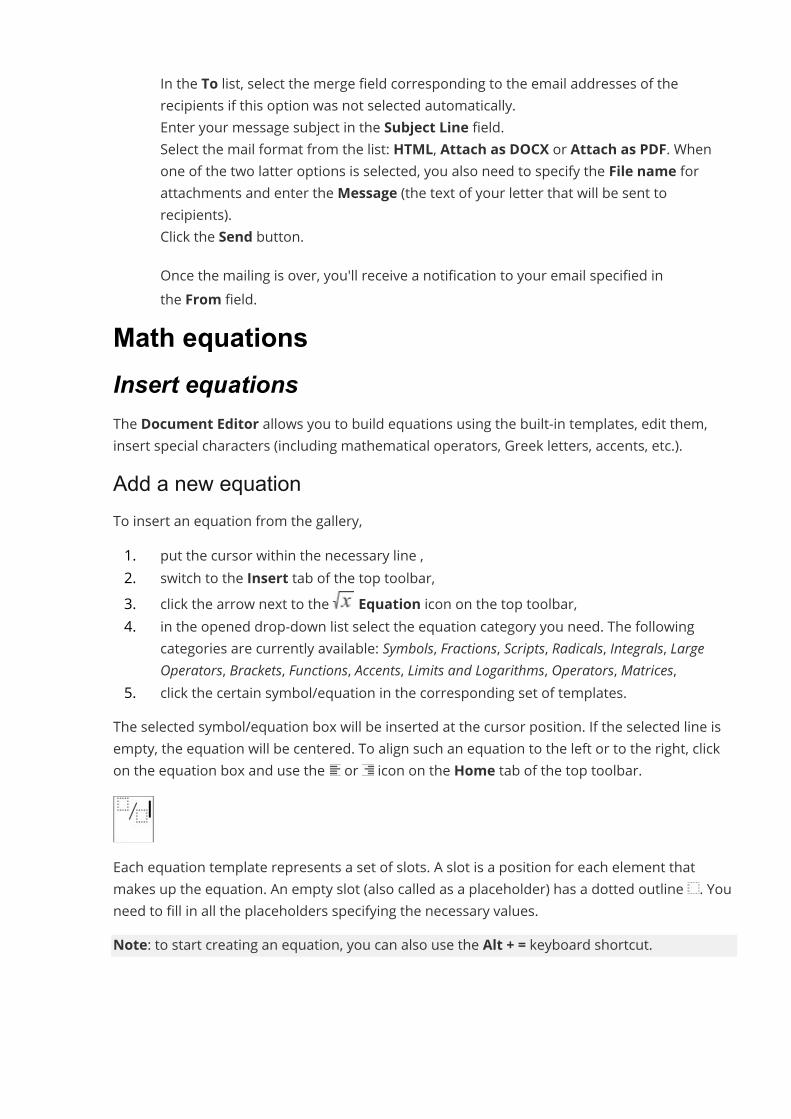
· In the To list, select the merge field corresponding to the email addresses of therecipients if this option was not selected automatically.
· Enter your message subject in the Subject Line field.· Select the mail format from the list: HTML, Attach as DOCX or Attach as PDF. When
one of the two latter options is selected, you also need to specify the File name forattachments and enter theMessage (the text of your letter that will be sent torecipients).
· Click the Send button.Once the mailing is over, you'll receive a notification to your email specified inthe From field.
Math equationsInsert equationsThe Document Editor allows you to build equations using the built-in templates, edit them,insert special characters (including mathematical operators, Greek letters, accents, etc.).Add a new equationTo insert an equation from the gallery,1. put the cursor within the necessary line ,2. switch to the Insert tab of the top toolbar,3. click the arrow next to the Equation icon on the top toolbar,4. in the opened drop-down list select the equation category you need. The following
categories are currently available: Symbols, Fractions, Scripts, Radicals, Integrals, LargeOperators, Brackets, Functions, Accents, Limits and Logarithms, Operators, Matrices,
5. click the certain symbol/equation in the corresponding set of templates.The selected symbol/equation box will be inserted at the cursor position. If the selected line isempty, the equation will be centered. To align such an equation to the left or to the right, clickon the equation box and use the or icon on the Home tab of the top toolbar.
Each equation template represents a set of slots. A slot is a position for each element thatmakes up the equation. An empty slot (also called as a placeholder) has a dotted outline . Youneed to fill in all the placeholders specifying the necessary values.Note: to start creating an equation, you can also use the Alt + = keyboard shortcut.
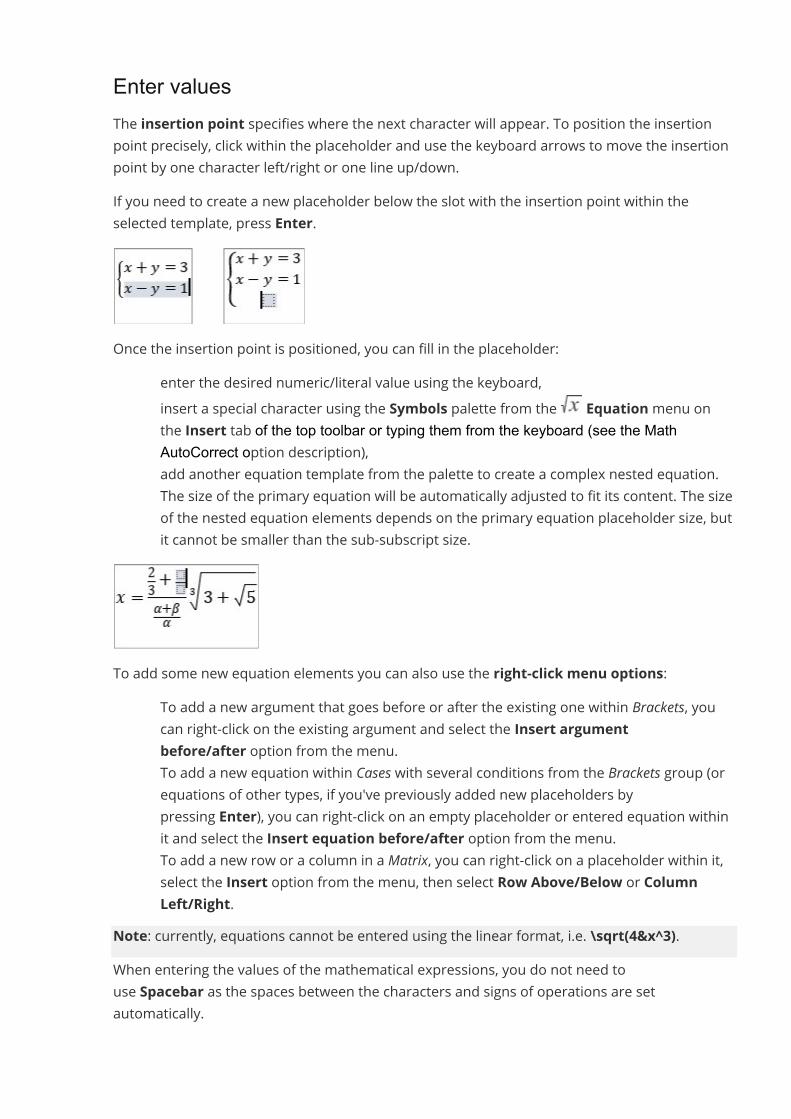
Enter valuesThe insertion point specifies where the next character will appear. To position the insertionpoint precisely, click within the placeholder and use the keyboard arrows to move the insertionpoint by one character left/right or one line up/down.If you need to create a new placeholder below the slot with the insertion point within theselected template, press Enter.
Once the insertion point is positioned, you can fill in the placeholder:· enter the desired numeric/literal value using the keyboard,· insert a special character using the Symbols palette from the Equationmenu on
the Insert tab of the top toolbar or typing them from the keyboard (see the MathAutoСorrect option description),
· add another equation template from the palette to create a complex nested equation.The size of the primary equation will be automatically adjusted to fit its content. The sizeof the nested equation elements depends on the primary equation placeholder size, butit cannot be smaller than the sub-subscript size.
To add some new equation elements you can also use the right-click menu options:· To add a new argument that goes before or after the existing one within Brackets, you
can right-click on the existing argument and select the Insert argumentbefore/after option from the menu.
· To add a new equation within Cases with several conditions from the Brackets group (orequations of other types, if you've previously added new placeholders bypressing Enter), you can right-click on an empty placeholder or entered equation withinit and select the Insert equation before/after option from the menu.
· To add a new row or a column in a Matrix, you can right-click on a placeholder within it,select the Insert option from the menu, then select Row Above/Below or ColumnLeft/Right.
Note: currently, equations cannot be entered using the linear format, i.e. \sqrt(4&x^3).When entering the values of the mathematical expressions, you do not need touse Spacebar as the spaces between the characters and signs of operations are setautomatically.
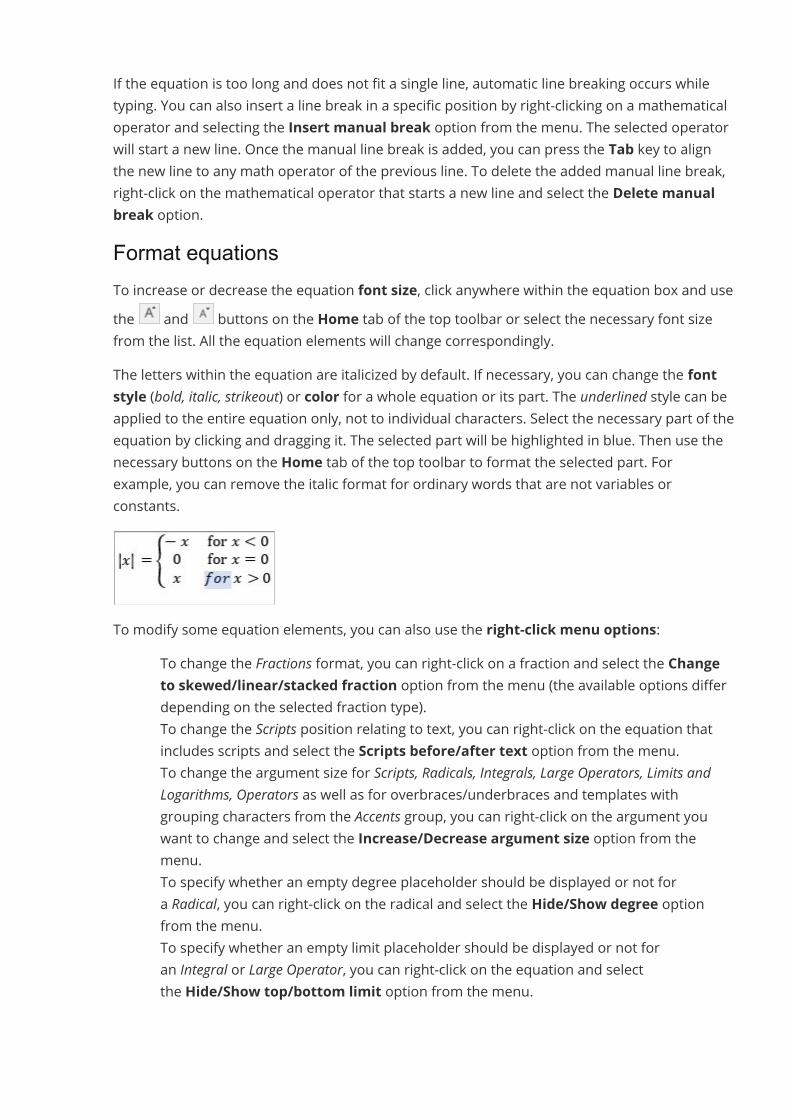
If the equation is too long and does not fit a single line, automatic line breaking occurs whiletyping. You can also insert a line break in a specific position by right-clicking on a mathematicaloperator and selecting the Insert manual break option from the menu. The selected operatorwill start a new line. Once the manual line break is added, you can press the Tab key to alignthe new line to any math operator of the previous line. To delete the added manual line break,right-click on the mathematical operator that starts a new line and select the Delete manualbreak option.Format equationsTo increase or decrease the equation font size, click anywhere within the equation box and usethe and buttons on the Home tab of the top toolbar or select the necessary font sizefrom the list. All the equation elements will change correspondingly.The letters within the equation are italicized by default. If necessary, you can change the fontstyle (bold, italic, strikeout) or color for a whole equation or its part. The underlined style can beapplied to the entire equation only, not to individual characters. Select the necessary part of theequation by clicking and dragging it. The selected part will be highlighted in blue. Then use thenecessary buttons on the Home tab of the top toolbar to format the selected part. Forexample, you can remove the italic format for ordinary words that are not variables orconstants.
To modify some equation elements, you can also use the right-click menu options:· To change the Fractions format, you can right-click on a fraction and select the Change
to skewed/linear/stacked fraction option from the menu (the available options differdepending on the selected fraction type).
· To change the Scripts position relating to text, you can right-click on the equation thatincludes scripts and select the Scripts before/after text option from the menu.
· To change the argument size for Scripts, Radicals, Integrals, Large Operators, Limits andLogarithms, Operators as well as for overbraces/underbraces and templates withgrouping characters from the Accents group, you can right-click on the argument youwant to change and select the Increase/Decrease argument size option from themenu.
· To specify whether an empty degree placeholder should be displayed or not fora Radical, you can right-click on the radical and select the Hide/Show degree optionfrom the menu.
· To specify whether an empty limit placeholder should be displayed or not foran Integral or Large Operator, you can right-click on the equation and selectthe Hide/Show top/bottom limit option from the menu.
· To change the limits position relating to the integral or operator signfor Integrals or Large Operators, you can right-click on the equation and selectthe Change limits location option from the menu. The limits can be displayed on theright of the operator sign (as subscripts and superscripts) or directly above and belowthe operator sign.
· To change the limits position relating to text for Limits and Logarithms and templateswith grouping characters from the Accents group, you can right-click on the equation andselect the Limit over/under text option from the menu.
· To choose which of the Brackets should be displayed, you can right-click on theexpression within them and select the Hide/Show opening/closing bracket optionfrom the menu.
· To control the Brackets size, you can right-click on the expression within them.The Stretch brackets option is selected by default so that the brackets can growaccording to the expression within them, but you can deselect this option to preventbrackets from stretching. When this option is activated, you can also use theMatchbrackets to argument height option.
· To change the character position relating to text for overbraces/underbraces oroverbars/underbars from the Accents group, you can right-click on the template andselect the Char/Bar over/under text option from the menu.
· To choose which borders should be displayed for a Boxed formula fromthe Accents group, you can right-click on the equation and select the Borderproperties option from the menu, then select Hide/Show top/bottom/left/rightborder or Add/Hide horizontal/vertical/diagonal line.
· To specify whether empty placeholders should be displayed or not for a Matrix, you canright-click on it and select the Hide/Show placeholder option from the menu.
To align some equation elements you can use the right-click menu options:· To align equations within Cases with several conditions from the Brackets group (or
equations of other types, if you've previously added new placeholders bypressing Enter), you can right-click on an equation, select the Alignment option fromthe menu, then select the alignment type: Top, Center, or Bottom.
· To align a Matrix vertically, you can right-click on the matrix, select theMatrixAlignment option from the menu, then select the alignment type: Top, Center,or Bottom.
· To align elements within a Matrix column horizontally, you can right-click on aplaceholder within the column, select the Column Alignment option from the menu,then select the alignment type: Left, Center, or Right.
Delete equation elementsTo delete a part of the equation, select it by dragging the mouse or holding down the Shift keyand using the arrow buttons, then press the Delete key on the keyboard.A slot can only be deleted together with the template it belongs to.
To delete the entire equation, select it completely by dragging the mouse or double-clicking onthe equation box and press the Delete key on the keyboard.
To delete some equation elements, you can also use the right-click menu options:· To delete a Radical, you can right-click on it and select the Delete radical option from
the menu.· To delete a Subscript and/or Superscript, you can right-click on the expression that
contains them and select the Remove subscript/superscript option from the menu. Ifthe expression contains scripts that go before text, the Remove scripts option isavailable.
· To delete Brackets, you can right-click on the expression within them and selectthe Delete enclosing characters or Delete enclosing characters andseparators option from the menu.
· If the expression within Brackets inclides more than one argument, you can right-click onthe argument you want to delete and select the Delete argument option from themenu.
· If Brackets enclose more than one equation (i.e. Cases with several conditions), you canright-click on the equation you want to delete and select the Delete equation optionfrom the menu. This option is also available for equations of other types if you'vepreviously added new placeholders by pressing Enter.
· To delete a Limit, you can right-click on it and select the Remove limit option from themenu.
· To delete an Accent, you can right-click on it and select the Remove accentcharacter, Delete char or Remove bar option from the menu (the available optionsdiffer depending on the selected accent).
· To delete a row or a column of a Matrix, you can right-click on the placeholder within therow/column you need to delete, select the Delete option from the menu, thenselect Delete Row/Column.
Convert equationsIf you open an existing document containing equations which were created with an old versionof equation editor (for example, with MS Office versions before 2007), you need to convertthese equations to the Office Math ML format to be able to edit them.To convert an equation, double-click it. The warning window will appear:
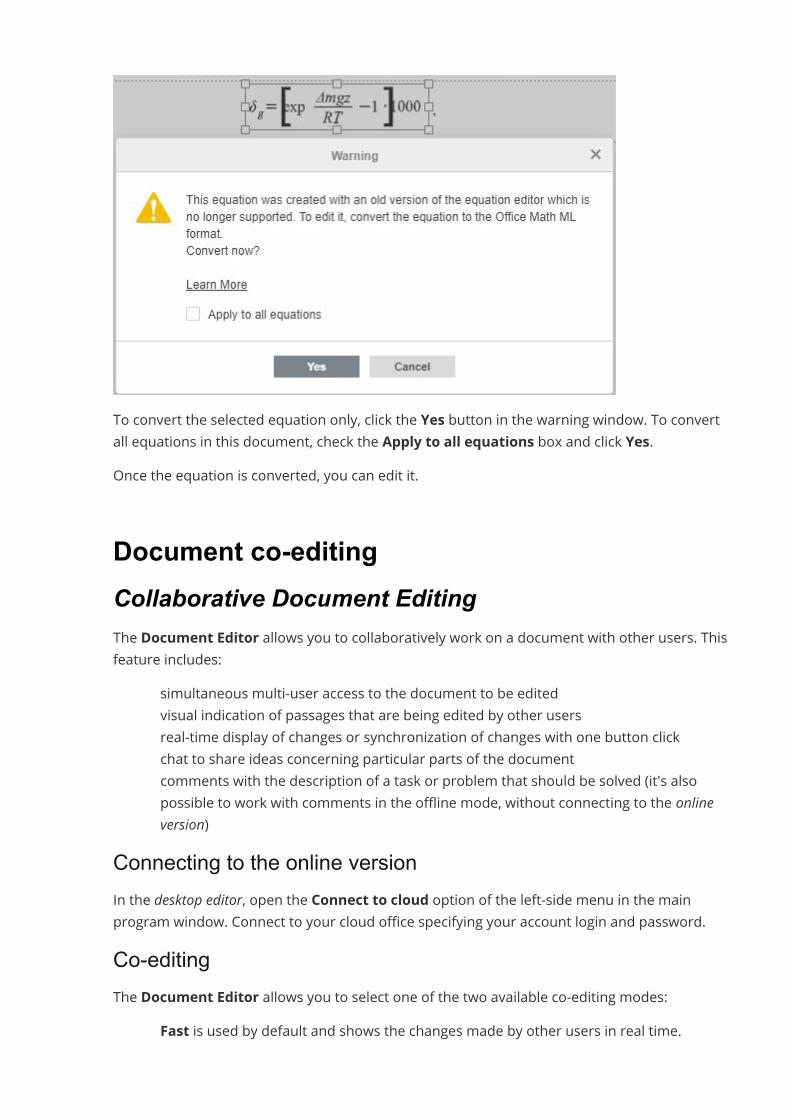
To convert the selected equation only, click the Yes button in the warning window. To convertall equations in this document, check the Apply to all equations box and click Yes.Once the equation is converted, you can edit it.
Document co-editingCollaborative Document EditingThe Document Editor allows you to collaboratively work on a document with other users. Thisfeature includes:
· simultaneous multi-user access to the document to be edited· visual indication of passages that are being edited by other users· real-time display of changes or synchronization of changes with one button click· chat to share ideas concerning particular parts of the document· comments with the description of a task or problem that should be solved (it's also
possible to work with comments in the offline mode, without connecting to the onlineversion)
Connecting to the online versionIn the desktop editor, open the Connect to cloud option of the left-side menu in the mainprogram window. Connect to your cloud office specifying your account login and password.Co-editingThe Document Editor allows you to select one of the two available co-editing modes:
· Fast is used by default and shows the changes made by other users in real time.

· Strict is selected to hide changes made by other users until you click the Save iconto save your own changes and accept the changes made by co-authors.
The mode can be selected in the Advanced Settings. It's also possible to choose the requiredmode using the Co-editing Mode icon on the Collaboration tab of the top toolbar:
Note: when you co-edit a document in the Fastmode, the possibility to Redo the last undoneoperation is not available.When a document is being edited by several users simultaneously in the Strictmode, theedited text passages are marked with dashed lines of different colors. By hovering the mousecursor over one of the edited passages, the name of the user who is editing it at the moment isdisplayed. The Fastmode will show the actions and the names of the co-editors when they areediting the text.The number of users who are working on the current document is displayed on the right side ofthe editor header - . If you want to see who exactly is editing the file now, you can click thisicon or open the Chat panel with the full list of the users.When no users are viewing or editing the file, the icon in the editor header will looklike allowing you to manage the users who have access to the file right from thedocument: invite new users giving them permissions to edit, read, comment, fillforms or review the document, or deny some users access rights to the file. Click this icon tomanage the access to the file; this can be done both when there are no other users who view orco-edit the document at the moment and when there are other users and the icon looks like
. It's also possible to set access rights using the Sharing icon at the Collaboration tabof the top toolbar.As soon as one of the users saves his/her changes by clicking the icon, the others will see anote within the status bar stating that they have updates. To save the changes you made, sothat other users can view them, and get the updates saved by your co-editors, click the iconin the left upper corner of the top toolbar. The updates will be highlighted for you to checkwhat exactly has been changed.You can specify what changes you want to be highlighted during co-editing if you clickthe File tab on the top toolbar, select the Advanced Settings... option and choosebetween none, all and last real-time collaboration changes. Selecting View all changes, all the
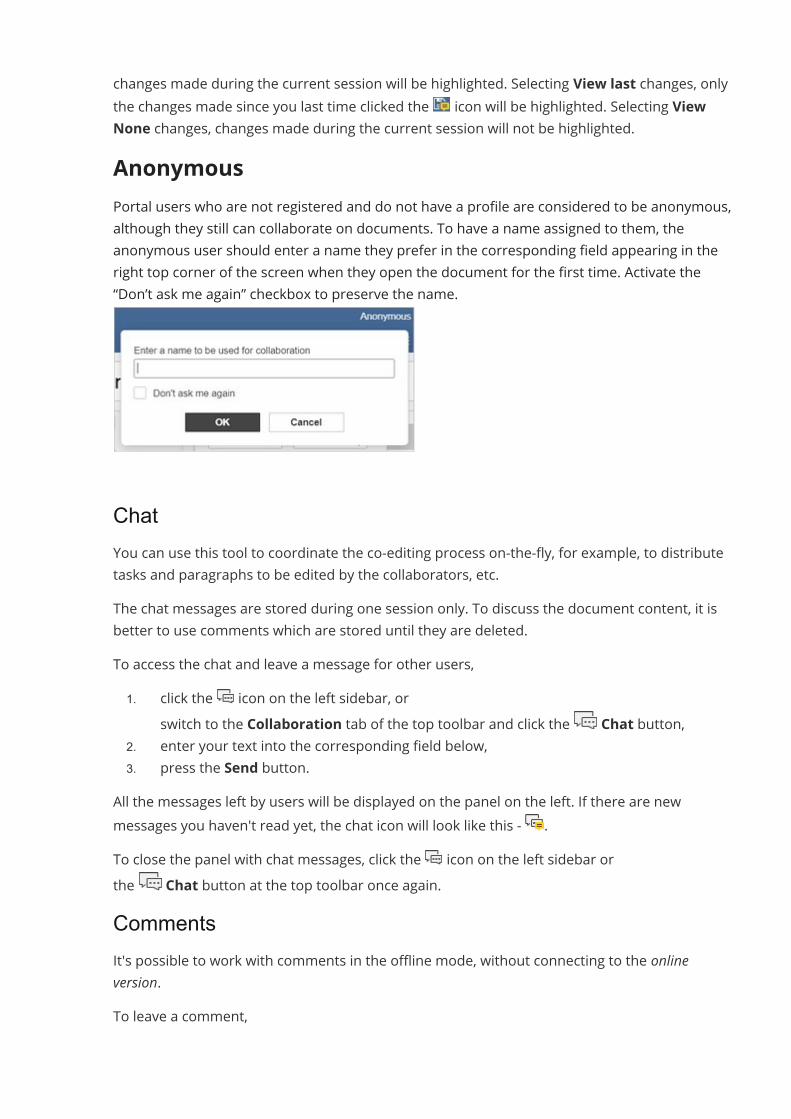
changes made during the current session will be highlighted. Selecting View last changes, onlythe changes made since you last time clicked the icon will be highlighted. Selecting ViewNone changes, changes made during the current session will not be highlighted.AnonymousPortal users who are not registered and do not have a profile are considered to be anonymous,although they still can collaborate on documents. To have a name assigned to them, theanonymous user should enter a name they prefer in the corresponding field appearing in theright top corner of the screen when they open the document for the first time. Activate the“Don’t ask me again” checkbox to preserve the name.
ChatYou can use this tool to coordinate the co-editing process on-the-fly, for example, to distributetasks and paragraphs to be edited by the collaborators, etc.The chat messages are stored during one session only. To discuss the document content, it isbetter to use comments which are stored until they are deleted.To access the chat and leave a message for other users,1. click the icon on the left sidebar, or
switch to the Collaboration tab of the top toolbar and click the Chat button,2. enter your text into the corresponding field below,3. press the Send button.
All the messages left by users will be displayed on the panel on the left. If there are newmessages you haven't read yet, the chat icon will look like this - .To close the panel with chat messages, click the icon on the left sidebar orthe Chat button at the top toolbar once again.CommentsIt's possible to work with comments in the offline mode, without connecting to the onlineversion.To leave a comment,
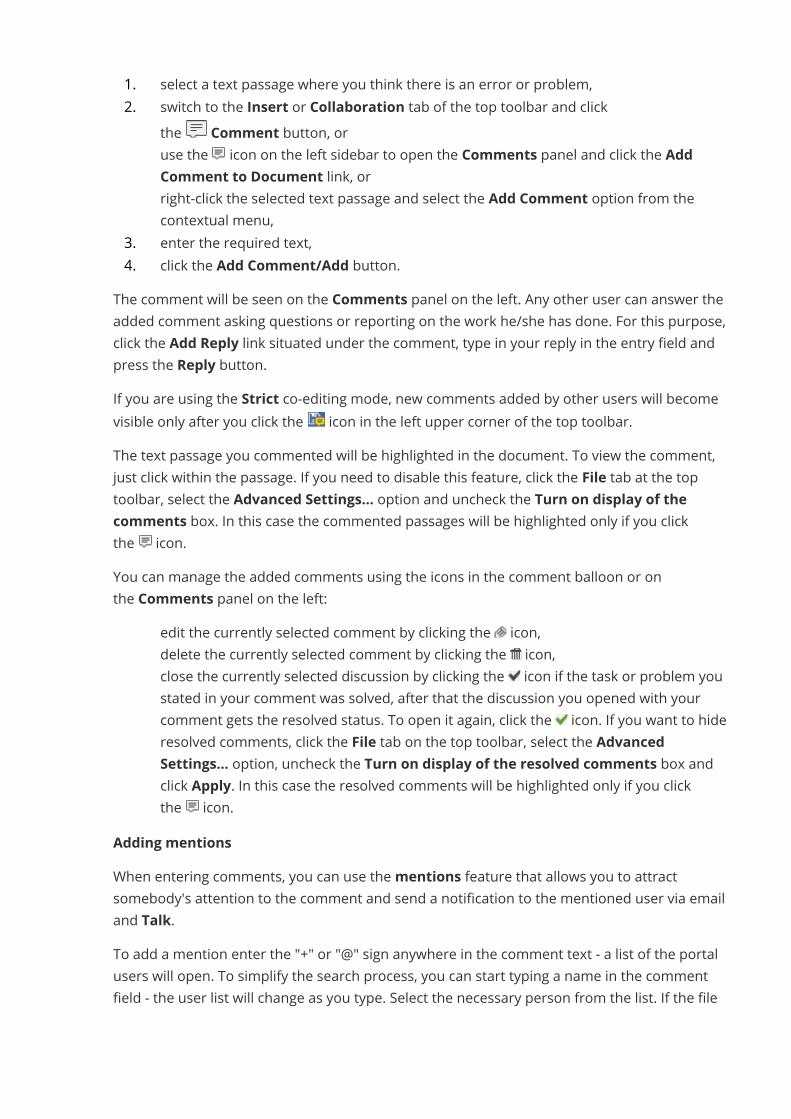
1. select a text passage where you think there is an error or problem,2. switch to the Insert or Collaboration tab of the top toolbar and click
the Comment button, oruse the icon on the left sidebar to open the Comments panel and click the AddComment to Document link, orright-click the selected text passage and select the Add Сomment option from thecontextual menu,
3. enter the required text,4. click the Add Comment/Add button.
The comment will be seen on the Comments panel on the left. Any other user can answer theadded comment asking questions or reporting on the work he/she has done. For this purpose,click the Add Reply link situated under the comment, type in your reply in the entry field andpress the Reply button.If you are using the Strict co-editing mode, new comments added by other users will becomevisible only after you click the icon in the left upper corner of the top toolbar.The text passage you commented will be highlighted in the document. To view the comment,just click within the passage. If you need to disable this feature, click the File tab at the toptoolbar, select the Advanced Settings... option and uncheck the Turn on display of thecomments box. In this case the commented passages will be highlighted only if you clickthe icon.You can manage the added comments using the icons in the comment balloon or onthe Comments panel on the left:
· edit the currently selected comment by clicking the icon,· delete the currently selected comment by clicking the icon,· close the currently selected discussion by clicking the icon if the task or problem you
stated in your comment was solved, after that the discussion you opened with yourcomment gets the resolved status. To open it again, click the icon. If you want to hideresolved comments, click the File tab on the top toolbar, select the AdvancedSettings... option, uncheck the Turn on display of the resolved comments box andclick Apply. In this case the resolved comments will be highlighted only if you clickthe icon.
Adding mentionsWhen entering comments, you can use thementions feature that allows you to attractsomebody's attention to the comment and send a notification to the mentioned user via emailand Talk.To add a mention enter the "+" or "@" sign anywhere in the comment text - a list of the portalusers will open. To simplify the search process, you can start typing a name in the commentfield - the user list will change as you type. Select the necessary person from the list. If the file
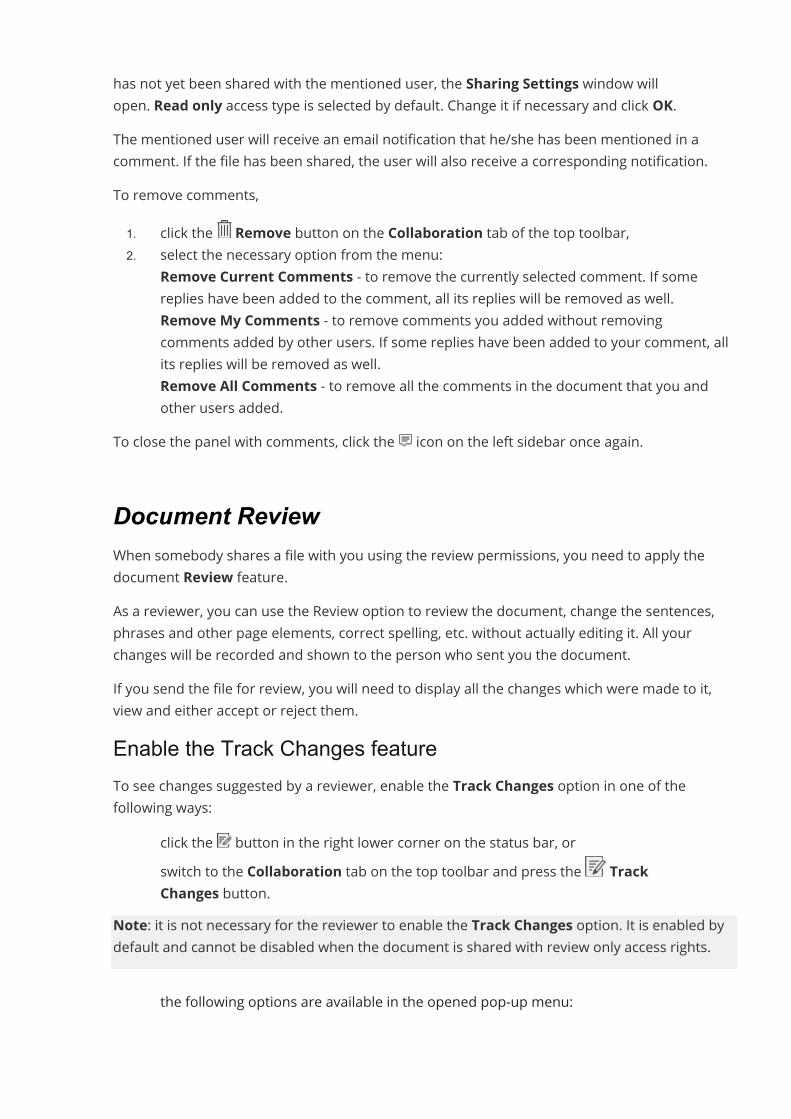
has not yet been shared with the mentioned user, the Sharing Settings window willopen. Read only access type is selected by default. Change it if necessary and click OK.The mentioned user will receive an email notification that he/she has been mentioned in acomment. If the file has been shared, the user will also receive a corresponding notification.To remove comments,1. click the Remove button on the Collaboration tab of the top toolbar,2. select the necessary option from the menu:· Remove Current Comments - to remove the currently selected comment. If some
replies have been added to the comment, all its replies will be removed as well.· Remove My Comments - to remove comments you added without removing
comments added by other users. If some replies have been added to your comment, allits replies will be removed as well.
· Remove All Comments - to remove all the comments in the document that you andother users added.
To close the panel with comments, click the icon on the left sidebar once again.
Document ReviewWhen somebody shares a file with you using the review permissions, you need to apply thedocument Review feature.As a reviewer, you can use the Review option to review the document, change the sentences,phrases and other page elements, correct spelling, etc. without actually editing it. All yourchanges will be recorded and shown to the person who sent you the document.If you send the file for review, you will need to display all the changes which were made to it,view and either accept or reject them.Enable the Track Changes featureTo see changes suggested by a reviewer, enable the Track Changes option in one of thefollowing ways:
· click the button in the right lower corner on the status bar, or· switch to the Collaboration tab on the top toolbar and press the Track
Changes button.Note: it is not necessary for the reviewer to enable the Track Changes option. It is enabled bydefault and cannot be disabled when the document is shared with review only access rights.
· the following options are available in the opened pop-up menu:
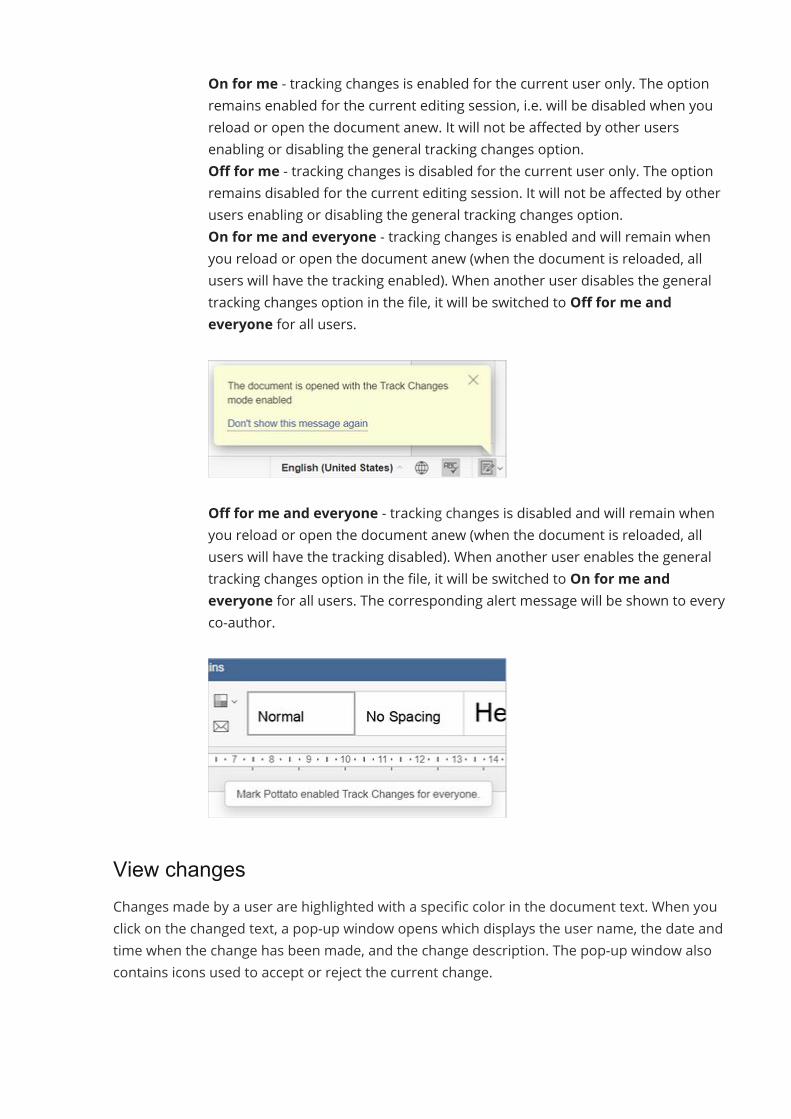
o On for me - tracking changes is enabled for the current user only. The optionremains enabled for the current editing session, i.e. will be disabled when youreload or open the document anew. It will not be affected by other usersenabling or disabling the general tracking changes option.
o Off for me - tracking changes is disabled for the current user only. The optionremains disabled for the current editing session. It will not be affected by otherusers enabling or disabling the general tracking changes option.
o On for me and everyone - tracking changes is enabled and will remain whenyou reload or open the document anew (when the document is reloaded, allusers will have the tracking enabled). When another user disables the generaltracking changes option in the file, it will be switched to Off for me andeveryone for all users.
o Off for me and everyone - tracking changes is disabled and will remain whenyou reload or open the document anew (when the document is reloaded, allusers will have the tracking disabled). When another user enables the generaltracking changes option in the file, it will be switched to On for me andeveryone for all users. The corresponding alert message will be shown to everyco-author.
View changesChanges made by a user are highlighted with a specific color in the document text. When youclick on the changed text, a pop-up window opens which displays the user name, the date andtime when the change has been made, and the change description. The pop-up window alsocontains icons used to accept or reject the current change.
If you drag and drop a piece of text to some other place in the document, the text in a newposition will be underlined with the double line. The text in the original position will be double-crossed. This will count as a single change.Click the double-crossed text in the original position and use the arrow in the change pop-upwindow to go to the new location of the text.Click the double-underlined text in the new position and use the arrow in the change pop-upwindow to go to to the original location of the text.Choose the changes display modeClick the Display Mode button on the top toolbar and select one of the available modesfrom the list:
· Markup - this option is selected by default. It allows both viewing the suggestedchanges and editing the document.
· Final - this mode is used to display all the changes as if they were accepted. This optiondoes not actually accept all changes, it only allows you to see how the document willlook like after you accept all the changes. In this mode, you cannot edit the document.
· Original - this mode is used to display all the changes as if they were rejected. Thisoption does not actually reject all changes, it only allows you to view the documentwithout changes. In this mode, you cannot edit the document.
Accept or reject changesUse the Previous and the Next buttons on the top toolbar to navigate through thechanges.To accept the currently selected change you can:
· click the Accept button on the top toolbar, or· click the downward arrow below the Accept button and select the Accept Current
Change option (in this case, the change will be accepted and you will proceed to thenext change), or
· click the Accept button of the change pop-up window.To quickly accept all the changes, click the downward arrow below the Accept button andselect the Accept All Changes option.To reject the current change you can:
· click the Reject button on the top toolbar, or· click the downward arrow below the Reject button and select the Reject Current
Change option (in this case, the change will be rejected and you will move on to the nextavailable change), or
· click the Reject button of the change pop-up window.To quickly reject all the changes, click the downward arrow below the Reject button andselect the Reject All Changes option.Note: if you review the document, the Accept and Reject options are not available for you. Youcan delete your changes using the icon within the change balloon.Compare documentsNote: this option is available in the paid online version only starting from DocumentServer v. 5.5.If you need to compare and merge two documents, you can use thedocument Compare feature. It allows displaying the differences between two documents andmerge the documents by accepting the changes one by one or all at once.After comparing and merging two documents, the result will be stored on the portal as a newversion of the original file.If you do not need to merge documents which are being compared, you can reject all thechanges so that the original document remains unchanged.Choose a document for comparisonTo compare two documents, open the original document that you need to compare and selectthe second document for comparison:1. switch to the Collaboration tab on the top toolbar and press the Compare button,2. select one of the following options to load the document:· the Document from File option will open the standard dialog window for file selection.
Browse your computer hard disk drive for the necessary .docx file and clickthe Open button.
· the Document from URL option will open the window where you can enter a link to thefile stored in a third-party web storage (for example, Nextcloud) if you havecorresponding access rights to it. The link must be a direct link for downloading thefile. When the link is specified, click the OK button.Note: The direct link allows downloading the file directly without opening it in a webbrowser. For example, to get a direct link in Nextcloud, find the necessary document inthe file list, select the Details option from the file menu. Click the Copy direct link (onlyworks for users who have access to this file/folder) icon on the right of the file nameon the details panel. To find out how to get a direct link for downloading the file in a
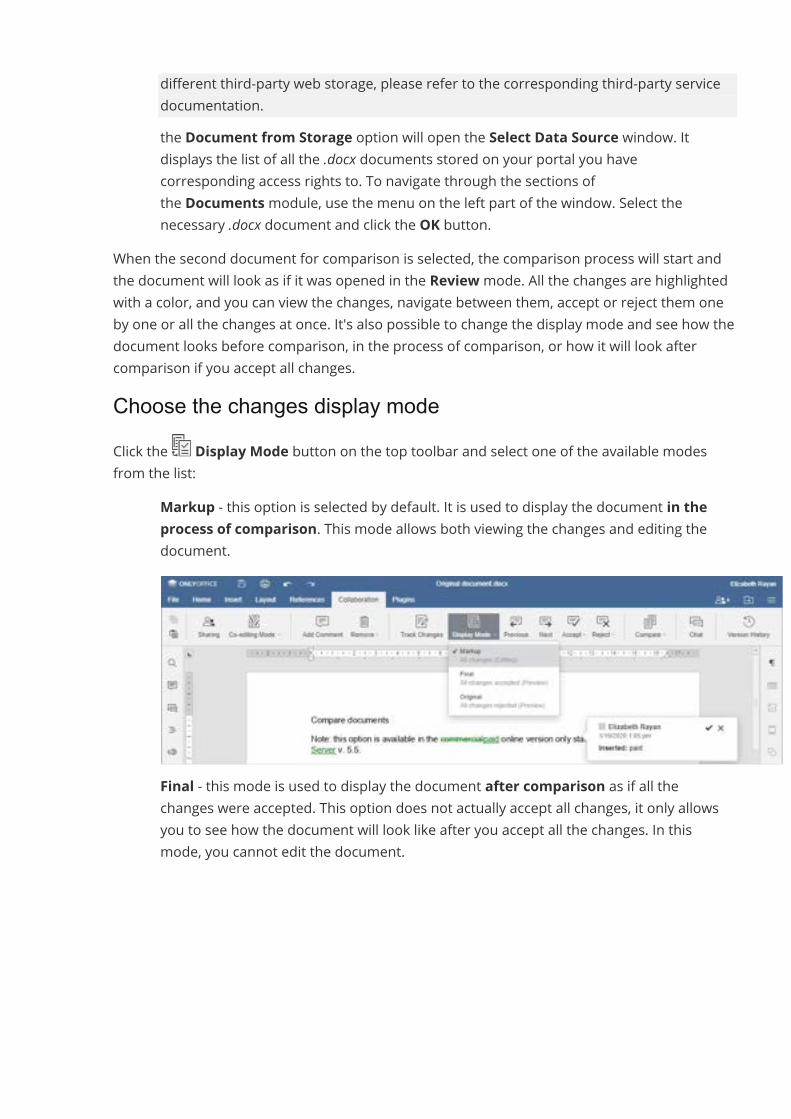
different third-party web storage, please refer to the corresponding third-party servicedocumentation.
· the Document from Storage option will open the Select Data Source window. Itdisplays the list of all the .docx documents stored on your portal you havecorresponding access rights to. To navigate through the sections ofthe Documentsmodule, use the menu on the left part of the window. Select thenecessary .docx document and click the OK button.
When the second document for comparison is selected, the comparison process will start andthe document will look as if it was opened in the Reviewmode. All the changes are highlightedwith a color, and you can view the changes, navigate between them, accept or reject them oneby one or all the changes at once. It's also possible to change the display mode and see how thedocument looks before comparison, in the process of comparison, or how it will look aftercomparison if you accept all changes.Choose the changes display modeClick the Display Mode button on the top toolbar and select one of the available modesfrom the list:
· Markup - this option is selected by default. It is used to display the document in theprocess of comparison. This mode allows both viewing the changes and editing thedocument.
· Final - this mode is used to display the document after comparison as if all thechanges were accepted. This option does not actually accept all changes, it only allowsyou to see how the document will look like after you accept all the changes. In thismode, you cannot edit the document.
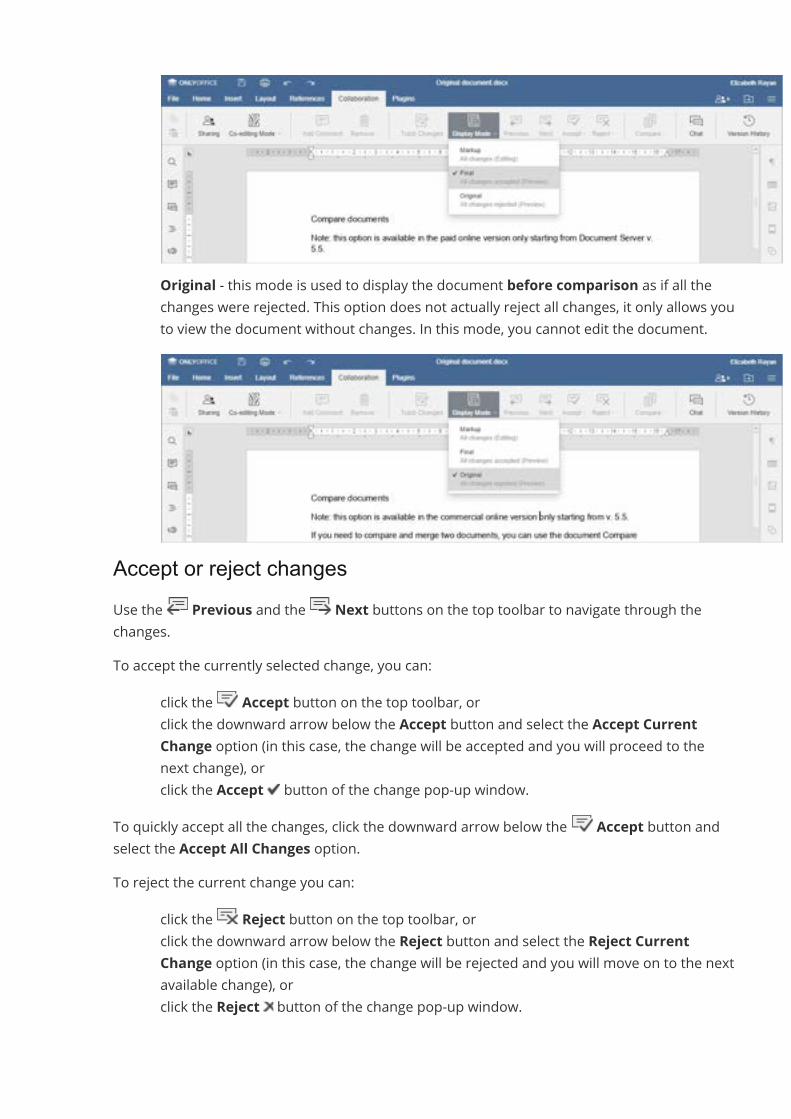
· Original - this mode is used to display the document before comparison as if all thechanges were rejected. This option does not actually reject all changes, it only allows youto view the document without changes. In this mode, you cannot edit the document.
Accept or reject changesUse the Previous and the Next buttons on the top toolbar to navigate through thechanges.To accept the currently selected change, you can:
· click the Accept button on the top toolbar, or· click the downward arrow below the Accept button and select the Accept Current
Change option (in this case, the change will be accepted and you will proceed to thenext change), or
· click the Accept button of the change pop-up window.To quickly accept all the changes, click the downward arrow below the Accept button andselect the Accept All Changes option.To reject the current change you can:
· click the Reject button on the top toolbar, or· click the downward arrow below the Reject button and select the Reject Current
Change option (in this case, the change will be rejected and you will move on to the nextavailable change), or
· click the Reject button of the change pop-up window.
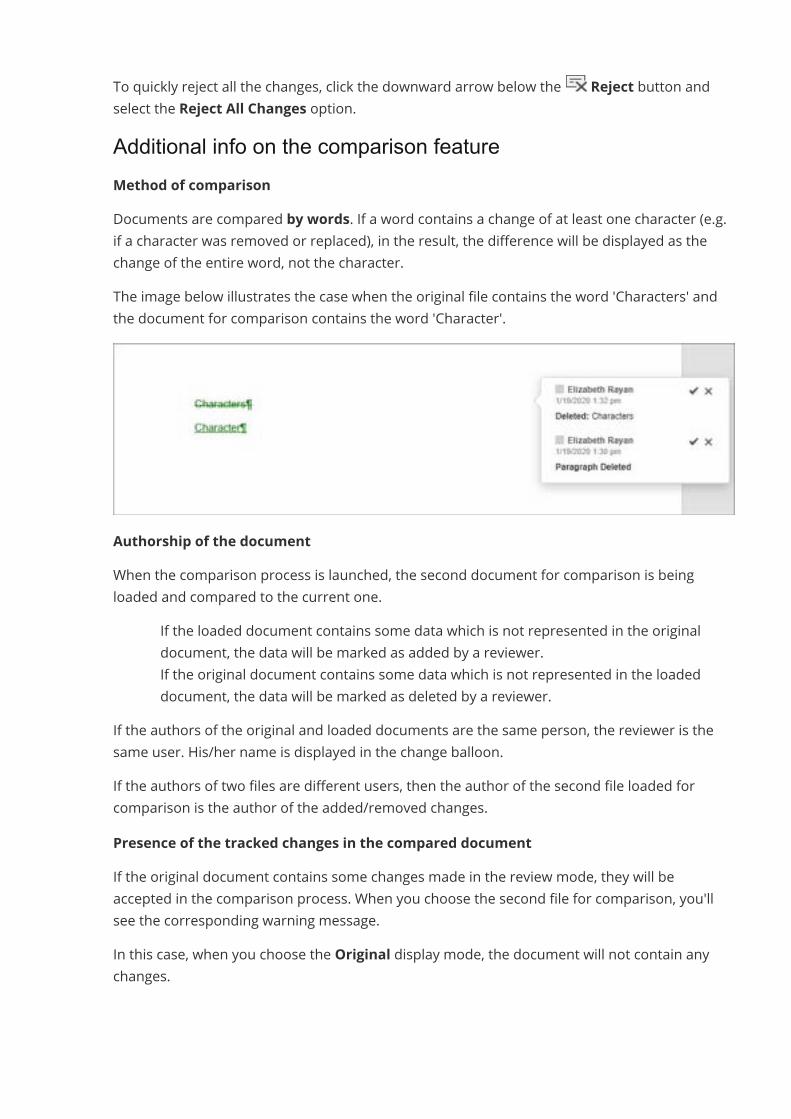
To quickly reject all the changes, click the downward arrow below the Reject button andselect the Reject All Changes option.Additional info on the comparison featureMethod of comparisonDocuments are compared by words. If a word contains a change of at least one character (e.g.if a character was removed or replaced), in the result, the difference will be displayed as thechange of the entire word, not the character.The image below illustrates the case when the original file contains the word 'Characters' andthe document for comparison contains the word 'Character'.
Authorship of the documentWhen the comparison process is launched, the second document for comparison is beingloaded and compared to the current one.
· If the loaded document contains some data which is not represented in the originaldocument, the data will be marked as added by a reviewer.
· If the original document contains some data which is not represented in the loadeddocument, the data will be marked as deleted by a reviewer.
If the authors of the original and loaded documents are the same person, the reviewer is thesame user. His/her name is displayed in the change balloon.If the authors of two files are different users, then the author of the second file loaded forcomparison is the author of the added/removed changes.Presence of the tracked changes in the compared documentIf the original document contains some changes made in the review mode, they will beaccepted in the comparison process. When you choose the second file for comparison, you'llsee the corresponding warning message.In this case, when you choose the Original display mode, the document will not contain anychanges.
PluginsEdit an imageONLYOFFICE comes with a very powerful photo editor, that allows you to adjust the image withfilters and make all kinds of annotations.1. Select an image in your document.2. Switch to the Plugins tab and choose Photo Editor.
You are now in the editing environment.· Below the image you will find the following checkboxes and slider filters:
o Grayscale, Sepia, Sepia 2, Blur, Emboss, Invert, Sharpen;o Remove White (Threshhold, Distance), Gradient
transparency, Brightness, Noise, Pixelate, Color Filter;o Tint,Multiply, Blend.
· Below the filters you will find buttons foro Undo, Redo and Resetting;o Delete, Delete all;o Crop (Custom, Square, 3:2, 4:3, 5:4, 7:5, 16:9);o Flip (Flip X, Flip Y, Reset);o Rotate (30 degree, -30 degree,Manual rotation slider);o Draw (Free, Straight, Color, Size slider);o Shape (Recrangle, Circle, Triangle, Fill, Stroke, Stroke size);o Icon (Arrows, Stars, Polygon, Location, Heart, Bubble, Custom icon, Color);o Text (Bold, Italic, Underline, Left, Center, Right, Color, Text size);o Mask.
Feel free to try all of these and remember you can always undo them.3. When finished, click the OK button.
The edited picture is now included in the document.
Edit HTMLIf you are writing a website page in a text editor and want to get it as an HTML code, usethe HTML plugin.
1. Open the Plugins tab and click Get and paste html.2. Select the necessary content.3. The HTML code of the selected paragraph will be displayed in the plugin field on the
left-side panel. You can edit the code to alter the text characteristics, e.g. fontsize or font family, etc.
4. Click Paste into the document to insert the text with its HTML code edited at thecurrent cursor position in your document.
You can also write your own HTML code (without selecting any document content) and thenpaste it to your document.
Correct typographyIf you need to correct typography in your text, use the Typograf plugin that will automaticallyplace non-breaking spaces and remove extra ones, as well as correct minor typos, insert correctquotes, replace hyphens with dashes, etc.
1. Open the Plugins tab and click Typograf.2. Click the Show advanced settings button.3. Choose the locale and the rules you want to apply to your text.4. Select the text you want to correct.5. Click the Correct text button.
Count wordsTo know the exact number of words and symbols both with and without spaces in yourdocument, as well as the number of paragraphs altogether, use the Word counter plugin.
1. Open the Plugins tab and click Count words and characters.2. Select the text.Please note that the following elements are not included in the word count:- footnote/endnote symbols,- numbers from numbered lists,- page numbers
Include a videoYou can include a video in your document. It will be shown as an image. By double-clicking theimage the video dialog opens. Here you can start the video.1. Copy the URL of the video you want to include.
(the complete address shown in the address line of your browser)2. Go to your document and place the cursor at the location where you want to include the
video.3. Switch to the Plugins tab and choose YouTube.4. Paste the URL and click OK.5. Check if it is the correct video and click the OK button below the video.
The video is now included in your document.
Insert highlighted codeYou can embed highlighted code with the already adjusted style in accordance with theprogramming language and coloring style of the program you have chosen.
1. Go to your document and place the cursor at the location where you want to include thecode.
2. Switch to the Plugins tab and choose Highlight code.3. Specify the programming Language.4. Select a Style of the code so that it appears as if it were open in this program.5. Specify if you want to replace tabs with spaces.6. Choose Background color. To do this, manually move the cursor over the palette or
insert the RBG/HSL/HEX value.7. Click OK to insert the code.
Insert referencesONLYOFFICE supportsMendeley, Zotero and EasyBib reference managers to insert referencesinto your document.MendeleyConnect ONLYOFFICE to Mendeley1. Login to yourMendeley account.2. In your document, switch to the Plugins tab and choose Mendeley, a sidebar will
open on the left side of your document.3. Click the Copy Link and Open Form button.
The browser opens a form on the Mendeley site. Complete this form and note theApplication ID for ONLYOFFICE.
4. Switch back to your document.5. Enter the Application ID and click Save.6. Click Login.7. Click Proceed.
Now ONLYOFFICE is connected to your Mendeley account.Inserting references1. Open the document and place the cursor on the spot where you want to insert the
reference(s).2. Switch to the Plugins tab and choose Mendeley.3. Enter a search text and hit Enter on your keyboard.4. Click on or more check-boxes.5. [Optional] Enter a new search text and click on one or more check-boxes.6. Choose the reference style from the Style pull-down menu.7. Click the Insert Bibliography button.
ZoteroConnect ONLYOFFICE to Zotero1. Login to your Zotero account.2. In your document, switch to the Plugins tab and choose Zotero, a sidebar will open
on the left side of your document.3. Click the Zotero API settings link.4. On the Zotero site, create a new key for Zotero, copy it and save it for later use.5. Switch to your document and paste the API key.6. Click Save.
Now ONLYOFFICE is connected to your Zotero account.Inserting references1. Open the document and place the cursor on the spot where you want to insert the
reference(s).2. Switch to the Plugins tab and choose Zotero.3. Enter a search text and hit Enter on your keyboard.4. Click on or more check-boxes.5. [Optional] Enter a new search text and click on one or more check-boxes.6. Choose the reference style from the Style pull-down menu.7. Click the Insert Bibliography button.EasyBib1. Open the document and place the cursor on the spot where you want to insert the
reference(s).2. Switch to the Plugins tab and choose EasyBib.3. Select the type of sourse you want to find.4. Enter a search text and hit Enter on your keyboard.5. Click '+' on the right side of the suitable Book/Journal article/Website. It will be added to
Bibliography.6. Select references style.7. Click the Add Bibliography to Doc to insert the references.
Translate textYou can translate your document from and to numerous languages.1. Select the text that you want to translate.2. Switch to the Plugins tab and choose Translator, the Translator appears in a
sidebar on the left.3. Click the drop-down box and choose the preferred language.
The text will be translated to the required language.
Changing the language of your result:1. Click the drop-down box and choose the preferred language.
The translation will change immediately.
Extract text from an imageWith ONLYOFFICE you can extract text from an image (.png .jpg) and insert it in your document.1. Open your document and place the cursor on the spot where you want to insert the
text.2. Switch to the Plugins tab and choose OCR from the menu.3. Click Load File and select the image.4. Choose the recognition language from the Choose Language pull-down menu.5. Click Recognize.6. Click Insert text.
You should check the inserted text for errors and layout.
Read the text out loudONLYOFFICE has a plugin that can read out the text for you.1. Select the text to be read out.2. Switch to the Plugins tab and choose Speech.
The text will now be read out.
Replace a word by a synonymIf you are using the same word multiple times, or a word is just not quite the word you arelooking for, ONLYOFFICE let you look up synonyms. It will show you the antonyms too.1. Select the word in your document.2. Switch to the Plugins tab and choose Thesaurus.3. The synonyms and antonyms will show up in the left sidebar.4. Click a word to replace the word in your document.
Upload a document to WordpressYou can write your articles in your ONLYOFFICE environment and upload them as a Wordpress-article.Connect to Wordpress1. Open your document.2. Switch to the Plugins tab and choose Wordpress.3. Log in into your Wordpress account and choose the website page you want to post your
document on.4. Enter a title for your article.5. Click Publish to publish immediatly or Save as draft to publish later from your
WordPress site or app.
Tools and settingsView document informationTo access the detailed information about the currently edited document, click the File tab ofthe top toolbar and select the Document Info... option.General InformationThe document information includes a number of the file properties which describe thedocument. Some of these properties are updated automatically, and some of them can beedited.
· Location - the folder in the Documentsmodule where the file is stored. Owner - thename of the user who has created the file. Uploaded - the date and time when the filehas been created. These properties are available in the online version only.
· Statistics - the number of pages, paragraphs, words, symbols, symbols with spaces.· Title, Subject, Comment - these properties allow yoy to simplify your documents
classification. You can specify the necessary text in the properties fields.· Last Modified - the date and time when the file was last modified.· Last Modified By - the name of the user who has made the latest change to the
document. This option is available if the document has been shared and can be editedby several users.
· Application - the application the document has been created with.· Author - the person who has created the file. You can enter the necessary name in this
field. Press Enter to add a new field that allows you to specify one more author.If you changed the file properties, click the Apply button to apply the changes.
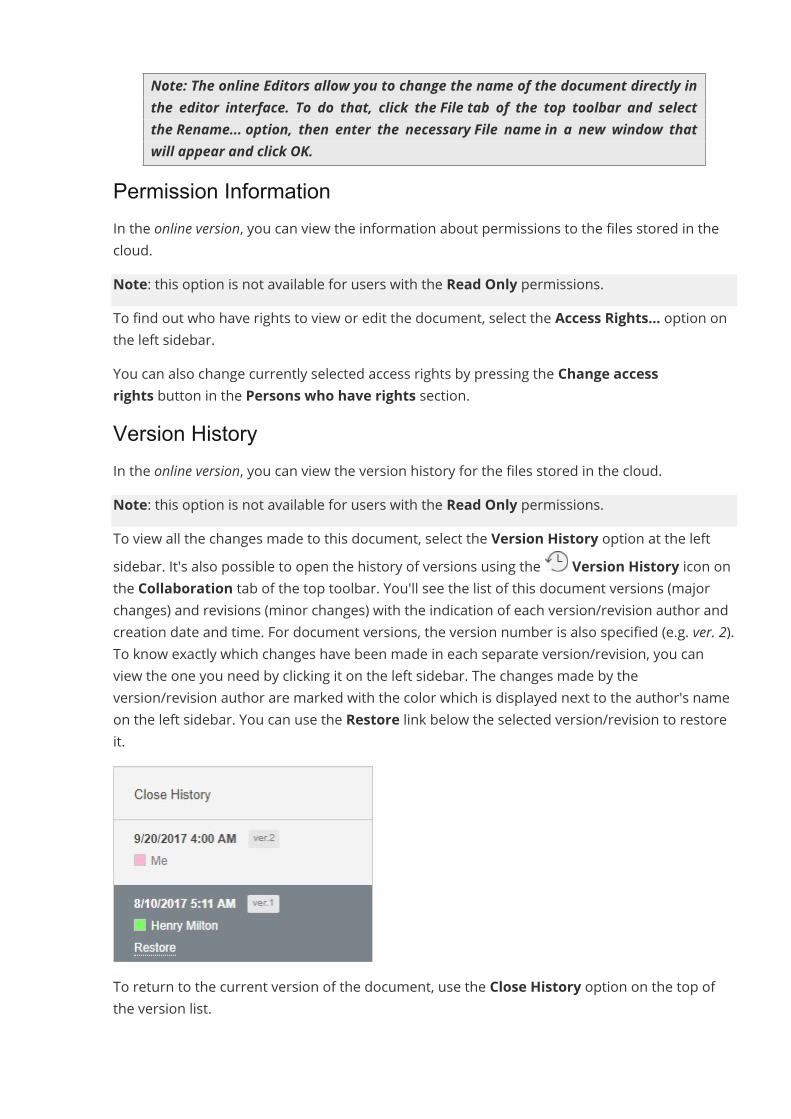
Note: The online Editors allow you to change the name of the document directly inthe editor interface. To do that, click the File tab of the top toolbar and selectthe Rename... option, then enter the necessary File name in a new window thatwill appear and click OK.
Permission InformationIn the online version, you can view the information about permissions to the files stored in thecloud.Note: this option is not available for users with the Read Only permissions.To find out who have rights to view or edit the document, select the Access Rights... option onthe left sidebar.You can also change currently selected access rights by pressing the Change accessrights button in the Persons who have rights section.Version HistoryIn the online version, you can view the version history for the files stored in the cloud.Note: this option is not available for users with the Read Only permissions.To view all the changes made to this document, select the Version History option at the leftsidebar. It's also possible to open the history of versions using the Version History icon onthe Collaboration tab of the top toolbar. You'll see the list of this document versions (majorchanges) and revisions (minor changes) with the indication of each version/revision author andcreation date and time. For document versions, the version number is also specified (e.g. ver. 2).To know exactly which changes have been made in each separate version/revision, you canview the one you need by clicking it on the left sidebar. The changes made by theversion/revision author are marked with the color which is displayed next to the author's nameon the left sidebar. You can use the Restore link below the selected version/revision to restoreit.
To return to the current version of the document, use the Close History option on the top ofthe version list.
To close the File panel and return to document editing, select the Close Menu option.
Save/download/print your documentSavingBy default, online Document Editor automatically saves your file each 2 seconds when youwork on it to prevent your data loss in case the program closes unexpectedly. If you co-edit thefile in the Fastmode, the timer requests for updates 25 times a second and saves the changesif they have been made. When the file is being co-edited in the Strictmode, changes areautomatically saved at 10-minute intervals. If necessary, you can easily select the preferred co-editing mode or disable the Autosave feature on the Advanced Settings page.To save your current document manually in the current format and location,
· press the Save icon in the left part of the editor header, or· use the Ctrl+S key combination, or· click the File tab of the top toolbar and select the Save option.
Note: in the desktop version, to prevent data from loss in case program closes unexpectedly,you can turn on the Autorecover option on the Advanced Settings page.In the desktop version, you can save the document with another name, in a new location orformat,1. click the File tab of the top toolbar,2. select the Save as... option,3. choose one of the available formats depending on your needs: DOCX, ODT, RTF, TXT,
PDF, PDFA. You can also choose the Document template (DOTX or OTT) option.DownloadingIn the online version, you can download the resulting document onto your computer hard diskdrive,1. click the File tab of the top toolbar,2. select the Download as... option,3. choose one of the available formats depending on your needs: DOCX, PDF, ODT, TXT,
DOTX, PDF/A, OTT, RTF, HTML.Saving a copyIn the online version, you can save a copy of the file on your portal,1. click the File tab of the top toolbar,2. select the Save Copy as... option,
3. choose one of the available formats depending on your needs: DOCX, PDF, ODT, TXT,DOTX, PDF/A, OTT, RTF, HTML,
4. select a location of the file on the portal and press Save.PrintingTo print out the current document,
· click the Print icon in the left part of the editor header, or· use the Ctrl+P key combination, or· click the File tab of the top toolbar and select the Print option.
It's also possible to print a selected text passage using the Print Selection option from thecontextual menu both in the Edit and Viewmodes (Right Mouse Button Click and chooseoption Print selection).In the desktop version, the file will be printed directly. In the online version, a PDF file will begenerated on the basis of the document. You can open and print it out, or save onto yourcomputer hard disk drive or removable medium to print it out later. Some browsers (e.g.Chrome and Opera) support direct printing.
Advanced Settings of the Document EditorThe Document Editor allows you to change its advanced settings. To access them, openthe File tab on the top toolbar and select the Advanced Settings... option. You can also clickthe View settings icon on the right side of the editor header and select the Advancedsettings option.The advanced settings are:
· Commenting Display is used to turn on/off the live commenting option:o Turn on display of the comments - if you disable this feature, the commented
passages will be highlighted only if you click the Comments icon on the leftsidebar.
o Turn on display of the resolved comments - this feature is disabled by defaultso that the resolved comments were hidden in the document text. You can viewsuch comments only if you click the Comments icon on the left sidebar.Enable this option if you want to display resolved comments in the documenttext.
· Spell Checking is used to turn on/off the spell checking option.· Proofing - used to automatically replace word or symbol typed in the Replace: box or
chosen from the list by a new word or symbol displayed in the By: box.· Alternate Input is used to turn on/off hieroglyphs.· Alignment Guides is used to turn on/off alignment guides that appear when you move
objects and allow you to position them on the page precisely.
· Compatibility is used to make the files compatible with older MS Word versions whensaved as DOCX.
· Autosave is used in the online version to turn on/off automatic saving of changes youmake while editing.
· Autorecover - is used in the desktop version to turn on/off the option that allowsautomatically recovering documents in case the program closes unexpectedly.
· Co-editing Mode is used to select the display of the changes made during the co-editing:
o By default the Fastmode is selected, the users who take part in the documentco-editing will see the changes in real time once they are made by other users.
o If you prefer not to see other user changes (so that they do not disturb you, orfor some other reason), select the Strictmode and all the changes will be shownonly after you click the Save icon notifying you that there are changes fromother users.
· Real-time Collaboration Changes is used to specify what changes you want to behighlighted during co-editing:
o Selecting the View None option, changes made during the current session willnot be highlighted.
o Selecting the View All option, all the changes made during the current sessionwill be highlighted.
o Selecting the View Last option, only the changes made since you last timeclicked the Save icon will be highlighted. This option is only available whenthe Strict co-editing mode is selected.
· Interface theme is used to change the color scheme of the editor’s interface.o Light color scheme incorporates standard blue, white, and light-gray colors with
less contrast in UI elements suitable for working during daytime.o Classic Light color scheme incorporates standard blue, white, and light-gray
colors.o Dark color scheme incorporates black, dark-gray, and light-gray colors suitable
for working during nighttime.· Default Zoom Value is used to set the default zoom value selecting it in the list of
available options from 50% to 200%. You can also choose the Fit to Page or Fit toWidth option.
· Font Hinting is used to select the type a font is displayed in the Document Editor:o Choose As Windows if you like the way fonts are usually displayed on Windows,
i.e. using Windows font hinting.o Choose As OS X if you like the way fonts are usually displayed on a Mac, i.e.
without any font hinting at all.o Choose Native if you want your text to be displayed with the hinting embedded
into font files.o Default cache mode - used to select the cache mode for the font characters. It’s
not recommended to switch it without any reason. It can be helpful in somecases only, for example, when an issue in the Google Chrome browser with theenabled hardware acceleration occurs.
The Document Editor has two cache modes:1. In the first cache mode, each letter is cached as a separate picture.2. In the second cache mode, a picture of a certain size is selected where letters
are placed dynamically and a mechanism of allocating/removing memory in thispicture is also implemented. If there is not enough memory, a second picture iscreated, etc.The Default cache mode setting applies two above mentioned cache modesseparately for different browsers:
o When the Default cache mode setting is enabled, Internet Explorer (v. 9, 10, 11)uses the second cache mode, other browsers use the first cache mode.
o When the Default cache mode setting is disabled, Internet Explorer (v. 9, 10, 11)uses the first cache mode, other browsers use the second cache mode.
· Unit of Measurement is used to specify what units are used on the rulers and inproperties windows for measuring elements parameters such as width, height, spacing,margins etc. You can select the Centimeter, Point, or Inch option.
· Cut, copy and paste - used to show the Paste Options button when content is pasted.Check the box to enable this feature.
· Macros Settings - used to set macros display with a notification.o Choose Disable all to disable all macros within the document;o Show notification to receive notifications about macros within the document;o Enable all to automatically run all macros within the document.
To save the changes you made, click the Apply button.
View Settings and Navigation ToolsThe Document Editor offers several tools to help you view and navigate through yourdocument: zoom, page number indicator etc.Adjust the View SettingsTo adjust default view settings and set the most convenient mode to work with the document,click the View settings icon on the right side of the editor header and select which interfaceelements you want to be hidden or shown. You can select the following options from the Viewsettings drop-down list:
· Hide Toolbar - hides the top toolbar that contains commands while tabs remain visible.When this option is enabled, you can click any tab to display the toolbar. The toolbar isdisplayed until you click anywhere outside it.To disable this mode, click the View settings icon and click the Hide Toolbar optiononce again. The top toolbar will be displayed all the time.
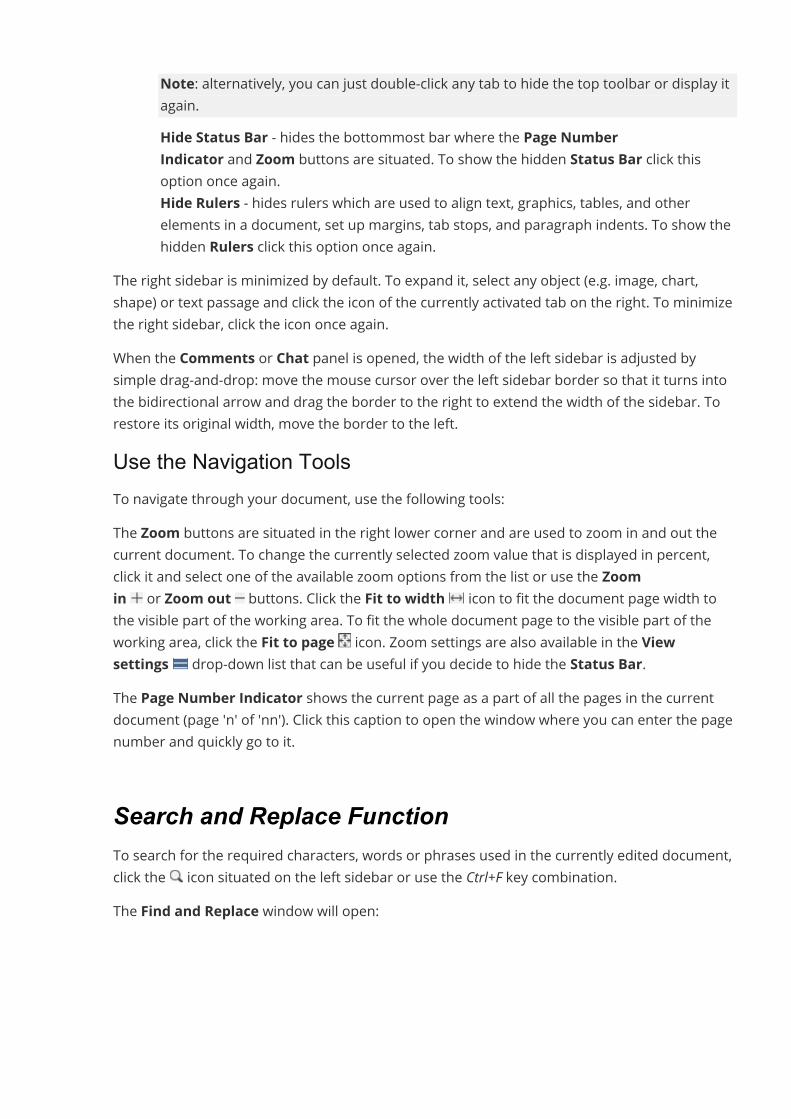
Note: alternatively, you can just double-click any tab to hide the top toolbar or display itagain.
· Hide Status Bar - hides the bottommost bar where the Page NumberIndicator and Zoom buttons are situated. To show the hidden Status Bar click thisoption once again.
· Hide Rulers - hides rulers which are used to align text, graphics, tables, and otherelements in a document, set up margins, tab stops, and paragraph indents. To show thehidden Rulers click this option once again.
The right sidebar is minimized by default. To expand it, select any object (e.g. image, chart,shape) or text passage and click the icon of the currently activated tab on the right. To minimizethe right sidebar, click the icon once again.When the Comments or Chat panel is opened, the width of the left sidebar is adjusted bysimple drag-and-drop: move the mouse cursor over the left sidebar border so that it turns intothe bidirectional arrow and drag the border to the right to extend the width of the sidebar. Torestore its original width, move the border to the left.Use the Navigation ToolsTo navigate through your document, use the following tools:The Zoom buttons are situated in the right lower corner and are used to zoom in and out thecurrent document. To change the currently selected zoom value that is displayed in percent,click it and select one of the available zoom options from the list or use the Zoomin or Zoom out buttons. Click the Fit to width icon to fit the document page width tothe visible part of the working area. To fit the whole document page to the visible part of theworking area, click the Fit to page icon. Zoom settings are also available in the Viewsettings drop-down list that can be useful if you decide to hide the Status Bar.The Page Number Indicator shows the current page as a part of all the pages in the currentdocument (page 'n' of 'nn'). Click this caption to open the window where you can enter the pagenumber and quickly go to it.
Search and Replace FunctionTo search for the required characters, words or phrases used in the currently edited document,click the icon situated on the left sidebar or use the Ctrl+F key combination.The Find and Replace window will open:
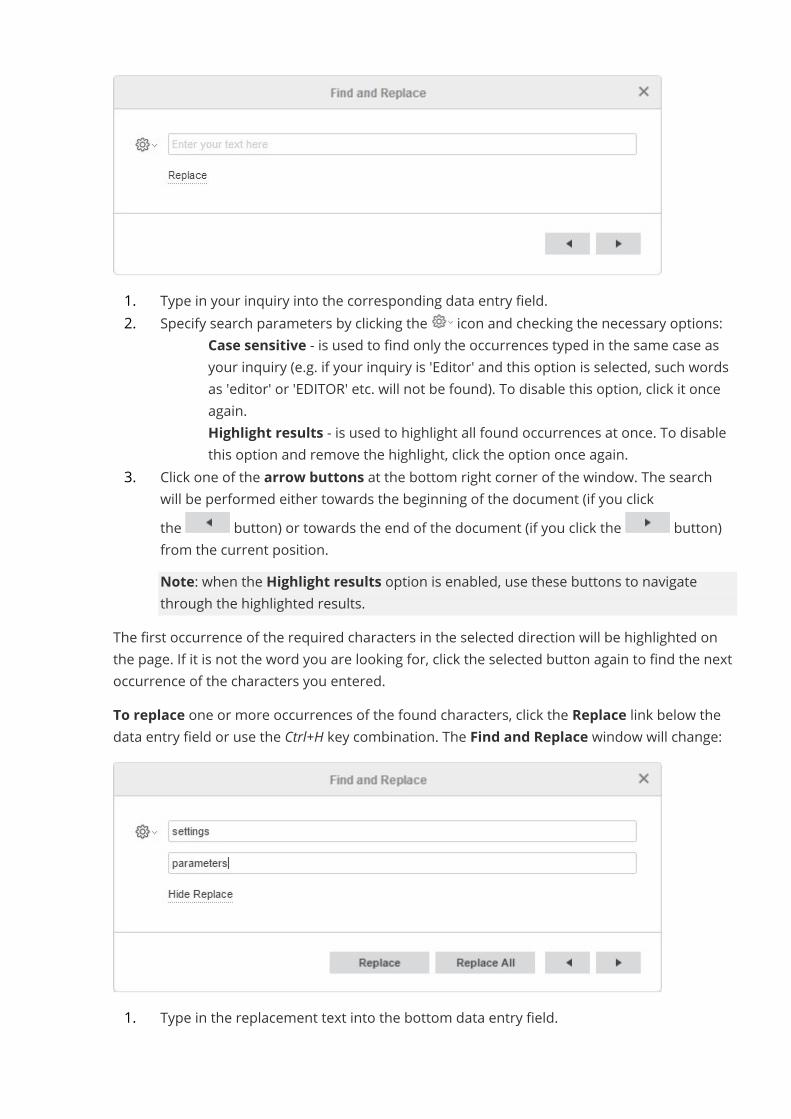
1. Type in your inquiry into the corresponding data entry field.2. Specify search parameters by clicking the icon and checking the necessary options:
· Case sensitive - is used to find only the occurrences typed in the same case asyour inquiry (e.g. if your inquiry is 'Editor' and this option is selected, such wordsas 'editor' or 'EDITOR' etc. will not be found). To disable this option, click it onceagain.
· Highlight results - is used to highlight all found occurrences at once. To disablethis option and remove the highlight, click the option once again.
3. Click one of the arrow buttons at the bottom right corner of the window. The searchwill be performed either towards the beginning of the document (if you clickthe button) or towards the end of the document (if you click the button)from the current position.Note: when the Highlight results option is enabled, use these buttons to navigatethrough the highlighted results.
The first occurrence of the required characters in the selected direction will be highlighted onthe page. If it is not the word you are looking for, click the selected button again to find the nextoccurrence of the characters you entered.To replace one or more occurrences of the found characters, click the Replace link below thedata entry field or use the Ctrl+H key combination. The Find and Replace window will change:
1. Type in the replacement text into the bottom data entry field.
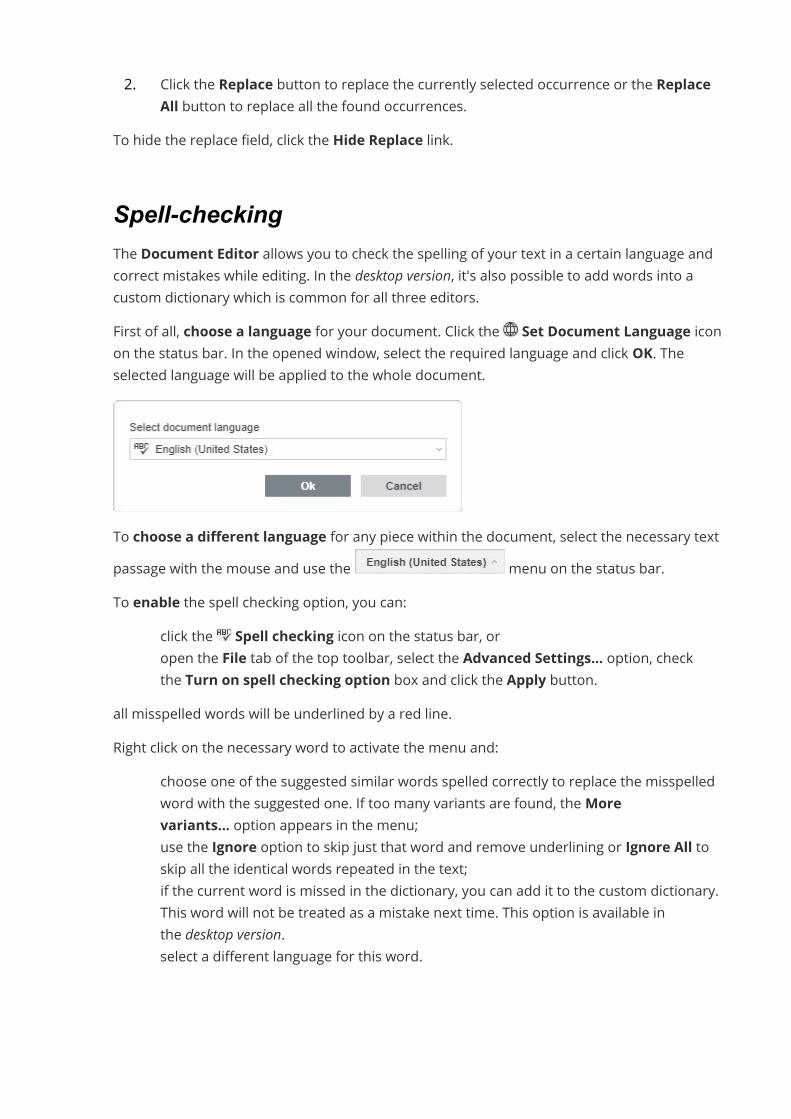
2. Click the Replace button to replace the currently selected occurrence or the ReplaceAll button to replace all the found occurrences.
To hide the replace field, click the Hide Replace link.
Spell-checkingThe Document Editor allows you to check the spelling of your text in a certain language andcorrect mistakes while editing. In the desktop version, it's also possible to add words into acustom dictionary which is common for all three editors.First of all, choose a language for your document. Click the Set Document Language iconon the status bar. In the opened window, select the required language and click OK. Theselected language will be applied to the whole document.
To choose a different language for any piece within the document, select the necessary textpassage with the mouse and use the menu on the status bar.To enable the spell checking option, you can:
· click the Spell checking icon on the status bar, or· open the File tab of the top toolbar, select the Advanced Settings... option, check
the Turn on spell checking option box and click the Apply button.all misspelled words will be underlined by a red line.Right click on the necessary word to activate the menu and:
· choose one of the suggested similar words spelled correctly to replace the misspelledword with the suggested one. If too many variants are found, theMorevariants... option appears in the menu;
· use the Ignore option to skip just that word and remove underlining or Ignore All toskip all the identical words repeated in the text;
· if the current word is missed in the dictionary, you can add it to the custom dictionary.This word will not be treated as a mistake next time. This option is available inthe desktop version.
· select a different language for this word.
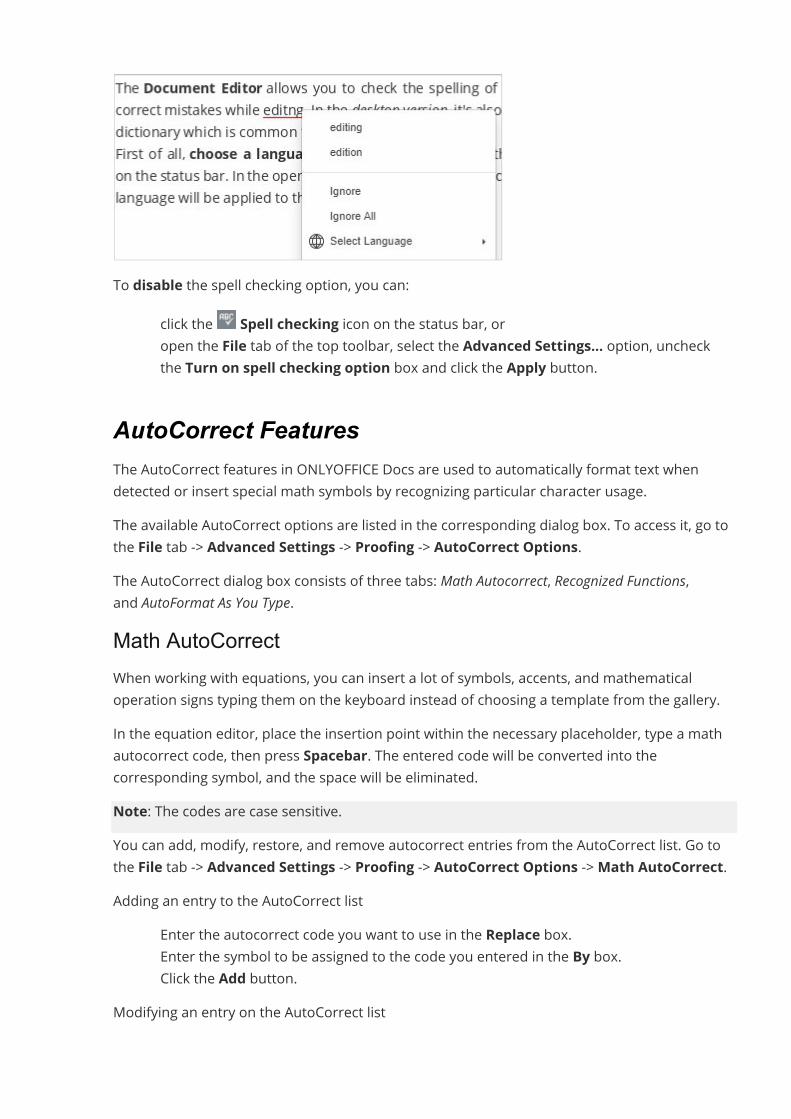
To disable the spell checking option, you can:· click the Spell checking icon on the status bar, or· open the File tab of the top toolbar, select the Advanced Settings... option, uncheck
the Turn on spell checking option box and click the Apply button.
AutoCorrect FeaturesThe AutoCorrect features in ONLYOFFICE Docs are used to automatically format text whendetected or insert special math symbols by recognizing particular character usage.The available AutoCorrect options are listed in the corresponding dialog box. To access it, go tothe File tab -> Advanced Settings -> Proofing -> AutoCorrect Options.The AutoCorrect dialog box consists of three tabs: Math Autocorrect, Recognized Functions,and AutoFormat As You Type.Math AutoCorrectWhen working with equations, you can insert a lot of symbols, accents, and mathematicaloperation signs typing them on the keyboard instead of choosing a template from the gallery.In the equation editor, place the insertion point within the necessary placeholder, type a mathautocorrect code, then press Spacebar. The entered code will be converted into thecorresponding symbol, and the space will be eliminated.Note: The codes are case sensitive.You can add, modify, restore, and remove autocorrect entries from the AutoCorrect list. Go tothe File tab -> Advanced Settings -> Proofing -> AutoCorrect Options ->Math AutoCorrect.Adding an entry to the AutoCorrect list
· Enter the autocorrect code you want to use in the Replace box.· Enter the symbol to be assigned to the code you entered in the By box.· Click the Add button.
Modifying an entry on the AutoCorrect list
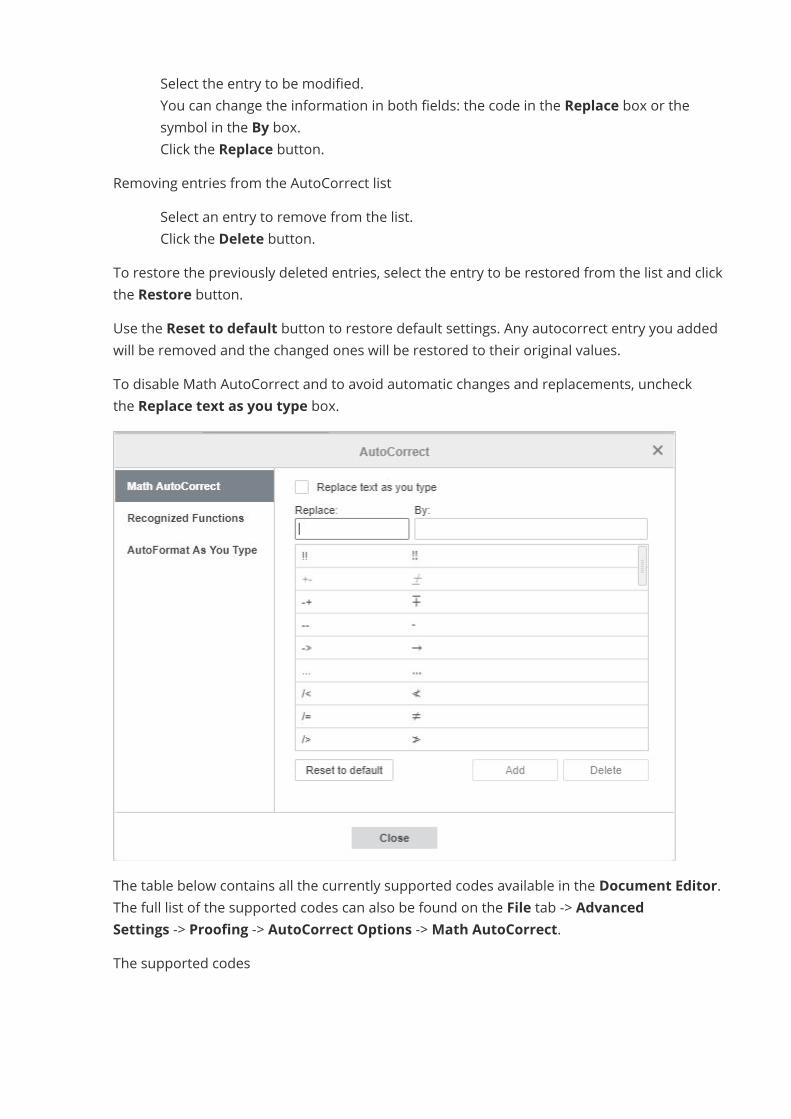
· Select the entry to be modified.· You can change the information in both fields: the code in the Replace box or the
symbol in the By box.· Click the Replace button.
Removing entries from the AutoCorrect list· Select an entry to remove from the list.· Click the Delete button.
To restore the previously deleted entries, select the entry to be restored from the list and clickthe Restore button.Use the Reset to default button to restore default settings. Any autocorrect entry you addedwill be removed and the changed ones will be restored to their original values.To disable Math AutoCorrect and to avoid automatic changes and replacements, uncheckthe Replace text as you type box.
The table below contains all the currently supported codes available in the Document Editor.The full list of the supported codes can also be found on the File tab -> AdvancedSettings -> Proofing -> AutoCorrect Options ->Math AutoCorrect.The supported codes

Recognized FunctionsIn this tab, you will find the list of math expressions that will be recognized by the Equationeditor as functions and therefore will not be automatically italicized. For the list of recognizedfunctions go to the File tab -> Advanced Settings -> Proofing -> AutoCorrectOptions -> Recognized Functions.To add an entry to the list of recognized functions, enter the function in the blank field and clickthe Add button.To remove an entry from the list of recognized functions, select the function to be removed andclick the Delete button.To restore the previously deleted entries, select the entry to be restored from the list and clickthe Restore button.Use the Reset to default button to restore default settings. Any function you added will beremoved and the removed ones will be restored.
AutoFormat As You TypeBy default, the editor formats the text while you are typing according to the auto-formattingpresets, for instance, it automatically starts a bullet list or a numbered list when a list isdetected, or replaces quotation marks, or converts hyphens to dashes.

If you need to disable auto-formatting presets, uncheck the box for the unnecessary options, goto the File tab -> Advanced Settings -> Proofing -> AutoCorrect Options -> AutoFormat AsYou Type.
Helpful hintsAbout the Document EditorThe Document Editor is an online application that allows you to view through and editdocuments directly in your browser.Using the Document Editor, you can perform various editing operations like in any desktopeditor, print the edited documents keeping all the formatting details or download them ontoyour computer hard disk drive of your computer as DOCX, PDF, ODT, TXT, DOTX, PDF/A, OTT,RTF, HTML, FB2, EPUB files.To view the current software version and licensor details in the online version, click the iconon the left sidebar. To view the current software version and licensor details in the desktopversion, select the Aboutmenu item on the left sidebar of the main program window.Supported Formats of Electronic DocumentsAn electronic document is one of the most commonly used computer. Due to the highlydeveloped modern computer network, it's more convenient to distribute electronic documents
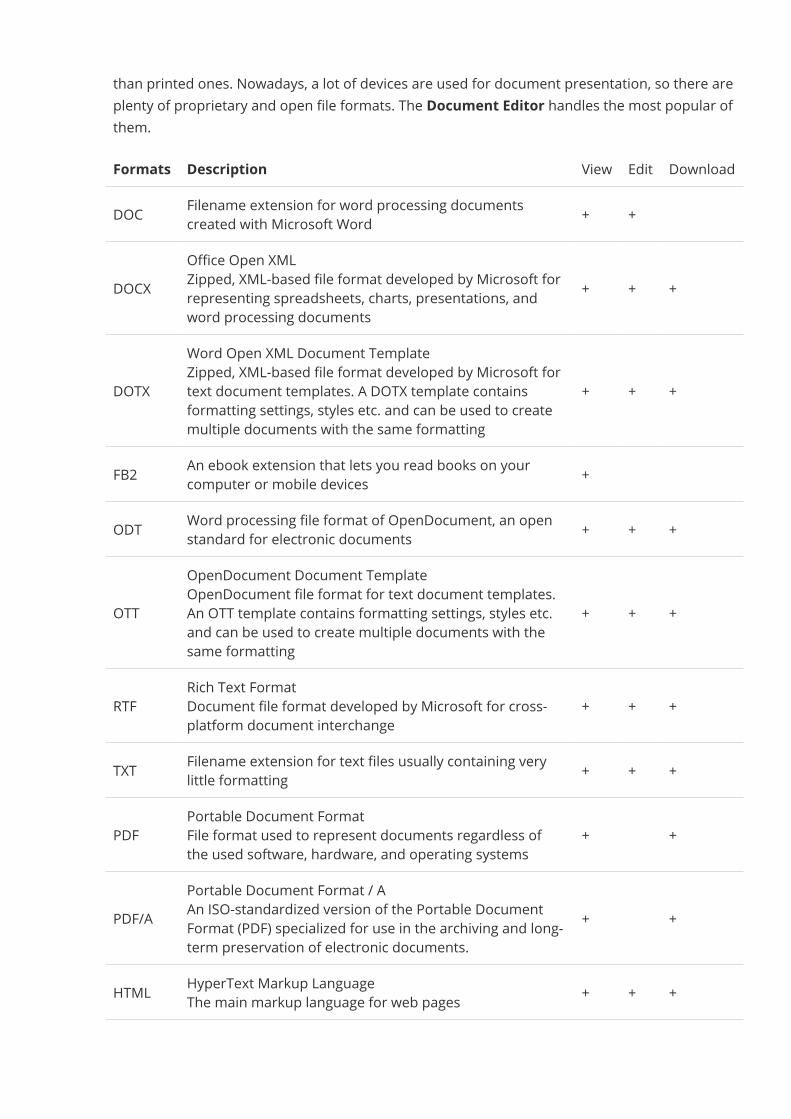
than printed ones. Nowadays, a lot of devices are used for document presentation, so there areplenty of proprietary and open file formats. The Document Editor handles the most popular ofthem.Formats Description View Edit DownloadDOC Filename extension for word processing documents
created with Microsoft Word + +
DOCXOffice Open XMLZipped, XML-based file format developed by Microsoft forrepresenting spreadsheets, charts, presentations, andword processing documents
+ + +
DOTXWord Open XML Document TemplateZipped, XML-based file format developed by Microsoft fortext document templates. A DOTX template containsformatting settings, styles etc. and can be used to createmultiple documents with the same formatting
+ + +
FB2 An ebook extension that lets you read books on yourcomputer or mobile devices +
ODT Word processing file format of OpenDocument, an openstandard for electronic documents + + +
OTTOpenDocument Document TemplateOpenDocument file format for text document templates.An OTT template contains formatting settings, styles etc.and can be used to create multiple documents with thesame formatting
+ + +
RTFRich Text FormatDocument file format developed by Microsoft for cross-platform document interchange
+ + +
TXT Filename extension for text files usually containing verylittle formatting + + +
PDFPortable Document FormatFile format used to represent documents regardless ofthe used software, hardware, and operating systems
+ +
PDF/APortable Document Format / AAn ISO-standardized version of the Portable DocumentFormat (PDF) specialized for use in the archiving and long-term preservation of electronic documents.
+ +
HTML HyperText Markup LanguageThe main markup language for web pages + + +
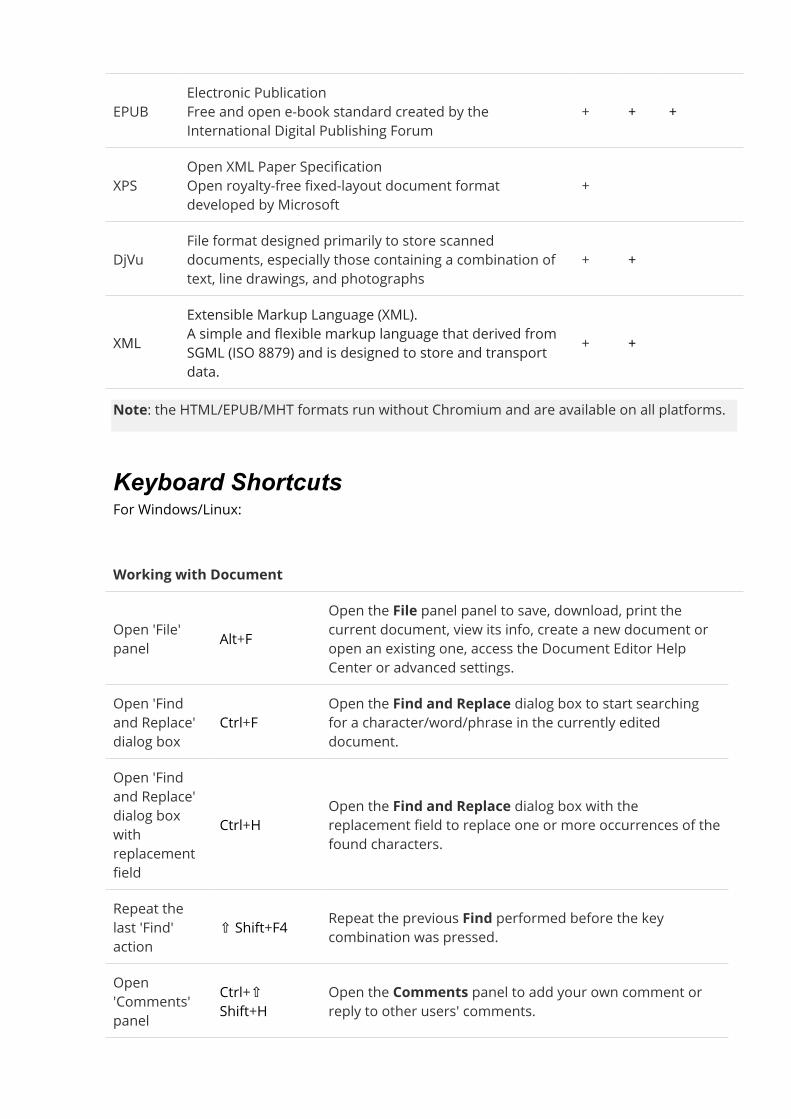
EPUBElectronic PublicationFree and open e-book standard created by theInternational Digital Publishing Forum
+ + +
XPSOpen XML Paper SpecificationOpen royalty-free fixed-layout document formatdeveloped by Microsoft
+
DjVuFile format designed primarily to store scanneddocuments, especially those containing a combination oftext, line drawings, and photographs
+ +
XMLExtensible Markup Language (XML).A simple and flexible markup language that derived fromSGML (ISO 8879) and is designed to store and transportdata.
+ +
Note: the HTML/EPUB/MHT formats run without Chromium and are available on all platforms.
Keyboard ShortcutsFor Windows/Linux:
Working with Document
Open 'File'panel Alt+F
Open the File panel panel to save, download, print thecurrent document, view its info, create a new document oropen an existing one, access the Document Editor HelpCenter or advanced settings.
Open 'Findand Replace'dialog box
Ctrl+FOpen the Find and Replace dialog box to start searchingfor a character/word/phrase in the currently editeddocument.
Open 'Findand Replace'dialog boxwithreplacementfield
Ctrl+HOpen the Find and Replace dialog box with thereplacement field to replace one or more occurrences of thefound characters.
Repeat thelast 'Find'action
⇧ Shift+F4 Repeat the previous Find performed before the keycombination was pressed.
Open'Comments'panel
Ctrl+⇧Shift+H
Open the Comments panel to add your own comment orreply to other users' comments.
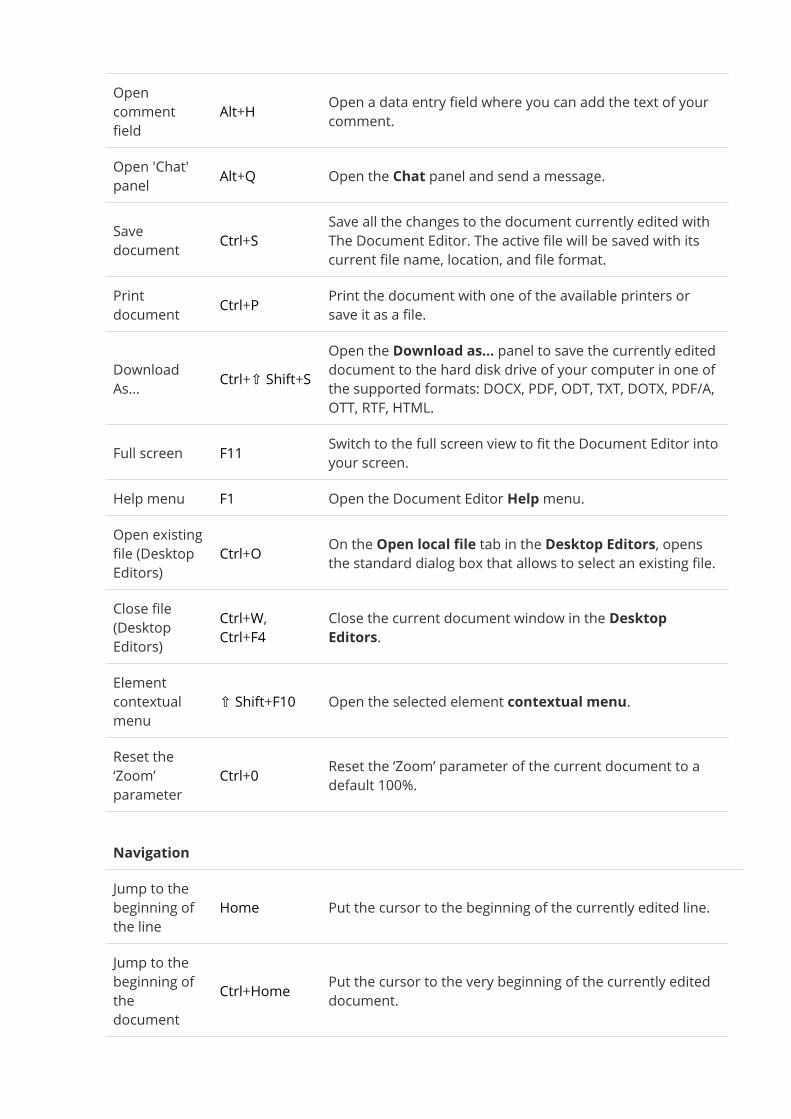
Opencommentfield
Alt+H Open a data entry field where you can add the text of yourcomment.
Open 'Chat'panel Alt+Q Open the Chat panel and send a message.
Savedocument Ctrl+S
Save all the changes to the document currently edited withThe Document Editor. The active file will be saved with itscurrent file name, location, and file format.
Printdocument Ctrl+P Print the document with one of the available printers or
save it as a file.
DownloadAs... Ctrl+⇧ Shift+S
Open the Download as... panel to save the currently editeddocument to the hard disk drive of your computer in one ofthe supported formats: DOCX, PDF, ODT, TXT, DOTX, PDF/A,OTT, RTF, HTML.
Full screen F11 Switch to the full screen view to fit the Document Editor intoyour screen.
Help menu F1 Open the Document Editor Helpmenu.Open existingfile (DesktopEditors)
Ctrl+O On the Open local file tab in the Desktop Editors, opensthe standard dialog box that allows to select an existing file.
Close file(DesktopEditors)
Ctrl+W,Ctrl+F4
Close the current document window in the DesktopEditors.Elementcontextualmenu
⇧ Shift+F10 Open the selected element contextual menu.
Reset the‘Zoom’parameter
Ctrl+0 Reset the ‘Zoom’ parameter of the current document to adefault 100%.
NavigationJump to thebeginning ofthe line
Home Put the cursor to the beginning of the currently edited line.
Jump to thebeginning ofthedocument
Ctrl+Home Put the cursor to the very beginning of the currently editeddocument.
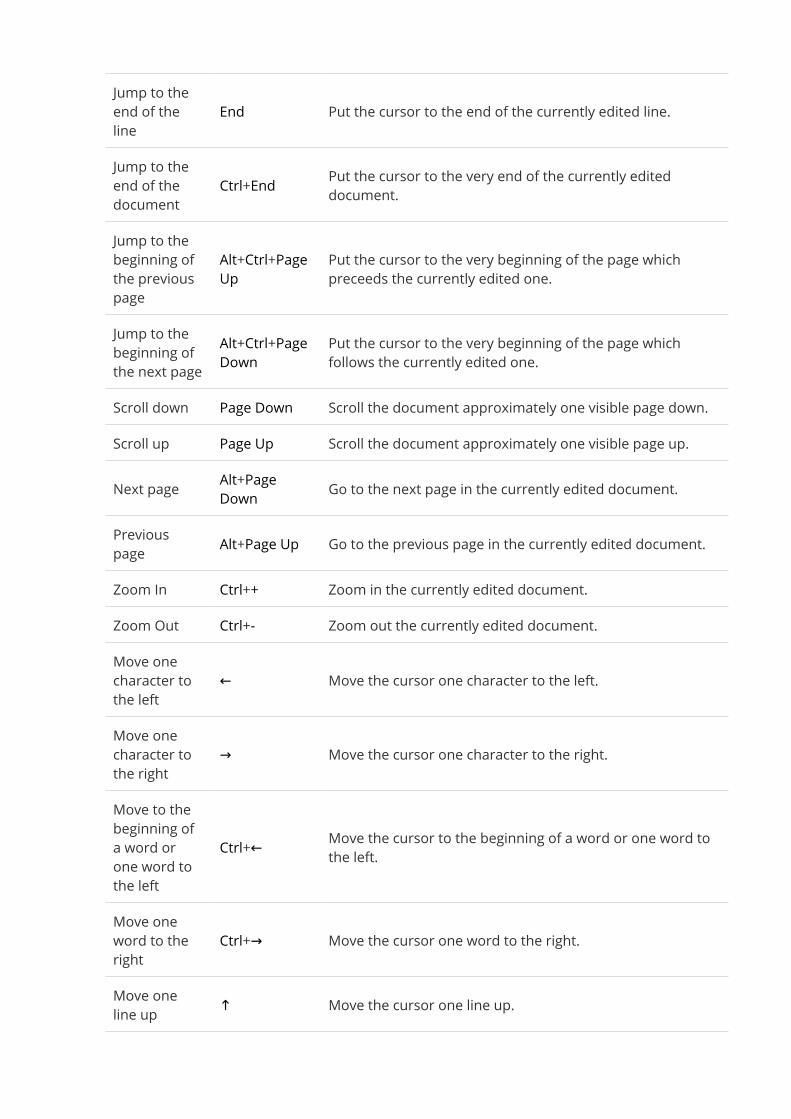
Jump to theend of theline
End Put the cursor to the end of the currently edited line.
Jump to theend of thedocument
Ctrl+End Put the cursor to the very end of the currently editeddocument.
Jump to thebeginning ofthe previouspage
Alt+Ctrl+PageUp
Put the cursor to the very beginning of the page whichpreceeds the currently edited one.
Jump to thebeginning ofthe next page
Alt+Ctrl+PageDown
Put the cursor to the very beginning of the page whichfollows the currently edited one.
Scroll down Page Down Scroll the document approximately one visible page down.Scroll up Page Up Scroll the document approximately one visible page up.Next page Alt+Page
Down Go to the next page in the currently edited document.Previouspage Alt+Page Up Go to the previous page in the currently edited document.Zoom In Ctrl++ Zoom in the currently edited document.Zoom Out Ctrl+- Zoom out the currently edited document.Move onecharacter tothe left
← Move the cursor one character to the left.
Move onecharacter tothe right
→ Move the cursor one character to the right.
Move to thebeginning ofa word orone word tothe left
Ctrl+← Move the cursor to the beginning of a word or one word tothe left.
Move oneword to theright
Ctrl+→ Move the cursor one word to the right.
Move oneline up ↑ Move the cursor one line up.
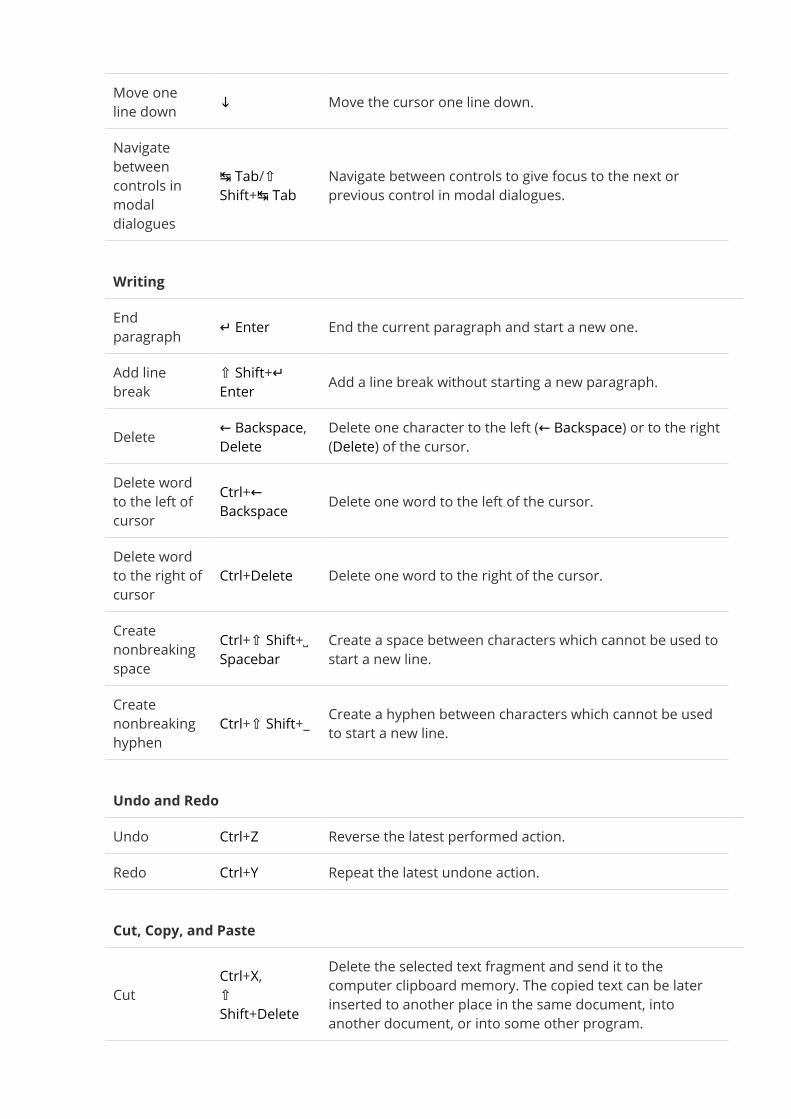
Move oneline down ↓ Move the cursor one line down.Navigatebetweencontrols inmodaldialogues
↹ Tab/⇧Shift+↹ Tab
Navigate between controls to give focus to the next orprevious control in modal dialogues.
WritingEndparagraph ↵ Enter End the current paragraph and start a new one.Add linebreak
⇧ Shift+↵Enter Add a line break without starting a new paragraph.
Delete ← Backspace,Delete
Delete one character to the left (← Backspace) or to the right(Delete) of the cursor.
Delete wordto the left ofcursor
Ctrl+←Backspace Delete one word to the left of the cursor.
Delete wordto the right ofcursor
Ctrl+Delete Delete one word to the right of the cursor.
Createnonbreakingspace
Ctrl+⇧ Shift+␣Spacebar
Create a space between characters which cannot be used tostart a new line.
Createnonbreakinghyphen
Ctrl+⇧ Shift+_ Create a hyphen between characters which cannot be usedto start a new line.
Undo and RedoUndo Ctrl+Z Reverse the latest performed action.Redo Ctrl+Y Repeat the latest undone action.
Cut, Copy, and Paste
CutCtrl+X,⇧Shift+Delete
Delete the selected text fragment and send it to thecomputer clipboard memory. The copied text can be laterinserted to another place in the same document, intoanother document, or into some other program.
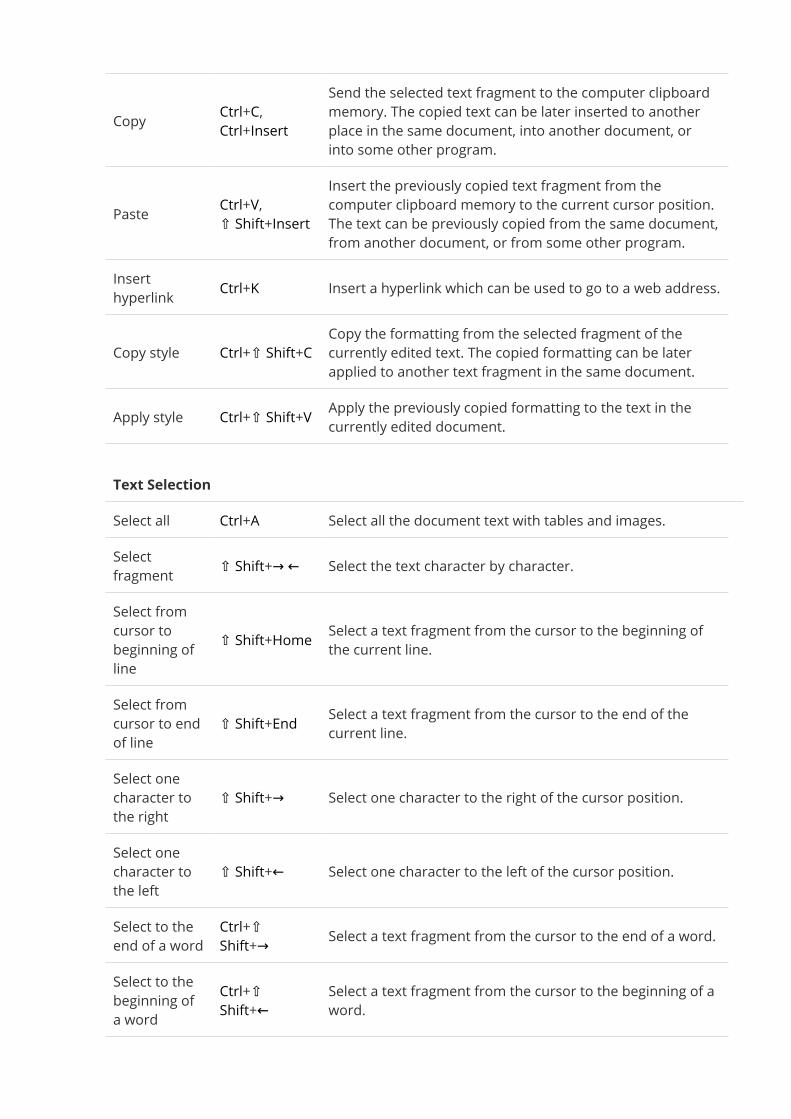
Copy Ctrl+C,Ctrl+Insert
Send the selected text fragment to the computer clipboardmemory. The copied text can be later inserted to anotherplace in the same document, into another document, orinto some other program.
Paste Ctrl+V,⇧ Shift+InsertInsert the previously copied text fragment from thecomputer clipboard memory to the current cursor position.The text can be previously copied from the same document,from another document, or from some other program.
Inserthyperlink Ctrl+K Insert a hyperlink which can be used to go to a web address.
Copy style Ctrl+⇧ Shift+CCopy the formatting from the selected fragment of thecurrently edited text. The copied formatting can be laterapplied to another text fragment in the same document.
Apply style Ctrl+⇧ Shift+V Apply the previously copied formatting to the text in thecurrently edited document.
Text SelectionSelect all Ctrl+A Select all the document text with tables and images.Selectfragment ⇧ Shift+→ ← Select the text character by character.Select fromcursor tobeginning ofline
⇧ Shift+Home Select a text fragment from the cursor to the beginning ofthe current line.
Select fromcursor to endof line
⇧ Shift+End Select a text fragment from the cursor to the end of thecurrent line.
Select onecharacter tothe right
⇧ Shift+→ Select one character to the right of the cursor position.
Select onecharacter tothe left
⇧ Shift+← Select one character to the left of the cursor position.
Select to theend of a word
Ctrl+⇧Shift+→ Select a text fragment from the cursor to the end of a word.
Select to thebeginning ofa word
Ctrl+⇧Shift+← Select a text fragment from the cursor to the beginning of a
word.
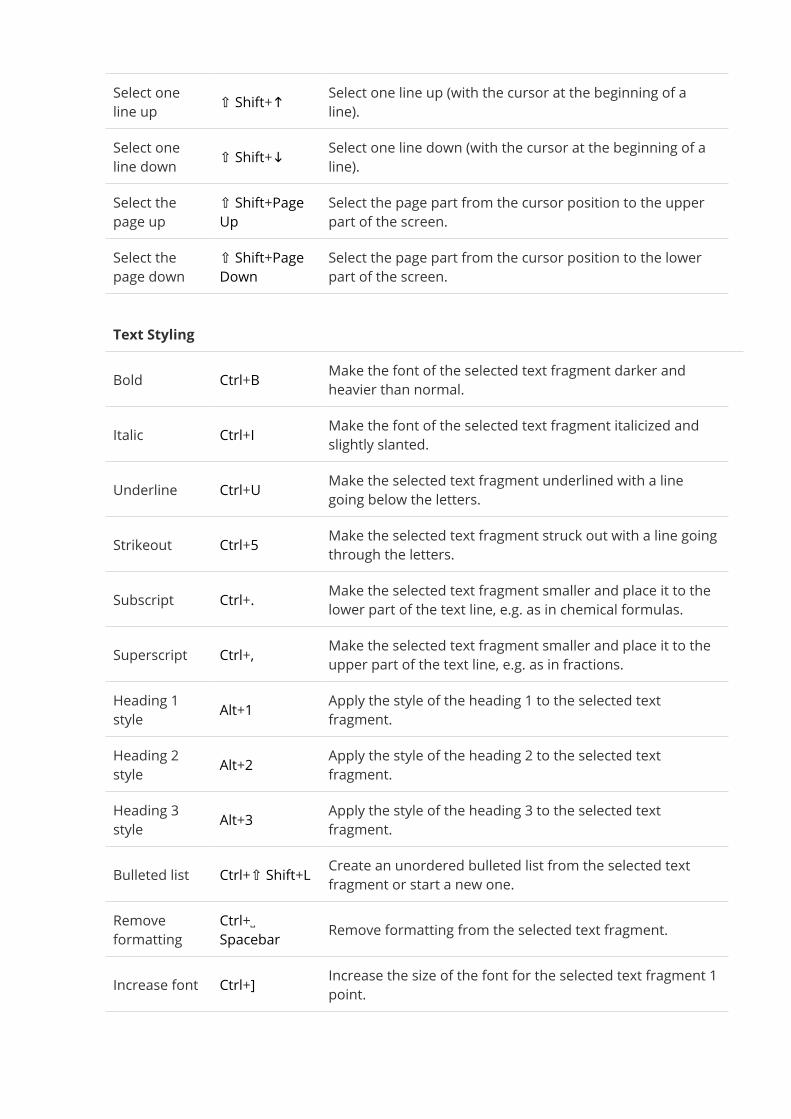
Select oneline up ⇧ Shift+↑ Select one line up (with the cursor at the beginning of a
line).Select oneline down ⇧ Shift+↓ Select one line down (with the cursor at the beginning of a
line).Select thepage up
⇧ Shift+PageUp
Select the page part from the cursor position to the upperpart of the screen.
Select thepage down
⇧ Shift+PageDown
Select the page part from the cursor position to the lowerpart of the screen.
Text StylingBold Ctrl+B Make the font of the selected text fragment darker and
heavier than normal.Italic Ctrl+I Make the font of the selected text fragment italicized and
slightly slanted.Underline Ctrl+U Make the selected text fragment underlined with a line
going below the letters.Strikeout Ctrl+5 Make the selected text fragment struck out with a line going
through the letters.Subscript Ctrl+. Make the selected text fragment smaller and place it to the
lower part of the text line, e.g. as in chemical formulas.Superscript Ctrl+, Make the selected text fragment smaller and place it to the
upper part of the text line, e.g. as in fractions.Heading 1style Alt+1 Apply the style of the heading 1 to the selected text
fragment.Heading 2style Alt+2 Apply the style of the heading 2 to the selected text
fragment.Heading 3style Alt+3 Apply the style of the heading 3 to the selected text
fragment.Bulleted list Ctrl+⇧ Shift+L Create an unordered bulleted list from the selected text
fragment or start a new one.Removeformatting
Ctrl+␣Spacebar Remove formatting from the selected text fragment.
Increase font Ctrl+] Increase the size of the font for the selected text fragment 1point.
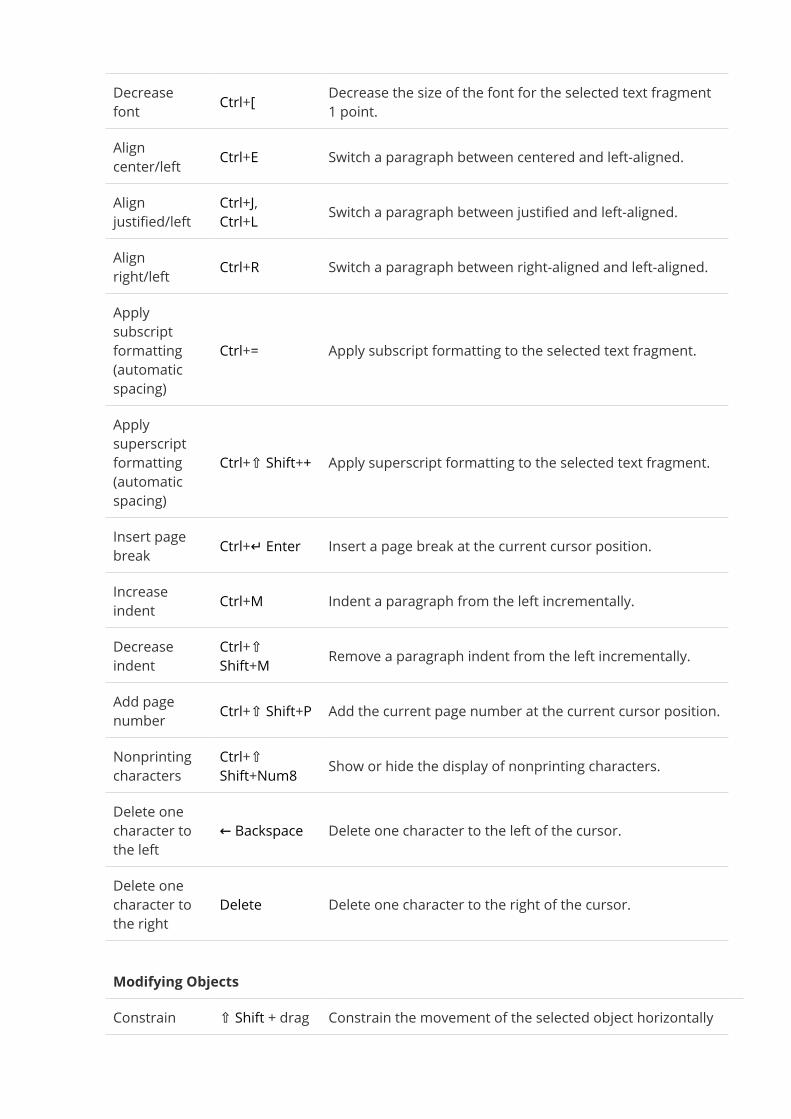
Decreasefont Ctrl+[ Decrease the size of the font for the selected text fragment
1 point.Aligncenter/left Ctrl+E Switch a paragraph between centered and left-aligned.Alignjustified/left
Ctrl+J,Ctrl+L Switch a paragraph between justified and left-aligned.
Alignright/left Ctrl+R Switch a paragraph between right-aligned and left-aligned.Applysubscriptformatting(automaticspacing)
Ctrl+= Apply subscript formatting to the selected text fragment.
Applysuperscriptformatting(automaticspacing)
Ctrl+⇧ Shift++ Apply superscript formatting to the selected text fragment.
Insert pagebreak Ctrl+↵ Enter Insert a page break at the current cursor position.Increaseindent Ctrl+M Indent a paragraph from the left incrementally.Decreaseindent
Ctrl+⇧Shift+M Remove a paragraph indent from the left incrementally.
Add pagenumber Ctrl+⇧ Shift+P Add the current page number at the current cursor position.Nonprintingcharacters
Ctrl+⇧Shift+Num8 Show or hide the display of nonprinting characters.
Delete onecharacter tothe left
← Backspace Delete one character to the left of the cursor.
Delete onecharacter tothe right
Delete Delete one character to the right of the cursor.
Modifying ObjectsConstrain ⇧ Shift + drag Constrain the movement of the selected object horizontally
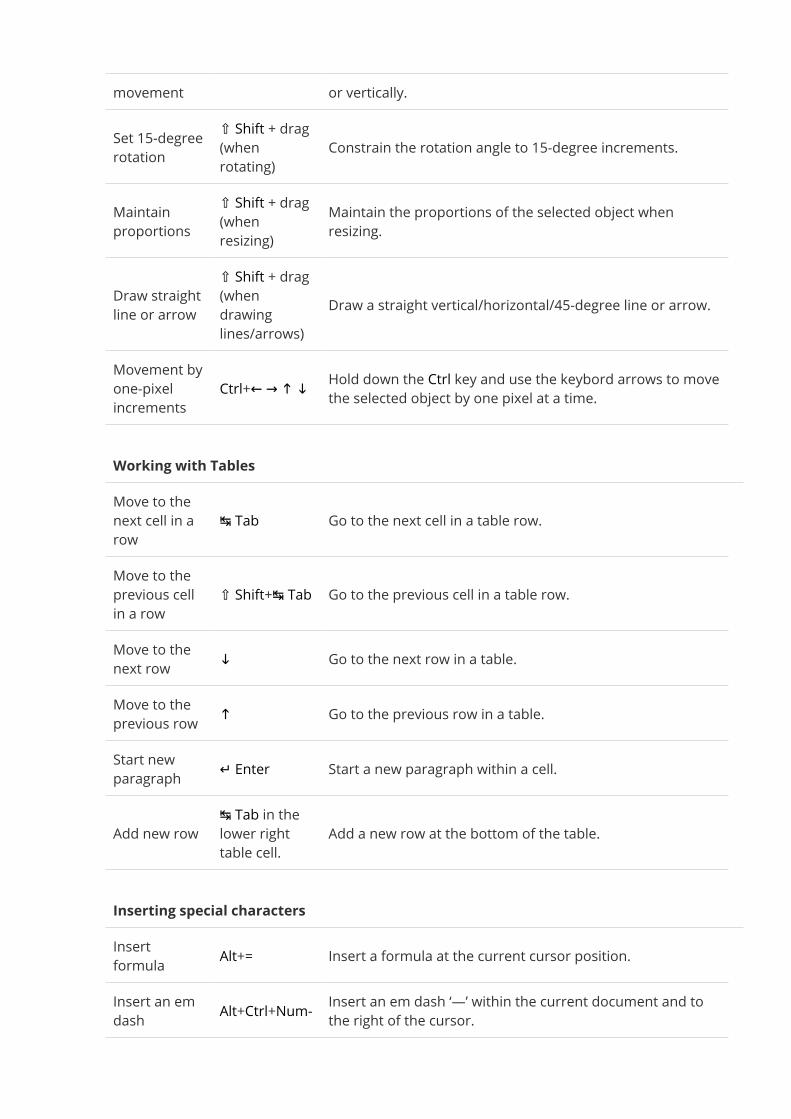
movement or vertically.Set 15-degreerotation
⇧ Shift + drag(whenrotating)
Constrain the rotation angle to 15-degree increments.
Maintainproportions
⇧ Shift + drag(whenresizing)
Maintain the proportions of the selected object whenresizing.
Draw straightline or arrow
⇧ Shift + drag(whendrawinglines/arrows)
Draw a straight vertical/horizontal/45-degree line or arrow.
Movement byone-pixelincrements
Ctrl+← → ↑ ↓ Hold down the Ctrl key and use the keybord arrows to movethe selected object by one pixel at a time.
Working with TablesMove to thenext cell in arow
↹ Tab Go to the next cell in a table row.
Move to theprevious cellin a row
⇧ Shift+↹ Tab Go to the previous cell in a table row.
Move to thenext row ↓ Go to the next row in a table.Move to theprevious row ↑ Go to the previous row in a table.Start newparagraph ↵ Enter Start a new paragraph within a cell.
Add new row↹ Tab in thelower righttable cell.
Add a new row at the bottom of the table.
Inserting special charactersInsertformula Alt+= Insert a formula at the current cursor position.Insert an emdash Alt+Ctrl+Num- Insert an em dash ‘—’ within the current document and to
the right of the cursor.
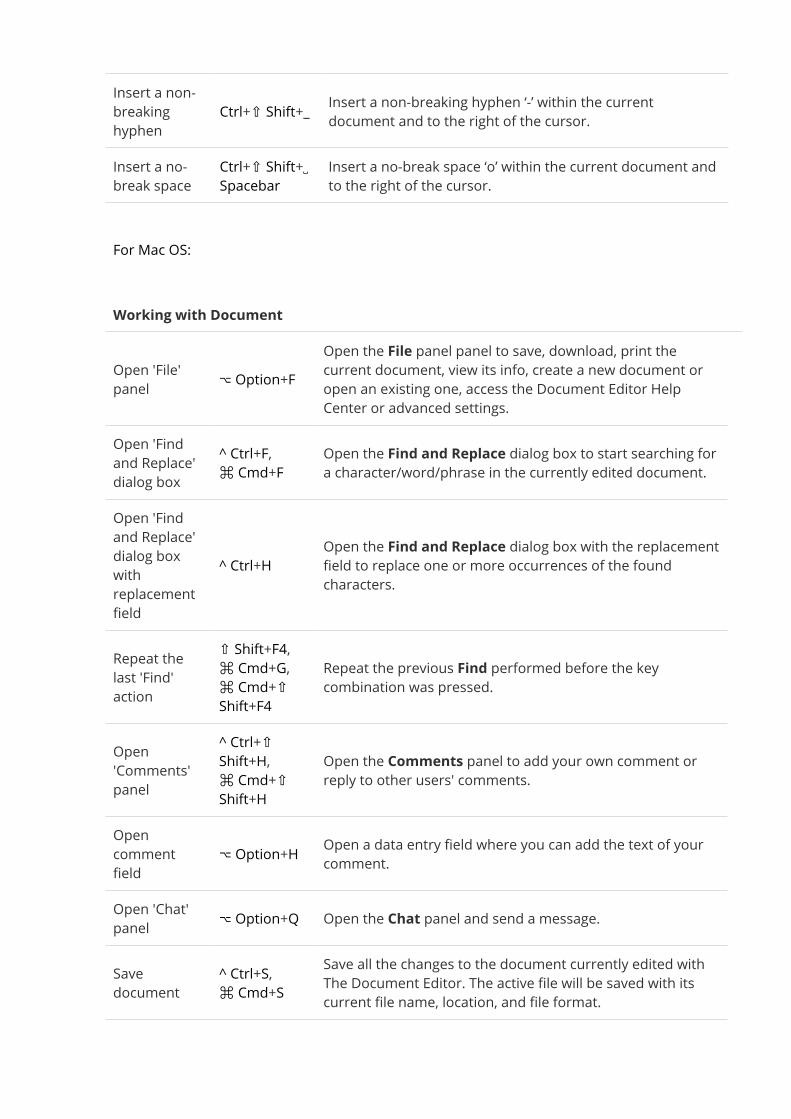
Insert a non-breakinghyphen
Ctrl+⇧ Shift+_ Insert a non-breaking hyphen ‘-’ within the currentdocument and to the right of the cursor.
Insert a no-break space
Ctrl+⇧ Shift+␣Spacebar
Insert a no-break space ‘o’ within the current document andto the right of the cursor.
For Mac OS:
Working with Document
Open 'File'panel ⌥ Option+F
Open the File panel panel to save, download, print thecurrent document, view its info, create a new document oropen an existing one, access the Document Editor HelpCenter or advanced settings.
Open 'Findand Replace'dialog box
^ Ctrl+F,⌘ Cmd+FOpen the Find and Replace dialog box to start searching fora character/word/phrase in the currently edited document.
Open 'Findand Replace'dialog boxwithreplacementfield
^ Ctrl+HOpen the Find and Replace dialog box with the replacementfield to replace one or more occurrences of the foundcharacters.
Repeat thelast 'Find'action
⇧ Shift+F4,⌘ Cmd+G,⌘ Cmd+⇧Shift+F4
Repeat the previous Find performed before the keycombination was pressed.
Open'Comments'panel
^ Ctrl+⇧Shift+H,⌘ Cmd+⇧Shift+H
Open the Comments panel to add your own comment orreply to other users' comments.
Opencommentfield
⌥ Option+H Open a data entry field where you can add the text of yourcomment.
Open 'Chat'panel ⌥ Option+Q Open the Chat panel and send a message.
Savedocument
^ Ctrl+S,⌘ Cmd+SSave all the changes to the document currently edited withThe Document Editor. The active file will be saved with itscurrent file name, location, and file format.
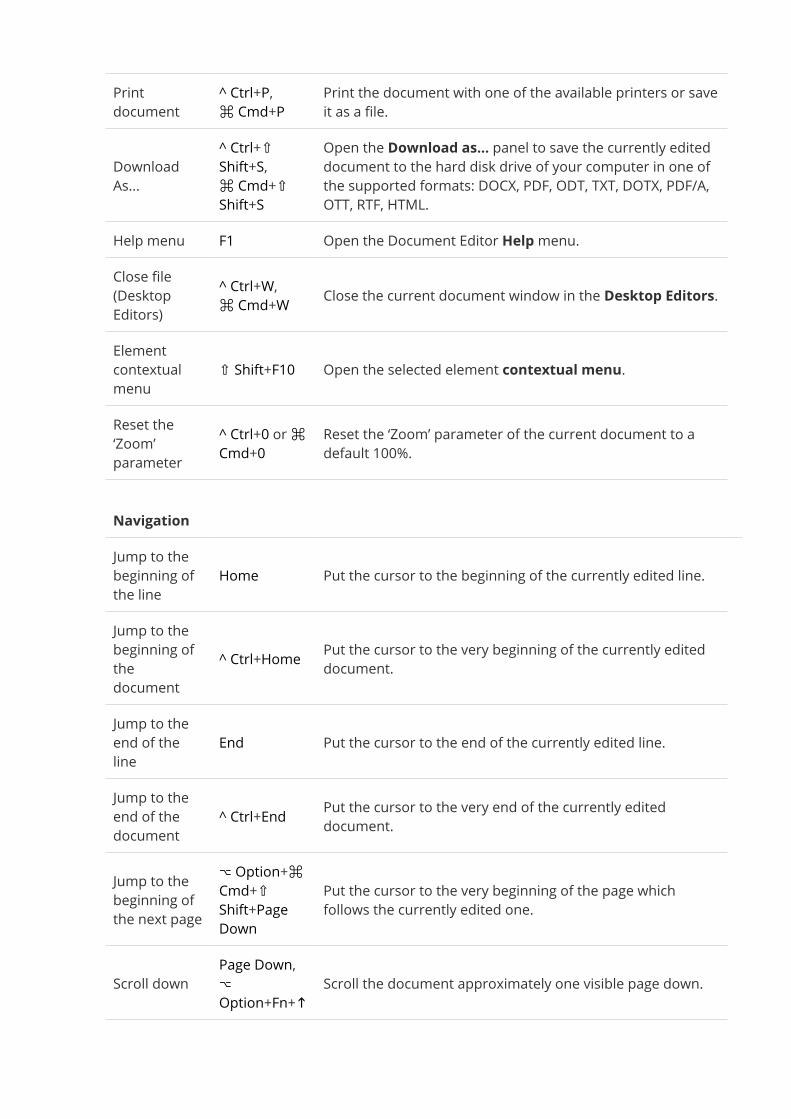
Printdocument
^ Ctrl+P,⌘ Cmd+PPrint the document with one of the available printers or saveit as a file.
DownloadAs...
^ Ctrl+⇧Shift+S,⌘ Cmd+⇧Shift+S
Open the Download as... panel to save the currently editeddocument to the hard disk drive of your computer in one ofthe supported formats: DOCX, PDF, ODT, TXT, DOTX, PDF/A,OTT, RTF, HTML.
Help menu F1 Open the Document Editor Helpmenu.Close file(DesktopEditors)
^ Ctrl+W,⌘ Cmd+W Close the current document window in the Desktop Editors.
Elementcontextualmenu
⇧ Shift+F10 Open the selected element contextual menu.
Reset the‘Zoom’parameter
^ Ctrl+0 or⌘Cmd+0
Reset the ‘Zoom’ parameter of the current document to adefault 100%.
NavigationJump to thebeginning ofthe line
Home Put the cursor to the beginning of the currently edited line.
Jump to thebeginning ofthedocument
^ Ctrl+Home Put the cursor to the very beginning of the currently editeddocument.
Jump to theend of theline
End Put the cursor to the end of the currently edited line.
Jump to theend of thedocument
^ Ctrl+End Put the cursor to the very end of the currently editeddocument.
Jump to thebeginning ofthe next page
⌥ Option+⌘Cmd+⇧Shift+PageDown
Put the cursor to the very beginning of the page whichfollows the currently edited one.
Scroll downPage Down,⌥Option+Fn+↑ Scroll the document approximately one visible page down.
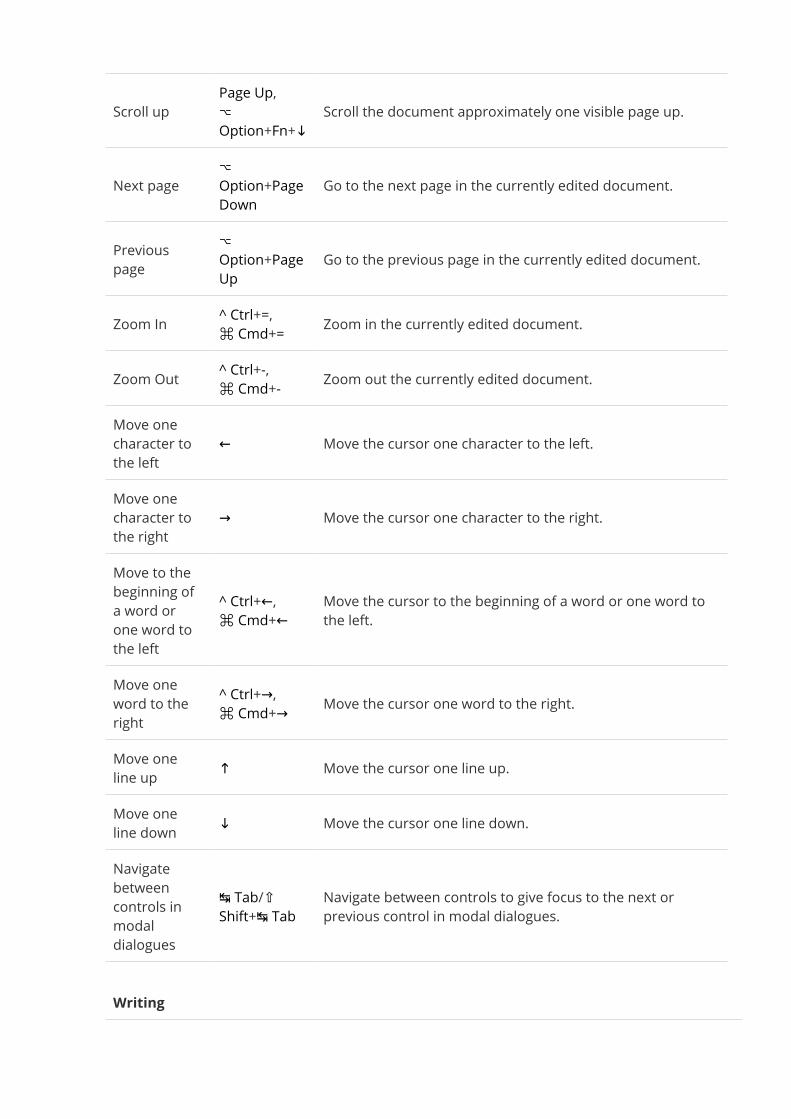
Scroll upPage Up,⌥Option+Fn+↓ Scroll the document approximately one visible page up.
Next page⌥Option+PageDown
Go to the next page in the currently edited document.
Previouspage
⌥Option+PageUp
Go to the previous page in the currently edited document.
Zoom In ^ Ctrl+=,⌘ Cmd+= Zoom in the currently edited document.
Zoom Out ^ Ctrl+-,⌘ Cmd+- Zoom out the currently edited document.Move onecharacter tothe left
← Move the cursor one character to the left.
Move onecharacter tothe right
→ Move the cursor one character to the right.
Move to thebeginning ofa word orone word tothe left
^ Ctrl+←,⌘ Cmd+← Move the cursor to the beginning of a word or one word tothe left.
Move oneword to theright
^ Ctrl+→,⌘ Cmd+→ Move the cursor one word to the right.
Move oneline up ↑ Move the cursor one line up.Move oneline down ↓ Move the cursor one line down.Navigatebetweencontrols inmodaldialogues
↹ Tab/⇧Shift+↹ Tab
Navigate between controls to give focus to the next orprevious control in modal dialogues.
Writing
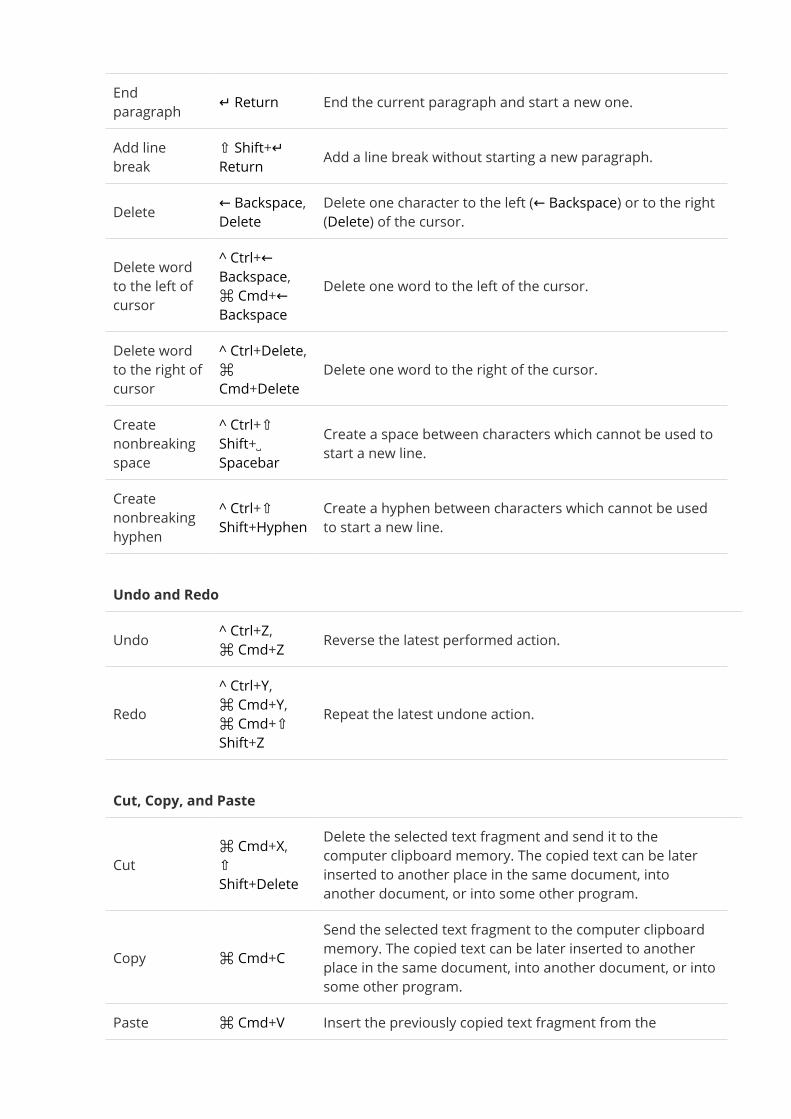
Endparagraph ↵ Return End the current paragraph and start a new one.Add linebreak
⇧ Shift+↵Return Add a line break without starting a new paragraph.
Delete ← Backspace,Delete
Delete one character to the left (← Backspace) or to the right(Delete) of the cursor.
Delete wordto the left ofcursor
^ Ctrl+←Backspace,⌘ Cmd+←Backspace
Delete one word to the left of the cursor.
Delete wordto the right ofcursor
^ Ctrl+Delete,⌘Cmd+Delete
Delete one word to the right of the cursor.
Createnonbreakingspace
^ Ctrl+⇧Shift+␣Spacebar
Create a space between characters which cannot be used tostart a new line.
Createnonbreakinghyphen
^ Ctrl+⇧Shift+Hyphen
Create a hyphen between characters which cannot be usedto start a new line.
Undo and RedoUndo ^ Ctrl+Z,⌘ Cmd+Z Reverse the latest performed action.
Redo^ Ctrl+Y,⌘ Cmd+Y,⌘ Cmd+⇧Shift+Z
Repeat the latest undone action.
Cut, Copy, and Paste
Cut⌘ Cmd+X,⇧Shift+Delete
Delete the selected text fragment and send it to thecomputer clipboard memory. The copied text can be laterinserted to another place in the same document, intoanother document, or into some other program.
Copy ⌘ Cmd+CSend the selected text fragment to the computer clipboardmemory. The copied text can be later inserted to anotherplace in the same document, into another document, or intosome other program.
Paste ⌘ Cmd+V Insert the previously copied text fragment from the

computer clipboard memory to the current cursor position.The text can be previously copied from the same document,from another document, or from some other program.
Inserthyperlink ⌘ Cmd+K Insert a hyperlink which can be used to go to a web address.
Copy style ⌘ Cmd+⇧Shift+C
Copy the formatting from the selected fragment of thecurrently edited text. The copied formatting can be laterapplied to another text fragment in the same document.
Apply style ⌘ Cmd+⇧Shift+V
Apply the previously copied formatting to the text in thecurrently edited document.
Text SelectionSelect all ⌘ Cmd+A Select all the document text with tables and images.Selectfragment ⇧ Shift+→ ← Select the text character by character.Select fromcursor tobeginning ofline
⇧Shift+Home
Select a text fragment from the cursor to the beginning ofthe current line.
Select fromcursor to endof line
⇧ Shift+End Select a text fragment from the cursor to the end of thecurrent line.
Select onecharacter tothe right
⇧ Shift+→ Select one character to the right of the cursor position.
Select onecharacter tothe left
⇧ Shift+← Select one character to the left of the cursor position.
Select oneline up ⇧ Shift+↑ Select one line up (with the cursor at the beginning of a line).Select oneline down ⇧ Shift+↓ Select one line down (with the cursor at the beginning of a
line).Select thepage up
⇧ Shift+PageUp
Select the page part from the cursor position to the upperpart of the screen.
Select thepage down
⇧ Shift+PageDown
Select the page part from the cursor position to the lowerpart of the screen.
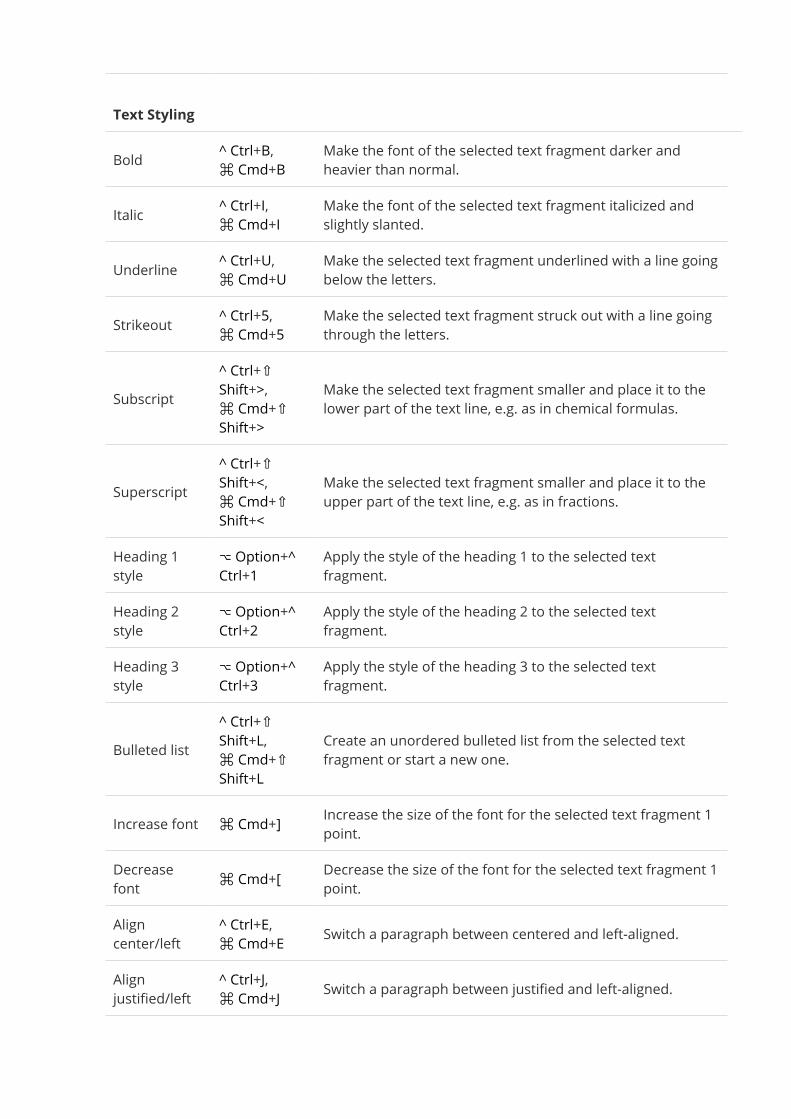
Text StylingBold ^ Ctrl+B,⌘ Cmd+B
Make the font of the selected text fragment darker andheavier than normal.
Italic ^ Ctrl+I,⌘ Cmd+IMake the font of the selected text fragment italicized andslightly slanted.
Underline ^ Ctrl+U,⌘ Cmd+UMake the selected text fragment underlined with a line goingbelow the letters.
Strikeout ^ Ctrl+5,⌘ Cmd+5Make the selected text fragment struck out with a line goingthrough the letters.
Subscript^ Ctrl+⇧Shift+>,⌘ Cmd+⇧Shift+>
Make the selected text fragment smaller and place it to thelower part of the text line, e.g. as in chemical formulas.
Superscript^ Ctrl+⇧Shift+<,⌘ Cmd+⇧Shift+<
Make the selected text fragment smaller and place it to theupper part of the text line, e.g. as in fractions.
Heading 1style
⌥ Option+^Ctrl+1
Apply the style of the heading 1 to the selected textfragment.
Heading 2style
⌥ Option+^Ctrl+2
Apply the style of the heading 2 to the selected textfragment.
Heading 3style
⌥ Option+^Ctrl+3
Apply the style of the heading 3 to the selected textfragment.
Bulleted list^ Ctrl+⇧Shift+L,⌘ Cmd+⇧Shift+L
Create an unordered bulleted list from the selected textfragment or start a new one.
Increase font ⌘ Cmd+] Increase the size of the font for the selected text fragment 1point.
Decreasefont ⌘ Cmd+[ Decrease the size of the font for the selected text fragment 1
point.Aligncenter/left
^ Ctrl+E,⌘ Cmd+E Switch a paragraph between centered and left-aligned.Alignjustified/left
^ Ctrl+J,⌘ Cmd+J Switch a paragraph between justified and left-aligned.
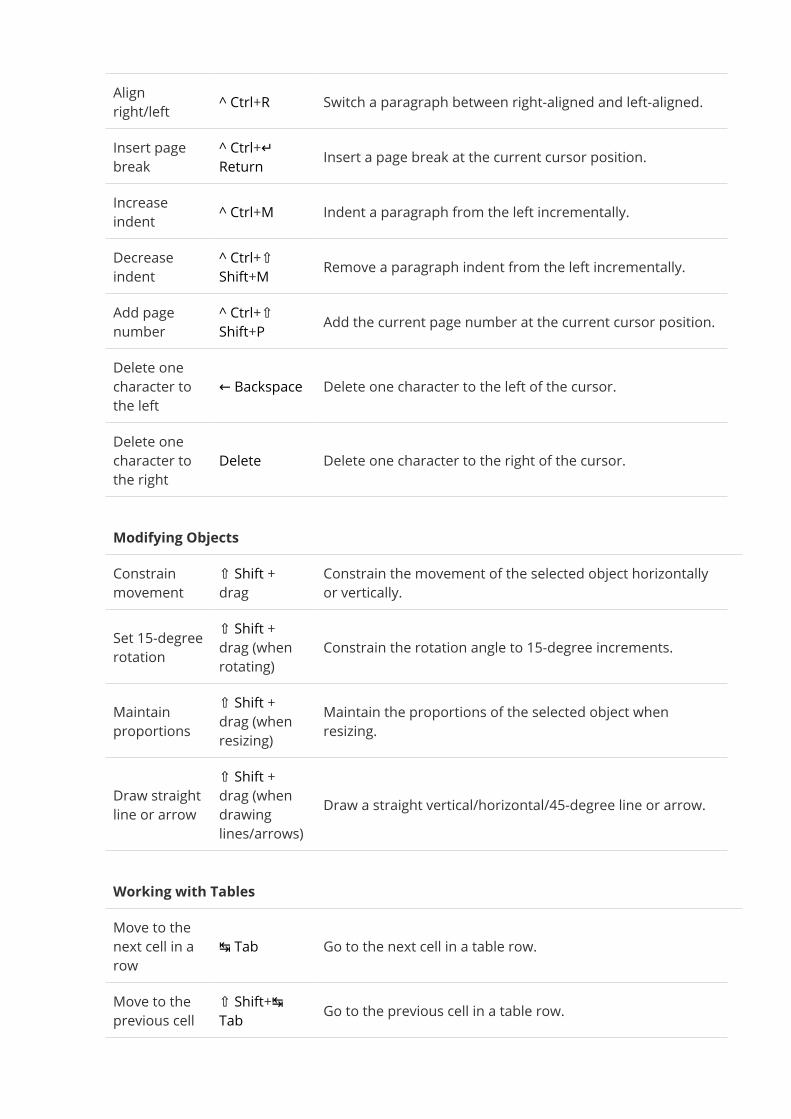
Alignright/left ^ Ctrl+R Switch a paragraph between right-aligned and left-aligned.Insert pagebreak
^ Ctrl+↵Return Insert a page break at the current cursor position.
Increaseindent ^ Ctrl+M Indent a paragraph from the left incrementally.Decreaseindent
^ Ctrl+⇧Shift+M Remove a paragraph indent from the left incrementally.
Add pagenumber
^ Ctrl+⇧Shift+P Add the current page number at the current cursor position.
Delete onecharacter tothe left
← Backspace Delete one character to the left of the cursor.
Delete onecharacter tothe right
Delete Delete one character to the right of the cursor.
Modifying ObjectsConstrainmovement
⇧ Shift +drag
Constrain the movement of the selected object horizontallyor vertically.
Set 15-degreerotation
⇧ Shift +drag (whenrotating)
Constrain the rotation angle to 15-degree increments.
Maintainproportions
⇧ Shift +drag (whenresizing)
Maintain the proportions of the selected object whenresizing.
Draw straightline or arrow
⇧ Shift +drag (whendrawinglines/arrows)
Draw a straight vertical/horizontal/45-degree line or arrow.
Working with TablesMove to thenext cell in arow
↹ Tab Go to the next cell in a table row.
Move to theprevious cell
⇧ Shift+↹Tab Go to the previous cell in a table row.
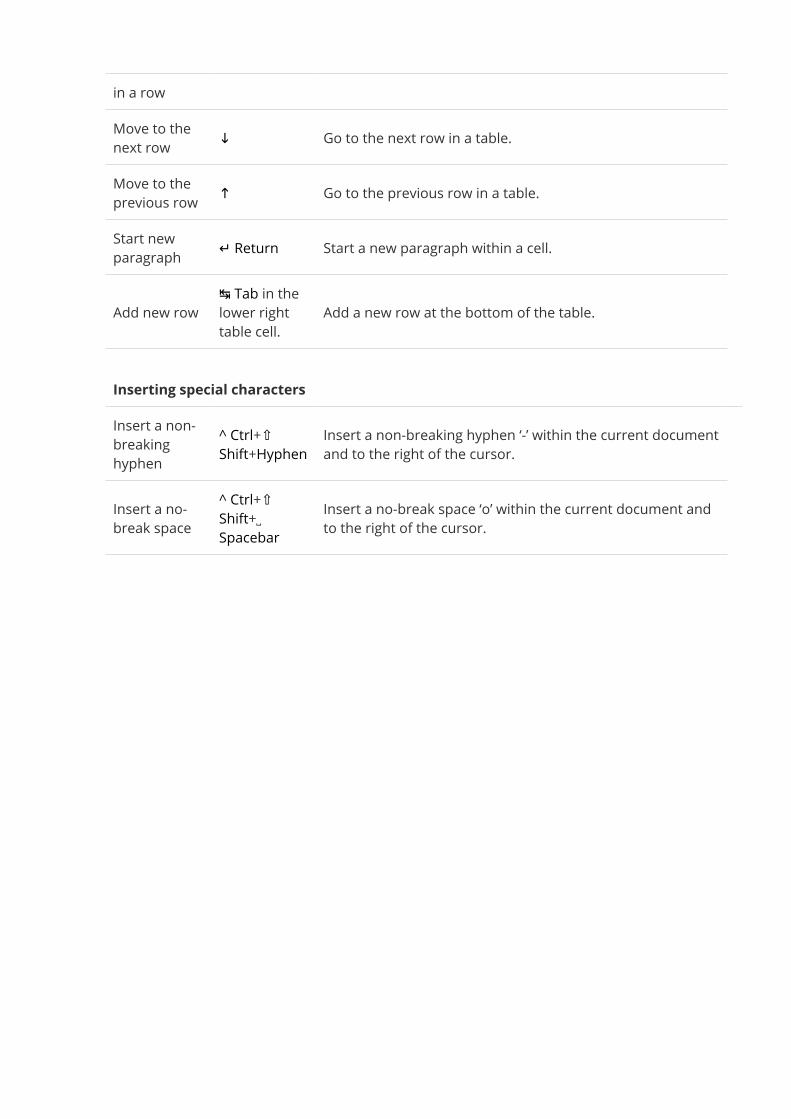
in a rowMove to thenext row ↓ Go to the next row in a table.Move to theprevious row ↑ Go to the previous row in a table.Start newparagraph ↵ Return Start a new paragraph within a cell.
Add new row↹ Tab in thelower righttable cell.
Add a new row at the bottom of the table.
Inserting special charactersInsert a non-breakinghyphen
^ Ctrl+⇧Shift+Hyphen
Insert a non-breaking hyphen ‘-’ within the current documentand to the right of the cursor.
Insert a no-break space
^ Ctrl+⇧Shift+␣Spacebar
Insert a no-break space ‘o’ within the current document andto the right of the cursor.
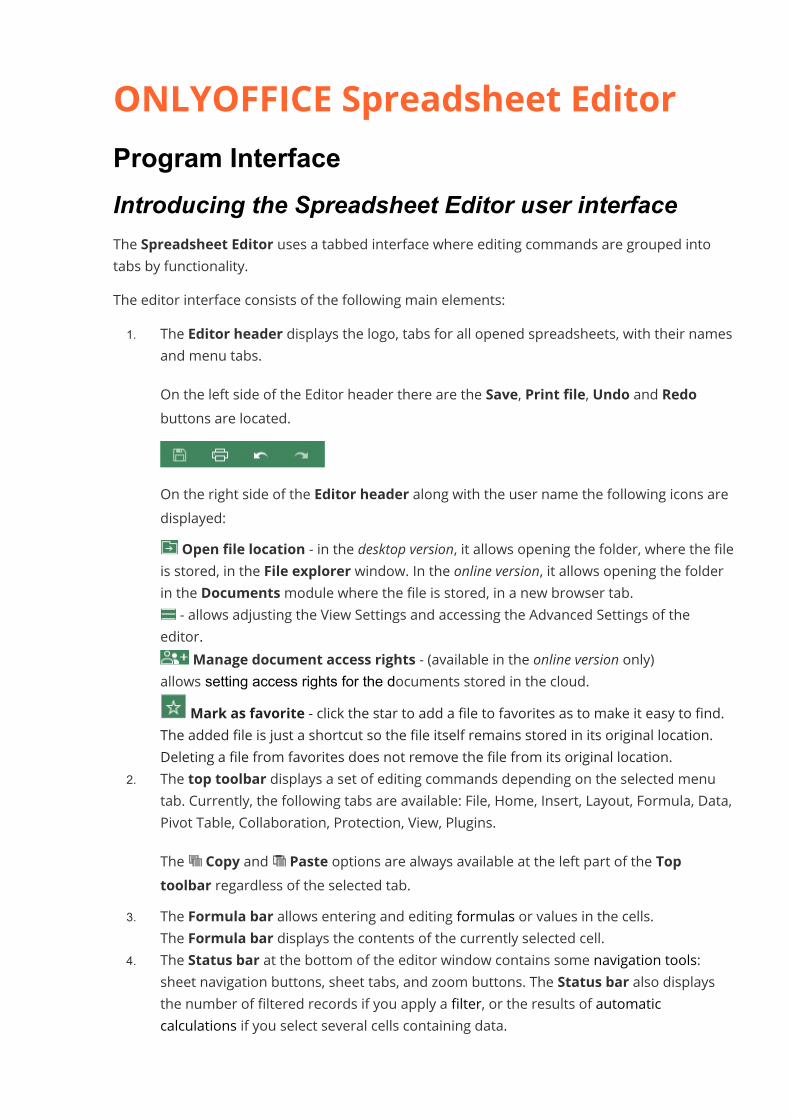
ONLYOFFICE Spreadsheet EditorProgram InterfaceIntroducing the Spreadsheet Editor user interfaceThe Spreadsheet Editor uses a tabbed interface where editing commands are grouped intotabs by functionality.The editor interface consists of the following main elements:1. The Editor header displays the logo, tabs for all opened spreadsheets, with their names
and menu tabs.On the left side of the Editor header there are the Save, Print file, Undo and Redobuttons are located.
On the right side of the Editor header along with the user name the following icons aredisplayed:
Open file location - in the desktop version, it allows opening the folder, where the fileis stored, in the File explorer window. In the online version, it allows opening the folderin the Documentsmodule where the file is stored, in a new browser tab.
- allows adjusting the View Settings and accessing the Advanced Settings of theeditor.
Manage document access rights - (available in the online version only)allows setting access rights for the documents stored in the cloud.
Mark as favorite - click the star to add a file to favorites as to make it easy to find.The added file is just a shortcut so the file itself remains stored in its original location.Deleting a file from favorites does not remove the file from its original location.
2. The top toolbar displays a set of editing commands depending on the selected menutab. Currently, the following tabs are available: File, Home, Insert, Layout, Formula, Data,Pivot Table, Collaboration, Protection, View, Plugins.The Copy and Paste options are always available at the left part of the Toptoolbar regardless of the selected tab.
3. The Formula bar allows entering and editing formulas or values in the cells.The Formula bar displays the contents of the currently selected cell.
4. The Status bar at the bottom of the editor window contains some navigation tools:sheet navigation buttons, sheet tabs, and zoom buttons. The Status bar also displaysthe number of filtered records if you apply a filter, or the results of automaticcalculations if you select several cells containing data.
5. The Left sidebar contains the following icons:· - allows using the Search and Replace tool,· - allows opening the Comments panel,· - (available in the online version only) allows opening the Chat panel,· - (available in the online version only) allows contacting our support team,· - (available in the online version only) allows viewing the information about the
program.6. The Right sidebar allows adjusting additional parameters of different objects. When
you select a particular object in a worksheet, the corresponding icon is activated on theright sidebar. Click this icon to expand the right sidebar.
7. TheWorking area allows viewing the contents of a spreadsheet, as well as entering andediting data.
8. The horizontal and vertical Scroll bars allow scrolling up/down and left/right.For your convenience, you can hide some components and display them again when necessary.
File tabThe File tab allows performing basic operations with the current file.Using this tab, you can perform the following operations:
· in the online version, save the current file (in case the Autosave option isdisabled), download as (save the spreadsheet in the selected format to hard disk driveof the computer), save copy as (save a copy of the spreadsheet in the selected format tothe portal documents), print or rename it, in the desktop version, save the current filekeeping the current format and location using the Save option or save the current filewith a different name, location or format using the Save as option, print the file.
· protect the file using a password, change or remove the password (available inthe desktop version only);
· create a new spreadsheet or open a recently edited one (available in the onlineversion only),
· view the general information about the spreadsheet or change some file properties,· manage access rights (available in the online version only),· access the Advanced Settings of the editor,· in the desktop version, open the folder, where the file is stored, in the File
explorer window. In the online version, open the folder in the Documentsmodule,where the file is stored, in a new browser tab.
Home tabThe Home tab opens by default when you open a spreadsheet. It allows you to format cells anddata in them, apply filters, insert functions, etc. Some other options are also available here,such as color schemes, Format as table template feature and so on.Using this tab, you can:
· set the font type, size, style, and colors,· align data in cells,· add cell borders andmerge cells,· insert functions and create named ranges,· sort and filter data,· change the number format,· add or remove cells, rows, columns,· copy/clear the cell formatting,· apply a table template to the selected cell range.
Insert tabThe Insert tab allows adding visual objects and comments to a spreadsheet.Using this tab, you can:
· insert pivot tables,· insert formatted tables,· insert images, shapes, text boxes and Text Art objects, charts,· insert comments and hyperlinks,· insert headers/footers,· insert equations and symbols,· insert slicers.
Layout tabThe Layout tab allows adjusting the appearance of a spreadsheet: setting up the pageparameters and defining the arrangement of visual elements.Using this tab, you can:
· adjust page margins, orientation, size,· specify a print area,· insert headers or footers,· scale a worksheet,· print titles on a page,
· align and arrange objects (images, charts, shapes).
Formula tabThe Formula tab allows working easily with all functions.Using this tab, you can:
· insert functions using the Insert Function dialog window,· quickly access Autosum formulas,· access 10 recently used formulas,· work with formulas classified into categories,· work with named ranges,· use the calculation options: calculate the entire workbook, or the current worksheet
only.Data tabThe Data tab allows to managing data in a sheet.Using this tab, you can:
· sort and filter data,· convert text to columns,· remove duplicates from a data range,· group and ungroup data,· set data validation parameters.
Pivot Table tabThe Pivot Table tab allows creating and editing pivot tables.Using this tab, you can:
· create a new pivot table,· choose the necessary layout for your pivot table,· update the pivot table if you change the data in your source data set,· select an entire pivot table with a single click,· highlight certain rows/columns by applying a specific formatting style to them,· choose one of the predefined tables styles.
Collaboration tabThe Collaboration tab allows working collaboratively on a spreadsheet. In the online version,you can share the file, select the required co-editing mode and manage comments. In the
commenting mode, you can add and remove comments and communicate via chat. Inthe desktop version, you can only manage comments.Using this tab, you can:
· adjust the sharing settings (available in the online version only),· switch between the Strict and Fast co-editing modes (available in the online
version only),· add or remove comments left in the spreadsheet,· open the Chat panel (available in the online version only).
View tabThe View tab allows you to manage sheet view presets based on applied filters.Using this tab, you can:
· manage sheet view presets,· adjust zoom value,· freeze panes,· manage the display of formula bars, headings, and gridlines.
Plugins tabThe Plugins tab allows accessing the advanced editing features using the available third-partycomponents. With this tab, you can also use macros to simplify routine operations.The Settings button allows you to open the window where you can view and manage all theinstalled plugins and add your own ones.TheMacros button allows you to open the window where you can create and run your ownmacros.Currently, the following plugins are available:
· Send allows to send the spreadsheet via email using the default desktop mail client(available in the desktop version only),
· Highlight code allows to highlight syntax of the code selecting the necessary language,style, background color,
· Photo Editor allows to edit images: crop, flip, rotate them, draw lines and shapes, addicons and text, load a mask and apply filters such as Grayscale, Invert, Sepia, Blur,Sharpen, Emboss, etc.,
· Thesaurus allows to search for synonyms and antonyms of a word and replace it withthe selected one,
· Translator allows to translate the selected text into other languages,
Note: this plugin doesn't work in Internet Explorer.· YouTube allows to embed YouTube videos into your spreadsheet.
To learn more about plugins please refer to our API Documentation. All the existing open-source plugin examples are currently available on GitHub.
Basic operationsCreate a new spreadsheet or open an existing oneTo create a new spreadsheetIn the online editor1. click the File tab on the top toolbar,2. select the Create New option.
In the desktop editor1. in the main program window, select the Spreadsheetmenu item from the Create
new section of the left sidebar - a new file will open in a new tab,2. when all the necessary changes are made, click the Save icon in the upper left corner
or switch to the File tab and choose the Save asmenu item.3. in the file manager window, select the location of the file, specify its name, choose the
required format (XLSX, Spreadsheet template (XLTX), ODS, OTS, CSV, PDF or PDFA) andclick the Save button.
To open an existing documentIn the desktop editor1. in the main program window, select the Open local filemenu item on the left sidebar,2. choose the necessary spreadsheet from the file manager window and click
the Open button.You can also right-click the necessary spreadsheet in the file manager window, select the Openwith option and choose the required application from the menu. If documents are associatedwith the required application, you can also open spreadsheets by double-clicking the file namein the file explorer window.All the directories that you have accessed using the desktop editor will be displayed inthe Recent folders list so that you can quickly access them afterwards. Click the necessaryfolder to select one of the files stored in it.
To open a recently edited spreadsheetIn the online editor1. click the File tab on the top toolbar,2. select the Open Recent... option,3. choose the required spreadsheet from the list of recently edited documents.
In the desktop editor1. in the main program window, select the Recent filesmenu item on the left sidebar,2. choose the required spreadsheet from the list of recently edited documents.
To open the folder, where the file is stored , in a new browser tab in the online version or in thefile explorer window in the desktop version, click the Open file location icon on the right sideof the editor header. Alternatively, you can switch to the File tab on the top toolbar and selectthe Open file location option.
Cut/copy/paste dataUse basic clipboard operationsTo cut, copy and paste data in the current spreadsheet make use of the right-click menu or usethe corresponding icons available on any tab of the top toolbar,
· Cut - select data and use the Cut option from the right-click menu to delete the selecteddata and send them to the computer clipboard memory. The cut data can be laterinserted to another place in the same spreadsheet.
· Copy - select data and either use the Copy icon at the top toolbar or right-click andselect the Copy option from the menu to send the selected data to the computerclipboard memory. The copied data can be later inserted to another place in the samespreadsheet.
· Paste - select a place and either use the Paste icon on the top toolbar or right-clickand select the Paste option to insert the previously copied/cut data from the computerclipboard memory to the current cursor position. The data can be previously copiedfrom the same spreadsheet.
In the online version, the following key combinations are only used to copy or paste datafrom/into another spreadsheet or some other program, in the desktop version, both thecorresponding buttons/menu options and key combinations can be used for any copy/pasteoperations:
· Ctrl+X key combination for cutting;· Ctrl+C key combination for copying;· Ctrl+V key combination for pasting.
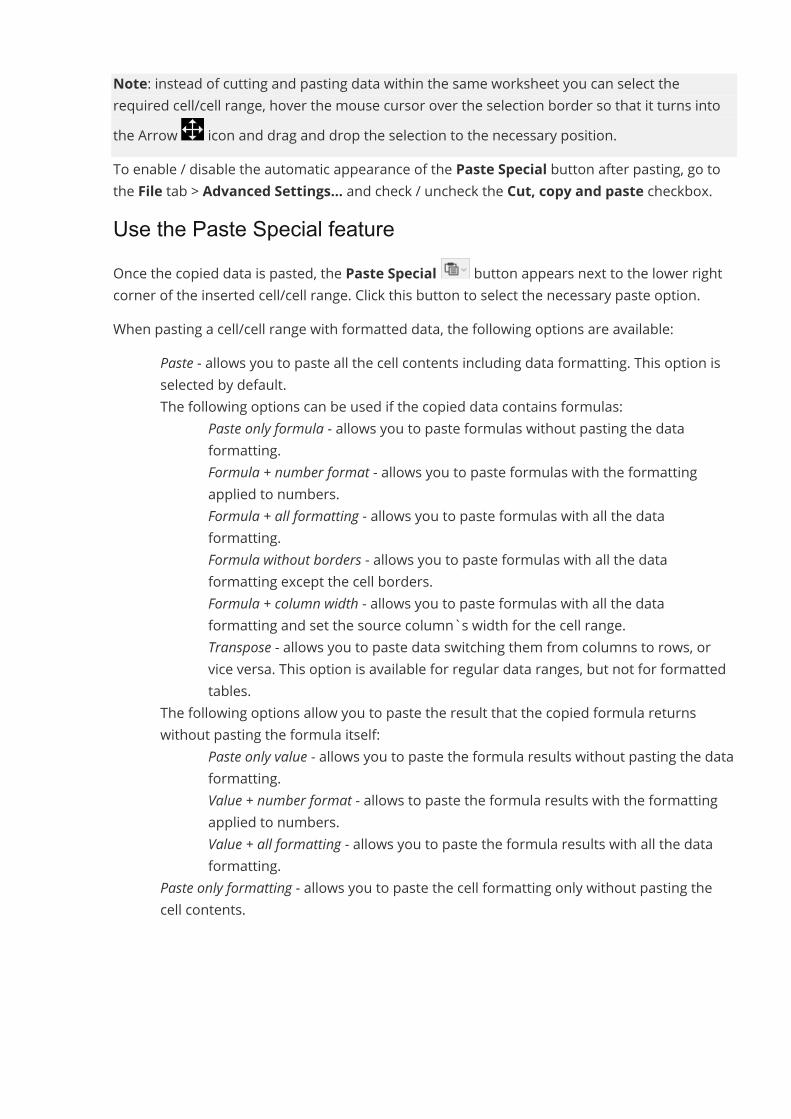
Note: instead of cutting and pasting data within the same worksheet you can select therequired cell/cell range, hover the mouse cursor over the selection border so that it turns intothe Arrow icon and drag and drop the selection to the necessary position.To enable / disable the automatic appearance of the Paste Special button after pasting, go tothe File tab > Advanced Settings... and check / uncheck the Cut, copy and paste checkbox.Use the Paste Special featureOnce the copied data is pasted, the Paste Special button appears next to the lower rightcorner of the inserted cell/cell range. Click this button to select the necessary paste option.When pasting a cell/cell range with formatted data, the following options are available:
· Paste - allows you to paste all the cell contents including data formatting. This option isselected by default.
· The following options can be used if the copied data contains formulas:o Paste only formula - allows you to paste formulas without pasting the data
formatting.o Formula + number format - allows you to paste formulas with the formatting
applied to numbers.o Formula + all formatting - allows you to paste formulas with all the data
formatting.o Formula without borders - allows you to paste formulas with all the data
formatting except the cell borders.o Formula + column width - allows you to paste formulas with all the data
formatting and set the source column`s width for the cell range.o Transpose - allows you to paste data switching them from columns to rows, or
vice versa. This option is available for regular data ranges, but not for formattedtables.
· The following options allow you to paste the result that the copied formula returnswithout pasting the formula itself:
o Paste only value - allows you to paste the formula results without pasting the dataformatting.
o Value + number format - allows to paste the formula results with the formattingapplied to numbers.
o Value + all formatting - allows you to paste the formula results with all the dataformatting.
· Paste only formatting - allows you to paste the cell formatting only without pasting thecell contents.
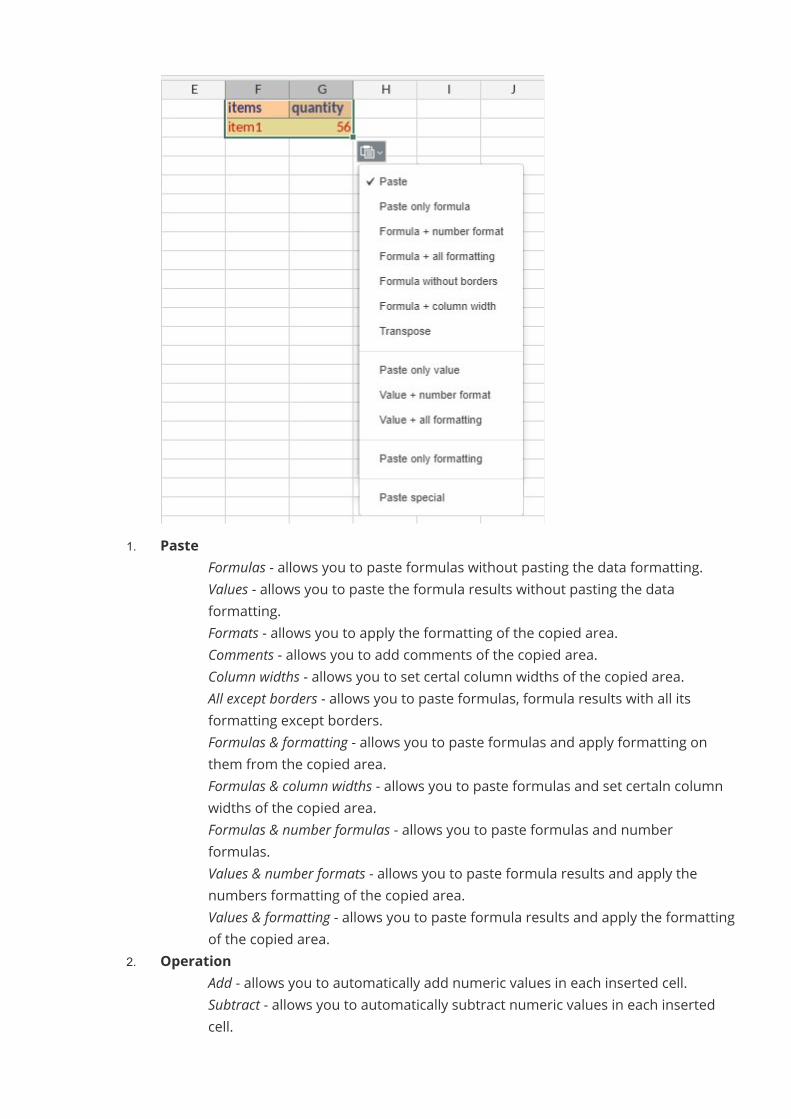
1. Pasteo Formulas - allows you to paste formulas without pasting the data formatting.o Values - allows you to paste the formula results without pasting the data
formatting.o Formats - allows you to apply the formatting of the copied area.o Comments - allows you to add comments of the copied area.o Column widths - allows you to set certal column widths of the copied area.o All except borders - allows you to paste formulas, formula results with all its
formatting except borders.o Formulas & formatting - allows you to paste formulas and apply formatting on
them from the copied area.o Formulas & column widths - allows you to paste formulas and set certaln column
widths of the copied area.o Formulas & number formulas - allows you to paste formulas and number
formulas.o Values & number formats - allows you to paste formula results and apply the
numbers formatting of the copied area.o Values & formatting - allows you to paste formula results and apply the formatting
of the copied area.2. Operation
o Add - allows you to automatically add numeric values in each inserted cell.o Subtract - allows you to automatically subtract numeric values in each inserted
cell.

o Multiply - allows you to automatically multiply numeric values in each insertedcell.
o Divide - allows you to automatically divide numeric values in each inserted cell.3. Transpose - allows you to paste data switching them from columns to rows, or vice
versa.4. Skip blanks - allows you to skip pasting empty cells and their formatting.
When pasting the contents of a single cell or some text within autoshapes, the followingoptions are available:
· Source formatting - allows you to keep the source formatting of the copied data.· Destination formatting - allows you to apply the formatting that is already used for the
cell/autoshape where the data are to be iserted to.Paste delimited textWhen pasting the delimited text copied from a .txt file, the following options are available:The delimited text can contain several records, and each record corresponds to a single tablerow. Each record can contain several text values separated with a delimiter (such as a comma,semicolon, colon, tab, space or other characters). The file should be saved as a plaintext .txt file.
· Keep text only - allows you to paste text values into a single column where each cellcontents corresponds to a row in the source text file.
· Use text import wizard - allows you to open the Text Import Wizard which helps to easilysplit the text values into multiple columns where each text value separated by adelimiter will be placed into a separate cell.
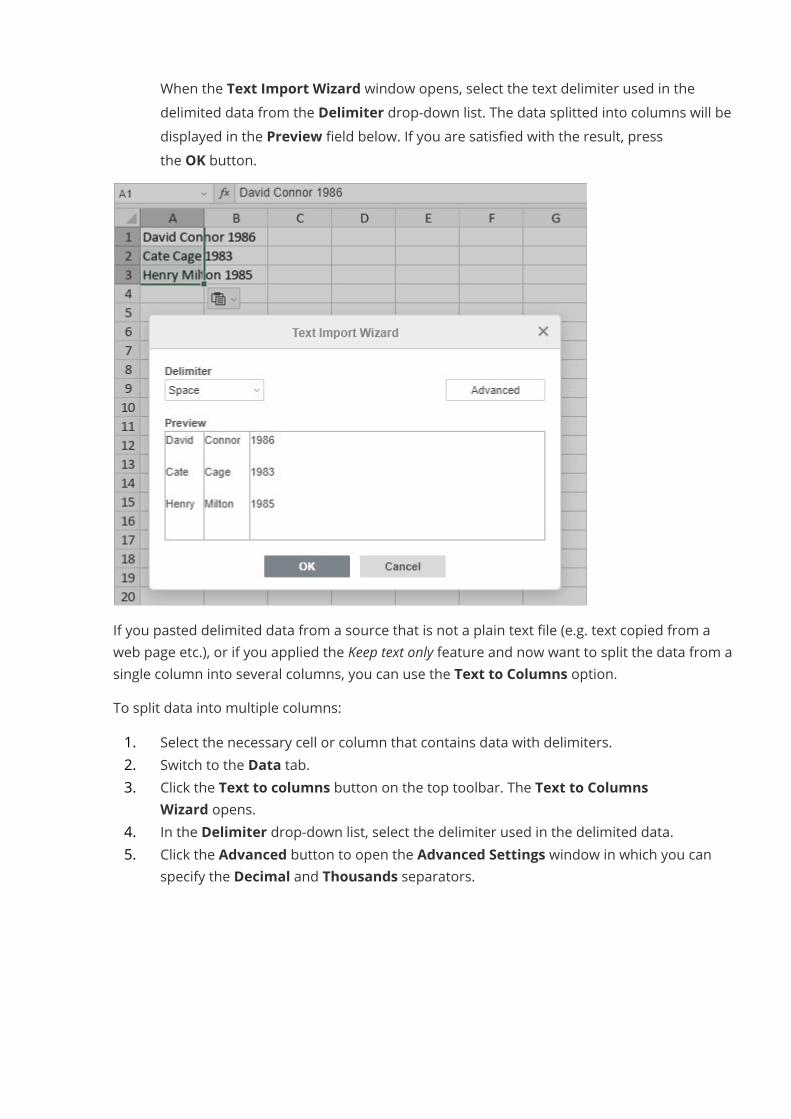
· When the Text Import Wizard window opens, select the text delimiter used in thedelimited data from the Delimiter drop-down list. The data splitted into columns will bedisplayed in the Preview field below. If you are satisfied with the result, pressthe OK button.
If you pasted delimited data from a source that is not a plain text file (e.g. text copied from aweb page etc.), or if you applied the Keep text only feature and now want to split the data from asingle column into several columns, you can use the Text to Columns option.To split data into multiple columns:1. Select the necessary cell or column that contains data with delimiters.2. Switch to the Data tab.3. Click the Text to columns button on the top toolbar. The Text to Columns
Wizard opens.4. In the Delimiter drop-down list, select the delimiter used in the delimited data.5. Click the Advanced button to open the Advanced Settings window in which you can
specify the Decimal and Thousands separators.
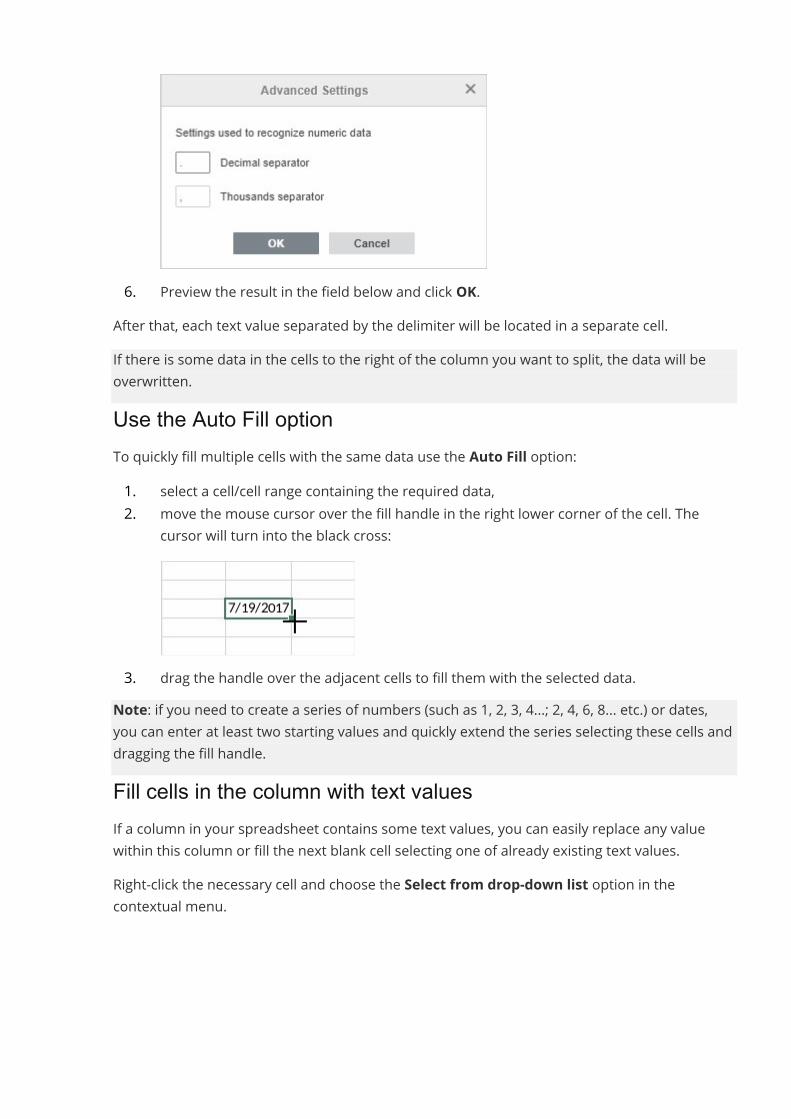
6. Preview the result in the field below and click OK.After that, each text value separated by the delimiter will be located in a separate cell.If there is some data in the cells to the right of the column you want to split, the data will beoverwritten.Use the Auto Fill optionTo quickly fill multiple cells with the same data use the Auto Fill option:1. select a cell/cell range containing the required data,2. move the mouse cursor over the fill handle in the right lower corner of the cell. The
cursor will turn into the black cross:
3. drag the handle over the adjacent cells to fill them with the selected data.Note: if you need to create a series of numbers (such as 1, 2, 3, 4...; 2, 4, 6, 8... etc.) or dates,you can enter at least two starting values and quickly extend the series selecting these cells anddragging the fill handle.Fill cells in the column with text valuesIf a column in your spreadsheet contains some text values, you can easily replace any valuewithin this column or fill the next blank cell selecting one of already existing text values.Right-click the necessary cell and choose the Select from drop-down list option in thecontextual menu.
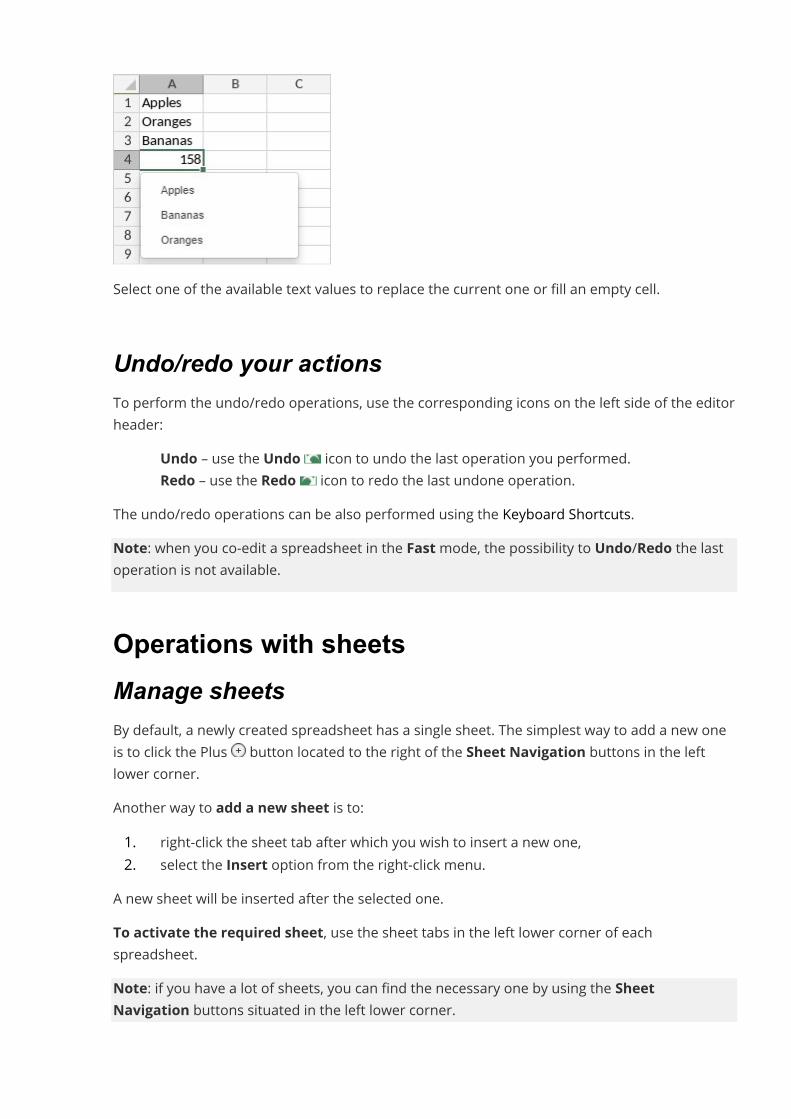
Select one of the available text values to replace the current one or fill an empty cell.
Undo/redo your actionsTo perform the undo/redo operations, use the corresponding icons on the left side of the editorheader:
· Undo – use the Undo icon to undo the last operation you performed.· Redo – use the Redo icon to redo the last undone operation.
The undo/redo operations can be also performed using the Keyboard Shortcuts.Note: when you co-edit a spreadsheet in the Fastmode, the possibility to Undo/Redo the lastoperation is not available.
Operations with sheetsManage sheetsBy default, a newly created spreadsheet has a single sheet. The simplest way to add a new oneis to click the Plus button located to the right of the Sheet Navigation buttons in the leftlower corner.Another way to add a new sheet is to:1. right-click the sheet tab after which you wish to insert a new one,2. select the Insert option from the right-click menu.
A new sheet will be inserted after the selected one.To activate the required sheet, use the sheet tabs in the left lower corner of eachspreadsheet.Note: if you have a lot of sheets, you can find the necessary one by using the SheetNavigation buttons situated in the left lower corner.
To delete an unnecessary sheet:1. right-click the sheet tab you wish to delete,2. select the Delete option from the right-click menu.
The selected sheet will be deleted from the current spreadsheet.To rename an existing sheet:1. right-click the sheet tab you wish to rename,2. select the Rename option from the right-click menu,3. enter the Sheet Name in the dialog box and click OK.
The selected sheet name will be changed.To copy an existing sheet:1. right-click the sheet tab you wish to copy,2. select the Copy option from the right-click menu,3. select the sheet before which you wish to insert the copied one or use the Copy to
end option to insert the copied sheet after all the existing ones,4. click the OK button to confirm your choice.
The selected sheet will be copied and inserted in the selected place.To move an existing sheet:1. right-click the sheet tab you wish to move,2. select theMove option from the right-click menu,3. select the sheet before which you wish to insert the selected one or use theMove to
end option to move the selected sheet after all the existing ones,4. click the OK button to confirm your choice.
Or simply drag the necessary sheet tab and drop it to a new location. The selected sheet will bemoved.You can also manualy drag'n'drop a sheet tab from one spreadsheet to another. In this case,the sheet from the original spreadsheet will be deleted.If you have a lot of sheets, you can hide some of them you don't need to facilitate your work. Todo that,1. right-click the sheet tab you wish to hide,2. select the Hide option from the right-click menu,
To display the hidden sheet tab, right-click any sheet tab, open the Hidden list and select thesheet tab you wish to display.To differentiate the sheets, you can assign different colors to the sheet tabs. To do that,1. right-click the sheet tab you wish to color,
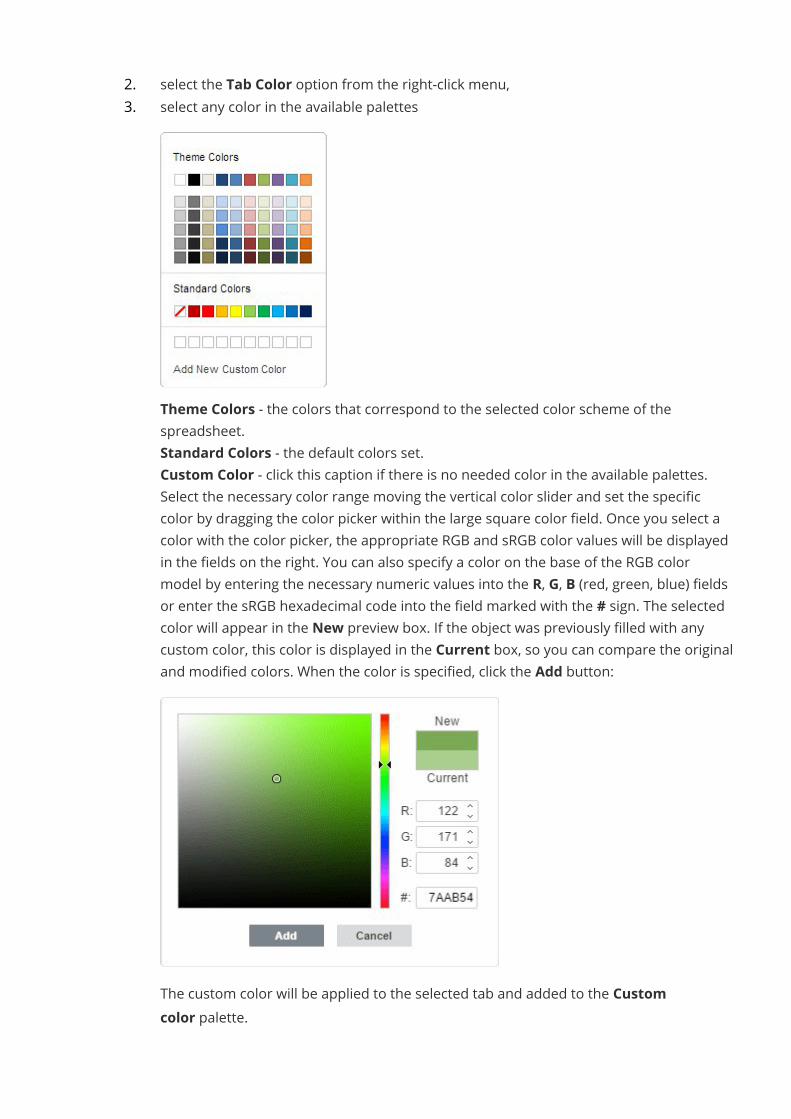
2. select the Tab Color option from the right-click menu,3. select any color in the available palettes
· Theme Colors - the colors that correspond to the selected color scheme of thespreadsheet.
· Standard Colors - the default colors set.· Custom Color - click this caption if there is no needed color in the available palettes.
Select the necessary color range moving the vertical color slider and set the specificcolor by dragging the color picker within the large square color field. Once you select acolor with the color picker, the appropriate RGB and sRGB color values will be displayedin the fields on the right. You can also specify a color on the base of the RGB colormodel by entering the necessary numeric values into the R, G, B (red, green, blue) fieldsor enter the sRGB hexadecimal code into the field marked with the # sign. The selectedcolor will appear in the New preview box. If the object was previously filled with anycustom color, this color is displayed in the Current box, so you can compare the originaland modified colors. When the color is specified, click the Add button:
The custom color will be applied to the selected tab and added to the Customcolor palette.
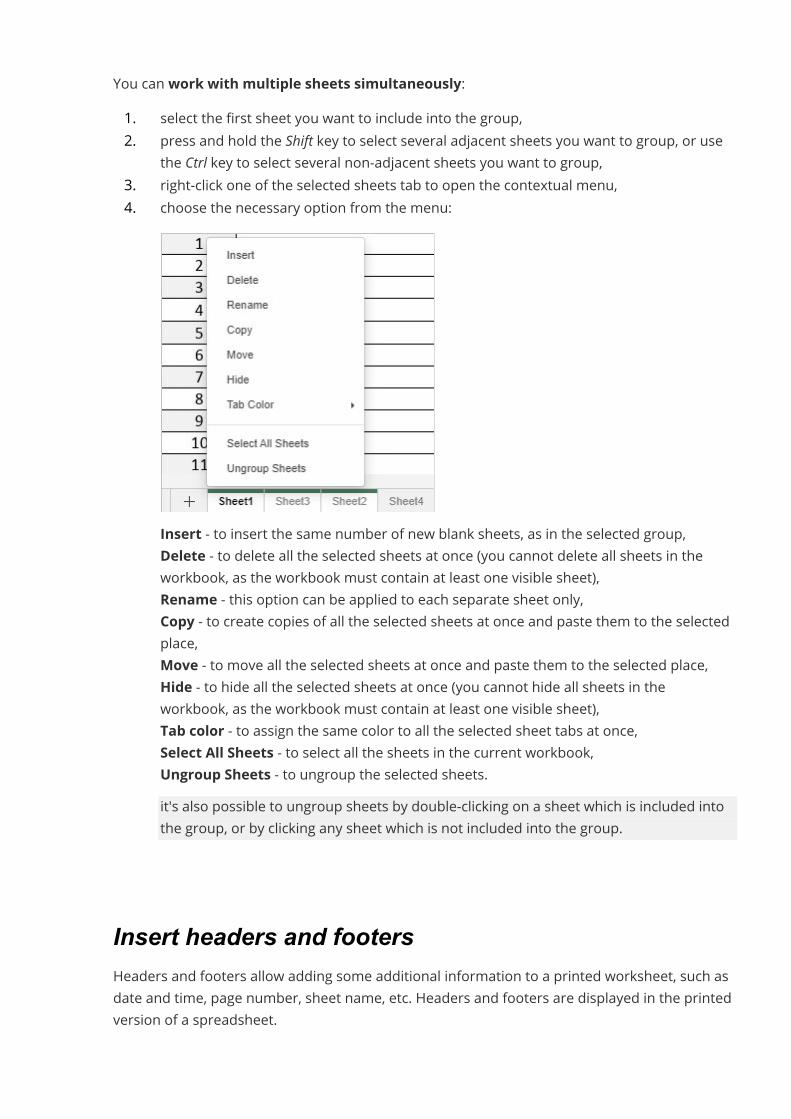
You can work with multiple sheets simultaneously:1. select the first sheet you want to include into the group,2. press and hold the Shift key to select several adjacent sheets you want to group, or use
the Ctrl key to select several non-adjacent sheets you want to group,3. right-click one of the selected sheets tab to open the contextual menu,4. choose the necessary option from the menu:
· Insert - to insert the same number of new blank sheets, as in the selected group,· Delete - to delete all the selected sheets at once (you cannot delete all sheets in the
workbook, as the workbook must contain at least one visible sheet),· Rename - this option can be applied to each separate sheet only,· Copy - to create copies of all the selected sheets at once and paste them to the selected
place,· Move - to move all the selected sheets at once and paste them to the selected place,· Hide - to hide all the selected sheets at once (you cannot hide all sheets in the
workbook, as the workbook must contain at least one visible sheet),· Tab color - to assign the same color to all the selected sheet tabs at once,· Select All Sheets - to select all the sheets in the current workbook,· Ungroup Sheets - to ungroup the selected sheets.
it's also possible to ungroup sheets by double-clicking on a sheet which is included intothe group, or by clicking any sheet which is not included into the group.
Insert headers and footersHeaders and footers allow adding some additional information to a printed worksheet, such asdate and time, page number, sheet name, etc. Headers and footers are displayed in the printedversion of a spreadsheet.
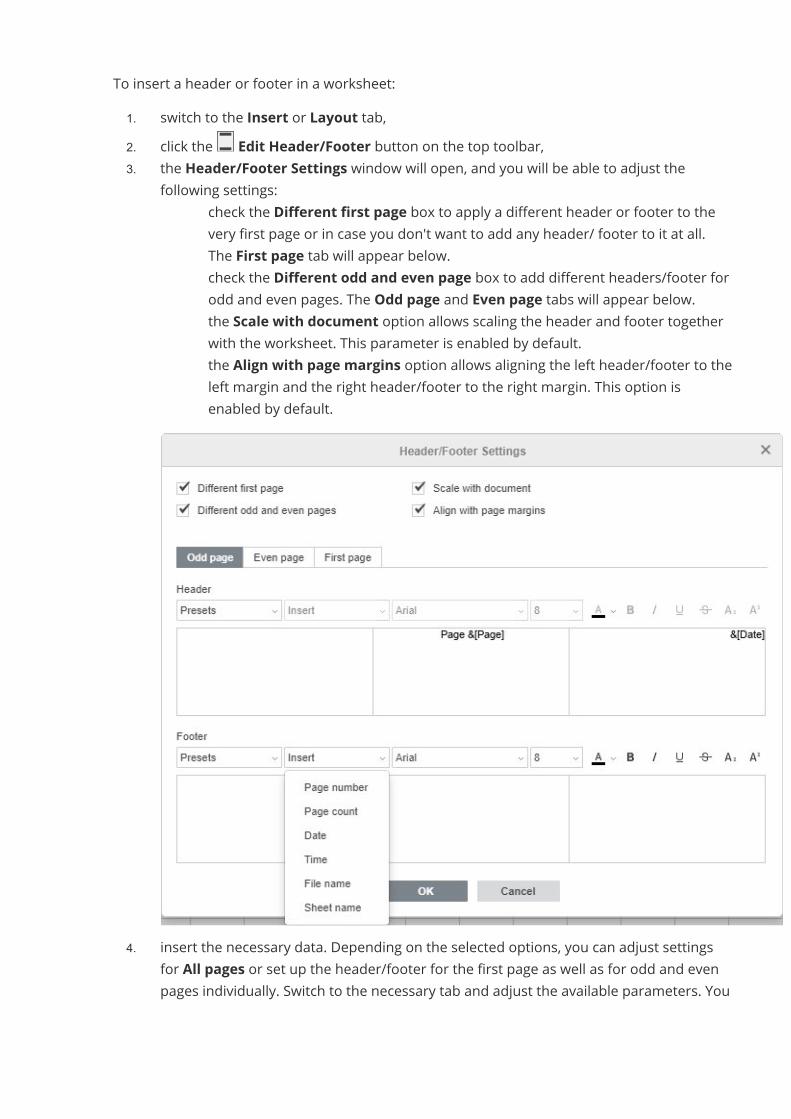
To insert a header or footer in a worksheet:1. switch to the Insert or Layout tab,2. click the Edit Header/Footer button on the top toolbar,3. the Header/Footer Settings window will open, and you will be able to adjust the
following settings:o check the Different first page box to apply a different header or footer to the
very first page or in case you don't want to add any header/ footer to it at all.The First page tab will appear below.
o check the Different odd and even page box to add different headers/footer forodd and even pages. The Odd page and Even page tabs will appear below.
o the Scale with document option allows scaling the header and footer togetherwith the worksheet. This parameter is enabled by default.
o the Align with page margins option allows aligning the left header/footer to theleft margin and the right header/footer to the right margin. This option isenabled by default.
4. insert the necessary data. Depending on the selected options, you can adjust settingsfor All pages or set up the header/footer for the first page as well as for odd and evenpages individually. Switch to the necessary tab and adjust the available parameters. You
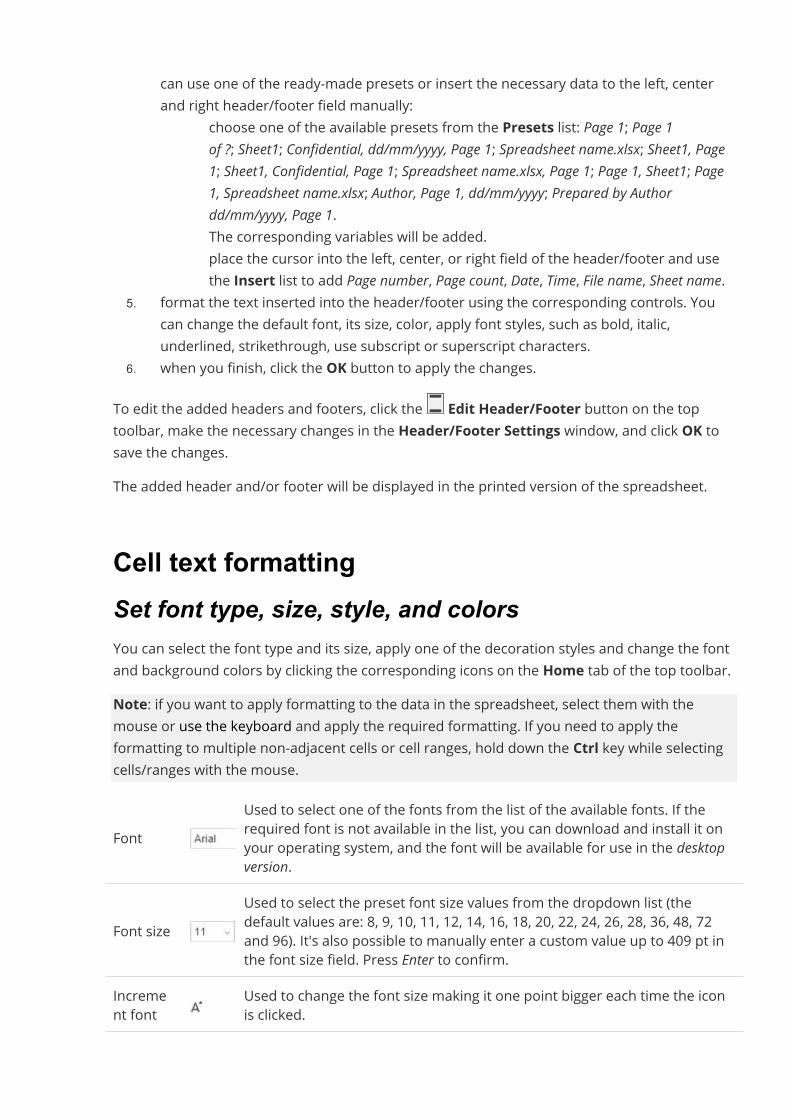
can use one of the ready-made presets or insert the necessary data to the left, centerand right header/footer field manually:
o choose one of the available presets from the Presets list: Page 1; Page 1of ?; Sheet1; Confidential, dd/mm/yyyy, Page 1; Spreadsheet name.xlsx; Sheet1, Page1; Sheet1, Confidential, Page 1; Spreadsheet name.xlsx, Page 1; Page 1, Sheet1; Page1, Spreadsheet name.xlsx; Author, Page 1, dd/mm/yyyy; Prepared by Authordd/mm/yyyy, Page 1.The corresponding variables will be added.
o place the cursor into the left, center, or right field of the header/footer and usethe Insert list to add Page number, Page count, Date, Time, File name, Sheet name.
5. format the text inserted into the header/footer using the corresponding controls. Youcan change the default font, its size, color, apply font styles, such as bold, italic,underlined, strikethrough, use subscript or superscript characters.
6. when you finish, click the OK button to apply the changes.To edit the added headers and footers, click the Edit Header/Footer button on the toptoolbar, make the necessary changes in the Header/Footer Settings window, and click OK tosave the changes.The added header and/or footer will be displayed in the printed version of the spreadsheet.
Cell text formattingSet font type, size, style, and colorsYou can select the font type and its size, apply one of the decoration styles and change the fontand background colors by clicking the corresponding icons on the Home tab of the top toolbar.Note: if you want to apply formatting to the data in the spreadsheet, select them with themouse or use the keyboard and apply the required formatting. If you need to apply theformatting to multiple non-adjacent cells or cell ranges, hold down the Ctrl key while selectingcells/ranges with the mouse.
FontUsed to select one of the fonts from the list of the available fonts. If therequired font is not available in the list, you can download and install it onyour operating system, and the font will be available for use in the desktopversion.
Font sizeUsed to select the preset font size values from the dropdown list (thedefault values are: 8, 9, 10, 11, 12, 14, 16, 18, 20, 22, 24, 26, 28, 36, 48, 72and 96). It's also possible to manually enter a custom value up to 409 pt inthe font size field. Press Enter to confirm.
Increment font
Used to change the font size making it one point bigger each time the iconis clicked.
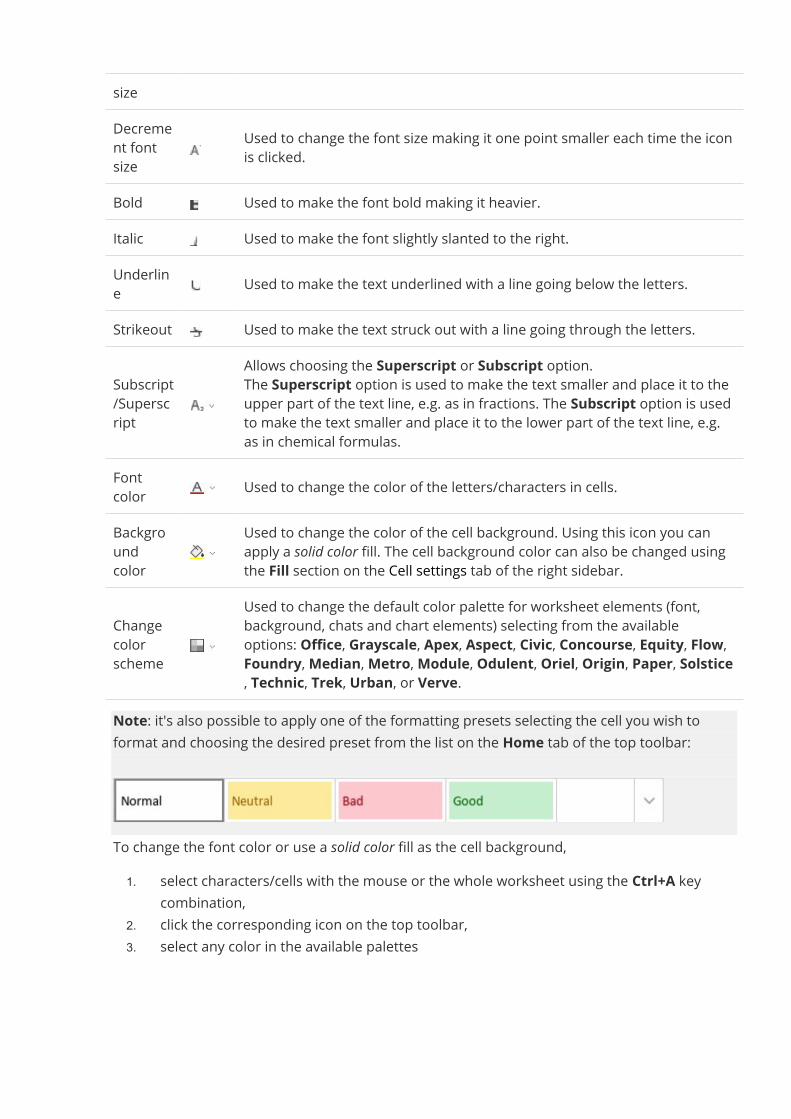
sizeDecrement fontsize
Used to change the font size making it one point smaller each time the iconis clicked.
Bold Used to make the font bold making it heavier.Italic Used to make the font slightly slanted to the right.Underline Used to make the text underlined with a line going below the letters.Strikeout Used to make the text struck out with a line going through the letters.
Subscript/Superscript
Allows choosing the Superscript or Subscript option.The Superscript option is used to make the text smaller and place it to theupper part of the text line, e.g. as in fractions. The Subscript option is usedto make the text smaller and place it to the lower part of the text line, e.g.as in chemical formulas.
Fontcolor Used to change the color of the letters/characters in cells.Backgroundcolor
Used to change the color of the cell background. Using this icon you canapply a solid color fill. The cell background color can also be changed usingthe Fill section on the Cell settings tab of the right sidebar.
Changecolorscheme
Used to change the default color palette for worksheet elements (font,background, chats and chart elements) selecting from the availableoptions: Office, Grayscale, Apex, Aspect, Civic, Concourse, Equity, Flow,Foundry,Median,Metro,Module, Odulent, Oriel, Origin, Paper, Solstice, Technic, Trek, Urban, or Verve.
Note: it's also possible to apply one of the formatting presets selecting the cell you wish toformat and choosing the desired preset from the list on the Home tab of the top toolbar:
To change the font color or use a solid color fill as the cell background,1. select characters/cells with the mouse or the whole worksheet using the Ctrl+A key
combination,2. click the corresponding icon on the top toolbar,3. select any color in the available palettes
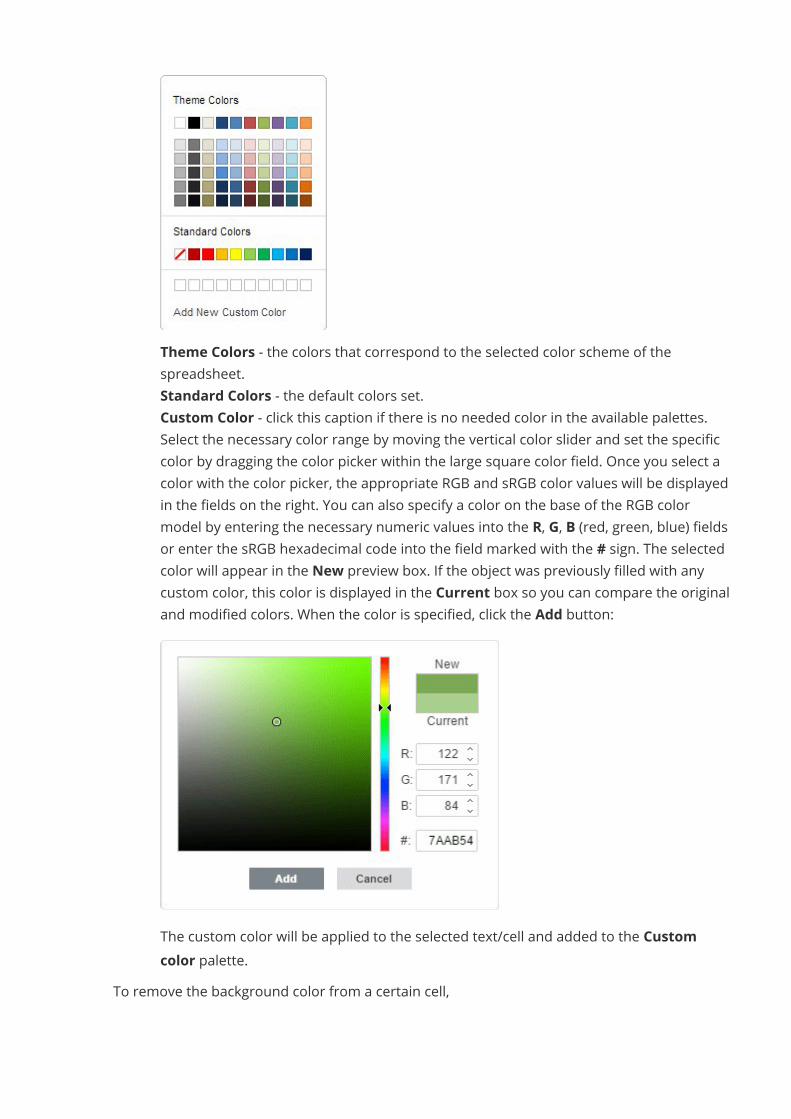
· Theme Colors - the colors that correspond to the selected color scheme of thespreadsheet.
· Standard Colors - the default colors set.· Custom Color - click this caption if there is no needed color in the available palettes.
Select the necessary color range by moving the vertical color slider and set the specificcolor by dragging the color picker within the large square color field. Once you select acolor with the color picker, the appropriate RGB and sRGB color values will be displayedin the fields on the right. You can also specify a color on the base of the RGB colormodel by entering the necessary numeric values into the R, G, B (red, green, blue) fieldsor enter the sRGB hexadecimal code into the field marked with the # sign. The selectedcolor will appear in the New preview box. If the object was previously filled with anycustom color, this color is displayed in the Current box so you can compare the originaland modified colors. When the color is specified, click the Add button:
The custom color will be applied to the selected text/cell and added to the Customcolor palette.
To remove the background color from a certain cell,
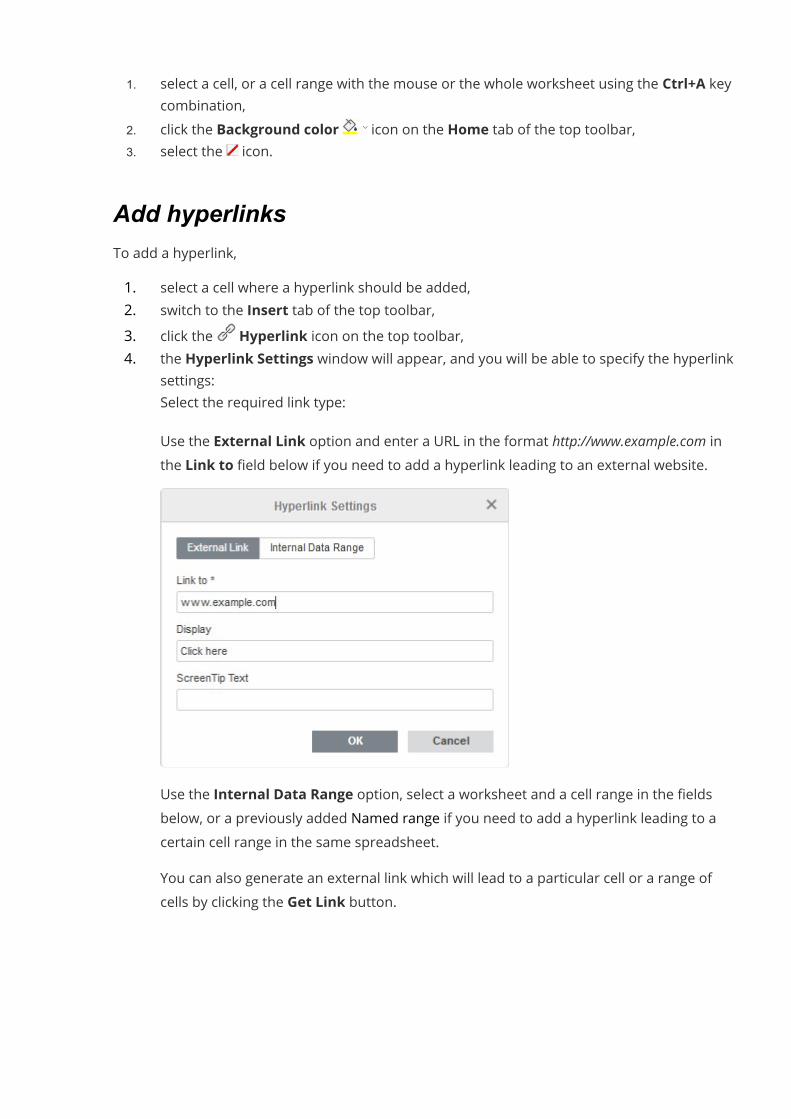
1. select a cell, or a cell range with the mouse or the whole worksheet using the Ctrl+A keycombination,
2. click the Background color icon on the Home tab of the top toolbar,3. select the icon.
Add hyperlinksTo add a hyperlink,1. select a cell where a hyperlink should be added,2. switch to the Insert tab of the top toolbar,3. click the Hyperlink icon on the top toolbar,4. the Hyperlink Settings window will appear, and you will be able to specify the hyperlink
settings:· Select the required link type:
Use the External Link option and enter a URL in the format http://www.example.com inthe Link to field below if you need to add a hyperlink leading to an external website.
Use the Internal Data Range option, select a worksheet and a cell range in the fieldsbelow, or a previously added Named range if you need to add a hyperlink leading to acertain cell range in the same spreadsheet.You can also generate an external link which will lead to a particular cell or a range ofcells by clicking the Get Link button.
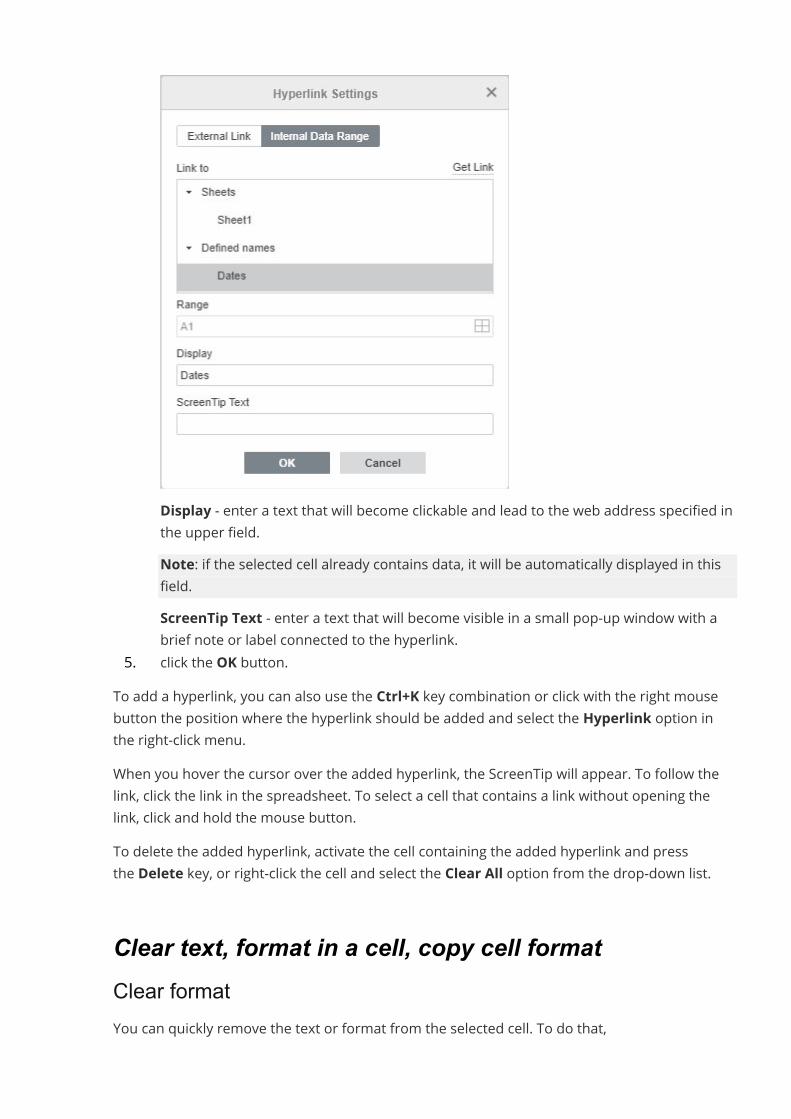
· Display - enter a text that will become clickable and lead to the web address specified inthe upper field.Note: if the selected cell already contains data, it will be automatically displayed in thisfield.
· ScreenTip Text - enter a text that will become visible in a small pop-up window with abrief note or label connected to the hyperlink.
5. click the OK button.To add a hyperlink, you can also use the Ctrl+K key combination or click with the right mousebutton the position where the hyperlink should be added and select the Hyperlink option inthe right-click menu.When you hover the cursor over the added hyperlink, the ScreenTip will appear. To follow thelink, click the link in the spreadsheet. To select a cell that contains a link without opening thelink, click and hold the mouse button.To delete the added hyperlink, activate the cell containing the added hyperlink and pressthe Delete key, or right-click the cell and select the Clear All option from the drop-down list.
Clear text, format in a cell, copy cell formatClear formatYou can quickly remove the text or format from the selected cell. To do that,
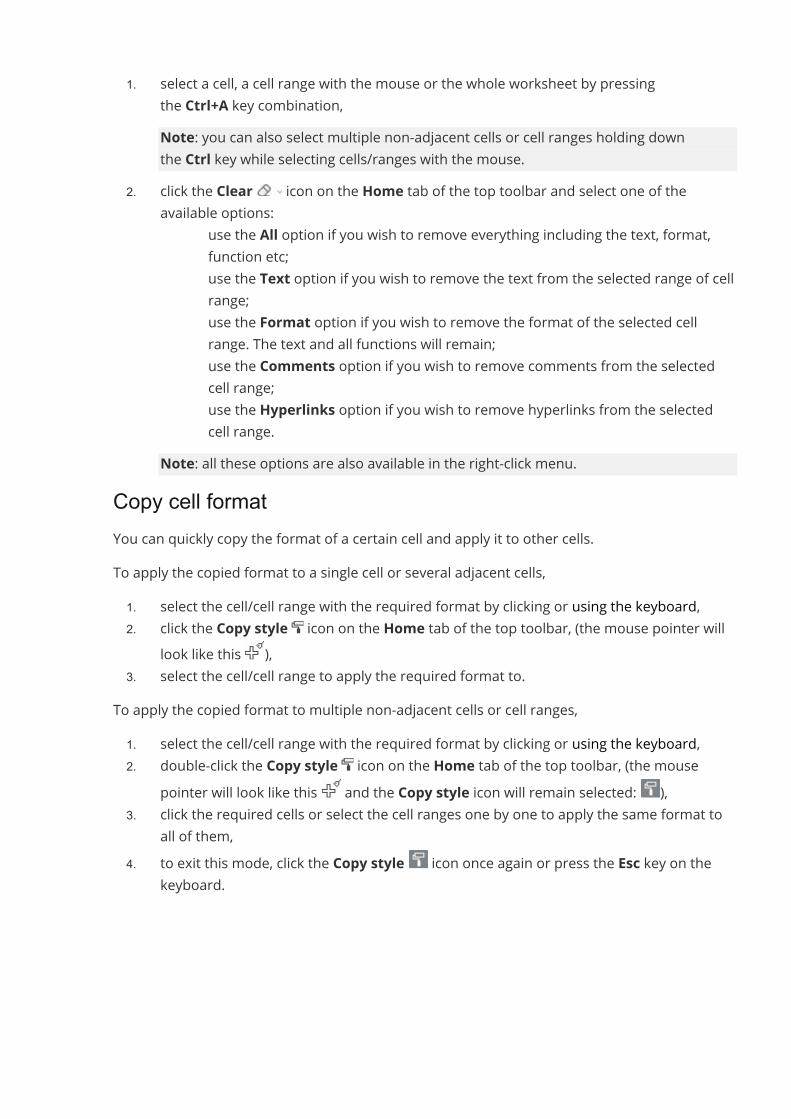
1. select a cell, a cell range with the mouse or the whole worksheet by pressingthe Ctrl+A key combination,Note: you can also select multiple non-adjacent cells or cell ranges holding downthe Ctrl key while selecting cells/ranges with the mouse.
2. click the Clear icon on the Home tab of the top toolbar and select one of theavailable options:
o use the All option if you wish to remove everything including the text, format,function etc;
o use the Text option if you wish to remove the text from the selected range of cellrange;
o use the Format option if you wish to remove the format of the selected cellrange. The text and all functions will remain;
o use the Comments option if you wish to remove comments from the selectedcell range;
o use the Hyperlinks option if you wish to remove hyperlinks from the selectedcell range.
Note: all these options are also available in the right-click menu.Copy cell formatYou can quickly copy the format of a certain cell and apply it to other cells.To apply the copied format to a single cell or several adjacent cells,1. select the cell/cell range with the required format by clicking or using the keyboard,2. click the Copy style icon on the Home tab of the top toolbar, (the mouse pointer will
look like this ),3. select the cell/cell range to apply the required format to.
To apply the copied format to multiple non-adjacent cells or cell ranges,1. select the cell/cell range with the required format by clicking or using the keyboard,2. double-click the Copy style icon on the Home tab of the top toolbar, (the mouse
pointer will look like this and the Copy style icon will remain selected: ),3. click the required cells or select the cell ranges one by one to apply the same format to
all of them,4. to exit this mode, click the Copy style icon once again or press the Esc key on the
keyboard.
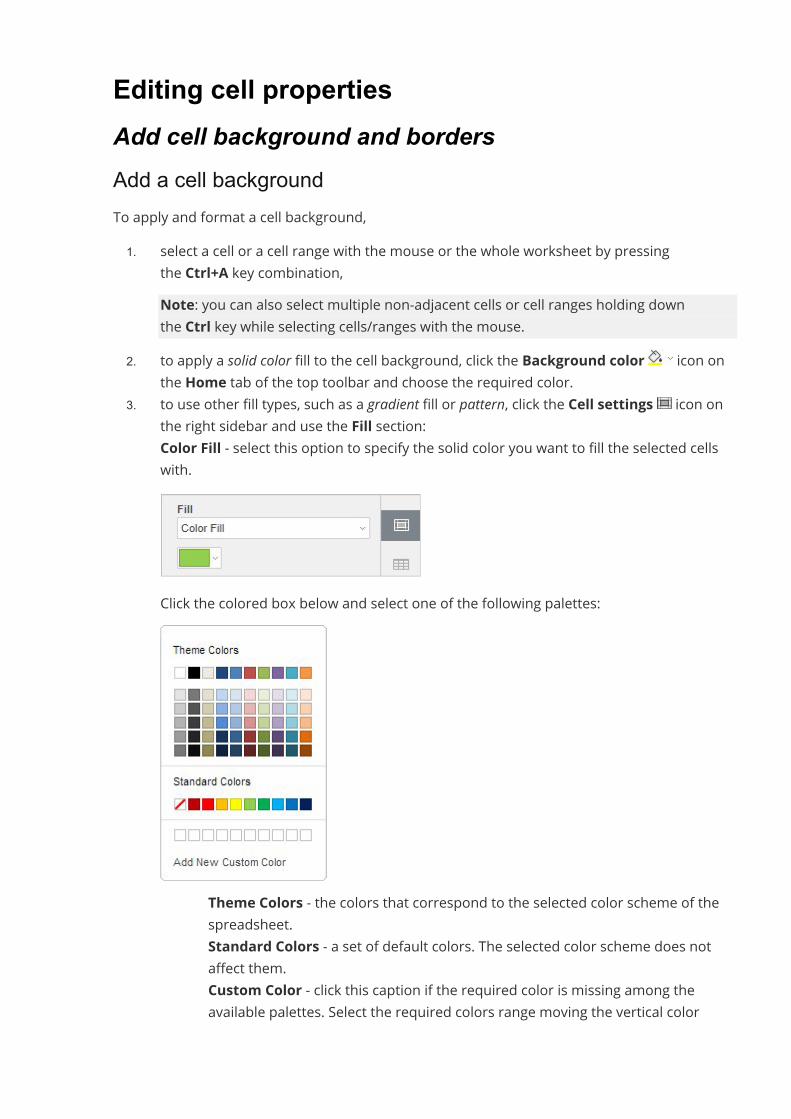
Editing cell propertiesAdd cell background and bordersAdd a cell backgroundTo apply and format a cell background,1. select a cell or a cell range with the mouse or the whole worksheet by pressing
the Ctrl+A key combination,Note: you can also select multiple non-adjacent cells or cell ranges holding downthe Ctrl key while selecting cells/ranges with the mouse.
2. to apply a solid color fill to the cell background, click the Background color icon onthe Home tab of the top toolbar and choose the required color.
3. to use other fill types, such as a gradient fill or pattern, click the Cell settings icon onthe right sidebar and use the Fill section:
· Color Fill - select this option to specify the solid color you want to fill the selected cellswith.
Click the colored box below and select one of the following palettes:
o Theme Colors - the colors that correspond to the selected color scheme of thespreadsheet.
o Standard Colors - a set of default colors. The selected color scheme does notaffect them.
o Custom Color - click this caption if the required color is missing among theavailable palettes. Select the required colors range moving the vertical color

slider and set a specific color dragging the color picker within the large squarecolor field. Once you select a color with the color picker, the appropriate RGBand sRGB color values will be displayed in the fields on the right. You can alsodefine a color on the base of the RGB color model by entering the correspondingnumeric values into the R, G, B (red, green, blue) fields or enter the sRGBhexadecimal code into the field marked with the # sign. The selected colorappears in the New preview box. If the object was previously filled with anycustom color, this color is displayed in the Current box so you can compare theoriginal and modified colors. When the color is defined, click the Add button:
The custom color will be applied to the selected element and added tothe Custom color palette.
· Gradient Fill - fill the selected cells with two colors which smoothly change from one tothe other.
· Angle - manually specify an exact value in degrees that defines the gradient direction(colors change in a straight line at the specified angle).
· Direction - choose a predefined template from the menu. The following directions areavailable: top-left to bottom-right (45°), top to bottom (90°), top-right to bottom-left
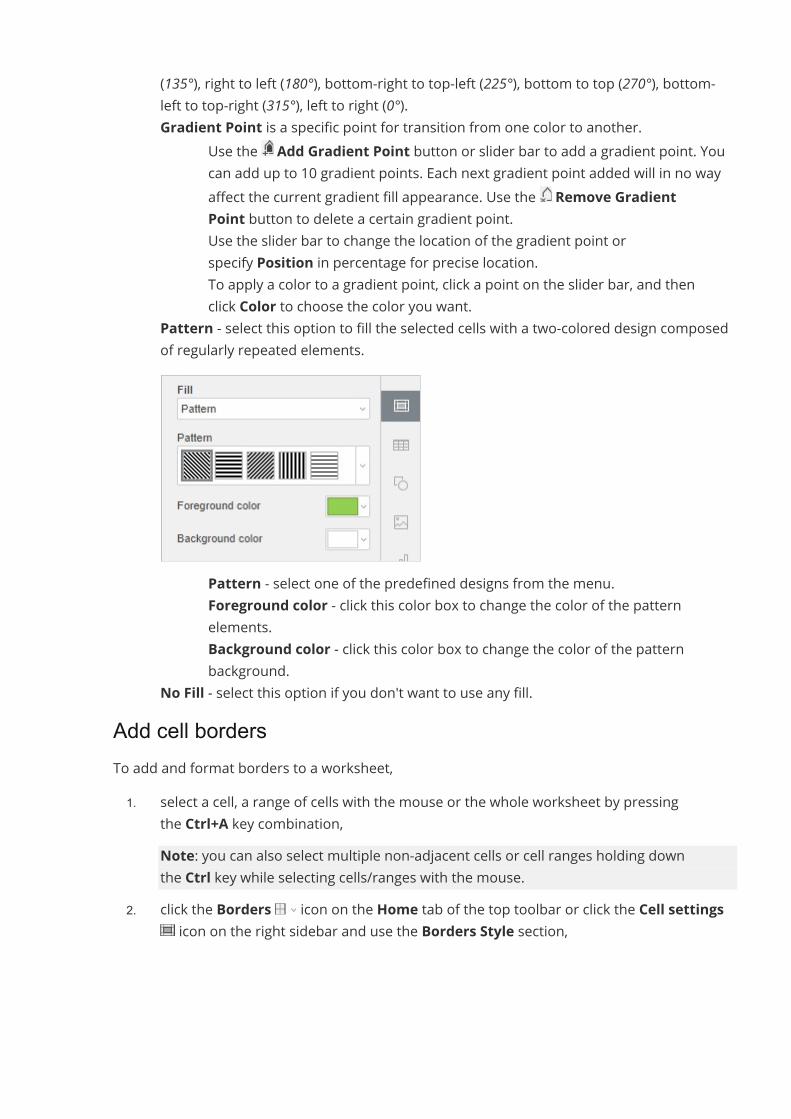
(135°), right to left (180°), bottom-right to top-left (225°), bottom to top (270°), bottom-left to top-right (315°), left to right (0°).
· Gradient Point is a specific point for transition from one color to another.o Use the Add Gradient Point button or slider bar to add a gradient point. You
can add up to 10 gradient points. Each next gradient point added will in no wayaffect the current gradient fill appearance. Use the Remove GradientPoint button to delete a certain gradient point.
o Use the slider bar to change the location of the gradient point orspecify Position in percentage for precise location.
o To apply a color to a gradient point, click a point on the slider bar, and thenclick Color to choose the color you want.
· Pattern - select this option to fill the selected cells with a two-colored design composedof regularly repeated elements.
o Pattern - select one of the predefined designs from the menu.o Foreground color - click this color box to change the color of the pattern
elements.o Background color - click this color box to change the color of the pattern
background.· No Fill - select this option if you don't want to use any fill.
Add cell bordersTo add and format borders to a worksheet,1. select a cell, a range of cells with the mouse or the whole worksheet by pressing
the Ctrl+A key combination,Note: you can also select multiple non-adjacent cells or cell ranges holding downthe Ctrl key while selecting cells/ranges with the mouse.
2. click the Borders icon on the Home tab of the top toolbar or click the Cell settingsicon on the right sidebar and use the Borders Style section,
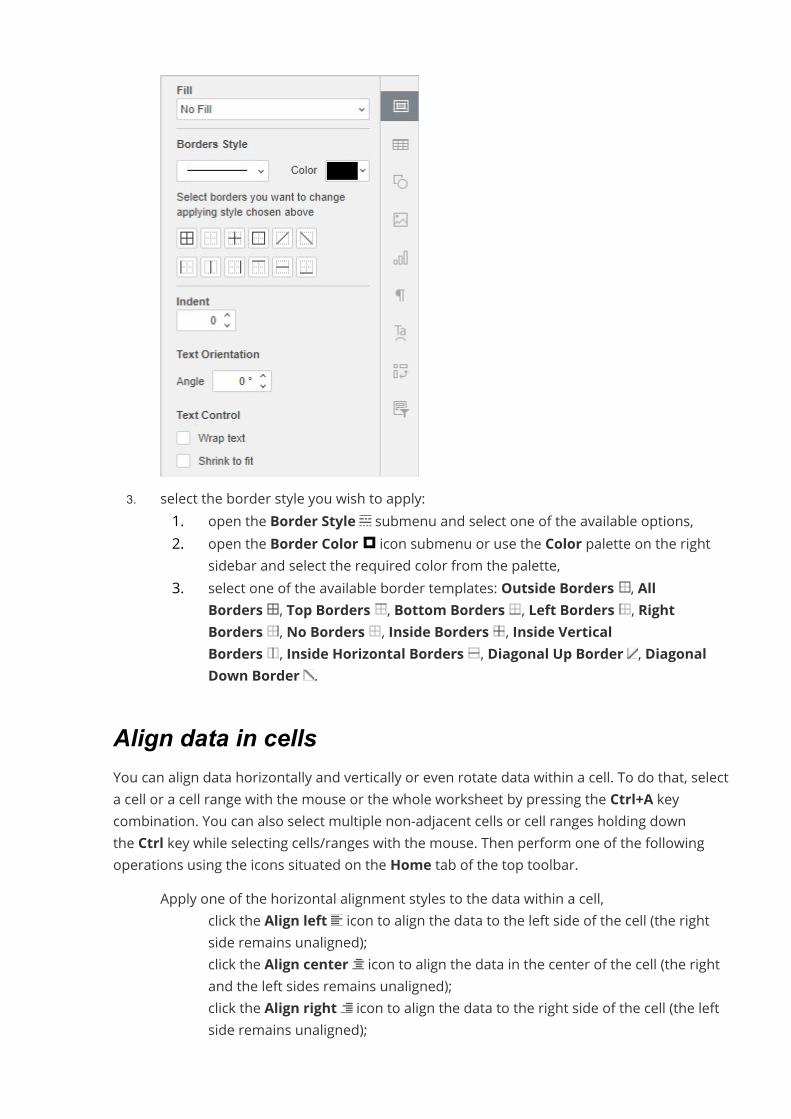
3. select the border style you wish to apply:1. open the Border Style submenu and select one of the available options,2. open the Border Color icon submenu or use the Color palette on the right
sidebar and select the required color from the palette,3. select one of the available border templates: Outside Borders , All
Borders , Top Borders , Bottom Borders , Left Borders , RightBorders , No Borders , Inside Borders , Inside VerticalBorders , Inside Horizontal Borders , Diagonal Up Border , DiagonalDown Border .
Align data in cellsYou can align data horizontally and vertically or even rotate data within a cell. To do that, selecta cell or a cell range with the mouse or the whole worksheet by pressing the Ctrl+A keycombination. You can also select multiple non-adjacent cells or cell ranges holding downthe Ctrl key while selecting cells/ranges with the mouse. Then perform one of the followingoperations using the icons situated on the Home tab of the top toolbar.
· Apply one of the horizontal alignment styles to the data within a cell,o click the Align left icon to align the data to the left side of the cell (the right
side remains unaligned);o click the Align center icon to align the data in the center of the cell (the right
and the left sides remains unaligned);o click the Align right icon to align the data to the right side of the cell (the left
side remains unaligned);
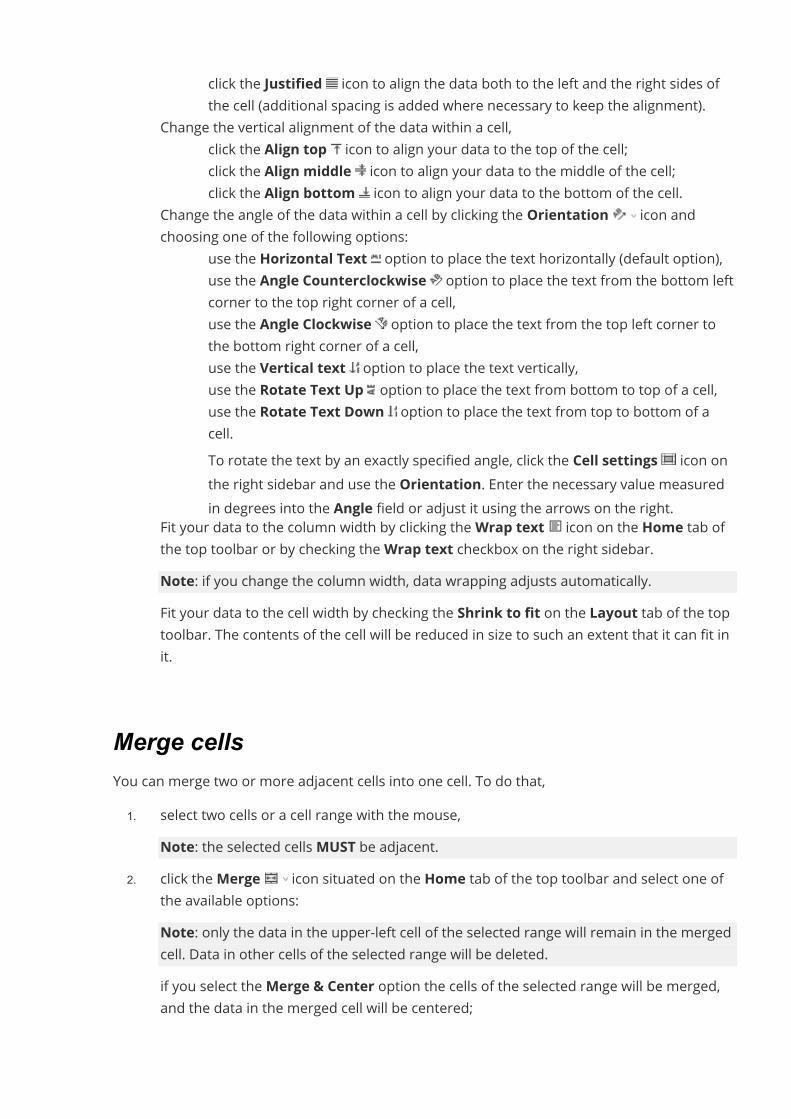
o click the Justified icon to align the data both to the left and the right sides ofthe cell (additional spacing is added where necessary to keep the alignment).
· Change the vertical alignment of the data within a cell,o click the Align top icon to align your data to the top of the cell;o click the Align middle icon to align your data to the middle of the cell;o click the Align bottom icon to align your data to the bottom of the cell.
· Change the angle of the data within a cell by clicking the Orientation icon andchoosing one of the following options:
o use the Horizontal Text option to place the text horizontally (default option),o use the Angle Counterclockwise option to place the text from the bottom left
corner to the top right corner of a cell,o use the Angle Clockwise option to place the text from the top left corner to
the bottom right corner of a cell,o use the Vertical text option to place the text vertically,o use the Rotate Text Up option to place the text from bottom to top of a cell,o use the Rotate Text Down option to place the text from top to bottom of a
cell.o To rotate the text by an exactly specified angle, click the Cell settings icon on
the right sidebar and use the Orientation. Enter the necessary value measuredin degrees into the Angle field or adjust it using the arrows on the right.
· Fit your data to the column width by clicking theWrap text icon on the Home tab ofthe top toolbar or by checking theWrap text checkbox on the right sidebar.Note: if you change the column width, data wrapping adjusts automatically.
· Fit your data to the cell width by checking the Shrink to fit on the Layout tab of the toptoolbar. The contents of the cell will be reduced in size to such an extent that it can fit init.
Merge cellsYou can merge two or more adjacent cells into one cell. To do that,
1. select two cells or a cell range with the mouse,Note: the selected cellsMUST be adjacent.
2. click theMerge icon situated on the Home tab of the top toolbar and select one ofthe available options:Note: only the data in the upper-left cell of the selected range will remain in the mergedcell. Data in other cells of the selected range will be deleted.
· if you select theMerge & Center option the cells of the selected range will be merged,and the data in the merged cell will be centered;
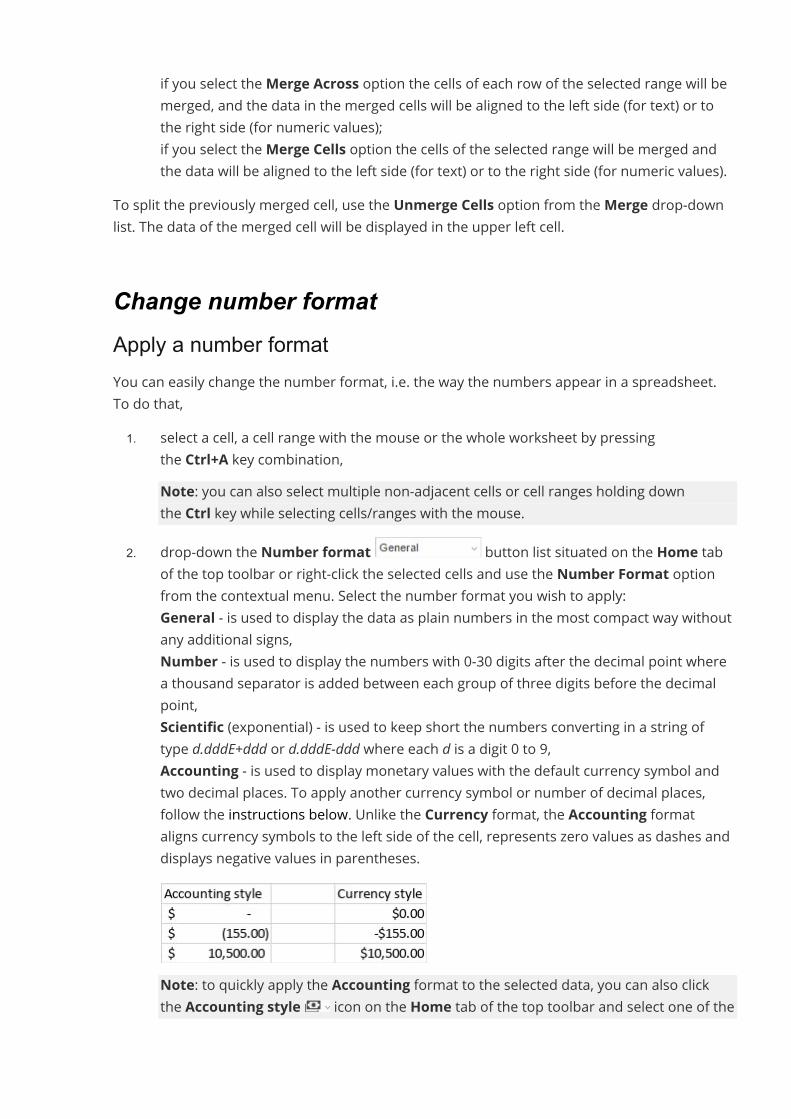
· if you select theMerge Across option the cells of each row of the selected range will bemerged, and the data in the merged cells will be aligned to the left side (for text) or tothe right side (for numeric values);
· if you select theMerge Cells option the cells of the selected range will be merged andthe data will be aligned to the left side (for text) or to the right side (for numeric values).
To split the previously merged cell, use the Unmerge Cells option from theMerge drop-downlist. The data of the merged cell will be displayed in the upper left cell.
Change number formatApply a number formatYou can easily change the number format, i.e. the way the numbers appear in a spreadsheet.To do that,1. select a cell, a cell range with the mouse or the whole worksheet by pressing
the Ctrl+A key combination,Note: you can also select multiple non-adjacent cells or cell ranges holding downthe Ctrl key while selecting cells/ranges with the mouse.
2. drop-down the Number format button list situated on the Home tabof the top toolbar or right-click the selected cells and use the Number Format optionfrom the contextual menu. Select the number format you wish to apply:
· General - is used to display the data as plain numbers in the most compact way withoutany additional signs,
· Number - is used to display the numbers with 0-30 digits after the decimal point wherea thousand separator is added between each group of three digits before the decimalpoint,
· Scientific (exponential) - is used to keep short the numbers converting in a string oftype d.dddE+ddd or d.dddE-ddd where each d is a digit 0 to 9,
· Accounting - is used to display monetary values with the default currency symbol andtwo decimal places. To apply another currency symbol or number of decimal places,follow the instructions below. Unlike the Currency format, the Accounting formataligns currency symbols to the left side of the cell, represents zero values as dashes anddisplays negative values in parentheses.
Note: to quickly apply the Accounting format to the selected data, you can also clickthe Accounting style icon on the Home tab of the top toolbar and select one of the
following currency symbols: $ Dollar, € Euro, £ Pound, ₽ Rouble, ¥ Yen, kn CroatianKuna.
· Currency - is used to display monetary values with the default currency symbol and twodecimal places. To apply another currency symbol or number of decimal places, followthe instructions below. Unlike the Accounting format, the Currency format places acurrency symbol directly before the first digit and displays negative values with thenegative sign (-).
· Date - is used to display dates,· Time - is used to display time,· Percentage - is used to display the data as a percentage accompanied by a percent
sign%,Note: to quickly apply the percent style to the data, you can also use the Percent styleicon on the Home tab of the top toolbar.
· Fraction - is used to display the numbers as common fractions rather than decimals.· Text - is used to display the numeric values as a plain text with as much precision as
possible.· More formats - is used to create a custom number format or to customize the already
applied number formats specifying additional parameters (see the description below).· Custom - is used to create a custom format:
o select a cell, a range of cells, or the whole worksheet for values you want toformat,
o choose the Custom option from theMore formatsmenu,o enter the required codes and check the result in the preview area or choose one
of the templates and/or combine them. If you want to create a format based onthe existing one, first apply the existing format and then edit the codes to yourpreference,
o click OK.3. change the number of decimal places if needed:· use the Increase decimal icon situated on the Home tab of the top toolbar to display
more digits after the decimal point,· use the Decrease decimal icon situated on the Home tab of the top toolbar to
display fewer digits after the decimal point.Customize the number formatYou can customize the applied number format in the following way:1. select the cells whose number format you want to customize,2. drop-down the Number format button list on the Home tab of the top
toolbar or right-click the selected cells and use the Number Format option from thecontextual menu,
3. select theMore formats option,

4. in the opened Number Format window, adjust the available parameters. The optionsdiffer depending on the number format that is applied to the selected cells. You can usethe Category list to change the number format.
· for the Number format, you can set the number of Decimal points, specify if you wantto Use 1000 separator or not and choose one of the available Formats for displayingnegative values.
· for the Scientific and Percentage formats, you can set the number of Decimal points.· for the Accounting and Currency formats, you can set the number of Decimal points,
choose one of the available currency Symbols and one of the available Formats fordisplaying negative values.
· for the Date format, you can select one of the available dateformats: 4/15, 4/15/06, 04/15/06, 4/15/2006, 4/15/06 0:00, 4/15/06 12:00 AM, A, April 152006, 15-Apr, 15-Apr-06, Apr-06, April-06, A-06, 06-Apr, 15-Apr-2006, 2006-Apr-15, 06-Apr-15, 15/Apr, 15/Apr/06, Apr/06, April/06, A/06, 06/Apr, 15/Apr/2006, 2006/Apr/15, 06/Apr/15, 15 Apr, 15 Apr 06, Apr 06, April 06, A 06, 06 Apr, 15 Apr 2006, 2006 Apr 15, 06 Apr15, 06/4/15, 06/04/15, 2006/4/15.
· for the Time format, you can select one of the available time formats: 12:48:58PM, 12:48, 12:48 PM, 12:48:58, 48:57.6, 36:48:58.
· for the Fraction format, you can select one of the available formats: Up to one digit(1/3), Up to two digits (12/25), Up to three digits (131/135), As halves (1/2), As fourths (2/4), Aseighths (4/8), As sixteenths (8/16), As tenths (5/10) , As hundredths (50/100).
5. click the OK button to apply the changes.
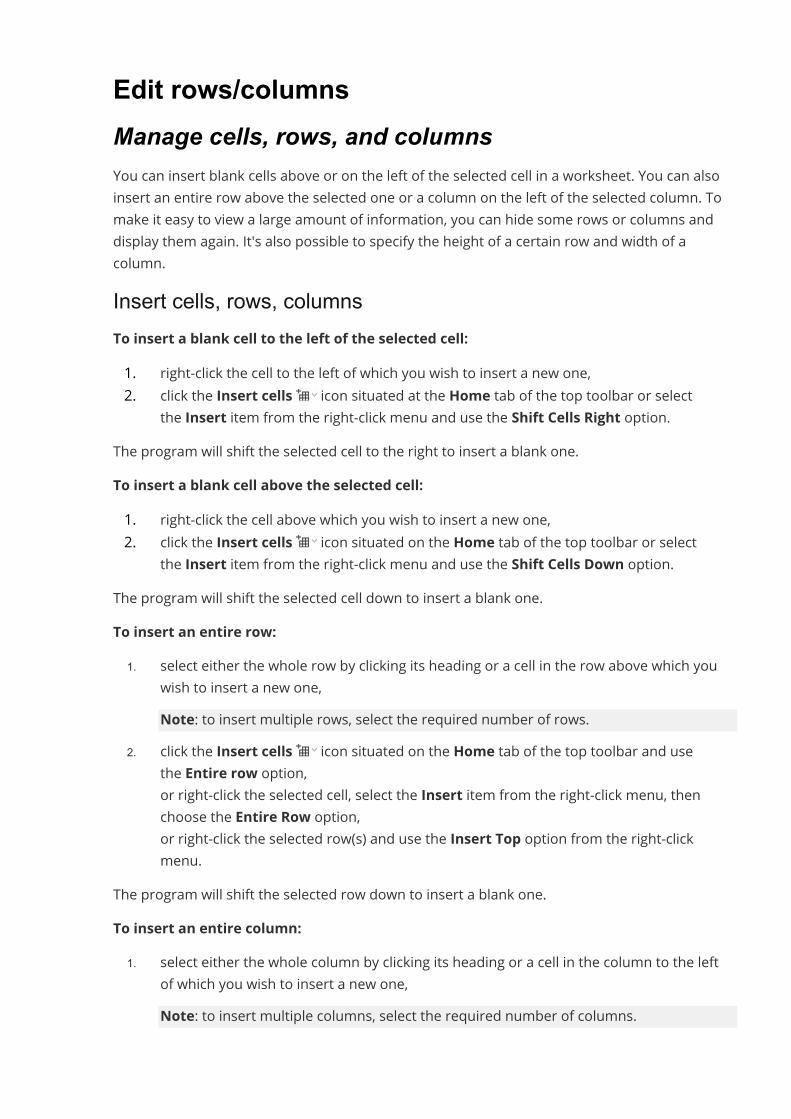
Edit rows/columnsManage cells, rows, and columnsYou can insert blank cells above or on the left of the selected cell in a worksheet. You can alsoinsert an entire row above the selected one or a column on the left of the selected column. Tomake it easy to view a large amount of information, you can hide some rows or columns anddisplay them again. It's also possible to specify the height of a certain row and width of acolumn.Insert cells, rows, columnsTo insert a blank cell to the left of the selected cell:1. right-click the cell to the left of which you wish to insert a new one,2. click the Insert cells icon situated at the Home tab of the top toolbar or select
the Insert item from the right-click menu and use the Shift Cells Right option.The program will shift the selected cell to the right to insert a blank one.To insert a blank cell above the selected cell:1. right-click the cell above which you wish to insert a new one,2. click the Insert cells icon situated on the Home tab of the top toolbar or select
the Insert item from the right-click menu and use the Shift Cells Down option.The program will shift the selected cell down to insert a blank one.To insert an entire row:
1. select either the whole row by clicking its heading or a cell in the row above which youwish to insert a new one,Note: to insert multiple rows, select the required number of rows.
2. click the Insert cells icon situated on the Home tab of the top toolbar and usethe Entire row option,or right-click the selected cell, select the Insert item from the right-click menu, thenchoose the Entire Row option,or right-click the selected row(s) and use the Insert Top option from the right-clickmenu.
The program will shift the selected row down to insert a blank one.To insert an entire column:
1. select either the whole column by clicking its heading or a cell in the column to the leftof which you wish to insert a new one,Note: to insert multiple columns, select the required number of columns.
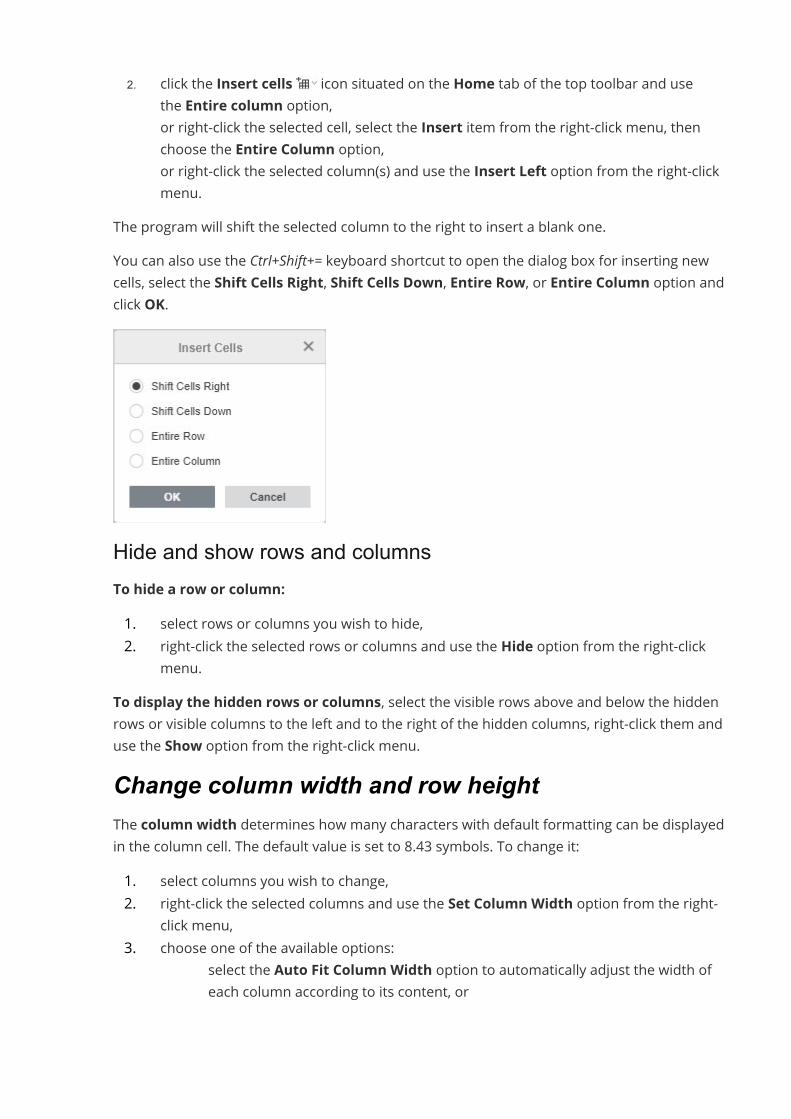
2. click the Insert cells icon situated on the Home tab of the top toolbar and usethe Entire column option,or right-click the selected cell, select the Insert item from the right-click menu, thenchoose the Entire Column option,or right-click the selected column(s) and use the Insert Left option from the right-clickmenu.
The program will shift the selected column to the right to insert a blank one.You can also use the Ctrl+Shift+= keyboard shortcut to open the dialog box for inserting newcells, select the Shift Cells Right, Shift Cells Down, Entire Row, or Entire Column option andclick OK.
Hide and show rows and columnsTo hide a row or column:1. select rows or columns you wish to hide,2. right-click the selected rows or columns and use the Hide option from the right-click
menu.To display the hidden rows or columns, select the visible rows above and below the hiddenrows or visible columns to the left and to the right of the hidden columns, right-click them anduse the Show option from the right-click menu.Change column width and row heightThe column width determines how many characters with default formatting can be displayedin the column cell. The default value is set to 8.43 symbols. To change it:1. select columns you wish to change,2. right-click the selected columns and use the Set Column Width option from the right-
click menu,3. choose one of the available options:
o select the Auto Fit Column Width option to automatically adjust the width ofeach column according to its content, or
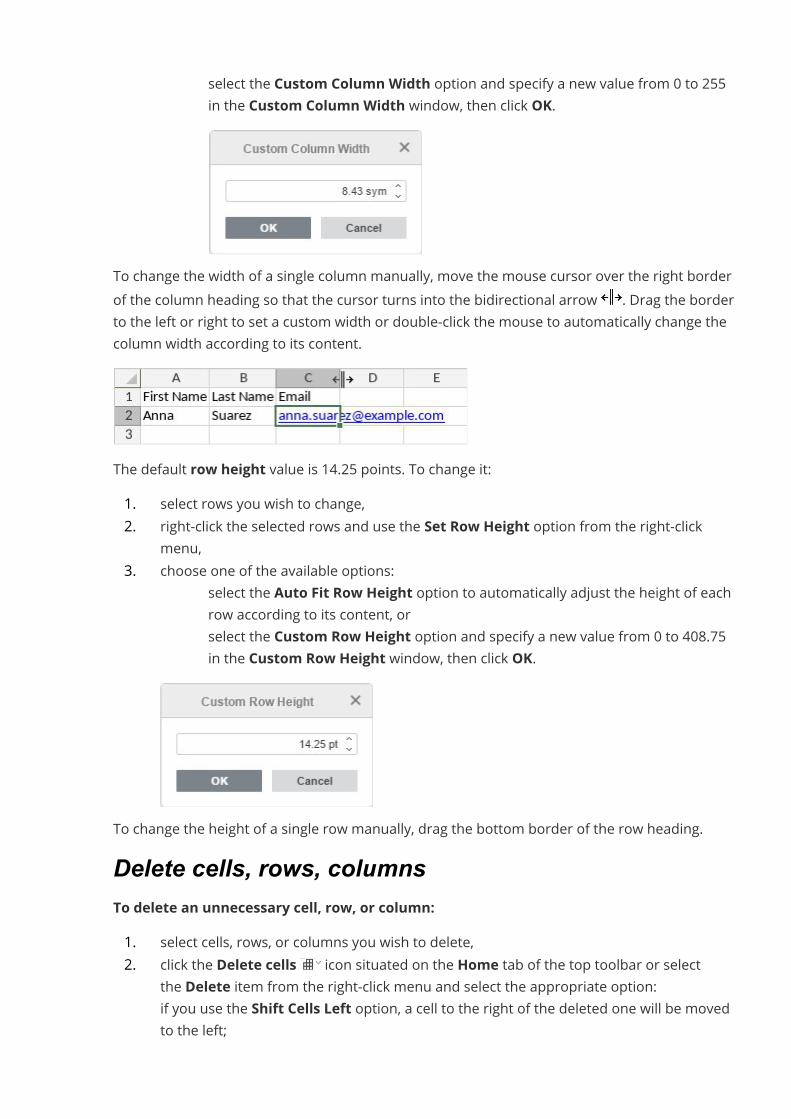
o select the Custom Column Width option and specify a new value from 0 to 255in the Custom Column Width window, then click OK.
To change the width of a single column manually, move the mouse cursor over the right borderof the column heading so that the cursor turns into the bidirectional arrow . Drag the borderto the left or right to set a custom width or double-click the mouse to automatically change thecolumn width according to its content.
The default row height value is 14.25 points. To change it:1. select rows you wish to change,2. right-click the selected rows and use the Set Row Height option from the right-click
menu,3. choose one of the available options:
o select the Auto Fit Row Height option to automatically adjust the height of eachrow according to its content, or
o select the Custom Row Height option and specify a new value from 0 to 408.75in the Custom Row Height window, then click OK.
To change the height of a single row manually, drag the bottom border of the row heading.Delete cells, rows, columnsTo delete an unnecessary cell, row, or column:1. select cells, rows, or columns you wish to delete,2. click the Delete cells icon situated on the Home tab of the top toolbar or select
the Delete item from the right-click menu and select the appropriate option:if you use the Shift Cells Left option, a cell to the right of the deleted one will be movedto the left;
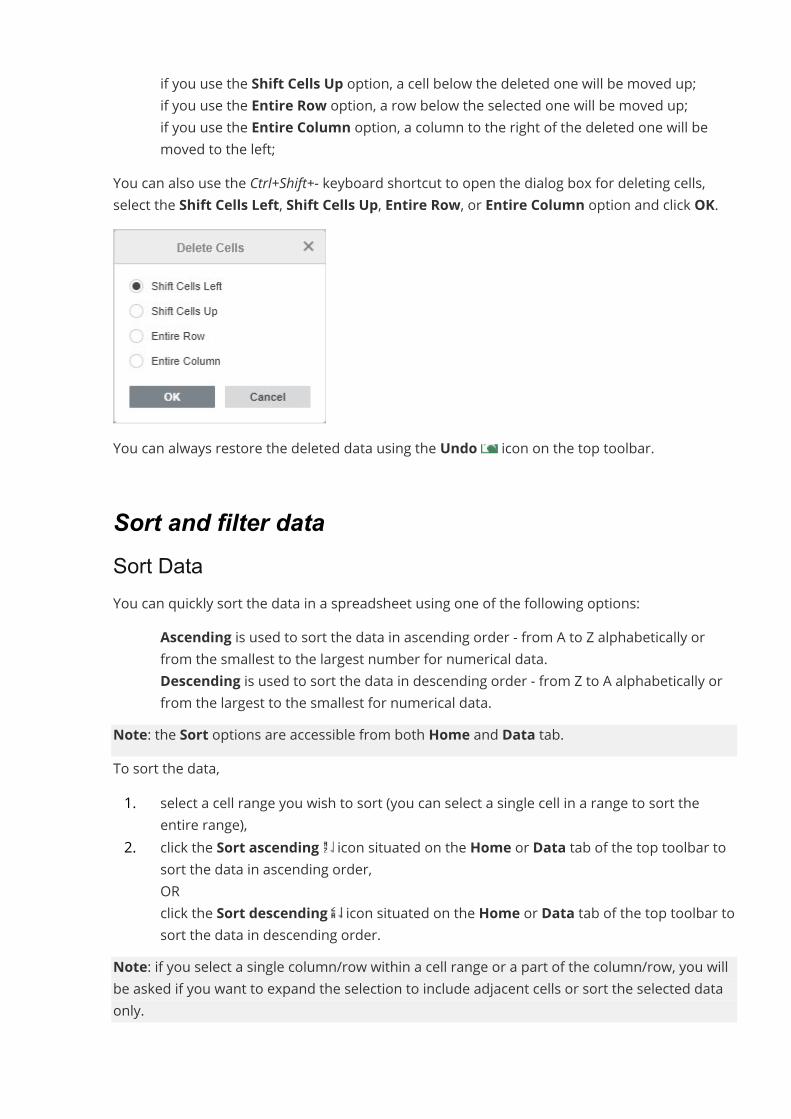
if you use the Shift Cells Up option, a cell below the deleted one will be moved up;if you use the Entire Row option, a row below the selected one will be moved up;if you use the Entire Column option, a column to the right of the deleted one will bemoved to the left;
You can also use the Ctrl+Shift+- keyboard shortcut to open the dialog box for deleting cells,select the Shift Cells Left, Shift Cells Up, Entire Row, or Entire Column option and click OK.
You can always restore the deleted data using the Undo icon on the top toolbar.
Sort and filter dataSort DataYou can quickly sort the data in a spreadsheet using one of the following options:
· Ascending is used to sort the data in ascending order - from A to Z alphabetically orfrom the smallest to the largest number for numerical data.
· Descending is used to sort the data in descending order - from Z to A alphabetically orfrom the largest to the smallest for numerical data.
Note: the Sort options are accessible from both Home and Data tab.To sort the data,1. select a cell range you wish to sort (you can select a single cell in a range to sort the
entire range),2. click the Sort ascending icon situated on the Home or Data tab of the top toolbar to
sort the data in ascending order,ORclick the Sort descending icon situated on the Home or Data tab of the top toolbar tosort the data in descending order.
Note: if you select a single column/row within a cell range or a part of the column/row, you willbe asked if you want to expand the selection to include adjacent cells or sort the selected dataonly.
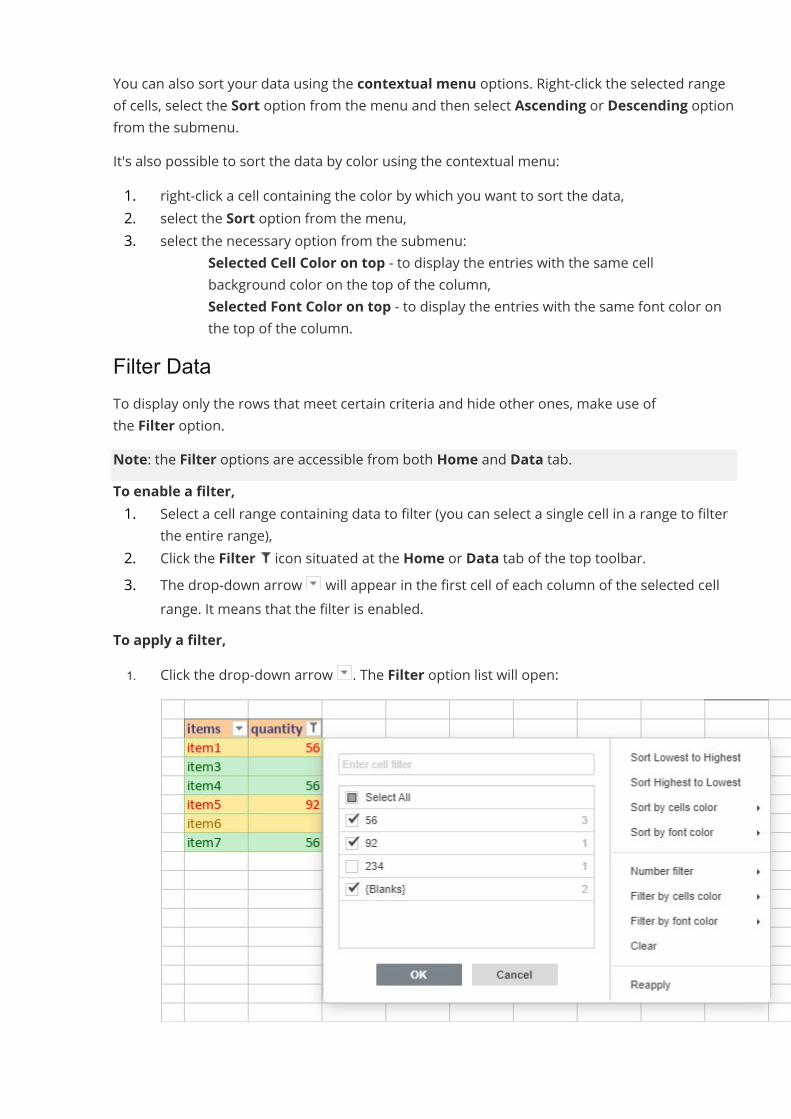
You can also sort your data using the contextual menu options. Right-click the selected rangeof cells, select the Sort option from the menu and then select Ascending or Descending optionfrom the submenu.It's also possible to sort the data by color using the contextual menu:1. right-click a cell containing the color by which you want to sort the data,2. select the Sort option from the menu,3. select the necessary option from the submenu:
o Selected Cell Color on top - to display the entries with the same cellbackground color on the top of the column,
o Selected Font Color on top - to display the entries with the same font color onthe top of the column.
Filter DataTo display only the rows that meet certain criteria and hide other ones, make use ofthe Filter option.Note: the Filter options are accessible from both Home and Data tab.To enable a filter,1. Select a cell range containing data to filter (you can select a single cell in a range to filter
the entire range),2. Click the Filter icon situated at the Home or Data tab of the top toolbar.3. The drop-down arrow will appear in the first cell of each column of the selected cell
range. It means that the filter is enabled.To apply a filter,1. Click the drop-down arrow . The Filter option list will open:
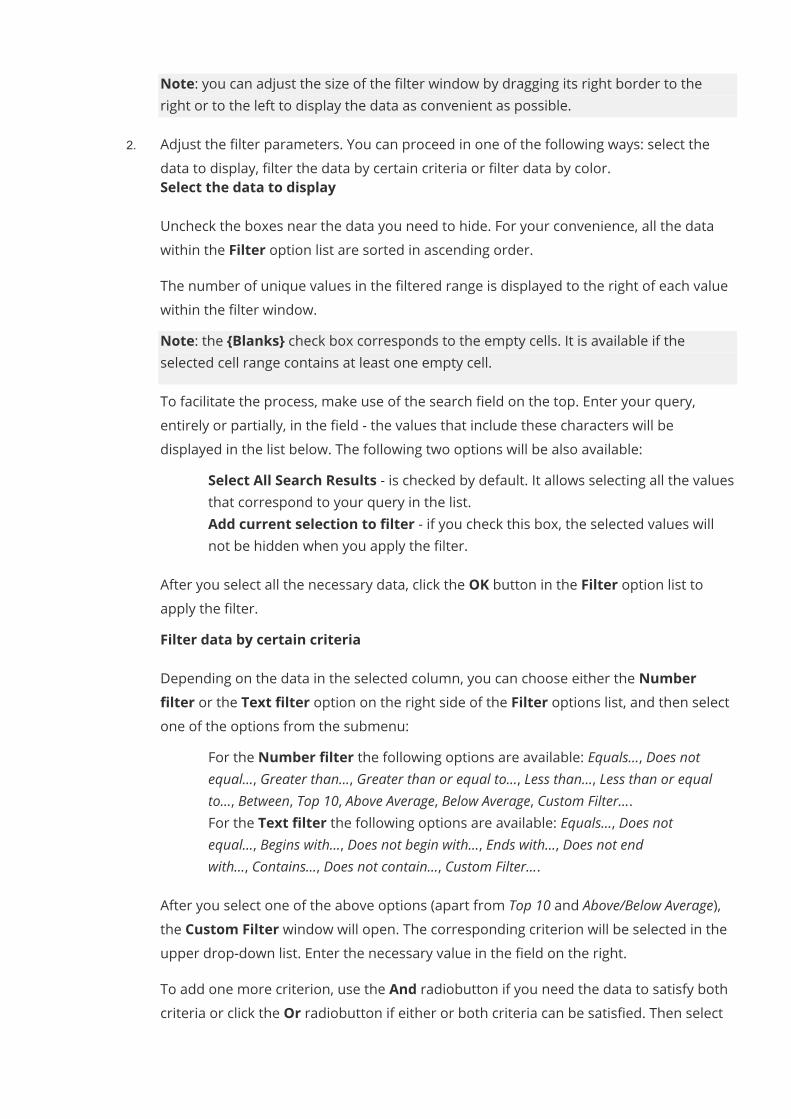
Note: you can adjust the size of the filter window by dragging its right border to theright or to the left to display the data as convenient as possible.
2. Adjust the filter parameters. You can proceed in one of the following ways: select thedata to display, filter the data by certain criteria or filter data by color.
· Select the data to displayUncheck the boxes near the data you need to hide. For your convenience, all the datawithin the Filter option list are sorted in ascending order.The number of unique values in the filtered range is displayed to the right of each valuewithin the filter window.Note: the {Blanks} check box corresponds to the empty cells. It is available if theselected cell range contains at least one empty cell.To facilitate the process, make use of the search field on the top. Enter your query,entirely or partially, in the field - the values that include these characters will bedisplayed in the list below. The following two options will be also available:
o Select All Search Results - is checked by default. It allows selecting all the valuesthat correspond to your query in the list.
o Add current selection to filter - if you check this box, the selected values willnot be hidden when you apply the filter.
After you select all the necessary data, click the OK button in the Filter option list toapply the filter.
· Filter data by certain criteriaDepending on the data in the selected column, you can choose either the Numberfilter or the Text filter option on the right side of the Filter options list, and then selectone of the options from the submenu:
o For the Number filter the following options are available: Equals..., Does notequal..., Greater than..., Greater than or equal to..., Less than..., Less than or equalto..., Between, Top 10, Above Average, Below Average, Custom Filter....
o For the Text filter the following options are available: Equals..., Does notequal..., Begins with..., Does not begin with..., Ends with..., Does not endwith..., Contains..., Does not contain..., Custom Filter....
After you select one of the above options (apart from Top 10 and Above/Below Average),the Custom Filter window will open. The corresponding criterion will be selected in theupper drop-down list. Enter the necessary value in the field on the right.To add one more criterion, use the And radiobutton if you need the data to satisfy bothcriteria or click the Or radiobutton if either or both criteria can be satisfied. Then select
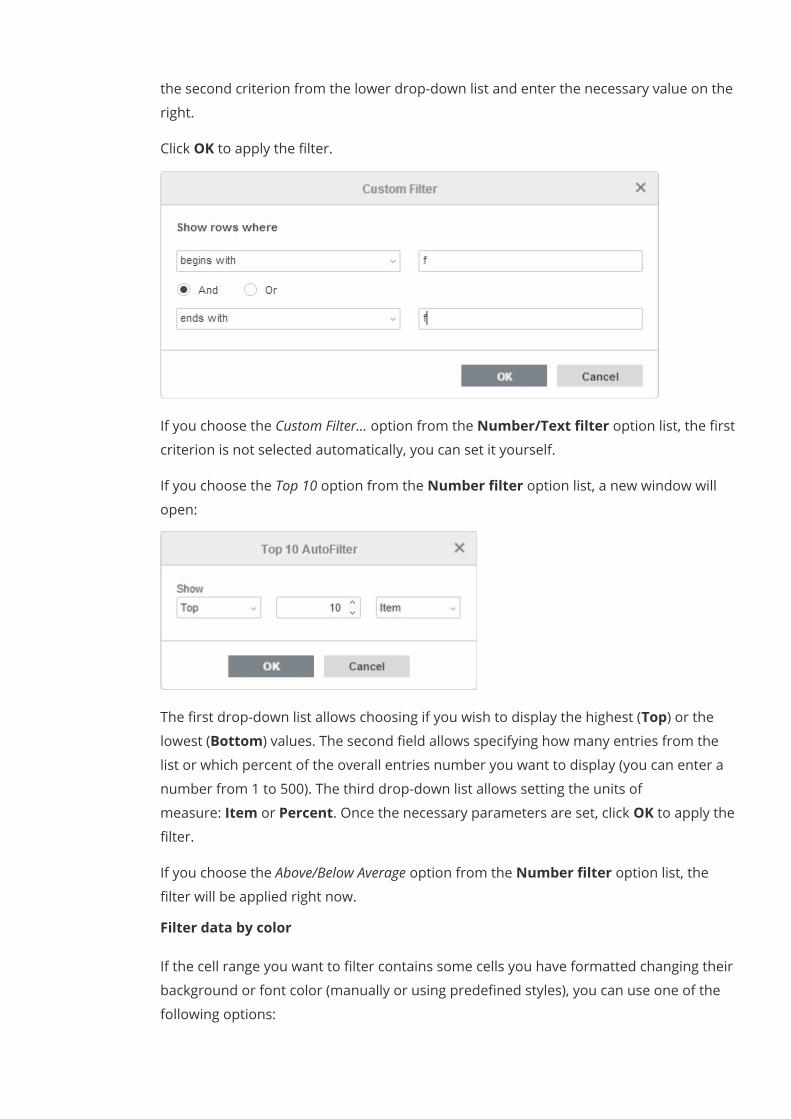
the second criterion from the lower drop-down list and enter the necessary value on theright.Click OK to apply the filter.
If you choose the Custom Filter... option from the Number/Text filter option list, the firstcriterion is not selected automatically, you can set it yourself.If you choose the Top 10 option from the Number filter option list, a new window willopen:
The first drop-down list allows choosing if you wish to display the highest (Top) or thelowest (Bottom) values. The second field allows specifying how many entries from thelist or which percent of the overall entries number you want to display (you can enter anumber from 1 to 500). The third drop-down list allows setting the units ofmeasure: Item or Percent. Once the necessary parameters are set, click OK to apply thefilter.If you choose the Above/Below Average option from the Number filter option list, thefilter will be applied right now.
· Filter data by colorIf the cell range you want to filter contains some cells you have formatted changing theirbackground or font color (manually or using predefined styles), you can use one of thefollowing options:
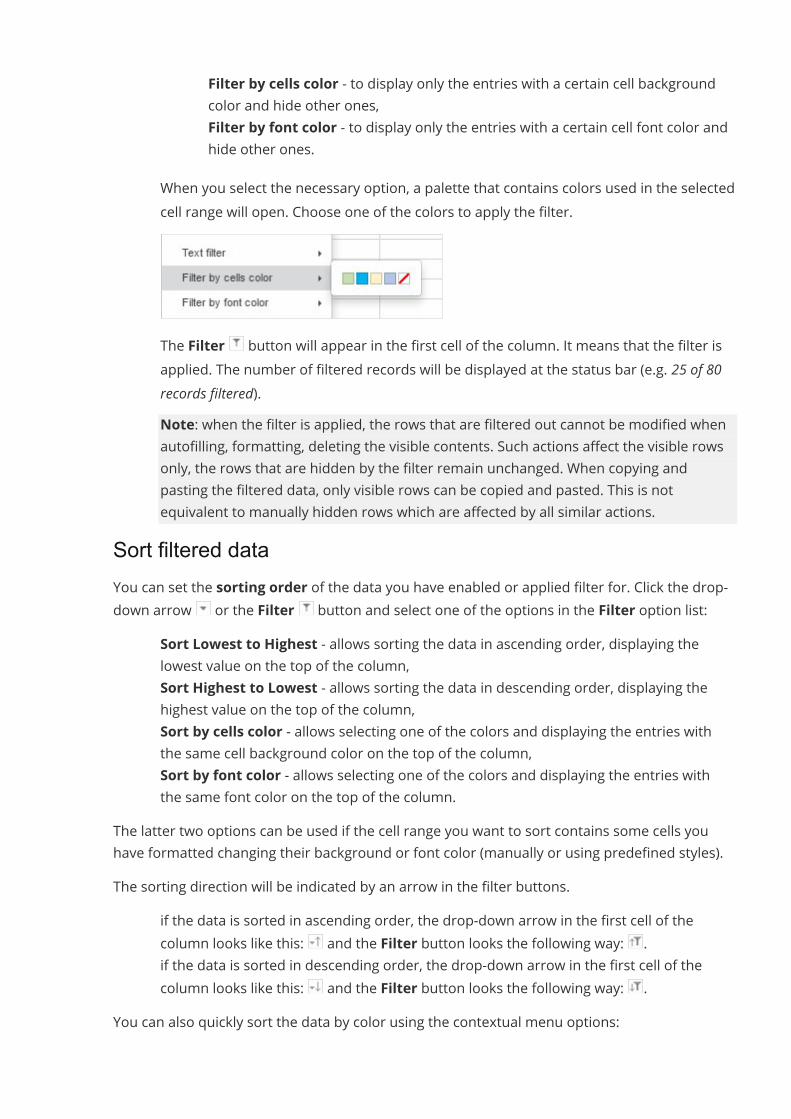
o Filter by cells color - to display only the entries with a certain cell backgroundcolor and hide other ones,
o Filter by font color - to display only the entries with a certain cell font color andhide other ones.
When you select the necessary option, a palette that contains colors used in the selectedcell range will open. Choose one of the colors to apply the filter.
The Filter button will appear in the first cell of the column. It means that the filter isapplied. The number of filtered records will be displayed at the status bar (e.g. 25 of 80records filtered).Note: when the filter is applied, the rows that are filtered out cannot be modified whenautofilling, formatting, deleting the visible contents. Such actions affect the visible rowsonly, the rows that are hidden by the filter remain unchanged. When copying andpasting the filtered data, only visible rows can be copied and pasted. This is notequivalent to manually hidden rows which are affected by all similar actions.
Sort filtered dataYou can set the sorting order of the data you have enabled or applied filter for. Click the drop-down arrow or the Filter button and select one of the options in the Filter option list:
· Sort Lowest to Highest - allows sorting the data in ascending order, displaying thelowest value on the top of the column,
· Sort Highest to Lowest - allows sorting the data in descending order, displaying thehighest value on the top of the column,
· Sort by cells color - allows selecting one of the colors and displaying the entries withthe same cell background color on the top of the column,
· Sort by font color - allows selecting one of the colors and displaying the entries withthe same font color on the top of the column.
The latter two options can be used if the cell range you want to sort contains some cells youhave formatted changing their background or font color (manually or using predefined styles).The sorting direction will be indicated by an arrow in the filter buttons.
· if the data is sorted in ascending order, the drop-down arrow in the first cell of thecolumn looks like this: and the Filter button looks the following way: .
· if the data is sorted in descending order, the drop-down arrow in the first cell of thecolumn looks like this: and the Filter button looks the following way: .
You can also quickly sort the data by color using the contextual menu options:
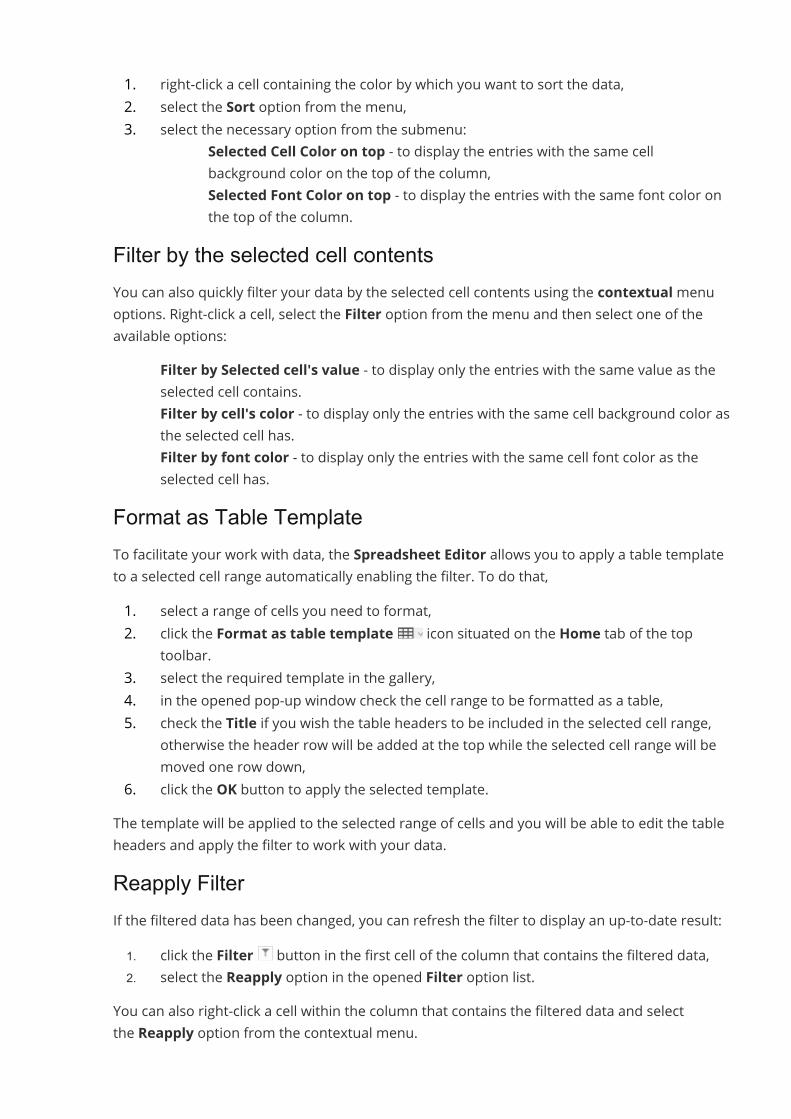
1. right-click a cell containing the color by which you want to sort the data,2. select the Sort option from the menu,3. select the necessary option from the submenu:
· Selected Cell Color on top - to display the entries with the same cellbackground color on the top of the column,
· Selected Font Color on top - to display the entries with the same font color onthe top of the column.
Filter by the selected cell contentsYou can also quickly filter your data by the selected cell contents using the contextualmenuoptions. Right-click a cell, select the Filter option from the menu and then select one of theavailable options:
· Filter by Selected cell's value - to display only the entries with the same value as theselected cell contains.
· Filter by cell's color - to display only the entries with the same cell background color asthe selected cell has.
· Filter by font color - to display only the entries with the same cell font color as theselected cell has.
Format as Table TemplateTo facilitate your work with data, the Spreadsheet Editor allows you to apply a table templateto a selected cell range automatically enabling the filter. To do that,1. select a range of cells you need to format,2. click the Format as table template icon situated on the Home tab of the top
toolbar.3. select the required template in the gallery,4. in the opened pop-up window check the cell range to be formatted as a table,5. check the Title if you wish the table headers to be included in the selected cell range,
otherwise the header row will be added at the top while the selected cell range will bemoved one row down,
6. click the OK button to apply the selected template.The template will be applied to the selected range of cells and you will be able to edit the tableheaders and apply the filter to work with your data.Reapply FilterIf the filtered data has been changed, you can refresh the filter to display an up-to-date result:1. click the Filter button in the first cell of the column that contains the filtered data,2. select the Reapply option in the opened Filter option list.
You can also right-click a cell within the column that contains the filtered data and selectthe Reapply option from the contextual menu.
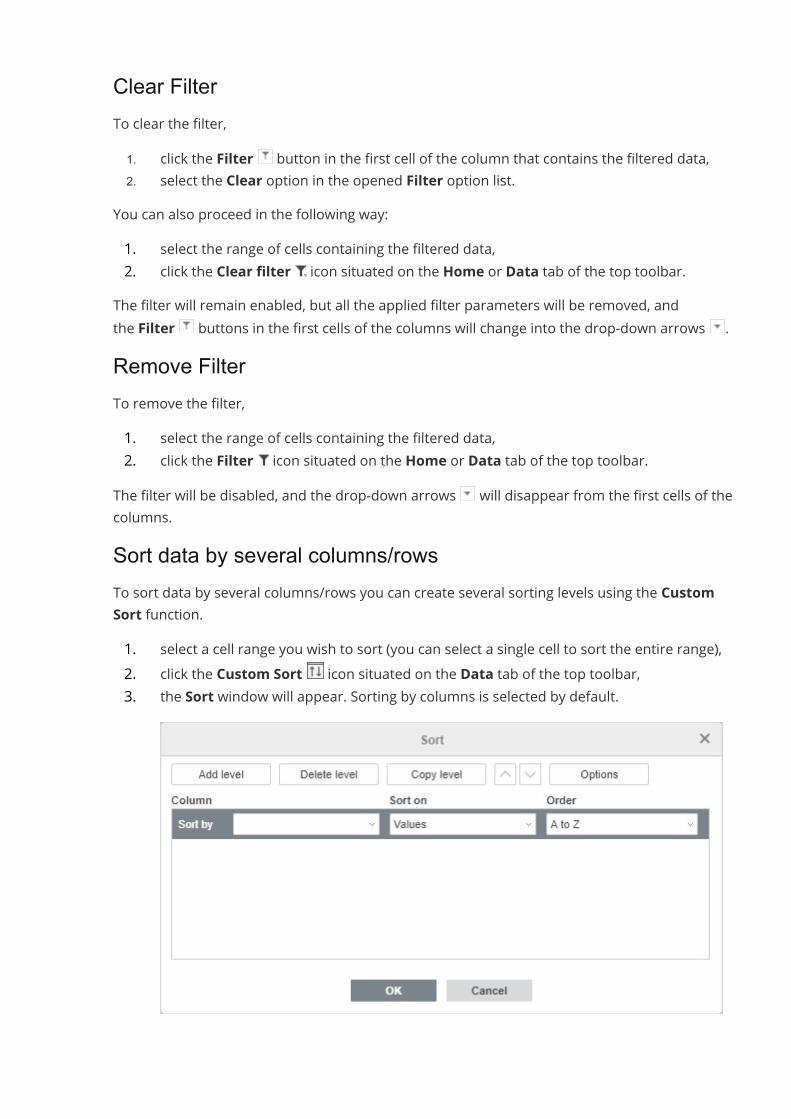
Clear FilterTo clear the filter,1. click the Filter button in the first cell of the column that contains the filtered data,2. select the Clear option in the opened Filter option list.
You can also proceed in the following way:1. select the range of cells containing the filtered data,2. click the Clear filter icon situated on the Home or Data tab of the top toolbar.
The filter will remain enabled, but all the applied filter parameters will be removed, andthe Filter buttons in the first cells of the columns will change into the drop-down arrows .Remove FilterTo remove the filter,1. select the range of cells containing the filtered data,2. click the Filter icon situated on the Home or Data tab of the top toolbar.
The filter will be disabled, and the drop-down arrows will disappear from the first cells of thecolumns.Sort data by several columns/rowsTo sort data by several columns/rows you can create several sorting levels using the CustomSort function.1. select a cell range you wish to sort (you can select a single cell to sort the entire range),2. click the Custom Sort icon situated on the Data tab of the top toolbar,3. the Sort window will appear. Sorting by columns is selected by default.
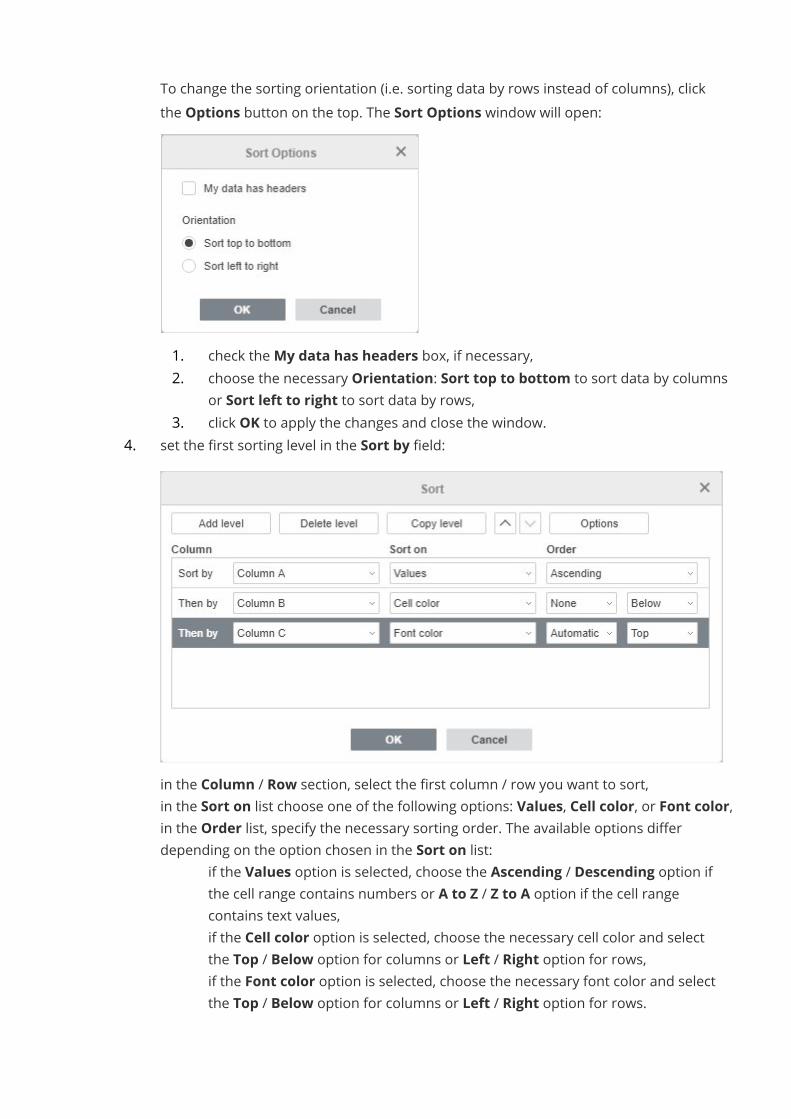
To change the sorting orientation (i.e. sorting data by rows instead of columns), clickthe Options button on the top. The Sort Options window will open:
1. check theMy data has headers box, if necessary,2. choose the necessary Orientation: Sort top to bottom to sort data by columns
or Sort left to right to sort data by rows,3. click OK to apply the changes and close the window.
4. set the first sorting level in the Sort by field:
· in the Column / Row section, select the first column / row you want to sort,· in the Sort on list choose one of the following options: Values, Cell color, or Font color,· in the Order list, specify the necessary sorting order. The available options differ
depending on the option chosen in the Sort on list:· if the Values option is selected, choose the Ascending / Descending option if
the cell range contains numbers or A to Z / Z to A option if the cell rangecontains text values,
· if the Cell color option is selected, choose the necessary cell color and selectthe Top / Below option for columns or Left / Right option for rows,
· if the Font color option is selected, choose the necessary font color and selectthe Top / Below option for columns or Left / Right option for rows.
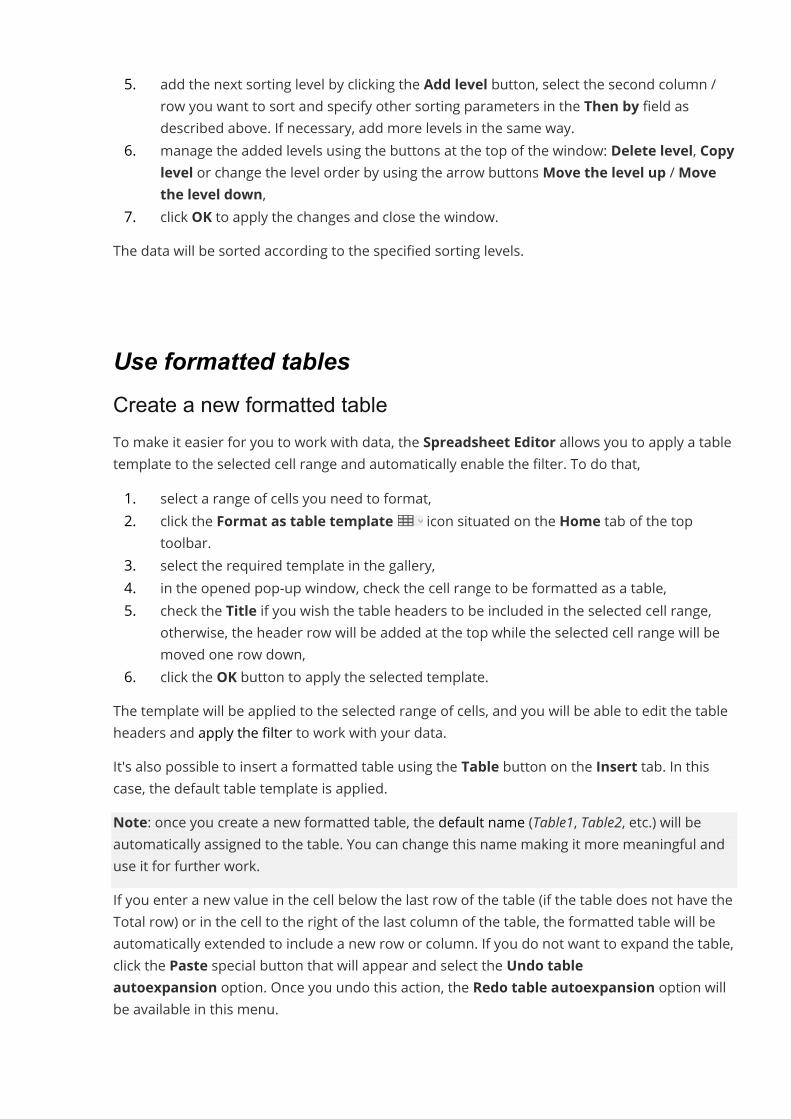
5. add the next sorting level by clicking the Add level button, select the second column /row you want to sort and specify other sorting parameters in the Then by field asdescribed above. If necessary, add more levels in the same way.
6. manage the added levels using the buttons at the top of the window: Delete level, Copylevel or change the level order by using the arrow buttonsMove the level up /Movethe level down,
7. click OK to apply the changes and close the window.The data will be sorted according to the specified sorting levels.
Use formatted tablesCreate a new formatted tableTo make it easier for you to work with data, the Spreadsheet Editor allows you to apply a tabletemplate to the selected cell range and automatically enable the filter. To do that,1. select a range of cells you need to format,2. click the Format as table template icon situated on the Home tab of the top
toolbar.3. select the required template in the gallery,4. in the opened pop-up window, check the cell range to be formatted as a table,5. check the Title if you wish the table headers to be included in the selected cell range,
otherwise, the header row will be added at the top while the selected cell range will bemoved one row down,
6. click the OK button to apply the selected template.The template will be applied to the selected range of cells, and you will be able to edit the tableheaders and apply the filter to work with your data.It's also possible to insert a formatted table using the Table button on the Insert tab. In thiscase, the default table template is applied.Note: once you create a new formatted table, the default name (Table1, Table2, etc.) will beautomatically assigned to the table. You can change this name making it more meaningful anduse it for further work.If you enter a new value in the cell below the last row of the table (if the table does not have theTotal row) or in the cell to the right of the last column of the table, the formatted table will beautomatically extended to include a new row or column. If you do not want to expand the table,click the Paste special button that will appear and select the Undo tableautoexpansion option. Once you undo this action, the Redo table autoexpansion option willbe available in this menu.
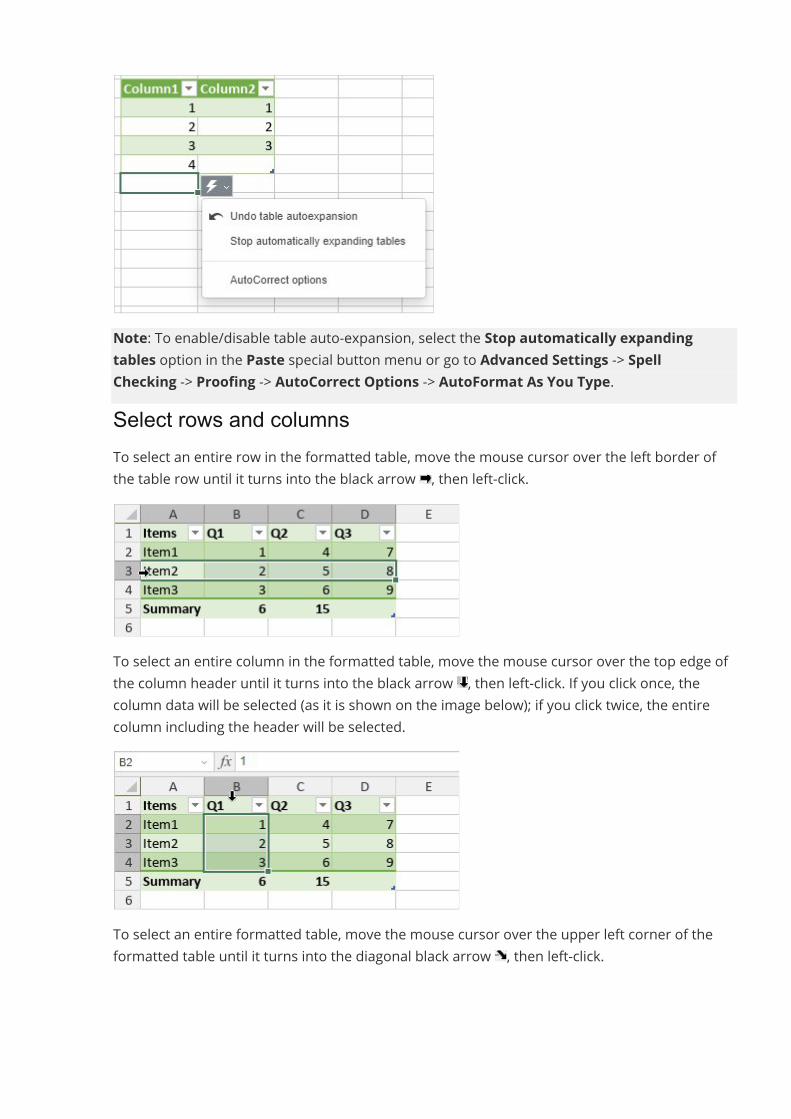
Note: To enable/disable table auto-expansion, select the Stop automatically expandingtables option in the Paste special button menu or go to Advanced Settings -> SpellChecking -> Proofing -> AutoCorrect Options -> AutoFormat As You Type.Select rows and columnsTo select an entire row in the formatted table, move the mouse cursor over the left border ofthe table row until it turns into the black arrow , then left-click.
To select an entire column in the formatted table, move the mouse cursor over the top edge ofthe column header until it turns into the black arrow , then left-click. If you click once, thecolumn data will be selected (as it is shown on the image below); if you click twice, the entirecolumn including the header will be selected.
To select an entire formatted table, move the mouse cursor over the upper left corner of theformatted table until it turns into the diagonal black arrow , then left-click.
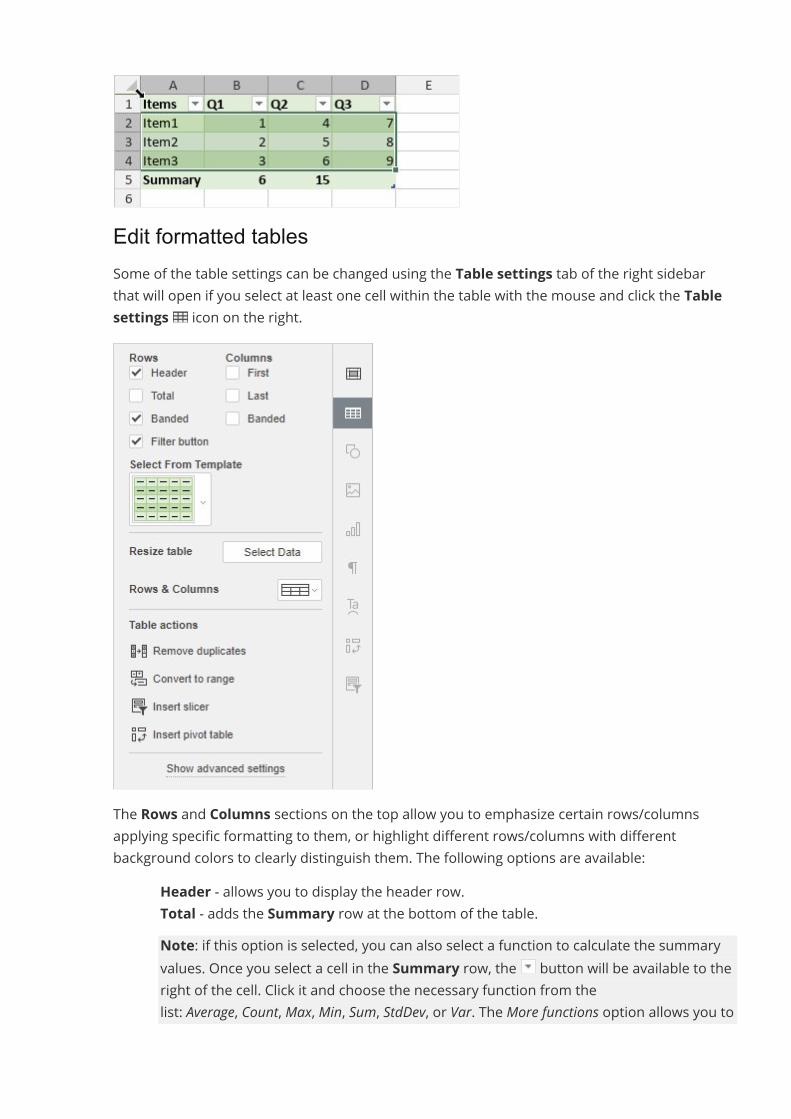
Edit formatted tablesSome of the table settings can be changed using the Table settings tab of the right sidebarthat will open if you select at least one cell within the table with the mouse and click the Tablesettings icon on the right.
The Rows and Columns sections on the top allow you to emphasize certain rows/columnsapplying specific formatting to them, or highlight different rows/columns with differentbackground colors to clearly distinguish them. The following options are available:
· Header - allows you to display the header row.· Total - adds the Summary row at the bottom of the table.
Note: if this option is selected, you can also select a function to calculate the summaryvalues. Once you select a cell in the Summary row, the button will be available to theright of the cell. Click it and choose the necessary function from thelist: Average, Count, Max, Min, Sum, StdDev, or Var. The More functions option allows you to
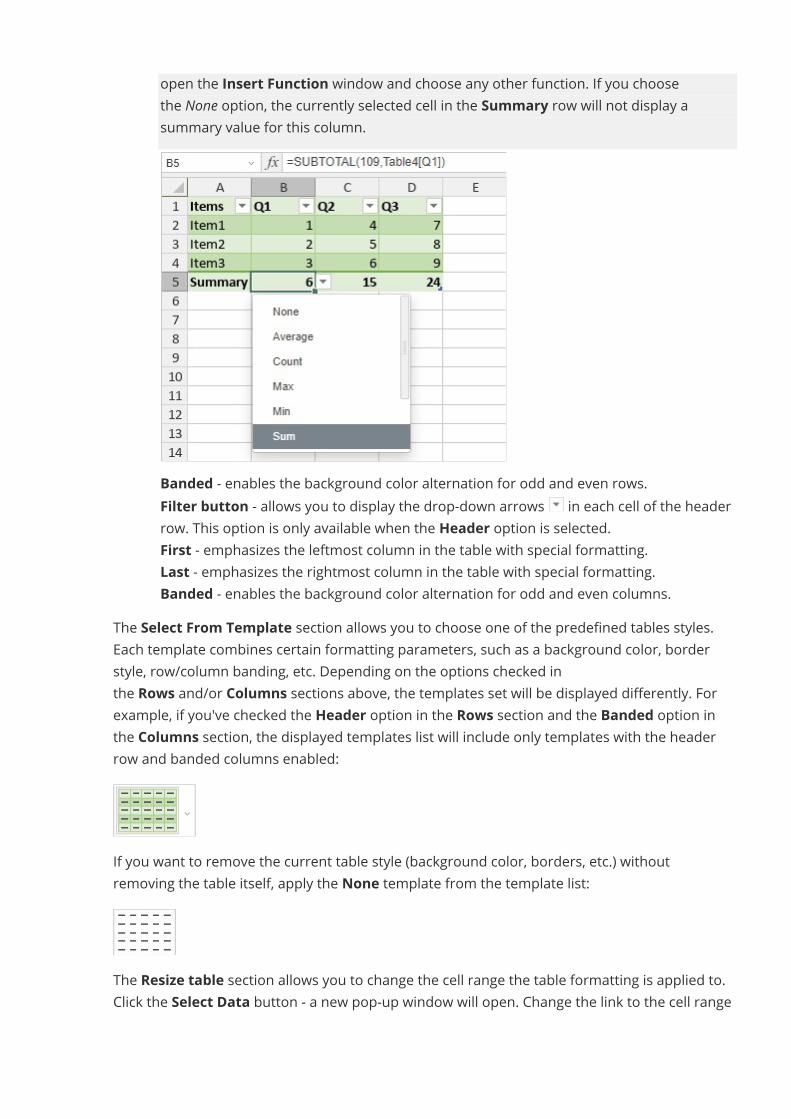
open the Insert Function window and choose any other function. If you choosethe None option, the currently selected cell in the Summary row will not display asummary value for this column.
· Banded - enables the background color alternation for odd and even rows.· Filter button - allows you to display the drop-down arrows in each cell of the header
row. This option is only available when the Header option is selected.· First - emphasizes the leftmost column in the table with special formatting.· Last - emphasizes the rightmost column in the table with special formatting.· Banded - enables the background color alternation for odd and even columns.
The Select From Template section allows you to choose one of the predefined tables styles.Each template combines certain formatting parameters, such as a background color, borderstyle, row/column banding, etc. Depending on the options checked inthe Rows and/or Columns sections above, the templates set will be displayed differently. Forexample, if you've checked the Header option in the Rows section and the Banded option inthe Columns section, the displayed templates list will include only templates with the headerrow and banded columns enabled:
If you want to remove the current table style (background color, borders, etc.) withoutremoving the table itself, apply the None template from the template list:
The Resize table section allows you to change the cell range the table formatting is applied to.Click the Select Data button - a new pop-up window will open. Change the link to the cell range
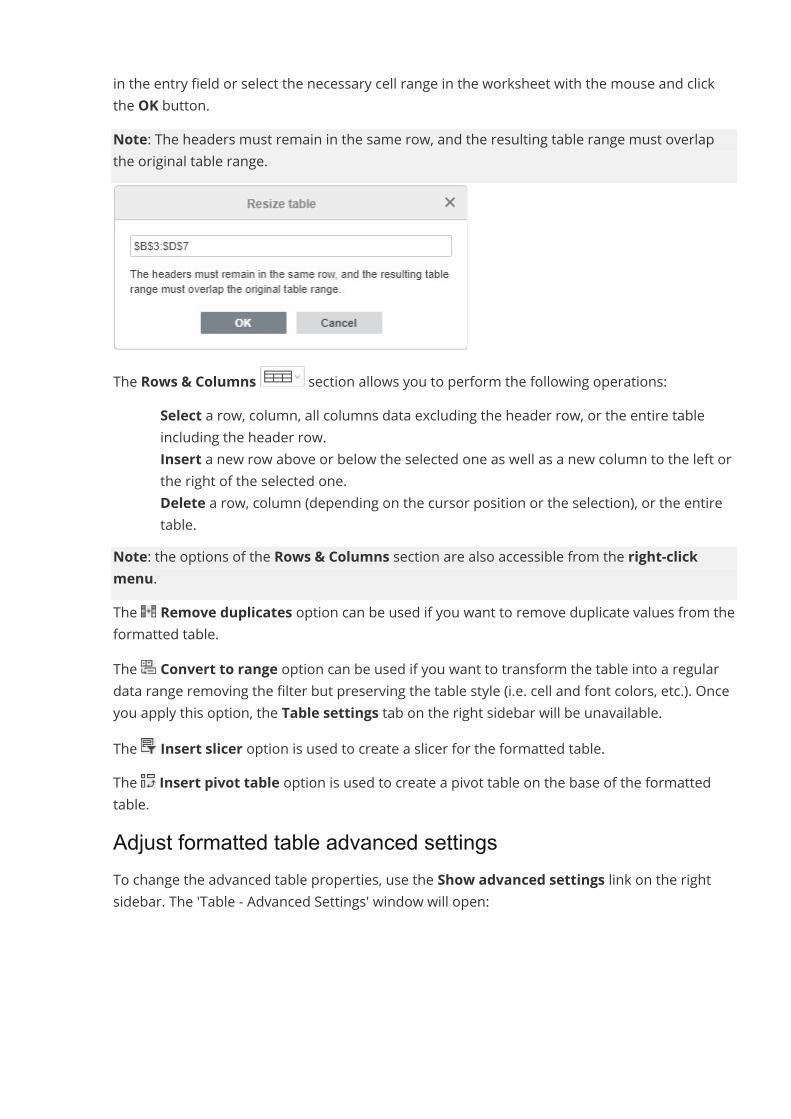
in the entry field or select the necessary cell range in the worksheet with the mouse and clickthe OK button.Note: The headers must remain in the same row, and the resulting table range must overlapthe original table range.
The Rows & Columns section allows you to perform the following operations:· Select a row, column, all columns data excluding the header row, or the entire table
including the header row.· Insert a new row above or below the selected one as well as a new column to the left or
the right of the selected one.· Delete a row, column (depending on the cursor position or the selection), or the entire
table.Note: the options of the Rows & Columns section are also accessible from the right-clickmenu.The Remove duplicates option can be used if you want to remove duplicate values from theformatted table.The Convert to range option can be used if you want to transform the table into a regulardata range removing the filter but preserving the table style (i.e. cell and font colors, etc.). Onceyou apply this option, the Table settings tab on the right sidebar will be unavailable.The Insert slicer option is used to create a slicer for the formatted table.The Insert pivot table option is used to create a pivot table on the base of the formattedtable.Adjust formatted table advanced settingsTo change the advanced table properties, use the Show advanced settings link on the rightsidebar. The 'Table - Advanced Settings' window will open:
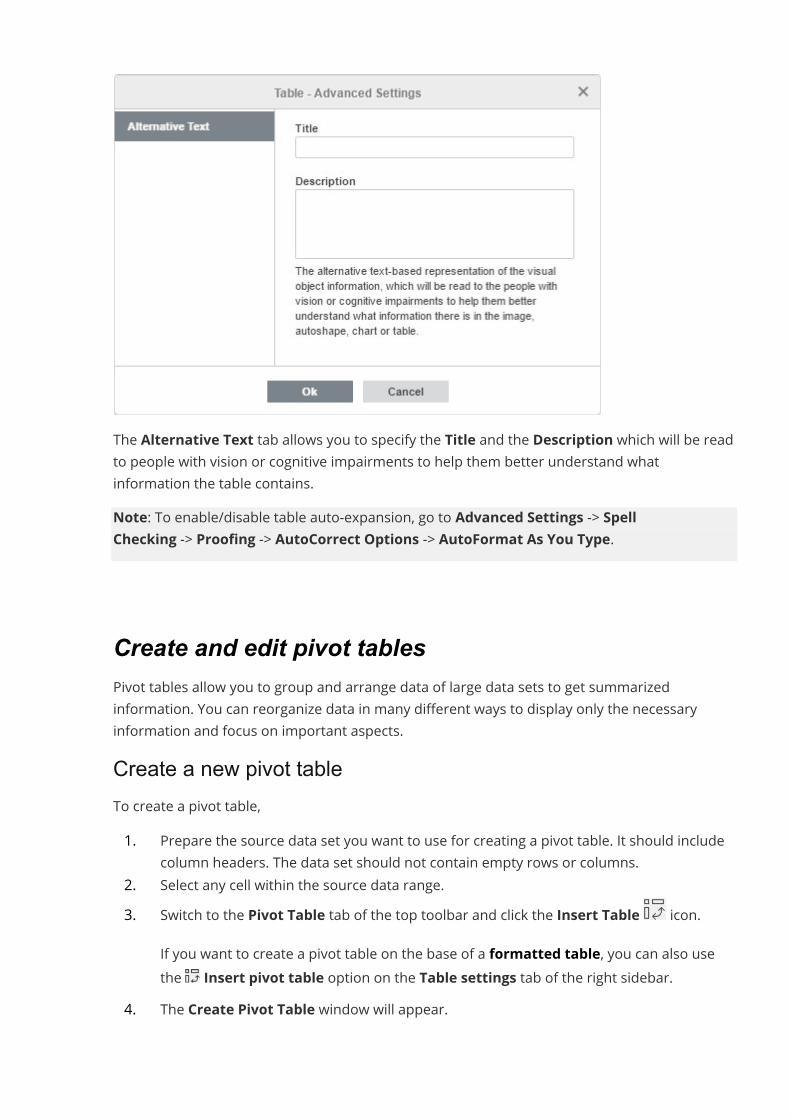
The Alternative Text tab allows you to specify the Title and the Description which will be readto people with vision or cognitive impairments to help them better understand whatinformation the table contains.Note: To enable/disable table auto-expansion, go to Advanced Settings -> SpellChecking -> Proofing -> AutoCorrect Options -> AutoFormat As You Type.
Create and edit pivot tablesPivot tables allow you to group and arrange data of large data sets to get summarizedinformation. You can reorganize data in many different ways to display only the necessaryinformation and focus on important aspects.Create a new pivot tableTo create a pivot table,1. Prepare the source data set you want to use for creating a pivot table. It should include
column headers. The data set should not contain empty rows or columns.2. Select any cell within the source data range.3. Switch to the Pivot Table tab of the top toolbar and click the Insert Table icon.
If you want to create a pivot table on the base of a formatted table, you can also usethe Insert pivot table option on the Table settings tab of the right sidebar.
4. The Create Pivot Table window will appear.
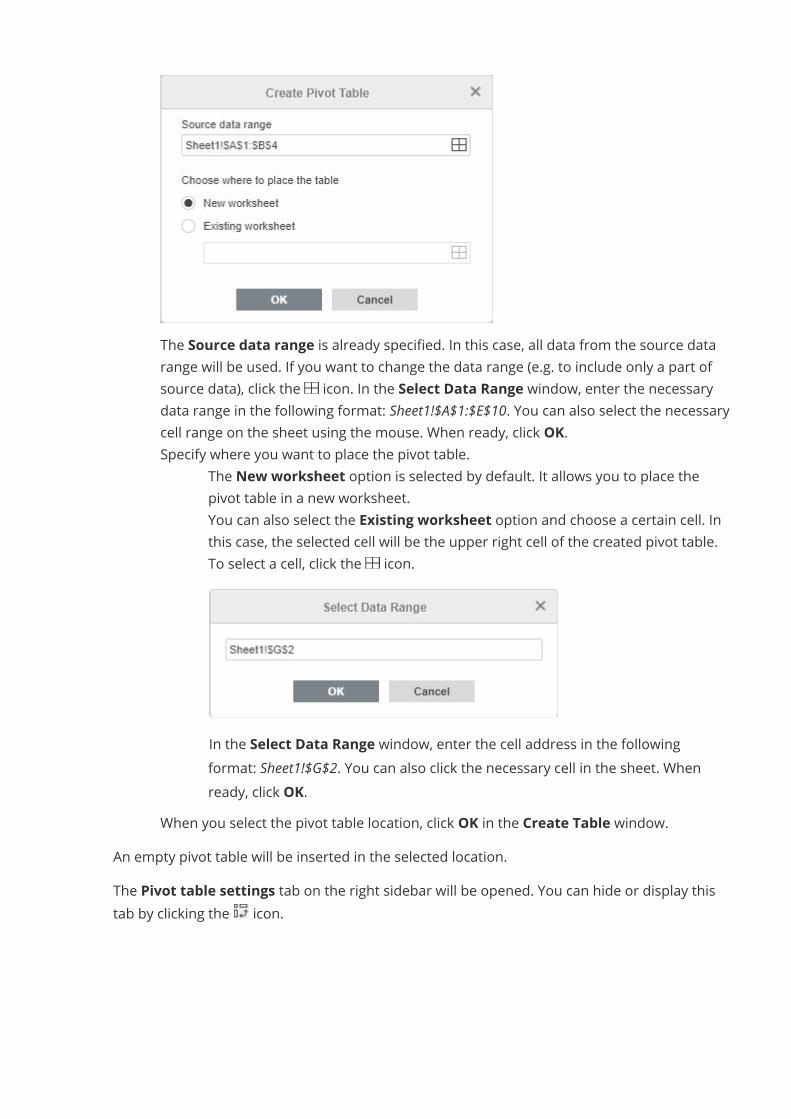
· The Source data range is already specified. In this case, all data from the source datarange will be used. If you want to change the data range (e.g. to include only a part ofsource data), click the icon. In the Select Data Range window, enter the necessarydata range in the following format: Sheet1!$A$1:$E$10. You can also select the necessarycell range on the sheet using the mouse. When ready, click OK.
· Specify where you want to place the pivot table.o The New worksheet option is selected by default. It allows you to place the
pivot table in a new worksheet.o You can also select the Existing worksheet option and choose a certain cell. In
this case, the selected cell will be the upper right cell of the created pivot table.To select a cell, click the icon.
In the Select Data Range window, enter the cell address in the followingformat: Sheet1!$G$2. You can also click the necessary cell in the sheet. Whenready, click OK.
· When you select the pivot table location, click OK in the Create Table window.An empty pivot table will be inserted in the selected location.The Pivot table settings tab on the right sidebar will be opened. You can hide or display thistab by clicking the icon.
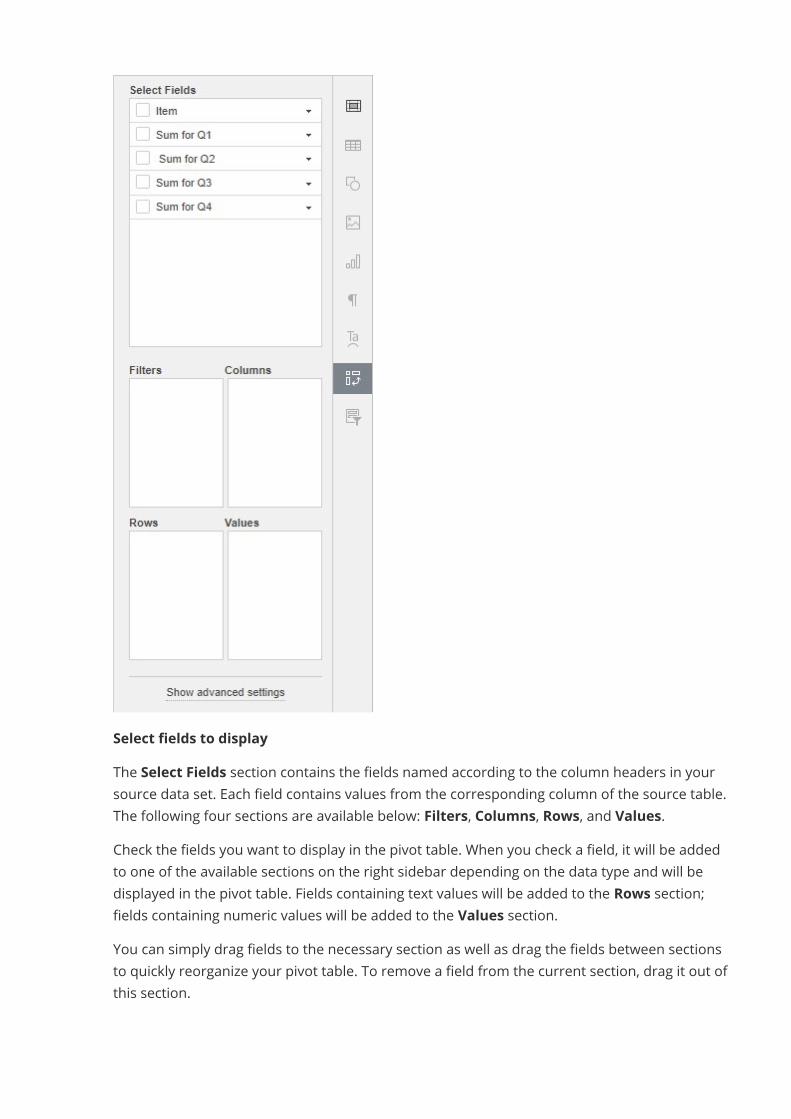
Select fields to displayThe Select Fields section contains the fields named according to the column headers in yoursource data set. Each field contains values from the corresponding column of the source table.The following four sections are available below: Filters, Columns, Rows, and Values.Check the fields you want to display in the pivot table. When you check a field, it will be addedto one of the available sections on the right sidebar depending on the data type and will bedisplayed in the pivot table. Fields containing text values will be added to the Rows section;fields containing numeric values will be added to the Values section.You can simply drag fields to the necessary section as well as drag the fields between sectionsto quickly reorganize your pivot table. To remove a field from the current section, drag it out ofthis section.
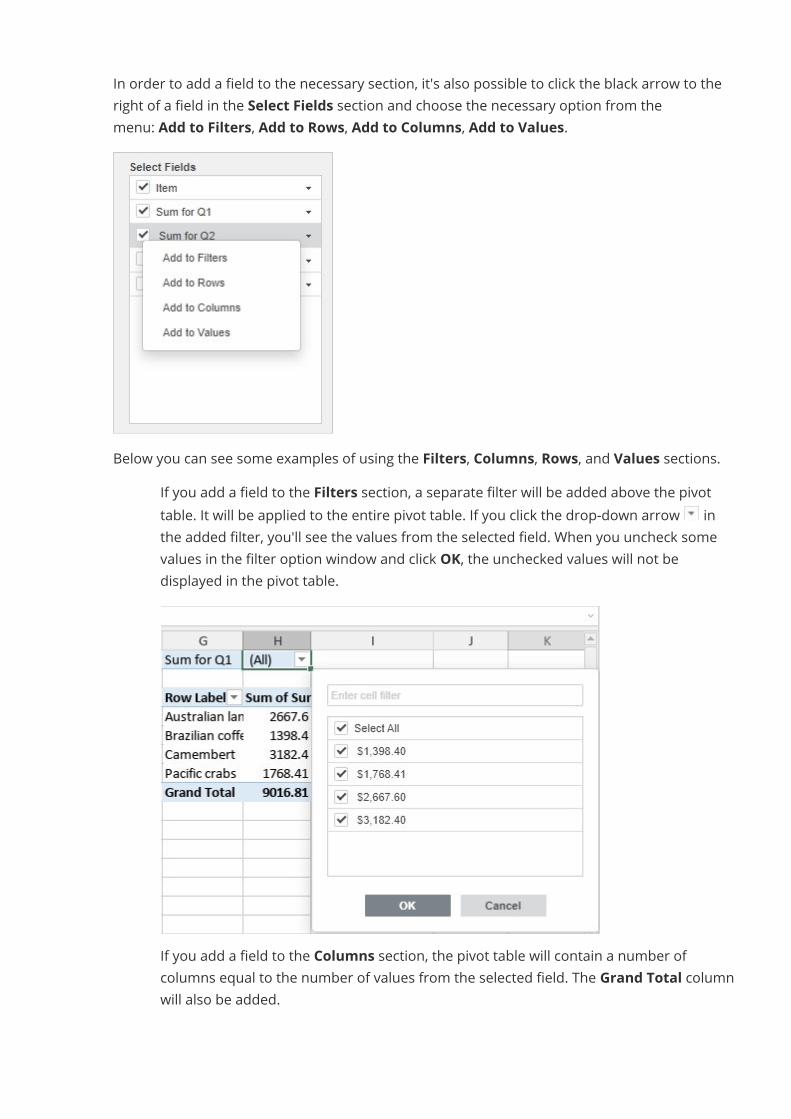
In order to add a field to the necessary section, it's also possible to click the black arrow to theright of a field in the Select Fields section and choose the necessary option from themenu: Add to Filters, Add to Rows, Add to Columns, Add to Values.
Below you can see some examples of using the Filters, Columns, Rows, and Values sections.· If you add a field to the Filters section, a separate filter will be added above the pivot
table. It will be applied to the entire pivot table. If you click the drop-down arrow inthe added filter, you'll see the values from the selected field. When you uncheck somevalues in the filter option window and click OK, the unchecked values will not bedisplayed in the pivot table.
· If you add a field to the Columns section, the pivot table will contain a number ofcolumns equal to the number of values from the selected field. The Grand Total columnwill also be added.
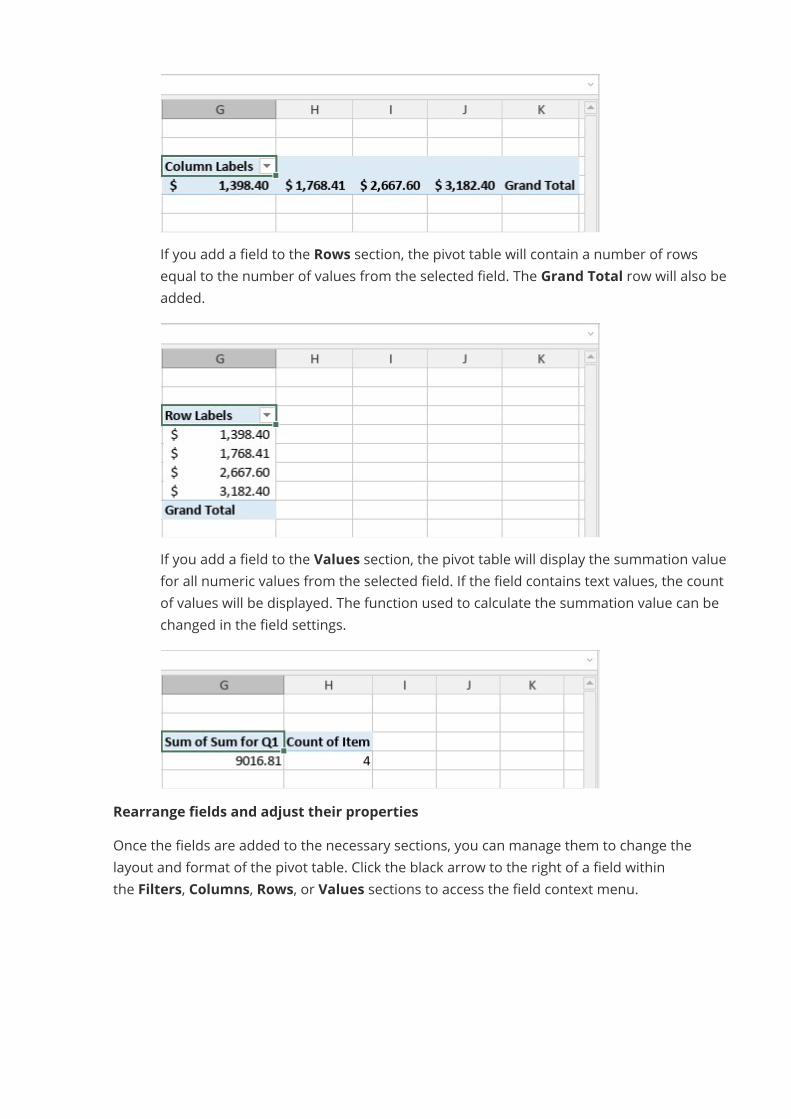
· If you add a field to the Rows section, the pivot table will contain a number of rowsequal to the number of values from the selected field. The Grand Total row will also beadded.
· If you add a field to the Values section, the pivot table will display the summation valuefor all numeric values from the selected field. If the field contains text values, the countof values will be displayed. The function used to calculate the summation value can bechanged in the field settings.
Rearrange fields and adjust their propertiesOnce the fields are added to the necessary sections, you can manage them to change thelayout and format of the pivot table. Click the black arrow to the right of a field withinthe Filters, Columns, Rows, or Values sections to access the field context menu.
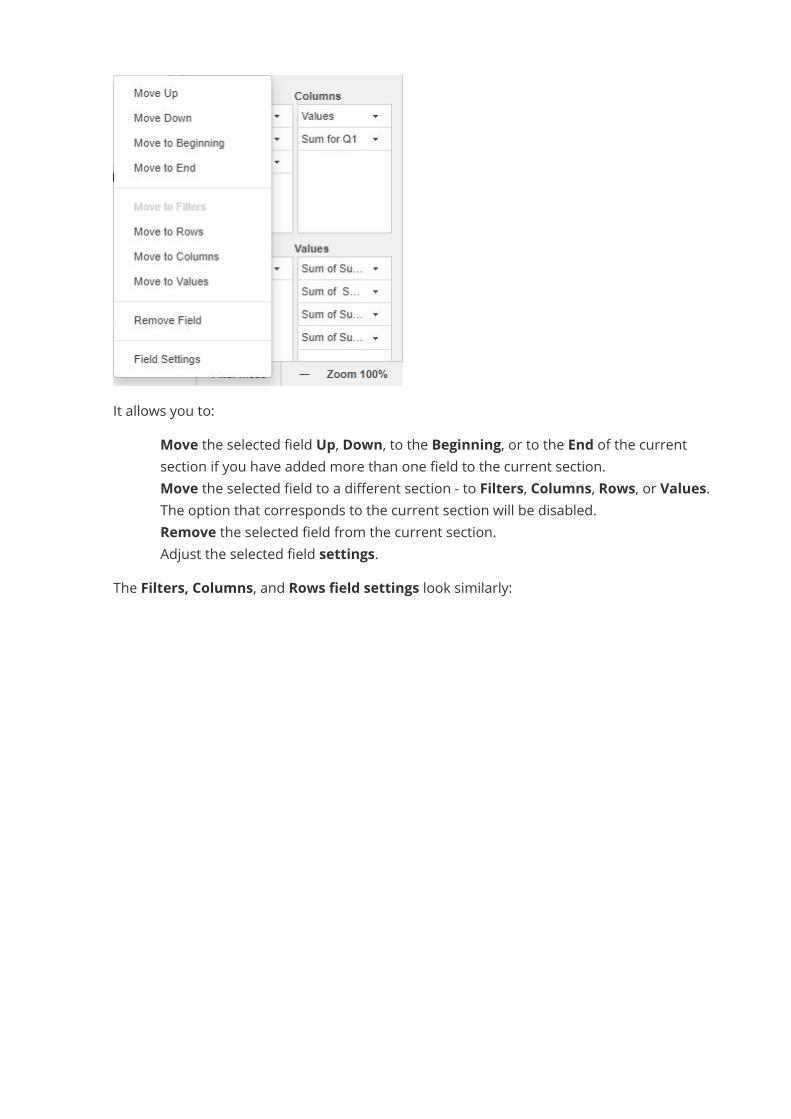
It allows you to:· Move the selected field Up, Down, to the Beginning, or to the End of the current
section if you have added more than one field to the current section.· Move the selected field to a different section - to Filters, Columns, Rows, or Values.
The option that corresponds to the current section will be disabled.· Remove the selected field from the current section.· Adjust the selected field settings.
The Filters, Columns, and Rows field settings look similarly:
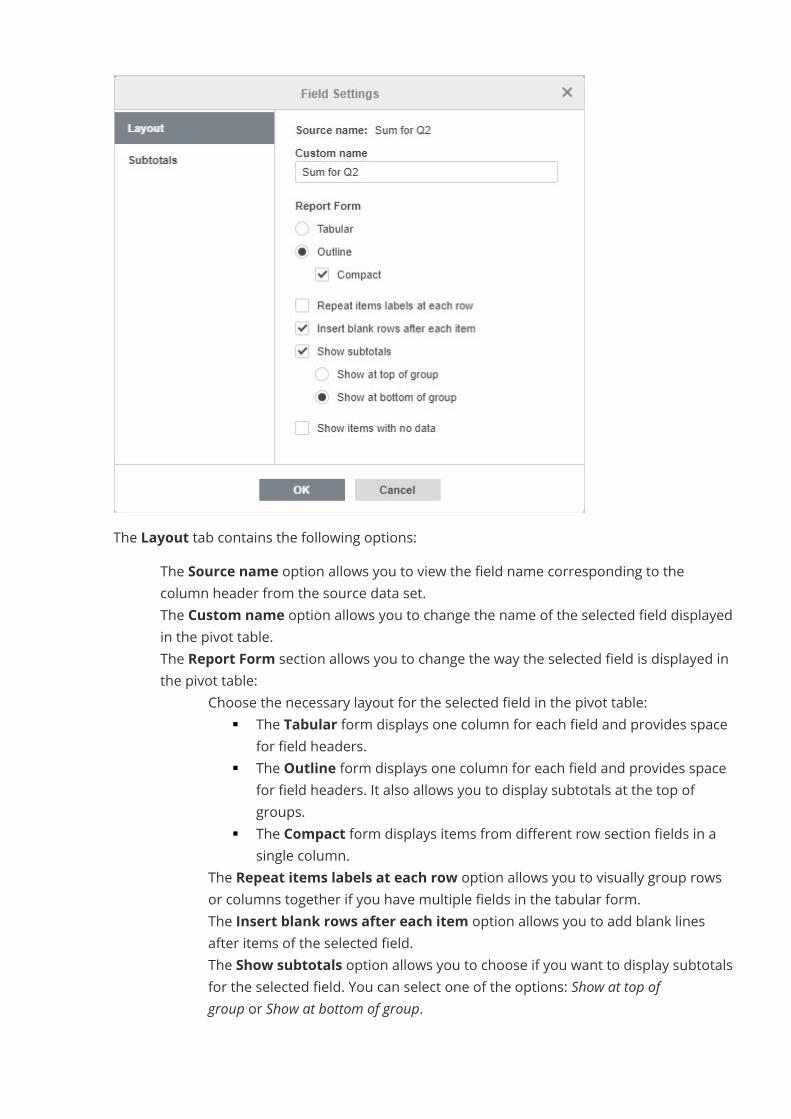
The Layout tab contains the following options:· The Source name option allows you to view the field name corresponding to the
column header from the source data set.· The Custom name option allows you to change the name of the selected field displayed
in the pivot table.· The Report Form section allows you to change the way the selected field is displayed in
the pivot table:o Choose the necessary layout for the selected field in the pivot table:
§ The Tabular form displays one column for each field and provides spacefor field headers.
§ The Outline form displays one column for each field and provides spacefor field headers. It also allows you to display subtotals at the top ofgroups.
§ The Compact form displays items from different row section fields in asingle column.
o The Repeat items labels at each row option allows you to visually group rowsor columns together if you have multiple fields in the tabular form.
o The Insert blank rows after each item option allows you to add blank linesafter items of the selected field.
o The Show subtotals option allows you to choose if you want to display subtotalsfor the selected field. You can select one of the options: Show at top ofgroup or Show at bottom of group.
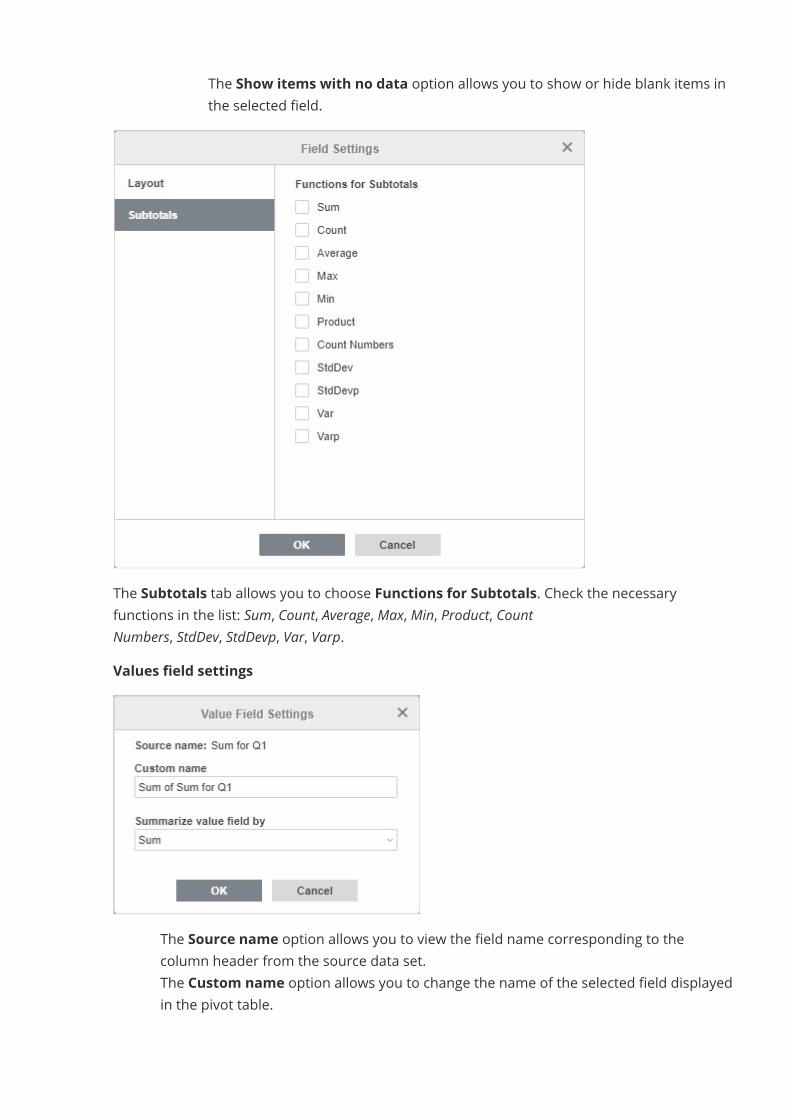
o The Show items with no data option allows you to show or hide blank items inthe selected field.
The Subtotals tab allows you to choose Functions for Subtotals. Check the necessaryfunctions in the list: Sum, Count, Average, Max, Min, Product, CountNumbers, StdDev, StdDevp, Var, Varp.Values field settings
· The Source name option allows you to view the field name corresponding to thecolumn header from the source data set.
· The Custom name option allows you to change the name of the selected field displayedin the pivot table.
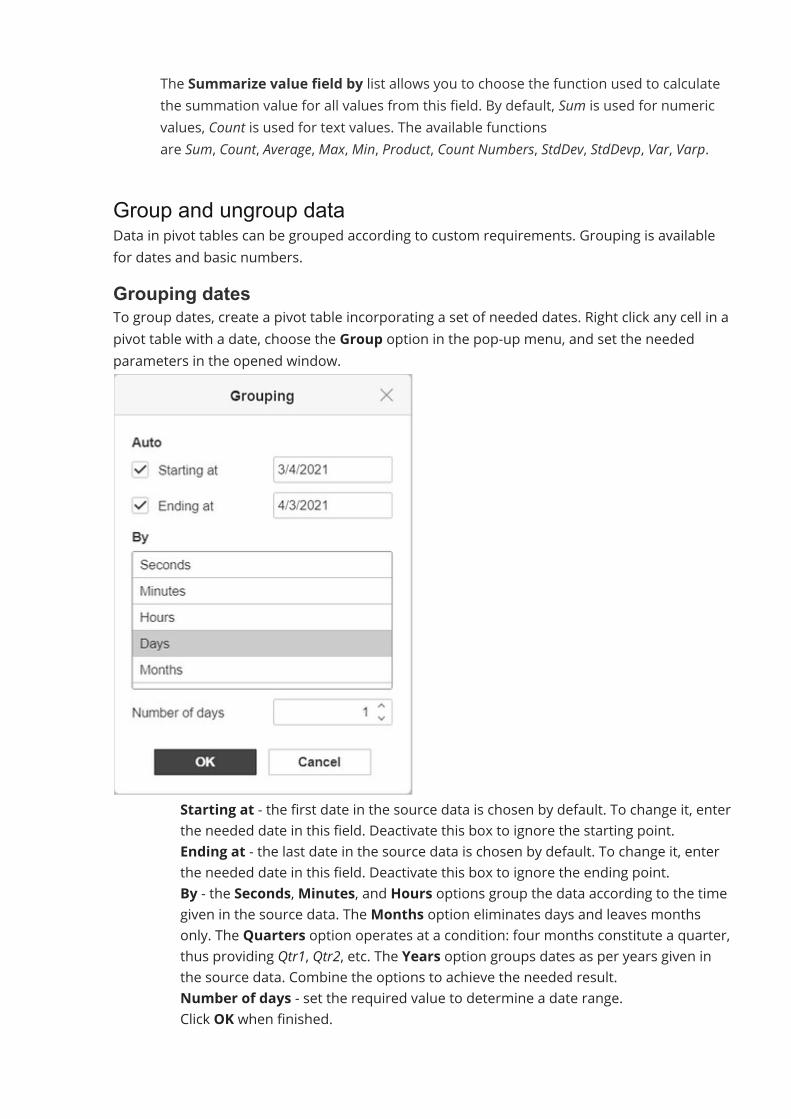
· The Summarize value field by list allows you to choose the function used to calculatethe summation value for all values from this field. By default, Sum is used for numericvalues, Count is used for text values. The available functionsare Sum, Count, Average, Max, Min, Product, Count Numbers, StdDev, StdDevp, Var, Varp.
Group and ungroup dataData in pivot tables can be grouped according to custom requirements. Grouping is availablefor dates and basic numbers.Grouping datesTo group dates, create a pivot table incorporating a set of needed dates. Right click any cell in apivot table with a date, choose the Group option in the pop-up menu, and set the neededparameters in the opened window.
· Starting at - the first date in the source data is chosen by default. To change it, enterthe needed date in this field. Deactivate this box to ignore the starting point.
· Ending at - the last date in the source data is chosen by default. To change it, enterthe needed date in this field. Deactivate this box to ignore the ending point.
· By - the Seconds,Minutes, and Hours options group the data according to the timegiven in the source data. TheMonths option eliminates days and leaves monthsonly. The Quarters option operates at a condition: four months constitute a quarter,thus providing Qtr1, Qtr2, etc. The Years option groups dates as per years given inthe source data. Combine the options to achieve the needed result.
· Number of days - set the required value to determine a date range.· Click OK when finished.
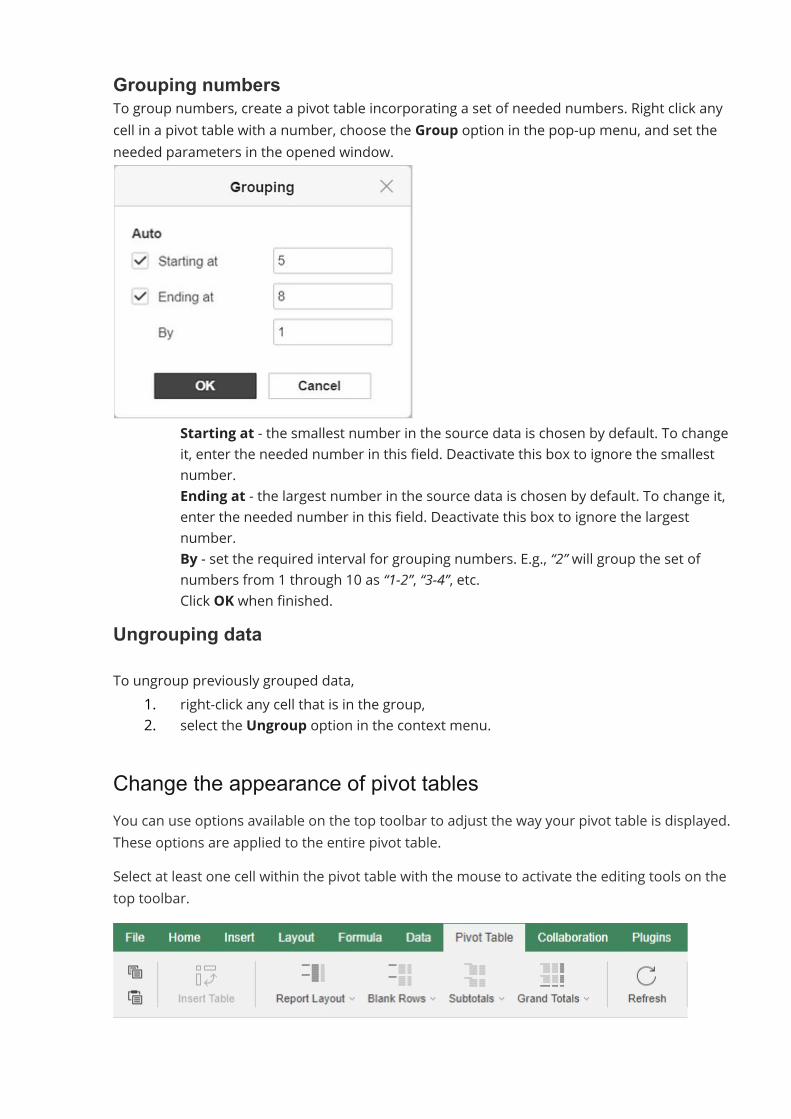
Grouping numbersTo group numbers, create a pivot table incorporating a set of needed numbers. Right click anycell in a pivot table with a number, choose the Group option in the pop-up menu, and set theneeded parameters in the opened window.
· Starting at - the smallest number in the source data is chosen by default. To changeit, enter the needed number in this field. Deactivate this box to ignore the smallestnumber.
· Ending at - the largest number in the source data is chosen by default. To change it,enter the needed number in this field. Deactivate this box to ignore the largestnumber.
· By - set the required interval for grouping numbers. E.g., “2” will group the set ofnumbers from 1 through 10 as “1-2”, “3-4”, etc.
· Click OK when finished.Ungrouping dataTo ungroup previously grouped data,
1. right-click any cell that is in the group,2. select the Ungroup option in the context menu.
Change the appearance of pivot tablesYou can use options available on the top toolbar to adjust the way your pivot table is displayed.These options are applied to the entire pivot table.Select at least one cell within the pivot table with the mouse to activate the editing tools on thetop toolbar.
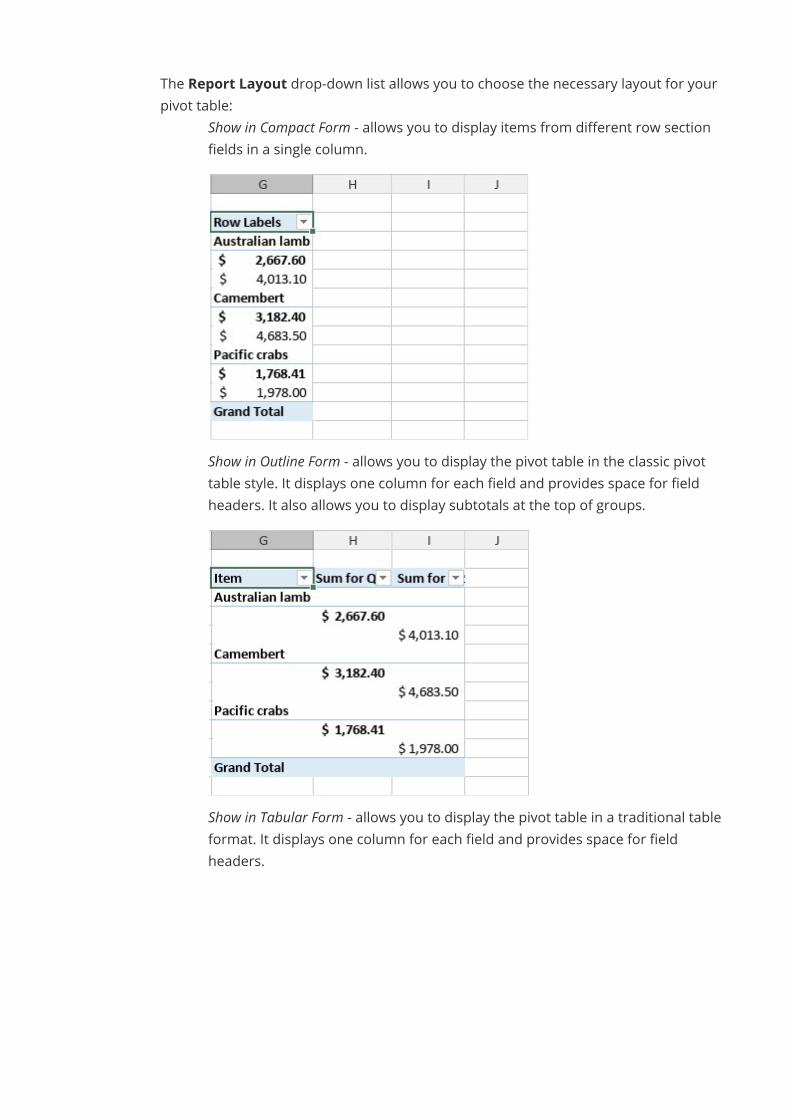
· The Report Layout drop-down list allows you to choose the necessary layout for yourpivot table:
o Show in Compact Form - allows you to display items from different row sectionfields in a single column.
o Show in Outline Form - allows you to display the pivot table in the classic pivottable style. It displays one column for each field and provides space for fieldheaders. It also allows you to display subtotals at the top of groups.
o Show in Tabular Form - allows you to display the pivot table in a traditional tableformat. It displays one column for each field and provides space for fieldheaders.
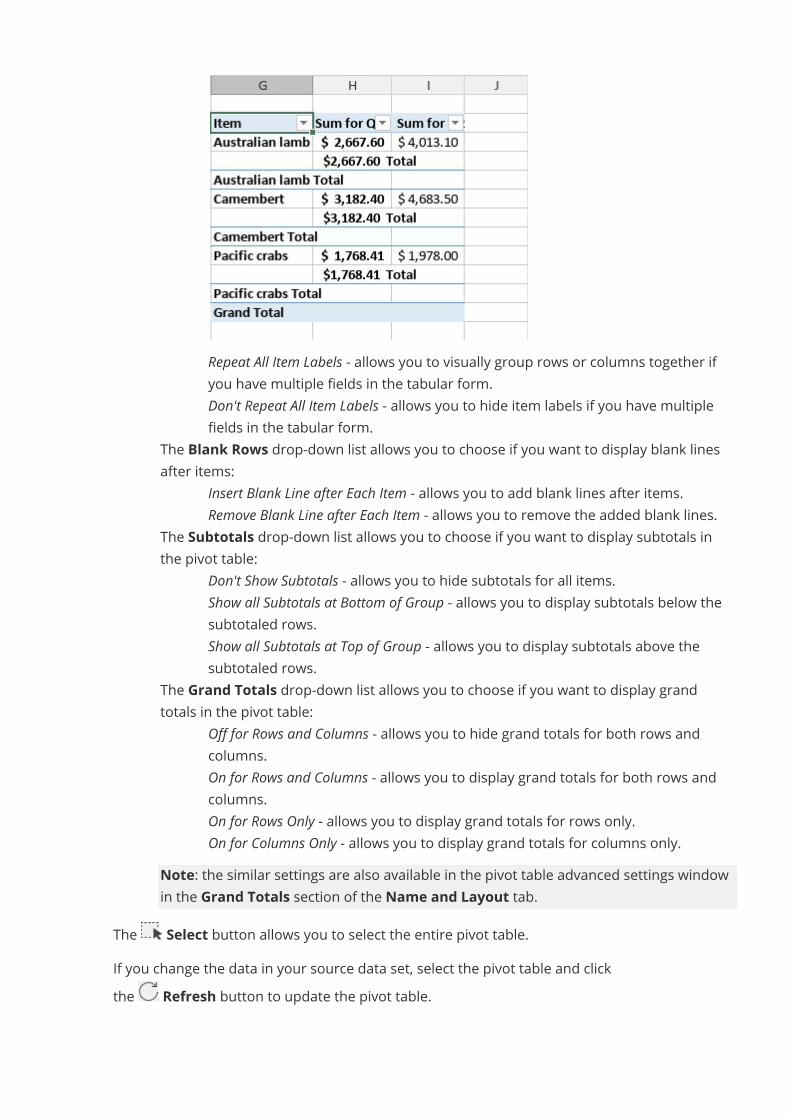
o Repeat All Item Labels - allows you to visually group rows or columns together ifyou have multiple fields in the tabular form.
o Don't Repeat All Item Labels - allows you to hide item labels if you have multiplefields in the tabular form.
· The Blank Rows drop-down list allows you to choose if you want to display blank linesafter items:
o Insert Blank Line after Each Item - allows you to add blank lines after items.o Remove Blank Line after Each Item - allows you to remove the added blank lines.
· The Subtotals drop-down list allows you to choose if you want to display subtotals inthe pivot table:
o Don't Show Subtotals - allows you to hide subtotals for all items.o Show all Subtotals at Bottom of Group - allows you to display subtotals below the
subtotaled rows.o Show all Subtotals at Top of Group - allows you to display subtotals above the
subtotaled rows.· The Grand Totals drop-down list allows you to choose if you want to display grand
totals in the pivot table:o Off for Rows and Columns - allows you to hide grand totals for both rows and
columns.o On for Rows and Columns - allows you to display grand totals for both rows and
columns.o On for Rows Only - allows you to display grand totals for rows only.o On for Columns Only - allows you to display grand totals for columns only.
Note: the similar settings are also available in the pivot table advanced settings windowin the Grand Totals section of the Name and Layout tab.
The Select button allows you to select the entire pivot table.If you change the data in your source data set, select the pivot table and clickthe Refresh button to update the pivot table.
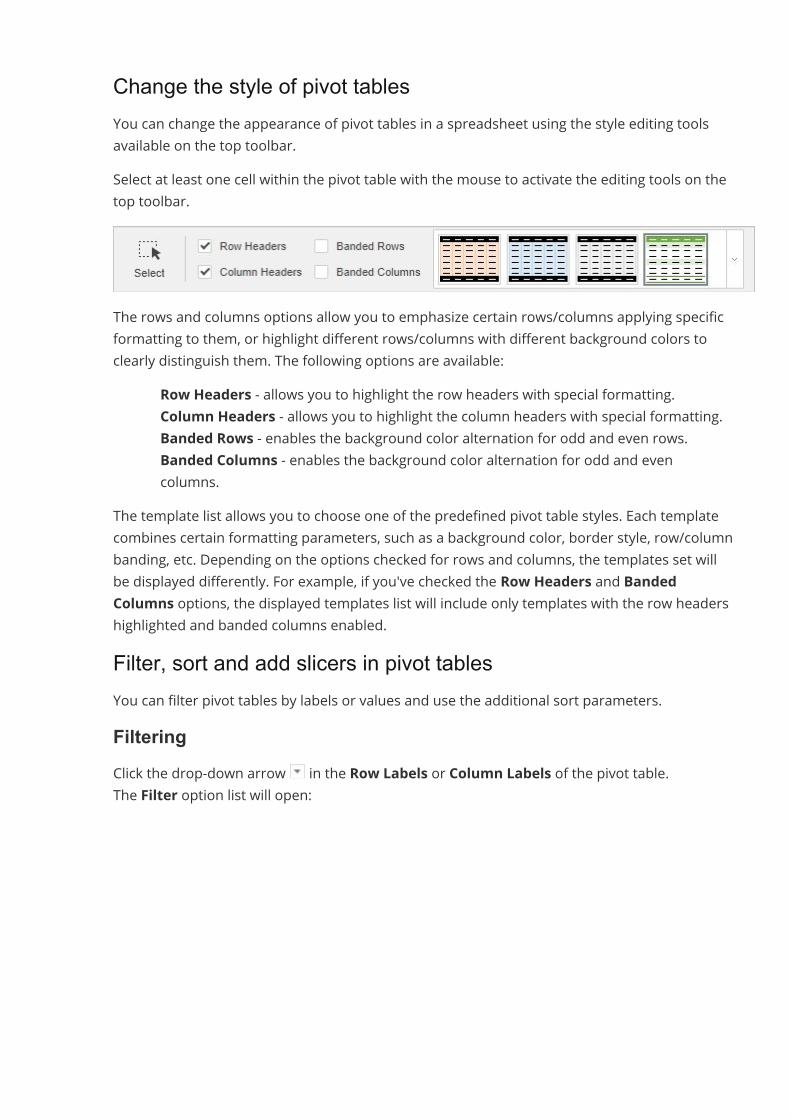
Change the style of pivot tablesYou can change the appearance of pivot tables in a spreadsheet using the style editing toolsavailable on the top toolbar.Select at least one cell within the pivot table with the mouse to activate the editing tools on thetop toolbar.
The rows and columns options allow you to emphasize certain rows/columns applying specificformatting to them, or highlight different rows/columns with different background colors toclearly distinguish them. The following options are available:
· Row Headers - allows you to highlight the row headers with special formatting.· Column Headers - allows you to highlight the column headers with special formatting.· Banded Rows - enables the background color alternation for odd and even rows.· Banded Columns - enables the background color alternation for odd and even
columns.The template list allows you to choose one of the predefined pivot table styles. Each templatecombines certain formatting parameters, such as a background color, border style, row/columnbanding, etc. Depending on the options checked for rows and columns, the templates set willbe displayed differently. For example, if you've checked the Row Headers and BandedColumns options, the displayed templates list will include only templates with the row headershighlighted and banded columns enabled.Filter, sort and add slicers in pivot tablesYou can filter pivot tables by labels or values and use the additional sort parameters.FilteringClick the drop-down arrow in the Row Labels or Column Labels of the pivot table.The Filter option list will open:
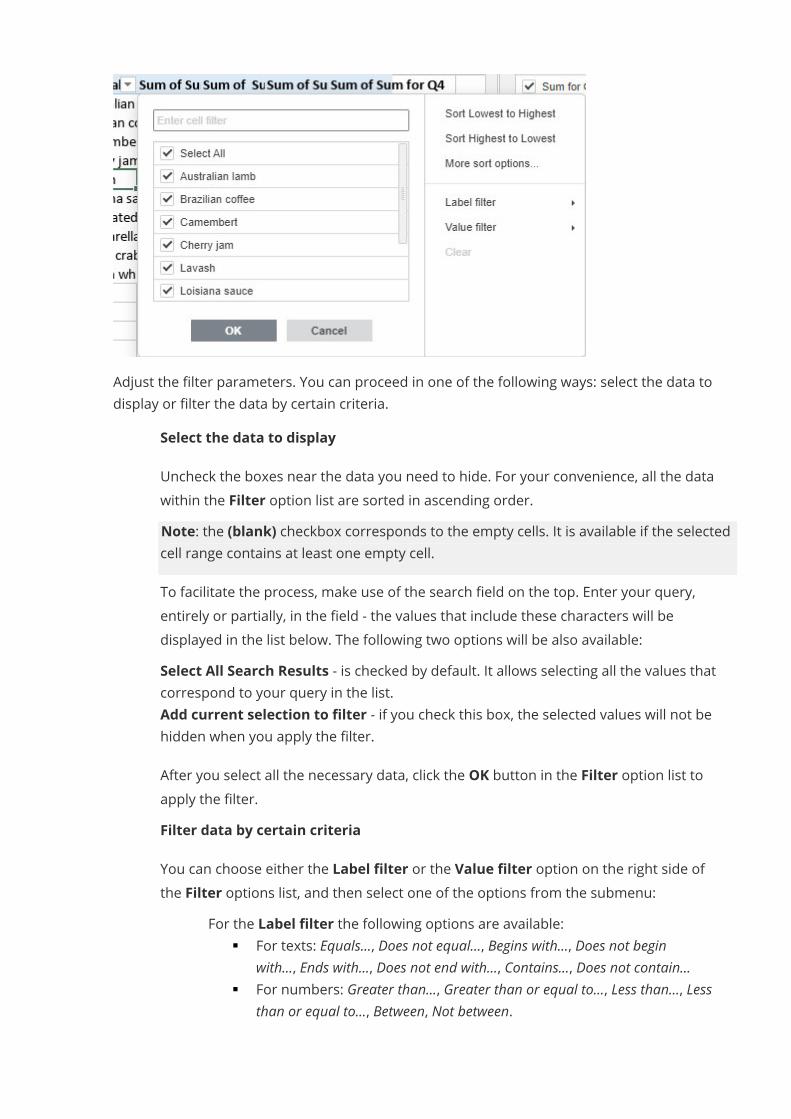
Adjust the filter parameters. You can proceed in one of the following ways: select the data todisplay or filter the data by certain criteria.
· Select the data to displayUncheck the boxes near the data you need to hide. For your convenience, all the datawithin the Filter option list are sorted in ascending order.Note: the (blank) checkbox corresponds to the empty cells. It is available if the selectedcell range contains at least one empty cell.To facilitate the process, make use of the search field on the top. Enter your query,entirely or partially, in the field - the values that include these characters will bedisplayed in the list below. The following two options will be also available:
· Select All Search Results - is checked by default. It allows selecting all the values thatcorrespond to your query in the list.
· Add current selection to filter - if you check this box, the selected values will not behidden when you apply the filter.After you select all the necessary data, click the OK button in the Filter option list toapply the filter.
· Filter data by certain criteriaYou can choose either the Label filter or the Value filter option on the right side ofthe Filter options list, and then select one of the options from the submenu:
o For the Label filter the following options are available:§ For texts: Equals..., Does not equal..., Begins with..., Does not begin
with..., Ends with..., Does not end with..., Contains..., Does not contain...§ For numbers: Greater than..., Greater than or equal to..., Less than..., Less
than or equal to..., Between, Not between.
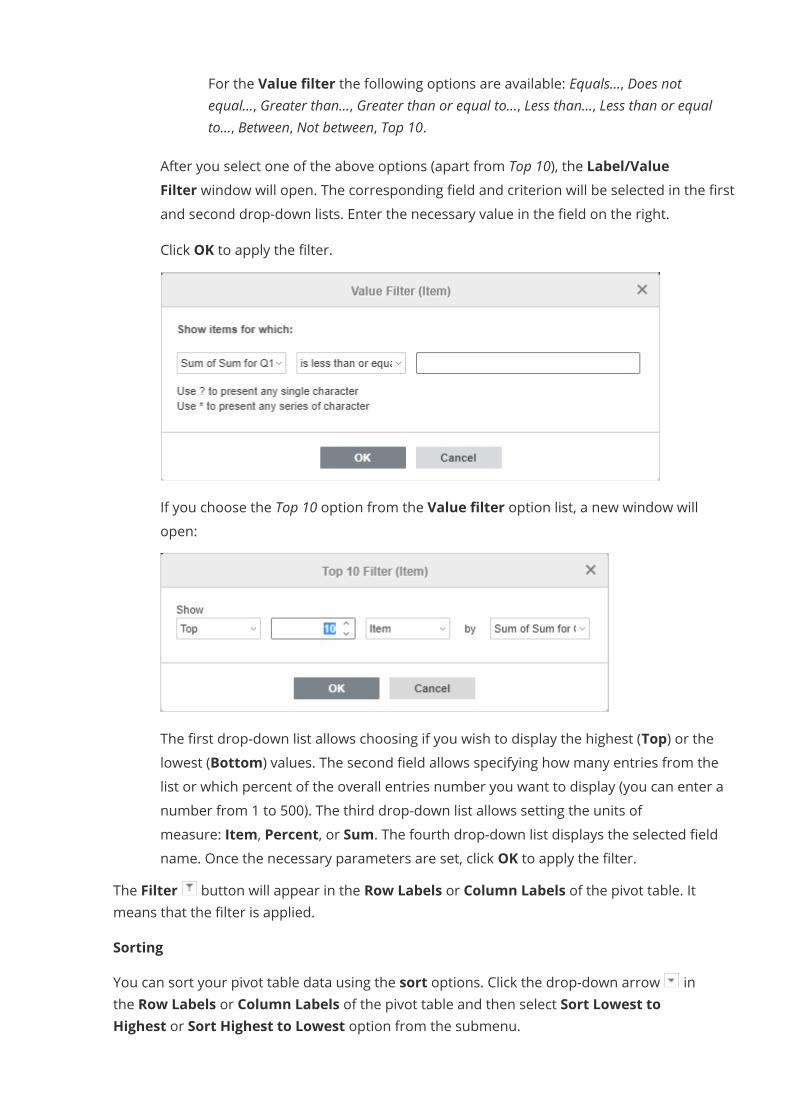
o For the Value filter the following options are available: Equals..., Does notequal..., Greater than..., Greater than or equal to..., Less than..., Less than or equalto..., Between, Not between, Top 10.
After you select one of the above options (apart from Top 10), the Label/ValueFilter window will open. The corresponding field and criterion will be selected in the firstand second drop-down lists. Enter the necessary value in the field on the right.Click OK to apply the filter.
If you choose the Top 10 option from the Value filter option list, a new window willopen:
The first drop-down list allows choosing if you wish to display the highest (Top) or thelowest (Bottom) values. The second field allows specifying how many entries from thelist or which percent of the overall entries number you want to display (you can enter anumber from 1 to 500). The third drop-down list allows setting the units ofmeasure: Item, Percent, or Sum. The fourth drop-down list displays the selected fieldname. Once the necessary parameters are set, click OK to apply the filter.
The Filter button will appear in the Row Labels or Column Labels of the pivot table. Itmeans that the filter is applied.SortingYou can sort your pivot table data using the sort options. Click the drop-down arrow inthe Row Labels or Column Labels of the pivot table and then select Sort Lowest toHighest or Sort Highest to Lowest option from the submenu.
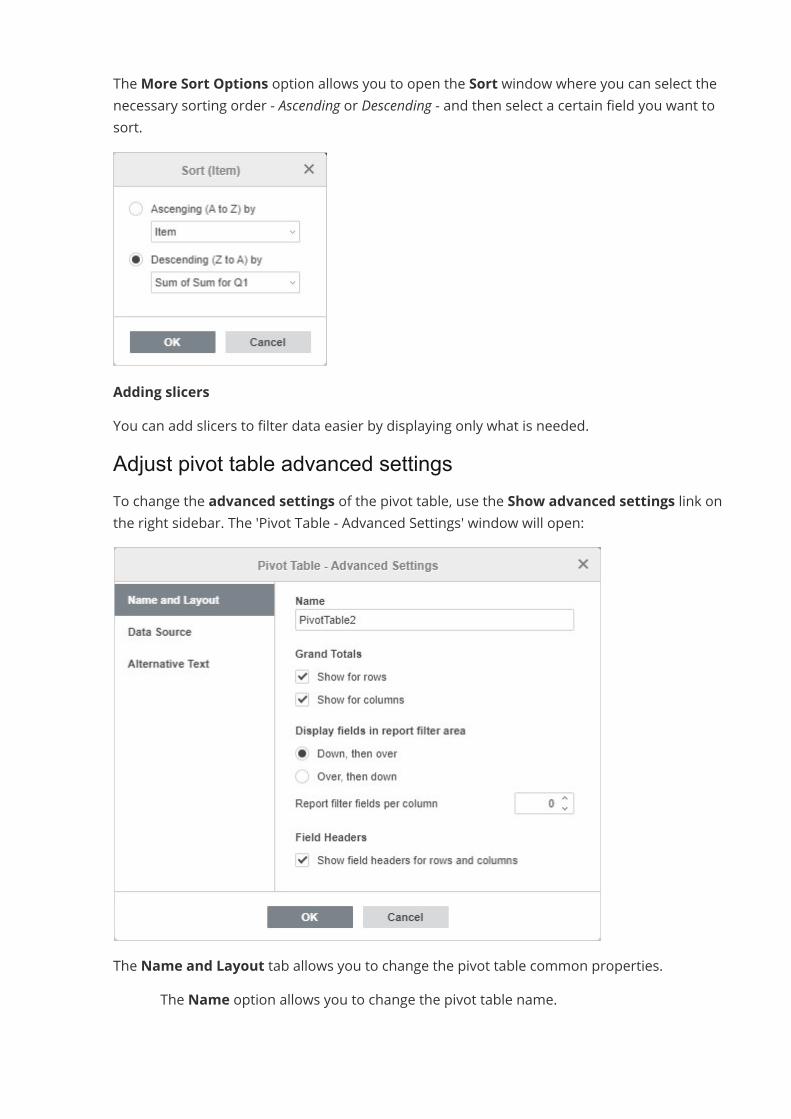
TheMore Sort Options option allows you to open the Sort window where you can select thenecessary sorting order - Ascending or Descending - and then select a certain field you want tosort.
Adding slicersYou can add slicers to filter data easier by displaying only what is needed.Adjust pivot table advanced settingsTo change the advanced settings of the pivot table, use the Show advanced settings link onthe right sidebar. The 'Pivot Table - Advanced Settings' window will open:
The Name and Layout tab allows you to change the pivot table common properties.· The Name option allows you to change the pivot table name.
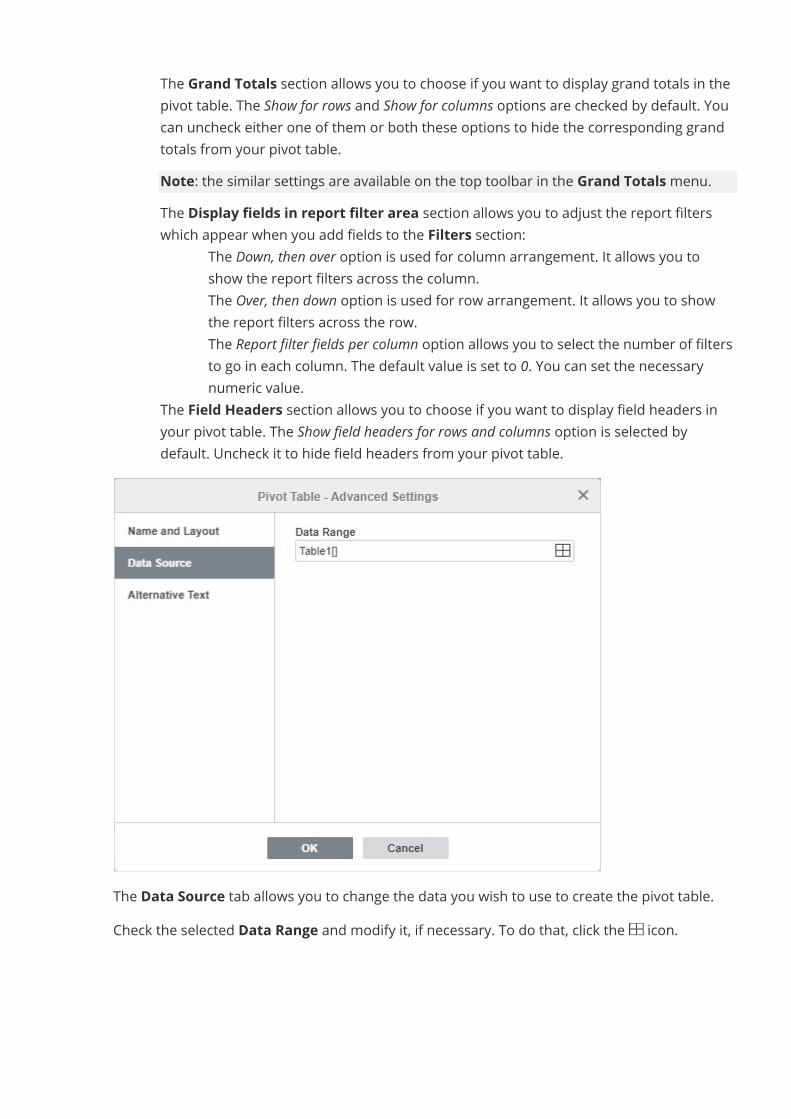
· The Grand Totals section allows you to choose if you want to display grand totals in thepivot table. The Show for rows and Show for columns options are checked by default. Youcan uncheck either one of them or both these options to hide the corresponding grandtotals from your pivot table.Note: the similar settings are available on the top toolbar in the Grand Totalsmenu.
· The Display fields in report filter area section allows you to adjust the report filterswhich appear when you add fields to the Filters section:
o The Down, then over option is used for column arrangement. It allows you toshow the report filters across the column.
o The Over, then down option is used for row arrangement. It allows you to showthe report filters across the row.
o The Report filter fields per column option allows you to select the number of filtersto go in each column. The default value is set to 0. You can set the necessarynumeric value.
· The Field Headers section allows you to choose if you want to display field headers inyour pivot table. The Show field headers for rows and columns option is selected bydefault. Uncheck it to hide field headers from your pivot table.
The Data Source tab allows you to change the data you wish to use to create the pivot table.Check the selected Data Range and modify it, if necessary. To do that, click the icon.
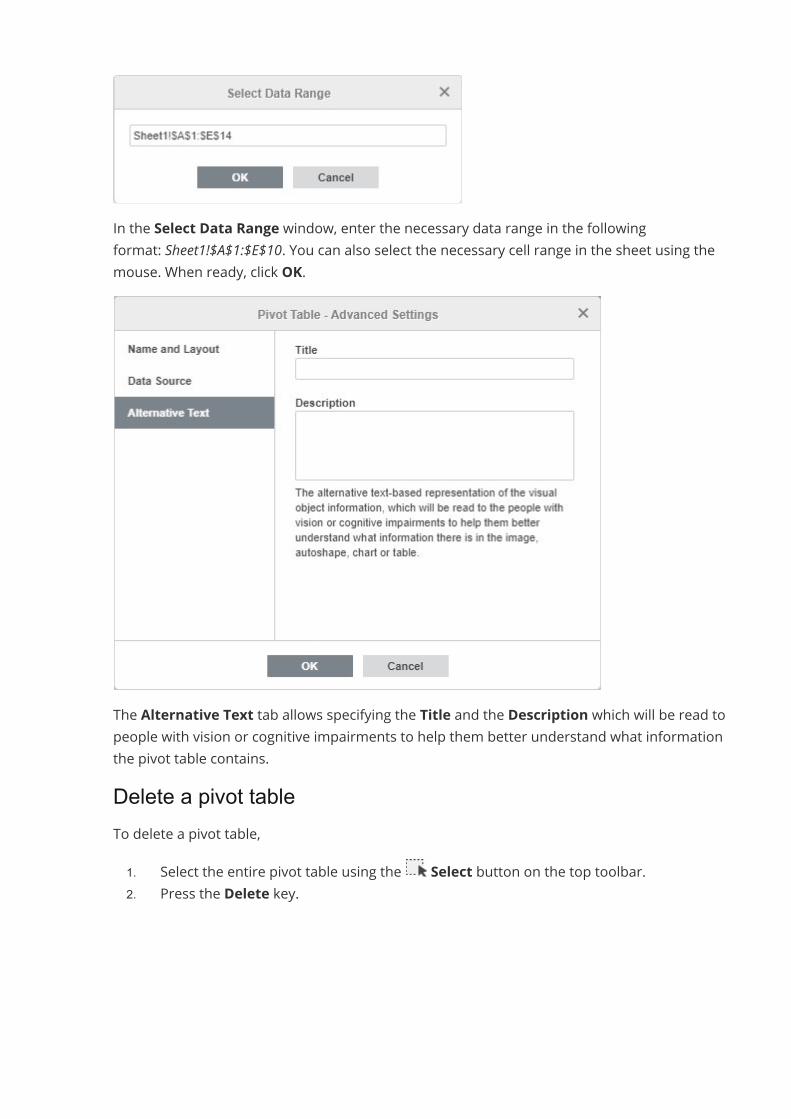
In the Select Data Range window, enter the necessary data range in the followingformat: Sheet1!$A$1:$E$10. You can also select the necessary cell range in the sheet using themouse. When ready, click OK.
The Alternative Text tab allows specifying the Title and the Description which will be read topeople with vision or cognitive impairments to help them better understand what informationthe pivot table contains.Delete a pivot tableTo delete a pivot table,1. Select the entire pivot table using the Select button on the top toolbar.2. Press the Delete key.
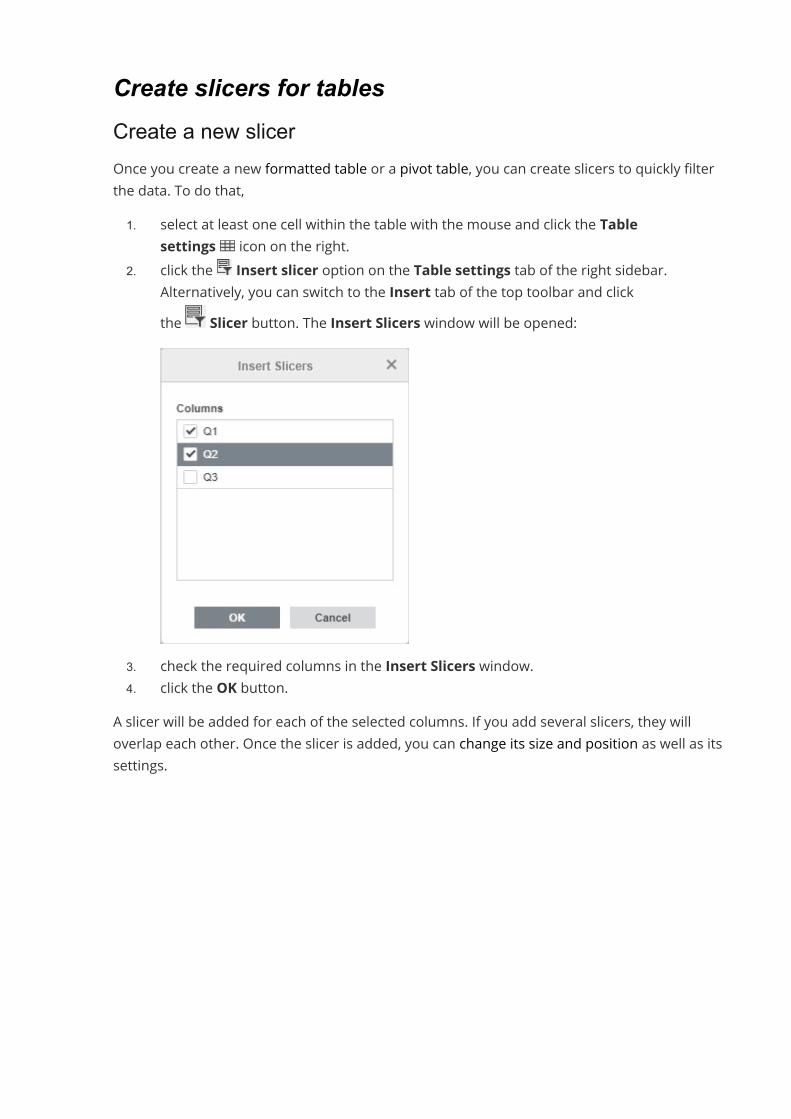
Create slicers for tablesCreate a new slicerOnce you create a new formatted table or a pivot table, you can create slicers to quickly filterthe data. To do that,1. select at least one cell within the table with the mouse and click the Table
settings icon on the right.2. click the Insert slicer option on the Table settings tab of the right sidebar.
Alternatively, you can switch to the Insert tab of the top toolbar and clickthe Slicer button. The Insert Slicers window will be opened:
3. check the required columns in the Insert Slicers window.4. click the OK button.
A slicer will be added for each of the selected columns. If you add several slicers, they willoverlap each other. Once the slicer is added, you can change its size and position as well as itssettings.
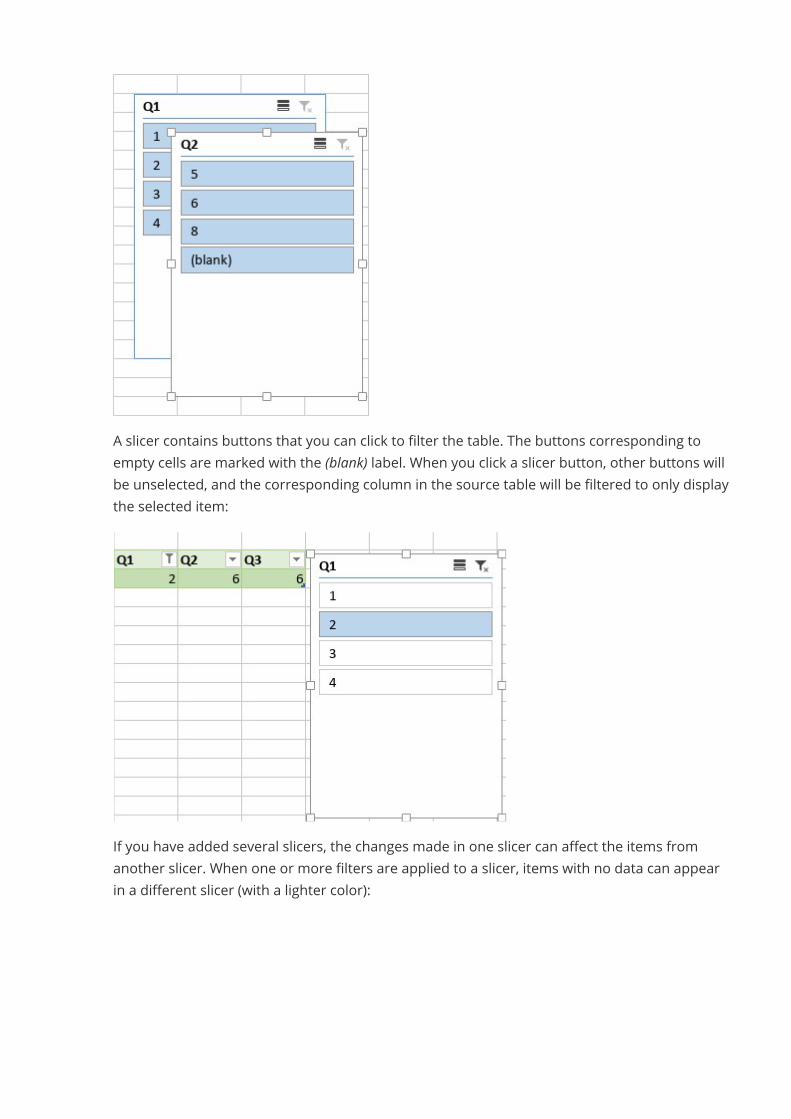
A slicer contains buttons that you can click to filter the table. The buttons corresponding toempty cells are marked with the (blank) label. When you click a slicer button, other buttons willbe unselected, and the corresponding column in the source table will be filtered to only displaythe selected item:
If you have added several slicers, the changes made in one slicer can affect the items fromanother slicer. When one or more filters are applied to a slicer, items with no data can appearin a different slicer (with a lighter color):
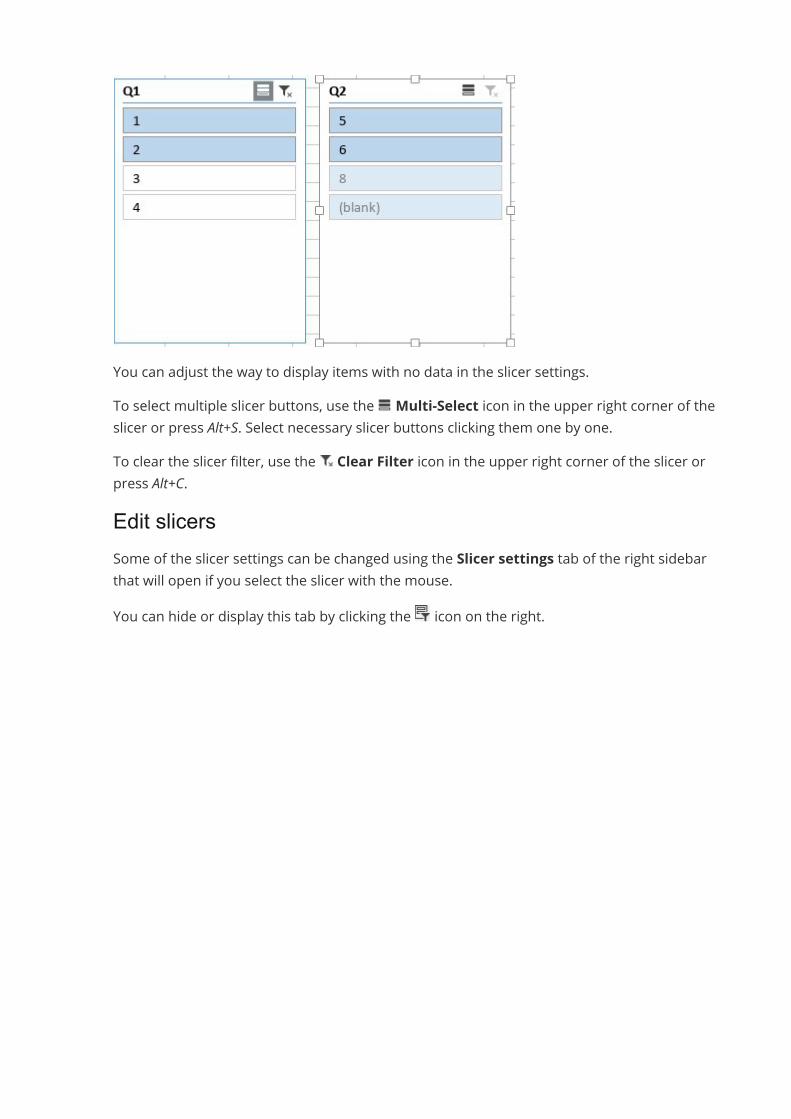
You can adjust the way to display items with no data in the slicer settings.To select multiple slicer buttons, use the Multi-Select icon in the upper right corner of theslicer or press Alt+S. Select necessary slicer buttons clicking them one by one.To clear the slicer filter, use the Clear Filter icon in the upper right corner of the slicer orpress Alt+C.Edit slicersSome of the slicer settings can be changed using the Slicer settings tab of the right sidebarthat will open if you select the slicer with the mouse.You can hide or display this tab by clicking the icon on the right.
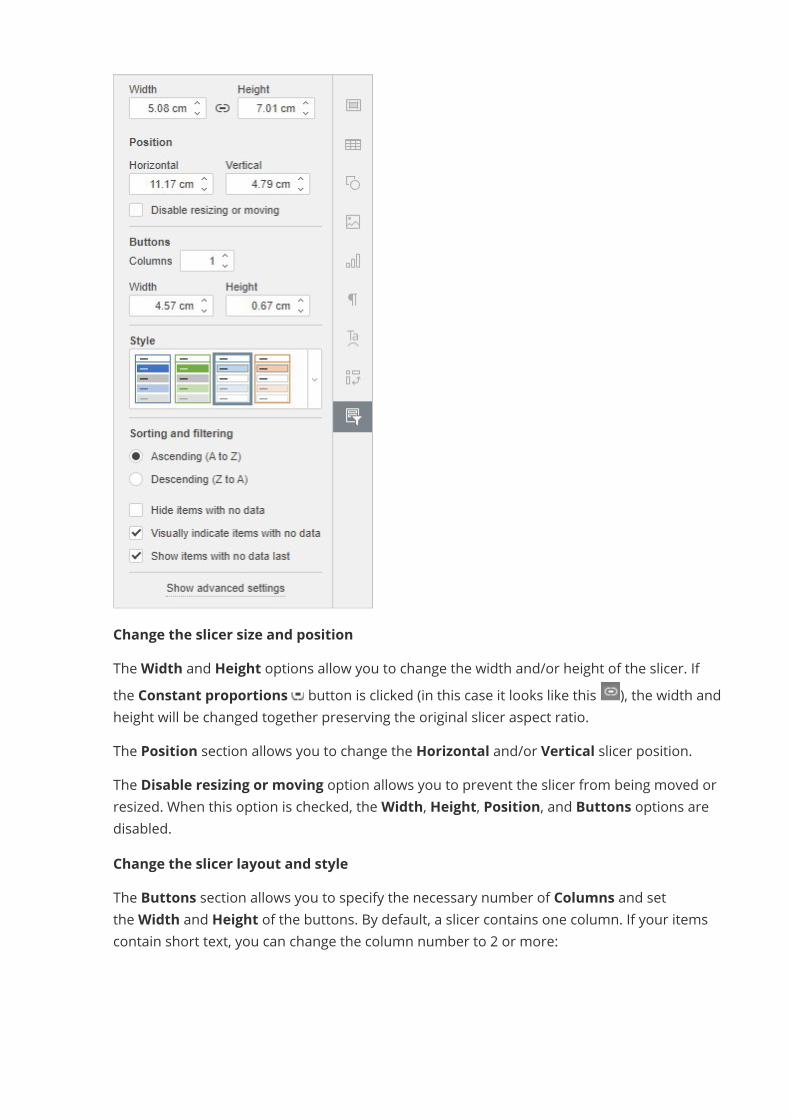
Change the slicer size and positionTheWidth and Height options allow you to change the width and/or height of the slicer. Ifthe Constant proportions button is clicked (in this case it looks like this ), the width andheight will be changed together preserving the original slicer aspect ratio.The Position section allows you to change the Horizontal and/or Vertical slicer position.The Disable resizing or moving option allows you to prevent the slicer from being moved orresized. When this option is checked, theWidth, Height, Position, and Buttons options aredisabled.Change the slicer layout and styleThe Buttons section allows you to specify the necessary number of Columns and settheWidth and Height of the buttons. By default, a slicer contains one column. If your itemscontain short text, you can change the column number to 2 or more:
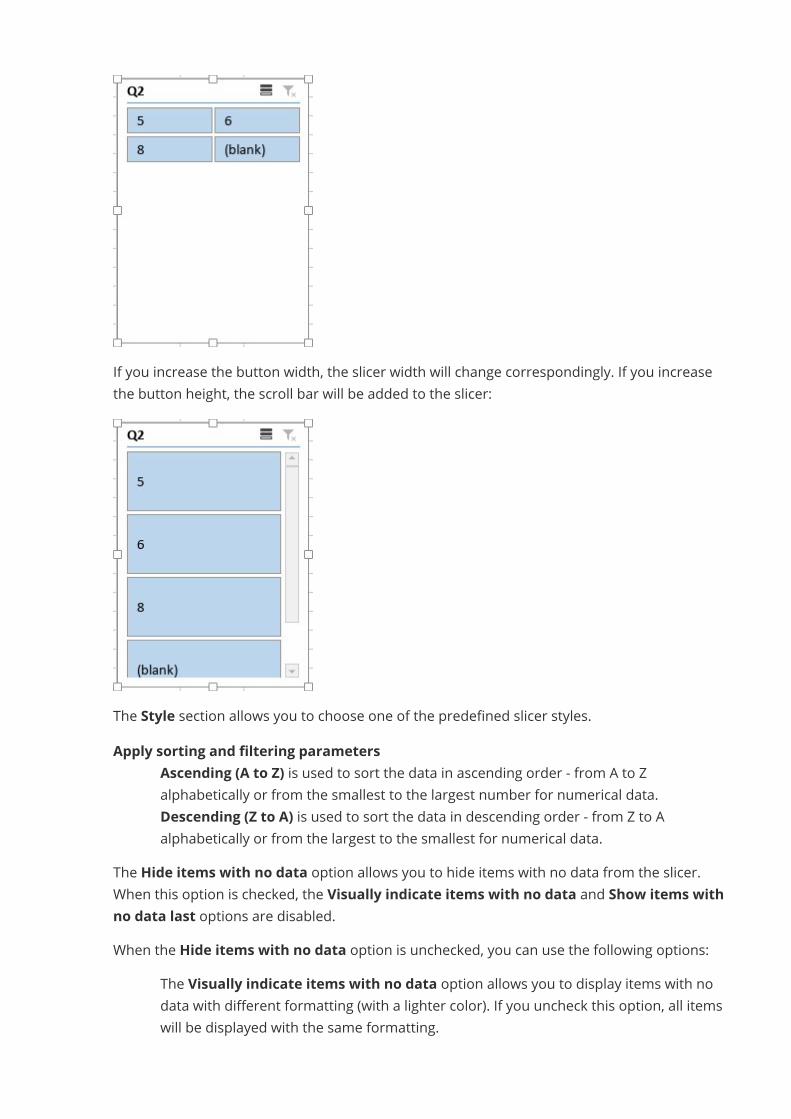
If you increase the button width, the slicer width will change correspondingly. If you increasethe button height, the scroll bar will be added to the slicer:
The Style section allows you to choose one of the predefined slicer styles.Apply sorting and filtering parameters
· Ascending (A to Z) is used to sort the data in ascending order - from A to Zalphabetically or from the smallest to the largest number for numerical data.
· Descending (Z to A) is used to sort the data in descending order - from Z to Aalphabetically or from the largest to the smallest for numerical data.
The Hide items with no data option allows you to hide items with no data from the slicer.When this option is checked, the Visually indicate items with no data and Show items withno data last options are disabled.When the Hide items with no data option is unchecked, you can use the following options:
· The Visually indicate items with no data option allows you to display items with nodata with different formatting (with a lighter color). If you uncheck this option, all itemswill be displayed with the same formatting.
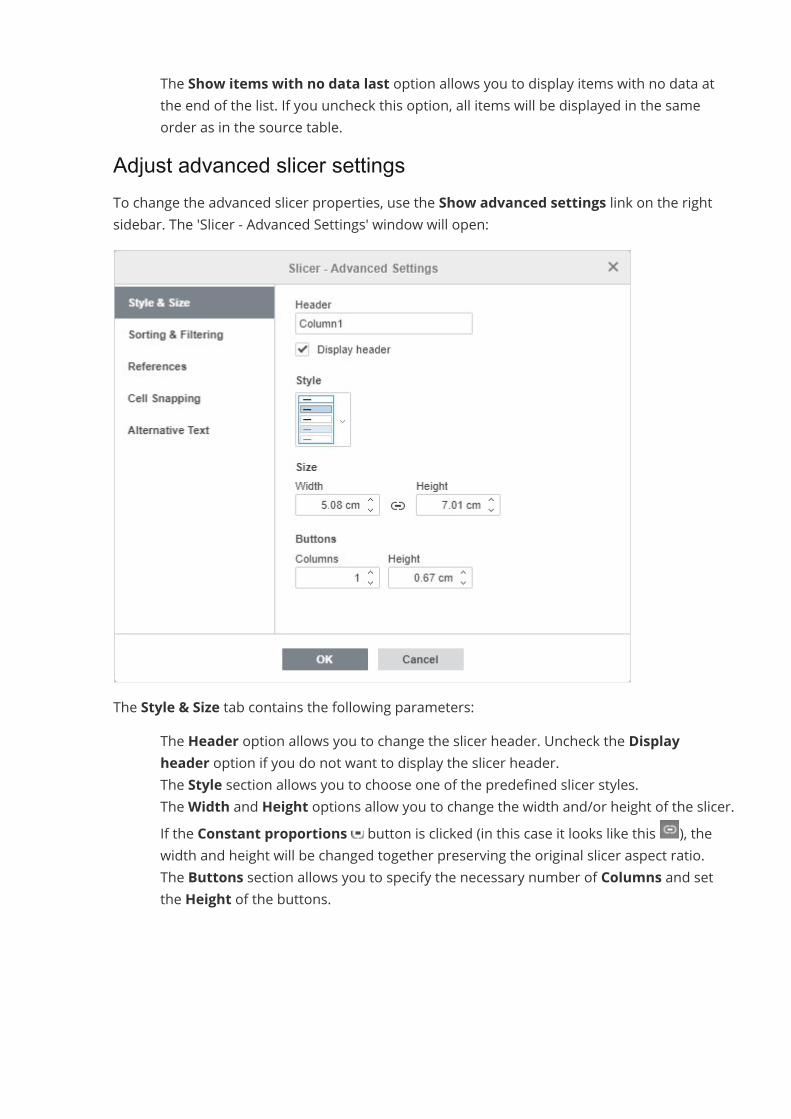
· The Show items with no data last option allows you to display items with no data atthe end of the list. If you uncheck this option, all items will be displayed in the sameorder as in the source table.
Adjust advanced slicer settingsTo change the advanced slicer properties, use the Show advanced settings link on the rightsidebar. The 'Slicer - Advanced Settings' window will open:
The Style & Size tab contains the following parameters:· The Header option allows you to change the slicer header. Uncheck the Display
header option if you do not want to display the slicer header.· The Style section allows you to choose one of the predefined slicer styles.· TheWidth and Height options allow you to change the width and/or height of the slicer.
If the Constant proportions button is clicked (in this case it looks like this ), thewidth and height will be changed together preserving the original slicer aspect ratio.
· The Buttons section allows you to specify the necessary number of Columns and setthe Height of the buttons.
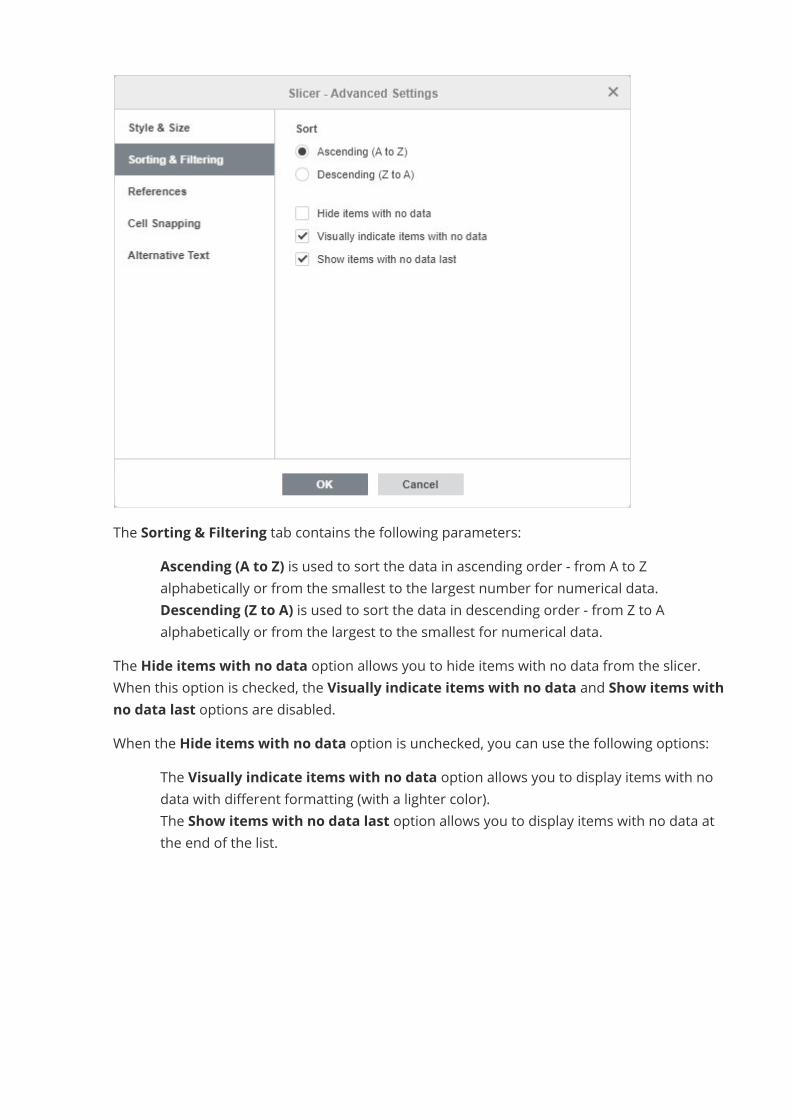
The Sorting & Filtering tab contains the following parameters:· Ascending (A to Z) is used to sort the data in ascending order - from A to Z
alphabetically or from the smallest to the largest number for numerical data.· Descending (Z to A) is used to sort the data in descending order - from Z to A
alphabetically or from the largest to the smallest for numerical data.The Hide items with no data option allows you to hide items with no data from the slicer.When this option is checked, the Visually indicate items with no data and Show items withno data last options are disabled.When the Hide items with no data option is unchecked, you can use the following options:
· The Visually indicate items with no data option allows you to display items with nodata with different formatting (with a lighter color).
· The Show items with no data last option allows you to display items with no data atthe end of the list.
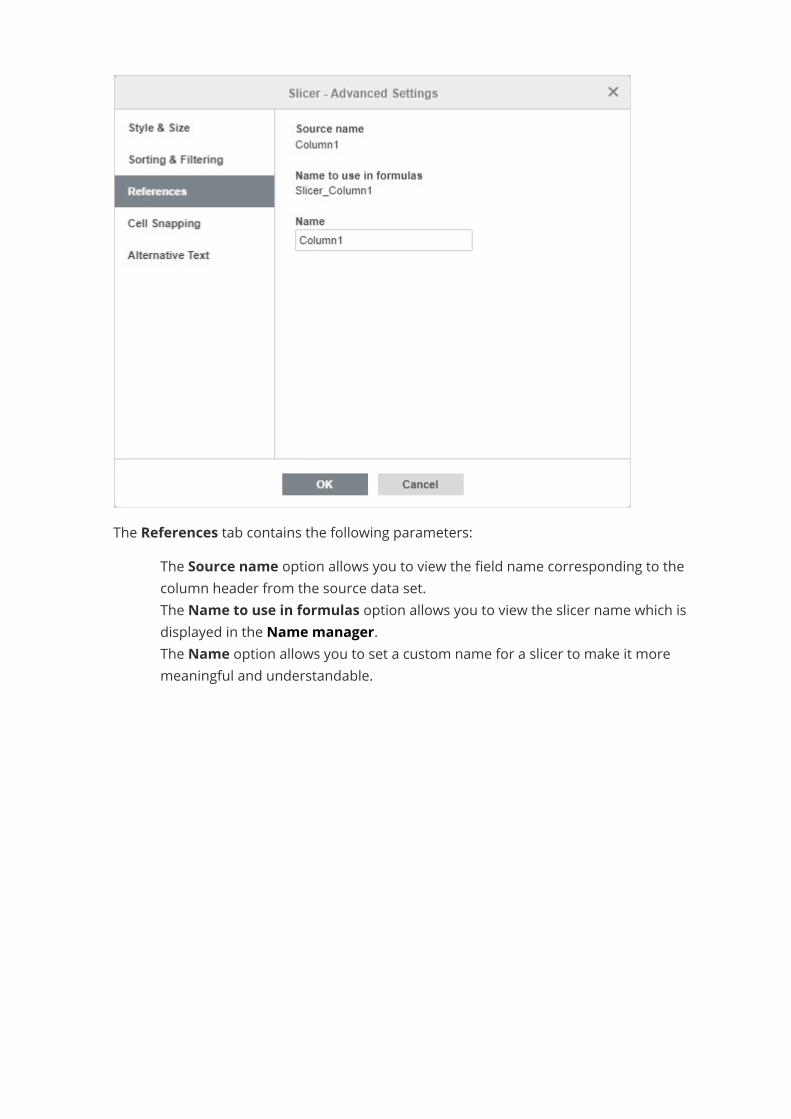
The References tab contains the following parameters:· The Source name option allows you to view the field name corresponding to the
column header from the source data set.· The Name to use in formulas option allows you to view the slicer name which is
displayed in the Name manager.· The Name option allows you to set a custom name for a slicer to make it more
meaningful and understandable.
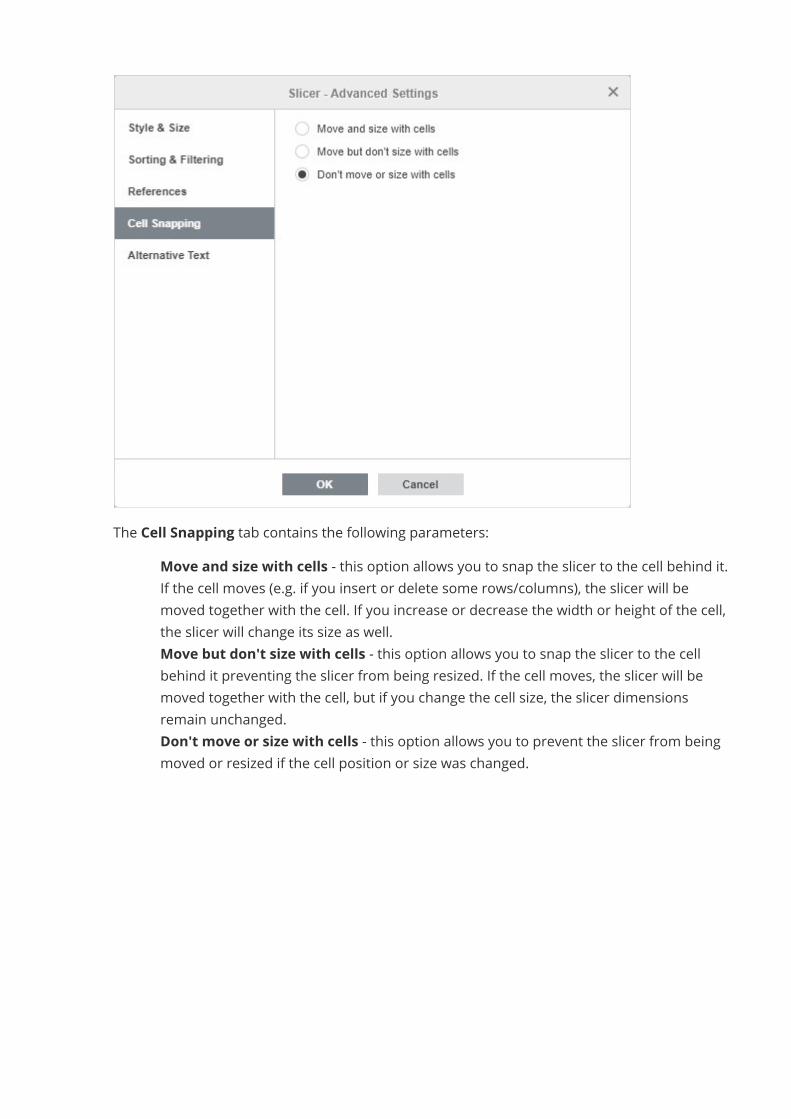
The Cell Snapping tab contains the following parameters:· Move and size with cells - this option allows you to snap the slicer to the cell behind it.
If the cell moves (e.g. if you insert or delete some rows/columns), the slicer will bemoved together with the cell. If you increase or decrease the width or height of the cell,the slicer will change its size as well.
· Move but don't size with cells - this option allows you to snap the slicer to the cellbehind it preventing the slicer from being resized. If the cell moves, the slicer will bemoved together with the cell, but if you change the cell size, the slicer dimensionsremain unchanged.
· Don't move or size with cells - this option allows you to prevent the slicer from beingmoved or resized if the cell position or size was changed.
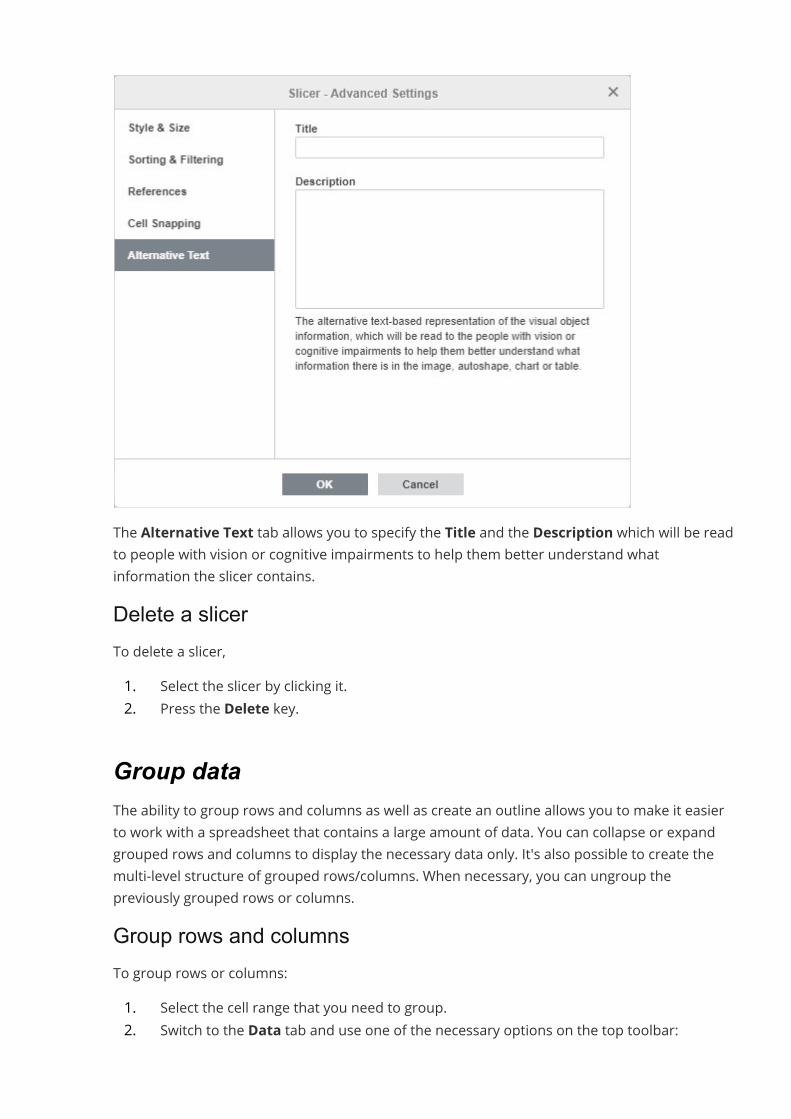
The Alternative Text tab allows you to specify the Title and the Description which will be readto people with vision or cognitive impairments to help them better understand whatinformation the slicer contains.Delete a slicerTo delete a slicer,1. Select the slicer by clicking it.2. Press the Delete key.
Group dataThe ability to group rows and columns as well as create an outline allows you to make it easierto work with a spreadsheet that contains a large amount of data. You can collapse or expandgrouped rows and columns to display the necessary data only. It's also possible to create themulti-level structure of grouped rows/columns. When necessary, you can ungroup thepreviously grouped rows or columns.Group rows and columnsTo group rows or columns:1. Select the cell range that you need to group.2. Switch to the Data tab and use one of the necessary options on the top toolbar:
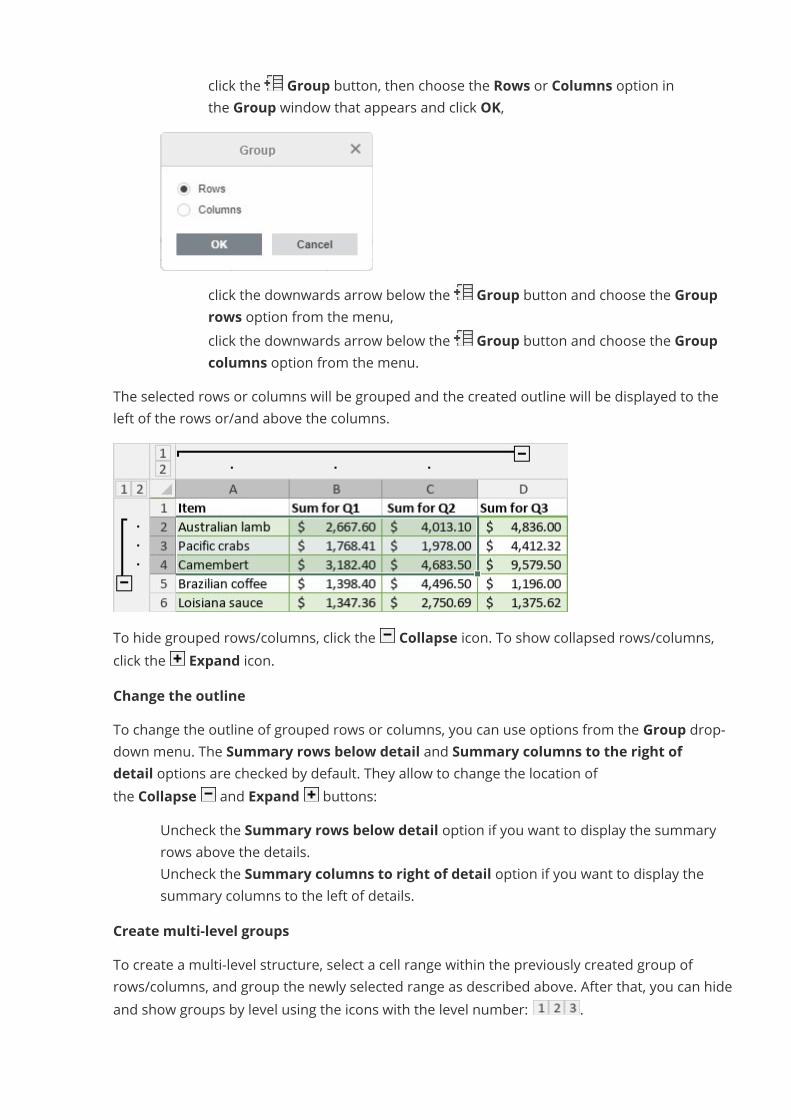
o click the Group button, then choose the Rows or Columns option inthe Group window that appears and click OK,
o click the downwards arrow below the Group button and choose the Grouprows option from the menu,
o click the downwards arrow below the Group button and choose the Groupcolumns option from the menu.
The selected rows or columns will be grouped and the created outline will be displayed to theleft of the rows or/and above the columns.
To hide grouped rows/columns, click the Collapse icon. To show collapsed rows/columns,click the Expand icon.Change the outlineTo change the outline of grouped rows or columns, you can use options from the Group drop-down menu. The Summary rows below detail and Summary columns to the right ofdetail options are checked by default. They allow to change the location ofthe Collapse and Expand buttons:
· Uncheck the Summary rows below detail option if you want to display the summaryrows above the details.
· Uncheck the Summary columns to right of detail option if you want to display thesummary columns to the left of details.
Create multi-level groupsTo create a multi-level structure, select a cell range within the previously created group ofrows/columns, and group the newly selected range as described above. After that, you can hideand show groups by level using the icons with the level number: .
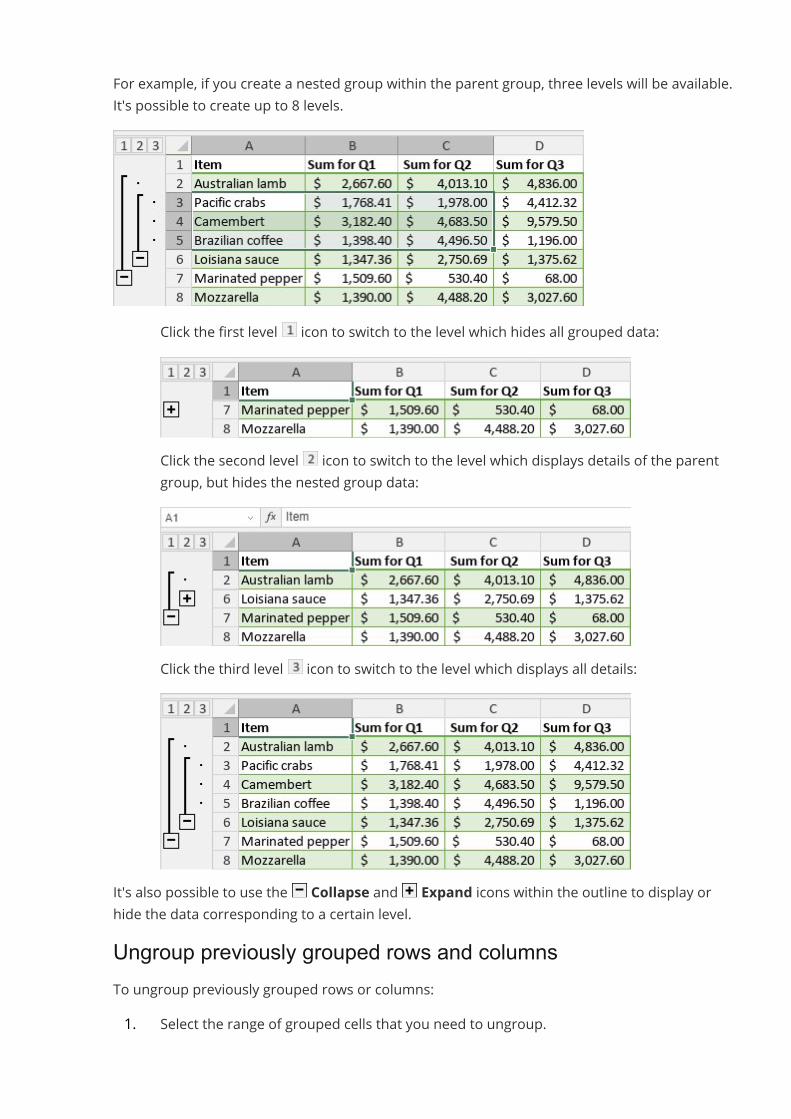
For example, if you create a nested group within the parent group, three levels will be available.It's possible to create up to 8 levels.
· Click the first level icon to switch to the level which hides all grouped data:
· Click the second level icon to switch to the level which displays details of the parentgroup, but hides the nested group data:
· Click the third level icon to switch to the level which displays all details:
It's also possible to use the Collapse and Expand icons within the outline to display orhide the data corresponding to a certain level.Ungroup previously grouped rows and columnsTo ungroup previously grouped rows or columns:1. Select the range of grouped cells that you need to ungroup.
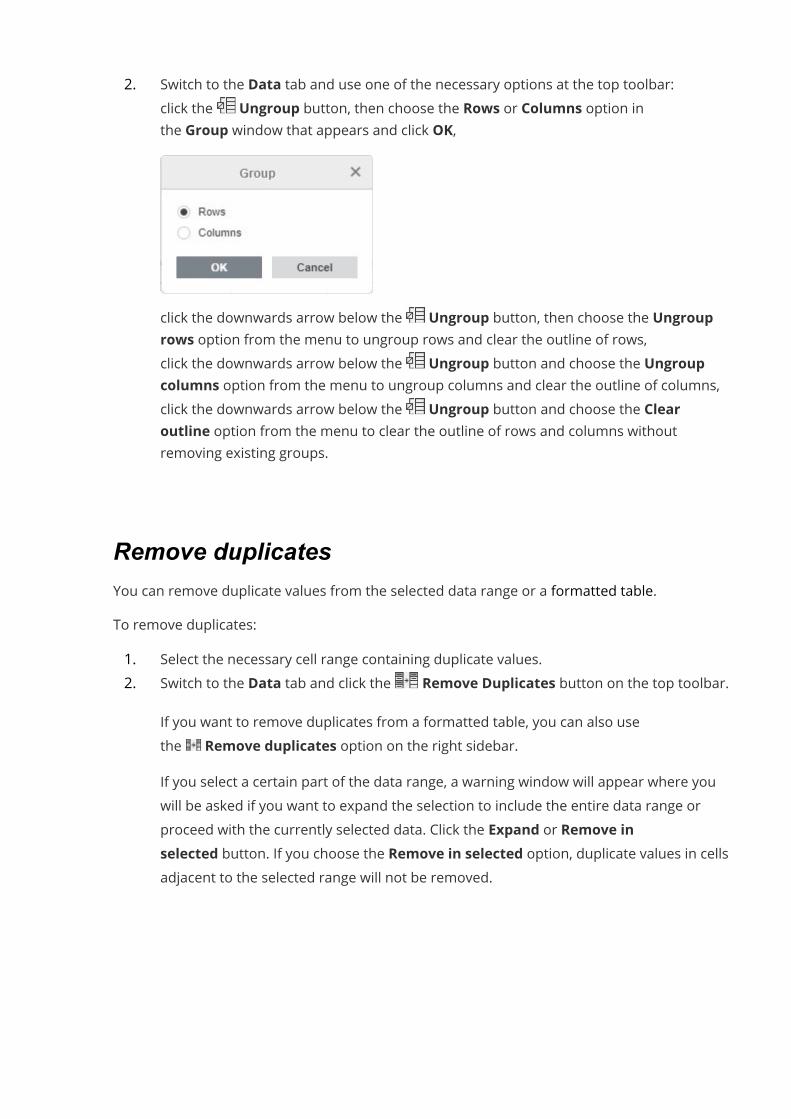
2. Switch to the Data tab and use one of the necessary options at the top toolbar:· click the Ungroup button, then choose the Rows or Columns option in
the Group window that appears and click OK,
· click the downwards arrow below the Ungroup button, then choose the Ungrouprows option from the menu to ungroup rows and clear the outline of rows,
· click the downwards arrow below the Ungroup button and choose the Ungroupcolumns option from the menu to ungroup columns and clear the outline of columns,
· click the downwards arrow below the Ungroup button and choose the Clearoutline option from the menu to clear the outline of rows and columns withoutremoving existing groups.
Remove duplicatesYou can remove duplicate values from the selected data range or a formatted table.To remove duplicates:1. Select the necessary cell range containing duplicate values.2. Switch to the Data tab and click the Remove Duplicates button on the top toolbar.
If you want to remove duplicates from a formatted table, you can also usethe Remove duplicates option on the right sidebar.If you select a certain part of the data range, a warning window will appear where youwill be asked if you want to expand the selection to include the entire data range orproceed with the currently selected data. Click the Expand or Remove inselected button. If you choose the Remove in selected option, duplicate values in cellsadjacent to the selected range will not be removed.
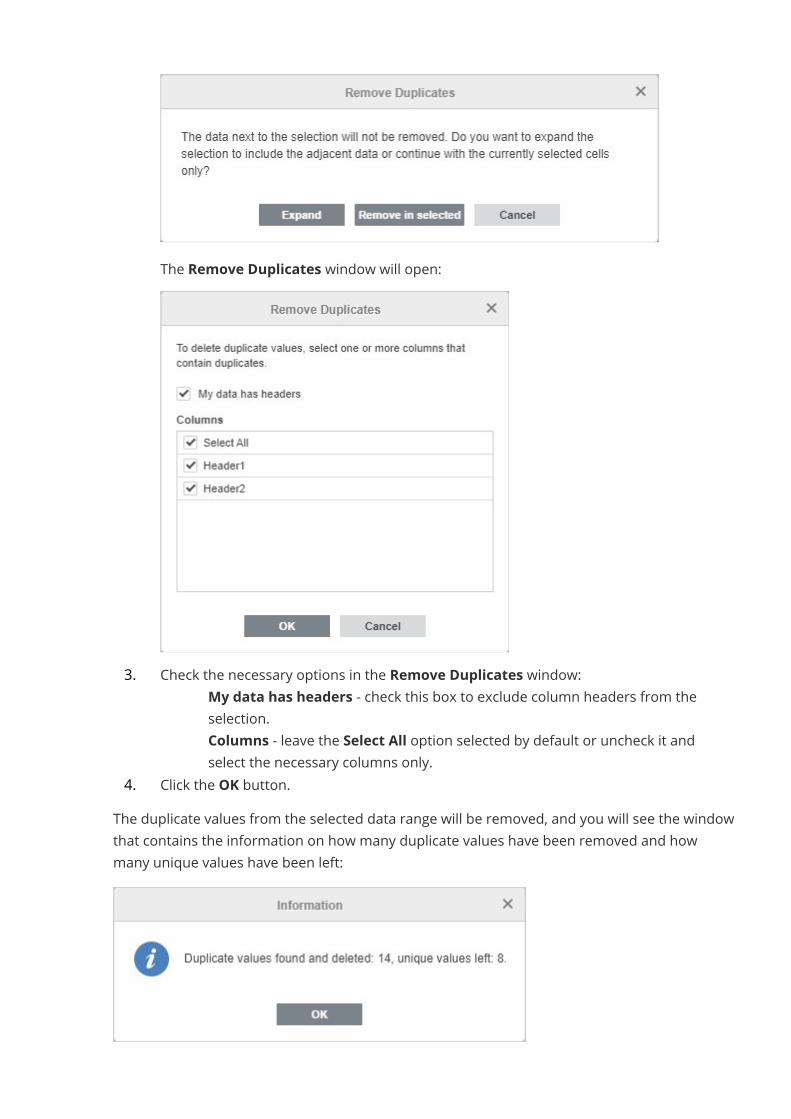
The Remove Duplicates window will open:
3. Check the necessary options in the Remove Duplicates window:o My data has headers - check this box to exclude column headers from the
selection.o Columns - leave the Select All option selected by default or uncheck it and
select the necessary columns only.4. Click the OK button.
The duplicate values from the selected data range will be removed, and you will see the windowthat contains the information on how many duplicate values have been removed and howmany unique values have been left:
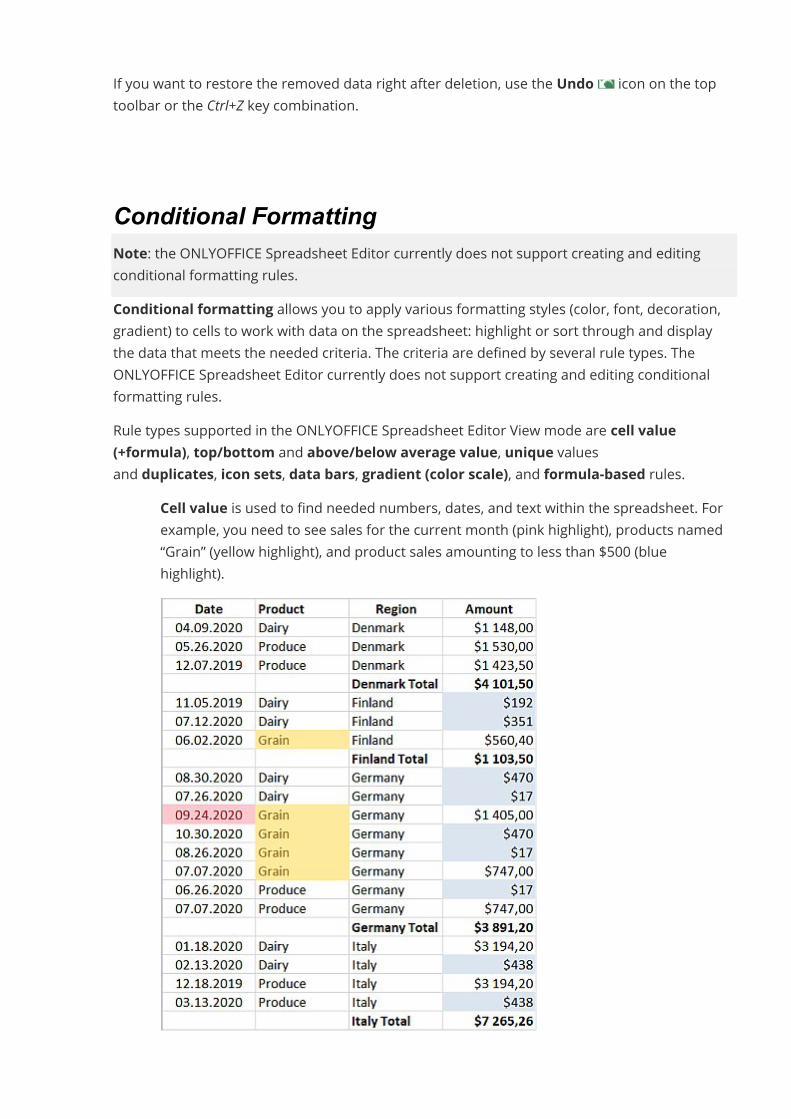
If you want to restore the removed data right after deletion, use the Undo icon on the toptoolbar or the Ctrl+Z key combination.
Conditional FormattingNote: the ONLYOFFICE Spreadsheet Editor currently does not support creating and editingconditional formatting rules.Conditional formatting allows you to apply various formatting styles (color, font, decoration,gradient) to cells to work with data on the spreadsheet: highlight or sort through and displaythe data that meets the needed criteria. The criteria are defined by several rule types. TheONLYOFFICE Spreadsheet Editor currently does not support creating and editing conditionalformatting rules.Rule types supported in the ONLYOFFICE Spreadsheet Editor View mode are cell value(+formula), top/bottom and above/below average value, unique valuesand duplicates, icon sets, data bars, gradient (color scale), and formula-based rules.
· Cell value is used to find needed numbers, dates, and text within the spreadsheet. Forexample, you need to see sales for the current month (pink highlight), products named“Grain” (yellow highlight), and product sales amounting to less than $500 (bluehighlight).
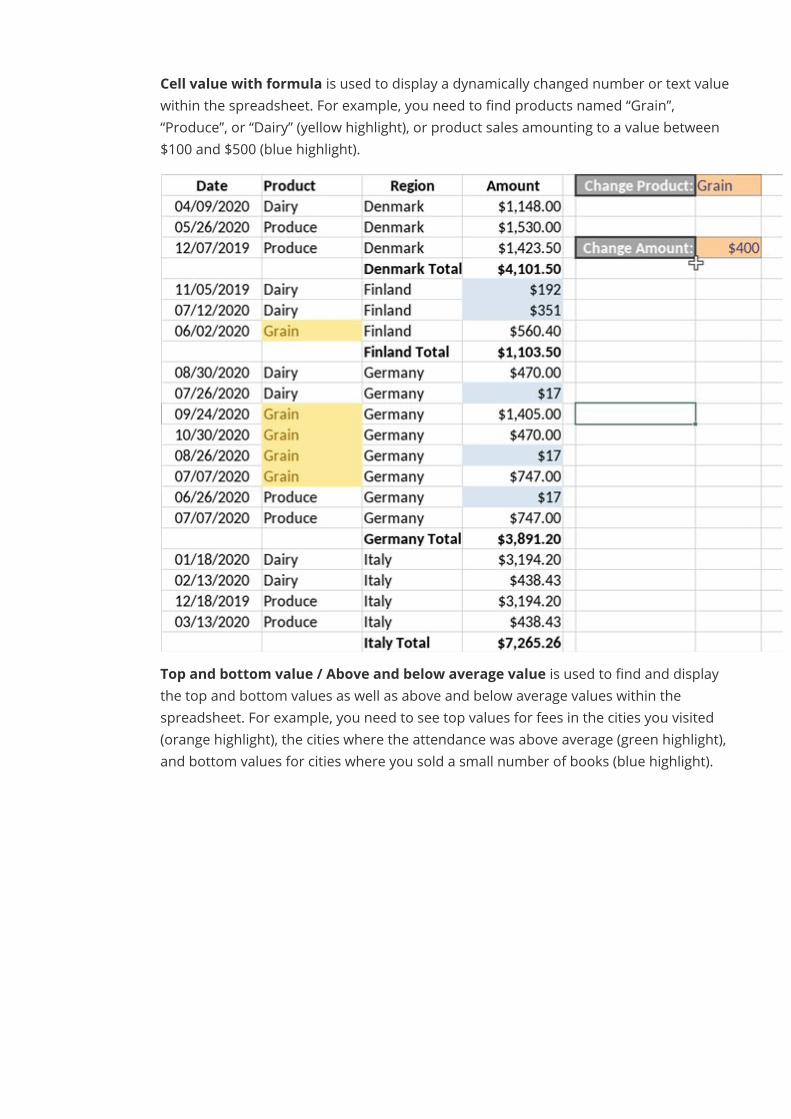
· Cell value with formula is used to display a dynamically changed number or text valuewithin the spreadsheet. For example, you need to find products named “Grain”,“Produce”, or “Dairy” (yellow highlight), or product sales amounting to a value between$100 and $500 (blue highlight).
· Top and bottom value / Above and below average value is used to find and displaythe top and bottom values as well as above and below average values within thespreadsheet. For example, you need to see top values for fees in the cities you visited(orange highlight), the cities where the attendance was above average (green highlight),and bottom values for cities where you sold a small number of books (blue highlight).
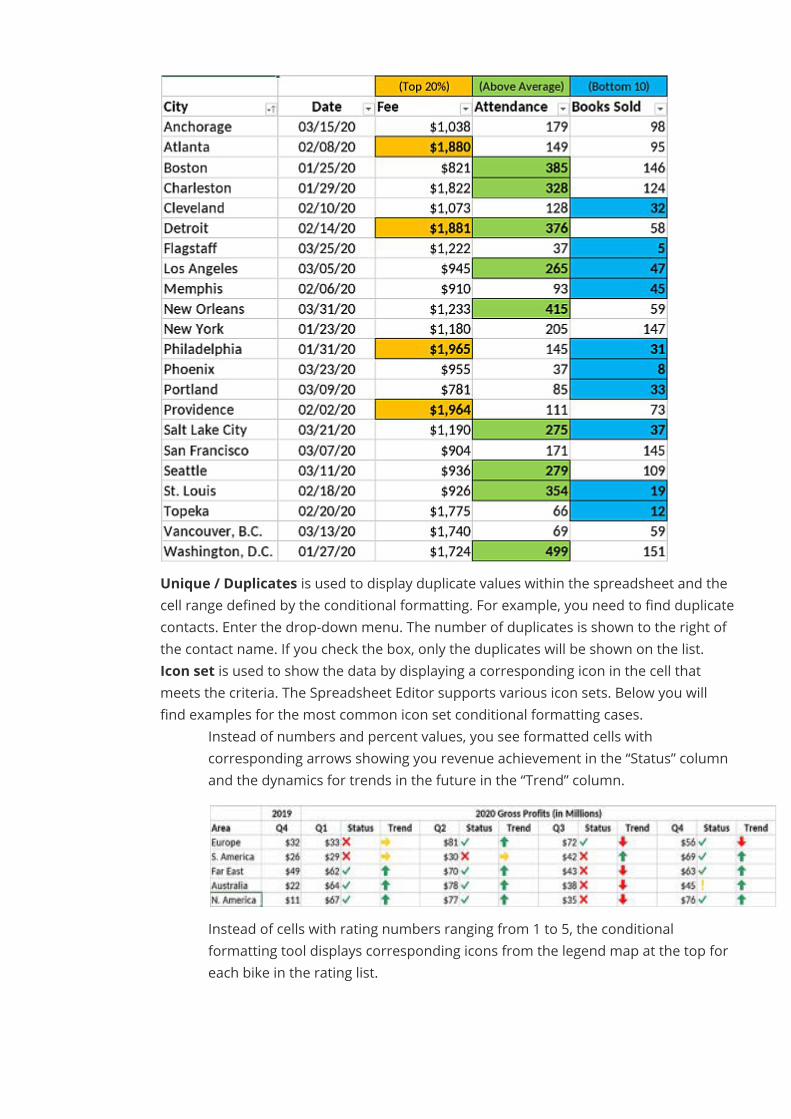
· Unique / Duplicates is used to display duplicate values within the spreadsheet and thecell range defined by the conditional formatting. For example, you need to find duplicatecontacts. Enter the drop-down menu. The number of duplicates is shown to the right ofthe contact name. If you check the box, only the duplicates will be shown on the list.
· Icon set is used to show the data by displaying a corresponding icon in the cell thatmeets the criteria. The Spreadsheet Editor supports various icon sets. Below you willfind examples for the most common icon set conditional formatting cases.
o Instead of numbers and percent values, you see formatted cells withcorresponding arrows showing you revenue achievement in the “Status” columnand the dynamics for trends in the future in the “Trend” column.
o Instead of cells with rating numbers ranging from 1 to 5, the conditionalformatting tool displays corresponding icons from the legend map at the top foreach bike in the rating list.

o Instead of manually comparing monthly profit dynamics data, the formatted cellshave a corresponding red or green arrow.
o Use the traffic lights system (red, yellow, and green circles) to visualize salesdynamics.
· Data bars are used to compare values in the form of a diagram bar. For example,compare mountain heights by displaying their default value in meters (green bar) andthe same value in 0 to 100 percent range (yellow bar); percentile when extreme valuesslant the data (light blue bar); bars only instead of numbers (blue bar); two-column dataanalysis to see both numbers and bars (red bar).

· Gradient, or color scale, is used to highlight values within the spreadsheet through agradient scale. The columns from “Dairy” through “Beverage” display data via a two-colorscale with variation from yellow to red; the “Total Sales” column displays data via athree-color scale from the smallest amount in red to the largest amount in blue.
· Formula-based formatting uses various formulas to filter data as per specific needs. Forexample, you can shade alternate rows,
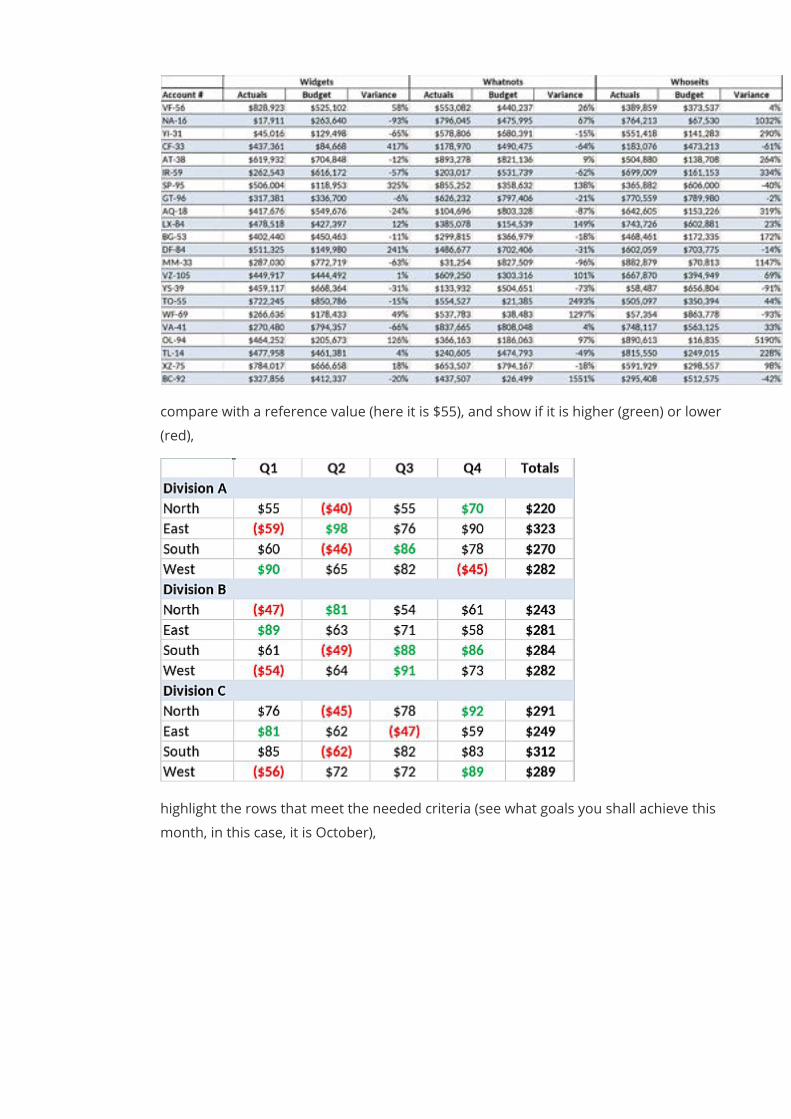
compare with a reference value (here it is $55), and show if it is higher (green) or lower(red),
highlight the rows that meet the needed criteria (see what goals you shall achieve thismonth, in this case, it is October),
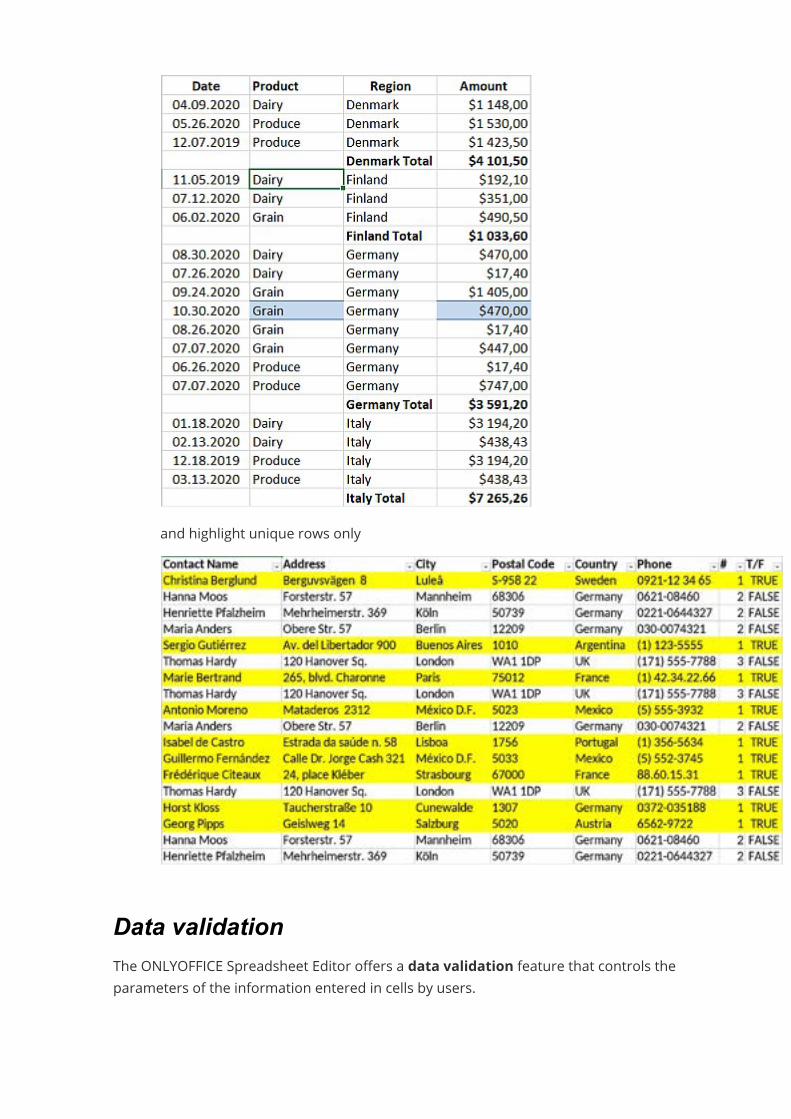
and highlight unique rows only
Data validationThe ONLYOFFICE Spreadsheet Editor offers a data validation feature that controls theparameters of the information entered in cells by users.

To access the data validation feature, choose a cell, a range of cells, or a whole spreadsheet youwant to apply the feature to, open the Data tab, and click the Data Validation icon on the toptoolbar. The opened Data Validation window contains three tabs: Settings, Input Message,and Error Alert.SettingsThe Settings section allows you to specify the type of data that can be entered:Note: Check the Apply these changes to all other cells with the same settings box to usethe same settings to the selected range of cells or a whole worksheet.
· choose the required option in the Allowmenu:o Any value: no limitations on information type.o Whole number: only whole numbers are allowed.o Decimal: only numbers with a decimal point are allowed.o List: only options from the drop-down list you created are allowed. Uncheck
the Show drop-down list in cell box to hide the drop-down arrow.
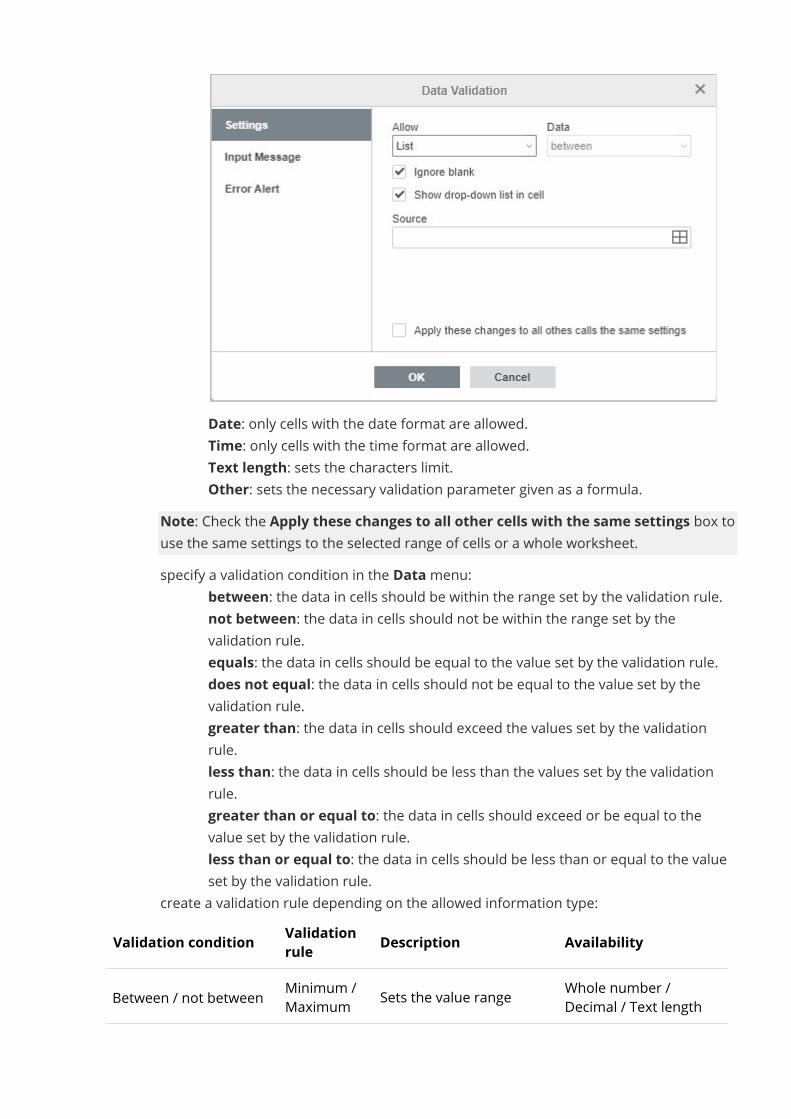
o Date: only cells with the date format are allowed.o Time: only cells with the time format are allowed.o Text length: sets the characters limit.o Other: sets the necessary validation parameter given as a formula.
Note: Check the Apply these changes to all other cells with the same settings box touse the same settings to the selected range of cells or a whole worksheet.
· specify a validation condition in the Datamenu:o between: the data in cells should be within the range set by the validation rule.o not between: the data in cells should not be within the range set by the
validation rule.o equals: the data in cells should be equal to the value set by the validation rule.o does not equal: the data in cells should not be equal to the value set by the
validation rule.o greater than: the data in cells should exceed the values set by the validation
rule.o less than: the data in cells should be less than the values set by the validation
rule.o greater than or equal to: the data in cells should exceed or be equal to the
value set by the validation rule.o less than or equal to: the data in cells should be less than or equal to the value
set by the validation rule.· create a validation rule depending on the allowed information type:
Validation condition Validationrule Description Availability
Between / not between Minimum /Maximum Sets the value range Whole number /
Decimal / Text length
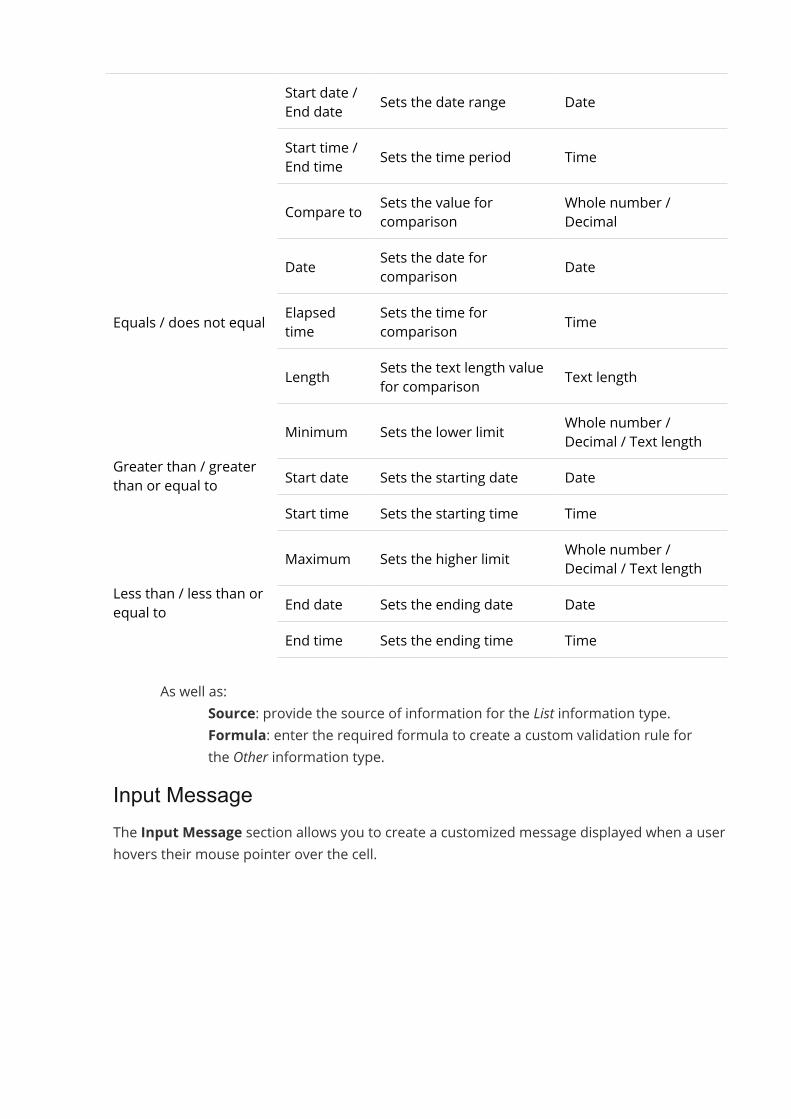
Start date /End date Sets the date range DateStart time /End time Sets the time period Time
Equals / does not equal
Compare to Sets the value forcomparison
Whole number /Decimal
Date Sets the date forcomparison Date
Elapsedtime
Sets the time forcomparison Time
Length Sets the text length valuefor comparison Text length
Greater than / greaterthan or equal to
Minimum Sets the lower limit Whole number /Decimal / Text length
Start date Sets the starting date DateStart time Sets the starting time Time
Less than / less than orequal to
Maximum Sets the higher limit Whole number /Decimal / Text length
End date Sets the ending date DateEnd time Sets the ending time Time
As well as:o Source: provide the source of information for the List information type.o Formula: enter the required formula to create a custom validation rule for
the Other information type.Input MessageThe Input Message section allows you to create a customized message displayed when a userhovers their mouse pointer over the cell.
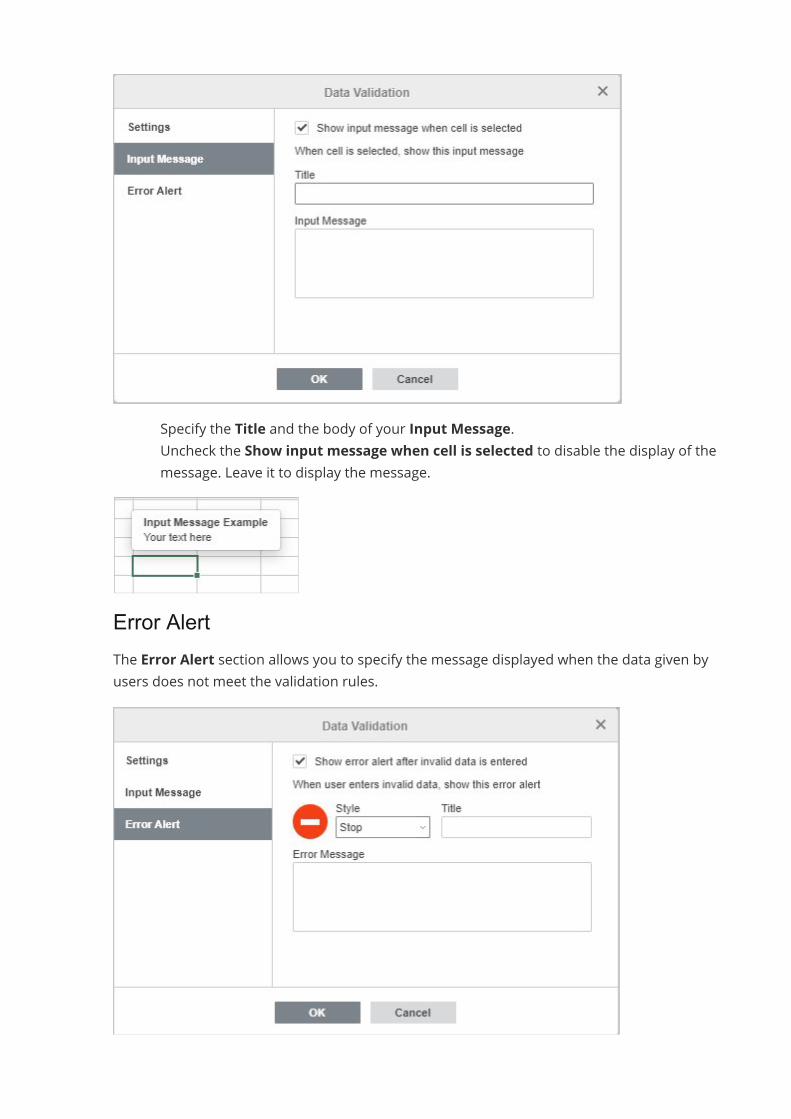
· Specify the Title and the body of your Input Message.· Uncheck the Show input message when cell is selected to disable the display of the
message. Leave it to display the message.
Error AlertThe Error Alert section allows you to specify the message displayed when the data given byusers does not meet the validation rules.
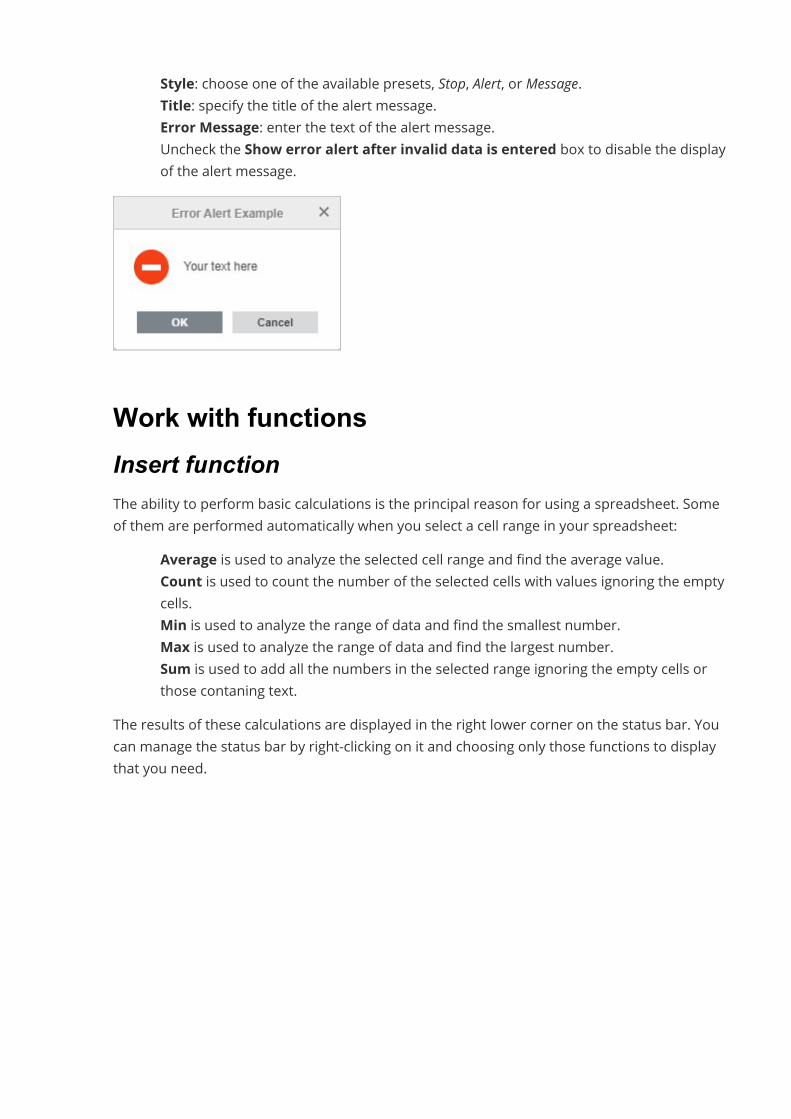
· Style: choose one of the available presets, Stop, Alert, or Message.· Title: specify the title of the alert message.· Error Message: enter the text of the alert message.· Uncheck the Show error alert after invalid data is entered box to disable the display
of the alert message.
Work with functionsInsert functionThe ability to perform basic calculations is the principal reason for using a spreadsheet. Someof them are performed automatically when you select a cell range in your spreadsheet:
· Average is used to analyze the selected cell range and find the average value.· Count is used to count the number of the selected cells with values ignoring the empty
cells.· Min is used to analyze the range of data and find the smallest number.· Max is used to analyze the range of data and find the largest number.· Sum is used to add all the numbers in the selected range ignoring the empty cells or
those contaning text.The results of these calculations are displayed in the right lower corner on the status bar. Youcan manage the status bar by right-clicking on it and choosing only those functions to displaythat you need.
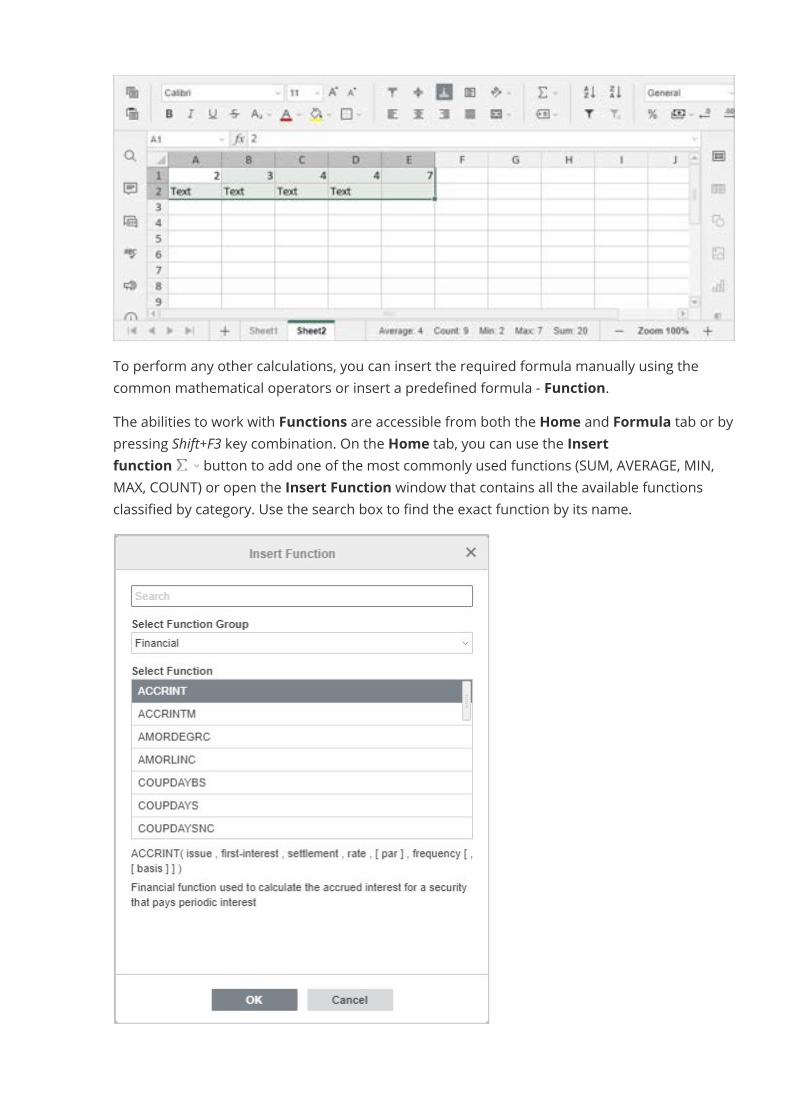
To perform any other calculations, you can insert the required formula manually using thecommon mathematical operators or insert a predefined formula - Function.The abilities to work with Functions are accessible from both the Home and Formula tab or bypressing Shift+F3 key combination. On the Home tab, you can use the Insertfunction button to add one of the most commonly used functions (SUM, AVERAGE, MIN,MAX, COUNT) or open the Insert Function window that contains all the available functionsclassified by category. Use the search box to find the exact function by its name.
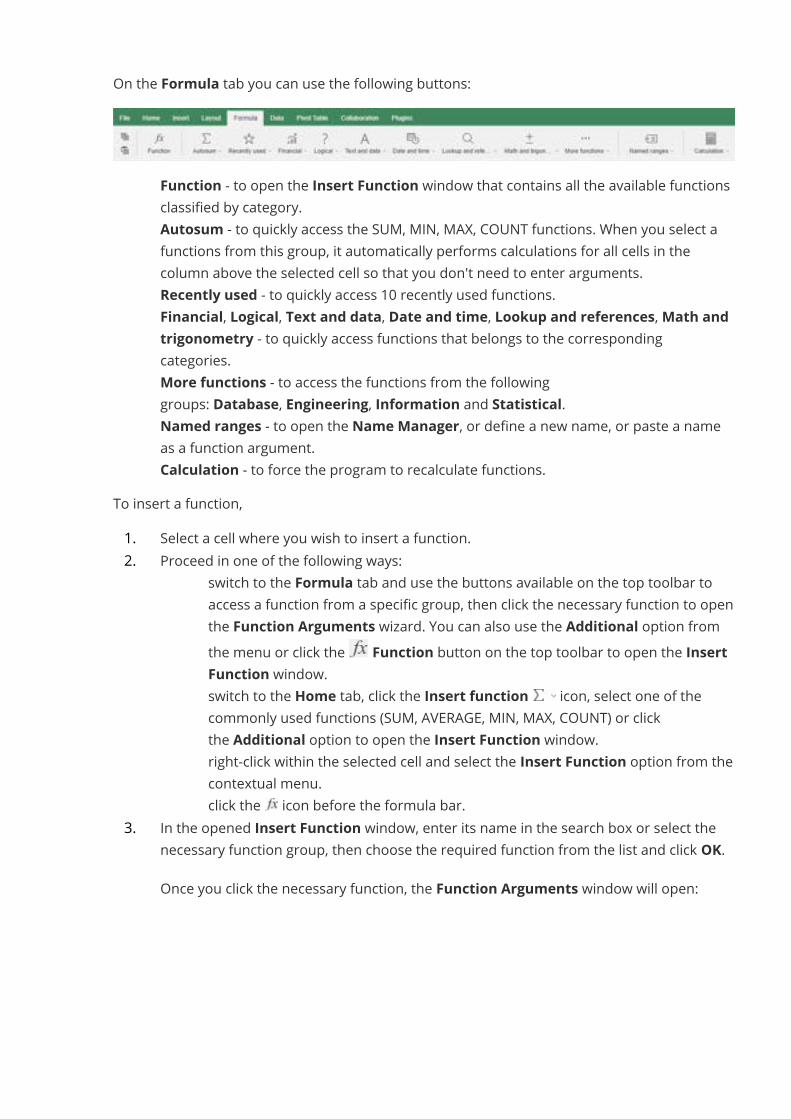
On the Formula tab you can use the following buttons:
· Function - to open the Insert Function window that contains all the available functionsclassified by category.
· Autosum - to quickly access the SUM, MIN, MAX, COUNT functions. When you select afunctions from this group, it automatically performs calculations for all cells in thecolumn above the selected cell so that you don't need to enter arguments.
· Recently used - to quickly access 10 recently used functions.· Financial, Logical, Text and data, Date and time, Lookup and references,Math and
trigonometry - to quickly access functions that belongs to the correspondingcategories.
· More functions - to access the functions from the followinggroups: Database, Engineering, Information and Statistical.
· Named ranges - to open the Name Manager, or define a new name, or paste a nameas a function argument.
· Calculation - to force the program to recalculate functions.To insert a function,1. Select a cell where you wish to insert a function.2. Proceed in one of the following ways:
· switch to the Formula tab and use the buttons available on the top toolbar toaccess a function from a specific group, then click the necessary function to openthe Function Arguments wizard. You can also use the Additional option fromthe menu or click the Function button on the top toolbar to open the InsertFunction window.
· switch to the Home tab, click the Insert function icon, select one of thecommonly used functions (SUM, AVERAGE, MIN, MAX, COUNT) or clickthe Additional option to open the Insert Function window.
· right-click within the selected cell and select the Insert Function option from thecontextual menu.
· click the icon before the formula bar.3. In the opened Insert Function window, enter its name in the search box or select the
necessary function group, then choose the required function from the list and click OK.Once you click the necessary function, the Function Arguments window will open:
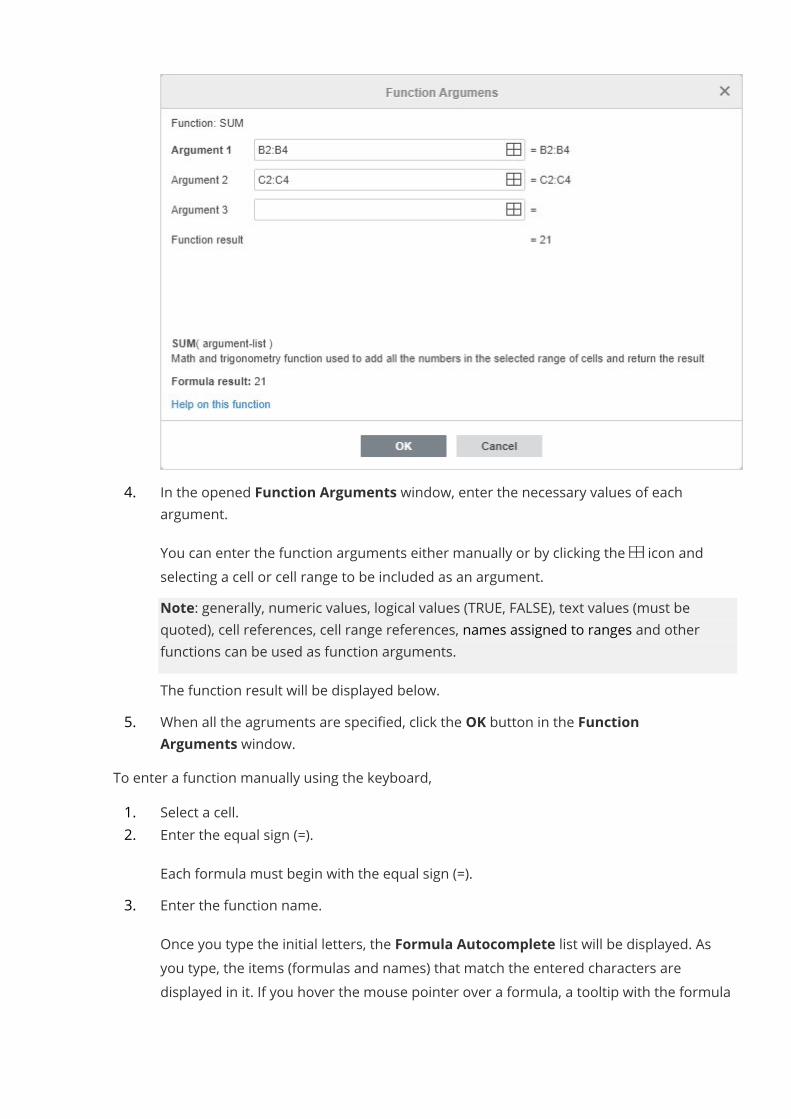
4. In the opened Function Arguments window, enter the necessary values of eachargument.You can enter the function arguments either manually or by clicking the icon andselecting a cell or cell range to be included as an argument.Note: generally, numeric values, logical values (TRUE, FALSE), text values (must bequoted), cell references, cell range references, names assigned to ranges and otherfunctions can be used as function arguments.The function result will be displayed below.
5. When all the agruments are specified, click the OK button in the FunctionArguments window.
To enter a function manually using the keyboard,1. Select a cell.2. Enter the equal sign (=).
Each formula must begin with the equal sign (=).3. Enter the function name.
Once you type the initial letters, the Formula Autocomplete list will be displayed. Asyou type, the items (formulas and names) that match the entered characters aredisplayed in it. If you hover the mouse pointer over a formula, a tooltip with the formula
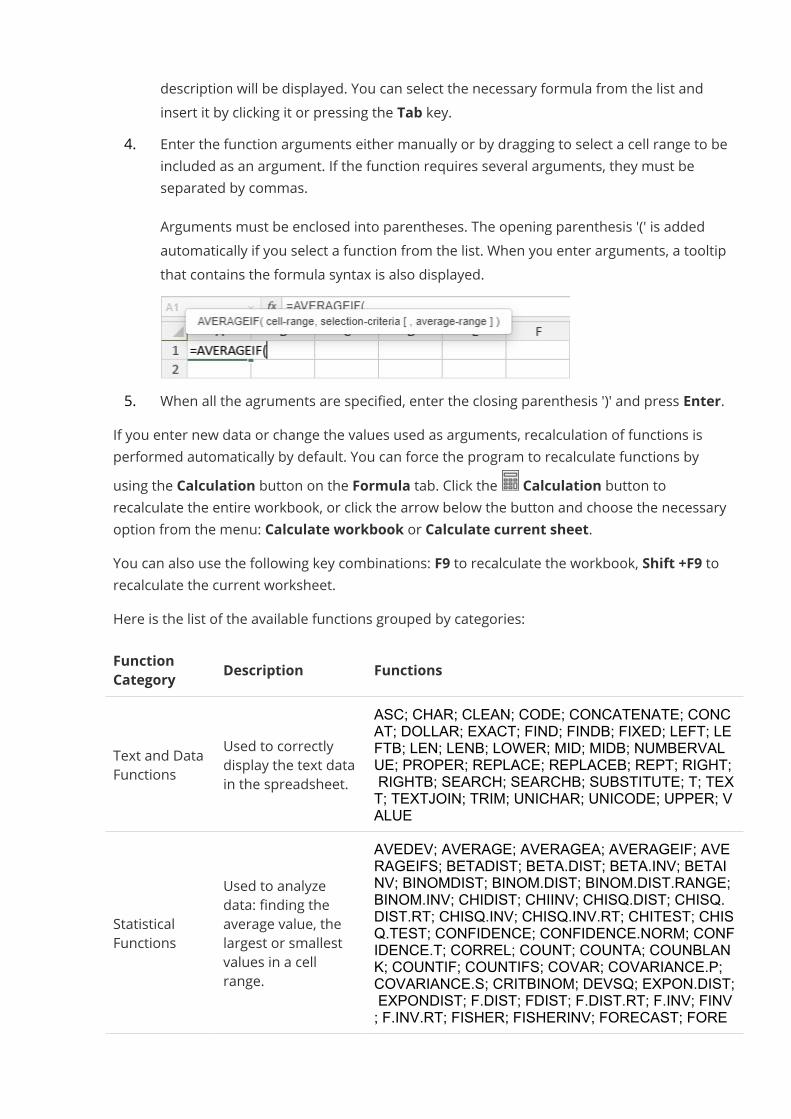
description will be displayed. You can select the necessary formula from the list andinsert it by clicking it or pressing the Tab key.
4. Enter the function arguments either manually or by dragging to select a cell range to beincluded as an argument. If the function requires several arguments, they must beseparated by commas.Arguments must be enclosed into parentheses. The opening parenthesis '(' is addedautomatically if you select a function from the list. When you enter arguments, a tooltipthat contains the formula syntax is also displayed.
5. When all the agruments are specified, enter the closing parenthesis ')' and press Enter.If you enter new data or change the values used as arguments, recalculation of functions isperformed automatically by default. You can force the program to recalculate functions byusing the Calculation button on the Formula tab. Click the Calculation button torecalculate the entire workbook, or click the arrow below the button and choose the necessaryoption from the menu: Calculate workbook or Calculate current sheet.You can also use the following key combinations: F9 to recalculate the workbook, Shift +F9 torecalculate the current worksheet.Here is the list of the available functions grouped by categories:FunctionCategory Description Functions
Text and DataFunctions
Used to correctlydisplay the text datain the spreadsheet.
ASC; CHAR; CLEAN; CODE; CONCATENATE; CONCAT; DOLLAR; EXACT; FIND; FINDB; FIXED; LEFT; LEFTB; LEN; LENB; LOWER; MID; MIDB; NUMBERVALUE; PROPER; REPLACE; REPLACEB; REPT; RIGHT;RIGHTB; SEARCH; SEARCHB; SUBSTITUTE; T; TEXT; TEXTJOIN; TRIM; UNICHAR; UNICODE; UPPER; VALUE
StatisticalFunctions
Used to analyzedata: finding theaverage value, thelargest or smallestvalues in a cellrange.
AVEDEV; AVERAGE; AVERAGEA; AVERAGEIF; AVERAGEIFS; BETADIST; BETA.DIST; BETA.INV; BETAINV; BINOMDIST; BINOM.DIST; BINOM.DIST.RANGE;BINOM.INV; CHIDIST; CHIINV; CHISQ.DIST; CHISQ.DIST.RT; CHISQ.INV; CHISQ.INV.RT; CHITEST; CHISQ.TEST; CONFIDENCE; CONFIDENCE.NORM; CONFIDENCE.T; CORREL; COUNT; COUNTA; COUNBLANK; COUNTIF; COUNTIFS; COVAR; COVARIANCE.P;COVARIANCE.S; CRITBINOM; DEVSQ; EXPON.DIST;EXPONDIST; F.DIST; FDIST; F.DIST.RT; F.INV; FINV; F.INV.RT; FISHER; FISHERINV; FORECAST; FORE
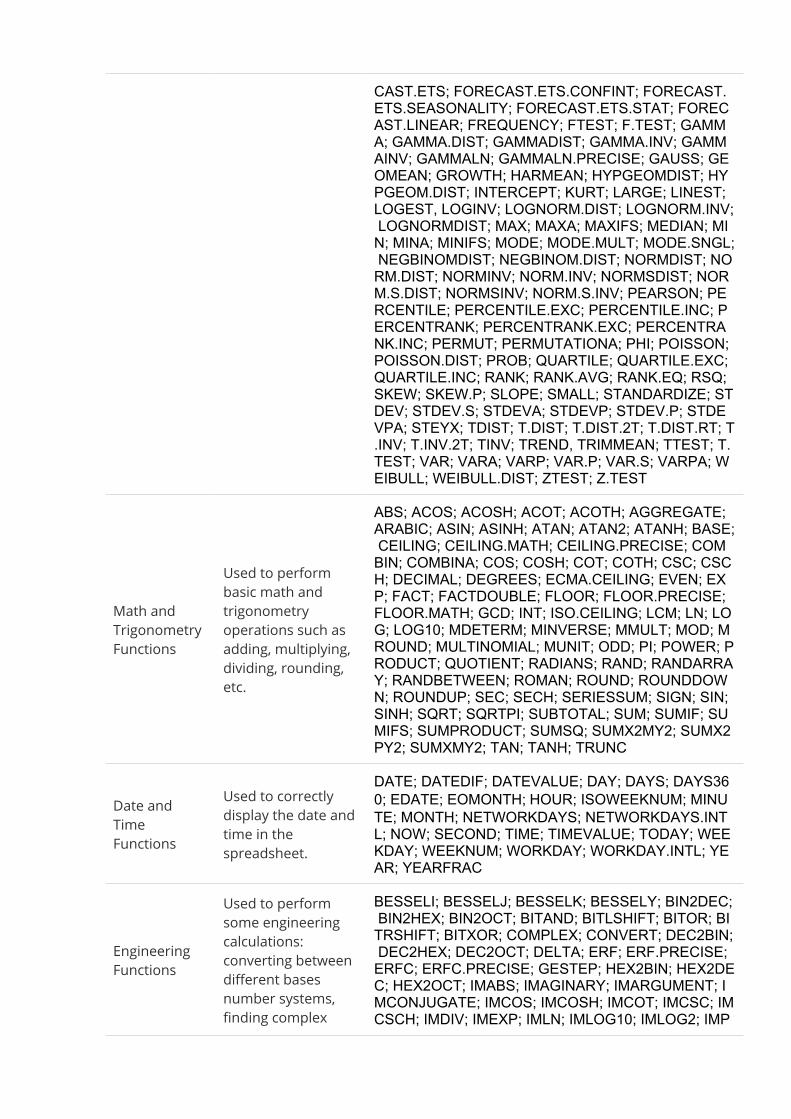
CAST.ETS; FORECAST.ETS.CONFINT; FORECAST.ETS.SEASONALITY; FORECAST.ETS.STAT; FORECAST.LINEAR; FREQUENCY; FTEST; F.TEST; GAMMA; GAMMA.DIST; GAMMADIST; GAMMA.INV; GAMMAINV; GAMMALN; GAMMALN.PRECISE; GAUSS; GEOMEAN; GROWTH; HARMEAN; HYPGEOMDIST; HYPGEOM.DIST; INTERCEPT; KURT; LARGE; LINEST;LOGEST, LOGINV; LOGNORM.DIST; LOGNORM.INV;LOGNORMDIST; MAX; MAXA; MAXIFS; MEDIAN; MIN; MINA; MINIFS; MODE; MODE.MULT; MODE.SNGL;NEGBINOMDIST; NEGBINOM.DIST; NORMDIST; NORM.DIST; NORMINV; NORM.INV; NORMSDIST; NORM.S.DIST; NORMSINV; NORM.S.INV; PEARSON; PERCENTILE; PERCENTILE.EXC; PERCENTILE.INC; PERCENTRANK; PERCENTRANK.EXC; PERCENTRANK.INC; PERMUT; PERMUTATIONA; PHI; POISSON;POISSON.DIST; PROB; QUARTILE; QUARTILE.EXC;QUARTILE.INC; RANK; RANK.AVG; RANK.EQ; RSQ;SKEW; SKEW.P; SLOPE; SMALL; STANDARDIZE; STDEV; STDEV.S; STDEVA; STDEVP; STDEV.P; STDEVPA; STEYX; TDIST; T.DIST; T.DIST.2T; T.DIST.RT; T.INV; T.INV.2T; TINV; TREND, TRIMMEAN; TTEST; T.TEST; VAR; VARA; VARP; VAR.P; VAR.S; VARPA; WEIBULL; WEIBULL.DIST; ZTEST; Z.TEST
Math andTrigonometryFunctions
Used to performbasic math andtrigonometryoperations such asadding, multiplying,dividing, rounding,etc.
ABS; ACOS; ACOSH; ACOT; ACOTH; AGGREGATE;ARABIC; ASIN; ASINH; ATAN; ATAN2; ATANH; BASE;CEILING; CEILING.MATH; CEILING.PRECISE; COMBIN; COMBINA; COS; COSH; COT; COTH; CSC; CSCH; DECIMAL; DEGREES; ECMA.CEILING; EVEN; EXP; FACT; FACTDOUBLE; FLOOR; FLOOR.PRECISE;FLOOR.MATH; GCD; INT; ISO.CEILING; LCM; LN; LOG; LOG10; MDETERM; MINVERSE; MMULT; MOD; MROUND; MULTINOMIAL; MUNIT; ODD; PI; POWER; PRODUCT; QUOTIENT; RADIANS; RAND; RANDARRAY; RANDBETWEEN; ROMAN; ROUND; ROUNDDOWN; ROUNDUP; SEC; SECH; SERIESSUM; SIGN; SIN;SINH; SQRT; SQRTPI; SUBTOTAL; SUM; SUMIF; SUMIFS; SUMPRODUCT; SUMSQ; SUMX2MY2; SUMX2PY2; SUMXMY2; TAN; TANH; TRUNC
Date andTimeFunctions
Used to correctlydisplay the date andtime in thespreadsheet.
DATE; DATEDIF; DATEVALUE; DAY; DAYS; DAYS360; EDATE; EOMONTH; HOUR; ISOWEEKNUM; MINUTE; MONTH; NETWORKDAYS; NETWORKDAYS.INTL; NOW; SECOND; TIME; TIMEVALUE; TODAY; WEEKDAY; WEEKNUM; WORKDAY; WORKDAY.INTL; YEAR; YEARFRAC
EngineeringFunctions
Used to performsome engineeringcalculations:converting betweendifferent basesnumber systems,finding complex
BESSELI; BESSELJ; BESSELK; BESSELY; BIN2DEC;BIN2HEX; BIN2OCT; BITAND; BITLSHIFT; BITOR; BITRSHIFT; BITXOR; COMPLEX; CONVERT; DEC2BIN;DEC2HEX; DEC2OCT; DELTA; ERF; ERF.PRECISE;ERFC; ERFC.PRECISE; GESTEP; HEX2BIN; HEX2DEC; HEX2OCT; IMABS; IMAGINARY; IMARGUMENT; IMCONJUGATE; IMCOS; IMCOSH; IMCOT; IMCSC; IMCSCH; IMDIV; IMEXP; IMLN; IMLOG10; IMLOG2; IMP
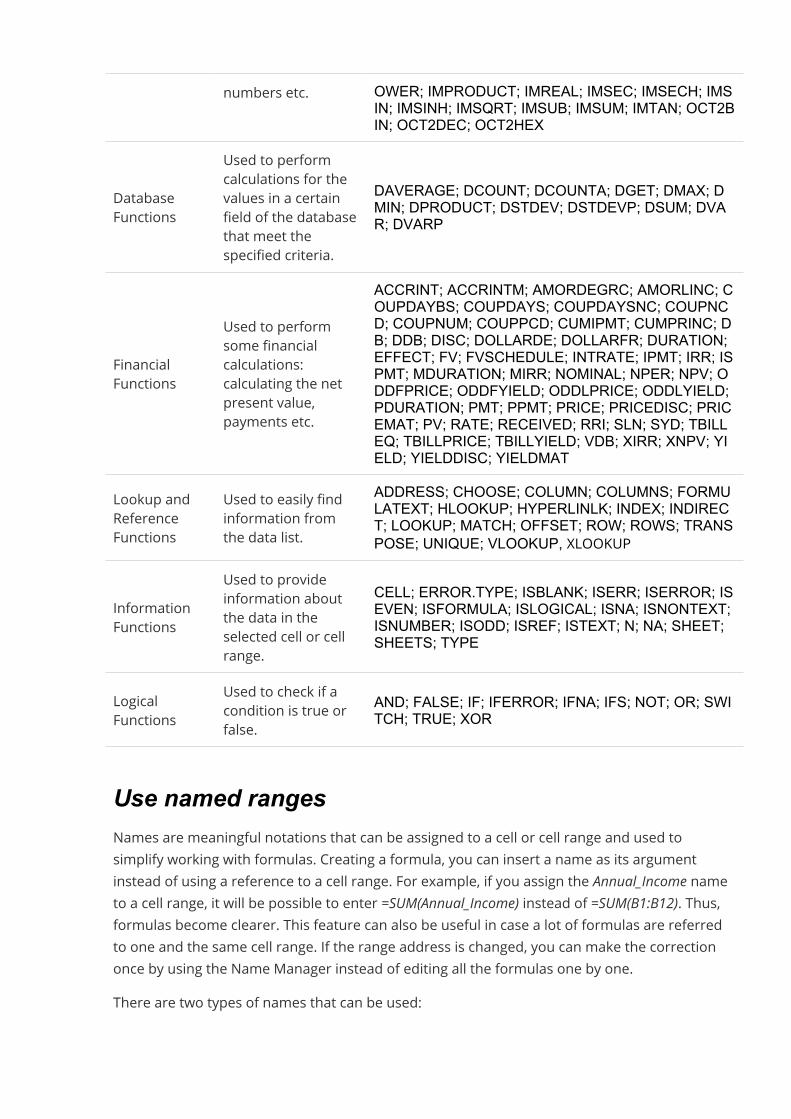
numbers etc. OWER; IMPRODUCT; IMREAL; IMSEC; IMSECH; IMSIN; IMSINH; IMSQRT; IMSUB; IMSUM; IMTAN; OCT2BIN; OCT2DEC; OCT2HEX
DatabaseFunctions
Used to performcalculations for thevalues in a certainfield of the databasethat meet thespecified criteria.
DAVERAGE; DCOUNT; DCOUNTA; DGET; DMAX; DMIN; DPRODUCT; DSTDEV; DSTDEVP; DSUM; DVAR; DVARP
FinancialFunctions
Used to performsome financialcalculations:calculating the netpresent value,payments etc.
ACCRINT; ACCRINTM; AMORDEGRC; AMORLINC; COUPDAYBS; COUPDAYS; COUPDAYSNC; COUPNCD; COUPNUM; COUPPCD; CUMIPMT; CUMPRINC; DB; DDB; DISC; DOLLARDE; DOLLARFR; DURATION;EFFECT; FV; FVSCHEDULE; INTRATE; IPMT; IRR; ISPMT; MDURATION; MIRR; NOMINAL; NPER; NPV; ODDFPRICE; ODDFYIELD; ODDLPRICE; ODDLYIELD;PDURATION; PMT; PPMT; PRICE; PRICEDISC; PRICEMAT; PV; RATE; RECEIVED; RRI; SLN; SYD; TBILLEQ; TBILLPRICE; TBILLYIELD; VDB; XIRR; XNPV; YIELD; YIELDDISC; YIELDMATLookup andReferenceFunctions
Used to easily findinformation fromthe data list.
ADDRESS; CHOOSE; COLUMN; COLUMNS; FORMULATEXT; HLOOKUP; HYPERLINLK; INDEX; INDIRECT; LOOKUP; MATCH; OFFSET; ROW; ROWS; TRANSPOSE; UNIQUE; VLOOKUP, XLOOKUP
InformationFunctions
Used to provideinformation aboutthe data in theselected cell or cellrange.
CELL; ERROR.TYPE; ISBLANK; ISERR; ISERROR; ISEVEN; ISFORMULA; ISLOGICAL; ISNA; ISNONTEXT;ISNUMBER; ISODD; ISREF; ISTEXT; N; NA; SHEET;SHEETS; TYPE
LogicalFunctions
Used to check if acondition is true orfalse.
AND; FALSE; IF; IFERROR; IFNA; IFS; NOT; OR; SWITCH; TRUE; XOR
Use named rangesNames are meaningful notations that can be assigned to a cell or cell range and used tosimplify working with formulas. Creating a formula, you can insert a name as its argumentinstead of using a reference to a cell range. For example, if you assign the Annual_Income nameto a cell range, it will be possible to enter =SUM(Annual_Income) instead of =SUM(B1:B12). Thus,formulas become clearer. This feature can also be useful in case a lot of formulas are referredto one and the same cell range. If the range address is changed, you can make the correctiononce by using the Name Manager instead of editing all the formulas one by one.There are two types of names that can be used:
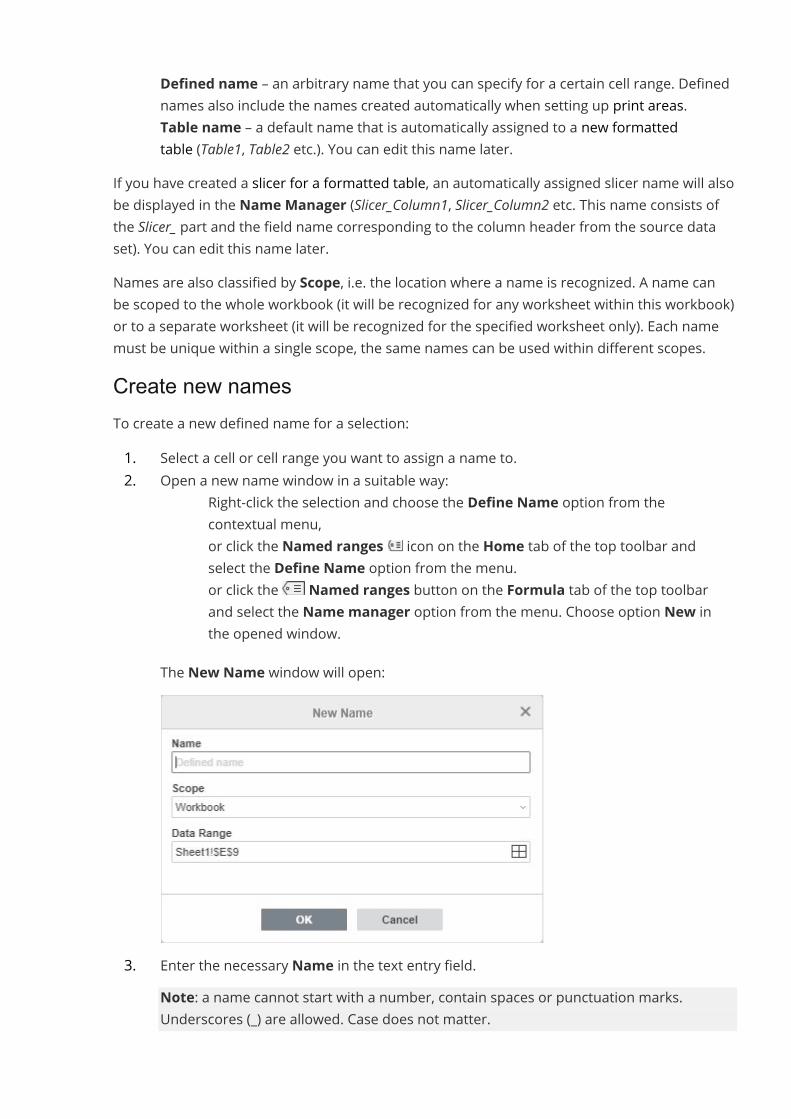
· Defined name – an arbitrary name that you can specify for a certain cell range. Definednames also include the names created automatically when setting up print areas.
· Table name – a default name that is automatically assigned to a new formattedtable (Table1, Table2 etc.). You can edit this name later.
If you have created a slicer for a formatted table, an automatically assigned slicer name will alsobe displayed in the Name Manager (Slicer_Column1, Slicer_Column2 etc. This name consists ofthe Slicer_ part and the field name corresponding to the column header from the source dataset). You can edit this name later.Names are also classified by Scope, i.e. the location where a name is recognized. A name canbe scoped to the whole workbook (it will be recognized for any worksheet within this workbook)or to a separate worksheet (it will be recognized for the specified worksheet only). Each namemust be unique within a single scope, the same names can be used within different scopes.Create new namesTo create a new defined name for a selection:1. Select a cell or cell range you want to assign a name to.2. Open a new name window in a suitable way:
· Right-click the selection and choose the Define Name option from thecontextual menu,
· or click the Named ranges icon on the Home tab of the top toolbar andselect the Define Name option from the menu.
· or click the Named ranges button on the Formula tab of the top toolbarand select the Name manager option from the menu. Choose option New inthe opened window.
The New Name window will open:
3. Enter the necessary Name in the text entry field.Note: a name cannot start with a number, contain spaces or punctuation marks.Underscores (_) are allowed. Case does not matter.
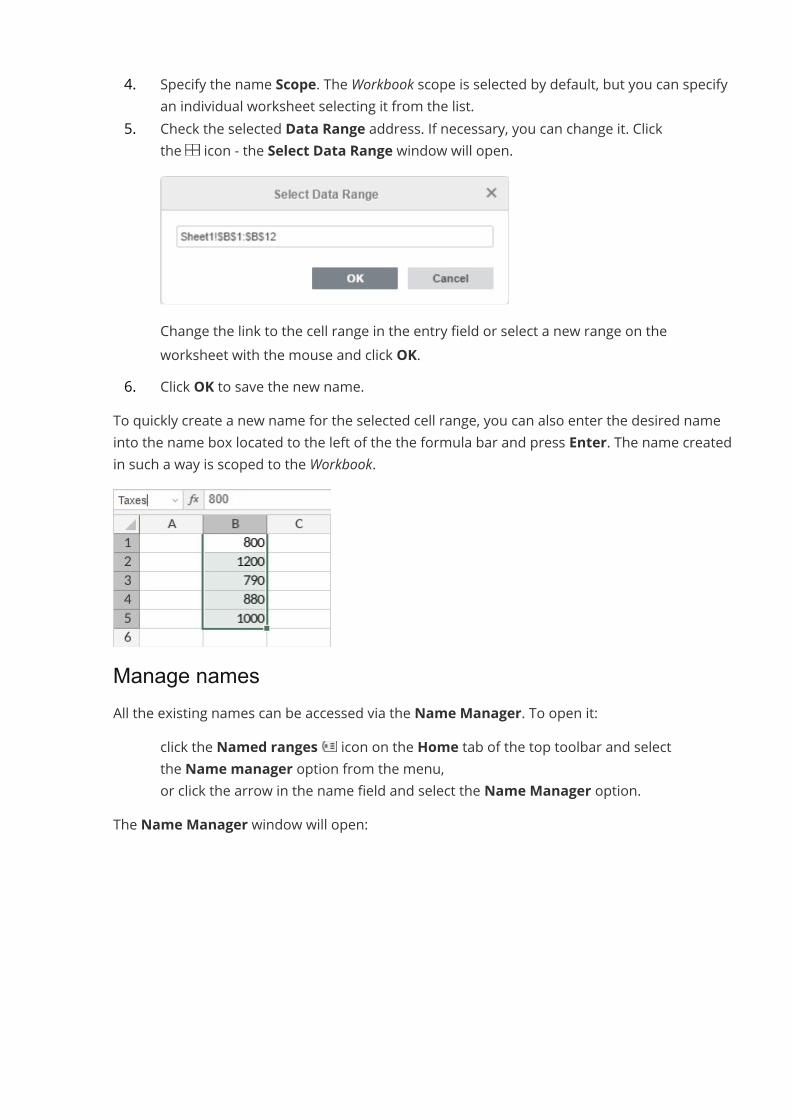
4. Specify the name Scope. The Workbook scope is selected by default, but you can specifyan individual worksheet selecting it from the list.
5. Check the selected Data Range address. If necessary, you can change it. Clickthe icon - the Select Data Range window will open.
Change the link to the cell range in the entry field or select a new range on theworksheet with the mouse and click OK.
6. Click OK to save the new name.To quickly create a new name for the selected cell range, you can also enter the desired nameinto the name box located to the left of the the formula bar and press Enter. The name createdin such a way is scoped to the Workbook.
Manage namesAll the existing names can be accessed via the Name Manager. To open it:
· click the Named ranges icon on the Home tab of the top toolbar and selectthe Name manager option from the menu,
· or click the arrow in the name field and select the Name Manager option.The Name Manager window will open:
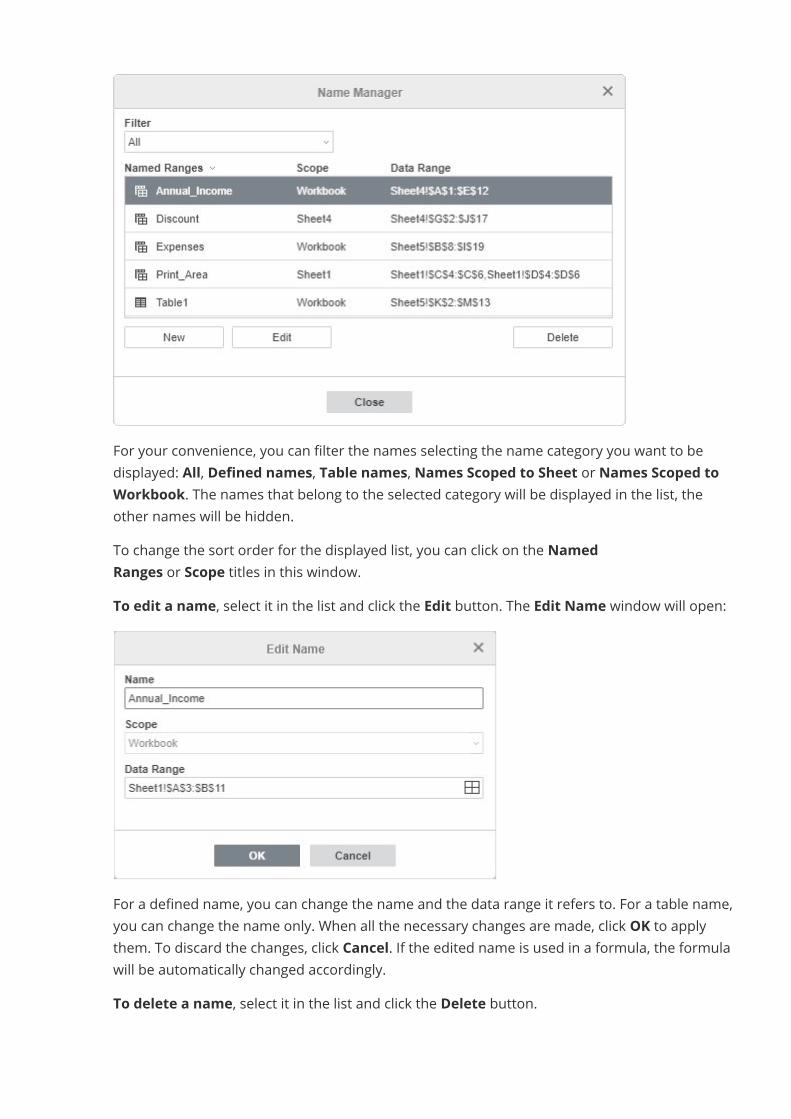
For your convenience, you can filter the names selecting the name category you want to bedisplayed: All, Defined names, Table names, Names Scoped to Sheet or Names Scoped toWorkbook. The names that belong to the selected category will be displayed in the list, theother names will be hidden.To change the sort order for the displayed list, you can click on the NamedRanges or Scope titles in this window.To edit a name, select it in the list and click the Edit button. The Edit Name window will open:
For a defined name, you can change the name and the data range it refers to. For a table name,you can change the name only. When all the necessary changes are made, click OK to applythem. To discard the changes, click Cancel. If the edited name is used in a formula, the formulawill be automatically changed accordingly.To delete a name, select it in the list and click the Delete button.
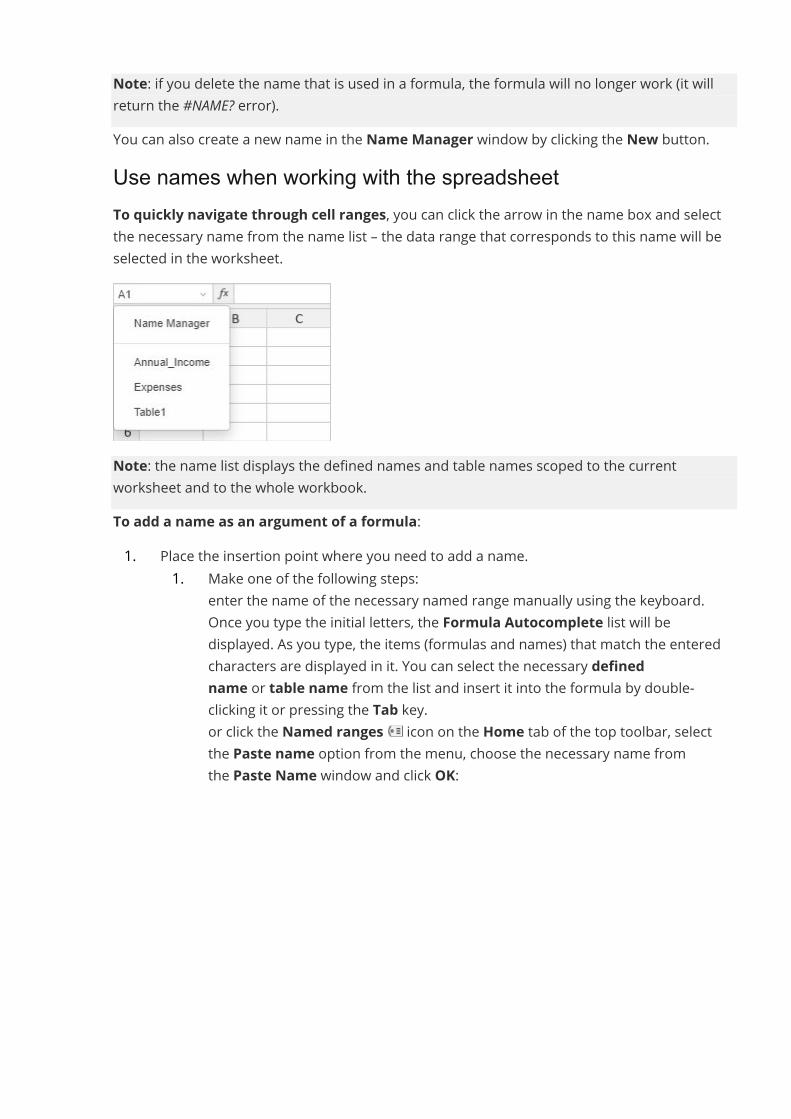
Note: if you delete the name that is used in a formula, the formula will no longer work (it willreturn the #NAME? error).You can also create a new name in the Name Manager window by clicking the New button.Use names when working with the spreadsheetTo quickly navigate through cell ranges, you can click the arrow in the name box and selectthe necessary name from the name list – the data range that corresponds to this name will beselected in the worksheet.
Note: the name list displays the defined names and table names scoped to the currentworksheet and to the whole workbook.To add a name as an argument of a formula:1. Place the insertion point where you need to add a name.
1. Make one of the following steps:· enter the name of the necessary named range manually using the keyboard.
Once you type the initial letters, the Formula Autocomplete list will bedisplayed. As you type, the items (formulas and names) that match the enteredcharacters are displayed in it. You can select the necessary definedname or table name from the list and insert it into the formula by double-clicking it or pressing the Tab key.
· or click the Named ranges icon on the Home tab of the top toolbar, selectthe Paste name option from the menu, choose the necessary name fromthe Paste Name window and click OK:
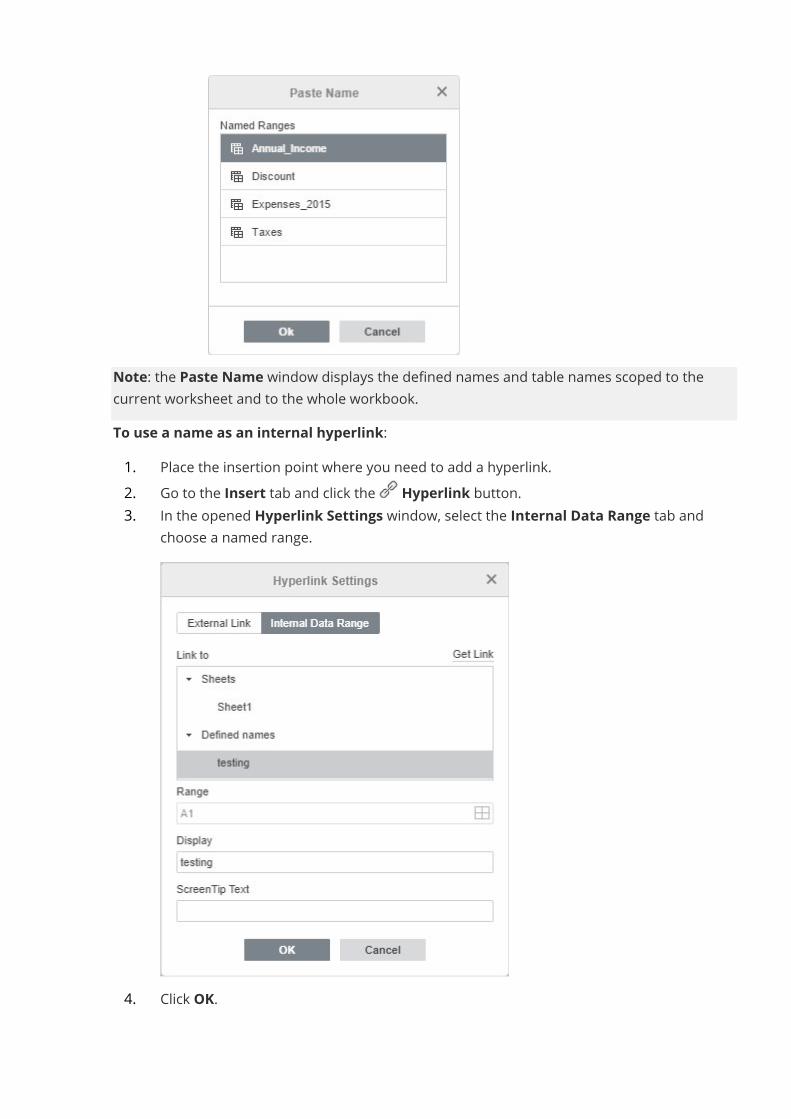
Note: the Paste Name window displays the defined names and table names scoped to thecurrent worksheet and to the whole workbook.To use a name as an internal hyperlink:1. Place the insertion point where you need to add a hyperlink.2. Go to the Insert tab and click the Hyperlink button.3. In the opened Hyperlink Settings window, select the Internal Data Range tab and
choose a named range.
4. Click OK.
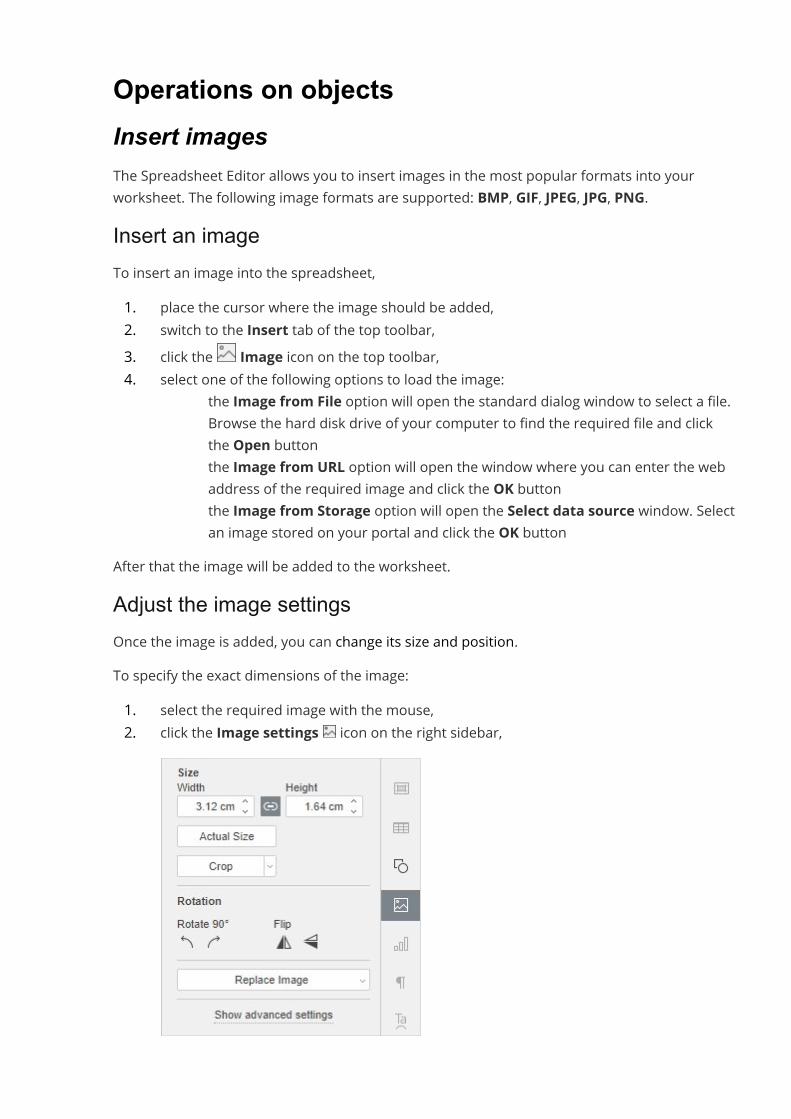
Operations on objectsInsert imagesThe Spreadsheet Editor allows you to insert images in the most popular formats into yourworksheet. The following image formats are supported: BMP, GIF, JPEG, JPG, PNG.Insert an imageTo insert an image into the spreadsheet,1. place the cursor where the image should be added,2. switch to the Insert tab of the top toolbar,3. click the Image icon on the top toolbar,4. select one of the following options to load the image:
· the Image from File option will open the standard dialog window to select a file.Browse the hard disk drive of your computer to find the required file and clickthe Open button
· the Image from URL option will open the window where you can enter the webaddress of the required image and click the OK button
· the Image from Storage option will open the Select data source window. Selectan image stored on your portal and click the OK button
After that the image will be added to the worksheet.Adjust the image settingsOnce the image is added, you can change its size and position.To specify the exact dimensions of the image:1. select the required image with the mouse,2. click the Image settings icon on the right sidebar,

3. in the Size section, set the necessaryWidth and Height values. If the Constantproportions button is clicked (in this case it looks like this ), the width and heightwill be changed together preserving the original image aspect ratio. To restore theactual size of the added image, click the Actual Size button.
To crop the image:Click the Crop button to activate cropping handles which appear on the image corners and inthe center of each side. Manually drag the handles to set the cropping area. You can move themouse cursor over the cropping area border so that it turns into the Arrow icon and dragthe area.
· To crop a single side, drag the handle located in the center of this side.· To simultaneously crop two adjacent sides, drag one of the corner handles.· To equally crop two opposite sides of the image, hold down the Ctrl key when dragging
the handle in the center of one of these sides.· To equally crop all sides of the image, hold down the Ctrl key when dragging any of the
corner handles.When the cropping area is specified, click the Crop button once again, or press the Esc key, orclick anywhere outside of the cropping area to apply the changes.After the cropping area is selected, it's also possible to use the Fill and Fit options availablefrom the Crop drop-down menu. Click the Crop button once again and select the option youneed:
· If you select the Fill option, the central part of the original image will be preserved andused to fill the selected cropping area, while other parts of the image will be removed.
· If you select the Fit option, the image will be resized so that it fits the height or width ofthe cropping area. No parts of the original image will be removed, but empty spacesmay appear within the selected cropping area.
To rotate the image:1. select the required image with the mouse,2. click the Image settings icon on the right sidebar,3. in the Rotation section, click one of the buttons:
· to rotate the image by 90 degrees counterclockwise· to rotate the image by 90 degrees clockwise· to flip the image horizontally (left to right)· to flip the image vertically (upside down)
Note: alternatively, you can right-click the image and use the Rotate option from thecontextual menu.
To replace the inserted image,1. select the required image with the mouse,
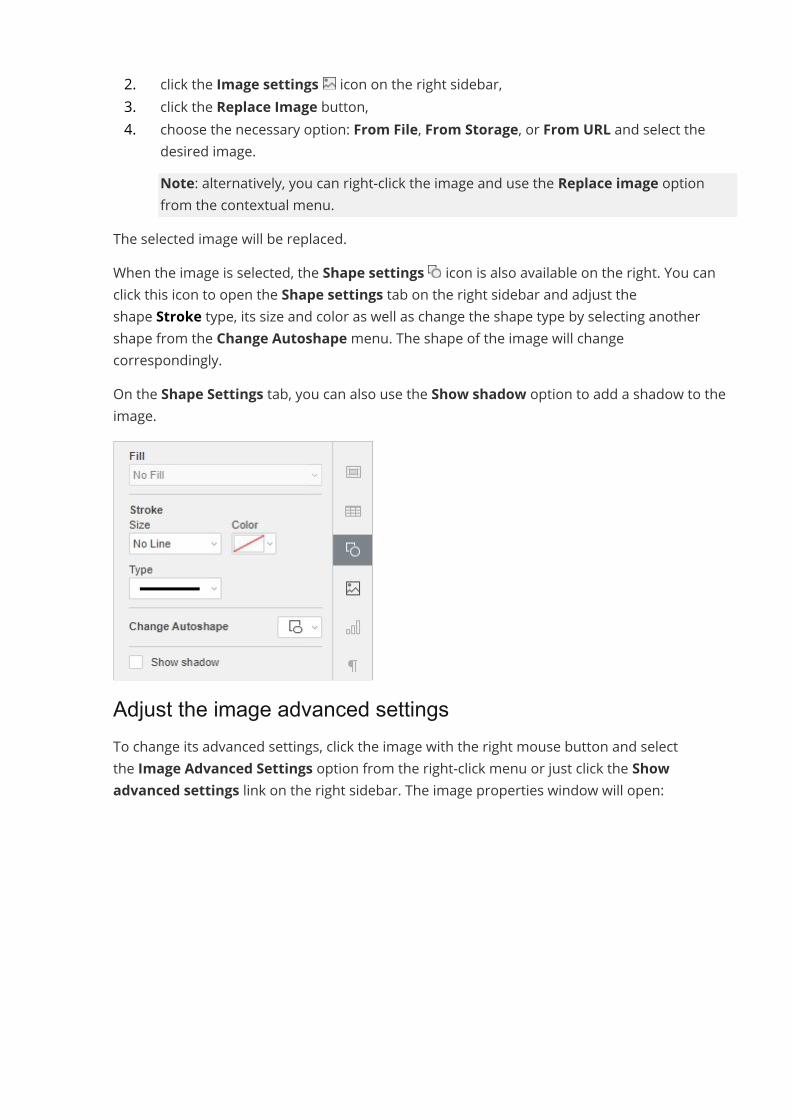
2. click the Image settings icon on the right sidebar,3. click the Replace Image button,4. choose the necessary option: From File, From Storage, or From URL and select the
desired image.Note: alternatively, you can right-click the image and use the Replace image optionfrom the contextual menu.
The selected image will be replaced.When the image is selected, the Shape settings icon is also available on the right. You canclick this icon to open the Shape settings tab on the right sidebar and adjust theshape Stroke type, its size and color as well as change the shape type by selecting anothershape from the Change Autoshapemenu. The shape of the image will changecorrespondingly.On the Shape Settings tab, you can also use the Show shadow option to add a shadow to theimage.
Adjust the image advanced settingsTo change its advanced settings, click the image with the right mouse button and selectthe Image Advanced Settings option from the right-click menu or just click the Showadvanced settings link on the right sidebar. The image properties window will open:
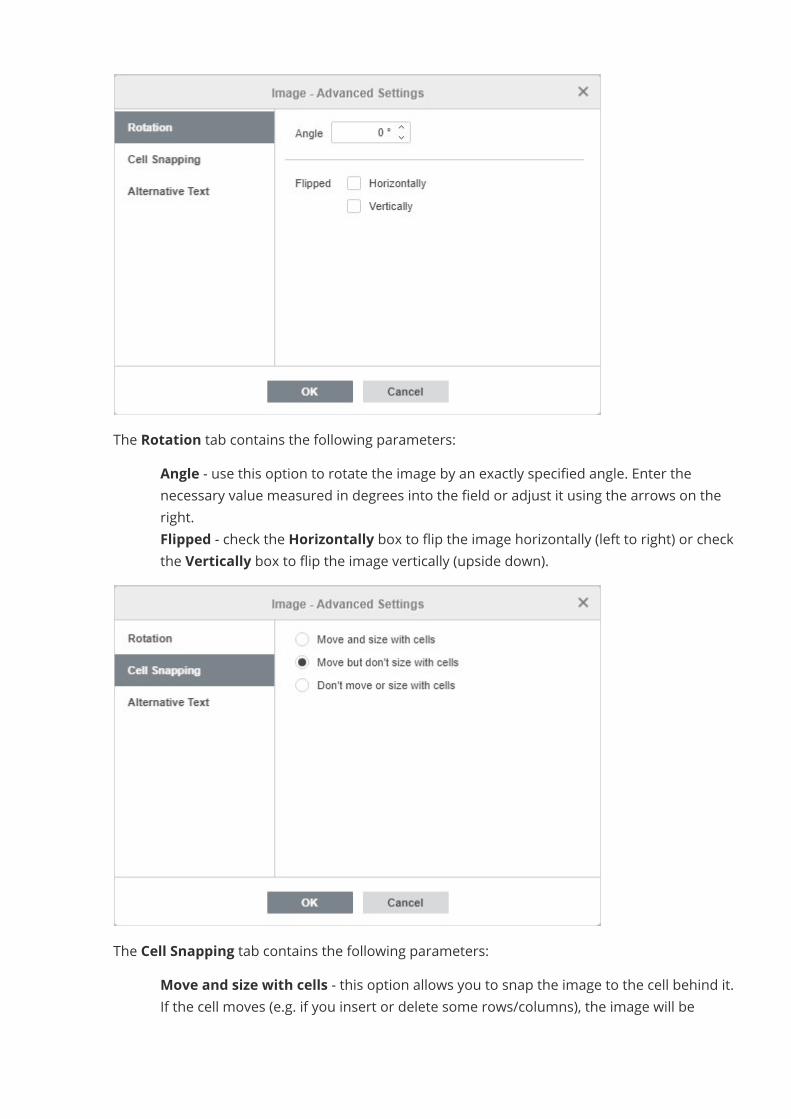
The Rotation tab contains the following parameters:· Angle - use this option to rotate the image by an exactly specified angle. Enter the
necessary value measured in degrees into the field or adjust it using the arrows on theright.
· Flipped - check the Horizontally box to flip the image horizontally (left to right) or checkthe Vertically box to flip the image vertically (upside down).
The Cell Snapping tab contains the following parameters:· Move and size with cells - this option allows you to snap the image to the cell behind it.
If the cell moves (e.g. if you insert or delete some rows/columns), the image will be
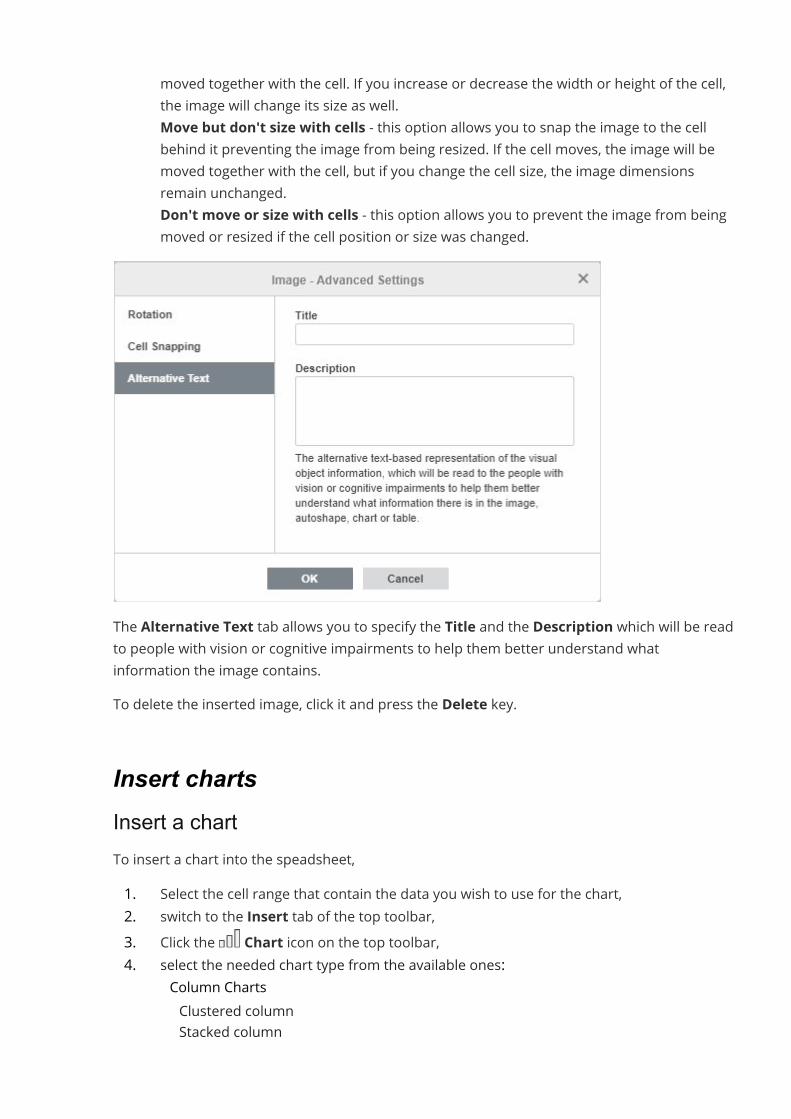
moved together with the cell. If you increase or decrease the width or height of the cell,the image will change its size as well.
· Move but don't size with cells - this option allows you to snap the image to the cellbehind it preventing the image from being resized. If the cell moves, the image will bemoved together with the cell, but if you change the cell size, the image dimensionsremain unchanged.
· Don't move or size with cells - this option allows you to prevent the image from beingmoved or resized if the cell position or size was changed.
The Alternative Text tab allows you to specify the Title and the Description which will be readto people with vision or cognitive impairments to help them better understand whatinformation the image contains.To delete the inserted image, click it and press the Delete key.
Insert chartsInsert a chartTo insert a chart into the speadsheet,1. Select the cell range that contain the data you wish to use for the chart,2. switch to the Insert tab of the top toolbar,3. Click the Chart icon on the top toolbar,4. select the needed chart type from the available ones:
· Column Chartso Clustered columno Stacked column
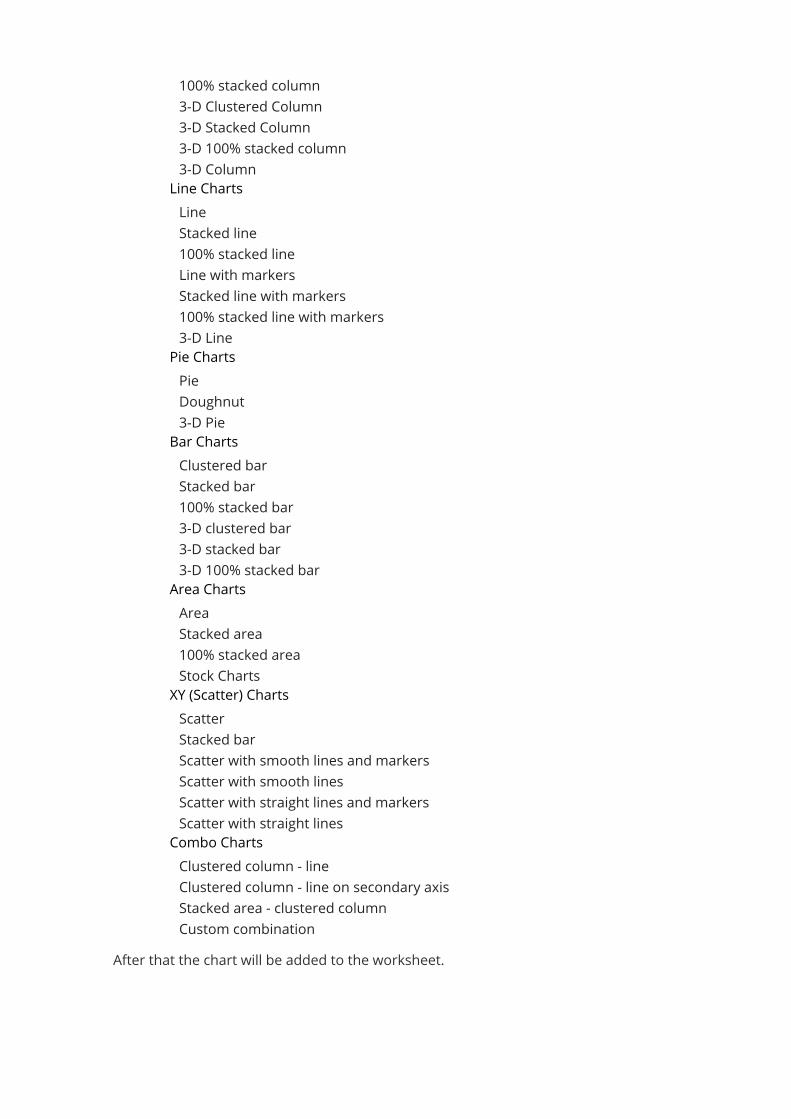
o 100% stacked columno 3-D Clustered Columno 3-D Stacked Columno 3-D 100% stacked columno 3-D Column· Line Chartso Lineo Stacked lineo 100% stacked lineo Line with markerso Stacked line with markerso 100% stacked line with markerso 3-D Line· Pie Chartso Pieo Doughnuto 3-D Pie· Bar Chartso Clustered baro Stacked baro 100% stacked baro 3-D clustered baro 3-D stacked baro 3-D 100% stacked bar· Area Chartso Areao Stacked areao 100% stacked areao Stock Charts· XY (Scatter) Chartso Scattero Stacked baro Scatter with smooth lines and markerso Scatter with smooth lineso Scatter with straight lines and markerso Scatter with straight lines· Combo Chartso Clustered column - lineo Clustered column - line on secondary axiso Stacked area - clustered columno Custom combination
After that the chart will be added to the worksheet.
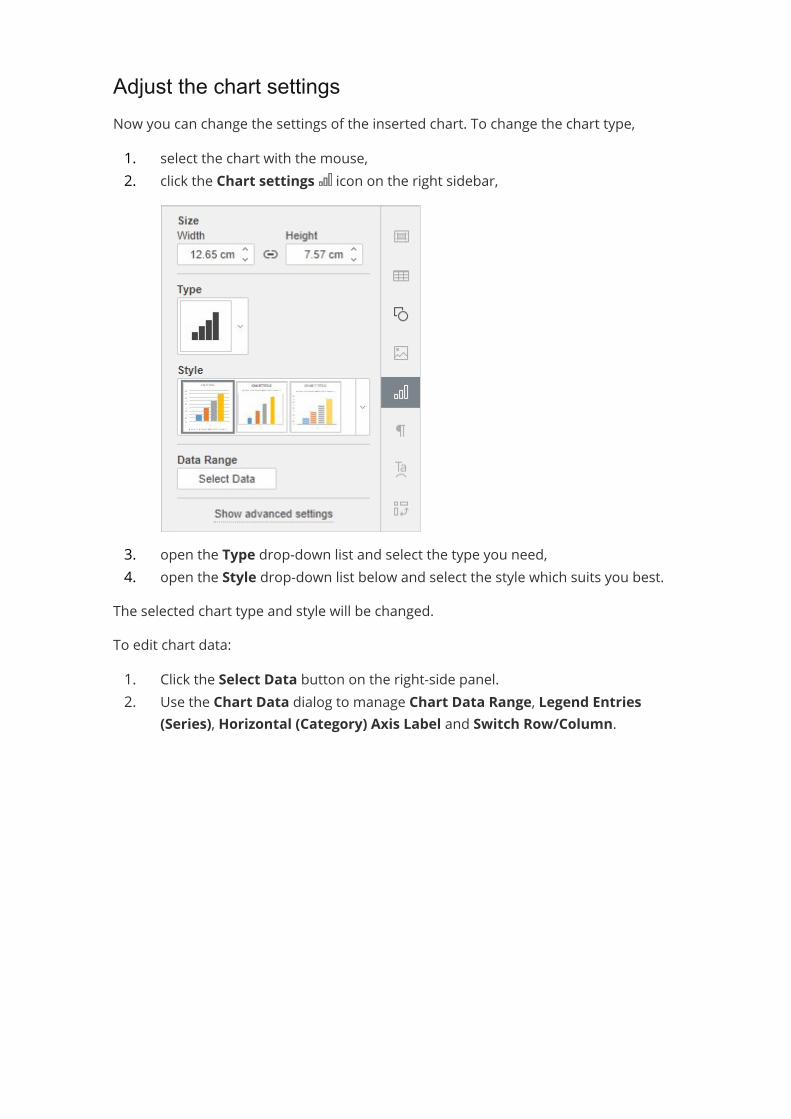
Adjust the chart settingsNow you can change the settings of the inserted chart. To change the chart type,1. select the chart with the mouse,2. click the Chart settings icon on the right sidebar,
3. open the Type drop-down list and select the type you need,4. open the Style drop-down list below and select the style which suits you best.
The selected chart type and style will be changed.To edit chart data:1. Click the Select Data button on the right-side panel.2. Use the Chart Data dialog to manage Chart Data Range, Legend Entries
(Series), Horizontal (Category) Axis Label and Switch Row/Column.
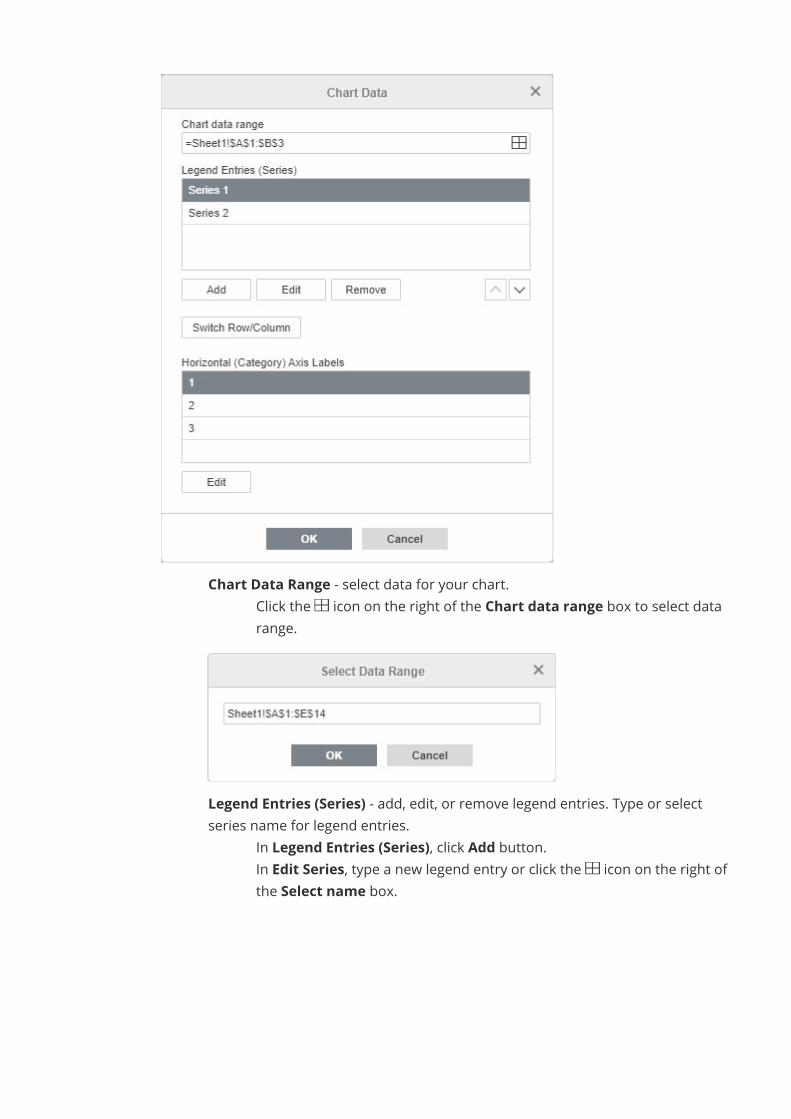
· Chart Data Range - select data for your chart.o Click the icon on the right of the Chart data range box to select data
range.
· Legend Entries (Series) - add, edit, or remove legend entries. Type or selectseries name for legend entries.
o In Legend Entries (Series), click Add button.o In Edit Series, type a new legend entry or click the icon on the right of
the Select name box.
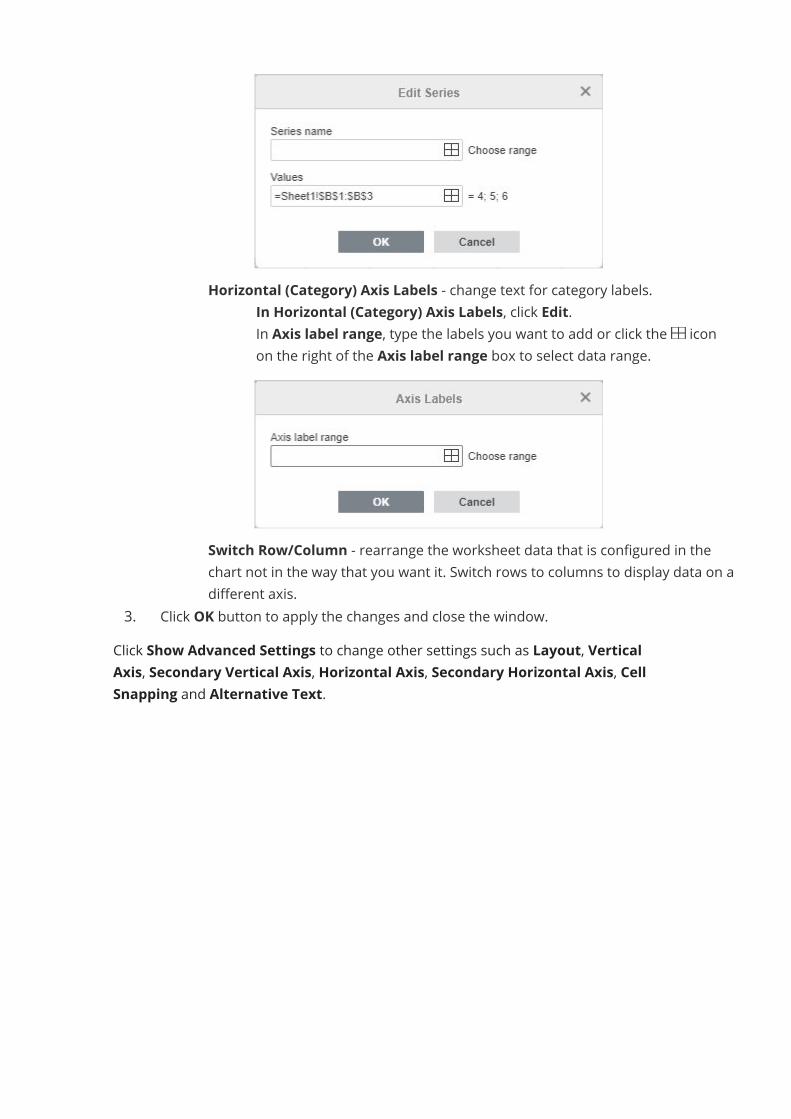
· Horizontal (Category) Axis Labels - change text for category labels.o In Horizontal (Category) Axis Labels, click Edit.o In Axis label range, type the labels you want to add or click the icon
on the right of the Axis label range box to select data range.
· Switch Row/Column - rearrange the worksheet data that is configured in thechart not in the way that you want it. Switch rows to columns to display data on adifferent axis.
3. Click OK button to apply the changes and close the window.Click Show Advanced Settings to change other settings such as Layout, VerticalAxis, Secondary Vertical Axis, Horizontal Axis, Secondary Horizontal Axis, CellSnapping and Alternative Text.
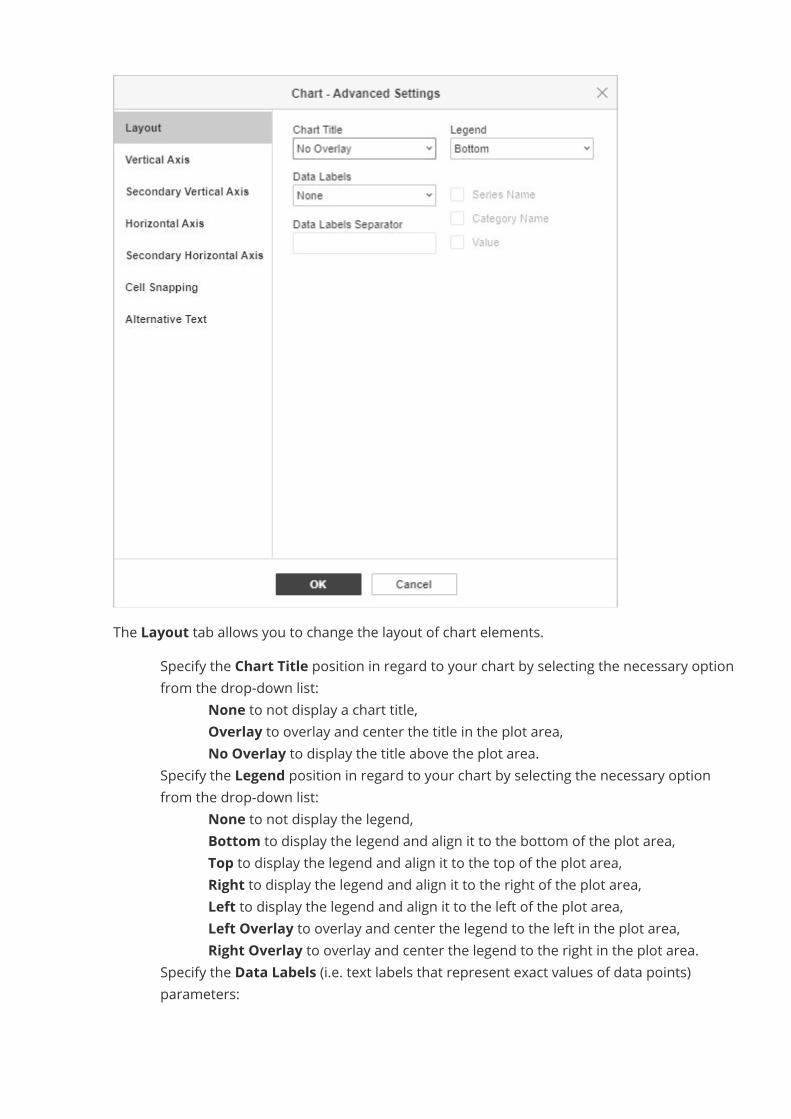
The Layout tab allows you to change the layout of chart elements.· Specify the Chart Title position in regard to your chart by selecting the necessary option
from the drop-down list:o None to not display a chart title,o Overlay to overlay and center the title in the plot area,o No Overlay to display the title above the plot area.
· Specify the Legend position in regard to your chart by selecting the necessary optionfrom the drop-down list:
o None to not display the legend,o Bottom to display the legend and align it to the bottom of the plot area,o Top to display the legend and align it to the top of the plot area,o Right to display the legend and align it to the right of the plot area,o Left to display the legend and align it to the left of the plot area,o Left Overlay to overlay and center the legend to the left in the plot area,o Right Overlay to overlay and center the legend to the right in the plot area.
· Specify the Data Labels (i.e. text labels that represent exact values of data points)parameters:

o specify the Data Labels position relative to the data points by selecting thenecessary option from the drop-down list. The available options vary dependingon the selected chart type.
§ For Column/Bar charts, you can choose the followingoptions: None, Center, Inner Bottom, Inner Top, Outer Top.
§ For Line/XY (Scatter)/Stock charts, you can choose the followingoptions: None, Center, Left, Right, Top, Bottom.
§ For Pie charts, you can choose the following options: None, Center, Fitto Width, Inner Top, Outer Top.
§ For Area charts as well as for 3D Column, Line and Bar charts, you canchoose the following options: None, Center.
o select the data you wish to include into your labels checking the correspondingboxes: Series Name, Category Name, Value,
o enter a character (comma, semicolon etc.) you wish to use for separating severallabels into the Data Labels Separator entry field.
· Lines - is used to choose a line style for Line/XY (Scatter) charts. You can choose oneof the following options: Straight to use straight lines between data points, Smooth touse smooth curves between data points, or None to not display lines.
· Markers - is used to specify whether the markers should be displayed (if the box ischecked) or not (if the box is unchecked) for Line/XY (Scatter) charts.Note: the Lines andMarkers options are available for Line charts and XY (Scatter)charts only.

The Vertical Axis tab allows you to change the parameters of the vertical axis also referred toas the values axis or y-axis which displays numeric values. Note that the vertical axis will be thecategory axis which displays text labels for the Bar charts, therefore in this case the VerticalAxis tab options will correspond to the ones described in the next section. For the XY (Scatter)charts, both axes are value axes.Note: the Axis Settings and Gridlines sections will be disabled for Pie charts since charts of thistype have no axes and gridlines.
· select Hide to hide vertical axis in the chart, leave it unchecked to have vertical axisdisplayed.
· specify Title orientation by selecting the necessary option from the drop-down list:o None to not display a vertical axis titleo Rotated to display the title from bottom to top to the left of the vertical axis,o Horizontal to display the title horizontally to the left of the vertical axis.
· Minimum Value - is used to specify the lowest value displayed at the vertical axis start.The Auto option is selected by default, in this case the minimum value is calculatedautomatically depending on the selected data range. You can select the Fixed optionfrom the drop-down list and specify a different value in the entry field on the right.
· Maximum Value - is used to specify the highest value displayed at the vertical axis end.The Auto option is selected by default, in this case the maximum value is calculated
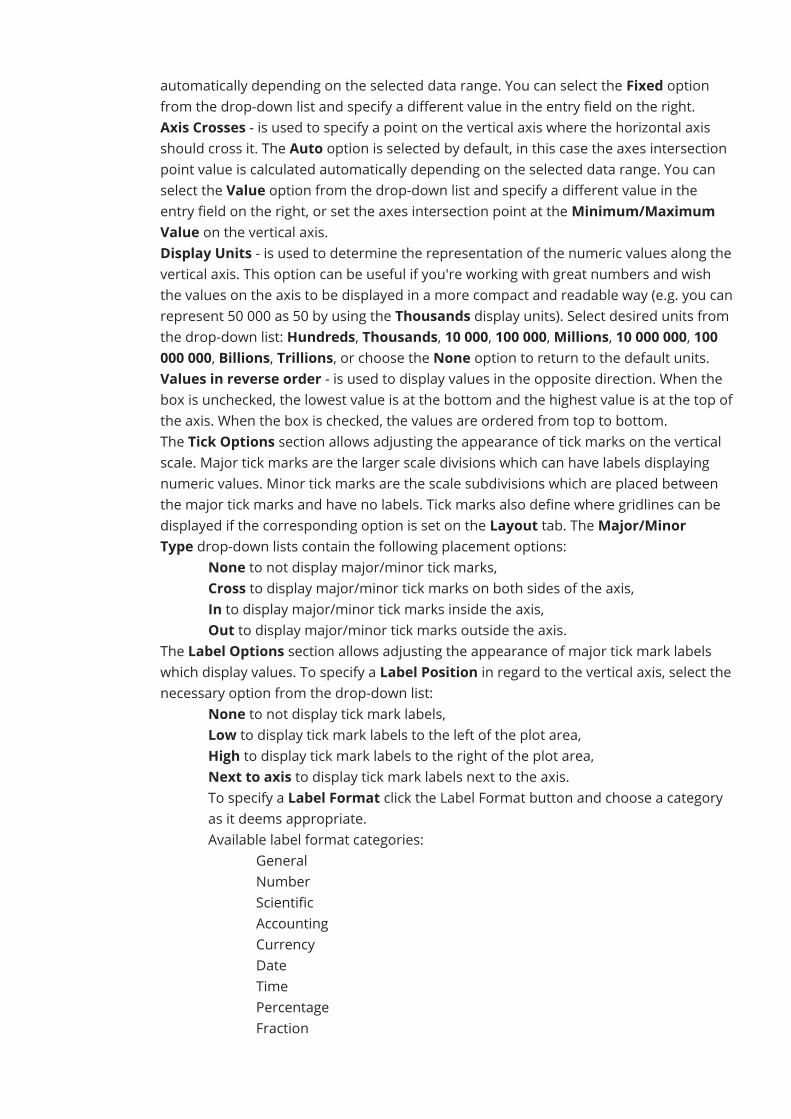
automatically depending on the selected data range. You can select the Fixed optionfrom the drop-down list and specify a different value in the entry field on the right.
· Axis Crosses - is used to specify a point on the vertical axis where the horizontal axisshould cross it. The Auto option is selected by default, in this case the axes intersectionpoint value is calculated automatically depending on the selected data range. You canselect the Value option from the drop-down list and specify a different value in theentry field on the right, or set the axes intersection point at theMinimum/MaximumValue on the vertical axis.
· Display Units - is used to determine the representation of the numeric values along thevertical axis. This option can be useful if you're working with great numbers and wishthe values on the axis to be displayed in a more compact and readable way (e.g. you canrepresent 50 000 as 50 by using the Thousands display units). Select desired units fromthe drop-down list: Hundreds, Thousands, 10 000, 100 000,Millions, 10 000 000, 100000 000, Billions, Trillions, or choose the None option to return to the default units.
· Values in reverse order - is used to display values in the opposite direction. When thebox is unchecked, the lowest value is at the bottom and the highest value is at the top ofthe axis. When the box is checked, the values are ordered from top to bottom.
· The Tick Options section allows adjusting the appearance of tick marks on the verticalscale. Major tick marks are the larger scale divisions which can have labels displayingnumeric values. Minor tick marks are the scale subdivisions which are placed betweenthe major tick marks and have no labels. Tick marks also define where gridlines can bedisplayed if the corresponding option is set on the Layout tab. TheMajor/MinorType drop-down lists contain the following placement options:
o None to not display major/minor tick marks,o Cross to display major/minor tick marks on both sides of the axis,o In to display major/minor tick marks inside the axis,o Out to display major/minor tick marks outside the axis.
· The Label Options section allows adjusting the appearance of major tick mark labelswhich display values. To specify a Label Position in regard to the vertical axis, select thenecessary option from the drop-down list:
o None to not display tick mark labels,o Low to display tick mark labels to the left of the plot area,o High to display tick mark labels to the right of the plot area,o Next to axis to display tick mark labels next to the axis.o To specify a Label Format click the Label Format button and choose a category
as it deems appropriate.Available label format categories:
· General· Number· Scientific· Accounting· Currency· Date· Time· Percentage· Fraction
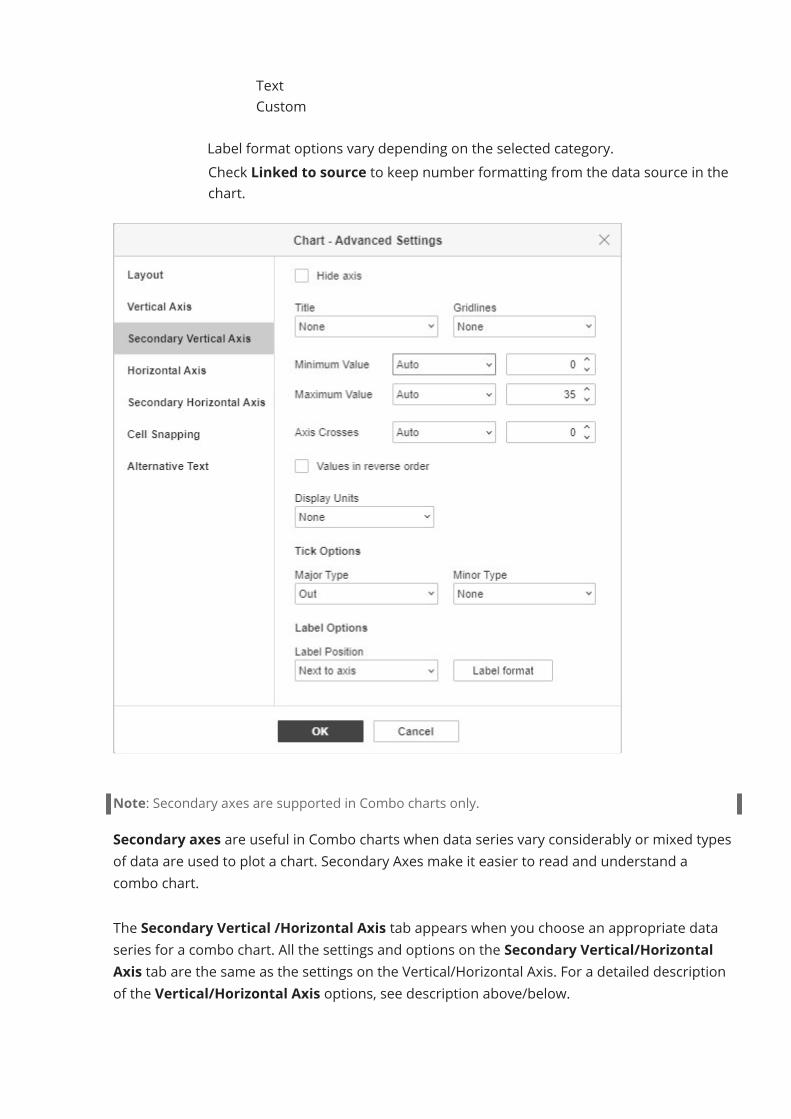
· Text· Custom
Label format options vary depending on the selected category.o Check Linked to source to keep number formatting from the data source in the
chart.
Note: Secondary axes are supported in Combo charts only.Secondary axes are useful in Combo charts when data series vary considerably or mixed typesof data are used to plot a chart. Secondary Axes make it easier to read and understand acombo chart.The Secondary Vertical /Horizontal Axis tab appears when you choose an appropriate dataseries for a combo chart. All the settings and options on the Secondary Vertical/HorizontalAxis tab are the same as the settings on the Vertical/Horizontal Axis. For a detailed descriptionof the Vertical/Horizontal Axis options, see description above/below.
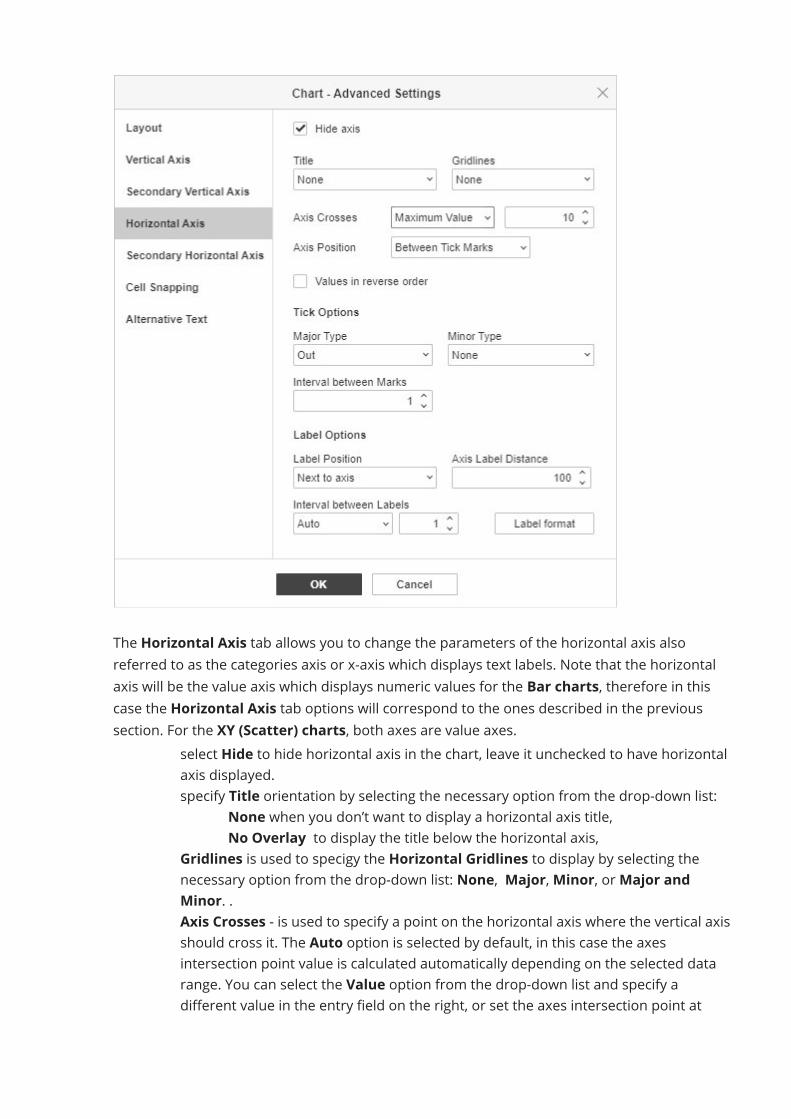
The Horizontal Axis tab allows you to change the parameters of the horizontal axis alsoreferred to as the categories axis or x-axis which displays text labels. Note that the horizontalaxis will be the value axis which displays numeric values for the Bar charts, therefore in thiscase the Horizontal Axis tab options will correspond to the ones described in the previoussection. For the XY (Scatter) charts, both axes are value axes.
· select Hide to hide horizontal axis in the chart, leave it unchecked to have horizontalaxis displayed.
· specify Title orientation by selecting the necessary option from the drop-down list:o None when you don’t want to display a horizontal axis title,o No Overlay to display the title below the horizontal axis,
· Gridlines is used to specigy the Horizontal Gridlines to display by selecting thenecessary option from the drop-down list: None, Major,Minor, orMajor andMinor. .
· Axis Crosses - is used to specify a point on the horizontal axis where the vertical axisshould cross it. The Auto option is selected by default, in this case the axesintersection point value is calculated automatically depending on the selected datarange. You can select the Value option from the drop-down list and specify adifferent value in the entry field on the right, or set the axes intersection point at
theMinimum/Maximum Value (that corresponds to the first and last category) onthe horizontal axis.
· Axis Position - is used to specify where the axis text labels should be placed: On TickMarks or Between Tick Marks.
· Values in reverse order - is used to display categories in the opposite direction.When the box is unchecked, categories are displayed from left to right. When the boxis checked, the categories are ordered from right to left.
· The Tick Options section allows adjusting the appearance of tick marks on thehorizontal scale. Major tick marks are the larger divisions which can have labelsdisplaying category values. Minor tick marks are the smaller divisions which areplaced between the major tick marks and have no labels. Tick marks also definewhere gridlines can be displayed if the corresponding option is set onthe Layout tab. You can adjust the following tick mark parameters:
o Major/Minor Type - is used to specify the following placementoptions: None to not display major/minor tick marks, Cross to displaymajor/minor tick marks on both sides of the axis, In to display major/minortick marks inside the axis, Out to display major/minor tick marks outside theaxis.
o Interval between Marks - is used to specify how many categories should bedisplayed between two adjacent tick marks.
· The Label Options section allows adjusting the appearance of labels which displaycategories.
o Label Position - is used to specify where the labels should be placed inregard to the horizontal axis. Select the necessary option from the drop-downlist: None to not display category labels, Low to display category labels at thebottom of the plot area, High to display category labels at the top of the plotarea, Next to axis to display category labels next to the axis.
o Axis Label Distance - is used to specify how closely the labels should beplaced to the axis. You can specify the necessary value in the entry field. Themore the value you set, the more the distance between the axis and labels is.
o Interval between Labels - is used to specify how often the labels should bedisplayed. The Auto option is selected by default, in this case labels aredisplayed for every category. You can select theManual option from thedrop-down list and specify the necessary value in the entry field on the right.For example, enter 2 to display labels for every other category etc.
o To specify a Label Format click the Label Format button and choose acategory as it deems appropriate.
o Available label format categories:o Generalo Numbero Scientifico Accountingo Currencyo Dateo Timeo Percentage
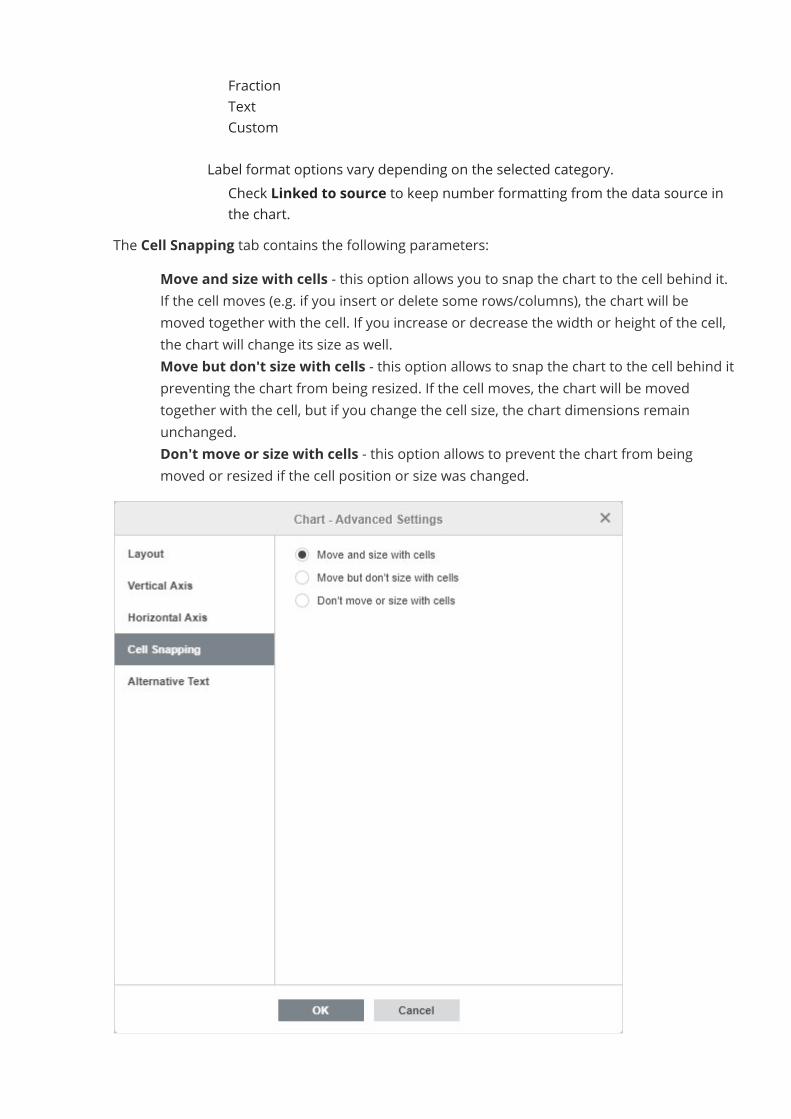
o Fractiono Texto CustomLabel format options vary depending on the selected category.o Check Linked to source to keep number formatting from the data source in
the chart.The Cell Snapping tab contains the following parameters:
· Move and size with cells - this option allows you to snap the chart to the cell behind it.If the cell moves (e.g. if you insert or delete some rows/columns), the chart will bemoved together with the cell. If you increase or decrease the width or height of the cell,the chart will change its size as well.
· Move but don't size with cells - this option allows to snap the chart to the cell behind itpreventing the chart from being resized. If the cell moves, the chart will be movedtogether with the cell, but if you change the cell size, the chart dimensions remainunchanged.
· Don't move or size with cells - this option allows to prevent the chart from beingmoved or resized if the cell position or size was changed.
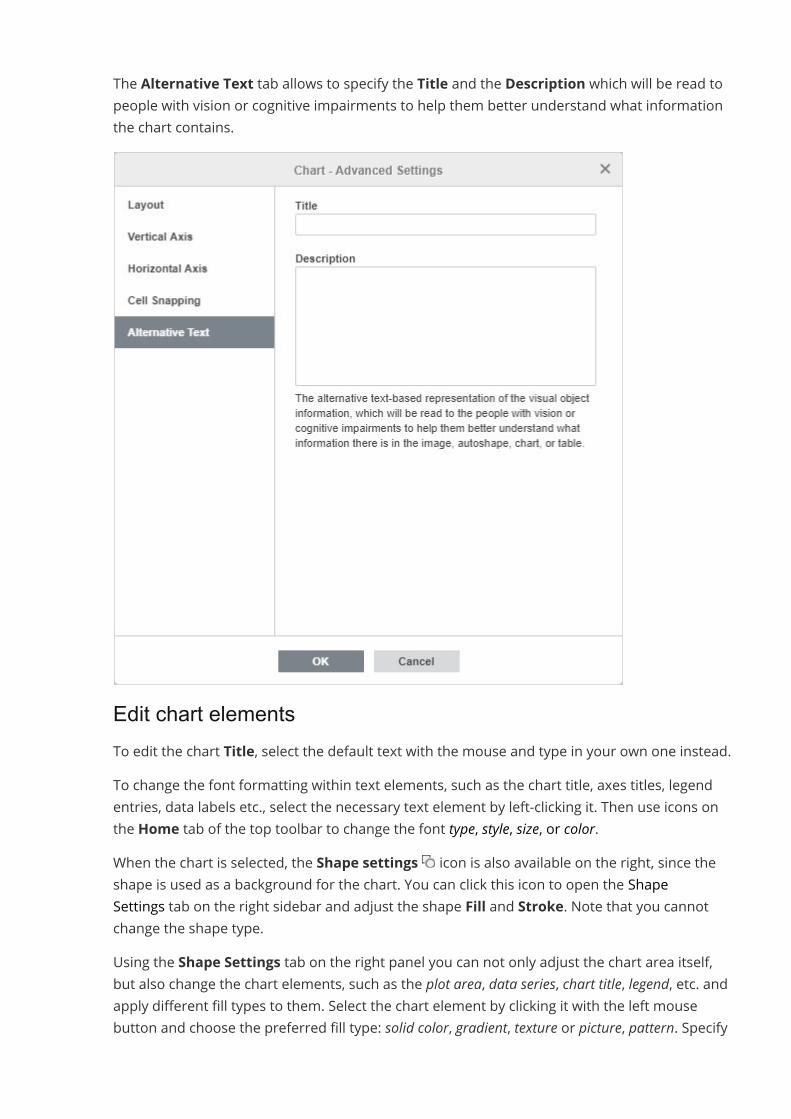
The Alternative Text tab allows to specify the Title and the Description which will be read topeople with vision or cognitive impairments to help them better understand what informationthe chart contains.
Edit chart elementsTo edit the chart Title, select the default text with the mouse and type in your own one instead.To change the font formatting within text elements, such as the chart title, axes titles, legendentries, data labels etc., select the necessary text element by left-clicking it. Then use icons onthe Home tab of the top toolbar to change the font type, style, size, or color.When the chart is selected, the Shape settings icon is also available on the right, since theshape is used as a background for the chart. You can click this icon to open the ShapeSettings tab on the right sidebar and adjust the shape Fill and Stroke. Note that you cannotchange the shape type.Using the Shape Settings tab on the right panel you can not only adjust the chart area itself,but also change the chart elements, such as the plot area, data series, chart title, legend, etc. andapply different fill types to them. Select the chart element by clicking it with the left mousebutton and choose the preferred fill type: solid color, gradient, texture or picture, pattern. Specify
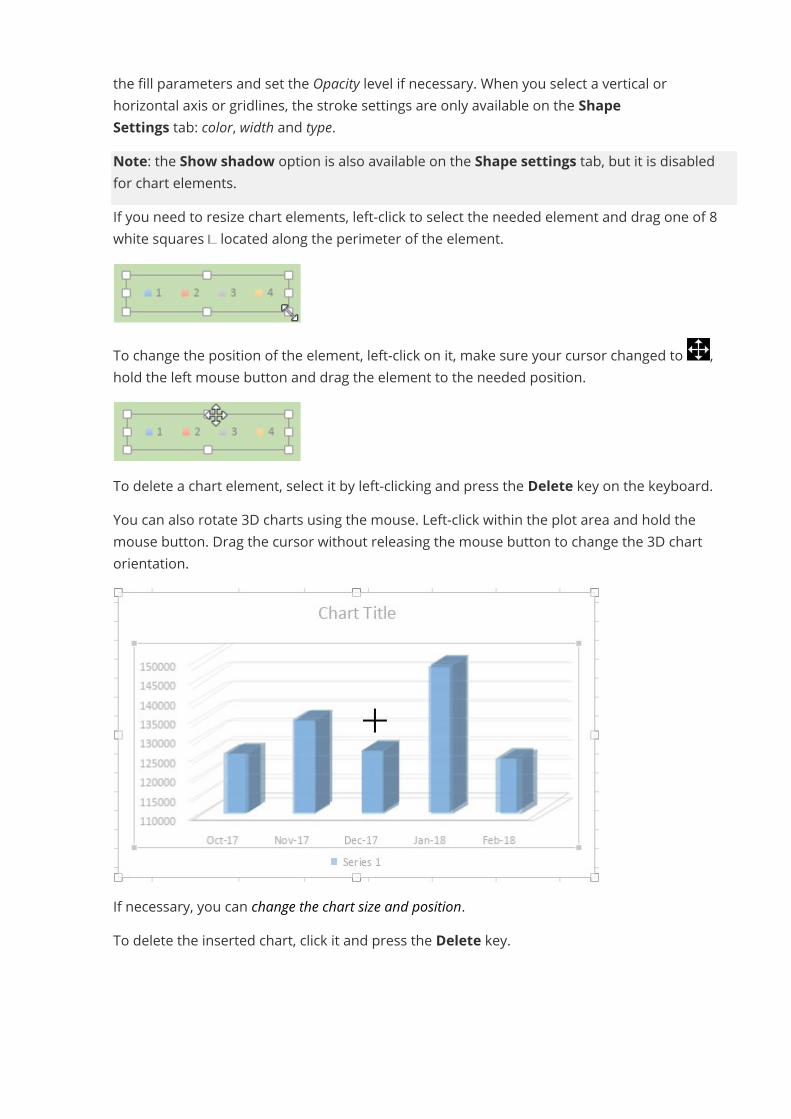
the fill parameters and set the Opacity level if necessary. When you select a vertical orhorizontal axis or gridlines, the stroke settings are only available on the ShapeSettings tab: color, width and type.Note: the Show shadow option is also available on the Shape settings tab, but it is disabledfor chart elements.If you need to resize chart elements, left-click to select the needed element and drag one of 8white squares located along the perimeter of the element.
To change the position of the element, left-click on it, make sure your cursor changed to ,hold the left mouse button and drag the element to the needed position.
To delete a chart element, select it by left-clicking and press the Delete key on the keyboard.You can also rotate 3D charts using the mouse. Left-click within the plot area and hold themouse button. Drag the cursor without releasing the mouse button to change the 3D chartorientation.
If necessary, you can change the chart size and position.To delete the inserted chart, click it and press the Delete key.
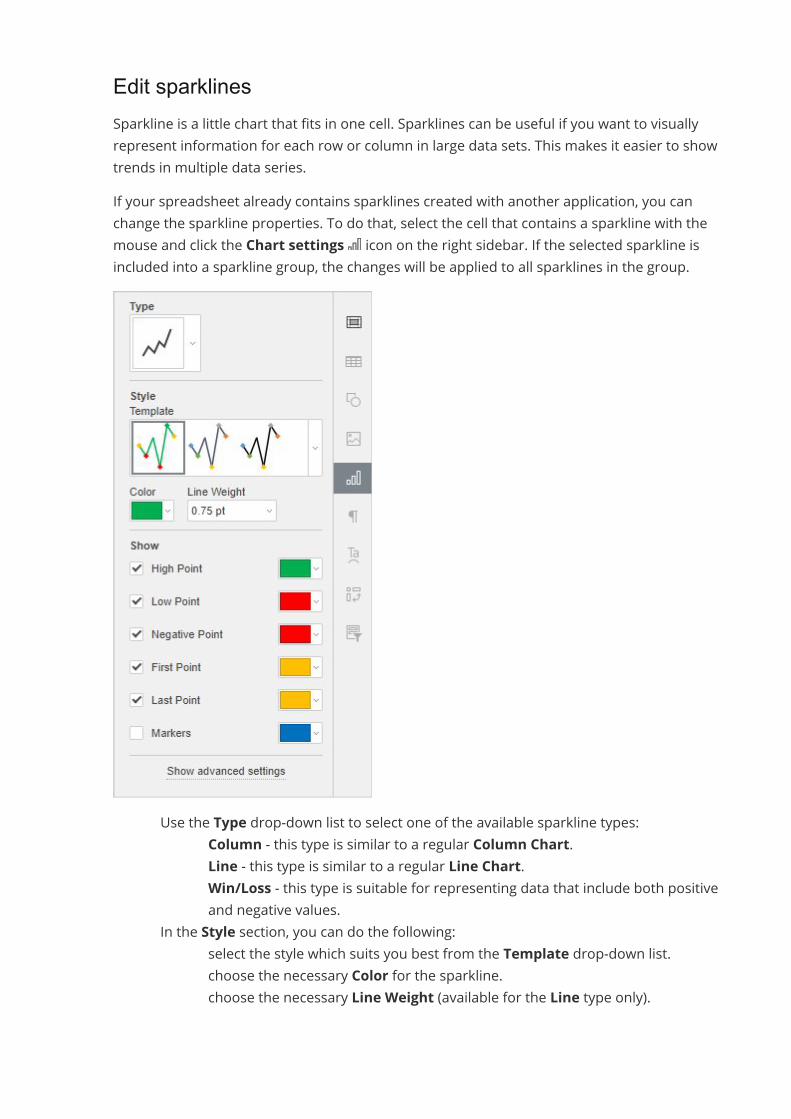
Edit sparklinesSparkline is a little chart that fits in one cell. Sparklines can be useful if you want to visuallyrepresent information for each row or column in large data sets. This makes it easier to showtrends in multiple data series.If your spreadsheet already contains sparklines created with another application, you canchange the sparkline properties. To do that, select the cell that contains a sparkline with themouse and click the Chart settings icon on the right sidebar. If the selected sparkline isincluded into a sparkline group, the changes will be applied to all sparklines in the group.
· Use the Type drop-down list to select one of the available sparkline types:o Column - this type is similar to a regular Column Chart.o Line - this type is similar to a regular Line Chart.o Win/Loss - this type is suitable for representing data that include both positive
and negative values.· In the Style section, you can do the following:
o select the style which suits you best from the Template drop-down list.o choose the necessary Color for the sparkline.o choose the necessary Line Weight (available for the Line type only).
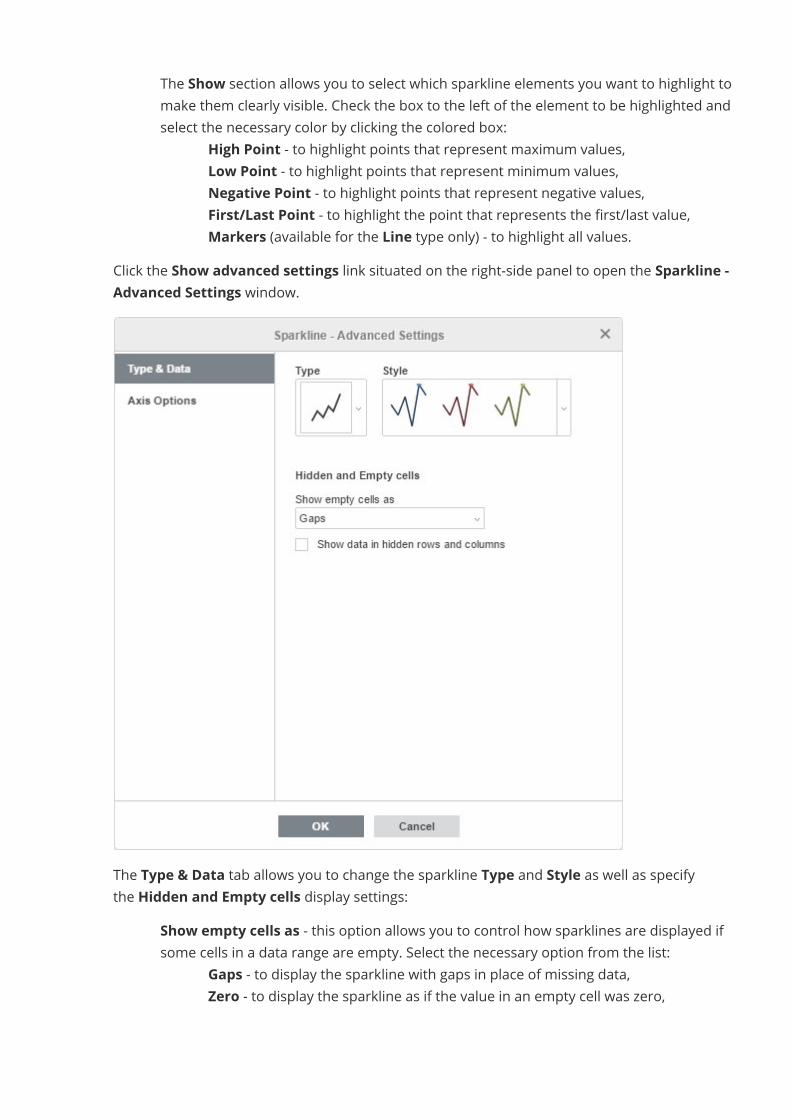
· The Show section allows you to select which sparkline elements you want to highlight tomake them clearly visible. Check the box to the left of the element to be highlighted andselect the necessary color by clicking the colored box:
o High Point - to highlight points that represent maximum values,o Low Point - to highlight points that represent minimum values,o Negative Point - to highlight points that represent negative values,o First/Last Point - to highlight the point that represents the first/last value,o Markers (available for the Line type only) - to highlight all values.
Click the Show advanced settings link situated on the right-side panel to open the Sparkline -Advanced Settings window.
The Type & Data tab allows you to change the sparkline Type and Style as well as specifythe Hidden and Empty cells display settings:
· Show empty cells as - this option allows you to control how sparklines are displayed ifsome cells in a data range are empty. Select the necessary option from the list:
o Gaps - to display the sparkline with gaps in place of missing data,o Zero - to display the sparkline as if the value in an empty cell was zero,
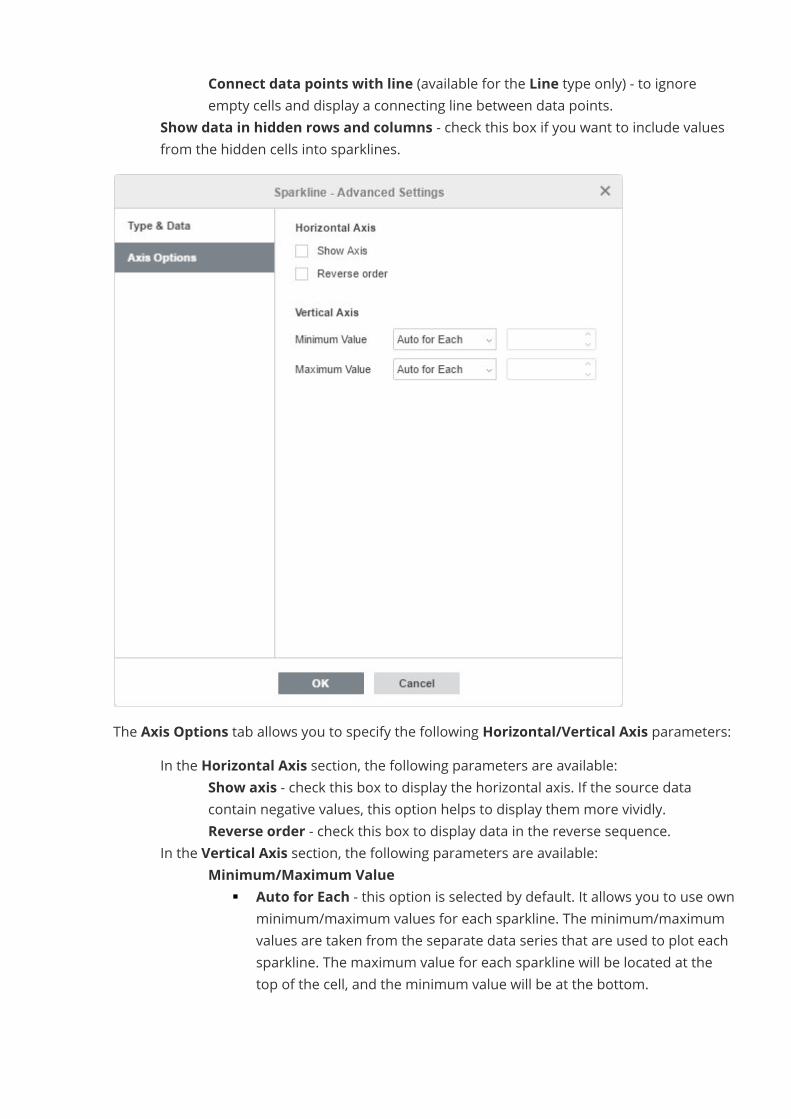
o Connect data points with line (available for the Line type only) - to ignoreempty cells and display a connecting line between data points.
· Show data in hidden rows and columns - check this box if you want to include valuesfrom the hidden cells into sparklines.
The Axis Options tab allows you to specify the following Horizontal/Vertical Axis parameters:· In the Horizontal Axis section, the following parameters are available:
o Show axis - check this box to display the horizontal axis. If the source datacontain negative values, this option helps to display them more vividly.
o Reverse order - check this box to display data in the reverse sequence.· In the Vertical Axis section, the following parameters are available:
o Minimum/Maximum Value§ Auto for Each - this option is selected by default. It allows you to use own
minimum/maximum values for each sparkline. The minimum/maximumvalues are taken from the separate data series that are used to plot eachsparkline. The maximum value for each sparkline will be located at thetop of the cell, and the minimum value will be at the bottom.
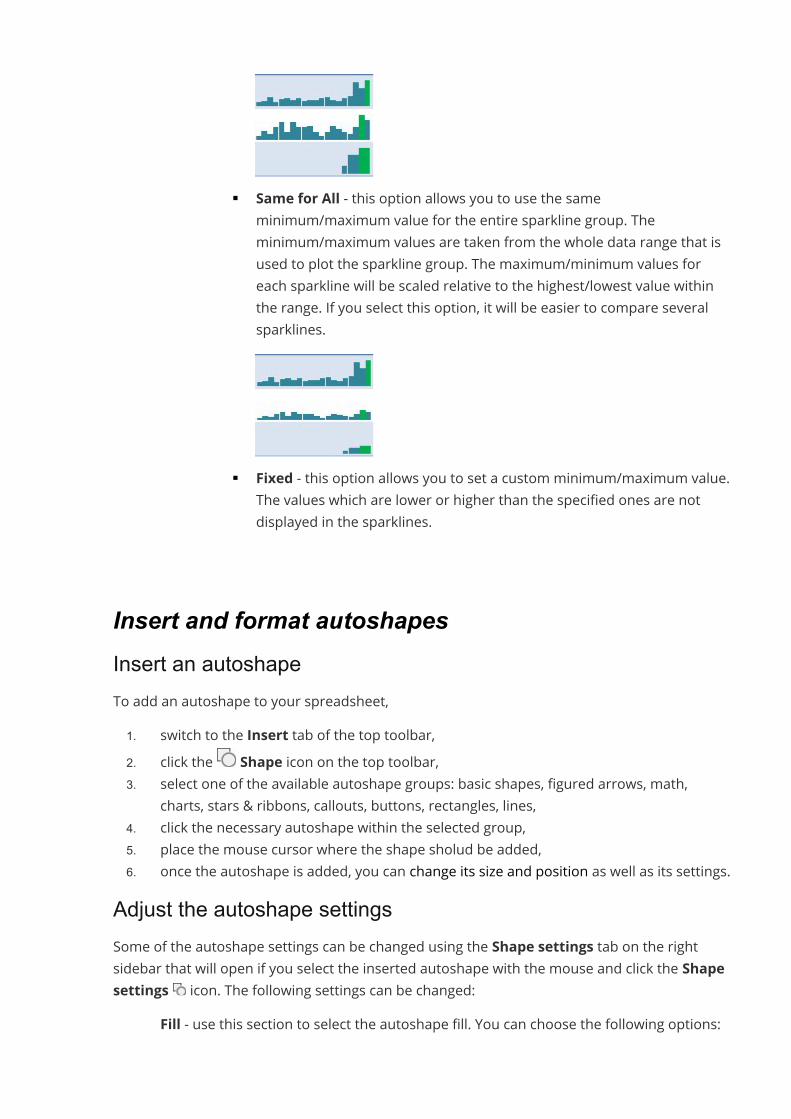
§ Same for All - this option allows you to use the sameminimum/maximum value for the entire sparkline group. Theminimum/maximum values are taken from the whole data range that isused to plot the sparkline group. The maximum/minimum values foreach sparkline will be scaled relative to the highest/lowest value withinthe range. If you select this option, it will be easier to compare severalsparklines.
§ Fixed - this option allows you to set a custom minimum/maximum value.The values which are lower or higher than the specified ones are notdisplayed in the sparklines.
Insert and format autoshapesInsert an autoshapeTo add an autoshape to your spreadsheet,1. switch to the Insert tab of the top toolbar,2. click the Shape icon on the top toolbar,3. select one of the available autoshape groups: basic shapes, figured arrows, math,
charts, stars & ribbons, callouts, buttons, rectangles, lines,4. click the necessary autoshape within the selected group,5. place the mouse cursor where the shape sholud be added,6. once the autoshape is added, you can change its size and position as well as its settings.
Adjust the autoshape settingsSome of the autoshape settings can be changed using the Shape settings tab on the rightsidebar that will open if you select the inserted autoshape with the mouse and click the Shapesettings icon. The following settings can be changed:
· Fill - use this section to select the autoshape fill. You can choose the following options:
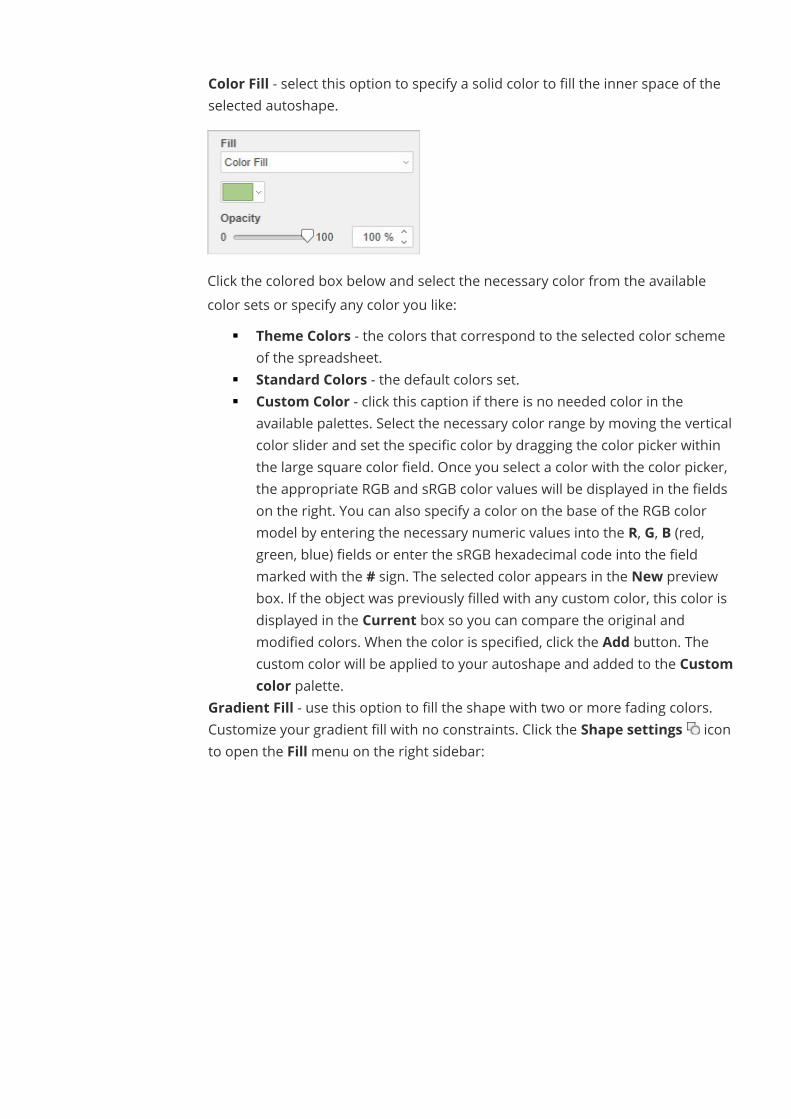
o Color Fill - select this option to specify a solid color to fill the inner space of theselected autoshape.
Click the colored box below and select the necessary color from the availablecolor sets or specify any color you like:
§ Theme Colors - the colors that correspond to the selected color schemeof the spreadsheet.
§ Standard Colors - the default colors set.§ Custom Color - click this caption if there is no needed color in the
available palettes. Select the necessary color range by moving the verticalcolor slider and set the specific color by dragging the color picker withinthe large square color field. Once you select a color with the color picker,the appropriate RGB and sRGB color values will be displayed in the fieldson the right. You can also specify a color on the base of the RGB colormodel by entering the necessary numeric values into the R, G, B (red,green, blue) fields or enter the sRGB hexadecimal code into the fieldmarked with the # sign. The selected color appears in the New previewbox. If the object was previously filled with any custom color, this color isdisplayed in the Current box so you can compare the original andmodified colors. When the color is specified, click the Add button. Thecustom color will be applied to your autoshape and added to the Customcolor palette.
o Gradient Fill - use this option to fill the shape with two or more fading colors.Customize your gradient fill with no constraints. Click the Shape settings iconto open the Fillmenu on the right sidebar:
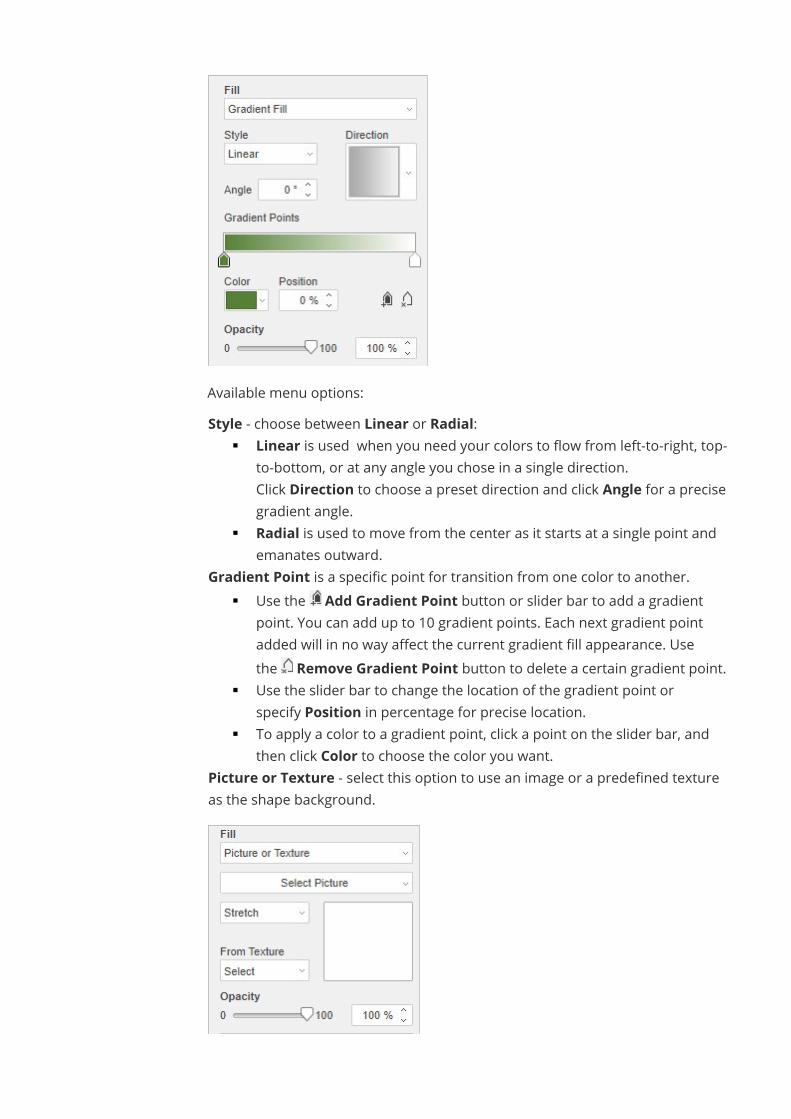
Available menu options:o Style - choose between Linear or Radial:
§ Linear is used when you need your colors to flow from left-to-right, top-to-bottom, or at any angle you chose in a single direction.Click Direction to choose a preset direction and click Angle for a precisegradient angle.
§ Radial is used to move from the center as it starts at a single point andemanates outward.
o Gradient Point is a specific point for transition from one color to another.§ Use the Add Gradient Point button or slider bar to add a gradient
point. You can add up to 10 gradient points. Each next gradient pointadded will in no way affect the current gradient fill appearance. Usethe Remove Gradient Point button to delete a certain gradient point.
§ Use the slider bar to change the location of the gradient point orspecify Position in percentage for precise location.
§ To apply a color to a gradient point, click a point on the slider bar, andthen click Color to choose the color you want.
o Picture or Texture - select this option to use an image or a predefined textureas the shape background.
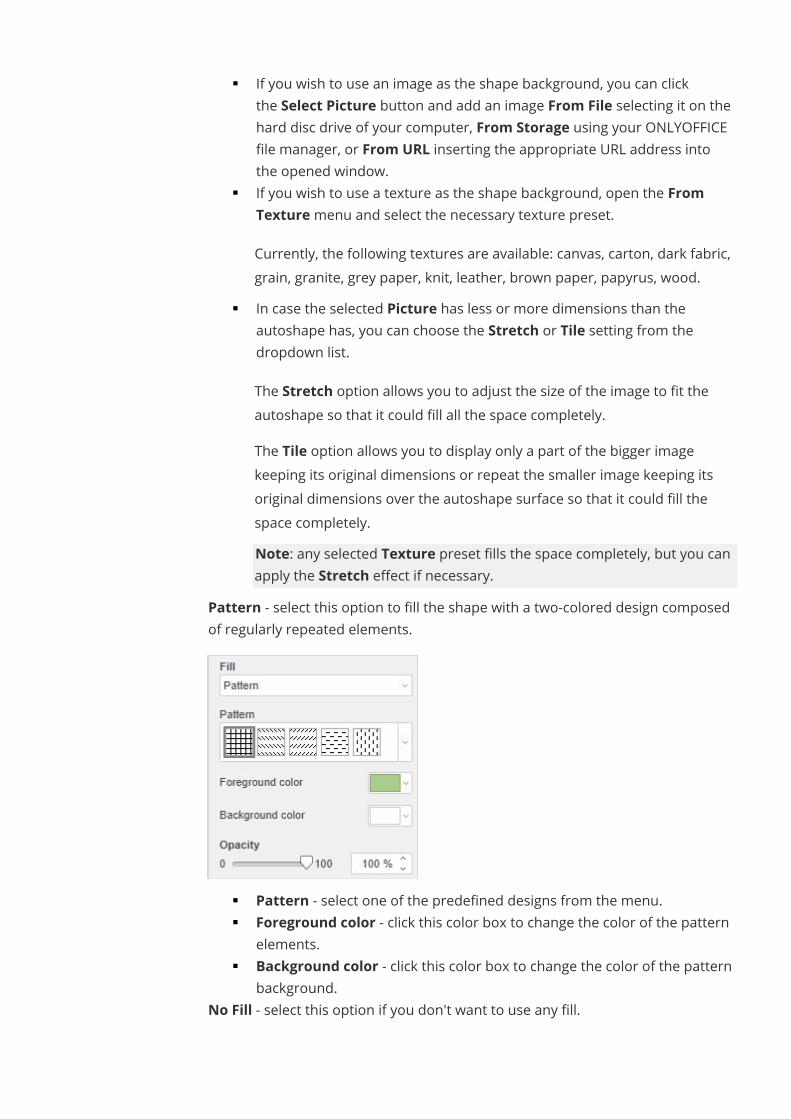
§ If you wish to use an image as the shape background, you can clickthe Select Picture button and add an image From File selecting it on thehard disc drive of your computer, From Storage using your ONLYOFFICEfile manager, or From URL inserting the appropriate URL address intothe opened window.
§ If you wish to use a texture as the shape background, open the FromTexturemenu and select the necessary texture preset.Currently, the following textures are available: canvas, carton, dark fabric,grain, granite, grey paper, knit, leather, brown paper, papyrus, wood.
§ In case the selected Picture has less or more dimensions than theautoshape has, you can choose the Stretch or Tile setting from thedropdown list.The Stretch option allows you to adjust the size of the image to fit theautoshape so that it could fill all the space completely.The Tile option allows you to display only a part of the bigger imagekeeping its original dimensions or repeat the smaller image keeping itsoriginal dimensions over the autoshape surface so that it could fill thespace completely.Note: any selected Texture preset fills the space completely, but you canapply the Stretch effect if necessary.
o Pattern - select this option to fill the shape with a two-colored design composedof regularly repeated elements.
§ Pattern - select one of the predefined designs from the menu.§ Foreground color - click this color box to change the color of the pattern
elements.§ Background color - click this color box to change the color of the pattern
background.o No Fill - select this option if you don't want to use any fill.
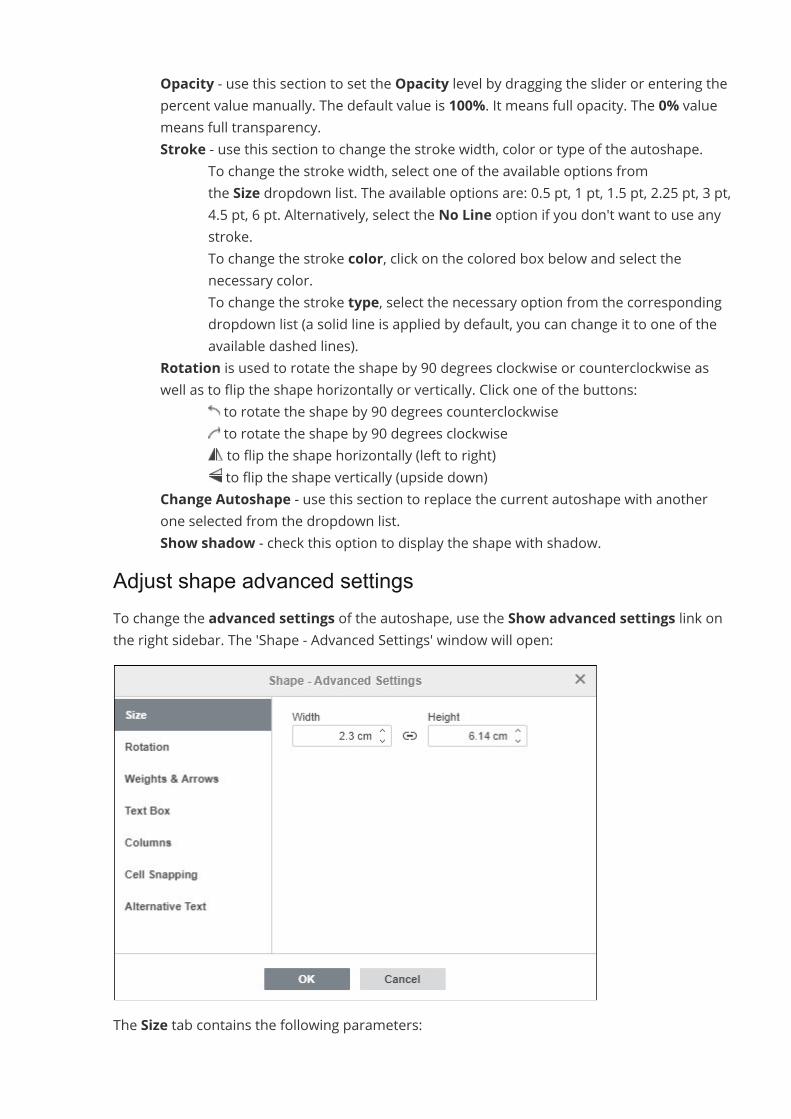
· Opacity - use this section to set the Opacity level by dragging the slider or entering thepercent value manually. The default value is 100%. It means full opacity. The 0% valuemeans full transparency.
· Stroke - use this section to change the stroke width, color or type of the autoshape.o To change the stroke width, select one of the available options from
the Size dropdown list. The available options are: 0.5 pt, 1 pt, 1.5 pt, 2.25 pt, 3 pt,4.5 pt, 6 pt. Alternatively, select the No Line option if you don't want to use anystroke.
o To change the stroke color, click on the colored box below and select thenecessary color.
o To change the stroke type, select the necessary option from the correspondingdropdown list (a solid line is applied by default, you can change it to one of theavailable dashed lines).
· Rotation is used to rotate the shape by 90 degrees clockwise or counterclockwise aswell as to flip the shape horizontally or vertically. Click one of the buttons:
o to rotate the shape by 90 degrees counterclockwiseo to rotate the shape by 90 degrees clockwiseo to flip the shape horizontally (left to right)o to flip the shape vertically (upside down)
· Change Autoshape - use this section to replace the current autoshape with anotherone selected from the dropdown list.
· Show shadow - check this option to display the shape with shadow.Adjust shape advanced settingsTo change the advanced settings of the autoshape, use the Show advanced settings link onthe right sidebar. The 'Shape - Advanced Settings' window will open:
The Size tab contains the following parameters:
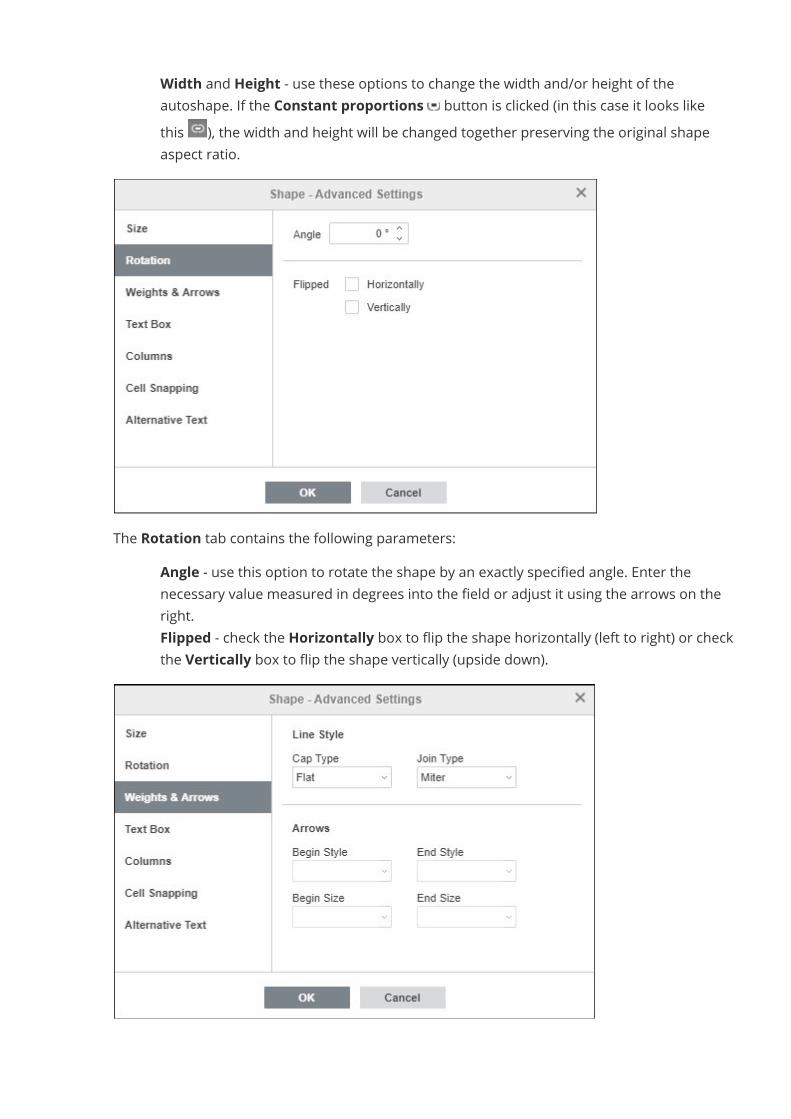
· Width and Height - use these options to change the width and/or height of theautoshape. If the Constant proportions button is clicked (in this case it looks likethis ), the width and height will be changed together preserving the original shapeaspect ratio.
The Rotation tab contains the following parameters:· Angle - use this option to rotate the shape by an exactly specified angle. Enter the
necessary value measured in degrees into the field or adjust it using the arrows on theright.
· Flipped - check the Horizontally box to flip the shape horizontally (left to right) or checkthe Vertically box to flip the shape vertically (upside down).
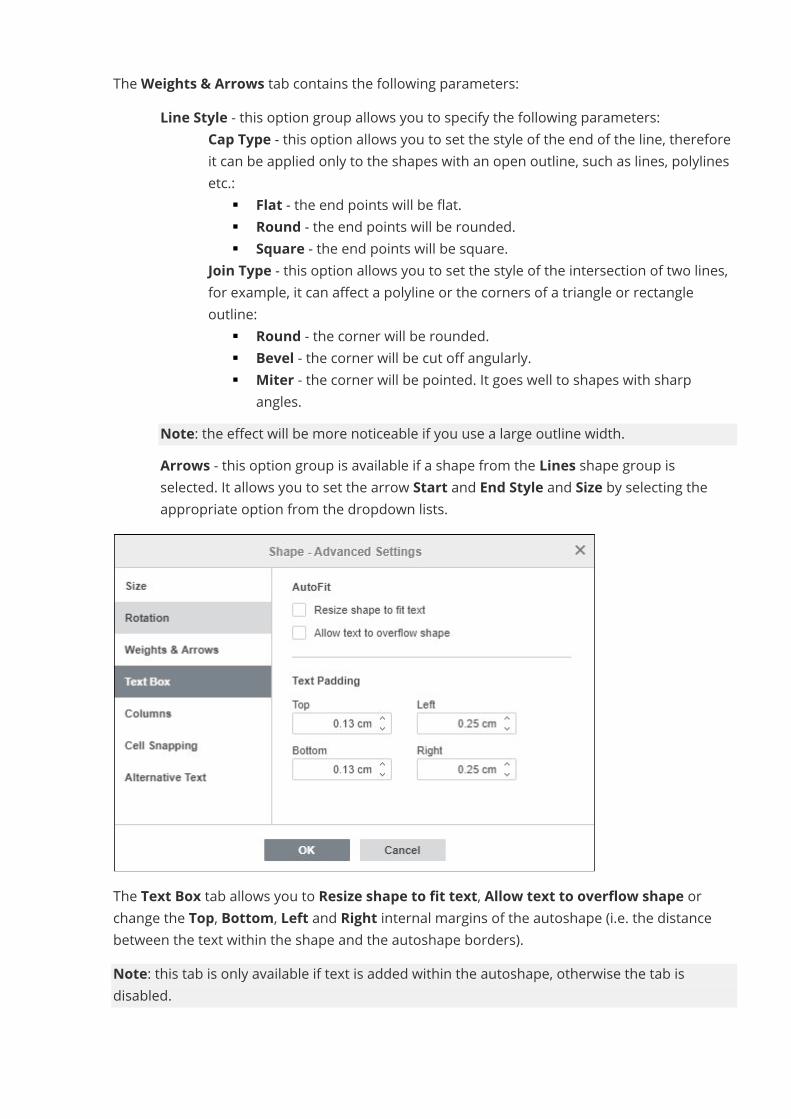
TheWeights & Arrows tab contains the following parameters:· Line Style - this option group allows you to specify the following parameters:
o Cap Type - this option allows you to set the style of the end of the line, thereforeit can be applied only to the shapes with an open outline, such as lines, polylinesetc.:
§ Flat - the end points will be flat.§ Round - the end points will be rounded.§ Square - the end points will be square.
o Join Type - this option allows you to set the style of the intersection of two lines,for example, it can affect a polyline or the corners of a triangle or rectangleoutline:
§ Round - the corner will be rounded.§ Bevel - the corner will be cut off angularly.§ Miter - the corner will be pointed. It goes well to shapes with sharp
angles.Note: the effect will be more noticeable if you use a large outline width.
· Arrows - this option group is available if a shape from the Lines shape group isselected. It allows you to set the arrow Start and End Style and Size by selecting theappropriate option from the dropdown lists.
The Text Box tab allows you to Resize shape to fit text, Allow text to overflow shape orchange the Top, Bottom, Left and Right internal margins of the autoshape (i.e. the distancebetween the text within the shape and the autoshape borders).Note: this tab is only available if text is added within the autoshape, otherwise the tab isdisabled.
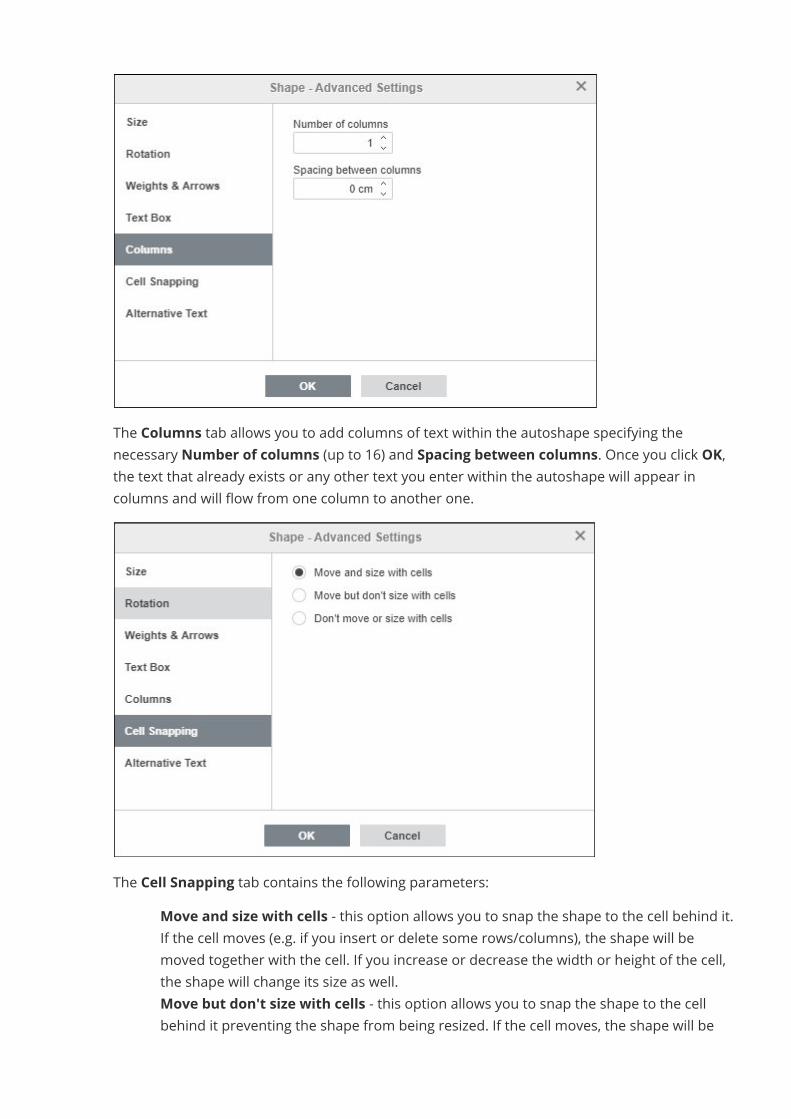
The Columns tab allows you to add columns of text within the autoshape specifying thenecessary Number of columns (up to 16) and Spacing between columns. Once you click OK,the text that already exists or any other text you enter within the autoshape will appear incolumns and will flow from one column to another one.
The Cell Snapping tab contains the following parameters:· Move and size with cells - this option allows you to snap the shape to the cell behind it.
If the cell moves (e.g. if you insert or delete some rows/columns), the shape will bemoved together with the cell. If you increase or decrease the width or height of the cell,the shape will change its size as well.
· Move but don't size with cells - this option allows you to snap the shape to the cellbehind it preventing the shape from being resized. If the cell moves, the shape will be
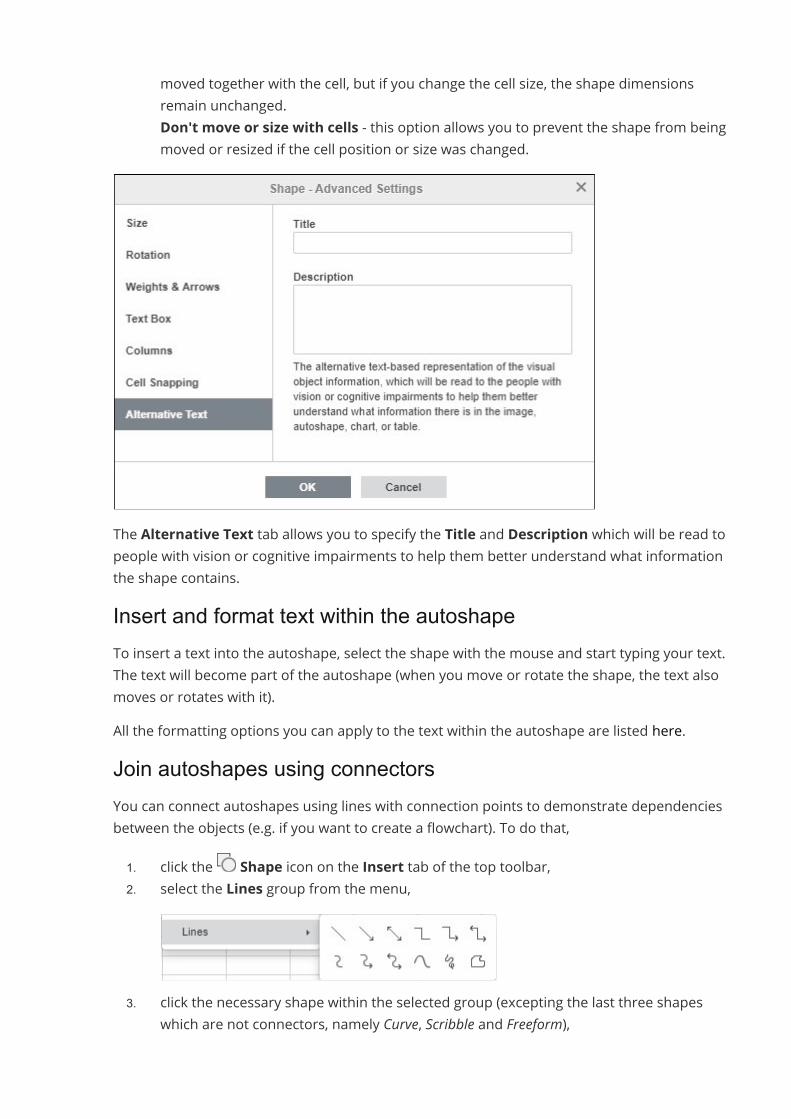
moved together with the cell, but if you change the cell size, the shape dimensionsremain unchanged.
· Don't move or size with cells - this option allows you to prevent the shape from beingmoved or resized if the cell position or size was changed.
The Alternative Text tab allows you to specify the Title and Description which will be read topeople with vision or cognitive impairments to help them better understand what informationthe shape contains.Insert and format text within the autoshapeTo insert a text into the autoshape, select the shape with the mouse and start typing your text.The text will become part of the autoshape (when you move or rotate the shape, the text alsomoves or rotates with it).All the formatting options you can apply to the text within the autoshape are listed here.Join autoshapes using connectorsYou can connect autoshapes using lines with connection points to demonstrate dependenciesbetween the objects (e.g. if you want to create a flowchart). To do that,1. click the Shape icon on the Insert tab of the top toolbar,2. select the Lines group from the menu,
3. click the necessary shape within the selected group (excepting the last three shapeswhich are not connectors, namely Curve, Scribble and Freeform),

4. hover the mouse cursor over the first autoshape and click one of the connectionpoints that appear on the shape outline,
5. drag the mouse cursor towards the second autoshape and click the necessaryconnection point on its outline.
If you move the joined autoshapes, the connector remains attached to the shapes and movestogether with them.
You can also detach the connector from the shapes and then attach it to any other connectionpoints.
Insert text objectsTo draw attention to a specific part of the spreadsheet, you can insert a text box (a rectangularframe that allows you to enter text within it) or a Text Art object (a text box with a predefinedfont style and color that allows you to apply some text effects).Add a text objectYou can add a text object anywhere in the worksheet. To do that:1. switch to the Insert tab of the top toolbar,2. select the necessary text object type:· to add a text box, click the Text Box icon on the top toolbar, then click where the
text box should be inserted, hold the mouse button and drag the text box border tospecify its size. When you release the mouse button, the insertion point will appear inthe added text box, and you will bу able to enter your text.

Note: it's also possible to insert a text box by clicking the Shape icon on the toptoolbar and selecting the Insert Text autoshape from the Basic Shapes group.
· to add a Text Art object, click the Text Art icon on the top toolbar, then click on thedesired style template – the Text Art object will be added in the center of the worksheet.Select the default text within the text box with the mouse and replace it with your owntext.
3. click outside of the text object to apply the changes and return to the worksheet.The text within the text object is a part of the latter (when you move or rotate the text object,the text moves or rotates with it).As an inserted text object represents a rectangular frame with text in it (Text Art objects haveinvisible text box borders by default) and this frame is a common autoshape, you can changeboth the shape and text properties.To delete the added text object, click on the text box border and press the Delete key on thekeyboard. The text within the text box will also be deleted.Format a text boxSelect the text box by clicking on its border to change its properties. When the text box isselected, its borders are displayed as solid (not dashed) lines.
· to manually resize, move, rotate the text box, use the special handles on the edges ofthe shape.
· to edit the text box fill, stroke, replace the rectangular box with a different shape, oraccess the shape advanced settings, click the Shape settings icon on the rightsidebar and use the corresponding options.
· to arrange text boxes as related to other objects, align several text boxes as related toeach other, rotate or flip a text box, right-click on the text box border and use thecontextual menu options.
· to create columns of text within the text box, right-click on the text box border, clickthe Shape Advanced Settings option and switch to the Columns tab in the Shape -Advanced Settings window.
Format the text within the text boxClick the text within the text box to change its properties. When the text is selected, the text boxborders are displayed as dashed lines.
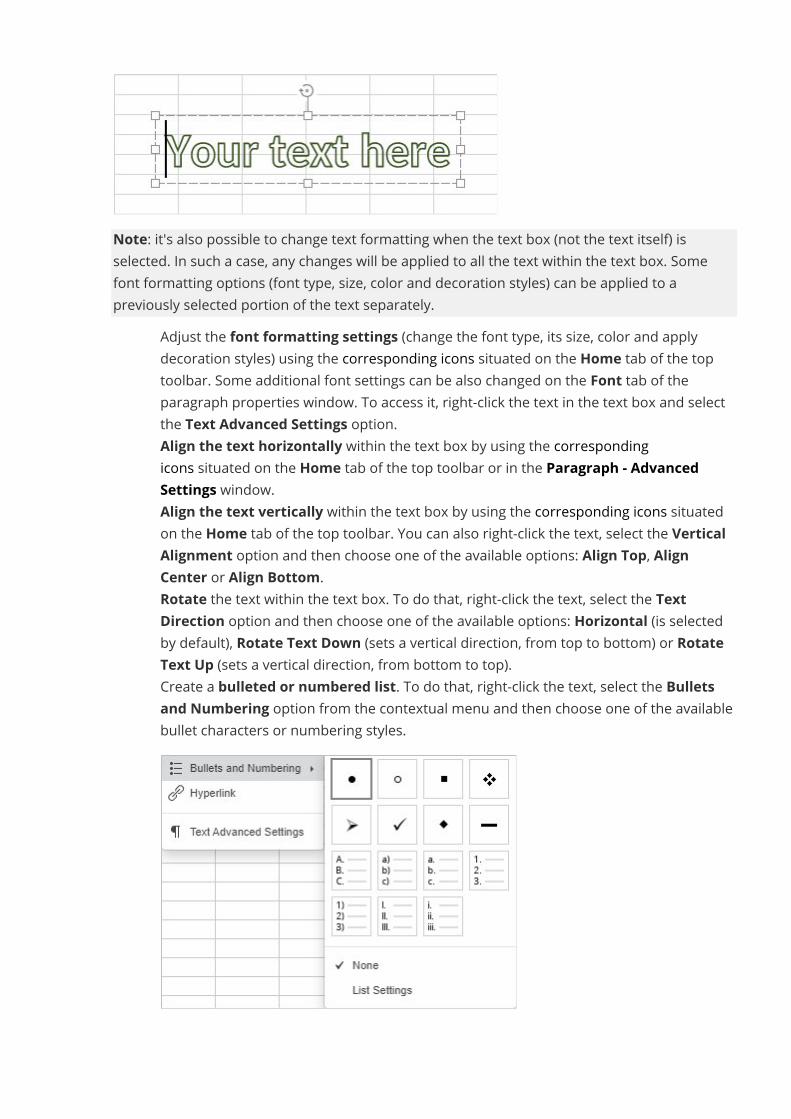
Note: it's also possible to change text formatting when the text box (not the text itself) isselected. In such a case, any changes will be applied to all the text within the text box. Somefont formatting options (font type, size, color and decoration styles) can be applied to apreviously selected portion of the text separately.
· Adjust the font formatting settings (change the font type, its size, color and applydecoration styles) using the corresponding icons situated on the Home tab of the toptoolbar. Some additional font settings can be also changed on the Font tab of theparagraph properties window. To access it, right-click the text in the text box and selectthe Text Advanced Settings option.
· Align the text horizontally within the text box by using the correspondingicons situated on the Home tab of the top toolbar or in the Paragraph - AdvancedSettings window.
· Align the text vertically within the text box by using the corresponding icons situatedon the Home tab of the top toolbar. You can also right-click the text, select the VerticalAlignment option and then choose one of the available options: Align Top, AlignCenter or Align Bottom.
· Rotate the text within the text box. To do that, right-click the text, select the TextDirection option and then choose one of the available options: Horizontal (is selectedby default), Rotate Text Down (sets a vertical direction, from top to bottom) or RotateText Up (sets a vertical direction, from bottom to top).
· Create a bulleted or numbered list. To do that, right-click the text, select the Bulletsand Numbering option from the contextual menu and then choose one of the availablebullet characters or numbering styles.
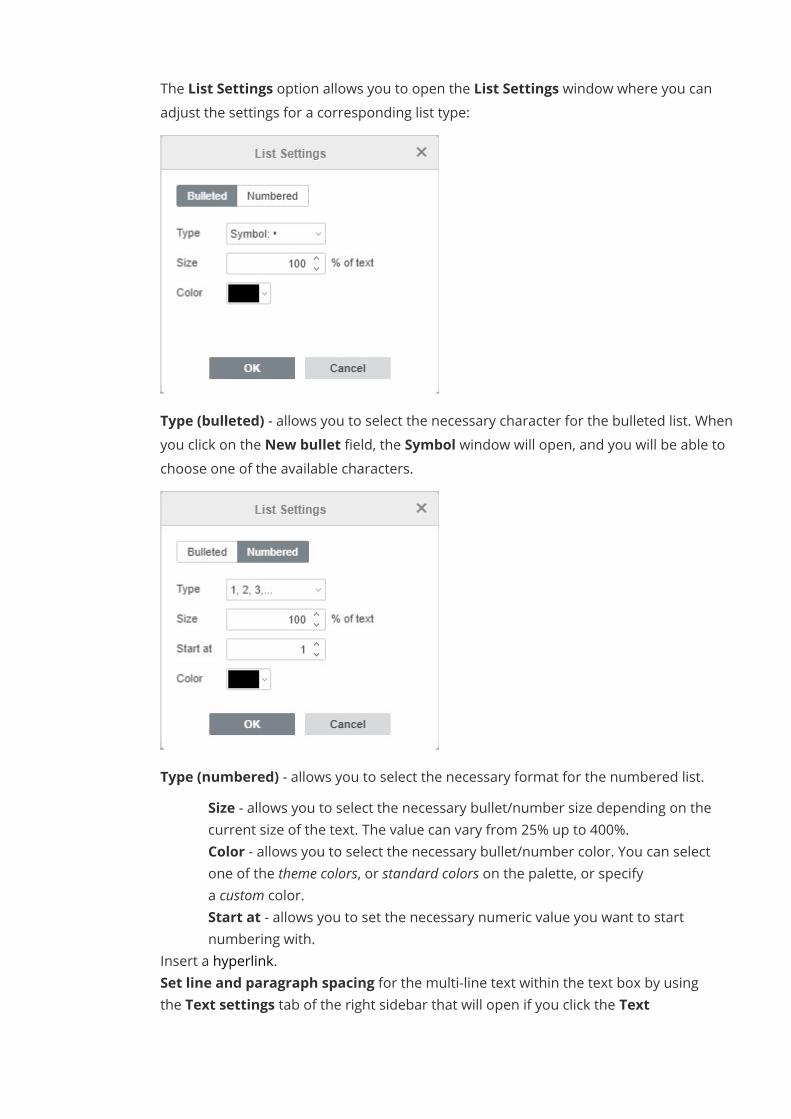
The List Settings option allows you to open the List Settings window where you canadjust the settings for a corresponding list type:
Type (bulleted) - allows you to select the necessary character for the bulleted list. Whenyou click on the New bullet field, the Symbol window will open, and you will be able tochoose one of the available characters.
Type (numbered) - allows you to select the necessary format for the numbered list.o Size - allows you to select the necessary bullet/number size depending on the
current size of the text. The value can vary from 25% up to 400%.o Color - allows you to select the necessary bullet/number color. You can select
one of the theme colors, or standard colors on the palette, or specifya custom color.
o Start at - allows you to set the necessary numeric value you want to startnumbering with.
· Insert a hyperlink.· Set line and paragraph spacing for the multi-line text within the text box by using
the Text settings tab of the right sidebar that will open if you click the Text
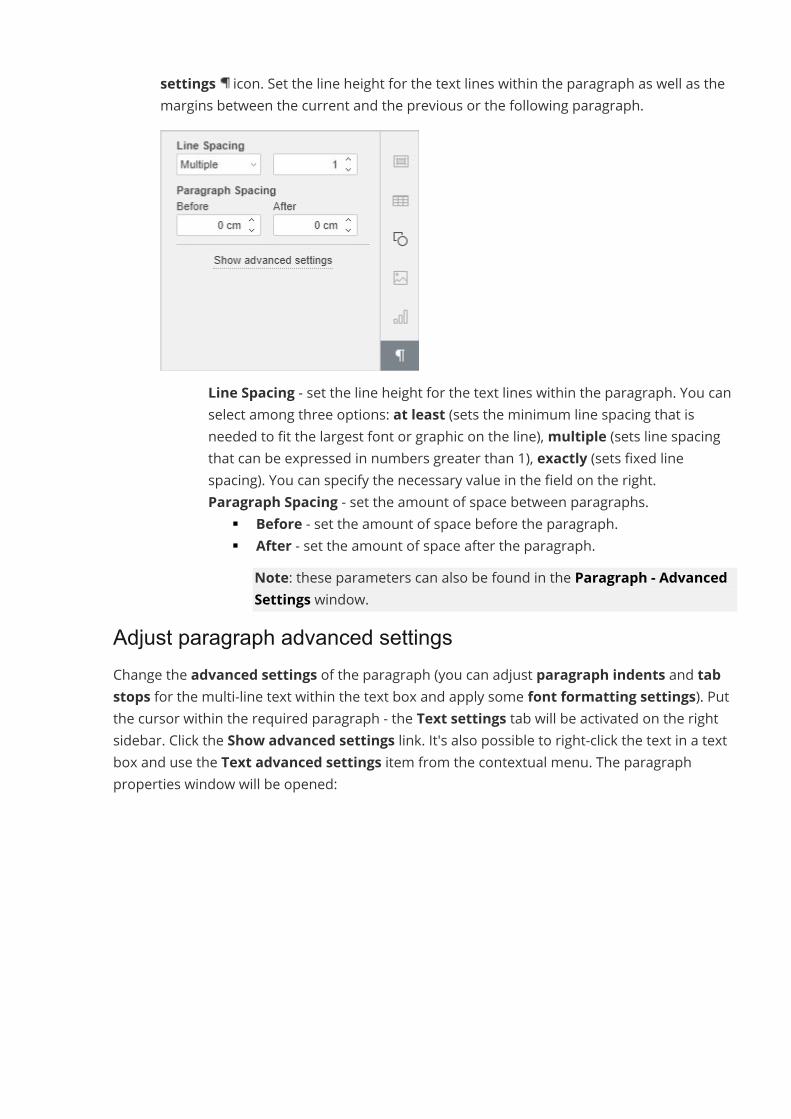
settings icon. Set the line height for the text lines within the paragraph as well as themargins between the current and the previous or the following paragraph.
o Line Spacing - set the line height for the text lines within the paragraph. You canselect among three options: at least (sets the minimum line spacing that isneeded to fit the largest font or graphic on the line),multiple (sets line spacingthat can be expressed in numbers greater than 1), exactly (sets fixed linespacing). You can specify the necessary value in the field on the right.
o Paragraph Spacing - set the amount of space between paragraphs.§ Before - set the amount of space before the paragraph.§ After - set the amount of space after the paragraph.
Note: these parameters can also be found in the Paragraph - AdvancedSettings window.
Adjust paragraph advanced settingsChange the advanced settings of the paragraph (you can adjust paragraph indents and tabstops for the multi-line text within the text box and apply some font formatting settings). Putthe cursor within the required paragraph - the Text settings tab will be activated on the rightsidebar. Click the Show advanced settings link. It's also possible to right-click the text in a textbox and use the Text advanced settings item from the contextual menu. The paragraphproperties window will be opened:
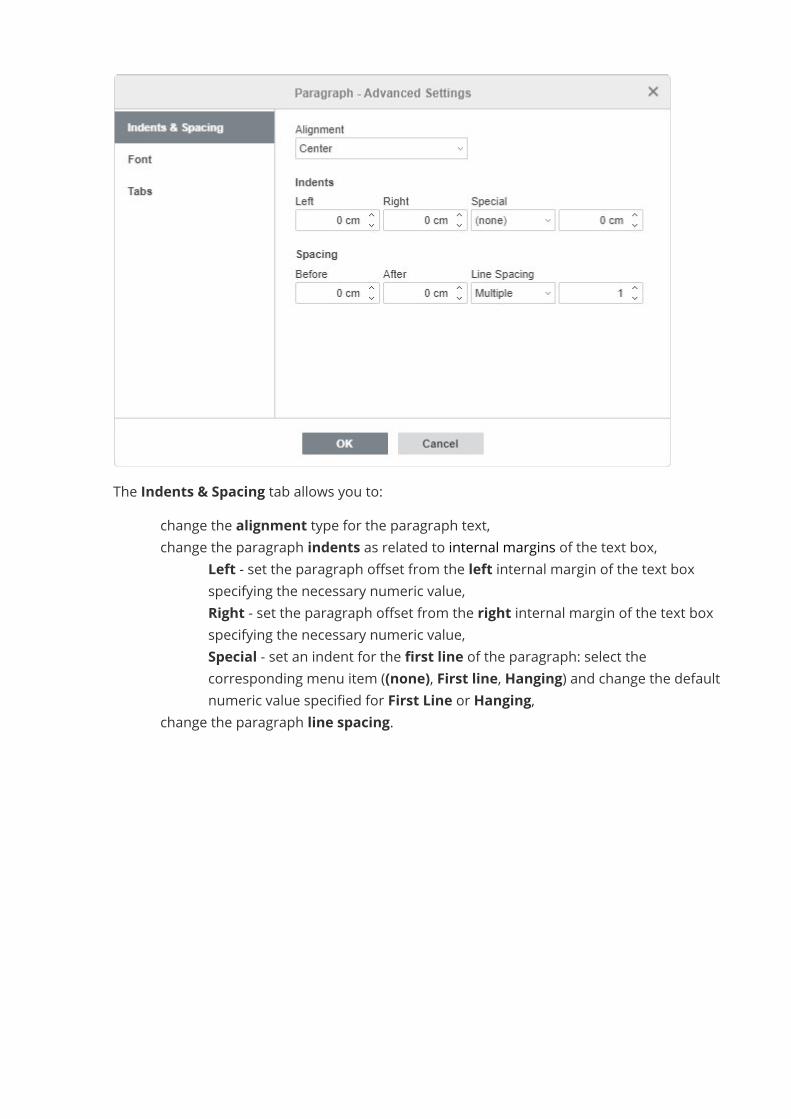
The Indents & Spacing tab allows you to:· change the alignment type for the paragraph text,· change the paragraph indents as related to internal margins of the text box,
o Left - set the paragraph offset from the left internal margin of the text boxspecifying the necessary numeric value,
o Right - set the paragraph offset from the right internal margin of the text boxspecifying the necessary numeric value,
o Special - set an indent for the first line of the paragraph: select thecorresponding menu item ((none), First line, Hanging) and change the defaultnumeric value specified for First Line or Hanging,
· change the paragraph line spacing.
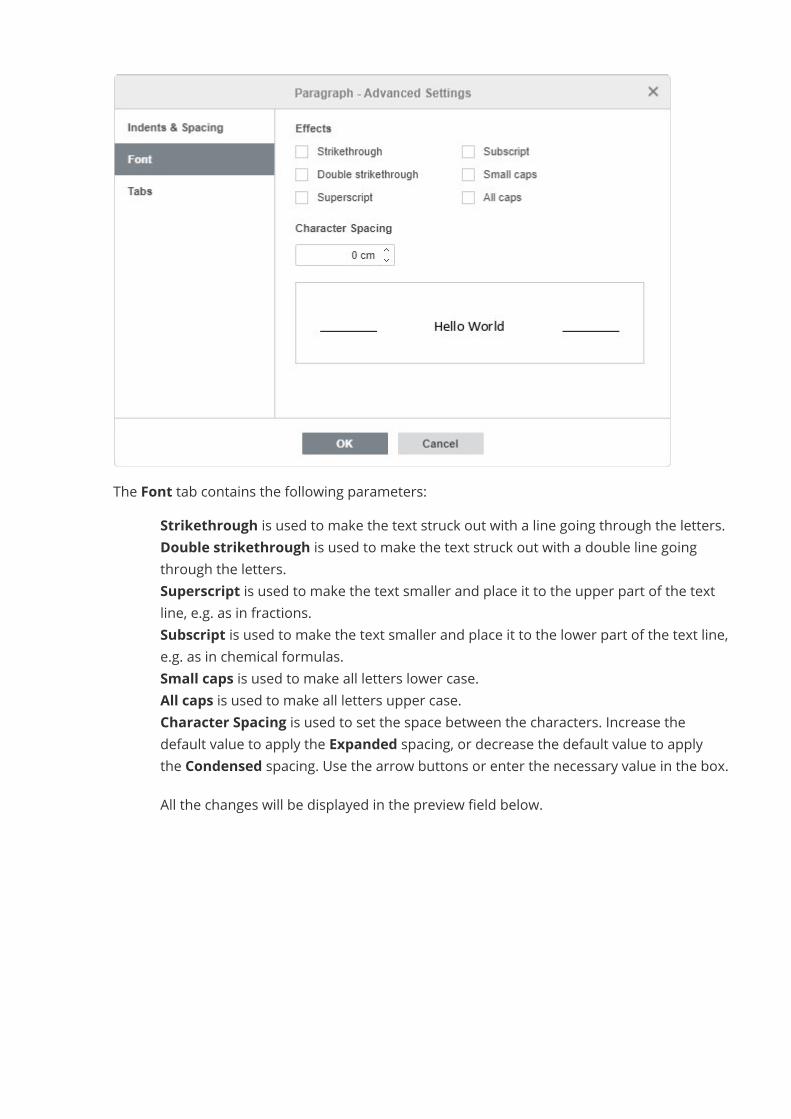
The Font tab contains the following parameters:· Strikethrough is used to make the text struck out with a line going through the letters.· Double strikethrough is used to make the text struck out with a double line going
through the letters.· Superscript is used to make the text smaller and place it to the upper part of the text
line, e.g. as in fractions.· Subscript is used to make the text smaller and place it to the lower part of the text line,
e.g. as in chemical formulas.· Small caps is used to make all letters lower case.· All caps is used to make all letters upper case.· Character Spacing is used to set the space between the characters. Increase the
default value to apply the Expanded spacing, or decrease the default value to applythe Condensed spacing. Use the arrow buttons or enter the necessary value in the box.All the changes will be displayed in the preview field below.
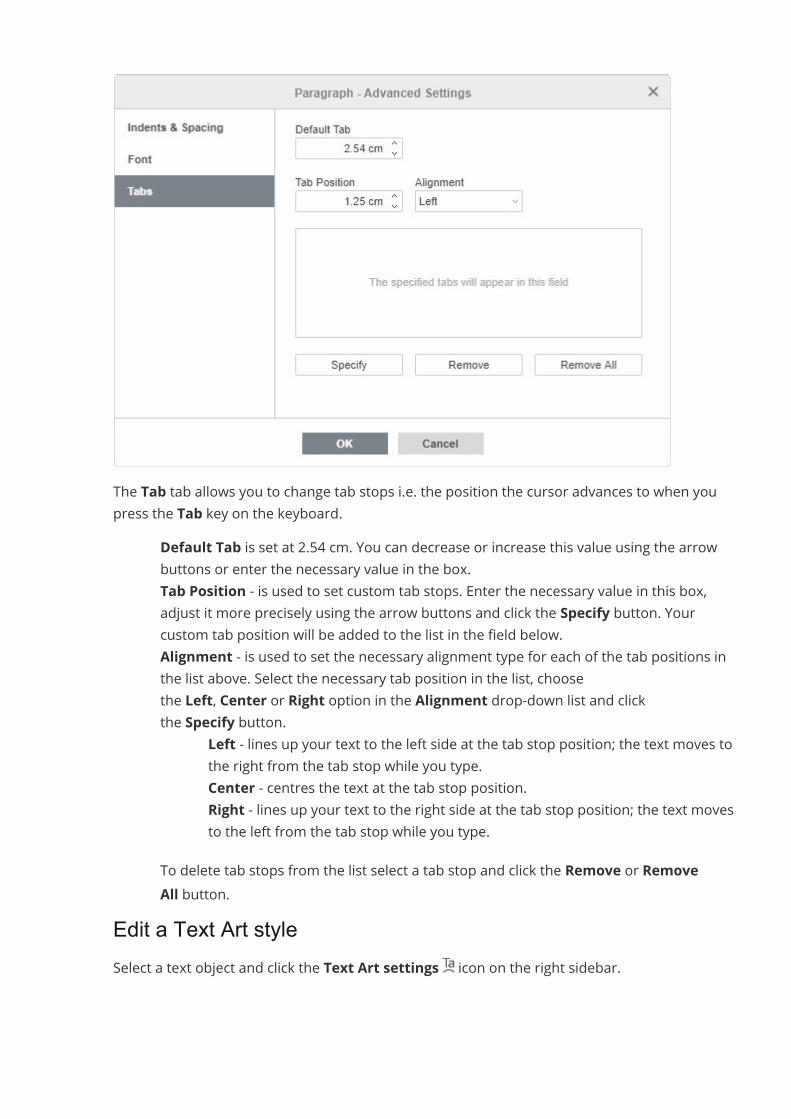
The Tab tab allows you to change tab stops i.e. the position the cursor advances to when youpress the Tab key on the keyboard.
· Default Tab is set at 2.54 cm. You can decrease or increase this value using the arrowbuttons or enter the necessary value in the box.
· Tab Position - is used to set custom tab stops. Enter the necessary value in this box,adjust it more precisely using the arrow buttons and click the Specify button. Yourcustom tab position will be added to the list in the field below.
· Alignment - is used to set the necessary alignment type for each of the tab positions inthe list above. Select the necessary tab position in the list, choosethe Left, Center or Right option in the Alignment drop-down list and clickthe Specify button.
o Left - lines up your text to the left side at the tab stop position; the text moves tothe right from the tab stop while you type.
o Center - centres the text at the tab stop position.o Right - lines up your text to the right side at the tab stop position; the text moves
to the left from the tab stop while you type.To delete tab stops from the list select a tab stop and click the Remove or RemoveAll button.
Edit a Text Art styleSelect a text object and click the Text Art settings icon on the right sidebar.
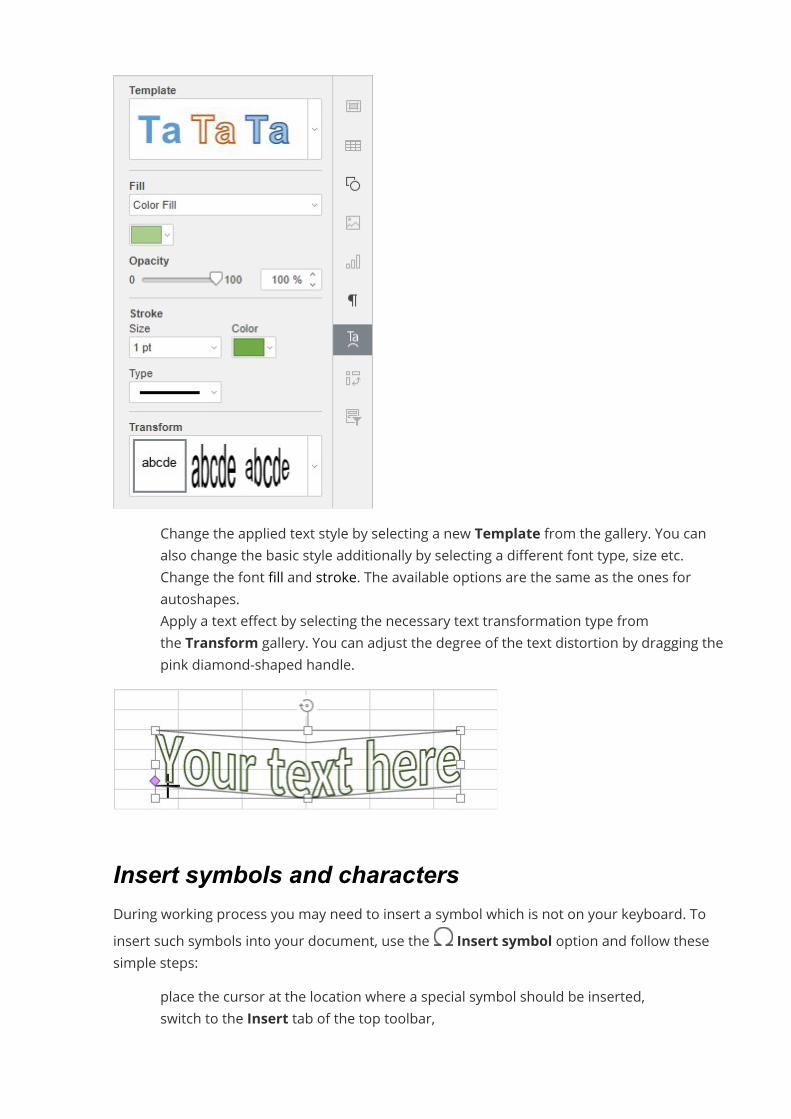
· Change the applied text style by selecting a new Template from the gallery. You canalso change the basic style additionally by selecting a different font type, size etc.
· Change the font fill and stroke. The available options are the same as the ones forautoshapes.
· Apply a text effect by selecting the necessary text transformation type fromthe Transform gallery. You can adjust the degree of the text distortion by dragging thepink diamond-shaped handle.
Insert symbols and charactersDuring working process you may need to insert a symbol which is not on your keyboard. Toinsert such symbols into your document, use the Insert symbol option and follow thesesimple steps:
· place the cursor at the location where a special symbol should be inserted,· switch to the Insert tab of the top toolbar,
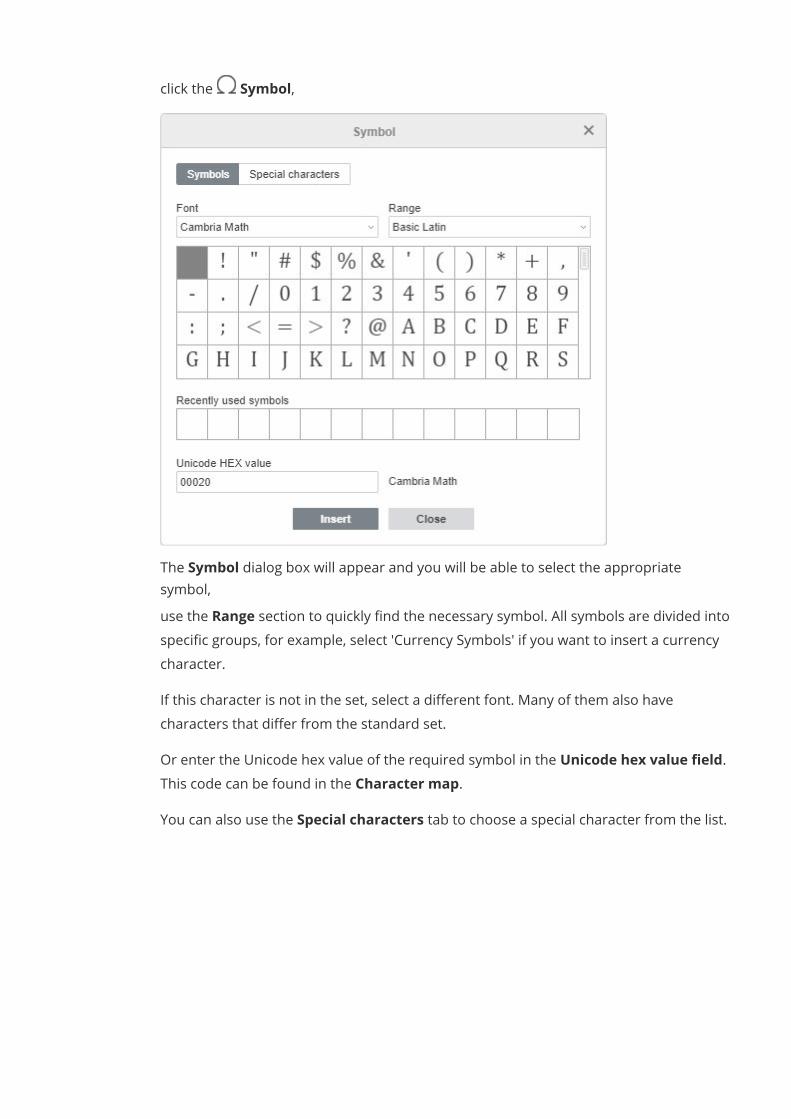
· click the Symbol,
· The Symbol dialog box will appear and you will be able to select the appropriatesymbol,
· use the Range section to quickly find the necessary symbol. All symbols are divided intospecific groups, for example, select 'Currency Symbols' if you want to insert a currencycharacter.If this character is not in the set, select a different font. Many of them also havecharacters that differ from the standard set.Or enter the Unicode hex value of the required symbol in the Unicode hex value field.This code can be found in the Character map.You can also use the Special characters tab to choose a special character from the list.
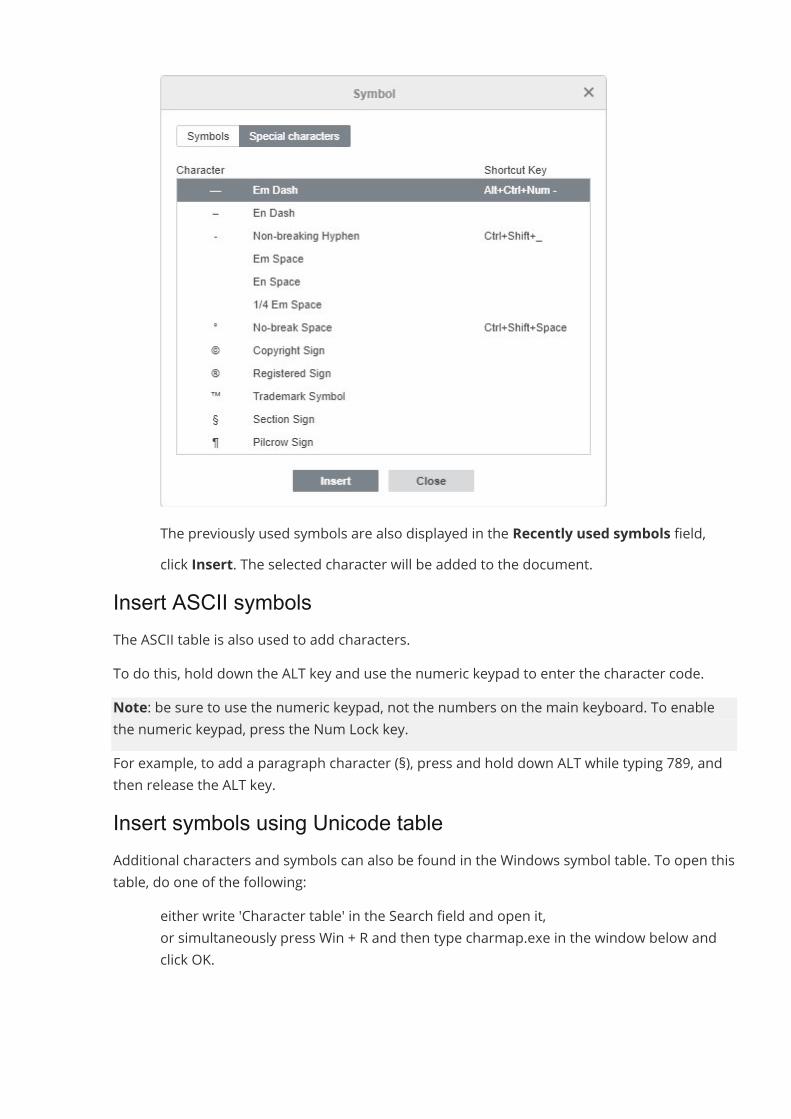
The previously used symbols are also displayed in the Recently used symbols field,· click Insert. The selected character will be added to the document.
Insert ASCII symbolsThe ASCII table is also used to add characters.To do this, hold down the ALT key and use the numeric keypad to enter the character code.Note: be sure to use the numeric keypad, not the numbers on the main keyboard. To enablethe numeric keypad, press the Num Lock key.For example, to add a paragraph character (§), press and hold down ALT while typing 789, andthen release the ALT key.Insert symbols using Unicode tableAdditional characters and symbols can also be found in the Windows symbol table. To open thistable, do one of the following:
· either write 'Character table' in the Search field and open it,· or simultaneously press Win + R and then type charmap.exe in the window below and
click OK.
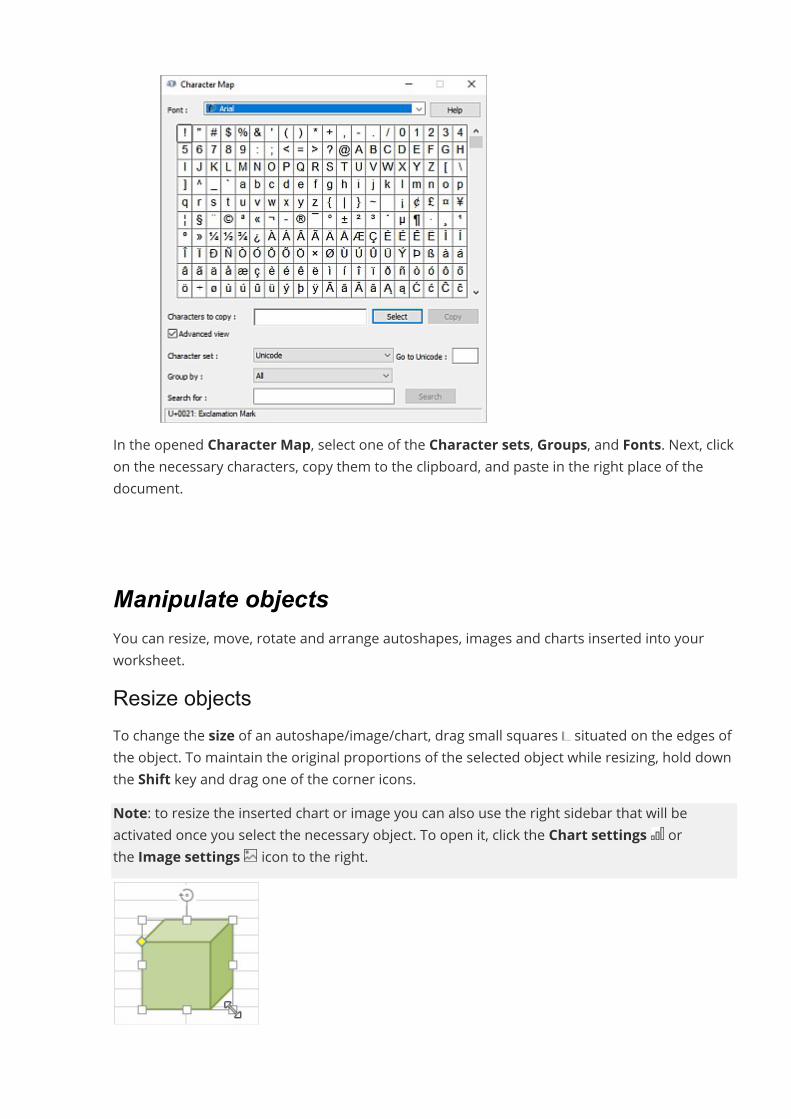
In the opened Character Map, select one of the Character sets, Groups, and Fonts. Next, clickon the necessary characters, copy them to the clipboard, and paste in the right place of thedocument.
Manipulate objectsYou can resize, move, rotate and arrange autoshapes, images and charts inserted into yourworksheet.Resize objectsTo change the size of an autoshape/image/chart, drag small squares situated on the edges ofthe object. To maintain the original proportions of the selected object while resizing, hold downthe Shift key and drag one of the corner icons.Note: to resize the inserted chart or image you can also use the right sidebar that will beactivated once you select the necessary object. To open it, click the Chart settings orthe Image settings icon to the right.
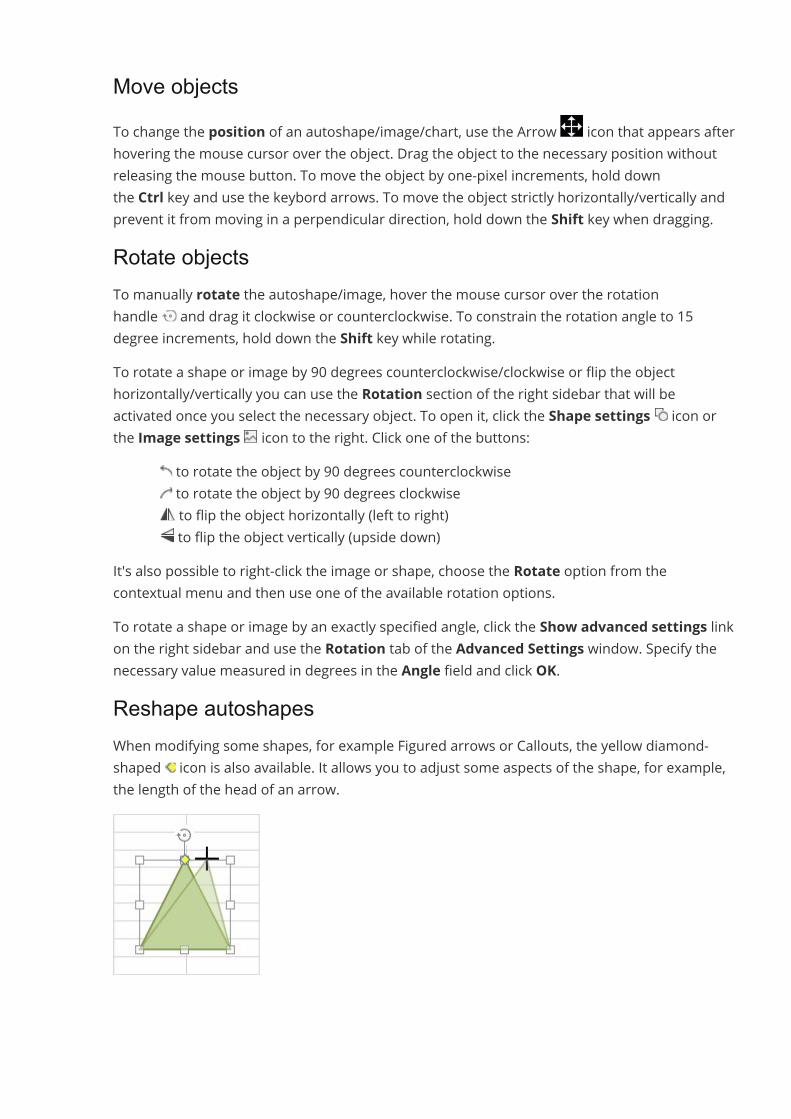
Move objectsTo change the position of an autoshape/image/chart, use the Arrow icon that appears afterhovering the mouse cursor over the object. Drag the object to the necessary position withoutreleasing the mouse button. To move the object by one-pixel increments, hold downthe Ctrl key and use the keybord arrows. To move the object strictly horizontally/vertically andprevent it from moving in a perpendicular direction, hold down the Shift key when dragging.Rotate objectsTo manually rotate the autoshape/image, hover the mouse cursor over the rotationhandle and drag it clockwise or counterclockwise. To constrain the rotation angle to 15degree increments, hold down the Shift key while rotating.To rotate a shape or image by 90 degrees counterclockwise/clockwise or flip the objecthorizontally/vertically you can use the Rotation section of the right sidebar that will beactivated once you select the necessary object. To open it, click the Shape settings icon orthe Image settings icon to the right. Click one of the buttons:
· to rotate the object by 90 degrees counterclockwise· to rotate the object by 90 degrees clockwise· to flip the object horizontally (left to right)· to flip the object vertically (upside down)
It's also possible to right-click the image or shape, choose the Rotate option from thecontextual menu and then use one of the available rotation options.To rotate a shape or image by an exactly specified angle, click the Show advanced settings linkon the right sidebar and use the Rotation tab of the Advanced Settings window. Specify thenecessary value measured in degrees in the Angle field and click OK.Reshape autoshapesWhen modifying some shapes, for example Figured arrows or Callouts, the yellow diamond-shaped icon is also available. It allows you to adjust some aspects of the shape, for example,the length of the head of an arrow.
Align objectsTo align two or more selected objects in relation to each other, hold down the Ctrl key whileselecting the objects with the mouse, then click the Align icon on the Layout tab of the toptoolbar and select the necessary alignment type from the list:
· Align Left - to align objects relative to each other to the left edge of the leftmostobject,
· Align Center - to align objects relative to each other in the center,· Align Right - to align objects relative to each other to the right edge of the rightmost
object,· Align Top - to align objects relative to each other to the top edge of the topmost
object,· Align Middle - to align objects relative to each other in the middle,· Align Bottom - to align objects relative to each other to the bottom edge of the
bottommost object.Alternatively, you can right-click the selected objects, choose the Align option from thecontextual menu and then use one of the available alignment options.Note: the alignment options are disabled if you select less than two objects.Distribute objectsTo distribute three or more selected objects horizontally or vertically between two outermostselected objects so that there is equal distance between them, click the Align icon onthe Layout tab of the top toolbar and select the necessary distribution type from the list:
· Distribute Horizontally - to distribute objects evenly between the leftmost andrightmost selected objects.
· Distribute Vertically - to distribute objects evenly between the topmost andbottommost selected objects.
Alternatively, you can right-click the selected objects, choose the Align option from thecontextual menu and then use one of the available distribution options.Note: the distribution options are disabled if you select less than three objects.Group several objectsTo manipulate several objects at once, you can group them. Hold down the Ctrl key whileselecting the objects with the mouse, then click the arrow next to the Group icon onthe Layout tab of the top toolbar and select the necessary option from the list:
· Group - to combine several objects into a group so that they can be simultaneouslyrotated, moved, resized, aligned, arranged, copied, pasted, formatted like a singleobject.
· Ungroup - to ungroup the selected group of the previously combined objects.
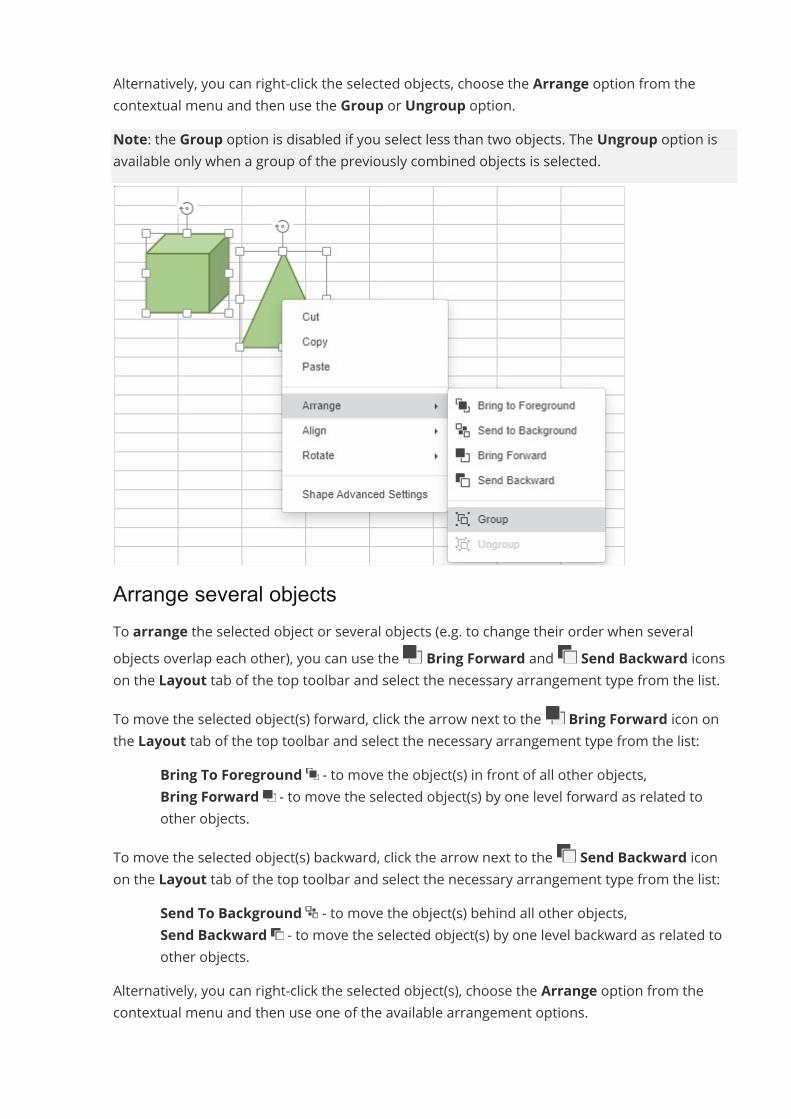
Alternatively, you can right-click the selected objects, choose the Arrange option from thecontextual menu and then use the Group or Ungroup option.Note: the Group option is disabled if you select less than two objects. The Ungroup option isavailable only when a group of the previously combined objects is selected.
Arrange several objectsTo arrange the selected object or several objects (e.g. to change their order when severalobjects overlap each other), you can use the Bring Forward and Send Backward iconson the Layout tab of the top toolbar and select the necessary arrangement type from the list.To move the selected object(s) forward, click the arrow next to the Bring Forward icon onthe Layout tab of the top toolbar and select the necessary arrangement type from the list:
· Bring To Foreground - to move the object(s) in front of all other objects,· Bring Forward - to move the selected object(s) by one level forward as related to
other objects.To move the selected object(s) backward, click the arrow next to the Send Backward iconon the Layout tab of the top toolbar and select the necessary arrangement type from the list:
· Send To Background - to move the object(s) behind all other objects,· Send Backward - to move the selected object(s) by one level backward as related to
other objects.Alternatively, you can right-click the selected object(s), choose the Arrange option from thecontextual menu and then use one of the available arrangement options.
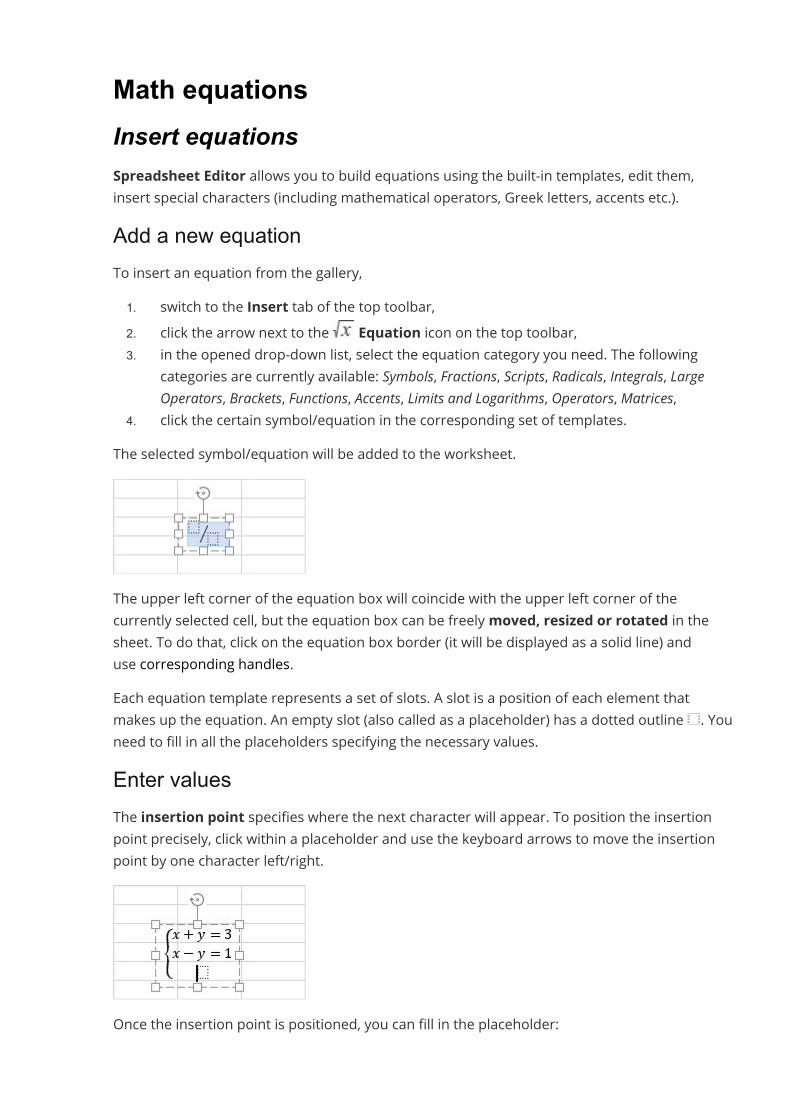
Math equationsInsert equationsSpreadsheet Editor allows you to build equations using the built-in templates, edit them,insert special characters (including mathematical operators, Greek letters, accents etc.).Add a new equationTo insert an equation from the gallery,1. switch to the Insert tab of the top toolbar,2. click the arrow next to the Equation icon on the top toolbar,3. in the opened drop-down list, select the equation category you need. The following
categories are currently available: Symbols, Fractions, Scripts, Radicals, Integrals, LargeOperators, Brackets, Functions, Accents, Limits and Logarithms, Operators, Matrices,
4. click the certain symbol/equation in the corresponding set of templates.The selected symbol/equation will be added to the worksheet.
The upper left corner of the equation box will coincide with the upper left corner of thecurrently selected cell, but the equation box can be freelymoved, resized or rotated in thesheet. To do that, click on the equation box border (it will be displayed as a solid line) anduse corresponding handles.Each equation template represents a set of slots. A slot is a position of each element thatmakes up the equation. An empty slot (also called as a placeholder) has a dotted outline . Youneed to fill in all the placeholders specifying the necessary values.Enter valuesThe insertion point specifies where the next character will appear. To position the insertionpoint precisely, click within a placeholder and use the keyboard arrows to move the insertionpoint by one character left/right.
Once the insertion point is positioned, you can fill in the placeholder:
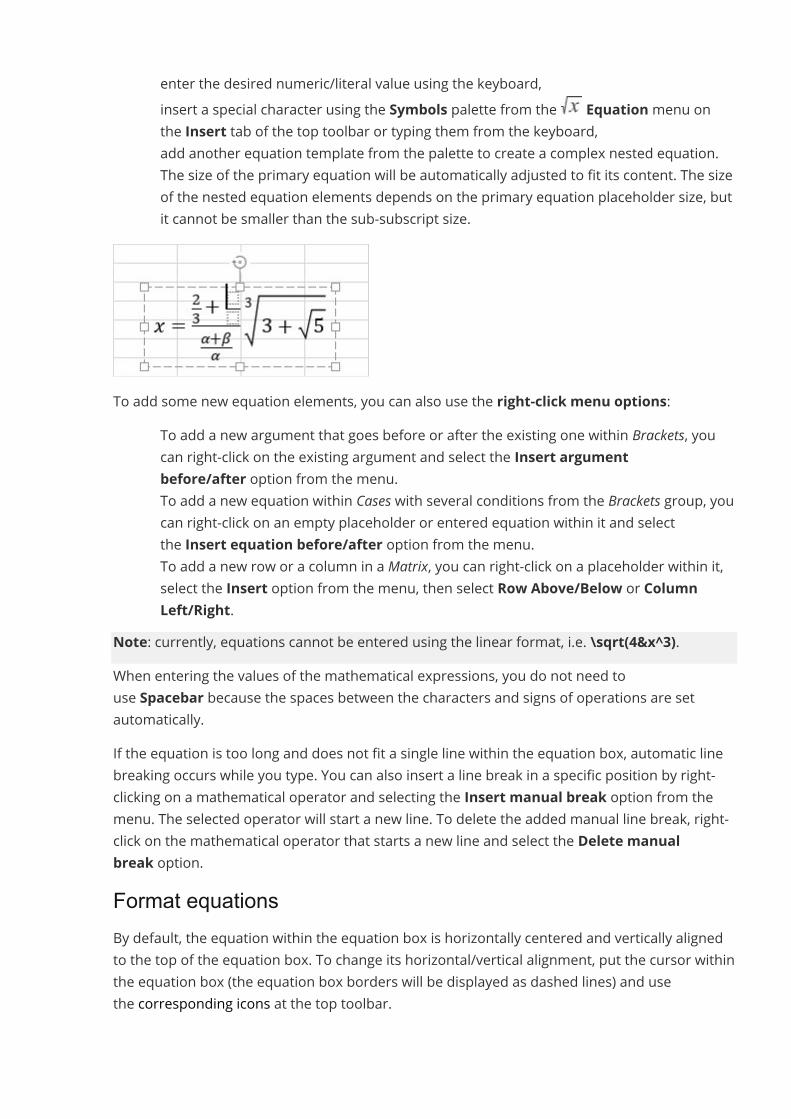
· enter the desired numeric/literal value using the keyboard,· insert a special character using the Symbols palette from the Equationmenu on
the Insert tab of the top toolbar or typing them from the keyboard,· add another equation template from the palette to create a complex nested equation.
The size of the primary equation will be automatically adjusted to fit its content. The sizeof the nested equation elements depends on the primary equation placeholder size, butit cannot be smaller than the sub-subscript size.
To add some new equation elements, you can also use the right-click menu options:· To add a new argument that goes before or after the existing one within Brackets, you
can right-click on the existing argument and select the Insert argumentbefore/after option from the menu.
· To add a new equation within Cases with several conditions from the Brackets group, youcan right-click on an empty placeholder or entered equation within it and selectthe Insert equation before/after option from the menu.
· To add a new row or a column in a Matrix, you can right-click on a placeholder within it,select the Insert option from the menu, then select Row Above/Below or ColumnLeft/Right.
Note: currently, equations cannot be entered using the linear format, i.e. \sqrt(4&x^3).When entering the values of the mathematical expressions, you do not need touse Spacebar because the spaces between the characters and signs of operations are setautomatically.If the equation is too long and does not fit a single line within the equation box, automatic linebreaking occurs while you type. You can also insert a line break in a specific position by right-clicking on a mathematical operator and selecting the Insert manual break option from themenu. The selected operator will start a new line. To delete the added manual line break, right-click on the mathematical operator that starts a new line and select the Delete manualbreak option.Format equationsBy default, the equation within the equation box is horizontally centered and vertically alignedto the top of the equation box. To change its horizontal/vertical alignment, put the cursor withinthe equation box (the equation box borders will be displayed as dashed lines) and usethe corresponding icons at the top toolbar.
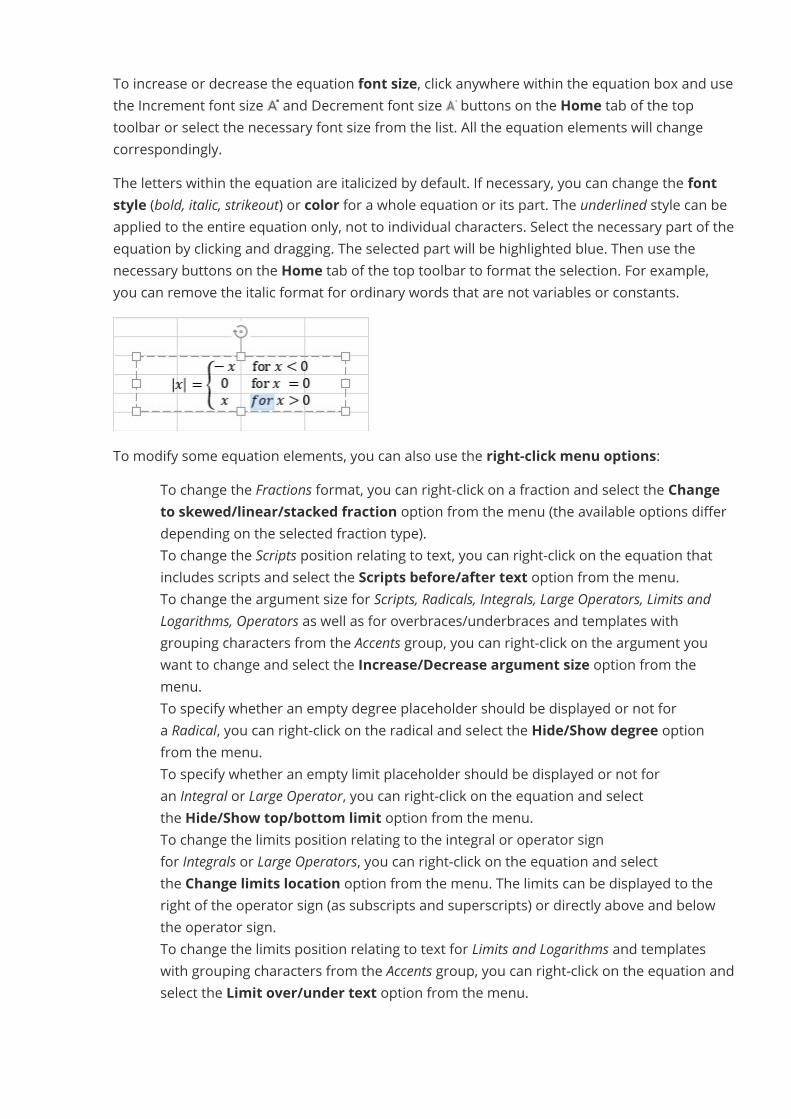
To increase or decrease the equation font size, click anywhere within the equation box and usethe Increment font size and Decrement font size buttons on the Home tab of the toptoolbar or select the necessary font size from the list. All the equation elements will changecorrespondingly.The letters within the equation are italicized by default. If necessary, you can change the fontstyle (bold, italic, strikeout) or color for a whole equation or its part. The underlined style can beapplied to the entire equation only, not to individual characters. Select the necessary part of theequation by clicking and dragging. The selected part will be highlighted blue. Then use thenecessary buttons on the Home tab of the top toolbar to format the selection. For example,you can remove the italic format for ordinary words that are not variables or constants.
To modify some equation elements, you can also use the right-click menu options:· To change the Fractions format, you can right-click on a fraction and select the Change
to skewed/linear/stacked fraction option from the menu (the available options differdepending on the selected fraction type).
· To change the Scripts position relating to text, you can right-click on the equation thatincludes scripts and select the Scripts before/after text option from the menu.
· To change the argument size for Scripts, Radicals, Integrals, Large Operators, Limits andLogarithms, Operators as well as for overbraces/underbraces and templates withgrouping characters from the Accents group, you can right-click on the argument youwant to change and select the Increase/Decrease argument size option from themenu.
· To specify whether an empty degree placeholder should be displayed or not fora Radical, you can right-click on the radical and select the Hide/Show degree optionfrom the menu.
· To specify whether an empty limit placeholder should be displayed or not foran Integral or Large Operator, you can right-click on the equation and selectthe Hide/Show top/bottom limit option from the menu.
· To change the limits position relating to the integral or operator signfor Integrals or Large Operators, you can right-click on the equation and selectthe Change limits location option from the menu. The limits can be displayed to theright of the operator sign (as subscripts and superscripts) or directly above and belowthe operator sign.
· To change the limits position relating to text for Limits and Logarithms and templateswith grouping characters from the Accents group, you can right-click on the equation andselect the Limit over/under text option from the menu.
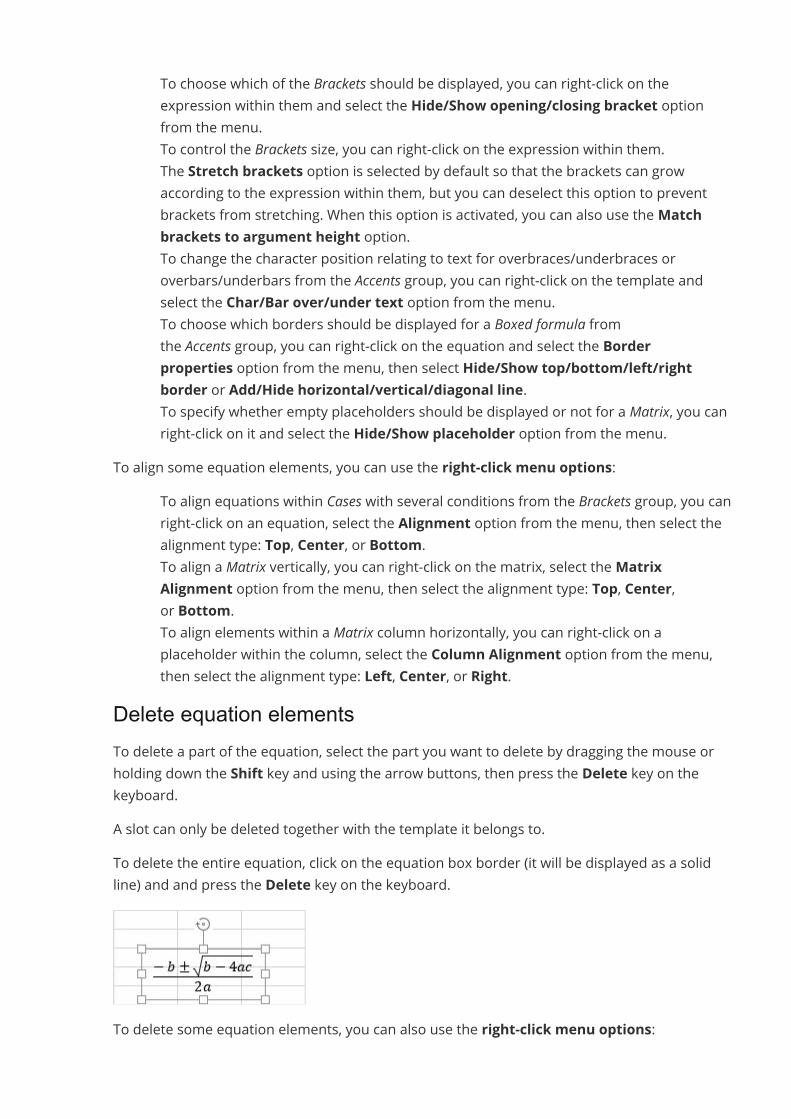
· To choose which of the Brackets should be displayed, you can right-click on theexpression within them and select the Hide/Show opening/closing bracket optionfrom the menu.
· To control the Brackets size, you can right-click on the expression within them.The Stretch brackets option is selected by default so that the brackets can growaccording to the expression within them, but you can deselect this option to preventbrackets from stretching. When this option is activated, you can also use theMatchbrackets to argument height option.
· To change the character position relating to text for overbraces/underbraces oroverbars/underbars from the Accents group, you can right-click on the template andselect the Char/Bar over/under text option from the menu.
· To choose which borders should be displayed for a Boxed formula fromthe Accents group, you can right-click on the equation and select the Borderproperties option from the menu, then select Hide/Show top/bottom/left/rightborder or Add/Hide horizontal/vertical/diagonal line.
· To specify whether empty placeholders should be displayed or not for a Matrix, you canright-click on it and select the Hide/Show placeholder option from the menu.
To align some equation elements, you can use the right-click menu options:· To align equations within Cases with several conditions from the Brackets group, you can
right-click on an equation, select the Alignment option from the menu, then select thealignment type: Top, Center, or Bottom.
· To align a Matrix vertically, you can right-click on the matrix, select theMatrixAlignment option from the menu, then select the alignment type: Top, Center,or Bottom.
· To align elements within a Matrix column horizontally, you can right-click on aplaceholder within the column, select the Column Alignment option from the menu,then select the alignment type: Left, Center, or Right.
Delete equation elementsTo delete a part of the equation, select the part you want to delete by dragging the mouse orholding down the Shift key and using the arrow buttons, then press the Delete key on thekeyboard.A slot can only be deleted together with the template it belongs to.To delete the entire equation, click on the equation box border (it will be displayed as a solidline) and and press the Delete key on the keyboard.
To delete some equation elements, you can also use the right-click menu options:

· To delete a Radical, you can right-click on it and select the Delete radical option fromthe menu.
· To delete a Subscript and/or Superscript, you can right-click on the expression thatcontains them and select the Remove subscript/superscript option from the menu. Ifthe expression contains scripts that go before text, the Remove scripts option isavailable.
· To delete Brackets, you can right-click on the expression within them and selectthe Delete enclosing characters or Delete enclosing characters andseparators option from the menu.
· If the expression within Brackets inclides more than one argument, you can right-click onthe argument you want to delete and select the Delete argument option from themenu.
· If Brackets enclose more than one equation (i.e. Cases with several conditions), you canright-click on the equation you want to delete and select the Delete equation optionfrom the menu.
· To delete a Limit, you can right-click on it and select the Remove limit option from themenu.
· To delete an Accent, you can right-click on it and select the Remove accentcharacter, Delete char or Remove bar option from the menu (the available optionsdiffer depending on the selected accent).
· To delete a row or a column of a Matrix, you can right-click on the placeholder within therow/column you need to delete, select the Delete option from the menu, thenselect Delete Row/Column.
Spreadsheet co-editingCollaborative Spreadsheet EditingSpreadsheet Editor offers you the possibility to work on a spreadsheet collaboratively withother users. This feature includes:
· simultaneous multi-user access to the edited spreadsheet· visual indication of cells that are being edited by other users· real-time changes display or synchronization of changes with one button click· chat to share ideas concerning particular parts of the spreadsheet· comments containing the description of a task or problem that should be solved (it's
also possible to work with comments in the offline mode, without connecting tothe online version)
Connecting to the online versionIn the desktop editor, open the Connect to cloud option on the left side of the main programwindow. Connect to your cloud office specifying your account login and password.
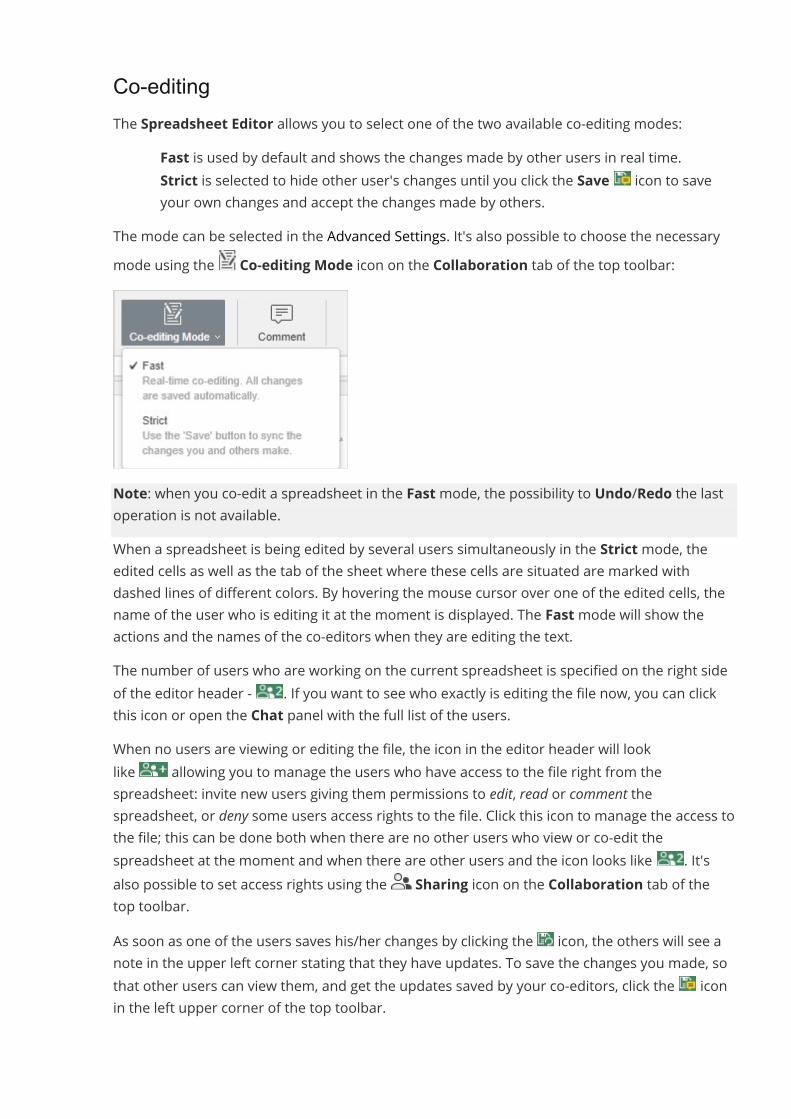
Co-editingThe Spreadsheet Editor allows you to select one of the two available co-editing modes:
· Fast is used by default and shows the changes made by other users in real time.· Strict is selected to hide other user's changes until you click the Save icon to save
your own changes and accept the changes made by others.The mode can be selected in the Advanced Settings. It's also possible to choose the necessarymode using the Co-editing Mode icon on the Collaboration tab of the top toolbar:
Note: when you co-edit a spreadsheet in the Fastmode, the possibility to Undo/Redo the lastoperation is not available.When a spreadsheet is being edited by several users simultaneously in the Strictmode, theedited cells as well as the tab of the sheet where these cells are situated are marked withdashed lines of different colors. By hovering the mouse cursor over one of the edited cells, thename of the user who is editing it at the moment is displayed. The Fastmode will show theactions and the names of the co-editors when they are editing the text.The number of users who are working on the current spreadsheet is specified on the right sideof the editor header - . If you want to see who exactly is editing the file now, you can clickthis icon or open the Chat panel with the full list of the users.When no users are viewing or editing the file, the icon in the editor header will looklike allowing you to manage the users who have access to the file right from thespreadsheet: invite new users giving them permissions to edit, read or comment thespreadsheet, or deny some users access rights to the file. Click this icon to manage the access tothe file; this can be done both when there are no other users who view or co-edit thespreadsheet at the moment and when there are other users and the icon looks like . It'salso possible to set access rights using the Sharing icon on the Collaboration tab of thetop toolbar.As soon as one of the users saves his/her changes by clicking the icon, the others will see anote in the upper left corner stating that they have updates. To save the changes you made, sothat other users can view them, and get the updates saved by your co-editors, click the iconin the left upper corner of the top toolbar.
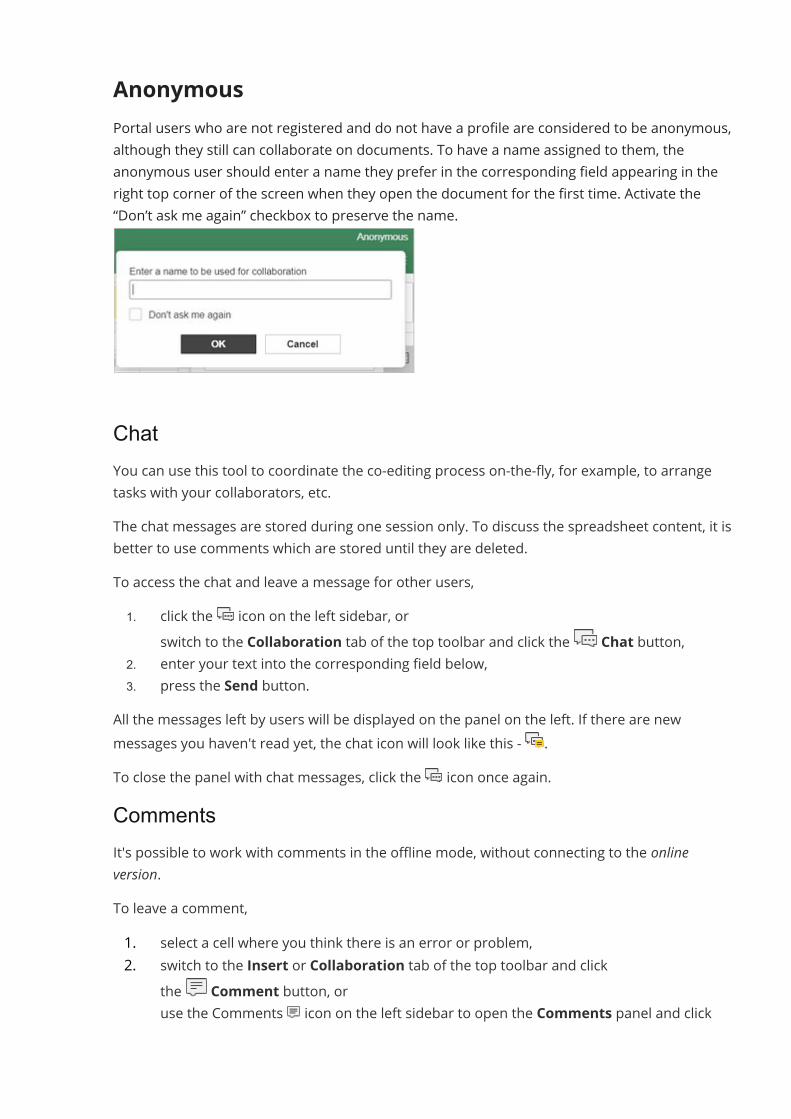
AnonymousPortal users who are not registered and do not have a profile are considered to be anonymous,although they still can collaborate on documents. To have a name assigned to them, theanonymous user should enter a name they prefer in the corresponding field appearing in theright top corner of the screen when they open the document for the first time. Activate the“Don’t ask me again” checkbox to preserve the name.
ChatYou can use this tool to coordinate the co-editing process on-the-fly, for example, to arrangetasks with your collaborators, etc.The chat messages are stored during one session only. To discuss the spreadsheet content, it isbetter to use comments which are stored until they are deleted.To access the chat and leave a message for other users,1. click the icon on the left sidebar, or
switch to the Collaboration tab of the top toolbar and click the Chat button,2. enter your text into the corresponding field below,3. press the Send button.
All the messages left by users will be displayed on the panel on the left. If there are newmessages you haven't read yet, the chat icon will look like this - .To close the panel with chat messages, click the icon once again.CommentsIt's possible to work with comments in the offline mode, without connecting to the onlineversion.To leave a comment,1. select a cell where you think there is an error or problem,2. switch to the Insert or Collaboration tab of the top toolbar and click
the Comment button, oruse the Comments icon on the left sidebar to open the Comments panel and click
the Add Comment to Document link, orright-click within the selected cell and select the Add Сomment option from the menu,
3. enter the needed text,4. click the Add Comment/Add button.
The comment will be seen on the panel on the left. The orange triangle will appear in the upperright corner of the cell you commented. If you need to disable this feature, click the File tab onthe top toolbar, select the Advanced Settings... option and uncheck the Turn on display ofthe comments box. In this case, the commented cells will be marked only if you click theComments icon.If you are using the Strict co-editing mode, new comments added by other users will becomevisible only after you click the icon in the left upper corner of the top toolbar.To view the comment, just click within the cell. You or any other user can answer to the addedcomment asking questions or reporting on the work he/she has done. For this purpose, usethe Add Reply link, type in your reply text in the entry field and press the Reply button.You can manage the added comments using the icons in the comment balloon or onthe Comments panel on the left:
· edit the currently selected by clicking the icon,· delete the currently selected by clicking the icon,· close the currently selected discussion by clicking the icon if the task or problem you
stated in your comment was solved, after that the discussion you opened with yourcomment gets the resolved status. To open it again, click the icon. If you want to hideresolved comments, click the File tab on the top toolbar, select the AdvancedSettings... option, uncheck the Turn on display of the resolved comments box andclick Apply. In this case the resolved comments will be highlighted only if you clickthe icon.
Adding mentionsWhen entering comments, you can use thementions feature that allows you to attractsomebody's attention to the comment and send a notification to the mentioned user via emailand Talk.To add a mention enter the "+" or "@" sign anywhere in the comment text - a list of the portalusers will open. To simplify the search process, you can start typing the required name in thecomment field - the user list will change while you type. Select the necessary person from thelist. If the file has not been shared with the mentioned user yet, the Sharing Settings windowwill open. The Read only access type is selected by default. Change it if necessary and click OK.The mentioned user will receive an email notification that he/she has been mentioned in acomment. If the file has been shared, the user will also receive a corresponding notification.To remove comments,
1. click the Remove button on the Collaboration tab of the top toolbar,2. select the necessary option from the menu:· Remove Current Comments - to remove the currently selected comment. If some
replies have been added to the comment, all its replies will be removed as well.· Remove My Comments - to remove comments you added without removing
comments added by other users. If some replies have been added to your comment, allits replies will be removed as well.
· Remove All Comments - to remove all the comments in the spreadsheet that you andother users added.
To close the panel with comments, click the Comments icon on the left sidebar once again.
Manage sheet view presetsNote: this feature is available in the paid version only starting from ONLYOFFICE Docs v. 6.1.The ONLYOFFICE Spreadsheet Editor offers a sheet viewmanager for view presets that arebased on the applied filters. Now you can save the required filtering parameters as a viewpreset and use it afterwards together with your colleagues as well as create several presets andswitch among them effortlessly. If you are collaborating on a spreadsheet, create individualview presets and continue working with the filters you need without being disrupted by otherco-editors.Creating a new sheet view presetSince a view preset is designed to save customized filtering parameters, first you need to applythe said parameters to the sheet.There are two ways to create a new sheet view preset. You can either
· go to the View tab and click the Sheet View icon,· choose the View manager option from the drop-down menu,· click the New button in the opened Sheet View Manager window,· specify the name of the sheet view preset,
or· click the New button on the View tab located at the top toolbar. The preset will be
created under a default name “View1/2/3...”. To change the name, go to the Sheet ViewManager, select the required preset, and click Rename.
Click Go to view to activate the created view preset.Switching among sheet view presets1. Go to the View tab and click the Sheet View icon.2. Choose the View manager option from the drop-down menu.
3. Select the sheet view preset you want to activate in the Sheet views field.4. Click Go to view to switch to the selected preset.
To exit the current sheet view preset, Close icon on the View tab located at the top toolbar.Managing sheet view presets1. Go to the View tab and click the Sheet View icon.2. Choose the View manager option from the drop-down menu.3. Select the sheet view preset you want to edit in the opened Sheet View
Manager window.4. Choose one of the editing options:· Rename to rename the selected preset,· Duplicate to create a copy of the selected preset,· Delete to delete the selected preset.
5. Click Go to view to activate the selected preset.
PluginsEdit an imageONLYOFFICE comes with a very powerful photo editor, that allows you to adjust the image withfilters and make all kinds of annotations.1. Select an image in your spreadsheet.2. Switch to the Plugins tab and choose Photo Editor.
You are now in the editing environment.· Below the image you will find the following checkboxes and slider filters:
o Grayscale, Sepia, Sepia 2, Blur, Emboss, Invert, Sharpen;o Remove White (Threshhold, Distance), Gradient
transparency, Brightness, Noise, Pixelate, Color Filter;o Tint,Multiply, Blend.
· Below the filters you will find buttons foro Undo, Redo and Resetting;o Delete, Delete all;o Crop (Custom, Square, 3:2, 4:3, 5:4, 7:5, 16:9);o Flip (Flip X, Flip Y, Reset);o Rotate (30 degree, -30 degree,Manual rotation slider);o Draw (Free, Straight, Color, Size slider);o Shape (Recrangle, Circle, Triangle, Fill, Stroke, Stroke size);o Icon (Arrows, Stars, Polygon, Location, Heart, Bubble, Custom icon, Color);o Text (Bold, Italic, Underline, Left, Center, Right, Color, Text size);
o Mask.Feel free to try all of these and remember you can always undo them.
3. When finished, click the OK button.The edited picture is now included in the spreadsheet.Include a videoYou can include a video in your spreadsheet. It will be shown as an image. By double-clickingthe image the video dialog opens. Here you can start the video.1. Copy the URL of the video you want to include.
(the complete address shown in the address line of your browser)2. Go to your spreadsheet and place the cursor at the location where you want to include
the video.3. Switch to the Plugins tab and choose YouTube.4. Paste the URL and click OK.5. Check if it is the correct video and click the OK button below the video.
The video is now included in your spreadsheet.
Insert highlighted codeYou can embed highlighted code with the already adjusted style in accordance with theprogramming language and coloring style of the program you have chosen.1. Go to your spreadsheet and place the cursor at the location where you want to include
the code.2. Switch to the Plugins tab and choose Highlight code.3. Specify the programming Language.4. Select a Style of the code so that it appears as if it were open in this program.5. Specify if you want to replace tabs with spaces.6. Choose Background color. To do this, manually move the cursor over the palette or
insert the RBG/HSL/HEX value.7. Click OK to insert the code.
Translate textYou can translate your spreadsheet from and to numerous languages.1. Select the text that you want to translate.2. Switch to the Plugins tab and choose Translator, the Translator appears in a
sidebar on the left.
3. Click the drop-down box and choose the preferred language.The text will be translated to the required language.Changing the language of your result:1. Click the drop-down box and choose the preferred language.
The translation will change immediately.
Replace a word by a synonymIf you are using the same word multiple times, or a word is just not quite the word you arelooking for, ONLYOFFICE let you look up synonyms. It will show you the antonyms too.1. Select the word in your spreadsheet.2. Switch to the Plugins tab and choose Thesaurus.3. The synonyms and antonyms will show up in the left sidebar.4. Click a word to replace the word in your spreadsheet.
Tools and settingsView file informationTo access the detailed information about the currently edited spreadsheet, click the File tab ofthe top toolbar and select the Spreadsheet Info option.General InformationThe spreadsheet information includes a number of file properties which describe thespreadsheet. Some of these properties are updated automatically, and some of them can beedited.
· Location - the folder in the Documentsmodule where the file is stored. Owner - thename of the user who has created the file. Uploaded - the date and time when the filehas been created. These properties are available in the online version only.
· Title, Subject, Comment - these properties allow you to simplify the classification ofyour documents. You can specify the necessary text in the properties fields.
· Last Modified - the date and time when the file was last modified.· Last Modified By - the name of the user who has made the latest change to the
spreadsheet if the spreadsheet has been shared and it can be edited by several users.· Application - the application the spreadsheet was created with.· Author - the person who has created the file. You can enter the necessary name in this
field. Press Enter to add a new field that allows you to specify one more author.
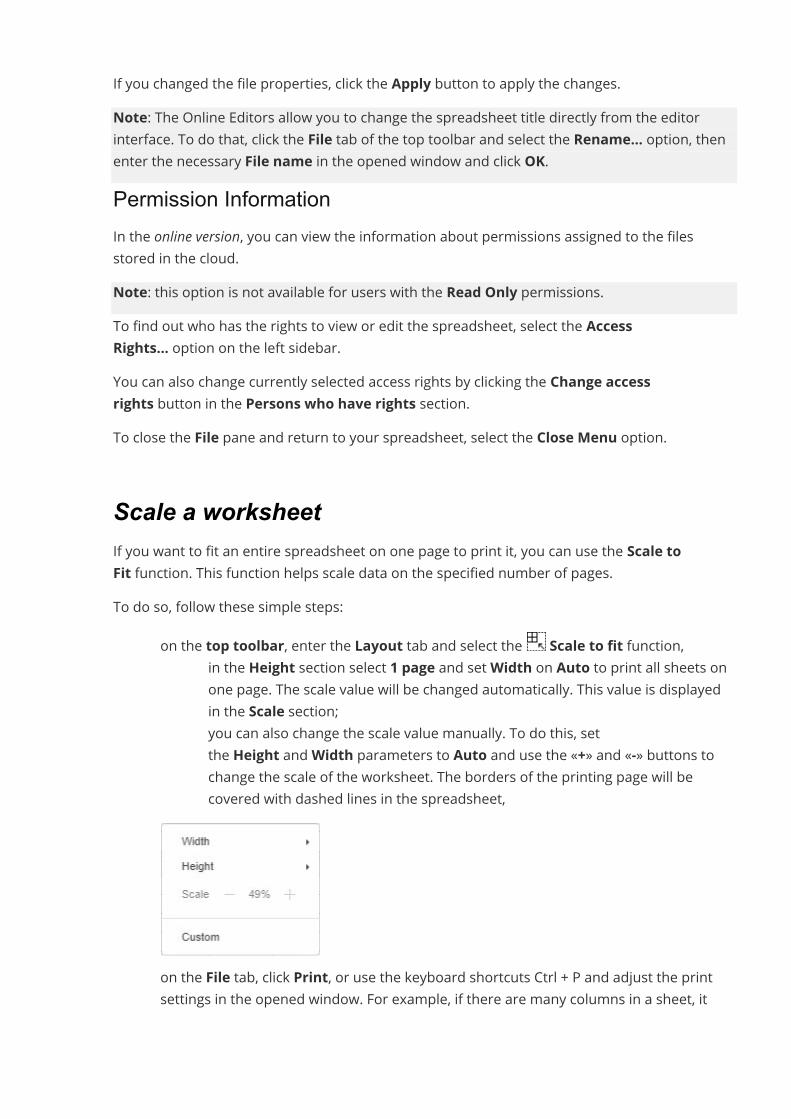
If you changed the file properties, click the Apply button to apply the changes.Note: The Online Editors allow you to change the spreadsheet title directly from the editorinterface. To do that, click the File tab of the top toolbar and select the Rename... option, thenenter the necessary File name in the opened window and click OK.Permission InformationIn the online version, you can view the information about permissions assigned to the filesstored in the cloud.Note: this option is not available for users with the Read Only permissions.To find out who has the rights to view or edit the spreadsheet, select the AccessRights... option on the left sidebar.You can also change currently selected access rights by clicking the Change accessrights button in the Persons who have rights section.To close the File pane and return to your spreadsheet, select the Close Menu option.
Scale a worksheetIf you want to fit an entire spreadsheet on one page to print it, you can use the Scale toFit function. This function helps scale data on the specified number of pages.To do so, follow these simple steps:
· on the top toolbar, enter the Layout tab and select the Scale to fit function,o in the Height section select 1 page and setWidth on Auto to print all sheets on
one page. The scale value will be changed automatically. This value is displayedin the Scale section;
o you can also change the scale value manually. To do this, setthe Height andWidth parameters to Auto and use the «+» and «-» buttons tochange the scale of the worksheet. The borders of the printing page will becovered with dashed lines in the spreadsheet,
· on the File tab, click Print, or use the keyboard shortcuts Ctrl + P and adjust the printsettings in the opened window. For example, if there are many columns in a sheet, it
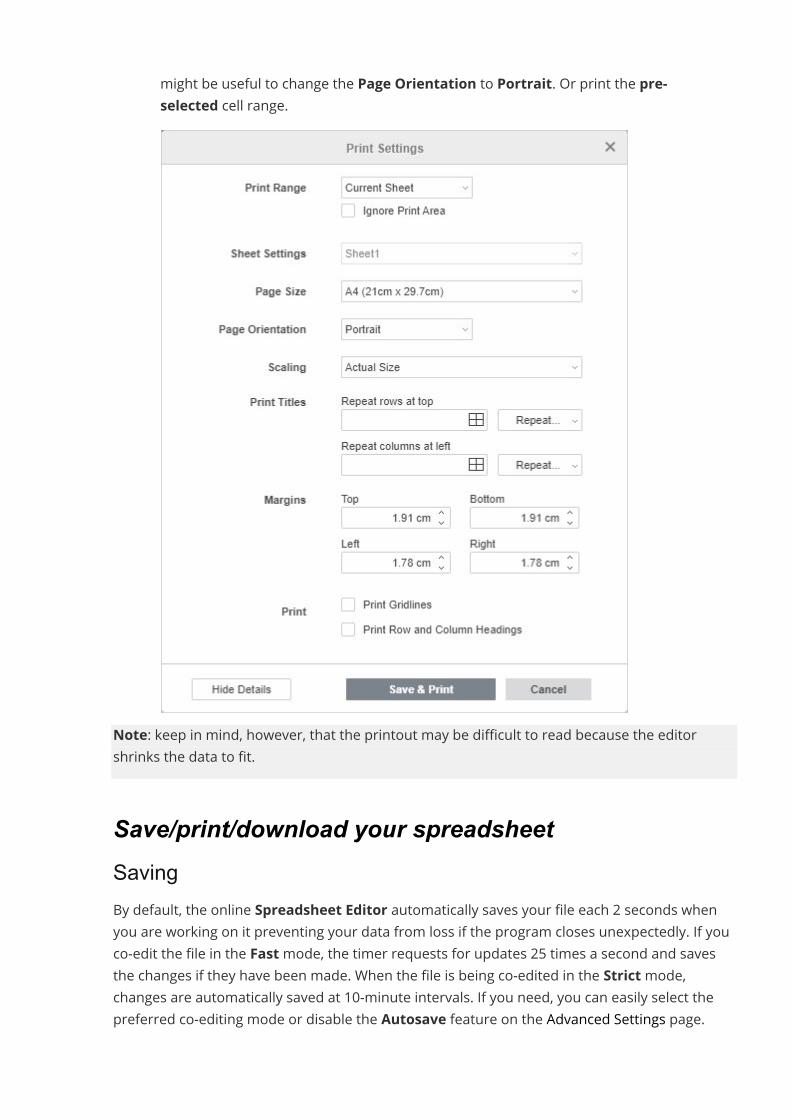
might be useful to change the Page Orientation to Portrait. Or print the pre-selected cell range.
Note: keep in mind, however, that the printout may be difficult to read because the editorshrinks the data to fit.
Save/print/download your spreadsheetSavingBy default, the online Spreadsheet Editor automatically saves your file each 2 seconds whenyou are working on it preventing your data from loss if the program closes unexpectedly. If youco-edit the file in the Fastmode, the timer requests for updates 25 times a second and savesthe changes if they have been made. When the file is being co-edited in the Strictmode,changes are automatically saved at 10-minute intervals. If you need, you can easily select thepreferred co-editing mode or disable the Autosave feature on the Advanced Settings page.
To save your current spreadsheet manually in the current format and location,· click the Save icon on the left side of the editor header, or· use the Ctrl+S key combination, or· click the File tab of the top toolbar and select the Save option.
Note: in the desktop version, to prevent data loss if the program closes unexpectedly, you canturn on the Autorecover option on the Advanced Settings page.In the desktop version, you can save the spreadsheet with another name, in a new location orformat,1. click the File tab of the top toolbar,2. select the Save as... option,3. choose one of the available formats depending on your needs: XLSX, ODS, CSV, PDF,
PDFA. You can also choose the Spreadsheet template (XLTX or OTS) option.DownloadingIn the online version, you can download the resulting spreadsheet onto your computer hard diskdrive,1. click the File tab of the top toolbar,2. select the Download as... option,3. choose one of the available formats depending on your needs: XLSX, PDF, ODS, CSV,
XLTX, PDF/A, OTS.Note: if you select the CSV format, all features (font formatting, formulas etc.) exceptthe plain text will not be preserved in the CSV file. If you continue saving, the ChooseCSV Options window will open. By default, Unicode (UTF-8) is used as the Encoding type.The default Delimiter is comma (,), but the following options are alsoavailable: semicolon (;), colon (:), Tab, Space and Other (this option allows you to set acustom delimiter character).
Saving a copyIn the online version, you can save a copy of the file on your portal,1. click the File tab of the top toolbar,2. select the Save Copy as... option,3. choose one of the available formats depending on your needs: XLSX, PDF, ODS, CSV,
XLTX, PDF/A, OTS,4. select a location of the file on the portal and press Save.
PrintingTo print out the current spreadsheet,
· click the Print icon on the left side of the editor header, or
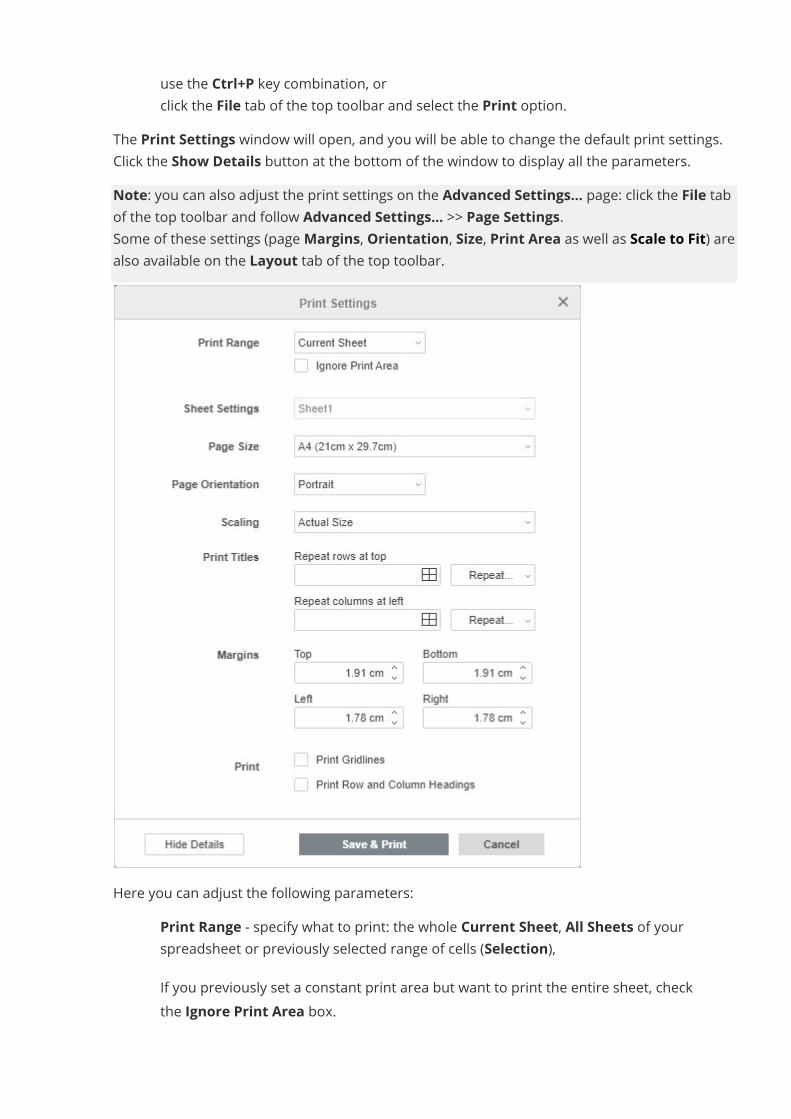
· use the Ctrl+P key combination, or· click the File tab of the top toolbar and select the Print option.
The Print Settings window will open, and you will be able to change the default print settings.Click the Show Details button at the bottom of the window to display all the parameters.Note: you can also adjust the print settings on the Advanced Settings... page: click the File tabof the top toolbar and follow Advanced Settings... >> Page Settings.Some of these settings (pageMargins, Orientation, Size, Print Area as well as Scale to Fit) arealso available on the Layout tab of the top toolbar.
Here you can adjust the following parameters:· Print Range - specify what to print: the whole Current Sheet, All Sheets of your
spreadsheet or previously selected range of cells (Selection),If you previously set a constant print area but want to print the entire sheet, checkthe Ignore Print Area box.
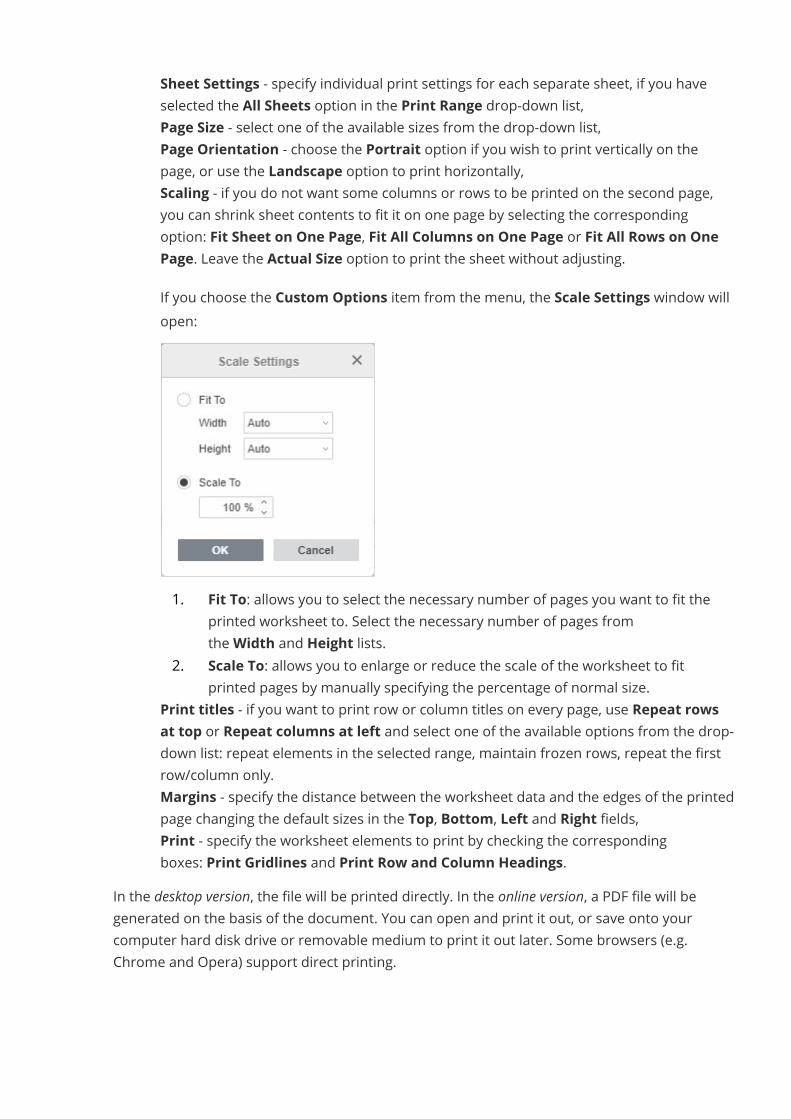
· Sheet Settings - specify individual print settings for each separate sheet, if you haveselected the All Sheets option in the Print Range drop-down list,
· Page Size - select one of the available sizes from the drop-down list,· Page Orientation - choose the Portrait option if you wish to print vertically on the
page, or use the Landscape option to print horizontally,· Scaling - if you do not want some columns or rows to be printed on the second page,
you can shrink sheet contents to fit it on one page by selecting the correspondingoption: Fit Sheet on One Page, Fit All Columns on One Page or Fit All Rows on OnePage. Leave the Actual Size option to print the sheet without adjusting.If you choose the Custom Options item from the menu, the Scale Settings window willopen:
1. Fit To: allows you to select the necessary number of pages you want to fit theprinted worksheet to. Select the necessary number of pages fromtheWidth and Height lists.
2. Scale To: allows you to enlarge or reduce the scale of the worksheet to fitprinted pages by manually specifying the percentage of normal size.
· Print titles - if you want to print row or column titles on every page, use Repeat rowsat top or Repeat columns at left and select one of the available options from the drop-down list: repeat elements in the selected range, maintain frozen rows, repeat the firstrow/column only.
· Margins - specify the distance between the worksheet data and the edges of the printedpage changing the default sizes in the Top, Bottom, Left and Right fields,
· Print - specify the worksheet elements to print by checking the correspondingboxes: Print Gridlines and Print Row and Column Headings.
In the desktop version, the file will be printed directly. In the online version, a PDF file will begenerated on the basis of the document. You can open and print it out, or save onto yourcomputer hard disk drive or removable medium to print it out later. Some browsers (e.g.Chrome and Opera) support direct printing.
Setting up the print areaIf you want to print the selected cell range only instead of the entire worksheet, you can usethe Selection option from the Print Range drop-down list. When the workbook is saved, thissetting is not saved, it is intended for single use.If a cell range should be printed frequently, you can set a constant print area on the worksheet.When the workbook is saved, the print area is also saved, it can be used when you open thespreadsheet next time. It's also possible to set several constant print areas in a sheet, in thiscase each area will be printed on a separate page.To set the print area:1. select the necessary cell range on the worksheet. To select multiple cell ranges, hold
down the Ctrl key,2. switch to the Layout tab of the top toolbar,3. click the arrow next to the Print Area button and select the Set Print Area option.
The created print area is saved when the workbook is saved. When you open the file next time,the specified print area will be printed.Note: when you create a print area, a Print_Area named range is also automatically created,which is displayed in the Name Manager. To highlight the borders of all the print areas on thecurrent worksheet, you can click the arrow in the name box located to the left of the theformula bar and select the Print_Area name from the name list.To add cells to the print area:1. open the necessary worksheet where the print area is added,2. select the necessary cell range on the worksheet,3. switch to the Layout tab of the top toolbar,4. click the arrow next to the Print Area button and select the Add to Print
Area option.A new print area will be added. Each print area will be printed on a separate page.To remove the print area:1. open the necessary worksheet where the print area is added,2. switch to the Layout tab of the top toolbar,3. click the arrow next to the Print Area button and select the Clear Print Area option.
All the existing print areas in this sheet will be removed. Then the entire sheet will be printed.
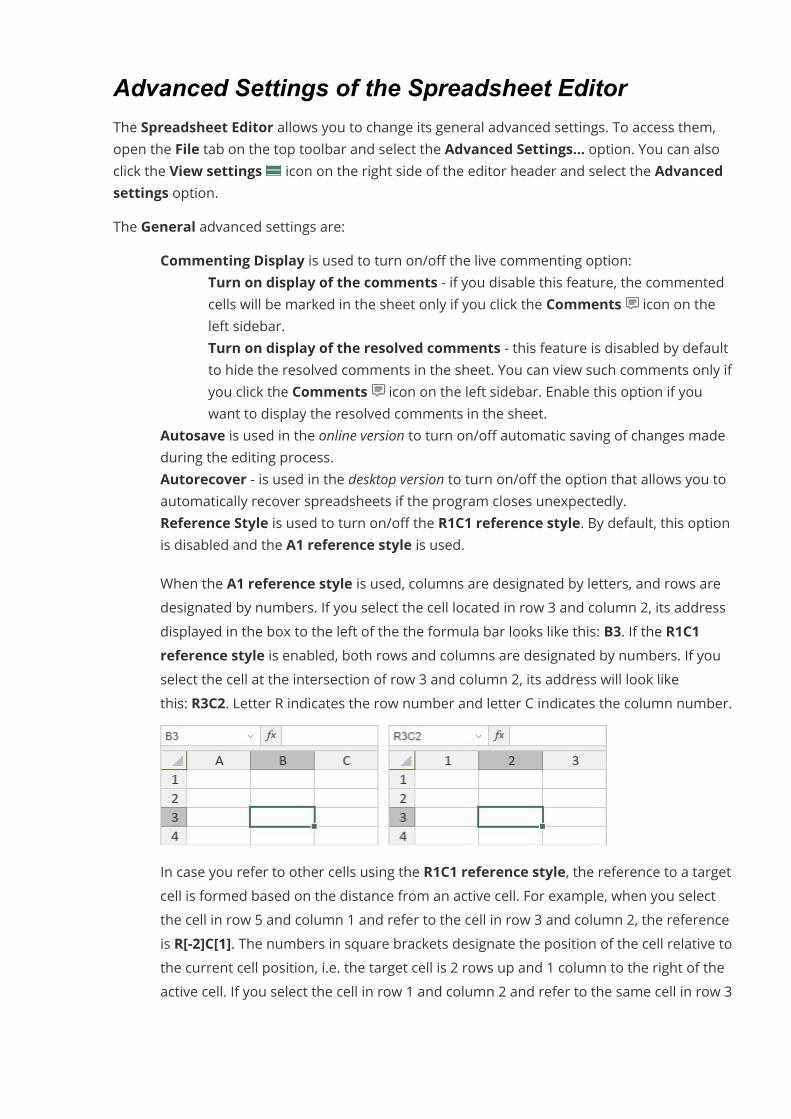
Advanced Settings of the Spreadsheet EditorThe Spreadsheet Editor allows you to change its general advanced settings. To access them,open the File tab on the top toolbar and select the Advanced Settings... option. You can alsoclick the View settings icon on the right side of the editor header and select the Advancedsettings option.The General advanced settings are:
· Commenting Display is used to turn on/off the live commenting option:o Turn on display of the comments - if you disable this feature, the commented
cells will be marked in the sheet only if you click the Comments icon on theleft sidebar.
o Turn on display of the resolved comments - this feature is disabled by defaultto hide the resolved comments in the sheet. You can view such comments only ifyou click the Comments icon on the left sidebar. Enable this option if youwant to display the resolved comments in the sheet.
· Autosave is used in the online version to turn on/off automatic saving of changes madeduring the editing process.
· Autorecover - is used in the desktop version to turn on/off the option that allows you toautomatically recover spreadsheets if the program closes unexpectedly.
· Reference Style is used to turn on/off the R1C1 reference style. By default, this optionis disabled and the A1 reference style is used.When the A1 reference style is used, columns are designated by letters, and rows aredesignated by numbers. If you select the cell located in row 3 and column 2, its addressdisplayed in the box to the left of the the formula bar looks like this: B3. If the R1C1reference style is enabled, both rows and columns are designated by numbers. If youselect the cell at the intersection of row 3 and column 2, its address will look likethis: R3C2. Letter R indicates the row number and letter C indicates the column number.
In case you refer to other cells using the R1C1 reference style, the reference to a targetcell is formed based on the distance from an active cell. For example, when you selectthe cell in row 5 and column 1 and refer to the cell in row 3 and column 2, the referenceis R[-2]C[1]. The numbers in square brackets designate the position of the cell relative tothe current cell position, i.e. the target cell is 2 rows up and 1 column to the right of theactive cell. If you select the cell in row 1 and column 2 and refer to the same cell in row 3
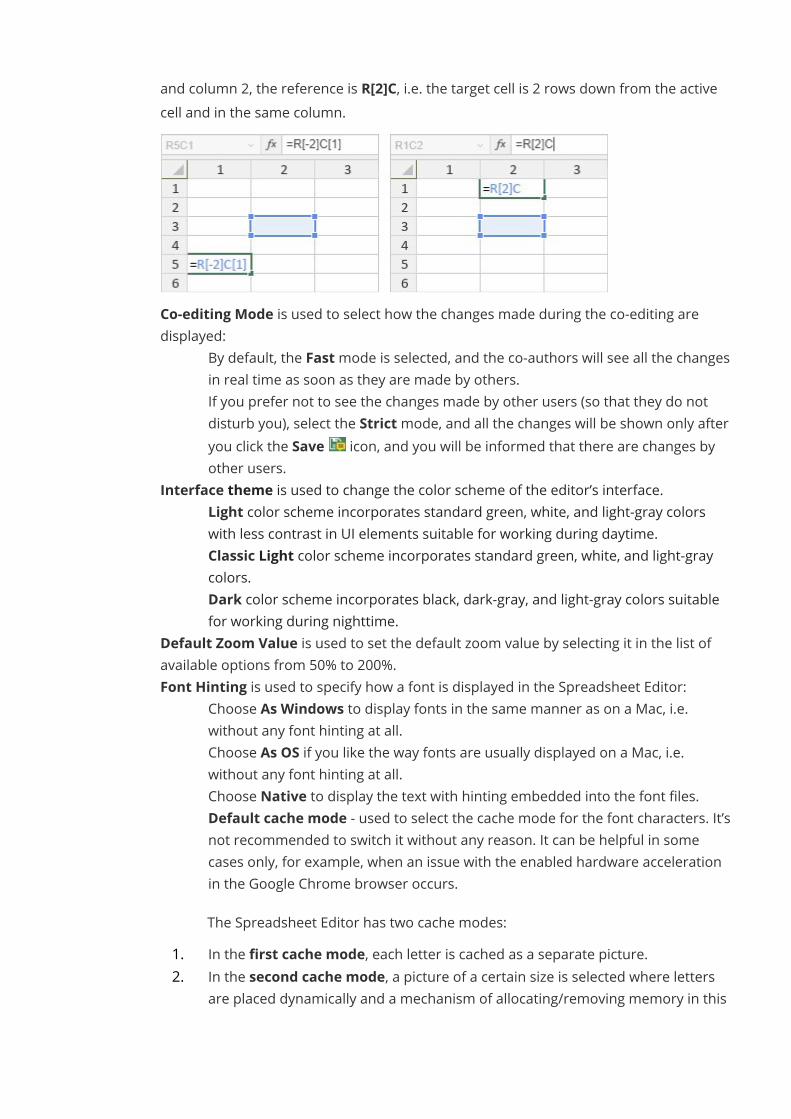
and column 2, the reference is R[2]C, i.e. the target cell is 2 rows down from the activecell and in the same column.
· Co-editing Mode is used to select how the changes made during the co-editing aredisplayed:
o By default, the Fastmode is selected, and the co-authors will see all the changesin real time as soon as they are made by others.
o If you prefer not to see the changes made by other users (so that they do notdisturb you), select the Strictmode, and all the changes will be shown only afteryou click the Save icon, and you will be informed that there are changes byother users.
· Interface theme is used to change the color scheme of the editor’s interface.o Light color scheme incorporates standard green, white, and light-gray colors
with less contrast in UI elements suitable for working during daytime.o Classic Light color scheme incorporates standard green, white, and light-gray
colors.o Dark color scheme incorporates black, dark-gray, and light-gray colors suitable
for working during nighttime.· Default Zoom Value is used to set the default zoom value by selecting it in the list of
available options from 50% to 200%.· Font Hinting is used to specify how a font is displayed in the Spreadsheet Editor:
o Choose As Windows to display fonts in the same manner as on a Mac, i.e.without any font hinting at all.
o Choose As OS if you like the way fonts are usually displayed on a Mac, i.e.without any font hinting at all.
o Choose Native to display the text with hinting embedded into the font files.o Default cache mode - used to select the cache mode for the font characters. It’s
not recommended to switch it without any reason. It can be helpful in somecases only, for example, when an issue with the enabled hardware accelerationin the Google Chrome browser occurs.The Spreadsheet Editor has two cache modes:
1. In the first cache mode, each letter is cached as a separate picture.2. In the second cache mode, a picture of a certain size is selected where letters
are placed dynamically and a mechanism of allocating/removing memory in this
picture is also implemented. If there is not enough memory, a second picture iscreated, etc.
The Default cache mode setting applies two above mentioned cache modes separatelyfor different browsers:
o When the Default cache mode setting is enabled, Internet Explorer (v. 9, 10, 11)uses the second cache mode, other browsers use the first cache mode.
o When the Default cache mode setting is disabled, Internet Explorer (v. 9, 10, 11)uses the first cache mode, other browsers use the second cache mode.
· Unit of Measurement is used to specify what units are used for measuring elementsparameters such as width, height, spacing, margins etc. You can selectthe Centimeter, Point, or Inch option.
· Formula Language is used to select the language for displaying and entering formulanames.
· Regional Settings is used to select the default display format for currency and date andtime.
· Separator is used to specify the characters that you want to use as separators fordecimals and thousands. The Use separators based on regional settings option isselected by default. If you want to use custom separators, uncheck this box and enterthe necessary characters in the Decimal separator and Thousands separator fieldsbelow.
· Cut, copy and paste - used to show the Paste Options button when content is pasted.Check the box to enable this feature.
· Macros Settings - used to set macros display with a notification.o Choose Disable all to disable all macros within the spreadsheet;o Show notification to receive notifications about macros within the spreadsheet;o Enable all to automatically run all macros within the spreadsheet.
To save the changes you made, click the Apply button.
View Settings and Navigation ToolsTo help you view and select cells in large spreadsheets, the Spreadsheet Editor offers severaltools: adjustable bars, scrollbars, sheet navigation buttons, sheet tabs and zoom.Adjust the View SettingsTo adjust default view settings and set the most convenient mode to work with thespreadsheet, click the View settings icon on the right side of the editor header and selectwhich interface elements you want to be hidden or shown. You can select the following optionsfrom the View settings drop-down list:
· Hide Toolbar - hides the top toolbar with commands while the tabs remain visible.When this option is enabled, you can click any tab to display the toolbar. The toolbar is
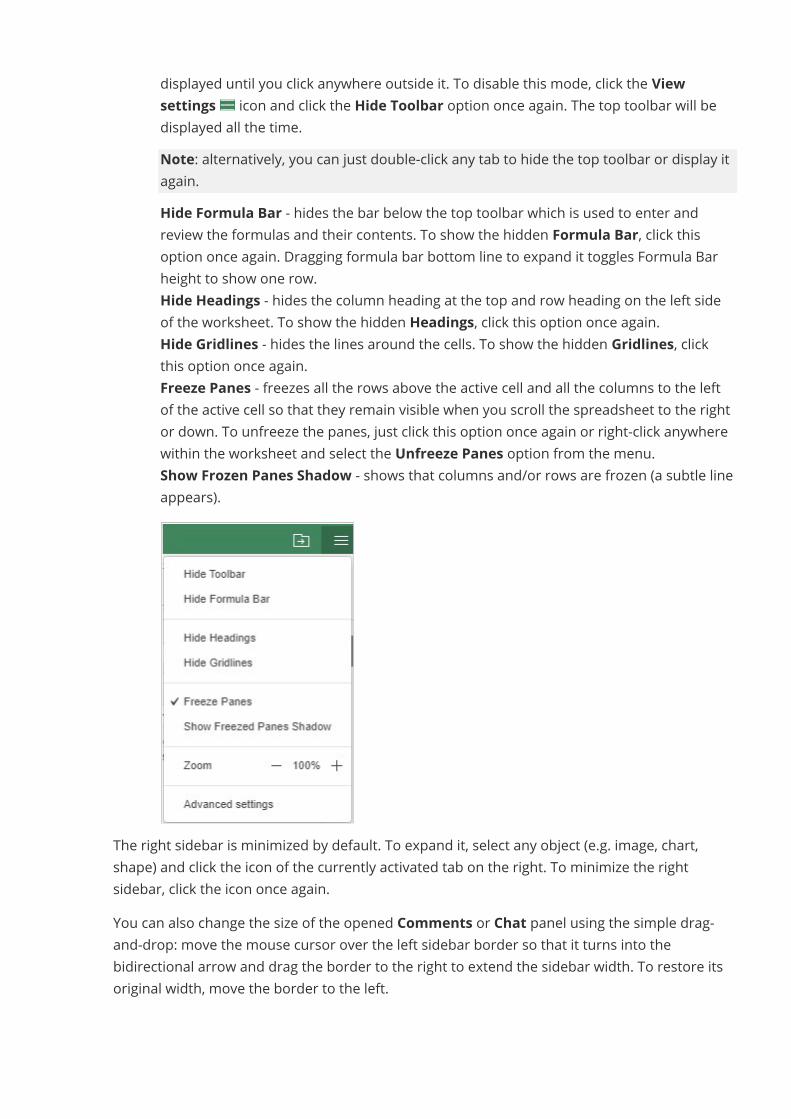
displayed until you click anywhere outside it. To disable this mode, click the Viewsettings icon and click the Hide Toolbar option once again. The top toolbar will bedisplayed all the time.Note: alternatively, you can just double-click any tab to hide the top toolbar or display itagain.
· Hide Formula Bar - hides the bar below the top toolbar which is used to enter andreview the formulas and their contents. To show the hidden Formula Bar, click thisoption once again. Dragging formula bar bottom line to expand it toggles Formula Barheight to show one row.
· Hide Headings - hides the column heading at the top and row heading on the left sideof the worksheet. To show the hidden Headings, click this option once again.
· Hide Gridlines - hides the lines around the cells. To show the hidden Gridlines, clickthis option once again.
· Freeze Panes - freezes all the rows above the active cell and all the columns to the leftof the active cell so that they remain visible when you scroll the spreadsheet to the rightor down. To unfreeze the panes, just click this option once again or right-click anywherewithin the worksheet and select the Unfreeze Panes option from the menu.
· Show Frozen Panes Shadow - shows that columns and/or rows are frozen (a subtle lineappears).
The right sidebar is minimized by default. To expand it, select any object (e.g. image, chart,shape) and click the icon of the currently activated tab on the right. To minimize the rightsidebar, click the icon once again.You can also change the size of the opened Comments or Chat panel using the simple drag-and-drop: move the mouse cursor over the left sidebar border so that it turns into thebidirectional arrow and drag the border to the right to extend the sidebar width. To restore itsoriginal width, move the border to the left.
Use the Navigation ToolsTo navigate through your spreadsheet, use the following tools:The Scrollbars (at the bottom or on the right side) are used to scroll up/down and left/right thecurrent sheet. To navigate a spreadsheet using the scrollbars:
· click the up/down or right/left arrows on the scrollbars;· drag the scroll box;· click any area to the left/right or above/below the scroll box on the scrollbar.
You can also use themouse scroll wheel to scroll your spreadsheet up or down.The Sheet Navigation buttons are situated in the left lower corner and are used to scroll thesheet list to the right/left and navigate among the sheet tabs.
· click the Scroll to first sheet button to scroll the sheet list to the first sheet tab of thecurrent spreadsheet;
· click the Scroll sheet list left button to scroll the sheet list of the current spreadsheetto the left;
· click the Scroll sheet list right button to scroll the sheet list of the currentspreadsheet to the right;
· click the Scroll to last sheet button to scroll the sheet list to the last sheet tab of thecurrent spreadsheet.
To activate the appropriate sheet, click its Sheet Tab at the bottom next to the SheetNavigation buttons.The Zoom buttons are situated in the lower right corner and are used to zoom in and out of thecurrent sheet. To change the currently selected zoom value that is displayed in percent, click itand select one of the available zoom options from the list (50% / 75% / 100% / 125% / 150% /175% / 200%) or use the Zoom in or Zoom out buttons. The Zoom settings are alsoavailable in the View settings drop-down list.Search and Replace FunctionsTo search for the required characters, words or phrases used in the current spreadsheet, clickthe Search icon situated on the left sidebar or use the Ctrl+F key combination.If you want to search for/replace some values only within a certain area in the current sheet,select the necessary cell range and then click the Search icon.The Find and Replace window will open:
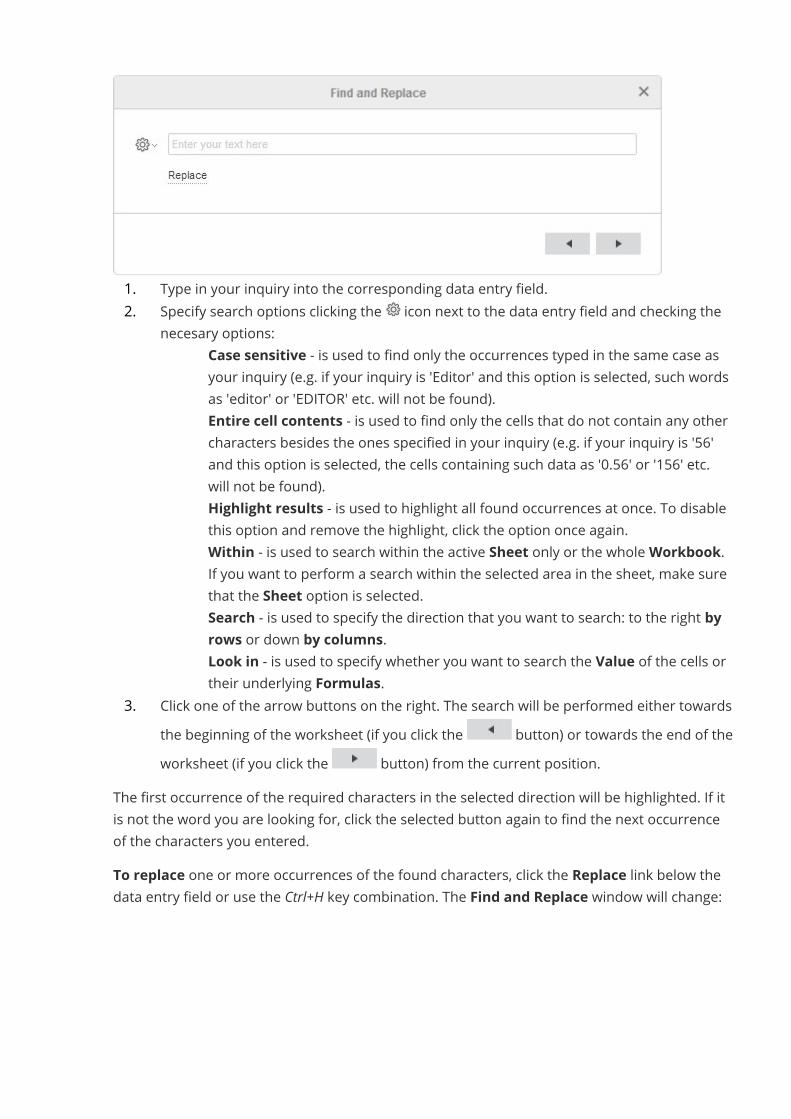
1. Type in your inquiry into the corresponding data entry field.2. Specify search options clicking the icon next to the data entry field and checking the
necesary options:o Case sensitive - is used to find only the occurrences typed in the same case as
your inquiry (e.g. if your inquiry is 'Editor' and this option is selected, such wordsas 'editor' or 'EDITOR' etc. will not be found).
o Entire cell contents - is used to find only the cells that do not contain any othercharacters besides the ones specified in your inquiry (e.g. if your inquiry is '56'and this option is selected, the cells containing such data as '0.56' or '156' etc.will not be found).
o Highlight results - is used to highlight all found occurrences at once. To disablethis option and remove the highlight, click the option once again.
o Within - is used to search within the active Sheet only or the wholeWorkbook.If you want to perform a search within the selected area in the sheet, make surethat the Sheet option is selected.
o Search - is used to specify the direction that you want to search: to the right byrows or down by columns.
o Look in - is used to specify whether you want to search the Value of the cells ortheir underlying Formulas.
3. Click one of the arrow buttons on the right. The search will be performed either towardsthe beginning of the worksheet (if you click the button) or towards the end of theworksheet (if you click the button) from the current position.
The first occurrence of the required characters in the selected direction will be highlighted. If itis not the word you are looking for, click the selected button again to find the next occurrenceof the characters you entered.To replace one or more occurrences of the found characters, click the Replace link below thedata entry field or use the Ctrl+H key combination. The Find and Replace window will change:
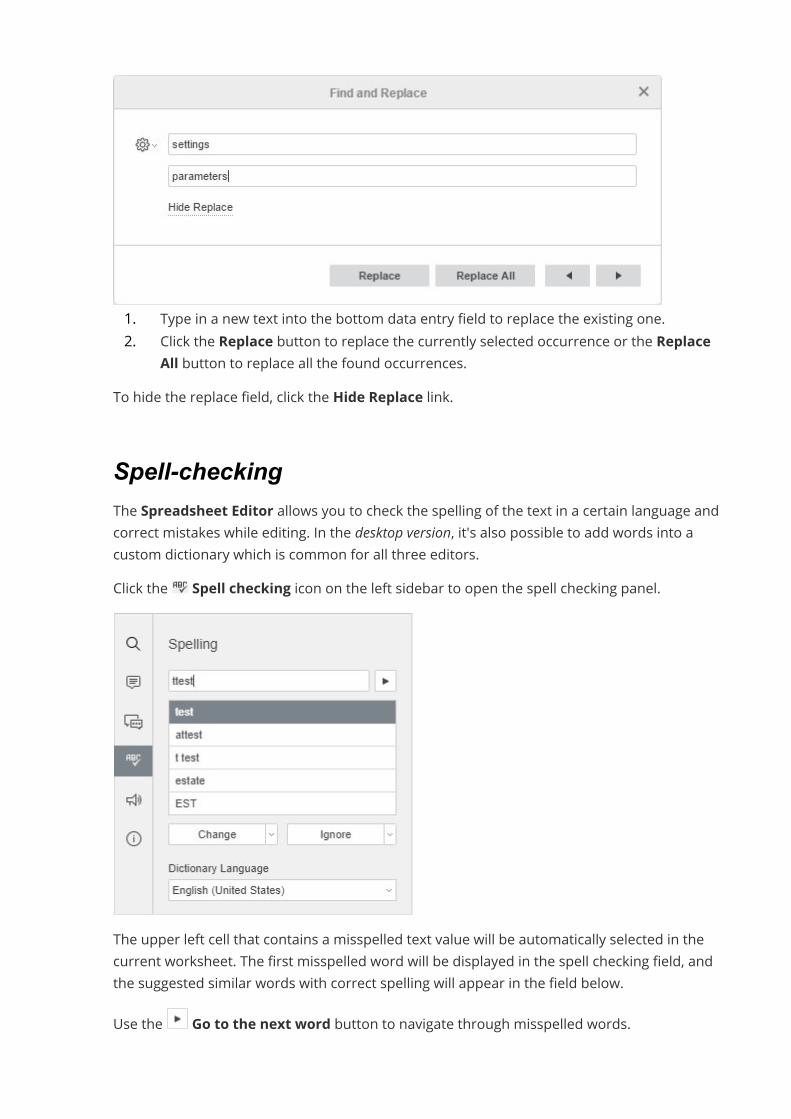
1. Type in a new text into the bottom data entry field to replace the existing one.2. Click the Replace button to replace the currently selected occurrence or the Replace
All button to replace all the found occurrences.To hide the replace field, click the Hide Replace link.
Spell-checkingThe Spreadsheet Editor allows you to check the spelling of the text in a certain language andcorrect mistakes while editing. In the desktop version, it's also possible to add words into acustom dictionary which is common for all three editors.Click the Spell checking icon on the left sidebar to open the spell checking panel.
The upper left cell that contains a misspelled text value will be automatically selected in thecurrent worksheet. The first misspelled word will be displayed in the spell checking field, andthe suggested similar words with correct spelling will appear in the field below.Use the Go to the next word button to navigate through misspelled words.
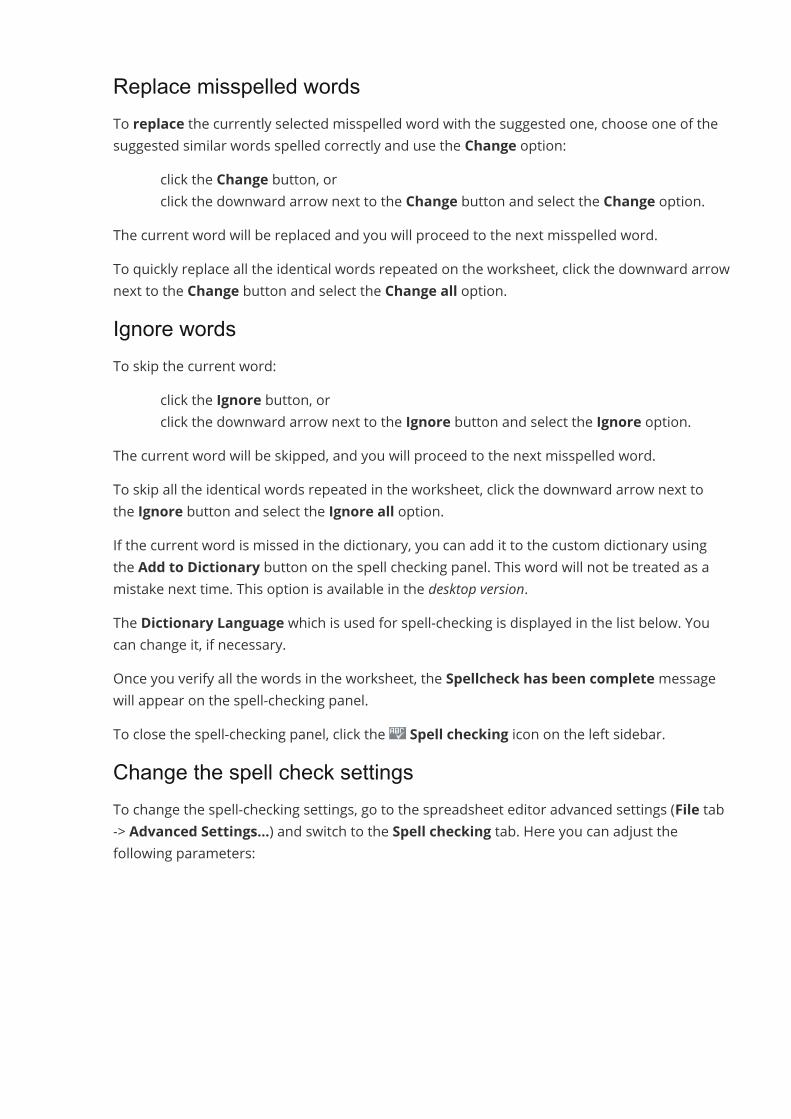
Replace misspelled wordsTo replace the currently selected misspelled word with the suggested one, choose one of thesuggested similar words spelled correctly and use the Change option:
· click the Change button, or· click the downward arrow next to the Change button and select the Change option.
The current word will be replaced and you will proceed to the next misspelled word.To quickly replace all the identical words repeated on the worksheet, click the downward arrownext to the Change button and select the Change all option.Ignore wordsTo skip the current word:
· click the Ignore button, or· click the downward arrow next to the Ignore button and select the Ignore option.
The current word will be skipped, and you will proceed to the next misspelled word.To skip all the identical words repeated in the worksheet, click the downward arrow next tothe Ignore button and select the Ignore all option.If the current word is missed in the dictionary, you can add it to the custom dictionary usingthe Add to Dictionary button on the spell checking panel. This word will not be treated as amistake next time. This option is available in the desktop version.The Dictionary Language which is used for spell-checking is displayed in the list below. Youcan change it, if necessary.Once you verify all the words in the worksheet, the Spellcheck has been completemessagewill appear on the spell-checking panel.To close the spell-checking panel, click the Spell checking icon on the left sidebar.Change the spell check settingsTo change the spell-checking settings, go to the spreadsheet editor advanced settings (File tab-> Advanced Settings...) and switch to the Spell checking tab. Here you can adjust thefollowing parameters:
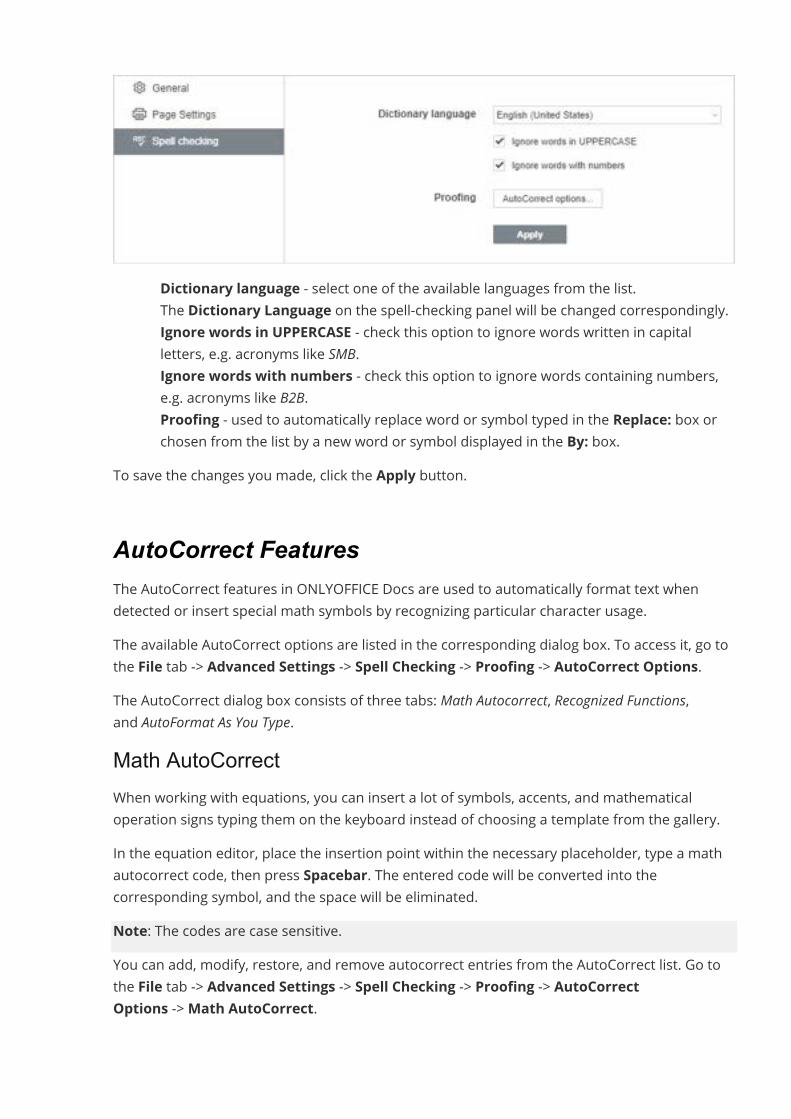
· Dictionary language - select one of the available languages from the list.The Dictionary Language on the spell-checking panel will be changed correspondingly.
· Ignore words in UPPERCASE - check this option to ignore words written in capitalletters, e.g. acronyms like SMB.
· Ignore words with numbers - check this option to ignore words containing numbers,e.g. acronyms like B2B.
· Proofing - used to automatically replace word or symbol typed in the Replace: box orchosen from the list by a new word or symbol displayed in the By: box.
To save the changes you made, click the Apply button.
AutoCorrect FeaturesThe AutoCorrect features in ONLYOFFICE Docs are used to automatically format text whendetected or insert special math symbols by recognizing particular character usage.The available AutoCorrect options are listed in the corresponding dialog box. To access it, go tothe File tab -> Advanced Settings -> Spell Checking -> Proofing -> AutoCorrect Options.The AutoCorrect dialog box consists of three tabs: Math Autocorrect, Recognized Functions,and AutoFormat As You Type.Math AutoCorrectWhen working with equations, you can insert a lot of symbols, accents, and mathematicaloperation signs typing them on the keyboard instead of choosing a template from the gallery.In the equation editor, place the insertion point within the necessary placeholder, type a mathautocorrect code, then press Spacebar. The entered code will be converted into thecorresponding symbol, and the space will be eliminated.Note: The codes are case sensitive.You can add, modify, restore, and remove autocorrect entries from the AutoCorrect list. Go tothe File tab -> Advanced Settings -> Spell Checking -> Proofing -> AutoCorrectOptions ->Math AutoCorrect.
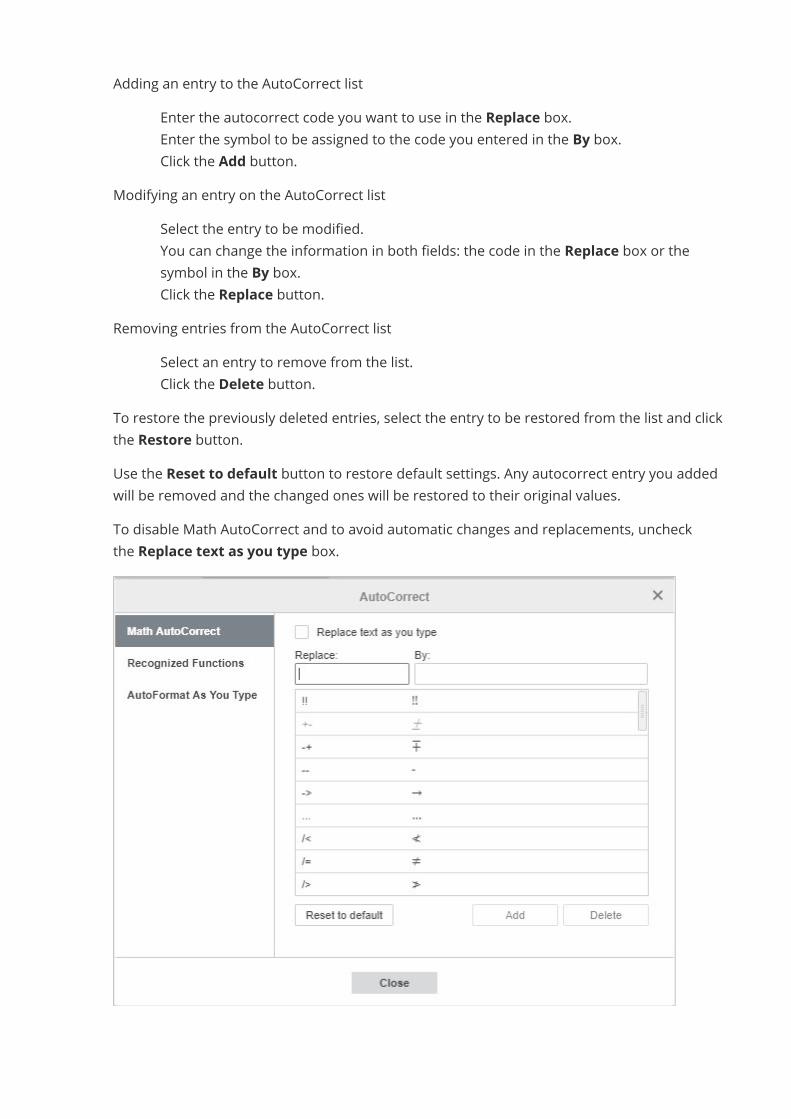
Adding an entry to the AutoCorrect list· Enter the autocorrect code you want to use in the Replace box.· Enter the symbol to be assigned to the code you entered in the By box.· Click the Add button.
Modifying an entry on the AutoCorrect list· Select the entry to be modified.· You can change the information in both fields: the code in the Replace box or the
symbol in the By box.· Click the Replace button.
Removing entries from the AutoCorrect list· Select an entry to remove from the list.· Click the Delete button.
To restore the previously deleted entries, select the entry to be restored from the list and clickthe Restore button.Use the Reset to default button to restore default settings. Any autocorrect entry you addedwill be removed and the changed ones will be restored to their original values.To disable Math AutoCorrect and to avoid automatic changes and replacements, uncheckthe Replace text as you type box.

The table below contains all the currently supported codes available in the SpreadsheetEditor. The full list of the supported codes can also be found on the File tab in the AdvancedSettings... -> Spell Checking -> Proofing section.Recognized FunctionsIn this tab, you will find the list of math expressions that will be recognized by the Equationeditor as functions and therefore will not be automatically italicized. For the list of recognizedfunctions go to the File tab -> Advanced Settings -> SpellChecking -> Proofing -> AutoCorrect Options -> Recognized Functions.To add an entry to the list of recognized functions, enter the function in the blank field and clickthe Add button.To remove an entry from the list of recognized functions, select the function to be removed andclick the Delete button.To restore the previously deleted entries, select the entry to be restored from the list and clickthe Restore button.Use the Reset to default button to restore default settings. Any function you added will beremoved and the removed ones will be restored.
AutoFormat As You TypeBy default, the editor automatically includes new rows and columns in the formatted tablewhen you enter new data in the row below the table or in the column next to it.
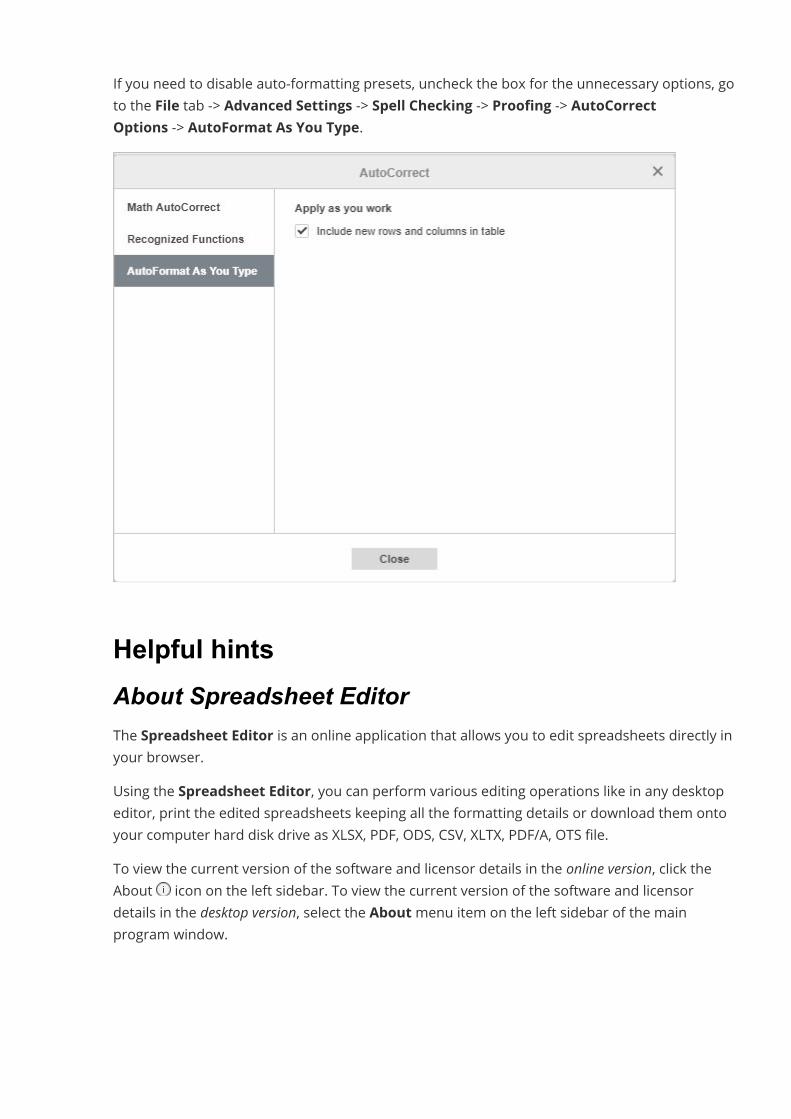
If you need to disable auto-formatting presets, uncheck the box for the unnecessary options, goto the File tab -> Advanced Settings -> Spell Checking -> Proofing -> AutoCorrectOptions -> AutoFormat As You Type.
Helpful hintsAbout Spreadsheet EditorThe Spreadsheet Editor is an online application that allows you to edit spreadsheets directly inyour browser.Using the Spreadsheet Editor, you can perform various editing operations like in any desktopeditor, print the edited spreadsheets keeping all the formatting details or download them ontoyour computer hard disk drive as XLSX, PDF, ODS, CSV, XLTX, PDF/A, OTS file.To view the current version of the software and licensor details in the online version, click theAbout icon on the left sidebar. To view the current version of the software and licensordetails in the desktop version, select the Aboutmenu item on the left sidebar of the mainprogram window.
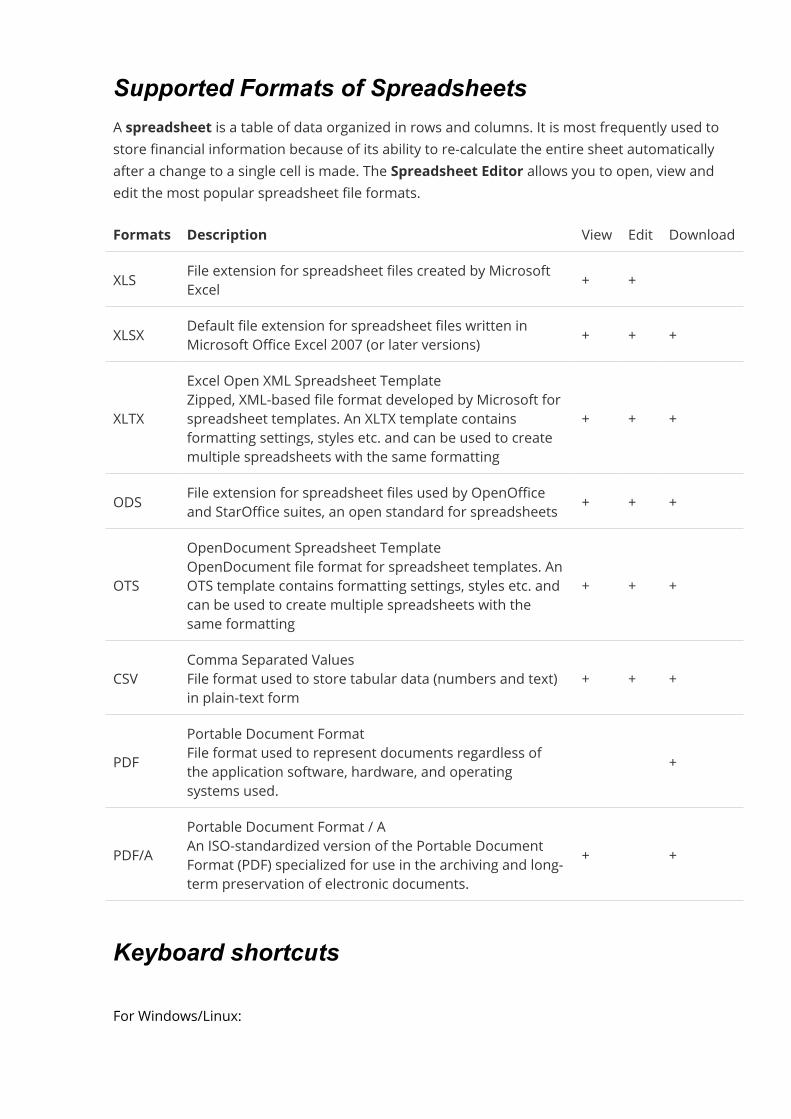
Supported Formats of SpreadsheetsA spreadsheet is a table of data organized in rows and columns. It is most frequently used tostore financial information because of its ability to re-calculate the entire sheet automaticallyafter a change to a single cell is made. The Spreadsheet Editor allows you to open, view andedit the most popular spreadsheet file formats.Formats Description View Edit DownloadXLS File extension for spreadsheet files created by Microsoft
Excel + +
XLSX Default file extension for spreadsheet files written inMicrosoft Office Excel 2007 (or later versions) + + +
XLTXExcel Open XML Spreadsheet TemplateZipped, XML-based file format developed by Microsoft forspreadsheet templates. An XLTX template containsformatting settings, styles etc. and can be used to createmultiple spreadsheets with the same formatting
+ + +
ODS File extension for spreadsheet files used by OpenOfficeand StarOffice suites, an open standard for spreadsheets + + +
OTSOpenDocument Spreadsheet TemplateOpenDocument file format for spreadsheet templates. AnOTS template contains formatting settings, styles etc. andcan be used to create multiple spreadsheets with thesame formatting
+ + +
CSVComma Separated ValuesFile format used to store tabular data (numbers and text)in plain-text form
+ + +
PDFPortable Document FormatFile format used to represent documents regardless ofthe application software, hardware, and operatingsystems used.
+
PDF/APortable Document Format / AAn ISO-standardized version of the Portable DocumentFormat (PDF) specialized for use in the archiving and long-term preservation of electronic documents.
+ +
Keyboard shortcutsFor Windows/Linux:
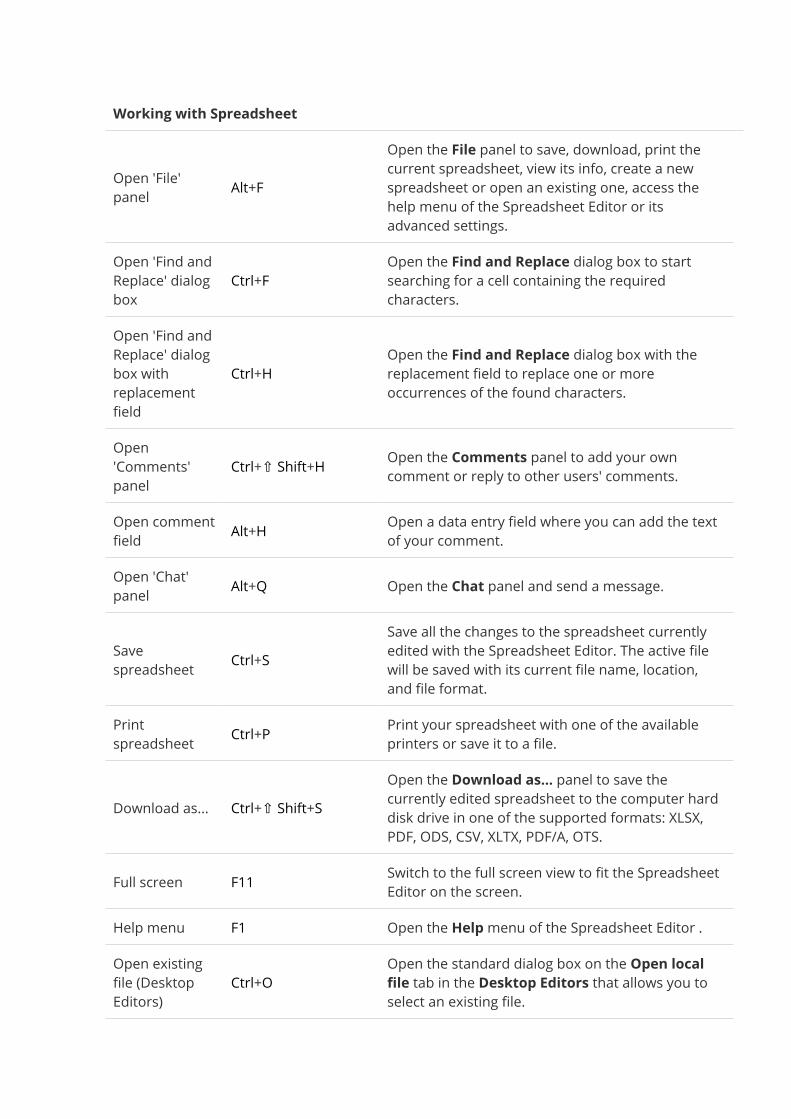
Working with Spreadsheet
Open 'File'panel Alt+F
Open the File panel to save, download, print thecurrent spreadsheet, view its info, create a newspreadsheet or open an existing one, access thehelp menu of the Spreadsheet Editor or itsadvanced settings.
Open 'Find andReplace' dialogbox
Ctrl+FOpen the Find and Replace dialog box to startsearching for a cell containing the requiredcharacters.
Open 'Find andReplace' dialogbox withreplacementfield
Ctrl+HOpen the Find and Replace dialog box with thereplacement field to replace one or moreoccurrences of the found characters.
Open'Comments'panel
Ctrl+⇧ Shift+H Open the Comments panel to add your owncomment or reply to other users' comments.
Open commentfield Alt+H Open a data entry field where you can add the text
of your comment.Open 'Chat'panel Alt+Q Open the Chat panel and send a message.
Savespreadsheet Ctrl+S
Save all the changes to the spreadsheet currentlyedited with the Spreadsheet Editor. The active filewill be saved with its current file name, location,and file format.
Printspreadsheet Ctrl+P Print your spreadsheet with one of the available
printers or save it to a file.
Download as... Ctrl+⇧ Shift+SOpen the Download as... panel to save thecurrently edited spreadsheet to the computer harddisk drive in one of the supported formats: XLSX,PDF, ODS, CSV, XLTX, PDF/A, OTS.
Full screen F11 Switch to the full screen view to fit the SpreadsheetEditor on the screen.
Help menu F1 Open the Helpmenu of the Spreadsheet Editor .Open existingfile (DesktopEditors)
Ctrl+OOpen the standard dialog box on the Open localfile tab in the Desktop Editors that allows you toselect an existing file.
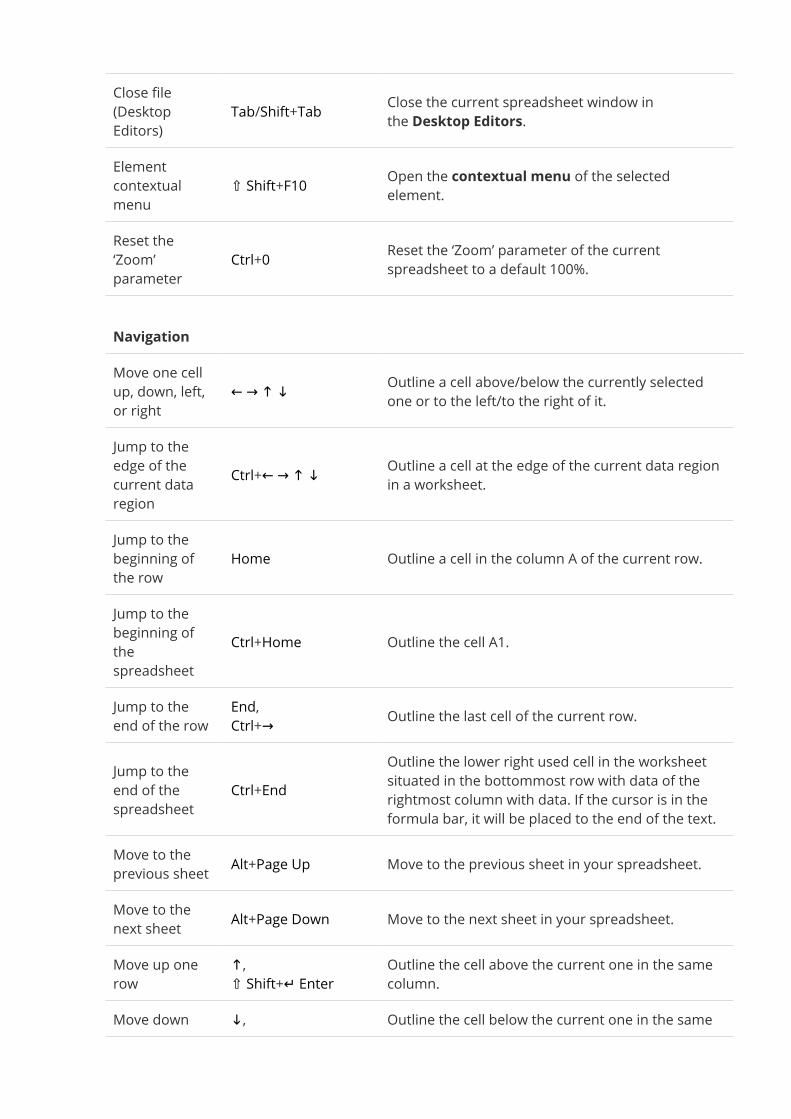
Close file(DesktopEditors)
Tab/Shift+Tab Close the current spreadsheet window inthe Desktop Editors.
Elementcontextualmenu
⇧ Shift+F10 Open the contextual menu of the selectedelement.
Reset the‘Zoom’parameter
Ctrl+0 Reset the ‘Zoom’ parameter of the currentspreadsheet to a default 100%.
NavigationMove one cellup, down, left,or right
← → ↑ ↓ Outline a cell above/below the currently selectedone or to the left/to the right of it.
Jump to theedge of thecurrent dataregion
Ctrl+← → ↑ ↓ Outline a cell at the edge of the current data regionin a worksheet.
Jump to thebeginning ofthe row
Home Outline a cell in the column A of the current row.
Jump to thebeginning ofthespreadsheet
Ctrl+Home Outline the cell A1.
Jump to theend of the row
End,Ctrl+→ Outline the last cell of the current row.
Jump to theend of thespreadsheet
Ctrl+EndOutline the lower right used cell in the worksheetsituated in the bottommost row with data of therightmost column with data. If the cursor is in theformula bar, it will be placed to the end of the text.
Move to theprevious sheet Alt+Page Up Move to the previous sheet in your spreadsheet.Move to thenext sheet Alt+Page Down Move to the next sheet in your spreadsheet.Move up onerow
↑,⇧ Shift+↵ EnterOutline the cell above the current one in the samecolumn.
Move down ↓, Outline the cell below the current one in the same
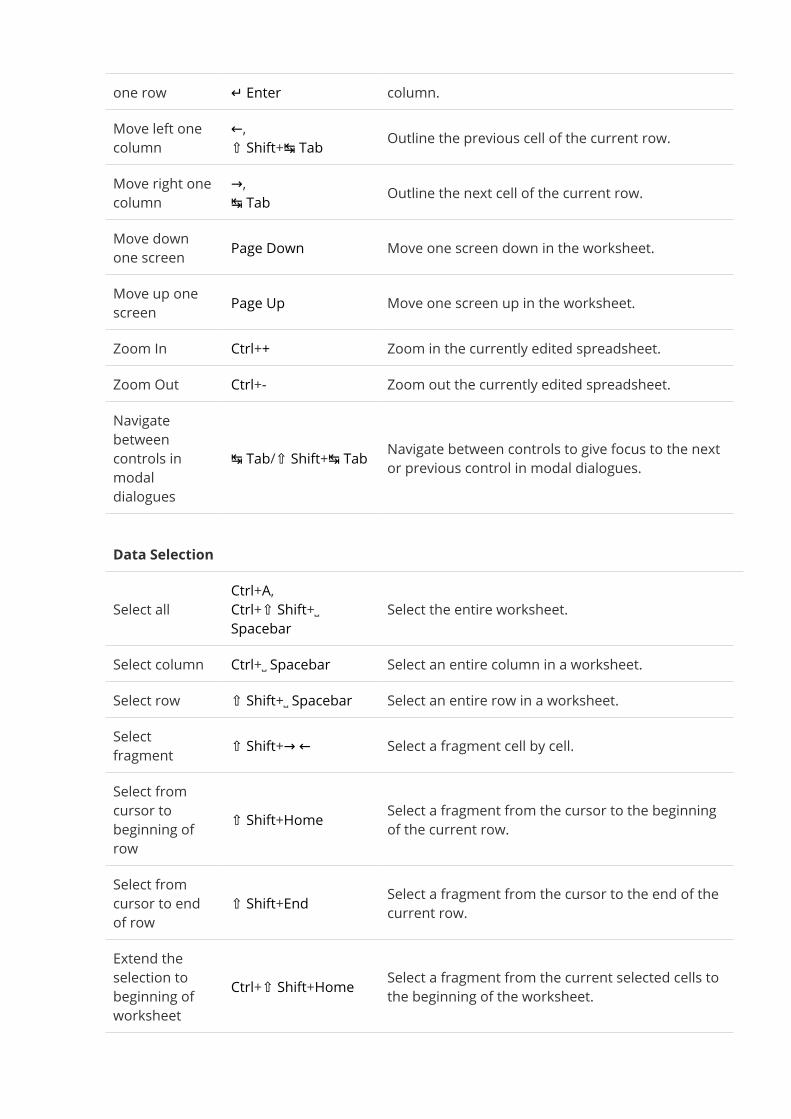
one row ↵ Enter column.Move left onecolumn
←,⇧ Shift+↹ Tab Outline the previous cell of the current row.Move right onecolumn
→,↹ Tab Outline the next cell of the current row.Move downone screen Page Down Move one screen down in the worksheet.Move up onescreen Page Up Move one screen up in the worksheet.Zoom In Ctrl++ Zoom in the currently edited spreadsheet.Zoom Out Ctrl+- Zoom out the currently edited spreadsheet.Navigatebetweencontrols inmodaldialogues
↹ Tab/⇧ Shift+↹ Tab Navigate between controls to give focus to the nextor previous control in modal dialogues.
Data Selection
Select allCtrl+A,Ctrl+⇧ Shift+␣Spacebar
Select the entire worksheet.
Select column Ctrl+␣ Spacebar Select an entire column in a worksheet.Select row ⇧ Shift+␣ Spacebar Select an entire row in a worksheet.Selectfragment ⇧ Shift+→ ← Select a fragment cell by cell.Select fromcursor tobeginning ofrow
⇧ Shift+Home Select a fragment from the cursor to the beginningof the current row.
Select fromcursor to endof row
⇧ Shift+End Select a fragment from the cursor to the end of thecurrent row.
Extend theselection tobeginning ofworksheet
Ctrl+⇧ Shift+Home Select a fragment from the current selected cells tothe beginning of the worksheet.

Extend theselection to thelast used cell
Ctrl+⇧ Shift+End
Select a fragment from the current selected cells tothe last used cell in the worksheet (in thebottommost row with data of the rightmost columnwith data). If the cursor is in the formula bar, thiswill select all text in the formula bar from the cursorposition to the end without affecting the height ofthe formula bar.
Select one cellto the left ⇧ Shift+↹ Tab Select one cell to the left in a table.Select one cellto the right ↹ Tab Select one cell to the right in a table.Extend theselection to thenearestnonblank cellto the right
⇧ Shift+Alt+End,Ctrl+⇧ Shift+→
Extend the selection to the nearest nonblank cell inthe same row to the right of the active cell. If thenext cell is blank, the selection will be extended tothe next nonblank cell.
Extend theselection to thenearestnonblank cellto the left
⇧ Shift+Alt+Home,Ctrl+⇧ Shift+←
Extend the selection to the nearest nonblank cell inthe same row to the left of the active cell. If the nextcell is blank, the selection will be extended to thenext nonblank cell.
Extend theselection to thenearestnonblank cellup/down thecolumn
Ctrl+⇧ Shift+↑ ↓Extend the selection to the nearest nonblank cell inthe same column up/down from the active cell. Ifthe next cell is blank, the selection will be extendedto the next nonblank cell.
Extend theselection downone screen
⇧ Shift+Page Down Extend the selection to include all the cells onescreen down from the active cell.
Extend theselection upone screen
⇧ Shift+Page Up Extend the selection to include all the cells onescreen up from the active cell.
Undo and RedoUndo Ctrl+Z Reverse the latest performed action.Redo Ctrl+Y Repeat the latest undone action.
Cut, Copy, and Paste
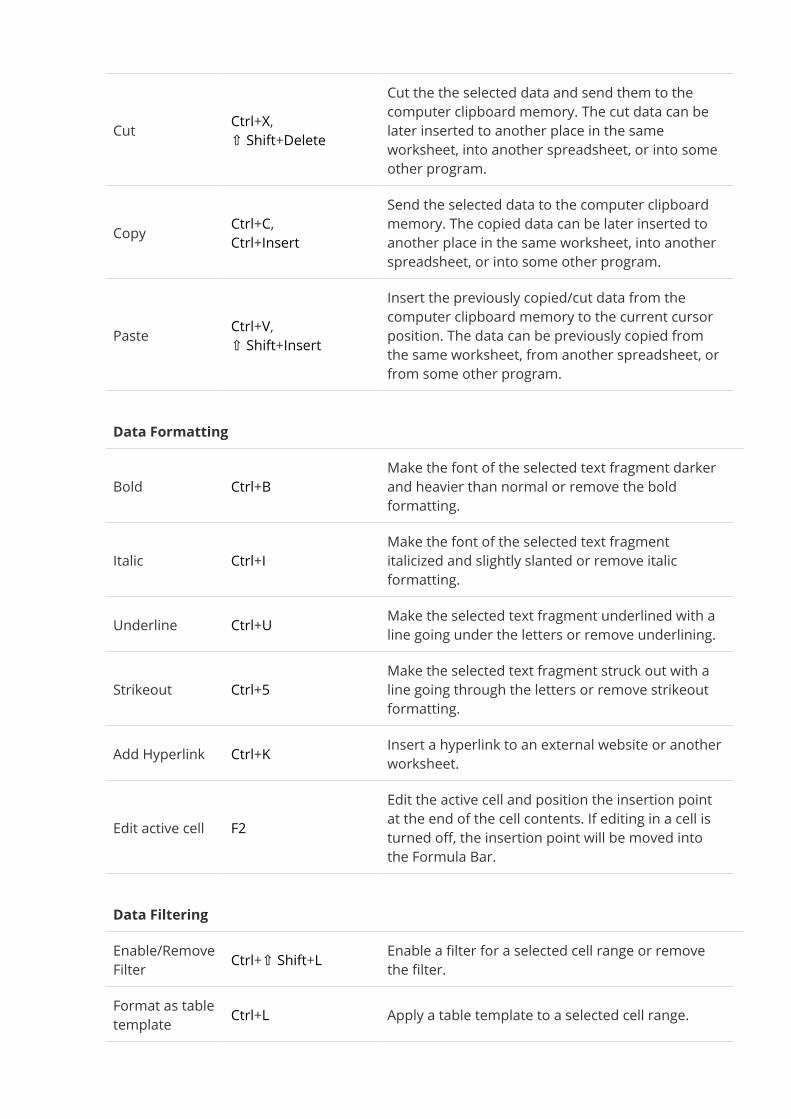
Cut Ctrl+X,⇧ Shift+Delete
Cut the the selected data and send them to thecomputer clipboard memory. The cut data can belater inserted to another place in the sameworksheet, into another spreadsheet, or into someother program.
Copy Ctrl+C,Ctrl+Insert
Send the selected data to the computer clipboardmemory. The copied data can be later inserted toanother place in the same worksheet, into anotherspreadsheet, or into some other program.
Paste Ctrl+V,⇧ Shift+Insert
Insert the previously copied/cut data from thecomputer clipboard memory to the current cursorposition. The data can be previously copied fromthe same worksheet, from another spreadsheet, orfrom some other program.
Data Formatting
Bold Ctrl+BMake the font of the selected text fragment darkerand heavier than normal or remove the boldformatting.
Italic Ctrl+IMake the font of the selected text fragmentitalicized and slightly slanted or remove italicformatting.
Underline Ctrl+U Make the selected text fragment underlined with aline going under the letters or remove underlining.
Strikeout Ctrl+5Make the selected text fragment struck out with aline going through the letters or remove strikeoutformatting.
Add Hyperlink Ctrl+K Insert a hyperlink to an external website or anotherworksheet.
Edit active cell F2Edit the active cell and position the insertion pointat the end of the cell contents. If editing in a cell isturned off, the insertion point will be moved intothe Formula Bar.
Data FilteringEnable/RemoveFilter Ctrl+⇧ Shift+L Enable a filter for a selected cell range or remove
the filter.Format as tabletemplate Ctrl+L Apply a table template to a selected cell range.
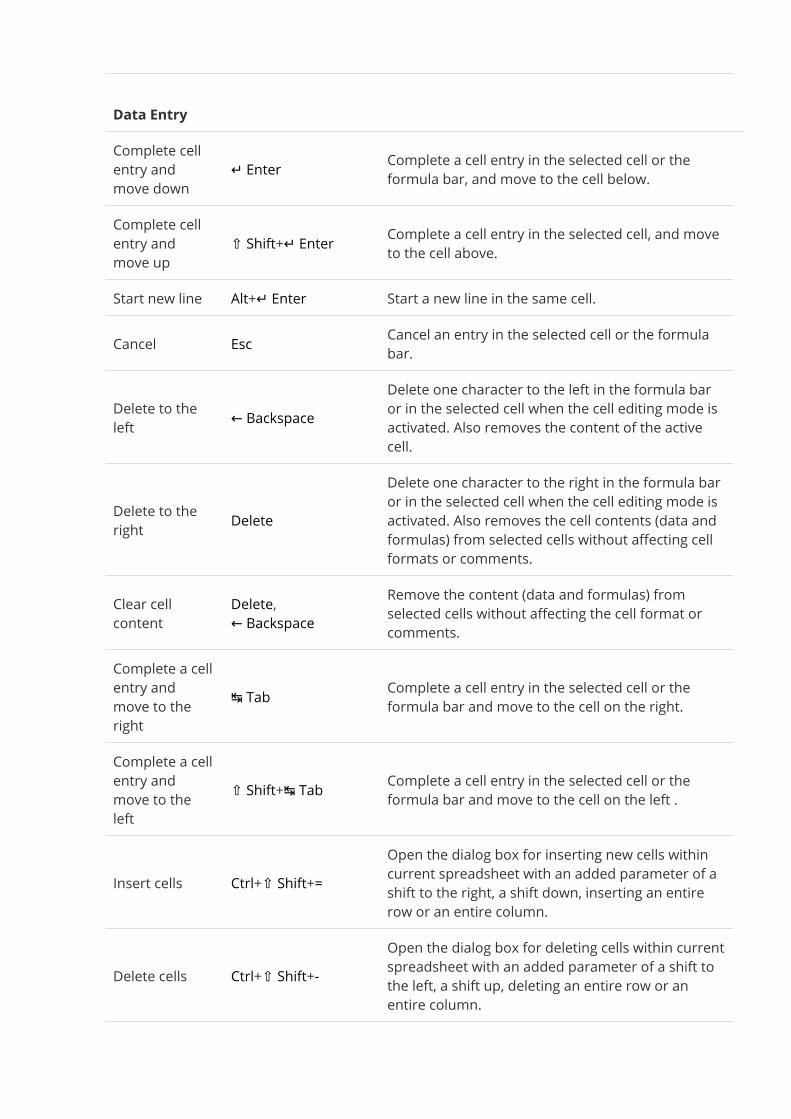
Data EntryComplete cellentry andmove down
↵ Enter Complete a cell entry in the selected cell or theformula bar, and move to the cell below.
Complete cellentry andmove up
⇧ Shift+↵ Enter Complete a cell entry in the selected cell, and moveto the cell above.
Start new line Alt+↵ Enter Start a new line in the same cell.Cancel Esc Cancel an entry in the selected cell or the formula
bar.
Delete to theleft ← Backspace
Delete one character to the left in the formula baror in the selected cell when the cell editing mode isactivated. Also removes the content of the activecell.
Delete to theright Delete
Delete one character to the right in the formula baror in the selected cell when the cell editing mode isactivated. Also removes the cell contents (data andformulas) from selected cells without affecting cellformats or comments.
Clear cellcontent
Delete,← BackspaceRemove the content (data and formulas) fromselected cells without affecting the cell format orcomments.
Complete a cellentry andmove to theright
↹ Tab Complete a cell entry in the selected cell or theformula bar and move to the cell on the right.
Complete a cellentry andmove to theleft
⇧ Shift+↹ Tab Complete a cell entry in the selected cell or theformula bar and move to the cell on the left .
Insert cells Ctrl+⇧ Shift+=Open the dialog box for inserting new cells withincurrent spreadsheet with an added parameter of ashift to the right, a shift down, inserting an entirerow or an entire column.
Delete cells Ctrl+⇧ Shift+-Open the dialog box for deleting cells within currentspreadsheet with an added parameter of a shift tothe left, a shift up, deleting an entire row or anentire column.
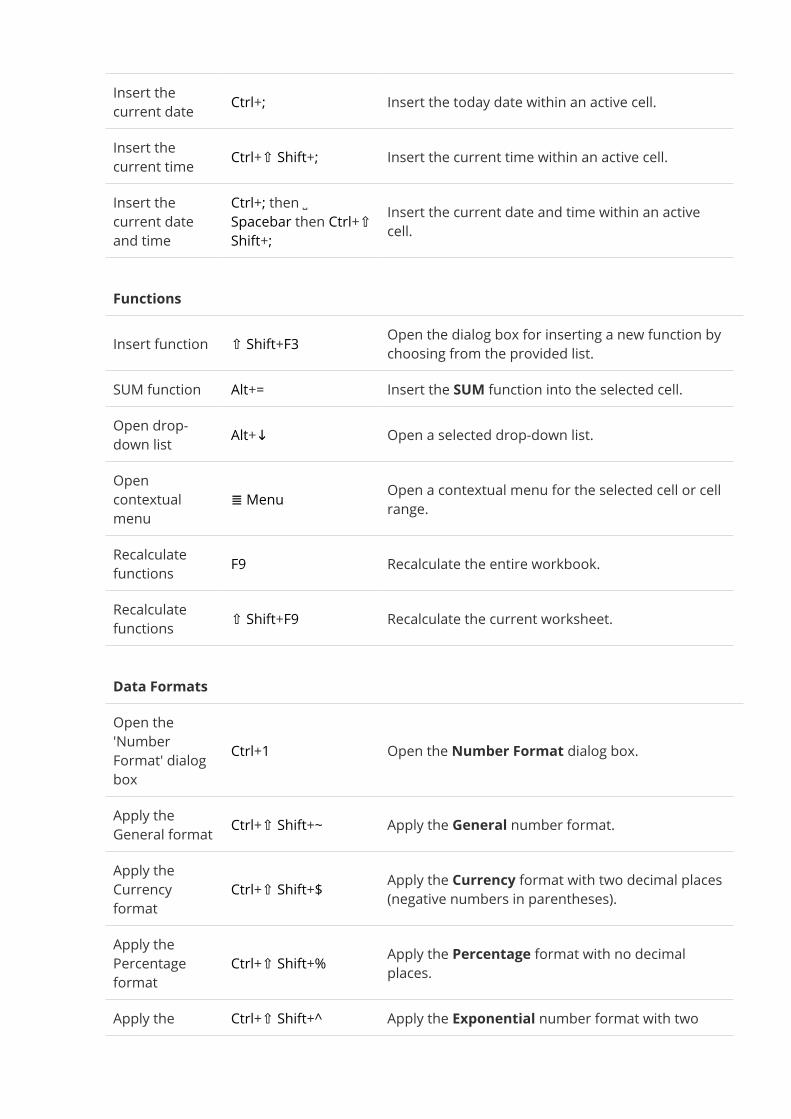
Insert thecurrent date Ctrl+; Insert the today date within an active cell.Insert thecurrent time Ctrl+⇧ Shift+; Insert the current time within an active cell.Insert thecurrent dateand time
Ctrl+; then ␣Spacebar then Ctrl+⇧Shift+;
Insert the current date and time within an activecell.
FunctionsInsert function ⇧ Shift+F3 Open the dialog box for inserting a new function by
choosing from the provided list.SUM function Alt+= Insert the SUM function into the selected cell.Open drop-down list Alt+↓ Open a selected drop-down list.Opencontextualmenu
≣Menu Open a contextual menu for the selected cell or cellrange.
Recalculatefunctions F9 Recalculate the entire workbook.Recalculatefunctions ⇧ Shift+F9 Recalculate the current worksheet.
Data FormatsOpen the'NumberFormat' dialogbox
Ctrl+1 Open the Number Format dialog box.
Apply theGeneral format Ctrl+⇧ Shift+~ Apply the General number format.Apply theCurrencyformat
Ctrl+⇧ Shift+$ Apply the Currency format with two decimal places(negative numbers in parentheses).
Apply thePercentageformat
Ctrl+⇧ Shift+% Apply the Percentage format with no decimalplaces.
Apply the Ctrl+⇧ Shift+^ Apply the Exponential number format with two
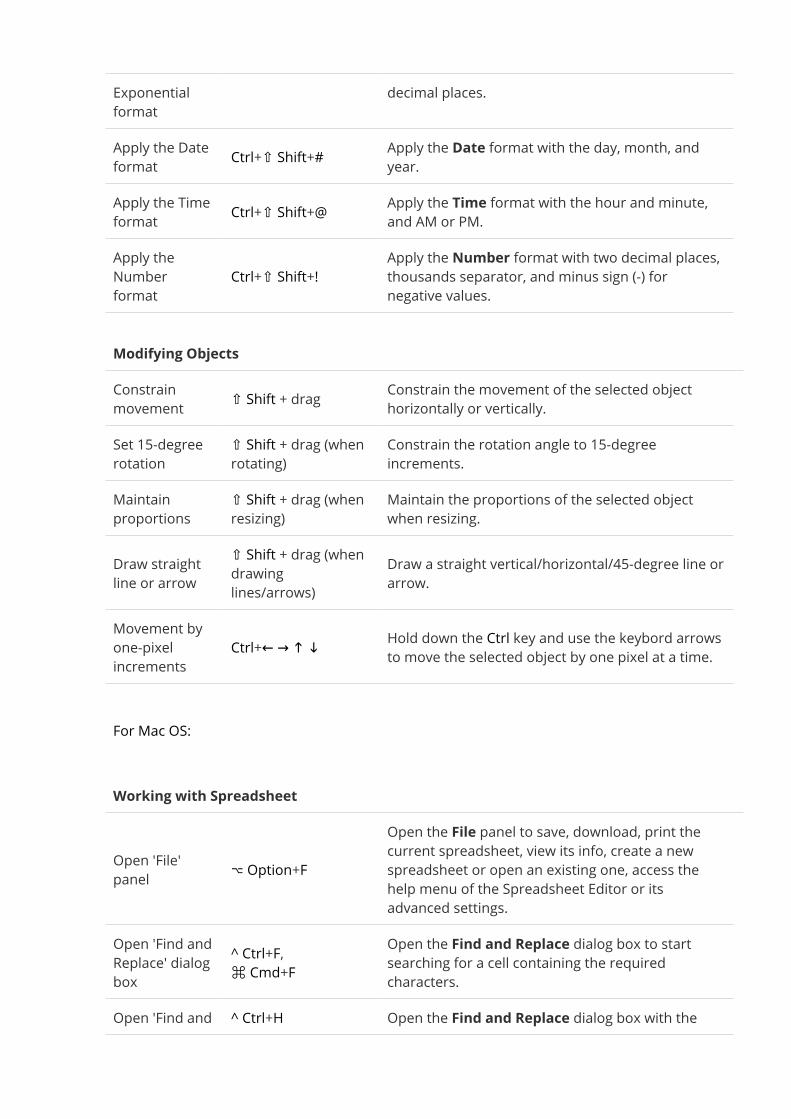
Exponentialformat
decimal places.
Apply the Dateformat Ctrl+⇧ Shift+# Apply the Date format with the day, month, and
year.Apply the Timeformat Ctrl+⇧ Shift+@ Apply the Time format with the hour and minute,
and AM or PM.Apply theNumberformat
Ctrl+⇧ Shift+!Apply the Number format with two decimal places,thousands separator, and minus sign (-) fornegative values.
Modifying ObjectsConstrainmovement ⇧ Shift + drag Constrain the movement of the selected object
horizontally or vertically.Set 15-degreerotation
⇧ Shift + drag (whenrotating)
Constrain the rotation angle to 15-degreeincrements.
Maintainproportions
⇧ Shift + drag (whenresizing)
Maintain the proportions of the selected objectwhen resizing.
Draw straightline or arrow
⇧ Shift + drag (whendrawinglines/arrows)
Draw a straight vertical/horizontal/45-degree line orarrow.
Movement byone-pixelincrements
Ctrl+← → ↑ ↓ Hold down the Ctrl key and use the keybord arrowsto move the selected object by one pixel at a time.
For Mac OS:
Working with Spreadsheet
Open 'File'panel ⌥ Option+F
Open the File panel to save, download, print thecurrent spreadsheet, view its info, create a newspreadsheet or open an existing one, access thehelp menu of the Spreadsheet Editor or itsadvanced settings.
Open 'Find andReplace' dialogbox
^ Ctrl+F,⌘ Cmd+FOpen the Find and Replace dialog box to startsearching for a cell containing the requiredcharacters.
Open 'Find and ^ Ctrl+H Open the Find and Replace dialog box with the
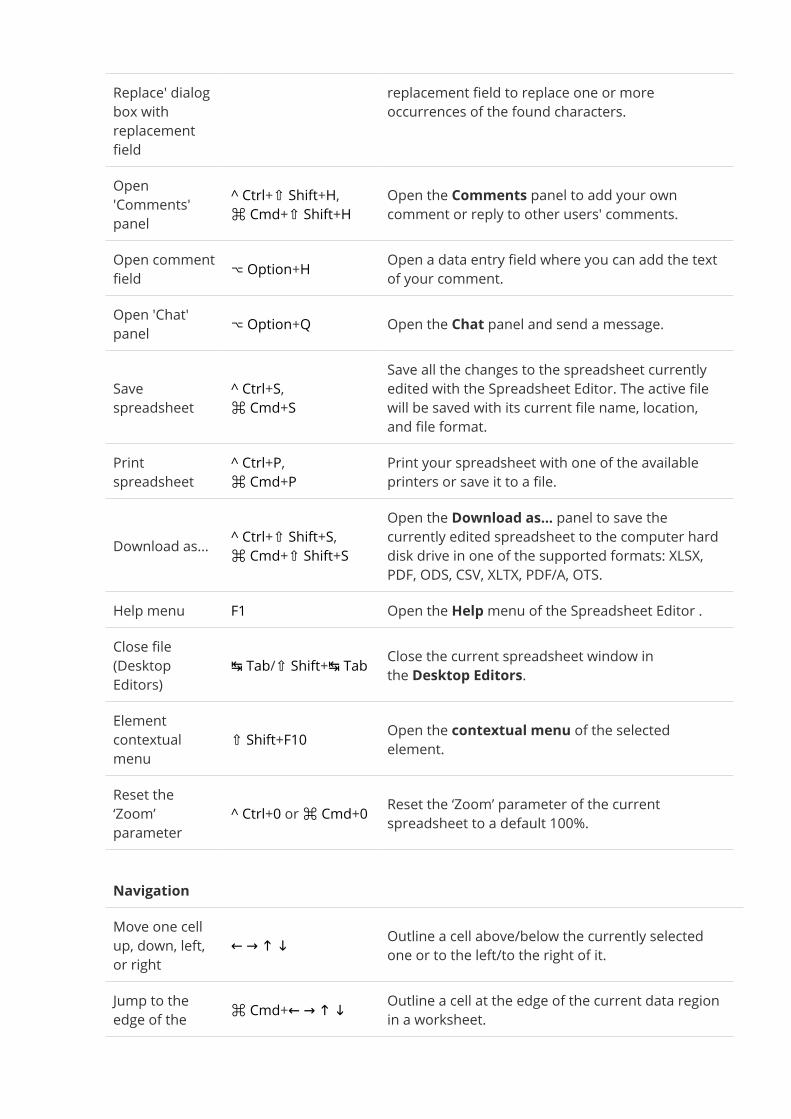
Replace' dialogbox withreplacementfield
replacement field to replace one or moreoccurrences of the found characters.
Open'Comments'panel
^ Ctrl+⇧ Shift+H,⌘ Cmd+⇧ Shift+HOpen the Comments panel to add your owncomment or reply to other users' comments.
Open commentfield ⌥ Option+H Open a data entry field where you can add the text
of your comment.Open 'Chat'panel ⌥ Option+Q Open the Chat panel and send a message.
Savespreadsheet
^ Ctrl+S,⌘ Cmd+SSave all the changes to the spreadsheet currentlyedited with the Spreadsheet Editor. The active filewill be saved with its current file name, location,and file format.
Printspreadsheet
^ Ctrl+P,⌘ Cmd+PPrint your spreadsheet with one of the availableprinters or save it to a file.
Download as... ^ Ctrl+⇧ Shift+S,⌘ Cmd+⇧ Shift+SOpen the Download as... panel to save thecurrently edited spreadsheet to the computer harddisk drive in one of the supported formats: XLSX,PDF, ODS, CSV, XLTX, PDF/A, OTS.
Help menu F1 Open the Helpmenu of the Spreadsheet Editor .Close file(DesktopEditors)
↹ Tab/⇧ Shift+↹ Tab Close the current spreadsheet window inthe Desktop Editors.
Elementcontextualmenu
⇧ Shift+F10 Open the contextual menu of the selectedelement.
Reset the‘Zoom’parameter
^ Ctrl+0 or⌘ Cmd+0 Reset the ‘Zoom’ parameter of the currentspreadsheet to a default 100%.
NavigationMove one cellup, down, left,or right
← → ↑ ↓ Outline a cell above/below the currently selectedone or to the left/to the right of it.
Jump to theedge of the ⌘ Cmd+← → ↑ ↓ Outline a cell at the edge of the current data region
in a worksheet.

current dataregionJump to thebeginning ofthe row
Home Outline a cell in the column A of the current row.
Jump to thebeginning ofthespreadsheet
^ Ctrl+Home Outline the cell A1.
Jump to theend of the row
End,⌘ Cmd+→ Outline the last cell of the current row.
Jump to theend of thespreadsheet
^ Ctrl+EndOutline the lower right used cell in the worksheetsituated in the bottommost row with data of therightmost column with data. If the cursor is in theformula bar, it will be placed to the end of the text.
Move to theprevious sheet ⌥ Option+Page Up Move to the previous sheet in your spreadsheet.Move to thenext sheet
⌥ Option+PageDown Move to the next sheet in your spreadsheet.
Move up onerow ⇧ Shift+↵ Return Outline the cell above the current one in the same
column.Move downone row ↵ Return Outline the cell below the current one in the same
column.Move left onecolumn
←,⇧ Shift+↹ Tab Outline the previous cell of the current row.Move right onecolumn
→,↹ Tab Outline the next cell of the current row.Move downone screen Page Down Move one screen down in the worksheet.Move up onescreen Page Up Move one screen up in the worksheet.
Zoom In ^ Ctrl+=,⌘ Cmd+= Zoom in the currently edited spreadsheet.
Zoom Out ^ Ctrl+-,⌘ Cmd+- Zoom out the currently edited spreadsheet.Navigate ↹ Tab/⇧ Shift+↹ Tab Navigate between controls to give focus to the next
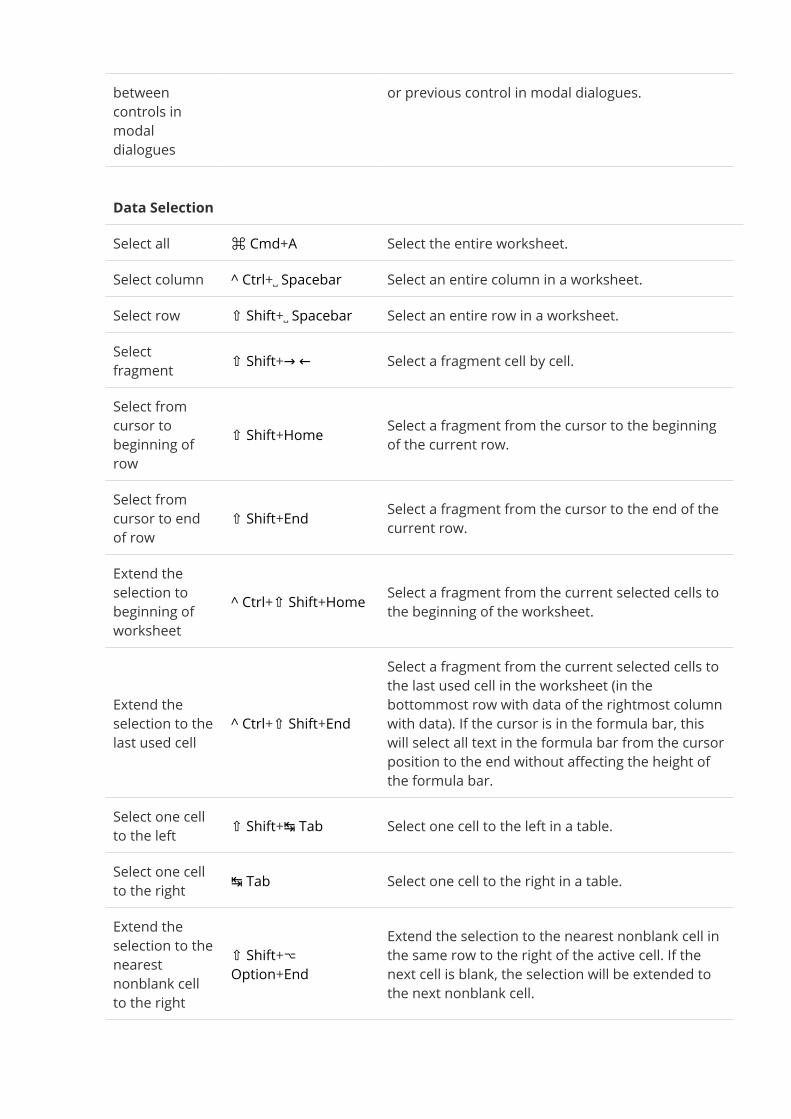
betweencontrols inmodaldialogues
or previous control in modal dialogues.
Data SelectionSelect all ⌘ Cmd+A Select the entire worksheet.Select column ^ Ctrl+␣ Spacebar Select an entire column in a worksheet.Select row ⇧ Shift+␣ Spacebar Select an entire row in a worksheet.Selectfragment ⇧ Shift+→ ← Select a fragment cell by cell.Select fromcursor tobeginning ofrow
⇧ Shift+Home Select a fragment from the cursor to the beginningof the current row.
Select fromcursor to endof row
⇧ Shift+End Select a fragment from the cursor to the end of thecurrent row.
Extend theselection tobeginning ofworksheet
^ Ctrl+⇧ Shift+Home Select a fragment from the current selected cells tothe beginning of the worksheet.
Extend theselection to thelast used cell
^ Ctrl+⇧ Shift+End
Select a fragment from the current selected cells tothe last used cell in the worksheet (in thebottommost row with data of the rightmost columnwith data). If the cursor is in the formula bar, thiswill select all text in the formula bar from the cursorposition to the end without affecting the height ofthe formula bar.
Select one cellto the left ⇧ Shift+↹ Tab Select one cell to the left in a table.Select one cellto the right ↹ Tab Select one cell to the right in a table.Extend theselection to thenearestnonblank cellto the right
⇧ Shift+⌥Option+End
Extend the selection to the nearest nonblank cell inthe same row to the right of the active cell. If thenext cell is blank, the selection will be extended tothe next nonblank cell.
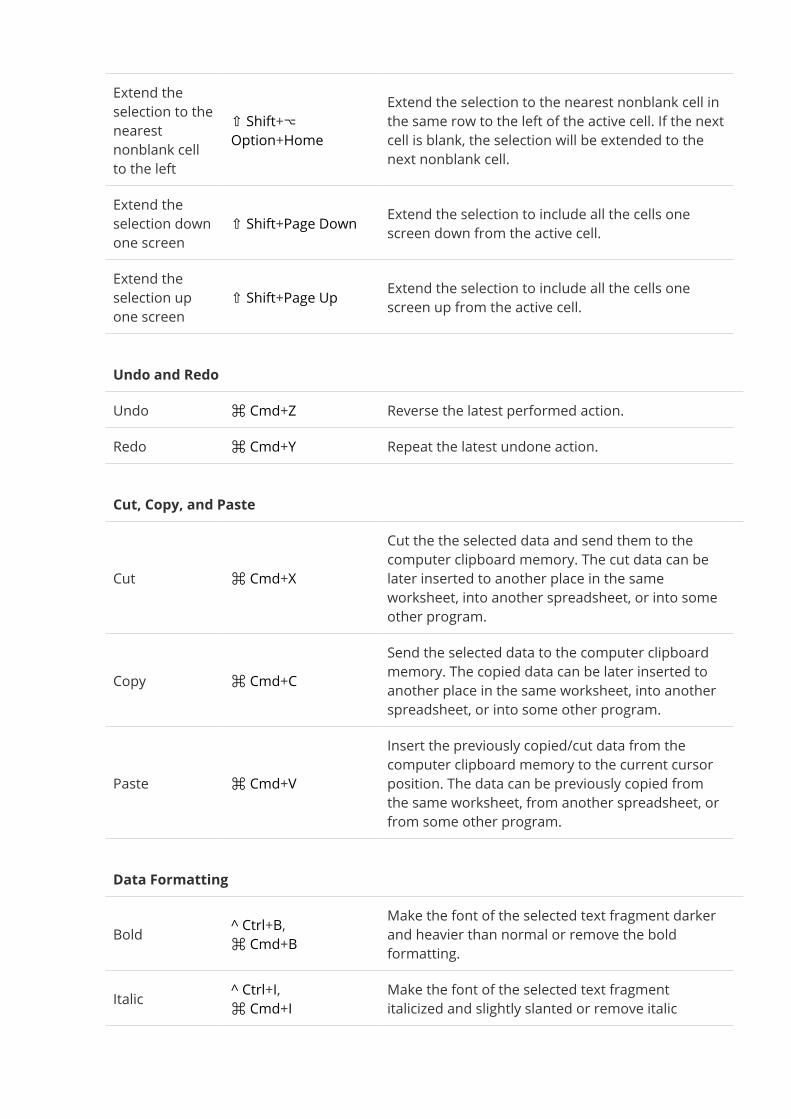
Extend theselection to thenearestnonblank cellto the left
⇧ Shift+⌥Option+Home
Extend the selection to the nearest nonblank cell inthe same row to the left of the active cell. If the nextcell is blank, the selection will be extended to thenext nonblank cell.
Extend theselection downone screen
⇧ Shift+Page Down Extend the selection to include all the cells onescreen down from the active cell.
Extend theselection upone screen
⇧ Shift+Page Up Extend the selection to include all the cells onescreen up from the active cell.
Undo and RedoUndo ⌘ Cmd+Z Reverse the latest performed action.Redo ⌘ Cmd+Y Repeat the latest undone action.
Cut, Copy, and Paste
Cut ⌘ Cmd+XCut the the selected data and send them to thecomputer clipboard memory. The cut data can belater inserted to another place in the sameworksheet, into another spreadsheet, or into someother program.
Copy ⌘ Cmd+CSend the selected data to the computer clipboardmemory. The copied data can be later inserted toanother place in the same worksheet, into anotherspreadsheet, or into some other program.
Paste ⌘ Cmd+VInsert the previously copied/cut data from thecomputer clipboard memory to the current cursorposition. The data can be previously copied fromthe same worksheet, from another spreadsheet, orfrom some other program.
Data Formatting
Bold ^ Ctrl+B,⌘ Cmd+BMake the font of the selected text fragment darkerand heavier than normal or remove the boldformatting.
Italic ^ Ctrl+I,⌘ Cmd+IMake the font of the selected text fragmentitalicized and slightly slanted or remove italic
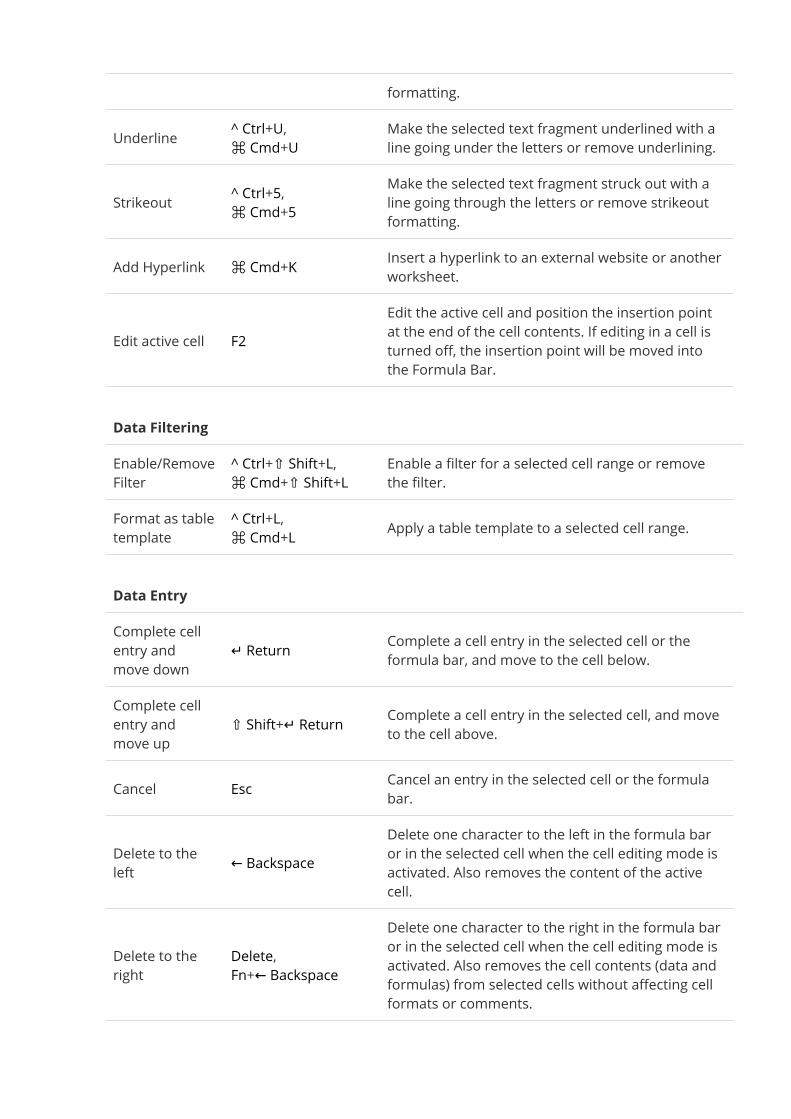
formatting.Underline ^ Ctrl+U,⌘ Cmd+U
Make the selected text fragment underlined with aline going under the letters or remove underlining.
Strikeout ^ Ctrl+5,⌘ Cmd+5Make the selected text fragment struck out with aline going through the letters or remove strikeoutformatting.
Add Hyperlink ⌘ Cmd+K Insert a hyperlink to an external website or anotherworksheet.
Edit active cell F2Edit the active cell and position the insertion pointat the end of the cell contents. If editing in a cell isturned off, the insertion point will be moved intothe Formula Bar.
Data FilteringEnable/RemoveFilter
^ Ctrl+⇧ Shift+L,⌘ Cmd+⇧ Shift+LEnable a filter for a selected cell range or removethe filter.
Format as tabletemplate
^ Ctrl+L,⌘ Cmd+L Apply a table template to a selected cell range.
Data EntryComplete cellentry andmove down
↵ Return Complete a cell entry in the selected cell or theformula bar, and move to the cell below.
Complete cellentry andmove up
⇧ Shift+↵ Return Complete a cell entry in the selected cell, and moveto the cell above.
Cancel Esc Cancel an entry in the selected cell or the formulabar.
Delete to theleft ← Backspace
Delete one character to the left in the formula baror in the selected cell when the cell editing mode isactivated. Also removes the content of the activecell.
Delete to theright
Delete,Fn+← Backspace
Delete one character to the right in the formula baror in the selected cell when the cell editing mode isactivated. Also removes the cell contents (data andformulas) from selected cells without affecting cellformats or comments.
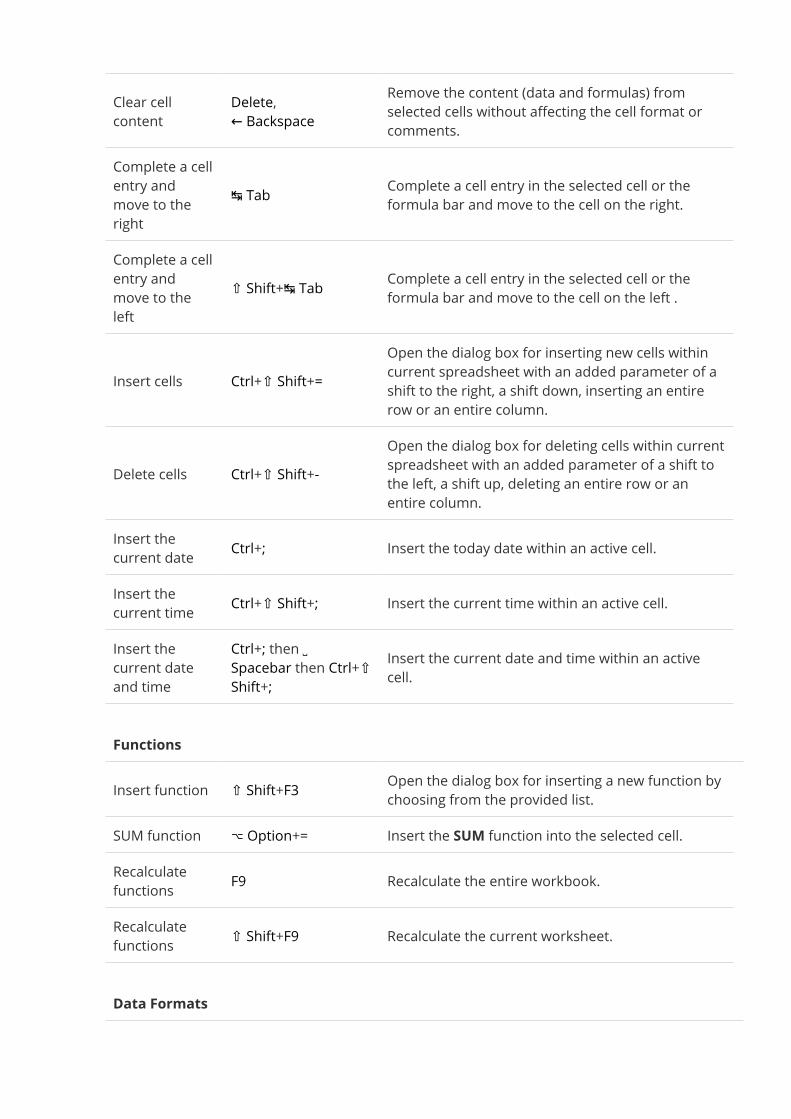
Clear cellcontent
Delete,← BackspaceRemove the content (data and formulas) fromselected cells without affecting the cell format orcomments.
Complete a cellentry andmove to theright
↹ Tab Complete a cell entry in the selected cell or theformula bar and move to the cell on the right.
Complete a cellentry andmove to theleft
⇧ Shift+↹ Tab Complete a cell entry in the selected cell or theformula bar and move to the cell on the left .
Insert cells Ctrl+⇧ Shift+=Open the dialog box for inserting new cells withincurrent spreadsheet with an added parameter of ashift to the right, a shift down, inserting an entirerow or an entire column.
Delete cells Ctrl+⇧ Shift+-Open the dialog box for deleting cells within currentspreadsheet with an added parameter of a shift tothe left, a shift up, deleting an entire row or anentire column.
Insert thecurrent date Ctrl+; Insert the today date within an active cell.Insert thecurrent time Ctrl+⇧ Shift+; Insert the current time within an active cell.Insert thecurrent dateand time
Ctrl+; then ␣Spacebar then Ctrl+⇧Shift+;
Insert the current date and time within an activecell.
FunctionsInsert function ⇧ Shift+F3 Open the dialog box for inserting a new function by
choosing from the provided list.SUM function ⌥ Option+= Insert the SUM function into the selected cell.Recalculatefunctions F9 Recalculate the entire workbook.Recalculatefunctions ⇧ Shift+F9 Recalculate the current worksheet.
Data Formats
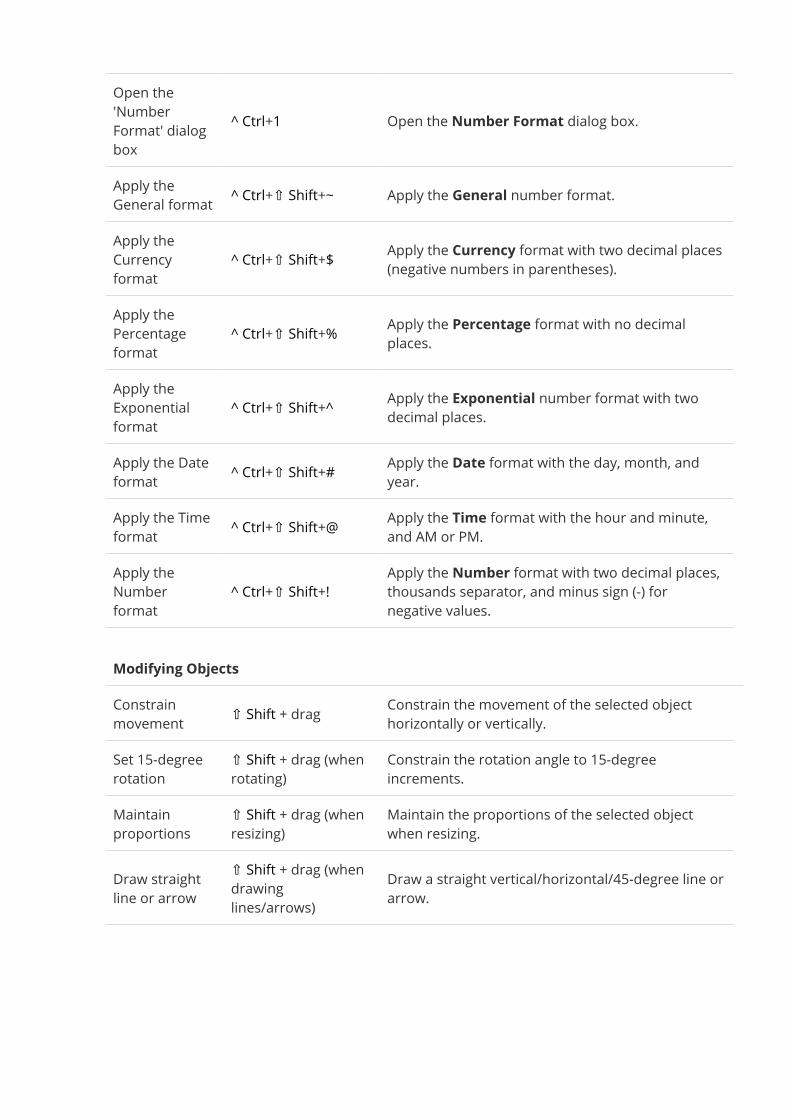
Open the'NumberFormat' dialogbox
^ Ctrl+1 Open the Number Format dialog box.
Apply theGeneral format ^ Ctrl+⇧ Shift+~ Apply the General number format.Apply theCurrencyformat
^ Ctrl+⇧ Shift+$ Apply the Currency format with two decimal places(negative numbers in parentheses).
Apply thePercentageformat
^ Ctrl+⇧ Shift+% Apply the Percentage format with no decimalplaces.
Apply theExponentialformat
^ Ctrl+⇧ Shift+^ Apply the Exponential number format with twodecimal places.
Apply the Dateformat ^ Ctrl+⇧ Shift+# Apply the Date format with the day, month, and
year.Apply the Timeformat ^ Ctrl+⇧ Shift+@ Apply the Time format with the hour and minute,
and AM or PM.Apply theNumberformat
^ Ctrl+⇧ Shift+!Apply the Number format with two decimal places,thousands separator, and minus sign (-) fornegative values.
Modifying ObjectsConstrainmovement ⇧ Shift + drag Constrain the movement of the selected object
horizontally or vertically.Set 15-degreerotation
⇧ Shift + drag (whenrotating)
Constrain the rotation angle to 15-degreeincrements.
Maintainproportions
⇧ Shift + drag (whenresizing)
Maintain the proportions of the selected objectwhen resizing.
Draw straightline or arrow
⇧ Shift + drag (whendrawinglines/arrows)
Draw a straight vertical/horizontal/45-degree line orarrow.

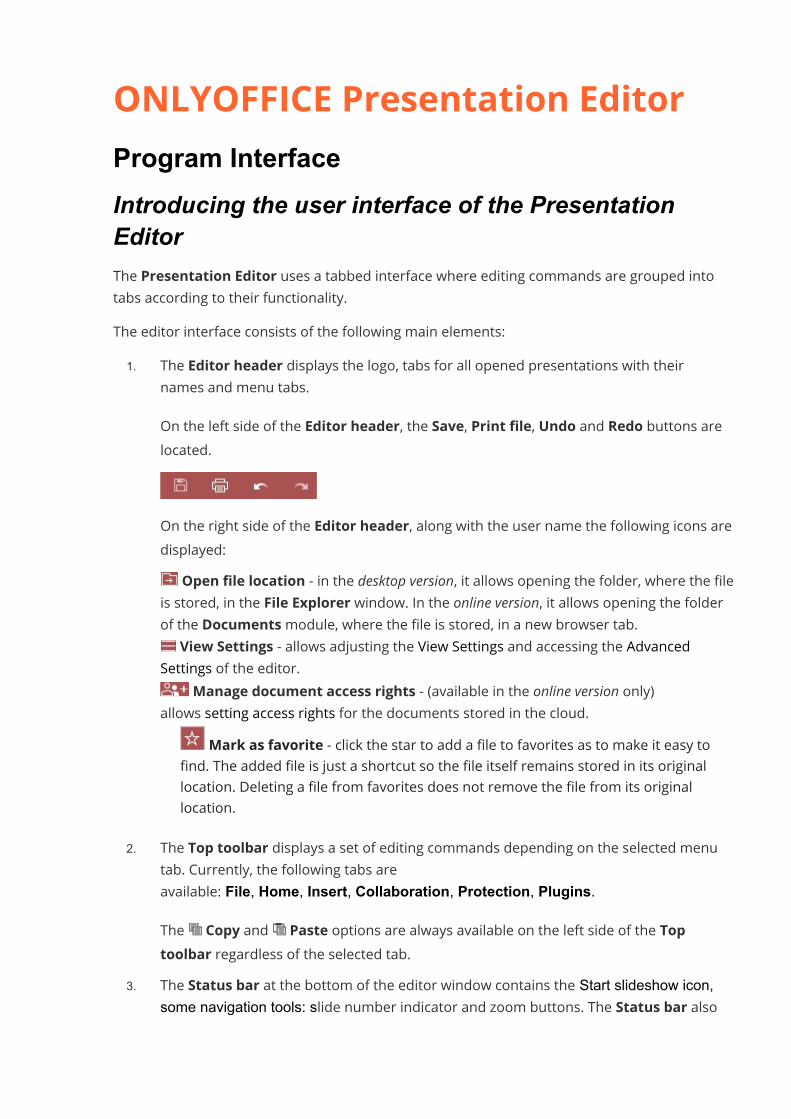
ONLYOFFICE Presentation EditorProgram InterfaceIntroducing the user interface of the PresentationEditorThe Presentation Editor uses a tabbed interface where editing commands are grouped intotabs according to their functionality.The editor interface consists of the following main elements:1. The Editor header displays the logo, tabs for all opened presentations with their
names and menu tabs.On the left side of the Editor header, the Save, Print file, Undo and Redo buttons arelocated.
On the right side of the Editor header, along with the user name the following icons aredisplayed:
· Open file location - in the desktop version, it allows opening the folder, where the fileis stored, in the File Explorer window. In the online version, it allows opening the folderof the Documentsmodule, where the file is stored, in a new browser tab.
· View Settings - allows adjusting the View Settings and accessing the AdvancedSettings of the editor.
· Manage document access rights - (available in the online version only)allows setting access rights for the documents stored in the cloud.· Mark as favorite - click the star to add a file to favorites as to make it easy to
find. The added file is just a shortcut so the file itself remains stored in its originallocation. Deleting a file from favorites does not remove the file from its originallocation.
2. The Top toolbar displays a set of editing commands depending on the selected menutab. Currently, the following tabs areavailable: File, Home, Insert, Collaboration, Protection, Plugins.The Copy and Paste options are always available on the left side of the Toptoolbar regardless of the selected tab.
3. The Status bar at the bottom of the editor window contains the Start slideshow icon,some navigation tools: slide number indicator and zoom buttons. The Status bar also
displays some notifications (such as "All changes saved", etc.) and allows setting the textlanguage and enable spell checking.
4. The Left sidebar contains the following icons:o - allows using the Search and Replace tool,o - allows opening the Comments panel,o - (available in the online version only) allows opening the Chat panel,o - (available in the online version only) allows contacting our support team,o - (available in the online version only) allows viewing the information about the
program.5. The Right sidebar allows adjusting additional parameters of different objects. When
you select a particular object on a slide, the corresponding icon is activated on the rightsidebar. Click this icon to expand the right sidebar.
6. The horizontal and vertical Rulers help you place objects on a slide and allow you to setup tab stops and paragraph indents within the text boxes.
7. TheWorking area allows viewing the presentation content, entering and editing data.8. The Scroll bar on the right allows scrolling the presentation up and down.
For your convenience, you can hide some components and display them again when necessary.File tabThe File tab allows performing some basic file operations.Using this tab, you can:
· in the online version, save the current file (in case the Autosave option isdisabled), download as (save the document in the selected format to the hard disk driveof your computer), save copy as (save a copy of the document in the selected format tothe portal documents), print or rename it, in the desktop version, save the current filekeeping the current format and location using the Save option or save the current fileunder a different name and change its location or format using the Saveas option, print the file.
· protect the file using a password, change or remove the password (available inthe desktop version only);
· create a new presentation or open a recently edited one (available in the onlineversion only),
· view general information about the presentation or change some file properties,· manage access rights (available in the online version only),· access the Advanced Settings of the editor,· in the desktop version, open the folder, where the file is stored, in the File
Explorer window. In the online version, open the folder of the Documentsmodule,where the file is stored, in a new browser tab.
Home tabThe Home tab opens by default when you open a presentation. It allows you to set generalslide parameters, format text, insert some objects, align and arrange them.Using this tab, you can:
· manage slides and start a slideshow,· format text within a text box,· insert text boxes, pictures, shapes,· align and arrange objects on a slide,· copy/clear text formatting,· change a theme, color scheme or slide size.
Insert tabThe Insert tab allows adding visual objects and comments to your presentation.Using this tab, you can:
· insert tables,· insert text boxes and Text Art objects, pictures, shapes, charts,· insert comments and hyperlinks,· insert footers, date and time, slide numbers.· insert equations, symbols,· insert audio and video records stored on the hard disk drive of your computer (available
in the desktop version only, not available for Mac OS).Note: to be able to playback video, you'll need to install codecs, for example, K-Lite.
Collaboration tabThe Collaboration tab allows collaborating on presentations. In the online version, you canshare a file, select a co-editing mode and manage comments. In the commenting mode, youcan add and remove comments and use the chat. In the desktop version, you can only managecomments.Using this tab, you can:
· specify the sharing settings (available in the online version only),· switch between the Strict and Fast co-editing modes (available in the online
version only),· add comments to your presentation and remove them,· open the Chat panel (available in the online version only).
Plugins tabThe Plugins tab makes it possible to access the advanced editing features using the availablethird-party components. Here you can also use macros to simplify routine operations.The Settings button allows you to open the window where you can view and manage allinstalled plugins and add your own ones.TheMacros button allows to open the window where you can create your own macros and runthem.Currently, the following plugins are available:
· Send allows sending the presentation via email using the default desktop mail client(available in the desktop version only),
· Highlight code allows highlighting the code syntax by selecting the necessary language,style, background color, etc.,
· Photo Editor allows editing images: cropping, flipping, rotating, drawing lines andshapes, adding icons and text, loading a mask and applying filters such as Grayscale,Invert, Sepia, Blur, Sharpen, Emboss, etc.,
· Thesaurus allows finding synonyms and antonyms for the selected word and replacingit with the chosen one,
· Translator allows translating the selected text into other languages,Note: this plugin doesn't work in Internet Explorer.
· YouTube allows embedding YouTube videos into your presentation.Basic operationsCreate a new presentation or open an existing oneTo create a new presentationIn the online editor1. click the File tab of the top toolbar,2. select the Create New option.
In the desktop editor1. in the main program window, select the Presentationmenu item from the Create
new section of the left sidebar - a new file will open in a new tab,2. when all the necessary changes are made, click the Save icon in the upper left corner
or switch to the File tab and choose the Save asmenu item.3. in the file manager window, select the file location, specify its name, choose the format
you want to save the presentation to (PPTX, Presentation template (POTX), ODP, OTP,PDF or PDFA) and click the Save button.
To open an existing presentationIn the desktop editor1. in the main program window, select the Open local filemenu item on the left sidebar,2. choose the necessary presentation from the file manager window and click
the Open button.You can also right-click the necessary presentation in the file manager window, select the Openwith option and choose the necessary application from the menu. If the office documents filesare associated with the application, you can also open presentations by double-clicking the filename in the file explorer window.All the directories that you have accessed using the desktop editor will be displayed inthe Recent folders list so that you can quickly access them afterwards. Click the necessaryfolder to select one of the files stored in it.To open a recently edited presentationIn the online editor1. click the File tab of the top toolbar,2. select the Open Recent... option,3. choose the presentation you need from the list of recently edited documents.
In the desktop editor1. in the main program window, select the Recent filesmenu item on the left sidebar,2. choose the presentation you need from the list of recently edited documents.
To open the folder where the file is stored in a new browser tab in the online version, in the fileexplorer window in the desktop version, click the Open file location icon on the right side ofthe editor header. Alternatively, you can switch to the File tab of the top toolbar and selectthe Open file location option.
Copy/paste data, undo/redo your actionsUse basic clipboard operationsTo cut, copy and paste the selected objects (slides, text passages, autoshapes) in the currentpresentation or undo/redo your actions, use the corresponding options from the right-clickmenu, keyboard shortcuts or icons available on any tab of the top toolbar:
· Cut – select an object and use the Cut option from the right-click menu to delete theselection and send it to the computer clipboard memory. The cut data can be laterinserted to another place in the same presentation.
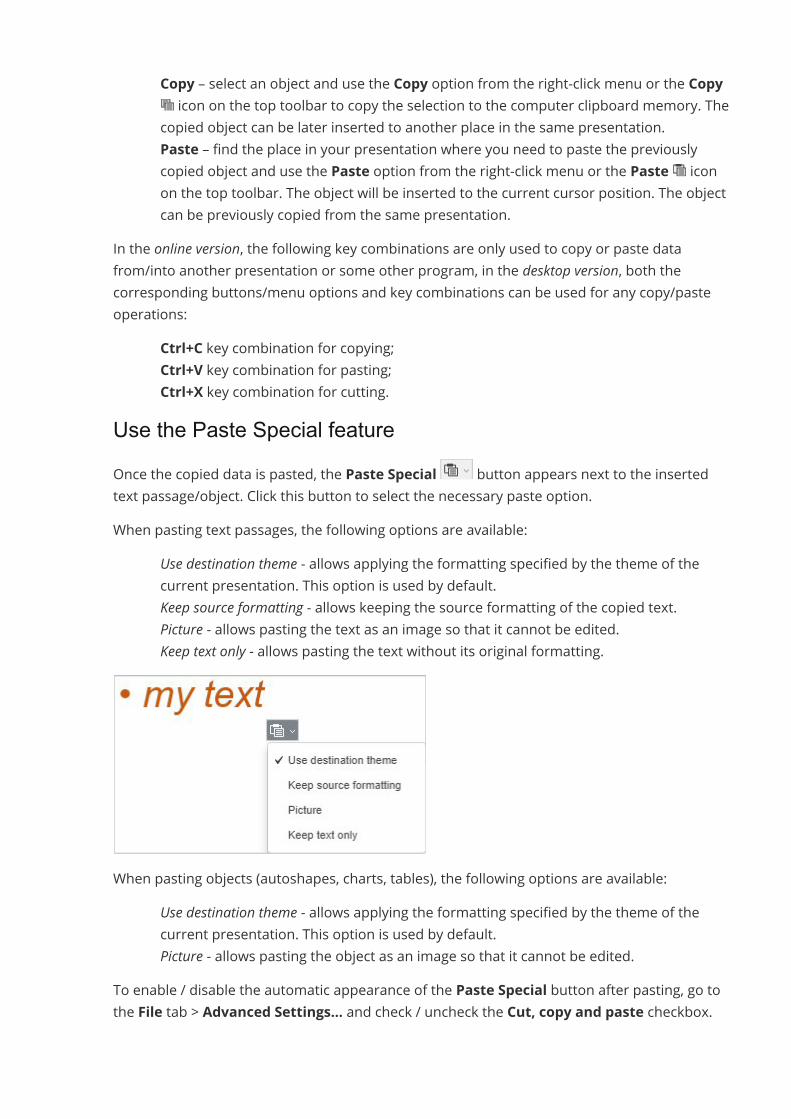
· Copy – select an object and use the Copy option from the right-click menu or the Copyicon on the top toolbar to copy the selection to the computer clipboard memory. The
copied object can be later inserted to another place in the same presentation.· Paste – find the place in your presentation where you need to paste the previously
copied object and use the Paste option from the right-click menu or the Paste iconon the top toolbar. The object will be inserted to the current cursor position. The objectcan be previously copied from the same presentation.
In the online version, the following key combinations are only used to copy or paste datafrom/into another presentation or some other program, in the desktop version, both thecorresponding buttons/menu options and key combinations can be used for any copy/pasteoperations:
· Ctrl+C key combination for copying;· Ctrl+V key combination for pasting;· Ctrl+X key combination for cutting.
Use the Paste Special featureOnce the copied data is pasted, the Paste Special button appears next to the insertedtext passage/object. Click this button to select the necessary paste option.When pasting text passages, the following options are available:
· Use destination theme - allows applying the formatting specified by the theme of thecurrent presentation. This option is used by default.
· Keep source formatting - allows keeping the source formatting of the copied text.· Picture - allows pasting the text as an image so that it cannot be edited.· Keep text only - allows pasting the text without its original formatting.
When pasting objects (autoshapes, charts, tables), the following options are available:· Use destination theme - allows applying the formatting specified by the theme of the
current presentation. This option is used by default.· Picture - allows pasting the object as an image so that it cannot be edited.
To enable / disable the automatic appearance of the Paste Special button after pasting, go tothe File tab > Advanced Settings... and check / uncheck the Cut, copy and paste checkbox.
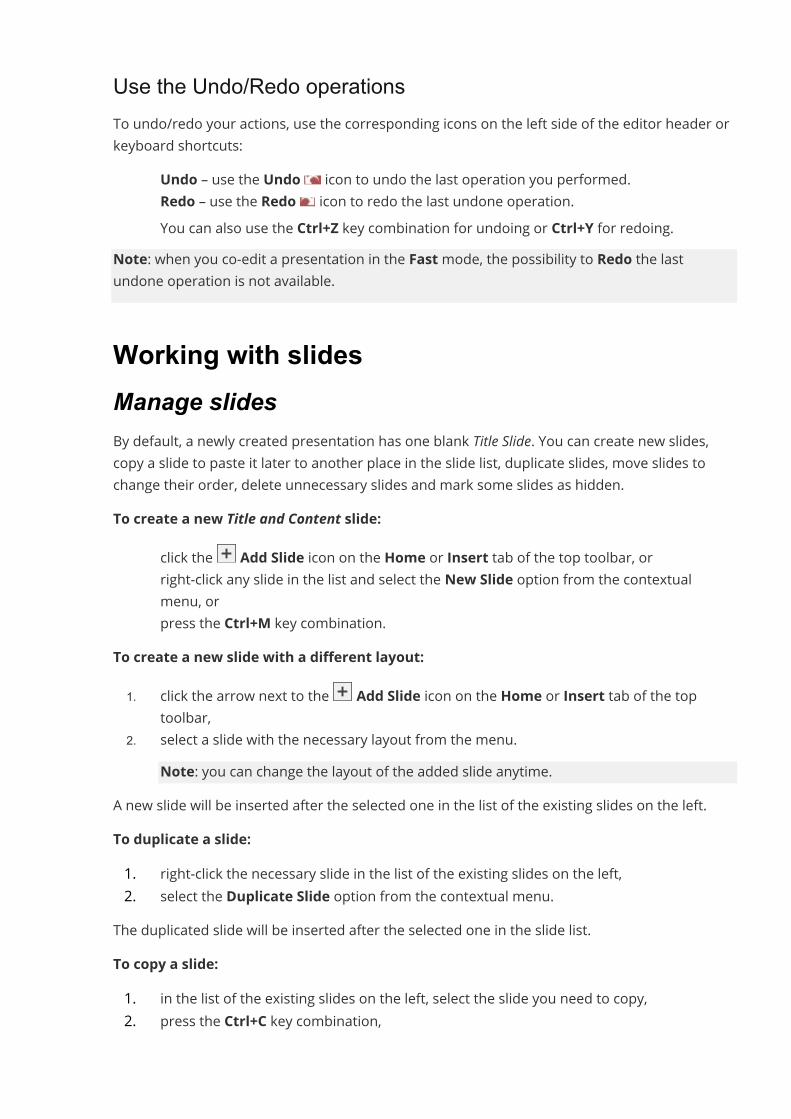
Use the Undo/Redo operationsTo undo/redo your actions, use the corresponding icons on the left side of the editor header orkeyboard shortcuts:
· Undo – use the Undo icon to undo the last operation you performed.· Redo – use the Redo icon to redo the last undone operation.· You can also use the Ctrl+Z key combination for undoing or Ctrl+Y for redoing.
Note: when you co-edit a presentation in the Fastmode, the possibility to Redo the lastundone operation is not available.
Working with slidesManage slidesBy default, a newly created presentation has one blank Title Slide. You can create new slides,copy a slide to paste it later to another place in the slide list, duplicate slides, move slides tochange their order, delete unnecessary slides and mark some slides as hidden.To create a new Title and Content slide:
· click the Add Slide icon on the Home or Insert tab of the top toolbar, or· right-click any slide in the list and select the New Slide option from the contextual
menu, or· press the Ctrl+M key combination.
To create a new slide with a different layout:1. click the arrow next to the Add Slide icon on the Home or Insert tab of the top
toolbar,2. select a slide with the necessary layout from the menu.
Note: you can change the layout of the added slide anytime.A new slide will be inserted after the selected one in the list of the existing slides on the left.To duplicate a slide:1. right-click the necessary slide in the list of the existing slides on the left,2. select the Duplicate Slide option from the contextual menu.
The duplicated slide will be inserted after the selected one in the slide list.To copy a slide:1. in the list of the existing slides on the left, select the slide you need to copy,2. press the Ctrl+C key combination,
3. in the slide list, select the slide after which the copied slide should be pasted,4. press the Ctrl+V key combination.
To move an existing slide:1. left-click the necessary slide in the list of the existing slides on the left,2. without releasing the mouse button, drag it to the necessary place in the list (a
horizontal line indicates a new location).To delete an unnecessary slide:1. right-click the slide you want to delete in the list of the existing slides on the left,2. select the Delete Slide option from the contextual menu.
To mark a slide as hidden:1. right-click the slide you want to hide in the list of the existing slides on the left,2. select the Hide Slide option from the contextual menu.
The number that corresponds to the hidden slide in the slide list on the left will be crossed out.To display the hidden slide as a regular one in the slide list, click the Hide Slide option onceagain.
Note: use this option if you do not want to demonstrate some slides to your audience, butwant to be able to access them if necessary. If you start the slideshow in the Presentermode,you can see all the existing slides in the list on the left, while hidden slides numbers are crossedout. If you wish to show a slide marked as hidden to others, just click it in the slide list on theleft - the slide will be displayed.To select all the existing slides at once:1. right-click any slide in the list of the existing slides on the left,2. select the Select All option from the contextual menu.
To select several slides:1. hold down the Ctrl key,2. select the necessary slides by left-clicking them in the list of the existing slides on the
left.
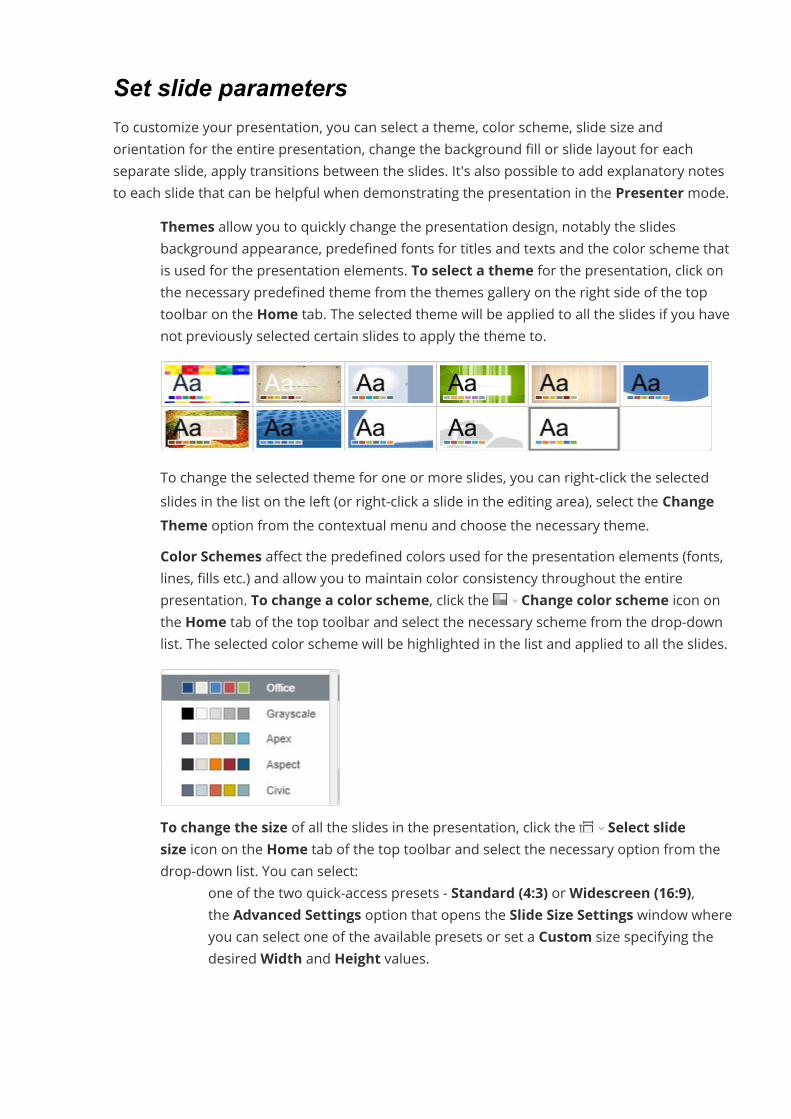
Set slide parametersTo customize your presentation, you can select a theme, color scheme, slide size andorientation for the entire presentation, change the background fill or slide layout for eachseparate slide, apply transitions between the slides. It's also possible to add explanatory notesto each slide that can be helpful when demonstrating the presentation in the Presentermode.
· Themes allow you to quickly change the presentation design, notably the slidesbackground appearance, predefined fonts for titles and texts and the color scheme thatis used for the presentation elements. To select a theme for the presentation, click onthe necessary predefined theme from the themes gallery on the right side of the toptoolbar on the Home tab. The selected theme will be applied to all the slides if you havenot previously selected certain slides to apply the theme to.
To change the selected theme for one or more slides, you can right-click the selectedslides in the list on the left (or right-click a slide in the editing area), select the ChangeTheme option from the contextual menu and choose the necessary theme.
· Color Schemes affect the predefined colors used for the presentation elements (fonts,lines, fills etc.) and allow you to maintain color consistency throughout the entirepresentation. To change a color scheme, click the Change color scheme icon onthe Home tab of the top toolbar and select the necessary scheme from the drop-downlist. The selected color scheme will be highlighted in the list and applied to all the slides.
· To change the size of all the slides in the presentation, click the Select slidesize icon on the Home tab of the top toolbar and select the necessary option from thedrop-down list. You can select:
o one of the two quick-access presets - Standard (4:3) orWidescreen (16:9),o the Advanced Settings option that opens the Slide Size Settings window where
you can select one of the available presets or set a Custom size specifying thedesiredWidth and Height values.
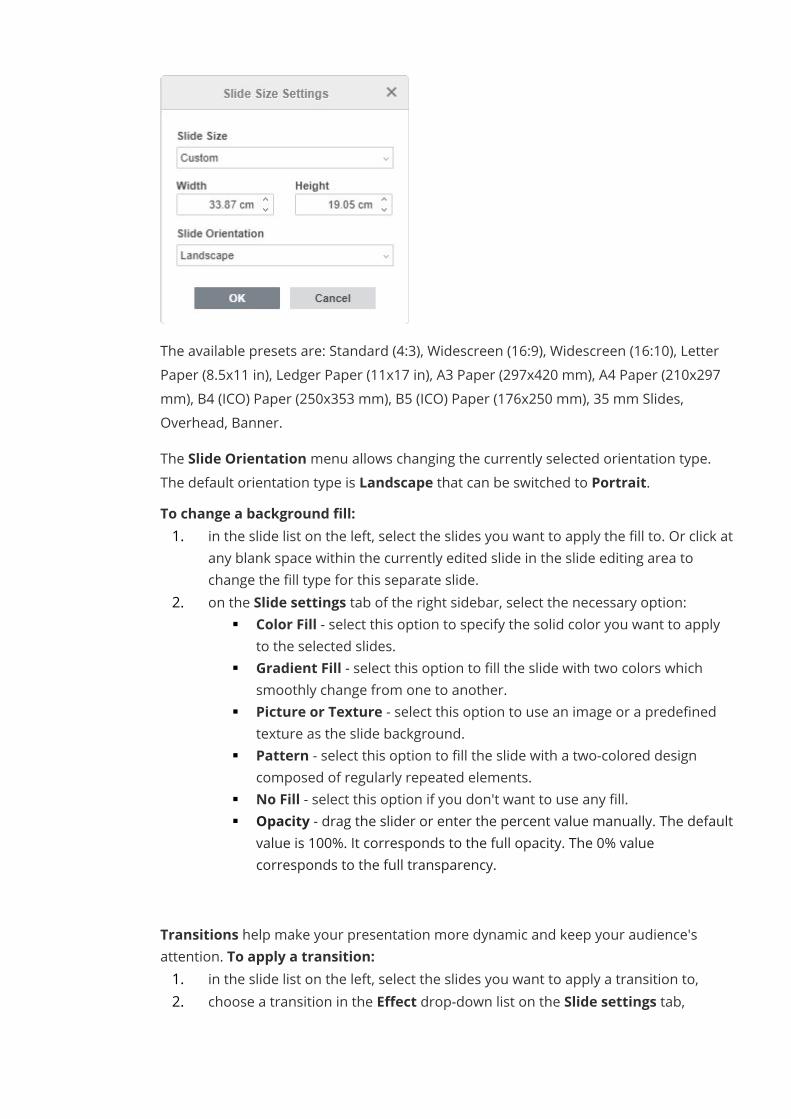
The available presets are: Standard (4:3), Widescreen (16:9), Widescreen (16:10), LetterPaper (8.5x11 in), Ledger Paper (11x17 in), A3 Paper (297x420 mm), A4 Paper (210x297mm), B4 (ICO) Paper (250x353 mm), B5 (ICO) Paper (176x250 mm), 35 mm Slides,Overhead, Banner.The Slide Orientationmenu allows changing the currently selected orientation type.The default orientation type is Landscape that can be switched to Portrait.
· To change a background fill:1. in the slide list on the left, select the slides you want to apply the fill to. Or click at
any blank space within the currently edited slide in the slide editing area tochange the fill type for this separate slide.
2. on the Slide settings tab of the right sidebar, select the necessary option:§ Color Fill - select this option to specify the solid color you want to apply
to the selected slides.§ Gradient Fill - select this option to fill the slide with two colors which
smoothly change from one to another.§ Picture or Texture - select this option to use an image or a predefined
texture as the slide background.§ Pattern - select this option to fill the slide with a two-colored design
composed of regularly repeated elements.§ No Fill - select this option if you don't want to use any fill.§ Opacity - drag the slider or enter the percent value manually. The default
value is 100%. It corresponds to the full opacity. The 0% valuecorresponds to the full transparency.
· Transitions help make your presentation more dynamic and keep your audience'sattention. To apply a transition:1. in the slide list on the left, select the slides you want to apply a transition to,2. choose a transition in the Effect drop-down list on the Slide settings tab,
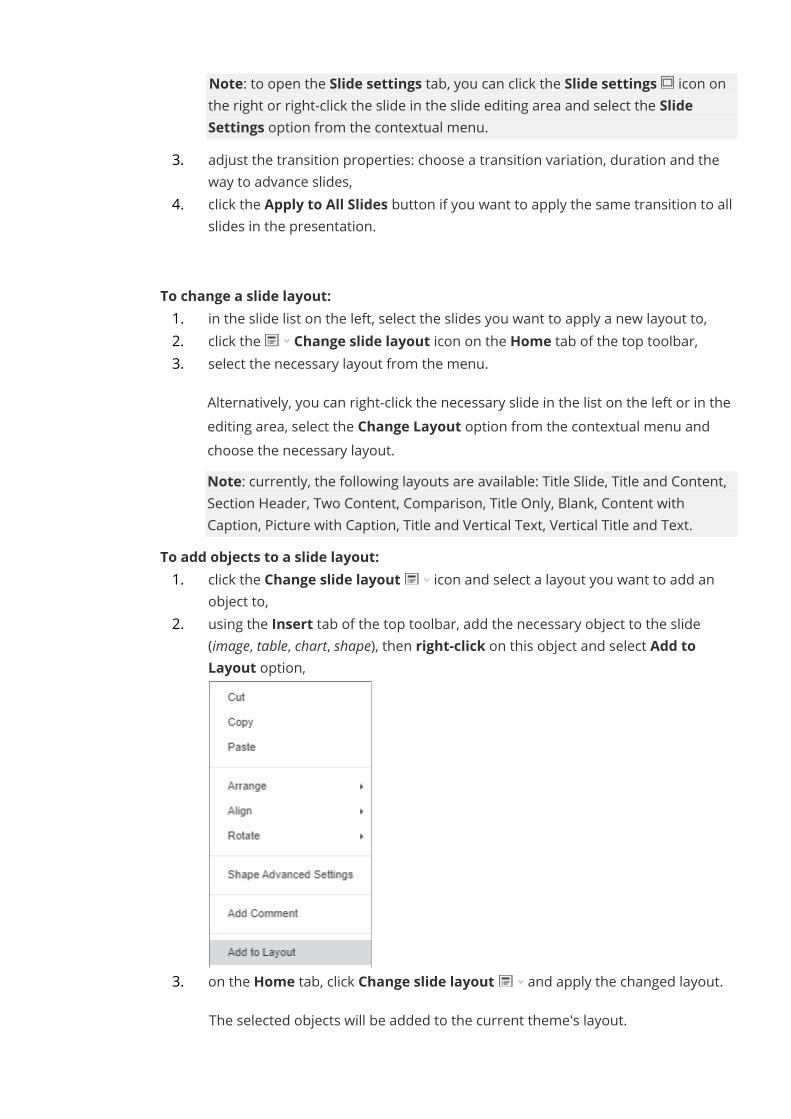
Note: to open the Slide settings tab, you can click the Slide settings icon onthe right or right-click the slide in the slide editing area and select the SlideSettings option from the contextual menu.
3. adjust the transition properties: choose a transition variation, duration and theway to advance slides,
4. click the Apply to All Slides button if you want to apply the same transition to allslides in the presentation.
· To change a slide layout:1. in the slide list on the left, select the slides you want to apply a new layout to,2. click the Change slide layout icon on the Home tab of the top toolbar,3. select the necessary layout from the menu.
Alternatively, you can right-click the necessary slide in the list on the left or in theediting area, select the Change Layout option from the contextual menu andchoose the necessary layout.Note: currently, the following layouts are available: Title Slide, Title and Content,Section Header, Two Content, Comparison, Title Only, Blank, Content withCaption, Picture with Caption, Title and Vertical Text, Vertical Title and Text.
· To add objects to a slide layout:1. click the Change slide layout icon and select a layout you want to add an
object to,2. using the Insert tab of the top toolbar, add the necessary object to the slide
(image, table, chart, shape), then right-click on this object and select Add toLayout option,
3. on the Home tab, click Change slide layout and apply the changed layout.The selected objects will be added to the current theme's layout.
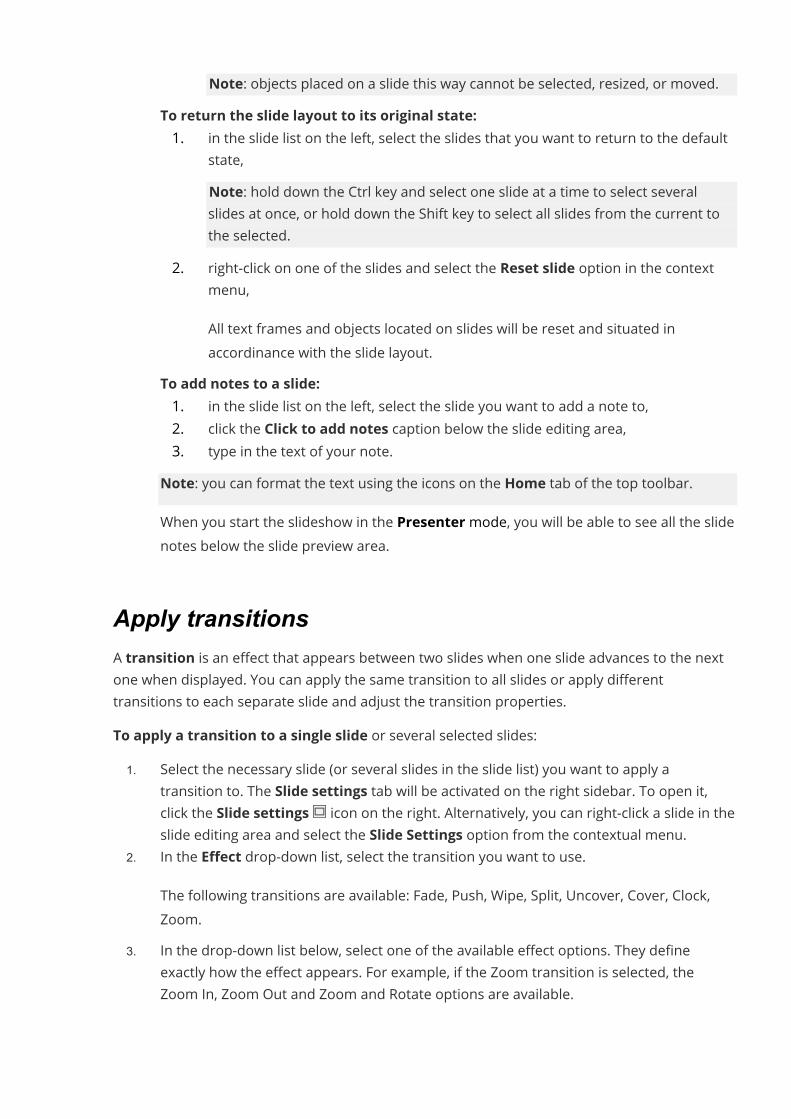
Note: objects placed on a slide this way cannot be selected, resized, or moved.· To return the slide layout to its original state:
1. in the slide list on the left, select the slides that you want to return to the defaultstate,Note: hold down the Ctrl key and select one slide at a time to select severalslides at once, or hold down the Shift key to select all slides from the current tothe selected.
2. right-click on one of the slides and select the Reset slide option in the contextmenu,All text frames and objects located on slides will be reset and situated inaccordinance with the slide layout.
· To add notes to a slide:1. in the slide list on the left, select the slide you want to add a note to,2. click the Click to add notes caption below the slide editing area,3. type in the text of your note.
Note: you can format the text using the icons on the Home tab of the top toolbar.When you start the slideshow in the Presentermode, you will be able to see all the slidenotes below the slide preview area.
Apply transitionsA transition is an effect that appears between two slides when one slide advances to the nextone when displayed. You can apply the same transition to all slides or apply differenttransitions to each separate slide and adjust the transition properties.To apply a transition to a single slide or several selected slides:1. Select the necessary slide (or several slides in the slide list) you want to apply a
transition to. The Slide settings tab will be activated on the right sidebar. To open it,click the Slide settings icon on the right. Alternatively, you can right-click a slide in theslide editing area and select the Slide Settings option from the contextual menu.
2. In the Effect drop-down list, select the transition you want to use.The following transitions are available: Fade, Push, Wipe, Split, Uncover, Cover, Clock,Zoom.
3. In the drop-down list below, select one of the available effect options. They defineexactly how the effect appears. For example, if the Zoom transition is selected, theZoom In, Zoom Out and Zoom and Rotate options are available.
4. Specify how long you want the transition to last. In the Duration box, enter or select thenecessary time value, measured in seconds.
5. Press the Preview button to view the slide with the applied transition in the slide editingarea.
6. Specify how long you want the slide to be displayed until it advances to another one:· Start on click – check this box if you don't want to restrict the time while the
selected slide is displayed. The slide will advance to another one only when youclick on it with the mouse.
· Delay – use this option if you want the selected slide to be displayed within aspecified period of time until it advances to the next one. Check this box andenter or select the necessary time value, measured in seconds.Note: if you check only the Delay box, the slides will advance automaticallywithin a specified time interval. If you check both the Start on click andthe Delay boxes and set the delay value, the slides will advance automatically aswell, but you will also be able to click a slide to advance from it to the next.
To apply a transition to all the slides in your presentation: perform the procedure describedabove and press the Apply to All Slides button.To delete a transition: select the necessary slide and choose the None option inthe Effect list.To delete all transitions: select any slide, choose the None option in the Effect list and pressthe Apply to All Slides button.
Insert footersFooters allow adding some additional info to a slide, such as date and time, slide number, or atext.To insert a footer in a presentation:1. switch to the Insert tab,2. click the Edit footer button on the top toolbar,3. the Footer Settings window will open. Check the data you want to add to the footer.
The changes are displayed in the preview window on the right.· check the Date and time box to insert a date or time in the selected format. The
selected date will be added to the left field of the slide footer.Specify the necessary data format:
o Update automatically - check this radio button if you want toautomatically update the date and time according to the current date andtime.
Then select the necessary date and time Format and Language from thelists.
o Fixed - check this radio button if you do not want to automatically updatethe date and time.
· check the Slide number box to insert the current slide number. The slidenumber will be added in the right field of the slide footer.
· check Text in footer box to insert any text. Enter the necessary text in the entryfield below. The text will be added in the central field of the slide footer.
4. check the Don't show on the title slide option if necessary,5. click the Apply to all button to apply changes to all slides or use the Apply button to
apply the changes to the current slide only.To quickly insert a date or a slide number to the footer of the selected slide, you can usethe Show slide Number and Show Date and Time options on the Slide Settings tab of theright sidebar. In this case, the selected settings will be applied to the current slide only. Thedate and time or slide number added in such a way can be adjusted later using the FooterSettings window.To edit the added footer, click the Edit footer button on the top toolbar, make thenecessary changes in the Footer Settings window, and click the Apply or Apply to All buttonto save the changes.Insert date and time and slide number into the text boxIt's also possible to insert date and time or slide number into the selected text box using thecorresponding buttons on the Insert tab of the top toolbar.Insert date and time1. put the mouse cursor within the text box where you want to insert the date and time,2. click the Date & Time button on the Insert tab of the top toolbar,3. select the necessary Language from the list and choose the necessary date and
time Format in the Date & Time window,4. if necessary, check the Update automatically box or press the Set as default box to
set the selected date and time format as default for the specified language,5. click the OK button to apply the changes.
The date and time will be inserted in the current cursor position. To edit the inserted date andtime,1. select the inserted date and time in the text box,2. click the Date & Time button on the Insert tab of the top toolbar,3. choose the necessary format in the Date & Time window,4. click the OK button.
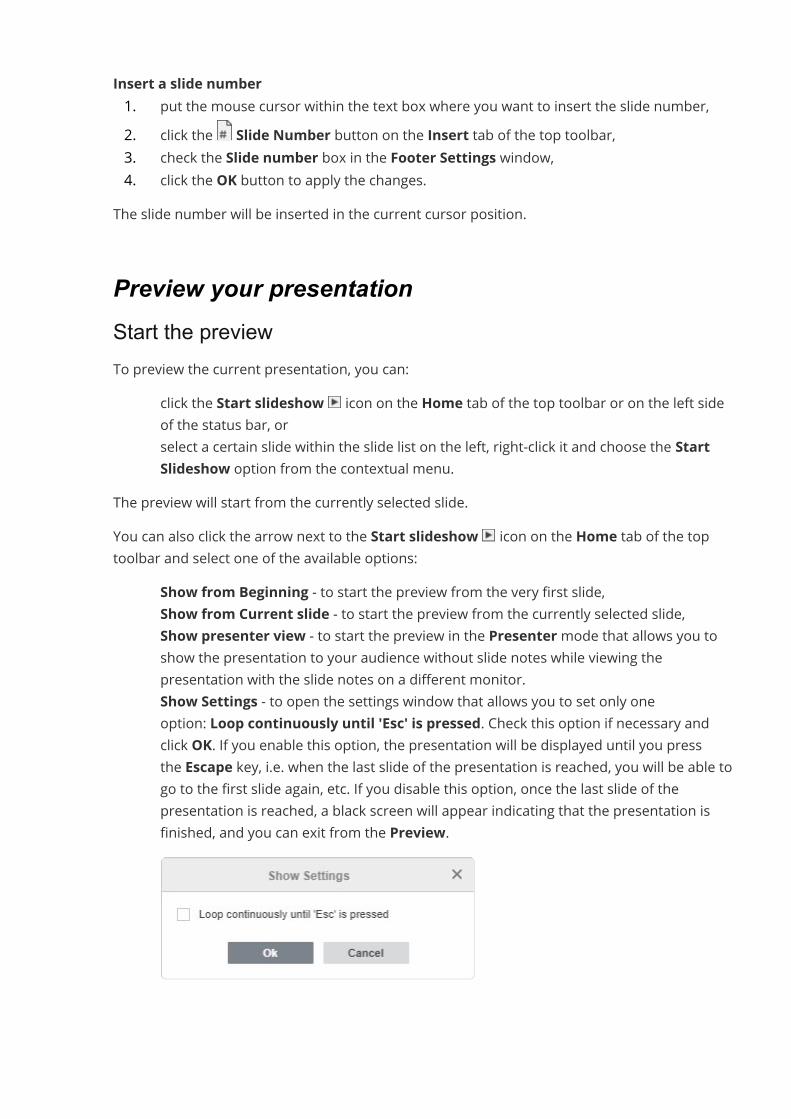
Insert a slide number1. put the mouse cursor within the text box where you want to insert the slide number,2. click the Slide Number button on the Insert tab of the top toolbar,3. check the Slide number box in the Footer Settings window,4. click the OK button to apply the changes.
The slide number will be inserted in the current cursor position.
Preview your presentationStart the previewTo preview the current presentation, you can:
· click the Start slideshow icon on the Home tab of the top toolbar or on the left sideof the status bar, or
· select a certain slide within the slide list on the left, right-click it and choose the StartSlideshow option from the contextual menu.
The preview will start from the currently selected slide.You can also click the arrow next to the Start slideshow icon on the Home tab of the toptoolbar and select one of the available options:
· Show from Beginning - to start the preview from the very first slide,· Show from Current slide - to start the preview from the currently selected slide,· Show presenter view - to start the preview in the Presentermode that allows you to
show the presentation to your audience without slide notes while viewing thepresentation with the slide notes on a different monitor.
· Show Settings - to open the settings window that allows you to set only oneoption: Loop continuously until 'Esc' is pressed. Check this option if necessary andclick OK. If you enable this option, the presentation will be displayed until you pressthe Escape key, i.e. when the last slide of the presentation is reached, you will be able togo to the first slide again, etc. If you disable this option, once the last slide of thepresentation is reached, a black screen will appear indicating that the presentation isfinished, and you can exit from the Preview.
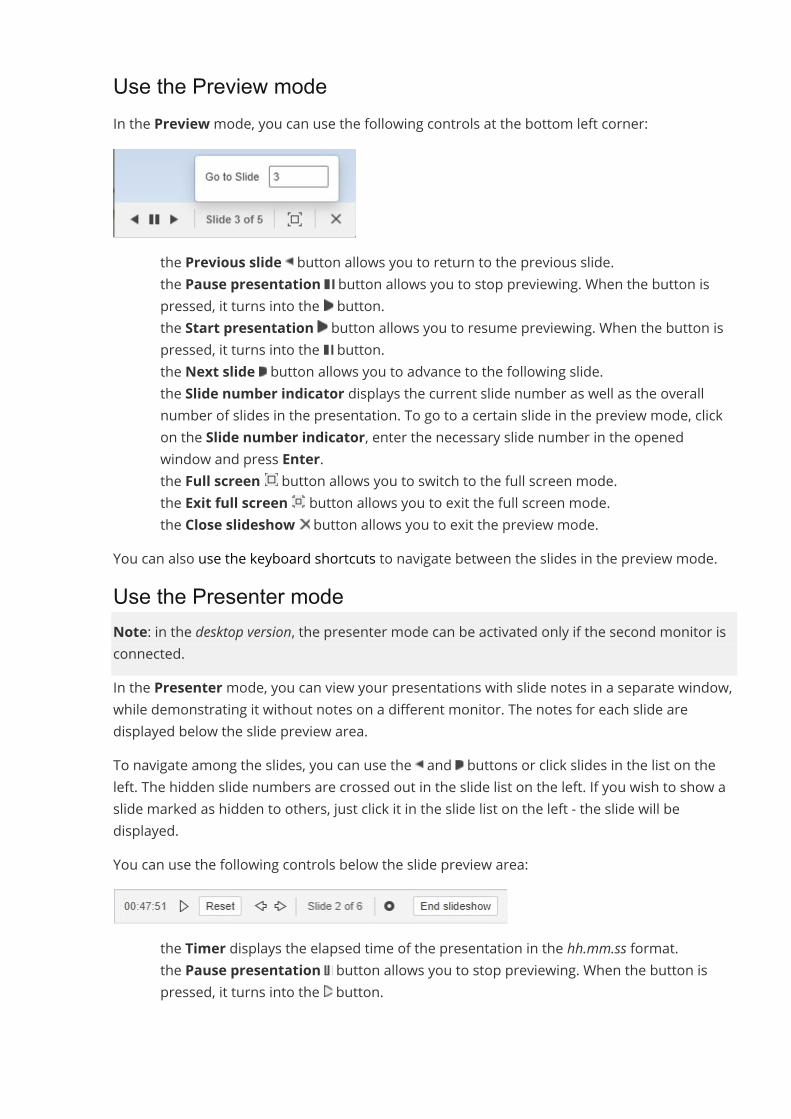
Use the Preview modeIn the Previewmode, you can use the following controls at the bottom left corner:
· the Previous slide button allows you to return to the previous slide.· the Pause presentation button allows you to stop previewing. When the button is
pressed, it turns into the button.· the Start presentation button allows you to resume previewing. When the button is
pressed, it turns into the button.· the Next slide button allows you to advance to the following slide.· the Slide number indicator displays the current slide number as well as the overall
number of slides in the presentation. To go to a certain slide in the preview mode, clickon the Slide number indicator, enter the necessary slide number in the openedwindow and press Enter.
· the Full screen button allows you to switch to the full screen mode.· the Exit full screen button allows you to exit the full screen mode.· the Close slideshow button allows you to exit the preview mode.
You can also use the keyboard shortcuts to navigate between the slides in the preview mode.Use the Presenter modeNote: in the desktop version, the presenter mode can be activated only if the second monitor isconnected.In the Presentermode, you can view your presentations with slide notes in a separate window,while demonstrating it without notes on a different monitor. The notes for each slide aredisplayed below the slide preview area.To navigate among the slides, you can use the and buttons or click slides in the list on theleft. The hidden slide numbers are crossed out in the slide list on the left. If you wish to show aslide marked as hidden to others, just click it in the slide list on the left - the slide will bedisplayed.You can use the following controls below the slide preview area:
· the Timer displays the elapsed time of the presentation in the hh.mm.ss format.· the Pause presentation button allows you to stop previewing. When the button is
pressed, it turns into the button.
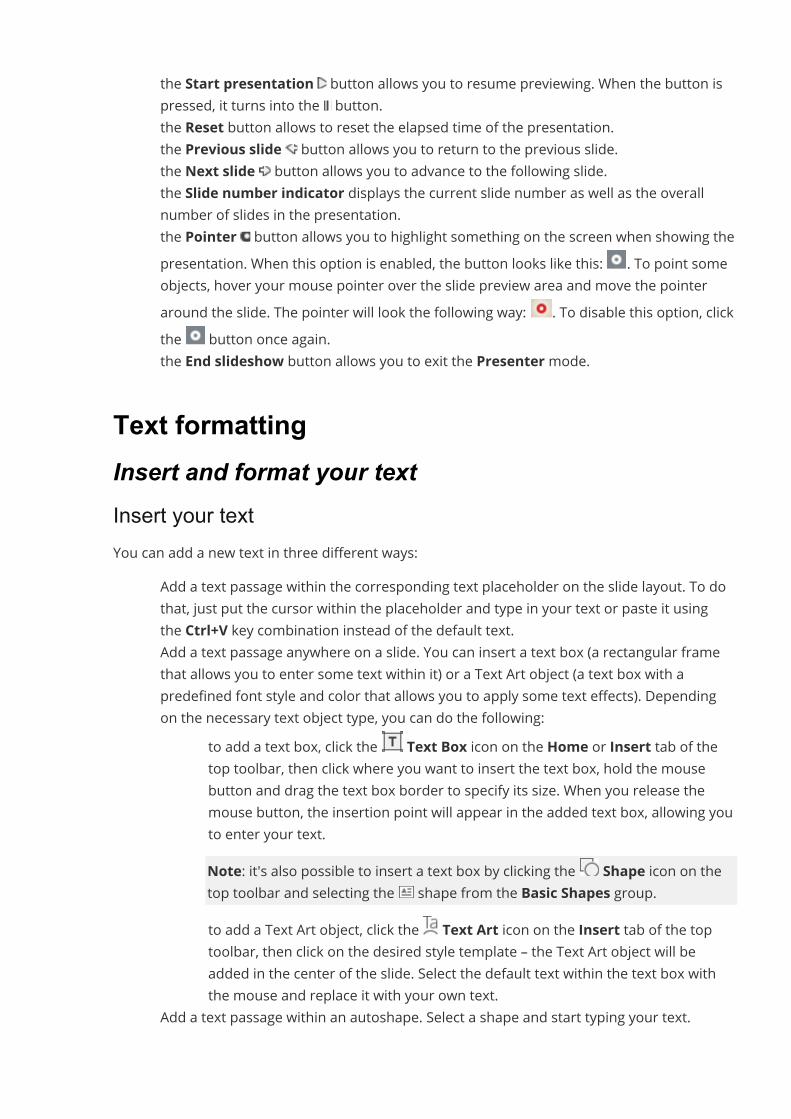
· the Start presentation button allows you to resume previewing. When the button ispressed, it turns into the button.
· the Reset button allows to reset the elapsed time of the presentation.· the Previous slide button allows you to return to the previous slide.· the Next slide button allows you to advance to the following slide.· the Slide number indicator displays the current slide number as well as the overall
number of slides in the presentation.· the Pointer button allows you to highlight something on the screen when showing the
presentation. When this option is enabled, the button looks like this: . To point someobjects, hover your mouse pointer over the slide preview area and move the pointeraround the slide. The pointer will look the following way: . To disable this option, clickthe button once again.
· the End slideshow button allows you to exit the Presentermode.
Text formattingInsert and format your textInsert your textYou can add a new text in three different ways:
· Add a text passage within the corresponding text placeholder on the slide layout. To dothat, just put the cursor within the placeholder and type in your text or paste it usingthe Ctrl+V key combination instead of the default text.
· Add a text passage anywhere on a slide. You can insert a text box (a rectangular framethat allows you to enter some text within it) or a Text Art object (a text box with apredefined font style and color that allows you to apply some text effects). Dependingon the necessary text object type, you can do the following:
o to add a text box, click the Text Box icon on the Home or Insert tab of thetop toolbar, then click where you want to insert the text box, hold the mousebutton and drag the text box border to specify its size. When you release themouse button, the insertion point will appear in the added text box, allowing youto enter your text.Note: it's also possible to insert a text box by clicking the Shape icon on thetop toolbar and selecting the shape from the Basic Shapes group.
o to add a Text Art object, click the Text Art icon on the Insert tab of the toptoolbar, then click on the desired style template – the Text Art object will beadded in the center of the slide. Select the default text within the text box withthe mouse and replace it with your own text.
· Add a text passage within an autoshape. Select a shape and start typing your text.
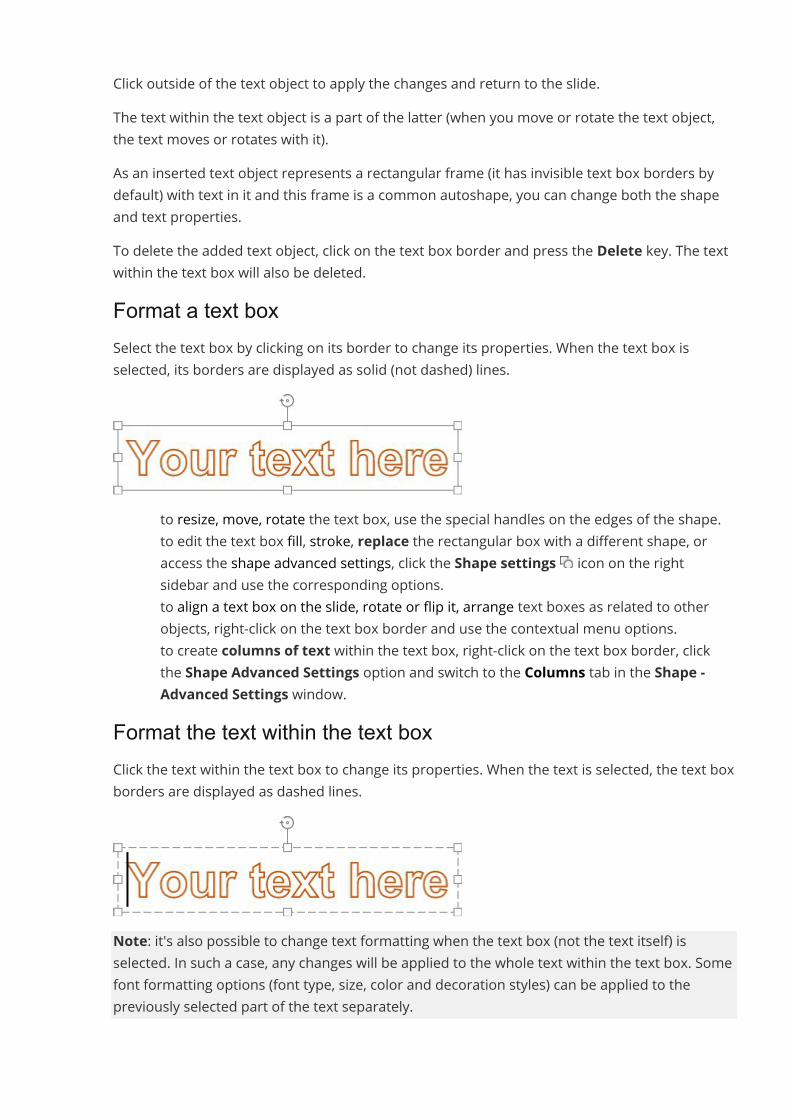
Click outside of the text object to apply the changes and return to the slide.The text within the text object is a part of the latter (when you move or rotate the text object,the text moves or rotates with it).As an inserted text object represents a rectangular frame (it has invisible text box borders bydefault) with text in it and this frame is a common autoshape, you can change both the shapeand text properties.To delete the added text object, click on the text box border and press the Delete key. The textwithin the text box will also be deleted.Format a text boxSelect the text box by clicking on its border to change its properties. When the text box isselected, its borders are displayed as solid (not dashed) lines.
· to resize, move, rotate the text box, use the special handles on the edges of the shape.· to edit the text box fill, stroke, replace the rectangular box with a different shape, or
access the shape advanced settings, click the Shape settings icon on the rightsidebar and use the corresponding options.
· to align a text box on the slide, rotate or flip it, arrange text boxes as related to otherobjects, right-click on the text box border and use the contextual menu options.
· to create columns of text within the text box, right-click on the text box border, clickthe Shape Advanced Settings option and switch to the Columns tab in the Shape -Advanced Settings window.
Format the text within the text boxClick the text within the text box to change its properties. When the text is selected, the text boxborders are displayed as dashed lines.
Note: it's also possible to change text formatting when the text box (not the text itself) isselected. In such a case, any changes will be applied to the whole text within the text box. Somefont formatting options (font type, size, color and decoration styles) can be applied to thepreviously selected part of the text separately.
Align your text within the text boxThe text is aligned horizontally in four ways: left, right, center or justified. To do that:1. place the cursor to the position where you want the alignment to be applied (this can be
a new line or already entered text),2. drop-down the Horizontal align list on the Home tab of the top toolbar,3. select the alignment type you would like to apply:
o the Align text left option allows you to line up your text on the left side of thetext box (the right side remains unaligned).
o the Align text center option allows you to line up your text in the center ofthe text box (the right and the left sides remains unaligned).
o the Align text right option allows you to line up your text on the right side ofthe text box (the left side remains unaligned).
o the Justify option allows you to line up your text both on the left and on theright sides of the text box (additional spacing is added where necessary to keepthe alignment).
Note: these parameters can also be found in the Paragraph - Advanced Settings window.The text is aligned vertically in three ways: top, middle or bottom. To do that:1. place the cursor to the position where you want the alignment to be applied (this can be
a new line or already entered text),2. drop-down the Vertical align list on the Home tab of the top toolbar,3. select the alignment type you would like to apply:
o the Align text to the top option allows you to line up your text to the top ofthe text box.
o the Align text to the middle option allows you to line up your text in thecenter of the text box.
o the Align text to the bottom option allows you to line up your text to thebottom of the text box.
Change the text directionTo Rotate the text within the text box, right-click the text, select the Text Direction option andthen choose one of the available options: Horizontal (selected by default), Rotate TextDown (used to set a vertical direction, from top to bottom) or Rotate Text Up (used to set avertical direction, from bottom to top).Adjust font type, size, color and apply decoration stylesYou can select the font type, its size and color as well as apply various font decoration stylesusing the corresponding icons situated on the Home tab of the top toolbar.Note: in case you want to apply the formatting to the text already present in the presentation,select it with the mouse or using the keyboard and apply the formatting.
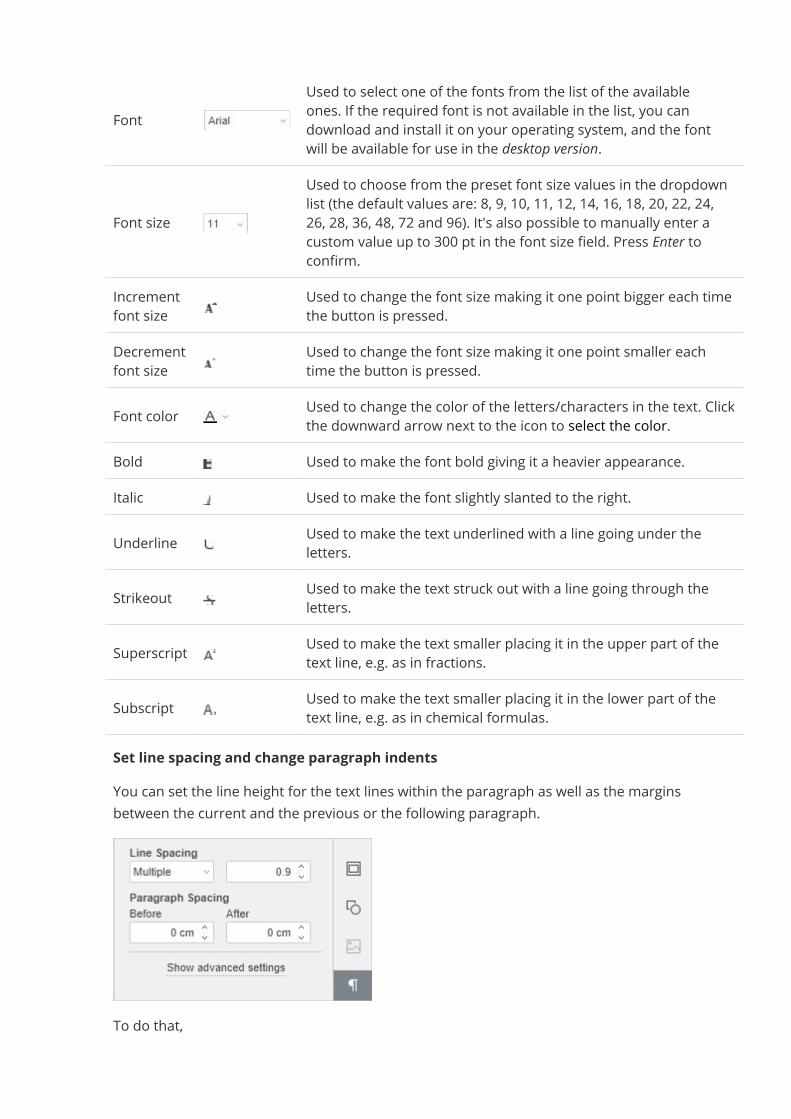
FontUsed to select one of the fonts from the list of the availableones. If the required font is not available in the list, you candownload and install it on your operating system, and the fontwill be available for use in the desktop version.
Font sizeUsed to choose from the preset font size values in the dropdownlist (the default values are: 8, 9, 10, 11, 12, 14, 16, 18, 20, 22, 24,26, 28, 36, 48, 72 and 96). It's also possible to manually enter acustom value up to 300 pt in the font size field. Press Enter toconfirm.
Incrementfont size
Used to change the font size making it one point bigger each timethe button is pressed.
Decrementfont size
Used to change the font size making it one point smaller eachtime the button is pressed.
Font color Used to change the color of the letters/characters in the text. Clickthe downward arrow next to the icon to select the color.
Bold Used to make the font bold giving it a heavier appearance.Italic Used to make the font slightly slanted to the right.Underline Used to make the text underlined with a line going under the
letters.Strikeout Used to make the text struck out with a line going through the
letters.Superscript Used to make the text smaller placing it in the upper part of the
text line, e.g. as in fractions.Subscript Used to make the text smaller placing it in the lower part of the
text line, e.g. as in chemical formulas.Set line spacing and change paragraph indentsYou can set the line height for the text lines within the paragraph as well as the marginsbetween the current and the previous or the following paragraph.
To do that,
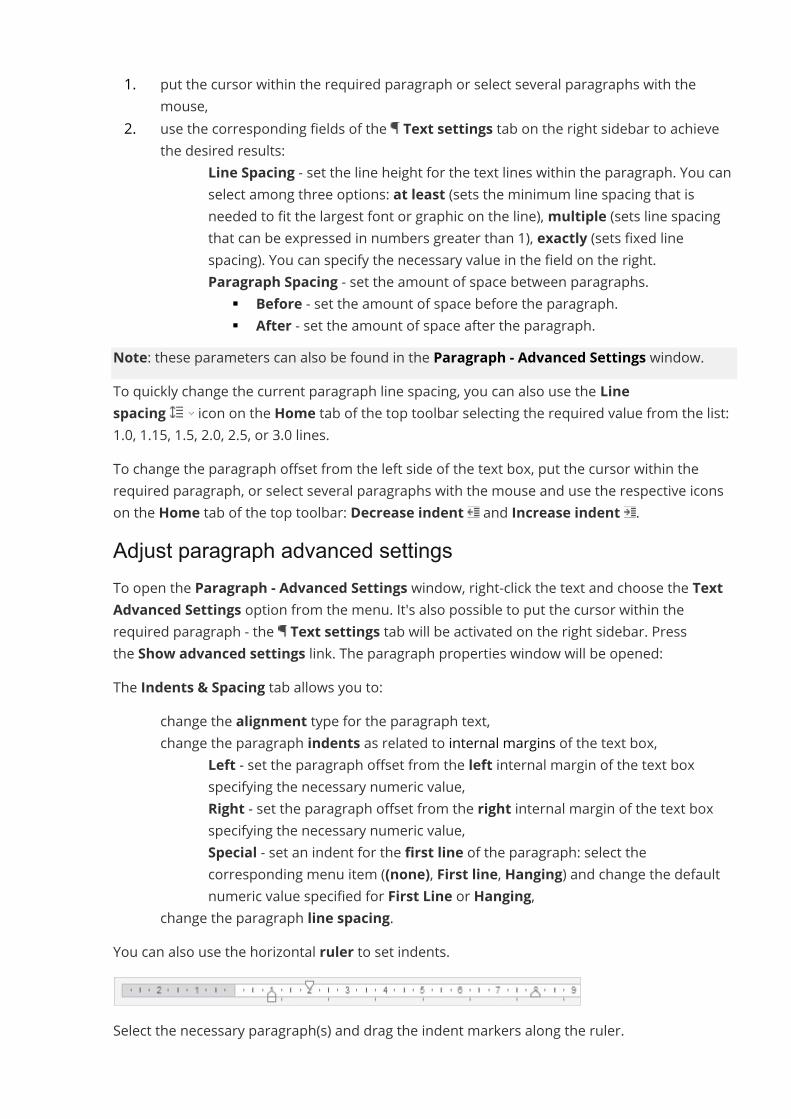
1. put the cursor within the required paragraph or select several paragraphs with themouse,
2. use the corresponding fields of the Text settings tab on the right sidebar to achievethe desired results:
o Line Spacing - set the line height for the text lines within the paragraph. You canselect among three options: at least (sets the minimum line spacing that isneeded to fit the largest font or graphic on the line),multiple (sets line spacingthat can be expressed in numbers greater than 1), exactly (sets fixed linespacing). You can specify the necessary value in the field on the right.
o Paragraph Spacing - set the amount of space between paragraphs.§ Before - set the amount of space before the paragraph.§ After - set the amount of space after the paragraph.
Note: these parameters can also be found in the Paragraph - Advanced Settings window.To quickly change the current paragraph line spacing, you can also use the Linespacing icon on the Home tab of the top toolbar selecting the required value from the list:1.0, 1.15, 1.5, 2.0, 2.5, or 3.0 lines.To change the paragraph offset from the left side of the text box, put the cursor within therequired paragraph, or select several paragraphs with the mouse and use the respective iconson the Home tab of the top toolbar: Decrease indent and Increase indent .Adjust paragraph advanced settingsTo open the Paragraph - Advanced Settings window, right-click the text and choose the TextAdvanced Settings option from the menu. It's also possible to put the cursor within therequired paragraph - the Text settings tab will be activated on the right sidebar. Pressthe Show advanced settings link. The paragraph properties window will be opened:The Indents & Spacing tab allows you to:
· change the alignment type for the paragraph text,· change the paragraph indents as related to internal margins of the text box,
o Left - set the paragraph offset from the left internal margin of the text boxspecifying the necessary numeric value,
o Right - set the paragraph offset from the right internal margin of the text boxspecifying the necessary numeric value,
o Special - set an indent for the first line of the paragraph: select thecorresponding menu item ((none), First line, Hanging) and change the defaultnumeric value specified for First Line or Hanging,
· change the paragraph line spacing.You can also use the horizontal ruler to set indents.
Select the necessary paragraph(s) and drag the indent markers along the ruler.
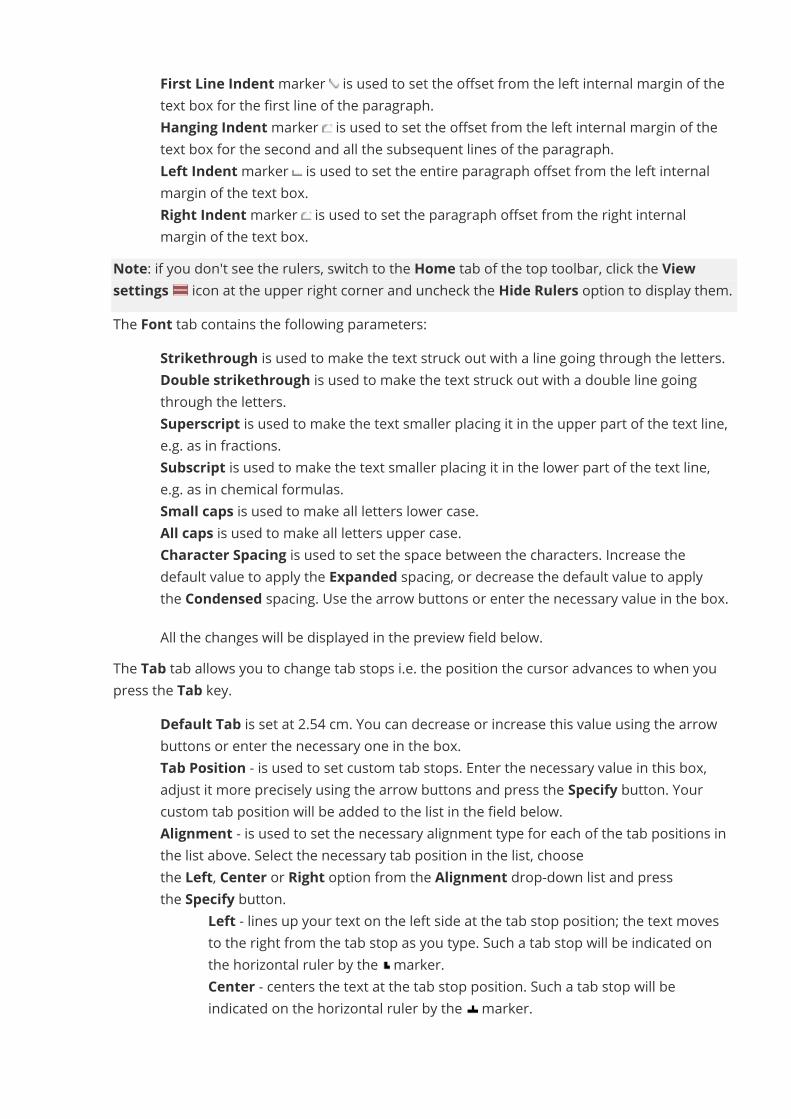
· First Line Indentmarker is used to set the offset from the left internal margin of thetext box for the first line of the paragraph.
· Hanging Indentmarker is used to set the offset from the left internal margin of thetext box for the second and all the subsequent lines of the paragraph.
· Left Indentmarker is used to set the entire paragraph offset from the left internalmargin of the text box.
· Right Indentmarker is used to set the paragraph offset from the right internalmargin of the text box.
Note: if you don't see the rulers, switch to the Home tab of the top toolbar, click the Viewsettings icon at the upper right corner and uncheck the Hide Rulers option to display them.The Font tab contains the following parameters:
· Strikethrough is used to make the text struck out with a line going through the letters.· Double strikethrough is used to make the text struck out with a double line going
through the letters.· Superscript is used to make the text smaller placing it in the upper part of the text line,
e.g. as in fractions.· Subscript is used to make the text smaller placing it in the lower part of the text line,
e.g. as in chemical formulas.· Small caps is used to make all letters lower case.· All caps is used to make all letters upper case.· Character Spacing is used to set the space between the characters. Increase the
default value to apply the Expanded spacing, or decrease the default value to applythe Condensed spacing. Use the arrow buttons or enter the necessary value in the box.All the changes will be displayed in the preview field below.
The Tab tab allows you to change tab stops i.e. the position the cursor advances to when youpress the Tab key.
· Default Tab is set at 2.54 cm. You can decrease or increase this value using the arrowbuttons or enter the necessary one in the box.
· Tab Position - is used to set custom tab stops. Enter the necessary value in this box,adjust it more precisely using the arrow buttons and press the Specify button. Yourcustom tab position will be added to the list in the field below.
· Alignment - is used to set the necessary alignment type for each of the tab positions inthe list above. Select the necessary tab position in the list, choosethe Left, Center or Right option from the Alignment drop-down list and pressthe Specify button.
o Left - lines up your text on the left side at the tab stop position; the text movesto the right from the tab stop as you type. Such a tab stop will be indicated onthe horizontal ruler by the marker.
o Center - centers the text at the tab stop position. Such a tab stop will beindicated on the horizontal ruler by the marker.
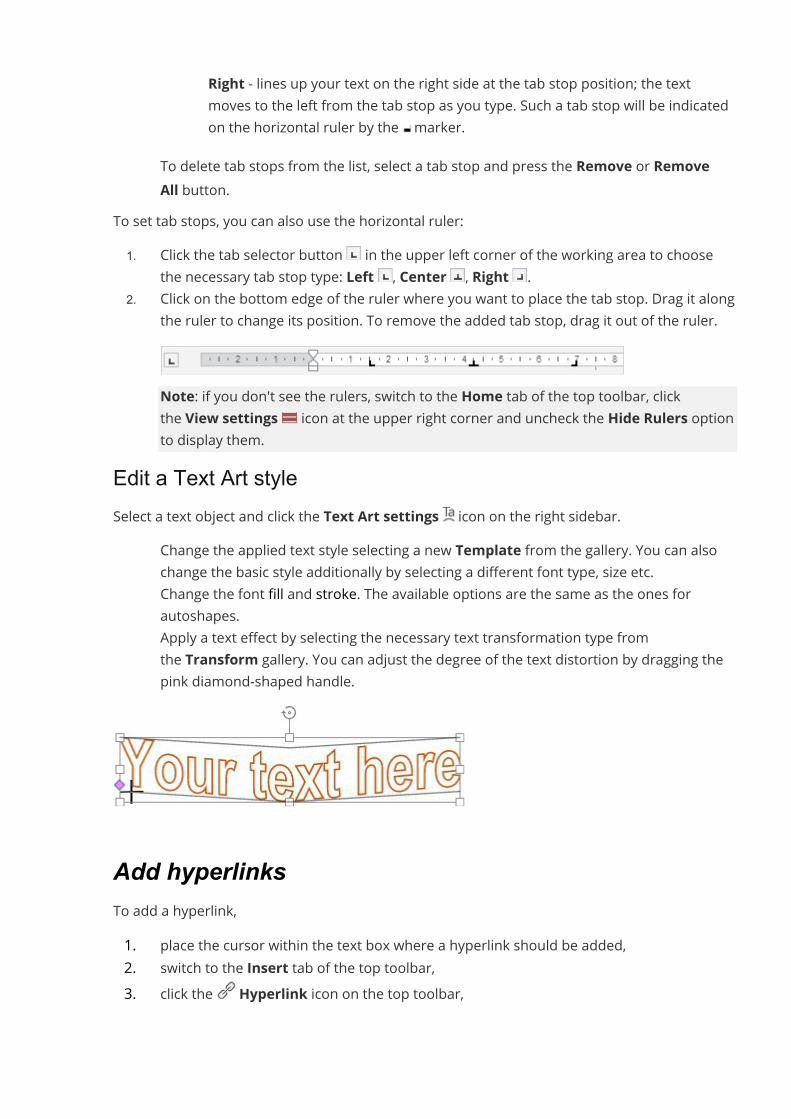
o Right - lines up your text on the right side at the tab stop position; the textmoves to the left from the tab stop as you type. Such a tab stop will be indicatedon the horizontal ruler by the marker.
To delete tab stops from the list, select a tab stop and press the Remove or RemoveAll button.
To set tab stops, you can also use the horizontal ruler:1. Click the tab selector button in the upper left corner of the working area to choose
the necessary tab stop type: Left , Center , Right .2. Click on the bottom edge of the ruler where you want to place the tab stop. Drag it along
the ruler to change its position. To remove the added tab stop, drag it out of the ruler.
Note: if you don't see the rulers, switch to the Home tab of the top toolbar, clickthe View settings icon at the upper right corner and uncheck the Hide Rulers optionto display them.
Edit a Text Art styleSelect a text object and click the Text Art settings icon on the right sidebar.
· Change the applied text style selecting a new Template from the gallery. You can alsochange the basic style additionally by selecting a different font type, size etc.
· Change the font fill and stroke. The available options are the same as the ones forautoshapes.
· Apply a text effect by selecting the necessary text transformation type fromthe Transform gallery. You can adjust the degree of the text distortion by dragging thepink diamond-shaped handle.
Add hyperlinksTo add a hyperlink,1. place the cursor within the text box where a hyperlink should be added,2. switch to the Insert tab of the top toolbar,3. click the Hyperlink icon on the top toolbar,
4. after that the Hyperlink Settings window will appear where you can specify thehyperlink parameters:
· Select a link type you wish to insert:o Use the External Link option and enter a URL in the format
http://www.example.com in the Link to field below if you need to add ahyperlink leading to an external website.
o Use the Slide In This Presentation option and select one of the optionsbelow if you need to add a hyperlink leading to a certain slide in the samepresentation. The following options are available: Next Slide, PreviousSlide, First Slide, Last Slide, Slide with the specified number.
· Display - enter a text that will get clickable and lead to the web address/slidespecified in the upper field.
· ScreenTip text - enter a text that will become visible in a small pop-up windowwith a brief note or label pertaining to the hyperlink to be pointed.
5. Click the OK button.To add a hyperlink, you can also use the Ctrl+K key combination or click with the right mousebutton where a hyperlink should be added and select the Hyperlink option in the right-clickmenu.Note: it's also possible to select a character, word or word combination with the mouseor using the keyboard and then open the Hyperlink Settings window as described above. Inthis case, the Display field will be filled with the text fragment you selected.By hovering the cursor over the added hyperlink, the ScreenTip will appear containing the textyou specified. You can follow the link by pressing the CTRL key and clicking the link in yourpresentation.To edit or delete the added hyperlink, click it with the right mouse button, selectthe Hyperlink option in the right-click menu and then the action you want to perform - EditHyperlink or Remove Hyperlink.Create listsTo create a list in your presentation,1. place the cursor where a list should start (this can be a new line or the already entered
text),2. switch to the Home tab of the top toolbar,3. select the list type you would like to start:· Unordered list with markers is created using the Bullets icon situated on the top
toolbar· Ordered list with digits or letters is created using the Numbering icon situated at
the top toolbarNote: click the downward arrow next to the Bullets or Numbering icon to select howthe list is going to look like.
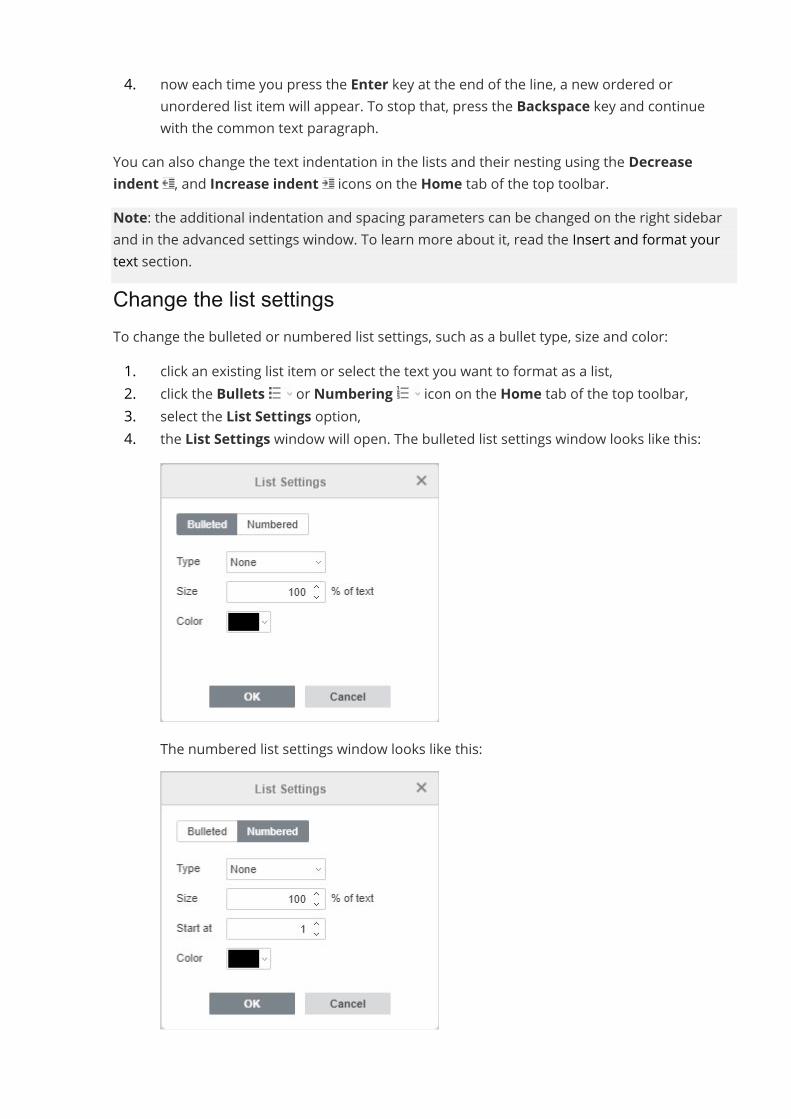
4. now each time you press the Enter key at the end of the line, a new ordered orunordered list item will appear. To stop that, press the Backspace key and continuewith the common text paragraph.
You can also change the text indentation in the lists and their nesting using the Decreaseindent , and Increase indent icons on the Home tab of the top toolbar.Note: the additional indentation and spacing parameters can be changed on the right sidebarand in the advanced settings window. To learn more about it, read the Insert and format yourtext section.Change the list settingsTo change the bulleted or numbered list settings, such as a bullet type, size and color:1. click an existing list item or select the text you want to format as a list,2. click the Bullets or Numbering icon on the Home tab of the top toolbar,3. select the List Settings option,4. the List Settings window will open. The bulleted list settings window looks like this:
The numbered list settings window looks like this:
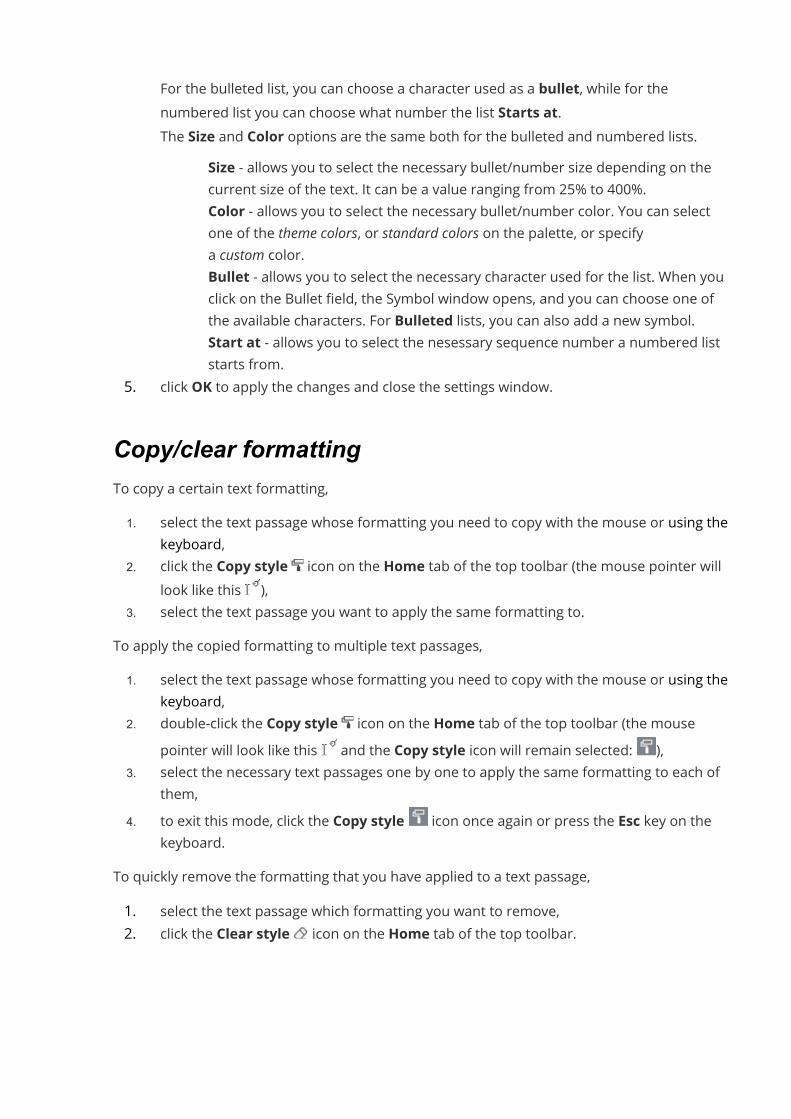
For the bulleted list, you can choose a character used as a bullet, while for thenumbered list you can choose what number the list Starts at.The Size and Color options are the same both for the bulleted and numbered lists.
· Size - allows you to select the necessary bullet/number size depending on thecurrent size of the text. It can be a value ranging from 25% to 400%.
· Color - allows you to select the necessary bullet/number color. You can selectone of the theme colors, or standard colors on the palette, or specifya custom color.
· Bullet - allows you to select the necessary character used for the list. When youclick on the Bullet field, the Symbol window opens, and you can choose one ofthe available characters. For Bulleted lists, you can also add a new symbol.
· Start at - allows you to select the nesessary sequence number a numbered liststarts from.
5. click OK to apply the changes and close the settings window.
Copy/clear formattingTo copy a certain text formatting,1. select the text passage whose formatting you need to copy with the mouse or using the
keyboard,2. click the Copy style icon on the Home tab of the top toolbar (the mouse pointer will
look like this ),3. select the text passage you want to apply the same formatting to.
To apply the copied formatting to multiple text passages,1. select the text passage whose formatting you need to copy with the mouse or using the
keyboard,2. double-click the Copy style icon on the Home tab of the top toolbar (the mouse
pointer will look like this and the Copy style icon will remain selected: ),3. select the necessary text passages one by one to apply the same formatting to each of
them,4. to exit this mode, click the Copy style icon once again or press the Esc key on the
keyboard.To quickly remove the formatting that you have applied to a text passage,1. select the text passage which formatting you want to remove,2. click the Clear style icon on the Home tab of the top toolbar.
Operations on objectsInsert and format autoshapesInsert an autoshapeTo add an autoshape to a slide,1. in the slide list on the left, select the slide you want to add the autoshape to,2. click the Shape icon on the Home or Insert tab of the top toolbar,3. select one of the available autoshape groups: Basic Shapes, Figured Arrows, Math,
Charts, Stars & Ribbons, Callouts, Buttons, Rectangles, Lines,4. click on the necessary autoshape within the selected group,5. in the slide editing area, place the mouse cursor where you want the shape to be put,
Note: you can click and drag to stretch the shape.6. once the autoshape is added, you can change its size, position and properties.
Note: to add a caption within the autoshape, make sure the shape is selected on theslide and start typing your text. The text you add in this way becomes a part of theautoshape (when you move or rotate the shape, the text moves or rotates with it).
It's also possible to add an autoshape to a slide layout.Adjust autoshape settingsSome of the autoshape settings can be altered using the Shape settings tab of the rightsidebar. To activate it, click the autoshape and choose the Shape settings icon on the right.Here you can change the following properties:
· Fill - use this section to select the autoshape fill. You can choose the following options:o Color Fill - to specify the solid color you want to apply to the selected shape.o Gradient Fill - to fill the shape with two colors which smoothly change from one
to another.o Picture or Texture - to use an image or a predefined texture as the shape
background.o Pattern - to fill the shape with a two-colored design composed of regularly
repeated elements.o No Fill - select this option if you don't want to use any fill.
For more detailed information on these options, please refer to the Fill objects andselect colors section.
· Stroke - use this section to change the autoshape stroke width, color or type.o To change the stroke width, select one of the available options from
the Size drop-down list. The available options are: 0.5 pt, 1 pt, 1.5 pt, 2.25 pt, 3pt, 4.5 pt, 6 pt. Or select the No Line option if you don't want to use any stroke.
o To change the stroke color, click on the colored box below and select thenecessary color. You can use the selected theme color, a standard color orchoose a custom color.
o To change the stroke type, select the necessary option from the correspondingdropdown list (a solid line is applied by default, you can change it to one of theavailable dashed lines).
· Rotation is used to rotate the shape by 90 degrees clockwise or counterclockwise aswell as to flip the shape horizontally or vertically. Click one of the buttons:
o to rotate the shape by 90 degrees counterclockwiseo to rotate the shape by 90 degrees clockwiseo to flip the shape horizontally (left to right)o to flip the shape vertically (upside down)
· Change Autoshape - use this section to replace the current autoshape with anotherone selected from the dropdown list.
· Show shadow - check this option to display shape with shadow.To change the advanced settings of the autoshape, right-click the shape and select the ShapeAdvanced Settings option from the contextual menu or left-click it and press the Showadvanced settings link on the right sidebar. The shape properties window will be opened.The Size tab allows you to change the autoshapeWidth and/or Height. If the Constantproportions button is clicked (in this case it looks like this ), the width and height will bechanged together preserving the original autoshape aspect ratio.The Rotation tab contains the following parameters:
· Angle - use this option to rotate the shape by an exactly specified angle. Enter thenecessary value measured in degrees into the field or adjust it using the arrows on theright.
· Flipped - check the Horizontally box to flip the shape horizontally (left to right) or checkthe Vertically box to flip the shape vertically (upside down).
TheWeights & Arrows tab contains the following parameters:· Line Style - this option allows specifying the following parameters:
o Cap Type - this option allows setting the style for the end of the line, therefore itcan be applied only to the shapes with the open outline, such as lines, polylines,etc.:
§ Flat - the end points will be flat.§ Round - the end points will be rounded.§ Square - the end points will be square.
o Join Type - this option allows setting the style for the intersection of two lines,for example, it can affect a polyline or the corners of the triangle or rectangleoutline:
§ Round - the corner will be rounded.§ Bevel - the corner will be cut off angularly.
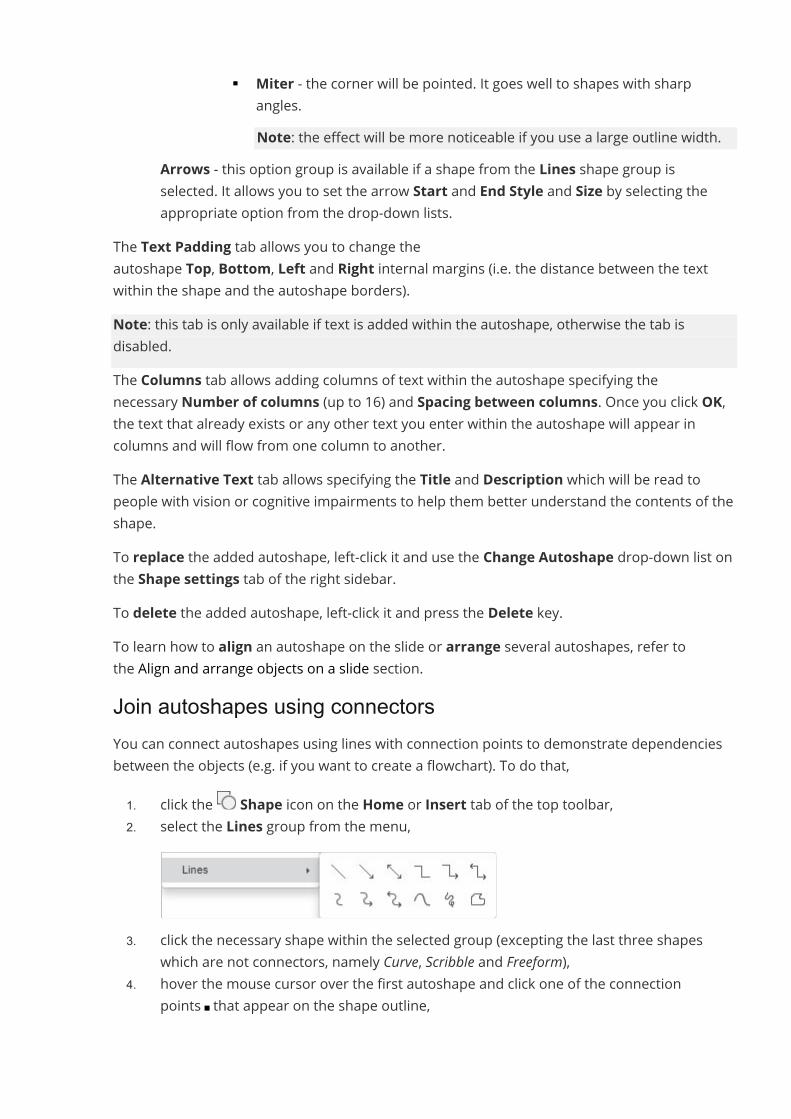
§ Miter - the corner will be pointed. It goes well to shapes with sharpangles.Note: the effect will be more noticeable if you use a large outline width.
· Arrows - this option group is available if a shape from the Lines shape group isselected. It allows you to set the arrow Start and End Style and Size by selecting theappropriate option from the drop-down lists.
The Text Padding tab allows you to change theautoshape Top, Bottom, Left and Right internal margins (i.e. the distance between the textwithin the shape and the autoshape borders).Note: this tab is only available if text is added within the autoshape, otherwise the tab isdisabled.The Columns tab allows adding columns of text within the autoshape specifying thenecessary Number of columns (up to 16) and Spacing between columns. Once you click OK,the text that already exists or any other text you enter within the autoshape will appear incolumns and will flow from one column to another.The Alternative Text tab allows specifying the Title and Description which will be read topeople with vision or cognitive impairments to help them better understand the contents of theshape.To replace the added autoshape, left-click it and use the Change Autoshape drop-down list onthe Shape settings tab of the right sidebar.To delete the added autoshape, left-click it and press the Delete key.To learn how to align an autoshape on the slide or arrange several autoshapes, refer tothe Align and arrange objects on a slide section.Join autoshapes using connectorsYou can connect autoshapes using lines with connection points to demonstrate dependenciesbetween the objects (e.g. if you want to create a flowchart). To do that,1. click the Shape icon on the Home or Insert tab of the top toolbar,2. select the Lines group from the menu,
3. click the necessary shape within the selected group (excepting the last three shapeswhich are not connectors, namely Curve, Scribble and Freeform),
4. hover the mouse cursor over the first autoshape and click one of the connectionpoints that appear on the shape outline,
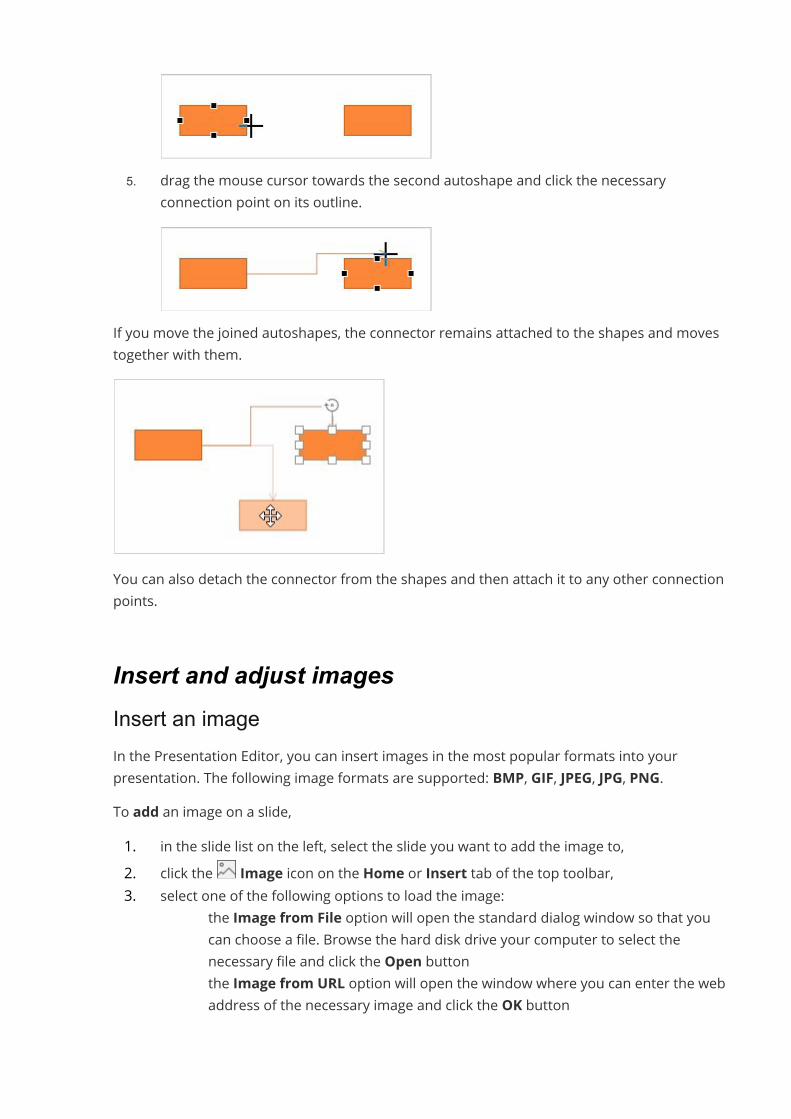
5. drag the mouse cursor towards the second autoshape and click the necessaryconnection point on its outline.
If you move the joined autoshapes, the connector remains attached to the shapes and movestogether with them.
You can also detach the connector from the shapes and then attach it to any other connectionpoints.
Insert and adjust imagesInsert an imageIn the Presentation Editor, you can insert images in the most popular formats into yourpresentation. The following image formats are supported: BMP, GIF, JPEG, JPG, PNG.To add an image on a slide,1. in the slide list on the left, select the slide you want to add the image to,2. click the Image icon on the Home or Insert tab of the top toolbar,3. select one of the following options to load the image:
o the Image from File option will open the standard dialog window so that youcan choose a file. Browse the hard disk drive your computer to select thenecessary file and click the Open button
o the Image from URL option will open the window where you can enter the webaddress of the necessary image and click the OK button

o the Image from Storage option will open the Select data source window. Selectan image stored on your portal and click the OK button
4. once the image is added, you can change its size and position.You can also add an image into a text placeholder pressing the Image from file in it andselecting the necessary image stored on your PC, or use the Image from URL button andspecify the image URL address.It's also possible to add an image to a slide layout.Adjust image settingsThe right sidebar is activated when you left-click an image and choose the Imagesettings icon on the right. It contains the following sections:Size - is used to view theWidth and Height of the current image or restore its Actual Size ifnecessary.The Crop button is used to crop the image. Click the Crop button to activate cropping handleswhich appear on the image corners and in the center of its each side. Manually drag thehandles to set the cropping area. You can move the mouse cursor over the cropping areaborder so that it turns into the icon and drag the area.
· To crop a single side, drag the handle located in the center of this side.· To simultaneously crop two adjacent sides, drag one of the corner handles.· To equally crop two opposite sides of the image, hold down the Ctrl key when dragging
the handle in the center of one of these sides.· To equally crop all sides of the image, hold down the Ctrl key when dragging any of the
corner handles.When the cropping area is specified, click the Crop button once again, or press the Esc key, orclick anywhere outside of the cropping area to apply the changes.After the cropping area is selected, it's also possible to use the Fill and Fit options availablefrom the Crop drop-down menu. Click the Crop button once again and select the option youneed:
· If you select the Fill option, the central part of the original image will be preserved andused to fill the selected cropping area, while other parts of the image will be removed.
· If you select the Fit option, the image will be resized so that it fits the cropping areaheight or width. No parts of the original image will be removed, but empty spaces mayappear within the selected cropping area.
Replace Image - is used to load another image instead of the current one from the desiredsource. You can select one of the options: From File, From Storage, or From URL. The Replaceimage option is also available in the right-click menu.
Rotation is used to rotate the image by 90 degrees clockwise or counterclockwise as well as toflip the image horizontally or vertically. Click one of the buttons:
· to rotate the image by 90 degrees counterclockwise· to rotate the image by 90 degrees clockwise· to flip the image horizontally (left to right)· to flip the image vertically (upside down)
When the image is selected, the Shape settings icon is also available on the right. You canclick this icon to open the Shape settings tab on the right sidebar and adjust the Stroke type,size and color of the shape as well as change its type by selecting another shape fromthe Change Autoshapemenu. The shape of the image will change correspondingly.On the Shape Settings tab, you can also use the Show shadow option to add a shadow to theimage.To change the advanced settings of the image, right-click the image and select the ImageAdvanced Settings option from the contextual menu or left-click the image and pressthe Show advanced settings link on the right sidebar. The image properties window will beopened.The Placement tab allows you to set the following image properties:
· Size - use this option to change the image width and/or height. If the Constantproportions button is clicked (in this case it looks like this ), the width and heightwill be changed together preserving the original image aspect ratio. To restore theactual size of the added image, click the Actual Size button.
· Position - use this option to change the image position on the slide (the position iscalculated from the top and the left side of the slide).
The Rotation tab contains the following parameters:· Angle - use this option to rotate the image by an exactly specified angle. Enter the
necessary value measured in degrees into the field or adjust it using the arrows on theright.
· Flipped - check the Horizontally box to flip the image horizontally (left to right) or checkthe Vertically box to flip the image vertically (upside down).
The Alternative Text tab allows specifying the Title and Description which will be read topeople with vision or cognitive impairments to help them better understand the contents of theimage.To delete the inserted image, left-click it and press the Delete key.
Insert and edit chartsInsert a chartTo insert a chart into your presentation,1. put the cursor where you want to add a chart,2. switch to the Insert tab of the top toolbar,3. click the Chart icon on the top toolbar,4. select the needed chart type from the available ones:
· Column Chartso Clustered columno Stacked columno 100% stacked columno 3-D Clustered Columno 3-D Stacked Columno 3-D 100% stacked columno 3-D Column· Line Chartso Lineo Stacked lineo 100% stacked lineo Line with markerso Stacked line with markerso 100% stacked line with markerso 3-D Line· Pie Chartso Pieo Doughnuto 3-D Pie· Bar Chartso Clustered baro Stacked baro 100% stacked baro 3-D clustered baro 3-D stacked baro 3-D 100% stacked bar· Area Chartso Areao Stacked areao 100% stacked areao Stock Charts· XY (Scatter) Chartso Scattero Stacked bar
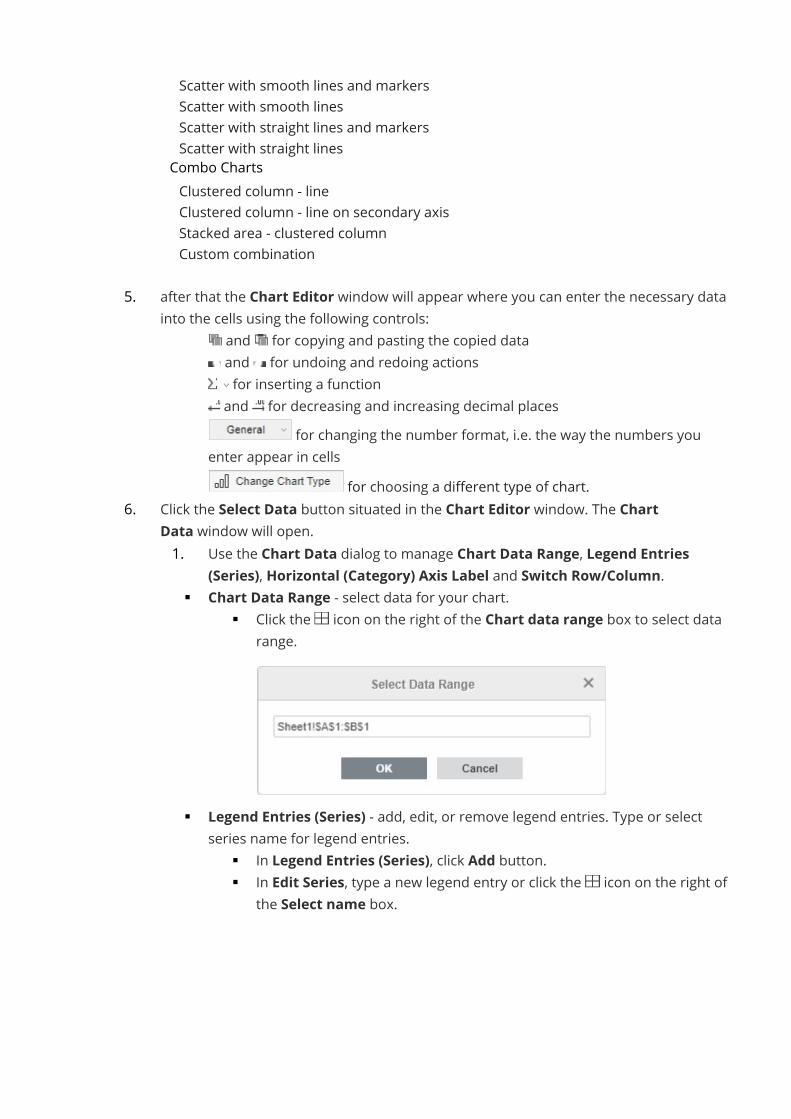
o Scatter with smooth lines and markerso Scatter with smooth lineso Scatter with straight lines and markerso Scatter with straight lines· Combo Chartso Clustered column - lineo Clustered column - line on secondary axiso Stacked area - clustered columno Custom combination
5. after that the Chart Editor window will appear where you can enter the necessary datainto the cells using the following controls:
· and for copying and pasting the copied data· and for undoing and redoing actions· for inserting a function· and for decreasing and increasing decimal places· for changing the number format, i.e. the way the numbers you
enter appear in cells· for choosing a different type of chart.
6. Click the Select Data button situated in the Chart Editor window. The ChartData window will open.1. Use the Chart Data dialog to manage Chart Data Range, Legend Entries
(Series), Horizontal (Category) Axis Label and Switch Row/Column.§ Chart Data Range - select data for your chart.
§ Click the icon on the right of the Chart data range box to select datarange.
§ Legend Entries (Series) - add, edit, or remove legend entries. Type or selectseries name for legend entries.
§ In Legend Entries (Series), click Add button.§ In Edit Series, type a new legend entry or click the icon on the right of
the Select name box.
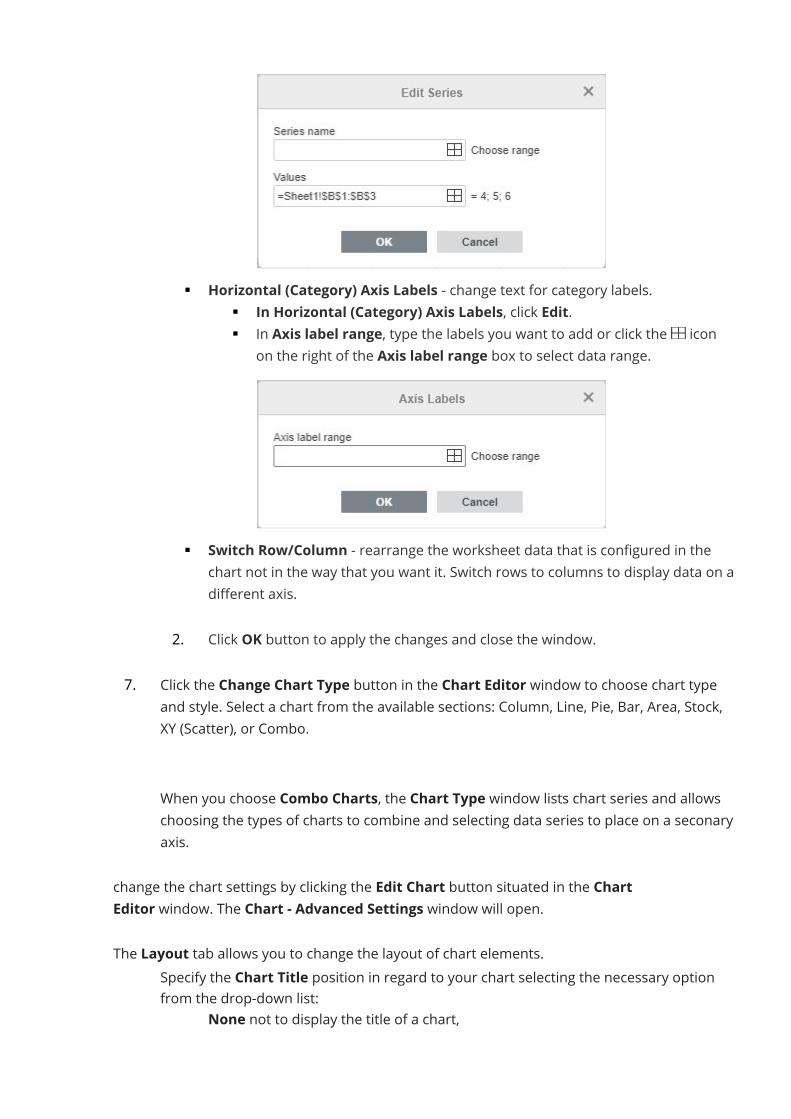
§ Horizontal (Category) Axis Labels - change text for category labels.§ In Horizontal (Category) Axis Labels, click Edit.§ In Axis label range, type the labels you want to add or click the icon
on the right of the Axis label range box to select data range.
§ Switch Row/Column - rearrange the worksheet data that is configured in thechart not in the way that you want it. Switch rows to columns to display data on adifferent axis.
2. Click OK button to apply the changes and close the window.7. Click the Change Chart Type button in the Chart Editor window to choose chart type
and style. Select a chart from the available sections: Column, Line, Pie, Bar, Area, Stock,XY (Scatter), or Combo.
When you choose Combo Charts, the Chart Type window lists chart series and allowschoosing the types of charts to combine and selecting data series to place on a seconaryaxis.
change the chart settings by clicking the Edit Chart button situated in the ChartEditor window. The Chart - Advanced Settings window will open.The Layout tab allows you to change the layout of chart elements.
· Specify the Chart Title position in regard to your chart selecting the necessary optionfrom the drop-down list:
o None not to display the title of a chart,
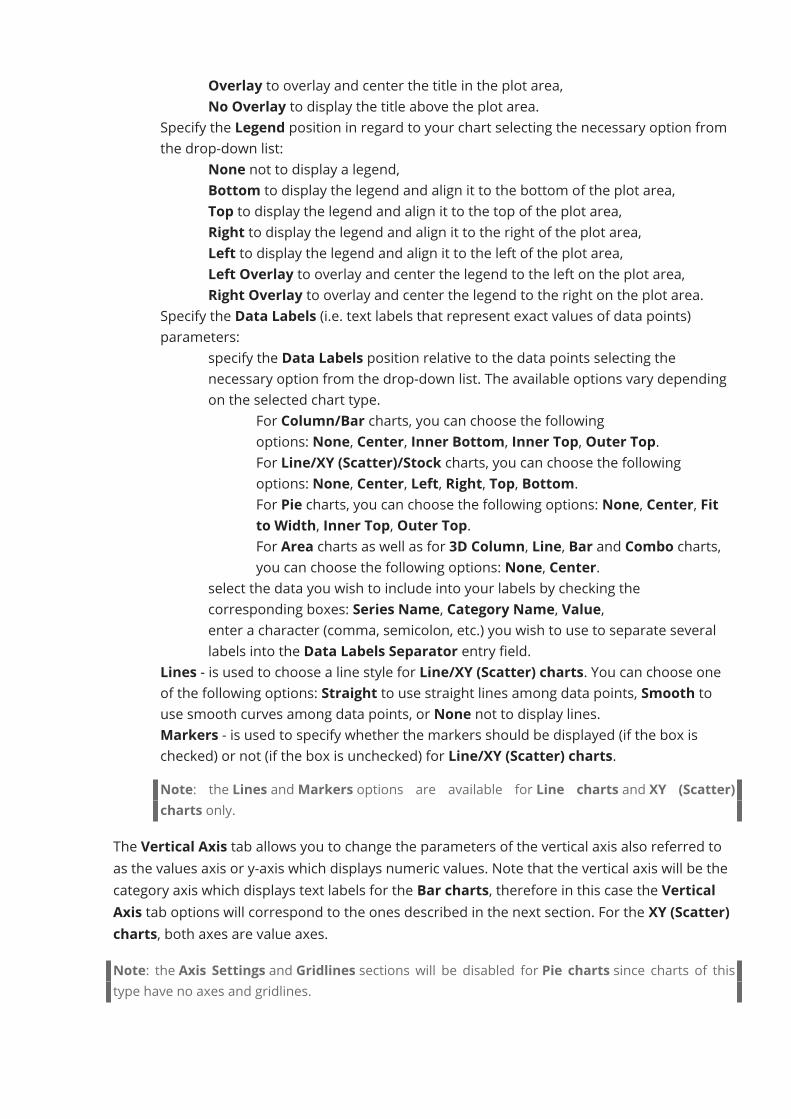
o Overlay to overlay and center the title in the plot area,o No Overlay to display the title above the plot area.
· Specify the Legend position in regard to your chart selecting the necessary option fromthe drop-down list:
o None not to display a legend,o Bottom to display the legend and align it to the bottom of the plot area,o Top to display the legend and align it to the top of the plot area,o Right to display the legend and align it to the right of the plot area,o Left to display the legend and align it to the left of the plot area,o Left Overlay to overlay and center the legend to the left on the plot area,o Right Overlay to overlay and center the legend to the right on the plot area.
· Specify the Data Labels (i.e. text labels that represent exact values of data points)parameters:
o specify the Data Labels position relative to the data points selecting thenecessary option from the drop-down list. The available options vary dependingon the selected chart type.
· For Column/Bar charts, you can choose the followingoptions: None, Center, Inner Bottom, Inner Top, Outer Top.
· For Line/XY (Scatter)/Stock charts, you can choose the followingoptions: None, Center, Left, Right, Top, Bottom.
· For Pie charts, you can choose the following options: None, Center, Fitto Width, Inner Top, Outer Top.
· For Area charts as well as for 3D Column, Line, Bar and Combo charts,you can choose the following options: None, Center.
o select the data you wish to include into your labels by checking thecorresponding boxes: Series Name, Category Name, Value,
o enter a character (comma, semicolon, etc.) you wish to use to separate severallabels into the Data Labels Separator entry field.
· Lines - is used to choose a line style for Line/XY (Scatter) charts. You can choose oneof the following options: Straight to use straight lines among data points, Smooth touse smooth curves among data points, or None not to display lines.
· Markers - is used to specify whether the markers should be displayed (if the box ischecked) or not (if the box is unchecked) for Line/XY (Scatter) charts.Note: the Lines andMarkers options are available for Line charts and XY (Scatter)charts only.
The Vertical Axis tab allows you to change the parameters of the vertical axis also referred toas the values axis or y-axis which displays numeric values. Note that the vertical axis will be thecategory axis which displays text labels for the Bar charts, therefore in this case the VerticalAxis tab options will correspond to the ones described in the next section. For the XY (Scatter)charts, both axes are value axes.Note: the Axis Settings and Gridlines sections will be disabled for Pie charts since charts of thistype have no axes and gridlines.
· select Hide to hide vertical axis in the chart, leave it unchecked to have vertical axisdisplayed.
· specify Title orientation by selecting the necessary option from the drop-down list:o None to not display a vertical axis titleo Rotated to display the title from bottom to top to the left of the vertical axis,o Horizontal to display the title horizontally to the left of the vertical axis.
· Minimum Value - is used to specify the lowest value displayed at the vertical axisstart. The Auto option is selected by default, in this case the minimum value iscalculated automatically depending on the selected data range. You can selectthe Fixed option from the drop-down list and specify a different value in the entryfield on the right.
· Maximum Value - is used to specify the highest value displayed at the vertical axisend. The Auto option is selected by default, in this case the maximum value iscalculated automatically depending on the selected data range. You can selectthe Fixed option from the drop-down list and specify a different value in the entryfield on the right.
· Axis Crosses - is used to specify a point on the vertical axis where the horizontal axisshould cross it. The Auto option is selected by default, in this case the axesintersection point value is calculated automatically depending on the selected datarange. You can select the Value option from the drop-down list and specify adifferent value in the entry field on the right, or set the axes intersection point attheMinimum/Maximum Value on the vertical axis.
· Display Units - is used to determine the representation of the numeric values alongthe vertical axis. This option can be useful if you're working with great numbers andwish the values on the axis to be displayed in a more compact and readable way (e.g.you can represent 50 000 as 50 by using the Thousands display units). Select desiredunits from the drop-down list: Hundreds, Thousands, 10 000, 100 000,Millions, 10000 000, 100 000 000, Billions, Trillions, or choose the None option to return to thedefault units.
· Values in reverse order - is used to display values in the opposite direction. Whenthe box is unchecked, the lowest value is at the bottom and the highest value is atthe top of the axis. When the box is checked, the values are ordered from top tobottom.
· The Tick Options section allows adjusting the appearance of tick marks on thevertical scale. Major tick marks are the larger scale divisions which can have labelsdisplaying numeric values. Minor tick marks are the scale subdivisions which areplaced between the major tick marks and have no labels. Tick marks also definewhere gridlines can be displayed if the corresponding option is set onthe Layout tab. TheMajor/Minor Type drop-down lists contain the followingplacement options:
o None to not display major/minor tick marks,o Cross to display major/minor tick marks on both sides of the axis,o In to display major/minor tick marks inside the axis,o Out to display major/minor tick marks outside the axis.
· The Label Options section allows adjusting the appearance of major tick mark labelswhich display values. To specify a Label Position in regard to the vertical axis, selectthe necessary option from the drop-down list:
o None to not display tick mark labels,o Low to display tick mark labels to the left of the plot area,o High to display tick mark labels to the right of the plot area,o Next to axis to display tick mark labels next to the axis.o To specify a Label Format click the Label Format button and choose a
category as it deems appropriate.Available label format categories:o Generalo Numbero Scientifico Accountingo Currencyo Dateo Timeo Percentageo Fractiono Texto Custom
Label format options vary depending on the selected category.o Check Linked to source to keep number formatting from the data source in
the chart.
Note: Secondary axes are supported in Combo charts only.Secondary axes are useful in Combo charts when data series vary considerably or mixed typesof data are used to plot a chart. Secondary Axes make it easier to read and understand acombo chart.The Secondary Vertical /Horizontal Axis tab appears when you choose an appropriate dataseries for a combo chart. All the settings and options on the Secondary Vertical/HorizontalAxis tab are the same as the settings on the Vertical/Horizontal Axis. For a detailed descriptionof the Vertical/Horizontal Axis options, see description above/below.The Horizontal Axis tab allows you to change the parameters of the horizontal axis alsoreferred to as the categories axis or x-axis which displays text labels. Note that the horizontalaxis will be the value axis which displays numeric values for the Bar charts, therefore in thiscase the Horizontal Axis tab options will correspond to the ones described in the previoussection. For the XY (Scatter) charts, both axes are value axes.
· select Hide to hide horizontal axis in the chart, leave it unchecked to have horizontalaxis displayed.
· specify Title orientation by selecting the necessary option from the drop-down list:o None when you don’t want to display a horizontal axis title,
o No Overlay to display the title below the horizontal axis,· Gridlines is used to specify the Horizontal Gridlines to display by selecting the
necessary option from the drop-down list: None, Major,Minor, orMajor andMinor.
· Axis Crosses - is used to specify a point on the horizontal axis where the vertical axisshould cross it. The Auto option is selected by default, in this case the axesintersection point value is calculated automatically depending on the selected datarange. You can select the Value option from the drop-down list and specify adifferent value in the entry field on the right, or set the axes intersection point attheMinimum/Maximum Value (that corresponds to the first and last category) onthe horizontal axis.
· Axis Position - is used to specify where the axis text labels should be placed: On TickMarks or Between Tick Marks.
· Values in reverse order - is used to display categories in the opposite direction.When the box is unchecked, categories are displayed from left to right. When the boxis checked, the categories are ordered from right to left.
· The Tick Options section allows adjusting the appearance of tick marks on thehorizontal scale. Major tick marks are the larger divisions which can have labelsdisplaying category values. Minor tick marks are the smaller divisions which areplaced between the major tick marks and have no labels. Tick marks also definewhere gridlines can be displayed if the corresponding option is set onthe Layout tab. You can adjust the following tick mark parameters:
o Major/Minor Type - is used to specify the following placementoptions: None to not display major/minor tick marks, Cross to displaymajor/minor tick marks on both sides of the axis, In to display major/minortick marks inside the axis, Out to display major/minor tick marks outside theaxis.
o Interval between Marks - is used to specify how many categories should bedisplayed between two adjacent tick marks.
· The Label Options section allows adjusting the appearance of labels which displaycategories.
o Label Position - is used to specify where the labels should be placed inregard to the horizontal axis. Select the necessary option from the drop-downlist: None to not display category labels, Low to display category labels at thebottom of the plot area, High to display category labels at the top of the plotarea, Next to axis to display category labels next to the axis.
o Axis Label Distance - is used to specify how closely the labels should beplaced to the axis. You can specify the necessary value in the entry field. Themore the value you set, the more the distance between the axis and labels is.
o Interval between Labels - is used to specify how often the labels should bedisplayed. The Auto option is selected by default, in this case labels aredisplayed for every category. You can select theManual option from thedrop-down list and specify the necessary value in the entry field on the right.For example, enter 2 to display labels for every other category etc.
o To specify a Label Format click the Label Format button and choose acategory as it deems appropriate.
Available label format categories:o Generalo Numbero Scientifico Accountingo Currencyo Dateo Timeo Percentageo Fractiono Texto Custom
Label format options vary depending on the selected category.o Check Linked to source to keep number formatting from the data source in
the chart.The Cell Snapping tab contains the following parameters:· Move and size with cells - this option allows you to snap the chart to the cell behind
it. If the cell moves (e.g. if you insert or delete some rows/columns), the chart will bemoved together with the cell. If you increase or decrease the width or height of thecell, the chart will change its size as well.
· Move but don't size with cells - this option allows to snap the chart to the cellbehind it preventing the chart from being resized. If the cell moves, the chart will bemoved together with the cell, but if you change the cell size, the chart dimensionsremain unchanged.
· Don't move or size with cells - this option allows to prevent the chart from beingmoved or resized if the cell position or size was changed.
The Alternative Text tab allows specifying the Title and Description which will be readto people with vision or cognitive impairments to help them better understand thecontents of the chart.
9. once the chart is added, you can also change its size and position.You can specify the chart position on the slide by dragging it vertically or horizontally.
You can also add a chart into a text placeholder by pressing the Chart icon within it andselecting the necessary chart type.It's also possible to add a chart to a slide layout.
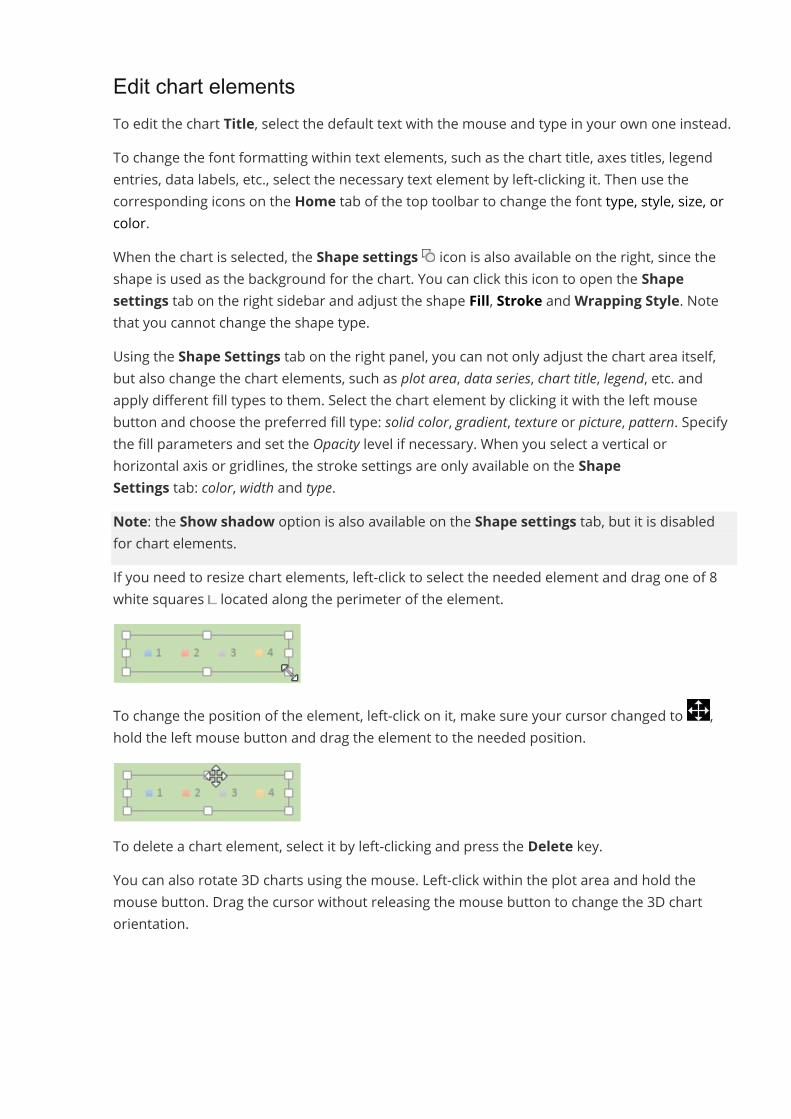
Edit chart elementsTo edit the chart Title, select the default text with the mouse and type in your own one instead.To change the font formatting within text elements, such as the chart title, axes titles, legendentries, data labels, etc., select the necessary text element by left-clicking it. Then use thecorresponding icons on the Home tab of the top toolbar to change the font type, style, size, orcolor.When the chart is selected, the Shape settings icon is also available on the right, since theshape is used as the background for the chart. You can click this icon to open the Shapesettings tab on the right sidebar and adjust the shape Fill, Stroke andWrapping Style. Notethat you cannot change the shape type.Using the Shape Settings tab on the right panel, you can not only adjust the chart area itself,but also change the chart elements, such as plot area, data series, chart title, legend, etc. andapply different fill types to them. Select the chart element by clicking it with the left mousebutton and choose the preferred fill type: solid color, gradient, texture or picture, pattern. Specifythe fill parameters and set the Opacity level if necessary. When you select a vertical orhorizontal axis or gridlines, the stroke settings are only available on the ShapeSettings tab: color, width and type.Note: the Show shadow option is also available on the Shape settings tab, but it is disabledfor chart elements.If you need to resize chart elements, left-click to select the needed element and drag one of 8white squares located along the perimeter of the element.
To change the position of the element, left-click on it, make sure your cursor changed to ,hold the left mouse button and drag the element to the needed position.
To delete a chart element, select it by left-clicking and press the Delete key.You can also rotate 3D charts using the mouse. Left-click within the plot area and hold themouse button. Drag the cursor without releasing the mouse button to change the 3D chartorientation.
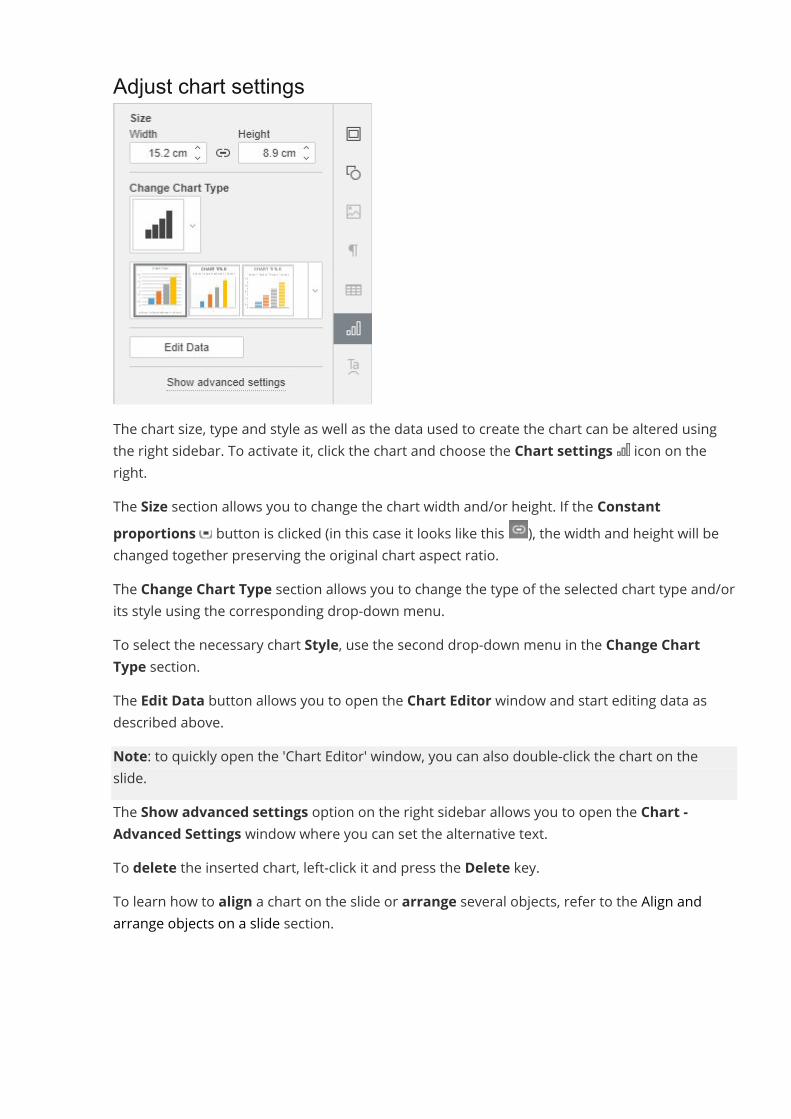
Adjust chart settings
The chart size, type and style as well as the data used to create the chart can be altered usingthe right sidebar. To activate it, click the chart and choose the Chart settings icon on theright.The Size section allows you to change the chart width and/or height. If the Constantproportions button is clicked (in this case it looks like this ), the width and height will bechanged together preserving the original chart aspect ratio.The Change Chart Type section allows you to change the type of the selected chart type and/orits style using the corresponding drop-down menu.To select the necessary chart Style, use the second drop-down menu in the Change ChartType section.The Edit Data button allows you to open the Chart Editor window and start editing data asdescribed above.Note: to quickly open the 'Chart Editor' window, you can also double-click the chart on theslide.The Show advanced settings option on the right sidebar allows you to open the Chart -Advanced Settings window where you can set the alternative text.To delete the inserted chart, left-click it and press the Delete key.To learn how to align a chart on the slide or arrange several objects, refer to the Align andarrange objects on a slide section.
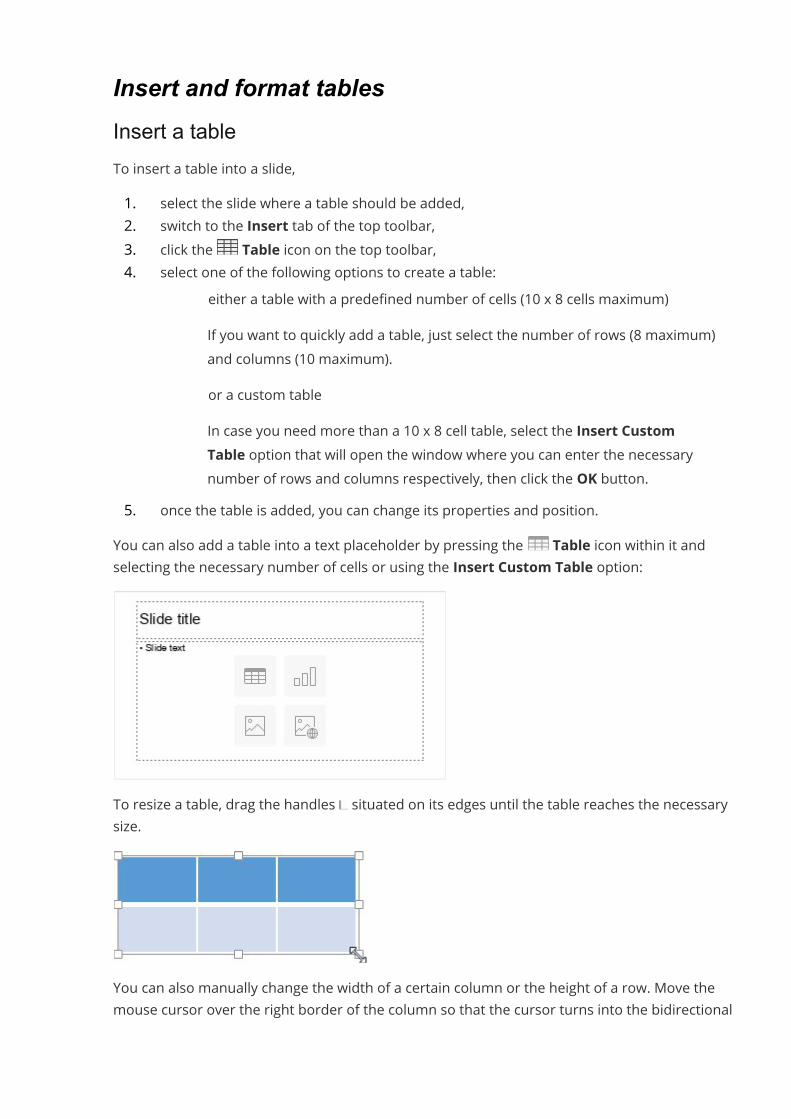
Insert and format tablesInsert a tableTo insert a table into a slide,1. select the slide where a table should be added,2. switch to the Insert tab of the top toolbar,3. click the Table icon on the top toolbar,4. select one of the following options to create a table:
· either a table with a predefined number of cells (10 x 8 cells maximum)If you want to quickly add a table, just select the number of rows (8 maximum)and columns (10 maximum).
· or a custom tableIn case you need more than a 10 x 8 cell table, select the Insert CustomTable option that will open the window where you can enter the necessarynumber of rows and columns respectively, then click the OK button.
5. once the table is added, you can change its properties and position.You can also add a table into a text placeholder by pressing the Table icon within it andselecting the necessary number of cells or using the Insert Custom Table option:
To resize a table, drag the handles situated on its edges until the table reaches the necessarysize.
You can also manually change the width of a certain column or the height of a row. Move themouse cursor over the right border of the column so that the cursor turns into the bidirectional
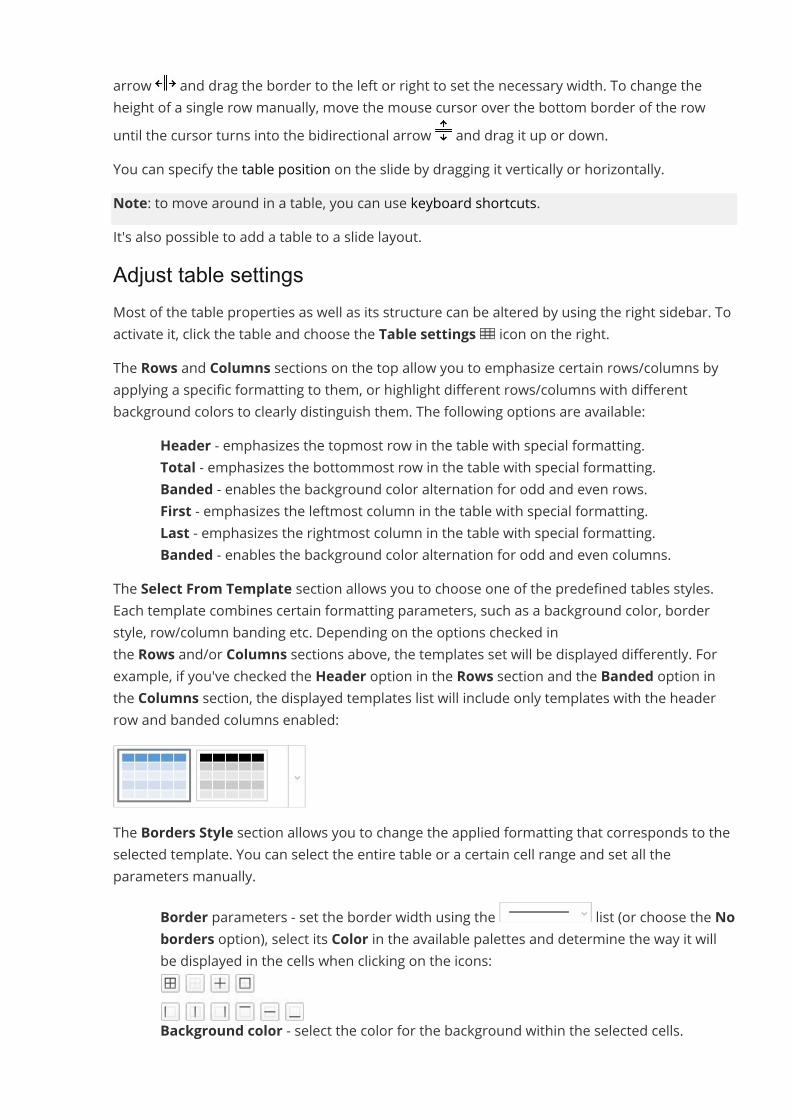
arrow and drag the border to the left or right to set the necessary width. To change theheight of a single row manually, move the mouse cursor over the bottom border of the rowuntil the cursor turns into the bidirectional arrow and drag it up or down.You can specify the table position on the slide by dragging it vertically or horizontally.Note: to move around in a table, you can use keyboard shortcuts.It's also possible to add a table to a slide layout.Adjust table settingsMost of the table properties as well as its structure can be altered by using the right sidebar. Toactivate it, click the table and choose the Table settings icon on the right.The Rows and Columns sections on the top allow you to emphasize certain rows/columns byapplying a specific formatting to them, or highlight different rows/columns with differentbackground colors to clearly distinguish them. The following options are available:
· Header - emphasizes the topmost row in the table with special formatting.· Total - emphasizes the bottommost row in the table with special formatting.· Banded - enables the background color alternation for odd and even rows.· First - emphasizes the leftmost column in the table with special formatting.· Last - emphasizes the rightmost column in the table with special formatting.· Banded - enables the background color alternation for odd and even columns.
The Select From Template section allows you to choose one of the predefined tables styles.Each template combines certain formatting parameters, such as a background color, borderstyle, row/column banding etc. Depending on the options checked inthe Rows and/or Columns sections above, the templates set will be displayed differently. Forexample, if you've checked the Header option in the Rows section and the Banded option inthe Columns section, the displayed templates list will include only templates with the headerrow and banded columns enabled:
The Borders Style section allows you to change the applied formatting that corresponds to theselected template. You can select the entire table or a certain cell range and set all theparameters manually.
· Border parameters - set the border width using the list (or choose the Noborders option), select its Color in the available palettes and determine the way it willbe displayed in the cells when clicking on the icons:
·· Background color - select the color for the background within the selected cells.
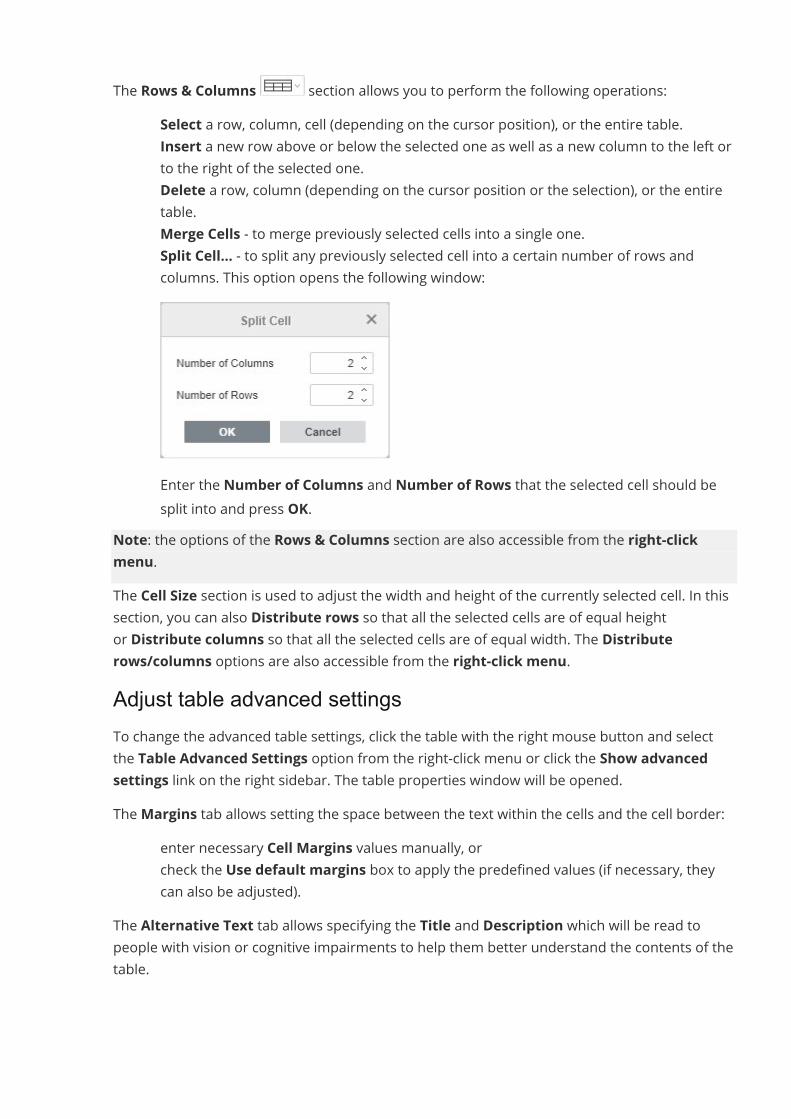
The Rows & Columns section allows you to perform the following operations:· Select a row, column, cell (depending on the cursor position), or the entire table.· Insert a new row above or below the selected one as well as a new column to the left or
to the right of the selected one.· Delete a row, column (depending on the cursor position or the selection), or the entire
table.· Merge Cells - to merge previously selected cells into a single one.· Split Cell... - to split any previously selected cell into a certain number of rows and
columns. This option opens the following window:
· Enter the Number of Columns and Number of Rows that the selected cell should besplit into and press OK.
Note: the options of the Rows & Columns section are also accessible from the right-clickmenu.The Cell Size section is used to adjust the width and height of the currently selected cell. In thissection, you can also Distribute rows so that all the selected cells are of equal heightor Distribute columns so that all the selected cells are of equal width. The Distributerows/columns options are also accessible from the right-click menu.Adjust table advanced settingsTo change the advanced table settings, click the table with the right mouse button and selectthe Table Advanced Settings option from the right-click menu or click the Show advancedsettings link on the right sidebar. The table properties window will be opened.TheMargins tab allows setting the space between the text within the cells and the cell border:
· enter necessary Cell Margins values manually, or· check the Use default margins box to apply the predefined values (if necessary, they
can also be adjusted).The Alternative Text tab allows specifying the Title and Description which will be read topeople with vision or cognitive impairments to help them better understand the contents of thetable.
To format the entered text within the table cells, you can use icons on the Home tab of thetop toolbar. The right-click menu, which appears when you click the table with the right mousebutton, includes two additional options:
· Cell vertical alignment - it allows you to set the preferred type of the text verticalalignment within the selected cells: Align Top, Align Center, or Align Bottom.
· Hyperlink - it allows you to insert a hyperlink into the selected cell.
Insert symbols and charactersWhen working on a presentation, you may need to insert a symbol which is not available onyour keyboard. To insert such symbols into your presentation, use the Insertsymbol option and follow these simple steps:
· place the cursor where a special symbol should be inserted,· switch to the Insert tab of the top toolbar,· click the Symbol,· The Symbol dialog box will appear, and you will be able to select the required symbol,· use the Range section to quickly find the necessary symbol. All symbols are divided into
specific groups, for example, select 'Currency Symbols' if you want to insert a currencycharacter.If this character is not in the set, select a different font. Many of them also havecharacters that differ from the standard set.Or, enter the Unicode hex value of the required symbol into the Unicode hex valuefield. This code can be found in the Character map.You can also use the Special characters tab to choose a special character from the list.The previously used symbols are also displayed in the Recently used symbols field,
· click Insert. The selected character will be added to the presentation.Insert ASCII symbolsASCII table is also used to add characters.To do this, hold down the ALT key and use the numeric keypad to enter the character code.Note: be sure to use the numeric keypad, not the numbers on the main keyboard. To enablethe numeric keypad, press the Num Lock key.For example, to add a paragraph character (§), press and hold down ALT while typing 789, andthen release the ALT key.
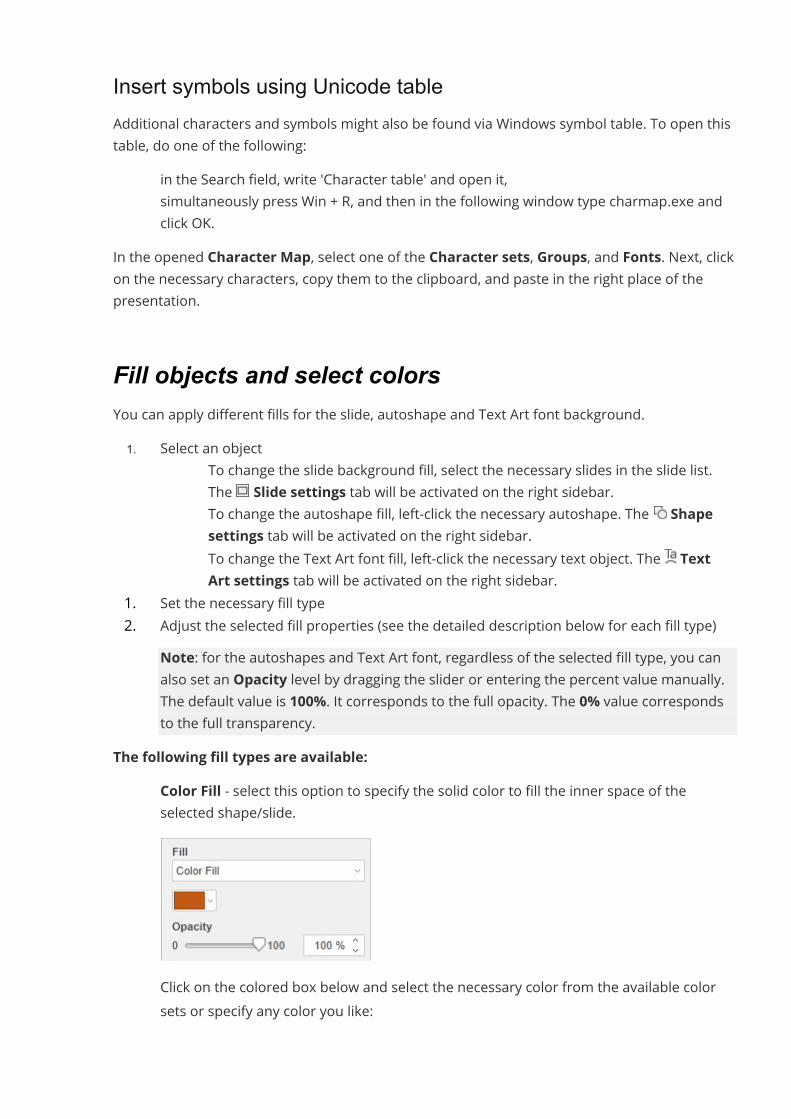
Insert symbols using Unicode tableAdditional characters and symbols might also be found via Windows symbol table. To open thistable, do one of the following:
· in the Search field, write 'Character table' and open it,· simultaneously press Win + R, and then in the following window type charmap.exe and
click OK.In the opened Character Map, select one of the Character sets, Groups, and Fonts. Next, clickon the necessary characters, copy them to the clipboard, and paste in the right place of thepresentation.
Fill objects and select colorsYou can apply different fills for the slide, autoshape and Text Art font background.1. Select an object
· To change the slide background fill, select the necessary slides in the slide list.The Slide settings tab will be activated on the right sidebar.
· To change the autoshape fill, left-click the necessary autoshape. The Shapesettings tab will be activated on the right sidebar.
· To change the Text Art font fill, left-click the necessary text object. The TextArt settings tab will be activated on the right sidebar.
1. Set the necessary fill type2. Adjust the selected fill properties (see the detailed description below for each fill type)
Note: for the autoshapes and Text Art font, regardless of the selected fill type, you canalso set an Opacity level by dragging the slider or entering the percent value manually.The default value is 100%. It corresponds to the full opacity. The 0% value correspondsto the full transparency.
The following fill types are available:· Color Fill - select this option to specify the solid color to fill the inner space of the
selected shape/slide.
Click on the colored box below and select the necessary color from the available colorsets or specify any color you like:
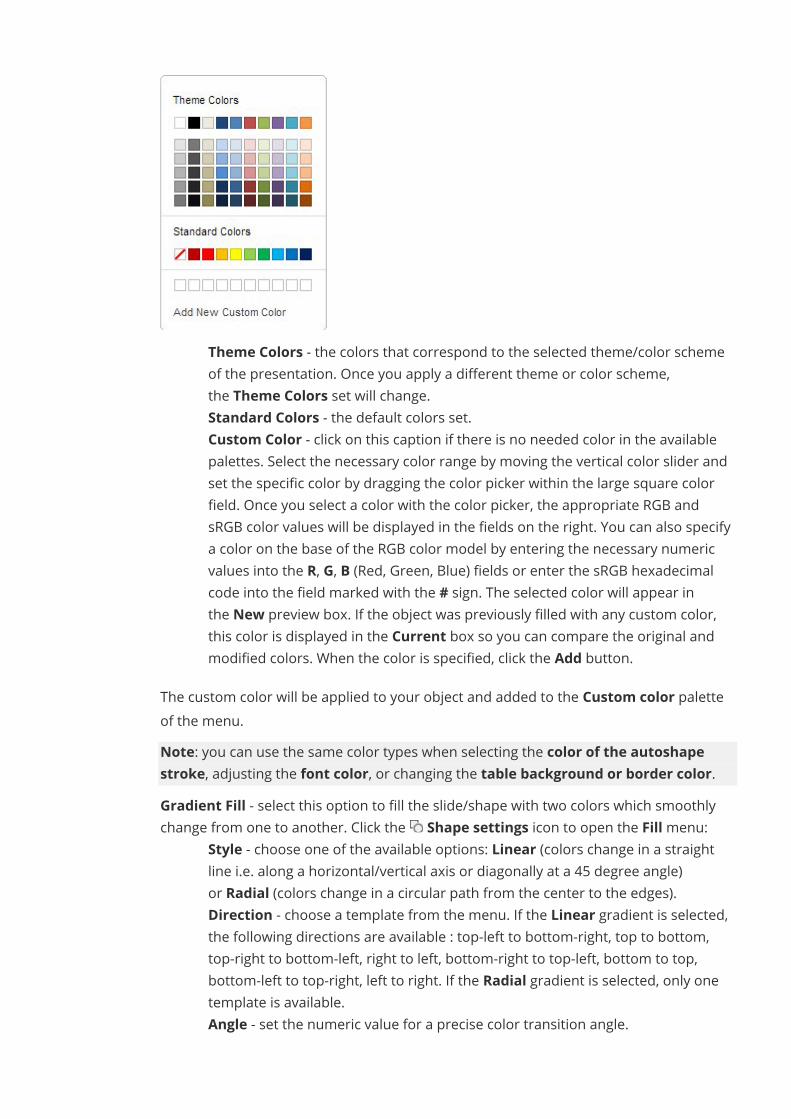
o Theme Colors - the colors that correspond to the selected theme/color schemeof the presentation. Once you apply a different theme or color scheme,the Theme Colors set will change.
o Standard Colors - the default colors set.o Custom Color - click on this caption if there is no needed color in the available
palettes. Select the necessary color range by moving the vertical color slider andset the specific color by dragging the color picker within the large square colorfield. Once you select a color with the color picker, the appropriate RGB andsRGB color values will be displayed in the fields on the right. You can also specifya color on the base of the RGB color model by entering the necessary numericvalues into the R, G, B (Red, Green, Blue) fields or enter the sRGB hexadecimalcode into the field marked with the # sign. The selected color will appear inthe New preview box. If the object was previously filled with any custom color,this color is displayed in the Current box so you can compare the original andmodified colors. When the color is specified, click the Add button.
The custom color will be applied to your object and added to the Custom color paletteof the menu.Note: you can use the same color types when selecting the color of the autoshapestroke, adjusting the font color, or changing the table background or border color.
· Gradient Fill - select this option to fill the slide/shape with two colors which smoothlychange from one to another. Click the Shape settings icon to open the Fillmenu:
o Style - choose one of the available options: Linear (colors change in a straightline i.e. along a horizontal/vertical axis or diagonally at a 45 degree angle)or Radial (colors change in a circular path from the center to the edges).
o Direction - choose a template from the menu. If the Linear gradient is selected,the following directions are available : top-left to bottom-right, top to bottom,top-right to bottom-left, right to left, bottom-right to top-left, bottom to top,bottom-left to top-right, left to right. If the Radial gradient is selected, only onetemplate is available.
o Angle - set the numeric value for a precise color transition angle.
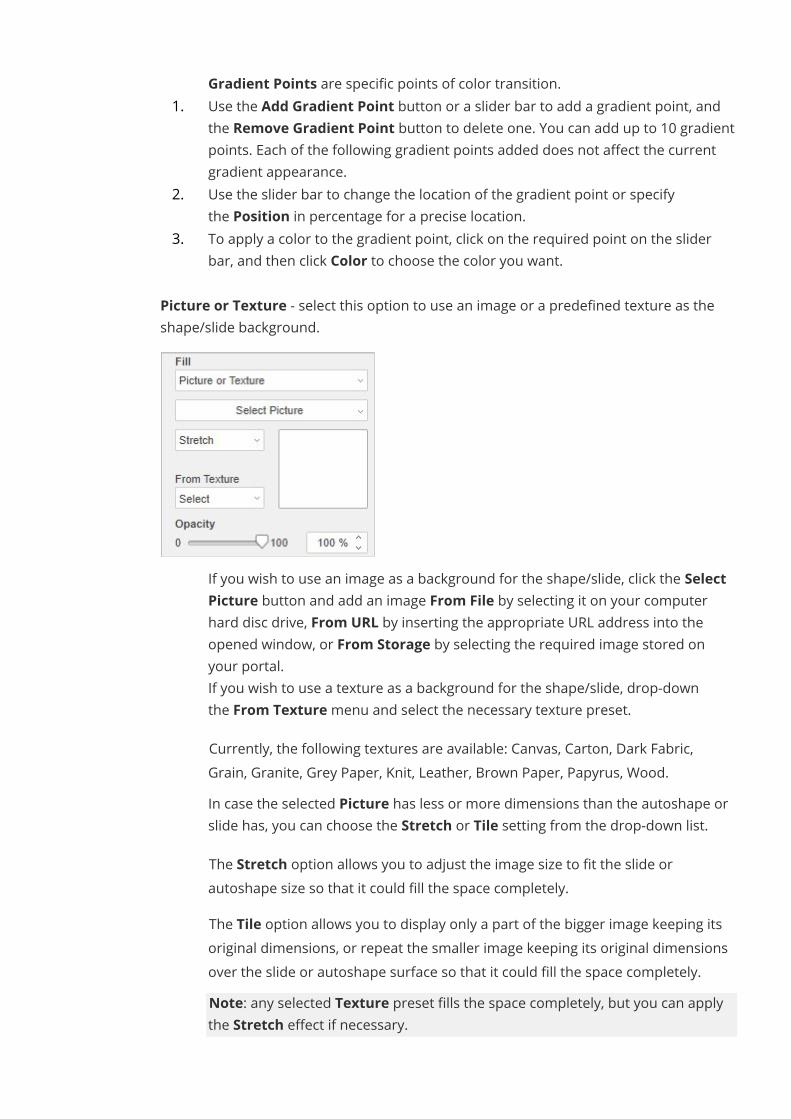
o Gradient Points are specific points of color transition.1. Use the Add Gradient Point button or a slider bar to add a gradient point, and
the Remove Gradient Point button to delete one. You can add up to 10 gradientpoints. Each of the following gradient points added does not affect the currentgradient appearance.
2. Use the slider bar to change the location of the gradient point or specifythe Position in percentage for a precise location.
3. To apply a color to the gradient point, click on the required point on the sliderbar, and then click Color to choose the color you want.
· Picture or Texture - select this option to use an image or a predefined texture as theshape/slide background.
o If you wish to use an image as a background for the shape/slide, click the SelectPicture button and add an image From File by selecting it on your computerhard disc drive, From URL by inserting the appropriate URL address into theopened window, or From Storage by selecting the required image stored onyour portal.
o If you wish to use a texture as a background for the shape/slide, drop-downthe From Texturemenu and select the necessary texture preset.Currently, the following textures are available: Canvas, Carton, Dark Fabric,Grain, Granite, Grey Paper, Knit, Leather, Brown Paper, Papyrus, Wood.
o In case the selected Picture has less or more dimensions than the autoshape orslide has, you can choose the Stretch or Tile setting from the drop-down list.The Stretch option allows you to adjust the image size to fit the slide orautoshape size so that it could fill the space completely.The Tile option allows you to display only a part of the bigger image keeping itsoriginal dimensions, or repeat the smaller image keeping its original dimensionsover the slide or autoshape surface so that it could fill the space completely.Note: any selected Texture preset fills the space completely, but you can applythe Stretch effect if necessary.

· Pattern - select this option to fill the slide/shape with a two-colored design composed ofregularly repeated elements.
o Pattern - select one of the predefined designs from the menu.o Foreground color - click this color box to change the color of the pattern
elements.o Background color - click this color box to change the color of the pattern
background.· No Fill - select this option if you don't want to use any fill.
Manipulate objects on a slideYou can resize, move, rotate different objects on a slide manually using the special handles. Youcan also specify the dimensions and position of some objects exactly using the right sidebaror Advanced Settings window.Resize objectsTo change the autoshape/image/chart/table/text box size, drag small squares situated onthe object edges. To maintain the original proportions of the selected object while resizing, holddown the Shift key and drag one of the corner icons.
To specify the precise width and height of a chart, select it on a slide and use the Size sectionof the right sidebar that will be activated.
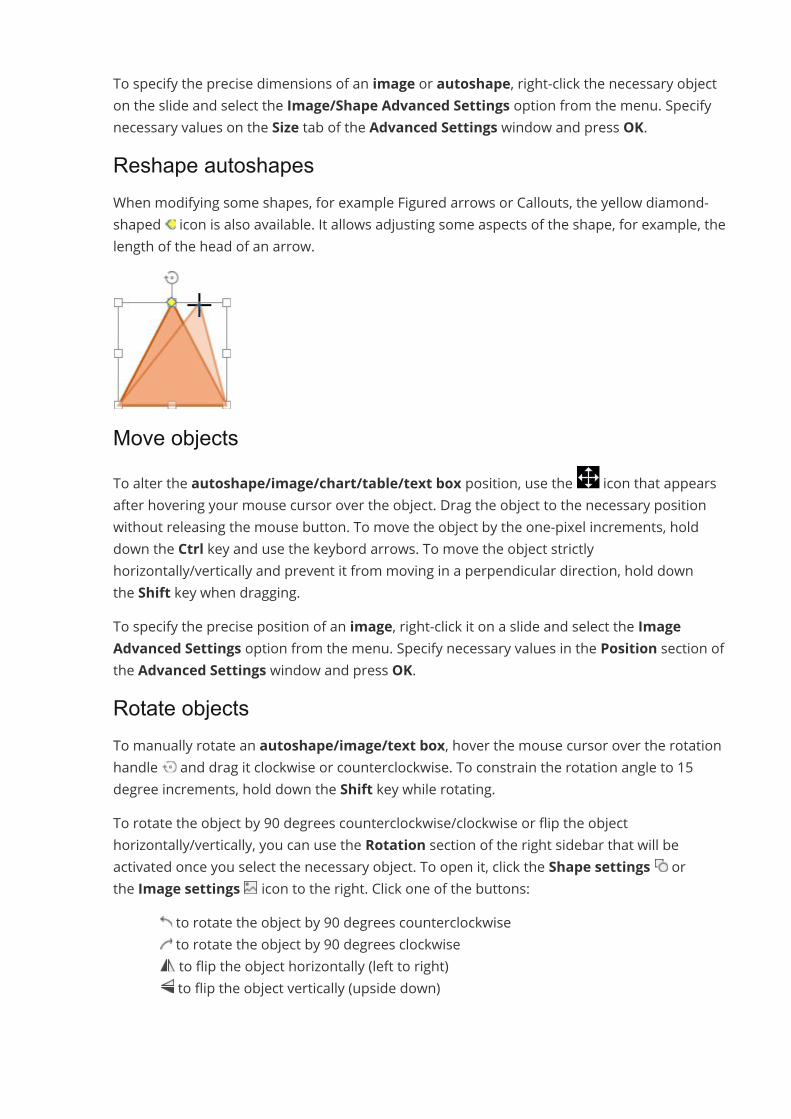
To specify the precise dimensions of an image or autoshape, right-click the necessary objecton the slide and select the Image/Shape Advanced Settings option from the menu. Specifynecessary values on the Size tab of the Advanced Settings window and press OK.Reshape autoshapesWhen modifying some shapes, for example Figured arrows or Callouts, the yellow diamond-shaped icon is also available. It allows adjusting some aspects of the shape, for example, thelength of the head of an arrow.
Move objectsTo alter the autoshape/image/chart/table/text box position, use the icon that appearsafter hovering your mouse cursor over the object. Drag the object to the necessary positionwithout releasing the mouse button. To move the object by the one-pixel increments, holddown the Ctrl key and use the keybord arrows. To move the object strictlyhorizontally/vertically and prevent it from moving in a perpendicular direction, hold downthe Shift key when dragging.To specify the precise position of an image, right-click it on a slide and select the ImageAdvanced Settings option from the menu. Specify necessary values in the Position section ofthe Advanced Settings window and press OK.Rotate objectsTo manually rotate an autoshape/image/text box, hover the mouse cursor over the rotationhandle and drag it clockwise or counterclockwise. To constrain the rotation angle to 15degree increments, hold down the Shift key while rotating.To rotate the object by 90 degrees counterclockwise/clockwise or flip the objecthorizontally/vertically, you can use the Rotation section of the right sidebar that will beactivated once you select the necessary object. To open it, click the Shape settings orthe Image settings icon to the right. Click one of the buttons:
· to rotate the object by 90 degrees counterclockwise· to rotate the object by 90 degrees clockwise· to flip the object horizontally (left to right)· to flip the object vertically (upside down)
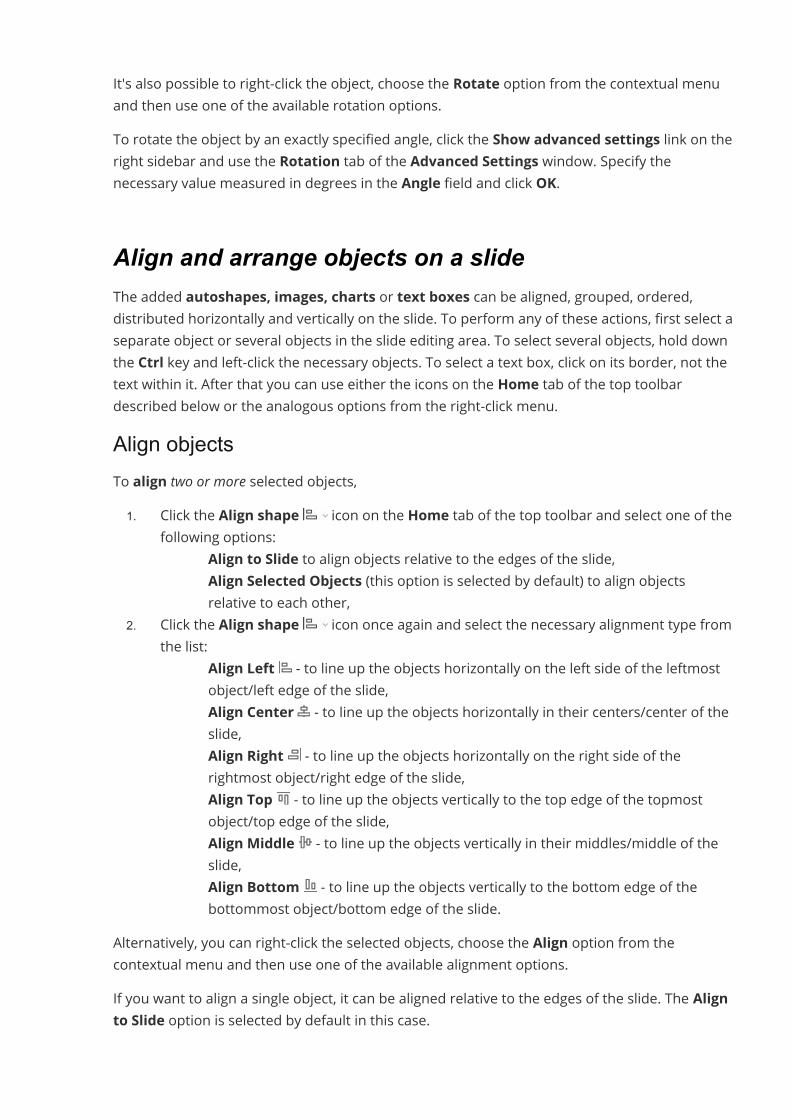
It's also possible to right-click the object, choose the Rotate option from the contextual menuand then use one of the available rotation options.To rotate the object by an exactly specified angle, click the Show advanced settings link on theright sidebar and use the Rotation tab of the Advanced Settings window. Specify thenecessary value measured in degrees in the Angle field and click OK.
Align and arrange objects on a slideThe added autoshapes, images, charts or text boxes can be aligned, grouped, ordered,distributed horizontally and vertically on the slide. To perform any of these actions, first select aseparate object or several objects in the slide editing area. To select several objects, hold downthe Ctrl key and left-click the necessary objects. To select a text box, click on its border, not thetext within it. After that you can use either the icons on the Home tab of the top toolbardescribed below or the analogous options from the right-click menu.Align objectsTo align two or more selected objects,1. Click the Align shape icon on the Home tab of the top toolbar and select one of the
following options:o Align to Slide to align objects relative to the edges of the slide,o Align Selected Objects (this option is selected by default) to align objects
relative to each other,2. Click the Align shape icon once again and select the necessary alignment type from
the list:o Align Left - to line up the objects horizontally on the left side of the leftmost
object/left edge of the slide,o Align Center - to line up the objects horizontally in their centers/center of the
slide,o Align Right - to line up the objects horizontally on the right side of the
rightmost object/right edge of the slide,o Align Top - to line up the objects vertically to the top edge of the topmost
object/top edge of the slide,o Align Middle - to line up the objects vertically in their middles/middle of the
slide,o Align Bottom - to line up the objects vertically to the bottom edge of the
bottommost object/bottom edge of the slide.Alternatively, you can right-click the selected objects, choose the Align option from thecontextual menu and then use one of the available alignment options.If you want to align a single object, it can be aligned relative to the edges of the slide. The Alignto Slide option is selected by default in this case.

Distribute objectsTo distribute three or more selected objects horizontally or vertically so that the equal distanceappears between them,1. Click the Align icon on the Home tab of the top toolbar and select one of the
following options:o Align to Slide to distribute objects between the edges of the slide,o Align Selected Objects (this option is selected by default) to distribute objects
between two outermost selected objects,2. Click the Align shape icon once again and select the necessary distribution type
from the list:o Distribute Horizontally - to distribute objects evenly between the leftmost
and rightmost selected objects/left and right edges of the slide.o Distribute Vertically - to distribute objects evenly between the topmost and
bottommost selected objects/top and bottom edges of the slide.Alternatively, you can right-click the selected objects, choose the Align option from thecontextual menu and then use one of the available distribution options.Note: the distribution options are disabled if you select less than three objects.Group objectsTo group two or more selected objects or ungroup them, click the Arrange shape icon onthe Home tab of the top toolbar and select the necessary option from the list:
· Group - to combine several objects into a group so that they can be simultaneouslyrotated, moved, resized, aligned, arranged, copied, pasted, formatted like a singleobject.
· Ungroup - to ungroup the selected group of the previously combined objects.Alternatively, you can right-click the selected objects, choose the Arrange option from thecontextual menu and then use the Group or Ungroup option.Note: the Group option is disabled if you select less than two objects. The Ungroup option isavailable only when a group of the previously joined objects is selected.Arrange objectsTo arrange the selected object(s) (i.e. to change their order when several objects overlap eachother), click the Arrange shape icon on the Home tab of the top toolbar and select thenecessary arrangement type from the list.
· Bring To Foreground - to move the object(s) in front of all other objects,· Send To Background - to move the object(s) behind all other objects,· Bring Forward - to move the selected object(s) one level forward as related to other
objects.
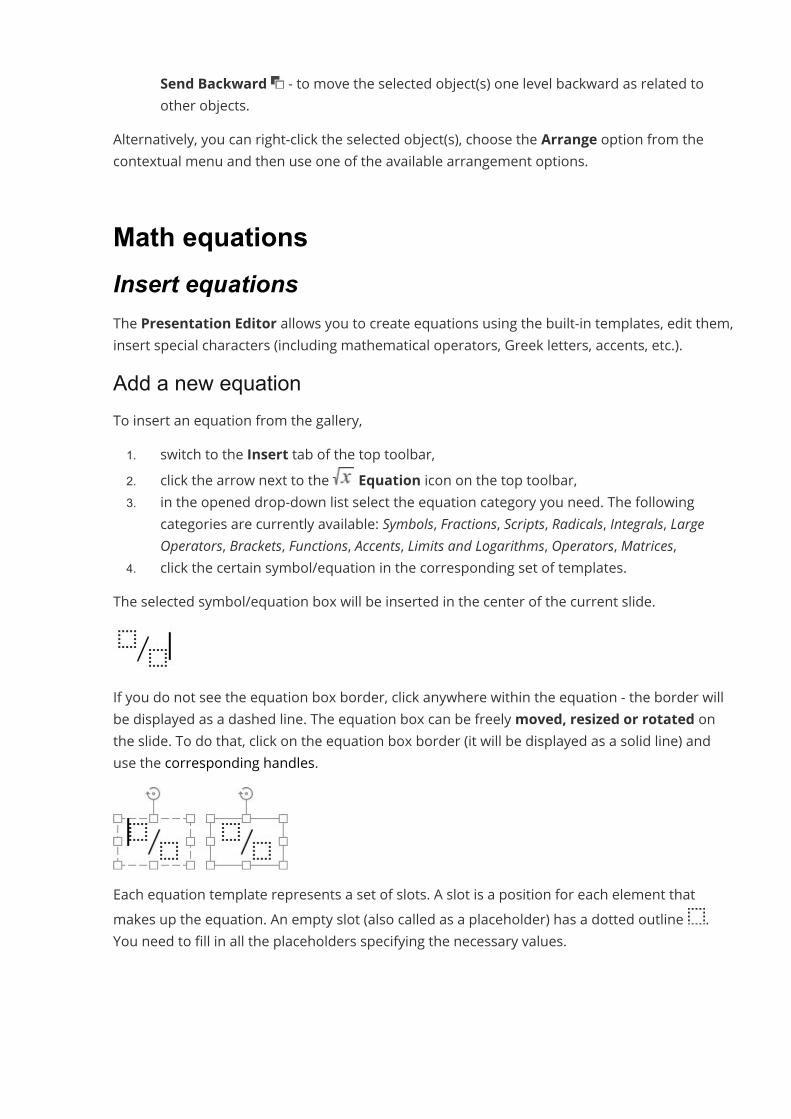
· Send Backward - to move the selected object(s) one level backward as related toother objects.
Alternatively, you can right-click the selected object(s), choose the Arrange option from thecontextual menu and then use one of the available arrangement options.
Math equationsInsert equationsThe Presentation Editor allows you to create equations using the built-in templates, edit them,insert special characters (including mathematical operators, Greek letters, accents, etc.).Add a new equationTo insert an equation from the gallery,1. switch to the Insert tab of the top toolbar,2. click the arrow next to the Equation icon on the top toolbar,3. in the opened drop-down list select the equation category you need. The following
categories are currently available: Symbols, Fractions, Scripts, Radicals, Integrals, LargeOperators, Brackets, Functions, Accents, Limits and Logarithms, Operators, Matrices,
4. click the certain symbol/equation in the corresponding set of templates.The selected symbol/equation box will be inserted in the center of the current slide.
If you do not see the equation box border, click anywhere within the equation - the border willbe displayed as a dashed line. The equation box can be freelymoved, resized or rotated onthe slide. To do that, click on the equation box border (it will be displayed as a solid line) anduse the corresponding handles.
Each equation template represents a set of slots. A slot is a position for each element thatmakes up the equation. An empty slot (also called as a placeholder) has a dotted outline .You need to fill in all the placeholders specifying the necessary values.
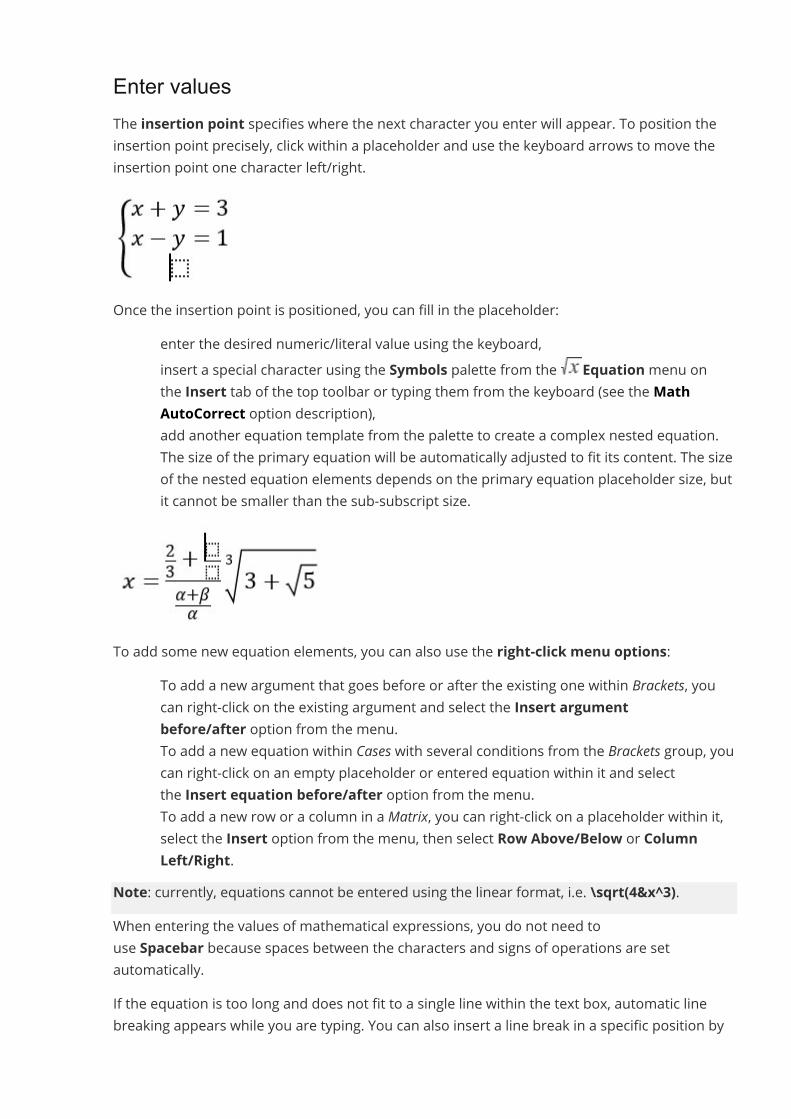
Enter valuesThe insertion point specifies where the next character you enter will appear. To position theinsertion point precisely, click within a placeholder and use the keyboard arrows to move theinsertion point one character left/right.
Once the insertion point is positioned, you can fill in the placeholder:· enter the desired numeric/literal value using the keyboard,· insert a special character using the Symbols palette from the Equationmenu on
the Insert tab of the top toolbar or typing them from the keyboard (see theMathAutoСorrect option description),
· add another equation template from the palette to create a complex nested equation.The size of the primary equation will be automatically adjusted to fit its content. The sizeof the nested equation elements depends on the primary equation placeholder size, butit cannot be smaller than the sub-subscript size.
To add some new equation elements, you can also use the right-click menu options:· To add a new argument that goes before or after the existing one within Brackets, you
can right-click on the existing argument and select the Insert argumentbefore/after option from the menu.
· To add a new equation within Cases with several conditions from the Brackets group, youcan right-click on an empty placeholder or entered equation within it and selectthe Insert equation before/after option from the menu.
· To add a new row or a column in a Matrix, you can right-click on a placeholder within it,select the Insert option from the menu, then select Row Above/Below or ColumnLeft/Right.
Note: currently, equations cannot be entered using the linear format, i.e. \sqrt(4&x^3).When entering the values of mathematical expressions, you do not need touse Spacebar because spaces between the characters and signs of operations are setautomatically.If the equation is too long and does not fit to a single line within the text box, automatic linebreaking appears while you are typing. You can also insert a line break in a specific position by
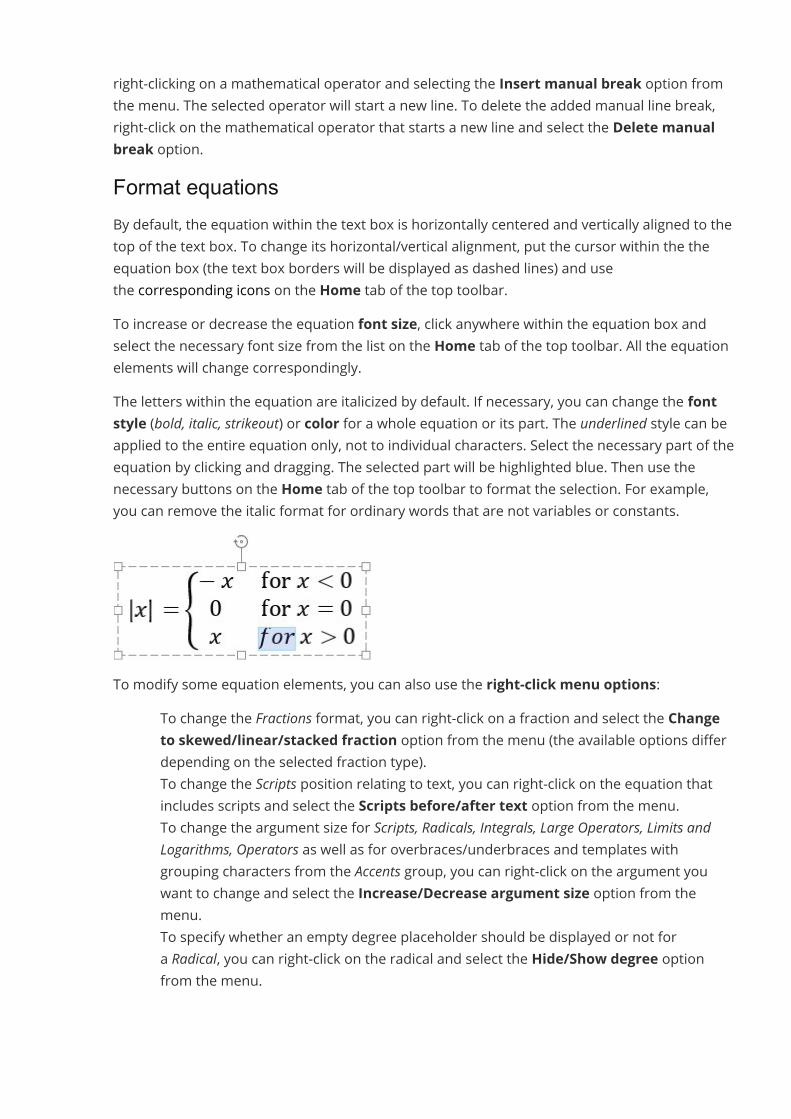
right-clicking on a mathematical operator and selecting the Insert manual break option fromthe menu. The selected operator will start a new line. To delete the added manual line break,right-click on the mathematical operator that starts a new line and select the Delete manualbreak option.Format equationsBy default, the equation within the text box is horizontally centered and vertically aligned to thetop of the text box. To change its horizontal/vertical alignment, put the cursor within the theequation box (the text box borders will be displayed as dashed lines) and usethe corresponding icons on the Home tab of the top toolbar.To increase or decrease the equation font size, click anywhere within the equation box andselect the necessary font size from the list on the Home tab of the top toolbar. All the equationelements will change correspondingly.The letters within the equation are italicized by default. If necessary, you can change the fontstyle (bold, italic, strikeout) or color for a whole equation or its part. The underlined style can beapplied to the entire equation only, not to individual characters. Select the necessary part of theequation by clicking and dragging. The selected part will be highlighted blue. Then use thenecessary buttons on the Home tab of the top toolbar to format the selection. For example,you can remove the italic format for ordinary words that are not variables or constants.
To modify some equation elements, you can also use the right-click menu options:· To change the Fractions format, you can right-click on a fraction and select the Change
to skewed/linear/stacked fraction option from the menu (the available options differdepending on the selected fraction type).
· To change the Scripts position relating to text, you can right-click on the equation thatincludes scripts and select the Scripts before/after text option from the menu.
· To change the argument size for Scripts, Radicals, Integrals, Large Operators, Limits andLogarithms, Operators as well as for overbraces/underbraces and templates withgrouping characters from the Accents group, you can right-click on the argument youwant to change and select the Increase/Decrease argument size option from themenu.
· To specify whether an empty degree placeholder should be displayed or not fora Radical, you can right-click on the radical and select the Hide/Show degree optionfrom the menu.
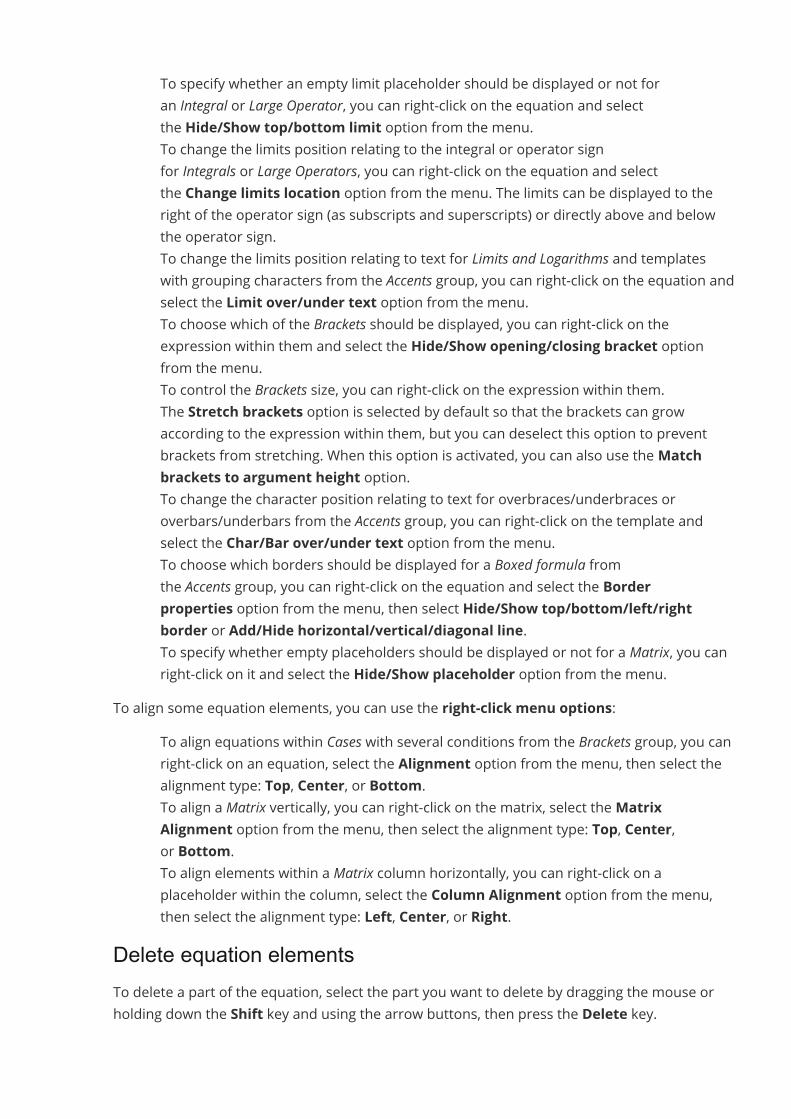
· To specify whether an empty limit placeholder should be displayed or not foran Integral or Large Operator, you can right-click on the equation and selectthe Hide/Show top/bottom limit option from the menu.
· To change the limits position relating to the integral or operator signfor Integrals or Large Operators, you can right-click on the equation and selectthe Change limits location option from the menu. The limits can be displayed to theright of the operator sign (as subscripts and superscripts) or directly above and belowthe operator sign.
· To change the limits position relating to text for Limits and Logarithms and templateswith grouping characters from the Accents group, you can right-click on the equation andselect the Limit over/under text option from the menu.
· To choose which of the Brackets should be displayed, you can right-click on theexpression within them and select the Hide/Show opening/closing bracket optionfrom the menu.
· To control the Brackets size, you can right-click on the expression within them.The Stretch brackets option is selected by default so that the brackets can growaccording to the expression within them, but you can deselect this option to preventbrackets from stretching. When this option is activated, you can also use theMatchbrackets to argument height option.
· To change the character position relating to text for overbraces/underbraces oroverbars/underbars from the Accents group, you can right-click on the template andselect the Char/Bar over/under text option from the menu.
· To choose which borders should be displayed for a Boxed formula fromthe Accents group, you can right-click on the equation and select the Borderproperties option from the menu, then select Hide/Show top/bottom/left/rightborder or Add/Hide horizontal/vertical/diagonal line.
· To specify whether empty placeholders should be displayed or not for a Matrix, you canright-click on it and select the Hide/Show placeholder option from the menu.
To align some equation elements, you can use the right-click menu options:· To align equations within Cases with several conditions from the Brackets group, you can
right-click on an equation, select the Alignment option from the menu, then select thealignment type: Top, Center, or Bottom.
· To align a Matrix vertically, you can right-click on the matrix, select theMatrixAlignment option from the menu, then select the alignment type: Top, Center,or Bottom.
· To align elements within a Matrix column horizontally, you can right-click on aplaceholder within the column, select the Column Alignment option from the menu,then select the alignment type: Left, Center, or Right.
Delete equation elementsTo delete a part of the equation, select the part you want to delete by dragging the mouse orholding down the Shift key and using the arrow buttons, then press the Delete key.
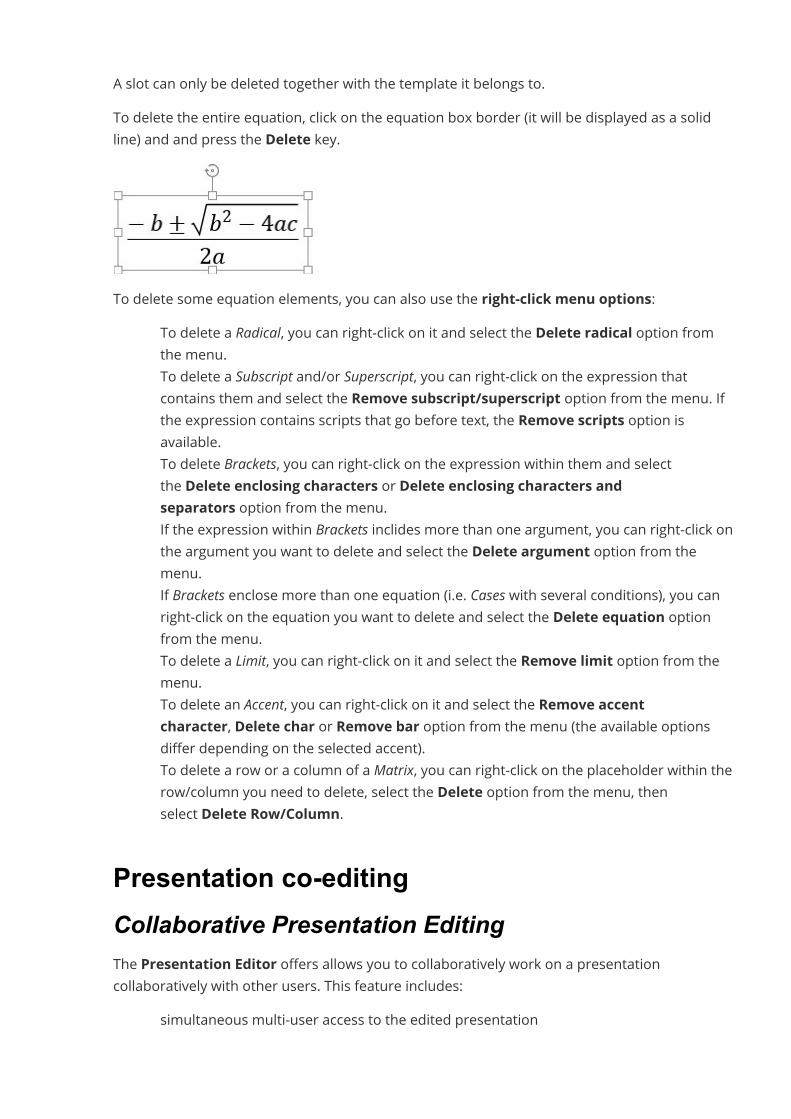
A slot can only be deleted together with the template it belongs to.To delete the entire equation, click on the equation box border (it will be displayed as a solidline) and and press the Delete key.
To delete some equation elements, you can also use the right-click menu options:· To delete a Radical, you can right-click on it and select the Delete radical option from
the menu.· To delete a Subscript and/or Superscript, you can right-click on the expression that
contains them and select the Remove subscript/superscript option from the menu. Ifthe expression contains scripts that go before text, the Remove scripts option isavailable.
· To delete Brackets, you can right-click on the expression within them and selectthe Delete enclosing characters or Delete enclosing characters andseparators option from the menu.
· If the expression within Brackets inclides more than one argument, you can right-click onthe argument you want to delete and select the Delete argument option from themenu.
· If Brackets enclose more than one equation (i.e. Cases with several conditions), you canright-click on the equation you want to delete and select the Delete equation optionfrom the menu.
· To delete a Limit, you can right-click on it and select the Remove limit option from themenu.
· To delete an Accent, you can right-click on it and select the Remove accentcharacter, Delete char or Remove bar option from the menu (the available optionsdiffer depending on the selected accent).
· To delete a row or a column of a Matrix, you can right-click on the placeholder within therow/column you need to delete, select the Delete option from the menu, thenselect Delete Row/Column.
Presentation co-editingCollaborative Presentation EditingThe Presentation Editor offers allows you to collaboratively work on a presentationcollaboratively with other users. This feature includes:
· simultaneous multi-user access to the edited presentation
· visual indication of objects that are being edited by other users· real-time display of changes or their synchronization with one button click· a chat to share ideas concerning particular parts of the presentation· comments containing the description of a task or problem that should be solved (it's
also possible to work with comments in the offline mode, without connecting tothe online version)
Connecting to the online versionIn the desktop editor, open the Connect to cloud option of the left-side menu in the mainprogram window. Connect to your cloud office specifying your account login and password.Co-editingThe Presentation Editor allows you to select one of the two available co-editing modes:
· Fast is used by default and shows the changes made by other users in real time.· Strict is selected to hide other user's changes until you click the Save icon to save
your own changes and accept the changes made by the others.The mode can be selected in the Advanced Settings. It's also possible to choose the necessarymode using the Co-editing Mode icon on the Collaboration tab of the top toolbar.Note: when you co-edit a presentation in the Fastmode, the possibility to Redo the lastundone operation is not available.When a presentation is being edited by several users simultaneously in the Strictmode, theedited objects (autoshapes, text objects, tables, images, charts) are marked with dashed lines ofdifferent colors. The object that you are editing is surrounded by the green dashed line. Reddashed lines indicate that objects are being edited by other users. By hovering the mousecursor over one of the edited passages, the name of the user who is editing it at the moment isdisplayed. The Fastmode will show the actions and the names of the co-editors when they areediting the text.The number of users who are working on the current presentation is specified on the right sideof the editor header - . If you want to see who exactly is editing the file now, you can clickthis icon or open the Chat panel with the full list of the users.When no users are viewing or editing the file, the icon in the editor header will looklike allowing you to manage the users who have access to the file right from thedocument: invite new users giving them permissions to edit, read or comment the presentation,or deny some users access rights to the file. Click this icon to manage the access to the file; thiscan be done both when there are no other users who view or co-edit the document at themoment and when there are other users and the icon looks like . It's also possible to setaccess rights using the Sharing icon on the Collaboration tab of the top toolbar.As soon as one of the users saves his/her changes by clicking the icon, the others will see anote within the status bar stating that they have updates. To save the changes you made, so
that other users can view them, and get the updates saved by your co-editors, click the iconin the left upper corner of the top toolbar. The updates will be highlighted for you to checkwhat exactly has been changed.AnonymousPortal users who are not registered and do not have a profile are considered to be anonymous,although they still can collaborate on documents. To have a name assigned to them, theanonymous user should enter a name they prefer in the corresponding field appearing in theright top corner of the screen when they open the document for the first time. Activate the“Don’t ask me again” checkbox to preserve the name.
ChatYou can use this tool to coordinate the co-editing process on-the-fly, for example, to distributetasks with your collaborators.The chat messages are stored during one session only. To discuss the document content, it isbetter to use comments which are stored until you decide to delete them.To access the chat and leave a message for other users,1. click the icon on the left sidebar, or
switch to the Collaboration tab of the top toolbar and click the Chat button,2. enter your text into the corresponding field below,3. press the Send button.
All the messages left by users will be displayed on the panel on the left. If there are newmessages you haven't read yet, the chat icon will look like this - .To close the panel with chat messages, click the icon on the left sidebar orthe Chat button on the top toolbar once again.CommentsIt's possible to work with comments in the offline mode, without connecting to the onlineversion.To leave a comment to a certain object (text box, shape etc.):1. select an object where you think there is an error or problem,2. switch to the Insert or Collaboration tab of the top toolbar and click
the Comment button, orright-click the selected object and select the Add Сomment option from the menu,
3. enter the needed text,4. click the Add Comment/Add button.
The object you commented will be marked with the icon. To view the comment, just click onthis icon.To add a comment to a certain slide, select the slide and use the Comment button onthe Insert or Collaboration tab of the top toolbar. The added comment will be displayed in theupper left corner of the slide.To create a presentation-level comment which is not related to a certain object or slide, clickthe icon on the left sidebar to open the Comments panel and use the Add Comment toDocument link. The presentation-level comments can be viewed on the Comments panel.Comments related to objects and slides are also available here.Any other user can answer to the added comment asking questions or reporting on the workhe/she has done. For this purpose, click the Add Reply link situated under the comment, typein your reply text in the entry field and press the Reply button.If you are using the Strict co-editing mode, new comments added by other users will becomevisible only after you click the icon in the left upper corner of the top toolbar.You can manage the added comments using the icons in the comment balloon or onthe Comments panel on the left:
· edit the currently selected by clicking the icon,· delete the currently selected by clicking the icon,· close the currently selected discussion by clicking the icon if the task or problem you
stated in your comment was solved, after that the discussion you opened with yourcomment gets the resolved status. To open it again, click the icon.
Adding mentionsWhen entering comments, you can use thementions feature that allows you to attractsomebody's attention to the comment and send a notification to the mentioned user via emailand Talk.To add a mention enter the "+" or "@" sign anywhere in the comment text - a list of the portalusers will open. To simplify the search process, you can start typing a name in the commentfield - the user list will change as you type. Select the necessary person from the list. If the filehas not yet been shared with the mentioned user, the Sharing Settings window willopen. Read only access type is selected by default. Change it if necessary and click OK.The mentioned user will receive an email notification that he/she has been mentioned in acomment. If the file has been shared, the user will also receive a corresponding notification.To remove comments,1. click the Remove button on the Collaboration tab of the top toolbar,2. select the necessary option from the menu:
o Remove Current Comments - to remove the currently selected comment. Ifsome replies have been added to the comment, all its replies will be removed aswell.
o Remove My Comments - to remove comments you added without removingcomments added by other users. If some replies have been added to yourcomment, all its replies will be removed as well.
o Remove All Comments - to remove all the comments in the presentation thatyou and other users added.
To close the panel with comments, click the icon on the left sidebar once again.
PluginsEdit an imageONLYOFFICE comes with a very powerful photo editor, that allows you to adjust the image withfilters and make all kinds of annotations.1. Select an image in your presentation.2. Switch to the Plugins tab and choose Photo Editor.
You are now in the editing environment.· Below the image you will find the following checkboxes and slider filters:
o Grayscale, Sepia, Sepia 2, Blur, Emboss, Invert, Sharpen;o Remove White (Threshhold, Distance), Gradient
transparency, Brightness, Noise, Pixelate, Color Filter;o Tint,Multiply, Blend.
· Below the filters you will find buttons foro Undo, Redo and Resetting;o Delete, Delete all;o Crop (Custom, Square, 3:2, 4:3, 5:4, 7:5, 16:9);o Flip (Flip X, Flip Y, Reset);o Rotate (30 degree, -30 degree,Manual rotation slider);o Draw (Free, Straight, Color, Size slider);o Shape (Recrangle, Circle, Triangle, Fill, Stroke, Stroke size);o Icon (Arrows, Stars, Polygon, Location, Heart, Bubble, Custom icon, Color);o Text (Bold, Italic, Underline, Left, Center, Right, Color, Text size);o Mask.
Feel free to try all of these and remember you can always undo them.3. When finished, click the OK button.
The edited picture is now included in the presentation.
Include a videoYou can include a video in your presentation. It will be shown as an image. By double-clickingthe image the video dialog opens. Here you can start the video.1. Copy the URL of the video you want to include.
(the complete address shown in the address line of your browser)2. Go to your presentation and place the cursor at the location where you want to include
the video.3. Switch to the Plugins tab and choose YouTube.4. Paste the URL and click OK.5. Check if it is the correct video and click the OK button below the video.
The video is now included in your presentation.
Insert highlighted codeYou can embed highlighted code with the already adjusted style in accordance with theprogramming language and coloring style of the program you have chosen.1. Go to your presentation and place the cursor at the location where you want to include
the code.2. Switch to the Plugins tab and choose Highlight code.3. Specify the programming Language.4. Select a Style of the code so that it appears as if it were open in this program.5. Specify if you want to replace tabs with spaces.6. Choose Background color. To do this, manually move the cursor over the palette or
insert the RBG/HSL/HEX value.7. Click OK to insert the code.
Translate textYou can translate your presentation from and to numerous languages.1. Select the text that you want to translate.2. Switch to the Plugins tab and choose Translator, the Translator appears in a
sidebar on the left.3. Click the drop-down box and choose the preferred language.
The text will be translated to the required language.
Changing the language of your result:1. Click the drop-down box and choose the preferred language.
The translation will change immediately.
Replace a word by a synonymIf you are using the same word multiple times, or a word is just not quite the word you arelooking for, ONLYOFFICE let you look up synonyms. It will show you the antonyms too.1. Select the word in your presentation.2. Switch to the Plugins tab and choose Thesaurus.3. The synonyms and antonyms will show up in the left sidebar.4. Click a word to replace the word in your presentation.
Tools and settingsView the information about your presentationTo access the detailed information about the currently edited presentation, click the File tab ofthe top toolbar and select the Presentation Info option.General InformationThe spreadsheet information includes a number of file properties which describe thespreadsheet. Some of these properties are updated automatically, and some of them can beedited.
· Location - the folder in the Documentsmodule where the file is stored. Owner - thename of the user who has created the file. Uploaded - the date and time when the filehas been created. These properties are available in the online version only.
· Title, Subject, Comment - these properties allow you to simplify the classification ofyour documents. You can specify the necessary text in the properties fields.
· Last Modified - the date and time when the file was last modified.· Last Modified By - the name of the user who has made the latest change to the
presentation if it was shared and can be edited by several users.· Application - the application the presentation was created with.· Author - the person who has created the file. You can enter the necessary name in this
field. Press Enter to add a new field that allows you to specify one more author.If you changed the file properties, click the Apply button to apply the changes.
Note: Online Editors allow you to change the presentation title directly from the editorinterface. To do that, click the File tab of the top toolbar and select the Rename... option, thenenter the necessary File name in a new window that opens and click OK.Permission InformationIn the online version, you can view the information about permissions to the files stored in thecloud.Note: this option is not available for users with the Read Only permissions.To find out who has the rights to view or edit the presentation, select the AccessRights... option on the left sidebar.You can also change currently selected access rights by pressing the Change accessrights button in the Persons who have rights section.To close the File pane and return to presentation editing, select the Close Menu option.
Save/print/download your presentationSavingBy default, the online Рresentation Editor automatically saves your file every 2 seconds whenyou are working on it preventing your data loss if the program closes unexpectedly. If you co-edit the file in the Fastmode, the timer requests for updates 25 times a second and saves thechanges if there are any. When the file is co-edited in the Strictmode, changes areautomatically saved within 10-minute intervals. If you need, you can easily select the preferredco-editing mode or disable the Autosave feature on the Advanced Settings page.To save your presentation manually in the current format and location,
· press the Save icon on the left side of the editor header, or· use the Ctrl+S key combination, or· click the File tab of the top toolbar and select the Save option.
Note: in the desktop version, to prevent data loss if the program closes unexpectedly, you canturn on the Autorecover option on the Advanced Settings page.In the desktop version, you can save the presentation under a different name, in a new locationor format,1. click the File tab of the top toolbar,2. select the Save as... option,3. choose one of the available formats depending on your needs: PPTX, ODP, PDF, PDFA.
You can also choose the Рresentation template (POTX or OTP) option.
DownloadingIn the online version, you can download the resulting presentation onto the hard disk drive ofyour computer,1. click the File tab of the top toolbar,2. select the Download as... option,3. choose one of the available formats depending on your needs: PPTX, PDF, ODP, POTX,
PDF/A, OTP.Saving a copyIn the online version, you can save a copy of the file on your portal,1. click the File tab of the top toolbar,2. select the Save Copy as... option,3. choose one of the available formats depending on your needs: PPTX, PDF, ODP, POTX,
PDF/A, OTP,4. select a location of the file on the portal and press Save.
PrintingTo print out the current presentation,
· click the Print icon on the left side of the editor header, or· use the Ctrl+P key combination, or· click the File tab of the top toolbar and select the Print option.
It's also possible to print the selected slides using the Print Selection option from thecontextual menu both in the Edit and Viewmodes (Right Mouse Button Click on the selectedslides and choose option Print selection).In the desktop version, the file will be printed directly. In the online version, a PDF file based onyour presentation will be generated. You can open and print it out, or save onto the hard diskdrive of your computer or a removable medium to print it out later. Some browsers (e.g.Chrome and Opera) support direct printing.
Advanced Settings of the Presentation EditorThe Presentation Editor allows you to change its advanced settings. To access them, openthe File tab on the top toolbar and select the Advanced Settings... option. You can also clickthe View settings icon on the right side of the editor header and select the Advancedsettings option.The advanced settings are:
· Spell Checking is used to turn on/off the spell checking option.
· Proofing - used to automatically replace word or symbol typed in the Replace: box orchosen from the list by a new word or symbol displayed in the By: box.
· Alternate Input is used to turn on/off hieroglyphs.· Alignment Guides is used to turn on/off alignment guides that appear when you move
objects and allow you to position them on the slide precisely.· Autosave is used in the online version to turn on/off automatic saving of changes you
make while editing.· Autorecover - is used in the desktop version to turn on/off the option that allows you to
automatically recover documents if the program closes unexpectedly.· Co-editing Mode is used to select a way of displaying changes made during co-editing:
o By default, the Fastmode is selected, the users who take part in thepresentation co-editing, will see the changes in real time once they are made byother users.
o If you prefer not to see the changes made by other users (so that they will notdisturb you, or for some other reason), select the Strictmode, and all thechanges will be shown only after you click the Save icon with a notificationthat there are some changes made by other users.
· Interface theme is used to change the color scheme of the editor’s interface.o Light color scheme incorporates standard orange, white, and light-gray colors
with less contrast in UI elements suitable for working during daytime.o Classic Light color scheme incorporates standard orange, white, and light-
gray colors.o Dark color scheme incorporates black, dark-gray, and light-gray colors
suitable for working during nighttime.· Default Zoom Value is used to set the default zoom value selecting it in the list of
available options from 50% to 200%. You can also choose the Fit to Slide or Fit toWidth option.
· Font Hinting is used to select a way fonts are displayed in the Presentation Editor:o Choose As Windows if you like the way fonts are usually displayed on Windows,
i.e. using Windows font hinting.o Choose As OS X if you like the way fonts are usually displayed on a Mac, i.e.
without any font hinting at all.o Choose Native if you want your text to be displayed with the hinting embedded
into font files.o Default cache mode - used to select the cache mode for the font characters. It’s
not recommended to switch it without any reason. It can be helpful in somecases only, for example, when the Google Chrome browser has problems withthe enabled hardware acceleration.The Presentation Editor has two cache modes:
1. In the first cache mode, each letter is cached as a separate picture.2. In the second cache mode, a picture of a certain size is selected where
letters are placed dynamically and a mechanism of allocating/removing

memory in this picture is also implemented. If there is not enoughmemory, a second picture is created, etc.
The Default cache mode setting applies two above mentioned cache modesseparately for different browsers:
§ When the Default cache mode setting is enabled, Internet Explorer (v. 9,10, 11) uses the second cache mode, other browsers use the first cachemode.
§ When the Default cache mode setting is disabled, Internet Explorer (v. 9,10, 11) uses the first cache mode, other browsers use the second cachemode.
· Unit of Measurement is used to specify what units are used on the rulers and inproperties windows for measuring elements parameters such as width, height, spacing,margins, etc. You can select the Centimeter, Point, or Inch option.
· Cut, copy and paste - used to show the Paste Options button when content is pasted.Check the box to enable this feature.
· Macros Settings - used to set macros display with a notification.o Choose Disable all to disable all macros within the presentation;o Show notification to receive notifications about macros within the presentation;o Enable all to automatically run all macros within the presentation.
To save the changes you made, click the Apply button.
View Settings and Navigation ToolsThe Presentation Editor offers several tools to help you view and navigate through yourpresentation: zoom, previous/next slide buttons and slide number indicator.Adjust the View SettingsTo adjust default view settings and set the most convenient mode to work with thepresentation, click the View settings icon on the right side of the editor header and selectwhich interface elements you want to be hidden or shown. You can select the following optionsfrom the View settings drop-down list:
· Hide Toolbar - hides the top toolbar that contains commands while tabs remain visible.When this option is enabled, you can click any tab to display the toolbar. The toolbar isdisplayed until you click anywhere outside it. To disable this mode, click the Viewsettings icon and click the Hide Toolbar option once again. The top toolbar will bedisplayed all the time.Note: alternatively, you can just double-click any tab to hide the top toolbar or display itagain.
· Hide Status Bar - hides the bottommost bar where the Slide NumberIndicator and Zoom buttons are situated. To show the hidden Status Bar, click thisoption once again.
· Hide Rulers - hides rulers which are used to set up tab stops and paragraph indentswithin the text boxes. To show the hidden Rulers, click this option once again.
The right sidebar is minimized by default. To expand it, select any object/slide and click the iconof the currently activated tab on the right. To minimize the right sidebar, click the icon onceagain. The left sidebar width is adjusted by simple drag-and-drop: move the mouse cursor overthe left sidebar border so that it turns into the bidirectional arrow and drag the border to theleft to reduce the sidebar width or to the right to extend it.Use the Navigation ToolsTo navigate through your presentation, use the following tools:The Zoom buttons are situated in the right lower corner and are used to zoom in and out thecurrent presentation. To change the currently selected zoom value that is displayed in percent,click it and select one of the available zoom options from the list (50% / 75% / 100% / 125% /150% / 175% / 200%) or use the Zoom in or Zoom out buttons. Click the Fit towidth icon to fit the slide width to the visible part of the working area. To fit the whole slideto the visible part of the working area, click the Fit to slide icon. Zoom settings are alsoavailable in the View settings drop-down list that can be useful if you decide to hidethe Status Bar.Note: you can set a default zoom value. Switch to the File tab of the top toolbar, go tothe Advanced Settings... section, choose the necessary Default Zoom Value from the list andclick the Apply button.To go to the previous or next slide when editing the presentation, you can usethe and buttons at the top and bottom of the vertical scroll bar located to the right of theslide.The Slide Number Indicator shows the current slide as a part of all the slides in the currentpresentation (slide 'n' of 'nn'). Click this caption to open the window where you can enter theslide number and quickly go to it. If you decide to hide the Status Bar, this tool will becomeinaccessible.
Search and Replace FunctionTo search for the needed characters, words or phrases used in the currently editedpresentation, click the icon situated on the left sidebar or use the Ctrl+F key combination.The Find and Replace window will open.1. Type in your inquiry into the corresponding data entry field.
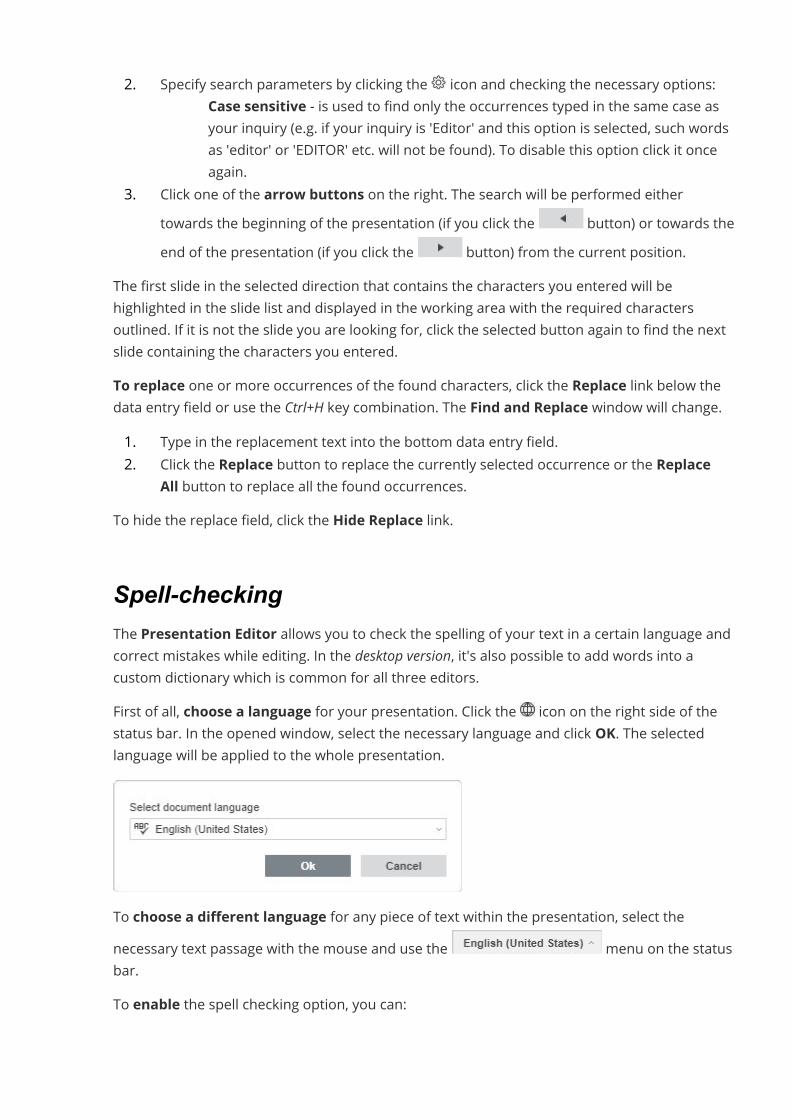
2. Specify search parameters by clicking the icon and checking the necessary options:· Case sensitive - is used to find only the occurrences typed in the same case as
your inquiry (e.g. if your inquiry is 'Editor' and this option is selected, such wordsas 'editor' or 'EDITOR' etc. will not be found). To disable this option click it onceagain.
3. Click one of the arrow buttons on the right. The search will be performed eithertowards the beginning of the presentation (if you click the button) or towards theend of the presentation (if you click the button) from the current position.
The first slide in the selected direction that contains the characters you entered will behighlighted in the slide list and displayed in the working area with the required charactersoutlined. If it is not the slide you are looking for, click the selected button again to find the nextslide containing the characters you entered.To replace one or more occurrences of the found characters, click the Replace link below thedata entry field or use the Ctrl+H key combination. The Find and Replace window will change.1. Type in the replacement text into the bottom data entry field.2. Click the Replace button to replace the currently selected occurrence or the Replace
All button to replace all the found occurrences.To hide the replace field, click the Hide Replace link.
Spell-checkingThe Presentation Editor allows you to check the spelling of your text in a certain language andcorrect mistakes while editing. In the desktop version, it's also possible to add words into acustom dictionary which is common for all three editors.First of all, choose a language for your presentation. Click the icon on the right side of thestatus bar. In the opened window, select the necessary language and click OK. The selectedlanguage will be applied to the whole presentation.
To choose a different language for any piece of text within the presentation, select thenecessary text passage with the mouse and use the menu on the statusbar.To enable the spell checking option, you can:
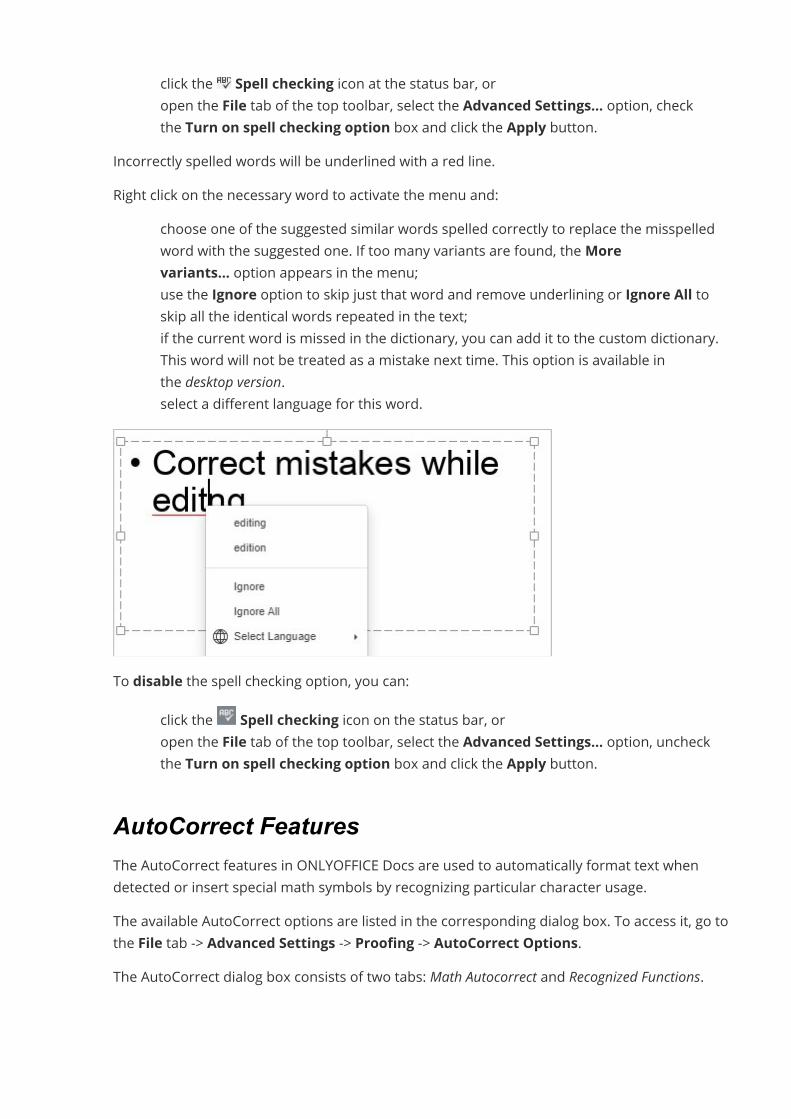
· click the Spell checking icon at the status bar, or· open the File tab of the top toolbar, select the Advanced Settings... option, check
the Turn on spell checking option box and click the Apply button.Incorrectly spelled words will be underlined with a red line.Right click on the necessary word to activate the menu and:
· choose one of the suggested similar words spelled correctly to replace the misspelledword with the suggested one. If too many variants are found, theMorevariants... option appears in the menu;
· use the Ignore option to skip just that word and remove underlining or Ignore All toskip all the identical words repeated in the text;
· if the current word is missed in the dictionary, you can add it to the custom dictionary.This word will not be treated as a mistake next time. This option is available inthe desktop version.
· select a different language for this word.
To disable the spell checking option, you can:· click the Spell checking icon on the status bar, or· open the File tab of the top toolbar, select the Advanced Settings... option, uncheck
the Turn on spell checking option box and click the Apply button.
AutoCorrect FeaturesThe AutoCorrect features in ONLYOFFICE Docs are used to automatically format text whendetected or insert special math symbols by recognizing particular character usage.The available AutoCorrect options are listed in the corresponding dialog box. To access it, go tothe File tab -> Advanced Settings -> Proofing -> AutoCorrect Options.The AutoCorrect dialog box consists of two tabs: Math Autocorrect and Recognized Functions.
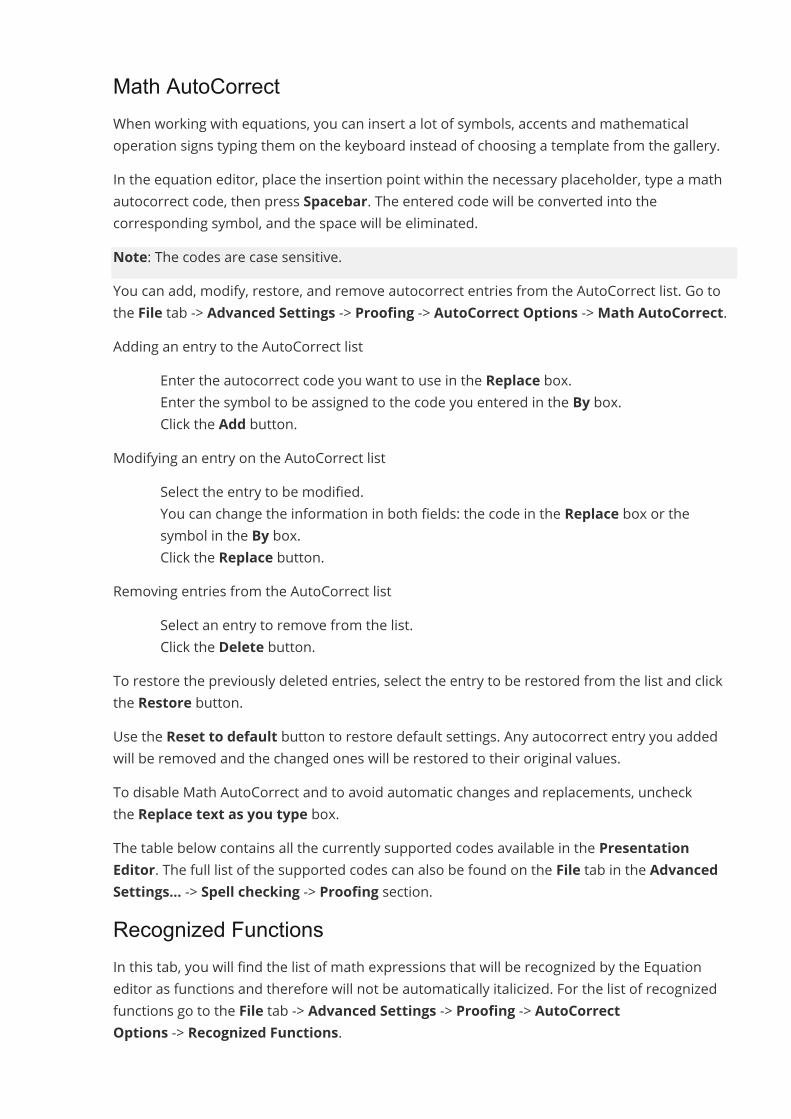
Math AutoCorrectWhen working with equations, you can insert a lot of symbols, accents and mathematicaloperation signs typing them on the keyboard instead of choosing a template from the gallery.In the equation editor, place the insertion point within the necessary placeholder, type a mathautocorrect code, then press Spacebar. The entered code will be converted into thecorresponding symbol, and the space will be eliminated.Note: The codes are case sensitive.You can add, modify, restore, and remove autocorrect entries from the AutoCorrect list. Go tothe File tab -> Advanced Settings -> Proofing -> AutoCorrect Options ->Math AutoCorrect.Adding an entry to the AutoCorrect list
· Enter the autocorrect code you want to use in the Replace box.· Enter the symbol to be assigned to the code you entered in the By box.· Click the Add button.
Modifying an entry on the AutoCorrect list· Select the entry to be modified.· You can change the information in both fields: the code in the Replace box or the
symbol in the By box.· Click the Replace button.
Removing entries from the AutoCorrect list· Select an entry to remove from the list.· Click the Delete button.
To restore the previously deleted entries, select the entry to be restored from the list and clickthe Restore button.Use the Reset to default button to restore default settings. Any autocorrect entry you addedwill be removed and the changed ones will be restored to their original values.To disable Math AutoCorrect and to avoid automatic changes and replacements, uncheckthe Replace text as you type box.The table below contains all the currently supported codes available in the PresentationEditor. The full list of the supported codes can also be found on the File tab in the AdvancedSettings... -> Spell checking -> Proofing section.Recognized FunctionsIn this tab, you will find the list of math expressions that will be recognized by the Equationeditor as functions and therefore will not be automatically italicized. For the list of recognizedfunctions go to the File tab -> Advanced Settings -> Proofing -> AutoCorrectOptions -> Recognized Functions.
To add an entry to the list of recognized functions, enter the function in the blank field and clickthe Add button.To remove an entry from the list of recognized functions, select the function to be removed andclick the Delete button.To restore the previously deleted entries, select the entry to be restored from the list and clickthe Restore button.Use the Reset to default button to restore default settings. Any function you added will beremoved and the removed ones will be restored.
AutoFormat as You TypeBy default, the editor formats the text while you are typing according to the auto-formattingpresets, for instance, it automatically starts a bullet list or a numbered list when a list isdetected, or replaces quotation marks, or converts hyphens to dashes.If you need to disable auto-formatting presets, uncheck the box for the unnecessary options, goto the File tab -> Advanced Settings -> Proofing -> AutoCorrect Options -> AutoFormat AsYou Type.
Helpful hintsAbout the Presentation EditorThe Presentation Editor is an online application that lets you look through and editpresentations directly in your browser.Using the Presentation Editor, you can perform various editing operations like in any desktopeditor, print the edited presentations keeping all the formatting details or download them ontothe hard disk drive of your computer as PPTX, PDF, ODP, POTX, PDF/A, OTP files.To view the current software version and licensor details in the online version, click the iconon the left sidebar. To view the current software version and licensor details in the desktopversion, select the Aboutmenu item on the left sidebar of the main program window.
Supported Formats of Electronic PresentationA presentation is a set of slides that may include different types of content such as images,media files, text, effects, etc. The Presentation Editor handles the following presentationformats:
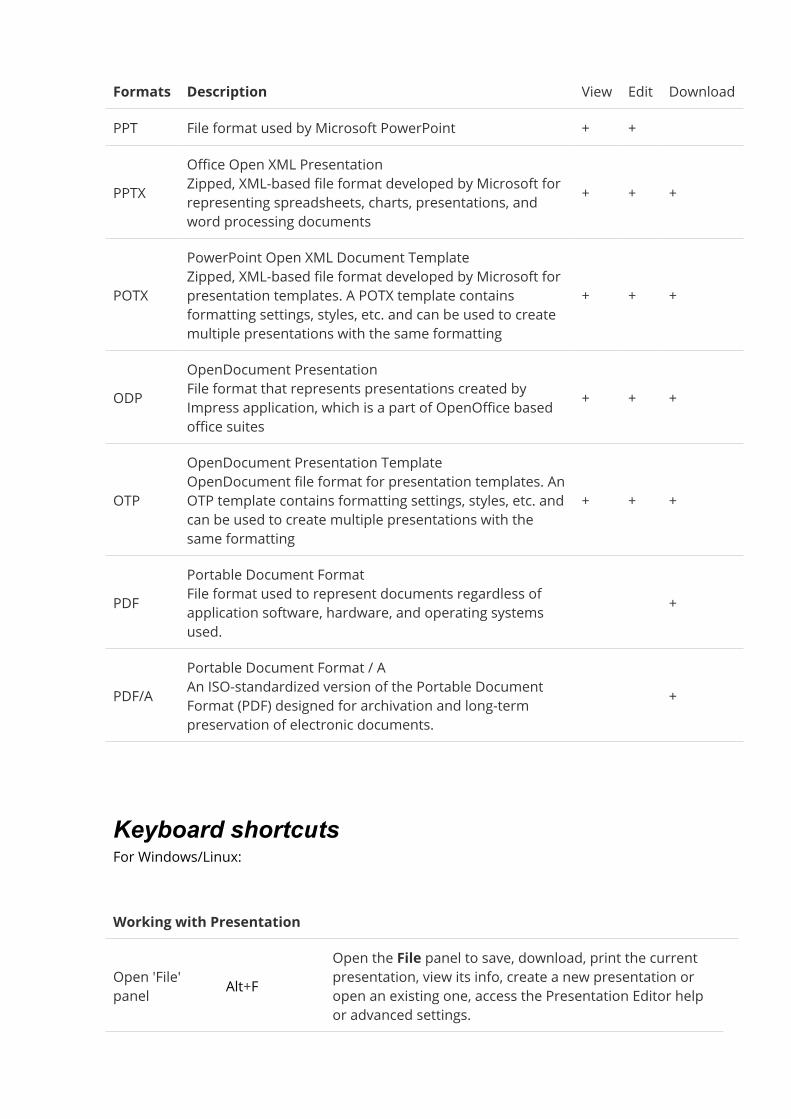
Formats Description View Edit DownloadPPT File format used by Microsoft PowerPoint + +
PPTXOffice Open XML PresentationZipped, XML-based file format developed by Microsoft forrepresenting spreadsheets, charts, presentations, andword processing documents
+ + +
POTXPowerPoint Open XML Document TemplateZipped, XML-based file format developed by Microsoft forpresentation templates. A POTX template containsformatting settings, styles, etc. and can be used to createmultiple presentations with the same formatting
+ + +
ODPOpenDocument PresentationFile format that represents presentations created byImpress application, which is a part of OpenOffice basedoffice suites
+ + +
OTPOpenDocument Presentation TemplateOpenDocument file format for presentation templates. AnOTP template contains formatting settings, styles, etc. andcan be used to create multiple presentations with thesame formatting
+ + +
PDFPortable Document FormatFile format used to represent documents regardless ofapplication software, hardware, and operating systemsused.
+
PDF/APortable Document Format / AAn ISO-standardized version of the Portable DocumentFormat (PDF) designed for archivation and long-termpreservation of electronic documents.
+
Keyboard shortcutsFor Windows/Linux:
Working with Presentation
Open 'File'panel Alt+F
Open the File panel to save, download, print the currentpresentation, view its info, create a new presentation oropen an existing one, access the Presentation Editor helpor advanced settings.
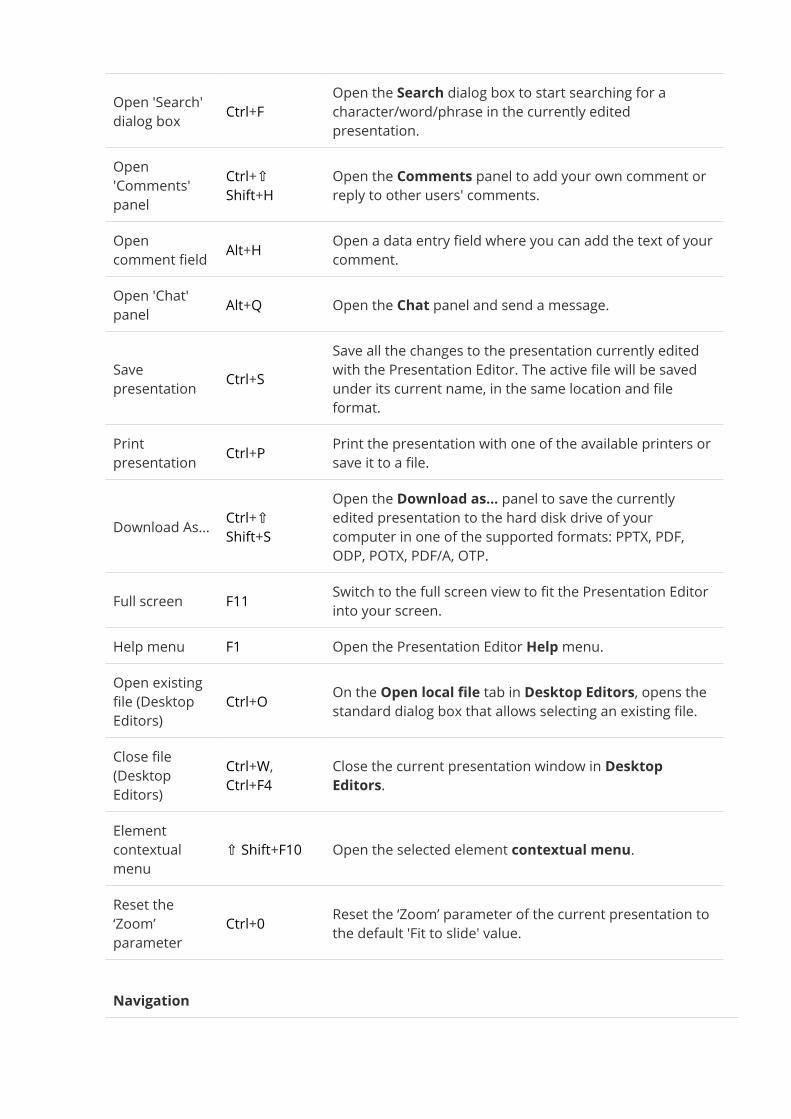
Open 'Search'dialog box Ctrl+F
Open the Search dialog box to start searching for acharacter/word/phrase in the currently editedpresentation.
Open'Comments'panel
Ctrl+⇧Shift+H
Open the Comments panel to add your own comment orreply to other users' comments.
Opencomment field Alt+H Open a data entry field where you can add the text of your
comment.Open 'Chat'panel Alt+Q Open the Chat panel and send a message.
Savepresentation Ctrl+S
Save all the changes to the presentation currently editedwith the Presentation Editor. The active file will be savedunder its current name, in the same location and fileformat.
Printpresentation Ctrl+P Print the presentation with one of the available printers or
save it to a file.
Download As... Ctrl+⇧Shift+S
Open the Download as... panel to save the currentlyedited presentation to the hard disk drive of yourcomputer in one of the supported formats: PPTX, PDF,ODP, POTX, PDF/A, OTP.
Full screen F11 Switch to the full screen view to fit the Presentation Editorinto your screen.
Help menu F1 Open the Presentation Editor Helpmenu.Open existingfile (DesktopEditors)
Ctrl+O On the Open local file tab in Desktop Editors, opens thestandard dialog box that allows selecting an existing file.
Close file(DesktopEditors)
Ctrl+W,Ctrl+F4
Close the current presentation window in DesktopEditors.Elementcontextualmenu
⇧ Shift+F10 Open the selected element contextual menu.
Reset the‘Zoom’parameter
Ctrl+0 Reset the ‘Zoom’ parameter of the current presentation tothe default 'Fit to slide' value.
Navigation
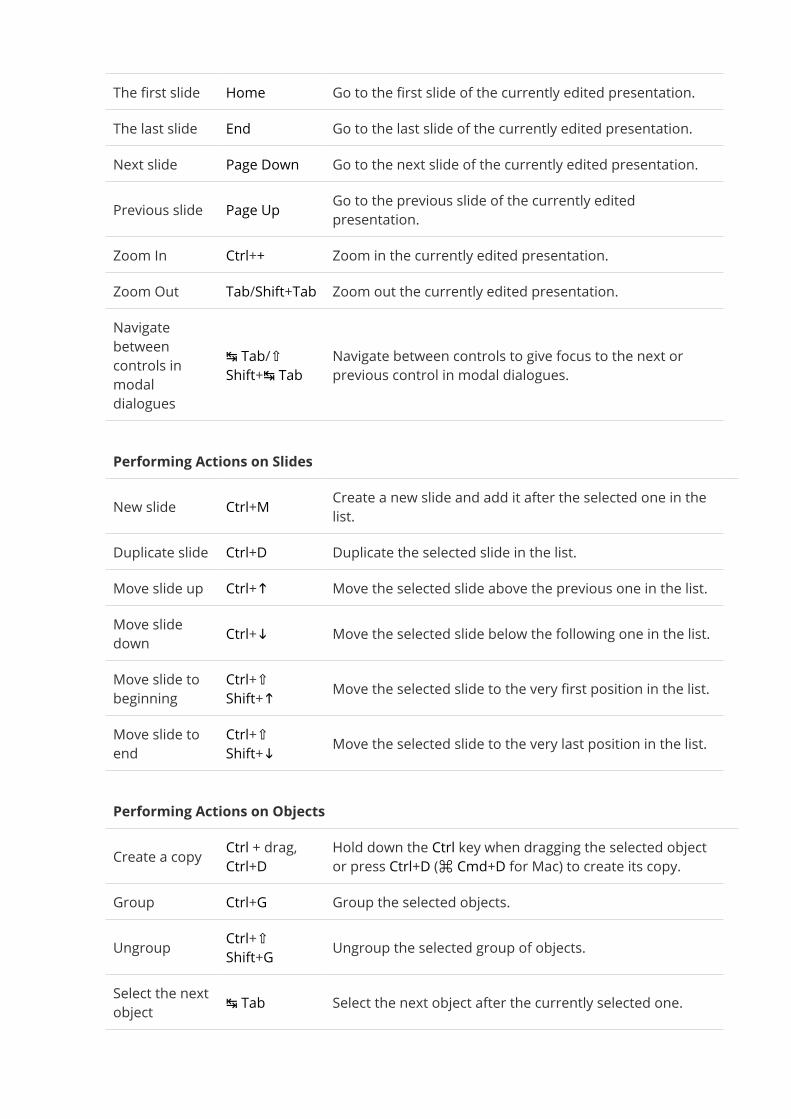
The first slide Home Go to the first slide of the currently edited presentation.The last slide End Go to the last slide of the currently edited presentation.Next slide Page Down Go to the next slide of the currently edited presentation.Previous slide Page Up Go to the previous slide of the currently edited
presentation.Zoom In Ctrl++ Zoom in the currently edited presentation.Zoom Out Tab/Shift+Tab Zoom out the currently edited presentation.Navigatebetweencontrols inmodaldialogues
↹ Tab/⇧Shift+↹ Tab
Navigate between controls to give focus to the next orprevious control in modal dialogues.
Performing Actions on SlidesNew slide Ctrl+M Create a new slide and add it after the selected one in the
list.Duplicate slide Ctrl+D Duplicate the selected slide in the list.Move slide up Ctrl+↑ Move the selected slide above the previous one in the list.Move slidedown Ctrl+↓ Move the selected slide below the following one in the list.Move slide tobeginning
Ctrl+⇧Shift+↑ Move the selected slide to the very first position in the list.
Move slide toend
Ctrl+⇧Shift+↓ Move the selected slide to the very last position in the list.
Performing Actions on ObjectsCreate a copy Ctrl + drag,
Ctrl+DHold down the Ctrl key when dragging the selected objector press Ctrl+D (⌘ Cmd+D for Mac) to create its copy.
Group Ctrl+G Group the selected objects.Ungroup Ctrl+⇧
Shift+G Ungroup the selected group of objects.Select the nextobject ↹ Tab Select the next object after the currently selected one.
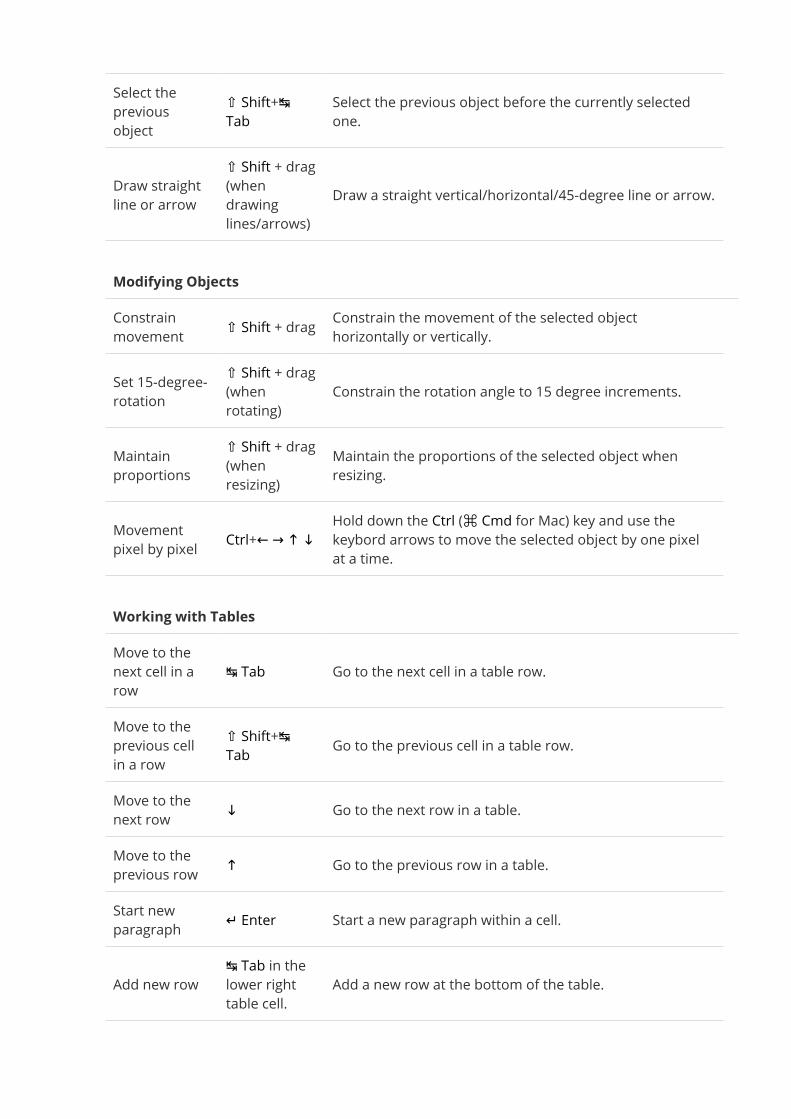
Select thepreviousobject
⇧ Shift+↹Tab
Select the previous object before the currently selectedone.
Draw straightline or arrow
⇧ Shift + drag(whendrawinglines/arrows)
Draw a straight vertical/horizontal/45-degree line or arrow.
Modifying ObjectsConstrainmovement ⇧ Shift + drag Constrain the movement of the selected object
horizontally or vertically.Set 15-degree-rotation
⇧ Shift + drag(whenrotating)
Constrain the rotation angle to 15 degree increments.
Maintainproportions
⇧ Shift + drag(whenresizing)
Maintain the proportions of the selected object whenresizing.
Movementpixel by pixel Ctrl+← → ↑ ↓ Hold down the Ctrl (⌘ Cmd for Mac) key and use the
keybord arrows to move the selected object by one pixelat a time.
Working with TablesMove to thenext cell in arow
↹ Tab Go to the next cell in a table row.
Move to theprevious cellin a row
⇧ Shift+↹Tab Go to the previous cell in a table row.
Move to thenext row ↓ Go to the next row in a table.Move to theprevious row ↑ Go to the previous row in a table.Start newparagraph ↵ Enter Start a new paragraph within a cell.
Add new row↹ Tab in thelower righttable cell.
Add a new row at the bottom of the table.

Previewing PresentationStart previewfrom thebeginning
Ctrl+F5 Start a presentation from the beginning.
Navigateforward
↵ Enter,Page Down,→,↓,␣ Spacebar
Display the next transition effect or advance to the nextslide.
Navigatebackward
Page Up,←,↑Display the previous transition effect or return to theprevious slide.
Close preview Esc End a presentation.
Undo and RedoUndo Ctrl+Z Reverse the latest performed action.Redo Ctrl+Y Repeat the latest undone action.
Cut, Copy, and Paste
CutCtrl+X,⇧Shift+Delete
Cut the selected object and send it to the computerclipboard memory. The cut object can be later inserted toanother place in the same presentation.
Copy Ctrl+C,Ctrl+Insert
Send the selected object to the computer clipboardmemory. The copied object can be later inserted toanother place in the same presentation.
Paste Ctrl+V,⇧ Shift+InsertInsert the previously copied object from the computerclipboard memory to the current cursor position. Theobject can be previously copied from the samepresentation.
Inserthyperlink Ctrl+K Insert a hyperlink which can be used to go to a web
address or to a certain slide in the presentation.
Copy style Ctrl+⇧Shift+C
Copy the formatting from the selected fragment of thecurrently edited text. The copied formatting can be laterapplied to another text fragment in the samepresentation.
Apply style Ctrl+⇧ Apply the previously copied formatting to the text in the
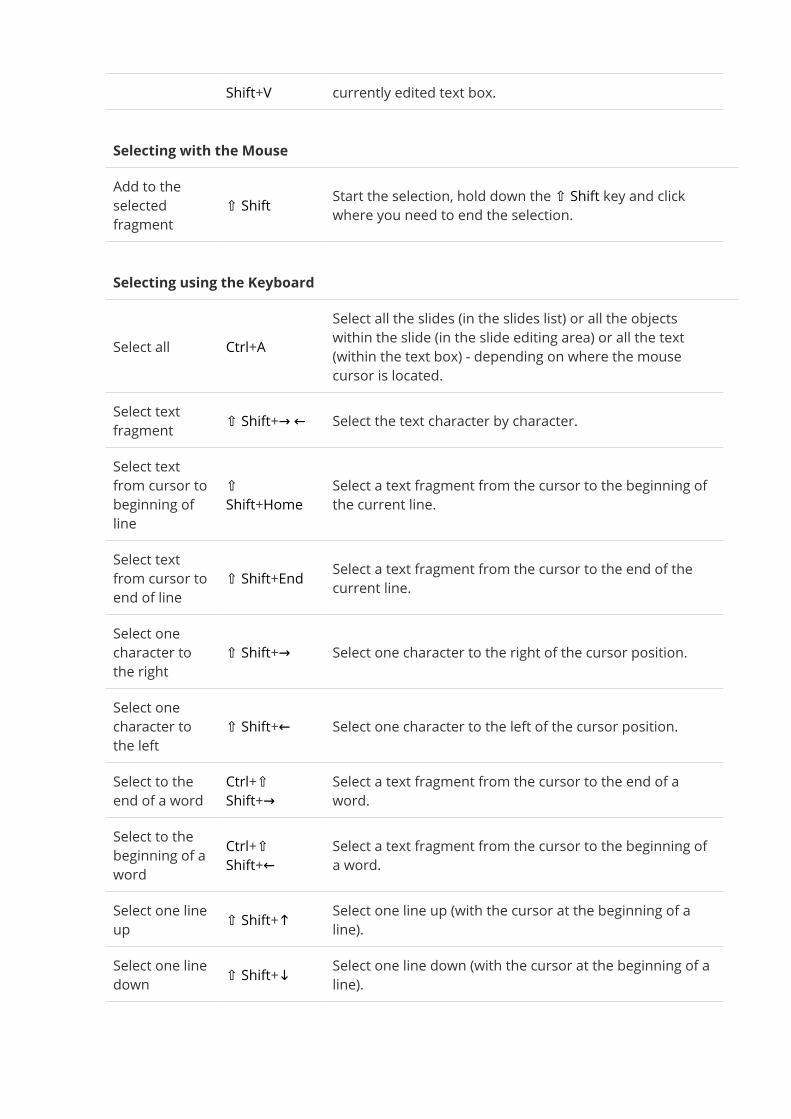
Shift+V currently edited text box.
Selecting with the MouseAdd to theselectedfragment
⇧ Shift Start the selection, hold down the ⇧ Shift key and clickwhere you need to end the selection.
Selecting using the Keyboard
Select all Ctrl+ASelect all the slides (in the slides list) or all the objectswithin the slide (in the slide editing area) or all the text(within the text box) - depending on where the mousecursor is located.
Select textfragment ⇧ Shift+→ ← Select the text character by character.Select textfrom cursor tobeginning ofline
⇧Shift+Home
Select a text fragment from the cursor to the beginning ofthe current line.
Select textfrom cursor toend of line
⇧ Shift+End Select a text fragment from the cursor to the end of thecurrent line.
Select onecharacter tothe right
⇧ Shift+→ Select one character to the right of the cursor position.
Select onecharacter tothe left
⇧ Shift+← Select one character to the left of the cursor position.
Select to theend of a word
Ctrl+⇧Shift+→ Select a text fragment from the cursor to the end of a
word.Select to thebeginning of aword
Ctrl+⇧Shift+← Select a text fragment from the cursor to the beginning of
a word.Select one lineup ⇧ Shift+↑ Select one line up (with the cursor at the beginning of a
line).Select one linedown ⇧ Shift+↓ Select one line down (with the cursor at the beginning of a
line).
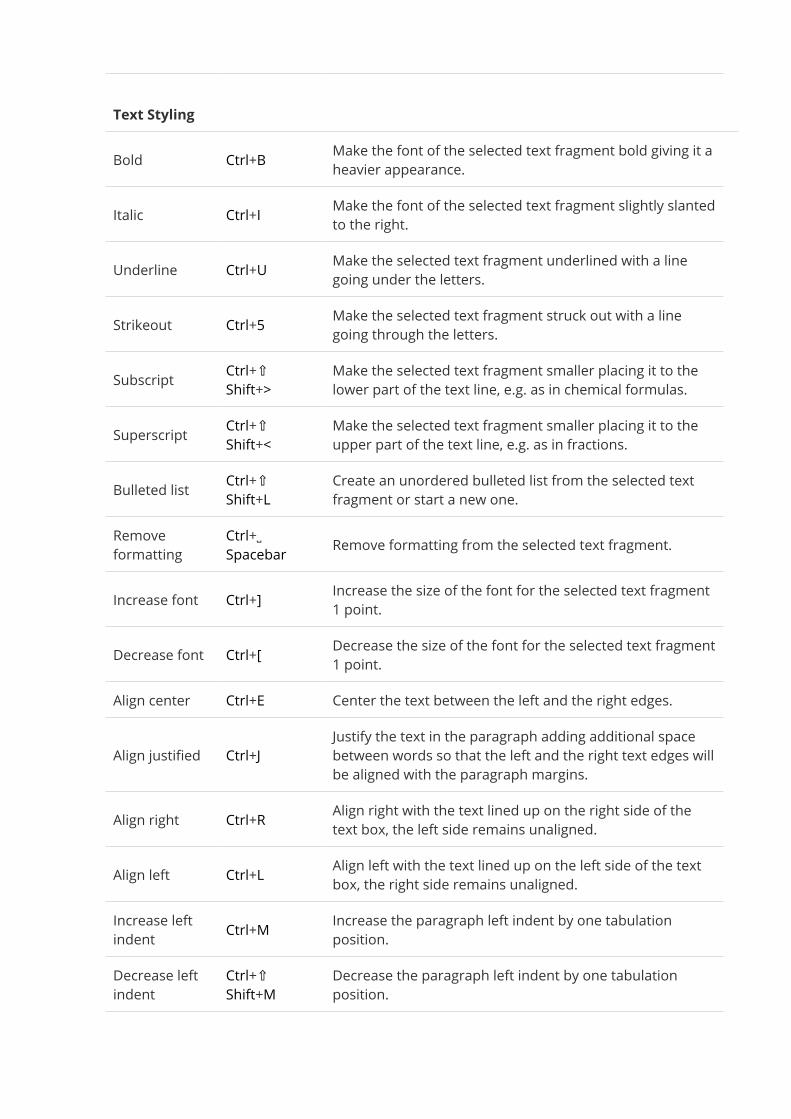
Text StylingBold Ctrl+B Make the font of the selected text fragment bold giving it a
heavier appearance.Italic Ctrl+I Make the font of the selected text fragment slightly slanted
to the right.Underline Ctrl+U Make the selected text fragment underlined with a line
going under the letters.Strikeout Ctrl+5 Make the selected text fragment struck out with a line
going through the letters.Subscript Ctrl+⇧
Shift+>Make the selected text fragment smaller placing it to thelower part of the text line, e.g. as in chemical formulas.
Superscript Ctrl+⇧Shift+<
Make the selected text fragment smaller placing it to theupper part of the text line, e.g. as in fractions.
Bulleted list Ctrl+⇧Shift+L
Create an unordered bulleted list from the selected textfragment or start a new one.
Removeformatting
Ctrl+␣Spacebar Remove formatting from the selected text fragment.
Increase font Ctrl+] Increase the size of the font for the selected text fragment1 point.
Decrease font Ctrl+[ Decrease the size of the font for the selected text fragment1 point.
Align center Ctrl+E Center the text between the left and the right edges.
Align justified Ctrl+JJustify the text in the paragraph adding additional spacebetween words so that the left and the right text edges willbe aligned with the paragraph margins.
Align right Ctrl+R Align right with the text lined up on the right side of thetext box, the left side remains unaligned.
Align left Ctrl+L Align left with the text lined up on the left side of the textbox, the right side remains unaligned.
Increase leftindent Ctrl+M Increase the paragraph left indent by one tabulation
position.Decrease leftindent
Ctrl+⇧Shift+M
Decrease the paragraph left indent by one tabulationposition.
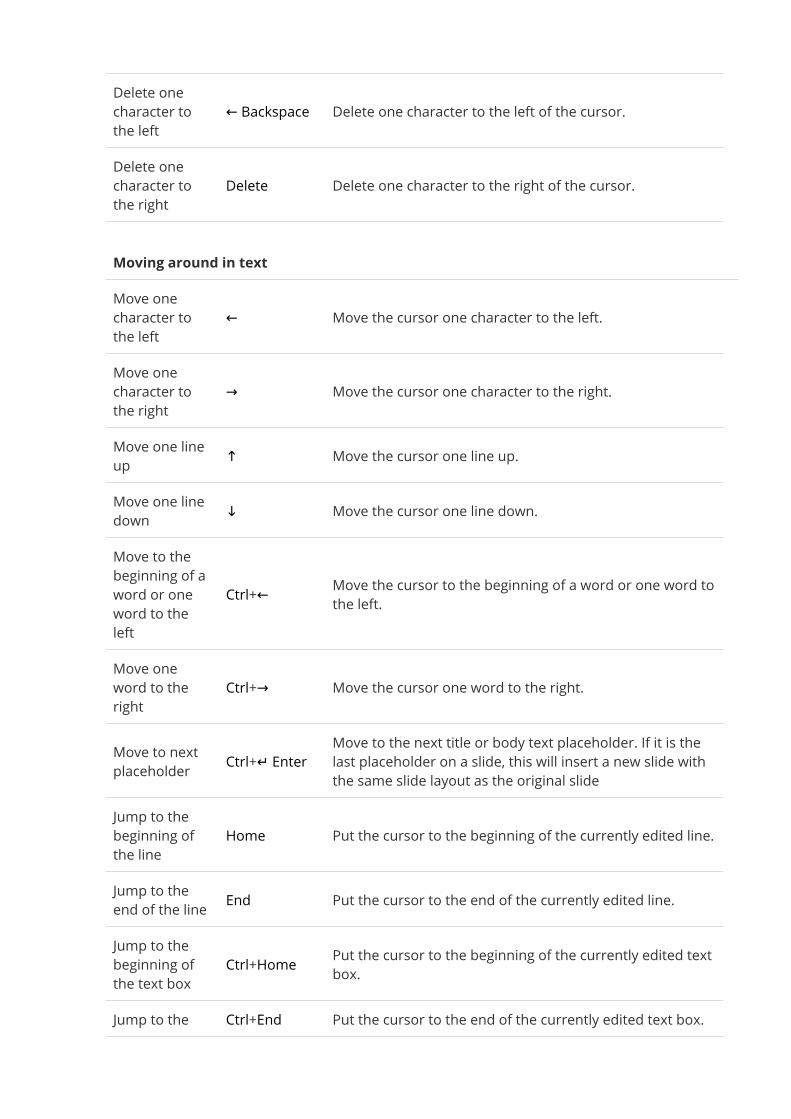
Delete onecharacter tothe left
← Backspace Delete one character to the left of the cursor.
Delete onecharacter tothe right
Delete Delete one character to the right of the cursor.
Moving around in textMove onecharacter tothe left
← Move the cursor one character to the left.
Move onecharacter tothe right
→ Move the cursor one character to the right.
Move one lineup ↑ Move the cursor one line up.Move one linedown ↓ Move the cursor one line down.Move to thebeginning of aword or oneword to theleft
Ctrl+← Move the cursor to the beginning of a word or one word tothe left.
Move oneword to theright
Ctrl+→ Move the cursor one word to the right.
Move to nextplaceholder Ctrl+↵ Enter
Move to the next title or body text placeholder. If it is thelast placeholder on a slide, this will insert a new slide withthe same slide layout as the original slide
Jump to thebeginning ofthe line
Home Put the cursor to the beginning of the currently edited line.
Jump to theend of the line End Put the cursor to the end of the currently edited line.Jump to thebeginning ofthe text box
Ctrl+Home Put the cursor to the beginning of the currently edited textbox.
Jump to the Ctrl+End Put the cursor to the end of the currently edited text box.
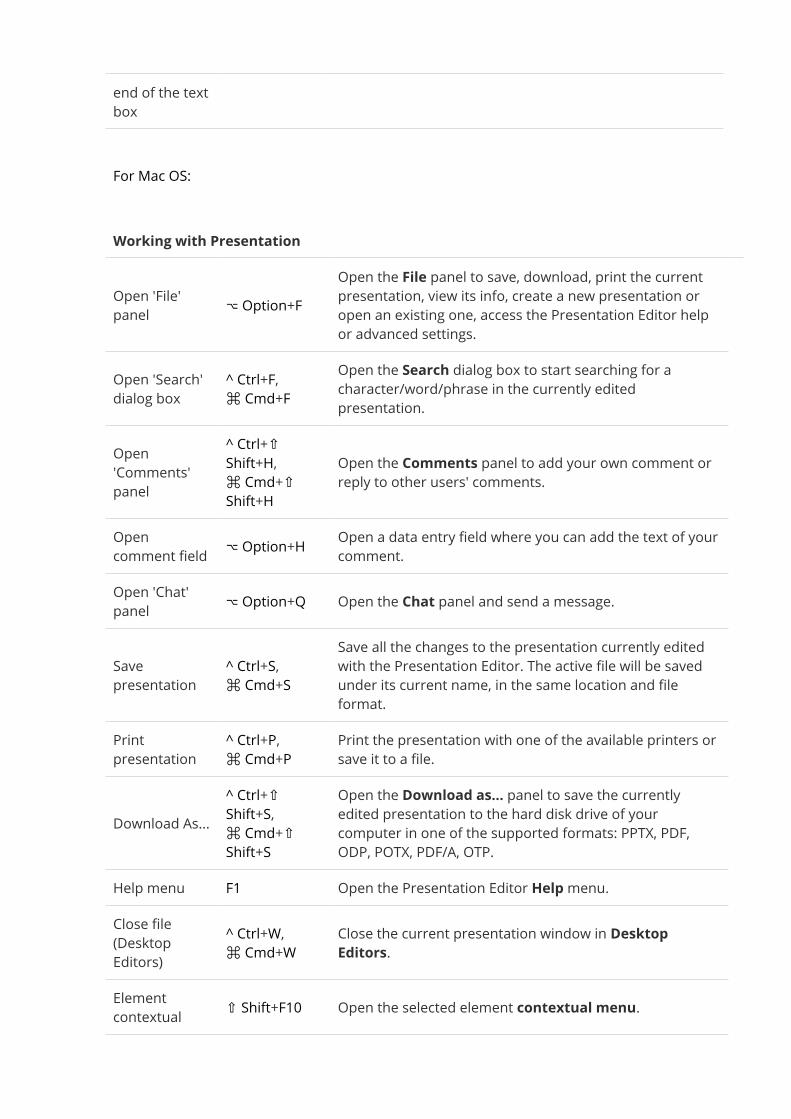
end of the textbox
For Mac OS:
Working with Presentation
Open 'File'panel ⌥ Option+F
Open the File panel to save, download, print the currentpresentation, view its info, create a new presentation oropen an existing one, access the Presentation Editor helpor advanced settings.
Open 'Search'dialog box
^ Ctrl+F,⌘ Cmd+FOpen the Search dialog box to start searching for acharacter/word/phrase in the currently editedpresentation.
Open'Comments'panel
^ Ctrl+⇧Shift+H,⌘ Cmd+⇧Shift+H
Open the Comments panel to add your own comment orreply to other users' comments.
Opencomment field ⌥ Option+H Open a data entry field where you can add the text of your
comment.Open 'Chat'panel ⌥ Option+Q Open the Chat panel and send a message.
Savepresentation
^ Ctrl+S,⌘ Cmd+SSave all the changes to the presentation currently editedwith the Presentation Editor. The active file will be savedunder its current name, in the same location and fileformat.
Printpresentation
^ Ctrl+P,⌘ Cmd+PPrint the presentation with one of the available printers orsave it to a file.
Download As...^ Ctrl+⇧Shift+S,⌘ Cmd+⇧Shift+S
Open the Download as... panel to save the currentlyedited presentation to the hard disk drive of yourcomputer in one of the supported formats: PPTX, PDF,ODP, POTX, PDF/A, OTP.
Help menu F1 Open the Presentation Editor Helpmenu.Close file(DesktopEditors)
^ Ctrl+W,⌘ Cmd+WClose the current presentation window in DesktopEditors.
Elementcontextual ⇧ Shift+F10 Open the selected element contextual menu.
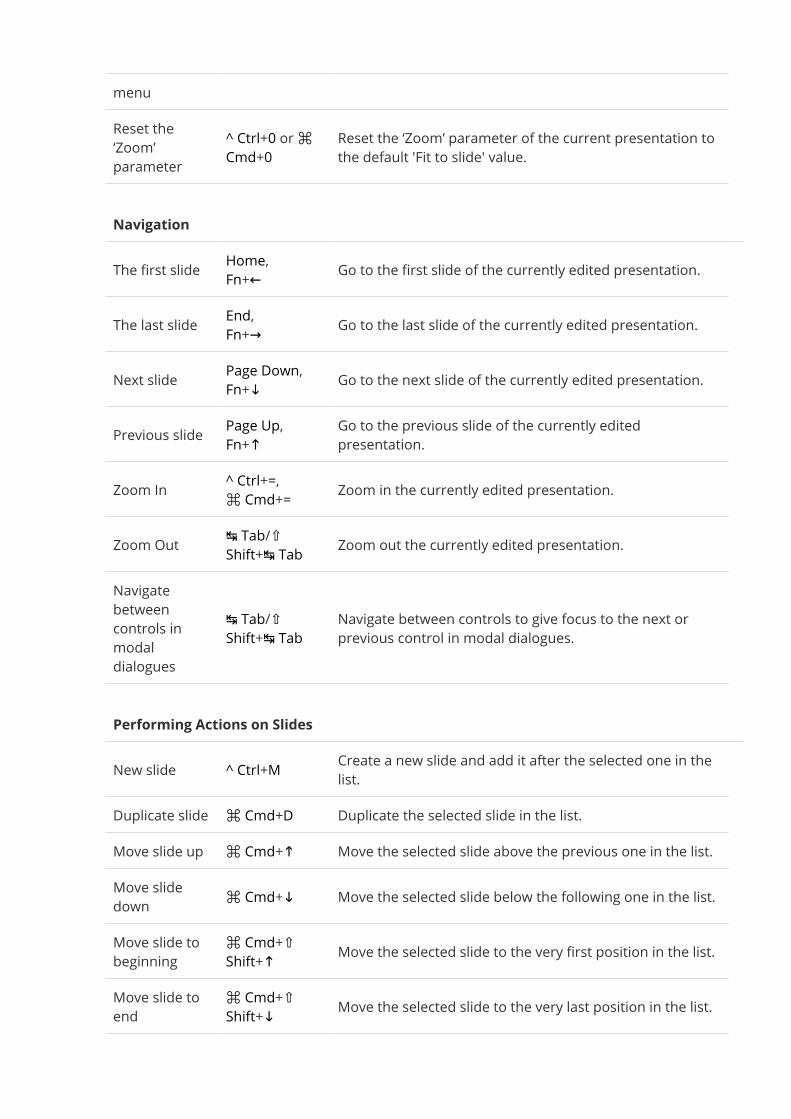
menuReset the‘Zoom’parameter
^ Ctrl+0 or⌘Cmd+0
Reset the ‘Zoom’ parameter of the current presentation tothe default 'Fit to slide' value.
NavigationThe first slide Home,
Fn+← Go to the first slide of the currently edited presentation.
The last slide End,Fn+→ Go to the last slide of the currently edited presentation.
Next slide Page Down,Fn+↓ Go to the next slide of the currently edited presentation.
Previous slide Page Up,Fn+↑ Go to the previous slide of the currently edited
presentation.Zoom In ^ Ctrl+=,⌘ Cmd+= Zoom in the currently edited presentation.
Zoom Out ↹ Tab/⇧Shift+↹ Tab Zoom out the currently edited presentation.
Navigatebetweencontrols inmodaldialogues
↹ Tab/⇧Shift+↹ Tab
Navigate between controls to give focus to the next orprevious control in modal dialogues.
Performing Actions on SlidesNew slide ^ Ctrl+M Create a new slide and add it after the selected one in the
list.Duplicate slide ⌘ Cmd+D Duplicate the selected slide in the list.Move slide up ⌘ Cmd+↑ Move the selected slide above the previous one in the list.Move slidedown ⌘ Cmd+↓ Move the selected slide below the following one in the list.Move slide tobeginning
⌘ Cmd+⇧Shift+↑ Move the selected slide to the very first position in the list.
Move slide toend
⌘ Cmd+⇧Shift+↓ Move the selected slide to the very last position in the list.
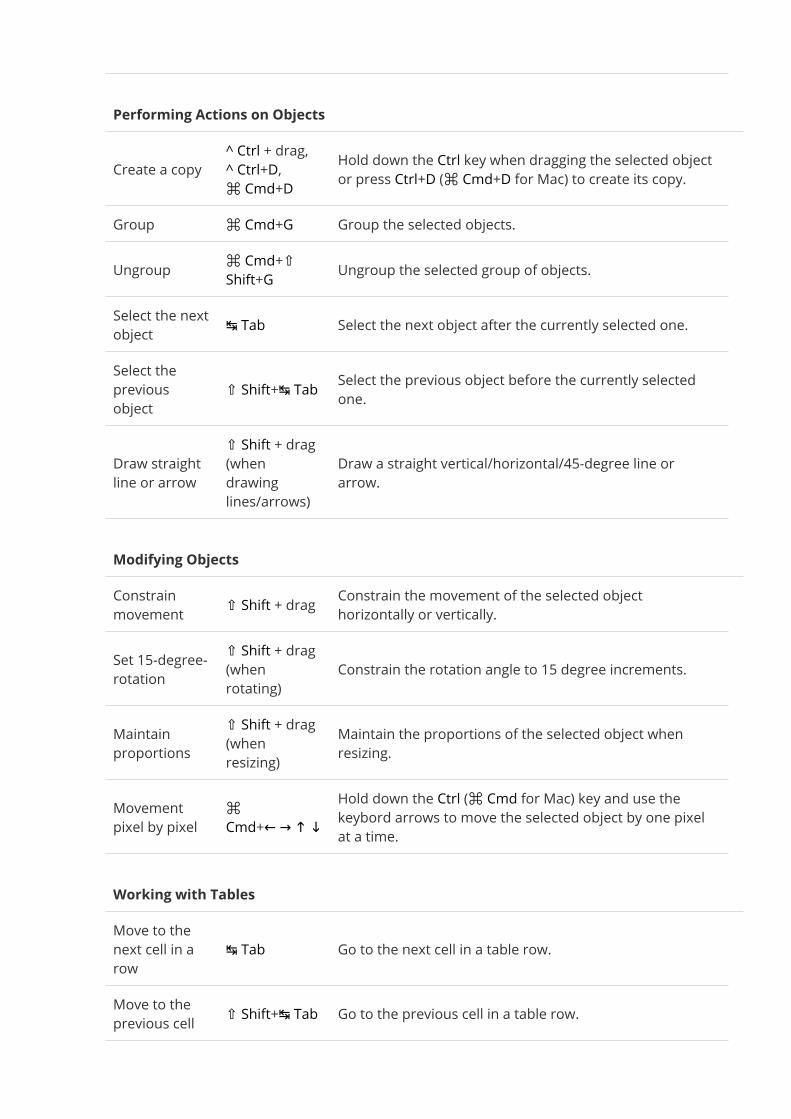
Performing Actions on Objects
Create a copy^ Ctrl + drag,^ Ctrl+D,⌘ Cmd+D
Hold down the Ctrl key when dragging the selected objector press Ctrl+D (⌘ Cmd+D for Mac) to create its copy.
Group ⌘ Cmd+G Group the selected objects.Ungroup ⌘ Cmd+⇧
Shift+G Ungroup the selected group of objects.Select the nextobject ↹ Tab Select the next object after the currently selected one.Select thepreviousobject
⇧ Shift+↹ Tab Select the previous object before the currently selectedone.
Draw straightline or arrow
⇧ Shift + drag(whendrawinglines/arrows)
Draw a straight vertical/horizontal/45-degree line orarrow.
Modifying ObjectsConstrainmovement ⇧ Shift + drag Constrain the movement of the selected object
horizontally or vertically.Set 15-degree-rotation
⇧ Shift + drag(whenrotating)
Constrain the rotation angle to 15 degree increments.
Maintainproportions
⇧ Shift + drag(whenresizing)
Maintain the proportions of the selected object whenresizing.
Movementpixel by pixel
⌘Cmd+← → ↑ ↓
Hold down the Ctrl (⌘ Cmd for Mac) key and use thekeybord arrows to move the selected object by one pixelat a time.
Working with TablesMove to thenext cell in arow
↹ Tab Go to the next cell in a table row.
Move to theprevious cell ⇧ Shift+↹ Tab Go to the previous cell in a table row.
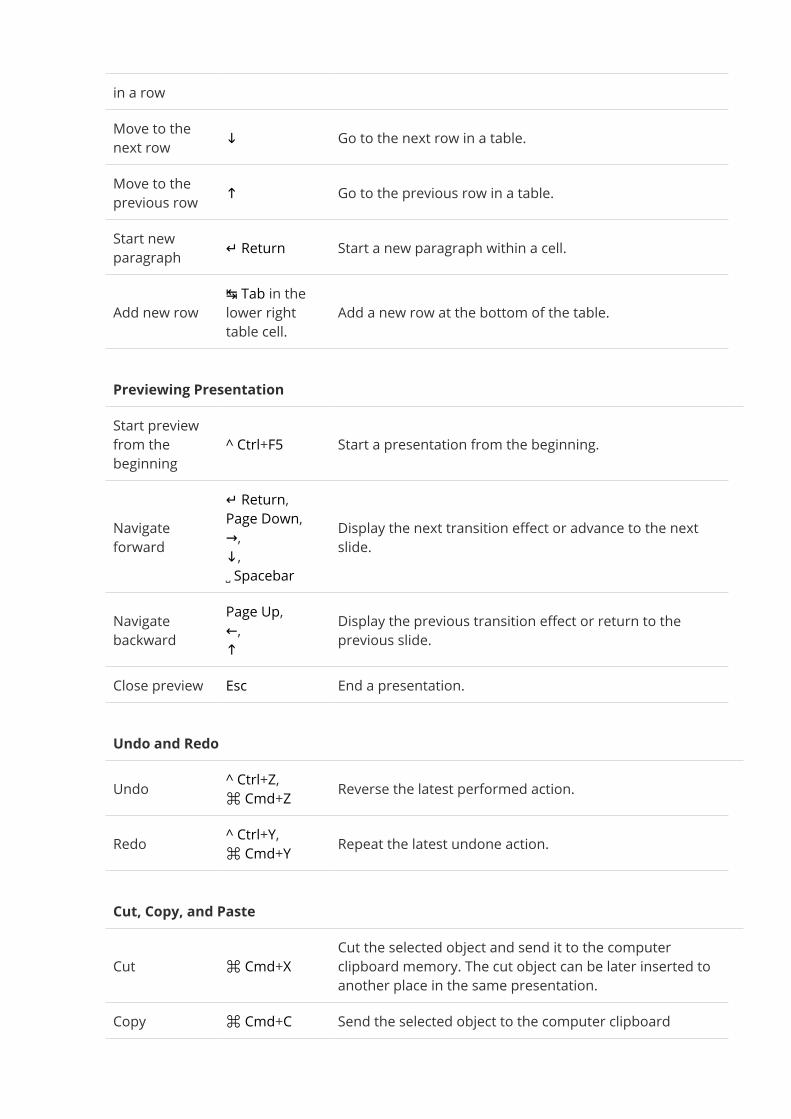
in a rowMove to thenext row ↓ Go to the next row in a table.Move to theprevious row ↑ Go to the previous row in a table.Start newparagraph ↵ Return Start a new paragraph within a cell.
Add new row↹ Tab in thelower righttable cell.
Add a new row at the bottom of the table.
Previewing PresentationStart previewfrom thebeginning
^ Ctrl+F5 Start a presentation from the beginning.
Navigateforward
↵ Return,Page Down,→,↓,␣ Spacebar
Display the next transition effect or advance to the nextslide.
Navigatebackward
Page Up,←,↑Display the previous transition effect or return to theprevious slide.
Close preview Esc End a presentation.
Undo and RedoUndo ^ Ctrl+Z,⌘ Cmd+Z Reverse the latest performed action.
Redo ^ Ctrl+Y,⌘ Cmd+Y Repeat the latest undone action.
Cut, Copy, and Paste
Cut ⌘ Cmd+XCut the selected object and send it to the computerclipboard memory. The cut object can be later inserted toanother place in the same presentation.
Copy ⌘ Cmd+C Send the selected object to the computer clipboard
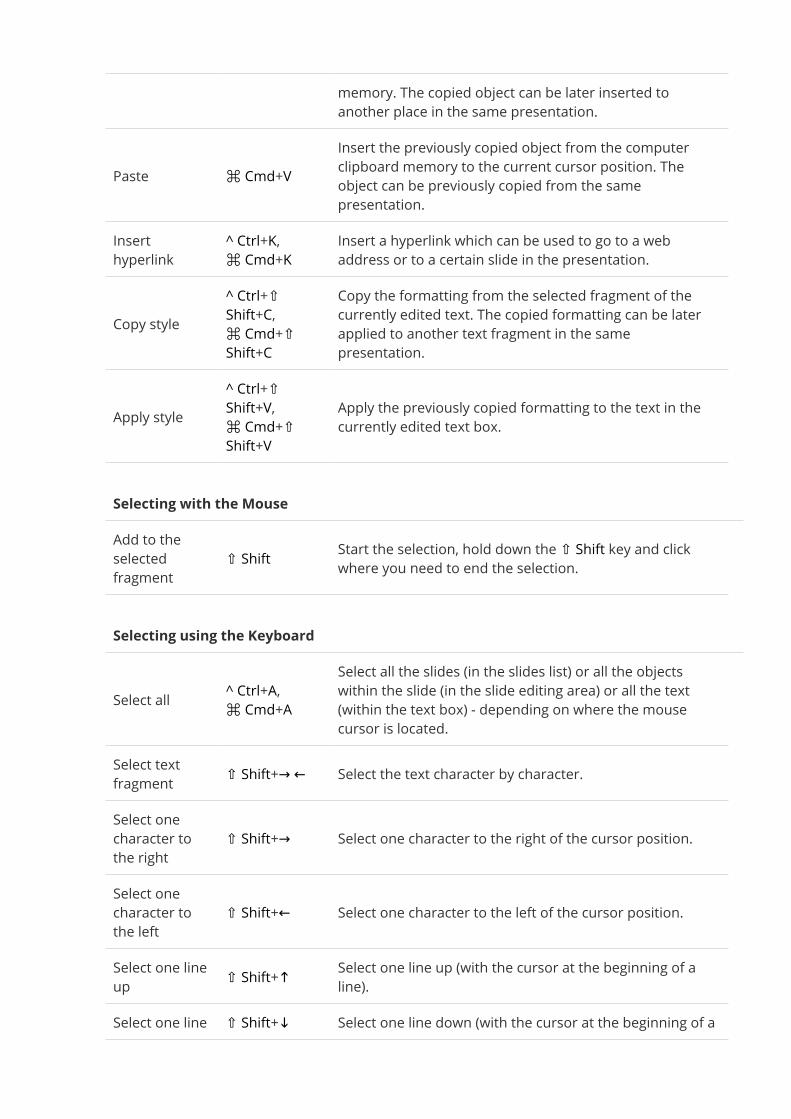
memory. The copied object can be later inserted toanother place in the same presentation.
Paste ⌘ Cmd+VInsert the previously copied object from the computerclipboard memory to the current cursor position. Theobject can be previously copied from the samepresentation.
Inserthyperlink
^ Ctrl+K,⌘ Cmd+KInsert a hyperlink which can be used to go to a webaddress or to a certain slide in the presentation.
Copy style^ Ctrl+⇧Shift+C,⌘ Cmd+⇧Shift+C
Copy the formatting from the selected fragment of thecurrently edited text. The copied formatting can be laterapplied to another text fragment in the samepresentation.
Apply style^ Ctrl+⇧Shift+V,⌘ Cmd+⇧Shift+V
Apply the previously copied formatting to the text in thecurrently edited text box.
Selecting with the MouseAdd to theselectedfragment
⇧ Shift Start the selection, hold down the ⇧ Shift key and clickwhere you need to end the selection.
Selecting using the Keyboard
Select all ^ Ctrl+A,⌘ Cmd+ASelect all the slides (in the slides list) or all the objectswithin the slide (in the slide editing area) or all the text(within the text box) - depending on where the mousecursor is located.
Select textfragment ⇧ Shift+→ ← Select the text character by character.Select onecharacter tothe right
⇧ Shift+→ Select one character to the right of the cursor position.
Select onecharacter tothe left
⇧ Shift+← Select one character to the left of the cursor position.
Select one lineup ⇧ Shift+↑ Select one line up (with the cursor at the beginning of a
line).Select one line ⇧ Shift+↓ Select one line down (with the cursor at the beginning of a
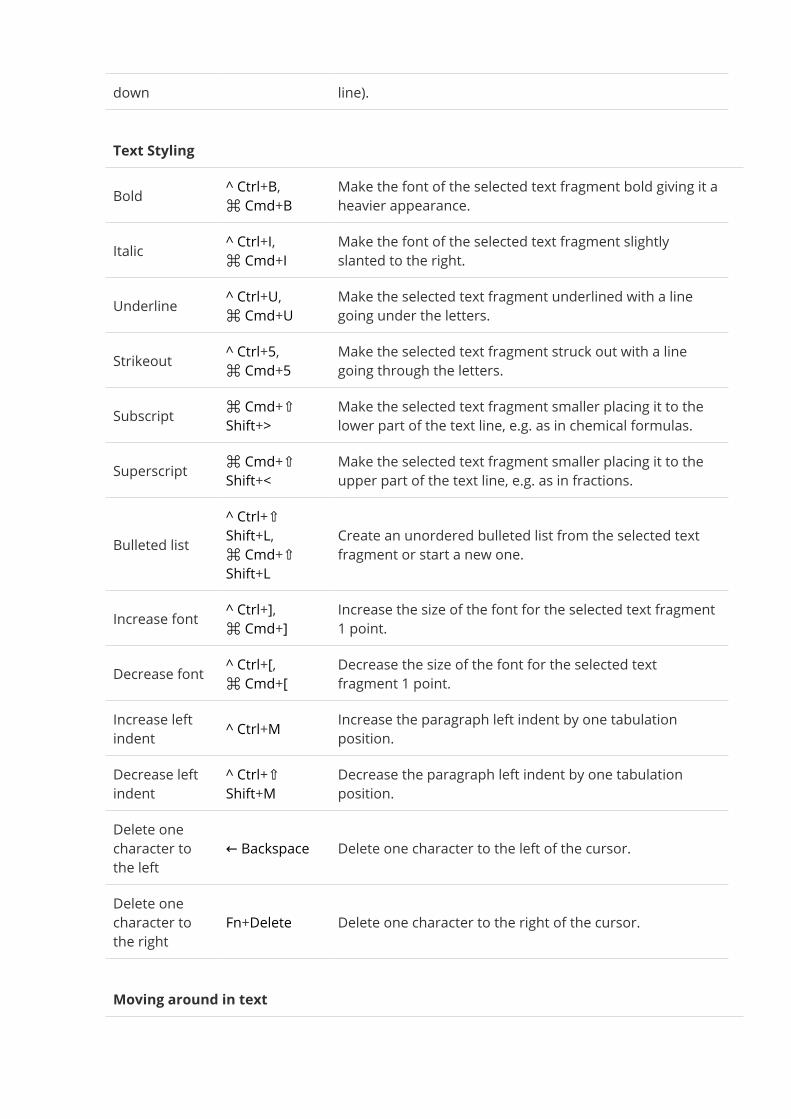
down line).
Text StylingBold ^ Ctrl+B,⌘ Cmd+B
Make the font of the selected text fragment bold giving it aheavier appearance.
Italic ^ Ctrl+I,⌘ Cmd+IMake the font of the selected text fragment slightlyslanted to the right.
Underline ^ Ctrl+U,⌘ Cmd+UMake the selected text fragment underlined with a linegoing under the letters.
Strikeout ^ Ctrl+5,⌘ Cmd+5Make the selected text fragment struck out with a linegoing through the letters.
Subscript ⌘ Cmd+⇧Shift+>
Make the selected text fragment smaller placing it to thelower part of the text line, e.g. as in chemical formulas.
Superscript ⌘ Cmd+⇧Shift+<
Make the selected text fragment smaller placing it to theupper part of the text line, e.g. as in fractions.
Bulleted list^ Ctrl+⇧Shift+L,⌘ Cmd+⇧Shift+L
Create an unordered bulleted list from the selected textfragment or start a new one.
Increase font ^ Ctrl+],⌘ Cmd+]Increase the size of the font for the selected text fragment1 point.
Decrease font ^ Ctrl+[,⌘ Cmd+[Decrease the size of the font for the selected textfragment 1 point.
Increase leftindent ^ Ctrl+M Increase the paragraph left indent by one tabulation
position.Decrease leftindent
^ Ctrl+⇧Shift+M
Decrease the paragraph left indent by one tabulationposition.
Delete onecharacter tothe left
← Backspace Delete one character to the left of the cursor.
Delete onecharacter tothe right
Fn+Delete Delete one character to the right of the cursor.
Moving around in text
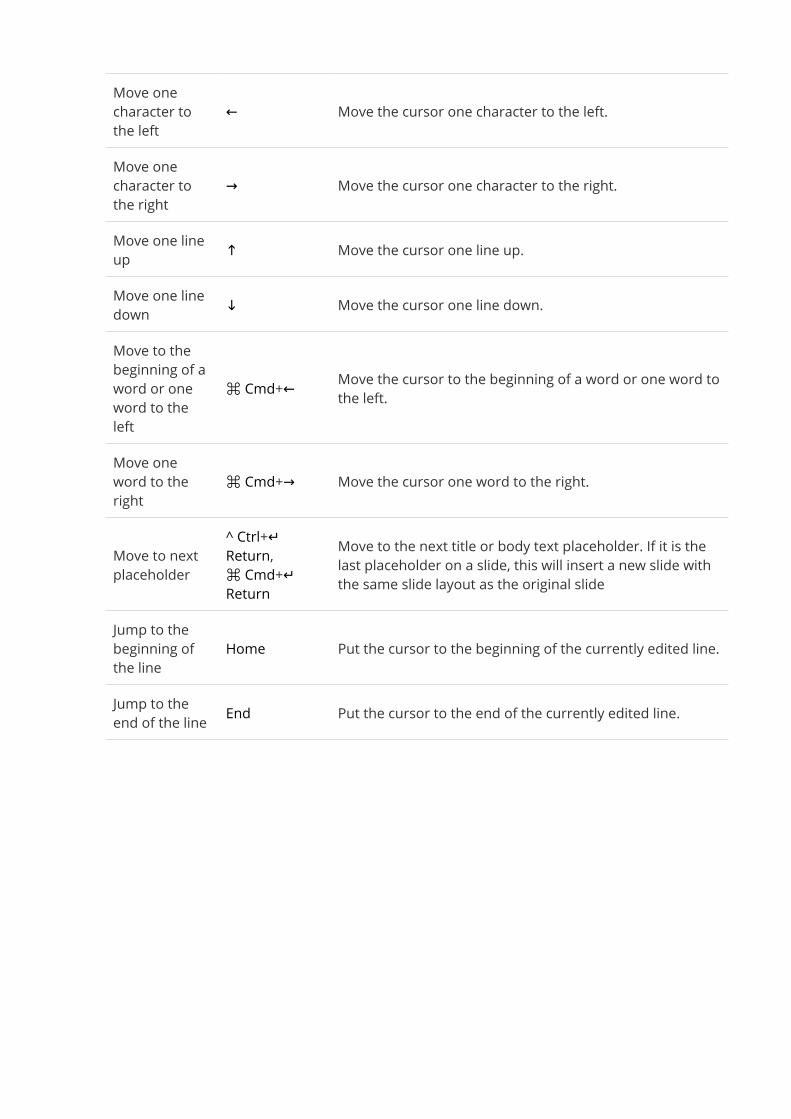
Move onecharacter tothe left
← Move the cursor one character to the left.
Move onecharacter tothe right
→ Move the cursor one character to the right.
Move one lineup ↑ Move the cursor one line up.Move one linedown ↓ Move the cursor one line down.Move to thebeginning of aword or oneword to theleft
⌘ Cmd+← Move the cursor to the beginning of a word or one word tothe left.
Move oneword to theright
⌘ Cmd+→ Move the cursor one word to the right.
Move to nextplaceholder
^ Ctrl+↵Return,⌘ Cmd+↵Return
Move to the next title or body text placeholder. If it is thelast placeholder on a slide, this will insert a new slide withthe same slide layout as the original slide
Jump to thebeginning ofthe line
Home Put the cursor to the beginning of the currently edited line.
Jump to theend of the line End Put the cursor to the end of the currently edited line.


