Embed Size (px)
Citation preview
Oracle® ApplicationsInstalling Oracle Applications
Release 11i (11.5.9)
Part No. B10638-01
June 2003
Oracle Applications, Installing Oracle Applications, Release 11i (11.5.9)
Part No. B10638-01
Copyright © 2000, 2003 Oracle Corporation. All rights reserved.
Primary Authors: Carole Eubanks
Contributors: Michael Bernstein, Michael Fiore, Ric Ginsberg, William Greene, Rick Lotero, Jeff Lunn, Terri Noyes, Andrew Rist, Prashant Saddi, Greg Seiden, Yun Shaw, Chris Tanabe, Sean Tuck
The Programs (which include both the software and documentation) contain proprietary information of Oracle Corporation; they are provided under a license agreement containing restrictions on use and disclosure and are also protected by copyright, patent and other intellectual and industrial property laws. Reverse engineering, disassembly or decompilation of the Programs, except to the extent required to obtain interoperability with other independently created software or as specified by law, is prohibited.
The information contained in this document is subject to change without notice. If you find any problems in the documentation, please report them to us in writing. Oracle Corporation does not warrant that this document is error-free. Except as may be expressly permitted in your license agreement for these Programs, no part of these Programs may be reproduced or transmitted in any form or by any means, electronic or mechanical, for any purpose, without the express written permission of Oracle Corporation.
If the Programs are delivered to the U.S. Government or anyone licensing or using the programs on behalf of the U.S. Government, the following notice is applicable:
Restricted Rights Notice Programs delivered subject to the DOD FAR Supplement are "commercial computer software" and use, duplication, and disclosure of the Programs, including documentation, shall be subject to the licensing restrictions set forth in the applicable Oracle license agreement. Otherwise, Programs delivered subject to the Federal Acquisition Regulations are "restricted computer software" and use, duplication, and disclosure of the Programs shall be subject to the restrictions in FAR 52.227-19, Commercial Computer Software - Restricted Rights (June, 1987). Oracle Corporation, 500 Oracle Parkway, Redwood City, CA 94065.
The Programs are not intended for use in any nuclear, aviation, mass transit, medical, or other inherently dangerous applications. It shall be the licensee's responsibility to take all appropriate fail-safe, backup, redundancy, and other measures to ensure the safe use of such applications if the Programs are used for such purposes, and Oracle Corporation disclaims liability for any damages caused by such use of the Programs.
The Programs may provide links to Web sites and access to content, products, and services from third parties. Oracle is not responsible for the availability of, or any content provided on, third-party Web sites. You bear all risks associated with the use of such content. If you choose to purchase any products or services from a third party, the relationship is directly between you and the third party. Oracle is not responsible for: (a) the quality of third-party products or services; or (b) fulfilling any of the terms of the agreement with the third party, including delivery of products or services and warranty obligations related to purchased products or services. Oracle is not responsible for any loss or damage of any sort that you may incur from dealing with any third party.
Oracle is a registered trademark, and ConText, JInitiator, Oracle Discoverer, OracleMetaLink, Oracle Store, Oracle8i, Oracle9i, Orcle9iAS Discoverer, PL/SQL, SQL*Net, and SQL*Plus are trademarks or registered trademarks of Oracle Corporation. Other names may be trademarks of their respective owners.
Contents
Send Us Your Comments .................................................................................................................. vii
Preface............................................................................................................................................................ ix
Intended Audience ................................................................................................................................ ixDocumentation Accessibility ............................................................................................................... ixStructure................................................................................................................................................... xRelated Documents................................................................................................................................. xTraining and Support............................................................................................................................ xiConventions........................................................................................................................................... xii
1 Getting Started
How an Installation Works .............................................................................................................. 1-1Using the Rapid Install Wizard .................................................................................................. 1-1Running Rapid Install .................................................................................................................. 1-3Accessing the Rapid Install Portal.............................................................................................. 1-3Upgrading with Rapid Install..................................................................................................... 1-4
Release 11i System Requirements ................................................................................................... 1-5Technology Stack Components .................................................................................................. 1-5Software Requirements................................................................................................................ 1-5CPU Requirements ....................................................................................................................... 1-6Memory Requirements (database tier and forms server) ....................................................... 1-7Disk Space Requirements (file system) ..................................................................................... 1-7
Before You Begin................................................................................................................................. 1-9Step 1: Create login accounts ...................................................................................................... 1-9
iii
Step 2: Install latest Java Development Kit (JDK) .................................................................. 1-10Step 3: Set up a stage directory or CD install.......................................................................... 1-11Startup Options ........................................................................................................................... 1-14
What To Do Next ............................................................................................................................... 1-15
2 Single-node Installations
Setting Up a Single-node Installation ............................................................................................ 2-1Running the Rapid Install Wizard ............................................................................................. 2-1
What to Expect During the Installation ........................................................................................ 2-20Status Indicators and Prompts.................................................................................................. 2-20Restarting the Installation.......................................................................................................... 2-21Review Post-installation Validations ....................................................................................... 2-22
What To Do Next ............................................................................................................................... 2-23
3 Multi-node Installations
Setting Up a Multi-node Installation .............................................................................................. 3-1Running the Rapid Install Wizard ............................................................................................. 3-1
What to Expect During the Installation ........................................................................................ 3-21Status Indicators and Prompts.................................................................................................. 3-21Restarting the Installation.......................................................................................................... 3-23Review Post-installation Validations ....................................................................................... 3-24
Setting Up the Other Nodes............................................................................................................ 3-25What To Do Next ............................................................................................................................... 3-26
4 Upgrading Your Installation
How an Upgrade Works..................................................................................................................... 4-1Upgrading with Rapid Install .......................................................................................................... 4-2What To Do Next ............................................................................................................................... 4-13
5 Finishing Your Installation
Required Post-install Steps............................................................................................................... 5-1Configure Client Software .......................................................................................................... 5-1Update PL/SQL Log and Out Directory................................................................................... 5-2Implement Product and Country-specific Functionality ........................................................ 5-3
iv
Configure Database Initialization Parameters ......................................................................... 5-3Change Passwords ....................................................................................................................... 5-3Maintain Snapshot Information ................................................................................................. 5-4
Logging On to Oracle Applications ................................................................................................ 5-4Tasks Specific to Your Configuration ............................................................................................. 5-5
Configuring Multiple Servers to Use JInitiator ........................................................................ 5-5Resize Your Database................................................................................................................... 5-5Set Up National Language Support (NLS) ............................................................................... 5-5Set Up UTF8 Character Set.......................................................................................................... 5-7Configure the Oracle Workflow Java-based Notification Mailer .......................................... 5-8Set Up and Implement Oracle Embedded Data Warehouse (EDW) .................................... 5-8Set Up and Implement Discoverer End User Layer (EUL)..................................................... 5-9Set Up Demand Planning ............................................................................................................ 5-9Convert Database to Multiple Organizations (Multi-Org)..................................................... 5-9Convert to Multiple Reporting Currencies (MRC).................................................................. 5-9Understand System Administration Tasks............................................................................... 5-9Set Up Printers .............................................................................................................................. 5-9Understand Oracle Applications Maintenance Tasks........................................................... 5-10
Back Up Oracle Applications ......................................................................................................... 5-10
A Configuration Details
Rapid Install Settings Definitions .................................................................................................. A-1Main Settings................................................................................................................................. A-1Derived Settings............................................................................................................................ A-2Instance Settings ........................................................................................................................... A-5Log Files ......................................................................................................................................... A-6
Production and Test Database Requirements ............................................................................... A-6Vision Demonstration Database Requirements ........................................................................... A-7
Index
v

vi

Send Us Your Comments
Oracle Applications, Installing Oracle Applications, Release 11i (11.5.9)
Part No. B10638-01
Oracle Corporation welcomes your comments and suggestions on the quality and usefulness of this document. Your input is an important part of the information used for revision.
■ Did you find any errors?■ Is the information clearly presented?■ Do you need more information? If so, where?■ Are the examples correct? Do you need more examples?■ What features did you like most?
If you find any errors or have any other suggestions for improvement, please indicate the document title and part number, and the chapter, section, and page number (if available). You can send com-ments to us at the following email address: [email protected].
If you have problems with the software, contact Oracle Support Services.
vii

viii
Preface
Installing Oracle Applications provides instructions for using Rapid Install in a first-time installation of Oracle Applications or an upgrade from Release 10.7 or 11.0 to the most current version of Release 11i of Oracle Applications products.
Intended AudienceThis book is intended for use by anyone who is responsible for installing or upgrading Oracle Applications.
Documentation AccessibilityOur goal is to make Oracle products, services, and supporting documentation accessible, with good usability, to the disabled community. To that end, our documentation includes features that make information available to users of assistive technology. This documentation is available in HTML format, and contains markup to facilitate access by the disabled community. Standards will continue to evolve over time, and Oracle Corporation is actively engaged with other market-leading technology vendors to address technical obstacles so that our documentation can be accessible to all of our customers. For additional information, visit the Oracle Accessibility Program Web site at http://www.oracle.com/accessibility/.
Accessibility of Code Examples in DocumentationJAWS, a Windows screen reader, may not always correctly read the code examples in this document. The conventions for writing code require that closing braces should appear on an otherwise empty line; however, JAWS may not always read a line of text that consists solely of a bracket or brace.
ix
Accessibility of Links to External Web Sites in DocumentationThis documentation may contain links to Web sites of other companies or organizations that Oracle Corporation does not own or control. Oracle Corporation neither evaluates nor makes any representations regarding the accessibility of these Web sites.
StructureThis book contains the following chapters and appendixes:
■ Chapter 1 describes the way Rapid Install works and explains how to get started.
■ Chapter 2 steps through the Rapid Install wizard screens used to set up an installation on a single node.
■ Chapter 3 steps through the Rapid Install wizard screens used to set up an installation on a system with two or more nodes.
■ Chapter 4 describes the Rapid Install wizard screens you use when upgrading your system. These steps are performed in conjunction with the instructions in Upgrading Oracle Applications.
■ Chapter 5 lists the steps required to finish the installation. It also lists optional steps you may need to perform.
■ Appendix A describes important details about the Rapid Install configuration.
Related DocumentsAll Release 11i documentation is included on the Oracle Applications Document Library CD, which is supplied in the Release 11i Update CD Pack. You can download some soft-copy documentation from Oracle Docs Online at http://otn.oracle.com/documentation. You can also purchase hard-copy documentation from the Oracle Store at http://oraclestore.oracle.com.
x
Update or patch readme files may contain additional information about new documentation that you can download.
Training and SupportOracle offers a complete set of training courses and multi-level support services.
Training You can attend training courses at any Oracle Education Center, arrange for trainers to teach at your facility, or use Oracle Learning Network (OLN) — Oracle University’s online education utility. Oracle training professionals can also develop
If you are looking for... See these documents...
Additional information Oracle Applications ConceptsUpgrading Oracle ApplicationsMaintaining Oracle Applications Documentation Set: Oracle Applications Maintenance Utilities Oracle Applications Maintenance ProceduresOracle Applications Installation Update Notes (for your platform)*Oracle Applications Release Notes*Oracle Applications NLS Release Notes*Oracle Applications System Administrator’s GuideOracle Workflow Administrator’s GuideOracle Workflow Developer’s GuideOracle Application Object Library/Workflow Technical Reference Manual
Information on new features in this release
Release Content Documents and Features Summary Matrices*Oracle Applications DBA 11i+ Features Matrix*Oracle Applications Product Update NotesElectronic Technical Reference Manual (eTRM)*Release Content Documents (RCD)*
Application-specific features
Oracle Applications user’s guidesOracle Applications implementation manualsMultiple Organizations in Oracle ApplicationsMultiple Reporting Currencies in Oracle Applications
Information about custom development
Oracle Applications User Interface Standards for Forms-based ProductsOracle Applications Developers’ Guide
Database information Oracle9i Documentation Set
* Available only on OracleMetaLink.
Note: Documentation associated with this release was current as of the time it was released. However, OracleMetaLink may contain more recent information.
xi
custom courses using your organization structure, terminology, and data as examples.
SupportThe Oracle support team includes your Technical Representative and Account Manager. It also includes Oracle consultants and support specialists who have expertise in your business area, and in managing an Oracle database server and your hardware and software environment.
OracleMetaLink is a self-service, web-based support connection, which is maintained by Oracle Support Services 24 hours a day, 7 days a week. Use it to obtain information and advice from technical libraries and forums, download patches, look at bug details, and create or update TARs. Register at http://metalink.oracle.com, and check for updates and information before you install or upgrade your Oracle Applications. The Start Here CD also contains links to the various resources on OracleMetaLink.
ConventionsThe following conventions are used in this book:
Convention Meaning
UNIX:Windows:
Indicates platform-specific information. This guide contains information for both UNIX and Windows platforms. Instructions for UNIX platforms also apply to Linux platforms, unless otherwise noted.
$ or C:\> Represents the platform-specific command prompt. Your prompt may differ.
Monospace text Represents command line text. Type this text exactly as shown.
< > Text enclosed in angle brackets represents a variable. Substitute a value for the variable text. Do not type the brackets.
[ ] Encloses optional items or indicate a function key. Do not type the brackets.
| Represents an or option among several options. You must enter only one of the options. Do not type the vertical bar.
\ In examples of commands you type online, a backslash at the end of a line signifies that you must type the entire command on one line. Do not type the backslash.
xii

Special Notes Alert you about information within the body of the book. They include Additional Information, Attention, Note, and Warning.
Convention Meaning
xiii

xiv
Getting S
1
Getting StartedThis chapter contains the following sections:
■ How an Installation Works
■ Release 11i System Requirements
■ Before You Begin
■ What To Do Next
How an Installation Works Rapid Install installs Oracle Applications products by providing a wizard for entering information specific to your installation or upgrade. Once you complete the information in the wizard, Rapid Install uses it to install the required Oracle technology stack and create the Oracle Applications file system. It also configures the servers on the application tier, and installs and configures the database.
In a single-node installation, all servers (database, concurrent processing, forms, and web) are installed on a single node (machine). This type of installation is generally used for smaller installations, for demonstration purposes, or for use in a shared APPL_TOP environment. A multi-node installation sets up any combination of servers you specify, on any number of nodes.
Using the Rapid Install WizardThe Rapid Install wizard consists of a series of screens where you enter the information Rapid Install needs to install your system. The following overview outlines the type of information collected by the Rapid Install wizard.
tarted 1-1
How an Installation Works
Choosing an installation environmentIn a single execution of Rapid Install, you create a complete, fully configured system. In this book we use the Rapid Install default names that suggest possible uses for the environment: production (PROD), test (TEST), or Vision Demonstration (VIS). When you set up the instance, you can install a fresh database, or a Vision Demonstration database, or no database at all.
Registering products and country-specific functionalityYou use Rapid Install wizard screens to register licensed products, languages, and country-specific functionality. During the installation, Rapid Install automatically installs and registers all products, country-specific functionality, languages, and required shared products in the database and in the file system. You may need to apply mini-packs and perform implementation steps for the registered products.
Selecting NLS settingsA new Oracle Applications database installation uses American English (AMERICAN) as the base language with US7ASCII as the default character set and a default territory setting of AMERICA. You can select additional languages and modify the other settings on the Rapid Install wizard screens. Choosing additional languages may require choosing an alternative character set for the database and the APPL_TOP. See Internationalization Support in Oracle Applications Concepts.
Selecting configuration parametersIndicate the main settings for mount points, directory paths, and ports. Then, specify the top-level and sub-level directories, user accounts, and other information needed to configure the APPL_TOP.
Note: The person responsible for completing the Rapid Install wizard screens and running the installation process should be familiar with your system requirements and resources, and should have a complete understanding of Oracle DBA or system administrator responsibilities.
Note: If you change a recommended character set (by overwriting the default on the derived settings screen), be sure the language you install is compatible with the character set you choose.
1-2 Installing Oracle Applications

How an Installation Works
Validating configuration parametersOnce you have indicated the parameters for your installation, Rapid Install performs a series of system validation checks and notifies you of the results.
Running Rapid InstallWhen you are sure the configuration parameters are correct, start Rapid Install. When the installation process is complete, you may need to perform some additional finishing or implementation steps. See Chapter 5 in this book for more information.
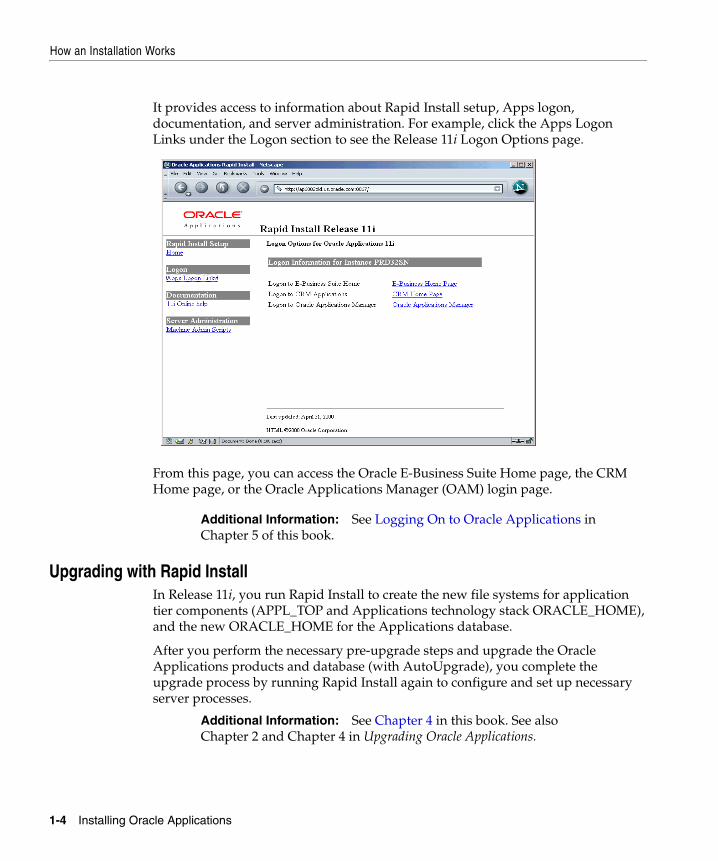
Accessing the Rapid Install PortalThe Rapid Install Portal is a web site created automatically during installation. You can access it with a standard browser using the following URL:
http://<SERVER>.<domain>:<http port>
For example, if you configured Rapid Install to install the HTTP server using port 7777 on a node named R11WEB in the domain MYCOMPANY.COM, you would use the following URL to connect to the Rapid Install Portal:
http://R11WEB.MYCOMPANY.COM:7777
Once connected, the Rapid Install Portal web page appears.
Getting Started 1-3
How an Installation Works
It provides access to information about Rapid Install setup, Apps logon, documentation, and server administration. For example, click the Apps Logon Links under the Logon section to see the Release 11i Logon Options page.
From this page, you can access the Oracle E-Business Suite Home page, the CRM Home page, or the Oracle Applications Manager (OAM) login page.
Upgrading with Rapid InstallIn Release 11i, you run Rapid Install to create the new file systems for application tier components (APPL_TOP and Applications technology stack ORACLE_HOME), and the new ORACLE_HOME for the Applications database.
After you perform the necessary pre-upgrade steps and upgrade the Oracle Applications products and database (with AutoUpgrade), you complete the upgrade process by running Rapid Install again to configure and set up necessary server processes.
Additional Information: See Logging On to Oracle Applications in Chapter 5 of this book.
Additional Information: See Chapter 4 in this book. See also Chapter 2 and Chapter 4 in Upgrading Oracle Applications.
1-4 Installing Oracle Applications
Release 11i System Requirements
Release 11i System RequirementsThis section contains general hardware and software requirements for Oracle Applications Release 11i.
Technology Stack ComponentsDuring the installation process, Rapid Install installs and configures the required technology stack components, including:
■ Oracle9i RDBMS (9.2.0.3)
■ 8.0.6 Oracle Home (8.0.6.3)
■ Oracle 9iAS (1.0.2.2.2) — includes Oracle HTTP Server
■ Oracle JInitiator for the PC client (1.1.8.16)
■ Oracle Developer6i Patch 12, which includes:
■ Oracle Forms (6.0.8.21)
■ Oracle Reports (6.0.8.21)
■ Oracle Graphics (6.0.8.21)
■ Oracle Java Server Pages (1.1.3)
■ Client libraries (Required Support Files) (8.0.6.3)
■ Java Database Connector (9.2.0.2)
See the Certify web page for the latest certification information. Access Certify from OracleMetaLink (Product Lifecycle > Certifications).
Software RequirementsThe software described in this section is required to complete the installation of Oracle Applications.
Additional Information: Oracle Applications Installation Update Notes contain any additional information necessary for specific platforms.
Additional Information: See Frequently Asked Questions about Certify, OracleMetaLink Doc ID: 119139.1.
Getting Started 1-5
Release 11i System Requirements
Java Development Kit (JDK)This release of Oracle Applications requires Java Development Kit (JDK) 1.3.1. See Step 2: Install latest Java Development Kit (JDK) in this chapter for more information.
Release Maintenance ToolsFor both single-user and multi-user installations, the following utilities must be installed on all server nodes in the PATH of the user account that runs the Rapid Install wizard.
UNIX:ar, cc, ld, make
Windows:cc, gnumake, link
See the Oracle Applications Installation Update Notes for your platform for specific software requirements.
CPU RequirementsCPU requirements for running Oracle Applications depend on:
■ the number of concurrent users and their usage profiles
■ the number of concurrent manager processes and the types of jobs that they are running
■ the load on the node for activities other than Oracle Applications
■ the size of your database
■ desired response time
Because there are different product combinations, different user profiles, and different configurations, there is no one sizing answer for all hardware platforms. The most reliable way to ensure that your hardware is sized appropriately is to install a test environment, and then set a benchmark with a configuration, product mix, and user load that simulates your own. These “actual” conditions can help verify performance before you install a production environment.
If a benchmark is not feasible, Oracle Consulting Services and your hardware vendor can help you find another Oracle Applications installation running a product mix and user profile similar to yours. Some hardware vendors have sizing
1-6 Installing Oracle Applications
Release 11i System Requirements
worksheets that model the CPU and memory requirements of Oracle Applications on their hardware.
Memory Requirements (database tier and forms server)To calculate the memory requirements on the database tier, consider the following:
■ Oracle database overhead
■ size of system global areas (SGA)
■ number of concurrent users
■ other software running on the database tier
Use a guideline of 8 MB per user to estimate the Applications requirements for the node where you install the forms server.
Disk Space Requirements (file system)Rapid Install installs the file system and database files for all products regardless of their licensed status. For database size information, see Production and Test Database Requirements and Vision Demonstration Database Requirements in Appendix A. The size of the remaining file system objects in a single node installation is approximately 50 – 55 GB. A multi-node installation splits the file system across several nodes, with some duplication. For example, a node that contains the forms and web servers might use approximately 12 - 14 GB of space, and the node that contains the database/concurrent processing servers might use approximately 12 – 14 GB.
Stage areaIf you run Rapid Install from a stage area, you need at least 20 GB to accommodate the file system and database files in your stage area. See the following section for information about additional space needed for installing languages.
Language filesIf you are installing Oracle Applications in a language other than American English, you need additional space for the language files. Unloading and uncompressing the Applications files requires about 7.0 GB per language.
Additional Information: See Run Rapid Install from a Stage Area on page 1-11.
Getting Started 1-7
Release 11i System Requirements
Applications log and output filesMany Oracle Applications products generate log and output files during runtime. The disk space needed for log and output files varies with the number of users and usage, and depends on how frequently you purge these files. Consult your product-specific documentation for more information.
Temporary directories and filesFor runtime, Oracle Applications requires temporary disk space. Rapid Install sets the temporary directory based on the value you supply on the derived settings screen. For example, each concurrent manager writes temporary parameter files, Oracle Reports writes temporary format files, and Oracle Forms writes temporary record buffers records.
For installation time temporary disk space, Rapid Install writes to the environment variable that defines the temp directory.
Updates and patches You need disk space for applying updates, patches, maintenance packs, and mini-packs (patch sets). This process may create backup copies of files, which also require disk space.
Note: Language files are located in language-specific CD packs, which must be ordered separately. No additional space is required for these files unless, and until, you unload these CDs.
Suggestion: Log and output files are not automatically purged. Determine a strategy for archiving and purging these files after the installation and monitor the disk space they consume to determine how much space you may need in the future.
Note: "Out of Record Buffer" messages indicate that the amount of disk space in the tmp file system is insufficient, or the limits on number of files and file sizes are too small. These limits are set at the operating system level.
1-8 Installing Oracle Applications

Before You Begin
Other files The total disk space estimate must account for the requirements of files other than those directly related to Oracle Applications. For example:
■ operating system software
■ online backups
■ custom Applications development files
■ files for other applications that you use
Before You BeginYou must follow the steps in this section before you begin your Rapid Install installation. It is also important to be familiar with the other documentation referenced in this section before you begin.
Step 1: Create login accountsRapid Install installs both the Oracle technology stack and the Oracle Applications file system. The way you create login accounts differs somewhat from UNIX machines to Windows machines. Follow the appropriate directions before you begin to use Rapid Install.
For UNIX Users (single-user installations)To install Oracle Applications as a single-user installation, create an oracle user account and log in as the oracle user to run Rapid Install.
For UNIX Users (multi-user installations)To install as a multi-user installation, create an oracle user account and an applmgr user account. Log in as root to run Rapid Install. Then, specify the oracle user as the owner of the ORACLE_HOME and the applmgr user as the owner of the APPL_TOP.
The operating system user that owns the Oracle database technology stack (including the database) is called the oracle user. The default environment name is
Additional Information: See AutoPatch in Oracle Applications Maintenance Utilities. See also Patching your System in Oracle Applications Maintenance Procedures.
Additional Information: See Oracle9i documentation set.
Getting Started 1-9
Before You Begin
ora<SID>. For example, for a production (PROD) environment, the default name might be oraprod.
The operating system user that owns the Oracle Applications file system is called the applmgr user. This user owns the APPL_TOP, 8.0.6 Oracle home, the Developer 6i software, the shared technology components, and the iAS Oracle home. The default environment name is appl<SID>. For example, for a Vision Demonstration (VIS) environment, the default name might be applvis.
For Windows UsersOn Windows platforms, the user who runs Rapid Install owns the file system for all components (both the database file system and the Oracle Applications file system). The NT install user is equivalent to the UNIX single-user installation.
Before you install Oracle Applications, make sure the user account for the installation (the install user) has full local administrative privileges and permission to print to either local or network printers. We suggest you create a new account (for example, oracle) on the domain level and make it a member of these groups:
■ Administrators (local user)
■ Domain Users (Domain user)
This account does not need to be a member of any other group, and must not be a member of the GUEST group. Refer to Windows Help for information on creating accounts and assigning accounts to groups.
On the Rapid Install main settings screen, there is an NT user field (with a default of applmgr) and an accompanying NT password field. We recommend that you modify the NT User and NT Password fields to correspond to the install user (who owns the file system) to avoid permission conflicts.
Step 2: Install latest Java Development Kit (JDK)This release of Oracle Applications requires Java Development Kit (JDK) 1.3. Before you begin your installation, download and install the latest version of JDK on your concurrent server, administration server, forms server, and web server.
Note: For both single-user or multi-user installations, the group you select on the Rapid Install screen determines which user group has privileged (dba) access to the database.
1-10 Installing Oracle Applications
Before You Begin
Download JDK 1.3 from the download site for the operating system where you will deploy the Oracle HTTP server. See OracleMetaLink document 130091.1 (Upgrading to JDK 1.3 with Oracle Applications 11i) for a list of the sites.
1. Follow the installation instructions provided with the download.
2. Make a note of the location where you install JDK. The Rapid Install wizard asks for this location on the Derived Settings screen. (See Step 8 on page 2-13 or Step 9 on page 3-15.)
Step 3: Set up a stage directory or CD installYou can start Rapid Install and run it either from a stage area or from the Rapid Install CDs.
Run Rapid Install from a Stage AreaTo shorten installation time, and eliminate the need for user access to the CD-ROM drive during the installation, run Rapid Install from a stage area. In this type of installation, you copy the CDs to a file system and run the installation from there.
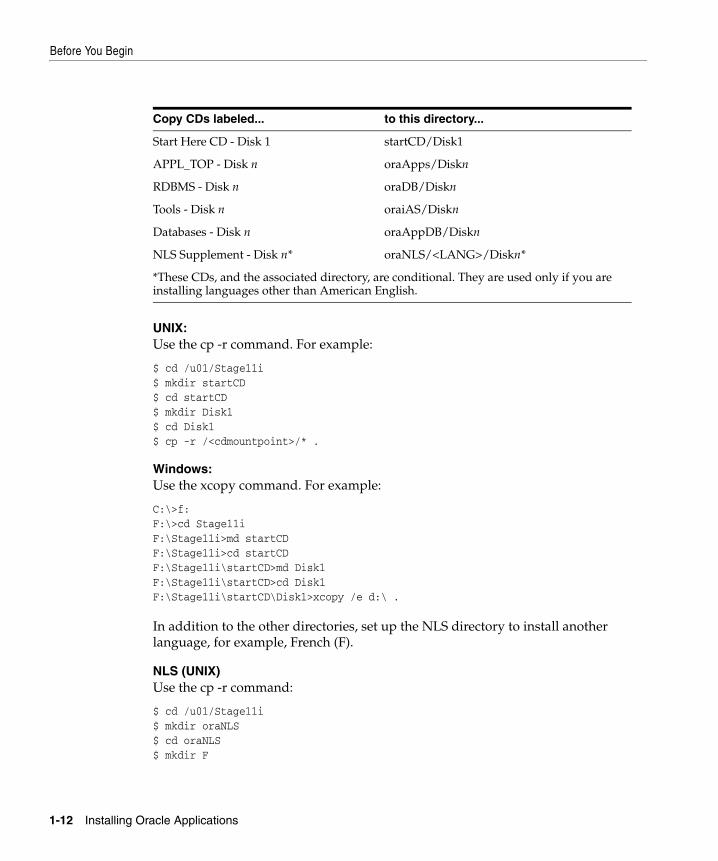
The Rapid Install CDs in the Release 11i software bundle are labeled Start Here, APPL_TOP, RDBMS, Tools, and Databases. If you are an NLS customer, you should also have a set of NLS Supplement CDs for each language you plan to install.
The number of CDs for each label may be different for each platform and for each language. The following table uses the letter n to indicate the number of disks that make up each label. In most cases, there is only one disk for each language.
Installation directories are case-sensitive and must be set up using the capitalization exactly as shown.
Attention: Installing from CDs could take up to 10 times longer than installing from a stage area.
Attention: If you choose to install a language other than American English during the initial installation, it is very important that you order the NLS Supplement CDs and have them available before you begin the installation. Rapid Install will not run to completion without these language-specific CDs.
Getting Started 1-11
Before You Begin
UNIX:Use the cp -r command. For example:
$ cd /u01/Stage11i$ mkdir startCD$ cd startCD$ mkdir Disk1$ cd Disk1$ cp -r /<cdmountpoint>/* .
Windows:Use the xcopy command. For example:
C:\>f:F:\>cd Stage11iF:\Stage11i>md startCDF:\Stage11i>cd startCDF:\Stage11i\startCD>md Disk1F:\Stage11i\startCD>cd Disk1F:\Stage11i\startCD\Disk1>xcopy /e d:\ .
In addition to the other directories, set up the NLS directory to install another language, for example, French (F).
NLS (UNIX)Use the cp -r command:
$ cd /u01/Stage11i$ mkdir oraNLS$ cd oraNLS$ mkdir F
Copy CDs labeled... to this directory...
Start Here CD - Disk 1 startCD/Disk1
APPL_TOP - Disk n oraApps/Diskn
RDBMS - Disk n oraDB/Diskn
Tools - Disk n oraiAS/Diskn
Databases - Disk n oraAppDB/Diskn
NLS Supplement - Disk n* oraNLS/<LANG>/Diskn*
*These CDs, and the associated directory, are conditional. They are used only if you are installing languages other than American English.
1-12 Installing Oracle Applications
Before You Begin
$ cd F$ mkdir Disk1$ cd Disk1$ cp -r /<cdmountpoint>/* .
NLS (Windows)Use the xcopy command. For example:
C:\>f:F:\>cd Stage11iF:\Stage11i>md oraNLSF:\Stage11i>cd oraNLSF:\Stage11i\oraNLS>md FF:\Stage11i\oraNLS>cd FF:\Stage11i\oraNLS\F>md Disk1F:\Stage11i\oraNLS\F>cd Disk1F:\Stage11i\startCD\F\Disk1>xcopy /e d:\ .
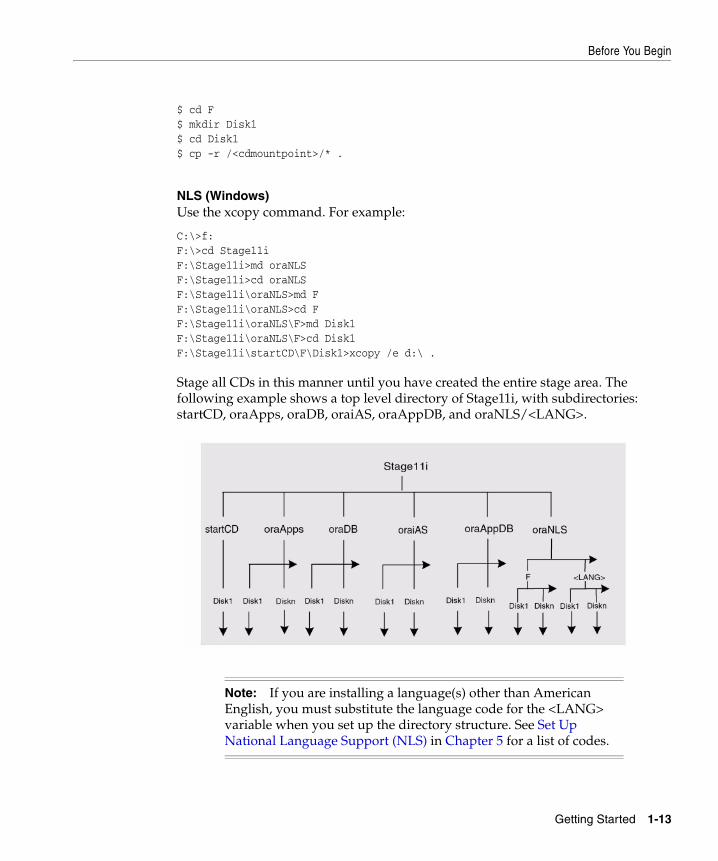
Stage all CDs in this manner until you have created the entire stage area. The following example shows a top level directory of Stage11i, with subdirectories: startCD, oraApps, oraDB, oraiAS, oraAppDB, and oraNLS/<LANG>.
Note: If you are installing a language(s) other than American English, you must substitute the language code for the <LANG> variable when you set up the directory structure. See Set Up National Language Support (NLS) in Chapter 5 for a list of codes.
Getting Started 1-13
Before You Begin
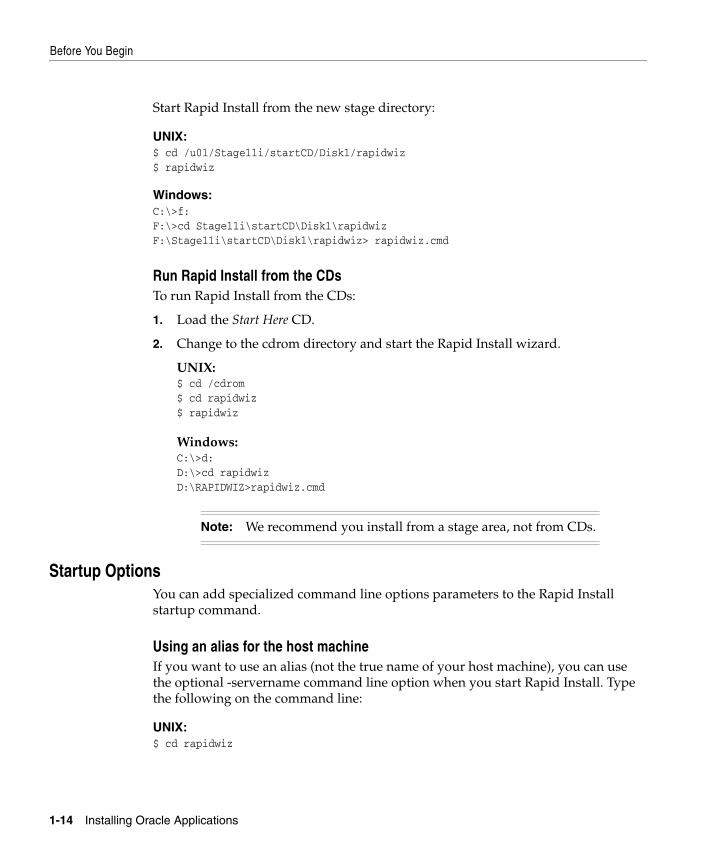
Start Rapid Install from the new stage directory:
UNIX:$ cd /u01/Stage11i/startCD/Disk1/rapidwiz$ rapidwiz
Windows:C:\>f:F:\>cd Stage11i\startCD\Disk1\rapidwizF:\Stage11i\startCD\Disk1\rapidwiz> rapidwiz.cmd
Run Rapid Install from the CDsTo run Rapid Install from the CDs:
1. Load the Start Here CD.
2. Change to the cdrom directory and start the Rapid Install wizard.
UNIX:$ cd /cdrom$ cd rapidwiz$ rapidwiz
Windows:C:\>d:D:\>cd rapidwizD:\RAPIDWIZ>rapidwiz.cmd
Startup OptionsYou can add specialized command line options parameters to the Rapid Install startup command.
Using an alias for the host machineIf you want to use an alias (not the true name of your host machine), you can use the optional -servername command line option when you start Rapid Install. Type the following on the command line:
UNIX:$ cd rapidwiz
Note: We recommend you install from a stage area, not from CDs.
1-14 Installing Oracle Applications
What To Do Next
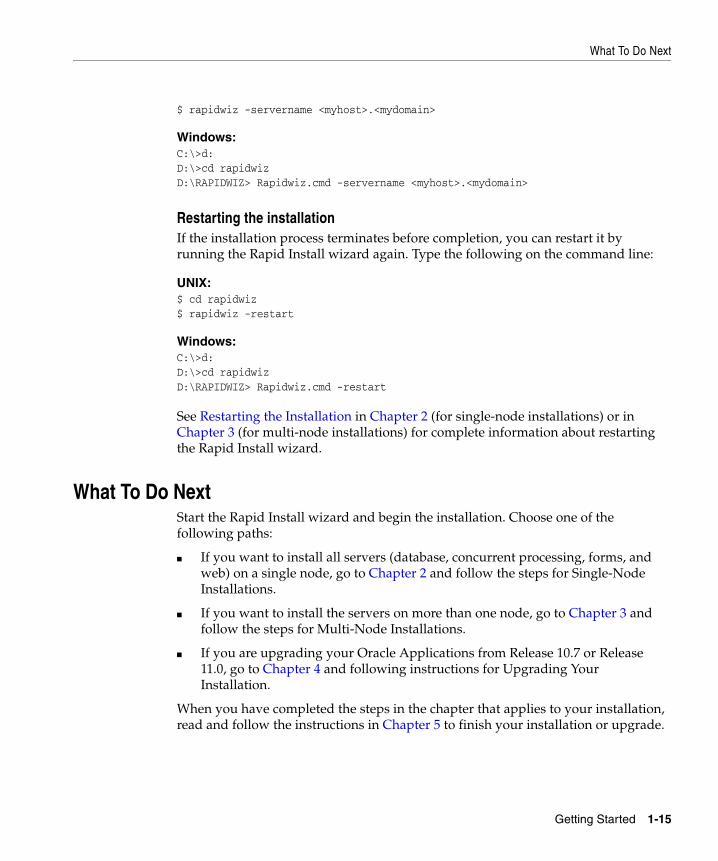
$ rapidwiz -servername <myhost>.<mydomain>
Windows:C:\>d:D:\>cd rapidwizD:\RAPIDWIZ> Rapidwiz.cmd -servername <myhost>.<mydomain>
Restarting the installationIf the installation process terminates before completion, you can restart it by running the Rapid Install wizard again. Type the following on the command line:
UNIX:$ cd rapidwiz$ rapidwiz -restart
Windows:C:\>d:D:\>cd rapidwizD:\RAPIDWIZ> Rapidwiz.cmd -restart
See Restarting the Installation in Chapter 2 (for single-node installations) or in Chapter 3 (for multi-node installations) for complete information about restarting the Rapid Install wizard.
What To Do NextStart the Rapid Install wizard and begin the installation. Choose one of the following paths:
■ If you want to install all servers (database, concurrent processing, forms, and web) on a single node, go to Chapter 2 and follow the steps for Single-Node Installations.
■ If you want to install the servers on more than one node, go to Chapter 3 and follow the steps for Multi-Node Installations.
■ If you are upgrading your Oracle Applications from Release 10.7 or Release 11.0, go to Chapter 4 and following instructions for Upgrading Your Installation.
When you have completed the steps in the chapter that applies to your installation, read and follow the instructions in Chapter 5 to finish your installation or upgrade.
Getting Started 1-15

What To Do Next
1-16 Installing Oracle Applications

Single-node Installa
2
Single-node InstallationsThis chapter contains the following sections:
■ Setting Up a Single-node Installation
■ What to Expect During the Installation
■ What To Do Next
Setting Up a Single-node InstallationIn a single-node installation, all servers (database, concurrent processing, admin, forms, and web) are installed on a single node.
Running the Rapid Install Wizard To begin, start Rapid Install as described in Chapter 1. Then complete the following tasks.
Step 1: Choose an installation operationClick the Install Oracle Applications button. Notice that pressing the Tab key moves the cursor between options. Moving the cursor by pressing the Up or Down Arrow keys selects the option as well.
Note: If your system will use multiple nodes, omit this chapter and proceed to Chapter 3, Multi-node Installations.
tions 2-1
Setting Up a Single-node Installation
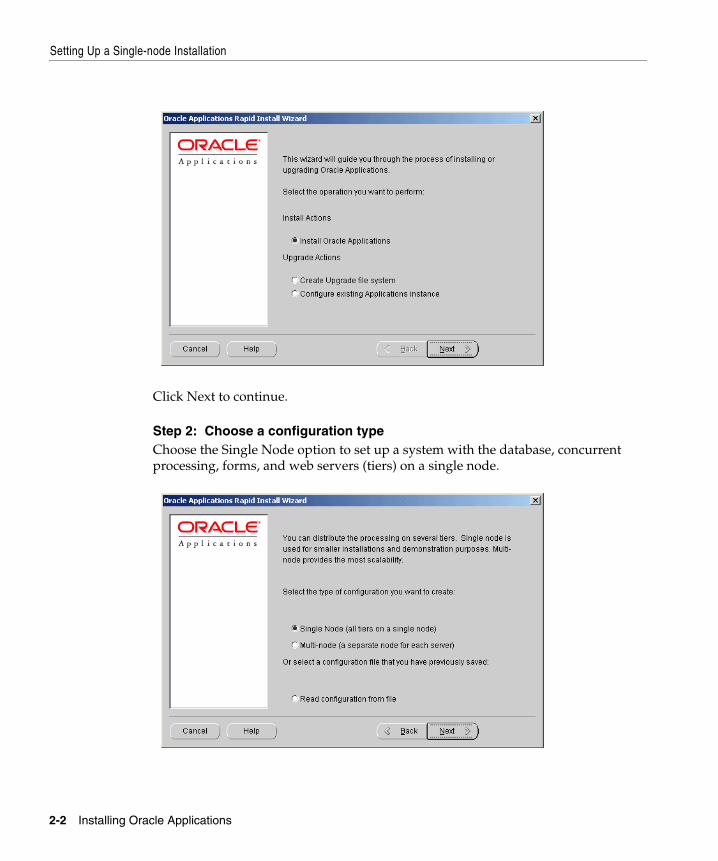
Click Next to continue.
Step 2: Choose a configuration type Choose the Single Node option to set up a system with the database, concurrent processing, forms, and web servers (tiers) on a single node.
2-2 Installing Oracle Applications
Setting Up a Single-node Installation
Click Next to continue.
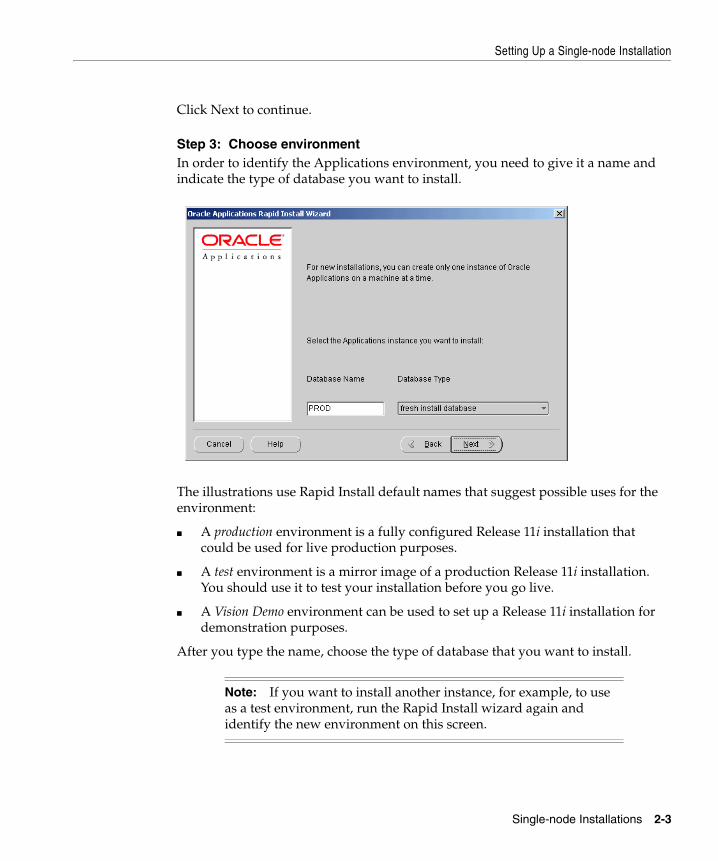
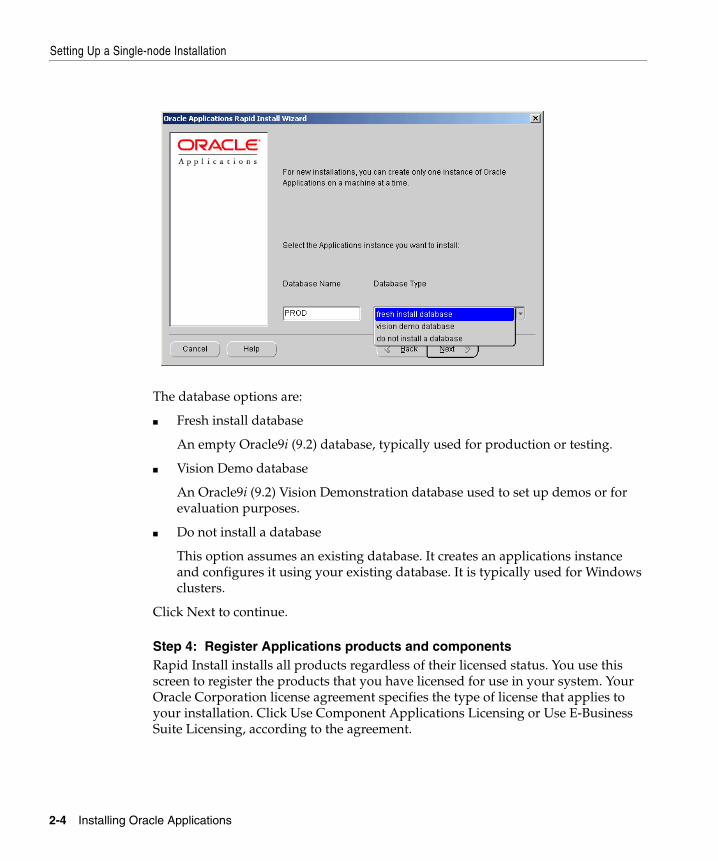
Step 3: Choose environmentIn order to identify the Applications environment, you need to give it a name and indicate the type of database you want to install.
The illustrations use Rapid Install default names that suggest possible uses for the environment:
■ A production environment is a fully configured Release 11i installation that could be used for live production purposes.
■ A test environment is a mirror image of a production Release 11i installation. You should use it to test your installation before you go live.
■ A Vision Demo environment can be used to set up a Release 11i installation for demonstration purposes.
After you type the name, choose the type of database that you want to install.
Note: If you want to install another instance, for example, to use as a test environment, run the Rapid Install wizard again and identify the new environment on this screen.
Single-node Installations 2-3
Setting Up a Single-node Installation
The database options are:
■ Fresh install database
An empty Oracle9i (9.2) database, typically used for production or testing.
■ Vision Demo database
An Oracle9i (9.2) Vision Demonstration database used to set up demos or for evaluation purposes.
■ Do not install a database
This option assumes an existing database. It creates an applications instance and configures it using your existing database. It is typically used for Windows clusters.
Click Next to continue.
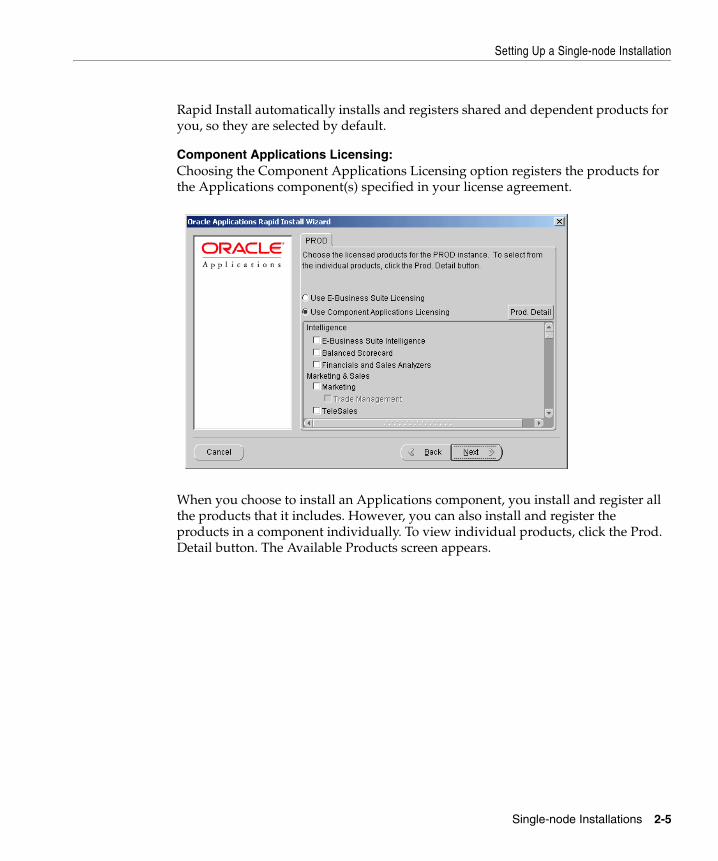
Step 4: Register Applications products and componentsRapid Install installs all products regardless of their licensed status. You use this screen to register the products that you have licensed for use in your system. Your Oracle Corporation license agreement specifies the type of license that applies to your installation. Click Use Component Applications Licensing or Use E-Business Suite Licensing, according to the agreement.
2-4 Installing Oracle Applications
Setting Up a Single-node Installation
Rapid Install automatically installs and registers shared and dependent products for you, so they are selected by default.
Component Applications Licensing:Choosing the Component Applications Licensing option registers the products for the Applications component(s) specified in your license agreement.
When you choose to install an Applications component, you install and register all the products that it includes. However, you can also install and register the products in a component individually. To view individual products, click the Prod. Detail button. The Available Products screen appears.
Single-node Installations 2-5
Setting Up a Single-node Installation
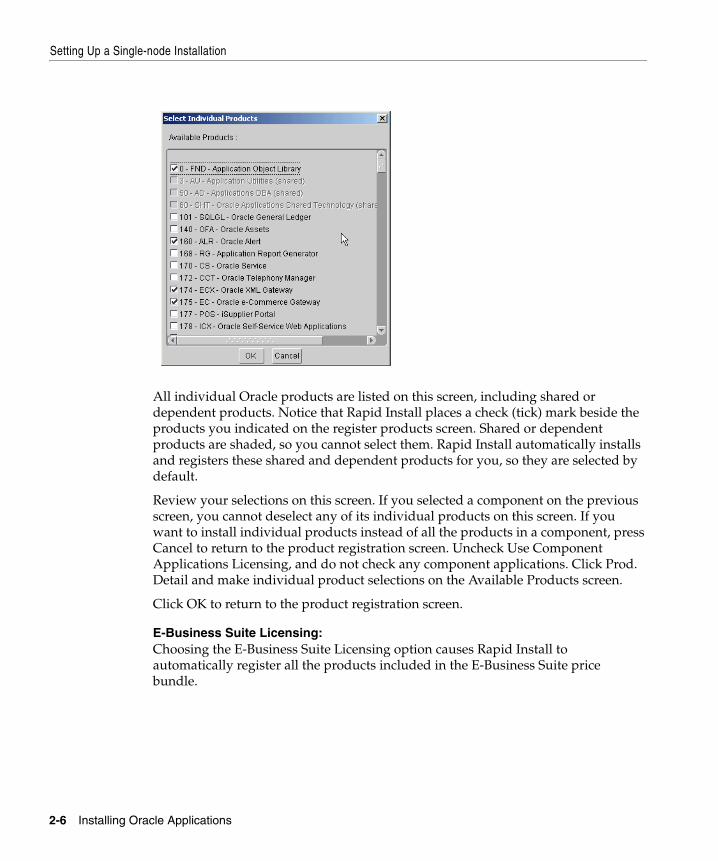
All individual Oracle products are listed on this screen, including shared or dependent products. Notice that Rapid Install places a check (tick) mark beside the products you indicated on the register products screen. Shared or dependent products are shaded, so you cannot select them. Rapid Install automatically installs and registers these shared and dependent products for you, so they are selected by default.
Review your selections on this screen. If you selected a component on the previous screen, you cannot deselect any of its individual products on this screen. If you want to install individual products instead of all the products in a component, press Cancel to return to the product registration screen. Uncheck Use Component Applications Licensing, and do not check any component applications. Click Prod. Detail and make individual product selections on the Available Products screen.
Click OK to return to the product registration screen.
E-Business Suite Licensing:Choosing the E-Business Suite Licensing option causes Rapid Install to automatically register all the products included in the E-Business Suite price bundle.
2-6 Installing Oracle Applications

Setting Up a Single-node Installation
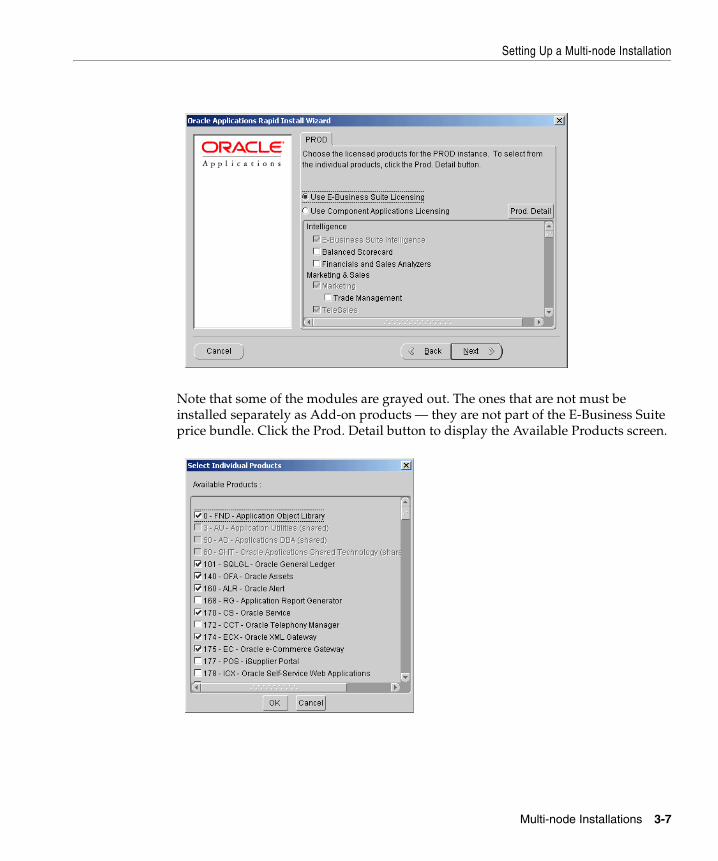
Note that some of the modules are grayed out. The ones that are not must be installed separately as Add-on products — they are not part of the E-Business Suite price bundle. Click the Prod. Detail button to display the Available Products screen.
Single-node Installations 2-7
Setting Up a Single-node Installation
Most of the individual Add-on products are checked, indicating that they will be installed and registered automatically. If you want to select individual products, select them now.
If you have chosen to install a product that is controlled, Rapid Install displays an alert screen. Follow the instructions on the screen as they apply to your installation. Click OK to return to the product registration screen. Click Next to continue.
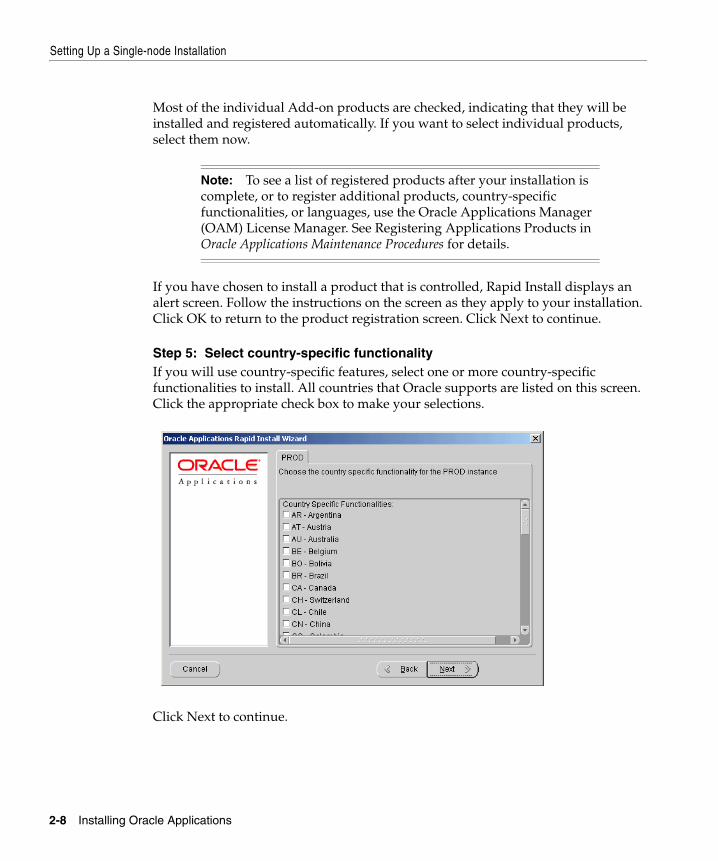
Step 5: Select country-specific functionalityIf you will use country-specific features, select one or more country-specific functionalities to install. All countries that Oracle supports are listed on this screen. Click the appropriate check box to make your selections.
Click Next to continue.
Note: To see a list of registered products after your installation is complete, or to register additional products, country-specific functionalities, or languages, use the Oracle Applications Manager (OAM) License Manager. See Registering Applications Products in Oracle Applications Maintenance Procedures for details.
2-8 Installing Oracle Applications

Setting Up a Single-node Installation
Step 6: Select NLS settingsThe fresh install database comes with American English (AMERICAN) installed as the default base language, AMERICA as the default territory, and US7ASCII as the default character set. You can select additional languages and modify the default base language and the default territory settings on this screen.
If you select additional languages, you may also need to select an alternative character set for the database and the APPL_TOP. Note that the conversion to a different character set will be automatic, but it may take several hours to complete.
The default territory is used as the NLS territory setting for all users of the Applications installation. The base language is used as the default NLS language setting. Choose a territory from the list of NLS territories if you want to change the default territory setting.
Click Select Languages to see a list of available languages.
Note: Release 11i does not support changing NLS settings or the character set for the Vision Demonstration database.
Single-node Installations 2-9
Setting Up a Single-node Installation
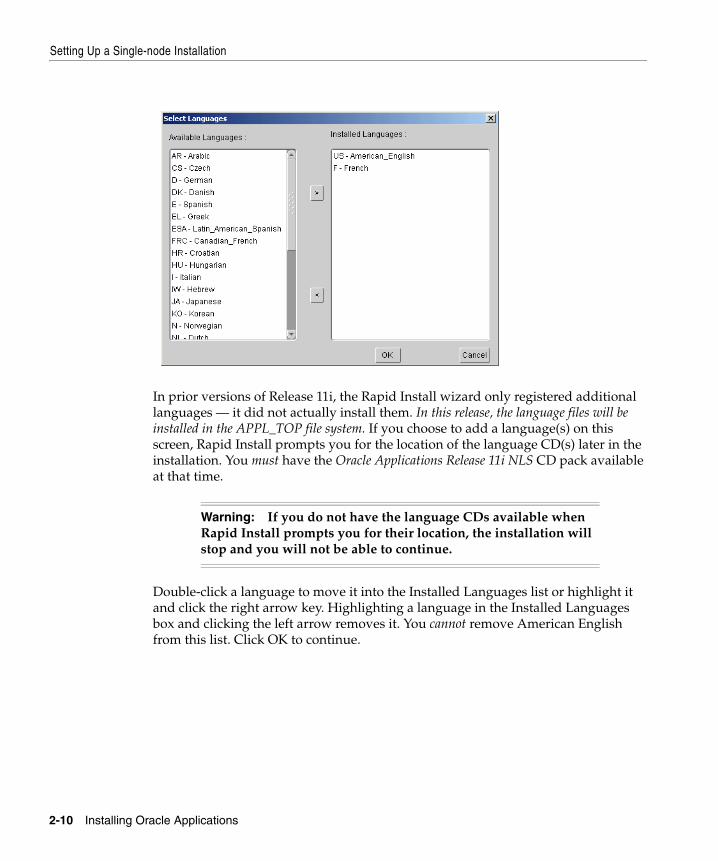
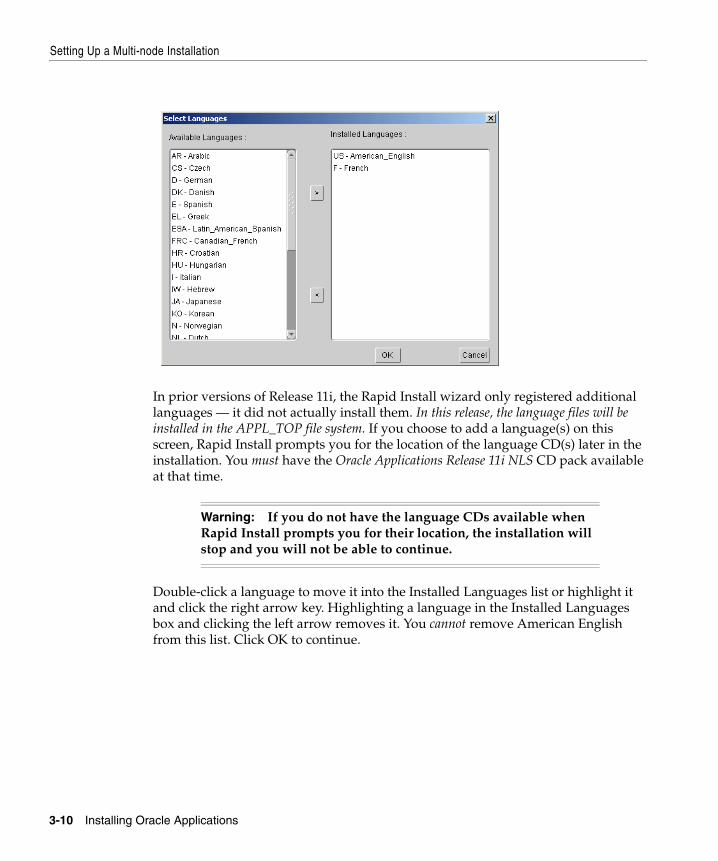
In prior versions of Release 11i, the Rapid Install wizard only registered additional languages — it did not actually install them. In this release, the language files will be installed in the APPL_TOP file system. If you choose to add a language(s) on this screen, Rapid Install prompts you for the location of the language CD(s) later in the installation. You must have the Oracle Applications Release 11i NLS CD pack available at that time.
Double-click a language to move it into the Installed Languages list or highlight it and click the right arrow key. Highlighting a language in the Installed Languages box and clicking the left arrow removes it. You cannot remove American English from this list. Click OK to continue.
Warning: If you do not have the language CDs available when Rapid Install prompts you for their location, the installation will stop and you will not be able to continue.
2-10 Installing Oracle Applications
Setting Up a Single-node Installation
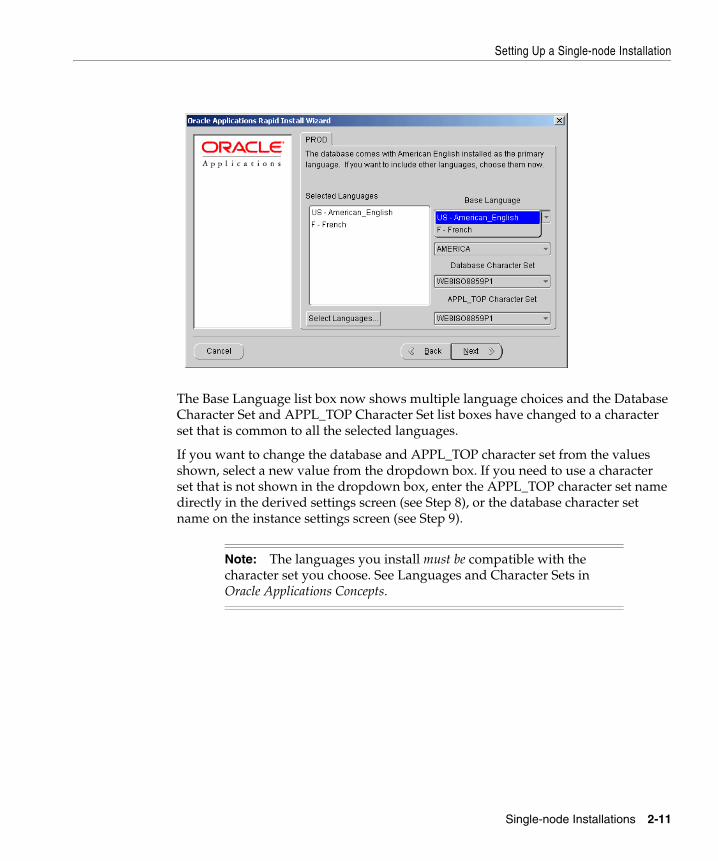
The Base Language list box now shows multiple language choices and the Database Character Set and APPL_TOP Character Set list boxes have changed to a character set that is common to all the selected languages.
If you want to change the database and APPL_TOP character set from the values shown, select a new value from the dropdown box. If you need to use a character set that is not shown in the dropdown box, enter the APPL_TOP character set name directly in the derived settings screen (see Step 8), or the database character set name on the instance settings screen (see Step 9).
Note: The languages you install must be compatible with the character set you choose. See Languages and Character Sets in Oracle Applications Concepts.
Single-node Installations 2-11
Setting Up a Single-node Installation
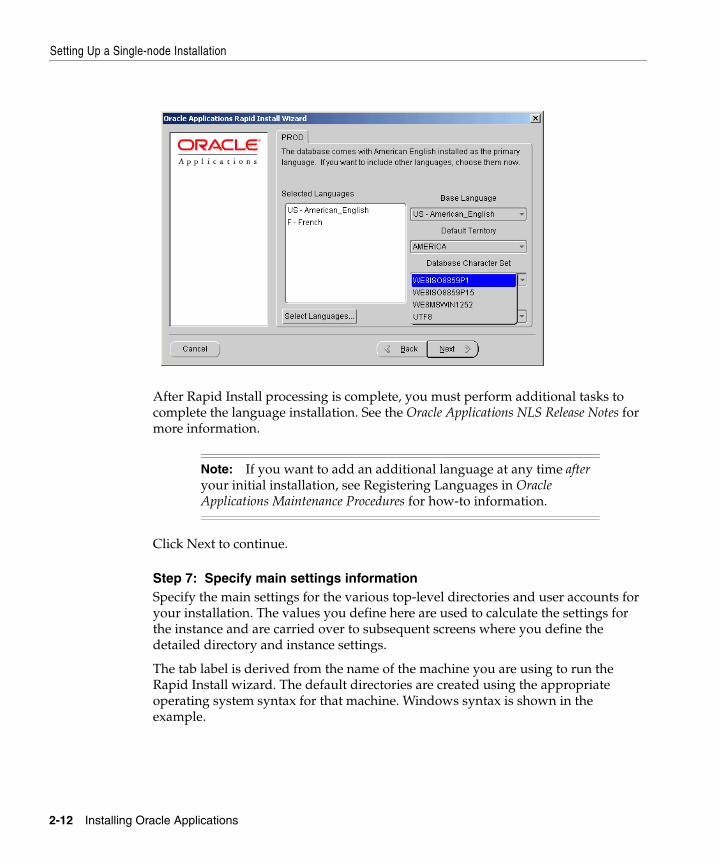
After Rapid Install processing is complete, you must perform additional tasks to complete the language installation. See the Oracle Applications NLS Release Notes for more information.
Click Next to continue.
Step 7: Specify main settings informationSpecify the main settings for the various top-level directories and user accounts for your installation. The values you define here are used to calculate the settings for the instance and are carried over to subsequent screens where you define the detailed directory and instance settings.
The tab label is derived from the name of the machine you are using to run the Rapid Install wizard. The default directories are created using the appropriate operating system syntax for that machine. Windows syntax is shown in the example.
Note: If you want to add an additional language at any time after your initial installation, see Registering Languages in Oracle Applications Maintenance Procedures for how-to information.
2-12 Installing Oracle Applications
Setting Up a Single-node Installation
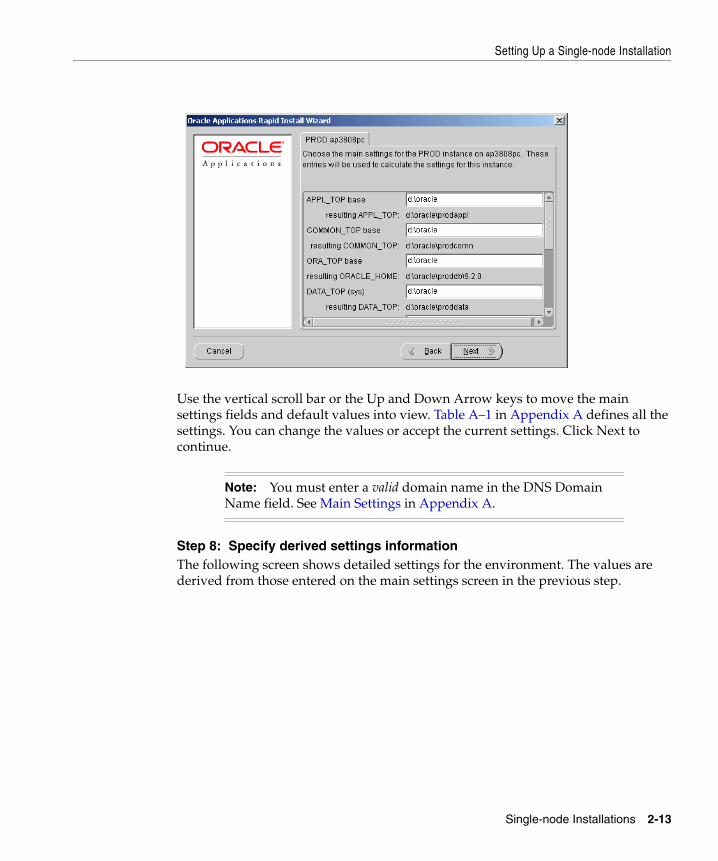
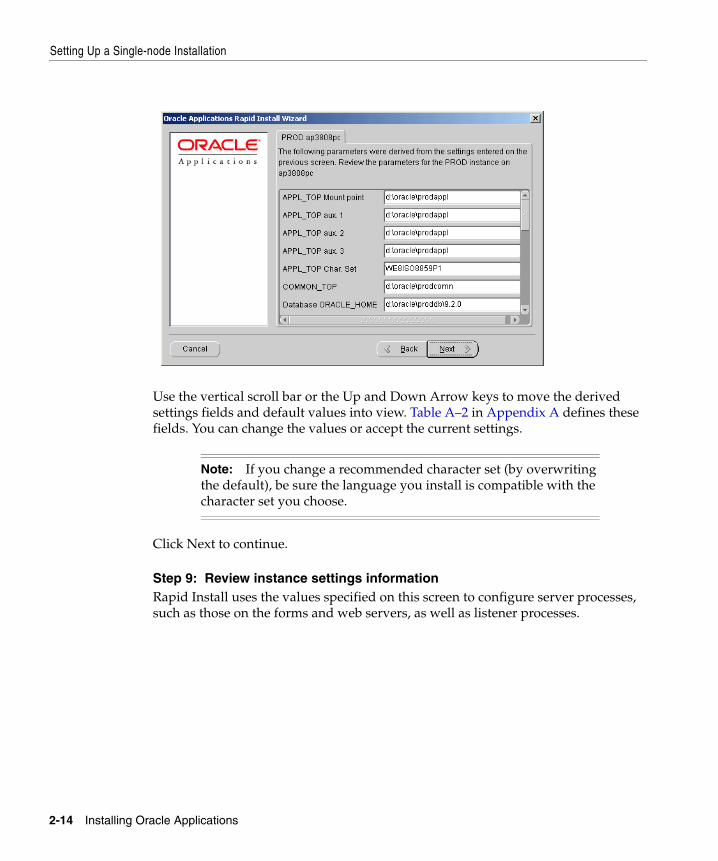
Use the vertical scroll bar or the Up and Down Arrow keys to move the main settings fields and default values into view. Table A–1 in Appendix A defines all the settings. You can change the values or accept the current settings. Click Next to continue.
Step 8: Specify derived settings informationThe following screen shows detailed settings for the environment. The values are derived from those entered on the main settings screen in the previous step.
Note: You must enter a valid domain name in the DNS Domain Name field. See Main Settings in Appendix A.
Single-node Installations 2-13
Setting Up a Single-node Installation
Use the vertical scroll bar or the Up and Down Arrow keys to move the derived settings fields and default values into view. Table A–2 in Appendix A defines these fields. You can change the values or accept the current settings.
Click Next to continue.
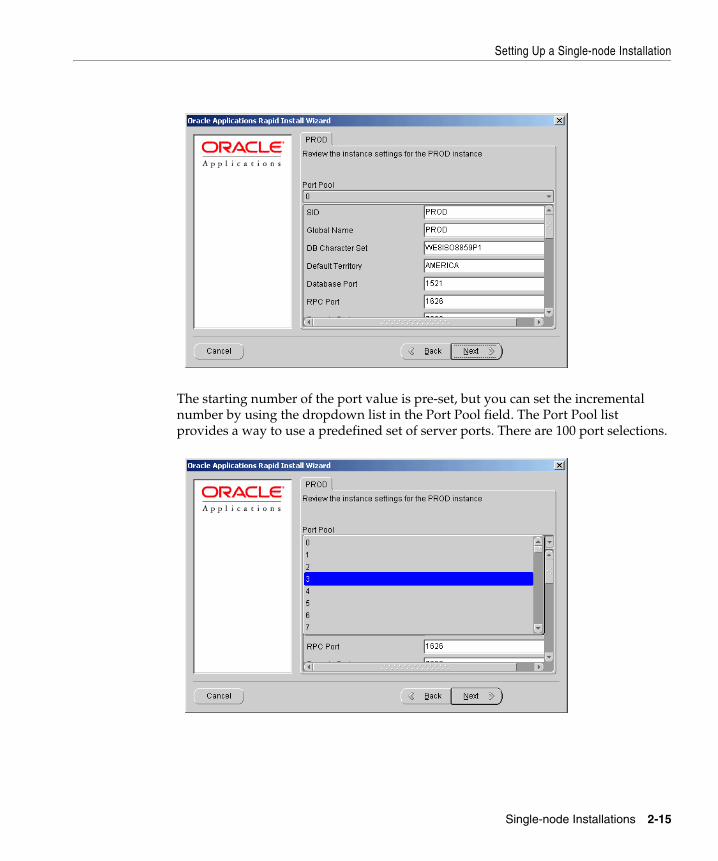
Step 9: Review instance settings informationRapid Install uses the values specified on this screen to configure server processes, such as those on the forms and web servers, as well as listener processes.
Note: If you change a recommended character set (by overwriting the default), be sure the language you install is compatible with the character set you choose.
2-14 Installing Oracle Applications
Setting Up a Single-node Installation
The starting number of the port value is pre-set, but you can set the incremental number by using the dropdown list in the Port Pool field. The Port Pool list provides a way to use a predefined set of server ports. There are 100 port selections.
Single-node Installations 2-15
Setting Up a Single-node Installation
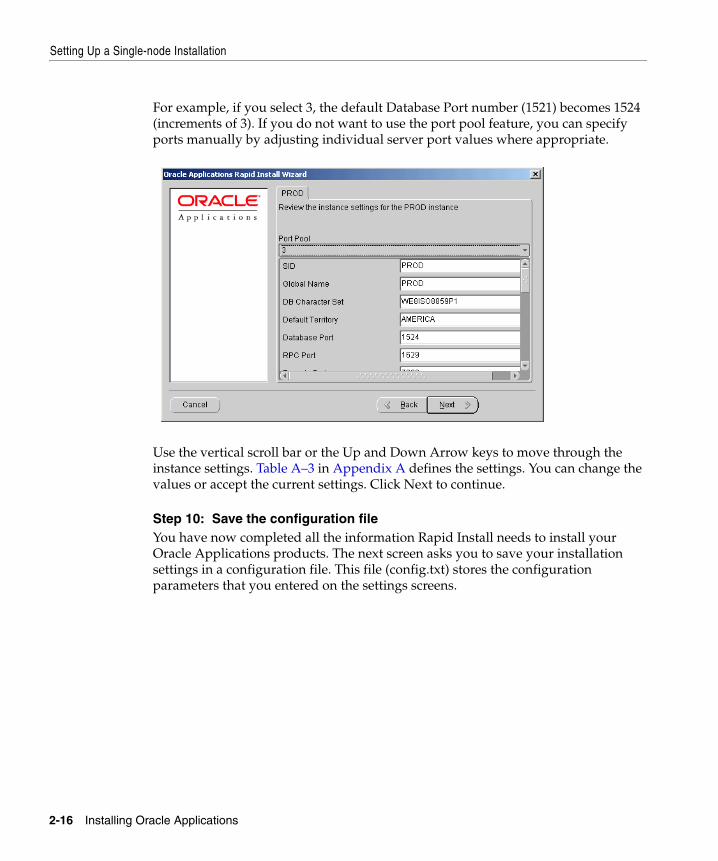
For example, if you select 3, the default Database Port number (1521) becomes 1524 (increments of 3). If you do not want to use the port pool feature, you can specify ports manually by adjusting individual server port values where appropriate.
Use the vertical scroll bar or the Up and Down Arrow keys to move through the instance settings. Table A–3 in Appendix A defines the settings. You can change the values or accept the current settings. Click Next to continue.
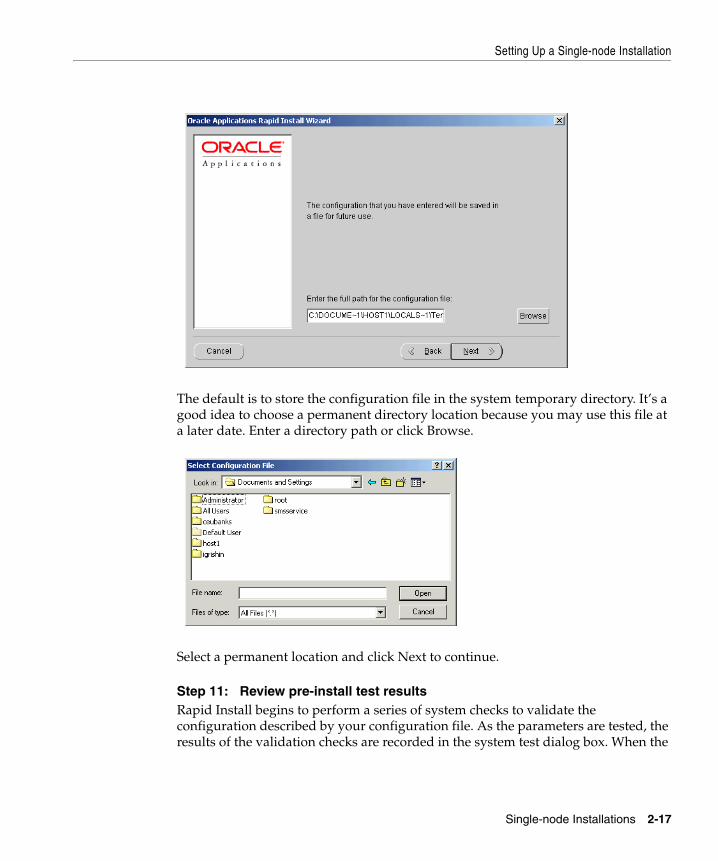
Step 10: Save the configuration file You have now completed all the information Rapid Install needs to install your Oracle Applications products. The next screen asks you to save your installation settings in a configuration file. This file (config.txt) stores the configuration parameters that you entered on the settings screens.
2-16 Installing Oracle Applications
Setting Up a Single-node Installation
The default is to store the configuration file in the system temporary directory. It’s a good idea to choose a permanent directory location because you may use this file at a later date. Enter a directory path or click Browse.
Select a permanent location and click Next to continue.
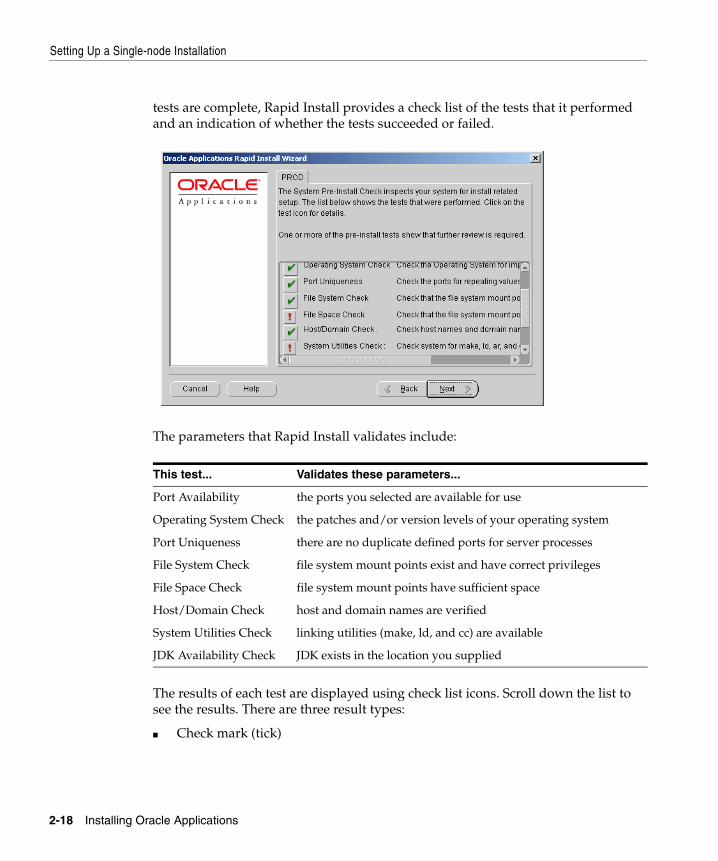
Step 11: Review pre-install test resultsRapid Install begins to perform a series of system checks to validate the configuration described by your configuration file. As the parameters are tested, the results of the validation checks are recorded in the system test dialog box. When the
Single-node Installations 2-17
Setting Up a Single-node Installation
tests are complete, Rapid Install provides a check list of the tests that it performed and an indication of whether the tests succeeded or failed.
The parameters that Rapid Install validates include:
The results of each test are displayed using check list icons. Scroll down the list to see the results. There are three result types:
■ Check mark (tick)
This test... Validates these parameters...
Port Availability the ports you selected are available for use
Operating System Check the patches and/or version levels of your operating system
Port Uniqueness there are no duplicate defined ports for server processes
File System Check file system mount points exist and have correct privileges
File Space Check file system mount points have sufficient space
Host/Domain Check host and domain names are verified
System Utilities Check linking utilities (make, ld, and cc) are available
JDK Availability Check JDK exists in the location you supplied
2-18 Installing Oracle Applications
Setting Up a Single-node Installation
The test succeeded.
■ Exclamation mark (!)
The configuration requires review. Click the ! to get information about the system test review. Click Yes to continue, and No if you are going to resolve the issues. Rapid Install alerts you if you continue without resolving the issues.
■ An x mark
All issues marked x must be resolved before you continue with the installation. Click the x to see the errors. If you can resolve an issue by fixing the values provided on the settings screen(s), click Back until you reach the appropriate screen, and re-enter the values. Some tests must be resolved in the operating system. In that case, you may have to restart the Rapid Install wizard after the problem has been fixed.
When there are no issues to resolve, click Next to continue.
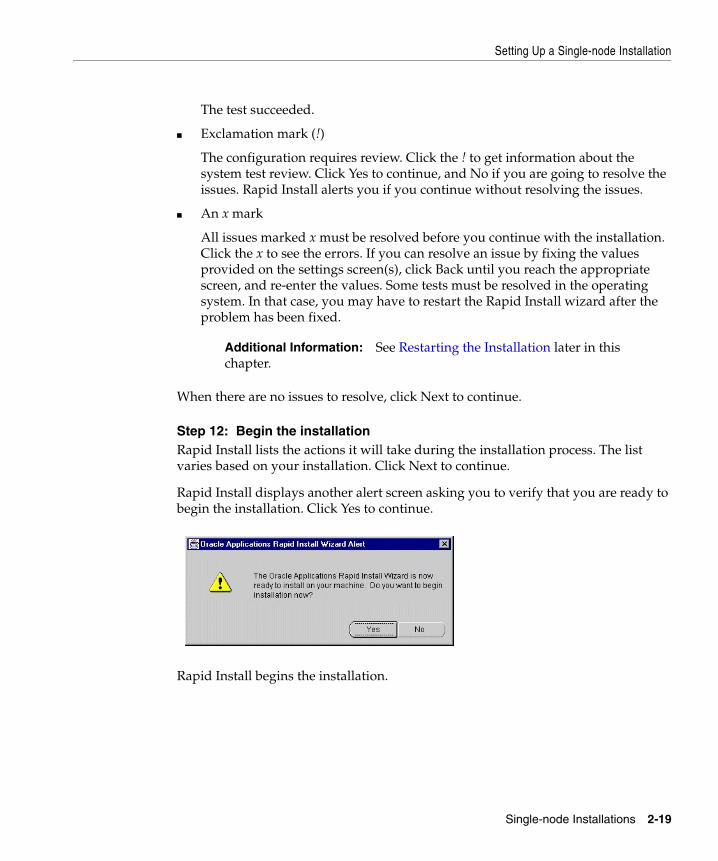
Step 12: Begin the installationRapid Install lists the actions it will take during the installation process. The list varies based on your installation. Click Next to continue. Rapid Install displays another alert screen asking you to verify that you are ready to begin the installation. Click Yes to continue.
Rapid Install begins the installation.
Additional Information: See Restarting the Installation later in this chapter.
Single-node Installations 2-19
What to Expect During the Installation
What to Expect During the InstallationRapid Install was designed to install your Oracle Applications products and the RDBMS with minimal user intervention. This section describes progress indicators and some prompts that may require your attention.
Status Indicators and PromptsDuring an installation, Rapid Install displays a main progress bar and an individual progress bar. The main progress bar reports on the completion percentage of the installation as a whole. The individual progress bar reports on the progress of each individual step. The installation is not complete until all the progress bars disappear from your screen.
Rapid Install requires very little user intervention. However, you may receive two prompts: one relating to the Universal Installer Inventory and the other requesting information about the location of the Rapid Install (or NLS) CDs.
Create the Oracle Universal Installer InventoryComponents installed by Rapid Install are listed in the Oracle Universal Installer Inventory so that users who need to use the Universal Installer for patching can continue to do so. If your machine has not had Oracle software installed on it, Rapid Install displays a message telling you to execute oraInstRoot.sh, which creates a location for the Installer Inventory.
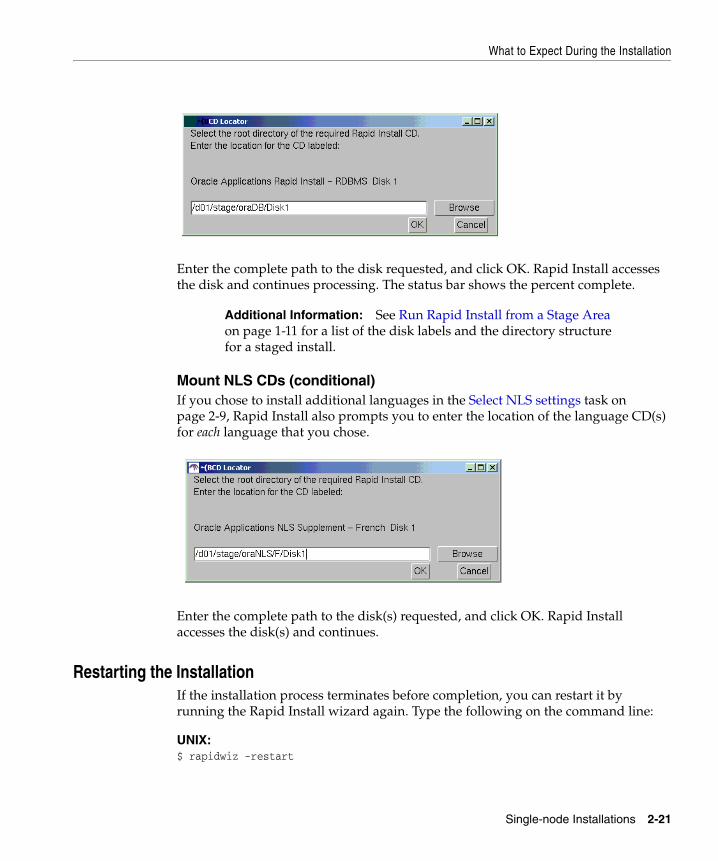
Mount CDsIf you installed Rapid Install so that it runs from stage area, you will not be prompted to mount CDs during the installation. However, if you are running your installation directly from the CDs, you will be prompted to mount the Release 11i Rapid Install CDs at various points during your installation.
Rapid Install displays a screen that indicates the label of the disk it needs, and a prompt for the location of the disk.
Attention: Installing from CDs could take up to 10 times longer than installing from a stage area. We highly recommend that you install from a stage area.
2-20 Installing Oracle Applications
What to Expect During the Installation
Enter the complete path to the disk requested, and click OK. Rapid Install accesses the disk and continues processing. The status bar shows the percent complete.
Mount NLS CDs (conditional)If you chose to install additional languages in the Select NLS settings task on page 2-9, Rapid Install also prompts you to enter the location of the language CD(s) for each language that you chose.
Enter the complete path to the disk(s) requested, and click OK. Rapid Install accesses the disk(s) and continues.
Restarting the InstallationIf the installation process terminates before completion, you can restart it by running the Rapid Install wizard again. Type the following on the command line:
UNIX:$ rapidwiz -restart
Additional Information: See Run Rapid Install from a Stage Area on page 1-11 for a list of the disk labels and the directory structure for a staged install.
Single-node Installations 2-21
What to Expect During the Installation
Windows:D:\RAPIDWIZ> Rapidwiz.cmd -restart
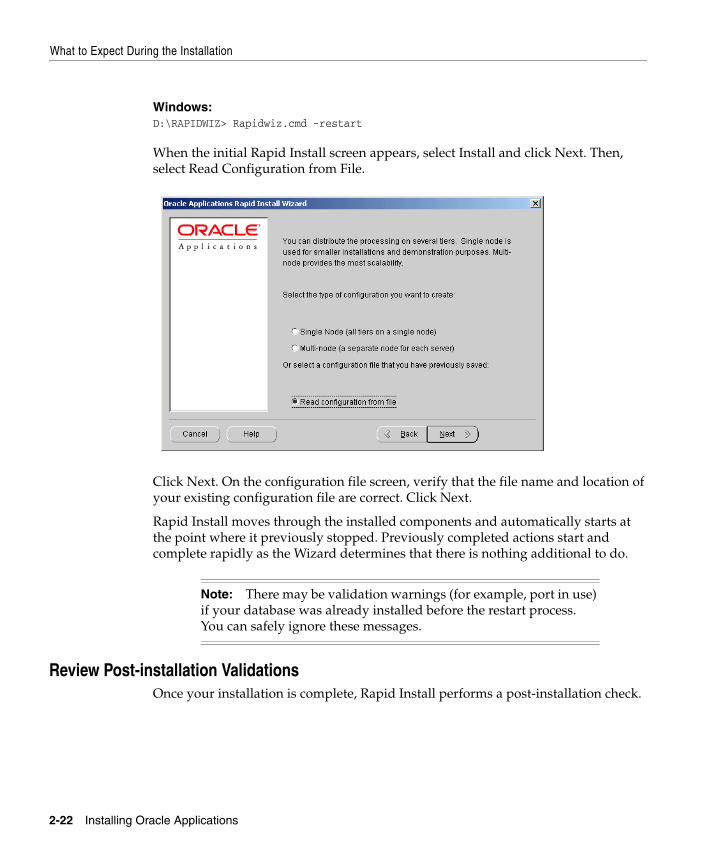
When the initial Rapid Install screen appears, select Install and click Next. Then, select Read Configuration from File.
Click Next. On the configuration file screen, verify that the file name and location of your existing configuration file are correct. Click Next.
Rapid Install moves through the installed components and automatically starts at the point where it previously stopped. Previously completed actions start and complete rapidly as the Wizard determines that there is nothing additional to do.
Review Post-installation ValidationsOnce your installation is complete, Rapid Install performs a post-installation check.
Note: There may be validation warnings (for example, port in use) if your database was already installed before the restart process. You can safely ignore these messages.
2-22 Installing Oracle Applications
What To Do Next
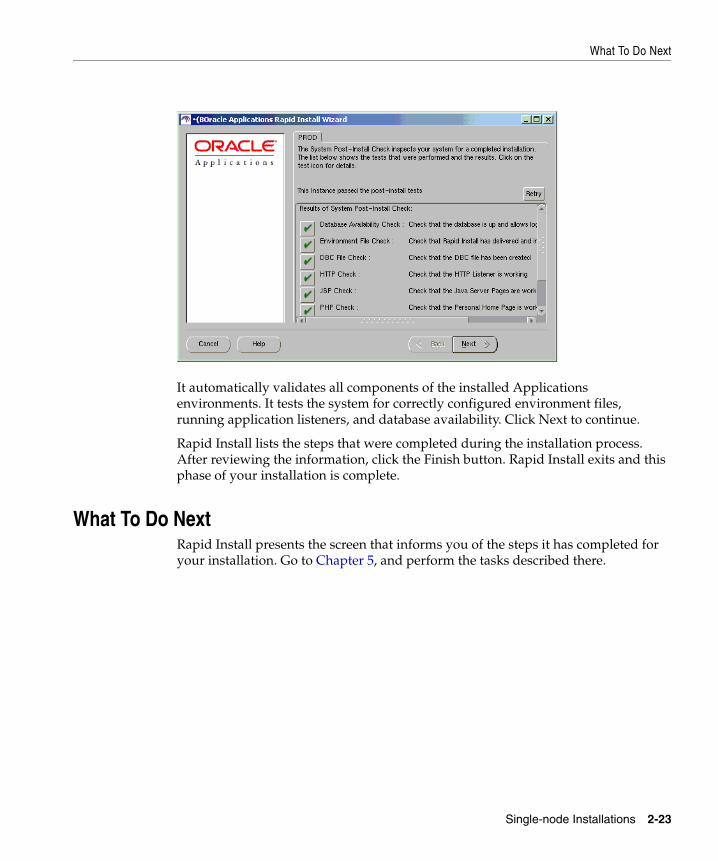
It automatically validates all components of the installed Applications environments. It tests the system for correctly configured environment files, running application listeners, and database availability. Click Next to continue.
Rapid Install lists the steps that were completed during the installation process. After reviewing the information, click the Finish button. Rapid Install exits and this phase of your installation is complete.
What To Do NextRapid Install presents the screen that informs you of the steps it has completed for your installation. Go to Chapter 5, and perform the tasks described there.
Single-node Installations 2-23

What To Do Next
2-24 Installing Oracle Applications
Multi-node Installa
3
Multi-node InstallationsThis chapter contains the following sections:
■ Setting Up a Multi-node Installation
■ What to Expect During the Installation
■ Setting Up the Other Nodes
■ What To Do Next
Setting Up a Multi-node InstallationIn a multi-node installation, you can set up your servers on more than one node. That means you can install any type of server, on any number of nodes, in any combination. Regardless of the number of nodes you plan to use, a multi-node installation requires that you run Rapid Install on your database node first, before you install the other nodes. Then, using the same configuration file you created while setting up your database node, you run Rapid Install on each of the other nodes in your installation.
Running the Rapid Install WizardStart Rapid Install as described in Chapter 1 to begin your installation. Then complete the following tasks on the database node.
Additional Information: See Setting Up the Other Nodes in this chapter.
tions 3-1
Setting Up a Multi-node Installation
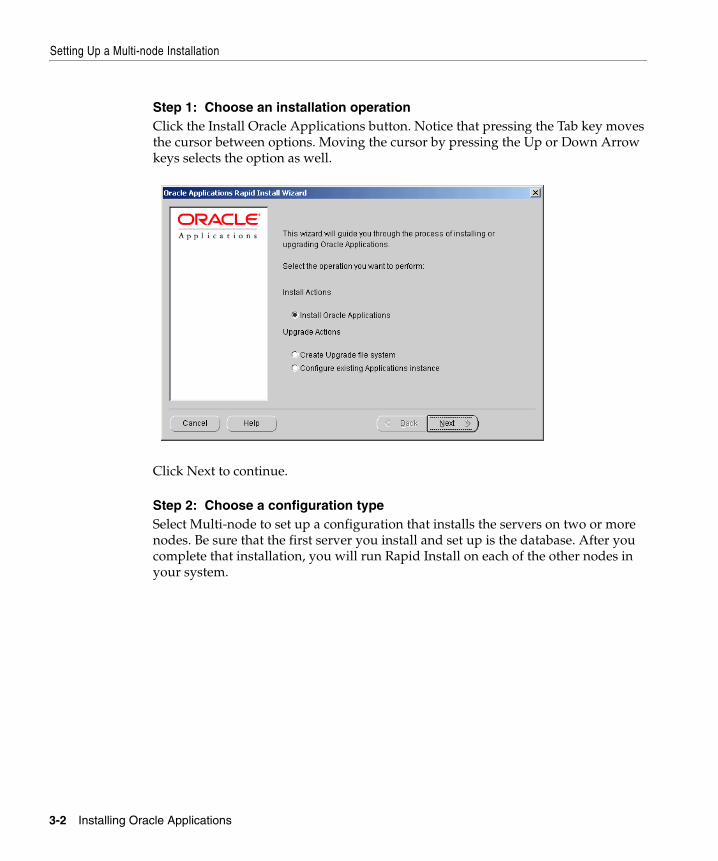
Step 1: Choose an installation operationClick the Install Oracle Applications button. Notice that pressing the Tab key moves the cursor between options. Moving the cursor by pressing the Up or Down Arrow keys selects the option as well.
Click Next to continue.
Step 2: Choose a configuration type Select Multi-node to set up a configuration that installs the servers on two or more nodes. Be sure that the first server you install and set up is the database. After you complete that installation, you will run Rapid Install on each of the other nodes in your system.
3-2 Installing Oracle Applications
Setting Up a Multi-node Installation
Click Next to continue.
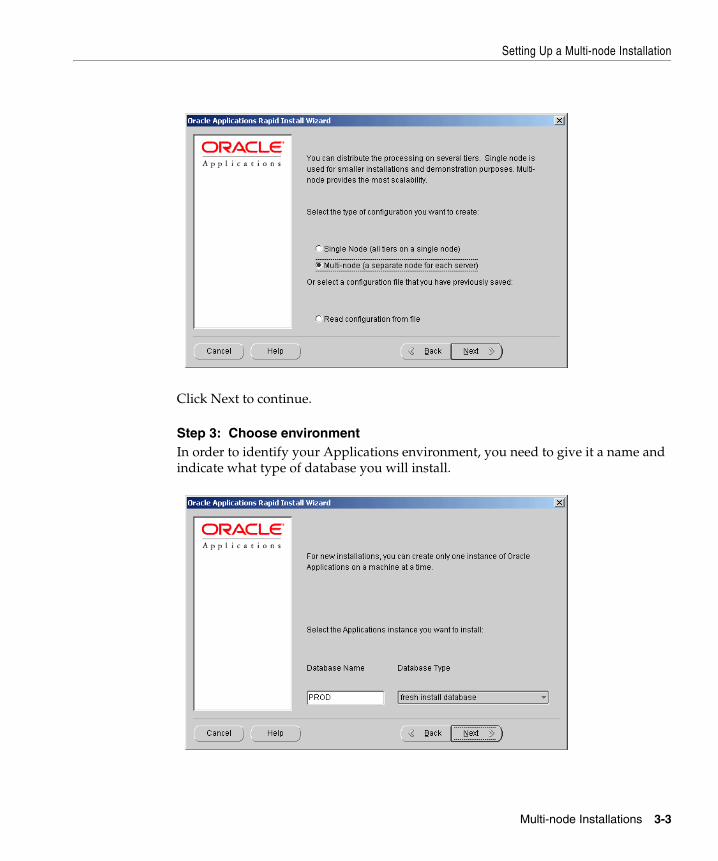
Step 3: Choose environmentIn order to identify your Applications environment, you need to give it a name and indicate what type of database you will install.
Multi-node Installations 3-3
Setting Up a Multi-node Installation
The illustrations use Rapid Install default names that suggest possible uses for the environment:
■ A production environment is a fully configured Release 11i installation that could be used for live production purposes.
■ A test environment is a mirror image of a production Release 11i installation. You should use it to test your installation before you go live.
■ A Vision Demo environment can be used to set up a Release 11i installation for demonstration purposes.
After you type the name, choose the type of database that you want to install.
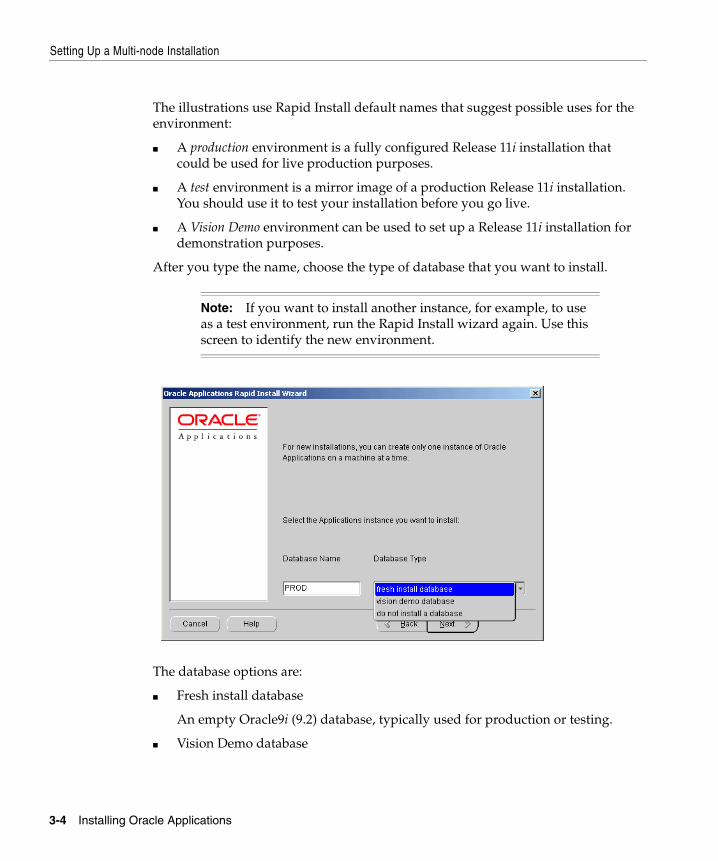
The database options are:
■ Fresh install database
An empty Oracle9i (9.2) database, typically used for production or testing.
■ Vision Demo database
Note: If you want to install another instance, for example, to use as a test environment, run the Rapid Install wizard again. Use this screen to identify the new environment.
3-4 Installing Oracle Applications
Setting Up a Multi-node Installation
An Oracle9i (9.2) Vision Demonstration database used to set up demos or for evaluation purposes.
■ Do not install a database
This option assumes an existing database. It creates an applications instance and configures it using your existing database. It is typically used for Windows clusters.
Click Next to continue.
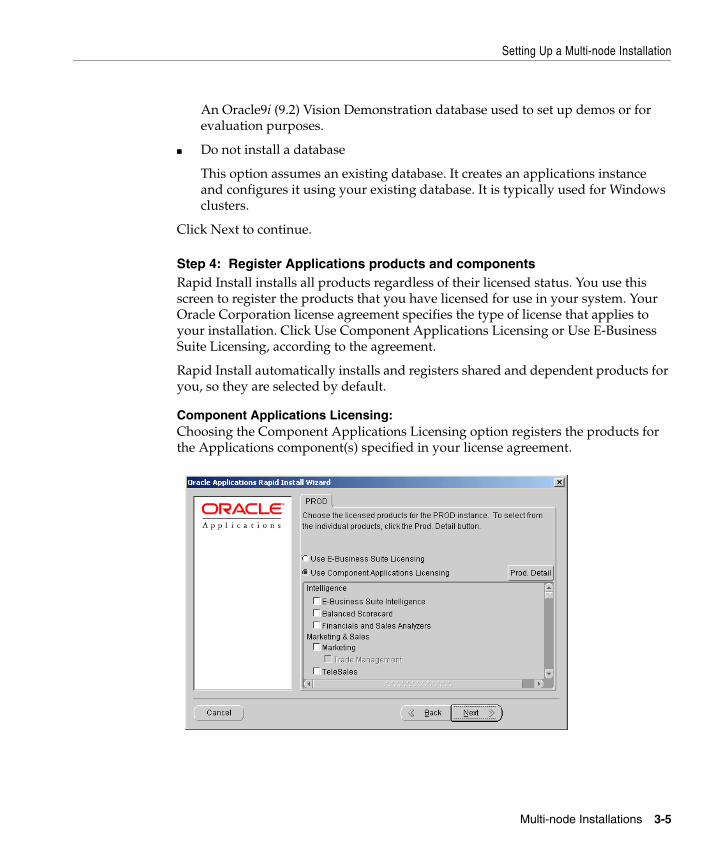
Step 4: Register Applications products and componentsRapid Install installs all products regardless of their licensed status. You use this screen to register the products that you have licensed for use in your system. Your Oracle Corporation license agreement specifies the type of license that applies to your installation. Click Use Component Applications Licensing or Use E-Business Suite Licensing, according to the agreement.
Rapid Install automatically installs and registers shared and dependent products for you, so they are selected by default.
Component Applications Licensing:Choosing the Component Applications Licensing option registers the products for the Applications component(s) specified in your license agreement.
Multi-node Installations 3-5
Setting Up a Multi-node Installation
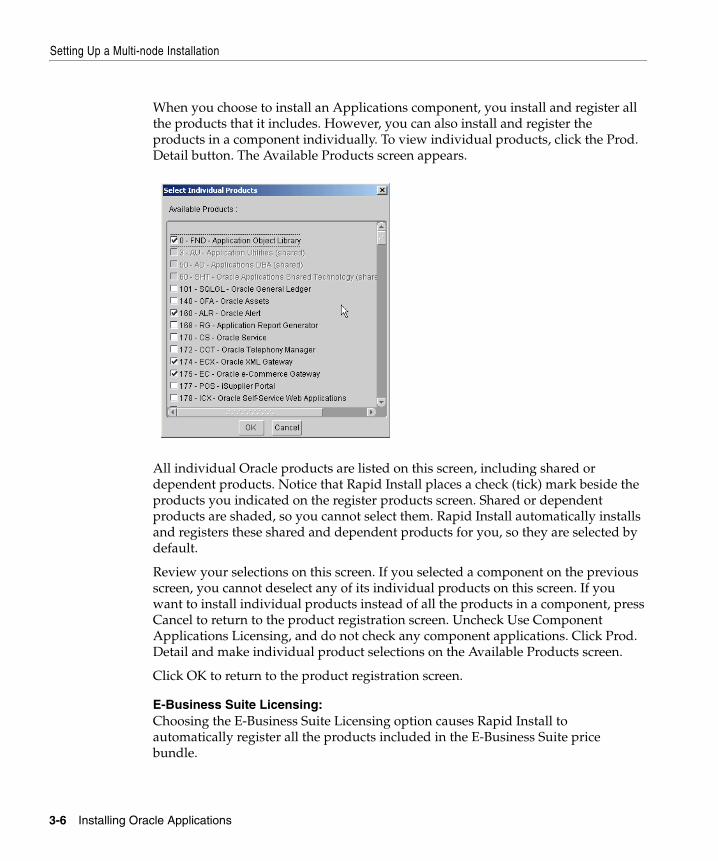
When you choose to install an Applications component, you install and register all the products that it includes. However, you can also install and register the products in a component individually. To view individual products, click the Prod. Detail button. The Available Products screen appears.
All individual Oracle products are listed on this screen, including shared or dependent products. Notice that Rapid Install places a check (tick) mark beside the products you indicated on the register products screen. Shared or dependent products are shaded, so you cannot select them. Rapid Install automatically installs and registers these shared and dependent products for you, so they are selected by default.
Review your selections on this screen. If you selected a component on the previous screen, you cannot deselect any of its individual products on this screen. If you want to install individual products instead of all the products in a component, press Cancel to return to the product registration screen. Uncheck Use Component Applications Licensing, and do not check any component applications. Click Prod. Detail and make individual product selections on the Available Products screen.
Click OK to return to the product registration screen.
E-Business Suite Licensing:Choosing the E-Business Suite Licensing option causes Rapid Install to automatically register all the products included in the E-Business Suite price bundle.
3-6 Installing Oracle Applications
Setting Up a Multi-node Installation
Note that some of the modules are grayed out. The ones that are not must be installed separately as Add-on products — they are not part of the E-Business Suite price bundle. Click the Prod. Detail button to display the Available Products screen.
Multi-node Installations 3-7

Setting Up a Multi-node Installation
Most of the individual Add-on products are checked, indicating that they will be installed and registered automatically. If you want to select individual products, select them now.
If you have chosen to install a product that is controlled, Rapid Install displays an alert screen. Follow the instructions on the screen as they apply to your installation. Click OK to return to the product registration screen. Click Next to continue.
Step 5: Select country-specific functionalityIf you will use country-specific features, select one or more country-specific functionalities to install. All countries that Oracle supports are listed on this screen. Click the appropriate check box to make your selections.
Click Next to continue.
Note: To see a list of registered products after your installation is complete, or to register additional products, country-specific functionalities, or languages, use the Oracle Applications Manager (OAM) License Manager. See Registering Applications Products in Oracle Applications Maintenance Procedures for details.
3-8 Installing Oracle Applications

Setting Up a Multi-node Installation
Step 6: Select NLS settingsThe fresh install database comes with American English (AMERICAN) installed as the default base language, AMERICA as the default territory, and US7ASCII as the default character set. You can select additional languages and modify the default base language and the default territory settings on this screen.
If you select additional languages, you may also need to select an alternative character set for the database and the APPL_TOP. Note that the conversion to a different character set will be automatic, but it may take several hours to complete.
The default territory is used as the NLS territory setting for all users of the Applications installation. The base language is used as the default NLS language setting. Choose a territory from the list of NLS territories if you want to change the default territory setting.
Click Select Languages to see a list of available languages.
Note: Release 11i does not support changing NLS settings or the character set for the Vision Demonstration database.
Multi-node Installations 3-9
Setting Up a Multi-node Installation
In prior versions of Release 11i, the Rapid Install wizard only registered additional languages — it did not actually install them. In this release, the language files will be installed in the APPL_TOP file system. If you choose to add a language(s) on this screen, Rapid Install prompts you for the location of the language CD(s) later in the installation. You must have the Oracle Applications Release 11i NLS CD pack available at that time.
Double-click a language to move it into the Installed Languages list or highlight it and click the right arrow key. Highlighting a language in the Installed Languages box and clicking the left arrow removes it. You cannot remove American English from this list. Click OK to continue.
Warning: If you do not have the language CDs available when Rapid Install prompts you for their location, the installation will stop and you will not be able to continue.
3-10 Installing Oracle Applications
Setting Up a Multi-node Installation
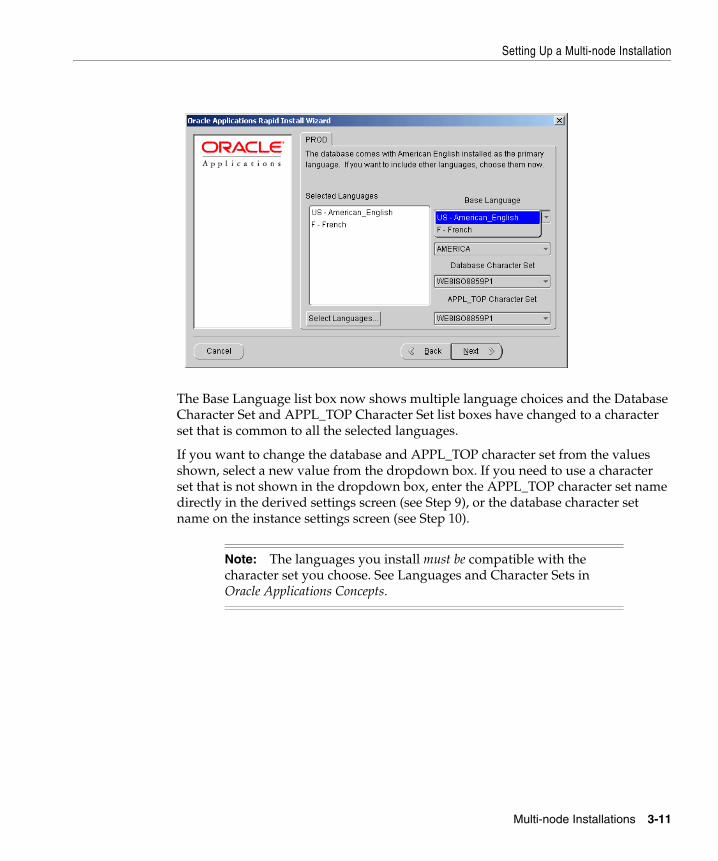
The Base Language list box now shows multiple language choices and the Database Character Set and APPL_TOP Character Set list boxes have changed to a character set that is common to all the selected languages.
If you want to change the database and APPL_TOP character set from the values shown, select a new value from the dropdown box. If you need to use a character set that is not shown in the dropdown box, enter the APPL_TOP character set name directly in the derived settings screen (see Step 9), or the database character set name on the instance settings screen (see Step 10).
Note: The languages you install must be compatible with the character set you choose. See Languages and Character Sets in Oracle Applications Concepts.
Multi-node Installations 3-11
Setting Up a Multi-node Installation
After Rapid Install processing is complete, you must perform additional tasks to complete the language installation. See the Oracle Applications NLS Release Notes for more information.
Click Next to continue.
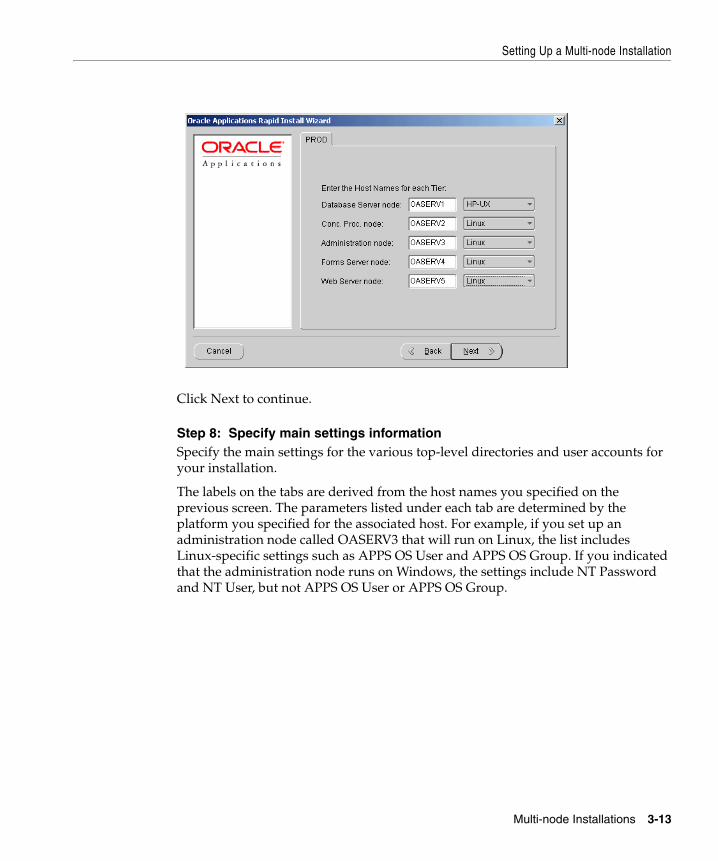
Step 7: Select host namesIn a multi-node installation, the Rapid Install wizard asks for the names of the hosts where you will install the components for your installation.
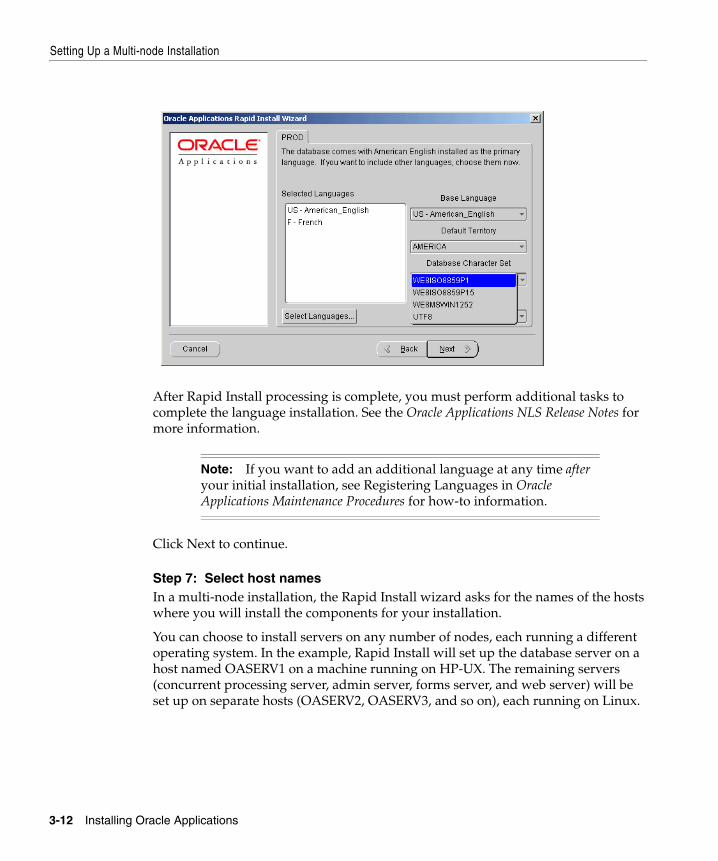
You can choose to install servers on any number of nodes, each running a different operating system. In the example, Rapid Install will set up the database server on a host named OASERV1 on a machine running on HP-UX. The remaining servers (concurrent processing server, admin server, forms server, and web server) will be set up on separate hosts (OASERV2, OASERV3, and so on), each running on Linux.
Note: If you want to add an additional language at any time after your initial installation, see Registering Languages in Oracle Applications Maintenance Procedures for how-to information.
3-12 Installing Oracle Applications
Setting Up a Multi-node Installation
Click Next to continue.
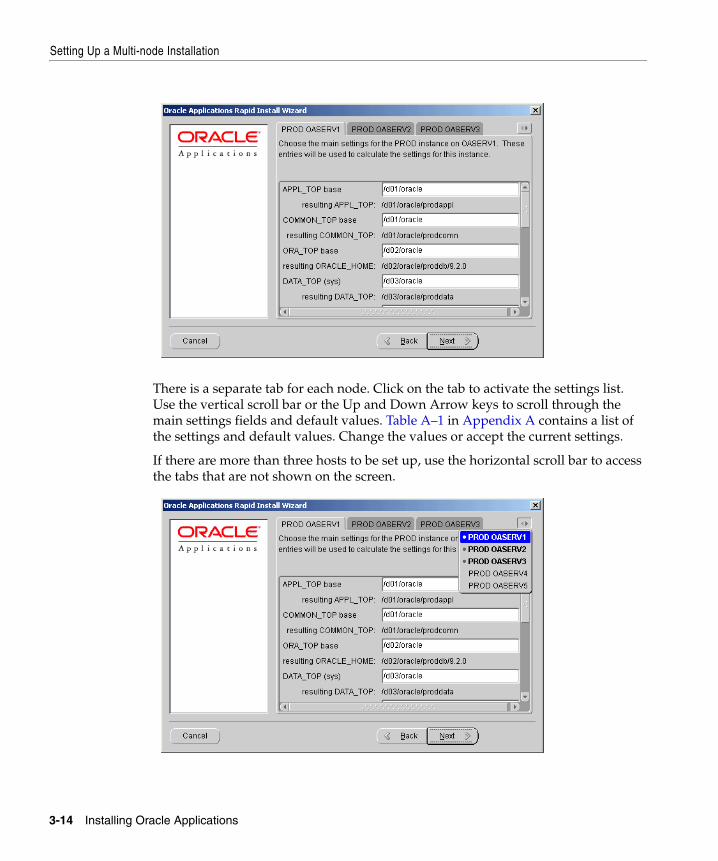
Step 8: Specify main settings informationSpecify the main settings for the various top-level directories and user accounts for your installation.
The labels on the tabs are derived from the host names you specified on the previous screen. The parameters listed under each tab are determined by the platform you specified for the associated host. For example, if you set up an administration node called OASERV3 that will run on Linux, the list includes Linux-specific settings such as APPS OS User and APPS OS Group. If you indicated that the administration node runs on Windows, the settings include NT Password and NT User, but not APPS OS User or APPS OS Group.
Multi-node Installations 3-13
Setting Up a Multi-node Installation
There is a separate tab for each node. Click on the tab to activate the settings list. Use the vertical scroll bar or the Up and Down Arrow keys to scroll through the main settings fields and default values. Table A–1 in Appendix A contains a list of the settings and default values. Change the values or accept the current settings.
If there are more than three hosts to be set up, use the horizontal scroll bar to access the tabs that are not shown on the screen.
3-14 Installing Oracle Applications
Setting Up a Multi-node Installation
If you are configuring a number of middle tiers to share a single APPL_TOP, the APPL_TOP base and COMMON_TOP base should be the same for all middle tiers and should be set to the shared disk resource. For more information, see Using a Shared APPL_TOP on OracleMetaLink.
Click Next to continue.
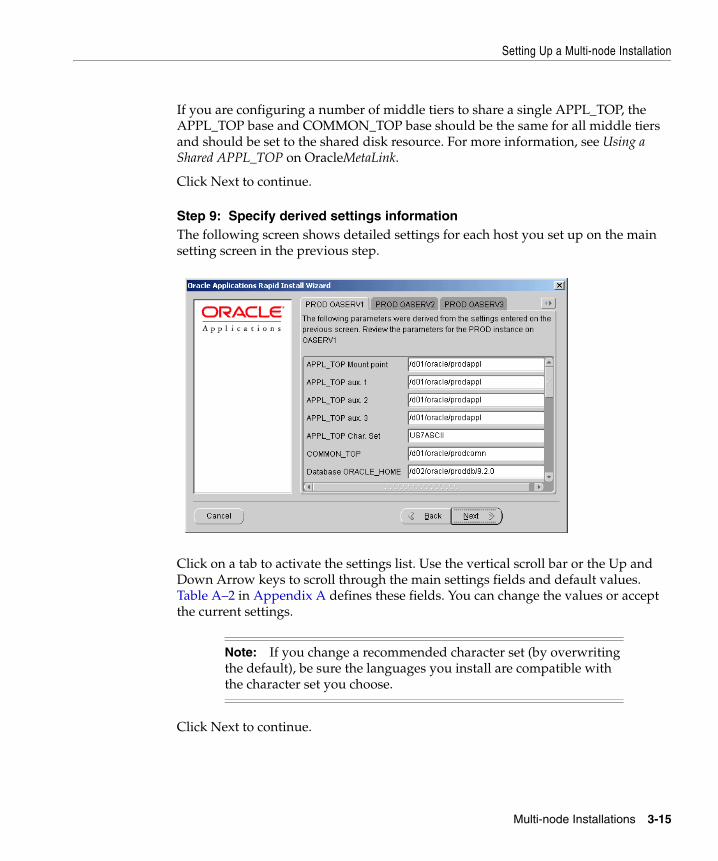
Step 9: Specify derived settings informationThe following screen shows detailed settings for each host you set up on the main setting screen in the previous step.
Click on a tab to activate the settings list. Use the vertical scroll bar or the Up and Down Arrow keys to scroll through the main settings fields and default values. Table A–2 in Appendix A defines these fields. You can change the values or accept the current settings.
Click Next to continue.
Note: If you change a recommended character set (by overwriting the default), be sure the languages you install are compatible with the character set you choose.
Multi-node Installations 3-15

Setting Up a Multi-node Installation
Step 10: Review instance settings informationRapid Install uses the values specified on this screen to configure server processes, such as those on the forms and web servers, as well as listener processes.
The starting number of the port value is pre-set, but you can set the incremental number by using the dropdown list in the Port Pool field. The Port Pool list provides a way to use a predefined set of server ports. There are 100 port selections.
3-16 Installing Oracle Applications
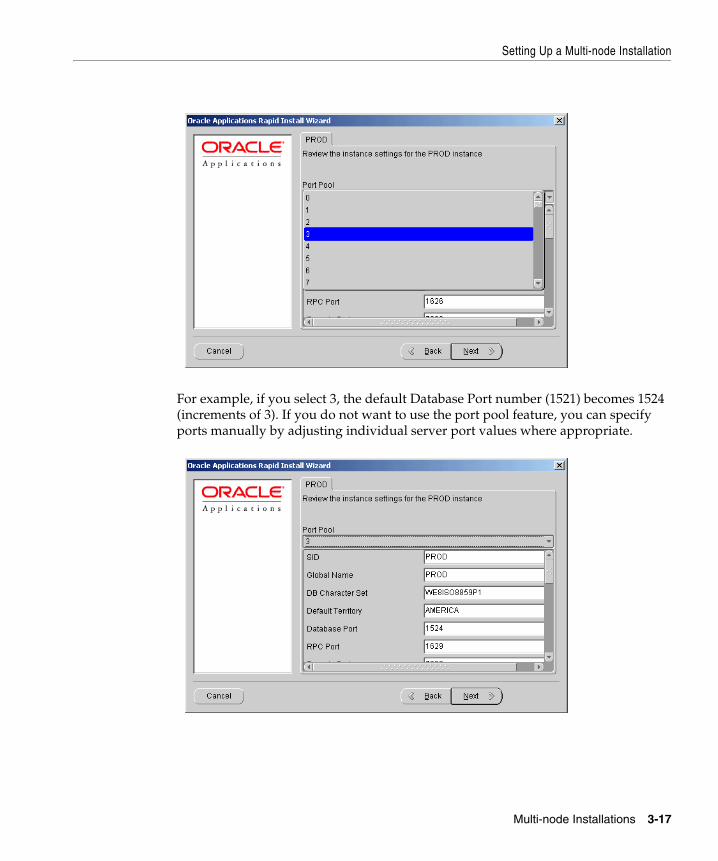
Setting Up a Multi-node Installation
For example, if you select 3, the default Database Port number (1521) becomes 1524 (increments of 3). If you do not want to use the port pool feature, you can specify ports manually by adjusting individual server port values where appropriate.
Multi-node Installations 3-17
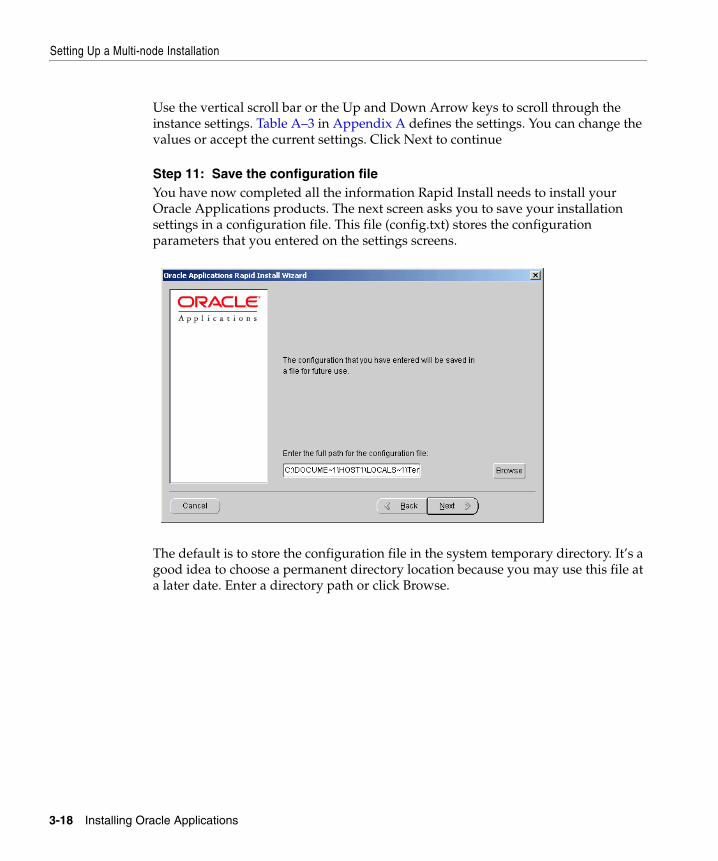
Setting Up a Multi-node Installation
Use the vertical scroll bar or the Up and Down Arrow keys to scroll through the instance settings. Table A–3 in Appendix A defines the settings. You can change the values or accept the current settings. Click Next to continue
Step 11: Save the configuration file You have now completed all the information Rapid Install needs to install your Oracle Applications products. The next screen asks you to save your installation settings in a configuration file. This file (config.txt) stores the configuration parameters that you entered on the settings screens.
The default is to store the configuration file in the system temporary directory. It’s a good idea to choose a permanent directory location because you may use this file at a later date. Enter a directory path or click Browse.
3-18 Installing Oracle Applications
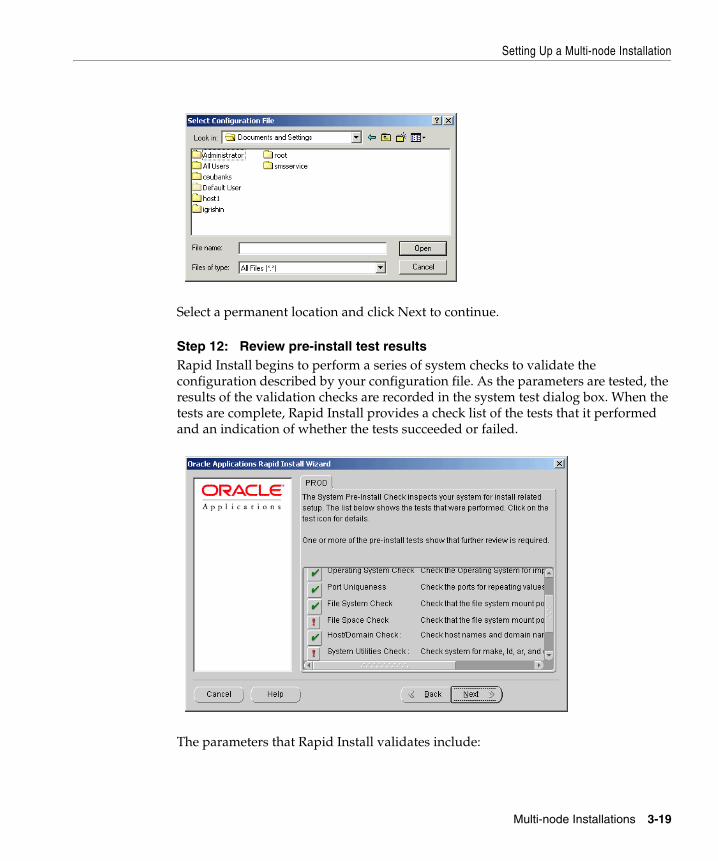
Setting Up a Multi-node Installation
Select a permanent location and click Next to continue.
Step 12: Review pre-install test resultsRapid Install begins to perform a series of system checks to validate the configuration described by your configuration file. As the parameters are tested, the results of the validation checks are recorded in the system test dialog box. When the tests are complete, Rapid Install provides a check list of the tests that it performed and an indication of whether the tests succeeded or failed.
The parameters that Rapid Install validates include:
Multi-node Installations 3-19
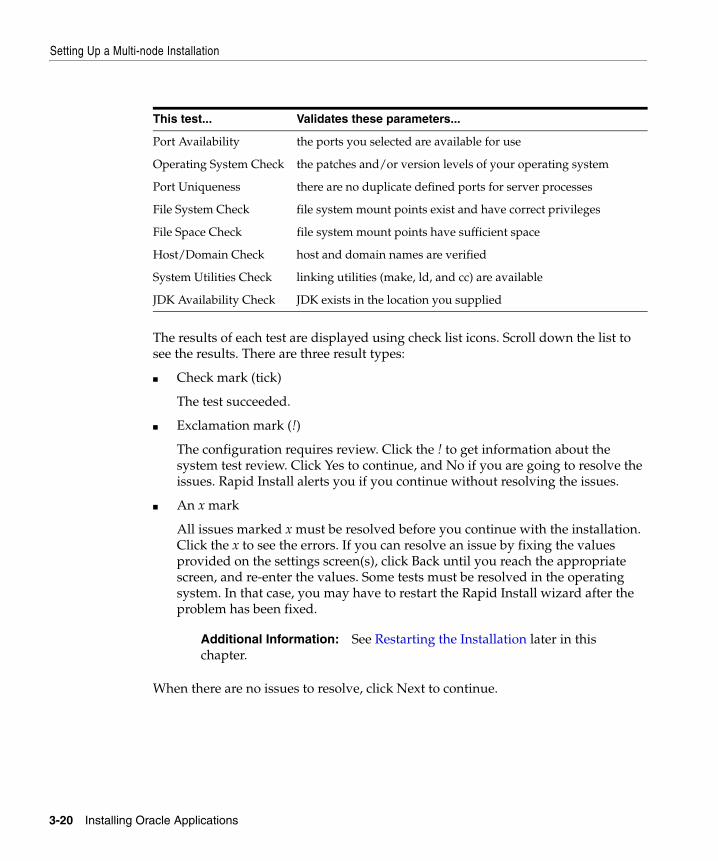
Setting Up a Multi-node Installation
The results of each test are displayed using check list icons. Scroll down the list to see the results. There are three result types:
■ Check mark (tick)
The test succeeded.
■ Exclamation mark (!)
The configuration requires review. Click the ! to get information about the system test review. Click Yes to continue, and No if you are going to resolve the issues. Rapid Install alerts you if you continue without resolving the issues.
■ An x mark
All issues marked x must be resolved before you continue with the installation. Click the x to see the errors. If you can resolve an issue by fixing the values provided on the settings screen(s), click Back until you reach the appropriate screen, and re-enter the values. Some tests must be resolved in the operating system. In that case, you may have to restart the Rapid Install wizard after the problem has been fixed.
When there are no issues to resolve, click Next to continue.
This test... Validates these parameters...
Port Availability the ports you selected are available for use
Operating System Check the patches and/or version levels of your operating system
Port Uniqueness there are no duplicate defined ports for server processes
File System Check file system mount points exist and have correct privileges
File Space Check file system mount points have sufficient space
Host/Domain Check host and domain names are verified
System Utilities Check linking utilities (make, ld, and cc) are available
JDK Availability Check JDK exists in the location you supplied
Additional Information: See Restarting the Installation later in this chapter.
3-20 Installing Oracle Applications
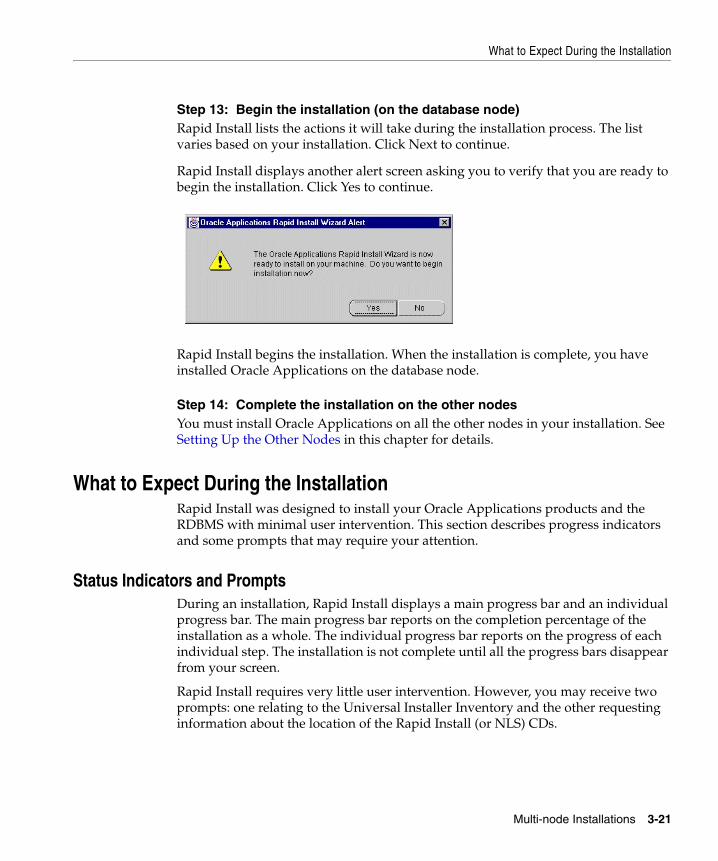
What to Expect During the Installation
Step 13: Begin the installation (on the database node)Rapid Install lists the actions it will take during the installation process. The list varies based on your installation. Click Next to continue. Rapid Install displays another alert screen asking you to verify that you are ready to begin the installation. Click Yes to continue.
Rapid Install begins the installation. When the installation is complete, you have installed Oracle Applications on the database node.
Step 14: Complete the installation on the other nodesYou must install Oracle Applications on all the other nodes in your installation. See Setting Up the Other Nodes in this chapter for details.
What to Expect During the InstallationRapid Install was designed to install your Oracle Applications products and the RDBMS with minimal user intervention. This section describes progress indicators and some prompts that may require your attention.
Status Indicators and PromptsDuring an installation, Rapid Install displays a main progress bar and an individual progress bar. The main progress bar reports on the completion percentage of the installation as a whole. The individual progress bar reports on the progress of each individual step. The installation is not complete until all the progress bars disappear from your screen.
Rapid Install requires very little user intervention. However, you may receive two prompts: one relating to the Universal Installer Inventory and the other requesting information about the location of the Rapid Install (or NLS) CDs.
Multi-node Installations 3-21
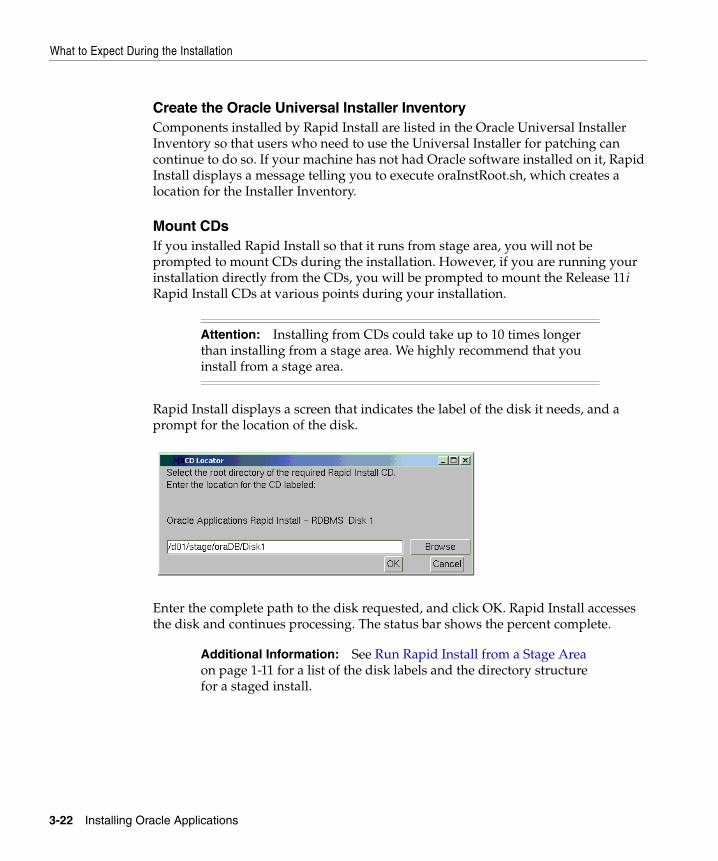
What to Expect During the Installation
Create the Oracle Universal Installer InventoryComponents installed by Rapid Install are listed in the Oracle Universal Installer Inventory so that users who need to use the Universal Installer for patching can continue to do so. If your machine has not had Oracle software installed on it, Rapid Install displays a message telling you to execute oraInstRoot.sh, which creates a location for the Installer Inventory.
Mount CDsIf you installed Rapid Install so that it runs from stage area, you will not be prompted to mount CDs during the installation. However, if you are running your installation directly from the CDs, you will be prompted to mount the Release 11i Rapid Install CDs at various points during your installation.
Rapid Install displays a screen that indicates the label of the disk it needs, and a prompt for the location of the disk.
Enter the complete path to the disk requested, and click OK. Rapid Install accesses the disk and continues processing. The status bar shows the percent complete.
Attention: Installing from CDs could take up to 10 times longer than installing from a stage area. We highly recommend that you install from a stage area.
Additional Information: See Run Rapid Install from a Stage Area on page 1-11 for a list of the disk labels and the directory structure for a staged install.
3-22 Installing Oracle Applications
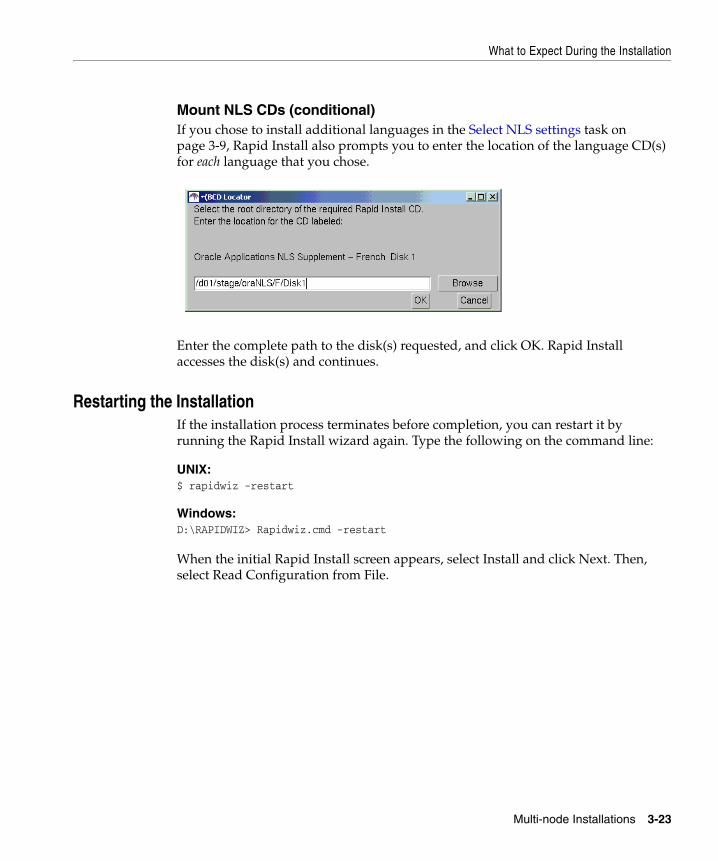
What to Expect During the Installation
Mount NLS CDs (conditional)If you chose to install additional languages in the Select NLS settings task on page 3-9, Rapid Install also prompts you to enter the location of the language CD(s) for each language that you chose.
Enter the complete path to the disk(s) requested, and click OK. Rapid Install accesses the disk(s) and continues.
Restarting the InstallationIf the installation process terminates before completion, you can restart it by running the Rapid Install wizard again. Type the following on the command line:
UNIX:$ rapidwiz -restart
Windows:D:\RAPIDWIZ> Rapidwiz.cmd -restart
When the initial Rapid Install screen appears, select Install and click Next. Then, select Read Configuration from File.
Multi-node Installations 3-23
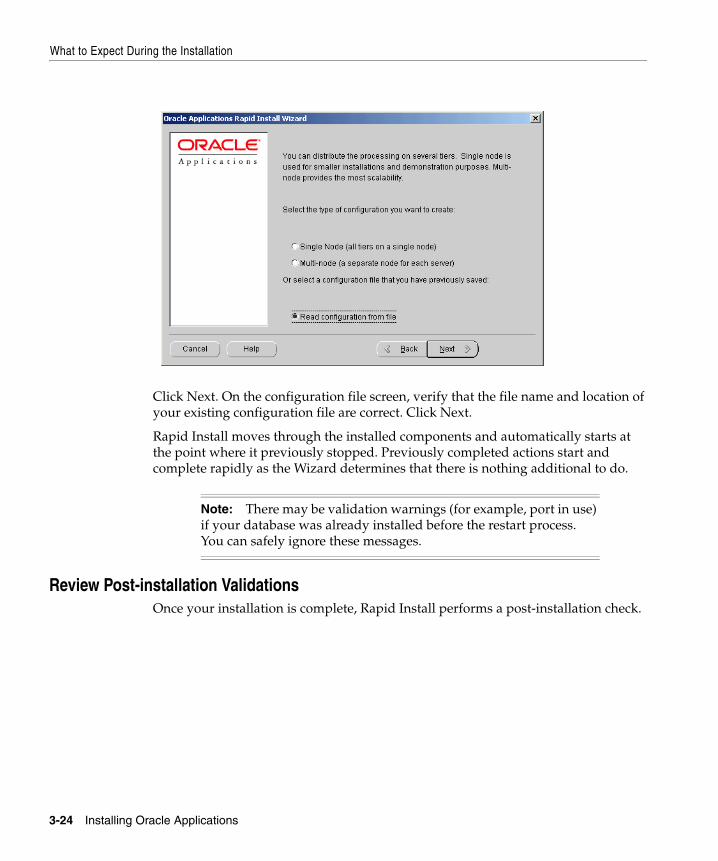
What to Expect During the Installation
Click Next. On the configuration file screen, verify that the file name and location of your existing configuration file are correct. Click Next.
Rapid Install moves through the installed components and automatically starts at the point where it previously stopped. Previously completed actions start and complete rapidly as the Wizard determines that there is nothing additional to do.
Review Post-installation ValidationsOnce your installation is complete, Rapid Install performs a post-installation check.
Note: There may be validation warnings (for example, port in use) if your database was already installed before the restart process. You can safely ignore these messages.
3-24 Installing Oracle Applications
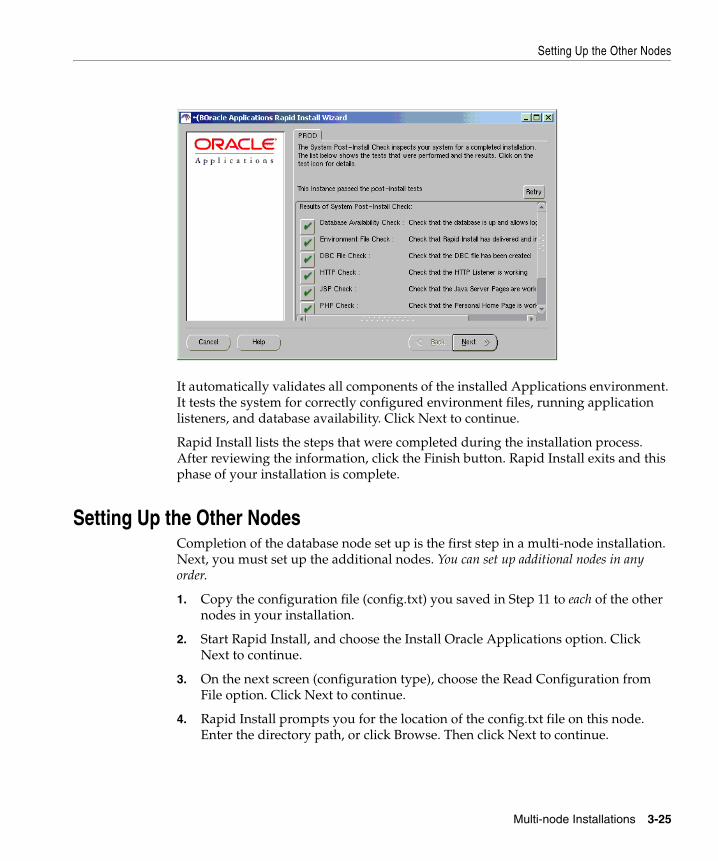
Setting Up the Other Nodes
It automatically validates all components of the installed Applications environment. It tests the system for correctly configured environment files, running application listeners, and database availability. Click Next to continue.
Rapid Install lists the steps that were completed during the installation process. After reviewing the information, click the Finish button. Rapid Install exits and this phase of your installation is complete.
Setting Up the Other NodesCompletion of the database node set up is the first step in a multi-node installation. Next, you must set up the additional nodes. You can set up additional nodes in any order.
1. Copy the configuration file (config.txt) you saved in Step 11 to each of the other nodes in your installation.
2. Start Rapid Install, and choose the Install Oracle Applications option. Click Next to continue.
3. On the next screen (configuration type), choose the Read Configuration from File option. Click Next to continue.
4. Rapid Install prompts you for the location of the config.txt file on this node. Enter the directory path, or click Browse. Then click Next to continue.
Multi-node Installations 3-25
What To Do Next
5. Because you set up the parameters for all nodes when you first created the configuration file, Rapid Install automatically moves past the main settings, derived settings, and instance settings screens. It goes directly to the pre-install test and begins the validation process. See Step 12 on page 3-19 for details.
6. Review or resolve any issues flagged with ! or x on the pre-install test results screen. Then, click Back to return to the screen where you saved the configuration file. Click Next to re-run the pre-install test. If there are no issues listed on the summary screen, click Next to continue.
7. Click Next when each alert screen is displayed. Rapid Install begins the installation on the second node.
8. Repeat all the steps in this section for each of the other nodes in your installation.
What To Do NextRapid Install presents the screen that informs you of the steps it has completed after you set up each node in your multi-node installation. Once you have completed the database node installation and the installation on each of the additional nodes, go to Chapter 5, and perform the tasks described there.
3-26 Installing Oracle Applications
Upgrading Your Insta
4
Upgrading Your InstallationIn Release 11i, Rapid Install is used throughout the process of upgrading from Oracle Applications Release 10.7 or Release 11.0. (You do not use Rapid Install to upgrade from previous versions of Release 11i.)
This chapter steps you through the upgrade process. It includes the following sections:
■ How an Upgrade Works
■ Upgrading with Rapid Install
■ What To Do Next
How an Upgrade WorksThe upgrade process combines Rapid Install functionality, manual upgrade steps, and the actions of the AutoUpgrade and AutoPatch utilities. In general, you must perform the following tasks:
■ Read and understand all the documentation associated with the current release, including Oracle Applications Release Notes, Oracle Applications NLS Release Notes, Oracle Applications Installation Update Notes, Upgrading Oracle Applications, and this manual. All documentation is available either on the Oracle Applications Documentation Library CD or from OracleMetaLink.
■ Complete the Category 1 steps listed in Upgrading Oracle Applications.
■ Begin the Category 2 steps in Upgrading Oracle Applications. When instructed to do so, run Rapid Install using the “Create Upgrade file system” option. Rapid Install creates the new file systems for your middle (application) tier components, and creates the new ORACLE_HOME for your Applications database.
llation 4-1
Upgrading with Rapid Install
■ Continue with the Category 2 steps. When instructed to do so, use AutoPatch (see AutoPatch in Oracle Applications Maintenance Utilities) to apply upgrade patches in pre-install mode. You can find a list of the most up-to-date patches in the Oracle Applications Release Notes.
■ Complete the remaining Category 2 steps, and the Category 3 steps, as directed in Upgrading Oracle Applications.
■ Run AutoUpgrade. See AutoUpgrade in Oracle Applications Maintenance Utilities.
■ Begin the Category 4 steps as directed in Upgrading Oracle Applications. When instructed to do so, follow the instructions in this chapter for running Rapid Install to configure and start the server processes.
■ Complete the remaining Category 4 steps as described in Upgrading Oracle Applications.
■ Complete the Category 5 steps, Category 6 steps, and the finishing steps.
Upgrading with Rapid InstallWhen the Category 2 instructions in Upgrading Oracle Applications direct you to do so, run Rapid Install to create middle tier file systems and the new Oracle Home for the database.
Step 1: Complete preliminary setupMake sure you have performed the preliminary setup steps in Before You Begin in Chapter 1 of this book.
Step 2: Start Rapid InstallStart Rapid Install and choose the Create Upgrade File System option. Click Next to continue.
4-2 Installing Oracle Applications
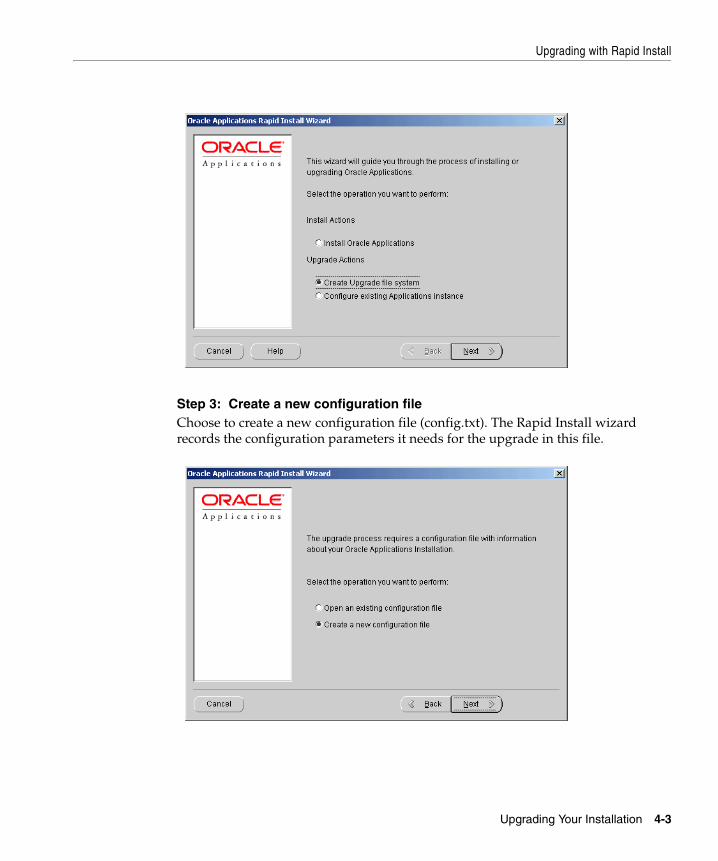
Upgrading with Rapid Install
Step 3: Create a new configuration fileChoose to create a new configuration file (config.txt). The Rapid Install wizard records the configuration parameters it needs for the upgrade in this file.
Upgrading Your Installation 4-3
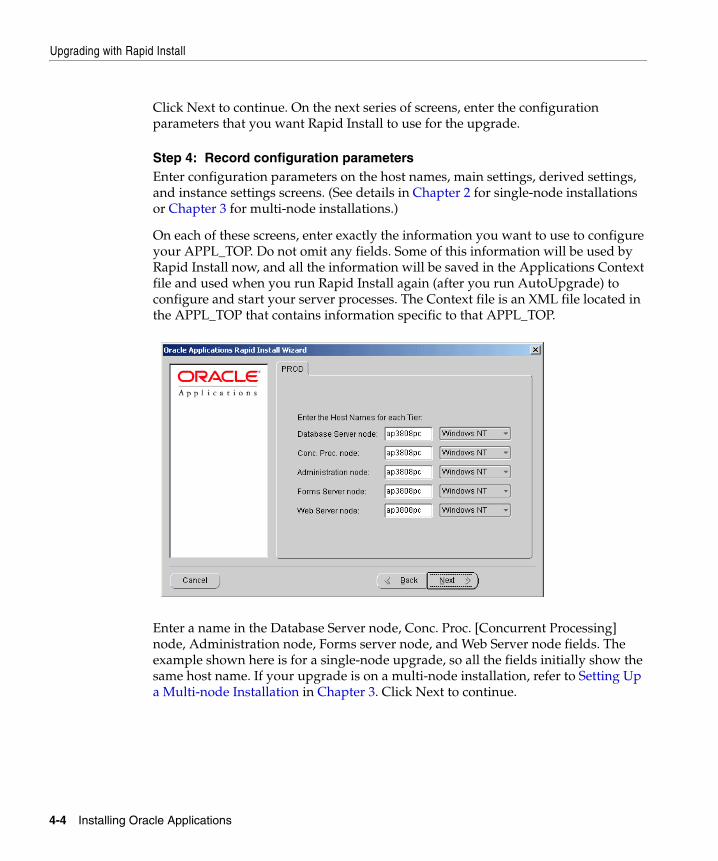
Upgrading with Rapid Install
Click Next to continue. On the next series of screens, enter the configuration parameters that you want Rapid Install to use for the upgrade.
Step 4: Record configuration parametersEnter configuration parameters on the host names, main settings, derived settings, and instance settings screens. (See details in Chapter 2 for single-node installations or Chapter 3 for multi-node installations.)
On each of these screens, enter exactly the information you want to use to configure your APPL_TOP. Do not omit any fields. Some of this information will be used by Rapid Install now, and all the information will be saved in the Applications Context file and used when you run Rapid Install again (after you run AutoUpgrade) to configure and start your server processes. The Context file is an XML file located in the APPL_TOP that contains information specific to that APPL_TOP.
Enter a name in the Database Server node, Conc. Proc. [Concurrent Processing] node, Administration node, Forms server node, and Web Server node fields. The example shown here is for a single-node upgrade, so all the fields initially show the same host name. If your upgrade is on a multi-node installation, refer to Setting Up a Multi-node Installation in Chapter 3. Click Next to continue.
4-4 Installing Oracle Applications
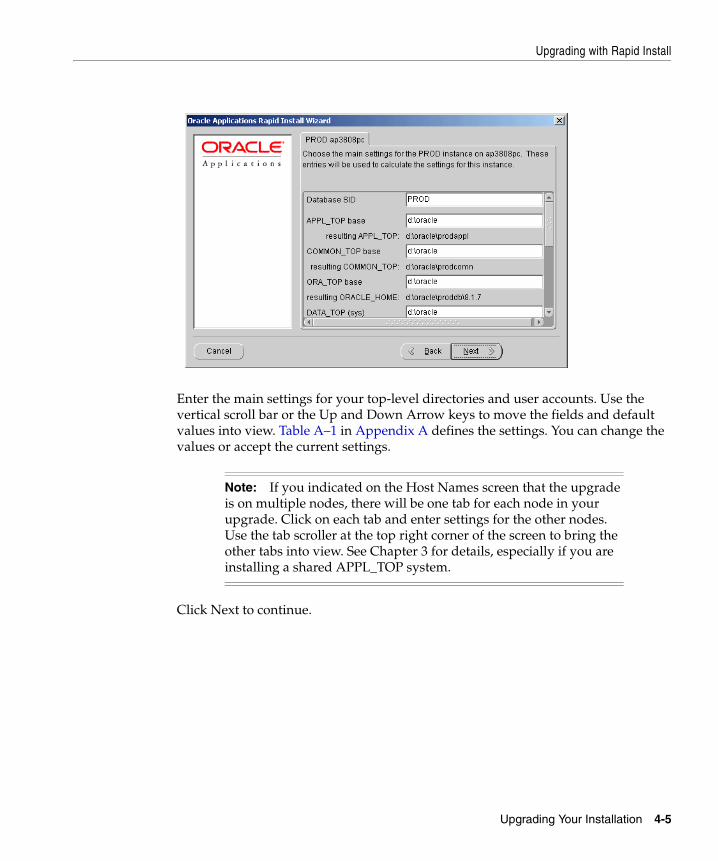
Upgrading with Rapid Install
Enter the main settings for your top-level directories and user accounts. Use the vertical scroll bar or the Up and Down Arrow keys to move the fields and default values into view. Table A–1 in Appendix A defines the settings. You can change the values or accept the current settings.
Click Next to continue.
Note: If you indicated on the Host Names screen that the upgrade is on multiple nodes, there will be one tab for each node in your upgrade. Click on each tab and enter settings for the other nodes. Use the tab scroller at the top right corner of the screen to bring the other tabs into view. See Chapter 3 for details, especially if you are installing a shared APPL_TOP system.
Upgrading Your Installation 4-5
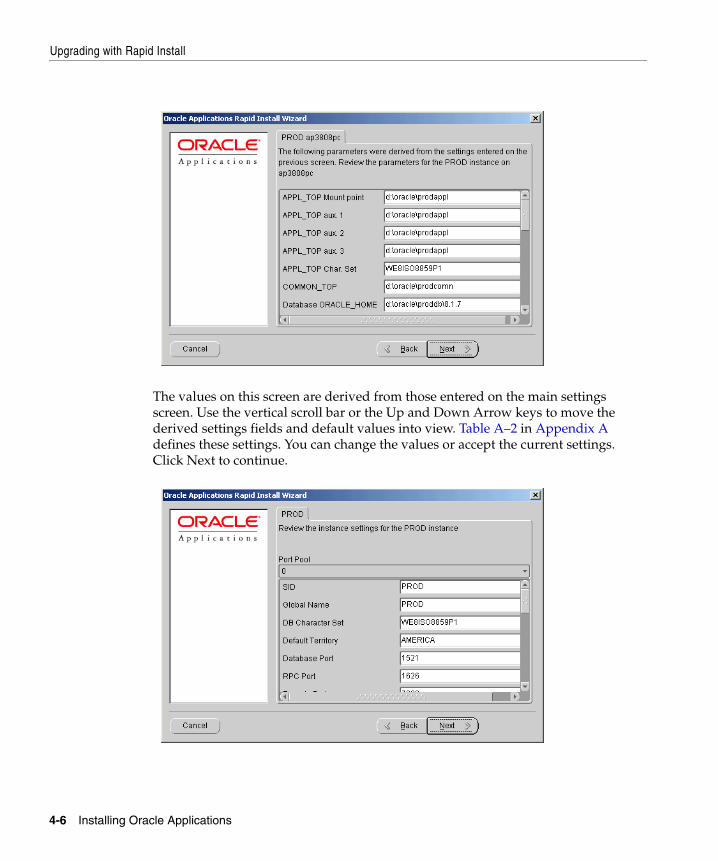
Upgrading with Rapid Install
The values on this screen are derived from those entered on the main settings screen. Use the vertical scroll bar or the Up and Down Arrow keys to move the derived settings fields and default values into view. Table A–2 in Appendix A defines these settings. You can change the values or accept the current settings. Click Next to continue.
4-6 Installing Oracle Applications
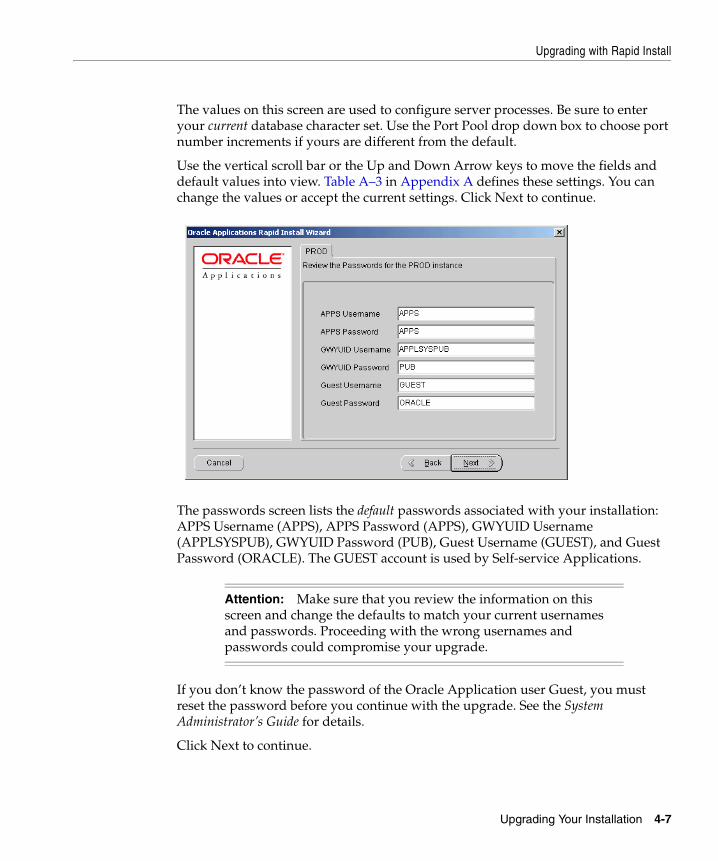
Upgrading with Rapid Install
The values on this screen are used to configure server processes. Be sure to enter your current database character set. Use the Port Pool drop down box to choose port number increments if yours are different from the default.
Use the vertical scroll bar or the Up and Down Arrow keys to move the fields and default values into view. Table A–3 in Appendix A defines these settings. You can change the values or accept the current settings. Click Next to continue.
The passwords screen lists the default passwords associated with your installation: APPS Username (APPS), APPS Password (APPS), GWYUID Username (APPLSYSPUB), GWYUID Password (PUB), Guest Username (GUEST), and Guest Password (ORACLE). The GUEST account is used by Self-service Applications.
If you don’t know the password of the Oracle Application user Guest, you must reset the password before you continue with the upgrade. See the System Administrator’s Guide for details.
Click Next to continue.
Attention: Make sure that you review the information on this screen and change the defaults to match your current usernames and passwords. Proceeding with the wrong usernames and passwords could compromise your upgrade.
Upgrading Your Installation 4-7
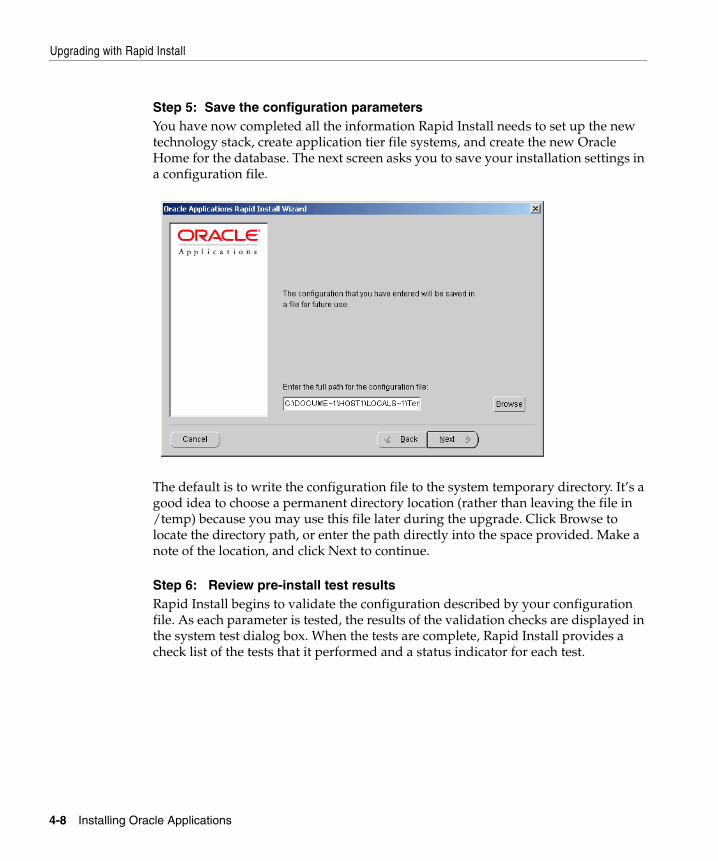
Upgrading with Rapid Install
Step 5: Save the configuration parametersYou have now completed all the information Rapid Install needs to set up the new technology stack, create application tier file systems, and create the new Oracle Home for the database. The next screen asks you to save your installation settings in a configuration file.
The default is to write the configuration file to the system temporary directory. It’s a good idea to choose a permanent directory location (rather than leaving the file in /temp) because you may use this file later during the upgrade. Click Browse to locate the directory path, or enter the path directly into the space provided. Make a note of the location, and click Next to continue.
Step 6: Review pre-install test resultsRapid Install begins to validate the configuration described by your configuration file. As each parameter is tested, the results of the validation checks are displayed in the system test dialog box. When the tests are complete, Rapid Install provides a check list of the tests that it performed and a status indicator for each test.
4-8 Installing Oracle Applications
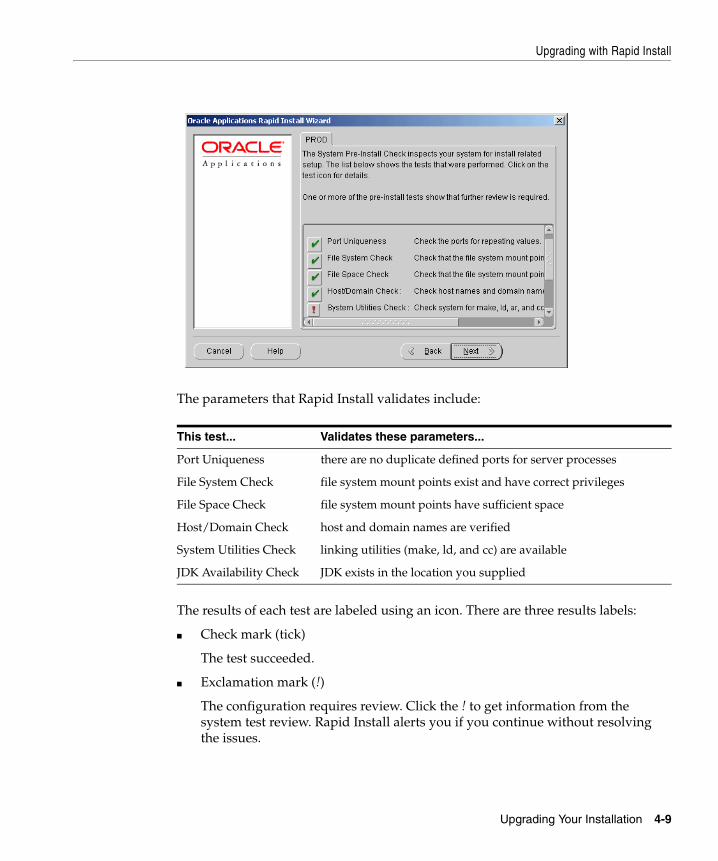
Upgrading with Rapid Install
The parameters that Rapid Install validates include:
The results of each test are labeled using an icon. There are three results labels:
■ Check mark (tick)
The test succeeded.
■ Exclamation mark (!)
The configuration requires review. Click the ! to get information from the system test review. Rapid Install alerts you if you continue without resolving the issues.
This test... Validates these parameters...
Port Uniqueness there are no duplicate defined ports for server processes
File System Check file system mount points exist and have correct privileges
File Space Check file system mount points have sufficient space
Host/Domain Check host and domain names are verified
System Utilities Check linking utilities (make, ld, and cc) are available
JDK Availability Check JDK exists in the location you supplied
Upgrading Your Installation 4-9
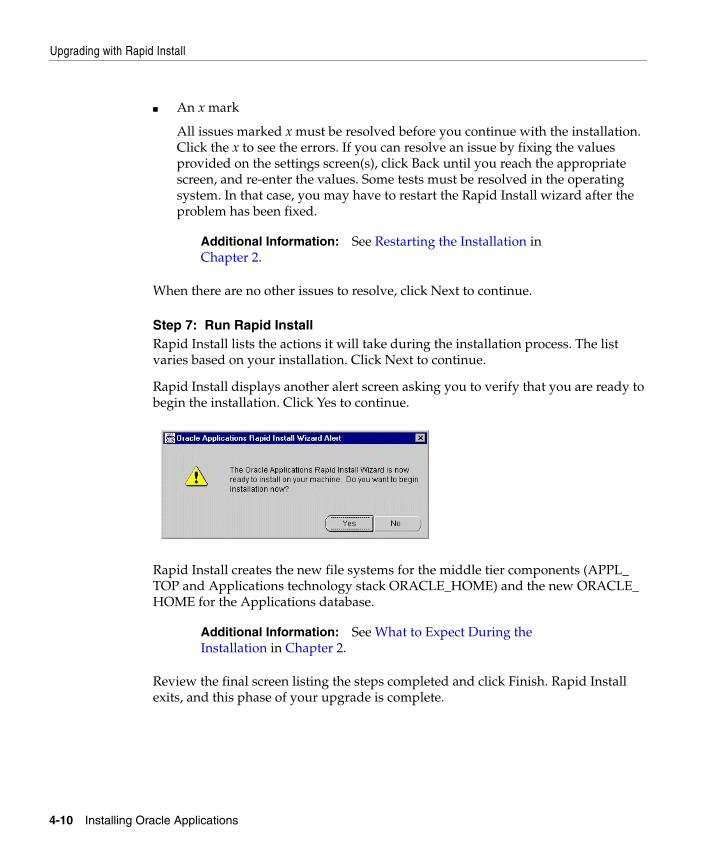
Upgrading with Rapid Install
■ An x mark
All issues marked x must be resolved before you continue with the installation. Click the x to see the errors. If you can resolve an issue by fixing the values provided on the settings screen(s), click Back until you reach the appropriate screen, and re-enter the values. Some tests must be resolved in the operating system. In that case, you may have to restart the Rapid Install wizard after the problem has been fixed.
When there are no other issues to resolve, click Next to continue.
Step 7: Run Rapid InstallRapid Install lists the actions it will take during the installation process. The list varies based on your installation. Click Next to continue. Rapid Install displays another alert screen asking you to verify that you are ready to begin the installation. Click Yes to continue.
Rapid Install creates the new file systems for the middle tier components (APPL_TOP and Applications technology stack ORACLE_HOME) and the new ORACLE_HOME for the Applications database.
Review the final screen listing the steps completed and click Finish. Rapid Install exits, and this phase of your upgrade is complete.
Additional Information: See Restarting the Installation in Chapter 2.
Additional Information: See What to Expect During the Installation in Chapter 2.
4-10 Installing Oracle Applications
Upgrading with Rapid Install
Step 8: Set up other nodes (if any)If this is a multi-node upgrade, you must run Rapid Install on each of the nodes on the middle tier. If this is upgrade is for a single-node system, omit this step.
1. Copy the configuration file (config.txt) you saved in Step 5 to each of the other nodes in your installation.
2. Go back to Step 2 and start Rapid Install. Choose to Create Upgrade File System.
3. Choose the Open an Existing Configuration File option.
4. Perform Steps 5 – 7 on each node in your installation.
Step 9: Complete Category 2 and Category 3 stepsReturn to Upgrading Oracle Applications and complete the remaining Category 2 steps in Chapter 2 and Category 3 Steps in Chapter 3 for each node in your installation . The Category 3 steps include running AutoUpgrade to upgrade your products. See Oracle Applications Maintenance Utilities for details on using AutoUpgrade.
Step 10: Apply post-upgrade patches and updatesAfter AutoUpgrade is finished, go to Chapter 4, Upgrading Oracle Applications, and complete the tasks under the Update and Patching Tasks heading. These tasks describe important post-upgrade patches and updates that must be applied before configuring and starting server processes. As a part of this set of tasks, you will apply the database driver that brings your database to the full Oracle Applications Release 11i maintenance level. If your installation is multi-node, you must complete this task on each node.
Step 11: Continue with database upgrade tasksContinue with the steps in Chapter 4 in Upgrading Oracle Applications. When the instructions direct you to do so, run Rapid Install. The steps are described in the remaining sections of this chapter.
Step 12: Configure and start server processesEnsure that your database and Net8 listener are started. Then, start Rapid Install. Choose the Configure the Existing Applications Instance option to indicate that you are going to use the same system environment settings that were stored when you ran Rapid Install to create the application tier file systems and the new database. If your installation is multi-node, you must complete this task on each middle tier node.
Upgrading Your Installation 4-11
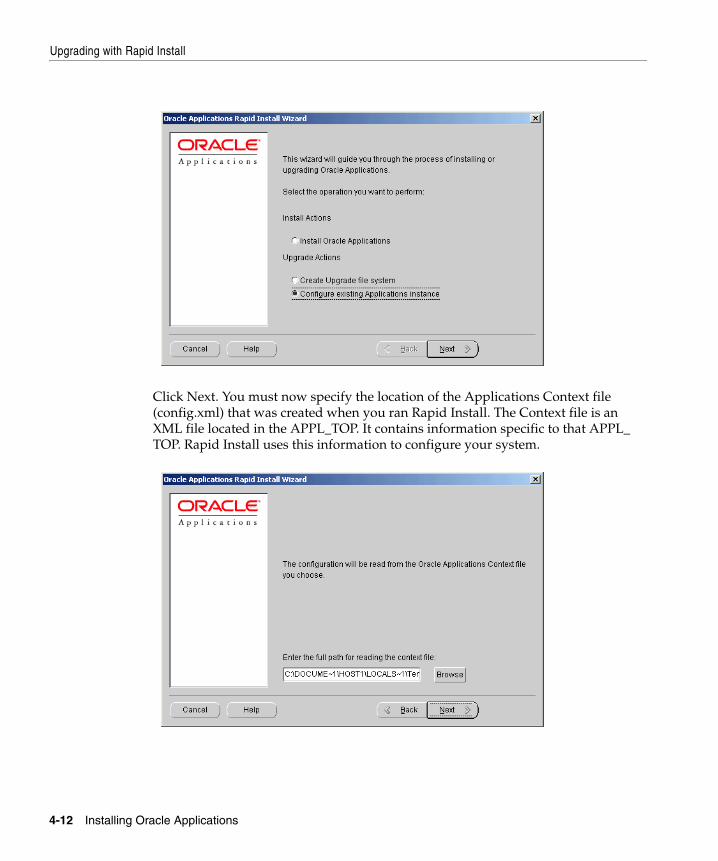
Upgrading with Rapid Install
Click Next. You must now specify the location of the Applications Context file (config.xml) that was created when you ran Rapid Install. The Context file is an XML file located in the APPL_TOP. It contains information specific to that APPL_TOP. Rapid Install uses this information to configure your system.
4-12 Installing Oracle Applications
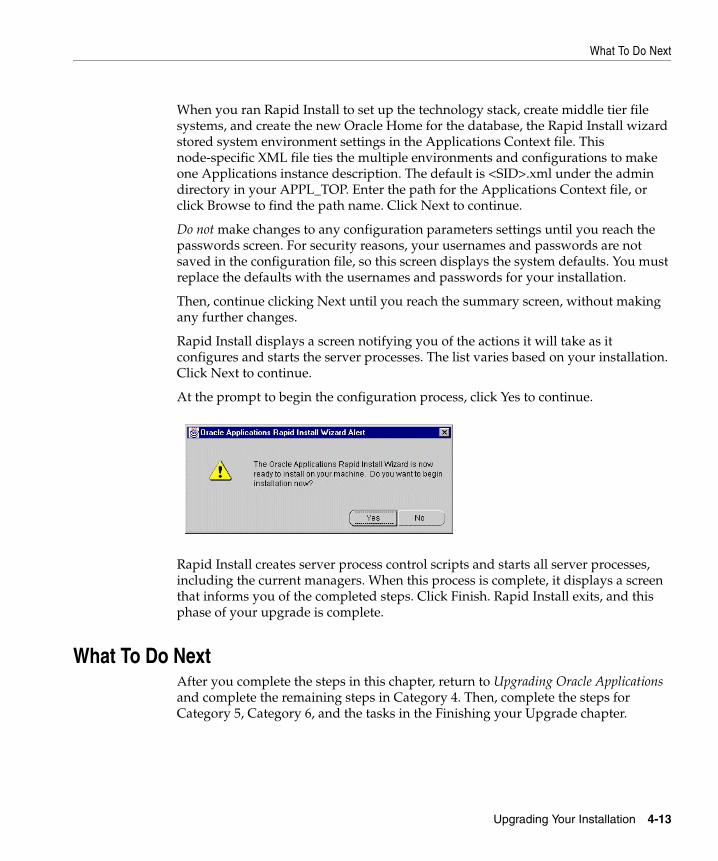
What To Do Next
When you ran Rapid Install to set up the technology stack, create middle tier file systems, and create the new Oracle Home for the database, the Rapid Install wizard stored system environment settings in the Applications Context file. This node-specific XML file ties the multiple environments and configurations to make one Applications instance description. The default is <SID>.xml under the admin directory in your APPL_TOP. Enter the path for the Applications Context file, or click Browse to find the path name. Click Next to continue.
Do not make changes to any configuration parameters settings until you reach the passwords screen. For security reasons, your usernames and passwords are not saved in the configuration file, so this screen displays the system defaults. You must replace the defaults with the usernames and passwords for your installation.
Then, continue clicking Next until you reach the summary screen, without making any further changes.
Rapid Install displays a screen notifying you of the actions it will take as it configures and starts the server processes. The list varies based on your installation. Click Next to continue.
At the prompt to begin the configuration process, click Yes to continue.
Rapid Install creates server process control scripts and starts all server processes, including the current managers. When this process is complete, it displays a screen that informs you of the completed steps. Click Finish. Rapid Install exits, and this phase of your upgrade is complete.
What To Do NextAfter you complete the steps in this chapter, return to Upgrading Oracle Applications and complete the remaining steps in Category 4. Then, complete the steps for Category 5, Category 6, and the tasks in the Finishing your Upgrade chapter.
Upgrading Your Installation 4-13

What To Do Next
4-14 Installing Oracle Applications
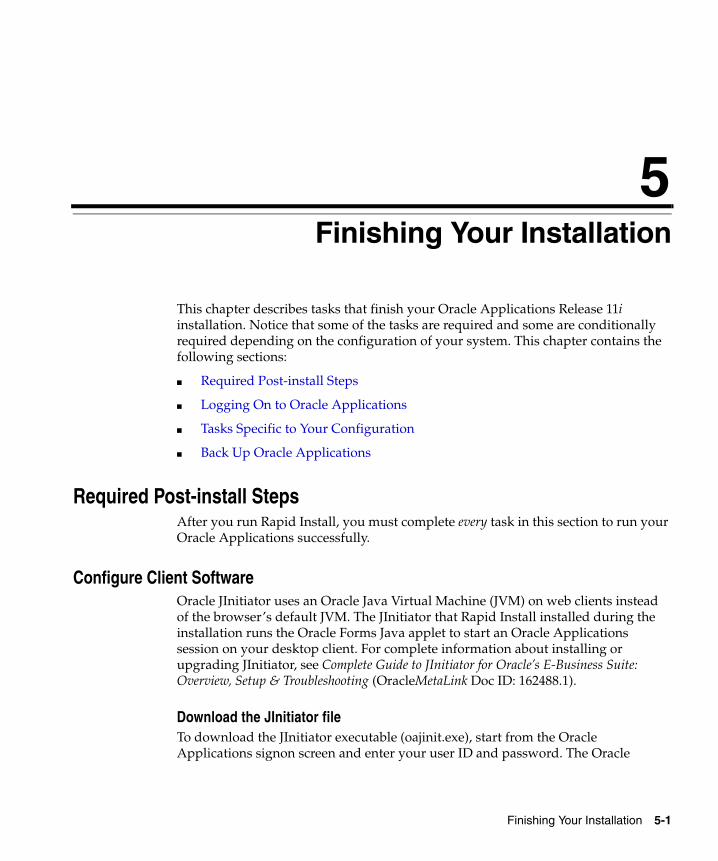
Finishing Your Insta
5
Finishing Your InstallationThis chapter describes tasks that finish your Oracle Applications Release 11i installation. Notice that some of the tasks are required and some are conditionally required depending on the configuration of your system. This chapter contains the following sections:
■ Required Post-install Steps
■ Logging On to Oracle Applications
■ Tasks Specific to Your Configuration
■ Back Up Oracle Applications
Required Post-install StepsAfter you run Rapid Install, you must complete every task in this section to run your Oracle Applications successfully.
Configure Client Software Oracle JInitiator uses an Oracle Java Virtual Machine (JVM) on web clients instead of the browser’s default JVM. The JInitiator that Rapid Install installed during the installation runs the Oracle Forms Java applet to start an Oracle Applications session on your desktop client. For complete information about installing or upgrading JInitiator, see Complete Guide to JInitiator for Oracle’s E-Business Suite: Overview, Setup & Troubleshooting (OracleMetaLink Doc ID: 162488.1).
Download the JInitiator fileTo download the JInitiator executable (oajinit.exe), start from the Oracle Applications signon screen and enter your user ID and password. The Oracle
llation 5-1
Required Post-install Steps
Applications E-Business Suite Home page appears. If this is your first logon since the installation, follow the instructions in this section, according to the type of browser you are using.
For Netscape users: 1. Click on the plug-in icon (a piece of a puzzle) and answer Yes to the prompt for
“trusting” Oracle. The Plug-in not Loaded window appears. Click the Get the Plug-in button.
2. In the Save As dialog box, indicate where you want to download the JInitiator executable (oajinit.exe). This behavior may vary if you have set up Netscape to use a download method other than the default, such as SmartDownload, or if you have certain antivirus software installed.
3. Save oajinit.exe to any location on the client (such as the temp directory).
4. Exit from all web browser sessions. Use the Windows Explorer to navigate to the location where you downloaded oajinit.exe. Double-click the executable.
5. InstallShield runs to install Oracle JInitiator. When prompted, click Yes and follow the instructions. (You can use the default location for installing Oracle JInitiator.)
6. After the installation is complete, exit from all web browser sessions to allow Netscape to load the Oracle Applications certificate that is needed for proper operation of Oracle Applications.
For Microsoft Internet Explorer users: 1. According to the security settings of your browser, JInitiator may begin
downloading automatically, or a Security Warning window may appear, prompting you to install Oracle JInitiator. If the Security Warning window appears, click Yes.
2. InstallShield runs to install Oracle JInitiator. When prompted, click Yes and follow the instructions. (You can use the default location for installing Oracle JInitiator.)
3. After the installation is complete, exit from all web browser sessions to allow Microsoft Internet Explorer to load the Oracle Applications certificate that is needed for proper operation of Oracle Applications.
Update PL/SQL Log and Out DirectoryThe temporary directory on your database server for log and output files from PL/SQL concurrent programs is set to /usr/tmp by default. This value is listed in
5-2 Installing Oracle Applications
Required Post-install Steps
the utl_file_dir parameter in the init.ora file and assigned to the APPLPTMP variable. This directory should be in a secure location on the database server node with read and write access for the owner of the database server.
Once you have chosen the new directory, enter it as the value for utl_file_dir in init.ora for your database. Then, use the Context Editor to update the APPLPTMP variable in the Applications Context with the directory location that you entered for utl_file_dir. Run AutoConfig to recreate the environment files.
Implement Product and Country-specific FunctionalityDepending on which products or country-specific functionality you plan to use in your installation, you may need to perform additional tasks or apply additional patches. Refer to the individual product or country-specific implementation manuals, user’s guides, or OracleMetaLink for details.
Configure Database Initialization ParametersThe current init.ora settings allow for a total of 100 connections. However, after the standard setup is complete, only a few users can be connected because of the connections used by the concurrent managers, AQ workers, job queues, and so on. You can find a complete list of the initialization parameters in the OracleMetaLink document Database Initialization Parameters for Oracle Applications 11i (Doc ID: 216205.1). See also Using AutoConfig to Manage System Configurations with Oracle Applications 11i on OracleMetaLink.
Change PasswordsThe default passwords for the SYS account and SYSTEM account of the Oracle Applications database are change_on_install and manager, respectively. To maintain database security and restrict access to these accounts, change these passwords. The password for both SYS and SYSTEM in the Vision Demo is manager.
Additional Information: See Editing Configuration Parameters and Generating and Applying Configuration Updates in Oracle Applications Maintenance Procedures. See also Using AutoConfig to Manage System Configurations with Oracle Applications 11i on OracleMetaLink.
Additional Information: See Managing User Privileges and Roles in the Oracle9i documentation set.
Finishing Your Installation 5-3
Logging On to Oracle Applications
You should also change the default passwords for the Applications product accounts of the production and test databases.
Maintain Snapshot InformationSnapshots give a picture of selected APPS-related files in a given APPL_TOP. They record details for each file in the APPL_TOP (like file name and file version). They may also record summary information about patches that have been applied to the APPL_TOP. You can use snapshots to compare two different APPL_TOPs or the same APPL_TOP at different times, and to track the current status of an APPL_TOP.
You must take a snapshot of each of your APPL_TOPs before applying any patches so that the prerequisite patch checking feature in AutoPatch will function correctly. To take a snapshot of your newly installed system, follow these steps.
1. From the AD Administration main menu, choose to the Maintain Applications Files menu and select “Maintain snapshot information.”
2. Under Snapshot Options, choose “Manage Snapshots within this Application System.”
3. Select “Refresh the Current View of this APPL_TOP in the database.”
4. Repeat this step for each APPL_TOP in your installation.
Running this task takes one to two hours for each APPL_TOP. However, it does not require that users log off. You need to run it only once for each APPL_TOP. After that, AutoPatch automatically keeps the current-view snapshot up to date.
Logging On to Oracle ApplicationsYou start Oracle Applications and access all Oracle E-Business Suite products from the E-Business Suite Home page, which you access from the Oracle Applications Login page, located at the following URL:
http://<host name>.<domain name>:<HTTP port>/oa_servlets/AppsLogin
For example:
Additional Information: See Applications DBA Duties in Oracle Applications System Administrator’s Guide.
Additional Information: See Maintain Applications Files Tasks in Oracle Applications Maintenance Utilities.
5-4 Installing Oracle Applications
Tasks Specific to Your Configuration
http://oraapps1.oracle.com:8000/oa_servlets/AppsLogin
The system administrator should log in the first time using the sysadmin login account that is pre-configured in the Applications installation. Use the System Administrator responsibility to launch an Applications Forms session where the system administrator can complete the implementation steps.
Tasks Specific to Your ConfigurationThe tasks in this section are conditionally required — you must perform them if any of these features or procedures apply to your Oracle Applications system.
Configuring Multiple Servers to Use JInitiatorDuring the installation, Rapid Install created several files associated with the JInitiator. If you have added additional HTTP (web) servers, you need to copy the following files to each additional server: adsign.txt and identitydb.obj.
Use a utility such as ftp to copy adsign.txt to $APPL_TOP/admin (UNIX) or %APPL_TOP%\admin (Windows). Copy identitydb.obj to the applmgr user’s home directory (UNIX) or to the root directory of the %SystemDrive% (Windows).
Resize Your DatabaseYou need to increase the size of your production database. The increase will depend on the products you have licensed and the additional features (such as multiple languages or multiple organizations) you configure in your installation.
Set Up National Language Support (NLS)If you will use languages other than American English in your installation, read the information in this section, and complete the necessary steps for installing the translated software.
Note: You can also access the E-Business Suite Home page from the Rapid Install Portal. See Accessing the Rapid Install Portal in Chapter 1
Additional Information: See Appendix F in the Oracle Applications System Administrator’s Guide. See also E-Business Suite Home in Oracle Applications Concepts.
Finishing Your Installation 5-5
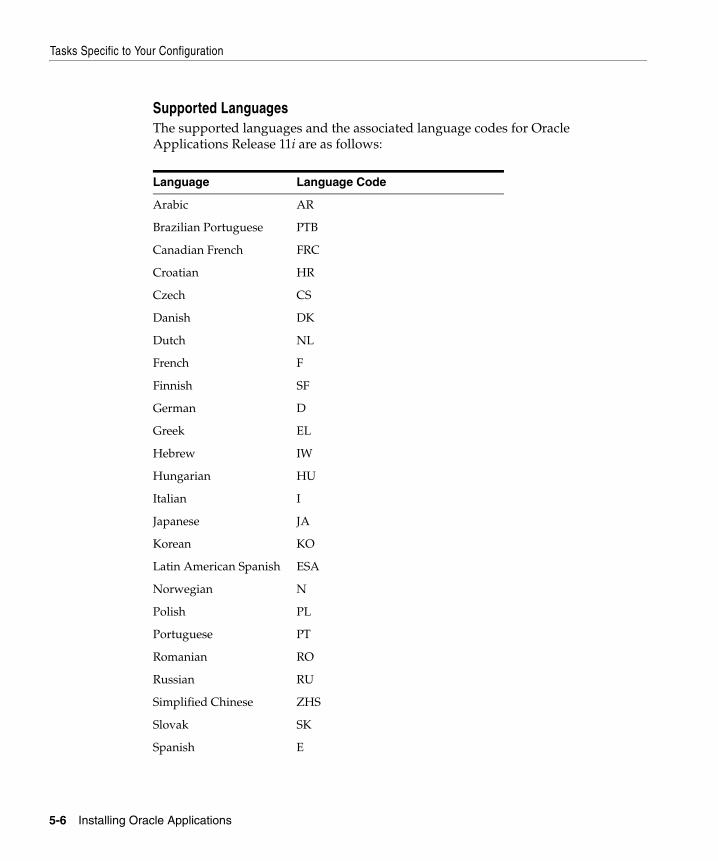
Tasks Specific to Your Configuration
Supported LanguagesThe supported languages and the associated language codes for Oracle Applications Release 11i are as follows:
Language Language Code
Arabic AR
Brazilian Portuguese PTB
Canadian French FRC
Croatian HR
Czech CS
Danish DK
Dutch NL
French F
Finnish SF
German D
Greek EL
Hebrew IW
Hungarian HU
Italian I
Japanese JA
Korean KO
Latin American Spanish ESA
Norwegian N
Polish PL
Portuguese PT
Romanian RO
Russian RU
Simplified Chinese ZHS
Slovak SK
Spanish E
5-6 Installing Oracle Applications
Tasks Specific to Your Configuration
Installing the Translated SoftwareLanguage files have been installed by Rapid Install. To finish the installation for NLS, follow the instructions in the Oracle Applications NLS Release Notes.
Set Up UTF8 Character SetRegardless of the languages installed, you must complete the additional steps in this section if you use the UTF8 character set.
For UNIX users:Complete the following tasks:
■ Copy UTF8 resource file fmrweb_utf8.res to fmrweb.res. Make a backup copy of fmrweb.res and replace it with fmrweb_utf8.res for each active language. For example, UNIX users who have German Applications installed, would do the following in their 8.0.6 ORACLE_HOME:
$ cd $ORACLE_HOME/forms60/admin/resource/D$ cp fmrweb.res fmrweb.res.bak$ cp fmrweb_utf8.res fmrweb.res
■ Modify Tk2Motif.rgb in your 8.0.6 ORACLE_HOME. For all Tk2Motif.rgb files located at $ORACLE_HOME/guicommon6 /tk60/admin and $ORACLE_HOME/guicommon6/tk60/admin/<LangCode>, open the file using any text editor and modify the line that looks like this:
!Tk2Motif*fontMapCs: iso8859-2=EE8ISO8859P2
Change the line to look like this:
Swedish S
Thai TH
Traditional Chinese ZHT
Turkish TR
Warning: You must complete the tasks in the Oracle Applications NLS Release Notes before using your Applications products in a language other than American English.
Language Language Code
Finishing Your Installation 5-7
Tasks Specific to Your Configuration
Tk2Motif*fontMapCs: iso8859-1=UTF8
Make sure you remove the “!” character to uncomment the line.
■ Use the PASTA utility (FNDPSTAX) for printing.
For Windows users:Complete the following steps:
■ For each active language, make a backup copy of fmrweb<LangCode>.res and replace it with the corresponding UTF8 version (fmrweb<LangCode>_utf8.res). For example, under the 8.0.6 ORACLE_HOME, type:
C:\> cd %ORACLE_HOME%/FORMS60C:\> rename fmrweb<LangCode>.res fmrweb<LangCode>.res.bakC:\> copy fmrweb<LangCode>_utf8.res fmrweb<LangCode>.res
This step is not required for American English because the default fmrweb.res file, which contains the English language information, is valid for UTF8 and all other character sets.
■ Use the PASTA utility (FNDPSTAX) for printing.
Configure the Oracle Workflow Java-based Notification MailerIf you plan to use the Oracle Workflow java-based Notifications Mailer, you must complete additional setup and implementation steps. See Configuring the Oracle Workflow 2.6 Java-based Notification Mailer with Oracle Applications 11i (OracleMetaLink Document ID: 231286.1) for complete information.
Set Up and Implement Oracle Embedded Data Warehouse (EDW)If you have licensed Oracle Embedded Data Warehouse (EDW), you must complete additional setup and implementation steps before using this product. Refer to Oracle Embedded Data Warehouse Release Notes (OracleMetaLink Document ID: 206194.1) for complete information.
Additional Information: See Printers in Oracle Applications System Administrator’s Guide.
Additional Information: See Printers in Oracle Applications System Administrator’s Guide.
5-8 Installing Oracle Applications
Tasks Specific to Your Configuration
Set Up and Implement Discoverer End User Layer (EUL) To set up and implement the End User Layer, follow the instructions documented in OracleMetaLink Doc ID: 206193.1. Choose the “If you are implementing Discoverer 4i EUL for the first time” option.
Set Up Demand PlanningTo set up and begin using Demand Planning, you must perform the implementation tasks outlined in the Oracle Demand Planning Installation and Configuration Guide.
Convert Database to Multiple Organizations (Multi-Org)The Rapid Install Vision Demo database is enabled for Multi-Org. However, the production and test databases are not. If you want Multi-Org architecture in the production or test environments, refer to the instructions for converting to Multi-Org in Oracle Applications Maintenance Procedures.
Convert to Multiple Reporting Currencies (MRC)The Rapid Install Vision Demo database is enabled for MRC. However, the production and test databases are not. If your production or test environment requires multiple reporting currencies, refer to the instructions for installing and implementing MRC in Multiple Reporting Currencies in Oracle Applications.
Understand System Administration TasksYou should be completely familiar with the information in the Oracle Applications System Administrator’s Guide. It contains important information about Oracle Applications.
Set Up PrintersFor details about setting up printers in your Oracle Applications installation, refer to the Oracle Applications System Administrator’s Guide.
Additional Information: See Multiple Organizations in Oracle Applications and Multiple Organization (Multi-Org) Architecture in Oracle Applications Concepts.
Finishing Your Installation 5-9
Back Up Oracle Applications
Understand Oracle Applications Maintenance TasksYou should be completely familiar with the information in both volumes of the Maintaining Oracle Applications Documentation Set (Oracle Applications Maintenance Utilities and Oracle Applications Maintenance Procedures). Both books contain important details about administration utilities and maintenance tasks.
Back Up Oracle ApplicationsYour operating system administrator should back up the Oracle Applications product files, including COMMON_TOP, 8.0.6 technology components, and the iAS technology components. Your database administrator should back up the Oracle Applications database and database home components.
5-10 Installing Oracle Applications
Configuration D
A
Configuration DetailsRapid Install sets up and configures technology stack products for you during the installation process. This appendix contains specific configuration details that further describe this process. It includes the following information:
■ Rapid Install Settings Definitions
■ Production and Test Database Requirements
■ Vision Demonstration Database Requirements
Rapid Install Settings DefinitionsThis section lists the various settings you enter when you complete the associated fields in the Rapid Install wizard.
Main SettingsThe main settings fields are found on the Rapid Install main settings screen. An example of this screen appears in the discussion that begins on page 2-12.
Table A–1 Main settings information
Field Name Definition
Database SID (for upgrades only)
The name of the database. Used in the upgrade process to capture the database name information that you supply on the installation environment(s) screen in a new installation.
APPL_TOP base This default directory mount setting appears on subsequent Rapid Install screens for convenience. The APPL_TOP directory is a subdirectory of this APPL_TOP base directory.
etails A-1
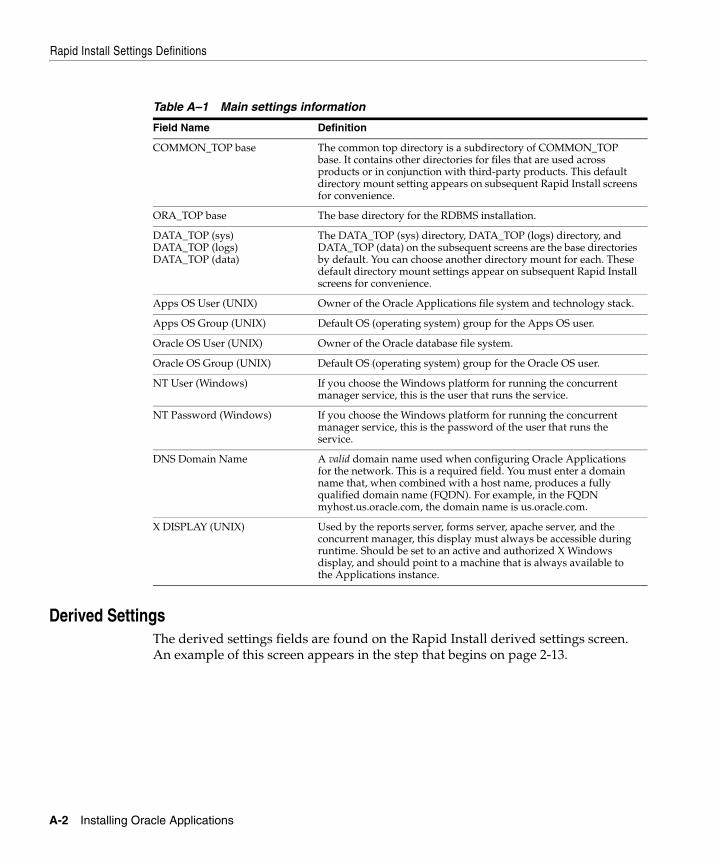
Rapid Install Settings Definitions
Derived SettingsThe derived settings fields are found on the Rapid Install derived settings screen. An example of this screen appears in the step that begins on page 2-13.
COMMON_TOP base The common top directory is a subdirectory of COMMON_TOP base. It contains other directories for files that are used across products or in conjunction with third-party products. This default directory mount setting appears on subsequent Rapid Install screens for convenience.
ORA_TOP base The base directory for the RDBMS installation.
DATA_TOP (sys)DATA_TOP (logs)DATA_TOP (data)
The DATA_TOP (sys) directory, DATA_TOP (logs) directory, and DATA_TOP (data) on the subsequent screens are the base directories by default. You can choose another directory mount for each. These default directory mount settings appear on subsequent Rapid Install screens for convenience.
Apps OS User (UNIX) Owner of the Oracle Applications file system and technology stack.
Apps OS Group (UNIX) Default OS (operating system) group for the Apps OS user.
Oracle OS User (UNIX) Owner of the Oracle database file system.
Oracle OS Group (UNIX) Default OS (operating system) group for the Oracle OS user.
NT User (Windows) If you choose the Windows platform for running the concurrent manager service, this is the user that runs the service.
NT Password (Windows) If you choose the Windows platform for running the concurrent manager service, this is the password of the user that runs the service.
DNS Domain Name A valid domain name used when configuring Oracle Applications for the network. This is a required field. You must enter a domain name that, when combined with a host name, produces a fully qualified domain name (FQDN). For example, in the FQDN myhost.us.oracle.com, the domain name is us.oracle.com.
X DISPLAY (UNIX) Used by the reports server, forms server, apache server, and the concurrent manager, this display must always be accessible during runtime. Should be set to an active and authorized X Windows display, and should point to a machine that is always available to the Applications instance.
Table A–1 Main settings information
Field Name Definition
A-2 Installing Oracle Applications
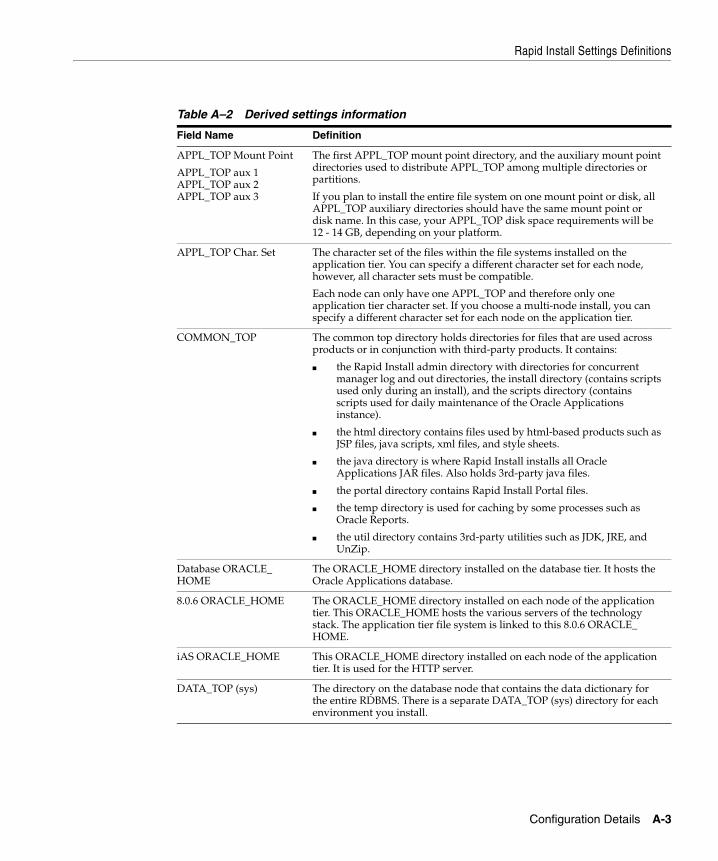
Rapid Install Settings Definitions
Table A–2 Derived settings information
Field Name Definition
APPL_TOP Mount Point
APPL_TOP aux 1APPL_TOP aux 2APPL_TOP aux 3
The first APPL_TOP mount point directory, and the auxiliary mount point directories used to distribute APPL_TOP among multiple directories or partitions.
If you plan to install the entire file system on one mount point or disk, all APPL_TOP auxiliary directories should have the same mount point or disk name. In this case, your APPL_TOP disk space requirements will be 12 - 14 GB, depending on your platform.
APPL_TOP Char. Set The character set of the files within the file systems installed on the application tier. You can specify a different character set for each node, however, all character sets must be compatible.
Each node can only have one APPL_TOP and therefore only one application tier character set. If you choose a multi-node install, you can specify a different character set for each node on the application tier.
COMMON_TOP The common top directory holds directories for files that are used across products or in conjunction with third-party products. It contains:
■ the Rapid Install admin directory with directories for concurrent manager log and out directories, the install directory (contains scripts used only during an install), and the scripts directory (contains scripts used for daily maintenance of the Oracle Applications instance).
■ the html directory contains files used by html-based products such as JSP files, java scripts, xml files, and style sheets.
■ the java directory is where Rapid Install installs all Oracle Applications JAR files. Also holds 3rd-party java files.
■ the portal directory contains Rapid Install Portal files.
■ the temp directory is used for caching by some processes such as Oracle Reports.
■ the util directory contains 3rd-party utilities such as JDK, JRE, and UnZip.
Database ORACLE_HOME
The ORACLE_HOME directory installed on the database tier. It hosts the Oracle Applications database.
8.0.6 ORACLE_HOME The ORACLE_HOME directory installed on each node of the application tier. This ORACLE_HOME hosts the various servers of the technology stack. The application tier file system is linked to this 8.0.6 ORACLE_HOME.
iAS ORACLE_HOME This ORACLE_HOME directory installed on each node of the application tier. It is used for the HTTP server.
DATA_TOP (sys) The directory on the database node that contains the data dictionary for the entire RDBMS. There is a separate DATA_TOP (sys) directory for each environment you install.
Configuration Details A-3
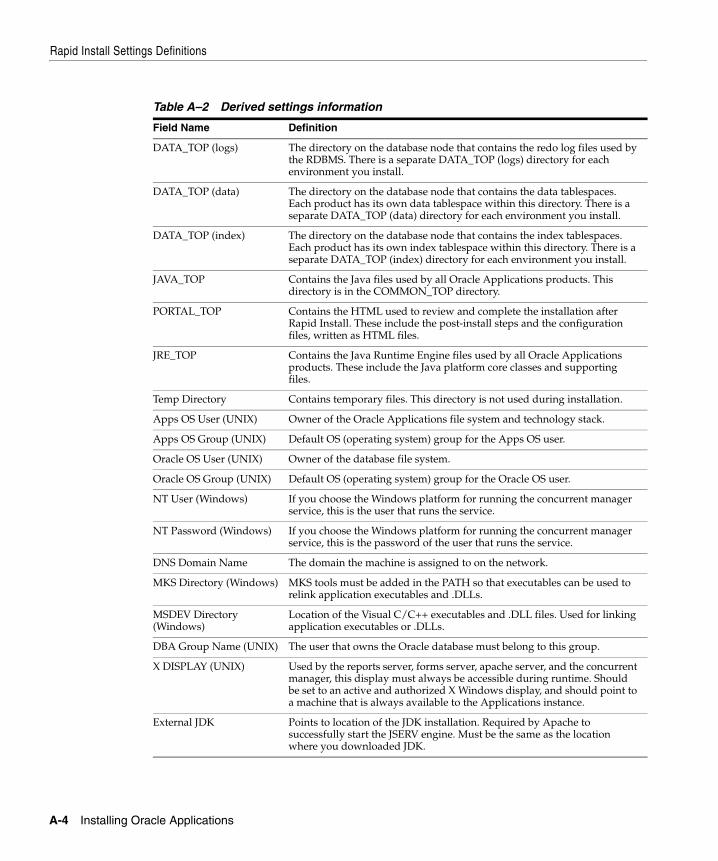
Rapid Install Settings Definitions
DATA_TOP (logs) The directory on the database node that contains the redo log files used by the RDBMS. There is a separate DATA_TOP (logs) directory for each environment you install.
DATA_TOP (data) The directory on the database node that contains the data tablespaces. Each product has its own data tablespace within this directory. There is a separate DATA_TOP (data) directory for each environment you install.
DATA_TOP (index) The directory on the database node that contains the index tablespaces. Each product has its own index tablespace within this directory. There is a separate DATA_TOP (index) directory for each environment you install.
JAVA_TOP Contains the Java files used by all Oracle Applications products. This directory is in the COMMON_TOP directory.
PORTAL_TOP Contains the HTML used to review and complete the installation after Rapid Install. These include the post-install steps and the configuration files, written as HTML files.
JRE_TOP Contains the Java Runtime Engine files used by all Oracle Applications products. These include the Java platform core classes and supporting files.
Temp Directory Contains temporary files. This directory is not used during installation.
Apps OS User (UNIX) Owner of the Oracle Applications file system and technology stack.
Apps OS Group (UNIX) Default OS (operating system) group for the Apps OS user.
Oracle OS User (UNIX) Owner of the database file system.
Oracle OS Group (UNIX) Default OS (operating system) group for the Oracle OS user.
NT User (Windows) If you choose the Windows platform for running the concurrent manager service, this is the user that runs the service.
NT Password (Windows) If you choose the Windows platform for running the concurrent manager service, this is the password of the user that runs the service.
DNS Domain Name The domain the machine is assigned to on the network.
MKS Directory (Windows) MKS tools must be added in the PATH so that executables can be used to relink application executables and .DLLs.
MSDEV Directory (Windows)
Location of the Visual C/C++ executables and .DLL files. Used for linking application executables or .DLLs.
DBA Group Name (UNIX) The user that owns the Oracle database must belong to this group.
X DISPLAY (UNIX) Used by the reports server, forms server, apache server, and the concurrent manager, this display must always be accessible during runtime. Should be set to an active and authorized X Windows display, and should point to a machine that is always available to the Applications instance.
External JDK Points to location of the JDK installation. Required by Apache to successfully start the JSERV engine. Must be the same as the location where you downloaded JDK.
Table A–2 Derived settings information
Field Name Definition
A-4 Installing Oracle Applications
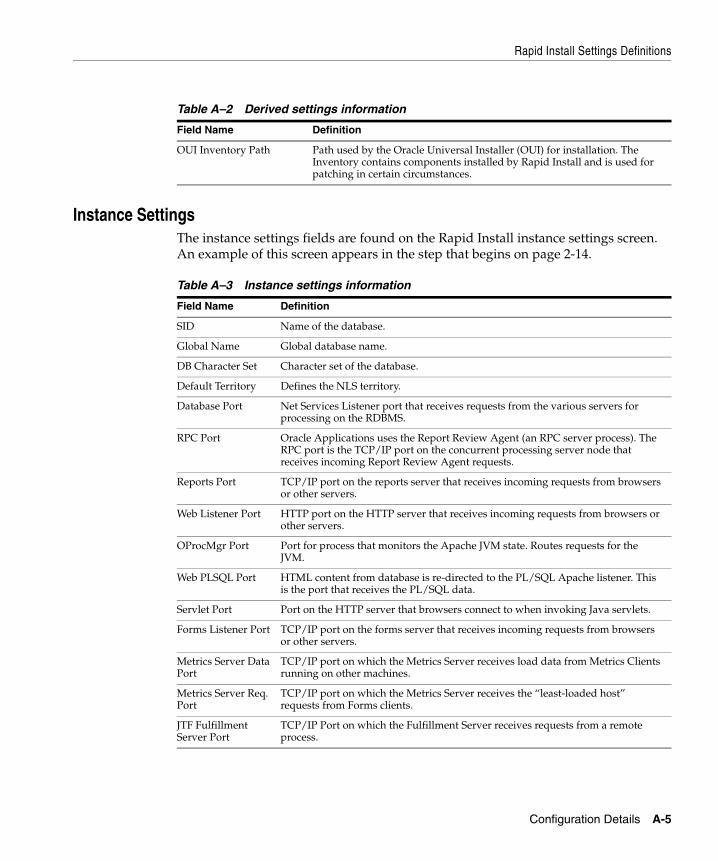
Rapid Install Settings Definitions
Instance SettingsThe instance settings fields are found on the Rapid Install instance settings screen. An example of this screen appears in the step that begins on page 2-14.
OUI Inventory Path Path used by the Oracle Universal Installer (OUI) for installation. The Inventory contains components installed by Rapid Install and is used for patching in certain circumstances.
Table A–3 Instance settings information
Field Name Definition
SID Name of the database.
Global Name Global database name.
DB Character Set Character set of the database.
Default Territory Defines the NLS territory.
Database Port Net Services Listener port that receives requests from the various servers for processing on the RDBMS.
RPC Port Oracle Applications uses the Report Review Agent (an RPC server process). The RPC port is the TCP/IP port on the concurrent processing server node that receives incoming Report Review Agent requests.
Reports Port TCP/IP port on the reports server that receives incoming requests from browsers or other servers.
Web Listener Port HTTP port on the HTTP server that receives incoming requests from browsers or other servers.
OProcMgr Port Port for process that monitors the Apache JVM state. Routes requests for the JVM.
Web PLSQL Port HTML content from database is re-directed to the PL/SQL Apache listener. This is the port that receives the PL/SQL data.
Servlet Port Port on the HTTP server that browsers connect to when invoking Java servlets.
Forms Listener Port TCP/IP port on the forms server that receives incoming requests from browsers or other servers.
Metrics Server Data Port
TCP/IP port on which the Metrics Server receives load data from Metrics Clients running on other machines.
Metrics Server Req. Port
TCP/IP port on which the Metrics Server receives the “least-loaded host” requests from Forms clients.
JTF Fulfillment Server Port
TCP/IP Port on which the Fulfillment Server receives requests from a remote process.
Table A–2 Derived settings information
Field Name Definition
Configuration Details A-5
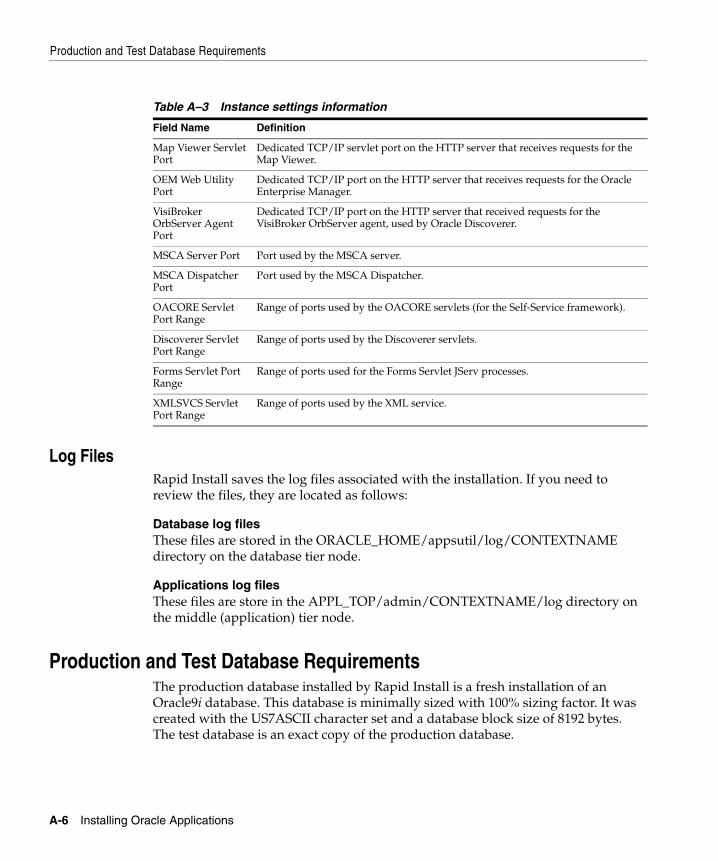
Production and Test Database Requirements
Log FilesRapid Install saves the log files associated with the installation. If you need to review the files, they are located as follows:
Database log filesThese files are stored in the ORACLE_HOME/appsutil/log/CONTEXTNAME directory on the database tier node.
Applications log filesThese files are store in the APPL_TOP/admin/CONTEXTNAME/log directory on the middle (application) tier node.
Production and Test Database RequirementsThe production database installed by Rapid Install is a fresh installation of an Oracle9i database. This database is minimally sized with 100% sizing factor. It was created with the US7ASCII character set and a database block size of 8192 bytes. The test database is an exact copy of the production database.
Map Viewer Servlet Port
Dedicated TCP/IP servlet port on the HTTP server that receives requests for the Map Viewer.
OEM Web Utility Port
Dedicated TCP/IP port on the HTTP server that receives requests for the Oracle Enterprise Manager.
VisiBroker OrbServer Agent Port
Dedicated TCP/IP port on the HTTP server that received requests for the VisiBroker OrbServer agent, used by Oracle Discoverer.
MSCA Server Port Port used by the MSCA server.
MSCA Dispatcher Port
Port used by the MSCA Dispatcher.
OACORE Servlet Port Range
Range of ports used by the OACORE servlets (for the Self-Service framework).
Discoverer Servlet Port Range
Range of ports used by the Discoverer servlets.
Forms Servlet Port Range
Range of ports used for the Forms Servlet JServ processes.
XMLSVCS Servlet Port Range
Range of ports used by the XML service.
Table A–3 Instance settings information
Field Name Definition
A-6 Installing Oracle Applications
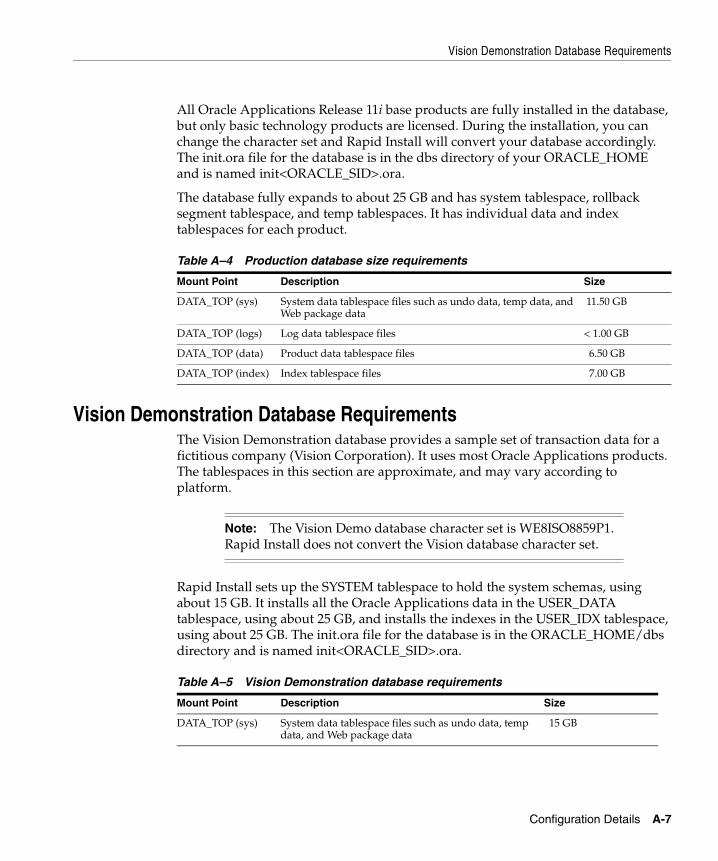
Vision Demonstration Database Requirements
All Oracle Applications Release 11i base products are fully installed in the database, but only basic technology products are licensed. During the installation, you can change the character set and Rapid Install will convert your database accordingly. The init.ora file for the database is in the dbs directory of your ORACLE_HOME and is named init<ORACLE_SID>.ora.
The database fully expands to about 25 GB and has system tablespace, rollback segment tablespace, and temp tablespaces. It has individual data and index tablespaces for each product.
Vision Demonstration Database RequirementsThe Vision Demonstration database provides a sample set of transaction data for a fictitious company (Vision Corporation). It uses most Oracle Applications products. The tablespaces in this section are approximate, and may vary according to platform.
Rapid Install sets up the SYSTEM tablespace to hold the system schemas, using about 15 GB. It installs all the Oracle Applications data in the USER_DATA tablespace, using about 25 GB, and installs the indexes in the USER_IDX tablespace, using about 25 GB. The init.ora file for the database is in the ORACLE_HOME/dbs directory and is named init<ORACLE_SID>.ora.
Table A–4 Production database size requirements
Mount Point Description Size
DATA_TOP (sys) System data tablespace files such as undo data, temp data, and Web package data
11.50 GB
DATA_TOP (logs) Log data tablespace files < 1.00 GB
DATA_TOP (data) Product data tablespace files 6.50 GB
DATA_TOP (index) Index tablespace files 7.00 GB
Note: The Vision Demo database character set is WE8ISO8859P1. Rapid Install does not convert the Vision database character set.
Table A–5 Vision Demonstration database requirements
Mount Point Description Size
DATA_TOP (sys) System data tablespace files such as undo data, temp data, and Web package data
15 GB
Configuration Details A-7
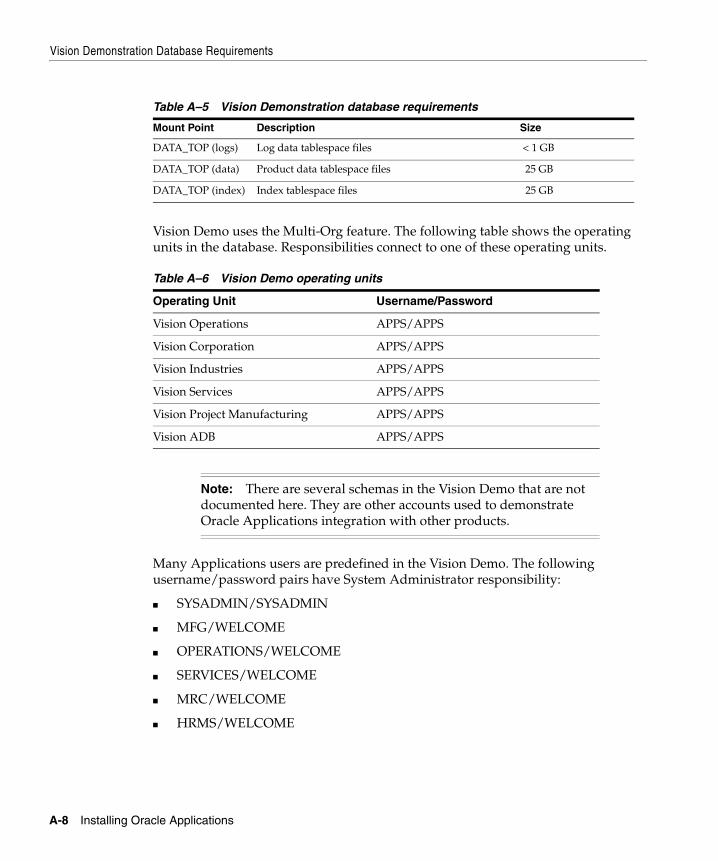
Vision Demonstration Database Requirements
Vision Demo uses the Multi-Org feature. The following table shows the operating units in the database. Responsibilities connect to one of these operating units.
Many Applications users are predefined in the Vision Demo. The following username/password pairs have System Administrator responsibility:
■ SYSADMIN/SYSADMIN
■ MFG/WELCOME
■ OPERATIONS/WELCOME
■ SERVICES/WELCOME
■ MRC/WELCOME
■ HRMS/WELCOME
DATA_TOP (logs) Log data tablespace files < 1 GB
DATA_TOP (data) Product data tablespace files 25 GB
DATA_TOP (index) Index tablespace files 25 GB
Table A–6 Vision Demo operating units
Operating Unit Username/Password
Vision Operations APPS/APPS
Vision Corporation APPS/APPS
Vision Industries APPS/APPS
Vision Services APPS/APPS
Vision Project Manufacturing APPS/APPS
Vision ADB APPS/APPS
Note: There are several schemas in the Vision Demo that are not documented here. They are other accounts used to demonstrate Oracle Applications integration with other products.
Table A–5 Vision Demonstration database requirements
Mount Point Description Size
A-8 Installing Oracle Applications
Index
Aadditional nodessetting up, 3-25Add-on products
installing, 2-7, 3-7administrators group
for Windows login account, 1-10adsign.txt, 5-5alias
using for host machine, 1-14alternative character set
choosing, 2-9, 3-9Apache Servlet Port
setting for, A-5APPL_TOP
alternative character set, 2-9, 3-9changing character set, 1-2, 2-11, 3-11character set for, A-3configuring in an upgrade, 4-4creating file system for, 1-4derived settings for, A-3owner of, 1-10setting base value, A-1sharing, 3-15
application tier componentscreating in an upgrade, 1-4, 4-1, 4-10
Applications Context fileabout, 4-4, 4-13editing, 5-3specifying location of, 4-12
Applications log fileslocation of, A-6
Apps OS Group
derived setting for, A-4setting for, A-2
Apps OS Userderived setting for, A-4setting for, A-2
AutoConfigrunning, 5-3
AutoUpgradewhen to run, 4-11
Bbacking up product files, 5-10base language
default, 1-2, 2-9, 3-9benchmark tests
using, 1-6
CCD install
instructions for, 1-14CDs
label names, 1-11prompts, 2-20, 3-22
certification informationwhere to find, 1-5
character setchanging, 2-11, 3-11choosing alternative, 2-9, 3-9default, 1-2, 2-9, 3-9setting in APPL_TOP, A-3
client softwareconfiguring, 5-1
Index-1
COMMON_TOPderived settings for, A-3main setting for, A-2
Component Applications Licensingabout, 2-5, 3-5
concurrent processingon Windows platforms, A-4
concurrent usersmemory requirements, 1-7
config.txt, 2-16, 3-18, 3-25, 4-11configuration
middle tiers, 3-15parameters, 1-2post-install test, 2-23, 3-24pre-install test, 2-17, 3-19validation, 1-3
configuration filecopy for multi-node install, 3-25copy for upgrade, 4-11saving, 2-16, 3-18saving in an upgrade, 4-8using temporary directory, 2-17, 3-18validating, 2-17, 3-19
configuration typechoosing for multi-node, 3-2choosing for single-node, 2-2
config.xml, 4-12Context file
about, 4-13location of, 4-12See Applications Context, 4-4
controlled productsinstalling, 2-8, 3-8
country-specific functionalityimplementing, 5-3licensing with Rapid Install, 1-2selecting, 2-8, 3-8
CPUestimating requirements, 1-6
Create Upgrade File Systemwhen to use, 4-2, 4-11
Ddata dictionary
location of, A-3data tablespaces
location of, A-4DATA_TOP
derived settings, A-3main setting for, A-2
databasealternative character set, 2-9, 3-9changing character set, 1-2changing passwords, 5-3do not install option, 2-4, 3-5for fresh install, 2-4, 3-4for Vision Demo, 2-4, 3-4owner of, 1-9sizing, 5-5
database log fileslocation of, A-6
Database Portsetting for, A-5
database tiermemory requirements, 1-7
DB Character Setsetting for, A-5
DBA Group Namederived setting for, A-4
Default Territorysetting for NLS, A-5
Demand Planningsetting up, 5-9
dependent productsinstalled, 2-6, 3-6
derived settingsfor an upgrade, 4-6list of, A-2specifying for multi-node, 3-15specifying for single-node, 2-13
Developer 6iowner of, 1-10
directoriesspecifying, 1-2
Discovererset up steps for, 5-9
Discoverer Servlet Port Rangesetting for, A-6
disk space
Index-2
estimating, 1-7language files, 1-7log files, 1-8other files, 1-9output files, 1-8stage area, 1-7temporary directories, 1-8
DNS Domain Namederived setting for, A-4main setting for, A-2
documentation accessibility, ixdocumentation library
contents, xdomain name
valid, 2-13Domain Users group
for Windows login account, 1-10
EE-Business Suite Licensing
about, 2-6, 3-6Embedded Data Warehouse
implementing, 5-8End User Layer
implementing, 5-9environment
choosing, 2-3, 3-3creating with Rapid Install, 1-2definitions of, 1-2
External JDKsetting for, A-4
Ffile space
validating, 4-9validation, 2-18, 3-20
file systemcreating, 1-1for an upgrade, 4-1, 4-10validation, 2-18, 3-20, 4-9
fmrweb_utf8.res, 5-7fmrweb.res, 5-7FNDPSTAX, 5-8
Forms Portsetting for, A-5
Forms servermemory requirements, 1-7TCP/IP port, A-5
Forms Servlet Port Rangesetting for, A-6
FQDNdefinition of, A-2
fresh installdatabase for, 2-4, 3-4
Fulfillment Serverlocation of, A-5
fully qualified domain namedefinition of, A-2
Gglobal database name
location of, A-5GUEST
account, 4-7username and password, 4-7
GUEST groupfor Windows login accounts, 1-10
Hhardware requirements
for this release, 1-5host machine
configuring alias for, 1-14host name
in an upgrade, 4-4selecting, 3-12using an alias, 1-14
host/domainvalidation, 2-18, 3-20, 4-9
HTTP portsetting for, A-5
HTTP serverApache Servlet Port, A-5configuring for JInitiator, 5-5
Index-3
IiAS ORACLE_HOME
derived setting for, A-3owner of, 1-10
identitydb.obj, 5-5index tablespaces
location of, A-4individual products
deselecting, 2-6, 3-6initialization parameters
configuring for database, 5-3init.ora
contents, 5-3in Vision Demo, A-7location of, A-7utl_file_dir parameter, 5-3
installation operationbeginning on multi-node, 3-21beginning on single-node, 2-19choosing, 2-1, 3-2from a stage area, 2-20, 3-22from CDs, 2-20, 3-22progress bars, 2-20, 3-21prompts, 2-20, 3-21what to expect, 2-20, 3-21
installation parameterslist of, A-1saving, 2-16, 3-18validating, 1-3, 2-17, 2-18, 3-19, 4-8
instance settingsfor an upgrade, 4-7list of, A-5specifying, 2-14, 3-16
JJava Development Kit (JDK)
installing, 1-10requirements, 1-6validating, 2-18, 3-20, 4-9
Java Runtime Engine fileslocation of, A-4
JAVA_TOPsettings for, A-4
JDKvalidation, 2-18, 3-20, 4-9
JInitiatordescription of, 5-1downloading executable, 5-1in MS Internet Explorer, 5-2in Netscape, 5-2installing, 5-1setting up on multiple servers, 5-5upgrading, 5-1
JRE_TOPsettings for, A-4
JSERV enginestarting, A-4
JTF Fulfillment Server Portsetting for, A-5
Llanguage CDs
availability, 2-10, 3-10languages
installed in APPL_TOP, 2-10, 3-10selecting additional, 1-2space requirements for, 1-7supported, 5-6
licensed productsselecting, 2-4, 3-5
log fileslocation of, A-6purging, 1-8space requirements, 1-8
login accountsadministrators group, 1-10creating, 1-9Domain Users group, 1-10for multi-user (UNIX), 1-9for single-user (UNIX), 1-9for Windows users, 1-10
Mmain settings
for an upgrade, 4-5specifying for multi-node, 3-13
Index-4
specifying for single-node, 2-12maintenance tasks
importance of, 5-10Map Viewer Servlet port
setting for, A-6memory requirements
estimating, 1-7MetaLink
see OracleMetaLinkMetrics server
least-loaded host, A-5TCP/IP port, A-5
Metrics Server Data Portsetting for, A-5
Metrics Server Req. Portsetting for, A-5
middle tiersconfiguring, 3-15
mini-packsapplying, 1-2
MKS Directoryderived setting for, A-4
mount CDsfor NLS, 2-21, 3-23prompts, 2-20, 3-22
mount pointsdefinitions of, A-3selecting settings, 1-2
MSCA Dispatcher portsetting for, A-6
MSCA Server portsetting for, A-6
MSDEV Directoryderived setting for, A-4
multi-node installdefinition of, 1-1, 3-1for upgrades, 4-11host names, 3-12servers, 3-12setting up, 3-1setting up other nodes, 3-21, 3-25settings for, 3-13
Multi-Orgconverting database to, 5-9in Vision Demo, A-8
Multiple Reporting Currencies (MRC)converting database to, 5-9
NName
setting for Global database name, A-5NLS
additional languages, 1-2base language default, 1-2, 2-9, 3-9changing APPL_TOP character set, 1-2changing database character set, 1-2character set default, 1-2installing translations, 5-7mount CDs, 2-21, 3-23selecting settings, 1-2, 2-9, 3-9setting up, 5-5supported languages, 5-6territory default, 1-2, 2-9, 3-9translated software, 2-12, 3-12Vision Demo configuration, 2-9, 3-9
NLS territorysetting for, A-5
nodesinstalling servers, 3-12
NT Passwordderived setting for, A-4setting for, A-2
NT Userderived setting for, A-4main setting for, A-2
OOACORE Servlet Port Range
setting for, A-6oajinit.exe, 5-1OEM Web Utility port
setting for, A-6online education
about, xiOpen an Existing Configuration File
when to use, 4-11operating system
users, 1-9
Index-5
validation, 2-18, 3-20OProcMgr Port
instance setting for, A-5ORA_TOP
setting base value, A-2oraAppDB, 1-12oraApps, 1-12Oracle Applications
logging on, 5-4Oracle Docs Online, xOracle Learning Network
about, xiOracle OS Group
derived setting for, A-4setting for, A-2
Oracle OS Userderived setting for, A-4setting for, A-2
Oracle Support Servicescontacting, xii
ORACLE_HOMEcreating file systems for, 1-4derived setting for (8.0.6), A-3derived setting for (8.1.7), A-3iAS, A-3owner of, 1-10
OracleMetaLinkusing, xii
oraclestore.oracle.com, xoraDB, 1-12oraiAS, 1-12oraInstRoot.sh, 2-20, 3-22oraNLS, 1-12other files
space requirements, 1-9OUI Inventory Path
derived setting for, A-5Out of Record Buffer message, 1-8output files
purging, 1-8space requirements, 1-8
Ppasswords
changing for database, 5-3in Vision Demo, A-8
PASTA utilityusing in NLS, 5-8
patchesapplying, 1-8
PL/SQL log directoryupdating, 5-2
PL/SQL out directoryupdating, 5-2
port availabilityvalidation, 2-18, 3-20
port uniquenessvalidation, 2-18, 3-20, 4-9
PORTAL_TOPsettings for, A-4
portssetting increments for, 2-15, 3-16setting values, 2-15, 3-16, 4-7settings, 1-2
post-install testinterpreting, 2-23reviewing results of, 2-22, 3-24
pre-install testin an upgrade, 4-8interpreting, 2-18, 3-20viewing results of, 2-17, 3-19
printerssetting up, 5-9
Prod. Detail buttonusing, 2-5, 3-6
production databasefile space requirements, A-6
production environmentdefinition of, 2-3, 3-4
productsapplying mini-packs, 1-2Component Applications Licensing, 2-5, 3-5Component Suite Licensing, 2-5, 3-5controlled, 2-8, 3-8E-Business Suite Licensing, 2-6, 3-6implementation steps for, 1-2licensing, 1-2, 2-6, 3-6registering, 2-4, 3-5selecting individual, 2-5, 3-6
Index-6
progress barsabout, 2-20, 3-21
promptsOUI, 2-20, 3-22
RRapid Install
description of, 1-1installing JDK, 1-10running from CDs, 1-14running from stage area, 1-11starting for multi-node, 3-1starting for single-node, 2-1starting in an upgrade, 4-2
Rapid Install Portalabout, 1-3
Read configuration from filewhen to use, 2-22, 3-23, 3-25
redo log fileslocation of, A-4
Report Review Agentlocation of, A-5
Reports Portsetting for, A-5
Reports serverTCP/IP port, A-5
restartingcommand for, 1-15how to, 2-21, 3-23
RPC Portsetting for, A-5
Sserver processes
configuring, 2-14, 3-16configuring in an upgrade, 4-7
SGA sizememory requirements, 1-7
shared productsinstalled, 2-6, 3-6
shared technology componentsowner of, 1-10
SID
instance setting for, A-5single-node install
definition of, 1-1, 2-1setting up, 2-1settings for, 2-12
sizingsuggestions, 1-6
snapshot informationmaintaining, 5-4
software bundlecontents of, 1-11
software requirementsfor this release, 1-5
stage area installinstructions for, 1-11space requirements, 1-7
startCD, 1-12startup options
for Rapidwiz, 1-14SYS account password
defaults for, 5-3SYSTEM account password
defaults for, 5-3system administration tasks
importance of, 5-9system requirements
for CPU, 1-6for this release, 1-5
SYSTEM tablespacein Vision Demo, A-7
system utilitiesvalidating, 4-9validation, 2-18, 3-20
Ttablespaces
in Vision Demo, A-7technology stack
in this release, 1-5Temp directory
settings for, A-4temporary directory
space requirements, 1-8using, 4-8
Index-7
temporary fileslocation of, A-4
territorydefault, 1-2, 2-9, 3-9
test databasefile space requirements, A-6
test environmentdefinition of, 2-3, 3-4
Tk2Motif.rgb, 5-7training
about, xitranslations
installing software, 5-7
UUniversal Installer Inventory
creating, 2-20, 3-22upgrades
application tier file systems, 4-1applying patches, 4-2, 4-11AutoUpgrade, 4-2completing configuration information, 4-4completing preliminary setup steps, 4-2configuring APPL_TOP, 4-4creating file systems, 4-1how they work, 4-1manual steps for, 4-11multi-node install, 4-11using GUEST account, 4-7using Rapid Install for, 1-4
user accountsspecifying, 1-2
USER_DATA tablespacein Vision Demo, A-7
USER_IDX tablespacein Vision Demo, A-7
usernamesin Vision Demo, A-8
UTF8 character setsetting up, 5-7using for NLS, 5-7
utl_file_dir parameterlocation of, 5-3
Vvalidation warnings
during restart, 2-22, 3-24VisiBroker OrbServer Agent port
setting for, A-6Vision Demo
database for, 2-4, 3-4definition of environment, 2-3, 3-4list of operating units, A-8NLS settings in, 2-9, 3-9passwords, A-8predefined users, A-8tablespace for, A-7using Multi-Org, A-8
WWeb PLSQL Port
instance setting for, A-5Web Port
setting for, A-5Windows clusters
database considerations, 2-4, 3-5Windows platforms
login accounts for, 1-10Workflow Mailer
configuring, 5-8
XX DISPLAY
setting for, A-2, A-4XMLSVCS Servlet Port Range
setting for, A-6
Index-8


![[1 ] Oracle® Traffic Director - Oracle Help Center](https://img.pdfslide.net/doc/110x75/6322fd7e28c4459891060116/1-oracle-traffic-director-oracle-help-center.jpg)