Embed Size (px)
Citation preview
Oracle® HRMS for NetherlandsSupplementRelease 12.2 Part No. F17850-04
May 2021
Oracle HRMS for Netherlands Supplement, Release 12.2
Part No. F17850-04
Copyright © 2002, 2021, Oracle and/or its affiliates.
Primary Author: Pragya Singh Nair
Contributing Author: Padma Rao
This software and related documentation are provided under a license agreement containing restrictions on use and disclosure and are protected by intellectual property laws. Except as expressly permitted in your license agreement or allowed by law, you may not use, copy, reproduce, translate, broadcast, modify, license, transmit, distribute, exhibit, perform, publish, or display any part, in any form, or by any means. Reverse engineering, disassembly, or decompilation of this software, unless required by law for interoperability, is prohibited.
The information contained herein is subject to change without notice and is not warranted to be error-free. If you find any errors, please report them to us in writing.
If this is software or related documentation that is delivered to the U.S. Government or anyone licensing it on behalf of the U.S. Government, then the following notice is applicable:
U.S. GOVERNMENT END USERS: Oracle programs, including any operating system, integrated software, any programs installed on the hardware, and/or documentation, delivered to U.S. Government end users are "commercial computer software" pursuant to the applicable Federal Acquisition Regulation and agency-specific supplemental regulations. As such, use, duplication, disclosure, modification, and adaptation of the programs, including any operating system, integrated software, any programs installed on the hardware, and/or documentation, shall be subject to license terms and license restrictions applicable to the programs. Noother rights are granted to the U.S. Government.
This software or hardware is developed for general use in a variety of information management applications. It is not developed or intended for use in any inherently dangerous applications, including applications that may create a risk of personal injury. If you use this software or hardware in dangerous applications, then you shall be responsible to take all appropriate fail-safe, backup, redundancy, and other measures to ensure its safe use. Oracle Corporation and its affiliates disclaim any liability for any damages caused by use of this software or hardware in dangerous applications.
Oracle and Java are registered trademarks of Oracle and/or its affiliates. Other names may be trademarks of their respective owners.
Intel and Intel Xeon are trademarks or registered trademarks of Intel Corporation. All SPARC trademarks are used under license and are trademarks or registered trademarks of SPARC International, Inc. AMD, Opteron, the AMD logo, and the AMD Opteron logo are trademarks or registered trademarks of Advanced Micro Devices. UNIX is a registered trademark of The Open Group.
This software or hardware and documentation may provide access to or information about content, products, and services from third parties. Oracle Corporation and its affiliates are not responsible for and expressly disclaim all warranties of any kind with respect to third-party content, products, and services unless otherwise set forth in an applicable agreement between you and Oracle. Oracle Corporation and its affiliates will not be responsible for any loss, costs, or damages incurred due to your access to or use of third-party content, products, or services, except as set forth in an applicable agreement between you and Oracle.
For information about Oracle's commitment to accessibility, visit the Oracle Accessibility Program website at http://www.oracle.com/pls/topic/lookup?ctx=acc&id=docacc.
Oracle customers that have purchased support have access to electronic support through My Oracle Support. For information, visit http://www.oracle.com/pls/topic/lookup?ctx=acc&id=info or visit http://www.oracle.com/pls/topic/lookup?ctx=acc&id=trs if you are hearing impaired.
iii
Contents
Send Us Your Comments
Preface
1 Organization StructuresOrganization Structures Overview........................................................................................... 1-1
Organization Structures............................................................................................................ 1-3
Organization.............................................................................................................................. 1-6
Key Concepts for Representing Enterprises.........................................................................1-6
Representing Organizations.................................................................................................1-8
Organization Classifications................................................................................................ 1-9
Dutch Organizations and Additional Information.............................................................1-19
Examples of Assigning Social Insurance Types and Providers to Employees................... 1-22
Methods for Deriving Social Insurance Days.....................................................................1-25
Creating an Organization...................................................................................................1-28
Entering Organization Classifications................................................................................1-30
Entering Additional Information....................................................................................... 1-31
Finding an Organization.................................................................................................... 1-35
Removing and Deleting Organizations..............................................................................1-36
Entering Business Group Information............................................................................... 1-37
Entering Dutch Business Group Information.....................................................................1-39
Business Groups: Entering Budget Value Defaults............................................................ 1-40
Business Groups: Selecting a PTO Balance Type............................................................... 1-41
Business Groups and HR Organizations: Entering Work Day Defaults............................ 1-42
Defining Benefits Defaults for a Business Group............................................................... 1-43
Business Group: Setting Up Public Sector-type Functionality........................................... 1-44
Business Groups: Entering Recruitment Information........................................................ 1-44
iv
Assigning ABP Pension Types to an Organization............................................................ 1-46
Assigning PGGM Pension Types to an Organization........................................................ 1-46
Entering Payslip Information............................................................................................. 1-47
Entering Self-Service Preference Information.................................................................... 1-48
Identifying Balances for the Payslip...................................................................................1-51
Identifying Elements for the Payslip.................................................................................. 1-52
HR Organizations: Entering Costing Information............................................................. 1-52
Entering Reporting Information for an HR Organization or a Company Cost Center.......1-53
HR Organizations: Entering Parent Organizations............................................................ 1-53
HR Organization: Entering Social Insurance Provider Information.................................. 1-54
HR Organization: Entering Dutch ABP Provider Information.......................................... 1-55
HR Organization: Entering ABP Pensions General Information........................................1-56
HR Organizations: Entering ABP Sender Details...............................................................1-57
HR Organization: Entering Dutch Organization Information........................................... 1-57
HR Organization: Entering General PGGM Information...................................................1-60
HR Organization: Entering Wage Report Information...................................................... 1-60
HR Organization: Entering Flat Rate Taxation Information.............................................. 1-61
Adding Sickness Information............................................................................................ 1-62
Adding Labor Cost Arrangement Information.................................................................. 1-62
Entering GL Company Cost Center Information for a Company Cost Center...................1-63
Entering Representative Body Information....................................................................... 1-64
Entering Constituency Information for a Representative Body......................................... 1-64
Entering Location Information for Constituencies............................................................. 1-65
Entering Organization Hierarchy Information for Constituencies.....................................1-65
Entering Organization Information for Constituencies......................................................1-66
Entering Grade Information for Constituencies.................................................................1-66
Entering Bargaining Unit Information for Constituencies................................................. 1-66
Entering Job Information for Constituencies..................................................................... 1-66
Entering Collective Agreement Grade Information for Constituencies............................. 1-67
Entering Trade Union Information for a Bargaining Association...................................... 1-67
Entering Additional Information for a Professional Body................................................. 1-68
Setting up Tax, Social Insurance, and Private Health Insurance Organizations................ 1-68
Dutch Private Health Insurance Organization: Entering IZA Provider Information......... 1-70
Setting up Social Insurance Days ...................................................................................... 1-71
Dutch UWV Organization: Entering Dutch SI Provider Information................................ 1-73
Dutch UWV Organization: Entering Social Insurance Type Information.......................... 1-73
Entering Statement of Earnings Information..................................................................... 1-76
Entering Statement of Earnings Detail Information........................................................... 1-77
Entering Related Organizations Information for an HR Organization.............................. 1-78
Locations.................................................................................................................................. 1-80
Locations............................................................................................................................ 1-80
v
Location Extra Information Types..................................................................................... 1-81
Setting Up Locations.......................................................................................................... 1-81
2 Occupational HealthDisability Information.............................................................................................................. 2-2
Occupational Health: Medical Assessments, Disabilities and Work Incidents.................... 2-2
Entering Disability Information........................................................................................... 2-5
3 People ManagementPeople Management Overview................................................................................................. 3-1
People Management.................................................................................................................. 3-4
People........................................................................................................................................ 3-7
Person Extra Information Types.......................................................................................... 3-7
Finding a Person Using the Find Person Window............................................................... 3-8
Entering a New Person (People Window)........................................................................... 3-9
Entering Additional Personal Information (People Window)............................................3-15
Entering Additional Sickness Details Information.............................................................3-19
Entering Additional Absence Detail Information.............................................................. 3-20
Entering Pictures................................................................................................................ 3-22
Running the Person Synchronization Report..................................................................... 3-23
Disabling Full Name Formats............................................................................................ 3-23
Entering a New Employee................................................................................................. 3-24
Employees................................................................................................................................ 3-29
The Employee Assignment................................................................................................ 3-29
Employment Information.................................................................................................. 3-34
Assigning Working Shift Patterns to an Employee............................................................ 3-36
Adding Further Collective Agreement Information.......................................................... 3-37
Workforce Information Management..................................................................................... 3-38
Previous Year's Taxable Income.........................................................................................3-38
Assignment Extra Information Types................................................................................ 3-39
Entering Additional Assignment Details (Assignment window)...................................... 3-49
Running the Dutch Reset Last Year Salary Override Process............................................ 3-58
Contact Information................................................................................................................ 3-60
Contact Information Overview.......................................................................................... 3-60
Entering Addresses (Address Window)............................................................................ 3-60
Adding Telephone Information (Phone Numbers Window)............................................. 3-63
Entering Communication Delivery Methods..................................................................... 3-64
Entering Next of Kin and Other Contacts.......................................................................... 3-65
Reporting on the Workforce....................................................................................................3-69
The Workforce Headcount Report Set............................................................................... 3-69
vi
Running the Full Personal Details Report Set.................................................................... 3-71
Running the Employee Summary Report.......................................................................... 3-72
Running the Employee Payroll Movements Report ..........................................................3-72
Running the Worker Organization Movements Report..................................................... 3-73
Running the Assignment Status Report ............................................................................ 3-74
Running the Terminations Report .....................................................................................3-75
Running the Conclude Placement Report.......................................................................... 3-76
Running the Head Count Detail Report.............................................................................3-76
Running the Workforce Count Reports............................................................................. 3-78
Running the Duplicate Person Report............................................................................... 3-79
Running the Full Person Details Report.............................................................................3-80
Running the Person Full History Report............................................................................3-80
Using the People Folders................................................................................................... 3-81
Listing Assignments Using the Assignments Folder......................................................... 3-82
Listing Assignments Using the List Assignments Window............................................... 3-83
Using the List People by Assignment Window................................................................. 3-83
Listing Workforce by Position........................................................................................... 3-84
Listing Workforce by Organization ...................................................................................3-85
Listing People by Special Information............................................................................... 3-86
Viewing a Worker's Assignment History...........................................................................3-87
Running the Dutch Assignment SCL Flexfield Upgrade Report........................................3-88
4 PayrollsPayrolls Overview..................................................................................................................... 4-1
Payrolls...................................................................................................................................... 4-2
Payroll Payments and Distributions......................................................................................... 4-4
Cash Management and Oracle Payroll.................................................................................4-4
Configuring the Statement of Earnings for the Netherlands................................................4-4
Setting Up Integration of Cash Management with Oracle Payroll for EFT Reconciliation............................................................................................................................................. 4-7
5 Payroll Processing and AnalysisPost Processing for a Payroll..................................................................................................... 5-2
Post-Processing for a Payroll................................................................................................5-2
Overview of RetroPay Processing........................................................................................ 5-3
RetroPay Standard and Replacement Methods....................................................................5-7
Setting Up Enhanced RetroPay with Component Usages and Element Time Spans......... 5-12
Setting Up the Adjustment Component of RetroPay......................................................... 5-14
Enabling the Method of RetroPay...................................................................................... 5-15
vii
6 Payroll Statutory Deductions and ReportingPayroll Statutory Deductions and Reporting Overview.......................................................... 6-1
Payroll Statutory Deductions and Reporting........................................................................... 6-1
Payroll Statutory Deductions and Reporting........................................................................... 6-3
Dutch Tax and Social Insurance........................................................................................... 6-3
Multiple Assignment Processing for Social Insurance and Taxation................................... 6-6
IZA Upload and Reporting Overview............................................................................... 6-12
Dutch Wage Reporting...................................................................................................... 6-14
Setting up Tax and Social Insurance Deductions............................................................... 6-16
Setting Up ZW, WW, WAO/IVA/WGA, ZVW (standard en low) and UFO Contributions........................................................................................................................................... 6-18Setting Up Flat Rate Taxation............................................................................................ 6-18
Running the Payment Output File (Dutch)........................................................................ 6-20
Running the Dutch Annual Tax Statement Archive...........................................................6-21
Running the Dutch Annual Tax Statement for the Employee............................................ 6-21
Setting up the Dutch Remuneration State Report.............................................................. 6-22
Running the Dutch Remuneration State Report.................................................................6-25
Setting Up the Dutch Wage Report.................................................................................... 6-26
Running the Dutch Wage Report Generator...................................................................... 6-29
Running the Dutch Wage Report....................................................................................... 6-29
Running the Dutch Wage Report Data Lock Process......................................................... 6-30
Setting up the Labor Cost Arrangement Report................................................................ 6-30
Running the Dutch Labour Cost Agreement Audit Report............................................... 6-31
Setting Up the First Day Report......................................................................................... 6-32
Generating the First Day Report........................................................................................ 6-32
Running the Dutch Element RetroPay Setup Report......................................................... 6-33
Running the Dutch ABP Report Archiver ......................................................................... 6-33
Running the Dutch ABP Report......................................................................................... 6-34
Running the Dutch ABP Retro Pension Salary Calculation............................................... 6-34
Running the Dutch Remuneration Statement ................................................................... 6-36
Setting Up Wage Tax Subsidies......................................................................................... 6-37
Generating the Dutch Wage Tax Subsidy Report.............................................................. 6-40
Running the Dutch IZA Upload Process............................................................................6-40
Running the Dutch IZA Upload Process Status Report..................................................... 6-41
Running the IZA Upload Process Status Purge Process.................................................... 6-42
Re-generating the IZA Upload Process Report.................................................................. 6-42
Running the Dutch AOW HR Report................................................................................ 6-43
viii
7 General Compensation StructuresElements.................................................................................................................................... 7-2
Survey of the Classifications ............................................................................................... 7-2
Absence Tracking.................................................................................................................... 7-15
Absence Tracking Reporting.............................................................................................. 7-15
Tracking Absences ............................................................................................................ 7-15
Running the Daily Sick and Recovery Report.................................................................... 7-17
Running the Absence Action List Report........................................................................... 7-17
Running the Re-integration Actions Report.......................................................................7-18
Dutch Digital Sickness Reporting.......................................................................................... 7-19
Sickness Reporting............................................................................................................. 7-19
Setting up the Dutch Digital Sickness Reports................................................................... 7-19
Running the Sickness Report............................................................................................. 7-20
Running the Sickness Recovery Report..............................................................................7-22
Running the WAZO Report............................................................................................... 7-23
Running the Long Term Sickness Report...........................................................................7-24
Running the Long Term Sickness Recovery Report........................................................... 7-25
8 Savings and RetirementsSavings and Retirement Overview........................................................................................... 8-1
Savings and Retirement............................................................................................................ 8-3
Pensions and Savings Schemes.................................................................................................8-5
Calculation of Pension and Savings Contributions.............................................................. 8-5
Elements, Formulas, and Balances for Pensions and Savings Schemes..............................8-11
Arrears Management......................................................................................................... 8-22
Setting Up Pension and Savings Schemes.......................................................................... 8-22
Setting Up a Pension or Savings Plan in Standard or Advanced Benefits..........................8-26
Entering ABP Salary Thresholds and Premiums That Vary By Age.................................. 8-28
Managing Pensions and Savings Contributions................................................................ 8-29
Enrolling Employees in Pension Schemes..........................................................................8-31
Enrolling Employees in Savings Schemes.......................................................................... 8-33
Adjusting Pension or Savings Deductions......................................................................... 8-35
Withdrawing Savings to Compensate for Unpaid Leave or for Retirement...................... 8-36
Notification of ABP Pensions and USZO Social Insurance Data.......................................... 8-37
Notification of ABP Pensions Data.................................................................................... 8-37
Setting Up the ABP Notification Extract............................................................................ 8-38
Running the ABP Notification Extract .............................................................................. 8-41
Setting Up the PGGM Notification Extract........................................................................ 8-41
Running the PGGM Notification Extract........................................................................... 8-43
ix
9 Other Payroll Earnings and DeductionsPayroll Earnings and Deductions Overview............................................................................ 9-1
Payroll Earnings and Deductions............................................................................................. 9-2
Additional Element Setup for Payroll...................................................................................... 9-6
Formulas and Payroll Run Results ...................................................................................... 9-6
Pay Values........................................................................................................................... 9-7
Predefined Elements............................................................................................................ 9-8
Predefined RetroPay Elements...........................................................................................9-15
Retropay Component Usages............................................................................................ 9-27
Element Span Usages......................................................................................................... 9-32
Setting Up Total Compensation Elements for Payroll........................................................9-37
Defining Frequency Rules.................................................................................................. 9-41
Defining Formula Processing and Result Rules................................................................. 9-42
Balances................................................................................................................................... 9-45
Payroll Balances................................................................................................................. 9-45
Netherlands Balance Dimensions...................................................................................... 9-47
Balance Initialization.......................................................................................................... 9-48
Netherlands Balances......................................................................................................... 9-52
Defining Secondary Element Classifications ..................................................................... 9-62
Creating Balance Feeds for Individual Elements............................................................... 9-63
Creating Classes of Balance Feeds..................................................................................... 9-64
Defining User Balances...................................................................................................... 9-64
10 Using Oracle FastFormulaFormula Reference...................................................................................................................10-2
Netherlands Payee Name Formulas.................................................................................. 10-2
Netherlands EFT Payment Override Formula................................................................... 10-2
Formulas for Netherlands Wage Tax Subsidies................................................................. 10-3
Netherlands Working Hours Formula .............................................................................. 10-3
Netherlands Reporting ABP Part Time Percentage............................................................10-3
Formulas to Enable Additional Part-Time Percentages for the Netherlands..................... 10-4
11 Additional Implementation StepsAdditional Implementation Steps for the Netherlands......................................................... 11-1
Index

xi
Send Us Your Comments
Oracle HRMS for Netherlands Supplement, Release 12.2Part No. F17850-04
Oracle welcomes customers' comments and suggestions on the quality and usefulness of this document. Your feedback is important, and helps us to best meet your needs as a user of our products. For example:
• Are the implementation steps correct and complete? • Did you understand the context of the procedures? • Did you find any errors in the information? • Does the structure of the information help you with your tasks? • Do you need different information or graphics? If so, where, and in what format? • Are the examples correct? Do you need more examples?
If you find any errors or have any other suggestions for improvement, then please tell us your name, the name of the company who has licensed our products, the title and part number of the documentation andthe chapter, section, and page number (if available).
Note: Before sending us your comments, you might like to check that you have the latest version of the document and if any concerns are already addressed. To do this, access the new Oracle E-Business Suite Release Online Documentation CD available on My Oracle Support and www.oracle.com. It contains the most current Documentation Library plus all documents revised or released recently.
Send your comments to us using the electronic mail address: [email protected]
Please give your name, address, electronic mail address, and telephone number (optional).
If you need assistance with Oracle software, then please contact your support representative or Oracle Support Services.
If you require training or instruction in using Oracle software, then please contact your Oracle local officeand inquire about our Oracle University offerings. A list of Oracle offices is available on our Web site at www.oracle.com.

xiii
Preface
Intended AudienceWelcome to Release 12.2 of the Oracle HRMS for Netherlands Supplement.
This guide assumes you have a working knowledge of the following:
• The principles and customary practices of your business area.
• Oracle HRMS.
If you have never used Oracle HRMS, Oracle suggests you attend one or more of the Oracle HRMS training classes available through Oracle University
• Oracle Self-Service Web Applications.
• The Oracle Applications graphical user interface.
To learn more about the Oracle Applications graphical user interface, read the Oracle E-Business Suite User's Guide.
See Related Information Sources on page xiv for more Oracle E-Business Suite product information.
Documentation AccessibilityFor information about Oracle's commitment to accessibility, visit the Oracle Accessibility Program website at http://www.oracle.com/pls/topic/lookup?ctx=acc&id=docacc.
Access to Oracle SupportOracle customers that have purchased support have access to electronic support through My Oracle Support. For information, visit http://www.oracle.
xiv
com/pls/topic/lookup?ctx=acc&id=info or visit http://www.oracle.com/pls/topic/lookup?ctx=acc&id=trs if you are hearing impaired.
Structure1 Organization Structures2 Occupational Health3 People Management4 Payrolls5 Payroll Processing and Analysis6 Payroll Statutory Deductions and Reporting7 General Compensation Structures8 Savings and Retirements9 Other Payroll Earnings and Deductions10 Using Oracle FastFormula11 Additional Implementation Steps
Related Information SourcesOracle HRMS shares business and setup information with other Oracle Applications products. Therefore, you may want to refer to other user guides when you set up and use Oracle HRMS.
You can read the guides online by choosing Library from the expandable menu on yourHTML help window, by reading from the Oracle Applications Document Library CD included in your media pack, or by using a Web browser with a URL that your system administrator provides.
If you require printed guides, you can purchase them from the Oracle store at http://oraclestore.oracle.com.
Guides Related to All Products
Oracle E-Business Suite User's Guide
This guide explains how to navigate, enter data, query, and run reports using the user interface (UI) of Oracle E-Business Suite. This guide also includes information on settinguser profiles, as well as running and reviewing concurrent requests.
Oracle Application Framework Personalization Guide
This guide covers the design-time and run-time aspects of personalizing applications built with Oracle Application Framework.
Guides Related to This Product
Oracle Human Resources Management Systems Enterprise and Workforce Management Guide
Learn how to use Oracle HRMS to represent your enterprise. This includes setting up your organization hierarchy, recording details about jobs and positions within your enterprise, defining person types to represent your workforce, and also how to manage
xv
your budgets and costs.
Oracle Human Resources Management Systems Workforce Sourcing, Deployment, and Talent Management Guide
Learn how to use Oracle HRMS to represent your workforce. This includes recruiting new workers, developing their careers, managing contingent workers, and reporting on your workforce.
Oracle Human Resources Management Systems Payroll Processing Management Guide
Learn about wage attachments, taxes and social insurance, the payroll run, and other processes.
Oracle Human Resources Management Systems Compensation and Benefits Management Guide
Learn how to use Oracle HRMS to manage your total compensation package. For example, read how to administer salaries and benefits, set up automated grade/step progression, and allocate salary budgets. You can also learn about setting up earnings and deductions for payroll processing, managing leave and absences, and reporting on compensation across your enterprise.
Oracle Human Resources Management Systems Configuring, Reporting, and System Administration Guide
Learn about extending and configuring Oracle HRMS, managing security, auditing, information access, and letter generation.
Oracle Human Resources Management Systems Implementation Guide
Learn about the setup procedures you need to carry out in order to implement Oracle HRMS successfully in your enterprise.
Oracle Human Resources Management Systems FastFormula User Guide
Learn about the different uses of Oracle FastFormula, and understand the rules and techniques you should employ when defining and amending formulas for use with Oracle applications.
Oracle Self-Service Human Resources Deploy Self-Service Capability Guide
Set up and use self-service human resources (SSHR) functions for managers, HR Professionals, and employees.
Oracle Performance Management Implementation and User Guide
Learn how to set up and use performance management functions. This includes setting objectives, defining performance management plans, managing appraisals, and administering questionnaires.
Oracle Succession Planning Implementation and User Guide
Learn how to set up and use Succession Planning functions. This includes identifying succession-planning requirements, using talent profile, suitability analyzer, and performance matrices.
xvi
Oracle Human Resources Management Systems Deploy Strategic Reporting (HRMSi)
Implement and administer Oracle Human Resources Management Systems Intelligence (HRMSi) in your environment.
Oracle Human Resources Management Systems Strategic Reporting (HRMSi) User Guide
Learn about the workforce intelligence Discoverer workbooks.
Oracle Human Resources Management Systems Approvals Management Implementation Guide
Use Oracle Approvals Management (AME) to define the approval rules that determine the approval processes for Oracle applications.
Oracle Human Resources Management Systems Window Navigation and Reports Guide
This guide lists the default navigation paths for all windows and the default reports andprocesses as they are supplied in Oracle HRMS.
Oracle iRecruitment Implementation and User Guide
Set up and use Oracle iRecruitment to manage all of your enterprise's recruitment needs.
Oracle Learning Management User Guide
Use Oracle Learning Management to accomplish your online and offline learning goals.
Oracle Learning Management Implementation Guide
Implement Oracle Learning Management to accommodate your specific business practices.
Oracle Time and Labor Implementation and User Guide
Learn how to capture work patterns, such as shift hours, so that this information can be used by other applications, such as General Ledger.
Oracle Labor Distribution User Guide
Learn how to maintain employee labor distribution schedules, distribute pay amounts, encumber (commit) labor expenses, distribute labor costs, adjust posted labor distribution, route distribution adjustment for approval, and manage error recovery processes. You also learn how to set up effort reporting for Office of Management and Budget (OMB) compliance.
Other Implementation Documentation
Oracle E-Business Suite Maintenance Guide
This guide contains information about the strategies, tasks, and troubleshooting activities that can be used to help ensure an Oracle E-Business Suite system keeps running smoothly, together with a comprehensive description of the relevant tools and utilities. It also describes how to patch a system, with recommendations for optimizing
xvii
typical patching operations and reducing downtime.
Oracle E-Business Suite Security Guide
This guide contains information on a comprehensive range of security-related topics, including access control, user management, function security, data security, and auditing. It also describes how Oracle E-Business Suite can be integrated into a single sign-on environment.
Oracle E-Business Suite Setup Guide
This guide contains information on system configuration tasks that are carried out either after installation or whenever there is a significant change to the system. The activities described include defining concurrent programs and managers, enabling Oracle Applications Manager features, and setting up printers and online help.
Oracle E-Business Suite Flexfields Guide
This guide provides flexfields planning, setup, and reference information for the Oracle E-Business Suite implementation team, as well as for users responsible for the ongoing maintenance of Oracle E-Business Suite product data. This guide also provides information on creating custom reports on flexfields data.
Oracle eTechnical Reference Manuals
Each eTechnical Reference Manual (eTRM) contains database diagrams and a detailed description of database tables, forms, reports, and programs for a specific Oracle Applications product. This information helps you convert data from your existing applications, integrate Oracle Applications data with non-Oracle applications, and writecustom reports for Oracle Applications products. Oracle eTRM is available on My Oracle Support.
Integration Repository The Oracle Integration Repository is a compilation of information about the service endpoints exposed by the Oracle E-Business Suite of applications. It provides a complete catalog of Oracle E-Business Suite's business service interfaces. The tool lets users easily discover and deploy the appropriate business service interface for integration with any system, application, or business partner.
The Oracle Integration Repository is shipped as part of the Oracle E-Business Suite. As your instance is patched, the repository is automatically updated with content appropriate for the precise revisions of interfaces in your environment.
Do Not Use Database Tools to Modify Oracle E-Business Suite DataOracle STRONGLY RECOMMENDS that you never use SQL*Plus, Oracle Data Browser, database triggers, or any other tool to modify Oracle E-Business Suite data unless otherwise instructed.
Oracle provides powerful tools you can use to create, store, change, retrieve, and
xviii
maintain information in an Oracle database. But if you use Oracle tools such as SQL*Plus to modify Oracle E-Business Suite data, you risk destroying the integrity of your data and you lose the ability to audit changes to your data.
Because Oracle E-Business Suite tables are interrelated, any change you make using an Oracle E-Business Suite form can update many tables at once. But when you modify Oracle E-Business Suite data using anything other than Oracle E-Business Suite, you may change a row in one table without making corresponding changes in related tables.If your tables get out of synchronization with each other, you risk retrieving erroneous information and you risk unpredictable results throughout Oracle E-Business Suite.
When you use Oracle E-Business Suite to modify your data, Oracle E-Business Suite automatically checks that your changes are valid. Oracle E-Business Suite also keeps track of who changes information. If you enter information into database tables using database tools, you may store invalid information. You also lose the ability to track whohas changed your information because SQL*Plus and other database tools do not keep arecord of changes.
Organization Structures 1-1
1Organization Structures
Organization Structures OverviewOracle HRMS provides you with organization management functionality to represent the operating structures of your enterprise.
Representing Organization Structures Using Oracle HRMS Using the Configuration Workbench for your implementation, you can configure the Oracle eBusiness Suite of applications to represent the management and operating structures of your enterprise.
The Configuration Workbench delivers an integrated configuration management toolsetfor HR systems and assists in the evaluation, configuration, deployment, and maintenance of HR applications. The workbench uses a configuration interview, to review the decisions and operational questions you make about setting up your enterprise using Oracle HRMS.
The Configuration Workbench configuration process suggests a combination of business groups and organizations to satisfy your integrated legal, financial, organization and employee management needs using Oracle HRMS. The suggested combination of business groups and organizations uses one of the following configuration models:
• A single operating company working within the legislative rules of a single country.
• A single operating company working within the legislative rules of multiple countries.
• Multiple operating companies working within the legislative rules of a single country.
• Multiple operating companies working within the legislative rules of multiple
1-2 Oracle HRMS for Netherlands Supplement
countries.
These configuration models define the basic information model to represent any enterprise. You can add other location and internal work structures that represent your internal organization or reporting structures for specific legal, personnel, and financial management requirements.
Managing your Work Structures Using Graphical Charting CapabilitiesYou can plan and implement new working structures ahead of time using graphical charts. The hierarchy diagrammer enables you to create organization and position hierarchies to reflect reporting lines and control access to information in your enterprise. See:
• Organization Hierarchies, Oracle HRMS Enterprise and Workforce Management Guide
• Position Hierarchies, Oracle HRMS Enterprise and Workforce Management Guide
The hierarchy diagrammers use the same security model as the other windows in Oracle HRMS and access to them is restricted by your responsibility.
Reporting on Organization StructuresOracle HRMS and Oracle HRMSi enable you to produce several reports to satisfy the statutory requirements for your legislation and meet your business analysis needs. For example:
• Oracle HRMS enables employers in the U.S. to generate reports to comply with the VETS government reporting requirements. The report lists the number of special disabled and Vietnam era veterans a U.S. enterprise employs in each of the nine job categories.
• Oracle HRMS provides you with a standard organization hierarchy report to view the relationships between organizations and their managers within a hierarchy.
• Oracle HRMSi offers the Organization Separation Report to investigate the performance of your best and worst organizations based on the workforce changes in an organization.
Reporting Costs for Your Organization StructuresWith the Oracle eBusiness suite of applications, you can automatically create HR organizations to corresponding company cost center combinations that exist in your GLaccount combinations.

Organization Structures 1-3
Key ConceptsTo effectively use Oracle HRMS for organization management, see:
Key Concepts for Representing Enterprises, page 1-6
Organization Classifications, page 1-9
Extending the Enterprise Framework, Oracle HRMS Enterprise and Workforce ManagementGuide
Configuration Models for Your Enterprise Framework, Oracle HRMS Enterprise and Workforce Management Guide
Locations, page 1-80
Organization Hierarchies, Oracle HRMS Enterprise and Workforce Management Guide
Defaults for the Business Group, Oracle HRMS Enterprise and Workforce Management Guide
Internal Organizations and Cost Centers, Oracle HRMS Enterprise and Workforce Management Guide
Organization StructuresOracle HRMS can represent all the components of your enterprise. You can record the physical locations where your employees work and all the different departments and sections that make up your enterprise. You can even record information about other organizations you work with, such as recruitment agencies or tax authorities.
See: Extending the Enterprise Framework, Oracle HRMS Enterprise and Workforce Management Guide
You can view and edit hierarchy diagrams for organizations and positions using:
• The Organization Hierarchy Diagrammer
• The Position Hierarchy Diagrammer
How do you represent your enterprise as an employer?You can use the GRE/Legal Entity and Employer organization classifications to represent the employer in each country you do business. If you use the Configuration Workbench to set up your organization structures, then an employer organization is set up in each country your enterprise operates.
In US and Canada, how do you manage government reporting?Oracle HRMS enables you to set up one or more Government Reporting Entities (GREs)within each of your Business Groups. GREs represent an employer the government
1-4 Oracle HRMS for Netherlands Supplement
recognizes as being responsible for paying employees and for filing a variety of reports that government agencies require. If your enterprise has a single Employer Identification Number from the Internal Revenue Service, your Business Group and GRE are the same organization.
For Canada, you also need to set up Provincial Reporting Establishments (PREs). GREs and PREs represent an employer the governments recognise as being responsible for paying employees and for filing a variety of reports. There must be a GRE for each Business Number that the Canada Revenue Agency (CRA) assigns to an employer. There must be a PRE for each Quebec Identification Number that the Ministere du Revenu assigns to an employer. If your enterprise has a single Business Number from the CRA and a single Quebec Identification Number, your Business Group, GRE and PRE are the same organization.
How do you represent the structure of an enterprise?Oracle HRMS enables you to build a model of your enterprise showing all the reportinglines and other hierarchical relationships. You can set up reporting hierarchies reflectingall the reporting lines in your enterprise, as established in organization charts.
The Configuration Workbench creates an enterprise structure that suits your operational (management and reporting), and geographical requirements. You can use the enterprise structure the workbench sets up as the basic infrastructure of your company. Once the basic structure is set up, you can define further locations and organizations and add them to your organization hierarchy.
Do I need to run a separate program to create hierarchy diagrams?No. The hierarchy diagrammers are standard Oracle HRMS windows, with the additionof a graphical area. They work together with the Organization Hierarchy window and Position Hierarchy window so you can create basic hierarchies using these windows and then make intuitive drag-and-drop changes using the diagrammers.
Any changes made using the hierarchy diagrammers are reflected in the hierarchy windows, and are saved in your database.
Can I create multiple versions of a hierarchy, and model different business scenarios?Yes. You can use the diagrammers together with the organization and position hierarchy windows to:
• Create new versions of existing hierarchies
• Create copies of existing hierarchies
• Create future-dated hierarchies to prepare for reorganizations in advance
Organization Structures 1-5
Can I print the graphical versions of the hierarchies?Yes. You can print pictorial representations of organization and position hierarchies.
Can I create hierarchies that contain organizations from multiple business groups?Yes. If you have the appropriate security access to more than one business group, you can include organizations from more than one business group in your hierarchy.
1-6 Oracle HRMS for Netherlands Supplement
Organization
Key Concepts for Representing EnterprisesYou represent your enterprise using key organization structures in Oracle HRMS. Thesestructures provide the framework so you can perform legal reporting, financial control, and management reporting. You can set up these organization structures yourself, or use the Configuration Workbench.
The Configuration Workbench delivers an integrated configuration management toolsetfor HR systems and assists in the evaluation, configuration, deployment, and maintenance of HR applications. The workbench suggests a basic structure of organizations for your enterprise based on configuration models.
See: Configuration Models for Your Enterprise Framework, Oracle HRMS Enterprise and Workforce Management Guide
Once the basic enterprise structure is set up, you add the additional organizations and locations that exist in your enterprise. You define the internal organizations that represent your internal divisions and departments, and you define the external organizations that represent the organizations outside of your enterprise. For example, you can set up an external organization to represent the tax office for which your enterprise uses for reporting purposes.
You can use organizations to represent many levels of your enterprise, from the highest level of organization that represents the whole enterprise, to the lowest level of organization that represents a section or department.
See: Extending the Enterprise Framework, Oracle HRMS Enterprise and Workforce Management Guide
See: Organization Classifications, page 1-9
See: Setting Up Organizations, Oracle HRMS Enterprise and Workforce Management Guide
Business GroupThe business group represents a country in which your enterprise operates. You create it as an organization in Oracle HRMS, but it does not represent a specific organization within your enterprise structure, and you do not include it in your organization hierarchies. A business group enables you to group and manage data in accordance with the rules and reporting requirements of each country, and to control access to data.
The critical factors for deciding when to use a separate business group, or an international business group, are based on the following factors:
• If you use Oracle Payroll
Organization Structures 1-7
• The number of people you employ in a country
• If you require legislative support for Oracle HR
Generally the laws are so different in each country that to be compliant, there must be a different business group for each country in which an enterprise has employees.
Operating CompanyAn operating company represents a division or line of business within your enterprise that is legally registered for reporting in at least one country. An operating company is a holding company, a company within a company.
Ultimate Legal EntityThe ultimate legal entity represents the enterprise, and typically, the enterprise is the highest (global) level of a business organization. The ultimate legal entity is the parent company or organization for all its subsidiaries and divisions. Oracle HRMS represents the ultimate legal entity with the GRE/Legal Entity organization classification.
Legal Entity/EmployerA legal entity represents the designated legal employer for all employment-related activities. The legal authorities in a country recognize this organization as a separate employer. In an organization hierarchy, a legal entity may report to an operating company or to the ultimate legal entity.
A legal employer is a legal entity that is responsible for employing people in a particular country. Therefore, if you employ people in a country, then you must have at least one organization classified as a legal entity and a legal employer.
The Configuration Workbench classifies an organization as a GRE/Legal Entity where your enterprise operates in a country, and classifies it as an Employer if you employ people in that country also. For example, you can have a legal entity in a country where you do business, but do not employ people in that country.
Consolidated Legal EntityA consolidated legal entity acts on behalf of multiple operating companies that are not legally registered, or simply on behalf of the enterprise in a country. You typically use the consolidated legal entity for when you have multiple operating companies in your enterprise, but for the purposes of consolidation, you group the information into one organization. For management reporting purposes, the organizations below the consolidated legal entity in an organization hierarchy, such as, your departments and sections, can report to any organization in the enterprise. However, for legal reporting purposes, they report up to the consolidated legal entity.
For information on how to model your enterprise using the key organization structures,
1-8 Oracle HRMS for Netherlands Supplement
see: Configuration Models for Your Enterprise Framework, Oracle HRMS Enterprise and Workforce Management Guide
Representing OrganizationsIn Oracle HRMS, the organizations you set up to represent your enterprise as an employer are the Business Group, and in the US and Canada, one or more GREs within the Business Group.
Below this level, you represent the groupings in which employees work, such as branches, departments or sections, by means of internal organizations. To enable the assignment of employees to an internal organization, you classify it as an HR Organization.
Korea users onlyYou must also define an organization classification called Business Place. You assign your employees to the business place in Korea, and use this to store establishment information such as business registration number, health insurance number, and address.
You also maintain information in the system about various types of external organizations relevant to human resources and payroll management and administration. These can include training vendors, tax offices, benefits carriers, or certification bodies.
External organizations can appear in your organization hierarchies together with internal organizations and are defined in the same way.
Note: You can never assign employees to external organizations, even those classified as HR Organizations.
Organization ClassificationWhenever you create an organization you have to give it a classification, such as Business Group or HR Organization. The classification you give to an organization defines its purpose and functionality within Oracle HRMS.
Selecting a classification enables you to set up additional information about your organization. The classification you enter controls the additional information you can set up.
Classification are predefined, and each Oracle Product group is installed with the classifications and information types relevant to their application. For example, Oracle Financials has different classifications from Oracle HRMS.
Note: Oracle HRMS enables you to install your own additional information types for classifications.
Organization Structures 1-9
Organization ClassificationsOrganization classifications define the purpose of an organization and its functionality within Oracle HRMS. The classifications you assign to an organization control the additional information you can set up at the organization level. The Configuration Workbench automatically assigns the appropriate classifications to the organizations it creates.
For more information on the key organization structures you use to represent your enterprise, see: Key Concepts for Representing Enterprises, page 1-6
You can define one organization with multiple classifications or you can define separateorganizations to represent different types of entity. For example, you can classify an organization as a legal entity as well as an HR organization if it's the same organization.If they are different, then you create two organizations.
Note: Oracle HRMS enables you to install your own additional information types for classifications.
You can select the following classifications in the Organization window, depending on your legislation:
All LegislationsAll legislations can use the following classifications:
• Business Group: Use this classification to group, manage, and control access to data in accordance with the rules and reporting requirements of a country.
• Operating Company: An operating company represents a division or line of business within your enterprise that is legally registered for reporting in at least onecountry.
• GRE/Legal Entity: Use this classification to represent the following organizations:
• Ultimate Legal Entity: this represents the enterprise, and typically, the enterprise is the highest (global) level of a business organization.
• Legal Entity: this represents the designated legal employer for all employment-related activities. The legal authorities in a country recognize this organization as a separate employer. In an organization hierarchy, a legal entity may report to an operating company or to the ultimate legal entity.
• Consolidated Legal Entity: this organization acts on behalf of multiple operating companies that are not legally registered, or simply on behalf of the enterprise in a country.
1-10 Oracle HRMS for Netherlands Supplement
For Chinese users only: Your organization hierarchy must contain at least one GRE with corporate and employer information. Statutory reporting requires this information.
• Employer: Use this along with the GRE/Legal Entity classification to define an organization as a legal entity that is responsible for employing people in a particular country.
For Indian users only: Your organization hierarchy must contain at least one GRE with income tax, challan bank, tax declaration and representative details. This information is used for statutory reporting.
• HR Organization: Use this classification for all organizations to which you want to assign employees and contingent workers.
• Payee Organization: Use this when defining an external organization that is the recipient of a third party payment from an employee, for example a court-ordered payment. You can then select this organization on the Personal Payment Method window when entering a third party payment method.
• Bargaining Association: Use this when defining an organization that is involved in negotiating a collective agreement. A bargaining association could be any organization representing the employees in negotiations, for example a trade union.The UK legislation also enables you to select a bargaining association in the Union Processing window to set up a union element.
• Representative Body: Use this when defining a representative body. This may be a body defined in legislation, such as a European Works Council, or may be defined by the employer, such as a Sports and Social Club.
• Disability Organization: Use this when defining an external organization with which employee disabilities are registered.
• Medical Service Provider: Use this when defining an organization that provides any medical services, such as medical assessments, to the people in your enterprise.
• Constituency: Use this to define a constituency to group together workers eligible to vote for particular elections.
• Company Cost Center: Use this to define organizations in Oracle HRMS that map to cost centers in Oracle GL. You can set up your application so that whenever a cost center is defined in GL, a corresponding organization with this classification is defined automatically.
• Professional Body Information: Use this to define an organization that is a professional body. Organizations with this classification are available to assign to people in the Qualifications window.
Organization Structures 1-11
• Operating Unit : Use the operating unit organization classification if you also use Multi-Org applications. You can associate an operating unit with an HR Organization. The application uses the HR Organization to find the operating unit to which a person belongs.
US LegislationThe US legislation can use the following classifications:
• Reporting Establishment, Corporate Headquarters, or AAP Organization: Use these when defining reporting organizations, that is, organizations required for the production of certain reports for government agencies.
• Parent Entity: Use this when defining an organization to be included at the top level of an establishment hierarchy. You can then use the hierarchy when producing certain reports for government agencies.
If you are assigning this classification to a Business Group, you must assign it to your default Business Group, that is the one defined in your security profile. If you do not, then your data will not be visible when you attempt to create your hierarchyin the Generic Hierarchy window.
• Benefits Carrier, Workers' Compensation Carrier, or Beneficiary Organization: Use these when defining an external organization belonging in one of these classifications. You can then select the organization when defining a benefit, entering information for Workers' Compensation calculations, or recording beneficiaries employees have named for certain benefits.
The Federal legislation can also use the Beneficiary Organization classification.
UK LegislationThe UK legislation can use the Education Authority classification to define a Local Education Authority (LEA) that is responsible for education within that council's jurisdiction.
Canadian LegislationThe Canadian legislation can use the following classifications:
• Provincial Medical Carrier: Use this to define a medical carrier for a province.
• Provincial Reporting Establishment: Use this to represent employees in the province of Quebec.

1-12 Oracle HRMS for Netherlands Supplement
French LegislationThe French legislation can use the following classifications:
• Company: records one or more companies in your business group. A company is a legal entity registered to "Registre du Commerce et des Societes". You must have at least one company.
• Establishment: identifies the organization that serves as the legal point of contact for settling any disputes and manages the personal details of the workforce.
Note: Do not classify an organization as both a company and an establishment; create two separate organizations.
• URSSAF Center or ASSEDIC Center: specifies an external organization that is a Social Security organization. You can select the organization when entering additional organization information for an establishment. You can also select URSSAF organizations when entering additional organization information for a company.
• Insurance Provider or Pension Provider: defines an external organization that provides insurance or pensions. You can select the organization when entering additional organization information for a company or an establishment.
• OPACIF or OPCA: specifies an external organization that collects the company's yearly training contribution.
• CPAM: identifies an external organization as a CPAM office. You can select the organization when entering employment information in the People window.
• Public Sector Other External Organization: records details of the various types of external organizations with whom public-sector companies deal. Be sure to create organizations with this classification as external organizations.
• Grouping of Employers: identifies the employers (normally establishments) who have decided to group together to make it easier to lend each other workforce and also to list the employees, contingent workers, and employees on loan for an establishment from that grouping in the Personnel Registry report.
• Tax Group: defines an external tax office.
Dutch LegislationThe Dutch legislation can use the following classifications:
• Dutch UWV Organization: Use this to indicate if your organization is a social
Organization Structures 1-13
insurance provider. If you enable this classification, you can enter additional information such as the type of provider in the Dutch UWV Organization window.
• Dutch Tax Office: Use this to define an external tax office.
• Dutch Private Health Insurance: Use this to define an external organization that provides private health insurance.
• Pension Provider: Use this to define an external organization that provides pensions to your employees.
German LegislationThe German legislation can use the following classifications:
• Budget Plan Unit: Use this to define internal organizations for which you can use for the budget plan structure. The budget plan structure defines the different levels of positions in your enterprise, and the budget plan units represent the different levels as organizations. You select which budget plan unit the position belongs to inthe Position window.
• German Additional Second Pension Insurance: Use this to record information about the contributions an organization makes to a second pension.
• German Capitalized Life Insurance Provider: Use this to indicate if your organization is a provider of German capitalized life insurance.
• German Mandatory Health/Special Care Insurance Provider: Use this to indicate ifyour organization is a provider of German mandatory health or special care insurance. If you enable this classification, you can enter additional information using the German Social Insurance Providers window.
• German Mandatory Pension Insurance Provider: Use this to indicate if your organization is a provider of German mandatory pension insurance. If you enable this classification, you can enter additional information using the German Social Insurance Providers window.
• German Private Health/Special Care Insurance Provider: Use this to indicate if your organization is a provider of German private health or special care insurance. If you enable this classification, you can enter additional information using the German Social Insurance Providers window.
• German Public Sector: Use this to indicate if your organization is a public sector organization. If you set this to yes then certain public sector specific windows and fields are made available to you.
• German Tax Office: Use this to indicate if your organization is a tax office. If you
1-14 Oracle HRMS for Netherlands Supplement
set this to yes then you can enter additional tax office information using the Others button.
• German Unemployment Insurance Provider: Use this to indicate if your organization is a provider of German unemployment insurance. If you enable this classification, you can enter additional information using the German Social Insurance Providers window.
• German Voluntary Pension Provider: Use this to indicator if your organization is aprovider of German voluntary pensions.
• German Work Incident Supervising Office: Use this to indicate if your organization is a work incident supervising office.
• German Workers' Liability Insurance Providers: Use this to indicate if your organization is a provider of German workers' liability insurance.
Hong Kong LegislationThe Hong Kong legislation can use the MPF Trustee Organization classification to set up and enrol employees in an MPF Trustee. This classification allows you to record details of the trustee and details of the scheme provided by the trustee.
Mexico LegislationThe Mexico legislation must use the legal employer classification to define the legal entity. You can add additional organization information for your legal employer, if needed.
Use the GRE/Legal Entity classification to define an organization that is recognized as aseparate employer by Social Security or other legal authorities. When you assign a location to a GRE, and you have not already associated them with each other in the generic hierarchy, HRMS will make the association for you.
Saudi LegislationThe Saudi legislation can use the following classifications:
• Saudi GOSI Office: Use this to represent the General Office of Social Insurance (GOSI) which the employer is registered. The GOSI office requires employers to make deductions for eligible employees and send all payments and reports to this office.
• Saudi Employment Office: Use this to represent an office to which the employer reports the status of its disabled employees.
Organization Structures 1-15
Hungary LegislationThe Hungary legislation can use the following classifications:
• Draft Agency: Use this to represent an external defense organization to which you send employee military service details.
• Company Information: Use this to represent the organization which is legally entitled to hire employees.
• Pension Provider: Use this to indicate an external organization that provides pensions to your employees.
Spanish LegislationThe Spanish legislation can use the following classifications:
• Work Center: Use this to define an internal organization that represents a facility within your enterprise. You use these organizations for statutory reporting purposes.
• Section: Use this to define an internal organization that represents the place where people work. You use these organizations for internal reporting purposes only.
• Tax Office: Use this to indicate if the organization is an external tax office.
• Tax Administration Office: Use this to indicate if the organization is an external taxadministration office.
• Social Security Office: Use this to define a social security office as an external organization. If you enable this classification, you can record the social security office details.
• Social Security Province Office: Use this to define an organization as an external social security office. If you enable this classification, you can enter the social security province office details.
• Health Care Organization: Use this to define an organization as an external health care organization. If you enable this classification, you can enter the insurance company details.
Korea LegislationThe Korean legislation can use the following classification:
• Business Place: Use this classification to define an organization as an employer to which you assign employees. You set up information such as the registration
1-16 Oracle HRMS for Netherlands Supplement
number, representative information, and the health insurance number for the National Tax Service (NTS).
Indian LegislationYour organization hierarchy should contain at least one GRE/Legal Entity (Tax Organization) and Registered Company.
The Indian legislation can use the following classifications:
• Registered Company: Records your company's Legal Name, Registration Number, Corporate Identity Number, Permanent Account Number (PAN) of the company and company's representative details.
• Factory: Records your factory's Registration Number, License Number, National Industrial Code, Production Commencement Date and factory's representative details.
• Shops/Establishment: Records your shops/establishment's registration number andrepresentative details.
• Contractor Details: Records a contractor's details, work details, and representative details. A contractor supplies contingent workers to an enterprise and can be either an individual or an external organization.
• ESI Organization: Use this to define an external organization that provides Employee State Insurance (ESI) to your employees. Records your Employee State Insurance (ESI) organization's Challan Information, General Information and Representative Details. You can have multiple ESI organizations and select an employee's ESI organization in the Assignment window.
• Provident Fund Organization: Records your PF organization's PF challan information, PF information, and PF representative details. You can have multiple PF organizations and select an employee's PF organization in the Assignment window.
• Professional Tax Organization: Records your Professional Tax organization's information, Professional Tax Challan information, and Representative Details information. You can have multiple professional tax organizations and select an employee's professional tax organization in the Assignment window.
• Income Tax Office: Records your income tax organization's information. You can enter the location details of the income tax office. You can select the income tax organization in the GRE/Legal Entity: Income Tax Details window.
• National Pension Scheme: Records the National Pension office information. You can enter the corporate registration account number and the corporate branch
Organization Structures 1-17
account number in the NPS Account Set Up window.
Polish LegislationThe Polish legislation can use the following classifications:
• PL SII Branch: Use this classification to represent a local branch of the Social Insurance Institute (SII), a public organization that deals with the social insurance benefits, such as sickness allowance, maternity allowance, and rehabilitation benefits. You use the SII branch information for social insurance reporting.
• PL Statistic Office: Use this to represent a local statistic office. You use this information in reports sent to the statistic office.
• PL Tax Office: Use this to define the tax office bank accounts for the employer and for the tax collected from the employees. You use this information in statutory reports.
Norwegian LegislationThe Norwegian legislation can use the following classifications:
• Local Unit: Use this classification to identify and report on the different work centers, within your enterprise, to which you assign employees.
• Payee Organization: Use this classification to define an external organization whichreceives third party payment from an employee
• Social Security Office: Use this to define external social security office organizations.
• Pension Provider: Use this classification to define an external organization that provides pensions to your employees.
• Statement Provider: Use this classification to define an external organization that provides reports on behalf of the legal employer.
• Tax Office: Use this classification to define an external tax organization.
Finnish LegislationThe Finnish legislation can use the following classifications:
• Local Unit: Use this classification to identify and report on the different work centers, within your enterprise, to which you assign employees.
• External Company: Use this to record details of the various types of external

1-18 Oracle HRMS for Netherlands Supplement
organizations with whom your organization deals. Ensure to create organizations with this classification as external organizations.
• Pension Provider: Use this to record the basic information about pension insurance providers to which you transfer the appropriate pension insurance deductions.
• Accident Insurance Provider: Use this to identify organizations that provide accident insurance coverage, group life insurance, and unemployment insurance.
• Finnish Magistrate Office: Use this for identifying the authority responsible for processing the employee court orders.
• Finnish Trade Union: Use this to record the basic information about the employees'trade unions to process employee deductions.
• Provincial Tax Office: Use this to identify the legal employer's tax office.
Danish LegislationThe Danish legislation can use the following classifications:
• Service Provider: Use this classification to record details of the various types of external service providers with whom your organization deals.
• Pension Provider: Use this classification to define external pension providers.
Swedish LegislationThe Swedish legislation can use the following classifications:
• Local Unit: Use this classification to identify and report on the different work centers, within your enterprise, to which you assign employees.
• Social Security Office: Use this to define external social security office organizations with which you coordinate medical reimbursements for the employees.
• Swedish Enforcement Office: Use this to define external enforcement office organizations with which you coordinate the attachment of earnings deductions for the employees.
South African LegislationThe South African legislation can use the following classification:
• Training Provider: Use this to indicate if an organization is a training provider.
Organization Structures 1-19
UAE LegislationThe UAE legislation can use the Legal Employer classification to define and enter additional organization information for your legal employer.
Irish LegislationThe Irish legislation can use the following classifications:
• Legal Employer: Use this classification to define and enter additional organization information for your legal employer.
• Pension Provider: Use this classification to define external pension provider.
Dutch Organizations and Additional InformationWithin Oracle HRMS you can enter the following information for each HR organizationwithin a Dutch organization hierarchy:
• social insurance provider
• tax office
To store this information, you first need to define each separate provider as an external organization with the corresponding organization classification.
You can create multiple external organizations for each organization classification depending on the requirements of your enterprise. For example, you may have two internal organizations that require different tax offices or tax numbers. Therefore, you can set up two Dutch tax offices as external organizations and assign them to each internal organization.
Linking External and Internal OrganizationsWhen you have defined your external organizations, you define links to your internal organizations. However, you do not need to define the information for each individual organization. As long as you maintain the information for at least the top-level HR organization, the values will be inherited by the subordinate organizations.
You specify the preferred hierarchy for your organization in the Dutch Business Group window.
See: Creating Organization Hierarchies, Oracle HRMS Enterprise and Workforce Management Guide
See: Entering Dutch Business Group Information, page 1-39
The following diagram illustrates how values entered against the top-level organizations are inherited by the subordinate organizations. The Social Insurance
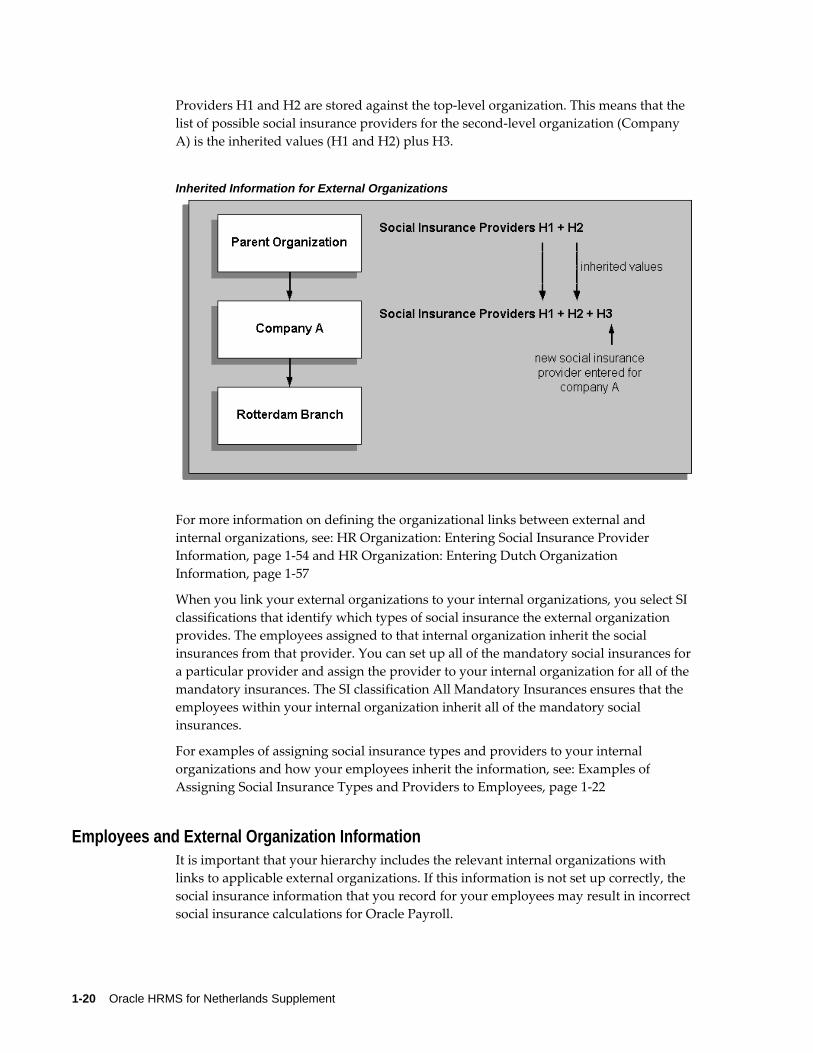
1-20 Oracle HRMS for Netherlands Supplement
Providers H1 and H2 are stored against the top-level organization. This means that the list of possible social insurance providers for the second-level organization (Company A) is the inherited values (H1 and H2) plus H3.
Inherited Information for External Organizations
For more information on defining the organizational links between external and internal organizations, see: HR Organization: Entering Social Insurance Provider Information, page 1-54 and HR Organization: Entering Dutch Organization Information, page 1-57
When you link your external organizations to your internal organizations, you select SI classifications that identify which types of social insurance the external organization provides. The employees assigned to that internal organization inherit the social insurances from that provider. You can set up all of the mandatory social insurances fora particular provider and assign the provider to your internal organization for all of the mandatory insurances. The SI classification All Mandatory Insurances ensures that the employees within your internal organization inherit all of the mandatory social insurances.
For examples of assigning social insurance types and providers to your internal organizations and how your employees inherit the information, see: Examples of Assigning Social Insurance Types and Providers to Employees, page 1-22
Employees and External Organization InformationIt is important that your hierarchy includes the relevant internal organizations with links to applicable external organizations. If this information is not set up correctly, the social insurance information that you record for your employees may result in incorrect social insurance calculations for Oracle Payroll.
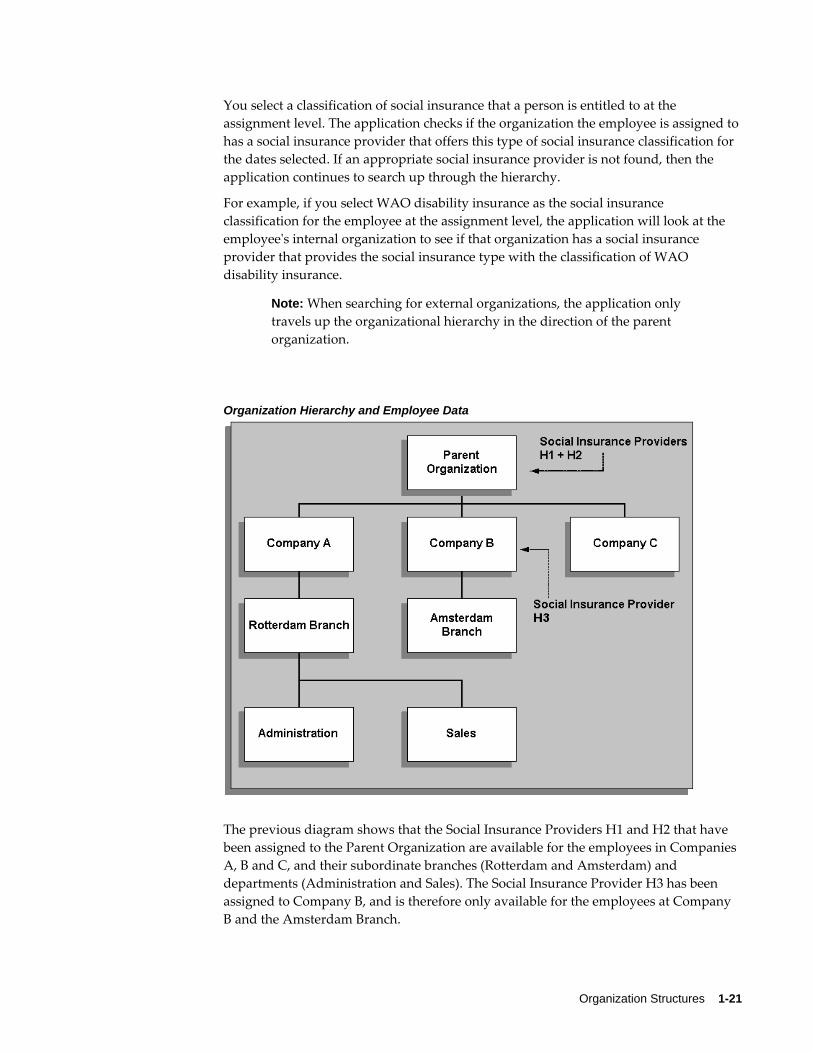
Organization Structures 1-21
You select a classification of social insurance that a person is entitled to at the assignment level. The application checks if the organization the employee is assigned tohas a social insurance provider that offers this type of social insurance classification for the dates selected. If an appropriate social insurance provider is not found, then the application continues to search up through the hierarchy.
For example, if you select WAO disability insurance as the social insurance classification for the employee at the assignment level, the application will look at the employee's internal organization to see if that organization has a social insurance provider that provides the social insurance type with the classification of WAO disability insurance.
Note: When searching for external organizations, the application only travels up the organizational hierarchy in the direction of the parent organization.
Organization Hierarchy and Employee Data
The previous diagram shows that the Social Insurance Providers H1 and H2 that have been assigned to the Parent Organization are available for the employees in Companies A, B and C, and their subordinate branches (Rotterdam and Amsterdam) and departments (Administration and Sales). The Social Insurance Provider H3 has been assigned to Company B, and is therefore only available for the employees at Company B and the Amsterdam Branch.
1-22 Oracle HRMS for Netherlands Supplement
If an employee at the Amsterdam Branch is eligible for a social insurance classification that required a social insurance type that Social Insurance Provider H3 did not provide, the application would search up through the hierarchy at the next parent organization (Parent Organization) in the organization hierarchy to find the relevant social insurance type.
Examples of Assigning Social Insurance Types and Providers to Employees
This topic explains the possible scenarios that might occur when you assign social insurance (SI) types and SI providers to your internal organizations, and how your employees inherit this information.
Scenario 1The following table describes a scenario of SI types and SI providers in an organization hierarchy. The text following the table explains how an employee from each organization inherits the information.
SI Types and SI Providers Scenario 1
Internal Organization
Order in Hierarchy
SI Provider SI Classification Primary Provider
HR Org 1 First UWV Org 1 ZVW Yes
UWV Org 2 ZW Yes
HR Org 101 Second UWV Org 3 ZVW Yes
UWV Org 4 ZW No
You assign Employee 1 to the internal organization HR Org 1. Employee 1 inherits the values for the ZVW social insurance type from the SI provider UWV Org 1, and inheritsthe values for social insurance ZW from the SI provider UWV Org 2.
You assign Employee 2 to the internal organization HR Org 101. Employee 2 inherits the values for the ZVW social insurance type from the SI provider UWV Org 3. UWV Org 3 is the primary provider of this social insurance for the employee's internal organization.
Employee 2 inherits the values for social insurance ZW from the SI provider UWV Org 2. The SI provider UWV Org 4 assigned to the HR Org 101 that provides the social insurance ZW, is not the primary provider for this SI type. The application searches up the hierarchy to the parent organization that has a primary SI provider that offers the
Organization Structures 1-23
ZW social insurance type (UWV Org 2).
Scenario 2The following table describes another scenario of SI types and SI providers set up in an organization hierarchy. The following text explains how an employee from each organization inherits the information. In this scenario, the SI classification All Mandatory Insurances applies all of the mandatory insurances to the SI provider's internal organization.
Note: All mandatory insurances include the following six types of social insurance: WAO Base, WAO diff, We Wa, We We, ZVW and ZW.
SI Types and SI Providers Scenario 2
Internal Organization
Order in Hierarchy
SI Provider SI Classification Primary Flag Checked?
HR Org 1 First UWV Org 1 All Mandatory Insurances
Yes
UWV Org 2 ZW Yes
HR Org 101 Second UWV Org 3 All Mandatory Insurances
No
UWV Org 4 ZW No
You assign Employee 3 to the internal organization HR Org 1. Employee 3 inherits the values for the ZVW social insurance from the SI provider UWV Org 1, and inherits the values for social insurance ZW from the SI provider UWV Org 2. Employee 3 inherits the SI type ZVW from the SI provider UWV Org 1 because the SI provider has an SI classification of All Mandatory Insurances, which includes the social insurance ZVW. The employee automatically inherits the SI type ZW from a separate SI provider (UWV Org 2).
Note: Every separate record you identify for a type of social insurance automatically overrides a primary provider that offers all of the mandatory insurances.
You assign Employee 4 to the internal organization HR Org 101. Employee 4 inherits the values for the ZVW social insurance from the SI provider UWV Org 2. For the employee's internal organization (HR Org 101), the SI provider UWV Org 3 offers the
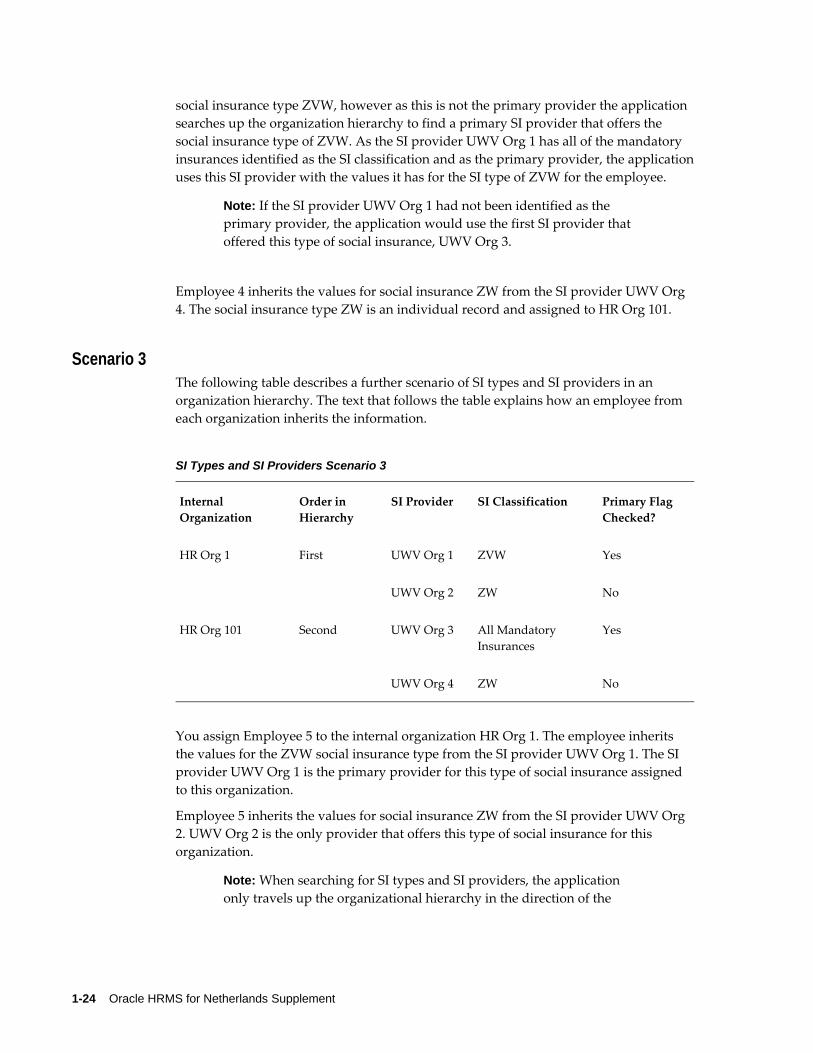
1-24 Oracle HRMS for Netherlands Supplement
social insurance type ZVW, however as this is not the primary provider the application searches up the organization hierarchy to find a primary SI provider that offers the social insurance type of ZVW. As the SI provider UWV Org 1 has all of the mandatory insurances identified as the SI classification and as the primary provider, the applicationuses this SI provider with the values it has for the SI type of ZVW for the employee.
Note: If the SI provider UWV Org 1 had not been identified as the primary provider, the application would use the first SI provider that offered this type of social insurance, UWV Org 3.
Employee 4 inherits the values for social insurance ZW from the SI provider UWV Org 4. The social insurance type ZW is an individual record and assigned to HR Org 101.
Scenario 3The following table describes a further scenario of SI types and SI providers in an organization hierarchy. The text that follows the table explains how an employee from each organization inherits the information.
SI Types and SI Providers Scenario 3
Internal Organization
Order in Hierarchy
SI Provider SI Classification Primary Flag Checked?
HR Org 1 First UWV Org 1 ZVW Yes
UWV Org 2 ZW No
HR Org 101 Second UWV Org 3 All Mandatory Insurances
Yes
UWV Org 4 ZW No
You assign Employee 5 to the internal organization HR Org 1. The employee inherits the values for the ZVW social insurance type from the SI provider UWV Org 1. The SI provider UWV Org 1 is the primary provider for this type of social insurance assigned to this organization.
Employee 5 inherits the values for social insurance ZW from the SI provider UWV Org 2. UWV Org 2 is the only provider that offers this type of social insurance for this organization.
Note: When searching for SI types and SI providers, the application only travels up the organizational hierarchy in the direction of the
Organization Structures 1-25
parent organization.
You assign Employee 6 to the internal organization HR Org 101. This employee inherits the values for the ZVW social insurance from the SI provider UWV Org 3. The SI provider has the SI classification of All Mandatory Insurances is the primary provider for the employee's internal organization.
Employee 6 inherits the values for social insurance ZW from the SI provider UWV Org 4. A separate SI provider (UWV Org 4) provides the SI type of ZW. This separate recordautomatically overrides the primary provider that offers all of the mandatory insurances.
Methods for Deriving Social Insurance DaysOracle HRMS for the Netherlands enables you to derive the number of social insurance (SI) days used in the SI contribution calculations, using the following methods:
• Average SI days: This method calculates a constant figure for SI days for each payroll period.
• Average SI days with work schedules: This method uses the average constant figure and divides the number of days an employee works by the number of days in the employee's work pattern and multiplies it by the average number of days in apayroll period.
• Real SI days: This method uses the employee's work schedule to count the number of days an employee actually worked during a payroll period.
Note: If you enable Law Walvis, the application does not use these methods. Instead, calculations are based on period amounts for SI thresholds and maximum wages.
The Average SI Days MethodsThe average SI days method calculates a constant average days figure for SI days for each payroll period. The average SI days with work schedules method uses the average days value and the employee's work pattern.
To derive the number of SI days in a period according to the average days method, the application uses the global value for average days. To derive the number of SI days in a period according to the average days with work schedules method, the formula performs the following steps:
• Checks if the employee has a work pattern attached to their assignment. The application uses the average SI days method if it does not find a work pattern for
1-26 Oracle HRMS for Netherlands Supplement
the employee.
• Finds the number of days in the employee's work pattern, and determines which are regular working days.
• Determines the average number of days in the period.
• Calculates the average SI days: divides the regular working days by the number of days in a work pattern, and multiplies it by the number of days in a period.
• Reduces the adjusted average days value by the number of days of unpaid leave that are deemed to be a non-SI absence.
The Real SI Days MethodThe real SI days method uses the employee's work pattern to determine the number of days an employee has actually worked. A day is counted as an SI day if an employee worked on that day, regardless of how many hours they actually worked. Only unpaid leave days which are not deemed as SI days, reduce the number of real SI days.
You decide the method for deriving the maximum of SI days allowed for each period in the employee's assignment. This maximum is either five days per week for the weeks that the employee works, or the number of week days in the period. Whichever maximum SI days method you choose, the maximum possible number of SI days in the year is 260, 261 or 262, depending on the year.
To derive the number of real SI days in a period according to the real SI days method, the fast formula performs the following steps:
• Determines the maximum number of SI days in the payroll period, using one of twomethods: either the number of week days (Monday to Friday) in the period, or five days per week that the employee works.
• Determines the regular working days in the period. This number indicates how many days an employee actually worked in the period.
• Compares the regular working days to the maximum number of SI days, and uses the lowest value.
• Reduces the real SI days value by the number of days of unpaid leave, that are deemed to be a non-SI absence.
Note: If both a Standard run and a Process Separate run are processed for an assignment, only the SI days will be shown in the Standard run and will be zero in the Process Standard run, even though the correct value is used in the calculation for the Process Separate run.
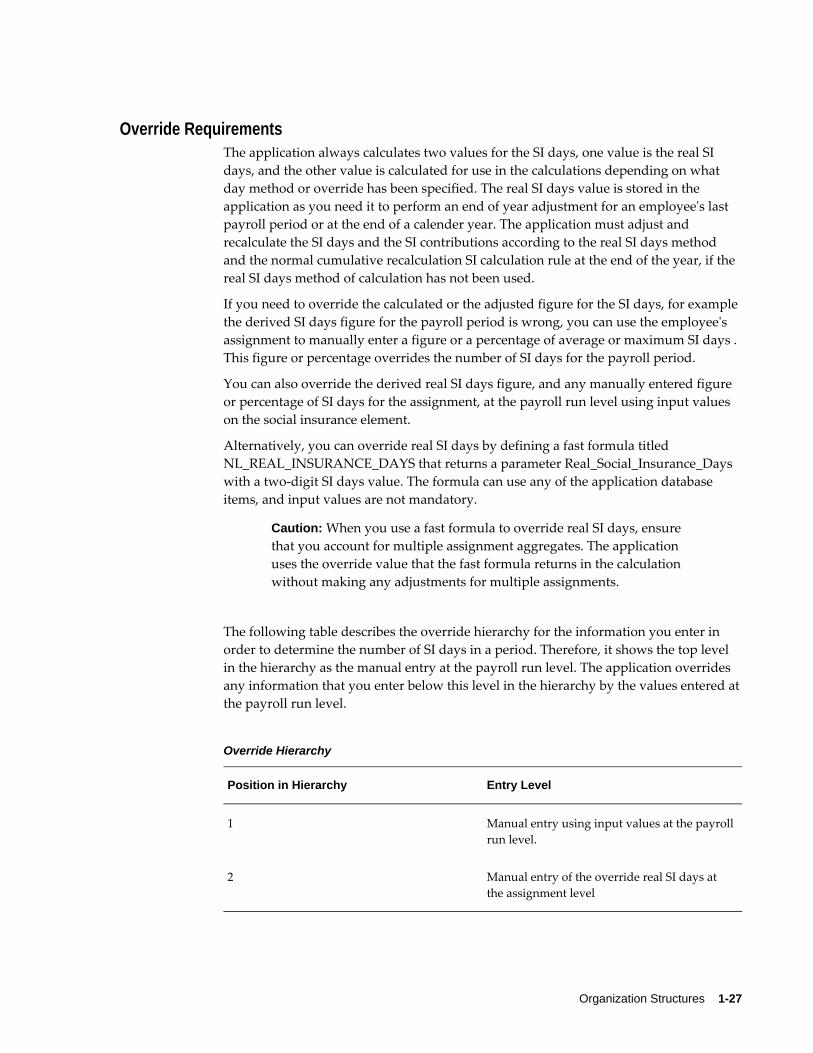
Organization Structures 1-27
Override RequirementsThe application always calculates two values for the SI days, one value is the real SI days, and the other value is calculated for use in the calculations depending on what day method or override has been specified. The real SI days value is stored in the application as you need it to perform an end of year adjustment for an employee's last payroll period or at the end of a calender year. The application must adjust and recalculate the SI days and the SI contributions according to the real SI days method and the normal cumulative recalculation SI calculation rule at the end of the year, if the real SI days method of calculation has not been used.
If you need to override the calculated or the adjusted figure for the SI days, for example the derived SI days figure for the payroll period is wrong, you can use the employee's assignment to manually enter a figure or a percentage of average or maximum SI days . This figure or percentage overrides the number of SI days for the payroll period.
You can also override the derived real SI days figure, and any manually entered figure or percentage of SI days for the assignment, at the payroll run level using input values on the social insurance element.
Alternatively, you can override real SI days by defining a fast formula titled NL_REAL_INSURANCE_DAYS that returns a parameter Real_Social_Insurance_Days with a two-digit SI days value. The formula can use any of the application database items, and input values are not mandatory.
Caution: When you use a fast formula to override real SI days, ensure that you account for multiple assignment aggregates. The application uses the override value that the fast formula returns in the calculation without making any adjustments for multiple assignments.
The following table describes the override hierarchy for the information you enter in order to determine the number of SI days in a period. Therefore, it shows the top level in the hierarchy as the manual entry at the payroll run level. The application overrides any information that you enter below this level in the hierarchy by the values entered atthe payroll run level.
Override Hierarchy
Position in Hierarchy Entry Level
1 Manual entry using input values at the payrollrun level.
2 Manual entry of the override real SI days at the assignment level
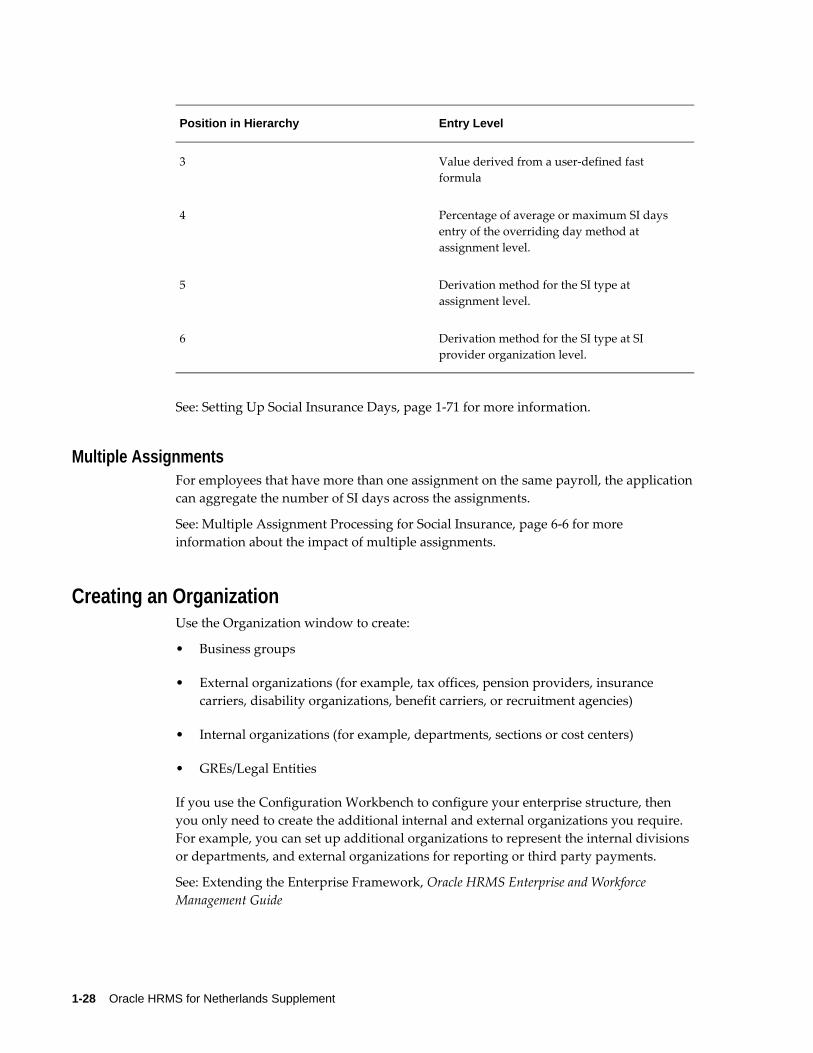
1-28 Oracle HRMS for Netherlands Supplement
Position in Hierarchy Entry Level
3 Value derived from a user-defined fast formula
4 Percentage of average or maximum SI days entry of the overriding day method at assignment level.
5 Derivation method for the SI type at assignment level.
6 Derivation method for the SI type at SI provider organization level.
See: Setting Up Social Insurance Days, page 1-71 for more information.
Multiple AssignmentsFor employees that have more than one assignment on the same payroll, the applicationcan aggregate the number of SI days across the assignments.
See: Multiple Assignment Processing for Social Insurance, page 6-6 for more information about the impact of multiple assignments.
Creating an OrganizationUse the Organization window to create:
• Business groups
• External organizations (for example, tax offices, pension providers, insurance carriers, disability organizations, benefit carriers, or recruitment agencies)
• Internal organizations (for example, departments, sections or cost centers)
• GREs/Legal Entities
If you use the Configuration Workbench to configure your enterprise structure, then you only need to create the additional internal and external organizations you require. For example, you can set up additional organizations to represent the internal divisions or departments, and external organizations for reporting or third party payments.
See: Extending the Enterprise Framework, Oracle HRMS Enterprise and Workforce Management Guide

Organization Structures 1-29
To create an organization:1. Navigate to the Organization window and click New to create a new organization.
Note: For information about querying existing organizations, see: Finding an Organization, page 1-35
2. Enter a name for your organization in the Name field. A check is performed to see iforganizations with the same name already exist.
All Oracle applications you install share the information entered in the Organization window. Therefore organization names must be unique within a business group, and business group names must be unique across your applicationsnetwork.
You can create two organizations with the same name in different business groups but this can cause confusion later, if the HR: Cross business group profile option is set to Yes and you decide to share certain information across all business groups. If you decide to create two organizations with the same name, be sure that this will not cause you problems in the future.
3. Optionally, select an organization type in the Type field.
Organization types do not classify your organization, you use them for reporting purposes only. The type may identify the function an organization performs, such as Administration or Service, or the level of each organization in your enterprise, such as Division, Department or Cost Center. You create the organization types yourequire by entering values for the Lookup Type ORG_TYPE.
4. Enter a start date in the From field. This should be early enough to include any historical information you need to enter.
Note: You cannot assign an employee to an organization before the start date of the organization.
5. Enter a location, if one exists. You can also enter an internal address to add more details such as floor or office number.
Dutch only: If you are setting up external organizations for a tax office, a social insurance provider or a private health insurance provider, you must enter the postal address and contact details using the NL_POSTAL_ADDRESS Location EIT.
Mexico only: When defining a GRE/Legal Entity, if you select a location here, HRMS automatically associates it with this GRE in the Generic Hierarchy.
US only: If you are using Oracle Payroll in the US, every organization to which employees can have assignments, including business groups, must have on record alocation with a complete address. This is because the system uses the location of the
1-30 Oracle HRMS for Netherlands Supplement
organization of the employee's primary assignment to determine employee work locations for tax purposes. This does not apply to GREs, because the assignment to a GRE exists in addition to the assignment to an organization.
India only: You can define an income tax organization and enter its location details.You can then select this organization at the GRE/Legal Entity Income Tax Office.
Note: If you are an Oracle Inventory user, then you must not assigna location to more than one organization classified as an Inventory Organization.
6. Enter internal or external in the Internal or External field. You cannot assign people to an external organization.
Examples of external organizations that may require entry are disability organizations, benefits carriers, insurance carriers, organizations that employees name as beneficiaries of certain employee benefits, and organizations that are recipients of third party payments from employees' pay.
7. Save the basic organization details.
Entering Organization ClassificationsTo determine the purpose and use of each organization you create, you give it one or more classifications. The setup information you enter for an organization depends in large part on its classification.
See: Organization Classifications, page 1-9
Note: If you classify an organization as a business group, it is not reversible.
To enter organization classifications:1. Enter the classification for your organization in the Name field.
2. Enable the classification by checking the Enable box. This allows you to use and enter the essential additional information for your organization.
3. Save the classification details.
4. You can either enter additional information for the classification type or enter another classification.
Note: Save each classification after entering and enabling it.
Organization Structures 1-31
Entering Additional InformationFor each classification you set up you can enter additional information. This information can be different for each classification.
For business group see: Business Group, page 1-31
For HR organization see: HR Organization, page 1-32
For representative body see: Representative Body, page 1-33
For constituency see: Constituency, page 1-33
For bargaining association see: Bargaining Association, page 1-34
For Dutch UWV organization see: Dutch UWV organization, page 1-34
For professional body information see: Professional Body Information, page 1-35
For pension providers, use the Framework Pension pages--rather than the Organization window--to assign pension types to each provider. Also use these pages to assign providers and types to your HR organizations. See: Setting Up Pension Schemes, page 8-22.
See Organization Classifications, page 1-9 if you need to check which classification to select.
To enter Business Group additional information:1. Click on the organization classification for which you want to enter additional
information.
2. Choose the Others button to open the Additional Organization Information window.
3. Select one of the following:
• Business Group Information, see: Entering Business Group Information, Oracle HRMS Enterprise and Workforce Management Guide.
• Budget Value Defaults, see: Business Groups: Entering Budget Value Defaults, page 1-40.
• Work Day Information, see: Business Groups and HR Organizations: Work DayDefaults, page 1-42.
• Benefits Defaults, see: Business Groups: Defining a Default Monthly Payroll, page 1-43.
• PTO Balance Type, see Business Groups: Selecting a PTO Balance Type, page 1-41.
1-32 Oracle HRMS for Netherlands Supplement
• Recruitment Information, see Business Groups: Entering Recruitment Information, page 1-44
• Dutch Business Group, see Business Groups: Entering Dutch Business Group Information, page 1-39
• Payslip Balances, see: Identifying Balances for the Payslip, page 1-51
• Payslip Elements, see: Identifying Elements for the Payslip, page 1-52
• ABP Pension Types, see: Assigning ABP Pension Types to an Organization, page 1-46
Important: Do not edit the NL ER Pension Types EIT from the Organization window. Instead, use the Pension pages to assign pension types to employers.
4. Repeat these steps to enter further information.
To enter HR organization additional information:1. Click on the organization classification for which you want to enter additional
information.
2. Choose the Others button to open the Additional Organization Information window.
3. Select one of the following:
• Reporting Information, see: Entering Reporting Information for an HR Organization or a Company Cost Center., page 1-53
• Costing Information, see: HR Organizations: Entering Costing Information, page 1-52
• Parent Organization, see: HR Organizations: Entering Parent Organizations, page 1-53
• Work Day Information, see: Business Groups and HR Organizations: Entering Work Day Defaults, page 1-42
• Dutch Organization, see HR Organizations: Entering Dutch Organization Information, page 1-57
• Dutch SI Provider, see HR Organizations: Entering Dutch SI Provider Information, page 1-54
Organization Structures 1-33
• Dutch ABP Provider, see: HR Organizations: Entering Dutch ABP Provider Information, page 1-55
• ABP Pension Types, see: Assigning ABP Pension Types to an Organization, page 1-46
Important: Do not edit the NL ER Pension Types EIT from the Organization window. Instead, assign pension types to employers using the Pension pages.
• ABP Pensions General Information, see: HR Organizations: Entering ABP Pensions General Information, page 1-56
• ABP Sender Details, see: HR Organizations: Entering ABP Sender Details, page 1-57
• Related Organizations Information, see: Entering Related Organizations Information for an HR Organization, page 1-78
4. Repeat these steps to enter further information.
To enter representative body additional information:1. Click on the organization classification for which you want to enter additional
information.
2. Choose the Others button to open the Additional Organization Information window.
3. Select one of the following:
• Representative Body Information, see: Entering Representative Body Information, page 1-64
• Constituency information, see: Entering Constituency Information for a Representative Body, page 1-64
• Work Day Information, see: Business Groups and HR Organizations: Entering Work Day Defaults, page 1-42
4. Repeat these steps to enter further information.
To enter constituency additional information:1. Click on the organization classification for which you want to enter additional
information.
1-34 Oracle HRMS for Netherlands Supplement
2. Choose the Others button to open the Additional Organization Information window.
3. Select one of the following:
• Location, see Entering Location Information for Constituencies, page 1-65
• Organization, see Entering Organization Information for Constituencies, page 1-66
• Organization Hierarchy, see Entering Organization Hierarchy information for Constituencies, page 1-65
• Grade, see Entering Grade information for Constituencies, page 1-66
• Bargaining Unit, see Entering Bargaining Unit information for Constituencies, page 1-66
• Job, see Entering Job information for Constituencies, page 1-66
• Collective Agreement Grade, see Entering Collective Agreement Grade information for Constituencies, page 1-67
4. Repeat these steps to enter further information.
To enter Dutch UWV organization additional information:1. Click on the organization classification for which you want to enter additional
information.
2. Choose the Others button to open the Additional Organization Information window.
3. Select one of the following:
• Dutch UWV Organization, see Dutch UWV Organization: Entering Dutch SI Provider Information, page 1-73
• Dutch SI Type, see Dutch UWV Organization: Entering Dutch SI Type Information, page 1-73
4. Repeat these steps to enter further information.
To enter bargaining association information:1. Click on the organization classification for which you want to enter additional
information.
Organization Structures 1-35
2. Choose the Others button to open the Additional Organization Information window.
3. Select Trade Union Information, see: Entering Trade Union Information for a Bargaining Association, page 1-67
4. Repeat these steps to enter further information.
To enter company cost center information:1. Click on the organization classification for which you want to enter additional
information.
2. Choose the Others button to open the Additional Organization Information window.
3. Select one of the following:
• GL Company Cost Center, see: Entering GL Company Cost Center Information for a Company Cost Center, page 1-63
• Reporting Information, see: Entering Reporting Information for an HR Organization or a Company Cost Center., page 1-53
4. Repeat these steps to enter further information.
To enter professional body information:1. Click on the organization classification for which you want to enter additional
information.
2. Choose the Others button to open the Additional Organization Information window.
3. Select Professional Body Info, see: Entering Additional Information for a Professional Body, page 1-68.
4. Repeat these steps to enter further information.
Finding an OrganizationUse the Find Organization window to find the organizations you want to review or amend. If you want to set up a new organization, rather than querying an existing organization, select the New button. For more information about creating a new organization, see Creating an Organization, page 1-28.
1-36 Oracle HRMS for Netherlands Supplement
Note: When you navigate to the Organization window, the Find Organization window automatically displays.
To query an organization using the Find Organization window:1. Do one, a selection, or all of the following:
• Enter a full or partial query on the organization's name. If more than one name matches the selection criteria, select one of the names.
• Enter a full or partial query on the organization type and/or location. If more than one organization type or location matches the selection criteria, select the type and/or location to query.
• Enter a full or partial query on the classification name. If more than one classification name matches the selection criteria, select the name to query.
For the classification you have selected indicate whether you want to query on:
• Enabledclassifications: This only returns those organizations that match your selection criteria and have your selected classification enabled.
• Disabled classification: This only returns those organizations that match your selection criteria and have your selected classification disabled.
• Both: This returns organizations that match your selection criteria and haveyour selected classification, regardless of whether the classification is enabled or disabled.
2. Choose the:
• Find button to run the query.
The organization or organizations found by the query display in the Organization window. If the query finds more than one organization, you can use the [Down Arrow] key or choose Next Record from the Go menu to display the next organization.
• Clear buttonto remove the existing selection criteria. You can then enter new information on which to perform a query.
Removing and Deleting OrganizationsRemove an organization if you want to prevent it being available for employee assignments. This still leaves a history of the organization. Only delete an organization if you want to completely remove it from your system.
Organization Structures 1-37
To remove an organization:1. Select the organization you want to remove.
2. Enter an end date (Date To) on the organization record.
To delete an organization:1. Remove any employee assignments to the organization.
2. Remove the organization from any hierarchies.
3. Disable its organization classifications in the Organization window.
4. Delete the organization in the Organization window.
Entering Business Group Information
To enter Business Group information:1. In the Organization window, query the Business Group if it does not already
appear there. In the Organization Classifications region, select Business Group, choose the Others button, and select Business Group Information.
2. Click in a field of the Additional Organization Information window to open the Business Group Information window.
3. You can enter a short name for the Business Group. This name is no longer used in Oracle HRMS it is provided for compatibility with earlier releases, where it appeared in the header line of each form.
4. Select the method of creating identifying numbers for employees, applicants, and contingent workers. The choices are:
• Automatic number generation.
If you choose the automatic entry method of number generation you can at a later date decide to switch to global sequencing. Global sequencing enables youto use a single sequence of person numbers for applicants, employees or contingent workers across multiple business groups.
See: Running the Global Sequencing for Person Number Generation Process, Oracle HRMS Enterprise and Workforce Management Guide
You can switch from local automatic numbering to manual numbering for a person type by editing the business group information and selecting Manual.
1-38 Oracle HRMS for Netherlands Supplement
Note: If you are using Oracle iRecruitment, ensure to set the applicant numbering to Automatic.
• Manual entry.
If you choose the manual entry method of number generation, but at a later date decide to change to the Automatic method of number generation, you can run the Change Person Numbering to Automatic process.
See: Running the Change Person Numbering to Automatic Process, Oracle HRMS Enterprise and Workforce Management Guide
• Automatic use of the national identifier (for example, the social security number in the US, and the NI number in the UK). If you choose this option you must ensure that a national identifier is entered for each new person. This option is not available for applicants.
Note: For whichever method of number generation you choose,it is important to be aware that the number is displayed in various windows and reports. Therefore, if you choose the national identifier method, the person's national identifier is displayed.
• Employee numbering for contingent worker. This option allows you to use the same sequence of numbers for contingent workers as you use for your employees. For example, you enter an employee and the application gives the employee number 101. If the next person entered is a contingent worker they receive the number 102.
5. Select the names of the key flexfield structuresyou want to use in this Business Group.
6. Select the appropriate Legislation Code and default currency. The Legislation Code determines the startup data you can access and the contents of some legislation-specific windows.
Mexico only: Specify MXN as the currency. Do not select MXP.
Important: Selecting the correct legislation code is essential for the correct functioning of Oracle HRMS. You cannot change the legislation code after entering employees against the Business Group.
7. US users: To maintain fiscal year balances in Oracle Payroll if your fiscal year is
Organization Structures 1-39
different from the calendar year, enter the fiscal year start date.
The application does not provide a connection between the fiscal year functionality in Oracle General Ledger and in Oracle HRMS. In Oracle General Ledger you specify how the fiscal calendar is broken down in the Accounting Calendar view. Oracle HRMS calculates a fiscal quarter as a three month period. The application calculates four equal three month periods beginning from the fiscal year start date.
South African users: You must enter the fiscal year start date for your Business Group, or you will not be able to define payrolls later.
8. You can enter a Minimum and Maximum Working Age for the Business Group. When you enter or hire employees, you receive a warning if the person's age is outside this range.
9. Save your work.
Entering Dutch Business Group InformationYou use the Dutch Business Group window to define the organization hierarchy for your business group, and to override the Replacement method of retropay you may have previously enabled.
For further information on how to enable your retropay method of choice, see: Enablingthe Method of Retropay, page 5-15
To enter Dutch business group information:1. Query the business group if it does not already appear there. In the Organization
Classifications region select Business Group, choose the Others button and select Dutch Business Group.
2. Click in the field in the Additional organization Information window to open the Dutch Business Group window.
3. Select the preferred hierarchy for your business group in the Organization Hierarchy field.
Note: The named hierarchy defines the way in which additional information is stored for your internal organizations. Information that is defined for a particular organization also applies to all child organizations within the named hierarchy.
See: Dutch Organizations and Additional Information, page 1-19
4. To override the Replacement method of retropay enabled, select Yes in the OverrideReplacement Method field. Select No if you wish to continue running this method.
1-40 Oracle HRMS for Netherlands Supplement
For further information on the methods of retropay available for the Netherlands, see: Retropay for the Netherlands, page 5-7
5. In the Sender Tax Reporting Name field, enter the name of your sender for tax reporting purposes. You can enter up to 22 characters.
6. In the Sender Tax Registration Number field, enter your sender's tax registration number. You can enter up to 12 digits.
7. Optionally, enter a start date from when the application must use the Adjustment and Correction retro components to identify the Correction periods in the Dutch wage report. Leave this field blank, if you want to report Corrections using the NewWage Override element.
8. In the Assignment Process Group field, select Employer to process multiple assignments according to employer. Alternatively, select Payroll to perform Payroll-based processing.
9. Specify whether you want the application to perform late hire processing. Select Yesto ensure the application uses the salary-earned date instead of salary-paid date for the calculation of SI and tax deductions for new hires and retrospective reversal of employee terminations.
Before processing previous period payroll for late hires, ensure you setup the predefined Late Hire Indicator element using the Element Entries window. Use the predefined Late Hire Indicator element only with the late hire employees. After youfinish processing payroll for the previous periods, specify an end date so that the application starts calculating the current period payroll using the salary-paid date. Do not use the adjustment component of the RetroPay for late hires as it will result in incorrect payroll calculation.
Note: For retrospective reversal of employee terminations, ensure that you create an element entry for the predefined element Late Hire Indicator for the valid period between the termination and reversal. For example, if you terminate an employee in February2006 and reverse the termination in May 2006, you need tocreate an element entry for the employee valid from 1st February 2006 to 31st May 2006.
10. Save your work.
Business Groups: Entering Budget Value DefaultsYou can set up budgets for non-monetary measures such as headcount or full-time equivalent. When you enter employee assignments to define the work an employee does for your enterprise, you can specify the value of the assignment towards these
Organization Structures 1-41
budgets. For example, all assignments typically count as one for headcount budgets, butmay count as less than one for full-time equivalent budgets.
To remove the requirement to enter these values for every assignment, you can enter defaults for the whole Business Group. You can override the defaults for individual assignments.
To define budget value defaults:1. In the Organization window, query the Business Group if it does not already
appear there. In the Organization Classifications region, select Business Group, choose the Others button, and select Budget Value Defaults.
2. Click in a field of the Additional Organization Information window to open the Budget Value Defaults window.
3. In the Units field, select a measurement type, such as Full Time Equivalent or Headcount.
4. Enter a default value in the Value field.
You can enter a default value for as many budgetary units as you plan to use for theBusiness Group.
To find out more about budgets see: Budgeting Overview, Oracle HRMS Enterprise and Workforce Management Guide
Business Groups: Selecting a PTO Balance TypeIf you use Oracle Payroll, you can choose to use a payroll balance to store gross accrualsfor an accrual plan. The payroll balance is maintained by the payroll run. It calculates accruals from the day after either the Date Earned or the Date Paid of the last payroll period in which the assignment was processed
To specify whether to use Date Earned or Date Paid for all your accrual plans, select a PTO Balance Type for your business group. The default is Date Paid.
To select a PTO balance type:1. In the Organization window, query the business group if it does not already appear
there. In the Organization Classifications region, select Business Group, choose Others, and select PTO Balance Type.
2. Click in the field on the Additional Organization Information window to open the PTO Balance Type window.
3. Select Date Paid or Date Earned in the PTO Balance Type field.
4. Save your work.
1-42 Oracle HRMS for Netherlands Supplement
Business Groups and HR Organizations: Entering Work Day DefaultsTo enter schedule information for a person, you can:
• Set up extensive availability information such as, shifts, schedules, and calendar events using integrated features from HRMS and Common Application Components (CAC).
See: Setting Up Availability, Oracle HRMS Workforce Sourcing, Deployment, and TalentManagement Guide
• Set up holiday calendars, shifts, and work plans in OTL.
See: Time Management Structures, Oracle Time and Labor Implementation and User Guide
Alternatively, you can enter basic schedule information in various areas of Oracle HRMS, such as here in the Organization window. You can set up default working hoursfor all employees in the Business Group or in an HR Organization, saving data entry at lower levels. When necessary, you can override the defaults at lower levels, for example, for individual positions or employee assignments.
Important: The application does not use the schedule information that you can enter here to determine a worker's availability. This is for information purposes only.
The decision for which method to set up is based on knowledge of which applications use which information.
The Salary Administration process uses working hours information to prorate the salary values against which it validates any salary proposals.
To define work day defaults:1. In the Organization window, query the Business Group or HR Organization if it
does not already appear there. In the Organization Classifications region, select Business Group or HR Organization, choose the Others button, and select Work Day Information.
2. Click in the field of the Additional Organization Information window to open the Work Day Information window.
3. Enter the normal start and end times in 24 hour format. For example, for 5.30 p.m., enter 17:30.
4. Enter a number in the Working Hours field, and select the corresponding period of time in the Frequency field. For example, enter 40 and select Week.
Organization Structures 1-43
You can add to the list of available frequencies by making entries for the Lookup Type FREQUENCY, using the Application Utilities Lookups window.
Defining Benefits Defaults for a Business GroupFollow this procedure to define a default payroll for benefits administration and to configure the use of benefits assignments.
You use both the Payroll Description window and the Organization window to assign adefault payroll to a business group.
When a benefits assignment is created for an employee, due to their termination or other qualifying event, the benefits assignment must have a default payroll. US and Canadian customers should define a default payroll with a periodicity of monthly.
You can indicate if you want the application to auto-generate benefits assignments for qualifying events. For US and Canadian customers, the application creates benefits assignments by default.
To define benefits defaults for a business group:1. For monthly payrolls, create a payroll with a period type of Calendar Month using
the Payroll Description window.
2. Save your work and exit the Payroll Description window.
3. Select the business group for which you want to define a default payroll using the Find Organization window.
4. Place the cursor in the Organization classifications block on the Business Group field and choose the Others button.
5. Select Benefits Defaults from the Additional Organization Information lookups.
6. Choose the Next button to display the Benefits Defaults window.
7. Select a default payroll for this business group.
8. In the Benefits Assignment field, select Yes if you want to record benefits assignments for continuing benefits eligibility.
If your enterprise uses Oracle HRMS solely for compensation management--or if you do not want the application to automatically create benefits assignments--selectNo.
See: Continuing Eligibility: Benefits Assignments, Oracle HRMS Compensation and Benefits Management Guide
9. Save your work.
1-44 Oracle HRMS for Netherlands Supplement
Business Group: Setting Up Public Sector-type FunctionalityOracle HR enables you to set up a particular business group for Commercial or Public Sector-type functionality.
To set up public sector-type functionality:1. In the organization window, query the Business Group if it does not already appear
there. In the Organization Classifications region, select Business Group, choose the Others button, and select Public Sector Details.
2. Click in a field of the Additional Organization information window to open the Public Sector Details window.
3. In the Installed field, select Yes or No.
The default value is No, hence there is no impact on existing business groups. SelectYes if you want to use the public sector-type functionality of Oracle HR. You need to manually change this value for each business group.
4. Save your work.
Business Groups: Entering Recruitment InformationYou enter recruitment information at the business group level to define various default values for iRecruitment.
You enter additional information for iRecruitment in the Organization window of Oracle HRMS.
To enter Recruitment information:1. In the Organization window, query the business group. In the Organization
Classifications region, select Business Group, choose the Others button, and select Recruitment.
2. Click in a field of the Additional Organization Information window to open the Recruitment information window.
3. Specify how the vacancy code is allocated. The choices are:
• Manual - the Vacancy Name field is displayed when you create a vacancy. You must manually enter a name for the vacancy.
• Automatic - the application assigns a unique vacancy name automatically. The Vacancy Name field is not displayed when you create a vacancy.
Organization Structures 1-45
4. Enter the default number of openings for a vacancy. The default number is displayed in the Total Openings field when you create a vacancy. You can overwrite the default value if required.
5. You can specify the organization defaulting method. The choices are:
• Creator - The default organization for a vacancy is the organization for the person who has created the vacancy (employee who has logged in).
• Manager - The default organization for a vacancy is the organization for the manager of the vacancy.
You can overwrite these defaults when you create a vacancy. Both methods use the primary assignment.
6. Specify the location defaulting method. The choices are:
• Manager - The default location for the vacancy is the same location as the manager for the vacancy.
• Position - The default location for the vacancy is the same location as the position for the vacancy.
7. You can select a default budget measurement type, for example, FTE or headcount.
To find out more about budgets, see Budgeting Overview, Oracle HRMS Enterprise and Workforce Management Guide
8. Select a default status which is assigned to a candidate when a candidate withdrawsan application. If you do not specify a particular status here, the candidate receives the Terminate status.
9. Specify a user-defined person type as a default for candidates who register in iRecruitment. Oracle HRMS creates a record with this default person type when a candidate registers in iRecruitment. If you do not specify a value, the default persontype is Candidate.
Note: The user person type that you define here is associated with the External system person type. The internal code for this system person type is OTHER.
10. Select Yes if you want to exclude this business group from the list of business groups available on the Create Vacancy page. You should do this if you do not want managers or recruiters to be able to create vacancies for this business group.
11. Select a default resume template that iRecruitment can use to create resumes for candidates. When candidates register, they can use the default template or select a
1-46 Oracle HRMS for Netherlands Supplement
template of their choice in the Create Resume page.
12. Select Yes to record and track applicant data for compliance purposes. When you enable the applicant tracking functionality, Oracle iRecruitment creates snapshots of applicants who apply for vacancies in that business group. The snapshots includepersonal information, skills, qualifications, and work preferences.
13. Save your work.
Assigning ABP Pension Types to an OrganizationEmployees participate in ABP pension types that are assigned to their organization or parent organizations in the default organization hierarchy. You can assign pension types to a business group or HR organization.
1. In the Organization window, query the Business Group or HR Organization if it does not already appear there. In the Organization Classifications region, select Business Group or HR Organization, choose the Others button, and select Dutch ABP Pension Types.
2. Click in the field of the Additional Organization Information window to open the Dutch ABP Pension Types window.
3. In the Date From field, enter the first day on which the pension type becomes valid for this organization. You can also enter an end date in the Date To field.
4. Select the pension type.
5. Optionally enter or change the employee and employer contribution percentages to provide a default for the employees assigned to this organization, or its child organizations.
6. Change the Valid field from Yes to No if you do not want this pension type to be available for all employees assigned to this organization, or its child organizations.
7. Choose OK and save your work.
8. You can repeat these steps to assign another pension type to this organization.
Assigning PGGM Pension Types to an OrganizationTo record PGGM pension information for employees, you assign PGGM pension types to their organization or parent organizations in the default organization hierarchy. You assign pension types to a business group or HR organization.
Organization Structures 1-47
To Assign PGGM Pension Types to an Organization:1. In the Organization window, query the business group or HR organization. In the
Organization Classifications region, select Business Group or HR Organization, click Others, and select PGGM Pension Types.
2. Click in the field of the Additional Organization Information window to open the PGGM Pension Types window.
3. In the Date From field, enter the first day on which the pension type becomes valid for this organization. Optionally, enter an end date.
4. Select the pension type.
5. To provide default values for employees assigned to this organization or its child organizations, enter or change the employee and total-contribution percentages.
Additional Information: The application calculates the employer contribution as the difference between the total and employee contributions.
6. Click OK, and save your work.
Entering Payslip Information
To enter payslip information:1. In the Organization window, query the Business Group if it does not already
appear there. In the Organization Classifications region, select either Business Group or HR Organization, choose Others, and select Payslip Information.
2. Click in a field of the Additional Organization Information window to open the Payslip Information window.
3. Select the type of extra information to be displayed on the payslip. The choices are:
• Balance
• Element
• Message
Your selection determines which other fields you must complete in this window.
1-48 Oracle HRMS for Netherlands Supplement
To enter Balance extra information:1. Select a balance name.
2. Select a dimension.
3. Optionally, enter a display name for the balance.
4. Optionally, enter a message text.
5. Save your work.
To enter Element extra information:1. Select the element you want to display.
2. Select the input value for the element.
3. Optionally, enter a display name for the element.
4. Optionally, enter a message text.
5. Save your work.
To enter Message extra information:1. Enter a display name for the message.
2. Enter a message text. This message will be displayed on the employees' online payslip.
3. Save your work.
Entering Self-Service Preference InformationYou enter self-service preference information to define whether documents such as the online payslip or tax form are available in an online and/or paper version.
Note: You can also enter this information at the Person or Location level.
See: Person Extra Information Types, Oracle HRMS Workforce Sourcing, Deployment, and Talent Management Guide and Location Extra Information Types, Oracle HRMS Enterprise and Workforce Management Guide

Organization Structures 1-49
These information levels are arranged in a hierarchy; if you define self-service preferences at the person level, the settings will override any other settings made at the location, business group, or HR organization level. Similarly, if you define self-service preferences at the location level, the settings override any settings at the business group or HR organization level. Settings at the HR organization level will override settings at the business group level.
To enter Self-Service Preference information:1. In the Organization window, query the Business Group or HR Organization if it
does not already appear there.
2. In the Organization Classifications region, select Business Group or HR Organization, choose Others, and select Self Service Preference.
3. Click in a field of the Additional Organization Information window to open the SelfService Preference window.
4. Select the document type for which you want to define preferences.
If Payslip Modeler functionality is available, you must select the document type as Payslip Modeler.
5. Select whether you want the document to be available online.
6. Select whether you want the document to be available on paper.
7. If you are providing payslips in PDF format:
• Select the appropriate localization template. If you do not select the a payslip template, then the web-based payslip is displayed.
Note: Australia, China, India, Hong Kong, Singapore, Korea, and New Zealand users should select the appropriate predefined localization template.
• You can append custom data to the generated XML. Specify the custom package and procedure in the XML Code field as : <custom.package>.<custom.procedure>
• Specify the dates these changes are to take effect.
Note: Template, XML Code and Effective Date fields in Self-Service
1-50 Oracle HRMS for Netherlands Supplement
Preference can be configured at the Business Group, HR Organization and Location levels.
The application generates either an Oracle Applications Framework (OAF)-based payslip or PDF payslip depending on the values entered in the Template and Effective Date fields. A PDF Payslip is generated when you select the template and enter the effective date on or before the payroll payment date.
For example, consider the effective date of PDF payslip as 01-Jun-2016:
• If the payment date is prior to effective date (31-May-2016), then the applicationgenerates an OAF payslip.
• If the payment date later than effective date (30-Jun-2016), then the application generates a PDF payslip.
For UAE only: The application supports only PDF payslip.
8. If payslip modelling is enabled for your localization, then select the template that you want to use for payslip modeling process to use, if you do not want the application to use the default template.
9. Select the element set to exclude the elements from being selected when you run a payslip modelling process.
10. Select either GRE/Legal Entity Address or HR Organization Address (default) for display on the payslip.
Note: You can configure this segment only at Business Group level.
For Canada only:Both the OAF and PDF payslips display the HR Organization as the Employer Address.
11. If you selected GRE/Legal Entity Address for the Payslip Employer Address field, then select the effective date after which the GRE address displays on the payslip.
Note: You can configure this segment only at Business Group level.
For Canada only:This field is not applicable.
12. Select either Payslip View Date or Date Paid to configure the date to be used for displaying Online Payslips. If this field is left blank or if the Payslip View Date is selected then the online payslip will be displayed based on the Payslip View Date that is defined for the payroll period. If Date Paid is selected, then the payslip will be displayed based on the Date Paid of the payroll run.
Organization Structures 1-51
Note: By default, Payslip View Date – Check Date for any period will be equal to the Payslip offset defined for the payroll. However, if the user manually changes these dates for any period, then the Payslip Offset for that period will be considered as the Payslip View Date – Check Date and not the Offset defined for the Payroll.
Further, if the Payslip View Date and/or the Payslip Offset is set to null, then all payslips (prior, current and future) will be available tothe employee. (By default, the Payslip Offset is set to zero when defining a payroll.)
13. Select whether you want to display the rate details section.
14. Save your work.
Identifying Balances for the PayslipYou enter payslip balances information to determine the balances you want to archive and display on the payslip. You can define multiple balances for archive.
Enter the payslip balances information using the Organization window.
To identify balances for the payslip:1. In the Organization window, query the Business Group if it does not already
appear there. In the Organization Classifications region, select Business Group, choose the Others button, and select Payslip Balances.
2. Click in the Additional Organization Information window to open the Payslip Balances window.
3. Select the Balance Name and Balance Dimension. In the Balance Narrative field enter a description of the balance information. This appears on the payslip. The order you define the balances determines the sequence the application picks them up and displays on the payslip.
Note: Netherlands users: You can select the Social Insurance Type from the list of values, but only if you have selected entries for boththe Balance Name and Balance Dimension fields.
4. Save your work.

1-52 Oracle HRMS for Netherlands Supplement
Identifying Elements for the PayslipYou enter payslip elements information to determine the elements you want to archive and appear on the payslip. You can define multiple element input values for archive.
Enter the payslip elements information using the Organization window.
To identify elements for the payslip:1. In the Organization window, query the Business Group if it does not already
appear there. In the Organization Classifications region, select Business Group, choose the Others button, and select Payslip Elements.
2. Click in the Additional Organization Information window to open the Payslip Elements window.
3. Select the Element Name and Input Value. In the Narrative field enter a description of the element information. This appears on the payslip. The order you define the elements, determines the sequence the application picks them up and displays themon the payslip.
Note: Netherlands users: You can select the Social Insurance Type from the list of values, but only if you have selected entries for boththe Balance Name and Balance Dimension fields.
4. Save your work.
HR Organizations: Entering Costing Information
To enter costing information:1. In the Organization window, query the HR Organization if it does not already
appear there. In the Organization Classifications region, select HR Organizations, choose Others, and select Costing Information.
2. Click in the Additional Information window to display the segments of the Cost Allocation flexfield set up with the qualifier of Organization.
3. Select the appropriate cost code in each segment.
For individual employees, you can override these organization-level codes by entering costing information on their assignments.

Organization Structures 1-53
Entering Reporting Information for an HR Organization or a Company CostCenter
Use the Reporting Information window to enter information that can be used when reporting on the organization.
If you want to enter managers for a number of organizations, or want to see an historical record of the managers for an organization, then you can use the OrganizationManager Relationship window. See: Selecting and Viewing Managers for Organizations, Oracle HRMS Enterprise and Workforce Management Guide
To enter reporting information:1. Query the Company Cost Center in the Organization window, if it does not already
appear there. In the Organization Classifications region, select Company Cost Center, choose the Others button, and select GL Company Cost Center Information.
2. Click in the field of the Additional Organization Information window to open the GL Company Cost Center Information window.
3. Enter a reporting name. This could be a short name that enables you to easily identify the organization in a report.
4. Select the manager of the cost center. The list of people consists of all active employees from your business group. If the HR: Cross Business Group profile option is set to yes, then it includes employees from all your business groups.
5. Enter a start date for the relationship, and an end date if required.
HR Organizations: Entering Parent OrganizationsAfter you set up organization hierarchies, use the Parent Organization window to place a subordinate organization in hierarchies by naming its immediate parent in each hierarchy.
To enter a parent organization:1. In the Organization window, query the HR Organization if it does not already
appear there. In the Organization Classifications region, select HR Organization, choose Others, and select Parent Organization to open the Parent Organization window.
2. Select the hierarchy name.
3. Select the name of the parent organization to which the HR Organization is
1-54 Oracle HRMS for Netherlands Supplement
subordinate in this hierarchy.
4. To enter the HR Organization in another hierarchy, repeat steps 2 and 3.
HR Organization: Entering Social Insurance Provider InformationYou can assign multiple SI (Social Insurance) classifications and SI providers to your HR Organization. Oracle recommends that you select at least one SI classification and provider at the highest level in your named hierarchy to ensure that the information is inherited by any subordinate organizations.
You enter SI provider information for your HR organization in the Organization window.
To enter social insurance provider information:1. Query the organization if it does not already appear there. In the Organization
Classification region, select HR Organization, the Others button and Dutch SI Provider.
2. Enter the dates for the period of time the social insurance is valid for the organization.
Important: When you select the dates for an SI provider, ensure that they cover the entire tax year period. This is to ensure that when a payroll is run for an employee's assignment, the correct SI information is used and avoids inconsistent payroll calculations. If you end date this information part way through a tax year, the payroll calculations will search up your organization hierarchy for another SI provider that offers the relevant SI type. This SI type may have different SI contribution percentages, thresholds and calculation methods set up, therefore resulting in incorrect SI calculations for the assignment.
3. Select the SI classification. Ensure you choose an SI classification for the SI type you defined previously.
For example, if you have defined an SI type of WAO basis for the SI provider, selectthe SI classification of WAO for your HR Organization.
Warning: The application will not prevent you from choosing an SI classification that is different from the SI type you have defined previously. It is important that you set up this information correctlyin order for the application to find the relevant social insurance information for your employees.

Organization Structures 1-55
If you select All Mandatory Insurances as the SI classification, effective from 2013, the SI type ZVWS are included. The SI types, ZVW Social Insurance, IVA Social Insurance, and WGA Social Insurance are not included. Ensure that each SI provider you select has all mandatory social insurance types assigned correctly to that provider. This means that you would only have to record this information once for your internal organization and it will prevent inconsistencies in your payroll results.
See: Entering Social Insurance Type Information, page 1-73
4. Select the SI provider that you defined previously.
See: Creating an Organization, page 1-28
5. Select whether you want this SI provider to be the primary SI provider in the Primary Provider field. This field determines the default SI provider.
Important: If you select Yes in the Primary Provider field and also select the SI classification: All Mandatory Insurances, then all of theinsurances apply to the employees you assign to this internal organization. If you have a different individual social insurance type, you can set up a separate record for that particular type of insurance, and assign it to the internal organization using the same SI classification as the SI type.
See: Examples of Assigning Social Insurance Types and Providers to Employees, page 1-22 for more information.
6. Enter the branch registration number and select a transfer indicator.
7. Enter the sender's and employer's reporting names and registration numbers.
You receive a reporting name and registration number when you register with the UWV social security agency.
8. Save your work.
HR Organization: Entering Dutch ABP Provider InformationYou enter ABP provider information for your HR organization in the Organization window. The ABP Notification report uses this information.
To enter ABP provider information:1. Query the organization if it does not already appear there. In the Organization
1-56 Oracle HRMS for Netherlands Supplement
Classification region, select HR Organization, choose the Others button, and select Dutch ABP Provider.
2. Click in the field to open the Dutch ABP Provider window.
3. Select an ABP Provider name.
4. Enter the registration number supplied by ABP.
5. Optionally, enter Submitter Identification. If you enter a name, it appears in the header of the ABP Notification report. If you leave this field blank, the organization name appears in the header instead.
6. Enter the period type belonging to the organization. Currently, only Calendar Month and Lunar are supported. This is a mandatory field.
7. Enter any information as free text for your reference.
8. Choose OK and save your work.
HR Organization: Entering ABP Pensions General InformationYou enter ABP pensions general information for your HR organization in the Organization window. The ABP report uses this information.
To enter ABP pensions general information:1. In the Organization window, query the HR Organization if it does not already
appear there.
2. In the Organization Classifications region, select HR Organizations, choose Others, and select ABP Sender Details.
3. Click in the field to open the ABP Pensions General Information window.
4. Select average of the previous year or first of January or hire date as the part time percent calculation for non recurring bonus.
5. Specify whether to apply OHT correction or not.
6. Enter the end of year bonus percentage.
7. Enter the employee number override, a number that replaces specific positions of the employee number.
8. Specify the starting position from where the employee number needs to be replaced. For example, to replace position 1 to 4 with 1015 in employee number, the
Organization Structures 1-57
fields should be populated with Employee Number Override - 1015 and Starting Position - 1.
HR Organizations: Entering ABP Sender DetailsOracle HRMS enables you to enter details about the ABP file and sender. You enter ABPsender details for your HR organization in the Organization window. The ABP report uses this information.
To enter ABP sender details:1. In the Organization window, query the HR Organization if it does not already
appear there. In the Organization Classifications region, select HR Organizations, choose Others, and select ABP Sender Details.
2. Click in the field to open the ABP Sender Details window.
3. Specify whether the file is generated for Test or Production environment. This is a mandatory field.
4. Enter the ABP registration number of the sender. This is a mandatory field.
5. Enter the name of the organization acting as the sender.
HR Organization: Entering Dutch Organization InformationUse the Dutch Organization information type to enter additional information for the Daily Sick and Recovery Report, tax office information, an average social insurance days figure, and a regular working hours figure for your internal organizations.
See: Running the Daily Sick and Recovery Report, page 7-17
See: Setting Up Social Insurance Days, page 1-71
Enter Dutch Organization information from the Additional Organization Information window.
To enter additional information for a Dutch organization:1. Query the Organization if it does not already appear there. In the Organization
Classifications region, select HR Organization, choose Others and select Dutch Organization to open the Dutch Organization window.
2. Select the region and organization number.
3. Select the tax office. You can only select a tax office that you defined previously as an external organization with the classification of Dutch Tax Office.
1-58 Oracle HRMS for Netherlands Supplement
See: Creating an Organization, page 1-28
4. Enter the tax registration number.
5. In the Tax Reporting Name field, enter the name of your company, for tax reportingpurposes.
6. Enter a value for the average number of days in a month. The figure you enter here is used in the social insurance days calculations for average SI days with work schedules for monthly and quarterly payrolls.
7. Enter a value for the regular working hours in a week. Ensure that the figure you enter is correct, as it defaults to each employee's assignment in this organization. If, at a later date, you need to change the regular working hours, for example, you entered an incorrect figure, the new value only effects new assignment records.
Note: This figure does not override any values that you previously entered for the employee's regular working hours in the employee'sassignment.
See: Entering Additional Assignment Details, page 3-49
8. Select Contract or Real Working Hours in the Part Time Percentage Method field. The method you select defines the type of hours used in the part-time percentage calculation for wage tax subsidies.
9. If you have a 53-week year with a 4-week payroll and a 5-week final month, then select the Yearly or Weekly Factor from the Lunar 5 Week Month Wage Method. The lunar method calculates the wages, wage limits, and wage tax subsidy for the period.
See: Setting Up Wage Tax Subsidies, page 6-37
10. Select which tax table to use to enable proration of standard tax for this organization. This means that you can calculate daily tax for newly hired employeesand employees that are leaving your enterprise part way through a payroll period. For example, select Daily Table using Calendar Days to convert the employee's standard taxable income to a day value, based on the number of calender days that the employee worked during the period, multiplied by 365.
11. Select the WAO contribution insurance type that applies to your employees. Recordthis information for the ABP pensions report.
12. Enter the percentage of the employee's gross salary that you pay as a Parental LeaveWage Percentage.
13. In the Customer Number field, optionally enter the company assigned by the
Organization Structures 1-59
service or accountancy agency.
14. If the employer is based in the public sector, select Yes in the Public Sector Organization field.
15. In the Full Sickness Wage Paid field, select Yes if the employer pays 100% of the employee's wage during sickness.
16. In the IZA Weekly Full Time Hours field, enter the number of full time weekly hours to use in the adjustments for part time and incidental employees.
Note: This field only applies if your employee is eligible for IZA private health insurance.
17. In the IZA Monthly Full Time Hours field, enter the number of full time monthly hours to use in the adjustments for part time and incidental employees.
Note: This field only applies if your employee is eligible for IZA private health insurance.
18. When you set the LHD Proration Override field to 'Yes', the application does not use the proration values given in the user-defined formula 'NL_OVERRIDE_SOCIAL_INSURANCE_DAYS' for Labour Handicap Discount calculation. When you set this field to 'No', the application uses the proration valuesfor Labour Handicap Discount calculation. If the value is not set, the value defaults to 'No'. Note: This field is used only in case of Labour Handicap Discount calculations and has no impact on other tax calculations where proration values defined in the formula 'NL_OVERRIDE_SOCIAL_INSURANCE_DAYS' are used. It enables you to keep the proration details of 'NL_OVERRIDE_SOCIAL_INSURANCE_DAYS' as applicable to achieve the desired calculations for Labour Handicap Discount.
19. Use the Beneficial Rule in Process Separate Run field to skip processing Beneficial Rule along with Net to Gross in Process Separate Run to avoid a Special Tax Deduction for the second assignment without any special taxable income. When this field is not set, it defaults to 'Yes'. When this field is set for a Parent organization, it is applicable for all its child organizations unless you override it. If you choose 'No' for an Organization, then the Beneficial Rule is not applied for applicable assignments of the Organization during the Process Separate Run.
20. Save your work.
1-60 Oracle HRMS for Netherlands Supplement
HR Organization: Entering General PGGM InformationUse the PGGM General Info window to specify employer's PGGM information, such as the holiday allowance and yearly-bonus percentages for all employees in your HR organization. The application uses these values for calculating the PGGM pension salary.
To Enter General PGGM Information:1. In the Organization window, query the HR organization. In the Organization
Classifications region, select HR Organization, click Others, and select PGGM General Info.
2. Click in the field of the Additional Organization Information window to open the PGGM General Info window.
3. In the Date From field, enter the first day on which the holiday allowance and yearly bonus percentages become valid for this organization. Optionally, enter an end date.
4. To provide default values for employees assigned to this organization or its child organizations, enter or change the holiday allowance and yearly-bonus percentages.
5. Enter the PGGM employer number and CAO Code, which identifies the collective agreement reference of the employer. Oracle HRMS uses this information for reporting purposes.
6. Click OK, and save your work.
HR Organization: Entering Wage Report InformationUse the Wage Report Information window to specify the sender ID and contact details for the wage report that you send to the tax authorities.
To enter wage report information:1. In the Organization window, query the HR organization identified as the employer.
2. In the Organization Classifications region, select HR Organization, click Others, andselect Wage Report Information.
3. Click in the field of the Additional Organization Information window to open the Wage Report Information window.
4. Enter sender ID, contact name, and contact number.
Organization Structures 1-61
5. In the Paid Assignments Only field, specify whether to include only assignments processed in the payroll run during the period specified in the wage-report-generator process.
6. Specify whether you have insurance cover other than WAO.
7. Click OK, and save your work.
HR Organization: Entering Flat Rate Taxation InformationUse the Wage Report Information window to specify flat rate taxation information.
To enter flat rate taxation Information:1. In the Organization window, query the HR organization identified as the employer.
2. In the Organization window, select HR Organization in the Organization Classifications region, and click Others.
3. Select Flat Rate Taxation in the Additional Organization Information window.
4. In the Additional Organization window that displays, click in the Flat Rate TaxationEIT field. Enter the following values in the Flat Rate Taxation window and click OK in both the windows:
• Date From and Date To
• Taxation Type – Choose from the following:
• Alternative use of Company Car
• Flat Rate Tax Deduction for Gifts
• Flat Rate Taxation for Early Retirement/Pre-Pension
• Labour Cost Arrangement
• Major Issue Flat Rate Tax Deduction
• Single Rate Exceptional Payment Tax Deduction
• Wage Tax Subsidy for Research and Development
• Amount
• Period Type
1-62 Oracle HRMS for Netherlands Supplement
• Payroll Frequency
• Correction - Yes or No
5. To update amount information, correct the Amount and select the Correction value as Yes.
6. Save the record.
Once you have entered flat rate tax information you can run the Dutch Wage Report to view the corrected flat rate taxation information.
Adding Sickness InformationUse the Organization window to enter details of sickness information for the classification you selected.
To add sickness information:1. Select Yes or No in the Test Message field.
2. Enter the Sector. This is a mandatory field.
3. Enter the Risk Group. This is a mandatory field.
4. Enter the Role of Sender. This is a mandatory field.
5. Enter the Sender Tax Registration Number. This is a mandatory field.
6. Enter the Contact Person or Department.
7. Enter the Establishment Name.
8. Select the Gender of Contact Person from the list.
9. Enter the Phone Number of Contact Person.
10. Click OK.
Adding Labor Cost Arrangement InformationUse the Organization Additional Information EIT to enter additional details about your Labor Cost Arrangement.

Organization Structures 1-63
To add Labor Cost Arrangement Information:1. Enter a value in the Year field. By default, this displays the current session date.
2. Enter a Calculation Method.
3. The Previous Year Taxable Income field displays automatically based on the value of the Year.
4. Save your work.
Entering GL Company Cost Center Information for a Company Cost CenterUse the GL Company Cost Center window to enter information about the company or cost center in Oracle General Ledger that the organization represents. Liaise with your Financials implementation team to get this information.
Oracle HRMS may default this information automatically if it is set up to generate organizations in HRMS whenever a cost center is defined in GL.
Once your company cost center information has been set up then you must not change it.
To define GL Company Cost Center Information:1. Query the company cost center in the Organization window, if it does not already
appear there. In the Organization Classifications region, select Company Cost Center, choose the Others button, and select GL Company Cost Center Information.
2. Click in the field of the Additional Organization Information window to open the GL Company Cost Center Information window.
3. Select the company value set that validates the company segment in your GL flexfield and the GL company name for the organization.
Note: If you are defining an organization that represents a company in GL do not complete any further fields and save your work.
4. Select the cost center value set that validates the cost center segment in your GL flexfield and the GL cost center name for the organization.
5. Save your work.
1-64 Oracle HRMS for Netherlands Supplement
Entering Representative Body InformationYou use the Representative Body Information window to record details about organizations classified as a representative body; for example, jurisdiction and duration of mandate.
To enter Representative Body Information:1. Select the Job Group associated with the representative body.
Note: You cannot associate a representative body with the default HR Job Group.
2. Select the body's jurisdiction; for example, fire wardens or health and safety issues. This list is maintained using the JURISDICTION lookup type
3. Enter the duration of the body's mandate and select the units (for example, years).
4. Select the body's method of funding; for example, employer funded, employee funded, or joint funded. This list is maintained using the FUNDING_METHOD lookup type.
5. Enter the maximum number of seats.
Note: The maximum number of seats for a constituency must not exceed the total number of seats available for the representative body.
6. Save your work.
Warning: Once you have attached roles to a representative body, you must not change the Job Group associated with the representative body, as this may lead to errors in the operating of the system.
Entering Constituency Information for a Representative BodyYou can assign constituencies to a representative body in the Constituency window.
To enter constituency information for a representative body:1. Select a constituency.
Organization Structures 1-65
2. Enter the number of seats.
Note: The number of seats allocated to a constituency must not exceed the maximum number of seats for its representative body.
3. Select a voting method.
4. Save your work.
Entering Location Information for ConstituenciesEnter a location for the constituency from the Organization window.
To enter a location:1. Select Location from the Others window.
2. Select a valid location.
3. Include or exclude the location from the constituency in the selection field.
4. Save your work.
Entering Organization Hierarchy Information for ConstituenciesEnter organization hierarchy information for the constituency in the Organization window. You can control which people to include or exclude in the constituency by indicating a starting node.
To enter organization hierarchy information:1. Select organization hierarchy from the Others window.
2. Select the organization hierarchy.
3. Enter the hierarchy starting node.
4. Include or exclude the organization hierarchy from the constituency in the selectionfield.
5. Save your work
1-66 Oracle HRMS for Netherlands Supplement
Entering Organization Information for ConstituenciesEnter an organization for the constituency from the Organization window.
To enter an organization:1. Select organization from the Others window.
2. Select the organization.
3. Include or exclude the organization from the constituency in the selection field.
4. Save your work.
Entering Grade Information for ConstituenciesEnter a grade for the constituency in the Organization window.
To enter additional grade information:1. Select grade from the Others window.
2. Select the grade.
3. Include or exclude the grade from the constituency in the selection field.
4. Save your work.
Entering Bargaining Unit Information for ConstituenciesEnter a bargaining unit for the constituency from the Organization window.
To enter additional bargaining unit information:1. Select bargaining unit from the Others window.
2. Select the bargaining unit.
3. Include or exclude the bargaining unit from the constituency in the selection field.
4. Save your work.
Entering Job Information for ConstituenciesEnter job information for the constituency from the Organization window.
Organization Structures 1-67
To enter additional job information:1. Select job from the Others window.
2. Select the job.
3. Include or exclude the job from the constituency in the selection field.
4. Save your work.
Entering Collective Agreement Grade Information for ConstituenciesEnter a collective agreement grade for the constituency from the Organization window.
To enter additional collective agreement grade information:1. Select collective agreement grades from the Others window.
2. Select the grade.
3. Include or exclude the grade from the constituency in the selection field.
4. Save your work.
Entering Trade Union Information for a Bargaining AssociationUse the Trade Union Information window to record further information about your bargaining association if it is a trade union.
To enter trade union information for a bargaining association:1. Query the bargaining association in the organizations window if it does not already
appear there. In the Organization Classifications region, select Bargaining Association, choose the Others button.
2. Click in a field of the Additional Organization Information window to open the Trade Union Information window.
3. Enter an employer reference and a trade union reference. These could be numbers to be used in an Electronic Data Interchange.
4. Save your work
1-68 Oracle HRMS for Netherlands Supplement
Entering Additional Information for a Professional BodyUse the Professional Body Info window to define details for a professional body.
To define professional body information:1. Query the professional body in the Organization window, if it does not already
appear there. In the Organization Classifications region, select Professional Body Information and choose the Others button.
2. Click in the field of the Additional Organization Information window to open the Professional Body Info. window.
3. Select the user defined table that should be used when calculating subscription rates for this professional body.
4. Enter the date upon which subscriptions to this body are to be reviewed.
5. Save your work.
Setting up Tax, Social Insurance, and Private Health Insurance Organizations
Before you set up your external tax and SI (Social Insurance) organizations and link them to your internal organizations, it is essential to set up an organization hierarchy for your business group. You can then assign your external organizations to at least the top-level HR Organization in your hierarchy. This ensures that the information you set up for your internal organizations is inherited by any child organizations in the hierarchy.
See: Creating Organization Hierarchies, Oracle HRMS Enterprise and Workforce Management Guide
See: Dutch Organizations and Additional Information, page 1-19
For more information on selecting the organization hierarchy for your business group see: Business Groups: Entering Dutch Business Group Information, page 1-39
To set up your tax and social insurance organizations:1. Define the location for each of your external organizations. Ensure you enter
additional postal address and contact details in the Location EIT.
See: Setting Up Locations, page 1-81
See: Location Extra Information Types, page 1-81
2. Create one or more external organizations for your tax office, SI providers and
Organization Structures 1-69
private health insurance providers using the Dutch Tax Office, the Dutch UWV Organization (for the SI provider), the Dutch Private Health Insurance Organizationand the Dutch IZA Provider Information classifications respectively.
The Dutch Private Health Organization classification has the mandatory field Provider Type attached to it. Within this field, select one of the following types of private health insurance:
• Collective
• GVP
• IZA
• IZR
• IZZ
• Other
Note: No additional organization information for the Dutch Tax Office classification is required. You enter further private health insurance information for your employees at the assignment level.
See: Creating an Organization, page 1-28
The Dutch IZA Provider Information classification requires you to enter the dates, contribution percentages and the maximum annual income fields.
See: Dutch Private Health Organization: Entering IZA Provider Information, page 1-70
Set Up Information for Dutch UWV Organizations3. For each Dutch UWV Organization you set up, enter additional information on the
SI provider and the SI type. You can set up multiple SI types for each SI provider you create.
See: Dutch UWV Organization: Entering Social Insurance Type Information, page 1-73
4. Select a method of calculating the number of SI days in a payroll period for each SI type.
See: Setting up Social Insurance Days, page 1-71
Set Up Information for the Employer5. Assign your external tax office organization to your internal organizations.
See: HR: Organizations: Entering Dutch Organization Information, page 1-57
1-70 Oracle HRMS for Netherlands Supplement
6. Assign your SI provider organizations to your internal organizations and enter any additional information.
If you create a record for each mandatory SI type for an individual SI provider, you can use this one SI provider for your internal organization to ensure that all of the mandatory insurances apply to your employees.
Note: You select the private health insurance organization at the employee level, you do not link it to an internal organization.
See: HR: Organizations: Entering Dutch SI Provider Information, page 1-54
7. Enter the sender's reporting name and registration number for the SI provider. As there can be multiple SI providers within your internal organization, the sender's reporting name and registration number help the UWV social security agencies to identify the sender of the NSI file.
8. Enter the employer's reporting name and registration number for the SI provider. The UWV social security agencies use this information to identify the employer of the NSI file.
Set Up Information for your Employees9. You can now record the social insurance, private health insurance and tax
information that you require for your employees:
• Social insurance and private health insurance information, see: Assignment Extra Information Types, page 3-39
• Tax information see: Entering Additional Assignment Details, page 3-49
Dutch Private Health Insurance Organization: Entering IZA Provider Information
To calculate the IZA contributions of employees eligible for IZA private health insurance, information must be entered at the private insurance provider level.
You enter the Dutch IZA Provider Information from the Additional Organization Information window.
To enter Dutch IZA Provider Information:1. In the Organization Classifications region, select Dutch Private Health Insurance
Organization.
2. Choose the Others button and select Dutch IZA Provider Information.
Organization Structures 1-71
3. Click in the highlighted field of the Additional Organization window to open the Dutch IZA Provider Information window.
4. Enter the start date, and optionally enter the end date.
5. Enter the percentage of the Employee Contribution.
6. Enter the percentage of the Employer Contribution.
7. Enter the Maximum Annual Income Base.
8. Save your work.
Setting up Social Insurance Days Use the following steps to derive social insurance (SI) days correctly for your employees.
See: Methods for Deriving Social Insurance Days, page 1-25 for more information.
1. Set up your SI organizations and SI types and assign them to an internal organization. Select the SI derivation method for the SI type in the Dutch SI Type window.
See: Setting up Dutch Organizations, page 1-68 and Entering Social Insurance Type Information, page 1-73
Specify the same method of calculation for all of the mandatory social insurance types (ZVW, WW, WAO and ZW).
See: Entering Dutch SI Type Information, page 1-73
Note: This rule does not apply to the additional SI types.
2. If want to override the SI days method of calculation for a specific assignment, you can choose an alternative method in the Day Method field at the assignment level.
See: Assignment Extra Information Types, page 3-39
3. Enter the average days in a month for the internal organization. This figure is used by the formula to calculate the Average SI days with work schedules, if the payroll period is monthly or quarterly.
See: Entering Dutch Organization Information, page 1-57
4. To correctly derive the number of regular working days for an employee, you must attach a work pattern to their assignment. Oracle HRMS recommend that you createa default work pattern that you can easily assign to your employees, as all employees must have a work pattern attached to their assignment.
1-72 Oracle HRMS for Netherlands Supplement
See: Assigning Work Shift Patterns to an Employee, page 3-36
5. Choose the method for determining the maximum number of SI days to be used in the calculation. You can also override the real SI days derived value in the OverrideReal SI Days field.
See: Entering Social Insurance Information in Entering Additional Assignment Details, page 3-49
6. If you need to perform an end of year adjustment, you can adjust the SI days to the real SI days figure and you can adjust the calculation method for the contribution calculations to the normal cumulative recalculation method. Select Yes in the Day Adjustment and Contribution Adjustment fields for the SI type at organization level.
See: Entering Dutch SI Type Information, page 1-73
7. You can override the day and contribution adjustments for a specific employee at the assignment level. Indicate whether you want to override the day adjustment to the real SI days value in the Day Adjustment field. In the Contribution Adjustment field indicate whether you want to adjust the contribution calculations to the normal cumulative recalculation method.
See: Assignment Extra Information Types, page 3-39
8. You can manually enter a figure or percentage of SI days at the assignment level to override the SI days figure derived from the day method. You can choose Manual Entry, Percentage of Average Days, or Percentage of Maximum SI Days in the Overriding Day Method field. If you choose Manual entry, you enter the number of SI days in the Overriding Day Value field. If you choose a percentage option, you enter the percentage in this field. Ensure that the override figure does not exceed the maximum number of SI days in a calendar year.
Note: Any end of year adjustments or multi assignment processing for SI days will not apply if an override has been entered.
See: Assignment Extra Information Types, page 3-39
9. Indicate whether or not to deduct an absence from the number of SI days in the Absence window. These absences reduce the number of SI days in a payroll period.
See: Entering Absences, Oracle HRMS Compensation and Benefits Management Guide
10. You can use the Payroll Run window to override any of the above steps for derivinga real SI days figure and the SI days used in the calculation. You can enter the overrides using input values on the Social Insurance element. This override option ensures the correct payroll results for your employee.
See: Setting up Social Insurance Deductions, page 6-16
Organization Structures 1-73
Dutch UWV Organization: Entering Dutch SI Provider InformationYou set up social insurance providers using the Dutch UWV Organization information type. You can enter SI (Social Insurance) provider information such as the provider type, contract number, branch number and branch name.
You can enter social insurance provider information from the Additional Organization Information window.
To enter additional information for a Dutch UWV organization:1. Query the social insurance provider if it does not already appear there. In the
Organization Classifications region, select Dutch UWV Organization.
2. Choose the Others button and select Dutch UWV Organization.
3. Click in a field of the Additional Organization Information window to open the Dutch UWV Organization window.
4. Enter the contract number.
5. Select the provider type.
6. Select the sector for the SI provider type. The sector determines the type of NSI file that applies to the SI provider.
7. Enter the risk group code associated with the UWV organization.
Note: If the same SI provider covers multiple sector and risk group combinations, then you need to set up multiple UWV organizations, one for each sector and risk group combination.
8. Enter the branch name and number of the SI provider.
9. Save your changes.
Dutch UWV Organization: Entering Social Insurance Type InformationYou can set up many different SI (Social Insurance) types for the SI provider depending on the different types of employment in your enterprise. The information you set up here is used in the process of social insurance calculations.
Tip: You can set up information for each mandatory social insurance type for the same SI provider and assign it to your internal
1-74 Oracle HRMS for Netherlands Supplement
organization. Then you can select the SI provider as the primary provider for your internal organization with the SI classification of All Mandatory Insurances. This setup ensures that all employees assigned to the internal organization inherit the mandatory social insurance information.
You enter social insurance type information using the Organization window.
To enter Dutch SI type information:1. Query the organization if it does not already appear there. In the Organization
Classifications region, select Dutch UWV Organization, choose Others and select Dutch SI Type.
2. Select the dates for the period of time the SI type is valid for the SI provider organization.
Note: When you select the start and end dates for an SI type, ensurethat for the same SI type, the information does not overlap for any period of time. For example, if you set up information for the SI type of ZW for the period 01-Jan-2001 to 31-Dec-2001, you must notset up SI information using the same SI type within this period of time. Otherwise this could lead to inconsistent payroll calculations for an employee's assignment during a payroll run.
3. Enter the name for the SI type.
4. Select the type of social insurance.
5. Select the basis calculation rule. Social Insurance Income and Total Gross are the only valid basis calculation rules. Hence you must choose either of these two basis calculation rules. The basis calculation you select here determines the type of SI income to be used in the calculation of the SI contributions.
6. Enter the employee and employer contribution percentages as the standard SI contribution rates for the SI calculations.
7. Effective after 31-Dec-2012, the employee and employer contribution percentages for senior SI contribution rates do not impact SI calculations and hence are non-mandatory.
8. Effective after 31-Dec-2012, the employee and employer thresholds do not impact SIcalculations and hence are non-mandatory.
9. Effective after 31-Dec-2012, the maximum salary figure as a daily amount does not

Organization Structures 1-75
impact SI calculations and hence is non-mandatory.
If you enable Law Walvis, as of 2013, you need to create a user table with periodic amounts for the maximum salary for SI. See: Additional Implementation Steps for Netherlands, Oracle HRMS for Netherlands Supplement. The created period must be the same as the payroll period. Ensure that daily amounts are stored for calculation of SI during hire and termination within the payroll period. In specific cases, the application calculates as follows:
• For new hires and terminations within the payroll period, the application adjusts the maximum SI wages to meet the legislative requirements. For these calculations, the application uses the total number of days in the period on which employee belongs to the payroll rather than the number of days the employee actually worked. For example, if an employee starts working on 20th February 2006 (Monday) for three days a week (Monday, Wednesday, Friday), then the employee will be paid for 4 days (Monday, Wednesday, Friday, Monday) in February. However, as the employee is on the payroll for a total of 7 week days in February, the application uses 7 days for calculation of maximum wages.
• For employees with the tax code for anonymous employees (tax code 940), the application sets the maximum salary to SI income. However, when an employee's status changes, the application calculates maximum salary retrospectively up to the employee's hire date (but not further back than the start of the current year). In addition, the application adjusts social insurance contributions retrospectively.
10. Select the calculation code. This code indicates the calculation method for the contribution calculation. Increasing SI Base Calculation and Adjusted Increasing SI Base Calculation are the only valid calculation methods. Hence you must choose either of these two calculation code.
Note: If you enable Law Walvis, then only the Increasing SI Base Calculation method applies.
• Use the Adjusted Increasing SI Base Calculation method, which is based on the Increasing SI Base Calculation, if you have employees who, either simultaneously or successively, work in different Sector and Risk Group combinations within the same payroll period.
• If you choose Increasing SI Base Calculation as the method, the application includes the values accumulated in previous payrolls in the current year. However, for calculating the maximum salary, this method uses the cumulativeyear-to-date values of the existing balances.
1-76 Oracle HRMS for Netherlands Supplement
Note: Any non-SI absences, for example, absences without leave or explanation, reduce the maximum SI salary.
11. Select the calculation method for calculating the number of SI days in a payroll period. Select Law Walvis to enable Law Walvis calculations in the application.
Note: The method you select here determines the calculation method for deriving SI days for employees within this organization. Ensure you use the Law Walvis method for all the mandatory SI types from January 2006 to meet the legislative requirements.
For more information on the different calculation methods see: Methods for Deriving Social Insurance Days, page 1-25 and for information on setting up SI dayssee: Setting up Social Insurance Days, page 1-71
12. Effective after 31-Dec-2012, the employer contribution taxable income does not impact SI calculations and hence is non-mandatory.
13. Effective after 31-Dec-2012, the employee contribution gross or net does not impact SI calculations and hence is non-mandatory.
14. Choose whether the application adjusts the SI days as part of an end of year adjustment in the Day Adjustment field. Select Yes to adjust the SI days to the real SI days value, and select No to keep the average SI days value.
Warning: This adjustment can be overridden at the employee assignment level for the SI classification.
15. Choose whether the application adjusts the SI contributions as part of an end of year adjustment in the Contribution Adjustment field. Select Yes to use the normal cumulative recalculation method, and select No to use whatever method has been chosen.
Warning: This adjustment can be overridden at the employee assignment level for the SI classification.
16. Save your work.
Entering Statement of Earnings InformationThe Statement of Earnings (SOE) displays details of earnings, deductions and other

Organization Structures 1-77
payroll related information for an employee assignment. You must enter the required elements and balances in the SOE Information flexfield for the business group you are using, to enable the information to feature on the Statement of Earnings.
For further information about the required elements and balances, see: Configuring the Netherlands Statement of Earnings, page 4-4
For further information about defining your element or balance display names, see: Entering Statement of Earnings Detail Information, page 1-77
You enter Statement of Earnings information from the Organization window.
To enter Statement of Earnings information:1. In the Organization Classifications region, select your business group and click the
Others button.
2. Select SOE Information, from the Additional Organization Information list.
3. Choose the resulting SOE Information entry to open the SOE Information flexfield.
4. In the Elements 1 field, select Dutch SOE Earnings.
5. In the Elements 2 field, select Dutch SOE Deductions.
6. In the Elements 3 field, select Dutch SOE Imputed Earnings.
7. In the Balances 1 field, select the Period to Date balance attribute.
8. In the Balances 2 field, select the Year to Date balance attribute.
9. Choose OK.
Entering Statement of Earnings Detail InformationThe Statement of Earnings (SOE) displays details of earnings, deductions and other payroll-related information for an employee assignment. You can define the display name and the order your elements and balances appear on the statement of earnings, if required.
For further information about the required elements and balances, see: Configuring the Netherlands Statement of Earnings, page 4-4
For further information about entering SOE information, see: Entering Statement of Earnings Information, page 1-76
You enter Statement of Earnings Detail Information from the Organization window.
1-78 Oracle HRMS for Netherlands Supplement
To enter Statement of Earnings Detail Information:1. In the Organization Classifications region, select your business group and click the
Others button.
2. Select SOE Detail Information, from the Additional Organization Information list ofvalues.
3. Click on the highlighted field to open up the SOE Detail Information flexfield.
4. In the Type field, select Element or Balance as required.
Note: You will have to complete different fields, depending on your choice of element or balance.
5. If you opted for Balance, select the balance from the Balance Name field.
6. Select a Dimension.
7. If you opted for Element, select the element from the Element Name field.
8. Select an Input Value.
9. For both element and balance, enter the name you want to appear on the statement of earnings, in the Display Name field.
10. For both element and balance, enter a number to signify the order they will appear in, on the statement of earnings.
11. Click Ok
Entering Related Organizations Information for an HR OrganizationUse the Related Organizations information type to associate an operating unit to an HR organization. If you use a multi-org application, then the operating unit you select here becomes the operating unit for workers assigned to the HR organization.
Tip: If you use the Multi-Org Access Control (MOAC) feature for a product that integrates with Oracle HRMS, then you can associate an operating unit to every HR organization in your enterprise using Web ADI. MOAC is a key feature in Oracle Applications that enables you to access multiple operating units from a single application responsibility. For more information on MOAC, see: Multiple Organizations Overview, Oracle HRMS Implementation Guide
Organization Structures 1-79
See: Data Download and Upload Using Web ADI Overview, Oracle HRMS Configuring, Reporting, and System Administration Guide
To enter related organizations information:1. Query the HR Organization in the Organization window if it does not already
appear there. In the Organization Classifications region, select HR Organizations, choose Others, and select Related Organizations.
2. Click in the Additional Information window to open the Related Organizations Information window.
3. Select an operating unit to associate to the HR organization.
1-80 Oracle HRMS for Netherlands Supplement
Locations
LocationsIn Oracle HRMS, you set up each physical site where your employees work as a separate location. If you use the Configuration Workbench to configure your basic enterprise structure, then you only need to create locations for the additional organizations you require.
See: Key Concepts for Representing Enterprises, page 1-6
You can set up:
• Global locations: These are available in all Business Groups.
• Business Group locations: These can only be used in one Business Group.
• Business Place locations (Korea only): These can only be used in one Business Place.
Similarly, you enter the addresses of external organizations that you want to maintain in your system, such as employment agencies, tax authorities, and insurance or benefits carriers. When setting up internal or external organizations, you select from a list of these locations.
This approach has these advantages:
• You enter information about each location only once, thereby saving data entry time.
• Central maintenance of locations ensures consistency of address standards.
• Your work sites exist as separate structures identifiable for reporting purposes, and for use in the rules that determine employee eligibility for various types of compensation and benefits.
Mexico OnlyOracle HRMS uses the location associated with an assignment to determine its social security affiliation. It is recommended that you associate all locations with one or more appropriate GRE using the Mexico HRMS Statutory Reporting Hierarchy. Oracle HRMSdetermines the GRE of an assignment based on the hierarchy you have associated the location with.
See: Government Reporting Entities (GREs), Oracle HRMS Enterprise and Workforce Management Guide (Mexico)
See: Mexico HRMS Statutory Reporting Generic Hierarchy Type, Oracle HRMS
Organization Structures 1-81
Enterprise and Workforce Management Guide (Mexico)
See: Entering an Assignment (Assignment Window), Oracle HRMS Workforce Sourcing, Deployment, and Talent Management Guide
Location Extra Information TypesYou can define as many Extra Information Types as you require to hold information about locations. There is also one predefined location EIT.
• Postal Address and Contact Details - this EIT enables you to enter a postal address and contact details for external organizations such as the tax office, social insurance providers and pension providers.
If you create multiple postal addresses for a location, the application only uses the most recently entered or updated address it finds.
Note: You must enter the postal code in the following format NNNNAA, for example, 1234AB.
To be able to access the predefined EITs, you must link the EIT to your responsibility, see: Setting Up Extra Information Types Against a Responsibility, Oracle HRMS Configuring, Reporting, and System Administration Guide
Setting Up LocationsYou can enter addresses in the Location window.
Locations are shared across Business Groups in HRMS and with two other Oracle applications: Inventory and Purchasing. HRMS does not use some of the fields in the Location window. These fields are disabled for HRMS users. For example, the Legal Address check box is read-only and supports future functionality in Oracle Financials.
For information about Oracle Purchasing locations, see: Defining Locations, Oracle Purchasing User's Guide.
To enter a work location and its address:1. Enter the name of the location, and a description if required.
2. Uncheck the Global check box if you want the location to only be available within the default Business Group of your current responsibility. Accept the default if you want the location to be a global location and therefore available to all Business Groups.
If you are setting up a global location, the location name must be unique across all Business Groups.
1-82 Oracle HRMS for Netherlands Supplement
If you are setting up a location for one Business Group, the location name must be unique within that Business Group and all global locations, but does not have to be unique across all Business Groups.
Note: You cannot amend the Global check box once you have set up your location.
3. Select a national address style from the list. If a local address style exists for your country, it is displayed as the default. Otherwise, the international style is displayed.
Australian users: There is a choice of Australia (International) address style and Australia address style. If you want to upgrade from an existing Australia (International) address style to the Australia address style, run the Upgrade Australia Address Style process. This is an optional step. This process enables you to validate and correct any invalid address information for reporting purposes.
If you are entering an international address, use the Australia (International) address style. If this is unavailable, use the generic style with a valid ISA 3166 code country code.
US and Canadian users: The local style is only displayed if you have Vertex geocode data installed.
Note: You can change existing address styles or create new ones if required.
See: Changing Default National Address Styles, Oracle HRMS Configuring, Reporting, and System Administration Guide
4. Enter address information in this window.
US Payroll users: If you change a location address, then you must update the location in the State Tax Rules window for each assignment at that location. If the Address Validation Using Vertex Web Services feature is enabled, then Vertex Web Services validates addresses in the Location window. See: Address Validation Using Vertex Web Services, Oracle HRMS Implementation Guide (US)
US users: In the EEO Exception Report, location addresses are truncated to 115 characters if the combined length of the location code and address lines 1,2, and 3 is greater than 115 characters.
Canadian Payroll users: You enter Census Metropolitan Area codes here in the Location Address flexfield.
Note: You must enter the postal code in the following format NNNNAA, for example, 1234AB.
Organization Structures 1-83
Irish users: You enter the employer's address here and attach it to the legal employer.
5. If the mailing address of the location differs from the payroll taxation address, you need to enter an overriding address into the Payroll Tax fields.
6. Select a time zone if you want to associate a time zone with the location.
Note: When you select a time zone, ensure that it corresponds to the location's address.
7. Choose OK, and then choose the Extra Information button to enter any additional information required by your enterprise.
See: Entering Extra Information, Oracle HRMS Configuring, Reporting, and System Administration Guide
8. Save your location.
To make locations inactive:Making a location inactive prevents users from selecting it.
To remove an address from the Location list:1. Enter an inactive date when the location is no longer in use in your enterprise, and
save your changes.
To delete a location:You can delete locations that have not been used.
Note: If a location is still in use, but you do not want it to be selected today or in the future, enter an inactive date.
1. Query the location you want to delete.
2. Delete the location.
3. Save the changes.


Occupational Health 2-1
2Occupational Health
2-2 Oracle HRMS for Netherlands Supplement
Disability Information
Occupational Health: Medical Assessments, Disabilities and Work Incidents
Oracle HRMS enables you to record medical assessments, disability information, and work incidents for the people in your enterprise. It also enables you to link this information together. For example, if a medical assessment is required as the result of a work accident, and that assessment then diagnoses a disability in the person, you could relate these records to one another.
Note: The Medical assessments, disabilities and work incidents functionality may not be used by your localization.
Medical AssessmentsThe Medical Assessment window enables you to enter information about the medical assessments (consultations) provided to the people in your enterprise. For example, youcan record:
• When the assessment took place, and the organization and person who performed it.
• The result of the assessment, for example, if a disability was identified.
• If the purpose of the assessment is to evaluate a particular disability, whether the person is considered fit for work.
• Any work incident that was the reason for this assessment.
A person can have multiple medical assessment records. For example, a person may have a recruitment medical and several annual medicals.
DisabilitiesUsing the datetracked Disabilities window, you can enter information about a person's disabilities. For example, you can record:
• The nature and severity of the disability
• The full-time equivalent that this person represents towards your enterprise's quotaof disabled employees
• The details of the registration of this disability with an official organization
Occupational Health 2-3
• Any work incident that was the cause of this disability
• The medical assessment that first identified this disability.
A person can have multiple disability records. Each disability can be linked to one workincident and to one medical assessment that diagnosed (or identified) the condition. Once a disability has been diagnosed and recorded, you can link it to multiple assessments that evaluate the disability.
Work IncidentsOracle HRMS enables you to record work incidents, for example, accidents, that involvethe people in your enterprise. Work incidents are incidents that occur:
• at work
• on the way to or from work
• in other circumstances that are defined as work-related by your enterprise.
Using the Work Incidents window, you can record:
• The details of the incident, for example, when and where it occurred.
• The health and safety official and/or representative body that were notified of the incident
• Medical details, such as any injury occurred, treatment given, and medical organizations involved
• Whether any compensation was paid
• Whether this person was absent as a result of the incident
• The job the person was doing when the incident occurred
A person can have multiple work incident records.
The graphic illustrates the relationship between the medical assessment, disability and work incident tasks. It shows the full process that you could follow if you wanted to record:
• A work incident that occurred
• The medical assessment that was required as a result of the work incident
• The disability record that was required as a result of a "Disability" result in the medical assessment

2-4 Oracle HRMS for Netherlands Supplement
• The subsequent "Disability type" medical assessments that were required to evaluate the disability on a regular basis
The "Start" boxes show the points at which you can start the process, depending on the task you need to perform.
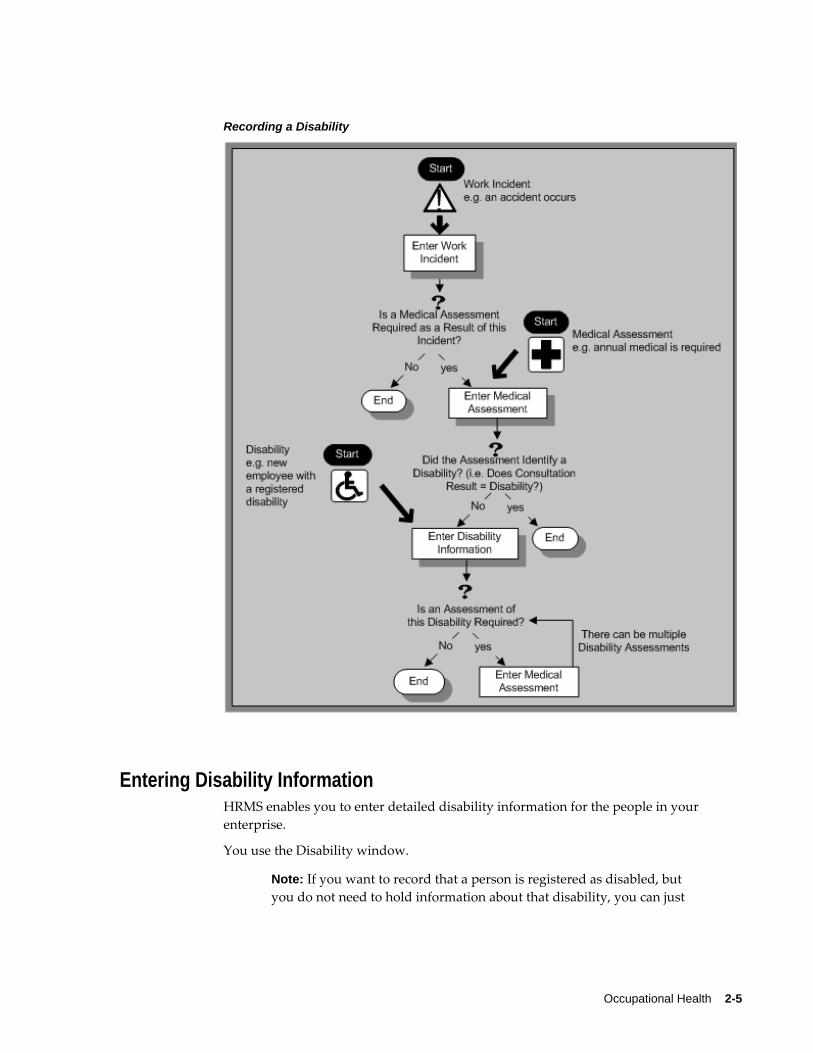
Occupational Health 2-5
Recording a Disability
Entering Disability InformationHRMS enables you to enter detailed disability information for the people in your enterprise.
You use the Disability window.
Note: If you want to record that a person is registered as disabled, but you do not need to hold information about that disability, you can just
2-6 Oracle HRMS for Netherlands Supplement
check the Registered Disabled check box on the Personal tab in the Person window.
See: Entering a New Person (People Window), page 3-9
To enter disability information:1. Set your effective date early enough to handle any historical disability information
that you want to enter.
Note: If you want to associate this disability record with an existingmedical assessment or work incident, your current effective date must be later than the assessment and incident dates.
2. Select Law REA or WAO Insurance for the disability category.
To qualify for the WAO insurance the employee is examined and the WAO percentage is determined based on the extent of disability. If the employee is not entitled to the WAO insurance and still has a disability, the employee can claim the insurance based on law REA. An employee cannot be registered with both the WAO insurance and law REA.
3. Enter into the FTE field the full-time equivalent that this person represents towards your enterprise's quota of disabled employees. If no quota scheme exists, then leavethe default value as 1.00.
Note: You can enter a number that is greater than 1.00, depending on the level of disability.
The actual figure will normally be provided by the official disability organization.
4. Select the status of this disability information.
• Active. This information will be included in reports. You cannot enter an Activestatus if the record has an end date.
• Inactive. This information will not be included in reports.
• Pending. This information is not yet complete because you entered it before youentered the medical assessment confirming this disability (where the consultation result was Disability.)
• Closed. This information has an end date because the person no longer has this disability.
Occupational Health 2-7
5. Select the reason for the disability, for example, Occupational Incident. If the disability was diagnosed as the result of a medical assessment, select Occupational Assessment.
6. Select the incident that is related to, or caused, this disability. The list of incidents is limited to incidents that occurred before the current effective date of this disability. When you select an incident, its date is displayed automatically.
7. Select the medical assessment that recorded this disability.
The list of assessments is limited to assessments that:
• have a result of Disability
• have a consultation date that is earlier than the current effective date of the disability
• are not already linked to a disability record for this person
• were linked to any incident that you selected in the previous step
To link an incident to an assessment, see: Entering Medical Assessments, Oracle HRMS Enterprise and Workforce Management Guide
This field is not datetracked.
Entering Disability Registration Information1. Choose the Registration tabbed region to enter the disability registration details.
2. Enter into the ID field the registration number assigned by the disability organization.
3. Select the name of the official disability organization with whom the person's disability is registered.
You create disability organizations in the Organization window. selecting the Disability Organization classification.
See: Creating an Organization, page 1-28.
4. Enter the date on which the employee was registered as disabled with the disability organization and the date on which this registration expires.
5. Enter further information about the adjusted work of the employe
Entering Additional Disability Information1. Choose the Other tabbed region to enter additional details about this
disability.
2-8 Oracle HRMS for Netherlands Supplement
2. Enter a description of the disability.
3. Enter information about the work restrictions that the employee is subject to as a result of their disability.
You can enter further information about this disability in the Further Disability information flexfield.
4. Select a disabilty degree.
5. Enter the remaining hours and units.
6. Save your work.
What Next?To set up an assessment to evaluate this disability, choose the Medical Asse. (Assessment) button.
Maintaining Disability InformationYou can make changes to the disability information that you saved previously, but if your disability record includes either incident or medical assessment information, you cannot change or delete this information once you have saved it.
People Management 3-1
3People Management
People Management OverviewOracle HRMS provides you with an efficient and flexible people management system toorganize your workforce as your enterprise requires. Using Oracle HRMS you can:
• Maintain information on all current and potential workforce to track their roles and activities from the time they apply for a job to when they leave your enterprise.
• Record deployment information such as organization, job, position, and grade of the workers in your enterprise.
• Maintain details such as qualifications, competency profiles, work choices, and benefits eligibility data to manage workforce development.
• Maintain documents of record such as work visas, permits, and certificates.
• Handle mass change processes to implement changes to high volumes of information, such as employee job data, new departments, or new work relationships.
Managing Workforce DetailsYou can manage your workforce details using the following features of Oracle HRMS:
• Workforce Assignments: Record the details about the different work an employee, or a contingent worker does in your enterprise and relate them to your overall workstructure.
• Identify Workforce and Assignments: Use unique numbers to distinguish your workers and their roles.
• Person number: Identifies every employee, contingent worker, or applicant in
3-2 Oracle HRMS for Netherlands Supplement
your business group.
• Assignment number: Identifies every assignment in your business group.
• Person Types: Record information related to different groups of people such as applicants, employees, and contingent workers and restrict access to the different group records.
• Assignment Statuses: Record changes in the work status of an employee or a contingent worker with statuses such as Active, Suspended, and Terminated. For example, if an employee is on maternity leave you can assign the Suspended status. To identify different work statuses in your enterprise you can expand the predefined system statuses and set up your own multiple user statuses. For example, you can define the user statuses of maternity leave, paternity leave, and military leave for the system status of Suspended.
Managing Your WorkforceYou can record details of your workforce on a daily basis using the People Managementtemplates or the People and Assignment windows.
• People Management Templates: To complete tasks like entering people and hiring applicants. Your system administrator can modify the templates to create windows that are specific to your business processes.
• People and Assignment Windows: To enter, track, and report on people on a day to day basis. You use these windows if People Management templates are not set up in your enterprise.
Recording Additional InformationIn addition to the workforce information you enter, you can set up flexfields to capture information unique to your enterprise. For example, you can define Special InformationTypes to hold employee disciplinary records and Extra Information Types to record data required by your localization such as birth certificate details.
To understand the difference between Special Information Types and Extra InformationTypes, see: Extra Information Types (EITs), Oracle HRMS Configuring, Reporting, and System Administration Guide
Workforce Management Using Oracle Self-Service Human Resources Oracle Self-Service Human Resources (SSHR) enables line managers, employees, and contingent workers to update their personal and professional information through interfaces personalized to their roles, work content, and information needs. Line managers can perform day-to-day HR tasks such as updating the employees'

People Management 3-3
assignment details and processing transfers, promotions, and terminations. To work with Oracle SSHR, you must purchase the license from Oracle. For information on licenses, contact your Oracle sales representative.
See: Using SSHR for Workforce Sourcing and Deployment, Oracle Self-Service Human Resources Deploy Self-Service Capability Guide
Reporting on Workforce ManagementOracle HRMS and Oracle HR Intelligence (HRI) provide a range of reports to track yourworkforce deployment. For example:
• Oracle HRMS offers the Assignment Status report, listing people assigned to particular organizations, jobs, positions, and grades with specific assignment statuses.
• Oracle HRI offers the Employee Separation by Reason (Organization Hierarchy) Status Analytics by Organization worksheet. This worksheet outlines the reasons for employees' separation in different organizations of your enterprise. To work with Oracle HRI reports you must purchase the appropriate license from Oracle. For information on licenses, contact your Oracle sales representative.
For more information, see: Reports and Processes in Oracle HRMS, Oracle HRMS Window Navigation and Reports Guide
Key ConceptsTo effectively use Oracle HRMS for workforce management, see:
• People in a Global Enterprise, Oracle HRMS Workforce Sourcing, Deployment, and Talent Management Guide
• The Employee Assignment, page 3-29
• Contingent Workers, Oracle HRMS Workforce Sourcing, Deployment, and Talent Management Guide
• Assignment Statuses, Oracle HRMS Workforce Sourcing, Deployment, and Talent Management Guide
• Overview of Self-Service Actions, Oracle HRMS Workforce Sourcing, Deployment, and Talent Management Guide
• Template Windows User Interface, Oracle HRMS Workforce Sourcing, Deployment, and Talent Management Guide
3-4 Oracle HRMS for Netherlands Supplement
People Management
How does Oracle HRMS enable you to manage all the people who make up your enterprise?
Using Oracle HRMS you can hold, inquire on, and track a wide range of personal information. This can include medical details, work schedules, preferred languages for correspondence, and personal contacts, as well as the basic details such as date of birth, employee number, and addresses.
You also need to record information about what the people in your enterprise are employed to do. You can enter, maintain, report, and inquire about all aspects of employment information.
Oracle HRMS enables you to enter and track people from the day they apply for a job tothe day they leave your enterprise.
Can you enter information specific to your enterprise?Yes, you can. Not every enterprise holds the same information about its workforce, so you can configure Oracle HRMS using descriptive flexfields, Extra Information Types, and Special Information Types to record everything you need to know.
Does Oracle HRMS provide any specific features for managing contingent workers?Yes, Oracle HRMS enables you to treat contingent workers as an entirely separate category of human resource that you can process and report on separately from employees.
How can I update a batch of assignments together, as when a department relocates?The Mass Assignment Update feature enables you to update assignment information for multiple employees and contingent workers in a single business group using a single update request. You can also update assignment information for multiple applicants using a single update request.
My organization is relocating in three months; is it possible to create a future-dated assignment update?
Yes it is. The mass update to be submitted must operate at one effective date, which can be a past, present, or future date. The effective date is the date on which the change is recorded, and the date the update is submitted.
People Management 3-5
Does Oracle HRMS provide features to update worker information across business groups using a single responsibility?
Yes. You can use the People Management templates to query and update worker information across business groups using a single responsibility. Oracle HRMS provides a search criterion called Business Group in addition to the existing criteria in the Find window of any people management template. This criterion enables you to search for employees belonging to one or more business groups.
When you perform a search, the Summary and Maintain windows display the business group to which the worker belongs. In addition, the key flexfields, descriptive flexfields,special information types, and extra information types display data that is appropriate to that worker's business group.
Can I move people automatically from one business group to another?Yes. Using the Global Deployments function, HR Professionals can transfer an employee either permanently or temporarily to a different business group.
At the start of the deployment, Oracle HRMS automatically creates or updates employee records in the destination business group. If the transfer is permanent, then HRMS terminates employee records in the source business group. If the transfer is temporary, then HRMS suspends the employee's current assignments. When the employee returns from a temporary deployment, HRMS automatically terminates the employee record in the destination business group and reinstates suspended assignments in the source business group.
What are personnel actions?Personnel Actions are business activities that define and document the status and conditions of employment, such as hiring, training, placement, discipline, promotion, transfer, compensation, or termination.
Personnel Actions fall into three overall types:
• Hiring
• Deployment
• Termination
Oracle Self Service Human Resources (SSHR) provides a configurable set of tools and web flows for initiating, approving, and managing these activities.
In what ways does Oracle SSHR make it easier to manage personnel actions?You can process multiple actions on the same person concurrently, so you needn't wait for other actions to process before initiating one of your own. The application calculates
3-6 Oracle HRMS for Netherlands Supplement
a person's eligibility for you automatically. Approvers can return an action to any previous approver for correction. Any approver on the chain with appropriate permissions can update an action, even change the effective date. You can also specify the date on which an action takes effect, or make it effective on final approval. The application gives you easy access to information about your people, the other approverson the chain of recipients, your pending actions, and actions on your people awaiting the approval of others.
Document management features enable you to automatically generate business documents, such as a request or notification, correspondence, or a contract. "What-If" analysis enables you to see the impact of your proposed change on a person's entitlement to compensation or benefits, before submitting the change for approval. You can attach supporting documents to an action, such as a resume, certificate, photo, or web address.
The flexibility of allowing multiple transactions and allowing any approver to change the effective date can lead to conflicts with other pending or approved actions. How does Oracle SSHR help manage this?
If someone makes a change to a person's record before you can approve your action, your setup can specify that the application add the updated information from the intervening change, or preserve your data. The application informs you of the status of the changes in a table that displays the original, intervening, and refreshed values.
Your setup can also specify that the application inform you when it encounters a future-dated change to the person's record. In this situation, the application routes your action to a Human Resources representative on approval, for manual entry of the changes.
I need to approve an absence, how do I know if another worker is available to cover the time?
You can use the Review Resource Availability page using the HR Professional responsibility to view a worker's schedule and any calendar events that affect their time. The application searches the person's schedules and applicable calendar events within the dates you specify, and displays the results in a table.
Use the integrated features from Oracle HRMS and Oracle Common Application Components (CAC) to set up shifts, schedules, and calendar events, so you can determine the availability of your workforce.

People Management 3-7
People
Person Extra Information TypesYou can define as many Extra Information Types as you require to hold information about people. Some of the predefined person EITs are:
• Alien Income Forecast - the type of income a visa holder receives, as well as the amount and the year in which the income was received.
• Global Work Permit - information about the work permit an employee holds.
• Identification Certificates - information about a person's identification certificate, such as the type of identification, identification number, issue date, expiry date, copy available and related information.
• Passport Details - information about the visa holder's passport, such as country of issue, passport number, issue date and expiry date.
• Visa Details - information about the visa an employee holds, such as visa type, visa number, issue date and expiry date.
• Visa Payroll Details - information about the amount of income and benefit a visa holder receives.
• Visa Residency Details - information about a visa holder's residency, such as residency status, the residency status date, the first entry date and tax residence country.
• Visa Visit History - records a visa holder's visits to a country. The EIT stores information such as the purpose of the visit, the start and end dates of the visit, and whether the visa holder was accompanied by a spouse or children.
• Work Permit - records work permit information such as permit name, number, effective date, expiry date, issuing authority, copy available and related information.
• Resignation Pay Details - Records whether the person receives FLO Payment, Disability Payment, or Payment of Resignation. If they receive Disability Payment, or Payment of Resignation, you can record the percentage of the usual calculated ABP pension deduction that they pay.
• Oracle Student System (OSS) Person Details - records OSS identification data for thestudent employee. The field Synchronize OSS Data controls synchronization of student employee address and telephone information between HRMS and OSS.
3-8 Oracle HRMS for Netherlands Supplement
• First Day Report Information - records the report date and resend status. If you make a correction or update any of the fields reported previously, the application creates a new record in this EIT with a Resend status of Yes. After running the report for a particular employee, the application sets the Resend status to No and records the report date.
Finding a Person Using the Find Person WindowWhen you navigate to the People window or any of the FastPath function windows, the Find Person window automatically displays in front of it.
To query a person using the Find Person window:1. Do one or a combination of the following:
• Enter a full or partial query on the person's name. Where a prefix has been defined for the person, a full name query should be in the format 'Maddox, Miss Julie'.
• Enter a full or partial query on the person's name. The full name format of the person determines how their name is displayed in the Find Person window. People who have been entered outside of the People window, for example using the Contact or Applicant Entry windows, are displayed at the top of the list using their surname only. All other people are then sorted in alphabetical order based on the first part of their full name format.
• If relevant, enter a query on employee number, applicant number or national identifier (such as social security number.)
• In the Search by number region, select a number type of employee, applicant or contingent worker to enter your query on. Then enter a full or partial query on employee number, applicant number, or contingent worker number.
2. Choose the Find button.
Note: If you choose Find without entering any search criteria, the People window is displayed with the first record shown. You can use the [Down Arrow] key or choose Next Record from the Go menu to display the next person
If only one person is found, they immediately display in the People window or the appropriate FastPath function window. If more than one person is found, the results display in a separate window.
3. Choose the person from the list and choose OK to display their details in the Peoplewindow or the appropriate FastPath function window.
People Management 3-9
Entering a New Person (People Window)Use the People window to enter and maintain basic personal information for all person types, including employees and contingent workers.
Note: You can also use one of the template windows such as Entering Employees or Entering Contingent Workers to enter new people.
The minimum information to enter for all categories of people is name and action type. In addition, for employees you must enter gender, employee number (if your enterpriseuses manual number entry), and date of birth (for assignment to a payroll). Your localization may require additional mandatory information.
To enter a new person:1. Set your effective date to the appropriate date for adding the person to the
application. If you are entering an employee, this should be their hire date.
2. Enter the person's name and other details in the Name region. Only the last name is required for most legislations, but some legislations require a first name too.
For UK users: The first name is a mandatory field. Ensure that the first character is an alphabet. The employee's last name is not a mandatory field, however, ensure that the first character is an alphabet.
For Romanian users: First and last names are mandatory.
• In the Title field, select a title such as Mrs. or Doctor.
• You can use the Prefix field to enter the first part of the person's name, such as van der. In the case of someone whose last name is van der Zee, you can sort bythe last word of the name, that is Zee. If the whole name van der Zee is entered in the Last Name field, the name is sorted under van.
For Romanian users only: Prefix is not required in Romania, so this field is not available to Romanian users.
For Russian users only: Prefix is not required in Russia, so this field is not available to Russian users.
For UAE users only: Prefix is recorded as additional personal information. Therefore, this field is not displayed in the Name region.
• The Suffix field holds part of the last name, such as Junior or II. You can report on the suffix separately, as required in some government-mandated reports.
For Romanian users only: Suffix is not required in Romania, so this field is not available to Romanian users.

3-10 Oracle HRMS for Netherlands Supplement
For Russian users only: Suffix is not required in Russia, so this field is not available to Russian users.
For UAE users only: Suffix is recorded as additional personal information. Therefore, this field is not displayed in the Name region.
• For Russian users only: In the Genitive Last field, enter the genitive case of the person's last name. For example, Ivanovskogo is the genitive case of the last name Ivanovskii. The genitive last name is required for some statutory reports. If you do not enter the genitive last name, the application uses the nominative last name.
3. Select a gender, if required. In the US, you must choose Male, Female, or Unknown Gender. In the UK, you must enter the gender of each employee. For Poland, the PESEL you enter supplies the gender information. For Finland, the PIN (Personal Identification Number) supplies the gender information.
Note: For Norway users only: A gender value will be automaticallygenerated based on the person`s National Identity number.
4. In the Action field, select an action type (such as Create Employment) and a person type. The person type you select displays immediately in the Person Type for Action field before you save it. If only one user person type exists for the action type, it displays automatically in the Person Type for Action field.
Note: If you enter a contingent worker who has a previous person type such as ex-employee, you can choose to revert the contingent worker back to the previous person type by using the Cancel Placement action.
If you are a Finnish user and need to pay salary to a contingent worker through Oracle payroll, you need to enter the person as an employee. You then change the person as a not employed person by changing the employee status in the Additional Assignment Details window. See: Entering Additional Assignment Details (Assignment Window), Oracle HRMS for Finland Supplement
You create user person types in the Person Types window. If you want to change a person type to another person type with the same system person type you must usethe Person Type Usage window.
See: Changing Person Type Usage and Deleting OAB Person Type Usage, Oracle HRMS Enterprise and Workforce Management Guide
Entering Employee Information:Enter the following information if the person is an employee.
People Management 3-11
1. If desired, change the Latest Start Date field.
• The Latest Start Date field displays your effective date.
• For employees who have previously worked for your enterprise, the Date First Hired field displays the start date of the employee's earliest, previous period of service. This date must be on or before the start date of the earliest period of service. The Date First Hired field is situated on the Benefits Tab.
If the latest start date and the date first hired are the same, when you amend the latest start date, the date first hired is set to the same date.
If you amend the latest start date to earlier than the date first hired, the date first hired is set to the same date.
Note: In the US, before making a change to a latest hire date already entered for an employee, ensure that the start date of the employee's primary address is the same as or earlier than the new hire date. This preserves the integrity of the employee's tax records.
Entering Identification Information:Enter the person's identification information in the Identification region:
1. If your enterprise uses a manual number generation scheme, enter an employee, applicant or contingent worker number. If your enterprise uses automatic number generation (including Use Employee Numbering for contingent workers), the employee, applicant, or contingent worker number automatically displays when you save your entries in this window.
Note: If you query a person who has a combination of employee, applicant, and contingent worker numbers, the employee number displays in the Number field. If the person lacks an employee number but has a contingent worker number and an applicant number, the contingent worker number displays. However, you can choose to view any of the identification numbers held for a person by selecting them from the list.
2. Enter the national identifier for your country. For example, enter the National Insurance number in the UK, the Social Security number in the US, the PPS Numberfor Ireland, the Fiscal Code in Italy, the IRD Number in New Zealand, the Social Security Code (TAJ) in Hungary, the Individual Tax Payer's Number (INN) in Russia or the ID number in South Africa.
For Japanese users: If you have entered the personal number using the self-service pages, then you can view the masked personal number You cannot update the
3-12 Oracle HRMS for Netherlands Supplement
personal number here. This is a unique identification number and is used for taxation and social insurance purposes and for display on the withholding income tax report, notification of acquisition of insurance qualification.
If you are an Australian user, leave the National Identifier field blank. For Finland, the PIN (Personal Identification Number) supplies the values for gender, date of birth, and age.
Note: For Norway and Sweden users only: The PIN (Personal Identification Number) supplies the values for gender, date of birth, and age.
Entering Personal Details:Enter personal details in the Personal tabbed region.
1. Enter a date of birth. You must do this before you can assign an employee to a payroll. For Poland, the PESEL supplies the date of birth. For Finland, the PIN (Personal Identification Number) supplies the date of birth.
For UK users only: If you have not entered the NI Number, the Date of Birth is a mandatory field.
2. Enter additional birth information into the Town of Birth, Region of Birth, and Country of Birth fields.
For Hungarian, UAE, and Indian users only: Enter the place of birth instead of town of birth as this information identifies employees and appears in statutory reports.
For Belgian users only: Region of birth information is not required in Belgium, so this field is not available to Belgian users.
For Romanian users only: You must select the country of birth first. If the country of birth is Romania, then the Region of Birth field displays the counties and on selecting the county, the Town of Birth displays the localities. If the country of birth is not Romania, then the Region of Birth and Town of Birth are free text fields.
3. For Russian users only: Enter the place of birth code in the Place of Birth field. The application uses this information when generating tax and pension statutory reports. You can find this code in the document All Russian Classification of Subjects of Administrative and Territorial Division (OKATO).
4. For Finnish and Romanian users only: Enter the place of residence. The place of residence influences the regional membership. You use the place of residence and regional membership to calculate income tax and other statutory deductions. Romanian users can optionally specify whether the person is a resident of Romania,a non resident non European Union, or a non resident European Union.
People Management 3-13
For Japanese users only:Enter the country of birth.
5. If the Work Telephone field is displayed, enter a work telephone number. Otherwise, use the Phone Numbers window to enter this information.
6. In the Status field, select a marital status.
7. Select a nationality.
For UAE users only: Nationality is recorded as additional personal information. Therefore, this field is not displayed in the Personal tabbed region.
8. For Russian users only: Enter the employee's statutory Pension Insurance Fund identifier. It is the employee's ID in the Statutory Pension Insurance Fund.
9. For Russian, Swedish, and Romanian users only: Select the person's citizenship. InRussia, you require this information for some statutory reporting to migration authorities. In Sweden, you can use this information to track persons who are not Swedish citizens, since the taxation and pension insurance schemes differ from those for Swedish citizens. For Romania, you can optionally specify whether the person is a Romanian, European Union, or other citizen.
10. Select whether your employee, applicant or contingent worker is:
• Registered disabled
• Not registered disabled
• Partially disabled
• Fully disabled
Note: Whether employees are fully or partially disabled affects benefits eligibility calculations.
In the US, the Americans with Disabilities Act (ADA) Report includes employees set up as registered disabled, partially disabled, and fully disabled.
For Norway, Finnish, Danish, and Swedish users only: This field is not available.
11. For Dutch users only: Select Yes in the Work Abroad Exceeding One Year field, if your employee has worked abroad for more than a year.
12. For Belgian users only: enter the person's preferred correspondence language in the Other region.
13. Save your work.
3-14 Oracle HRMS for Netherlands Supplement
Multiple Person Records:1. If your data already includes a person with the same national identifier, or with the
same surname and a first name and date of birth that is either the same or not entered, then a list of values shows all the people who share the details.
Note: People who are only entered with a person type of Other, that is someone external to your enterprise, are not shown in this list.
If you have entered neither a first name nor a date of birth, then the list of values displays all the records that match the information you have entered.
Note: The list of values displays only if your system administrator has set the HR: Cross Business Group profile option to Yes.
Do one of the following four tasks:
• If the person you are entering already exists, but in a different business group, then select that person from the list of values. The person you are entering is saved in your current business group and linked to the existing person record to indicate they are the same person. If your application has person synchronization enabled, then the personal information entered for the new person is copied across to existing records in other business groups. If existing records have values for fields that the new record leaves blank, then these values appear in the new record. See: Person Record Synchronization, Oracle HRMS Workforce Sourcing, Deployment, and Talent Management Guide
• If the person already exists in your current business group then select that person from the list of values. The application retrieves the existing record and cancels the save you were trying to make, as one business group cannot containtwo records for the same person. Close the new record and scroll down to display the existing record.
Note: You cannot link to any entry in the list of values marked withan asterisk as these either belong to your business group, or are linked to a person in your business group.
• If the person already exists in TCA, but not in HRMS, then select that person from the list of values. The person you are entering is saved in your current business group and linked to the existing person record to indicate they are the same person. The information held for the person in TCA is updated with that entered in HRMS. See: People in a Global Enterprise, Oracle HRMS Workforce Sourcing, Deployment, and Talent Management Guide
People Management 3-15
• If the person you are entering does not match any of the records displayed, thenselect No Match in the lookup. Your new person record is saved.
What Next?:Optionally, you can enter additional information for people in the tabbed regions.
Note: The Background Information, Medical Information, and Rehire Information tabbed regions appear only if your system administrator has enabled them for you.
Sending Emails for Personal Information Updates
Your system administrator can configure the application to send emails when you update personal information in the People window. Emails are sent to the email recorded in the Email field in the Office Details tab. See Subscribing to Business Events to Send Emails, Oracle HRMS Configuring, Reporting, and System Administration Guide for more information.
Entering Additional Personal Information (People Window)Optionally, you can enter additional information for people in the tabbed regions of the People window described in the following steps.
Note: The Background Information, Medical Information and Rehire Information tabbed regions appear only if your system administrator has enabled them for you.
To enter office information for a new hire, an existing employee, or a contingent worker:1. Choose the Office Details tabbed region.
2. Enter the office number for this office.
3. Enter the internal location of this office.
4. Enter the office identifier for internal mail.
5. Enter the person's email address.
6. In the Mail To field, select Home or Office to indicate the person's preferred mail destination.
3-16 Oracle HRMS for Netherlands Supplement
To enter information for an applicant:1. Choose the Applicant tabbed region.
2. If the applicant's resume is on file, check the Exists check box.
3. If the applicant's resume is on file, select the date indicating when the resume was last updated.
4. Select a final date a file is to be maintained for this applicant.
To enter information concerning the background check for a person:1. Choose the Background tabbed region.
2. Check whether the person's background check has been performed.
3. Select the date the background check was performed.
To enter rehire recommendation information for an applicant who was a former employee or contingent worker:1. Choose the Rehire tabbed region.
2. Check whether the former manager has recommended the applicant for rehire.
3. Select the reason for this recommendation.
To enter further name information:1. Choose the Further Name tabbed region.
2. Select the full name format.
The full name format determines the order in which you see the person's name in the Find window. The default for the full name format is: surname prefix initials prefix (partner) surname (partner). The full name format will change if the person's gender or marital status change. For example, if a female employee marries, the full name format changes to: initials prefix (partner) surname (partner) prefix surname. You can override this and select a different format from the list. The full name is displayed in the full name format selected.
You can change the default full name format using the profile option HR: Default Full Name Format.
See: User Profiles, Oracle HRMS Configuring, Reporting, and System Administration Guide
You can also disable full name formats that you do not wish to use.
People Management 3-17
See: Disabling Full Name Formats, page 3-23
3. Enter additional title information:
• Special title. This is a title that is awarded to a person according to their job or profession, for example, Minister or Doctor.
• Academic title
• Subsequent Academic title
4. Enter the person's middle name.
5. Enter the person's previous last name.
6. Enter the person's preferred name.
7. Select either Birth Name and Partner Name, Birth Name Only or Partner Name Only, for female employees in the Addressing Female Employee field. You record this information for the ABP pensions report.
To enter medical information for a person:1. Choose the Medical tabbed region.
2. Select the person's blood type.
3. Select the date of this person's last medical test.
4. Enter the name of the physician who performed this test.
To enter other information for a person:1. Choose the Other tabbed region.
2. Select the type of schedule in the Availability/Schedule field; for example, the days of the week your employee works.
3. Enter the person's current full time/part time availability to work with your company.
4. Select the language the person prefers for correspondence. For example, select German if the person prefers to correspond or receive company information (such as terms of pension plan) in German.
Note: The Correspondence Language list includes languages in the
3-18 Oracle HRMS for Netherlands Supplement
FND_LANGUAGES table. This table contains the languages that Oracle National Language Support Runtime Library (Oracle NLSRTL) supports. Check with your System Administrator for information on NLSRTL supported languages.
5. If the person has died, enter the date of death.
If you enter the termination reason of deceased and the actual termination date on the Terminate window and date of death has not been entered, it is set to the employee's termination date.
6. Select the current status of the student, if your employee is a student.
7. In the Date Last Verified field, you can enter the date the person last checked this personal information for accuracy.
8. Check the Second Passport Exists check box if the person possesses multiple passports.
To enter benefits information:1. Choose the Benefits tabbed region.
Note: If necessary, you can add the Benefits Tab to the People window. Query the BEN_MANAGER menu in the Menus window and add the HR View Benefits function to the menu.
2. Enter a benefit group for your employee or applicant. Benefit groups are used to determine a person's eligibility for a plan or for setting benefit rates. For example, benefit groups can be used for mergers and acquisitions where eligibility is complicated. They can also be used where a person is grandfathered into a very old plan.
3. Enter what kind of tobacco your employee uses, if any. For example, cigarettes, pipe, cigar or chewing. This is used within benefits to determine the eligibility and rates for particular plans.
4. Enter medical plan number. This is the policy or group plan number of an externally provided medical plan. This is used to determine eligibility to participatein some plans.
5. Enter the adoption date, if the employee whose record you are updating has adopted a child. This information, with the child's date of birth, is used to determine whether a dependant is covered by a plan. You can only enter the adoption date if you have entered a date of birth for the person. The adoption date

People Management 3-19
must be greater or equal to the date of birth.
6. Enter the date you received the death certificate, if your employee has died. You can only enter this once you have entered the date of death in the Other Informationregion. The receipt of the death certificate must be after or equal to the date of death.
7. Enter an adjusted service date for your employee. This date is used within benefits, in place of the date first hired, to determine the length of service for eligibility, enrollment and rates. The adjusted service date may be used to credit service for former employers, grand-fathered benefits or in the case of mergers and acquisitions.
8. Change the date first hired for your employee. For employees who have previously worked for your enterprise, the Date First Hired field displays the start date of youremployee's earliest, previous period of service. This date must be on or before the start date of the earliest period of service.
9. Check the Other Coverage checkbox, if your employee or applicant has externally provided coverage. This determines a person eligibility for certain plans.
10. Check the Voluntary Service checkbox, if your employee or applicant is volunteering, for example as a missionary. This determines eligibility to continue orreceive coverage from certain plans.
Entering Additional Sickness Details InformationUse the Extra Person Information window to enter default further information about sickness details. You must enter information about Stand-by Employee, Employee According to Art. 4, and Employee According to Art. 29B in this window. All other fields are available in the Absence Details window, with exception of contact details. If these fields are used they will override the data on organization level.
To enter additional sickness details information:1. In the Extra Person Information window that displays, select Sickness Report
Information as the Type.
2. Click in the Details field.
3. In the Extra Person Information window that displays, enter a value in the Date From field to indicate the start of the default sickness information. This is a mandatory field.
4. Enter a value in the Date To field.
3-20 Oracle HRMS for Netherlands Supplement
5. Select Yes or No from the Stand-by Employee list.
6. Select Yes or No from the Employee According to Art. 4 list.
7. Select Yes or No from the Employee According to Art. 29B list.
8. Enter a value in the Employer sickness reference field.
9. Select Yes or No in the Payment to Employee field.
10. Select Yes or No from the Workday on Saturday list.
11. Select Yes or No from the Workday on Sunday list.
12. Enter a value in the SI Wage on first day of sickness field.
13. Enter a value in the Daily SI wage field.
14. Select a value from the Accident list.
15. Enter a value in the Average working hours a week field.
16. Enter a value in the Date of notice of termination field.
17. Select Yes or No from the Immediate termination field.
18. Select Yes or No from the Period less than 3 months list.
19. Enter a value in the Number of first call for work.
20. Select Yes or No from the Exceeds allowed period of work list.
21. Enter a value in the Number of temporary contracts field.
22. Enter the Contact Person or Department.
23. Enter the Establishment Name.
24. Select the Gender of Contact Person from the list.
25. Enter the Phone Number of Contact Person.
26. Click OK.
Entering Additional Absence Detail InformationUse the Additional Absence Detail Information window to enter further information about absence details for the employee, which are required by UWV.
People Management 3-21
To enter additional absence detail information:1. Select an Absence Type from the list.
2. Click in the Further Information field. The Additional Absence Detail Information window displays.
3. Enter a value in the Percentage Sick field.
4. Select Yes or No in the Non SI/Pension Absence list.
5. Select Yes or No in the Non ABP Absence list.
6. Select a value in the Sickness Reporting list. If you select Sickness Report, then the application displays values you entered while adding additional sickness detail information in the Extra Person Information window. You can change those values here. If you change the values here, they override the values you entered while adding additional sickness detail information in the Extra Person Information window.
7. Select a value for the Assignment Number.
8. Enter a Sickness reference for employer.
9. Select Yes or No in the Payment to Employee field.
10. Select a value from the Reason for sickness report list.
11. Select Yes or No from the Workday on Saturday list.
12. Select Yes or No from the Workday on Sunday list.
13. Enter a value in the SI wage on first day of sickness field.
14. Enter a value in the Daily SI wage field.
15. Enter a value in the Amount of WSW subsidy field.
16. Select a value from the Accident list.
17. Enter a Reason for late payment request.
18. Enter a value in the Average working hours a week field.
19. Enter a value in the Date of notice of termination field.
20. Select a value from the Termination initiative list.
3-22 Oracle HRMS for Netherlands Supplement
21. Select Yes or No from the Immediate termination field.
22. Enter a value in the Number of calls for work field.
23. Select Yes or No from the Period less than 3 months list.
24. Enter a value in the Number of first call for work.
25. Select Yes or No from the Exceeds allowed period of work list.
26. Enter a value in the Number of temporary contracts field.
27. Select a value from the Connected Absence list.
28. Enter a value in the Over-All Start Date field.
29. Enter a value in the First day of partial recovery field.
30. In the View Attachment field, select Comments as the Category and Short text as the data type and enter the additional information about the sickness in the text area.
31. Click OK
Entering PicturesYou can store a picture associated with each person on your system, perhaps holding a photograph or digitized image of the person's signature. These may be useful for approval or identification purposes. You must digitize the image and save it in one of the following file formats:
• BMP
• CALS
• GIF
• JFIF
• JPEG
• PICT
• RAS
• TIFF
People Management 3-23
• TPIC
The default file format is TIFF so loading images using this format will give you the bestperformance.
You enter pictures in Oracle HRMS in the Picture page.
To enter a person's picture in Oracle HRMS:1. In the Picture page, enter the file path or click Browse to locate the directory in
which you saved the graphic file
2. Highlight the filename and click Open. The selected file is loaded and displayed in the Picture page.
Running the Person Synchronization ReportThe Person Synchronization report shows details of any person in your current businessgroup who also has a record in another business group on the date specified.
Run the Person Synchronization report in the Submit Requests window.
To run the Person Synchronization report:1. Select the Person Synchronization report in the name field.
2. Click in the Parameters field to display the Parameters window, if it does not automatically open.
3. Enter the date upon which you want to run the report. The default is the current system date.
4. Select a person for whom to run the report or leave blank to run for all people in your business groups who are also in another business group.
5. Choose OK to run the report. You can view the results from the Requests window.
Disabling Full Name FormatsYou can disable full name formats that you do not need to use in the User Types and Statuses window. The disabled full name formats, will not appear in the Full Name Format field.
See: Entering Additional Personal Information, page 3-15
3-24 Oracle HRMS for Netherlands Supplement
To disable full name formats:1. Query the HR_NL_FULL_NAME_FORMAT lookup in the Application Utilities
Lookups window and make a note of the code of the full name format that you want to disable.
Note: You cannot disable full name formats in this window becausethe HR_NL_FULL_NAME_FORMAT lookup is a system lookup.
See: Adding Lookup Types and Values, Oracle HRMS Configuring, Reporting, and System Administration Guide
2. Query the HR_NL_FULL_NAME_FORMAT lookup type in the Name field in the User Types and Statuses window.
3. Select the business group whose full name formats you want to change.
4. Select the full name format that you want to disable in the System Type field.
5. Enter a description and the code you made a note of earlier for the full name format. The description you enter is for information purposes only.
Ensure you enter the correct full name format code, for example, the code for the Surname (Partner) Prefix Surname Initials Prefix (Partner) full name format is FORMAT17.
Note: You cannot disable full name formats that you can define as the default. This includes formats 1-4, and any format that you previously defined as the default for the HR: Default Full Name Format profile option.
See: User Profiles, Oracle HRMS Configuring, Reporting, and System Administration Guide
6. Save your work.
If, in the future you want to re-enable a disabled full name format, then you can remove the record from the User Types and Statuses window.
Entering a New EmployeeThree templates are provided in Oracle HRMS that enable you to enter employees. These are:
• Enter Employees - This is intended to be used by users who are only interested in entering new employees onto the system, for example data entry clerks. It only uses
People Management 3-25
the Maintain window and includes all the fields required to set up an employee.
• Maintain Employees - This enables users to enter employees onto the system, and also to maintain existing records. It uses the Find, Summary and Maintain window to enable users to control a large amount of information relating to employees and their assignments.
• Enter and Maintain Employees (HR Foundation) - This template is included on theHR Foundation menu, but can also be used by people who have a full Oracle HR license. It uses the Find and Maintain windows and includes all the fields required to enter and maintain an employee. It has a very simple user-interface and does not have any date-track functionality enabled.
Your system administrator will have set up these templates according to the needs of your enterprise and will have restricted your access according to the role you have to perform.
To enter a new employee using the Enter Employees template:1. If the New window is not displayed choose the New icon in the toolbar. Select New
Employee.
2. Enter the personal details for the new employee. You must enter:
• name
• type
• gender
• employee number and hire date
• date of birth (for assignment to a payroll)
• BSN/SOFI number (Netherlands users only). By default this field is mandatory, however, you can change it to optional by setting the HR: Make National Identifier Optional profile option to Yes.
• Social Security Code (Hungarian users only)
• NIF Number (Spanish users only)
• Marital status and nationality (Polish users only)
• Family name (UAE users only)
All other personal information is optional.
3-26 Oracle HRMS for Netherlands Supplement
3. Enter the assignment details for the new employee. You must enter:
• organization (this defaults to the current Business Group)
• professional category and contribution group (Spanish users only)
You can also select other employment information, such as, job or position, grade, supervisor, and payroll details.
4. Your localization team may have created further tabs for you to complete. If you area Belgian user, then on the Further Details tab, you must select the preferred correspondence language in the Communication field and the required business group in the Business Group Name field.
If you are a Hungarian user then you must enter the tax identification number on the Employment tab and mother's maiden name on the Further Name tab.
If you are a Spanish user then you must enter the work center to which the employee belongs. You can also specify if the employee has contributed towards social security for over 35 years.
Netherlands users can enter the IZA participant number and specify whether the employee is on contract with another organization on the Further Details tab.
Polish users can enter NIP (personal tax identifier) number and the legal-employer name on the Employment Information tab.
If you are a UAE user, you must enter the following information:
• Nationality on the Additional Information tab
Important: The Date of Change and Reason for Change fields are enabled only if you enter a nationality that matches the local nationality for the legal employer and a previous nationality for the employee.
• Legal employer name on the Employment Details tab
In addition, UAE users can also enter personal details such as first name, family, and mother's name in an alternate language on the Additional Name Details tab.
5. Save your work. If you have missed any mandatory information, you are prompted to enter it before the new record is saved.
To enter a new employee using the Maintain Employees template:1. Display the Summary window of the Maintaining Employees form.
2. Choose the New icon in the toolbar or right-click on People By Name in the Data
People Management 3-27
Organizer and choose New from the right mouse menu.
3. Select New Employee and choose OK.
The Personal tab is displayed for you to start entering information about the employee.
4. Set your effective date to the date when you want the assignment to begin, such as the hire date You can enter a date in the Date field next to the timeline bar and choose Go.
5. Enter personal information for the employee. You must enter:
• name
• type
• gender
• employee number and hire date
• date of birth (for assignment to a payroll)
• BSN/SOFI number (Dutch users only)
• Mother's maiden name, tax identification number, and social security code (Hungarian users only)
• NIF number (Spanish users only)
• Marital status, nationality, and legal-employer name (Polish users only)
• Family name and nationality (UAE users only)
All other personal information is optional.
6. Choose the Communication tab if you want to enter contact information, such as addresses and phone numbers.
Note: It is mandatory for Belgian users to select the preferred correspondence language in the Communication field on this tab.
7. Enter application information in the Assignment, Compensation, and Schedule tabs, as required.
See: Entering Employment Information, Oracle HRMS Workforce Sourcing, Deployment, and Talent Management Guide
3-28 Oracle HRMS for Netherlands Supplement
8. Enter information in any other tabs that may have been created for your localization. For example, many localization teams will include an Extra Information tab to enable you to enter country-specific information.
If you are a UAE user, you must enter the employer name on the Employment Details tab.
9. Save your work. If you have missed any mandatory information, you are prompted to enter it before the new record is saved.
If a person already exists on your application with the same national identifier, or with the same surname and a first name and date of birth that is either the same or not entered, then a list of values is displayed that shows all the people who share the details. See Multiple Person Records, page 3-14
People Management 3-29
Employees
The Employee AssignmentThe assignment is the central concept that relates employees to the structures in which they work, and the compensation and benefits for which they are eligible.
In Oracle HRMS, many of the activities you undertake in human resource management,such as vacancy management and budget planning, are based around assignments and not people. In particular, you enter all earnings, deductions, and other pay-related elements for the employee assignment, rather than the employee. This makes it possibleto give an employee two or more assignments when this is necessary.
For example, if an employee has more than one role within your enterprise, he or she can have a separate assignment for each role.
Note: The assignment is datetracked to maintain a work history as the employee moves through your enterprise.
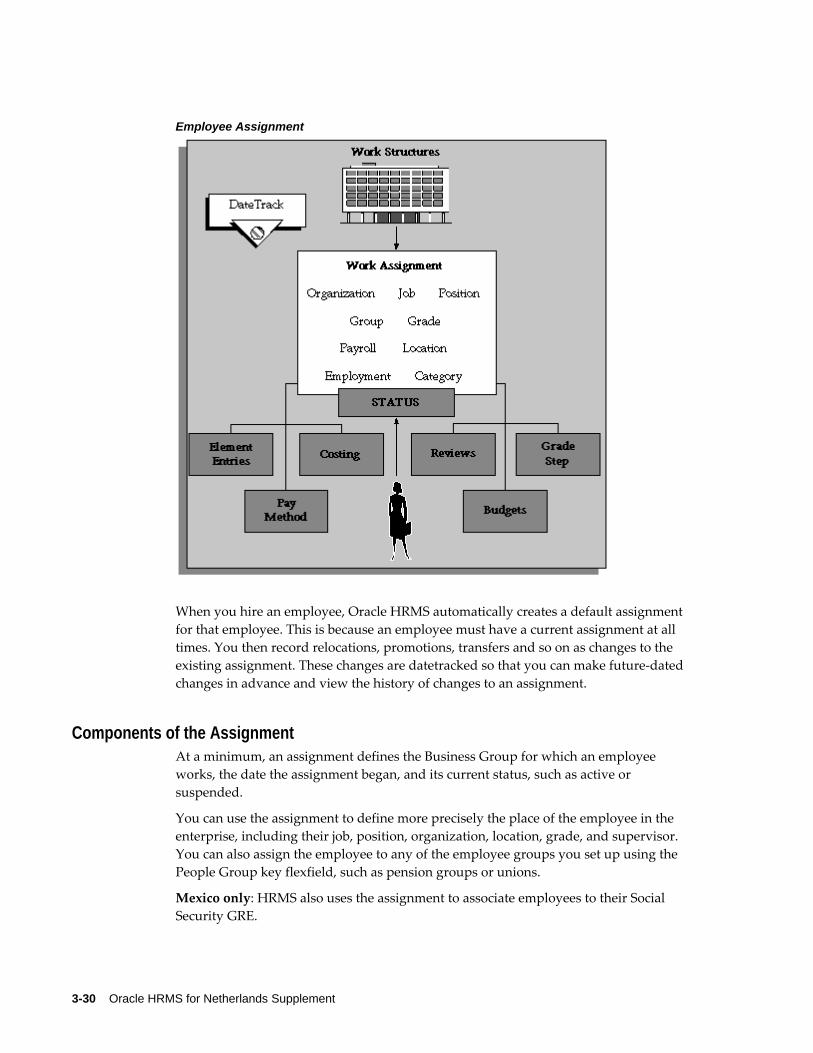
3-30 Oracle HRMS for Netherlands Supplement
Employee Assignment
When you hire an employee, Oracle HRMS automatically creates a default assignment for that employee. This is because an employee must have a current assignment at all times. You then record relocations, promotions, transfers and so on as changes to the existing assignment. These changes are datetracked so that you can make future-dated changes in advance and view the history of changes to an assignment.
Components of the AssignmentAt a minimum, an assignment defines the Business Group for which an employee works, the date the assignment began, and its current status, such as active or suspended.
You can use the assignment to define more precisely the place of the employee in the enterprise, including their job, position, organization, location, grade, and supervisor. You can also assign the employee to any of the employee groups you set up using the People Group key flexfield, such as pension groups or unions.
Mexico only: HRMS also uses the assignment to associate employees to their Social Security GRE.
People Management 3-31
You can assign employees to an employment category, such as Part Time - Regular or Full Time - Temporary. Your startup data includes four categories, and you can add others for the Lookup Type EMP_CAT.
You can assign employees to a salary basis and maintain their salaries or wages using theSalary Administration procedure. See: Salary Administration Overview, Oracle HRMS Compensation and Benefits Management Guide
Multiple AssignmentsIf your enterprise permits employees to work in two or more different capacities at onceand thereby become eligible for different benefits, you can enter multiple assignments for them. An employee can have multiple assignments, but only one is the primary assignment. Any others are secondary.
Relocations, transfers, promotions and so on go on record as datetracked changes to employees' existing assignments. You do not enter new assignments for changes like these.
Managing Multiple AssignmentsOracle HRMS separately manages each assignment, together with its associated compensation and benefits. When an employee has more than one assignment, one assignment is designated as the primary assignment. When you hire an employee (by entering a person as an employee, or by changing the person type to employee), Oracle HRMS automatically creates a primary assignment for that employee. (The Primary boxis automatically checked in the Miscellaneous tabbed region of the Assignment window).
If you then enter an additional assignment, the Primary box is automatically unchecked for that secondary assignment.
You can end all assignments except the primary assignment by entering a status changein the Assignment window. However to end an employee's primary assignment, you must terminate the employee, using the Terminate window.
To show that an assignment is part time, you use the employment categories Part Time - Regular or Part Time - Temporary. You could also set up a Full Time Equivalent budget, and weight each assignment as a fraction of a full time equivalent for the calculation of actual values. For more information about budgeting see: Budgeting Overview, Oracle HRMS Enterprise and Workforce Management Guide
Notice that when employees split their time between two departments performing the same job, or fulfill two different roles in one organization, you do not need to define two separate assignments to maintain accurate costing records. You can set up cost allocation to distribute proportions of one assignment's payroll costs to different cost centers.
For more information, see: Data Costed at the Organization and Assignment Levels, Oracle HRMS Enterprise and Workforce Management Guide

3-32 Oracle HRMS for Netherlands Supplement
Managing Changes in Assignment InformationWhen an employee experiences changes such as a promotion or transfer, or moves fromfull time to part time, you change a component of the assignment. A change to any of the assignment components produces the DateTrack prompt.
• If you choose Correction, Oracle HRMS overwrites the existing assignment information back to the last effective from date.
• If you choose Update, Oracle HRMS records the date and change, and retains the original information.
By changing your effective date on the system, you can see the employee's assignment at any point in time. You can also view the changes made to the assignment over time using DateTrack History.
DateTrack History shows the changes made to one assignment. Use the Assignment History window to view the history of all the employee's assignments, both currently and in any previous periods of service.
Mass Assignment UpdateWhen an organization changes its business rules, it is often necessary to update a large amount of employee assignment information. The mass assignment update process can now be managed by one window.
The Mass Assignment Update feature enables you to:
• Alter employee assignment information for past, present or future dates within a Business Group.
• Define search criteria to match the type of employee your organization needs to update.
• Add further information updates to individual employees.
• Filter assignment change information using folder forms.
The Mass Assignment Update feature gives your organization more control over which employees are updated, and when the employees are updated.
Effects of Changing an AssignmentChanging any assignment component can have the following effects:
• The employee may lose eligibility for some compensation types, benefits or deductions, and gain eligibility for others. You receive a warning that the system automatically ends any unprocessed element entries for which the employee is no
People Management 3-33
longer eligible.
• The employee may have a different level of access to Oracle HRMS, since the system's security is based on assignment to work structures.
• If you change the employee's grade when a grade step placement exists for the assignment, you receive a warning message that the placement will be date effectively ended and any future placements will be deleted. Also, the special ceiling point field is cleared.
• Mexico only: Changing assignments may result in a change of GRE. In this case, you must justify the separation to the Social Security agencies. Document a Social Security Leaving Reason in the Social Security Affiliation tabbed region of the Assignment window.
Note: If an assignment change causes the system to change element entries, you may not be able to save the change if a current or future pay period is closed. You must reopen the period or change your effective date to make the change.
Ending Assignments and Terminating EmployeesOracle HRMS does not permit an employee to exist in the system without an assignment. That is, an employee must always have at least one assignment at any pointin time. This means that for an employee with just one assignment, the only way to end the assignment is to terminate the employee, using the Terminate window.
For employees with more than one assignment, you can end all but one of their assignments by selecting an assignment status of End or Terminate in the Assignment window. At sites using Oracle Payroll, the choice of End or Terminate controls the ability to include the assignment in a payroll run after the date the assignment ends. Sites not using Oracle Payroll can use these two statuses to provide information. For example, End may mean that further pay processing cannot occur for the assignment, while Terminate may mean that further processing can occur. Alternatively, these sites can simply use the status End.
Accessing Ex-Employee and Future-Dated Employee RecordsOracle HRMS provides the HR: Access Non-Current Employee Data profile option to enable access to ex-employee and future-dated employee records. You can enable this profile option for HR users to:
• Access ex-employee records, for example, to manage retirement benefits.
• Update future-dated records.
3-34 Oracle HRMS for Netherlands Supplement
Oracle HRMS displays only those ex-employees who do not have future-dated records as of the system date. For example, you terminate an employee as on January 31st, 2007 and rehire the person as on March 1st, 2007. When you search for this person's record, as of the system date of February 15th Oracle HRMS will not display the ex-employee's record because a future-dated record exists for the ex-employee.
See: User Profiles, Oracle HRMS Configuring, Reporting, and System Administration Guide
Employment InformationAs well as recording personal information about employees you also need to record how they work for your enterprise. HRMS enables you to manage all your employment information and track the changes in employment information for each employee over the lifetime of their employment.
Oracle HRMS enables you to efficiently manage change in your enterprise for appropriate groups of people:
• Where a change affects a group, you can effect that change for every individual in the group according to a set of rules.
• Where a change affects only a few individuals, you can enter changes for just those individuals.
In Oracle HRMS, you manage these changes through the employee assignment:
• The assignment connects employees to your enterprise's work structures and policies, so that changes to the structures and policies are reflected in the employee's records.
• You can query groups of employees with similar assignments (such as all assignments on grade C2) and make changes for each employee in these groups.
Also, Oracle HRMS provides a number of predefined inquiry windows and reports for employment information. You can create your own inquires and reports using QuickPaint or other reporting tools.
For more information see: Information Access, Oracle HRMS Configuring, Reporting, and System Administration Guide.
Summary of Employment InformationThe following table shows the employment information typically held for an employee in Oracle HRMS and how you enter it.
Employment information summary table:
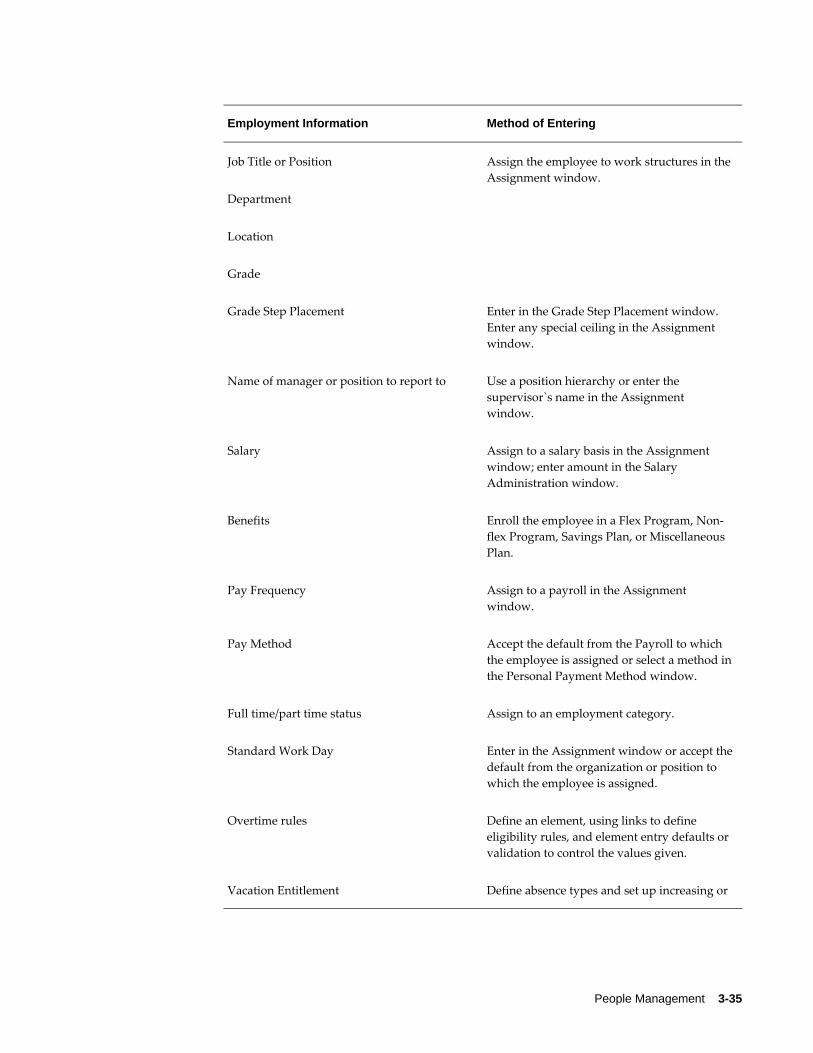
People Management 3-35
Employment Information Method of Entering
Job Title or Position Assign the employee to work structures in the Assignment window.
Department
Location
Grade
Grade Step Placement Enter in the Grade Step Placement window. Enter any special ceiling in the Assignment window.
Name of manager or position to report to Use a position hierarchy or enter the supervisor`s name in the Assignment window.
Salary Assign to a salary basis in the Assignment window; enter amount in the Salary Administration window.
Benefits Enroll the employee in a Flex Program, Non-flex Program, Savings Plan, or Miscellaneous Plan.
Pay Frequency Assign to a payroll in the Assignment window.
Pay Method Accept the default from the Payroll to which the employee is assigned or select a method inthe Personal Payment Method window.
Full time/part time status Assign to an employment category.
Standard Work Day Enter in the Assignment window or accept thedefault from the organization or position to which the employee is assigned.
Overtime rules Define an element, using links to define eligibility rules, and element entry defaults or validation to control the values given.
Vacation Entitlement Define absence types and set up increasing or
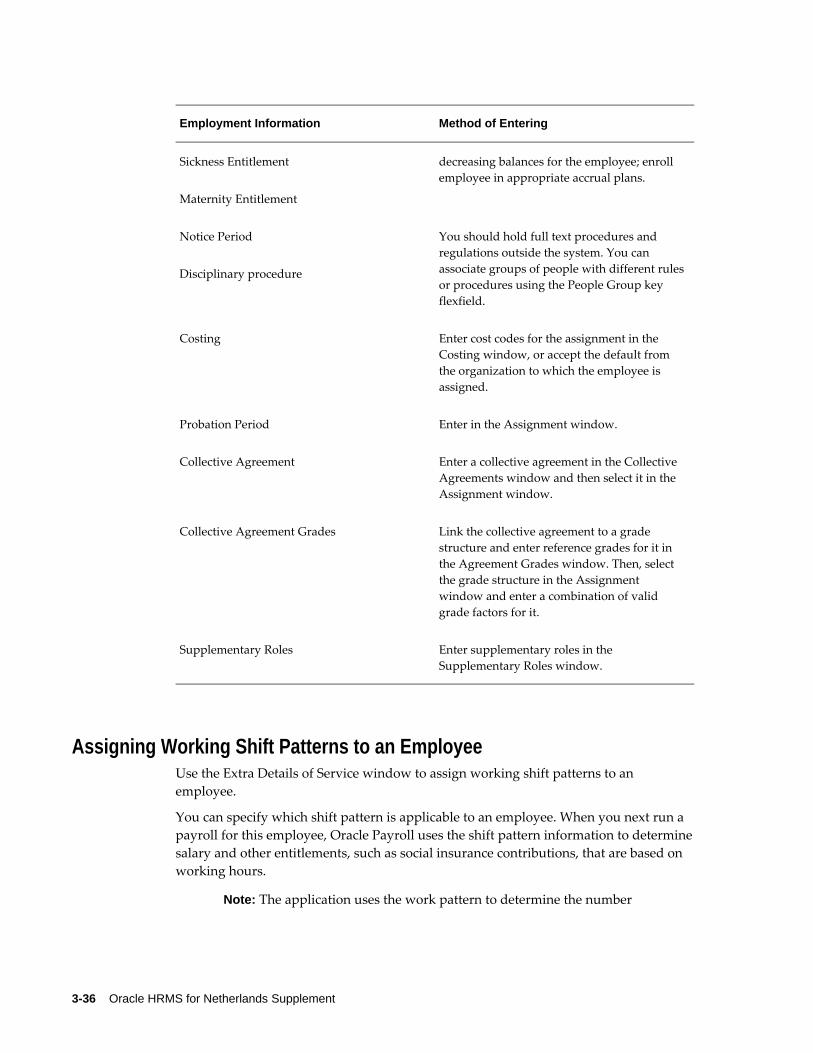
3-36 Oracle HRMS for Netherlands Supplement
Employment Information Method of Entering
Sickness Entitlement decreasing balances for the employee; enroll employee in appropriate accrual plans.
Maternity Entitlement
Notice Period You should hold full text procedures and regulations outside the system. You can associate groups of people with different rulesor procedures using the People Group key flexfield.
Disciplinary procedure
Costing Enter cost codes for the assignment in the Costing window, or accept the default from the organization to which the employee is assigned.
Probation Period Enter in the Assignment window.
Collective Agreement Enter a collective agreement in the Collective Agreements window and then select it in the Assignment window.
Collective Agreement Grades Link the collective agreement to a grade structure and enter reference grades for it in the Agreement Grades window. Then, select the grade structure in the Assignment window and enter a combination of valid grade factors for it.
Supplementary Roles Enter supplementary roles in the Supplementary Roles window.
Assigning Working Shift Patterns to an EmployeeUse the Extra Details of Service window to assign working shift patterns to an employee.
You can specify which shift pattern is applicable to an employee. When you next run a payroll for this employee, Oracle Payroll uses the shift pattern information to determinesalary and other entitlements, such as social insurance contributions, that are based on working hours.
Note: The application uses the work pattern to determine the number
People Management 3-37
of regular working days in a period for the calculation of social insurance days.
To assign a working shift pattern to an employee:1. Query the employee name.
2. Select the work pattern.
3. Enter the day of the work pattern which is the starting day of the shift for this employee. You do not have to make this the first day of the shift - you can submit a payroll process for an employee who starts work at any point within a shift cycle.
4. Save your work
Adding Further Collective Agreement InformationUse the Collective Agreements window to enter further information about sickness details.
To add further collective agreement information:1. Select the Code from the list.
2. Enter the Number of Waiting Days.
3. Enter the Sickness Wage Percentage.
4. Select a Contract Mapping from the list.
5. Select Yes or No from the CAO Rules Temporary Workers list.
6. Select Yes or No from the CAO Rules Temporary to Fixed list.
7. Select Yes or No from the Termination Contract with Notice list.
8. Select Yes or No from the Appearance Temporary Workers list.
9. Click OK.
3-38 Oracle HRMS for Netherlands Supplement
Workforce Information Management
Previous Year's Taxable IncomeTo derive the percentage rate used in special tax calculation, you need to determine the employee's taxable income from the previous year. The income value appears in the Last Year Salary field, incorporating the employee's entire taxable income for the year, and not just the income for their individual assignments. Oracle Payroll derives the total, but you can manually enter a value in the Override field, if required. If you enter avalue into this field, it automatically overrides any value returned in the Last Year Salary field.
If your employee has multiple assignments, then the system derives the taxable income for each assignment and adds them together to provide the total previous year's taxable income for the employee. You use the total income in the special tax calculation for eachassignment.
See: Entering Income Details for Taxation Information, page 3-49
See: Running the Dutch Reset Last Year Salary Override Process, page 3-58
The method for deriving the taxable income in the previous year for an employee depends on which of the following apply for each assignment:
The employee (assignment) worked the whole of the previous year, or the assignment ended part way through the year.
The system derives the total taxable income for the assignment in the previous year, for both standard and special rate, including any retrospective changes, by adding togetherthe values of the appropriate balances: Standard Taxable Income, Special Taxable Income, Retro Standard Taxable Income, Retro Standard Taxable Income Current Quarter and Retro Special Taxable Income.
The employee (assignment) was a new hire at the beginning of a payroll period, in the previous year.
The system derives the previous year's taxable income for an assignment starting part way through the previous year, but at the beginning of a payroll period, for example, the 1st June on a monthly payroll. When calculating the previous year's taxable income for a new hire in the previous year, you must remove any holiday allowance included in the taxable income for the part year, before any calculation is performed by the system.
Important: When setting up an earnings element for a holiday allowance payment for the Netherlands, you must specify the appropriate secondary element classification for the tax category, for example, Subject to Standard Tax or Subject to Special Tax. Most

People Management 3-39
holiday allowance payments are Subject to Special Tax. The mechanismfor calculating the previous year's taxable income always assumes any holiday allowance payment is taxable, and that you specify one of the aforementioned secondary element classifications for the holiday allowance payment element. Therefore, the system assumes the holidayallowance payment will never be non taxable. You must also add the secondary classification Holiday Allowance Payment, to indicate that it is a holiday allowance payment.
The employee (assignment) was a new hire during a payroll period, in the previous year.
The system derives the previous year's taxable income for an assignment starting part way through the previous year, and part way through a payroll period, for example, the15th June on a monthly payroll. When calculating the previous year's taxable income fora new hire in the previous year, you must remove any holiday allowance included in the taxable income for the part year, before any calculation is performed by the system.
The employee is a new hire in the current year, or was employed in the previous year but did not receive pay.
The system derives the previous years' taxable income for special tax calculation for a new starter in the current year, or an employee who was employed in the previous yearbut didn't receive any pay- returning a value of zero for annual income. The balance Special Rate Income is referenced for the current period to date, with the value multiplied by the number of periods in the year, providing an estimated annual income.
If the employee started part way through the current period, the period to date value for the income must be pro-rated to a value for the whole period according to the number of week days worked, before being multiplied by the number of periods in the year to provide the estimated annual income.
Note: You must set up the feeds for the balance Special Rate Income. Use this balance to derive the annual income for use in special rate taxation when the employee is a new starter in the current year, or was employed in the previous year but received no pay.
Assignment Extra Information TypesYou can define as many Extra Information Types (EITs) as you require to hold information about assignments. There are also some predefined assignment EITs, whichare listed below. You can assign multiple social insurances and private health insurances to an employee's assignment.
For employees with multiple assignments that you assign to the same Social Insurance (SI) provider, ensure that you set up the relevant Dutch Gak Reporting Information EIT for the assignment with the lowest number. The NSI reports use the assignment with
3-40 Oracle HRMS for Netherlands Supplement
the lowest number, if multiple assignments exist for the same SI provider.
Note: To be able to access the predefined EITs, you must link the EIT to your responsibility.
See: Setting Up Extra Information Types Against a Responsibility, Oracle HRMS Configuring, Reporting, and System Administration Guide
• ABP Participation and Salary Information - Use this EIT to enter certain employee-specific information required for pensions, and to override salary and pension basisvalues.
• Date From and Date To - These fields determine the period of time for which the override information is valid.
• Participation Start Age - Enter the age at which the employee began contributing to an ABP pension. This value determines the appropriate age-dependent premium.
• Kind of Participation - Optionally select a value (such as Employee, or Former Employee with Supplemental Payment) for reporting purposes.
• Value of Participation - This defaults to 1.0 but you can enter a lower proportion. For example, if you enter 0.5, the deduction amount is half the normal contribution.
• Override Annual Pension Salary and Override Pension Basis - Optionally enter a value to override the usual calculation of one of these values. If you enter an override you must select a reason.
When an employee avails the new leave types, Life Saving Scheme (WLV) and Partial Political Scheme (WGP), enter the part time percentage as though the employee took no leave. However, when you enter the value of participation, adjustthe value such that it includes the leave taken for WLV or WGP.
Note that the AAOP and FPU pension types are not affected by these two kinds of leaves. To enter the value of participation for these pension types, use the ABP Pensions Override Information EIT.
ABP Pensions Override Information - Use this EIT to add a pension type specifically for the assignment (in addition to the pension types specified at organization level) and to override certain pension information.
• Date From and Date To - These fields determine the period of time for which this pension type is valid for the assignment. If you enter a Date To, you can select a Participation End Reason.
• Override Employee Pension Contribution and Override Employer Pension
People Management 3-41
Contribution - Optionally enter values to override the usual calculation of pension contributions. If you enter an override you must select a reason.
• Employee Contribution Method and Value - Optionally change the usual contribution method (percentage or flat amount) for this employee and pensiontype. You can also change the percentage or amount. Similarly, you can change the Employer Contribution Method and Value.
• Override Employee Annual Limit and Override Employer Annual Limit - Theseare the maximum amounts the employee and employer can contribute to this pension type each year. If the employee has multiple assignments, the limit is split between the assignments.
For example, suppose you set the limit at 500 for Assignment 1 and 300 for Assignment 2. If the payroll run processes Assignment 1 first and deducts 300 Euros, it will take no deduction for Assignment 2 because it has already reached that assignment's limit. The next payroll run will deduct a further 200 Euros from Assignment 1. If the payroll run processes Assignment 2 first, it can deduct 300 Euros from Assignment 2 and 200 from Assignment 1.
• Override Pension Days - Optionally enter the average pension days used to convert annual pension threshold and contribution amounts to the current pay period. This value overrides--for this pension type only--any value you have entered in the Dutch Average Pension Days Information EIT.
• Withdraw Assignment - Setting this field to 'Yes' withdraws the assignment from ABP records. When this field is set to 'Yes', the following run of the Dutch ABP Report Archiver and Dutch ABP report withdraw the assignment from ABP record. Once set to 'Yes' and the report is run, any changes to this field have no effect. This field is not date-tracked.
Use this EIT if an employee avails leaves other than the new leave types, Life Saving Scheme (WLV) and Partial Political Scheme (WGP). See ABP Participation and Salary Information, page 3-40.
• Dutch Social Insurance Information - you use this EIT to enter the:
• Start and end dates - determine the period of time for which the social insurance is valid for the employee.
Note: If you set up multiple social insurance EIT records for thesame SI classification, the information must not overlap for anyperiod of time as this could lead to inconsistent payroll results. If multiple EIT records exist for the same SI classification at the same period of time, the application will use the most recent information set up for an EIT record.
3-42 Oracle HRMS for Netherlands Supplement
• SI classification - the SI classification determines which social insurance applies to the employee.
Note: You must ensure that each SI provider has all the relevant SI types when you select an SI classification for an employee. For example, if you select the SI classification All Mandatory Insurances, you must ensure that all of the mandatory social insurance types have been set up for the SI provider. This is to prevent inconsistent or zero payroll results.
See: Examples of Assigning Social Insurance Types and Providers to Employees, page 1-22 for more information on how employees inherit social insurance information identified at the organization level.
• Insurance Provider - you can select an SI provider organization with a Dutch UWV Organization classification for this assignment. The SI provider you selecthere overrides the default SI provider organization you selected at the organization level. If you do not select an insurance provider for the assignment, the application uses the default SI provider.
• Status - this indicates who pays the contributions for the SI classification such as, Insured Employee Contribution, Insured Employer Contribution, Insured Employee and Employer Contribution.
• Registration number.
• End and change reasons - use these fields to explain the reasons for ending and changing the employee's social insurance.
• Day method - select Average Days, Average Days with Work Schedules or Real Working Days as the calculation method for deriving SI day. This method overrides the method you selected at the organization level.
See: Methods for Deriving SI Days, page 1-25 for more information on the different methods for deriving SI days.
• Day adjustment - this option indicates whether to adjust the SI days to the real SI days value for an end of year adjustment, rather than the average SI days value. Select Yes to adjust the SI days method to the real SI days, and select No to prevent an end of year adjustment to the real SI days method.
Important: If you do not set a day adjustment, the application searches up the employee's organization hierarchy, to find the relevant information.
People Management 3-43
You must select No if you do not want an end of year adjustment for the employee, as the default in the calculations is Yes.
• Contribution adjustment - this option indicates whether to adjust the contribution calculation to the normal cumulative recalculation method for an end of year adjustment. Select Yes to adjust the SI contribution method to the normal cumulative recalculation method of calculating SI days, and select No toprevent an end of year contribution adjustment to the normal cumulative recalculation method.
Important: If you do not set a contribution adjustment, the application searches up the employee's organization hierarchy, to find the relevant information.
You must select No if you do not want an end of year adjustment for the employee, as the default in the calculations is Yes.
• Overriding day method - select an alternative calculation method for deriving SI days for this assignment.
• Overriding day value - enter a fixed number or percentage figure, depending on the overriding day method you selected in the previous step.
• WAO discount eligible - indicate whether the employee is eligible for the WAO discount.
Note: To indicate ineligibility of WAO discount for an employee over 50 years of age, select No. You can use this override, for example, for rehires within 6 months. You can select Yes or choose not to select a value for this field for the application to processes WAO discount for eligible employees. In case of multiple assignments, ensure you set the same value for each assignment.
• Code ZVW insured - indicate whether the employee is insured for ZVW and the tariff group the employee belongs to.
• Dutch IZA Health Insurance Information - you use this EIT to enter the:
• Date From and Date To - These fields determine the period of time for which IZA Health Insurance is valid for the employee.
3-44 Oracle HRMS for Netherlands Supplement
• Insurance Provider - this is mandatory field enabling you to specify the required IZA Insurance Provider.
Note: If information is effective at the assignment level for bothPrivate and IZA Health Insurances for a particular date, IZA information takes precedence.
• Dutch Average Pension Days Information - Use this EIT if you want to override the Average Pension Days figure used to convert annual pension threshold and contribution amounts to the current pay period. Otherwise, this figure is taken froma Global value (for the Average Working Days conversion rule) or calculated from the employee's work pattern (for the Average Days with Work Schedules conversion rule). See: "Conversion Rules" in Calculation of Pensions and Savings Contributions, page 8-5.
• If you select Manual in the Overriding Method field, you enter the average pension days in the Overriding Value field.
• If you select Percentage of Average Days or Percentage of Maximum SI Days in the Overriding Method field, you enter a percentage in the Overriding Value field. The formula uses this percentage to calculate the average pension days.
Note: If you select Percentage of Maximum SI Days, the system uses any override you have entered for Maximum SI Days on the Social Insurance/Pensions tab of the Assignment window.
• Dutch Gak Reporting Information - Use this EIT to record social insurance information for your employees, required by the reports for the UWV SI providers.
• Enter the date from which the Gak reporting information is valid from for the employee.
• Select an occupation description for the employee.
• Enter a figure for the expected number of SI days in the 4 Weekly Expected SI Days field. Use this field if the employee's work pattern is irregular and you want to record an estimated figure of the number of SI days in a 4 weekly payroll period.
See: Entering Additional Assignment Details, page 3-49
• Dutch ABP Reporting Information - Use this EIT to record the employee's level of participation, for reporting in the ABP Notification Extract.
• Enter the date from which the information is valid for the employee. You can
People Management 3-45
also enter a Date To if the information ceases to be valid at a certain date.
• Select the level of FPU Participation.
• Select the level of OP NP Participation.
• Select the level of ANW Participation.
• Select the level of IPAP Participation.
• Select the level of FUR Participation.
You can select the Employee Does Not Participate in FPU option in the FPU Participation field. This option ensures that the ABP Report displays the FPU Contribution ABP USZO value as G.
Note that the application checks the FPU Participation field only for those employees who do not participate in the FPU. For employees participating in the FPU, the ABP report displays the pension sub-category irrespective of the value youselect in the field.
• Saving Schemes Additional Contribution Information- Use this EIT to record an employees additional contributions to a savings scheme, as and when they contribute throughout the year.
• Select the Savings Type.
• Enter a Period Number.
• Enter an Amount for Saving.
• Dutch Influence Information - Use this EIT to record the:
• Validity period of the income relation
• Influence Code, which indicates why the employee is eligible for social insurances
• Dutch Labor Relation Information - Use this EIT to record the:
• Validity period of the income relation
• Labor Relation Code - Indicates the kind of income relation to determine whether the employee needs to have mandatory social-insurance benefits.
• Dutch Temp Labor Information - Use this EIT to record the:
• Validity period of the income relation
3-46 Oracle HRMS for Netherlands Supplement
• Temp Labor Code, which identifies the income relation type for temporary workers
• Dutch Temporary Tax Discount - Use this EIT to enter temporary tax discount information. You can enter the dates when this discount is applicable and specify the discount type.
• Dutch Labour Handicap Information - Use this EIT to record the:
• Validity period of the labor handicap discount
• Discount Type, which identifies the type of labor handicap discount applicable to the employee
• Dutch Wage Report Correction Information - Use this EIT to enter correction information for the Dutch Wage Report.
• Enter the period (Date From, Date To) in which the correction is made.
• Enter the applicable adjustment amounts for the following:
• Normal Rate Taxable Income
• SI Income
• Special Rate Taxable Income
• Holiday Allowance
• Reservation Holiday Allowance
• Additional Wages
• Reservation Additional Wages
• Wage in Money
• Wage in Kind
• Overtime Wage
• Deducted Wage Tax
• WAO Basis Contribution
• WAO Diff Contribution
• WW Contribution
People Management 3-47
• Contribution Waiting
• UFO Contribution
• ZVW Contribution Employee
• ZVW Contribution Employer
• Travel Allowance
• Labour Discount
• SI Days
• Life Saving Scheme
• Life Cycle Leave Discount
• Contribution Base WAO/IVA/WGA
• Contribution Base WAO/WGA Diff
• Contribution Base WW Awf
• Contribution Base UFO
• Contribution Base Waiting Fund
Note: If you have a negative adjustment, enter the value with a negative (-) sign. The Collective, Nominative section will also reflect the adjusted totals accordingly.
• Dutch ZVW Exclusion Information - Use this EIT to record:
• Year of Exclusion, which indicates the year in which ZVW has been excluded
• ZVW Excluded - selecting this option indicates that ZVW has been excluded forthe assignment
If an employee is not eligible for ZVW, use this EIT to indicate that you want to exclude ZVW for the employee. Or else, the application will display an error.
• Retro ABP Balance Setup - Use this EIT to determine which balance or element combination must be considered to derive if there is a retro change that would impact the ABP Pension Salary. If no balance has been configured in the EIT, then there is no retro salary processing. You must configure this EIT at the business
3-48 Oracle HRMS for Netherlands Supplement
group level. You can configure the following balances:
• ABP Scale Salary
• ABP Scale Salary For Holiday Allowance
• ABP Full Time Recurring Bonus
• ABP Full Time Recurring Bonus For Holiday Allowance
• ABP Part Time Recurring Bonus
• ABP Part Time Recurring Bonus For Holiday Allowance
• ABP Full Time End Of Year Bonus
• ABP Full Time End Of Year Bonus For Holiday Allowance
• ABP Part Time End Of Year Bonus
• ABP Part Time End Of Year Bonus For Holiday Allowance
• ABP Scale Salary For End Of Year Bonus
• ABP Full Time Recurring Bonus For End Of Year Bonus
• ABP Part Time Recurring Bonus For End Of Year Bonus
Note: If no balances are configured in the EIT, then the application does not perform any retro ABP Salary calculation.
• Dutch Wage Report Override - Use this EIT to enter correct SI days and hours worked alone for a period to report in current year correction wage report. Information in this EIT enables you to override the SI Days and Hours Worked along with the periods to be corrected and period to be reported in Dutch Wage Report in the current year. This EIT has the following fields:
• Date From - Start date of correction period
• Date To - End date of correction period
• Reporting Date - Date to report corrected details
• SI Days - SI Days to be overridden
• Hours Worked - Hours worked to be overridden
People Management 3-49
• Dutch Employment Relation Details - Add this EIT to the Information Types Security of your responsibility. This EIT has the following fields:
• Date From - This is a mandatory field used to capture the date from which the codes are valid.
• Date To - This field is used to capture the date till which the codes are valid.
• Code Permanent Contract < IndArbovOnbepTd - This field is used to capture the permanent contract status.
• Code Contract In Writing < IndSchriftArbov > - This field is used to capture the employment contract in writing status.
• Code Yearly Hours Contract < IndJrurennrm > - This field is used to capture theyearly hours contract status.
• Code Variable Hours In Contract < IndOprov > - This field is to capture the variable hours in contract status.
• Permanent Public Sect contract <IndPubAanOnbepTd> - This field contains a list with values Yes or No. A warning message is displayed if the Income Code is 11, 13 or 15 and the Code kind of labour relation is 18, and if no value is present for this tag.
Note: If the Income Code is 11, 13, or 15, then the Permanent Contract code (Tag IndArbovOnbepTd), Employment Contract in Writing (Tag IndSchriftArbov) and Variable hours Contract code (Tag IndOprov) must be set in the EIT in the first date of the payrollperiod or assignment start date whichever is earlier, or else an exception will be reported in the Dutch Wage Exception Report.
• Dutch Wage Report Correction Awf Information - Use this EIT for manual wage report correction for the WWAwf base and contribution tags(WWl,WWH,WWR). You must add this EIT to the Information Types Security of your responsibility.
Entering Additional Assignment Details (Assignment window)Once you have set up basic assignment details, you can enter additional information in the tabbed regions of the Assignment window, for example, supervisor details, special ceiling progression points or salary information.
The tabbed regions that appear in the Assignment window vary according to person type and localization.
3-50 Oracle HRMS for Netherlands Supplement
To enter supervisor information for an employee or contingent worker:1. Choose the Supervisor tabbed region.
2. Select the name and number of the worker's personal supervisor. If you use assignment-based supervisor hierarchies, select the supervisor's assignment number.
You can select a contingent worker as a supervisor only if the HR: Expand Role of Contingent Worker user profile option is set to Yes.
You can select a supervisor from another Business Group if the HR:Cross Business Group user profile option is set to Yes at your site.
Note: This information is not updated by the system. Use organization and position hierarchies to show management reporting lines.
Entering Probation and Notice Period InformationThe probation period defaults from the employee's position.
To enter probation period and notice information for an employee:1. Choose the Probation and Notice Period tabbed region.
2. Amend the default probation period for your employee's assignment, if required.
3. Enter the notice period for the assignment, if required.
Entering Standard Conditions Information The Normal Time field and the Working At Home check box default from the position. If these standard conditions are not defined for the position, they default from the internal organization or business group. The Regular Working Hours and Frequency fields inherit their values from the internal organization to which the employee is assigned. The Individual Working Hours field defaults to the same value as the regular working hours and the Part-time Percentage field defaults to 100%. If this information isnot defined for the internal organization, the application searches up the organization hierarchy to find the relevant information.
To enter standard conditions information for an employee or contingent worker:1. Choose the Standard Conditions tabbed region.
2. Amend the standard work day information for your employee or contingent worker assignment, if required.
People Management 3-51
3. Enter an employee's hours in the Individual Working Hours field if their working hours are different from the regular working hours. For example, if the employee is part-time. The Part-time Percentage field automatically calculates the employee's part time percentage value.
The ABP pensions report uses the part time percentage value for reporting purposes.
Note: If you selected the pseudo calculation rule to derive the social insurance (SI) basis, the application uses the part-time percentage value in the SI contribution calculations.
See: Entering Dutch SI Type Information, page 1-73
You can create a FastFormula to calculate a part-time percentage for an assignment and override the assignment-level information. You must name the formula NL_PART_TIME_PERCENTAGE. Theformula has no input values and returns a parameter called Part_Time_Percentage, in the format 999.9999.
See: Formulas to Enable Additional Part-time Percentages for the Netherlands, page 10-4
For IZA calculation: If the working hours vary during a payroll period and the IZA Working Hours balance does not have a value, the application derives an average value of the working hours for use in the IZA calculation.
4. For benefit administration, enter whether your employee's assignment is hourly or salaried. If you are in the US, benefits are often based on whether a person is paid hourly or receives a salary.
Note: If you are setting up benefits based on salaried or hourly pay you must set up the Hourly/Salaried field in addition to the Pay Basis. The Pay Basis identifies how pay is quoted within Salary Administration and enables an employee to have their pay quoted as hourly, but be paid a salary. Therefore, for benefits, you need to set up whether your employee is paid hourly or receives a salary.
Entering Primary or Secondary Assignment and Miscellaneous Information
To enter primary or secondary assignment and miscellaneous informationfor an employee or contingent worker:1. Choose the Miscellaneous tabbed region.
2. Enter the internal address details (such as the floor or office number), if required. The system adds the details to the location address.
3-52 Oracle HRMS for Netherlands Supplement
3. Select a reason for adding or changing the assignment, if required. You define valid reasons as values for the lookup types Reason for Change to Employee Assignment (EMP_ASSIGN_REASON) for employees and Contingent Worker Assignment Reasons (CWK_ASSIGN_REASON) for contingent workers.
4. If you use Oracle Services Procurement to provide purchase order information for contingent worker assignments, the purchase order line may include the projected assignment end date. In this case, the date appears in the Projected Assignment Endfield. Otherwise, enter the projected end date of the assignment.
5. Select a Job Level.
6. Select the Manager box if the assignment is at manager level and you want to include this worker in the Organization Hierarchy Report as a manager. (You can select Manager for a contingent worker assignment only if the HR: Expand Role of Contingent Worker user profile option is set to Yes.)
Primary or Secondary AssignmentBy default, the first assignment entered for an employee is the primary assignment, and the Primary box is automatically checked. If you are now entering a secondary assignment, the Primary box is automatically unchecked. You can leave the Primarybox as it is.
1. Check the Primary check box to update a secondary assignment to Primary. See: Changing Primary Assignments, Oracle HRMS Workforce Sourcing, Deployment, and Talent Management Guide
Entering Employment Terms
Entering Special Ceiling InformationA special ceiling progression point is the highest point to which the Increment Progression Points process can automatically progress the employee.
To enter special ceiling information for an employee:1. Choose the Special Ceiling tabbed region.
2. Enter a special ceiling if the employee is assigned to a grade, and a grade scale is defined for this grade. This special ceiling overrides the ceiling defined for the grade scale.
Entering Salary Information/Assign Employees to a Salary BasisUsing the Salary Administration window, you can enter a proposed salary change for an employee, associate this change with a performance review, and accept or revise the change later. To administer an employee's salary in this way, you first assign the employee to a salary basis in the Salary Information region.
People Management 3-53
To enter salary information for an employee:1. Choose the Salary Information tabbed region.
2. Select a salary basis for the employee.
3. You can also enter the frequency of salary and performance reviews.
Important: If you change an employee's salary basis to one that uses a different salary element, the employee's existing salary element entry will be ended. Using the Salary Administration window, you should make a new salary entry for the employee, effective from the date of the salary basis change.
For more information about salary administration, see: Salary Administration, Oracle HRMS Compensation and Benefits Management Guide
Entering Bargaining Unit and Union Membership Information
To enter bargaining unit and union membership information for an employee:1. Choose the Bargaining Unit tabbed region.
2. Enter a bargaining unit code for your employee's assignment. This is usually the legally recognized collective negotiating organization.
Note: You set up your different bargaining units as values for the Lookup type BARGAINING_UNIT_CODE
3. Select whether the employee associated with the assignment is a member of a union.
Note: This check box is not displayed for German users.
Entering a Billing Title (Oracle Projects only)
Note: This tabbed region displays only if you have Oracle Projects installed.
3-54 Oracle HRMS for Netherlands Supplement
To enter a billing title for an employee or contingent worker (Oracle Projects only):1. Choose the Project Information tabbed region.
2. Enter a billing title. The information you enter in the Billing Title field is used as the default on project customer invoices. You can override this information using Project Accounting.
3. Enter a project title.
Entering Supplier Information
Note: The Supplier tabbed region does not display for employees.
You use the Supplier tabbed region to record information about the supplier providing the contingent worker to your enterprise. The procedure depends on whether you are using Oracle Services Procurement to provide purchase order information for contingent worker assignments.
To enter supplier information for a contingent worker:If you are not using Oracle Services Procurement:
1. Choose the Supplier tabbed region.
2. Select the name of the supplier and the supplier site for the contingent worker.
3. Enter supplier IDs for the contingent worker and the assignment, if available. Thesevalues identify the worker and the assignment to the supplier.
If you are using Oracle Services Procurement:
1. Choose the Supplier tabbed region.
2. Select a purchase order number for this assignment.
3. If only one purchase order line exists, it appears in the Purchase Order Line field. Otherwise, select a purchase order line. Note that the Purchase Order Line field is enabled only when you select a purchase order.
4. Information from the purchase order appears automatically in the Supplier Name and Supplier Site fields. If the purchase order line includes a job value, it replaces any value in the Job field.
5. Enter supplier IDs for the contingent worker and the assignment, if available. Thesevalues identify the worker and the assignment to the supplier.
People Management 3-55
Entering Tax Reductions and Tax Code InformationThe information you select here determines the tax calculations for an employee's assignment.
Important: You must select a payroll for an employee's assignment before you can enter tax related information.
To enter tax reductions and tax code information for an employee:1. Choose the Tax Reductions and Tax Code tabbed region.
2. Select whether tax reductions apply to the employee.
This field indicates whether an employee is eligible for general tax reductions as well as all other tax reductions. If you select No, you will be unable to select further tax reduction information.
3. Select whether labour tax reductions apply to the employee.
Important: If you select Yes for labour tax reduction, the tax code for the employee must not be set to 226, 227 or 228. This is to ensurethat the calculations for standard tax are correct.
4. Select whether additional senior tax reductions apply to the employee. The additional senior tax reduction applies to employees who are 65 years of age or over.
5. Select the tax code.
There are three methods for selecting the tax code, you can:
• Manually enter the three digit tax code.
• Select a special tax code from the list. These tax codes are fixed for special employment, and have a certain tax calculation.
• Choose a type of taxation in the Taxation Type field and a tax table in the Tax Table field.
Important: If you select the white tax table and have the Labour TaxReduction field set to Yes for the employee, the first digit in the tax code must not be 6 or 7. This is to ensure that the calculations for standard tax are correct.
The payroll period information defaults from the payroll assigned to the employee's
3-56 Oracle HRMS for Netherlands Supplement
assignment.
Entering Income Details for Taxation Information
To enter income details for taxation information:1. Choose the Income Details for Taxation tabbed region.
2. Select the employee's income code.
Note: The income code does not affect the tax calculations.
To derive the percentage rate used in the special tax calculation, you need the employee's taxable income from the previous year. The system derives a value to appear in the Special Rate Annual Income field, representing the employee's previous year's taxable income. To enable the derivation of the employee's previousyear's salary for special type taxation calculation, you must run the Dutch Reset Last Year Salary Override Process.
See: Running the Dutch Reset Last Year Salary Override Process, page 3-58.
To derive the taxable income in the previous year for an employee, see: Previous Year's Taxable Income for the Netherlands, page 3-38
Note: If the system cannot derive a value, the application assumes the value to be zero.
3. If the application does not generate a value in the Last Year Salary field, you must enter the employee's previous year's salary in the Override field to enable the calculation of special type taxation. If you use this method of calculation, the value you enter automatically copies to the employee's active assignments, for the same effective date.
Caution: Ensure the Override field is blank if you want to use the derived value for the calculation of special tax. If a value exists in the Override field, even zero, it will override the derived figure.
Entering Special Indicators for Taxation InformationYou can select special indicators for an employee to indicate if they are entitled to a certain allowance or benefit. For example if an employee is entitled to a company car allowance, you can choose the special indicator: 01 Company Car.
If an employee is a student who works throughout the summer, you can choose the special indicator 28 Student Arrangement. This enables the student's taxes to be calculated at a more beneficial rate.
People Management 3-57
Note: This applies to standard taxation only and assumes that the standard taxable income is based on a quarter, even if the employee is on a monthly or weekly payroll.
To enter special indicators for taxation information:1. Choose the Special Indicators for Taxation tabbed region.
2. Select the special indicators that apply to the employee.
Entering Miscellaneous Tax Details InformationYou can select various tax deductions for the employee using the Miscellaneous Tax Details tabbed region.
To enter miscellaneous tax details information:1. Choose the Miscellaneous Tax Details tabbed region.
2. Select Yes in the 30% Rule field if the employee is a foreign worker that is entitled tobe taxed at a more beneficial rate. If this rule does apply, the social insurance income and social insurance gross salary will also be reduced by 30%.
3. Enter the date the rule expires in the 30% Rule Expiry Date field. If you do not enteran end date, the rule never expires.
4. Select any other miscellaneous tax information for the employee.
Note: The other information you select here is for information purposes only.
Entering Special Rate Taxation:Use the Special Rate Taxation tabbed region to record whether the employee is entitled to have their tax calculated at a more beneficial rate.
See: Processing the Beneficial Rule, page 6-6 for more information.
1. Choose the Special Rate Taxation tabbed region.
2. Select whether the beneficial rule applies to the employee.
3. If the employee has been assigned a special tax percentage from the tax authorities, enter the figure in the Individual Percentage field.
4. Enter the date the special tax percentage rate was approved in the Date Approved field.
3-58 Oracle HRMS for Netherlands Supplement
5. Enter the date from when the special tax percentage rate is effective in the Commencing From field.
6. Enter the date the special tax percentage rate ceases to apply in the Date Ending field.
Entering Social Insurance Information:Use the Social Insurance/Pensions tabbed region to select the method for deriving the maximum social insurance.
1. Choose the Social Insurance/Pensions tabbed region.
2. Select the method of deriving the maximum number of SI days allowed for each period. The social insurance contribution and pension contribution calculations use this method in the calculation of SI days.
• Weeks Worked - five days per week for the weeks that the employee works.
• Payroll Period - the number of week days in a period.
3. Enter a figure in the Override Real SI Days field. This figure overrides the figure derived from the maximum SI days method, if the real SI days is the chosen methodof calculation.
Entering Grade Ladder Information
To enter grade ladder information for an employee:You must enter grade ladder information to use the Grade/Step Progression process.
1. Choose the Grade Ladder tabbed region.
2. Select the grade ladder for this assignment. If you selected a grade for this assignment previously, all the grade ladders that use that grade are available. If youhave not selected a grade, all the active grade ladders in your enterprise are available.
Running the Dutch Reset Last Year Salary Override ProcessOracle Payroll enables you to reset the assignment level override values for the previous year's taxable income to null. The null setting applies to all the assignments of employees in a selected organization hierarchy, and employers. By returning the override values to null, and leaving the field blank, you can use the value in the Last Year Salary field in the special type taxation calculation.
For further information on entering an override value, see: Entering Income Details for Taxation Information, page 3-49
People Management 3-59
You run the Dutch Reset Last Year Salary Override Process from the Submit Request window.
To run the Dutch Reset Last Year Salary Override Process:1. Select the Dutch Reset Last Year Salary Override Process from the Name field.
2. In the Parameters window, enter the required year in the Effective Year field.
Note: The Effective Year entered must be a year later than the current system effective date, and not the same year. You can alter the effective system date if required.
3. Select your organization hierarchy in the Organization Hierarchy field. The field default value is the named hierarchy from the business group.
4. The HR Organization field is optional. If you leave the field blank, the report runs for all employers in the hierarchy.
Note: Do not update the override values for the previous year's taxable income for the forthcoming year, until after you run the process to initialize the values for the next year. It is advisable to run this process well in advance of the next year.
5. Click OK.
3-60 Oracle HRMS for Netherlands Supplement
Contact Information
Contact Information OverviewOracle HRMS enables you to record the ways in which you communicate with the people in your enterprise and the people whom they have a relationship with, such as an employee's partner.
Entering People as ContactsYou enter people as contact records to identify:
• People to contact in an emergency
• Dependents of the employed person
• Beneficiaries of certain benefits, such as insurance policies or stock purchase plans
• Individuals who receive a wage attachment payment
Entering Contact InformationEntering contact information includes entering contact details for the people in your enterprise, such as their home address. As an employer, you need to record contact details so that you can contact people either by email, phone, fax or post, and for reporting purposes. For example, in the Netherlands you must record a person's house number for social insurance reporting.
Entering Addresses (Address Window)You can enter as many addresses as necessary for each person, using the Address window.
Note: You cannot enter or update address information in the Address window for a contact who is also an employee or contingent worker. Instead, update the relevant employee or contingent worker record.
To enter an address for a person:1. Select a national address style and click in the Address field.
If a local address style exists for your country, it is displayed as the default. Otherwise, the international style is displayed.
People Management 3-61
Australia Users: There is a choice of Australia address style and Australia (International) address style. If you want change from Australia (International) address style to Australia address style, you can by running the Upgrade Australia Address Style process. This is an optional step.
Finnish Users: To display the postal code and post office on the same row in line with the Finnish Address standard, the application displays them in the same field, separated by a space. If you are not using Finnish postal codes upload functionality,you must enter postal codes and post offices manually. See: Entering Postal Codes, Oracle HRMS for Finland Supplement
Dutch Users: When you record foreign addresses, ensure you use the Dutch International address style. This address style enables you to report the address in the wage report in the required format.
US and Canadian Users: There is a choice of US address style and International address style if you have Vertex geocode data installed. If you are not maintaining DTW4 data and do not want to enforce the strict tax validation, then you can disable this using the HR:Enable DTW4 Defaults profile option.
US Payroll Users: If the Address Validation Using Vertex Web Services feature is enabled, then Vertex Web Services validates addresses in the Address window. See:Address Validation Using Vertex Web Services, Oracle HRMS Implementation Guide (US)
Singapore Users: When you record addresses for local employees, ensure you use the Singapore (Formatted) address style. This address style enables you to report the Primary address in the IRAS reports in the required format.
Note: You can change existing address styles or create new ones if required. See: Changing Default National Address Styles, Oracle HRMS Configuring, Reporting, and System Administration Guide
A window opens with the address format for the country you select.
2. Enter your address information in this window.
Note: India Users:If the city is Delhi, New Delhi, Mumbai, Bombay,Kolkata, Calcutta, Chennai, or Madras, the application sets the metro status to Yes, else it is set to No.
Note: Use the Phone Numbers window instead of this window to record telephone numbers otherwise you will be maintaining two lists of numbers.
Kuwaiti Users: You must select the Governorate (Muhafazat) for payroll processing.
3-62 Oracle HRMS for Netherlands Supplement
UK Users: If you enter the employee's address, then the first line is mandatory and the remaining lines are optional. If you enter the post code, then you must also enter the first line of the employee's address. If you enter the country in the first line, then you must enter the employee's address.
Romanian Users: If you enter the county name, then you must ensure to enter the street information.
See: Adding Telephone Information, page 3-63
Russian Users: Ensure you enter the zip code for the Residential address category so that the code appears in statutory reports.
3. Choose the OK button. This returns you to the Address window.
4. Select an address type, such as home, or weekend, or business. You can only have one address of each type at any time.
Singapore Users: If you use company quarters, be sure to choose this address type, so it appears in the A8A report.
5. Check the Primary checkbox to identify the person's main address. Otherwise, leaveblank. By default, the first address you enter is the Primary address.
Dutch Users - Use the Population Register Address type to record an additional address. The NSI reports use this information to report to the Dutch population register.
Only one address at any time can be a person's Primary address.
Singapore Users: If you use the Singapore (Formatted) address, you must enter the block number or address number, the street name, and the postal code values within the address to ensure that the IRAS process validates correctly. If you enter the Unit Number, you must enter the Level (Floor) number in the XXX-XXXXX format.
6. Save your work.
To update the primary address:1. Enter an end date for the existing primary address.
Do not save.
2. Create the new primary address starting the next day and check the Primary Checkbox.
Note: An employee must always have a primary address, but you cannot enter more than one primary address for the same time period.
People Management 3-63
3. Save the new primary address.
To change from an international to a local address style:1. To change from a global (international) address style to a local address style, choose
Change Global Style to Local. This button appears only when the current style is international.
The Personal Address Information window appears showing the new address structure. Values in fields common to both styles appear in the new structure.
If you choose Change Global Style to Local when there is no local style, Oracle HRMS displays an explanatory message and the style remains unchanged.
2. Complete the address definition, as appropriate.
3. Choose OK.
4. Save your work.
Sending Emails for Address Updates:Your system administrator can configure the application to send emails when you update address details in the Address window. Emails are sent to the email recorded in the Email field in the Office Details tab. See Subscribing to Business Events to Send Emails, Oracle HRMS Configuring, Reporting, and System Administration Guide for more information.
Adding Telephone Information (Phone Numbers Window)You can enter multiple telephone numbers for people in the HRMS database. To enter telephone information for a person, use the Phone Numbers window.
Note: You cannot enter or update telephone information in the Phone Numbers window for a contact who is also an employee or contingent worker. Instead, update the relevant employee or contingent worker record.
To enter a telephone number:1. In the Type field, select the type of the telephone device. For example, Office, Home
or Fax.
2. In the Phone Number field, enter the telephone number. You can use any format forthe telephone number unless specific instructions are listed below for your legislation.
3-64 Oracle HRMS for Netherlands Supplement
US Users: You must enter telephone numbers in one of the following formats to ensure they are included correctly on the US Magnetic Reports (for example, the State Quartely Wage Listing).
• 222-333-4444X55
• 222-333-4444Ext555
• 222-333-4444-555
Any format is allowed.
3. In the From field, select the start date for the telephone number.
4. In the To field, optionally select the date when the telephone number is no longer valid.
5. In North America, optionally add the extension number in the last field.
6. Save your work.
If you want to maintain a history of telephone numbers for this person, be sure to add a new entry for the new telephone number and enter an end date for the existing telephone number. If you do not want to maintain such a history, simply change the information for the existing telephone number.
Note: You can only have one active record for numbers with the types Home or Work. To add a new record for these types you must end date the existing record and begin a new record on the following day.
Sending Emails for Phone Number Updates:Your system administrator can configure the application to send emails when you update phone details in the Phone Numbers window. Emails are sent to the email recorded in the Email field in the Office Details tab. See Subscribing to Business Events to Send Emails, Oracle HRMS Configuring, Reporting, and System Administration Guide for more information.
Entering Communication Delivery MethodsWithin your enterprise you can contact your employees and applicants in a number of ways. For example, you could use E-Mail, Voice Mail, Fax or Post. Using the Communications Delivery Method window you can enter the different methods of contacting a person and indicate the method they prefer.
People Management 3-65
To enter a communication delivery method for a person:1. Enter the methods of delivering information in the Delivery Method field. You can
enter as many communication delivery methods as necessary.
2. Optionally, enter the period the delivery method is valid using the start and end dates. Otherwise, the start date is the effective date and the end date is not set.
3. Select a preferred communication delivery method, if your employee or enterprise prefers a particular form of communication. Each employee or applicant can only have one preferred communication delivery method.
4. Save the communication delivery methods for your employee or applicant.
Entering Next of Kin and Other ContactsUse the Contact window to hold information about contacts, for example:
• People to contact in an emergency.
• Dependents.
• Beneficiaries of benefits such as insurance policies or stock purchase plans.
• Individuals receiving payment of a wage attachment/third party payment deductedfrom the employee's salary.
A person entered as a contact can be one, some, or all of the above.
The coverage start date for an employee contact, is the employee hire date or the contactrelationship start date, whichever is later. This can be important in benefits processing, where eligibility for certain benefits starts from the start date of a contact relationship.
Creating The Same Contact Relationship More Than OnceYou can set up the same relationship more than once between the same two people. However, these relationships must not occur in the same time period. For example, you can set up that Person A married Person B from 01-Jan-1990 to 01-Feb-1991. Person A could then marry Person B again, starting from the 02-Feb-1991. However, you cannot enter that the couple remarried on 01-Jan-1991, as this would mean that they were married twice in the same time period.
Updating a Contact Relationship Start Date to Make it EarlierYou can update the contact relationship start date between two people, creating a supplementary record to cover the additional period.
For example, Person A exists on the application as an employee with a hire date of 01-Apr-1990. Person B exists on the application as a contact, with a creation date of 01-Jun-
3-66 Oracle HRMS for Netherlands Supplement
1990. Person A then marries Person B on 01-May-1990. As the application holds a contact coverage start date of 01-Jun-1990, a new contact record is entered to cover 01-May-1990 and 31-May-1990.
To enter a contact:1. Do one of the following:
• Enter the name of a new person.
• Select from a list of people already entered on the system.
2. If you enter a new person:
• Enter their gender and date of birth.
For UAE users only: Additionally, you must enter the father, grandfather, and family name.
For Romanian users only: Enter the Numerical Person Code (NPC/FRN) as the identification information.
• Select the user person type.
You can only select user person types which are set up for the system person type of Other, for example contact.
3. Enter details about the different contacts for your employee in the Contact Relationship fields.
4. For Japanese users only: You can view the masked personal number of the employee's dependent if the number has been entered using the self service pages.
To enter contact relationships:1. Select the contact relationship, for example child or spouse.
2. Enter the start and end date (if known) of the relationship.
Note: For Dutch users only, if you set up a spouse as a contact for an employee, whose full name format includes partner's prefix and surname, the full name of the employee changes automatically based on the spouse's name, if the contact relationship covers the employee's full period of employment. If it does not cover the full period the changes to the full name of the employee must be set manually on all datetrack records.
3. If you use Oracle Advanced Benefits or Standard Benefits, select a start and end
People Management 3-67
reason for the relationship.
4. Select whether the contact:
• Is the primary contact.
• Is the recipient of a third party payment (for example, from a court-ordered deduction/wage attachment).
This enables you to select this person on the Personal Payment Method windowwhen entering a third party payment method for the employee.
• Shares the same residence as the employee.
• Has a personal relationship with the employee. This identifies whether the third party should be considered as a possible dependent and/or beneficiary.
• Is a beneficiary or dependent. You can only enter these fields if you do not use Standard or Advanced benefits.
5. You can enter a sequence number for the contact relationship. This must be a unique number for each contact the employee has. However, because sequence numbers are employee based, these numbers only need to be unique within the employee's record.
For example, Person A has a relationship type of spouse with Person B. This is given the sequence number of 1. Person A also has a relationship type of father to Person C. This is given the sequence number of 2.
Person A also has a relationship type of emergency contact with Person B. This must also have the sequence number of 1 as a relationship between these two people is already recorded against Person A.
Person B is also an employee and therefore has her own set of contacts recorded against her. She has a relationship type of spouse with Person A. However, this relationship does not have to have the same sequence number as the relationship recorded against Person A, that is, this relationship has a sequence number of 5.
6. Select whether you want to create a mirror relationship and enter the mirror relationship type.
Important: You can only enter a mirror relationship and type when you first create the contact. Once the mirror relationship is saved, the relationships are maintained independently of each other, except for mirror relationships that are created automatically.
Oracle HRMS automatically creates a mirror relationships when you enter a spouse,parent or child. For example, if you create the spouse relationship from person A to
3-68 Oracle HRMS for Netherlands Supplement
person B, when you query person B in the Contact window, a mirror relationship ofspouse to person A is automatically created.
Furthermore, if you update a relationship that has had a mirror relationship automatically created, the mirror is also updated accordingly. For example, if you end date the relationship of spouse for person A, the spouse relationship for person B is also ended. If the relationship type is changed the relationships become independent.
7. Enter further information about the contact if your localization team has setup the configuration of the further information field.
For Spanish users only: Record if the contact (disabled dependant or a dependant) is financially dependent on the employee. The application uses this information to calculate the tax reductions the employee may be eligible for. You can also record if the employee is a single parent as this affects the employee's the tax-withholding rate.
For Russian users only: If the contact type is child, indicate whether the child is in full-time education. The application uses this information to calculate the employee's tax reductions. You must also record any disability information for the child contact, as this affects an employee's social security contributions, tax, and leave benefits.
See: Entering Disability Information, Oracle HRMS Enterprise and Workforce Management Guide
For Japanese users only:
• Record if the contact is subject to social insurance and income tax.
• Specify the sequence to display the dependent names in some statutory reports.
• Indicate if the contact is the head of the household. You require this informationto calculate the income tax.
• Select Yes if the contact is subject to income amount adjustment deduction. You report this information in the Japan, Withholding Tax Report of Earned Income report.
8. Save your work. If a person already exists on your application with the same surname and a first name that is either the same or not entered, then a list of values is displayed that shows all the people who share the details. See: Multiple Person Records, page 3-14
What Next?If you want to enter addresses or phones for the contact, choose the Contact Details button.
People Management 3-69
Reporting on the Workforce
The Workforce Headcount Report SetThe workforce headcount report set includes the Workforce Count Report, the Workforce Count Report (Spread Sheet Version) and the Head Count Detail Report. Thereports display headcount information for your organization on a local or world-wide basis for the search parameters you specify.
The Workforce Count ReportsBoth of the workforce count reports enable you to access simple workforce information for all organizations within an organization hierarchy and date range you specify. The difference between the workforce count reports is that the Workforce Count Report (Spread Sheet Version) enables you to open the report in a spreadsheet format. The reports display a breakdown of the information using the following headers:
• Organization
• Rev/Non-Rev
• Start (Total)
• End (Total)
• Net Change
• Hires
• Terminations
• Other (Net)
Important: The dates you specify must fall within one version of the Organization Hierarchy on which you are reporting.
The reports display a count of defined worker types, including all types of contingent and temporary workers. The reports also display transition information, for example the number of new hires and terminations.
The reports return a headcount value for the assignment ID based on either the assignment budget value, or the supplied TEMPLATE_HEAD FastFormula. You can create custom FastFormulas on which to return the headcount values by creating a FastFormula named BUDGET_HEAD. For more information, see Running the Workforce Count Reports, page 3-78
3-70 Oracle HRMS for Netherlands Supplement
The Head Count Detail ReportThe Head Count Detail Report enables you to display detailed headcount information for an organization hierarchy. The report displays a breakdown of the information using the following headers:
• Organization
• Division
• Rev/Non-Rev
• Beginning Head Count
• Regular
• Contract
• Temp
• New Hires
• Offers
• Vacant FTE
• Termination
• Ending Headcount
• # Change
• % Change
• Attrition Rates
Three FastFormulas are supplied with the Head Count Detail Report, that are used to control the output of the report. These are:
• HR_PERSON_TYPE_TEMPLATE which maps person types and employment categories to worker types regular, temporary and contract.
• HR_MOVE_TYPE_TEMPLATE which maps leaving reason to voluntary or involuntary termination types for employees.
• HR_CWK_MOVE_TYPE_TEMPLATE which maps leaving reason to voluntary or involuntary termination types for contingent workers.
If your enterprise has different requirements to those defined in the supplied formulas,
People Management 3-71
then you can create your own FastFormulas to accurately represent the setup of your enterprise. You can define worker type mappings to person type and employment category by creating a FastFormula named HR_PERSON_TYPE. Similarly, you can create your own FastFormula to define leaving reasons by creating a FastFormula named HR_MOVE_TYPE for your employees and HR_CWK_MOVE_TYPE for your contingent workers. If you define a formula with one of these names, then it overrides the corresponding supplied formula when you run the report. For more information, see: Running the Head Count Detail Report, page 3-76
Running the Full Personal Details Report SetTo create printed reports of the personal information held for one person, you can run the Full Personal Details report set. It comprises four reports that meet employees' rights to view their own personal details under data protection legislation:
• Full Person Details 1 reports on addresses and information entered in the People window, such as name, date of birth, nationality, and work telephone number.
• Full Person Details 2 reports on applications and applicant interviews.
• Full Person Details 3 reports on assignment information including periods of service, payment methods, and element entries.
• Full Person Details 4 reports on miscellaneous work information, including special information, absences, recruitment activities, and contacts.
If you do not need to see all this information for the employee, you can run individual reports rather than the report set. The Full Person Details report, Full Assignment Details report, and Full Work Details report are equivalent to reports 1, 3, and 4 in the report set, respectively. The Full Applicant Details report is equivalent to report 2 in the report set, but you can only run this as a separate report for an applicant, not an employee.
You run report sets from the Submit Request Set window.
To run the Full Personal Details report set:1. In the Request Set field, select Full Personal Details.
2. Enter the Parameters field to open the Parameters window.
3. Enter the effective date for which you want to see the reports.
4. Enter the name of the person for whom you want to print the reports.
5. Choose the Submit Request button.
3-72 Oracle HRMS for Netherlands Supplement
Running the Employee Summary ReportThis report is a current summary of information for an employee, covering addresses, contacts, period of service, assignments, special information, personal payment methods, and element entries.
Run reports from the Submit Requests window.
To run the Employee Summary Report:1. In the Name field, select Employee Summary.
2. Enter the Parameters field to open the Parameters window.
3. Enter the effective date for which you want to see the report.
4. Enter the name of the employee whose summary you want to see.
5. Choose the Submit button.
Running the Employee Payroll Movements Report The Employee Payroll Movements Report shows employee assignment changes for a particular payroll and pay period. Employee assignment changes include new hires, terminations, transfers in, and transfers out. You can use this information to monitor employee assignment changes for turnover analysis.
You run the Employee Payroll Movements Report from the Submit Requests window.
To run the Employee Payroll Movements Report:1. In the Name field, select Employee Payroll Movements Report.
2. If the Parameters window does not open automatically, click in the Parameters field.
3. Select the payroll and pay period for which you want to see the information.
4. In the Employee Detail field, select:
• Summary Only, to see only the totals for each category of change
• Assignment Number, to see a list of new hires, terminations, transfers in, and transfers out in order of assignment number
• Employee Name, to see a list of new hires, terminations, transfers in, and transfers out in order of employee name
People Management 3-73
5. If you are running the PDF version of this report, then select a template for your PDF output.
6. Click OK and then Submit.
Running the Worker Organization Movements ReportThe Worker Organization Movements Report shows worker movements into and out ofa particular organization or organization hierarchy. Worker movements include new starters, terminations, transfers in, and transfers out for employees, contingent workers,or both.
Run the Worker Organization Movements Report from the Submit Requests window.
To run the Worker Organization Movements Report:1. In the Name field, select Worker Organization Movements Report.
2. If the Parameters window does not open automatically, click in the Parameters field.
3. Specify the organization as follows:
• To see information for a whole organization hierarchy, select its name and version in the Organization Structure and Version fields. Leave the Parent Organization field blank.
• To see information for one organization, select its name in the Parent Organization field. Leave the Organization Structure and Version fields blank.
• To see information for an organization and its subordinates in a particular hierarchy, select the name of the organization in the Parent Organization field, and the name and version of the organization hierarchy to which it belongs in the Organization Structure and Version fields.
4. Specify the period for which you want to see the information.
5. In the Worker Type field, specify whether the report should include employees, contingent workers, or both.
6. In the Worker Detail field, select:
• Summary Only, to see only the totals for each type of movement
• Assignment Number, to see a list of worker movements in order of assignment number
3-74 Oracle HRMS for Netherlands Supplement
• Worker Name, to see a list of worker movements in order of worker name
7. Choose the Submit button.
Running the Assignment Status Report This report lists people assigned to particular organizations, jobs, positions and grades, with specific assignment statuses. If you select both applicants and employees as persontypes, the report prints out in two sections. Otherwise it prints for the type you select.
Run reports from the Submit Requests window.
To run the Assignment Status Report:1. In the Name field, select Assignment Status Report.
2. Enter the Parameters field to open the Parameters window.
3. Enter the effective date for which you want to see the report.
4. Leave the Organization Structure field blank to see information about all organizations. Select an organization hierarchy name to see assignment statuses in anumber of subordinate organizations.
5. If there are multiple versions, select a version.
If the effective date lies between the version's start and end dates, the report is effective as of this date. If it lies outside these dates, the report is effective as of the start date of the version you select.
6. Leave the Parent Organization field blank to see information about all organizations. Select a name in this field to see information on all subordinate organizations in the hierarchy.
Note: You must enter a value in this field if you have entered a value in the Organization Structure field, and you must leave this field blank if you left that field blank.
7. Make entries in the Group, Job, Position, Grade and Payroll fields as required.
If you leave all segments of the Group flexfield blank, you see information about employees in any groups. If you leave one segment blank you see employees with any value for that segment.
8. Enter Yes in the Primary field if you want to report on primary assignments only. Leave blank to include all assignments.
People Management 3-75
9. Select Employee, Applicant or Both in the Person Type field. This determines whichsections of the report are printed.
10. Select up to four assignment statuses, or leave blank to list employees and/or applicants with any assignment status.
11. Choose the Submit button.
Running the Terminations Report This report shows the reasons why workers left your organization within a specified period.
There are two Totals columns included in the Terminations report. The Total column represents the aggregate of individual Total columns whereas the All Termination column represents all the employees who have been terminated between the Date Fromand Date To parameters specified while generating the report.
You run reports from the Submit Requests window.
To run the Terminations Report:1. In the Name field, select Terminations Report.
The Parameters window opens.
2. Enter the effective date for which you want to see the report.
3. If you want to see terminations for a complete or partial organization hierarchy, select the hierarchy name and version.
4. In the Parent Organization field, select the parent organization within the selected organization hierarchy whose subordinate organizations you want to include in the report.
If you have not selected an organization hierarchy, enter in the Parent Organization field the name of the single organization for which you want to generate the report. In this case, as you have not selected an organization hierarchy, the report applies to the specified organization only; terminations in subordinate organizations do notappear in the report.
5. Enter the start and end dates of the period in which you are interested.
6. Select at least one termination reason to include in the report.
7. Click Submit.
3-76 Oracle HRMS for Netherlands Supplement
Running the Conclude Placement ReportThe Conclude Placement Report shows, for a specified period and termination reason, the number of terminated contingent-worker placements in an organization.
Run the Conclude Placement Report from the Submit Request window.
To run the Conclude Placement Report:1. In the Name field, select Conclude Placement Report.
The Parameters window opens.
2. To include placement-termination data for multiple organizations in an organization hierarchy, select the hierarchy name in the Organization Structure field.
3. In the Parent Organization field, select the organization, within the specified organization hierarchy, whose subordinate organizations you want to include in thereport. If you have not selected an organization hierarchy, enter the name of the single organization you want to include in the report in the Parent Organization field.
4. Enter the start and end dates of the period in which you are interested.
5. Select at least one termination reason.
6. Click Submit.
Running the Head Count Detail ReportYou run the Head Count Detail Report from the Submit Request window.
If the dates you enter in the Date From and Date To fields fall within one version of the organization hierarchy you define, only one page of results is returned. If, for example, the dates span more than one version of the organization hierarchy, one page of results will be returned for each version.
To run the Head Count Detail Report:1. In the Name field, select Head Count Detail Report.
2. Enter the Parameters field to open the Parameters window.
3. Set the date from which the report begins the search.
4. Set the date up until which the report searches.
People Management 3-77
5. Select the organization hierarchy on which you want to report.
6. Enter the top organization.
7. Select the type of worker which you want to report. For example, you can choose to report on employees, contingent workers, or both.
8. Select the roll up. If yes, all organization values will be rolled up to the parent organization.
9. Select the budget type for the report.
10. Select Yes, if you want to include the top organization entered at step 6.
If you set the Top Organization parameter to yes, headcount information for the toporganization is included in a separate row in the report.
11. Select the assignment type to include in the report.
12. Enter the reporting period in the Days Prior to End Date field. The number of days you enter determines how many days the report covers, prior to the end date of the organization hierarchy version you specify in step 4.
13. Choose the OK button.
14. Choose the Submit button to run the report.
The report displays the results for the criteria you entered.
• Organization: The top organization in the selected hierarchy.
• Division: The name of the organization below the top organization.
• Rev/Non-Rev: Indicates the headcount details in the Revenue or Non-Revenue headings. The application uses the value entered in the Job Category segment inthe Job Extra Information Type to display the headcount details in Rev/Non-Rev
• Beginning Head Count: The total headcount from the date entered in the Date From parameter.
• Permanent: Employee person type with the Full Time Regular or the Part Time Regular employment category status.
• Contract: The system person type of Contract
• Fixed Term: Indicates the temporary headcount. The report uses the HR_PERSON_TYPE_TEMPLATE formula to calculate worker type. If a worker is not assigned an Assignment Category or a value other than Fill-Time Regular
3-78 Oracle HRMS for Netherlands Supplement
in the Assignment window, then the Headcount Details report displays the worker in the Fixed Term count.
See: Configuring Workforce Calculations Using Oracle FastFormula, Oracle HRMS Configuring, Reporting, and System Administration Guide
• New Hires: The new hires count within the last x days as entered in the report parameter
• Transfers In: The number of employees or workers who have moved into the selected organization hierarchy.
• Transfers Out: The number of employees or workers who have moved out of the selected organization hierarchy.
• Numbers of open and accepted offers
• Vacant FTE: Number of vacant FTE for each open requisition within the division.
• Number of voluntary and involuntary terminations
• Ending Headcount: Total headcount on the date entered in the Date To parameter.
• Change: The difference between the beginning headcount and the ending headcount.
• % Change: The percentage change in the headcount over the reporting period, calculated as: (Beginning Head Count - Ending Head Count) / Beginning Headcount
• Attrition Rate: The total headcount of employees or workers who have separated from the selected organization during the reporting period, calculated as: (Sum of Terminations/ Sum of Beginning Headcount) * 100.
Running the Workforce Count ReportsYou run the Workforce Count Report and the Workforce Count Report (Spread Sheet Version) from the Submit Request window.
To run the workforce count reports:1. In the Name field, select either the Workforce Count Report or the Workforce Count
Report (Spread Sheet Version). Choose the spreadsheet version if you want to open the report in a spreadsheet format.
People Management 3-79
2. Enter the Parameters field to open the Parameters window.
3. Set the date from which the report begins to search.
4. Set the date until which the report searches.
Note: The Start Date and End Date you specify must fall within oneversion of the organization hierarchy on which you want to report.
5. Select the organization hierarchy on which you want to report.
6. Enter the top organization.
7. Select the roll up. If yes, all organization values will be rolled up to the parent organization.
8. Select the budget type for the report.
9. Select yes, if you want to include the top organization entered at step 6.
If you set the Top Organization parameter to yes, headcount information for the toporganization is included in a separate row in the report.
10. Select the assignment type to include in the report.
11. Choose the OK button.
12. Choose the Submit button to run the report.
The reports display headcount information for the parent organization and all the organizations below it in the organization hierarchy. You can choose to run the Workforce Count Report for an entire hierarchy, or from a selected parent organization within the hierarchy.
Running the Duplicate Person ReportIf you are upgrading from a release prior to the PER G Minipack, then, as part of your upgrade to support the global person functionality, an entry for every person record in HRMS is made in the TCA.
See: The Person Record, Oracle HRMS Workforce Sourcing, Deployment, and Talent Management Guide for more information on how the HRMS and TCA schemas link together.
If your enterprise has multiple business groups and you have international employees, then you may find that, after this upgrade, you have multiple TCA party records for thesame person. For example, this may occur if a person has transferred from one business group to another.
3-80 Oracle HRMS for Netherlands Supplement
To identify potential duplicate records, you run the Duplicate Person report in the Submit Requests window.
To run the Duplicate Person report:1. Select the Duplicate Person report in the name field.
2. Click in the Parameters field to display the Parameters window, if it does not automatically open.
3. Enter the date on which you want to run the report. The default date is the current system date.
4. Select a person for whom to run the report, or leave blank to run the report for all people in your business groups who are also in another business group.
5. Choose OK to run the report. You can view the results from the Requests window.
Running the Full Person Details ReportThe Full Person Details Report provides you with accurate information about an employee's history. The report features all periods of service and changes in employment history. Employee's can request the report on an ad-hoc basis.
Run reports from the Submit Request window.
To run the Full Person Details Report:1. In the Name field, select Full Person Details Report.
2. Enter the Parameters field to open the Parameters window.
3. Enter an effective date.
4. Select the employee to be reported on.
5. Choose the Submit button.
Running the Person Full History ReportUse this report to see the personal and professional details of employees and contingentworkers in your enterprise. You can include an employee's applicant history and detailsabout the current assignment such as absence, contact, and salary information in the report. You can also see the details of multiple assignments, if any, for the employee or contingent worker.
This report highlights any information that has changed over a period of time. If your
People Management 3-81
enterprise uses element sets to group together similar elements, then you can select to include only those elements from a particular set.
For contingent workers, you can see supplier details such as supplier site, purchase order number, and purchase order line, details about the periods of placement and assignment rates. You cannot view the absence and termination details for contingent workers.
Run the Person Full History Report from the Submit Request window.
To run the Person Full History Report:1. In the Name field, select the Person Full History Report.
2. Enter the Parameters field to open the Parameters window.
3. Select the person for whom you want to see the details.
4. Select Yes to include the details held in descriptive and key flexfields attached to a person, such as job, position, and assignment. If the flexfield structure is not definedor contains no values, you do not see these details in the report.
5. Select the element set to restrict the information to a specific group of elements. If you do not select any element set, all elements present in the employee's element entries are listed. For example, if the compensation element set includes details about salary, bonus, and stock options, you can view these details for the employee
6. Select Yes in the appropriate fields to include the following details:
• Employee's applicant record for the current assignment
• Employee's assignments, absences, and terminations, and contingent worker's assignments
• Employee's salary and contingent worker's assignment rates
• Contacts, addresses and phone numbers for employees and contingent workers
• Employee's ethnic origin, nationality, and disability status
Otherwise select No. If you enter No, or if there are no records for that parameter, you do not see the individual records in the report.
7. Choose the Submit button.
Using the People FoldersUsing the People Folder window, you can enter inquiries about the people held on Oracle HRMS. You select the fields of personal information you want to see, and
3-82 Oracle HRMS for Netherlands Supplement
position them in the order you prefer. For example, you can produce an alphabetical listing of all applicants and their gender, nationality, and disability registration.
The system saves your inquiry and field formatting as a folder so you can rerun the inquiry at any time. You can make this folder available to all users, or save it as a private folder.
Note: The system administrator can create configured versions of the People Folder window so that you use each version for one person typeonly.
To produce lists of assignments:1. Enter and run a query in the folder. For example, you could run the query "C%" in
the Full Name field to view all people whose names begin with C.
2. You can remove, rearrange, add, or resize fields in the folder if you have access to the Folder menu.
For further information about Folders see: Customizing the Presentation of Data in a Folder, Oracle E-Business Suite User's Guide
Listing Assignments Using the Assignments FolderUsing the Assignments Folder window, you can query lists of current assignments, pastassignments, or both. You select the fields of assignment information you want to see, and position them in the order you prefer. For example, you can produce a listing of all current employees ordered by organization, and by grade within organization.
The system saves your inquiry and field formatting as a folder so you can rerun the inquiry at any time. You can make this folder available to all users, or save it as a private folder.
Note: The system administrator can create customized versions of the Assignments Folder window so that you use each version for one person type only.
The system administrator can also link this window in a task flow so that you use it to access other windows of employment information. Notice that if you select a past assignment in the folder, you cannot open other windows of employment information.
To produce lists of assignments using the assignment folder:1. Select whether you want to view current assignments, past assignments or both.
People Management 3-83
2. Run the query.
The folder in the lower part of the window lists the assignments that match the selection criteria you entered.
3. You can enter a query in the folder to reduce further the list of assignments displayed. For example, you could run the query "C%" in the Full Name field to view the assignments of people whose names begin with C.
4. You can remove, rearrange, add, or resize fields in the folder if you have access to the Folder menu.
For further information about using Folders see: Customizing the Presentation of Data in a Folder, Oracle E-Business Suite User's Guide
Listing Assignments Using the List Assignments WindowIn this window, you can view current employees and applicants. To view former employees or applicants (or both current and former), see: Using the List People By Assignments Window, page 3-83
To produce lists of assignments:1. Select values in one or more fields in the top part of the window, and choose the
Find button.
If you enter the Job, Position, Grade, or Group fields, a window opens prompting you for individual segments of the flexfield. You can enter selection criteria in one or more segments. This means that you can search on parts of the job name, for example.
The folder in the lower part of the window lists the assignments that match the selection criteria you entered.
2. You can enter a query in the folder to reduce further the list of assignments displayed. For example, you could run the query "C%" in the Full Name field to view the assignments of people whose names begin with C.
3. You can remove, rearrange, add, or resize fields in the folder if you have access to the Folder menu.
For further information about using Folders see: Customizing the Presentation of Data in a Folder, Oracle E-Business Suite User's Guide
Using the List People by Assignment WindowIn this window you can choose whether to view current or former employees, applicants, or contingent workers. However, you must search on a whole Job, Position,
3-84 Oracle HRMS for Netherlands Supplement
or Grade name, not on segments of these flexfields. To search on segments of the flexfields, use the List Assignments window, see: Listing Assignments Using the List Assignments Window, page 3-83
To produce lists of assignments:1. Select values in one or more fields in the top part of the window, and choose the
Find button.
The folder in the lower part of the window lists the assignments that match the selection criteria you entered.
2. You can enter a query in the folder to reduce further the list of assignments displayed. For example, you could run the query "C%" in the Full Name field to view the assignments of people whose names begin with C.
3. You can remove, rearrange, add, or resize fields in the folder if you have access to the Folder menu.
For further information about using Folders see: Customizing the Presentation of Data in a Folder, Oracle E-Business Suite User's Guide
Listing Workforce by PositionThere are two windows for viewing lists of workers by position:
• List Workforce by Position
• List Workforce by Position Hierarchy
List Workforce by Position WindowTo view workers in a single position, or in all positions corresponding to a job or organization, use the List Workforce by Position window.
To view worker names by position:1. Select any combination of an organization, job, or position.
2. Choose the Find button.
The folder displays the positions that match your selection criteria, together with the holder's name employee, or contingent worker number and worker type. The worker type is similar to the person type, except that the worker type only displays the person's active worker type. For example, the person type of Employee.ex-applicant displays as Employee.
If there is more than one holder for a position, the number of holders is displayed inthe Holder Name field. You can view the names of these holders by choosing the
People Management 3-85
List icon from the Toolbar.
Note: You can enter a query in the folder to reduce further the list of positions displayed. You can remove, rearrange, add, or resize fields in the folder if you have access to the Folder menu.
List Workforce by Position Hierarchy WindowTo view lists of workers in a number of positions within a hierarchy, use the List Workforce by Position Hierarchy window.
To view lists of positions within a position hierarchy:1. Select a position hierarchy and the highest position in the hierarchy for which you
want to list workers.
2. Choose the Find button.
The folder displays all positions below the one you selected in the hierarchy. It also lists the employees and contingent workers who hold these positions as well as their worker type. The worker type is similar to the person type, except the worker type only displays the person's active worker type. For example, the person type of Employeee.ex-applicant displays as Employee.
If there is more than one holder for a position, the number of holders appears in the Holder Name field. You can view the names of these holders by choosing the List icon from the Toolbar.
Note: You can enter a query in the folder to reduce further the list of positions displayed. You can remove, rearrange, add, or resize fields in the folder if you have access to the Folder menu.
For further information about Folders see: Customizing the Presentation of Data , Oracle E-Business Suite User's Guide
Listing Workforce by Organization In the List Workforce by Organization window, you can view lists of employees within one organization or within all organizations below a specified level in a hierarchy you select.
To list workers in several organizations:1. Select an organization hierarchy and select the highest organization in this
hierarchy for which you want to list workers. Choose the Find button.
3-86 Oracle HRMS for Netherlands Supplement
To list workers in one organization only:1. Leave the Organization Hierarchy field blank and select an organization. Choose
the Find button.
You can enter a query in the Workforce block to further restrict the list of employeesto be displayed.
Manager FieldThe Manager field identifies any worker for whom the Manager check box is checked in the Miscellaneous region of the Assignment window.
If there is more than one manager in the organization you select, the Manager field displays the number of managers. You can view the names of these managers by choosing the List icon from the Toolbar.
Type Field
The Type field displays the person type related to the worker identified in the Name field.
Organization Field
If a worker belongs to more than one organization within the hierarchy you selected, the number of organizations appears in the Organization field. You can view the names of these organizations by choosing the List icon from the Toolbar.
Listing People by Special InformationTo view a list of people who match a particular profile for one Special Information Type, use the List People By Special Information window.
Note: The system administrator can create configured versions of the List People By Special Information window so that you use each version for one information type only. For example, one version could be called List People By Technical Skills.
To list people by special information:1. Select a Special Information Type.
2. Click in the Details field. A window opens prompting you for the details you have defined for this information type.
3. Enter values in the fields against which you want to match people, then choose OK. If you leave a field blank, it is not used in the matching process.
4. Choose the Find button.

People Management 3-87
Employees and applicants who match your selection criteria are listed in the folder in the lower part of the window. You can enter a query here to further restrict the list of people. If you have access to the Folder menu you can remove, rearrange, or resize the fields displayed.
For more information about using folders see: Customizing the Presentation of Datain a Folder, Oracle E-Business Suite User's Guide
Viewing a Worker's Assignment HistoryUse the Assignment History window to view information about a worker's assignmentsin both current and previous periods of service and placements. If a worker has been both an employee and a contingent worker, both types of assignment appear in the assignment history.
To view a worker's assignment history:1. In the Find Person window, select or enter the worker's full name or number. If you
select the worker's name or number from a list, you can limit the list size by selecting a value in the Current field:
• Yes includes only current workers.
• No includes only ex-workers.
• All includes both current and ex-workers.
2. Choose the Find button.
In the Assignment History window:
• This Period shows complete years and months in the current period of service or placement.
• All Periods shows complete years and months in all periods of service and placements.
• Including Breaks shows total elapsed years and months since the worker's initial hire or placement start date.
By default, Assignment History displays one row of information about each assignment in the current period of service or placement.
3. To display assignments from previous periods of service or placements, click in theWork History Start Date or End Date field and press the Down Arrow key. As the dates for previous periods of service or placements appear, related assignments appear in the Assignment History box. Use the Up Arrow key to reverse the display.
3-88 Oracle HRMS for Netherlands Supplement
Running the Dutch Assignment SCL Flexfield Upgrade ReportPrior to the Oracle HRMS Release 11i Product Family Pack March 2003 (HR_PF E), an employee's Dutch tax and social insurance information was held on the Statutory Info tabbed region in the Assignment window. However, to support Oracle Payroll for the Netherlands, this information has either been removed or is now recorded in other places.
The migration of any existing Statutory Info tab information is handled by an upgrade script. This script runs automatically the first tine you apply either the Oracle HRMS Release 11i Product Family Pack for March 2003 (HR_PF E) or a later HRMS Family Pack.
The upgrade script either removes or migrates the following information:
• UWV organization name
• Insurance registration number
• Social insurance start and end dates
• Reason for change and ending (for ZVW only)
• Senior, additional senior, labour, young disabled tax reductions
• Tax exemption rules
• Liable for national and social insurance
• ZVW, WW, ZW, WAO
• Work pattern
• Low wages
• Education
• Child day care
• Long term unemployed
• Foreigner with special knowledge (renamed to the 30% Rule)
• Job level
For employees with a current social insurance start date when the upgrade script runs, a new assignment EIT record will be produced. However, some social insurance information such as the UWV organization name, reason for change and ending will be
People Management 3-89
deleted and you will need to re-enter this information.
Note: A new assignment EIT record for the social insurance type of ZVW will only be created if the employee is under 65 years of age. If the employee's age was previously not entered, the application will assume the employee is under the age of 65 and produce a new Assignment EIT record.
The Dutch Assignment SCL Flexfield Upgrade Report enables you to see which information has been moved or deleted, and any new EITs that have been created.
You run the Dutch Assignment SCL Flexfield Upgrade Report using the Submit Request window.
To run the Dutch assignment SCL flexfield upgrade report:1. Select Dutch Assignment SCL Flexfield Upgrade Report in the Request Name field.
2. Choose Submit.
The report prints the previous Assignment SCL key flexfield information for each employee that has an effective datetracked assignment record by business group, employee name and assignment number. If a new assignment EIT record is created for an employee, the report displays the information with a new line beginning with 'Moved to Assignment EIT'.

Payrolls 4-1
4Payrolls
Payrolls OverviewUsing Oracle HRMS, you can set up payrolls to pay all your employees accurately and at the correct time.
Payrolls in Oracle HRMSA payroll is a set of employees whose pay you process with a single frequency, for example, weekly or monthly. You can define as many payrolls as you require to meet the pay policies of your enterprise. You put an employee on a payroll by making an assignment to the payroll.
You can also assign employees to other employee groups: for example, groups to indicate membership of a union or employment based sports club.
Key ConceptsTo enable you to set up payrolls correctly, you need to understand these key concepts:
• Consolidation sets, Oracle HRMS Payroll Processing Management Guide
• Assignment sets, Oracle HRMS Payroll Processing Management Guide
• Element sets and distribution sets, Oracle HRMS Compensation and Benefits Management Guide
Reporting on PayrollsFor more information, see Reports and Processes in Oracle HRMS, Oracle HRMS Configuring, Reporting, and System Administration Guide
4-2 Oracle HRMS for Netherlands Supplement
PayrollsYou can use Oracle Payroll to define a payroll, or range or payrolls that best suit your organizational needs.
Can you pay an employee with several assignments a single payment?Yes, Oracle Payroll enables you to pay a single payment to an employee with several assignments within your organization. You enable the payment by selecting the Multiple Assignment check box on the Define Payroll window.
Can you run payroll processes and reports multilingually?Payroll processes and reports are always submitted and always run in the local language only. This means that US and UK payroll reports can only be run in English. Canadian reports can be run in English or Canadian French.
How do you synchronise a payslip with the official payment date?Use the payslip offset on the Define Payroll window to specify the number of days between the completion of your payroll processes and the availability of employee payslips.
Is there any checklist that you must follow while running the various payroll processes?Oracle recommends that you follow this checklist while running the various payroll processes for that period:
• Do not update employee or assignment data while running the Payroll Run, Quickpay, Prepayment, Quick Prepay, Balance Adjustments, BEE, BAA, RetroPay, Costing, RetroCosting, Costing of Payments, Archiver processes . These processes access people as well as assignment data to derive results. Some of these processes are interdependent. An update to employee/assignment data can result in inconsistent results.
• Do not update element details, element link details, element entry details while running the Payroll Run, Quickpay, Balance Adjustments, BEE, BAA, RetroPay, Costing, RetroCosting processes as element details are accessed while running theseprocesses for different assignments.
• Do not update organization, payroll, group details while running the Payroll Run, Quickpay, Prepayment, Quick Prepay, Costing, Costing of Payments, RetroCosting process.
• Do not update fastformulas while running the Payroll Run, Quickpay, Retropay

Payrolls 4-3
processes as fastformulas are accessed by these processes.

4-4 Oracle HRMS for Netherlands Supplement
Payroll Payments and Distributions
Cash Management and Oracle PayrollOracle Cash Management manages and controls the enterprise cash cycle. The Cash Management auto reconciliation matches Oracle Payroll against bank statement lines if the transaction meets the following criteria:
• The Oracle Payroll payment number matches the statement line payment number.
• The Oracle Payroll payment amount matches the statement line payment amount.
Cash Management accesses a view of payments generated by Oracle Payroll and compares it against the information on the bank statement. This process generates error messages on mismatched transactions.
Each time a new payment method is created, the bank details transfer to Oracle Accounts Payable. When defining a payment method, you must enter the GL Cash Account field to work with Cash Management.
Important: Because payment method details are passed to Accounts Payable from Payroll, it is important to ensure that you are entering this information correctly. If you inadvertently enter incorrect details, you could end up with reconciliation issues later.
Cash Management is available only for the Payroll payment methods of checks/chequesand electronic fund transfers (such as NACHA in the U.S, Direct Deposit in India).
Important: If you want to use Cash Management fully, you must install Oracle Accounts Payable and Oracle Accounts Receivable due to the interdependency of the products. All accounting functions take place inAccounts Payable and Accounts Receivable, and Cash Management provides the engine for reconciliation and forecast.
Configuring the Statement of Earnings for the NetherlandsThe Statement of Earnings (SOE) displays details of earnings, deductions and other payroll-related information for an employee assignment. Dutch users must perform additional configuration to enable Netherlands-specific information to appear on the statement.
Note: You must use a responsibility with the Data Group Application
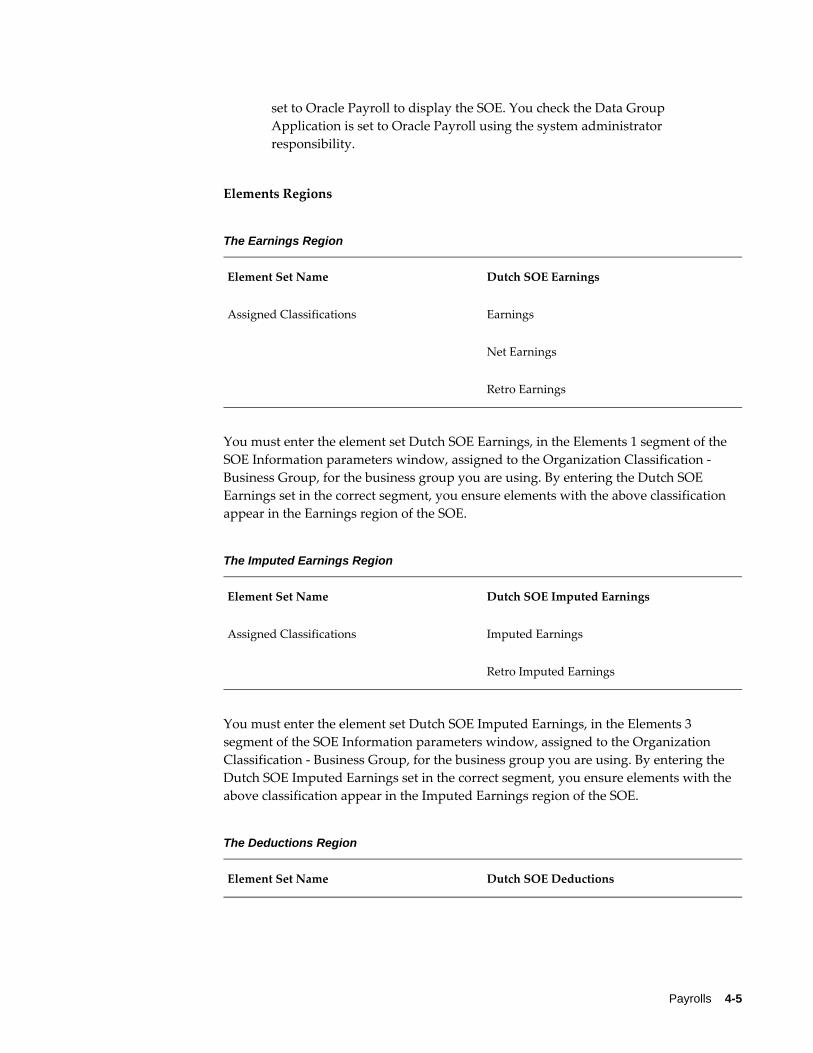
Payrolls 4-5
set to Oracle Payroll to display the SOE. You check the Data Group Application is set to Oracle Payroll using the system administrator responsibility.
Elements Regions
The Earnings Region
Element Set Name Dutch SOE Earnings
Assigned Classifications Earnings
Net Earnings
Retro Earnings
You must enter the element set Dutch SOE Earnings, in the Elements 1 segment of the SOE Information parameters window, assigned to the Organization Classification - Business Group, for the business group you are using. By entering the Dutch SOE Earnings set in the correct segment, you ensure elements with the above classification appear in the Earnings region of the SOE.
The Imputed Earnings Region
Element Set Name Dutch SOE Imputed Earnings
Assigned Classifications Imputed Earnings
Retro Imputed Earnings
You must enter the element set Dutch SOE Imputed Earnings, in the Elements 3 segment of the SOE Information parameters window, assigned to the Organization Classification - Business Group, for the business group you are using. By entering the Dutch SOE Imputed Earnings set in the correct segment, you ensure elements with the above classification appear in the Imputed Earnings region of the SOE.
The Deductions Region
Element Set Name Dutch SOE Deductions
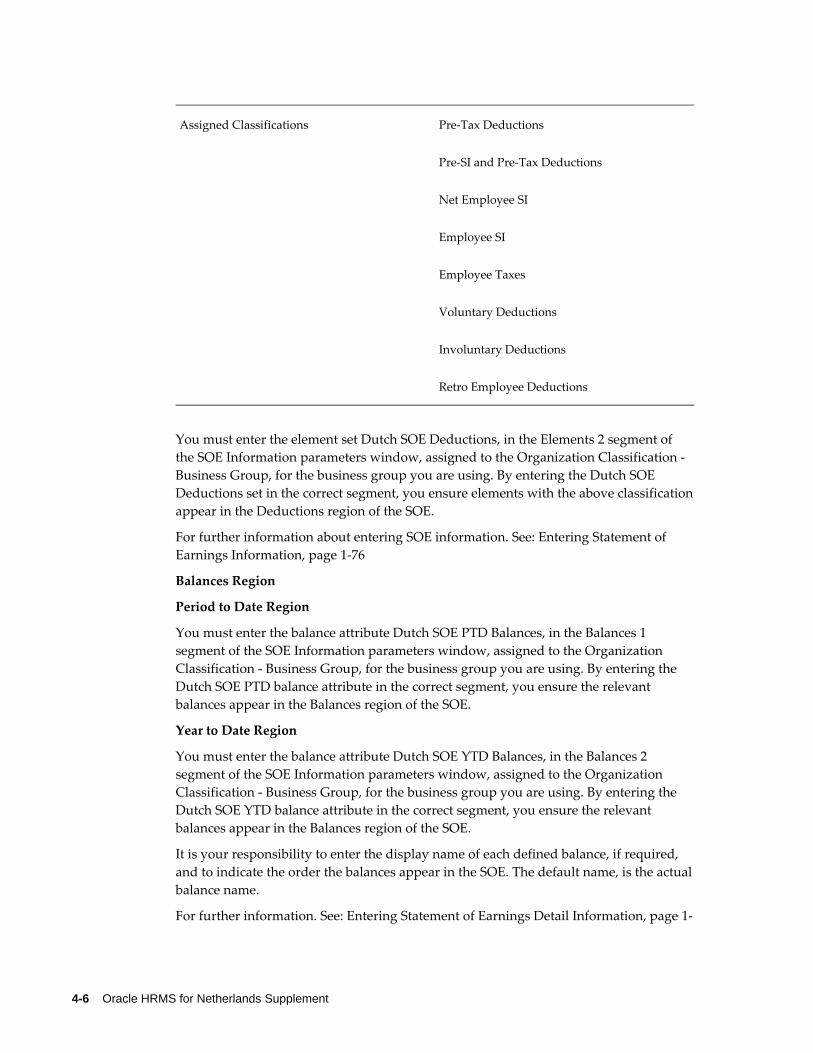
4-6 Oracle HRMS for Netherlands Supplement
Assigned Classifications Pre-Tax Deductions
Pre-SI and Pre-Tax Deductions
Net Employee SI
Employee SI
Employee Taxes
Voluntary Deductions
Involuntary Deductions
Retro Employee Deductions
You must enter the element set Dutch SOE Deductions, in the Elements 2 segment of the SOE Information parameters window, assigned to the Organization Classification - Business Group, for the business group you are using. By entering the Dutch SOE Deductions set in the correct segment, you ensure elements with the above classificationappear in the Deductions region of the SOE.
For further information about entering SOE information. See: Entering Statement of Earnings Information, page 1-76
Balances Region
Period to Date Region
You must enter the balance attribute Dutch SOE PTD Balances, in the Balances 1 segment of the SOE Information parameters window, assigned to the Organization Classification - Business Group, for the business group you are using. By entering the Dutch SOE PTD balance attribute in the correct segment, you ensure the relevant balances appear in the Balances region of the SOE.
Year to Date Region
You must enter the balance attribute Dutch SOE YTD Balances, in the Balances 2 segment of the SOE Information parameters window, assigned to the Organization Classification - Business Group, for the business group you are using. By entering the Dutch SOE YTD balance attribute in the correct segment, you ensure the relevant balances appear in the Balances region of the SOE.
It is your responsibility to enter the display name of each defined balance, if required, and to indicate the order the balances appear in the SOE. The default name, is the actualbalance name.
For further information. See: Entering Statement of Earnings Detail Information, page 1-
Payrolls 4-7
77
Setting Up Integration of Cash Management with Oracle Payroll for EFT Reconciliation
For setup steps to integrate Cash Management with Oracle Payroll, see the Oracle Cash Management User Guide.
Additional Steps to reconcile EFT payments for the Netherlands legislation:
Oracle HRMS provides a reconciliation function, pay_nl_payfile.f_get_payfile_recon_data, for NL EFT Payments (NL Direct Deposit EUR). This functionis predefined in the RECONCILIATION_FUNCTION column of the PAY_PAYMENT TYPES table. This function retrieves your Unique Identifier for the bank statements.
However, because the format of bank statements varies for different banks, Oracle HRMS allows you to specify your own Unique Identifier.
To use the Unique Identifier provided by Oracle HRMS, use the Application Developer responsibility and navigate to the Common window under Lookups. Add the followingdata to the lookup PAYMENT_TRX_CONC_IDENTS:
• Code: NL DIRECT DEPOSIT EUR
• Meaning: Acc Num, Batch Desc
• Enabled: Y
To specify your own Unique Identifier:
1. Add the following data to the lookup PAYMENT_TRX_CONC_IDENTS
• Code: NL DIRECT DEPOSIT EUR
• Meaning: <Your Unique Identifier>
• Enabled: Y
2. Create your reconciliation function. For details on how to create a reconciliation function, refer to Creating a Reconciliation Function on My Oracle Support, with the note ID 949409.1
3. use the HRMS Manager responsibility and navigate to the Table Values window under Other Definitions. Add this function in the user table NL_EFT_RECON_FUNC.

Payroll Processing and Analysis 5-1
5Payroll Processing and Analysis
5-2 Oracle HRMS for Netherlands Supplement
Post Processing for a Payroll
Post-Processing for a Payroll
PrePayments ProcessWithin Oracle Payroll the PrePayments process enables you to select a payment methodto pay your employees. You can distribute employee pay over more than one method using either a percentage or monetary split.
You can override the PrePayments process. For example, suppose you have run the normal payroll run and made payments via one payment method. You then have to runsupplementary payments for some employees and pay them by a different payment method. The PrePayments process, having distributed the regular payments over the payment methods entered, allocates the supplementary payments to the override method.
Payroll Submission Archive and Payroll Submission ReportIreland Users Only: Use the Payroll Submission Archive and Payroll Submission reports to submit payroll information to Revenue. You can generate these reports based on prepayments. This is a two-step process and includes archiving and reporting. Archiving enables you to archive the payroll details and the payroll submission report process enables you to generate the report based on the archived details.
Cheque/Check Writer ProcessRun the Cheque/Check Writer process to determine the generation of cheques/checks for a specified payroll and consolidation set over a specified time period.
You can generate contiguous serial numbers for cheque/check printing, and you can usethis feature to account for cheque/check stationery used during the cheque/check printing process. If you do this, you also need to take into account the cheques/checks you use to carry out the alignment of your printer.
A sample cheque/check report is supplied with the Cheque/Check Writer process. You can customize this report, or add your own cheque/check style to meet your enterprise requirements.
Oracle Payroll provides automatic cheque/check numbering for the Check Writer process. You can keep track of cheque/check numbers when you process multiple cheques/checks per day.
Note: Your System Administrator can enable the HR: Default
Payroll Processing and Analysis 5-3
Check/Cheque Number Method profile which enables you to use the automatic check/cheque numbering process.
See User Profiles, Oracle HRMS Configuring, Reporting, and System Administration Guide
Void Cheque/Check Payments ProcessRun the Void Cheque/Check Payments process when you want to void cheques/checks you have issued using Oracle Cheque/Check Writer. You may want to do this if there is a printing error or if the cheques/checks you print are afterwards lost. The process cancels the cheques/checks issued, records details of the cancellation, and enables you to give a reason for cancelling.
Check Writer - Override Payment Date ProcessWhen you reissue a check after voiding it using the Void Check Payments process, the Check Writer process prints the check with the original Payment Date by default. Using the Override Check Date feature, you can replace the original check date with a check date of your choice. For reporting purposes, the Payment Register Report captures the replacement date from the reprinted check.
External/Manual Payments ProcessUse the External/Manual Payments window to record cash or cheque/check payments to employees from external sources or petty cash. The window enables you to record details of each payment.
Overview of RetroPay Processing
Purpose of the RetroPay ProcessRun the RetroPay process to ensure that your payroll run for the current period reflects any backdated payments or deductions. Backdated adjustments can occur when:
• An employee receives a pay award that is backdated to a previous pay period.
• The payroll department makes a retrospective correction for an error that occurred in a previous pay period
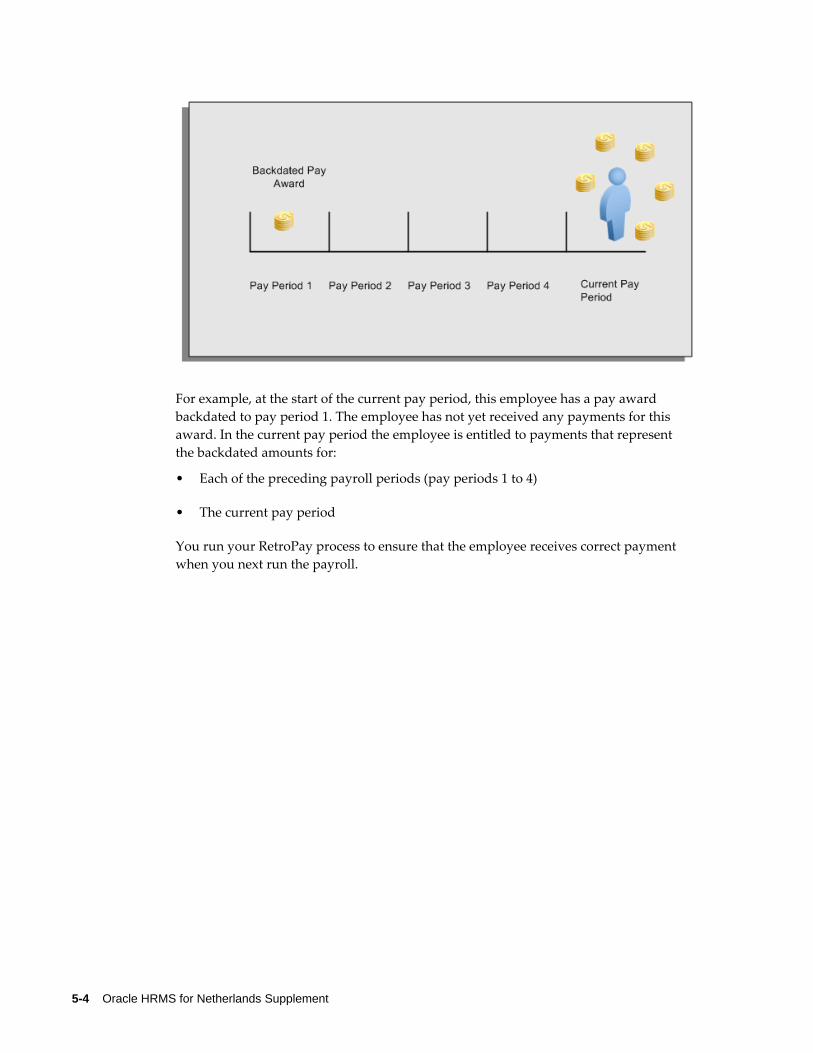
5-4 Oracle HRMS for Netherlands Supplement
For example, at the start of the current pay period, this employee has a pay award backdated to pay period 1. The employee has not yet received any payments for this award. In the current pay period the employee is entitled to payments that represent the backdated amounts for:
• Each of the preceding payroll periods (pay periods 1 to 4)
• The current pay period
You run your RetroPay process to ensure that the employee receives correct payment when you next run the payroll.

Payroll Processing and Analysis 5-5
Period Earned is Distinct from Period Paid
When backdated payments occur, the accuracy of your subsequent payroll processing depends on distinguishing between:
• The period in which the payment was earned
• The period in which the payment was made
For example, the taxation implications are different for:
• A pay award backdated to period 1 and not paid until the current period. You may want to tax this award in the current period.
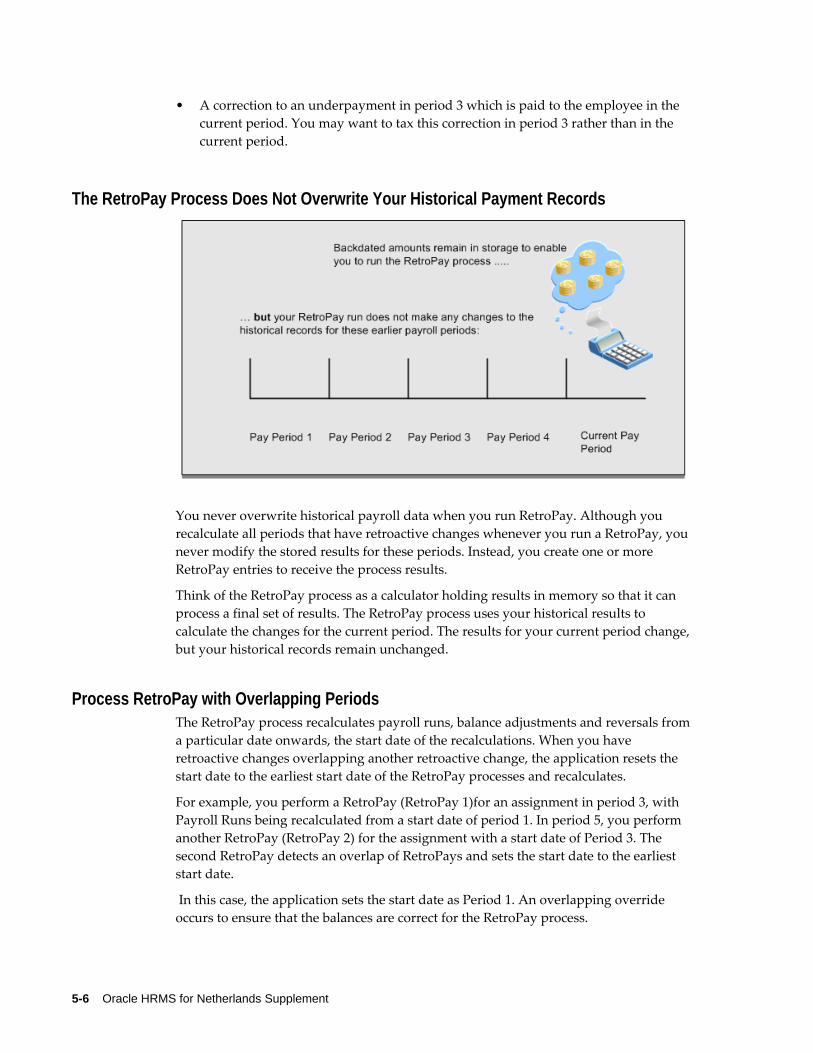
5-6 Oracle HRMS for Netherlands Supplement
• A correction to an underpayment in period 3 which is paid to the employee in the current period. You may want to tax this correction in period 3 rather than in the current period.
The RetroPay Process Does Not Overwrite Your Historical Payment Records
You never overwrite historical payroll data when you run RetroPay. Although you recalculate all periods that have retroactive changes whenever you run a RetroPay, you never modify the stored results for these periods. Instead, you create one or more RetroPay entries to receive the process results.
Think of the RetroPay process as a calculator holding results in memory so that it can process a final set of results. The RetroPay process uses your historical results to calculate the changes for the current period. The results for your current period change, but your historical records remain unchanged.
Process RetroPay with Overlapping PeriodsThe RetroPay process recalculates payroll runs, balance adjustments and reversals from a particular date onwards, the start date of the recalculations. When you have retroactive changes overlapping another retroactive change, the application resets the start date to the earliest start date of the RetroPay processes and recalculates.
For example, you perform a RetroPay (RetroPay 1)for an assignment in period 3, with Payroll Runs being recalculated from a start date of period 1. In period 5, you perform another RetroPay (RetroPay 2) for the assignment with a start date of Period 3. The second RetroPay detects an overlap of RetroPays and sets the start date to the earliest start date.
In this case, the application sets the start date as Period 1. An overlapping override occurs to ensure that the balances are correct for the RetroPay process.
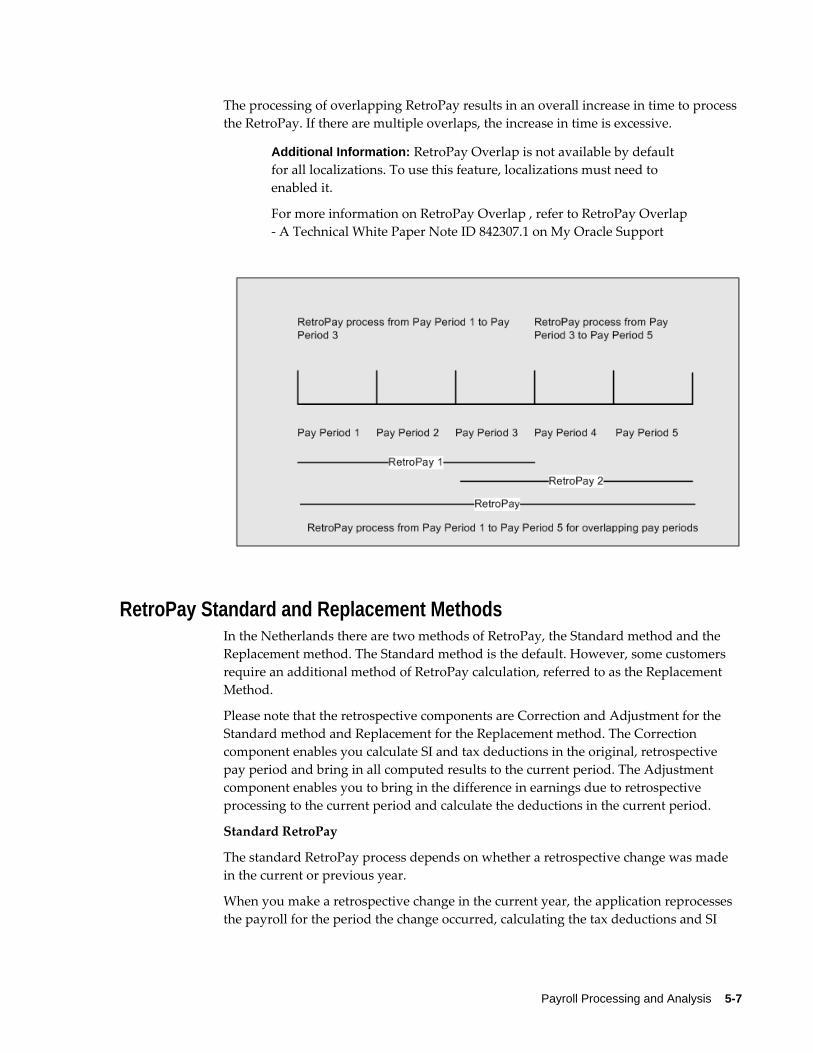
Payroll Processing and Analysis 5-7
The processing of overlapping RetroPay results in an overall increase in time to process the RetroPay. If there are multiple overlaps, the increase in time is excessive.
Additional Information: RetroPay Overlap is not available by default for all localizations. To use this feature, localizations must need to enabled it.
For more information on RetroPay Overlap , refer to RetroPay Overlap - A Technical White Paper Note ID 842307.1 on My Oracle Support
RetroPay Standard and Replacement MethodsIn the Netherlands there are two methods of RetroPay, the Standard method and the Replacement method. The Standard method is the default. However, some customers require an additional method of RetroPay calculation, referred to as the Replacement Method.
Please note that the retrospective components are Correction and Adjustment for the Standard method and Replacement for the Replacement method. The Correction component enables you calculate SI and tax deductions in the original, retrospective pay period and bring in all computed results to the current period. The Adjustment component enables you to bring in the difference in earnings due to retrospective processing to the current period and calculate the deductions in the current period.
Standard RetroPay
The standard RetroPay process depends on whether a retrospective change was made in the current or previous year.
When you make a retrospective change in the current year, the application reprocesses the payroll for the period the change occurred, calculating the tax deductions and SI
5-8 Oracle HRMS for Netherlands Supplement
contributions based on the tax and SI tables of the retrospective period. The changes to any earnings, deductions and other relevant values are carried forward to the current period.
When you make a retrospective change in the previous year, the application reprocessesthe period the change occurred. The application only carries forward earnings changes to the current period, and calculates deductions in the current payroll run based on the current tax tables.
Replacement RetroPay
The alternative method, Replacement RetroPay, handles retrospective changes to earnings or tax/social insurance related information made in the current year, differently. Earnings changes in the previous year can be processed, but are treated the same as earnings changes in the current year.
Note: The input values Wage Limit and Basis Salary, for the Wage Tax Subsidy Education, must have the unit of measure set to Character to avoid their values being reversed during the running of the Replacement Method of Retropay.
There are two main differences when processing retrospective changes in the current period using the Replacement method. Those differences are as follows:
Key difference between Replacement and Standard RetroPay
When Oracle Payroll reprocesses the retro period, instead of bringing forward the changes to the current period, the run results are negated and brought forward to the current period as RetroPay entries. The new run results are brought forward as entries also.
Example of running RetroPay using the Standard method
Original Run Results New Run Results RetroPay Entries
Salary: 1000 Salary: 1200 Salary 200
Tax: 100 Tax: 120 Tax: 120
The above example shows a payroll period processed with a salary of 1000 Euros and a tax rate of 10%. If you then run RetroPay using the standard method, changing the salary to 1200 Euros, only the changes are posted as RetroPay entries.
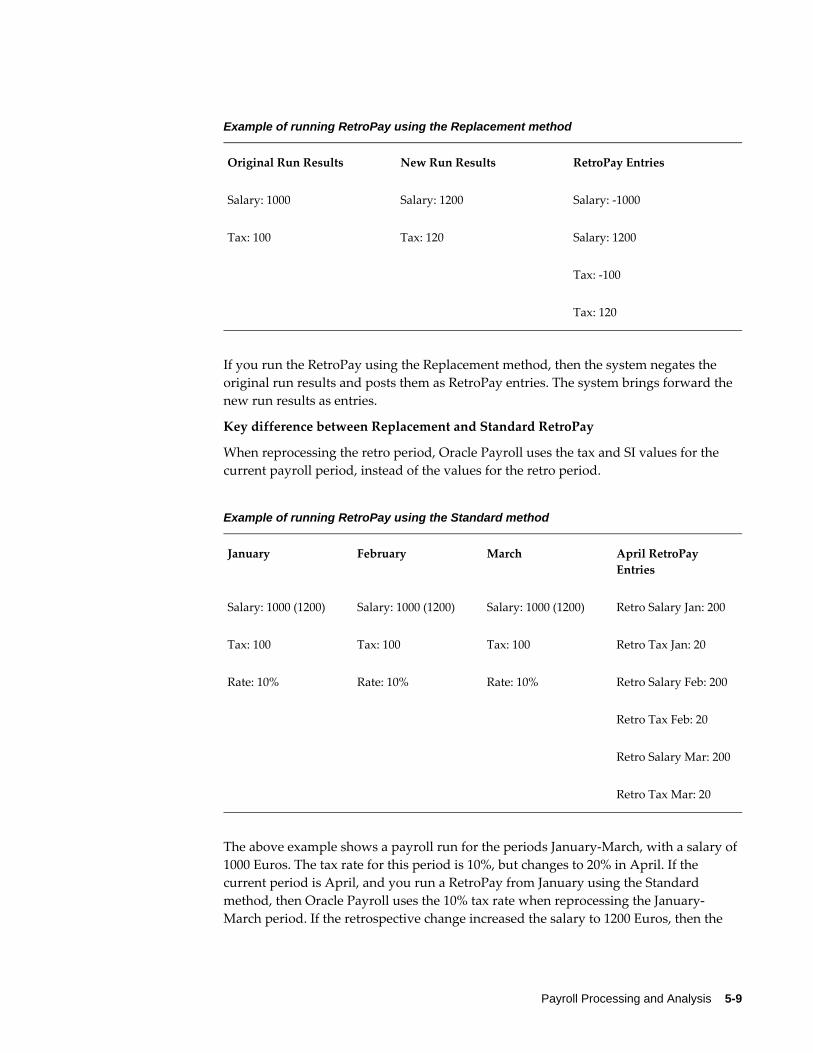
Payroll Processing and Analysis 5-9
Example of running RetroPay using the Replacement method
Original Run Results New Run Results RetroPay Entries
Salary: 1000 Salary: 1200 Salary: -1000
Tax: 100 Tax: 120 Salary: 1200
Tax: -100
Tax: 120
If you run the RetroPay using the Replacement method, then the system negates the original run results and posts them as RetroPay entries. The system brings forward the new run results as entries.
Key difference between Replacement and Standard RetroPay
When reprocessing the retro period, Oracle Payroll uses the tax and SI values for the current payroll period, instead of the values for the retro period.
Example of running RetroPay using the Standard method
January February March April RetroPay Entries
Salary: 1000 (1200) Salary: 1000 (1200) Salary: 1000 (1200) Retro Salary Jan: 200
Tax: 100 Tax: 100 Tax: 100 Retro Tax Jan: 20
Rate: 10% Rate: 10% Rate: 10% Retro Salary Feb: 200
Retro Tax Feb: 20
Retro Salary Mar: 200
Retro Tax Mar: 20
The above example shows a payroll run for the periods January-March, with a salary of 1000 Euros. The tax rate for this period is 10%, but changes to 20% in April. If the current period is April, and you run a RetroPay from January using the Standard method, then Oracle Payroll uses the 10% tax rate when reprocessing the January-March period. If the retrospective change increased the salary to 1200 Euros, then the
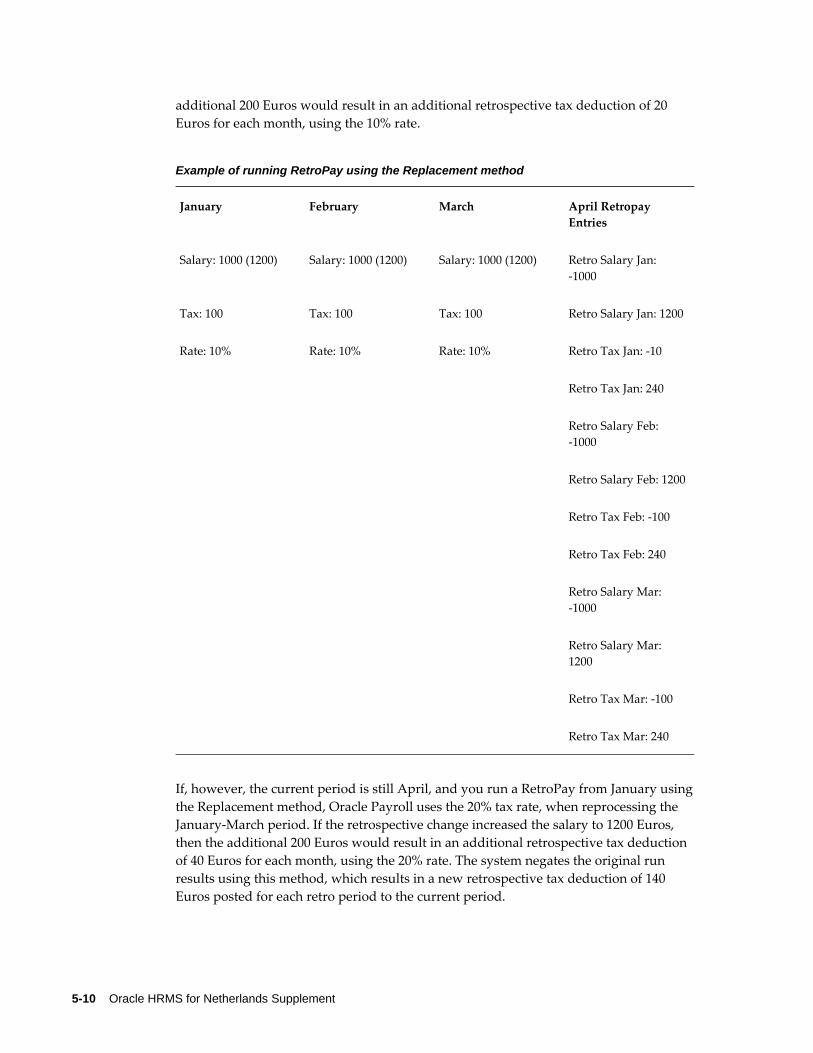
5-10 Oracle HRMS for Netherlands Supplement
additional 200 Euros would result in an additional retrospective tax deduction of 20 Euros for each month, using the 10% rate.
Example of running RetroPay using the Replacement method
January February March April Retropay Entries
Salary: 1000 (1200) Salary: 1000 (1200) Salary: 1000 (1200) Retro Salary Jan: -1000
Tax: 100 Tax: 100 Tax: 100 Retro Salary Jan: 1200
Rate: 10% Rate: 10% Rate: 10% Retro Tax Jan: -10
Retro Tax Jan: 240
Retro Salary Feb: -1000
Retro Salary Feb: 1200
Retro Tax Feb: -100
Retro Tax Feb: 240
Retro Salary Mar: -1000
Retro Salary Mar: 1200
Retro Tax Mar: -100
Retro Tax Mar: 240
If, however, the current period is still April, and you run a RetroPay from January usingthe Replacement method, Oracle Payroll uses the 20% tax rate, when reprocessing the January-March period. If the retrospective change increased the salary to 1200 Euros, then the additional 200 Euros would result in an additional retrospective tax deduction of 40 Euros for each month, using the 20% rate. The system negates the original run results using this method, which results in a new retrospective tax deduction of 140 Euros posted for each retro period to the current period.
Payroll Processing and Analysis 5-11
Note: The Standard method of RetroPay suits most customers, however, you may have a requirement for the Replacement method. If so, it is up to you to select the appropriate method you require.
To select the method of RetroPay you require, see: Enabling the Method of RetroPay, page 5-15
For further information on how to override the Replacement RetroPay method, see: Business Groups: Entering Dutch Business Group Information, page 1-39
For further information on setting up RetroPay, see: To Set Up Enhanced RetroPay withComponent Usages and Element Span Usages, page 5-12
The following information, when changed in the current year, affects Tax deductions or SI contributions:
• Tax Code
• Tax Reduction
• Senior Tax Reduction
• Additional Senior Tax Reduction
• Beneficial Rule
• 30% Foreigner Rule and related dates
• Last Years Salary
• Special Rate Individual Percentage and related dates
• Social Insurance (SI) Days
• SI Information at SI Provider level: Basis Calculation Rule, Employee Contribution (%), Employer Contribution (%), Senior Employee Contribution (%), Senior Employer Contribution (%), Employee Threshold, Employer Threshold, Maximum Salary, Calculation Code, Day Method, Employer Contribution Taxable Income, Employee Contribution Gross or Net, Day Adjustment and Contribution Adjustment
• Change of SI Provider for an employer
• Assignment level SI Information: SI Classification, Insurance Provider, Status, SI Day Method, Day Adjustment, Contribution Adjustment, Overriding Day Method and Overriding Day Value
• Assignment level private health insurance information: Employee Contribution,
5-12 Oracle HRMS for Netherlands Supplement
Employer Contribution, Unit of Contribution and Transfer Indicator.
• Changes to information on another assignment where Oracle Payroll has a number of multiple assignments to aggregate.
• Labour Tax Reduction
• SI Information at employer level: Insurance Provider, Primary Provider and Transfer Indicator.
• Override input values for SI days on the element Social Insurance
Important: Only earnings changes are recognized in the previous year.
Setting Up Enhanced RetroPay with Component Usages and Element TimeSpans
You can decide whether each retrospective payment requires:
A full reprocessing in which you recalculate all amounts for the current payroll. This option is typical when you are processing backdated payments, or when you want to deduct tax for backdated amounts in the period when it was earned, rather than in the current payroll period.
A limited reprocessing in which you recalculate only some of the amounts for the current payroll. This option is typical when you are processing corrections, or when youwant to deduct tax for retrospective changes in the current payroll period rather than in the period when it was earned.
Components for RetroPay
Oracle Payroll describes each different type of RetroPay run as a component. You set up RetroPay component usages to define how RetroPay will process the component. For example, you could set up a component Earnings Correction for the element Basic Salary. A component always has:
• A name (for example, Earnings Correction)
• A reprocess type (Static, Partial, Reprocess) to determine how to process the component
Element Time Spans for RetroPay
For each of these components, you define an element time span to specify the start and end dates of the retro processing, and which RetroPay element applies for each time span. If you are creating RetroPay elements manually, you must follow the process given below to set up retro components and element spans to process RetroPay correctly.
Payroll Processing and Analysis 5-13
Tip: Check if your Localization has components and time spans predefined that you can use to process retropay.
Additional Information: Check if your localization has any upgrade processes enabled if you are upgrading your current elements.
Setting Up Retropay Component Usages:Retropay component usages assign the components to the elements you created, ensuring all the elements recalculate with the latest values.
1. Query your defined element, in the Element window.
2. Select the Recalculation tab, and check the Retro Components button.
Note: South African users: Select the predefined ZA Statutory Updates event group from the list of values in the Recalculation Events field. Alternatively, you can create and attach an event group of your choice
3. In the Retropay Components region of the Retropay Element window, choose the component field, and an appropriate component from the list of values.
Note: Do not enable the Retro Component of the elements that are themselves being used to process retropay for another element.
4. Select the Reprocess Type. If you select Static, then Retropay will not process any changes to the element when running the relevant component. Opting for the Reprocess Type ensures the element changes process.
5. Save your work.
6. You can now enter the element time spans.
Setting Up Element Span Usages for Elements:The element time span usages defines the start and end dates for retropay processing. Most elements have the standard time span of Start of Current Year to End of Time already assigned, to cover any changes made in the current year. For each earnings element, or imputed earnings element with a defined retropay component usage, you must define two element span usages. These element span usages cover the earnings forboth the current and the previous year, defining not only how far back processing should cover, but also up to where a particular retropay element carries forward the
5-14 Oracle HRMS for Netherlands Supplement
retro changes. You must define your retropay elements and components before definingthe element time spans.
Set up the Element Span Usages in the Retropay Elements window.
1. Query your defined element in the Element window.
2. Select the Recalculation tab, and check the Retro Components button.
3. In the Retropay Elements region, select the appropriate time spans from the From and To fields, to define the time period the retropay element is covering.
4. Select the retropay elements you created from the Retropay Element field.
5. Save your work.
Setting Up the Adjustment Component of RetroPayThe Adjustment component of the RetroPay method enables you to bring in the difference in earnings due to retrospective processing to the current period and calculate the tax and social insurances in the current period. Ensure that you meet the following requirements to set up the Adjustment component for your payroll:
For elements that you need to process as Adjustment• You must enable both Adjustment and Correction components. Set the reprocess
type of the Adjustment component to Reprocess and the default component to Yes. Also, set the reprocess type of the Correction component to Static.
• Ensure that the RetroPay element has the same primary and secondary classifications as that of the element it represents.
• To process the Adjustment component element as Correction, you must attach the RetroPay element to the Correction component. Also, the RetroPay element must have the classifications as in the current method. For example, if the source element has the classification of Earnings, the RetroPay element must have the classification of Retro Earnings.
In addition, if you have run the RetroPay Notification Report, the application would have created a record for the Adjustment component. You must override thisrecord manually with Correction value using the RetroPay Status window.
• If you intend to use the element for Correction processing often, ensure that the Correction component, instead of Adjustment, has the reprocess Type as Reprocess with the default set to Yes.
• If you do not use the RetroPay Notification Report and create records manually using the RetroPay Status window, you must ensure that you add ALL elements that have retrospective changes.
Payroll Processing and Analysis 5-15
Note: If you enter only the Adjustment component elements, RetroPay does not process the Correction component elements.
Changes to the Setup of ABP Pension Schemes• Employers report pension basis (or base) to ABP at the start of employment or in
the month of January every year. The application derives pension basis from various Earnings elements. Usually, you might not encounter any changes to the salary or the Earnings element. However, if you need to change the pension salary and in turn the pension basis, you must do it manually and process these changes as Correction.
• If the Earnings element does not affect pension salary, you can process the element either as Adjustment or Correction.
Changes to the Setup of Life Savings Scheme
To process a change in earnings as Adjustment and recalculate the life savings contributions, you must add the Adjustment component to the following elements:
• <Base Name> Employee Savings Deduction
• <Base Name> Employer Savings Deduction
Note: Oracle HRMS for Netherlands' best practice is to use only ABP Pensions and Life Cycle Leave Discount elements in correction retropay. Use of other elements in correction retropay give unpredictable results.
Enabling the Method of RetroPayYou select the method of RetroPay by choosing either Standard or Replacement in the RetroPay Method field of the Parameters window.
You select the Enable Dutch RetroPay Method process from the Submit Request window.
For further information on setting up RetroPay, see Setting Up Enhanced RetroPay withComponent Usages and Element Span Usages., Oracle HRMS Payroll Processing Management Guide
To enable the required method of RetroPay:1. Select Enable Dutch RetroPay Method in the Name field
2. In the Parameters window, select either Standard, or Replacement as your required method of RetroPay
5-16 Oracle HRMS for Netherlands Supplement
Note: You can override the Replacement Method in the Override Replacement Method field for your business group.
See Business Groups: Entering Dutch Business Group Information., page 1-39
3. Click OK.
4. Choose the Submit button, view the Requests window, enabling you to view the request you submitted.
Payroll Statutory Deductions and Reporting 6-1
6Payroll Statutory Deductions and Reporting
Payroll Statutory Deductions and Reporting OverviewOracle Payroll enables you to calculate an employer's tax liability and deduct the appropriate sums from employee earnings. You can calculate employer and employee tax liabilities for all the taxes and statutory deductions that are applicable to your country. For example, this includes employer liability for state taxes such as State Unemployment Insurance and employee liability for federal, state and local taxes in the US, PAYE and NIC in the UK, PAYE, PRSI and USC in Ireland, Social Security, Unemployment and Complementary Pension in France, Standard and Special tax and Social Insurance in the Netherlands, and so on.
In each instance, Oracle Payroll enables you to enter details of the tax liability and process it at regular intervals.
Reporting on Payroll Statutory DeductionsSee: Reports and Processes in Oracle HRMS, Oracle HRMS Configuring, Reporting, and System Administration Guide
Payroll Statutory Deductions and ReportingOracle Payroll allows you to process tax and insurance deductions for employers and employees, and helps you comply with the legislative requirements applying to your organization.
Is Oracle Payroll flexible enough to calculate different legislative taxes?Yes. Oracle Payroll supports many country specific models of taxation, including the local, federal and state tax requirements of organizations operating in the US.

6-2 Oracle HRMS for Netherlands Supplement
Is the entry of tax details flexible enough to meet my organizational needs?Yes. You can calculate taxes for different types of employer to represent the diversity of your organization. You can also make retrospective adjustments to allow for overpayments and underpayments.
Is Oracle Payroll capable of processing the latest taxation updates? Yes. The details of taxation policy and social security entitlements are constantly changing, but Oracle Payroll is always promptly updated so that your processing includes the most recent updates.
Can Oracle Payroll transmit PAYE information electronically? (UK only)Yes. EDI allows two-way electronic transmission of documents between the Inland Revenue and employers. Oracle UK Payroll has developed a specified formatted file that, if used in conjunction with third party software, can be transmitted electronically to the Inland Revenue.
Can you record P11D details and submit an annual return? (UK Only)You can use Oracle HR to update your records throughout the year to show all the Class 1A National Insurance contributions for which your organization is liable. You can make this information available to employees so that they can preview their NI liabilities. You can then generate a report to view the final details and you can submit the complete and validated records to the Inland Revenue to comply with all reporting requirements.
Payroll Statutory Deductions and Reporting 6-3
Payroll Statutory Deductions and Reporting
Dutch Tax and Social InsuranceOracle Payroll for the Netherlands calculates statutory deductions, such as taxes and social insurance, as part of the payroll run. Through the use of FastFormula and employee assignments, you can determine how these processing rules apply to individual employees.
TaxOracle Payroll supports the following types of tax in the Netherlands:
• Standard (Normal) Tax - Calculated using annual figures and can incorporate both tax reductions and exemptions.
• Special Rate Tax - Annual or semi-annual bonuses are taxed according to a special rate.
• Flat Rate Tax - A tax paid by employers on payments to or deductions from employees, an example being the saving scheme deductions. The periodic tax report displays the total tax amount.
Several tax reductions can apply to the employee, depending on indicators set for the employee assignment. Oracle Payroll supports the following reductions:
• Labour Tax Reduction
• Senior Tax Reduction
• Additional Senior Tax Reduction
• Young Handicapped Employees Reduction
• Student Taxation- A student working throughout the summer can have their tax calculated at a more beneficial rate. Applying to standard tax only, the calculation assumes the standard taxable income is based on a quarter of the year, even if the employee is on a monthly or weekly payroll.
• The 30% Rule for Foreign Employees- For a stipulated period, certain foreign employees can be taxed at a more beneficial rate, with taxable income reduced by 30%. If this rate applies, their social insurance income and social insurance gross salary will also be reduced by 30%.
• The Beneficial Rule (Special Rate Tax) - The beneficial rule is automatically applied
6-4 Oracle HRMS for Netherlands Supplement
to calculate an employee's tax at a more beneficial rate, unless stated otherwise, via an indicator at assignment level.
To process the tax deductions, you must define your earnings elements and predefined taxation secondary classifications. You then link your earnings elements and tax information elements to your payroll. The Taxation initialization element triggers a formula which determines if an assignment is subject to standard or special rate tax.
Social InsuranceYou set up social insurance providers and the social insurance they provide for your organization. You then select the social insurance that applies to each employee.
• See: Setting up Tax and Social Insurance Organizations, page 1-68
The application calculates deductions using the following methods:
• Average days- derived from the average number of days for each payroll period.
• Average days with work schedules- derived from the average days an employee worked according to their work pattern.
• Real Social Insurance days- derived from the number of days an employee actually worked during a payroll period.
Note: If you enable Law Walvis, these methods for calculating deductions no longer apply.
You use the Social Insurance days calculation to determine your employee's and employer's Social Insurance contributions. You do not calculate for amounts over the maximum day salary or below the salary threshold. However, when you enable Law Walvis, the application uses period amounts for SI thresholds and maximum wages instead of social insurance days for calculating the social insurance contributions.
To calculate the social insurance salary, you select one of the following calculation methods:
• Normal cumulative method. This includes values accumulated in previous payrolls in the current year.
• Normal periodical calculation. This only calculates contributions based on figures in the current payroll period.
Note: If you enable Law Walvis, the application uses either Normal Cumulative Re-calculation method or Increasing SI Base method to calculate the social insurance contributions. Therefore, the remaining methods, such as Normal Periodical Calculation and Pseudo
Payroll Statutory Deductions and Reporting 6-5
Calculation methods no longer apply.
To process the social insurance deductions you must define your elements, and select the predefined tax and social insurance classifications. You then link your earnings elements and social insurance information elements to your payroll. The Social Insurance initialization element triggers a formula which checks your employee's eligibility for each social insurance type, and then makes the calculations for each eligible type.
The Social Insurance calculation uses a single generic SI base for all SI types and calculates the total SI days at person level instead of assignment level. The ZVWS Health Insurance - ZVW Standard and ZVWL Health Insurance - ZVW Low SI Types replace the ZVW Social Insurance effective after 31 December 2012. Additionally, the following SI Types are not valid after 31-DEC-2012 and are not part of the Social Insurance calculations:
• ZVW Social Insurance
• IVA Social Insurance
• WGA Social Insurance
• E4 Social Insurance
• E5 Social Insurance
• E6 Social Insurance
• E7 Social Insurance
• E8 Social Insurance
• E9 Social Insurance
• E10 Social Insurance
However, you can use WAOD to record the WGA employer and employee contributions. Effective from 2013, the application does not generate both employer andemployee run results for all the SI types. The run results for the SI Types are as follows:
SI Type Run Results
ZVWL Only Employee
WAOD, E1, E2 and E3 Both Employee and Employer
6-6 Oracle HRMS for Netherlands Supplement
SI Type Run Results
Rest of the SI types Only Employer
Defining an Earnings ElementYou must assign a secondary classification to each of your Earnings elements to identifyhow they are taxed, or a default of non-taxable will be assigned to the elements. When adding secondary classifications to an Earnings element, make sure you do not assign different tax categories, for example Special Rate tax and Standard tax, to the same element, otherwise the tax calculation will return incorrect values. To rectify this you must delete the invalid element entry, create a new element with the correct classifications, re-link the element to the employee assignment and re-run your payroll.
See: Payroll Runs and Processes Overview, page 4-1
Multiple Assignment Processing for Social Insurance and TaxationOracle Payroll for the Netherlands enables you to carry out multiple assignment processing for both Social Insurance and Taxation, enabling processing to take place for employees who have more than one assignment within a payroll.
Multiple Assignment Processing with Social Insurance• You aggregate multiple assignments for assignments on the same payroll and, in
the case of social insurance, only for those who also have the same social-insurance type.
• If an employee has multiple assignments across different employers, you must assign a separate payroll for each assignment with a different employer.
• If an employee has multiple assignments, the selected maximum SI days method must be the same across all assignments. This rule is not enforced, but ignoring it could lead to inconsistent payroll results.
• Do not perform a supplementary run for social insurance calculations where an employee has multiple assignments, as it could lead to inconsistent payroll results.
• Set the method for deriving Maximum SI Days to Payroll Period for any secondary assignments.
Note: If you enable Law Walvis, the application does not use the existing methods for deriving maximum SI days. Instead, the
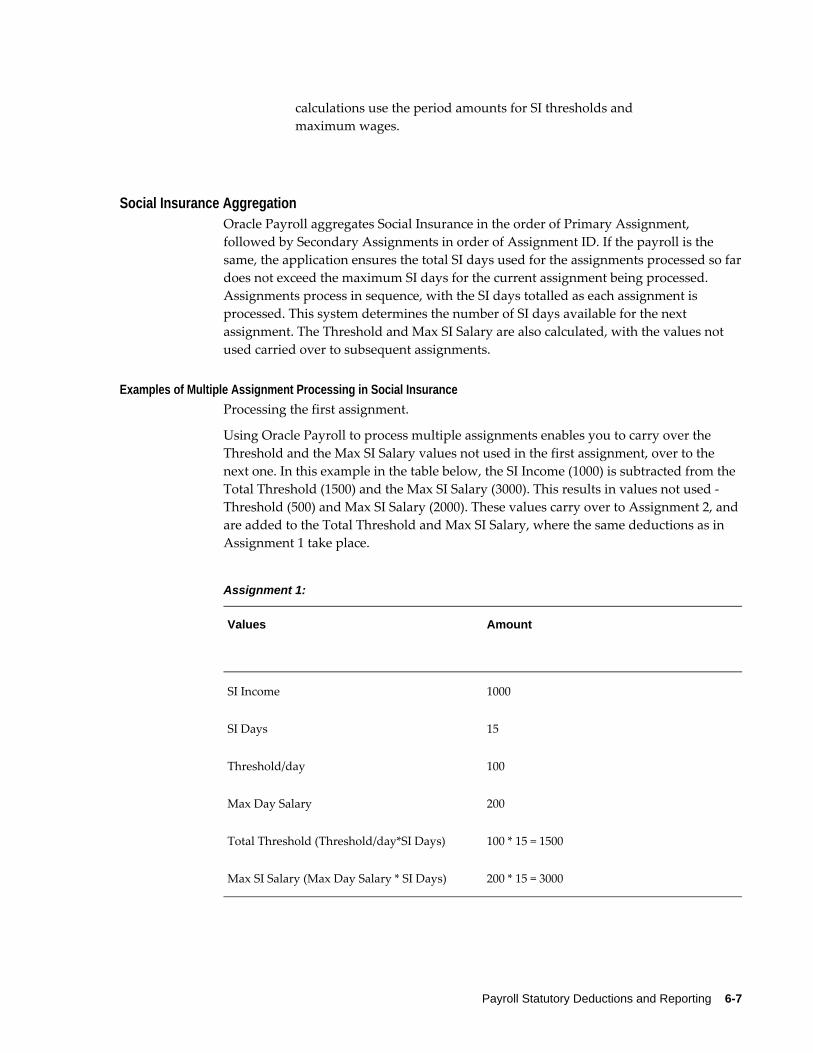
Payroll Statutory Deductions and Reporting 6-7
calculations use the period amounts for SI thresholds and maximum wages.
Social Insurance AggregationOracle Payroll aggregates Social Insurance in the order of Primary Assignment, followed by Secondary Assignments in order of Assignment ID. If the payroll is the same, the application ensures the total SI days used for the assignments processed so fardoes not exceed the maximum SI days for the current assignment being processed. Assignments process in sequence, with the SI days totalled as each assignment is processed. This system determines the number of SI days available for the next assignment. The Threshold and Max SI Salary are also calculated, with the values not used carried over to subsequent assignments.
Examples of Multiple Assignment Processing in Social InsuranceProcessing the first assignment.
Using Oracle Payroll to process multiple assignments enables you to carry over the Threshold and the Max SI Salary values not used in the first assignment, over to the next one. In this example in the table below, the SI Income (1000) is subtracted from the Total Threshold (1500) and the Max SI Salary (3000). This results in values not used - Threshold (500) and Max SI Salary (2000). These values carry over to Assignment 2, and are added to the Total Threshold and Max SI Salary, where the same deductions as in Assignment 1 take place.
Assignment 1:
Values Amount
SI Income 1000
SI Days 15
Threshold/day 100
Max Day Salary 200
Total Threshold (Threshold/day*SI Days) 100 * 15 = 1500
Max SI Salary (Max Day Salary * SI Days) 200 * 15 = 3000
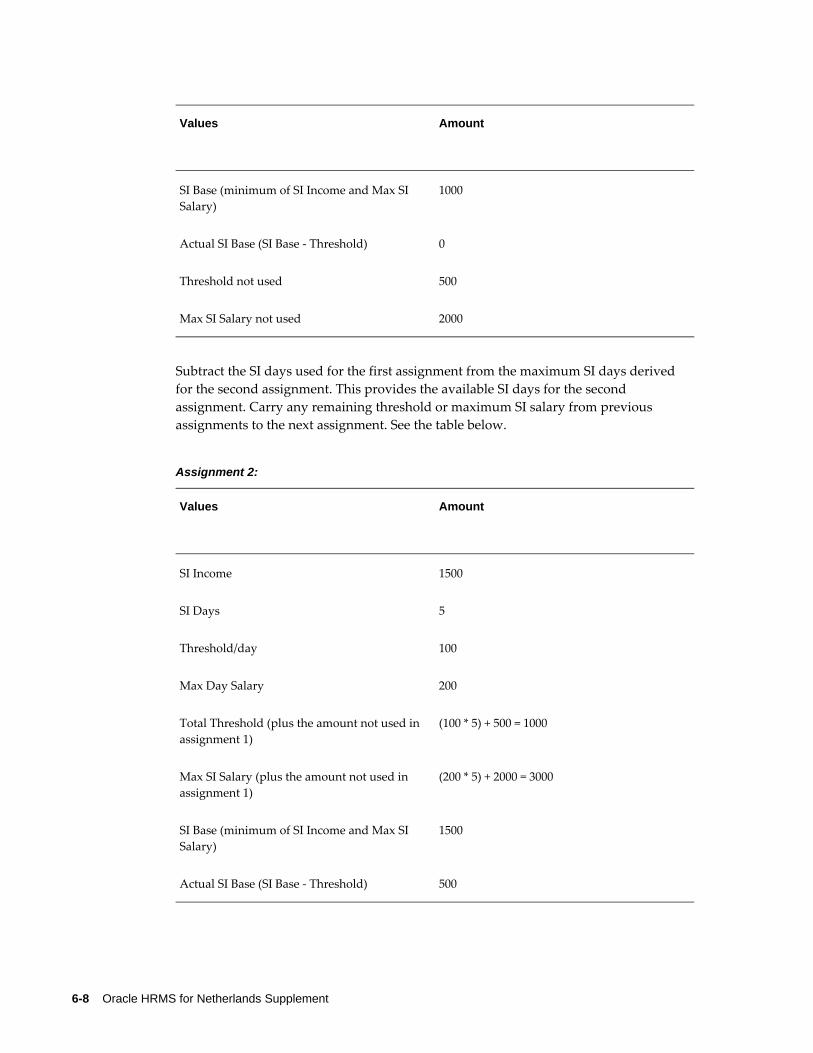
6-8 Oracle HRMS for Netherlands Supplement
Values Amount
SI Base (minimum of SI Income and Max SI Salary)
1000
Actual SI Base (SI Base - Threshold) 0
Threshold not used 500
Max SI Salary not used 2000
Subtract the SI days used for the first assignment from the maximum SI days derived for the second assignment. This provides the available SI days for the second assignment. Carry any remaining threshold or maximum SI salary from previous assignments to the next assignment. See the table below.
Assignment 2:
Values Amount
SI Income 1500
SI Days 5
Threshold/day 100
Max Day Salary 200
Total Threshold (plus the amount not used in assignment 1)
(100 * 5) + 500 = 1000
Max SI Salary (plus the amount not used in assignment 1)
(200 * 5) + 2000 = 3000
SI Base (minimum of SI Income and Max SI Salary)
1500
Actual SI Base (SI Base - Threshold) 500
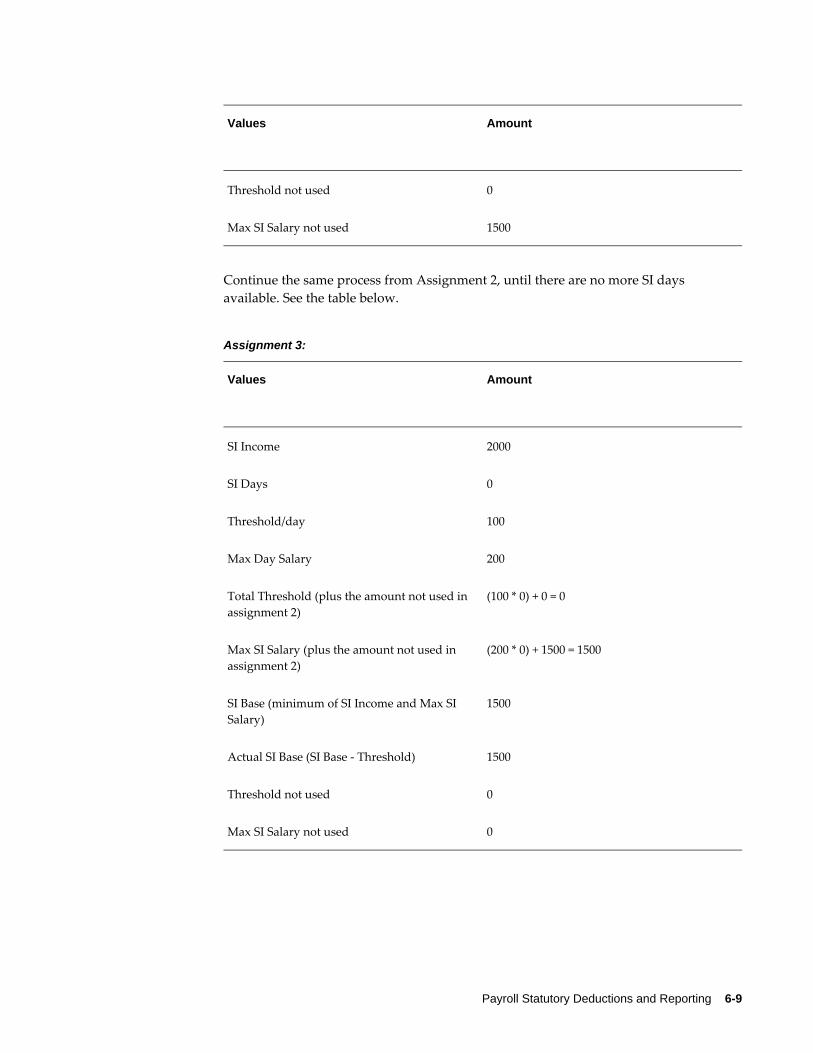
Payroll Statutory Deductions and Reporting 6-9
Values Amount
Threshold not used 0
Max SI Salary not used 1500
Continue the same process from Assignment 2, until there are no more SI days available. See the table below.
Assignment 3:
Values Amount
SI Income 2000
SI Days 0
Threshold/day 100
Max Day Salary 200
Total Threshold (plus the amount not used in assignment 2)
(100 * 0) + 0 = 0
Max SI Salary (plus the amount not used in assignment 2)
(200 * 0) + 1500 = 1500
SI Base (minimum of SI Income and Max SI Salary)
1500
Actual SI Base (SI Base - Threshold) 1500
Threshold not used 0
Max SI Salary not used 0
6-10 Oracle HRMS for Netherlands Supplement
Multiple Assignment Processing with Taxation• You aggregate multiple assignments if an employee has assignments on the same
payroll.
• If an employee has multiple assignments across different divisions, assign a separate payroll for each assignment with a different division.
• Do not perform supplementary runs for tax calculations where multiple assignments exist, as it can lead to inconsistent payroll results.
Note: If an employee has multiple assignments with differing tax codes it is likely that aggregation of those assignments will return incorrect values. Multiple assignments affect the automatic calculation for previous years taxable income, meaning you must enter manual override values in such situations.
Taxation Aggregation • Oracle Payroll aggregates tax in order of assignment number, for assignments on
the same payroll. Calculating tax deductions for the first assignment is carried out normally, but when processing the next assignment, taxable income from the previous assignment is added to the taxable income of the current assignment. Deductions are calculated on these combined totals. Once calculated, the deductions from the previous assignment are subtracted. This process is repeated for all subsequent assignments.
Processing Student Taxation• When processing student taxation, the application uses the taxable income for the
quarter to date, to determine the annual salary. If multiple assignments exist and student taxation applies, the quarterly taxable income for any previous assignmentsis added to the quarterly taxable income for the assignment being processed. You need a total taxable income before calculating the tax. Once the tax is calculated, thequarterly deductions for all previous assignments is subtracted from the total deduction, along with the quarterly deduction for the current assignment.
Processing the Beneficial Rule• Processing the beneficial rule involves adding the standard taxable income to the
special taxable income. The standard tax deduction is calculated from this combined amount to determine if the tax payable is less than the total if the standard and special rate deductions were calculated separately.
• If the beneficial rule applies, and your employee has multiple assignments, the
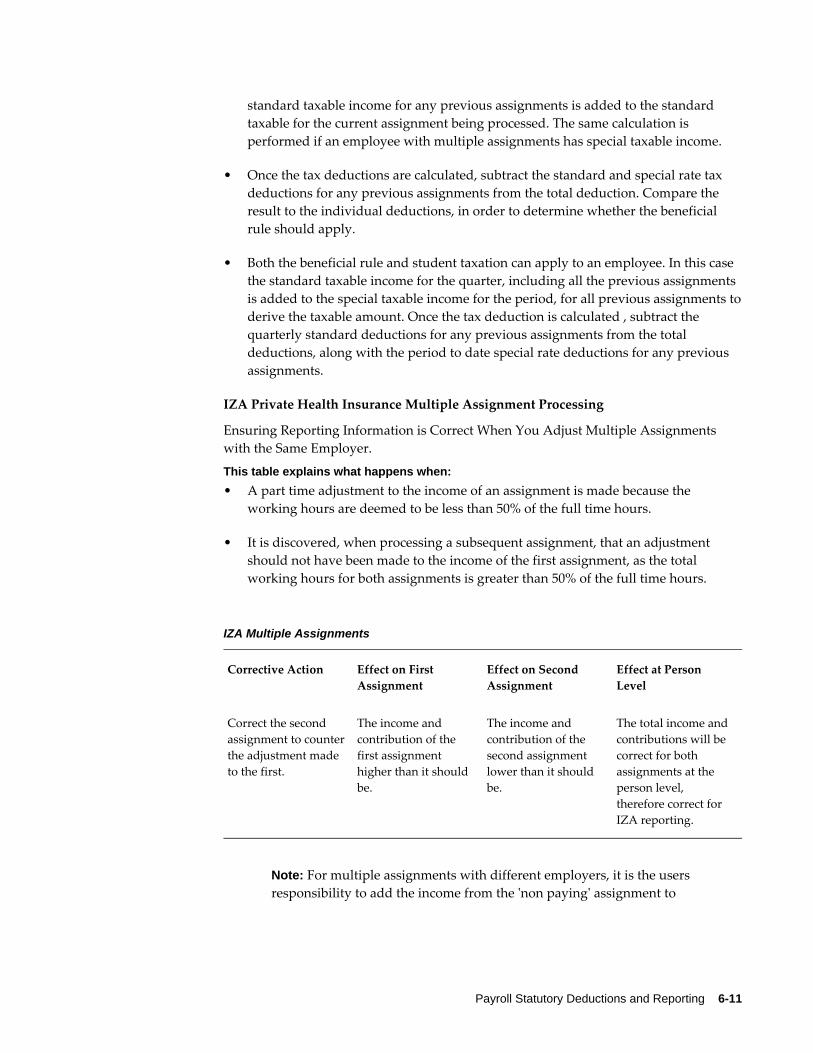
Payroll Statutory Deductions and Reporting 6-11
standard taxable income for any previous assignments is added to the standard taxable for the current assignment being processed. The same calculation is performed if an employee with multiple assignments has special taxable income.
• Once the tax deductions are calculated, subtract the standard and special rate tax deductions for any previous assignments from the total deduction. Compare the result to the individual deductions, in order to determine whether the beneficial rule should apply.
• Both the beneficial rule and student taxation can apply to an employee. In this case the standard taxable income for the quarter, including all the previous assignments is added to the special taxable income for the period, for all previous assignments toderive the taxable amount. Once the tax deduction is calculated , subtract the quarterly standard deductions for any previous assignments from the total deductions, along with the period to date special rate deductions for any previous assignments.
IZA Private Health Insurance Multiple Assignment Processing
Ensuring Reporting Information is Correct When You Adjust Multiple Assignments with the Same Employer.
This table explains what happens when:• A part time adjustment to the income of an assignment is made because the
working hours are deemed to be less than 50% of the full time hours.
• It is discovered, when processing a subsequent assignment, that an adjustment should not have been made to the income of the first assignment, as the total working hours for both assignments is greater than 50% of the full time hours.
IZA Multiple Assignments
Corrective Action Effect on First Assignment
Effect on Second Assignment
Effect at Person Level
Correct the second assignment to counterthe adjustment made to the first.
The income and contribution of the first assignment higher than it should be.
The income and contribution of the second assignment lower than it should be.
The total income and contributions will be correct for both assignments at the person level, therefore correct for IZA reporting.
Note: For multiple assignments with different employers, it is the users responsibility to add the income from the 'non paying' assignment to
6-12 Oracle HRMS for Netherlands Supplement
the income balances of the assignment, where the IZA contribution is tobe calculated.
IZA Upload and Reporting OverviewThe IZA upload and reporting process consists of the following tasks:
• Uploading the monthly IZA file to Oracle HRMS
• Generating a report detailing the employee records processed, rejected, or missing from the IZA file
• Removing obsolete information about processed, rejected, and missing records from the application database, when required
You can upload the monthly IZA file, which IZA sends to your organization, to Oracle HRMS to include the nominal employee IZA contributions in your regular payroll runs.
Note: For the upload process to read the IZA file on the file system, youmust set the UTL_FILE_DIR parameter. In addition, you must set the system profile PER_DATA_EXCHANGE_DIR to the directory where the IZA file is located. This directory must be in the file system specified in the UTL_FILE_DIR. Ensure that you define the directory specified in the previous step as a database directory for PL/SQL file I/O. See My Oracle Support Knowledge Document 2525754.1, Using UTL_FILE_DIR or Database Directories for PL/SQL File I/O in Oracle E-Business Suite Releases 12.1 and 12.2.
The information in the application must meet the following conditions for the successful upload of the IZA file:
• All employee numbers are numeric and are 9 digits in length.
• All the client and subemployer numbers are valid, three-digit numbers.
Caution: Note that even if the report contains a single invalid clientnumber and/or sub employer number, the entire IZA upload process can fail and the entire IZA input file will not be processed.
See: Running the Dutch IZA Upload Process, page 6-40
Once you complete the IZA file upload process, you can generate a report detailing the employee records processed, rejected, or missing from the IZA file. For each processed record, the application creates a Batch Element Entry (BEE) for each employee contribution and attaches the contribution to a nonrecurring element for the payroll

Payroll Statutory Deductions and Reporting 6-13
run. In addition, the application creates a new BEE header for the whole upload process.
See: Running the IZA Upload Process Status Report, page 6-41
Some reasons for the rejection of employee records from the IZA file are as follows:
Rejection Reasons for IZA Employee Records
Reason Description
Employee no longer employed A mismatch between the effective date of the employee's nominal IZA contribution record and the entire period of the payroll run
Employee not insured for IZA Employee not insured for IZA on the primary assignment during the entire period of the payroll run to which the effective date of the employee's nominal IZA contribution relates
Employee on contract with another enterprise Employee on contract with another organization for at least one day in the payrollperiod to which the effective date of the nominal IZA contribution record relates
Employee on unpaid leave Employee absence covers the entire payroll period where the flag Non-SI Days is set on the absence indicating that all days in the absence period are considered as non-SI days
Unknown exchange number The application fails to recognize an exchange number, a combination of the employer number and the employee number, during theentire payroll period to which the effective date of the nominal IZA contribution record relates
Employee gross salary insufficient for the IZA deduction
An employee has less net pay than the nominal IZA contribution, after the remainingdeductions from the employee's gross salary
Caution: Note that this condition is not checked automatically and can result in negative net pay for the primary assignment. In such cases, you should correct the payroll run results manually.
6-14 Oracle HRMS for Netherlands Supplement
Finally, you can use a purge process on a regular basis to remove obsolete information about processed, rejected, and missing records stored from the application database.
See: Running the Dutch IZA Upload Process Status Purge report, page 6-42
Dutch Wage ReportingWage reporting is a multistep process that employers follow to submit the wage report to the tax authorities for every payroll period. The wage report contains information about the employer, the personal and assignment information of all employees, and corresponding payroll-related information. Oracle HRMS enables you to process the wage report as shown here:
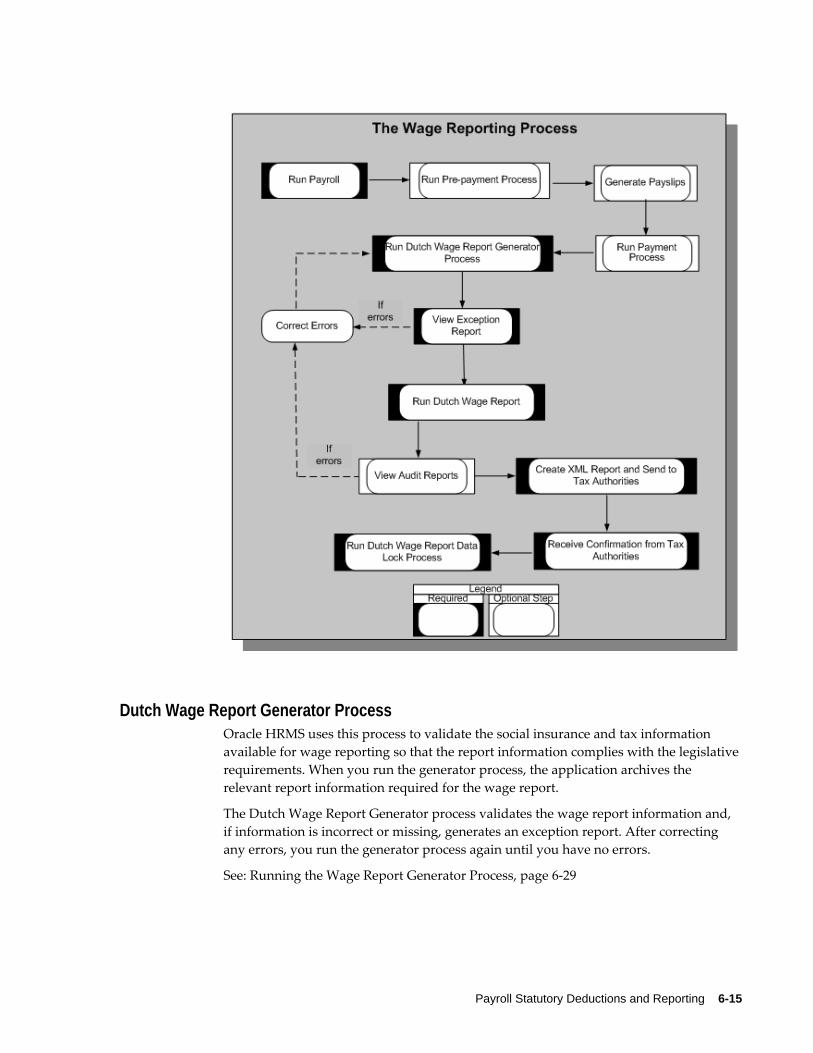
Payroll Statutory Deductions and Reporting 6-15
Dutch Wage Report Generator ProcessOracle HRMS uses this process to validate the social insurance and tax information available for wage reporting so that the report information complies with the legislativerequirements. When you run the generator process, the application archives the relevant report information required for the wage report.
The Dutch Wage Report Generator process validates the wage report information and, if information is incorrect or missing, generates an exception report. After correcting any errors, you run the generator process again until you have no errors.
See: Running the Wage Report Generator Process, page 6-29
6-16 Oracle HRMS for Netherlands Supplement
Dutch Wage ReportOnce the generator process has run without error, you can run the Dutch Wage Report process, which generates two types of reports:
• Audit reports, which are in PDF format so that you can easily verify the report contents
• XML Report, which you send to the tax authorities
See: Running the Dutch Wage Report, page 6-29
Dutch Wage Report Data Lock ProcessYou run the Dutch Wage Report Data Lock Process after the tax authorities have confirmed that your wage report is valid. This process prevents you from accidentally rolling back the generator process, which is the source of the wage report you submit to the tax authorities.
See: Running the Dutch Wage Report Data Lock process, page 6-30
Setting up Tax and Social Insurance DeductionsBefore you can set up your tax and social insurance deductions, you must create your social insurance and tax office information at the organization level, and link it to your employer. You then need to record the information that applies to each employee at the assignment level.
See: Setting up Tax and Social Insurance Organizations , page 1-68
To set up tax and social insurance deductions for your employees:1. Define your Earnings elements and select the predefined tax and social insurance
secondary classifications.
Important: When creating an Earnings element, make sure you assign a secondary classification to indicate whether it is taxable or not. Failure to do so will result in the earnings element having a default classification of non-taxable.
You must therefore assign one of the following secondary classifications to each of your Earnings elements:
• Non-taxable: Earnings
• Subject to standard tax: Earnings
Payroll Statutory Deductions and Reporting 6-17
• Subject to special tax: Earnings
When adding secondary classifications to an Earnings element, make sure you do not add the secondary classifications for different tax categories to the same element. For example, if an element has the classification Subject to Standard Tax, it should not also have the classification SI Income Subject to Special Tax.
Similarly, if the element is non-taxable, you should not assign an SI Income or SI Gross Salary secondary classification that is taxable. If you choose different types of taxes for the same element, the tax may calculate incorrectly.
See: Defining an Element, Oracle HRMS Compensation and Benefits Management Guide
See: Predefined Elements, page 9-8 for a list of the taxation and social insurance elements provided with Oracle HRMS for the Netherlands.
For information about the predefined primary and secondary element classifications (and their processing priorities), see: Survey of the Classifications, page 7-2
2. Link the Earnings elements, and the Taxation and Social Insurance Information elements to your payrolls.
The information elements trigger the eligibility formulas. The tax formula enables you to determine if an assignment is subject to standard or special rate tax. Checking the taxable income balances for each tax type, it initiates the calculation formula for each one. The social insurance formula determines the social insurance types assigned to an employee, and initiates the contribution calculation formula for each eligible type.
See: Defining Element Links, Oracle HRMS Compensation and Benefits Management Guide
3. In the Element Entries window select the elements you have created to complete theinformation for the employee.
See: Making Manual Element Entries, Oracle HRMS Compensation and Benefits Management Guide
4. For the Social Insurance element, you can enter an override figure for SI days for each type of social insurance and a figure to override the real SI days derived value.The figures you enter here override any figures manually entered or derived at the organization and assignment levels. Use the SI days overrides to ensure the correct payroll results for your employees. Choose the Entry Values button to enter any override figures for the SI days.
Note: If you enable Law Walvis, the application does not use SI days. Instead, calculations are based on the period amounts for SI thresholds and maximum wages.
6-18 Oracle HRMS for Netherlands Supplement
For more information on social insurance days see: Methods for Deriving Social Insurance Days, page 1-25 and Setting Up Social Insurance Days, page 1-71
5. To make manual corrections to the tax deductions Oracle Payroll calculates and report them along with the deduction values in reports, such as payslip, wage report, remuneration statement, and annual tax statement, you can use the Standard Tax Correction and Special Tax Correction predefined balances. You mustset up elements for these balances in accordance with your tax-correction requirements.
Setting Up ZW, WW, WAO/IVA/WGA, ZVW (standard en low) and UFO Contributions
To set up ZW, WW, WAO/IVA/WGA, ZVW (standard en low) and UFO contributions, perform the following steps:
1. Link the following predefined elements to initiate the contribution-calculation FastFormulas for specific social insurance contributions:
• ZVW Social Insurance
• WGA Social Insurance
• IVA Social Insurance
Note: You need not attach these elements to assignments eligible for the respective SI contributions. The application checks for eligibility during SI processing, and the relevant elements initiate the contribution calculation accordingly. Ensure you link the elements for costing purposes.
2. Set up social insurance types corresponding to the ZVW, WGA, IVA, and UFO social insurance contributions for the SI providers.
3. Modify the social insurance classifications for HR organizations to include the ZVW, WGA, IVA, and UFO social insurance types.
4. Add social insurance information for all assignments subject to the ZVW, WGA, IVA, and UFO contributions.
Setting Up Flat Rate TaxationTo enable flat rate taxation in Oracle HRMS, you must set up the relevant balances and elements, corresponding RetroPay components, and appropriate feeds.
Payroll Statutory Deductions and Reporting 6-19
To set up flat rate tax deductions for your employees:1. Ensure that you set up the relevant balances related to flat rate taxation.
See: Netherlands Balances, page 9-52for a list of balances provided with Oracle HRMS for the Netherlands.
2. Set up the feeds for the following balances:
• Pre Pension Taxable Amount
• National Holiday Gift Taxable Amount
• Single Rate Taxable Amount
• Gross Up Rate Taxable Amount
3. The period-to-date value for the relevant taxable amount balance must be greater than zero. Therefore, create elements that contribute to the taxable-amount balanceslisted in Step 2, and set up the related element entries.
See: Predefined Elements, page 9-8 for a list of elements provided with Oracle HRMS for the Netherlands.
4. Ensure that corresponding element links are set up for all the predefined RetroPay elements related to flat rate taxation.
See: Predefined RetroPay Elements, page 9-15 for a list of elements provided with Oracle HRMS for the Netherlands.
5. Derive deductions relating to flat rate taxation that are specific to handling major issues, and feed the balance Major Issue Flat Rate Tax Deduction with appropriate elements.
See: Netherlands Balances, page 9-52for a list of deduction balances provided with Oracle HRMS for the Netherlands.
6. Ensure that all relevant elements that contribute to the Major Issues Flat Rate Tax Deduction have corresponding RetroPay elements, Retro Component Usages, and Element Span Usages set up for RetroPay.
See: RetroPay Component Usages, page 9-27for predefined RetroPay component usages provided with Oracle HRMS for the Netherlands.
See: Element Span Usages, page 9-32for predefined element span usages provided with Oracle HRMS for the Netherlands.
7. To handle retrospective changes, set up the appropriate feeds to the balance Retro Major Issue Flat Rate Tax Deduction.
6-20 Oracle HRMS for Netherlands Supplement
Running the Payment Output File (Dutch)You use this report to initiate the creation of the EFT Payment file from within Oracle Payroll. The file is produced in the standard format required by the official body Interpay, in the Netherlands. The EFT Payment file enables you to send employee payment details to your bank on magnetic tape.
You can prevent the payee address information from appearing in the EFT Payment file. Select Yes in the Suppress Payee Address field of the Dutch Further Payment Method Info flexfield to achieve this.
Oracle enables you to override the contents of the Description field in the Transaction Description Record 160 of the EFT Payment file and enter your own information. To differentiate postal bank account numbers from other bank account numbers in the EFT Payment File, select Yes in the Identify Post Bank Numbers field of the Dutch Further Payment Method flexfield. This value ensures that the application sets the Transaction Type field to 003 on record 0100 of the EFT Payment File. The value 008 identifies other types of bank accounts.
To enable the transfer of the payment file to postal banks, select Desired in the NAW Code field of the Dutch Further Payment Method flexfield.
See: Netherlands EFT Payment Override Formula, page 10-2
You run the Payment Output File from the Submit Requests window.
To run the Payment Output File (Dutch):1. Query the Payment Output File (Dutch) in the Name field.
2. In the Parameters window, optionally enter the payroll name.
Note: You can restrict the processing of assignments to the specified payroll on the effective date.
3. Select the consolidation set.
4. Enter a start date. The date you enter here determines the start date of the prepayments.
5. Enter the effective date.
6. Select a payment method. This is a mandatory field.
7. Enter the process date or date of transfer.
8. In the batch description field, optionally enter a value.
Payroll Statutory Deductions and Reporting 6-21
9. Select the employee name or employee number for the sort sequence and choose OK.
10. Select Yes in the Account Number Consolidation field to consolidate multiple third party payments made to a single account on the employee's behalf. Otherwise, select No for separate entries for each third party payment..
11. Choose the Submit button.
Running the Dutch Annual Tax Statement ArchiveIn the Netherlands, you run the Annual Tax Statement Archive prior to the Dutch Annual Tax Statement for the Employee Report, enabling employee data to be archived before it is processed by the Annual Tax reports.
To run the Dutch Annual Tax Statement for the Employee.
See: Running the Dutch Annual Tax Statement for the Employee, page 6-21
You run the Dutch Annual Tax Statement Archive from the Submit Requests window.
To run the Dutch Annual Tax Statement Archive:1. Select Dutch Annual Tax Statement Archiver in the Name field.
2. In the Parameters window, the Year defaults to the year prior to the effective date.
3. Select the Organization Hierarchy.
4. Select an employer from the HR Organizations in the list of values.
5. Click OK.
6. Click Submit.
Running the Dutch Annual Tax Statement for the EmployeeIn the Netherlands, employers must produce an annual tax statement for each employee in their organization detailing the employee's taxes paid during that period.
Note: You must run the Dutch Tax Statement Archive before running this report.
See: Running the Dutch Annual Tax Statement Archive, page 6-21
You run the Dutch Annual Tax Statement for the Employee Report from the Submit Requests window.
6-22 Oracle HRMS for Netherlands Supplement
To run the Dutch Annual Tax Statement for the Employee Report:1. Select Dutch Annual Tax Statement for the Employee Report in the Name field.
2. In the Parameters window, the Year defaults to the year prior to the effective date.
3. Select the Organization Hierarchy.
4. Select an employer from the HR Organizations in the list of values.
Note: A separate page is printed for each employee assignment directly assigned to the employer. If there are employers below the selected employer in the hierarchy, employees of those employers are not included in the report. It is your responsibility to run this report for all your employers.
5. Select an employee. The list includes the names of all employees in the selected organization hierarchy.
6. In the Template field, enter the location and name of the PDF template to use with the XML Data Source. The predefined template is used by default.
7. Click OK.
8. Click Submit.
Setting up the Dutch Remuneration State ReportYou print the Dutch remuneration state report for a specific employer within an organization hierarchy.
To Set Up the Dutch Remuneration Report:1. The report derives information for each employee from specific details.
Ensure that the following Employee Details information are correct:
• Name and Initials
• Social Insurance Number
• Date of Birth
• Address
• Postal Code
Payroll Statutory Deductions and Reporting 6-23
• Residence
All information is up to date at the date paid of the period being printed or for 31st December if the report is for the year.
Note: You can maintain running totals for an employee or for the whole report, and print out the totals as required.
See: Entering a New Person, Oracle HRMS Workforce Sourcing, Deployment, and Talent Management Guide
See: Entering Addresses, Oracle HRMS Workforce Sourcing, Deployment, and Talent Management Guide
2. Ensure that the following employer details are correct:
• Name
• Address
• Residence of the company
• Tax Registration Number
See: Creating an Organization, page 1-28
See: HR Organizations: Entering Social Insurance Provider Information, page 1-54
See: HR Organizations: Entering Dutch Organization Information, page 1-57
All information is as at the date paid of the period being printed or for 31st December if the report is for the year.
3. Ensure that the following assignment details are correct:
• Assignment Number
• Service Start Date and End Date
See: Entering an Assignment (Assignment Window), Oracle HRMS Workforce Sourcing, Deployment, and Talent Management Guide
See: Entering an Assignment (Assignment Window), Oracle HRMS Workforce Sourcing, Deployment, and Talent Management Guide
4. Ensure that the following tax table details are correct:
• Colour Table
• Effective From
6-24 Oracle HRMS for Netherlands Supplement
• Wage Tax Discount
• Effective From
• Student Arrangement (this is special indicator 28)
See: Entering Additional Assignment Details (Assignment Window), page 3-49
5. Ensure that the following special rate table details are correct:
• Annual Salary Taxable
• Inspectors Approved Lower %
• Commencing From
• Date Approved
See 'Income Details' and 'Special Rate Taxation' in: Entering Additional Assignment Details (Assignment Window), page 3-49
All information is as at the date paid of the period being printed or for 31st December if the report is for the year.
6. Ensure that the following special indicators are correct. Set the values for these indicators to true if the employee is eligible for them at any time in the period/year:
• Company car or van placed at the employee disposal (special indicator 01)
• Agreement private use of company car or van (special indicator 02)
• Transportation on the account of employer (special indicator 03)
• Travel allowance (special indicator 04)
See: Entering Additional Assignment Details (Assignment Window), page 3-49
7. Check the secondary classification of your earnings or imputed earnings elements (including RetroPay elements) currently set up with secondary classifications for Wage in Money, Wage in Kind or Tips and Fund Payments. These elements are now treated as related to standard taxation. If these elements are related to special rate tax then you must assign them with the relevant secondary classification. For example, use the secondary classification 'Wage in Money Special Tax SI:Earnings' instead of Wage in Money Standard Tax SI:Earnings'.
Important: This step only applies to existing users prior to Family Pack H.
Payroll Statutory Deductions and Reporting 6-25
Note: To ensure the application deducts parental-leave amount from the Wage In Money amount in the third column of the Dutch Remuneration State Report, you must attach one or more of the following secondary classifications in addition to the regular secondary classifications:
• Deduction Standard Tax SI : Pre-SI and Pre-Tax Deductions
• Deduction Special Tax SI : Pre-SI and Pre-Tax Deductions
• Deduction Standard Tax SI : Retro Pre SI Pre Tax Deductions
• Deduction Special Tax SI : Retro Pre SI Pre Tax Deductions
See: Element Classifications and Processing Sequence, Oracle HRMS Compensation and Benefits Management Guide
What's NextSee: Running the Dutch Remuneration State Report, page 6-25
Running the Dutch Remuneration State ReportThe report contains separate pages for each employee assignment that is assigned to theemployer either directly, or indirectly through organizations below it in the hierarchy. The report retrieves all non employer organizations (these are HR organizations without tax details) below the employer specified in the parameters in the organization hierarchy, including the employer itself.
Information regarding payroll run result information is broken down by each period in the year for each employee assignment.
Additional Information: This report now displays the net employee ZVW contributions under columns 9 and 16, irrespective of the tax category the original social income base relates to.
You run the Dutch Remuneration State Report from the Submit Request window.
To run the Dutch Remuneration State Report:1. Query the Dutch Remuneration State Report in the Name field.
2. In the Payroll Period field, enter the date relating to the period that you want to runthe report for. For example, 1st March 2004 would relate to the March 2004 period for monthly payrolls.
6-26 Oracle HRMS for Netherlands Supplement
3. In the Year field, enter the year that you want to run the report for. This option is unavailable if you enter a payroll period.
4. The Organization Hierarchy is defaulted to the named hierarchy from the business group. If this is not correct, then choose the correct one from the list of values.
5. If required, chose an Employer from the list of values which contains all the HR Organizations that have Tax Registration Number and Tax Office details.
6. The Include Subordinate Employers option is only enabled if you have chosen an employer. Choose 'Yes' or 'No'.
Note: If this option is set to 'Yes', then all the employer organizations below the employer specified in the parameters are also retrieved. If the option is set to 'No', then only the employer and all non employer organizations below the employer in the hierarchy are retrieved. If the employer is not specified, then both employer and non employer organizations in the hierarchy are retrieved.
7. In the Employee field, choose from the list of values that includes the full names of all the employees in the selected organization hierarchy and also the employer, if applicable.
Related TopicsSee: Setting Up the Dutch Remuneration State Report, page 6-22
Setting Up the Dutch Wage ReportBefore you run the Dutch Wage Report:
1. Set up tax and social insurance deductions.
See: Setting up Tax and Social Insurance Deductions, page 6-16
2. If required, use the Legal Employer classification to record additional reporting employers for the wage report. You can record information, such as tax reference number, reporting name, and the HR organization. This task enables you to have multiple wage reports per employer.
3. Record additional organization information as follows:
• Use the Wage Report Information window to record the wage report information.
Payroll Statutory Deductions and Reporting 6-27
See: Entering Wage Report Information, page 1-60
• Record the risk group and sector information using the Dutch UWV Organization window.
See: Dutch UWV Organization: Entering Dutch SI Provider Information, page 1-73
4. Record additional assignment information using the Assignment window:
• Use the Dutch Temp Labour Information window to record the Temp Labour Code.
• Use the Dutch Influence Information window to record Influence Code.
• Use the Dutch Labour Relation Information window to record Labour Relation Code.
5. Use the Further Collective Agreement Details descriptive flexfield in the Collective Agreements window to record the collective agreement code.
Note: The application reports this collective agreement code only if you use the global collective agreement functionality.
6. Link the legal employer to a payroll using the Further Payroll Information window.This task enables you easily to identify all employees and assignments belonging to a specific employer for the wage report.
7. Link predefined elements, such as Holiday Coupons, Incidental Income Decrease, Additional Allowance, and New Wage Report Override. These element entries indicate whether an employee is eligible for employee benefits, such as holiday coupons and additional allowance over the UWV payments.
To report a RetroPay calculation as a correction in the wage report, you must create an element entry for the New Wage Report Override element. The application then reports the entry under the Correction section in the wage report. This is only applicable using the old retropay. Using the adjustment retropay, all adjustments will be reported in the current period and all corrections will be reported in the correction section of the wage report.
• You can use the element-link criteria to control eligibility for these elements based on your business requirements.
• When you process retropay for the previous year, ensure that you run it as an adjustment.

6-28 Oracle HRMS for Netherlands Supplement
8. Set up appropriate feeds for the following balances:
• Wage Tax Subsidy Arbo Non Profit
• Wage Tax Subsidy Ses Going EES
• Wage Tax Subsidy Research
• Reservation Holiday Allowance
• Additional Period Wage
• Reservation Additional Period Wage
• Overtime
• WWB Allowance Paid Alimony
• Directly Paid Alimony
• Hours Worked
Note: You need to feed these balances manually using user-definedelements, as the application does not feed these balances using a classification or a sub classification.
9. You can use the global Payroll Event Model functionality to monitor and report the HR data changes to the tax authorities through the wage report. To be able to monitor and report HR data, you must enable the Incident Register for your business group from the time you want to start monitoring changes to avoid gettinginvalid record in the Wage report you generate first. Use the Functional Area Maintenance window to enable the Incident Register.
For monitoring and reporting payroll changes, use the RetroPay functionality to process retrospective calculations and then use the predefined element New Wage Report Override to manually indicate which retrospective calculation is a changed event either as an adjustment or correction.
You can exclude a complete period previously reported for an employee by selecting Withdrawals as the value for the New Wage Report Override element.
To avoid displaying correction amounts from the previous period in the wage report, use the Adjustment component as the RetroPay type.
10. Use the Application Utilities Lookups window to add sector codes to the NL_SECTOR lookup.
11. Use the shared type NL_NATIONALITY in the User Types and Statuses window to
Payroll Statutory Deductions and Reporting 6-29
map the nationality codes to NEN1888 Norm.
See: Creating User Types and Statuses, Oracle HRMS Configuring, Reporting, and System Administration Guide
12. Use the NL_EMPLOYMENT_CATEGORY shared type in the User Types and Statuses window to map employment category to code contract.
13. You are now ready to run the Dutch Wage Report Process.
See: Dutch Wage Reporting, page 6-14
Running the Dutch Wage Report GeneratorYou run the Dutch Wage Report Generator before running the Dutch Wage Report. The Dutch Wage Report generator validates and archives the required reporting information for the Dutch Wage Report.
Use the Submit Requests window to run the Dutch Wage Report Generator.
To run the Dutch Wage Report Generator:1. In the Name field, select Dutch Wage Report Generator. The Parameters window
opens
2. Enter the effective start and end dates.
3. Select the legal employer.
4. Select the payroll type, such as calendar month or weekly.
5. Enter the sequence number.
6. Correction Report – Select Yes if this is a correction.
7. Employer Only – Select Yes or No.
8. Click OK.
9. Click Submit.
Running the Dutch Wage ReportThe Dutch Wage Report includes the total wages paid to employees, social insurance and tax contribution details, and various tax amounts to be paid to the tax authorities.
Use the Submit Requests window to run the Dutch Wage Report.
6-30 Oracle HRMS for Netherlands Supplement
To run the Dutch Wage Report:1. In the Name field, select Dutch Wage Report. The Parameters window opens.
2. Select the wage-report-generator request ID you want to report on. The application generates this ID when you run the Dutch Wage Report Generator process.
3. Select the report type.
• Audit Reports, which you can run for some or all wage-report information, enable you to identify and correct errors before generating the XML report.
• XML Report generates the complete report you send to the tax authorities.
4. To include information for specific employees only, select an assignment set.
5. Specify the order of the report information.
6. Click OK.
7. Click Submit.
Running the Dutch Wage Report Data Lock ProcessYou run the data lock process to ensure you do not accidentally roll back the Dutch Wage Report Generator process after submitting the wage report to the tax authorities. The data lock process locks all the actions performed on employee assignments since you run the wage report generator process. You use the Submit Requests window to run the data lock process.
To run the Dutch Wage Report Data Lock Process:1. In the Name field, select Dutch Wage Report : Data Lock Process.
2. Select the report-generator request ID associated with the wage report. The application generates this ID when you run the Dutch Wage Report Generator process.
3. Click OK.
4. Click Submit.
Setting up the Labor Cost Arrangement ReportThe Labor Cost Arrangement implies that the employer can pay tax free amounts for labor costs to the employees, without having to administer why these payments are
Payroll Statutory Deductions and Reporting 6-31
made. However, when the total of payments for an employer increases the threshold the employer has to pay LCA flat rate tax over the amount that is above the threshold.
There are three methods available to determine the amount of Labor Cost Arrangement flat rate tax:
• Method 1 - Periodic tax based on current period threshold value.
• Method 2 - Periodic tax based on predefined periodic threshold value.
• Method 3 - Cumulative tax based on predefined annual threshold value.
Set up the Labor Cost Arrangement report as follows:
1. Record additional organization information to define Labor Cost Arrangement Information details.
See: Adding Labor Cost Arrangement Information, page 1-62
Note: If you do not enter details in the Labor Cost Arrangement Information window, then , the existing Flat Rate Taxation will be used. Flat rate taxation if mentioned for Labour Cost Agreement will override the Labor Cost Arrangement Information.
2. Feed the Labor Cost Arrangement Payments balance with the element you require.
See: Balances in Oracle Payroll, Oracle HRMS Implementation Guide
Running the Dutch Labour Cost Agreement Audit ReportYou run the Dutch Labour Cost Agreement Audit Report to view the calculated amounts of LCA tax and the threshold required. Labour Cost Agreement Audit Report reports values only after running the Wage Report Data Lock Process for the period.
Note: Ensure that for a period, Wage Report Data Lock Process is run only once.
You run this report from the Submit Requests window.
To run the Dutch Labour Cost Agreement Audit Report:1. Select Dutch Labour Cost Agreement Audit Report in the Name field.
2. Select the Employer from the list.
3. Enter the Year for which you want to run the report.
6-32 Oracle HRMS for Netherlands Supplement
4. Select the Payroll Type from the list.
5. Click OK and submit your request.
Setting Up the First Day ReportFollow these steps to set up the first day report for employees in your organization.
To Set Up the First Day Report:1. Ensure that you attach the First Day Report Information EIT to the responsibility of
your choice.
See: Setting Up Extra Information Types For a Responsibility, Oracle HRMS Configuring, Reporting and System Administration Guide
2. Ensure that the following employee information is correct:
• Tax registration number of the employer
• Hire date
• BSN/SOFI number or employee number, if BSN/SOFI number is unavailable
• Initials
• Prefix
• Last Name
• Date of Birth
Generating the First Day ReportThe First Day Report is an electronic file in the XML format and contains new employees' information, such as employee number, name, and BSN/SOFI number. You send this report to tax authorities for new employees and rehires.
To Run the First Day Report:1. In the Name field, select Dutch First Day Notification Report. The Parameters
window opens.
2. Enter the report date.
3. Select the organization hierarchy, employer, and employee.
Payroll Statutory Deductions and Reporting 6-33
4. Click OK.
5. Click Submit.
Running the Dutch Element RetroPay Setup ReportUse the new Dutch Element RetroPay Setup Report to view the retropay setup of user elements. Run the report either to display all the elements or the elements with retropaysetup only.
To run the Dutch Element RetroPay Setup Report:1. In the Name field, select Dutch Element Retropay Setup Report.
2. In the Effective Date field, select a date to display all the elements that are effective from that date.
3. Select the default template in the Template Name field, or, to change the look and feel of the report select a customized template. The Element Retropay Setup Report template is the default template.
4. Select All Elements to display all the elements irrespective of their retropay setup. Alternatively, select Elements with Retropay Setup to display only elements that have retropay setup.
5. Click Ok.
6. Click Submit.
Running the Dutch ABP Report Archiver The Dutch ABP Report Archiver concurrent program archives the data that needs to be reported for the given period. An Exception Report similar to the Dutch Wage Report Generator is generated to inform user-related exceptions. Dutch ABP Report concurrentprogram reports the archived data in the desired output format.
Use the Submit Request window to run this program.
To run the Dutch ABP report archiver:1. In the Name field, select Dutch ABP Report Archiver.
2. As all the parameters are mandatory, enter the following:
• Start Date - Start Date of the period for which the ABP Pension details must be reported. Start Date cannot be earlier than 01-JAN-2013.
6-34 Oracle HRMS for Netherlands Supplement
• End Date - End Date of the period for which the ABP Pension details must be reported. End Date must be within 31 days from the Start Date as only Monthlyand Lunar payrolls are supported.
• Organization Hierarchy - The Organization Hierarchy selects all the available organization hierarchies in the business group. The existing value set HR_NL_ORG_STRUCT is used to list the available organization hierarchies.
• Employer - The Employer parameter displays all the organizations in the selected hierarchy. You can choose the desired organization.
• Report Type - Regular or Correction Report. Currently, only Regular report is generated.
• Sequence Number - Sequence number of the file sent for an employer for a period. By default, the sequence number is populated. You can change it, if required.
Running the Dutch ABP ReportRun the Dutch ABP report after the archiver program. Use the Submit Request window.
To run the Dutch ABP report:1. In the name field, select Dutch ABP Report.
2. Enter the following mandatory parameters:
• Archiver Request Id – Select the applicable archiver request ID from the list of request Ids of the Dutch ABP Report Archiver actions.
• Output Type - You can choose the either the XML Report or the Audit Reports as the output type.
Running the Dutch ABP Retro Pension Salary CalculationUse the Dutch ABP Retro Salary Calculation to calculate the retro difference in the ABP Pension Salary for the processing year and populates an assignment level EIT Dutch ABP Retro Pension Salary.
You run the Dutch ABP Retro Salary Calculation from the Submit Request window.
To run the Dutch ABP Retro Pension Salary Calculation:1. In the Name field, select Dutch Remuneration Statement.
Payroll Statutory Deductions and Reporting 6-35
2. Enter the following parameters:
• Reporting Year - the year for which the retro has to be calculated.
• Processing Year - the year for which the report is run.
• Legal Employer - the tax unit for which the report is to be run. The process will run for all the employees in the tax unit.
• Assignment Start Date - the assignment start date, assignments with assignment start date later than this date are not picked up for recalculation of ABP Pension Salary.
• Override Salary - the indicator to Include or Exclude the Override Salary mentioned in the ABP Participation and Salary Information EIT. If this field is set as Include, then the Override Salary will be considered, otherwise not.
The program checks for the balances defined in the new EIT Dutch ABP Retro Pension Salary Balance Setup. For each balance, the program checks for the element configured using the Balance – Element Setup.
After the list of elements which impact the Pension Salary change has been derived,the application performs the following step for each element for each assignment.
• Checks if the element is present in the run results for the first valid month of theyear for the assignment. The first valid month refers to the first payroll period of the year or the period in which the assignment starts. The process takes all the employees for the legal employer and creates action for all employees.
• The application then checks if the corresponding retro element (for the run result id) is present in the element entries in any period after that period till the current year.
• Based on the Element Balance Setup, the application calculates the new balance values considering the original values and the Retro values as on the processingyear and then recalculates the ABP Pension Salary for the original processing year using the same business logic used in normal payroll run.
• If the application finds any difference in the existing value and the new value, then the assignment level EIT Dutch ABP Retro Pension Salary is populated with the list of values:
• Reporting Year – The retro processing year for which the concurrent program has been run
• Processing year – the current year in which the concurrent program has been run
6-36 Oracle HRMS for Netherlands Supplement
• Original Pension Salary
• Revised Pension Salary
• Pension Salary Variance
• Change Reason
3. Click OK and Submit.
Running the Dutch Remuneration Statement Use the Dutch Remuneration Statement for reporting from year 2013 instead of the Dutch Remuneration State Report. You can continue to use existing Dutch Remuneration State Report for the previous tax years.
You run the Dutch Remuneration Statement from the Submit Request window.
To run the Dutch remuneration statement:1. In the Name field, select Dutch Remuneration Statement.
2. Enter the following parameters:
• In the Payroll Period field, enter the date relating to the period that you want to run the report for. For example, 1st March 2004 would relate to the March 2004 period for monthly payrolls.
• In the Year field, enter the year that you want to run the report for. This option is unavailable if you enter a payroll period.
• The Organization Hierarchy is defaulted to the named hierarchy from the business group. If this is not correct, then choose the correct one from the list of values.
• If required, chose an Employer from the list of values which contains all the HROrganizations that have Tax Registration Number and Tax Office details.
• The Include Subordinate Employers option is only enabled if you have chosen an employer. Choose 'Yes' or 'No'. Note: If this option is set to 'Yes', then all the employer organizations below the employer specified in the parameters are also retrieved. If the option is set to 'No', then only the employer and all non employer organizations below the employer in the hierarchy are retrieved. If the employer is not specified, then both employer and non employer organizations in the hierarchy are retrieved.
Payroll Statutory Deductions and Reporting 6-37
• In the Employee field, choose from the list of values that includes the full namesof all the employees in the selected organization hierarchy and also the employer, if applicable.
Setting Up Wage Tax SubsidiesEmployers can claim several wage tax subsidies to reduce their tax bill:
• Wage Tax Subsidy for Low Wages. This subsidy applies to each employee who is 23 or over and earns no more than a specified wage. Oracle Payroll enables you to calculate the wage tax subsidy for low wages for both full-time and part-time staff. You can produce a report showing the subsidy amount for specific employees, along with the information used to calculate the subsidy amount.
See: Generating the Dutch Wage Tax Subsidy Report, page 6-40
• Wage Tax Subsidy for Long-Term UnemploymentEmployees are eligible for the subsidy if they were receiving it prior to the 1st January 2003 and:
• Their income is less than or equal to 125% of the minimum wage, if they are under 50.
• Their income is less than or equal to 145% of the minimum wage, if they are 50 or over.
The subsidy is available for up to 48 months.
• Wage Tax Subsidy for Parental Leave. You can claim for eligible employees who earn at least the Dutch minimum wage for their age. These values are Dutch legislation defined. The subsidy is 50% of the taxable income used in the calculation, with a maximum value dependent on the employee's age.
• Wage Tax Subsidy for Education. You can claim the subsidy for employees whose taxable income is no more than 110% of the minimum wage. Employees under 23 must have been unemployed to be eligible. The subsidy amount depends on whether your employee is deemed to be participating in training.
Warning: In the wage tax subsidy for low wages calculation, the application checks that the combined subsidy amount for education and low wages does not exceed a specific maximum amount. If it does, the application reduces the low wages subsidy value accordingly. However, in the case of multiple assignments, the application does this check only if the first assignment has an associated education subsidy and the second has the low wages subsidy, and not vice versa. The application performs this check in the low wages calculation only after the education subsidy is known, which is not possible if the second
6-38 Oracle HRMS for Netherlands Supplement
assignment has an education subsidy.
To enable a wage tax subsidy for an assignment:You enable the various wage tax subsidies available by selecting the Wage Tax Subsidy element in the Element Entries window, for all applicable employee assignments. You must also set the appropriate indicators to yes in the Miscellaneous Tax Details, for the applicable wage tax subsidies.
1. In the People window select your employee.
2. Choose the Assignment button.
3. Choose the Entries button on the Assignment window.
4. In the Element Entries window, select the Wage Tax Subsidy element from the list of values.
5. Save your work and close the Element Entries window.
6. In the Assignment window, select the Miscellaneous Tax Details tab.
7. Select the required tax indicators and set to yes.
8. Save your work.
Important: Customers who have previously set up the wage tax subsidy, using the Wage Tax Subsidy Low Wages element, must remove any element entries set up for this element. For employee assignments affected by this subsidy, add an element entry for the element Wage Tax Subsidy. The default value of the Low Wages indicator at assignment level is Yes.
To override the age check for the wage tax subsidies for low wages and education: You can override the age check mechanism for this process if you do not require it.
1. In the People window enter your employee.
2. Choose the Assignment button.
3. Choose the Entries button on the Assignment window.
4. In the Element Entries window select the Wage Tax Subsidy element.
Payroll Statutory Deductions and Reporting 6-39
5. Choose the Entry Values button.
6. If you do not want to check that the employee meets the age criteria, then select Override Age Check, and enter Yes.
7. In the Training Type field select the type of Other or Starter Level from the list of values, if required.
8. Save your work.
9. Choose OK.
Required balances for the wage tax subsidies:The required balances are:
• Wage Tax Subsidy Base Salary - holds the salary for use in the wage tax calculation.
• Wage Tax Subsidy Parental Leave Hours - holds the parental leave hours for use in the wage tax subsidy calculation.
• Wage Tax Subsidy Working Hours - holds the working hours for use in wage tax calculation.
Note: You need to set up the feeds for the above balances as they are not predefined. For starters and leavers, it is assumed that any value for parental leave hours has not been prorated.
You use the Wage Tax Subsidy Base Salary for comparing to the wage limit, to determine the wage tax subsidy. The same secondary element classifications as the existing standard and special rate taxable income balances can feed the subsidy salary. You, however, must set up the element classifications you require to feed the balance. The Wage Tax Subsidy Working Hours is sued to calculate the part time percentage, and adjusts the wage limit and resulting subsidy value. You must define the element feeds for the Wage Tax Subsidy Working Hours balance and Wage Tax Subsidy Base Salary.
1. In the Balance window, query the Wage Tax Subsidy Working Hours balance.
2. Choose the Feeds button.
3. Select the elements you have created to feed the working hours balance, in the Balance Feeds window.
4. Save your work.
6-40 Oracle HRMS for Netherlands Supplement
Generating the Dutch Wage Tax Subsidy ReportIn the Netherlands, employers must send a report to the tax office at least every quarter,detailing taxes paid, including the wage tax subsidies. On this report the subsidies section shows the overall figures for the subsidy low wages. The Dutch Wage Tax Subsidy Report provides greater detail, showing the subsidy amount for specific employees, along with information used to calculate the subsidy amount. The report displays person-level subsidies for a specified period for each subsidy type.
You run the Dutch Wage Tax Subsidy Report from the Submit Request window.
To run the Dutch Wage Tax Subsidy Report:1. Select the Dutch Wage Tax Subsidy Report in the Name field.
2. In the Parameters region, enter the month from which you want to generate the report.
3. Enter the end date in the Month From field. The date must be the same or later than the date in the Month From field.
4. Select your organization hierarchy in the Organization Hierarchy field. The default entry is the named hierarchy from the business group.
5. Select your organization from the Top HR Organization field. If left blank, then the report runs for all the employers in the hierarchy.
6. Specify whether to include all subordinate employers in the top HR organization.
7. Select your employee from the Employee Name field. If left blank, the report retrieves records for all the employees within the employer organization, along with the subsidy information for the payroll period defined in the month start and end fields.
8. Select the report template. For example, select PAY_NL_WTS_NLTMP.rtf to run thereport in Dutch.
9. Choose the Submit button.
Running the Dutch IZA Upload ProcessEach month, IZA sends an ASCII-format file to employers detailing nominal employee IZA contributions. This file contains information grouped by each employer that is identified by a unique client number and a sub employer number, if appropriate.
You upload the IZA file to the application using the Dutch IZA upload process. You canthen run the batch element entries created by the application. The application processes
Payroll Statutory Deductions and Reporting 6-41
the IZA contributions as net deductions in the payroll for each employee. You run the Dutch IZA Upload Process from the Submit Request window.
To run the Dutch IZA Upload Process:1. Query Dutch IZA Upload Process in the Name field.
2. In the Parameters window, enter the name of the IZA input file that contains the details of the employee IZA nominal contributions. The batch Name defaults to IZAUpload with the application date and time displayed.
3. Specify whether to create a new entry, reject existing entries, or update existing element entries. The application uses this information in the BEE process during thepayroll run.
4. Specify whether to update, correct, or override date-effective changes to the records.
5. Click OK.
6. Click Submit.
Running the Dutch IZA Upload Process Status ReportThis report identifies processed, rejected, and missing records in the IZA file uploaded to the application. The report also includes the reason for any rejection. You run the Dutch IZA Upload Process Status Report from the Submit Request window.
To run the Dutch IZA Upload Process Status Report:1. Query Dutch IZA Upload Process Status Report in the Name field.
2. In the Parameters window, select the unique combination of month and year that you want to process the IZA file for.
3. Select the organization hierarchy containing the employer with which the contributions are associated.
4. If the business group has multiple employers, select the employer. The processing month and year, organization hierarchy, and the employer name are part of the report that you send back to IZA for further processing.
5. Click OK.
6. Click Submit.
6-42 Oracle HRMS for Netherlands Supplement
Running the IZA Upload Process Status Purge ProcessThis purge process enables you to delete the history of processed, rejected, and missing records from the application database. You run the Dutch IZA Upload Process Status Purge process from the Submit Request window.
To run the Dutch IZA Upload Process Status Purge process:1. Query Dutch IZA Upload Process Status Purge in the Name field.
2. In the Parameters window, specify the upload period of the processed IZA records that you want to purge using the Month From and Month To fields.
3. Select the organization hierarchy containing the employer with which the contributions are associated.
4. Select the employer in the business group.
5. Click OK.
6. Click Submit.
Re-generating the IZA Upload Process ReportThe application can reject certain records during the IZA upload process, if you have incorrect information, such as invalid client number and sub employer numbers, set up in the application. This incorrect information can cause the upload process to fail without creating any new BEE lines or recording the details of processed, rejected, and missing records. In such cases, you can rerun the upload process after correcting any invalid information.
To rerun the IZA Upload Process:1. Run the Dutch IZA Upload Process Status Purge process to delete the history of the
processed, rejected, and missing records from the previous upload. Ensure that you run the purge process for the relevant employer and that the specified time period matches the dates of the IZA file to be rerun.
See: Running the IZA Upload Process Status Purge Process, page 6-42
2. Delete the BEE header and lines created during the previous IZA upload.
3. Run the Dutch IZA Upload Process for the file to be reprocessed. However, ensure that you set the parameter Action If Exists to Reject Entry. This setting will reject any BEE line with an existing element entry and create element entries for newly created BEE lines.
Payroll Statutory Deductions and Reporting 6-43
See: Running the Dutch IZA Upload Process, page 6-40
4. Run the newly created BEE header and lines.
5. Run the Dutch IZA Upload Process Status Report.
See: Running the Dutch IZA Upload Process Status Report, page 6-41
Running the Dutch AOW HR ReportUse this report to display the AOW HR date for employees of a legal employer, who areretiring during the specified period.
Run the Dutch AOW HR Report from the Submit Request window
To run the Dutch AOW HR Report:1. Query Dutch AOW HR Report in the Name field.
2. Enter the following parameters:
• Employer: This is a mandatory parameter. Enter the legal employer name to include the employees of the organization.
• Retire From: This is an optional parameter. Enter the Start Date to run the report. All the employees who have the AOW date after this date are included in the report. If you leave this field blank, then the application considers 01-01-0001 as the Start Date.
• Retire To: This is an optional parameter. Enter the End Date to run the report. All the employees who have AOW date between the start date and the end dateare included and reported in the report. If you leave this field blank, then the application uses the last day of the current year as the End Date.

General Compensation Structures 7-1
7General Compensation Structures
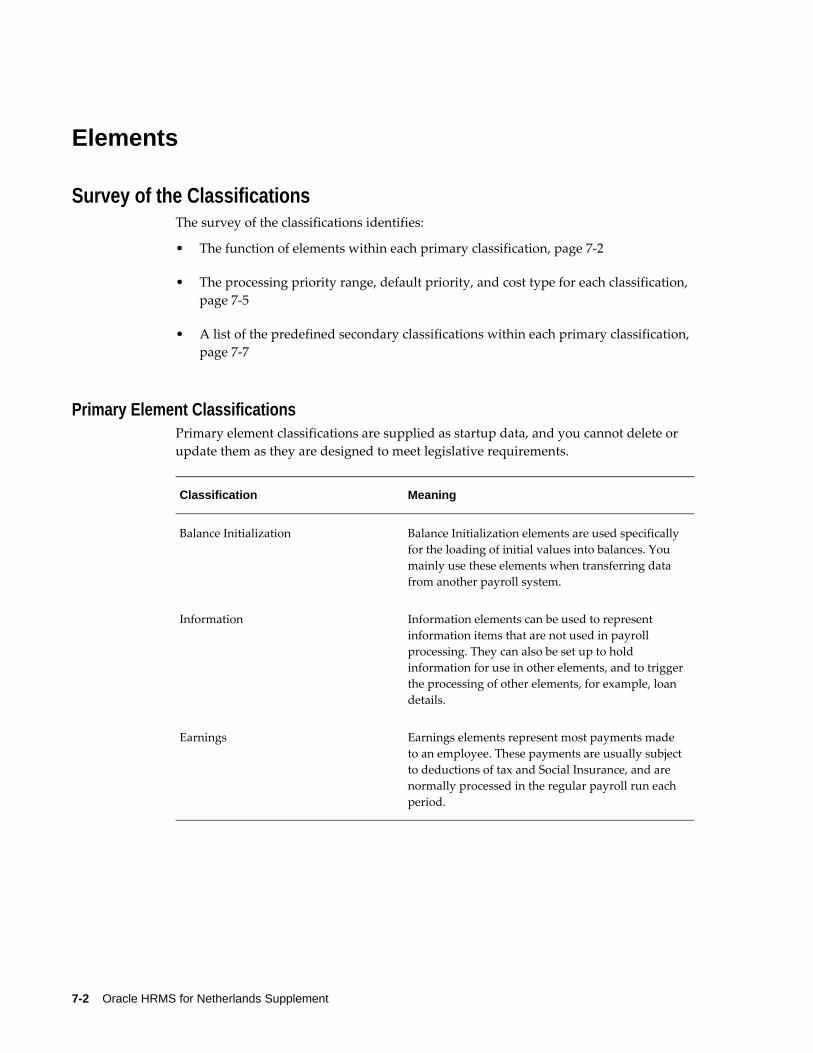
7-2 Oracle HRMS for Netherlands Supplement
Elements
Survey of the Classifications The survey of the classifications identifies:
• The function of elements within each primary classification, page 7-2
• The processing priority range, default priority, and cost type for each classification, page 7-5
• A list of the predefined secondary classifications within each primary classification, page 7-7
Primary Element ClassificationsPrimary element classifications are supplied as startup data, and you cannot delete or update them as they are designed to meet legislative requirements.
Classification Meaning
Balance Initialization Balance Initialization elements are used specifically for the loading of initial values into balances. You mainly use these elements when transferring data from another payroll system.
Information Information elements can be used to represent information items that are not used in payroll processing. They can also be set up to hold information for use in other elements, and to trigger the processing of other elements, for example, loan details.
Earnings Earnings elements represent most payments made to an employee. These payments are usually subject to deductions of tax and Social Insurance, and are normally processed in the regular payroll run each period.
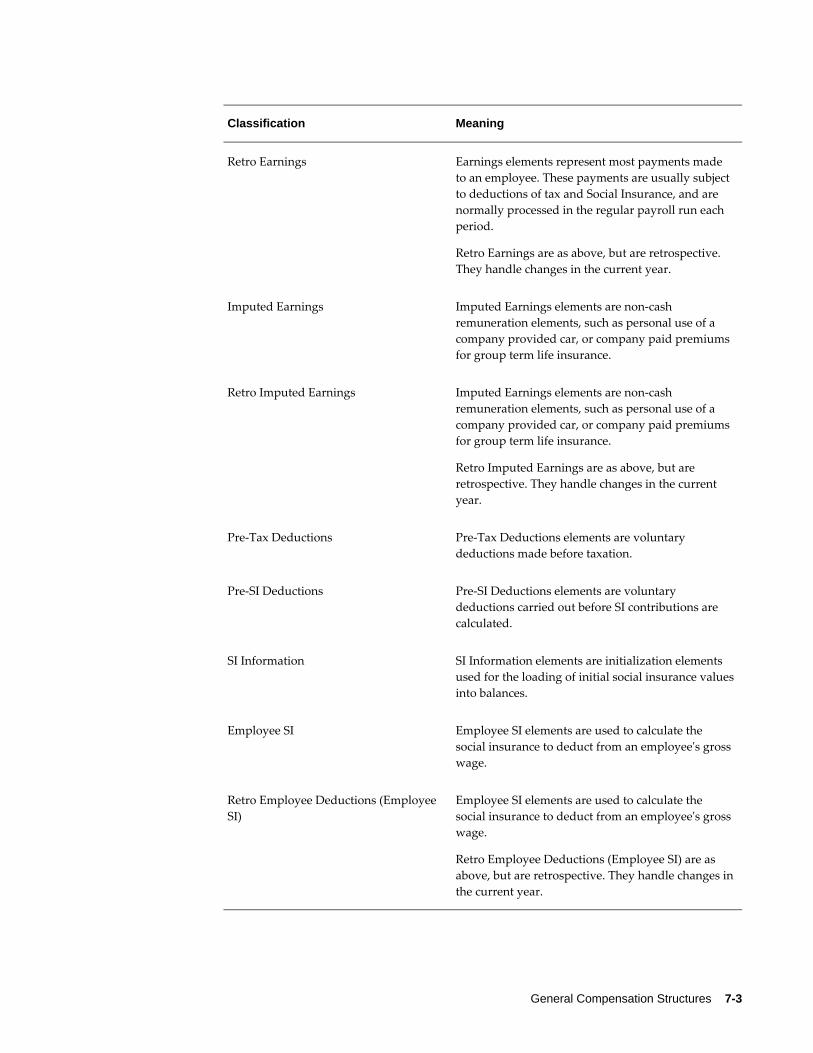
General Compensation Structures 7-3
Classification Meaning
Retro Earnings Earnings elements represent most payments made to an employee. These payments are usually subject to deductions of tax and Social Insurance, and are normally processed in the regular payroll run each period.
Retro Earnings are as above, but are retrospective. They handle changes in the current year.
Imputed Earnings Imputed Earnings elements are non-cash remuneration elements, such as personal use of a company provided car, or company paid premiums for group term life insurance.
Retro Imputed Earnings Imputed Earnings elements are non-cash remuneration elements, such as personal use of a company provided car, or company paid premiums for group term life insurance.
Retro Imputed Earnings are as above, but are retrospective. They handle changes in the current year.
Pre-Tax Deductions Pre-Tax Deductions elements are voluntary deductions made before taxation.
Pre-SI Deductions Pre-SI Deductions elements are voluntary deductions carried out before SI contributions are calculated.
SI Information SI Information elements are initialization elements used for the loading of initial social insurance valuesinto balances.
Employee SI Employee SI elements are used to calculate the social insurance to deduct from an employee's grosswage.
Retro Employee Deductions (Employee SI)
Employee SI elements are used to calculate the social insurance to deduct from an employee's grosswage.
Retro Employee Deductions (Employee SI) are as above, but are retrospective. They handle changes inthe current year.
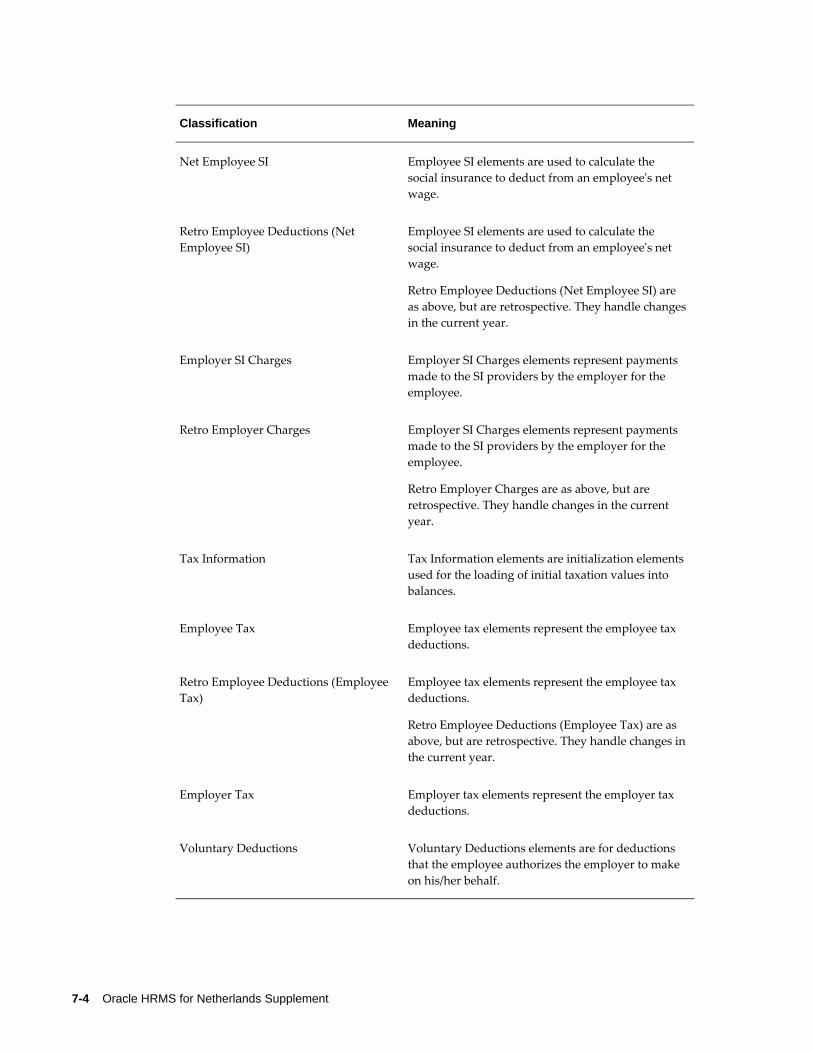
7-4 Oracle HRMS for Netherlands Supplement
Classification Meaning
Net Employee SI Employee SI elements are used to calculate the social insurance to deduct from an employee's net wage.
Retro Employee Deductions (Net Employee SI)
Employee SI elements are used to calculate the social insurance to deduct from an employee's net wage.
Retro Employee Deductions (Net Employee SI) are as above, but are retrospective. They handle changesin the current year.
Employer SI Charges Employer SI Charges elements represent payments made to the SI providers by the employer for the employee.
Retro Employer Charges Employer SI Charges elements represent payments made to the SI providers by the employer for the employee.
Retro Employer Charges are as above, but are retrospective. They handle changes in the current year.
Tax Information Tax Information elements are initialization elementsused for the loading of initial taxation values into balances.
Employee Tax Employee tax elements represent the employee tax deductions.
Retro Employee Deductions (Employee Tax)
Employee tax elements represent the employee tax deductions.
Retro Employee Deductions (Employee Tax) are as above, but are retrospective. They handle changes inthe current year.
Employer Tax Employer tax elements represent the employer tax deductions.
Voluntary Deductions Voluntary Deductions elements are for deductions that the employee authorizes the employer to make on his/her behalf.
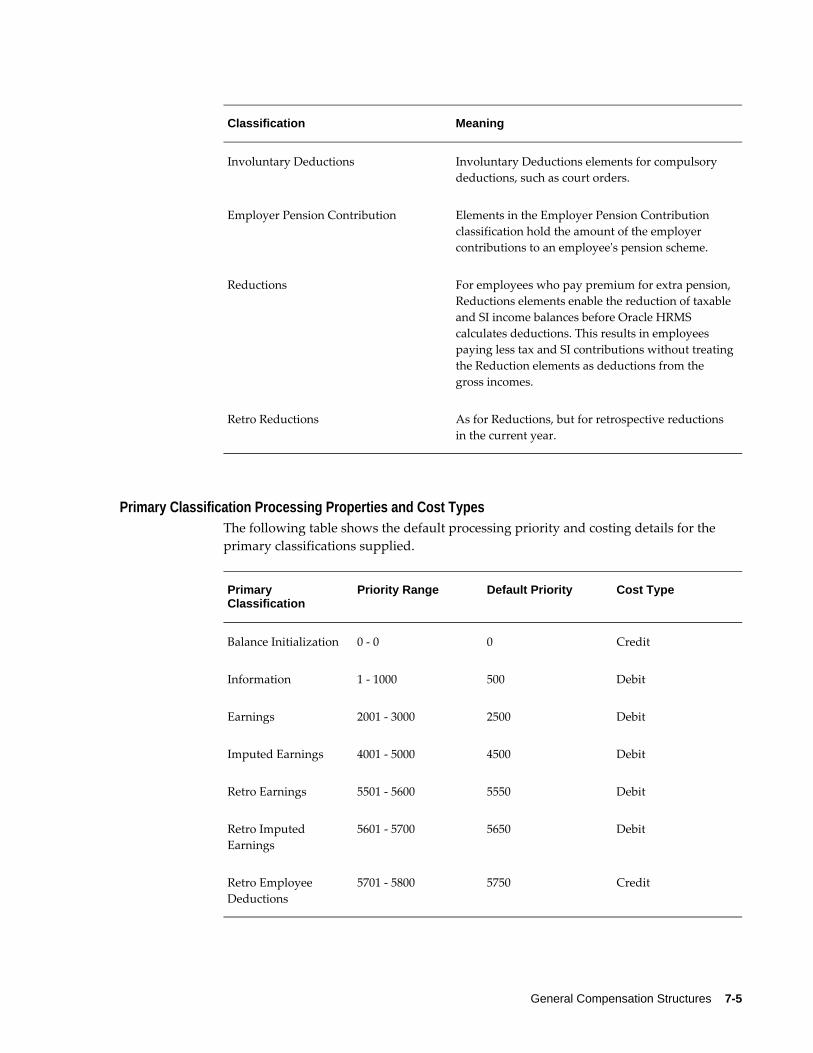
General Compensation Structures 7-5
Classification Meaning
Involuntary Deductions Involuntary Deductions elements for compulsory deductions, such as court orders.
Employer Pension Contribution Elements in the Employer Pension Contribution classification hold the amount of the employer contributions to an employee's pension scheme.
Reductions For employees who pay premium for extra pension, Reductions elements enable the reduction of taxable and SI income balances before Oracle HRMS calculates deductions. This results in employees paying less tax and SI contributions without treatingthe Reduction elements as deductions from the gross incomes.
Retro Reductions As for Reductions, but for retrospective reductions in the current year.
Primary Classification Processing Properties and Cost TypesThe following table shows the default processing priority and costing details for the primary classifications supplied.
Primary Classification
Priority Range Default Priority Cost Type
Balance Initialization 0 - 0 0 Credit
Information 1 - 1000 500 Debit
Earnings 2001 - 3000 2500 Debit
Imputed Earnings 4001 - 5000 4500 Debit
Retro Earnings 5501 - 5600 5550 Debit
Retro Imputed Earnings
5601 - 5700 5650 Debit
Retro Employee Deductions
5701 - 5800 5750 Credit
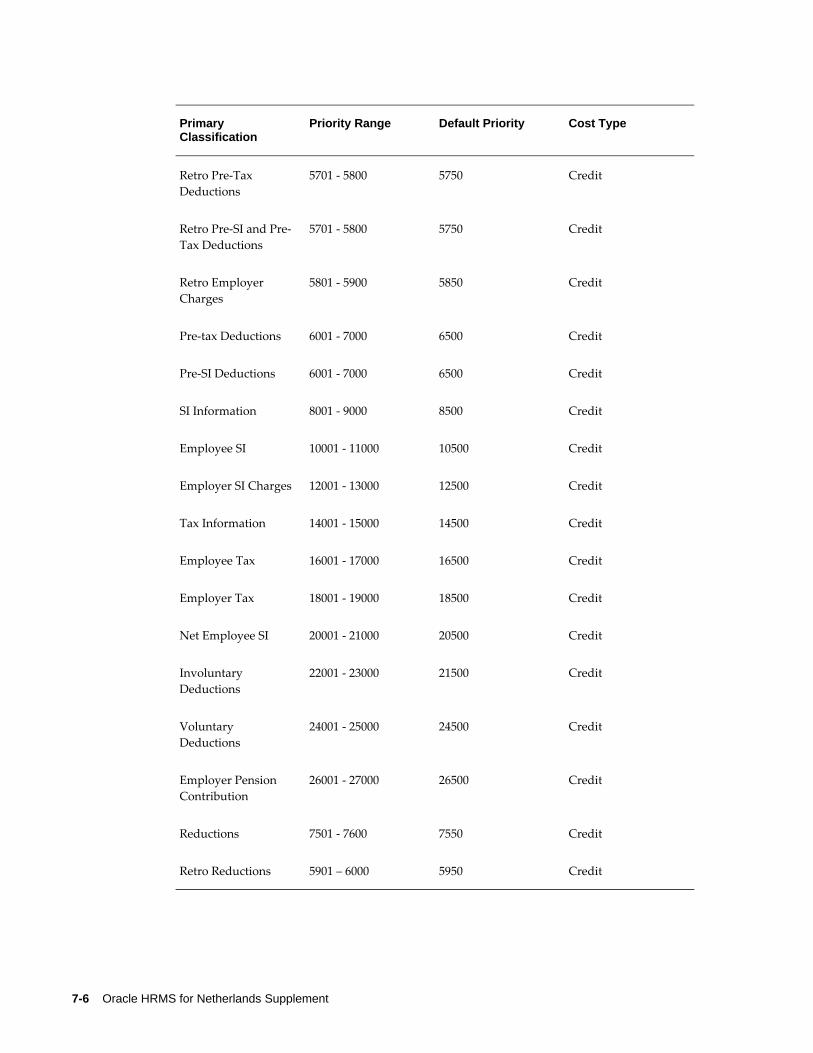
7-6 Oracle HRMS for Netherlands Supplement
Primary Classification
Priority Range Default Priority Cost Type
Retro Pre-Tax Deductions
5701 - 5800 5750 Credit
Retro Pre-SI and Pre-Tax Deductions
5701 - 5800 5750 Credit
Retro Employer Charges
5801 - 5900 5850 Credit
Pre-tax Deductions 6001 - 7000 6500 Credit
Pre-SI Deductions 6001 - 7000 6500 Credit
SI Information 8001 - 9000 8500 Credit
Employee SI 10001 - 11000 10500 Credit
Employer SI Charges 12001 - 13000 12500 Credit
Tax Information 14001 - 15000 14500 Credit
Employee Tax 16001 - 17000 16500 Credit
Employer Tax 18001 - 19000 18500 Credit
Net Employee SI 20001 - 21000 20500 Credit
Involuntary Deductions
22001 - 23000 21500 Credit
Voluntary Deductions
24001 - 25000 24500 Credit
Employer Pension Contribution
26001 - 27000 26500 Credit
Reductions 7501 - 7600 7550 Credit
Retro Reductions 5901 – 6000 5950 Credit
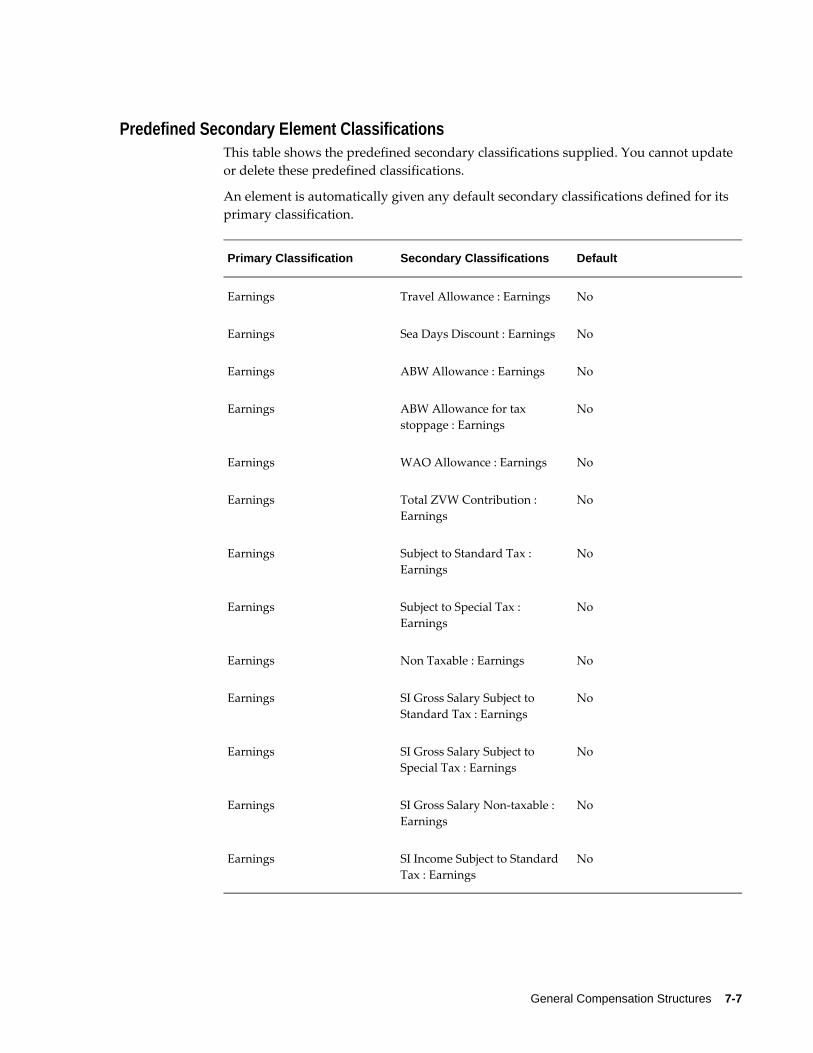
General Compensation Structures 7-7
Predefined Secondary Element Classifications This table shows the predefined secondary classifications supplied. You cannot update or delete these predefined classifications.
An element is automatically given any default secondary classifications defined for its primary classification.
Primary Classification Secondary Classifications Default
Earnings Travel Allowance : Earnings No
Earnings Sea Days Discount : Earnings No
Earnings ABW Allowance : Earnings No
Earnings ABW Allowance for tax stoppage : Earnings
No
Earnings WAO Allowance : Earnings No
Earnings Total ZVW Contribution : Earnings
No
Earnings Subject to Standard Tax : Earnings
No
Earnings Subject to Special Tax : Earnings
No
Earnings Non Taxable : Earnings No
Earnings SI Gross Salary Subject to Standard Tax : Earnings
No
Earnings SI Gross Salary Subject to Special Tax : Earnings
No
Earnings SI Gross Salary Non-taxable : Earnings
No
Earnings SI Income Subject to Standard Tax : Earnings
No
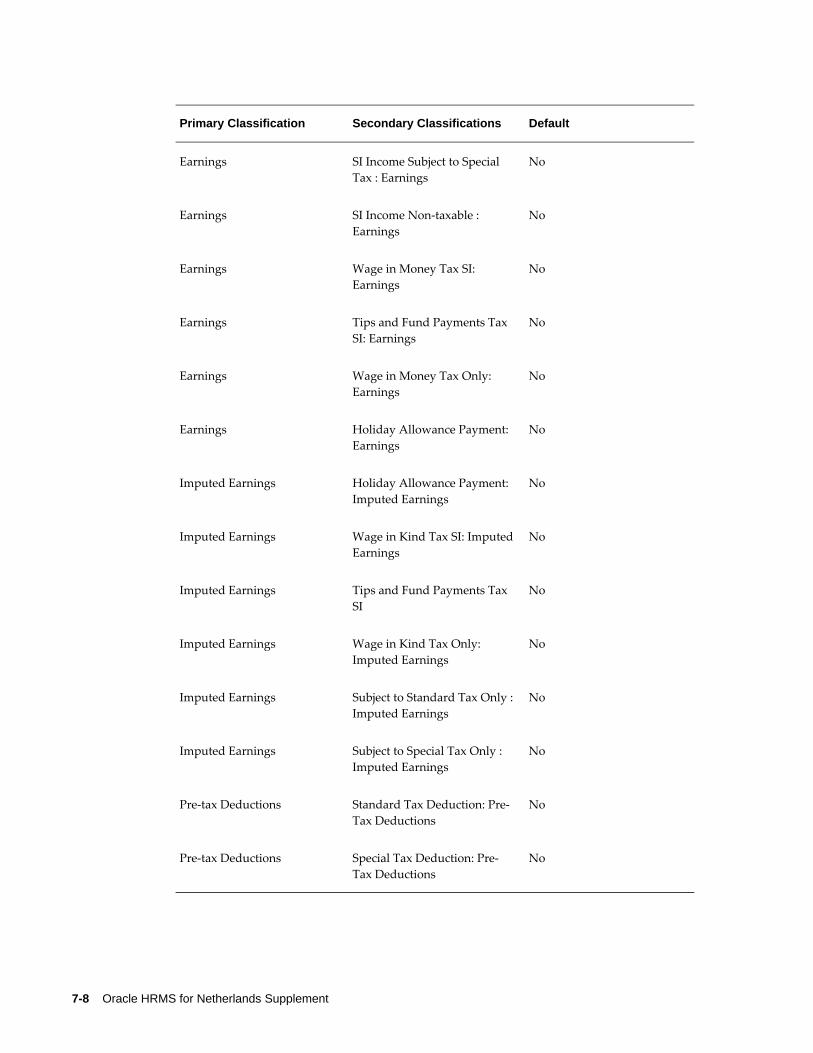
7-8 Oracle HRMS for Netherlands Supplement
Primary Classification Secondary Classifications Default
Earnings SI Income Subject to Special Tax : Earnings
No
Earnings SI Income Non-taxable : Earnings
No
Earnings Wage in Money Tax SI: Earnings
No
Earnings Tips and Fund Payments Tax SI: Earnings
No
Earnings Wage in Money Tax Only: Earnings
No
Earnings Holiday Allowance Payment: Earnings
No
Imputed Earnings Holiday Allowance Payment: Imputed Earnings
No
Imputed Earnings Wage in Kind Tax SI: Imputed Earnings
No
Imputed Earnings Tips and Fund Payments Tax SI
No
Imputed Earnings Wage in Kind Tax Only: Imputed Earnings
No
Imputed Earnings Subject to Standard Tax Only : Imputed Earnings
No
Imputed Earnings Subject to Special Tax Only : Imputed Earnings
No
Pre-tax Deductions Standard Tax Deduction: Pre-Tax Deductions
No
Pre-tax Deductions Special Tax Deduction: Pre-Tax Deductions
No
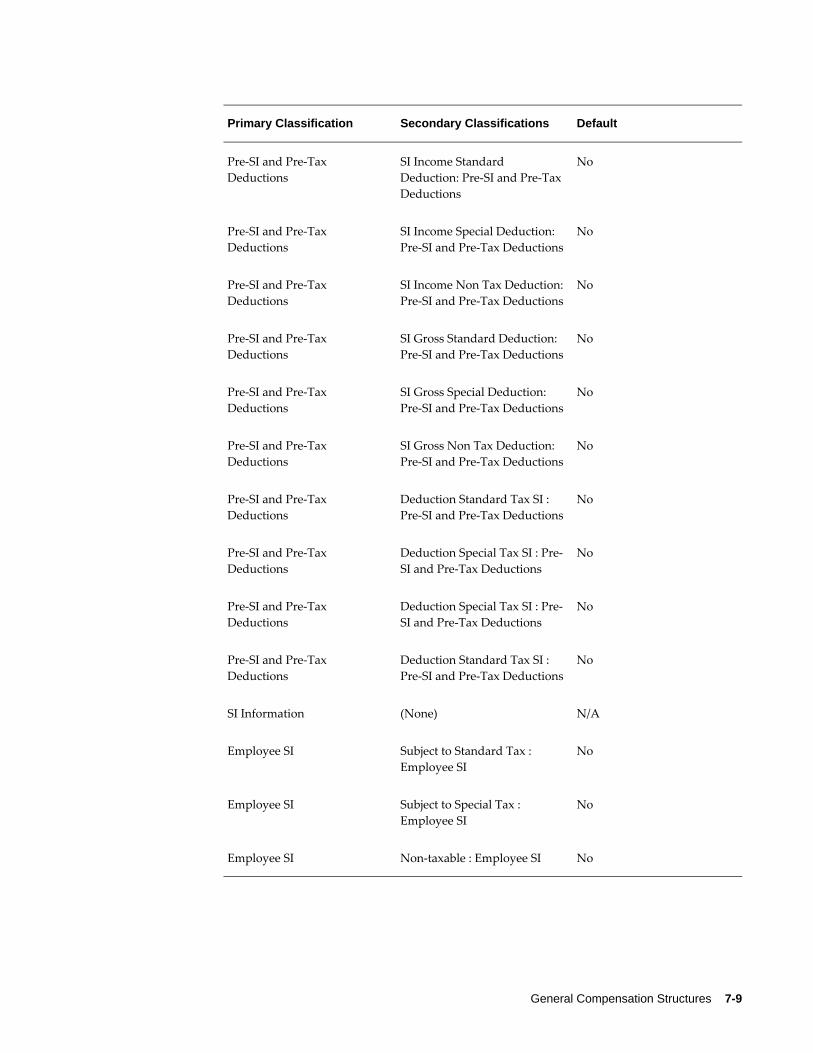
General Compensation Structures 7-9
Primary Classification Secondary Classifications Default
Pre-SI and Pre-Tax Deductions
SI Income Standard Deduction: Pre-SI and Pre-Tax Deductions
No
Pre-SI and Pre-Tax Deductions
SI Income Special Deduction: Pre-SI and Pre-Tax Deductions
No
Pre-SI and Pre-Tax Deductions
SI Income Non Tax Deduction:Pre-SI and Pre-Tax Deductions
No
Pre-SI and Pre-Tax Deductions
SI Gross Standard Deduction: Pre-SI and Pre-Tax Deductions
No
Pre-SI and Pre-Tax Deductions
SI Gross Special Deduction: Pre-SI and Pre-Tax Deductions
No
Pre-SI and Pre-Tax Deductions
SI Gross Non Tax Deduction: Pre-SI and Pre-Tax Deductions
No
Pre-SI and Pre-Tax Deductions
Deduction Standard Tax SI : Pre-SI and Pre-Tax Deductions
No
Pre-SI and Pre-Tax Deductions
Deduction Special Tax SI : Pre-SI and Pre-Tax Deductions
No
Pre-SI and Pre-Tax Deductions
Deduction Special Tax SI : Pre-SI and Pre-Tax Deductions
No
Pre-SI and Pre-Tax Deductions
Deduction Standard Tax SI : Pre-SI and Pre-Tax Deductions
No
SI Information (None) N/A
Employee SI Subject to Standard Tax : Employee SI
No
Employee SI Subject to Special Tax : Employee SI
No
Employee SI Non-taxable : Employee SI No
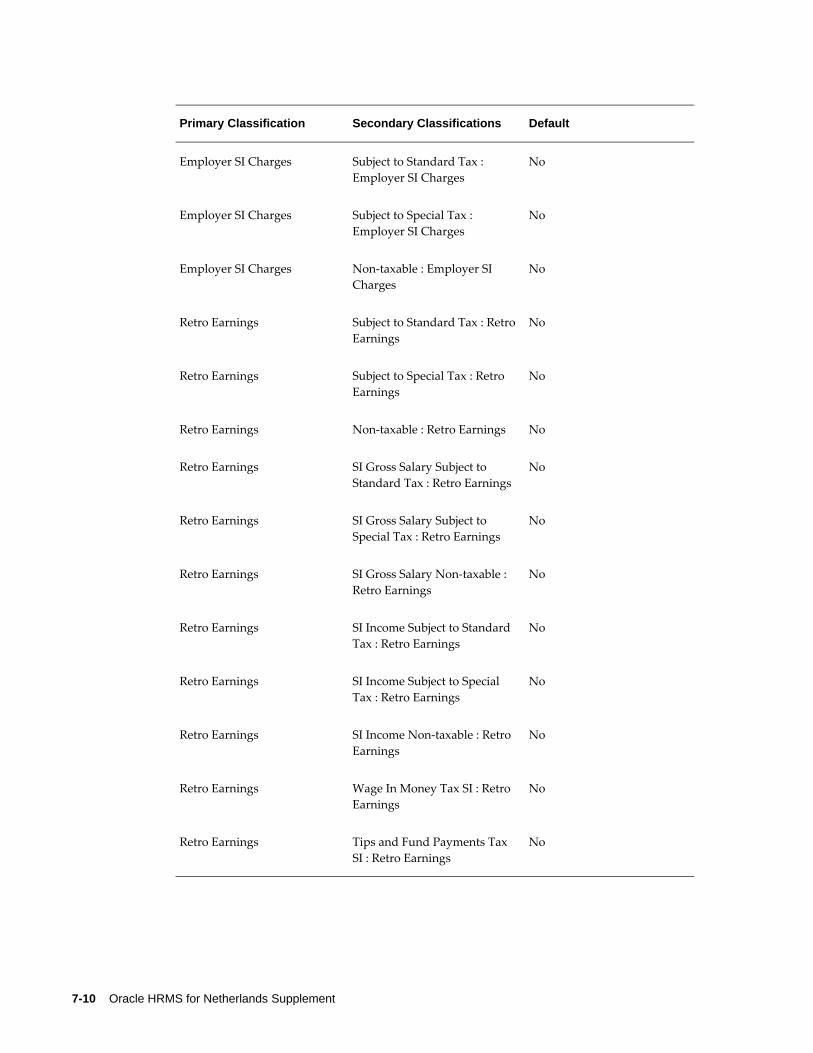
7-10 Oracle HRMS for Netherlands Supplement
Primary Classification Secondary Classifications Default
Employer SI Charges Subject to Standard Tax : Employer SI Charges
No
Employer SI Charges Subject to Special Tax : Employer SI Charges
No
Employer SI Charges Non-taxable : Employer SI Charges
No
Retro Earnings Subject to Standard Tax : RetroEarnings
No
Retro Earnings Subject to Special Tax : Retro Earnings
No
Retro Earnings Non-taxable : Retro Earnings No
Retro Earnings SI Gross Salary Subject to Standard Tax : Retro Earnings
No
Retro Earnings SI Gross Salary Subject to Special Tax : Retro Earnings
No
Retro Earnings SI Gross Salary Non-taxable : Retro Earnings
No
Retro Earnings SI Income Subject to Standard Tax : Retro Earnings
No
Retro Earnings SI Income Subject to Special Tax : Retro Earnings
No
Retro Earnings SI Income Non-taxable : Retro Earnings
No
Retro Earnings Wage In Money Tax SI : Retro Earnings
No
Retro Earnings Tips and Fund Payments Tax SI : Retro Earnings
No
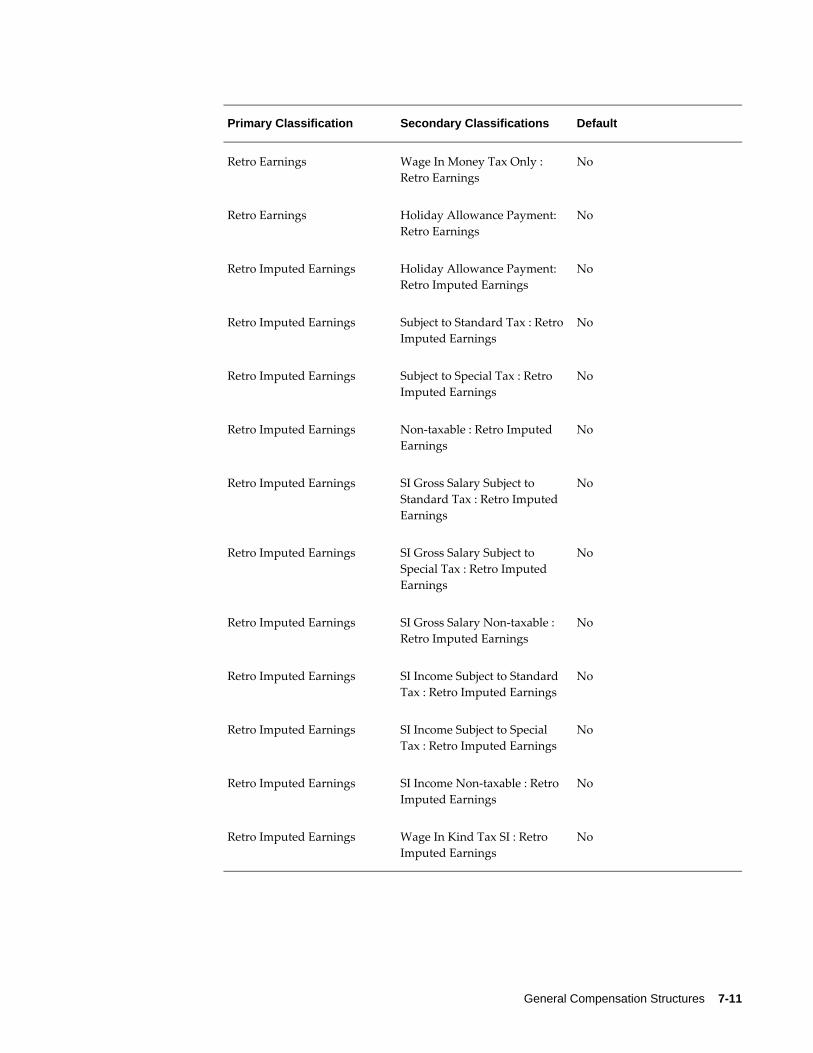
General Compensation Structures 7-11
Primary Classification Secondary Classifications Default
Retro Earnings Wage In Money Tax Only : Retro Earnings
No
Retro Earnings Holiday Allowance Payment: Retro Earnings
No
Retro Imputed Earnings Holiday Allowance Payment: Retro Imputed Earnings
No
Retro Imputed Earnings Subject to Standard Tax : RetroImputed Earnings
No
Retro Imputed Earnings Subject to Special Tax : Retro Imputed Earnings
No
Retro Imputed Earnings Non-taxable : Retro Imputed Earnings
No
Retro Imputed Earnings SI Gross Salary Subject to Standard Tax : Retro Imputed Earnings
No
Retro Imputed Earnings SI Gross Salary Subject to Special Tax : Retro Imputed Earnings
No
Retro Imputed Earnings SI Gross Salary Non-taxable : Retro Imputed Earnings
No
Retro Imputed Earnings SI Income Subject to Standard Tax : Retro Imputed Earnings
No
Retro Imputed Earnings SI Income Subject to Special Tax : Retro Imputed Earnings
No
Retro Imputed Earnings SI Income Non-taxable : Retro Imputed Earnings
No
Retro Imputed Earnings Wage In Kind Tax SI : Retro Imputed Earnings
No
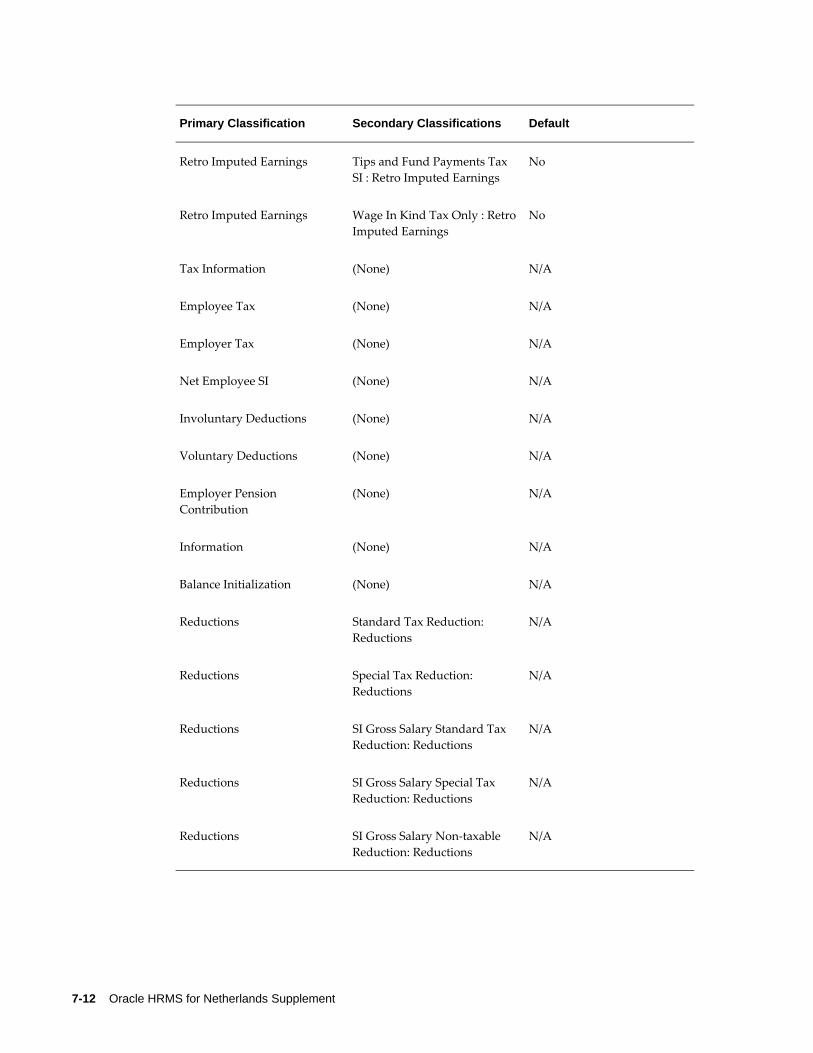
7-12 Oracle HRMS for Netherlands Supplement
Primary Classification Secondary Classifications Default
Retro Imputed Earnings Tips and Fund Payments Tax SI : Retro Imputed Earnings
No
Retro Imputed Earnings Wage In Kind Tax Only : RetroImputed Earnings
No
Tax Information (None) N/A
Employee Tax (None) N/A
Employer Tax (None) N/A
Net Employee SI (None) N/A
Involuntary Deductions (None) N/A
Voluntary Deductions (None) N/A
Employer Pension Contribution
(None) N/A
Information (None) N/A
Balance Initialization (None) N/A
Reductions Standard Tax Reduction: Reductions
N/A
Reductions Special Tax Reduction: Reductions
N/A
Reductions SI Gross Salary Standard Tax Reduction: Reductions
N/A
Reductions SI Gross Salary Special Tax Reduction: Reductions
N/A
Reductions SI Gross Salary Non-taxable Reduction: Reductions
N/A
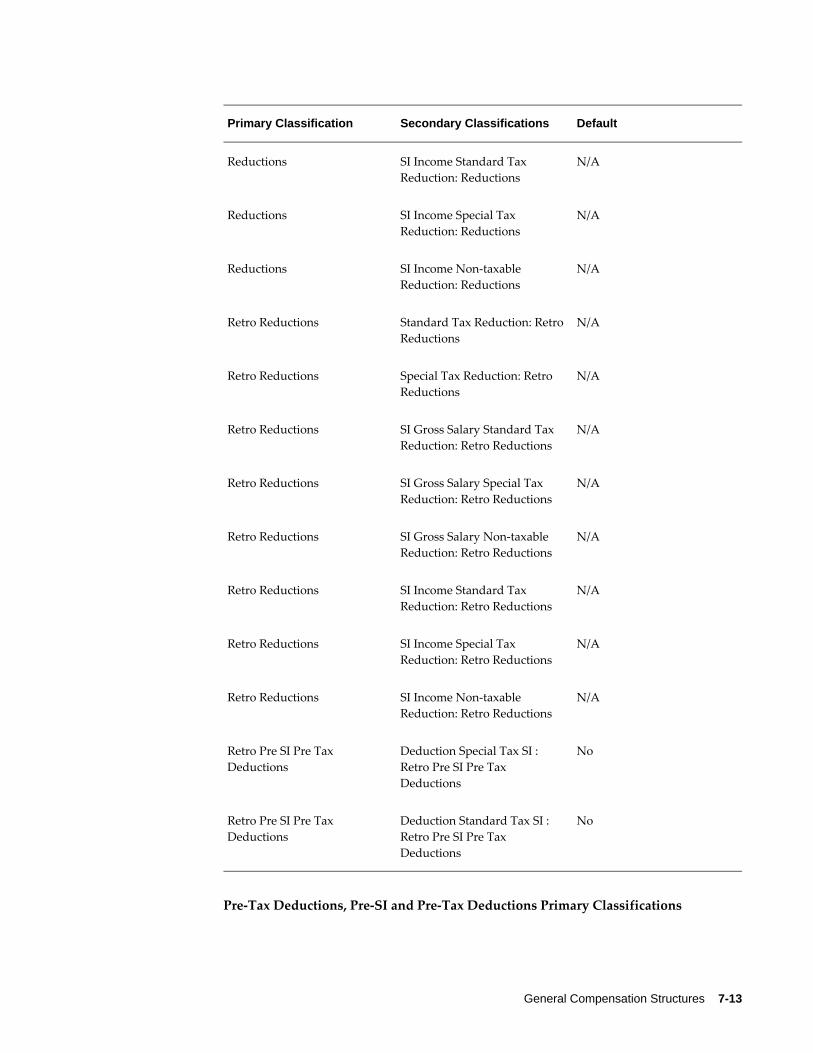
General Compensation Structures 7-13
Primary Classification Secondary Classifications Default
Reductions SI Income Standard Tax Reduction: Reductions
N/A
Reductions SI Income Special Tax Reduction: Reductions
N/A
Reductions SI Income Non-taxable Reduction: Reductions
N/A
Retro Reductions Standard Tax Reduction: RetroReductions
N/A
Retro Reductions Special Tax Reduction: Retro Reductions
N/A
Retro Reductions SI Gross Salary Standard Tax Reduction: Retro Reductions
N/A
Retro Reductions SI Gross Salary Special Tax Reduction: Retro Reductions
N/A
Retro Reductions SI Gross Salary Non-taxable Reduction: Retro Reductions
N/A
Retro Reductions SI Income Standard Tax Reduction: Retro Reductions
N/A
Retro Reductions SI Income Special Tax Reduction: Retro Reductions
N/A
Retro Reductions SI Income Non-taxable Reduction: Retro Reductions
N/A
Retro Pre SI Pre Tax Deductions
Deduction Special Tax SI : Retro Pre SI Pre Tax Deductions
No
Retro Pre SI Pre Tax Deductions
Deduction Standard Tax SI : Retro Pre SI Pre Tax Deductions
No
Pre-Tax Deductions, Pre-SI and Pre-Tax Deductions Primary Classifications
7-14 Oracle HRMS for Netherlands Supplement
These elements enable you to create your own Pre-Tax or Pre-SI Deductions. If you create them, be aware of the following behaviours:
• If a deduction is Pre-SI, by default it is also Pre-Tax, and uses the classification Pre-SI and Pre-Tax Deductions.
• If the deduction is Pre-Tax only, it uses the Pre-Tax Deductions only.
• Using Pre-Tax Deductions, you must clarify the deduction's related tax category to reduce the appropriate taxable income:
• Standard Tax Deduction
• Special Tax Deduction
• Using Pre-SI and Pre-Tax Deductions, you must clarify the deduction's related tax category to reduce the SI Income:
• SI Income Standard Deduction
• SI Income Special Deduction
• SI Income Non Tax Deduction
• If a deduction is Pre-SI, it reduces the SI Income, and you must specify an SI Incomesecondary classification. It is optional, however, whether SI Gross is reduced, so it isnot mandatory for the SI Gross secondary classification to be assigned.
• If you assign more than one secondary classification, the tax categories must correspond to the classifications.
General Compensation Structures 7-15
Absence Tracking
Absence Tracking ReportingAs part of your absence tracking, it is important that you report on your employees re-integration progress. Oracle HRMS provides the following reports and views to assist you:
• The Daily Sick and Recovery Report. Run this report on a daily basis to list all absence records that have been created, ended, changed or deleted for employees who are sick and employees who have recovered from an illness. You can use this information to report to your Arbodienst and to decide what employees need re-integration actions entered or updated for them.
• The Absence Action List report. Run this report to show the re-integration actions associated with your employees and when you need to perform them. You can also run this report on a daily basis to ensure you do not miss any dates when an action needs to be performed.
• The Re-integration Action report. Run this report to list all the re-integration actions that have been taken for an employee, and all the information associated to those actions. For example, the expected dates by which to perform the action and the actual dates they were carried out. You can use this information as part of your 'Reintegration Dossier' to apply for WAO insurance.
• The WAO List View. This view can be used to report on employees who are registered with the WAO. The name of the view is: per_nl_WAO_list_v.
• The Absence History View. This view can be used to maintain the history information for employee absence records. The name of the view is: per_nl_absence _history_v.
You can use these views to enable you to write your own reports using Oracle Discoverer:
For further information on using Oracle Discoverer see: Oracle Discoverer Administration Guide and Oracle Discoverer User Guide.
Tracking Absences As part of your absence management, keeping track of your employees' absences and their re-integration back into the workplace is your responsibility. As an employer, you must record your efforts to re-integrate your employees in order for you to report to an Arbodienst.
7-16 Oracle HRMS for Netherlands Supplement
Oracle HRMS enables you to keep track of your employee's absences and their re-integration with the Absence Tracking pages. These pages help you manage the re-integration actions associated with an employee's absence record. A re-integration action describes what you intend to do or what you have done to help re-integrate an employee.
To track absences:1. Ensure you have set up the default re-integration actions user table.
Note: Only the re-integration actions you set up for an absence category using the user tables appear for the absence records. You can, however, add further re-integration actions using the Absence Tracking pages.
See: Additional Implementation Steps for Dutch Localization, page 11-1
2. Enter an absence for your employee.
See: Entering Absences, Oracle HRMS Compensation and Benefits Management Guide
3. Use the Absence Tracking pages.
When you select an absence record in the Absence Tracking pages the default re-integration actions for the absence's category, set up in the user tables, are displayed.
Note: When you select an absence record for the first time, it saves all the default re-integration actions. If you do not want these re-integration actions for the absence record, you can delete them.
You can update these default re-integration actions, add new actions or delete them.Any actions you add to an absence record using the Absence Tracking pages appearonly for that record.
Any re-integration actions that have expected dates earlier than the effective date orno actual end dates, are highlighted by the colour red.
Once you save the re-integration actions, the dates are derived from the start date ofthe absence record, depending on the values for time period and time units set up in the relevant user table. For example, if you save an action that has a value of 2 as the time period, and a value of 'W' (weeks) as the time unit, then the expected date for you to perform the action is two weeks from the start date of the absence record.
Note: These dates may fall on a weekend or public holiday, however, you can manually update them.
General Compensation Structures 7-17
What Next?You can now report on your employee's absence records and the progress of their re-integration.
See: Absence Tracking Reporting, page 7-15
Running the Daily Sick and Recovery ReportThis report lists all new, ended, changed or deleted absence records for employees who are sick and employees who have recovered from an illness within an organization. Usethis information to send to your Arbodienst.
For this report, you can set up an organization hierarchy for your employees and select it in the Dutch Business Group information type. This enables the report to search through this hierarchy for the organization number if the selected organization does nothave an organization number to report on.
See: Creating Organization Hierarchies, Oracle HRMS Enterprise and Workforce Management Guide
See: Business Groups: Entering Dutch Business Group Information, page 1-39
Run the Daily Sick and Recovery Report from the Submit Request window.
To run the daily sick and recovery report:1. Select Daily Sick and Recovery Report in the Name field.
2. Select the organization hierarchy in the Organization Structure field.
Note: If you have specified a named hierarchy for your business group, it automatically displays in the Organization Structure field.
3. Select the top organization.
4. Select the effective date.
5. Select Yes in the Previously Reported Changes field, if you want to include changes to absence records that have already been included in a previous report.
6. Choose the Submit button.
Running the Absence Action List ReportThis report lists all the employees for whom actions are associated. You can use this report to ensure you perform any absence actions for your employees by a certain date. The report displays dates by which you need to perform actions.
7-18 Oracle HRMS for Netherlands Supplement
You run the Absence Action List Report from the Submit Request window.
To run the Absence Action List Report:1. Select the Absence Action List Report in the Name field.
2. Optionally select an employee's name, effective start date and effective end date.
The report displays all actions associated with the chosen employee within these dates.
3. Choose the Submit button.
Running the Re-integration Actions ReportThis report lists all the re-integration actions that have been taken for an employee, and all the information associated to those actions. For example, the expected dates by which to perform the action and the actual dates they were carried out. You can run thisreport to display the re-integration actions for a chosen employee on a specified date.
Run the Re-integration Actions Report from the Submit Request window.
To run the Re-integration Actions Report:1. Select the Re-integration Actions Report in the Name field.
2. Select the employee and optionally the effective date in the Parameters window.
The report displays all re-integration actions for the chosen employee on the given date.
3. Choose the Submit button.
General Compensation Structures 7-19
Dutch Digital Sickness Reporting
Sickness ReportingUVW is the Social Insurance Provider which provides social insurance payments in caseof certain sickness. The following sickness reports are available for digital (XML) sickness reporting using a concurrent request set:
• Sickness Report - run this to report and archive all absences with category Sickness and with Sickness Report flag set.
• Sickness Recovery Report - run this to report and archive all absences with categorySickness with Sickness Report flag set and absence end date populated within the report period. If you have multiple records with different partial sickness percentages, this you must run this report for each record end-date to report each change in sickness percentages. You can run this report only after you have run the Dutch Sickness Report.
• WAZO Report - run this report to report and archive all absences of Dutch WAZO Report category with start date within the report period.
• Long Term Sickness Report - run this on the selected parameters, it finds all absences of Sickness category with the Long Term Sickness Report flag set and then reports and archives the necessary information for each absence.
• Long Term Sickness Recovery Report - run this report to find all absences of Sickness category with the Long Term Sickness Report flag set and absence end date populated within the report period. It then reports and archives the necessary information for each absence.
Setting up the Dutch Digital Sickness Reports, page 7-19
Running the Sickness Report, page 7-20
Running the Sickness Recovery Report, page 7-22
Running the WAZO Report, page 7-23
Running the Long Term Sickness Report, page 7-24
Running the Long Term Sickness Recovery Report, page 7-25
Setting up the Dutch Digital Sickness ReportsTo set up the Dutch Digital Sickness Reports, complete the following steps:
1. Record additional organization information to define Sickness Information details.
7-20 Oracle HRMS for Netherlands Supplement
See: Adding Sickness Information, page 1-62
2. Update the Further Collective Agreement Details descriptive flexfield in the Collective Agreements window to record the collective agreement details to record sickness details.
See: Adding Further Collective Agreement Information, page 3-37
3. Select the Absence Type to use. Select Sickness as the category to run the Dutch Sickness Report, Sickness Recovery Report, Long Term Sickness Report, and the Long Term Sickness Recovery Report. Select Dutch WAZO Report as the category to run the WAZO Report.
See: Defining an Absence Type, Oracle HRMS Compensation and Benefits Management Guide
4. Update the People window to include Sickness Report Extra Information.
See: Entering Additional Sickness Details Information, page 3-19
5. Update your Phone and Address details.
See: Entering Addresses (Address Window), page 3-60
See: Adding Telephone Information (Phone Numbers Window), page 3-63
6. Enter Absence Details. To run the Sickness Report and the Long Terms Sickness report, ensure you enter the Actual Start Date. To run the Sickness Recovery Report and the Long Term Sickness Recovery Report, ensure you enter the Actual End Date. You can run the recovery reports one day after this end date and only after running the corresponding sickness report.
If you entered Sickness Report Extra Information details in the People Window, andyou select Sickness Report as the value in the Absence Details window, then the application automatically displays some of the details here. You can edit these details if required.
Note: The details you enter in the Absence Details window override the details you entered in the Sickness Report Extra Information window.
Running the Sickness ReportRun the Sickness Report concurrent program to report and archive all absences with category Sickness and with Sickness Report flag set.
You run the Sickness Report from the Submit Requests window.
General Compensation Structures 7-21
To run the sickness report:1. Select Sickness Report in the Name field.
2. Select the Start Date of the report. This is a mandatory field.
3. Select the End Date of the report. This is a mandatory field.
4. Select the Report Type. This is a mandatory field. Report Type specifies the type of report run. There are 3 values to choose from:
• Initial Report - Initial Report is chosen when a report is run for the first time for a specific set of dates . When you choose this option, the application retrieves details from live data and generates the required report.
• Regenerate - Regenerate is chosen to regenerate a report which has already been archived and generated.
You use this option if you require another copy of the report/if you have lost the report that was previously generated. When you choose this option, the application retrieves the details from the archived data and generates the reportfor the specified dates.
• Withdraw - Withdraw is chosen if you want to withdraw the report generated due to incorrect data entered for an employee and need to correct it.
When you choose this option, the application generates a report identical to the Initial Report, with the only difference being the Withdrawal flag set to Yes. Running the report with Withdraw option is necessary to change any incorrect details already reported. Once you correct the details, you can run the Initial Report again.
5. Select the Organization Hierarchy. This is a mandatory field. The Organization Hierarchy selects all the available organization hierarchies in the business group.
6. Select the Employer. The Employer parameter displays all the organizations in the selected hierarchy. You can choose the desired organization.
This field is not mandatory, hence when left blank, the report is generated for all theorganizations in the selected hierarchy.
7. Select the Employee. The Employee parameter displays all the employees in the selected hierarchy. You can choose a specific employee.
This field is not mandatory, hence when left blank, the report is generated for all theemployees in the organization/hierarchy selected.
8. Click OK and submit your request.
7-22 Oracle HRMS for Netherlands Supplement
Running the Sickness Recovery ReportRun this to report and archive all absences with category Sickness with Sickness Report flag set and recovery date (day after absence end date) falls within the report period. If you have multiple records with different partial sickness percentages, you must run thisreport for each record end-date to report each change in sickness percentages.
You run this report from the Submit Requests window after running the Sickness Report.
To run the sickness recovery report:1. Select Sickness Recovery Report in the Name field.
2. Select the Start Date of the report. This is a mandatory field.
3. Select the End Date of the report. This is a mandatory field.
4. Select the Report Type. This is a mandatory field. Report Type specifies the type of report run. There are 3 values to choose from:
• Initial Report - Initial Report is chosen when a report is run for the first time for a specific set of dates . When you choose this option, the application retrieves details from live data and generates the required report.
• Regenerate - Regenerate is chosen to regenerate a report which has already been archived and generated.
You use this option if you require another copy of the report/if you have lost the report that was previously generated. When you choose this option, the application retrieves the details from the archived data and generates the reportfor the specified dates.
• Withdraw - Withdraw is chosen if you want to withdraw the report generated due to incorrect data entered for an employee and need to correct it.
When you choose this option, the application generates a report identical to the Initial Report, with the only difference being the Withdrawal flag set to Yes.
Running the report with Withdraw option is necessary to change any incorrect details already reported. Once you correct the details, you can run the Initial Report again.
5. Select the Organization Hierarchy. This is a mandatory field. The Organization Hierarchy selects all the available organization hierarchies in the business group.
6. Select the Employer. The Employer parameter displays all the organizations in the selected hierarchy. You can choose the desired organization.
General Compensation Structures 7-23
This field is not mandatory, hence when left blank, the report is generated for all theorganizations in the selected hierarchy.
7. Select the Employee. The Employee parameter displays all the employees in the selected hierarchy. You can choose a specific employee.
This field is not mandatory, hence when left blank, the report is generated for all theemployees in the organization/hierarchy selected.
8. Click OK and submit your request.
Running the WAZO ReportWhen the WAZO Report is run, on the selected parameters, it finds all absences of Dutch WAZO Report category with start date within the report period. It then reports and archives the necessary information for each absence.
You run this report from the Submit Requests window.
To run the WAZO report:1. Select WAZO Report in the Name field.
2. Select the Start Date of the report. This is a mandatory field.
3. Select the End Date of the report. This is a mandatory field.
4. Select the Report Type. This is a mandatory field. Report Type specifies the type of report run. There are 3 values to choose from:
• Initial Report - Initial Report is chosen when a report is run for the first time for a specific set of dates . When you choose this option, the application retrieves details from live data and generates the required report.
• Regenerate - Regenerate is chosen to regenerate a report which has already been archived and generated.
You use this option if you require another copy of the report/if you have lost the report that was previously generated. When you choose this option, the application retrieves the details from the archived data and generates the reportfor the specified dates.
• Withdraw - Withdraw is chosen if you want to withdraw the report generated due to incorrect data entered for an employee and need to correct it.
When you choose this option, the application generates a report identical to the Initial Report, with the only difference being the Withdrawal flag set to Yes.
Running the report with Withdraw option is necessary to change any incorrect
7-24 Oracle HRMS for Netherlands Supplement
details already reported. Once you correct the details, you can run the Initial Report again.
5. Select the Organization Hierarchy. This is a mandatory field. The Organization Hierarchy selects all the available organization hierarchies in the business group.
6. Select the Employer. The Employer parameter displays all the organizations in the selected hierarchy. You can choose the desired organization.
This field is not mandatory, hence when left blank, the report is generated for all theorganizations in the selected hierarchy.
7. Select the Employee. The Employee parameter displays all the employees in the selected hierarchy. You can choose a specific employee.
This field is not mandatory, hence when left blank, the report is generated for all theemployees in the organization/hierarchy selected.
8. Click OK and submit your request.
Running the Long Term Sickness ReportWhen the Long Term Sickness Report is run, on the selected parameters, it finds all absences of Sickness category with the Long Term Sickness flag set and then reports and archives the necessary information for each absence. You run this report from the Submit Requests window.
To run the long term sickness report:1. Select Long Term Sickness Report in the Name field.
2. Select the Start Date of the report. This is a mandatory field.
3. Select the End Date of the report. This is a mandatory field.
4. Select the Report Type. This is a mandatory field. Report Type specifies the type of report run. There are 3 values to choose from:
• Initial Report - Initial Report is chosen when a report is run for the first time for a specific set of dates . When you choose this option, the application retrieves details from live data and generates the required report.
• Regenerate - Regenerate is chosen to regenerate a report which has already been archived and generated.
You use this option if you require another copy of the report/if you have lost the report that was previously generated. When you choose this option, the
General Compensation Structures 7-25
application retrieves the details from the archived data and generates the reportfor the specified dates.
• Withdraw - Withdraw is chosen if you want to withdraw the report generated due to incorrect data entered for an employee and need to correct it.
When you choose this option, the application generates a report identical to the Initial Report, with the only difference being the Withdrawal flag set to Yes.
Running the report with Withdraw option is necessary to change any incorrect details already reported. Once you correct the details, you can run the Initial Report again.
5. Select the Organization Hierarchy. This is a mandatory field. The Organization Hierarchy selects all the available organization hierarchies in the business group.
6. Select the Employer. The Employer parameter displays all the organizations in the selected hierarchy. You can choose the desired organization.
This field is not mandatory, hence when left blank, the report is generated for all theorganizations in the selected hierarchy.
7. Select the Employee. The Employee parameter displays all the employees in the selected hierarchy. You can choose a specific employee.
This field is not mandatory, hence when left blank, the report is generated for all theemployees in the organization/hierarchy selected.
8. Click OK and submit your request.
Running the Long Term Sickness Recovery ReportWhen the Long Term Sickness Recovery Report is run, on the selected parameters, it finds all absences of Sickness category with the Long Term Sickness Report flag set and recovery date (day after absence end date) falls within the report period. It then reports and archives the necessary information for each absence.
You run this report from the Submit Requests window after running the Long Term Sickness Report.
To run the long term sickness recovery report:1. Select Long Term Sickness Recovery Report in the Name field.
2. Select the Start Date of the report. This is a mandatory field.
3. Select the End Date of the report. This is a mandatory field.
7-26 Oracle HRMS for Netherlands Supplement
4. Select the Report Type. This is a mandatory field. Report Type specifies the type of report run. There are 3 values to choose from:
• Initial Report - Initial Report is chosen when a report is run for the first time for a specific set of dates . When you choose this option, the application retrieves details from live data and generates the required report.
• Regenerate - Regenerate is chosen to regenerate a report which has already been archived and generated.
You use this option if you require another copy of the report/if you have lost the report that was previously generated. When you choose this option, the application retrieves the details from the archived data and generates the reportfor the specified dates.
• Withdraw - Withdraw is chosen if you want to withdraw the report generated due to incorrect data entered for an employee and need to correct it.
When you choose this option, the application generates a report identical to the Initial Report, with the only difference being the Withdrawal flag set to Yes.
Running the report with Withdraw option is necessary to change any incorrect details already reported. Once you correct the details, you can run the Initial Report again.
5. Select the Organization Hierarchy. This is a mandatory field. The Organization Hierarchy selects all the available organization hierarchies in the business group.
6. Select the Employer. The Employer parameter displays all the organizations in the selected hierarchy. You can choose the desired organization.
This field is not mandatory, hence when left blank, the report is generated for all theorganizations in the selected hierarchy.
7. Select the Employee. The Employee parameter displays all the employees in the selected hierarchy. You can choose a specific employee.
This field is not mandatory, hence when left blank, the report is generated for all theemployees in the organization/hierarchy selected.
8. Click OK and submit your request.
Savings and Retirements 8-1
8Savings and Retirements
Savings and Retirement OverviewUse Oracle HRMS to set up the pension and savings schemes available to your employees. For employees in the government and education sectors, you can set up pension schemes offered by ABP (Algemeen Burgerlijk Pensioenfonds). You can set up one pension scheme in each of these ABP categories:
• OP/NP
• OP/NP--Including AOW
• OP/NP--Individual 65
• OP/NP--Individual WOU 25%
• OP/NP--Individual WOU 50%
• IPBW Low
• IPBW High
• FPU Base
• FPU Composition
• FPU Raise
• FPU Extra
• FPU Total
• FUR Standard

8-2 Oracle HRMS for Netherlands Supplement
• VSG
• IPAP
For employees, ex-employees, and pensioners in the health-care and social-work sectors, you can set up pension schemes for the following PGGM (Pension Fund for Healthcare and Social Work Sectors) pension types:
• OP Contribution
• Flex Contribution
• AP Contribution
Note: PGGM pensions support only monthly payrolls.
Pension Providers and TypesA pension provider is an organization that collects contributions provided by employees to their employer and then allocates the money to a particular pension or savings scheme. In Oracle HRMS you can assign as many pension types as you require to each pension provider, then select these for your employer organizations. The pension type defines how contributions are calculated, and this information is datetracked.
Pension and Savings SchemesWithin each pension type, you can create the pension and savings schemes in which you will enroll your employees. You can generate all the objects required for payroll processing for each scheme--elements, formulas, balances, balance feeds, and formula result rules. The formula is based on the rules you define for the pension type. You can configure the formula and other objects if you require additional rules.
Eligibility and EnrollmentABP Pension schemes: You specify the default pension types for which employees are eligible at the business group or HR organization level. You can add types at the child organization or assignment level. You use eligibility profiles or element links to specify eligibility to enroll in any ABP pension scheme, then enroll employees by entering a single element. When it processes this element, Oracle Payroll checks the ABP pension types you have specified in the employee's organization hierarchy and assignment. Oracle Payroll enrolls employees in all schemes for which they are eligible.
Other pension and saving schemes: You specify pension types for your employers, which can be a business group or any HR organization within the default hierarchy. Pension types assigned at the highest level propagate to the child organizations unless
Savings and Retirements 8-3
overridden at the child level. If you enter any pension types at the child level, only those pension types are available for that particular organization.
You can establish eligibility for pension schemes using eligibility profiles attached to pension plans, with Standard or Advanced Benefits. If you also use Self-Service, employees can select their pension scheme from a list of types for which they are eligible. Otherwise you must enroll them individually (Standard Benefits) or in a batch (Advanced Benefits). With Advanced Benefits you can trigger automatic enrollment based on life events.
Using Standard or Advanced Benefits is the recommended approach, however you can establish eligibility using element links instead, if you prefer. You can use a standard link to automatically assign the pension scheme to all eligible employees, or you can useBEE or the Element Entries window to enroll employees in pension schemes.
Extracting Data for Pension ProvidersOracle HRMS supplies a predefined report to extract the data required for the monthly notification on ABP pensions. See: Notification of ABP Pensions and USZO Social Insurance Data, page 8-37. You could also use or adapt predefined global pension extracts to report on other pensions and savings data, as required. By default the NL HRMS Reports & Process request set does not include the global extract processes, but you can add them. See: Pension Extracts, Oracle HRMS Compensation and Benefits Management Guide.
Savings and RetirementOracle HRMS provides pension pages to guide you through the setup of pension and savings schemes.
Can you set up any number of pension and savings schemes?Yes, you set up as many pension types as you require, then create pension or savings schemes, which are specific instances of pension types. When you create a scheme, Oracle HRMS generates all the objects required for payroll processing.
For savings schemes, you can set up wage saving or premium saving schemes. The appropriate balance feeds are created automatically to ensure correct taxation.
How do you control who can enroll in the schemes?For ABP pensions, you use the default organization hierarchy to specify which pension types are available to employees in each organization. Employees participate in pensiontypes specified for their own organization and any parent organizations within the hierarchy right up to the business group. You can also specify additional pension types for individual employee assignments.
For other pension and savings schemes, you assign pension providers and types to your
8-4 Oracle HRMS for Netherlands Supplement
employer organizations within your default organization hierarchy. Employees can select from the providers and types that are valid for their organization. Pension types specified for a child organization override any entries further up the hierarchy.
For all schemes, you can also set up eligibility criteria using eligibility profiles or element links. If you set up pension or savings plans, you use eligibility profiles to control who can enroll in the plan.
You can specify minimum and maximum ages for a pension type. An employee's age is checked against these limits by a formula during each payroll run.
What types of contribution calculations are supported?Pension contributions can be a percentage of pensionable salary, a flat amount, or a fixed premium amount specified by the pension provider and divided between employee and employer contributions.
You specify which earnings types contribute to pensionable salary by setting up balancefeeds. You can also include bonus payments in the pension basis. You can specify a threshold amount to be deducted from the annual salary before calculation of percentage contributions.
Savings contributions can be a fixed premium amount per year, a flat amount per pay period, or a percentage of the maximum contribution allowed.
What happens if there are insufficient earnings to take the regular contribution?For pension contributions, the contribution amount is fed to an arrears balance if there are insufficient earnings to take the full deduction. This functionality does not apply to savings deductions.
How do you pass pensions data to third party organizations?You can define extract criteria to determine which people to include in the extract file, and a layout definition to determine which data to extract and how to format the records in the extract file. Oracle HRMS supplies a global pensions extract definition, which you can use or adapt to meet your requirements.
A predefined extract process meets the monthly reporting requirements for ABP pensions.
Savings and Retirements 8-5
Pensions and Savings Schemes
Calculation of Pension and Savings ContributionsWhen you create a pension or savings scheme, Oracle Payroll generates a formula that calculates the contributions. The content of the formula depends on your choices when you set up the pension type and scheme. The formula uses default values specified for the pension type, or overrides you specify for the assignment or element entry. The formula may refer to balances for values, such as salary and past year bonuses.
Calculation of Pension ContributionsPension contributions can be:
• A fixed premium amount specified by the pension provider and divided between employee and employer contributions
To set this up, you select a salary calculation method of Fixed Premium Amount forthe pension type, and a Deduction Method of Percentage for the scheme. You enter the Annual Premium Amount and the percentage paid by the employee. The remaining proportion is paid by the employer.
Important: Fixed premium amount is not relevant to ABP pensions.
• A percentage of the pension basis (which is normally related to pensionable salary), calculated as:
• A payroll period contribution, based on salary in first payroll period in the yearor
• A payroll period contribution, based on the salary in that period
Important: The second option does not apply to ABP pensions. Percentage-based ABP pensions always use the salary calculation method Actual Salary of First Payroll Period in the Year.
To set this up, you select a salary calculation method of Actual Salary of first payrollperiod in the year or Actual Salary of each processing payroll period, and you selecta Deduction Method of Percentage for the scheme. You enter the percentage of salary paid by employee and, if appropriate, employer. For certain ABP pension types, you can use a user-defined table to specify percentages that depend on the employee's age and the age at which the employee began contributing to the
8-6 Oracle HRMS for Netherlands Supplement
pension.
• A flat amount entered separately for employee and employer (if there are employer contributions)
To set this up, you select a salary calculation method of Actual Salary of first payrollperiod in the year or Actual Salary of each processing payroll period, and you selecta Deduction Method of Flat Amount for the scheme. You enter the flat amount paidby the employee and, if appropriate, employer.
In all cases the contributions are paid as a regular deduction each payroll period.
Conversion RulesYou can select a conversion rule to define how to prorate the pension deduction amount, salary, and annual salary threshold to a particular pay period. There are four conversion rules. One--used particularly by ABP pensions--is called Prorate to Pay Period. This conversion rule simply divides the annual amount by the number of payroll periods in the year, such as 12 for an employee on a monthly payroll.
The other three rules calculate a daily amount--by dividing the annual amount by a global value for average days per year--and multiply this by a different factor. The following table explains the factors and how to override them at assignment and element entry levels. Notice that element entry overrides take precedence over assignment-level overrides.
Conversion Rule Uses the Factor . . . Override Factor At Assignment Level Using . . .
Override Factor At Lowest Level Using . . .
Average Working Days
Average number of working days in the payroll period (such as 5 for a weekly payroll)
Dutch Average Pension Days EIT
ABP schemes: ABP Pensions Override Information EIT (for aspecific pension type)
Other schemes: Override Pension Days input value on the Pension Deduction and Employer Pension Contribution elements.

Savings and Retirements 8-7
Conversion Rule Uses the Factor . . . Override Factor At Assignment Level Using . . .
Override Factor At Lowest Level Using . . .
Average Days With Work Schedules
Average Working Days calculated from the employee's work pattern (excluding non-SI absences). Average Working Days is calculated by dividing the number of days the employee is scheduled to work by the total number of days in the work pattern, and multiplying by the average number of days in the period. If the employee has no work pattern the calculation uses the same figures as in the Average Working Days method
Dutch Average Pension Days EIT
ABP schemes: ABP Pensions Override Information EIT (for aspecific pension type)
Other schemes: Override Pension Days input value on the Pension Deduction and Employer Pension Contribution elements.
Real Working Days Real working days in the pay period, according to the employee's work pattern (including paid leave but excluding non-SI absences). If the working days from the work pattern exceed the maximum Social Insurance Days, this maximum figure (minus any non-SI absences) is used in the calculation instead.
Override Real SI Daysfield on the Social Insurance/Pension tabof the Assignment window.
ABP schemes: ABP Pensions Override Information EIT (for aspecific pension type)
Other schemes: Override Pension Days input value on the Pension Deduction and Employer Pension Contribution elements.
Annual Limit on ContributionsYou can specify an annual limit on contributions, set for each pension type, which you
8-8 Oracle HRMS for Netherlands Supplement
can override at the assignment level. If an employee has multiple assignments, the limit is split between assignments.
Pension BasisFor percentage-based schemes, Oracle Payroll calculates the deduction as a percentage of the pension basis. You select one of the following as the pension basis for each pension type:
• Basis equals Pension Salary--deductions are a percentage of pensionable salary (which can include bonuses)
• Basis equals Annual Limit--deductions are a percentage of the maximum that employees and employers can contribute to this pension type
• Pension Salary Minus Threshold--deductions are a percentage of pensionable salaryminus the annual threshold prorated to the pay period using the specified conversion rule
• No Basis Required--deductions are based on a Fixed Premium Amount or Flat Amount.
Additional Information: For PGGM, you can specify whether to round up or round down the contribution and pension basis values individually. The two methods give slightly different final deduction amounts.
Oracle Payroll supports the use of multiple pay periods while calculating the pension basis and part-time percentage for PGGM pensions. You can choose either calendar month (12 pay periods), lunar month (13 pay periods), quarter (4 pay periods), or week (52 pay periods).
Pensionable SalaryIf you select Basis equals Pension Salary or Pension Salary Minus Threshold, you must specify how to calculate pensionable salary. You can select which pension salary balance to use, and you can specify whether to include bonuses. You can include this year's bonuses--calculated as a percentage of salary and prorated to the pay period--andlast year's bonuses, taken from a balance.
Note: Unlike ABP, OHT correction and inflation check are not applicable to PGGM pension salary.
Oracle Payroll calculates pensionable salary separately for each assignment, if an employee has multiple assignments. You can enter an override pensionable salary at theassignment level.
Savings and Retirements 8-9
Salary ThresholdIf you select the pension basis Pension Salary Minus Threshold, you must enter an annual threshold. For example:
Payroll = Calendar Month
Conversion Rule = Average Working Days
Employee Contribution Percentage = 10%
Pensionable Salary for the Pay Period = 5000
Annual Threshold = 12 000
Threshold for the pay period = (12000/261 ) * 21.75 = 1000
Deduction Amount for monthly pay period = 10% of (5000 - 1000) = 400
You can set a similar threshold for the employer contribution.
If an employee has multiple assignments, the threshold is split between assignments based on the FTE value of each assignment. For example, if the annual threshold is 1000 Euros for a pension type, the limit would be divided as follows:
• Assignment A, FTE 0.5, Annual limit = 1000 * (0.5/0.9) = 555.56
• Assignment B, FTE 0.4, Annual limit = 1000 * (0.4/0.9) = 444.44
For certain ABP pension types, you can specify age-dependent salary thresholds using user-defined tables.
Values Defaulted From Pension TypeFor a pension type where contributions are based on salary, you can set the following values for both employee and employer contributions:
• Contribution Percentage
• Annual Limit
• Annual Salary Threshold
For a pension type where contributions are based on a Fixed Premium Amount, you can set the following values:
• Annual Premium Amount
• Employee and employer percentage contributions (which must sum to 100%)
When you create a pension scheme, which is a specific instance of a pension type, these values are defaulted, but you can override them.
8-10 Oracle HRMS for Netherlands Supplement
Important: For Fixed Premium Amount schemes, the premium amount is divided between all of an employee's assignments. If you override Fixed Premium Amount or contribution percentages for one assignment (on the pension element entry), you must make the same change for all of this employee's other assignments that contribute to a scheme of the same pension type. If you override one assignment but not the others, the Fixed Premium Amount will not be split correctly between assignments.
Calculation of Savings ContributionsSavings contributions can be:
• A percentage of the fixed premium amount, such as 600 Euros per year, prorated to the pay period using the conversion rule.
• A flat amount, such as 100 Euros per pay period
• A percentage of the annual limit. For example, if the maximum employee contribution is 600 Euros per year, a 10% contribution would be 60 Euros per pay period until the maximum of 600 Euros is reached.
To create a flat amount or a percentage of the annual limit scheme, you can leave the Salary Calculation Method field blank when you define the pension type.
For life savings scheme, you can specify the deduction amount as a percentage of the savings basis, which can be:
• User-defined Balance - The application derives savings basis for the pay period from the ASG_RUN balance.
Note: If you use a customized balance, ensure that the balance gets populated when the application processes the savings scheme deduction elements.
• Predefined Basis Balances - Enables you to include portions of employee earnings, which you plan to pay at a later date, in the savings basis. This can be an annual amount based on the value of a predefined balance.
• Annual Premium Amount - The application considers the annual premium amount as the savings basis. For flat amount schemes, the application derives the amount by dividing the amount by the number of pay periods in an year. For percentage schemes, the application deducts a percentage of the annual premium amount as the life savings scheme amount.
• Annual Limit - The application considers the annual limit for the employee or
Savings and Retirements 8-11
employer as the savings basis.
The employer can match the employee's contribution. However, an annual limit exists for both the employee and employer contributions.
The application considers the Savings deductions as third party payments, so that you can transfer the calculated contribution to a separate bank account for the employee.
Elements, Formulas, and Balances for Pensions and Savings SchemesThis topic explains the purpose of the elements, formulas, and balances that the application generates when you create a pension or savings scheme.
ElementsWhen you create a pension type, Oracle Payroll generates a balance initialization element, <Pension Type> Balance Initialisation.
When you create a pension or savings scheme, Oracle Payroll generates the elements listed in the following table, where <BASE NAME> is the name you enter when you define the scheme. It generates all of the elements in the Tax Information and Social Insurance Information classifications, but only sets up formula result rules for the ones you selected when you defined the pension type.
Important: For ABP pensions:
• All the pre-tax element names include "ABP". For example, <BASE NAME> ABP Pension Deduction.
• There is a predefined element, in addition to the generated elements. The predefined element is called ABP Pensions, and you enter this element for all employees who are members of ABP schemes. The processing of this Information element feeds an indirect pre-tax element for each pension scheme for which the person is eligible.
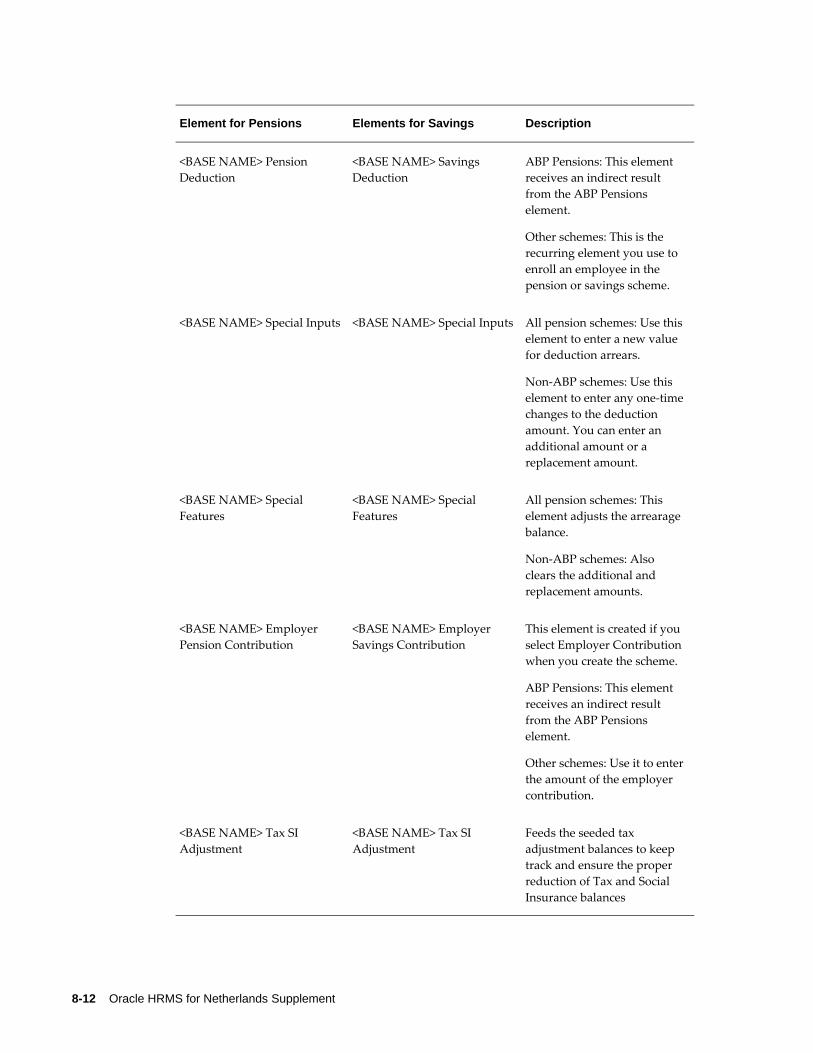
8-12 Oracle HRMS for Netherlands Supplement
Element for Pensions Elements for Savings Description
<BASE NAME> Pension Deduction
<BASE NAME> Savings Deduction
ABP Pensions: This element receives an indirect result from the ABP Pensions element.
Other schemes: This is the recurring element you use to enroll an employee in the pension or savings scheme.
<BASE NAME> Special Inputs <BASE NAME> Special Inputs All pension schemes: Use this element to enter a new value for deduction arrears.
Non-ABP schemes: Use this element to enter any one-timechanges to the deduction amount. You can enter an additional amount or a replacement amount.
<BASE NAME> Special Features
<BASE NAME> Special Features
All pension schemes: This element adjusts the arrearage balance.
Non-ABP schemes: Also clears the additional and replacement amounts.
<BASE NAME> Employer Pension Contribution
<BASE NAME> Employer Savings Contribution
This element is created if you select Employer Contribution when you create the scheme.
ABP Pensions: This element receives an indirect result from the ABP Pensions element.
Other schemes: Use it to enterthe amount of the employer contribution.
<BASE NAME> Tax SI Adjustment
<BASE NAME> Tax SI Adjustment
Feeds the seeded tax adjustment balances to keep track and ensure the proper reduction of Tax and Social Insurance balances

Savings and Retirements 8-13
Element for Pensions Elements for Savings Description
<BASE NAME> Standard Tax Adjustment
<BASE NAME> Standard Tax Adjustment
Holds the pension or savings contributions for the standardrate taxation balance.
<BASE NAME> Special Tax Adjustment
<BASE NAME> Special Tax Adjustment
Holds the pension or savings contributions for the special rate taxation balance.
<BASE NAME> SI Income Standard Adjustment
<BASE NAME> SI Income Standard Adjustment
Holds the pension or savings contributions for the standardrate tax deduction balance for SI Income.
<BASE NAME> SI Income Special Adjustment
<BASE NAME> SI Income Special Adjustment
Holds the pension or savings contributions for the special rate tax deduction balance for SI Income.
<BASE NAME> SI Income Non Tax Adjustment
<BASE NAME> SI Income Non Tax Adjustment
Holds the pension or savings contributions for the nontaxable balance for SI Income.
<BASE NAME> SI Gross Salary Standard Adjustment
<BASE NAME> SI Gross Salary Standard Adjustment
Holds the pension contributions for the standardrate tax deduction balance for SI Gross Salary.
<BASE NAME> SI Gross Salary Special Adjustment
<BASE NAME> SI Gross Salary Special Adjustment
Holds the pension contributions for the special rate tax deduction balance for SI Gross Salary.
<BASE NAME> SI Gross Salary Non Tax Adjustment
<BASE NAME> SI Gross Salary Non Tax Adjustment
Holds the pension contributions for the nontaxable balance for SI Gross Salary.
<BASE NAME> PGGM Disability Pension Contribution
<BASE NAME> PGGM Disability Pension Contribution
Holds PGGM pension contributions for disabled employees.
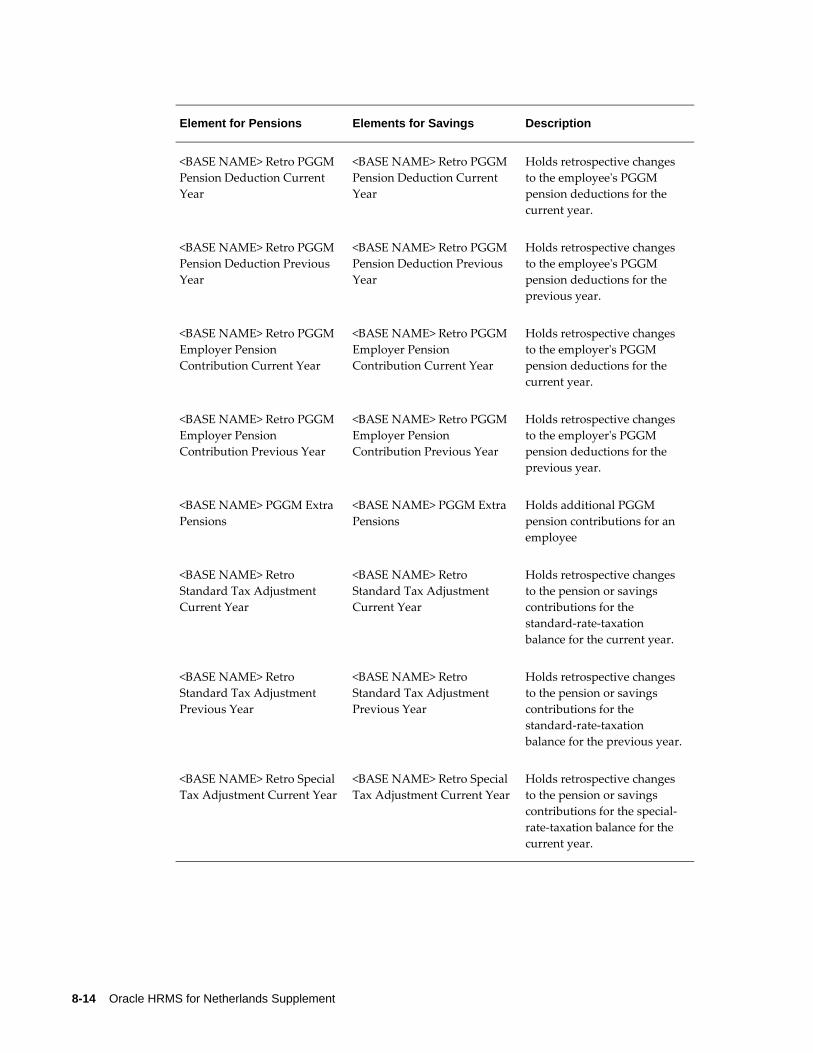
8-14 Oracle HRMS for Netherlands Supplement
Element for Pensions Elements for Savings Description
<BASE NAME> Retro PGGM Pension Deduction Current Year
<BASE NAME> Retro PGGM Pension Deduction Current Year
Holds retrospective changes to the employee's PGGM pension deductions for the current year.
<BASE NAME> Retro PGGM Pension Deduction Previous Year
<BASE NAME> Retro PGGM Pension Deduction Previous Year
Holds retrospective changes to the employee's PGGM pension deductions for the previous year.
<BASE NAME> Retro PGGM Employer Pension Contribution Current Year
<BASE NAME> Retro PGGM Employer Pension Contribution Current Year
Holds retrospective changes to the employer's PGGM pension deductions for the current year.
<BASE NAME> Retro PGGM Employer Pension Contribution Previous Year
<BASE NAME> Retro PGGM Employer Pension Contribution Previous Year
Holds retrospective changes to the employer's PGGM pension deductions for the previous year.
<BASE NAME> PGGM Extra Pensions
<BASE NAME> PGGM Extra Pensions
Holds additional PGGM pension contributions for an employee
<BASE NAME> Retro Standard Tax Adjustment Current Year
<BASE NAME> Retro Standard Tax Adjustment Current Year
Holds retrospective changes to the pension or savings contributions for the standard-rate-taxation balance for the current year.
<BASE NAME> Retro Standard Tax Adjustment Previous Year
<BASE NAME> Retro Standard Tax Adjustment Previous Year
Holds retrospective changes to the pension or savings contributions for the standard-rate-taxation balance for the previous year.
<BASE NAME> Retro Special Tax Adjustment Current Year
<BASE NAME> Retro Special Tax Adjustment Current Year
Holds retrospective changes to the pension or savings contributions for the special-rate-taxation balance for the current year.
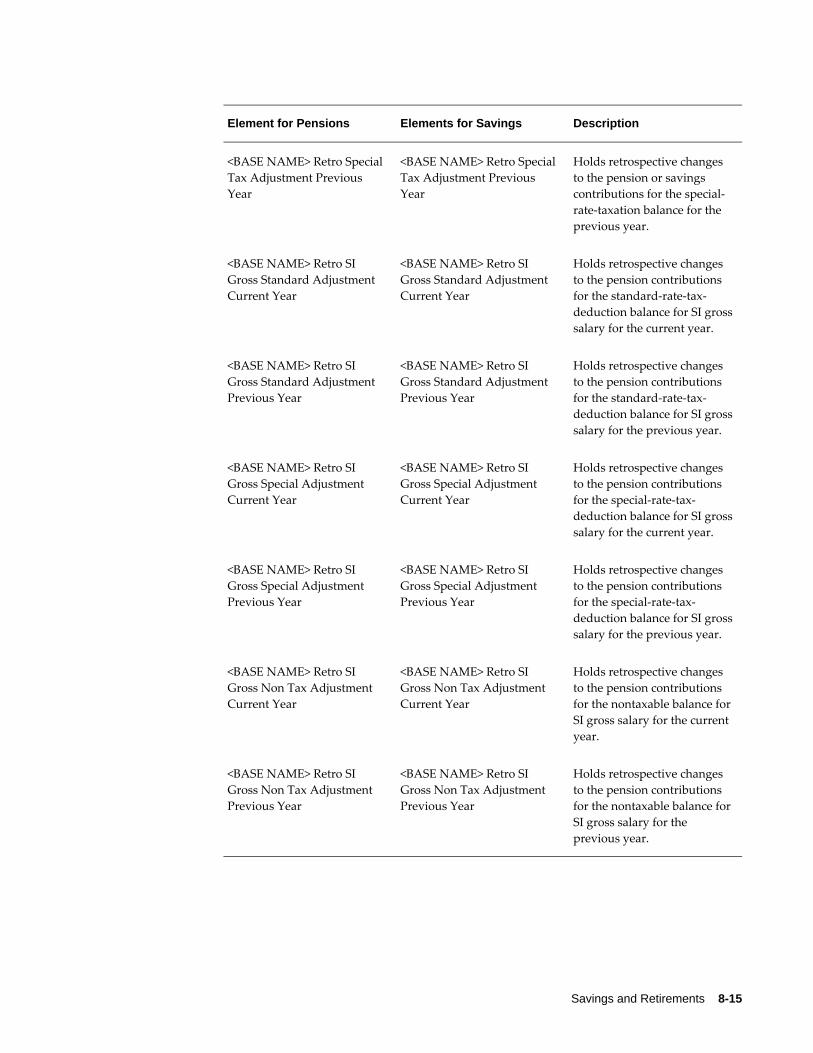
Savings and Retirements 8-15
Element for Pensions Elements for Savings Description
<BASE NAME> Retro Special Tax Adjustment Previous Year
<BASE NAME> Retro Special Tax Adjustment Previous Year
Holds retrospective changes to the pension or savings contributions for the special-rate-taxation balance for the previous year.
<BASE NAME> Retro SI Gross Standard Adjustment Current Year
<BASE NAME> Retro SI Gross Standard Adjustment Current Year
Holds retrospective changes to the pension contributions for the standard-rate-tax-deduction balance for SI grosssalary for the current year.
<BASE NAME> Retro SI Gross Standard Adjustment Previous Year
<BASE NAME> Retro SI Gross Standard Adjustment Previous Year
Holds retrospective changes to the pension contributions for the standard-rate-tax-deduction balance for SI grosssalary for the previous year.
<BASE NAME> Retro SI Gross Special Adjustment Current Year
<BASE NAME> Retro SI Gross Special Adjustment Current Year
Holds retrospective changes to the pension contributions for the special-rate-tax-deduction balance for SI grosssalary for the current year.
<BASE NAME> Retro SI Gross Special Adjustment Previous Year
<BASE NAME> Retro SI Gross Special Adjustment Previous Year
Holds retrospective changes to the pension contributions for the special-rate-tax-deduction balance for SI grosssalary for the previous year.
<BASE NAME> Retro SI Gross Non Tax Adjustment Current Year
<BASE NAME> Retro SI Gross Non Tax Adjustment Current Year
Holds retrospective changes to the pension contributions for the nontaxable balance for SI gross salary for the current year.
<BASE NAME> Retro SI Gross Non Tax Adjustment Previous Year
<BASE NAME> Retro SI Gross Non Tax Adjustment Previous Year
Holds retrospective changes to the pension contributions for the nontaxable balance for SI gross salary for the previous year.
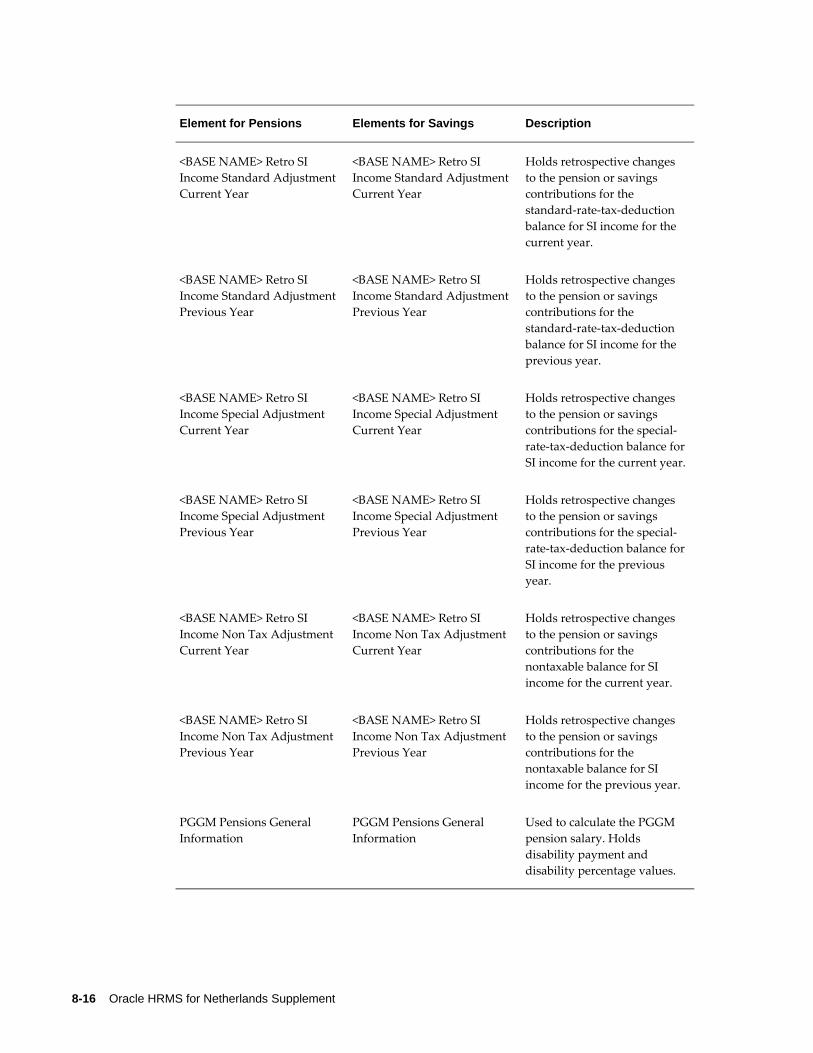
8-16 Oracle HRMS for Netherlands Supplement
Element for Pensions Elements for Savings Description
<BASE NAME> Retro SI Income Standard Adjustment Current Year
<BASE NAME> Retro SI Income Standard Adjustment Current Year
Holds retrospective changes to the pension or savings contributions for the standard-rate-tax-deduction balance for SI income for the current year.
<BASE NAME> Retro SI Income Standard Adjustment Previous Year
<BASE NAME> Retro SI Income Standard Adjustment Previous Year
Holds retrospective changes to the pension or savings contributions for the standard-rate-tax-deduction balance for SI income for the previous year.
<BASE NAME> Retro SI Income Special Adjustment Current Year
<BASE NAME> Retro SI Income Special Adjustment Current Year
Holds retrospective changes to the pension or savings contributions for the special-rate-tax-deduction balance forSI income for the current year.
<BASE NAME> Retro SI Income Special Adjustment Previous Year
<BASE NAME> Retro SI Income Special Adjustment Previous Year
Holds retrospective changes to the pension or savings contributions for the special-rate-tax-deduction balance forSI income for the previous year.
<BASE NAME> Retro SI Income Non Tax Adjustment Current Year
<BASE NAME> Retro SI Income Non Tax Adjustment Current Year
Holds retrospective changes to the pension or savings contributions for the nontaxable balance for SI income for the current year.
<BASE NAME> Retro SI Income Non Tax Adjustment Previous Year
<BASE NAME> Retro SI Income Non Tax Adjustment Previous Year
Holds retrospective changes to the pension or savings contributions for the nontaxable balance for SI income for the previous year.
PGGM Pensions General Information
PGGM Pensions General Information
Used to calculate the PGGM pension salary. Holds disability payment and disability percentage values.

Savings and Retirements 8-17
Element for Pensions Elements for Savings Description
PGGM Pensions Part Time Percentage
PGGM Pensions Part Time Percentage
Used to calculate the average part-time percentage for a period. Holds input values, such as part-time percentage, work hours, additional work hours, and parenta- leave information.
Retro PGGM Pensions General Information
Retro PGGM Pensions General Information
Holds retrospective changes to disability-payment and disability-percentage values.
Retro PGGM Pensions Part Time Percentage
Retro PGGM Pensions Part Time Percentage
Holds retrospective changes to overriding part-time percentage, work hours, additional work hours, and parental-leave information.
Retro PGGM Disability Pension Contribution
Retro PGGM Disability Pension Contribution
Holds retrospective changes to the PGGM pension contributions for disabled employees.
Retro PGGM Extra Pensions Retro PGGM Extra Pensions Holds retrospective changes to the additional PGGM pension contributions for an employee.
Linking the ElementsFor ABP pensions, you must define a link for the ABP Pensions element. For other schemes, you must define links for the Pension Deduction, Savings Deduction, Special Inputs, Employer Pension Contribution, and Employer Savings Contribution elements, if you want to use them. The payroll run enters the other elements as indirect results. You can define links for these also if you want to set up costing for them.
Pensions FormulaCreating a pension scheme also generates a payroll formula: <BASE NAME> Pension Deduction or <BASE NAME> ABP Pension Deduction. This formula does the following processing:
• Checks that the employee is between the minimum and maximum ages defined for
8-18 Oracle HRMS for Netherlands Supplement
the pension type.
• Checks if the person is eligible for the pension type.
• Calculates the pensionable salary, using the selected salary calculation method, and adjusting the value if the employee is not full time. There are three salary calculation methods:
• Actual Salary of first payroll period in the year
Note: This is the only valid method for ABP pension types.
• Actual Salary of each processing payroll period
• Fixed Premium Amount--No salary calculation necessary since the premium amount is supplied by the pension provider.
• Calculates the maximum contribution for the pay period. These limits are always defined as annual amounts so they have to be prorated to the pay period by using the conversion rule defined on the pension type.
• Returns the deduction amount, taking account of the maximum contribution permitted, and any arrearage. Also returns the addition to arrearage if the scheme allows arrearage. Partial deduction amounts are not taken - the deduction amount is either the whole amount or nothing at all.
• Reduces the tax and Social Insurance balances that you selected for the pension type, in the sequence you specified, using the tax and SI adjustment elements generated for the scheme.
Savings FormulaCreating a savings scheme also generates a payroll formula: <BASE NAME> Savings Deduction. This formula does the following processing:
• Checks if the person is eligible for the savings scheme
• Checks that the employee is between the minimum and maximum ages defined for the pension type
• Checks if any additional or replacement amounts have been entered
• Calculates the deduction amount, making sure that the year-to-date amount is less than the Annual Limit defined on the pension type
• Reduces the tax and Social Insurance balances that you selected for the pension
Savings and Retirements 8-19
type, in the sequence you specified, using the tax and SI adjustment elements generated for the scheme.
• Increases the Wage Saving or Premium Saving Taxable Amount balance by the amount of the deduction
BalancesOracle Payroll includes seeded balances to store employee and employer pension and savings contributions, and the total of all pre-tax deductions:
• Employee Pension Contribution
• Employer Pension Contribution
• Employee Savings Contribution
• Employer Savings Contribution
• Pre-Tax Deductions
• Wage Saving Taxable Amount
• Premium Saving Taxable Amount
• Recurring Bonus
• Non Recurring Bonus
• PGGM Pension Salary
• PGGM Part Time Percentage
• PGGM Scale Salary
• PGGM Full Time Recurring Payments
• PGGM Part Time Recurring Payments
• PGGM Scale Salary for Holiday Allowance
• PGGM Full Time Recurring Payments For Holiday Allowance
• PGGM Part Time Recurring Payments For Holiday Allowance
• PGGM Scale Salary For End Of Year Bonus
• PGGM Part Time Recurring Payments For End Of Year Bonus
8-20 Oracle HRMS for Netherlands Supplement
• PGGM Full Time Recurring Payments For End Of Year Bonus
• Balances to keep track of the adjustments that the pensions or savings elements do to the tax and SI balances:
SI Income Non Tax Adjustment
SI Income Special Tax Adjustment
SI Income Standard Tax Adjustment
SI Gross Salary Non Tax Adjustment
SI Gross Salary Special Tax Adjustment
SI Gross Salary Standard Tax Adjustment
Special Tax Adjustment
Standard Tax Adjustment
• ABP Employee Pension Contribution
• ABP Employer Pension Contribution
• ABP Pension Salary
When you create a pension type, Oracle Payroll creates primary balances for employee and employer contributions:
• <Pension Type> EE Contribution
• <Pension Type> ER Contribution
When you create a scheme, Oracle Payroll creates balance feeds from the generated elements to these balances.
Creating a pension scheme generates the following balances:
• <Base Name> EE Contribution
• <Base Name> ER Contribution
• <Base Name> Additional Amount
• <Base Name> Replacement Amount
• <Base Name> Arrears
• <Base Name> Not Taken
• <Base Name> Pension Contribution
Savings and Retirements 8-21
• <Base Name> Prior Contribution
• <Base Name> Pension Salary
Creating this balance is optional. Instead, the scheme can use the pension salary balance you specified for the pension type. The formula uses this balance for all calculations based on percentage of salary. By default, this balance is fed by all earnings. You can change the balance feeds, if required.
Creating a savings scheme generates the following balances:
• <Base Name> EE Savings Contribution
• <Base Name> ER Savings Contribution
• <Base Name> Additional Amount
• <Base Name> Replacement Amount
• <Base Name> Arrears (for future use)
• <Base Name> Not Taken (for future use)
Secondary Classifications for Balance FeedsThe following secondary classifications control balance feeds for correct calculation of tax and SI.
In the Pre-Tax Deductions classification:
• Standard Tax Deduction: Pre-tax Deductions
• Special Tax Deduction: Pre-tax Deductions
In the Pre-SI Deductions classification:
• SI Gross Salary Standard Tax Deduction: Pre-SI Deductions
• SI Gross Salary Special Tax Deduction: Pre-SI Deductions
• SI Gross Salary Non-taxable Deduction: Pre-SI Deductions
• SI Income Standard Tax Deduction: Pre-SI Deductions
• SI Income Special Tax Deduction: Pre-SI Deductions
• SI Income Non-taxable Deduction: Pre-SI Deductions
The following secondary classifications control the balance feeds for the calculation of recurring and non recurring balances:
8-22 Oracle HRMS for Netherlands Supplement
• Non Recurring Bonus: Earnings
• Recurring Bonus: Earnings
Arrears ManagementWhen you set up a pension scheme, you can specify whether you want to store arrears when employees have insufficient funds for the pensions contribution. Oracle Payroll does not take a partial deduction. Therefore, if there are insufficient funds to take the full contribution, this full amount is added to the arrears balance.
The Pensions Deduction element has an input value called Clear Arrears. You can use this to specify whether the payroll run should clear the arrears. If you set this input value to Y, the payroll run clears the arrears balance without affecting pay.
Oracle Payroll uses the Special Features element to manage arrears. This element - which is automatically generated when you set up the pension scheme - has the input values Not Taken, whichholds any amount not taken for the deduction in the most recent payroll run, and Arrears Contribution, whichfeeds the arrears balance.
Adjusting ArrearsIf you need to override the arrears balance, you enter the new arrears value in the Adjust Arrears input value of the Special Inputs element.
Setting Up Pension and Savings SchemesFollow these steps if you want to set up pension or savings schemes, enroll employees in the relevant schemes, and process contributions in the payroll run.
1. Enter your pension types. Choose the Pensions and Savings option in the Navigatorthen click on the Pension Types tab.
2. Enter your pension providers and assign pension types to your providers. Choose the Pensions and Savings option in the Navigator then click on the Pension Providers tab.
Important: Use the Pension pages - not the Organization window - to create pension providers, assign pension types to each provider, and assign providers and types to your HR organizations. The pages provide the required validation.
3. Do one of the following:
• ABP and PGGM pensions: Specify the default pension types for your business
Savings and Retirements 8-23
group and other organizations within the default hierarchy. Use the Organization window.
Note: The pension types are cumulative. If you specify pension types at the business group, parent organization, and child organization levels, employees assigned to the child organization will be eligible for the pension types specified at all levels.
See: Assigning ABP Pension Types to an Organization, page 1-46
See: Assigning PGGM Pension Types to an Organization, page 1-46
• Other pension or savings schemes: Assign pension providers and types to your employers using the Pension pages.
Note: Pension types assigned at the highest level propagate to the child organizations unless overridden at the child level. If you enter any pension types at the child level, only those pension types are available for that particular organization.
4. All schemes: Generate the payroll objects required for your pension and savings schemes. Choose the Pensions and Savings option in the Navigator then click on theSchemes tab.
5. Link the generated elements.
• ABP schemes: You must link the predefined ABP Pensions element.
• PGGM schemes: You can specify whether the application should automatically create links for retro and deduction elements. This helps in reducing the additional overhead of creating links before running a retropay process for the scheme.
• Life Savings Scheme: Link the predefined Employee Life Savings Contribution and Employer Life Savings Contribution elements to the relevant assignments.
• Other schemes: You must link the Pension Deduction, Savings Deduction, Special Inputs, and - if the scheme has employer contributions - Employer Pension or Savings Contribution elements.
You can also link the other generated elements, if required, for costing purposes. The names of all generated elements begin with the base name you entered on the Schemes tab.
See: Defining Element Links, Oracle HRMS Compensation and Benefits Management
8-24 Oracle HRMS for Netherlands Supplement
Guide
6. Review the generated formula <BASE_NAME>_PENSION_DEDUCTION or <BASE_NAME>_SAVINGS_DEDUCTION or <BASE_NAME>_ABP_PENSION_DEDUCTION or <BASE_NAME>_PGGM_PENSION_DEDUCTION to ensure that it handles the processing you require. You can configure this formula and the generated formula result rules, if required.
Note: If you want the ABP formula to check whether an employee is receiving FLO Payment (which means they cannot contribute to an ABP pension), you must uncomment the code that checks this field in the formula.
7. For pensions, check the balance feeds to the balances that you are using to calculate the pension basis, if the scheme's contributions are a percentage of the pension basis:
• If you chose to generate a new balance for the pension scheme, notice that all earnings feed this balance (<Base Name> Pension Salary), by default. You can change the balance feeds, or you can edit the formula to use another balance, if required.
• If you are including last year's bonuses in the pension basis, make sure that youclassify the appropriate earnings types with the secondary classifications Recurring Bonus: Earnings and Non Recurring Bonus: Earnings
For savings, ensure that the pay value of the Savings Deduction element feeds the Wage Savings Taxable Amount balance or the Premium Saving Taxable Amount balance, so that tax is calculated correctly.
See: Defining User Balances, page 9-64
For life savings scheme, ensure the employee and employer life savings elements feed the Employee Life Savings Contribution and Employer Life Savings Contribution balances. These balances enable you to report the savings amount on the wage tax report.
8. For savings schemes, define third party personal payment methods for your assignments.
1. Create an organizational payment method, of the direct deposit type, and enter a dummy account in the Bank Details window. See: Defining a Payment Method, Oracle HRMS Payroll Processing Management Guide
2. Select this method as a valid payment method for your payrolls. See: Defining aPayroll, Oracle HRMS Payroll Processing Management Guide
Savings and Retirements 8-25
3. In the Personal Payment Method window, select this third party payment method for employees who enroll in the savings scheme. Enter the details of thebank account the employee is using for the savings. Do not enter Payee details. See: Entering Payment Methods for an Employee Assignment, Oracle HRMS Workforce Sourcing, Deployment, and Talent Management Guide
When you enroll the employee in the savings scheme, you select this payment method in the Payee field of the Entry Values window.
9. Select the appropriate EITs for your responsibilities, using the Information Type Security window:
To Enable Users to Enter . . . Select This EIT . . .
Override Average Pension Days (used in the Average Working Days and Average Days With Work Schedules conversion rules)
Dutch Average Pension Days EIT (NL_PAI)
Override pension salary and pension basis at the assignment level for ABP pensions
ABP Participation and Salary Information EIT (NL_ABP_PAR_INFO)
Other override information for ABP pensions at the assignment and pension type level
ABP Pensions Override Information EIT (NL_ABP_PI)
Which people receive FLO Payment, Disability Pay, or Payment of Resignation
Resignation Pay Details EIT (NL_RESIGNATION_PAY)
Holiday allowance and end of year bonus percentages for PGGM pensions
Note: You can override these percentages at the assignment level (for example, for ineligible employees) using the two input values in the PGGM Pensions General Info element. Enter zero for ineligible employees.
PGGM General Info EIT (PQP_NL_PGGM_INFO)
8-26 Oracle HRMS for Netherlands Supplement
To Enable Users to Enter . . . Select This EIT . . .
Employee and total contribution percentages for PGGM pensions
Note: For PGGM pensions, you can specify the contribution percentages at either the organization or the element-entry level. You cannot specify them at the assignment level.
PGGM Pension Types EIT (PQP_NL_PGGM_PT)
See: Setting Up Extra Information Types Against a Responsibility, Oracle HRMS Configuring, Reporting, and System Administration Guide
10. If you are setting up ABP or ANW pensions in which the salary threshold or percentage contribution varies by employee age, set up the user-defined tables that hold the age-dependent values. See: Entering ABP Salary Thresholds and PremiumsThat Vary By Age, page 8-28.
For PGGM pensions, Oracle Payroll uses predefined salary-dependant and age-dependant thresholds in the pension-basis calculation.
11. If you are using element link criteria to establish eligibility for pension schemes, your setup is complete and you are ready to enroll employees using BEE or the Element Entries window. See: Managing Pensions and Savings Contributions, page 8-29
If you are using eligibility profiles to establish eligibility, you must set up a pension plan, and related items, following the usual procedures for Standard and AdvancedBenefits, which are summarized in: Setting Up a Pension or Savings Plan in Standard or Advanced Benefits, page 8-26
12. For ABP pension schemes, check that you have performed all the setup required to run the notification report. See: Setting Up The ABP Notification Extract, page 8-38
Setting Up a Pension or Savings Plan in Standard or Advanced Benefits1. Create a plan type.
See: Defining Plan Types, Oracle HRMS Compensation and Benefits Management Guide
2. Ensure you have Program/Plan years set up.
See: Defining a Program or Plan Year Period, Oracle HRMS Compensation and Benefits Management Guide
Savings and Retirements 8-27
3. Create the participant eligibility profiles you require for your pension plans.
See: Defining an Eligibility Profile, Oracle HRMS Compensation and Benefits Management Guide
4. Advanced Benefits only: Check which life event reasons you will use to trigger enrollment in the pension plan.
See: Life Event Management, Oracle HRMS Compensation and Benefits Management Guide
5. Create the pension plan, selecting the plan type, plan periods, and eligibility profile you already created. If you use Advanced Benefits, select the life event reasons to trigger enrollment or de-enrollment.
See: Defining a Benefits Plan, Oracle HRMS Compensation and Benefits Management Guide
See: Defining Participant Eligibility Criteria for a Compensation Object, Oracle HRMS Compensation and Benefits Management Guide
See: Associating a Life Event Reason With a Compensation Object, Oracle HRMS Compensation and Benefits Management Guide
6. Define the plan enrollment requirements.
See: Defining an Enrollment Method for a Plan, Oracle HRMS Compensation and Benefits Management Guide
7. Create standard rates for your pension plans, selecting the <BASE NAME> Pension Deduction element or <BASE NAME> Savings Deduction element .
See: Defining Activity Rates for a Standard Contribution/Distribution, Oracle HRMSCompensation and Benefits Management Guide
8. Test your setup:
1. Enroll employees in the pension or savings scheme, using one of the following methods:
• If you have set up a pension or savings plan, you enroll the employees in the plan using the Miscellaneous Plan window (for not-in-program plans) or Non-Flex Program window.
• If you have associated life events with the plan, you can trigger an automatic enrollment opportunity by creating the life event (such as hiring the employee).
• If you are not using a plan, you must enter the Pension Deduction element or the Savings Deduction element in the Element Entries window, or using BEE. For ABP pension schemes, you enter the ABP Pensions element.
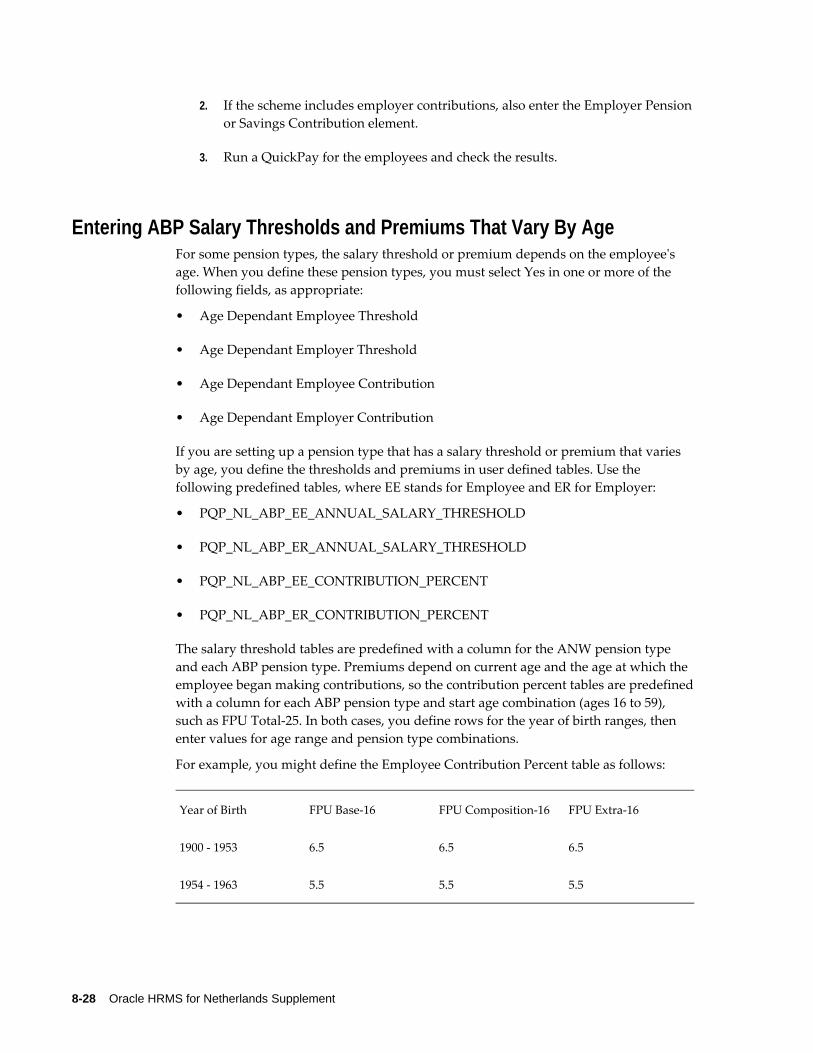
8-28 Oracle HRMS for Netherlands Supplement
2. If the scheme includes employer contributions, also enter the Employer Pensionor Savings Contribution element.
3. Run a QuickPay for the employees and check the results.
Entering ABP Salary Thresholds and Premiums That Vary By AgeFor some pension types, the salary threshold or premium depends on the employee's age. When you define these pension types, you must select Yes in one or more of the following fields, as appropriate:
• Age Dependant Employee Threshold
• Age Dependant Employer Threshold
• Age Dependant Employee Contribution
• Age Dependant Employer Contribution
If you are setting up a pension type that has a salary threshold or premium that varies by age, you define the thresholds and premiums in user defined tables. Use the following predefined tables, where EE stands for Employee and ER for Employer:
• PQP_NL_ABP_EE_ANNUAL_SALARY_THRESHOLD
• PQP_NL_ABP_ER_ANNUAL_SALARY_THRESHOLD
• PQP_NL_ABP_EE_CONTRIBUTION_PERCENT
• PQP_NL_ABP_ER_CONTRIBUTION_PERCENT
The salary threshold tables are predefined with a column for the ANW pension type and each ABP pension type. Premiums depend on current age and the age at which the employee began making contributions, so the contribution percent tables are predefinedwith a column for each ABP pension type and start age combination (ages 16 to 59), such as FPU Total-25. In both cases, you define rows for the year of birth ranges, then enter values for age range and pension type combinations.
For example, you might define the Employee Contribution Percent table as follows:
Year of Birth FPU Base-16 FPU Composition-16 FPU Extra-16
1900 - 1953 6.5 6.5 6.5
1954 - 1963 5.5 5.5 5.5
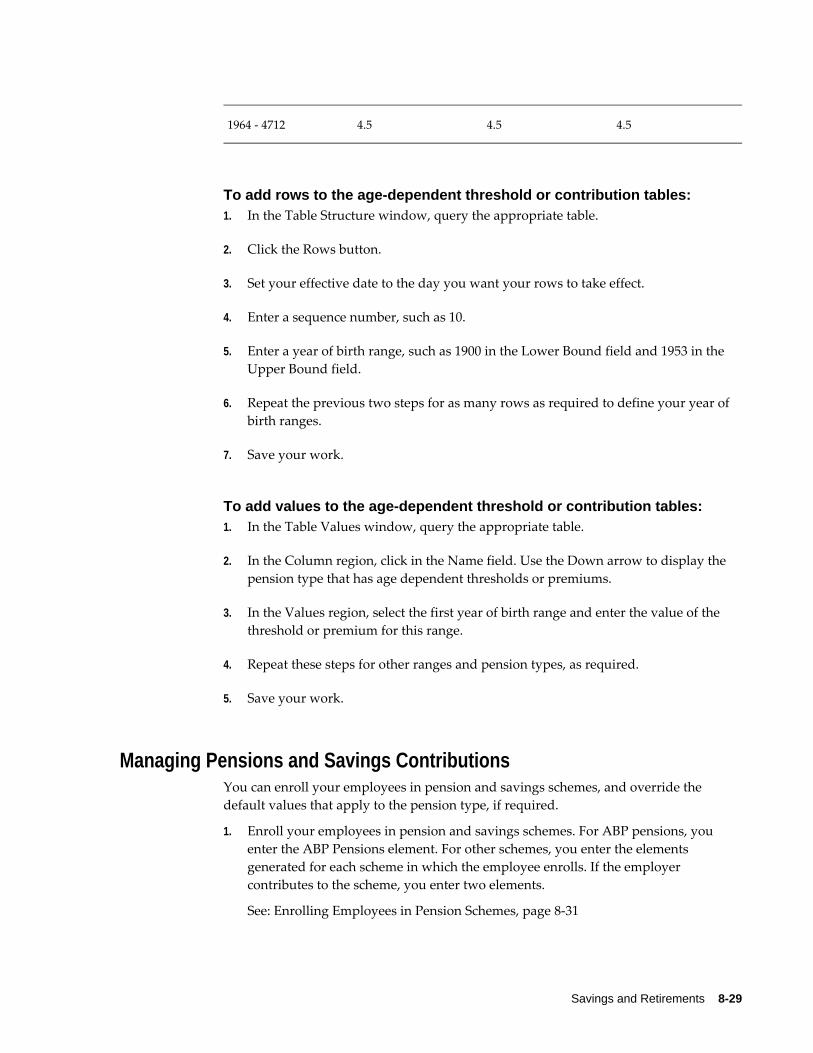
Savings and Retirements 8-29
1964 - 4712 4.5 4.5 4.5
To add rows to the age-dependent threshold or contribution tables:1. In the Table Structure window, query the appropriate table.
2. Click the Rows button.
3. Set your effective date to the day you want your rows to take effect.
4. Enter a sequence number, such as 10.
5. Enter a year of birth range, such as 1900 in the Lower Bound field and 1953 in the Upper Bound field.
6. Repeat the previous two steps for as many rows as required to define your year of birth ranges.
7. Save your work.
To add values to the age-dependent threshold or contribution tables:1. In the Table Values window, query the appropriate table.
2. In the Column region, click in the Name field. Use the Down arrow to display the pension type that has age dependent thresholds or premiums.
3. In the Values region, select the first year of birth range and enter the value of the threshold or premium for this range.
4. Repeat these steps for other ranges and pension types, as required.
5. Save your work.
Managing Pensions and Savings ContributionsYou can enroll your employees in pension and savings schemes, and override the default values that apply to the pension type, if required.
1. Enroll your employees in pension and savings schemes. For ABP pensions, you enter the ABP Pensions element. For other schemes, you enter the elements generated for each scheme in which the employee enrolls. If the employer contributes to the scheme, you enter two elements.
See: Enrolling Employees in Pension Schemes, page 8-31
8-30 Oracle HRMS for Netherlands Supplement
See: Enrolling Employees in Savings Schemes, page 8-33
2. If the employee's schemes use the Average Working Days or Average Days With Work Schedules conversion rules, you can override Average Pension Days for this assignment using the Dutch Average Pension Days EIT. If you don't enter an override, the number for Average Pension Days is taken from a predefined global value (for the Average Working Days conversion rule) or calculated from the employee's work pattern (for the Average Days with Work Schedules conversion rule).
Important: This override applies to all of the employee's schemes unless you entered a lower level override. For ABP schemes, you can enter an override for a specific pension type for the assignment using the ABP Pensions Override Information EIT. For other schemes, you can enter an override for a specific scheme in the Override Pension Days input value on the Pension Deduction and Employer Pension Contribution elements. The entry in the input value takes precedence.
See: Assignment Extra Information Types, page 3-39
3. For ABP pensions, check the pension types that are valid for this employee's organization. These appear in the Dutch ABP Pension Types EIT for the employee's organization or any parent organizations further up the default hierarchy. If you want to process any other pension types for this employee, use the ABP Pensions Override Information assignment EIT to enter the additional pension types.
See: Assigning ABP Pension Types to an Organization, page 1-46
See: Assignment Extra Information Types, page 3-39
4. You can override pension salary, annual limits, and contribution amounts for an employee assignment. For ABP pensions, use the ABP Participation and Salary Information assignment EIT to override pension salary and use the ABP Pensions Override Information EIT to override annual limits and contribution amounts for specific pension types. For other schemes, use the input values on the Pension or Savings Deduction element to override the contribution amount or annual limit.
For ABP pensions, see: Assignment Extra Information Types, page 3-39
For other schemes, see: Enrolling Employees in Pension Schemes, page 8-31 or: Enrolling Employees in Savings Schemes, page 8-33
5. If the employee contributes to an ABP pension type with an age-dependent premium, record the age at which the employee began contributing to the pension in the Participation Start Age field of the ABP Participation and Salary Information assignment EIT.
See: Assignment Extra Information Types, page 3-39
Savings and Retirements 8-31
6. If the employee receives FLO Payment, Disability Pay, or Payment of Resignation, record the fact using the Resignation Pay Details person EIT.
See: Person Extra Information Types, page 3-7
7. You enter the Special Inputs element if you want to enter a new arrearage amount or--for non-ABP schemes only--to make a one-time change to the employee contribution. See: Adjusting Pension or Savings Deductions, page 8-35
Enrolling Employees in Pension SchemesYou enroll employees in pension schemes by entering the appropriate elements. If you set up a pension plan, you enroll the employee in the plan (using Standard or AdvancedBenefits), and the application creates the element entry automatically.
Use the Element Entries window (or Batch Element Entry).
To enroll a person in an ABP pension scheme:1. Set your effective date to the day when the person's enrollment in the scheme
should begin.
2. In the Element Name field, select ABP Pensions.
There are no input values for this element.
3. Save your work.
Note: If you want to override the default salary and pension information, enter the override values in the ABP Participation and Salary Information EIT (for pension salary and salary basis values) or the ABP Pensions Override Information EIT for values specific to the pension type.
To enroll a person in other pension schemes:1. Set your effective date to the day when the person's enrollment in the scheme
should begin.
2. In the Element Name field, select the element for this pension scheme. Its name will take the form <base name> Pension Deduction.
3. Choose the Entry Values button to open the Entry Values window.
4. Do one of the following:
• For a fixed premium amount scheme, check the values in the Fixed Premium

8-32 Oracle HRMS for Netherlands Supplement
Amount and Percentage fields. You can override the defaults. The Fixed Premium Amount is the annual total amount paid for this employee's pension scheme. The percentage is the proportion of this amount paid by the employee. If it is less than 100% the employer pays the remaining percentage.
Important: If you override the Fixed Premium Amount or contribution percentages for one assignment, you must make the same change for any other assignments of this employee that contribute to a scheme of the same pension type. This change throughout ensures the Fixed Premium Amount is split correctly between assignments.
• For a percentage-based scheme, check the value in the Percentage field. You can override the default. This value is the percentage of the pension basis paid by the employee.
• For a flat amount scheme, check the values in the Amount and Period fields. You can override the defaults. These values are the flat amount the employee pays and the period that this amount covers, such as month or year (used for prorating the amount to a pay period).
5. Optionally use the Prior Contribution and Year of Prior Contribution fields to carry forward any contributions the employee made to the pension scheme while working for another employer.
6. Enter Y or N in the Clear Arrears field. Y means the payroll run sets the arrears balance to zero. N means the arrears balance does not change.
7. Optionally use the Override Annual Limit field to enter the maximum employee contribution that can be deducted in a year.
8. Optionally enter a value in the Override Pension Days field if you want to override the pension days factor used to prorate the pension deduction amount to a particular pay period.
9. Save your work.
To enable employer contributions to a scheme:1. Set your effective date to the day when the person's enrollment in the scheme
should begin.
2. In the Element Name field, select the employer contribution element for this pension scheme. Its name will take the form <base name> Employer Pension Contribution.
Savings and Retirements 8-33
3. Do one of the following:
• For a fixed premium amount pension scheme, save your work. The employer automatically contributes 100% minus the employee percentage of the fixed premium amount. You can skip the remaining steps.
• For other schemes, choose the Entry Values button to open the Entry Values window, and proceed with the remaining steps
4. Do one of the following:
• For a percentage-based scheme, check the value in the Percentage field. You can override the default. This value is the percentage of the pension basis paid by the employer.
• For a flat amount scheme, check the values in the Amount and Period fields. You can override the defaults. These values are the flat amount the employer pays and the period that this amount covers, such as month or year (used for prorating the amount to a pay period).
5. Optionally enter a value in the Override Pension Days field if you want to overridesthe pension days factor used to prorate the pension deduction amount to a particular pay period.
6. Save your work.
Enrolling Employees in Savings SchemesYou enroll employees in savings schemes by entering the appropriate elements.
Use the Element Entries window (or Batch Element Entry).
To enroll a person in a savings scheme:1. Set your effective date to the day when the person's enrollment in the scheme
should begin.
2. In the Element Name field, select the element for this savings scheme. Its name will take the form <base name> Savings Deduction.
3. Choose the Entry Values button to open the Entry Values window.
4. Do one of the following:
• For a fixed premium amount scheme, check the values in the Fixed Premium Amount and Percentage fields. You can override the defaults. The employee pays the given percentage of the Fixed Premium Amount each year, and this
8-34 Oracle HRMS for Netherlands Supplement
value is prorated to the pay period.
• For a percentage-based scheme, check the value in the Percentage field. You can override the default. This value is the percentage of the annual limit paid bythe employee.
• For a flat amount scheme, check the values in the Amount and Period fields. You can override the defaults. These values are the flat amount the employee pays and the period that this amount covers, such as month or year (used for prorating the amount to a pay period).
5. Optionally use the Override Annual Limit field to enter the maximum employee contribution that can be deducted in a year.
6. Optionally enter a value in the Override Pension Days field if you want to override the pension days factor used to prorate the deduction amount to a particular pay period.
Important: This field does not apply to savings schemes with the deduction method of Percentage of Annual Limit.
7. In the Payee Details field, select the name of the third party payment method set up for this payment.
8. Save your work.
To enable employer contributions to a scheme:1. Set your effective date to the day when the person's enrollment in the scheme
should begin.
2. In the Element Name field, select the employer contribution element for this pension scheme. Its name will take the form <base name> Employer Savings Contribution.
3. Choose the Entry Values button to open the Entry Values window.
4. Do one of the following:
• For a percentage-based scheme, check the value in the Percentage field. You can override the default. This value is the percentage of the annual limit or the fixed premium amount (depending on the deduction method) that the employer pays.
• For a flat amount scheme, check the values in the Amount and Period fields. You can override the defaults. These values are the flat amount the employer

Savings and Retirements 8-35
pays and the period that this amount covers, such as month or year (used for prorating the amount to a pay period).
5. Optionally enter a value in the Override Pension Days field if you want to override the pension days factor used to prorate the pension deduction amount to a particular pay period.
Important: This field does not apply to savings schemes with the deduction method of Percentage of Annual Limit.
6. In the Payee Details field, select the name of the third party payment method set up for this payment.
7. Save your work.
Adjusting Pension or Savings DeductionsBefore a run, you can enter an amount to replace the run result of a pensions or savings contribution deduction, or an amountto add to, or subtract from, the run result. You canalso change the arrears balance for a pensions deduction. For these changes, you use theSpecial Inputs element.
Important: For ABP pension schemes, you can change the arrears balance but you cannot adjust or replace the run result.
Use BEE or the Element Entries window.
To adjust a pension or savings deduction:1. In the Element Entries window, select the Special Inputs element, which has the
name <base name of scheme> Special Inputs.
2. Choose the Entry Values button.
3. Enter an adjustment value in the Additional Amount field or a replacement value inthe Replacement Amount field. An additional amount can be positive or negative.
4. If you want to override the arrears balance for a pensions deduction, make an entry in the Adjust Arrears input value.
5. Save your work.
8-36 Oracle HRMS for Netherlands Supplement
Withdrawing Savings to Compensate for Unpaid Leave or for RetirementEmployees participating in the Life Savings Scheme (LSS) can withdraw the amount saved to compensate for unpaid leave, or when they retire. Additionally, employees withdrawing money from their LSS receive a discount, the Life Cycle Leave Discount (LCLD), which is paid as part of the employees Net Earnings.
To meet Dutch legislation, any unused LCLD is not carried forward to the next pay period. If an employee has multiple assignments, any unused LCLD is carried over to the secondary assignments in the same Payroll Object Group.
To Withdraw Savings:1. In the Element Entries window, select the Life Savings Scheme Withdrawal
element.
2. Click Entry Values.
3. In the Withdrawal Amount field, enter the amount the employee wishes to withdraw.
According to Dutch legislation, the sum of the value entered in the Withdrawal Amount field and the wage amount cannot exceed the wage amount of the previous period.
4. In the Number of Years Saved field, enter the total number of years that the employee has participated in the Life Savings Scheme.
5. Optionally, to override the available LCLD amount, enter an amount in the Leave Discount field.
6. The Current and Previous Savings Adjustments fields displays the adjustments made to the savings balance by the current and previous employers.
The Previous Savings Adjustments field can go negative and is subtracted only if the withdrawal amount reduces the current employer savings balance to zero.
7. Save your work.
Savings and Retirements 8-37
Notification of ABP Pensions and USZO Social Insurance Data
Notification of ABP Pensions DataStichting Pensioenfonds ABP (Pension Provider) requires that employers send monthly notification reports for any key data changes, including:
• New Hire/Start of new Assignment
• Change in ABP Registration Number
• Change in Employee Number
• Start of dismissal pay assignment
• Change in employee personal details
• Change in employee's address
• Start and End of participation in ABP Pensions
• Change in Pension Salary
• Change in Pension Basis
• Change in Pension or SI Contribution
• Start and End of participation in certain SI types offered by ABP (WAO, WW, ZW and ZWF)
• Termination or End of an Assignment
Oracle HRMS supplies a predefined system extract to report on these changes for all assignments. You can view the change events recorded for a person using the Change Event Log window. See: Viewing Extract Change Events for a Person, Oracle HRMS Configuring, Reporting, and System Administration Guide
To control which changes the application tracks for this report, you can enable or disable the appropriate lookup code for the lookup type BEN_EXT_CHG_EVT.
Before using this system extract, you must ensure you have set up employees' personal, pensions, and social insurance data on the system. See: Setting Up the ABP Notification Extract, page 8-38
8-38 Oracle HRMS for Netherlands Supplement
Setting Up the ABP Notification Extract1. Ensure you have set up your ABP pensions schemes. See: Setting Up Pension and
Savings Schemes, page 8-22
2. Ensure you set up your Social Insurance (SI) providers and employer organizations.
See: Setting Up Tax, Social Insurance, and Private Health Insurance Organizations, page 1-54
Note: In the Dutch Organization EIT, make sure you select the WAO contribution insurance type that applies to your employees.
3. Use the Dutch ABP Provider organization EIT (PQP_ABP_PROVIDER) to enter the ABP Provider registration number. See: Entering Dutch ABP Provider Information, page 1-55
4. Enable the following lookups for the lookup type BEN_EXT_CHG_EVT so that the application tracks the changes to be reported in the notification:
• APS - Add Period of Service
• ASEA - Add Secondary Employee Assignment
• COAEN - Change of ABP Employer Number
• COAPPD - Change of ABP Pension Participation Date
• COAPS - Change of ABP Pension Salary
• COSIPD - Change of Social Insurance Participation Dates
• CODB - Update Date Of Birth
• COEN - Update Employee Number
• COEC - Update Employment Category
• COG - Update Gender
• COLN - Update Last Name
• COM - Update Marital Status
• CONA - Update Pre Name Adjunct
Savings and Retirements 8-39
• COPR - Update Primary Address
• COSS - Update Social Security/National Identifier
5. In the Extract Definition window, query the seeded extract definition (ABP USZO Electronic Notification), enter a prefix in the New Extract Preface field, and choose the Copy Extract button. Use this copy to create your notifications.
6. Ensure that for each employee address you set up, you record the correct house number and postal code information. See: Entering Addresses, page 3-60
7. Enroll your employees in ABP pension schemes, overriding default information for individual employees, if necessary, using the ABP Pensions Override Information assignment EIT and the ABP Participation and Salary Information EIT. See: Managing Pensions and Savings Contributions, page 8-29
8. For each employee:
• Use the Dutch Social Insurance Information assignment EIT to record participation in SI schemes.
• Use the Dutch ABP Reporting Information assignment EIT to record the employee's level of participation in each ABP pension category.
• Use the Dutch USZO Reporting Information assignment EIT to record, if appropriate, a principal objection code, whether the employee is an incidental worker, and whether the employee receives disability discount for wages WAOand wages UFO.
See: Assignment Extra Information Types, page 3-39
9. For each employee, enter the following information, which appears in the report:
• Select an employment type and subtype in the Employment Terms tabbed region on the Assignment window. See: Entering Additional Assignment Details, page 3-49
• Enter the assignment budget value, for employees who work less than full time.See: Entering Assignment Budget Values, Oracle HRMS Enterprise and Workforce Management Guide
• If an employee is receiving dismissal pay, ensure you select Dismissal Pay as the Assignment Category in the Assignment window.
10. Run the report using the Submit Requests window. See: Running the ABP Notification Extract, page 8-41
8-40 Oracle HRMS for Netherlands Supplement
Note: Creation of the ABP Pension Scheme automatically generates all the elements and balances required for ABP Pensions retropay processing. It is the user's responsibility to make sure element links exist for the following elements:
• <Base Name> Retro ABP Pension Deduction Current Year
• <Base Name> Retro ABP Employer Pension Contribution Current Year
• <Base Name> Retro ABP Pension Deduction Previous Year
• <Base Name> Retro ABP Employer Pension Contribution Previous Year
• Retro ABP Pensions Part Time Percentage
• Retro ABP Pensions Premium Reduction Information
11. Setting Up the ABP Notification Extract for a Specific Set of EmployeesIf you omit certain employees from a particular pay run, you can still extract information about those employees to send to ABP. The following steps enable you to extract the information for a specific set of employees without running the ABP notification extract for all employees again.
12. In the Find Extract window, query ABP USZO Electronic Notification.
13. Click Copy Extract. Specify a suitable name for the prefix of the extract, for exampleNew Hire.
14. Save the changes. Ensure this extract reflects any customization changes you might have performed for formulas.
15. Navigate to the Criteria Definition window. In the Find Profile window, query NewHire ABP USZO Electronic Notification Main Criteria or the new extract name.
16. On the People tab, delete the rule-based criterion, New Hire_PQP_NL_ABP_USZO_CRITERIA_FP. This value may appear with a different name if you have not used New Hire for the extract.
17. Create a new rule criterion, Person Full Name, and save your changes. Then, choosethe employees that need to be processed.
18. Process the ABP notification using the relevant dates. Ensure that you use the new extract, New Hire ABP USZO Electronic Notification so that the application extractsdata only for the people selected in step 16.
Savings and Retirements 8-41
Note: If you need to reuse this extract for different employees, the only change you need to make is to add these employees and remove those that are not necessary.
Running the ABP Notification Extract Run this predefined system extract to generate the monthly notification report for ABP. Before doing so, ensure you have recorded all the necessary data for your employees. See: Setting Up the ABP Notification Extract, page 8-38
Use the Submit Request window.
To run the ABP notification extract:1. Select Pension Extracts (Electronic Notification) in the Name field.
2. Click in the Parameters field to open the Parameters window.
3. Select ABP USZO Electronic Notification in the Extract Name field.
4. Select the employer in the Organization Name field. The process extracts data for employees assigned to this organization and its child organizations in the primary organization hierarchy.
5. Optionally select a payroll to restrict the report to employees assigned to this payroll.
6. Enter a Date From and Date To. These dates determine which changes are included in the extract.
7. Choose OK, then Submit.
8. View the output in the Extract Results window.
Setting Up the PGGM Notification Extract1. Set up PGGM pension types using the Pensions and Savings pages.
See: Setting Up Pension and Savings Schemes, page 8-22
2. Enable the following lookups for the lookup type BEN_EXT_CHG_EVT so that the application tracks the changes you need to report in the notification:
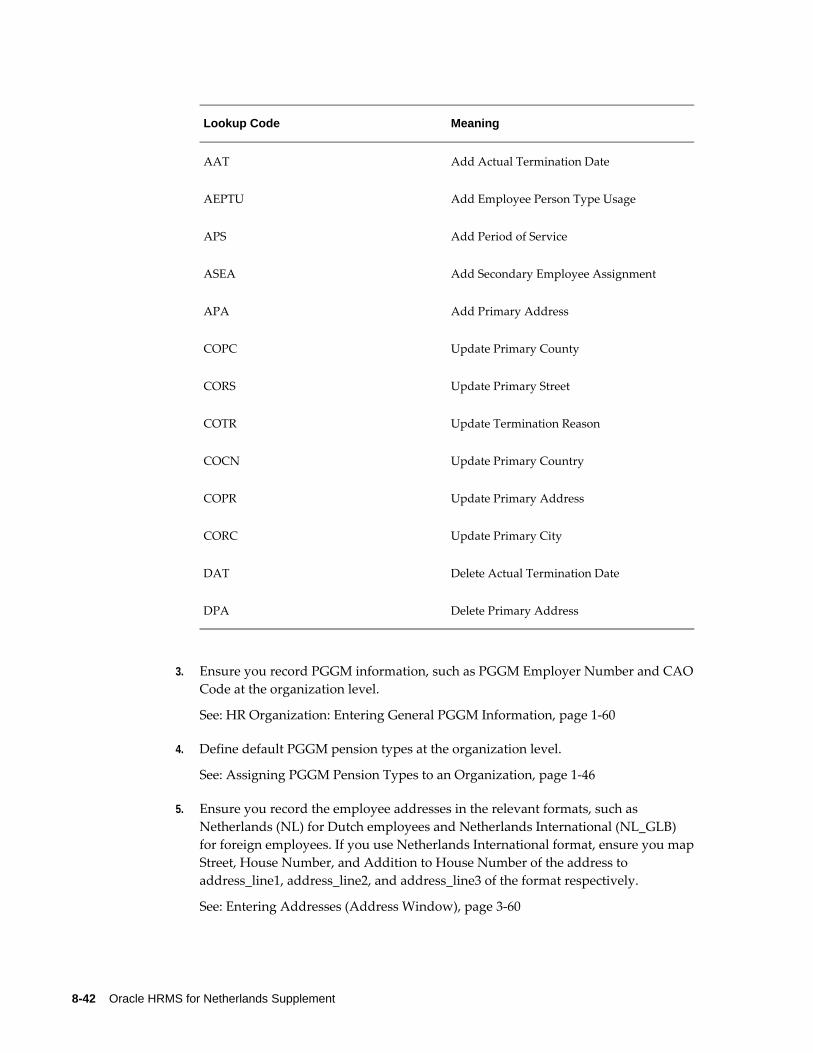
8-42 Oracle HRMS for Netherlands Supplement
Lookup Code Meaning
AAT Add Actual Termination Date
AEPTU Add Employee Person Type Usage
APS Add Period of Service
ASEA Add Secondary Employee Assignment
APA Add Primary Address
COPC Update Primary County
CORS Update Primary Street
COTR Update Termination Reason
COCN Update Primary Country
COPR Update Primary Address
CORC Update Primary City
DAT Delete Actual Termination Date
DPA Delete Primary Address
3. Ensure you record PGGM information, such as PGGM Employer Number and CAOCode at the organization level.
See: HR Organization: Entering General PGGM Information, page 1-60
4. Define default PGGM pension types at the organization level.
See: Assigning PGGM Pension Types to an Organization, page 1-46
5. Ensure you record the employee addresses in the relevant formats, such as Netherlands (NL) for Dutch employees and Netherlands International (NL_GLB) for foreign employees. If you use Netherlands International format, ensure you mapStreet, House Number, and Addition to House Number of the address to address_line1, address_line2, and address_line3 of the format respectively.
See: Entering Addresses (Address Window), page 3-60
Savings and Retirements 8-43
6. Create element links for the PGGM pension elements.
See: Defining Element Links, Oracle HRMS Compensation and Benefits Management Guide
7. Enroll your employees in PGGM pension schemes using element entries for PGGM elements.
See: Enrolling Employees in Pension Schemes, page 8-31
8. Ensure the Earnings element feeds the relevant PGGM balances, such as PGGM Scale Salary, PGGM Scale Salary For Holiday Allowance, and PGGM Scale Salary For End Of Year Bonus.
Running the PGGM Notification ExtractUse the Submit Request window to run the PGGM Notification extract.
To run the extract:1. In the Name field, select PGGM Pension Extracts (Electronic Notification). The
Parameters window opens.
2. Select PGGM Notification Request as the Extract Name.
3. Select the employer. The process extracts data for employees of the organization and its child organizations in the primary organization hierarchy.
4. Optionally, select a payroll to restrict the report to employees you assigned to the payroll.
5. Specify the period for which you want to extract the data.
6. Select the Extract Type, such as Monthly or Annual.
7. Click OK, and then submit the process.
8. View the output in the Extract Results window.

Other Payroll Earnings and Deductions 9-1
9Other Payroll Earnings and Deductions
Payroll Earnings and Deductions OverviewMany earnings and deductions - such as salary, pension deductions, and taxes - are discussed under specific functional headings, such as Salary and Grade Related Pay, or Savings and Retirement, or Payroll Statutory Deductions. In this area, we look at payroll earnings and deductions, such as wage attachments, that have not already been coveredunder other functional headings.
We also focus on additional setup required by Oracle Payroll for processing earnings and deductions. This setup includes the creation of formulas and balances. In some localizations, and for certain types of earnings and deductions, you can select template elements in the Configuration Workbench, or you can use the Element Design Wizard or template windows to generate all the components required for payroll processing, including elements, formulas, balances, and formula result rules.
Certain types of earnings and deductions require additional setup to enable special processing such as net-to-gross and proration, where this is enabled for your localization. Such setup is also discussed in this section.
Note: Mexico only: Oracle HRMS for Mexico does not support net-to-gross processing.
Key ConceptsTo get the most out of the earnings and deductions functionality of Oracle HRMS, you need to understand the following key concepts:
• Pay values
• Formulas
• Frequency rules
9-2 Oracle HRMS for Netherlands Supplement
• Payroll balances
• Earnings and deductions templates
• Proration
• Net-to-gross processing
• Third party payments
Payroll Earnings and DeductionsOracle HRMS provides an integrated solution for Human Resources and Payroll. Therefore your setup of compensation and benefits supports both compensation management and payroll management.
Can Oracle Payroll handle complex calculations?Yes it can, through its use of formulas to specify calculations for each earnings or deduction. These formulas use values from the HRMS database and can include conditional logic to perform different calculations for different groups of employees. For example, they can check balances or employee status to control how to process the earning or deduction. Many of the formulas you need, for example for tax calculations, are supplied with Oracle Payroll.
How do you control when each earning or deduction is processed?The sequence of processing in a payroll run is determined by classifications, such as Pre-tax Deductions and Tax Deductions. You can also prioritize the processing for an individual employee, for example to determine the order in which deductions are processed for wage attachments.
You control whether any value is processed just once, in every payroll run, or periodically (such as once a quarter). Your formulas can also change or stop the processing of an earning or deduction during a run, based on employee status.
How do you accumulate and review balances?The system can accumulate balances of payroll run results or values entered before the run. You can accumulate a balance over different time dimensions such as current run, month, and year to date. You can review balances after payroll processing and use balances to control the processing performed in the payroll run.
Can I set up new balances, for the values that are important to my company?Yes, you can define whatever additional balances your enterprise requires. For example,
Other Payroll Earnings and Deductions 9-3
you may require a Pensionable Earnings balance for a defined benefit pension plan yourenterprise offers employees.
How do you enter compensation values for the payroll run?Some values, such as salary, can be entered once and used in every payroll run (or periodic runs) until you need to update them. Other values, such as hours worked, needto be entered or calculated fresh for each run.
You can do one of the following:
• Use default values (which may be different for groups of employees)
• Enter values employee-by-employee
• Enter values in a batch
• Leave it to the system to enter values based on calculations performed during the payroll run
You can define validation rules to minimize data entry errors.
Wage Attachments
What wage attachments can I process using Oracle Payroll?The wage attachments that you can process depend on the specific payments that applyto your legislation. Examples of payments include child support payments, educational loans, taxes to local authorities, alimony, and bankruptcy orders.
See: Third Party Payments Overview, Oracle HRMS Compensation and Benefits Management Guide
US Only:
When the court issues a release notice for a wage attachment, or if you receive a Form 668-D for a federal tax levy, you must end the employee's wage attachment. Oracle Payroll also stops processing wage attachments when the total owed is reached.
Oracle Payroll supports electronic funds transfer (EFT) of state child support garnishments for the state of Illinois. However, all states accept the Oracle EFT format, but normally require different data dependent upon individual state requirements. You can use the Illinois EFT format to send support payments electronically to all states. Youneed to include only the information required by the state in the file. You create a separate file for each state containing different routing and account numbers, so you need to set up a separate third party payment method for each state.
Can I recoup my enterprise's costs automatically?Yes, if you operate in the US, you can use the Wage Attachment Fee Administration
9-4 Oracle HRMS for Netherlands Supplement
process to recoup costs. This process recoups costs in administering alimony, bankruptcy orders, employee requested attachments, and tax levies.
Can I determine the earnings types and amounts that are liable for wage attachment deductions?
Using Wage Attachment Earnings Rules you can determine which earnings types are considered disposable income and liable for wage attachment deductions.
Can I prioritize payment of wage attachments?You can determine the overall priority of a wage attachment compared to other deductions, and you can also determine sub priorities. For example, if an employee has multiple court orders against them, you can ensure that Oracle Payroll deducts the mostimportant order first.
The standard processing priority order for processing the various categories of attachment is the following:
• Alimony
• Child Support Orders
• Spousal Support Order
• Tax Levy
• State Tax Levy
• Bankruptcy Order
• Credit debt
• Debt Collection Improvement Act orders
• Educational Loan
• Garnishments
• Employee Requested Payment
Once deducted from an employee's wages, how is the wage attachment made?If enabled for your localization, you can use Oracle Payroll's Third Party Cheque Writerfeatures to produce cheques for either organizations or individuals. Localizations that do not have Oracle Payroll's Cheque Writer features available can make payments by credit transfer.
Other Payroll Earnings and Deductions 9-5
Can I use another system to manage the wage attachments?You can use an external system to manage your wage attachments. If you want to make entries from that system into Oracle Payroll for payroll processing, you can use predefined deductions that come with Oracle Payroll.
Can Oracle properly calculate overtime according to FLSA guidelines?Oracle Payroll fully supports the federal overtime calculation rule. The new functionality performs calculations for periods that are longer than a single workweek. You can configure the product to handle either Federal FLSA or State FLSA. You can also configure alternative overtime calculations as specified by selected states or by union contract.
Oracle Payroll uses the term Augments to refer to amounts paid which are in addition to the employee's regular rate of pay and which are considered to be non-discretionary, such as a commission or bonus. The new functionality prorates the augment across all periods during which it was earned.
9-6 Oracle HRMS for Netherlands Supplement
Additional Element Setup for Payroll
Formulas and Payroll Run Results Elements are processed during payroll runs according to the business rules for each element that you define at setup. Many of these rules are defined in formulas, written using Oracle FastFormula. Formulas specify how the payroll run should perform calculations for the element.
ExampleThis is a basic formula for the calculation for the element Wages:
Wages = Hours Worked in Week * Wage Rate
The processed results for each element are called the run results. They become balance feeds for different balances. Some balance feeds are predefined to feed required statutory balances, and you can create your own balance feeds to your own user defined balances.
Formula Inputs from Input Values or Database ItemsFormulas obtain some of the data they need from entries to their element's input values.The Wages formula above, for example, could locate each employee's hours worked as an entry to the input value Hours of the Wages element.
Formulas can also obtain information from database items. Much of the information in the Oracle HRMS database, including extensive information on employees and their assignments, is available to formulas as database items. For example, the Wages formula can locate each employee's wage rate as a database item.
Varying the Processing by Employee Group or StatusesThere are several ways to vary the processing performed by formulas:
• You can use conditional logic (IF..THEN) within a formula to perform different calculations depending on any information taken from input values or database items (such as length of service).
• You can associate more than one formula with an element, each triggered by a different assignment status (such as Active Assignment or On Sabbatical).
• You can use one formula but associate different formula results with each assignment status.
• You can associate a skip rule formula with an element. This formula can check balances, other element entries, the assignment status or any other database items
Other Payroll Earnings and Deductions 9-7
to determine whether the payroll run should process the element for an assignment.
Mexico only: Mexican implementations do not support skip rules by default. They must be enabled manually.
Types of Formula ResultsFormulas can produce different types of run results:
• The direct result is the amount of an earnings or deduction, for example, the dollar amount of wages an employee has earned that week. As well as calculating the amount to be paid, direct results can be used for costing purposes and analysis (such as tracking hours of overtime).
• Indirect results, updates, and stops. A formula result can make an entry to the input value of another element for its formula to use. An indirect result is an entry to a nonrecurring element. An update is an entry to a recurring element. A stop puts an end date on a recurring entry of another element, to prevent it being processed in the run.
• Order indirect. This result updates the subpriority of an element that has not yet been processed.
• Messages. For example, you can write a formula that checks the length of a text string, and have it issue a message for payroll users if the string is too short or too long.
You set up formula result rules to determine the type of each result, and the names and input values of any other elements the result may affect.
Formulas Included in Oracle Payroll Startup DataOracle Payroll comes with formulas specific to your legislation. Generally, you receive all the calculations required for employee tax withholding and employer taxes. When there are changes to taxes, you receive updates. You may also receive formulas for otherearnings and deductions, depending on your legislation.
Pay ValuesWhen you have occasion to look at the structure of an element online, you may see an input value named Pay Value at the top of its input value listing.
The Pay Value is different from other input values. Its purpose is to store an element's run result. For example, suppose the formula for the Wages element is:
Wages = Hours Worked * Wage Rate
If an employee whose wage rate is $10/hour works 40 hours in a week, the payroll run
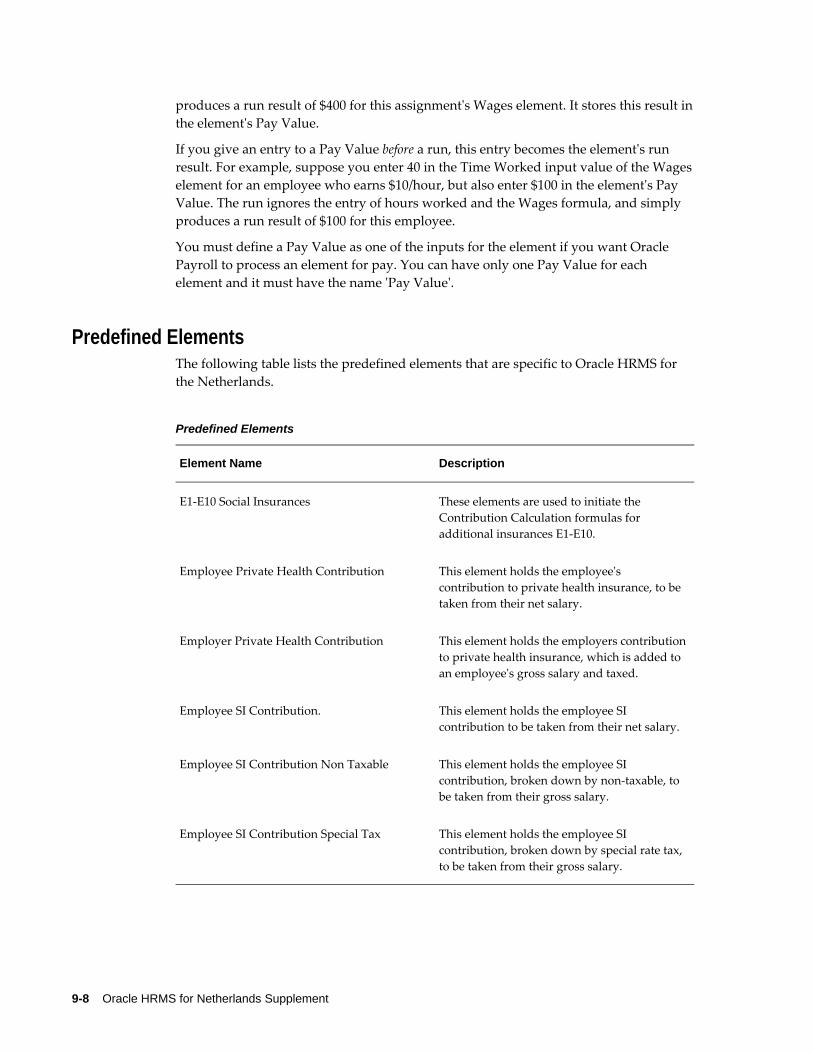
9-8 Oracle HRMS for Netherlands Supplement
produces a run result of $400 for this assignment's Wages element. It stores this result inthe element's Pay Value.
If you give an entry to a Pay Value before a run, this entry becomes the element's run result. For example, suppose you enter 40 in the Time Worked input value of the Wageselement for an employee who earns $10/hour, but also enter $100 in the element's Pay Value. The run ignores the entry of hours worked and the Wages formula, and simply produces a run result of $100 for this employee.
You must define a Pay Value as one of the inputs for the element if you want Oracle Payroll to process an element for pay. You can have only one Pay Value for each element and it must have the name 'Pay Value'.
Predefined ElementsThe following table lists the predefined elements that are specific to Oracle HRMS for the Netherlands.
Predefined Elements
Element Name Description
E1-E10 Social Insurances These elements are used to initiate the Contribution Calculation formulas for additional insurances E1-E10.
Employee Private Health Contribution This element holds the employee's contribution to private health insurance, to be taken from their net salary.
Employer Private Health Contribution This element holds the employers contributionto private health insurance, which is added to an employee's gross salary and taxed.
Employee SI Contribution. This element holds the employee SI contribution to be taken from their net salary.
Employee SI Contribution Non Taxable This element holds the employee SI contribution, broken down by non-taxable, to be taken from their gross salary.
Employee SI Contribution Special Tax This element holds the employee SI contribution, broken down by special rate tax, to be taken from their gross salary.
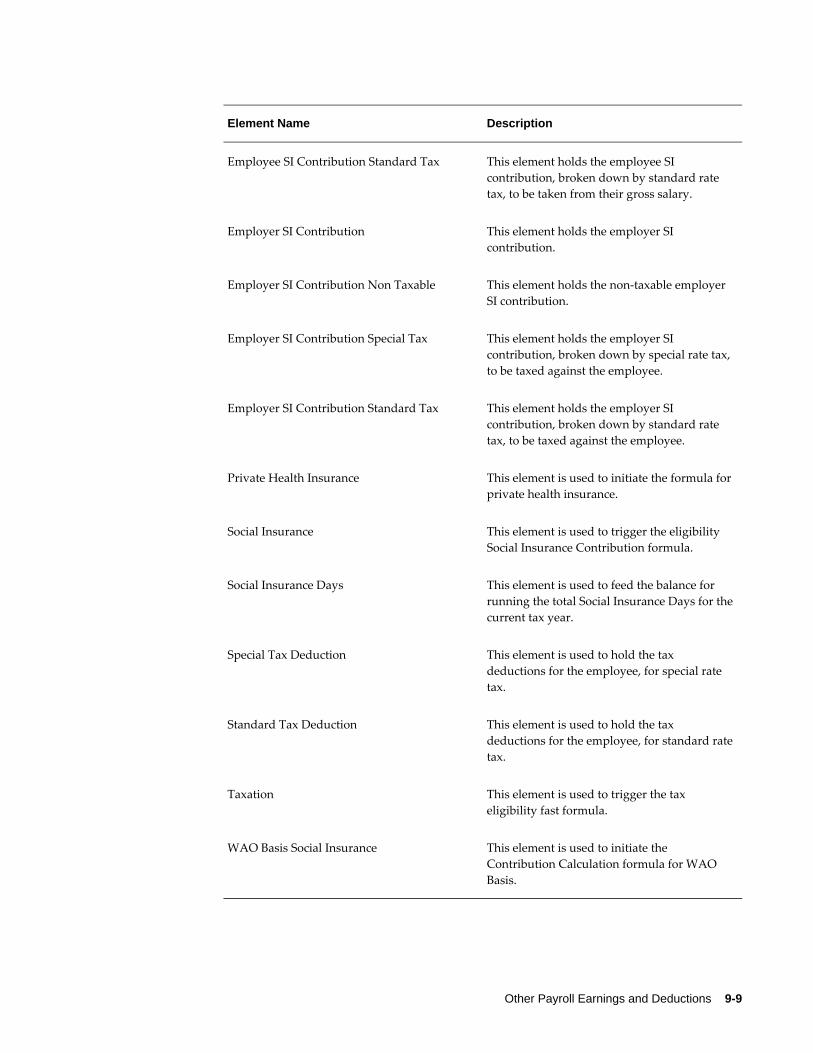
Other Payroll Earnings and Deductions 9-9
Element Name Description
Employee SI Contribution Standard Tax This element holds the employee SI contribution, broken down by standard rate tax, to be taken from their gross salary.
Employer SI Contribution This element holds the employer SI contribution.
Employer SI Contribution Non Taxable This element holds the non-taxable employer SI contribution.
Employer SI Contribution Special Tax This element holds the employer SI contribution, broken down by special rate tax, to be taxed against the employee.
Employer SI Contribution Standard Tax This element holds the employer SI contribution, broken down by standard rate tax, to be taxed against the employee.
Private Health Insurance This element is used to initiate the formula forprivate health insurance.
Social Insurance This element is used to trigger the eligibility Social Insurance Contribution formula.
Social Insurance Days This element is used to feed the balance for running the total Social Insurance Days for thecurrent tax year.
Special Tax Deduction This element is used to hold the tax deductions for the employee, for special rate tax.
Standard Tax Deduction This element is used to hold the tax deductions for the employee, for standard ratetax.
Taxation This element is used to trigger the tax eligibility fast formula.
WAO Basis Social Insurance This element is used to initiate the Contribution Calculation formula for WAO Basis.
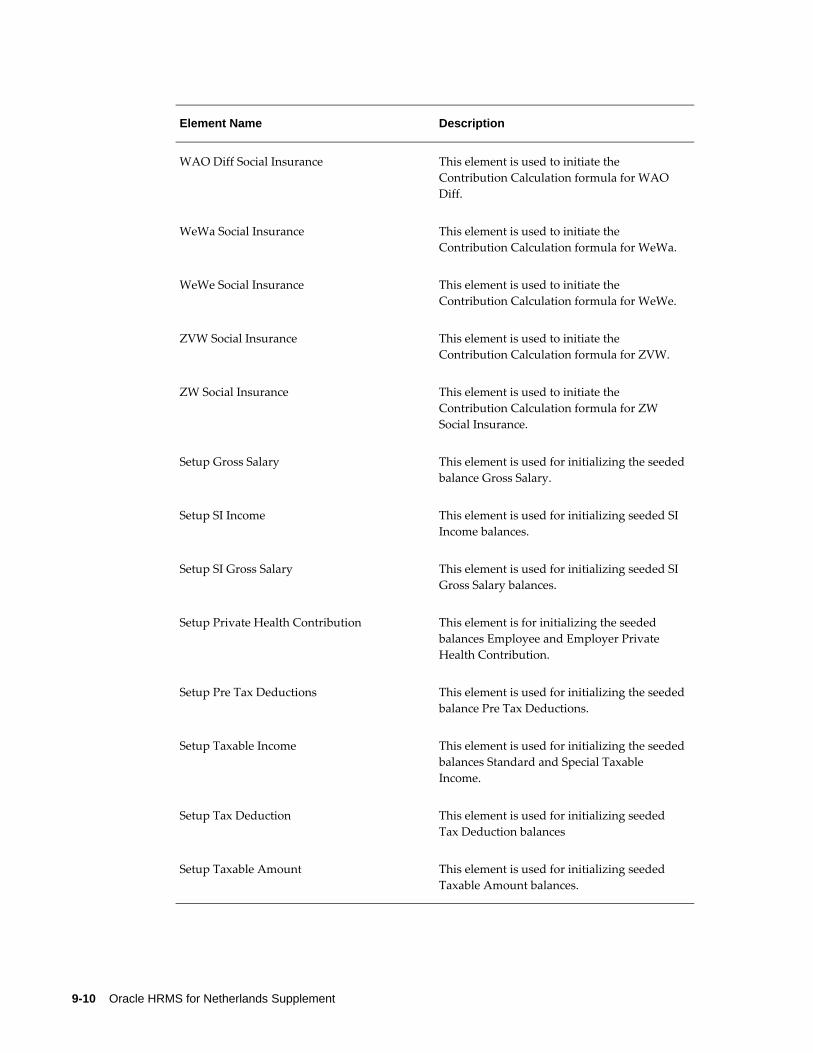
9-10 Oracle HRMS for Netherlands Supplement
Element Name Description
WAO Diff Social Insurance This element is used to initiate the Contribution Calculation formula for WAO Diff.
WeWa Social Insurance This element is used to initiate the Contribution Calculation formula for WeWa.
WeWe Social Insurance This element is used to initiate the Contribution Calculation formula for WeWe.
ZVW Social Insurance This element is used to initiate the Contribution Calculation formula for ZVW.
ZW Social Insurance This element is used to initiate the Contribution Calculation formula for ZW Social Insurance.
Setup Gross Salary This element is used for initializing the seededbalance Gross Salary.
Setup SI Income This element is used for initializing seeded SI Income balances.
Setup SI Gross Salary This element is used for initializing seeded SI Gross Salary balances.
Setup Private Health Contribution This element is for initializing the seeded balances Employee and Employer Private Health Contribution.
Setup Pre Tax Deductions This element is used for initializing the seededbalance Pre Tax Deductions.
Setup Taxable Income This element is used for initializing the seededbalances Standard and Special Taxable Income.
Setup Tax Deduction This element is used for initializing seeded Tax Deduction balances
Setup Taxable Amount This element is used for initializing seeded Taxable Amount balances.
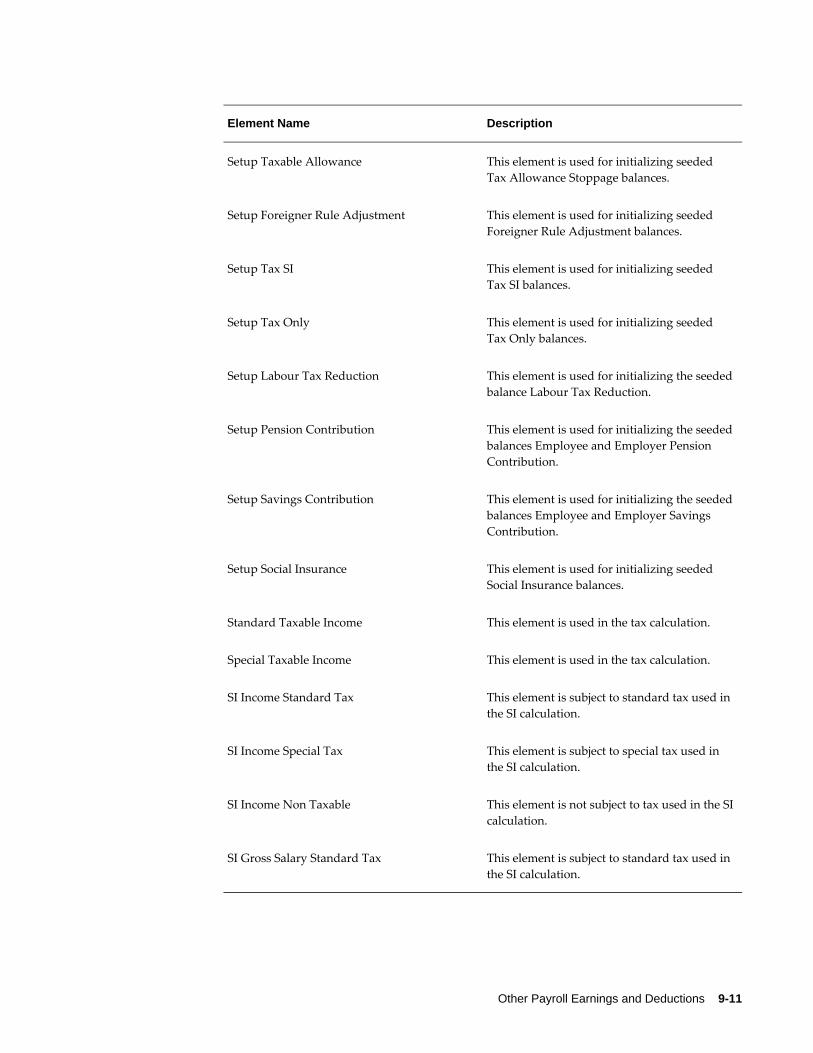
Other Payroll Earnings and Deductions 9-11
Element Name Description
Setup Taxable Allowance This element is used for initializing seeded Tax Allowance Stoppage balances.
Setup Foreigner Rule Adjustment This element is used for initializing seeded Foreigner Rule Adjustment balances.
Setup Tax SI This element is used for initializing seeded Tax SI balances.
Setup Tax Only This element is used for initializing seeded Tax Only balances.
Setup Labour Tax Reduction This element is used for initializing the seededbalance Labour Tax Reduction.
Setup Pension Contribution This element is used for initializing the seededbalances Employee and Employer Pension Contribution.
Setup Savings Contribution This element is used for initializing the seededbalances Employee and Employer Savings Contribution.
Setup Social Insurance This element is used for initializing seeded Social Insurance balances.
Standard Taxable Income This element is used in the tax calculation.
Special Taxable Income This element is used in the tax calculation.
SI Income Standard Tax This element is subject to standard tax used in the SI calculation.
SI Income Special Tax This element is subject to special tax used in the SI calculation.
SI Income Non Taxable This element is not subject to tax used in the SIcalculation.
SI Gross Salary Standard Tax This element is subject to standard tax used in the SI calculation.
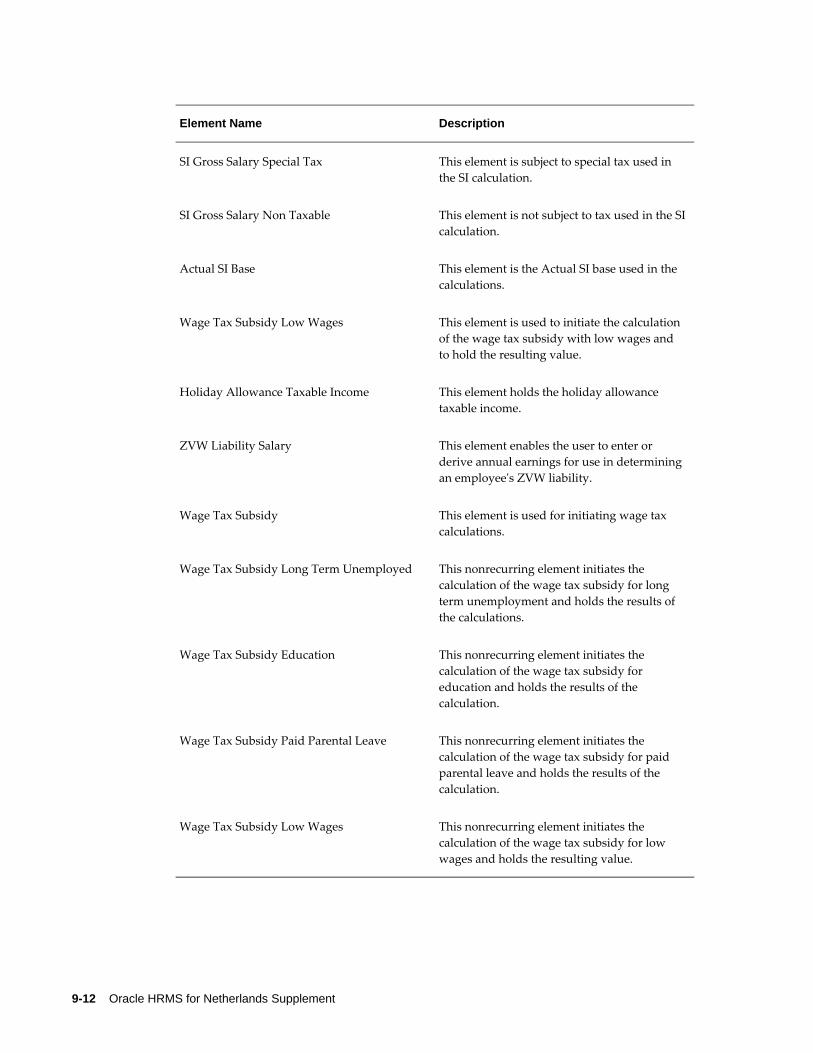
9-12 Oracle HRMS for Netherlands Supplement
Element Name Description
SI Gross Salary Special Tax This element is subject to special tax used in the SI calculation.
SI Gross Salary Non Taxable This element is not subject to tax used in the SIcalculation.
Actual SI Base This element is the Actual SI base used in the calculations.
Wage Tax Subsidy Low Wages This element is used to initiate the calculation of the wage tax subsidy with low wages and to hold the resulting value.
Holiday Allowance Taxable Income This element holds the holiday allowance taxable income.
ZVW Liability Salary This element enables the user to enter or derive annual earnings for use in determining an employee's ZVW liability.
Wage Tax Subsidy This element is used for initiating wage tax calculations.
Wage Tax Subsidy Long Term Unemployed This nonrecurring element initiates the calculation of the wage tax subsidy for long term unemployment and holds the results of the calculations.
Wage Tax Subsidy Education This nonrecurring element initiates the calculation of the wage tax subsidy for education and holds the results of the calculation.
Wage Tax Subsidy Paid Parental Leave This nonrecurring element initiates the calculation of the wage tax subsidy for paid parental leave and holds the results of the calculation.
Wage Tax Subsidy Low Wages This nonrecurring element initiates the calculation of the wage tax subsidy for low wages and holds the resulting value.
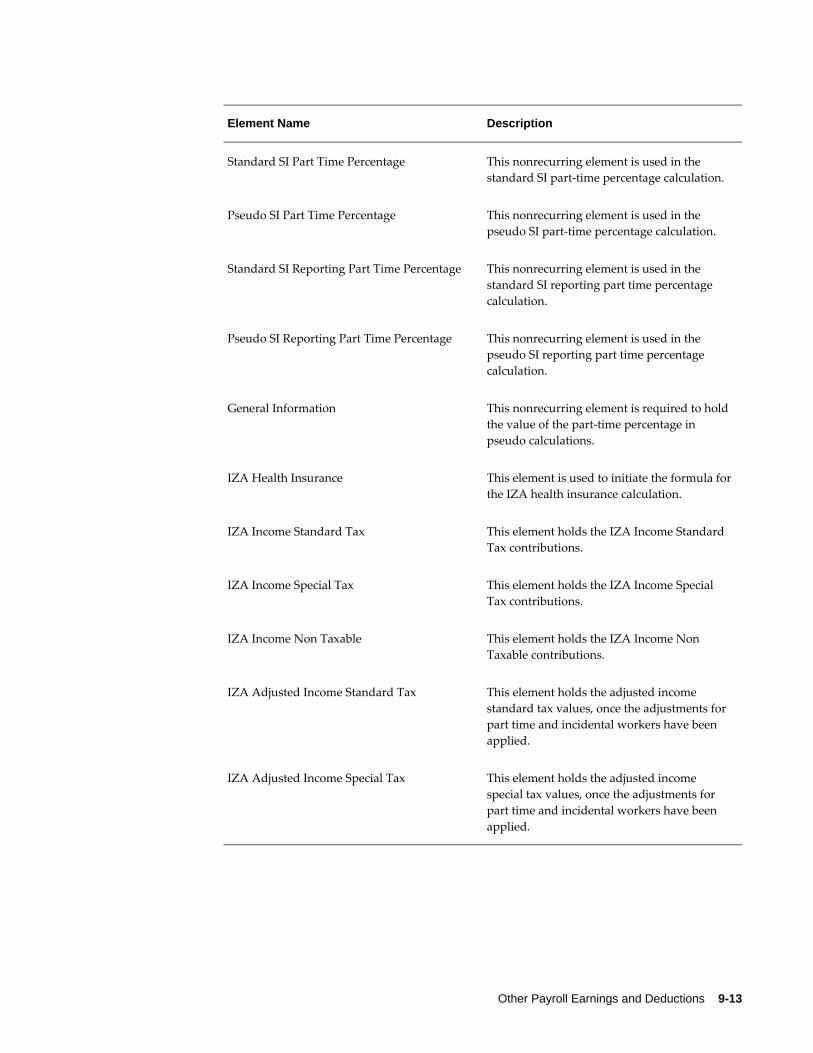
Other Payroll Earnings and Deductions 9-13
Element Name Description
Standard SI Part Time Percentage This nonrecurring element is used in the standard SI part-time percentage calculation.
Pseudo SI Part Time Percentage This nonrecurring element is used in the pseudo SI part-time percentage calculation.
Standard SI Reporting Part Time Percentage This nonrecurring element is used in the standard SI reporting part time percentage calculation.
Pseudo SI Reporting Part Time Percentage This nonrecurring element is used in the pseudo SI reporting part time percentage calculation.
General Information This nonrecurring element is required to hold the value of the part-time percentage in pseudo calculations.
IZA Health Insurance This element is used to initiate the formula forthe IZA health insurance calculation.
IZA Income Standard Tax This element holds the IZA Income Standard Tax contributions.
IZA Income Special Tax This element holds the IZA Income Special Tax contributions.
IZA Income Non Taxable This element holds the IZA Income Non Taxable contributions.
IZA Adjusted Income Standard Tax This element holds the adjusted income standard tax values, once the adjustments for part time and incidental workers have been applied.
IZA Adjusted Income Special Tax This element holds the adjusted income special tax values, once the adjustments for part time and incidental workers have been applied.
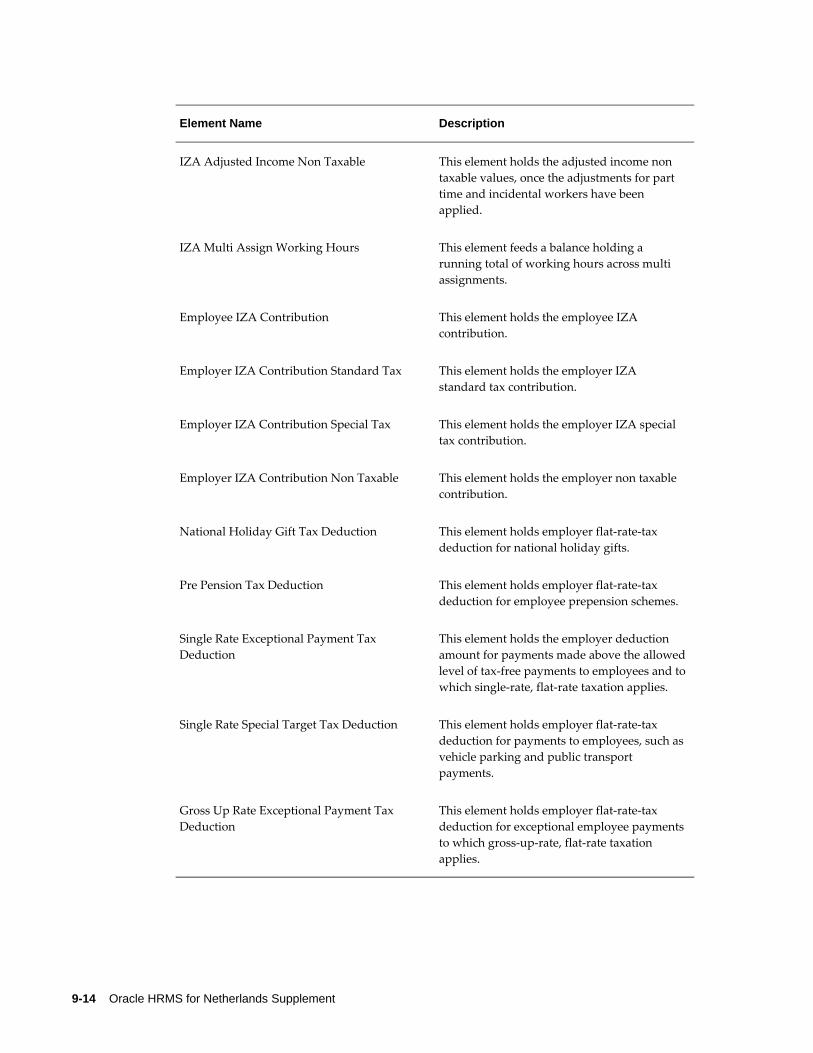
9-14 Oracle HRMS for Netherlands Supplement
Element Name Description
IZA Adjusted Income Non Taxable This element holds the adjusted income non taxable values, once the adjustments for part time and incidental workers have been applied.
IZA Multi Assign Working Hours This element feeds a balance holding a running total of working hours across multi assignments.
Employee IZA Contribution This element holds the employee IZA contribution.
Employer IZA Contribution Standard Tax This element holds the employer IZA standard tax contribution.
Employer IZA Contribution Special Tax This element holds the employer IZA special tax contribution.
Employer IZA Contribution Non Taxable This element holds the employer non taxable contribution.
National Holiday Gift Tax Deduction This element holds employer flat-rate-tax deduction for national holiday gifts.
Pre Pension Tax Deduction This element holds employer flat-rate-tax deduction for employee prepension schemes.
Single Rate Exceptional Payment Tax Deduction
This element holds the employer deduction amount for payments made above the allowedlevel of tax-free payments to employees and towhich single-rate, flat-rate taxation applies.
Single Rate Special Target Tax Deduction This element holds employer flat-rate-tax deduction for payments to employees, such asvehicle parking and public transport payments.
Gross Up Rate Exceptional Payment Tax Deduction
This element holds employer flat-rate-tax deduction for exceptional employee paymentsto which gross-up-rate, flat-rate taxation applies.
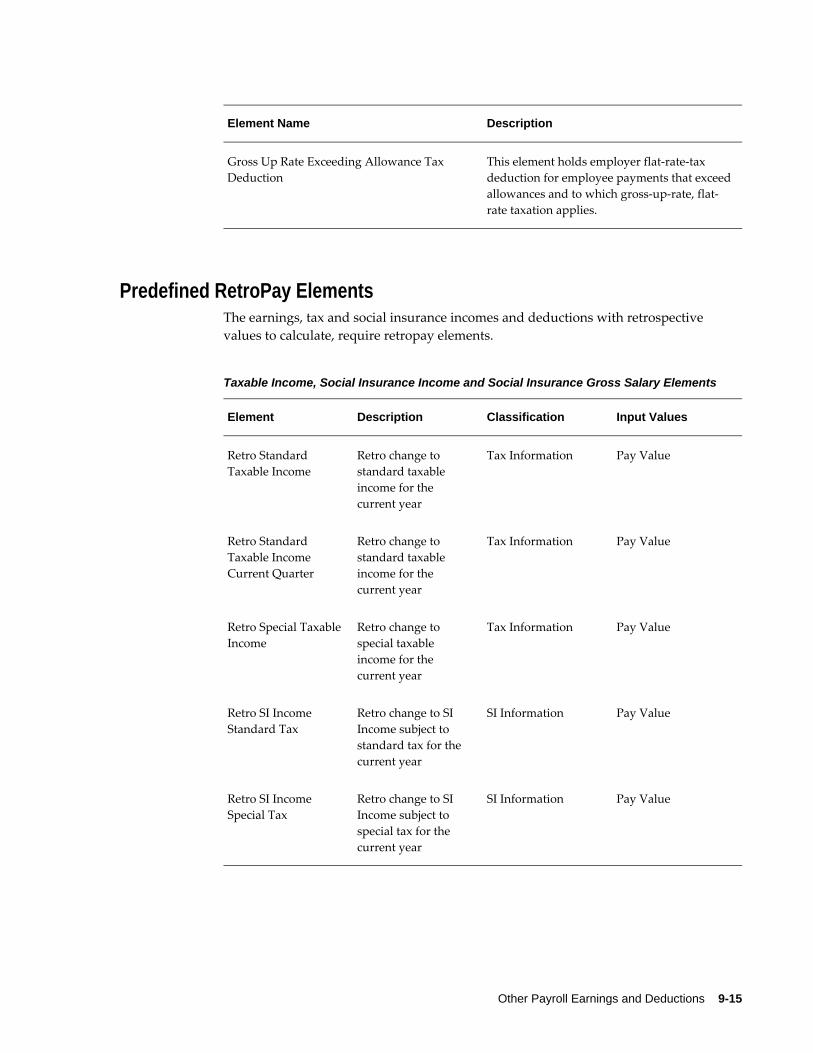
Other Payroll Earnings and Deductions 9-15
Element Name Description
Gross Up Rate Exceeding Allowance Tax Deduction
This element holds employer flat-rate-tax deduction for employee payments that exceedallowances and to which gross-up-rate, flat-rate taxation applies.
Predefined RetroPay ElementsThe earnings, tax and social insurance incomes and deductions with retrospective values to calculate, require retropay elements.
Taxable Income, Social Insurance Income and Social Insurance Gross Salary Elements
Element Description Classification Input Values
Retro Standard Taxable Income
Retro change to standard taxable income for the current year
Tax Information Pay Value
Retro Standard Taxable Income Current Quarter
Retro change to standard taxable income for the current year
Tax Information Pay Value
Retro Special Taxable Income
Retro change to special taxable income for the current year
Tax Information Pay Value
Retro SI Income Standard Tax
Retro change to SI Income subject to standard tax for the current year
SI Information Pay Value
Retro SI Income Special Tax
Retro change to SI Income subject to special tax for the current year
SI Information Pay Value
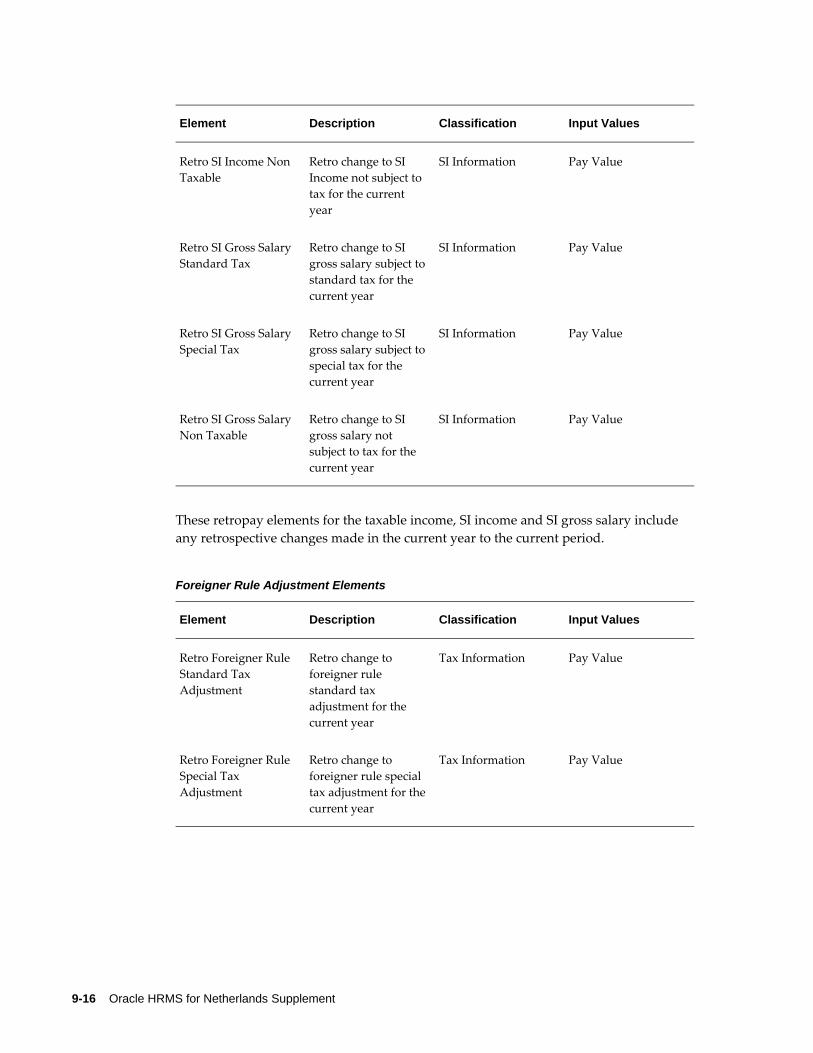
9-16 Oracle HRMS for Netherlands Supplement
Element Description Classification Input Values
Retro SI Income Non Taxable
Retro change to SI Income not subject to tax for the current year
SI Information Pay Value
Retro SI Gross Salary Standard Tax
Retro change to SI gross salary subject tostandard tax for the current year
SI Information Pay Value
Retro SI Gross Salary Special Tax
Retro change to SI gross salary subject tospecial tax for the current year
SI Information Pay Value
Retro SI Gross Salary Non Taxable
Retro change to SI gross salary not subject to tax for the current year
SI Information Pay Value
These retropay elements for the taxable income, SI income and SI gross salary include any retrospective changes made in the current year to the current period.
Foreigner Rule Adjustment Elements
Element Description Classification Input Values
Retro Foreigner Rule Standard Tax Adjustment
Retro change to foreigner rule standard tax adjustment for the current year
Tax Information Pay Value
Retro Foreigner Rule Special Tax Adjustment
Retro change to foreigner rule special tax adjustment for thecurrent year
Tax Information Pay Value
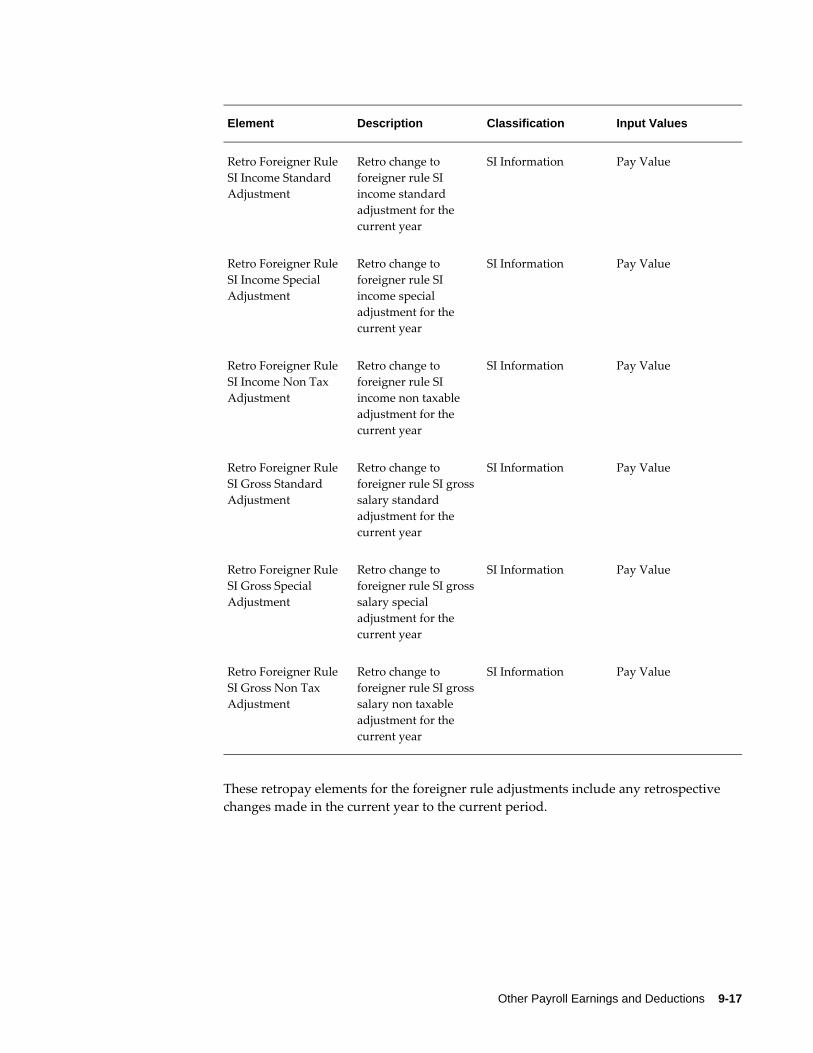
Other Payroll Earnings and Deductions 9-17
Element Description Classification Input Values
Retro Foreigner Rule SI Income Standard Adjustment
Retro change to foreigner rule SI income standard adjustment for the current year
SI Information Pay Value
Retro Foreigner Rule SI Income Special Adjustment
Retro change to foreigner rule SI income special adjustment for the current year
SI Information Pay Value
Retro Foreigner Rule SI Income Non Tax Adjustment
Retro change to foreigner rule SI income non taxable adjustment for the current year
SI Information Pay Value
Retro Foreigner Rule SI Gross Standard Adjustment
Retro change to foreigner rule SI grosssalary standard adjustment for the current year
SI Information Pay Value
Retro Foreigner Rule SI Gross Special Adjustment
Retro change to foreigner rule SI grosssalary special adjustment for the current year
SI Information Pay Value
Retro Foreigner Rule SI Gross Non Tax Adjustment
Retro change to foreigner rule SI grosssalary non taxable adjustment for the current year
SI Information Pay Value
These retropay elements for the foreigner rule adjustments include any retrospective changes made in the current year to the current period.
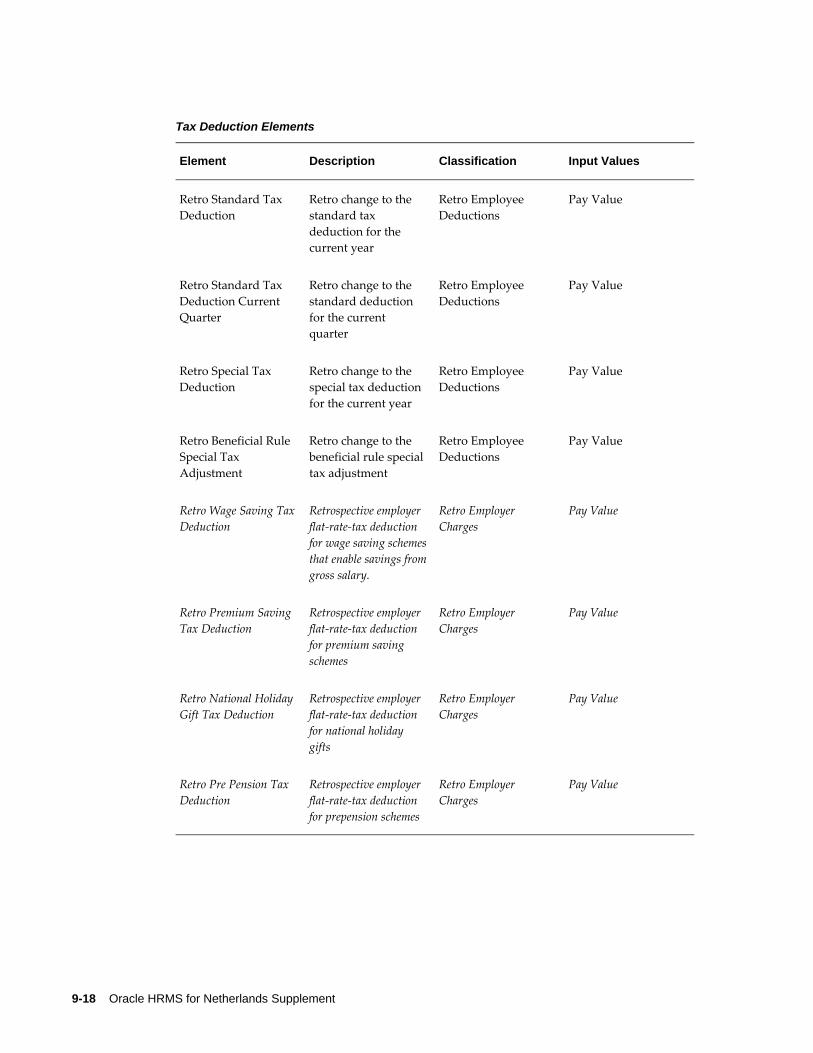
9-18 Oracle HRMS for Netherlands Supplement
Tax Deduction Elements
Element Description Classification Input Values
Retro Standard Tax Deduction
Retro change to the standard tax deduction for the current year
Retro Employee Deductions
Pay Value
Retro Standard Tax Deduction Current Quarter
Retro change to the standard deduction for the current quarter
Retro Employee Deductions
Pay Value
Retro Special Tax Deduction
Retro change to the special tax deduction for the current year
Retro Employee Deductions
Pay Value
Retro Beneficial Rule Special Tax Adjustment
Retro change to the beneficial rule special tax adjustment
Retro Employee Deductions
Pay Value
Retro Wage Saving TaxDeduction
Retrospective employer flat-rate-tax deduction for wage saving schemesthat enable savings fromgross salary.
Retro Employer Charges
Pay Value
Retro Premium Saving Tax Deduction
Retrospective employer flat-rate-tax deduction for premium saving schemes
Retro Employer Charges
Pay Value
Retro National Holiday Gift Tax Deduction
Retrospective employer flat-rate-tax deduction for national holiday gifts
Retro Employer Charges
Pay Value
Retro Pre Pension Tax Deduction
Retrospective employer flat-rate-tax deduction for prepension schemes
Retro Employer Charges
Pay Value
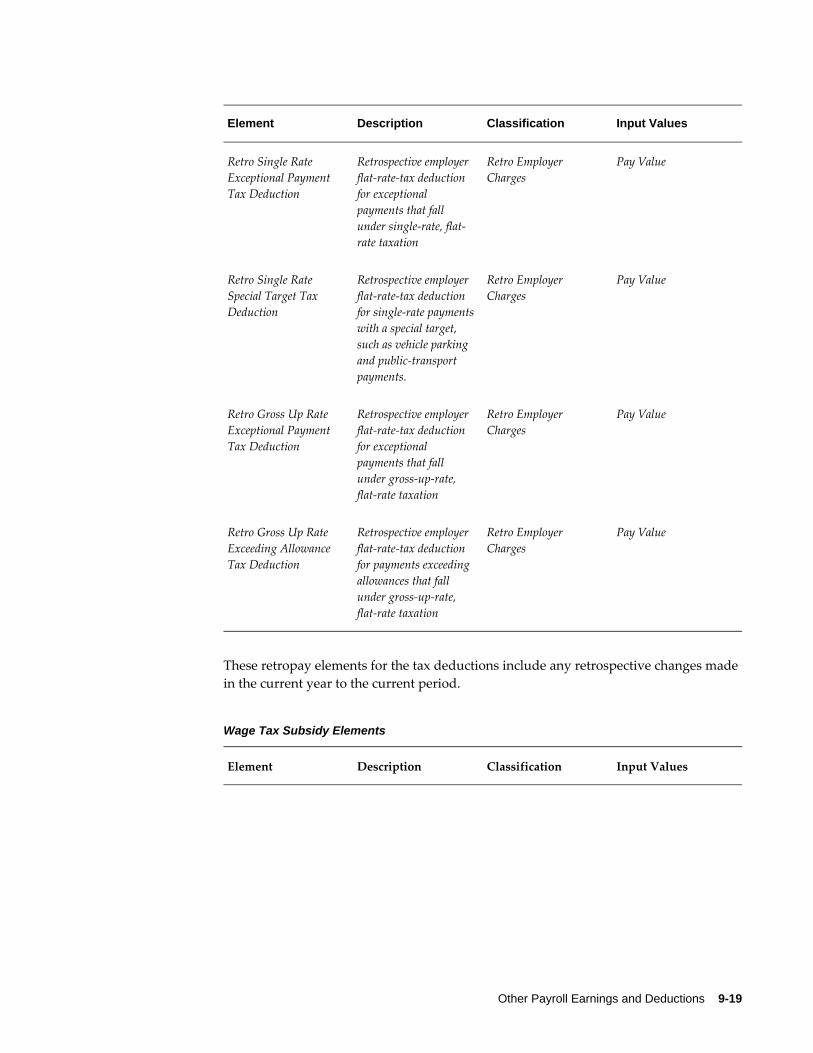
Other Payroll Earnings and Deductions 9-19
Element Description Classification Input Values
Retro Single Rate Exceptional Payment Tax Deduction
Retrospective employer flat-rate-tax deduction for exceptional payments that fall under single-rate, flat-rate taxation
Retro Employer Charges
Pay Value
Retro Single Rate Special Target Tax Deduction
Retrospective employer flat-rate-tax deduction for single-rate paymentswith a special target, such as vehicle parking and public-transport payments.
Retro Employer Charges
Pay Value
Retro Gross Up Rate Exceptional Payment Tax Deduction
Retrospective employer flat-rate-tax deduction for exceptional payments that fall under gross-up-rate, flat-rate taxation
Retro Employer Charges
Pay Value
Retro Gross Up Rate Exceeding Allowance Tax Deduction
Retrospective employer flat-rate-tax deduction for payments exceeding allowances that fall under gross-up-rate, flat-rate taxation
Retro Employer Charges
Pay Value
These retropay elements for the tax deductions include any retrospective changes made in the current year to the current period.
Wage Tax Subsidy Elements
Element Description Classification Input Values
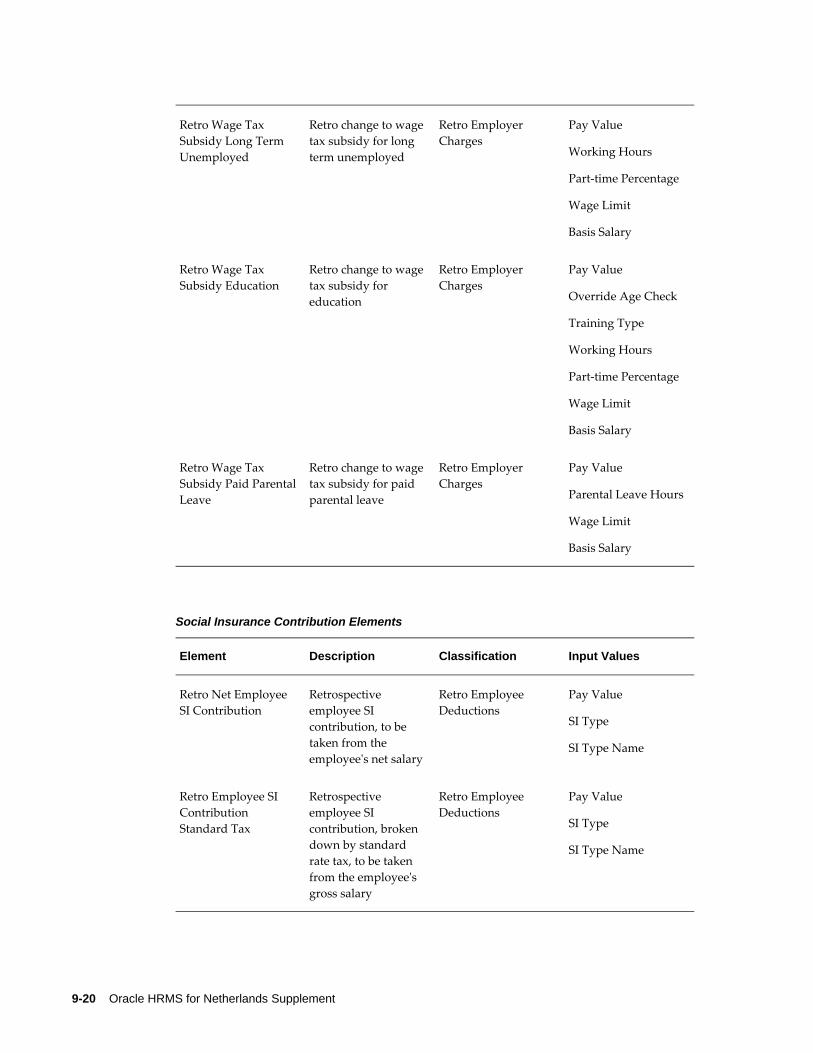
9-20 Oracle HRMS for Netherlands Supplement
Retro Wage Tax Subsidy Long Term Unemployed
Retro change to wage tax subsidy for long term unemployed
Retro Employer Charges
Pay Value
Working Hours
Part-time Percentage
Wage Limit
Basis Salary
Retro Wage Tax Subsidy Education
Retro change to wage tax subsidy for education
Retro Employer Charges
Pay Value
Override Age Check
Training Type
Working Hours
Part-time Percentage
Wage Limit
Basis Salary
Retro Wage Tax Subsidy Paid ParentalLeave
Retro change to wage tax subsidy for paid parental leave
Retro Employer Charges
Pay Value
Parental Leave Hours
Wage Limit
Basis Salary
Social Insurance Contribution Elements
Element Description Classification Input Values
Retro Net Employee SI Contribution
Retrospective employee SI contribution, to be taken from the employee's net salary
Retro Employee Deductions
Pay Value
SI Type
SI Type Name
Retro Employee SI Contribution Standard Tax
Retrospective employee SI contribution, broken down by standard rate tax, to be taken from the employee's gross salary
Retro Employee Deductions
Pay Value
SI Type
SI Type Name
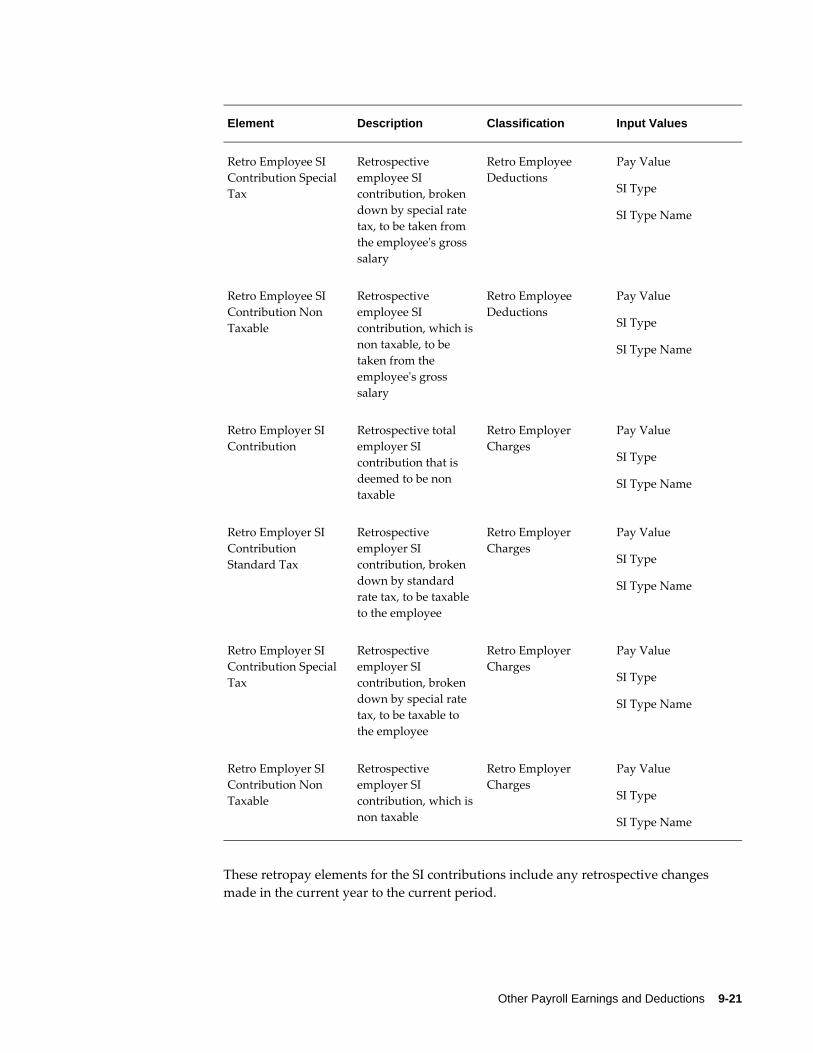
Other Payroll Earnings and Deductions 9-21
Element Description Classification Input Values
Retro Employee SI Contribution Special Tax
Retrospective employee SI contribution, broken down by special rate tax, to be taken from the employee's gross salary
Retro Employee Deductions
Pay Value
SI Type
SI Type Name
Retro Employee SI Contribution Non Taxable
Retrospective employee SI contribution, which isnon taxable, to be taken from the employee's gross salary
Retro Employee Deductions
Pay Value
SI Type
SI Type Name
Retro Employer SI Contribution
Retrospective total employer SI contribution that is deemed to be non taxable
Retro Employer Charges
Pay Value
SI Type
SI Type Name
Retro Employer SI Contribution Standard Tax
Retrospective employer SI contribution, broken down by standard rate tax, to be taxable to the employee
Retro Employer Charges
Pay Value
SI Type
SI Type Name
Retro Employer SI Contribution Special Tax
Retrospective employer SI contribution, broken down by special rate tax, to be taxable to the employee
Retro Employer Charges
Pay Value
SI Type
SI Type Name
Retro Employer SI Contribution Non Taxable
Retrospective employer SI contribution, which isnon taxable
Retro Employer Charges
Pay Value
SI Type
SI Type Name
These retropay elements for the SI contributions include any retrospective changes made in the current year to the current period.
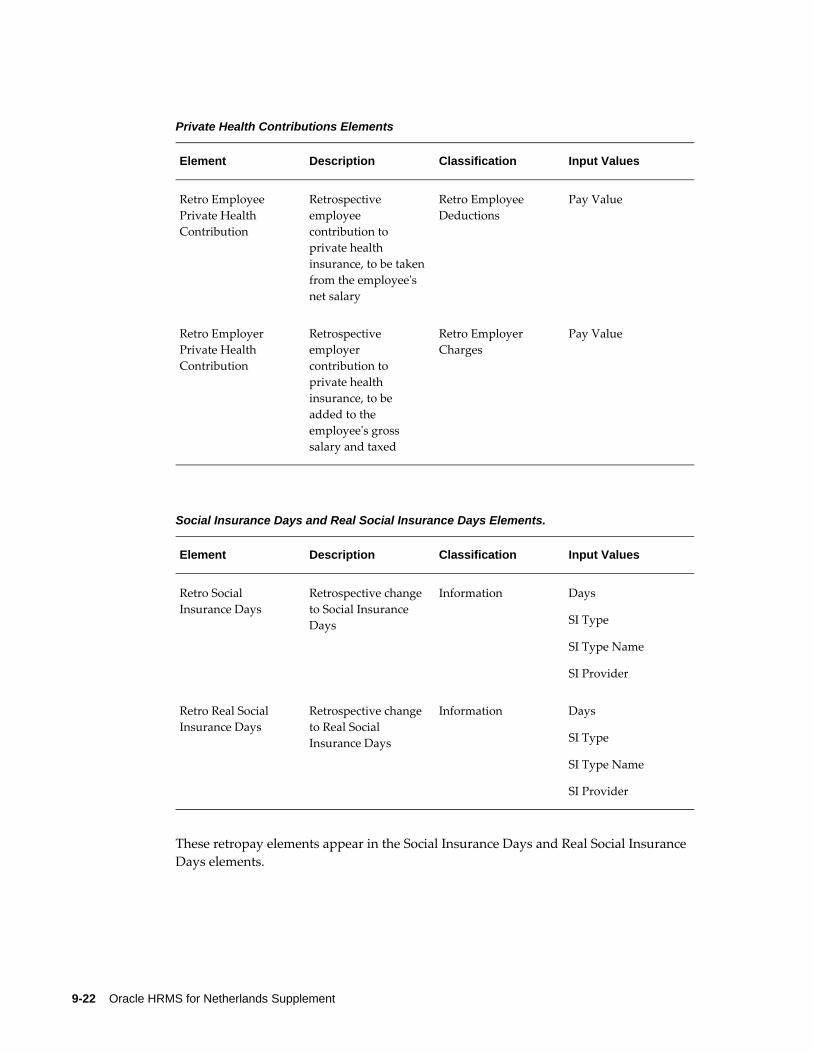
9-22 Oracle HRMS for Netherlands Supplement
Private Health Contributions Elements
Element Description Classification Input Values
Retro Employee Private Health Contribution
Retrospective employee contribution to private health insurance, to be takenfrom the employee's net salary
Retro Employee Deductions
Pay Value
Retro Employer Private Health Contribution
Retrospective employer contribution to private health insurance, to be added to the employee's gross salary and taxed
Retro Employer Charges
Pay Value
Social Insurance Days and Real Social Insurance Days Elements.
Element Description Classification Input Values
Retro Social Insurance Days
Retrospective change to Social Insurance Days
Information Days
SI Type
SI Type Name
SI Provider
Retro Real Social Insurance Days
Retrospective change to Real Social Insurance Days
Information Days
SI Type
SI Type Name
SI Provider
These retropay elements appear in the Social Insurance Days and Real Social Insurance Days elements.
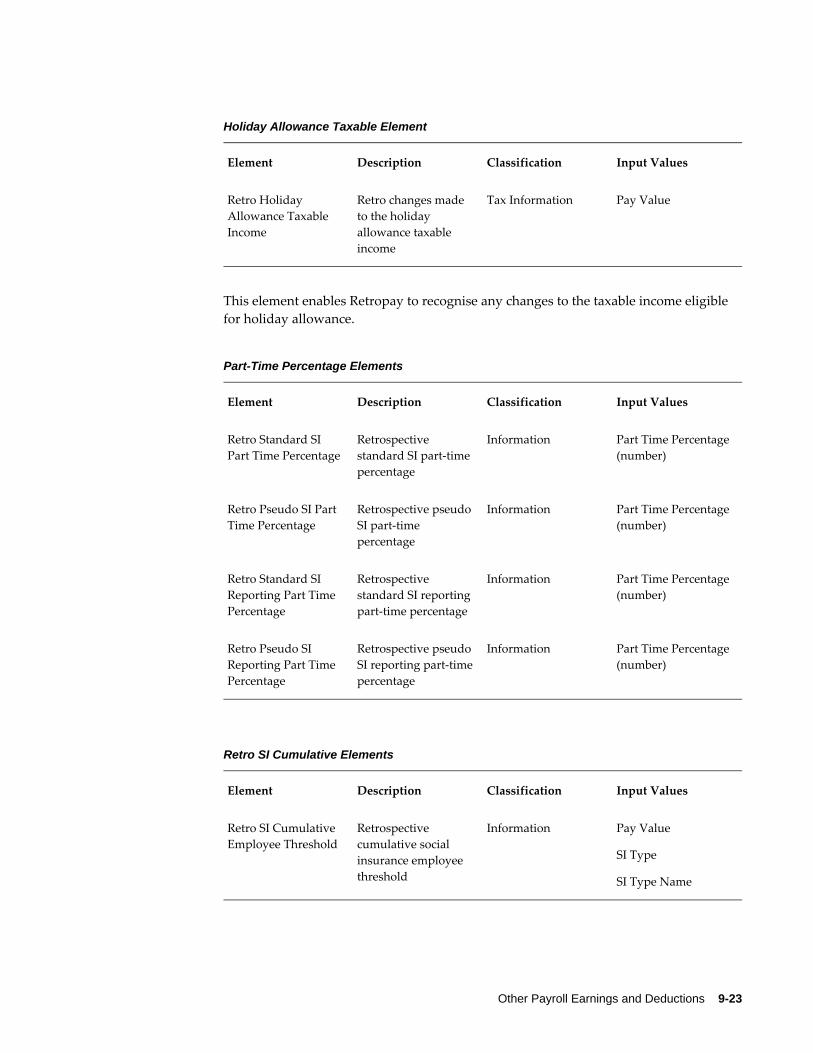
Other Payroll Earnings and Deductions 9-23
Holiday Allowance Taxable Element
Element Description Classification Input Values
Retro Holiday Allowance Taxable Income
Retro changes made to the holiday allowance taxable income
Tax Information Pay Value
This element enables Retropay to recognise any changes to the taxable income eligible for holiday allowance.
Part-Time Percentage Elements
Element Description Classification Input Values
Retro Standard SI Part Time Percentage
Retrospective standard SI part-time percentage
Information Part Time Percentage (number)
Retro Pseudo SI Part Time Percentage
Retrospective pseudo SI part-time percentage
Information Part Time Percentage (number)
Retro Standard SI Reporting Part Time Percentage
Retrospective standard SI reporting part-time percentage
Information Part Time Percentage (number)
Retro Pseudo SI Reporting Part Time Percentage
Retrospective pseudo SI reporting part-timepercentage
Information Part Time Percentage (number)
Retro SI Cumulative Elements
Element Description Classification Input Values
Retro SI Cumulative Employee Threshold
Retrospective cumulative social insurance employee threshold
Information Pay Value
SI Type
SI Type Name
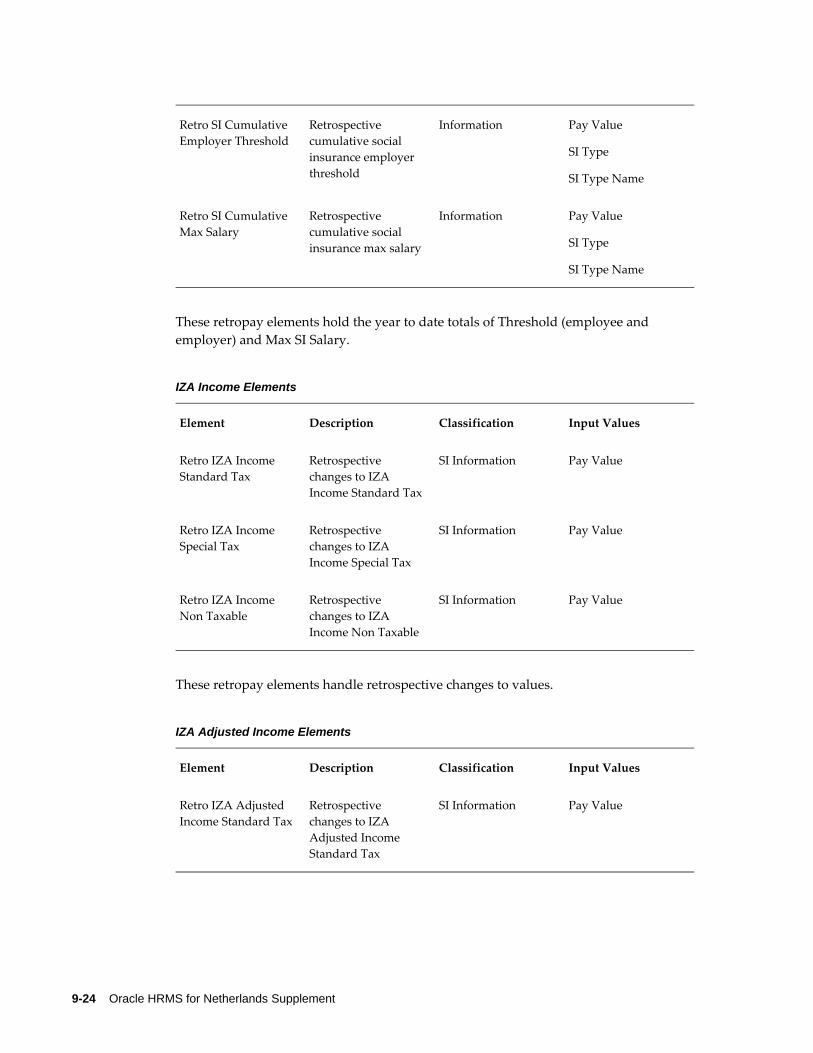
9-24 Oracle HRMS for Netherlands Supplement
Retro SI Cumulative Employer Threshold
Retrospective cumulative social insurance employer threshold
Information Pay Value
SI Type
SI Type Name
Retro SI Cumulative Max Salary
Retrospective cumulative social insurance max salary
Information Pay Value
SI Type
SI Type Name
These retropay elements hold the year to date totals of Threshold (employee and employer) and Max SI Salary.
IZA Income Elements
Element Description Classification Input Values
Retro IZA Income Standard Tax
Retrospective changes to IZA Income Standard Tax
SI Information Pay Value
Retro IZA Income Special Tax
Retrospective changes to IZA Income Special Tax
SI Information Pay Value
Retro IZA Income Non Taxable
Retrospective changes to IZA Income Non Taxable
SI Information Pay Value
These retropay elements handle retrospective changes to values.
IZA Adjusted Income Elements
Element Description Classification Input Values
Retro IZA Adjusted Income Standard Tax
Retrospective changes to IZA Adjusted Income Standard Tax
SI Information Pay Value
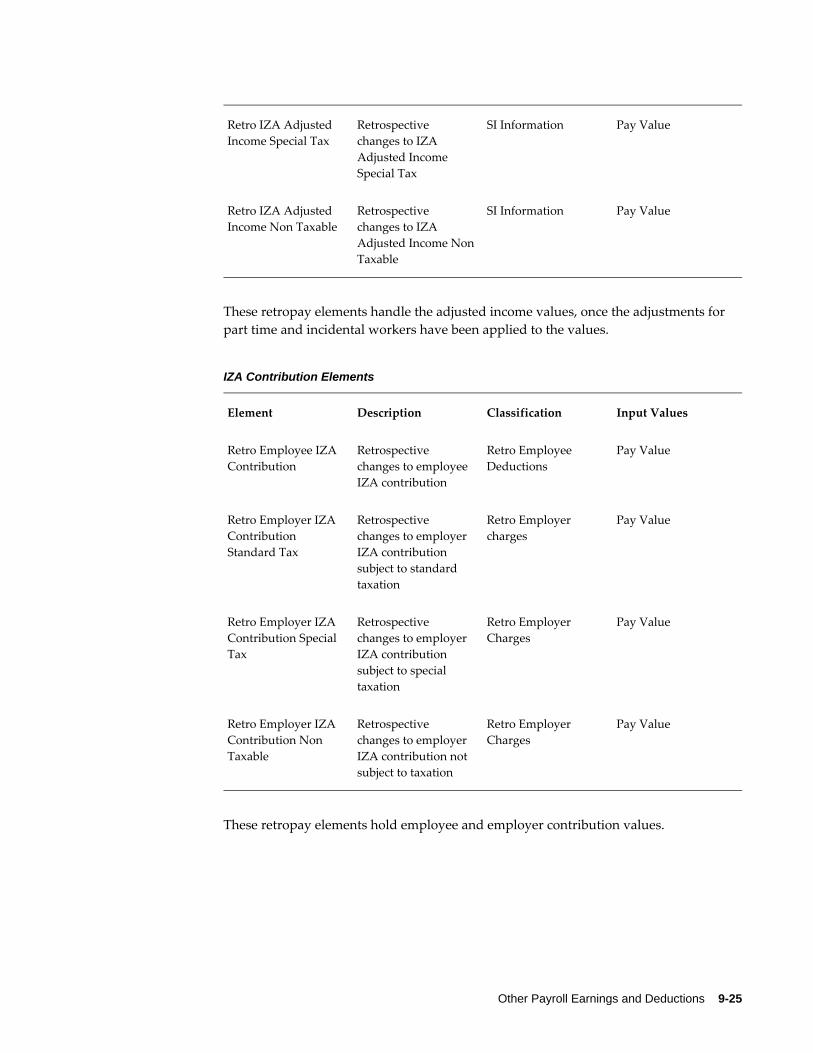
Other Payroll Earnings and Deductions 9-25
Retro IZA Adjusted Income Special Tax
Retrospective changes to IZA Adjusted Income Special Tax
SI Information Pay Value
Retro IZA Adjusted Income Non Taxable
Retrospective changes to IZA Adjusted Income NonTaxable
SI Information Pay Value
These retropay elements handle the adjusted income values, once the adjustments for part time and incidental workers have been applied to the values.
IZA Contribution Elements
Element Description Classification Input Values
Retro Employee IZA Contribution
Retrospective changes to employee IZA contribution
Retro Employee Deductions
Pay Value
Retro Employer IZA Contribution Standard Tax
Retrospective changes to employer IZA contribution subject to standard taxation
Retro Employer charges
Pay Value
Retro Employer IZA Contribution Special Tax
Retrospective changes to employer IZA contribution subject to special taxation
Retro Employer Charges
Pay Value
Retro Employer IZA Contribution Non Taxable
Retrospective changes to employer IZA contribution not subject to taxation
Retro Employer Charges
Pay Value
These retropay elements hold employee and employer contribution values.
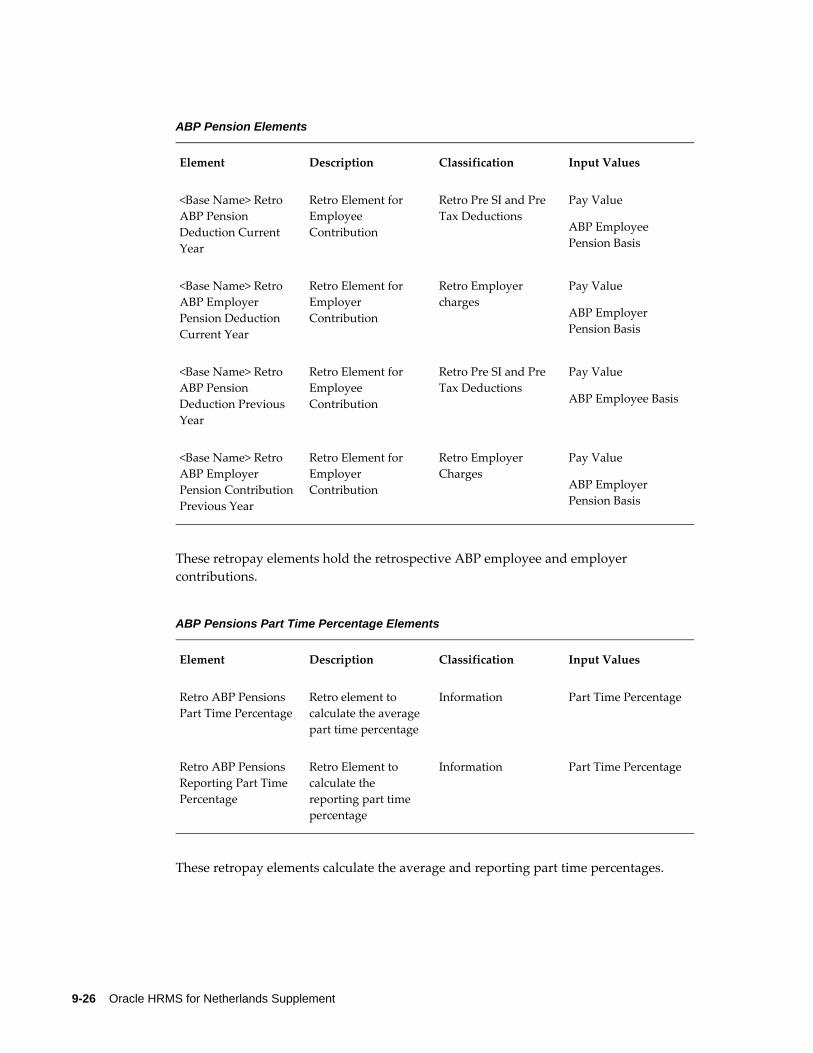
9-26 Oracle HRMS for Netherlands Supplement
ABP Pension Elements
Element Description Classification Input Values
<Base Name> Retro ABP Pension Deduction Current Year
Retro Element for Employee Contribution
Retro Pre SI and Pre Tax Deductions
Pay Value
ABP Employee Pension Basis
<Base Name> Retro ABP Employer Pension Deduction Current Year
Retro Element for Employer Contribution
Retro Employer charges
Pay Value
ABP Employer Pension Basis
<Base Name> Retro ABP Pension Deduction Previous Year
Retro Element for Employee Contribution
Retro Pre SI and Pre Tax Deductions
Pay Value
ABP Employee Basis
<Base Name> Retro ABP Employer Pension Contribution Previous Year
Retro Element for Employer Contribution
Retro Employer Charges
Pay Value
ABP Employer Pension Basis
These retropay elements hold the retrospective ABP employee and employer contributions.
ABP Pensions Part Time Percentage Elements
Element Description Classification Input Values
Retro ABP Pensions Part Time Percentage
Retro element to calculate the average part time percentage
Information Part Time Percentage
Retro ABP Pensions Reporting Part Time Percentage
Retro Element to calculate the reporting part time percentage
Information Part Time Percentage
These retropay elements calculate the average and reporting part time percentages.
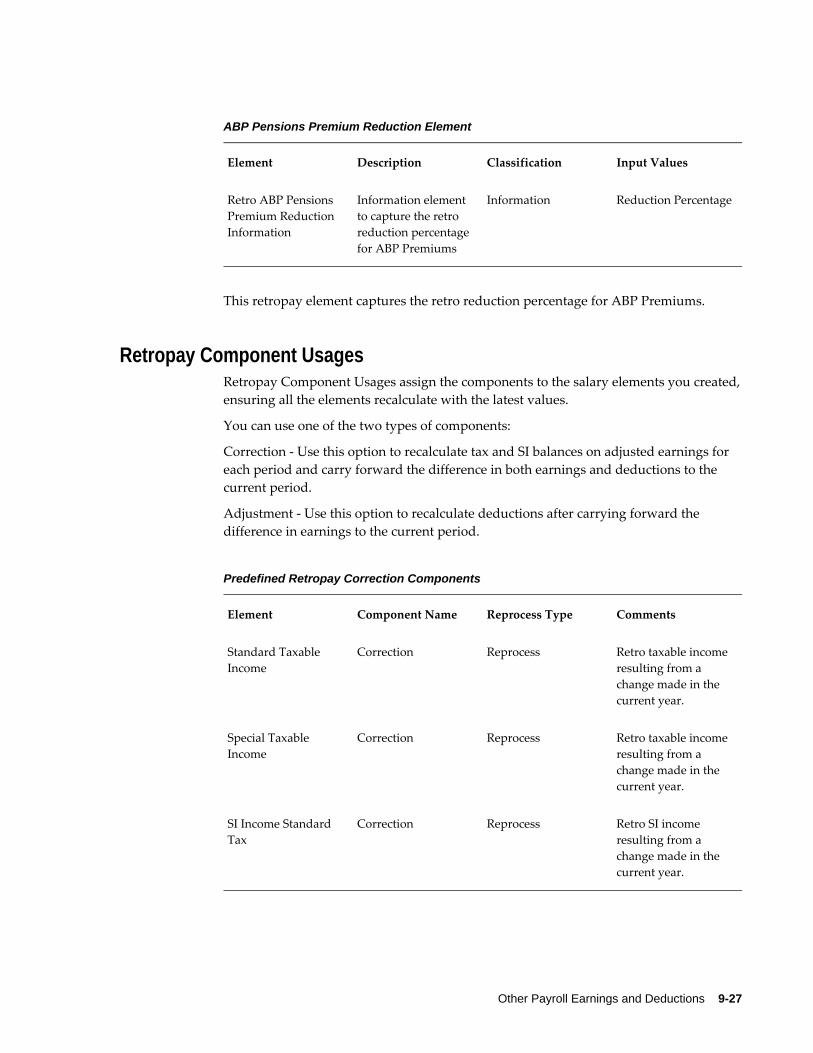
Other Payroll Earnings and Deductions 9-27
ABP Pensions Premium Reduction Element
Element Description Classification Input Values
Retro ABP Pensions Premium Reduction Information
Information element to capture the retro reduction percentage for ABP Premiums
Information Reduction Percentage
This retropay element captures the retro reduction percentage for ABP Premiums.
Retropay Component UsagesRetropay Component Usages assign the components to the salary elements you created,ensuring all the elements recalculate with the latest values.
You can use one of the two types of components:
Correction - Use this option to recalculate tax and SI balances on adjusted earnings for each period and carry forward the difference in both earnings and deductions to the current period.
Adjustment - Use this option to recalculate deductions after carrying forward the difference in earnings to the current period.
Predefined Retropay Correction Components
Element Component Name Reprocess Type Comments
Standard Taxable Income
Correction Reprocess Retro taxable income resulting from a change made in the current year.
Special Taxable Income
Correction Reprocess Retro taxable income resulting from a change made in the current year.
SI Income Standard Tax
Correction Reprocess Retro SI income resulting from a change made in the current year.
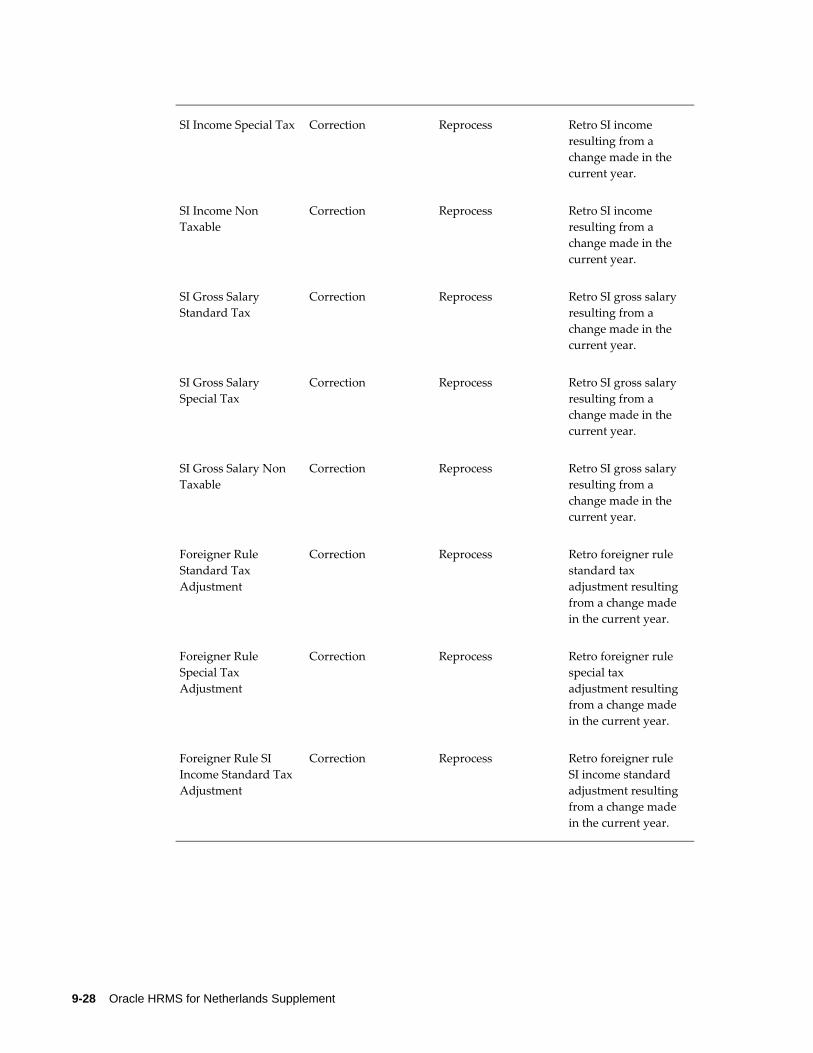
9-28 Oracle HRMS for Netherlands Supplement
SI Income Special Tax Correction Reprocess Retro SI income resulting from a change made in the current year.
SI Income Non Taxable
Correction Reprocess Retro SI income resulting from a change made in the current year.
SI Gross Salary Standard Tax
Correction Reprocess Retro SI gross salary resulting from a change made in the current year.
SI Gross Salary Special Tax
Correction Reprocess Retro SI gross salary resulting from a change made in the current year.
SI Gross Salary Non Taxable
Correction Reprocess Retro SI gross salary resulting from a change made in the current year.
Foreigner Rule Standard Tax Adjustment
Correction Reprocess Retro foreigner rule standard tax adjustment resulting from a change made in the current year.
Foreigner Rule Special Tax Adjustment
Correction Reprocess Retro foreigner rule special tax adjustment resulting from a change made in the current year.
Foreigner Rule SI Income Standard Tax Adjustment
Correction Reprocess Retro foreigner rule SI income standard adjustment resulting from a change made in the current year.
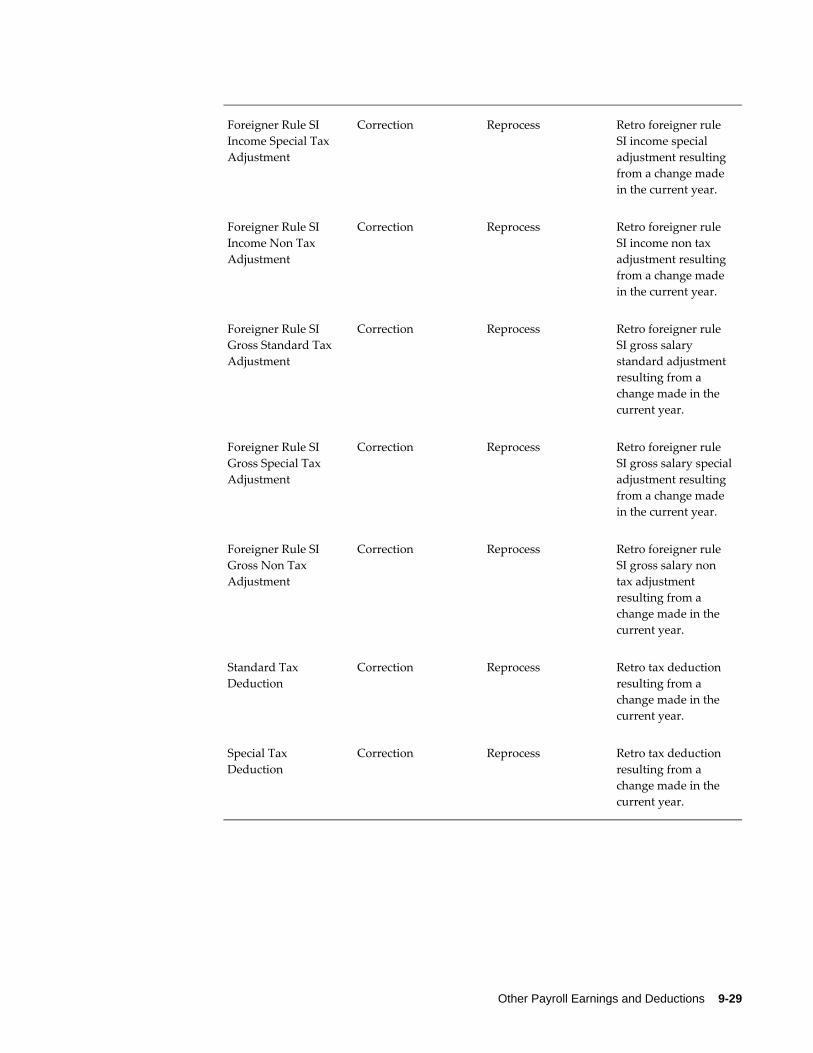
Other Payroll Earnings and Deductions 9-29
Foreigner Rule SI Income Special Tax Adjustment
Correction Reprocess Retro foreigner rule SI income special adjustment resulting from a change made in the current year.
Foreigner Rule SI Income Non Tax Adjustment
Correction Reprocess Retro foreigner rule SI income non tax adjustment resulting from a change made in the current year.
Foreigner Rule SI Gross Standard Tax Adjustment
Correction Reprocess Retro foreigner rule SI gross salary standard adjustment resulting from a change made in the current year.
Foreigner Rule SI Gross Special Tax Adjustment
Correction Reprocess Retro foreigner rule SI gross salary specialadjustment resulting from a change made in the current year.
Foreigner Rule SI Gross Non Tax Adjustment
Correction Reprocess Retro foreigner rule SI gross salary non tax adjustment resulting from a change made in the current year.
Standard Tax Deduction
Correction Reprocess Retro tax deduction resulting from a change made in the current year.
Special Tax Deduction
Correction Reprocess Retro tax deduction resulting from a change made in the current year.
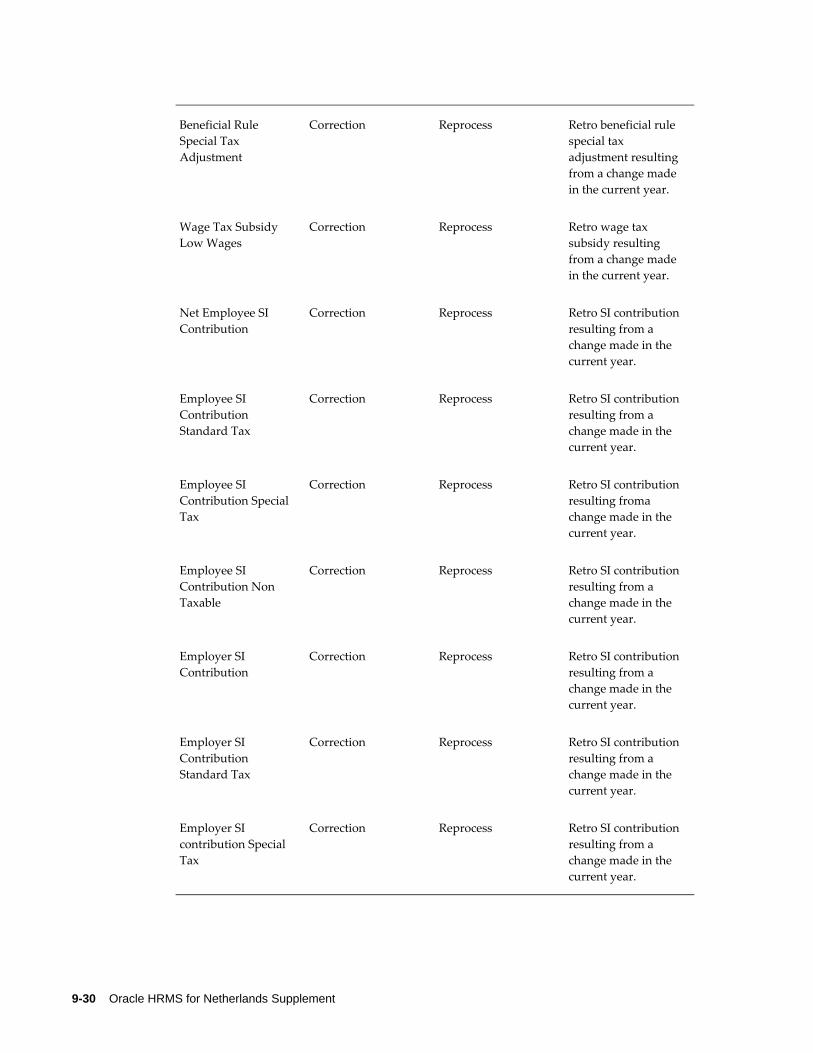
9-30 Oracle HRMS for Netherlands Supplement
Beneficial Rule Special Tax Adjustment
Correction Reprocess Retro beneficial rule special tax adjustment resulting from a change made in the current year.
Wage Tax Subsidy Low Wages
Correction Reprocess Retro wage tax subsidy resulting from a change made in the current year.
Net Employee SI Contribution
Correction Reprocess Retro SI contribution resulting from a change made in the current year.
Employee SI Contribution Standard Tax
Correction Reprocess Retro SI contribution resulting from a change made in the current year.
Employee SI Contribution Special Tax
Correction Reprocess Retro SI contribution resulting froma change made in the current year.
Employee SI Contribution Non Taxable
Correction Reprocess Retro SI contribution resulting from a change made in the current year.
Employer SI Contribution
Correction Reprocess Retro SI contribution resulting from a change made in the current year.
Employer SI Contribution Standard Tax
Correction Reprocess Retro SI contribution resulting from a change made in the current year.
Employer SI contribution Special Tax
Correction Reprocess Retro SI contribution resulting from a change made in the current year.
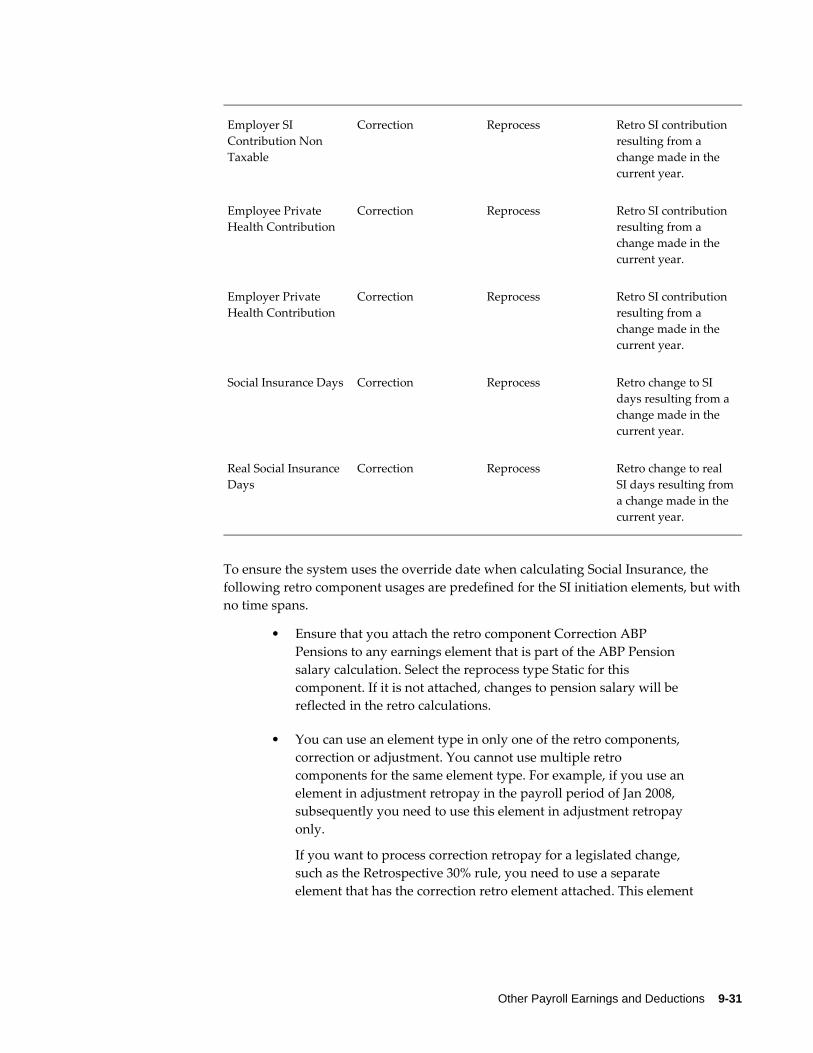
Other Payroll Earnings and Deductions 9-31
Employer SI Contribution Non Taxable
Correction Reprocess Retro SI contribution resulting from a change made in the current year.
Employee Private Health Contribution
Correction Reprocess Retro SI contribution resulting from a change made in the current year.
Employer Private Health Contribution
Correction Reprocess Retro SI contribution resulting from a change made in the current year.
Social Insurance Days Correction Reprocess Retro change to SI days resulting from a change made in the current year.
Real Social Insurance Days
Correction Reprocess Retro change to real SI days resulting froma change made in the current year.
To ensure the system uses the override date when calculating Social Insurance, the following retro component usages are predefined for the SI initiation elements, but withno time spans.
• Ensure that you attach the retro component Correction ABP Pensions to any earnings element that is part of the ABP Pension salary calculation. Select the reprocess type Static for this component. If it is not attached, changes to pension salary will be reflected in the retro calculations.
• You can use an element type in only one of the retro components, correction or adjustment. You cannot use multiple retro components for the same element type. For example, if you use an element in adjustment retropay in the payroll period of Jan 2008, subsequently you need to use this element in adjustment retropay only.
If you want to process correction retropay for a legislated change, such as the Retrospective 30% rule, you need to use a separate element that has the correction retro element attached. This element
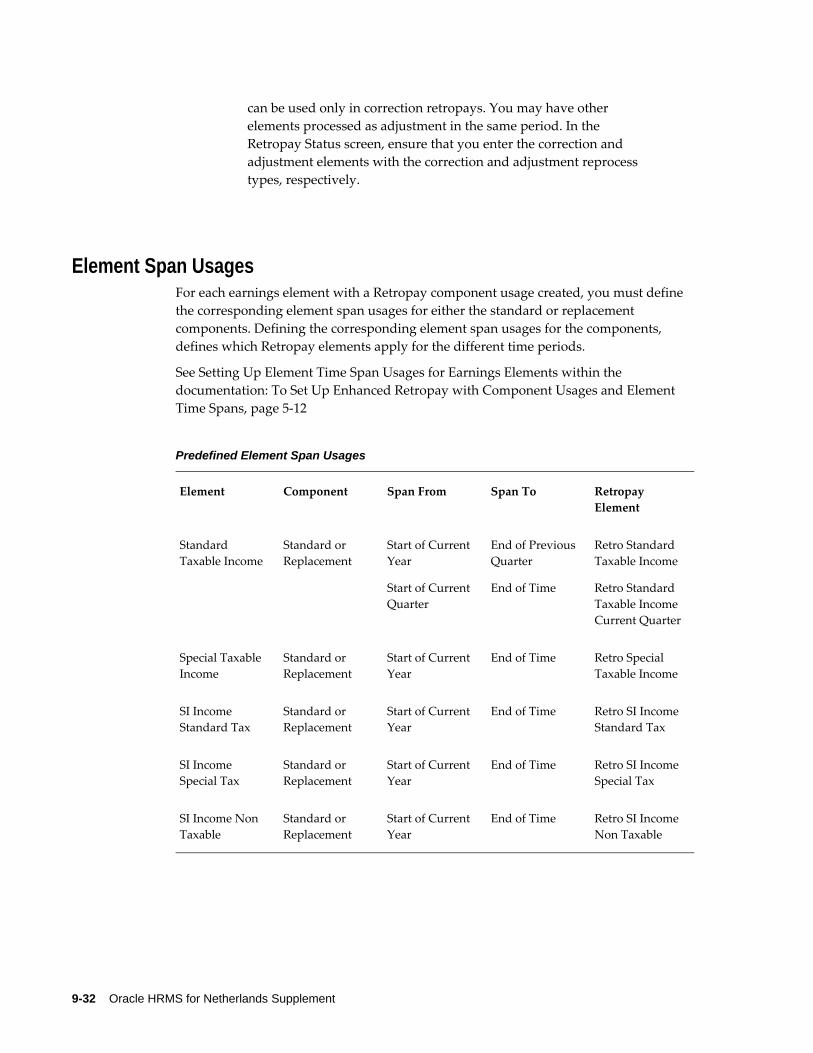
9-32 Oracle HRMS for Netherlands Supplement
can be used only in correction retropays. You may have other elements processed as adjustment in the same period. In the Retropay Status screen, ensure that you enter the correction and adjustment elements with the correction and adjustment reprocess types, respectively.
Element Span UsagesFor each earnings element with a Retropay component usage created, you must define the corresponding element span usages for either the standard or replacement components. Defining the corresponding element span usages for the components, defines which Retropay elements apply for the different time periods.
See Setting Up Element Time Span Usages for Earnings Elements within the documentation: To Set Up Enhanced Retropay with Component Usages and Element Time Spans, page 5-12
Predefined Element Span Usages
Element Component Span From Span To Retropay Element
Standard Taxable Income
Standard or Replacement
Start of Current Year
Start of Current Quarter
End of Previous Quarter
End of Time
Retro Standard Taxable Income
Retro Standard Taxable Income Current Quarter
Special Taxable Income
Standard or Replacement
Start of Current Year
End of Time Retro Special Taxable Income
SI Income Standard Tax
Standard or Replacement
Start of Current Year
End of Time Retro SI Income Standard Tax
SI Income Special Tax
Standard or Replacement
Start of Current Year
End of Time Retro SI Income Special Tax
SI Income Non Taxable
Standard or Replacement
Start of Current Year
End of Time Retro SI Income Non Taxable
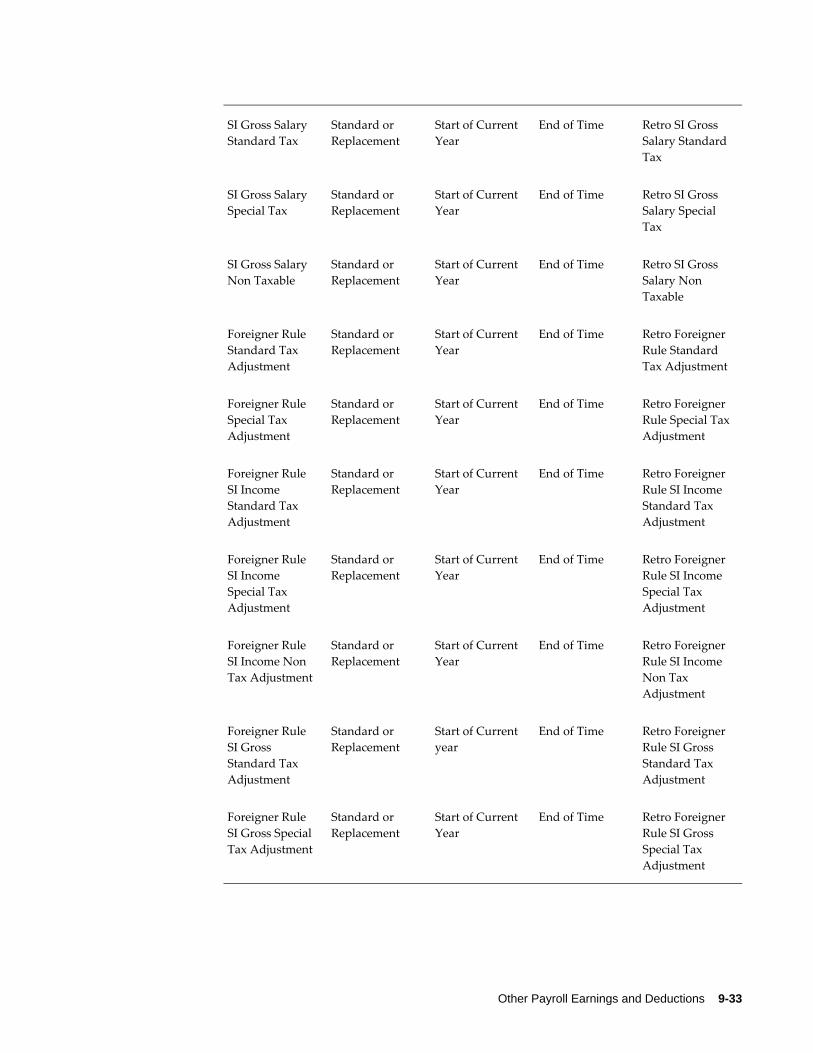
Other Payroll Earnings and Deductions 9-33
SI Gross Salary Standard Tax
Standard or Replacement
Start of Current Year
End of Time Retro SI Gross Salary Standard Tax
SI Gross Salary Special Tax
Standard or Replacement
Start of Current Year
End of Time Retro SI Gross Salary Special Tax
SI Gross Salary Non Taxable
Standard or Replacement
Start of Current Year
End of Time Retro SI Gross Salary Non Taxable
Foreigner Rule Standard Tax Adjustment
Standard or Replacement
Start of Current Year
End of Time Retro Foreigner Rule Standard Tax Adjustment
Foreigner Rule Special Tax Adjustment
Standard or Replacement
Start of Current Year
End of Time Retro Foreigner Rule Special Tax Adjustment
Foreigner Rule SI Income Standard Tax Adjustment
Standard or Replacement
Start of Current Year
End of Time Retro Foreigner Rule SI Income Standard Tax Adjustment
Foreigner Rule SI Income Special Tax Adjustment
Standard or Replacement
Start of Current Year
End of Time Retro Foreigner Rule SI Income Special Tax Adjustment
Foreigner Rule SI Income Non Tax Adjustment
Standard or Replacement
Start of Current Year
End of Time Retro Foreigner Rule SI Income Non Tax Adjustment
Foreigner Rule SI Gross Standard Tax Adjustment
Standard or Replacement
Start of Current year
End of Time Retro Foreigner Rule SI Gross Standard Tax Adjustment
Foreigner Rule SI Gross Special Tax Adjustment
Standard or Replacement
Start of Current Year
End of Time Retro Foreigner Rule SI Gross Special Tax Adjustment

9-34 Oracle HRMS for Netherlands Supplement
Foreigner Rule SI Gross Non Tax Adjustment
Standard or Replacement
Start of Current Year
End of Time Retro Foreigner Rule SI Gross Non Tax Adjustment
Standard Tax Deduction
Standard or Replacement
Start of Current Year
Start of Current Quarter
End of Previous Quarter
End of Time
Retro Standard Tax Deduction
Retro Standard Tax Deduction Current Quarter
Special Tax Deduction
Standard or Replacement
Start of Current Year
End of Time Retro Special Tax Deduction
Beneficial Rule Special Tax Adjustment
Standard or Replacement
Start of Current Year
End of Time Retro Beneficial Rule Special Tax Adjustment
Wage Tax Subsidy Low Wages
Standard or Replacement
Start of Current Year
End of Time Retro Wage Tax Subsidy Low Wages
Net Employee SIContribution
Standard or Replacement
Start of Current Year
End of Time Retro Net Employee SI Contribution
Employee SI Contribution Standard Tax
Standard or Replacement
Start of Current Year
End of Time Retro Employee SI Contribution Standard Tax
Employee SI Contribution Special Tax
Standard or Replacement
Start of Current Year
End of Time Retro Employee SI Contribution Special Tax
Employee SI Contribution Non Taxable
Standard or Replacement
Start of Current Year
End of Time Retro Employee SI Contribution Non Taxable
Employer SI Contribution
Standard or Replacement
Start of Current Year
End of Time Retro Employer SI Contribution
Employer SI Contribution Standard Tax
Standard or Replacement
Start of Current Year
End of Time Retro Employer SI Contribution Standard Tax
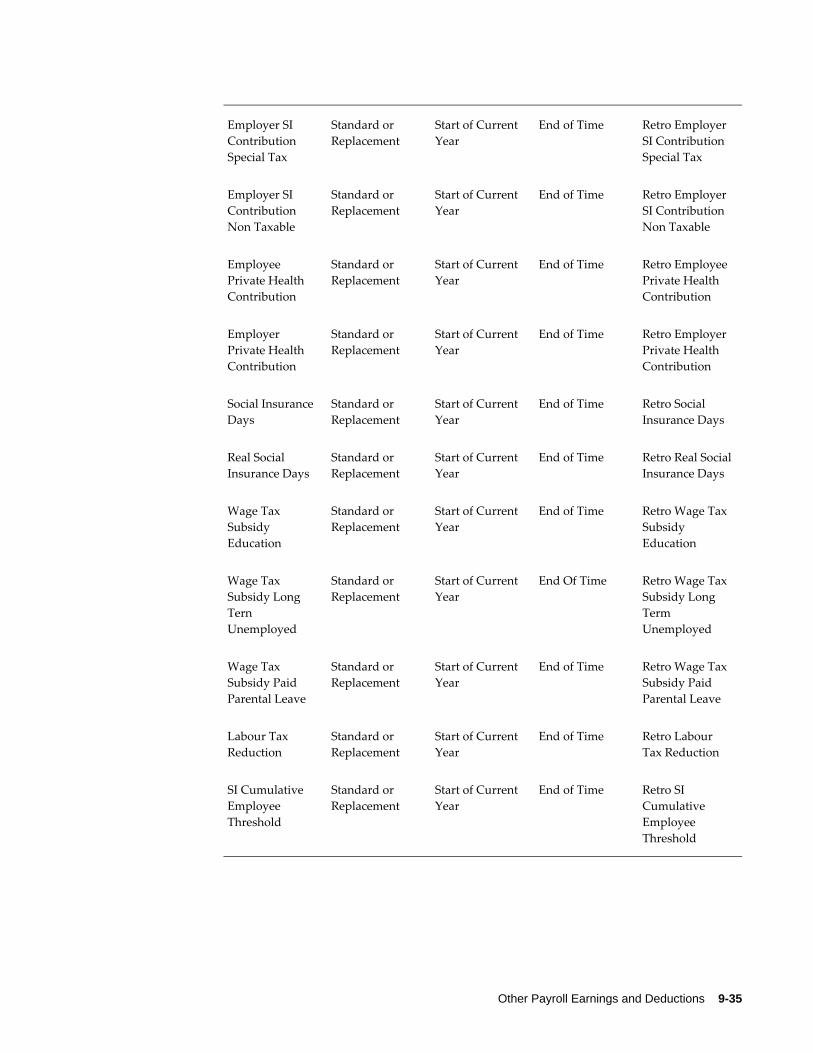
Other Payroll Earnings and Deductions 9-35
Employer SI Contribution Special Tax
Standard or Replacement
Start of Current Year
End of Time Retro Employer SI Contribution Special Tax
Employer SI Contribution Non Taxable
Standard or Replacement
Start of Current Year
End of Time Retro Employer SI Contribution Non Taxable
Employee Private Health Contribution
Standard or Replacement
Start of Current Year
End of Time Retro Employee Private Health Contribution
Employer Private Health Contribution
Standard or Replacement
Start of Current Year
End of Time Retro Employer Private Health Contribution
Social Insurance Days
Standard or Replacement
Start of Current Year
End of Time Retro Social Insurance Days
Real Social Insurance Days
Standard or Replacement
Start of Current Year
End of Time Retro Real SocialInsurance Days
Wage Tax Subsidy Education
Standard or Replacement
Start of Current Year
End of Time Retro Wage Tax Subsidy Education
Wage Tax Subsidy Long Tern Unemployed
Standard or Replacement
Start of Current Year
End Of Time Retro Wage Tax Subsidy Long Term Unemployed
Wage Tax Subsidy Paid Parental Leave
Standard or Replacement
Start of Current Year
End of Time Retro Wage Tax Subsidy Paid Parental Leave
Labour Tax Reduction
Standard or Replacement
Start of Current Year
End of Time Retro Labour Tax Reduction
SI Cumulative Employee Threshold
Standard or Replacement
Start of Current Year
End of Time Retro SI Cumulative Employee Threshold
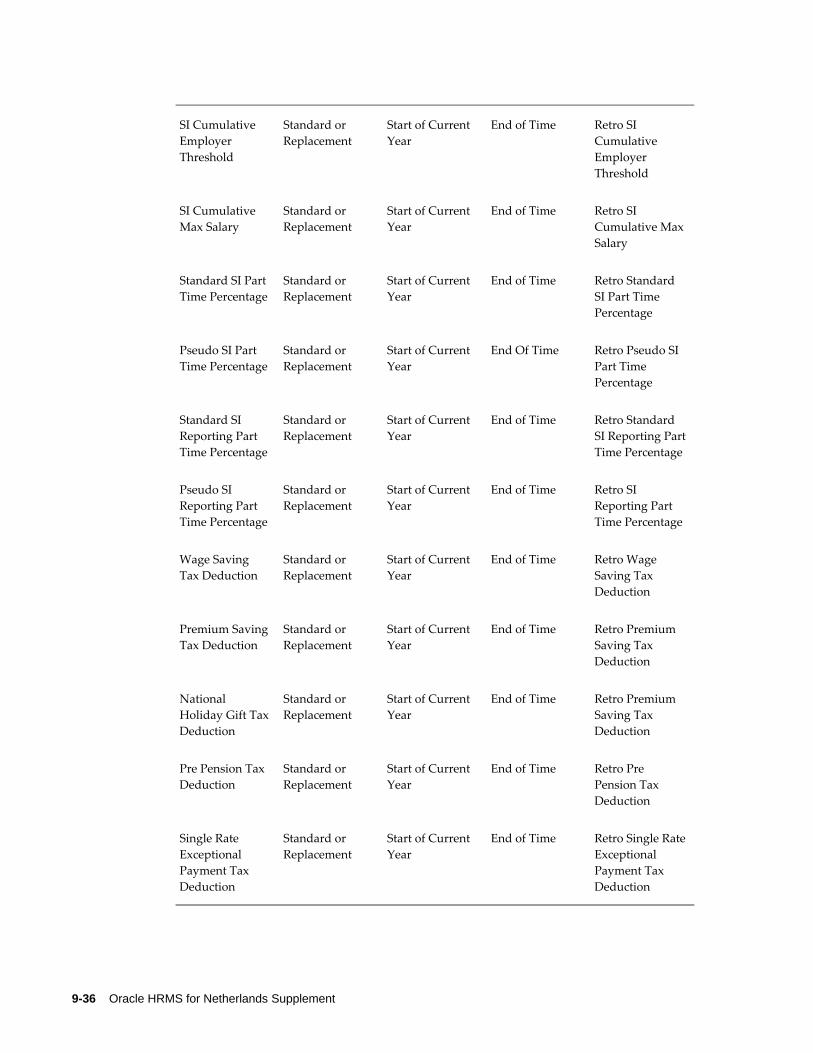
9-36 Oracle HRMS for Netherlands Supplement
SI Cumulative Employer Threshold
Standard or Replacement
Start of Current Year
End of Time Retro SI Cumulative Employer Threshold
SI Cumulative Max Salary
Standard or Replacement
Start of Current Year
End of Time Retro SI Cumulative MaxSalary
Standard SI Part Time Percentage
Standard or Replacement
Start of Current Year
End of Time Retro Standard SI Part Time Percentage
Pseudo SI Part Time Percentage
Standard or Replacement
Start of Current Year
End Of Time Retro Pseudo SI Part Time Percentage
Standard SI Reporting Part Time Percentage
Standard or Replacement
Start of Current Year
End of Time Retro Standard SI Reporting PartTime Percentage
Pseudo SI Reporting Part Time Percentage
Standard or Replacement
Start of Current Year
End of Time Retro SI Reporting Part Time Percentage
Wage Saving Tax Deduction
Standard or Replacement
Start of Current Year
End of Time Retro Wage Saving Tax Deduction
Premium Saving Tax Deduction
Standard or Replacement
Start of Current Year
End of Time Retro Premium Saving Tax Deduction
National Holiday Gift TaxDeduction
Standard or Replacement
Start of Current Year
End of Time Retro Premium Saving Tax Deduction
Pre Pension Tax Deduction
Standard or Replacement
Start of Current Year
End of Time Retro Pre Pension Tax Deduction
Single Rate Exceptional Payment Tax Deduction
Standard or Replacement
Start of Current Year
End of Time Retro Single RateExceptional Payment Tax Deduction
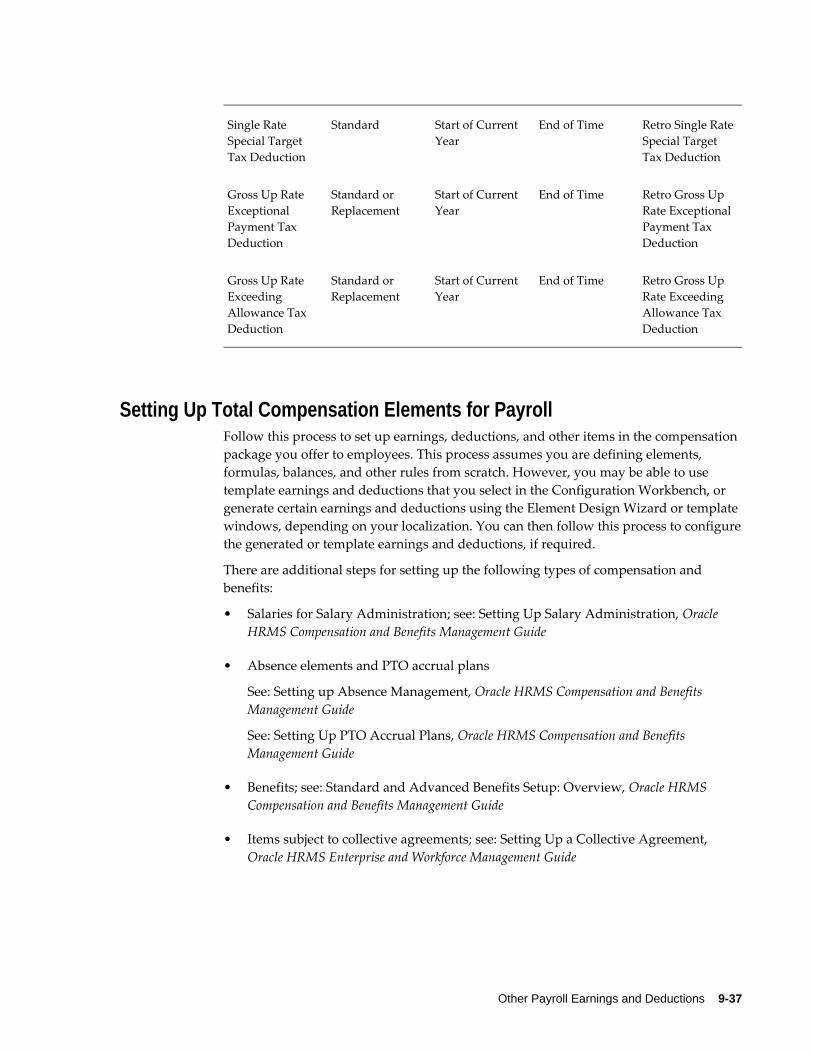
Other Payroll Earnings and Deductions 9-37
Single Rate Special Target Tax Deduction
Standard Start of Current Year
End of Time Retro Single RateSpecial Target Tax Deduction
Gross Up Rate Exceptional Payment Tax Deduction
Standard or Replacement
Start of Current Year
End of Time Retro Gross Up Rate Exceptional Payment Tax Deduction
Gross Up Rate Exceeding Allowance Tax Deduction
Standard or Replacement
Start of Current Year
End of Time Retro Gross Up Rate Exceeding Allowance Tax Deduction
Setting Up Total Compensation Elements for PayrollFollow this process to set up earnings, deductions, and other items in the compensation package you offer to employees. This process assumes you are defining elements, formulas, balances, and other rules from scratch. However, you may be able to use template earnings and deductions that you select in the Configuration Workbench, or generate certain earnings and deductions using the Element Design Wizard or template windows, depending on your localization. You can then follow this process to configurethe generated or template earnings and deductions, if required.
There are additional steps for setting up the following types of compensation and benefits:
• Salaries for Salary Administration; see: Setting Up Salary Administration, Oracle HRMS Compensation and Benefits Management Guide
• Absence elements and PTO accrual plans
See: Setting up Absence Management, Oracle HRMS Compensation and Benefits Management Guide
See: Setting Up PTO Accrual Plans, Oracle HRMS Compensation and Benefits Management Guide
• Benefits; see: Standard and Advanced Benefits Setup: Overview, Oracle HRMS Compensation and Benefits Management Guide
• Items subject to collective agreements; see: Setting Up a Collective Agreement, Oracle HRMS Enterprise and Workforce Management Guide
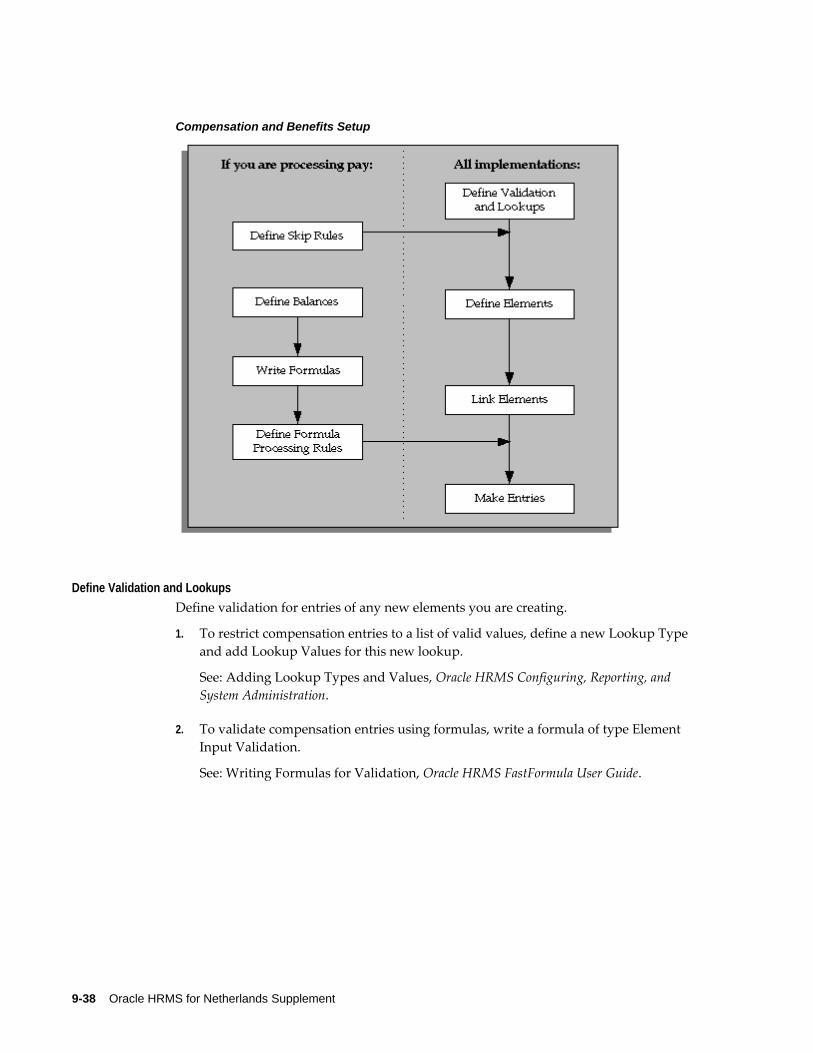
9-38 Oracle HRMS for Netherlands Supplement
Compensation and Benefits Setup
Define Validation and LookupsDefine validation for entries of any new elements you are creating.
1. To restrict compensation entries to a list of valid values, define a new Lookup Type and add Lookup Values for this new lookup.
See: Adding Lookup Types and Values, Oracle HRMS Configuring, Reporting, and System Administration.
2. To validate compensation entries using formulas, write a formula of type Element Input Validation.
See: Writing Formulas for Validation, Oracle HRMS FastFormula User Guide.
Other Payroll Earnings and Deductions 9-39
3. To create a matrix of values (such as bonus amount against years of service) for use in formulas or QuickPaint reports, set up user tables.
See: Setting Up User Tables, Columns, and Rows, Oracle HRMS Configuring, Reporting, and System Administration Guide.
Define Element Skip Rules
4. If some elements should not be processed in every payroll run, write formulas for element skip rules defining the conditions when the run should process these elements.
See: Writing Formulas for Element Skip Rules, Oracle HRMS Configuring, Reporting, and System Administration Guide.
Set Up Proration
5. If the Proration tab is available on the Element window for your localization, you can set up proration. For earnings or deductions that the payroll run should proratewhen relevant factors (such as pay rates, grades, or working hours) change during apay period, make sure you have completed the basic proration setup steps. See: Setting Up Proration, Oracle HRMS Compensation and Benefits Management Guide.
Define Elements
6. Define elements and element input values:
• To record information about employee compensation, benefits, and equipment
• For processing earnings and deductions. (Note that some elements for legislative deductions are predefined.)
See: Defining an Element, Oracle HRMS Compensation and Benefits Management Guide.
See: Defining an Element's Input Values, Oracle HRMS Compensation and BenefitsManagement Guide.
See also: Deleting an Element, Oracle HRMS Compensation and Benefits Management Guide.
7. Define frequency rules, if necessary, to determine the periods in which the element should be processed.
See: Defining Frequency Rules, page 9-41.
Define Links for Predefined and User-defined Elements
8. If the payroll costs of an element should be distributed over other elements, define adistribution set.
9-40 Oracle HRMS for Netherlands Supplement
See: Defining an Element or Distribution Set, Oracle HRMS Compensation and BenefitsManagement Guide
9. Define element links to identify one or more groups of employees who are eligible to receive an element.
See: Defining Element Links, Oracle HRMS Compensation and Benefits Management Guide.
See also: Running the Element Link Details Report, Oracle HRMS Compensation and Benefits Management Guide.
Define BalancesOracle Payroll has many predefined balances installed with the system. You can define other balances.
10. Define secondary element classifications.
See: Defining Secondary Element Classifications, page 9-62.
11. Create classes of balance feeds by entering or removing secondary classifications foryour elements.
See: Creating Classes of Balance Feeds, page 9-64.
12. Define user balances and create balance feeds for individual elements.
See: Defining User Balances, page 9-64.
See: Creating Balance Feeds for Individual Elements, page 9-63.
For information on uploading initial balances, please refer to the appropriate Legislative Balance Initialization technical essay.
Write Payroll Formulas
13. Oracle Payroll provides formulas for processing legislative deductions. For other elements, you can write formulas to calculate element results and other processing outcomes in payroll runs.
See: Writing Payroll Formulas for Elements, Oracle HRMS FastFormula User Guide.
Define Formula Processing and Result Rules
14. To define which formula processes an element for Active assignments (and optionally for other assignment statuses), define processing rules for the element. To specify what happens to formula results (that is, the values you include in the formula's Return statement), define formula result rules.
See: Defining Formula Processing and Result Rules, page 9-42.
Other Payroll Earnings and Deductions 9-41
Define Rules for Net-to-Gross ProcessingIf your localization supports net-to-gross processing, you can define rules for iterative processing of earnings and for excluding balances.
15. Define rules for the processing of the iterative formula. See: Defining Iterative Processing Rules, Oracle HRMS Compensation and Benefits Management Guide UK.
16. Specify which balances to exclude from the net-to-gross calculation. See: Excluding Balances From an Element's Grossup Calculation, Oracle HRMS Compensation and Benefits Management Guide UK.
Make Entries
17. For elements without Standard links, make entries of your elements for all employee who should receive them.
See: Making Manual Element Entries, Oracle HRMS Compensation and Benefits Management Guide.
Defining Frequency RulesRecurring elements may require frequency rules to determine in which pay periods they should process. For example, a monthly deduction might be processed in the third period of the month for weekly-paid employees and in the second period of the month for employees paid on a semi-monthly basis.
It is possible to set frequency rules to process once- or twice-yearly deductions on monthly, quarterly, or semi-annual payrolls. These rules' periods then refer to periods within a year (months, quarters or half years) instead or periods within a month. However, for infrequent deductions, you may prefer to define them as nonrecurring and use BEE to make entries when required.
Use the Frequency Rules window to define or change an element's frequency rules at any time.
US and Canada Payroll only: Use the Deduction form to define or change a deduction'sfrequency rules.
Mexico only: Use the Element Design Wizard to define or change a deduction's frequency rules.
To define frequency rules:1. Select the name of the payroll for which you want to define frequency rules.
2. In the Date field, you can override the default date that the payroll run uses to assess the frequency rule, if required.
9-42 Oracle HRMS for Netherlands Supplement
For example, suppose you are defining frequency rules for a monthly deduction. If you select Effective Date for a Weekly payroll and check Processing Period 1, the payroll run only takes the deduction if the run's effective date is in the first week of the month.
3. Check the boxes for the processing period or periods in which you want the element to process for each payroll.
For example, if you want a monthly deduction to process in the second week of the month for a weekly payroll, check the box under 2 for that payroll.
Notice that some periods are not available for all payrolls. For example, a bi-weeklypayroll can only have, at most, three periods a month, so periods 4, 5, and 6 are not relevant to this payroll.
Defining Formula Processing and Result RulesUse the Formula Result Rules window to associate one or more formula processing rules with an element.
At minimum, an element needs one standard processing rule. This identifies the formula the payroll run uses to process the element for employees with an Active assignment status (and a Payroll system status of Process). It is also the default formula for other assignment statuses. However, you can define other processing rules if you need to use different formulas for assignments at other statuses. For example, you couldhave two rules for a Wages element: Standard Wages and Paid Training Leave.
Also use this window to define how each formula result is used by the payroll run.
Correcting and Updating Processing RulesWhen you add a formula result, it takes on the effective end date of its processing rule. Any date effective changes you make to existing processing rules can affect formula results as follows:
• Update: If you update a processing rule or give it an effective end date, all the rule'scurrently effective and future-dated formula results automatically get identical end dates.
• Correction: If you correct a processing rule, all its currently effective and future-dated formula results remain unchanged.
• Future delete: If you delete all future changes scheduled for a processing rule, this also deletes any future changes scheduled for the rule's formula results.
To associate processing rules with elements:1. Set your effective date to the start date for the processing rule.
Other Payroll Earnings and Deductions 9-43
2. Select the element for which you are entering rules. The element's description and classification automatically display.
3. Click Find to display any existing processing rules for this element.
4. In the Processing Rules region, select Standard and the regular formula for the element. If you have other formulas for this element, select them and the assignment statuses you want to associate with them.
Note: If you select a formula with inputs that do not match the element, you will receive a warning message, but you can still save your rule. Remember to update the formula before running the payroll.
5. Save your entries.
To define formula result rules for each processing rule:1. Click on a processing rule to select it.
2. In the Formula Results region, select a formula result name from the list of results specified when the formula was written.
3. Select the appropriate formula result type. There are five possible types:
Direct result: This is the element's run result (if you send the result to the element's pay value), or a direct result updating another of the element's input values.
Indirect result: This result passes as an element entry to another nonrecurring element not yet processed.
Message: The formula issues messages under certain conditions. For example, a formula can check a loan repayment balance and, if the balance is zero, issue the message "Loan is repaid." You read formula messages using the View Run Messages window.
Order Indirect: This result updates the subpriority of the element you select in the Element field.
Stop: This formula result uses the Date Earned of the payroll run to put an end dateon a recurring entry of this or another element (which must be defined with multiple entries not allowed.)
Update recurring entry: This result updates recurring entries of this or another element on the effective date of the payroll run. The receiving element must be defined with multiple entries not allowed unless you are passing a recurring element's entries to itself, that is updating another entry of the same element.
9-44 Oracle HRMS for Netherlands Supplement
Important: If your result type is Update Recurring Entry, then the application inserts an entry and any future dated changes to the entry remain unchanged by the results of the current payroll run.
4. For all formula result types except Direct Result or Message, select the name of the element to which you want to pass the formula result. This element must have a processing priority causing it to process after the element sending the result.
5. For the formula result types Direct Result, Indirect Result, and Update Recurring Entry, select the input value to update.
6. If you select Message as the formula result type, select a message severity level. There are three choices:
Fatal: When a message with this severity results from your formula, the run rolls back all processing for the employee assignment.
Warning: A message with this level of severity does not affect payroll processing but warns the user of a possible problem.
Information: A message with this level of severity simply gives information.
Other Payroll Earnings and Deductions 9-45
Balances
Payroll BalancesBalances show the positive or negative accumulation of particular values over periods of time. They are fed either by the direct run results (that is, Pay Values) of elements processed in the payroll run, or by input values. For example, in North American installations, the input value Hours of the element Time Entry Wages feeds the balance Regular Hours Worked.
Balance Dimensions and LevelsBalances exist for various time dimensions, such as current run, period to date, month, quarter to date, and year to date.
Balances also exist at different levels, such as assignment level or person level. Balances for individual employee assignments are at the assignment level (in North America, they can be at the assignment level within a GRE). If your enterprise permits employeesto hold more than one assignment at the same time, you can hold balances at the personlevel. For example, a person level Gross Earnings balance is the sum of an employee's assignment level Gross Earnings balances.
Choosing Elements To Feed a BalanceYou can select elements to feed a balance in three ways:
• Select a primary classification. The run results of all elements in the classification feed the balance. However, you must have an input value of Pay Value if you want to create a feed between an element and a balance.
• Select a secondary classification. You choose which elements from a primary classification (such as Earnings) are to feed the balance by giving these elements a secondary classification. Again it is the run results of the elements that feed the balance.
Note: Secondary classifications are not used in the North American versions of Oracle Payroll at this time.
• Select an individual element. You can select either the run result or an input value to feed the balance. The input value must have the same unit of measure (such as hours or number) as the balance.
You can choose any number of classifications or any number of elements to feed a balance. However you cannot use a mixture of classifications and individual elements
9-46 Oracle HRMS for Netherlands Supplement
to feed a balance. When you select an element or classification as a balance feed, you specify whether the run results (or input values) should add to or subtract from the balance.
Startup and User Defined BalancesThe balances and balance feeds for the elements supplied with Oracle Payroll are present in the system when you receive it. For North American users, when you initiate earnings types, deductions and other items that process in the payroll run, the system generates the appropriate balances and balance feeds together with the necessary elements.
You can define any additional balances your enterprise requires. For example, you may require a Pensionable Earnings balance for a pension plan your enterprise offers employees.
Primary BalancesImportant: You cannot have two or more elements with the same primary balance. This setup will cause incorrect elements to show up on reports or Statement of Earnings when the process uses balance reporting architecture.
You define primary balance using the following navigation:
• Balance window (Total Compensation > Basic > Balance):
You define primary balance by selecting an element and an input value in the Primary Balance region in the Balance window. This type of balance is fed by a single element and can only be inserted if no balance feeds exist for the balance, with the exception of Balance Initialization feeds. When you create a primary balance, the associated feed is created automatically. No other feeds can be created for the balance. Note that if the Primary Balance region is disabled, then the primary balance functionality is not enabled for that localization.
• Earnings or Deductions window:
When you create a balance, the balance gets created with name same as that of the element and the element input "Pay Value" gets added as a feed to this balance. Thisbalance is considered as a Primary Balance for this element and can be seen from the Primary Balance field in the Element Description, Further Information window.Changing this Primary Balance in the Further Element Information will result in incorrect values to be reported. For example, Statement of Earnings (SOE) is designed to display the values based on the Primary Balance associated with the elements that are processed.
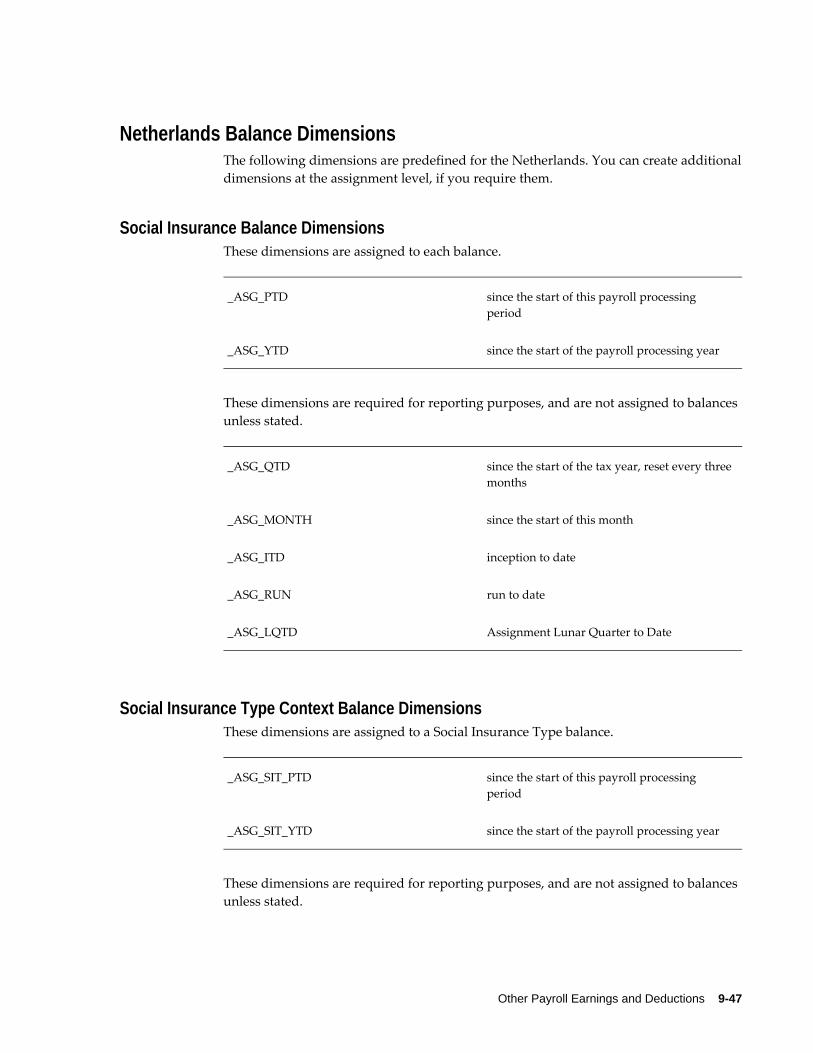
Other Payroll Earnings and Deductions 9-47
Netherlands Balance DimensionsThe following dimensions are predefined for the Netherlands. You can create additionaldimensions at the assignment level, if you require them.
Social Insurance Balance DimensionsThese dimensions are assigned to each balance.
_ASG_PTD since the start of this payroll processing period
_ASG_YTD since the start of the payroll processing year
These dimensions are required for reporting purposes, and are not assigned to balances unless stated.
_ASG_QTD since the start of the tax year, reset every threemonths
_ASG_MONTH since the start of this month
_ASG_ITD inception to date
_ASG_RUN run to date
_ASG_LQTD Assignment Lunar Quarter to Date
Social Insurance Type Context Balance DimensionsThese dimensions are assigned to a Social Insurance Type balance.
_ASG_SIT_PTD since the start of this payroll processing period
_ASG_SIT_YTD since the start of the payroll processing year
These dimensions are required for reporting purposes, and are not assigned to balances unless stated.
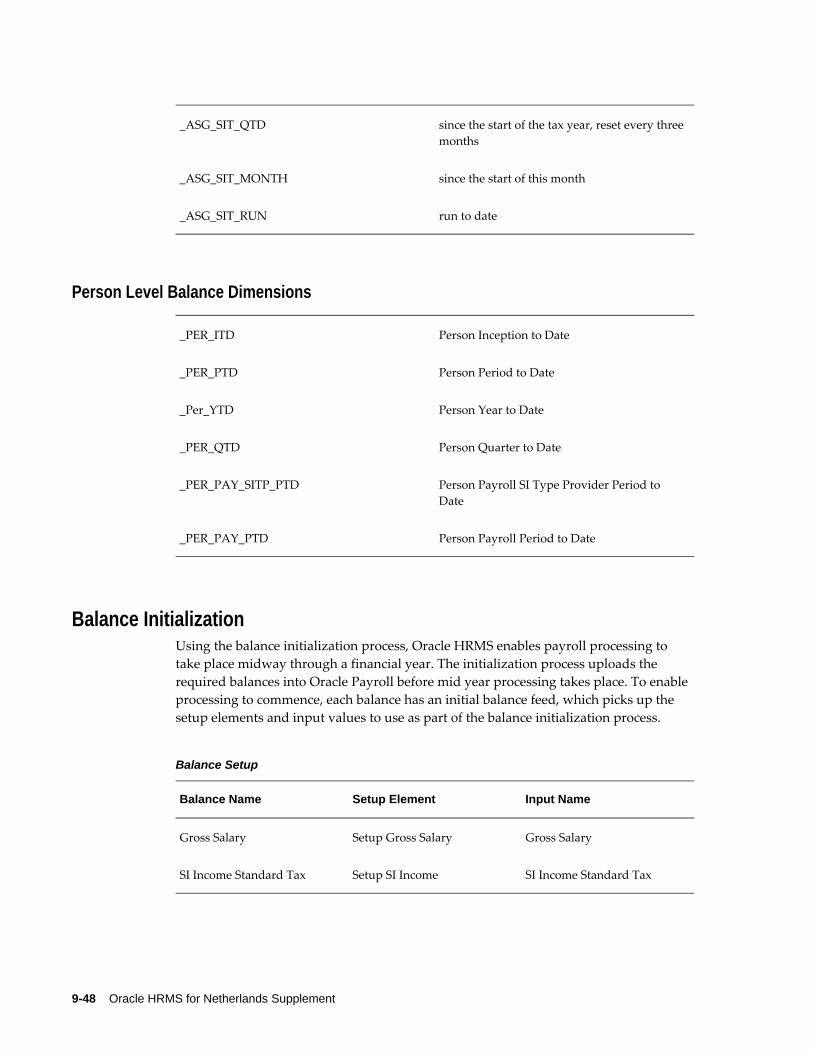
9-48 Oracle HRMS for Netherlands Supplement
_ASG_SIT_QTD since the start of the tax year, reset every threemonths
_ASG_SIT_MONTH since the start of this month
_ASG_SIT_RUN run to date
Person Level Balance Dimensions
_PER_ITD Person Inception to Date
_PER_PTD Person Period to Date
_Per_YTD Person Year to Date
_PER_QTD Person Quarter to Date
_PER_PAY_SITP_PTD Person Payroll SI Type Provider Period to Date
_PER_PAY_PTD Person Payroll Period to Date
Balance InitializationUsing the balance initialization process, Oracle HRMS enables payroll processing to take place midway through a financial year. The initialization process uploads the required balances into Oracle Payroll before mid year processing takes place. To enable processing to commence, each balance has an initial balance feed, which picks up the setup elements and input values to use as part of the balance initialization process.
Balance Setup
Balance Name Setup Element Input Name
Gross Salary Setup Gross Salary Gross Salary
SI Income Standard Tax Setup SI Income SI Income Standard Tax

Other Payroll Earnings and Deductions 9-49
Balance Name Setup Element Input Name
SI Income Special Tax Setup SI Income SI Income Special Tax
SI Income Non Taxable Setup SI Income SI Income Non Taxable
SI Gross Salary Standard Tax Setup SI Gross Salary SI Gross Salary Standard Tax
SI Gross Salary Special Tax Setup SI Gross Salary SI Gross Salary Special Tax
SI Gross Salary Non Taxable Setup SI Gross Salary SI Gross Salary Non Taxable
Employee Private Health Contribution
Setup Private Health Contribution
EE Private Health Contribution
Employer Private Health Contribution
Setup Private Health Contribution
ER Private Health Contribution
Pre Tax Deductions Setup Pre Tax Deductions Pre Tax Deductions
Standard Taxable Income Setup Taxable Income Standard Taxable Income
Special Taxable Income Setup Taxable Income Special Taxable Income
Standard Tax Deduction Setup Tax Deduction Standard Tax Deduction
Special Tax Deduction Setup Tax Deduction Special Tax Deduction
Wage Saving Deduction Setup Tax Deduction Wage Saving Tax Deduction
Premium Saving Tax Deduction
Setup Tax Deduction Premium Saving Tax Deduction
Wage Saving Taxable Amount
Setup Taxable Amount Wage Saving Taxable Amount
Premium Saving Taxable Amount
Setup Taxable Amount Premium Saving Taxable Amount
Tax Travel Allowance Setup Tax Allowance Tax Travel Allowance
Tax Sea Days Discount Setup Tax Allowance Tax Sea Days Discount
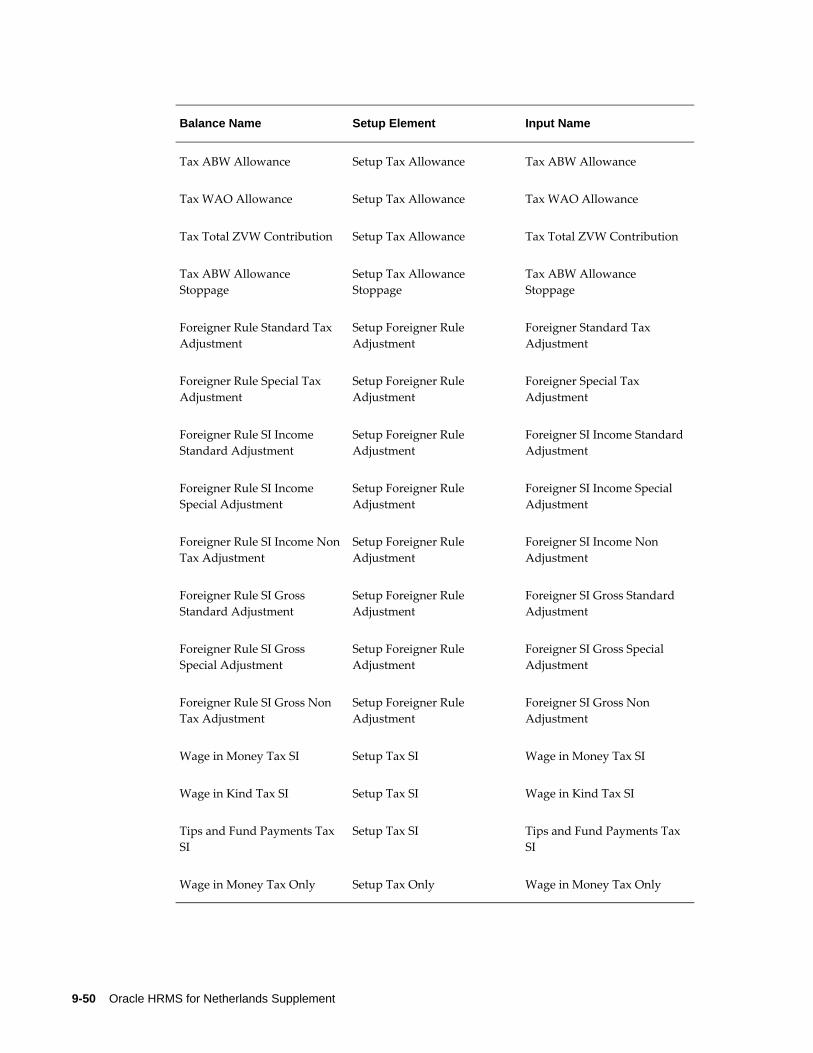
9-50 Oracle HRMS for Netherlands Supplement
Balance Name Setup Element Input Name
Tax ABW Allowance Setup Tax Allowance Tax ABW Allowance
Tax WAO Allowance Setup Tax Allowance Tax WAO Allowance
Tax Total ZVW Contribution Setup Tax Allowance Tax Total ZVW Contribution
Tax ABW Allowance Stoppage
Setup Tax Allowance Stoppage
Tax ABW Allowance Stoppage
Foreigner Rule Standard Tax Adjustment
Setup Foreigner Rule Adjustment
Foreigner Standard Tax Adjustment
Foreigner Rule Special Tax Adjustment
Setup Foreigner Rule Adjustment
Foreigner Special Tax Adjustment
Foreigner Rule SI Income Standard Adjustment
Setup Foreigner Rule Adjustment
Foreigner SI Income StandardAdjustment
Foreigner Rule SI Income Special Adjustment
Setup Foreigner Rule Adjustment
Foreigner SI Income Special Adjustment
Foreigner Rule SI Income NonTax Adjustment
Setup Foreigner Rule Adjustment
Foreigner SI Income Non Adjustment
Foreigner Rule SI Gross Standard Adjustment
Setup Foreigner Rule Adjustment
Foreigner SI Gross Standard Adjustment
Foreigner Rule SI Gross Special Adjustment
Setup Foreigner Rule Adjustment
Foreigner SI Gross Special Adjustment
Foreigner Rule SI Gross Non Tax Adjustment
Setup Foreigner Rule Adjustment
Foreigner SI Gross Non Adjustment
Wage in Money Tax SI Setup Tax SI Wage in Money Tax SI
Wage in Kind Tax SI Setup Tax SI Wage in Kind Tax SI
Tips and Fund Payments Tax SI
Setup Tax SI Tips and Fund Payments Tax SI
Wage in Money Tax Only Setup Tax Only Wage in Money Tax Only
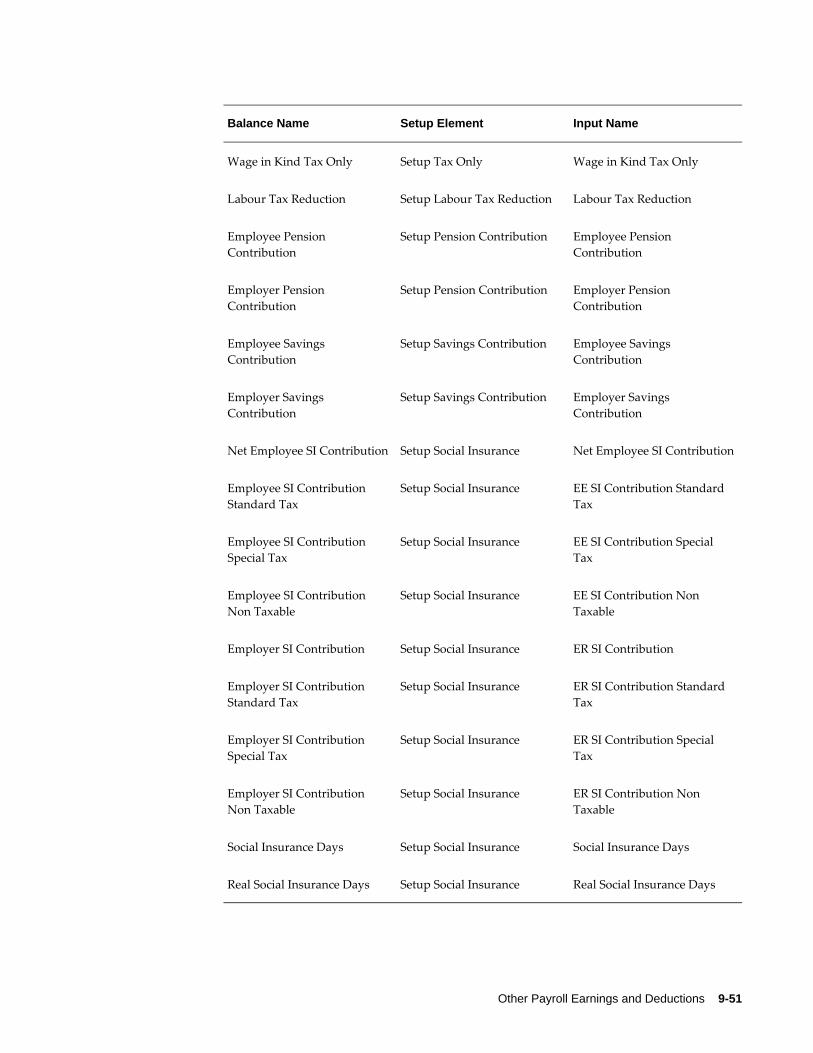
Other Payroll Earnings and Deductions 9-51
Balance Name Setup Element Input Name
Wage in Kind Tax Only Setup Tax Only Wage in Kind Tax Only
Labour Tax Reduction Setup Labour Tax Reduction Labour Tax Reduction
Employee Pension Contribution
Setup Pension Contribution Employee Pension Contribution
Employer Pension Contribution
Setup Pension Contribution Employer Pension Contribution
Employee Savings Contribution
Setup Savings Contribution Employee Savings Contribution
Employer Savings Contribution
Setup Savings Contribution Employer Savings Contribution
Net Employee SI Contribution Setup Social Insurance Net Employee SI Contribution
Employee SI Contribution Standard Tax
Setup Social Insurance EE SI Contribution Standard Tax
Employee SI Contribution Special Tax
Setup Social Insurance EE SI Contribution Special Tax
Employee SI Contribution Non Taxable
Setup Social Insurance EE SI Contribution Non Taxable
Employer SI Contribution Setup Social Insurance ER SI Contribution
Employer SI Contribution Standard Tax
Setup Social Insurance ER SI Contribution Standard Tax
Employer SI Contribution Special Tax
Setup Social Insurance ER SI Contribution Special Tax
Employer SI Contribution Non Taxable
Setup Social Insurance ER SI Contribution Non Taxable
Social Insurance Days Setup Social Insurance Social Insurance Days
Real Social Insurance Days Setup Social Insurance Real Social Insurance Days
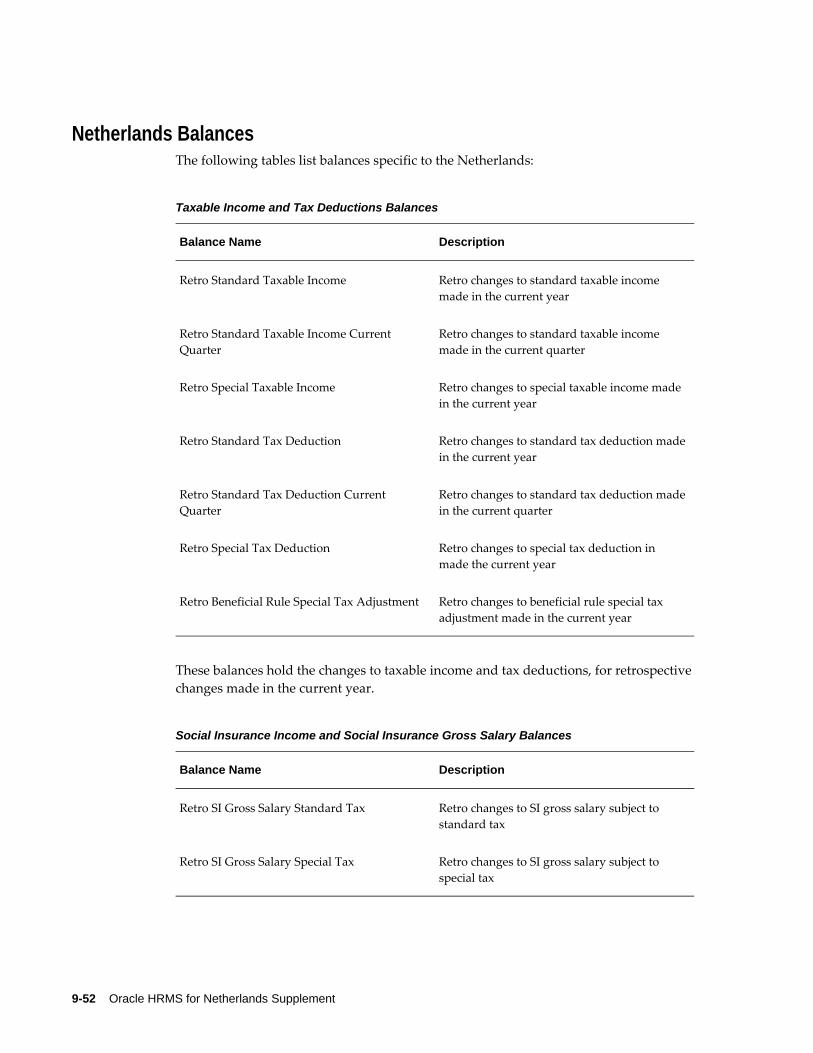
9-52 Oracle HRMS for Netherlands Supplement
Netherlands BalancesThe following tables list balances specific to the Netherlands:
Taxable Income and Tax Deductions Balances
Balance Name Description
Retro Standard Taxable Income Retro changes to standard taxable income made in the current year
Retro Standard Taxable Income Current Quarter
Retro changes to standard taxable income made in the current quarter
Retro Special Taxable Income Retro changes to special taxable income made in the current year
Retro Standard Tax Deduction Retro changes to standard tax deduction madein the current year
Retro Standard Tax Deduction Current Quarter
Retro changes to standard tax deduction madein the current quarter
Retro Special Tax Deduction Retro changes to special tax deduction in made the current year
Retro Beneficial Rule Special Tax Adjustment Retro changes to beneficial rule special tax adjustment made in the current year
These balances hold the changes to taxable income and tax deductions, for retrospectivechanges made in the current year.
Social Insurance Income and Social Insurance Gross Salary Balances
Balance Name Description
Retro SI Gross Salary Standard Tax Retro changes to SI gross salary subject to standard tax
Retro SI Gross Salary Special Tax Retro changes to SI gross salary subject to special tax
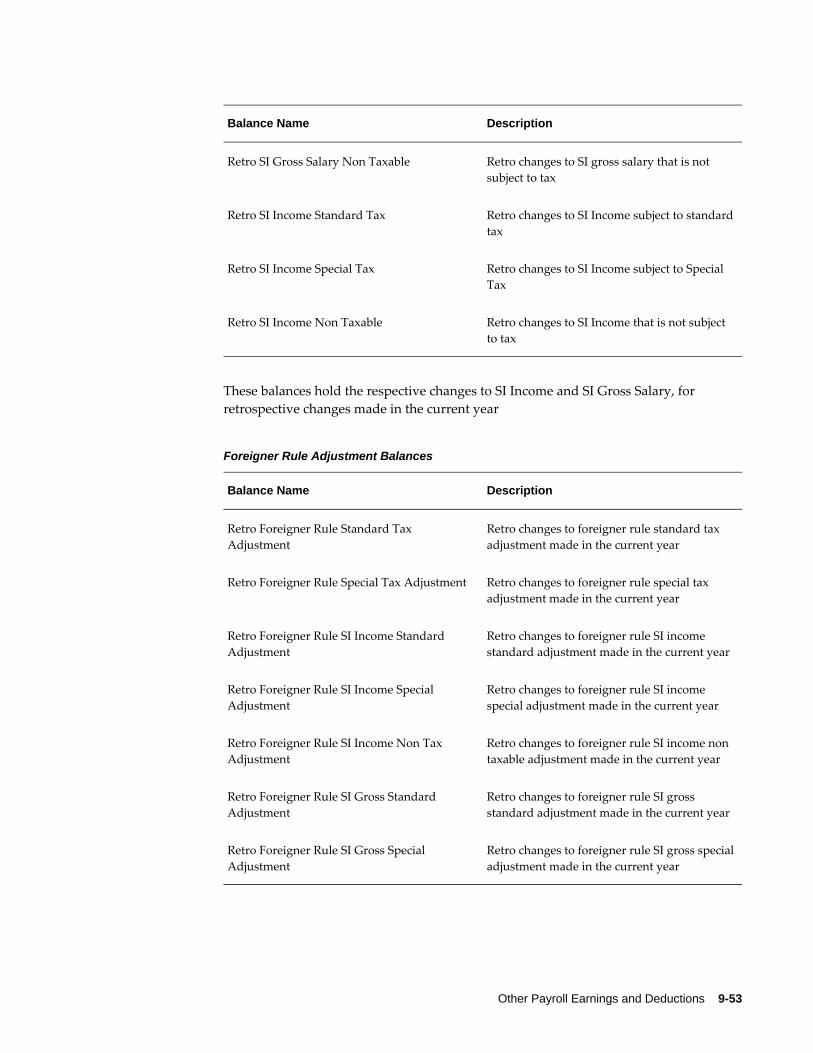
Other Payroll Earnings and Deductions 9-53
Balance Name Description
Retro SI Gross Salary Non Taxable Retro changes to SI gross salary that is not subject to tax
Retro SI Income Standard Tax Retro changes to SI Income subject to standardtax
Retro SI Income Special Tax Retro changes to SI Income subject to Special Tax
Retro SI Income Non Taxable Retro changes to SI Income that is not subject to tax
These balances hold the respective changes to SI Income and SI Gross Salary, for retrospective changes made in the current year
Foreigner Rule Adjustment Balances
Balance Name Description
Retro Foreigner Rule Standard Tax Adjustment
Retro changes to foreigner rule standard tax adjustment made in the current year
Retro Foreigner Rule Special Tax Adjustment Retro changes to foreigner rule special tax adjustment made in the current year
Retro Foreigner Rule SI Income Standard Adjustment
Retro changes to foreigner rule SI income standard adjustment made in the current year
Retro Foreigner Rule SI Income Special Adjustment
Retro changes to foreigner rule SI income special adjustment made in the current year
Retro Foreigner Rule SI Income Non Tax Adjustment
Retro changes to foreigner rule SI income non taxable adjustment made in the current year
Retro Foreigner Rule SI Gross Standard Adjustment
Retro changes to foreigner rule SI gross standard adjustment made in the current year
Retro Foreigner Rule SI Gross Special Adjustment
Retro changes to foreigner rule SI gross specialadjustment made in the current year
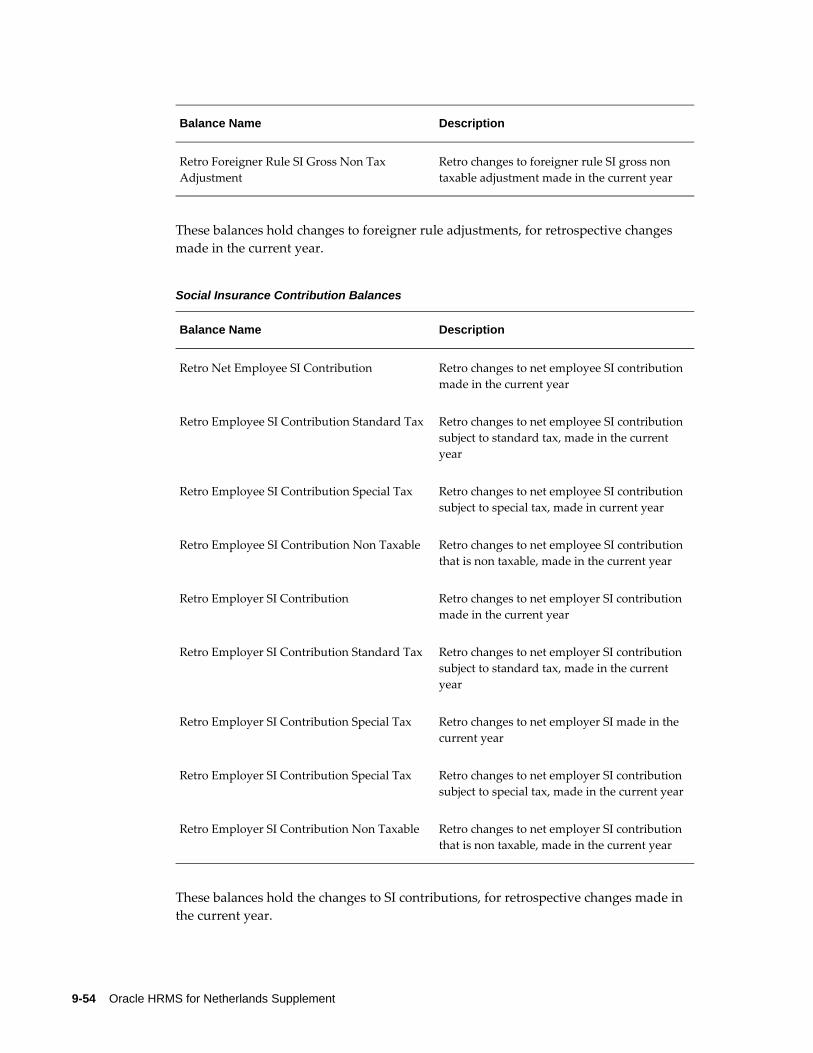
9-54 Oracle HRMS for Netherlands Supplement
Balance Name Description
Retro Foreigner Rule SI Gross Non Tax Adjustment
Retro changes to foreigner rule SI gross non taxable adjustment made in the current year
These balances hold changes to foreigner rule adjustments, for retrospective changes made in the current year.
Social Insurance Contribution Balances
Balance Name Description
Retro Net Employee SI Contribution Retro changes to net employee SI contribution made in the current year
Retro Employee SI Contribution Standard Tax Retro changes to net employee SI contribution subject to standard tax, made in the current year
Retro Employee SI Contribution Special Tax Retro changes to net employee SI contribution subject to special tax, made in current year
Retro Employee SI Contribution Non Taxable Retro changes to net employee SI contribution that is non taxable, made in the current year
Retro Employer SI Contribution Retro changes to net employer SI contribution made in the current year
Retro Employer SI Contribution Standard Tax Retro changes to net employer SI contribution subject to standard tax, made in the current year
Retro Employer SI Contribution Special Tax Retro changes to net employer SI made in the current year
Retro Employer SI Contribution Special Tax Retro changes to net employer SI contribution subject to special tax, made in the current year
Retro Employer SI Contribution Non Taxable Retro changes to net employer SI contribution that is non taxable, made in the current year
These balances hold the changes to SI contributions, for retrospective changes made in the current year.
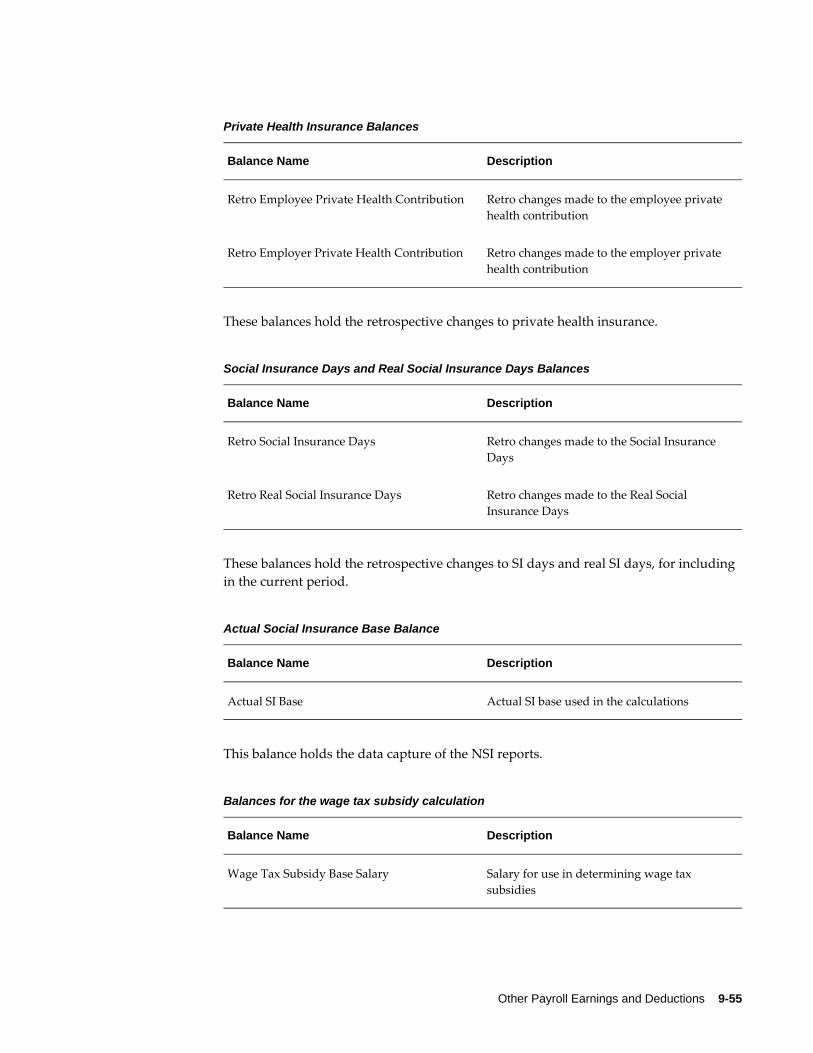
Other Payroll Earnings and Deductions 9-55
Private Health Insurance Balances
Balance Name Description
Retro Employee Private Health Contribution Retro changes made to the employee private health contribution
Retro Employer Private Health Contribution Retro changes made to the employer private health contribution
These balances hold the retrospective changes to private health insurance.
Social Insurance Days and Real Social Insurance Days Balances
Balance Name Description
Retro Social Insurance Days Retro changes made to the Social Insurance Days
Retro Real Social Insurance Days Retro changes made to the Real Social Insurance Days
These balances hold the retrospective changes to SI days and real SI days, for including in the current period.
Actual Social Insurance Base Balance
Balance Name Description
Actual SI Base Actual SI base used in the calculations
This balance holds the data capture of the NSI reports.
Balances for the wage tax subsidy calculation
Balance Name Description
Wage Tax Subsidy Base Salary Salary for use in determining wage tax subsidies
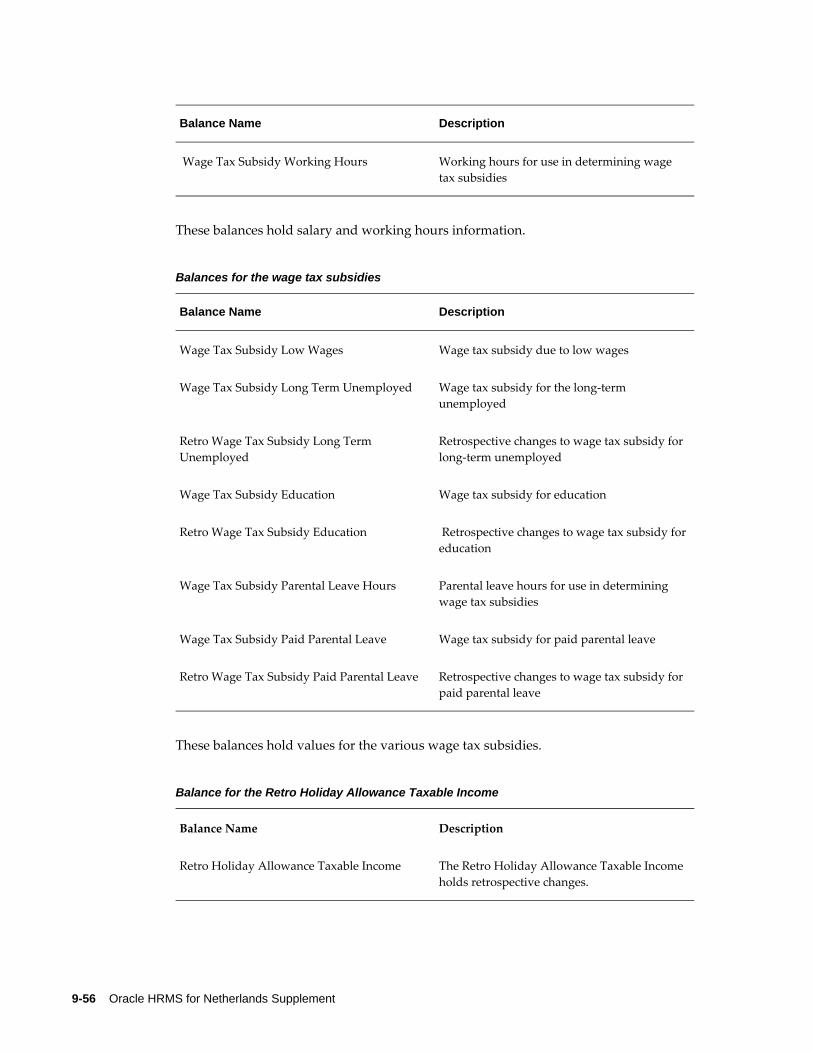
9-56 Oracle HRMS for Netherlands Supplement
Balance Name Description
Wage Tax Subsidy Working Hours Working hours for use in determining wage tax subsidies
These balances hold salary and working hours information.
Balances for the wage tax subsidies
Balance Name Description
Wage Tax Subsidy Low Wages Wage tax subsidy due to low wages
Wage Tax Subsidy Long Term Unemployed Wage tax subsidy for the long-term unemployed
Retro Wage Tax Subsidy Long Term Unemployed
Retrospective changes to wage tax subsidy for long-term unemployed
Wage Tax Subsidy Education Wage tax subsidy for education
Retro Wage Tax Subsidy Education Retrospective changes to wage tax subsidy foreducation
Wage Tax Subsidy Parental Leave Hours Parental leave hours for use in determining wage tax subsidies
Wage Tax Subsidy Paid Parental Leave Wage tax subsidy for paid parental leave
Retro Wage Tax Subsidy Paid Parental Leave Retrospective changes to wage tax subsidy for paid parental leave
These balances hold values for the various wage tax subsidies.
Balance for the Retro Holiday Allowance Taxable Income
Balance Name Description
Retro Holiday Allowance Taxable Income The Retro Holiday Allowance Taxable Incomeholds retrospective changes.
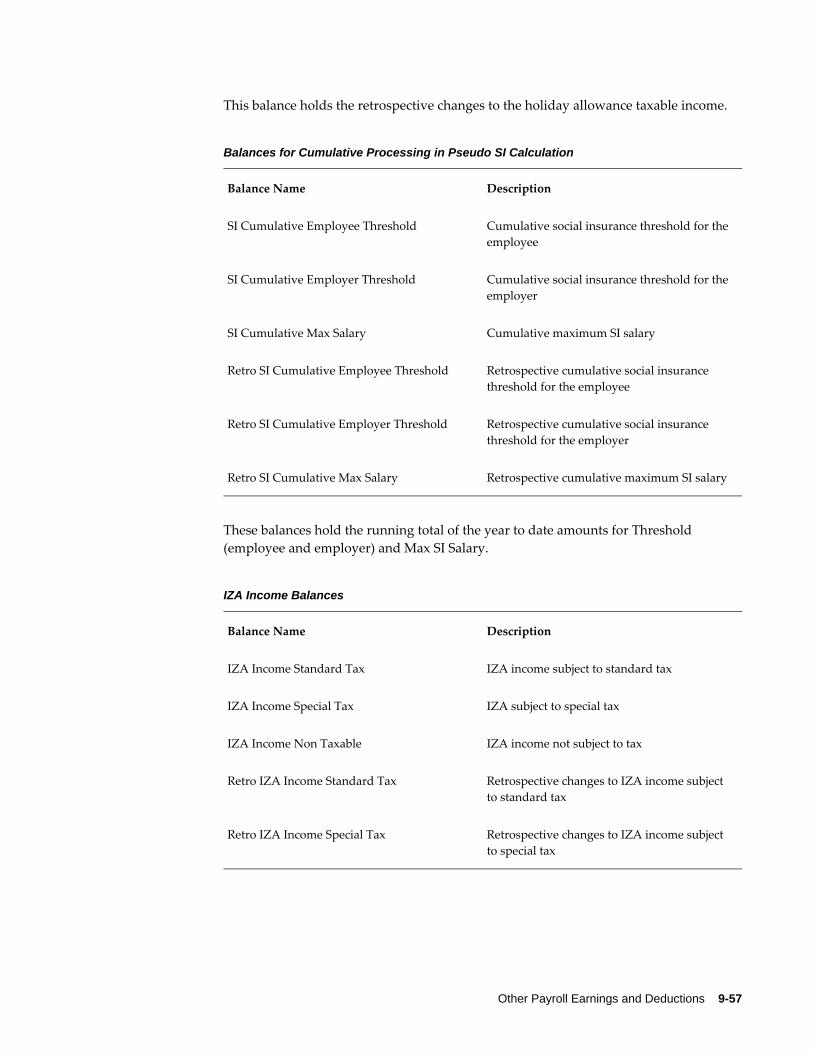
Other Payroll Earnings and Deductions 9-57
This balance holds the retrospective changes to the holiday allowance taxable income.
Balances for Cumulative Processing in Pseudo SI Calculation
Balance Name Description
SI Cumulative Employee Threshold Cumulative social insurance threshold for the employee
SI Cumulative Employer Threshold Cumulative social insurance threshold for the employer
SI Cumulative Max Salary Cumulative maximum SI salary
Retro SI Cumulative Employee Threshold Retrospective cumulative social insurance threshold for the employee
Retro SI Cumulative Employer Threshold Retrospective cumulative social insurance threshold for the employer
Retro SI Cumulative Max Salary Retrospective cumulative maximum SI salary
These balances hold the running total of the year to date amounts for Threshold (employee and employer) and Max SI Salary.
IZA Income Balances
Balance Name Description
IZA Income Standard Tax IZA income subject to standard tax
IZA Income Special Tax IZA subject to special tax
IZA Income Non Taxable IZA income not subject to tax
Retro IZA Income Standard Tax Retrospective changes to IZA income subject to standard tax
Retro IZA Income Special Tax Retrospective changes to IZA income subject to special tax
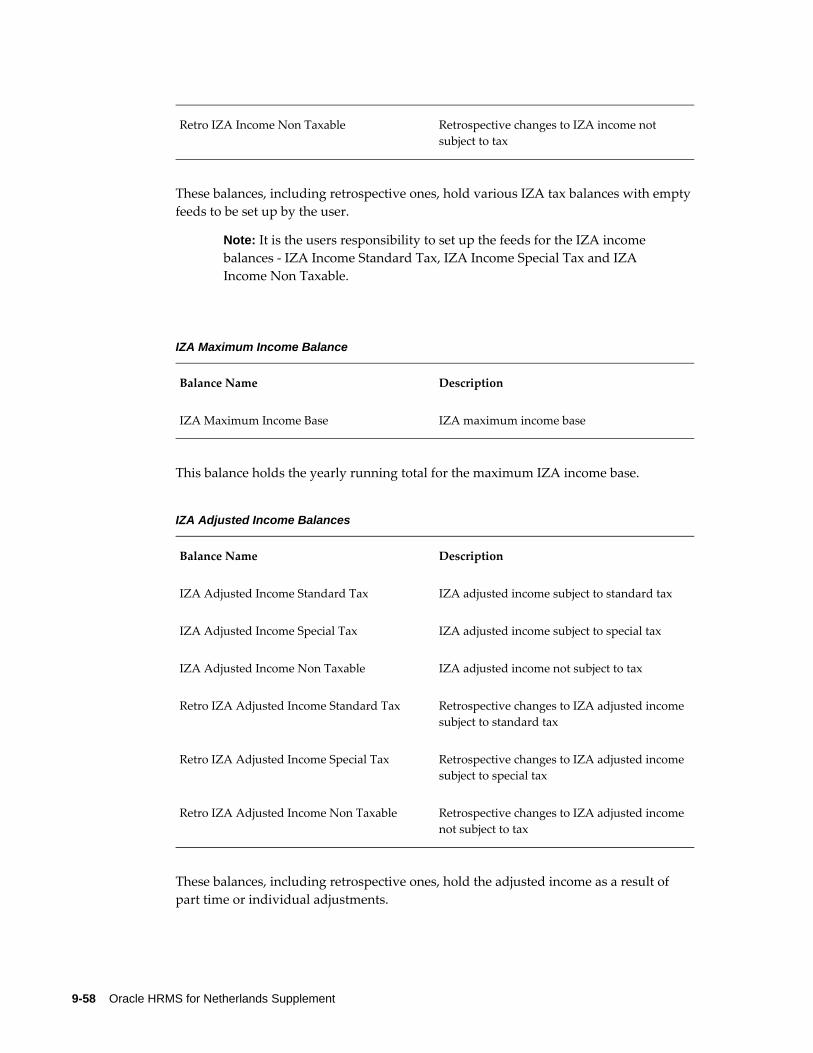
9-58 Oracle HRMS for Netherlands Supplement
Retro IZA Income Non Taxable Retrospective changes to IZA income not subject to tax
These balances, including retrospective ones, hold various IZA tax balances with emptyfeeds to be set up by the user.
Note: It is the users responsibility to set up the feeds for the IZA incomebalances - IZA Income Standard Tax, IZA Income Special Tax and IZA Income Non Taxable.
IZA Maximum Income Balance
Balance Name Description
IZA Maximum Income Base IZA maximum income base
This balance holds the yearly running total for the maximum IZA income base.
IZA Adjusted Income Balances
Balance Name Description
IZA Adjusted Income Standard Tax IZA adjusted income subject to standard tax
IZA Adjusted Income Special Tax IZA adjusted income subject to special tax
IZA Adjusted Income Non Taxable IZA adjusted income not subject to tax
Retro IZA Adjusted Income Standard Tax Retrospective changes to IZA adjusted incomesubject to standard tax
Retro IZA Adjusted Income Special Tax Retrospective changes to IZA adjusted incomesubject to special tax
Retro IZA Adjusted Income Non Taxable Retrospective changes to IZA adjusted incomenot subject to tax
These balances, including retrospective ones, hold the adjusted income as a result of part time or individual adjustments.
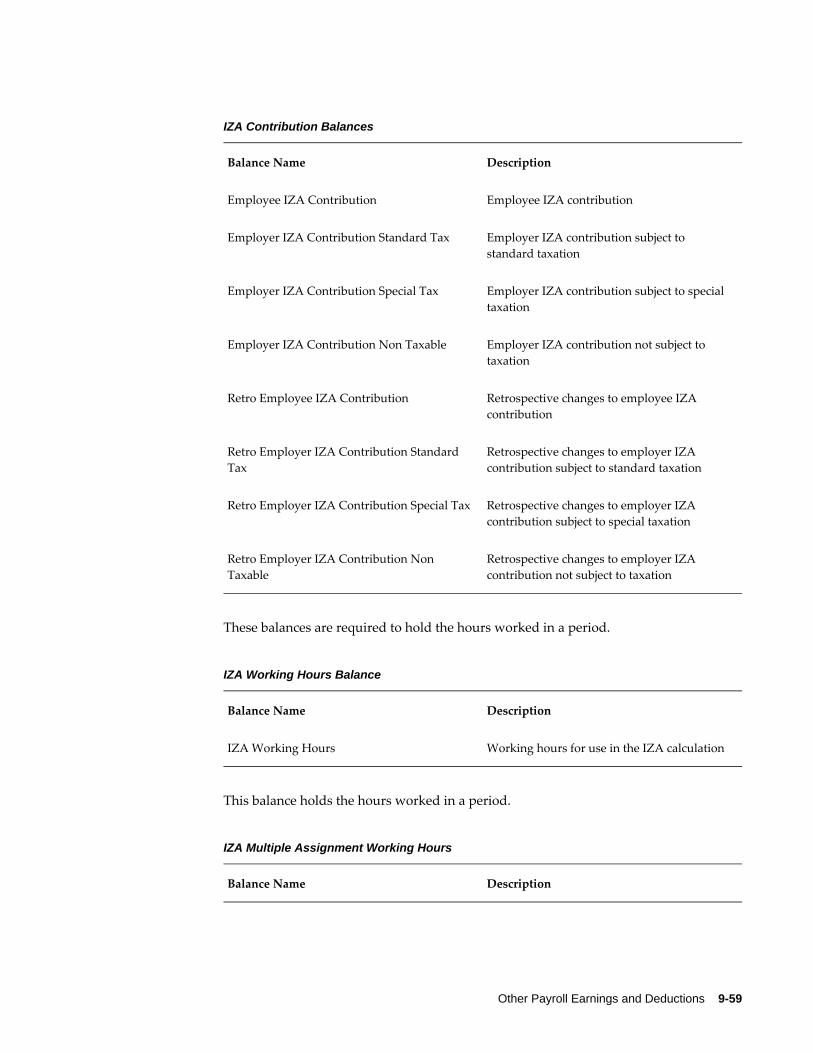
Other Payroll Earnings and Deductions 9-59
IZA Contribution Balances
Balance Name Description
Employee IZA Contribution Employee IZA contribution
Employer IZA Contribution Standard Tax Employer IZA contribution subject to standard taxation
Employer IZA Contribution Special Tax Employer IZA contribution subject to special taxation
Employer IZA Contribution Non Taxable Employer IZA contribution not subject to taxation
Retro Employee IZA Contribution Retrospective changes to employee IZA contribution
Retro Employer IZA Contribution Standard Tax
Retrospective changes to employer IZA contribution subject to standard taxation
Retro Employer IZA Contribution Special Tax Retrospective changes to employer IZA contribution subject to special taxation
Retro Employer IZA Contribution Non Taxable
Retrospective changes to employer IZA contribution not subject to taxation
These balances are required to hold the hours worked in a period.
IZA Working Hours Balance
Balance Name Description
IZA Working Hours Working hours for use in the IZA calculation
This balance holds the hours worked in a period.
IZA Multiple Assignment Working Hours
Balance Name Description
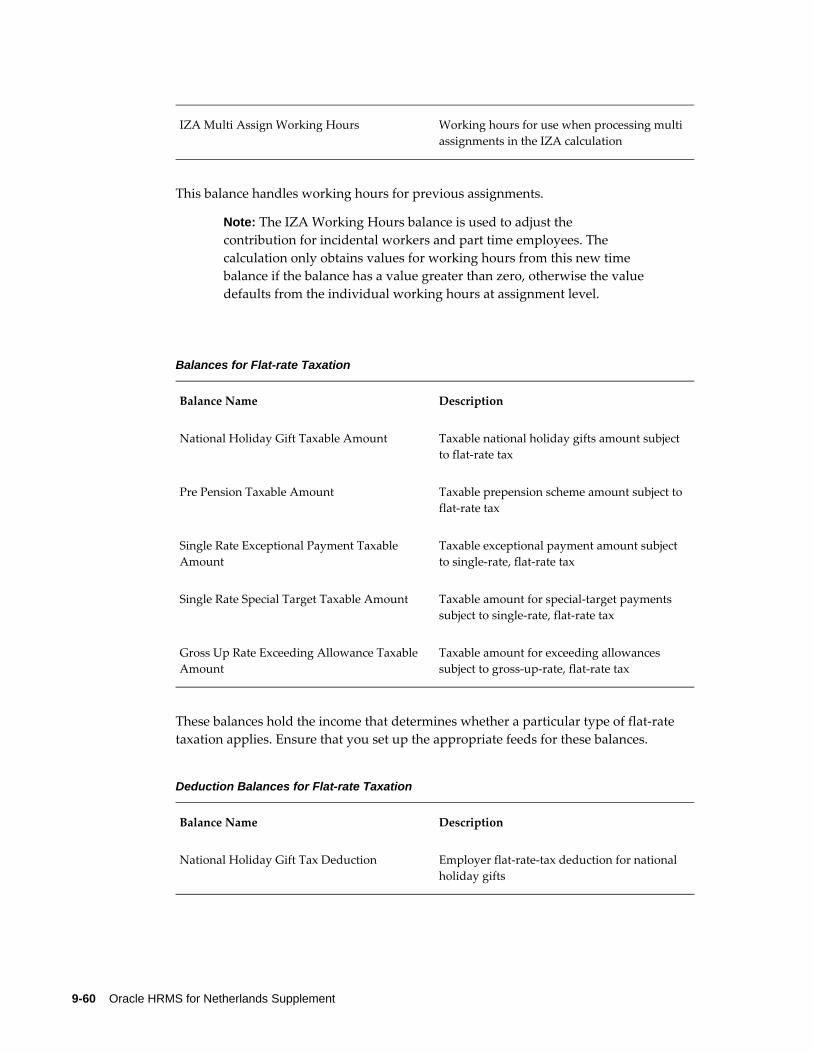
9-60 Oracle HRMS for Netherlands Supplement
IZA Multi Assign Working Hours Working hours for use when processing multi assignments in the IZA calculation
This balance handles working hours for previous assignments.
Note: The IZA Working Hours balance is used to adjust the contribution for incidental workers and part time employees. The calculation only obtains values for working hours from this new time balance if the balance has a value greater than zero, otherwise the valuedefaults from the individual working hours at assignment level.
Balances for Flat-rate Taxation
Balance Name Description
National Holiday Gift Taxable Amount Taxable national holiday gifts amount subject to flat-rate tax
Pre Pension Taxable Amount Taxable prepension scheme amount subject to flat-rate tax
Single Rate Exceptional Payment Taxable Amount
Taxable exceptional payment amount subject to single-rate, flat-rate tax
Single Rate Special Target Taxable Amount Taxable amount for special-target payments subject to single-rate, flat-rate tax
Gross Up Rate Exceeding Allowance Taxable Amount
Taxable amount for exceeding allowances subject to gross-up-rate, flat-rate tax
These balances hold the income that determines whether a particular type of flat-rate taxation applies. Ensure that you set up the appropriate feeds for these balances.
Deduction Balances for Flat-rate Taxation
Balance Name Description
National Holiday Gift Tax Deduction Employer flat-rate-tax deduction for national holiday gifts
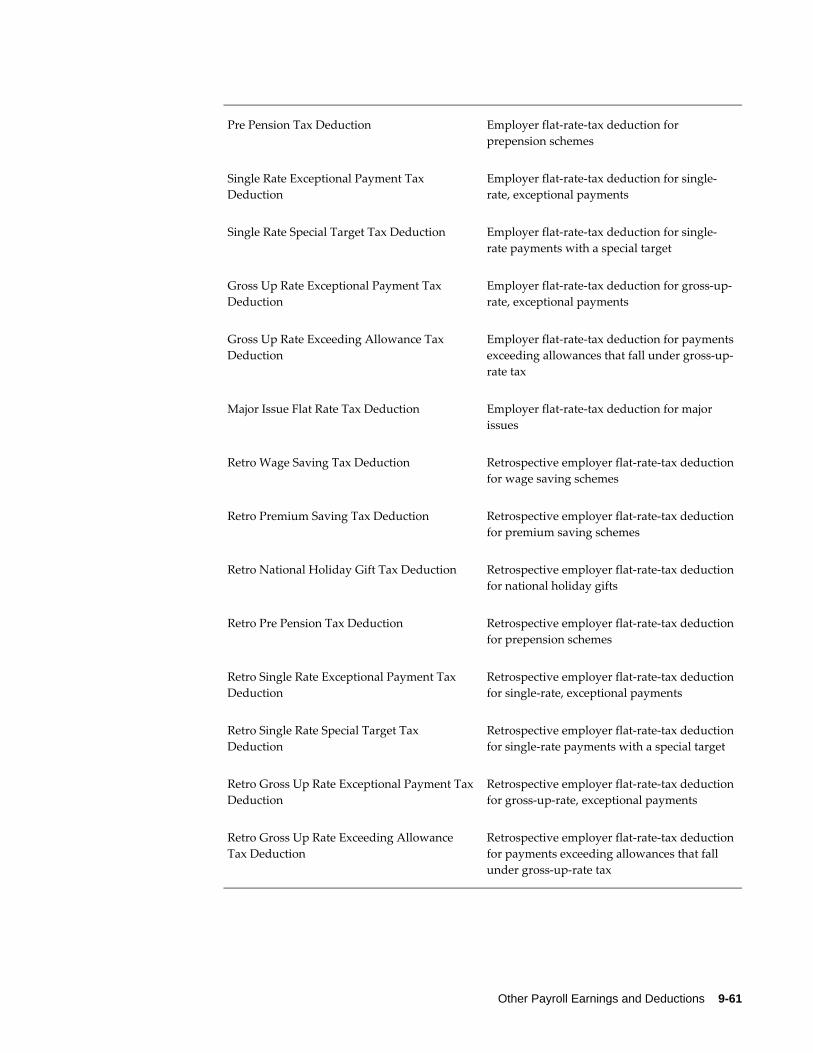
Other Payroll Earnings and Deductions 9-61
Pre Pension Tax Deduction Employer flat-rate-tax deduction for prepension schemes
Single Rate Exceptional Payment Tax Deduction
Employer flat-rate-tax deduction for single-rate, exceptional payments
Single Rate Special Target Tax Deduction Employer flat-rate-tax deduction for single-rate payments with a special target
Gross Up Rate Exceptional Payment Tax Deduction
Employer flat-rate-tax deduction for gross-up-rate, exceptional payments
Gross Up Rate Exceeding Allowance Tax Deduction
Employer flat-rate-tax deduction for paymentsexceeding allowances that fall under gross-up-rate tax
Major Issue Flat Rate Tax Deduction Employer flat-rate-tax deduction for major issues
Retro Wage Saving Tax Deduction Retrospective employer flat-rate-tax deductionfor wage saving schemes
Retro Premium Saving Tax Deduction Retrospective employer flat-rate-tax deductionfor premium saving schemes
Retro National Holiday Gift Tax Deduction Retrospective employer flat-rate-tax deductionfor national holiday gifts
Retro Pre Pension Tax Deduction Retrospective employer flat-rate-tax deductionfor prepension schemes
Retro Single Rate Exceptional Payment Tax Deduction
Retrospective employer flat-rate-tax deductionfor single-rate, exceptional payments
Retro Single Rate Special Target Tax Deduction
Retrospective employer flat-rate-tax deductionfor single-rate payments with a special target
Retro Gross Up Rate Exceptional Payment TaxDeduction
Retrospective employer flat-rate-tax deductionfor gross-up-rate, exceptional payments
Retro Gross Up Rate Exceeding Allowance Tax Deduction
Retrospective employer flat-rate-tax deductionfor payments exceeding allowances that fall under gross-up-rate tax
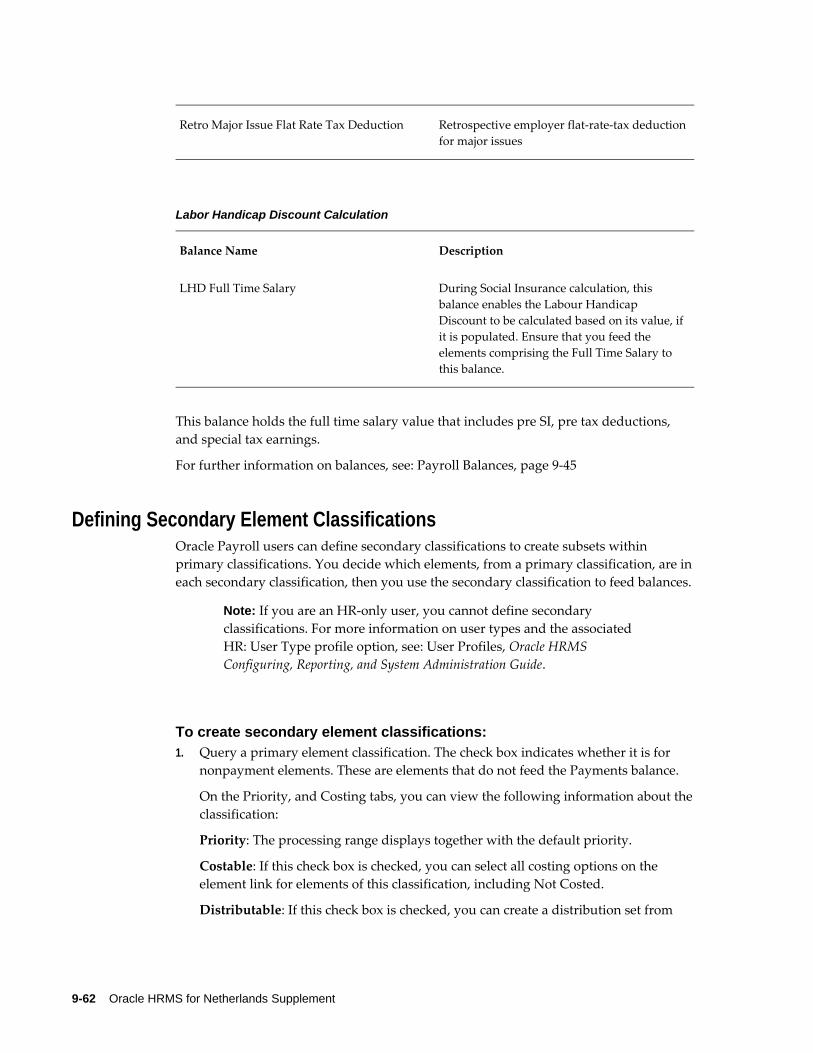
9-62 Oracle HRMS for Netherlands Supplement
Retro Major Issue Flat Rate Tax Deduction Retrospective employer flat-rate-tax deductionfor major issues
Labor Handicap Discount Calculation
Balance Name Description
LHD Full Time Salary During Social Insurance calculation, this balance enables the Labour Handicap Discount to be calculated based on its value, ifit is populated. Ensure that you feed the elements comprising the Full Time Salary to this balance.
This balance holds the full time salary value that includes pre SI, pre tax deductions, and special tax earnings.
For further information on balances, see: Payroll Balances, page 9-45
Defining Secondary Element Classifications Oracle Payroll users can define secondary classifications to create subsets within primary classifications. You decide which elements, from a primary classification, are ineach secondary classification, then you use the secondary classification to feed balances.
Note: If you are an HR-only user, you cannot define secondary classifications. For more information on user types and the associated HR: User Type profile option, see: User Profiles, Oracle HRMS Configuring, Reporting, and System Administration Guide.
To create secondary element classifications:1. Query a primary element classification. The check box indicates whether it is for
nonpayment elements. These are elements that do not feed the Payments balance.
On the Priority, and Costing tabs, you can view the following information about theclassification:
Priority: The processing range displays together with the default priority.
Costable: If this check box is checked, you can select all costing options on the element link for elements of this classification, including Not Costed.
Distributable: If this check box is checked, you can create a distribution set from
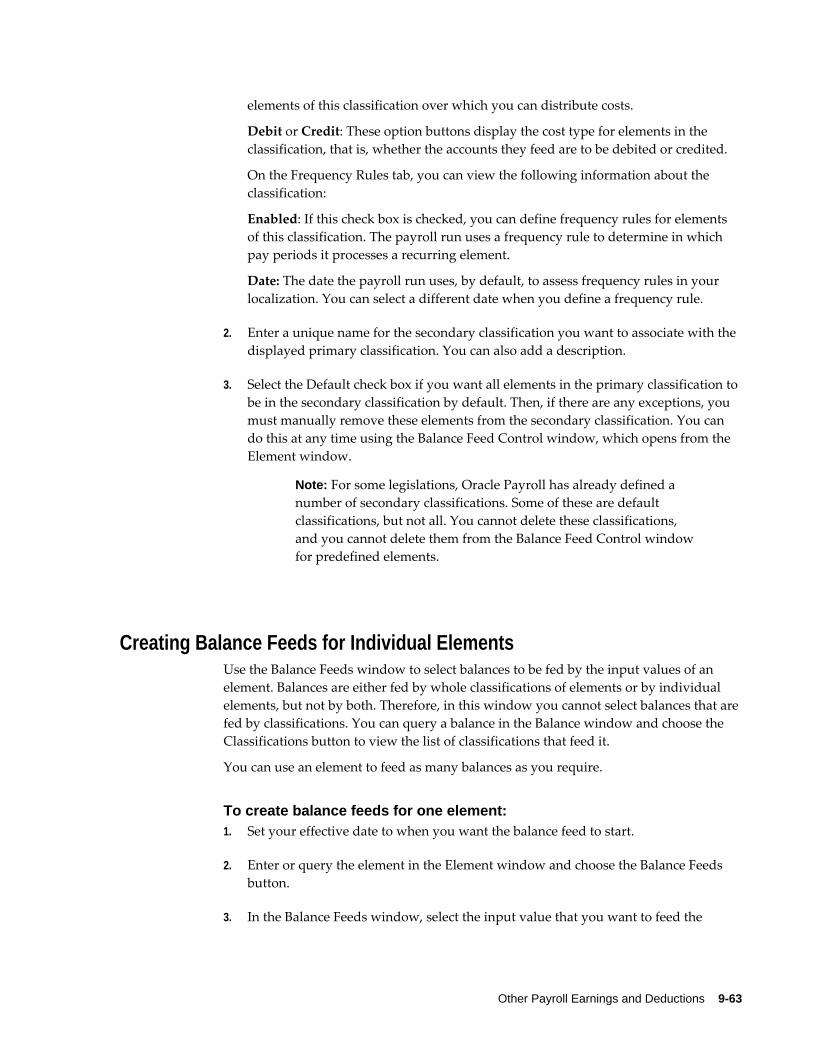
Other Payroll Earnings and Deductions 9-63
elements of this classification over which you can distribute costs.
Debit or Credit: These option buttons display the cost type for elements in the classification, that is, whether the accounts they feed are to be debited or credited.
On the Frequency Rules tab, you can view the following information about the classification:
Enabled: If this check box is checked, you can define frequency rules for elements of this classification. The payroll run uses a frequency rule to determine in which pay periods it processes a recurring element.
Date: The date the payroll run uses, by default, to assess frequency rules in your localization. You can select a different date when you define a frequency rule.
2. Enter a unique name for the secondary classification you want to associate with the displayed primary classification. You can also add a description.
3. Select the Default check box if you want all elements in the primary classification to be in the secondary classification by default. Then, if there are any exceptions, you must manually remove these elements from the secondary classification. You can do this at any time using the Balance Feed Control window, which opens from the Element window.
Note: For some legislations, Oracle Payroll has already defined a number of secondary classifications. Some of these are default classifications, but not all. You cannot delete these classifications, and you cannot delete them from the Balance Feed Control windowfor predefined elements.
Creating Balance Feeds for Individual ElementsUse the Balance Feeds window to select balances to be fed by the input values of an element. Balances are either fed by whole classifications of elements or by individual elements, but not by both. Therefore, in this window you cannot select balances that are fed by classifications. You can query a balance in the Balance window and choose the Classifications button to view the list of classifications that feed it.
You can use an element to feed as many balances as you require.
To create balance feeds for one element:1. Set your effective date to when you want the balance feed to start.
2. Enter or query the element in the Element window and choose the Balance Feeds button.
3. In the Balance Feeds window, select the input value that you want to feed the
9-64 Oracle HRMS for Netherlands Supplement
balance with.
The list displays all the input values defined for the element. These input values may have different units of measure. When you select an input value its unit of measure displays in the Units field. To feed a balance with the element's direct run result, select Pay Value.
4. Select the balance you want the input value to feed.
The list restricts your choice to balances having the same unit of measure as the input value you selected.
5. Select Add or Subtract for the balance feed.
Note: Secondary classifications and balance feed controls currently do not apply to the US version of Oracle Payroll.
Creating Classes of Balance FeedsIn the Balance Feed Control window, you can classify an element using secondary classifications. These determine the balances that the element feeds. You can query a balance in the Balance window and choose the Classifications button to view the list of classifications that feed it.
To select or remove secondary element classifications:1. Set your effective date to when you want the element to begin feeding the balances
that the secondary classifications feed.
2. Enter or query the element in the Element window and choose the Balance Feed Control button.
3. In the Balance Feed Control window, delete any default secondary classifications you do not require for the element.
When this window opens, it displays any default secondary classifications for the element's primary classification. Unless they are predefined, you can delete any of these classifications, and you can change their effective start dates.
4. Select any non-default secondary classifications you require.
Defining User BalancesDefining a balance includes defining its feeds and dimensions. When selecting feeds for the balance you have to choose between specifying element input values directly, and selecting element classifications to determine the feeds. You cannot choose both
Other Payroll Earnings and Deductions 9-65
methods together.
You can group similar balances - such as all earnings balances - in a single category for quicker and easier processing. Each localization has a defined set of categories. If there are no categories in the list of values, this means your legislation is not yet using the category functionality.
Balances often share a common relevancy to certain assignments. In some localizations, you can define base balances to imply a relationship between the balances that can be relied upon when processing and reporting. For example, "Loan Repayment" could be the base balance for "Loan Repayment Arrears".
You define balances in the Balance window.
To define a user balance:1. Do one of the following:
• Enter a unique name and a reporting name for the new balance. If you do not provide a reporting name, the first seven characters of the balance name appearon reports.
• Query any user balances you want to change.
2. Optionally, select a balance category in the Category field.
Australian Users: Attach all user-defined balances to the relevant balance category and to the _ASG_RUN and _ASG_YTD dimensions to populate the run balances. You must attach all user-defined allowance balances required to be reported individually on the Payment Summary to the Balance Category of Allowance and tothe _ASG_LE_RUN and _ASG_LE_YTD dimensions.
New Zealand Users: You must assign a balance category for each element that you define.
3. Optionally, select a Base Balance.
4. Enter the unit of measure for the balance. The choices are days, hours (listed in different formats), integer, money and number. If you select money as the unit you must also select a currency.
Note: Do not select the Use for Remuneration check box. This displays the balance that has been predefined as the Remuneration balance. Only one balance within a legislation can have this value.
5. To define a primary balance - one fed by a single element - select an element and input value in the Primary Balance region (if this region is available for your localization).
9-66 Oracle HRMS for Netherlands Supplement
6. Go to the Balance Feeds window or the Balance Classifications window.
In the Balance Feeds window:• Set your effective date to the start date for the balance feeds.
• Select one or more elements to feed the balance. Only those elements whose input values have the same unit of measure as the balance are listed.
When you select an element, its classification is displayed. You can select elements with different classifications.
• Select the input value that is to feed the balance.
For most payroll balances select Pay Value so that the element's run result feedsthe balance.
• Select Add or Subtract for the balance feed.
In the Balance Classifications window:• Select one or more element classifications and select Add or Subtract for each.
The run results of all elements in the classification will feed the balance.
The list includes all the primary and secondary element classifications that are valid for this balance. If you select a secondary classification, you cannot also select its parent primary classification.
Note: Secondary classifications are not used in the North American or Singapore versions of Oracle Payroll at this time.
Balance Dimensions Window
7. Choose the Dimensions button.
8. Select the dimensions you require.
New Zealand Users: For each new balance, you must attach the balance dimension _ASG_RUN for it to generate run balances.
Australian Users: Select the _ASG_RUN and _ASG_YTD dimensions for all user-defined balances. You must attach the _ASG_LE_YTD and _ASG_LE_RUN dimensions to the allowance balances required in the Payment Summary reports.
You can remove any dimension previously selected for a user-defined balance. You can also add dimensions to the startup balances included with your system, and later remove these additional dimensions. However, you cannot remove the dimensions that were predefined for the startup balances.
Other Payroll Earnings and Deductions 9-67
Note: To hold balances for a fiscal year that is different from the calendar year, you must supply the fiscal year start date for your Business Group.
9. Optionally, select the Grossup Balance check box for one of the dimensions, to makethe balance eligible for grossup.
UK users: If you want to make the balance eligible for grossup, you must select this check box for the _ASG_RUN dimension.
Initial Balance Feed Window
10. Choose the Initial Feed button.
11. In the Initial Balance Feed window you can see details of the element and input value used for the Initial Balance feed. This feed is defined by implementation consultants prior to performing an initial balance upload at implementation time.
Balance Attributes window
12. Choose the Attributes button.
13. Select an attribute definition and a dimension.
Balance attributes identify which balances can be used in which reports. Attributes can be predefined by localizations, created as a result of predefined defaults, or you can enter them in this window.
Note: For UK SOE Balances, ensure you attach the attribute to the Balances1 segment in the Business Group Information. Attach the attribute to each balance you want to display on the Online SOE. For every balance with an attached attribute, you must add individual balance to the SOE Details Information (in the Business Group Information).
The balances you attach to the SOE Details Information are defined at business group level, hence even if you change the user category profile it will not have any result on the data defined in the SOE Details Information.
Additional Information: Saudi Users: Oracle Payroll provides SaudiSOE Balance Attributes to view the SOE report. You can use the predefined balance attributes or create your own balance attributes.


Using Oracle FastFormula 10-1
10Using Oracle FastFormula
10-2 Oracle HRMS for Netherlands Supplement
Formula Reference
Netherlands Payee Name FormulasOracle HRMS enables you to present the Payee Name of an employee/organization in a specified format, in the EFT Payment File. Creating a FastFormula entitled NL_PAYEE_REPORTING_NAME, you can decide the format the name appears on the file.
Prior to using the FastFormula, the Payee Name of the person/organization appearing on the EFT Payment is taken from the Payee Name field on the Personal Payment Method form. If this field is blank, a check is carried out to find the NL_PAYEE_REPORTING_NAME FastFormula, and use the information generated there. The Payee Name is set to Last Name +"+ Initials of the person being paid, if no formula has been defined.
The Payee Address is taken from the City of the primary address of the relevant employee/organization identified in the Payee Name record. This is left blank if it does not exist. If the Payee Name is derived from the Payee Name field on the Personal Payment Method form, the address used depends on whether the Payee Name specified is a person or an organization. The Payee Address for an organization is taken from the City on the appropriate location address, otherwise, it is taken from the City on the employee's address.
However, if a FastFormula is selected, or the Payee Name consists of the Last Name +"+ Initials, then the City from the employee address is used.
Netherlands EFT Payment Override FormulaOracle HRMS enables you to override the contents of the Description field in the Transaction Description Record 160 of the EFT Payment file and enter your own information. You define a FastFormula with the standard name NL_TRANSACTION_DESCRIPTION, returning a value called Transaction_Description. The code in the formula can access any database item to derive the Transaction Description value. This description can be up to 128 characters inlength, and spread over a maximum of 4 Transaction Description records.
Note: If you use the override, none of the derived values, such as Employee Name and Assignment Number, is included in the Transaction Description records unless added in the FastFormula.
Using Oracle FastFormula 10-3
Formulas for Netherlands Wage Tax SubsidiesOracle HRMS provides you with FastFormulas for each of the following Wage Tax Subsidies:
• Wage Tax Eligibility - NL_WAGE_TAX_SUBSIDY_ELIGIBILITY. This formula derives the applicable wage tax subsidies for an employee assignment, and returns values for the relevant subsidies.
• Wage Tax Subsidy for Low Wages - NL_CALC_LOW_WAGES_TAX_SUBSIDY. This formula derives the wage tax subsidy for low wages for an employee.
• Wage Tax Subsidy for Paid Parental Leave - NL_CALC_PAID_PARENTAL_LEAVE_TAX_SUBSIDY. This formula derives a value for the wage tax subsidy for paid parental leave for an employee.
• Wage Tax Subsidy for Education - NL_CALC_EDUCATION_TAX_SUBSIDY. This formula derives a value for the wage tax subsidy for education for an employee.
• Wage Tax Subsidy for the Long Term Unemployed - NL_CALC_LONG_TERM_UNEMPLOYED_TAX_SUBSIDY. This formula derives avalue for the wage tax subsidy for long term unemployed for an employee.
Netherlands Working Hours Formula Oracle HRMS enables you to derive the weekly working hours using a formula. You define a FastFormula with the name NL_WEEKLY_WORKING_HOURS, to return a parameter called Working_Hours with a value for weekly working hours in the format 99.99. The formula code uses any database items or balances to obtain a value for the weekly working hours.
Note: If you do not define a FastFormula, the application draws the working hours from the Individual Working Hours held on the assignment.
Netherlands Reporting ABP Part Time PercentageOracle HRMS enables you to override the ABP Part Time percentage at the assignment level. You define a FastFormula with the name NL_ABP_REPORTING_PART_TIME_PERCENTAGE, returning a value called Part_Time_Percentage. The formula code uses any available database items or balances to obtain a value.

10-4 Oracle HRMS for Netherlands Supplement
Note: This action is only required if you want to override the assignment level information.
Formulas to Enable Additional Part-Time Percentages for the NetherlandsOracle HRMS enables you to create FastFormulas to calculate each of the additional part-time percentage values for an assignment, overriding the current general part-time percentage and assignment level information. The FastFormulas will have no input values, returning a parameter called Part_Time_Percentage, in the format 999.9999.
If you want all part-time percentage values to be set from information at the assignmentlevel, you do not need to define any overriding FastFormulas.
If you want to override all the part-time percentage values using the same calculation, you define one formula called NL_PART_TIME_PERCENTAGE.
If you need to override any of the part-time percentage values, you must create the appropriate formula from the following:
• Standard SI part-time percentage- NL_STANDARD_SI_PART_TIME_PERCENTAGE
• Pseudo SI part-time percentage- NL_PSEUDO_SI_PART_TIME_PERCENTAGE
• Standard SI part-time percentage for reporting- NL_STANDARD_SI_REPORTING_PART_TIME_PERCENTAGE
• Pseudo SI part-time percentage for reporting- NL_PSEUDO_SI_REPORTING_PART_TIME_PERCENTAGE
Note: Pseudo SI Calculation uses the Pseudo SI Part-time Percentage. All the part-time percentages are limited according to the maximum limits set in the corresponding global values.
Additional Implementation Steps 11-1
11Additional Implementation Steps
Additional Implementation Steps for the NetherlandsIf you are implementing Oracle HR for the Netherlands, you may also need to completethe following additional implementation steps.
Additional Implementation Steps
Step 1: Configure the Title FieldIf the Title field does not meet the requirements of your enterprise, you can add new values to the existing set of predefined lookup values.
• Lookup Type: TITLE
See: Adding Lookup Types and Values, Oracle HRMS Configuring, Reporting, and System Administration Guide
Step 2: Configure User Tables for Default Absence ActionsTo use absence tracking, you must first set up a user table to store default re-integration actions for each absence category you want to use. As a minimum you must set up one user table for the absence category of Sickness.
The re-integration actions you set up here are displayed in the Absence Tracking pages for absence records with the relevant absence category. Using the Absence Tracking pages you can use these actions and update them, add more actions to the absence record or delete the actions from the record.
Note: Only the default re-integration actions you set up for an absence category using the user tables appear for the absence records. Any actions you add, update or delete to an absence record using the Absence Tracking pages appear only for that record.
11-2 Oracle HRMS for Netherlands Supplement
Set up the default re-integration actions user tables as follows:
• Name each user table: NL_ABS_ACTION_(category code). The absence category code relates to the relevant lookup code in the Absence Category Lookup Type. For example, the category code for Sickness is 'S'.
• Set the match type as Match and the key units of measure as Text.
• Set up the following four columns and values:
Column Name Required Values Example Values
ROW_NUMBER NA This column uniquely identifies the ACTION. You can enter alpha and numercial values, for example 1, 1A, 1B etc.
ACTION NA This column describes the re-integration action, for example Progression Plan.
TIME_PERIOD NA This column describes the number of timeunits. For example, for the action Progression Plan, you set up a time period of 1 and a time unit of 'M' for months, this means you have one month to perform the action for the employee from the start of the absence record.
TIME_UNITS 'D' for Days, 'W' for Weeks, 'M' for Months
NA
• Set up row labels for each row in the Exact field, and set up the order you want the rows to appear in the table using the Sequence field. The number of rows you set updetermines the number of values you can enter.
• For every date effective row you set up in the user table, you must also set up a dateeffective value for each column. This is to ensure that when you use the Absence Tracking pages on a date that is on or later than the effective dates set up, then the user table displays the default actions and their values.
Note: If you use the Absence Tracking pages on a date that is earlier than the effective dates set up in the user table, an error message displays to indicate that the user table is incorrectly set up.
See: User and Extensible Lookups, Oracle HRMS Configuring, Reporting, and System
Additional Implementation Steps 11-3
Administration Guide
See: Setting Up User Tables, Columns and Rows, Oracle HRMS Configuring, Reporting, and System Administration Guide
See: Tracking Absences, page 7-15
Step 3: Set Up Dutch Organizations for Social Insurance and TaxYou must set up your organizations correctly to enable you to:
• Record the correct tax and social insurance information for your employers and employees.
• Process the tax deductions and social insurance contributions.
See: Setting up Tax, Social Insurance, and Private Health Insurance Organizations, page 1-68
See: Setting Up Social Insurance Days, page 1-71
Step 4: Set up Statutory DeductionsIf you are using Oracle Payroll, you must set up your statutory tax and social insurance deductions.
See: Setting up Tax and Social Insurance Deductions, page 6-16
To enable flat rate taxation in Oracle Payroll, you must set up elements and balances related to flat rate tax.
See: Setting Up Flat Rate Taxation, page 6-18
Step 5: Set Up Pension SchemesYou can set up the pension schemes available to your employees. This enables you to process pension contributions in the payroll run. To review the functionality available, see: Savings and Retirement Overview, page 8-1. For the setup steps, see: Setting Up Pension and Savings Schemes, page 8-22
Step 6: Disable Full Name Formats Optional StepYou can disable full name formats that you do not wish to use in the User Types and Statuses window. The full name formats that you disable, do not appear in the Full Name Format field in the People window.
See: Disabling Full Name Formats, page 3-23
See: Entering Additional Personal Information (People Window), page 3-15
Step 7: Set Up Information for the Wage Report Required StepSome setup tasks are necessary before you can run the Dutch Wage Report.
See: Setting Up the Dutch Wage Report, page 6-26
11-4 Oracle HRMS for Netherlands Supplement
Step 8: Link Predefined Elements Required StepYou must link the following predefined elements:
• Labour Handicap Discount, which holds the calculated discount value for labor handicapped employees
• Retro Labour Handicap Discount, which holds changes made retrospectively to the Labour Handicap Discount element
Note: You do not need to attach these elements to assignments eligible for labor handicap discount. The application checks for eligibility during SI processing and generates results for eligible elements. Ensure you link the elements for costing purposes.
You need to attach the predefined element, SI Override Days to assignments to enter override days manually. The application uses this information in case of the following:
• For long-term unpaid leave
• If an employee has more than three active assignments and a time gap exists between assignments, for example, the employee has one or more days between thepayroll start date (or employee period of service start date if earlier than period start date) and payroll end date (or employee period of service end date if later thanperiod start date) where no active assignment exists.
Note: You do not need to use this element if the assignments remain active throughout the payroll period and period of service.
Step 9: Set Up Information for Health and Disability Insurance Contributions Required StepSome setup tasks are necessary before the payroll process can calculate health and disability insurance contributions.
See: Setting Up ZVW, WGA, IVA, and UFO Contributions, page 6-18
Step 10: Set Up First Day Report Required StepYou need to set up the first day report for enabling you to electronically send the employee information to tax authorities.
See: Setting Up the First Day Report, page 6-32
Step 11: Create a User Table for Each Dutch Business Group for Deriving Maximum SI Wage. Required StepAs the maximum SI wage is retrieved from a user defined table instead of deriving it from a global value, you must create a user table for each Dutch business group in the format given below and keep it updated:
Additional Implementation Steps 11-5
• Table : PAY_NL_MAXIMUM_SI_WAGE
• Key Units of Measure : Text
• Column Name : FREQUENCY
• Exact : Day, Week, FourWeek, Month, Quarter, Year
You must ensure that a row is defined for each payroll frequency used in the business group and mandatorily specify day.
Step 12: Set up the Special and Non-tax Elements Required StepFor Savings Schemes, currently elements such as '% Standard Tax Adjustment' only feeds balance 'Standard Taxable Income'. You must ensure that the balance feed 'SI Income Standard Tax Adjustment' is also added. You must set up the Special and Non-tax elements similarly as shown below:
Element Name Like Additional Balance feed effective from 1-Jan-2013
Add or Subtract
%Standard Tax Adjustment SI Income Standard Tax Adjustment
Subtract
%Special Tax Adjustment SI Income Special Tax Adjustment
Subtract
%Non Tax Adjustment SI Income Non Tax Adjustment
Subtract
Step 13: Set up Value for Action Parameter - Maximum Errors Allowed Required StepEnsure that you specify the number of assignment action failures that can happen during the Magtape process. The Magtape processes, Payment Output File (Dutch) and Dutch SEPA XML File and Report, consider the Action Parameter 'Maximum Errors Allowed' for assignment level errors. The payroll process completes successfully if the number of assignment action failures do not exceed the value mentioned in the Action Parameter 'Maximum Errors Allowed'. This enables you to correct the individual assignment failures. If you do not specify any value for this action parameter, then the complete payroll process fails in case the Magtape Process encounters any single assignment action failure.

Index-1
Index
AABP Part-Time Percentage
Netherlands ABP Reporting, 10-3ABP pensions, 8-1
assigning pension types to an organization, 1-46entering provider information, 1-55
absence informationentering additional information, 3-20
Absence trackingreporting, 7-15
ADA reportingregistering employees with disabilities, 3-13
additional part-time percentagesenable percentages, 10-4
Addressesentering, 3-60floor or office numbers, 3-51for people, 3-60
addresses of work sites, 1-80applicant identification numbers, 1-37Applicants
Applicant Details Report, 3-71checking information on file, 3-16creating applicant numbers, 3-11rehire recommendations for former employees, 3-16using folders for customized queries, 3-81viewing current list, 3-83
Arrearsadjusting pension arrears, 8-35
management of pension arrears, 8-22Assigning Social Insurance Types and Providers to Employees, 1-22Assignment
additional information for, 3-49extra information types, 3-39
Assignment reportingAssignments Folder, 3-82
Assignmentscreating, 3-30for employees, 3-29
Assignment statusesreporting on, 3-74
BBalance dimensions, 9-45, 9-47
selecting for user balances, 9-66Balance feeds, 9-45
controlling with classifications, 9-64, 9-66creating for individual elements, 9-63, 9-66from input values, 9-63
Balancesdefining, 9-64for pension schemes, 8-11Netherlands, 9-52overview, 9-45
balances, fiscal year, 1-38bargaining associations
entering trade union information, 1-67Bargaining Unit
entering on assignment, 3-53Bargaining Unit, organization classification, 1-10
Index-2
bargaining unit information for constituencies, 1-66Benefit plans
for pensions, 8-26benefits defaults, defining for a business group, 1-43Birth details, for payrolls, 3-12Blood type
entering employee details, 3-17budget value defaults, defining for business groups, 1-40Business Group, organization classification, 1-9business groups
creating hierarchies for multiple , 1-5defining, 1-28, 1-37defining a default monthly payroll, 1-43defining benefits defaults for, 1-43defining budget value defaults for, 1-40multiple, 1-6payslip balances for, 1-51payslip elements for, 1-52payslip information for, 1-47public sector-type functionality for, 1-44recruitment information for, 1-44representing employers by, 1-1selecting a PTO balance type for, 1-41self-service preference information for, 1-48setting up benefits assignments for, 1-43single, 1-6work day information for, 1-42
Business groupsadditional information, 1-31Dutch business group information, 1-39
Ccash management, 4-7Cheque Writer process, 5-2Classifications
of elements, 7-2classifications, organization, 1-30collective agreement
adding further information, 3-37collective agreements
grade information, 1-67Communication delivery methods
entering, 3-64
company cost centerentering GL company cost center information for, 1-63entering reporting information for, 1-53
Company Cost Center, organization classification, 1-10Compensation and benefits
setup overview, 9-37Conclude Placement Report, 3-76configuration models, 1-6Configuration Workbench
organization structures, 1-6consolidated legal entities, 1-9constituencies
entering bargaining unit information for, 1-66entering collective agreement grade information for, 1-67entering grade information for, 1-66entering job information for, 1-66entering location information for, 1-65entering organization hierarchy information for, 1-65entering organization information for, 1-66
Constituency, organization classification, 1-10Contacts, 3-65
entering information, 3-60Contingent workers
Conclude Placement Report, 3-76Contracts
referring an assignment to, 3-Customizing
People Folder window, 3-82
Ddatabase items
and payroll formula inputs, 9-6deductions, 9-1, 9-2defining frequency rules, 9-41Dependents, 3-65Disabilities
entering information, 2-5disabilities, overview, 2-2Disability
entering insurance information, 2-6Disability Organization, organization classification, 1-10
Index-3
Disability payment, 3-7Duplicate person report
running the, 3-79Dutch ABP report
running, 6-34Dutch ABP report archiver
running, 6-33Dutch ABP Retro Pension Salary Calculation Report
running, 6-34Dutch Annual Tax Statement Archive, 6-21Dutch Annual Tax Statement for the Employee, 6-21Dutch Digital Sickness Reports
setting up, 7-19Dutch Labor Cost Agreement Audit Report
running, 6-31Dutch remuneration statement
running, 6-36Dutch UWV organization
additional information for, 1-31entering additional information, 1-73entering SI provider information, 1-73entering SI type information, 1-73
Dutch Wage Report, 6-29Set up, 6-26
Dutch Wage Report Data Lock, 6-30Dutch Wage Report Generator, 6-29Dutch Wage Tax Subsidy
Low Wages Report, 6-40
Eearnings, 9-1, 9-2EFT payment override formula, 10-2Element classifications, 7-2
secondary element classifications, 7-7element entries
by indirect formula results, 9-7, 9-42elements
and run results, 9-6formula result rules, 9-42formulas for, 9-6
ElementsDutch Tax, 9-8for pension schemes, 8-11
Element Span
Span Usages, 9-32Employee assignments
allocation of costs for, 3-31and work structures, 3-29changes to and DateTrack, 3-32components of, 3-30contract, 3-defining as primary, 3-52definition, 3-29ending one of multiple, 3-33manager-level, 3-52primary assignments, 3-31using multiple assignments, 3-31viewing current list, 3-83
Employee listsby assignment statuses, 3-74by organization, 3-85by personal information, 3-81by position, 3-84by position hierarchy, 3-85by special information type, 3-86
Employeesassigning shift patterns, 3-36background checks on, 3-16creating employee numbers, 3-11entering and maintaining, 3-24entering benefits information, 3-18entering date of death, 3-18entering disability information, 2-5entering further name information, 3-16entering income details for taxation, 3-56entering medical details of, 3-17entering miscellaneous details for, 3-17entering miscellaneous tax details, 3-57entering new, 3-24entering new office information, 3-15entering special indicators, 3-56entering tax reductions and tax code, 3-55external organizations, 1-20recording transfers and relocations, 3-30selecting SI classification, 3-42
employee statusesformula processing rules for, 9-6, 9-42
Employer, organization classification, 1-10Employment categories
adding new, 3-31full time and part time, 3-31

Index-4
in startup data, 3-31Employment information
entering, 3-34managing for groups and individuals, 3-34
end of period processing, 6-1enterprise structures, 1-6external organizations, 1-8Extra information types
assignment, 3-39location, 1-81person, 3-7
FFirst Day Report
running, 6-32Setting up, 6-32
fiscal year balances, 1-38Flat Rate Tax
deductions for employees, 6-18flat rate taxation information
entering, 1-61FLO payment, 3-7formulas
and employee statuses, 9-6EFT payment override (Netherlands), 10-2enable additional part-time percentages (Netherlands), 10-4for element processing, 9-6formula result rules, 9-42for tax calculations, 9-7in payroll startup data, 9-7Netherlands, 10-4payee name (Netherlands), 10-2processing rules for, 9-6result rules for, 9-7wage tax subsidies (Netherlands), 10-3working hours (Netherlands), 10-3
Formulasfor pension schemes, 8-11
frequency rulesdefining, 9-41
Full name format, 3-8, 3-16Full person details report
running the, 3-80
G
Genitive Last informationentering for person, 3-10
GL company cost center information, entering, 1-63grade information for constituencies, 1-66Grade ladder
entering, 3-58Graphics, 3-22GRE/Legal Entity, organization classification, 1-9GREs/legal entities, 1-9
HHierarchy Diagrammers
creating hierarchies using multiple business groups, 1-5editing, 1-3organization, 1-3overview, 1-1position, 1-3
Hours of work, 3-50hours of work, entering default values for, 1-42HR Organization
entering related organizations information, 1-78
HR Organization, organization classification, 1-10HR organizations
entering costing information for, 1-52entering general PGGM information, 1-60entering reporting information for, 1-53selecting parent organizations for, 1-53
HR OrganizationsDutch organization information, 1-57entering ABP pensions general information, 1-56entering ABP sender details, 1-57entering additional information, 1-57entering Dutch ABP Provider information, 1-55entering SI provider information, 1-54entering tax office information, 1-57
IIdentification certificates, 3-7Implementation Steps
Netherlands, 11-1
Index-5
indirect resultsformula result rules for, 9-42
input valuesand formula inputs, 9-6
Input valuesand Pay Value, 9-7
integration with payrollsetup, 4-7
internal organizations, 1-8iRecruitment applicants, automatic numbering, 1-37IZA Provider Information
Dutch Private Health Insurance, 1-70IZA Reporting, 6-12IZA Upload, 6-12IZA Upload Process Status
Running the IZA Upload Process Status, 6-41IZA Upload Rerun
Re-generating the IZA Upload Process Report,6-42
Jjob information for constituencies, 1-66
Llabor cost arrangement
adding additional information, 1-62Labor Cost Arrangement report
setting up, 6-30Last Year Salary
Deriving Previous Years Salary, 3-38Law REA, 2-6Legal Employer, 1-19, 1-19Legal Employer, organization classification, 1-9legal employers, 1-9legal entities, 1-9Legal Entity, organization classification, 1-9legislation code, 1-38Life Savings Scheme
withdrawing savings, 8-36Location
extra information type, 1-81location information for constituencies, 1-65locations, 1-80
deleting, 1-83making inactive, 1-83
setting up, 1-81long term sickness recovery report
running, 7-25long term sickness report
running, 7-24Lookup types
EMP_ASSIGN_REASON, 3-52EMP_CAT, 3-31
MMail location information
entry of, 3-15Mailstop
entry of, 3-15Manager-level assignments, 3-86manual payments
recording details, 5-3medical assessments
overview, 2-2Medical Service Provider, organization classification, 1-10messages
formula result rules for, 9-42Methods for Deriving Social Insurance Days, 1-25
NNetherlands SOE
Entering the Statement of Earnings, 1-76Netherlands Statement of Earnings
Configuring the statement of Earnings, 4-4Netherlands working hours
weekly working hours formula, 10-3
Ooccupational health, 2-2operating companies, 1-9Operating Unit, 1-11Oracle Cash Management, 4-4Oracle HRMS Workbench
overview, 1-1Oracle Payroll
answering your business requirements, 4-2organization classifications, 1-8
Bargaining Unit, 1-10Business Group, 1-9
Index-6
Company Cost Center, 1-10Constituency, 1-10Disability Organization, 1-10Employer, 1-10for the Canadian legislation, 1-11for the Dutch legislation, 1-12for the Finnish legislation, 1-17for the French legislation, 1-12for the German legislation, 1-13for the Hong Kong legislation, 1-14for the Hungarian legislation, 1-15for the Indian legislation, 1-16for the Korean legislation, 1-15for the Mexican legislation, 1-14for the Norwegian legislation, 1-17for the Polish legislation, 1-17for the Saudi legislation, 1-14for the South African legislation, 1-18for the Spanish legislation, 1-15for the U.K. legislation, 1-11for the U.S. legislation, 1-11GRE/Legal Entity, 1-9HR Organization, 1-10Legal Employer, 1-9Legal Entity, 1-9Medical Service Provider, 1-10Operating Unit, 1-11Payee Organization, 1-10Professional Body Information, 1-10Representative Body, 1-10
Organization classificationsentering additional information, 1-31
organization classifications for Danish legislations, 1-18organization classifications for Irish legislations, 1-19organization classifications for Swedish legislations, 1-18organization classifications for UAE legislation, 1-19organization hierarchies
adding organizations to, 1-53Organization Hierarchy Diagrammer, 1-3organization hierarchy information for constituencies, 1-65organization information for constituencies, 1-66organization management overview, 1-1
organizationsadding to hierarchies, 1-53defining, 1-28defining using Oracle HRMS Workbench, 1-1deleting, 1-36entering classifications for, 1-30entering locations for, 1-81external, 1-8removing, 1-36reporting on, 1-1representing enterprise structures by, 1-8
Organizationsadding to hierarchies, 1-31additional Dutch information, 1-19entering Dutch ABP Provider information, 1-55entering SI provider information, 1-54linking external and internal, 1-19listing employees assigned to, 3-85
PPart time employment category, 3-31payee name formulas
for Netherlands, 10-2Payee Organization, organization classification, 1-10payroll earnings and deductions, 9-1, 9-2payroll formulas
for element processing, 9-6payroll processes
Cheque Writer, 5-2External/Manual Payments, 5-3PrePayments, 5-2RetroPay, 5-3Void Cheque Payments, 5-3
payrollspost-processing
summary of payroll post-processes, 5-2payslip balances, for the business group, 1-51payslip elements, for the business group, 1-52payslip information, entering, 1-47Pay values
purpose of, 9-7Pension deductions
adjusting, 8-35adjusting arrears, 8-35
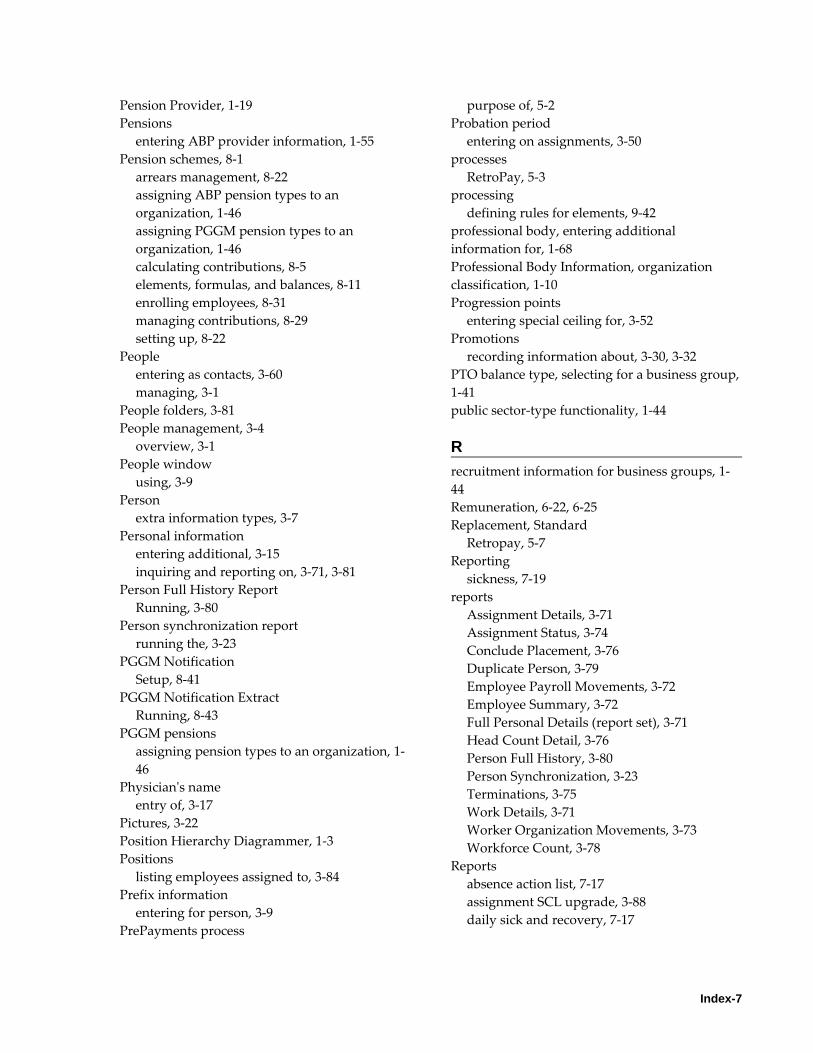
Index-7
Pension Provider, 1-19Pensions
entering ABP provider information, 1-55Pension schemes, 8-1
arrears management, 8-22assigning ABP pension types to an organization, 1-46assigning PGGM pension types to an organization, 1-46calculating contributions, 8-5elements, formulas, and balances, 8-11enrolling employees, 8-31managing contributions, 8-29setting up, 8-22
Peopleentering as contacts, 3-60managing, 3-1
People folders, 3-81People management, 3-4
overview, 3-1People window
using, 3-9Person
extra information types, 3-7Personal information
entering additional, 3-15inquiring and reporting on, 3-71, 3-81
Person Full History ReportRunning, 3-80
Person synchronization reportrunning the, 3-23
PGGM NotificationSetup, 8-41
PGGM Notification ExtractRunning, 8-43
PGGM pensionsassigning pension types to an organization, 1-46
Physician's nameentry of, 3-17
Pictures, 3-22Position Hierarchy Diagrammer, 1-3Positions
listing employees assigned to, 3-84Prefix information
entering for person, 3-9PrePayments process
purpose of, 5-2Probation period
entering on assignments, 3-50processes
RetroPay, 5-3processing
defining rules for elements, 9-42professional body, entering additional information for, 1-68Professional Body Information, organization classification, 1-10Progression points
entering special ceiling for, 3-52Promotions
recording information about, 3-30, 3-32PTO balance type, selecting for a business group,1-41public sector-type functionality, 1-44
Rrecruitment information for business groups, 1-44Remuneration, 6-22, 6-25Replacement, Standard
Retropay, 5-7Reporting
sickness, 7-19reports
Assignment Details, 3-71Assignment Status, 3-74Conclude Placement, 3-76Duplicate Person, 3-79Employee Payroll Movements, 3-72Employee Summary, 3-72Full Personal Details (report set), 3-71Head Count Detail, 3-76Person Full History, 3-80Person Synchronization, 3-23Terminations, 3-75Work Details, 3-71Worker Organization Movements, 3-73Workforce Count, 3-78
Reportsabsence action list, 7-17assignment SCL upgrade, 3-88daily sick and recovery, 7-17
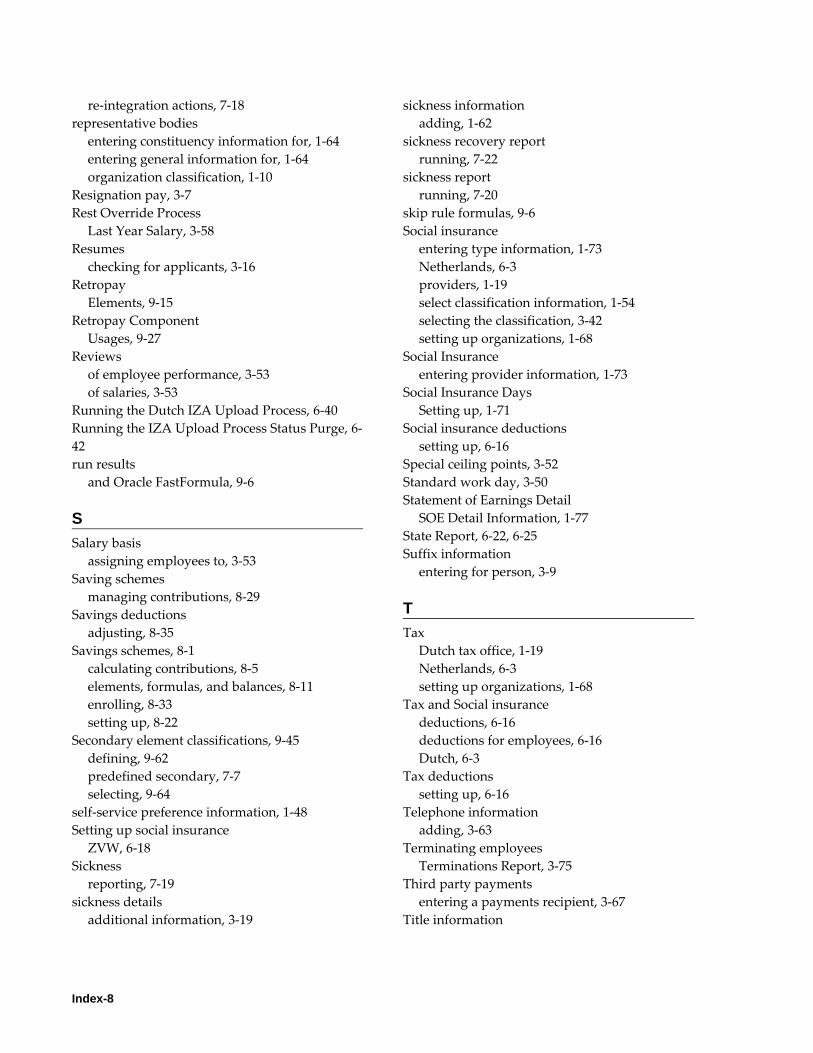
Index-8
re-integration actions, 7-18representative bodies
entering constituency information for, 1-64entering general information for, 1-64organization classification, 1-10
Resignation pay, 3-7Rest Override Process
Last Year Salary, 3-58Resumes
checking for applicants, 3-16Retropay
Elements, 9-15Retropay Component
Usages, 9-27Reviews
of employee performance, 3-53of salaries, 3-53
Running the Dutch IZA Upload Process, 6-40Running the IZA Upload Process Status Purge, 6-42run results
and Oracle FastFormula, 9-6
SSalary basis
assigning employees to, 3-53Saving schemes
managing contributions, 8-29Savings deductions
adjusting, 8-35Savings schemes, 8-1
calculating contributions, 8-5elements, formulas, and balances, 8-11enrolling, 8-33setting up, 8-22
Secondary element classifications, 9-45defining, 9-62predefined secondary, 7-7selecting, 9-64
self-service preference information, 1-48Setting up social insurance
ZVW, 6-18Sickness
reporting, 7-19sickness details
additional information, 3-19
sickness informationadding, 1-62
sickness recovery reportrunning, 7-22
sickness reportrunning, 7-20
skip rule formulas, 9-6Social insurance
entering type information, 1-73Netherlands, 6-3providers, 1-19select classification information, 1-54selecting the classification, 3-42setting up organizations, 1-68
Social Insuranceentering provider information, 1-73
Social Insurance DaysSetting up, 1-71
Social insurance deductionssetting up, 6-16
Special ceiling points, 3-52Standard work day, 3-50Statement of Earnings Detail
SOE Detail Information, 1-77State Report, 6-22, 6-25Suffix information
entering for person, 3-9
TTax
Dutch tax office, 1-19Netherlands, 6-3setting up organizations, 1-68
Tax and Social insurancedeductions, 6-16deductions for employees, 6-16Dutch, 6-3
Tax deductionssetting up, 6-16
Telephone informationadding, 3-63
Terminating employeesTerminations Report, 3-75
Third party paymentsentering a payments recipient, 3-67
Title information
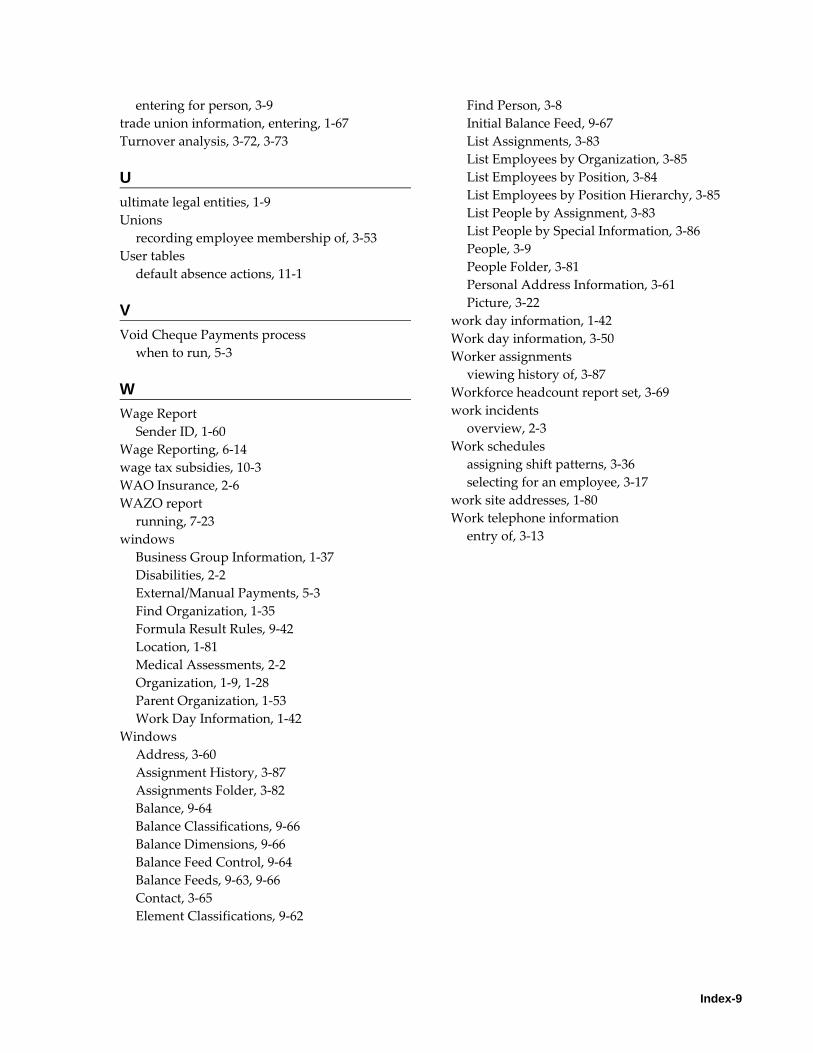
Index-9
entering for person, 3-9trade union information, entering, 1-67Turnover analysis, 3-72, 3-73
Uultimate legal entities, 1-9Unions
recording employee membership of, 3-53User tables
default absence actions, 11-1
VVoid Cheque Payments process
when to run, 5-3
WWage Report
Sender ID, 1-60Wage Reporting, 6-14wage tax subsidies, 10-3WAO Insurance, 2-6WAZO report
running, 7-23windows
Business Group Information, 1-37Disabilities, 2-2External/Manual Payments, 5-3Find Organization, 1-35Formula Result Rules, 9-42Location, 1-81Medical Assessments, 2-2Organization, 1-9, 1-28Parent Organization, 1-53Work Day Information, 1-42
WindowsAddress, 3-60Assignment History, 3-87Assignments Folder, 3-82Balance, 9-64Balance Classifications, 9-66Balance Dimensions, 9-66Balance Feed Control, 9-64Balance Feeds, 9-63, 9-66Contact, 3-65Element Classifications, 9-62
Find Person, 3-8Initial Balance Feed, 9-67List Assignments, 3-83List Employees by Organization, 3-85List Employees by Position, 3-84List Employees by Position Hierarchy, 3-85List People by Assignment, 3-83List People by Special Information, 3-86People, 3-9People Folder, 3-81Personal Address Information, 3-61Picture, 3-22
work day information, 1-42Work day information, 3-50Worker assignments
viewing history of, 3-87Workforce headcount report set, 3-69work incidents
overview, 2-3Work schedules
assigning shift patterns, 3-36selecting for an employee, 3-17
work site addresses, 1-80Work telephone information
entry of, 3-13


