Embed Size (px)
Citation preview
Oracle® Key VaultAdministrator's Guide
Release 21.1F33287-07August 2021
Oracle Key Vault Administrator's Guide, Release 21.1
F33287-07
Copyright © 2014, 2021, Oracle and/or its affiliates.
Primary Authors: Mark Doran, Patricia Huey
Contributing Authors: Hans Forbrich, Mark Fuller, James Womack
Contributors: Alexis Abell, Bharathi Baskaran, Lalitha Chowdary, Shubham Goyal, Fahad Ibrar, SrivatsanKannan, Usha Krishnamurthy, Shirley Kumamoto, Swapna Jawarikapisha, Peter Knaggs, Michael Leong, HuiLi, William Maroulis, Khushal Melana, Rahil Mir, Dongwon Park, Sunil Pulla, Vipin Samar, Radhika Siravara,Ajay Srivastava, Peter Wahl
This software and related documentation are provided under a license agreement containing restrictions onuse and disclosure and are protected by intellectual property laws. Except as expressly permitted in yourlicense agreement or allowed by law, you may not use, copy, reproduce, translate, broadcast, modify, license,transmit, distribute, exhibit, perform, publish, or display any part, in any form, or by any means. Reverseengineering, disassembly, or decompilation of this software, unless required by law for interoperability, isprohibited.
The information contained herein is subject to change without notice and is not warranted to be error-free. Ifyou find any errors, please report them to us in writing.
If this is software or related documentation that is delivered to the U.S. Government or anyone licensing it onbehalf of the U.S. Government, then the following notice is applicable:
U.S. GOVERNMENT END USERS: Oracle programs (including any operating system, integrated software,any programs embedded, installed or activated on delivered hardware, and modifications of such programs)and Oracle computer documentation or other Oracle data delivered to or accessed by U.S. Government endusers are "commercial computer software" or "commercial computer software documentation" pursuant to theapplicable Federal Acquisition Regulation and agency-specific supplemental regulations. As such, the use,reproduction, duplication, release, display, disclosure, modification, preparation of derivative works, and/oradaptation of i) Oracle programs (including any operating system, integrated software, any programsembedded, installed or activated on delivered hardware, and modifications of such programs), ii) Oraclecomputer documentation and/or iii) other Oracle data, is subject to the rights and limitations specified in thelicense contained in the applicable contract. The terms governing the U.S. Government’s use of Oracle cloudservices are defined by the applicable contract for such services. No other rights are granted to the U.S.Government.
This software or hardware is developed for general use in a variety of information management applications.It is not developed or intended for use in any inherently dangerous applications, including applications thatmay create a risk of personal injury. If you use this software or hardware in dangerous applications, then youshall be responsible to take all appropriate fail-safe, backup, redundancy, and other measures to ensure itssafe use. Oracle Corporation and its affiliates disclaim any liability for any damages caused by use of thissoftware or hardware in dangerous applications.
Oracle, Java, and MySQL are registered trademarks of Oracle and/or its affiliates. Other names may betrademarks of their respective owners.
Intel and Intel Inside are trademarks or registered trademarks of Intel Corporation. All SPARC trademarks areused under license and are trademarks or registered trademarks of SPARC International, Inc. AMD, Epyc,and the AMD logo are trademarks or registered trademarks of Advanced Micro Devices. UNIX is a registeredtrademark of The Open Group.
This software or hardware and documentation may provide access to or information about content, products,and services from third parties. Oracle Corporation and its affiliates are not responsible for and expresslydisclaim all warranties of any kind with respect to third-party content, products, and services unless otherwiseset forth in an applicable agreement between you and Oracle. Oracle Corporation and its affiliates will not beresponsible for any loss, costs, or damages incurred due to your access to or use of third-party content,products, or services, except as set forth in an applicable agreement between you and Oracle.

Contents
Preface
Audience xxii
Documentation Accessibility xxii
Related Documents xxii
Conventions xxiii
Changes in This Release for Oracle Key Vault
Changes for Oracle Key Vault Release 21.1 xxiv
Changes for Oracle Key Vault Release 18.6 xxvi
1 Introduction to Oracle Key Vault
1.1 About Oracle Key Vault and Key Management 1-1
1.2 Benefits of Using Oracle Key Vault 1-2
1.3 Oracle Key Vault Use Cases 1-4
1.3.1 Centralized Storage of Oracle Wallet Files and Java Keystores 1-4
1.3.2 Centralized Management of TDE Master Encryption Keys Using Online MasterKeys 1-5
1.3.3 Storage of Credential Files 1-7
1.3.4 Online Management of Endpoint Keys and Secret Data 1-7
1.4 Who Should Use Oracle Key Vault 1-8
1.5 Major Features of Oracle Key Vault 1-8
1.5.1 Centralized Storage and Management of Security Objects 1-9
1.5.2 Management of Key Lifecycle 1-10
1.5.3 Reporting and Alerts 1-10
1.5.4 Separation of Duties for Oracle Key Vault Users 1-10
1.5.5 Persistent Master Encryption Key Cache 1-11
1.5.6 Backup and Restore Functionality for Security Objects 1-11
1.5.7 Management of Oracle Key Vault Using RESTful Service 1-12
1.5.8 Support for OASIS Key Management Interoperability Protocol (KMIP) 1-12
1.5.9 Database Release and Platform Support 1-13
1.5.10 Integration with External Audit and Monitoring Services 1-13
iii
1.5.11 Integration of MySQL with Oracle Key Vault 1-13
1.5.12 Automatic Storage Management Cluster File System (ACFS) Encryption 1-14
1.5.13 Support for Oracle Cloud Database as a Service Endpoints 1-14
1.5.14 Oracle Key Vault Hardware Security Module Integration 1-14
1.5.15 Support for a Primary-Standby Environment 1-14
1.6 Oracle Key Vault Interfaces 1-15
1.6.1 Oracle Key Vault Management Console 1-15
1.6.2 Oracle Key Vault okvutil Endpoint Utility 1-15
1.6.3 Oracle Key Vault RESTful Services 1-16
1.6.4 Oracle Key Vault Client SDK 1-16
1.7 Overview of an Oracle Key Vault Deployment 1-16
2 Oracle Key Vault Concepts
2.1 Overview of Oracle Key Vault Concepts 2-1
2.2 Oracle Key Vault Deployment Architecture 2-2
2.3 Access Control Configuration 2-3
2.3.1 About Access Control Configuration 2-3
2.3.2 Access Grants 2-4
2.3.3 Access Control Options 2-4
2.4 Administrative Roles and Endpoint Privileges within Oracle Key Vault 2-5
2.4.1 Separation of Duties in Oracle Key Vault 2-5
2.4.2 Administrative Roles 2-6
2.4.2.1 About Administrative Roles in Oracle Key Vault 2-6
2.4.2.2 System Administrator Role Duties 2-7
2.4.2.3 Key Administrator Role Duties 2-8
2.4.2.4 Audit Manager Role Duties 2-8
2.4.3 Endpoint Privileges 2-8
2.4.3.1 About Endpoint Privileges in Oracle Key Vault 2-9
2.4.3.2 Create Endpoint Privilege Duties and Scope 2-9
2.4.3.3 Manage Endpoint Privilege Duties and Scope 2-10
2.4.3.4 Create Endpoint Group Privilege Duties and Scope 2-11
2.4.3.5 Manage Endpoint Group Privilege Duties and Scope 2-13
2.5 Naming Guidelines for Objects 2-14
2.6 Emergency System Recovery Process 2-15
2.7 Root and Support User Accounts 2-15
2.8 Endpoint Administrators 2-16
2.9 FIPS Mode 2-16
iv
3 Oracle Key Vault Multi-Master Cluster Concepts
3.1 Oracle Key Vault Multi-Master Cluster Overview 3-1
3.2 Benefits of Oracle Key Vault Multi-Master Clustering 3-2
3.3 Multi-Master Cluster Architecture 3-3
3.3.1 Oracle Key Vault Cluster Nodes 3-4
3.3.2 Cluster Node Limitations 3-4
3.3.3 Cluster Subgroups 3-5
3.3.4 Critical Data in Oracle Key Vault 3-5
3.3.5 Oracle Key Vault Read-Write Nodes 3-6
3.3.6 Oracle Key Vault Read-Only Nodes 3-6
3.3.7 Cluster Node Mode Types 3-6
3.3.8 Operations Permitted on Cluster Nodes in Different Modes 3-7
3.4 Building and Managing a Multi-Master Cluster 3-7
3.4.1 About Building and Managing a Multi-Master Cluster 3-7
3.4.2 Creation of the Initial Node in a Multi-Master Cluster 3-8
3.4.3 Expansion of a Multi-Master Cluster 3-9
3.4.3.1 About the Expansion of a Multi-Master Cluster 3-9
3.4.3.2 Management of Cluster Reconfiguration Changes Using a ControllerNode 3-9
3.4.3.3 Addition of a Candidate Node to the Multi-Master Cluster 3-10
3.4.3.4 Addition of More Nodes to a Multi-Master Cluster 3-10
3.4.4 Migration to the Cluster from an Existing Deployment 3-12
3.4.4.1 Conversion of an Oracle Key Vault Standalone Server to a Multi-MasterCluster 3-12
3.4.4.2 Conversion from a Primary-Standby Server to a Multi-Master Cluster 3-13
3.5 Oracle Key Vault Multi-Master Cluster Deployment Scenarios 3-13
3.5.1 Cluster Size and Availability in Deployments 3-14
3.5.2 Two-Node Cluster Deployment 3-14
3.5.3 Mid-Size Cluster Across Two Data Centers Deployment 3-15
3.6 Multi-Master Cluster Features 3-18
3.6.1 Cluster Inconsistency Resolution in a Multi-Master Cluster 3-19
3.6.2 Name Conflict Resolution in a Multi-Master Cluster 3-19
3.6.3 Endpoint Node Connection Lists (Endpoint Node Scan Lists) 3-19
3.7 Cluster Management Information 3-20
4 Oracle Key Vault Installation and Configuration
4.1 About Oracle Key Vault Installation and Configuration 4-1
4.2 Oracle Key Vault Installation Requirements 4-2
4.2.1 System Requirements 4-2
4.2.2 Network Port Requirements 4-3
v
4.2.3 Supported Endpoint Platforms 4-4
4.2.4 Endpoint Database Requirements 4-4
4.3 Installing and Configuring Oracle Key Vault 4-5
4.3.1 Downloading the Oracle Key Vault Appliance Software 4-5
4.3.2 Installing the Oracle Key Vault Appliance Software 4-7
4.3.3 Performing Post-Installation Tasks 4-10
4.4 Logging In to the Oracle Key Vault Management Console 4-16
4.5 Upgrading a Standalone or Primary-Standby Oracle Key Vault Server 4-16
4.5.1 About Upgrading the Oracle Key Vault Server Software 4-17
4.5.2 Step 1: Back Up the Server Before You Upgrade 4-17
4.5.3 Step 2: Perform Pre-Upgrade Tasks 4-18
4.5.4 Step 3: Add Disk Space to Extend the vg_root for the Release 21.1 Upgrade 4-19
4.5.5 Step 4: Upgrade the Oracle Key Vault Server or Primary-Standby Pair 4-21
4.5.5.1 About Upgrading an Oracle Key Vault Server or Primary-Standby Pair 4-22
4.5.5.2 Upgrading a Standalone Oracle Key Vault Server 4-22
4.5.5.3 Upgrading a Pair of Oracle Key Vault Servers in a Primary-StandbyDeployment 4-24
4.5.6 Step 5: Upgrade the Endpoint Software 4-25
4.5.7 Step 6: If Necessary, Add Disk Space to Extend Swap Space 4-26
4.5.8 Step 7: If Necessary, Remove Old Kernels 4-29
4.5.9 Step 8: If Necessary, Remove SSH-Related DSA Keys 4-30
4.5.10 Step 9: Back Up the Upgraded Oracle Key Vault Server 4-31
4.6 Upgrading Oracle Key Vault in a Multi-Master Cluster Environment 4-31
4.6.1 About Upgrading Oracle Key Vault in a Multi-Master Cluster Environment 4-32
4.6.2 Step 1: Perform Pre-Upgrade Tasks 4-33
4.6.3 Step 2: Add Disk Space to Extend the vg_root for Upgrade to Oracle Key VaultRelease 21.1 4-34
4.6.4 Step 3: Upgrade Multi-Master Clusters 4-36
4.6.4.1 About Upgrading Multi-Master Clusters 4-36
4.6.4.2 Upgrading Multi-Master Cluster Read-Only Nodes 4-37
4.6.4.3 Upgrading Multi-Master Cluster Read-Write Pairs 4-38
4.6.5 Step 4: Check the Node Version and the Cluster Version 4-42
4.6.6 Step 5: If Necessary, Change the Network Interface for Upgraded Nodes 4-42
4.7 Overview of the Oracle Key Vault Management Console 4-43
4.8 Performing Actions and Searches 4-43
4.8.1 Actions Menus 4-43
4.8.2 Search Bars 4-44
5 Managing Oracle Key Vault Multi-Master Clusters
5.1 About Managing Oracle Key Vault Multi-Master Clusters 5-2
5.2 Setting Up a Cluster 5-2
vi
5.2.1 About Setting Up a Cluster 5-2
5.2.2 Creating the First (Initial) Node of a Cluster 5-2
5.2.3 Adding Nodes to a Cluster 5-3
5.2.3.1 Adding a Node to Create a Read-Write Pair 5-4
5.2.3.2 Adding a Node as a Read-Only Node 5-6
5.2.3.3 Creating an Additional Read-Write Pair in a Cluster 5-7
5.3 Terminating the Pairing of a Node 5-8
5.4 Disabling a Cluster Node 5-9
5.5 Enabling a Disabled Cluster Node 5-9
5.6 Deleting a Cluster Node 5-10
5.7 Force Deleting a Cluster Node 5-10
5.8 Managing Replication Between Nodes 5-11
5.8.1 Restarting Cluster Services 5-11
5.8.2 Disabling Node Replication 5-11
5.8.3 Enabling Node Replication 5-11
5.9 Cluster Management Information 5-12
5.10 Cluster Monitoring Information 5-13
5.11 Naming Conflicts and Resolution 5-14
5.11.1 About Naming Conflicts and Resolution 5-15
5.11.2 Naming Conflict Resolution Information 5-15
5.11.3 Changing the Suggested Conflict Resolution Name 5-16
5.11.4 Accepting the Suggested Conflict Resolution Name 5-16
5.12 Multi-Master Cluster Deployment Recommendations 5-17
6 Managing an Oracle Key Vault Primary-Standby Configuration
6.1 Overview of the Oracle Key Vault Primary-Standby Configuration 6-1
6.1.1 About the Oracle Key Vault Primary-Standby Configuration 6-2
6.1.2 Benefits of an Oracle Key Vault Primary-Standby Configuration 6-3
6.1.3 Difference Between Primary-Standby Configuration and Multi-Master Cluster 6-4
6.1.4 Primary Server Role in a Primary-Standby Configuration 6-4
6.1.5 Standby Server Role in a Primary-Standby Configuration 6-5
6.2 Configuring the Primary-Standby Environment 6-5
6.2.1 Step 1: Configure the Primary Server 6-5
6.2.2 Step 2: Configure the Standby Server 6-6
6.2.3 Step 3: Complete the Configuration on the Primary Server 6-8
6.3 Switching the Primary and Standby Servers 6-9
6.4 Restoring Primary-Standby After a Failover 6-10
6.5 Disabling (Unpairing) the Primary-Standby Configuration 6-11
6.6 Read-Only Restricted Mode in a Primary-Standby Configuration 6-12
6.6.1 About Read-Only Restricted Mode in a Primary-Standby Configuration 6-13
vii

6.6.2 Primary-Standby with Read-Only Restricted Mode 6-14
6.6.3 Primary-Standby without Read-Only Restricted Mode 6-14
6.6.4 States of Read-Only Restricted Mode 6-15
6.6.4.1 About the States of Read-Only Restricted Mode 6-15
6.6.4.2 Read-Only Restricted State Functionality During a Primary Server Failure 6-16
6.6.4.3 Read-Only Restricted Mode Functionality During a Standby ServerFailure 6-17
6.6.4.4 Read-Only Restricted State Functionality During a Network Failure 6-17
6.6.5 Enabling Read-Only Restricted Mode 6-17
6.6.6 Disabling Read-Only Restricted Mode 6-18
6.6.7 Recovering from Read-Only Restricted Mode 6-19
6.6.8 Read-Only Restricted Mode Notifications 6-20
6.7 Best Practices for Using Oracle Key Vault in a Primary-Standby Configuration 6-20
7 Deploying Oracle Key Vault on an Oracle Cloud Infrastructure VMCompute Instance
7.1 About Deploying Oracle Key Vault on an Oracle Cloud Infrastructure ComputeInstance 7-1
7.2 Benefits of Using Oracle Key Vault in Oracle Cloud Infrastructure 7-2
7.3 Provisioning an Oracle Key Vault Compute Instance 7-3
7.3.1 About Provisioning an Oracle Key Vault Compute Instance 7-3
7.3.2 Launching the Oracle Key Vault Compute Instance 7-4
7.3.2.1 About Launching the Oracle Key Vault Compute Instance 7-4
7.3.2.2 Step 1: Ensure That You Have Prerequisites in Place 7-4
7.3.2.3 Step 2: Find the Oracle Key Vault Image 7-4
7.3.2.4 Step 3: Launch the Oracle Key Vault VM Compute Instance 7-5
7.3.2.5 Step 4: Perform Post-Launch and Post-Installation Tasks 7-5
7.4 General Management of an Oracle Key Vault Compute Instance 7-6
7.4.1 Starting, Restarting, or Stopping an Oracle Key Vault Compute Instance 7-7
7.4.2 System Settings in an Oracle Key Vault Compute Instance 7-7
7.4.3 Backup and Restore Operations for Oracle Key Vault Compute Instances 7-8
7.4.4 Terminating an Oracle Key Vault Compute Instance 7-8
7.5 Migrating Oracle Key Vault Deployments Between On-Premises and OCI 7-9
7.5.1 About Performing Migrations with Oracle Key Vault Compute Instance Data 7-9
7.5.2 Migrating Oracle Key Vault Deployments into OCI Using Backup and Restore 7-9
7.5.3 Migrating Oracle Key Vault Deployments Out of OCI Using Backup andRestore 7-10
8 Oracle Database Instances in Oracle Cloud Infrastructure
8.1 About Managing Oracle Cloud Infrastructure Database Instance Endpoints 8-1
viii
8.2 Preparing a Database Instance on OCI to be an Oracle Key Vault Endpoint 8-2
8.2.1 About Preparing a Database Instance on OCI to be an Oracle Key VaultEndpoint 8-2
8.2.2 Configuring a Database Cloud Service Instance 8-2
8.2.3 Creating a Low Privileged Operating System User on Database as a Service 8-3
8.3 Using an SSH Tunnel Between Oracle Key Vault and Database as a Service 8-4
8.3.1 Creating an SSH Tunnel Between Oracle Key Vault and a DBaaS Instance 8-5
8.3.2 Managing a Reverse SSH Tunnel in a Multi-Master Cluster 8-8
8.3.3 Managing a Reverse SSH Tunnel in a Primary-Standby Configuration 8-8
8.3.4 Viewing SSH Tunnel Configuration Details 8-9
8.3.5 Disabling an SSH Tunnel Connection 8-9
8.3.6 How the Connection Works if the SSH Tunnel Is Not Active 8-11
8.3.7 Deleting an SSH Tunnel Configuration 8-11
8.4 Registering and Enrolling a Database as a Service Instance as an Oracle Key VaultEndpoint 8-12
8.4.1 About Registering and Enrolling a Database as a Service Instance as anOracle Key Vault Endpoint 8-12
8.4.2 Step 1: Register the Endpoint in the Oracle Key Vault Management Console 8-13
8.4.3 Step 2: Prepare the Endpoint Environment 8-15
8.4.4 Step 3: Install the Oracle Key Vault Software onto the Endpoint for Registrationand Enrollment 8-15
8.4.5 Step 4: Perform Post-Installation Tasks 8-17
8.5 Suspending Database Cloud Service Access to Oracle Key Vault 8-18
8.5.1 About Suspending Database Cloud Service Access to Oracle Key Vault 8-18
8.5.2 Suspending Access for a Database Cloud Service to Oracle Key Vault 8-19
8.6 Resuming Database Cloud Service Access to Oracle Key Vault 8-20
8.7 Resuming a Database Endpoint Configured with a Password-Based Keystore 8-20
9 Managing Oracle Key Vault Users
9.1 Managing User Accounts 9-1
9.1.1 About Oracle Key Vault User Accounts 9-1
9.1.2 How a Multi-Master Cluster Affects User Accounts 9-2
9.1.2.1 Multi-Master Cluster Effect on System Administrator Users 9-3
9.1.2.2 Multi-Master Cluster Effect on Key Administrator Users 9-3
9.1.2.3 Multi-Master Cluster Effect on Audit Manager Users 9-3
9.1.2.4 Multi-Master Cluster Effect on Administration Users 9-4
9.1.2.5 Multi-Master Cluster Effect on System Users 9-4
9.1.3 Creating an Oracle Key Vault User Account 9-5
9.1.4 Viewing User Account Details 9-7
9.1.5 Deleting an Oracle Key Vault User Account 9-7
9.2 Managing Administrative Roles and User Privileges 9-7
ix
9.2.1 About Managing Administrative Roles and User Privileges 9-8
9.2.2 Granting or Changing an Administrative Role of a User 9-8
9.2.3 Granting the Create Endpoint Privilege 9-10
9.2.4 Granting the Manage Endpoint Privilege 9-10
9.2.5 Granting the Create Endpoint Group Privilege 9-11
9.2.6 Granting the Manage Endpoint Group Privilege 9-11
9.2.7 Granting a User Access to a Virtual Wallet 9-12
9.2.8 Revoking an Administrative Role or Endpoint Privilege from a User 9-13
9.3 Managing User Passwords 9-14
9.3.1 About Changing User Passwords 9-14
9.3.2 Changing Your Own Password 9-15
9.3.3 Changing Another User's Password 9-15
9.3.3.1 Changing a Password Manually 9-16
9.3.3.2 Changing a Password Through Email Notification 9-16
9.3.3.3 Changing the Support User Account Password 9-17
9.3.4 Controlling the Use of Password Reset Methods 9-18
9.3.4.1 About Controlling the Use of Password Reset Methods 9-18
9.3.4.2 Configuring the Use of Password Reset Operations 9-18
9.4 Managing User Email 9-19
9.4.1 Changing the User Email Address 9-19
9.4.2 Disabling Email Notifications for a User 9-19
9.5 Managing User Groups 9-20
9.5.1 About Managing User Groups 9-20
9.5.2 How a Multi-Master Cluster Affects User Groups 9-20
9.5.3 Creating a User Group 9-21
9.5.4 Adding a User to a User Group 9-22
9.5.5 Granting a User Group Access to a Virtual Wallet 9-23
9.5.6 Renaming a User Group 9-23
9.5.7 Changing a User Group Description 9-24
9.5.8 Removing a User from a User Group 9-24
9.5.9 Deleting a User Group 9-25
10
Managing LDAP User Authentication and Authorization in Oracle KeyVault
10.1 About Managing LDAP User Authentication and Authorization in Oracle Key Vault 10-1
10.2 Privilege Grants and Revokes for LDAP Users 10-3
10.3 Configuring the LDAP Directory Server Connection to Oracle Key Vault 10-4
10.3.1 Step 1: Prepare the LDAP Directory Server 10-4
10.3.2 Step 2: Create the LDAP Connection in Oracle Key Vault 10-5
10.3.3 Step 3: Map LDAP Groups to Oracle Key Vault User Groups 10-6
x
10.4 Logins to Oracle Key Vault as an LDAP User 10-7
10.4.1 About Logins to Oracle Key Vault as an LDAP User 10-7
10.4.2 Logging in to Oracle Key Vault as an LDAP User 10-7
10.5 Managing the LDAP Configuration 10-8
10.5.1 Enabling an LDAP Configuration 10-9
10.5.2 Modifying an LDAP Configuration 10-9
10.5.3 Testing an LDAP Configuration 10-10
10.5.4 Disabling an LDAP Configuration 10-10
10.5.5 Deleting an LDAP Configuration 10-10
10.6 Managing LDAP Groups 10-11
10.6.1 About Managing LDAP Groups 10-11
10.6.2 Modifying an LDAP Group Mapping 10-11
10.6.3 Validating LDAP Group Mappings 10-12
10.6.4 Deleting LDAP Group Mappings 10-13
10.7 Managing Oracle Key Vault-Generated LDAP Users 10-13
10.7.1 About Managing LDAP Users 10-13
10.7.2 Finding Information About an Oracle Key Vault-Generated LDAP User 10-14
10.7.3 Validation of Oracle Key Vault-Generated LDAP Users 10-14
10.7.3.1 About the Validation of Oracle Key Vault-Generated LDAP Users 10-15
10.7.3.2 Validating Oracle Key Vault-Generated LDAP Users 10-15
10.7.4 Modifying an Oracle Key Vault-Generated LDAP User Account WalletPrivileges 10-15
10.7.4.1 About Modifying an Oracle Key Vault-Generated LDAP User AccountWallet Privileges 10-16
10.7.4.2 Modifying an Oracle Key Vault-Generated LDAP User Account WalletPrivileges (Key Administrators) 10-16
10.7.4.3 Modifying an Oracle Key Vault-Generated LDAP User Account WalletPrivileges (Regular Users) 10-17
10.7.5 Deleting Oracle Key Vault-Generated LDAP Users 10-17
11
Managing Oracle Key Vault Virtual Wallets and Security Objects
11.1 Managing Virtual Wallets 11-1
11.1.1 About Virtual Wallets 11-2
11.1.2 Creating a Virtual Wallet 11-2
11.1.3 Modifying a Virtual Wallet 11-4
11.1.4 Adding Security Objects to a Virtual Wallet 11-5
11.1.5 Removing Security Objects from a Virtual Wallet 11-6
11.1.6 Deleting a Virtual Wallet 11-6
11.2 Managing Access to Virtual Wallets from Keys and Wallets Tab 11-7
11.2.1 About Managing Access to Virtual Wallets from Keys and Wallets Tab 11-7
11.2.2 Granting Access to Users, User Groups, Endpoints, and Endpoint Groups 11-7
xi
11.2.3 Modifying Access to Users, User Groups, Endpoints, and Endpoint Groups 11-9
11.3 Managing Access to Virtual Wallets from User’s Menu 11-9
11.3.1 Granting a User Access to a Virtual Wallet 11-10
11.3.2 Revoking User Access from a Virtual Wallet 11-10
11.3.3 Granting a User Group Access to a Virtual Wallet 11-11
11.3.4 Revoking User Group Access from a Virtual Wallet 11-11
11.4 Managing the State of a Key or a Security Object 11-11
11.4.1 About Managing the State of a Key or a Security Object 11-12
11.4.2 How a Multi-Master Cluster Affects Keys and Security Objects 11-12
11.4.3 Activating a Key or Security Object 11-13
11.4.4 Deactivating a Key or Security Object 11-13
11.4.5 Revoking a Key or Security Object 11-13
11.4.6 Destroying a Key or Security Object 11-14
11.5 Managing Details of Security Objects 11-14
11.5.1 About Managing the Details of Security Objects 11-14
11.5.2 Searching for Security Object Items 11-15
11.5.3 Viewing the Details of a Security Object 11-16
11.5.4 Adding or Modifying Details of a Security Object 11-19
12
Managing Oracle Key Vault Master Encryption Keys
12.1 Using the Persistent Master Encryption Key Cache 12-1
12.1.1 About the Persistent Master Encryption Key Cache 12-2
12.1.2 About Oracle Key Vault Persistent Master Encryption Key Cache Architecture 12-2
12.1.3 Caching Master Encryption Keys in the In-Memory and Persistent MasterEncryption Key Cache 12-3
12.1.4 Storage Location of Persistent Master Encryption Key Cache 12-3
12.1.5 Persistent Master Encryption Key Cache Modes of Operation 12-4
12.1.5.1 Oracle Key Vault First Mode 12-4
12.1.5.2 Persistent Master Encryption Key Cache First Mode 12-4
12.1.6 Persistent Master Encryption Key Cache Refresh Window 12-5
12.1.7 Persistent Master Encryption Key Cache Parameters 12-5
12.1.7.1 PKCS11_CACHE_TIMEOUT Parameter 12-6
12.1.7.2 PKCS11_PERSISTENT_CACHE_TIMEOUT Parameter 12-6
12.1.7.3 PKCS11_PERSISTENT_CACHE_FIRST Parameter 12-7
12.1.7.4 PKCS11_CONFIG_PARAM_REFRESH_INTERVAL Parameter 12-7
12.1.7.5 PKCS11_PERSISTENT_CACHE_REFRESH_WINDOW Parameter 12-8
12.1.7.6 EXPIRE PKCS11 PERSISTENT CACHE ON DATABASE SHUTDOWNParameter 12-8
12.1.8 Listing the Contents of the Persistent Master Key Cache 12-9
12.1.9 Oracle Database Deployments and Persistent Master Encryption Key Cache 12-11
12.2 Configuring an Oracle Key Vault to New TDE-Enabled Database Connection 12-11
xii
12.2.1 About Configuring an Oracle Key Vault to New TDE-Enabled DatabaseConnection 12-12
12.2.2 Limitations to Transparent Data Encryption Endpoint Integration 12-12
12.2.3 Step 1: Configure the Oracle Key Vault Server Environment 12-13
12.2.4 Step 2: Integrate Transparent Data Encryption with Oracle Key Vault 12-15
12.3 Migrating Existing TDE Wallets to Oracle Key Vault 12-16
12.3.1 About Migrating Existing TDE Wallets to Oracle Key Vault 12-16
12.3.2 Migrating an Existing TDE Wallet to Oracle Key Vault 12-17
12.3.3 Restoring Database Contents Previously Encrypted by TDE Using an OracleWallet 12-19
12.4 Uploading and Downloading Oracle Wallets 12-19
12.4.1 About Uploading and Downloading Oracle Wallets 12-20
12.4.2 Uploading Oracle Wallets 12-20
12.4.3 Downloading Oracle Wallets 12-21
12.4.4 Guidelines for Uploading and Downloading Oracle Wallets 12-22
12.5 Uploading and Downloading JKS and JCEKS Keystores 12-23
12.5.1 About Uploading and Downloading JKS and JCEKS Keystores 12-23
12.5.2 Uploading JKS or JCEKS Keystores 12-23
12.5.3 Downloading JKS or JCEKS Keystores 12-24
12.5.4 Guidelines for Uploading and Downloading JKS and JCEKS Keystores 12-25
12.6 Using a User-Defined Key as the TDE Master Encryption Key 12-25
12.6.1 About Using a User-Defined Key as the TDE Master Encryption Key 12-26
12.6.2 Step 1: Upload the User-Defined Key 12-26
12.6.3 Step 2: Activate the User-Defined Key as a TDE Master Encryption Key 12-28
13
Managing Oracle Key Vault Endpoints
13.1 Overview of Managing Endpoints 13-1
13.1.1 About Managing Endpoints 13-1
13.1.2 How a Multi-Master Cluster Affects Endpoints 13-3
13.2 Managing Endpoints 13-3
13.2.1 Types of Endpoint Enrollment 13-3
13.2.2 Endpoint Enrollment in a Multi-Master Cluster 13-4
13.2.3 Adding an Endpoint as an Oracle Key Vault System Administrator or CreateEndpoint User 13-5
13.2.4 Adding Endpoints Using Self-Enrollment 13-9
13.2.4.1 About Adding Endpoints Using Self-Enrollment 13-9
13.2.4.2 Adding an Endpoint Using Self-Enrollment 13-9
13.2.5 Deleting, Suspending, or Reenrolling Endpoints 13-10
13.2.5.1 About Deleting Endpoints 13-10
13.2.5.2 Deleting One or More Endpoints 13-11
13.2.5.3 Deleting One Endpoint (Alternative Method) 13-11
xiii
13.2.5.4 Suspending an Endpoint 13-12
13.2.5.5 Reenrolling an Endpoint 13-13
13.3 Managing Endpoint Details 13-13
13.3.1 About Endpoint Details 13-14
13.3.2 Modifying Endpoint Details 13-14
13.3.3 Global Endpoint Configuration Parameters 13-15
13.3.3.1 About Global Endpoint Configuration Parameters 13-15
13.3.3.2 Setting Global Endpoint Configuration Parameters 13-16
13.3.4 Modifying Configuration Parameters for an Individual Endpoint 13-17
13.4 Default Wallets and Endpoints 13-18
13.4.1 Associating a Default Wallet with an Endpoint 13-18
13.4.2 Setting the Default Wallet for an Endpoint 13-18
13.5 Managing Endpoint Access to a Virtual Wallet 13-20
13.5.1 Granting an Endpoint Access to a Virtual Wallet 13-20
13.5.2 Revoking Endpoint Access to a Virtual Wallet 13-21
13.5.3 Viewing Wallet Items Accessed by Endpoints 13-22
13.6 Managing Endpoint Groups 13-22
13.6.1 How a Multi-Master Cluster Affects Endpoint Groups 13-23
13.6.2 Creating an Endpoint Group 13-23
13.6.3 Modifying Endpoint Group Details 13-25
13.6.4 Granting an Endpoint Group Access to a Virtual Wallet 13-26
13.6.5 Adding an Endpoint to an Endpoint Group 13-27
13.6.6 Removing an Endpoint from an Endpoint Group 13-28
13.6.7 Deleting Endpoint Groups 13-29
14
Enrolling and Upgrading Endpoints for Oracle Key Vault
14.1 About Endpoint Enrollment and Provisioning 14-1
14.2 Finalizing Enrollment and Provisioning 14-3
14.2.1 Step 1: Enroll the Endpoint and Download the Software 14-3
14.2.2 Step 2: Prepare the Endpoint Environment 14-5
14.2.3 Step 3: Install the Oracle Key Vault Software onto the Endpoint 14-5
14.2.4 Step 4: Perform Post-Installation Tasks 14-7
14.3 Environment Variables and Endpoint Provisioning Guidance 14-8
14.3.1 How the Location of JAVA_HOME Location Is Determined 14-8
14.3.2 Location of the okvclient.ora File and Environment Variables 14-9
14.3.3 Setting OKV_HOME for Non-Database Utilities to Communicate with OracleKey Vault 14-9
14.3.4 Environment Variables in sqlnet.ora File 14-9
14.4 Endpoints That Do Not Use the Oracle Key Vault Client Software 14-10
14.5 Transparent Data Encryption Endpoint Management 14-10
14.6 Endpoint okvclient.ora Configuration File 14-11
xiv
14.7 Upgrading Endpoints 14-12
14.7.1 Upgrading Endpoint Software from an Endpoint 14-12
14.7.1.1 Step 1: Prepare the Endpoint Environment 14-12
14.7.1.2 Step 2: Download the Oracle Key Vault Software onto the Endpoint 14-13
14.7.1.3 Step 3: Install the Oracle Key Vault Software onto the Endpoint 14-13
14.7.1.4 Step 4: Perform Post-Installation Tasks 14-15
14.7.2 Upgrading Endpoint Software on an Enrolled Endpoint 14-16
15
Managing Keys for Oracle Products
15.1 Using a TDE-Configured Oracle Database in an Oracle RAC Environment 15-1
15.2 Using a TDE-Configured Oracle Database in an Oracle GoldenGate Environment 15-2
15.2.1 Oracle Wallets in an Oracle GoldenGate Environment 15-2
15.2.2 Configuring Online Master Keys in an Oracle GoldenGate Deployment 15-3
15.2.3 Migration of TDE Wallets in Oracle GoldenGate to Oracle Key Vault 15-3
15.3 Using a TDE-Configured Oracle Database in an Oracle Data Guard Environment 15-4
15.3.1 About Uploading Oracle Wallets in an Oracle Data Guard Environment 15-4
15.3.2 Uploading Oracle Wallets in an Oracle Data Guard Environment 15-5
15.3.3 Performing an Online Master Key Connection in an Oracle Data GuardEnvironment 15-5
15.3.4 Migrating Oracle Wallets in an Oracle Data Guard Environment 15-6
15.3.5 Reverse Migrating Oracle Wallets in an Oracle Data Guard Environment 15-7
15.3.6 Migrating an Oracle TDE Wallet to Oracle Key Vault for a Logical StandbyDatabase 15-8
15.3.7 Checking the Oracle TDE Wallet Migration for a Logical Standby Database 15-8
15.4 Uploading Keystores from Automatic Storage Management to Oracle Key Vault 15-9
15.4.1 About Uploading Keystores from Automatic Storage Management to OracleKey Vault 15-9
15.4.2 Uploading a Keystore from Automatic Storage Management to Oracle KeyVault 15-9
15.4.3 Copying a Keystore from Oracle Key Vault to Automatic Storage Management 15-11
15.5 MySQL Integration with Oracle Key Vault 15-11
15.6 Other Oracle Database Features That Oracle Key Vault Supports 15-12
16
Managing Online and Offline Secrets
16.1 Uploading and Downloading Credential Files 16-1
16.1.1 About Uploading and Downloading Credential Files 16-1
16.1.2 Uploading a Credential File 16-2
16.1.3 Downloading a Credential File 16-3
16.1.4 Guidelines for Uploading and Downloading Credential Files 16-3
16.2 Managing Secrets and Credentials for SQL*Plus 16-4
xv
16.3 Managing Secrets and Credentials for SSH 16-4
16.4 Centrally Managing Passwords in Oracle Key Vault 16-5
16.4.1 About Centrally Managing Passwords in Oracle Key Vault 16-6
16.4.2 Creating and Sharing Centrally Managed Passwords 16-6
16.4.3 Example: Script for Using External Keystore Passwords in SQL*PlusOperations 16-9
16.4.4 Sharing Secrets with Other Databases 16-10
16.4.5 Changing Passwords for a Large Database Deployment 16-12
17
Oracle Key Vault General System Administration
17.1 Overview of Oracle Key Vault General System Administration 17-1
17.1.1 About Oracle Key Vault General System Administration 17-2
17.1.2 Viewing the Oracle Key Vault Dashboard 17-2
17.1.3 Using the Status Panes in the Dashboard 17-2
17.2 Configuring Oracle Key Vault in a Non-Multi-Master Cluster Environment 17-4
17.2.1 Configuring the Network Details 17-5
17.2.2 Configuring the Network Services 17-6
17.2.3 Configuring the System Time 17-7
17.2.4 Configuring DNS 17-9
17.2.5 Configuring FIPS Mode 17-10
17.2.6 Configuring Syslog 17-10
17.2.7 Changing the Network Interface Mode 17-11
17.2.8 Configuring RESTful Services 17-13
17.2.9 Configuring Oracle Audit Vault Integration 17-14
17.2.10 Configuring the Oracle Key Vault Management Console Web SessionTimeout 17-14
17.2.11 Restarting or Powering Off Oracle Key Vault 17-15
17.3 Configuring Oracle Key Vault in a Multi-Master Cluster Environment 17-15
17.3.1 About Configuring Oracle Key Vault in a Multi-Master Cluster Environment 17-15
17.3.2 Configuring System Settings for Individual Multi-Master Cluster Nodes 17-16
17.3.2.1 Configuring the Network Details for the Node 17-17
17.3.2.2 Configuring the Network Services for the Node 17-17
17.3.2.3 Configuring the System Time for the Node 17-18
17.3.2.4 Configuring DNS for the Node 17-19
17.3.2.5 Configuring the FIPS Mode for the Node 17-19
17.3.2.6 Configuring Syslog for the Node 17-19
17.3.2.7 Changing the Network Interface Mode for the Node 17-20
17.3.2.8 Configuring Auditing for the Node 17-22
17.3.2.9 Configuring SNMP Settings for the Node 17-23
17.3.2.10 Configuring Oracle Audit Vault Integration for the Node 17-23
17.3.2.11 Restarting or Powering Off Oracle Key Vault from a Node 17-24
xvi
17.3.3 Managing Oracle Key Vault Multi-Master Clusters 17-24
17.3.3.1 Configuring the System Time for the Cluster 17-25
17.3.3.2 Configuring DNS for the Cluster 17-25
17.3.3.3 Configuring Maximum Disable Node Duration for the Cluster 17-25
17.3.3.4 Configuring Syslog for the Cluster 17-26
17.3.3.5 Configuring RESTful Services for the Cluster 17-26
17.3.3.6 Configuring Auditing for the Cluster 17-27
17.3.3.7 Configuring SNMP Settings for the Cluster 17-27
17.3.3.8 Configuring the Oracle Key Vault Management Console Web SessionTimeout for the Cluster 17-28
17.4 Managing System Recovery 17-28
17.4.1 About Managing System Recovery 17-28
17.4.2 Recovering Credentials for Administrators 17-29
17.4.3 Changing the Recovery Passphrase in a Non-Clusters Environment 17-29
17.4.4 Changing the Recovery Passphrase in a Multi-Master Cluster 17-29
17.4.4.1 Step 1: Initiate the Recovery Passphrase Change Across the Nodes 17-30
17.4.4.2 Step 2: Change the Recovery Passphrase 17-31
17.5 Support for a Primary-Standby Environment 17-31
17.6 Commercial National Security Algorithm Suite Support 17-32
17.6.1 About Commercial National Security Algorithm Suite Support 17-32
17.6.2 Running the Commercial National Security Algorithm Scripts 17-33
17.6.3 Performing Backup and Restore Operations with CNSA 17-34
17.6.4 Upgrading a Standalone Oracle Key Vault Server with CNSA 17-35
17.6.5 Upgrading Primary-Standby Oracle Key Vault Servers to Use CNSA 17-36
17.7 Minimizing Downtime 17-37
18
Managing Certificates
18.1 Rotating Certificates 18-1
18.1.1 About Rotating Certificates 18-1
18.1.2 Advice for Managing Certificate Rotations 18-2
18.1.3 Factors That May Affect the Certificate Rotation Process 18-3
18.1.4 Rotating All Certificates 18-4
18.1.5 Checking the Certificate Rotation Status 18-6
18.2 Managing Console Certificates 18-6
18.2.1 About Managing Console Certificates 18-7
18.2.2 Step 1: Download the Certificate Request 18-7
18.2.3 Step 2: Have the Certificate Signed 18-8
18.2.4 Step 3: Upload the Signed Certificate to Oracle Key Vault 18-8
18.2.5 Console Certificates in Special Use Case Scenarios 18-9
xvii
19
Backup and Restore Operations
19.1 About Backing Up and Restoring Data in Oracle Key Vault 19-1
19.2 Oracle Key Vault Backup Destinations 19-2
19.2.1 About the Oracle Key Vault Backup Destination 19-2
19.2.2 Creating a Remote Backup Destination 19-3
19.2.3 Changing Settings on a Remote Backup Destination 19-5
19.2.4 Deleting a Remote Backup Destination 19-6
19.3 Backup Schedules and States 19-6
19.3.1 About Backup Schedule Types and States 19-7
19.3.2 Types of Oracle Key Vault Backups 19-7
19.3.3 Scheduled Backup States in Oracle Key Vault 19-8
19.4 Scheduling and Managing Oracle Key Vault Backups 19-8
19.4.1 Scheduling a Backup for Oracle Key Vault 19-9
19.4.2 Changing a Backup Schedule for Oracle Key Vault 19-10
19.4.3 Deleting a Backup Schedule from Oracle Key Vault 19-10
19.4.4 How Primary-Standby Affects Oracle Key Vault Backups 19-10
19.4.5 How Using a Cluster Affects Oracle Key Vault Backups 19-11
19.4.6 Protecting the Backup Using the Recovery Passphrase 19-11
19.5 Restoring Oracle Key Vault Data 19-11
19.5.1 About the Oracle Key Vault Restore Process 19-12
19.5.2 Procedure for Restoring Oracle Key Vault Data 19-13
19.5.3 Multi-Master Cluster and the Restore Operation 19-14
19.5.4 Primary-Standby and the Restore Operation 19-14
19.5.5 Certificates and the Restore Operation 19-15
19.5.6 Changes Resulting from a System State Restore 19-15
19.6 Backup and Restore Best Practices 19-15
20
Monitoring and Auditing Oracle Key Vault
20.1 Managing System Monitoring 20-1
20.1.1 Configuring Remote Monitoring to Use SNMP 20-1
20.1.1.1 About Using SNMP for Oracle Key Vault 20-2
20.1.1.2 Granting SNMP Access to Users 20-3
20.1.1.3 Changing the SNMP User Name and Password 20-4
20.1.1.4 Changing SNMP Settings on the Standby Server 20-4
20.1.1.5 Remotely Monitoring Oracle Key Vault Using SNMP 20-5
20.1.1.6 SNMP Management Information Base Variables for Oracle Key Vault 20-6
20.1.1.7 Example: Simplified Remote Monitoring of Oracle Key Vault UsingSNMP 20-7
20.1.2 Configuring Email Notification 20-9
20.1.2.1 About Email Notification 20-10
xviii
20.1.2.2 Configuring Email Settings 20-10
20.1.2.3 Testing the Email Configuration 20-12
20.1.2.4 Disabling Email Notifications for a User 20-13
20.1.3 Configuring the Syslog Destination for Individual Multi-Master Cluster Nodes 20-13
20.1.3.1 Setting the Syslog Destination Setting for the Node 20-13
20.1.3.2 Clearing the Syslog Destination Setting for the Node 20-14
20.1.4 Capturing System Diagnostics 20-14
20.1.4.1 About Capturing System Diagnostics 20-14
20.1.4.2 Installing the Diagnostics Generation Utility 20-15
20.1.4.3 Generating a System Diagnostics File 20-16
20.1.4.4 Removing the Diagnostic Generation Utility Temporary Files 20-16
20.1.4.5 Removing the Diagnostic Generation Utility 20-16
20.1.5 Configuring Oracle Audit Vault Integration for the Node 20-17
20.2 Configuring Oracle Key Vault Alerts 20-17
20.2.1 About Configuring Alerts 20-17
20.2.2 Configuring Alerts 20-19
20.2.3 Viewing Open Alerts 20-20
20.3 Managing System Auditing 20-22
20.3.1 About Auditing in Oracle Key Vault 20-22
20.3.2 Enabling Auditing and Configuring Syslog to Store Audit Records 20-23
20.3.3 Viewing Audit Records 20-23
20.3.4 Exporting and Deleting Audit Records 20-24
20.3.5 Audit Consolidation with Audit Vault and Database Firewall 20-24
20.4 Using Oracle Key Vault Reports 20-25
20.4.1 About Oracle Key Vault Reports 20-25
20.4.2 Viewing Key Management Reports for Oracle Endpoints 20-26
20.4.3 Viewing Keys and Wallets Reports 20-27
20.4.4 Viewing Secrets Management Reports 20-28
20.4.5 Viewing Endpoint Reports 20-29
20.4.6 Viewing User Reports 20-30
20.4.7 Viewing System Reports 20-31
A Oracle Key Vault Multi-Master Cluster Operations
B Oracle Key Vault okvutil Endpoint Utility Reference
B.1 About the okvutil Utility B-1
B.2 okvutil Command Syntax B-1
B.3 okvutil changepwd Command B-3
B.4 okvutil diagnostics Command B-3
xix
B.5 okvutil download Command B-4
B.6 okvutil list Command B-6
B.7 okvutil upload Command B-8
C Troubleshooting Oracle Key Vault
C.1 Oracle Key Vault Pre-Installation Checklist C-2
C.2 Integrating Oracle Key Vault with Oracle Audit Vault and Database Firewall C-3
C.2.1 Step 1: Check the Environment C-3
C.2.2 Step 2: Register Oracle Key Vault as a Secured Target with AVDF C-4
C.2.3 Step 3: Register Oracle Key Vault as a Host with AVDF C-4
C.2.4 Step 4: Download the AVDF Agent and Upload it to Oracle Key Vault C-4
C.2.5 Step 5: Install the AVDF agent.jar File on the Oracle Key Vault Server C-5
C.2.6 Step 6: Add the Oracle Key Vault Audit Trail to AVDF C-6
C.2.7 Step 7: View Oracle Key Vault Audit Data Collected by AVDF C-6
C.3 RESTful Services Troubleshooting Help C-6
C.4 Error: Cannot Open Keystore Message C-7
C.5 KMIP Error: Invalid Field C-7
C.6 WARNING: Could Not Store Private Key Errors C-8
C.7 Errors After Upgrading Oracle Key Vault C-8
C.8 Error: Failed to Open Wallet C-8
C.9 Transaction Check Error: Diagnostics Generation Utility C-9
C.10 Fast-Start Failover (FSFO) Suspended (ORA-16818) C-9
C.11 SSH Tunnel Add Failure C-9
C.12 Error: Provision Command Fails if /usr/bin/java Does Not Exist C-10
C.13 TDE Endpoint Integration Issues C-10
C.14 Failover Situations in Primary-Standby Mode C-10
C.14.1 About Failover Situations in Primary-Standby Mode C-11
C.14.2 Failover Situations Without Read-Only Restricted Mode C-11
C.14.2.1 Primary Server: Planned Shutdown During an Upgrade C-11
C.14.2.2 Primary Server: Planned Shutdown During Maintenance C-12
C.14.2.3 Standby Server: Planned Shutdown C-12
C.14.2.4 Primary Server: Unplanned Shutdown C-13
C.14.2.5 Standby Server: Unplanned Shutdown C-13
C.14.3 Failover Situations with Read-Only Restricted Mode C-14
C.14.3.1 Primary Server: Planned Shutdown During an Upgrade C-14
C.14.3.2 Primary Server: Planned Shutdown During Maintenance C-14
C.14.3.3 Standby Server: Planned Shutdown C-15
C.14.3.4 Primary Server: Unplanned Shutdown C-15
C.14.3.5 Standby Server: Unplanned Shutdown C-16
C.15 Performing a Planned Shutdown C-16
xx
C.15.1 Primary Server Planned Shutdown C-16
C.15.1.1 Performing a Primary Server Planned Shutdown During an Upgrade C-17
C.15.1.2 Performing a Primary Server Planned Shutdown During Maintenance C-17
C.15.2 Standby Server Planned Shutdown C-17
C.15.2.1 Performing a Standby Server Planned Shutdown During an Upgrade C-18
C.15.2.2 Performing a Standby Server Planned Shutdown During Maintenance C-18
D Security Technical Implementation Guides Compliance Standards
D.1 About Security Technical Implementation Guides D-1
D.2 Enabling and Disabling STIG Rules on Oracle Key Vault D-2
D.2.1 Enabling STIG Rules on Oracle Key Vault D-2
D.2.2 Disabling STIG Rules on Oracle Key Vault D-2
D.3 Current Implementation of STIG Rules on Oracle Key Vault D-2
D.4 Current Implementation of Database STIG Rules D-3
D.5 Current Implementation of Operating System STIG Rules D-6
Glossary
Index
xxi
Preface
Welcome to Oracle Key Vault Administrator's Guide. This guide explains how to install,configure, and use Oracle Key Vault.
• Audience
• Documentation Accessibility
• Related Documents
• Conventions
AudienceOracle Key Vault Administrator's Guide is written for Oracle security administratorswho are responsible for managing and centralizing encryption keys and other securityobjects.
Documentation AccessibilityFor information about Oracle's commitment to accessibility, visit the OracleAccessibility Program website at http://www.oracle.com/pls/topic/lookup?ctx=acc&id=docacc.
Access to Oracle Support
Oracle customers that have purchased support have access to electronic supportthrough My Oracle Support. For information, visit http://www.oracle.com/pls/topic/lookup?ctx=acc&id=info or visit http://www.oracle.com/pls/topic/lookup?ctx=acc&id=trsif you are hearing impaired.
Related DocumentsFor more information, see these Oracle resources:
• Oracle Key Vault Root of Trust HSM Configuration Guide
• Oracle Key Vault RESTful Services Administrator's Guide
• Oracle Key Vault Developer's Guide
• Oracle Key Vault Licensing Information
• Oracle Key Vault Release Notes
• Key Management Interoperability Protocol Specification Version 1.1
To download the product data sheet, frequently asked questions, links to the latestproduct documentation, product download, and other collateral, visit the Oracle
Preface
xxii
Technology Network (OTN). You must register online before using OTN. Registration is freeand can be done at
https://www.oracle.com/database/technologies/security/key-vault.html
ConventionsThe following text conventions are used in this document:
Convention Meaning
boldface Boldface type indicates graphical user interface elements associated with anaction, or terms defined in text or the glossary.
italic Italic type indicates book titles, emphasis, or placeholder variables for whichyou supply particular values.
monospace Monospace type indicates commands within a paragraph, URLs, code inexamples, text that appears on the screen, or text that you enter.
Preface
xxiii
Changes in This Release for Oracle KeyVault
This Oracle Key Vault release introduces new features that enhance the use of OracleKey Vault in a large enterprise.
• Changes for Oracle Key Vault Release 21.1Oracle Key Vault release 21.1 introduces several new features.
• Changes for Oracle Key Vault Release 18.6Oracle Key Vault release 18.6 introduces the following new features.
Changes for Oracle Key Vault Release 21.1Oracle Key Vault release 21.1 introduces several new features.
• Dual NIC Network Interface SupportStarting with this release, Oracle Key Vault supports the use of two networkinterfaces, referred to as dual NIC configuration.
• LDAP User Authentication and Authorization in Oracle Key VaultStarting with this release, you can configure authentication and authorization ofOracle Key Vault users to be centrally managed in a Microsoft Active Directory.
• RESTful Services Utility Command-Line Interface for Appliance ManagementIn this release, the the RESTful service command-line interface has beenexpanded and redesigned to provide more functionality.
• Support for SFTP to Transfer External BackupsOracle Key Vault now supports the use of SSH Secure File Transfer Protocol(SFTP) for the transfer of (scheduled) external backups to remote backupdestinations.
• Development Using the Java SDKThis release introduces a new Java language software development kit that youcan use to integrate endpoints with the Oracle Key Vault server.
• Development Using the C SDKThis release introduces a new C language software development kit.
Dual NIC Network Interface SupportStarting with this release, Oracle Key Vault supports the use of two network interfaces,referred to as dual NIC configuration.
In a dual NIC configuration, Oracle Key Vault combines the two network interfaces intoa single logical interface using the Linux NIC bonding mechanism to provideredundancy at the network layer. The dual NIC configuration maintains the networkavailability of an Oracle Key Vault in case one of the interfaces becomes unavailable.
Changes in This Release for Oracle Key Vault
xxiv

Depending upon the dual NIC configuration mode, load balancing of the network traffic mayalso be achieved.
This type of configuration is particularly useful in large Oracle Key Vault deployments whereneed for operational continuity is higher despite physical or software failures. Configuring adual NIC network interface helps to avoid the scenario where, for example, a networkinterface associated with an Oracle Key Vault server becomes unavailable, which can resultin a loss of communication between the Oracle Key Vault nodes and between endpoints andOracle Key Vault server.
In previous releases, Oracle Key Vault supported only one network interface. When youinstall and configure Oracle Key Vault in this release, you have the option of using a singlenetwork interface (Classic mode) or using dual NIC mode.
Related Topics
• Installing the Oracle Key Vault Appliance SoftwareThe Oracle Key Vault installation process installs all the required software componentsonto a dedicated server or virtual machine.
• Changing the Network Interface ModeYou can switch between dual NIC mode and classic mode for the network interface.
• Changing the Network Interface Mode for the NodeYou can switch between dual NIC mode and classic mode for the network interface for anode in a multi-master cluster environment.
LDAP User Authentication and Authorization in Oracle Key VaultStarting with this release, you can configure authentication and authorization of Oracle KeyVault users to be centrally managed in a Microsoft Active Directory.
This feature benefits large deployment environments where enterprise users are centrallymanaged in a Microsoft Active Directory. Centrally managing users, as opposed to creatinguser accounts in different systems and applications, is not only easier and more efficient foradministrators, it improves compliance, control, and security. You enable the Microsoft ActiveDirectory users to authenticate with Oracle Key Vault through the use of their directorycredentials. You manage the authorization of the directory users in Oracle Key Vault throughmapping definitions between Microsoft Active Directory groups and Oracle Key Vaultadministrative roles or user groups. When a directory user successfully logs in to Oracle KeyVault the first time, Oracle Key Vault automatically creates an Oracle Key Vault user accountfor this user.
Related Topics
• Managing LDAP User Authentication and Authorization in Oracle Key VaultYou can configure a connection between Oracle Key Vault and an LDAP server (currentlyMicrosoft Active Directory) so that their users can access Oracle Key Vault.
RESTful Services Utility Command-Line Interface for ApplianceManagement
In this release, the the RESTful service command-line interface has been expanded andredesigned to provide more functionality.
This redesign includes the following:
• Structured and simplified command-line interface with the following format:
Changes in This Release for Oracle Key Vault
xxv
okv category resource action configuration-options command-options
• Profile support in configuration file to centrally administer multiple Oracle Key Vaultendpoints.
• JSON support for command input and output.
• New commands to support system management tasks and monitoring ofdeployments, in addition to the enhancements for the current functionality forendpoints, wallets, and security objects.
In previous releases, the RESTful command-line interface covered only endpoint,wallet, and security object management commands. The addition of systemmanagement commands, which include commands for backup operations and serveroperations for standalone, multi-master, and primary-standby environments, benefitslarge deployments where the automation of these types of configuration is needed.
The previous RESTful services APIs are still supported.
Related Topics
• Oracle Key Vault RESTful Services Administrator's Guide
Support for SFTP to Transfer External BackupsOracle Key Vault now supports the use of SSH Secure File Transfer Protocol (SFTP)for the transfer of (scheduled) external backups to remote backup destinations.
SFTP enables the use of ZFS Storage Appliance as a backup destination. The use ofSecure Copy Protocol (SCP) is also supported.
Related Topics
• Backup and Restore Functionality for Security ObjectsOracle Key Vault enables you to back up all security objects including keys,certificates, and passwords.
Development Using the Java SDKThis release introduces a new Java language software development kit that you canuse to integrate endpoints with the Oracle Key Vault server.
The Java SDK enables developers to create their own custom endpoint integrationsolutions for Oracle Key Vault.
Related Topics
• Oracle Key Vault Developer's Guide
Development Using the C SDKThis release introduces a new C language software development kit.
The C SDK allows developers to create their own custom endpoint integrationsolutions for Oracle Key Vault.
Changes for Oracle Key Vault Release 18.6Oracle Key Vault release 18.6 introduces the following new features.
Changes in This Release for Oracle Key Vault
xxvi
• New Privileges to Enable Regular Administrators to Manage Endpoints and EndpointGroupsOracle Key Vault RESTful services are used for automated endpoint enrollment.
New Privileges to Enable Regular Administrators to Manage Endpoints andEndpoint Groups
Oracle Key Vault RESTful services are used for automated endpoint enrollment.
Oracle Key Vault regular users can now be authorized to manage endpoints and endpointgroups without having to grant them administrative roles. Previously, the user required theSystem Administrator role to manage endpoints and Key Administrator role to manageendpoint groups. These are powerful administrative roles. Not all Oracle Key Vault operationsnecessarily require all the functionality provided by these administrative roles. Users settingup the Oracle Key Vault endpoints using RESTful services need privileges for endpointenrollment, provisioning and endpoint group setup. With Oracle Key Vault release 18.6, aregular user can be granted create endpoint, manage endpoint, create endpoint group andmanage endpoint groups privileges to do just that. Furthermore, the new privileges enableisolation among users managing different set of endpoints and endpoint groups. These usersget full control on the management of a set of endpoints and endpoint groups that they areauthorized to manage, but they cannot affect any other endpoints or endpoint groups, unlikeusers with the administrative roles.
Changes in This Release for Oracle Key Vault
xxvii
1Introduction to Oracle Key Vault
Oracle Key Vault is a full-stack, security-hardened software appliance built to centralize themanagement of keys and security objects within the enterprise.
• About Oracle Key Vault and Key ManagementOracle Key Vault is a fault-tolerant, highly available and scalable, secure and standards-compliant key and secrets management tool, where you can store, manage, and shareyour security objects.
• Benefits of Using Oracle Key VaultOracle Key Vault helps you to fight security threats, centralize key storage, and centralizekey lifecycle management.
• Oracle Key Vault Use CasesThe most typical use cases for Oracle Key Vault are centralized storage andmanagement of security objects.
• Who Should Use Oracle Key VaultOracle Key Vault is designed for users who are responsible for deploying, maintaining,and managing security within the enterprise.
• Major Features of Oracle Key VaultOracle Key Vault enhances security in key management with a wide range of featuresthat support different database deployments.
• Oracle Key Vault InterfacesOracle Key Vault provides both a graphical user interface and command-line interfaces.
• Overview of an Oracle Key Vault DeploymentThere are three different Oracle Key Vault deployment options.
1.1 About Oracle Key Vault and Key ManagementOracle Key Vault is a fault-tolerant, highly available and scalable, secure and standards-compliant key and secrets management tool, where you can store, manage, and share yoursecurity objects.
A security object contains critical data that is provided by a user. Security objects that youcan manage with Oracle Key Vault include encryption keys, Oracle wallets, Java keystores(JKS), Java Cryptography Extension keystores (JCEKS), and credential files. Credential filescan include SSH private keys (used for public key authentication to remote servers (forexample OCI compute instances)) or database account passwords for unattended executionof regularly scheduled maintenance scripts.
To increase key and secret availability, you can install Oracle Key Vault as a multi-mastercluster with up to 16 (geographically distributed) nodes.
Oracle Key Vault centralizes encryption key storage across your organization quickly andefficiently. Built on Oracle Linux, Oracle Database, Oracle Database security features likeOracle Transparent Data Encryption, Oracle Database Vault, Oracle Virtual Private Database,and Oracle GoldenGate technology, Oracle Key Vault's centralized, highly available, andscalable security solution helps to overcome the biggest key-management challenges facing
1-1
organizations today. With Oracle Key Vault you can retain, back up, and restore yoursecurity objects, prevent their accidental loss, and manage their lifecycle in a protectedenvironment.
Oracle Key Vault is optimized for the Oracle Stack (database, middleware, systems),and Advanced Security Transparent Data Encryption (TDE). In addition, it complieswith the industry standard OASIS Key Management Interoperability Protocol (KMIP)for compatibility with KMIP-based clients.
Oracle Key Vault works with endpoints, which it treats as clients to store and managesecurity objects, share them with trusted peers, and retrieve them. An endpoint is acomputer system such as a database server, an application server, and otherinformation systems, where keys are used to access encrypted data and credentialsare used to authenticate to other systems. You can use Oracle Key Vault to manage avariety of other endpoints, such as master encryption keys for Oracle Golden Gateencrypted trail files, MySQL TDE, encrypted ACFS file systems, ZDLRA, and manymore KMIP-compliant endpoints. The Java and C software development kits make iteasy to integrate other endpoints as well.
Related Topics
• Support for OASIS Key Management Interoperability Protocol (KMIP)You can use Oracle Key Vault with a range of OASIS KMIP Version 1.1 profiles.
1.2 Benefits of Using Oracle Key VaultOracle Key Vault helps you to fight security threats, centralize key storage, andcentralize key lifecycle management.
Deploying Oracle Key Vault in your organization will help you accomplish the following:
• Manage the lifecycle for endpoint security objects and keys, which includes keycreation, rotation, deactivation, and removal.
• Prevent the loss of keys and wallets due to forgotten passwords or accidentaldeletion.
• Share keys securely between authorized endpoints across the organization.
• Enroll and provision endpoints easily using a single software package thatcontains all the necessary binaries, configuration files, and endpoint certificates formutually authenticated connections (TLS 1.2) between endpoints and Oracle KeyVault.
• Work with other Oracle products and features in addition to Transparent DataEncryption (TDE), such as Oracle Real Application Clusters (Oracle RAC), OracleData Guard, pluggable databases, and Oracle GoldenGate. Oracle Key Vaultfacilitates the movement of encrypted data using Oracle Data Pump andtransportable tablespaces, a key feature of Oracle Database.
Chapter 1Benefits of Using Oracle Key Vault
1-2
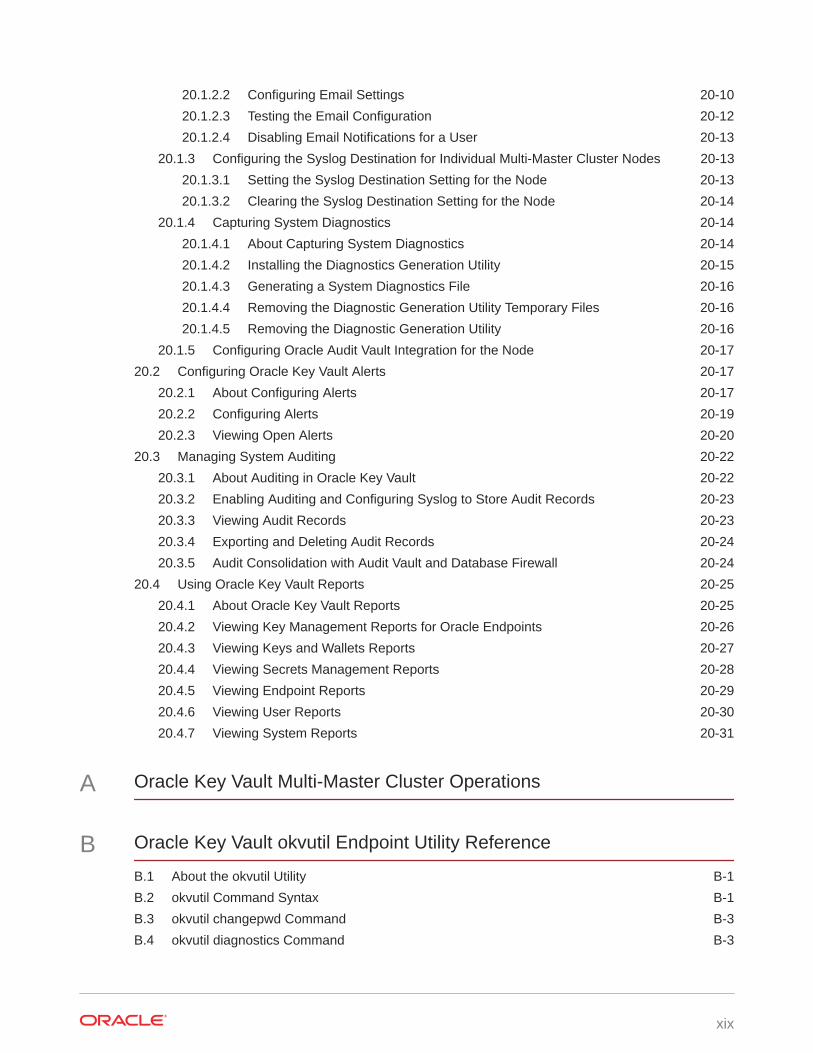
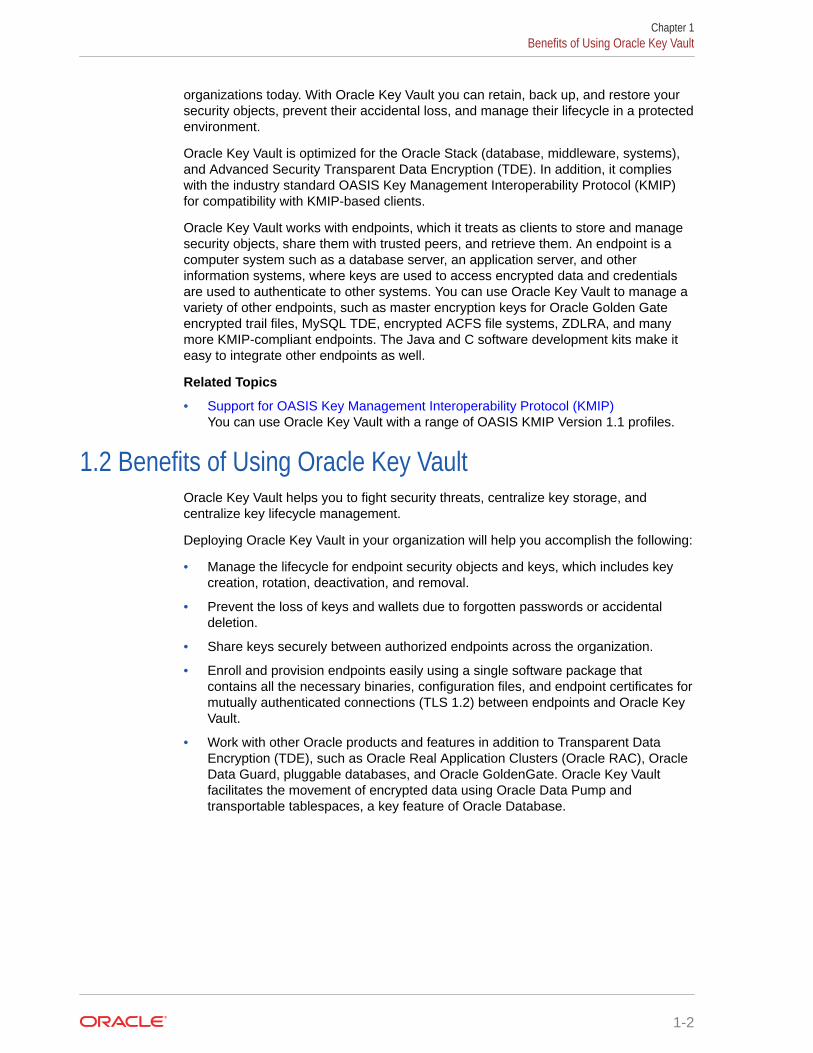
Figure 1-1 The Centralized Key-Management Platform of Oracle Key Vault
ApplianceBackup
Oracle Wallets andJava Keystores
Transparent DataEncryption
Management Console
Other Keystore Files
********
****
****
****
****
****
****
****
********
********
********
********
****
****
****
****
****
****
****
****
****
****
****
****
****
****
****
****
****
****
****
****
****
****
****
****
****
****
****
****
****
****
****
****
****
****
OracleKey Vault
This figure illustrates a typical deployment of Oracle Key Vault from a location central to theenterprise.
It interacts with the following components:
• Transparent Data Encryption refers to Oracle databases protected with TDE.
• Oracle wallets and Java keystores are containers for keys and sensitive objects thatyou upload and download between Oracle Key Vault and endpoints.
• Other Keystore Files are security objects like certificates, and credential files likeKerberos keytab files, SSH key files, and server password files, that you upload to OracleKey Vault from endpoints.
• Oracle Key Vault Management Console refers to the Oracle Key Vault graphical userinterface, where you can log in to manage your security objects and administer theOracle Key Vault system.
• Oracle Key Vault Backup refers to a backup device, where security objects in OracleKey Vault can be backed up on-demand or on-schedule.
Oracle Key Vault multi-master cluster provides additional benefits, such as:
• Maximum key availability by providing multiple Oracle Key Vault nodes from which datamay be retrieved
• Zero endpoint downtime during Oracle Key Vault multi-master cluster maintenance
Chapter 1Benefits of Using Oracle Key Vault
1-3
1.3 Oracle Key Vault Use CasesThe most typical use cases for Oracle Key Vault are centralized storage andmanagement of security objects.
• Centralized Storage of Oracle Wallet Files and Java KeystoresYou can store security objects centrally in Oracle Key Vault, and manage themwith automatic mechanisms for tracking, backup, and recovery.
• Centralized Management of TDE Master Encryption Keys Using Online MasterKeysYou can use an online master key to centralize the management of TDE masterencryption keys over a direct network connection.
• Storage of Credential FilesOracle Key Vault can back up credential files other than Oracle wallets and Javakeystores for long-term retention and recovery.
• Online Management of Endpoint Keys and Secret DataYou can use the RESTful key management interface to manage the storage andretrieval of keys.
1.3.1 Centralized Storage of Oracle Wallet Files and Java KeystoresYou can store security objects centrally in Oracle Key Vault, and manage them withautomatic mechanisms for tracking, backup, and recovery.
This will help you address many operational and security challenges posed by themanual tracking and management of security objects dispersed widely across multipleservers.
Oracle Key Vault stores copies of Oracle wallet files, Java keystores, and othersecurity objects in a centralized location for long-term retention and recovery. Thesesecurity objects can later be downloaded to a new wallet or keystore file and sharedwith trusted server peer endpoints.
The Oracle Key Vault endpoint software can read the format of Oracle wallet files andJava keystores to store their contents at the granularity of individual security objects.You can upload both password-protected and auto-login wallets, and then downloadthe wallet contents to a new wallet of either type. This enables users to managesecurity objects individually and add them to virtual wallets for sharing.
Oracle Key Vault can individually store and manage the security objects contained in:
• Oracle wallet files
Symmetric keys used for encryption (including TDE master encryption keys),passwords (Secure External Password Store), and X.509 certificates (networkencryption).
Oracle Key Vault supports wallet files from all supported releases of the OracleDatabase.
• Java keystores
Symmetric keys, asymmetric keys such as private keys, and X.509 certificates.
Oracle Key Vault supports both JKS and JCEKS types of Java keystores.
Chapter 1Oracle Key Vault Use Cases
1-4
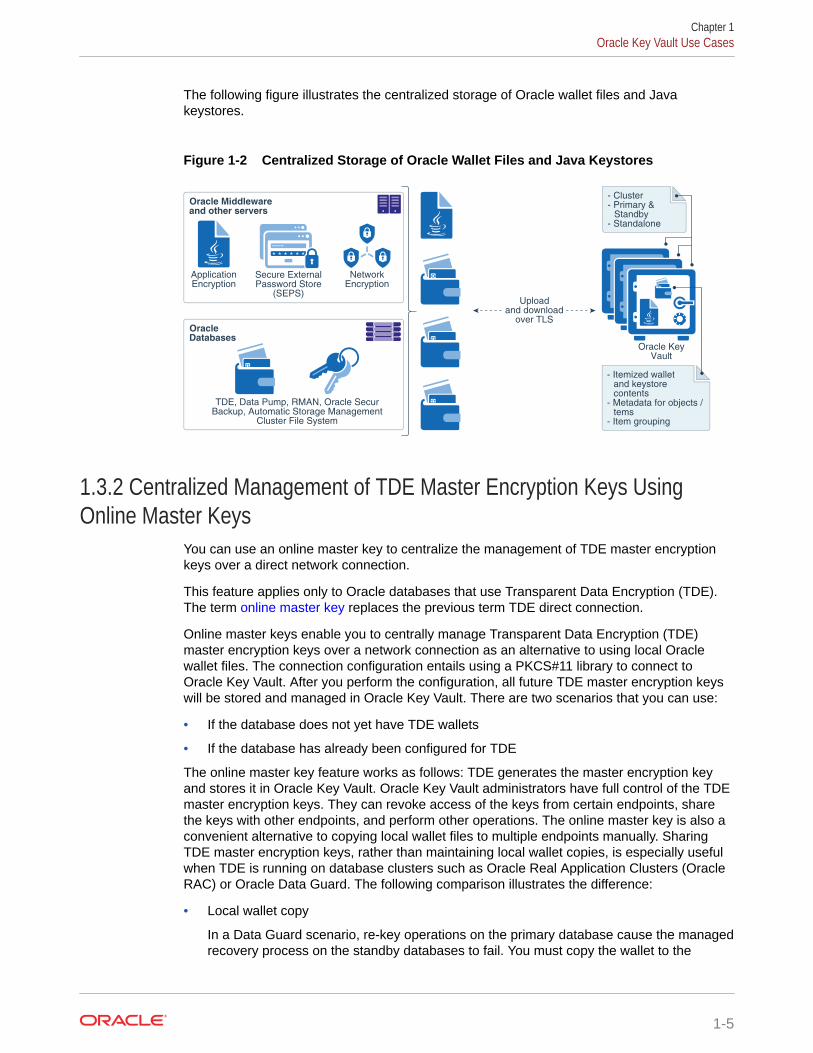
The following figure illustrates the centralized storage of Oracle wallet files and Javakeystores.
Figure 1-2 Centralized Storage of Oracle Wallet Files and Java Keystores
Oracle Middleware
and other servers
Oracle
Databases
ApplicationEncryption
TDE, Data Pump, RMAN, Oracle SecurBackup, Automatic Storage Management
Cluster File System
Oracle KeyVault
- Cluster- Primary & Standby- Standalone
- Itemized wallet and keystore contents- Metadata for objects / tems- Item grouping
Secure ExternalPassword Store
(SEPS)
NetworkEncryption
Uploadand download
over TLS
1.3.2 Centralized Management of TDE Master Encryption Keys UsingOnline Master Keys
You can use an online master key to centralize the management of TDE master encryptionkeys over a direct network connection.
This feature applies only to Oracle databases that use Transparent Data Encryption (TDE).The term online master key replaces the previous term TDE direct connection.
Online master keys enable you to centrally manage Transparent Data Encryption (TDE)master encryption keys over a network connection as an alternative to using local Oraclewallet files. The connection configuration entails using a PKCS#11 library to connect toOracle Key Vault. After you perform the configuration, all future TDE master encryption keyswill be stored and managed in Oracle Key Vault. There are two scenarios that you can use:
• If the database does not yet have TDE wallets
• If the database has already been configured for TDE
The online master key feature works as follows: TDE generates the master encryption keyand stores it in Oracle Key Vault. Oracle Key Vault administrators have full control of the TDEmaster encryption keys. They can revoke access of the keys from certain endpoints, sharethe keys with other endpoints, and perform other operations. The online master key is also aconvenient alternative to copying local wallet files to multiple endpoints manually. SharingTDE master encryption keys, rather than maintaining local wallet copies, is especially usefulwhen TDE is running on database clusters such as Oracle Real Application Clusters (OracleRAC) or Oracle Data Guard. The following comparison illustrates the difference:
• Local wallet copy
In a Data Guard scenario, re-key operations on the primary database cause the managedrecovery process on the standby databases to fail. You must copy the wallet to the
Chapter 1Oracle Key Vault Use Cases
1-5
standby database, and then an administrator must open the wallet (if the wallet isnot an auto-login wallet). Afterward, you must restart the managed recoveryprocess.
• Shared TDE key in a virtual wallet in Oracle Key Vault
In a database cluster, after a key rotation operation, Oracle Key Vault immediatelyshares the new TDE master encryption key with other nodes in the cluster. Thereis no need to copy the wallet manually to the other nodes. In a Data Guardconfiguration, after key rotation, the new keys are immediately available to thestandby databases, making the key management operations seamless.
Centralized management facilitates copying encrypted data between databases usingOracle Data Pump export, import, and the transportable tablespaces features ofOracle Database when master encryption keys are stored in the wallet.
• In non-centralized management the wallet must be manually copied from source totarget databases.
• In centralized management these master encryption keys are easily shared whenyou place them in a virtual wallet in Oracle Key Vault, and then grant eachendpoint access to the virtual wallet.
You must open the wallet before encryption and decryption. After you close the wallet,then encrypted data in tables and tablespaces is unavailable to you. You should rotatethe TDE master encryption key regularly to remain in compliance with the applicableregulations.
Oracle Key Vault supports the SQL statements that were used to administer earlierTDE releases, specifically the use of the ALTER SYSTEM and ADMINISTER KEYMANAGEMENT SQL statements.
Online master keys are supported on Oracle Database 11g release 2 or later versions.
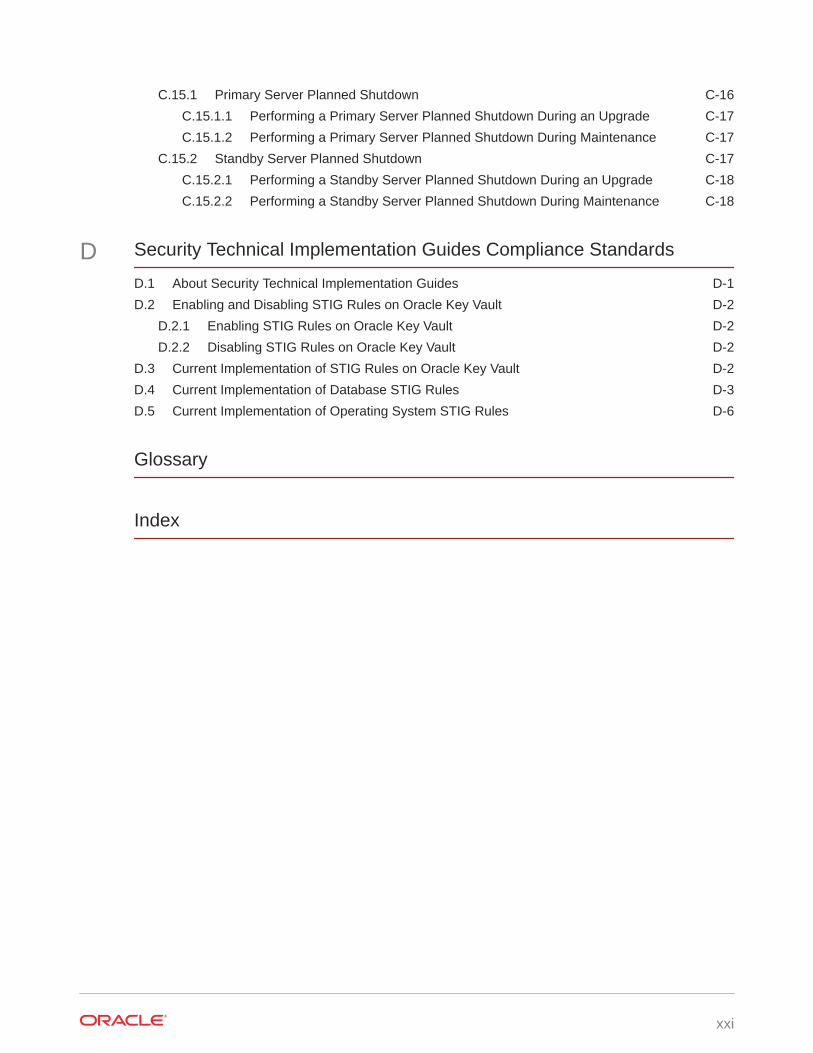
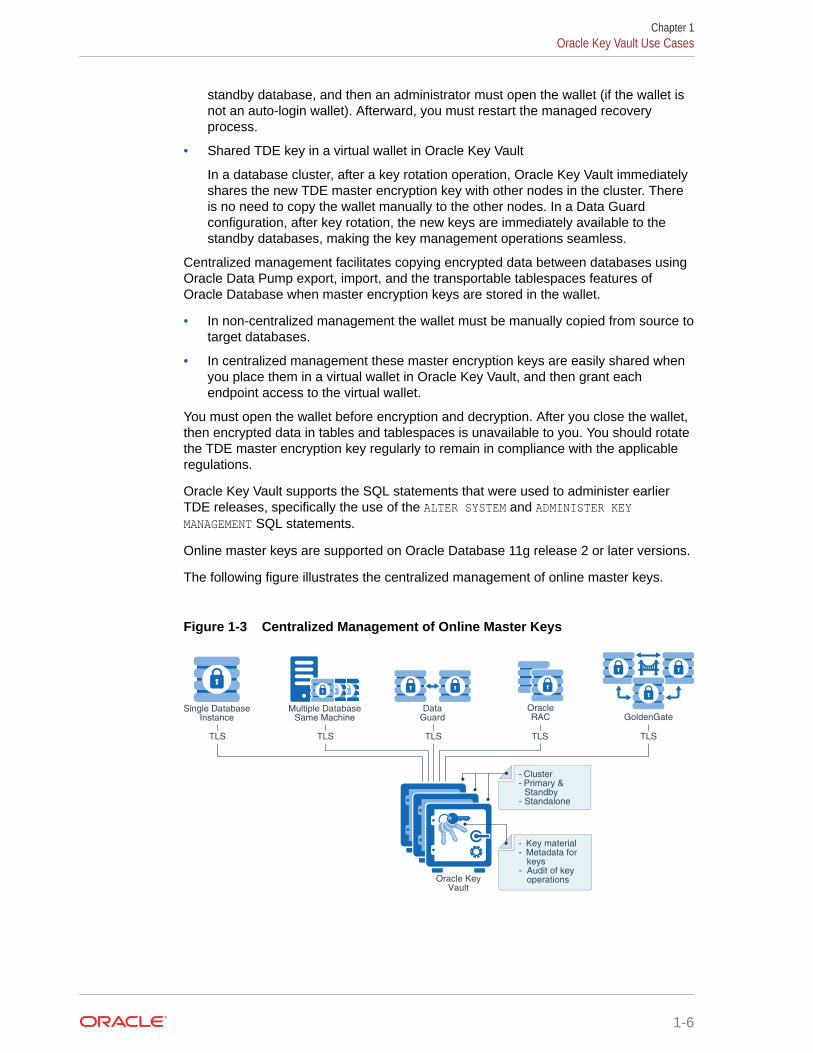
The following figure illustrates the centralized management of online master keys.
Figure 1-3 Centralized Management of Online Master Keys
Oracle KeyVault
- Key material- Metadata for
keys - Audit of key operations
- Cluster- Primary &
Standby - Standalone
OracleRAC
Multiple DatabaseSame Machine
Single DatabaseInstance
TLS TLSTLS TLS TLS
GoldenGateData
Guard
Chapter 1Oracle Key Vault Use Cases
1-6
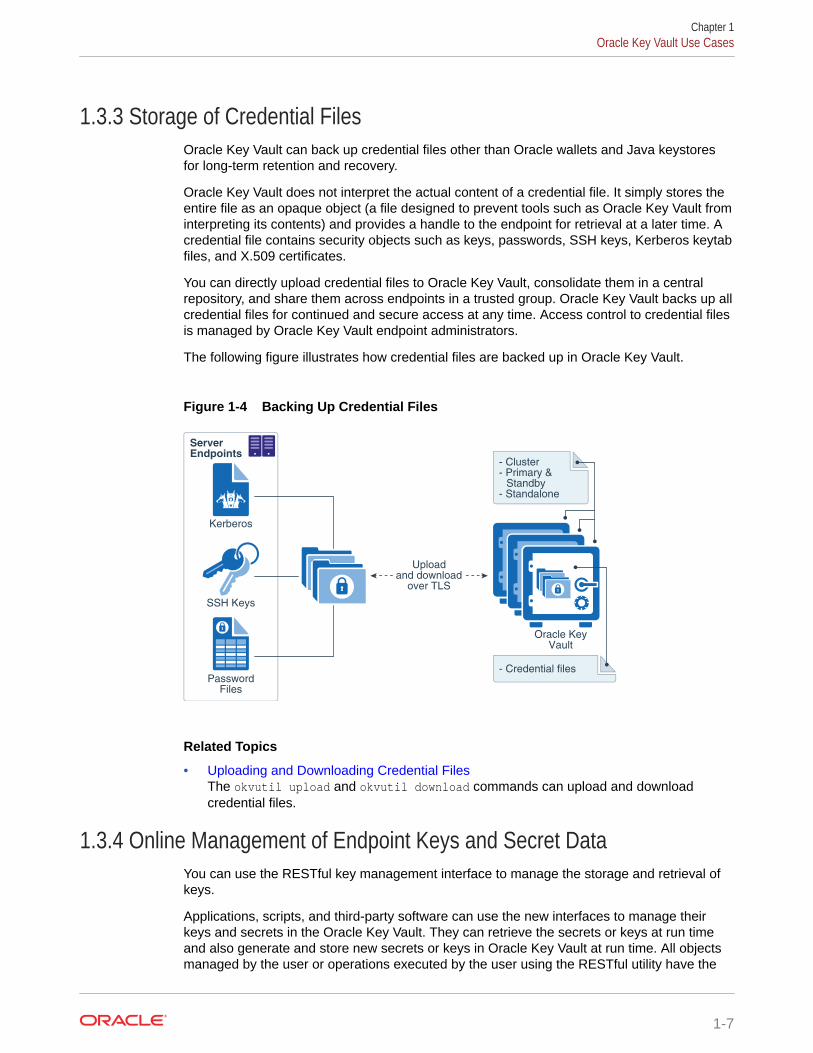
1.3.3 Storage of Credential FilesOracle Key Vault can back up credential files other than Oracle wallets and Java keystoresfor long-term retention and recovery.
Oracle Key Vault does not interpret the actual content of a credential file. It simply stores theentire file as an opaque object (a file designed to prevent tools such as Oracle Key Vault frominterpreting its contents) and provides a handle to the endpoint for retrieval at a later time. Acredential file contains security objects such as keys, passwords, SSH keys, Kerberos keytabfiles, and X.509 certificates.
You can directly upload credential files to Oracle Key Vault, consolidate them in a centralrepository, and share them across endpoints in a trusted group. Oracle Key Vault backs up allcredential files for continued and secure access at any time. Access control to credential filesis managed by Oracle Key Vault endpoint administrators.
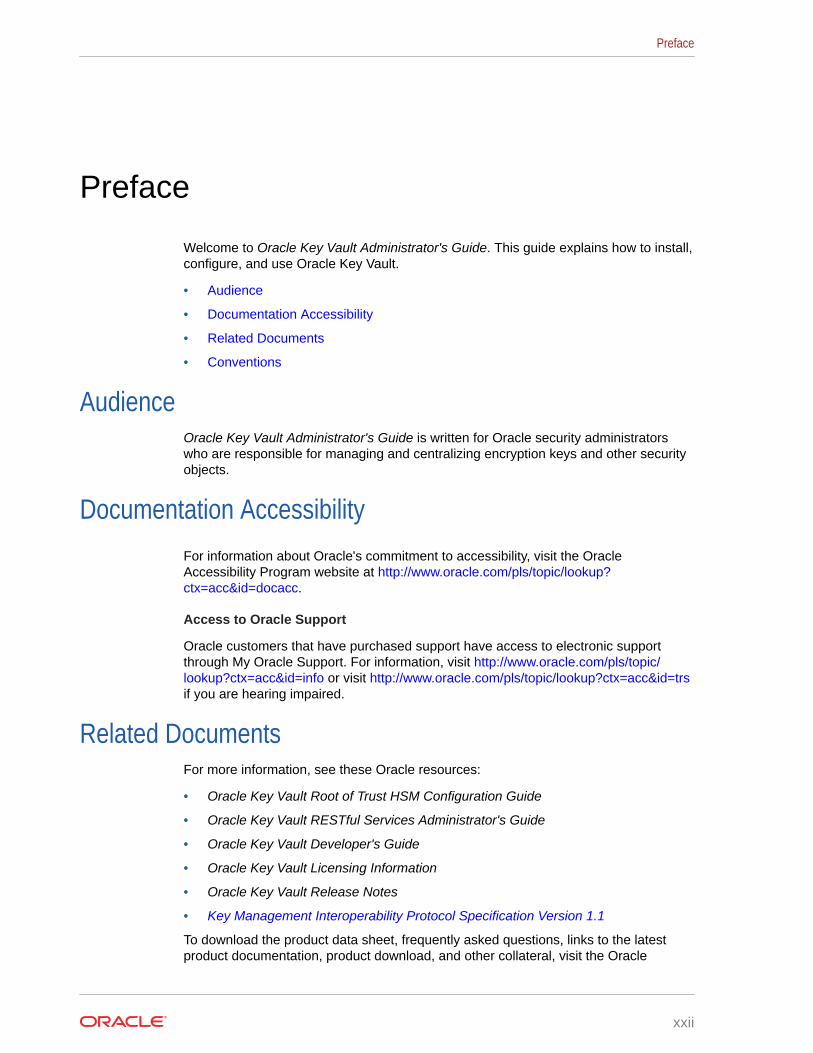
The following figure illustrates how credential files are backed up in Oracle Key Vault.
Figure 1-4 Backing Up Credential Files
Uploadand download
over TLS
Server Endpoints
Kerberos
PasswordFiles
SSH Keys
Oracle KeyVault
- Credential files
- Cluster- Primary & Standby- Standalone
Related Topics
• Uploading and Downloading Credential FilesThe okvutil upload and okvutil download commands can upload and downloadcredential files.
1.3.4 Online Management of Endpoint Keys and Secret DataYou can use the RESTful key management interface to manage the storage and retrieval ofkeys.
Applications, scripts, and third-party software can use the new interfaces to manage theirkeys and secrets in the Oracle Key Vault. They can retrieve the secrets or keys at run timeand also generate and store new secrets or keys in Oracle Key Vault at run time. All objectsmanaged by the user or operations executed by the user using the RESTful utility have the
Chapter 1Oracle Key Vault Use Cases
1-7
same security and availability attributes and the same access control as those createdby other Oracle Key Vault endpoint utilities such as okvutil.
1.4 Who Should Use Oracle Key VaultOracle Key Vault is designed for users who are responsible for deploying, maintaining,and managing security within the enterprise.
These users can be database, system, or security administrators, indeed anyinformation security personnel responsible for protecting enterprise data in databaseservers, application servers, operating systems, and other information systems. Theymanage encryption keys, Oracle wallets, Java keystores, and other security objects ona regular basis.
Other users can include personnel responsible for Oracle databases, and servers thatinteract with Oracle Database, because Oracle Key Vault provides inherently tighterintegration with Oracle database. These systems often deploy encryption on a largescale and may have a need to simplify key and wallet management.
1.5 Major Features of Oracle Key VaultOracle Key Vault enhances security in key management with a wide range of featuresthat support different database deployments.
• Centralized Storage and Management of Security ObjectsYou can store and manage security objects, such as TDE master encryption keys,wallets and keystores, and certificates, using Oracle Key Vault.
• Management of Key LifecycleThe management of the key lifecycle is critical for maintaining security andregulatory compliance, and consists of creation, backup, rotation, and expiration.
• Reporting and AlertsOracle Key Vault provides reports and alerts to track system activity in depth.
• Separation of Duties for Oracle Key Vault UsersOracle Key Vault provides for separation of duties in the form of three console userroles and four endpoint privileges.
• Persistent Master Encryption Key CacheThe persistent master encryption key cache feature of the endpoint softwareenables databases to operate when the Oracle Key Vault server is unavailable.
• Backup and Restore Functionality for Security ObjectsOracle Key Vault enables you to back up all security objects including keys,certificates, and passwords.
• Management of Oracle Key Vault Using RESTful ServiceYou can use Oracle Key Vault RESTful services to automate many of theconfiguration, deployment, and administration tasks at scale.
• Support for OASIS Key Management Interoperability Protocol (KMIP)You can use Oracle Key Vault with a range of OASIS KMIP Version 1.1 profiles.
• Database Release and Platform SupportOracle Key Vault supports both full Oracle Database releases and bundle patchesof Oracle Database.
Chapter 1Who Should Use Oracle Key Vault
1-8
• Integration with External Audit and Monitoring ServicesYou can use Oracle Key Vault with Oracle Audit Vault and Database Firewall and SimpleNetwork Management Protocol (SNMP).
• Integration of MySQL with Oracle Key VaultOracle Key Vault can manage MySQL TDE encryption keys.
• Automatic Storage Management Cluster File System (ACFS) EncryptionOracle Key Vault supports key management for Automatic Storage Management (ASM)cluster file system (ACFS) encryption.
• Support for Oracle Cloud Database as a Service EndpointsAn Oracle Key Vault on-premises server can manage Transparent Data Encryption (TDE)master encryption keys for Oracle Cloud Database as a Service instance.
• Oracle Key Vault Hardware Security Module IntegrationOracle Key Vault can use a hardware security module (HSM) as a Root of Trust (RoT)that protects encryption keys.
• Support for a Primary-Standby EnvironmentTo ensure that Oracle Key Vault can always access security objects, you can deployOracle Key Vault in a primary-standby (highly available) configuration.
Related Topics
• Benefits of Oracle Key Vault Multi-Master ClusteringThe Oracle Key Vault multi-master cluster configuration addresses high availability betterthan primary-standby environments.
1.5.1 Centralized Storage and Management of Security ObjectsYou can store and manage security objects, such as TDE master encryption keys, walletsand keystores, and certificates, using Oracle Key Vault.
• TDE master encryption keys
For Oracle databases that use Transparent Data Encryption (TDE), Oracle Key Vaultmanages master encryption keys over a direct network connection using an onlinemaster encryption key as an alternative to using local wallet files. The keys stored inOracle Key Vault can be shared across databases according to endpoint access controlsettings. This method of sharing keys without local wallet copies is useful when TDE isrunning on database clusters such as Oracle Real Application Clusters (Oracle RAC),Oracle Data Guard, or Oracle GoldenGate. You can easily migrate master encryptionkeys from Oracle wallets to Oracle Key Vault. Direct connections between TDE andOracle Key Vault are supported for Oracle Database 11g release 2 or later.
• Oracle wallets and Java keystores
Oracle wallets and Java keystores are often widely distributed across servers and serverclusters, with backup and distribution of these files performed manually. Oracle Key Vaultitemizes and stores contents of these files in a master repository, yet allows serverendpoints to continue operating with their local copies, while being disconnected fromOracle Key Vault. After you have archived wallets and keystores, you can recover themto their servers if their local copies are mistakenly deleted or their passwords areforgotten. Oracle Key Vault streamlines the sharing of wallets across database clusterssuch as Oracle RAC, Oracle Active Data Guard, and Oracle GoldenGate. Sharing walletsalso facilitates the movement of encrypted data using Oracle Data Pump and thetransportable tablespaces feature of Oracle Database, or when migrating (unplugging orplugging) a PDB. You can use Oracle Key Vault with Oracle wallets from all supportedreleases of Oracle middleware products and Oracle Database.
Chapter 1Major Features of Oracle Key Vault
1-9
• Credential files
Applications store keys, passwords, and other types of sensitive information incredential files that are often widely distributed without appropriate protectivemechanisms. Secure Shell (SSH) key files and Kerberos keytabs are examples ofcredential files. Oracle Key Vault backs up credential files for long-term retentionand recovery, audits access to them, and shares them across trusted serverendpoints.
• Certificate files
X.509 certificate files (common file extensionsinclude .pem, .cer, .crt, .der, .p12) used to authenticate and validate useridentities and encrypt data on communication channels may also be stored,shared, and managed in Oracle Key Vault.
1.5.2 Management of Key LifecycleThe management of the key lifecycle is critical for maintaining security and regulatorycompliance, and consists of creation, backup, rotation, and expiration.
Oracle Key Vault provides mechanisms for facilitating periodic key rotations, backup,and recovery, which ensure that you can stay in regulatory compliance, unlike othersystems that create keys and passwords. You can create policies to track the keylifecycle, and configure Oracle Key Vault to report key lifecycle changes as theyhappen. In this manner, you will know when keys are due to expire, and can ensurethat they are properly rotated and backed up.
Key lifecycle tracking is very important to maintain compliance with industry andgovernmental standards, such as the Payment Card Industry Data Security Standard(PCI DSS), which deal with highly sensitive data, and therefore have stringentrequirements regarding the maximum lifetime of encryption keys and passwords.
1.5.3 Reporting and AlertsOracle Key Vault provides reports and alerts to track system activity in depth.
• Reports
The Oracle Key Vault audit and management reports provide detailed statistics onsystem, user, and endpoint activity, certificate, key and password expiry,entitlement and metadata of security objects. Audit reports capture all user andendpoint actions, the objects of the actions, and their final result.
• Alerts
You can configure the types of alerts that you want to receive. These include alertsfor the expiration of keys, endpoint certificates, and user passwords, diskutilization, system backup, and primary-standby events. You can choose to sendalerts to syslog to allow for external monitoring.
1.5.4 Separation of Duties for Oracle Key Vault UsersOracle Key Vault provides for separation of duties in the form of three console userroles and four endpoint privileges.
Chapter 1Major Features of Oracle Key Vault
1-10
The roles are System Administrator, Key Administrator, and Audit Manager. The endpointprivileges are Create Endpoint, Manage Endpoint, Create Endpoint Group, and ManageEndpoint Group.
Each user role possesses privileges for a type of task and may be assigned to one user (for astrict separation of duties) or combined so a single user performs multiple user rolesaccording to the needs of the organization.
The user who is responsible for uploading and downloading security objects between OracleKey Vault and the endpoint is referred to as the endpoint administrator. Only endpointadministrators can directly access security objects provided they have been granted accessand only through installing the endpoint software. You cannot retrieve security objects usingthe Oracle Key Vault management console.
Related Topics
• Administrative Roles and Endpoint Privileges within Oracle Key VaultOracle Key Vault provides separation of duty compliant administrative roles andprivileges that you can combine in various ways to meet enterprise needs.
1.5.5 Persistent Master Encryption Key CacheThe persistent master encryption key cache feature of the endpoint software enablesdatabases to operate when the Oracle Key Vault server is unavailable.
The TDE master encryption key is cached in the persistent master encryption key cache inaddition to the in-memory cache, to make the master encryption key available acrossdatabase processes. It eliminates the need for databases to contact the Oracle Key Vaultserver for every new process, redo log switch, or database start-up operations.
The persistent master encryption key cache is not necessary in a multi-master clusterdeployment. It is primarily used for standalone or primary-standby Oracle Key Vaultdeployments.
Related Topics
• Using the Persistent Master Encryption Key CacheThe persistent master encryption key cache feature enables databases to be operationalwhen the Oracle Key Vault server is unavailable.
1.5.6 Backup and Restore Functionality for Security ObjectsOracle Key Vault enables you to back up all security objects including keys, certificates, andpasswords.
It encrypts backups for better protection of the sensitive keys and security objects andsupports storing them securely at a remote destination.
This feature prevents loss of your sensitive data in the case of server failure, because youcan restore a new Oracle Key Vault server to a previous state from a backup.
Oracle Key Vault can transfer backup files to any remote location that implements the SecureCopy Protocol (SCP) or SSH Secure File Transfer Protocol (SFTP).
Users with the System Administrator role can perform the following backup and restore tasksin Oracle Key Vault:
• Managing incremental and full backups
Chapter 1Major Features of Oracle Key Vault
1-11
• Creating, deleting, and modifying remote backup locations
• Setting up, modifying, or disabling the current backup schedule
• Initiating an immediate one-time backup
• Scheduling a future one-time backup
Oracle Key Vault performs hot backup operation which means that the system is notinterrupted while the backup is being created.
Related Topics
• Support for SFTP to Transfer External BackupsOracle Key Vault now supports the use of SSH Secure File Transfer Protocol(SFTP) for the transfer of (scheduled) external backups to remote backupdestinations.
• Backup and Restore OperationsYou may configure automatic backups for continuous, reliable, and protectedaccess to security objects with minimum downtime.
1.5.7 Management of Oracle Key Vault Using RESTful ServiceYou can use Oracle Key Vault RESTful services to automate many of theconfiguration, deployment, and administration tasks at scale.
A large distributed enterprise deployment often requires automation through scriptingto enable mass endpoint deployments, apply configuration changes, and performroutine management operations. The Oracle Key Vault RESTful services utility enablesyou perform all of these tasks in a way that facilitates faster deployment with lesshuman intervention. You can use Oracle Key Vault RESTful services to automate themanagement of endpoints, wallets, access control, deployment operations, andbackup operations at scale.
The Oracle Key Vault RESTful services utility also enables the automation of most keymanagement functions at scale by providing a simplified interface to Key ManagementInteroperability Protocol (KMIP) operations. The RESTful services utility allowsoperations on managed objects such as keys, certificates, and other objects in asimple manner without requiring any client side development.
Related Topics
• Oracle Key Vault RESTful Services Administrator's Guide
1.5.8 Support for OASIS Key Management Interoperability Protocol(KMIP)
You can use Oracle Key Vault with a range of OASIS KMIP Version 1.1 profiles.
OASIS Key Management Interoperability Protocol (KMIP) standardizes keymanagement operations between key management servers and endpoints provided bydifferent vendors.
Oracle Key Vault implements the following OASIS KMIP Version 1.1 profiles:
• Basic Discover Versions Server Profile: Provides the server version toendpoints.
Chapter 1Major Features of Oracle Key Vault
1-12
• Basic Baseline Server KMIP Profile: Provides core functionality to retrieve objects fromthe server.
• Basic Secret Data Server KMIP Profile: Provides endpoints the ability to create, store,and retrieve secret data (typically passwords) on the server.
• Basic Symmetric Key Store and Server KMIP Profile: Provides endpoints the ability tostore and retrieve symmetric encryption keys on the server.
• Basic Symmetric Key Foundry and Server KMIP Profile: Provides endpoints theability to create new symmetric encryption keys on the server.
Related Topics
• Key Management Interoperability Protocol Specification Version 1.1
1.5.9 Database Release and Platform SupportOracle Key Vault supports both full Oracle Database releases and bundle patches of OracleDatabase.
Oracle Key Vault supports Oracle Database releases 11g release 2 or later on Oracle Linuxx86-64, Solaris, AIX, and HP-UX (IA) as endpoints without patching. Oracle Key Vault alsosupports the bundle patches of Oracle Database release 11g release 2 and 12c release 1(12.1.0.2) or later on Windows Server 2012.
Related Topics
• Oracle Key Vault Installation RequirementsThe Oracle Key Vault installation requirements cover system requirements such as CPU,memory, disk space, network interfaces, and supported endpoint platforms.
1.5.10 Integration with External Audit and Monitoring ServicesYou can use Oracle Key Vault with Oracle Audit Vault and Database Firewall and SimpleNetwork Management Protocol (SNMP).
Oracle Key Vault supports integration with Oracle Audit Vault and Database Firewall forcentral storage of audit records generated. Oracle Key Vault also supports use of SNMPversion 3 to monitor the health and availability of the system.
1.5.11 Integration of MySQL with Oracle Key VaultOracle Key Vault can manage MySQL TDE encryption keys.
Note:
MySQL Windows databases are not supported.
Related Topics
• MySQL Integration with Oracle Key VaultYou can manage TDE encryption keys in MySQL with Oracle Key Vault.
Chapter 1Major Features of Oracle Key Vault
1-13
1.5.12 Automatic Storage Management Cluster File System (ACFS)Encryption
Oracle Key Vault supports key management for Automatic Storage Management(ASM) cluster file system (ACFS) encryption.
1.5.13 Support for Oracle Cloud Database as a Service EndpointsAn Oracle Key Vault on-premises server can manage Transparent Data Encryption(TDE) master encryption keys for Oracle Cloud Database as a Service instance.
Related Topics
• Oracle Database Instances in Oracle Cloud InfrastructureOracle Key Vault deployed on-premises can manage the TDE master encryptionkeys for Oracle Database instances running in Oracle Cloud Infrastructure (OCI).
1.5.14 Oracle Key Vault Hardware Security Module IntegrationOracle Key Vault can use a hardware security module (HSM) as a Root of Trust (RoT)that protects encryption keys.
HSMs are built with specialized tamper-resistant hardware which is harder to accessthan normal servers. This protects the RoT and makes it difficult to extract, loweringthe risk of compromise. In addition, you can use HSMs in FIPS 140-2 Level 3 modewhich can help meet certain compliance requirements.
Related Topics
• Oracle Key Vault Root of Trust HSM Configuration Guide
1.5.15 Support for a Primary-Standby EnvironmentTo ensure that Oracle Key Vault can always access security objects, you can deployOracle Key Vault in a primary-standby (highly available) configuration.
This configuration also supports disaster recovery scenarios.
You can deploy two Oracle Key Vault servers in a primary-standby configuration. Theprimary server services the requests that come from endpoints. If the primary serverfails, then the standby server takes over after a configurable preset delay. Thisconfigurable delay ensures that the standby server does not take over prematurely incase of short communication gaps.
The primary-standby configuration was previously known as the high availabilityconfiguration. The primary-standby configuration and the multi-master clusterconfiguration are mutually exclusive.
Oracle Key Vault supports primary-standby read-only restricted mode. When theprimary server is affected by server, hardware, or network failures, primary-standbyread-only restricted mode ensures that an Oracle Key Vault server is available toservice endpoints, thus ensuring operational continuity. However, key and sensitiveoperations, such as generation of keys are disabled, while operations such asgeneration of audit logs are unaffected.
Chapter 1Major Features of Oracle Key Vault
1-14
When an unplanned shutdown makes the standby server unreachable, the primary server isstill available to the endpoints in read-only mode.
Related Topics
• About the Oracle Key Vault Primary-Standby ConfigurationYou configure a primary-standby environment by providing the primary and standbyservers with each other's IP address and certificate, and then pairing them.
1.6 Oracle Key Vault InterfacesOracle Key Vault provides both a graphical user interface and command-line interfaces.
• Oracle Key Vault Management ConsoleThe Oracle Key Vault management console is a browser-based graphical user interfacethat Key Vault administrators use to perform day-to-day tasks.
• Oracle Key Vault okvutil Endpoint UtilityEndpoint administrators can use the okvutil command-line utility to upload anddownload security objects between Oracle Key Vault and endpoints.
• Oracle Key Vault RESTful ServicesYou can use the Oracle Key Vault RESTful Services utility to automate processes for alarge distributed enterprise deployment.
• Oracle Key Vault Client SDK
1.6.1 Oracle Key Vault Management ConsoleThe Oracle Key Vault management console is a browser-based graphical user interface thatKey Vault administrators use to perform day-to-day tasks.
It enables Oracle Key Vault administrators to manage keys and sensitive objects, wallets,endpoints, and users. The console can also configure settings for individual Oracle Key Vaultservers, as well as multi-master clusters, primary-standby environments, backup, andrecovery.
Related Topics
• Logging In to the Oracle Key Vault Management ConsoleTo use Oracle Key Vault, you can log in to the Oracle Key Vault management console.
1.6.2 Oracle Key Vault okvutil Endpoint UtilityEndpoint administrators can use the okvutil command-line utility to upload and downloadsecurity objects between Oracle Key Vault and endpoints.
The okvutil utility communicates with Oracle Key Vault over a mutually authenticated secureconnection.
Related Topics
• Oracle Key Vault okvutil Endpoint Utility ReferenceThe okvutil utility enables you to perform tasks uploading and downloading securityobjects.
Chapter 1Oracle Key Vault Interfaces
1-15
1.6.3 Oracle Key Vault RESTful ServicesYou can use the Oracle Key Vault RESTful Services utility to automate processes for alarge distributed enterprise deployment.
This utility enables you to automate the management of endpoints, wallets, securityobjects, deployment operations, and backup operations using RESTful services thatare JSON compliant.
Related Topics
• Oracle Key Vault RESTful Services Administrator's Guide
1.6.4 Oracle Key Vault Client SDK
Various Oracle and non-Oracle products can use the Oracle Key Vault client SDK tointegrate directly with Oracle Key Vault.
The client SDK is available in both Java and C. It has a comprehensive set of high-level and low-level APIs and sample programs.
Related Topics
• Oracle Key Vault Developer's Guide
1.7 Overview of an Oracle Key Vault DeploymentThere are three different Oracle Key Vault deployment options.
• A multi-master cluster configuration allows for up to 16 nodes and isrecommended for deployments requiring high availability. This is therecommended deployment.
• A standalone deployment is simplest to deploy. However, it does not providecontinuous availability of the key service in the event an Oracle Key Vault serverbecomes unavailable.
• A primary-standby configuration enables the deployment of a second Oracle KeyVault server as a passive standby to an active primary server. If a primary serverbecomes unavailable, then the standby server becomes the new primary OracleKey Vault server to service read and write requests from the endpoints. This is thehigh availability mode that was introduced in Oracle Key Vault release 12.2.
You can use the following steps as a guideline to deploying Oracle Key Vault withinyour organization:
1. Understand important concepts described in Oracle Key Vault Concepts and Oracle Key Vault Multi-Master Cluster Concepts.
2. Install and configure Oracle Key Vault as described in Oracle Key Vault Installationand Configuration.
3. Create a multi-master cluster by adding up to 16 Oracle Key Vault servers formaximum redundancy and reliability. This is described in Managing Oracle KeyVault Multi-Master Clusters.
You must have a separate license for each Oracle Key Vault server installation in amulti-master cluster environment.
Chapter 1Overview of an Oracle Key Vault Deployment
1-16
4. As an alternative to a multi-master cluster deployment, create a primary-standbyconfiguration by adding a second Oracle Key Vault server. Enable primary-standby read-only restricted mode to ensure operational continuity of the endpoints. This is describedin Managing an Oracle Key Vault Primary-Standby Configuration.
You must have a separate license for each Oracle Key Vault server installation in aprimary-standby environment.
5. Create users to manage the day-to-day tasks for Oracle Key Vault as described in Managing Oracle Key Vault Users .
6. Register endpoints so that they can use Oracle Key Vault to store and manage theirsecurity objects described in Managing Oracle Key Vault Endpoints.
7. Register endpoints in the cloud described in Oracle Database Instances in Oracle CloudInfrastructure.
8. Enroll endpoints so that you can upload or download security objects between theendpoints and Oracle Key Vault described in Enrolling and Upgrading Endpoints forOracle Key Vault .
9. Upload or add virtual wallets to Oracle Key Vault described in Managing Oracle Key VaultMaster Encryption Keys.
10. Use automating endpoint enrollment and provisioning for large-scale deployments in Oracle Key Vault RESTful Services Administrator's Guide .
11. Read about using Oracle Key Vault with other features, such as Oracle GoldenGate, in Managing Keys for Oracle Products.
12. Automate key management to perform online key management with other software usingRESTful services and client SDK, as described in Oracle Key Vault RESTful ServicesAdministrator's Guide .
13. Learn how to perform periodic maintenance tasks such as administering and monitoringthe system, as described in Oracle Key Vault General System Administration.
14. Learn how to monitor Oracle Key Vault by performing tasks such as creating alerts, asdescribed in Monitoring and Auditing Oracle Key Vault.
Chapter 1Overview of an Oracle Key Vault Deployment
1-17
2Oracle Key Vault Concepts
To successfully deploy Oracle Key Vault, you must understand the deployment architecture,use cases, access control, administrative roles, and endpoints.
• Overview of Oracle Key Vault ConceptsEndpoints are computer systems such as database and application servers, and otherinformation systems where keys and credentials access data.
• Oracle Key Vault Deployment ArchitectureOracle Key Vault is packaged as a software appliance preconfigured with an operatingsystem, a database, and the Oracle Key Vault application.
• Access Control ConfigurationOracle Key Vault enables you to control access to security objects at various accesslevels.
• Administrative Roles and Endpoint Privileges within Oracle Key VaultOracle Key Vault provides separation of duty compliant administrative roles andprivileges that you can combine in various ways to meet enterprise needs.
• Naming Guidelines for ObjectsThe naming guidelines affect the following Oracle Key Vault objects: users, user groups,endpoints, endpoint groups, and virtual wallets.
• Emergency System Recovery ProcessDuring installation, you will be required to create a special recovery passphrase thatOracle Key Vault uses to recover from emergency situations.
• Root and Support User AccountsBoth the root and support user accounts are used with the command-line interface.
• Endpoint AdministratorsAn endpoint administrator owns and manages endpoints, which are entities such asOracle databases that use Oracle Key Vault.
• FIPS ModeFIPS mode enables Oracle Key Vault to adhere to FIPS 140-2 compliance.
2.1 Overview of Oracle Key Vault ConceptsEndpoints are computer systems such as database and application servers, and otherinformation systems where keys and credentials access data.
These endpoint systems must store and manage their encryption keys and secrets efficiently,so that data is secure, accessible, and available to meet the day-to-day activities of theenterprise. Endpoints with pre-existing keys, or the capability to generate them, can useOracle Key Vault as secure, external, long-term storage.
You must register and enroll an endpoint so that it can communicate with Oracle Key Vault.Enrolled endpoints can upload their keys, share them with other endpoints, and downloadthem to access their data. Oracle Key Vault keeps track of all enrolled endpoints.
2-1
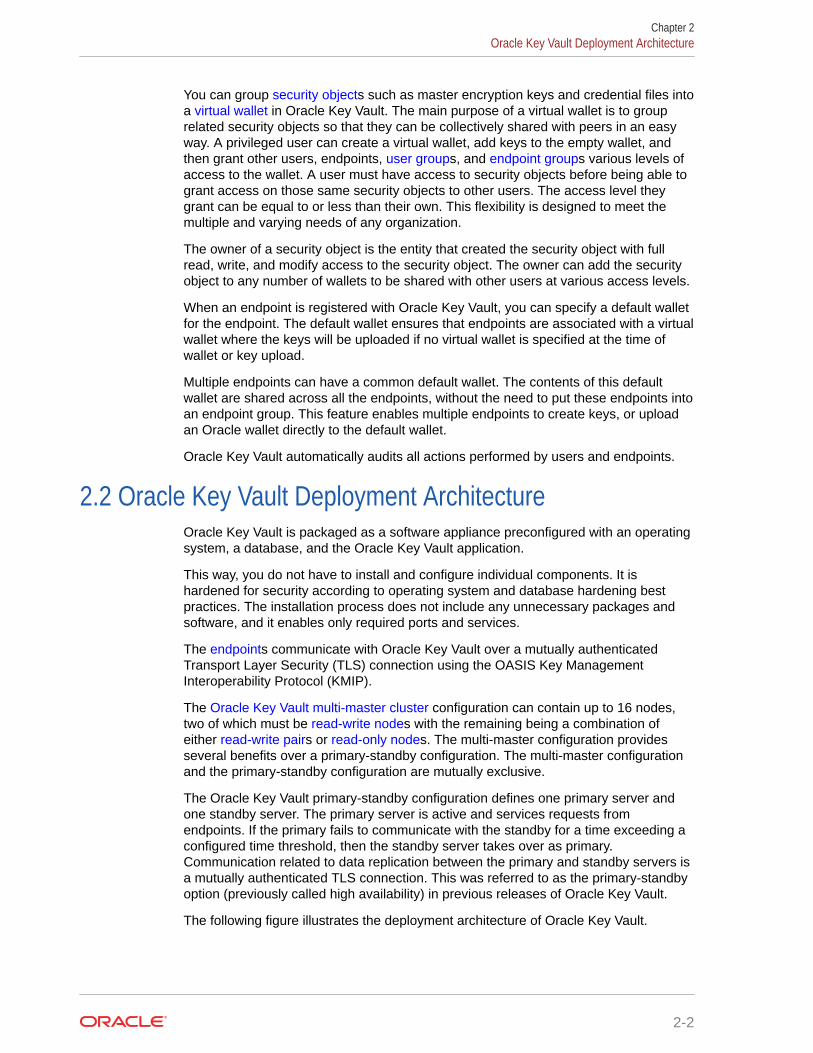
You can group security objects such as master encryption keys and credential files intoa virtual wallet in Oracle Key Vault. The main purpose of a virtual wallet is to grouprelated security objects so that they can be collectively shared with peers in an easyway. A privileged user can create a virtual wallet, add keys to the empty wallet, andthen grant other users, endpoints, user groups, and endpoint groups various levels ofaccess to the wallet. A user must have access to security objects before being able togrant access on those same security objects to other users. The access level theygrant can be equal to or less than their own. This flexibility is designed to meet themultiple and varying needs of any organization.
The owner of a security object is the entity that created the security object with fullread, write, and modify access to the security object. The owner can add the securityobject to any number of wallets to be shared with other users at various access levels.
When an endpoint is registered with Oracle Key Vault, you can specify a default walletfor the endpoint. The default wallet ensures that endpoints are associated with a virtualwallet where the keys will be uploaded if no virtual wallet is specified at the time ofwallet or key upload.
Multiple endpoints can have a common default wallet. The contents of this defaultwallet are shared across all the endpoints, without the need to put these endpoints intoan endpoint group. This feature enables multiple endpoints to create keys, or uploadan Oracle wallet directly to the default wallet.
Oracle Key Vault automatically audits all actions performed by users and endpoints.
2.2 Oracle Key Vault Deployment ArchitectureOracle Key Vault is packaged as a software appliance preconfigured with an operatingsystem, a database, and the Oracle Key Vault application.
This way, you do not have to install and configure individual components. It ishardened for security according to operating system and database hardening bestpractices. The installation process does not include any unnecessary packages andsoftware, and it enables only required ports and services.
The endpoints communicate with Oracle Key Vault over a mutually authenticatedTransport Layer Security (TLS) connection using the OASIS Key ManagementInteroperability Protocol (KMIP).
The Oracle Key Vault multi-master cluster configuration can contain up to 16 nodes,two of which must be read-write nodes with the remaining being a combination ofeither read-write pairs or read-only nodes. The multi-master configuration providesseveral benefits over a primary-standby configuration. The multi-master configurationand the primary-standby configuration are mutually exclusive.
The Oracle Key Vault primary-standby configuration defines one primary server andone standby server. The primary server is active and services requests fromendpoints. If the primary fails to communicate with the standby for a time exceeding aconfigured time threshold, then the standby server takes over as primary.Communication related to data replication between the primary and standby servers isa mutually authenticated TLS connection. This was referred to as the primary-standbyoption (previously called high availability) in previous releases of Oracle Key Vault.
The following figure illustrates the deployment architecture of Oracle Key Vault.
Chapter 2Oracle Key Vault Deployment Architecture
2-2
Figure 2-1 Oracle Key Vault Deployment Architecture
Oracle KeyVault
ManagementConsole
Remote BackupLocation
Endpoint Utility (okvutil)
For backup / restore of credential files and wallets
Endpoint Library
PKCS#11 KMIP for TDE Direct Connection
Endpoint
3rd party KMIP clientDB & other clients
KMIP over TLS
HTTPS
SCP
- Cluster- Primary & Standby- Standalone
For multiple geographically distributed data centers with high load and extreme availabilityrequirements, you should deploy Oracle Key Vault in a multi-master cluster configuration. Theread-write pairs should span data centers. For single data centers where data does not leavethe data center, consider using a 2-node cluster deployment (one read-write pair) of OracleKey Vault, instead of a primary-standby deployment. It provides better resource utilization (noidle standby server) and is the ideal platform for a growing Oracle Key Vault cluster in casethe demand increases over time. A standalone deployment of Oracle Key Vault is useful fortesting and development environments.
Related Topics
• Oracle Key Vault Multi-Master Cluster OverviewThe multi-master cluster nodes provide high availability, disaster recovery, loaddistribution, and geographic distribution to an Oracle Key Vault environment.
• Benefits of an Oracle Key Vault Primary-Standby ConfigurationThe benefits of an Oracle Key Vault primary-standby configuration include highavailability, necessary for business-critical operations.
2.3 Access Control ConfigurationOracle Key Vault enables you to control access to security objects at various access levels.
• About Access Control ConfigurationYou can grant users access to security objects in Oracle Key Vault at a level appropriateto their function in the organization.
• Access GrantsYou can grant access to virtual wallets directly or indirectly.
• Access Control OptionsAccess control options enable you to set the type of privileges that users have to read,write, and delete security objects.
2.3.1 About Access Control ConfigurationYou can grant users access to security objects in Oracle Key Vault at a level appropriate totheir function in the organization.
Chapter 2Access Control Configuration
2-3
You can set access control on security objects individually, or collectively when yougroup them into a virtual wallet. Oracle Key Vault uses a virtual wallet to share a set ofsecurity objects with others. You can set access levels on a virtual wallet for an endpoint or user, thus granting simultaneous access to all the security objectscontained within the virtual wallet.
In addition to being able to grant access to users or endpoints individually, you cancollectively grant access by using user groups or endpoint groups. If multipleendpoints need access to a virtual wallet, it is simpler to add these endpoints to anendpoint group, and grant the endpoint group access to the virtual wallet. Thealternative is to grant access to each endpoint individually. When you grant anendpoint group access to a virtual wallet, you are granting access to all the memberendpoints in the endpoint group .
2.3.2 Access GrantsYou can grant access to virtual wallets directly or indirectly.
• Grant users and endpoints access directly.
• Grant users and endpoints groups access indirectly through a group membership.When you grant a user or endpoint group access, you are granting all members ofthe group access. This is a convenient alternative to individually granting eachuser or endpoint access.
From the Oracle Key Vault management console, you can grant access mappings on avirtual wallet in the following two ways:
• From the user, endpoint, or their respective groups. You can start at the user,endpoint, or respective group and add the wallet and access mappings for thisuser.
• From the virtual wallet. You can start from the virtual wallet and add users,endpoints, and their respective groups that can access it at access mappings thatyou set.
Related Topics
• Granting Access to Users, User Groups, Endpoints, and Endpoint GroupsYou can grant the Read Only, Read and Modify, and Manage Wallet accesslevels to users, user groups, endpoints, and endpoint groups.
• Granting an Endpoint Access to a Virtual WalletAn endpoint must have the Read and Modify and Manage Wallet privileges on thewallet before security objects can be uploaded or downloaded.
• Granting a User Group Access to a Virtual WalletYou can modify the access level to a virtual wallet for a user group as functionalneeds change.
2.3.3 Access Control OptionsAccess control options enable you to set the type of privileges that users have to read,write, and delete security objects.
You can control access to virtual wallets by setting different access levels for users,user groups, endpoints, and endpoint groups corresponding to their role and functionin the organization.
Chapter 2Access Control Configuration
2-4
There are three access levels:
• Read Only grants read privileges on the security object.
• Read and Modify grants read and modify privileges on the security object.
• Manage Wallet grants the following privileges:
– Adding or removing security objects from the virtual wallet. The user must have Readand Modify access on the security object to be added to the virtual wallet.
– Granting others access to the wallet
– Modifying wallet settings, such as its description
– Deleting the wallet
2.4 Administrative Roles and Endpoint Privileges within OracleKey Vault
Oracle Key Vault provides separation of duty compliant administrative roles and privilegesthat you can combine in various ways to meet enterprise needs.
• Separation of Duties in Oracle Key VaultWhen you grant the Oracle Key Vault roles and system privileges to users, ensure thatyou adhere to separation of duty guidelines.
• Administrative RolesThe Oracle Key Vault administrative roles are System Administrator, Key Administrator,and Audit Manager.
• Endpoint PrivilegesOracle Key Vault provides privileges for creating and managing endpoints and endpointgroups.
2.4.1 Separation of Duties in Oracle Key VaultWhen you grant the Oracle Key Vault roles and system privileges to users, ensure that youadhere to separation of duty guidelines.
Oracle Key Vault users can be assigned the administrative roles by function, so there is aclear separation of duties between the System Administrator role, the Key Administrator Role,and the Audit Manager role. The Create Endpoint, Manage Endpoint, Create Endpoint Group,and Manage Endpoint Group privileges enable users to manage a subset of endpoints orendpoint groups without requiring these users to be granted more powerful administrativeroles. You also can create users that have no administrative privileges.
In a strict separation of duties environment, different users are responsible for differentfunctions. For example, for endpoints, the operations to manage an endpoint and grantpermissions to the endpoint must be done by different users. Only users with SystemAdministrator role or Manage Endpoint privilege can enroll an endpoint and only users withKey Administrator role or Manage Endpoint Group privilege can add an endpoint to theendpoint group.
You can achieve a separation of duties in two ways:
• For each person who has been granted a role or a privilege, grant them the appropriateprivileges for the functional area that they manage. For example, grant the System
Chapter 2Administrative Roles and Endpoint Privileges within Oracle Key Vault
2-5
Administrator role for system-related tasks such user, backup/recovery, andendpoint management; the Key Administrator role to manage encryption keys,wallets, and endpoint groups (within the Oracle Key Vault interface); and the AuditManager role to manage auditing-related tasks.
• Grant a user access to one object or function independently of all others using afine-grained division of access control. For example, grant the Manage Endpointprivilege and Manage Endpoint Group privileges to different users based on theirarea of responsibility. These users do not need to have any of the administrativeroles to perform their function.
You should ensure that every user who interacts with Oracle Key Vault has their ownunique user account and password. Because the System Administrator and KeyAdministrator roles are powerful, also ensure that these users are trustworthy and thatthey are knowledgeable about the areas that they manage.
2.4.2 Administrative RolesThe Oracle Key Vault administrative roles are System Administrator, KeyAdministrator, and Audit Manager.
• About Administrative Roles in Oracle Key VaultOracle Key Vault provides the System Administrator, Key Administrator, and AuditManager roles.
• System Administrator Role DutiesThe Oracle Key Vault System Administrator is responsible for general system-related tasks.
• Key Administrator Role DutiesThe Oracle Key Vault Key Administrator is responsible for managing securityobjects.
• Audit Manager Role DutiesThe Oracle Key Vault Audit Manager is responsible for audit-related tasks.
2.4.2.1 About Administrative Roles in Oracle Key VaultOracle Key Vault provides the System Administrator, Key Administrator, and AuditManager roles.
• System Administrator role provides privileges for creating and managing users,creating and managing endpoints, configuring system settings and alerts, andgenerally administering Oracle Key Vault. This is the most powerful role.
• Key Administrator role provides privileges for managing the key life cycle andcontrolling access to all security objects in Oracle Key Vault.
• Audit Manager role provides privileges for managing the audit life cycle and auditpolicies.
The System Administrator, Key Administrator, and Audit Manager roles are designedto be flexible to support various organizational needs and structures. Users who havethese roles can grant their roles to other users. If one administrative user is performingtwo administrative functions, then that user will have two roles in Oracle Key Vault.This user can grant other users one or both the roles as needed. For example, if auser has both the System Administrator and Key Administrator role, then he or she
Chapter 2Administrative Roles and Endpoint Privileges within Oracle Key Vault
2-6

can grant another user both those roles or just one, depending on the needs of theorganization.
One of the post-installation tasks is to create three administrative users for the threeadministrative roles. The installation process also prompts you to create a recoverypassphrase. In a situation where there is no administrative user present, you will use therecovery passphrase to repeat the post-installation configuration, and create threeadministrative users in order to ensure continued operation and management of Oracle KeyVault.
You can grant management privileges to a user for any endpoint regardless of whether theuser created the endpoint or the endpoint group. Another specific area that users can haveprivileges for is the management of virtual wallets. You can grant these users access to thevirtual wallet appropriate to their function within the organization, thus limiting access tosecurity objects to just those users who need it. In this manner, access to security objects iscontrolled, yet flexible to meet the evolving needs of the enterprise.
When you use the management console interface, your access to the various tabs, menus,and actions depends on your role and the objects that you have access to.
2.4.2.2 System Administrator Role DutiesThe Oracle Key Vault System Administrator is responsible for general system-related tasks.
• Creating and managing users
• Adding and managing endpoints (you also can grant privileges to individual regular usersto handle endpoints)
• Setting up the primary-standby servers
• Configuring alerts and key rotation reminders
• Scheduling backups
• Starting and stopping Oracle Key Vault
• Configuring SMTP server settings for email notification
• Enabling or disabling FIPS mode
• Configuring Oracle Key Vault to use a hardware security module
• Configuring SNMP for remote monitoring
• Enabling automated endpoint enrollment and key management through RESTfulServices
• Enabling audit consolidation with Audit Vault Database Firewall
• Creating SSH tunnels for Oracle Cloud Database as a Service endpoints
• Setting up a cluster
• Managing and monitoring a cluster
• Managing the cluster configuration
• Granting and revoking the System Administrator role to and from other users
• Granting and revoking the Create Endpoint and Manage Endpoint privileges to and fromother users
Chapter 2Administrative Roles and Endpoint Privileges within Oracle Key Vault
2-7
2.4.2.3 Key Administrator Role DutiesThe Oracle Key Vault Key Administrator is responsible for managing security objects.
• Managing the lifecycle of security objects
• Having full access on all virtual wallets and security objects
• Adding and managing endpoint groups (you also can grant privileges to individualregular users to handle endpoint groups)
• Controlling access to virtual wallets for users, endpoints, user groups, andendpoint groups
• Granting and revoking the Key Administrator role to and from other users
• Granting and revoking the Create Endpoint Group and Manage Endpoint Groupprivileges to and from other users
2.4.2.4 Audit Manager Role DutiesThe Oracle Key Vault Audit Manager is responsible for audit-related tasks.
• Managing the audit trail as the only user who has privileges to export or deleteOracle Key Vault audit records
• Having read access on all security objects
• Managing audit settings
• Granting the Audit Manager role to other users
2.4.3 Endpoint PrivilegesOracle Key Vault provides privileges for creating and managing endpoints andendpoint groups.
• About Endpoint Privileges in Oracle Key VaultOracle Key Vault provides fine-grained endpoint-management privileges thatenable users who do not have the System Administrator and Key Administratorroles to create and manage endpoints and endpoint groups.
• Create Endpoint Privilege Duties and ScopeThe Create Endpoint system privilege enables user to create an endpoint.
• Manage Endpoint Privilege Duties and ScopeThe Manage Endpoint object privilege on an endpoint enables a user to performall endpoint management operations on the endpoint.
• Create Endpoint Group Privilege Duties and ScopeThe Create Endpoint Group system privilege enables a user to create an endpointgroup.
• Manage Endpoint Group Privilege Duties and ScopeThe Manage Endpoint Group object privilege on an endpoint group enables a userto perform all endpoint group management operations on the endpoint group.
Chapter 2Administrative Roles and Endpoint Privileges within Oracle Key Vault
2-8
2.4.3.1 About Endpoint Privileges in Oracle Key VaultOracle Key Vault provides fine-grained endpoint-management privileges that enable userswho do not have the System Administrator and Key Administrator roles to create and manageendpoints and endpoint groups.
These privileges are as follows:
• Create Endpoint system privilege enables a user to create endpoints.
• Manage Endpoint object privilege object privilege on an endpoint enables a user toperform all endpoint management operations on the endpoint.
• Create Endpoint Group system privilege enables a user to create endpoint groups.
• Manage Endpoint Group object privilege object privilege on an endpoint groupenables a user to perform all endpoint group management operations on the endpointgroup.
Only users who have the System Administrator or Key Administrator role can performprivilege grants and revokes for the endpoint privileges, as follows:
• Create Endpoint and Manage Endpoint privileges: System Administrator role
• Create Endpoint Group and Manage Endpoint Group privileges: Key Administratorrole
The System Administrator and Key Administrator roles are powerful roles that enable userswith these roles to modify or delete any objects in Oracle Key Vault that belong to otherusers. The endpoint and endpoint group privileges enable you to allow regular users who donot have these roles to create and manage a specific set of endpoints and endpoint groups.These users cannot perform operations on other endpoints or endpoint groups that they arenot authorized to manage. These privileges help implement isolation among different sets ofendpoints and endpoint groups that are managed by different users. For example, one set ofusers can be responsible for managing all cloud database endpoints, and other users can beresponsible for managing all on-premises database endpoints.
These privileges are enforced when endpoint or endpoint group operations are executed fromeither the Oracle Key Vault management console or using Oracle Key Vault RESTful servicescommand-line interface.
2.4.3.2 Create Endpoint Privilege Duties and ScopeThe Create Endpoint system privilege enables user to create an endpoint.
When a user is granted the Create Endpoint privilege, Oracle Key Vault automatically grantsthe Manage Endpoint privilege to the user, unless the user already has the SystemAdministrator role. The grant of Manage Endpoint enables the user to perform managementoperations on the endpoint that the user created.
When the user creates the endpoint, Oracle Key Vault automatically grants the user theManage Endpoint privilege on this endpoint, which allows the user to manage the endpointsthat they created without requiring additional privilege grants. However, the user's ManageEndpoint privilege on this endpoint can be revoked later.
If this is the first endpoint that the user created, and if that user does not hold the ManageEndpoint privilege on any other endpoint, then this user should log out, and then log back intothe Oracle Key Vault management console session. Doing so enables the user to exercisethe Manage Endpoint privilege on that endpoint.
Chapter 2Administrative Roles and Endpoint Privileges within Oracle Key Vault
2-9
Who Can or Cannot Grant or Revoke the Create Endpoint Privilege?
Only a user who has the System Administrator role can grant or revoke the CreateEndpoint privilege. Users who have the Create Endpoint privilege cannot grant orrevoke this privilege to or from any user. A user can only be granted the CreateEndpoint privilege if that user does not have any administrative roles. When the userhas this privilege, the user cannot be granted any administrative roles.
How the Create Endpoint Privilege Works with the Manage Endpoint Privilege
Even though the Manage Endpoint privilege is automatically granted to a user who hasbeen granted the Create Endpoint privilege when this user creates an endpoint, theManage Endpoint privilege can be revoked from this user at any time, so that this useris restricted to creating endpoints only but not modifying or deleting them.
System Administrator Role and the Create Endpoint Privilege
As in previous releases, System Administrators can still create endpoints. If theSystem Administrator role is revoked from a user, then the user can no longer createany endpoint. The user, however, can now be granted Create Endpoint to enable theuser to create endpoints.
Revocation of the Create Endpoint Privilege
A revoke of the Create Endpoint privilege prevents the user from being able to createmore endpoints. Users cannot revoke the Create Endpoint privilege from themselves.The Create Endpoint privilege can be revoked from a user without affecting the user'sManage Endpoint privilege on one or more endpoints.
Deletion of Users Who Have Been Granted the Create Endpoint Privilege
The endpoint creator does not have perpetual ownership of the endpoint. The ManageEndpoint privilege on that endpoint granted to the endpoint's creator can be revoked,after which the endpoint creator cannot manage that endpoint anymore. Deletion of anendpoint's creator has no special significance other than the one that this user mayhave been granted the Manage Endpoint privilege at the time of the endpoint creation.If there are no other users with the Manage Endpoint privilege on that endpoint, thenthe System Administrator becomes responsible for managing that endpoint.
Related Topics
• Manage Endpoint Privilege Duties and ScopeThe Manage Endpoint object privilege on an endpoint enables a user to performall endpoint management operations on the endpoint.
2.4.3.3 Manage Endpoint Privilege Duties and ScopeThe Manage Endpoint object privilege on an endpoint enables a user to perform allendpoint management operations on the endpoint.
The user who has the Manage Endpoint privilege on an endpoint can perform thefollowing tasks:
• Perform all endpoint management operations (such as re-enroll, suspend, resume,or delete) on the endpoint.
• Set the default wallet of that endpoint if the user also has full access on the subjectwallet.
Chapter 2Administrative Roles and Endpoint Privileges within Oracle Key Vault
2-10
Who Can or Cannot Grant or Revoke the Manage Endpoint Privilege?
Only a user who has the System Administrator role can grant or revoke the Manage Endpointprivilege. Users who have the Manage Endpoint privilege cannot grant or revoke this privilegeto or from other users. A user can only be granted the Manage Endpoint privilege if that userdoes not have any administrative roles. When the user has this privilege, the user cannot begranted any administrative roles.
System Administrator Role and Users Who Have the Manage Endpoint Privilege
As in previous releases, System Administrators can still manage endpoints, includingendpoints that were created by users with the Create Endpoint privilege. If the SystemAdministrator role is revoked from a user, then the user can no longer manage any endpointsincluding those he or she created previously with that role. The user must be explicitlygranted the Manage Endpoint privilege on an endpoint so that the user can manage thatendpoint.
Objects and Wallets Associated with an Endpoint
Objects that are created by an endpoint are always owned by the endpoint. The endpointcreator or users with the Manage Endpoint privilege do not get automatic or implicit access toany objects that were created by the endpoint.
A user with the Manage Endpoint privilege can set the endpoint’s default wallet if the useralso has full access on the wallet. Revocation of the wallet access from the user afterwardsdoes not affect the endpoint’s default wallet setting.
Revocation of the Manage Endpoint Privilege
The Manage Endpoint privilege can be revoked on the endpoint from a user without affectingthe user's Create Endpoint privilege status. Users cannot revoke the Manage Endpointprivilege from themselves. If there are no users with the Manage Endpoint privilege for theendpoint, then managing that endpoint becomes the responsibility of users with the SystemAdministrator role.
Deletion of Users Who Have Been Granted the Manage Endpoint Privilege
If the user who manages an endpoint is deleted, then the System Administrator or any otherusers who have the Manage Endpoint privilege for that endpoint can still manage theendpoint.
Related Topics
• Create Endpoint Privilege Duties and ScopeThe Create Endpoint system privilege enables user to create an endpoint.
2.4.3.4 Create Endpoint Group Privilege Duties and ScopeThe Create Endpoint Group system privilege enables a user to create an endpoint group.
When a user is granted the Create Endpoint Group privilege, Oracle Key Vault automaticallygrants the Manage Endpoint Group privilege to the user at the time the user creates anendpoint group. The grant of Manage Endpoint Group enables the user to performmanagement operations on the endpoint group that the user created, and perform walletoperations that affect the endpoint group.
Chapter 2Administrative Roles and Endpoint Privileges within Oracle Key Vault
2-11
If this is the first endpoint group that the user created, and if that user does not holdthe Manage Endpoint Group privilege on any other endpoint group, then this usershould log out, and then log back into the Oracle Key Vault management consolesession. Doing so enables the user to exercise the Manage Endpoint privilege on thatendpoint group.
Who Can or Cannot Grant or Revoke the Create Endpoint Group Privilege?
Only a user who has the Key Administrator role can grant or revoke the CreateEndpoint Group privilege. Users who have the Create Endpoint Group privilege cannotgrant or revoke this privilege to or from other users. A user can only be granted theCreate Endpoint Group privilege if that user does not have any administrative roles.When the user has this privilege, the user cannot be granted any administrative roles.
How the Create Endpoint Group Privilege Works with the Manage EndpointGroup Privilege
Even though the Manage Endpoint Group privilege is automatically granted to a userwhen the user creates an endpoint group, the Manage Endpoint Group privilege canbe revoked for the endpoint group from this user at any time, so that this user can nolonger modify or delete that endpoint group.
Key Administrator Role and Users Who Have the Create Endpoint GroupPrivilege
As in previous releases, Key Administrators can still create endpoint groups. If the KeyAdministrator role is revoked from a user, then the user can no longer create anyendpoint group. The user, however, can now be granted Create Endpoint privilege toenable the user to create endpoint groups.
Revocation of the Create Endpoint Group Privilege
A revoke of the Create Endpoint Group privilege prevents the user from being able tocreate more endpoint groups. Users cannot revoke the Create Endpoint Groupprivilege from themselves. The Create Endpoint Group privilege can be revoked froma user without affecting the user's Manage Endpoint Group privilege on one or moreendpoint groups.
Deletion of Users Who Have Been Granted the Create Endpoint Group Privilege
The endpoint group creator does not have perpetual ownership of the endpoint group.The Manage Endpoint Group privilege on that endpoint group granted to the endpointgroup's creator can be revoked, after which the endpoint group creator cannot managethat endpoint group anymore. Deletion of an endpoint group's creator has no specialsignificance other than the one that this user may have been granted the ManageEndpoint Group privilege at the time of the endpoint group creation. If there are noother users with the Manage Endpoint Group privilege on that endpoint group, then theKey Administrator becomes responsible for managing that endpoint group.
Related Topics
• Manage Endpoint Group Privilege Duties and ScopeThe Manage Endpoint Group object privilege on an endpoint group enables a userto perform all endpoint group management operations on the endpoint group.
Chapter 2Administrative Roles and Endpoint Privileges within Oracle Key Vault
2-12
2.4.3.5 Manage Endpoint Group Privilege Duties and ScopeThe Manage Endpoint Group object privilege on an endpoint group enables a user to performall endpoint group management operations on the endpoint group.
The user who has the Manage Endpoint Group privilege on an endpoint group can performall endpoint group management operations (such as adding or removing an endpoint to orfrom an endpoint group, deleting endpoint groups, and so on) on the endpoint group. Thisuser inherits access to wallets from the endpoint group. This inheritance of wallet accesspermissions works in the same way as an endpoint or user inherits wallet permissions froman endpoint group or user group, respectively.
Who Can or Cannot Grant or Revoke the Manage Endpoint Group Privilege?
Only a user who has the Key Administrator role can grant or revoke the Manage EndpointGroup privilege. Users who have the Manage Endpoint Group privilege cannot grant orrevoke this privilege to or from other users. A user can only be granted the Manage EndpointGroup privilege if that user does not have any administrative roles. When the user has thisprivilege, the user cannot be granted any administrative roles.
Key Administrator Role and Users Who Have the Manage Endpoint Group Privilege
As in previous releases, Key Administrators can still manage endpoint groups, includingendpoint groups that were created by users with the Create Endpoint Group privilege. If theKey Administrator role is revoked from a user, then the user can no longer manage anyendpoint groups including those he or she created previously with that role. The user must beexplicitly granted the Manage Endpoint Group privilege on an endpoint so that the user canmanage that endpoint group.
Inheritance of Wallet Access from an Endpoint Group
• A user who has been granted the Manage Endpoint Group privilege on an endpointgroup (this user is also called the endpoint group manager) inherits the access to walletsfrom the endpoint group. This inheritance of wallet access permissions works in the sameway as an endpoint or user inherits wallet permissions from an endpoint group or usergroup, respectively.Granting wallet access to an endpoint group results in implicitly giving the same walletaccess to all the users who have the Manage Endpoint Group privilege on that endpointgroup. These inherited privileges from an endpoint group are effective as long as the useris the endpoint group manager for the endpoint group. This rule ensures that all endpointgroup managers of an endpoint group always have at least the same level of access towallets that the endpoint group has. This way, when an endpoint is added to the endpointgroup, its endpoint group managers remain fully aware of the wallet permissions that theendpoint is implicitly being granted, by virtue of adding an endpoint’s membership into theendpoint group.
• A user's effective wallet access is the union of the following:
– Direct wallet access grants to the user
– Inherited wallet access grants from the user groups of which this user is a member
– Inherited wallet access grants from the endpoint groups that this user is authorized tomanage
Chapter 2Administrative Roles and Endpoint Privileges within Oracle Key Vault
2-13
How Wallets Are Affected by Revoke Operations
• Revoking a wallet’s access from an endpoint group only results in the endpointgroup's managers to lose the wallet access rights that were inherited from therespective endpoint group. The endpoint group's managers may continue to haveaccess to the same wallet either from direct grants or from the inheritance of walletaccess from user groups or other endpoint groups.
• Revoking the Manage Endpoint Group privilege on an endpoint group from a user(that is, an endpoint group manager) prevents the user from inheriting future walletaccess rights from that endpoint group.
• An endpoint group's manager can revoke access of a wallet from the endpointgroup (or from any other user, user group, endpoint, or endpoint group) if the userhas the Manage Wallet Access privilege on that wallet even if this access wasinherited from the endpoint group itself.
Revocation of the Manage Endpoint Group Privilege
The Manage Endpoint Group privilege can be revoked from a user without affectingthe user's Create Endpoint Group privilege status. Users cannot revoke the ManageEndpoint Group privilege from themselves. If there are no users with the ManageEndpoint Group privilege for the endpoint, then managing that endpoint groupbecomes the responsibility of users with the Key Administrator role.
Deletion of Users Who Have Been Granted the Manage Endpoint Group Privilege
Deletion of an endpoint group's creator does not affect the endpoint groups that thisuser created. If the user who manages the endpoint group is deleted, then any otherusers who have the Manage Endpoint Group privilege for that endpoint group can stillmanage the endpoint group. If no such users exist, then a user who has the KeyAdministrator role becomes responsible for managing the endpoint group.
Related Topics
• Create Endpoint Group Privilege Duties and ScopeThe Create Endpoint Group system privilege enables a user to create an endpointgroup.
2.5 Naming Guidelines for ObjectsThe naming guidelines affect the following Oracle Key Vault objects: users, usergroups, endpoints, endpoint groups, and virtual wallets.
The naming conventions for these objects are as follows:
• You can include the following characters in the names of endpoints, endpointgroups, user groups, and virtual wallets: letters (a–z, A–Z), numbers (0-9),underscores (_), periods (.), and hyphens (-).
• You can include the following characters in the names of users: letters (a–z, A–Z),numbers (0-9), and underscores (_).
• In most environments, the maximum number of bytes allowed for the name lengthis 120 bytes. If you are in a multi-master cluster environment that has any nodesthat have not yet been upgraded to Oracle Key Vault release 18.5 or later, thenuse a maximum of 24 bytes for the object name.
Chapter 2Naming Guidelines for Objects
2-14
• The names of users, user groups, endpoints, and endpoint groups are not case sensitive.For example, pfitch and PFITCH are considered the same user in Oracle Key Vault.
• The names of virtual wallets are case sensitive. For example, wallet_hr and WALLET_HRare considered two separate wallets in Oracle Key Vault.
2.6 Emergency System Recovery ProcessDuring installation, you will be required to create a special recovery passphrase that OracleKey Vault uses to recover from emergency situations.
These situations can arise due to administrative users not being immediately available, orsomething more commonplace such as forgotten passwords.
The recovery passphrase is needed in the following situations:
• If there is no administrative user available to log into Oracle Key Vault, then you can usethe recovery passphrase to repeat the post-installation tasks and create newadministrative users for system, key, and audit management.
• If you want to restore Oracle Key Vault from a previous backup, then you must have therecovery passphrase that is associated with that backup.
• You will be prompted for the recovery passphrase during the node induction process inthe cluster mode.
• You will need it if you want to reset the recovery passphrase periodically.
For these reasons, it is very important to store the recovery passphrase in a safe andaccessible place and keep track of older recovery passphrases. The recovery passphrase isthe same passphrase that you use when you add nodes to a multi-master cluster.
The only way to recover from a lost recovery passphrase is to reinstall Oracle Key Vault.
Related Topics
• Managing System RecoverySystem recovery includes tasks such as recovering lost administrative passwords.
• Restoring Oracle Key Vault DataOracle Key Vault data from a remote backup destination can be restored onto anotherOracle Key Vault server.
• Performing Post-Installation TasksAfter you install Oracle Key Vault, you must complete a set of post-installation tasks.
2.7 Root and Support User AccountsBoth the root and support user accounts are used with the command-line interface.
The root user account is the super user account for the operating system that hosts OracleKey Vault. You do not need the root account for normal Oracle Key Vault administration.Instead, you must use the root account when you want to upgrade to a later bundle patch orperform some command-line operations such as adding disk space. The support user is theonly account that can remotely log in to the operating system hosting the Oracle Key Vaultwhen SSH is enabled.
Be aware that if you enter the root or support passwords incorrectly three times, then theaccount is locked for a brief period.
Chapter 2Emergency System Recovery Process
2-15
2.8 Endpoint AdministratorsAn endpoint administrator owns and manages endpoints, which are entities such asOracle databases that use Oracle Key Vault.
This user is typically a system, security, or database administrator, but can be anypersonnel charged with deploying, managing and maintaining security within anenterprise. Endpoint administrators are responsible for enrolling endpoints. (This useris different from the Oracle Key Vault users who have the Manage Endpoints andManage Endpoint Group privileges.)
The endpoint administrator for an Oracle database endpoint is the databaseadministrator, who is responsible for managing the database.
2.9 FIPS ModeFIPS mode enables Oracle Key Vault to adhere to FIPS 140-2 compliance.
Federal Information Processing Standard (FIPS) publications are issued by theNational Institute of Standards and Technology (NIST). The publication entitledSecurity Requirements for Cryptographic Modules (FIPS PUB 140-2) specifies thesecurity requirements over several key areas that will be satisfied by a cryptographicmodule utilized within a security system protecting sensitive but unclassifiedinformation.
The Oracle Key Vault is FIPS 140–2 compliant. Selecting the option to install with FIPS140–2 compliance performs all required changes during the installation. No additionalmodifications are necessary after the installation. You can also enable FIPS 140-2compliance after the installation if it was not done during the initial installation ofOracle Key Vault. Enabling or disabling FIPS mode requires you to restart Oracle KeyVault.
Related Topics
• Configuring the FIPS Mode for the NodeAll multi-master cluster nodes must use the same FIPS mode setting or you willreceive an alert.
Chapter 2Endpoint Administrators
2-16
3Oracle Key Vault Multi-Master ClusterConcepts
A multi-master cluster is a fully connected network of Oracle Key Vault servers called nodes.
• Oracle Key Vault Multi-Master Cluster OverviewThe multi-master cluster nodes provide high availability, disaster recovery, loaddistribution, and geographic distribution to an Oracle Key Vault environment.
• Benefits of Oracle Key Vault Multi-Master ClusteringThe Oracle Key Vault multi-master cluster configuration addresses high availability betterthan primary-standby environments.
• Multi-Master Cluster ArchitectureAn Oracle Key Vault node can be a read-write or a read-only node operating in differentmodes. Nodes can also form a subgroup.
• Building and Managing a Multi-Master ClusterYou initialize a multi-master cluster using a single Oracle Key Vault server.
• Oracle Key Vault Multi-Master Cluster Deployment ScenariosAll multi-master cluster nodes can serve endpoints actively and independently.
• Multi-Master Cluster FeaturesOracle Key Vault provides features that help with inconsistency resolution and nameconflict resolution in clusters, and endpoint node scan lists.
• Cluster Management InformationThe Cluster Management page provides a concise overview of the cluster and the statusof each node.
3.1 Oracle Key Vault Multi-Master Cluster OverviewThe multi-master cluster nodes provide high availability, disaster recovery, load distribution,and geographic distribution to an Oracle Key Vault environment.
Oracle recommends that you use the Oracle Key Vault multi-master clusters deployment overother Oracle Key Vault deployments.
An Oracle Key Vault multi-master cluster provides a mechanism to create read-write pairs ofOracle Key Vault nodes for maximum availability and reliability. You can add read-only OracleKey Vault nodes to the cluster to provide even greater availability to endpoints that needOracle wallets, encryption keys, Java keystores, certificates, credential files, and otherobjects.
An Oracle Key Vault multi-master cluster is an interconnected group of Oracle Key Vault nodes. Each node in the cluster is automatically configured to connect with all the othernodes, in a fully connected network. The nodes can be geographically distributed. Oracle KeyVault endpoints interact with any node in the cluster.
This configuration replicates data to all other nodes, reducing risk of data loss. To preventdata loss, you must configure pairs of nodes called read-write pairs to enable bi-directional
3-1
synchronous replication. This configuration enables an update to one node to bereplicated to the other node, and verifies this on the other node, before the update isconsidered successful. Critical data can only be added or updated within the read-write pairs. All added or updated data is asynchronously replicated to the rest of thecluster.
After you have completed the upgrade process, every node in the Oracle Key Vaultcluster must be at Oracle Key Vault release 18.1 or later, and within one releaseupdate of all other nodes. Any new Oracle Key Vault server that is to join the clustermust be at the same release level as the cluster.
The clocks on all the nodes of the cluster must be synchronized. Consequently, allnodes of the cluster must have the Network Time Protocol (NTP) settings enabled.
Every node in the cluster can serve endpoints actively and independently whilemaintaining an identical dataset through continuous replication across the cluster. Thesmallest possible configuration is a two node cluster, and the largest configuration canhave up to 16 nodes with several pairs spread across several data centers.
3.2 Benefits of Oracle Key Vault Multi-Master ClusteringThe Oracle Key Vault multi-master cluster configuration addresses high availabilitybetter than primary-standby environments.
To ensure high availability for geographically distributed endpoints, Oracle Key Vault nodes that are deployed in different data centers operate in active-active multi-mastercluster configurations to create and share keys. With an active-active configuration,there are no passive machines in the cluster, which allows for better resourceutilization. An added benefit of the multi-master cluster configuration is loaddistribution. When multiple Oracle Key Vault nodes in multi-master configuration aredeployed in a data center, they can actively share the key requests of the endpointdatabases in that data center.
In a typical large scale deployment, Oracle Key Vault must serve a large number ofendpoints, possibly distributed in geographically distant data centers.
In comparison to a multi-master deployment, standalone Oracle Key Vaultdeployments provide the least availability, while primary-standby deployments offerlimited availability:
• A primary-standby configuration only has a single primary Oracle Key Vault serverthat can actively serve clients.
• If the server running in the standby role is unavailable, then the server running inthe primary role is in read-only mode and does not allow any write operations.
• The primary-standby mode can support either high availability in the same datacenter or disaster recovery across data centers.
• If the persistent master encryption key cache is not enabled, then databasedowntime is unavoidable during maintenance windows.
The Oracle Key Vault multi-master cluster configuration addresses these limitations.You can geographically disperse nodes to provide simultaneous high availability anddisaster recovery capability.
An Oracle Key Vault multi-master cluster configuration offers significant benefits asfollows:
Chapter 3Benefits of Oracle Key Vault Multi-Master Clustering
3-2
• Data compatibility between multi-master cluster nodes similar to a primary-standbydeployment
Because all the nodes have an identical data set, the endpoints can retrieve informationfrom any node. In a cluster, the unavailability of an Oracle Key Vault node does not affectthe operations of an endpoint. If a given node is unavailable, then the endpoint interactstransparently with another node in the cluster.
• Fault tolerance
Successfully enrolled clients transparently update their own list of available Oracle KeyVault nodes in the cluster. This enables clients to locate available nodes at any giventime, without additional intervention. As such, unexpected failure in nodes or networkdisruptions do not lead to service interruption for endpoints as long as at least oneoperational Oracle Key Vault read-write pair remains accessible to the endpoint. If allread-write pairs are unavailable to an endpoint, but a read-only restricted node isavailable, then the endpoint can still invoke read-only operations.
• Zero data loss
Data that has been added or updated at a read-write node is immediately replicated to itsread-write peer and must be confirmed at the peer to be considered committed. It is thendistributed across the cluster. Therefore, data updates are considered successful only ifthey are guaranteed to exist in multiple servers.
• No passive machines in the system
A primary-standby configuration requires a passive standby server. The Oracle Key Vaultmulti-master cluster contains only active servers. This allows for better utilization ofhardware.
• Scaling up and scaling down
You can add extra Oracle Key Vault nodes to the cluster or remove existing nodes fromthe cluster without interrupting the overall Oracle Key Vault services to clients. Thismeans the number of nodes in the cluster can be increased or decreased as required tomeet the expected workload.
• Maintenance
Whenever hardware or software maintenance is required, Oracle Key Vault nodes canleave the cluster and return back to the cluster after maintenance. The remaining nodescontinue to serve the clients. Properly planned maintenance does not cause any servicedowntime, avoiding interruption of service to endpoints.
3.3 Multi-Master Cluster ArchitectureAn Oracle Key Vault node can be a read-write or a read-only node operating in differentmodes. Nodes can also form a subgroup.
• Oracle Key Vault Cluster NodesAn Oracle Key Vault node is an Oracle Key Vault server that operates as a member of amulti-master cluster.
• Cluster Node LimitationsLimitations to cluster nodes depend on whether the node is asynchronous orsynchronous.
• Cluster SubgroupsA cluster subgroup is a group of one or more nodes of the cluster.
Chapter 3Multi-Master Cluster Architecture
3-3
• Critical Data in Oracle Key VaultOracle Key Vault stores critical data that is necessary for the endpoints to operate.Read-only nodes can read critical data as well.
• Oracle Key Vault Read-Write NodesA read-write node is a node in which critical data can be added or updated usingthe Oracle Key Vault or endpoint software.
• Oracle Key Vault Read-Only NodesIn a read-only node, users can add or update non-critical data but not add orupdate critical data. However, read-only nodes can read critical data.
• Cluster Node Mode TypesOracle Key Vault supports two types of mode for cluster nodes: read-onlyrestricted mode or read-write mode.
• Operations Permitted on Cluster Nodes in Different ModesIn an Oracle Key Vault multi-master cluster, operations are available or restrictedbased on the node and the operating mode of the node.
3.3.1 Oracle Key Vault Cluster NodesAn Oracle Key Vault node is an Oracle Key Vault server that operates as a member ofa multi-master cluster.
To configure an Oracle Key Vault server to operate as a member of the cluster, youmust convert it to be a multi-master cluster node. The process is referred to as nodeinduction. You initiate induction on the Cluster Management page of the Oracle KeyVault management console.
On induction, Oracle Key Vault modifies the Cluster tab to enable management,monitoring, and conflict resolution capabilities on the management console of thenode. Cluster-specific features of the management console, such as cluster settings,audit replication, naming resolution, cluster alerts, and so on, are enabled as well.
The Primary-Standby Configuration page is not available on the Oracle Key Vaultmanagement console of a node. A node cannot have a passive standby server, norcan it become a passive standby server.
A node runs additional services to enable it to communicate with the other nodes ofthe cluster. Endpoints enrolled from a node are made aware of the cluster topology.
Each node in the cluster has a user-allocated node identifier. The node identifier mustbe unique in the cluster.
The Oracle Key Vault release in which the node was created will affect the byte lengthfor the names of users, user groups, endpoints, endpoint groups, and virtual wallets.See Naming Guidelines for Objects.
3.3.2 Cluster Node LimitationsLimitations to cluster nodes depend on whether the node is asynchronous orsynchronous.
The nodes of a Oracle Key Vault multi-master cluster replicate data asynchronouslybetween them. The only exception is replicating data to the read-write peer. There arevarious limitations arising as a result of the asynchronous replicate operations.
Chapter 3Multi-Master Cluster Architecture
3-4
The IP addresses of a node in the cluster are static and cannot be changed after the nodejoins the cluster. If you want the node to have a different IP address, then delete the nodefrom the cluster, and either add a new node with the correct IP address, or re-image thedeleted node using the correct IP address before adding it back to the cluster.
You can perform only one cluster change operation (such as adding, disabling, or deleting anode) at a time.
Node IDs are unique across the cluster. You must ensure that the node ID is unique whenyou select the node during the induction process.
An Oracle Key Vault cluster does a best-effort job at preventing users from performingunsupported actions. It will try to remove node IDs that are in-use from the node inductiondrop-down on the user interface and prevent the user from adding a second read-write peer ifone already exists. Similarly, a multi-master cluster will prevent the user from adding asecond read-write peer if one already exists.
3.3.3 Cluster SubgroupsA cluster subgroup is a group of one or more nodes of the cluster.
A cluster can be conceptually divided into one or more cluster subgroups.
The node is assigned to a subgroup when you add the node to the multi-master cluster. Youcan change the assignment at any time, so long as a certificate rotation operation isnot in progress. A node's cluster subgroup assignment is a property of the individual node,and members of a read-write pair may be in different cluster subgroups.
A cluster subgroup represents the notion of endpoint affinity. A node's cluster subgroupassignment is used to set the search order in the endpoint's node scan list. Nodes in thesame cluster subgroup as an endpoint are considered local to the endpoint. You can checkwhich node this refers to by checking the Cluster Subgroup column on the Endpoints page.The nodes within an endpoint's local subgroup are scanned first, before communicating withnodes that are not in the local subgroup.
The cluster topology can change when you add or remove new nodes to and from the cluster.Nodes can also be added or removed from the local cluster subgroup. Each endpoint mayget updates to this information along with the response message for any successful non-empty operation which the endpoint initiated. The updated endpoint's node scan list is sentback to the endpoint periodically even if there is no change to cluster topology. This is tomake up for any lost messages.
3.3.4 Critical Data in Oracle Key VaultOracle Key Vault stores critical data that is necessary for the endpoints to operate. Read-onlynodes can read critical data as well.
The loss of this information can result in the loss of data on the endpoint. Endpoint encryptionkeys, certificates, and similar security objects that Oracle Key Vault manages are examples ofcritical data in Oracle Key Vault. Critical data must be preserved in the event of an Oracle KeyVault server failure to ensure endpoint recovery and continued operations.
Oracle Key Vault data that can be re-created or discarded after an Oracle Key Vault serverfailure is non-critical data. Cluster configuration settings, alert settings, and email settings areexamples of non-critical data.
Chapter 3Multi-Master Cluster Architecture
3-5

3.3.5 Oracle Key Vault Read-Write NodesA read-write node is a node in which critical data can be added or updated using theOracle Key Vault or endpoint software.
The critical data that is added or updated can be data such as keys, wallet contents,and certificates.
Oracle Key Vault read-write nodes always exist in pairs. Each node in the read-writepair can accept updates to critical and non-critical data, and these updates areimmediately replicated to the other member of the pair, the read-write peer. A read-write peer is the specific member of one, and only one, read-write pair in the cluster.There is bi-directional synchronous replication between read-write peers. Replicationto all nodes that are not a given node's read-write peer is asynchronous.
A node can be a member of, at most, one read-write pair. A node can have only oneread-write peer. A node becomes a member of a read-write pair, and therefore a read-write node, during the induction process. A read-write node reverts to being a read-only node when its read-write peer is deleted, at which time it can form a new read-write pair.
A read-write node operates in read-write mode when it can successfully replicate to itsread-write peer and when both peers are active. A read-write node is temporarilyplaced in read-only restricted mode when it is unable to replicate to its read-write peeror when its read-write peer is disabled.
An Oracle Key Vault multi-master cluster requires at least one read-write pair to befully operational. It can have a maximum of 8 read-write pairs.
3.3.6 Oracle Key Vault Read-Only NodesIn a read-only node, users can add or update non-critical data but not add or updatecritical data. However, read-only nodes can read critical data.
Critical data is updated only through replication from other nodes.
A read-only node is not a member of a read-write pair and does not have an activeread-write peer.
A read-only node can induct a new server into a multi-master cluster. The new nodecan be another read-only node. However, a read-only node becomes a read-writenode if it inducts another node as its read-write peer.
The first node in the cluster is a read-only node. Read-only nodes are used to expandthe cluster. A multi-master cluster, after it has been built, does not need to have anyread-only nodes. A multi-master cluster with only read-only nodes is not ideal becauseno useful critical data can be added to such a multi-master cluster.
3.3.7 Cluster Node Mode TypesOracle Key Vault supports two types of mode for cluster nodes: read-only restrictedmode or read-write mode.
• Read-only restricted mode: In this mode, only non-critical data can be updatedor added to the node. Critical data can be updated or added only through
Chapter 3Multi-Master Cluster Architecture
3-6

replication in this mode. There are two situations in which a node is in read-only restrictedmode:
– A node is read-only and does not yet have a read-write peer.
– A node is part of a read-write pair but there has been a breakdown in communicationwith its read-write peer or if there is a node failure. When one of the two nodes isnon-operational, then the remaining node is set to be in the read-only restrictedmode. When a read-write node is again able to communicate with its read-write peer,then the node reverts back to read-write mode from read-only restricted mode.
• Read-write mode: This mode enables both critical and non-critical information to bewritten to a node. A read-write node should always operate in the read-write mode.
You can find the mode type of the cluster node on the Monitoring page of the Cluster tab ofthe node management console. The Cluster tab of any node management console displaysthe mode type of all nodes in the cluster.
3.3.8 Operations Permitted on Cluster Nodes in Different ModesIn an Oracle Key Vault multi-master cluster, operations are available or restricted based onthe node and the operating mode of the node.
Related Topics
• Oracle Key Vault Multi-Master Cluster OperationsThere are restrictions and conditions for Oracle Key Vault multi-master cluster operationson cluster nodes.
3.4 Building and Managing a Multi-Master ClusterYou initialize a multi-master cluster using a single Oracle Key Vault server.
• About Building and Managing a Multi-Master ClusterAfter the initial cluster is created in the Oracle Key Vault server, you can add the differenttypes of nodes that you need for the cluster.
• Creation of the Initial Node in a Multi-Master ClusterThe initial node in a multi-master cluster must follow certain requirements before beingmade the initial node.
• Expansion of a Multi-Master ClusterAfter you initialize the cluster, you can expand it by adding up to 15 more nodes, as eitherread-write pairs or read-only nodes.
• Migration to the Cluster from an Existing DeploymentYou can migrate an existing Oracle Key Vault deployment to a multi-master cluster node.
3.4.1 About Building and Managing a Multi-Master ClusterAfter the initial cluster is created in the Oracle Key Vault server, you can add the differenttypes of nodes that you need for the cluster.
This Oracle Key Vault server seeds the cluster data and converts the server into the firstcluster node, which is called the initial node. The cluster is expanded when you inductadditional Oracle Key Vault servers, and add them as read-write nodes, or as simple read-only nodes.
A multi-master cluster can contain a minimum of 2 nodes and a maximum of 16 nodes.
Chapter 3Building and Managing a Multi-Master Cluster
3-7
3.4.2 Creation of the Initial Node in a Multi-Master ClusterThe initial node in a multi-master cluster must follow certain requirements before beingmade the initial node.
You create a multi-master cluster by converting a single Oracle Key Vault server tobecome the initial node. The Oracle Key Vault server can be a freshly installed OracleKey Vault server, or it can already be in service with existing data. A standalone server,or a primary server of a primary-standby configuration can be converted to the initialnode of a cluster.
Before using the primary server of the primary-standby configuration, you must unpairthe primary-standby configuration. For a primary-standby configuration, you can useeither of the following methods to upgrade to a cluster:
• Method 1:
1. Back up the servers.
2. Upgrade both the primary and standby servers to the latest release.
3. Unpair the paired primary and standby servers. (Before you unpair theservers, see Oracle Key Vault Release Notes for known issues regarding theunpair process.)
4. Convert the primary server to be the first node of the cluster.
• Method 2:
1. Back up the servers.
2. Unpair the paired primary and standby servers.
3. Upgrade the former primary server to the latest release.
4. Convert the primary server to be the first node of the cluster.
The freshly installed servers must be of the same current version as the initial node.The initial node is special in that it provides the entirety of the data with which thecluster is initialized. This happens only once for the cluster when it is created. The dataprovided by the initial node will include but is not limited to the following components:
• Certificates, keys, wallets, and other security objects
• Users and groups
• Endpoint information
• Audits
• Reports
All other nodes added after the initial node must be created from freshly installedOracle Key Vault servers.
The cluster name is chosen when the initial node is created. Once this name ischosen, you cannot change the cluster name.
The cluster subgroup of the initial node is also configured when the initial node iscreated. You must configure an Oracle Key Vault server that is converted to the initialnode to use a valid Network Time Protocol (NTP) setting before you begin theconversion. The initial node always starts as a read-only node in read-only restrictedmode.
Chapter 3Building and Managing a Multi-Master Cluster
3-8
Related Topics
• Creating the First (Initial) Node of a ClusterTo create a cluster, you must convert an existing standalone Oracle Key Vault server tobecome the first node in the cluster.
• Oracle Key Vault Release Notes
3.4.3 Expansion of a Multi-Master ClusterAfter you initialize the cluster, you can expand it by adding up to 15 more nodes, as eitherread-write pairs or read-only nodes.
• About the Expansion of a Multi-Master ClusterNode induction is the process of configuring an Oracle Key Vault server to operate as amulti-master cluster node.
• Management of Cluster Reconfiguration Changes Using a Controller NodeA controller node is the node that controls or manages a cluster reconfiguration change,such as adding, enabling, disabling, or removing nodes.
• Addition of a Candidate Node to the Multi-Master ClusterA freshly installed Oracle Key Vault server that is being added to a cluster is called acandidate node.
• Addition of More Nodes to a Multi-Master ClusterYou add nodes one at a time, first as a single read-only node, and then later as read-writepaired nodes.
3.4.3.1 About the Expansion of a Multi-Master ClusterNode induction is the process of configuring an Oracle Key Vault server to operate as a multi-master cluster node.
A controller node inducts an Oracle Key Vault server that has been converted to a candidatenode into the cluster.
To expand a multi-master cluster, you use the induction process found on the Cluster tab ofthe Oracle Key Vault Management console. Nodes added to the Oracle Key Vault multi-master cluster are initialized with the current cluster data. You can add nodes either as read-write peers, or as read-only nodes.
Related Topics
• Adding a Node to Create a Read-Write PairAfter you create the initial node, you must add an additional read-write peer to the cluster.
• Adding a Node as a Read-Only NodeTo add a new read-only cluster node, you add a newly configured server from anyexisting cluster node.
3.4.3.2 Management of Cluster Reconfiguration Changes Using a Controller NodeA controller node is the node that controls or manages a cluster reconfiguration change, suchas adding, enabling, disabling, or removing nodes.
A node is only a controller node during the life of the change. During induction, the controllernode provides the server certificate and the data that is used to initialize the candidate node.Another node can be the controller node for a subsequent cluster change. One controller
Chapter 3Building and Managing a Multi-Master Cluster
3-9
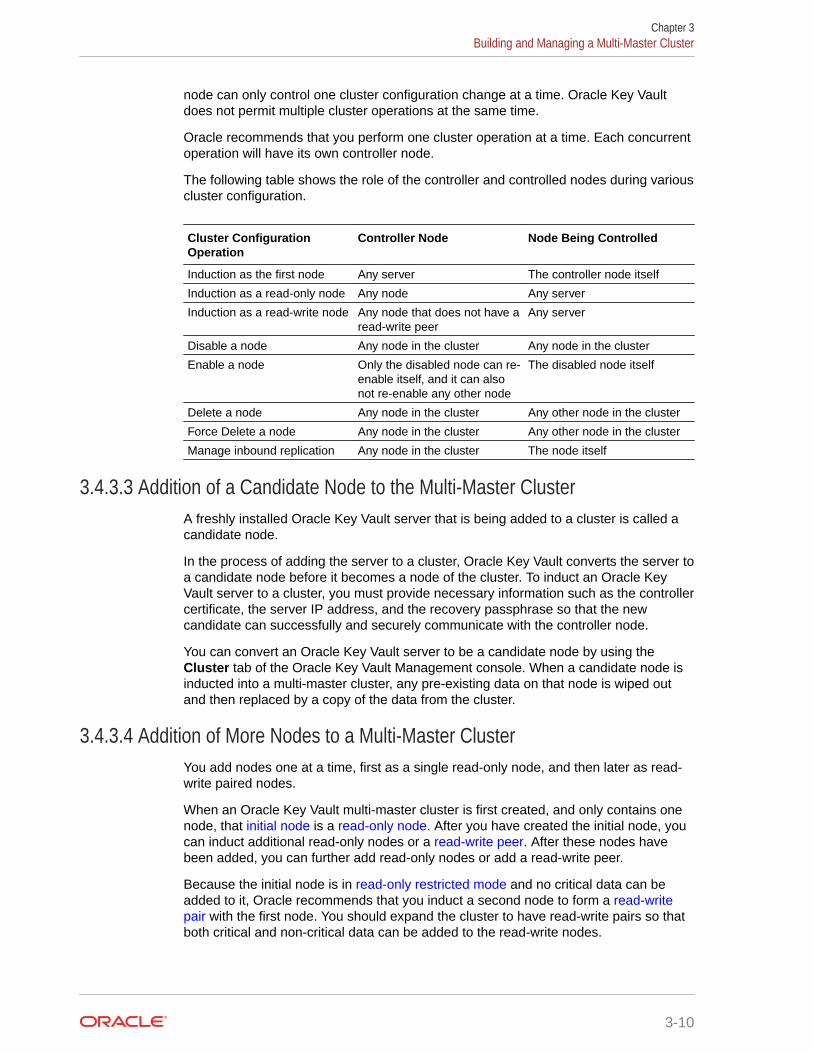
node can only control one cluster configuration change at a time. Oracle Key Vaultdoes not permit multiple cluster operations at the same time.
Oracle recommends that you perform one cluster operation at a time. Each concurrentoperation will have its own controller node.
The following table shows the role of the controller and controlled nodes during variouscluster configuration.
Cluster ConfigurationOperation
Controller Node Node Being Controlled
Induction as the first node Any server The controller node itself
Induction as a read-only node Any node Any server
Induction as a read-write node Any node that does not have aread-write peer
Any server
Disable a node Any node in the cluster Any node in the cluster
Enable a node Only the disabled node can re-enable itself, and it can alsonot re-enable any other node
The disabled node itself
Delete a node Any node in the cluster Any other node in the cluster
Force Delete a node Any node in the cluster Any other node in the cluster
Manage inbound replication Any node in the cluster The node itself
3.4.3.3 Addition of a Candidate Node to the Multi-Master ClusterA freshly installed Oracle Key Vault server that is being added to a cluster is called acandidate node.
In the process of adding the server to a cluster, Oracle Key Vault converts the server toa candidate node before it becomes a node of the cluster. To induct an Oracle KeyVault server to a cluster, you must provide necessary information such as the controllercertificate, the server IP address, and the recovery passphrase so that the newcandidate can successfully and securely communicate with the controller node.
You can convert an Oracle Key Vault server to be a candidate node by using theCluster tab of the Oracle Key Vault Management console. When a candidate node isinducted into a multi-master cluster, any pre-existing data on that node is wiped outand then replaced by a copy of the data from the cluster.
3.4.3.4 Addition of More Nodes to a Multi-Master ClusterYou add nodes one at a time, first as a single read-only node, and then later as read-write paired nodes.
When an Oracle Key Vault multi-master cluster is first created, and only contains onenode, that initial node is a read-only node. After you have created the initial node, youcan induct additional read-only nodes or a read-write peer. After these nodes havebeen added, you can further add read-only nodes or add a read-write peer.
Because the initial node is in read-only restricted mode and no critical data can beadded to it, Oracle recommends that you induct a second node to form a read-writepair with the first node. You should expand the cluster to have read-write pairs so thatboth critical and non-critical data can be added to the read-write nodes.
Chapter 3Building and Managing a Multi-Master Cluster
3-10
The general process for adding nodes to a cluster is to add one node at a time, and then pairthese so that they become read-write pairs:
1. Add the initial node (for example, N1). N1 is a read-only node.
2. Add the second node, N2. N2 will be in read-only restricted mode during the inductionprocess.If you are adding N2 as the read-write peer of N1, then both N1 and N2 will become read-write nodes when N2 is added to the cluster. Otherwise, N1 and N2 will remain read-onlynodes after you add N2 to the cluster. If you want to add N2 as the read-write peer of N1,then you must set Add Candidate Node as Read-Write Peer to Yes on N1 during theinduction process. If you do not want N2 to be paired with N1, then set Add CandidateNode as Read-Write Peer to No. This example assumes that N2 will be made a read-write peer of N1.
3. Add a third node, N3, which must be a read-only node if N1 and N2 were made read-write peers, because the other two nodes in the cluster already are read-write peers.In fact, you can add multiple read-only nodes to this cluster, but Oracle recommends thatyou not do this, because when write operations take place, the few read-write nodes thatare in the cluster will be overloaded. For optimum performance and load balancing, youmust have more read-write pairs.
4. To create a second read-write pair for the cluster, when you add the next node (N4), setAdd Candidate Node as Read-Write Peer to Yes to add node N4 to be paired with nodeN3.Node N4 must be added from N3 to make the second read-write pair, because N3 is theonly node without a read-write peer at this point. After you complete this step, at thisstage the cluster has two read-write pairs: the N1-N2 pair, and the N3-N4 pair.
5. To create the next pairing, add the next read-only node (for example, N5), followed bynode N6.Be sure to set Add Candidate Node as Read-Write Peer to Yes when you add N6.Node N6 must be added to N5 because at this point, N5 is the only node without a read-write peer. By the time you complete this step, there will be three read-write pairs in thecluster: the N1-N2 pair, the N3-N4 pair, and the N5-N6 pair.
A freshly installed Oracle Key Vault server at the same version as the other nodes in thecluster, that is, at release 18.1 or later is converted to a candidate node. You should ensurethat the candidate has Network Time Protocol (NTP) configured.
Any node in the cluster can be the controller node given no other cluster change operationsare in progress. The candidate and the controller node exchange information that enables thecontroller node to ascertain the viability of induction. Induction replicates the cluster data setto the candidate node. After a successful induction, you can configure the node to use thecluster-wide configuration settings. A cluster data set includes but is not limited to thefollowing components:
• Certificates, keys, wallets, and other security objects
• Users and user groups
• Endpoint and endpoint group information
• Audit data
• Cluster name and cluster node details
• Cluster settings
The controller node assigns the node ID and the cluster subgroup for the candidate node. Ifthe controller node provides an existing cluster subgroup during induction, then the candidatenode becomes part of that subgroup. If the controller node provides the name of the cluster
Chapter 3Building and Managing a Multi-Master Cluster
3-11
subgroup that does not exist, then the cluster subgroup is created as part of theinduction process and the candidate node is added to the cluster subgroup. You canhave all endpoints associated with one subgroup, if you want. For example, allendpoints in data center A can be in one subgroup, and all endpoints in data center Bcan be in another subgroup. Endpoints that are in the same subgroup will prioritizeconnecting to the nodes in that subgroup before connecting to nodes in othersubgroups.
A read-write node can become a read-only node if its read-write peer is deleted. Thisread-only node can be used to form another read-write pair.
Related Topics
• Adding a Node as a Read-Only NodeTo add a new read-only cluster node, you add a newly configured server from anyexisting cluster node.
• Creating an Additional Read-Write Pair in a ClusterAny node can be read-write paired with only one other node, and there can bemultiple read-write pairs in a cluster.
3.4.4 Migration to the Cluster from an Existing DeploymentYou can migrate an existing Oracle Key Vault deployment to a multi-master clusternode.
• Conversion of an Oracle Key Vault Standalone Server to a Multi-Master ClusterYou can migrate a standalone Oracle Key Vault deployment that is at an olderrelease to a multi-master deployment.
• Conversion from a Primary-Standby Server to a Multi-Master ClusterYou can migrate an Oracle Key Vault primary-standby deployment to a multi-master deployment.
3.4.4.1 Conversion of an Oracle Key Vault Standalone Server to a Multi-MasterCluster
You can migrate a standalone Oracle Key Vault deployment that is at an older releaseto a multi-master deployment.
First, you must upgrade the server to the latest Oracle Key Vault release. After youcomplete the upgrade, you then can convert it to an initial node.
If your Oracle Key Vault server deployment is already at the current release, then youcan directly convert it to an initial node.
The initial node will retain all the data of the existing Oracle Key Vault standalonedeployment. After you create the initial node of the cluster, you can add more nodes tothis cluster as necessary. Ensure that the new nodes that you add were installed at thecurrent version of the initial node.
Related Topics
• Oracle Key Vault Release Notes
• Creating the First (Initial) Node of a ClusterTo create a cluster, you must convert an existing standalone Oracle Key Vaultserver to become the first node in the cluster.
Chapter 3Building and Managing a Multi-Master Cluster
3-12
3.4.4.2 Conversion from a Primary-Standby Server to a Multi-Master ClusterYou can migrate an Oracle Key Vault primary-standby deployment to a multi-masterdeployment.
First, you must unpair the primary-standby server configuration. Then you should upgrade theunpaired former primary server to the latest Oracle Key Vault release. (Alternatively, you canperform the upgrade and then unpair the primary-standby server configuration.) Aftercompleting these steps, you can convert the upgraded, former primary server to an initialnode.
If you have the latest release of Oracle Key Vault in a primary-standby deployment, you mustalso unpair it before you can move it to a multi-master cluster. Then, you can directly convertthe former primary server to an initial node.
Before you perform this kind of migration, you should back up the servers that are currentlyused in the primary-standby deployment.
Related Topics
• Disabling (Unpairing) the Primary-Standby ConfigurationYou can disable the primary-standby configuration by unpairing the primary and standbyservers.
• Creating the First (Initial) Node of a ClusterTo create a cluster, you must convert an existing standalone Oracle Key Vault server tobecome the first node in the cluster.
• Creation of the Initial Node in a Multi-Master ClusterThe initial node in a multi-master cluster must follow certain requirements before beingmade the initial node.
3.5 Oracle Key Vault Multi-Master Cluster DeploymentScenarios
All multi-master cluster nodes can serve endpoints actively and independently.
They can do this while striving to maintain an identical cluster data set through continuousreplication across the cluster. Deployment scenarios of the multi-master cluster can rangefrom a small two-node cluster to large 16-node deployments spanning across data centers.
• Cluster Size and Availability in DeploymentsIn general, the availability of the critical data to the endpoints increases with theincreasing size of the cluster.
• Two-Node Cluster DeploymentA single read-write pair formed with two Oracle Key Vault nodes is the simplest multi-master cluster.
• Mid-Size Cluster Across Two Data Centers DeploymentA two-data center configuration provides high availability, disaster recovery, and loaddistribution.
Chapter 3Oracle Key Vault Multi-Master Cluster Deployment Scenarios
3-13
3.5.1 Cluster Size and Availability in DeploymentsIn general, the availability of the critical data to the endpoints increases with theincreasing size of the cluster.
You may be required to disable both nodes in a read-write pair from the clustertogether to undergo maintenance such as patching or upgrade. If you have a cluster ofonly two nodes, then this means that the endpoints may have downtime.
A two-node cluster is suitable for development and test environments where theendpoint downtime is non-critical. For small deployments where critical data is addedor updated infrequently or can be controlled, a three-node cluster is acceptable. Largescale deployments under heavy load should deploy at least two read-write pairs toensure endpoint continuity.
A three-node cluster with one read-write pair and one read-only node fares better thana two-node cluster because it provides endpoint continuity so long as no critical data isadded or updated.
A four-node, two read-write pair cluster provides continuity for all endpoint operationswhile the nodes are in maintenance.
The cluster should ideally be comprised of read-write pairs. If network latency ornetwork interruptions across data centers is of little concern, then you should deployread-write pairs across data centers. In case of a disaster, where one node of a read-write pair is lost, the keys are preserved in the read-write peer. However, if the networklatency or interruptions are of concern, then you should place the read-write pair in thesame data center. A disaster resulting in the loss of read-write pair may result in theloss of keys or other data if the disaster strikes before the created data isasynchronously replicated to other nodes.
3.5.2 Two-Node Cluster DeploymentA single read-write pair formed with two Oracle Key Vault nodes is the simplest multi-master cluster.
A two-node multi-master cluster looks similar to a standard primary-standbyenvironment, in that there are only two nodes. The significant difference is that unlikethe primary-standby configuration where the standby is passive, both nodes are activeand can respond to endpoint requests at the same time.
Using a two-node multi-master cluster provides the following advantages over aprimary-standby environment:
• Both nodes can be actively queried and updated by endpoints unlike the primary-standby configuration where only the primary server can be queried.
• A multi-master cluster can be expanded to three or more nodes without downtime.
• If the nodes are in separate data centers, then endpoints can prioritize interactingwith nodes in the same subgroup, rather than reach across the network to theprimary server node.
The following figure describes the deployment used for a two-node, single data center.
Chapter 3Oracle Key Vault Multi-Master Cluster Deployment Scenarios
3-14
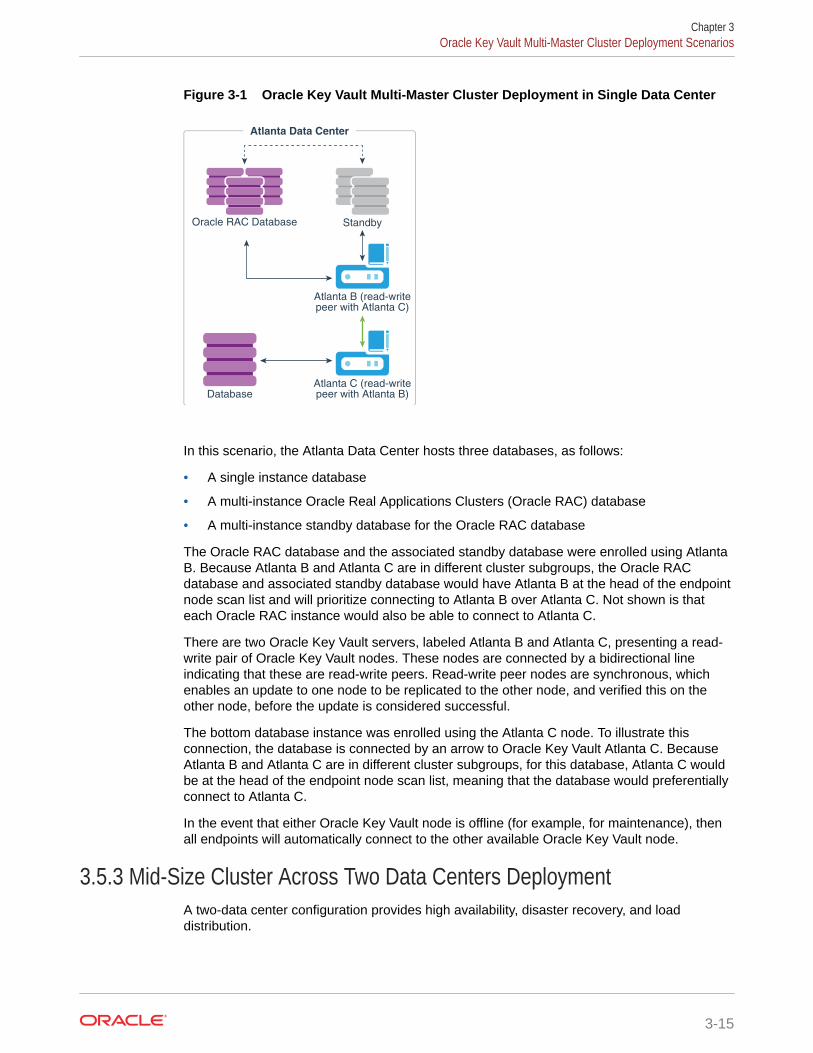
Figure 3-1 Oracle Key Vault Multi-Master Cluster Deployment in Single Data Center
Database
Standby
Atlanta B (read-writepeer with Atlanta C)
Atlanta C (read-writepeer with Atlanta B)
Oracle RAC Database
Atlanta Data Center
In this scenario, the Atlanta Data Center hosts three databases, as follows:
• A single instance database
• A multi-instance Oracle Real Applications Clusters (Oracle RAC) database
• A multi-instance standby database for the Oracle RAC database
The Oracle RAC database and the associated standby database were enrolled using AtlantaB. Because Atlanta B and Atlanta C are in different cluster subgroups, the Oracle RACdatabase and associated standby database would have Atlanta B at the head of the endpointnode scan list and will prioritize connecting to Atlanta B over Atlanta C. Not shown is thateach Oracle RAC instance would also be able to connect to Atlanta C.
There are two Oracle Key Vault servers, labeled Atlanta B and Atlanta C, presenting a read-write pair of Oracle Key Vault nodes. These nodes are connected by a bidirectional lineindicating that these are read-write peers. Read-write peer nodes are synchronous, whichenables an update to one node to be replicated to the other node, and verified this on theother node, before the update is considered successful.
The bottom database instance was enrolled using the Atlanta C node. To illustrate thisconnection, the database is connected by an arrow to Oracle Key Vault Atlanta C. BecauseAtlanta B and Atlanta C are in different cluster subgroups, for this database, Atlanta C wouldbe at the head of the endpoint node scan list, meaning that the database would preferentiallyconnect to Atlanta C.
In the event that either Oracle Key Vault node is offline (for example, for maintenance), thenall endpoints will automatically connect to the other available Oracle Key Vault node.
3.5.3 Mid-Size Cluster Across Two Data Centers DeploymentA two-data center configuration provides high availability, disaster recovery, and loaddistribution.
Chapter 3Oracle Key Vault Multi-Master Cluster Deployment Scenarios
3-15
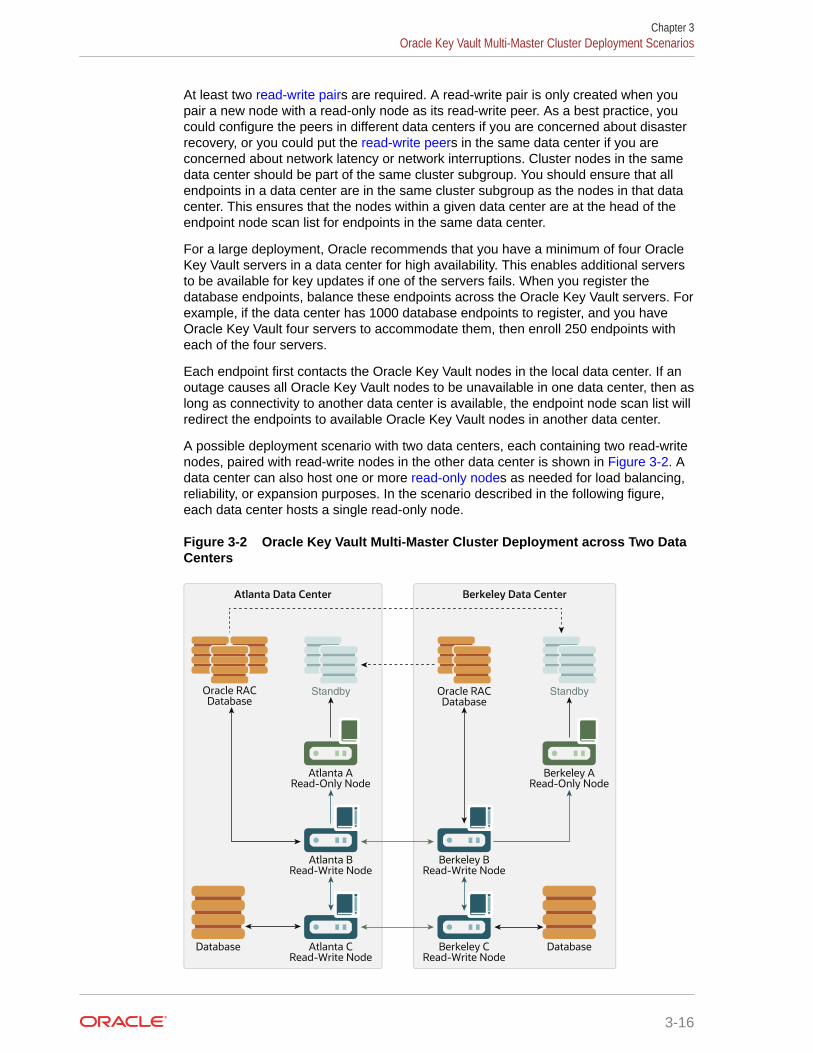
At least two read-write pairs are required. A read-write pair is only created when youpair a new node with a read-only node as its read-write peer. As a best practice, youcould configure the peers in different data centers if you are concerned about disasterrecovery, or you could put the read-write peers in the same data center if you areconcerned about network latency or network interruptions. Cluster nodes in the samedata center should be part of the same cluster subgroup. You should ensure that allendpoints in a data center are in the same cluster subgroup as the nodes in that datacenter. This ensures that the nodes within a given data center are at the head of theendpoint node scan list for endpoints in the same data center.
For a large deployment, Oracle recommends that you have a minimum of four OracleKey Vault servers in a data center for high availability. This enables additional serversto be available for key updates if one of the servers fails. When you register thedatabase endpoints, balance these endpoints across the Oracle Key Vault servers. Forexample, if the data center has 1000 database endpoints to register, and you haveOracle Key Vault four servers to accommodate them, then enroll 250 endpoints witheach of the four servers.
Each endpoint first contacts the Oracle Key Vault nodes in the local data center. If anoutage causes all Oracle Key Vault nodes to be unavailable in one data center, then aslong as connectivity to another data center is available, the endpoint node scan list willredirect the endpoints to available Oracle Key Vault nodes in another data center.
A possible deployment scenario with two data centers, each containing two read-writenodes, paired with read-write nodes in the other data center is shown in Figure 3-2. Adata center can also host one or more read-only nodes as needed for load balancing,reliability, or expansion purposes. In the scenario described in the following figure,each data center hosts a single read-only node.
Figure 3-2 Oracle Key Vault Multi-Master Cluster Deployment across Two DataCenters
Atlanta Data Center
Standby
Berkeley Data Center
Database Database
Atlanta ARead-Only Node
Oracle RACDatabase
Standby
Atlanta BRead-Write Node
Atlanta CRead-Write Node
Berkeley BRead-Write Node
Berkeley CRead-Write Node
Berkeley ARead-Only Node
Oracle RACDatabase
Chapter 3Oracle Key Vault Multi-Master Cluster Deployment Scenarios
3-16
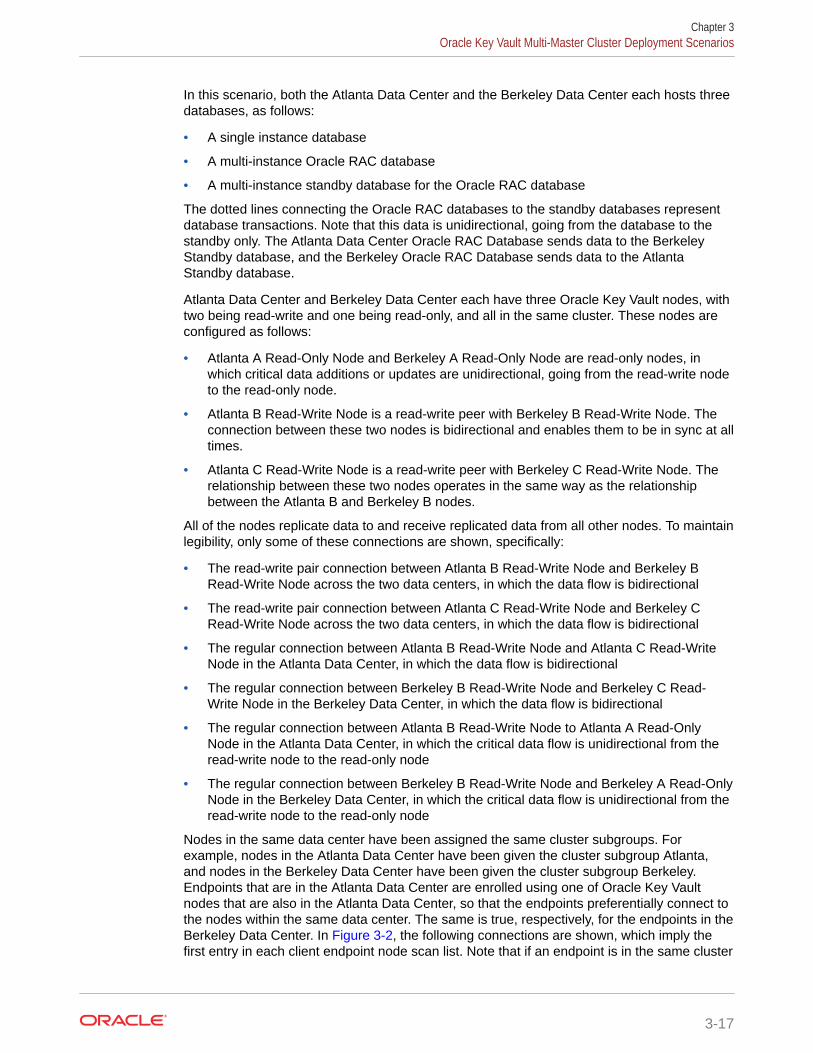
In this scenario, both the Atlanta Data Center and the Berkeley Data Center each hosts threedatabases, as follows:
• A single instance database
• A multi-instance Oracle RAC database
• A multi-instance standby database for the Oracle RAC database
The dotted lines connecting the Oracle RAC databases to the standby databases representdatabase transactions. Note that this data is unidirectional, going from the database to thestandby only. The Atlanta Data Center Oracle RAC Database sends data to the BerkeleyStandby database, and the Berkeley Oracle RAC Database sends data to the AtlantaStandby database.
Atlanta Data Center and Berkeley Data Center each have three Oracle Key Vault nodes, withtwo being read-write and one being read-only, and all in the same cluster. These nodes areconfigured as follows:
• Atlanta A Read-Only Node and Berkeley A Read-Only Node are read-only nodes, inwhich critical data additions or updates are unidirectional, going from the read-write nodeto the read-only node.
• Atlanta B Read-Write Node is a read-write peer with Berkeley B Read-Write Node. Theconnection between these two nodes is bidirectional and enables them to be in sync at alltimes.
• Atlanta C Read-Write Node is a read-write peer with Berkeley C Read-Write Node. Therelationship between these two nodes operates in the same way as the relationshipbetween the Atlanta B and Berkeley B nodes.
All of the nodes replicate data to and receive replicated data from all other nodes. To maintainlegibility, only some of these connections are shown, specifically:
• The read-write pair connection between Atlanta B Read-Write Node and Berkeley BRead-Write Node across the two data centers, in which the data flow is bidirectional
• The read-write pair connection between Atlanta C Read-Write Node and Berkeley CRead-Write Node across the two data centers, in which the data flow is bidirectional
• The regular connection between Atlanta B Read-Write Node and Atlanta C Read-WriteNode in the Atlanta Data Center, in which the data flow is bidirectional
• The regular connection between Berkeley B Read-Write Node and Berkeley C Read-Write Node in the Berkeley Data Center, in which the data flow is bidirectional
• The regular connection between Atlanta B Read-Write Node to Atlanta A Read-OnlyNode in the Atlanta Data Center, in which the critical data flow is unidirectional from theread-write node to the read-only node
• The regular connection between Berkeley B Read-Write Node and Berkeley A Read-OnlyNode in the Berkeley Data Center, in which the critical data flow is unidirectional from theread-write node to the read-only node
Nodes in the same data center have been assigned the same cluster subgroups. Forexample, nodes in the Atlanta Data Center have been given the cluster subgroup Atlanta,and nodes in the Berkeley Data Center have been given the cluster subgroup Berkeley.Endpoints that are in the Atlanta Data Center are enrolled using one of Oracle Key Vaultnodes that are also in the Atlanta Data Center, so that the endpoints preferentially connect tothe nodes within the same data center. The same is true, respectively, for the endpoints in theBerkeley Data Center. In Figure 3-2, the following connections are shown, which imply thefirst entry in each client endpoint node scan list. Note that if an endpoint is in the same cluster
Chapter 3Oracle Key Vault Multi-Master Cluster Deployment Scenarios
3-17
subgroup as at least one node in the cluster, the first entry in the endpoint node scanlist will be randomly chosen from the nodes that are in the same cluster subgroup asthe endpoint:
• In Atlanta Data Center:
– The Oracle RAC Database connects to Atlanta B Read-Write Node, with thedata going in a bidirectional flow.
– The Atlanta A Read-Only Node connect to the Standby, with the data goingfrom the read-only node to the standby in a unidirectional flow.
– The Database connects to the Atlanta C Read-Write Node, with the data goingin a bidirectional flow.
• In Berkeley Data Center:
– The Oracle RAC Database connects to Berkeley B Read-Write Node, with thedata going in a bidirectional flow.
– The Berkeley A Read-Only Node connects to the Standby, with the data goingfrom the read-only node to the standby in a unidirectional flow.
– The Database connects to Berkeley C Read-Write Node, with the data goingin a bidirectional flow.
In the event that Atlanta C Read-Write node cannot be reached or does not have thenecessary key, the database that connected to it will connect to other Oracle Key Vaultnodes to fetch the key.
Related Topics
• Oracle Key Vault Read-Write NodesA read-write node is a node in which critical data can be added or updated usingthe Oracle Key Vault or endpoint software.
• Oracle Key Vault Read-Only NodesIn a read-only node, users can add or update non-critical data but not add orupdate critical data. However, read-only nodes can read critical data.
3.6 Multi-Master Cluster FeaturesOracle Key Vault provides features that help with inconsistency resolution and nameconflict resolution in clusters, and endpoint node scan lists.
• Cluster Inconsistency Resolution in a Multi-Master ClusterNetwork outages can introduce inconsistency in data in a cluster, but when theoutage is over and the network connection resumes, the data will becomeconsistent again.
• Name Conflict Resolution in a Multi-Master ClusterNaming conflicts can arise when an object has the same name as another objectin a different node.
• Endpoint Node Connection Lists (Endpoint Node Scan Lists)An endpoint node scan list is a list of nodes to which the endpoint can connect.
Chapter 3Multi-Master Cluster Features
3-18
3.6.1 Cluster Inconsistency Resolution in a Multi-Master ClusterNetwork outages can introduce inconsistency in data in a cluster, but when the outage is overand the network connection resumes, the data will become consistent again.
A node can be disconnected from other nodes in the cluster voluntarily or involuntarily. Whena node becomes available to the cluster after being voluntarily disconnected, any datachanges in the cluster are replicated to the node. Network disruptions, power outages, andother disconnects can happen any time for any Oracle Key Vault node, causing aninvoluntary disconnection from other nodes in the cluster. Such failures interrupt the datareplication processes within a multi-master cluster. Temporary failures do not alwaysintroduce inconsistency to a cluster. As soon as the problem is addressed, the datareplication process will resume from the moment it was halted. This ensures that even aftersome disconnections, disconnected Oracle Key Vault nodes will be able to synchronizethemselves with the other nodes in the cluster eventually.
Any change made in a read-write node is guaranteed to be replicated to the other pairedread-write node. Therefore, even if the read-write node suffers a failure, the data is availableon at least one other node in the cluster.
3.6.2 Name Conflict Resolution in a Multi-Master ClusterNaming conflicts can arise when an object has the same name as another object in adifferent node.
Users must specify names when creating virtual wallets, users, user groups, endpoints, andendpoint groups. A name conflict arises when two or more users create the same type ofobject with the same name on different nodes before the object has been replicated. If theobject has been replicated on other nodes, then the system prevents the creation of objectswith duplicate names. But replication in the Oracle Key Vault cluster is not instantaneous, sothere is a possibility that during the replication window (which can be in the order of seconds),another object with the same name may have been created in this cluster. If this happens, itbecomes a name conflict. Name conflicts have obvious drawbacks. For example, the systemcannot distinguish between the references to two objects with duplicate names. Uniquenessin names is thus enforced to avoid inconsistencies in the cluster. All other object names mustbe unique within their object type, such as wallets, endpoint groups, user groups, and anyother object type. For example, no two wallets may have the same name within the cluster.User names and endpoint names must not conflict.
While rare, a naming conflict can still arise. When this occurs, Oracle Key Vault detects thisname conflict and raises an alert. Oracle Key Vault then will append _OKVxx (where xx is thenode ID of the node on which the renamed object was created) to the name of the conflictingobject that was created later. You can choose to accept this suggested object name orrename the object.
To accept or change a conflicting object name, click the Cluster tab, then ConflictResolution from the left navigation bar to see and resolve all conflicts.
3.6.3 Endpoint Node Connection Lists (Endpoint Node Scan Lists)An endpoint node scan list is a list of nodes to which the endpoint can connect.
An endpoint connects to an Oracle Key Vault server or node to manage or access wallets,keys, certificates, and credentials.
Chapter 3Multi-Master Cluster Features
3-19
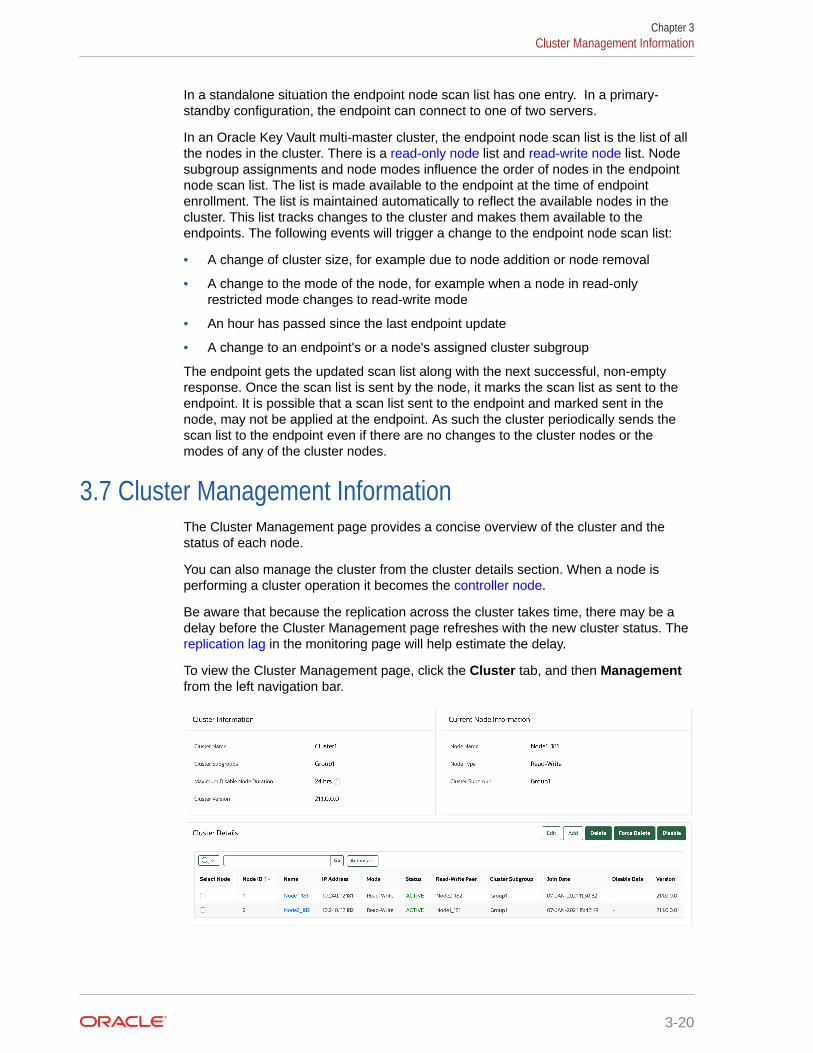
In a standalone situation the endpoint node scan list has one entry. In a primary-standby configuration, the endpoint can connect to one of two servers.
In an Oracle Key Vault multi-master cluster, the endpoint node scan list is the list of allthe nodes in the cluster. There is a read-only node list and read-write node list. Nodesubgroup assignments and node modes influence the order of nodes in the endpointnode scan list. The list is made available to the endpoint at the time of endpointenrollment. The list is maintained automatically to reflect the available nodes in thecluster. This list tracks changes to the cluster and makes them available to theendpoints. The following events will trigger a change to the endpoint node scan list:
• A change of cluster size, for example due to node addition or node removal
• A change to the mode of the node, for example when a node in read-onlyrestricted mode changes to read-write mode
• An hour has passed since the last endpoint update
• A change to an endpoint's or a node's assigned cluster subgroup
The endpoint gets the updated scan list along with the next successful, non-emptyresponse. Once the scan list is sent by the node, it marks the scan list as sent to theendpoint. It is possible that a scan list sent to the endpoint and marked sent in thenode, may not be applied at the endpoint. As such the cluster periodically sends thescan list to the endpoint even if there are no changes to the cluster nodes or themodes of any of the cluster nodes.
3.7 Cluster Management InformationThe Cluster Management page provides a concise overview of the cluster and thestatus of each node.
You can also manage the cluster from the cluster details section. When a node isperforming a cluster operation it becomes the controller node.
Be aware that because the replication across the cluster takes time, there may be adelay before the Cluster Management page refreshes with the new cluster status. The replication lag in the monitoring page will help estimate the delay.
To view the Cluster Management page, click the Cluster tab, and then Management from the left navigation bar.
Chapter 3Cluster Management Information
3-20
Cluster Information
• Cluster Name: The name of the cluster.
• Cluster Subgroups: All subgroups within the cluster.
• Maximum Disable Node Duration: The maximum time, in hours, that a node can bedisabled before it can no longer be enabled.
• Cluster Version: The version of Oracle Key Vault in which the cluster is operating.
Current Node Information
• Node Name: The name of this node.
• Node Type: The type of node, such as whether it is read-only or read-write.
• Cluster Subgroup: The subgroup to which this node belongs.
Cluster Details
• Select Node: Used to select a node for a specific operation, such as delete, force delete,or disable.
• Node ID: The ID of the node.
• Node Name: The name of the node. Clicking the node name takes you to the ClusterManagement page of that node.
• IP Address: The IP address of the node.
• Mode: The mode in which the node is operating, such as read-write or read-onlyrestricted.
• Status: The status of the node, such as active, pairing, disabling, disabled, enabling,deleting, or deleted.
• Read-Write Peer: The read-write peer of the node. If blank, it has no read-write peer.
• Cluster Subgroup: The subgroup to which the node belongs. You can change this by 1)checking the check box next to a node, 2) clicking the Edit button, which displays awindow, 3) entering a new cluster subgroup in the field, and 4) clicking Save.
• Join Date: The date and time that the node was added to the cluster or most recentlyenabled
• Disable Date: The date and time that the node was disabled.
• Node Version: The current version of the Oracle Key Vault node.
Chapter 3Cluster Management Information
3-21
4Oracle Key Vault Installation andConfiguration
Installing Oracle Key Vault entails ensuring that the environment meets the necessaryrequirements before you begin the installation and configuration.
• About Oracle Key Vault Installation and ConfigurationOracle Key Vault is a software appliance that is delivered as an ISO image.
• Oracle Key Vault Installation RequirementsThe Oracle Key Vault installation requirements cover system requirements such as CPU,memory, disk space, network interfaces, and supported endpoint platforms.
• Installing and Configuring Oracle Key VaultYou must download the Oracle Key Vault application software, and then you can performthe installation.
• Logging In to the Oracle Key Vault Management ConsoleTo use Oracle Key Vault, you can log in to the Oracle Key Vault management console.
• Upgrading a Standalone or Primary-Standby Oracle Key Vault ServerThis upgrade includes the Oracle Key Vault server software and utilities that control theassociated endpoint software.
• Upgrading Oracle Key Vault in a Multi-Master Cluster EnvironmentSimilar to a standalone or primary-standby upgrade, this type of upgrade includes theOracle Key Vault server software and endpoint software-related utilities.
• Overview of the Oracle Key Vault Management ConsoleThe Oracle Key Vault management console provides a graphical user interface for OracleKey Vault users.
• Performing Actions and SearchesThe Oracle Key Vault management console enables you to perform standard actions andsearch operations, as well as get help information.
4.1 About Oracle Key Vault Installation and ConfigurationOracle Key Vault is a software appliance that is delivered as an ISO image.
The software appliance consists of a pre-configured operating system, an Oracle database,and the Oracle Key Vault application. You can install Oracle Key Vault onto its own dedicatedserver, as a VM guest into your virtualization platform, or as a compute instance in your OCItenancy. See the Oracle Cloud Marketplace at https://cloudmarketplace.oracle.com/marketplace/app/OracleKeyVault.
Before you begin the installation or upgrade process for Oracle Key Vault, check the OracleKey Vault Release Notes for any known issues that you should be aware of.
4-1
4.2 Oracle Key Vault Installation RequirementsThe Oracle Key Vault installation requirements cover system requirements such asCPU, memory, disk space, network interfaces, and supported endpoint platforms.
• System RequirementsSystem requirements include CPU, memory, disk, network interface, hardwarecompatibility, and RESTful services client.
• Network Port RequirementsNetwork port requirements includes requirements for SSH/SCP, SNMP, HTTPS,listeners, KMIP, and TCP ports.
• Supported Endpoint PlatformsOracle Key Vault supports both UNIX and Windows endpoint platforms.
• Endpoint Database RequirementsAdministrators can use online master keys and the Oracle Database COMPATIBLEinitialization parameter to manage Oracle Database endpoints.
4.2.1 System RequirementsSystem requirements include CPU, memory, disk, network interface, hardwarecompatibility, and RESTful services client.
The Oracle Key Vault installation removes existing software on a server.
Deployment on virtual machines is not recommended for production systems.However, virtual machines are useful for testing and proof of concept purposes.
The minimum hardware requirements for deploying the Oracle Key Vault softwareappliance are:
• CPU: Minimum: x86-64 16 cores. Recommended: 24-48 cores with cryptographicacceleration support (Intel AESNI).
• Memory: Minimum 16 GB of RAM. Recommended: 32–64 GB.
• Disk: Both BIOS and UEFI boot mode. For a system with a boot disk size greaterthan 2 TB, Oracle Key Vault supports booting in UEFI mode only.
• Network interface: One network interface.
• Hardware Compatibility: Any Intel x86 64-bit hardware platform supported byOracle Key Vault's embedded operating system. Oracle Key Vault uses OracleLinux release 7 with the Unbreakable Enterprise Kernel (UEK) version 5. For a listof compatible hardware, refer to Hardware Certification List for Oracle Linux andOracle VM in the Related Topics. This list contains the minimum version of OracleLinux certified with the selected hardware. All Oracle Linux updates starting withOracle Linux release 7 as the minimum are also certified unless otherwise noted.Refer to Oracle Linux documentation for more information on the operating systemplatform.
Chapter 4Oracle Key Vault Installation Requirements
4-2
Note:
You can find the supported hardware from the hardware certification list forOracle Linux and Oracle VM. Filter the results by selecting All OperatingSystems and choosing Oracle Linux 7.9. However, be aware that Oracle KeyVault does not support the QLogic QL4* family of network cards.
Oracle Key Vault supports both Legacy BIOS and UEFI BIOS boot modes. The supportfor UEFI BIOS mode allows the installation of Oracle Key Vault on servers thatexclusively support UEFI BIOS only, such as Oracle X7-2 Server. Oracle Key Vault canbe installed on Oracle X7–2 servers as a standalone server, a primary-standbyconfiguration, or a multi-master cluster configuration.
• RESTful Services Client: If RESTful Services are enabled, then each endpoint thatconnects to the Oracle Key Vault management console must have at least Java 1.7.0.21installed.
Note:
For deployment with a large number of endpoints, the hardware requirement mayneed to scale to meet the workload.
Related Topics
• Hardware Certification List for Oracle Linux and Oracle VM
4.2.2 Network Port RequirementsNetwork port requirements includes requirements for SSH/SCP, SNMP, HTTPS, listeners,KMIP, and TCP ports.
Oracle Key Vault and its endpoints use a set of specific ports for communication. Networkadministrators must ensure that these ports are open in the network firewall.
The following table lists the required network ports for Oracle Key Vault:
Table 4-1 Ports Required for Oracle Key Vault
Port Number Protocol Descriptions
22 SSH/SCP port Used by Oracle Key Vault administrators and support personnelto remotely administer Oracle Key Vault
161 SNMP port Used by monitoring software to poll Oracle Key Vault for systeminformation
443 HTTPS port Used by web clients such as browsers and RESTfulAdministrative commands to communicate with Oracle KeyVault
5695 HTTPS port Used by RESTful Key Management commands to communicatewith Oracle Key Vault
Chapter 4Oracle Key Vault Installation Requirements
4-3
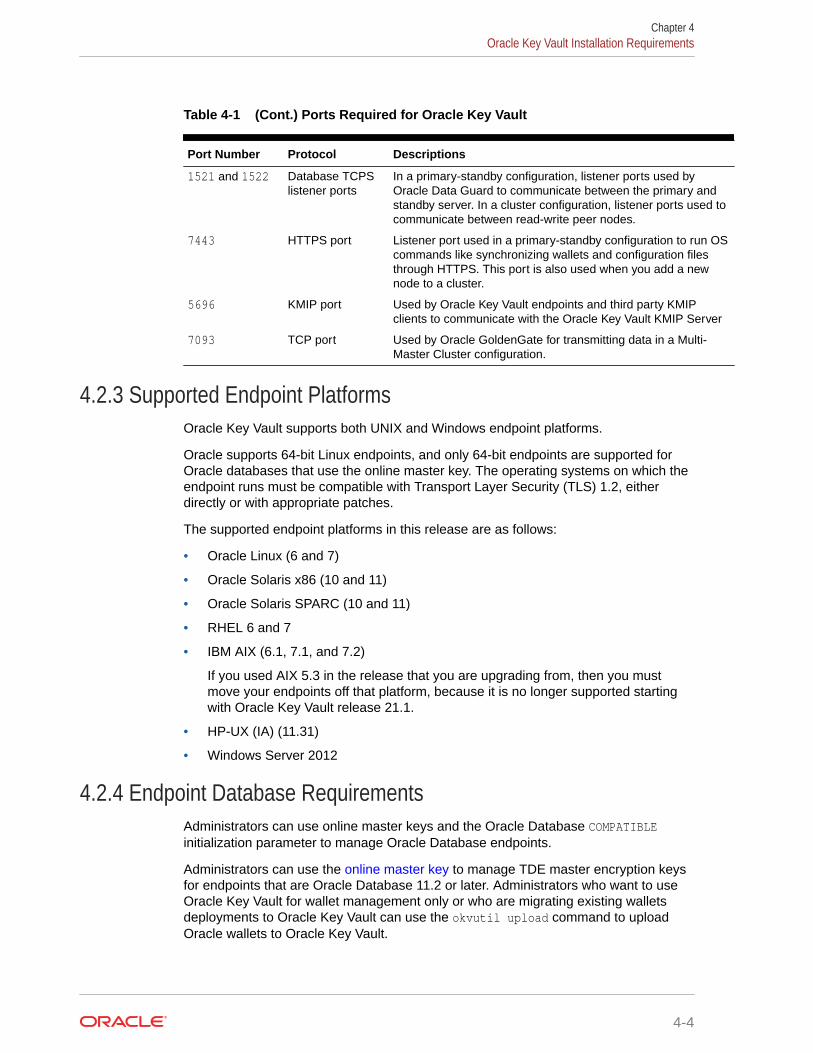
Table 4-1 (Cont.) Ports Required for Oracle Key Vault
Port Number Protocol Descriptions
1521 and 1522 Database TCPSlistener ports
In a primary-standby configuration, listener ports used byOracle Data Guard to communicate between the primary andstandby server. In a cluster configuration, listener ports used tocommunicate between read-write peer nodes.
7443 HTTPS port Listener port used in a primary-standby configuration to run OScommands like synchronizing wallets and configuration filesthrough HTTPS. This port is also used when you add a newnode to a cluster.
5696 KMIP port Used by Oracle Key Vault endpoints and third party KMIPclients to communicate with the Oracle Key Vault KMIP Server
7093 TCP port Used by Oracle GoldenGate for transmitting data in a Multi-Master Cluster configuration.
4.2.3 Supported Endpoint PlatformsOracle Key Vault supports both UNIX and Windows endpoint platforms.
Oracle supports 64-bit Linux endpoints, and only 64-bit endpoints are supported forOracle databases that use the online master key. The operating systems on which theendpoint runs must be compatible with Transport Layer Security (TLS) 1.2, eitherdirectly or with appropriate patches.
The supported endpoint platforms in this release are as follows:
• Oracle Linux (6 and 7)
• Oracle Solaris x86 (10 and 11)
• Oracle Solaris SPARC (10 and 11)
• RHEL 6 and 7
• IBM AIX (6.1, 7.1, and 7.2)
If you used AIX 5.3 in the release that you are upgrading from, then you mustmove your endpoints off that platform, because it is no longer supported startingwith Oracle Key Vault release 21.1.
• HP-UX (IA) (11.31)
• Windows Server 2012
4.2.4 Endpoint Database RequirementsAdministrators can use online master keys and the Oracle Database COMPATIBLEinitialization parameter to manage Oracle Database endpoints.
Administrators can use the online master key to manage TDE master encryption keysfor endpoints that are Oracle Database 11.2 or later. Administrators who want to useOracle Key Vault for wallet management only or who are migrating existing walletsdeployments to Oracle Key Vault can use the okvutil upload command to uploadOracle wallets to Oracle Key Vault.
Chapter 4Oracle Key Vault Installation Requirements
4-4
Administrators who manage endpoints that are Oracle Database may need to set theCOMPATIBLE initialization parameter.
For an endpoint that is Oracle Database release 11.2 or later, set the COMPATIBLE initializationparameter to 11.2.0.0 or later. A COMPATIBLE setting of 11.2 or later enables TransparentData Encryption to work with Oracle Key Vault. For example:
SQL> ALTER SYSTEM SET COMPATIBLE = '11.2.0.0' SCOPE=SPFILE;
This applies to an Oracle Database endpoint that use the online master key to manage TDEmaster encryption keys. This compatibility mode setting is not required for Oracle walletupload or download operations.
Also note that after setting the COMPATIBLE parameter to 11.2.0.0, you cannot set it to alower value such as 10.2. After you set the COMPATIBLE parameter, you must restart thedatabase.
4.3 Installing and Configuring Oracle Key VaultYou must download the Oracle Key Vault application software, and then you can perform theinstallation.
• Downloading the Oracle Key Vault Appliance SoftwareYou can download executable files for both a fresh Oracle Key Vault installation or anupgrade.
• Installing the Oracle Key Vault Appliance SoftwareThe Oracle Key Vault installation process installs all the required software componentsonto a dedicated server or virtual machine.
• Performing Post-Installation TasksAfter you install Oracle Key Vault, you must complete a set of post-installation tasks.
4.3.1 Downloading the Oracle Key Vault Appliance SoftwareYou can download executable files for both a fresh Oracle Key Vault installation or anupgrade.
For a fresh installation, you can download the Oracle Key Vault appliance softwarefrom Software Delivery Cloud. You cannot use this package to upgrade Oracle Key Vault. Foran upgrade, you can download the Oracle Key Vault upgrade software from the My OracleSupport website.
1. Use a web browser to access the Oracle Software Delivery Cloud portal:
https://edelivery.oracle.com
2. Click Sign In, and if prompted, enter your User ID and Password.
3. In the All Categories menu, select Release. In the next field, enter Oracle Key Vaultand then click Search.
4. From the list that is displayed, select Oracle Key Vault 21.1.0.0.0 or click the +Add toCart button next to the Oracle Key Vault 21.1.0.0.0.
The download is added to your cart. (To check the cart contents, click View Cart in theupper right of the screen.)
Chapter 4Installing and Configuring Oracle Key Vault
4-5
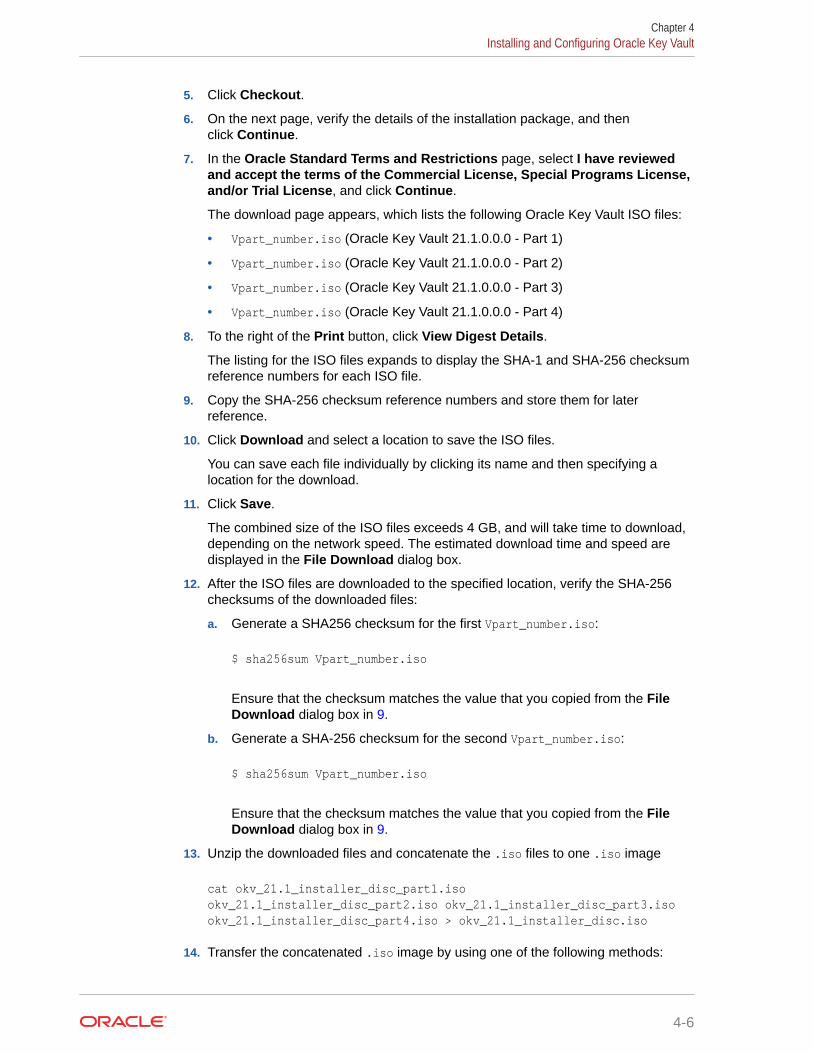
5. Click Checkout.
6. On the next page, verify the details of the installation package, and thenclick Continue.
7. In the Oracle Standard Terms and Restrictions page, select I have reviewedand accept the terms of the Commercial License, Special Programs License,and/or Trial License, and click Continue.
The download page appears, which lists the following Oracle Key Vault ISO files:
• Vpart_number.iso (Oracle Key Vault 21.1.0.0.0 - Part 1)
• Vpart_number.iso (Oracle Key Vault 21.1.0.0.0 - Part 2)
• Vpart_number.iso (Oracle Key Vault 21.1.0.0.0 - Part 3)
• Vpart_number.iso (Oracle Key Vault 21.1.0.0.0 - Part 4)
8. To the right of the Print button, click View Digest Details.
The listing for the ISO files expands to display the SHA-1 and SHA-256 checksumreference numbers for each ISO file.
9. Copy the SHA-256 checksum reference numbers and store them for laterreference.
10. Click Download and select a location to save the ISO files.
You can save each file individually by clicking its name and then specifying alocation for the download.
11. Click Save.
The combined size of the ISO files exceeds 4 GB, and will take time to download,depending on the network speed. The estimated download time and speed aredisplayed in the File Download dialog box.
12. After the ISO files are downloaded to the specified location, verify the SHA-256checksums of the downloaded files:
a. Generate a SHA256 checksum for the first Vpart_number.iso:
$ sha256sum Vpart_number.iso
Ensure that the checksum matches the value that you copied from the FileDownload dialog box in 9.
b. Generate a SHA-256 checksum for the second Vpart_number.iso:
$ sha256sum Vpart_number.iso
Ensure that the checksum matches the value that you copied from the FileDownload dialog box in 9.
13. Unzip the downloaded files and concatenate the .iso files to one .iso image
cat okv_21.1_installer_disc_part1.iso okv_21.1_installer_disc_part2.iso okv_21.1_installer_disc_part3.iso okv_21.1_installer_disc_part4.iso > okv_21.1_installer_disc.iso
14. Transfer the concatenated .iso image by using one of the following methods:
Chapter 4Installing and Configuring Oracle Key Vault
4-6
• Burn the concatenated .iso image onto a bootable DVD.
• Copy the concatenated .iso image onto a bootable USB stick.
• Mount the concatenated .iso image with your virtualization software, in order to runOracle Key Vault as a virtual machine, booting from the concatenated .iso image.
You now can install Oracle Key Vault on the server.
4.3.2 Installing the Oracle Key Vault Appliance SoftwareThe Oracle Key Vault installation process installs all the required software components onto adedicated server or virtual machine.
The installation process may take from 30 minutes or longer to complete, depending on theserver resources where you are installing Oracle Key Vault.If you are installing Oracle Key Vault on VMware, then set the VMX configuration parameterdisk.EnableUUID to TRUE. In addition, you must set your virtual machine to use EFI boot. Insome versions of VMware this is done by selecting the VM Options tab, then expandingBoot Options, and then setting the firmware to EFI. You must disable secure boot. Withoutthis setting, the Oracle Key Vault installation on VMware will fail.
Caution:
The Oracle Key Vault installation wipes the server, repartitions the disk, and installsa hardened Oracle Linux 7 Update 9. The installation erases existing software anddata on the server.
Ensure that you have met the following prerequisites.
• Ensure that the server meets the recommended requirements.
• Request a fixed IP address, network mask, and gateway address from your networkadministrator. You will need this information to configure the network.
To install the Oracle Key Vault appliance:
1. Make the .iso image available to the computer where you want to install it, and thenrestart the computer.
The .iso image can available in any of these ways:
• Burned onto a bootable DVD
• Copied onto a bootable USB stick
• Mounted with your site's virtualization software
You may need to change the boot order of your server to boot from the USB-stick or theDVD.
Chapter 4Installing and Configuring Oracle Key Vault
4-7
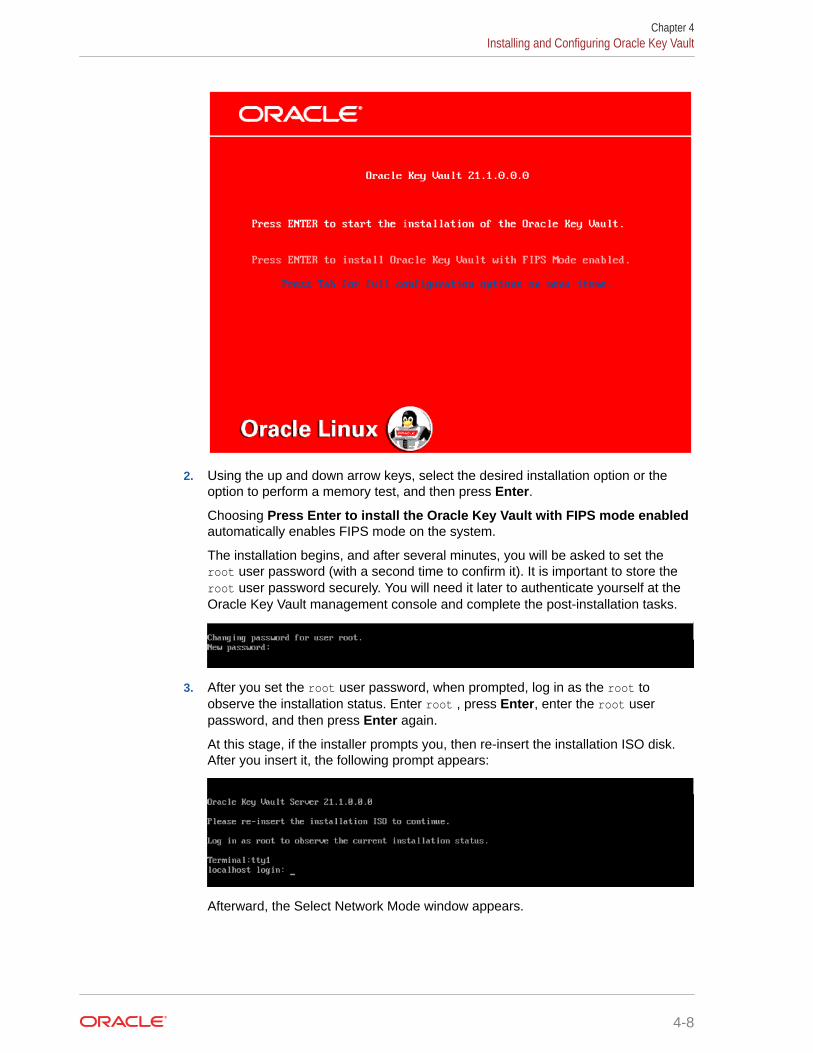
2. Using the up and down arrow keys, select the desired installation option or theoption to perform a memory test, and then press Enter.
Choosing Press Enter to install the Oracle Key Vault with FIPS mode enabledautomatically enables FIPS mode on the system.
The installation begins, and after several minutes, you will be asked to set theroot user password (with a second time to confirm it). It is important to store theroot user password securely. You will need it later to authenticate yourself at theOracle Key Vault management console and complete the post-installation tasks.
3. After you set the root user password, when prompted, log in as the root toobserve the installation status. Enter root , press Enter, enter the root userpassword, and then press Enter again.
At this stage, if the installer prompts you, then re-insert the installation ISO disk.After you insert it, the following prompt appears:
Afterward, the Select Network Mode window appears.
Chapter 4Installing and Configuring Oracle Key Vault
4-8
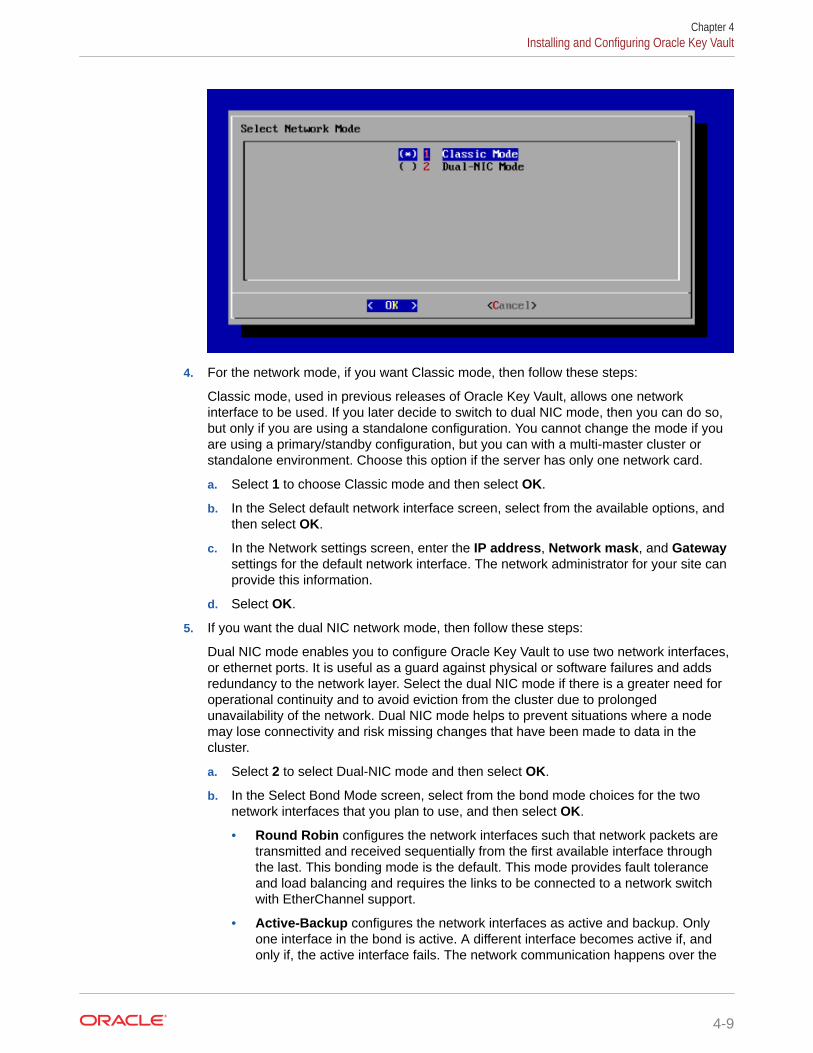
4. For the network mode, if you want Classic mode, then follow these steps:
Classic mode, used in previous releases of Oracle Key Vault, allows one networkinterface to be used. If you later decide to switch to dual NIC mode, then you can do so,but only if you are using a standalone configuration. You cannot change the mode if youare using a primary/standby configuration, but you can with a multi-master cluster orstandalone environment. Choose this option if the server has only one network card.
a. Select 1 to choose Classic mode and then select OK.
b. In the Select default network interface screen, select from the available options, andthen select OK.
c. In the Network settings screen, enter the IP address, Network mask, and Gatewaysettings for the default network interface. The network administrator for your site canprovide this information.
d. Select OK.
5. If you want the dual NIC network mode, then follow these steps:
Dual NIC mode enables you to configure Oracle Key Vault to use two network interfaces,or ethernet ports. It is useful as a guard against physical or software failures and addsredundancy to the network layer. Select the dual NIC mode if there is a greater need foroperational continuity and to avoid eviction from the cluster due to prolongedunavailability of the network. Dual NIC mode helps to prevent situations where a nodemay lose connectivity and risk missing changes that have been made to data in thecluster.
a. Select 2 to select Dual-NIC mode and then select OK.
b. In the Select Bond Mode screen, select from the bond mode choices for the twonetwork interfaces that you plan to use, and then select OK.
• Round Robin configures the network interfaces such that network packets aretransmitted and received sequentially from the first available interface throughthe last. This bonding mode is the default. This mode provides fault toleranceand load balancing and requires the links to be connected to a network switchwith EtherChannel support.
• Active-Backup configures the network interfaces as active and backup. Onlyone interface in the bond is active. A different interface becomes active if, andonly if, the active interface fails. The network communication happens over the
Chapter 4Installing and Configuring Oracle Key Vault
4-9
active interface. This mode provides fault tolerance and does not requireany switch support.
• 802.3ad creates aggregation groups that share the same speed andduplex settings. Network packets are transmitted and received on allinterfaces. This mode provides fault tolerance and load balancing andrequires a switch that supports IEEE 802.3ad dynamic link aggregation.
c. In the Select two network interfaces screen, select the two network interfacesthat you want, and then select OK.
d. In the Network settings screen, enter the IP address, Network mask,Gateway, and Hostname settings for the default network interface. Thenetwork administrator for your site can provide this information. For the hostname, use only lowercase characters. The host name can be the fully qualifiedhost name or the short host name.
e. Select OK.
6. When prompted, select Reboot to complete installation and press Enter.
The installer installs and configures the operating system, database, and OracleKey Vault on the server to make it a self-contained hardened appliance. Theinstallation and configuration process can take an hour or longer.
Related Topics
• Dual NIC Network Interface SupportStarting with this release, Oracle Key Vault supports the use of two networkinterfaces, referred to as dual NIC configuration.
4.3.3 Performing Post-Installation TasksAfter you install Oracle Key Vault, you must complete a set of post-installation tasks.
These tasks include configuring the administrative user accounts and passwords forrecovery, and operating system accounts and passwords for root and support.
1. Use a web browser to connect to the Oracle Key Vault server.
For example, to connect in to an Oracle Key Vault server whose IP address is192.0.2.254, enter the following in the address bar:
https://192.0.2.254
2. If the web browser displays a security warning message stating that you areconnecting to a website with an untrusted or self-signed security certificate, acceptthe security warning message and proceed to connect to the Oracle Key Vaultserver.
This message is only temporary. When you configure third-party certificates, thismessage will no longer appear. After completing the post-installation tasks, youcan upload a custom certificate or certificate chain that is trusted by the browser,so that you can connect to the Oracle Key Vault server without encountering thesecurity warning message. For more information about uploading a customcertificate, see Managing Console Certificates.
3. In the root password screen, enter the root password.
Chapter 4Installing and Configuring Oracle Key Vault
4-10
The root password screen is displayed when you connect to the Oracle Key Vault serverfor the first time, in order to complete the post-installation tasks. After you complete thepost-installation tasks, the Oracle Key Vault login screen is displayed when you accessthe Oracle Key Vault management console through the web browser.
After you log in with the root user password, the Post-Install Configuration screen isdisplayed.
4. In the User Setup pane, create three administrative user accounts for the KeyAdministrator, System Administrator, and Audit Manager.
Chapter 4Installing and Configuring Oracle Key Vault
4-11
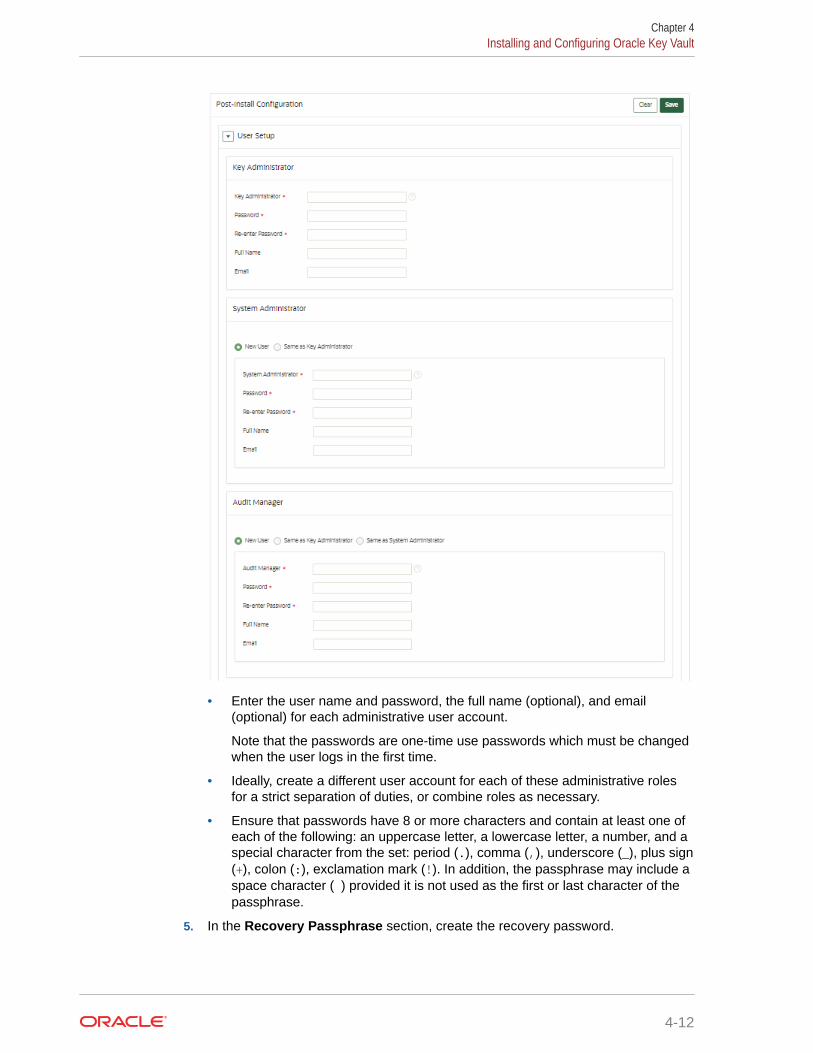
• Enter the user name and password, the full name (optional), and email(optional) for each administrative user account.
Note that the passwords are one-time use passwords which must be changedwhen the user logs in the first time.
• Ideally, create a different user account for each of these administrative rolesfor a strict separation of duties, or combine roles as necessary.
• Ensure that passwords have 8 or more characters and contain at least one ofeach of the following: an uppercase letter, a lowercase letter, a number, and aspecial character from the set: period (.), comma (,), underscore (_), plus sign(+), colon (:), exclamation mark (!). In addition, the passphrase may include aspace character ( ) provided it is not used as the first or last character of thepassphrase.
5. In the Recovery Passphrase section, create the recovery password.
Chapter 4Installing and Configuring Oracle Key Vault
4-12
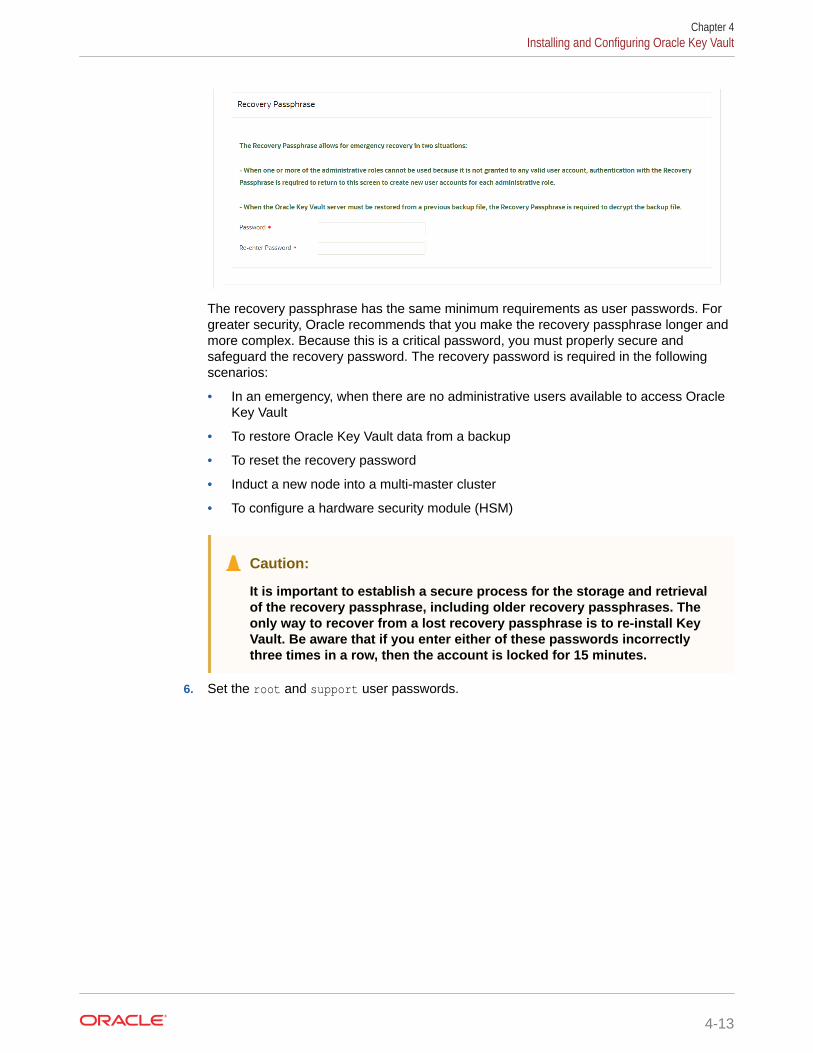
The recovery passphrase has the same minimum requirements as user passwords. Forgreater security, Oracle recommends that you make the recovery passphrase longer andmore complex. Because this is a critical password, you must properly secure andsafeguard the recovery password. The recovery password is required in the followingscenarios:
• In an emergency, when there are no administrative users available to access OracleKey Vault
• To restore Oracle Key Vault data from a backup
• To reset the recovery password
• Induct a new node into a multi-master cluster
• To configure a hardware security module (HSM)
Caution:
It is important to establish a secure process for the storage and retrievalof the recovery passphrase, including older recovery passphrases. Theonly way to recover from a lost recovery passphrase is to re-install KeyVault. Be aware that if you enter either of these passwords incorrectlythree times in a row, then the account is locked for 15 minutes.
6. Set the root and support user passwords.
Chapter 4Installing and Configuring Oracle Key Vault
4-13
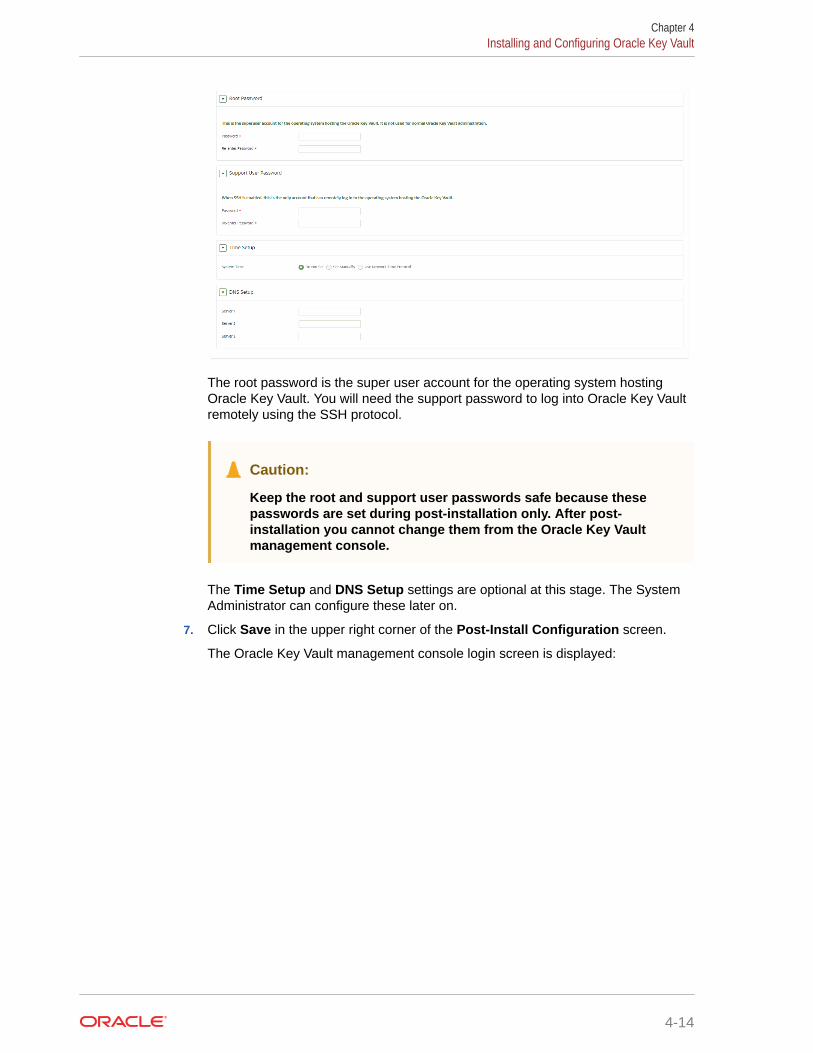
The root password is the super user account for the operating system hostingOracle Key Vault. You will need the support password to log into Oracle Key Vaultremotely using the SSH protocol.
Caution:
Keep the root and support user passwords safe because thesepasswords are set during post-installation only. After post-installation you cannot change them from the Oracle Key Vaultmanagement console.
The Time Setup and DNS Setup settings are optional at this stage. The SystemAdministrator can configure these later on.
7. Click Save in the upper right corner of the Post-Install Configuration screen.
The Oracle Key Vault management console login screen is displayed:
Chapter 4Installing and Configuring Oracle Key Vault
4-14
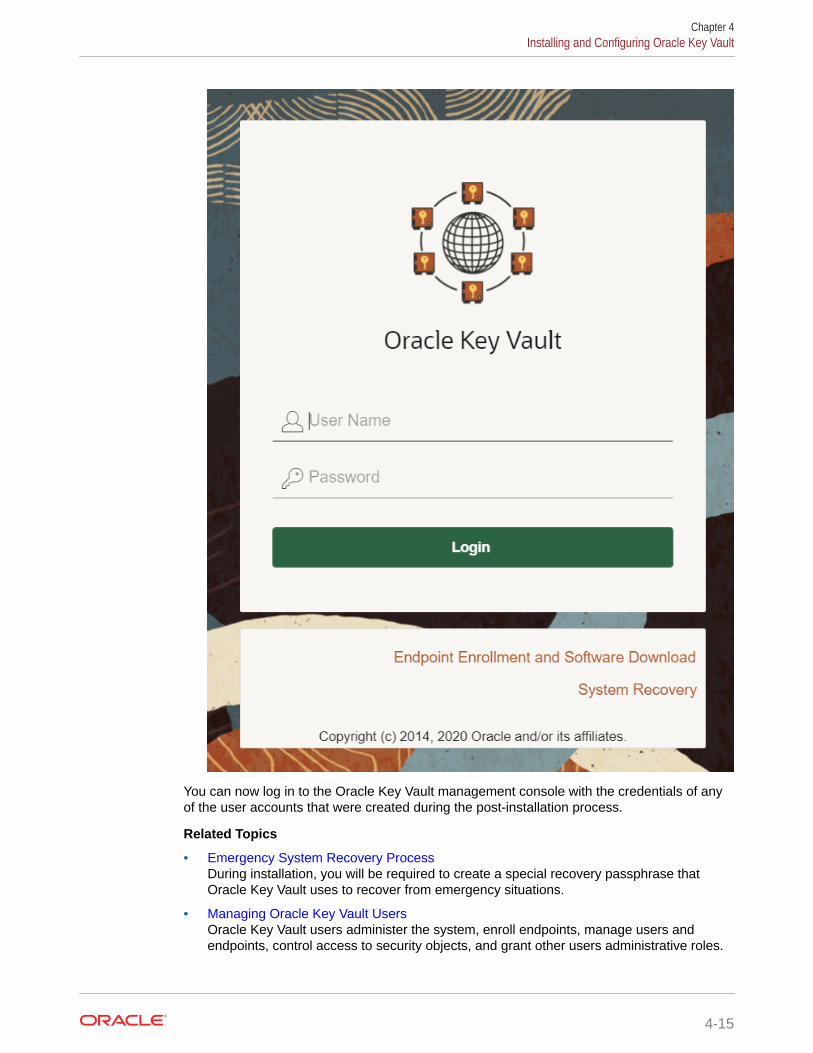
You can now log in to the Oracle Key Vault management console with the credentials of anyof the user accounts that were created during the post-installation process.
Related Topics
• Emergency System Recovery ProcessDuring installation, you will be required to create a special recovery passphrase thatOracle Key Vault uses to recover from emergency situations.
• Managing Oracle Key Vault UsersOracle Key Vault users administer the system, enroll endpoints, manage users andendpoints, control access to security objects, and grant other users administrative roles.
Chapter 4Installing and Configuring Oracle Key Vault
4-15
4.4 Logging In to the Oracle Key Vault ManagementConsole
To use Oracle Key Vault, you can log in to the Oracle Key Vault management console.
1. Open a web browser.
2. Connect using an HTTPS connection and the IP address of Oracle Key Vault.
For example, to log in to a server whose IP address is 192.0.2.254, enter:
https://192.0.2.254
3. After the login screen appears, enter your user name and password.
4. Click Login.
4.5 Upgrading a Standalone or Primary-Standby Oracle KeyVault Server
This upgrade includes the Oracle Key Vault server software and utilities that controlthe associated endpoint software.
• About Upgrading the Oracle Key Vault Server SoftwareWhen you upgrade the Oracle Key Vault server software appliance, also upgradethe endpoint software to get access to the latest enhancements.
• Step 1: Back Up the Server Before You UpgradeBefore you upgrade the Oracle Key Vault server, perform a one-time backup to aremote destination so that you can recover data in case the upgrade fails.
• Step 2: Perform Pre-Upgrade TasksTo ensure a smooth upgrade to Oracle Key Vault, you should prepare the serveryou are upgrading.
• Step 3: Add Disk Space to Extend the vg_root for the Release 21.1 UpgradeBefore upgrading to Oracle Key Vault release 21.1, you will need to extend thevg_root to increase disk space.
• Step 4: Upgrade the Oracle Key Vault Server or Primary-Standby PairYou can upgrade a standalone Oracle Key Vault server or a pair of Oracle KeyVault servers in a primary-standby deployment.
• Step 5: Upgrade the Endpoint SoftwareAs part of the upgrade, you must reenroll endpoints created in earlier releases ofOracle Key Vault, or update the endpoint software.
• Step 6: If Necessary, Add Disk Space to Extend Swap SpaceIf necessary, extend the swap space. Oracle Key Vault release 21.1 requires ahard disk size greater than or equal to 1 TB in size with approximately 64 GB ofswap space.
• Step 7: If Necessary, Remove Old KernelsOracle recommends that you clean up the older kernels that were left behind afterthe upgrade.
Chapter 4Logging In to the Oracle Key Vault Management Console
4-16
• Step 8: If Necessary, Remove SSH-Related DSA KeysYou should remove SSH-related DSA keys left behind after the upgrade, because theycan cause problems with some code analysis tools.
• Step 9: Back Up the Upgraded Oracle Key Vault ServerYou must perform server backup and user password tasks after completing a successfulupgrade.
4.5.1 About Upgrading the Oracle Key Vault Server SoftwareWhen you upgrade the Oracle Key Vault server software appliance, also upgrade theendpoint software to get access to the latest enhancements.
However, the endpoint software downloaded from the previous Oracle Key Vault release willcontinue to function with the upgraded Oracle Key Vault server. Be aware that while the oldendpoint software will continue to work with the upgraded Oracle Key Vault server, the newendpoint functionality may not work.
You must upgrade in the order shown: first perform a full backup of Oracle Key Vault,upgrade the Oracle Key Vault server or server pair in the case of a primary-standbydeployment, the endpoint software, and last, perform another full backup of the upgradedserver. Note that upgrading requires a restart of the Oracle Key Vault server.
The Oracle Key Vault server is not available to endpoints for a limited duration during theupgrade. You can enable the persistent cache feature to enable endpoints to continueoperation during the upgrade process.
Before you begin the upgrade, refer to Oracle Key Vault Release Notes for additionalinformation about performing upgrades.
Related Topics
• Oracle Key Vault Release Notes
• Using the Persistent Master Encryption Key CacheThe persistent master encryption key cache feature enables databases to be operationalwhen the Oracle Key Vault server is unavailable.
4.5.2 Step 1: Back Up the Server Before You UpgradeBefore you upgrade the Oracle Key Vault server, perform a one-time backup to a remotedestination so that you can recover data in case the upgrade fails.
Caution:
Do not bypass this step. Back up the server before you perform the upgrade so thatyour data is safe and recoverable.
Related Topics
• Oracle Database Backup and Recovery User’s Guide
Chapter 4Upgrading a Standalone or Primary-Standby Oracle Key Vault Server
4-17
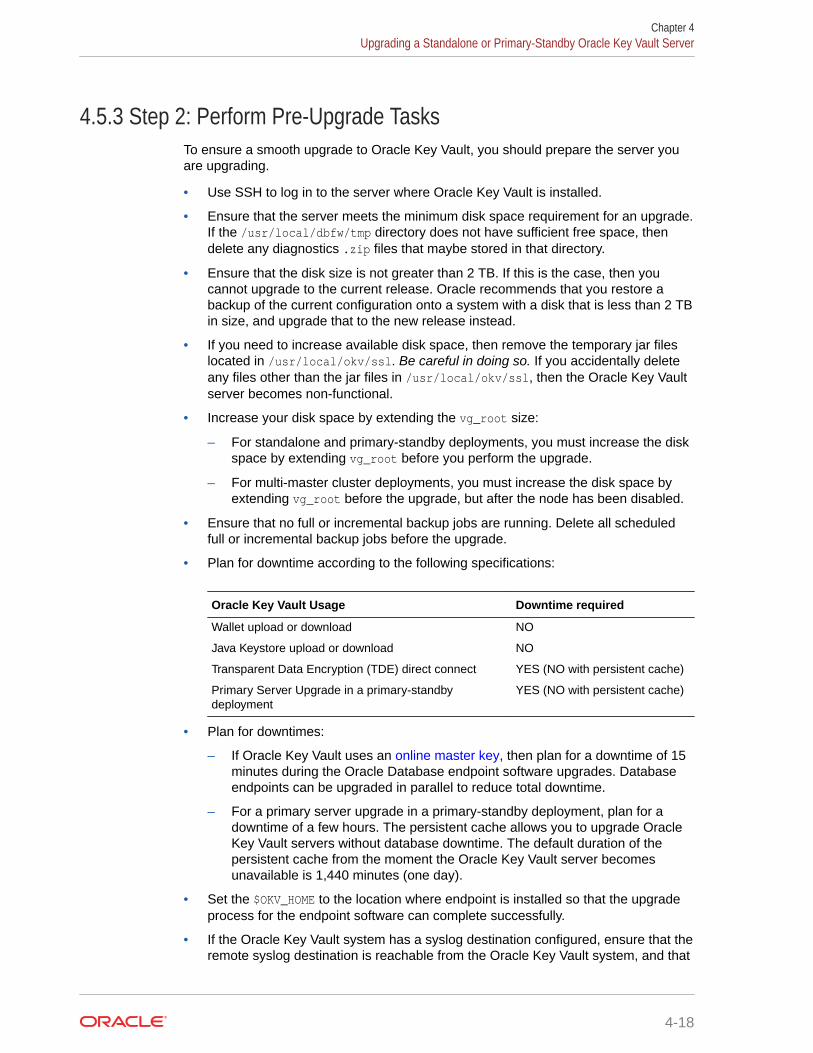
4.5.3 Step 2: Perform Pre-Upgrade TasksTo ensure a smooth upgrade to Oracle Key Vault, you should prepare the server youare upgrading.
• Use SSH to log in to the server where Oracle Key Vault is installed.
• Ensure that the server meets the minimum disk space requirement for an upgrade.If the /usr/local/dbfw/tmp directory does not have sufficient free space, thendelete any diagnostics .zip files that maybe stored in that directory.
• Ensure that the disk size is not greater than 2 TB. If this is the case, then youcannot upgrade to the current release. Oracle recommends that you restore abackup of the current configuration onto a system with a disk that is less than 2 TBin size, and upgrade that to the new release instead.
• If you need to increase available disk space, then remove the temporary jar fileslocated in /usr/local/okv/ssl. Be careful in doing so. If you accidentally deleteany files other than the jar files in /usr/local/okv/ssl, then the Oracle Key Vaultserver becomes non-functional.
• Increase your disk space by extending the vg_root size:
– For standalone and primary-standby deployments, you must increase the diskspace by extending vg_root before you perform the upgrade.
– For multi-master cluster deployments, you must increase the disk space byextending vg_root before the upgrade, but after the node has been disabled.
• Ensure that no full or incremental backup jobs are running. Delete all scheduledfull or incremental backup jobs before the upgrade.
• Plan for downtime according to the following specifications:
Oracle Key Vault Usage Downtime required
Wallet upload or download NO
Java Keystore upload or download NO
Transparent Data Encryption (TDE) direct connect YES (NO with persistent cache)
Primary Server Upgrade in a primary-standbydeployment
YES (NO with persistent cache)
• Plan for downtimes:
– If Oracle Key Vault uses an online master key, then plan for a downtime of 15minutes during the Oracle Database endpoint software upgrades. Databaseendpoints can be upgraded in parallel to reduce total downtime.
– For a primary server upgrade in a primary-standby deployment, plan for adowntime of a few hours. The persistent cache allows you to upgrade OracleKey Vault servers without database downtime. The default duration of thepersistent cache from the moment the Oracle Key Vault server becomesunavailable is 1,440 minutes (one day).
• Set the $OKV_HOME to the location where endpoint is installed so that the upgradeprocess for the endpoint software can complete successfully.
• If the Oracle Key Vault system has a syslog destination configured, ensure that theremote syslog destination is reachable from the Oracle Key Vault system, and that
Chapter 4Upgrading a Standalone or Primary-Standby Oracle Key Vault Server
4-18
logs are being correctly forwarded. If the remote syslog destination is not reachable fromthe Oracle Key Vault system, then the upgrade process can become much slower thannormal.
• If you are performing an upgrade while using an HSM as a Root of Trust, then consultOracle Key Vault Root of Trust HSM Configuration Guide for any additional steps thatmay be needed.
• If you have STIG enabled, then disable STIG before performing an upgrade by executingthe following command as the root user:
/usr/local/dbfw/bin/stig --apply --disable
Related Topics
• Step 3: Add Disk Space to Extend the vg_root for the Release 21.1 UpgradeBefore upgrading to Oracle Key Vault release 21.1, you will need to extend the vg_rootto increase disk space.
• Oracle Key Vault Root of Trust HSM Configuration Guide
• Configuring the Syslog Destination for Individual Multi-Master Cluster NodesOn each node, you can forward syslog entries to a remote service such as Splunk orSIEM.
4.5.4 Step 3: Add Disk Space to Extend the vg_root for the Release 21.1Upgrade
Before upgrading to Oracle Key Vault release 21.1, you will need to extend the vg_root toincrease disk space.
Before you start this procedure, ensure that all endpoints have persistent cache enabled andin use.
1. Log in to the server for which you will perform the upgrade and switch user as root.
2. Ensure that the persistent cache settings for Oracle Key Vault have been set.
You will need to ensure that the persistent cache has been enabled because in a laterstep in this procedure, you must shut down the server. Shutting down the Oracle KeyVault server will incur downtime. To avoid any downtime, Oracle recommends that youturn on persistent cache.
3. Run the vgs command to determine the free space
vgs
The VFree column shows how much free space you have (for example, 21 GB).
4. Power off the server in order to add a new disk
/sbin/shutdown -h now
5. Add a new disk to the server with a capacity of 100 GB or greater
6. Start the server.
Chapter 4Upgrading a Standalone or Primary-Standby Oracle Key Vault Server
4-19
7. Log in to the Oracle Key Vault server through SSH as user support, then switchuser su to root.
ssh support@okv_server_IP_addresssu - root
8. Stop the Oracle Key Vault services.
service tomcat stop;service httpd stop;service kmipus stop;service kmip stop;service okvogg stop;service javafwk stop;service monitor stop;service controller stop;service dbfwlistener stop;service dbfwdb stop;service rsyslog stop;
9. Run the fdisk -l command to find if there are any available partitions on the newdisk.
fdisk -l
At this stage, there should be no available partitions.
10. Run the fdisk disk_device_to_be_added command to create the new partition.
For example, to create a disk device named /dev/sdb:
fdisk /dev/sdb
In the prompts that appear, enter the following commands in sequence:
• n for new partition
• p for primary
• 1 for partition number
• Accept the default values for cylinder (press Enter twice).
• w to write and exit
11. Use the pvcreate disk_device_partition command to add the newly added diskto the physical volume.
For example, for a disk device named /dev/sdb1, which is the name of the diskpartition that you created (based on the name used for the disk device that wasadded).
pvcreate /dev/sdb1
Chapter 4Upgrading a Standalone or Primary-Standby Oracle Key Vault Server
4-20
Output similar to the following appears:
Physical volume "/dev/sdb1" successfully created
12. Use the vgextend vg_root disk_device_partition command to extend the logicalvolume with this disk space that you just added.
For example, for the partition /dev/sdb1, you would run:
vgextend vg_root /dev/sdb1
Output similar to the following appears:
Volume group "vg_root" successfully extended
13. Run the vgs command again to ensure that VFree shows an increase of 100 GB.
vgs
Output similar to the following appears:
VG #PV #LV #SN Attr VSize VFreevg_root 2 12 0 wz--n- 598.75g <121.41g
14. Restart the Oracle Key Vault server.
/sbin/reboot
For primary-standby deployments, ensure that the primary and standby nodes sync upbefore proceeding further with next steps.
Related Topics
• Using the Persistent Master Encryption Key CacheThe persistent master encryption key cache feature enables databases to be operationalwhen the Oracle Key Vault server is unavailable.
4.5.5 Step 4: Upgrade the Oracle Key Vault Server or Primary-StandbyPair
You can upgrade a standalone Oracle Key Vault server or a pair of Oracle Key Vault serversin a primary-standby deployment.
• About Upgrading an Oracle Key Vault Server or Primary-Standby PairIn a standalone deployment you must upgrade a single Oracle Key Vault server, but in aprimary-standby deployment you must upgrade both primary and standby Oracle KeyVault servers.
• Upgrading a Standalone Oracle Key Vault ServerA single Oracle Key Vault server in a standalone deployment is the most typicaldeployment in test and development environments.
Chapter 4Upgrading a Standalone or Primary-Standby Oracle Key Vault Server
4-21
• Upgrading a Pair of Oracle Key Vault Servers in a Primary-Standby DeploymentYou should allocate several hours to upgrade the primary server after upgradingthe standby.
4.5.5.1 About Upgrading an Oracle Key Vault Server or Primary-Standby PairIn a standalone deployment you must upgrade a single Oracle Key Vault server, but ina primary-standby deployment you must upgrade both primary and standby OracleKey Vault servers.
Note that persistent caching enables endpoints to continue to be operational duringthe upgrade process.
Note:
If you are upgrading from a system with 4 GB memory, first add an additional12 GB memory to the system before upgrading.
Related Topics
• About the Persistent Master Encryption Key CacheThe persistent master encryption key cache ensures the availability of TDE masterencryption keys.
4.5.5.2 Upgrading a Standalone Oracle Key Vault ServerA single Oracle Key Vault server in a standalone deployment is the most typicaldeployment in test and development environments.
1. Ensure that you have backed up the server you are upgrading so your data is safeand recoverable.
Do not proceed without completing this step.
2. Log into the Oracle Key Vault management console as a user who has the SystemAdministrator role.
3. Ensure that SSH access is enabled.
Log in to the Oracle Key Vault management console as a user who has theSystem Administrator role. Select the System tab, then Settings. In the NetworkDetails area, click SSH Access. Select IP address(es) and then enter only the IPaddresses that you need, or select All. Click Save.
4. Ensure you have enough space in the destination directory for the upgrade ISOfiles.
5. Log in to the Oracle Key Vault server through SSH as user support, then switchuser su to root.
If the SSH connection times out while you are executing any step of the upgrade,then the operation will not complete successfully. Oracle recommends that youensure that you use the appropriate values for the ServerAliveInterval andServerAliveCountMax options for your SSH sessions to avoid upgrade failures.
6. Copy the upgrade ISO file to the destination directory using Secure CopyProtocol or other secure transmission method.
Chapter 4Upgrading a Standalone or Primary-Standby Oracle Key Vault Server
4-22
Note that the upgrade ISO file is not the installation ISO file that you downloaded fromeDelivery. You can download the Oracle Key Vault upgrade software from the My OracleSupport website at https://support.oracle.com/portal/.
scp remote_host:remote_path/okv-upgrade-disc-new_software_release.iso /var/lib/oracle
In this specification:
• remote_host is the IP address of the computer containing the ISO upgrade file.
• remote_path is the directory of the ISO upgrade file. Do not copy this file to anylocation other than the /var/lib/oracle directory.
7. Make the upgrade accessible by using the mount command:
/bin/mount -o loop,ro /var/lib/oracle/okv-upgrade-disc-new_software_release.iso /images
8. Clear the cache using the clean all command:
root# yum -c /images/upgrade.repo clean all
9. Apply the upgrade with upgrade.rb command:
root# /usr/bin/ruby /images/upgrade.rb --confirm
If the system is successfully upgraded, then the command will display the followingmessage:
Remove media and reboot now to fully apply changes.
If you see an error message, then check the log file /var/log/messages for additionalinformation.
10. Restart the Oracle Key Vault server by running reboot command:
root# /sbin/reboot
On the first restart of the computer after the upgrade, the system will apply the necessarychanges. This can take a few hours. Do not shut down the system during this time.
The upgrade is completed when the screen with heading: Oracle Key Vault Servernew_software_release appears. The revision should reflect the upgraded release.
11. Confirm that Oracle Key Vault has been upgraded to the correct version.
a. Log in to the Oracle Key Vault management console as a user who has the SystemAdministrator role.
b. Select the System tab, and then select Status.
c. Verify that the version displayed is the latest release number.
The release number is also at the bottom of each page, to the right of the copyrightinformation.
12. If your site uses the Commercial National Security Algorithm (CNSA) suite, then re-installthese algorithms onto the standalone server.
13. Disable SSH access.
Log in to the Oracle Key Vault management console as a user who has the SystemAdministrator role. Select the System tab, then Settings. In the Network Details area,click SSH Access. Select Disabled. Click Save.
Chapter 4Upgrading a Standalone or Primary-Standby Oracle Key Vault Server
4-23
Related Topics
• Upgrading a Standalone Oracle Key Vault Server with CNSAYou can upgrade a standalone Oracle Key Vault while using Commercial NationalSecurity Algorithm (CNSA) compliance by upgrading and then executing theokv_cnsa script.
• Oracle Key Vault Root of Trust HSM Configuration Guide
4.5.5.3 Upgrading a Pair of Oracle Key Vault Servers in a Primary-StandbyDeployment
You should allocate several hours to upgrade the primary server after upgrading thestandby.
You must perform the upgrade of standby and primary servers in one session with aslittle time between the standby and primary upgrade. The upgrade time is approximateand a function of the volume of data stored and managed by Oracle Key Vault. Forlarge volumes of data, the upgrade time may be longer than several hours.
1. For both primary and standby servers in the primary-standby configuration,prepare for upgrade.
• Ensure that both the primary and standby systems have at least 16 GBmemory.
• Add disk space to extend the vg_root.
• While the upgrade is in progress, do not change any settings or perform anyother operations that are not part of the upgrade instructions below.
• Upgrade the Oracle Key Vault server during a planned maintenance windowbecause the upgrade process requires the endpoints to be shut down duringthe upgrade, if no persistent cache has been configured. With persistent cacheenabled, endpoints will continue to be operational during the upgrade process.
2. Ensure that you have backed up the server you are upgrading so your data is safeand recoverable.
Ensure that in the time between the backup and shutting down the Oracle KeyVault servers for upgrade, that no databases perform a set or rekey operation (forexample, using the ADMINISTER KEY MANAGEMENT statement), since these newkeys will not be included in the backup.
Do not proceed without completing this step.
3. First, upgrade the standby server while the primary server is running.
Follow Steps 2 through 10 of the standalone Oracle Key Vault server upgrade.
4. Ensure that the upgraded standby Oracle Key Vault server is restarted andrunning.
5. Upgrade the primary Oracle Key Vault server following Steps 2 through 10 of thestandalone Oracle Key Vault server upgrade.
After both the standby and primary Oracle Key Vault servers are upgraded, thetwo servers will automatically synchronize.
6. Log in to the Oracle Key Vault management console as a user with the SystemAdministrator role.
7. Select the System tab, and then Status.
Chapter 4Upgrading a Standalone or Primary-Standby Oracle Key Vault Server
4-24
8. Verify that the Version field displays the new software version.
9. If your site uses the Commercial National Security Algorithm (CNSA) suite, then re-installthese algrorithms onto the primary and standby servers.
Related Topics
• Upgrading a Standalone Oracle Key Vault ServerA single Oracle Key Vault server in a standalone deployment is the most typicaldeployment in test and development environments.
4.5.6 Step 5: Upgrade the Endpoint SoftwareAs part of the upgrade, you must reenroll endpoints created in earlier releases of Oracle KeyVault, or update the endpoint software.
If you are upgrading from an earlier release to the latest release of Oracle Key Vault, then youmust reenroll the endpoint instead of upgrading the endpoint software. Reenrolling theendpoint automatically updates the endpoint software.
1. Ensure that you have upgraded the Oracle Key Vault servers. If you are upgrading theendpoint software for an Oracle database configured for direct-connect, then shut downthe database.
2. Download the endpoint software (okvclient.jar) for your platform from the Oracle KeyVault server as follows:
a. Go to the Oracle Key Vault management console login screen.
b. Click the Endpoint Enrollment and Software Download link.
c. In the Download Endpoint Software Only section, select the appropriate platformfrom the drop-down list.
d. Click the Download button.
3. Identify the path to your existing endpoint installation that you are about to upgrade (forexample, /home/oracle/okvutil).
4. Install the endpoint software by executing the following command:
java -jar okvclient.jar -d existing_endpoint_directory_path
For example:
java -jar okvclient.jar -d /home/oracle/okvutil
If you are installing the okvclient.jar file on a Windows endpoint system that hasOracle Database release 11.2.0.4 only, then include the -db112 option. (This option isnot necessary for any other combination of endpoint platform or Oracle Databaseversion.) For example:
java -jar okvclient.jar -d /home/oracle/okvutil -v -db112
5. Install the updated PKCS#11 library file.
This step is needed only for online TDE master encryption key management by OracleKey Vault.
Chapter 4Upgrading a Standalone or Primary-Standby Oracle Key Vault Server
4-25
• On UNIX/Linux platforms: Run root.sh from the bin directory of endpointinstallation directory to copy the latest liborapkcs.so file for Oracle Databaseendpoints.
$ sudo $OKV_HOME/bin/root.sh
Or
$ su - root# bin/root.sh
• On Windows platforms: Run root.bat from the bin directory of endpointinstallation directory to copy the latest liborapkcs.dll file for OracleDatabase endpoints. You will be prompted for the version of the database inuse.
bin\root.bat
6. Restart the endpoint if it was shut down.
Related Topics
• Reenrolling an EndpointWhen you reenroll an endpoint, the enrollment process automatically upgrades theendpoint software.
4.5.7 Step 6: If Necessary, Add Disk Space to Extend Swap SpaceIf necessary, extend the swap space. Oracle Key Vault release 21.1 requires a harddisk size greater than or equal to 1 TB in size with approximately 64 GB of swapspace.
If your system does not meet this requirement, follow these instructions to extend theswap space. You can check how much swap space you have by running the swapon -s command. By default, Oracle Key Vault releases earlier than release 18.1 wereinstalled with approximately 4 GB of swap space. After you complete the upgrade torelease 18.1 or later, Oracle recommends that you increase the swap space allocationfor the server on which you upgraded Oracle Key Vault. A new Oracle Key Vaultinstallation is automatically configured with sufficient swap space. However, if youupgraded from a previous release, and your system does not have the desired amountof swap space configured, then you must manually add disk space to extend the swapspace, particularly if the intention is to convert the upgraded server into the first nodeof a multi-master cluster.
1. Log in to the server in which you upgraded Oracle Key Vault and connect as root.
2. Check the current amount of swap space.
[root@my_okv_server support]# swapon -s
Output similar to the following appears. This example shows that the system has 4GB of swap space.
Filename Type Size Used Priority/dev/dm-0 partition 4194300 3368 -1
There must be 64 GB of swap space if the disk is greater than 1 TB in size.
Chapter 4Upgrading a Standalone or Primary-Standby Oracle Key Vault Server
4-26
3. Run the vgs command to determine how much free space is available.
vgs
The VFree column shows how much free space you have (for example, 21 GB).
4. Power off the server in order to add a new disk.
/sbin/shutdown -h now
5. Add a new disk to the server of a size that will bring the VFree value to over 64 GB.
6. Start the server.
7. Log in to the Oracle Key Vault server through SSH as user support, then switch user suto root.
ssh support@okv_server_IP_addresssu - root
8. Run the fdisk -l command to find if there are any available partitions on the new disk.
fdisk -l
At this stage, there should be no available partitions.
9. Run the fdisk disk_device_to_be_added command to create the new partition.
For example, to create a disk device named /dev/sdc:
fdisk /dev/sdc
In the prompts that appear, enter the following commands in sequence:
• n for new partition
• p for primary
• 1 for partition number
• Accept the default values for cylinder (press Enter twice).
• w to write and exit
10. Use the pvcreate disk_device_partition command to add the newly added disk to thephysical volume.
For example, for a disk device named /dev/sdc1, which is the name of the disk partitionthat you created (based on the name used for the disk device that was added).
pvcreate /dev/sdc1
Output similar to the following appears:
Physical volume "/dev/sdc1" successfully created
Chapter 4Upgrading a Standalone or Primary-Standby Oracle Key Vault Server
4-27
11. Use the vgextend vg_root disk_device_partition command to extend thelogical volume with this disk space that you just added.
For example, for the partition /dev/sdc1, you would run:
vgextend vg_root /dev/sdc1
Output similar to the following appears:
Volume group "vg_root" successfully extended
12. Run the vgs command again to ensure that VFree shows an increase of 64 GB.
vgs
13. Disable swapping.
[root@my_okv_server support]# swapoff -v /dev/vg_root/lv_swap
14. To extend the swap space, run the lvresize command.
[root@my_okv_server support]# lvresize -L +60G /dev/vg_root/lv_swap
Output similar to the following appears:
Size of logical volume vg_root/lv_swap changed from 4.00 GiB (128 extents) to 64.00 GiB (2048 extents)Logical volume lv_swap successfully resized.
15. Format the newly added swap space.
[root@my_okv_server support]# mkswap /dev/vg_root/lv_swap
Output similar to the following appears:
mkswap: /dev/vg_root/lv_swap: warning: don't erase bootbits sectorson whole disk. Use -f to force.Setting up swapspace version 1, size = 67108860 KiBno label, UUID=fea7fc72-0fea-43a3-8e5d-e29955d46891
16. Enable swapping again.
[root@my_okv_server support]# swapon -v /dev/vg_root/lv_swap
17. Verify the amount of swap space that is available.
[root@my_okv_server support]# swapon -s
Chapter 4Upgrading a Standalone or Primary-Standby Oracle Key Vault Server
4-28
Output similar to the following appears:
Filename Type Size Used Priority /dev/dm-0 partition 67108860 0 -1
18. Restart the Oracle Key Vault server.
/sbin/reboot
For primary-standby deployments, ensure that the primary and standby nodes sync upbefore proceeding further with next steps.
4.5.8 Step 7: If Necessary, Remove Old KernelsOracle recommends that you clean up the older kernels that were left behind after theupgrade.
While the older kernel is not in use, it may be marked as an issue by some code analysistools.
1. Log in to the Oracle Key Vault server as the support user.
2. Switch to the root user.
su - root
3. Mount /boot if it was not mounted on the system.
a. Check if the /boot is mounted. The following command should display /bootinformation if it was mounted.
df -h /boot;
b. Mount it if /boot is not mounted.
/bin/mount /boot;
4. Check the installed kernels and the running kernel.
a. Search for any kernels that are installed.
rpm -q kernel-uek | sort;
The following example output shows that two kernels are installed:
kernel-uek-4.1.12-103.9.4.el6uek.x86_64kernel-uek-4.1.12-112.16.7.el6uek.x86_64
b. Check the latest kernel.
uname -r;
The following output shows an example of a kernel version that was installed at thetime:
4.1.12-112.16.7.el6uek.x86_64
This example assumes that 4.1.12-112.16.7.el6uek.x86_64 is the latest version,but newer versions may be available by now. Based on this output, you will need toremove the kernel-uek-4.1.12-103.9.4.el6uek.x86_64 kernel. You should removeall kernels that are older than the latest kernel.
Chapter 4Upgrading a Standalone or Primary-Standby Oracle Key Vault Server
4-29
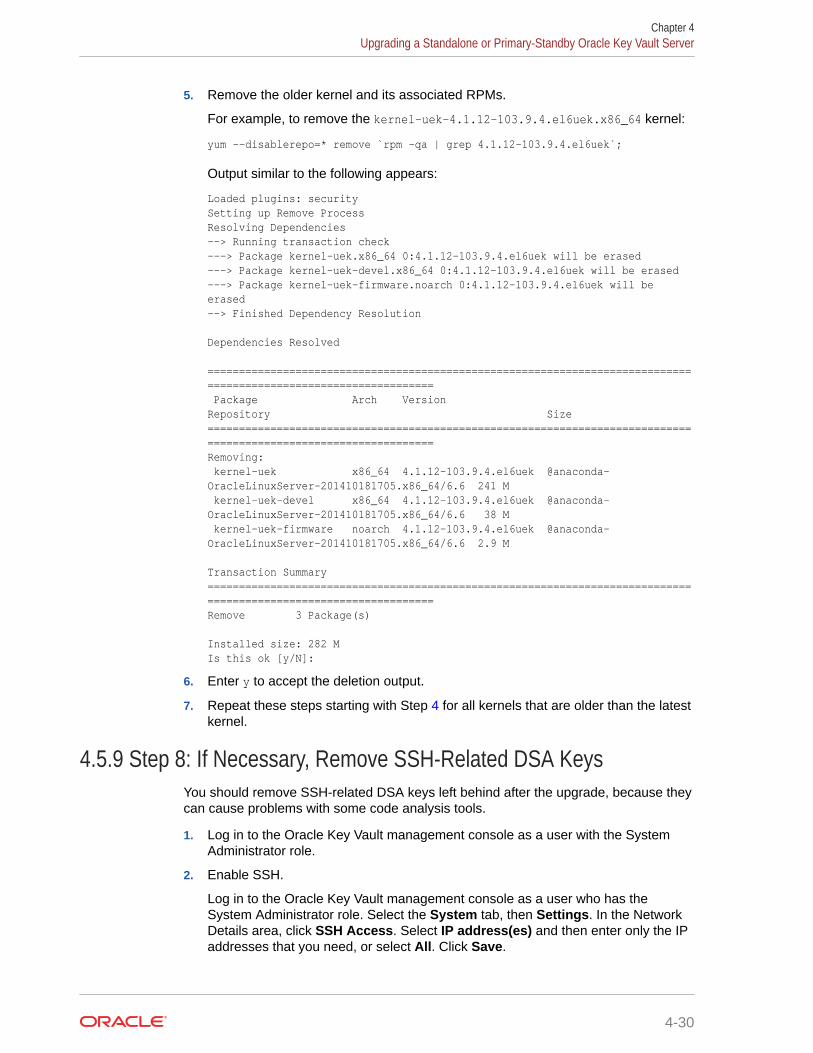
5. Remove the older kernel and its associated RPMs.
For example, to remove the kernel-uek-4.1.12-103.9.4.el6uek.x86_64 kernel:
yum --disablerepo=* remove `rpm -qa | grep 4.1.12-103.9.4.el6uek`;
Output similar to the following appears:
Loaded plugins: securitySetting up Remove ProcessResolving Dependencies--> Running transaction check---> Package kernel-uek.x86_64 0:4.1.12-103.9.4.el6uek will be erased---> Package kernel-uek-devel.x86_64 0:4.1.12-103.9.4.el6uek will be erased---> Package kernel-uek-firmware.noarch 0:4.1.12-103.9.4.el6uek will be erased--> Finished Dependency Resolution
Dependencies Resolved
================================================================================================================= Package Arch Version Repository Size=================================================================================================================Removing: kernel-uek x86_64 4.1.12-103.9.4.el6uek @anaconda-OracleLinuxServer-201410181705.x86_64/6.6 241 M kernel-uek-devel x86_64 4.1.12-103.9.4.el6uek @anaconda-OracleLinuxServer-201410181705.x86_64/6.6 38 M kernel-uek-firmware noarch 4.1.12-103.9.4.el6uek @anaconda-OracleLinuxServer-201410181705.x86_64/6.6 2.9 M
Transaction Summary=================================================================================================================Remove 3 Package(s)
Installed size: 282 MIs this ok [y/N]:
6. Enter y to accept the deletion output.
7. Repeat these steps starting with Step 4 for all kernels that are older than the latestkernel.
4.5.9 Step 8: If Necessary, Remove SSH-Related DSA KeysYou should remove SSH-related DSA keys left behind after the upgrade, because theycan cause problems with some code analysis tools.
1. Log in to the Oracle Key Vault management console as a user with the SystemAdministrator role.
2. Enable SSH.
Log in to the Oracle Key Vault management console as a user who has theSystem Administrator role. Select the System tab, then Settings. In the NetworkDetails area, click SSH Access. Select IP address(es) and then enter only the IPaddresses that you need, or select All. Click Save.
Chapter 4Upgrading a Standalone or Primary-Standby Oracle Key Vault Server
4-30
3. Login to the Oracle Key Vault support account using SSH.
ssh support@OracleKeyVault_serverIPaddress
4. Switch to the root user.
su - root
5. Change directory to /etc/ssh.
cd /etc/ssh
6. Rename the following keys.
mv ssh_host_dsa_key.pub ssh_host_dsa_key.pub.retiremv ssh_host_dsa_key ssh_host_dsa_key.retire
7. Disable SSH access.
Log in to the Oracle Key Vault management console as a user who has the SystemAdministrator role. Select the System tab, then Settings. In the Network Details area,click SSH Access. Select Disabled. Click Save.
4.5.10 Step 9: Back Up the Upgraded Oracle Key Vault ServerYou must perform server backup and user password tasks after completing a successfulupgrade.
1. Take a full backup of the upgraded Oracle Key Vault Server Database to a new remotedestination. Avoid using the old backup destination for the new backups.
2. Schedule a new periodic incremental backup to the new destination defined in thepreceding step.
3. Change the Oracle Key Vault administrative passwords.
Password hashing has been upgraded to a more secure standard than in earlierreleases. This change affects the operating system passwords, support and root. Youmust change Oracle Key Vault administrative passwords after the upgrade to takeadvantage of the more secure hash.
Related Topics
• Oracle Database Backup and Recovery User’s Guide
4.6 Upgrading Oracle Key Vault in a Multi-Master ClusterEnvironment
Similar to a standalone or primary-standby upgrade, this type of upgrade includes the OracleKey Vault server software and endpoint software-related utilities.
• About Upgrading Oracle Key Vault in a Multi-Master Cluster EnvironmentTo perform this upgrade, you must upgrade each multi-master cluster node.
• Step 1: Perform Pre-Upgrade TasksSimilar to a standalone or primary-standby environment, you must prepare the OracleKey Vault server for the pre-upgrade multi-master cluster process.
Chapter 4Upgrading Oracle Key Vault in a Multi-Master Cluster Environment
4-31
• Step 2: Add Disk Space to Extend the vg_root for Upgrade to Oracle Key VaultRelease 21.1To upgrade to Oracle Key Vault release 21.1, you will need additional disk spaceby adding an additional disk to be able to extend the vg_root.
• Step 3: Upgrade Multi-Master ClustersDepending on your multi-master cluster configuration, you must follow the stepsthat are specific to your deployment.
• Step 4: Check the Node Version and the Cluster VersionAfter you complete the upgrade of at least one node, you can log into any of theupgraded nodes to check the node and cluster versions.
• Step 5: If Necessary, Change the Network Interface for Upgraded NodesNodes that were created in Oracle Key Vault releases earlier than release 21.1use Classic mode, in which only one network interface was used.
4.6.1 About Upgrading Oracle Key Vault in a Multi-Master ClusterEnvironment
To perform this upgrade, you must upgrade each multi-master cluster node.
There are different steps for upgrading the multi-master cluster depending on yourdeployment. A 2-node cluster, running Oracle Key Vault release 18.5 or earlier,configured as a single read-write pair would involve running a pre-upgrade script whichno other deployment requires. Multi-master cluster nodes deployed in a read-writeconfiguration must follow different upgrade steps than those deployed as read-onlynodes.
Oracle does not support direct upgrades from Oracle Key Vault release 18.1 or earlier.You must upgrade to Oracle Key Vault release 18.2 or later before upgrading torelease 21.1.
The upgrade process involves performing the upgrade on each multi-master clusternode. After you have begun a cluster upgrade, ensure that you upgrade all the nodesin the cluster one after the other, without too much intervening time between upgradesof two nodes.
Upgrading an Oracle Key Vault multi-master cluster includes upgrading each clusternode to the new later version. You must upgrade all nodes to the same Oracle KeyVault version. You should first upgrade the read-only nodes of the cluster, and thenupgrade the read-write pairs. As each cluster node is upgraded, its node version isupdated to the new version of the Oracle Key Vault. After you complete the upgrade ofall cluster nodes, the cluster version is updated to the new version of the Oracle KeyVault. You can check node version or the cluster version by selecting the Cluster tab,then in the left navigation bar, selecting Management. Oracle Key Vault multi-mastercluster upgrade is considered complete when node version and cluster version at eachcluster node is updated to the latest version of Oracle Key Vault.
Before you perform the upgrade, note the following:
• Perform the entire upgrade process on all multi-master cluster nodes, withoutinterruption. That is, after you have started the cluster upgrade process, ensurethat you try and upgrade all nodes, individually one after the other or in read-writepairs. Do not perform any critical operations or make configurational changes toOracle Key Vault until you have completed upgrading all the nodes in yourenvironment.
Chapter 4Upgrading Oracle Key Vault in a Multi-Master Cluster Environment
4-32
• Be aware that you cannot use any new features that were introduced in this release untilyou have completed upgrading all of the multi-master cluster nodes. An error is returnedwhen such features are used from the node that has been upgraded. Oraclerecommends that you plan the upgrade of all cluster nodes close to each other to ensureavailability of the new features sooner.
Related Topics
• Upgrading Multi-Master Cluster Read-Only NodesBefore upgrading multi-master cluster read-only nodes, ensure that you understand therequirements for performing this kind of upgrade.
• Upgrading Multi-Master Cluster Read-Write PairsBefore upgrading multi-master cluster read-write pairs, ensure that you understand therequirements for performing this kind of upgrade.
• Step 4: Check the Node Version and the Cluster VersionAfter you complete the upgrade of at least one node, you can log into any of theupgraded nodes to check the node and cluster versions.
4.6.2 Step 1: Perform Pre-Upgrade TasksSimilar to a standalone or primary-standby environment, you must prepare the Oracle KeyVault server for the pre-upgrade multi-master cluster process.
1. Back up the server so that you can recover data in case the upgrade fails.
2. Perform the pre-upgrade tasks that are described for standalone or primary-standbyenvironments, which include tasks such as ensuring that the server meets the minimumdisk space requirements by adding a new disk to extend vg_root, ensuring that no full orincremental backup jobs are running, planning for any down time, and disabling STIG.(To disable STIG, as root, execute the following command: /usr/local/dbfw/bin/stig--apply --disable) Adding a new disk to a multi-master cluster node requires that thenode be disabled before it is shut down to add the new disk, and then enabled again afterthe disk has been successfully added.
3. Check the disk size before you begin the upgrade. If any of the nodes in question have adisk size that is greater than 2 TB, then you cannot upgrade that system to the newrelease. Oracle recommends that you remove the node from the cluster and if possible,replace it with a node whose disk is less than 2 TB in size.
4. Increase the Maximum Disable Node Duration setting as appropriate so that anydisabled cluster nodes have sufficient time to be upgraded then enabled back into thecluster. Note that increasing the Maximum Disable Node Duration setting alsoincreases disk space usage.
Related Topics
• Step 3: Add Disk Space to Extend the vg_root for the Release 21.1 UpgradeBefore upgrading to Oracle Key Vault release 21.1, you will need to extend the vg_rootto increase disk space.
• Oracle Database Backup and Recovery User’s Guide
• Step 2: Perform Pre-Upgrade TasksTo ensure a smooth upgrade to Oracle Key Vault, you should prepare the server you areupgrading.
• Configuring Maximum Disable Node Duration for the ClusterYou can set the maximum node duration time for the cluster in hours.
Chapter 4Upgrading Oracle Key Vault in a Multi-Master Cluster Environment
4-33
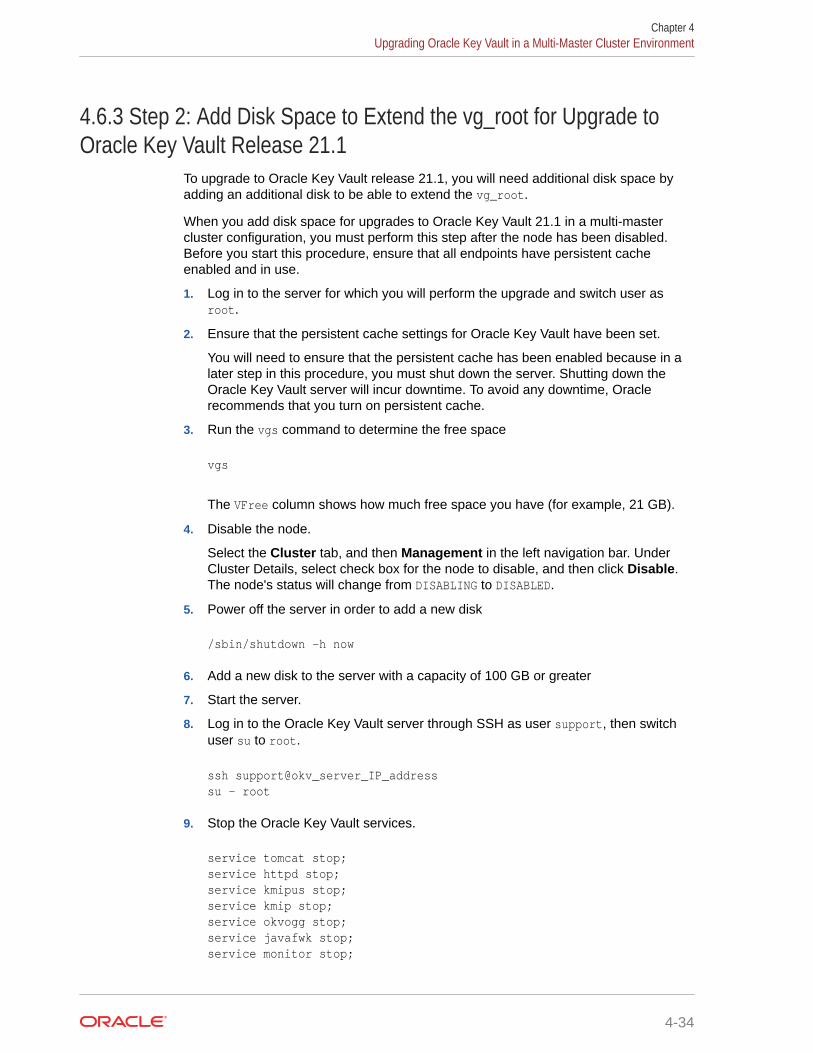
4.6.3 Step 2: Add Disk Space to Extend the vg_root for Upgrade toOracle Key Vault Release 21.1
To upgrade to Oracle Key Vault release 21.1, you will need additional disk space byadding an additional disk to be able to extend the vg_root.
When you add disk space for upgrades to Oracle Key Vault 21.1 in a multi-mastercluster configuration, you must perform this step after the node has been disabled.Before you start this procedure, ensure that all endpoints have persistent cacheenabled and in use.
1. Log in to the server for which you will perform the upgrade and switch user asroot.
2. Ensure that the persistent cache settings for Oracle Key Vault have been set.
You will need to ensure that the persistent cache has been enabled because in alater step in this procedure, you must shut down the server. Shutting down theOracle Key Vault server will incur downtime. To avoid any downtime, Oraclerecommends that you turn on persistent cache.
3. Run the vgs command to determine the free space
vgs
The VFree column shows how much free space you have (for example, 21 GB).
4. Disable the node.
Select the Cluster tab, and then Management in the left navigation bar. UnderCluster Details, select check box for the node to disable, and then click Disable.The node's status will change from DISABLING to DISABLED.
5. Power off the server in order to add a new disk
/sbin/shutdown -h now
6. Add a new disk to the server with a capacity of 100 GB or greater
7. Start the server.
8. Log in to the Oracle Key Vault server through SSH as user support, then switchuser su to root.
ssh support@okv_server_IP_addresssu - root
9. Stop the Oracle Key Vault services.
service tomcat stop;service httpd stop;service kmipus stop;service kmip stop;service okvogg stop;service javafwk stop;service monitor stop;
Chapter 4Upgrading Oracle Key Vault in a Multi-Master Cluster Environment
4-34
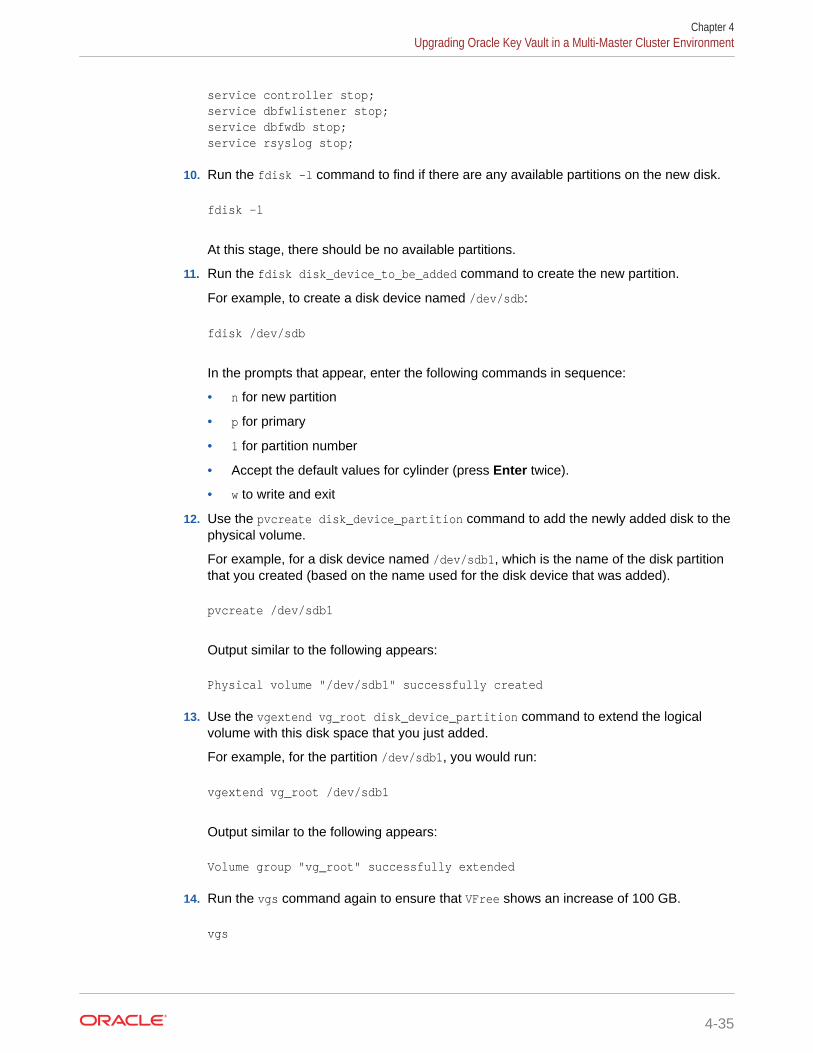
service controller stop;service dbfwlistener stop;service dbfwdb stop;service rsyslog stop;
10. Run the fdisk -l command to find if there are any available partitions on the new disk.
fdisk -l
At this stage, there should be no available partitions.
11. Run the fdisk disk_device_to_be_added command to create the new partition.
For example, to create a disk device named /dev/sdb:
fdisk /dev/sdb
In the prompts that appear, enter the following commands in sequence:
• n for new partition
• p for primary
• 1 for partition number
• Accept the default values for cylinder (press Enter twice).
• w to write and exit
12. Use the pvcreate disk_device_partition command to add the newly added disk to thephysical volume.
For example, for a disk device named /dev/sdb1, which is the name of the disk partitionthat you created (based on the name used for the disk device that was added).
pvcreate /dev/sdb1
Output similar to the following appears:
Physical volume "/dev/sdb1" successfully created
13. Use the vgextend vg_root disk_device_partition command to extend the logicalvolume with this disk space that you just added.
For example, for the partition /dev/sdb1, you would run:
vgextend vg_root /dev/sdb1
Output similar to the following appears:
Volume group "vg_root" successfully extended
14. Run the vgs command again to ensure that VFree shows an increase of 100 GB.
vgs
Chapter 4Upgrading Oracle Key Vault in a Multi-Master Cluster Environment
4-35

Output similar to the following appears:
VG #PV #LV #SN Attr VSize VFreevg_root 2 12 0 wz--n- 598.75g <121.41g
15. Restart the Oracle Key Vault server.
/sbin/reboot
After you have successfully added the disk, re- enable the node. After you re-enable the disabled multi-master cluster node, its status changes from DISABLED toENABLING, then to ACTIVE. The status of the node will remain at ENABLING and willnot change to ACTIVE unless bidirectional replication between it and all othernodes is occurring successfully.
Related Topics
• Using the Persistent Master Encryption Key CacheThe persistent master encryption key cache feature enables databases to beoperational when the Oracle Key Vault server is unavailable.
4.6.4 Step 3: Upgrade Multi-Master ClustersDepending on your multi-master cluster configuration, you must follow the steps thatare specific to your deployment.
• About Upgrading Multi-Master ClustersWhen upgrading a multi-master cluster, you may upgrade the read-only nodes oneafter the other and in the case of read-write pairs, you must upgrade both of thenodes simultaneously.
• Upgrading Multi-Master Cluster Read-Only NodesBefore upgrading multi-master cluster read-only nodes, ensure that youunderstand the requirements for performing this kind of upgrade.
• Upgrading Multi-Master Cluster Read-Write PairsBefore upgrading multi-master cluster read-write pairs, ensure that you understandthe requirements for performing this kind of upgrade.
4.6.4.1 About Upgrading Multi-Master ClustersWhen upgrading a multi-master cluster, you may upgrade the read-only nodes oneafter the other and in the case of read-write pairs, you must upgrade both of the nodessimultaneously.
To perform the upgrade, you must upgrade each multi-master cluster node. There aredifferent steps for upgrading the multi-master cluster depending on your deployment. Atwo-node cluster, running Oracle Key Vault release 18.5 or earlier, configured as asingle read-write pair would involve running a pre-upgrade script which no otherdeployment requires. For multi-master cluster nodes that were deployed in a read-write configuration, you must follow different upgrade steps than those that weredeployed as read-only nodes.
This section describes the upgrade methods for the various deployments. Choose themethod that is appropriate for your configuration. When upgrading read-write pairs,after disabling both the nodes, you can upgrade the nodes at the same time. However,
Chapter 4Upgrading Oracle Key Vault in a Multi-Master Cluster Environment
4-36
Oracle recommends that you upgrade the cluster nodes one at a time. If you have a multi-master cluster with three or more nodes, then you can upgrade two nodes at the same timewith no down time.
When upgrading read-write pairs, it is critically important that you perform the steps in theproper order on the two nodes.
If your cluster consists of only two nodes in a read-write configuration and if you areupgrading from Oracle Key Vault release 18.2 through 18.5, then you must execute a pre-upgrade script before performing the upgrade. The pre-upgrade script is not to be executed inany other multi-master cluster configuration.
4.6.4.2 Upgrading Multi-Master Cluster Read-Only NodesBefore upgrading multi-master cluster read-only nodes, ensure that you understand therequirements for performing this kind of upgrade.
Oracle recommends that you upgrade the read-only nodes one at a time. You must upgraderead-only nodes ahead of any read-write pairs. Direct upgrades from release 18.1 or earlierare not supported. You must upgrade to Oracle Key Vault release 18.2 or later beforeupgrading to release 21.1. Do not perform any critical operations or make configurationalchanges to Oracle Key Vault until you have completed upgrading all multi-master clusternodes.
You must perform these steps on each read-only node of the cluster, one after the other.
1. Ensure that you have performed the pre-upgrade steps.
2. Log in to the management console as a user with the System Administrator role.
3. Disable the multi-master cluster node.
Select the Cluster tab, and then Management in the left navigation bar. Under ClusterDetails, select check box for the node to disable, and then click Disable. The node'sstatus will change from DISABLING to DISABLED
4. Ensure that you have added disk space to extend the vg_root for the upgrade to release21.1.
5. Perform the upgrade as you would upgrade a standalone Oracle Key Vault server byperforming steps 2 through 10 (but not a primary-standby pair).
When you run the /usr/bin/ruby /images/upgrade.rb --confirm step during theupgrade, you may be asked to confirm that you completed the pre-upgrade steps.
6. After the node has been successfully upgraded, re-enable it.
To enable it, select the Cluster tab, and then Management in the left navigation bar.Under Cluster Details, select check box for the node to enable, and then click Enable.
After you re-enable the disabled multi-master cluster node, its status changes fromDISABLED to ENABLING, then to ACTIVE. The status of the node will remain at ENABLINGand will not change to ACTIVE unless bidirectional replication between it and all othernodes is occurring successfully.
7. As necessary, disable SSH access on this node.
Log in to the Oracle Key Vault management console as a user who has the SystemAdministrator role. Select the System tab, then Settings. In the Network Details area,click SSH Access. Select Disabled. Click Save.
8. After you have successfully completed this procedure, repeat these upgrade steps on allremaining read-only multi-master cluster nodes.
Chapter 4Upgrading Oracle Key Vault in a Multi-Master Cluster Environment
4-37
Related Topics
• Step 1: Perform Pre-Upgrade TasksSimilar to a standalone or primary-standby environment, you must prepare theOracle Key Vault server for the pre-upgrade multi-master cluster process.
• Upgrading a Standalone Oracle Key Vault ServerA single Oracle Key Vault server in a standalone deployment is the most typicaldeployment in test and development environments.
• Step 2: Add Disk Space to Extend the vg_root for Upgrade to Oracle Key VaultRelease 21.1To upgrade to Oracle Key Vault release 21.1, you will need additional disk spaceby adding an additional disk to be able to extend the vg_root.
• Disabling a Cluster NodeYou can temporarily disable a cluster node, which is required for upgrades andmaintenance.
• Step 4: Upgrade the Oracle Key Vault Server or Primary-Standby PairYou can upgrade a standalone Oracle Key Vault server or a pair of Oracle KeyVault servers in a primary-standby deployment.
• Upgrading a Standalone or Primary-Standby Oracle Key Vault ServerThis upgrade includes the Oracle Key Vault server software and utilities thatcontrol the associated endpoint software.
• Enabling a Disabled Cluster NodeYou can enable any cluster node that was previously disabled. You must performthis operation from the disabled node.
4.6.4.3 Upgrading Multi-Master Cluster Read-Write PairsBefore upgrading multi-master cluster read-write pairs, ensure that you understand therequirements for performing this kind of upgrade.
Do not perform any critical operations or make configuration changes to Oracle KeyVault until you have completed upgrading all multi-master cluster nodes.
You must perform these steps on both nodes of the cluster read-write pair in the orderspecified for all read-write pairs of your cluster. In order to perform the upgrade usingthis method, you must arbitrarily decide which of the read-write nodes of your pair willbe Node A and which node will be Node B. The steps below will refer to Node A andNode B which correspond to your Node A and Node B.
Direct upgrades to Oracle Key Vault 21.2 from releases 18.1 or earlier are notsupported. You must upgrade to Oracle Key Vault release 18.2 or later beforeupgrading to release 21.2. If you are upgrading a two-node cluster that runs OracleKey Vault release 18.5 or earlier and is configured as a single read-write pair, then youmust run the pre-upgrade script on each multi-master cluster node after mounting theISO, but before performing the full upgrade.
Generally, once your cluster nodes are disabled, they become unavailable for use.Therefore, in order to allow operational continuity when you upgrade a two-nodecluster that is configured as a read-write pair, applying the pre-upgrade script on bothnodes allows the node to remain available in a read-only mode, even when the node isdisabled. After both the nodes are disabled, you can upgrade the nodes one at a time;the order is at your discretion. However, when you enable the nodes after they havebeen upgraded, you must enable them in the reverse order that they were disabled.
Chapter 4Upgrading Oracle Key Vault in a Multi-Master Cluster Environment
4-38
If your deployment required running the pre-upgrade script, then after you run the pre-upgrade script, proceed with the standard upgrade process as follows. Disable both nodes(the order of disabling matters) of the read-write pair, add the extra disk space as necessaryand then perform the upgrade and reboot. When you run the upgrade and reboot commands,Oracle recommends running them on one node of the pair before running it on the other nodeto avoid down time.
1. Log into the Node A Oracle Key Vault management console as a user who has theSystem Administrator role.
2. Ensure that SSH access is enabled.
Log in to the Oracle Key Vault management console as a user who has the SystemAdministrator role. Select the System tab, then Settings. In the Network Details area,click SSH Access. Select IP address(es) and then enter only the IP addresses that youneed, or select All. Click Save.
3. Ensure you have enough space in the destination directory for the upgrade ISO files.
4. Log in to the Oracle Key Vault server through SSH as user support, then switch user suto root.
If the SSH connection times out while you are executing any step of the upgrade, thenthe operation will not complete successfully. Oracle recommends that you ensure thatyou use the appropriate values for the ServerAliveInterval and ServerAliveCountMaxoptions for your SSH sessions to avoid upgrade failures.
Using the screen command prevents network disconnections interrupting the upgrade. Ifthe session terminates, resume as follows:
screen -r
5. Copy the upgrade ISO file to the destination directory using Secure Copy Protocol orother secure transmission method.
scp remote_host:remote_path/okv-upgrade-disc-new_software_release.iso /var/lib/oracle
• remote_host is the IP address of the computer containing the ISO upgrade file.
• remote_path is the directory of the ISO upgrade file. Do not copy this file to anylocation other than the /var/lib/oracle directory.
6. Make the upgrade accessible by using the mount command:
/bin/mount -o loop,ro /var/lib/oracle/okv-upgrade-disc-new_software_release.iso /images
7. If your Oracle Key Vault deployment consists solely of two cluster nodes in a read-writeconfiguration running Oracle Key Vault 18.5 or earlier, then you must prepare the clusterfor the upgrade process by executing a pre-upgrade script on both nodes.
You must run this pre-upgrade step only when you are upgrading a two-nodecluster, running Oracle Key Vault 18.5 or earlier, configured as a single read-writepair. Do not run this pre-upgrade script on a cluster of any other configuration.
Chapter 4Upgrading Oracle Key Vault in a Multi-Master Cluster Environment
4-39

a. Unzip the upgrade script and save it in /tmp. Perform this step on both nodes.
/usr/bin/unzip -d /tmp/ /images/preupgrade/cluster_preupgrade_211.zip
b. Execute the upgrade script on each node to be upgraded.
/tmp/cluster_preupgrade_211.sh
c. Check for errors on each node by executing the following command:
echo $?
d. Check the upgrade script log /tmp/cluster_preupgrade_211.log on eachnode for any errors.
8. Disable Node A.
Select the Cluster tab, and then Management in the left navigation bar. UnderCluster Details, select check box for the node to disable, and then click Disable.The node's status will change from DISABLING to DISABLED
9. Wait until Node A is disabled before proceeding.
10. Log into the Node B management console as a user with the System Administratorrole.
11. Disable Node B.
Select the Cluster tab, and then Management in the left navigation bar. UnderCluster Details, select check box for the node to disable, and then click Disable.The node's status will change from DISABLING to DISABLED
12. Wait until Node B is disabled before proceeding
13. Ensure that you have added disk space to extend the vg_root for both nodes.
14. For each node of the read-write pair, do the following:
Complete these steps on each node of a read-write pair in turn. In other words,perform the steps on the disabled Node A, allow the upgrade to complete, andthen perform the steps on the disabled Node B.
a. Log in to the Oracle Key Vault server through SSH as user support, thenswitch user su to root.
ssh support@okv_server_IP_addresssu - root
b. Clear the cache using the clean all command:
root# yum -c /images/upgrade.repo clean all
c. Apply the upgrade with upgrade.rb command:
root# /usr/bin/ruby /images/upgrade.rb --confirm
Chapter 4Upgrading Oracle Key Vault in a Multi-Master Cluster Environment
4-40
When you run the /usr/bin/ruby /images/upgrade.rb --confirm step during theupgrade, you may be asked to confirm that you completed the pre-upgrade steps.
When you run the upgrade.rb command, Oracle recommends that you execute thisstep and the next step (reboot) on one node first and then on the second after thefirst has completed. If your multi-master cluster deployment consists of three or morenodes, then you can upgrade both nodes of the read-write pair at the same time andavoid any down time.
If the system is successfully upgraded, then the command will display the followingmessage:
Remove media and reboot now to fully apply changes.
If you see an error message, then check the log file /var/log/messages for additionalinformation.
d. Restart the Oracle Key Vault server by running reboot command:
root# /sbin/reboot
On the first restart of the computer after the upgrade, the system will apply thenecessary changes. This can take a few hours. Do not shut down the system duringthis time.
The upgrade of the cluster node is completed when the screen with heading: OracleKey Vault Server new_software_release appears, with new_software_releasereflecting the release number of the upgraded version. Following the headingappears the menu item Display Appliance Info. Select Display Appliance Info andpress the Enter key to see the IP address settings for the appliance.
15. After each node has been upgraded, clear your browser's cache before attempting to login.
16. After both nodes has been successfully upgraded, re-enable Node B first (nodes mustbe enabled in the reverse order that they were disabled).
After you re-enable the disabled multi-master cluster node, its status changes fromDISABLED to ENABLING, then to ACTIVE. The status of the node will remain at ENABLINGand will not change to ACTIVE unless bidirectional replication between it and all othernodes is occurring successfully.
17. Re-enable Node A.
After you re-enable the disabled multi-master cluster node, its status changes fromDISABLED to ENABLING, then to ACTIVE. The status of the node will remain at ENABLINGand will not change to ACTIVE unless bidirectional replication between it and all othernodes is occurring successfully.
18. As necessary, disable SSH access on each node.
Log in to the Oracle Key Vault management console as a user who has the SystemAdministrator role. Select the System tab, then Settings. In the Network Details area,click SSH Access. Select Disabled. Click Save.
19. After you have successfully completed this procedure, repeat these upgrade steps on allremaining multi-master cluster read-write pairs.
Chapter 4Upgrading Oracle Key Vault in a Multi-Master Cluster Environment
4-41
Related Topics
• Step 3: Add Disk Space to Extend the vg_root for the Release 21.1 UpgradeBefore upgrading to Oracle Key Vault release 21.1, you will need to extend thevg_root to increase disk space.
• Disabling a Cluster NodeYou can temporarily disable a cluster node, which is required for upgrades andmaintenance.
• Step 4: Upgrade the Oracle Key Vault Server or Primary-Standby PairYou can upgrade a standalone Oracle Key Vault server or a pair of Oracle KeyVault servers in a primary-standby deployment.
• Upgrading a Standalone or Primary-Standby Oracle Key Vault ServerThis upgrade includes the Oracle Key Vault server software and utilities thatcontrol the associated endpoint software.
• Enabling a Disabled Cluster NodeYou can enable any cluster node that was previously disabled. You must performthis operation from the disabled node.
4.6.5 Step 4: Check the Node Version and the Cluster VersionAfter you complete the upgrade of at least one node, you can log into any of theupgraded nodes to check the node and cluster versions.
Oracle Key Vault tracks the version information of each cluster node as well as theversion of the cluster as a whole. The node version represents the version of theOracle Key Vault software on a given node. When a node is upgraded, its nodeversion is updated to the new version of the Oracle Key Vault software. The clusterversion is derived from the version information of the cluster nodes and is set to theminimum version of any cluster node. During cluster upgrade, node version is updatedas each cluster node is upgraded to the later version. When all of the cluster nodeshave been upgraded, the cluster version is then updated to the new version. (TheCluster Version and Node Version fields are available in Oracle Key Vault release 18.2or later.)
1. Log in to the Oracle Key Vault management console as a user who has theSystem Administrator role.
2. Select the Cluster tab.
3. In the left navigation bar, select Management.
4. Check the following areas:
• To find the node version, check the Cluster Details area.
• To find the cluster version, check the Cluster Information area.
4.6.6 Step 5: If Necessary, Change the Network Interface forUpgraded Nodes
Nodes that were created in Oracle Key Vault releases earlier than release 21.1 useClassic mode, in which only one network interface was used.
If you prefer to use dual NIC network mode, which supports the use two networkinterfaces, then you can switch the node to use this mode, from the command line.
Chapter 4Upgrading Oracle Key Vault in a Multi-Master Cluster Environment
4-42
Related Topics
• Changing the Network Interface ModeYou can switch between dual NIC mode and classic mode for the network interface.
4.7 Overview of the Oracle Key Vault Management ConsoleThe Oracle Key Vault management console provides a graphical user interface for OracleKey Vault users.
The Oracle Key Vault management console is a browser-based console that connects to theserver using the https secure communication channel. It provides the graphical userinterface for Oracle Key Vault, where users can perform tasks such as the following:
• Setting up and managing the cluster
• Creating and managing users, endpoints, and their respective groups
• Creating and managing virtual wallets and security objects
• Setting system settings, like network and other services
• Setting up primary-standby
• Performing backups
4.8 Performing Actions and SearchesThe Oracle Key Vault management console enables you to perform standard actions andsearch operations, as well as get help information.
Many of the tab and menu pages contain an Actions menu or Search bars that allow you tosearch and perform actions on lists and the results of searches. The Help selection of theActions list provides detailed help for using these features.
• Actions MenusThe actions available from an Actions drop-down menu can vary but typically include aset of standard menu items.
• Search BarsAlong with Actions menus, many tabs in the Oracle Key Vault management consolecontain search bars.
4.8.1 Actions MenusThe actions available from an Actions drop-down menu can vary but typically include a set ofstandard menu items.
These items are as follows:
• Select Columns: Select which column should be displayed.
• Filter: Filter by column or row and a user-defined expression.
• Rows Per Page: Choose how many rows you want to view .
• Format: Choose formatting such as Sort, Control Break, Highlight, Compute,Aggregate, Chart, and Group By.
• Save Report: Save reports.
Chapter 4Overview of the Oracle Key Vault Management Console
4-43
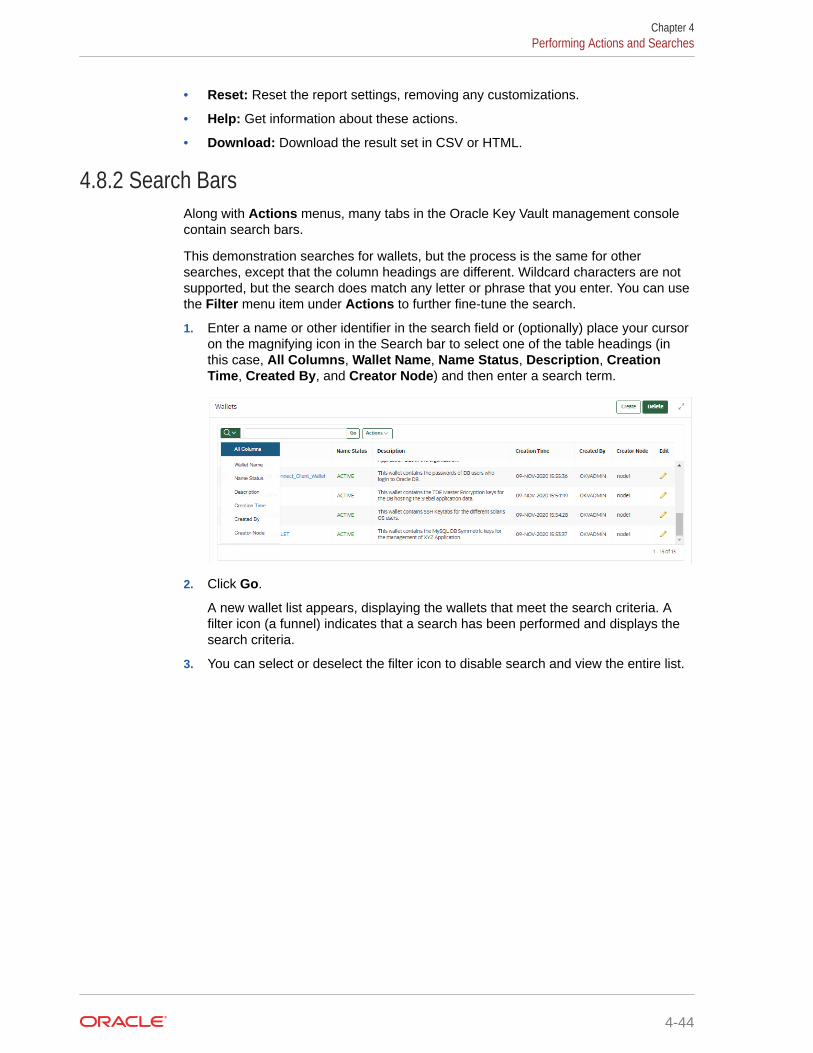
• Reset: Reset the report settings, removing any customizations.
• Help: Get information about these actions.
• Download: Download the result set in CSV or HTML.
4.8.2 Search BarsAlong with Actions menus, many tabs in the Oracle Key Vault management consolecontain search bars.
This demonstration searches for wallets, but the process is the same for othersearches, except that the column headings are different. Wildcard characters are notsupported, but the search does match any letter or phrase that you enter. You can usethe Filter menu item under Actions to further fine-tune the search.
1. Enter a name or other identifier in the search field or (optionally) place your cursoron the magnifying icon in the Search bar to select one of the table headings (inthis case, All Columns, Wallet Name, Name Status, Description, CreationTime, Created By, and Creator Node) and then enter a search term.
2. Click Go.
A new wallet list appears, displaying the wallets that meet the search criteria. Afilter icon (a funnel) indicates that a search has been performed and displays thesearch criteria.
3. You can select or deselect the filter icon to disable search and view the entire list.
Chapter 4Performing Actions and Searches
4-44
5Managing Oracle Key Vault Multi-MasterClusters
You can create, configure, manage, and administer an Oracle Key Vault multi-master clusterby using the Oracle Key Vault management console.
• About Managing Oracle Key Vault Multi-Master ClustersYou can add or remove nodes from the cluster, disable or enable cluster nodes, andmanage activities such as node conflicts and replication.
• Setting Up a ClusterAfter you add an initial node to a cluster, you can add more nodes, thereby creating read-write pairs of nodes or read-only nodes.
• Terminating the Pairing of a NodeOn the controller node, you can terminate the pairing process for a new node.
• Disabling a Cluster NodeYou can temporarily disable a cluster node, which is required for upgrades andmaintenance.
• Enabling a Disabled Cluster NodeYou can enable any cluster node that was previously disabled. You must perform thisoperation from the disabled node.
• Deleting a Cluster NodeYou can permanently delete a node from the cluster.
• Force Deleting a Cluster NodeYou can permanently force delete a node from a cluster that is dead, unresponsive, orhas exceeded the maximum disabled node time limit.
• Managing Replication Between NodesYou can enable and disable node replication from the Oracle Key Vault managementconsole.
• Cluster Management InformationThe Cluster Management page provides a concise overview of the cluster and the statusof each node.
• Cluster Monitoring InformationThe Cluster Monitoring page provides the replication health of the cluster and the currentnode.
• Naming Conflicts and ResolutionOracle Key Vault can resolve naming conflicts that can arise as users create objects suchas endpoints, endpoint groups, and user groups.
• Multi-Master Cluster Deployment RecommendationsOracle provides deployment recommendations for deployments that have two or morenodes.
5-1
5.1 About Managing Oracle Key Vault Multi-Master ClustersYou can add or remove nodes from the cluster, disable or enable cluster nodes, andmanage activities such as node conflicts and replication.
5.2 Setting Up a ClusterAfter you add an initial node to a cluster, you can add more nodes, thereby creatingread-write pairs of nodes or read-only nodes.
• About Setting Up a ClusterYou create a multi-master cluster by converting a single Oracle Key Vault server tobecome the initial node.
• Creating the First (Initial) Node of a ClusterTo create a cluster, you must convert an existing standalone Oracle Key Vaultserver to become the first node in the cluster.
• Adding Nodes to a ClusterAfter you have created a cluster to have the initial node, you can add more nodesto the cluster.
5.2.1 About Setting Up a ClusterYou create a multi-master cluster by converting a single Oracle Key Vault server tobecome the initial node.
This Oracle Key Vault server seeds the cluster data and converts the server into thefirst cluster node, which is called the initial node.
After the initial cluster is created in the Oracle Key Vault server, you can add thedifferent types of nodes that you need for the cluster. The cluster is expanded whenyou induct additional Oracle Key Vault servers, and add them as read-write nodes, oras simple read-only nodes.
5.2.2 Creating the First (Initial) Node of a ClusterTo create a cluster, you must convert an existing standalone Oracle Key Vault server tobecome the first node in the cluster.
This first node is called the initial node. The standalone Oracle Key Vault server canalso be a server that has been upgraded to Oracle Key Vault release 18.1 or later froma previous release, or it can also be the server that is unpaired from a primary-standbyconfiguration. Check Oracle Key Vault Release Notes for known issues about unpairoperations and upgrades.
You can use this node to add one or more nodes to the cluster. The node operates inread-only restricted mode until it is part of a read-write pair.
1. Perform a full backup of the Oracle Key Vault server to a remote destination.
2. Log into the Oracle Key Vault management console as a user who has the SystemAdministrator role.
Chapter 5About Managing Oracle Key Vault Multi-Master Clusters
5-2
3. If the Oracle Key Vault server was upgraded from a release earlier than Oracle Key Vaultrelease 12.2 (bundle patch 8), then generate and activate (rotate) a new certificate for thenode.
If this step does not apply to your deployment, then you can bypass it.
4. Select the Cluster tab, and then select Configure from the left navigation bar.
5. In the Configure as Candidate Node page, enter the following settings:
• First Node of Cluster: Select the Yes button.
• Node Name: Enter a unique name for this node. This field is auto-populated with theOracle Key Vault server name as the node name. You may specify another name.You cannot change this name later.
• Cluster Name: Enter a name for this cluster of nodes. You cannot change this namelater.
• Cluster Subgroup: Enter a name for this sub-group of nodes, such as a data centername or a logical group name.
6. Click Convert to Candidate Node.
The conversion can take several minutes. After the conversion is complete, the ClusterManagement page is displayed and the node is now operating in read-only restricted mode.At this stage, you can add another node to this cluster. In that case, the initial node will nolonger be a candidate node: it will become the controller node and the new node will be thecandidate node. The data on the controller node will overwrite the data on the candidatenode.
Related Topics
• Rotating All CertificatesYou can use the Oracle Key Vault management console to rotate certificates.
• Managing CertificatesIn addition to Oracle Key Vault-generated certificates, you can manage third-partycertificates.
• Oracle Key Vault Release Notes
5.2.3 Adding Nodes to a ClusterAfter you have created a cluster to have the initial node, you can add more nodes to thecluster.
• Adding a Node to Create a Read-Write PairAfter you create the initial node, you must add an additional read-write peer to the cluster.
• Adding a Node as a Read-Only NodeTo add a new read-only cluster node, you add a newly configured server from anyexisting cluster node.
• Creating an Additional Read-Write Pair in a ClusterAny node can be read-write paired with only one other node, and there can be multipleread-write pairs in a cluster.
Chapter 5Setting Up a Cluster
5-3
5.2.3.1 Adding a Node to Create a Read-Write PairAfter you create the initial node, you must add an additional read-write peer to thecluster.
You can configure any two nodes as a read-write pair. However, any single node canbe read-write paired with only one other node.
To create a read-write pair using two nodes in a cluster, you pair a node (referred to asthe controller node) with a newly configured server (referred to as the candidate node).Note that this will take some time: an hour or more, depending on the speed of yourserver, network, and volume of data in the cluster. Be aware that the controller nodewill be unable to service endpoints during certain parts of this operation.
1. Perform a full backup of the controller node to a remote destination beforecontinuing.
2. Ensure that the following network requirements are in place:
• There is good network connectivity between the servers that host thecontroller node and the candidate node.
• The ports that are required for Oracle Key Vault are open in the networkfirewall. These ports are described in Network Port Requirements.
3. As a user who has the System Administrator role, log in to the Oracle Key Vaultmanagement console of the node that you want to use as a controller node .
You can use any existing node, including the first node, that does not have a read-write peer to be the controller node for this operation. If necessary, add a read-onlynode first.
4. Select the Cluster tab, and then select Management from the left navigation bar.
5. Under Cluster Details, select Add.
6. In the Add Candidate Node to Cluster page, under Add Cluster Details, enter therecovery passphrase in the Recovery Passphrase of the Cluster field.
This value will be used later when you pair with the candidate node. The recoverypassphrase is that of the first node of the cluster and will be used later across allthe cluster nodes.
7. Enter the following details under Add Candidate Node Details.
While you enter these details, do not save any of this information or click the AddNode button until you reach Step 14.
• Add Node as Read-Write Peer: Select Yes.
• Node ID: Select a unique ID for the candidate node. Remember that after youcreate this ID, you cannot change it. Node ID is auto populated but you maychange it. Ensure that the candidate node ID is unique in the cluster.
• Node Name: Enter a unique name of the candidate node. After you create thisname, you cannot change it.
• Cluster Subgroup: Enter the sub-group name for the candidate node. Youcan provide an existing subgroup name. If you provide a subgroup name thatdoes not exist, it will be created. (This field is auto-populated with the clustersubgroup name of the controller node.)
• Cluster Name is auto-populated and cannot be changed.
Chapter 5Setting Up a Cluster
5-4
• IP Address: Enter the IP address of the candidate node.
• Certificate of Candidate Node: The next steps explain how you can find thecertificate of the candidate node.
Do not exit this page.
8. In a new browser window, log into the Oracle Key Vault management console of thecandidate node as a user who has the System Administrator role.
9. Select the Cluster tab, and then select Configure from the left navigation bar.
10. In the Configure as Candidate Node page, enter the following details:
• First Node of the Cluster: Select No. Selecting No shows additional fields to enter.
• Recovery Passphrase of the Cluster: enter the recovery passphrase of the clusterthat you entered earlier for the controller node.
• IP Address: enter the IP address of the controller node.
• Certificate of Controller Node: Use these steps to enter certificate of controllernode.
– In the browser window for the controller node, scroll to the bottom of the screen.Select and copy the entire certificate value shown for Certificate of ControllerNode.
– In the browser window for the candidate node, paste the copied certificate fromthe controller node into the Certificate of the Controller Node field.
• Check the recovery passphrase, the IP address, and the pasted in certificate verycarefully to ensure that you copied it correctly. If there is an error, then after you clickConvert to Candidate Node, you will need to terminate the pairing process orpotentially reinstall Oracle Key Vault on this node.
11. Click Convert to Candidate Node.
The conversion can take several minutes. After the conversion is complete, the screenwill refresh and the Adding Candidate Node to Cluster page is displayed. The certificatefor the candidate node appears on this page.
12. Select and copy the entire candidate node certificate.
13. In the browser window of the controller node, paste the copied certificate from thecandidate node into the Certificate of Candidate Node box.
14. Click Add Node.
This process will take an hour or more, depending on the speed of your server, network,and volume of data in the cluster. During this time, the network management interface ofthe Oracle Key Vault will be restarted and you might momentarily get a Server Error500 on the controller node. On the candidate node, errors may also appear, such as BadGateway. The candidate node will restart as part of the induction process. This is normal.During the pairing process, the status of the candidate node will display as PAIRING on allcluster nodes.
To view the status of any server, view the output on the management console.
After the candidate node restarts and completes the pairing process, you can log in toeither cluster node to view the cluster status by selecting the Cluster tab. Both nodes willnow show as ACTIVE. The candidate node may briefly display that it is in read-onlyrestricted mode after it automatically restarts. This node is now a synchronously pairedcluster node and no longer a candidate node. After a node is part of a cluster, the console
Chapter 5Setting Up a Cluster
5-5
will display the node name, subgroup name, and cluster name in the top right areaof the console header.
5.2.3.2 Adding a Node as a Read-Only NodeTo add a new read-only cluster node, you add a newly configured server from anyexisting cluster node.
The existing cluster node is referred to as the controller node, and the newlyconfigured server is referred to as the candidate node. This process will take an houror more, depending on the speed of your server, network, and volume of data in thecluster.
1. Perform a server backup before continuing.
2. Ensure that the following network requirements are in place:
• There is good network connectivity between the servers that host thecontroller node and the candidate node.
• The ports that are required for Oracle Key Vault are open in the networkfirewall. These ports are described in Network Port Requirements.
3. Log into the controller node Oracle Key Vault management console as a user whohas the System Administrator role.
You can use any existing node as a controller for this operation.
4. Select the Cluster tab, and then select Management from the left navigation bar.
5. In the Cluster Details section click Add.
6. In the Add Cluster Details section, enter the cluster recovery passphrase in theRecovery Passphrase of the Cluster field.
This value will be used later when pairing with the candidate node.
7. Under Add Candidate Node Details, enter the following information:
• Add Node as Read-Write Peer: Select No.
• Node ID: Select a unique ID for the candidate node. Remember that after youcreate this ID, you cannot change it. Node ID is auto populated but you maychange it. Ensure that the candidate node ID is unique in the cluster.
• Node Name: Enter a unique name of the candidate node. After you create thisname, you cannot change it.
• Cluster Subgroup: Enter the subgroup name for the candidate node. You canprovide an existing subgroup name. If you provide a subgroup name that doesnot exist, then it will be created.
• Cluster Name: This name is populated automatically.
• IP Address: Enter the IP address of the candidate node.
Do not exit this page.
8. In a new browser window, log into the Oracle Key Vault management console ofthe candidate node as a user who has the System Administrator role.
9. Select the Cluster tab, and then select Configure from the left navigation bar.
The Configure as Cluster Candidate page appears.
10. In the Configure as Candidate Node page, enter the following details:
Chapter 5Setting Up a Cluster
5-6
• First Node of the Cluster: Select No. Selecting No shows additional fields to enter.
• Recovery Passphrase of the Cluster: enter the recovery passphrase of the clusterthat you entered earlier for the controller node.
• IP Address: enter the IP address of the controller node.
• Certificate of Controller Node: Use these steps to enter certificate of controllernode.
– In the browser window for the controller node, scroll to the bottom of the screen.Select and copy the entire certificate value shown for Certificate of ControllerNode.
– In the browser window for the candidate node, paste the copied certificate fromthe controller node into the Certificate of the Controller Node field.
• Check the recovery passphrase, the IP address, and the pasted in certificate verycarefully to ensure that you copied it correctly. If there is an error, after you clickConvert to Candidate Node, you will need to terminate the pairing process orpotentially reinstall Oracle Key Vault on this node.
11. Click Convert to Candidate.
The conversion can take several minutes. After the conversion is complete, the screenwill refresh and the Adding Candidate Node to Cluster page is displayed. The certificatefor the candidate node appears on this page.
12. Select and copy the entire candidate node certificate.
13. In the browser window of the controller node, paste the copied certificate from thecandidate node into the Certificate of Candidate Node box.
14. Click Add Node.
This process will take an hour or more, depending on the speed of your server, network,and volume of data in the cluster. During this time, the Oracle Key Vault console of thecontroller node will become unresponsive and can display an error such as Server Error500. On the candidate node, errors may also appear, such as Bad Gateway. Thecandidate node will restart as part of the synchronization process. This is normal. Duringthe pairing process, the status of the candidate node will display as PAIRING on all othercluster nodes not involved in this pairing process.
To view the status of any server, view the output on the server console.
After the candidate node restarts and completes the pairing process, you can log intoeither cluster node to view the cluster status by selecting the Cluster tab. Both nodes willnow show as ACTIVE. The candidate node may briefly display that it is in read-onlyrestricted mode after it automatically restarts. This node is now a read-only paired clusternode and no longer a candidate node. After a node is part of a cluster, the console willdisplay the node name, sub-group name, and cluster name in the top right area of theconsole header.
5.2.3.3 Creating an Additional Read-Write Pair in a ClusterAny node can be read-write paired with only one other node, and there can be multiple read-write pairs in a cluster.
1. Select a read-only cluster node as the controller node to pair with a new candidate node.
2. Follow the steps to create a read-write pair of nodes in a cluster.
Chapter 5Setting Up a Cluster
5-7
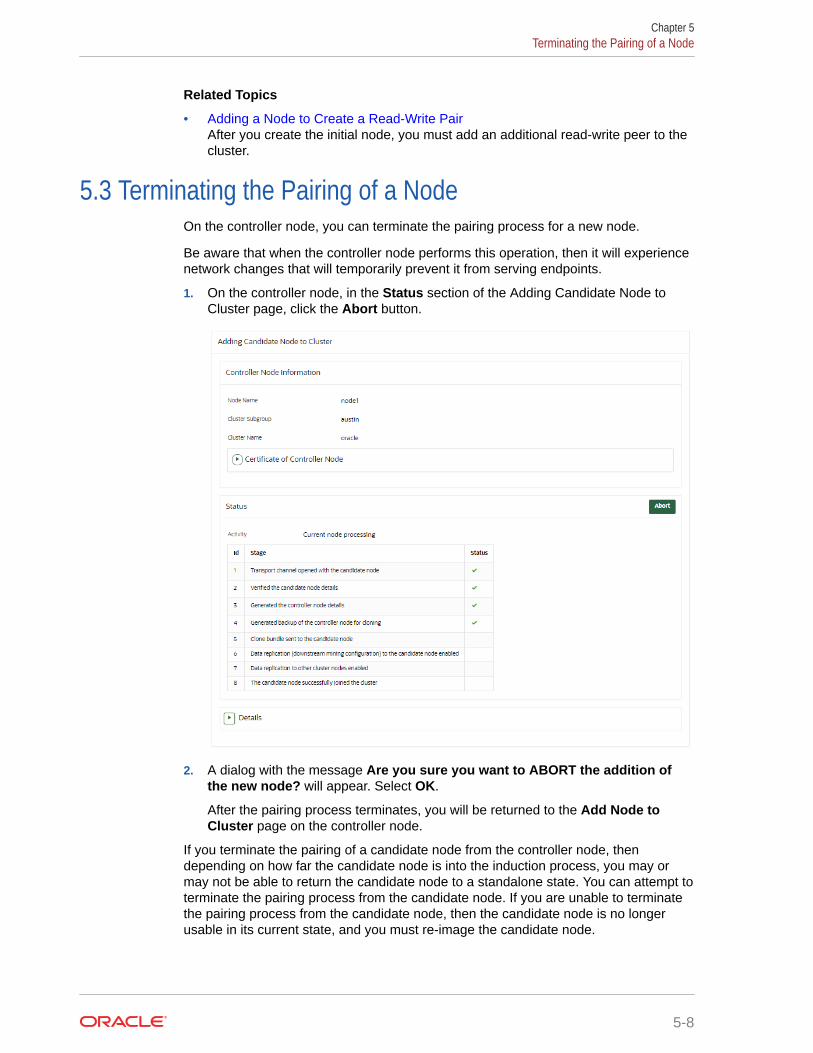
Related Topics
• Adding a Node to Create a Read-Write PairAfter you create the initial node, you must add an additional read-write peer to thecluster.
5.3 Terminating the Pairing of a NodeOn the controller node, you can terminate the pairing process for a new node.
Be aware that when the controller node performs this operation, then it will experiencenetwork changes that will temporarily prevent it from serving endpoints.
1. On the controller node, in the Status section of the Adding Candidate Node toCluster page, click the Abort button.
2. A dialog with the message Are you sure you want to ABORT the addition ofthe new node? will appear. Select OK.
After the pairing process terminates, you will be returned to the Add Node toCluster page on the controller node.
If you terminate the pairing of a candidate node from the controller node, thendepending on how far the candidate node is into the induction process, you may ormay not be able to return the candidate node to a standalone state. You can attempt toterminate the pairing process from the candidate node. If you are unable to terminatethe pairing process from the candidate node, then the candidate node is no longerusable in its current state, and you must re-image the candidate node.
Chapter 5Terminating the Pairing of a Node
5-8
5.4 Disabling a Cluster NodeYou can temporarily disable a cluster node, which is required for upgrades and maintenance.
However, be aware that a node can only be disabled for a set period of time. When itexceeds that time, it cannot be enabled again. The default maximum disable node durationtime is 24 hours, but you can set it for as high as 240 hours. Note that as this value isincreased, the average amount of disk space consumed by cluster-related data alsoincreases.
Do not attempt disabling a node unless replication between all nodes is healthy. Failure to doso will result in a node stuck in the DISABLING state, which may then have to be force-deletedfrom the cluster.
1. Log into any cluster Oracle Key Vault management console as a user who has theSystem Administrator role.
2. Select the Cluster tab, and then select Management from the left navigation bar.
3. Under Cluster Details, in the Select Node column, select the check box of the node todisable.
4. Click Disable.
On the node that is being disabled, the node status will display as DISABLING during thedisabling process. The other nodes will display the status for this node as DISABLED.When the disabling process is complete, the node that you disabled displays theDISABLED status.
Related Topics
• Configuring Maximum Disable Node Duration for the ClusterYou can set the maximum node duration time for the cluster in hours.
5.5 Enabling a Disabled Cluster NodeYou can enable any cluster node that was previously disabled. You must perform thisoperation from the disabled node.
1. As a user who has the System Administrator role, log into the Oracle Key Vaultmanagement console of any active node in the cluster.
2. Select the Cluster tab, and then select Management from the left navigation bar.
3. In the Cluster Details section, note the dates in which the nodes have been disabled.
Oracle recommends that you enable the nodes in the reverse order in which theywere disabled. Otherwise, the enabling action may not be able to complete.
4. In the Cluster Details section, under Name, click the name of the node that was disabledmost recently.
Clicking the node name enables you to log in to this node. You can only enable disablednodes from the disabled node itself.
5. Select Enable.
You do not need to check the check box of the disabled node in the Cluster Details table.
6. Repeat this step for each disabled node, from the most recent to the node that wasdisabled first.
Chapter 5Disabling a Cluster Node
5-9
5.6 Deleting a Cluster NodeYou can permanently delete a node from the cluster.
Deleted nodes cannot be added back to any cluster, not just to the current cluster fromwhich they were deleted. However, you can reinstall the Oracle Key Vault appliancesoftware on this server and add the deleted node to a cluster. All data will besynchronized with the cluster before the node is deleted. A node cannot delete itself.Be aware that if a deleted node has a read-write peer, then this read-write peer nodewill experience network changes that will temporarily prevent it from serving endpoints.
1. As a user who has the System Administrator role, on a different node, log into theOracle Key Vault management console.
A node cannot delete itself.
2. Select the Cluster tab, and then select Management from the left navigation bar.
3. Under Cluster Details, in the Select Node column, select the check box of thenode to delete.
4. Click Delete.
The node status will display as DELETING. After it is deleted, it will show asDELETED, or later be removed from the cluster management page.This action is immediate. The node status will display as DELETING. Do not shutdown the deleted server until it no longer shows in the Cluster Details table on theCluster Management page. However, Oracle recommends that you wait an hourafter deleting a cluster node before reusing the node ID of the node that wasdeleted.
5.7 Force Deleting a Cluster NodeYou can permanently force delete a node from a cluster that is dead, unresponsive, orhas exceeded the maximum disabled node time limit.
Forcefully deleting a node that is still a part of a cluster may cause inconsistency in thecluster. Be aware that if the read-write peer of the node that was forcefully deleted isalso removed from the cluster before confirming that all critical data from the forcefullydeleted node has reached other nodes, then data loss can result. When you forcefullydelete a node, ensure that the node to be deleted has first been shut down. A nodecannot be deleted from its own management console. When you must forcefully deletea node, ensure that the node to be deleted has first been shut down. Deleted nodescannot be added back to the cluster. However, you can reinstall the Oracle Key Vaultappliance software on a server and then add the deleted node to a cluster. Be awarethat if a deleted node has a read-write peer, then this read-write peer node willexperience network changes that will temporarily prevent it from serving endpoints.
1. On a different node, log into the Oracle Key Vault management console as a userwho has the System Administrator role.
A node cannot delete itself. Oracle recommends that if the node to be deleted hasa read-write peer, to force delete the node from its read-write peer.
2. Select the Cluster tab, and then select Management from the left navigation bar.
3. Under Cluster Details, in the Select Node column, select the check box of thenode to disable.
Chapter 5Deleting a Cluster Node
5-10
4. Click Force Delete.
The node status will display as DELETING. After it is deleted, it will show as DELETED, orlater be removed from the cluster management page. Oracle recommends that you waitan hour after force deleting a cluster node before reusing the node ID of the node thatwas deleted.
5.8 Managing Replication Between NodesYou can enable and disable node replication from the Oracle Key Vault management console.
• Restarting Cluster ServicesWhile managing replication between nodes, you can restart a node's cluster serviceswhen the cluster service status for the node is down.
• Disabling Node ReplicationYou can disable the replication link between the current node and any other node in acluster.
• Enabling Node ReplicationYou can enable the replication link between the current node and any other node in acluster.
5.8.1 Restarting Cluster ServicesWhile managing replication between nodes, you can restart a node's cluster services whenthe cluster service status for the node is down.
1. Log into Oracle Key Vault management console of any cluster node as a user who hasthe System Administrator role.
2. Select the Cluster tab, and then Monitoring from the left navigation bar.
3. In the Node State pane, click the Restart Cluster Services button.
5.8.2 Disabling Node ReplicationYou can disable the replication link between the current node and any other node in a cluster.
1. Log into Oracle Key Vault management console of any cluster node as a user who hasthe System Administrator role.
2. Select the Cluster tab, and then Monitoring from the left navigation bar.
3. Under Cluster Link State, select the check boxes for the nodes for which you want todisable replication.
4. Click Disable.
5. Click OK to confirm in the dialog box.
5.8.3 Enabling Node ReplicationYou can enable the replication link between the current node and any other node in a cluster.
1. As a user who has the System Administrator role, log in to the Oracle Key Vaultmanagement console of the node for which replication should be managed.
2. Select the Cluster tab, and then Monitoring from the left navigation bar.
Chapter 5Managing Replication Between Nodes
5-11
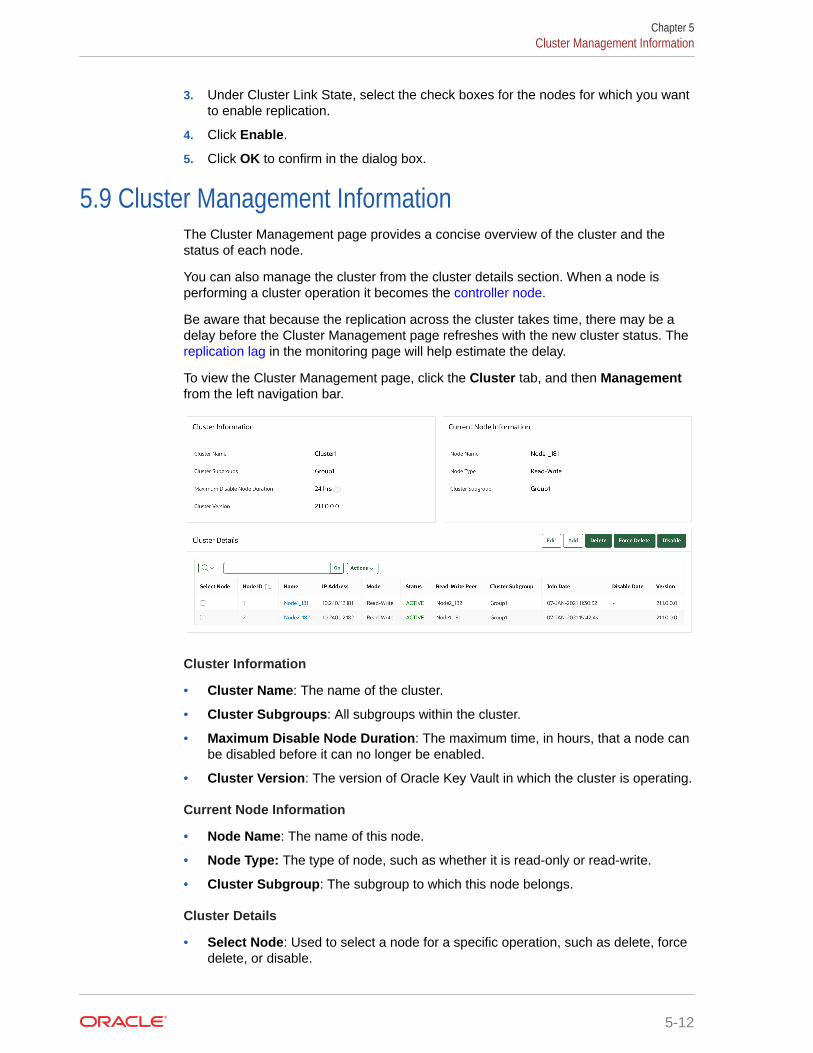
3. Under Cluster Link State, select the check boxes for the nodes for which you wantto enable replication.
4. Click Enable.
5. Click OK to confirm in the dialog box.
5.9 Cluster Management InformationThe Cluster Management page provides a concise overview of the cluster and thestatus of each node.
You can also manage the cluster from the cluster details section. When a node isperforming a cluster operation it becomes the controller node.
Be aware that because the replication across the cluster takes time, there may be adelay before the Cluster Management page refreshes with the new cluster status. The replication lag in the monitoring page will help estimate the delay.
To view the Cluster Management page, click the Cluster tab, and then Management from the left navigation bar.
Cluster Information
• Cluster Name: The name of the cluster.
• Cluster Subgroups: All subgroups within the cluster.
• Maximum Disable Node Duration: The maximum time, in hours, that a node canbe disabled before it can no longer be enabled.
• Cluster Version: The version of Oracle Key Vault in which the cluster is operating.
Current Node Information
• Node Name: The name of this node.
• Node Type: The type of node, such as whether it is read-only or read-write.
• Cluster Subgroup: The subgroup to which this node belongs.
Cluster Details
• Select Node: Used to select a node for a specific operation, such as delete, forcedelete, or disable.
Chapter 5Cluster Management Information
5-12
• Node ID: The ID of the node.
• Node Name: The name of the node. Clicking the node name takes you to the ClusterManagement page of that node.
• IP Address: The IP address of the node.
• Mode: The mode in which the node is operating, such as read-write or read-onlyrestricted.
• Status: The status of the node, such as active, pairing, disabling, disabled, enabling,deleting, or deleted.
• Read-Write Peer: The read-write peer of the node. If blank, it has no read-write peer.
• Cluster Subgroup: The subgroup to which the node belongs. You can change this by 1)checking the check box next to a node, 2) clicking the Edit button, which displays awindow, 3) entering a new cluster subgroup in the field, and 4) clicking Save.
• Join Date: The date and time that the node was added to the cluster or most recentlyenabled
• Disable Date: The date and time that the node was disabled.
• Node Version: The current version of the Oracle Key Vault node.
5.10 Cluster Monitoring InformationThe Cluster Monitoring page provides the replication health of the cluster and the currentnode.
This page also provides a concise overview of the settings enabled in the cluster. You cannotupdate the settings on this page. Because the replication across the cluster takes time, theremay be a delay before the Cluster Monitoring page refreshes with the new cluster state.Replication lag will help estimate the delay.
To view the cluster monitoring page, click the Cluster tab, and then Monitoring from the leftnavigation bar.
You can hover the mouse over the checkmarks or X's in the Cluster Settings State pane. Itwill display one of the following explanations of the state:
• Enabled in Cluster
• Enabled in Node
• Disabled in Cluster
• Disabled in Node
Chapter 5Cluster Monitoring Information
5-13
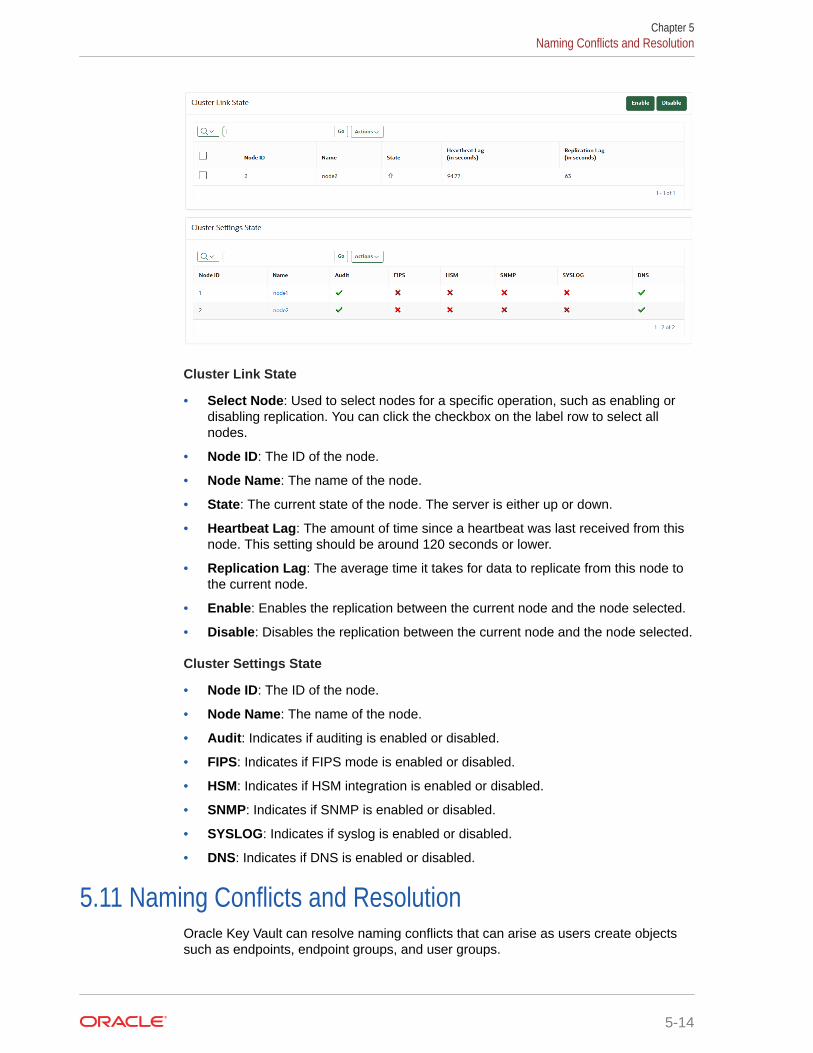
Cluster Link State
• Select Node: Used to select nodes for a specific operation, such as enabling ordisabling replication. You can click the checkbox on the label row to select allnodes.
• Node ID: The ID of the node.
• Node Name: The name of the node.
• State: The current state of the node. The server is either up or down.
• Heartbeat Lag: The amount of time since a heartbeat was last received from thisnode. This setting should be around 120 seconds or lower.
• Replication Lag: The average time it takes for data to replicate from this node tothe current node.
• Enable: Enables the replication between the current node and the node selected.
• Disable: Disables the replication between the current node and the node selected.
Cluster Settings State
• Node ID: The ID of the node.
• Node Name: The name of the node.
• Audit: Indicates if auditing is enabled or disabled.
• FIPS: Indicates if FIPS mode is enabled or disabled.
• HSM: Indicates if HSM integration is enabled or disabled.
• SNMP: Indicates if SNMP is enabled or disabled.
• SYSLOG: Indicates if syslog is enabled or disabled.
• DNS: Indicates if DNS is enabled or disabled.
5.11 Naming Conflicts and ResolutionOracle Key Vault can resolve naming conflicts that can arise as users create objectssuch as endpoints, endpoint groups, and user groups.
Chapter 5Naming Conflicts and Resolution
5-14
• About Naming Conflicts and ResolutionIf you create an object that has the same name as another object on another node,Oracle Key Vault resolves this conflict.
• Naming Conflict Resolution InformationThe Cluster Conflict Resolution page provides a list of objects with names that conflictwith objects created on different nodes.
• Changing the Suggested Conflict Resolution NameYou can change the suggested name for an object that conflicts with another object of thesame type.
• Accepting the Suggested Conflict Resolution NameYou can accept the suggested name for an object name that conflicts with another objectof the same type.
5.11.1 About Naming Conflicts and ResolutionIf you create an object that has the same name as another object on another node, OracleKey Vault resolves this conflict.
You can create a new object with a name that conflicts with an object of the same typecreated on another node. If a conflict happens, then Oracle Key Vault will make the name ofthe conflicting object unique by adding _OKVxx, where xx is the node ID of the node on whichthe object was created. You can choose to accept this new name or change the object name.
Users who have the System Administrator role can resolve the following naming conflicts:
• User names
• Endpoint names
Users who have the Key Administrator role can resolve the following naming conflicts:
• Endpoint groups
• Security objects
• User groups
• Wallets
If an object is stuck in the PENDING state and will not transition to ACTIVE, then check for anybroken replication links in the cluster. You can find cluster links in the Oracle Key Vaultmanagement console by selecting the Cluster tab and then selecting Monitoring.
5.11.2 Naming Conflict Resolution InformationThe Cluster Conflict Resolution page provides a list of objects with names that conflict withobjects created on different nodes.
On this page, you can accept the suggested unique name or edit the object name. To viewthe Cluster Conflict Resolution page, click the Cluster tab, and then ConflictResolution from the left navigation bar. Alternatively, you can click on the Click here fordetails button on a Naming Conflict alert from the Alerts table on the Home page.
Chapter 5Naming Conflicts and Resolution
5-15
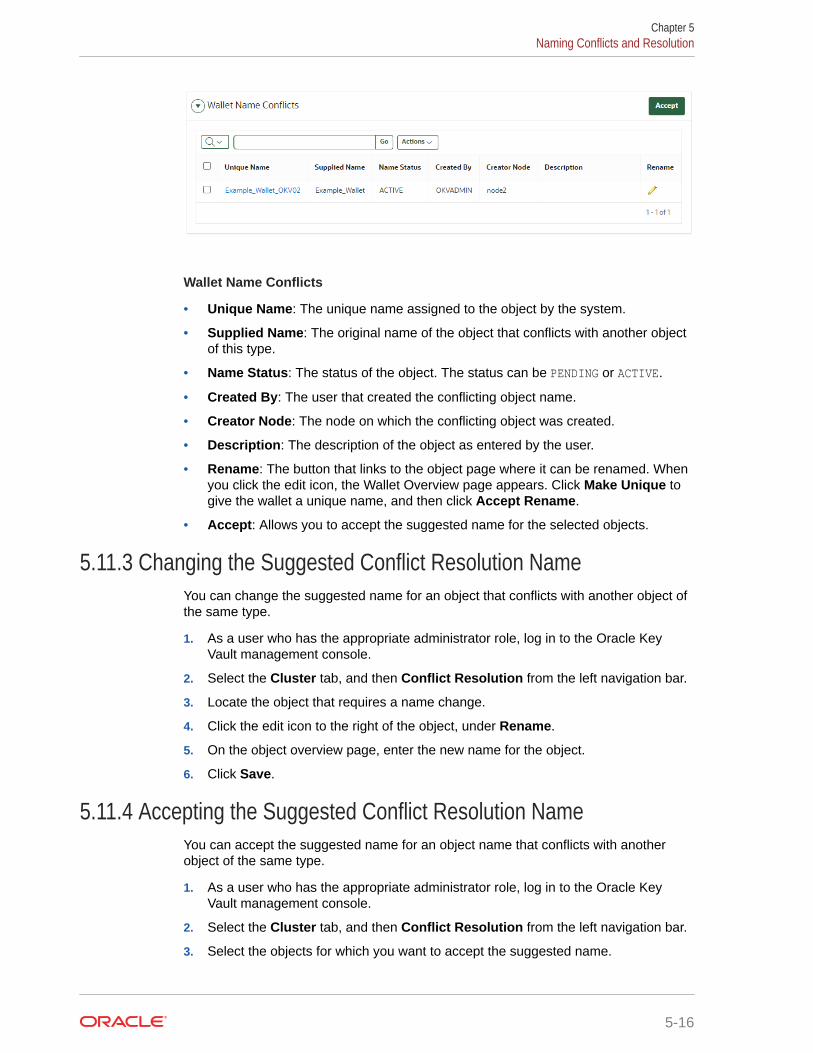
Wallet Name Conflicts
• Unique Name: The unique name assigned to the object by the system.
• Supplied Name: The original name of the object that conflicts with another objectof this type.
• Name Status: The status of the object. The status can be PENDING or ACTIVE.
• Created By: The user that created the conflicting object name.
• Creator Node: The node on which the conflicting object was created.
• Description: The description of the object as entered by the user.
• Rename: The button that links to the object page where it can be renamed. Whenyou click the edit icon, the Wallet Overview page appears. Click Make Unique togive the wallet a unique name, and then click Accept Rename.
• Accept: Allows you to accept the suggested name for the selected objects.
5.11.3 Changing the Suggested Conflict Resolution NameYou can change the suggested name for an object that conflicts with another object ofthe same type.
1. As a user who has the appropriate administrator role, log in to the Oracle KeyVault management console.
2. Select the Cluster tab, and then Conflict Resolution from the left navigation bar.
3. Locate the object that requires a name change.
4. Click the edit icon to the right of the object, under Rename.
5. On the object overview page, enter the new name for the object.
6. Click Save.
5.11.4 Accepting the Suggested Conflict Resolution NameYou can accept the suggested name for an object name that conflicts with anotherobject of the same type.
1. As a user who has the appropriate administrator role, log in to the Oracle KeyVault management console.
2. Select the Cluster tab, and then Conflict Resolution from the left navigation bar.
3. Select the objects for which you want to accept the suggested name.
Chapter 5Naming Conflicts and Resolution
5-16
4. Click Accept.
5.12 Multi-Master Cluster Deployment RecommendationsOracle provides deployment recommendations for deployments that have two or more nodes.
Two-Node Deployment Recommendations
Use a two-node deployments for the following situations:
• Non-critical environments, such as test and development
• Simple deployment of read-write pairs with both nodes active, replacing classic primary-standby
• Single data center environments
Considerations for a two-node deployment:
• Availability is provided by multiple nodes.
• Maintenance will require down time.
• Good network connectivity between data centers is mandatory.
• Take regular backups to remote destinations for disaster recovery.
Three-Node Deployment Recommendations
Use a three-node deployment for the following situations:
• Single data center environments with minimal downtime requirement
• Single read-write pair with additional read-only node to handle load
• One read-only node is available for zero downtime during maintenance
Considerations for a three-node deployment:
• Take regular backups to remote destinations for disaster recovery.
Four or More Node Deployment Recommendations
Use a deployment of four or more nodes for the the following situations:
• Large data centers distributed across geographical locations
• Deployment of read-write pairs with pair members spanning geography
Considerations for a large deployment:
• Availability is provided by multiple nodes.
• Additional read-only nodes can be used to handle load.
• Good network connectivity between data centers is mandatory.
Chapter 5Multi-Master Cluster Deployment Recommendations
5-17
6Managing an Oracle Key Vault Primary-Standby Configuration
You can deploy Oracle Key Vault in a primary-standby server configuration.
• Overview of the Oracle Key Vault Primary-Standby ConfigurationThe Oracle Key Vault primary-standby configuration provides benefits based on the typeof deployment your site needs.
• Configuring the Primary-Standby EnvironmentTo configure a primary-standby environment, you must have the System Administratorrole and have access to the two servers (one primary and one standby).
• Switching the Primary and Standby ServersYou can switch the roles of the primary and standby server for situations such asmaintenance periods.
• Restoring Primary-Standby After a FailoverA failover takes place if the primary server fails.
• Disabling (Unpairing) the Primary-Standby ConfigurationYou can disable the primary-standby configuration by unpairing the primary and standbyservers.
• Read-Only Restricted Mode in a Primary-Standby ConfigurationThe read-only restricted mode is the default mode in a primary-standby configuration.
• Best Practices for Using Oracle Key Vault in a Primary-Standby ConfigurationOracle provides guidelines for ensuring operational continuity and minimal downtime ofOracle Key Vault.
6.1 Overview of the Oracle Key Vault Primary-StandbyConfiguration
The Oracle Key Vault primary-standby configuration provides benefits based on the type ofdeployment your site needs.
• About the Oracle Key Vault Primary-Standby ConfigurationYou configure a primary-standby environment by providing the primary and standbyservers with each other's IP address and certificate, and then pairing them.
• Benefits of an Oracle Key Vault Primary-Standby ConfigurationThe benefits of an Oracle Key Vault primary-standby configuration include highavailability, necessary for business-critical operations.
• Difference Between Primary-Standby Configuration and Multi-Master ClusterIn both primary-standby and multi-master cluster configurations, one server will alwaysoperate in read-write mode.
6-1
• Primary Server Role in a Primary-Standby ConfigurationA primary-standby deployment consists of two Oracle Key Vault servers operatingin a primary-standby configuration.
• Standby Server Role in a Primary-Standby ConfigurationIn a primary-standby environment, one server runs in the standby server role.
6.1.1 About the Oracle Key Vault Primary-Standby ConfigurationYou configure a primary-standby environment by providing the primary and standbyservers with each other's IP address and certificate, and then pairing them.
While pairing the primary and standby servers, you can select one as the primaryserver, and the other as the standby. A failover timeout that you set determines whenthe standby starts to take over as the primary server.
Note:
Oracle strongly recommends that you keep the primary and standby systemsas identical as possible, because their roles can be reversed in maintenanceperiods and failure situations. These include the following:
• Oracle Key Vault software versions
• Disk size
• RAM size
• System clocks on both systems must be synchronized
If your deployment requires a primary-standby configuration, then Oracle recommendsthat you configure it before adding endpoints to Oracle Key Vault. This enables theendpoints to know about both the primary and standby servers. An endpoint that isadded before the standby server configuration will not know about the standby server,unless you re-enroll the endpoint. If you configure the primary-standby environmentafter adding endpoints, then you must re-enroll the endpoints to ensure the endpointsrecognize both servers that were previously enrolled with the primary and standbyservers in standalone mode.
WARNING:
Configure primary-standby deployments before adding endpoints to ensurethat the endpoints know about both nodes.
If you want to add SNMP support in a primary-standby environment, then ideally,configure SNMP on both the primary and the standby servers before pairing them.This is because the standby server is no longer accessible from the Oracle Key Vaultmanagement console, because all requests are forwarded to the primary server.However you can also add SNMP support to the standby after pairing the servers byaccessing the standby using SSH.
If you want to use a third-party certificate in a primary-standby configuration, then youmust install it on the primary and standby servers first, and then pair them.
Chapter 6Overview of the Oracle Key Vault Primary-Standby Configuration
6-2
If you want to enable FIPS mode in a primary-standby environment, then you must ensurethat both the primary and standby servers use the same FIPS mode: either both are enabled,or both are disabled for FIPS mode. This is because the standby server is no longeraccessible from the Oracle Key Vault management console, because all requests areforwarded to the primary server.
With persistent cache enabled, both the primary and the standby will cache the masterencryption keys from Oracle Key Vault independently. Ensure that TDE operations haveexecuted on the primary and standby servers after these servers have started to verify thepersistent cache. The persistent cache feature also enables endpoints to be operationalduring primary-standby operations, such as configuration, switchovers, and failovers.
If enabled, read-only restricted mode ensures endpoint operational continuity (such asenabling the endpoints to fetch keys) if either the standby or primary server is not available.For example, if the standby shuts down, then the primary will go into read-only restrictedmode and enable the endpoints to fetch keys and continue operations.
A primary-standby configuration is characterized by continuous synchronization between theprimary server and the standby server. When synchronization is lost between the primary andstandby servers, it is possible to encounter a split-brain scenario where two primary serversmight be active simultaneously. In such a scenario, both servers record new data thatdiverges from the last synchronized state. When connectivity is restored between the primaryand standby servers, it may not be possible to reconcile the changes on the two servers anddata loss may occur.
You can enable or disable restricted mode when configuring the primary-standby environmentby selecting the Allow Read-Only Restricted Mode option to Yes or No on the ConfigurePrimary-Standby page.
When read-only restricted mode is enabled, the primary server enters read-only restrictedmode if the standby server is unavailable. In read-only restricted mode, the primary serverallows keys to be retrieved, but does not allow keys to be modified or new keys to be added.This ensures that endpoints still have access to their keys, and key data or metadata is notlost due to a split-brain scenario. However, the primary server still writes audit records, whichmay be lost if a split-brain scenario occurs with the standby server.
When read-only restricted mode is disabled, the primary server becomes unavailable andstops accepting new requests if the standby server is unavailable. Endpoints connected toOracle Key Vault will be unable to retrieve keys from the server until connectivity is restoredbetween primary and standby servers. You can use the persistent master encryption keycache feature to avoid endpoint downtime. With this feature, data integrity is ensured byallowing endpoints to communicate with one primary server at any given time. This avoidssplit-brain situations, and the risk of data loss associated with such situations.
Related Topics
• Changing SNMP Settings on the Standby ServerYou change the SNMP settings from the command line on the standby server.
6.1.2 Benefits of an Oracle Key Vault Primary-Standby ConfigurationThe benefits of an Oracle Key Vault primary-standby configuration include high availability,necessary for business-critical operations.
Users performing business-critical operations must have data to be accessible andrecoverable with minimum downtime. These requirements are met in a primary-standbyconfiguration.
Chapter 6Overview of the Oracle Key Vault Primary-Standby Configuration
6-3
You achieve high availability by adding redundancy in the form of a standby server thatcan take over the functions of the primary server in case of failure. The standby serverhelps you eliminate single points of failure and reduce server downtime. This is asignificant reason to deploy Oracle Key Vault in a primary-standby configuration. In aclassic primary-standby configuration, the emphasis is on key preservation. In a multi-master cluster, emphasis is on both key preservation and availability of the keys.
You can create a cluster of Oracle Key Vault server nodes for greater availability andredundancy. A primary-standby configuration is limited to two servers, whereas a multi-master cluster can have up to 16 geographically distributed nodes. The primary-standby configuration and the multi-master configuration are mutually exclusive.
Related Topics
• Oracle Key Vault Multi-Master Cluster OverviewThe multi-master cluster nodes provide high availability, disaster recovery, loaddistribution, and geographic distribution to an Oracle Key Vault environment.
6.1.3 Difference Between Primary-Standby Configuration and Multi-Master Cluster
In both primary-standby and multi-master cluster configurations, one server will alwaysoperate in read-write mode.
In a primary-standby configuration, when both servers are available, one of the serversoperates in read-write mode in the primary server role, and the other operates in thestandby server role. The endpoints only connect to the server running in the primaryserver role. The roles can be switched manually to support maintenance operations, orautomatically due to server or connectivity failure. If either the primary or standbyserver becomes unavailable, then the remaining server operates in a read-onlyrestricted mode, limiting normal updates while allowing audits and other internalupdates.
In a multi-master cluster, the endpoints can connect to any Oracle Key Vaultserver. Some servers are configured as bi-directional read-write pairs in whichinformation updated in either node must be successfully replicated to the other nodeimmediately. If one of the nodes in a read-write pair becomes unavailable, thesurviving node operates in read-only restricted mode until the other node is restoredand synchronization resumes. A fully functional multi-master cluster must have at leastone read-write pair.
When a successful update occurs in a read-write pair, the update is propagated to allother nodes in the cluster.
A primary-standby configuration and a multi-master cluster configuration are mutuallyexclusive and incompatible configurations. The specific configuration of an Oracle KeyVault deployment has no ramification on the endpoint side configuration.
6.1.4 Primary Server Role in a Primary-Standby ConfigurationA primary-standby deployment consists of two Oracle Key Vault servers operating in aprimary-standby configuration.
By default, endpoints only connect to the primary server until it becomes unavailable.At any time, only one server operates in the primary server role and that serveractively accepts client connections. The other server operates in the standby server
Chapter 6Overview of the Oracle Key Vault Primary-Standby Configuration
6-4
role, which receives updates from the primary server. On failure of the server running in theprimary server role, the standby assumes the primary role. There may be restrictions inoperations if the primary-standby pair is not fully available and operational.
6.1.5 Standby Server Role in a Primary-Standby ConfigurationIn a primary-standby environment, one server runs in the standby server role.
This standby server does not accept client connections while in that role. The server receivesupdates only from the paired server running in primary server role. If the primary server is nolonger available, including being available to the administrator, then the server running in thestandby role switches to assume the primary server role. There may be restrictions inoperations if the primary-standby pair is not fully available and operational.
6.2 Configuring the Primary-Standby EnvironmentTo configure a primary-standby environment, you must have the System Administrator roleand have access to the two servers (one primary and one standby).
• Step 1: Configure the Primary ServerTo configure the primary server, you must enable it to connect to the standby server.
• Step 2: Configure the Standby ServerTo configure the standby server, you must enable it to connect to the primary server.
• Step 3: Complete the Configuration on the Primary ServerAfter you configure the primary and standby servers, you can enable the primary-standbyon the designated primary server.
6.2.1 Step 1: Configure the Primary ServerTo configure the primary server, you must enable it to connect to the standby server.
If you plan to configure an HSM (such as Thales Luna or Utimaco) with Oracle Key Vault,then you must first enable this HSM in Oracle Key Vault before configuring the primary server.
1. Open a web browser and enter the IP address of the designated primary server.
The Oracle Key Vault Management Console login screen is displayed.
2. Log in to the Oracle Key Vault management console as a user who has the SystemAdministrator role.
3. Check if the server has FIPS mode enabled, and if necessary, enable or disable it.
You must ensure that both the primary and standby servers use the same FIPS modesetting: either both are enabled, or both are disabled, for FIPS mode. Changing the FIPSmode setting requires a restart of Oracle Key Vault.
a. Select the System tab, and then select Settings in the left navigation bar.
b. In the System Configuration section, click FIPS.
c. In FIPS Mode dialog box, either select or clear the Enable check box, depending onwhether both servers will use FIPS mode.
d. Click Save.
In a moment, Oracle Key Vault will restart.
Chapter 6Configuring the Primary-Standby Environment
6-5
4. If you changed the FIPS mode, then log back into the designated primary serveras a user who has the System Administrator role.
5. Select the System tab, and then Settings in the left navigation bar.
6. In the System Configuration area, click Primary-Standby.
The Primary-Standby page appears. The following are the fields on this page:
• Current status: Displays the IP address and status of the current server.
• Fast Start Failover Threshold (in secs): Displays the duration (in seconds)that will elapse before the server takes over from a failed peer server. Thedefault is 60 seconds.
To avoid failover during brief or intermittent failures, increase the duration.
• Configure this server as: Displays whether the server is configured as aPrimary server or Standby server.
• Allow Read-Only Restricted Mode: Displays the status of read-onlyrestricted mode. The default is Yes.
When enabled, read-only restricted mode ensures operational continuity of theendpoints if the primary or standby Oracle Key Vault server is affected byserver, hardware, or network failures
• FIPS Mode: Displays the current FIPS mode status of the server.
• Current Server Certificate: Displays the server certificate.
7. Copy the following information, and then store it in a text file named primary.txt.
You will need this information when you configure the standby server.
• From the Current status field, copy the IP address and paste it inprimary.txt.
• From the Current Server Certificate field, copy the server certificate andpaste it on a new line in primary.txt after the IP address.
Save primary.txt.
Next, you are ready to configure the standby server.
Related Topics
• Step 2: Configure the Standby ServerTo configure the standby server, you must enable it to connect to the primaryserver.
• Oracle Key Vault Root of Trust HSM Configuration Guide
6.2.2 Step 2: Configure the Standby ServerTo configure the standby server, you must enable it to connect to the primary server.
If you plan to configure an HSM (such as SafeNet or Utimaco) with Oracle Key Vault,then you must first enable this HSM in Oracle Key Vault before configuring the standbyserver.
1. Open a web browser and enter the IP address of the designated standby server.
The Oracle Key Vault Management Console login screen is displayed.
Chapter 6Configuring the Primary-Standby Environment
6-6
2. Log in to the Oracle Key Vault management console as a user who has the SystemAdministrator role.
3. Check if the server has FIPS mode enabled, and if necessary, enable or disable it.
You must ensure that both the primary and standby servers use the same FIPS modesetting: either both are enabled, or both are disabled, for FIPS mode. Changing the FIPSmode setting requires a restart of Oracle Key Vault.
a. Select the System tab, and then Settings in the left navigation bar.
b. In the System Configuration area, click Primary-Standby.
c. Either select or clear the Enable check box, depending on whether both servers willuse FIPS mode.
d. Click Save.
In a moment, Oracle Key Vault will restart.
4. If you changed the FIPS mode, then log back into the designated standby server as auser who has the System Administrator role.
5. Select the System tab, and then Settings in the left navigation bar.
6. In the System Configuration area, click Primary-Standby.
The Configure Primary-Standby page is displayed.
7. Copy the following information, and store it in a text file named standby.txt.
You will need this information when you configure the primary server.
• From the Current status field, copy the IP address and paste it in standby.txt.
• From the Current Server Certificate field, copy the server certificate and paste it ona new line in standby.txt after the IP address.
Save standby.txt.
8. In the Configure this server as field, select Standby server.
The Primary server IP address and Primary server certificate fields are displayed.
Ensure that Yes is selected in the Allow Read-Only Restricted Mode field.
Do not disable read only restricted mode unless necessary. If the primary-standbyconfiguration is configured with read only restricted mode disabled, then you must enableit by reinstalling and configuring Oracle Key Vault again.
9. Copy the following information from primary.txt, and paste it in the Configure Primary-Standby page of the standby server:
• Copy the IP address and paste it in the Primary server IP address field.
• Copy the server certificate and paste it in the Primary server certificate field.
10. Click Save.
The Settings Saved page is displayed.
The Reset button enables you to delete the primary-standby configuration, if necessary.
11. Do not exit the management console.
At this stage, the primary-standby configuration is complete on the designated standbyserver. The next step is to enable primary-standby on the designated primary server.
Chapter 6Configuring the Primary-Standby Environment
6-7

Related Topics
• Step 3: Complete the Configuration on the Primary ServerAfter you configure the primary and standby servers, you can enable the primary-standby on the designated primary server.
• Oracle Key Vault Root of Trust HSM Configuration GuideConfiguring HSM
6.2.3 Step 3: Complete the Configuration on the Primary ServerAfter you configure the primary and standby servers, you can enable the primary-standby on the designated primary server.
1. Ensure that you are logged in to the standby server as a user with the SystemAdministrator Role and that the Oracle Key Vault management console ConfigurePrimary-Standby page is displayed.
2. On the Settings Saved page, click the IP address of the primary server displayedat the top of the page.
The Oracle Key Vault Management Console login screen of the primary serveris displayed.
3. Log in to the Oracle Key Vault management console as a user who has theSystem Administrator role.
4. Select the System tab, and then Settings in the left navigation bar.
5. In the System Configuration area, click Primary-Standby.
6. In the Configure this server as field, select Primary server.
The Standby server IP address and Standby server certificate fields aredisplayed.
Ensure that Yes is selected in the Allow Read-Only Restricted Mode field.
Do not disable read only restricted mode unless necessary. If the primary-standbyconfiguration is configured with read only restricted mode disabled, then you mustenable it by reinstalling and configuring Oracle Key Vault again.
7. Copy the following information from standby.txt, and paste it in the ConfigurePrimary-Standby page of the primary server:
• Copy the IP address and paste it in the Standby server IP address field.
• Copy the server certificate and paste it in the Standby server certificate field.
8. Click Initiate Pairing.
9. In the confirmation message that is displayed, click OK. The Operation inProgress page is displayed.
Caution:
Allow at least 10 minutes to elapse before performing the next step.
10. After at least 10 minutes have elapsed, click Refresh.
If the pairing of primary and standby servers is successful, then the currentsession is terminated. The Oracle Key Vault Management Console login
Chapter 6Configuring the Primary-Standby Environment
6-8
screen of the primary server is displayed. The primary-standby configuration is nowcomplete.
11. Check that the configuration was successful.
a. Log in as the System Administrator.
b. Select the System tab, and then Settings in the left navigation bar.
c. In the System Configuration area, click Primary-Standby.
The Primary-Standby Status page appears.
d. Ensure that the Status label is set to Primary-Standby mode is enabled.
e. Ensure that the Switchover Status is correct. In this example, the status is correctlyset to TO STANDBY.
At this stage, the primary-standby configuration should be complete and ready to use. Notethe following:
• You cannot log in to the standby server using a web browser because all configuration ispropagated from the primary.
• With the persistent cache enabled, endpoints will continue to operate while the primary-standby configuration is enabled. The IP Address, Network Mask, and Gateway fieldsin the Network Info page (found from selecting the System tab, and then SystemSettings in the left navigation bar) will no longer be modifiable.
• To manage the primary-standby deployment, log in to the primary server using a webbrowser.
Caution:
Ensure that you leave read-only restricted mode enabled while configuring primary-standby. Enabling it later requires a reinstall of the Oracle Key Vault server softwareon the standby server.
After configuring the primary-standby environment, do not change the system timeon the primary server. The changed system time causes the standby server to godown, thus disrupting the functioning of the primary-standby configuration.
6.3 Switching the Primary and Standby ServersYou can switch the roles of the primary and standby server for situations such asmaintenance periods.
During such maintenance periods, you might want to shut down a server to upgrade softwareor install patches. If you have persistent cache enabled and the persistent cache timeout issufficiently tuned, then the endpoints will continue to be operational during the switchover,minimizing endpoint downtime.
1. Log in to the Oracle Key Vault management console of the primary node as a user withthe System Administrator role.
2. Before switching the primary and standby servers, ensure that there are no primary-standby related alerts on the Alerts page.
Chapter 6Switching the Primary and Standby Servers
6-9
To access the Alerts page, click the Reports tab, and then click Alerts in the leftpane. Ensure that all primary-standby related alerts on the Alerts page areaddressed before switching the primary and standby servers.
3. Select the System tab, and then Settings in the left navigation bar.
4. In the System Configuration area, click Primary-Standby.
The Primary-Standby Status page appears.
5. Click Switch Roles on the top right.
The Switch Roles button allows you to switch the roles of the primary server andthe standby server. The primary server then assumes the role of the standbyserver, while the standby server assumes the role of the new primary server.
Click OK in the confirmation message.
An operation-initiated message is followed by the Operation in Progress pageindicating that the switchover operation will take 10 minutes to completesuccessfully.
Caution:
You must wait for a minimum period of 10 minutes for the switchoveroperation to complete successfully. If you refresh the UI before theswitchover operation is complete, an error message is displayed. Theerror message is displayed until the switchover is completedsuccessfully.
6. Ensure that at least 10 minutes have elapsed, and only then, click Refresh.
This logs you out of the current session and then opens a login page to theswitched primary server. Otherwise, try accessing the new primary server's URLdirectly.
Both the primary and standby servers are restarted. However, you will only be ableto log in to the new primary node's web console. The primary server is the activeserver, and all requests to the standby will be forwarded to the primary.
7. Log in to the primary server to see the IP address of the switched standby node.
8. Select the System tab, then Settings in the left navigation bar, and then clickPrimary-Standby in the System Configuration area.
The Primary-Standby Status page appears. The Standby server IP address fielddisplays the IP address.
6.4 Restoring Primary-Standby After a FailoverA failover takes place if the primary server fails.
If the primary server is not available, then the standby server takes over the primaryrole. If the standby server does not hear from the primary server for a time exceedingthe Fast Start Failover Threshold value, then it will assume that the primary is shutdown and start the failover process. You can configure the value in the Fast StartFailover Threshold field from the Oracle Key Vault management console from thedefault of 60 seconds. If the failed server (the old primary) becomes available again,then in most cases it will automatically become the new standby server. If the primary
Chapter 6Restoring Primary-Standby After a Failover
6-10
server fails permanently, then the standby server will take over as the primary. In this case,you must restore the primary-standby configuration.
1. Reinstall the Oracle Key Vault image on the failed server.
Ensure that you use the original IP address for the failed server.
2. Log on to the newly installed server and follow the steps to configure the primary-standbyenvironment.
You can designate the new server as the standby server (because the cluster has afunctional primary) and then pair it with the functioning primary.
3. If you want to restore the original configuration and set the new server as the primary,then click the Switch Roles option after you successfully pair the two nodes and enableprimary-standby.
The Switch Roles button enables you to switch the roles of the primary server and thestandby server. The primary server then assumes the role of the standby server, whilethe standby server assumes the role of the new primary server.
Note:
When read-only restricted mode is disabled, the primary server's failover statusgoes into suspended state causing the standby server to wait indefinitely for theprimary server to come back up. This is expected behavior to avoid a split-brainscenario where two primary servers are simultaneously active.
When read-only restricted mode is enabled, a primary or standby server failurecauses the operational peer to enter read-only restricted mode, thus ensuringendpoint operational continuity.
Related Topics
• Failover Situations in Primary-Standby ModeFailover situations can occur with or without read-only restricted mode or during aplanned shutdown operation for both primary and standby servers.
6.5 Disabling (Unpairing) the Primary-Standby ConfigurationYou can disable the primary-standby configuration by unpairing the primary and standbyservers.
After the two servers are unpaired, the primary and standby servers will operate instandalone mode. To prevent endpoints from connecting to the old standby (now standalone)Oracle Key Vault server, you must take the old standby off the network. See Oracle Key VaultRelease Notes for guidance about setting the permissions of the /var/lib/oracle/diag/rdbms/dbfwdb/dbfwdb/metadata_pv directory beforehand. Check the Release Notes foradditional issues related to unpair operations.
1. Log in to the primary server's management console as a user with System Administratorprivileges.
2. Select the System tab, and then Settings in the left navigation bar.
3. In the System Configuration area, click Primary-Standby.
Chapter 6Disabling (Unpairing) the Primary-Standby Configuration
6-11
The Primary-Standby Status page appears with Unpair and Switch Roles on thetop right. The Unpair and Switch Roles options do the following:
• The Unpair button allows you to disconnect the primary server from thestandby server, if required.
• The Switch Roles button allows you to switch the roles of the primary serverand the standby server, if required. The primary server then assumes the roleof the standby server, while the standby server assumes the role of the newprimary server.
4. Click Unpair.
A brief message with a green check appears indicating that the operation hasbeen successfully initiated.
The Operation in Progress page appears, indicating a wait time of at least 10minutes for the un-pairing to complete.
Wait 10 minutes.
5. After 10 minutes, click the Refresh button to be logged out of the current session.
6. Log back in to the management console of the primary server.
7. Select the System tab, then Settings in the left navigation bar, and then clickPrimary-Standby in the System Configuration area.
The Configure Primary-Standby page appears. The Current status field showsthe server in standalone mode.
Caution:
If you want to use the old standby (now standalone) Oracle Key Vaultserver as a standby in a new primary-standby deployment, or as part ofa multi-master cluster, then you must re-install the Oracle Key Vaultsoftware
Related Topics
• Oracle Key Vault Release Notes
6.6 Read-Only Restricted Mode in a Primary-StandbyConfiguration
The read-only restricted mode is the default mode in a primary-standby configuration.
• About Read-Only Restricted Mode in a Primary-Standby ConfigurationPrimary-standby read-only restricted mode ensures endpoint operationalcontinuity.
• Primary-Standby with Read-Only Restricted ModeRead-only restricted mode is the default primary-standby mode in Oracle KeyVault.
• Primary-Standby without Read-Only Restricted ModeWhen a primary-standby environment is configured without read-only restrictedmode, the impact on endpoint operations differs.
Chapter 6Read-Only Restricted Mode in a Primary-Standby Configuration
6-12
• States of Read-Only Restricted ModeA server using read-only restricted mode is affected by the failure in a primary server, astandby server, and the network.
• Enabling Read-Only Restricted ModeRead-only restricted mode is enabled by default when primary-standby is configured.
• Disabling Read-Only Restricted ModeRead-only restricted mode is enabled by default when primary-standby is configured.
• Recovering from Read-Only Restricted ModeTo recover an instance from read-only restricted mode after a network failure or standbyserver failure, manual intervention may be required.
• Read-Only Restricted Mode NotificationsWhen the primary or standby server enters read-only restricted mode, an alert isgenerated.
6.6.1 About Read-Only Restricted Mode in a Primary-StandbyConfiguration
Primary-standby read-only restricted mode ensures endpoint operational continuity.
This endpoint operational continuity is essential when the primary or standby Oracle KeyVault servers are affected by server, hardware, or network failures.
When an unplanned shutdown makes the primary or standby server offline, the endpoints canstill connect to the surviving peer server to perform critical operations. Primary-standby read-only restricted mode ensures that operations that replicate data are blocked. Operations thatreplicate data are allowed when both primary and standby servers are back online, thusensuring that no critical data is lost.
In a primary-standby Oracle Key Vault configuration, the single point of failure is eliminatedwhen you replicate the primary server’s data to the standby server. Read-only restrictedmode enables the generation of non-critical data such as audit records. However, generationof critical data such as keys is disabled. When the primary server is down, operations thatgenerate new critical data on the standby are disabled. The reverse is also true. When thestandby server is down, operations that attempt to modify or create any data on the primaryserver are disabled.
In a primary-standby deployment without read-only restricted mode, most endpointoperations are blocked because endpoint operations generate audit records, which is datathat needs replication, thus disrupting operational continuity.
The following are the benefits of using read-only restricted mode:
• Enables endpoint operational continuity when the primary or standby server is offline
• Ensures symmetrical behavior when the primary or standby server is offline
The following sections describe the behavior of:
Chapter 6Read-Only Restricted Mode in a Primary-Standby Configuration
6-13
6.6.2 Primary-Standby with Read-Only Restricted ModeRead-only restricted mode is the default primary-standby mode in Oracle Key Vault.
Note:
You can disable read-only restricted mode during the primary-standbyconfiguration. Oracle recommends that you configure primary-standby withread-only restricted mode enabled, which is the default mode. Whileconfiguring primary-standby, ensure that Yes is selected in the Allow Read-Only Restricted Mode field on the Configure Primary-Standby page.
Read-only restricted mode ensures endpoint operational continuity as well assymmetrical behavior when the primary or standby server is offline. Symmetricalbehavior ensures that the online server seamlessly takes over from its failed peer, andcontinues to service the endpoints without any disruption. For more information aboutprimary-standby failover situations with read-only restricted mode, see FailoverSituations with Read-Only Restricted Mode.
In read-only restricted mode, the surviving Oracle Key Vault server operates withlimited functionality. Endpoint operations that add or modify critical data on the OracleKey Vault server are blocked. However, endpoint operations that involve fetching ofdata are allowed. This ensures endpoint operational continuity and data integrity. Formore information about blocked and allowed operations, see About the States ofRead-Only Restricted Mode.
For more information about read-only restricted mode, see States of Read-OnlyRestricted Mode.
Note:
Read-only restricted mode has no impact on a standalone server.
6.6.3 Primary-Standby without Read-Only Restricted ModeWhen a primary-standby environment is configured without read-only restricted mode,the impact on endpoint operations differs.
This impact depends on the type of failure encountered: primary failure, standbyfailure, or a network failure that prevents communication between the primary andstandby servers. The following are the possible scenarios:
• Primary server failure: The standby server will failover and take over from theaffected primary server. This allows the Oracle Key Vault service to remainoperational. Data modifications are stored on the primary server until they can bereplicated to the standby server. This ensures endpoint operational continuitywhen the primary server goes offline due to an unplanned shutdown.
• Standby server failure: The primary server is unavailable to the endpoints,because it is not possible to distinguish a standby server failure from a networkfailure that prevents communication between the primary and standby servers.
Chapter 6Read-Only Restricted Mode in a Primary-Standby Configuration
6-14
• Power loss or network connectivity failure: The primary and standby servers areunable to communicate. The standby server will failover and take over from the primaryserver. To avoid a split-brain scenario, only one of the servers is allowed to service theendpoints.
Note:
A split-brain scenario in Oracle Key Vault occurs when the primary server fails,causing the standby server to failover and take over from the primary server. Thiscauses a situation where the primary and standby servers are available to servicethe endpoints, and create new data. A split-brain scenario causes data on theprimary and standby servers to go out of sync. This can lead to data loss andcorruption, as well as loss of operational continuity. To avoid a split-brain scenario,only one of the servers is allowed to service the endpoints after a failover occurs.
In primary-standby without read-only restricted mode, one of the following situations istriggered when a failure occurs:
• Endpoints suffer a temporary operational disruption to avoid a split-brain scenario.
• The standby server accepts new requests and generates new data without attempting tosynchronize the data with the failed primary server. Replication of data is temporarilydisabled until the primary server is online, thus ensuring operational continuity.
6.6.4 States of Read-Only Restricted ModeA server using read-only restricted mode is affected by the failure in a primary server, astandby server, and the network.
• About the States of Read-Only Restricted ModeRead-only restricted mode puts the Oracle Key Vault instance into the read-onlyrestricted mode state.
• Read-Only Restricted State Functionality During a Primary Server FailureYou can set a failover threshold value to determine when a standby server takes over fora failed primary server.
• Read-Only Restricted Mode Functionality During a Standby Server FailureIf a standby fails, the primary server waits for the duration in the Fast Start FailoverThreshold field on the Configure Primary-Standby page.
• Read-Only Restricted State Functionality During a Network FailureWhen a network failure affects communication between primary and standby servers,communication between certain endpoints and the primary server may also be affected.
6.6.4.1 About the States of Read-Only Restricted ModeRead-only restricted mode puts the Oracle Key Vault instance into the read-only restrictedmode state.
However, read-only restricted mode does not put the embedded Oracle Key Vault databaseinto the read-only restricted mode state. In read-only restricted mode, the following behavioroccurs when a primary or a standby server is unavailable:
Chapter 6Read-Only Restricted Mode in a Primary-Standby Configuration
6-15
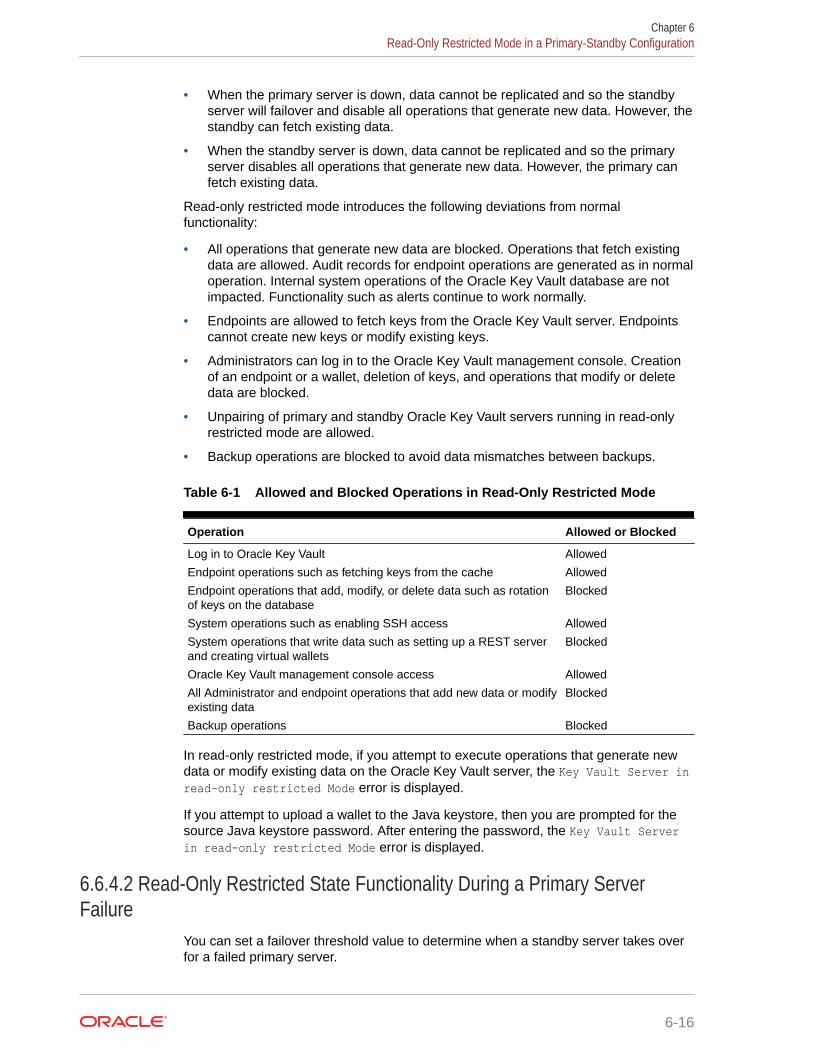
• When the primary server is down, data cannot be replicated and so the standbyserver will failover and disable all operations that generate new data. However, thestandby can fetch existing data.
• When the standby server is down, data cannot be replicated and so the primaryserver disables all operations that generate new data. However, the primary canfetch existing data.
Read-only restricted mode introduces the following deviations from normalfunctionality:
• All operations that generate new data are blocked. Operations that fetch existingdata are allowed. Audit records for endpoint operations are generated as in normaloperation. Internal system operations of the Oracle Key Vault database are notimpacted. Functionality such as alerts continue to work normally.
• Endpoints are allowed to fetch keys from the Oracle Key Vault server. Endpointscannot create new keys or modify existing keys.
• Administrators can log in to the Oracle Key Vault management console. Creationof an endpoint or a wallet, deletion of keys, and operations that modify or deletedata are blocked.
• Unpairing of primary and standby Oracle Key Vault servers running in read-onlyrestricted mode are allowed.
• Backup operations are blocked to avoid data mismatches between backups.
Table 6-1 Allowed and Blocked Operations in Read-Only Restricted Mode
Operation Allowed or Blocked
Log in to Oracle Key Vault Allowed
Endpoint operations such as fetching keys from the cache Allowed
Endpoint operations that add, modify, or delete data such as rotationof keys on the database
Blocked
System operations such as enabling SSH access Allowed
System operations that write data such as setting up a REST serverand creating virtual wallets
Blocked
Oracle Key Vault management console access Allowed
All Administrator and endpoint operations that add new data or modifyexisting data
Blocked
Backup operations Blocked
In read-only restricted mode, if you attempt to execute operations that generate newdata or modify existing data on the Oracle Key Vault server, the Key Vault Server inread-only restricted Mode error is displayed.
If you attempt to upload a wallet to the Java keystore, then you are prompted for thesource Java keystore password. After entering the password, the Key Vault Serverin read-only restricted Mode error is displayed.
6.6.4.2 Read-Only Restricted State Functionality During a Primary ServerFailure
You can set a failover threshold value to determine when a standby server takes overfor a failed primary server.
Chapter 6Read-Only Restricted Mode in a Primary-Standby Configuration
6-16
In the event of a primary server failure, the standby server waits for the duration specified inthe Fast Start Failover Threshold (in secs) field on the Configure Primary-Standby page. Ifthe primary server is not reachable after the specified duration has elapsed, the standbyserver enters read-only restricted mode. In read-only restricted mode, only operations thatfetch data are allowed. Endpoint operations that add new data or modify existing data on theOracle Key Vault server are blocked.
Related Topics
• Configuring the Primary-Standby EnvironmentTo configure a primary-standby environment, you must have the System Administratorrole and have access to the two servers (one primary and one standby).
6.6.4.3 Read-Only Restricted Mode Functionality During a Standby Server FailureIf a standby fails, the primary server waits for the duration in the Fast Start FailoverThreshold field on the Configure Primary-Standby page.
If the standby server is not reachable after the specified duration has elapsed, the primaryserver enters read-only restricted mode. In read-only restricted mode, only operations thatfetch data are allowed. Endpoint operations that add new data or modify existing data on theOracle Key Vault server are blocked.
The primary server continues to provide limited service to the endpoints.
Related Topics
• Configuring the Primary-Standby EnvironmentTo configure a primary-standby environment, you must have the System Administratorrole and have access to the two servers (one primary and one standby).
6.6.4.4 Read-Only Restricted State Functionality During a Network FailureWhen a network failure affects communication between primary and standby servers,communication between certain endpoints and the primary server may also be affected.
The primary server waits for the duration specified in the Fast Start Failover Threshold fieldon the Configure Primary-Standby page. If the standby server is not reachable after thespecified duration has elapsed, the primary server enters read-only restricted mode.
The standby server will also wait for the same duration. If the primary server is not reachableafter the specified duration has elapsed, the standby server enters read-only restricted mode.The standby server takes over as the new primary server, and provides service to endpointsthat cannot communicate with the affected primary server.
Related Topics
• Configuring the Primary-Standby EnvironmentTo configure a primary-standby environment, you must have the System Administratorrole and have access to the two servers (one primary and one standby).
6.6.5 Enabling Read-Only Restricted ModeRead-only restricted mode is enabled by default when primary-standby is configured.
Oracle recommends that you configure the primary-standby servers with read-only restrictedmode enabled.
Chapter 6Read-Only Restricted Mode in a Primary-Standby Configuration
6-17
1. Unpair the primary server from the standby server, and then reinstall Oracle KeyVault on the standby server.
2. Perform post-installation tasks on the standby server.
3. Log in to the standby server Oracle Key Vault management console as a user whohas the System Administrator role.
4. Select the System tab, and then Settings in the left navigation bar.
5. In the System Configuration area, click Primary-Standby.
On the Primary-Standby page, ensure that Yes is selected in the Allow Read-Only Restricted Mode field.
6. Log in to the primary server Oracle Key Vault management console as a user whohas the System Administrator role.
7. On the Primary-Standby page, ensure that Yes is selected in the Allow Read-Only Restricted Mode field.
8. Click Initiate Pairing.
Read-only restricted mode takes effect if connectivity is lost between the primary andstandby servers. Read-only restricted mode has no effect on a standalone server.
Related Topics
• Installing the Oracle Key Vault Appliance SoftwareThe Oracle Key Vault installation process installs all the required softwarecomponents onto a dedicated server or virtual machine.
• Performing Post-Installation TasksAfter you install Oracle Key Vault, you must complete a set of post-installationtasks.
• Configuring the Primary-Standby EnvironmentTo configure a primary-standby environment, you must have the SystemAdministrator role and have access to the two servers (one primary and onestandby).
6.6.6 Disabling Read-Only Restricted ModeRead-only restricted mode is enabled by default when primary-standby is configured.
Oracle recommends that you configure primary-standby with read-only restricted modeenabled. Follow these steps if an existing primary-standby deployment with read-onlyrestricted mode that is enabled must be converted to a deployment that has read-onlyrestricted mode disabled.
1. Unpair the primary server from the standby server, and reinstall Oracle Key Vaulton the standby server.
2. Perform post-installation tasks on the standby server.
3. Log in to the standby server Oracle Key Vault management console as a user whohas the System Administrator role.
4. Select the System tab, and then Settings in the left navigation bar.
5. In the System Configuration area, click Primary-Standby.
On the Primary-Standby page, ensure that No is selected in the Allow Read-OnlyRestricted Mode field.
Chapter 6Read-Only Restricted Mode in a Primary-Standby Configuration
6-18
6. Log in to the primary server Oracle Key Vault management console as a user who hasthe System Administrator role.
7. On the Primary-Standby page, ensure that No is selected in the Allow Read-OnlyRestricted Mode field.
8. Click Initiate Pairing.
After read-only restricted mode is disabled, it does not take effect if connectivity is lostbetween the primary and standby servers. Read-only restricted mode has no effect on astandalone server.
Related Topics
• Installing the Oracle Key Vault Appliance SoftwareThe Oracle Key Vault installation process installs all the required software componentsonto a dedicated server or virtual machine.
• Performing Post-Installation TasksAfter you install Oracle Key Vault, you must complete a set of post-installation tasks.
• Configuring the Primary-Standby EnvironmentTo configure a primary-standby environment, you must have the System Administratorrole and have access to the two servers (one primary and one standby).
6.6.7 Recovering from Read-Only Restricted ModeTo recover an instance from read-only restricted mode after a network failure or standbyserver failure, manual intervention may be required.
You will need to unpair and reset the surviving instance, reinstate a new Oracle Key Vaultserver, and pair it as the new standby to the surviving server. The following are the possiblescenarios:
• Primary server failure: Depending on the operational state of the primary server at thetime of failure, it could be restarted and some functionality may be available. However,due to possible corruption of the embedded Oracle Key Vault database, recovery may notbe possible. You would then need to reinstate the Oracle Key Vault instance because ofthe partial failure. If the failed server is unable to again pair with the peer server within 20minutes, then you must reinstantiate the server.
Even though the endpoint processes communicating with the Oracle Key Vault serversretain the IP address of the last known reachable server, they must determine the IPaddress of the new Oracle Key Vault server when spawned. The endpoint processesattempt to communicate with the Oracle Key Vault server configured as the primaryserver in the configuration scripts, and then wait for a response before trying to reach theserver configured as the standby server in the configuration scripts. To minimizedowntime, Oracle recommends that you initiate a switchover after reinstating the failedprimary server.
• Standby server failure: The primary server will run in the read-only restricted mode ifthere is a standby server failure. Reinstate the standby server if it does not automaticallypair with the primary server.
• Power loss or network connectivity failure: When a network failure occurs, theprimary and standby servers are unable to communicate, and both servers enter read-only restricted mode. The standby also attempts to failover to the primary server. Oncecommunication is re-established between the primary and standby servers, the oldprimary server is automatically converted to the new standby. The data from the newprimary server overwrites the old primary server’s data, resulting in the loss of audit
Chapter 6Read-Only Restricted Mode in a Primary-Standby Configuration
6-19
records from the old primary server. It is recommended that you enable syslogauditing to preserve the audit records that were overwritten on the old primary.Similar to recovering from primary server failure, Oracle recommends that youperform a switchover after recovery. You should also not enroll any new endpointsbefore the switchover.
Related Topics
• Restoring Primary-Standby After a FailoverA failover takes place if the primary server fails.
6.6.8 Read-Only Restricted Mode NotificationsWhen the primary or standby server enters read-only restricted mode, an alert isgenerated.
You can view these alerts on the Alerts page. If email notifications are configured,then an email notification is sent.
Related Topics
• Viewing Open AlertsUsers can view alerts depending on their privileges.
• Configuring Email NotificationYou can use email notifications to directly notify administrators of Key Vault statuschanges without logging into the Oracle Key Vault management console.
6.7 Best Practices for Using Oracle Key Vault in a Primary-Standby Configuration
Oracle provides guidelines for ensuring operational continuity and minimal downtimeof Oracle Key Vault.
• Configure your Transparent Data Encryption (TDE)-enabled databases to have anauto-login connection into Oracle Key Vault. Oracle Database Advanced SecurityGuide describes how to configure auto-login keystores.
• Apply the database patch for Bug 22734547 to tune the Oracle Key Vaultheartbeat.
• Ensure that read-only restricted mode is enabled in primary-standby Oracle KeyVault deployments.
• Set the duration in the Fast Start Failover Threshold field on the ConfigurePrimary-Standby page to a value that avoids unnecessary failover due to transientnetwork interruptions.
• Configure syslog auditing to capture audit records in read-only restricted mode.
• Switch over to the original primary server in case the primary server is reinstated.
• Before attempting any unpair operations, check Oracle Key Vault Release Notesfor known issues.
• Before attempting any switchover or unpair operations, check Oracle Key VaultRelease Notes for any known issues.
Chapter 6Best Practices for Using Oracle Key Vault in a Primary-Standby Configuration
6-20

Related Topics
• Oracle Database Advanced Security Guide
• Oracle Key Vault Release Notes
Chapter 6Best Practices for Using Oracle Key Vault in a Primary-Standby Configuration
6-21
7Deploying Oracle Key Vault on an OracleCloud Infrastructure VM Compute Instance
You can install Oracle Key Vault on an Oracle Cloud Infrastructure (OCI) VM computeinstance from Oracle Cloud Marketplace.
• About Deploying Oracle Key Vault on an Oracle Cloud Infrastructure Compute InstanceOracle Key Vault on Oracle Cloud Marketplace is the cloud-based version of Oracle KeyVault and provides flexible, continuous and scalable key management.
• Benefits of Using Oracle Key Vault in Oracle Cloud InfrastructureQuick deployments and ease of use are among the benefits of using an Oracle Key VaultOracle Cloud Infrastructure (OCI) compute instance.
• Provisioning an Oracle Key Vault Compute InstanceThe provisioning process for an Oracle Key Vault compute instance entails launching thecompute instance and performing post-launch and post-installation tasks.
• General Management of an Oracle Key Vault Compute InstanceYou can perform many of the Oracle Key Vault compute instance general managementtasks in the Oracle Key Vault management console.
• Migrating Oracle Key Vault Deployments Between On-Premises and OCIYou can migrate an Oracle Key Vault standalone, primary-standby or cluster deploymentfrom an on-premises environment to OCI or back.
7.1 About Deploying Oracle Key Vault on an Oracle CloudInfrastructure Compute Instance
Oracle Key Vault on Oracle Cloud Marketplace is the cloud-based version of Oracle Key Vaultand provides flexible, continuous and scalable key management.
Oracle Key Vault is quick and easy to launch on a VM compute instance of any shape or sizein your OCI tenancy. This eliminates the need to procure hardware and drastically shortensthe time to provision a fully functional Oracle Key Vault deployment. Oracle Key Vaultdeployed on an OCI VM compute instance (referred to as an Oracle Key Vault computeinstance) is private to your tenancy and is managed by you. After the launch, an Oracle KeyVault compute instance has the same look and feel as an on-premises Oracle Key Vaultinstallation, with the same flexibility in configuration.
An Oracle Key Vault server that is deployed on Oracle Cloud Infrastructure (OCI) VMcompute instance can operate in the following situations:
• A standalone environment
• Be paired with another Oracle Key Vault server in OCI or on-premises to form a primary-standby configuration
• Be paired with other nodes in OCI or on-premises to form a multi-master cluster
7-1
The Oracle Key Vault multi-master cluster nodes could be entirely in OCI forming acloud-only Oracle Key Vault cluster or some of the nodes can exist on-premises, thusforming a hybrid Oracle Key Vault cluster. This flexible deployment provides scalabilityregardless of whether Oracle Key Vault nodes are deployed in on-premises or cloudenvironments.
The Oracle Key Vault compute instance deployment enables the use of Oracle KeyVault to manage the encryption keys of your OCI-based database deployments. Thisenables you to maintain control over your encryption keys in a cloud environment. Youcan have up to 16 Oracle Key Vault compute instances in a multi-master cluster,distributed across any of the Oracle Cloud regions, to provide key managementservices to your globally distributed, on-premises, hybrid, or cloud-only Oracledatabase deployments.
When you enroll endpoints with the Oracle Key Vault compute instance, you mustensure that they are in the same VCN as the Oracle Key Vault compute instance itself.The endpoints will communicate with the Oracle Key Vault compute instance using theprivate IP of the instance. You can optionally configure the Oracle Key Vault computeinstance to have a public IP address that can be used to access the Oracle Key Vaultmanagement console. You must configure the network to ensure that connectivityexists between Oracle Key Vault compute instances as well as between endpoints andthe Oracle Key Vault compute instances.
7.2 Benefits of Using Oracle Key Vault in Oracle CloudInfrastructure
Quick deployments and ease of use are among the benefits of using an Oracle KeyVault Oracle Cloud Infrastructure (OCI) compute instance.
• Key management for OCI-based database environment: The Oracle Key Vaultcompute instance deployment provides key management to your OCI-baseddatabase environments as well as on-premises and hybrid databaseenvironments. This enables you to own, manage, and maintain control overencryption keys of your database environments in the cloud.
• Quick deployment: You can launch the Oracle Key Vault compute instance withinminutes and without the need to manage hardware or set up virtual machines.After it is launched, the Oracle Key Vault compute instance can run stand-alone, orbe added to a multi-master cluster, or used in primary-standby configuration. Youcan enroll endpoints with an Oracle Key Vault compute instance. This way, youcan quickly set up a production environment. You can also use Oracle Key Vaultcompute instances to quickly set up a test and development environment tovalidate and experiment with various use-cases and deployment scenarios ofOracle Key Vault.
• Scaling out a production environment during peak load or hardwareunavailability: If you use FastConnect or IPSec VPN in OCI, then you can extendthe Oracle Key Vault cloud deployments to an on-premises environment. UsingFastConnect or IPSec VPN, you can pair Oracle Key Vault nodes on-premiseswith Oracle Key Vault compute instances in OCI to form a hybrid cluster. You canuse a hybrid cluster to run production Oracle Key Vault servers in OCI, or usethem to expand the Oracle Key Vault cluster temporarily. Oracle Key Vaultcompute instances can be added quickly as new nodes to an on-premises, OCI orhybrid Oracle Key Vault cluster. This type of deployment provides spontaneous
Chapter 7Benefits of Using Oracle Key Vault in Oracle Cloud Infrastructure
7-2
elasticity to the Oracle Key Vault cluster, and can be used to address any temporaryincrease of load on nodes of the Oracle Key Vault cluster.
• Reduced latency for hybrid database environments: For use cases where the data isshared between on-premises and cloud databases, managing the keys in a hybrid OracleKey Vault cluster provides for locality of reference. Because the keys are available on allnodes of the cluster, the cluster subgroups can be setup in such a way that thedatabases in the cloud can primarily fetch the keys from the cluster nodes in OCI and theon-premises databases can primarily fetch the keys from cluster nodes that areprovisioned on-premises.
• Simplified transition of on-premises to OCI-based Oracle Key Vault clusters: If youare connected to OCI using FastConnect or IPSec VPN, then you can extend your on-premises Oracle Key Vault cluster by adding Oracle Key Vault compute instances to thatcluster. The IP addresses of the Oracle Key Vault nodes in OCI are added to the scanlists of your database endpoints. Once you have the appropriate number of Oracle KeyVault nodes in your OCI tenancy, you can remove the on-premises Oracle Key Vaultnodes from the cluster. Following the same procedure, it is possible to seamlesslytransition from an Oracle Key Vault cluster in OCI back to an on-premises Oracle KeyVault cluster.
• Engaging OCI infrastructure and services: You can take advantage of the uniquebenefits of the Oracle Cloud Infrastructure. If you install multiple Oracle Key Vaultcompute instances in the same region, you can choose to deploy them in differentavailability domains (fault domains are selected automatically, but can be changed) toguarantee the highest possible availability of your key management service. Servicessuch as DNS and NTP are also natively available in OCI. You do not have to set them up,thereby simplifying Oracle Key Vault provisioning.
7.3 Provisioning an Oracle Key Vault Compute InstanceThe provisioning process for an Oracle Key Vault compute instance entails launching thecompute instance and performing post-launch and post-installation tasks.
• About Provisioning an Oracle Key Vault Compute InstanceTo provision the Oracle Key Vault compute instance, you choose an Oracle Key Vaultimage as your custom image.
• Launching the Oracle Key Vault Compute InstanceThe launching process for the Oracle Key Vault compute instance should take roughlytwo to five minutes.
7.3.1 About Provisioning an Oracle Key Vault Compute InstanceTo provision the Oracle Key Vault compute instance, you choose an Oracle Key Vault imageas your custom image.
You will launch this image from the OCI Marketplace on a compute shape. After you completethe process, the Oracle Key Vault compute image becomes unique to your environment. Thedisk size of this image is 2 TB.
After you complete the launch, you can begin to use the Oracle Key Vault compute imageimmediately. The steps that you must perform after the launch are similar to the steps thatyou would perform for an on-premises Oracle Key Vault installation.
Chapter 7Provisioning an Oracle Key Vault Compute Instance
7-3

Related Topics
• Installing and Configuring Oracle Key VaultYou must download the Oracle Key Vault application software, and then you canperform the installation.
7.3.2 Launching the Oracle Key Vault Compute InstanceThe launching process for the Oracle Key Vault compute instance should take roughlytwo to five minutes.
• About Launching the Oracle Key Vault Compute InstanceThe launch process requires some minor preparation work on your system.
• Step 1: Ensure That You Have Prerequisites in PlaceBefore you can launch an Oracle Key Vault compute instance, you must ensurethat you have prerequisites in place in the Oracle cloud.
• Step 2: Find the Oracle Key Vault ImageThe Oracle Key Vault image is available on the Oracle Cloud Marketplace website.
• Step 3: Launch the Oracle Key Vault VM Compute InstanceYou perform the entire launching process in the Oracle Cloud Marketplace.
• Step 4: Perform Post-Launch and Post-Installation TasksAfter you launch Oracle Key Vault in an OCI compute instance, you first performthe post-launch task, followed by post-installation tasks.
7.3.2.1 About Launching the Oracle Key Vault Compute InstanceThe launch process requires some minor preparation work on your system.
Before you begin the launch process, ensure that the endpoints that you plan to useare in the same VCN as the Oracle Key Vault instance will be. The endpoints willcommunicate with Oracle Key Vault using the private IP of the compute instance.Optionally, the Oracle Key Vault compute instance can have a public IP that can beused to access the Oracle Key Vault management console. You will also set up thenetwork and configure it to ensure that network connectivity will exist between theendpoints and the OCI compute instances.
7.3.2.2 Step 1: Ensure That You Have Prerequisites in PlaceBefore you can launch an Oracle Key Vault compute instance, you must ensure thatyou have prerequisites in place in the Oracle cloud.
Ensure that the following are in place:
• You have an Oracle cloud account.
• You have access to your assigned Oracle cloud tenant.
• You have sufficient compute node resources within the Oracle cloud tenant.
7.3.2.3 Step 2: Find the Oracle Key Vault ImageThe Oracle Key Vault image is available on the Oracle Cloud Marketplace web site.
1. Log in to the Oracle Cloud Marketplace web site.
Chapter 7Provisioning an Oracle Key Vault Compute Instance
7-4

https://cloudMarketplace.oracle.com/marketplace/oci
2. In the Products search field, enter Oracle Key Vault and then click Go.
3. Under the Search Results, click Oracle Key Vault to navigate to the Oracle Key Vaultpage.
7.3.2.4 Step 3: Launch the Oracle Key Vault VM Compute InstanceYou perform the entire launching process in the Oracle Cloud Marketplace.
1. Click the Get App button.
2. If you already have an OCI account, select your home region, and then click Sign In.Otherwise, click Sign Up to create a new account.
3. In the Get Version menu, ensure that Oracle Key Vault current_version is displayed.
4. From the Compartment menu, select your compartment.
5. Select the I have reviewed the terms and conditions check box.
6. In the Oracle Key Vault page, select Launch Instance.
7. In the page that appears, click Change Instance.
8. For the shape, select VM.Standard2.2 or bigger. If you are using an older standard, thenselect VM.Standard1.4 or bigger. Then click Select Shape.
Next, you are ready to configure the network.
9. Upload your SSH public key.
10. Click Advanced Options, and then choose the Network tab.
Here you can replace the default private address with another one. Both of theseaddresses must be within the range of your current subnet. In addition, you can changethe host name to match your naming convention. Otherwise, the host name will beconstructed from okv|MAC-address-of-NIC.
11. In the Boot Volume area, do not select any settings.
12. Click Create to complete the shape creation.
In a moment, the Oracle Key Vault compute image starts and is made available as anOracle Key Vault server.
At this stage, you must perform the post-launch and post-installation steps.
Related Topics
• Network Port RequirementsNetwork port requirements includes requirements for SSH/SCP, SNMP, HTTPS, listeners,KMIP, and TCP ports.
7.3.2.5 Step 4: Perform Post-Launch and Post-Installation TasksAfter you launch Oracle Key Vault in an OCI compute instance, you first perform the post-launch task, followed by post-installation tasks.
The post-launch task is to set the installation passphrase. After you set this passphrase, youmust perform the post-installation tasks, which are the same tasks that are required for anon-premises deployment. After you complete the post-installation tasks, you can start building
Chapter 7Provisioning an Oracle Key Vault Compute Instance
7-5
your Oracle Key Vault cluster, set up the primary-standby configuration, or leaveOracle Key Vault in stand-alone mode.
1. Set the installation passphrase.
a. In a command prompt, log in as the opc user.
ssh opc@Oracle_Key_Vault_OCI_IP_address
b. Set the installation passphrase by executing the following command:
set_installation_passphrase
c. When prompted, enter and confirm the installation passphrase.
After you successfully enter the passphrase, the system deletes the opcaccount. After this deletion, logins to the Oracle Key Vault instance using SSHwill be disabled.
Only during upgrades, or when directed by Oracle Support, you cantemporarily enable SSH from the Oracle Key Vault management console. Youcan then use SSH to log into the Oracle Key Vault server as the support userusing the same SSH public key as the opc user.
2. Perform the following post-installation tasks:
• Create the Oracle Key Vault administrator accounts, the recovery passphrase,and the root and support user passwords.
• Enter the NTP and DNS addresses, using one of the following choices:
– The NTP server address in Oracle Cloud Infrastructure, which is169.254.169.254, and then leave the remaining fields empty.
– In all three fields, enter any external NTP servers. For example:
0.north-america.pool.ntp.org
1.north-america.pool.ntp.org
2.north-america.pool.ntp.org
Related Topics
• Performing Post-Installation TasksAfter you install Oracle Key Vault, you must complete a set of post-installationtasks.
7.4 General Management of an Oracle Key Vault ComputeInstance
You can perform many of the Oracle Key Vault compute instance general managementtasks in the Oracle Key Vault management console.
• Starting, Restarting, or Stopping an Oracle Key Vault Compute InstanceDepending on the action you need, you can use the Oracle Key Vaultmanagement console or the OCI console.
• System Settings in an Oracle Key Vault Compute InstanceMost system settings in an Oracle Key Vault compute instance are the same as anon-premises deployment, with a few exceptions.
Chapter 7General Management of an Oracle Key Vault Compute Instance
7-6
• Backup and Restore Operations for Oracle Key Vault Compute InstancesYou can back up and restore Oracle Key Vault data between OCI environments and on-premises environments.
• Terminating an Oracle Key Vault Compute InstanceYou terminate an Oracle Key Vault compute instance from the OCI console.
7.4.1 Starting, Restarting, or Stopping an Oracle Key Vault ComputeInstance
Depending on the action you need, you can use the Oracle Key Vault management consoleor the OCI console.
You can use the Oracle Key Vault management console or OCI console to restart and stop anOracle Key Vault compute instance, but to start an already stopped instance, you must usethe OCI console.
Select one of the following methods to restart or stop an Oracle Key Vault compute instance:
• From the Oracle Key Vault management console, you can restart or stop the Oracle KeyVault compute instance:
1. Log into the Oracle Key Vault management console as a user with the SystemAdministrator role.
2. Select System, then Status from the left navigation bar.
3. In the Status page, do one of the following:
– To restart, click Reboot.
– To stop, click Power Off.
• From the OCI console, you can start, restart, or stop the Oracle Key Vault computeinstance:
1. Open the navigation menu. Under Core Infrastructure, go to Compute and clickInstances.
2. Select the Oracle Key Vault compute instance that you want to stop or start.
3. Click one of the following actions:
– To start a stopped instance, click Start.
– To gracefully shut down the instance by sending a shutdown command to theoperating system, click Stop.If the Oracle Key Vault compute instance takes a long time to shut down, it couldbe improperly stopped, resulting in data corruption. To avoid this, shut down theinstance using the commands available in the operating system before you stopthe instance using the console.
– To gracefully restart the Oracle Key Vault compute instance by sending ashutdown command to the operating system, and then power the instance backon, click Reboot.
7.4.2 System Settings in an Oracle Key Vault Compute InstanceMost system settings in an Oracle Key Vault compute instance are the same as an on-premises deployment, with a few exceptions.
Chapter 7General Management of an Oracle Key Vault Compute Instance
7-7
Settings for system features such as auditing, email, RESTful services, integration withOracle Audit Vault and Database Firewall are the same in both on-premises and OCIdeployments.
• You can configure an Oracle Key Vault host name in either the OCI console or inthe Oracle Key Vault management console. However, remember that if you set theIP address of the host in the OCI console, later on, you cannot change it in eitherthe OCI console or the Oracle Key Vault management console.
• Oracle Cloud Infrastructure provides NTP and DNS services. For NTP, enter justone IP address into the first of three fields in the NTP section of the Oracle KeyVault management console System Settings page: 169.254.169.254. For the DNSsettings, consult with your network team because there are multiple optionsdepending how DNS is configured in your subnet and tenancy.
• The SSH tunnel settings are used when on-premises Oracle Key Vault clustersprovide key management services to Oracle databases that are deployed in OCI.Do not establish an SSH tunnel in OCI-based Oracle Key Vault deployments.
7.4.3 Backup and Restore Operations for Oracle Key Vault ComputeInstances
You can back up and restore Oracle Key Vault data between OCI environments andon-premises environments.
You can back up an Oracle Key Vault compute instance that is stored in an on-premises host: this is the same backup that will be restored. Another on-premisesOracle Key Vault server can be a backup location for a server that is being restoredinto an Oracle Key Vault compute instance.
Requirements are as follows:
• If you are performing a backup or restore operation from Oracle Key Vaultcompute instances to an OCI compute instance, then persistent networkconnectivity to the OCI compute instance from Oracle Key Vault compute instancemust exist.
• If you want to perform a backup or restore operation between an Oracle Key Vaultcompute instance and an on-premises host, ensure that the VCN can span the on-premises hosts.
7.4.4 Terminating an Oracle Key Vault Compute InstanceYou terminate an Oracle Key Vault compute instance from the OCI console.
When you terminate the compute instance, all data, including keys that protectendpoints, are permanently lost and cannot be recovered except from a backup. Evenbackups may not have the most recent keys. Terminating the instances can lead toloss of data for all endpoints. Exercise extreme caution before terminating an instance.Terminate the Oracle Key Vault compute instance only if you are sure that you have acopy of the keys in another, safe location or that you do not need them.
1. Log in to the OCI console.
2. Under Core Infrastructure, go to Compute, and then click Instances.
3. Select the name of the Oracle Key Vault compute instance that you want toremove.
Chapter 7General Management of an Oracle Key Vault Compute Instance
7-8
4. Click Terminate, and then respond to the confirmation prompt.
Terminated instances temporarily remain in the list of instances with the status Terminated.
7.5 Migrating Oracle Key Vault Deployments Between On-Premises and OCI
You can migrate an Oracle Key Vault standalone, primary-standby or cluster deployment froman on-premises environment to OCI or back.
• About Performing Migrations with Oracle Key Vault Compute Instance DataYou can transition an Oracle Key Vault deployment from on-premises to OCI, and fromOCI back to on-premises.
• Migrating Oracle Key Vault Deployments into OCI Using Backup and RestoreA user who has the System Administrator role can transition the Oracle Key Vaultdeployment from on-premises to OCI using backup and restore.
• Migrating Oracle Key Vault Deployments Out of OCI Using Backup and RestoreA user who has the System Administrator role can transition the Oracle Key Vaultdeployment from OCI to on-premises.
7.5.1 About Performing Migrations with Oracle Key Vault ComputeInstance Data
You can transition an Oracle Key Vault deployment from on-premises to OCI, and from OCIback to on-premises.
You can quickly set up a production Oracle Key Vault deployment in OCI to address yourimmediate key management needs and then transition to the on-premises deployment.Alternately, Oracle Key Vault compute instances require little to no overhead of hardware andVM management. To eliminate this overhead, you may want to transition your on-premisesOracle Key Vault deployment to OCI.
You can use the Oracle Key Vault backup and restore features to migrate an Oracle Key Vaultcluster from on-premises to OCI, and back. You can transition an on-premises Oracle KeyVault cluster deployment to OCI by adding Oracle Key Vault compute instances to the clusterand removing on-premises Oracle Key Vault nodes from the cluster. The cluster is fullytransitioned to OCI when no on-premises Oracle Key Vault node is left in the cluster.Similarly, you can also transition an Oracle Key Vault cluster in OCI to on-premises.
7.5.2 Migrating Oracle Key Vault Deployments into OCI Using Backup andRestore
A user who has the System Administrator role can transition the Oracle Key Vault deploymentfrom on-premises to OCI using backup and restore.
1. Log in to the on-premises Oracle Key Vault server as a user who has the SystemAdministrator role.
2. Configure an OCI compute instance as the backup destination.
3. Back up the on-premises Oracle Key Vault server to an OCI compute instance.
Chapter 7Migrating Oracle Key Vault Deployments Between On-Premises and OCI
7-9
4. Launch an Oracle Key Vault compute instance with same Oracle Key Vault versionas the on-premises Oracle Key Vault server.
5. Log in to the Oracle Key Vault compute instance as a user who has the SystemAdministrator role.
6. Restore the backup from the OCI compute instance to the newly installed OracleKey Vault compute instance.
7. To set up an Oracle Key Vault multi-master cluster, convert the restored OracleKey Vault compute instance as the first (initial) node of the cluster.
8. Configure additional Oracle Key Vault compute instances and add them to thecluster as needed.
Related Topics
• Creating the First (Initial) Node of a ClusterTo create a cluster, you must convert an existing standalone Oracle Key Vaultserver to become the first node in the cluster.
• Setting Up a ClusterAfter you add an initial node to a cluster, you can add more nodes, therebycreating read-write pairs of nodes or read-only nodes.
• Backup and Restore OperationsYou may configure automatic backups for continuous, reliable, and protectedaccess to security objects with minimum downtime.
7.5.3 Migrating Oracle Key Vault Deployments Out of OCI UsingBackup and Restore
A user who has the System Administrator role can transition the Oracle Key Vaultdeployment from OCI to on-premises.
1. Log in to the Oracle Key Vault compute instance as a user who has the SystemAdministrator role.
2. Back up the Oracle Key Vault compute instance to an on-premises system.
3. Install a new Oracle Key Vault server on-premises with same Oracle Key Vaultversion as the Oracle Key Vault compute instance.
4. Log in to the on-premise Oracle Key Vault server as a user who has the SystemAdministrator role.
5. Restore the backup from the on-premises backup destination to the newly installedon-premises Oracle Key Vault server.
6. To set up an Oracle Key Vault multi-master cluster, convert the restored on-premises Oracle Key Vault server as the first (initial) node of the cluster.
7. Configure additional Oracle Key Vault compute instances and add them to thecluster as needed.
Related Topics
• Creating the First (Initial) Node of a ClusterTo create a cluster, you must convert an existing standalone Oracle Key Vaultserver to become the first node in the cluster.
Chapter 7Migrating Oracle Key Vault Deployments Between On-Premises and OCI
7-10

• Setting Up a ClusterAfter you add an initial node to a cluster, you can add more nodes, thereby creating read-write pairs of nodes or read-only nodes.
• Backup and Restore OperationsYou may configure automatic backups for continuous, reliable, and protected access tosecurity objects with minimum downtime.
Chapter 7Migrating Oracle Key Vault Deployments Between On-Premises and OCI
7-11
8Oracle Database Instances in Oracle CloudInfrastructure
Oracle Key Vault deployed on-premises can manage the TDE master encryption keys forOracle Database instances running in Oracle Cloud Infrastructure (OCI).
• About Managing Oracle Cloud Infrastructure Database Instance EndpointsThis type of Oracle Key Vault server deployment meets compliance standards for themanagement of encryption keys.
• Preparing a Database Instance on OCI to be an Oracle Key Vault EndpointOracle Key Vault supports the use of Oracle database instances on Oracle CloudInfrastructure (OCI).
• Using an SSH Tunnel Between Oracle Key Vault and Database as a ServiceAn on-premises Oracle Key Vault communicates with an Oracle Cloud Database as aService instance using a secure SSH tunnel.
• Registering and Enrolling a Database as a Service Instance as an Oracle Key VaultEndpointYou can use the command line and the Oracle Key Vault management console tocomplete this task.
• Suspending Database Cloud Service Access to Oracle Key VaultYou can suspend one or more enrolled Database as a Service endpoints from access toOracle Key Vault.
• Resuming Database Cloud Service Access to Oracle Key VaultYou can reinstate the connection between suspended Database Cloud Service endpointsand Oracle Key Vault.
• Resuming a Database Endpoint Configured with a Password-Based KeystoreDepending on the configuration, a Database as a Service endpoint can resume eitherautomatically or must be manually resumed.
8.1 About Managing Oracle Cloud Infrastructure DatabaseInstance Endpoints
This type of Oracle Key Vault server deployment meets compliance standards for themanagement of encryption keys.
The Oracle Database instances running in Oracle Cloud Infrastructure (OCI) can be deployedon VMshape, bare metal, or Exadata. This type of deployment provides physical separationof keys from the encrypted data, and gives on-premises administrators control and visibility ofhow encryption keys are used to access encrypted data in the cloud. This also meetscompliance requirements where encryption keys must be managed on-premises or separatefrom systems containing encrypted data.
8-1
Related Topics
• Managing a Reverse SSH Tunnel in a Multi-Master ClusterYou can reverse an SSH tunnel in a multi-master cluster from more than one nodeto the cloud-based endpoint for redundancy.
8.2 Preparing a Database Instance on OCI to be an OracleKey Vault Endpoint
Oracle Key Vault supports the use of Oracle database instances on Oracle CloudInfrastructure (OCI).
• About Preparing a Database Instance on OCI to be an Oracle Key Vault EndpointTo prepare an Oracle database instance on OCI to be an Oracle Key Vaultendpoint, you must first configure the instance, and then create a low-privilegeduser.
• Configuring a Database Cloud Service InstanceAn Database as a Service (DBaaS) instance must have the correct networkconfiguration.
• Creating a Low Privileged Operating System User on Database as a ServiceThe low privileged user account, okv, will be responsible for configuring an SSHtunnel and communicating with the DBaaS instances.
8.2.1 About Preparing a Database Instance on OCI to be an OracleKey Vault Endpoint
To prepare an Oracle database instance on OCI to be an Oracle Key Vault endpoint,you must first configure the instance, and then create a low-privileged user.
Oracle databases on Oracle Cloud Infrastructure (OCI) provide fully functional Oracledatabase instances that use computing and storage resources provided by OracleCompute Cloud Service. It eliminates the need to purchase, build, and manage silos ofserver and storage systems. It also makes database resources and capabilitiesavailable online so users can consume them whenever and wherever they areneeded.
8.2.2 Configuring a Database Cloud Service InstanceAn Database as a Service (DBaaS) instance must have the correct networkconfiguration.
You can find instructions for configuring a Database as a Service (DBaaS) instance inthe Oracle Database Cloud Service (Database as a Service) documentation.
After you have configured the DBaaS instance, it should have the following defaultvalues:
• A public IP address
• Two users: oracle and opc (Oracle Public Cloud)
• SSH access to the oracle and opc users
Chapter 8Preparing a Database Instance on OCI to be an Oracle Key Vault Endpoint
8-2
8.2.3 Creating a Low Privileged Operating System User on Database as aService
The low privileged user account, okv, will be responsible for configuring an SSH tunnel andcommunicating with the DBaaS instances.
By default, Database as a Service instances are provisioned with the oracle and opc users.These users have more privileges than necessary to create the SSH tunnel, so Oraclerecommends that you create another low privileged operating system user named okv on theDatabase as a Service instance. Oracle Key Vault will use user okv to configure an SSHtunnel and communicate with the Database as a Service instances.
1. Log in to the Oracle Cloud Infrastructure (OCI) instance using public key authentication(default for Oracle OCI) as user opc.
$ ssh -i private_key_file opc@node_ip_address
In this specification:
• private_key_file is the path to your private key file (~/.ssh/id_rsa). This key is thecounterpart to the public key that you uploaded when you provisioned the OracleCloud Infrastructure instance.
• node_ip_address is the public IP address of the Database as a Service computenode in x.x.x.x format.
If this is the first time you are connecting to the compute node, the SSH utility promptsyou to confirm the public key.
2. In response to the prompt asking you to confirm the public key, enter yes.
3. Create the Oracle Key Vault user.
$ sudo adduser okv
4. Append the Oracle Key Vault user okv to the AllowUsers parameter in the SSHsshd_config configuration file in the /etc/ssh/ directory.
$ sudo vi /etc/ssh/sshd_config
5. Add the following entry to the end of the file:
AllowUsers oracle opc okv
6. Restart the SSH daemon:
$ sudo /sbin/service sshd restart
7. Grant the Oracle Key Vault user okv permission to execute /sbin/fuser by followingthese steps:
a. Change the file permission of the /etc/sudoers file.
sudo chmod 740 /etc/sudoers
b. Edit the /etc/sudoers file.
sudo vi /etc/sudoers
c. Add the following entry:
okv ALL=(root) NOPASSWD:/sbin/fuser
d. Save the /etc/sudoers file. Change the file permission of the /etc/sudoers file.
Chapter 8Preparing a Database Instance on OCI to be an Oracle Key Vault Endpoint
8-3
sudo chmod 440 /etc/sudoers
e. The /etc/sudoers would look similar to the following:
## Allow root to run any commands anywhere root ALL=(ALL) ALL okv ALL=(root) NOPASSWD:/sbin/fuser
8. Become the okv user.
$ su okv
9. Create the authorized_keys file and then set appropriate permissions for this file.
$ cd $HOME$ mkdir ./.ssh$ chmod 700 ./.ssh$ touch ./.ssh/authorized_keys$ chmod 640 ./.ssh/authorized_keys
10. Log in to the Oracle Key Vault instance as the support user, and switch from root,and then switch to oracle.
11. Execute the following command to upload the Oracle Key Vault public key into theauthorized_keys file in the Oracle Cloud Infrastructure that you just created.
ssh-copy-id ./.ssh/id_rsa.pub okv@node_ip_address
12. Confirm that the oracle user in Oracle Key Vault can log in to the OCI instancewithout providing a password:
$ ssh okv@node_ip_address
8.3 Using an SSH Tunnel Between Oracle Key Vault andDatabase as a Service
An on-premises Oracle Key Vault communicates with an Oracle Cloud Database as aService instance using a secure SSH tunnel.
• Creating an SSH Tunnel Between Oracle Key Vault and a DBaaS InstanceYou can create a connection between Oracle Key Vault and a Database as aService (DBaaS) instance by configuring an SSH tunnel.
• Managing a Reverse SSH Tunnel in a Multi-Master ClusterYou can reverse an SSH tunnel in a multi-master cluster from more than one nodeto the cloud-based endpoint for redundancy.
• Managing a Reverse SSH Tunnel in a Primary-Standby ConfigurationA reverse SSH tunnel in a primary-standby configuration is similar to a reverseSSH tunnel on a standalone Oracle Key Vault server.
• Viewing SSH Tunnel Configuration DetailsThe Oracle Key Vault management console provides information about SSHtunnels that have been configured for Oracle Key Vault.
• Disabling an SSH Tunnel ConnectionYou can use the Oracle Key Vault management console to disable the Oracle KeyVault and Database as a Service instance connection.
Chapter 8Using an SSH Tunnel Between Oracle Key Vault and Database as a Service
8-4
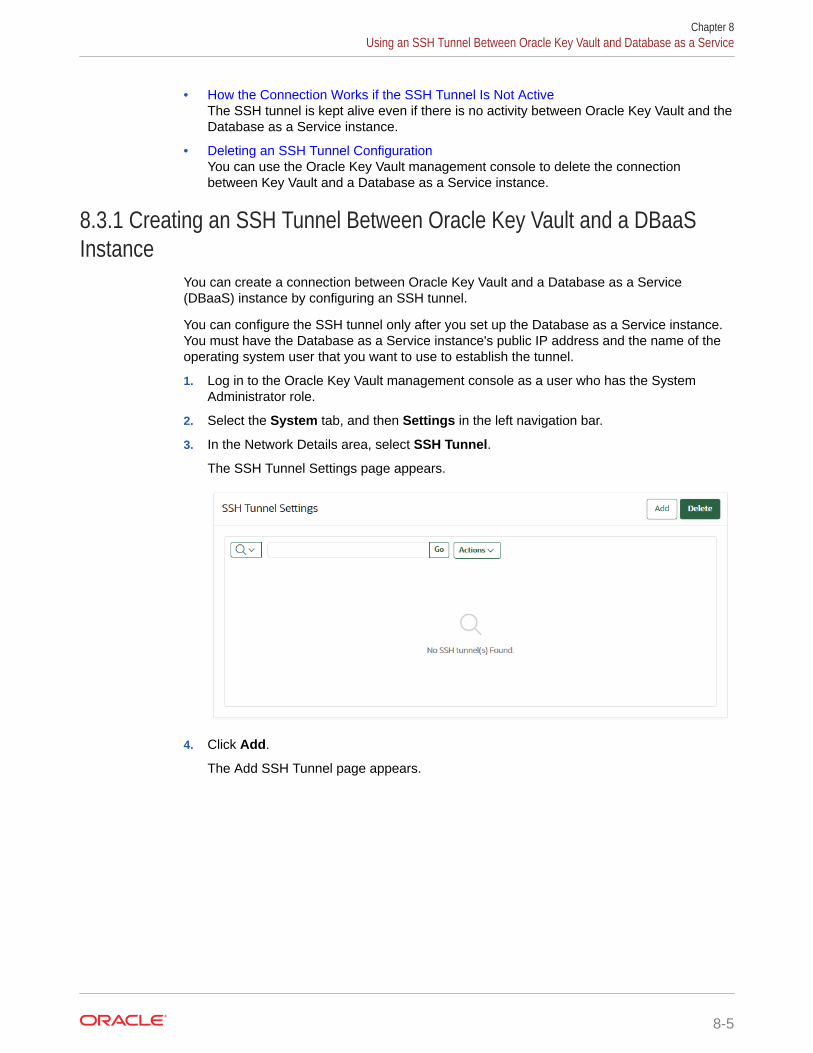
• How the Connection Works if the SSH Tunnel Is Not ActiveThe SSH tunnel is kept alive even if there is no activity between Oracle Key Vault and theDatabase as a Service instance.
• Deleting an SSH Tunnel ConfigurationYou can use the Oracle Key Vault management console to delete the connectionbetween Key Vault and a Database as a Service instance.
8.3.1 Creating an SSH Tunnel Between Oracle Key Vault and a DBaaSInstance
You can create a connection between Oracle Key Vault and a Database as a Service(DBaaS) instance by configuring an SSH tunnel.
You can configure the SSH tunnel only after you set up the Database as a Service instance.You must have the Database as a Service instance's public IP address and the name of theoperating system user that you want to use to establish the tunnel.
1. Log in to the Oracle Key Vault management console as a user who has the SystemAdministrator role.
2. Select the System tab, and then Settings in the left navigation bar.
3. In the Network Details area, select SSH Tunnel.
The SSH Tunnel Settings page appears.
4. Click Add.
The Add SSH Tunnel page appears.
Chapter 8Using an SSH Tunnel Between Oracle Key Vault and Database as a Service
8-5
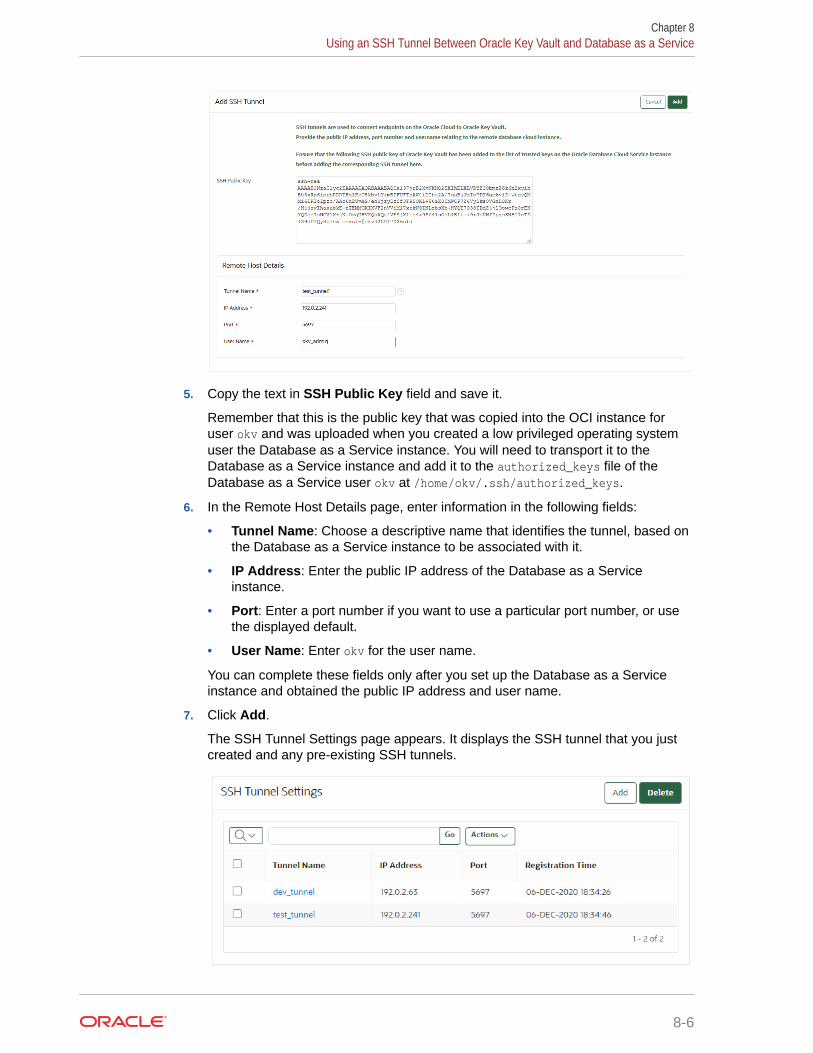
5. Copy the text in SSH Public Key field and save it.
Remember that this is the public key that was copied into the OCI instance foruser okv and was uploaded when you created a low privileged operating systemuser the Database as a Service instance. You will need to transport it to theDatabase as a Service instance and add it to the authorized_keys file of theDatabase as a Service user okv at /home/okv/.ssh/authorized_keys.
6. In the Remote Host Details page, enter information in the following fields:
• Tunnel Name: Choose a descriptive name that identifies the tunnel, based onthe Database as a Service instance to be associated with it.
• IP Address: Enter the public IP address of the Database as a Serviceinstance.
• Port: Enter a port number if you want to use a particular port number, or usethe displayed default.
• User Name: Enter okv for the user name.
You can complete these fields only after you set up the Database as a Serviceinstance and obtained the public IP address and user name.
7. Click Add.
The SSH Tunnel Settings page appears. It displays the SSH tunnel that you justcreated and any pre-existing SSH tunnels.
Chapter 8Using an SSH Tunnel Between Oracle Key Vault and Database as a Service
8-6
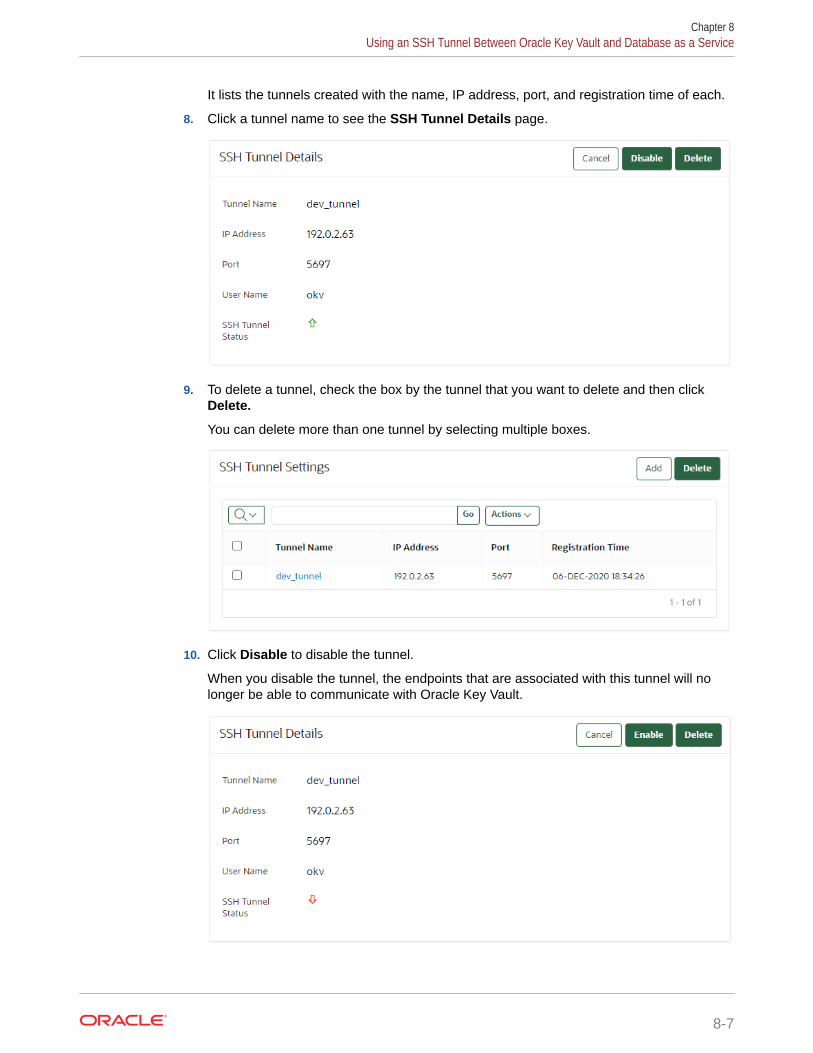
It lists the tunnels created with the name, IP address, port, and registration time of each.
8. Click a tunnel name to see the SSH Tunnel Details page.
9. To delete a tunnel, check the box by the tunnel that you want to delete and then clickDelete.
You can delete more than one tunnel by selecting multiple boxes.
10. Click Disable to disable the tunnel.
When you disable the tunnel, the endpoints that are associated with this tunnel will nolonger be able to communicate with Oracle Key Vault.
Chapter 8Using an SSH Tunnel Between Oracle Key Vault and Database as a Service
8-7
11. In the confirmation dialog box, click Yes.
The Disable button is replaced by an Enable button.
Related Topics
• Creating a Low Privileged Operating System User on Database as a ServiceThe low privileged user account, okv, will be responsible for configuring an SSHtunnel and communicating with the DBaaS instances.
8.3.2 Managing a Reverse SSH Tunnel in a Multi-Master ClusterYou can reverse an SSH tunnel in a multi-master cluster from more than one node tothe cloud-based endpoint for redundancy.
Oracle recommends that you configure three tunnels. Ideally, the cloud-based reverseSSH tunnels should be from different read-write pairs. Multiple SSH tunnels to thesame endpoint are distinguished by the port number used. Oracle Key Vault suggestsunique port numbers based on node ID. If you want to specify different port numbers,make port numbers for SSH tunnels from different nodes to the same endpoint unique.
In a multi-master cluster, multiple SSH tunnels are created from multiple nodes to thesame endpoint. However, when you register and enroll endpoints, you will only see thetunnel from that node.
Be aware of the following:
• You should register and enroll the endpoint where there is a SSH tunnel created tothat endpoint.
• You only see the tunnel from that node to endpoint in the following places:
– During the registration, the option to select the SSH tunnel.
– After registration, when you view endpoint details, only that tunnel isdisplayed.
– When you submit the enrollment token and download the endpoint software,only that tunnel is displayed. However, the endpoint software downloaded hasinformation about all tunnels to the endpoint. This means that the endpoint isable to use all the tunnels that were created before the endpoint is created.
All nodes which have an SSH tunnel created display their tunnel to the endpoint on theEndpoint Details page. They also list all tunnels that were created from that node onthe SSH Tunnels page in the Oracle Key Vault management console.
8.3.3 Managing a Reverse SSH Tunnel in a Primary-StandbyConfiguration
A reverse SSH tunnel in a primary-standby configuration is similar to a reverse SSHtunnel on a standalone Oracle Key Vault server.
The SSH key of the primary and standby servers are the same after pairing. Tunnelscreated on an Oracle Key Vault server before primary-standby pairing as well astunnels created on the primary after the primary-standby pairing are valid afterprimary-standby operations such as switchover, and failover, although the tunnels maybe unavailable during the execution of these operations.
Chapter 8Using an SSH Tunnel Between Oracle Key Vault and Database as a Service
8-8
8.3.4 Viewing SSH Tunnel Configuration DetailsThe Oracle Key Vault management console provides information about SSH tunnels thathave been configured for Oracle Key Vault.
1. Log in to the Oracle Key Vault management console as a user who has the SystemAdministrator role.
2. Select the System tab, and then Settings in the left navigation bar.
3. In the Network Details area, select SSH Tunnel.
The SSH Tunnel Settings page appears.
4. Click a tunnel name to see the SSH Tunnel Details page.
8.3.5 Disabling an SSH Tunnel ConnectionYou can use the Oracle Key Vault management console to disable the Oracle Key Vault andDatabase as a Service instance connection.
1. Log in to the Oracle Key Vault management console as a user who has the SystemAdministrator role.
2. Select the System tab, and then Settings in the left navigation bar.
3. In the Network Details area, select SSH Tunnel.
Chapter 8Using an SSH Tunnel Between Oracle Key Vault and Database as a Service
8-9

The SSH Tunnel Settings page appears.
4. Click a tunnel name to see the SSH Tunnel Details page.
5. Click Disable to disable the tunnel.
When you disable the tunnel, the endpoints that are associated with this tunnel willno longer be able to communicate with Oracle Key Vault. A red down arrowappears next to the SSH Tunnel Status label.
6. In the confirmation dialog box, click Yes.
The Disable button is replaced by an Enable button.
Chapter 8Using an SSH Tunnel Between Oracle Key Vault and Database as a Service
8-10
8.3.6 How the Connection Works if the SSH Tunnel Is Not ActiveThe SSH tunnel is kept alive even if there is no activity between Oracle Key Vault and theDatabase as a Service instance.
If the tunnel stops, then it is automatically restarted. An alert will be sent if the tunnel is notavailable for any reason. An administrative user may elect to receive these alerts by email byconfiguring SMTP settings on Oracle Key Vault.
Related Topics
• Configuring Email SettingsYou can configure the Simple Mail Transfer Protocol (SMTP) server properties to receiveemail notifications from Oracle Key Vault.
8.3.7 Deleting an SSH Tunnel ConfigurationYou can use the Oracle Key Vault management console to delete the connection betweenKey Vault and a Database as a Service instance.
1. Log in to the Oracle Key Vault management console as a user who has the SystemAdministrator role.
2. Click System.
The Status page appears.
3. Select SSH Tunnel Settings from the left side bar.
The SSH Tunnel Settings page appears.
4. To delete a tunnel, check the box by the tunnel that you want to delete and then clickDelete.
You can delete more than one tunnel by selecting multiple boxes.
Chapter 8Using an SSH Tunnel Between Oracle Key Vault and Database as a Service
8-11
8.4 Registering and Enrolling a Database as a ServiceInstance as an Oracle Key Vault Endpoint
You can use the command line and the Oracle Key Vault management console tocomplete this task.
• About Registering and Enrolling a Database as a Service Instance as an OracleKey Vault EndpointYou must enroll the Oracle Database as a Service instance before it cancommunicate with an Oracle Key Vault server.
• Step 1: Register the Endpoint in the Oracle Key Vault Management ConsoleThe endpoint registration process downloads an okvclient.jar file, whichcontains the Oracle Key Vault software that the endpoint needs, to the localsystem.
• Step 2: Prepare the Endpoint EnvironmentThe endpoint must have a compatible version of the Java Development Toolkit(JDK) and the Oracle Database environment variables must be set.
• Step 3: Install the Oracle Key Vault Software onto the Endpoint for Registrationand EnrollmentTo install the Oracle Key Vault software installation, you run the okvclient.jar fileon the endpoint.
• Step 4: Perform Post-Installation TasksPost-installation tasks are important for a fully functioning Oracle Key Vaultinstallation.
8.4.1 About Registering and Enrolling a Database as a ServiceInstance as an Oracle Key Vault Endpoint
You must enroll the Oracle Database as a Service instance before it can communicatewith an Oracle Key Vault server.
The enrollment of Database as a Service endpoints is similar to the enrollment of on-premises endpoints with the following exceptions:
• Database as a Service endpoints should be registered with an endpoint type of“Oracle Database Cloud Service".
Chapter 8Registering and Enrolling a Database as a Service Instance as an Oracle Key Vault Endpoint
8-12
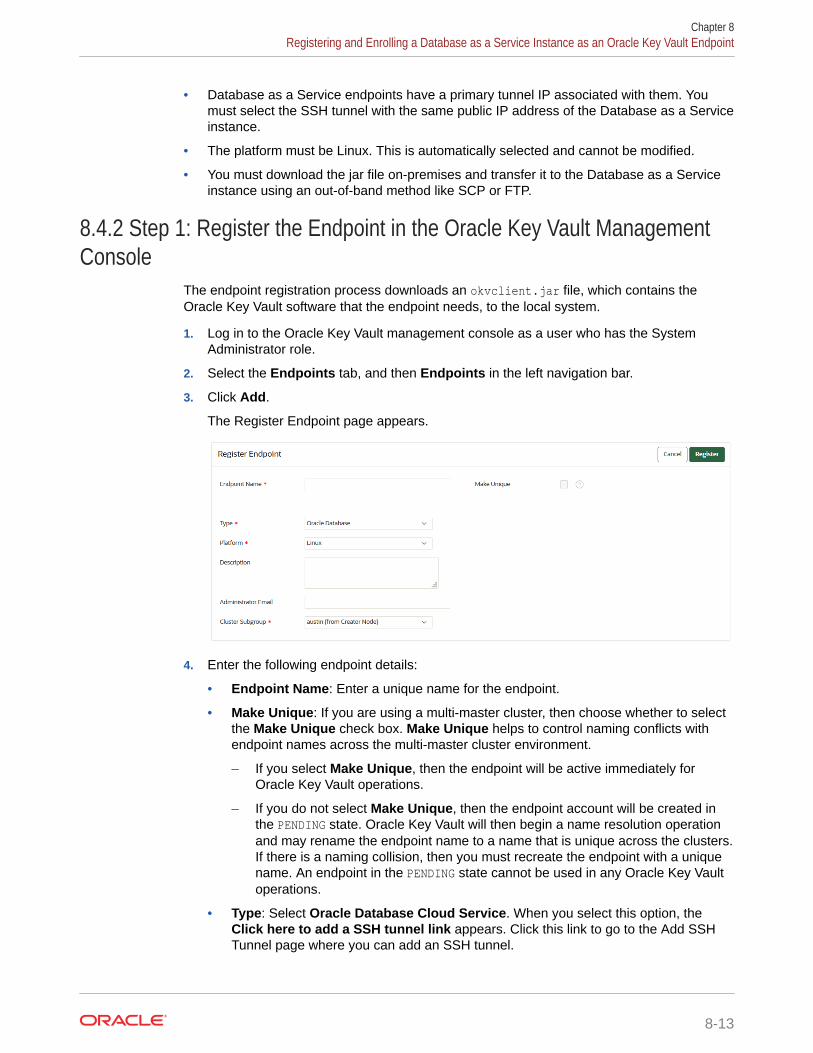
• Database as a Service endpoints have a primary tunnel IP associated with them. Youmust select the SSH tunnel with the same public IP address of the Database as a Serviceinstance.
• The platform must be Linux. This is automatically selected and cannot be modified.
• You must download the jar file on-premises and transfer it to the Database as a Serviceinstance using an out-of-band method like SCP or FTP.
8.4.2 Step 1: Register the Endpoint in the Oracle Key Vault ManagementConsole
The endpoint registration process downloads an okvclient.jar file, which contains theOracle Key Vault software that the endpoint needs, to the local system.
1. Log in to the Oracle Key Vault management console as a user who has the SystemAdministrator role.
2. Select the Endpoints tab, and then Endpoints in the left navigation bar.
3. Click Add.
The Register Endpoint page appears.
4. Enter the following endpoint details:
• Endpoint Name: Enter a unique name for the endpoint.
• Make Unique: If you are using a multi-master cluster, then choose whether to selectthe Make Unique check box. Make Unique helps to control naming conflicts withendpoint names across the multi-master cluster environment.
– If you select Make Unique, then the endpoint will be active immediately forOracle Key Vault operations.
– If you do not select Make Unique, then the endpoint account will be created inthe PENDING state. Oracle Key Vault will then begin a name resolution operationand may rename the endpoint name to a name that is unique across the clusters.If there is a naming collision, then you must recreate the endpoint with a uniquename. An endpoint in the PENDING state cannot be used in any Oracle Key Vaultoperations.
• Type: Select Oracle Database Cloud Service. When you select this option, theClick here to add a SSH tunnel link appears. Click this link to go to the Add SSHTunnel page where you can add an SSH tunnel.
Chapter 8Registering and Enrolling a Database as a Service Instance as an Oracle Key Vault Endpoint
8-13
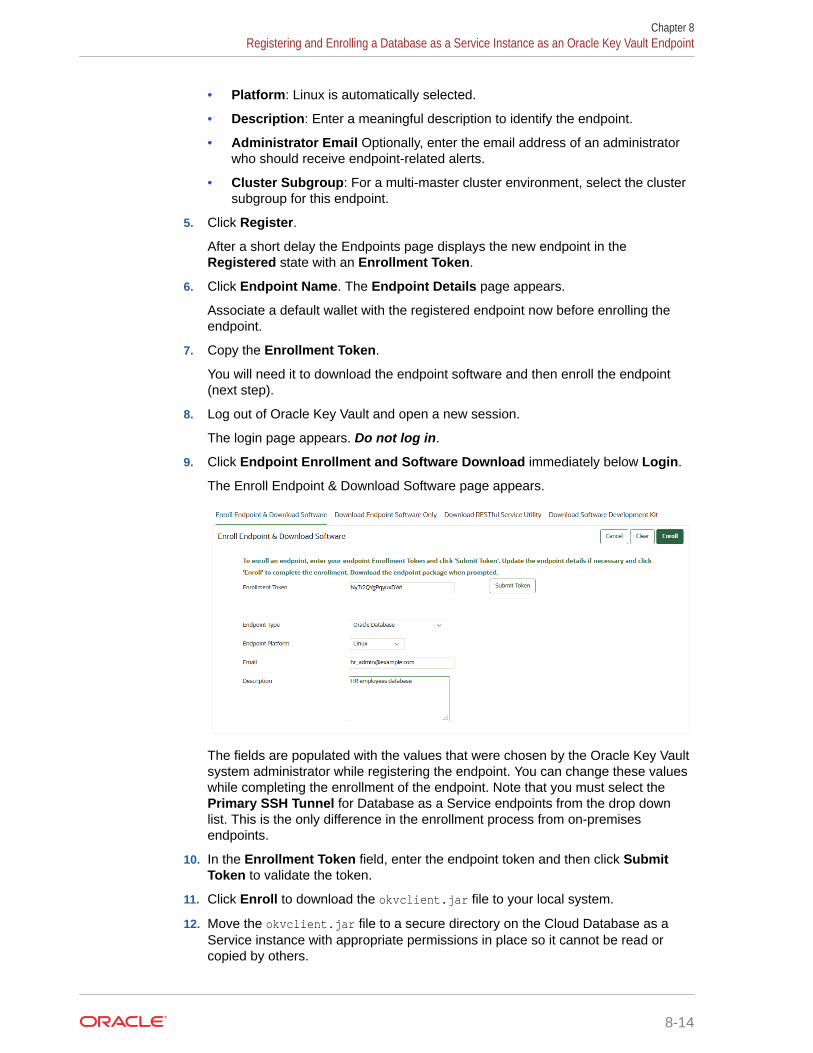
• Platform: Linux is automatically selected.
• Description: Enter a meaningful description to identify the endpoint.
• Administrator Email Optionally, enter the email address of an administratorwho should receive endpoint-related alerts.
• Cluster Subgroup: For a multi-master cluster environment, select the clustersubgroup for this endpoint.
5. Click Register.
After a short delay the Endpoints page displays the new endpoint in theRegistered state with an Enrollment Token.
6. Click Endpoint Name. The Endpoint Details page appears.
Associate a default wallet with the registered endpoint now before enrolling theendpoint.
7. Copy the Enrollment Token.
You will need it to download the endpoint software and then enroll the endpoint(next step).
8. Log out of Oracle Key Vault and open a new session.
The login page appears. Do not log in.
9. Click Endpoint Enrollment and Software Download immediately below Login.
The Enroll Endpoint & Download Software page appears.
The fields are populated with the values that were chosen by the Oracle Key Vaultsystem administrator while registering the endpoint. You can change these valueswhile completing the enrollment of the endpoint. Note that you must select thePrimary SSH Tunnel for Database as a Service endpoints from the drop downlist. This is the only difference in the enrollment process from on-premisesendpoints.
10. In the Enrollment Token field, enter the endpoint token and then click SubmitToken to validate the token.
11. Click Enroll to download the okvclient.jar file to your local system.
12. Move the okvclient.jar file to a secure directory on the Cloud Database as aService instance with appropriate permissions in place so it cannot be read orcopied by others.
Chapter 8Registering and Enrolling a Database as a Service Instance as an Oracle Key Vault Endpoint
8-14
$ scp -i path_to_private_key-file path_to_okvclient.jar_on_local_computer oracle@node_ip_address:path_to_okvclient.jar_on_cloud_db_instance
In this specification:
• path_to_okvclient.jar_on_local_computer refers to the location of okvclient.jaron an on-premises local computer.
• path_to_okvclient.jar_on_cloud_db_instance refers to the location ofokvclient.jar on the oracle cloud database as a service instance.
Related Topics
• Types of Endpoint EnrollmentThe first step in enrolling an endpoint is to add the endpoint to Oracle Key Vault.
• Setting the Default Wallet for an EndpointSetting a default wallet for an endpoint automatically uploads the endpoint's securityobjects to the wallet if another wallet is not explicitly specified.
8.4.3 Step 2: Prepare the Endpoint EnvironmentThe endpoint must have a compatible version of the Java Development Toolkit (JDK) and theOracle Database environment variables must be set.
1. Ensure that you have the necessary administrative privileges to install software on theendpoint.
2. Ensure that you have JDK 1.5 or later installed, and that the PATH environment variableincludes the java executable (in the JAVA_HOME/bin directory).
Oracle Key Vault supports JDK versions 1.5, 1.6, 7, and 8.
3. Run the shell utility oraenv or source oraenv command to set the correct environmentvariables on Oracle Database servers.
4. Check that the environment variables ORACLE_BASE and ORACLE_HOME are correctly set.
If you used oraenv to set these variables, then you must verify that ORACLE_BASE points tothe root directory for Oracle Databases, and that ORACLE_HOME points to a sub-directoryunder ORACLE_BASE where an Oracle database is installed.
8.4.4 Step 3: Install the Oracle Key Vault Software onto the Endpoint forRegistration and Enrollment
To install the Oracle Key Vault software installation, you run the okvclient.jar file on theendpoint.
1. Ensure that you are logged in to the endpoint server as the endpoint administrator.
2. Navigate to the directory in which you saved the okvclient.jar file.
3. Confirm that the target directory exists, and that it is empty.
4. Run the java command to install the okvclient.jar file.
java -jar okvclient.jar -d c:\db\okv_home -v [-db112]
In this specification:
Chapter 8Registering and Enrolling a Database as a Service Instance as an Oracle Key Vault Endpoint
8-15
• -d specifies the directory location for the endpoint software and configurationfiles, in this case /home/oracle/okvutil.
• -v writes the installation logs to the /home/oracle/okvutil/log/okvutil.deploy.log file at the server endpoint.
• -db112 applies only if the Oracle database is 11.2.0.4 and the endpointplatform is Windows.
-o is an optional argument that enables you to overwrite the symbolic linkreference to okvclient.ora when okvclient.jar is deployed in a directory otherthan the original directory. This argument is used only when you re-enroll anendpoint.
If you are installing the okvclient.jar file on a Windows endpoint system that hasOracle Database release 11.2.0.4 only, then include the -db112 option. (Thisoption is not necessary for any other combination of endpoint platform or OracleDatabase version.) For example:
java -jar okvclient.jar -d c:\db\okv_home\okvutil -v -db112
5. When you are prompted for a password, then perform either of the following twosteps.
The optional password goes into two places: okvutil and in ADMINISTER KEYMANAGEMENT. With okvutil, only users who know that password can upload ordownload content to and from Oracle Key Vault. With ADMINISTER KEYMANAGEMENT, it becomes the password that you must use in the IDENTIFIED BYpassword clause. If you choose not to give a password, then okvutil upload anddownload commands will not prompt for a password, and the password forADMINISTER KEY MANAGEMENT becomes NULL.
The choices for handling the password are as follows:
• If you want to create a password-protected wallet, at minimum enter apassword between 8 and 30 characters and then press Enter. For bettersecurity, Oracle recommends that you include uppercase letters, lowercasecharacters, special characters, and numbers in the password. The followingspecial characters are allowed: (.), comma (,), underscore (_), plus sign (+),colon (:), space.
Enter new Key Vault endpoint password (<enter> for auto-login): Key_Vault_endpoint_passwordConfirm new endpoint password: Key_Vault_endpoint_password
A password-protected wallet is an Oracle wallet file that store the endpoint'scredentials to access Oracle Key Vault. This password will be requiredwhenever the endpoint connects to Oracle Key Vault.
• Alternatively, enter no password and then press Enter.
A successful installation of the endpoint software creates the following directories:
• bin: contains the okvutil program, the root.sh and root.bat scripts, and thebinary file okveps.x64
• conf: contains the configuration file okvclient.ora
• jlib: contains the Java library files
• lib: contains the file liborapkcs.so
• log: contains the log files
Chapter 8Registering and Enrolling a Database as a Service Instance as an Oracle Key Vault Endpoint
8-16
• ssl: contains the TLS-related files and wallet files. The wallet files contain theendpoint credentials to connect to Oracle Key Vault.
The ewallet.p12 file refers to a password-protected wallet. The cwallet.sso filerefers to an auto-login wallet.
8.4.5 Step 4: Perform Post-Installation TasksPost-installation tasks are important for a fully functioning Oracle Key Vault installation.
After you complete the installation, you can optionally configure a TDE connection for theendpoint, check the installation contents, and then delete the okvclient.jar file.
1. Optionally, configure a TDE connection for the endpoint.
On UNIX platforms, the liborapkcs.so file contains the library that the Oracle databaseuses to communicate with Oracle Key Vault. On Windows platforms, the liborapkcs.dllfile contains the library that the Oracle database uses to communicate with Oracle KeyVault.
• On Oracle Linux x86-64, Solaris, AIX, and HP-UX (IA) installations: Log in as theroot and then execute either of the following commands:
$ sudo bin/root.sh
Or:
$ su -# bin/root.sh
This command creates the directory tree /opt/oracle/extapi/64/hsm/oracle/1.0.0, changes ownership and permissions, then copies the PKCS#11 library intothis directory.
• On Windows installations: Run the following command:
bin\root.bat
This command copies the liborapkcs.dll file to theC:\oracle\extapi\64\hsm\oracle\1.0.0 directory.
2. Use a command such as namei or ls -l to confirm that a softlink was createdin $ORACLE_BASE/okv/$ORACLE_SID/okvclient.ora to point to the real file in the /confsubdirectory of the installation target directory.
If the ORACLE_BASE environment variable has not been set, then the softlink was createdin $ORACLE_HOME/okv/$ORACLE_SID.
3. Run the okvutil list command to verify that the endpoint software installed correctly,and that the endpoint can connect to the Oracle Key Vault server.
$ ./okvutil list
If the endpoint is able to connect to Key Vault, then the No objects found messageappears. If a Server connect failed message appears, then you must troubleshoot theinstallation for possible issues. Check that environment variables are correctly set. To gethelp on the endpoint software, execute the following command:
java -jar okvclient.jar -h
Output similar to the following appears:
Chapter 8Registering and Enrolling a Database as a Service Instance as an Oracle Key Vault Endpoint
8-17
Production on Fri Apr 12 15:03:01 PDT 2019Copyright (c) 1996, 2019 Oracle. All Rights Reserved.Usage: java -jar okvclient.jar [-h | -help] [[-v | -verbose] [-d <destination directory>] [-o]]
Options: -h or -help : Display command help. -v or -verbose : Turn on the verbose mode. Logs will be written to files under <destination directory>/log/ directory. -d <destination directory> : Specify the software installation directory. -o : Overwrite the current symbolic link to okvclient.ora.
8.5 Suspending Database Cloud Service Access to OracleKey Vault
You can suspend one or more enrolled Database as a Service endpoints from accessto Oracle Key Vault.
• About Suspending Database Cloud Service Access to Oracle Key VaultWhen the DBaaS service is suspended, the Oracle Key Vault Server rejects allrequests from the suspended endpoints.
• Suspending Access for a Database Cloud Service to Oracle Key VaultAfter you suspend the Database as a Service access to Oracle Key Vault, you canresume the access when needed.
8.5.1 About Suspending Database Cloud Service Access to OracleKey Vault
When the DBaaS service is suspended, the Oracle Key Vault Server rejects allrequests from the suspended endpoints.
When you use an on-premises Oracle Key Vault to manage the online master keys forDatabase as a Service endpoints, the master encryption keys are never storedpersistently in Oracle Cloud. This way, the on-premises Oracle Key Vault administratorcan control access to the encrypted data in the cloud.
An on-premises Oracle Key Vault administrator can suspend Database as a Serviceendpoints with a single click. This means that the Oracle Key Vault Server rejects allrequests from the suspended endpoints. Because the endpoint cannot request keysfrom the Oracle Key Vault server, its ability to access encrypted data is lost after thekey cached in memory times out. For Oracle Database Cloud Service endpoints, thistime out is 5 minutes by default.
The on-premises Oracle Key Vault administrator can resume a suspended endpoint.This means that the Oracle Key Vault server can start servicing requests from thereinstated endpoint. The reinstated endpoint can now retrieve keys from the OracleKey Vault server and access sensitive data.
In a multi-master cluster, when a node is being enabled or disabled, the informationmay not yet have reached all nodes in the cluster. If an endpoint attempts to contact anode whose information has not yet propagated throughout the cluster, an error maybe returned.
Chapter 8Suspending Database Cloud Service Access to Oracle Key Vault
8-18
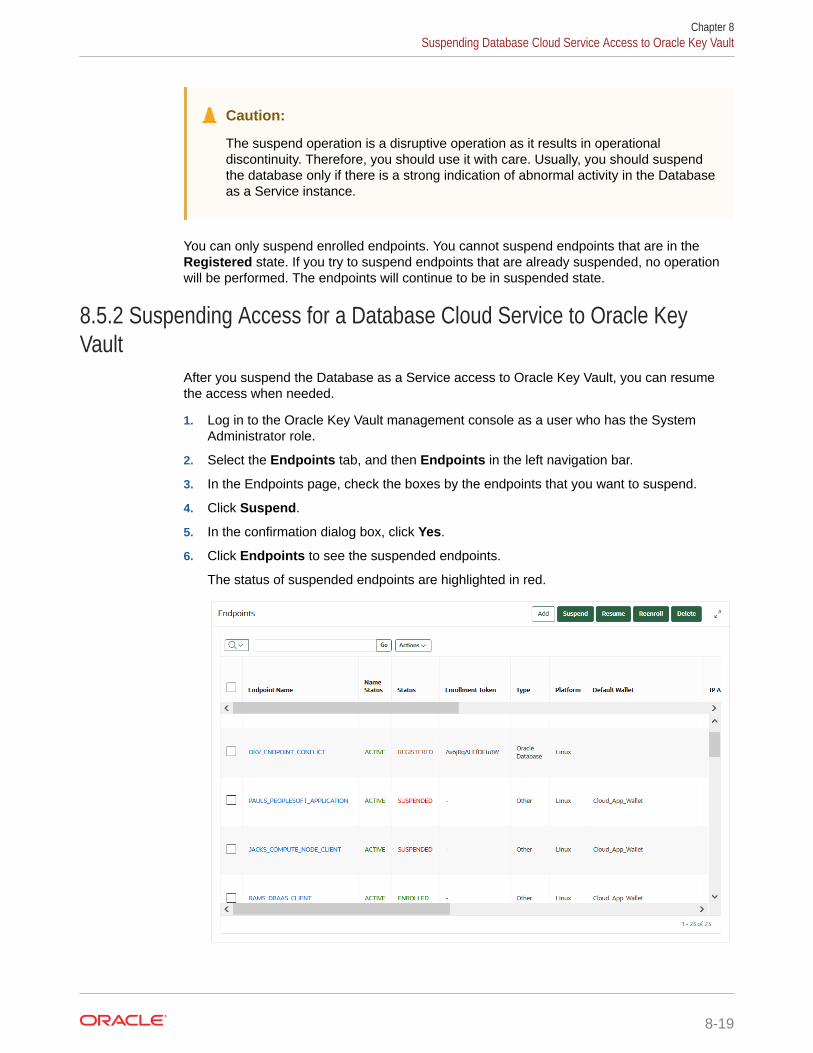
Caution:
The suspend operation is a disruptive operation as it results in operationaldiscontinuity. Therefore, you should use it with care. Usually, you should suspendthe database only if there is a strong indication of abnormal activity in the Databaseas a Service instance.
You can only suspend enrolled endpoints. You cannot suspend endpoints that are in theRegistered state. If you try to suspend endpoints that are already suspended, no operationwill be performed. The endpoints will continue to be in suspended state.
8.5.2 Suspending Access for a Database Cloud Service to Oracle KeyVault
After you suspend the Database as a Service access to Oracle Key Vault, you can resumethe access when needed.
1. Log in to the Oracle Key Vault management console as a user who has the SystemAdministrator role.
2. Select the Endpoints tab, and then Endpoints in the left navigation bar.
3. In the Endpoints page, check the boxes by the endpoints that you want to suspend.
4. Click Suspend.
5. In the confirmation dialog box, click Yes.
6. Click Endpoints to see the suspended endpoints.
The status of suspended endpoints are highlighted in red.
Chapter 8Suspending Database Cloud Service Access to Oracle Key Vault
8-19
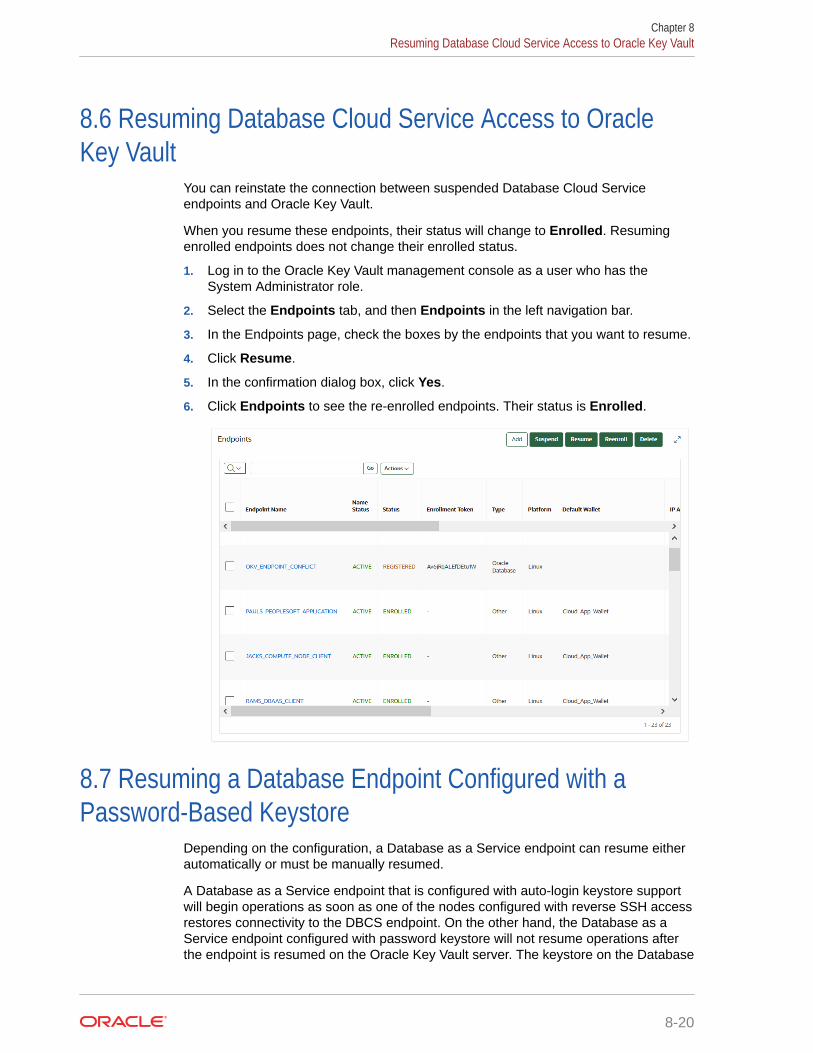
8.6 Resuming Database Cloud Service Access to OracleKey Vault
You can reinstate the connection between suspended Database Cloud Serviceendpoints and Oracle Key Vault.
When you resume these endpoints, their status will change to Enrolled. Resumingenrolled endpoints does not change their enrolled status.
1. Log in to the Oracle Key Vault management console as a user who has theSystem Administrator role.
2. Select the Endpoints tab, and then Endpoints in the left navigation bar.
3. In the Endpoints page, check the boxes by the endpoints that you want to resume.
4. Click Resume.
5. In the confirmation dialog box, click Yes.
6. Click Endpoints to see the re-enrolled endpoints. Their status is Enrolled.
8.7 Resuming a Database Endpoint Configured with aPassword-Based Keystore
Depending on the configuration, a Database as a Service endpoint can resume eitherautomatically or must be manually resumed.
A Database as a Service endpoint that is configured with auto-login keystore supportwill begin operations as soon as one of the nodes configured with reverse SSH accessrestores connectivity to the DBCS endpoint. On the other hand, the Database as aService endpoint configured with password keystore will not resume operations afterthe endpoint is resumed on the Oracle Key Vault server. The keystore on the Database
Chapter 8Resuming Database Cloud Service Access to Oracle Key Vault
8-20

as a Service instance was closed because Oracle Key Vault suspended the endpoint. Youshould open the password-based keystore on the Database as a Service instance to resumeoperations.
Chapter 8Resuming a Database Endpoint Configured with a Password-Based Keystore
8-21
9Managing Oracle Key Vault Users
Oracle Key Vault users administer the system, enroll endpoints, manage users andendpoints, control access to security objects, and grant other users administrative roles.
• Managing User AccountsYou can create Oracle Key Vault user accounts, grant these users Key Vaultadministrative roles, and add the users to user groups. You can also grant users systemprivileges for managing endpoints and endpoint groups.
• Managing Administrative Roles and User PrivilegesOracle Key Vault has predefined roles and privileges that you can grant to (or change) orrevoke from users.
• Managing User PasswordsYou or the user can change the user's password. You also can have passwords resetautomatically.
• Managing User EmailOracle Key Vault users should have their current email on file so that they can receivealerts such as system changes.
• Managing User GroupsYou can organize users who have a common purpose into a named user group.
9.1 Managing User AccountsYou can create Oracle Key Vault user accounts, grant these users Key Vault administrativeroles, and add the users to user groups. You can also grant users system privileges formanaging endpoints and endpoint groups.
• About Oracle Key Vault User AccountsOracle Key Vault users fulfill multiple functions.
• How a Multi-Master Cluster Affects User AccountsAn Oracle Key Vault multi-master cluster environment affects users in various ways.
• Creating an Oracle Key Vault User AccountA user with the System Administrator role can create user accounts from the Oracle KeyVault management console.
• Viewing User Account DetailsAll administrative users can view the list of Oracle Key Vault user accounts and theirdetails.
• Deleting an Oracle Key Vault User AccountDeleting an Oracle Key Vault user removes the user from any user groups the user waspart of in Oracle Key Vault.
9.1.1 About Oracle Key Vault User AccountsOracle Key Vault users fulfill multiple functions.
9-1
An important user function is to register and enroll Oracle Key Vault endpoints,enabling the user to manage his or her security objects by using Oracle Key Vault.
There are three types of Oracle Key Vault users:
• Administrative users who have one or more of the three administrative roles:System Administrator, Key Administrator, or Audit Manager
• Users who have any of the following privileges: Create Endpoint, ManageEndpoint, Create Endpoint Group, Manage Endpoint Group
• Ordinary users who have none of the administrative roles, but who have access tosecurity objects
Separation of duties in Oracle Key Vault means that users with an administrative roleor privilege have access to functions pertaining to their role or privilege, but not otherroles or privileges. For example, only a user with the System Administrator role hasaccess to the full System tab, not users with the Key Administrator or Audit Managerroles. A user who has the Key Administrator role or a user with the Manage EndpointGroup privilege can add endpoint groups (but cannot add endpoints). The userinterface elements needed to create endpoint groups are visible only to the users whohave the privileges for managing endpoints and endpoint groups.
Users who have no administrative role can be granted access to security objects thatare specific to their function. For example, you can grant a user access to a specificvirtual wallet. This user can log into the Oracle Key Vault management console andadd, manage, and delete his or her own security objects, but he or she cannot seesystem menus, details of other users and endpoints, their wallets, or audit reports.
Although the separation of user duties is recommended, you can have a single userperform all the administrative functions by granting that user all the administrativeroles.
Oracle Key Vault does not permit the user name to be the same as the name ofanother user or an endpoint. If you are creating users in a multi-master clusterenvironment, there is a chance that user with the same name will be created inanother node at the same time. In that case, Oracle Key Vault checks for namingconflicts and will automatically rename the user account that was created after the firstuser account of that name. You must either accept the generated name for the seconduser or drop the user and then recreate it with a different name.
9.1.2 How a Multi-Master Cluster Affects User AccountsAn Oracle Key Vault multi-master cluster environment affects users in various ways.
These can include expanding the activities that they can perform and ensuring thattheir names do not conflict with other objects in the cluster environment.
• Multi-Master Cluster Effect on System Administrator UsersThe user who is granted the System Administrator role is responsible formanaging the cluster configuration.
• Multi-Master Cluster Effect on Key Administrator UsersThe user who is granted the Key Adminstrator role manages endpoint groups,user groups, wallets, and objects.
• Multi-Master Cluster Effect on Audit Manager UsersThe user who is granted the Audit Manager role is responsible for configuring auditsettings.
Chapter 9Managing User Accounts
9-2
• Multi-Master Cluster Effect on Administration UsersAdministrative users can have any combination of the administration roles, including theSystem Administrator, Key Administrator, and Audit Manager roles.
• Multi-Master Cluster Effect on System UsersSystem users are responsible for the operating system of each Oracle Key Vaultappliance, server, and node.
9.1.2.1 Multi-Master Cluster Effect on System Administrator UsersThe user who is granted the System Administrator role is responsible for managing thecluster configuration.
The System Administrator role in a multi-master cluster includes the following responsibilities:
• All system administrator responsibilities for a single Oracle Key Vault server
• Cluster initialization, converting the first Oracle Key Vault server to the initial node
• Adding and removing nodes from the cluster
• Disabling and enabling nodes in the cluster
• Managing cluster-wide system settings
• Monitoring cluster operations and cluster health indicators
• Enabling and disabling replication between nodes
• Monitoring and resolving data and naming conflicts
• Monitoring and reacting to cluster alerts
• Managing cluster settings
The user who has the System Administrator privilege can also create and then manageendpoints. A user with the Create Endpoint privilege can create his or her own endpoints, anda user with the Manage Endpoint privilege can manage his or her own endpoints.
9.1.2.2 Multi-Master Cluster Effect on Key Administrator UsersThe user who is granted the Key Adminstrator role manages endpoint groups, user groups,wallets, and objects.
In a multi-master cluster, when these items are uploaded in separate nodes and in separatedata centers, name conflicts can occur. The key administrator provides input to the systemadministrator to resolve these conflicts for wallets, KMIP objects, endpoint groups, and usergroups.
A user with the Create Endpoint Group privilege can create his or her own endpoint groups,and a user with the Manage Endpoint Group privilege can manage his or her own endpointgroups.
Related Topics
• Naming Conflicts and ResolutionOracle Key Vault can resolve naming conflicts that can arise as users create objects suchas endpoints, endpoint groups, and user groups.
9.1.2.3 Multi-Master Cluster Effect on Audit Manager UsersThe user who is granted the Audit Manager role is responsible for configuring audit settings.
Chapter 9Managing User Accounts
9-3
In a multi-master cluster environment, this user can configure audit settings for theentire cluster and for individual nodes. The audit manager user can use differentsetting for different nodes, if necessary. However, this user can also unify auditsettings across the entire cluster.
The audit manager can replicate audit trails between nodes, if necessary. However,this can result in significant traffic between nodes, so the audit manager can turn on oroff the audit trail replication. By default, the audit trails replication is turned off.
9.1.2.4 Multi-Master Cluster Effect on Administration UsersAdministrative users can have any combination of the administration roles, includingthe System Administrator, Key Administrator, and Audit Manager roles.
Administrative user information created in the Oracle Key Vault server that is used asthe initial node seeds the cluster.
New servers added to a cluster will get administrative user information from thecluster. Administrator information that is created on the server for the purpose ofinducting the server into the cluster will be removed.
Administrative users that are created in a node after the node joins an Oracle KeyVault cluster will have a cluster-wide presence. New administrative users that areadded to the Oracle Key Vault cluster on different Oracle Key Vault nodes may havename conflicts. When the user account is created, Oracle Key Vault automaticallyresolves the administrative user name conflicts. User and endpoint conflictswill displayed in the Conflicts Resolution page and administrators can choose torename endpoint conflicts. If there is a user name conflict, then you must either acceptthe automatically generated user name, or delete and recreate the user. Useraccounts will not be available for use and will be placed in a PENDING state until thename resolution is completed. User accounts in the PENDING state cannot be deleted.
Related Topics
• Naming Conflicts and ResolutionOracle Key Vault can resolve naming conflicts that can arise as users createobjects such as endpoints, endpoint groups, and user groups.
9.1.2.5 Multi-Master Cluster Effect on System UsersSystem users are responsible for the operating system of each Oracle Key Vaultappliance, server, and node.
Oracle Key Vault servers are first installed or later configured to become nodes of anOracle Key Vault cluster. As part of the server configuration, the operating systemusers (support and root) are created. Those users will remain unchanged after theserver joins a cluster.
Unless security requirements specify otherwise, the same support and rootpasswords should be used for all the Oracle Key Vault nodes. Unlike Oracle Key Vaultadministrative accounts that are replicated, the support and root accounts areoperating system users, and their passwords are not automatically synchronizedacross the cluster. Therefore, each node can potentially have a different support orroot user password, making it difficult to manage multiple nodes of the cluster.
Chapter 9Managing User Accounts
9-4
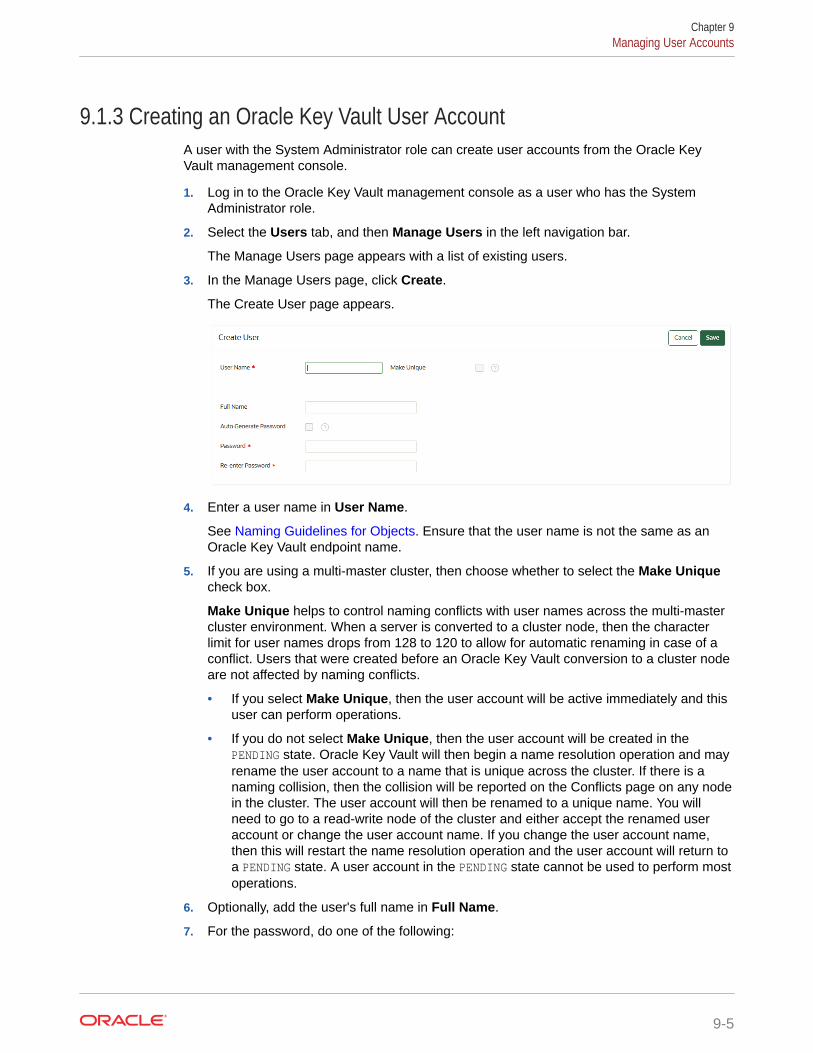
9.1.3 Creating an Oracle Key Vault User AccountA user with the System Administrator role can create user accounts from the Oracle KeyVault management console.
1. Log in to the Oracle Key Vault management console as a user who has the SystemAdministrator role.
2. Select the Users tab, and then Manage Users in the left navigation bar.
The Manage Users page appears with a list of existing users.
3. In the Manage Users page, click Create.
The Create User page appears.
4. Enter a user name in User Name.
See Naming Guidelines for Objects. Ensure that the user name is not the same as anOracle Key Vault endpoint name.
5. If you are using a multi-master cluster, then choose whether to select the Make Uniquecheck box.
Make Unique helps to control naming conflicts with user names across the multi-mastercluster environment. When a server is converted to a cluster node, then the characterlimit for user names drops from 128 to 120 to allow for automatic renaming in case of aconflict. Users that were created before an Oracle Key Vault conversion to a cluster nodeare not affected by naming conflicts.
• If you select Make Unique, then the user account will be active immediately and thisuser can perform operations.
• If you do not select Make Unique, then the user account will be created in thePENDING state. Oracle Key Vault will then begin a name resolution operation and mayrename the user account to a name that is unique across the cluster. If there is anaming collision, then the collision will be reported on the Conflicts page on any nodein the cluster. The user account will then be renamed to a unique name. You willneed to go to a read-write node of the cluster and either accept the renamed useraccount or change the user account name. If you change the user account name,then this will restart the name resolution operation and the user account will return toa PENDING state. A user account in the PENDING state cannot be used to perform mostoperations.
6. Optionally, add the user's full name in Full Name.
7. For the password, do one of the following:
Chapter 9Managing User Accounts
9-5
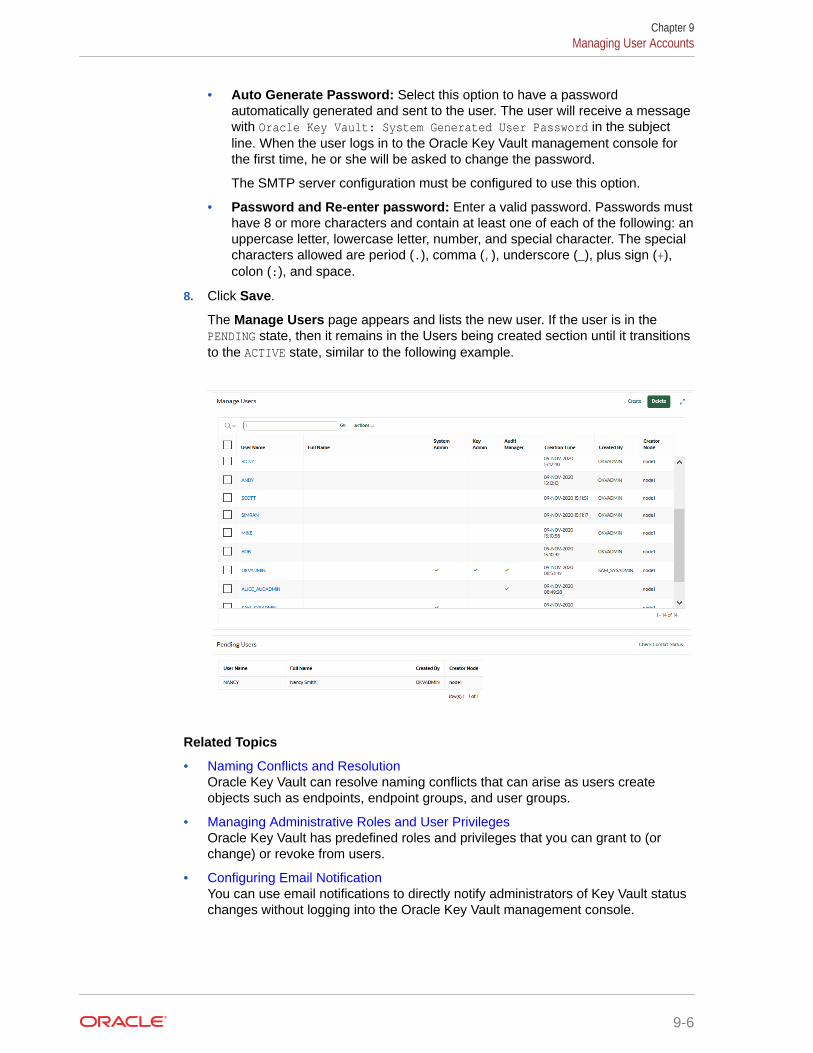
• Auto Generate Password: Select this option to have a passwordautomatically generated and sent to the user. The user will receive a messagewith Oracle Key Vault: System Generated User Password in the subjectline. When the user logs in to the Oracle Key Vault management console forthe first time, he or she will be asked to change the password.
The SMTP server configuration must be configured to use this option.
• Password and Re-enter password: Enter a valid password. Passwords musthave 8 or more characters and contain at least one of each of the following: anuppercase letter, lowercase letter, number, and special character. The specialcharacters allowed are period (.), comma (,), underscore (_), plus sign (+),colon (:), and space.
8. Click Save.
The Manage Users page appears and lists the new user. If the user is in thePENDING state, then it remains in the Users being created section until it transitionsto the ACTIVE state, similar to the following example.
Related Topics
• Naming Conflicts and ResolutionOracle Key Vault can resolve naming conflicts that can arise as users createobjects such as endpoints, endpoint groups, and user groups.
• Managing Administrative Roles and User PrivilegesOracle Key Vault has predefined roles and privileges that you can grant to (orchange) or revoke from users.
• Configuring Email NotificationYou can use email notifications to directly notify administrators of Key Vault statuschanges without logging into the Oracle Key Vault management console.
Chapter 9Managing User Accounts
9-6
9.1.4 Viewing User Account DetailsAll administrative users can view the list of Oracle Key Vault user accounts and their details.
Users without any of the three administrative roles can only see their own user details. TheUser Details page provides a consolidated view of the Oracle Key Vault user. This is thepage where all user management tasks are performed.
1. Log in to the Oracle Key Vault management console.
2. Select the Users tab, and then Manage Users in the left navigation bar.
The Manage Users page appears with a list of existing users. You can sort and searchthe list by the column user name, full name, or roles.
3. Click on a user name to display the User Details page.
Related Topics
• Administrative Roles and Endpoint Privileges within Oracle Key VaultOracle Key Vault provides separation of duty compliant administrative roles andprivileges that you can combine in various ways to meet enterprise needs.
• Performing Actions and SearchesThe Oracle Key Vault management console enables you to perform standard actions andsearch operations, as well as get help information.
9.1.5 Deleting an Oracle Key Vault User AccountDeleting an Oracle Key Vault user removes the user from any user groups the user was partof in Oracle Key Vault.
The operation does not delete any security objects managed by the user. Administrators canonly delete users that are not in the PENDING state.
1. Log in to the Oracle Key Vault management console as a user with the SystemAdministrator role and the same roles as the user being deleted, should that user haveany administrative roles.
2. Select the Users tab, and then Manage Users in the left navigation bar.
The Manage Users page appears with a list of existing users.
3. Check the boxes by the users you want to delete.
4. Click Delete.
5. In the confirmation dialog box, click OK.
6. Click Save.
9.2 Managing Administrative Roles and User PrivilegesOracle Key Vault has predefined roles and privileges that you can grant to (or change) orrevoke from users.
• About Managing Administrative Roles and User PrivilegesYou can grant or change an administrative role or user privileges for a user account thatyou have added.
Chapter 9Managing Administrative Roles and User Privileges
9-7
• Granting or Changing an Administrative Role of a UserYou can use the Manage Users page to grant or change a user administrative role.
• Granting the Create Endpoint PrivilegeThe Create Endpoint privilege enables a user to create the user's own endpoints.
• Granting the Manage Endpoint PrivilegeThe Manage Endpoint privilege enables a user to manage the user's ownendpoints.
• Granting the Create Endpoint Group PrivilegeThe Create Endpoint Group privilege enables a user to create the user's ownendpoint groups.
• Granting the Manage Endpoint Group PrivilegeThe Manage Endpoint Group privilege enables a user to manage the user's ownendpoint groups.
• Granting a User Access to a Virtual WalletA user with the Key Administrator role controls access to security objects forusers, endpoints, and their respective groups.
• Revoking an Administrative Role or Endpoint Privilege from a UserYou can use the Manage User page to revoke a role or an endpoint privilege froma user.
9.2.1 About Managing Administrative Roles and User PrivilegesYou can grant or change an administrative role or user privileges for a user accountthat you have added.
You must be a user with the System administrative role to grant, change, or revoke theCreate Endpoint and Manage Endpoint privileges to or from other users. You must bea user with the Key Administrative role to grant, change, or revoke the CreateEndpoint Group and Manage Endpoint Group privileges to or from other users. Youcan also revoke the privilege when it is no longer needed. Users with the CreateEndpoint, Manage Endpoint, Create Endpoint Group, or Manage Endpoint Groupprivilege cannot grant this privilege to other users.
If you are using a multi-master cluster environment, then you cannot grant, change,and revoke administrative roles for users in the PENDING state.
If you are using a multi-master cluster environment, then you cannot grant, change,and revoke user privileges for users in the PENDING state
9.2.2 Granting or Changing an Administrative Role of a UserYou can use the Manage Users page to grant or change a user administrative role.
1. Log in to the Oracle Key Vault management console as a user who has the samerole that is to be granted.
For example, if the user needs the System Administrator role, then log in as a userwho has been granted the System Administrator role.
2. Select the Users tab, and then Manage Users in the left navigation bar.
The Manage Users page appears displaying the list of users.
Chapter 9Managing Administrative Roles and User Privileges
9-8
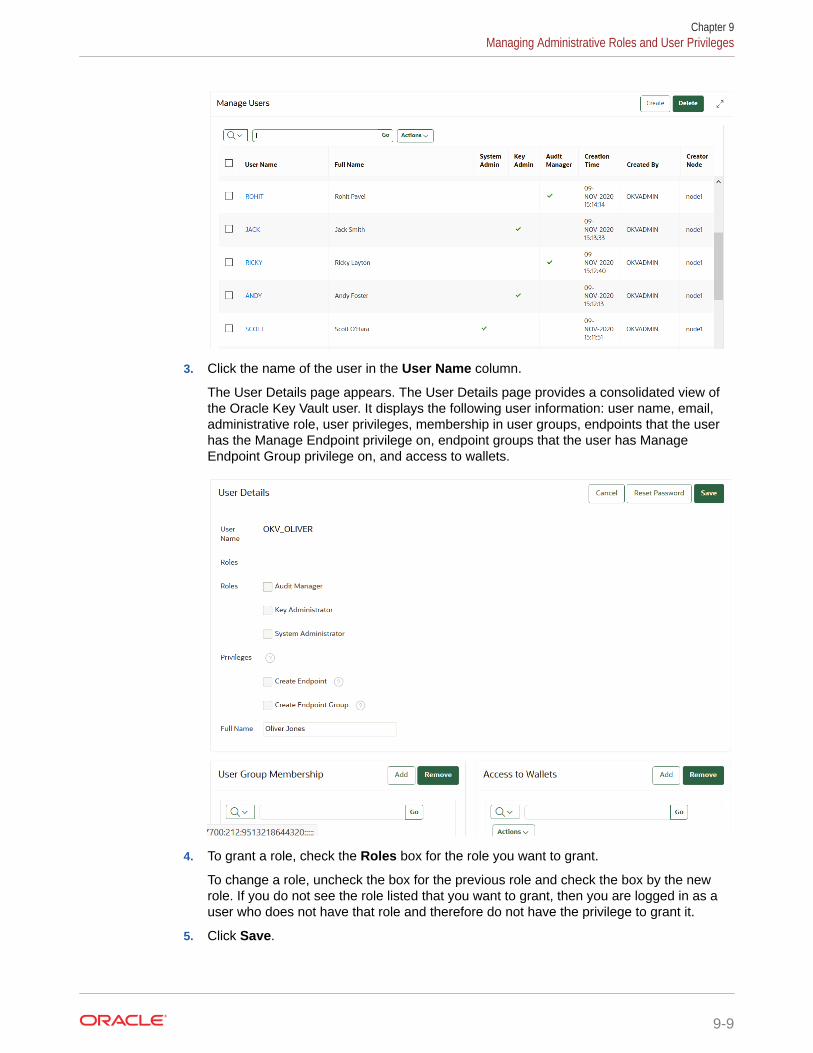
3. Click the name of the user in the User Name column.
The User Details page appears. The User Details page provides a consolidated view ofthe Oracle Key Vault user. It displays the following user information: user name, email,administrative role, user privileges, membership in user groups, endpoints that the userhas the Manage Endpoint privilege on, endpoint groups that the user has ManageEndpoint Group privilege on, and access to wallets.
4. To grant a role, check the Roles box for the role you want to grant.
To change a role, uncheck the box for the previous role and check the box by the newrole. If you do not see the role listed that you want to grant, then you are logged in as auser who does not have that role and therefore do not have the privilege to grant it.
5. Click Save.
Chapter 9Managing Administrative Roles and User Privileges
9-9
You cannot grant or revoke administrator roles to an LDAP user directly. LDAPusers can be granted administrative roles only through LDAP group mappings.
Related Topics
• Privilege Grants and Revokes for LDAP UsersLDAP users have limited access to Oracle Key Vault role and privilege grants.
9.2.3 Granting the Create Endpoint PrivilegeThe Create Endpoint privilege enables a user to create the user's own endpoints.
1. Log in to the Oracle Key Vault management console as a user who has theSystem Administrator role.
Users who have the Create Endpoint privilege cannot grant it to other users.
2. Select the Users tab, and then Manage Users in the left navigation bar.
The Manage Users page appears displaying the list of users.
3. Select the user to whom you want to grant the Create Endpoint privilege.
4. Under User Details, select the Create Endpoint check box.
5. Click Save.
After the user has been granted the Create Endpoint privilege, this user cannot begranted the System Management, Key Management, or Audit Manager roles until theCreate Endpoint privilege or any other endpoint privilege that the user has beengranted is revoked from the user. In addition, you cannot grant LDAP users the CreateEndpoint privilege or any other endpoint privilege.
Related Topics
• Privilege Grants and Revokes for LDAP UsersLDAP users have limited access to Oracle Key Vault role and privilege grants.
9.2.4 Granting the Manage Endpoint PrivilegeThe Manage Endpoint privilege enables a user to manage the user's own endpoints.
1. Log in to the Oracle Key Vault management console as a user who has theSystem Administrator role.
Users who have the Manage Endpoint privilege cannot grant it to other users.
2. Select the Users tab, and then Manage Users in the left navigation bar.
The Manage Users page appears displaying the list of users.
3. Select the user to whom you want to grant the Manage Endpoint privilege.
4. In the Access on Endpoints area, click Add.
5. In the Add Endpoint Access to User page, under Select Endpoint, select theendpoint to which you want to grant the user the Manage Endpoint privilege.
6. Click Save.
After the user has been granted the Manage Endpoint privilege on the selectedendpoints, this user cannot be granted the System Management, Key Management, orAudit Manager roles until the Manage Endpoint privilege or any other endpoint
Chapter 9Managing Administrative Roles and User Privileges
9-10
privilege that the user has been granted is revoked. In addition, you cannot grant LDAP usersthe Manage Endpoint privilege or any other endpoint privilege.
Related Topics
• Privilege Grants and Revokes for LDAP UsersLDAP users have limited access to Oracle Key Vault role and privilege grants.
9.2.5 Granting the Create Endpoint Group PrivilegeThe Create Endpoint Group privilege enables a user to create the user's own endpointgroups.
1. Log in to the Oracle Key Vault management console as a user who has the KeyAdministrator role.
Users who have the Create Endpoint Group privilege cannot grant it to other users.
2. Select the Users tab, and then Manage Users in the left navigation bar.
The Manage Users page appears displaying the list of users.
3. Select the user to whom you want to grant the Create Endpoint Group privilege.
4. Under User Details, select the Create Endpoint Group check box.
5. Click Save.
After the user has been granted the Create Endpoint Group privilege, this user cannot begranted the System Management, Key Management, or Audit Manager roles until the CreateEndpoint Group privilege or any other endpoint privilege that the user has been granted isrevoked from the user. In addition, you cannot grant LDAP users the Create Endpoint Groupprivilege or any other endpoint privilege.
Related Topics
• Privilege Grants and Revokes for LDAP UsersLDAP users have limited access to Oracle Key Vault role and privilege grants.
9.2.6 Granting the Manage Endpoint Group PrivilegeThe Manage Endpoint Group privilege enables a user to manage the user's own endpointgroups.
1. Log in to the Oracle Key Vault management console as a user who has the KeyAdministrator role.
Users who have the Manage Endpoint Group privilege cannot grant it to other users.
2. Select the Users tab, and then Manage Users in the left navigation bar.
The Manage Users page appears displaying the list of users.
3. Select the user to whom you want to grant the Manage Endpoint Group privilege.
4. In the Access on Endpoint Groups area, click Add.
5. In the Add Endpoint Group Access to User page, in the Select Endpoint Group area,select the endpoint group to which you want to grant the user the Manage EndpointGroup privilege.
6. Click Save.
Chapter 9Managing Administrative Roles and User Privileges
9-11
After the user has been granted the Manage Endpoint Groups privilege on theselected endpoint groups, this user cannot be granted the System Management, KeyManagement, or Audit Manager roles until the Manage Endpoint Groups privilege orany other endpoint privilege that the user has been granted is revoked from the user.In addition, you cannot grant LDAP users the Manage Endpoint Group privilege or anyother endpoint privilege.
Related Topics
• Privilege Grants and Revokes for LDAP UsersLDAP users have limited access to Oracle Key Vault role and privilege grants.
9.2.7 Granting a User Access to a Virtual WalletA user with the Key Administrator role controls access to security objects for users,endpoints, and their respective groups.
Any user can be granted access to security objects in Oracle Key Vault at a level thatis appropriate to their function in the organization.
You cannot grant access to a virtual wallet if the wallet is in the PENDING state.
1. Log in to the Oracle Key Vault management console as a user who has the KeyAdministrator role.
2. Select the Users tab, and then Manage Users in the left navigation bar.
The Manage Users page appears displaying the list of users.
3. Click the name of the user you want to grant access.
The User Details page appears.
4. Click Add in the Access to Wallets section.
The Add Access to User page appears.
5. Select the wallet under Select Wallet.
6. Set the access level to the selected wallet under Select Access Level: ReadOnly, Read and Modify, or Manage Wallet.
Set access levels when you grant access to the wallet, if you know the level togrant. You can also set or modify access levels from the wallet menu.
7. Click Save.
Related Topics
• Access Control ConfigurationOracle Key Vault enables you to control access to security objects at variousaccess levels.
• Managing Access to Virtual Wallets from Keys and Wallets TabYou can grant virtual wallet access to and revoke virtual wallet access fromendpoint by using the Keys and Wallets tab.
Chapter 9Managing Administrative Roles and User Privileges
9-12
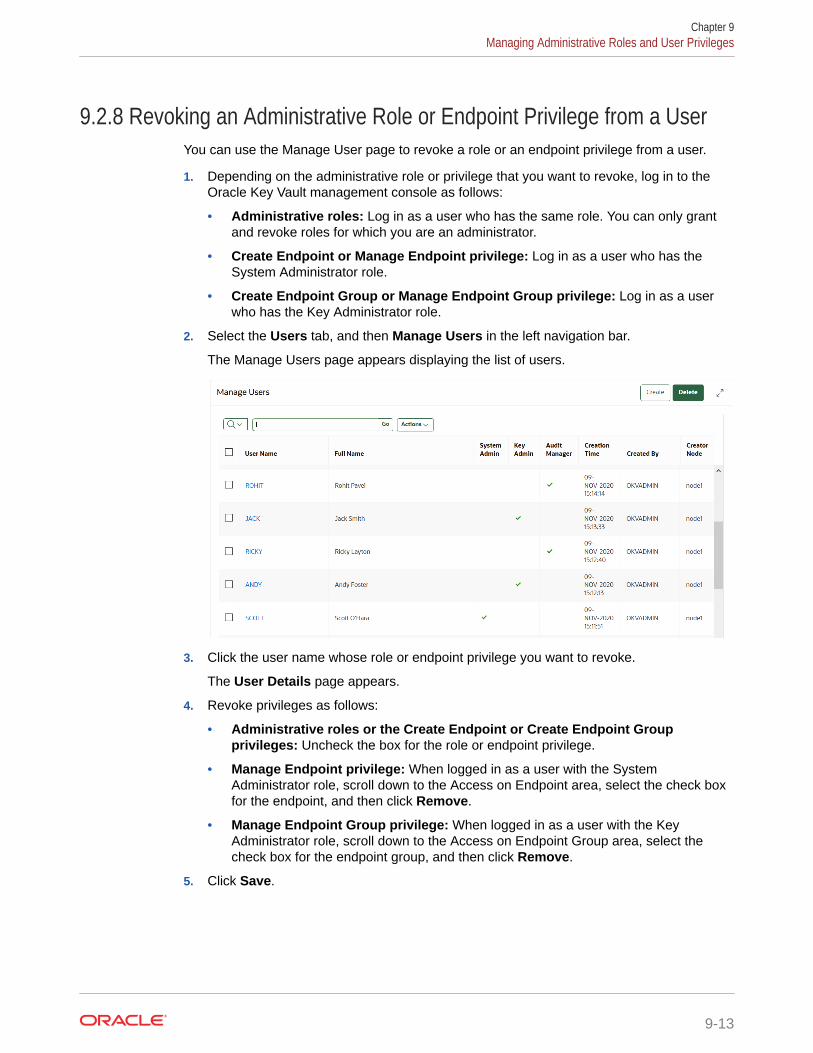
9.2.8 Revoking an Administrative Role or Endpoint Privilege from a UserYou can use the Manage User page to revoke a role or an endpoint privilege from a user.
1. Depending on the administrative role or privilege that you want to revoke, log in to theOracle Key Vault management console as follows:
• Administrative roles: Log in as a user who has the same role. You can only grantand revoke roles for which you are an administrator.
• Create Endpoint or Manage Endpoint privilege: Log in as a user who has theSystem Administrator role.
• Create Endpoint Group or Manage Endpoint Group privilege: Log in as a userwho has the Key Administrator role.
2. Select the Users tab, and then Manage Users in the left navigation bar.
The Manage Users page appears displaying the list of users.
3. Click the user name whose role or endpoint privilege you want to revoke.
The User Details page appears.
4. Revoke privileges as follows:
• Administrative roles or the Create Endpoint or Create Endpoint Groupprivileges: Uncheck the box for the role or endpoint privilege.
• Manage Endpoint privilege: When logged in as a user with the SystemAdministrator role, scroll down to the Access on Endpoint area, select the check boxfor the endpoint, and then click Remove.
• Manage Endpoint Group privilege: When logged in as a user with the KeyAdministrator role, scroll down to the Access on Endpoint Group area, select thecheck box for the endpoint group, and then click Remove.
5. Click Save.
Chapter 9Managing Administrative Roles and User Privileges
9-13
9.3 Managing User PasswordsYou or the user can change the user's password. You also can have passwords resetautomatically.
• About Changing User PasswordsAny valid Oracle Key Vault user can change his or her own password.
• Changing Your Own PasswordAny user can change his or her own Oracle Key Vault account password.
• Changing Another User's PasswordYou can change another user's password if you have the identical administrativeroles (at minimum) as the user whose password you want to reset.
• Controlling the Use of Password Reset MethodsYou can restrict the ability of users to reset another user's password manually sothat only password reset operations through email notifications are allowed.
9.3.1 About Changing User PasswordsAny valid Oracle Key Vault user can change his or her own password.
You can reset the password of another user if you have at minimum the sameadministrative roles as that user. For example, if you want to change the password of auser who has the Audit Manager role, then you also must have the Audit Manager rolebefore you can change the password.
Consider the following users and roles:
User System Admin Key Admin Audit Manager
OKV_ALL_JANE Yes Yes Yes
OKV_SYS_KEYS_JOE Yes Yes -
OKV_SYS_SEAN Yes - -
OKV_KEYS_KATE - Yes -
OKV_AUD_AUDREY - - Yes
OKV_OLIVER - - -
Suppose that user OKV_SYS_KEYS_JOE, who has the System Administrator and KeyAdministrator roles, is logged in and wants to change the other users' passwords. Thefollowing happens:
• OKV_KEYS_KATE: OKV_SYS_KEYS_JOE can change the password for OKV_KEYS_KATEbecause they have the Key Administrator role in common.
• OKV_AUD_AUDREY: OKV_SYS_KEYS_JOE cannot change OKV_AUD_AUDREY's passwordbecause OKV_SYS_KEYS_JOE does not have the Audit Manager role.
• OKV_ALL_JANE: OKV_SYS_KEYS_JOE cannot change the password for userOKV_ALL_JANE because he does not have the Audit Manager role.
• OKV_OLIVER: OKV_SYS_KEYS_JOE can change the password for user OKV_OLIVER,who has no roles at all.
Chapter 9Managing User Passwords
9-14

Any user can change his or her own password.
Assuming you have privileges to do so, you can change the password of another user byusing either of the following methods:
• Specify a new password for the other user and then notify this user of the new passwordby using any out-of-band method.
• Send the user a randomly generated one-time password to their email account.
Related Topics
• Controlling the Use of Password Reset MethodsYou can restrict the ability of users to reset another user's password manually so thatonly password reset operations through email notifications are allowed.
9.3.2 Changing Your Own PasswordAny user can change his or her own Oracle Key Vault account password.
1. Log in to the Oracle Key Vault management console.
2. Select the Users tab, and then Change Password in the left navigation bar.
The Change Password page appears for your account.
3. Enter your current password in Current Password.
4. Enter the new password in New Password and Re-enter New Password.
5. Click Save.
9.3.3 Changing Another User's PasswordYou can change another user's password if you have the identical administrative roles (atminimum) as the user whose password you want to reset.
• Changing a Password ManuallyYou can change the password manually for a user and then use any out-of-band methodto notify the user of the new password.
• Changing a Password Through Email NotificationYou can change a user's password by sending them a randomly generated one-timepassword to their email account.
• Changing the Support User Account PasswordBefore you perform the post-installation configuration task after the Oracle Key Vaultinstallation, you can change the password for the support account in the server terminalconsole.
Chapter 9Managing User Passwords
9-15
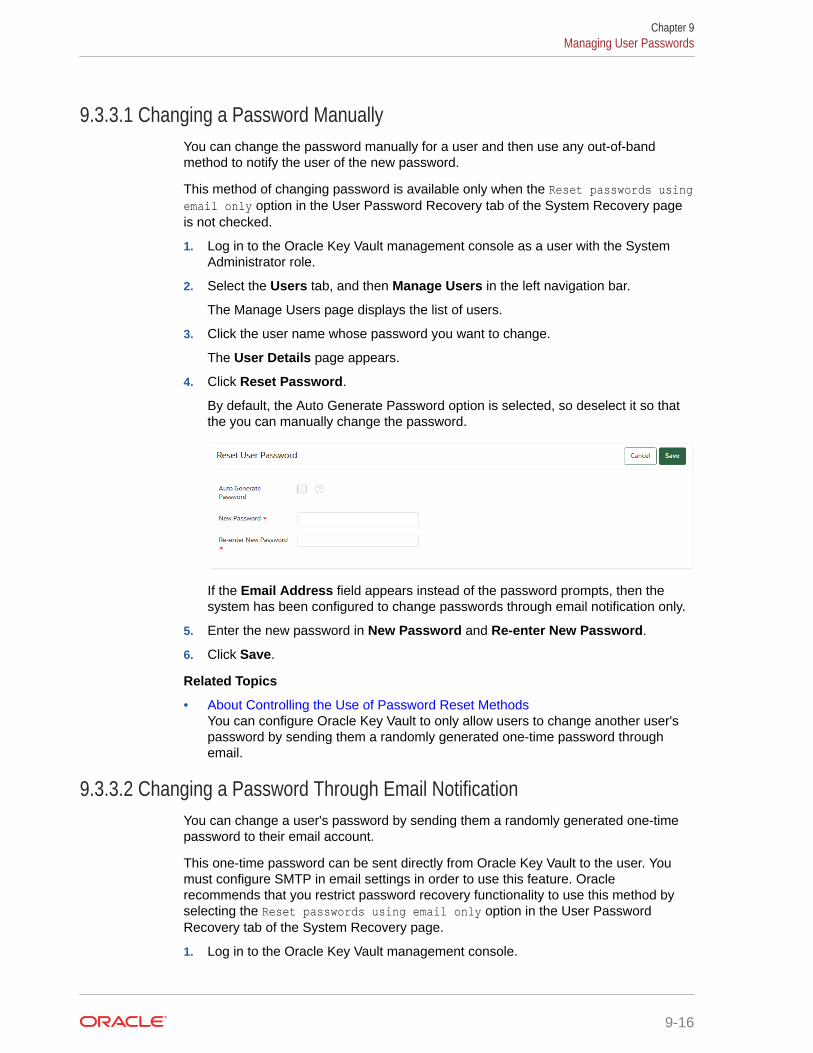
9.3.3.1 Changing a Password ManuallyYou can change the password manually for a user and then use any out-of-bandmethod to notify the user of the new password.
This method of changing password is available only when the Reset passwords usingemail only option in the User Password Recovery tab of the System Recovery pageis not checked.
1. Log in to the Oracle Key Vault management console as a user with the SystemAdministrator role.
2. Select the Users tab, and then Manage Users in the left navigation bar.
The Manage Users page displays the list of users.
3. Click the user name whose password you want to change.
The User Details page appears.
4. Click Reset Password.
By default, the Auto Generate Password option is selected, so deselect it so thatthe you can manually change the password.
If the Email Address field appears instead of the password prompts, then thesystem has been configured to change passwords through email notification only.
5. Enter the new password in New Password and Re-enter New Password.
6. Click Save.
Related Topics
• About Controlling the Use of Password Reset MethodsYou can configure Oracle Key Vault to only allow users to change another user'spassword by sending them a randomly generated one-time password throughemail.
9.3.3.2 Changing a Password Through Email NotificationYou can change a user's password by sending them a randomly generated one-timepassword to their email account.
This one-time password can be sent directly from Oracle Key Vault to the user. Youmust configure SMTP in email settings in order to use this feature. Oraclerecommends that you restrict password recovery functionality to use this method byselecting the Reset passwords using email only option in the User PasswordRecovery tab of the System Recovery page.
1. Log in to the Oracle Key Vault management console.
Chapter 9Managing User Passwords
9-16
2. Select the Users tab, and then Manage Users in the left navigation bar.
The Manage Users page appears displaying the list of users.
3. Click the user name of the user whose password you want to change.
The User Details page appears.
4. Click Reset Password.
The Reset User Password page appears.
5. Check the box by Auto Generate Password.
If SMTP is configured, then an email address field appears.
6. Enter the email address of the user.
7. Click Send One-Time Password.
If you check Auto Generate Password without configuring SMTP, the link Click here toconfigure SMTP appears. Click the link to configure email settings and repeat the steps inthis topic.
Related Topics
• Controlling the Use of Password Reset MethodsYou can restrict the ability of users to reset another user's password manually so thatonly password reset operations through email notifications are allowed.
• Configuring Email SettingsYou can configure the Simple Mail Transfer Protocol (SMTP) server properties to receiveemail notifications from Oracle Key Vault.
9.3.3.3 Changing the Support User Account PasswordBefore you perform the post-installation configuration task after the Oracle Key Vaultinstallation, you can change the password for the support account in the server terminalconsole.
After setting the password for the support account during the post-installation task, you canuse SSH to change the support password. (When you install Oracle Key Vault, you createthis account as part of the process.) The support user will be prompted to change theirpassword when the next time they log in is past the expiration time of their passwords. Theexpiration times are 365 days with a warning at 120 days, and with STIG enabled, it is 60days with a warning at 60 days.
1. Connect to the server console.
2. Enable SSH.
Log in to the Oracle Key Vault management console as a user who has the SystemAdministrator role. Select the System tab, then Settings. In the Network Details area,click SSH Access. Select IP address(es) and then enter only the IP addresses that youneed, or select All. Click Save.
3. As the root user, execute the following command to set the password for the supportuser:
passwd support
4. Enter and then re-enter the new password for the support user when prompted.
Chapter 9Managing User Passwords
9-17
After the password is set successfully, the following message is displayed on theconsole:
All authentication tokens updated successfully.
9.3.4 Controlling the Use of Password Reset MethodsYou can restrict the ability of users to reset another user's password manually so thatonly password reset operations through email notifications are allowed.
• About Controlling the Use of Password Reset MethodsYou can configure Oracle Key Vault to only allow users to change another user'spassword by sending them a randomly generated one-time password throughemail.
• Configuring the Use of Password Reset OperationsA user who has access to the system recovery passphrase can configure the useof password reset operations
9.3.4.1 About Controlling the Use of Password Reset MethodsYou can configure Oracle Key Vault to only allow users to change another user'spassword by sending them a randomly generated one-time password through email.
The user performing a password change for another user must be either an OracleKey Vault administrator or have the same or higher privileges as the user whosepassword needs to be reset.
By default, there are two ways to change another user's password:
• Manually, in which you create a new password for the user. In this scenario, bothyou and the user will know the password (until this user manually changes his orher own password)
• Automatically, in which you trigger an automatically-generated password for theuser, who is then emailed the new password on a one-time basis. In this scenario,only the user knows his or her new password.
You can enable only automatic password generation through email notification anddisable manual password reset operations. The email notification uses the email IDthat is associated with the user's account. The benefit of this feature is that the newlygenerated password is known only to the user whose password needed to be reset,not to the user who initiated the user's password change. Users can still change theirown passwords when this feature is enabled.
When this feature is disabled, then both methods of user creation are allowed: manualpassword reset operations, and automatic password reset operations.
9.3.4.2 Configuring the Use of Password Reset OperationsA user who has access to the system recovery passphrase can configure the use ofpassword reset operations
1. Navigate to the Oracle Key Vault management console, but do not log in.
2. Below the login screen, click the System Recovery button.
Chapter 9Managing User Passwords
9-18
3. When prompted, enter the system recovery passphrase.
4. Select the User Password Recovery tab.
5. In the User Password Recovery page, select the Reset passwords using email onlyoption to enable or disable this option.
6. Click Save.
Related Topics
• Changing a Password Through Email NotificationYou can change a user's password by sending them a randomly generated one-timepassword to their email account.
9.4 Managing User EmailOracle Key Vault users should have their current email on file so that they can receive alertssuch as system changes.
• Changing the User Email AddressAfter creating a user account, you can add or change the user's email address.
• Disabling Email Notifications for a UserYou can disable email notifications for a user on the User Details page.
9.4.1 Changing the User Email AddressAfter creating a user account, you can add or change the user's email address.
1. Log in to the Oracle Key Vault management console as a user who has the SystemAdministrator role.
2. Select the Users tab, and then Manage Users in the left navigation bar.
The Manage Users page appears displaying the list of users.
3. Click the user's name in the User Name column.
The User Details page appears.
4. Enter the email address in Email.
5. Click Save.
9.4.2 Disabling Email Notifications for a UserYou can disable email notifications for a user on the User Details page.
1. Log in to the Oracle Key Vault management console as a user who has the SystemAdministrator role.
2. Select the Users tab, and then Manage Users in the left navigation bar.
The Manage Users page appears displaying the list of users.
3. Click the user's name in the User Name column.
The User Details page appears:
4. Select the Do not receive email alerts check box.
5. Click Save.
Chapter 9Managing User Email
9-19
9.5 Managing User GroupsYou can organize users who have a common purpose into a named user group.
• About Managing User GroupsUsers who have the Key Administrator role can create, modify, and delete usergroups.
• How a Multi-Master Cluster Affects User GroupsUser groups are used at the Oracle Key Vault server and cluster level to groupuser roles and permissions.
• Creating a User GroupYou can create a user group when a set of users must manage a set of commonsecurity objects.
• Adding a User to a User GroupYou can add an existing user to a user group if that user must manage the samesecurity objects as the group.
• Granting a User Group Access to a Virtual WalletYou can modify the access level to a virtual wallet for a user group as functionalneeds change.
• Renaming a User GroupDepending on its status, you can change the name of a user group.
• Changing a User Group DescriptionA group description is useful for identifying the purpose of the group.
• Removing a User from a User GroupDepending on the circumstances, you can remove a user from a user group.
• Deleting a User GroupYou can delete a user group when the users in the group do not need to accessthe same security objects.
9.5.1 About Managing User GroupsUsers who have the Key Administrator role can create, modify, and delete user groups.
This enables them to manage their access to virtual wallets. After a user group iscreated, you can modify its details.
The main purpose of a user group is simplify access control to security objects. If a setof users need access to a common set of security objects, then you can assign theseusers to a group and grant the group access instead of granting access to each useror based on each security object. When certain users do not need access to thesecurity objects any longer, you can remove them from the group. You can add newusers to the group. You can modify the group's access level to security objects at anytime.
9.5.2 How a Multi-Master Cluster Affects User GroupsUser groups are used at the Oracle Key Vault server and cluster level to group userroles and permissions.
Chapter 9Managing User Groups
9-20
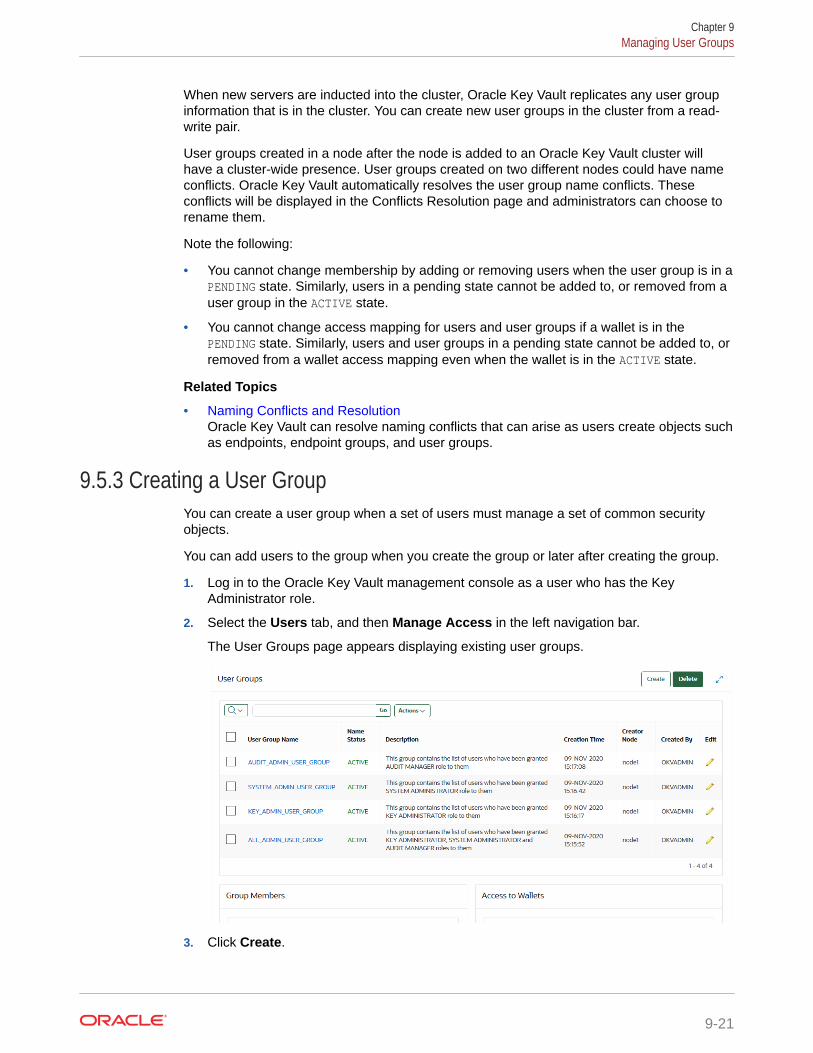
When new servers are inducted into the cluster, Oracle Key Vault replicates any user groupinformation that is in the cluster. You can create new user groups in the cluster from a read-write pair.
User groups created in a node after the node is added to an Oracle Key Vault cluster willhave a cluster-wide presence. User groups created on two different nodes could have nameconflicts. Oracle Key Vault automatically resolves the user group name conflicts. Theseconflicts will be displayed in the Conflicts Resolution page and administrators can choose torename them.
Note the following:
• You cannot change membership by adding or removing users when the user group is in aPENDING state. Similarly, users in a pending state cannot be added to, or removed from auser group in the ACTIVE state.
• You cannot change access mapping for users and user groups if a wallet is in thePENDING state. Similarly, users and user groups in a pending state cannot be added to, orremoved from a wallet access mapping even when the wallet is in the ACTIVE state.
Related Topics
• Naming Conflicts and ResolutionOracle Key Vault can resolve naming conflicts that can arise as users create objects suchas endpoints, endpoint groups, and user groups.
9.5.3 Creating a User GroupYou can create a user group when a set of users must manage a set of common securityobjects.
You can add users to the group when you create the group or later after creating the group.
1. Log in to the Oracle Key Vault management console as a user who has the KeyAdministrator role.
2. Select the Users tab, and then Manage Access in the left navigation bar.
The User Groups page appears displaying existing user groups.
3. Click Create.
Chapter 9Managing User Groups
9-21
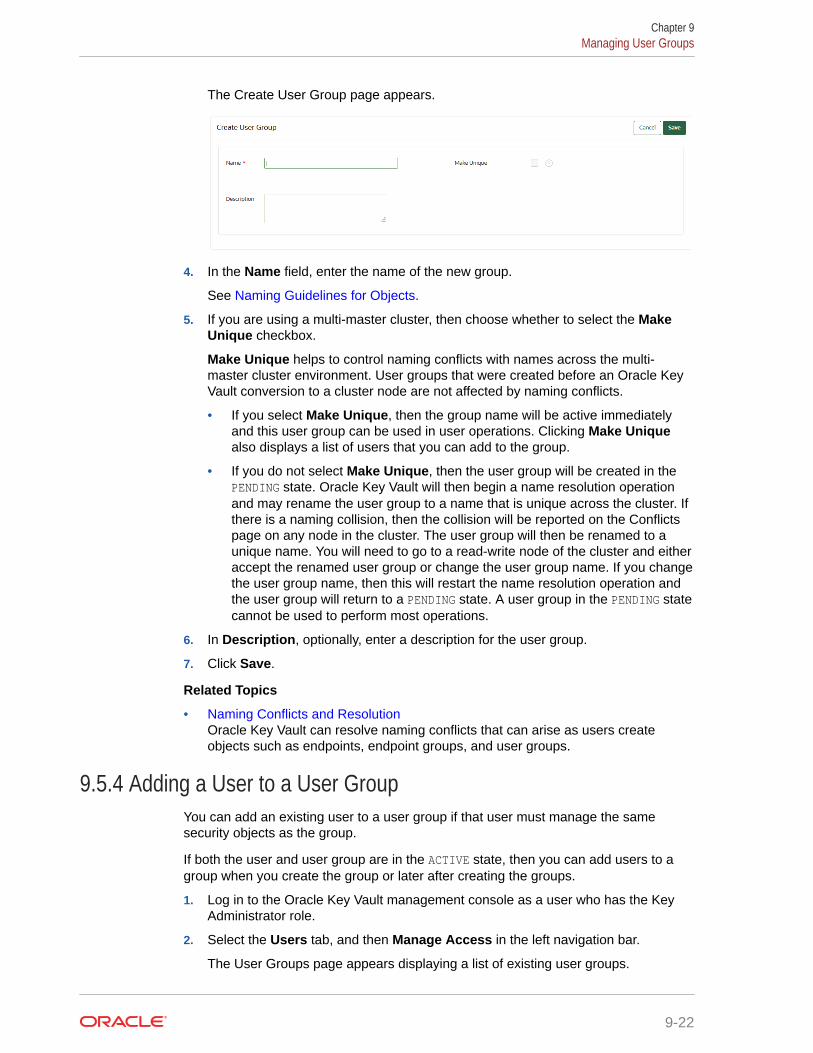
The Create User Group page appears.
4. In the Name field, enter the name of the new group.
See Naming Guidelines for Objects.
5. If you are using a multi-master cluster, then choose whether to select the MakeUnique checkbox.
Make Unique helps to control naming conflicts with names across the multi-master cluster environment. User groups that were created before an Oracle KeyVault conversion to a cluster node are not affected by naming conflicts.
• If you select Make Unique, then the group name will be active immediatelyand this user group can be used in user operations. Clicking Make Uniquealso displays a list of users that you can add to the group.
• If you do not select Make Unique, then the user group will be created in thePENDING state. Oracle Key Vault will then begin a name resolution operationand may rename the user group to a name that is unique across the cluster. Ifthere is a naming collision, then the collision will be reported on the Conflictspage on any node in the cluster. The user group will then be renamed to aunique name. You will need to go to a read-write node of the cluster and eitheraccept the renamed user group or change the user group name. If you changethe user group name, then this will restart the name resolution operation andthe user group will return to a PENDING state. A user group in the PENDING statecannot be used to perform most operations.
6. In Description, optionally, enter a description for the user group.
7. Click Save.
Related Topics
• Naming Conflicts and ResolutionOracle Key Vault can resolve naming conflicts that can arise as users createobjects such as endpoints, endpoint groups, and user groups.
9.5.4 Adding a User to a User GroupYou can add an existing user to a user group if that user must manage the samesecurity objects as the group.
If both the user and user group are in the ACTIVE state, then you can add users to agroup when you create the group or later after creating the groups.
1. Log in to the Oracle Key Vault management console as a user who has the KeyAdministrator role.
2. Select the Users tab, and then Manage Access in the left navigation bar.
The User Groups page appears displaying a list of existing user groups.
Chapter 9Managing User Groups
9-22
3. Click the pencil icon in the Edit for the user group.
The User Group Details page appears.
4. Click Add in the User Group Members pane.
The Add User Group Members page appears displaying the list of existing users who arenot in the user group.
5. Check the boxes for the users you want to add.
6. Click Save.
9.5.5 Granting a User Group Access to a Virtual WalletYou can modify the access level to a virtual wallet for a user group as functional needschange.
However, you can only modify the access level if the user group and wallet are in the ACTIVEstate.
1. Log in to the Oracle Key Vault management console as a user who has the KeyAdministrator role.
2. Select the Users tab, and then Manage Access in the left navigation bar.
The User Groups page appears displaying a list of existing user groups.
3. Click the pencil icon in the Edit column, for the user group that you want to modify.
The User Group Details page appears.
4. Click Add in the Access to Wallets section.
The Add Access to User Group page appears.
5. Select the wallet in Select Wallet.
6. Set the access level to the selected wallet in Select Access Level.
Select Read Only, Read and Modify, or Manage Wallet.
7. Click Save.
Related Topics
• Access Control ConfigurationOracle Key Vault enables you to control access to security objects at various accesslevels.
9.5.6 Renaming a User GroupDepending on its status, you can change the name of a user group.
In a multi-master cluster, if the user group is in the PENDING state, then only the creator usercan rename the user group.
1. Log in to the Oracle Key Vault management console as a user who has the KeyAdministrator role.
2. Select the Users tab, and then Manage Access in the left navigation bar.
The User Groups page appears.
3. On the User Groups page, select the pencil icon in the Edit column, for the user groupthat you want to modify.
Chapter 9Managing User Groups
9-23

The User Group Details page appears.
4. Enter a new name in the Name field.
See Naming Guidelines for Objects. If this node is part of a multi-master clusterand you do not select Make Unique, then the user group will enter the PENDINGstate after being renamed.
5. Click Save.
9.5.7 Changing a User Group DescriptionA group description is useful for identifying the purpose of the group.
You can change this description at any time to match the purpose of the group. In amulti-master cluster, if the user group is in the PENDING state, then only the creator canmodify the user group description.
1. Log in to the Oracle Key Vault management console as a user who has the KeyAdministrator role.
2. Select the Users tab, and then Manage Access in the left navigation bar.
The User Groups page appears.
3. On the User Groups page, select the pencil icon in the Edit column, for the usergroup that you want to modify.
The User Group Details page appears.
4. Enter a new description in the Description field.
5. Click Save.
9.5.8 Removing a User from a User GroupDepending on the circumstances, you can remove a user from a user group.
In a multi-master cluster, if both the user and the user group are in the ACTIVE state,then you can remove users from a user group. You may want to remove these userswhen their function in the organization changes, and they no longer need to managethe same security objects as the group.
1. Log in to the Oracle Key Vault management console as a user who has the KeyAdministrator role.
2. Select the Users tab, and then Manage Access in the left navigation bar.
The User Groups page appears displaying a list of existing user groups.
3. Click the pencil icon in the Edit for the user group.
The User Group Details page appears.
4. In the User Group Members area, check the boxes for the users you want toremove.
5. Click Remove.
6. Click OK to confirm.
Chapter 9Managing User Groups
9-24

9.5.9 Deleting a User GroupYou can delete a user group when the users in the group do not need to access the samesecurity objects.
Removing a user group automatically deletes the group's access to wallets and securityobjects. In a multi-master cluster, if a user group is in the PENDING state, then only the creatorcan delete it.
1. Log in to the Oracle Key Vault management console to Oracle Key Vault as a user whohas been granted the Key Administrator role.
2. Select the Users tab, and then Manage Access in the left navigation bar.
The User Groups page appears.
3. Check the boxes for the user groups that you want to delete.
4. Click Delete.
5. Click OK to confirm.
Chapter 9Managing User Groups
9-25
10Managing LDAP User Authentication andAuthorization in Oracle Key Vault
You can configure a connection between Oracle Key Vault and an LDAP server (currentlyMicrosoft Active Directory) so that their users can access Oracle Key Vault.
• About Managing LDAP User Authentication and Authorization in Oracle Key VaultYou can configure Oracle Key Vault users to be centrally managed in the configuredLDAP directory server.
• Privilege Grants and Revokes for LDAP UsersLDAP users have limited access to Oracle Key Vault role and privilege grants.
• Configuring the LDAP Directory Server Connection to Oracle Key VaultBoth the LDAP administrator and Oracle Key Vault administrator play a role in configuringthe LDAP directory server connection to Oracle Key Vault.
• Logins to Oracle Key Vault as an LDAP UserAn LDAP user who has been properly configured can log in to the Oracle Key Vaultmanagement console.
• Managing the LDAP ConfigurationYou can enable, validate, modify, disable, and delete the LDAP configuration.
• Managing LDAP GroupsYou can modify or delete LDAP group mappings.
• Managing Oracle Key Vault-Generated LDAP UsersYou cannot administer the actual LDAP user account in the LDAP directory server butyou can administer the Oracle Key Vault-generated user account that is created the firsttime the LDAP user logs in to Oracle Key Vault.
Related Topics
• LDAP User Authentication and Authorization in Oracle Key VaultStarting with this release, you can configure authentication and authorization of OracleKey Vault users to be centrally managed in a Microsoft Active Directory.
10.1 About Managing LDAP User Authentication andAuthorization in Oracle Key Vault
You can configure Oracle Key Vault users to be centrally managed in the configured LDAPdirectory server.
Oracle Key Vault supports only Microsoft Active Directory as an LDAP provider. This type ofconfiguration enables you to manage authentication and authorization of Oracle Key Vaultusers in an LDAP directory server so that LDAP users can perform the following operations:
• Log in to the Oracle Key Vault management console and perform administrative tasks forwhich they are authorized.
10-1
• Run Oracle Key Vault RESTful services commands at the command line.
In a large enterprise, centrally managing users and their authorization not only bringsoperational efficiencies in user management but also significantly improvescompliance, control, and security. For example, when terminating an employee, anLDAP administrator can lock the user's account in the LDAP directory server to endthe employee’s access to various systems, including Oracle Key Vault.
By centrally managing Oracle Key Vault users in an LDAP directory server, youeliminate the need to maintain user account policies and password policies for LDAPusers in each Oracle Key Vault instance. Instead, you can manage these policiescentrally in the LDAP directory server.
This feature implements automatic provisioning of LDAP users in Oracle Key Vault.When an LDAP user successfully logs in to Oracle Key Vault the first time, Oracle KeyVault automatically creates an Oracle Key Vault user account for this user, based onthe user account information from the LDAP directory server. You cannot modify thisuser account except for granting or revoking Oracle Key Vault privileges. Otherchanges to the user account, such as changing the user's password, must beperformed to the actual account in its LDAP directory server. The automaticprovisioning of users is not only beneficial for new Oracle Key Vault deployments butalso when access to an existing Oracle Key Vault deployment must be granted to otheremployees, including provisioning of new employees.
To enable authentication and authorization of LDAP users with Oracle Key Vault, anOracle Key Vault administrator must perform the following configuration in Oracle KeyVault:
1. Configure a connection to LDAP directory server.
2. Map one or more Oracle Key Vault administrative roles or user groups with LDAPgroups.
Most of the configuration work is performed by an Oracle Key Vault administrator usingthe Oracle Key Vault management console.
The general process for using Oracle Key Vault in an LDAP directory server is asfollows:
1. An administrator for the LDAP directory server identifies the LDAP users who needaccess to Oracle Key Vault, along with their authorization requirements in OracleKey Vault. This administrator configures one or more LDAP groups, depending onthe required separation of roles and duties of these users. This administrator thenassigns specific users to respective LDAP groups.
2. To enable the Oracle Key Vault administrator to configure a connection to theLDAP directory server, the LDAP administrator creates an LDAP user account(called service directory user). Oracle Key Vault uses this user account to connectto the LDAP directory server and fetch the necessary information from the LDAPdirectory server during the user login process. The LDAP administrator providesthe details of this LDAP user as well as the trust certificate of the LDAP directoryserver to an Oracle Key Vault administrator.
3. The Oracle Key Vault administrator uses the Oracle Key Vault managementconsole to configure the connection between Oracle Key Vault and the LDAPdirectory server.
4. The Oracle Key Vault administrator then maps each LDAP group to theappropriate Oracle Key Vault user group or administrative role. These user groupsmust be granted the appropriate privileges that you want the LDAP user to have.
Chapter 10About Managing LDAP User Authentication and Authorization in Oracle Key Vault
10-2
The privileges of these users in Oracle Key Vault are determined based on the OracleKey Vault administrative roles or user groups that are mapped to the user’s LDAPgroups. For example, if the Oracle Key Vault group has been granted the Audit Managerrole, then the LDAP user will be indirectly granted the Audit Manager role.
5. The LDAP users are now able to log in to Oracle Key Vault and perform tasks for whichthey are authorized. After first successful login, a new user account is automaticallycreated in Oracle Key Vault.
6. In addition to the administrative roles and privileges granted to the user through LDAPgroup mappings, you can directly grant privileges to LDAP user account after it has beencreated in Oracle Key Vault.
Authorization for an LDAP user session is a combination of the authorization granted throughthe LDAP groups as well as the authorization that is granted to the LDAP user locally.Authorization through LDAP groups is granted at the login time and is effective only for thatsession. During logon of an LDAP user, Oracle Key Vault fetches the user’s LDAP groupsfrom the directory server and determines mapped administrative roles and groups that areeffective for the current user session. The set of these mapped user groups is referred to aseffective user group membership of the LDAP user.
Note that you cannot add an LDAP user as a member of an Oracle Key Vault user groupdirectly.
Any changes to the user’s membership in the LDAP groups or to the mapping between theuser’s LDAP groups and Oracle Key Vault user groups or administrative roles do not affectthe administrative roles and user group memberships that are currently effective for theexisting user sessions. However, any changes to the privileges that have been granted to orrevoked from the Oracle Key Vault user groups take effect immediately and apply to allexisting sessions.
Note the following:
• You can perform the LDAP configuration with a Microsoft Active Directory version thatsupports the LDAP-v3 protocol.
• You can perform the LDAP configuration in a primary-standby environment. No specialconfiguration is necessary.
• In multi-master cluster environments, the LDAP configuration is effective on all clusternodes. You can configure node-specific configuration of LDAP directory server and hosts.
• For LDAP directory servers that support multiple domains, access to users from differentdomains is enabled by setting up multiple LDAP configurations, one for each domain.
10.2 Privilege Grants and Revokes for LDAP UsersLDAP users have limited access to Oracle Key Vault role and privilege grants.
Note the following restrictions with regard to LDAP users, Oracle Key Vault user groups,endpoint privileges, and wallet privileges:
• You cannot directly add an LDAP user as a member of an Oracle Key Vault user group.
• Because the endpoint privileges (Create Endpoint, Manage Endpoint, Create EndpointGroup, and Manage Endpoint Group) cannot be granted to Oracle Key Vault user groups,LDAP users cannot have access to these privileges.
Chapter 10Privilege Grants and Revokes for LDAP Users
10-3

• After the LDAP user is created in Oracle Key Vault, this user can be granted walletprivileges locally. However, the LDAP user cannot be directly granted endpoint orendpoint group privileges.
• Administrator roles cannot be directly granted to an LDAP user account in OracleKey Vault. LDAP users cannot be granted endpoint privileges either directly orthrough an Oracle Key Vault user group.
10.3 Configuring the LDAP Directory Server Connection toOracle Key Vault
Both the LDAP administrator and Oracle Key Vault administrator play a role inconfiguring the LDAP directory server connection to Oracle Key Vault.
• Step 1: Prepare the LDAP Directory ServerBefore the Oracle Key Vault administrator can create a connection to an LDAPdirectory server, the LDAP administrator must perform preparation tasks.
• Step 2: Create the LDAP Connection in Oracle Key VaultAn Oracle Key Vault user who has the System Administrator role uses the OracleKey Vault management console to create the LDAP connection.
• Step 3: Map LDAP Groups to Oracle Key Vault User GroupsAn Oracle Key Vault user who has the Key Administrator role can map LDAPgroups to Oracle Key Vault user groups or administrative roles.
10.3.1 Step 1: Prepare the LDAP Directory ServerBefore the Oracle Key Vault administrator can create a connection to an LDAPdirectory server, the LDAP administrator must perform preparation tasks.
1. As the LDAP administrator (or a user who has the appropriate privileges), log in tothe LDAP directory server.
2. Create or designate existing LDAP groups that you want to map to Oracle KeyVault.
3. Assign users to these LDAP groups.
The group will determine the privileges that its member users will have in OracleKey Vault when the connection configuration is complete. If a user must havespecific privileges that are not covered by any existing LDAP groups, then create aspecific group for this user.
4. Create a service directory user account if such an account does not yet exist, andthen provide this account name and its password to the Oracle Key Vaultadministrator.
This service directory user account will be used in the LDAP configuration that theOracle Key Vault administrator will create. Oracle Key Vault will use this account toperform necessary LDAP actions, such as searches. If this user account changesin the future, then notify the Oracle Key Vault administrator immediately.
5. Obtain the trust certificate for the LDAP directory server and then provide thiscertificate to the Oracle Key Vault administrator.
This certificate will be used in the LDAP configuration that the Oracle Key Vaultadministrator will create.
Chapter 10Configuring the LDAP Directory Server Connection to Oracle Key Vault
10-4
10.3.2 Step 2: Create the LDAP Connection in Oracle Key VaultAn Oracle Key Vault user who has the System Administrator role uses the Oracle Key Vaultmanagement console to create the LDAP connection.
1. Log in to the Oracle Key Vault management console as a user who has the SystemAdministrator role.
2. Select the System tab, then Settings from the left navigation bar.
3. In Network Services, click LDAP to display the Manage LDAP Configuration page.
4. Click Add to display the Add LDAP Configuration page.
5. Enter the following settings:
• Configuration Name: Enter a name for the LDAP configuration. The maximumcharacter length is 120 bytes.
• Directory Type: Ensure that Microsoft Active Directory is selected from this list.
• Service Directory User Name: Enter the service directory user account that theLDAP administrator provided. You can enter this name using any of the followingformats:
– NetBIOS Domain Name\Account Name: For example, global\johndoe
– User principal name: For example, [email protected]
• Service Directory User Password: Enter the password that the LDAP administratorprovided with the service directory user account. If the password changes in theLDAP directory server, you must update it in Oracle Key Vault.
• Hostname: Enter either a host name or an IP address for the Microsoft ActiveDirectory domain controller (server) that will service the client requests.
• LDAPS Port: Enter the port number. 636, the default, is the standard port number forLDAP connections for Secure Sockets Layer (SSL) connections.
• Trusted Certificate: Paste the server trust certificate of the LDAP directory serverthat the LDAP administrator provided.
• Domain Name: This setting is auto-populated when you complete the precedingsettings and click the Get Domain Name button. This is the name of the MicrosoftActive Directory domain of which the specified host (domain controller) is a member.You cannot change this setting.
• Search Base DN: This setting is auto-populated when you complete the precedingsettings and click the Get Domain Name button. It represents a distinguished nameof the search base object, which defines the location in the directory from which theLDAP search begins. This setting is useful for environments where the number ofusers and groups in a directory is very large, and if the users and groups that arerelevant for managing Oracle Key Vault access are placed under this directorycontainer. Setting the base DN to this directory container can help to improveperformance for user and group searches. Optionally, modify this search base.
• Defunct LDAP Users Grace Period (in days): Enter the duration in days after whichthe users deleted in LDAP directory server are automatically deleted from Oracle KeyVault. This value also defines the duration after which the users whose LDAPconfiguration no longer exists are deleted from Oracle Key Vault automatically. Thedefault is 15 days.
Chapter 10Configuring the LDAP Directory Server Connection to Oracle Key Vault
10-5
6. Click Test Connection to ensure that the connection works.
7. Click Add to complete the configuration.
The Manage LDAP Configuration page appears, with the new configuration listedunder LDAP Configuration Name.
Related Topics
• Step 3: Map LDAP Groups to Oracle Key Vault User GroupsAn Oracle Key Vault user who has the Key Administrator role can map LDAPgroups to Oracle Key Vault user groups or administrative roles.
10.3.3 Step 3: Map LDAP Groups to Oracle Key Vault User GroupsAn Oracle Key Vault user who has the Key Administrator role can map LDAP groups toOracle Key Vault user groups or administrative roles.
1. Log in to the Oracle Key Vault management console as a user who has the KeyAdministrator role.
2. Configure the Oracle Key Vault user groups that you want to map to the LDAPgroups.
Ensure that these groups have the appropriate Oracle Key Vault privileges, andthat you understand how privilege grants and revokes work for LDAP users.
3. Select the Users tab, and then Manage LDAP Mappings from the left navigationbar .
4. Click Create to display the Create LDAP Group Mapping page.
5. Enter the following settings:
• Domain: From the list, select the domain that is associated with the LDAPdirectory server configuration for which you want to define the mapping.
• LDAP Group: From the list, select the LDAP group.
• Roles: Optionally, grant the Key Administrator role to the LDAP group.(Remember that you cannot grant a role that is different from the role youcurrently have.)If you want to grant the user the System Administrator or Audit Manager role,then a user who has the Key Administrator role first must create an LDAPgroup mapping (with or without any user group). After the LDAP groupmapping is created, a user with the System Administrator or Audit Managerrole then can edit the existing LDAP group mapping to map it with thecorresponding administrative role.
• Under User Groups, select the Oracle Key Vault user groups that you want tomap to the LDAP group.You can find information about a user group by clicking its Details button.
6. Click Create.
The LDAP Access Mappings page appears, where the new mapping is included inthe list.
7. Define more LDAP group mappings as necessary.
At this stage, the configuration is complete and LDAP users can log in to Oracle KeyVault.
Chapter 10Configuring the LDAP Directory Server Connection to Oracle Key Vault
10-6
Related Topics
• Privilege Grants and Revokes for LDAP UsersLDAP users have limited access to Oracle Key Vault role and privilege grants.
10.4 Logins to Oracle Key Vault as an LDAP UserAn LDAP user who has been properly configured can log in to the Oracle Key Vaultmanagement console.
• About Logins to Oracle Key Vault as an LDAP UserAfter the LDAP directory server configuration with Oracle Key Vault is complete, LDAPusers can log in to Oracle Key Vault if they have valid authorization.
• Logging in to Oracle Key Vault as an LDAP UserAn LDAP user who is a member of an LDAP group that has been mapped to an OracleKey Vault user group or administrative role can log in to the Oracle Key Vaultmanagement console.
10.4.1 About Logins to Oracle Key Vault as an LDAP UserAfter the LDAP directory server configuration with Oracle Key Vault is complete, LDAP userscan log in to Oracle Key Vault if they have valid authorization.
The login is successful if:
• The user provides the correct LDAP credential.
• The user’s LDAP groups from the LDAP directory server map to at least one of theOracle Key Vault user groups or administrative roles.
At the login time, user's authorization is determined based on the LDAP groups of which thisuser is a member. The user is granted administrative roles or privileges of the user groupsthat are mapped to user's LDAP groups. When a user successfully logs into Oracle Key Vaultfor the first time, a new user account is automatically created in Oracle Key Vault. (Ensurethat you understand how privilege grants and revokes work for LDAP users.)
In a multi-master cluster environment, an LDAP user can log in to any node in the cluster.The first time that the LDAP user logs in to a node, a single Oracle Key Vault-generated useraccount is created for this user. This account will apply to all nodes in the cluster.
Valid LDAP users can execute Oracle Key Vault RESTful services commands. Oracle KeyVault RESTful Services Administrator's Guide describes how to use the RESTful services.
Related Topics
• Privilege Grants and Revokes for LDAP UsersLDAP users have limited access to Oracle Key Vault role and privilege grants.
10.4.2 Logging in to Oracle Key Vault as an LDAP UserAn LDAP user who is a member of an LDAP group that has been mapped to an Oracle KeyVault user group or administrative role can log in to the Oracle Key Vault managementconsole.
1. Open a web browser.
2. Connect using an HTTPS connection and the IP address of Oracle Key Vault.
Chapter 10Logins to Oracle Key Vault as an LDAP User
10-7
For example, to log in to a server whose IP address is 192.0.2.254, enter:
https://192.0.2.254
3. After the login screen appears, enter the following credentials:
• Domain: From the list, select the domain of the LDAP user.
• User Name: Enter your user name using one of the following formats:
– NetBIOS Domain Name\Account Name: For example, global\johndoeFor convenience, when a user specifies the user name in the NetBIOSDomain Name or User Principal Name format (described next), thedomain name in the drop-down list is automatically selected based on thepattern matching of the NetBIOS domain name or the domain name of theuser principal name with the names of the configured domains. You canselect the domain manually, as needed. The domain name Local is not anActive Directory domain. The use of the domain Local indicates that theuser account was created locally.
– User principal name: For example, [email protected]
– Login name: For example, johndoe. This name must match thesAMAccountName attribute of the LDAP user account.
• Password: Enter your password.
4. Click Login.
LDAP users who have the appropriate Oracle Key Vault authorization can also executethe Oracle Key Vault RESTful services commands.
Related Topics
• About Managing LDAP UsersThe LDAP user account in Oracle Key Vault is an automatically created accountthat is based on the LDAP user account in the configured LDAP directory server.
• Oracle Key Vault RESTful Services Administrator's Guide
10.5 Managing the LDAP ConfigurationYou can enable, validate, modify, disable, and delete the LDAP configuration.
• Enabling an LDAP ConfigurationA user who has the System Administrator role can enable an LDAP configuration.
• Modifying an LDAP ConfigurationA user who has the System Administrator role can modify an LDAP configuration.
• Testing an LDAP ConfigurationA user who has the System Administrator role can test an LDAP configuration.
• Disabling an LDAP ConfigurationA user who has the System Administrator role can disable an LDAP configuration.
• Deleting an LDAP ConfigurationA user who has the System Administrator role can delete an LDAP configuration.
Chapter 10Managing the LDAP Configuration
10-8
10.5.1 Enabling an LDAP ConfigurationA user who has the System Administrator role can enable an LDAP configuration.
An LDAP configuration is effective only when it has been enabled. By default, after an LDAPconfiguration is created, it is enabled. In a multi-master cluster environment, the enablementof an LDAP configuration apply to all nodes in the cluster and can be performed in any node.
1. Log in to the Oracle Key Vault management console as a user who has the SystemAdministrator role.
2. Select the System tab, then Settings from the left navigation bar.
3. In Network Services, click LDAP to display the Manage LDAP Configuration page.
4. Select the check box for the LDAP configuration and then click the Enable button.
5. In the confirmation window, click OK.
10.5.2 Modifying an LDAP ConfigurationA user who has the System Administrator role can modify an LDAP configuration.
In a multi-master cluster environment, changes to an LDAP configuration apply to all nodes inthe cluster and can be performed in any node. However, be aware that a node-specific hostconfiguration takes precedence over cluster-wide host configuration.
1. Log in to the Oracle Key Vault management console as a user who has the SystemAdministrator role.
2. Select the System tab, then Settings from the left navigation bar.
3. In Network Services, click LDAP to display the Manage LDAP Configuration page.
4. Select the LDAP configuration name to display the Edit LDAP Configuration page.
5. Modify the following settings as necessary:
• Configuration Name: Update the name of the configuration.
• Service Directory User Name: Update the service directory user name.
• Service Directory User Password: Update the service directory user's password.
• Trusted Certificate: Paste a different server trust certificate.
• Search Base DN: Update the base DN that is used for searching users and groups
• Defunct LDAP Users Grace Period (in days): Enter a new grace period value. Thedefault is 15.
• Under Servers, do the following:
– To add a new server, click Add and then provide the Hostname, Port, andService Directory User Password. To test the connection, click Test Server.Then click Add. You can only select a server that is in the same domain as thecurrent server.
– To remove a server, select its check box and then click Delete.
6. Click Test Connection(s) to ensure that the new configuration settings work.
7. Click Save.
Chapter 10Managing the LDAP Configuration
10-9
10.5.3 Testing an LDAP ConfigurationA user who has the System Administrator role can test an LDAP configuration.
In a multi-master cluster environment, you can test the LDAP configuration from anynode in the cluster. The test connection validates the connection to LDAP hosts thatare effective for the current cluster node. If node-specific LDAP hosts are configured,then the connection to those hosts is validated.
1. Log in to the Oracle Key Vault management console as a user who has theSystem Administrator role.
2. Select the System tab, then Settings from the left navigation bar.
3. In Network Services, click LDAP to display the Manage LDAP Configuration page.
4. Select the LDAP configuration name to display the Edit LDAP Configuration page.
5. Click Test Connection(s).
10.5.4 Disabling an LDAP ConfigurationA user who has the System Administrator role can disable an LDAP configuration.
Disabling an LDAP configuration effectively makes the configuration unavailable foruse. Users from the disabled LDAP configuration are denied access when they try tolog in into Oracle Key Vault. However, disabling an LDAP configuration does not affectusers who are currently logged in using the configuration. In a multi-master clusterenvironment, the disablement of an LDAP configuration applies to all nodes in thecluster and can be performed in any node.
1. Log in to the Oracle Key Vault management console as a user who has theSystem Administrator role.
2. Select the System tab, then Settings from the left navigation bar.
3. In Network Services, click LDAP to display the Manage LDAP Configuration page.
4. Select the check boxes for the configurations to disable, and then click Disable.
5. In the confirmation window, click OK.
10.5.5 Deleting an LDAP ConfigurationA user who has the System Administrator role can delete an LDAP configuration.
In a multi-master cluster environment, the deletion of an LDAP configuration applies toall nodes in the cluster and can be performed from any node. However, deleting anLDAP configuration does not log out users who are currently logged in using theconfiguration.
1. Log in to the Oracle Key Vault management console as a user who has theSystem Administrator role.
2. Select the System tab, then Settings from the left navigation bar.
3. In Network Services, click LDAP to display the Manage LDAP Configuration page.
4. Select the check boxes for the LDAP configurations that you want to delete andthen click one of the following buttons:
Chapter 10Managing the LDAP Configuration
10-10
• Click Delete if there are no mappings defined in Oracle Key Vault for any LDAPgroups associated with the LDAP configuration.
• Click Force Delete if there are group mappings defined for this LDAP configuration.You must have both the System Administrator and Key Administrator role to performthis operation. Otherwise, first delete all LDAP group mappings defined for the LDAPconfiguration before a user with the System Administrator role deletes the LDAPconfiguration.
5. In the confirmation window, select OK.
When you delete an LDAP configuration, the associated LDAP user accounts are not deletedimmediately. Oracle Key Vault deletes these accounts after number of days that werespecified in the Defunct LDAP Users Grace Period setting in the Edit LDAP Configurationpage have passed. You can delete an LDAP user account any time. If you recreate theidentical LDAP configuration before associated LDAP user accounts are deleted, then OracleKey Vault will make these user accounts valid again.
10.6 Managing LDAP GroupsYou can modify or delete LDAP group mappings.
• About Managing LDAP GroupsThe LDAP group can be mapped to Oracle Key Vault administrator roles and one or moreuser groups.
• Modifying an LDAP Group MappingYou can modify the mappings for an LDAP group after you have configured the LDAPconnection.
• Validating LDAP Group MappingsIn the event that LDAP groups change in the LDAP directory server, a user who has theKey Administrator role can validate their mappings in Oracle Key Vault.
• Deleting LDAP Group MappingsA user who has the Key Administrator role can delete one or more LDAP groups andassociated mappings from Oracle Key Vault.
10.6.1 About Managing LDAP GroupsThe LDAP group can be mapped to Oracle Key Vault administrator roles and one or moreuser groups.
A user with the Oracle Key Vault administrator role can modify an LDAP group’s mappingwith the Oracle Key Vault administrator roles or user groups depending upon the type ofadministrator role the user has. This user, however, cannot modify an LDAP group in theLDAP directory server. If an LDAP group mapping changes, then the authorization of theusers who are members of the LDAP group changes as well.
Local Oracle Key Vault users cannot be members of an LDAP group.
10.6.2 Modifying an LDAP Group MappingYou can modify the mappings for an LDAP group after you have configured the LDAPconnection.
Chapter 10Managing LDAP Groups
10-11
1. Log in to the Oracle Key Vault management console as a user who has the rolethat is required for the privileges that must be granted to the LDAP users.
A user with the Key Administrator role can modify all of the mapping information.Users who have the System Administrator or Audit Manager role can see the basicinformation and only modify role assignments for the group, depending on whattheir own role is. For example, a System Administrator can grant or revoke onlythe System Administrator role.
2. Select the Users tab, then Manage LDAP Mappings from the left navigation bar.
3. Under LDAP Group Mappings, find the LDAP group whose privileges you want tochange.
4. Select the Edit button for this LDAP group to display.
5. Under Roles, select from the available roles.
• Audit Manager
• Key Administrator
• System Administrator
You cannot grant endpoint privileges to LDAP users.
6. Under User Groups, select from the available Oracle Key Vault user groups toassociate with this LDAP group.
7. To remove an Oracle Key Vault user group from the mapping, select it from theUser Groups Mapped list and then click Remove User Groups.
8. Optionally, select the Details button of the Oracle Key Vault group to modify theuser group's settings and privileges.
9. Click Save.
Oracle Key Vault determines the LDAP user’s authorization for the current sessiononly at the login time. During the login process, Oracle Key Vault fetches the user'sLDAP groups from the LDAP directory server and then determines the mapped OracleKey Vault administrative roles and user groups for the current session. Any changes tothe user's membership in the LDAP groups or changes to the mapping between theuser’s LDAP groups and Oracle Key Vault user groups or administrative roles do notaffect user’s authorization for existing sessions. Note, however, that any changes tothe privileges that are granted to the Oracle Key Vault user groups take effectimmediately and apply to all existing sessions.
10.6.3 Validating LDAP Group MappingsIn the event that LDAP groups change in the LDAP directory server, a user who hasthe Key Administrator role can validate their mappings in Oracle Key Vault.
In a multi-master cluster environment, the validation of an LDAP group mappingapplies to all nodes in the cluster and can be performed in any node.
1. Log in to the Oracle Key Vault management console as a user who has the KeyAdministrator role.
2. Select the Users tab, then Manage LDAP Mappings from the left navigation bar.
3. Under LDAP Group Mappings, select the check boxes for the group mappings thatyou want to validate.
4. Select the Validate button.
Chapter 10Managing LDAP Groups
10-12
5. In the confirmation window, click OK.
10.6.4 Deleting LDAP Group MappingsA user who has the Key Administrator role can delete one or more LDAP groups andassociated mappings from Oracle Key Vault.
In a multi-master cluster environment, the LDAP group mapping deletion applies to all nodesin the cluster and can be performed in any node.
1. Log in to the Oracle Key Vault management console as a user who has the KeyAdministrator role.
2. Select the Users tab, then Manage LDAP Mappings from the left navigation bar.
3. In the LDAP Group Mappings page, select the check boxes for the LDAP groups that youwant to delete.
4. Click Delete.
5. In the confirmation window, click OK.
10.7 Managing Oracle Key Vault-Generated LDAP UsersYou cannot administer the actual LDAP user account in the LDAP directory server but youcan administer the Oracle Key Vault-generated user account that is created the first time theLDAP user logs in to Oracle Key Vault.
• About Managing LDAP UsersThe LDAP user account in Oracle Key Vault is an automatically created account that isbased on the LDAP user account in the configured LDAP directory server.
• Finding Information About an Oracle Key Vault-Generated LDAP UserYou can find information about the Oracle Key Vault-generated LDAP user accounts.
• Validation of Oracle Key Vault-Generated LDAP UsersYou can find if an LDAP user account that is associated with the Oracle Key Vault-generated LDAP user account is a valid account.
• Modifying an Oracle Key Vault-Generated LDAP User Account Wallet PrivilegesUsers who have either the Key Administrator role or regular users who have privileges tomanage wallets can modify the wallet privileges of Oracle Key Vault-generated LDAPuser account.
• Deleting Oracle Key Vault-Generated LDAP UsersA user who has the System Administrator role can delete an LDAP user account fromOracle Key Vault.
10.7.1 About Managing LDAP UsersThe LDAP user account in Oracle Key Vault is an automatically created account that is basedon the LDAP user account in the configured LDAP directory server.
Oracle Key Vault creates this account the first time that the LDAP user logs in to Oracle KeyVault, capturing the first name, last name, and email attributes of the user. These valuescannot be changed in Oracle Key Vault; they can only be changed in their LDAP directoryserver corresponding account by a privileged LDAP administrator. If these values change,then Oracle Key Vault updates the user account with these values the next time the LDAPuser logs in to Oracle Key Vault. Except for granting and revoking wallet privileges to and
Chapter 10Managing Oracle Key Vault-Generated LDAP Users
10-13
from this user from Oracle Key Vault, the Oracle Key Vault administrator cannot makeany changes to this account.
In a multi-master cluster environment, there is no need for user name conflictresolution because the uniqueness of the account is guaranteed by the LDAP directoryserver where the LDAP user account exists. If the LDAP user logs in to different nodesin the cluster, then an identical user account is created, and this account is uniformacross the cluster. Each of these account creations is timestamped. The Oracle KeyVault synchronization process keeps the most recent account creation timestampvalue (that is, from the node where this user was created last). Hence, throughout thecluster environment, the timestamp value is the same as the most recent user accountcreation timestamp.
10.7.2 Finding Information About an Oracle Key Vault-GeneratedLDAP User
You can find information about the Oracle Key Vault-generated LDAP user accounts.
You cannot change the LDAP user account in Oracle Key Vault; instead you mustmodify the account in the LDAP directory server where the user account exists. If youwant to move the user to a different LDAP group, you must do this in the LDAPdirectory server.
1. Log in to the Oracle Key Vault management console as a user who has theSystem Administrator, Key Administrator, or Audit Manager role.
2. Select the Users tab, and then Manage Users from the left navigation bar.
3. In the Manage Users page, scroll down to the Manage LDAP Users section.
You can find the following information:
• The user's distinguished name (DN)
• The user's full name
• The name of the LDAP configuration
• The domain name for the user account
• Oracle Key Vault roles to which the user has been granted through the LDAPgroup
• Mapped groups for the user
• The effective membership of an LDAP user in Oracle Key Vault user groups
• The user's access to wallets
10.7.3 Validation of Oracle Key Vault-Generated LDAP UsersYou can find if an LDAP user account that is associated with the Oracle Key Vault-generated LDAP user account is a valid account.
• About the Validation of Oracle Key Vault-Generated LDAP UsersAn Oracle Key Vault-generated user account still exists in Oracle Key Vault if theLDAP user account has been deleted in the source LDAP directory server.
Chapter 10Managing Oracle Key Vault-Generated LDAP Users
10-14
• Validating Oracle Key Vault-Generated LDAP UsersA user who has the System Administrator role can manually validate Oracle Key Vault-Generated LDAP users.
10.7.3.1 About the Validation of Oracle Key Vault-Generated LDAP UsersAn Oracle Key Vault-generated user account still exists in Oracle Key Vault if the LDAP useraccount has been deleted in the source LDAP directory server.
A user who has the System Administrator role can find if the Oracle Key Vault-generated useraccount still exists in the source LDAP directory server by validating it in Oracle Key Vault. Ina multi-master cluster environment, the validation of an Oracle Key Vault-Generated LDAPuser account applies to all nodes in the cluster.
Oracle Key Vault periodically checks the validity of the LDAP user accounts and marks themas NOT FOUND if the following events take place:
• The LDAP user account does not exist in the LDAP directory server.
• The LDAP configuration that is associated with the LDAP user account is deleted.
Oracle Key Vault automatically deletes invalid LDAP user accounts after the number of daysconfigured in the Defunct LDAP Users Grace Period setting (in the Edit LDAP Configurationpage) have passed. You can delete an LDAP user account from Oracle Key Vault any time.
10.7.3.2 Validating Oracle Key Vault-Generated LDAP UsersA user who has the System Administrator role can manually validate Oracle Key Vault-Generated LDAP users.
1. Log in to the Oracle Key Vault management console as a user who has the SystemAdministrator role.
2. Select the Users tab, then Manage Users from the left navigation bar.
3. In the Manage Users page, scroll down to the Manage LDAP Users section.
4. Select the check box of the LDAP users that you want to validate.
5. Click Validate.
If an LDAP account is not valid, then a NOT FOUND message appears.
10.7.4 Modifying an Oracle Key Vault-Generated LDAP User AccountWallet Privileges
Users who have either the Key Administrator role or regular users who have privileges tomanage wallets can modify the wallet privileges of Oracle Key Vault-generated LDAP useraccount.
• About Modifying an Oracle Key Vault-Generated LDAP User Account Wallet PrivilegesThe wallet privileges that you can change are Read Only, Read and Modify, or ManageWallet.
• Modifying an Oracle Key Vault-Generated LDAP User Account Wallet Privileges (KeyAdministrators)A user who has the Key Administrator role can grant and revoke wallet privileges for anywallet to LDAP users in Oracle Key Vault.
Chapter 10Managing Oracle Key Vault-Generated LDAP Users
10-15
• Modifying an Oracle Key Vault-Generated LDAP User Account Wallet Privileges(Regular Users)A regular user who has privileges to manage wallets can grant and revokeprivileges for these wallets to LDAP users in Oracle Key Vault.
10.7.4.1 About Modifying an Oracle Key Vault-Generated LDAP User AccountWallet Privileges
The wallet privileges that you can change are Read Only, Read and Modify, or ManageWallet.
You cannot change the corresponding LDAP account in the LDAP directory, but youcan change the wallet privileges of the Oracle Key Vault-generated LDAP useraccount. Changes to the privileges granted directly to the LDAP user account inOracle Key Vault are applied immediately, even to the existing sessions of the sameuser. If the LDAP user account is modified on the LDAP server (such as a change inLDAP group membership of the user), then the changes take effect from the next userlogin. In a multi-master cluster environment, changes to an LDAP user apply to allnodes in the cluster and can be performed in any node.
10.7.4.2 Modifying an Oracle Key Vault-Generated LDAP User Account WalletPrivileges (Key Administrators)
A user who has the Key Administrator role can grant and revoke wallet privileges forany wallet to LDAP users in Oracle Key Vault.
1. Log in to the Oracle Key Vault management console as a user who has the KeyAdministrator role.
2. Select the Users tab, then Manage Users from the left navigation bar.
3. Under Manage Users, scroll down to the Manage LDAP Users section.
4. Select the name of the LDAP user account to display the LDAP User Details page.
5. In the Access to Wallets pane, do the following:
a. Click Add to display the Add Access to User page.
b. Under Select Wallet, select the wallets to which you want to grant privileges tothe LDAP user.
c. Under Select Access Level, select Read Only, Read and Modify, or ManageWallet.
d. Click Save.
The wallet privilege is added as a direct privilege for this user, as opposed to awallet privilege that is available through an LDAP group. If the user alreadyhas a wallet privilege from the LDAP group to which they are assigned, thenthe user has a union of the privileges from both the direct privilege grant andthe LDAP group privilege grant.
6. Click Save.
Chapter 10Managing Oracle Key Vault-Generated LDAP Users
10-16
10.7.4.3 Modifying an Oracle Key Vault-Generated LDAP User Account WalletPrivileges (Regular Users)
A regular user who has privileges to manage wallets can grant and revoke privileges forthese wallets to LDAP users in Oracle Key Vault.
1. Log in to the Oracle Key Vault management console as a user who has privileges tomanage wallets.
2. Select the Keys & Wallets tab, and then Wallets from the left navigation bar.
The Wallets page lists the wallets for which this user has privileges.
3. Select the Edit icon for the wallet whose privileges you want to modify.
The Wallet Access Settings area lists all the users who have privileges for this wallet.
4. In the Wallet Access Settings area, click Add.
5. In the Add Access to Wallets page, under Select Endpoint/User Group, select Users fromthe Type menu.
6. Select the check boxes for the user to whom you want to grant privileges.
7. In the Select Access Level area, select Read Only, Read and Modify, or ManageWallet.
8. Click Save.
The wallet privilege is added as a direct privilege for this user, as opposed to a walletprivilege that is available through an LDAP group. If the user already has a walletprivilege from the LDAP group to which they are assigned, then the user has a union ofthe privileges from both the direct privilege grant and the LDAP group privilege grant.
10.7.5 Deleting Oracle Key Vault-Generated LDAP UsersA user who has the System Administrator role can delete an LDAP user account from OracleKey Vault.
If an LDAP user account is deleted from the LDAP directory server, during a periodic check,Oracle Key Vault automatically first marks such user accounts as invalid (NOT FOUND) andthen deletes these accounts after the Defunct LDAP Users Grace Period setting (on theEdit LDAP Configuration page) passes.
If you inadvertently delete an Oracle Key Vault-generated LDAP user account, then the nexttime the user logs in, the account is recreated. However, the user would no longer own anyobjects that they created before the deletion. In a multi-master cluster environment, theremoval of an Oracle Key Vault-Generated LDAP user account applies to all nodes in thecluster and can be performed in any node.
1. Log in to the Oracle Key Vault management console as a user who has the KeyAdministrator role.
2. Select the Users tab, then Manage Users from the left navigation bar.
3. In the Manage Users page, scroll down to the Manage LDAP Users section.
4. Select the check box of the LDAP users that you want to remove.
5. Click Delete.
6. In the confirmation window, click OK.
Chapter 10Managing Oracle Key Vault-Generated LDAP Users
10-17

The user account is deleted immediately.
Chapter 10Managing Oracle Key Vault-Generated LDAP Users
10-18
11Managing Oracle Key Vault Virtual Walletsand Security Objects
You can create a virtual wallet to store security objects, and then share this wallet with trustedpeers at different access levels.
• Managing Virtual WalletsA virtual wallet is a container for security objects that you can create and then grantaccess to users.
• Managing Access to Virtual Wallets from Keys and Wallets TabYou can grant virtual wallet access to and revoke virtual wallet access from endpoint byusing the Keys and Wallets tab.
• Managing Access to Virtual Wallets from User’s MenuTo manage access control on virtual wallets for users, endpoints, and their respectivegroups, you can use the Users menu or Endpoints menu.
• Managing the State of a Key or a Security ObjectYou can set the date to activate or deactivate keys or security objects, and change thestate of some virtual wallet security objects.
• Managing Details of Security ObjectsYou can manage details about security objects, such as find details about these objectsand modifying these details.
11.1 Managing Virtual WalletsA virtual wallet is a container for security objects that you can create and then grant access tousers.
• About Virtual WalletsA virtual wallet is a container for security objects.
• Creating a Virtual WalletYou can create a virtual wallet and add security objects to it at the same time.
• Modifying a Virtual WalletYou can modify a virtual wallet and add security objects to it at the same time.
• Adding Security Objects to a Virtual WalletYou can add new security objects to a virtual wallet at any time as needed.
• Removing Security Objects from a Virtual WalletYou cannot remove security objects from virtual wallets at any time as needed.
• Deleting a Virtual WalletDeleting a virtual wallet removes the wallet as a container, but does not delete thesecurity objects that were contained in it.
11-1
11.1.1 About Virtual WalletsA virtual wallet is a container for security objects.
These security objects can be public and private encryption keys, includingTransparent Data Encryption (TDE) keystores, Oracle wallets, Java keystores,certificates, secret data, and credential files. You can use a virtual wallet to groupsecurity objects for sharing with multiple users who need them to access encrypteddata.
Any user can create a virtual wallet. After you create a virtual wallet, you can add keysand other security objects to the wallet. You can then grant other users, endpoints,user groups, and endpoint groups access to the virtual wallet at various levels ofaccess. You can modify a virtual wallet and its wallet contents at any time. You canalso modify virtual wallet user lists and their respective access level.
Other than the Key Administrator, access to the virtual wallet must be granted explicitlyto users. Read, modify, and manage wallet permissions are required to add andremove objects from the wallet, and to grant or modify wallet access to other usersand groups.
11.1.2 Creating a Virtual WalletYou can create a virtual wallet and add security objects to it at the same time.
However, you can also create an empty virtual wallet, and add security objects to itlater. You can modify access mappings on a virtual wallet at any time.
1. Log in to the Oracle Key Vault management console as a user with the KeyAdministrator role.
2. Select the Keys & Wallets tab, then Wallets in the left navigation bar.
3. In the Wallets page, click Create.
The Create Wallet page appears.
Chapter 11Managing Virtual Wallets
11-2
4. Enter a name for the wallet in the Name field and an identifying description inDescription.
See Naming Guidelines for Objects.
5. If you are using a multi-master cluster, then choose whether to select the Make Uniquecheck box.
Make Unique helps to control naming conflicts with virtual wallet names across the multi-master cluster environment. Virtual wallets that were created before an Oracle Key Vaultconversion to a cluster node are not affected by naming conflicts.
• If you select Make Unique, then the virtual wallet will be active immediately and thiswallet can be used in operations.
• If you do not select Make Unique, then the wallet will be created in the PENDINGstate. Oracle Key Vault will then begin a name resolution operation and may renamethe wallet to a name that is unique across the cluster. If there is a naming collision,then the collision will be reported on the Conflicts page on any node in the cluster.The wallet will then be renamed to a unique name. You will need to go to a read-writenode of the cluster and either accept the renamed wallet name or change the walletname. If you change the wallet name, then this will restart the name resolutionoperation and the wallet will return to a PENDING state. A wallet in the PENDING statecannot be used to perform most operations.
6. In the Add Wallet Contents pane, check the boxes by the names of the listed securityobjects that you want to add to the wallet.
The Add Wallet Contents pane lists the security objects you have Read and Modifyaccess to. If the list is empty, then you have no access to the security objects already inOracle Key Vault. In this case, you would add security objects to the wallet after youupload them to Oracle Key Vault.
You can modify the columns in the table in the Wallet Contents pane to show moreinformation. From the Actions menu, select Select Columns. In the Select Columns
Chapter 11Managing Virtual Wallets
11-3
dialog box, move the columns that you want to see to the Display in Report list,and then click Apply.
7. Click Save to create the new wallet with any associated security objects.
A Wallet created successfully message appears. The Wallets page appears anddisplays the new wallet in the list.
To see the contents in the wallet click the wallet name as the following figureshows.
Related Topics
• Name Conflict Resolution in a Multi-Master ClusterNaming conflicts can arise when an object has the same name as another objectin a different node.
11.1.3 Modifying a Virtual WalletYou can modify a virtual wallet and add security objects to it at the same time.
1. Log in to the Oracle Key Vault management console as a user with the KeyAdministrator role.
2. Select the Keys & Wallets tab, then Wallets in the left navigation bar.
3. In the Wallets page, click the Edit button for the wallet that you want to modify.
4. In the Wallet Overview pane, enter a new name for the wallet in the Name fieldand an identifying description in Description.
See Naming Guidelines for Objects.
5. If you are using a multi-master cluster, then choose whether to select the MakeUnique check box.
Chapter 11Managing Virtual Wallets
11-4
Make Unique helps to control naming conflicts with virtual wallet names across the multi-master cluster environment. Virtual wallets that were created before an Oracle Key Vaultconversion to a cluster node are not affected by naming conflicts.
• If you select Make Unique, then the virtual wallet will be active immediately and thiswallet can be used in operations.
• If you do not select Make Unique, then the wallet will be created in the PENDINGstate. Oracle Key Vault will then begin a name resolution operation and may renamethe wallet to a name that is unique across the cluster. If there is a naming collision,then the collision will be reported on the Conflicts page on any node in the cluster.The wallet will then be renamed to a unique name. You will need to go to a read-writenode of the cluster and either accept the renamed wallet name or change the walletname. If you change the wallet name, then this will restart the name resolutionoperation and the wallet will return to a PENDING state. A wallet in the PENDING statecannot be used to perform most operations.
6. To modify endpoint access settings, in the Wallet Access Settings pane, click Add to addnew endpoints or click Remove to remove existing endpoints.
7. In the Wallet Contents pane, check the boxes by the names of the listed security objectsthat you want to add to or remove to the wallet.
The Wallet Contents pane lists the security objects you have Read and Modify accessto. If the list is empty, then you have no access to the security objects already in OracleKey Vault. In this case, you would add security objects to the wallet after you upload themto Oracle Key Vault.
You can modify the columns in the table in the Wallet Contents pane to show moreinformation. From the Actions menu, select Select Columns. In the Select Columnsdialog box, move the columns that you want to see to the Display in Report list, and thenclick Apply.
Select Add Items or Remove Items.
8. Click Save to create the new wallet with any associated security objects.
9. To view the status of the modified wallet, click Wallets in the left navigation bar.
The Wallets page appears and displays the modified wallet in the list, with the status ofPENDING.
Related Topics
• Name Conflict Resolution in a Multi-Master ClusterNaming conflicts can arise when an object has the same name as another object in adifferent node.
11.1.4 Adding Security Objects to a Virtual WalletYou can add new security objects to a virtual wallet at any time as needed.
In a multi-master cluster, you cannot add security objects to a virtual wallet when it is in thePENDING state.
1. Log in to the Oracle Key Vault management console as a user who has the ManageWallet access on the virtual wallet or as a user with the Key Administrator role.
2. Select the Keys & Wallets tab, then Wallets in the left navigation bar.
3. In the Wallets page, click the pencil icon in the Edit column corresponding to the walletyou want to work with.
Chapter 11Managing Virtual Wallets
11-5
The Wallet Overview page appears. The Wallet Contents pane lists the securityobjects already in the wallet.
4. In the Wallet Contents pane, click Add Objects to display the Add Wallet Contentspane.
The Add Wallet Contents pane lists the security objects you have Read andModify access to. If the list is empty, then you have no access to the securityobjects already in Oracle Key Vault. In this case, you would add security objects tothe wallet after you upload them to Oracle Key Vault.
You can modify the columns in the table in the Wallet Contents pane to show moreinformation. From the Actions menu, select Select Columns. In the SelectColumns dialog box, move the columns that you want to see to the Display inReport list, and then click Apply.
5. Check the boxes by the security objects that you want to add to the wallet.
6. Click Save.
A confirmation message appears, then the Wallet Overview page appears. WalletContents lists the new security objects added.
11.1.5 Removing Security Objects from a Virtual WalletYou cannot remove security objects from virtual wallets at any time as needed.
In a multi-master cluster, you can remove security objects from a virtual wallet when itis in the PENDING state.
1. Log in to the Oracle Key Vault management console as a user who has theManage Wallet access on the virtual wallet or as a user with the Key Administratorrole.
2. Select the Keys & Wallets tab, then Wallets in the left navigation bar.
3. In the Wallets pane, click the pencil icon in the Edit column corresponding to thewallet that you want to work with.
The Wallet Overview page appears. The Wallet Contents pane lists the securityobjects already in the wallet.
4. Check the boxes by the security objects you want to remove from the wallet.
5. Click Remove Objects.
The Wallet Contents pane in the Wallet Overview page displays the revised list.
11.1.6 Deleting a Virtual WalletDeleting a virtual wallet removes the wallet as a container, but does not delete thesecurity objects that were contained in it.
These security objects will continue to remain in Oracle Key Vault. Endpoints that havedownloaded this virtual wallet will continue to retain their local copy. In a multi-mastercluster, you cannot delete a virtual wallet when it is in the PENDING state.
1. Log in to the Oracle Key Vault management console as a user who has theManage Wallet access on the virtual wallet, or as a user with the Key Administratorrole.
2. Select the Keys & Wallets tab, then Wallets in the left navigation bar.
Chapter 11Managing Virtual Wallets
11-6
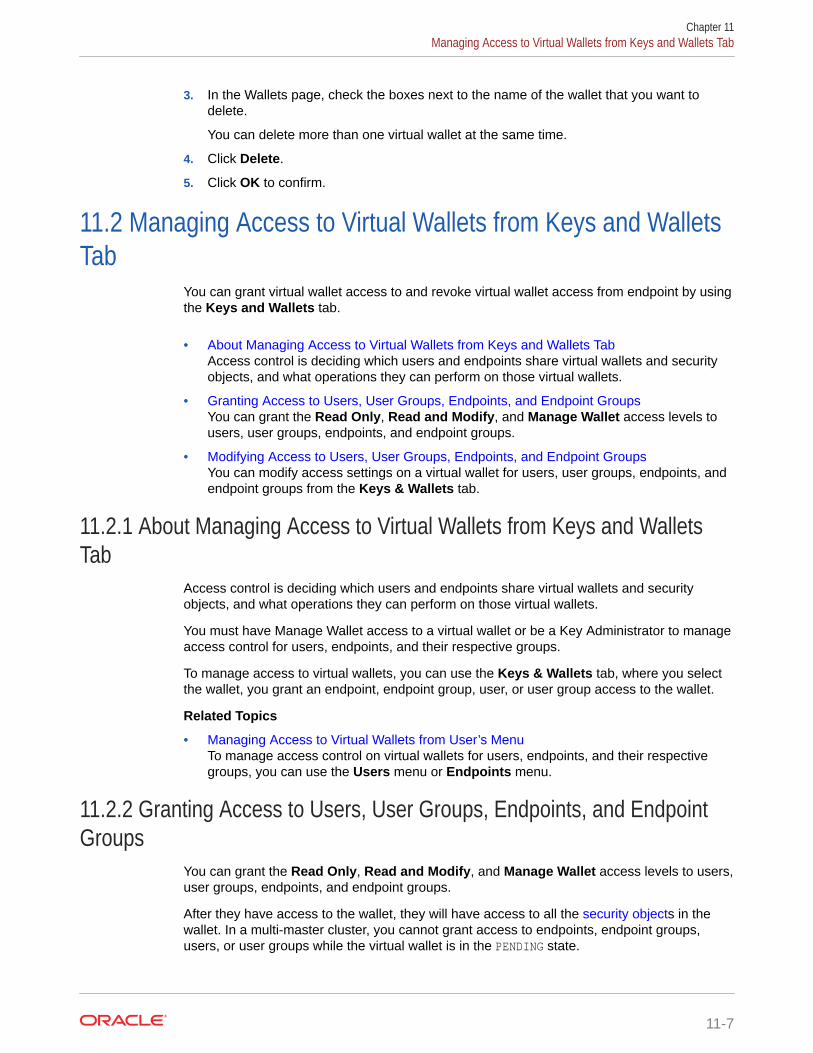
3. In the Wallets page, check the boxes next to the name of the wallet that you want todelete.
You can delete more than one virtual wallet at the same time.
4. Click Delete.
5. Click OK to confirm.
11.2 Managing Access to Virtual Wallets from Keys and WalletsTab
You can grant virtual wallet access to and revoke virtual wallet access from endpoint by usingthe Keys and Wallets tab.
• About Managing Access to Virtual Wallets from Keys and Wallets TabAccess control is deciding which users and endpoints share virtual wallets and securityobjects, and what operations they can perform on those virtual wallets.
• Granting Access to Users, User Groups, Endpoints, and Endpoint GroupsYou can grant the Read Only, Read and Modify, and Manage Wallet access levels tousers, user groups, endpoints, and endpoint groups.
• Modifying Access to Users, User Groups, Endpoints, and Endpoint GroupsYou can modify access settings on a virtual wallet for users, user groups, endpoints, andendpoint groups from the Keys & Wallets tab.
11.2.1 About Managing Access to Virtual Wallets from Keys and WalletsTab
Access control is deciding which users and endpoints share virtual wallets and securityobjects, and what operations they can perform on those virtual wallets.
You must have Manage Wallet access to a virtual wallet or be a Key Administrator to manageaccess control for users, endpoints, and their respective groups.
To manage access to virtual wallets, you can use the Keys & Wallets tab, where you selectthe wallet, you grant an endpoint, endpoint group, user, or user group access to the wallet.
Related Topics
• Managing Access to Virtual Wallets from User’s MenuTo manage access control on virtual wallets for users, endpoints, and their respectivegroups, you can use the Users menu or Endpoints menu.
11.2.2 Granting Access to Users, User Groups, Endpoints, and EndpointGroups
You can grant the Read Only, Read and Modify, and Manage Wallet access levels to users,user groups, endpoints, and endpoint groups.
After they have access to the wallet, they will have access to all the security objects in thewallet. In a multi-master cluster, you cannot grant access to endpoints, endpoint groups,users, or user groups while the virtual wallet is in the PENDING state.
Chapter 11Managing Access to Virtual Wallets from Keys and Wallets Tab
11-7
1. Log in to the Oracle Key Vault management console as a user who has theManage Wallet access on the virtual wallet, or as a user with the KeyAdministrator role.
2. Select the Keys & Wallets tab, then Wallets in the left navigation bar.
3. In the Wallets pane, click the pencil icon in the Edit column corresponding to thewallet to which you want to grant access.
The Wallet Overview page appears.
4. In the Wallet Access Settings pane, click Add.
The Add Access to Wallet page appears.
5. In the Add Access to Wallet page, under Select Endpoint/User Group, from theType menu, select the entity type you want to grant access.
Possible values for Type are Endpoint Groups, Endpoints, User Groups, andUsers.The type you select determines the list that is displayed. For example, if you selectEndpoint Groups as the Type, the list of Oracle Key Vault endpoint groups isdisplayed under the heading Endpoint Groups. If you select Users, the list ofOracle Key Vault users are displayed under the heading Users.
6. Select the check box in the Name table corresponding to the entity you want togrant access.
7. In the Select Access Level pane, select one of the following access levels: in theSelect Access Level pane.
• Read Only or Read and Modify
• Manage Wallet
8. Click Save.
The Wallet Access Settings pane displays the new entity.
Chapter 11Managing Access to Virtual Wallets from Keys and Wallets Tab
11-8
11.2.3 Modifying Access to Users, User Groups, Endpoints, and EndpointGroups
You can modify access settings on a virtual wallet for users, user groups, endpoints, andendpoint groups from the Keys & Wallets tab.
In a multi-master cluster, you cannot modify access to endpoints, endpoint groups, users, oruser groups while the virtual wallet is in the PENDING state.
1. Log in to the Oracle Key Vault management console as a user who has the ManageWallet permission on the virtual wallet or as a user with the Key Administrator role.
2. Select the Keys & Wallets tab, then Wallets in the left navigation bar.
3. In the Wallets pane, click the pencil icon in the Edit column corresponding to the walletname.
The Wallet Overview page appears, with Wallet Access Settings listing the entities thathave access to the wallet and their access levels.
4. In Wallet Access Settings, click the pencil icon corresponding to the entity under SubjectName.
A Modify Access window appears. Wallet Access Settings lists all the entities that haveaccess to this wallet under Subject Name, and can include users, endpoints, user groups,and endpoint groups.
5. Select the access settings that you want to modify, then click Save.
A message appears: Successfully updated. The Wallet Overview page appears andWallet Access Settings displays the new access mapping for the entity.
6. Click Save in the Wallet Overview page.
11.3 Managing Access to Virtual Wallets from User’s MenuTo manage access control on virtual wallets for users, endpoints, and their respective groups,you can use the Users menu or Endpoints menu.
• Granting a User Access to a Virtual WalletYou can grant access to a virtual wallet by using the Users tab.
• Revoking User Access from a Virtual WalletYou can revoke access to a virtual wallet for a user by using the Users tab.
• Granting a User Group Access to a Virtual WalletYou can grant user group access to a virtual wallet by using the Users tab.
• Revoking User Group Access from a Virtual WalletYou can remove user group access to a virtual wallet by using the Users tab.
Related Topics
• Managing Endpoint Access to a Virtual WalletYou can grant an endpoint access to a virtual wallet, and revoke or modify access when itis no longer necessary.
Chapter 11Managing Access to Virtual Wallets from User’s Menu
11-9

• Managing Access to Virtual Wallets from Keys and Wallets TabYou can grant virtual wallet access to and revoke virtual wallet access fromendpoint by using the Keys and Wallets tab.
11.3.1 Granting a User Access to a Virtual WalletYou can grant access to a virtual wallet by using the Users tab.
In a multi-master cluster, you cannot grant a user access to a virtual wallet while thevirtual wallet is in the PENDING state.
1. Log in to the Oracle Key Vault management console as a user who has theManage Wallet permission on the virtual wallet, or as a user with the KeyAdministrator role.
2. Select the Users tab, then Manage Users in the left navigation bar.
3. In the Manage Users pane, click the user's name in the User Name column.
4. In the Access to Wallets pane, click Add.
The Add Access to User page appears.
5. Select a virtual wallet from the available list.
6. In the Select Access Level pane select the desired access levels.
7. Click Save.
A message appears: Access mapping successfully added. You can checkAccess to Wallets in User Details for the user to see the wallet added.
Related Topics
• Access Control Options
11.3.2 Revoking User Access from a Virtual WalletYou can revoke access to a virtual wallet for a user by using the Users tab.
In a multi-master cluster, you cannot revoke user access from a virtual wallet while thevirtual wallet is in the PENDING state.
1. Log in to the Oracle Key Vault management console as a user who has theManage Wallet access on the virtual wallet, or as a user with the Key Administratorrole.
2. Select the Users tab, then Manage Users in the left navigation bar.
3. In the Manage Users pane, click the user's name under the User Name column.
4. In the Access to Wallets pane, check the box by the virtual wallet that you want torevoke access to.
5. Click Remove.
6. In the confirmation window, click OK.
A message appears: Access mapping(s) deleted successfully. You can checkAccess to Wallets in User Details for the user to see the wallet deleted.
Chapter 11Managing Access to Virtual Wallets from User’s Menu
11-10
11.3.3 Granting a User Group Access to a Virtual WalletYou can grant user group access to a virtual wallet by using the Users tab.
When you grant a user group access to a virtual wallet all members of the group will haveaccess to the security objects within the wallet. In a multi-master cluster, you cannot grant auser group access to a virtual wallet while the virtual wallet is in the PENDING state.
1. Log in to the Oracle Key Vault management console as a user who has the KeyAdministrator role.
2. Select the Users tab, then Manage Access in the left navigation bar.
3. Click the pencil icon in the Edit column corresponding to the user group.
4. In the Access to Wallets pane, click Add.
The Add Access to User Group page appears.
5. In the Select Wallet pane, select the check boxes for one or more wallets.
6. In the Select Access Level pane, select the desired access levels.
7. Click Save.
A message appears: Access mapping successfully added. You can check Access toWallets in User Groups for the user to see the wallet added.
11.3.4 Revoking User Group Access from a Virtual WalletYou can remove user group access to a virtual wallet by using the Users tab.
In a multi-master cluster environment, you cannot revoke user group access from a virtualwallet while the virtual wallet is in the PENDING state.
1. Log in to the Oracle Key Vault management console as a user who has the KeyAdministrator role.
2. Select the Users tab, and then select Manage Access in the left sidebar.
The User Groups page appears.
3. Click the pencil icon in the Details column corresponding to the user group.
The User Group Details page appears.
4. In the Access to Wallets pane, check the box by the virtual wallet you want to revokeaccess to.
5. Click Remove.
6. Click OK to confirm.
A message appears: Access mapping(s) deleted successfully. You can check Accessto Wallets in User Groups to see the wallet removed from the list.
11.4 Managing the State of a Key or a Security ObjectYou can set the date to activate or deactivate keys or security objects, and change the stateof some virtual wallet security objects.
Chapter 11Managing the State of a Key or a Security Object
11-11

• About Managing the State of a Key or a Security ObjectYou can control the dates when a key or a security object is active, that is, when itcan be used.
• How a Multi-Master Cluster Affects Keys and Security ObjectsKeys that you create on one node of a multi-master cluster will take some time toappear on other nodes in the cluster.
• Activating a Key or Security ObjectKeys can be in the Active or Pre-Active state.
• Deactivating a Key or Security ObjectA key deactivates or expires when it passes the date that has been set fordeactivation.
• Revoking a Key or Security ObjectWhen you revoke a key, you can set its state to Deactivated or Compromised.
• Destroying a Key or Security ObjectWhen a key is no longer used or compromised in some way, then you can destroyit.
11.4.1 About Managing the State of a Key or a Security ObjectYou can control the dates when a key or a security object is active, that is, when it canbe used.
You also revoke and destroy keys and security objects. Be aware that a multi-mastercluster affects the activation or de-activation times of keys and security objects ondifferent nodes, and that naming conflicts can arise.
Related Topics
• How a Multi-Master Cluster Affects Keys and Security ObjectsKeys that you create on one node of a multi-master cluster will take some time toappear on other nodes in the cluster.
11.4.2 How a Multi-Master Cluster Affects Keys and Security ObjectsKeys that you create on one node of a multi-master cluster will take some time toappear on other nodes in the cluster.
The time is defined by the replication lag between nodes. The replication lag value isdisplayed on the Cluster Link State pane of the Monitoring page, which can beaccessed by choosing the Cluster tab.
If you add a Transparent Data Encryption (TDE) master encryption key to two differentkeystores on two different nodes, then it will be shown in both keystores.
Adjusting the activation date, deactivation date, process start date, and protect stopdate has restrictions. For these dates, if changes are made to the security object veryclose to the current time, then state changes can happen because of replication lag.
As with the creation of any object in a multi-master cluster, a security object can havea name conflict with an object created on a different node. If there is a conflict, thenOracle Key Vault will suggest a unique name or allow you to rename it.
Chapter 11Managing the State of a Key or a Security Object
11-12
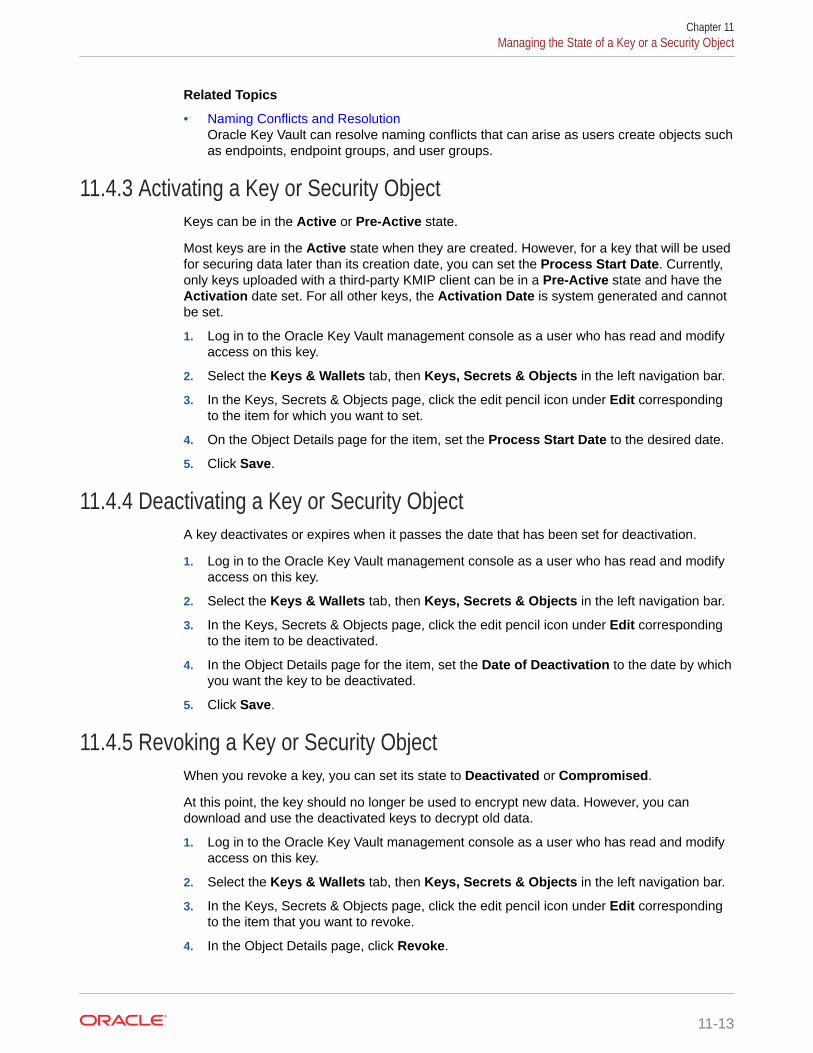
Related Topics
• Naming Conflicts and ResolutionOracle Key Vault can resolve naming conflicts that can arise as users create objects suchas endpoints, endpoint groups, and user groups.
11.4.3 Activating a Key or Security ObjectKeys can be in the Active or Pre-Active state.
Most keys are in the Active state when they are created. However, for a key that will be usedfor securing data later than its creation date, you can set the Process Start Date. Currently,only keys uploaded with a third-party KMIP client can be in a Pre-Active state and have theActivation date set. For all other keys, the Activation Date is system generated and cannotbe set.
1. Log in to the Oracle Key Vault management console as a user who has read and modifyaccess on this key.
2. Select the Keys & Wallets tab, then Keys, Secrets & Objects in the left navigation bar.
3. In the Keys, Secrets & Objects page, click the edit pencil icon under Edit correspondingto the item for which you want to set.
4. On the Object Details page for the item, set the Process Start Date to the desired date.
5. Click Save.
11.4.4 Deactivating a Key or Security ObjectA key deactivates or expires when it passes the date that has been set for deactivation.
1. Log in to the Oracle Key Vault management console as a user who has read and modifyaccess on this key.
2. Select the Keys & Wallets tab, then Keys, Secrets & Objects in the left navigation bar.
3. In the Keys, Secrets & Objects page, click the edit pencil icon under Edit correspondingto the item to be deactivated.
4. In the Object Details page for the item, set the Date of Deactivation to the date by whichyou want the key to be deactivated.
5. Click Save.
11.4.5 Revoking a Key or Security ObjectWhen you revoke a key, you can set its state to Deactivated or Compromised.
At this point, the key should no longer be used to encrypt new data. However, you candownload and use the deactivated keys to decrypt old data.
1. Log in to the Oracle Key Vault management console as a user who has read and modifyaccess on this key.
2. Select the Keys & Wallets tab, then Keys, Secrets & Objects in the left navigation bar.
3. In the Keys, Secrets & Objects page, click the edit pencil icon under Edit correspondingto the item that you want to revoke.
4. In the Object Details page, click Revoke.
Chapter 11Managing the State of a Key or a Security Object
11-13
5. In the Revoke Object page, from the Revocation Reason drop-down list, select areason for the revocation.
6. Optionally, add more details in Revocation Message
7. Click Save.
11.4.6 Destroying a Key or Security ObjectWhen a key is no longer used or compromised in some way, then you can destroy it.
Metadata for destroyed keys and security objects are kept in Oracle Key Vault evenafter they have been destroyed.
1. Log in to the Oracle Key Vault management console as a user who has read andmodify access on this key.
2. Select the Keys & Wallets tab, then Keys, Secrets & Objects in the leftnavigation bar.
3. In the Keys, Secrets & Objects page, click the edit pencil icon under Editcorresponding to the item for that you want to destroy.
4. On the Object Details page, click Destroy.
5. In the confirmation window, click OK.
11.5 Managing Details of Security ObjectsYou can manage details about security objects, such as find details about theseobjects and modifying these details.
• About Managing the Details of Security ObjectsYou can search for security objects within a virtual wallet, and add, modify, orremove these security objects.
• Searching for Security Object ItemsYou can search for individual security objects if you have privileges to view theseobjects.
• Viewing the Details of a Security ObjectAn administrative user with the Key Administrator role can view, add, and modifythe details of a security object.
• Adding or Modifying Details of a Security ObjectOnly users who have the appropriate privileges can add or modify the details of asecurity object.
11.5.1 About Managing the Details of Security ObjectsYou can search for security objects within a virtual wallet, and add, modify, or removethese security objects.
Security objects are managed by Oracle Key Vault administrative users with a clearseparation of duties. You must be an administrative user with the Key Administratorrole to manage wallet privilege on the virtual wallet containing the security objects. Auser with the Audit Manager role can view security objects, but cannot modify them,whereas individual security objects are not even viewable to a user with the SystemAdministrator role.
Chapter 11Managing Details of Security Objects
11-14
11.5.2 Searching for Security Object ItemsYou can search for individual security objects if you have privileges to view these objects.
1. Log in to the Oracle Key Vault management console as a user with the Key Administratorrole, an Audit Manager role, or as a user with access to a virtual wallet.
2. Select the Keys & Wallets tab, then Keys, Secrets & Objects in the left navigation bar.
The Keys, Secrets & Objects page appears displaying all the security objects in a table.
By default, the table has the following columns for each security object:
• Display Name lists the name of the object.
• Type: Indicates the object type of security object. Valid values are Symmetric Key,Private Key, Template, Opaque Object, Certificate, and Secret Data.
• Wallet Membership: The virtual wallet that contains the security object.
• Creating Endpoint: The endpoint that owns the security object.
• Creating Database: Indicates the database in which the security object was created.
• State: Indicates the state of the object. Valid values are Active and N/A.
• Creation Date: Date and time that the security object was added to Oracle KeyVault.
• Deactivation Date: Date and time that the security object was deactivated.
• Name: Actual name of the object.
• Unique Identifier: Lists the identifier for the security object and includes a prefix thathelps identify a subtype for the item.
• Edit: A pencil icon links to the Item Details page for the security object.
Chapter 11Managing Details of Security Objects
11-15
You can modify these columns to show more information. From the Actions menu,select Select Columns. In the Select Columns window, move the columns thatyou want to see to the Display in Report list, and then click Apply.
3. If the security object does not appear, then search for it using the Search bar orthe Actions menu.
Related Topics
• Performing Actions and SearchesThe Oracle Key Vault management console enables you to perform standardactions and search operations, as well as get help information.
11.5.3 Viewing the Details of a Security ObjectAn administrative user with the Key Administrator role can view, add, and modify thedetails of a security object.
The administrative user can perform these actions on the security object from itscorresponding Item Details page. Item details are attributes of a specific securityobject and depend on the type of security object.
1. Log in to the Oracle Key Vault management console as a user with the KeyAdministrator role or as a user with access to the virtual wallet.
2. Select the Keys & Wallets tab, then Keys, Secrets & Objects in the leftnavigation bar.
3. In the Keys, Secrets & Objects page, search for the security object that you want.
The Keys, Secrets & Wallets page shows a table that displays the security objectsin Key Vault.
You can modify the columns in this table to show more information. From theActions menu, select Select Columns. In the Select Columns dialog box, movethe columns that you want to see to the Display in Report list, and then clickApply.
4. Click the pencil icon in the Edit column corresponding to the security object.
The Object Details page appears displaying the attributes of the security object.The following screen shows a partial view of all the activities that you can performon this object.
Chapter 11Managing Details of Security Objects
11-16
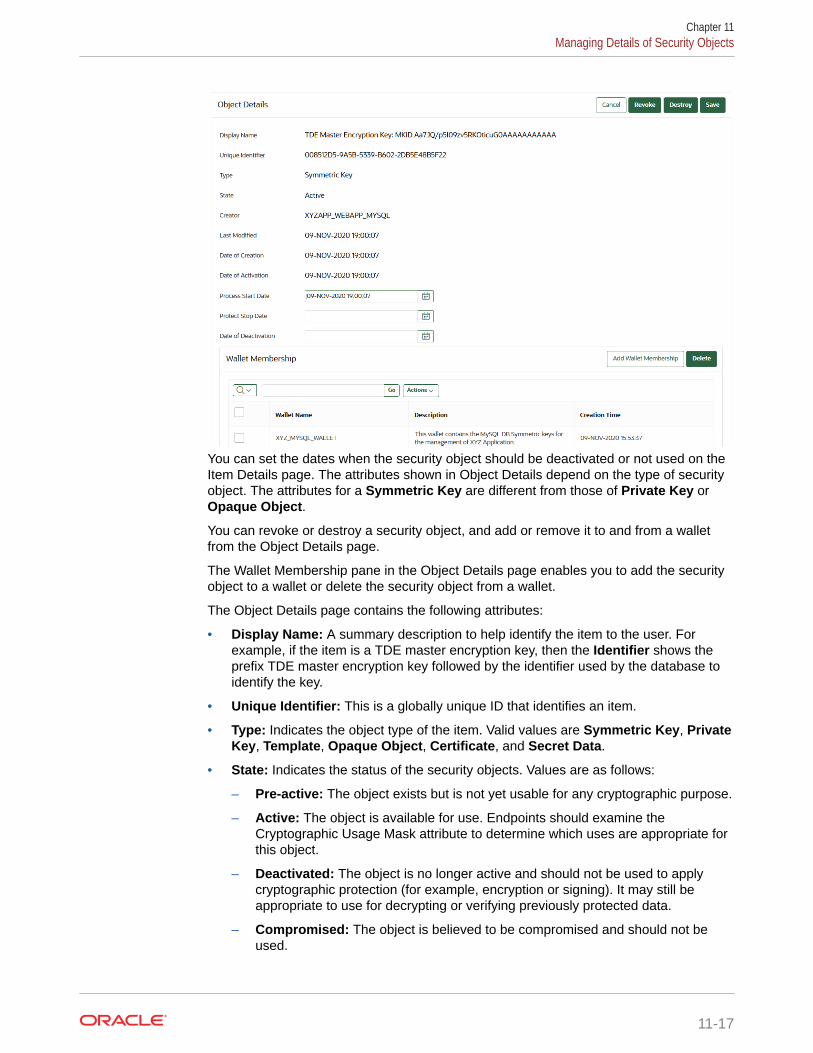
You can set the dates when the security object should be deactivated or not used on theItem Details page. The attributes shown in Object Details depend on the type of securityobject. The attributes for a Symmetric Key are different from those of Private Key orOpaque Object.
You can revoke or destroy a security object, and add or remove it to and from a walletfrom the Object Details page.
The Wallet Membership pane in the Object Details page enables you to add the securityobject to a wallet or delete the security object from a wallet.
The Object Details page contains the following attributes:
• Display Name: A summary description to help identify the item to the user. Forexample, if the item is a TDE master encryption key, then the Identifier shows theprefix TDE master encryption key followed by the identifier used by the database toidentify the key.
• Unique Identifier: This is a globally unique ID that identifies an item.
• Type: Indicates the object type of the item. Valid values are Symmetric Key, PrivateKey, Template, Opaque Object, Certificate, and Secret Data.
• State: Indicates the status of the security objects. Values are as follows:
– Pre-active: The object exists but is not yet usable for any cryptographic purpose.
– Active: The object is available for use. Endpoints should examine theCryptographic Usage Mask attribute to determine which uses are appropriate forthis object.
– Deactivated: The object is no longer active and should not be used to applycryptographic protection (for example, encryption or signing). It may still beappropriate to use for decrypting or verifying previously protected data.
– Compromised: The object is believed to be compromised and should not beused.
Chapter 11Managing Details of Security Objects
11-17

– Destroyed: The object is no longer usable for any purpose.
– Destroyed Compromised: The object was compromised and destroyed.It is no longer usable for any purpose.
• Creator: The endpoint that created the security object.
• Last Modified: The date last modified.
• Date of Creation: The date created.
• Date of Activation: The date of activation.
• Process Start Date: The date when the key may start to be used to encryptdata. It can be equal or later than the Date of Activation setting but cannotprecede it.
• Protect Stop Date: When this date is passed, the key should not be used toencrypt any more data. It cannot be later than the Date of Deactivationsetting.
• Date of Deactivation: The date of deactivation.
5. Click Advanced to view the cryptographic attributes of the security object. Thefollowing screen shows a partial view of all the activities that you can perform inAdvanced.
Attribute information and queries will vary depending on the item type. Examplesof attributes are as follows:
• Cryptographic Algorithms: The encryption algorithm used by the item
• Key Usage: Operations that the key can be used for. Clients may or may notuse these attributes. For example, Transparent Data Encryption does notconsult the key usage attributes.
• Names: Labels attached by a user or endpoint to identify the key
• Custom Attributes: Additional attributes defined by the endpoint and notinterpreted by Oracle Key Vault
Chapter 11Managing Details of Security Objects
11-18
• Cryptographic Parameters: Optional parameters for the encryption algorithm usedby the item, such as block cipher mode and padding method
• Cryptographic Length: The length in bits of the key
• Retrieved at Least Once: Indicates if the object has been served to the client
• Contact Information: Used for contact purposes only
• Digests: Digest values of the security object
• Link Details: Links to related objects
Related Topics
• Key Management Interoperability Protocol Specification Version 1.1
11.5.4 Adding or Modifying Details of a Security ObjectOnly users who have the appropriate privileges can add or modify the details of a securityobject.
To modify the attributes of a security object you must be a user with the Key Administratorrole, or you must have Read and Modify access on the security object. You can get Readand Modify access on a security object if you own the security object or if you have accessto a virtual wallet that contains the security object.
1. Log in to the Oracle Key Vault management console as a user with the Key Administratorrole or as a user with access to a virtual wallet.
2. Select the Keys & Wallets tab, then Keys, Secrets & Objects in the left navigation bar.
The Keys, Secrets & Objects page shows a table listing all the security objects in a table.You can modify the columns in this table to show more information. From the Actionsmenu, select Select Columns. In the Select Columns dialog box, move the columns thatyou want to see to the Display in Report list, and then click Apply.
3. Click the pencil icon corresponding to the security object.
The Item Details page appears.
4. In the Advanced pane, make the necessary changes.
5. Click Save in the top right corner of the pane.
Chapter 11Managing Details of Security Objects
11-19
12Managing Oracle Key Vault Master EncryptionKeys
Managing security objects includes uploading and downloading security objects, managingthe persistent master encryption key cache, and using user-defined TDE keys.
• Using the Persistent Master Encryption Key CacheThe persistent master encryption key cache feature enables databases to be operationalwhen the Oracle Key Vault server is unavailable.
• Configuring an Oracle Key Vault to New TDE-Enabled Database ConnectionYou can configure a connection between Oracle Key Vault and a database that has notyet been configured for Transparent Data Encryption.
• Migrating Existing TDE Wallets to Oracle Key VaultA migrated TDE wallet can be used to restore database contents that were previouslyencrypted by TDE.
• Uploading and Downloading Oracle WalletsTo store and share Oracle wallets, you must upload them to Oracle Key Vault.
• Uploading and Downloading JKS and JCEKS KeystoresThe okvutil upload and okvutil download commands can upload and download JKSand JCEKS keystores.
• Using a User-Defined Key as the TDE Master Encryption KeyYou can import a generated key to be used as the Transparent Data Encryption (TDE)master encryption key in Oracle Key Vault.
12.1 Using the Persistent Master Encryption Key CacheThe persistent master encryption key cache feature enables databases to be operationalwhen the Oracle Key Vault server is unavailable.
• About the Persistent Master Encryption Key CacheThe persistent master encryption key cache ensures the availability of TDE masterencryption keys.
• About Oracle Key Vault Persistent Master Encryption Key Cache ArchitectureThe Oracle Key Vault persistent master encryption key cache is implemented in OracleKey Vault’s PKCS#11 library.
• Caching Master Encryption Keys in the In-Memory and Persistent Master Encryption KeyCacheAfter a master encryption key is created or fetched from a different location, it is stored inan Oracle Key Vault cache.
• Storage Location of Persistent Master Encryption Key CacheThe persistent master encryption key cache is created in the same location as theconfiguration file okvclient.ora.
12-1
• Persistent Master Encryption Key Cache Modes of OperationThe persistent master encryption key cache operates in two modes.
• Persistent Master Encryption Key Cache Refresh WindowThe persistent master encryption key cache refresh window helps to extend theavailability of the master encryption key.
• Persistent Master Encryption Key Cache ParametersOracle Key Vault provides parameters to configure the persistent masterencryption key cache.
• Listing the Contents of the Persistent Master Key CacheThe okvutil list command lists the master encryption keys that are cached inthe persistent master encryption key cache.
• Oracle Database Deployments and Persistent Master Encryption Key CacheThe persistent master encryption key cache affects the integration of other Oraclefeatures with Oracle Key Vault.
12.1.1 About the Persistent Master Encryption Key CacheThe persistent master encryption key cache ensures the availability of TDE masterencryption keys.
It accomplishes this by reducing dependence on the state of the Oracle Key Vaultserver.
The TDE master encryption key is cached in the persistent master encryption keycache in addition to the in-memory cache, to make the master encryption key availableacross database processes. It eliminates the need for databases to contact the OracleKey Vault server for every new process, redo log switch, or database startupoperation.
The following are the benefits of ensuring availability of TDE master encryption keys:
• Continuous operation of endpoints during upgrade, primary-standby configuration,switchover, failover, and other procedures that require an Oracle Key Vault restartoperation
• Less load on the Oracle Key Vault server when multiple sessions of a singledatabase request the same master encryption key
• Improved scalability of Oracle Key Vault
12.1.2 About Oracle Key Vault Persistent Master Encryption KeyCache Architecture
The Oracle Key Vault persistent master encryption key cache is implemented in OracleKey Vault’s PKCS#11 library.
When the persistent master encryption key cache feature is configured, the OracleKey Vault PKCS#11 library will create the persistent master encryption key cache whenthe first master encryption key is retrieved from Oracle Key Vault.
The persistent master encryption key cache is an auto-login wallet or a password-based wallet, depending on how Oracle Key Vault is installed:
• If the Oracle Key Vault client is installed with a password specified, then thepersistent master encryption key cache is a password-based wallet.
Chapter 12Using the Persistent Master Encryption Key Cache
12-2
• If the Oracle Key Vault client is installed without a password specified, then the persistentmaster encryption key cache is an auto-login wallet.
The PKCS#11 library also implements an in-memory master encryption key cache. When thein-memory master encryption key cache feature is configured, the master encryption key iscached in the process memory of the process that loaded the library into memory. The in-memory and persistent master encryption key caches are independent of each other. You canenable and disable these caches independently.
For operations that involve encryption and decryption, PKCS#11 attempts to look up themaster encryption key in the in-memory master encryption key cache. If it does not find it,PKCS#11 then it looks up the master encryption key in the persistent master encryption keycache. If the master encryption key is not found in the in-memory or the persistent masterencryption key cache, then it is retrieved from the Oracle Key Vault server, if the server isonline.
Related Topics
• Step 3: Install the Oracle Key Vault Software onto the EndpointTo upgrade to the latest endpoint software for an enrolled endpoint, you can downloadthe endpoint software without having to reenroll the endpoint.
12.1.3 Caching Master Encryption Keys in the In-Memory and PersistentMaster Encryption Key Cache
After a master encryption key is created or fetched from a different location, it is stored in anOracle Key Vault cache.
When the master encryption key is first fetched from the Oracle Key Vault server, or createdin the Oracle Key Vault server, the master encryption key is stored in the in-memory masterencryption key cache and in the persistent master encryption key cache.
Master encryption keys stored in the in-memory master encryption key cache are availablefor a limited time from the moment the key is placed into the persistent cache. The duration isdefined by the PKCS11_CACHE_TIMEOUT parameter in the okvclient.ora file.
If the persistent cache exists, then it will be used. If the persistent cache does not exist, thenOracle Key Vault creates it. When the key is created, all future sessions will retrieve it fromthe in-memory master encryption key cache or persistent master encryption key cache.
Persistent master encryption keys that are stored in the persistent master encryption keycache are available for a limited time from the moment the key is placed into the persistentcache. You can define this time by setting the PKCS11_PERSISTENT_CACHE_TIMEOUT parameterin the okvclient.ora file.
When the endpoint deletes the master encryption key, the key will be removed from the in-memory master encryption key cache and persistent master encryption key cache.
12.1.4 Storage Location of Persistent Master Encryption Key CacheThe persistent master encryption key cache is created in the same location as theconfiguration file okvclient.ora.
The default location for the okvclient.ora file is the directory $OKV_HOME/conf.
Chapter 12Using the Persistent Master Encryption Key Cache
12-3

It is important that the ORACLE_HOME, ORACLE_BASE, and OKV_HOME environmentvariables are consistently set across the deployment. If they are not consistent, thenoperations requiring the persistent cache may fail, and the persistent cache may becreated in multiple locations.
If the environment variable OKV_HOME is set, then the persistent cache is createdin $OKV_HOME/conf.
If OKV_HOME is not set, but ORACLE_BASE is set, then the persistent cache is createdin $ORACLE_BASE/okv/$ORACLE_SID.
If neither OKV_HOME nor ORACLE_BASE is set, but ORACLE_HOME is set, then the persistentcache is created in $ORACLE_HOME/okv/$ORACLE_SID.
Note:
Ensure that the directory in which the persistent cache is created is secureand has restricted permissions.
12.1.5 Persistent Master Encryption Key Cache Modes of OperationThe persistent master encryption key cache operates in two modes.
The difference between the two modes is the order in which the persistent masterencryption key cache and Oracle Key Vault are looked up to retrieve the masterencryption key.
• Oracle Key Vault First ModeIn Oracle Key Vault first mode, the endpoints attempt to retrieve the masterencryption key from the Oracle Key Vault server.
• Persistent Master Encryption Key Cache First ModeIn persistent master encryption key cache first mode, the endpoints retrieve themaster encryption key from the persistent master encryption key cache.
12.1.5.1 Oracle Key Vault First ModeIn Oracle Key Vault first mode, the endpoints attempt to retrieve the master encryptionkey from the Oracle Key Vault server.
If the Oracle Key Vault server is offline, then the endpoints attempt to retrieve themaster encryption key from the persistent master encryption key cache.
The endpoints must determine the status of the Oracle Key Vault server, and if it isoffline, then the endpoints attempt to retrieve the master encryption key from thepersistent master encryption key cache. Hence, database operations that requireaccess to master encryption keys will experience a delay.
12.1.5.2 Persistent Master Encryption Key Cache First ModeIn persistent master encryption key cache first mode, the endpoints retrieve the masterencryption key from the persistent master encryption key cache.
Chapter 12Using the Persistent Master Encryption Key Cache
12-4

If the master encryption key is not available in the persistent master encryption key cache,then the endpoints attempt to retrieve the master encryption key from the Oracle Key Vaultserver.
The modifications to the master encryption keys on the Oracle Key Vault server are notapplied until the key expires in the persistent master encryption key cache.
12.1.6 Persistent Master Encryption Key Cache Refresh WindowThe persistent master encryption key cache refresh window helps to extend the availability ofthe master encryption key.
The refresh window feature of the persistent master encryption key cache enables thedatabase endpoint to make multiple attempts to refresh the expired master encryption keyfrom the Oracle Key Vault server. In that sense, the endpoint waits for the Oracle Key Vaultserver to be back online for the master encryption key refresh to complete. Meanwhile, if themaster encryption key refresh attempt fails, then the keys are retrieved from the persistentcache for the duration of the refresh window.
The refresh window feature of the persistent master encryption key cache therefore extendsthe duration for which the master encryption key is available after it is cached in thepersistent master encryption key cache. At the same time, the endpoints can refresh the keyduring the refresh window instead of once at the end of the cache time. This addresses thepossibility that persistent cache expires during the time when the Oracle Key Vault isunavailable, such as when a primary-standby switchover is in progress. The refresh windowterminates and then the cache period begins as soon as the key is refreshed.
In the okvclient.ora file, you can use the PKCS11_PERSISTENT_CACHE_REFRESH_WINDOWparameter to extend the duration for which the master encryption key is available after it iscached in the persistent master encryption key cache. This value reflects the amount of timeit takes for the Oracle Key Vault server to recover and return online. You must specify thisvalue in minutes. The default value for PKCS11_PERSISTENT_CACHE_REFRESH_WINDOW is 30(minutes).
Related Topics
• PKCS11_PERSISTENT_CACHE_TIMEOUT ParameterThe PKCS11_PERSISTENT_CACHE_TIMEOUT parameter sets how long the master encryptionis available in the persistent cache.
12.1.7 Persistent Master Encryption Key Cache ParametersOracle Key Vault provides parameters to configure the persistent master encryption keycache.
• PKCS11_CACHE_TIMEOUT ParameterThe PKCS11_CACHE_TIMEOUT parameter sets how long a master encryption key isavailable in the in-memory cache.
• PKCS11_PERSISTENT_CACHE_TIMEOUT ParameterThe PKCS11_PERSISTENT_CACHE_TIMEOUT parameter sets how long the master encryptionis available in the persistent cache.
• PKCS11_PERSISTENT_CACHE_FIRST ParameterThe PKCS11_PERSISTENT_CACHE_FIRST parameter sets the persistent master encryptionkey cache operation mode.
Chapter 12Using the Persistent Master Encryption Key Cache
12-5
• PKCS11_CONFIG_PARAM_REFRESH_INTERVAL ParameterThe PKCS11_CONFIG_PARAM_REFRESH_INTERVAL parameter describes the frequencyat which a long-running process will re-read the okvclient.ora configuration file.
• PKCS11_PERSISTENT_CACHE_REFRESH_WINDOW ParameterThe PKCS11_PERSISTENT_CACHE_REFRESH_WINDOW parameter extends time themaster encryption key is available after it is cached in the persistent masterencryption key cache.
• EXPIRE PKCS11 PERSISTENT CACHE ON DATABASE SHUTDOWN ParameterThe EXPIRE PKCS11 PERSISTENT CACHE ON DATABASE SHUTDOWN parameterensures that the PKCS#11 persistent cache for a given endpoint databaseautomatically expires upon shutdown of the endpoint database.
12.1.7.1 PKCS11_CACHE_TIMEOUT ParameterThe PKCS11_CACHE_TIMEOUT parameter sets how long a master encryption key isavailable in the in-memory cache.
You set the PKCS11_CACHE_TIMEOUT parameter in the okvclient.ora file. You mustspecify the value in minutes. When the specified duration of time elapses, the masterencryption key expires. Expired master encryption keys are not deleted from the in-memory cache.
The default value for PKCS11_CACHE_TIMEOUT is 60 (minutes). Oracle recommends thatyou set the PKCS11_CACHE_TIMEOUT parameter in the Oracle Key Vault managementconsole, where it is called PKCS11 In-Memory Cache Timeout.
Related Topics
• Setting Global Endpoint Configuration ParametersYou can set global endpoint configuration parameters in the Oracle Key Vaultmanagement console.
12.1.7.2 PKCS11_PERSISTENT_CACHE_TIMEOUT ParameterThe PKCS11_PERSISTENT_CACHE_TIMEOUT parameter sets how long the masterencryption is available in the persistent cache.
You set the PKCS11_PERSISTENT_CACHE_TIMEOUT parameter in the okvclient.ora file.This time starts when the database retrieves the key from the Oracle Key Vault serverand puts it in the cache. After this duration has elapsed, the master encryption keyexpires. At this time, the endpoint will attempt to contact the Oracle Key Vault server inorder to retrieve the key, and if it succeeds, the key remains available for anotherduration specified by this parameter. If it is unable to retrieve the key, the key remainsavailable for the amount of time dictated by thePKCS11_PERSISTENT_CACHE_REFRESH_WINDOW parameter, after which the database canno longer use the key without successfully retrieving it again from the Oracle Key Vaultserver. Expired master encryption keys are not deleted from persistent masterencryption key cache.
The Cache Start Time and Maximum Use Time values displayed in the OKVPersistent Cache entries list is updated when the master encryption key isrefreshed.
The default value for PKCS11_PERSISTENT_CACHE_TIMEOUT is 1440 (minutes).
Chapter 12Using the Persistent Master Encryption Key Cache
12-6
You can disable the persistent master encryption key cache by setting both thePKCS11_PERSISTENT_CACHE_REFRESH_WINDOW and the PKCS11_PERSISTENT_CACHE_TIMEOUTparameters to 0 (zero).
Oracle recommends that you set this global parameter in the Oracle Key Vault managementconsole.
Note:
The parameter PKCS11_PERSISTENT_CACHE_TIMEOUT and its default value areincluded by default in the okvclient.ora file.
Related Topics
• Setting Global Endpoint Configuration ParametersYou can set global endpoint configuration parameters in the Oracle Key Vaultmanagement console.
12.1.7.3 PKCS11_PERSISTENT_CACHE_FIRST ParameterThe PKCS11_PERSISTENT_CACHE_FIRST parameter sets the persistent master encryption keycache operation mode.
You set the PKCS11_PERSISTENT_CACHE_FIRST parameter in the okvclient.ora file.
The following are the modes of operation:
• Oracle Key Vault First Mode: To enable Oracle Key Vault first mode, set the value of thePKCS11_PERSISTENT_CACHE_FIRST parameter to 0 (zero).
• Persistent Master Encryption Key Cache First Mode: Persistent master encryptionkey cache first mode is the default mode.
To enable persistent master encryption key cache first mode, set the value of thePKCS11_PERSISTENT_CACHE_FIRST parameter to 1.
Related Topics
• Oracle Key Vault First ModeIn Oracle Key Vault first mode, the endpoints attempt to retrieve the master encryptionkey from the Oracle Key Vault server.
• Persistent Master Encryption Key Cache First ModeIn persistent master encryption key cache first mode, the endpoints retrieve the masterencryption key from the persistent master encryption key cache.
12.1.7.4 PKCS11_CONFIG_PARAM_REFRESH_INTERVAL ParameterThe PKCS11_CONFIG_PARAM_REFRESH_INTERVAL parameter describes the frequency at which along-running process will re-read the okvclient.ora configuration file.
When the process cannot use a key from the in-memory cache and instead reaches out tothe persistent cache or the Oracle Key Vault server, if it has been longer than the valuespecified by PKCS11_CONFIG_PARAM_REFRESH_INTERVAL since okvclient.ora was last read,the process will re-read okvclient.ora and start using any changed parameters. Note that ifthe parameter for the in-memory cache, PKCS11_CACHE_TIMEOUT, is larger than
Chapter 12Using the Persistent Master Encryption Key Cache
12-7
PKCS11_CONFIG_PARAM_REFRESH_INTERVAL, then okvclient.ora will be re-read atintervals described by the PKCS11_CACHE_TIMEOUT parameter instead.
You set the PKCS11_CONFIG_PARAM_REFRESH_INTERVAL parameter in okvclient.ora.You must specify this value in minutes. The default value forPKCS11_CONFIG_PARAM_REFRESH_INTERVAL is 10 (minutes).
You can disable this parameter by setting thePKCS11_CONFIG_PARAM_REFRESH_INTERVAL parameter to 0 (zero).
12.1.7.5 PKCS11_PERSISTENT_CACHE_REFRESH_WINDOW ParameterThe PKCS11_PERSISTENT_CACHE_REFRESH_WINDOW parameter extends time the masterencryption key is available after it is cached in the persistent master encryption keycache.
You set the PKCS11_PERSISTENT_CACHE_REFRESH_WINDOW parameter in theokvclient.ora. You must specify the value in minutes. The default value forPKCS11_PERSISTENT_CACHE_REFRESH_WINDOW is 30 (minutes).
You can disable the persistent master encryption key cache by setting thePKCS11_PERSISTENT_CACHE_REFRESH_WINDOW and PKCS11_PERSISTENT_CACHE_TIMEOUTparameters to 0 (zero). Oracle recommends that you set these global parameters inthe Oracle Key Vault management console.
Related Topics
• Setting Global Endpoint Configuration ParametersYou can set global endpoint configuration parameters in the Oracle Key Vaultmanagement console.
12.1.7.6 EXPIRE PKCS11 PERSISTENT CACHE ON DATABASESHUTDOWN Parameter
The EXPIRE PKCS11 PERSISTENT CACHE ON DATABASE SHUTDOWN parameter ensuresthat the PKCS#11 persistent cache for a given endpoint database automaticallyexpires upon shutdown of the endpoint database.
When enabled, the EXPIRE PKCS11 PERSISTENT CACHE ON DATABASE SHUTDOWNprotects the persistent cache by using a system-generated random password that isindependent of the password that was set when an endpoint database was enrolled inOracle Key Vault, even if an auto-login wallet was used. Having the persistent cachepassword protected provides better security.
Before you can use the EXPIRE PKCS11 PERSISTENT CACHE ON DATABASE SHUTDOWNparameter, ensure that the endpoint database has had the patch for bug 29869906:AUTO-LOGIN OKV NEEDS PERSISTENT CACHE PROTECTION KEY FROM RDBMS applied to it.This patch applies to Oracle Database releases 12.1 through 19c. Contact OracleSupport for more information.
You can set EXPIRE PKCS11 PERSISTENT CACHE ON DATABASE SHUTDOWN for individualendpoint databases that have been enrolled with Oracle Key Vault, or globally for allendpoint databases that have been enrolled in Oracle Key Vault. This parameter is notavailable in the okvclient.ora configuration file for the database endpoint. To set thisparameter, use the Oracle Key Vault management console.
Chapter 12Using the Persistent Master Encryption Key Cache
12-8
After you have enabled EXPIRE PKCS11 PERSISTENT CACHE ON DATABASE SHUTDOWN, thePKCS#11 persistent cache is created when keys are fetched from Oracle Key Vault. Thecache remains available to the endpoint database only as long as the database instance ismounted or open. When the endpoint database is shut down, the PKCS#11 persistent cacheis no longer available, but is recreated the next time the endpoint database is started. Thepersistent cache does, however, remain available when an endpoint pluggable database(PDB) is closed and then re-opened.
Be aware that after you have enabled EXPIRE PKCS11 PERSISTENT CACHE ON DATABASESHUTDOWN for a given endpoint database, you can no longer use the okvutil list -tokv_persistent_cache command to view the contents of the persistent cache. In addition,you must ensure that Oracle Key Vault is available when keys are fetched after the endpointdatabase is started.
Setting EXPIRE PKCS11 PERSISTENT CACHE ON DATABASE SHUTDOWN forIndividual Endpoint Databases
1. Log in to the Oracle Key Vault management console as a user who has the SystemAdministrator role.
2. Click the Endpoints tab.
3. On the Endpoints page, select the endpoint for which you want to set EXPIRE PKCS11PERSISTENT CACHE ON DATABASE SHUTDOWN.
4. On the Endpoint Details page, scroll to the bottom and then set the Expire PKCS11Persistent Cache on Database Shutdown checkbox.
5. Click Save.
Setting EXPIRE PKCS11 PERSISTENT CACHE ON DATABASE SHUTDOWN Globally
The following procedure will apply the EXPIRE PKCS11 PERSISTENT CACHE ON DATABASESHUTDOWN to all current and future endpoint databases that have been enrolled with OracleKey Vault.
1. Log in to the Oracle Key Vault management console as a user who has the SystemAdministrator role.
2. Select the Endpoints tab, and then Settings from the left side bar..
3. In the Global Endpoint Configuration Parameters page, set the Expire PKCS11Persistent Cache on Database Shutdown checkbox.
4. Click Save.
12.1.8 Listing the Contents of the Persistent Master Key CacheThe okvutil list command lists the master encryption keys that are cached in thepersistent master encryption key cache.
After installing the endpoint software, endpoint administrators can use the command-lineutility okvutil to communicate with Oracle Key Vault to view, upload, and download securityobjects.
• Execute the okvutil list command, similar to the following example:
$ ./okvutil list -t okv_persistent_cache -l $ORACLE_HOME/okv/$ORACLE_SIDEnter Oracle Key Vault endpoint password: password
Output similar to the following appears:
Chapter 12Using the Persistent Master Encryption Key Cache
12-9
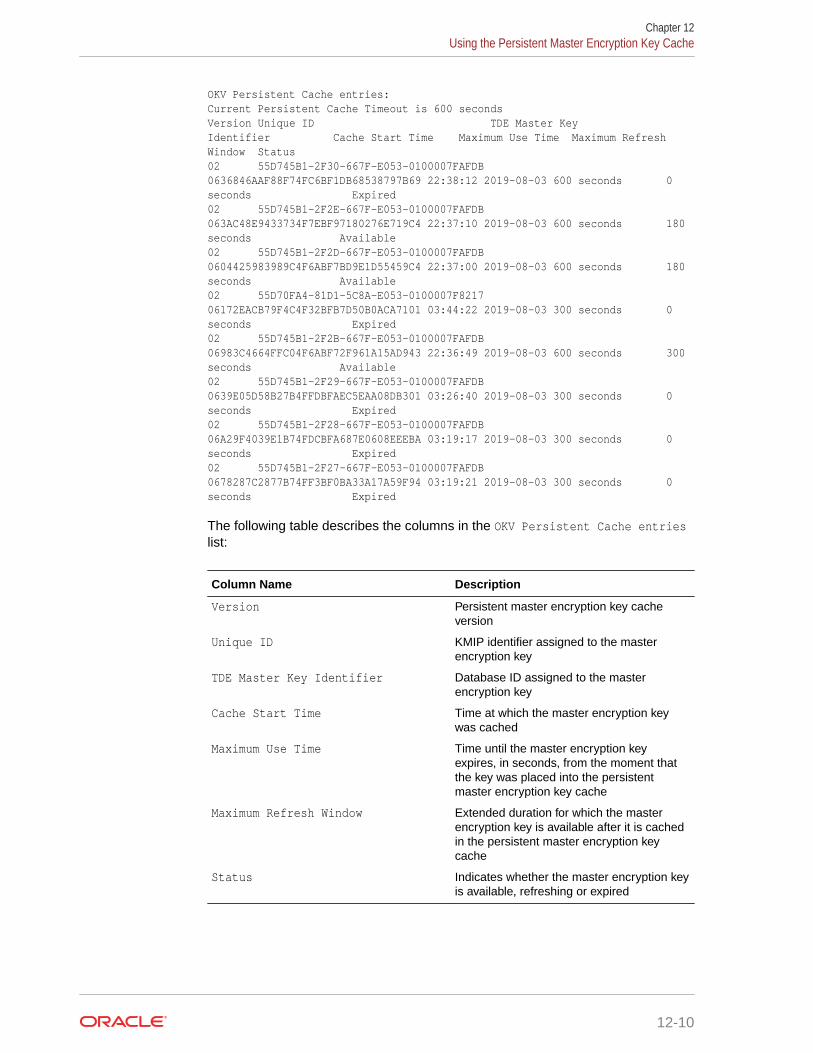
OKV Persistent Cache entries:Current Persistent Cache Timeout is 600 secondsVersion Unique ID TDE Master Key Identifier Cache Start Time Maximum Use Time Maximum Refresh Window Status02 55D745B1-2F30-667F-E053-0100007FAFDB 0636846AAF88F74FC6BF1DB68538797B69 22:38:12 2019-08-03 600 seconds 0 seconds Expired02 55D745B1-2F2E-667F-E053-0100007FAFDB 063AC48E9433734F7EBF97180276E719C4 22:37:10 2019-08-03 600 seconds 180 seconds Available02 55D745B1-2F2D-667F-E053-0100007FAFDB 0604425983989C4F6ABF7BD9E1D55459C4 22:37:00 2019-08-03 600 seconds 180 seconds Available02 55D70FA4-81D1-5C8A-E053-0100007F8217 06172EACB79F4C4F32BFB7D50B0ACA7101 03:44:22 2019-08-03 300 seconds 0 seconds Expired02 55D745B1-2F2B-667F-E053-0100007FAFDB 06983C4664FFC04F6ABF72F961A15AD943 22:36:49 2019-08-03 600 seconds 300 seconds Available02 55D745B1-2F29-667F-E053-0100007FAFDB 0639E05D58B27B4FFDBFAEC5EAA08DB301 03:26:40 2019-08-03 300 seconds 0 seconds Expired02 55D745B1-2F28-667F-E053-0100007FAFDB 06A29F4039E1B74FDCBFA687E0608EEEBA 03:19:17 2019-08-03 300 seconds 0 seconds Expired02 55D745B1-2F27-667F-E053-0100007FAFDB 0678287C2877B74FF3BF0BA33A17A59F94 03:19:21 2019-08-03 300 seconds 0 seconds Expired
The following table describes the columns in the OKV Persistent Cache entrieslist:
Column Name Description
Version Persistent master encryption key cacheversion
Unique ID KMIP identifier assigned to the masterencryption key
TDE Master Key Identifier Database ID assigned to the masterencryption key
Cache Start Time Time at which the master encryption keywas cached
Maximum Use Time Time until the master encryption keyexpires, in seconds, from the moment thatthe key was placed into the persistentmaster encryption key cache
Maximum Refresh Window Extended duration for which the masterencryption key is available after it is cachedin the persistent master encryption keycache
Status Indicates whether the master encryption keyis available, refreshing or expired
Chapter 12Using the Persistent Master Encryption Key Cache
12-10
12.1.9 Oracle Database Deployments and Persistent Master EncryptionKey Cache
The persistent master encryption key cache affects the integration of other Oracle featureswith Oracle Key Vault.
• Database restart when the Oracle Key Vault Server is offline: When you configureOracle Key Vault to use an auto-login wallet, the database connects to the Oracle KeyVault server when the database is restarted. If the Oracle Key Vault server is offline whenthe database restarts, then the database retrieves master encryption keys from thepersistent master encryption key cache. Database operations resume normally if themaster encryption keys are active and have not expired.
Ensure that the passwords of the persistent master encryption key cache and the OracleKey Vault endpoint wallet are synchronized.
Note:
The persistent master encryption key cache must be deleted when the endpointwallet credentials are modified.
• Using the persistent master encryption key cache in an Oracle Real ApplicationCluster (Oracle RAC) environment: In an Oracle RAC environment, each Oracle RACnode is an unique database endpoint, and uses a unique persistent master encryptionkey cache.
In an Oracle RAC Environment, you must query the database from each Oracle RACnode to cache the most recent version of the master encryption key in the persistentmaster encryption key cache of each Oracle RAC node.
• Using persistent master encryption key cache in an Oracle Data GuardEnvironment: Rotation of the master encryption key in the primary server’s databasecaches the master encryption key in the persistent master encryption key cache of theprimary server’s database.
The standby server retrieves and caches the new master encryption key in the persistentmaster encryption key cache of the standby server’s database after the new REDO logsfrom the primary server are applied on the standby server. To avoid disruptions, youshould synchronize the primary and standby servers immediately after the rotation of themaster encryption key in the primary server’s database.
12.2 Configuring an Oracle Key Vault to New TDE-EnabledDatabase Connection
You can configure a connection between Oracle Key Vault and a database that has not yetbeen configured for Transparent Data Encryption.
• About Configuring an Oracle Key Vault to New TDE-Enabled Database ConnectionYou can configure a connection between Oracle Key Vault and a database that has notyet been configured for TDE.
Chapter 12Configuring an Oracle Key Vault to New TDE-Enabled Database Connection
12-11
• Limitations to Transparent Data Encryption Endpoint IntegrationThis type of Transparent Data Encryption (TDE) endpoint integration can haveproblems if the versions are incompatible.
• Step 1: Configure the Oracle Key Vault Server EnvironmentBefore you can configure the connection, you must ensure that Oracle settings arecorrect.
• Step 2: Integrate Transparent Data Encryption with Oracle Key VaultThis integration enables Oracle Key Vault to directly manage the TDE masterencryption keys.
12.2.1 About Configuring an Oracle Key Vault to New TDE-EnabledDatabase Connection
You can configure a connection between Oracle Key Vault and a database that has notyet been configured for TDE.
Before you start configuring the connection, ensure that the Oracle Key Vault clientinstallation environment is the same as the database runtime environment. Theenvironment variables ORACLE_HOME, ORACLE_BASE, and ORACLE_SID must be set to thesame values in svrctl and operating system environment variables. This also appliesif you are using the Oracle Key Vault RESTful services utility to enroll endpoints.
For information about configuring Oracle Data Guard so that it can work with TDE andOracle Key Vault:
• Oracle Database Advanced Security Guide, release 19c
• Oracle Database Advanced Security Guide, release 18c
• Oracle Database Advanced Security Guide, release 12.2.0.1
For information about configuring Oracle Real Application Clusters (Oracle RAC) towork with TDE and Oracle Key Vault:
• Oracle Database Advanced Security Guide, release 19c
• Oracle Database Advanced Security Guide, release 18c
• Oracle Database Advanced Security Guide, release 12.2.0.1
12.2.2 Limitations to Transparent Data Encryption Endpoint IntegrationThis type of Transparent Data Encryption (TDE) endpoint integration can haveproblems if the versions are incompatible.
The limitations to TDE endpoint integration are as follows:
• All endpoints on the same computer must use the same version of the Oracle KeyVault library. There is only one location per computer for the liborapkcs.so file,which is /opt/oracle/expapi/64/hsm/oracle/1.0.0/liborapkcs.so.
• If you have multiple databases on the same host, and those databases share thesame sqlnet.ora file, then you must migrate all databases at the same time. Ifeach database has its own sqlnet.ora file (controlled by individual settings for theTNS_ADMIN parameter), then you can migrate the databases into Oracle Key Vaultat independent points in time.
Chapter 12Configuring an Oracle Key Vault to New TDE-Enabled Database Connection
12-12
Caution:
Oracle strongly recommends that you never remove keys from a wallet or the walletitself after TDE is configured. Loss of keys will result in the loss of the database.This is true even in the following scenarios:
• If you had created or opened a keystore (wallet or Oracle Key Vault), evenbefore setting the first key and before encrypting data in your database
• If all of the encrypted data has been decrypted
• If you have migrated your keys and wallets to a hardware security module
12.2.3 Step 1: Configure the Oracle Key Vault Server EnvironmentBefore you can configure the connection, you must ensure that Oracle settings are correct.
These settings include Oracle environment variables and the Oracle COMPATIBILITYparameter.
1. Log in to the server where the database endpoint is installed.
2. Ensure that the ORACLE_BASE environment variable is set for the current operating systemsession, as well as in srvctl for Oracle Real Application Clusters (Oracle RAC)-enableddatabases, before you start the database.
This step is very important. If the ORACLE_BASE environment variable is not present, thencreate a soft link from the $ORACLE_BASE/okv/$ORACLE_SID/okvclient.ora file to thekey_vault_endpoint_installation_dir/conf/okvclient.ora file. In an Oracle RealApplication Clusters environment, you must perform this step on all database instances.
3. Ensure that the COMPATIBILITY initialization parameter is set to 11.2.0.0 or later.
4. Enroll and provision the endpoint for the Transparent Data Encryption (TDE)-enableddatabase that contains the TDE data.
When you initially enroll the endpoint, select ORACLE_DB as the endpoint type forintegration with TDE.
5. Ensure that the endpoint has access to the virtual wallet that you want to use by definingthe wallet as the default wallet for that endpoint.
In Oracle RAC and Oracle Data Guard environments, the endpoints of all primary andstandby instances share the same default wallet.
6. Depending on the Oracle Database release, configure the encryption wallet location.
• For Oracle Database release 11.2.0.4 and 12.1.0.2, configure the sqlnet.ora file onthis database to point to Oracle Key Vault as follows:
ENCRYPTION_WALLET_LOCATION=(SOURCE=(METHOD=HSM))
• For Oracle Database release 12.2.0.1, configure the sqlnet.ora file on this databaseto point to Oracle Key Vault as follows:
ENCRYPTION_WALLET_LOCATION=(SOURCE=(METHOD=OKV))
By default, the sqlnet.ora file is located in the ORACLE_HOME/network/admin directoryor in the location set by the TNS_ADMIN environment variable.
Chapter 12Configuring an Oracle Key Vault to New TDE-Enabled Database Connection
12-13
• For Oracle Database release 18c or later, configure the following parameters:
– Set WALLET_ROOT to define the installation directory of the Oracle Key Vaultclient. The directory that will be defined as WALLET_ROOT must have thefollowing sub-directories (in lower case) in order for the database to auto-discover the correct keystore configuration:
* /okv: The Oracle Key Vault client software is installed into thisdirectory.
* /tde: The TDE wallet (or the auto-open wallet for Oracle Key Vault)goes into this subdirectory.
* /tde_seps: This directory is for a wallet that will hide the keystorepassword (wallet or Oracle Key Vault) from the ADMINISTER KEYMANAGEMENT command when the EXTERNAL STORE clause is used toreplace the password.
– Set TDE_CONFIGURATION to OKV for Oracle Key Vault, or OKV|FILE for anauto-open connection into Oracle Key Vault.
Endpoints use the PKCS#11 library support to manage TDE master encryptionkeys. Execute the root.sh script (in theokvclient_installation_directory/bin directory) to deploy the PKCS#11library that facilitates the communication between the endpoint and Oracle KeyVault.
At this stage, the Oracle database will use Oracle Key Vault for centralized keymanagement. For all TDE commands and statements, use the Oracle KeyVault endpoint password that was specified during the installation of theendpoint software, unless the keystore password is hidden from theADMINISTER KEY MANAGEMENT commands in a wallet that was created in theWALLET_ROOT/tde_seps directory.
7. Reconnect to the database if you are in SQL*Plus.
The changes will appear after you log out of the current SQL*Plus session andthen connect again.
8. Query the V$ENCRYPTION_WALLET dynamic view to ensure that the METHOD_DATAsetting in the sqlnet.ora file changed.
SELECT * FROM V$ENCRYPTION_WALLET;
The output of the query should now show OKV.
The TDE configuration is complete at this stage. You can now encrypt existingtablespaces or create new encrypted tablespaces in the database. Oracle does notrecommend using TDE column encryption with any external key manager. If you haveconfigured the sqlnet.ora file correctly along with the rest of the TDE configuration,then a TDE master encryption key is created in Oracle Key Vault when you set theencryption key by using one of the following SQL statements:
• ALTER SYSTEM SET [ENCRYPTION] KEY IDENTIFIED BY "password";
• ADMINISTER KEY MANAGEMENT SET [ENCRYPTION] KEY IDENTIFIED BY"password" WITH BACKUP;
With both of these SQL statements, the password was defined when the Oracle KeyVault client software was installed. If no password was defined at that time, then thepassword for these two statements is NULL.
Chapter 12Configuring an Oracle Key Vault to New TDE-Enabled Database Connection
12-14
12.2.4 Step 2: Integrate Transparent Data Encryption with Oracle Key VaultThis integration enables Oracle Key Vault to directly manage the TDE master encryptionkeys.
1. Ensure that you are logged into the server where the Oracle Key Vault client is installed.
2. Execute the root script from okvclient_installation_directory/bin.
This script implements the persistent master encryption key cache feature in the OracleKey Vault PKCS#11 library, which improves the availability of the database duringintermittent network disruptions or Oracle Key Vault upgrade.
• UNIX: The root script copies the PKCS#11 library into /opt/oracle/extapi/64/hsm/oracle/1.0.0 and minimizes the file access privileges.
• Windows: Run the root.bat script to copy the liborapkcs.dll file (located in thelib directory) to the C:\oracle\extapi\64\hsm\oracle\1.0.0 directory. Provide thedatabase version when prompted.
3. For password-protected wallets on the database, open the wallet. (Auto-login wallets areautomatically opened.)
• For Oracle Database release 11.2.0.4: As a user who has been granted the ALTERSYSTEM system privilege:
ALTER SYSTEM SET [ENCRYPTION] WALLET OPEN IDENTIFIED BY "Oracle_Key_Vault_endpoint_password";
• For Oracle Database release 12.1.0.2 or later: As a user who has been granted theSYSKM administrative privilege:
ADMINISTER KEY MANAGEMENT SET KEYSTORE OPEN IDENTIFIED BY "Oracle_Key_Vault_endpoint_password";
4. Set the master encryption key.
• For Oracle Database release 11.0.2:
ALTER SYSTEM SET [ENCRYPTION] KEY IDENTIFIED BY "Oracle_Key_Vault_endpoint_password";
• For Oracle Database release 12.1.0.2 or later:
ADMINISTER KEY MANAGEMENT SET [ENCRYPTION] KEY IDENTIFIED BY "Oracle_Key_Vault_endpoint_password" WITH BACKUP;
Related Topics
• Enrolling and Upgrading Endpoints for Oracle Key VaultAfter an endpoint is registered in Oracle Key Vault, an endpoint administrator enrolls andprovisions the endpoint to manage security objects in Key Vault.
• Endpoint Database RequirementsAdministrators can use online master keys and the Oracle Database COMPATIBLEinitialization parameter to manage Oracle Database endpoints.
• Managing EndpointsYou can enroll, reenroll, suspend, and delete endpoints.
• Granting Access to Users, User Groups, Endpoints, and Endpoint GroupsYou can grant the Read Only, Read and Modify, and Manage Wallet access levels tousers, user groups, endpoints, and endpoint groups.
Chapter 12Configuring an Oracle Key Vault to New TDE-Enabled Database Connection
12-15
12.3 Migrating Existing TDE Wallets to Oracle Key VaultA migrated TDE wallet can be used to restore database contents that were previouslyencrypted by TDE.
• About Migrating Existing TDE Wallets to Oracle Key VaultThe sqlnet.ora file enables the migration of existing TDE wallets to Oracle KeyVault.
• Migrating an Existing TDE Wallet to Oracle Key VaultYou can use the okvutil upload command to start the migration of a TDE-enabled database from an existing TDE wallet to Oracle Key Vault.
• Restoring Database Contents Previously Encrypted by TDE Using an OracleWalletYou perform the restoration process on the endpoint where you downloaded theOracle wallet.
12.3.1 About Migrating Existing TDE Wallets to Oracle Key VaultThe sqlnet.ora file enables the migration of existing TDE wallets to Oracle Key Vault.
For Oracle Database release 12.2.0.1 or earlier, the sqlnet.ora file enables themigration of existing TDE wallets to Oracle Key Vault. For Oracle Database release18c or later, you must set the parameters TDE_CONFIGURATION and WALLET_ROOT tomigrate wallets to Oracle Key Vault.
When the Transparent Data Encryption (TDE) wallets already exist, you must modifythe sqlnet.ora file or the TDE_CONFIGURATION parameter to recognize Oracle KeyVault before you can migrate the existing TDE wallets to Oracle Key Vault.
Along with the current TDE master encryption key, Oracle wallets maintain historicalTDE master encryption keys that are replaced by each rekey operation that rotates theTDE master encryption key. These historical TDE master encryption keys help torestore Oracle Database backups that were previously made using one of thehistorical TDE master encryption keys. During the TDE migration from an Oracle walletfile to Oracle Key Vault, Key Vault generates new master encryption keys. After thismaster encryption key generation, Oracle Key Vault maintains all new keys.
Oracle recommends that you upload the Oracle wallet to Oracle Key Vault before youperform the migration. This enables you to keep a backup of the wallet with all of thehistorical key information, before you begin the migration. When the migration iscomplete, manually delete the old wallet on the client system.
If you are operating on an Oracle Real Application Clusters (Oracle RAC)configuration, ensure that you migrate from a shared TDE wallet (in Oracle AutomaticStorage Management (Oracle ASM) or Oracle Automatic Storage ManagementCluster File System (Oracle ACFS)) to Oracle Key Vault. Individual wallets for eachOracle RAC node are not supported.
Related Topics
• Restoring Database Contents Previously Encrypted by TDE Using an OracleWalletYou perform the restoration process on the endpoint where you downloaded theOracle wallet.
Chapter 12Migrating Existing TDE Wallets to Oracle Key Vault
12-16
12.3.2 Migrating an Existing TDE Wallet to Oracle Key VaultYou can use the okvutil upload command to start the migration of a TDE-enabled databasefrom an existing TDE wallet to Oracle Key Vault.
1. Back up the database that you want to migrate.
2. Complete the enrollment of the endpoint.
3. If you have not done so already, then use the okvutil upload command to uploadcurrent and historical master encryption keys from the TDE wallet into the virtual wallet inOracle Key Vault.
$ OKV_HOME/bin/okvutil upload -t WALLET -l /path/to/tde-wallet -g name_of_wallet_in_Oracle_Key_Vault -v 4
This step allows you to delete the wallet after a successful migration, which is often arequirement of security policies that do not allow encryption keys on the encryptingserver.
4. Configure the wallet location.
• For Oracle Database release 12.2.0.1 or earlier: Edit the METHOD setting of theOracle Database sqlnet.ora file for the migration to Oracle Key Vault:
ENCRYPTION_WALLET_LOCATION=(SOURCE=(METHOD=OKV)(METHOD_DATA=(DIRECTORY=wallet_location)))
By default, the sqlnet.ora file is located in the ORACLE_HOME/network/admindirectory or in the location set by the TNS_ADMIN environment variable.
• For Oracle Database release 18c or later: Set the TDE_CONFIGURATION parameter.
ALTER SYSTEM SET TDE_CONFIGURATION = "KEYSTORE_CONFIGURATION=OKV|FILE" SCOPE = BOTH;
The WALLET_ROOT parameter is already set, so you do not need to change it.
5. Reconnect to the database instance (or restart an Oracle RAC database) to capture thechanges in the sqlnet.ora file.
If you are reconnecting to the database instance, then changes to theTDE_CONFIGURATION parameter in Oracle Databae 18c or later are applied immediately,and no restart is necessary.
6. Query the V$ENCRYPTION_WALLET dynamic view to ensure that the METHOD_DATA setting inthe sqlnet.ora file changed.
SELECT CON_ID, WALLET_TYPE, WALLET_ORDER, STATUS FROM V$ENCRYPTION_WALLET WHERE CON_ID <> 2;
The output of the query should now show METHOD=OKV.
7. If the endpoint is a an Oracle Release 11g release 2 database, then close the localOracle wallet and open the HSM wallet as follows:
8. Close the local Oracle wallet using these steps:
a. Close the local Oracle wallet as follows:
If the auto-login wallet is open, execute the following commands:
Chapter 12Migrating Existing TDE Wallets to Oracle Key Vault
12-17
oracle$ cd wallet_locationoracle$ mv cwallet.sso cwallet.sso.baksqlplus sys as sysdbaEnter password: password SQL> ALTER SYSTEM SET WALLET CLOSE;
If the password-protected wallet is open, then execute the following statementin SQL*Plus:
ALTER SYSTEM SET WALLET CLOSE IDENTIFIED BY "wallet_password";
b. In SQL*Plus, open the connection into Oracle Key Vault, whereOracle_Key_Vault_password is the password that was provided when theokvclient.jar file was installed:
ALTER SYSTEM SET WALLET OPEN IDENTIFIED BY "Oracle_Key_Vault_password";
9. Migrate from TDE wallets to Oracle Key Vault.
• For Oracle Database 11g release 2: If you entered a password for the walletwhile installing the endpoint client software, then in SQL*Plus, execute thisstatement:
ALTER SYSTEM SET ENCRYPTION KEY IDENTIFIED BY "Oracle_Key_Vault_password" MIGRATE USING "wallet_password";
If you chose the auto-login option while installing the endpoint client software,then execute this statement:
ALTER SYSTEM SET ENCRYPTION KEY IDENTIFIED BY "NULL" MIGRATE USING "wallet_password";
• For Oracle Database 12c or later: As a user who has been granted theSYSKM administrative privilege:
ADMINISTER KEY MANAGEMENT SET ENCRYPTION KEY IDENTIFIED BY "Oracle_Key_Vault_password" MIGRATE USING "wallet_password" WITH BACKUP;
Though the WITH BACKUP clause is required for the ADMINISTER KEYMANAGEMENT statement, it is ignored by TDE in Oracle Key Vault.
10. Open the wallet.
• For Oracle Database 11g release 2: If the endpoint requires a password toconnect to Oracle Key Vault, then enter the password.
ALTER SYSTEM SET ENCRYPTION WALLET OPEN IDENTIFIED BY "Oracle_Key_Vault_endpoint_password";
• For Oracle Database 12c or later:
ADMINISTER KEY MANAGEMENT SET KEYSTORE OPEN IDENTIFIED BY "Oracle_Key_Vault_endpoint_password";
11. After you complete the migration, if you are using an auto-login wallet, then re-enable it by renaming the cwallet.sso.bak file to cwallet.sso.
Related Topics
• About Endpoint Enrollment and ProvisioningEndpoints are Oracle Key Vault clients that use the server to store and managesecurity objects, share them with trusted peers, and retrieve them.
Chapter 12Migrating Existing TDE Wallets to Oracle Key Vault
12-18
• okvutil download CommandThe okvutil download command downloads security objects from Oracle Key Vault tothe endpoint.
12.3.3 Restoring Database Contents Previously Encrypted by TDE Usingan Oracle Wallet
You perform the restoration process on the endpoint where you downloaded the Oraclewallet.
When an Oracle database endpoint is converted from a local Oracle wallet file to usingOracle Key Vault, you may need to restore backups that were encrypted by using a key fromthis local wallet file.
In this case, you must download the necessary key from Oracle Key Vault to a local wallet fileto be used when you decrypt the backup during the restore process. For example, supposethat the Finance_DB database had recently migrated to use an online master key to OracleKey Vault after you have uploaded the premigration wallet. If a system failure forces you torestore from a database backup taken before the migration to Oracle Key Vault, then you canstill restore the contents of the database by using an Oracle wallet downloaded from theOracle virtual wallet that contains the Finance_DB wallet data that you had uploaded earlier.
1. Download this Oracle wallet from Oracle Key Vault by using the okvutil downloadcommand.
2. On the endpoint where you downloaded the Oracle wallet, edit the sqlnet.ora file tohave the following setting:
ENCRYPTION_WALLET_LOCATION=(SOURCE=(METHOD=FILE)(METHOD_DATA=(DIRECTORY=wallet_file_path)))
Put the ENCRYPTION_WALLET_LOCATION setting on one line.
3. Open the downloaded wallet using the password you specified.
• For Oracle Database 11g release 2, as a user who has been granted the ALTERSYSTEM system privilege:
ALTER SYSTEM SET ENCRYPTION WALLET OPEN IDENTIFIED BY "wallet_password";
• For Oracle Database 12c or later, as a user who has been granted the SYSKMadministrative privilege:
ADMINISTER KEY MANAGEMENT SET KEYSTORE OPEN IDENTIFIED BY "wallet_password";
Opening the wallet enables the server to read the contents of the updated sqlnet.orafile. At this point, the endpoint server has been restored to a state where it now can runwith the original version of the wallet.
Related Topics
• okvutil download CommandThe okvutil download command downloads security objects from Oracle Key Vault tothe endpoint.
12.4 Uploading and Downloading Oracle WalletsTo store and share Oracle wallets, you must upload them to Oracle Key Vault.
Chapter 12Uploading and Downloading Oracle Wallets
12-19
• About Uploading and Downloading Oracle WalletsYou use the okvutil utility to upload and download Oracle wallets.
• Uploading Oracle WalletsThe okvutil upload command uploads wallets to Oracle Key Vault.
• Downloading Oracle WalletsThe okvutil download command downloads an Oracle wallet from the OracleKey Vault server to an endpoint.
• Guidelines for Uploading and Downloading Oracle WalletsOracle provides guidelines for uploading and downloading wallets to and fromOracle Key Vault.
12.4.1 About Uploading and Downloading Oracle WalletsYou use the okvutil utility to upload and download Oracle wallets.
After you upload a wallet to Oracle Key Vault, you can then create a new virtual walletin Key Vault, and add security objects to it that you want to share. You must grantendpoints access to the virtual wallet before they can download it. You can use theokvutil upload and okvutil download commands to upload and download Oraclewallets between Oracle Key Vault and its endpoints. The okvutil utility is packagedwith the endpoint software that you install at the endpoint.
The Oracle Key Vault okvutil software can read an Oracle wallet at the granularitylevel of an individual security object. It therefore uploads the wallet contents asindividual items. During download you can recreate the original wallet with the sameset of security objects, or create a new wallet with different set of security objects.
You can upload and download both password-based wallets and auto-login wallets.The wallet contents can be downloaded later into a new wallet of either type. Forexample, an uploaded password-protected wallet can be downloaded as an auto-loginwallet, or an uploaded auto-login wallet can be downloaded as a password-protectedwallet.
You can use Oracle Key Vault to construct a new virtual wallet containing securityobjects from previously uploaded Oracle wallets. For example, given a previouslyuploaded Oracle wallet containing five symmetric keys and three opaque objects, youcan create a new virtual wallet consisting of only three of the original five symmetrickeys and one of the three original opaque objects. This virtual wallet can bedownloaded like the original wallet to provide the endpoint with access to only a subsetof the keys. This process does not modify the original wallet.
Related Topics
• Oracle Key Vault okvutil Endpoint Utility ReferenceThe okvutil utility enables you to perform tasks uploading and downloadingsecurity objects.
12.4.2 Uploading Oracle WalletsThe okvutil upload command uploads wallets to Oracle Key Vault.
Uploading the contents of a TDE wallet into Oracle Key Vault is a unique feature ofOracle Key Vault: If you plan to migrate the database to use Oracle Key Vault in onlinemaster key mode then you must upload the wallet content before the migration step.That allows you to delete the file-based wallet after a successful migration from the
Chapter 12Uploading and Downloading Oracle Wallets
12-20
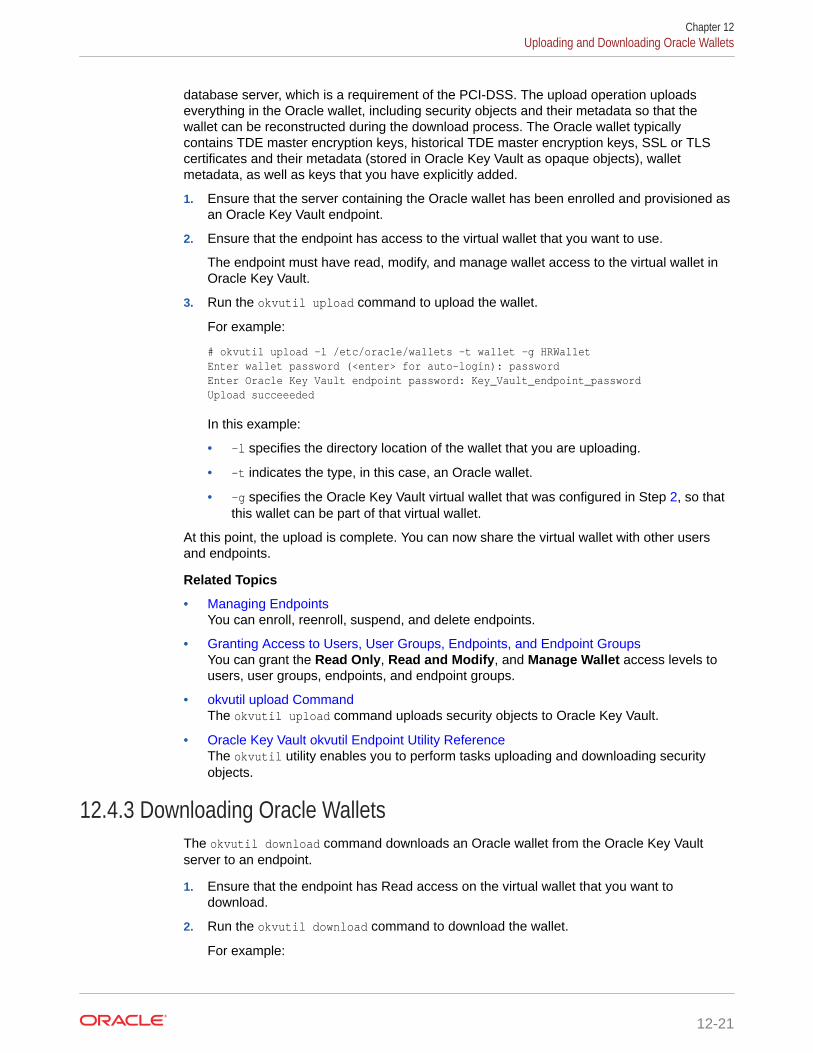
database server, which is a requirement of the PCI-DSS. The upload operation uploadseverything in the Oracle wallet, including security objects and their metadata so that thewallet can be reconstructed during the download process. The Oracle wallet typicallycontains TDE master encryption keys, historical TDE master encryption keys, SSL or TLScertificates and their metadata (stored in Oracle Key Vault as opaque objects), walletmetadata, as well as keys that you have explicitly added.
1. Ensure that the server containing the Oracle wallet has been enrolled and provisioned asan Oracle Key Vault endpoint.
2. Ensure that the endpoint has access to the virtual wallet that you want to use.
The endpoint must have read, modify, and manage wallet access to the virtual wallet inOracle Key Vault.
3. Run the okvutil upload command to upload the wallet.
For example:
# okvutil upload -l /etc/oracle/wallets -t wallet -g HRWalletEnter wallet password (<enter> for auto-login): passwordEnter Oracle Key Vault endpoint password: Key_Vault_endpoint_passwordUpload succeeeded
In this example:
• -l specifies the directory location of the wallet that you are uploading.
• -t indicates the type, in this case, an Oracle wallet.
• -g specifies the Oracle Key Vault virtual wallet that was configured in Step 2, so thatthis wallet can be part of that virtual wallet.
At this point, the upload is complete. You can now share the virtual wallet with other usersand endpoints.
Related Topics
• Managing EndpointsYou can enroll, reenroll, suspend, and delete endpoints.
• Granting Access to Users, User Groups, Endpoints, and Endpoint GroupsYou can grant the Read Only, Read and Modify, and Manage Wallet access levels tousers, user groups, endpoints, and endpoint groups.
• okvutil upload CommandThe okvutil upload command uploads security objects to Oracle Key Vault.
• Oracle Key Vault okvutil Endpoint Utility ReferenceThe okvutil utility enables you to perform tasks uploading and downloading securityobjects.
12.4.3 Downloading Oracle WalletsThe okvutil download command downloads an Oracle wallet from the Oracle Key Vaultserver to an endpoint.
1. Ensure that the endpoint has Read access on the virtual wallet that you want todownload.
2. Run the okvutil download command to download the wallet.
For example:
Chapter 12Uploading and Downloading Oracle Wallets
12-21
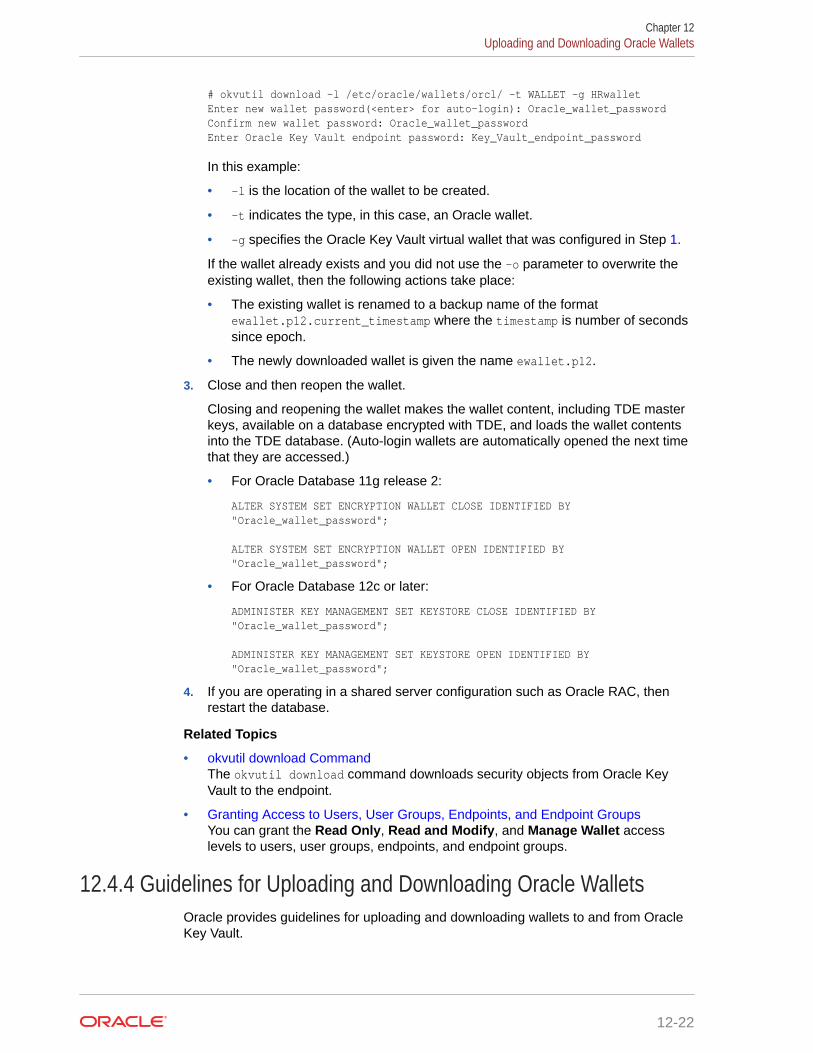
# okvutil download -l /etc/oracle/wallets/orcl/ -t WALLET -g HRwalletEnter new wallet password(<enter> for auto-login): Oracle_wallet_passwordConfirm new wallet password: Oracle_wallet_passwordEnter Oracle Key Vault endpoint password: Key_Vault_endpoint_password
In this example:
• -l is the location of the wallet to be created.
• -t indicates the type, in this case, an Oracle wallet.
• -g specifies the Oracle Key Vault virtual wallet that was configured in Step 1.
If the wallet already exists and you did not use the -o parameter to overwrite theexisting wallet, then the following actions take place:
• The existing wallet is renamed to a backup name of the formatewallet.p12.current_timestamp where the timestamp is number of secondssince epoch.
• The newly downloaded wallet is given the name ewallet.p12.
3. Close and then reopen the wallet.
Closing and reopening the wallet makes the wallet content, including TDE masterkeys, available on a database encrypted with TDE, and loads the wallet contentsinto the TDE database. (Auto-login wallets are automatically opened the next timethat they are accessed.)
• For Oracle Database 11g release 2:
ALTER SYSTEM SET ENCRYPTION WALLET CLOSE IDENTIFIED BY "Oracle_wallet_password";
ALTER SYSTEM SET ENCRYPTION WALLET OPEN IDENTIFIED BY "Oracle_wallet_password";
• For Oracle Database 12c or later:
ADMINISTER KEY MANAGEMENT SET KEYSTORE CLOSE IDENTIFIED BY "Oracle_wallet_password";
ADMINISTER KEY MANAGEMENT SET KEYSTORE OPEN IDENTIFIED BY "Oracle_wallet_password";
4. If you are operating in a shared server configuration such as Oracle RAC, thenrestart the database.
Related Topics
• okvutil download CommandThe okvutil download command downloads security objects from Oracle KeyVault to the endpoint.
• Granting Access to Users, User Groups, Endpoints, and Endpoint GroupsYou can grant the Read Only, Read and Modify, and Manage Wallet accesslevels to users, user groups, endpoints, and endpoint groups.
12.4.4 Guidelines for Uploading and Downloading Oracle WalletsOracle provides guidelines for uploading and downloading wallets to and from OracleKey Vault.
Chapter 12Uploading and Downloading Oracle Wallets
12-22
• If there is a change to the content of the original wallet, such as a key rotation or a rekeyoperation, then upload the wallet again to Oracle Key Vault so that Key Vault has thelatest copy of the wallet.
• Use care if you plan to use the okvutil upload and okvutil download commands,which provide an overwrite (-o) option. This option overwrites data in the virtual walletthat conflicts with the data to be uploaded. Before you use the -o option, you shouldcreate a local backup of the wallet file.
• Do not try to upload the same physical Oracle wallet to more than one virtual wallet onthe Oracle Key Vault server. If you want to share an Oracle wallet with multiple endpoints,then create an endpoint group.
Related Topics
• Managing Endpoint GroupsAn endpoint group is a named group of endpoints that share a common set of wallets.
12.5 Uploading and Downloading JKS and JCEKS KeystoresThe okvutil upload and okvutil download commands can upload and download JKS andJCEKS keystores.
• About Uploading and Downloading JKS and JCEKS KeystoresYou use the okvutil utility to upload and download JKS and JCEKS keystores.
• Uploading JKS or JCEKS KeystoresThe okvutil upload command can upload a JKS or JCEKS to the Oracle Key Vaultserver.
• Downloading JKS or JCEKS KeystoresThe okvutil download command can download an uploaded JKS or JCEKS keystore.
• Guidelines for Uploading and Downloading JKS and JCEKS KeystoresOracle provides recommendations for when you upload and download JKS and JCEKSkeystores.
12.5.1 About Uploading and Downloading JKS and JCEKS KeystoresYou use the okvutil utility to upload and download JKS and JCEKS keystores.
You can upload JKS and JCEKS keystores to Oracle Key Vault for long-term retention,recovery, and sharing, and when you need them, download them to an endpoint.
Similar to wallets, when you upload a JKS or JCEKS keystore, Oracle Key Vault can readeach item within the keystore. It uploads the keystore contents as individual items.
12.5.2 Uploading JKS or JCEKS KeystoresThe okvutil upload command can upload a JKS or JCEKS to the Oracle Key Vault server.
1. Ensure that the server containing the Java keystore has been enrolled and provisionedas an Oracle Key Vault endpoint.
2. Ensure that access control has been configured for the endpoint.
If you are uploading the keystore to a virtual wallet, then ensure that the endpoint has theread, modify, and manage wallet access to this virtual wallet.
Chapter 12Uploading and Downloading JKS and JCEKS Keystores
12-23
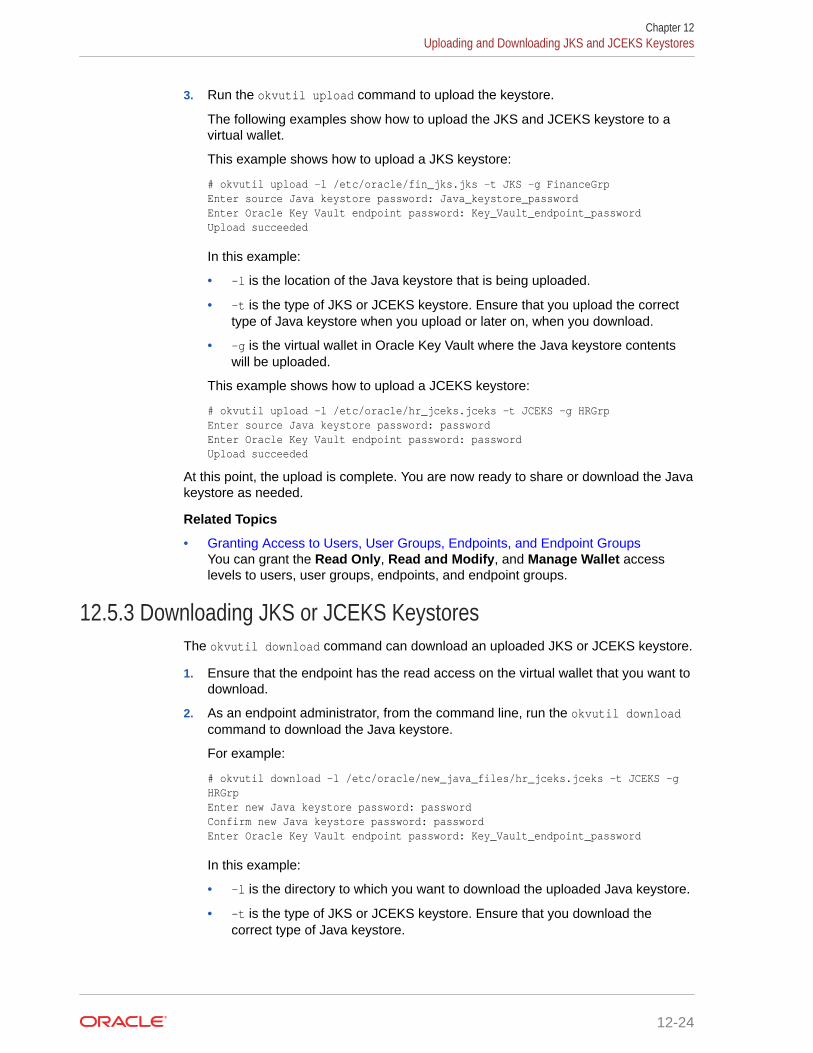
3. Run the okvutil upload command to upload the keystore.
The following examples show how to upload the JKS and JCEKS keystore to avirtual wallet.
This example shows how to upload a JKS keystore:
# okvutil upload -l /etc/oracle/fin_jks.jks -t JKS -g FinanceGrpEnter source Java keystore password: Java_keystore_passwordEnter Oracle Key Vault endpoint password: Key_Vault_endpoint_passwordUpload succeeded
In this example:
• -l is the location of the Java keystore that is being uploaded.
• -t is the type of JKS or JCEKS keystore. Ensure that you upload the correcttype of Java keystore when you upload or later on, when you download.
• -g is the virtual wallet in Oracle Key Vault where the Java keystore contentswill be uploaded.
This example shows how to upload a JCEKS keystore:
# okvutil upload -l /etc/oracle/hr_jceks.jceks -t JCEKS -g HRGrpEnter source Java keystore password: passwordEnter Oracle Key Vault endpoint password: passwordUpload succeeded
At this point, the upload is complete. You are now ready to share or download the Javakeystore as needed.
Related Topics
• Granting Access to Users, User Groups, Endpoints, and Endpoint GroupsYou can grant the Read Only, Read and Modify, and Manage Wallet accesslevels to users, user groups, endpoints, and endpoint groups.
12.5.3 Downloading JKS or JCEKS KeystoresThe okvutil download command can download an uploaded JKS or JCEKS keystore.
1. Ensure that the endpoint has the read access on the virtual wallet that you want todownload.
2. As an endpoint administrator, from the command line, run the okvutil downloadcommand to download the Java keystore.
For example:
# okvutil download -l /etc/oracle/new_java_files/hr_jceks.jceks -t JCEKS -g HRGrpEnter new Java keystore password: passwordConfirm new Java keystore password: passwordEnter Oracle Key Vault endpoint password: Key_Vault_endpoint_password
In this example:
• -l is the directory to which you want to download the uploaded Java keystore.
• -t is the type of JKS or JCEKS keystore. Ensure that you download thecorrect type of Java keystore.
Chapter 12Uploading and Downloading JKS and JCEKS Keystores
12-24
• -g is the name of the object to download, which in this case is the JKS keystoreHRGrp.
Related Topics
• okvutil download CommandThe okvutil download command downloads security objects from Oracle Key Vault tothe endpoint.
• Granting Access to Users, User Groups, Endpoints, and Endpoint GroupsYou can grant the Read Only, Read and Modify, and Manage Wallet access levels tousers, user groups, endpoints, and endpoint groups.
12.5.4 Guidelines for Uploading and Downloading JKS and JCEKSKeystores
Oracle provides recommendations for when you upload and download JKS and JCEKSkeystores.
• If there is a change to the content of the original JKS or JCEKS keystore, then upload thekeystore again to Oracle Key Vault so that Key Vault has the latest copy of the keystore.
• Use care if you plan to use the okvutil upload and okvutil download commands,which provide an overwrite (-o) option. This option overwrites data in the file. Before youuse the -o option, you should create backups of the keystore files before downloadingthem.
• Do not try to upload the same physical JKS or JCEKS keystore to more than one virtualwallet on the Oracle Key Vault server. If you want to share a Java keystore with multipleendpoints, then create an endpoint group.
Related Topics
• Managing Endpoint GroupsAn endpoint group is a named group of endpoints that share a common set of wallets.
12.6 Using a User-Defined Key as the TDE Master EncryptionKey
You can import a generated key to be used as the Transparent Data Encryption (TDE) masterencryption key in Oracle Key Vault.
• About Using a User-Defined Key as the TDE Master Encryption KeyUsers who have the Key Administrator role can upload a user-defined key to the virtualwallet to which they have write access.
• Step 1: Upload the User-Defined KeyUse the okvutil upload command to upload user-defined master encryption keys toOracle Key Vault.
• Step 2: Activate the User-Defined Key as a TDE Master Encryption KeyAfter you upload the user-defined key, you are ready to activate the key as a TDE masterencryption key.
Chapter 12Using a User-Defined Key as the TDE Master Encryption Key
12-25
12.6.1 About Using a User-Defined Key as the TDE Master EncryptionKey
Users who have the Key Administrator role can upload a user-defined key to the virtualwallet to which they have write access.
This enables it so that it can be used as the Transparent Data Encryption (TDE)master encryption key. This feature provides key administrators with more control oncreation of the master encryption key used to encrypt TDE data encryption keys.
The type parameter of the okvutil upload command includes the optionTDE_KEY_BYTES, which enables you to upload user-defined key bytes to Oracle KeyVault to be used as the TDE master encryption key. You must then activate the key asa TDE master encryption key by running the ADMINISTER KEY MANAGEMENT SQLstatement on the database.
Related Topics
• Oracle Database Advanced Security Guide
12.6.2 Step 1: Upload the User-Defined KeyUse the okvutil upload command to upload user-defined master encryption keys toOracle Key Vault.
The raw bytes data of the user-defined key is stored in a text file and uploaded toOracle Key Vault.
The raw bytes data uploaded to Oracle Key Vault forms part of the TDE Master Keyand the TDE Master Key Identifier. Additional metadata is added to the raw bytesdata to enable the database to identify and activate the data as the TDE Master Keyand the TDE Master Key Identifier. In the text file, the raw bytes data that forms theTDE Master Key is prefixed by TDE Master Key. The raw bytes data that forms the TDEMaster Key Identifier is prefixed by TDE Master Key Identifier. TDE Master KeyIdentifier represents the master encryption key in the database. Once the key isactivated, you should see the user-defined raw bytes that form the TDE Master KeyIdentifier as the subset of the KEY_ID column of the V$ENCRYPTION_KEYS view. InOracle Key Vault, the TDE Master Key and TDE Master Key Identifier values arestored as managed KMIP objects with a symmetric key as a KMIP object type.
1. Create a text file containing the raw bytes data of the user-defined key.
Use the following format:
TDE Master Encryption Key Identifier: contiguous_TDE_Master_Encryption_Key_Identifier_bytes_encoded_in_32_hex_characters_(16_bytes_long)TDE Master Encryption Key: contiguous_TDE_Master_Encryption_Key_bytes_encoded_in_64_hex_characters_(32_bytes_long)
Chapter 12Using a User-Defined Key as the TDE Master Encryption Key
12-26
For example:
TDE Master Encryption Key Identifier: 1F1E1D1C1B1A10191817161514131210TDE Master Encryption Key: 000102030405060708090A0B0C0D0E0F101112131415161718191A1B1C1D1E1F
2. Save the file as tde_key_bytes.txt.
3. Use the okvutil upload command to upload tde_key_bytes.txt.
The format of the okvutil upload command is:
okvutil upload [--overwrite] --location location --type type [--group group] [--description description] [--verbose verbosity_level]
Example:
$OKV_HOME/bin/okvutil upload -l /home/oracle/tde_key_bytes.txt -t TDE_KEY_BYTES -g "FIN_DATABASE_VIRTUAL_WALLET" -d "This key was created for Financial database use on 1st Mar 2019"
In this example:
• -l specifies the path to the tde_key_bytes.txt file.
• -t specifies the type of the object to upload. To upload a user-defined key, specifythe type as TDE_KEY_BYTES.
• -g specifies the name of an Oracle Key Vault virtual wallet to which the key is added.
• -d specifies a description for the key.
When -t is TDE_KEY_BYTES, the description specified for –d is displayed as the tag in theV$ENCRYPTION_KEYS dynamic view.
4. Specify the required parameters and then press Enter.
5. Enter the Oracle Key Vault endpoint password and press Enter.
The message Upload succeeded is displayed.
$OKV_HOME/bin/okvutil upload -l /home/oracle/tde_key_bytes.txt -t TDE_KEY_BYTES -g "FIN_DATABASE_VIRTUAL_WALLET" -d "This key was created for Financial database use on 1st Mar 2019" Enter Oracle Key Vault endpoint password:Upload succeeded
The raw bytes data of the user-defined key is uploaded. The next step is to activate the user-defined key as a TDE master encryption key.
Related Topics
• Step 2: Activate the User-Defined Key as a TDE Master Encryption KeyAfter you upload the user-defined key, you are ready to activate the key as a TDE masterencryption key.
Chapter 12Using a User-Defined Key as the TDE Master Encryption Key
12-27
12.6.3 Step 2: Activate the User-Defined Key as a TDE MasterEncryption Key
After you upload the user-defined key, you are ready to activate the key as a TDEmaster encryption key.
The raw bytes data uploaded to Oracle Key Vault for the TDE Master Key Identifieris displayed as the NAME attribute of the KMIP object that is created as thecorresponding TDE master encryption key in Oracle Key Vault.
1. Log in to the Oracle Key Vault management console as a user with the KeyAdministrator role or as a user with access to the virtual wallet.
2. Select the Keys & Wallets tab, then Keys, Secrets & Objects in the leftnavigation bar.
3. In the Object Details page, expand Advanced.
The required Key ID is displayed in the Names area. The Key ID is prefixed withORACLE.TDE.HSM.MK.
For example:
ORACLE.TDE.HSM.MK.1F1E1D1C1B1A10191817161514131210
The TDE master encryption key identifiers contain the user defined raw bytes dataprefixed by additional metadata.
4. Copy and store the key ID displayed after the prefix ORACLE.TDE.HSM.MK
For example:
1F1E1D1C1B1A10191817161514131210
5. Connect to the Oracle database as a user who has privileges to run theADMINISTER KEY MANAGEMENT SQL statement.
For example:
sqlplus / as sysdba
6. Activate the key as a TDE master encryption key using the ADMINISTER KEYMANAGEMENT command.
ADMINISTER KEY MANAGEMENT USE KEY '1F1E1D1C1B1A10191817161514131210' IDENTIFIED BY "password";
You can query the TAG column of the V$ENCRYPTION_KEYS view for the identifier ofthe newly created key.
Chapter 12Using a User-Defined Key as the TDE Master Encryption Key
12-28
13Managing Oracle Key Vault Endpoints
Oracle Key Vault endpoints are computer systems like database or application servers, wherekeys and credentials are used to access data.
• Overview of Managing EndpointsYou can manage endpoints in both standalone environments and multi-master clusters inmostly the same way, except that multi-master clusters have more restrictions.
• Managing EndpointsYou can enroll, reenroll, suspend, and delete endpoints.
• Managing Endpoint DetailsEndpoint details refers to endpoint name, type, description, platform, and email, andadding the endpoint to a group, or upgrading the endpoint software.
• Default Wallets and EndpointsYou can use a default wallet, which is a type of virtual wallet, with an endpoint.
• Managing Endpoint Access to a Virtual WalletYou can grant an endpoint access to a virtual wallet, and revoke or modify access when itis no longer necessary.
• Managing Endpoint GroupsAn endpoint group is a named group of endpoints that share a common set of wallets.
13.1 Overview of Managing EndpointsYou can manage endpoints in both standalone environments and multi-master clusters inmostly the same way, except that multi-master clusters have more restrictions.
• About Managing EndpointsYou must register and enroll an endpoint to communicate with Oracle Key Vault.
• How a Multi-Master Cluster Affects EndpointsYou should be aware of how a multi-master cluster affects endpoints, both in the way anendpoint connects to it and with restrictions.
13.1.1 About Managing EndpointsYou must register and enroll an endpoint to communicate with Oracle Key Vault.
Afterward, keys in the endpoint can be uploaded to Oracle Key Vault and be shared withother endpoints and then downloaded from these endpoints so that users can access theirdata. Only a user with the System Administrator role or the Create Endpoint privilege can addan endpoint to Oracle Key Vault. After the endpoint is added, the endpoint administrator canenroll the endpoint by downloading and installing the endpoint software at the endpoint. Theendpoint can then use the utilities packaged with the endpoint software to upload anddownload security objects to and from Oracle Key Vault.
13-1
All users can create virtual wallets but only a user with the Key Administrator role cangrant endpoints access to security objects contained in virtual wallets. A KeyAdministrator user can grant access to any wallet in an endpoint. A user with the KeyAdministrator role or Create Endpoint Group privilege can also create endpoint groupsto enable shared access to virtual wallets. Any user (including users who created theendpoint) who has the manage wallet permission on a wallet can grant access to thatwallet to an endpoint. When you grant an endpoint group access to a virtual wallet, allthe member endpoints will have access to the virtual wallet. For example, you cangrant all the nodes in an Oracle Real Application Clusters (Oracle RAC) databaseaccess to a virtual wallet by putting them in an endpoint group. This saves you thestep of granting each node access to the virtual wallet.
If you have a large deployment, then install at least four Oracle Key Vault servers, andwhen you enroll the endpoints, balance them across these four servers to ensure highavailability. For example, if a data center has 1000 database endpoints to register, andyou have Oracle Key Vault four servers to accommodate them, then enroll 250endpoints with each of the four servers.
When you name an endpoint, remember that an Oracle Key Vault user name cannotbe the same as an Oracle Key Vault endpoint name.
The administrative roles and privileges as they pertain to endpoints are as follows:
• Endpoint creation: A user with the System Administrator role can createendpoints anywhere in the Oracle Key Vault system. A user with the CreateEndpoint privilege can create their own endpoints.
• Endpoint management: A user with the System Administrator role can manageendpoints anywhere in the Oracle Key Vault system. A user with the ManageEndpoint privilege can manage his or her own endpoints. This includes endpointsthat the user was explicitly granted the Manage Endpoint privilege on, or endpointsthat the user created and continues to have the Manage Endpoint privileges on.This management includes the following duties:
– Managing the endpoint metadata such as the name, type, platform,description, and email notifications
– Managing the endpoint life cycle, which consists of enrolling, suspending,reenrolling, and deleting endpoints
• Endpoint group creation: A user with the Key Administrator role can createendpoint groups anywhere in the Oracle Key Vault system. A user with the CreateEndpoint Group privilege can create his or her own endpoint groups.
• Endpoint group management: A user with the Key Administrator role canmanage endpoint groups anywhere in the Oracle Key Vault system. A user withthe Manage Endpoint Group privilege can manage his or her own endpointgroups. The endpoint groups that a user can manage include those that the userwas explicitly granted the Manage Endpoint Group privilege on, or those that theuser created and continues to have the Manage Endpoint Group privilege on. Thismanagement includes the following duties:
– Managing the endpoint group lifecycle, which consists of creating, modifying,and deleting endpoint groups
– Managing the life cycle of security objects, which consists of creating,modifying and deleting security objects
Chapter 13Overview of Managing Endpoints
13-2
Related Topics
• Endpoint PrivilegesOracle Key Vault provides privileges for creating and managing endpoints and endpointgroups.
13.1.2 How a Multi-Master Cluster Affects EndpointsYou should be aware of how a multi-master cluster affects endpoints, both in the way anendpoint connects to it and with restrictions.
In a multi-master configuration, when an endpoint attempts to make a connection to OracleKey Vault, it performs the following actions:
• First, it obtains the list of server IPs from its configuration file (okvclient.ora).
• Next, it picks one at random, preferentially from those in the same cluster subgroup asthe endpoint.
Be aware of the following restrictions with how endpoints work in multi-master clusters:
• An endpoint can only be enrolled from the same node where it was most recently createdor re-enrolled.
• You cannot assign a default wallet to an endpoint if one or both of them (wallet andendpoint) is in the PENDING state and if the assignment is attempted from a non-creatornode. After both the endpoint and wallet are in the ACTIVE state, this restriction ends.
13.2 Managing EndpointsYou can enroll, reenroll, suspend, and delete endpoints.
• Types of Endpoint EnrollmentThe first step in enrolling an endpoint is to add the endpoint to Oracle Key Vault.
• Endpoint Enrollment in a Multi-Master ClusterEndpoints of a cluster are the client systems of the multi-master cluster.
• Adding an Endpoint as an Oracle Key Vault System Administrator or Create EndpointUserA user who has been granted the System Administrator role or the Create Endpointprivilege can add an endpoint by using the Endpoints tab.
• Adding Endpoints Using Self-EnrollmentThe self-enrollment process immediately sends the endpoint to the Enrolled statuswithout the intermediate Registered status.
• Deleting, Suspending, or Reenrolling EndpointsWhen endpoints no longer use Oracle Key Vault to store security objects, you can deletethem, and then re-enroll when they are needed.
13.2.1 Types of Endpoint EnrollmentThe first step in enrolling an endpoint is to add the endpoint to Oracle Key Vault.
There are two methods for adding, also known as registering, an endpoint:
• Initiated by an administrator
Chapter 13Managing Endpoints
13-3
An Oracle Key Vault user who has the System Administrator role initiates theenrollment from the Oracle Key Vault side by adding the endpoint to Oracle KeyVault. When the endpoint is added, a one-time enrollment token is generated. Thistoken can be communicated to the endpoint administrator in two ways:
– Directly from Oracle Key Vault by email. To use email notification you mustconfigure SMTP in email settings.
– Out-of-band method, such as email or telephone.
The endpoint administrator uses the enrollment token to download the endpointsoftware and complete the enrollment process on the endpoint side. In a multi-master cluster, the same node that is used to add the endpoint must be used toenroll the endpoint.
After the enrollment token is used to enroll an endpoint, it cannot be used again foranother enrollment. If you must reenroll an endpoint, then the reenrollmentprocess will generate a new one-time enrollment token for this purpose.
• Self-enrolledEndpoints may enroll themselves during specific times without humanadministrative intervention. Endpoint self-enrollment is useful when the endpointsdo not share security objects, and use Oracle Key Vault primarily to store andrestore their own security objects. Another use for endpoint self-enrollment istesting.
A self-enrolled endpoint is created with a generic endpoint name in this format:ENDPT_001. In a cluster, a self-enrolled endpoint is created with a generic endpointname in this format: ENDPT_xx_001, where xx is a 2-digit node identifier or nodenumber. Initially, a self-enrolled endpoint has access only to the security objectsthat it uploads or creates. It does not have access to any virtual wallets. You canlater grant the endpoint access to virtual wallets after verifying its identity.
Endpoint self-enrollment is disabled by default, and must be enabled by a userwith the System Administrator role. A best practice is to enable self-enrollment forshort periods, when you expect endpoints to self enroll, and then disable it whenthe self-enrollment period ends.
Related Topics
• Configuring Email NotificationYou can use email notifications to directly notify administrators of Key Vault statuschanges without logging into the Oracle Key Vault management console.
13.2.2 Endpoint Enrollment in a Multi-Master ClusterEndpoints of a cluster are the client systems of the multi-master cluster.
Endpoint enrollment is divided into two steps. First you add the endpoint and then youenroll it.
The Oracle Key Vault server that becomes the initial node can have endpoints alreadyenrolled, especially if it was upgraded from a previous release. These existingendpoints initialize, or seed, the cluster. During induction, information about theendpoints that were enrolled in the cluster is replicated to the newly added node.During induction, Oracle Key Vault removes information about the endpoints that werepreviously enrolled in all candidate nodes added to the cluster.
Endpoints can only be enrolled on a read-write node.
Chapter 13Managing Endpoints
13-4
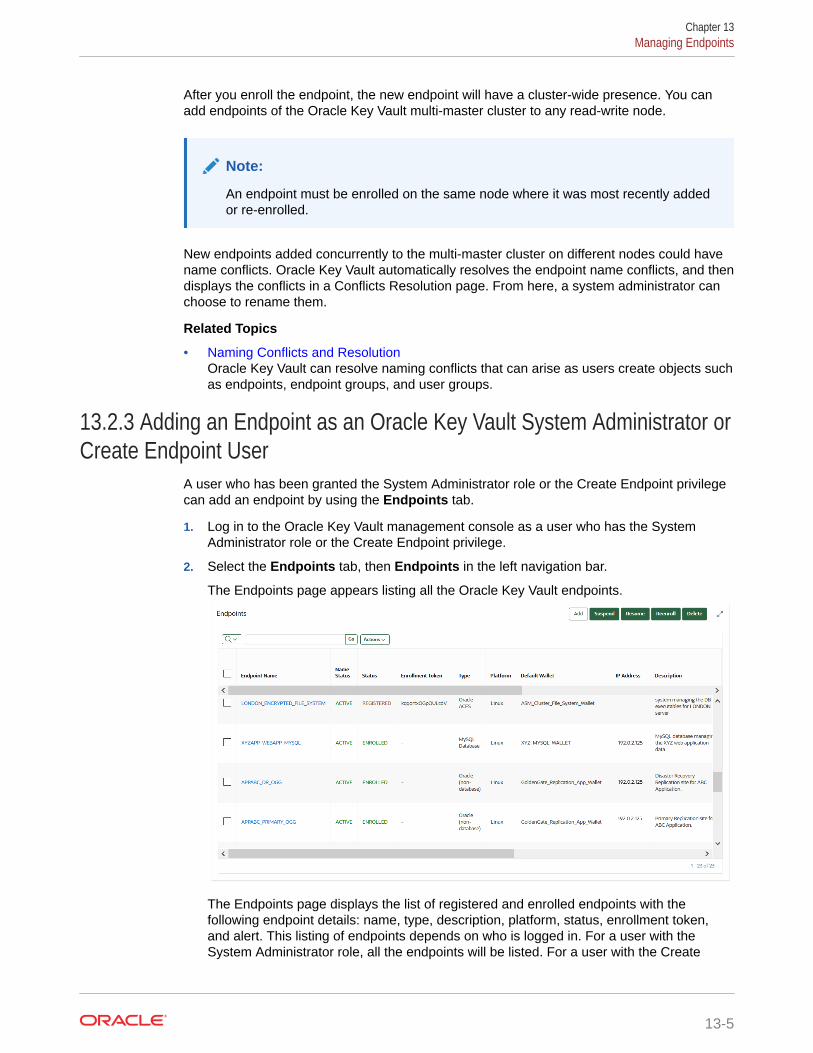
After you enroll the endpoint, the new endpoint will have a cluster-wide presence. You canadd endpoints of the Oracle Key Vault multi-master cluster to any read-write node.
Note:
An endpoint must be enrolled on the same node where it was most recently addedor re-enrolled.
New endpoints added concurrently to the multi-master cluster on different nodes could havename conflicts. Oracle Key Vault automatically resolves the endpoint name conflicts, and thendisplays the conflicts in a Conflicts Resolution page. From here, a system administrator canchoose to rename them.
Related Topics
• Naming Conflicts and ResolutionOracle Key Vault can resolve naming conflicts that can arise as users create objects suchas endpoints, endpoint groups, and user groups.
13.2.3 Adding an Endpoint as an Oracle Key Vault System Administrator orCreate Endpoint User
A user who has been granted the System Administrator role or the Create Endpoint privilegecan add an endpoint by using the Endpoints tab.
1. Log in to the Oracle Key Vault management console as a user who has the SystemAdministrator role or the Create Endpoint privilege.
2. Select the Endpoints tab, then Endpoints in the left navigation bar.
The Endpoints page appears listing all the Oracle Key Vault endpoints.
The Endpoints page displays the list of registered and enrolled endpoints with thefollowing endpoint details: name, type, description, platform, status, enrollment token,and alert. This listing of endpoints depends on who is logged in. For a user with theSystem Administrator role, all the endpoints will be listed. For a user with the Create
Chapter 13Managing Endpoints
13-5
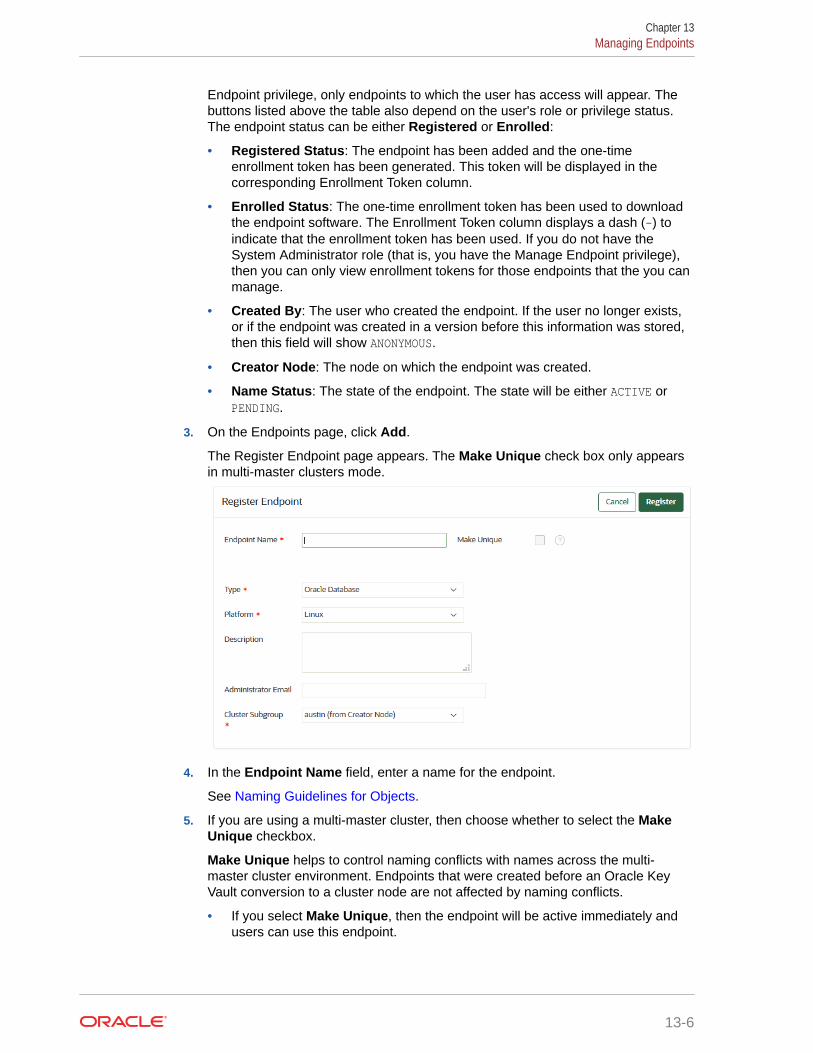
Endpoint privilege, only endpoints to which the user has access will appear. Thebuttons listed above the table also depend on the user's role or privilege status.The endpoint status can be either Registered or Enrolled:
• Registered Status: The endpoint has been added and the one-timeenrollment token has been generated. This token will be displayed in thecorresponding Enrollment Token column.
• Enrolled Status: The one-time enrollment token has been used to downloadthe endpoint software. The Enrollment Token column displays a dash (-) toindicate that the enrollment token has been used. If you do not have theSystem Administrator role (that is, you have the Manage Endpoint privilege),then you can only view enrollment tokens for those endpoints that the you canmanage.
• Created By: The user who created the endpoint. If the user no longer exists,or if the endpoint was created in a version before this information was stored,then this field will show ANONYMOUS.
• Creator Node: The node on which the endpoint was created.
• Name Status: The state of the endpoint. The state will be either ACTIVE orPENDING.
3. On the Endpoints page, click Add.
The Register Endpoint page appears. The Make Unique check box only appearsin multi-master clusters mode.
4. In the Endpoint Name field, enter a name for the endpoint.
See Naming Guidelines for Objects.
5. If you are using a multi-master cluster, then choose whether to select the MakeUnique checkbox.
Make Unique helps to control naming conflicts with names across the multi-master cluster environment. Endpoints that were created before an Oracle KeyVault conversion to a cluster node are not affected by naming conflicts.
• If you select Make Unique, then the endpoint will be active immediately andusers can use this endpoint.
Chapter 13Managing Endpoints
13-6
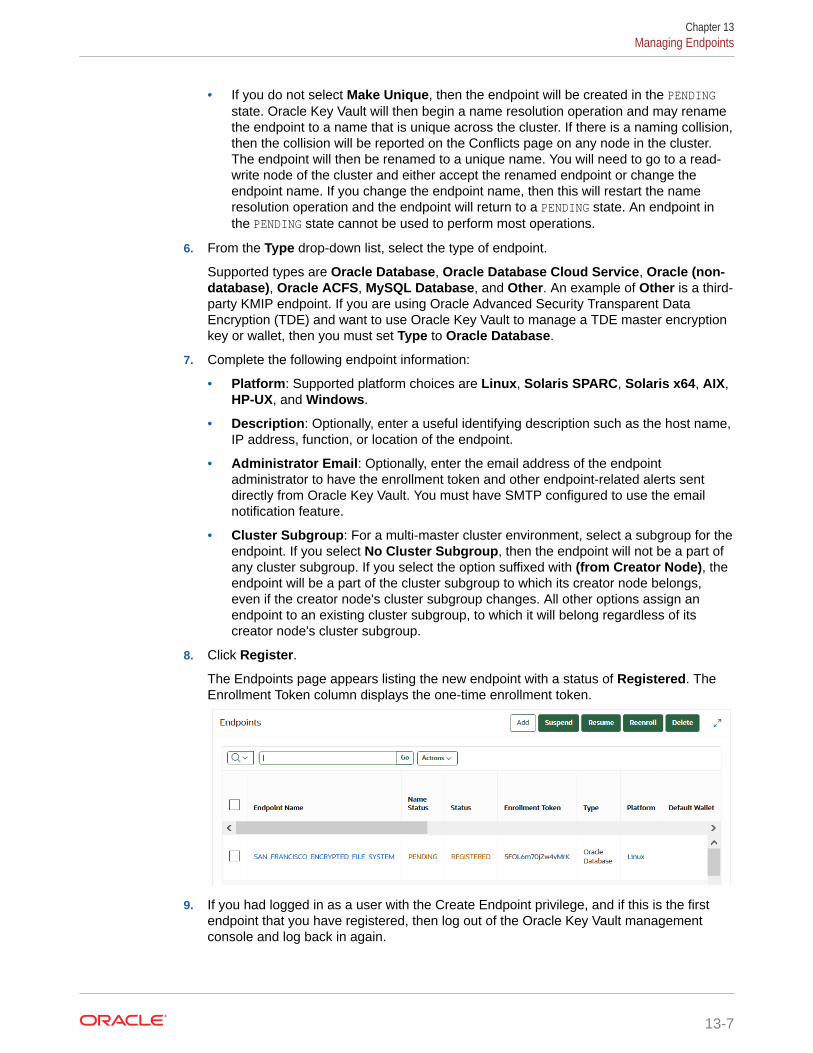
• If you do not select Make Unique, then the endpoint will be created in the PENDINGstate. Oracle Key Vault will then begin a name resolution operation and may renamethe endpoint to a name that is unique across the cluster. If there is a naming collision,then the collision will be reported on the Conflicts page on any node in the cluster.The endpoint will then be renamed to a unique name. You will need to go to a read-write node of the cluster and either accept the renamed endpoint or change theendpoint name. If you change the endpoint name, then this will restart the nameresolution operation and the endpoint will return to a PENDING state. An endpoint inthe PENDING state cannot be used to perform most operations.
6. From the Type drop-down list, select the type of endpoint.
Supported types are Oracle Database, Oracle Database Cloud Service, Oracle (non-database), Oracle ACFS, MySQL Database, and Other. An example of Other is a third-party KMIP endpoint. If you are using Oracle Advanced Security Transparent DataEncryption (TDE) and want to use Oracle Key Vault to manage a TDE master encryptionkey or wallet, then you must set Type to Oracle Database.
7. Complete the following endpoint information:
• Platform: Supported platform choices are Linux, Solaris SPARC, Solaris x64, AIX,HP-UX, and Windows.
• Description: Optionally, enter a useful identifying description such as the host name,IP address, function, or location of the endpoint.
• Administrator Email: Optionally, enter the email address of the endpointadministrator to have the enrollment token and other endpoint-related alerts sentdirectly from Oracle Key Vault. You must have SMTP configured to use the emailnotification feature.
• Cluster Subgroup: For a multi-master cluster environment, select a subgroup for theendpoint. If you select No Cluster Subgroup, then the endpoint will not be a part ofany cluster subgroup. If you select the option suffixed with (from Creator Node), theendpoint will be a part of the cluster subgroup to which its creator node belongs,even if the creator node's cluster subgroup changes. All other options assign anendpoint to an existing cluster subgroup, to which it will belong regardless of itscreator node's cluster subgroup.
8. Click Register.
The Endpoints page appears listing the new endpoint with a status of Registered. TheEnrollment Token column displays the one-time enrollment token.
9. If you had logged in as a user with the Create Endpoint privilege, and if this is the firstendpoint that you have registered, then log out of the Oracle Key Vault managementconsole and log back in again.
Chapter 13Managing Endpoints
13-7
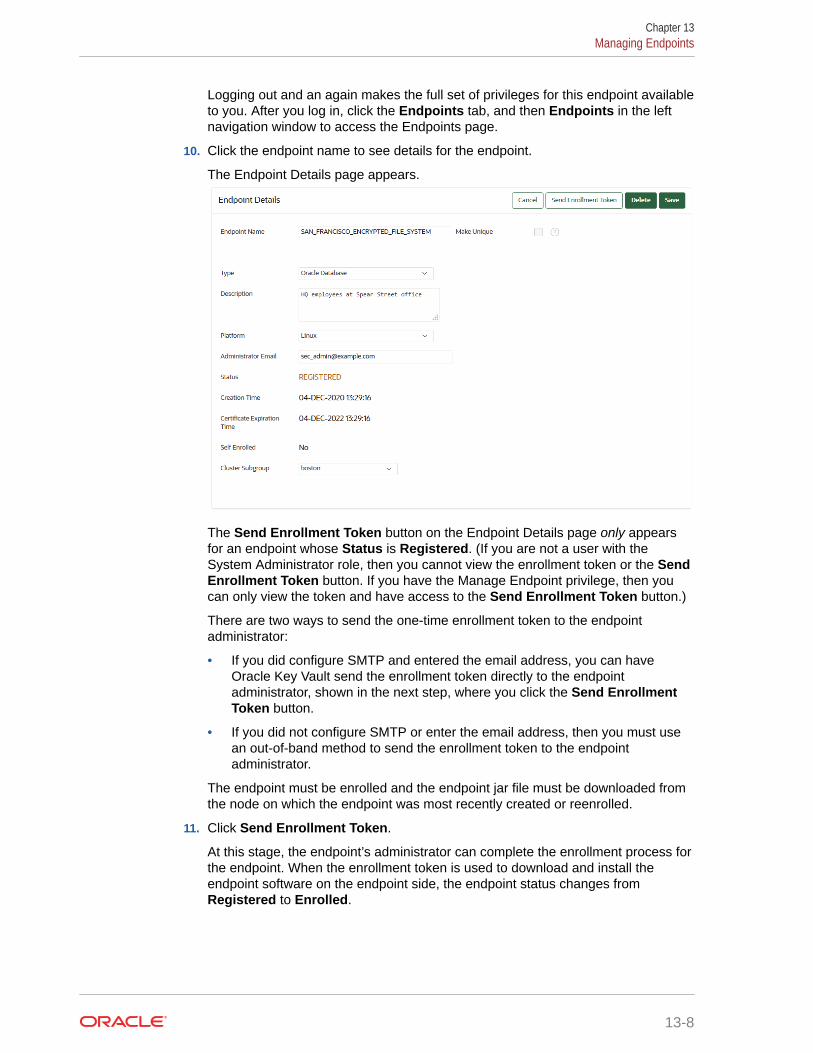
Logging out and an again makes the full set of privileges for this endpoint availableto you. After you log in, click the Endpoints tab, and then Endpoints in the leftnavigation window to access the Endpoints page.
10. Click the endpoint name to see details for the endpoint.
The Endpoint Details page appears.
The Send Enrollment Token button on the Endpoint Details page only appearsfor an endpoint whose Status is Registered. (If you are not a user with theSystem Administrator role, then you cannot view the enrollment token or the SendEnrollment Token button. If you have the Manage Endpoint privilege, then youcan only view the token and have access to the Send Enrollment Token button.)
There are two ways to send the one-time enrollment token to the endpointadministrator:
• If you did configure SMTP and entered the email address, you can haveOracle Key Vault send the enrollment token directly to the endpointadministrator, shown in the next step, where you click the Send EnrollmentToken button.
• If you did not configure SMTP or enter the email address, then you must usean out-of-band method to send the enrollment token to the endpointadministrator.
The endpoint must be enrolled and the endpoint jar file must be downloaded fromthe node on which the endpoint was most recently created or reenrolled.
11. Click Send Enrollment Token.
At this stage, the endpoint’s administrator can complete the enrollment process forthe endpoint. When the enrollment token is used to download and install theendpoint software on the endpoint side, the endpoint status changes fromRegistered to Enrolled.
Chapter 13Managing Endpoints
13-8
Related Topics
• Configuring Email NotificationYou can use email notifications to directly notify administrators of Key Vault statuschanges without logging into the Oracle Key Vault management console.
• Step 1: Enroll the Endpoint and Download the SoftwareYou must have the endpoint's enrollment token before you can download the endpointsoftware okvclient.jar.
13.2.4 Adding Endpoints Using Self-EnrollmentThe self-enrollment process immediately sends the endpoint to the Enrolled status withoutthe intermediate Registered status.
• About Adding Endpoints Using Self-EnrollmentOracle Key Vault associates a self-enrolled attribute with all endpoints that are enrolledthrough endpoint self-enrollment.
• Adding an Endpoint Using Self-EnrollmentYou can configure the self-enrollment process for endpoints from the Oracle Key Vaultmanagement console.
13.2.4.1 About Adding Endpoints Using Self-EnrollmentOracle Key Vault associates a self-enrolled attribute with all endpoints that are enrolledthrough endpoint self-enrollment.
Self-enrolled endpoints go directly to Enrolled status without the intermediate Registeredstatus when they download the endpoint software. You can recognize self-enrolled endpointsby their system generated names in the format ENDPT_001. In a multi-master cluster, systemgenerated endpoint names are in the format ENDPT_node_id_sequential_number, wherenode_id is a value such as 01 or 02. For example, ENDPT_01_001 can be the generated nameof an endpoint.
Endpoint self-enrollment is disabled by default and must be enabled by a user who has theSystem Administrator role.
A best practice is to enable endpoint self-enrollment for limited periods when you expectendpoints to enroll. After the expected endpoints have been enrolled, you should disableendpoint self-enrollment.
13.2.4.2 Adding an Endpoint Using Self-EnrollmentYou can configure the self-enrollment process for endpoints from the Oracle Key Vaultmanagement console.
1. Log in to the Oracle Key Vault management console as a user who has the SystemAdministrator role.
2. Select the Endpoints tab, and then Settings from the left navigation bar.
The Endpoint Settings page appears.
Chapter 13Managing Endpoints
13-9
3. Check the box to the right of Allow Endpoint Self-Enrollment.
4. Click Save.
Related Topics
• Step 1: Enroll the Endpoint and Download the SoftwareYou must have the endpoint's enrollment token before you can download theendpoint software okvclient.jar.
13.2.5 Deleting, Suspending, or Reenrolling EndpointsWhen endpoints no longer use Oracle Key Vault to store security objects, you candelete them, and then re-enroll when they are needed.
• About Deleting EndpointsDeleting an endpoint removes it permanently from Oracle Key Vault.
• Deleting One or More EndpointsThe Endpoints page enables you to delete a group of endpoints from Oracle KeyVault at one time.
• Deleting One Endpoint (Alternative Method)The Endpoint Details page provides a consolidated view for the selectedendpoint including a mechanism to delete the endpoint from Oracle Key Vault.
• Suspending an EndpointYou can suspend an endpoint temporarily for security reasons, and then reinstatethe endpoint once the threat has passed.
• Reenrolling an EndpointWhen you reenroll an endpoint, the enrollment process automatically upgrades theendpoint software.
13.2.5.1 About Deleting EndpointsDeleting an endpoint removes it permanently from Oracle Key Vault.
Chapter 13Managing Endpoints
13-10
However, security objects that were previously created or uploaded by that endpoint willremain in Oracle Key Vault. Similarly, security objects that are associated with that endpointalso remain. To permanently delete or reassign these security objects, you must be a userwith the Key Administrator role or authorized to merge these objects by managing walletprivileges. The endpoint software previously downloaded at the endpoint also remains on theendpoint until the endpoint administrator removes it.
You cannot delete an endpoint that is in the PENDING state unless you are the user whocreated it. You must delete it on the node on which it was created.
13.2.5.2 Deleting One or More EndpointsThe Endpoints page enables you to delete a group of endpoints from Oracle Key Vault at onetime.
You can also delete a single endpoint from this page.
1. Log in to the Oracle Key Vault management console as a user who has the SystemAdministrator role or the Manage Endpoint privilege on that endpoint.
A user who has the Manage Endpoint privilege can only delete endpoints on which thisuser has been granted the Manage Endpoint privilege. To see which endpoints that auser can manage, select the Users tab, then select Manage Users. Check the UserDetails page for the user in question, and scroll down to the Access to Endpoints area.
2. Select the Endpoints tab, then Endpoints in the left navigation bar.
The Endpoints page lists all the endpoints currently registered or enrolled.
3. In the Endpoints page, select the check boxes to the left of the endpoints that you want todelete.
4. Click Delete.
5. In the confirmation window, click OK.
Related Topics
• Performing Actions and SearchesThe Oracle Key Vault management console enables you to perform standard actions andsearch operations, as well as get help information.
13.2.5.3 Deleting One Endpoint (Alternative Method)The Endpoint Details page provides a consolidated view for the selected endpoint includinga mechanism to delete the endpoint from Oracle Key Vault.
1. Log in to the Oracle Key Vault management console as a user who has the SystemAdministrator role or the Manage Endpoint privilege on that endpoint.
A user who has the Manage Endpoint privilege can only delete endpoints on which thisuser has been granted the Manage Endpoint privilege. To see which endpoints that auser can manage, select the Users tab, then select Manage Users. Check the UserDetails page for the user in question, and scroll down to the Access to Endpoints area.
2. Select the Endpoints tab, then Endpoints in the left navigation bar.
The Endpoints page appears listing all the Oracle Key Vault endpoints.
3. Click the endpoint name that you want to delete.
The Endpoint Details page appears.
Chapter 13Managing Endpoints
13-11
4. Click Delete.
5. In the confirmation window, click OK.
Related Topics
• Performing Actions and SearchesThe Oracle Key Vault management console enables you to perform standardactions and search operations, as well as get help information.
13.2.5.4 Suspending an EndpointYou can suspend an endpoint temporarily for security reasons, and then reinstate theendpoint once the threat has passed.
When you suspend an endpoint, its status will change from Enrolled to Suspended.You cannot suspend an endpoint that is in the PENDING state unless you are the userwho created it.
1. Log in to the Oracle Key Vault management console as a user who has theSystem Administrator role or the Manage Endpoint privilege.
A user who has the Manage Endpoint privilege can only suspend endpoints thathe or she created.
2. Select the Endpoints tab, then Endpoints in the left navigation bar.
The Endpoints page appears listing all the Oracle Key Vault endpoints.
3. In the Endpoints page, select the check boxes to the left of the endpoints that youwant to suspend.
4. Click Suspend.
5. In the confirmation window, click OK.
When you suspend an endpoint, its Status on the Endpoints page will beSuspended.
6. To enable the endpoint, perform Steps 1-3.
From the Endpoint Details pane click Enable. The endpoint Status on theEndpoints page will now read Enrolled.
The following rules apply to suspending an endpoint in a multi-master cluster:
• For regular endpoints, the endpoint will continue to operate until all suspendoperation requests have reached all nodes in the cluster.
• You can suspend the endpoint on any node.
• For cloud-based endpoints, the endpoint will continue to operate until the suspendoperation has reached all nodes from where the reverse SSH tunnel isestablished.
• You can potentially suspend the endpoint on any node from the cloud-basedendpoint from where the reverse SSH tunnel is established.
Related Topics
• Performing Actions and SearchesThe Oracle Key Vault management console enables you to perform standardactions and search operations, as well as get help information.
Chapter 13Managing Endpoints
13-12
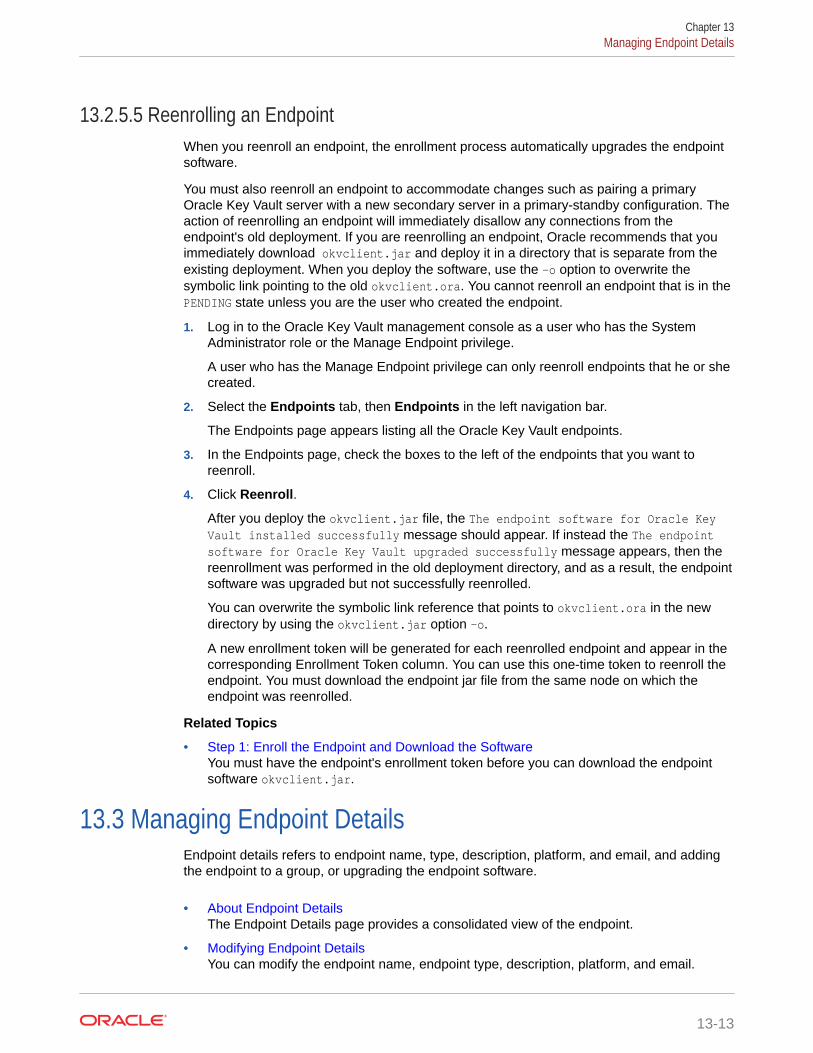
13.2.5.5 Reenrolling an EndpointWhen you reenroll an endpoint, the enrollment process automatically upgrades the endpointsoftware.
You must also reenroll an endpoint to accommodate changes such as pairing a primaryOracle Key Vault server with a new secondary server in a primary-standby configuration. Theaction of reenrolling an endpoint will immediately disallow any connections from theendpoint's old deployment. If you are reenrolling an endpoint, Oracle recommends that youimmediately download okvclient.jar and deploy it in a directory that is separate from theexisting deployment. When you deploy the software, use the -o option to overwrite thesymbolic link pointing to the old okvclient.ora. You cannot reenroll an endpoint that is in thePENDING state unless you are the user who created the endpoint.
1. Log in to the Oracle Key Vault management console as a user who has the SystemAdministrator role or the Manage Endpoint privilege.
A user who has the Manage Endpoint privilege can only reenroll endpoints that he or shecreated.
2. Select the Endpoints tab, then Endpoints in the left navigation bar.
The Endpoints page appears listing all the Oracle Key Vault endpoints.
3. In the Endpoints page, check the boxes to the left of the endpoints that you want toreenroll.
4. Click Reenroll.
After you deploy the okvclient.jar file, the The endpoint software for Oracle KeyVault installed successfully message should appear. If instead the The endpointsoftware for Oracle Key Vault upgraded successfully message appears, then thereenrollment was performed in the old deployment directory, and as a result, the endpointsoftware was upgraded but not successfully reenrolled.
You can overwrite the symbolic link reference that points to okvclient.ora in the newdirectory by using the okvclient.jar option -o.
A new enrollment token will be generated for each reenrolled endpoint and appear in thecorresponding Enrollment Token column. You can use this one-time token to reenroll theendpoint. You must download the endpoint jar file from the same node on which theendpoint was reenrolled.
Related Topics
• Step 1: Enroll the Endpoint and Download the SoftwareYou must have the endpoint's enrollment token before you can download the endpointsoftware okvclient.jar.
13.3 Managing Endpoint DetailsEndpoint details refers to endpoint name, type, description, platform, and email, and addingthe endpoint to a group, or upgrading the endpoint software.
• About Endpoint DetailsThe Endpoint Details page provides a consolidated view of the endpoint.
• Modifying Endpoint DetailsYou can modify the endpoint name, endpoint type, description, platform, and email.
Chapter 13Managing Endpoint Details
13-13
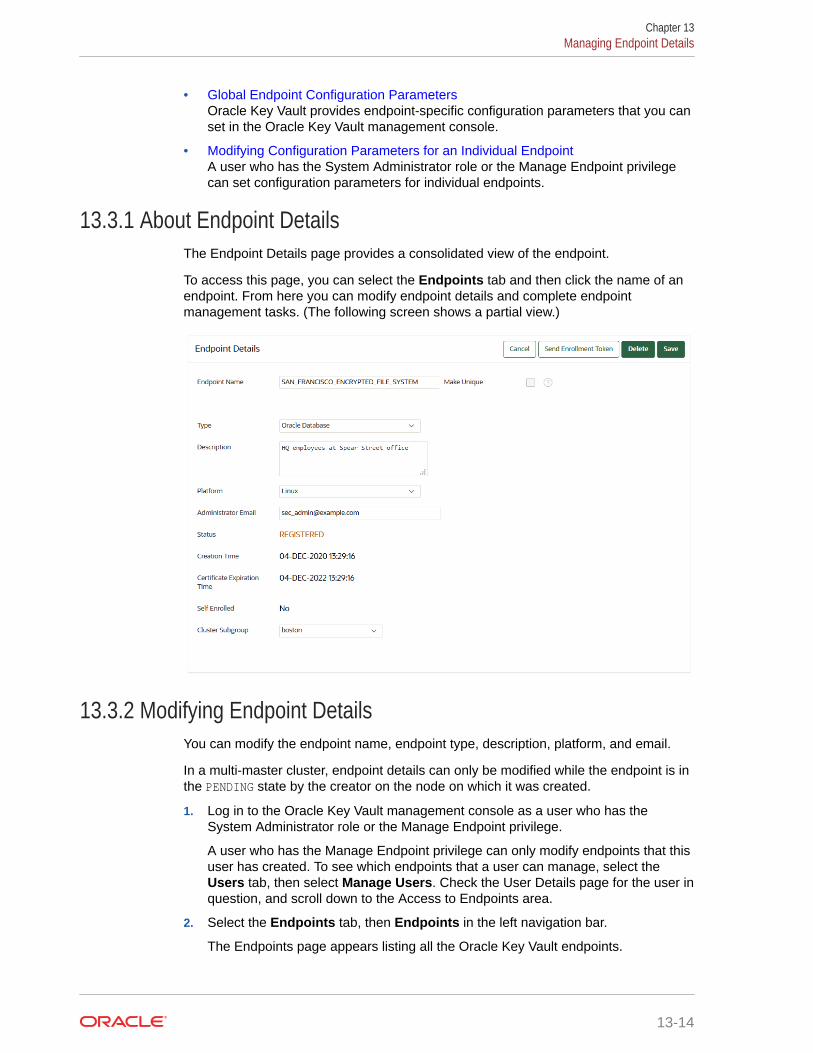
• Global Endpoint Configuration ParametersOracle Key Vault provides endpoint-specific configuration parameters that you canset in the Oracle Key Vault management console.
• Modifying Configuration Parameters for an Individual EndpointA user who has the System Administrator role or the Manage Endpoint privilegecan set configuration parameters for individual endpoints.
13.3.1 About Endpoint DetailsThe Endpoint Details page provides a consolidated view of the endpoint.
To access this page, you can select the Endpoints tab and then click the name of anendpoint. From here you can modify endpoint details and complete endpointmanagement tasks. (The following screen shows a partial view.)
13.3.2 Modifying Endpoint DetailsYou can modify the endpoint name, endpoint type, description, platform, and email.
In a multi-master cluster, endpoint details can only be modified while the endpoint is inthe PENDING state by the creator on the node on which it was created.
1. Log in to the Oracle Key Vault management console as a user who has theSystem Administrator role or the Manage Endpoint privilege.
A user who has the Manage Endpoint privilege can only modify endpoints that thisuser has created. To see which endpoints that a user can manage, select theUsers tab, then select Manage Users. Check the User Details page for the user inquestion, and scroll down to the Access to Endpoints area.
2. Select the Endpoints tab, then Endpoints in the left navigation bar.
The Endpoints page appears listing all the Oracle Key Vault endpoints.
Chapter 13Managing Endpoint Details
13-14
3. In the Endpoints page, click the name of the endpoint.
The Endpoint Details page appears.
4. In the Endpoint Details page, modify any of the following: Endpoint Name, Type,Description, Platform, Administrator Email, Cluster Subgroup (for multi-mastercluster environments only), or Strict IP Check.
The Strict IP Check setting is enabled by default for any endpoint that was created inOracle Key Vault. If you select this check box, then Oracle Key Vault checks if theendpoint is connecting to it using the same IP that was used when the endpoint softwarewas first deployed. If you disable this check box, then Oracle Key Vault allows theendpoint to connect to it using any IP address. Oracle recommends that you enable thissetting unless otherwise required.
See Naming Guidelines for Objects.
5. Click Save.
13.3.3 Global Endpoint Configuration ParametersOracle Key Vault provides endpoint-specific configuration parameters that you can set in theOracle Key Vault management console.
• About Global Endpoint Configuration ParametersUsers who have the System Administrator role can centrally update certain endpointconfiguration parameters in the Oracle Key Vault management console.
• Setting Global Endpoint Configuration ParametersYou can set global endpoint configuration parameters in the Oracle Key Vaultmanagement console.
13.3.3.1 About Global Endpoint Configuration ParametersUsers who have the System Administrator role can centrally update certain endpointconfiguration parameters in the Oracle Key Vault management console.
This feature enables system administrators to set certain endpoint configuration parametersglobally, that is, for all endpoints, or on a per-endpoint basis. It simplifies the process ofmanaging multiple endpoints for system administrators.
Endpoint-specific parameters take precedence over global parameters. Global parameterstake effect when endpoint-specific parameters are cleared. Oracle Key Vault uses the default
Chapter 13Managing Endpoint Details
13-15
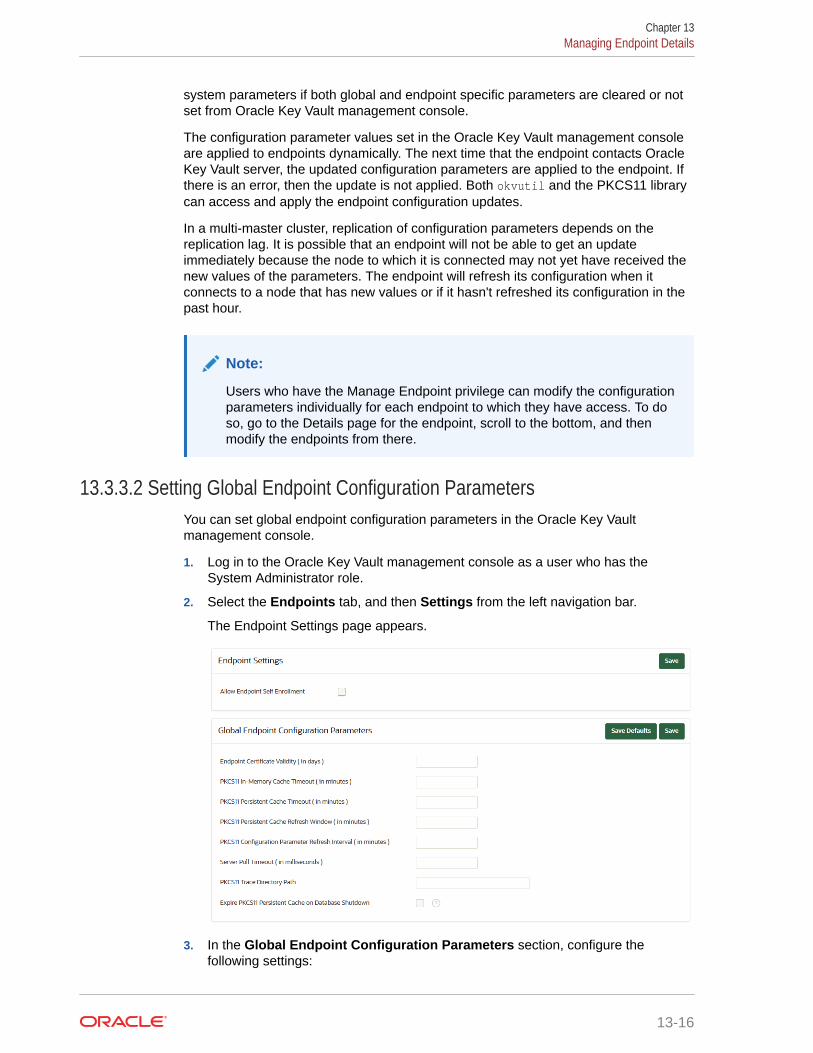
system parameters if both global and endpoint specific parameters are cleared or notset from Oracle Key Vault management console.
The configuration parameter values set in the Oracle Key Vault management consoleare applied to endpoints dynamically. The next time that the endpoint contacts OracleKey Vault server, the updated configuration parameters are applied to the endpoint. Ifthere is an error, then the update is not applied. Both okvutil and the PKCS11 librarycan access and apply the endpoint configuration updates.
In a multi-master cluster, replication of configuration parameters depends on thereplication lag. It is possible that an endpoint will not be able to get an updateimmediately because the node to which it is connected may not yet have received thenew values of the parameters. The endpoint will refresh its configuration when itconnects to a node that has new values or if it hasn't refreshed its configuration in thepast hour.
Note:
Users who have the Manage Endpoint privilege can modify the configurationparameters individually for each endpoint to which they have access. To doso, go to the Details page for the endpoint, scroll to the bottom, and thenmodify the endpoints from there.
13.3.3.2 Setting Global Endpoint Configuration ParametersYou can set global endpoint configuration parameters in the Oracle Key Vaultmanagement console.
1. Log in to the Oracle Key Vault management console as a user who has theSystem Administrator role.
2. Select the Endpoints tab, and then Settings from the left navigation bar.
The Endpoint Settings page appears.
3. In the Global Endpoint Configuration Parameters section, configure thefollowing settings:
Chapter 13Managing Endpoint Details
13-16
• Endpoint Certificate Validity ( in days ): Specify the number of days for which thecurrent endpoint certificate is valid.
• PKCS 11 In-Memory Cache Timeout ( in minutes ): Specify the duration in minutesfor which the master encryption key is available after it is cached in the in-memorycache. For more information about the PKCS 11 In-Memory Cache Timeout setting,see PKCS11_CACHE_TIMEOUT Parameter.PKCS 11 Persistent Cache Timeout ( in minutes ): Specify the duration in minutesfor which the master encryption key is available after it is cached in the persistentmaster encryption key cache. For more information about the PKCS 11 CachePersistent Timeout setting, see PKCS11_PERSISTENT_CACHE_TIMEOUTParameter.
• PKCS 11 Persistent Cache Refresh Window ( in minutes ): Specify the duration inminutes to extend the period of time for which the master encryption key is availableafter it is cached in the persistent master encryption key cache. For more informationabout the PKCS 11 Persistent Cache Refresh Window setting, see PKCS11_PERSISTENT_CACHE_REFRESH_WINDOW Parameter.
• Server Poll Timeout ( in milliseconds ): Specify a timeout in seconds for a client'sattempt to connect to an Oracle Key Vault server, before trying the next server in thelist. The default value is 300 (milliseconds).
• PKCS 11 Trace Directory Path: Specify a directory to save the trace files.
• Expire PKCS11 Persistent Cache on Database Shutdown: Enables or disablesthe PKCS#11 persistent cache for a given endpoint database to automatically expireupon shutdown of the endpoint database. See EXPIRE PKCS11 PERSISTENTCACHE ON DATABASE SHUTDOWN Parameter.
4. Click Save.
13.3.4 Modifying Configuration Parameters for an Individual EndpointA user who has the System Administrator role or the Manage Endpoint privilege can setconfiguration parameters for individual endpoints.
A user with the System Administrator role can set configuration parameters for any endpoint.A user with the Manage Endpoint privilege can only set configuration parameters for theendpoints for which the user has the Manage Endpoint privilege.
1. Log in to the Oracle Key Vault management console as a user who has the SystemAdministrator role or the Manage Endpoint privilege.
2. Select the Endpoints tab, and then Endpoints from the left navigation bar.
3. In the Endpoints page, select the endpoint that you want to modify.
4. In the Endpoint Details page, scroll down to the Endpoint Configuration Parameters area.
5. Modify the configuration parameters as necessary.
The configuration parameters are the same as the configuration parameters that can bemodified globally.
6. Click Save.
Related Topics
• Setting Global Endpoint Configuration ParametersYou can set global endpoint configuration parameters in the Oracle Key Vaultmanagement console.
Chapter 13Managing Endpoint Details
13-17
13.4 Default Wallets and EndpointsYou can use a default wallet, which is a type of virtual wallet, with an endpoint.
• Associating a Default Wallet with an EndpointA default wallet is a type of virtual wallet to which security objects are uploadedwhen a wallet is not explicitly specified.
• Setting the Default Wallet for an EndpointSetting a default wallet for an endpoint automatically uploads the endpoint'ssecurity objects to the wallet if another wallet is not explicitly specified.
13.4.1 Associating a Default Wallet with an EndpointA default wallet is a type of virtual wallet to which security objects are uploaded whena wallet is not explicitly specified.
Default wallets are useful for sharing with other endpoints such as nodes in an OracleReal Application Clusters (Oracle RAC), or primary and standby nodes in Oracle DataGuard by having all endpoints use the same default wallet.
If you want to use the default wallet, then you must set after you register the endpointbefore you enroll it. If you decide to use a default wallet after enrollment, then youmust remove the default wallet and subsequently reenroll the endpoint.
An enrollment status of registered means that the endpoint has been added to OracleKey Vault, but the endpoint software has not yet been downloaded and installed. Whenthe status is registered, then you must associate the default wallet with the endpoint.
The endpoint's enrollment status becomes enrolled when you download and installthe endpoint software to the endpoint. If you set the default wallet after you enroll theendpoint, then you must re-enroll the endpoint to ensure that all future security objectscreated by the endpoint are automatically associated with that wallet.
In a multi-master cluster, you can only assign the default wallet on the same nodewhere the endpoint and wallet were created when either are still in the PENDING state.After both are in the ACTIVE state, then there are no restrictions. After the default walletis assigned and the endpoint is enrolled, the default wallet can be accessed from anynode, as long as both are in the ACTIVE state and the information has been replicatedto that node.
13.4.2 Setting the Default Wallet for an EndpointSetting a default wallet for an endpoint automatically uploads the endpoint's securityobjects to the wallet if another wallet is not explicitly specified.
Oracle requires that you set the default wallet right after registering the endpoint, andbefore downloading the endpoint software.
1. Log in to the Oracle Key Vault management console as a user who has the KeyAdministrator role or the Manage Endpoint privilege.
If you are logging on as a user with the Manage Endpoint privilege, then you musthave full wallet access (Read/Write/Manage Wallet) on the wallet that you want toset as the endpoint's default wallet.
Chapter 13Default Wallets and Endpoints
13-18
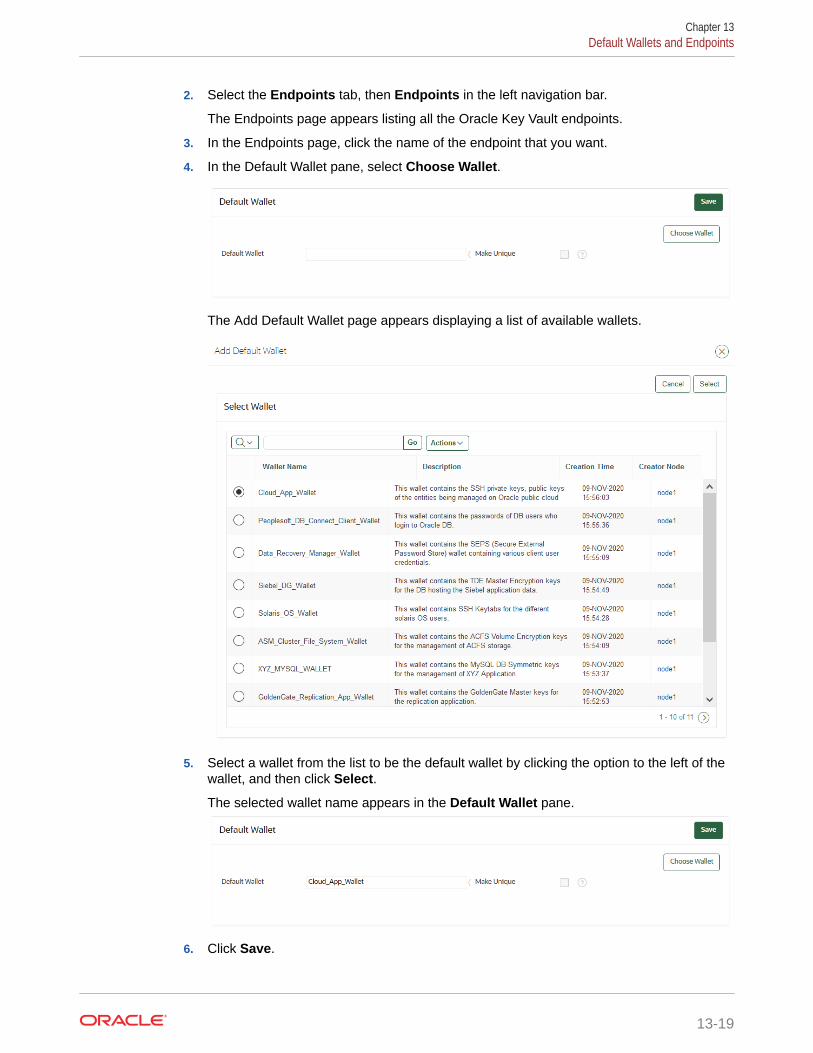
2. Select the Endpoints tab, then Endpoints in the left navigation bar.
The Endpoints page appears listing all the Oracle Key Vault endpoints.
3. In the Endpoints page, click the name of the endpoint that you want.
4. In the Default Wallet pane, select Choose Wallet.
The Add Default Wallet page appears displaying a list of available wallets.
5. Select a wallet from the list to be the default wallet by clicking the option to the left of thewallet, and then click Select.
The selected wallet name appears in the Default Wallet pane.
6. Click Save.
Chapter 13Default Wallets and Endpoints
13-19
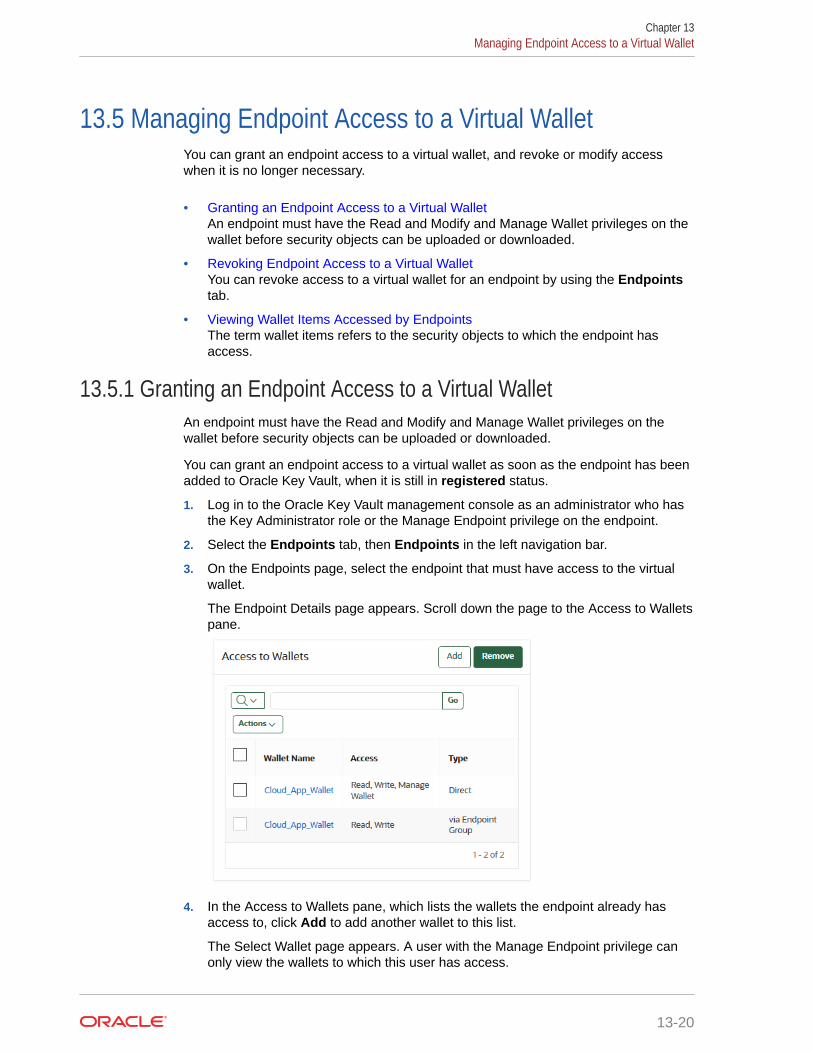
13.5 Managing Endpoint Access to a Virtual WalletYou can grant an endpoint access to a virtual wallet, and revoke or modify accesswhen it is no longer necessary.
• Granting an Endpoint Access to a Virtual WalletAn endpoint must have the Read and Modify and Manage Wallet privileges on thewallet before security objects can be uploaded or downloaded.
• Revoking Endpoint Access to a Virtual WalletYou can revoke access to a virtual wallet for an endpoint by using the Endpointstab.
• Viewing Wallet Items Accessed by EndpointsThe term wallet items refers to the security objects to which the endpoint hasaccess.
13.5.1 Granting an Endpoint Access to a Virtual WalletAn endpoint must have the Read and Modify and Manage Wallet privileges on thewallet before security objects can be uploaded or downloaded.
You can grant an endpoint access to a virtual wallet as soon as the endpoint has beenadded to Oracle Key Vault, when it is still in registered status.
1. Log in to the Oracle Key Vault management console as an administrator who hasthe Key Administrator role or the Manage Endpoint privilege on the endpoint.
2. Select the Endpoints tab, then Endpoints in the left navigation bar.
3. On the Endpoints page, select the endpoint that must have access to the virtualwallet.
The Endpoint Details page appears. Scroll down the page to the Access to Walletspane.
4. In the Access to Wallets pane, which lists the wallets the endpoint already hasaccess to, click Add to add another wallet to this list.
The Select Wallet page appears. A user with the Manage Endpoint privilege canonly view the wallets to which this user has access.
Chapter 13Managing Endpoint Access to a Virtual Wallet
13-20
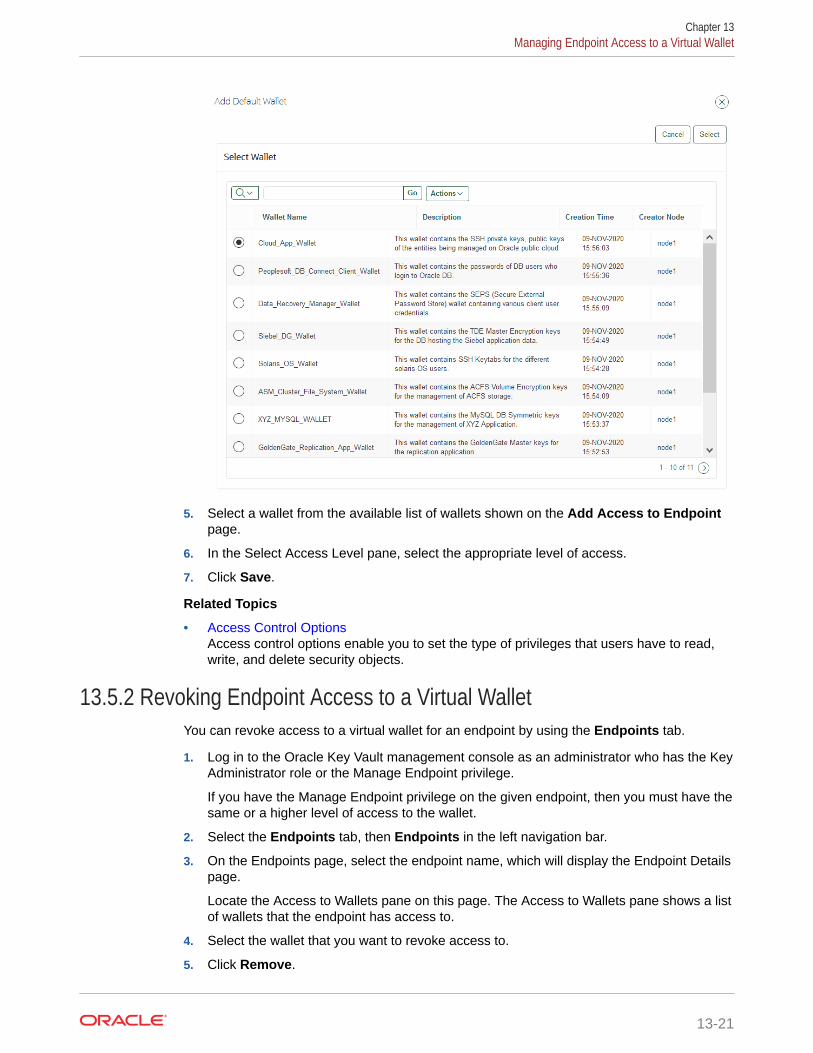
5. Select a wallet from the available list of wallets shown on the Add Access to Endpointpage.
6. In the Select Access Level pane, select the appropriate level of access.
7. Click Save.
Related Topics
• Access Control OptionsAccess control options enable you to set the type of privileges that users have to read,write, and delete security objects.
13.5.2 Revoking Endpoint Access to a Virtual WalletYou can revoke access to a virtual wallet for an endpoint by using the Endpoints tab.
1. Log in to the Oracle Key Vault management console as an administrator who has the KeyAdministrator role or the Manage Endpoint privilege.
If you have the Manage Endpoint privilege on the given endpoint, then you must have thesame or a higher level of access to the wallet.
2. Select the Endpoints tab, then Endpoints in the left navigation bar.
3. On the Endpoints page, select the endpoint name, which will display the Endpoint Detailspage.
Locate the Access to Wallets pane on this page. The Access to Wallets pane shows a listof wallets that the endpoint has access to.
4. Select the wallet that you want to revoke access to.
5. Click Remove.
Chapter 13Managing Endpoint Access to a Virtual Wallet
13-21
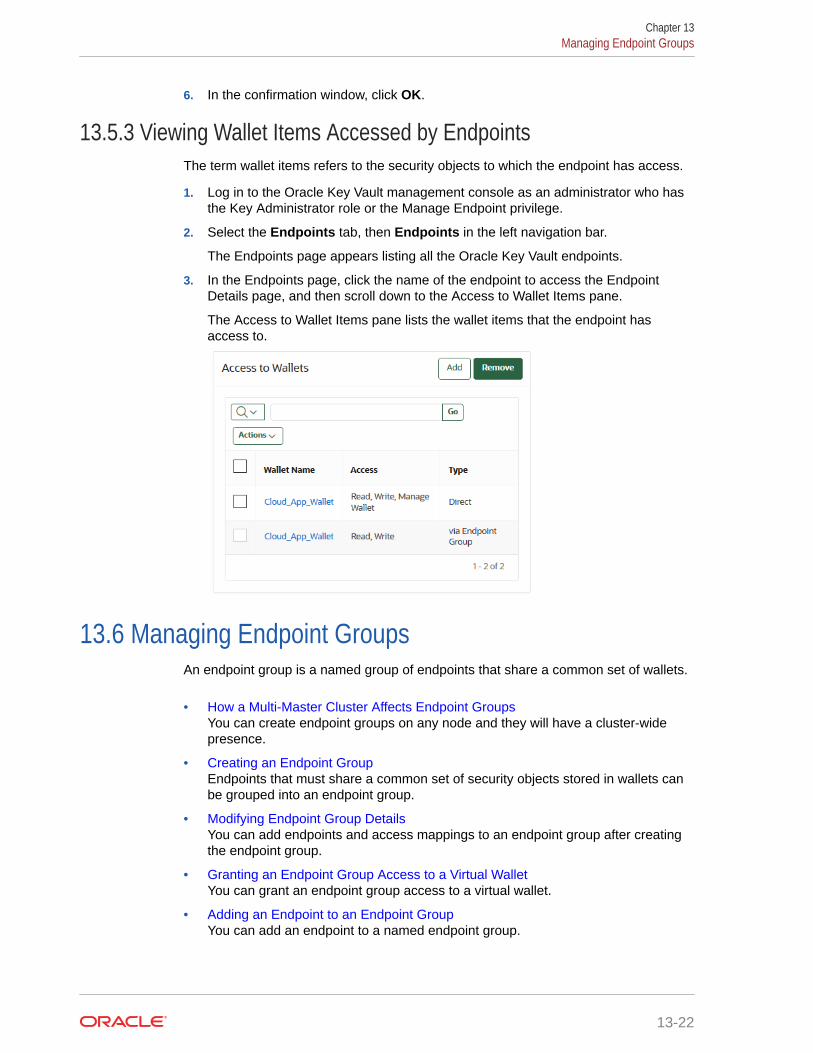
6. In the confirmation window, click OK.
13.5.3 Viewing Wallet Items Accessed by EndpointsThe term wallet items refers to the security objects to which the endpoint has access.
1. Log in to the Oracle Key Vault management console as an administrator who hasthe Key Administrator role or the Manage Endpoint privilege.
2. Select the Endpoints tab, then Endpoints in the left navigation bar.
The Endpoints page appears listing all the Oracle Key Vault endpoints.
3. In the Endpoints page, click the name of the endpoint to access the EndpointDetails page, and then scroll down to the Access to Wallet Items pane.
The Access to Wallet Items pane lists the wallet items that the endpoint hasaccess to.
13.6 Managing Endpoint GroupsAn endpoint group is a named group of endpoints that share a common set of wallets.
• How a Multi-Master Cluster Affects Endpoint GroupsYou can create endpoint groups on any node and they will have a cluster-widepresence.
• Creating an Endpoint GroupEndpoints that must share a common set of security objects stored in wallets canbe grouped into an endpoint group.
• Modifying Endpoint Group DetailsYou can add endpoints and access mappings to an endpoint group after creatingthe endpoint group.
• Granting an Endpoint Group Access to a Virtual WalletYou can grant an endpoint group access to a virtual wallet.
• Adding an Endpoint to an Endpoint GroupYou can add an endpoint to a named endpoint group.
Chapter 13Managing Endpoint Groups
13-22
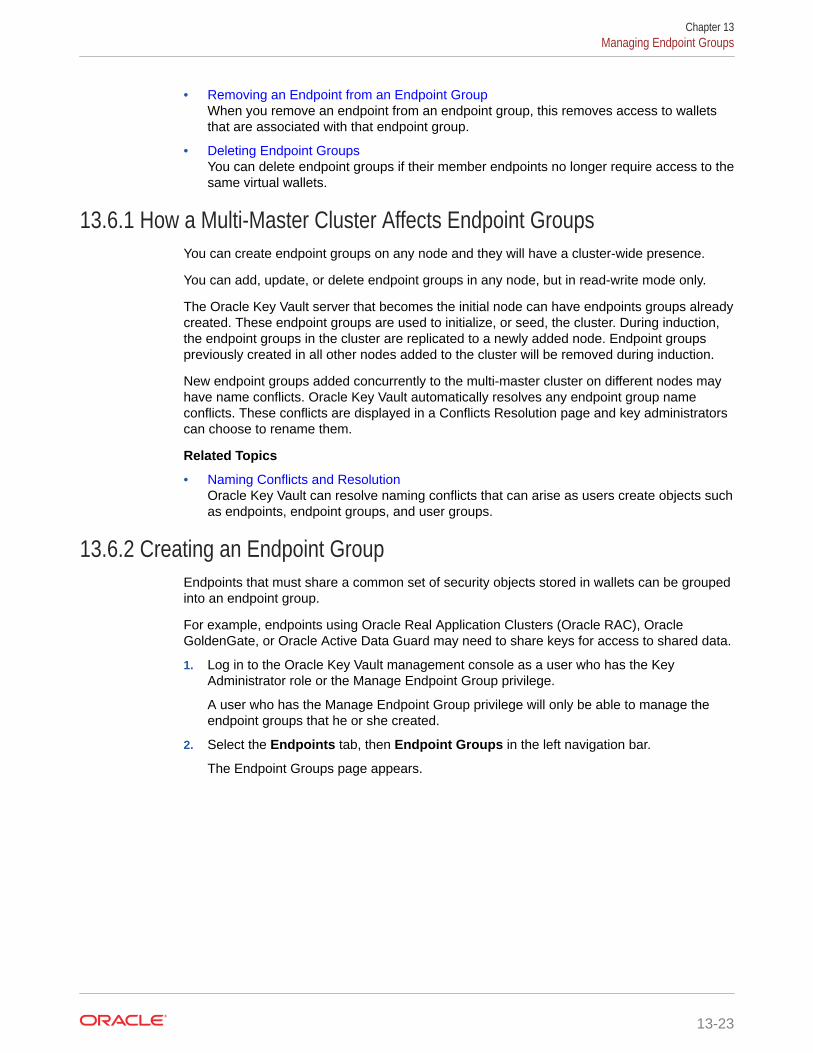
• Removing an Endpoint from an Endpoint GroupWhen you remove an endpoint from an endpoint group, this removes access to walletsthat are associated with that endpoint group.
• Deleting Endpoint GroupsYou can delete endpoint groups if their member endpoints no longer require access to thesame virtual wallets.
13.6.1 How a Multi-Master Cluster Affects Endpoint GroupsYou can create endpoint groups on any node and they will have a cluster-wide presence.
You can add, update, or delete endpoint groups in any node, but in read-write mode only.
The Oracle Key Vault server that becomes the initial node can have endpoints groups alreadycreated. These endpoint groups are used to initialize, or seed, the cluster. During induction,the endpoint groups in the cluster are replicated to a newly added node. Endpoint groupspreviously created in all other nodes added to the cluster will be removed during induction.
New endpoint groups added concurrently to the multi-master cluster on different nodes mayhave name conflicts. Oracle Key Vault automatically resolves any endpoint group nameconflicts. These conflicts are displayed in a Conflicts Resolution page and key administratorscan choose to rename them.
Related Topics
• Naming Conflicts and ResolutionOracle Key Vault can resolve naming conflicts that can arise as users create objects suchas endpoints, endpoint groups, and user groups.
13.6.2 Creating an Endpoint GroupEndpoints that must share a common set of security objects stored in wallets can be groupedinto an endpoint group.
For example, endpoints using Oracle Real Application Clusters (Oracle RAC), OracleGoldenGate, or Oracle Active Data Guard may need to share keys for access to shared data.
1. Log in to the Oracle Key Vault management console as a user who has the KeyAdministrator role or the Manage Endpoint Group privilege.
A user who has the Manage Endpoint Group privilege will only be able to manage theendpoint groups that he or she created.
2. Select the Endpoints tab, then Endpoint Groups in the left navigation bar.
The Endpoint Groups page appears.
Chapter 13Managing Endpoint Groups
13-23
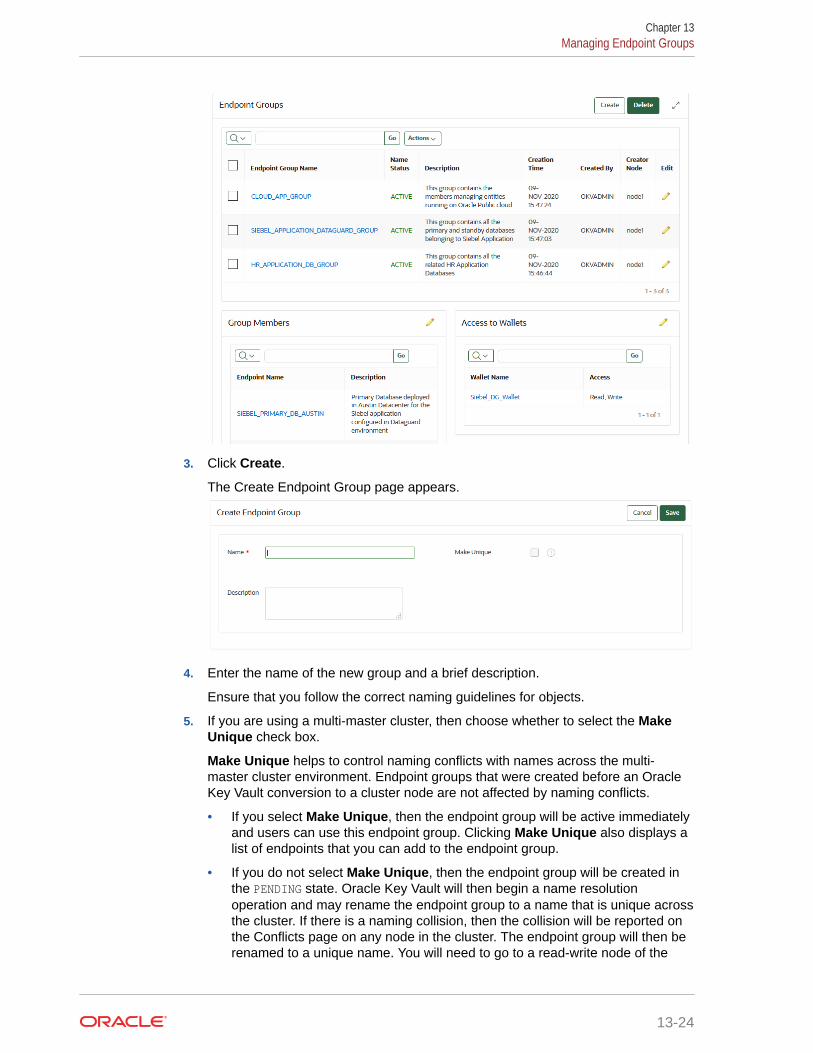
3. Click Create.
The Create Endpoint Group page appears.
4. Enter the name of the new group and a brief description.
Ensure that you follow the correct naming guidelines for objects.
5. If you are using a multi-master cluster, then choose whether to select the MakeUnique check box.
Make Unique helps to control naming conflicts with names across the multi-master cluster environment. Endpoint groups that were created before an OracleKey Vault conversion to a cluster node are not affected by naming conflicts.
• If you select Make Unique, then the endpoint group will be active immediatelyand users can use this endpoint group. Clicking Make Unique also displays alist of endpoints that you can add to the endpoint group.
• If you do not select Make Unique, then the endpoint group will be created inthe PENDING state. Oracle Key Vault will then begin a name resolutionoperation and may rename the endpoint group to a name that is unique acrossthe cluster. If there is a naming collision, then the collision will be reported onthe Conflicts page on any node in the cluster. The endpoint group will then berenamed to a unique name. You will need to go to a read-write node of the
Chapter 13Managing Endpoint Groups
13-24
cluster and either accept the renamed endpoint group or change the endpoint name.If you change the endpoint group name, then this will restart the name resolutionoperation and the endpoint group will return to a PENDING state. An endpoint group inthe PENDING state cannot be used to perform most operations.
6. Click Save to complete creating the endpoint group.
The new endpoint group now appears in the Endpoint Groups page.
7. If you had logged in as a user with the Create Endpoint Group privilege, and if this is thefirst endpoint group that you have created, then log out of the Oracle Key Vaultmanagement console and log back in again.
Logging out and an again makes the full set of privileges for this endpoint group availableto you.
Related Topics
• Naming Guidelines for ObjectsThe naming guidelines affect the following Oracle Key Vault objects: users, user groups,endpoints, endpoint groups, and virtual wallets.
• Modifying Endpoint Group DetailsYou can add endpoints and access mappings to an endpoint group after creating theendpoint group.
• Performing Actions and SearchesThe Oracle Key Vault management console enables you to perform standard actions andsearch operations, as well as get help information.
13.6.3 Modifying Endpoint Group DetailsYou can add endpoints and access mappings to an endpoint group after creating theendpoint group.
An endpoint can belong to more than one endpoint group. You cannot add one endpointgroup to another endpoint group.
1. Log in to the Oracle Key Vault management console as a user who has the KeyAdministrator role or the Manage Endpoint Group privilege.
A user who has the Manage Endpoint Group privilege can only modify endpoint groupsthat he or she created.
2. Select the Endpoints tab, then Endpoint Groups in the left navigation bar.
The Endpoint Groups page appears.
3. Click the edit pencil icon in the Edit column corresponding to the endpoint group.
The Endpoint Group Details page appears.
Chapter 13Managing Endpoint Groups
13-25
4. Modify the endpoint name as necessary.
See Naming Guidelines for Objects.
5. Modify the description as needed.
6. Add or remove access to wallets or endpoint group members by clicking Add orRemove.
7. Click Save.
13.6.4 Granting an Endpoint Group Access to a Virtual WalletYou can grant an endpoint group access to a virtual wallet.
In a multi-master cluster, you cannot grant access to an endpoint group that is in thePENDING state to a virtual wallet.
1. Log in to the Oracle Key Vault management console as a user who has the KeyAdministrator role or the Manage Endpoint Group privilege.
A user who has the Manage Endpoint Group privilege can grant endpoint groupaccess to wallets for only endpoint groups that the user created.
2. Select the Endpoints tab, then Endpoint Groups in the left navigation bar.
The Endpoint Groups page appears.
3. Click the pencil icon in the Edit column corresponding to the endpoint group.
The Endpoint Group Details page appears.
4. In the Access to Wallets pane, click Add.
5. Select a virtual wallet from the available list.
6. Select an Access Level:
• Read Only: This level grants the endpoint group read access to the virtualwallet and its items.
• Read and Modify: This level grants the endpoint group read and write accessto the virtual wallet and its items.
Chapter 13Managing Endpoint Groups
13-26
7. Select the Manage Wallet check box if you want endpoints to:
• Add or remove objects from the virtual wallet.
• Grant other endpoints or endpoint groups access to the virtual wallet.
8. Click Save.
Related Topics
• Manage Endpoint Group Privilege Duties and ScopeThe Manage Endpoint Group object privilege on an endpoint group enables a user toperform all endpoint group management operations on the endpoint group.
13.6.5 Adding an Endpoint to an Endpoint GroupYou can add an endpoint to a named endpoint group.
In a multi-master cluster, you cannot add an endpoint that is in the PENDING state to anendpoint group. Also, you cannot add an endpoint to an endpoint group that is in the PENDINGstate.
1. Log in to the Oracle Key Vault management console as an administrator who has the KeyAdministrator role or Manage Endpoint Group privilege.
A user who has the Manage Endpoint Group privilege can only add endpoints to endpointgroups that he or she created.
2. Select the Endpoints tab, then Endpoints in the left navigation bar.
The Endpoints page appears.
3. Select the endpoint you want to add to a group.
The Endpoint Details page appears.
4. Scroll to Endpoint Group Membership and then click Add.
The Add Endpoint Group Membership page appears.
A list of endpoint groups is displayed under Endpoint Group Name.
5. Check the boxes to the left of the endpoint groups you want to add the endpoint to.
6. Click Save.
The Endpoint Group Membership pane displays the checked endpoint group.
Chapter 13Managing Endpoint Groups
13-27
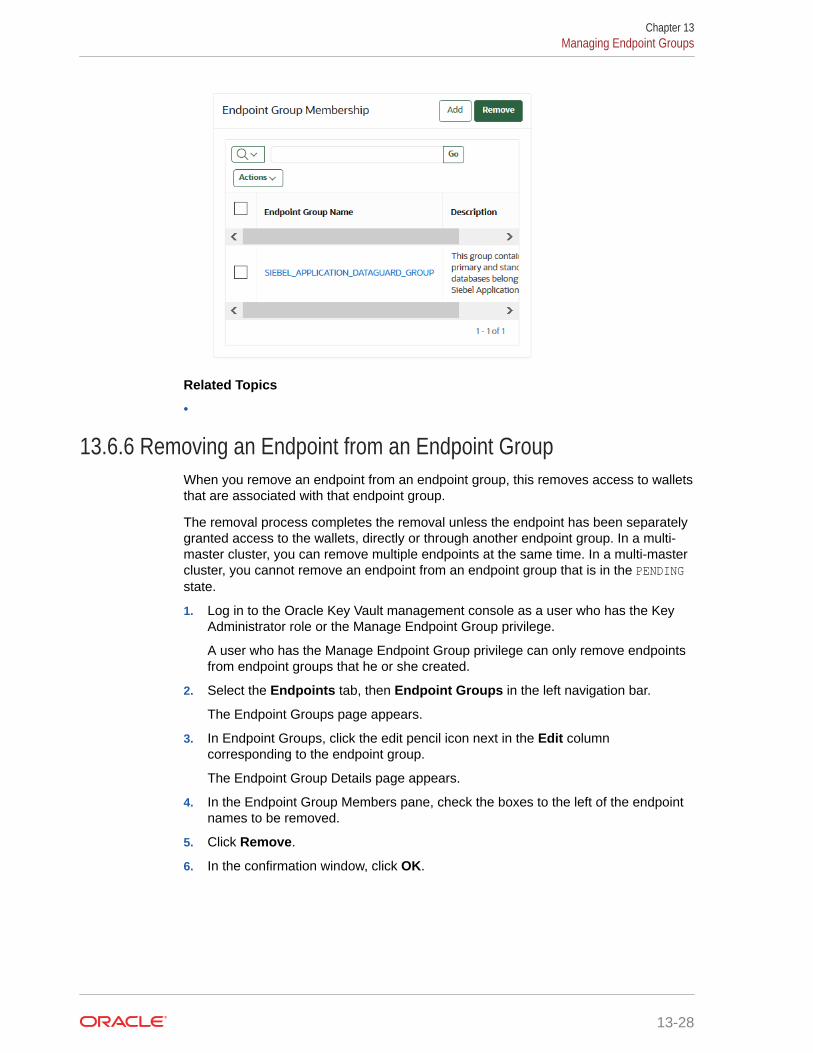
Related Topics
•
13.6.6 Removing an Endpoint from an Endpoint GroupWhen you remove an endpoint from an endpoint group, this removes access to walletsthat are associated with that endpoint group.
The removal process completes the removal unless the endpoint has been separatelygranted access to the wallets, directly or through another endpoint group. In a multi-master cluster, you can remove multiple endpoints at the same time. In a multi-mastercluster, you cannot remove an endpoint from an endpoint group that is in the PENDINGstate.
1. Log in to the Oracle Key Vault management console as a user who has the KeyAdministrator role or the Manage Endpoint Group privilege.
A user who has the Manage Endpoint Group privilege can only remove endpointsfrom endpoint groups that he or she created.
2. Select the Endpoints tab, then Endpoint Groups in the left navigation bar.
The Endpoint Groups page appears.
3. In Endpoint Groups, click the edit pencil icon next in the Edit columncorresponding to the endpoint group.
The Endpoint Group Details page appears.
4. In the Endpoint Group Members pane, check the boxes to the left of the endpointnames to be removed.
5. Click Remove.
6. In the confirmation window, click OK.
Chapter 13Managing Endpoint Groups
13-28
13.6.7 Deleting Endpoint GroupsYou can delete endpoint groups if their member endpoints no longer require access to thesame virtual wallets.
This action removes the shared access of member endpoints to wallets, not the endpointsthemselves. You can only delete an endpoint group that is in the PENDING state if it has nomembers or access to wallets.
1. Log in to the Oracle Key Vault management console as a user who has the KeyAdministrator role or the Manage Endpoint Group privilege.
A user who has the Manage Endpoint Group privilege can only remove endpoint groupsthat he or she created.
2. Select the Endpoints tab, then Endpoint Groups in the left navigation bar.
The Endpoint Groups page appears.
3. Check the boxes to the left of the endpoint group names that you want to delete.
4. Click Delete.
5. In the confirmation window, click OK.
Chapter 13Managing Endpoint Groups
13-29
14Enrolling and Upgrading Endpoints for OracleKey Vault
After an endpoint is registered in Oracle Key Vault, an endpoint administrator enrolls andprovisions the endpoint to manage security objects in Key Vault.
• About Endpoint Enrollment and ProvisioningEndpoints are Oracle Key Vault clients that use the server to store and manage securityobjects, share them with trusted peers, and retrieve them.
• Finalizing Enrollment and ProvisioningTo enroll and provision a registered endpoint an endpoint administrator must downloadand then install the okvclient.jar file.
• Environment Variables and Endpoint Provisioning GuidanceEnvironment variables such as JAVA_HOME and OKV_HOME must be correctly set so thatOracle Key Vault can access its utilities.
• Endpoints That Do Not Use the Oracle Key Vault Client SoftwareThird-party KMIP endpoints do not use the Oracle Key Vault software okvutil andliborapkcs.so.
• Transparent Data Encryption Endpoint ManagementOracle Key Vault can manage TDE keys by using the same PKCS#11 interface that TDEuses to communicate with an external keystore.
• Endpoint okvclient.ora Configuration FileOracle Key Vault endpoint libraries and utilities use the okvclient.ora configuration file,which stores the configuration parameters associated with the endpoint.
• Upgrading EndpointsYou can perform endpoint upgrades from either the Oracle Key Vault managementconsole login page or from the endpoint.
14.1 About Endpoint Enrollment and ProvisioningEndpoints are Oracle Key Vault clients that use the server to store and manage securityobjects, share them with trusted peers, and retrieve them.
These clients can be systems like Oracle database servers, Oracle middleware servers,operating systems, and other information systems.
An Oracle Key Vault system administrator first adds (or registers) the endpoint to Key Vault,and then sends the endpoint's enrollment token (generated during registration) to theendpoint administrator. The endpoint administrator verifies the enrollment token beforeenrolling and provisioning the endpoint. An enrolled endpoint can upload, download, andmanage security objects using Key Vault.
Endpoint enrollment is a three-step process performed by two kinds of administrative userssummarized in the following table.
14-1
Table 14-1 Summary of Endpoint Enrollment
Step#
Task Performed by Endpoint Status (asseen on Oracle KeyVault ManagementConsole)
1. 1. System administrator oruser with Manage Endpointprivilege creates anendpoint.
2. If this is an Oracledatabase, a keyadministrator creates avirtual wallet.
3. System administrator addsor registers the endpoint toOracle Key Vault. Anenrollment token for theendpoint is generated.
4. System administrator sendsthe enrollment token to theendpoint administrator tocomplete the enrollmentprocess.
Users with the SystemAdministrator role and KeyAdministrator role onOracle Key Vault, or userwith the Manage Endpointprivilege
Registered
2. 1. Verify the enrollment token.
2. Submit enrollment token todownload endpoint softwareokvclient.jar to theendpoint.
Endpoint administratorusing the Oracle Key Vaultmanagement console
Enrolled
3. Install okvclient.jar on theendpoint.
Endpoint administrator onendpoint
Enrolled
Endpoint enrollment ensures that only authorized endpoints can communicate withOracle Key Vault because the utilities needed to communicate are bundled with theokvclient.jar endpoint software file.
okvclient.jar contains the following:
• A Transport Layer Security (TLS) certificate and private key that the endpoint usesto authenticate itself to Oracle Key Vault
• A TLS certificate for Oracle Key Vault that serves as the root CA
• Endpoint libraries and utilities
• Additional information such as the Oracle Key Vault IP address that is used byokvutil to create the okvclient.ora configuration file
In an Oracle Real Application Clusters (RAC) environment, you must enroll andprovision each Oracle RAC node as an endpoint. Each Oracle RAC-enabled databasecorresponds to one virtual wallet in Oracle Key Vault. Each Oracle RAC instance ofthat database corresponds to an endpoint in Oracle Key Vault. All endpoints for eachdatabase share the same wallet as their default wallet. You must download one distinctokvclient.jar for each instance.
Chapter 14About Endpoint Enrollment and Provisioning
14-2
Related Topics
• Types of Endpoint EnrollmentThe first step in enrolling an endpoint is to add the endpoint to Oracle Key Vault.
• Endpoint okvclient.ora Configuration FileOracle Key Vault endpoint libraries and utilities use the okvclient.ora configuration file,which stores the configuration parameters associated with the endpoint.
• Oracle Key Vault okvutil Endpoint Utility ReferenceThe okvutil utility enables you to perform tasks uploading and downloading securityobjects.
14.2 Finalizing Enrollment and ProvisioningTo enroll and provision a registered endpoint an endpoint administrator must download andthen install the okvclient.jar file.
• Step 1: Enroll the Endpoint and Download the SoftwareYou must have the endpoint's enrollment token before you can download the endpointsoftware okvclient.jar.
• Step 2: Prepare the Endpoint EnvironmentYou must ensure that you have the right version of the Java Development Toolkit (JDK)and that the Oracle environment variables are set.
• Step 3: Install the Oracle Key Vault Software onto the EndpointTo upgrade to the latest endpoint software for an enrolled endpoint, you can downloadthe endpoint software without having to reenroll the endpoint.
• Step 4: Perform Post-Installation TasksThe post-installation procedures include optionally configuring a TDE connection for theendpoint, checking the installation contents, and deleting the okvclient.jar file.
14.2.1 Step 1: Enroll the Endpoint and Download the SoftwareYou must have the endpoint's enrollment token before you can download the endpointsoftware okvclient.jar.
After registering the endpoint, the Oracle Key Vault system administrator sends thisendpoint's enrollment token to the endpoint administrator by email or other out-of-bandmethod.
1. Log in to the endpoint server as the endpoint administrator.
2. Connect to the Oracle Key Vault management console.
For example:
https://192.0.2.254
The login page to the Oracle Key Vault management console appears. Do not log in.
3. In the lower right corner of the login page, click the Endpoint Enrollment and SoftwareDownload button, which is below the Login button.
The Enroll Endpoint & Download Software page appears.
Chapter 14Finalizing Enrollment and Provisioning
14-3
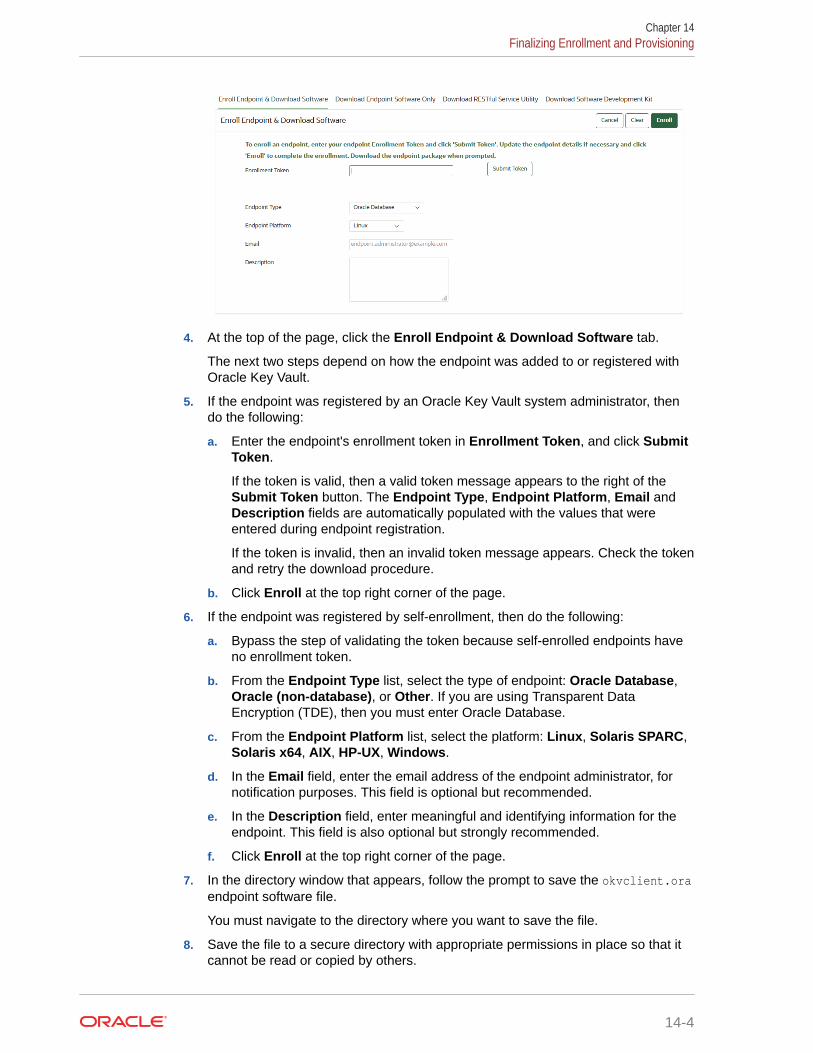
4. At the top of the page, click the Enroll Endpoint & Download Software tab.
The next two steps depend on how the endpoint was added to or registered withOracle Key Vault.
5. If the endpoint was registered by an Oracle Key Vault system administrator, thendo the following:
a. Enter the endpoint's enrollment token in Enrollment Token, and click SubmitToken.
If the token is valid, then a valid token message appears to the right of theSubmit Token button. The Endpoint Type, Endpoint Platform, Email andDescription fields are automatically populated with the values that wereentered during endpoint registration.
If the token is invalid, then an invalid token message appears. Check the tokenand retry the download procedure.
b. Click Enroll at the top right corner of the page.
6. If the endpoint was registered by self-enrollment, then do the following:
a. Bypass the step of validating the token because self-enrolled endpoints haveno enrollment token.
b. From the Endpoint Type list, select the type of endpoint: Oracle Database,Oracle (non-database), or Other. If you are using Transparent DataEncryption (TDE), then you must enter Oracle Database.
c. From the Endpoint Platform list, select the platform: Linux, Solaris SPARC,Solaris x64, AIX, HP-UX, Windows.
d. In the Email field, enter the email address of the endpoint administrator, fornotification purposes. This field is optional but recommended.
e. In the Description field, enter meaningful and identifying information for theendpoint. This field is also optional but strongly recommended.
f. Click Enroll at the top right corner of the page.
7. In the directory window that appears, follow the prompt to save the okvclient.oraendpoint software file.
You must navigate to the directory where you want to save the file.
8. Save the file to a secure directory with appropriate permissions in place so that itcannot be read or copied by others.
Chapter 14Finalizing Enrollment and Provisioning
14-4
9. Verify that the file has been downloaded.
If the download fails, then you must obtain a new enrollment token from the keyadministrator for the endpoint and repeat these steps, starting with Step 5. Note that ifyou did not download the file to the endpoint system, you must use an out-of-bandmethod to copy the file to that system and install it there.
At this stage, you are ready to install the Oracle Key Vault okvclient.jar software file on theendpoint, starting with preparing the endpoint environment.
Related Topics
• Step 2: Prepare the Endpoint EnvironmentYou must ensure that you have the right version of the Java Development Toolkit (JDK)and that the Oracle environment variables are set.
14.2.2 Step 2: Prepare the Endpoint EnvironmentYou must ensure that you have the right version of the Java Development Toolkit (JDK) andthat the Oracle environment variables are set.
1. Ensure that you have the necessary administrative privileges to install software on theendpoint.
2. Ensure that you have JDK 1.5 or later installed, and that the PATH environment variableincludes the java executable (in the JAVA_HOME/bin directory).
Oracle Key Vault supports JDK versions 1.5, 1.6, 7, and 8.
3. Run the shell utility oraenv or source oraenv command to set the correct environmentvariables on Oracle Database servers.
4. Check that the environment variables ORACLE_BASE and ORACLE_HOME are correctly set.
If you used oraenv to set these variables, then you must verify that ORACLE_BASE points tothe root directory for Oracle Databases, and that ORACLE_HOME points to a sub-directoryunder ORACLE_BASE where an Oracle database is installed.
14.2.3 Step 3: Install the Oracle Key Vault Software onto the EndpointTo upgrade to the latest endpoint software for an enrolled endpoint, you can download theendpoint software without having to reenroll the endpoint.
1. Ensure that you are logged in to the endpoint server as the endpoint administrator.
2. Navigate to the directory in which you saved the okvclient.jar file.
3. Confirm that the target directory exists, and that it is empty.
4. Run the java command to install the okvclient.jar file.
java -jar okvclient.jar -d c:\db\okv_home -v [-db112]
In this specification:
• -d specifies the directory location for the endpoint software and configuration files, inthis case /home/oracle/okvutil.
• -v writes the installation logs to the /home/oracle/okvutil/log/okvutil.deploy.log file at the server endpoint.
Chapter 14Finalizing Enrollment and Provisioning
14-5
• -db112 applies only if the Oracle database is 11.2.0.4 and the endpointplatform is Windows.
-o is an optional argument that enables you to overwrite the symbolic linkreference to okvclient.ora when okvclient.jar is deployed in a directory otherthan the original directory. This argument is used only when you re-enroll anendpoint.
If you are installing the okvclient.jar file on a Windows endpoint system that hasOracle Database release 11.2.0.4 only, then include the -db112 option. (Thisoption is not necessary for any other combination of endpoint platform or OracleDatabase version.) For example:
java -jar okvclient.jar -d c:\db\okv_home\okvutil -v -db112
5. When you are prompted for a password, then perform either of the following twosteps.
The optional password goes into two places: okvutil and in ADMINISTER KEYMANAGEMENT. With okvutil, only users who know that password can upload ordownload content to and from Oracle Key Vault. With ADMINISTER KEYMANAGEMENT, it becomes the password that you must use in the IDENTIFIED BYpassword clause. If you choose not to give a password, then okvutil upload anddownload commands will not prompt for a password, and the password forADMINISTER KEY MANAGEMENT becomes NULL.
The choices for handling the password are as follows:
• If you want to create a password-protected wallet, at minimum enter apassword between 8 and 30 characters and then press Enter. For bettersecurity, Oracle recommends that you include uppercase letters, lowercasecharacters, special characters, and numbers in the password. The followingspecial characters are allowed: (.), comma (,), underscore (_), plus sign (+),colon (:), space.
Enter new Key Vault endpoint password (<enter> for auto-login): Key_Vault_endpoint_passwordConfirm new endpoint password: Key_Vault_endpoint_password
A password-protected wallet is an Oracle wallet file that store the endpoint'scredentials to access Oracle Key Vault. This password will be requiredwhenever the endpoint connects to Oracle Key Vault.
• Alternatively, enter no password and then press Enter.
A successful installation of the endpoint software creates the following directories:
• bin: contains the okvutil program, the root.sh and root.bat scripts, and thebinary file okveps.x64
• conf: contains the configuration file okvclient.ora
• jlib: contains the Java library files
• lib: contains the file liborapkcs.so
• log: contains the log files
• ssl: contains the TLS-related files and wallet files. The wallet files contain theendpoint credentials to connect to Oracle Key Vault.
The ewallet.p12 file refers to a password-protected wallet. The cwallet.ssofile refers to an auto-login wallet.
Chapter 14Finalizing Enrollment and Provisioning
14-6
14.2.4 Step 4: Perform Post-Installation TasksThe post-installation procedures include optionally configuring a TDE connection for theendpoint, checking the installation contents, and deleting the okvclient.jar file.
1. Optionally, configure a TDE connection for the endpoint.
On UNIX platforms, the liborapkcs.so file contains the library that the Oracle databaseuses to communicate with Oracle Key Vault. On Windows platforms, the liborapkcs.dllfile contains the library that the Oracle database uses to communicate with Oracle KeyVault.
• On Oracle Linux x86-64, Solaris, AIX, and HP-UX (IA) installations: Log in as theroot and then execute either of the following commands:
$ sudo bin/root.sh
Or:
$ su -# bin/root.sh
This command creates the directory tree /opt/oracle/extapi/64/hsm/oracle/1.0.0, changes ownership and permissions, then copies the PKCS#11 library intothis directory.
• On Windows installations: Run the following command:
bin\root.bat
This command copies the liborapkcs.dll file to theC:\oracle\extapi\64\hsm\oracle\1.0.0 directory.
2. Use a command such as namei or ls -l to confirm that a softlink was createdin $ORACLE_BASE/okv/$ORACLE_SID/okvclient.ora to point to the real file in the /confsubdirectory of the installation target directory.
If the ORACLE_BASE environment variable has not been set, then the softlink was createdin $ORACLE_HOME/okv/$ORACLE_SID.
3. Run the okvutil list command to verify that the endpoint software installed correctly,and that the endpoint can connect to the Oracle Key Vault server.
$ ./okvutil list
If the endpoint is able to connect to Key Vault, then the No objects found messageappears. If a Server connect failed message appears, then you must troubleshoot theinstallation for possible issues. Check that environment variables are correctly set. To gethelp on the endpoint software, execute the following command:
java -jar okvclient.jar -h
Output similar to the following appears:
Production on Fri Apr 12 15:03:01 PDT 2019Copyright (c) 1996, 2019 Oracle. All Rights Reserved.Usage: java -jar okvclient.jar [-h | -help] [[-v | -verbose] [-d <destination directory>] [-o]]
Chapter 14Finalizing Enrollment and Provisioning
14-7
Options: -h or -help : Display command help. -v or -verbose : Turn on the verbose mode. Logs will be written to files under <destination directory>/log/ directory. -d <destination directory> : Specify the software installation directory. -o : Overwrite the current symbolic link to okvclient.ora.
14.3 Environment Variables and Endpoint ProvisioningGuidance
Environment variables such as JAVA_HOME and OKV_HOME must be correctly set so thatOracle Key Vault can access its utilities.
• How the Location of JAVA_HOME Location Is DeterminedThe default location for the okvclient.ora file is the $OKV_HOME/conf directory.
• Location of the okvclient.ora File and Environment Variables$OKV_HOME is the destination directory for the endpoint software specified with the -d option during installation.
• Setting OKV_HOME for Non-Database Utilities to Communicate with Oracle KeyVaultFor non-database utilities, you must set the environment variable OKV_HOME topoint to the destination directory for the endpoint software.
• Environment Variables in sqlnet.ora FileYou must consider several points while using the srvctl utility on OracleDatabase endpoints.
14.3.1 How the Location of JAVA_HOME Location Is DeterminedThe default location for the okvclient.ora file is the $OKV_HOME/conf directory.
When you provision endpoints you must know how the installation process determinesthe location of Java home and the okvclient.ora file.
The endpoint software installation process uses the following rules to determine theJava home location:
• If a user-defined JAVA_HOME environment variable exists, the installation processuses this value.
• If JAVA_HOME is not set, then the installation process looks for it in the java.homesystem property of the Java Virtual Machine (JVM).
After the JAVA_HOME path is determined, the installation process adds it to theokvclient.ora configuration file to be used by all okvutil commands.
You can force okvutil to use a different JAVA_HOME setting by using one of thefollowing methods:
• Set the JAVA_HOME environment variable in the shell where you run okvutil:
setenv JAVA_HOME path_to_Java_home
Or:
Chapter 14Environment Variables and Endpoint Provisioning Guidance
14-8

export JAVA_HOME = path_to_Java_home
• Set the JAVA_HOME property directly in the okvclient.ora configuration file.
JAVA_HOME=path_to_Java_home
14.3.2 Location of the okvclient.ora File and Environment Variables$OKV_HOME is the destination directory for the endpoint software specified with the -d optionduring installation.
The okvclient.ora file is a configuration file in the $OKV_HOME/conf directory .
In addition to the $OKV_HOME/conf file, the installation process creates a soft link tookvclient.ora for an existing database. The location of the soft link depends on thefollowing:
• If the $ORACLE_BASE environment variable is set, then the installation process creates asymbolic link to the okvclient.ora configuration file (in $OKV_HOME/conf) inthe $ORACLE_BASE/okv/$ORACLE_SID location.
If the okvclient.ora file already exists in the $ORACLE_BASE/okv/$ORACLE_SID location,then the installation process accepts the existing soft link to okvclient.ora as a a validsoft link.
• If the $ORACLE_BASE/okv/$ORACLE_SID directory is not set, then the installation processtries to create it.
• If the $ORACLE_HOME environment variable is set but the $ORACLE_BASE variable is not set,then the installation process creates a symbolic link forthe $ORACLE_HOME/okv/$ORACLE_SID location to point to the configuration file inthe $OKV_HOME/conf directory.
14.3.3 Setting OKV_HOME for Non-Database Utilities to Communicatewith Oracle Key Vault
For non-database utilities, you must set the environment variable OKV_HOME to point to thedestination directory for the endpoint software.
You must manually set OKV_HOME because the installation process does not set this variableautomatically. Setting OKV_HOME enables utilities to communicate with Oracle Key Vault. Theseinclude utilities such as Oracle Recovery Manager (RMAN) that access Oracle Key Vault forkeys.
You must set OKV_HOME in all environments where you will run utilities such as RMAN. Forexample, if you spawn a new xterm window, then you will need to set OKV_HOME in thisenvironment before running RMAN.
14.3.4 Environment Variables in sqlnet.ora FileYou must consider several points while using the srvctl utility on Oracle Databaseendpoints.
• If you are using the srvctl utility, and if you want to include environment variables in thesqlnet.ora configuration file, then you must set these environment variables in both theoperating system and the srvctl environment.
Chapter 14Environment Variables and Endpoint Provisioning Guidance
14-9
• For Oracle Database endpoints, if you are using the srvctl utility and settingenvironment variables in sqlnet.ora, then you must set them in both theoperating system and the srvctl environment.
• The operating system and srvctl utility should have $ORACLE_SID, $ORACLE_HOMEand $ORACLE_BASE set to the same values.
14.4 Endpoints That Do Not Use the Oracle Key Vault ClientSoftware
Third-party KMIP endpoints do not use the Oracle Key Vault software okvutil andliborapkcs.so.
In this case you must manually set the Transport Layer Security (TLS) authenticationas follows:
1. Extract the ssl directory from the okvclient.jar file.
jar xvf okvclient.jar ssl
2. Use the following files to set up the TLS authentication:
• ssl/key.pem: Endpoint private key
• ssl/cert.pem: Endpoint certificate
• ssl/cert_req.pem: Certificate request corresponding to cert.pem
• ssl/CA.pem: Trust anchor for verifying the Oracle Key Vault server certificate
14.5 Transparent Data Encryption Endpoint ManagementOracle Key Vault can manage TDE keys by using the same PKCS#11 interface thatTDE uses to communicate with an external keystore.
Therefore, you do not need to patch the database to use Oracle Key Vault for storingand retrieving TDE master encryption keys. Oracle Key Vault supplies the PKCS#11library to communicate with Oracle Key Vault.
Oracle Key Vault improves upon TDE key management. For example, you can directlyupload the keys in the wallet to Oracle Key Vault for long-term retention, to be sharedwith other database endpoints within the same endpoint group. Therefore, you do notneed to store the wallet indefinitely after migration. Migration in this context means thatthe database is configured to use Oracle Key Vault for wallet backup, and that theadministrator intends to migrate to an online master key (formerly knows as TDE directconnect).
You can continue to use the wallet, and upload wallet copies to Key Vault as part ofevery TDE key administration SQL operation, involving a WITH BACKUP SQL clause.However, be aware that TDE ignores the WITH BACKUP clause in an Oracle Key Vaultonline key deployment, even if it is required for the ADMINISTER KEY MANAGEMENTstatement.
Oracle Database TDE are endpoints for Oracle Key Vault. Endpoint enrollment andinstallation ensure that the PKCS#11 library is installed in the correct location for TDEto pick up and use. When the PKCS#11 library is installed, all other configurations andoperations are in effect.
Chapter 14Endpoints That Do Not Use the Oracle Key Vault Client Software
14-10
Example 14-1 shows examples of setting an encryption key.
Example 14-1 Setting an Encryption Key
ALTER SYSTEM SET ENCRYPTION KEY IDENTIFIED BY secret_passphrase -- For Oracle Database 11g Release 2
ADMINISTER KEY MANAGEMENT SET ENCRYPTION KEY IDENTIFIED BY secret_passphrase WITH BACKUP; -- For Oracle Database 12c or later
Related Topics
• Centralized Management of TDE Master Encryption Keys Using Online Master KeysYou can use an online master key to centralize the management of TDE masterencryption keys over a direct network connection.
14.6 Endpoint okvclient.ora Configuration FileOracle Key Vault endpoint libraries and utilities use the okvclient.ora configuration file,which stores the configuration parameters associated with the endpoint.
The okvclient.ora file consists of key-value pairs separated by an equal sign (=). Atminimum, set the following parameters in the endpoint configuration file:
• SERVER=node1_IP:node1_port/node1_DN,node2_IP:node2_port/node2_DN,...
This parameter specifies the IP address and port number of the Oracle Key Vault server,separated by a colon. If the port number is not specified, then it defaults to the standardKMIP port 5696.
• STANDBY_SERVER=standby_server_IP:standby_server port
This is the standby server. If primary-standby is configured, then this parameter showsthe standby IP address.
• READ_SERVER=node1_IP:node1_port/node1_DN,node2_IP:node2_port/node2_DN,...This parameter specifies the list of read-only servers.
• SSL_WALLET_LOC=directory
This parameter specifies the location of the wallet containing TLS credentials for theendpoint.
• SERVER_POLL_TIMEOUT=timeout_value
You can use the SERVER_POLL_TIMEOUT parameter to specify a timeout for a client'sattempt to connect to an Oracle Key Vault server before trying the next server in the list.The default value is 300 (milliseconds).
In Oracle Key Vault clients first establish a non-blocking TCP connection to Oracle KeyVault to quickly detect unreachable servers.
After the first attempt, the client makes a second and final attempt to connect to theserver but this time waits for twice as long as the duration specified bythe SERVER_POLL_TIMEOUT parameter. This is done to overcome possible networkcongestion or delays.
The CONF_ID value in an okvclient.ora file is a unique internal value that helps an Oracledatabase to find its virtual wallet in Oracle Key Vault. Do not modify any settings in theokvclient.ora file. Instead, set endpoint configuration parameters through the Oracle KeyVault management console. Depending on your privileges, you can set these for individualendpoints or globally, for all endpoints.
Chapter 14Endpoint okvclient.ora Configuration File
14-11

Related Topics
• Managing Endpoint DetailsEndpoint details refers to endpoint name, type, description, platform, and email,and adding the endpoint to a group, or upgrading the endpoint software.
14.7 Upgrading EndpointsYou can perform endpoint upgrades from either the Oracle Key Vault managementconsole login page or from the endpoint.
• Upgrading Endpoint Software from an EndpointYou can upgrade the endpoint software from the Oracle Key Vault managementconsole login window.
• Upgrading Endpoint Software on an Enrolled EndpointYou should upgrade the endpoint software on an enrolled endpoint any time youupgraded to a new release of Oracle Key Vault.
14.7.1 Upgrading Endpoint Software from an EndpointYou can upgrade the endpoint software from the Oracle Key Vault managementconsole login window.
• Step 1: Prepare the Endpoint EnvironmentEnsure that you have the correct privileges and that the endpoint has the correctconfiguration, such as Oracle environment variables.
• Step 2: Download the Oracle Key Vault Software onto the EndpointYou download the okvclient.jar file to local computer.
• Step 3: Install the Oracle Key Vault Software onto the EndpointYou must be the endpoint administrator to install the Oracle Key Vault softwareonto the endpoint.
• Step 4: Perform Post-Installation TasksAfter you complete the installation, you can configure a TDE connection for theendpoint and verify that the endpoint software was installed correctly.
14.7.1.1 Step 1: Prepare the Endpoint EnvironmentEnsure that you have the correct privileges and that the endpoint has the correctconfiguration, such as Oracle environment variables.
These steps assume that the endpoint has already been enrolled in a previous releaseof Oracle Key Vault.
1. Ensure that you have the necessary administrative privileges to install software onthe endpoint.
2. Ensure that you have JDK 1.5 or later installed, and that the PATH environmentvariable includes the java executable (in the JAVA_HOME/bin directory).
Oracle Key Vault supports JDK versions 1.5, 1.6, 7, and 8.
3. Run the shell utility oraenv or source oraenv command to set the correctenvironment variables on Oracle Database servers.
Chapter 14Upgrading Endpoints
14-12
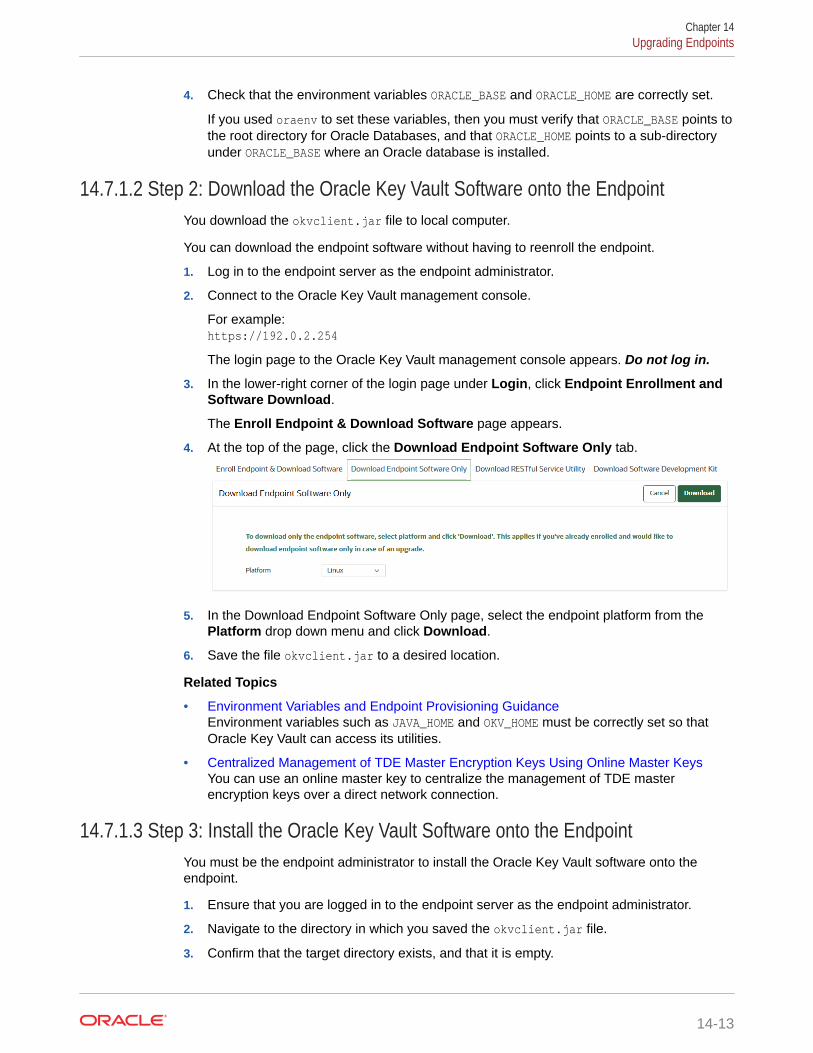
4. Check that the environment variables ORACLE_BASE and ORACLE_HOME are correctly set.
If you used oraenv to set these variables, then you must verify that ORACLE_BASE points tothe root directory for Oracle Databases, and that ORACLE_HOME points to a sub-directoryunder ORACLE_BASE where an Oracle database is installed.
14.7.1.2 Step 2: Download the Oracle Key Vault Software onto the EndpointYou download the okvclient.jar file to local computer.
You can download the endpoint software without having to reenroll the endpoint.
1. Log in to the endpoint server as the endpoint administrator.
2. Connect to the Oracle Key Vault management console.
For example:https://192.0.2.254
The login page to the Oracle Key Vault management console appears. Do not log in.
3. In the lower-right corner of the login page under Login, click Endpoint Enrollment andSoftware Download.
The Enroll Endpoint & Download Software page appears.
4. At the top of the page, click the Download Endpoint Software Only tab.
5. In the Download Endpoint Software Only page, select the endpoint platform from thePlatform drop down menu and click Download.
6. Save the file okvclient.jar to a desired location.
Related Topics
• Environment Variables and Endpoint Provisioning GuidanceEnvironment variables such as JAVA_HOME and OKV_HOME must be correctly set so thatOracle Key Vault can access its utilities.
• Centralized Management of TDE Master Encryption Keys Using Online Master KeysYou can use an online master key to centralize the management of TDE masterencryption keys over a direct network connection.
14.7.1.3 Step 3: Install the Oracle Key Vault Software onto the EndpointYou must be the endpoint administrator to install the Oracle Key Vault software onto theendpoint.
1. Ensure that you are logged in to the endpoint server as the endpoint administrator.
2. Navigate to the directory in which you saved the okvclient.jar file.
3. Confirm that the target directory exists, and that it is empty.
Chapter 14Upgrading Endpoints
14-13
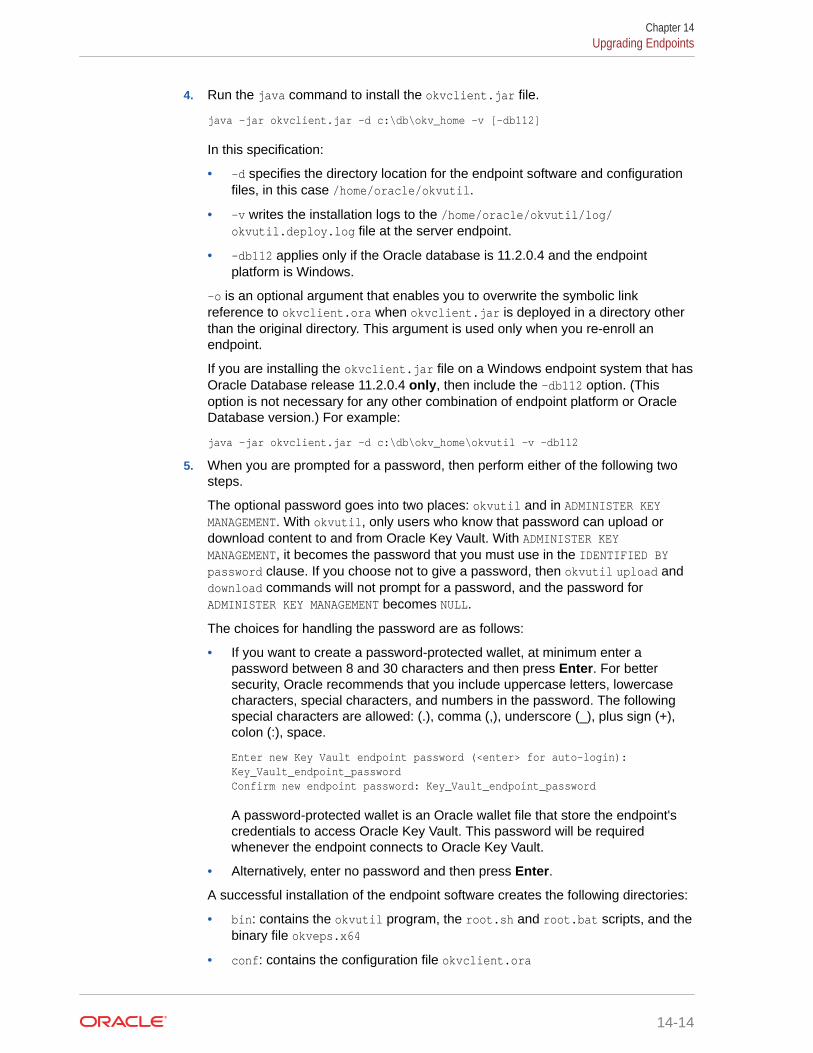
4. Run the java command to install the okvclient.jar file.
java -jar okvclient.jar -d c:\db\okv_home -v [-db112]
In this specification:
• -d specifies the directory location for the endpoint software and configurationfiles, in this case /home/oracle/okvutil.
• -v writes the installation logs to the /home/oracle/okvutil/log/okvutil.deploy.log file at the server endpoint.
• -db112 applies only if the Oracle database is 11.2.0.4 and the endpointplatform is Windows.
-o is an optional argument that enables you to overwrite the symbolic linkreference to okvclient.ora when okvclient.jar is deployed in a directory otherthan the original directory. This argument is used only when you re-enroll anendpoint.
If you are installing the okvclient.jar file on a Windows endpoint system that hasOracle Database release 11.2.0.4 only, then include the -db112 option. (Thisoption is not necessary for any other combination of endpoint platform or OracleDatabase version.) For example:
java -jar okvclient.jar -d c:\db\okv_home\okvutil -v -db112
5. When you are prompted for a password, then perform either of the following twosteps.
The optional password goes into two places: okvutil and in ADMINISTER KEYMANAGEMENT. With okvutil, only users who know that password can upload ordownload content to and from Oracle Key Vault. With ADMINISTER KEYMANAGEMENT, it becomes the password that you must use in the IDENTIFIED BYpassword clause. If you choose not to give a password, then okvutil upload anddownload commands will not prompt for a password, and the password forADMINISTER KEY MANAGEMENT becomes NULL.
The choices for handling the password are as follows:
• If you want to create a password-protected wallet, at minimum enter apassword between 8 and 30 characters and then press Enter. For bettersecurity, Oracle recommends that you include uppercase letters, lowercasecharacters, special characters, and numbers in the password. The followingspecial characters are allowed: (.), comma (,), underscore (_), plus sign (+),colon (:), space.
Enter new Key Vault endpoint password (<enter> for auto-login): Key_Vault_endpoint_passwordConfirm new endpoint password: Key_Vault_endpoint_password
A password-protected wallet is an Oracle wallet file that store the endpoint'scredentials to access Oracle Key Vault. This password will be requiredwhenever the endpoint connects to Oracle Key Vault.
• Alternatively, enter no password and then press Enter.
A successful installation of the endpoint software creates the following directories:
• bin: contains the okvutil program, the root.sh and root.bat scripts, and thebinary file okveps.x64
• conf: contains the configuration file okvclient.ora
Chapter 14Upgrading Endpoints
14-14
• jlib: contains the Java library files
• lib: contains the file liborapkcs.so
• log: contains the log files
• ssl: contains the TLS-related files and wallet files. The wallet files contain theendpoint credentials to connect to Oracle Key Vault.
The ewallet.p12 file refers to a password-protected wallet. The cwallet.sso filerefers to an auto-login wallet.
Related Topics
• Environment Variables and Endpoint Provisioning GuidanceEnvironment variables such as JAVA_HOME and OKV_HOME must be correctly set so thatOracle Key Vault can access its utilities.
• Centralized Management of TDE Master Encryption Keys Using Online Master KeysYou can use an online master key to centralize the management of TDE masterencryption keys over a direct network connection.
14.7.1.4 Step 4: Perform Post-Installation TasksAfter you complete the installation, you can configure a TDE connection for the endpoint andverify that the endpoint software was installed correctly.
1. Optionally, configure a TDE connection for the endpoint.
On UNIX platforms, the liborapkcs.so file contains the library that the Oracle databaseuses to communicate with Oracle Key Vault. On Windows platforms, the liborapkcs.dllfile contains the library that the Oracle database uses to communicate with Oracle KeyVault.
• On Oracle Linux x86-64, Solaris, AIX, and HP-UX (IA) installations: Log in as theroot and then execute either of the following commands:
$ sudo bin/root.sh
Or:
$ su -# bin/root.sh
This command creates the directory tree /opt/oracle/extapi/64/hsm/oracle/1.0.0, changes ownership and permissions, then copies the PKCS#11 library intothis directory.
• On Windows installations: Run the following command:
bin\root.bat
This command copies the liborapkcs.dll file to theC:\oracle\extapi\64\hsm\oracle\1.0.0 directory.
2. Use a command such as namei or ls -l to confirm that a softlink was createdin $ORACLE_BASE/okv/$ORACLE_SID/okvclient.ora to point to the real file in the /confsubdirectory of the installation target directory.
If the ORACLE_BASE environment variable has not been set, then the softlink was createdin $ORACLE_HOME/okv/$ORACLE_SID.
Chapter 14Upgrading Endpoints
14-15
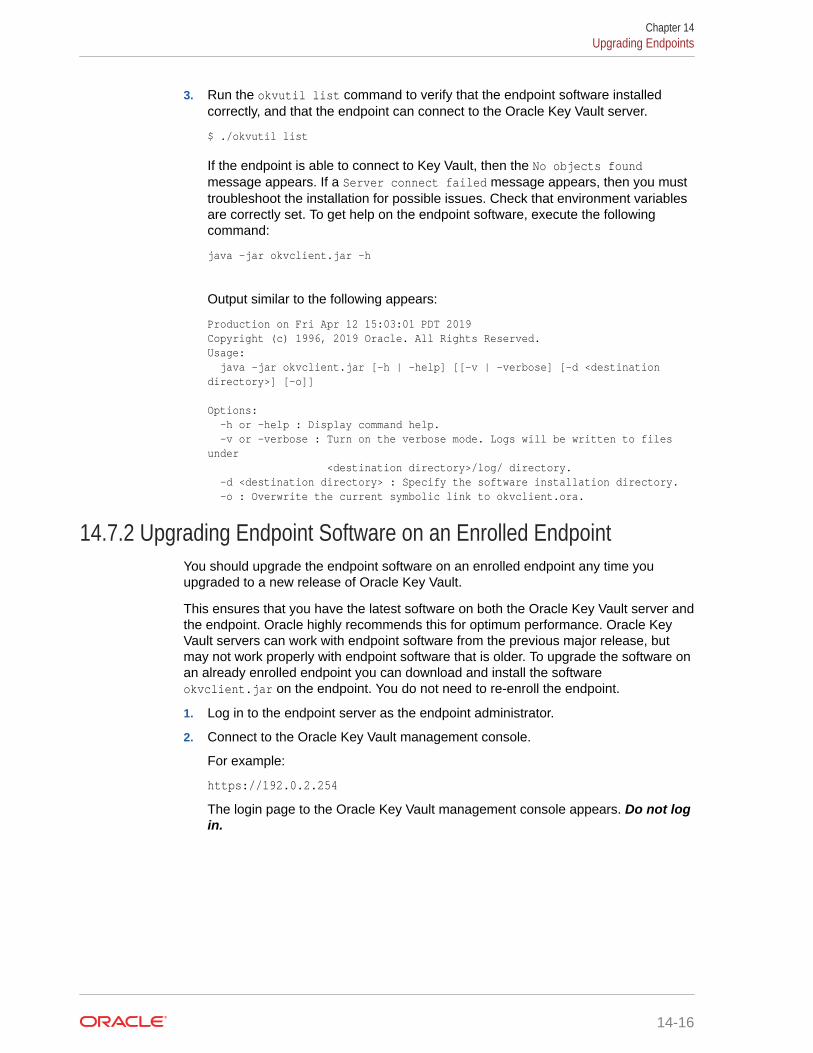
3. Run the okvutil list command to verify that the endpoint software installedcorrectly, and that the endpoint can connect to the Oracle Key Vault server.
$ ./okvutil list
If the endpoint is able to connect to Key Vault, then the No objects foundmessage appears. If a Server connect failed message appears, then you musttroubleshoot the installation for possible issues. Check that environment variablesare correctly set. To get help on the endpoint software, execute the followingcommand:
java -jar okvclient.jar -h
Output similar to the following appears:
Production on Fri Apr 12 15:03:01 PDT 2019Copyright (c) 1996, 2019 Oracle. All Rights Reserved.Usage: java -jar okvclient.jar [-h | -help] [[-v | -verbose] [-d <destination directory>] [-o]]
Options: -h or -help : Display command help. -v or -verbose : Turn on the verbose mode. Logs will be written to files under <destination directory>/log/ directory. -d <destination directory> : Specify the software installation directory. -o : Overwrite the current symbolic link to okvclient.ora.
14.7.2 Upgrading Endpoint Software on an Enrolled EndpointYou should upgrade the endpoint software on an enrolled endpoint any time youupgraded to a new release of Oracle Key Vault.
This ensures that you have the latest software on both the Oracle Key Vault server andthe endpoint. Oracle highly recommends this for optimum performance. Oracle KeyVault servers can work with endpoint software from the previous major release, butmay not work properly with endpoint software that is older. To upgrade the software onan already enrolled endpoint you can download and install the softwareokvclient.jar on the endpoint. You do not need to re-enroll the endpoint.
1. Log in to the endpoint server as the endpoint administrator.
2. Connect to the Oracle Key Vault management console.
For example:
https://192.0.2.254
The login page to the Oracle Key Vault management console appears. Do not login.
Chapter 14Upgrading Endpoints
14-16
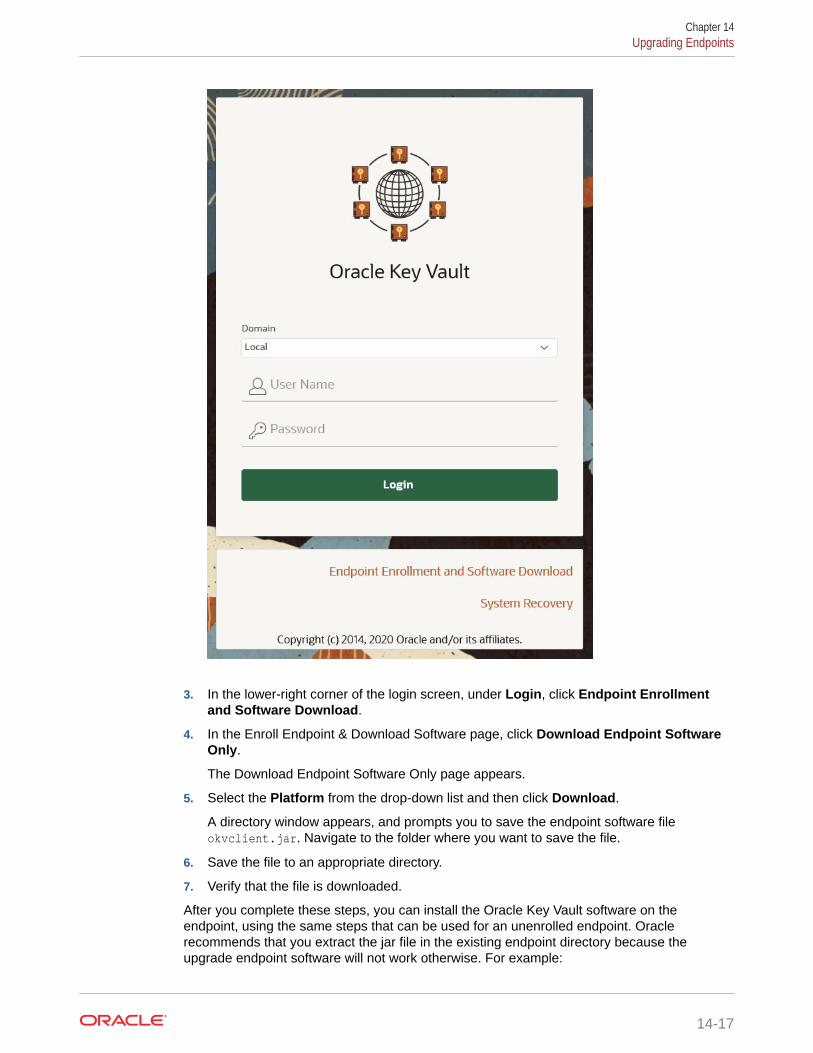
3. In the lower-right corner of the login screen, under Login, click Endpoint Enrollmentand Software Download.
4. In the Enroll Endpoint & Download Software page, click Download Endpoint SoftwareOnly.
The Download Endpoint Software Only page appears.
5. Select the Platform from the drop-down list and then click Download.
A directory window appears, and prompts you to save the endpoint software fileokvclient.jar. Navigate to the folder where you want to save the file.
6. Save the file to an appropriate directory.
7. Verify that the file is downloaded.
After you complete these steps, you can install the Oracle Key Vault software on theendpoint, using the same steps that can be used for an unenrolled endpoint. Oraclerecommends that you extract the jar file in the existing endpoint directory because theupgrade endpoint software will not work otherwise. For example:
Chapter 14Upgrading Endpoints
14-17

java -jar /path/to/okvclient.jar -d /path/to/existing/ep/files -v
Related Topics
• Step 3: Install the Oracle Key Vault Software onto the EndpointYou must be the endpoint administrator to install the Oracle Key Vault softwareonto the endpoint.
Chapter 14Upgrading Endpoints
14-18
15Managing Keys for Oracle Products
You can use Oracle Key Vault with other Oracle features and products, such as OracleGoldenGate or Oracle Data Guard.
• Using a TDE-Configured Oracle Database in an Oracle RAC EnvironmentEach Oracle RAC database has its own Oracle virtual wallet in Oracle Key Vault.
• Using a TDE-Configured Oracle Database in an Oracle GoldenGate EnvironmentOracle Key Vault supports the use of Oracle wallets with Oracle GoldenGate sharedsecrets.
• Using a TDE-Configured Oracle Database in an Oracle Data Guard EnvironmentYou can perform the activities such as uploading Oracle wallets or using online masterkeys in an Oracle Data Guard environment.
• Uploading Keystores from Automatic Storage Management to Oracle Key VaultYou can copy a keystore from Automatic Storage Management (ASM) to Oracle KeyVault and vice versa in a two-step process.
• MySQL Integration with Oracle Key VaultYou can manage TDE encryption keys in MySQL with Oracle Key Vault.
• Other Oracle Database Features That Oracle Key Vault SupportsYou can deploy Transparent Data Encryption (TDE) in multiple topologies with otherdatabase features that move or use clustered deployments.
15.1 Using a TDE-Configured Oracle Database in an OracleRAC Environment
Each Oracle RAC database has its own Oracle virtual wallet in Oracle Key Vault.
In an Oracle Real Application Clusters (Oracle RAC) environment, each Oracle RAC instancehas its own endpoint in Oracle Key Vault; these endpoints share the same virtual wallet inOracle Key Vault as their default wallet.
You can enable the cluster to share the virtual wallet by using either of the followingapproaches:
• If the Oracle RAC database is using TDE with individual wallets, then confirm that thesewallets have the identical content. Execute the mkstore -wrl /directory/to/TDE-wallet -list command to compare the content of each wallet. If they all contain thesame keys, then upload the content of one of them into the shared virtual wallet in OracleKey Vault.
• If the Oracle RAC database is using TDE with a shared wallet (which is therecommended deployment), then upload that wallet to Oracle Key Vault.
• Establish an auto-open connection with Oracle Key Vault.
• Migrate the Oracle RAC database to Oracle Key Vault.
15-1
As with single-instance database environments, after you download a password-protected wallet, you must manually open it. If you have one wallet on the primarynode and then download the wallet to the other nodes, then you must explicitly openthe wallets on each of these nodes.
Each Oracle RAC node is a different endpoint of the database and has its ownindividual persistent cache. For Oracle RAC databases, you should initiate a queryfrom each Oracle RAC node to cache the latest master encryption key in the OracleRAC node for uninterrupted operations
Related Topics
• About the Persistent Master Encryption Key CacheThe persistent master encryption key cache ensures the availability of TDE masterencryption keys.
• Uploading Oracle WalletsThe okvutil upload command uploads wallets to Oracle Key Vault.
15.2 Using a TDE-Configured Oracle Database in an OracleGoldenGate Environment
Oracle Key Vault supports the use of Oracle wallets with Oracle GoldenGate sharedsecrets.
You can upload or migrate Oracle wallets that contain Oracle GoldenGate sharedsecrets and TDE master encryption keys to the Oracle Key Vault server.
• Oracle Wallets in an Oracle GoldenGate EnvironmentAn Oracle GoldenGate shared secret can be in the same Oracle wallet wheremaster encryption keys are stored.
• Configuring Online Master Keys in an Oracle GoldenGate DeploymentThere are two configuration steps to using the online master key in an OracleGoldenGate deployment.
• Migration of TDE Wallets in Oracle GoldenGate to Oracle Key VaultOracle wallets can contain both a TDE master encryption key and an OracleGoldenGate shared secret.
15.2.1 Oracle Wallets in an Oracle GoldenGate EnvironmentAn Oracle GoldenGate shared secret can be in the same Oracle wallet where masterencryption keys are stored.
In an environment where Oracle Key Vault is not used and an Oracle TDE-enableddatabase is configured with an Oracle wallet with Oracle GoldenGate, this database(called the source database) stores an Oracle GoldenGate shared secret in the sameOracle wallet where master encryption keys are stored.
This means that when you configure the source database as an Oracle Key Vaultendpoint, the Oracle GoldenGate shared secret is stored in Oracle Key Vault in thesame virtual wallet where the master encryption keys are stored for the TDE-enabledsource database.
When you migrate an Oracle wallet that contains an Oracle GoldenGate shared secretand TDE master encryption keys to Oracle Key Vault using the okvutil command-line
Chapter 15Using a TDE-Configured Oracle Database in an Oracle GoldenGate Environment
15-2
utility, the default wallet for the TDE-enabled source database now stores the entire Oraclewallet migrated with shared secret and master encryption keys.
In addition, if the configured target database is an Oracle database, then you must ensurethat this target database is TDE-enabled so that all the TDE commands can be replicated.The two Oracle TDE-enabled databases, source and target, do not need to have the samemaster encryption key in the Oracle wallet. If you configure this target database as a newOracle Key Vault endpoint, then you can upload and download wallets to and from OracleKey Vault as you normally would with any independent Oracle Key Vault endpoint. Noadditional configuration is necessary.
15.2.2 Configuring Online Master Keys in an Oracle GoldenGateDeployment
There are two configuration steps to using the online master key in an Oracle GoldenGatedeployment.
1. Configure a connection between the source database in the GoldenGate deployment andOracle Key Vault.
2. Configure the storage of Oracle GoldenGate secrets in the Oracle wallet on the sourcedatabase.
At this stage, the configuration is complete. If you have configured the sqlnet.ora filecorrectly and completed the other configuration steps required for TDE on the sourcedatabase, then when you set the encryption key (using either ALTER SYSTEM SET ENCRYPTIONKEY or ADMINISTER KEY MANAGEMENT SET ENCRYPTION KEY), a TDE master encryption key iscreated in Oracle Key Vault. You can encrypt tables or create encrypted tablespaces in thedatabase. The encrypted data created in the source database continues to be replicated onthe target database after you perform this procedure. The other Oracle GoldenGate sharedsecrets are stored in Oracle Key Vault.
See Also:
• Step 1: Configure the Oracle Key Vault Server Environment for instructions toconnect a source database in GoldenGate to Oracle Key Vault.
• Oracle Database Advanced Security Guide for more information on configuringthe storage of Oracle GoldenGate secrets in the source database.
15.2.3 Migration of TDE Wallets in Oracle GoldenGate to Oracle Key VaultOracle wallets can contain both a TDE master encryption key and an Oracle GoldenGateshared secret.
In an Oracle GoldenGate environment with a TDE-configured database, an Oracle walletcontains both the TDE master encryption keys and the Oracle GoldenGate shared secret.
You can also configure target Oracle TDE-enabled databases that are used in this OracleGoldenGate environment to use Oracle Key Vault or continue to use an Oracle wallet. Youshould treat these databases as you would any standalone TDE database endpoint.
Chapter 15Using a TDE-Configured Oracle Database in an Oracle GoldenGate Environment
15-3
After you complete this migration, the configuration is complete. If you have configuredthe sqlnet.ora file correctly and completed the other configuration required for TDE,then when you set the encryption key (using either ALTER SYSTEM SET ENCRYPTIONKEY or ADMINISTER KEY MANAGEMENT SET ENCRYPTION KEY), a TDE master encryptionkey is created in Oracle Key Vault. You can continue to create and use encryptedtables or tablespaces in the database. The encrypted data created in the sourcedatabase continues to be replicated on the target database after this procedure isperformed.
Related Topics
• Migration of TDE Wallets in Oracle GoldenGate to Oracle Key VaultOracle wallets can contain both a TDE master encryption key and an OracleGoldenGate shared secret.
15.3 Using a TDE-Configured Oracle Database in an OracleData Guard Environment
You can perform the activities such as uploading Oracle wallets or using online masterkeys in an Oracle Data Guard environment.
• About Uploading Oracle Wallets in an Oracle Data Guard EnvironmentThe upload operation enables both a primary and standby to benefit from the useof Oracle wallets.
• Uploading Oracle Wallets in an Oracle Data Guard EnvironmentYou can upload an Oracle wallet to an Oracle Data Guard environment.
• Performing an Online Master Key Connection in an Oracle Data GuardEnvironmentThe procedure for performing a TDE direct connection in an Oracle Data Guardenvironment is the same as in a standard Oracle Database environment.
• Migrating Oracle Wallets in an Oracle Data Guard EnvironmentYou can migrate an Oracle wallet in an Oracle Data Guard environment by usingokvutil and SQL*Plus.
• Reverse Migrating Oracle Wallets in an Oracle Data Guard EnvironmentYou can use okvutil and SQL*Plus to reverse migrate an Oracle wallet in anOracle Data Guard environment.
• Migrating an Oracle TDE Wallet to Oracle Key Vault for a Logical StandbyDatabaseYou can migrate a TDE wallet to Oracle Key Vault to a logical standby databaseusing Oracle Database release 12c or 18c.
• Checking the Oracle TDE Wallet Migration for a Logical Standby DatabaseYou use SQL*Plus to check the migration.
15.3.1 About Uploading Oracle Wallets in an Oracle Data GuardEnvironment
The upload operation enables both a primary and standby to benefit from the use ofOracle wallets.
Chapter 15Using a TDE-Configured Oracle Database in an Oracle Data Guard Environment
15-4
In an Oracle Data Guard environment with a TDE-enabled primary and standby databasesusing an Oracle wallet, you must physically copy the Oracle wallet file from the primarydatabase to the standby and restart the managed recovery process after the initial TDEconfiguration or later, when you rekey the master encryption key on the primary database.
Whereas, when using Oracle Key Vault with a TDE-enabled Oracle Data Guard database,you must register the primary and standby databases in Oracle Key Vault as endpoints. Youmust ensure that the endpoints for the primary and all standby databases share the samevirtual wallet.
This way, the primary and standby databases can benefit from centralized key managementwithout the need of a manual copy of the wallet file from the primary database to the standbydatabase.
In an Oracle Data Guard environment, for a persistent cache, a rekey operation on theprimary database will cache the master encryption key in its own persistent cache. When thenew redo logs from the primary are applied on the standby, only then will the standby fetchthe new key from the Oracle Key Vault and cache it in the persistent cache of the standby.There is a time lag between the caching of the key in primary and the caching of the key instandby. Oracle recommends that you synchronize the primary and standby as soon aspossible after the rekey operation. In addition, you should confirm the content of thepersistent cache on the primary and standby databases with the following command:
$ okvutil list -t okv_peristent_cache -l /path_to_persistent_cache/
Related Topics
• About the Persistent Master Encryption Key CacheThe persistent master encryption key cache ensures the availability of TDE masterencryption keys.
15.3.2 Uploading Oracle Wallets in an Oracle Data Guard EnvironmentYou can upload an Oracle wallet to an Oracle Data Guard environment.
1. Register one endpoint each for the primary and standby databases.
2. Download the okvclient.jar file for each endpoint on the respective databases.
3. Ensure that the endpoint password is the same as the TDE wallet password if you mustperform a migration or a reverse migration.
4. Ensure that both the primary and standby database endpoints use the same defaultvirtual wallet.
Related Topics
• Managing EndpointsYou can enroll, reenroll, suspend, and delete endpoints.
15.3.3 Performing an Online Master Key Connection in an Oracle DataGuard Environment
The procedure for performing a TDE direct connection in an Oracle Data Guard environmentis the same as in a standard Oracle Database environment.
Chapter 15Using a TDE-Configured Oracle Database in an Oracle Data Guard Environment
15-5
Related Topics
• Centralized Management of TDE Master Encryption Keys Using Online MasterKeysYou can use an online master key to centralize the management of TDE masterencryption keys over a direct network connection.
15.3.4 Migrating Oracle Wallets in an Oracle Data Guard EnvironmentYou can migrate an Oracle wallet in an Oracle Data Guard environment by usingokvutil and SQL*Plus.
1. Use the okvutil upload command to upload the contents of the local Oraclewallet that is on the primary database to Oracle Key Vault.
2. Perform the steps to migrate the wallet, as described in Migrating an Existing TDEWallet to Oracle Key Vault.
3. Close the existing Oracle wallet on the standby database.
• For Oracle Database 11g release 2, as a user who has been granted theALTER SYSTEM system privilege:
ALTER SYSTEM SET ENCRYPTION WALLET CLOSE IDENTIFIED BY "Key_Vault_endpoint_password";
• For Oracle Database 12c or later, as a user who has been granted the SYSKMadministrative privilege:
ADMINISTER KEY MANAGEMENT SET KEYSTORE CLOSE IDENTIFIED BY "Key_Vault_endpoint_password";
4. Shut down the standby database.
For example:
SHUTDOWN IMMEDIATE
5. Restart the standby database.
For example:
STARTUP
6. Open the Oracle wallet.
• For Oracle Database 11g release 2, as a user who has been granted theALTER SYSTEM system privilege:
ALTER SYSTEM SET ENCRYPTION WALLET OPEN IDENTIFIED BY "Key_Vault_endpoint_password";
• For Oracle Database 12c or 18c, as a user who has been granted the SYSKMadministrative privilege:
ADMINISTER KEY MANAGEMENT SET KEYSTORE OPEN IDENTIFIED BY "Key_Vault_endpoint_password";
7. Start the apply process on the standby database, as described in Oracle DataGuard Concepts and Administration.
Related Topics
• okvutil upload CommandThe okvutil upload command uploads security objects to Oracle Key Vault.
Chapter 15Using a TDE-Configured Oracle Database in an Oracle Data Guard Environment
15-6
• Migrating Existing TDE Wallets to Oracle Key VaultA migrated TDE wallet can be used to restore database contents that were previouslyencrypted by TDE.
• Oracle Data Guard Concepts and Administration
15.3.5 Reverse Migrating Oracle Wallets in an Oracle Data GuardEnvironment
You can use okvutil and SQL*Plus to reverse migrate an Oracle wallet in an Oracle DataGuard environment.
1. Use the okvutil download command to download the Oracle wallet keys onto theprimary database from Oracle Key Vault. Download these keys to a local keystore.
2. Perform a reverse migration, as described in Oracle Database Advanced Security Guide.
3. Close the existing Oracle wallet on the standby database.
• For Oracle Database 11g release 2:
ALTER SYSTEM SET ENCRYPTION WALLET CLOSE IDENTIFIED BY "Key_Vault_endpoint_password";
• For Oracle Database 12c or 18c:
ADMINISTER KEY MANAGEMENT SET KEYSTORE CLOSE IDENTIFIED BY "Key_Vault_endpoint_password";
4. Copy the Oracle wallet from the primary database to the standby database, as describedin Oracle Database Advanced Security Guide.
5. Open the Oracle wallet on the standby database.
• For Oracle Database 11g release 2:
ALTER SYSTEM SET ENCRYPTION WALLET OPEN IDENTIFIED BY "Key_Vault_endpoint_password";
• For Oracle Database 12c or 18c:
ADMINISTER KEY MANAGEMENT SET KEYSTORE OPEN IDENTIFIED BY "Key_Vault_endpoint_password";
6. Start the apply process on the standby database, as described in Oracle Data GuardConcepts and Administration.
If the endpoint password and the local TDE wallet password are different, then use the auto-login HSM feature.
Related Topics
• okvutil upload CommandThe okvutil upload command uploads security objects to Oracle Key Vault.
• Oracle Database Advanced Security Guide
• Oracle Database Advanced Security Guide
• Oracle Data Guard Concepts and Administration
Chapter 15Using a TDE-Configured Oracle Database in an Oracle Data Guard Environment
15-7
15.3.6 Migrating an Oracle TDE Wallet to Oracle Key Vault for aLogical Standby Database
You can migrate a TDE wallet to Oracle Key Vault to a logical standby database usingOracle Database release 12c or 18c.
1. Register the primary and standby endpoints to have the same default virtualwallet.
2. If necessary, download and install the okvclient.jar file to each endpoint.
3. Perform the migration on the primary database.
4. Complete the SQL apply process on the logical standby and then restart thestandby database, as described in Oracle Data Guard Concepts andAdministration.
5. To check that the status the that migration was successful, query theV$ENCRYPTION_WALLET dynamic view.
Related Topics
• Migrating an Existing TDE Wallet to Oracle Key VaultYou can use the okvutil upload command to start the migration of a TDE-enabled database from an existing TDE wallet to Oracle Key Vault.
• Oracle Data Guard Concepts and Administration
15.3.7 Checking the Oracle TDE Wallet Migration for a LogicalStandby Database
You use SQL*Plus to check the migration.
In an Oracle Database Release 12c environment, after you have migrated an OracleTDE wallet in a logical standby configuration, you can check the configuration.
1. In the standby database instance, log in to SQL*Plus.
For example:
sqlplus / as sysdba
2. Query the WRL_TYPE and WALLET_ORDER columns of the V$ENCRYPTION_WALLETdynamic view.
The V$ENCRYPTION_WALLET view tracks the primary keystore. If you have only asingle wallet configured, then the WALLET_ORDER column is set to SINGLE. In a two-wallet or mixed configuration, the column is set to PRIMARY or SECONDARY,depending on where the active master encryption key is located.
For example, in the following, only a single wallet is configured:
SELECT WRL_TYPE, WALLET_ORDER FROM V$ENCRYPTION_WALLET;
WRL_TYPE WALLET_ORDER-------------------- ------------FILE SINGLE
Chapter 15Using a TDE-Configured Oracle Database in an Oracle Data Guard Environment
15-8
In this query in a logical standby configuration, the active master encryption key has beenmigrated to an Oracle Key Vault virtual wallet:
SELECT WRL_TYPE, WALLET_ORDER FROM V$ENCRYPTION_WALLET; WRL_TYPE WALLET_ORDER-------------------- ------------FILE SECONDARYHSM PRIMARY
This query should show the HSM as the PRIMARY wallet in both the primary and standbydatabase for the logical configuration.
15.4 Uploading Keystores from Automatic Storage Managementto Oracle Key Vault
You can copy a keystore from Automatic Storage Management (ASM) to Oracle Key Vaultand vice versa in a two-step process.
• About Uploading Keystores from Automatic Storage Management to Oracle Key VaultUploading a keystore from Oracle Automatic Storage Management (ASM) to Oracle KeyVault is a two-step process.
• Uploading a Keystore from Automatic Storage Management to Oracle Key VaultYou can use the ADMINISTER KEY MANAGEMENT statement to move a software keystore outof Automatic Storage Management (ASM).
• Copying a Keystore from Oracle Key Vault to Automatic Storage ManagementYou use both okvutil download and SQL*Plus to complete the copy process.
15.4.1 About Uploading Keystores from Automatic Storage Management toOracle Key Vault
Uploading a keystore from Oracle Automatic Storage Management (ASM) to Oracle KeyVault is a two-step process.
1. Copy the keystore from ASM to the file system.
2. Upload the keystore from the file system to Oracle Key Vault.
Copying a keystore from ASM to the file system or vice versa requires the keystore mergeoperation that merges one software keystore to an existing key store. Therefore, in order tocopy a keystore from a source path to a target path, a keystore must exist at the target path.
15.4.2 Uploading a Keystore from Automatic Storage Management toOracle Key Vault
You can use the ADMINISTER KEY MANAGEMENT statement to move a software keystore out ofAutomatic Storage Management (ASM).
1. Initialize a target keystore on the file system with the following SQL statement:
ADMINISTER KEY MANAGEMENT CREATE KEYSTORE targetKeystorePath IDENTIFIED BY targetKeystorePassword;
Chapter 15Uploading Keystores from Automatic Storage Management to Oracle Key Vault
15-9

In this specification:
• targetKeystorePath is the directory path to the target keystore on the filesystem.
• targetKeystorePassword is a password that you create for the keystore.
For example:
ADMINISTER KEY MANAGEMENT CREATE KEYSTORE '/etc/ORACLE/KEYSTORE/DB1/' IDENTIFIED BY "destination_password";
In this specification, /etc/ORACLE/KEYSTORE/DB1/ is the path to the target keystorein the file system and destination_password is the keystore password.
You now can copy the keystore from ASM to the target keystore.
2. Copy the keystore from ASM to the target keystore that you just created.
This step requires that you merge the keystore from ASM to the file system asfollows:
ADMINISTER KEY MANAGEMENT MERGE KEYSTORE srcKeystorePath IDENTIFIED BY srcKeystorePassword INTO EXISTING KEYSTORE targetKeystorePath IDENTIFIED BY targetKeystorePassword WITH BACKUP USING backupIdentifier;
In this specification:
• srcKeystorePath is the directory path to the source keystore.
• srcKeystorePassword is the source keystore password.
• targetKeystorePath is the path to the target keystore.
• targetKeystorePassword is the target keystore password.
• backupIdentifier is the backup identifier to be added to the backup filename.
For example:
ADMINISTER KEY MANAGEMENT MERGE KEYSTORE '+DATAFILE' IDENTIFIED BY "srcPassword" INTO EXISTING KEYSTORE '/etc/ORACLE/KEYSTORE/DB1/' IDENTIFIED BY "destination_password" WITH BACKUP USING "bkup";
The keystore is copied to the file system and can now be uploaded to Oracle KeyVault.
3. Upload keystore from file system to Oracle Key Vault by using the okvutil uploadcommand.
$ okvutil upload -l location -t type
In this specification:
• location is the path to the target keystore in the file system
• type is wallet
For example:
$ okvutil upload -l /etc/ORACLE/KEYSTORE/DB1 -t wallet
Chapter 15Uploading Keystores from Automatic Storage Management to Oracle Key Vault
15-10
15.4.3 Copying a Keystore from Oracle Key Vault to Automatic StorageManagement
You use both okvutil download and SQL*Plus to complete the copy process.
To copy a keystore from Oracle Key Vault to Automatic Storage Management (ASM), use thereverse procedure from copying the keystore from ASM to Oracle Key Vault.
1. Initialize a target keystore on the file system, if the keystore does not exist.
If the keystore does exist on the file system, then bypass this step.
2. Copy the keystore from Oracle Key Vault to the target keystore on the file system usingthe okvutil download command.
$ okvutil download -l location -t type
In this specifcation:
• location is the path to the target keystore in the file system
• type is wallet
For example:
$ okvutil download -l /etc/ORACLE/KEYSTORE/DB1 -t wallet
3. Initialize a keystore on the ASM instance by using the following SQL statement:
ADMINISTER KEY MANAGEMENT CREATE KEYSTORE asmKeystorePath IDENTIFIED BY asmKeystorePassword;
In this specification:
• asmKeystorePath is the directory path for the keystore on the ASM file system.
• asmKeystorePassword is a password that you create for the keystore.
4. Copy the keystore to the initialized ASM keystore that you just created.
This step requires that you merge the keystore from the file system to ASM as follows:
ADMINISTER KEY MANAGEMENT MERGE KEYSTORE srcKeystorePath IDENTIFIED BY srcKeystorePassword INTO EXISTING KEYSTORE asmKeystorePath IDENTIFIED BY asmKeystorePassword WITH BACKUP USING backupIdentifier;
In this specification:
• srcKeystorePath is the directory path to the source keystore.
• srcKeystorePassword is the source keystore password.
• asmKeystorePath is the path to the ASM keystore.
• asmKeystorePassword is the ASM keystore password.
• backupIdentifier is the backup identifier to be added to the backup file name.
15.5 MySQL Integration with Oracle Key VaultYou can manage TDE encryption keys in MySQL with Oracle Key Vault.
Chapter 15MySQL Integration with Oracle Key Vault
15-11
Oracle Key Vault supports integration with MySQL from Release 12.2 or later.
Note:
MySQL Windows databases are not supported.
Oracle Key Vault can manage MySQL TDE encryption keys.
15.6 Other Oracle Database Features That Oracle Key VaultSupports
You can deploy Transparent Data Encryption (TDE) in multiple topologies with otherdatabase features that move or use clustered deployments.
Data movement and replication are major challenges for Oracle Advanced SecurityTDE because it must keep the master encryption key synchronized at both endpoints.To help with these challenges, Oracle Key Vault supports common Oracle Databasefeatures.
To move data, Oracle Key Vault supports the following:
• Oracle Recovery Manager (RMAN) backup and recovery operations
• Oracle Data Pump
• Transportable tablespaces (Oracle Database 12c or later)
For clustered deployments, Oracle Key Vault supports the following:
• Oracle Data Guard
• Oracle Real Application Clusters (Oracle RAC)
• Oracle GoldenGate
Chapter 15Other Oracle Database Features That Oracle Key Vault Supports
15-12
16Managing Online and Offline Secrets
You can store and manage credential files in Oracle Key Vault as opaque objects that anendpoint can retrieve when needed.
• Uploading and Downloading Credential FilesThe okvutil upload and okvutil download commands can upload and downloadcredential files.
• Managing Secrets and Credentials for SQL*PlusTo manage passwords in SQL*Plus scripts for a large number of Oracle databases, youcan upload the passwords to Oracle Key Vault.
• Managing Secrets and Credentials for SSHYou can perform public key authentication with private keys that are protected in OracleKey Vault.
• Centrally Managing Passwords in Oracle Key VaultYou can centrally manage passwords in Oracle Key Vault by using external keystores oradding them to shared virtual wallets as secrets.
16.1 Uploading and Downloading Credential FilesThe okvutil upload and okvutil download commands can upload and download credentialfiles.
• About Uploading and Downloading Credential FilesYou use the okvutil utility to upload and download credential files.
• Uploading a Credential FileThe okvutil upload command can upload credential files.
• Downloading a Credential FileThe okvutil download command can download credential files.
• Guidelines for Uploading and Downloading Credential FilesOracle provides recommendations for when you upload and download credential files.
16.1.1 About Uploading and Downloading Credential FilesYou use the okvutil utility to upload and download credential files.
Credential files are uploaded and stored as opaque objects in Oracle Key Vault, which meansthat Oracle Key Vault does not parse the contents of the file like an Oracle wallet or Javakeystore. The upload process does not alter the credential file.
Examples of opaque objects are as follows:
• Files that contain X.509 certificates
• Kerberos keytabs
16-1
• Files containing passwords
• Files containing SSH keys
Uploading these credential files provides a central, secure location for long-termretention. After you have uploaded a credential file, you can download it in the sameserver location or share it with other trusted servers. Oracle Key Vault supportscredential files up to 128 KB in size.
You can place the credential file anywhere in your server infrastructure (which includesdatabase servers and application servers) that is accessible by an Oracle Key Vaultendpoint.
16.1.2 Uploading a Credential FileThe okvutil upload command can upload credential files.
1. Ensure that the server that contains the credential file has been enrolled andprovisioned as an Oracle Key Vault endpoint.
2. Ensure that access control has been configured for the endpoint.
If you are uploading the credential file to a virtual wallet, then ensure that theendpoint has read, modify, and manage wallet access to the wallet.
3. Run the okvutil upload command.
For example:
# okvutil upload -l "/etc/oracle/app/creds/hr.keytab" -t kerberos -g HRWallet -d "Kerberos keytab file for HR group, 06_11_14"Enter Oracle Key Vault endpoint password: Key_Vault_endpoint_password
In this example:
• -l is the directory path to the hr.keytab credential file, which is beinguploaded. Enclose the directory location in double quotation marks.
• -t specifies the type of credential file, which in this example is a Kerberoskeytab file. In addition to KERBEROS, other types that you can specify are asfollows:
– SSH for an SSH key file
– OTHER for other files that store secrets, such as uploaded or downloadedfiles
• -g adds the credential file to the virtual wallet HRWallet, which must alreadyexist. This parameter enables you to upload the credential to a wallet that isspecifically for the HR application users' needs, rather than to the defaultvirtual wallet. In this example, HRWallet is the Oracle Key Vault virtual wallet towhich access control was configured in Step 2.
• -d is an optional description. As a best practice, include a brief description ofwhat the credential file is used for and the date you performed the upload. Thisinformation helps for future reference and tracking of the credential file. Youcan modify this description later on in the Oracle Key Vault managementconsole if necessary.
Related Topics
• okvutil upload CommandThe okvutil upload command uploads security objects to Oracle Key Vault.
Chapter 16Uploading and Downloading Credential Files
16-2
• Managing EndpointsYou can enroll, reenroll, suspend, and delete endpoints.
• Granting Access to Users, User Groups, Endpoints, and Endpoint GroupsYou can grant the Read Only, Read and Modify, and Manage Wallet access levels tousers, user groups, endpoints, and endpoint groups.
16.1.3 Downloading a Credential FileThe okvutil download command can download credential files.
1. Find the unique ID of the credential file that you must download, by using one of thefollowing methods:
• Oracle Key Vault management console: Log in as user who has the necessaryaccess to the virtual wallet. In the Oracle Key Vault management console, from theKeys & Wallets tab, select Keys, Secrets & Objects to find the uploaded files. Notethe unique ID of the uploaded file that you want to download. Credential files arelisted as opaque objects.
• okvutil list command: Run the okvutil list command from an endpoint that hasaccess to the credential file or a virtual wallet that contains the credential file. Locatethe unique ID of the credential file that you must download based on the descriptionthat you provided when you uploaded the file.
2. From the command line, run the okvutil download command to download the credentialfile.
For example:
# okvutil download -l "/etc/oracle/app/newcreds/hr.keytab" -t kerberos -i 6ba7b810-9dad-11d1-80b4-00c04fd430c8Enter Oracle Key Vault endpoint password: Key_Vault_endpoint_password
In this example:
• -l is the directory to which you want to download the uploaded credential.
• -t specifies the type of credential file, which in this example is a Kerberos keytab file.In addition to KERBEROS, other types that you can specify are as follows:
– SSH for an SSH key file
– OTHER for other files that store secrets, such as uploaded or downloaded files
• -i is the unique ID of the credential file.
Related Topics
• okvutil upload CommandThe okvutil upload command uploads security objects to Oracle Key Vault.
16.1.4 Guidelines for Uploading and Downloading Credential FilesOracle provides recommendations for when you upload and download credential files.
• After you complete the upload, upload the credential file again the next time it is changed.Otherwise, the uploaded (and subsequent downloaded version) file will be outdated.Periodically, you should compare the last modification date of the credential file with thetimestamp of the uploaded version.
Chapter 16Uploading and Downloading Credential Files
16-3
• Use care if you use the okvutil upload and okvutil download commands, whichprovide an overwrite (-o) option. This option overwrites the uploaded credentialfile. You may want to create backups of the credential files before beginning theupload and download processes.
• You can share one credential file among multiple server endpoints. Add thecredential file as an opaque object to a virtual wallet using the -g option of theokvutil upload command. Grant access of that virtual wallet to all the serverendpoints. Optionally, define an endpoint group and then make all the serverendpoints members of that endpoint group. Grant this endpoint group access tothat virtual wallet. Afterward, all the members of the group will have access to thatwallet.
16.2 Managing Secrets and Credentials for SQL*PlusTo manage passwords in SQL*Plus scripts for a large number of Oracle databases,you can upload the passwords to Oracle Key Vault.
Many large sites use automated scripts to log in to Oracle databases to performregular maintenance activities such as Oracle Recovery Manager (Oracle RMAN)backups, batch loading into an Oracle Database data warehouse, and similar tasks.Usually these scripts must connect as a highly privileged user. Logging in as a highlyprivileged user means that the scripts must have access to the user's password. Hard-coding a clear-text password into a script is, of course, very poor security. And if theuser's password changes, then none of the scripts can work. One solution to avoidingthe use of clear-text passwords in scripts is to put the passwords into an auto-openwallet (called the secure external password store) and then instruct the clientapplication to retrieve the password from there. However, this idea only works if youonly have a few databases. But if you have hundreds of databases, then thepasswords are difficult to manage and require an update for each secure externalpassword store.
If you have a large number of Oracle databases, you can store passwords centrallyand then retrieve them securely for database connections. This capability has thefollowing advantages:
• Eliminates clear-text passwords from your maintenance scripts
• Simplifies password changes
• Does not require extra entries in the sqlnet.ora file
• Makes the secure external password store obsolete
Related Topics
• Sharing Secrets with Other DatabasesSharing information in Oracle Key Vault requires a virtual wallet in Oracle KeyVault, and multiple databases connecting into their own endpoints that haveaccess to the shared wallet.
16.3 Managing Secrets and Credentials for SSHYou can perform public key authentication with private keys that are protected inOracle Key Vault.
In many IT departments, public key authentication is the default approach to securelylog into remote servers without having an administrator having to remember the
Chapter 16Managing Secrets and Credentials for SQL*Plus
16-4
password, for both on-premise or cloud-based hosts. If you are using Oracle CloudInfrastructure (Oracle OCI), then the password of the user opc is unknown, so public keyauthentication is the only way to log into an OCI compute instance. This method isconvenient, but not without risk. If the private key is lost, then remotely logging in is no longerpossible. In addition, the process of provisioning a new public key is time consuming. Anotherproblem is that because the private key uniquely identifies its owner, if it is stolen, copied, orcompromised, then an intruder can easily cause a great deal of trouble, with the evidencepointing at the owner, not the intruder.
As a solution to these problems, consider uploading the SSH private keys into Oracle KeyVault by using the okvutil upload command. The benefits are as follows:
• Because the SSH keys are not on your host computer, they cannot be copied or stolen,and furthermore, they are safe from disk or file corruptions.
• The SSH keys are included in Oracle Key Vault backup operations, so losing them isimpossible.
• Oracle Key Vault provides continuous and fault-tolerant availability by allowing up to 16Oracle Key Vault servers to connect to one multi-master cluster. Read-write pairsguarantee that highly sensitive information (such as encryption keys or passwords) arereplicated to at least one or more Oracle Key Vault servers.
Related Topics
• okvutil upload CommandThe okvutil upload command uploads security objects to Oracle Key Vault.
16.4 Centrally Managing Passwords in Oracle Key VaultYou can centrally manage passwords in Oracle Key Vault by using external keystores oradding them to shared virtual wallets as secrets.
• About Centrally Managing Passwords in Oracle Key VaultYou can store passwords centrally in Oracle Key Vault and retrieve these passwordssecurely (for example, when logging into an Oracle database).
• Creating and Sharing Centrally Managed PasswordsTo create and share centrally managed passwords (external keystore passwords) forlarge database deployments, you first must use an Oracle Key Vault client and RESTfulservices commands.
• Example: Script for Using External Keystore Passwords in SQL*Plus OperationsYou can create a script that retrieves the UUID of uploaded passwords by the user nameand then inserts the password into the SQL*Plus command.
• Sharing Secrets with Other DatabasesSharing information in Oracle Key Vault requires a virtual wallet in Oracle Key Vault, andmultiple databases connecting into their own endpoints that have access to the sharedwallet.
• Changing Passwords for a Large Database DeploymentFor better security, on a regular basis, you should change passwords that are used byboth humans and automated processes.
Chapter 16Centrally Managing Passwords in Oracle Key Vault
16-5
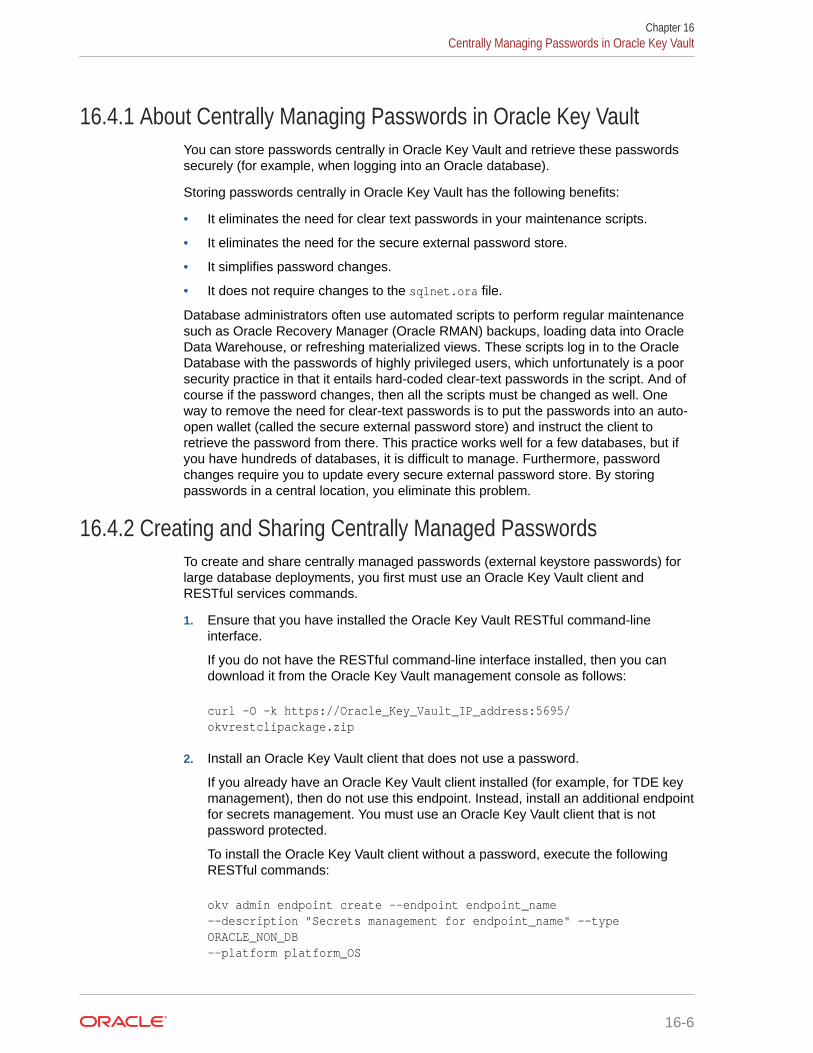
16.4.1 About Centrally Managing Passwords in Oracle Key VaultYou can store passwords centrally in Oracle Key Vault and retrieve these passwordssecurely (for example, when logging into an Oracle database).
Storing passwords centrally in Oracle Key Vault has the following benefits:
• It eliminates the need for clear text passwords in your maintenance scripts.
• It eliminates the need for the secure external password store.
• It simplifies password changes.
• It does not require changes to the sqlnet.ora file.
Database administrators often use automated scripts to perform regular maintenancesuch as Oracle Recovery Manager (Oracle RMAN) backups, loading data into OracleData Warehouse, or refreshing materialized views. These scripts log in to the OracleDatabase with the passwords of highly privileged users, which unfortunately is a poorsecurity practice in that it entails hard-coded clear-text passwords in the script. And ofcourse if the password changes, then all the scripts must be changed as well. Oneway to remove the need for clear-text passwords is to put the passwords into an auto-open wallet (called the secure external password store) and instruct the client toretrieve the password from there. This practice works well for a few databases, but ifyou have hundreds of databases, it is difficult to manage. Furthermore, passwordchanges require you to update every secure external password store. By storingpasswords in a central location, you eliminate this problem.
16.4.2 Creating and Sharing Centrally Managed PasswordsTo create and share centrally managed passwords (external keystore passwords) forlarge database deployments, you first must use an Oracle Key Vault client andRESTful services commands.
1. Ensure that you have installed the Oracle Key Vault RESTful command-lineinterface.
If you do not have the RESTful command-line interface installed, then you candownload it from the Oracle Key Vault management console as follows:
curl -O -k https://Oracle_Key_Vault_IP_address:5695/okvrestclipackage.zip
2. Install an Oracle Key Vault client that does not use a password.
If you already have an Oracle Key Vault client installed (for example, for TDE keymanagement), then do not use this endpoint. Instead, install an additional endpointfor secrets management. You must use an Oracle Key Vault client that is notpassword protected.
To install the Oracle Key Vault client without a password, execute the followingRESTful commands:
okv admin endpoint create --endpoint endpoint_name --description "Secrets management for endpoint_name" --type ORACLE_NON_DB --platform platform_OS
Chapter 16Centrally Managing Passwords in Oracle Key Vault
16-6
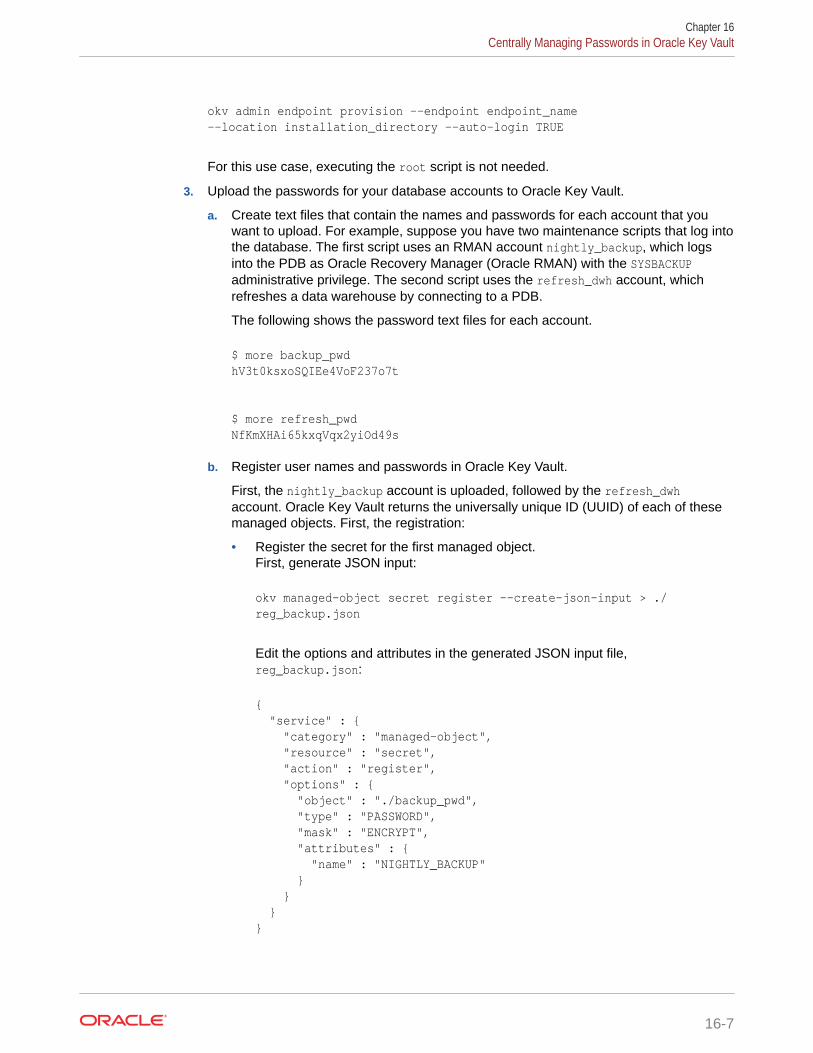
okv admin endpoint provision --endpoint endpoint_name --location installation_directory --auto-login TRUE
For this use case, executing the root script is not needed.
3. Upload the passwords for your database accounts to Oracle Key Vault.
a. Create text files that contain the names and passwords for each account that youwant to upload. For example, suppose you have two maintenance scripts that log intothe database. The first script uses an RMAN account nightly_backup, which logsinto the PDB as Oracle Recovery Manager (Oracle RMAN) with the SYSBACKUPadministrative privilege. The second script uses the refresh_dwh account, whichrefreshes a data warehouse by connecting to a PDB.
The following shows the password text files for each account.
$ more backup_pwdhV3t0ksxoSQIEe4VoF237o7t
$ more refresh_pwdNfKmXHAi65kxqVqx2yiOd49s
b. Register user names and passwords in Oracle Key Vault.
First, the nightly_backup account is uploaded, followed by the refresh_dwhaccount. Oracle Key Vault returns the universally unique ID (UUID) of each of thesemanaged objects. First, the registration:
• Register the secret for the first managed object.First, generate JSON input:
okv managed-object secret register --create-json-input > ./reg_backup.json
Edit the options and attributes in the generated JSON input file,reg_backup.json:
{ "service" : { "category" : "managed-object", "resource" : "secret", "action" : "register", "options" : { "object" : "./backup_pwd", "type" : "PASSWORD", "mask" : "ENCRYPT", "attributes" : { "name" : "NIGHTLY_BACKUP" } } }}
Chapter 16Centrally Managing Passwords in Oracle Key Vault
16-7
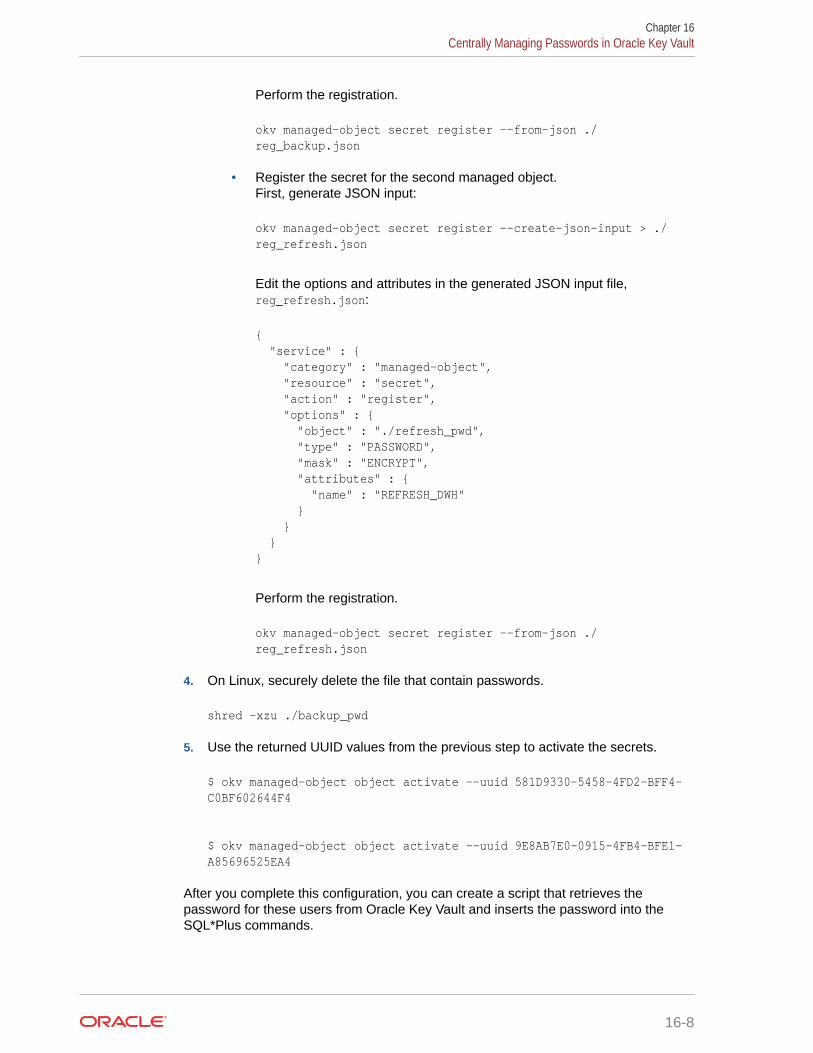
Perform the registration.
okv managed-object secret register --from-json ./reg_backup.json
• Register the secret for the second managed object.First, generate JSON input:
okv managed-object secret register --create-json-input > ./reg_refresh.json
Edit the options and attributes in the generated JSON input file,reg_refresh.json:
{ "service" : { "category" : "managed-object", "resource" : "secret", "action" : "register", "options" : { "object" : "./refresh_pwd", "type" : "PASSWORD", "mask" : "ENCRYPT", "attributes" : { "name" : "REFRESH_DWH" } } }}
Perform the registration.
okv managed-object secret register --from-json ./reg_refresh.json
4. On Linux, securely delete the file that contain passwords.
shred -xzu ./backup_pwd
5. Use the returned UUID values from the previous step to activate the secrets.
$ okv managed-object object activate --uuid 581D9330-5458-4FD2-BFF4-C0BF602644F4
$ okv managed-object object activate --uuid 9E8AB7E0-0915-4FB4-BFE1-A85696525EA4
After you complete this configuration, you can create a script that retrieves thepassword for these users from Oracle Key Vault and inserts the password into theSQL*Plus commands.
Chapter 16Centrally Managing Passwords in Oracle Key Vault
16-8
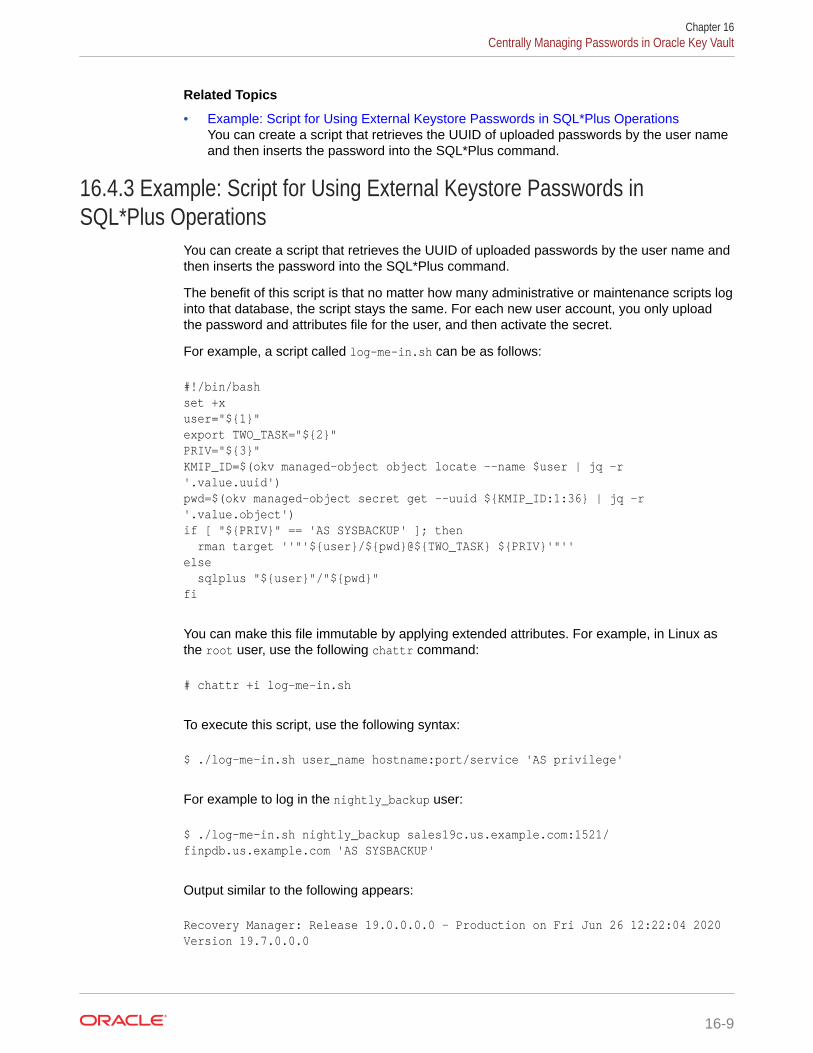
Related Topics
• Example: Script for Using External Keystore Passwords in SQL*Plus OperationsYou can create a script that retrieves the UUID of uploaded passwords by the user nameand then inserts the password into the SQL*Plus command.
16.4.3 Example: Script for Using External Keystore Passwords inSQL*Plus Operations
You can create a script that retrieves the UUID of uploaded passwords by the user name andthen inserts the password into the SQL*Plus command.
The benefit of this script is that no matter how many administrative or maintenance scripts loginto that database, the script stays the same. For each new user account, you only uploadthe password and attributes file for the user, and then activate the secret.
For example, a script called log-me-in.sh can be as follows:
#!/bin/bashset +xuser="${1}"export TWO_TASK="${2}"PRIV="${3}"KMIP_ID=$(okv managed-object object locate --name $user | jq -r '.value.uuid')pwd=$(okv managed-object secret get --uuid ${KMIP_ID:1:36} | jq -r '.value.object')if [ "${PRIV}" == 'AS SYSBACKUP' ]; then rman target ''"'${user}/${pwd}@${TWO_TASK} ${PRIV}'"''else sqlplus "${user}"/"${pwd}"fi
You can make this file immutable by applying extended attributes. For example, in Linux asthe root user, use the following chattr command:
# chattr +i log-me-in.sh
To execute this script, use the following syntax:
$ ./log-me-in.sh user_name hostname:port/service 'AS privilege'
For example to log in the nightly_backup user:
$ ./log-me-in.sh nightly_backup sales19c.us.example.com:1521/finpdb.us.example.com 'AS SYSBACKUP'
Output similar to the following appears:
Recovery Manager: Release 19.0.0.0.0 - Production on Fri Jun 26 12:22:04 2020Version 19.7.0.0.0
Chapter 16Centrally Managing Passwords in Oracle Key Vault
16-9
Copyright (c) 1982, 2019, Oracle and/or its affiliates. All rights reserved.
connected to target database: sales19c:finpdb (DBID=3200396863)
RMAN>
The following example command logs in as the refresh_dwh user:
$ ./log-me-in.sh refresh_dwh sales19c.us.example.com:1521/finpdb.us.example.com
SQL> SHOW USERREFRESH_DWH
If the owner of the target schema allows the refresh_dwh account user to log in, thenthe schema owner must grant the CONNECT THROUGH privilege to refresh_dwh, asfollows:
1. In SQL*Plus, execute the ALTER USER statement to create the proxy. For example:
ALTER USER HR GRANT CONNECT THROUGH refresh_dwh;
2. In the script, change the last line (sqlplus "${user}"/"${pwd}") to include theproxy. For example, to include HR:
sqlplus "${user}"[HR]/"${pwd}"
Related Topics
• Creating and Sharing Centrally Managed PasswordsTo create and share centrally managed passwords (external keystore passwords)for large database deployments, you first must use an Oracle Key Vault client andRESTful services commands.
16.4.4 Sharing Secrets with Other DatabasesSharing information in Oracle Key Vault requires a virtual wallet in Oracle Key Vault,and multiple databases connecting into their own endpoints that have access to theshared wallet.
1. Log in to the server from which you want to share the secret (the source server).
2. Create a virtual wallet and make it the default wallet of the endpoint.
For example, to make a default wallet for an endpoint called secrets_db_name:
okv manage-access wallet create --wallet shared_secretsokv manage-access wallet set-default --wallet shared_secrets --endpoint secrets_db_name
Chapter 16Centrally Managing Passwords in Oracle Key Vault
16-10
3. Add the secret (password) to the shared virtual wallet.
okv managed-object wallet add-member --uuid 994CB3E5-C5B3-4F75-BFED-CB41AE15D0B1 --wallet shared_secrets
994CB3E5-C5B3-4F75-BFED-CB41AE15D0B1 is the UUID for the secret. In the event thatyou have forgotten the UUID, you can retrieve it. For example, to retrieve the UUID fornightly_backup:
$ okv managed-object object locate --name nightly_backup
4. Log in to the server that will use the shared secret (the destination server).
5. Create an endpoint, and then make the shared_secrets wallet the default wallet of thatnew endpoint:
okv admin endpoint create --endpoint secrets_db_name --description "Endpoint for Secrets Management in db_name" --type ORACLE_NON_DB --platform LINUX64okv manage-access wallet set-default --wallet shared_secrets --endpoint secrets_db_nameokv admin endpoint provision --endpoint secrets_db_name --location /directory/for/new/endpoint/ --auto-login TRUE
6. Securely copy the script that you created (for example, log-me-in.sh) from its sourceserver to the destination server that will use the shared secret.
$ scp log-me-in.sh destination_server:/remote_path
7. In the destination server, use the following syntax to execute the script:
$ ./log-me-in.sh user_name hostname:port/service 'AS privilege'
For example:
$ ./log-me-in.sh nightly_backup 192.0.2.1:1521/hr_pdb 'AS SYSBACKUP'
Output similar to the following should appear:
Recovery Manager: Release 19.0.0.0.0 - Production on Fri Jun 26 13:10:49 2020Version 19.7.0.0.0
Copyright (c) 1982, 2019, Oracle and/or its affiliates. All rights reserved.
connected to target database: hr_db:hr_pdb (DBID=1932795327)
RMAN>
Chapter 16Centrally Managing Passwords in Oracle Key Vault
16-11
Related Topics
• Example: Script for Using External Keystore Passwords in SQL*Plus OperationsYou can create a script that retrieves the UUID of uploaded passwords by the username and then inserts the password into the SQL*Plus command.
16.4.5 Changing Passwords for a Large Database DeploymentFor better security, on a regular basis, you should change passwords that are used byboth humans and automated processes.
To change the passwords that are stored in Oracle Key Vault, you revoke and destroythe old password, and then upload and activate the new password. Finally, you mustchange the password in SQL*Plus.
1. Log in to a server that has access to the stored password.
2. Retrieve the UUID of this password.
$ okv managed-object object locate --name nightly_backup
UUID output similar to the following appears:
994CB3E5-C5B3-4F75-BFED-CB41AE15D0B1
3. Use this UUID to revoke this password.
$ okv managed-object object revoke --code CESSATION_OF_OPERATION --uuid 994CB3E5-C5B3-4F75-BFED-CB41AE15D0B1
You must provide a code for revoking the password. Possible values are asfollows:
• UNSPECIFIED
• KEY_COMPROMISE
• CA_COMPROMISE
• AFFILIATION_CHANGED
• SUPERSEDED
• CESSATION_OF_OPERATION
• PRIVILEGE_WITHDRAWN
4. Destroy this password.
$ okv managed-object object destroy --uuid 994CB3E5-C5B3-4F75-BFED-CB41AE15D0B1
5. In the Oracle Key Vault management console, delete the secret.
Chapter 16Centrally Managing Passwords in Oracle Key Vault
16-12
6. Create a text file to contain the new password, similar to the original password text filethat was used to configure the original external keystore password.
$ more backup_pwdcn0KpOnY9vNec2sLVHFnJwR6
7. Upload the new password and attributes, and then activate the new secret.
a. Generate JSON output.
okv managed-object secret register --generate-json-input > reg_secret.json
b. Check the generated output.
$ more reg_secret.json
{ "service" : { "category" : "managed-object", "resource" : "secret", "action" : "register", "options" : { "object" : "./backup_pwd", "type" : "PASSWORD", "mask" : "ENCRYPT", "attributes" : { "name" : "NIGHTLY_BACKUP" } } }}
c. Perform the registration.
okv managed-object secret register --from-json ./reg_secret.json
d. Activate the secret.
$ okv managed-object object activate --uuid 0739649D-3058-4F34-BF84-50B2BD652C2D
8. On Linux, securely delete the file that contain passwords.
shred -xz backup_pwdrm backup_pwd
9. In each Oracle database that shares the secret, log in to SQL*Plus and use the passwordcommand to change the password.
For example:
SYS> password nightly_backupChanging password for nightly_backupNew password: cn0KpOnY9vNec2sLVHFnJwR6
Chapter 16Centrally Managing Passwords in Oracle Key Vault
16-13

Retype new password: cn0KpOnY9vNec2sLVHFnJwR6Password changed
Related Topics
• Destroying a Key or Security ObjectWhen a key is no longer used or compromised in some way, then you can destroyit.
Chapter 16Centrally Managing Passwords in Oracle Key Vault
16-14

17Oracle Key Vault General SystemAdministration
General system administration refers to system management tasks for the Oracle Key Vaultsystem, such as configuring network details and services.
• Overview of Oracle Key Vault General System AdministrationSystem administrators can perform most general administration tasks in the Oracle KeyVault management console, including finding the current status of the overall system.
• Configuring Oracle Key Vault in a Non-Multi-Master Cluster EnvironmentOn the system Settings page, you can configure the network settings for either astandalone environment or a primary-standby environment.
• Configuring Oracle Key Vault in a Multi-Master Cluster EnvironmentWhen you configure Oracle Key Vault in a multi-master cluster environment, you canconfigure either individual nodes or the entire multi-master cluster environment.
• Managing System RecoverySystem recovery includes tasks such as recovering lost administrative passwords.
• Support for a Primary-Standby EnvironmentTo ensure that Oracle Key Vault can always access security objects, you can deployOracle Key Vault in a primary-standby (highly available) configuration.
• Commercial National Security Algorithm Suite SupportYou can use scripts to perform Commercial National Security Algorithm (CNSA)operations for Oracle Key Vault HSM backup and upgrade operations.
• Minimizing DowntimeBusiness-critical operations require data to be accessible and recoverable with minimumdowntime.
17.1 Overview of Oracle Key Vault General SystemAdministration
System administrators can perform most general administration tasks in the Oracle Key Vaultmanagement console, including finding the current status of the overall system.
• About Oracle Key Vault General System AdministrationSystem administrators configure the Oracle Key Vault system settings.
• Viewing the Oracle Key Vault DashboardThe dashboard presents the current status of the Oracle Key Vault at a high level and isvisible to all users.
• Using the Status Panes in the DashboardThe status panes on the dashboard provide useful high level information, such as links toalerts.
17-1
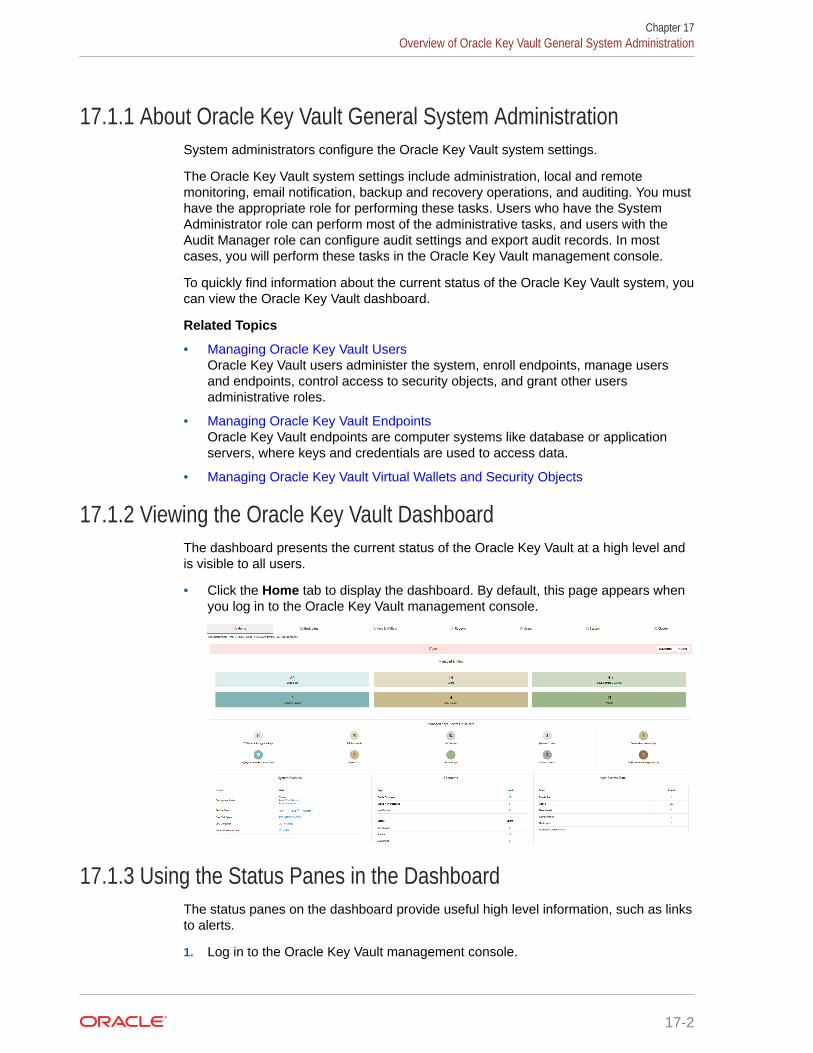
17.1.1 About Oracle Key Vault General System AdministrationSystem administrators configure the Oracle Key Vault system settings.
The Oracle Key Vault system settings include administration, local and remotemonitoring, email notification, backup and recovery operations, and auditing. You musthave the appropriate role for performing these tasks. Users who have the SystemAdministrator role can perform most of the administrative tasks, and users with theAudit Manager role can configure audit settings and export audit records. In mostcases, you will perform these tasks in the Oracle Key Vault management console.
To quickly find information about the current status of the Oracle Key Vault system, youcan view the Oracle Key Vault dashboard.
Related Topics
• Managing Oracle Key Vault UsersOracle Key Vault users administer the system, enroll endpoints, manage usersand endpoints, control access to security objects, and grant other usersadministrative roles.
• Managing Oracle Key Vault EndpointsOracle Key Vault endpoints are computer systems like database or applicationservers, where keys and credentials are used to access data.
• Managing Oracle Key Vault Virtual Wallets and Security Objects
17.1.2 Viewing the Oracle Key Vault DashboardThe dashboard presents the current status of the Oracle Key Vault at a high level andis visible to all users.
• Click the Home tab to display the dashboard. By default, this page appears whenyou log in to the Oracle Key Vault management console.
17.1.3 Using the Status Panes in the DashboardThe status panes on the dashboard provide useful high level information, such as linksto alerts.
1. Log in to the Oracle Key Vault management console.
Chapter 17Overview of Oracle Key Vault General System Administration
17-2

The dashboard appears in the Home tab.
2. To take corrective action on a particular alert:
a. Click Show Details to find a summary of the alerts.
b. Click the link that corresponds to the alert. The appropriate page appears.
c. Take the corrective action for the alert as necessary.
3. To configure the alerts that you want to see on the dashboard:
a. Click the Reports tab, and then click Alerts from the left side bar to display the Alertspage.
b. Click Configure from the top right to display the Configure Alerts page.
c. Select the Alert Type, check Enabled, set the Limit, and then click Save.
4. To view managed content, click appropriate button in the panes that follow the alerts.
These panes on the dashboard display aggregated information about security objectsand other areas of the product that are currently stored and managed in Oracle KeyVault. The contents are as follows:
• Tabs at the top of the page for you to perform various tasks. For example, to create anew endpoint, you click the Endpoints tab.
• Alerts enables you to access alerts. Fin more information by clicking Show Details orAll Alerts.
• Managed Entities enables you to find the status of these categories: Endpoints;Endpoint Groups; Users; User Groups; Keys, Secrets & Objects; Wallets. Eachcategories indicates how many of that category's item is configured. For example, ifthe system has 23 endpoints, then 23 appears above the Endpoints label. To find andmodify the details of these endpoints, click the Endpoints label.
• Managed Keys, Secrets & Objects shows the different details of each of thesupported security objects: TDE Master Encryption Keys, MySQL Master EncryptionKeys, DB Passwords, Secret Data, Symmetric Keys, Opaque Objects, GoldenGateMaster Keys, ACFS Volume Encryption Keys. Similar to the Managed Entitiescontents, to find and modify the details about a security object, click on its label.
• System Overview provides information about the installation: Deployment Mode,Service Status, Used Disk Space, and CPU Utilization.
• Endpoints provides a status and count of the Type (Oracle Database, Oracle Non-Database, Non-Oracle) and Status (Registered, Enrolled, Suspended) of theregistered endpoints.
• Keys, Secrets State provides a status and count of these objects: Pre-Active, Active,Deactivated, Compromised, Destroyed, Destroyed Compromised.
Throughout this page, the item type and item state are displayed at the last timerefreshed.
Related Topics
• Searching for Security Object ItemsYou can search for individual security objects if you have privileges to view these objects.
Chapter 17Overview of Oracle Key Vault General System Administration
17-3
17.2 Configuring Oracle Key Vault in a Non-Multi-MasterCluster Environment
On the system Settings page, you can configure the network settings for either astandalone environment or a primary-standby environment.
• Configuring the Network DetailsIn a non-multi-master cluster environment, you can configure the network detailsfrom any Oracle Key Vault management console.
• Configuring the Network ServicesIn a non-multi-master cluster, you can configure the network services from anyOracle Key Vault management console.
• Configuring the System TimeIn a non-multi-master cluster environment, you can set the system time for theOracle Key Vault system.
• Configuring DNSIn a non-multi-master cluster environment, you can enter up to three DNS serverIP addresses.
• Configuring FIPS ModeIn a non-multi-master cluster environment, you can enable or disable FIPS modefor Oracle Key Vault.
• Configuring SyslogIn a non-multi-master cluster environment, you can enable syslog for specificdestinations and transmit the records either using Transmission Control Protocol(TCP) or User Datagram Protocol (UDP).
• Changing the Network Interface ModeYou can switch between dual NIC mode and classic mode for the networkinterface.
• Configuring RESTful ServicesIn a non-multi-master cluster environment, you can enable or disable RESTfulservices.
• Configuring Oracle Audit Vault IntegrationIn a non-multi-master cluster environment, you can enable Oracle Key Vault tosend data to Oracle Audit Vault for centralized audit reporting and alerting.
• Configuring the Oracle Key Vault Management Console Web Session TimeoutIn a non-multi-master cluster environment, you can configure a timeout value inminutes for the Oracle Key Vault management console Web session.
• Restarting or Powering Off Oracle Key VaultYou can manually restart or power off Oracle Key Vault as required formaintenance or for patch and upgrade procedures.
Chapter 17Configuring Oracle Key Vault in a Non-Multi-Master Cluster Environment
17-4
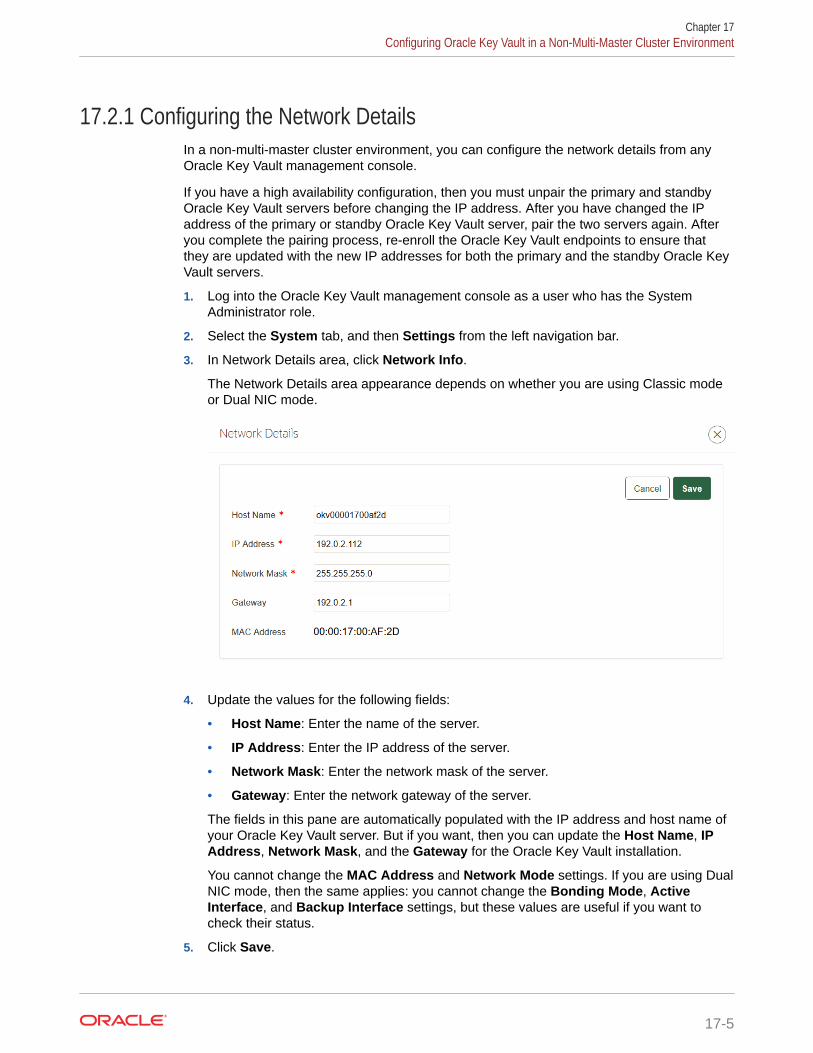
17.2.1 Configuring the Network DetailsIn a non-multi-master cluster environment, you can configure the network details from anyOracle Key Vault management console.
If you have a high availability configuration, then you must unpair the primary and standbyOracle Key Vault servers before changing the IP address. After you have changed the IPaddress of the primary or standby Oracle Key Vault server, pair the two servers again. Afteryou complete the pairing process, re-enroll the Oracle Key Vault endpoints to ensure thatthey are updated with the new IP addresses for both the primary and the standby Oracle KeyVault servers.
1. Log into the Oracle Key Vault management console as a user who has the SystemAdministrator role.
2. Select the System tab, and then Settings from the left navigation bar.
3. In Network Details area, click Network Info.
The Network Details area appearance depends on whether you are using Classic modeor Dual NIC mode.
4. Update the values for the following fields:
• Host Name: Enter the name of the server.
• IP Address: Enter the IP address of the server.
• Network Mask: Enter the network mask of the server.
• Gateway: Enter the network gateway of the server.
The fields in this pane are automatically populated with the IP address and host name ofyour Oracle Key Vault server. But if you want, then you can update the Host Name, IPAddress, Network Mask, and the Gateway for the Oracle Key Vault installation.
You cannot change the MAC Address and Network Mode settings. If you are using DualNIC mode, then the same applies: you cannot change the Bonding Mode, ActiveInterface, and Backup Interface settings, but these values are useful if you want tocheck their status.
5. Click Save.
Chapter 17Configuring Oracle Key Vault in a Non-Multi-Master Cluster Environment
17-5

17.2.2 Configuring the Network ServicesIn a non-multi-master cluster, you can configure the network services from any OracleKey Vault management console.
You can enable services for Web Access and SSH Access (Secure Shell Access) forall, none, or a subset of clients, determined by their IP addresses.
1. Log into the Oracle Key Vault management console as a user who has the SystemAdministrator role.
2. Select the System tab, and then Settings from the left navigation bar.
3. In the Network Details area, select Web Access.
4. Select one of the following options:
• All to select all IP addresses
• IP Address(es) to select a set of IP addresses that you specify in the nextfield, separating each IP address by a space. The IP address(es) web accessoption enables you to restrict access to the Oracle Key Vault managementconsole to a limited set of users that you specify to meet your organizationalneeds.
5. Click Save.
6. To set the SSH access, in the Settings page under Network Details, select SSHAccess.
Enabling SSH Access gives you access to Oracle Key Vault from the commandline. This helps you diagnose problems not immediately apparent from themanagement console. You must log in as the user support, with the supportpassword that you created during installation. SSH access is used only under thedirection of Oracle Support, or when you upgrade.As a best practice, enable SSH access for short durations, solely for diagnostic,troubleshooting, or upgrade purposes, and then disable it as soon as you aredone.
Enabling or disabling SSH access will enable or disable the inbound SSHconnection to the Oracle Key Vault server. Enabling or disabling SSH access inthis manner has no bearing on the SSH Tunnel settings or any other outboundSSH connections that the Oracle Key Vault server itself establishes. SSHconnections can still be established by the Oracle Key Vault to other servers as inthe case of SSH Tunnel settings.
Chapter 17Configuring Oracle Key Vault in a Non-Multi-Master Cluster Environment
17-6
7. In the SSH Access window, enter the following settings:
• Disabled to disable all IP addresses SSH access
• IP Address(es) to select a set of IP addresses that you specify in the next field,separating each IP address by a space.
• All to enable SSH access from all IP addresses.
8. Click Save.
17.2.3 Configuring the System TimeIn a non-multi-master cluster environment, you can set the system time for the Oracle KeyVault system.
You can configure Oracle Key Vault to use an NTP server to remain synchronized with thecurrent time. (Fields for up to three servers are provided.) If an NTP server is not available,then you can set the current time manually. You should use the calendar icon to set the dateand time so that these values are stored in the correct format. In a primary-standbydeployment, you must set the primary and standby servers to the same time. If you want tosave an NTP server using its host name, then ensure that you have already configured DNS.
1. Log into the Oracle Key Vault management console as a user who has the SystemAdministrator role.
2. Select the System tab, and then Settings from the left navigation bar.
3. In the Network Services area, click NTP to display the System Time window.
The following screen shows a partial view of the System Time window. NTP Server 3 hasthe same settings as NTP Server 2.
Chapter 17Configuring Oracle Key Vault in a Non-Multi-Master Cluster Environment
17-7
4. Enter up to three NTP server IP addresses, and then click Save.
If you plan to use host names for the NTP servers, then you must configure DNSbeforehand.
5. If necessary, return to the System Settings page by select System Settings underthe System tab.
6. Choose Use Network Time Protocol.
7. Enter values for the following fields:
• Synchronize After Save: This setting immediately synchronizes the systemtime to one of the given NTP servers after you save the settings.
• Synchronize Periodically: This setting synchronizes the system time at apredetermined interval.
• Server 1: Enter the IP address of a NTP server. You must supply an addressfor Server 1. To test the NTP server, click Test Server. To immediatelysynchronize the system time with this server, click Apply Server.
Chapter 17Configuring Oracle Key Vault in a Non-Multi-Master Cluster Environment
17-8
• Server 2: Enter the IP address of a second NTP server. This value is optional. To testthe NTP server, click Test Server. To immediately synchronize the system time withthis server, click Apply Server.
• Server 3: Enter the IP address of a third NTP server. This value is optional. To testthe NTP server, click Test Server. To immediately synchronize the system time withthis server, click Apply Server.
8. Click Save.
Related Topics
• Configuring DNSIn a non-multi-master cluster environment, you can enter up to three DNS server IPaddresses.
17.2.4 Configuring DNSIn a non-multi-master cluster environment, you can enter up to three DNS server IPaddresses.
You can configure up to three domain name service (DNS) servers with IP addresses thatOracle Key Vault will use to resolve host names. This is useful if you only know the hostname and not the IP address of a server you need access to. For example, while configuringthe SMTP server for email notifications, you can optionally enter the host name instead of theIP address, after you set up DNS.
1. Log into the Oracle Key Vault management console as a user who has the SystemAdministrator role.
2. Select the System tab, and then Settings from the left navigation bar.
3. In the Network Services area, click DNS.
4. Enter up to three IP addresses for DNS servers.
You must at minimum configure the DNS setting for Server 1.
5. Click Save.
Related Topics
• Configuring the System TimeIn a non-multi-master cluster environment, you can set the system time for the OracleKey Vault system.
Chapter 17Configuring Oracle Key Vault in a Non-Multi-Master Cluster Environment
17-9
17.2.5 Configuring FIPS ModeIn a non-multi-master cluster environment, you can enable or disable FIPS mode forOracle Key Vault.
In a primary-standby environment, ensure that both servers are consistent in theirFIPS mode setting: either both are enabled, or both are disabled.
1. Log into the Oracle Key Vault management console as a user who has the SystemAdministrator role.
2. Select the System tab, and then Settings from the left navigation bar.
3. In the System Configuration area, click FIPS.
4. Do one of the following:
• To enable FIPS mode, select the Enable check box.
• To disable FIPS mode, clear the Enable check box.
Enabling or disabling FIPS mode will take a few minutes and will also restart thesystem automatically.
5. Click Save.
After you click Save, a confirmation dialog box will appear.
6. In the confirmation dialog box, click OK to apply the changes and restart theOracle Key Vault system.
If you click OK, be aware that the operation cannot be canceled. The restartoperation takes place immediately.
17.2.6 Configuring SyslogIn a non-multi-master cluster environment, you can enable syslog for specificdestinations and transmit the records either using Transmission Control Protocol(TCP) or User Datagram Protocol (UDP).
All system related alerts are sent to syslog.
1. Log into the Oracle Key Vault management console as a user who has the SystemAdministrator role.
2. Select the System tab, and then Settings from the left navigation bar.
3. In the Monitoring and Alerts area, click Syslog.
Chapter 17Configuring Oracle Key Vault in a Non-Multi-Master Cluster Environment
17-10
4. Select one of the following protocols:
• TCP: Enables syslog using the TCP protocol.
• UDP: Enables syslog using the UDP protocol.
5. Enter the syslog destination IP addresses and port numbers in the Syslog Destinationsfield, in the format IP_address:port.
You can enter multiple destinations, separated by a space.
6. Click Save.
17.2.7 Changing the Network Interface ModeYou can switch between dual NIC mode and classic mode for the network interface.
You can both switch the network mode and update the IP information. If you are using aprimary/standby configuration, then you cannot change this mode. You first configured thenetwork interface mode when you installed the Oracle Key Vault appliance software.
1. Log in to the Oracle Key Vault server as the support user.
2. Switch to the root user.
su - root
3. At the command line, execute the following script:
/usr/local/okv/bin/okv_configure_network
4. In the Select Network Mode window, select the network interface that you want to use,and then select OK.
Chapter 17Configuring Oracle Key Vault in a Non-Multi-Master Cluster Environment
17-11
5. For the network mode, if you want Classic mode, then follow these steps:
Classic mode, used in previous releases of Oracle Key Vault, allows one networkinterface to be used. If you later decide to switch to dual NIC mode, then you cando so, but only if you are using a standalone configuration. You cannot change themode if you are using a multi-master cluster or primary/standby configuration.Choose this option if the server has only one network card.
a. Select 1 to choose Classic mode and then select OK.
b. In the Select default network interface screen, select from the availableoptions, and then select OK.
c. In the Network settings screen, enter the IP address, Network mask, andGateway settings for the default network interface. The network administratorfor your site can provide this information.
d. Select OK.
6. If you want the dual NIC network mode, then follow these steps:
Dual NIC mode enables you to configure Oracle Key Vault to use two networkinterfaces, or ethernet ports. It is useful as a guard against physical or softwarefailures and adds redundancy to the network layer. Select the dual NIC mode ifthere is a greater need for operational continuity and to avoid eviction from thecluster due to prolonged unavailability of the network. Dual NIC mode helps toprevent situations where a node may lose connectivity and risk missing changesthat have been made to data in the cluster.
a. Select 2 to select Dual-NIC mode and then select OK.
b. In the Select Bond Mode screen, select from the bond mode choices for thetwo network interfaces that you plan to use, and then select OK.
• Round Robin configures the network interfaces such that networkpackets are transmitted and received sequentially from the first availableinterface through the last. This bonding mode is the default. This modeprovides fault tolerance and load balancing and requires the links to beconnected to a network switch with EtherChannel support.
• Active-Backup configures the network interfaces as active and backup.Only one interface in the bond is active. A different interface becomesactive if, and only if, the active interface fails. The network communication
Chapter 17Configuring Oracle Key Vault in a Non-Multi-Master Cluster Environment
17-12
happens over the active interface. This mode provides fault tolerance and doesnot require any switch support.
• 802.3ad creates aggregation groups that share the same speed and duplexsettings. Network packets are transmitted and received on all interfaces. Thismode provides fault tolerance and load balancing and requires a switch thatsupports IEEE 802.3ad dynamic link aggregation.
c. In the Select two network interfaces screen, select the two network interfaces thatyou want, and then select OK.
d. In the Network settings screen, enter the IP address, Network mask, Gateway, andHostname settings for the default network interface. The network administrator foryour site can provide this information. For the host name, use only lowercasecharacters. The host name can be the fully qualified host name or the short hostname.
e. Select OK.
You do not need to restart Oracle Key Vault after changing the network mode.
Related Topics
• Dual NIC Network Interface SupportStarting with this release, Oracle Key Vault supports the use of two network interfaces,referred to as dual NIC configuration.
• Installing the Oracle Key Vault Appliance SoftwareThe Oracle Key Vault installation process installs all the required software componentsonto a dedicated server or virtual machine.
17.2.8 Configuring RESTful ServicesIn a non-multi-master cluster environment, you can enable or disable RESTful services.
RESTful services allow you to automate endpoint enrollment and provisioning. RESTfulservices also support regular key management activities.
1. Log into the Oracle Key Vault management console as a user who has the SystemAdministrator role.
2. Select the System tab, and then Settings from the left navigation bar.
3. In the System Configuration area, click RESTful Services.
4. Select the Enable checkbox in the RESTful Services section.
To disable RESTful services, clear the Enable checkbox.
5. Click Save.
Chapter 17Configuring Oracle Key Vault in a Non-Multi-Master Cluster Environment
17-13
17.2.9 Configuring Oracle Audit Vault IntegrationIn a non-multi-master cluster environment, you can enable Oracle Key Vault to senddata to Oracle Audit Vault for centralized audit reporting and alerting.
1. Log into the Oracle Key Vault management console as a user who has the SystemAdministrator role.
2. Select the System tab, and then Settings from the left navigation bar.
3. In the Monitoring and Alerts area, click Audit Vault.
4. Select the Enable check box.
5. When prompted, enter the Oracle Audit Vault Super Administrator password.
6. Click Save.
17.2.10 Configuring the Oracle Key Vault Management Console WebSession Timeout
In a non-multi-master cluster environment, you can configure a timeout value inminutes for the Oracle Key Vault management console Web session.
1. Log into any Oracle Key Vault management console as a user who has theSystem Administrator role.
2. Select the System tab, and then Settings from the left navigation bar.
3. In the System Configuration area, click Console Timeout.
4. Enter the value in minutes for the timeout.
The default value is 10. The range you can enter is 1 through 100.
5. Click Save.
After you click Save, for the currently active user Web session as well as for otheractive sessions, this setting takes effect when the session is extended, the userrefreshes the page, or the user navigates to another page. The user sessionremains active as long as the user clicks a button, moves the mouse or presses akey, or is performing other activities. If the user session is idle for more than themanagement console timeout duration, then the user is logged out and the loginscreen appears.
Just before the Web session ends, the user will be notified, starting earlier if thetimeout value is larger, and is given the option to extend the session for the samelength of time that was set for timeout value. For example, if the timeout was set to 20minutes, then the user can extend the session for another 20 minutes.
Chapter 17Configuring Oracle Key Vault in a Non-Multi-Master Cluster Environment
17-14
17.2.11 Restarting or Powering Off Oracle Key VaultYou can manually restart or power off Oracle Key Vault as required for maintenance or forpatch and upgrade procedures.
1. Log into the Oracle Key Vault management console as a user who has the SystemAdministrator role.
2. Select the System tab, and then Status from the left navigation bar.
3. Go to the top of the Status page.
4. Do one of the following:
• To restart, click Reboot.
• To power off, click Power Off.
17.3 Configuring Oracle Key Vault in a Multi-Master ClusterEnvironment
When you configure Oracle Key Vault in a multi-master cluster environment, you canconfigure either individual nodes or the entire multi-master cluster environment.
• About Configuring Oracle Key Vault in a Multi-Master Cluster EnvironmentYou have the option of configuring settings for individual nodes or the entire multi-mastercluster.
• Configuring System Settings for Individual Multi-Master Cluster NodesYou can set or change settings that apply to the cluster node.
• Managing Oracle Key Vault Multi-Master ClustersYou can create, configure, manage, and administer an Oracle Key Vault multi-mastercluster by using the Oracle Key Vault management console.
17.3.1 About Configuring Oracle Key Vault in a Multi-Master ClusterEnvironment
You have the option of configuring settings for individual nodes or the entire multi-mastercluster.
Some of the settings for individual nodes and the entire cluster are the same. For example,you can set the DNS for an individual node or for an entire cluster. Any values that are setand saved to an individual node will not be overridden by cluster settings. When you set avalue for the entire cluster, it may take several minutes for changes to propagate to othernodes.
When you start the configuration, you have the choice of setting the following View Settingsmenu options:
• Node only means that the setting can be set only on that node and will apply to onlynode.
Chapter 17Configuring Oracle Key Vault in a Multi-Master Cluster Environment
17-15
• Cluster only means that the setting is a cluster-wide setting and updating it willchange the settings across the cluster.
• Both means that the setting can be set at both node level and cluster level. Forthese settings, you can navigate between node and cluster settings by using theright arrow button that is present in the respective setting page. For example, ifyou select DNS, then you can configure DNS settings for both individual nodesand for the entire cluster, in one operation.
• All shows all the available settings without any filter.
17.3.2 Configuring System Settings for Individual Multi-Master ClusterNodes
You can set or change settings that apply to the cluster node.
Examples of these settings are the network details, network services, system time,FIPS mode, syslog, and Oracle Audit Vault integration. Values set for the nodeoverride the cluster setting. However, you can clear any individual node setting torevert to the cluster setting.
• Configuring the Network Details for the NodeIn a multi-master cluster, you can change the host name for a node.
• Configuring the Network Services for the NodeIn a multi-master cluster, you can configure the network services for a node.
• Configuring the System Time for the NodeIn a multi-master cluster, you can set the system time for a node.
• Configuring DNS for the NodeWhen you configure the DNS for a multi-master cluster node, you should entermore than one DNS IP address.
• Configuring the FIPS Mode for the NodeAll multi-master cluster nodes must use the same FIPS mode setting or you willreceive an alert.
• Configuring Syslog for the NodeIn a node, you can enable syslog for specific destinations and transmit the recordseither using Transmission Control Protocol (TCP) or User Datagram Protocol(UDP).
• Changing the Network Interface Mode for the NodeYou can switch between dual NIC mode and classic mode for the networkinterface for a node in a multi-master cluster environment.
• Configuring Auditing for the NodeYou can enable or disable audit settings for a node.
• Configuring SNMP Settings for the NodeYou can enable or disable SNMP access for a multi-master cluster node.
• Configuring Oracle Audit Vault Integration for the NodeYou can configure the integration of Oracle Audit Vault (but not the DatabaseFirewall component) for a node.
• Restarting or Powering Off Oracle Key Vault from a NodeYou can manually restart or power off an Oracle Key Vault node as required formaintenance or for patch and upgrade procedures.
Chapter 17Configuring Oracle Key Vault in a Multi-Master Cluster Environment
17-16
17.3.2.1 Configuring the Network Details for the NodeIn a multi-master cluster, you can change the host name for a node.
1. Log into any Oracle Key Vault management console for the node as a user who has theSystem Administrator role.
2. Select the System tab, and then Settings from the left navigation bar.
3. In the Network Details area, select Network Info.
4. In the Host Name field, enter the name of the host name for the node.
You cannot modify the IP Address, Network Mask, Gateway, and MAC Address fields,which are automatically populated.
5. Click Save.
17.3.2.2 Configuring the Network Services for the NodeIn a multi-master cluster, you can configure the network services for a node.
1. Log into the Oracle Key Vault management console for the node as a user who has theSystem Administrator role.
2. Select the System tab, and then Settings from the left navigation bar.
3. In the Network Details area, select Web Access.
4. Select one of the following options:
• All to select all IP addresses
• IP Address(es) to select a set of IP addresses that you specify in the next field,separating each IP address by a space. The IP address(es) web access optionenables you to restrict access to the Oracle Key Vault management console to alimited set of users that you specify to meet your organizational needs.
5. Click Save.
6. To set the SSH access, in the Settings page under Network Details, select SSH Access.
Enabling SSH Access gives you access to Oracle Key Vault from the command line.This helps you diagnose problems not immediately apparent from the managementconsole. You must log in as the user support, with the support password that you created
Chapter 17Configuring Oracle Key Vault in a Multi-Master Cluster Environment
17-17
during installation. SSH access is used only under the direction of Oracle Support,or when you upgrade.As a best practice, enable SSH access for short durations, solely for diagnostic,troubleshooting, or upgrade purposes, and then disable it as soon as you aredone.
Enabling or disabling SSH access will enable or disable the inbound SSHconnection to the Oracle Key Vault server. Enabling or disabling SSH access inthis manner has no bearing on the SSH Tunnel settings or any other outboundSSH connections that the Oracle Key Vault server itself establishes. SSHconnections can still be established by the Oracle Key Vault to other servers as inthe case of SSH Tunnel settings.
7. In the SSH Access window, enter the following settings:
• Disabled to disable all IP addresses SSH access
• IP Address(es) to select a set of IP addresses that you specify in the nextfield, separating each IP address by a space.
• All to enable SSH access from all IP addresses.
8. Click Save.
17.3.2.3 Configuring the System Time for the NodeIn a multi-master cluster, you can set the system time for a node.
1. Log into the Oracle Key Vault management console for the node as a user whohas the System Administrator role.
2. Select the System tab, and then Settings from the left navigation bar.
3. If you want to configure NTP servers using their host names, then ensure thatDNS is configured first.
4. If necessary, return to the system settings page by select Settings under theSystem tab.
5. In the Network Services area, click NTP.
In cluster mode, you must use the Network Time Protocol (NTP), so you cannotchange the selection from Use Network Time Protocol to Set Manually.
6. In the System Time window, ensure that you are on Node Details - Effective onthis Node page.
If you are on the Cluster Details page, then click the arrow on the right to toggleback to Node Details - Effective on this Node.
7. In the Node Details - Effective on this Node page, enter values for the followingfields:
• Synchronize After Save: This setting immediately synchronizes the systemtime for the node to one of the given NTP servers after you save the settings.
• Synchronize Periodically: This setting synchronizes the system time for thenode at a predetermined interval.
• Server 1: Enter the IP address of a NTP server. You must supply an addressfor Server 1. To test the NTP server, click Test Server. To immediatelysynchronize the system time with this server, click Apply Server.
Chapter 17Configuring Oracle Key Vault in a Multi-Master Cluster Environment
17-18
• Server 2: Enter the IP address of a second NTP server. This value is optional. To testthe NTP server, click Test Server. To immediately synchronize the system time withthis server, click Apply Server.
• Server 3: Enter the IP address of a third NTP server. This value is optional. To testthe NTP server, click Test Server. To immediately synchronize the system time withthis server, click Apply Server.
8. Click Save (or Save to Cluster).
17.3.2.4 Configuring DNS for the NodeWhen you configure the DNS for a multi-master cluster node, you should enter more thanone DNS IP address.
1. Log into the Oracle Key Vault management console for the node as a user who has theSystem Administrator role.
2. Select the System tab, and then Settings from the left navigation bar.
3. In the Network Services area, click DNS.
4. In the DNS window, ensure that you are on Node Details - Effective on this Node page.
If you are on the Cluster Details page, then click the arrow on the right to toggle back toNode Details - Effective on this Node.
5. In the Node Details - Effective on this Node window, enter up to three DNS server IPaddresses.
While only the first value is required, two entries are recommended for fault tolerance.
6. Click Save.
17.3.2.5 Configuring the FIPS Mode for the NodeAll multi-master cluster nodes must use the same FIPS mode setting or you will receive analert.
1. Log into the Oracle Key Vault management console for the node as a user who has theSystem Administrator role.
2. Select the System tab, and then Settings from the left navigation bar.
3. In the System Configuration area, click FIPS.
4. In the FIPS Mode window, do one of the following:
• To enable FIPS mode, select the Enable check box.
• To disable FIPS mode, clear the Enable check box.
Enabling or disabling FIPS mode will take a few minutes and will also restart the systemautomatically.
5. Click Save.
After you click Save, Oracle Key Vault will restart automatically.
17.3.2.6 Configuring Syslog for the NodeIn a node, you can enable syslog for specific destinations and transmit the records eitherusing Transmission Control Protocol (TCP) or User Datagram Protocol (UDP).
Chapter 17Configuring Oracle Key Vault in a Multi-Master Cluster Environment
17-19
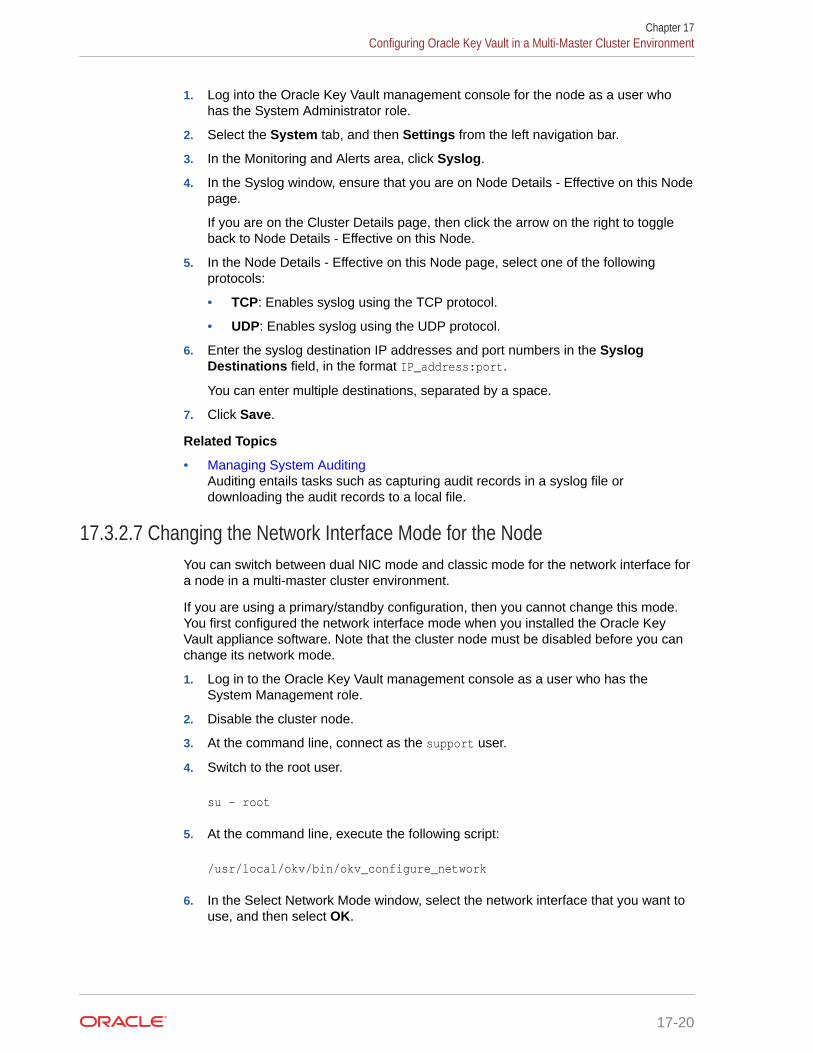
1. Log into the Oracle Key Vault management console for the node as a user whohas the System Administrator role.
2. Select the System tab, and then Settings from the left navigation bar.
3. In the Monitoring and Alerts area, click Syslog.
4. In the Syslog window, ensure that you are on Node Details - Effective on this Nodepage.
If you are on the Cluster Details page, then click the arrow on the right to toggleback to Node Details - Effective on this Node.
5. In the Node Details - Effective on this Node page, select one of the followingprotocols:
• TCP: Enables syslog using the TCP protocol.
• UDP: Enables syslog using the UDP protocol.
6. Enter the syslog destination IP addresses and port numbers in the SyslogDestinations field, in the format IP_address:port.
You can enter multiple destinations, separated by a space.
7. Click Save.
Related Topics
• Managing System AuditingAuditing entails tasks such as capturing audit records in a syslog file ordownloading the audit records to a local file.
17.3.2.7 Changing the Network Interface Mode for the NodeYou can switch between dual NIC mode and classic mode for the network interface fora node in a multi-master cluster environment.
If you are using a primary/standby configuration, then you cannot change this mode.You first configured the network interface mode when you installed the Oracle KeyVault appliance software. Note that the cluster node must be disabled before you canchange its network mode.
1. Log in to the Oracle Key Vault management console as a user who has theSystem Management role.
2. Disable the cluster node.
3. At the command line, connect as the support user.
4. Switch to the root user.
su - root
5. At the command line, execute the following script:
/usr/local/okv/bin/okv_configure_network
6. In the Select Network Mode window, select the network interface that you want touse, and then select OK.
Chapter 17Configuring Oracle Key Vault in a Multi-Master Cluster Environment
17-20
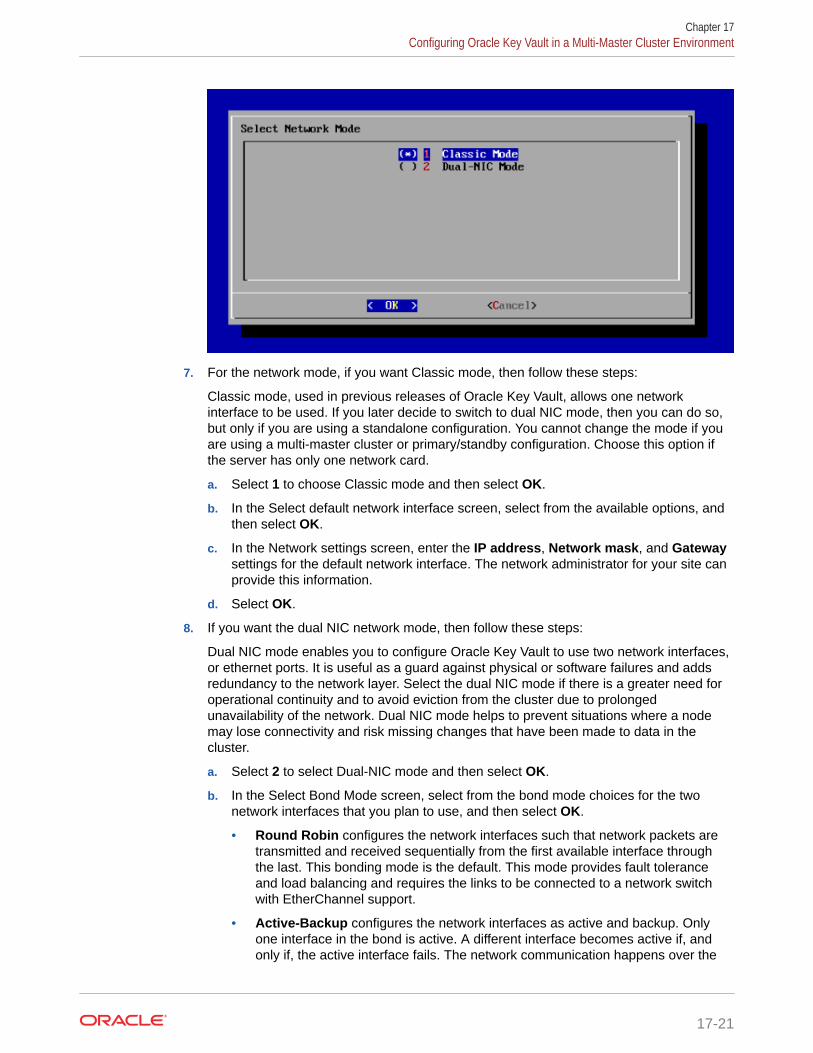
7. For the network mode, if you want Classic mode, then follow these steps:
Classic mode, used in previous releases of Oracle Key Vault, allows one networkinterface to be used. If you later decide to switch to dual NIC mode, then you can do so,but only if you are using a standalone configuration. You cannot change the mode if youare using a multi-master cluster or primary/standby configuration. Choose this option ifthe server has only one network card.
a. Select 1 to choose Classic mode and then select OK.
b. In the Select default network interface screen, select from the available options, andthen select OK.
c. In the Network settings screen, enter the IP address, Network mask, and Gatewaysettings for the default network interface. The network administrator for your site canprovide this information.
d. Select OK.
8. If you want the dual NIC network mode, then follow these steps:
Dual NIC mode enables you to configure Oracle Key Vault to use two network interfaces,or ethernet ports. It is useful as a guard against physical or software failures and addsredundancy to the network layer. Select the dual NIC mode if there is a greater need foroperational continuity and to avoid eviction from the cluster due to prolongedunavailability of the network. Dual NIC mode helps to prevent situations where a nodemay lose connectivity and risk missing changes that have been made to data in thecluster.
a. Select 2 to select Dual-NIC mode and then select OK.
b. In the Select Bond Mode screen, select from the bond mode choices for the twonetwork interfaces that you plan to use, and then select OK.
• Round Robin configures the network interfaces such that network packets aretransmitted and received sequentially from the first available interface throughthe last. This bonding mode is the default. This mode provides fault toleranceand load balancing and requires the links to be connected to a network switchwith EtherChannel support.
• Active-Backup configures the network interfaces as active and backup. Onlyone interface in the bond is active. A different interface becomes active if, andonly if, the active interface fails. The network communication happens over the
Chapter 17Configuring Oracle Key Vault in a Multi-Master Cluster Environment
17-21
active interface. This mode provides fault tolerance and does not requireany switch support.
• 802.3ad creates aggregation groups that share the same speed andduplex settings. Network packets are transmitted and received on allinterfaces. This mode provides fault tolerance and load balancing andrequires a switch that supports IEEE 802.3ad dynamic link aggregation.
c. In the Select two network interfaces screen, select the two network interfacesthat you want, and then select OK.
d. In the Network settings screen, enter the IP address, Network mask,Gateway, and Hostname settings for the default network interface. Thenetwork administrator for your site can provide this information. For the hostname, use only lowercase characters. The host name can be the fully qualifiedhost name or the short host name.
e. Select OK.
9. Re-enable the disabled cluster node.
You do not need to restart Oracle Key Vault after changing the network mode.
Related Topics
• Dual NIC Network Interface SupportStarting with this release, Oracle Key Vault supports the use of two networkinterfaces, referred to as dual NIC configuration.
• Disabling a Cluster NodeYou can temporarily disable a cluster node, which is required for upgrades andmaintenance.
• Enabling a Disabled Cluster NodeYou can enable any cluster node that was previously disabled. You must performthis operation from the disabled node.
• Installing the Oracle Key Vault Appliance SoftwareThe Oracle Key Vault installation process installs all the required softwarecomponents onto a dedicated server or virtual machine.
17.3.2.8 Configuring Auditing for the NodeYou can enable or disable audit settings for a node.
1. Log into the Oracle Key Vault management console for the node as a user whohas the System Administrator role.
2. Select the System tab, and then Settings from the left navigation bar.
3. In the Monitoring and Alerts area, click Auditing.
You can enable or disable the following auditing categories:
• Enable Auditing: This setting will turn the auditing on or off. Turning off thissetting will not generate audit records.
• Replicate Audit Records: This setting applies only to a cluster configuration.It indicates if the audit records are replicated across the cluster nodes.
• Send Audit Records to Syslog: This setting writes the audit records tosyslog. To enable this setting, you must first configure the syslog destination.
Chapter 17Configuring Oracle Key Vault in a Multi-Master Cluster Environment
17-22
4. In the Audit Settings window for each of these categories, ensure that you are on NodeDetails - Effective on this Node page.
If you are on the Cluster Details page, then click the arrow on the right to toggle back toNode Details - Effective on this Node.
5. In the Node Details - Effective on this Node page, select Yes or No for each category.
6. Click Save.
Related Topics
• Managing System AuditingAuditing entails tasks such as capturing audit records in a syslog file or downloading theaudit records to a local file.
17.3.2.9 Configuring SNMP Settings for the NodeYou can enable or disable SNMP access for a multi-master cluster node.
1. Log into any Oracle Key Vault management console as a user who has the SystemAdministrator role.
2. Select the System tab, and then Settings from the left navigation bar.
3. In the Monitoring and Alerts area, click SNMP.
4. In the SNMP window, ensure that you are on Node Details - Effective on this Node page.
If you are on the Cluster Details page, then click the arrow on the right to toggle back toNode Details - Effective on this Node.
5. In the Node Details - Effective on this Node page, select who has SNMP access to themulti-master cluster by choosing one of the options:
• All: Allows SNMP access from all IP addresses.
• Disabled: Allows no SNMP access.
• IP address(es): Allows SNMP access from the list of IP addresses supplied in theaddress box. Enter a space-separated list of IP addresses.
6. Enter values for the following fields:
• Username: Enter the SNMP user name.
• Password: Enter the SNMP password.
• Reenter Password: Enter the SNMP password again.
7. Click Save.
Alternatively, you can select Delete to remove the SNMP setting.
17.3.2.10 Configuring Oracle Audit Vault Integration for the NodeYou can configure the integration of Oracle Audit Vault (but not the Database Firewallcomponent) for a node.
1. Log into the Oracle Key Vault management console for the node as a user who has theSystem Administrator role.
2. Select the System tab, and then Settings from the left navigation bar.
3. In the Monitoring and Alerts area, click Audit Vault.
Chapter 17Configuring Oracle Key Vault in a Multi-Master Cluster Environment
17-23
4. In the Audit Vault Integration window, select the Enable check box to enableOracle Audit Vault Integration for the node.
5. In the Password and Reenter password fields that appear after you click Enable,enter the password of the user in the database that Audit Vault and DatabaseFirewall will use to extract the audit records.
6. Click Save.
17.3.2.11 Restarting or Powering Off Oracle Key Vault from a NodeYou can manually restart or power off an Oracle Key Vault node as required formaintenance or for patch and upgrade procedures.
When you restart or power-off Oracle Key Vault nodes, only the current node isrestarted or powered-off. The other nodes in the cluster are unable to send informationto and from the nodes that are powered off. When the nodes are restarted, there willbe a period needed for the restarted nodes to catch up on activities that took placewhile they were down.
1. Log into the Oracle Key Vault management console for the node as a user whohas the System Administrator role.
2. Select the System tab, and then Status from the left navigation bar.
3. At the top of the Status page, do one of the following to restart or power off thenode:
• To restart, click Reboot.
• To power off, click Power Off.
17.3.3 Managing Oracle Key Vault Multi-Master ClustersYou can create, configure, manage, and administer an Oracle Key Vault multi-mastercluster by using the Oracle Key Vault management console.
• Configuring the System Time for the ClusterWhen you configure the system time, you can set it for multiple servers and alsoset the synchronization.
• Configuring DNS for the ClusterWhen you configure the DNS for a cluster, you can enter up to three DNS serverIP addresses.
• Configuring Maximum Disable Node Duration for the ClusterYou can set the maximum node duration time for the cluster in hours.
• Configuring Syslog for the ClusterIn a multi-master cluster environment, you can enable syslog for specificdestinations and transmit the records either using Transmission Control Protocol(TCP) or User Datagram Protocol (UDP).
• Configuring RESTful Services for the ClusterYou can enable or disable RESTful Services for the cluster.
• Configuring Auditing for the ClusterYou can enable or disable audit settings for the cluster.
• Configuring SNMP Settings for the ClusterYou can enable or disable SNMP access for a multi-master cluster.
Chapter 17Configuring Oracle Key Vault in a Multi-Master Cluster Environment
17-24
• Configuring the Oracle Key Vault Management Console Web Session Timeout for theClusterYou can configure a timeout value in minutes for the Oracle Key Vault managementconsole for all nodes in a multi-master cluster.
17.3.3.1 Configuring the System Time for the ClusterWhen you configure the system time, you can set it for multiple servers and also set thesynchronization.
1. Log into any Oracle Key Vault management console as a user who has the SystemAdministrator role.
2. Select the System tab, and then Settings from the left navigation bar.
3. In the Network Services area, click NTP.
4. In the System Time page, click the arrow to the left to toggle to the Cluster Details page.
5. In the Cluster Details page, enter values for the following fields:
• Synchronize After Save: This synchronizes the time across the cluster after yousave the settings.
• Synchronize Periodically: This synchronizes the time across the cluster at apredetermined interval. Once selected and applied, this option cannot be deselected.
• Server 1: Enter the IP address of a NTP server. To test the NTP server, click TestServer. To immediately synchronize the system time with this server, click ApplyServer.
• Server 2: Enter the IP address of a second NTP server. To test the NTP server, clickTest Server. To immediately synchronize the system time with this server, clickApply Server.
• Server 3: Enter the IP address of a third NTP server. To test the NTP server, clickTest Server. To immediately synchronize the system time with this server, clickApply Server.
6. Click Save.
17.3.3.2 Configuring DNS for the ClusterWhen you configure the DNS for a cluster, you can enter up to three DNS server IPaddresses.
1. Log into any Oracle Key Vault management console as a user who has the SystemAdministrator role.
2. Select the System tab, and then Settings from the left navigation bar.
3. In the Network Services area, click DNS.
4. In the DNS window, click the arrow to the left to toggle to the Cluster Details page.
5. In the Cluster Details page, enter up to three DNS Server IP addresses.
6. Click Save.
17.3.3.3 Configuring Maximum Disable Node Duration for the ClusterYou can set the maximum node duration time for the cluster in hours.
Chapter 17Configuring Oracle Key Vault in a Multi-Master Cluster Environment
17-25
1. Log into any Oracle Key Vault management console as a user who has theSystem Administrator role.
2. Select the System tab, and then Settings from the left navigation bar.
3. In the System Configuration area, click Maximum Disable Node Duration.
4. In the Maximum Disable Node Duration window, enter a value, in hours, for theduration that a node can be disabled before it is evicted from the cluster.
Note that as this value is increased, the average amount of disk space consumedby cluster-related data also increases.
5. Click Save.
17.3.3.4 Configuring Syslog for the ClusterIn a multi-master cluster environment, you can enable syslog for specific destinationsand transmit the records either using Transmission Control Protocol (TCP) or UserDatagram Protocol (UDP).
1. Log into any Oracle Key Vault management console as a user who has theSystem Administrator role.
2. Select the System tab, and then Settings from the left navigation bar.
3. In the Monitor and Alerts area, click Syslog.
4. In the Syslog page, click the arrow to the left to toggle to the Cluster Details page.
5. In the Cluster Details page, select one of the following protocols:
• TCP: Enables syslog using the TCP protocol.
• UDP: Enables syslog using the UDP protocol.
6. Enter the syslog destination IP addresses and port numbers in the SyslogDestinations field, in the format IP_address:port.
You can enter multiple destinations, separated by a space.
7. Click Save.
Related Topics
• Managing System AuditingAuditing entails tasks such as capturing audit records in a syslog file ordownloading the audit records to a local file.
17.3.3.5 Configuring RESTful Services for the ClusterYou can enable or disable RESTful Services for the cluster.
1. Log into any Oracle Key Vault management console as a user who has theSystem Administrator role.
2. Select the System tab, and then Settings from the left navigation bar.
3. In the System Configuration area, click RESTful Services.
4. In the RESTful Services window, select the Enable check box.
5. Click Save.
Chapter 17Configuring Oracle Key Vault in a Multi-Master Cluster Environment
17-26
17.3.3.6 Configuring Auditing for the ClusterYou can enable or disable audit settings for the cluster.
1. Log into any Oracle Key Vault management console as a user who has the SystemAdministrator role.
2. Select the System tab, and then Settings from the left navigation bar.
3. In the Monitoring and Alerts area, click Auditing.
You can enable or disable the following auditing categories:
• Enable Auditing: This setting will turn the auditing on or off. Turning off this settingwill not generate audit records.
• Replicate Audit Records: This setting applies only to a cluster configuration. Itindicates if the audit records are replicated across the cluster nodes.
• Send Audit Records to Syslog: This setting writes the audit records to syslog. Toenable this setting, you must first configure the syslog destination.
4. In the Audit Settings page, for each of these categories, click the arrow to the left totoggle to the Cluster Details page.
5. In the Cluster Details page, select Yes or No for each category.
6. Click Save.
Related Topics
• Managing System AuditingAuditing entails tasks such as capturing audit records in a syslog file or downloading theaudit records to a local file.
17.3.3.7 Configuring SNMP Settings for the ClusterYou can enable or disable SNMP access for a multi-master cluster.
1. Log into any Oracle Key Vault management console as a user who has the SystemAdministrator role.
2. Select the System tab, and then Settings from the left navigation bar.
3. In the Monitoring and Alerts area, click SNMP.
4. Select who has SNMP access to the multi-master cluster by choosing one of the options:
• All: Allows SNMP access from all IP addresses.
• Disabled: Allows no SNMP access.
• IP address(es): Allows SNMP access from the list of IP addresses supplied in theaddress box. Enter a space-separated list of IP addresses.
5. Enter values for the following fields:
• Username: Enter the SNMP user name.
• Password: Enter the SNMP password.
• Reenter Password: Enter the SNMP password again.
6. Click Save.
Alternatively, you can select Delete to remove the SNMP setting.
Chapter 17Configuring Oracle Key Vault in a Multi-Master Cluster Environment
17-27
17.3.3.8 Configuring the Oracle Key Vault Management Console Web SessionTimeout for the Cluster
You can configure a timeout value in minutes for the Oracle Key Vault managementconsole for all nodes in a multi-master cluster.
1. Log into any Oracle Key Vault management console as a user who has theSystem Administrator role.
2. Select the System tab, and then Settings from the left navigation bar.
3. In the System Configuration area, click Console Timeout.
4. In the Management Console Timeout window, enter the value in minutes for thetimeout.
The default value is 10. The range you can enter is 1 through 100.
5. Click Save.
After you click Save,the setting is applied to all nodes in the cluster. For thecurrently active user Web session as well as for other active sessions, this settingtakes effect when the session is extended, the user refreshes the page, or theuser navigates to another page. The user session remains active as long as theuser clicks a button, moves the mouse or presses a key, or is performing otheractivities. If the user session is idle for more than the management consoletimeout duration, then the user is logged out and the login screen appears.
Just before the Web session ends, the user will be notified, starting earlier if thetimeout value is larger, and is given the option to extend the session for the samelength of time that was set for timeout value. For example, if the timeout was set to 20minutes, then the user can extend the session for another 20 minutes.
17.4 Managing System RecoverySystem recovery includes tasks such as recovering lost administrative passwords.
• About Managing System RecoveryTo perform system recovery, you use the recovery passphrase.
• Recovering Credentials for AdministratorsYou can recover the system by adding credentials for administrative users.
• Changing the Recovery Passphrase in a Non-Clusters EnvironmentPeriodically changing the recovery passphrase is a good security practice.
• Changing the Recovery Passphrase in a Multi-Master ClusterChanging the recovery passphrase in a multi-master cluster is a two-step process.
17.4.1 About Managing System RecoveryTo perform system recovery, you use the recovery passphrase.
In an emergency when no administrative users are available, or you must change thepassword of administrative users, you can recover the system with the recoverypassphrase that was created during Oracle Key Vault installation. In addition, you canchange the recovery passphrase to keep up with security best practices.
Chapter 17Managing System Recovery
17-28
17.4.2 Recovering Credentials for AdministratorsYou can recover the system by adding credentials for administrative users.
1. From a web browser using HTTPS, enter the IP address of the Oracle Key Vaultinstallation.
2. In the Oracle Key Vault login page, do not log in.
3. Click the System Recovery link at the lower right corner of the page.
4. In the Recovery Passphrase field, enter the recovery passphrase and then click Login.
5. In the page that appears, select the Administrator Recovery tab.
6. Fill out the fields in the Key Administrator, System Administrator, and Audit Managerpanes to assign these roles to new or existing user accounts.
7. Click Save.
Related Topics
• Performing Post-Installation TasksAfter you install Oracle Key Vault, you must complete a set of post-installation tasks.
17.4.3 Changing the Recovery Passphrase in a Non-Clusters EnvironmentPeriodically changing the recovery passphrase is a good security practice.
A user with the System Administrator role should perform a new backup whenever therecovery passphrase changes, so that there is always a backup protected with the currentrecovery passphrase. This ensures that you will have at least one backup with the latest data.
1. Perform a server backup.
2. From a web browser, enter the IP address of your Oracle Key Vault installation.
3. In the Oracle Key Vault login page, do not log in.
4. Click the System Recovery link.
A new login page appears with a single field: Recovery Passphrase.
5. Enter the recovery passphrase and then click Login.
6. Select the Recovery Passphrase tab.
7. In the Recovery Passphrase page, enter and re-enter a new password for the recoverypassphrase.
8. Click Submit.
Related Topics
• Oracle Database Backup and Recovery User’s Guide
17.4.4 Changing the Recovery Passphrase in a Multi-Master ClusterChanging the recovery passphrase in a multi-master cluster is a two-step process.
To change the recovery passphrase for a multi-master cluster, you must first initiate thechange throughout the nodes in the multi-master cluster environment before changing therecovery passphrase.
Chapter 17Managing System Recovery
17-29
• Step 1: Initiate the Recovery Passphrase Change Across the NodesA user with the System Administrator role should perform a new backup wheneverthe recovery passphrase changes.
• Step 2: Change the Recovery PassphraseAfter the multi-master cluster nodes have been notified of the impending recoverypassphrase change, you can change the recovery passphrase.
17.4.4.1 Step 1: Initiate the Recovery Passphrase Change Across the NodesA user with the System Administrator role should perform a new backup whenever therecovery passphrase changes.
This is so that there is always a backup protected with the current recoverypassphrase. This ensures that you will have at least one backup with the latest data.First, you must initiate the change for the recovery passphrase so that all nodes in themulti-master cluster will be notified of the impending change.
1. Perform a server backup.
2. Ensure that all nodes are in the ACTIVE state and replication has been verifiedbetween all nodes. Ensure that there are no cluster operations going on (such asadding a node).
3. From a web browser, enter the IP address of the Oracle Key Vault installation thatis not in read-only restricted mode.
4. In the Oracle Key Vault login page, do not log in.
5. Click the System Recovery link at the lower right corner of the login page.
A new login page appears with a single field: Recovery Passphrase.
6. Enter the recovery passphrase and click Login.
7. Click the Recovery Passphrase tab.
8. Click the Initiate Change button.
9. Log out.
10. Wait 3 to 4 minutes before continuing.
During this time, all nodes will be notified that a passphrase change will beperformed. To cancel a passphrase change, click the Reset button.
All nodes will determine if more than one passphrase change has been initiated. Ifmore than one passphrase change has been initiated, conflict resolution will beperformed.
After you cancel a passphrase change by using the Reset button, Oraclerecommends that you remedy the issue and again initiate a passphrase change,making sure to then change the passphrase on every node in the cluster.
Related Topics
• Oracle Database Backup and Recovery User’s Guide
• Step 2: Change the Recovery PassphraseAfter the multi-master cluster nodes have been notified of the impending recoverypassphrase change, you can change the recovery passphrase.
Chapter 17Managing System Recovery
17-30

17.4.4.2 Step 2: Change the Recovery PassphraseAfter the multi-master cluster nodes have been notified of the impending recoverypassphrase change, you can change the recovery passphrase.
1. From a Web browser, enter the IP address of a multi-master cluster node in the OracleKey Vault installation.
You can find a list of available nodes in the Oracle Key Vault management console byselecting the Clusters tab and then checking the Cluster Details section.
2. In the Oracle Key Vault login page, do not log in.
3. Click the System Recovery link at the lower right corner of the login page.
4. Enter the recovery passphrase and click Login.
5. Click the Recovery Passphrase tab.
6. Enter the new recovery passphrase in the two fields.
7. Click Submit.
8. Repeat these steps for each node in the cluster.
Note:
HSM reverse migrate cannot run when the recovery passphrase is beingchanged.
Caution:
It is your responsibility to keep the recovery passphrase the same on all nodesin the cluster. If you set the recovery passphrase differently on cluster nodes itwill negatively impact cluster functionality, such as adding nodes and HSM-enabling nodes. In addition to the addition of nodes and nodes being HSM-enabled, certificate rotation in a multi-master cluster depends on all nodeshaving the same recovery passphrase.
Related Topics
• Step 1: Initiate the Recovery Passphrase Change Across the NodesA user with the System Administrator role should perform a new backup whenever therecovery passphrase changes.
17.5 Support for a Primary-Standby EnvironmentTo ensure that Oracle Key Vault can always access security objects, you can deploy OracleKey Vault in a primary-standby (highly available) configuration.
This configuration also supports disaster recovery scenarios.
You can deploy two Oracle Key Vault servers in a primary-standby configuration. The primaryserver services the requests that come from endpoints. If the primary server fails, then the
Chapter 17Support for a Primary-Standby Environment
17-31
standby server takes over after a configurable preset delay. This configurable delayensures that the standby server does not take over prematurely in case of shortcommunication gaps.
The primary-standby configuration was previously known as the high availabilityconfiguration. The primary-standby configuration and the multi-master clusterconfiguration are mutually exclusive.
Oracle Key Vault supports primary-standby read-only restricted mode. When theprimary server is affected by server, hardware, or network failures, primary-standbyread-only restricted mode ensures that an Oracle Key Vault server is available toservice endpoints, thus ensuring operational continuity. However, key and sensitiveoperations, such as generation of keys are disabled, while operations such asgeneration of audit logs are unaffected.
When an unplanned shutdown makes the standby server unreachable, the primaryserver is still available to the endpoints in read-only mode.
Related Topics
• About the Oracle Key Vault Primary-Standby ConfigurationYou configure a primary-standby environment by providing the primary andstandby servers with each other's IP address and certificate, and then pairingthem.
17.6 Commercial National Security Algorithm Suite SupportYou can use scripts to perform Commercial National Security Algorithm (CNSA)operations for Oracle Key Vault HSM backup and upgrade operations.
• About Commercial National Security Algorithm Suite SupportYou can configure Oracle Key Vault for compliance with the Commercial NationalSecurity Algorithm (CNSA) Suite.
• Running the Commercial National Security Algorithm ScriptsThe Commercial National Security Algorithm (CNSA) scripts update theokv_security.conf file.
• Performing Backup and Restore Operations with CNSAAfter you back up and restore Oracle Key Vault, use /usr/local/okv/bin/okv_cnsa to use the enhanced Commercial National Security Algorithm (CNSA)Suite.
• Upgrading a Standalone Oracle Key Vault Server with CNSAYou can upgrade a standalone Oracle Key Vault while using Commercial NationalSecurity Algorithm (CNSA) compliance by upgrading and then executing theokv_cnsa script.
• Upgrading Primary-Standby Oracle Key Vault Servers to Use CNSAYou can upgrade Oracle Key Vault primary-standby servers while usingCommercial National Security Algorithm (CNSA) compliance by upgrading andthen executing the okv_cnsa script.
17.6.1 About Commercial National Security Algorithm Suite SupportYou can configure Oracle Key Vault for compliance with the Commercial NationalSecurity Algorithm (CNSA) Suite.
Chapter 17Commercial National Security Algorithm Suite Support
17-32
This compliance applies to TLS connections to and from the Oracle Key Vault appliance.
The CNSA suite is a list of strong encryption algorithms and key lengths, that offer greatersecurity and relevance into the future.
Oracle Key Vault release 12.2 BP3 or later do not provide complete compliance across everycomponent in the system. You will be able to switch to the CNSA algorithms, where availableby means of the following scripts that are packaged with the Oracle Key Vault ISO:
• /usr/local/okv/bin/okv_cnsa makes configuration file changes to update as manycomponents as possible to use the enhanced algorithms.
• /usr/local/okv/bin/okv_cnsa_cert regenerates CNSA compliant public key pairs andcertificates.
Note:
The /usr/local/okv/bin/okv_cnsa and /usr/local/okv/bin/okv_cnsa_certscripts are both disruptive because they replace the old key pairs with newones. This has consequences for the following operations:
– Endpoint Enrollment: Enroll endpoints after running this script whenpossible. If you had endpoints enrolled before running the CNSA script, youmust reenroll them so that fresh CNSA compliant keys are generated usingCNSA algorithms.
– Primary-Standby: Run the CNSA scripts on both Oracle Key Vaultinstances before pairing them in a primary-standby configuration whenpossible. If you had primary-standby before you run the CNSA scripts, thenyou must re-configure primary-standby as follows: unpair the primary andstandby servers, reinstall the standby server, run the CNSA scriptsindividually on each server, and then pair them again.
Limitations:
• CNSA compliance is not supported for all components in the Oracle Key Vaultinfrastructure (for example, SSH or Transparent Data Encryption (TDE)).
• The Firefox browser is not supported for use with the Oracle Key Vaultmanagement console when CNSA is enabled. This is because the Firefoxbrowser does not support CNSA-approved cipher suites.
17.6.2 Running the Commercial National Security Algorithm ScriptsThe Commercial National Security Algorithm (CNSA) scripts update the okv_security.conffile.
1. Back up Oracle Key Vault.
2. If necessary, enable SSH access.
Log in to the Oracle Key Vault management console as a user who has the SystemAdministrator role. Select the System tab, then Settings. In the Network Details area,
Chapter 17Commercial National Security Algorithm Suite Support
17-33
click SSH Access. Select IP address(es) and then enter only the IP addressesthat you need, or select All. Click Save.
3. SSH into the Oracle Key Vault server as the support user, entering the supportuser password that was created during post-installation, when prompted.
$ ssh support@okv_instance
4. Change to the root user:
$ su root
5. Run the scripts as follows:
root# /usr/local/okv/bin/okv_cnsaroot# /usr/local/okv/bin/okv_cnsa_cert
6. Disable SSH access and then restart the Oracle Key Vault server.
Log in to the Oracle Key Vault management console as a user who has theSystem Administrator role. Select the System tab, then Settings. In the NetworkDetails area, click SSH Access. Select Disabled. Click Save. Restart the OracleKey Vault server by selecting the System tab, then Status.
The scripts update the /usr/local/okv/etc/okv_security.conf with the followingline:
USE_ENHANCED_ALGORITHMS_ONLY="1"
Related Topics
• Backup and Restore OperationsYou may configure automatic backups for continuous, reliable, and protectedaccess to security objects with minimum downtime.
17.6.3 Performing Backup and Restore Operations with CNSAAfter you back up and restore Oracle Key Vault, use /usr/local/okv/bin/okv_cnsa touse the enhanced Commercial National Security Algorithm (CNSA) Suite.
1. Perform the backup and restore operation.
2. Wait until the restore operation is complete and the system has restarted.
Do not proceed without completing this step.
3. SSH into the Oracle Key Vault server as the support user:
$ ssh support@okv_instance
4. Switch to the root user:
$ su root
5. Run the following CNSA script :
root# /usr/local/okv/bin/okv_cnsa
Related Topics
• Backup and Restore OperationsYou may configure automatic backups for continuous, reliable, and protectedaccess to security objects with minimum downtime.
Chapter 17Commercial National Security Algorithm Suite Support
17-34
17.6.4 Upgrading a Standalone Oracle Key Vault Server with CNSAYou can upgrade a standalone Oracle Key Vault while using Commercial National SecurityAlgorithm (CNSA) compliance by upgrading and then executing the okv_cnsa script.
1. Ensure that you have backed up the server you are upgrading so your data is safe andrecoverable.
Do not proceed without completing this step.
2. Log into the Oracle Key Vault management console as a user who has the SystemAdministrator role.
3. If necessary, enable SSH access.
Log in to the Oracle Key Vault management console as a user who has the SystemAdministrator role. Select the System tab, then Settings. In the Network Details area,click SSH Access. Select IP address(es) and then enter only the IP addresses that youneed, or select All. Click Save.
4. Ensure you have enough space in the destination directory for the upgrade ISO files.
5. Log in to the Oracle Key Vault server through SSH as user support, then switch user suto root.
6. Copy the upgrade ISO file to the destination directory using Secure Copy Protocol orother secure transmission method.
scp remote_host:remote_path/okv-upgrade-disc-new_software_release_number.iso /var/lib/oracle/destination_directory_for_iso_file
In this specification:
• remote_host is the IP address of the computer containing the ISO upgrade file.
• remote_path is the location of the ISO upgrade file.
7. Make the upgrade accessible by using the mount command:
root# /bin/mount -o loop,ro /var/lib/oracle/okv-upgrade-disc-new_software_release_number.iso /images
8. Clear the cache using the clean all command:
root# yum -c /images/upgrade.repo clean all
9. Execute the following upgrade ruby script:
root# /usr/bin/ruby/images/upgrade.rb --confirm
If the system is successfully upgraded, then the command will display the followingmessage:
Remove media and reboot now to fully apply changes
If you see an error message, then check the log file /var/log/messages for additionalinformation.
10. Run the first CNSA script, which is available from the Oracle Key Vault ISO files location:
root# /usr/local/okv/bin/okv_cnsa
11. Restart the Oracle Key Vault server:
root# /sbin/reboot
Chapter 17Commercial National Security Algorithm Suite Support
17-35
On the first restart of the computer after the upgrade, the system will apply thenecessary changes. This can take a few hours. Do not shut down the systemduring this time.
The upgrade is completed when the screen with heading: Oracle Key VaultServer release_number installation has completed. The release_numbervalue should reflect the upgraded release.
12. Confirm that Oracle Key Vault has been upgraded to the correct version.
a. Log in to the Oracle Key Vault management console as a user who has theSystem Administrator role.
b. Select the System tab, and then select Status.
c. Verify that the version displayed is that of the new software release.
The release number is also at the bottom of each page, to the right of thecopyright information.
13. Disable SSH access.
Log in to the Oracle Key Vault management console as a user who has theSystem Administrator role. Select the System tab, then Settings. In the NetworkDetails area, click SSH Access. Select Disabled. Click Save.
Related Topics
• https://apps.nsa.gov/iaarchive/programs/iad-initiatives/cnsa-suite.cfm
• https://cryptome.org/2016/01/CNSA-Suite-and-Quantum-Computing-FAQ.pdf
17.6.5 Upgrading Primary-Standby Oracle Key Vault Servers to UseCNSA
You can upgrade Oracle Key Vault primary-standby servers while using CommercialNational Security Algorithm (CNSA) compliance by upgrading and then executing theokv_cnsa script.
You must perform the upgrade standby and primary servers in one session with aslittle time between the standby and primary upgrade as possible. The upgrade time isapproximate and a function of the volume of data stored and managed by Oracle KeyVault. For large volumes of data, the upgrade time may be longer than several hours.
1. Prepare for the upgrade.
• While the upgrade is in progress, do not change any settings or perform anyother operations that are not part of the upgrade instructions below.
• Upgrade the Oracle Key Vault server during a planned maintenance windowbecause the upgrade process requires the endpoints to be shut down duringthe upgrade, if no persistent cache has been configured. With persistent cacheenabled, endpoints will continue to be operational during the upgrade process.
• Ensure that both the primary and standby systems have 8 GB memory.
2. Ensure that you have backed up the server you are upgrading so your data is safeand recoverable.
You can use Oracle Backup and Recovery (Oracle RMAN) to perform this backup.Ensure that in the time between the backup and shutting down the Oracle KeyVault servers for upgrade, that no databases perform a set or rekey operation (for
Chapter 17Commercial National Security Algorithm Suite Support
17-36
example, using the ADMINISTER KEY MANAGEMENT statement), since these new keys willnot included in the backup.
Do not proceed without completing this step.
3. First, upgrade the standby server while the primary server is running.
Follow Steps 2 through Step 11 of the standalone server upgrade process for CNSA.
4. Ensure that the upgraded standby Oracle Key Vault server is restarted and running.
5. Upgrade the primary Oracle Key Vault server following Steps 1 through 11 of thestandalone server upgrade.
After both the standby and primary Oracle Key Vault servers are upgraded, the twoservers will automatically synchronize.
6. Log in to the Oracle Key Vault management console as a user with the SystemAdministrator role.
7. Select the System tab, and then Status.
8. Verify that the Version field displays the new software version release number.
Related Topics
• Upgrading a Standalone Oracle Key Vault Server with CNSAYou can upgrade a standalone Oracle Key Vault while using Commercial NationalSecurity Algorithm (CNSA) compliance by upgrading and then executing the okv_cnsascript.
• Oracle Database Backup and Recovery User’s Guide
17.7 Minimizing DowntimeBusiness-critical operations require data to be accessible and recoverable with minimumdowntime.
You can configure Oracle Key Vault to ensure minimum downtime in the following ways:
• Configuring a multi-master cluster: You can configure a multi-master cluster by addingredundancy in the form of additional nodes. The client can access any available node. Inthe event of a failure of any node, a client will automatically connect to another node inthe endpoint node scan list. This reduces and potentially eliminates downtime.
• Configuring a primary-standby environment: A primary-standby environment isconfigured by adding redundancy in the form of a standby server. The standby servertakes over from the primary server in the event of a failure, thus eliminating single pointsof failure, and minimizing downtime.
• Enabling read-only restricted mode: Primary-standby read-only restricted modeensures endpoint operational continuity when primary or standby Oracle Key Vaultservers are affected by server, hardware, or network failures. When an unplannedshutdown causes the standby server to become unreachable, the primary server is stillavailable to the endpoints.
If primary-standby read-only restricted mode is disabled, then the primary server willbecome unavailable and stop accepting requests in the event of a standby failure.Endpoints connected to Oracle Key Vault are unable to retrieve keys until connectivity isrestored between primary and standby servers.
To ensure endpoint operational continuity in the event of a primary or standby serverfailure, enable read-only restricted mode.
Chapter 17Minimizing Downtime
17-37
• Enabling persistent master encryption key cache: The persistent masterencryption key cache ensures that the endpoints can access keys in the event of aprimary or standby server failure. While the surviving server is taking over from thefailed peer, the endpoints can retrieve keys from the persistent cache and continueoperations normally.
• Apply the TDE heartbeat database patch on endpoints: Apply the databasepatch for Bug 22734547 to tune the Oracle Key Vault heartbeat.
Oracle strongly recommends that you back up Oracle Key Vault data regularly on aschedule. This practice ensures that backups are current and hold the most recentdata. You can use this backup to restore a new or existing Oracle Key Vault server andenable it to be fully operational with minimum downtime and data loss.
If the Oracle Key Vault installation uses an online master key (formerly known as TDEdirect connect), then during an upgrade, ensure that you upgrade database endpointsin parallel to reduce total downtime.
Related Topics
• Using the Persistent Master Encryption Key CacheThe persistent master encryption key cache feature enables databases to beoperational when the Oracle Key Vault server is unavailable.
Chapter 17Minimizing Downtime
17-38
18Managing Certificates
In addition to Oracle Key Vault-generated certificates, you can manage third-party certificates.
• Rotating CertificatesYou can rotate both Oracle Key Vault-generated certificates or third-party certificates.
• Managing Console CertificatesYou can use the Oracle Key Vault management console to manage console certificates.
18.1 Rotating CertificatesYou can rotate both Oracle Key Vault-generated certificates or third-party certificates.
• About Rotating CertificatesThe certificate rotation process captures all certificates in the Oracle Key Vault server.This operation does not rotate the console certificates.
• Advice for Managing Certificate RotationsOracle Key Vault provides advice on the best ways to rotate certificates.
• Factors That May Affect the Certificate Rotation ProcessFactors that affect the certificate rotation process occur in all Oracle Key Vaultenvironments.
• Rotating All CertificatesYou can use the Oracle Key Vault management console to rotate certificates.
• Checking the Certificate Rotation StatusYou can use the Oracle Key Vault management console to check the status of acertificate rotation.
18.1.1 About Rotating CertificatesThe certificate rotation process captures all certificates in the Oracle Key Vault server. Thisoperation does not rotate the console certificates.
A certificate in Oracle Key Vault lasts 730 days. If you do not rotate the certificate (both serverand endpoint certificates), then the endpoints that use the certificate cannot connect to theOracle Key Vault server. When this happens, you must reenroll the endpoint. To avoid thisscenario, you can configure an alert to remind you to rotate the certificate before the 730-daylimit is up. The rotation process handles the rotation for all certificates in one operation. Youcan find how much time the Oracle Key Vault server certificate has before it expires bychecking the OKV Server Certificate Expiration setting on the Configure Alerts page in theOracle Key Vault management console. To find the expiry time of the endpoints' certificates,you must navigate to the Endpoints page and check the Certificate Expires field.
18-1
Note:
If you do not rotate certificates before their expiration date, then all endpointswill experience downtime. Ensure that you rotate certificates well in advanceof their expiration date. You can find the expiration date of your site'scertificates by selecting the System tab, then Status, and then checking theServer Certificate Expiration Date field.
In addition to standalone environments, you can rotate certificates in primary-standbyand multi-master cluster environments. In both, Oracle Key Vault automaticallysynchronizes the certificates in both systems in a primary-standby configuration, andin all nodes in a multi-master cluster configuration. You do not have to perform anyextra configuration.
Related Topics
• Configuring AlertsYou can configure alerts in the Reports page of the Oracle Key Vault managementconsole.
18.1.2 Advice for Managing Certificate RotationsOracle Key Vault provides advice on the best ways to rotate certificates.
• The default alert time for a certificate expiration is 30 days, but Oraclerecommends that you set it to 60 days or earlier. A certificate rotation can taketime, so setting the value to a higher number enables an administrator to receivethe alert early enough to plan for downtime and to take action.
• Do not initiate a certificate rotation while a node addition is in progress.
• Do not try node operations (such as adding or disabling nodes) while a certificaterotation is in process.
• You cannot initiate certificate rotation unless all nodes in the cluster are active. Youcan check if a node is active by checking the Cluster Monitoring page. (Click theCluster tab, and then select Monitoring from the left navigation bar.)
• In a primary-standby configuration, do not perform certificate rotation if the primaryserver is in read-only restricted mode. Only initiate a certificate rotation when bothservers in the configuration are active and synchronized with each other.
• If you are performing certificate rotation on a system that was upgraded from aprevious release, ensure that you upgrade the endpoints as well. Endpoints whosesoftware has not been upgraded will not receive updated credentials.
• You cannot perform a certificate rotation while a backup operation or a restoreoperation is in progress.
• Before performing a certificate rotation, back up the Oracle Key Vault system.
• In order for the certificate rotation process to fully complete, you must delete andreenroll all endpoints that are not in the Enrolled state. If you no longer need theendpoint, then you only need to delete it.
• In a multi-master cluster environment, do not perform any major operations in asingle-node cluster where the single remaining node is in read-only restrictedmode.
Chapter 18Rotating Certificates
18-2
• After the certificate rotation is completed, you must download the RESTful services utilityagain so that you can have access to the updated software with the latest servercertificate.Important: Do not use this feature if the certificates have already expired. Contact OracleSupport if you have tried using the RESTful services utility when certificates haveexpired.
18.1.3 Factors That May Affect the Certificate Rotation ProcessFactors that affect the certificate rotation process occur in all Oracle Key Vault environments.
• Each cluster node only generates certificates for a small set of endpoints. Theseendpoints are those whose creator node (the node on which the certificates aregenerated) it is. (You can find an endpoint's creator node in the Oracle Key Vaultmanagement console by going to the Endpoints page, and then looking for the creatornode for each endpoint.) If all endpoints were created before an upgrade from Oracle KeyVault release 12.2, then it is possible that they may all be associated with one singlecluster node. This can make the rotation process slower than if the endpoints had beencreated on different cluster nodes.
• During the rotation process, Oracle Key Vault rotates endpoints in batches on each nodeof the cluster, with a maximum number of endpoints that are allowed to be in the rotatedstate at any one time. At least one of those rotated endpoints must receive its newcertificates and acknowledge receipt (involving at least two communications with theserver) before the server moves on to processing another endpoint. If all endpoints areconsidered to have been created on a single Oracle Key Vault cluster node, then therotation process may degenerate to rotating a few endpoints at a time across the cluster.
• In order to receive the new certificates, the endpoint must reach out to the node on whichits certificates have been generated (that is, the creator node).
• In a multi-master cluster configuration, whenever the endpoint attempts to make aconnection to Oracle Key Vault, it performs the following actions:
– First, it obtains the list of server IPs from its configuration file (okvclient.ora).
– Next, it picks one at random from those in the cluster subgroup to which the endpointbelongs.The endpoint reaches out to a random Oracle Key Vault cluster node, and notnecessarily to its creator node. This means that even if the Oracle Key Vaultmanagement console shows that the endpoint has had its certificates rotated, theendpoint may not receive the new certificates for some considerable period of time,despite making repeated attempts to reach out to the Oracle Key Vault cluster. Anendpoint can only successfully receive an update if it has at least one objectuploaded to the Oracle Key Vault server. You can check if the endpoint has objectsby executing the okvutil list command.
• If a given endpoint does not receive its rotated certificates due to network or other issues,or is in the SUSPENDED state, Oracle recommends that you reenroll the endpoint, or evendelete it. This will allow the certificate rotation process to continue on to completion. Youcan find the current certificate rotation status by going to the Endpoints page and lookingfor Common Name of Certificate Issuer.
Related Topics
• Deleting, Suspending, or Reenrolling EndpointsWhen endpoints no longer use Oracle Key Vault to store security objects, you can deletethem, and then re-enroll when they are needed.
Chapter 18Rotating Certificates
18-3
18.1.4 Rotating All CertificatesYou can use the Oracle Key Vault management console to rotate certificates.
Before beginning certificate rotation, ensure that the recovery passphrase is the sameacross all multi-master cluster nodes.
1. Back up Oracle Key Vault.
2. Log in to Oracle Key Vault management console as a user who has the SystemAdministrator role.
In a primary-standby environment, log in to the primary Oracle Key Vault server. Ina multi-master cluster environment, you can log in to any node in the cluster.Oracle recommends that you initiate the rotation from one node at a time. Do notperform multiple rotations on different nodes at once.
3. Select the System tab, then Settings from the left navigation side bar.
4. In the Certificates area, click Server Certificate.
By default, Server Certificate is selected.
5. In the Manage Server Certificate window, select Generate Server Certificate.
6. In the confirmation dialog box, select OK.
This creates a new CA certificate, but does not enable it. At this stage, endpointscan still use their old credentials to connect using the previous certificate. The OldCertificate area shows the details of the currently active CA. The New Certificatearea shows that the certificate has been rotated and displays its common name. Ifyou want to cancel the rotation process, click Abort to cancel the process andclean up the new CA directory that was generated.
In a mult-master cluster environment:
• After the certification rotation process is initiated, the details of the newcertificate that was generated are shown on the node on which you initiatedthe rotation. After a few minutes, if you refresh the Manage Server Certificatepage on all of the other nodes, this page should show that a message sayingthat the new certificate is being propagated to that node.
• The certificate will be propagated to all nodes, but not activated. Depending onthe number of nodes in the cluster, it may take some time to complete thepropagation process.
• You can cancel the certificate rotation only up to the point that 1) all nodes inthe cluster have received the certificates, and 2) each node has notified theother nodes that it has received the certificate. At this point, the Abort buttonwill disappear and only Activate Certificate remains. The certificate activationprocess can only take place when all nodes in the cluster no longer have theAbort button appearing.
• Periodically refresh the Manage Server Certificate page, in case there havebeen changes to the status. For example, you should refresh this page if youwant to determine that the Abort button is no longer showing and the ActivateCertificate button has appeared. To access this page, select the System tab,select Settings in the left navigation bar, and then select Manage ServerCertificate in the Certificates area.
Chapter 18Rotating Certificates
18-4

7. In the Manage Server Certificate window, when the Activate Certificate button appearsand is enabled, click it.
Clicking Activate Certificate begins the process of putting the new Oracle Key Vault CAinto use. When it completes, the endpoints should be able to connect to the Oracle KeyVault server using either the new or the old Oracle Key Vault CA. This process may takea few minutes to complete. You cannot cancel the rotation process after you clickActivate Certificate.
In a multi-master cluster environment, Activate Certificate applies the certificate to allnodes in the cluster. The certificate activation process can only take place when all nodesin the cluster no longer have the Abort button appearing. It takes a few minutes for theremaining nodes to be updated. Ensure that you click Activate Certificate on only onenode before you refresh the Manage Server Certificates page on the other nodes. Wait afew minutes for the screen to refresh. (You only need to click Activate Certificate on onenode, not multiple nodes.) Note that the Manage Server Certificates page on all nodesother than the one that you clicked Activate Certificate on may show no change instatus for a few minutes, until the process starts to take effect on those nodes.
8. In the confirmation dialog box, click OK.
A message appears saying that the automatic certificate update of the endpoints is inprogress. In the background, Oracle Key Vault starts regenerating certificates for itsendpoints, for a few endpoints at a time (so that not all endpoints are updated at once).To check if the credentials for an endpoint have been updated, click the Check EndpointProgress button. The Endpoints page appears. If, for a given endpoint, the CommonName of Certificate Issuer field shows the common name of the old CA, the newcredentials have not yet been generated. However, if, for existing endpoints, the fieldshows Updating to Current Certificate Issuer, the process has begun. Endpointsshould be able to retrieve updated credentials a few minutes after this status haschanged.
After the new credentials have been generated for a given endpoint, when the endpointnext makes a connection to the Oracle Key Vault server, the new credentials for thecertificate are sent over to the endpoint. After an endpoint has received its updatedcredentials from the Oracle Key Vault server, it must try to connect to the Oracle KeyVault server to let the server know that it has successfully received the credentials. Youshould periodically check the status of replication across the cluster by viewing either theCluster Monitoring page or the Cluster Management page. (To access either of thesepages, click the Cluster tab, and then select either Management or Monitoring in theleft navigation bar.) When the endpoint successfully receives the credentials, the value inthe Common Name of Certificate Issuer field for that endpoint on the Endpoints pageshould reflect the common name of the new Oracle Key Vault CA certificate.
9. If you had previously downloaded the Oracle Key Vault RESTful services software utility(okvrestclipackage.zip), then download it again so that you can continue to use theRESTful services utility.
If you are using KMIP REST, then you do not need to perform this step because theokvutil endpoint that contains the okvclient.ora has received the updates.
After all the endpoints have been updated to using the new CA, the Oracle Key Vault serverbegins the process of fully rotating its own server certificates in the background. The processcan be deemed to be complete when the Manage Server Certificate page no longer showstwo certificates listed, but only a single one reflecting the new CA certificate. The OKVServer Expiration Date field in the System Status page should reflect the expiration time ofthe new CA certificate as well. In a multi-master cluster environment, you can initiate anothercertificate rotation only after all the nodes have completed their certification rotation process.
Chapter 18Rotating Certificates
18-5
After you complete the rotation, you should configure an alert for the next time the newcertificate should be rotated.
Related Topics
• Backup and Restore OperationsYou may configure automatic backups for continuous, reliable, and protectedaccess to security objects with minimum downtime.
• Configuring AlertsYou can configure alerts in the Reports page of the Oracle Key Vault managementconsole.
18.1.5 Checking the Certificate Rotation StatusYou can use the Oracle Key Vault management console to check the status of acertificate rotation.
You should also check the Manage Server Certificates page.
1. Log in to Oracle Key Vault management console as a user who has the SystemAdministrator role.
2. Select the Endpoints tab.
3. Select Endpoints.
On the Endpoints page, you can see a status of the rotation process for thecertificate (Updating to current certificate issuer) in the Endpoints page. Whenit is complete, it will show the name of the common name of the new Oracle KeyVault CA.
If there are errors with the certificate rotation of an endpoint, then Oraclerecommends that you re-enroll the endpoint.
18.2 Managing Console CertificatesYou can use the Oracle Key Vault management console to manage consolecertificates.
• About Managing Console CertificatesOracle Key Vault enables you to install a certificate signed by a CertificateAuthority (CA) for more secure connections.
• Step 1: Download the Certificate RequestWhen you request the console certificate, you can suppress warning messages.
• Step 2: Have the Certificate SignedAfter you download the Oracle Key Vault certificate.csr file, you can have itsigned.
• Step 3: Upload the Signed Certificate to Oracle Key VaultIn addition to uploading the signed certificate, you can optionally choose todeactivate and re-activate the certificate.
• Console Certificates in Special Use Case ScenariosDepending on the situation, you must perform additional steps when you useconsole certificates.
Chapter 18Managing Console Certificates
18-6
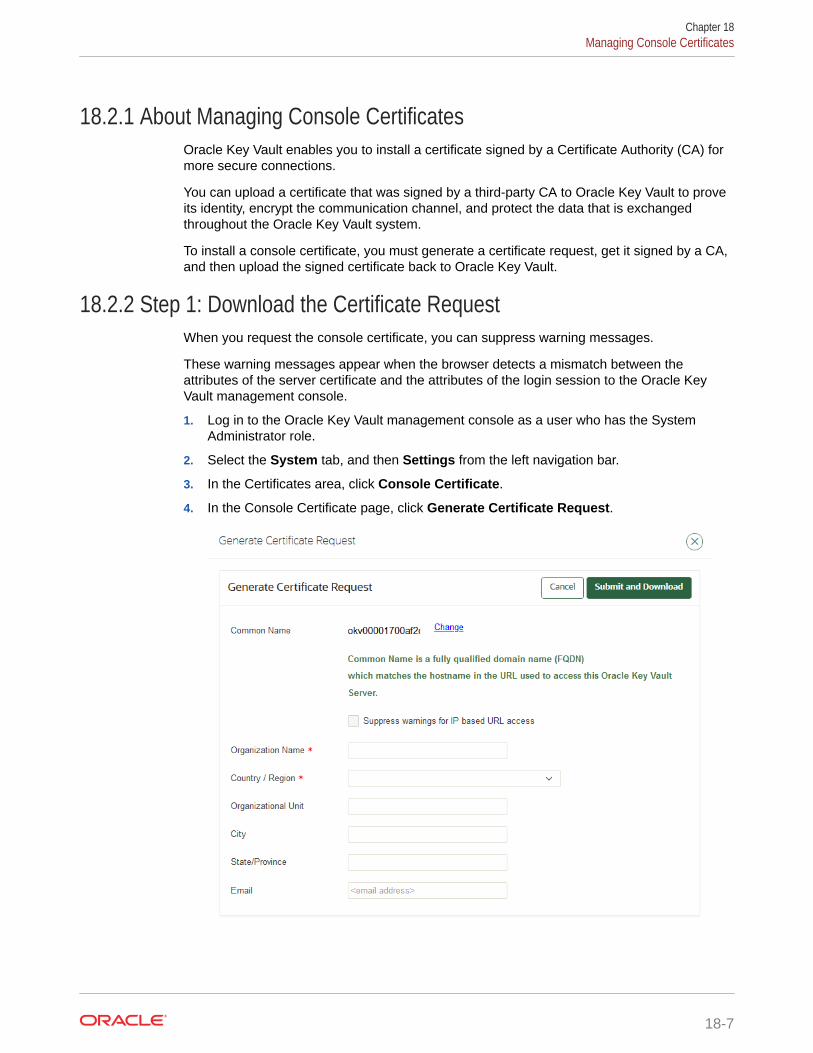
18.2.1 About Managing Console CertificatesOracle Key Vault enables you to install a certificate signed by a Certificate Authority (CA) formore secure connections.
You can upload a certificate that was signed by a third-party CA to Oracle Key Vault to proveits identity, encrypt the communication channel, and protect the data that is exchangedthroughout the Oracle Key Vault system.
To install a console certificate, you must generate a certificate request, get it signed by a CA,and then upload the signed certificate back to Oracle Key Vault.
18.2.2 Step 1: Download the Certificate RequestWhen you request the console certificate, you can suppress warning messages.
These warning messages appear when the browser detects a mismatch between theattributes of the server certificate and the attributes of the login session to the Oracle KeyVault management console.
1. Log in to the Oracle Key Vault management console as a user who has the SystemAdministrator role.
2. Select the System tab, and then Settings from the left navigation bar.
3. In the Certificates area, click Console Certificate.
4. In the Console Certificate page, click Generate Certificate Request.
Chapter 18Managing Console Certificates
18-7

5. If you need to change the host name of the Oracle Key Vault server, whichappears next to Common Name, then click Change.
The Network Details window appears, where you can change the Host Namesetting. Click Save afterward.
6. Check the box to the left of text Suppress warnings for IP based URL access ifyou want to suppress browser warnings for server IP address changes.
7. Enter the required fields marked with an asterisk, Organization Name andCountry / Region.
You must enter values for these fields in order to proceed without errors. You mayenter values in the rest of the optional fields as needed.
8. Click Submit and Download to the top right.
A directory window appears, where you can save the certificate.csr file. Selecta directory and save the file to a secure location.
18.2.3 Step 2: Have the Certificate SignedAfter you download the Oracle Key Vault certificate.csr file, you can have it signed.
• Use any out-of-band method to have the certificate.csr file signed by a CA ofyour choice.
Afterward, you can upload the signed certificate back to Oracle Key Vault using themanagement console.
18.2.4 Step 3: Upload the Signed Certificate to Oracle Key VaultIn addition to uploading the signed certificate, you can optionally choose to deactivateand re-activate the certificate.
1. Log in to the Oracle Key Vault management console as a user who has theSystem Administrator role.
2. Select the System tab, and then Settings from the left navigation bar.
3. In the Certificates area, click Console Certificate.
4. Click Upload Certificate at the top right to display the Upload Certificate page.
5. Select Choose File to display a directory window on your local system.
6. Navigate to the directory where you stored the signed certificate and select it.When you are done, you will see the file name to the right of text Choose File.
After you select the certificate, you will see the file name to the right of ChooseFile.
7. Click Upload.
If the certificate is installed with no errors, then you will see its details appear in anew Uploaded Certificate Details panel just below Console Certificate.
At this stage, if you need to, you can deactivate the certificate by clicking Deactivateon the top right of the Uploaded Certificate Details section. When you deactivate thecertificate, the Deactivate button is replaced by an Apply Certificate button. You canclick this button to re-activate the certificate.
Chapter 18Managing Console Certificates
18-8
18.2.5 Console Certificates in Special Use Case ScenariosDepending on the situation, you must perform additional steps when you use consolecertificates.
• Primary-standby environments: If you want to use a console certificate in a primary-standby configuration, then you must install it on the primary and standby servers first,and then pair them.
• RESTful services: When you install a console certificate, you must download theRESTful software utility again before you can use the new certificate.
• Restored data from a backup: If you install a console certificate, perform a backup, andthen restore another Oracle Key Vault appliance from that backup, you must re-install theconsole certificate on the new server before you can use it. The restore process does notcopy the console certificate.
Chapter 18Managing Console Certificates
18-9
19Backup and Restore Operations
You may configure automatic backups for continuous, reliable, and protected access tosecurity objects with minimum downtime.
• About Backing Up and Restoring Data in Oracle Key VaultYou can use Oracle Key Vault to back up and restore Oracle Key Vault data.
• Oracle Key Vault Backup DestinationsA backup destination is the location where Oracle Key Vault data will be copied to andstored.
• Backup Schedules and StatesOracle Key Vault provides backup schedule types depending on the backup destination,and different states that indicate the progress of the backup activity.
• Scheduling and Managing Oracle Key Vault BackupsYou can schedule Oracle Key Vault backups to specific backup destinations and times.
• Restoring Oracle Key Vault DataOracle Key Vault data from a remote backup destination can be restored onto anotherOracle Key Vault server.
• Backup and Restore Best PracticesOracle provides best practices to keep backups current so that you can recover fromcatastrophic failures with minimum down time and data loss.
19.1 About Backing Up and Restoring Data in Oracle Key VaultYou can use Oracle Key Vault to back up and restore Oracle Key Vault data.
You should back up data periodically to reduce down time and recover from unexpected datalosses and system failures. You can restore a new or existing Oracle Key Vault server from abackup.
Backup and restore operations may be performed from the Oracle Key Vault managementconsole. You must be a user who has the System Administrator role to back up and restoreOracle Key Vault data. You can schedule backups at periodic intervals to run automatically atdesignated times. You also can run these operations on-demand to save a current snapshotof the system.
Oracle strongly recommends that you back up Oracle Key Vault data regularly on a schedule.This practice ensures that backups are current and hold the most recent data. You can usethis backup to restore a new or existing Oracle Key Vault server and be fully operational withminimum downtime and data loss.
Oracle Key Vault encrypts all backed up data, which is copied to the backup destination usingthe secure copy protocol (SCP) or the secure file transfer protocol (SFTP). You musttherefore ensure that either SCP or SFTP are supported at the backup destination.
In an Oracle Key Vault multi-master cluster environment, the replication intrinsically createscopies of data on other nodes in the cluster. However, you can still perform backups andbackup-related operations on all individual Oracle Key Vault cluster nodes. Be aware that
19-1
backups can still only be restored to standalone Oracle Key Vault servers. Therefore,backups in a cluster are taken for disaster recovery in case of a complete clusterfailure and should all be on remote destinations.
19.2 Oracle Key Vault Backup DestinationsA backup destination is the location where Oracle Key Vault data will be copied to andstored.
• About the Oracle Key Vault Backup DestinationThe backup destination enables the backup data to be available in a location otherthan the Oracle Key Vault server itself.
• Creating a Remote Backup DestinationYou can use the Oracle Key Vault management console to create a remote backupdestination.
• Changing Settings on a Remote Backup DestinationAfter you have created the backup destination, you can only change the SCP orSFTP port number and details of the user account.
• Deleting a Remote Backup DestinationYou can delete a remote backup destination to stop future backups to thatdestination server.
19.2.1 About the Oracle Key Vault Backup DestinationThe backup destination enables the backup data to be available in a location otherthan the Oracle Key Vault server itself.
This ensures that you have all the relevant data to recover in case of a catastrophicfailure with the Oracle Key Vault server or hardware.
The backup destination is usually another server or computer system that you haveaccess to. You can add, delete, and modify a backup destination.
The backup operation copies Oracle Key Vault data to a backup destination of yourchoice. The backup destination stores the data until it is needed.
Oracle Key Vault provides two types of backup destinations: local and remote. Thelocal backup destination resides on the Oracle Key Vault server itself, the remote oneresides externally in a different server or computer system. You can create more thanone backup destination for greater availability.
Local and remote backup destinations have the following characteristics:
• Local backup destination: The local backup destination, LOCAL, is present bydefault and cannot be removed. Backups to the local backup destination are localbackups.
Backups to LOCAL are useful to save a current state of Oracle Key Vault. Becausethese backups are stored on disk, they could be lost in the case of hardware orother catastrophic failure. They will also not be available after a failover orswitchover in a primary-standby configuration. They cannot be restored to aprimary-standby or cluster configuration. Therefore, you should back up the datato a remote destination when using these configurations.
Chapter 19Oracle Key Vault Backup Destinations
19-2
A LOCAL destination can store only the last full backup and the cumulative incrementalbackups after that full backup. After a new full backup of the periodic backup to LOCALcompletes, the previous periodic full or cumulative incremental backups are deleted.
• Remote backup destinations: Remote backup destinations reside on external serversand can be dispersed geographically for disaster recovery purposes. Backups to remotebackup destinations are remote backups.
Each backup destination on the external server is associated with a backup catalog filecalled okvbackup.mgr that Oracle Key Vault maintains at the backup destination. Theokvbackup.mgr file catalogs the backups performed and is used to restore data.
Note:
You cannot use another Oracle Key Vault server as a remote backupdestination.
Caution:
• Oracle Key Vault may not be able to find the backups if you delete or modify thebackup catalog file. Therefore, do not delete or modify this file.
• Do not configure the same remote backup destination directory for differentOracle Key Vault servers as backup destinations, because backups that happenconcurrently from different Oracle Key Vault servers will overwrite each other'scatalog file, with the result that Oracle Key Vault may not be able to locate thebackups correctly.
• After you restore a backup that contains a remote backup destination, do notcontinue to use that remote backup destination. Delete any backup jobs thatare configured to send backups to that destination. Continuing to use thisbackup destination could corrupt the backup catalog file. Oracle Key Vault maynot be able to locate backups correctly.
• Configure each node in a multi-master cluster to send their backups to adifferent backup destination.
Related Topics
• Types of Oracle Key Vault BackupsOracle Key Vault provides two types of backup jobs that can be scheduled: one-timebackups and periodic backups.
19.2.2 Creating a Remote Backup DestinationYou can use the Oracle Key Vault management console to create a remote backupdestination.
To create a remote backup destination, you must provide a user account, a unique existingdirectory location on an external server, and an authentication method (password or key-based). Oracle Key Vault needs this information to make a secure connection with the remoteserver.
Chapter 19Oracle Key Vault Backup Destinations
19-3
1. Log in to the Oracle Key Vault management console as a user with the SystemAdministrator role.
2. Select the System tab, and then Settings from the left navigation bar.
3. In the System Configuration area, click Backup and Restore.
4. In the System Backup page, select Manage Backup Destinations.
The Manage Backup Destinations window appears.
5. Click Create.
The Create Backup Destination window appears.
6. Enter the following information for the backup location:
• Destination Name: Enter a descriptive name to identify the backupdestination.
• Transfer Method: Choose between scp and sftp to copy files to the remotedestination.
• Hostname: Enter the host name or IP address of the remote server for thebackup. If you enter the host name, then ensure that DNS is configured totranslate the host name to its corresponding IP address. Do not includespaces, single quotation marks, or double quotation marks in a host name thatis in a remote backup destination.
• Port: Enter the SCP or SFTP port number on the external server. The defaultis 22.
• Destination Path: Enter the path to an existing directory on the externalserver where the backup file will be copied. You cannot modify this directorylocation after the backup destination is created. This path must not be thedestination for backups from another Oracle Key Vault server. Do not include
Chapter 19Oracle Key Vault Backup Destinations
19-4
spaces, single quotation marks, or double quotation marks destination path that is ina remote backup destination.
• Username Enter the user name of the user account on the remote server. Ensurethat write permissions are set on the directory specified in Destination Path for theuser identity that establishes the SCP or SFTP connection. Do not include spaces,single quotation marks, or double quotation marks in a user name that is in a remotebackup destination.
• Authentication Method: Choose one of the following:
– Key-based Authentication: Copy the public key that appears and paste it in theappropriate configuration file, such as authorized_keys, on the destinationserver. Check that the permissions of the configuration file are set to allowaccess only to the backup account owner and no other group or user. Be awarethat certain events may trigger a change of the public key, which means thatOracle Key Vault cannot use the backup destination until the new public key isre-copied from Oracle Key Vault to the appropriate configuration file. Theseevents include but are not limited to certificate rotation, changing the IP address,and conversion to a cluster node.
– Password Authentication: The password of the user account entered in theUsername field.
7. Click Save.
Oracle Key Vault validates the input that you supplied to create the backup destination. If thevalidation fails, then the backup destination is not created. If this happens, then check valuesfor the user account on the remote server (user name and password or key) and ensure thatthe directory has write permissions for the user. Finally, ensure that the remote server isactive.
19.2.3 Changing Settings on a Remote Backup DestinationAfter you have created the backup destination, you can only change the SCP or SFTP portnumber and details of the user account.
You cannot change any other setting.
1. Log in to the Oracle Key Vault management console as a user who has the SystemAdministrator role.
2. Select the System tab, and then Settings from the left navigation bar.
3. In the System Configuration area, click Backup and Restore.
4. Select Manage Backup Destinations.
The Manage Backup Destinations page appears displaying LOCAL and remote backupdestinations.
5. Click the backup destination name to edit the backup destination.
The Edit Backup Destination page appears.
6. Modify the following information:
• Port: Change the SCP or SFTP port number on the external server.
• Destination Public Key: This field shows the public key information that Oracle KeyVault currently has stored in its known_hosts file for the remote server. If the remoteserver's public key changes, then Oracle Key Vault cannot copy backups to or fromthe remote server. In order to store the new public key in the known_hosts file, click
Chapter 19Oracle Key Vault Backup Destinations
19-5
the Reset Dest Public Key button, which will retrieve and save the new publickey from the remote server.
• Username: Enter the user name of the user account on the remote server.Ensure that the new user has write permissions on the directory that isspecified in Destination Path, because this path cannot be changed.
• Authentication Method: Choose one of the following:
– Password Authentication: The password of the user account entered inthe Username field.
– Key-based Authentication: If the Oracle Key Vault public key haschanged, re-copy the public key that appears in the Public Key field andthen paste it in the appropriate configuration file, such asauthorized_keys, on the destination server. Be aware that certain eventsmay trigger a change of the public key, which means that Oracle Key Vaultcannot use the backup destination until the new public key is re-copiedfrom Oracle Key Vault to the appropriate configuration file. These eventsinclude but are not limited to certificate rotation, changing the IP address,and conversion to a cluster node.
7. Click Save.
Oracle Key Vault validates the input that you supplied to update the backupdestination. If the validation fails, then the backup destination is not updated. If thishappens, then check values for the user account on the remote server (user name andpassword) and ensure that the directory has write permissions for the user. Finally,ensure that the remote server is active.
19.2.4 Deleting a Remote Backup DestinationYou can delete a remote backup destination to stop future backups to that destinationserver.
Backups already on the destination server will remain there.
1. Log in to the Oracle Key Vault management console as a user who has theSystem Administrator role.
2. Select the System tab, and then Settings from the left navigation bar.
3. In the System Configuration area, click Backup and Restore.
4. Select Manage Backup Destinations.
5. In the Manage Backup Destinations page, check the boxes for the backupdestinations that you want to delete.
6. Click Delete.
19.3 Backup Schedules and StatesOracle Key Vault provides backup schedule types depending on the backupdestination, and different states that indicate the progress of the backup activity.
• About Backup Schedule Types and StatesYou can schedule backups in Oracle Key Vault for specific times and backupdestinations.
Chapter 19Backup Schedules and States
19-6
• Types of Oracle Key Vault BackupsOracle Key Vault provides two types of backup jobs that can be scheduled: one-timebackups and periodic backups.
• Scheduled Backup States in Oracle Key VaultScheduled backups have four states, which indicate whether the backup is scheduled, inprogress, completed, or paused.
19.3.1 About Backup Schedule Types and StatesYou can schedule backups in Oracle Key Vault for specific times and backup destinations.
The backup process starts at the scheduled time and generates a system backup, which is afile that is stored on the backup destination. There is one backup file for each completedbackup.
No backup can start if another backup is in progress. You can change the schedule ofbackups as needs change. You can continue working with Oracle Key Vault while the backupis in progress.
A system restart will terminate any ongoing backup. If you must restart the system, then youcan cancel a backup that is scheduled to happen at the same time, and backup the systemafter the restart.
19.3.2 Types of Oracle Key Vault BackupsOracle Key Vault provides two types of backup jobs that can be scheduled: one-time backupsand periodic backups.
• One-time backup: A one-time backup makes a full backup of the Oracle Key Vaultsystem. You can schedule multiple one-time backup jobs, each with its own start time.
You should make one-time local backups before making significant configuration changesto Oracle Key Vault, in case you need to recover from configuration failures.
LOCAL destinations can only store the last one-time backup. When a one-time backup toLOCAL completes, the previous backup is deleted.
• Periodic backup: The periodic backup process first makes a full backup of the OracleKey Vault system and puts the backup schedule in active state. At the end of thesubsequent periodic interval, a cumulative incremental backup starts. This cumulativeincremental backup holds changes from the last full backup. Another full backup is madeafter 7 days have passed since the last full backup.
For example, if the backup period is once a day, then every seventh one is a full backup.If the backup period is every 8 days, then all backups are full backups. If the backupperiod is 12 hours, then there are 13 cumulative backups before a full backup.
You should schedule periodic backups with a period of at least one day to minimize dataloss.
A LOCAL destination can store only the last full backup and the cumulative incrementalbackups after that full backup. After a new full backup of the periodic backup to LOCALcompletes, previous periodic full or cumulative incremental backups are deleted.
Cumulative incremental backups are faster than full backups. Only one periodic backupcan be scheduled at any time.
Chapter 19Backup Schedules and States
19-7
Related Topics
• Scheduled Backup States in Oracle Key VaultScheduled backups have four states, which indicate whether the backup isscheduled, in progress, completed, or paused.
19.3.3 Scheduled Backup States in Oracle Key VaultScheduled backups have four states, which indicate whether the backup is scheduled,in progress, completed, or paused.
• ACTIVE: The backup is scheduled and will be processed at the specified starttime or period.
• PAUSED: All future backups are on hold and will not start even if the start timehas passed. They will start when they are explicitly resumed. You can change thestate from active to paused and back. Put a scheduled backup in the paused statefor these situations:
– When communication between Oracle Key Vault and the remote destination isbroken
– If the remote destination is unavailable or inactive
– If you want to defer the backup
You can delete the scheduled backups that have not completed.
• ONGOING: The backup is in progress.
• DONE: The backup is complete.
19.4 Scheduling and Managing Oracle Key Vault BackupsYou can schedule Oracle Key Vault backups to specific backup destinations and times.
You must create the backup destinations that you will use beforehand, and you canmodify or delete backup schedules.
• Scheduling a Backup for Oracle Key VaultYou can schedule a one-time or a periodic backup to a local or remote backupdestination.
• Changing a Backup Schedule for Oracle Key VaultYou cannot change the schedule of a backup in progress.
• Deleting a Backup Schedule from Oracle Key VaultYou can delete a backup schedule from the Oracle Key Vault managementconsole.
• How Primary-Standby Affects Oracle Key Vault BackupsIn a primary-standby deployment, you must perform backups on the primaryserver.
• How Using a Cluster Affects Oracle Key Vault BackupsIn a multi-master cluster environment, be aware of how the backup process worksin individual nodes and the entire cluster.
• Protecting the Backup Using the Recovery PassphraseOracle Key Vault uses the recovery passphrase to control who can restore userand system data.
Chapter 19Scheduling and Managing Oracle Key Vault Backups
19-8

19.4.1 Scheduling a Backup for Oracle Key VaultYou can schedule a one-time or a periodic backup to a local or remote backup destination.
You can start a one-time backup to start immediately without setting a time. However, do notschedule backup operations if a certificate rotation or cluster operation is in progress.
1. Log in to the Oracle Key Vault management console as a user who has the SystemAdministrator role.
2. Select the System tab, and then Settings from the left navigation bar.
3. In the System Configuration area, click Backup and Restore.
4. In the Backup page, click Backup.
The Backup page appears. The following image shows how it appears when PERIODICis selected.
5. In the Name field, enter a name for the backup.
6. If you want to perform a periodic backup, then do the following:
a. In the Start Time field, use the Calendar icon to specify the start time for the backup.
b. For Type, select PERIODIC.
The additional fields Days, Hours, and Mins appear.
c. In the Days, Hours, and Mins fields, enter the times for the periodic backups tooccur.
d. For Destination, select the destination backup from the list.
e. Click Schedule to add the scheduled backup to the Scheduled Backup(s) page.
7. If you want to perform a one-time backup, then do the following:
a. In the Start Time field, use the Calendar icon to specify the start time for the backup.If you want the backup to perform immediately after you click Schedule, then selectNow.
b. For Type, select ONE-TIME.
c. For Destination, select the destination backup from the list.
d. Click Schedule to add the scheduled backup to the Scheduled Backup(s) page.
Chapter 19Scheduling and Managing Oracle Key Vault Backups
19-9
19.4.2 Changing a Backup Schedule for Oracle Key VaultYou cannot change the schedule of a backup in progress.
To change the backup schedule the state must be active or paused.
1. Log in to the Oracle Key Vault management console as a user who has theSystem Administrator role.
2. Select the System tab, and then Settings from the left navigation bar.
3. In the System Configuration area, click Backup and Restore.
4. Click the name of the scheduled backup in the Scheduled Backup(s) page.
5. Enter the Start Time or click the calender icon for a one-time backup.
For a one-time backup, you can only change the start time if the backup has notalready started. This means that the state cannot be ongoing or done. For aperiodic backup you can change the start time if the scheduled start time has notpassed.
6. Enter the Days, Hours, and Mins for a periodic backup.
7. Select Save.
19.4.3 Deleting a Backup Schedule from Oracle Key VaultYou can delete a backup schedule from the Oracle Key Vault management console.
1. Log in to the Oracle Key Vault management console as a user who has theSystem Administrator role.
2. Select the System tab, and then Settings from the left navigation bar.
3. In the System Configuration area, click Backup and Restore.
4. Check the boxes of scheduled backups listed in the Scheduled Backup(s) page.
5. Click Delete to delete the selected backup schedules.
19.4.4 How Primary-Standby Affects Oracle Key Vault BackupsIn a primary-standby deployment, you must perform backups on the primary server.
Because the standby synchronizes its state with the primary, you do not need to backup the standby.
Be aware of the following behavior for failover or switchover operations in a primary-standby deployment:
• Any backups in progress will terminate if there is a failover or a primary-standbyswitchover. Backups to LOCAL are private to the Oracle Key Vault server andtherefore the local backup on the primary server is not available after a failover orswitchover.
• Backups scheduled with password authentication start as usual after the failoveror switchover.
• Remote backups using key-based authentication will need to update the public keyon the destination to match the one shown on the new primary system.
Chapter 19Scheduling and Managing Oracle Key Vault Backups
19-10
• Because backups can only be restored to standalone servers, you must unpair primary-standby deployments before you can perform a backup restore operation on the formerprimary.
19.4.5 How Using a Cluster Affects Oracle Key Vault BackupsIn a multi-master cluster environment, be aware of how the backup process works inindividual nodes and the entire cluster.
• In an Oracle Key Vault multi-master cluster environment, the replication intrinsicallycreates copies of data on other nodes in the cluster. However, you can still performbackups and backup-related operations on all individual Oracle Key Vault cluster nodes.
• Backups in a cluster are taken for disaster recovery in case of a complete cluster failureand should all be done on remote destinations.
• Backups can still only be restored to standalone Oracle Key Vault servers. Because acluster node cannot be switched back to a standalone server, only remote backupsshould be taken.
19.4.6 Protecting the Backup Using the Recovery PassphraseOracle Key Vault uses the recovery passphrase to control who can restore user and systemdata.
To restore a backup, use the Oracle Key Vault recovery passphrase from the time when thebackup was initiated. This is necessary even if the recovery passphrase was changed afterthe backup completed. Oracle recommends that you make a new backup every time therecovery passphrase is changed to ensure that there is always a copy of the backup that isprotected by the most recent recovery passphrase.
Related Topics
• Emergency System Recovery ProcessDuring installation, you will be required to create a special recovery passphrase thatOracle Key Vault uses to recover from emergency situations.
19.5 Restoring Oracle Key Vault DataOracle Key Vault data from a remote backup destination can be restored onto another OracleKey Vault server.
This restore operation minimizes downtime and data loss.
• About the Oracle Key Vault Restore ProcessThe restore process replaces all data on the new server except the root and supportuser passwords.
• Procedure for Restoring Oracle Key Vault DataYou can restore Oracle Key Vault data to a standalone server using the Oracle Key Vaultmanagement console.
• Multi-Master Cluster and the Restore OperationIn a multi-master cluster deployment, you must consider several factors before yourestore data to Oracle Key Vault.
Chapter 19Restoring Oracle Key Vault Data
19-11
• Primary-Standby and the Restore OperationIn a primary-standby deployment, you must consider several factors before yourestore data to Oracle Key Vault.
• Certificates and the Restore OperationA third-party certificate installed at the time of a backup will not be copied whenyou restore another server from this backup.
• Changes Resulting from a System State RestoreRestoring an Oracle Key Vault server brings the system state back to the timewhen the backup last performed.
19.5.1 About the Oracle Key Vault Restore ProcessThe restore process replaces all data on the new server except the root and supportuser passwords.
You will not be able to restore data to a server if there is a scheduled backup inprocess on the server.
Note:
You must restore Oracle Key Vault data to a server only after ensuring thatall scheduled backups on the server are completed.
Restoring data to an Oracle Key Vault server replaces the data in the server with thatof the backup. Any changes made since the last backup will be lost. Backups can onlybe restored to the same version of Oracle Key Vault at which the backup was taken.
The maximum life of a backup is 1 year.
Note:
Any backup older than a year cannot be restored.
You must have the recovery passphrase that was in effect at the time of the backup inorder to restore data from a backup. If you have not changed the recovery passphrasesince installing Oracle Key Vault, then you must use the recovery passphrase that youcreated during the post-installation process.
Restoring data in Oracle Key Vault entails the following general steps:
1. Setting up the backup environment, which includes, after install Oracle Key Vault,configuring backup destinations.
2. Performing the restore operation by determining the backup to use from a local orremote backup destination, and then providing the recovery passphrase to beginthe restore process. You create the recovery passphrase as part of the post-installation tasks for Oracle Key Vault.
Chapter 19Restoring Oracle Key Vault Data
19-12
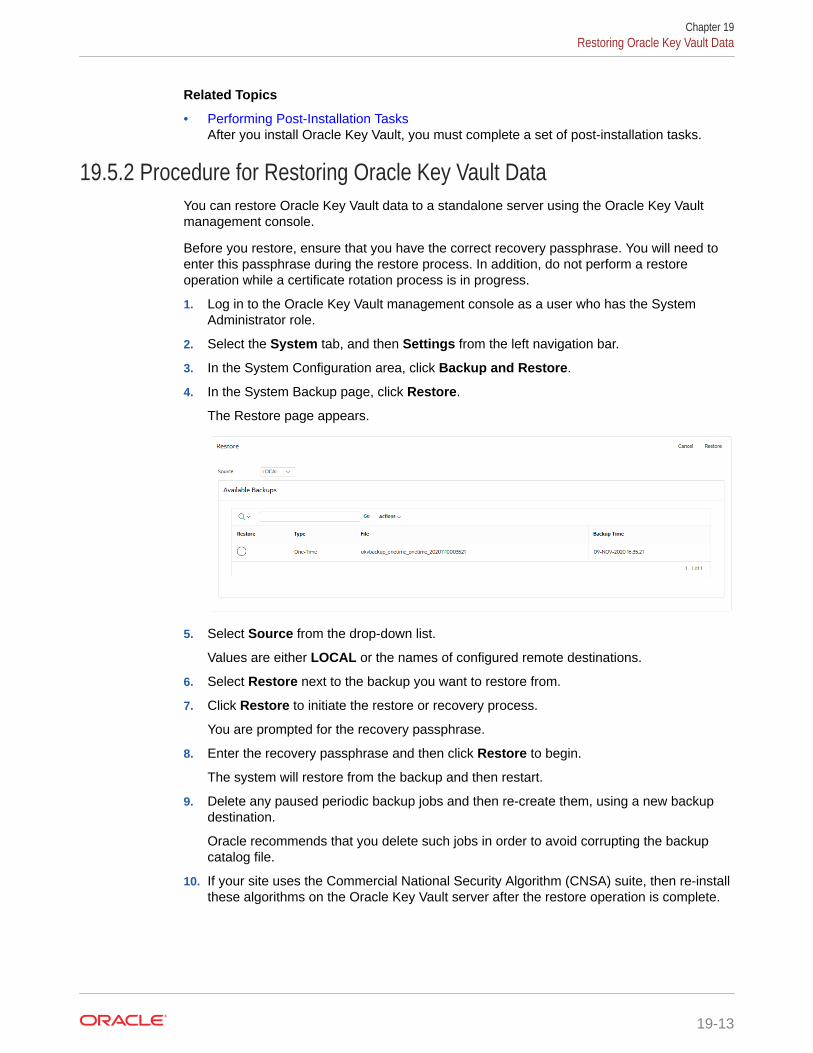
Related Topics
• Performing Post-Installation TasksAfter you install Oracle Key Vault, you must complete a set of post-installation tasks.
19.5.2 Procedure for Restoring Oracle Key Vault DataYou can restore Oracle Key Vault data to a standalone server using the Oracle Key Vaultmanagement console.
Before you restore, ensure that you have the correct recovery passphrase. You will need toenter this passphrase during the restore process. In addition, do not perform a restoreoperation while a certificate rotation process is in progress.
1. Log in to the Oracle Key Vault management console as a user who has the SystemAdministrator role.
2. Select the System tab, and then Settings from the left navigation bar.
3. In the System Configuration area, click Backup and Restore.
4. In the System Backup page, click Restore.
The Restore page appears.
5. Select Source from the drop-down list.
Values are either LOCAL or the names of configured remote destinations.
6. Select Restore next to the backup you want to restore from.
7. Click Restore to initiate the restore or recovery process.
You are prompted for the recovery passphrase.
8. Enter the recovery passphrase and then click Restore to begin.
The system will restore from the backup and then restart.
9. Delete any paused periodic backup jobs and then re-create them, using a new backupdestination.
Oracle recommends that you delete such jobs in order to avoid corrupting the backupcatalog file.
10. If your site uses the Commercial National Security Algorithm (CNSA) suite, then re-installthese algorithms on the Oracle Key Vault server after the restore operation is complete.
Chapter 19Restoring Oracle Key Vault Data
19-13
Related Topics
• Performing Backup and Restore Operations with CNSAAfter you back up and restore Oracle Key Vault, use /usr/local/okv/bin/okv_cnsa to use the enhanced Commercial National Security Algorithm (CNSA)Suite.
19.5.3 Multi-Master Cluster and the Restore OperationIn a multi-master cluster deployment, you must consider several factors before yourestore data to Oracle Key Vault.
• You must restore only if all nodes in the cluster are lost.
• You must restore the backup to a standalone Oracle Key Vault server that has thesame IP address as the node from which the backup was taken. Not doing so mayaffect the ability of endpoints to connect to the restored backup.
• The data restored is only as current as the backup.
• After the restore operation, you must now use the restored server as the first nodeof a new cluster.
19.5.4 Primary-Standby and the Restore OperationIn a primary-standby deployment, you must consider several factors before yourestore data to Oracle Key Vault.
• You must perform the restore operation only if both the primary and standby dataare lost.
• You must restore the backup on a standalone Oracle Key Vault server only, even ifthe backup was taken from the primary.
• The restore operation replaces the Oracle Key Vault server with the backup. Thismeans that some data can be lost. You might need to restore the endpointdatabase.
• If you restore a backup taken from the primary node, you must use a freshlyinstalled Oracle Key Vault server as the new standby.
• If the standby server has taken over as primary, and the former primary is lost,then there is no need to restore data from a backup to a new standby server. Justadd a new standby server to the primary-standby deployment, which willautomatically synchronize with the new primary.
• If your site uses the Commercial National Security Algorithm (CNSA) suite, thenyou must re-install these algorithms on the Oracle Key Vault server after therestore operation is complete.
Related Topics
• Performing Backup and Restore Operations with CNSAAfter you back up and restore Oracle Key Vault, use /usr/local/okv/bin/okv_cnsa to use the enhanced Commercial National Security Algorithm (CNSA)Suite.
Chapter 19Restoring Oracle Key Vault Data
19-14
19.5.5 Certificates and the Restore OperationA third-party certificate installed at the time of a backup will not be copied when you restoreanother server from this backup.
You must re-install the third-party certificate on the new server in order to use it.
If you perform a certificate rotation in your configuration (so that the endpoints have beenupdated to using new certificates as well), but then restore the Oracle Key Vault server from abackup that was taken before the certificate rotation was performed, then the endpoints willnot be able to connect to the restored Oracle Key Vault system.
Related Topics
• Managing Console CertificatesYou can use the Oracle Key Vault management console to manage console certificates.
19.5.6 Changes Resulting from a System State RestoreRestoring an Oracle Key Vault server brings the system state back to the time when thebackup last performed.
Therefore, any changes that were made after the backup was made do not exist on therestored system. For example, if a user's password was changed after the backup operation,the new password will not be available in the restored system. The restored system will havethe password that was in effect when the backup was made.
Note:
Restoring also changes the recovery passphrase to the one that was in effectduring the backup.
You should change the user passwords, enroll the endpoints created after backup, and makeother similar changes, if required. You should confirm that everything is configured correctlyafter restoring.
If you are not certain that you restored the correct backup, then you can restore a differentone, provided that Oracle Key Vault continues to remain a standalone server. To restoreanother backup, first configure the remote destination of this backup on the restored OracleKey Vault itself, and then start the restore process. You do not need to reinstall the OracleKey Vault appliance.
When the Oracle Key Vault server has been restored and is functional, you can continue toback up Oracle Key Vault data to new remote destinations.
Oracle recomments that you change user passwords after a restore operation and backupthe Oracle Key Vault.
19.6 Backup and Restore Best PracticesOracle provides best practices to keep backups current so that you can recover fromcatastrophic failures with minimum down time and data loss.
Chapter 19Backup and Restore Best Practices
19-15
• Ensure that the recovery passphrase at the time of backup is accessible becauseyou will need it to restore data from a backup.
• Back up data any time you change the recovery passphrase.
• Ensure that you create at least one remote backup destination in a primary-standby deployment. Because the local backup resides on the Oracle Key Vaultserver itself, it will be lost in a failover or switchover situation.
• Do not edit or delete the backup catalog file that is associated with a remotebackup destination, even if you stop using the backup destination. If you ever needto restore from a backup on this server, you will need the backup catalog file.
• If you use the same remote server for multiple backup destinations, then ensurethat the directories are unique so that you have distinct backup catalog filesassociated with each backup destination. If you fail to do this, then the backupcatalog file will be overwritten during subsequent backups and become unusable.
• When you restore a backup, do so to a standalone Oracle Key Vault server thathas the same IP address as the Oracle Key Vault server on which the backup wastaken. Failing to do so may result in endpoints not being able to connect to therestored backup.
• Before you restore data, ensure that all scheduled backups are complete.
• To create remote backup destinations successfully:
– Ensure that the servers used as remote backup destinations are enabled andactive.
– Ensure that there is connectivity between Oracle Key Vault and remote serverthat you plan to use as a backup destination.
– Ensure that the remote server designated as a backup destination supportsthe secure copy protocol (SCP) or the SSH file transfer protocol (SFTP).
– Validate the user account credentials on the remote server before you createthe backup destination on Oracle Key Vault.
– Ensure that the destination directory has write permissions.
– Create more than one remote backup destination on multiple servers forredundancy.
– Ensure that the destination directories are unique if you are using the sameremote server for multiple backup destinations. You must do this to preventlater backups from overwriting previous ones.
• Perform a one-time backup once every seven days.
• Schedule a periodic backup with a period of one day. This ensures that you have afull backup once in seven days.
• Perform a local one-time backup before system changes. You can use this backupas a restore point.
• Backup before and after upgrading Oracle Key Vault server software.
• Change the backup destination after each upgrade. If at all possible do not reusethe backup destination.
Chapter 19Backup and Restore Best Practices
19-16
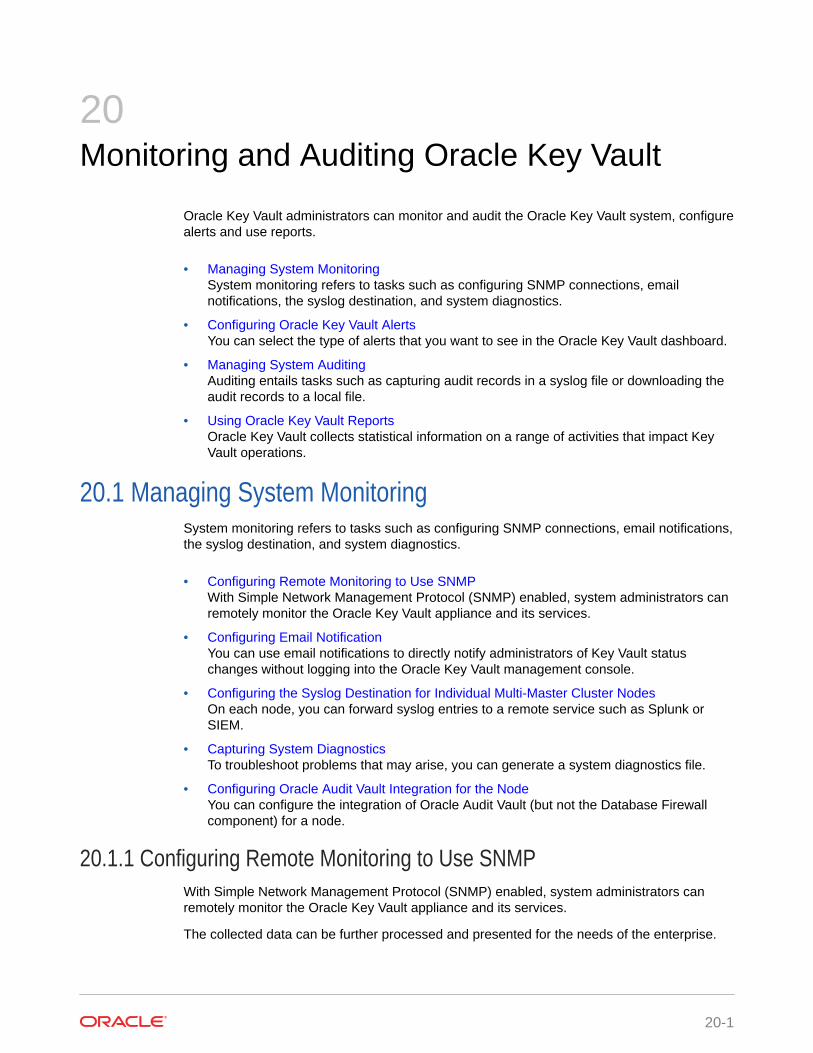
20Monitoring and Auditing Oracle Key Vault
Oracle Key Vault administrators can monitor and audit the Oracle Key Vault system, configurealerts and use reports.
• Managing System MonitoringSystem monitoring refers to tasks such as configuring SNMP connections, emailnotifications, the syslog destination, and system diagnostics.
• Configuring Oracle Key Vault AlertsYou can select the type of alerts that you want to see in the Oracle Key Vault dashboard.
• Managing System AuditingAuditing entails tasks such as capturing audit records in a syslog file or downloading theaudit records to a local file.
• Using Oracle Key Vault ReportsOracle Key Vault collects statistical information on a range of activities that impact KeyVault operations.
20.1 Managing System MonitoringSystem monitoring refers to tasks such as configuring SNMP connections, email notifications,the syslog destination, and system diagnostics.
• Configuring Remote Monitoring to Use SNMPWith Simple Network Management Protocol (SNMP) enabled, system administrators canremotely monitor the Oracle Key Vault appliance and its services.
• Configuring Email NotificationYou can use email notifications to directly notify administrators of Key Vault statuschanges without logging into the Oracle Key Vault management console.
• Configuring the Syslog Destination for Individual Multi-Master Cluster NodesOn each node, you can forward syslog entries to a remote service such as Splunk orSIEM.
• Capturing System DiagnosticsTo troubleshoot problems that may arise, you can generate a system diagnostics file.
• Configuring Oracle Audit Vault Integration for the NodeYou can configure the integration of Oracle Audit Vault (but not the Database Firewallcomponent) for a node.
20.1.1 Configuring Remote Monitoring to Use SNMPWith Simple Network Management Protocol (SNMP) enabled, system administrators canremotely monitor the Oracle Key Vault appliance and its services.
The collected data can be further processed and presented for the needs of the enterprise.
20-1
• About Using SNMP for Oracle Key VaultYou can use the Simple Network Management Protocol (SNMP) to monitordevices on a network for resource usage.
• Granting SNMP Access to UsersYou can grant any user, including users who are not Oracle Key Vaultadministrators, access to SNMP data.
• Changing the SNMP User Name and PasswordYou can change the SNMP user name and password for a node at any time.
• Changing SNMP Settings on the Standby ServerYou change the SNMP settings from the command line on the standby server.
• Remotely Monitoring Oracle Key Vault Using SNMPSNMP enables you to monitor the vital components of Oracle Key Vault remotelywithout having to install new software in Oracle Key Vault.
• SNMP Management Information Base Variables for Oracle Key VaultOracle Key Vault provides a set of SNMP Management Information Base (MIB)variables that you can track.
• Example: Simplified Remote Monitoring of Oracle Key Vault Using SNMPIn Linux, you can simplify the SNMP commands you manually enter to find OracleKey Vault information, yet still have useful and detailed output.
20.1.1.1 About Using SNMP for Oracle Key VaultYou can use the Simple Network Management Protocol (SNMP) to monitor devices ona network for resource usage.
Monitoring Oracle Key Vault is an important aspect how critical Oracle Key Vault'savailability is when hundreds or thousands of Oracle and MySQL databases store theirTDE master encryption keys in an Oracle Key Vault multi-master cluster. The types ofresource usage that you should monitor include memory, CPU utilization, andprocesses. Even though Oracle Key Vault provides continuous key availability byallowing up to 16 (geographically distributed) instances to be connected to a singlecluster, the health of each individual node contributes to the performance andavailability of the entire cluster.
You can use Simple Network Management Protocol (SNMP) third-party tool to monitorremote systems that access Oracle Key Vault. The benefits of using SNMP to monitorOracle Key Vault are as follows:
• There is no need to allow SSH access to Oracle Key Vault. (SSH access shouldonly be enabled for the window of time in which it is being used.)
• You do not need to install additional tools to perform an SNMP monitoringoperation.
Oracle Key Vault uses SNMP version 3 for user authentication and data encryptionfeatures. Unlike SNMP versions 1 and 2 that communicate in readable, insecureplaintext, SNMP 3 authenticates users and encrypts data on the communicationchannel between the monitoring server and the target. The information from OracleKey Vault is unreadable to an intruder, even if the communication channel isintercepted.
In addition, with SNMP enabled on Oracle Key Vault, you can determine whether thekey management server (KMIP daemon) is running. To track this information, you must
Chapter 20Managing System Monitoring
20-2
use a third-party SNMP client to poll the Oracle Key Vault instance, because Oracle Key Vaultdoes not provide SNMP client software.
Oracle Key Vault audits the creation and modification of SNMP credentials.
You must be a user with the System Administrator role to configure the SNMP account with auser name and password. These SNMP credentials are needed to access SNMP data.
In a multi-master cluster, the SNMP account with a user name and password can be set forall nodes of the cluster at once. It can also be set for each individual node.
Note:
You must ensure that the SNMP username and password is not the sameusername and password as any of the Oracle Key Vault administrative useraccounts with the System Administrator, Key Administrator, or Audit Manager role.
20.1.1.2 Granting SNMP Access to UsersYou can grant any user, including users who are not Oracle Key Vault administrators, accessto SNMP data.
1. Log in to the Oracle Key Vault management console as a user with the SystemAdministrator role.
2. Select the System tab, and then select Settings from the left navigation bar.
3. In the Monitoring and Alerts area, click SNMP.
The Monitoring page appears.
4. In the Monitoring Settings page, enter the following information:
Chapter 20Managing System Monitoring
20-3
• SNMP Access allowed from: Select All to enable a client at any IP addressto poll Oracle Key Vault for information, Disabled to prevent any client,regardless of the client IP address, to poll Oracle Key Vault for information, orIP Address(es) if you want to restrict polling to clients with specific IPaddresses. If you select IP Address(es), then enter the IP addresses of theusers you want to grant access to in the IP Address field. Separate multiple IPaddresses by a space. You cannot enter a range of IP addresses. You mustlist each IP address individually.
• User Name: Enter a name to associate with the SNMP configuration that willperform the monitoring.
• Password and Re-enter Password: Enter a secure password for this userthat is at least 8 or more characters and contains at least one of each of thefollowing: an uppercase letter, a lowercase letter, a number, and a specialcharacter from the set: period (.), comma (,), underscore (_), plus sign (+),colon (:), space. The SNMP password must not be the same as the passwordused to login into the Oracle Key Vault management console in any of theadministrative roles.
5. Click Save.
20.1.1.3 Changing the SNMP User Name and PasswordYou can change the SNMP user name and password for a node at any time.
1. Log in to the Oracle Key Vault management console as a user who has theSystem Administrator role.
2. Select the System tab, and then select Settings from the left navigation bar.
3. In the Monitoring and Alerts area, click SNMP.
4. In the User Name, Password, and Re-enter Password fields, enter the username and password information.
5. Click Save.
20.1.1.4 Changing SNMP Settings on the Standby ServerYou change the SNMP settings from the command line on the standby server.
To add SNMP support in a primary-standby environment, you should configure SNMPon both the primary and standby servers before pairing them. This is because thestandby server is no longer accessible from the Oracle Key Vault managementconsole because all requests are forwarded to the primary server. However, you canchange SNMP settings on the standby server in a primary-standby environment.
1. Log in to the standby server as the support user.
2. Switch to the root user.
su -
3. Go to the Oracle Key Vault bin directory.
cd /usr/local/okv/bin/
4. Run the stdby_snmp_enable script.
./stdby_snmp_enable parameter "options"
Chapter 20Managing System Monitoring
20-4
In this specification:
• parameter can be the following:
– -a, which sets the SNMP access. It accepts the following options:
* all grants SNMP access.
* disabled disables SNMP access.
* IP_addresses specifies one or more IP addresses to be granted SNMPaccess. Separate each IP address with a space.
– -u sets the user's SNMP name.
– -p sets the user's SNMP password.
• options is only used with the -a parameter.
The following examples show how to change SNMP settings on a standby server:
To grant SNMP access to all IP addresses and assign a user name snmpuser and passwordpassword:
./stdby_snmp_enable -a "all" -u "snmpuser" -p "password"
To disable SNMP access from all IP addresses:
./stdby_snmp_enable -a "disabled"
To grant SNMP access to certain IP addresses and assign user name snmpuser andpassword password:
./stdby_snmp_enable -a "192.0.2.1 192.0.2.3 192.0.2.3" -u "snmpuser" -p "password"
20.1.1.5 Remotely Monitoring Oracle Key Vault Using SNMPSNMP enables you to monitor the vital components of Oracle Key Vault remotely withouthaving to install new software in Oracle Key Vault.
Though there are third-party tools that graphically display the information that SNMP extractsfrom Oracle Key Vault, the examples shown here are given with snmpwalk and snmpget fromthe command line on a remote computer that has a network connection into the SNMPaccount in Oracle Key Vault.
1. Log in to the remote host that will monitor Oracle Key Vault.
2. Confirm that the UCD-SNMP-MIB is installed on the remote host from which Oracle KeyVault is monitored.
3. Query the object ID for an Oracle Key Vault-supported SNMP Management InformationBase (MIB) variable.
For example, suppose you wanted to track the number of processes running for theSNMP host. You can use a third-party SNMP client utility to query the status of the KMIPMIB whose object ID is 1.3.6.1.4.1.2021.2, as follows:
third_party_snmp_client_command -v 3 OKV_IP_address -u SNMP_user -a SHA -A SNMP_password -x AES -X SNMP_password -l authPriv iso.3.6.1.4.1.2021.2.1.2
Chapter 20Managing System Monitoring
20-5
The output is similar to the following:
iso.3.6.1.4.1.2021.2.1.2.1 = STRING: "mwecsvc" <== Event collectoriso.3.6.1.4.1.2021.2.1.2.2 = STRING: "httpd" <== httpdiso.3.6.1.4.1.2021.2.1.2.3 = STRING: "kmipd" <== KMIP daemoniso.3.6.1.4.1.2021.2.1.2.4 = STRING: "ora_pmon_dbfwdb" <== embedded DBiso.3.6.1.4.1.2021.2.1.2.5 = STRING: "ServiceManager" <== Golden Gate Service Manager (Monitors other processes and reports status)iso.3.6.1.4.1.2021.2.1.2.6 = STRING: "adminsrvr" <== Golden Gate Admin Server (Communicates with the DB to perform certain maintenance/admin tasks)iso.3.6.1.4.1.2021.2.1.2.7 = STRING: "distsrvr" <== Golden Gate Distribution Server (Sends the OGG changes to other nodes)iso.3.6.1.4.1.2021.2.1.2.8 = STRING: "recvsrvr" <== Golden Gate Receiver Server
Related Topics
• SNMP Management Information Base Variables for Oracle Key VaultOracle Key Vault provides a set of SNMP Management Information Base (MIB)variables that you can track.
20.1.1.6 SNMP Management Information Base Variables for Oracle Key VaultOracle Key Vault provides a set of SNMP Management Information Base (MIB)variables that you can track.
The following table lists the MIB variables that are supported.
Table 20-1 MIBs That SNMP Tracks for Oracle Key Vault
MIB Variable Object ID Description
hrSystemUptime 1.3.6.1.2.1.25.1.1 Tracks the amount of time that anOracle Key Vault instance hasbeen running
ifAdminStatus.x 1.3.6.1.2.1.2.2.1.7 Tracks if the Oracle Key Vaultnetwork interface (x) are running,not running, or being tested.Values are as follows:
• 1: Instance is running• 2: Instance is down• 3: Instance is being tested
memAvailReal 1.3.6.1.4.1.2021.4.6 Tracks the available RAM
memTotalReal 1.3.6.1.4.1.2021.4.5 Tracks the total amount of RAMbeing used
ssCpuRawIdle 1.3.6.1.4.1.2021.11.53 For CPU monitoring; tracks thenumber of ticks (typically 1/100s)spent idle
ssCpuRawInterrupt 1.3.6.1.4.1.2021.11.56 For CPU monitoring; tracks thenumber of ticks (typically 1/100s)spent processing hardwareinterrupts
Chapter 20Managing System Monitoring
20-6
Table 20-1 (Cont.) MIBs That SNMP Tracks for Oracle Key Vault
MIB Variable Object ID Description
ssCpuRawKernel 1.3.6.1.4.1.2021.11.55 For CPU monitoring; tracks thenumber of ticks (typically 1/100s)spent processing kernel-levelcode
ssCpuRawNice 1.3.6.1.4.1.2021.11.51 For CPU monitoring; tracks thenumber of ticks (typically 1/100s)spent processing reduced-prioritycode
ssCpuRawSystem 1.3.6.1.4.1.2021.11.52 For CPU monitoring; tracks thenumber of ticks (typically 1/100s)spent processing system-levelcode
ssCpuRawUser 1.3.6.1.4.1.2021.11.50 For CPU monitoring; tracks thenumber of ticks (typically 1/100s)spent processing user-level code
ssCpuRawWait 1.3.6.1.4.1.2021.11.54 For CPU monitoring; tracks thenumber of ticks (typically 1/100s)spent waiting for input-output (IO)
UCD-SNMP-MIB.prTable 1.3.6.1.4.1.2021.2 Tracks the number of processesrunning under a certain name.Names we monitor are httpd(the http server), kmipd (the kmipdaemon), andora_pmon_dbfwdb (anindicator if the DB isdown)
nsExtendOutputFull 1.3.6.1.4.1.8072.1.3.2.3.1.2 For monitoring Fast RecoveryArea Space utilization; tracks thetotal limit, space used, and spacefree
See Also:
For more information refer to the Net-SNMP documentation at http://www.net-snmp.org
20.1.1.7 Example: Simplified Remote Monitoring of Oracle Key Vault Using SNMPIn Linux, you can simplify the SNMP commands you manually enter to find Oracle Key Vaultinformation, yet still have useful and detailed output.
The configuration in this section assumes that you have granted SNMP access to a trusteduser. It also assumes that the you have installed the SNMP Management Information Base(MIB) variables on the remote host that will monitor Oracle Key Vault.
Chapter 20Managing System Monitoring
20-7
For example, a lengthy version of the snmpwalk command for an SNMP user namedsnmp_admin is as follows:
snmpwalk -v3 OKV_IP_address -n "" -l authPriv -u snmp_admin -a SHA -A snmp_user_password -x AES -X snmp_user_password
This command lists the vital services that are running on Oracle Key Vault. However,you can modify the command (and other SNMP commands) to be not only shorter, butto show additional information, such as whether the services are running or notrunning.
To simplify this type of command, you can edit the /etc/snmp/snmp.conf configurationfile so that the SNMP commands you enter will automatically include commonly usedsettings, such as the default user or the default security level. The example in thistopic omits password parameters so that users can enter the password at thecommand line interactively.
1. Log in to the remote host that will monitor Oracle Key Vault.
2. Edit the /etc/snmp/snmp.conf, which appears as follows:
# As the snmp packages come without MIB files due to license reasons, # loading MIBs is disabled by default. If you added the MIBs you # can reenable loading them by commenting out the following line. mibs :
3. Comment out the # mibs : line and then add the following lines, as follows:
# loading MIBs is disabled by default. If you added the MIBs you # can reenable loading them by commenting out the following line. # mibs : defSecurityName snmp_admin defSecurityLevel authPriv defAuthType SHA defPrivType AES
In this example:
• defSecurityName: Enter the name of the user to whom you granted SNMPaccess. This example uses snmp_admin.
• defSecurityLevel: Enter the default security level to use. This example usesauthPriv, which enables communication with authentication and privacy.
• defAuthType: Enter the default authorization type. This example uses SHA.
• defPrivType: Enter the default privilege type. This example uses AES.
4. Restart snmpd to load the configuration file.For example, for Linux 7:
systemctl restart snmpd
For Linux 6:
service snmpd restart
5. To run the simplified version of the snmpwalk command that was shown earlier,enter the following command:
snmpwalk okv_ip_address prNames -A snmp_user_pwd -X snmp_user_pwd
In this command, prNames refers to "process names", which displays the names ofprocesses instead of numbers. For example:
Chapter 20Managing System Monitoring
20-8
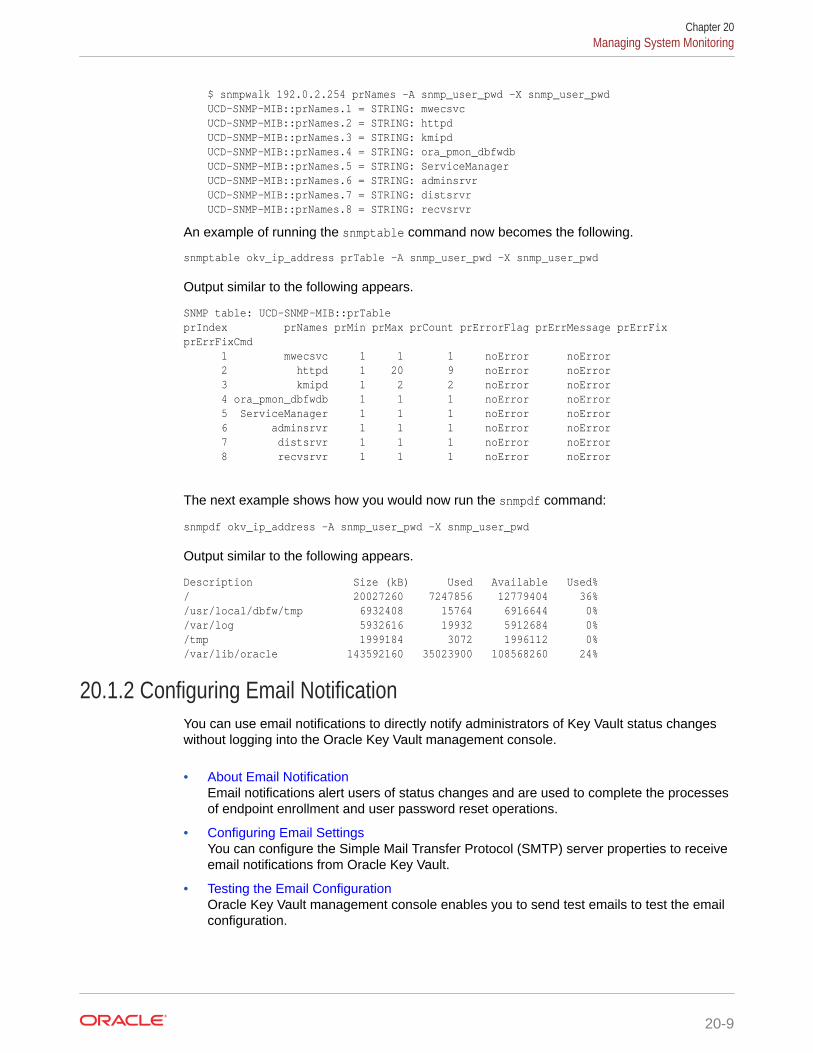
$ snmpwalk 192.0.2.254 prNames -A snmp_user_pwd -X snmp_user_pwdUCD-SNMP-MIB::prNames.1 = STRING: mwecsvcUCD-SNMP-MIB::prNames.2 = STRING: httpdUCD-SNMP-MIB::prNames.3 = STRING: kmipdUCD-SNMP-MIB::prNames.4 = STRING: ora_pmon_dbfwdbUCD-SNMP-MIB::prNames.5 = STRING: ServiceManagerUCD-SNMP-MIB::prNames.6 = STRING: adminsrvrUCD-SNMP-MIB::prNames.7 = STRING: distsrvrUCD-SNMP-MIB::prNames.8 = STRING: recvsrvr
An example of running the snmptable command now becomes the following.
snmptable okv_ip_address prTable -A snmp_user_pwd -X snmp_user_pwd
Output similar to the following appears.
SNMP table: UCD-SNMP-MIB::prTable prIndex prNames prMin prMax prCount prErrorFlag prErrMessage prErrFix prErrFixCmd 1 mwecsvc 1 1 1 noError noError 2 httpd 1 20 9 noError noError 3 kmipd 1 2 2 noError noError 4 ora_pmon_dbfwdb 1 1 1 noError noError 5 ServiceManager 1 1 1 noError noError 6 adminsrvr 1 1 1 noError noError 7 distsrvr 1 1 1 noError noError 8 recvsrvr 1 1 1 noError noError
The next example shows how you would now run the snmpdf command:
snmpdf okv_ip_address -A snmp_user_pwd -X snmp_user_pwd
Output similar to the following appears.
Description Size (kB) Used Available Used% / 20027260 7247856 12779404 36% /usr/local/dbfw/tmp 6932408 15764 6916644 0% /var/log 5932616 19932 5912684 0% /tmp 1999184 3072 1996112 0% /var/lib/oracle 143592160 35023900 108568260 24%
20.1.2 Configuring Email NotificationYou can use email notifications to directly notify administrators of Key Vault status changeswithout logging into the Oracle Key Vault management console.
• About Email NotificationEmail notifications alert users of status changes and are used to complete the processesof endpoint enrollment and user password reset operations.
• Configuring Email SettingsYou can configure the Simple Mail Transfer Protocol (SMTP) server properties to receiveemail notifications from Oracle Key Vault.
• Testing the Email ConfigurationOracle Key Vault management console enables you to send test emails to test the emailconfiguration.
Chapter 20Managing System Monitoring
20-9
• Disabling Email Notifications for a UserYou can use the Oracle Key Vault management console to enable or disable emailnotifications.
20.1.2.1 About Email NotificationEmail notifications alert users of status changes and are used to complete theprocesses of endpoint enrollment and user password reset operations.
To enable email notification you must set your email preferences in Oracle Key Vault.You can choose the events that you want updates to. The events include Oracle KeyVault system status like disk utilization, backup, and primary-standby, or user andendpoint status like expiration of user passwords, endpoint certificates, and keys, orcluster status like the heartbeat lag, naming conflicts, cluster-wide HSM status, andothers.
Oracle Key Vault supports anonymous and insecure connections to the SMTP server.By default, Oracle Key Vault uses the default Java truststore packaged with OracleKey Vault's Java library to validate the server certificate. Optionally, you can upload acustom truststore in order to use a specific certificate or certificate chain at the sametime you configure SMTP settings.
You can modify the SMTP server configuration at any time. If a custom SMTPcertificate was used initially, and you later decide to use the default, you can modifythe trust store setting to default, instead of custom.
For example:
• The enrollment token generated during endpoint enrollment can be mailed directlyto the endpoint administrator from Oracle Key Vault.
• An Oracle Key Vault system administrator can send the random temporarypassword directly to the user when the user password is reset.
To enable email notifications successfully, there must be a connection between OracleKey Vault and the SMTP server.
You can disable email notifications at any time.
20.1.2.2 Configuring Email SettingsYou can configure the Simple Mail Transfer Protocol (SMTP) server properties toreceive email notifications from Oracle Key Vault.
1. Log in to the Oracle Key Vault management console as a user with the SystemAdministrator role.
2. Select the System tab, and then select Settings from the left navigation bar.
3. In the Network Services area, click Email.
The Email Settings page appears.
Chapter 20Managing System Monitoring
20-10
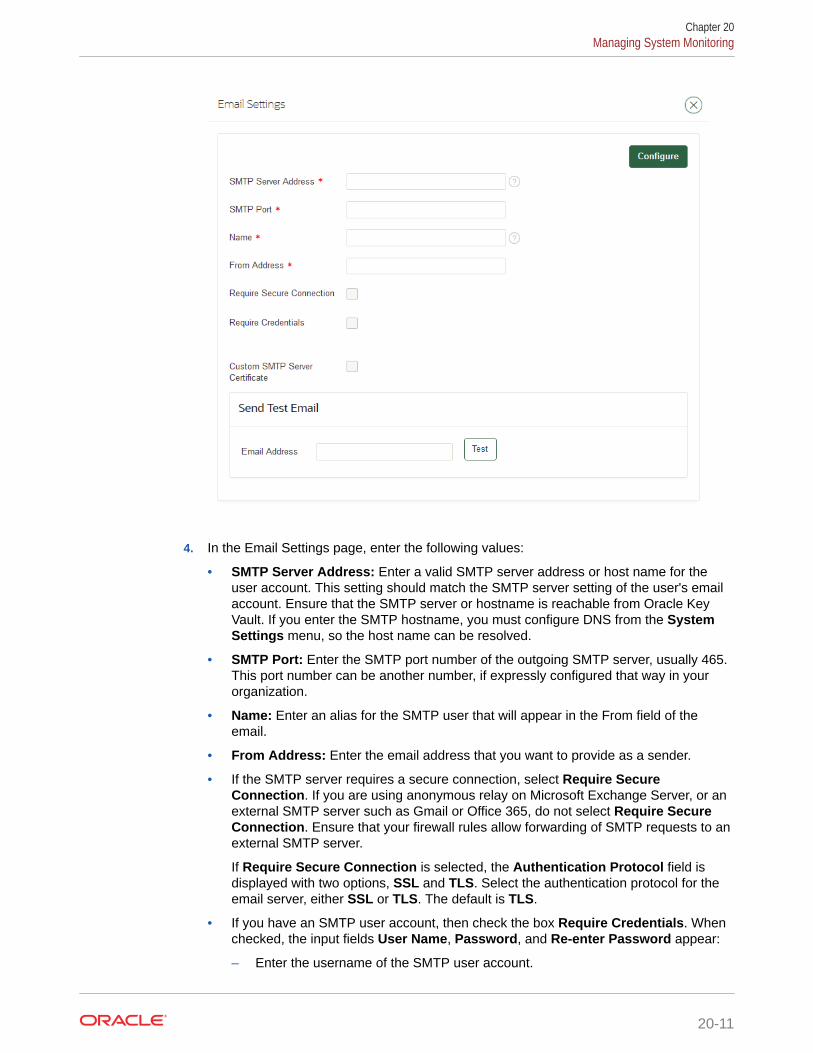
4. In the Email Settings page, enter the following values:
• SMTP Server Address: Enter a valid SMTP server address or host name for theuser account. This setting should match the SMTP server setting of the user's emailaccount. Ensure that the SMTP server or hostname is reachable from Oracle KeyVault. If you enter the SMTP hostname, you must configure DNS from the SystemSettings menu, so the host name can be resolved.
• SMTP Port: Enter the SMTP port number of the outgoing SMTP server, usually 465.This port number can be another number, if expressly configured that way in yourorganization.
• Name: Enter an alias for the SMTP user that will appear in the From field of theemail.
• From Address: Enter the email address that you want to provide as a sender.
• If the SMTP server requires a secure connection, select Require SecureConnection. If you are using anonymous relay on Microsoft Exchange Server, or anexternal SMTP server such as Gmail or Office 365, do not select Require SecureConnection. Ensure that your firewall rules allow forwarding of SMTP requests to anexternal SMTP server.
If Require Secure Connection is selected, the Authentication Protocol field isdisplayed with two options, SSL and TLS. Select the authentication protocol for theemail server, either SSL or TLS. The default is TLS.
• If you have an SMTP user account, then check the box Require Credentials. Whenchecked, the input fields User Name, Password, and Re-enter Password appear:
– Enter the username of the SMTP user account.
Chapter 20Managing System Monitoring
20-11

– Enter the password for the SMTP user account.
– Reenter the password for the SMTP user account.
Caution:
Oracle strongly recommends that you have a secure connection tothe SMTP server, because auto-generated tokens are sent overemail for operations such as the creation of administrative users andOracle Key Vault system alerts.
Do not check Require Credentials for non-secure connections.
• If Custom SMTP Server Certificate is checked, then the field UploadCertificate File appears with the Choose File button to its right. Select thisoption if you want to upload a custom SMTP server's certificate to establish aTLS session between SMTP and Oracle Key Vault. This is how you can add acustom truststore in cases where the default Java truststore does not containa necessary certificate. After Upload Certificate File, click Browse to upload acustom certificate file.
5. Click Configure.
On successful configuration, a SMTP successfully configured message isdisplayed.
If the configuration fails, then check that the SMTP server settings of the useremail account are correct. Error messages highlight the field where the error hasoccurred to help isolate the problem.
20.1.2.3 Testing the Email ConfigurationOracle Key Vault management console enables you to send test emails to test theemail configuration.
You can test the email configuration of the SMTP user account any time after you savethe configuration. If you change an existing SMTP configuration, then you must savethe configuration before you can test it.
1. Log in to the Oracle Key Vault management console as a user who has theSystem Administrator role.
2. Select the System tab, and then select Settings from the left navigation bar.
3. In the Network Services area, click Email.
4. In the Email Settings window, configure the user's SMTP settings.
5. Save the configuration by clicking Configure.
You must save the configuration before you can test it.
6. In the Send Test Email section, enter the user email address in the EmailAddress field. Then click Test.
An email is sent to the user with Oracle Key Vault: Test Message in the subjectline.
Depending on the Oracle Key Vault server timestamp, the email notification maynot show up as the latest email.
Chapter 20Managing System Monitoring
20-12
The email notification may also not show up in your inbox, in which case you must checkthe spam folder.
If the email notification is not received, click the Reports tab and select System Reportsfrom the left sidebar. On the System Reports page, click Notification Report. Check thelist to determine the issue encountered while sending the email notification.
Related Topics
• Configuring Email SettingsYou can configure the Simple Mail Transfer Protocol (SMTP) server properties to receiveemail notifications from Oracle Key Vault.
20.1.2.4 Disabling Email Notifications for a UserYou can use the Oracle Key Vault management console to enable or disable emailnotifications.
An Oracle Key Vault user may elect not to receive email alerts. Only a user with the SystemAdministrator role, or a user managing his own account can disable email notifications.
1. Log in to the Oracle Key Vault management console as a user with the SystemAdministrator role.
2. Select the Users tab.
The Manage Users page appears.
3. Click user name of the user.
The User Details page appears.
4. Check the box to the left of text Do not receive email alerts.
5. Click Save.
20.1.3 Configuring the Syslog Destination for Individual Multi-MasterCluster Nodes
On each node, you can forward syslog entries to a remote service such as Splunk or SIEM.
• Setting the Syslog Destination Setting for the NodeYou can set the syslog destination to use either Transmission Control Protocol (TCP) orUser Datagram Protocol (UDP).
• Clearing the Syslog Destination Setting for the NodeYou can clear the syslog destination setting for the node and then reset the node to thecluster setting.
20.1.3.1 Setting the Syslog Destination Setting for the NodeYou can set the syslog destination to use either Transmission Control Protocol (TCP) or UserDatagram Protocol (UDP).
1. Log into the Oracle Key Vault management console for the node as a user who has theSystem Administrator role.
2. Select the System tab, and then Settings from the left navigation bar.
3. In the Monitoring and Alerts area, click Syslog.
Chapter 20Managing System Monitoring
20-13
4. In the Syslog window, select one of the following options:
• TCP: Enables syslog using the TCP protocol.
• UDP: Enables syslog using the UDP protocol.
5. Enter the syslog destination IP addresses and port numbers in the SyslogDestinations field, in the format IP_address:port.
You can enter multiple destinations, each separated by a space.
6. Click Save.
20.1.3.2 Clearing the Syslog Destination Setting for the NodeYou can clear the syslog destination setting for the node and then reset the node to thecluster setting.
1. Log into the Oracle Key Vault management console for the node as a user whohas the System Administrator role.
2. Select the System tab, and then Settings from the left navigation bar.
3. In the Monitoring and Alerts area, click Syslog.
4. In the Syslog window, click Delete.
20.1.4 Capturing System DiagnosticsTo troubleshoot problems that may arise, you can generate a system diagnostics file.
• About Capturing System DiagnosticsThe Oracle Key Vault diagnostics file provides advanced debug andtroubleshooting information for problems that you may encounter while usingOracle Key Vault.
• Installing the Diagnostics Generation UtilityYou can use the Oracle Key Vault management console to download instructionsfor installing and using the diagnostics generation utility.
• Generating a System Diagnostics FileThe system diagnostics file that you download is in a .zip file.
• Removing the Diagnostic Generation Utility Temporary FilesRemoving the diagnostic generation utility temporary files frees up space on yourserver.
• Removing the Diagnostic Generation UtilityIf you no longer need to generate system diagnostic reports, then you can removethe diagnostic generation utility.
20.1.4.1 About Capturing System DiagnosticsThe Oracle Key Vault diagnostics file provides advanced debug and troubleshootinginformation for problems that you may encounter while using Oracle Key Vault.
You can download this file and provide it to Oracle support for further analysis anddebugging. The diagnostics file includes information about free space and disk usagereported is space available to Oracle Key Vault and not based on total disk size.
Chapter 20Managing System Monitoring
20-14
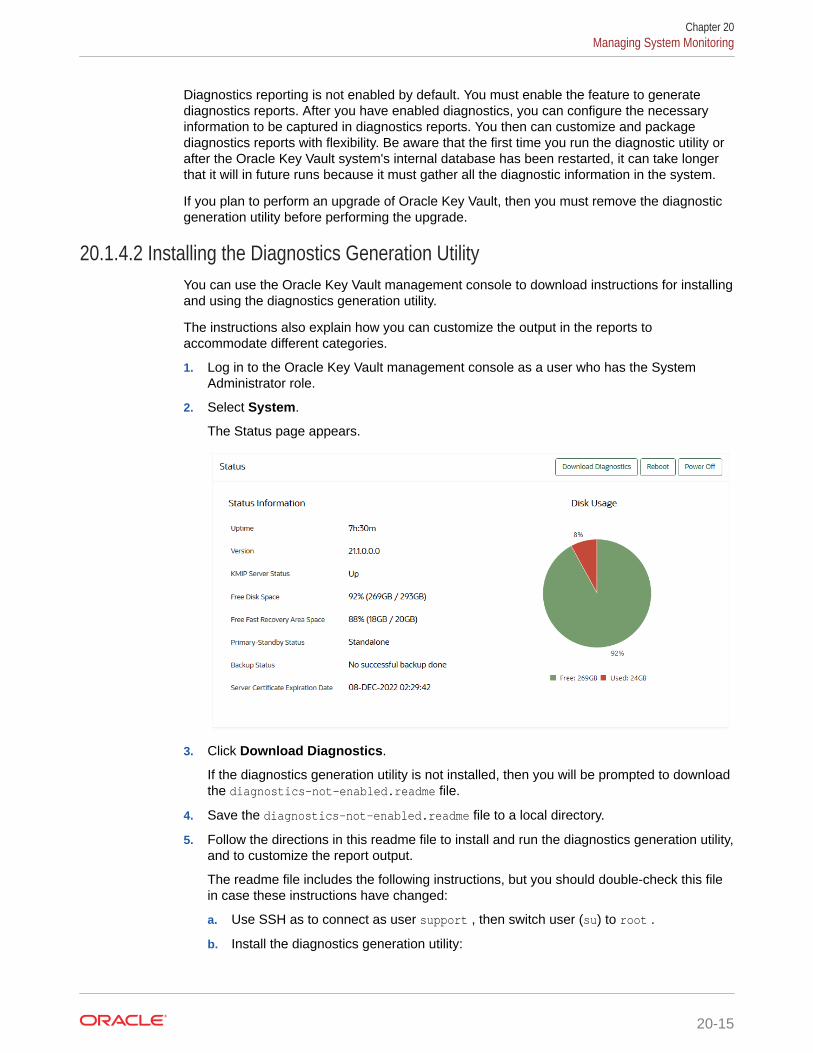
Diagnostics reporting is not enabled by default. You must enable the feature to generatediagnostics reports. After you have enabled diagnostics, you can configure the necessaryinformation to be captured in diagnostics reports. You then can customize and packagediagnostics reports with flexibility. Be aware that the first time you run the diagnostic utility orafter the Oracle Key Vault system's internal database has been restarted, it can take longerthat it will in future runs because it must gather all the diagnostic information in the system.
If you plan to perform an upgrade of Oracle Key Vault, then you must remove the diagnosticgeneration utility before performing the upgrade.
20.1.4.2 Installing the Diagnostics Generation UtilityYou can use the Oracle Key Vault management console to download instructions for installingand using the diagnostics generation utility.
The instructions also explain how you can customize the output in the reports toaccommodate different categories.
1. Log in to the Oracle Key Vault management console as a user who has the SystemAdministrator role.
2. Select System.
The Status page appears.
3. Click Download Diagnostics.
If the diagnostics generation utility is not installed, then you will be prompted to downloadthe diagnostics-not-enabled.readme file.
4. Save the diagnostics-not-enabled.readme file to a local directory.
5. Follow the directions in this readme file to install and run the diagnostics generation utility,and to customize the report output.
The readme file includes the following instructions, but you should double-check this filein case these instructions have changed:
a. Use SSH as to connect as user support , then switch user (su) to root .
b. Install the diagnostics generation utility:
Chapter 20Managing System Monitoring
20-15
/usr/local/dbfw/bin/priv/dbfw-diagnostics-package.rb --install
c. Enable the collection of diagnostics:
/usr/local/dbfw/bin/priv/dbfw-diagnostics-package.rb --enable ALL
20.1.4.3 Generating a System Diagnostics FileThe system diagnostics file that you download is in a .zip file.
1. Log in to the Oracle Key Vault management console as a user who has theSystem Administrator role.
2. Select the System tab and then Status from the left navigation bar.
3. Click Download Diagnostics.
You should be prompted to download a .zip file, which will contain the diagnosticsreports. If you are prompted to download the diagnostics-not-enabled.readmefile, then the diagnostics generation utility has not been installed and you will needto install it.
4. Download the .zip file that contains the diagnostic reports to a secure location.
Related Topics
• Installing the Diagnostics Generation UtilityYou can use the Oracle Key Vault management console to download instructionsfor installing and using the diagnostics generation utility.
20.1.4.4 Removing the Diagnostic Generation Utility Temporary FilesRemoving the diagnostic generation utility temporary files frees up space on yourserver.
After you have run diagnostic reports, temporary files will accumulate. You shouldperiodically remove these files. You can execute the command to remove these filesfrom any directory.
1. Log in to the server where you downloaded and installed the diagnostic generationutility.
2. Use SSH as to connect as user support , then switch user (su) to root .
3. Execute the following command:
/usr/local/dbfw/bin/priv/dbfw-diagnostics-package.rb --clean
This command removes any .zip files that are found in the /usr/local/dbfw/tmpdirectory.
20.1.4.5 Removing the Diagnostic Generation UtilityIf you no longer need to generate system diagnostic reports, then you can remove thediagnostic generation utility.
If you plan to upgrade Oracle Key Vault, then you must remove the diagnosticgeneration utility before you perform the upgrade. Removing this utility does notremove its temporary files.
1. Log in to the server where you downloaded and installed the diagnostic generationutility.
Chapter 20Managing System Monitoring
20-16
2. Use SSH as to connect as user support , then switch user (su) to root .
3. Execute the following command:
/usr/local/dbfw/bin/priv/dbfw-diagnostics-package.rb --remove
20.1.5 Configuring Oracle Audit Vault Integration for the NodeYou can configure the integration of Oracle Audit Vault (but not the Database Firewallcomponent) for a node.
1. Log into the Oracle Key Vault management console for the node as a user who has theSystem Administrator role.
2. Select the System tab, and then Settings from the left navigation bar.
3. In the Monitoring and Alerts area, click Audit Vault.
4. In the Audit Vault Integration window, select the Enable check box to enable Oracle AuditVault Integration for the node.
5. In the Password and Reenter password fields that appear after you click Enable, enterthe password of the user in the database that Audit Vault and Database Firewall will useto extract the audit records.
6. Click Save.
20.2 Configuring Oracle Key Vault AlertsYou can select the type of alerts that you want to see in the Oracle Key Vault dashboard.
• About Configuring AlertsSystem administrators can configure alerts from the Oracle Key Vault dashboard, but allusers can see alerts for their security objects.
• Configuring AlertsYou can configure alerts in the Reports page of the Oracle Key Vault managementconsole.
• Viewing Open AlertsUsers can view alerts depending on their privileges.
20.2.1 About Configuring AlertsSystem administrators can configure alerts from the Oracle Key Vault dashboard, but allusers can see alerts for their security objects.
The Oracle Key Vault dashboard is the first page you see on logging into to the managementconsole. You can navigate to this page by clicking the Home tab. All users can see the alertson security objects they have access to, but only users with the System Administrator rolecan configure alerts.
Oracle Key Vault has 17 alerts, including alerts for an HSM-enabled Oracle Key Vault server,that you can configure with appropriate thresholds according to your requirements.
You can configure the following alerts:
Chapter 20Configuring Oracle Key Vault Alerts
20-17
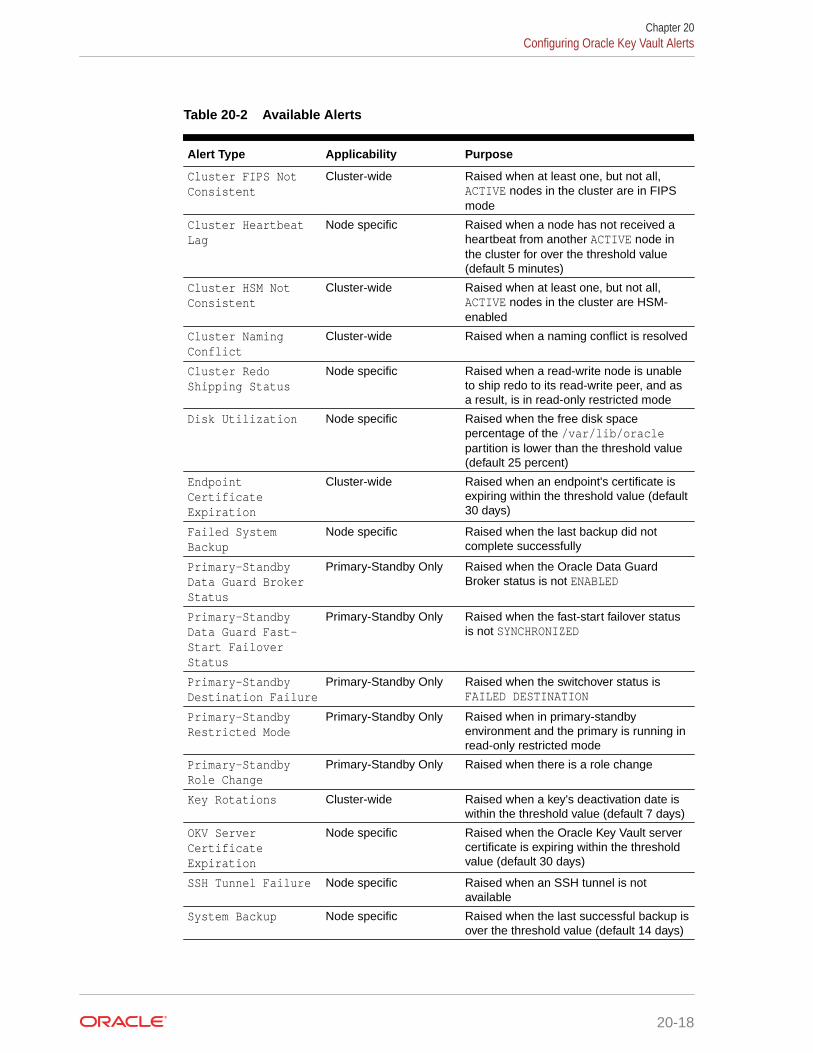
Table 20-2 Available Alerts
Alert Type Applicability Purpose
Cluster FIPS NotConsistent
Cluster-wide Raised when at least one, but not all,ACTIVE nodes in the cluster are in FIPSmode
Cluster HeartbeatLag
Node specific Raised when a node has not received aheartbeat from another ACTIVE node inthe cluster for over the threshold value(default 5 minutes)
Cluster HSM NotConsistent
Cluster-wide Raised when at least one, but not all,ACTIVE nodes in the cluster are HSM-enabled
Cluster NamingConflict
Cluster-wide Raised when a naming conflict is resolved
Cluster RedoShipping Status
Node specific Raised when a read-write node is unableto ship redo to its read-write peer, and asa result, is in read-only restricted mode
Disk Utilization Node specific Raised when the free disk spacepercentage of the /var/lib/oraclepartition is lower than the threshold value(default 25 percent)
EndpointCertificateExpiration
Cluster-wide Raised when an endpoint's certificate isexpiring within the threshold value (default30 days)
Failed SystemBackup
Node specific Raised when the last backup did notcomplete successfully
Primary-StandbyData Guard BrokerStatus
Primary-Standby Only Raised when the Oracle Data GuardBroker status is not ENABLED
Primary-StandbyData Guard Fast-Start FailoverStatus
Primary-Standby Only Raised when the fast-start failover statusis not SYNCHRONIZED
Primary-StandbyDestination Failure
Primary-Standby Only Raised when the switchover status isFAILED DESTINATION
Primary-StandbyRestricted Mode
Primary-Standby Only Raised when in primary-standbyenvironment and the primary is running inread-only restricted mode
Primary-StandbyRole Change
Primary-Standby Only Raised when there is a role change
Key Rotations Cluster-wide Raised when a key's deactivation date iswithin the threshold value (default 7 days)
OKV ServerCertificateExpiration
Node specific Raised when the Oracle Key Vault servercertificate is expiring within the thresholdvalue (default 30 days)
SSH Tunnel Failure Node specific Raised when an SSH tunnel is notavailable
System Backup Node specific Raised when the last successful backup isover the threshold value (default 14 days)
Chapter 20Configuring Oracle Key Vault Alerts
20-18
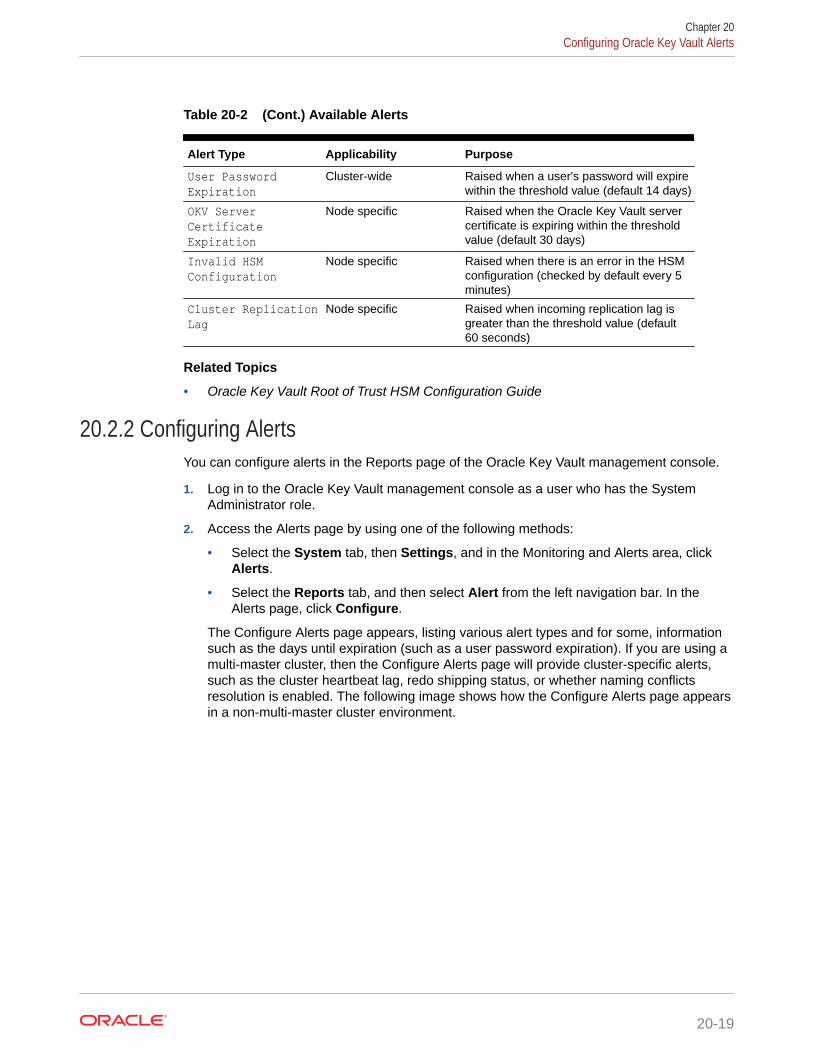
Table 20-2 (Cont.) Available Alerts
Alert Type Applicability Purpose
User PasswordExpiration
Cluster-wide Raised when a user's password will expirewithin the threshold value (default 14 days)
OKV ServerCertificateExpiration
Node specific Raised when the Oracle Key Vault servercertificate is expiring within the thresholdvalue (default 30 days)
Invalid HSMConfiguration
Node specific Raised when there is an error in the HSMconfiguration (checked by default every 5minutes)
Cluster ReplicationLag
Node specific Raised when incoming replication lag isgreater than the threshold value (default60 seconds)
Related Topics
• Oracle Key Vault Root of Trust HSM Configuration Guide
20.2.2 Configuring AlertsYou can configure alerts in the Reports page of the Oracle Key Vault management console.
1. Log in to the Oracle Key Vault management console as a user who has the SystemAdministrator role.
2. Access the Alerts page by using one of the following methods:
• Select the System tab, then Settings, and in the Monitoring and Alerts area, clickAlerts.
• Select the Reports tab, and then select Alert from the left navigation bar. In theAlerts page, click Configure.
The Configure Alerts page appears, listing various alert types and for some, informationsuch as the days until expiration (such as a user password expiration). If you are using amulti-master cluster, then the Configure Alerts page will provide cluster-specific alerts,such as the cluster heartbeat lag, redo shipping status, or whether naming conflictsresolution is enabled. The following image shows how the Configure Alerts page appearsin a non-multi-master cluster environment.
Chapter 20Configuring Oracle Key Vault Alerts
20-19
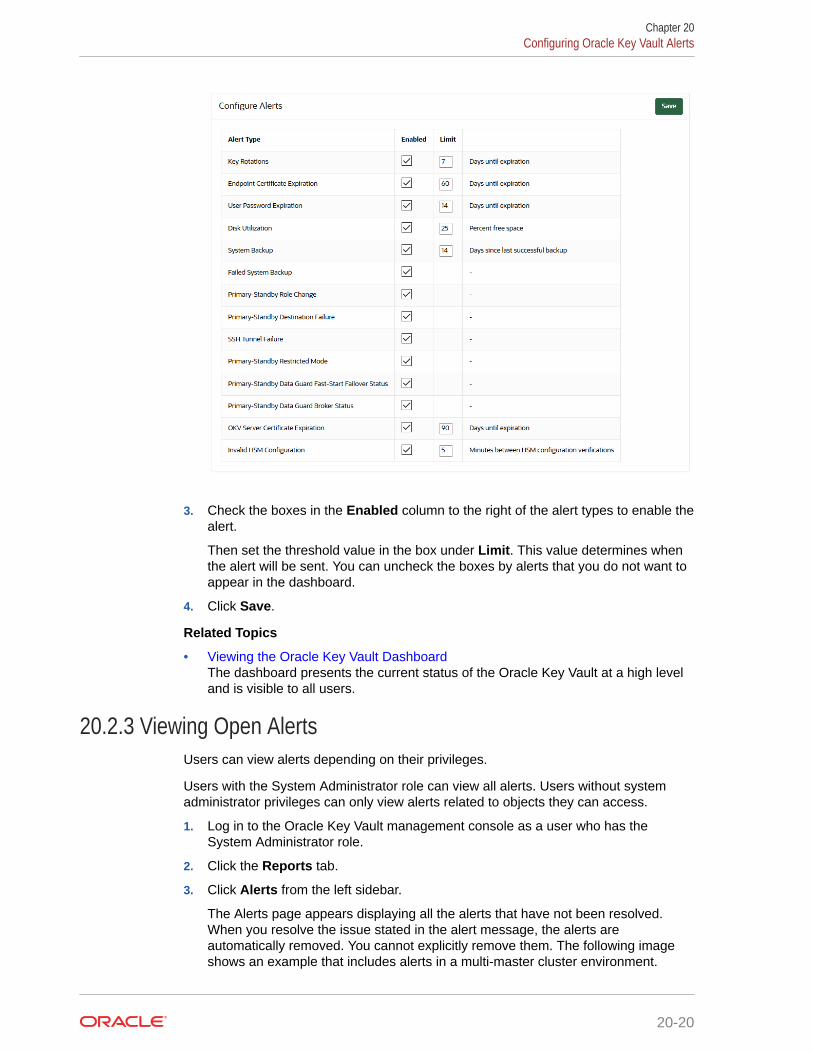
3. Check the boxes in the Enabled column to the right of the alert types to enable thealert.
Then set the threshold value in the box under Limit. This value determines whenthe alert will be sent. You can uncheck the boxes by alerts that you do not want toappear in the dashboard.
4. Click Save.
Related Topics
• Viewing the Oracle Key Vault DashboardThe dashboard presents the current status of the Oracle Key Vault at a high leveland is visible to all users.
20.2.3 Viewing Open AlertsUsers can view alerts depending on their privileges.
Users with the System Administrator role can view all alerts. Users without systemadministrator privileges can only view alerts related to objects they can access.
1. Log in to the Oracle Key Vault management console as a user who has theSystem Administrator role.
2. Click the Reports tab.
3. Click Alerts from the left sidebar.
The Alerts page appears displaying all the alerts that have not been resolved.When you resolve the issue stated in the alert message, the alerts areautomatically removed. You cannot explicitly remove them. The following imageshows an example that includes alerts in a multi-master cluster environment.
Chapter 20Configuring Oracle Key Vault Alerts
20-20
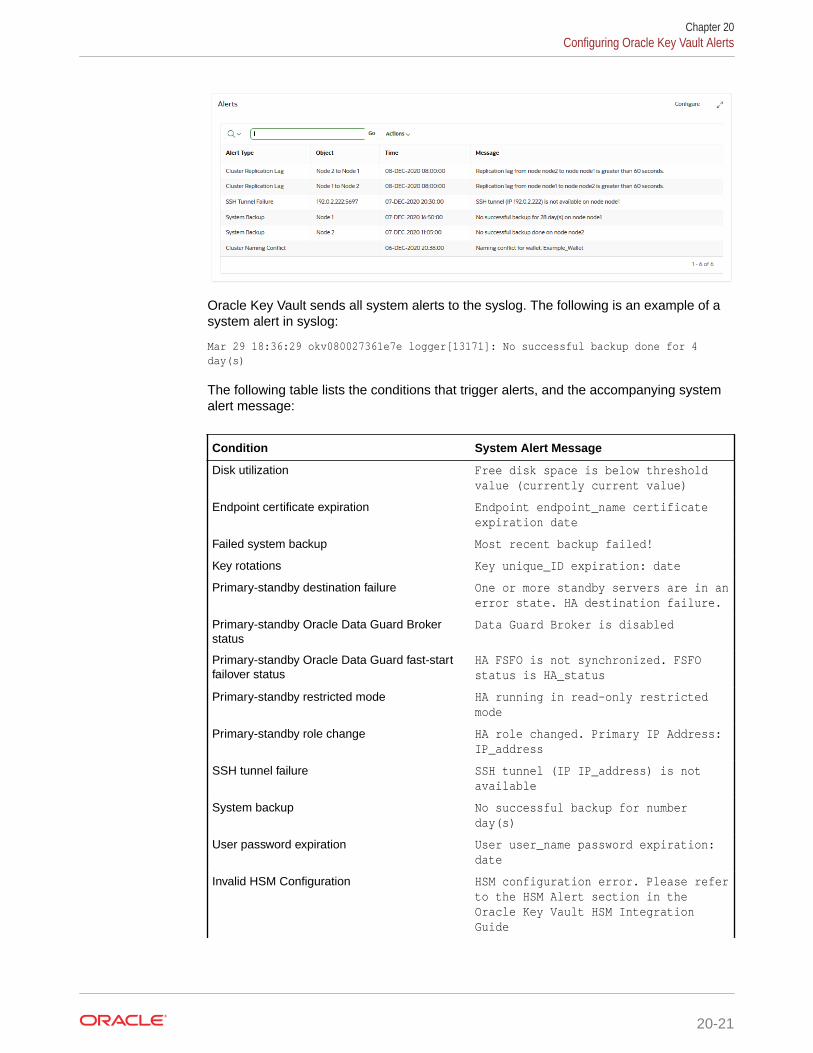
Oracle Key Vault sends all system alerts to the syslog. The following is an example of asystem alert in syslog:
Mar 29 18:36:29 okv080027361e7e logger[13171]: No successful backup done for 4 day(s)
The following table lists the conditions that trigger alerts, and the accompanying systemalert message:
Condition System Alert Message
Disk utilization Free disk space is below thresholdvalue (currently current value)
Endpoint certificate expiration Endpoint endpoint_name certificateexpiration date
Failed system backup Most recent backup failed!
Key rotations Key unique_ID expiration: date
Primary-standby destination failure One or more standby servers are in anerror state. HA destination failure.
Primary-standby Oracle Data Guard Brokerstatus
Data Guard Broker is disabled
Primary-standby Oracle Data Guard fast-startfailover status
HA FSFO is not synchronized. FSFOstatus is HA_status
Primary-standby restricted mode HA running in read-only restrictedmode
Primary-standby role change HA role changed. Primary IP Address:IP_address
SSH tunnel failure SSH tunnel (IP IP_address) is notavailable
System backup No successful backup for numberday(s)
User password expiration User user_name password expiration:date
Invalid HSM Configuration HSM configuration error. Please referto the HSM Alert section in theOracle Key Vault HSM IntegrationGuide
Chapter 20Configuring Oracle Key Vault Alerts
20-21
Condition System Alert Message
Cluster Replication Lag Replication lag from node node_nameto node node_name is greater thannumber seconds.
20.3 Managing System AuditingAuditing entails tasks such as capturing audit records in a syslog file or downloadingthe audit records to a local file.
• About Auditing in Oracle Key VaultOracle Key Vault records and time-stamps all endpoint and user activity.
• Enabling Auditing and Configuring Syslog to Store Audit RecordsYou can enable or disable auditing and then configure the Oracle Key Vault syslogto store audit records if the System Administrator has enabled this functionality.
• Viewing Audit RecordsTo view audit records, access the Oracle Key Vault management console AuditTrail page.
• Exporting and Deleting Audit RecordsOracle Key Vault audit records are stored in a .csv file.
• Audit Consolidation with Audit Vault and Database FirewallOracle Key Vault audit data can be forwarded to Audit Vault and Database Firewall(AVDF) for audit consolidation.
20.3.1 About Auditing in Oracle Key VaultOracle Key Vault records and time-stamps all endpoint and user activity.
The audit records include endpoint groups and user groups, from endpoint enrollmentand user password reset, to the management of keys and wallets, and changes tosystem settings and SNMP credentials. The audit trail captures details on who initiatedwhich action, with what keys and tokens, and the result of the action. In addition, itrecords the success or failure of each action.
Only a user who has the Audit Manager role can manage the audit trail for Oracle KeyVault activity. Each user can see audit records of the objects that the user can access.
Auditing in Oracle Key Vault is enabled by default.
A user with the Audit Manager role can see and manage all the audit records. Otherusers can see only those audit records that pertain to security objects that they havecreated, or have been granted access to.
The audit manager can export audit records to view system activity off line. Afterexporting the records, the audit manager can delete them from the system to free upresources.
Related Topics
• Audit Manager Role DutiesThe Oracle Key Vault Audit Manager is responsible for audit-related tasks.
Chapter 20Managing System Auditing
20-22
20.3.2 Enabling Auditing and Configuring Syslog to Store Audit RecordsYou can enable or disable auditing and then configure the Oracle Key Vault syslog to storeaudit records if the System Administrator has enabled this functionality.
1. Log in to the Oracle Key Vault management console as a user who has the AuditManager role.
2. Access the Audit Settings page by using one of the following methods:
• Select the Systems tab, then Settings in the left navigation bar. In the Monitoringand Alerts area, click Audit.
• Select the Reports tab, then Audit Trail in the left navigation bar. In the Audit Trailpage, click Audit Settings.
The Audit Settings page appears. The categories that you can configure are as follows:
• Enable Auditing
• Replicate Audit Records
• Send Audit Records to Syslog
3. For each category, do the following:
a. In a multimaster cluster environment, click the right-hand arrow that appears over theSave button to toggle between the current node and the entire cluster.
b. Select either the Yes or No option for the auditing.
c. Click Save.
4. If syslog is configured, then perform additional steps as needed.
If syslog is not configured, then the Syslog forwarding to remote machines notenabled error message appears. If this error appears, then enable syslog.
a. Select the System tab, and then select Settings.
b. In the Monitoring and Alerts area, select Syslog.
c. In a multi-master cluster environment, toggle between Node Details - Effective on thisNode and Cluster Details by clicking the arrow under the Save button.
d. Select the protocol to use to transfer syslog files: TCP or UDP.
e. Enter the IP address of the remote system where the syslog files will be stored.
f. Click Save.
20.3.3 Viewing Audit RecordsTo view audit records, access the Oracle Key Vault management console Audit Trail page.
The reports page shows the Audit Trail page by default. The Audit Trail page lists all systemactivity with details on who performed an operation, when the operation was performed, whatobject was used to perform the operation, and the result.
1. Log in to the Oracle Key Vault management console as a user who has the AuditManager role.
2. Click the Reports tab, and then Audit Trail from the left navigation bar.
Chapter 20Managing System Auditing
20-23
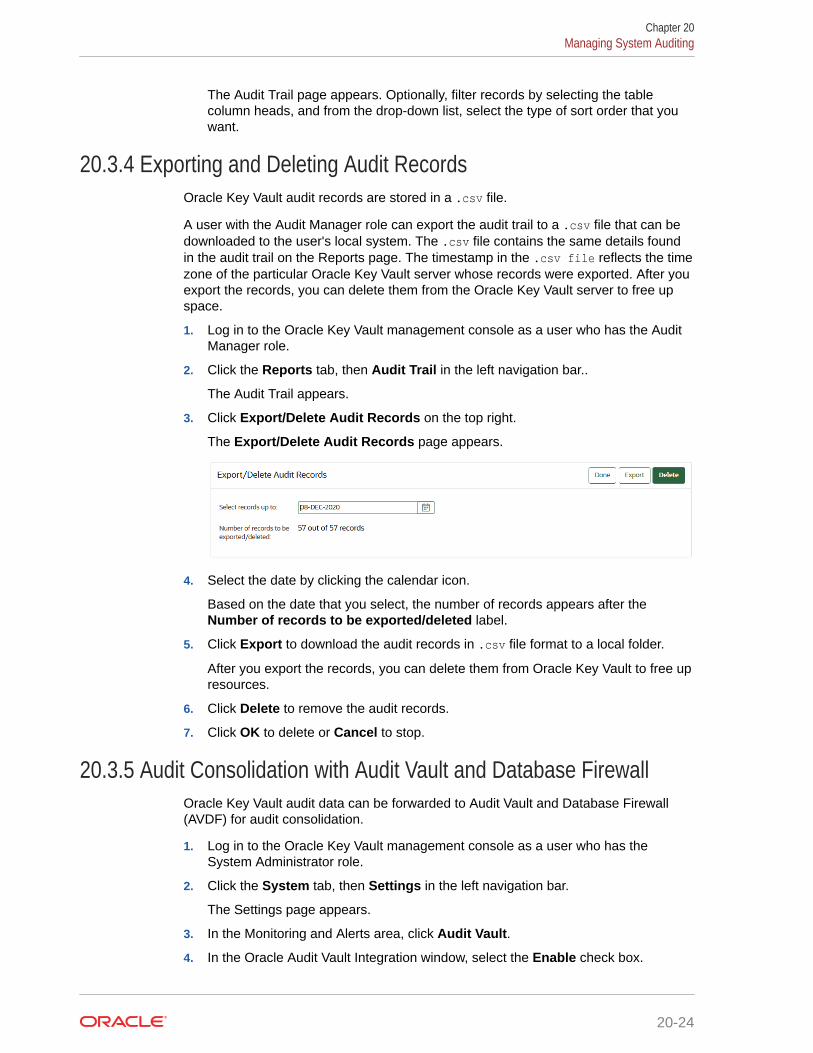
The Audit Trail page appears. Optionally, filter records by selecting the tablecolumn heads, and from the drop-down list, select the type of sort order that youwant.
20.3.4 Exporting and Deleting Audit RecordsOracle Key Vault audit records are stored in a .csv file.
A user with the Audit Manager role can export the audit trail to a .csv file that can bedownloaded to the user's local system. The .csv file contains the same details foundin the audit trail on the Reports page. The timestamp in the .csv file reflects the timezone of the particular Oracle Key Vault server whose records were exported. After youexport the records, you can delete them from the Oracle Key Vault server to free upspace.
1. Log in to the Oracle Key Vault management console as a user who has the AuditManager role.
2. Click the Reports tab, then Audit Trail in the left navigation bar..
The Audit Trail appears.
3. Click Export/Delete Audit Records on the top right.
The Export/Delete Audit Records page appears.
4. Select the date by clicking the calendar icon.
Based on the date that you select, the number of records appears after theNumber of records to be exported/deleted label.
5. Click Export to download the audit records in .csv file format to a local folder.
After you export the records, you can delete them from Oracle Key Vault to free upresources.
6. Click Delete to remove the audit records.
7. Click OK to delete or Cancel to stop.
20.3.5 Audit Consolidation with Audit Vault and Database FirewallOracle Key Vault audit data can be forwarded to Audit Vault and Database Firewall(AVDF) for audit consolidation.
1. Log in to the Oracle Key Vault management console as a user who has theSystem Administrator role.
2. Click the System tab, then Settings in the left navigation bar.
The Settings page appears.
3. In the Monitoring and Alerts area, click Audit Vault.
4. In the Oracle Audit Vault Integration window, select the Enable check box.
Chapter 20Managing System Auditing
20-24
Two password fields appear: Enter Password and Re-enter Password.
5. Enter the password and confirm it.
Store this password in a safe place. You will need it when you create a secured target onthe Audit Vault and Database Firewall (AVDF) side.
Related Topics
• Integrating Oracle Key Vault with Oracle Audit Vault and Database FirewallYou can consolidate audits between Oracle Audit Vault and Database Firewall (AVDF)with Oracle Key Vault. To do this, you must integrate Audit Vault and Database Firewallwith Oracle Key Vault.
20.4 Using Oracle Key Vault ReportsOracle Key Vault collects statistical information on a range of activities that impact Key Vaultoperations.
• About Oracle Key Vault ReportsThe reports cover system activity, certificate expiration, keys, passwords, entitlementstatus, and metadata.
• Viewing Key Management Reports for Oracle EndpointsAll users can view the key management reports for Oracle endpoints.
• Viewing Keys and Wallets ReportsThe keys and wallets reports require different privileges for viewing, depending on thereport.
• Viewing Secrets Management ReportsAll users can view the secrets management reports.
• Viewing Endpoint ReportsYou must have the System Management role or the Audit Manager role to view the fourcategories of endpoint reports.
• Viewing User ReportsYou must have the System Management role, the Key Management role, or the AuditManager role to view the four categories of user reports.
• Viewing System ReportsYou must have the System Management role or the Audit Manager role to view thesystem reports.
20.4.1 About Oracle Key Vault ReportsThe reports cover system activity, certificate expiration, keys, passwords, entitlement status,and metadata.
Oracle Key Vault provides six types of reports for endpoints, users, keys and wallets, andsystem. In a multi-master cluster, some reports contain additional information, such as thenode ID, node name, and IP address.
The six report types are as follows:
• Key management reports for Oracle endpoints, which includes information about TDEmaster encryption keys, GoldenGate master keys, and ACFS volume encryption keydetails
Chapter 20Using Oracle Key Vault Reports
20-25
• Keys and wallets reports list the access privileges granted to all keys and wallets,and the details of TDE master encryption keys managed by Oracle Key Vault
• Secrets management reports for database passwords, secret data, and opaqueobjects
• Endpoint reports contain details of all endpoint and endpoint group activity,certificate and password expiration, and access privileges
• User reports contain details of all user and user group activity, their certificate andpassword expiration, and access privileges
• System reports contain a history of system backups taken and scheduled, detailsof remote restoration points, and RESTful command-line interface usage
A user who has the Audit Manager role can view all reports, including reports that areaccessible from the Audit Trail pages in the Oracle Key Vault management console. Auser with the Key Administrator role can view user reports and keys and walletsreports. Users with the System Administrator role can view endpoint, user, and systemreports.
Related Topics
• Managing System AuditingAuditing entails tasks such as capturing audit records in a syslog file ordownloading the audit records to a local file.
20.4.2 Viewing Key Management Reports for Oracle EndpointsAll users can view the key management reports for Oracle endpoints.
1. Log in to the Oracle Key Vault management console.
2. Click the Reports tab and then Reports from left navigation bar.
3. Expand Key Management Reports for Oracle Endpoints Reports.
The Key Management Reports for Oracle Endpoints Reports page appearsdisplaying the four types of user reports.
Chapter 20Using Oracle Key Vault Reports
20-26
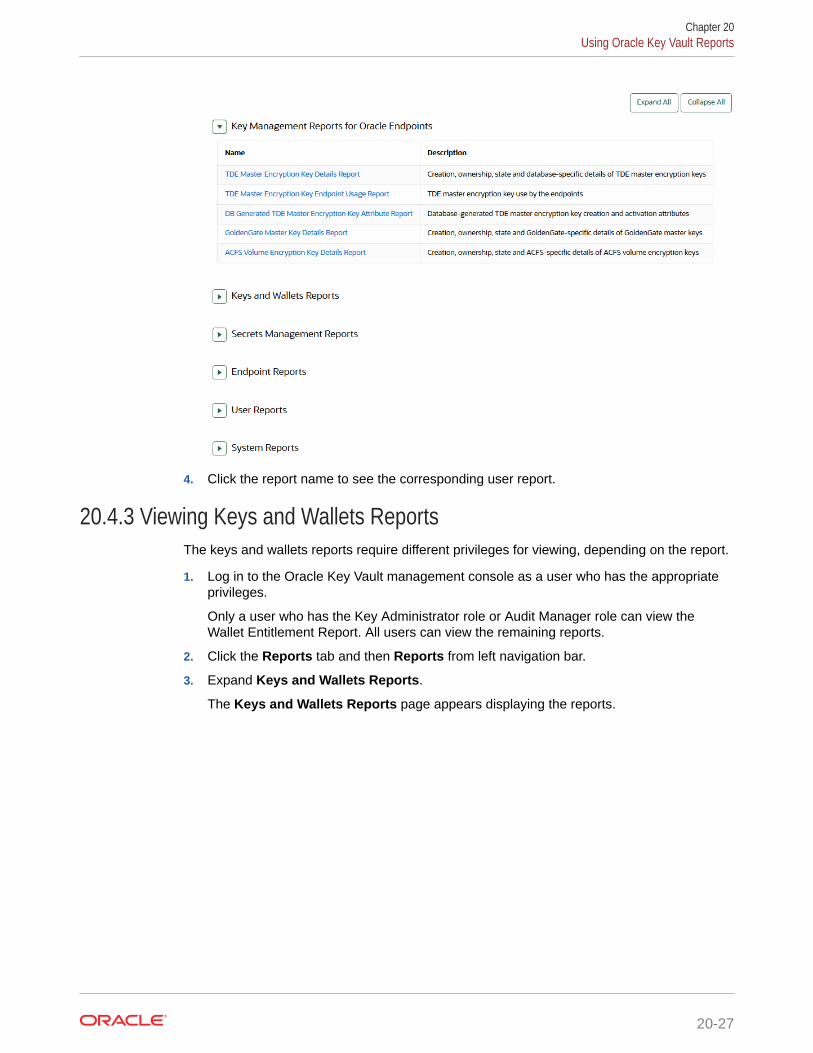
4. Click the report name to see the corresponding user report.
20.4.3 Viewing Keys and Wallets ReportsThe keys and wallets reports require different privileges for viewing, depending on the report.
1. Log in to the Oracle Key Vault management console as a user who has the appropriateprivileges.
Only a user who has the Key Administrator role or Audit Manager role can view theWallet Entitlement Report. All users can view the remaining reports.
2. Click the Reports tab and then Reports from left navigation bar.
3. Expand Keys and Wallets Reports.
The Keys and Wallets Reports page appears displaying the reports.
Chapter 20Using Oracle Key Vault Reports
20-27
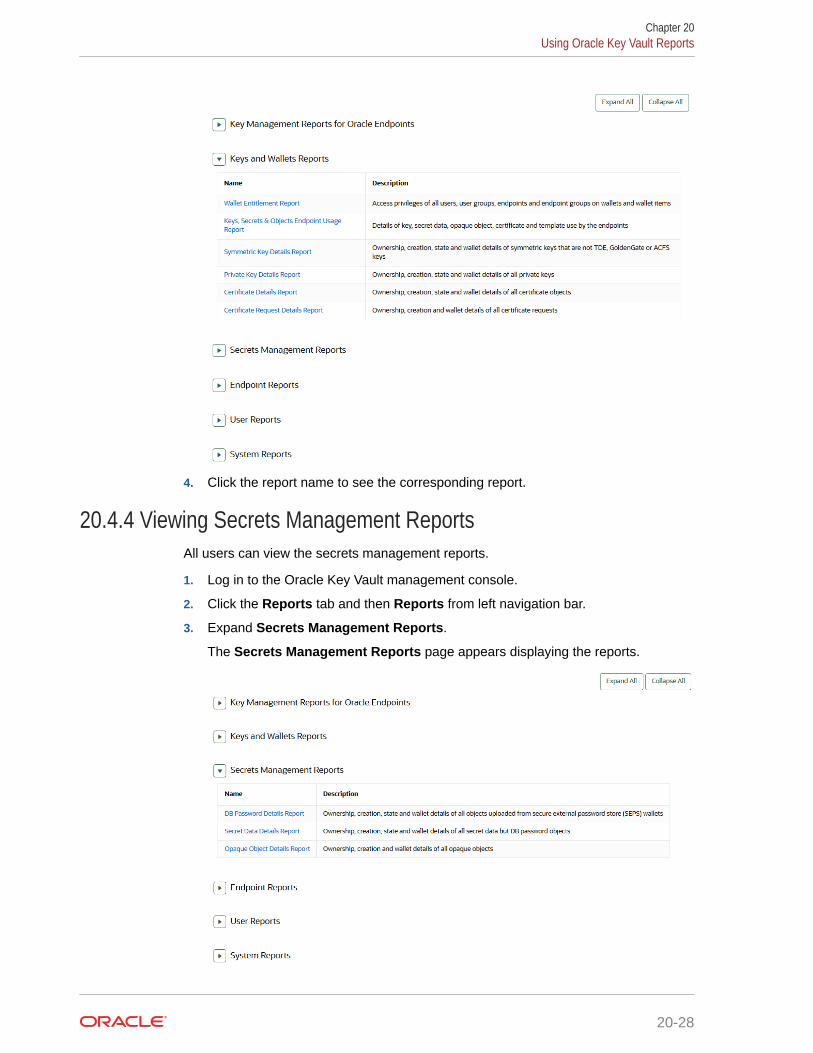
4. Click the report name to see the corresponding report.
20.4.4 Viewing Secrets Management ReportsAll users can view the secrets management reports.
1. Log in to the Oracle Key Vault management console.
2. Click the Reports tab and then Reports from left navigation bar.
3. Expand Secrets Management Reports.
The Secrets Management Reports page appears displaying the reports.
Chapter 20Using Oracle Key Vault Reports
20-28
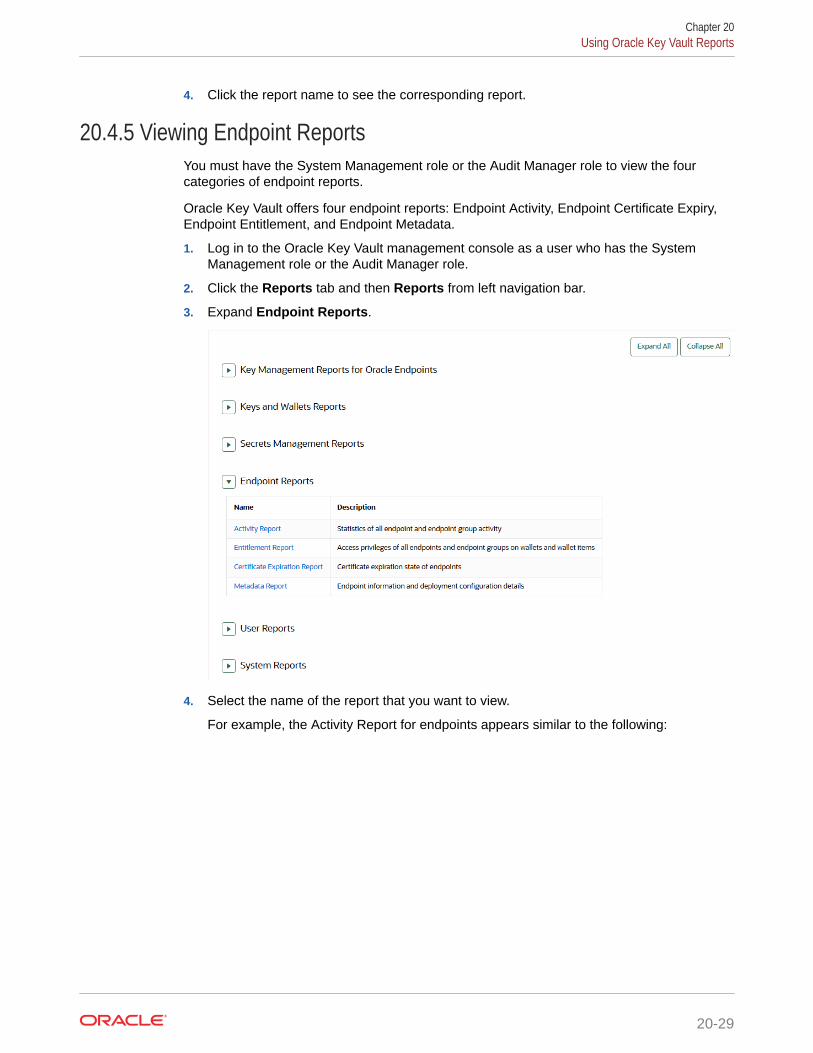
4. Click the report name to see the corresponding report.
20.4.5 Viewing Endpoint ReportsYou must have the System Management role or the Audit Manager role to view the fourcategories of endpoint reports.
Oracle Key Vault offers four endpoint reports: Endpoint Activity, Endpoint Certificate Expiry,Endpoint Entitlement, and Endpoint Metadata.
1. Log in to the Oracle Key Vault management console as a user who has the SystemManagement role or the Audit Manager role.
2. Click the Reports tab and then Reports from left navigation bar.
3. Expand Endpoint Reports.
4. Select the name of the report that you want to view.
For example, the Activity Report for endpoints appears similar to the following:
Chapter 20Using Oracle Key Vault Reports
20-29
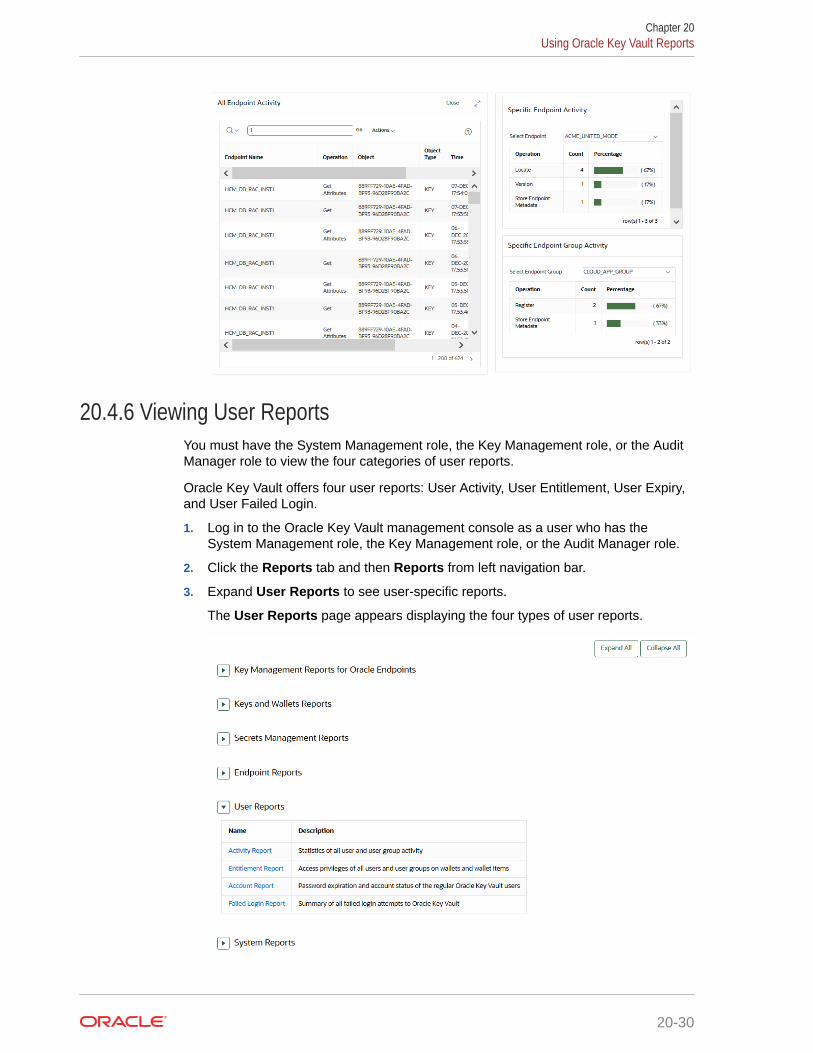
20.4.6 Viewing User ReportsYou must have the System Management role, the Key Management role, or the AuditManager role to view the four categories of user reports.
Oracle Key Vault offers four user reports: User Activity, User Entitlement, User Expiry,and User Failed Login.
1. Log in to the Oracle Key Vault management console as a user who has theSystem Management role, the Key Management role, or the Audit Manager role.
2. Click the Reports tab and then Reports from left navigation bar.
3. Expand User Reports to see user-specific reports.
The User Reports page appears displaying the four types of user reports.
Chapter 20Using Oracle Key Vault Reports
20-30
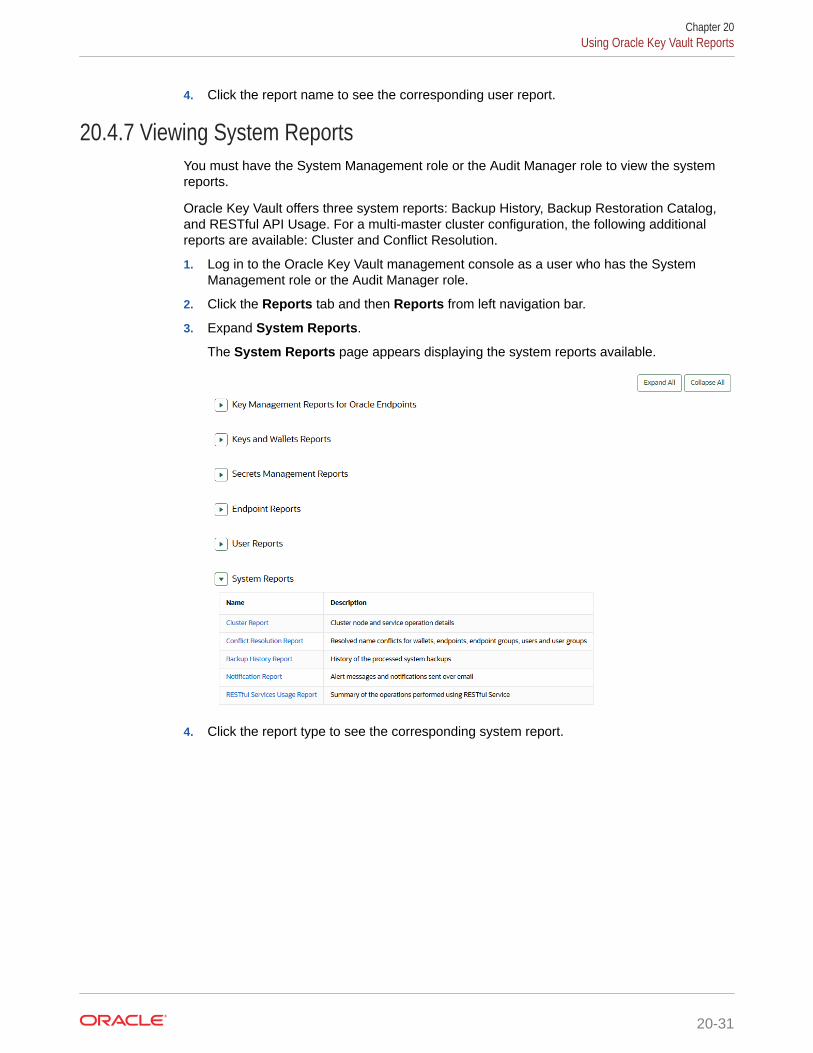
4. Click the report name to see the corresponding user report.
20.4.7 Viewing System ReportsYou must have the System Management role or the Audit Manager role to view the systemreports.
Oracle Key Vault offers three system reports: Backup History, Backup Restoration Catalog,and RESTful API Usage. For a multi-master cluster configuration, the following additionalreports are available: Cluster and Conflict Resolution.
1. Log in to the Oracle Key Vault management console as a user who has the SystemManagement role or the Audit Manager role.
2. Click the Reports tab and then Reports from left navigation bar.
3. Expand System Reports.
The System Reports page appears displaying the system reports available.
4. Click the report type to see the corresponding system report.
Chapter 20Using Oracle Key Vault Reports
20-31
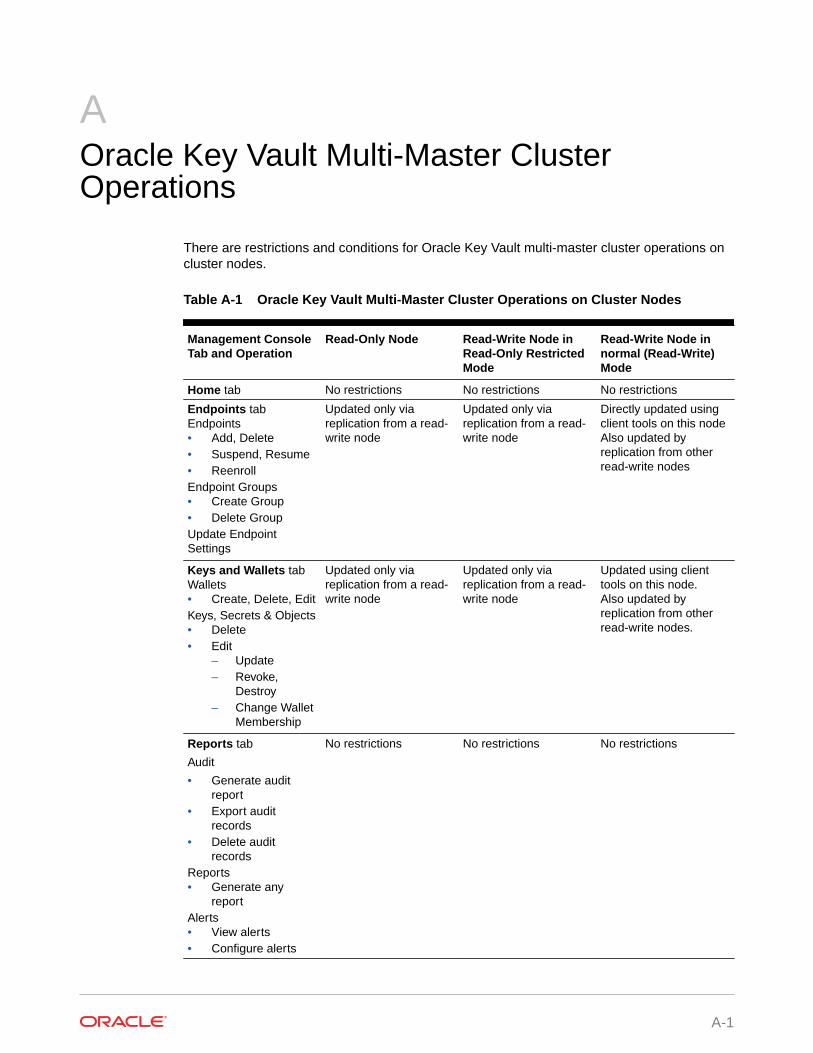
AOracle Key Vault Multi-Master ClusterOperations
There are restrictions and conditions for Oracle Key Vault multi-master cluster operations oncluster nodes.
Table A-1 Oracle Key Vault Multi-Master Cluster Operations on Cluster Nodes
Management ConsoleTab and Operation
Read-Only Node Read-Write Node inRead-Only RestrictedMode
Read-Write Node innormal (Read-Write)Mode
Home tab No restrictions No restrictions No restrictions
Endpoints tabEndpoints• Add, Delete• Suspend, Resume• ReenrollEndpoint Groups• Create Group• Delete GroupUpdate EndpointSettings
Updated only viareplication from a read-write node
Updated only viareplication from a read-write node
Directly updated usingclient tools on this nodeAlso updated byreplication from otherread-write nodes
Keys and Wallets tabWallets• Create, Delete, EditKeys, Secrets & Objects• Delete• Edit
– Update– Revoke,
Destroy– Change Wallet
Membership
Updated only viareplication from a read-write node
Updated only viareplication from a read-write node
Updated using clienttools on this node.Also updated byreplication from otherread-write nodes.
Reports tab
Audit
• Generate auditreport
• Export auditrecords
• Delete auditrecords
Reports• Generate any
reportAlerts• View alerts• Configure alerts
No restrictions No restrictions No restrictions
A-1
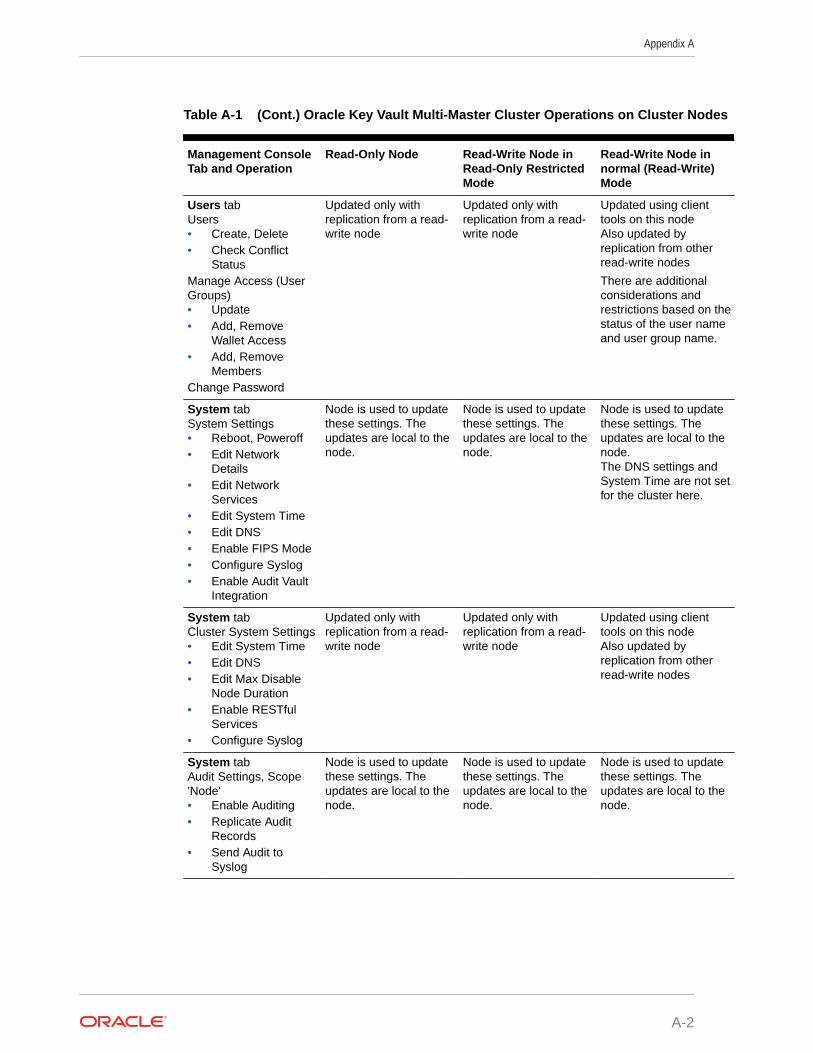
Table A-1 (Cont.) Oracle Key Vault Multi-Master Cluster Operations on Cluster Nodes
Management ConsoleTab and Operation
Read-Only Node Read-Write Node inRead-Only RestrictedMode
Read-Write Node innormal (Read-Write)Mode
Users tabUsers• Create, Delete• Check Conflict
StatusManage Access (UserGroups)• Update• Add, Remove
Wallet Access• Add, Remove
MembersChange Password
Updated only withreplication from a read-write node
Updated only withreplication from a read-write node
Updated using clienttools on this nodeAlso updated byreplication from otherread-write nodes
There are additionalconsiderations andrestrictions based on thestatus of the user nameand user group name.
System tabSystem Settings• Reboot, Poweroff• Edit Network
Details• Edit Network
Services• Edit System Time• Edit DNS• Enable FIPS Mode• Configure Syslog• Enable Audit Vault
Integration
Node is used to updatethese settings. Theupdates are local to thenode.
Node is used to updatethese settings. Theupdates are local to thenode.
Node is used to updatethese settings. Theupdates are local to thenode.The DNS settings andSystem Time are not setfor the cluster here.
System tabCluster System Settings• Edit System Time• Edit DNS• Edit Max Disable
Node Duration• Enable RESTful
Services• Configure Syslog
Updated only withreplication from a read-write node
Updated only withreplication from a read-write node
Updated using clienttools on this nodeAlso updated byreplication from otherread-write nodes
System tabAudit Settings, Scope'Node'• Enable Auditing• Replicate Audit
Records• Send Audit to
Syslog
Node is used to updatethese settings. Theupdates are local to thenode.
Node is used to updatethese settings. Theupdates are local to thenode.
Node is used to updatethese settings. Theupdates are local to thenode.
Appendix A
A-2
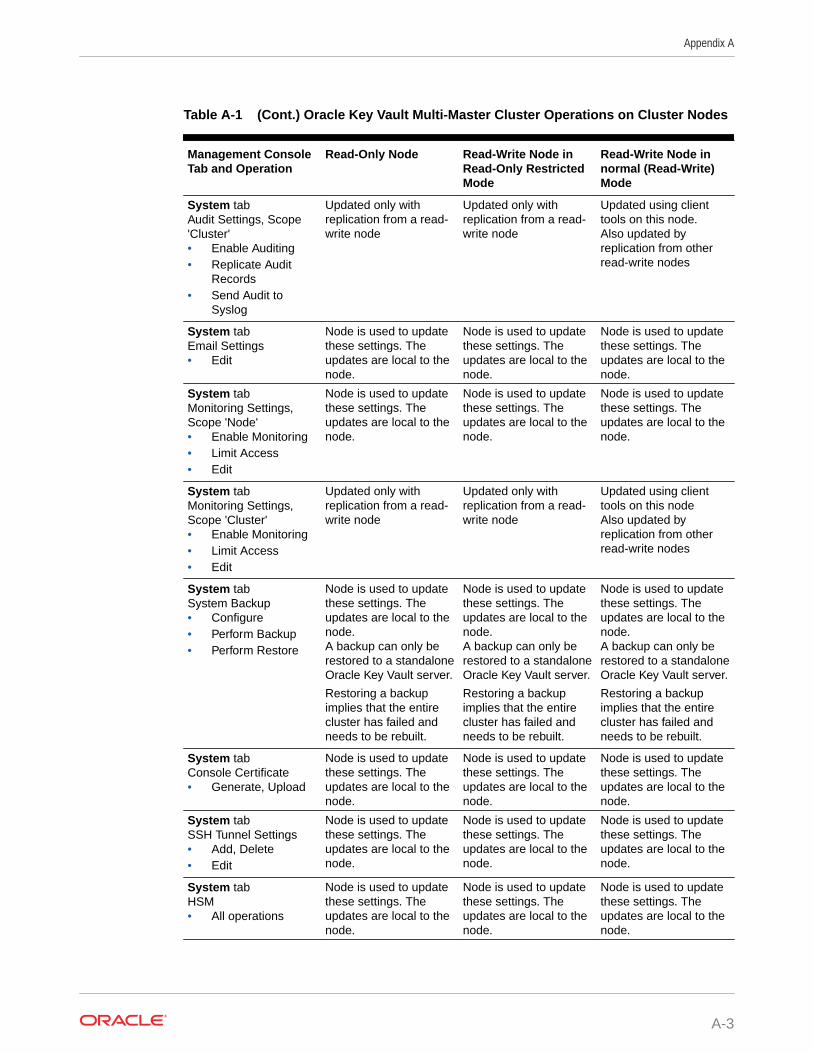
Table A-1 (Cont.) Oracle Key Vault Multi-Master Cluster Operations on Cluster Nodes
Management ConsoleTab and Operation
Read-Only Node Read-Write Node inRead-Only RestrictedMode
Read-Write Node innormal (Read-Write)Mode
System tabAudit Settings, Scope'Cluster'• Enable Auditing• Replicate Audit
Records• Send Audit to
Syslog
Updated only withreplication from a read-write node
Updated only withreplication from a read-write node
Updated using clienttools on this node.Also updated byreplication from otherread-write nodes
System tabEmail Settings• Edit
Node is used to updatethese settings. Theupdates are local to thenode.
Node is used to updatethese settings. Theupdates are local to thenode.
Node is used to updatethese settings. Theupdates are local to thenode.
System tabMonitoring Settings,Scope 'Node'• Enable Monitoring• Limit Access• Edit
Node is used to updatethese settings. Theupdates are local to thenode.
Node is used to updatethese settings. Theupdates are local to thenode.
Node is used to updatethese settings. Theupdates are local to thenode.
System tabMonitoring Settings,Scope 'Cluster'• Enable Monitoring• Limit Access• Edit
Updated only withreplication from a read-write node
Updated only withreplication from a read-write node
Updated using clienttools on this nodeAlso updated byreplication from otherread-write nodes
System tabSystem Backup• Configure• Perform Backup• Perform Restore
Node is used to updatethese settings. Theupdates are local to thenode.A backup can only berestored to a standaloneOracle Key Vault server.
Restoring a backupimplies that the entirecluster has failed andneeds to be rebuilt.
Node is used to updatethese settings. Theupdates are local to thenode.A backup can only berestored to a standaloneOracle Key Vault server.
Restoring a backupimplies that the entirecluster has failed andneeds to be rebuilt.
Node is used to updatethese settings. Theupdates are local to thenode.A backup can only berestored to a standaloneOracle Key Vault server.
Restoring a backupimplies that the entirecluster has failed andneeds to be rebuilt.
System tabConsole Certificate• Generate, Upload
Node is used to updatethese settings. Theupdates are local to thenode.
Node is used to updatethese settings. Theupdates are local to thenode.
Node is used to updatethese settings. Theupdates are local to thenode.
System tabSSH Tunnel Settings• Add, Delete• Edit
Node is used to updatethese settings. Theupdates are local to thenode.
Node is used to updatethese settings. Theupdates are local to thenode.
Node is used to updatethese settings. Theupdates are local to thenode.
System tabHSM• All operations
Node is used to updatethese settings. Theupdates are local to thenode.
Node is used to updatethese settings. Theupdates are local to thenode.
Node is used to updatethese settings. Theupdates are local to thenode.
Appendix A
A-3
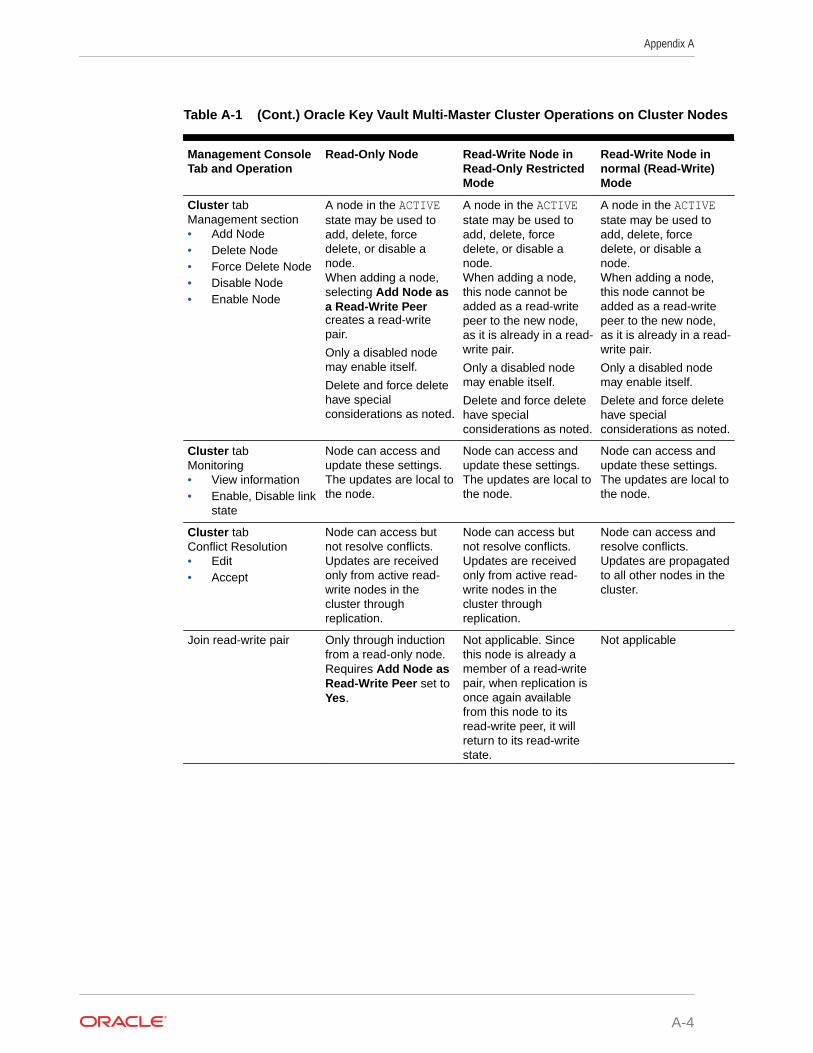
Table A-1 (Cont.) Oracle Key Vault Multi-Master Cluster Operations on Cluster Nodes
Management ConsoleTab and Operation
Read-Only Node Read-Write Node inRead-Only RestrictedMode
Read-Write Node innormal (Read-Write)Mode
Cluster tabManagement section• Add Node• Delete Node• Force Delete Node• Disable Node• Enable Node
A node in the ACTIVEstate may be used toadd, delete, forcedelete, or disable anode.When adding a node,selecting Add Node asa Read-Write Peercreates a read-writepair.
Only a disabled nodemay enable itself.
Delete and force deletehave specialconsiderations as noted.
A node in the ACTIVEstate may be used toadd, delete, forcedelete, or disable anode.When adding a node,this node cannot beadded as a read-writepeer to the new node,as it is already in a read-write pair.
Only a disabled nodemay enable itself.
Delete and force deletehave specialconsiderations as noted.
Cluster tabMonitoring• View information• Enable, Disable link
state
Node can access andupdate these settings.The updates are local tothe node.
Node can access andupdate these settings.The updates are local tothe node.
Node can access andupdate these settings.The updates are local tothe node.
Cluster tabConflict Resolution• Edit• Accept
Node can access butnot resolve conflicts.Updates are receivedonly from active read-write nodes in thecluster throughreplication.
Node can access butnot resolve conflicts.Updates are receivedonly from active read-write nodes in thecluster throughreplication.
Node can access andresolve conflicts.Updates are propagatedto all other nodes in thecluster.
Join read-write pair Only through inductionfrom a read-only node.Requires Add Node asRead-Write Peer set toYes.
Not applicable. Sincethis node is already amember of a read-writepair, when replication isonce again availablefrom this node to itsread-write peer, it willreturn to its read-writestate.
Not applicable
Appendix A
A-4
BOracle Key Vault okvutil Endpoint UtilityReference
The okvutil utility enables you to perform tasks uploading and downloading security objects.
• About the okvutil UtilityThe okvutil utility is a command-line utility that you can use to manage security objects.
• okvutil Command SyntaxThe okvutil utility syntax provides short and long options for specifying commands.
• okvutil changepwd CommandThe okvutil changepwd command changes the password associated with thecredentials used to connect to Oracle Key Vault.
• okvutil diagnostics CommandThe okvutil diagnostics command collects diagnostic and environmental informationon an endpoint to troubleshoot deployment issues.
• okvutil download CommandThe okvutil download command downloads security objects from Oracle Key Vault tothe endpoint.
• okvutil list CommandThe okvutil list command lists the available security objects that are uploaded.
• okvutil upload CommandThe okvutil upload command uploads security objects to Oracle Key Vault.
B.1 About the okvutil UtilityThe okvutil utility is a command-line utility that you can use to manage security objects.
The okvutil command-line utility enables you to locate, upload, and download securityobjects to and from Oracle Key Vault. You can also use okvutil to change the walletpassword and collect system diagnostics.
The okvutil utility uses the Transport Layer Security (TLS) credentials provisioned for theendpoint to authenticate to Oracle Key Vault.
B.2 okvutil Command SyntaxThe okvutil utility syntax provides short and long options for specifying commands.
Syntax
okvutil command arguments [-v verbosity_level]
B-1
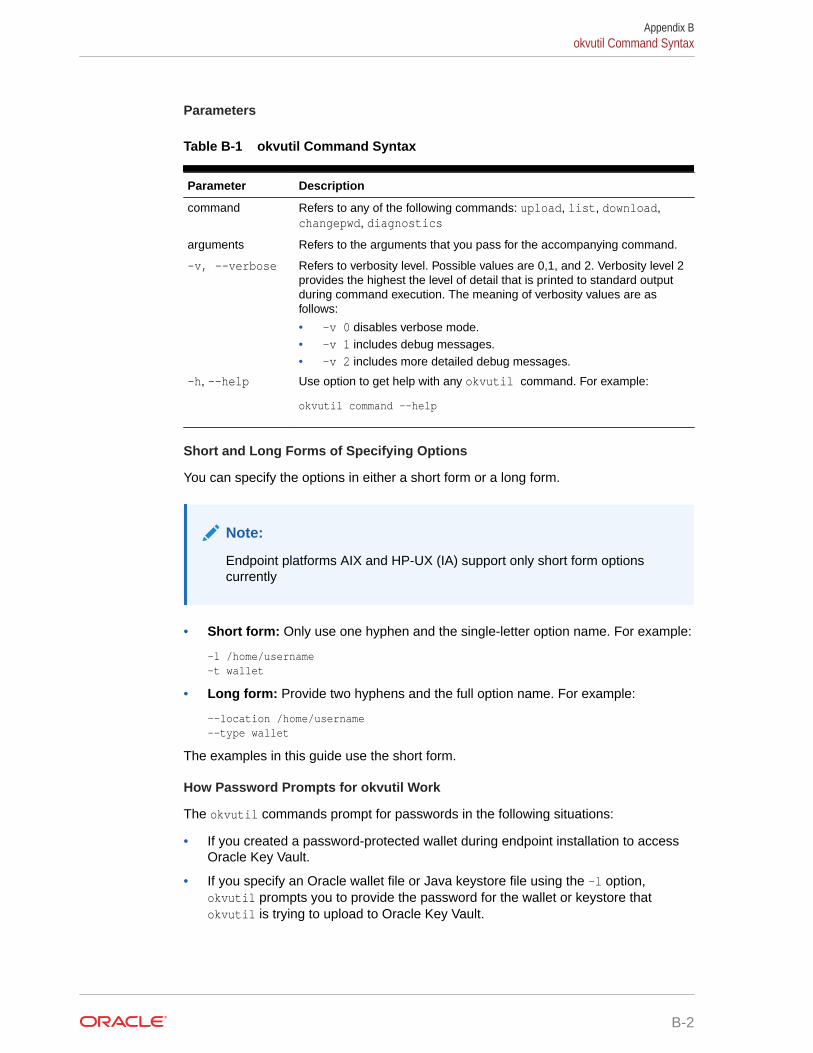
Parameters
Table B-1 okvutil Command Syntax
Parameter Description
command Refers to any of the following commands: upload, list, download,changepwd, diagnostics
arguments Refers to the arguments that you pass for the accompanying command.
-v, --verbose Refers to verbosity level. Possible values are 0,1, and 2. Verbosity level 2provides the highest the level of detail that is printed to standard outputduring command execution. The meaning of verbosity values are asfollows:
• -v 0 disables verbose mode.• -v 1 includes debug messages.• -v 2 includes more detailed debug messages.
-h, --help Use option to get help with any okvutil command. For example:
okvutil command --help
Short and Long Forms of Specifying Options
You can specify the options in either a short form or a long form.
Note:
Endpoint platforms AIX and HP-UX (IA) support only short form optionscurrently
• Short form: Only use one hyphen and the single-letter option name. For example:
-l /home/username-t wallet
• Long form: Provide two hyphens and the full option name. For example:
--location /home/username --type wallet
The examples in this guide use the short form.
How Password Prompts for okvutil Work
The okvutil commands prompt for passwords in the following situations:
• If you created a password-protected wallet during endpoint installation to accessOracle Key Vault.
• If you specify an Oracle wallet file or Java keystore file using the -l option,okvutil prompts you to provide the password for the wallet or keystore thatokvutil is trying to upload to Oracle Key Vault.
Appendix Bokvutil Command Syntax
B-2
B.3 okvutil changepwd CommandThe okvutil changepwd command changes the password associated with the credentialsused to connect to Oracle Key Vault.
Use this command if you used a password-protected wallet to store the Oracle Key Vaultendpoint user credentials. The new password does not need to be the same password for theJCKS or wallet file when it was uploaded.
Syntax
Short format:
okvutil changepwd -l location -t type [-v verbosity_level]
Long format:
okvutil changepwd --location location --type type [--verbose verbosity_level]
Parameters
Table B-2 okvutil changepwd Command Options
Parameter Description
-l, --location Specifies the directory location of the wallet whose password you want tochange.
-t, --type Specifies the data type. Enter WALLET.
-v, --verbose Refers to the verbosity level from 0 (none), 1 (debug), 2 (detailed debug).
Example: Changing an Oracle Key Vault Endpoint Password
The following example shows how to use the okvutil changepwd command change theendpoint password. When you are prompted to create the new password, enter a passwordthat is between 8 and 30 characters.
$ okvutil changepwd -l ./home/oracle/okvutil/ssl -t WALLETEnter wallet password: current_endpoint_passwordEnter new wallet password: new_endpoint_passwordConfirm new wallet password: new_endpoint_password
B.4 okvutil diagnostics CommandThe okvutil diagnostics command collects diagnostic and environmental information on anendpoint to troubleshoot deployment issues.
The information is placed in a diagnostics.zip file, which can be given to Oracle support forfurther analysis and debugging.
The information gathered includes information on the following:
• The shell environment variables: OKV_HOME, ORACLE_HOME, ORACLE_BASE, ORACLE_SID,PATH, CLASSPATH
• Configuration and IP address of the Oracle Key Vault server from okvclient.ora
Appendix Bokvutil changepwd Command
B-3
• Directory listing of OKV_HOME and its sub-directories
• Oracle Key Vault log files from the endpoint
• Listing of symbolic links created by the Oracle Key Vault endpoint installer
• Network settings and ping results
The okvutil diagnostics command does not collect sensitive information such asuser credentials or security objects.
Syntax
Short format:
okvutil diagnostics [-v verbosity_level]
Long format:
okvutil diagnostics [--verbose verbosity_level]
Parameters
Table B-3 okvutil diagnostics Command Options
Parameter Description
-v, --verbose Refers to the verbosity level from 0 (none), 1 (debug), 2 (detaileddebug)
Example: Collecting System Diagnostics
The following example shows how to execute the okvutil diagnostics command.After you execute the command, when the Diagnostics complete message appears,then the diagnostics.zip file will be available in the current directory.
$ okvutil diagnostics Diagnostics collection complete.lsdiagnostics.zip
B.5 okvutil download CommandThe okvutil download command downloads security objects from Oracle Key Vault tothe endpoint.
These security objects include Oracle wallets including auto-login wallets, Javakeystores, credential files, and other types of key storage files.
You can only download the contents of a virtual wallet into a keystore (a containersuch as an Oracle wallet or a JCEKS keystore that can hold multiple security objects),and not into a credential file.
Some keystores only support the storage of certain types of security objects. An erroroccurs if you upload a DSA key from a Java keystore or later try to download it to adifferent type of keystore like an Oracle wallet.
Syntax
Short format:
Appendix Bokvutil download Command
B-4
okvutil download -l location -t type [-g group | -i object_id] [-o] [-v verbosity_level]
Long format:
okvutil download --location location --type type [--group group | --item object_id] [--overwrite] [--verbose verbosity_level]
Parameters
Table B-4 okvutil download Command Options
Parameter Description
-l, --location Specifies the file location to store the items that you want to download. Ensurethat you have permission to create wallets in this location. Ensure that the fileyou download is no more than 120 KB. This setting is mandatory.
-t, --type Specifies the data type of the object being downloaded from Oracle Key Vault.It must be a value from the following list:
• WALLET for an Oracle wallet• JKS for a Java keystore• JCEKS for a Java Cryptography Extension keystore (JCEKS)• SSH for an SSH key file, to be downloaded as an opaque object.• KERBEROS for a Kerberos keytab, to be downloaded as an opaque object.• OTHER for opaque objects, which are other files that store secrets.The WALLET, JKS, and JCEKS types contain multiple objects. Oracle Key Vaultdownloads each of these objects individually. The SSH, KERBEROS, and OTHERtypes, being opaque objects, are downloaded as single files.
This setting is not case-sensitive. This setting is mandatory.
-g, --group Is the name of a virtual wallet from which you download an item for theWALLET, JKS, and JCEKS types. The virtual wallet must already exist, and theuser must have authorization to access it. The okvutil utility downloads theentire virtual wallet specified by the -g option, and stores it in a new wallet.There must be no existing wallet at the specified location. The okvutil utilitywill create one. okvutil prompts you to create and enter a password for thenew wallet. Record this password for the future. Remember that the groupname is case-sensitive.
If the type is WALLET, JKS, or JCEKS, then you can either include or omit thegroup setting. If the type is SSH, KERBEROS, or OTHER, then you must includethe object_id option, but not include the group setting.
In a multi-master cluster, only the default wallet assigned to the endpoint canbe specified when the name status is PENDING.
-i, --item Refers to the unique ID of the object that you want to download, such assecrets (for example, -i oracle.security.client.password1 for the firstsecure external password store (SEPS) entry inside a wallet).
Appendix Bokvutil download Command
B-5
Table B-4 (Cont.) okvutil download Command Options
Parameter Description
-o, --overwrite Downloads data into an existing WALLET, JKS, or JCEKS file specified by -l,which must exist. If a conflict arises between the data to download and thedata that already exists in the container, then the new data overwrites the olddata. The -o, --overwrite option does not apply to the other types (SSH,KERBEROS, and OTHER). Use care if you plan to specify this option.
If you omit the o or overwrite option when you download wallets that alreadyexist in the current directory, then the original wallet file is renamed to eitherewallet.p12.timestamp.bak or owallet.sso.timestamp.bak before thenew wallet file is downloaded. For files that are not wallets (such as Javakeystore files), an error appears, and you will need to rename the file or moveit to a new location before performing the download.
-v, --verbose Refers to the verbosity level from 0 (none), 1 (debug), 2 (detailed debug).
Example: Downloading a Virtual Wallet to a Java Keystore
The following example shows how to use the okvutil download command todownload the Oracle Key Vault virtual wallet FinanceWallet to a Java keystore. This isuseful if you are sharing the same Java key store across multiple application serversand want to use the same wallet.
$ okvutil download -l ./fin/okv/work -t JCEKS -g FinanceWallet
The command will prompt for a new password for the Java Keystore as below:
Enter new Java keystore password:Confirm new Java keystore password:Download succeeded
Related Topics
• okvutil list CommandThe okvutil list command lists the available security objects that are uploaded.
• Downloading Oracle WalletsThe okvutil download command downloads an Oracle wallet from the OracleKey Vault server to an endpoint.
B.6 okvutil list CommandThe okvutil list command lists the available security objects that are uploaded.
When used without options or with the -g group option, it displays the unique ID,object type, and a descriptor for each item it lists from Oracle Key Vault.
Syntax
Short format:
okvutil list [-l location -t type | -g group] [-v verbosity_level]
Long format:
Appendix Bokvutil list Command
B-6
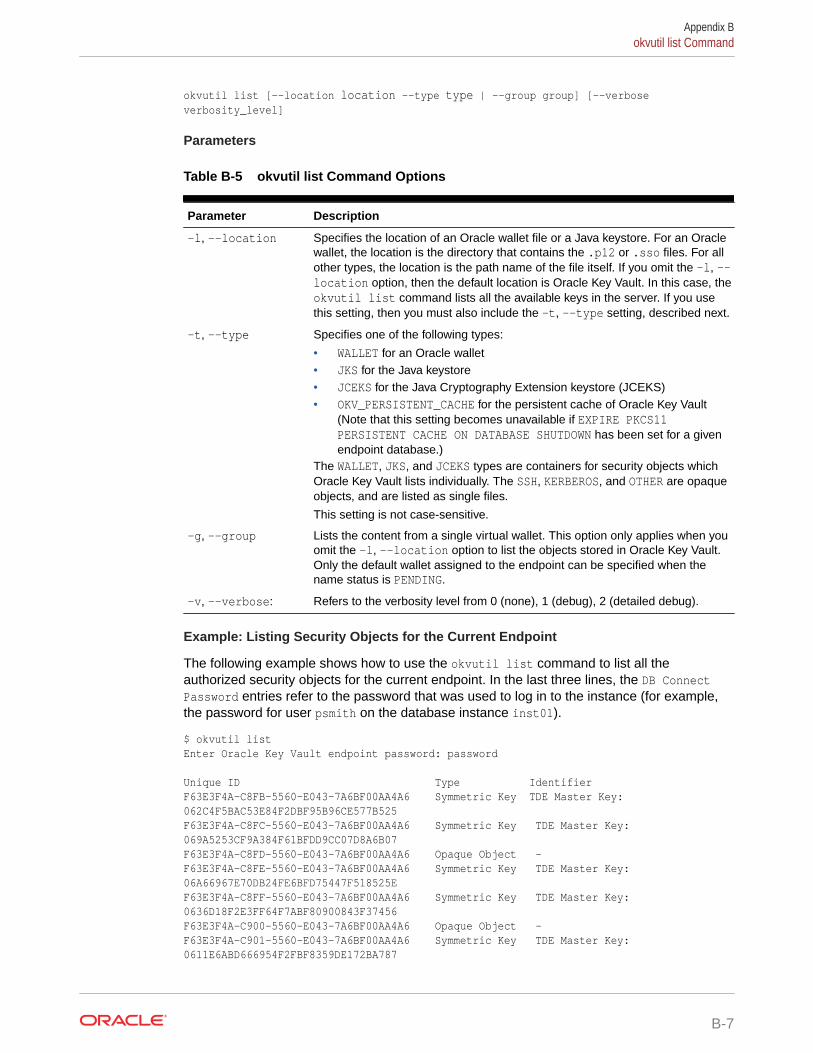
okvutil list [--location location --type type | --group group] [--verbose verbosity_level]
Parameters
Table B-5 okvutil list Command Options
Parameter Description
-l, --location Specifies the location of an Oracle wallet file or a Java keystore. For an Oraclewallet, the location is the directory that contains the .p12 or .sso files. For allother types, the location is the path name of the file itself. If you omit the -l, --location option, then the default location is Oracle Key Vault. In this case, theokvutil list command lists all the available keys in the server. If you usethis setting, then you must also include the -t, --type setting, described next.
-t, --type Specifies one of the following types:
• WALLET for an Oracle wallet• JKS for the Java keystore• JCEKS for the Java Cryptography Extension keystore (JCEKS)• OKV_PERSISTENT_CACHE for the persistent cache of Oracle Key Vault
(Note that this setting becomes unavailable if EXPIRE PKCS11PERSISTENT CACHE ON DATABASE SHUTDOWN has been set for a givenendpoint database.)
The WALLET, JKS, and JCEKS types are containers for security objects whichOracle Key Vault lists individually. The SSH, KERBEROS, and OTHER are opaqueobjects, and are listed as single files.
This setting is not case-sensitive.
-g, --group Lists the content from a single virtual wallet. This option only applies when youomit the -l, --location option to list the objects stored in Oracle Key Vault.Only the default wallet assigned to the endpoint can be specified when thename status is PENDING.
-v, --verbose: Refers to the verbosity level from 0 (none), 1 (debug), 2 (detailed debug).
Example: Listing Security Objects for the Current Endpoint
The following example shows how to use the okvutil list command to list all theauthorized security objects for the current endpoint. In the last three lines, the DB ConnectPassword entries refer to the password that was used to log in to the instance (for example,the password for user psmith on the database instance inst01).
$ okvutil listEnter Oracle Key Vault endpoint password: password
Unique ID Type IdentifierF63E3F4A-C8FB-5560-E043-7A6BF00AA4A6 Symmetric Key TDE Master Key: 062C4F5BAC53E84F2DBF95B96CE577B525F63E3F4A-C8FC-5560-E043-7A6BF00AA4A6 Symmetric Key TDE Master Key: 069A5253CF9A384F61BFDD9CC07D8A6B07F63E3F4A-C8FD-5560-E043-7A6BF00AA4A6 Opaque Object -F63E3F4A-C8FE-5560-E043-7A6BF00AA4A6 Symmetric Key TDE Master Key: 06A66967E70DB24FE6BFD75447F518525EF63E3F4A-C8FF-5560-E043-7A6BF00AA4A6 Symmetric Key TDE Master Key: 0636D18F2E3FF64F7ABF80900843F37456F63E3F4A-C900-5560-E043-7A6BF00AA4A6 Opaque Object -F63E3F4A-C901-5560-E043-7A6BF00AA4A6 Symmetric Key TDE Master Key: 0611E6ABD666954F2FBF8359DE172BA787
Appendix Bokvutil list Command
B-7
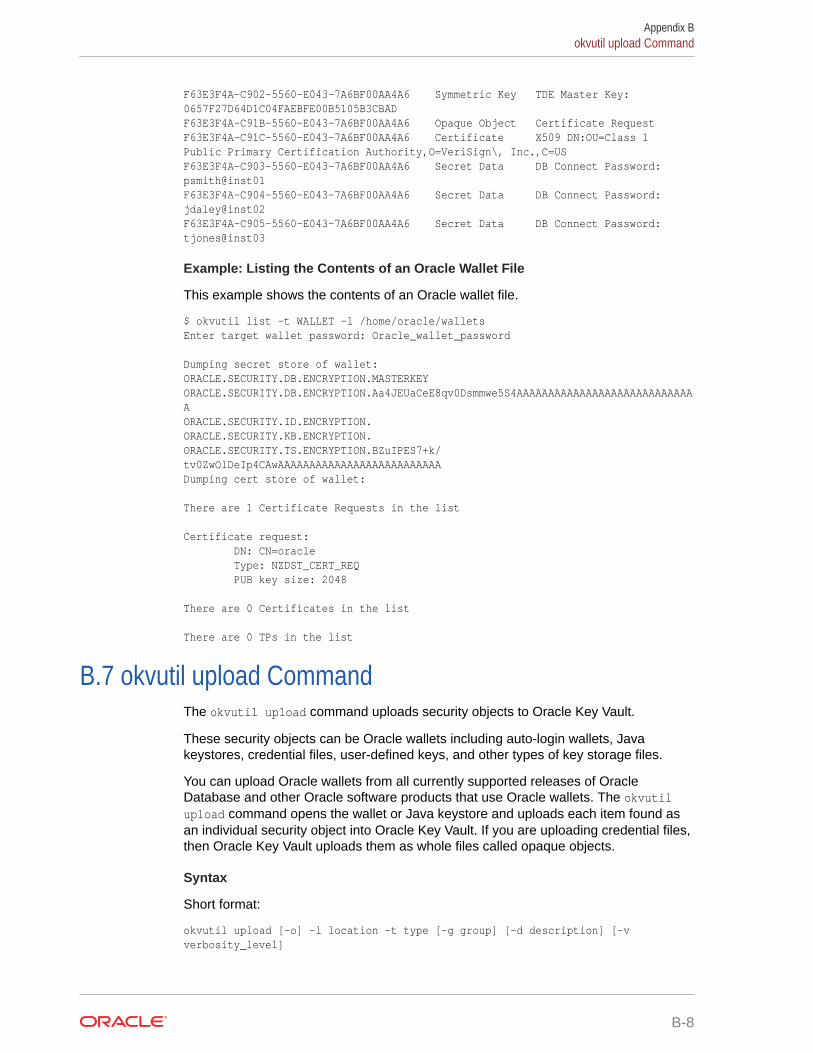
F63E3F4A-C902-5560-E043-7A6BF00AA4A6 Symmetric Key TDE Master Key: 0657F27D64D1C04FAEBFE00B5105B3CBADF63E3F4A-C91B-5560-E043-7A6BF00AA4A6 Opaque Object Certificate RequestF63E3F4A-C91C-5560-E043-7A6BF00AA4A6 Certificate X509 DN:OU=Class 1 Public Primary Certification Authority,O=VeriSign\, Inc.,C=US F63E3F4A-C903-5560-E043-7A6BF00AA4A6 Secret Data DB Connect Password: psmith@inst01F63E3F4A-C904-5560-E043-7A6BF00AA4A6 Secret Data DB Connect Password: jdaley@inst02F63E3F4A-C905-5560-E043-7A6BF00AA4A6 Secret Data DB Connect Password: tjones@inst03
Example: Listing the Contents of an Oracle Wallet File
This example shows the contents of an Oracle wallet file.
$ okvutil list -t WALLET -l /home/oracle/walletsEnter target wallet password: Oracle_wallet_password
Dumping secret store of wallet:ORACLE.SECURITY.DB.ENCRYPTION.MASTERKEYORACLE.SECURITY.DB.ENCRYPTION.Aa4JEUaCeE8qv0Dsmmwe5S4AAAAAAAAAAAAAAAAAAAAAAAAAAAAAORACLE.SECURITY.ID.ENCRYPTION.ORACLE.SECURITY.KB.ENCRYPTION.ORACLE.SECURITY.TS.ENCRYPTION.BZuIPES7+k/tv0ZwOlDeIp4CAwAAAAAAAAAAAAAAAAAAAAAAAAAADumping cert store of wallet: There are 1 Certificate Requests in the list Certificate request: DN: CN=oracle Type: NZDST_CERT_REQ PUB key size: 2048 There are 0 Certificates in the list There are 0 TPs in the list
B.7 okvutil upload CommandThe okvutil upload command uploads security objects to Oracle Key Vault.
These security objects can be Oracle wallets including auto-login wallets, Javakeystores, credential files, user-defined keys, and other types of key storage files.
You can upload Oracle wallets from all currently supported releases of OracleDatabase and other Oracle software products that use Oracle wallets. The okvutilupload command opens the wallet or Java keystore and uploads each item found asan individual security object into Oracle Key Vault. If you are uploading credential files,then Oracle Key Vault uploads them as whole files called opaque objects.
Syntax
Short format:
okvutil upload [-o] -l location -t type [-g group] [-d description] [-v verbosity_level]
Appendix Bokvutil upload Command
B-8
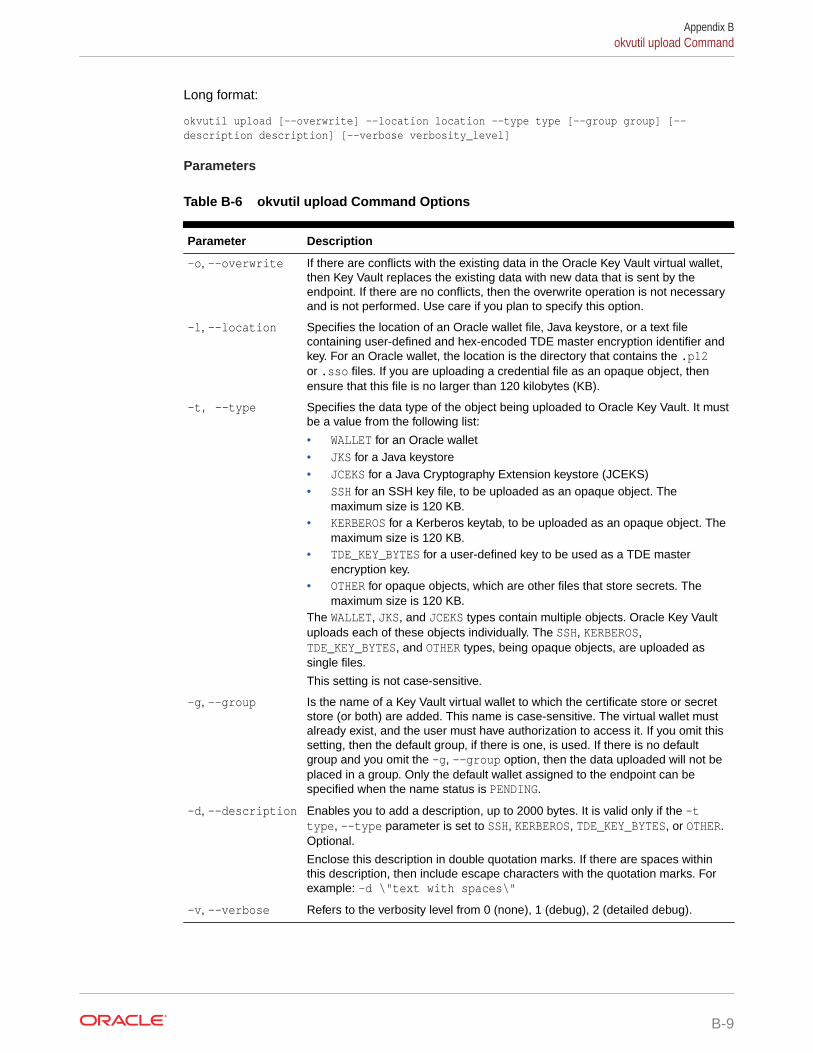
Long format:
okvutil upload [--overwrite] --location location --type type [--group group] [--description description] [--verbose verbosity_level]
Parameters
Table B-6 okvutil upload Command Options
Parameter Description
-o, --overwrite If there are conflicts with the existing data in the Oracle Key Vault virtual wallet,then Key Vault replaces the existing data with new data that is sent by theendpoint. If there are no conflicts, then the overwrite operation is not necessaryand is not performed. Use care if you plan to specify this option.
-l, --location Specifies the location of an Oracle wallet file, Java keystore, or a text filecontaining user-defined and hex-encoded TDE master encryption identifier andkey. For an Oracle wallet, the location is the directory that contains the .p12or .sso files. If you are uploading a credential file as an opaque object, thenensure that this file is no larger than 120 kilobytes (KB).
-t, --type Specifies the data type of the object being uploaded to Oracle Key Vault. It mustbe a value from the following list:
• WALLET for an Oracle wallet• JKS for a Java keystore• JCEKS for a Java Cryptography Extension keystore (JCEKS)• SSH for an SSH key file, to be uploaded as an opaque object. The
maximum size is 120 KB.• KERBEROS for a Kerberos keytab, to be uploaded as an opaque object. The
maximum size is 120 KB.• TDE_KEY_BYTES for a user-defined key to be used as a TDE master
encryption key.• OTHER for opaque objects, which are other files that store secrets. The
maximum size is 120 KB.The WALLET, JKS, and JCEKS types contain multiple objects. Oracle Key Vaultuploads each of these objects individually. The SSH, KERBEROS,TDE_KEY_BYTES, and OTHER types, being opaque objects, are uploaded assingle files.
This setting is not case-sensitive.
-g, --group Is the name of a Key Vault virtual wallet to which the certificate store or secretstore (or both) are added. This name is case-sensitive. The virtual wallet mustalready exist, and the user must have authorization to access it. If you omit thissetting, then the default group, if there is one, is used. If there is no defaultgroup and you omit the -g, --group option, then the data uploaded will not beplaced in a group. Only the default wallet assigned to the endpoint can bespecified when the name status is PENDING.
-d, --description Enables you to add a description, up to 2000 bytes. It is valid only if the -ttype, --type parameter is set to SSH, KERBEROS, TDE_KEY_BYTES, or OTHER.Optional.
Enclose this description in double quotation marks. If there are spaces withinthis description, then include escape characters with the quotation marks. Forexample: -d \"text with spaces\"
-v, --verbose Refers to the verbosity level from 0 (none), 1 (debug), 2 (detailed debug).
Appendix Bokvutil upload Command
B-9
Example: Uploading a Java Keystore Using the -v 2 Option
The following example shows how to use the okvutil upload command to upload aJava keystore. The -v 2 option enables the command to list the items that areuploaded. The okvutil command prompts if necessary for passwords to connect toOracle Key Vault and to open the Oracle wallet file.
$ okvutil upload -l ./fin_jceks.jck -t JCEKS -g fin_wal -v 2
okvutil version 18.3.0.0.0Configuration file: /tmp/fin_okv/conf/okvclient.oraServer: 192.0.2.254:5696Standby Server: 127.0.0.1:5696Uploading from /tmp/fin_okv/keystores/jks/keystore.jksEnter source Java keystore password:Uploading private keyUploading trust pointUploading trust pointUploading private keyUploading private key Uploaded 3 private keysUploaded 0 secret keysUploaded 2 trust points Upload succeeded
Example: Uploading a Password-Protected Wallet File
The following example shows how to use the okvutil upload command to upload apassword-protected wallet file when there is no password for the endpoint to connectto Oracle Key Vault.
$ okvutil upload -l . -t WALLET -g FinanceWallet Enter source wallet password: password
Upload succeeded
Example: Uploading a User-Defined Key to Use as a TDE Master Encryption Key
The following example shows how to upload a user-defined key.
$ okvutil upload -l /tmp/tde_key_bytes.txt -t TDE_KEY_BYTES -g "FIN_DATABASE_VIRTUAL_WALLET" -d \"This key was created for Financial database use on 1st April 2020\"
Related Topics
• Uploading Oracle WalletsThe okvutil upload command uploads wallets to Oracle Key Vault.
• Step 1: Upload the User-Defined KeyUse the okvutil upload command to upload user-defined master encryption keysto Oracle Key Vault.
• Adding Security Objects to a Virtual WalletYou can add new security objects to a virtual wallet at any time as needed.
• Uploading Oracle WalletsThe okvutil upload command uploads wallets to Oracle Key Vault.
Appendix Bokvutil upload Command
B-10
CTroubleshooting Oracle Key Vault
Oracle provides checklists and tips for commonly encountered errors that will help you installand deploy Oracle Key Vault.
• Oracle Key Vault Pre-Installation ChecklistThe pre-installation checklist covers all the requirements to successfully install Key Vault.
• Integrating Oracle Key Vault with Oracle Audit Vault and Database FirewallYou can consolidate audits between Oracle Audit Vault and Database Firewall (AVDF)with Oracle Key Vault. To do this, you must integrate Audit Vault and Database Firewallwith Oracle Key Vault.
• RESTful Services Troubleshooting HelpThe Oracle Key Vault log files capture all the error messages sent by the server.
• Error: Cannot Open Keystore MessageThe Cannot Open Keystore error can appear when you try to upload a Java keystore tothe Oracle Key Vault server.
• KMIP Error: Invalid FieldThe Invalid Field KMIP error can occur when you are trying to upload Oracle wallets tovirtual wallets on multiple endpoints.
• WARNING: Could Not Store Private Key ErrorsIf you upload two keystores with the same file name but different contents, a WARNING:Could not store private key error appears.
• Errors After Upgrading Oracle Key VaultSome errors that appear after the upgrade can be ignored.
• Error: Failed to Open WalletAn Failed to Open Wallet error can appear if you attempt to use an online master key.
• Transaction Check Error: Diagnostics Generation UtilityIf you are trying to perform an upgrade of Oracle Key Vault, a transaction check errormay appear.
• Fast-Start Failover (FSFO) Suspended (ORA-16818)An ORA-16818: Fast-Start Failover suspended error can appear as a result of a faststart failover operation failing.
• SSH Tunnel Add FailureWhile you are configuring the SSH tunnel, a Failed to establish SSH tunnel. Referto Oracle documentation error may appear.
• Error: Provision Command Fails if /usr/bin/java Does Not ExistThe RESTful service command to provision an endpoint fails if the soft link /usr/bin/java does not exist or points to an incorrect Java directory.
• TDE Endpoint Integration IssuesSeveral issues related to Transparent Data Encryption (TDE) endpoint integrationproblems can arise.
C-1
• Failover Situations in Primary-Standby ModeFailover situations can occur with or without read-only restricted mode or during aplanned shutdown operation for both primary and standby servers.
• Performing a Planned ShutdownA user who has the System Administrator role can perform planned shutdownsduring an upgrade or a maintenance window.
Related Topics
• Guidelines for Uploading and Downloading Oracle WalletsOracle provides guidelines for uploading and downloading wallets to and fromOracle Key Vault.
• Guidelines for Uploading and Downloading JKS and JCEKS KeystoresOracle provides recommendations for when you upload and download JKS andJCEKS keystores.
• Guidelines for Uploading and Downloading Credential FilesOracle provides recommendations for when you upload and download credentialfiles.
C.1 Oracle Key Vault Pre-Installation ChecklistThe pre-installation checklist covers all the requirements to successfully install KeyVault.
Table C-1 Oracle Key Vault Pre-Installation Checklist
Item# Check Task
1. [ x ] System requirements Confirm that you have enough CPU, memory, and disk asdescribed in System Requirements.
2. [ x ] Open all the requirednetwork ports in yourfirewall
For details on network ports, see Network PortRequirements.
3. [ x ] Supported endpointplatforms
See Supported Endpoint Platforms.
4. [ x ] Set the COMPATIBLEinitialization parameterfor online master key(previously TDE directconnect).
Guidance for setting this parameter for Oracle Database11.2.0.0 or later is in Supported Endpoint Platforms.
5. [ x ] Get a fixed IP address,network mask, andgateway address fromyour networkadministrator.
You will need this information for Step 6 in Installing theOracle Key Vault Appliance Software
Appendix COracle Key Vault Pre-Installation Checklist
C-2
C.2 Integrating Oracle Key Vault with Oracle Audit Vault andDatabase Firewall
You can consolidate audits between Oracle Audit Vault and Database Firewall (AVDF) withOracle Key Vault. To do this, you must integrate Audit Vault and Database Firewall withOracle Key Vault.
• Step 1: Check the EnvironmentBefore you begin the integration, you should ensure that the required components are allin place.
• Step 2: Register Oracle Key Vault as a Secured Target with AVDFYou must register the Oracle Key Vault server as a secured target on the Oracle AuditVault and Database Firewall server.
• Step 3: Register Oracle Key Vault as a Host with AVDFNext, you must register the Oracle Key Vault server as a host on the Audit Vault andDatabase Firewall server.
• Step 4: Download the AVDF Agent and Upload it to Oracle Key VaultYou must next download the Oracle Audit Vault and Database Firewall agent and thenupload it to the Oracle Key Vault server.
• Step 5: Install the AVDF agent.jar File on the Oracle Key Vault ServerAt this stage, you are ready to install the agent.jar file on the Oracle Key Vault server.
• Step 6: Add the Oracle Key Vault Audit Trail to AVDFNext, you can add the audit trail to Oracle Audit Vault and Database Firewall.
• Step 7: View Oracle Key Vault Audit Data Collected by AVDFAfter you have completed the integration and are collecting data, you can view datacollected by Oracle Audit Vault and Database Firewall.
C.2.1 Step 1: Check the EnvironmentBefore you begin the integration, you should ensure that the required components are all inplace.
1. Ensure that Oracle Audit Vault and Database Firewall is properly installed andconfigured.
This one-time activity requires administrative access to the Oracle Audit Vault server inorder to register Oracle Key Vault as a secured target, and to download the AVAgentsoftware, which will be installed in Oracle Key Vault.
2. Temporarily, enable SSH access in Oracle Key Vault.
Log in to the Oracle Key Vault management console as a user who has the SystemAdministrator role. Select the System tab, then Settings. In the Network Details area,click SSH Access. Select IP address(es) and then enter only the IP addresses that youneed, or select All. Click Save.
3. In Oracle Key Vault, enable the integration with Oracle Audit Vault.
As a user who has the System Administrator role, in the Oracle Key Vault managementconsole, select the System tab, then Settings, and then select Audit Vault in theMonitoring and Alerts section. In the Oracle Audit Vault Integration window, selectEnable, and the provide the password for the avcollector user. Then click Save.
Appendix CIntegrating Oracle Key Vault with Oracle Audit Vault and Database Firewall
C-3
C.2.2 Step 2: Register Oracle Key Vault as a Secured Target withAVDF
You must register the Oracle Key Vault server as a secured target on the Oracle AuditVault and Database Firewall server.
1. Log in to the Oracle Audit Vault Server console as an administrator (avadmin).
2. Click the Secured Targets tab, and then select Register.
3. In the New Secured Target Name field, enter the name of the Oracle Key Vaultserver.
4. For Secured Target Type, select Oracle Key Vault from the menu.
5. In the Add Secured Target Location section, add the following for the connectstring:
jdbc:oracle:thin:@//127.0.0.1:1521/dbfwdb
6. For the user name and password, enter avcollector, followed by the passwordthat you created when you enabled the integration with Oracle Audit Vault whilechecking the environment, in the previous section.
7. Add the following collection attribute:
av.collector.securedTargetVersion 12.2.0.0.0av.collector.TimeZoneOffset +5:30
You can use any TimeZoneOffset setting that applies to your situation.
C.2.3 Step 3: Register Oracle Key Vault as a Host with AVDFNext, you must register the Oracle Key Vault server as a host on the Audit Vault andDatabase Firewall server.
1. Log in to the Oracle Audit Vault Server console as an administrator (avadmin).
2. Click the Hosts tab, then select Register.
3. In the Host Name field, enter the name of the Oracle Key Vault server.
4. In the Host IP field, enter the IP address of the Oracle Key Vault server.
5. Click Save.
6. When the new entry appears with an agent activation key, copy this value andstore it in a safe place.
You will need this agent activation key value later on in these steps.
C.2.4 Step 4: Download the AVDF Agent and Upload it to Oracle KeyVault
You must next download the Oracle Audit Vault and Database Firewall agent and thenupload it to the Oracle Key Vault server.
1. Log in to the Oracle Audit Vault Server console as an administrator (avadmin).
Appendix CIntegrating Oracle Key Vault with Oracle Audit Vault and Database Firewall
C-4
2. Select the Hosts tab, and then select Agent.
3. Click the Download button to download Agent Release version.
4. Select the agent, which should be the first item in the list.
5. Save this item as agent.jar.
6. Use scp to upload agent.jar to the Oracle Key Vault server.
For example:
$ scp agent.jar support@OKV_IP_address:/tmp
C.2.5 Step 5: Install the AVDF agent.jar File on the Oracle Key Vault ServerAt this stage, you are ready to install the agent.jar file on the Oracle Key Vault server.
1. Log on to the Oracle Key Vault command line as user support and then su to root tocreate the directory and set permissions:
# mkdir -pv /usr/local/okv/avdf# chown -Rv oracle:oinstall /usr/local/okv/avdf
2. su to oracle and extract the agent:
su - oracle$ java -jar /tmp/agent.jar -d /usr/local/okv/avdf
The following output should appear:
Checking for updates...Agent is updating. This operation may take a few minutes. Please wait...Agent updated successfully.Agent installed successfully.If deploying host monitor please refer to product documentation for additional installation steps.
3. As oracle, start the agent and enter the agent activation key that you generated earlierwhen you registered Oracle Key Vault as a secured target with AVDF.
$ /usr/local/okv/avdf/bin/agentctl start -kEnter Activation Key: activation_key
The following output should appear:
Agent started successfully.
4. Because you no longer need to copy files from one server to another, disable SSHaccess.
Log in to the Oracle Key Vault management console as a user who has the SystemAdministrator role. Select the System tab, then Settings. In the Network Details area,click SSH Access. Select Disabled. Click Save. Restart the Oracle Key Vault server byselecting the System tab, then Status.
Appendix CIntegrating Oracle Key Vault with Oracle Audit Vault and Database Firewall
C-5
Related Topics
• Step 2: Register Oracle Key Vault as a Secured Target with AVDFYou must register the Oracle Key Vault server as a secured target on the OracleAudit Vault and Database Firewall server.
C.2.6 Step 6: Add the Oracle Key Vault Audit Trail to AVDFNext, you can add the audit trail to Oracle Audit Vault and Database Firewall.
1. Log in to the Oracle Audit Vault Server console as an administrator (avadmin).
2. Select Secured Targets, and then under Monitoring, select Audit Trails.
3. To add the new audit trail, click Add.
4. From the Audit Trail Type drop-down list, select TABLE.
5. In the Collection Host field, specify the host computer where you installed theagent.jar agent file. (You can use the Search icon to find this host computer.)
6. In the Secured Target Name field, enter the name of the secured target.
You can use the Search icon to find the name of the secured target.
7. In the Trail Location field, enter keyvault.audit_trail.
8. Click Save.
9. Select this audit trail and then start the audit trail collection.
In the Audit Trails page, select the audit trail and then click Start.
C.2.7 Step 7: View Oracle Key Vault Audit Data Collected by AVDFAfter you have completed the integration and are collecting data, you can view datacollected by Oracle Audit Vault and Database Firewall.
1. Log in to the Oracle Audit Vault Server console as an auditor (avauditor).
2. Select the Reports tab.
3. Select All Activity.
4. Select All Activity Report.
C.3 RESTful Services Troubleshooting HelpThe Oracle Key Vault log files capture all the error messages sent by the server.
The error messages are written to the /var/log/messages file. The first debuggingstep is to read the messages file.
1. Log in to the Oracle Key Vault server.
2. As the root user, check for log file errors as follows:
root# vi /var/log/messages
Appendix CRESTful Services Troubleshooting Help
C-6
C.4 Error: Cannot Open Keystore MessageThe Cannot Open Keystore error can appear when you try to upload a Java keystore to theOracle Key Vault server.
To remedy this problem, try the following solutions:
• Ensure that the PATH environment variable has been correctly set.
• Check where the keytool and Java are pointing to, by entering the following commandsin a shell:
which keytoolwhich java
• Ensure that you are using Oracle Java.
C.5 KMIP Error: Invalid FieldThe Invalid Field KMIP error can occur when you are trying to upload Oracle wallets tovirtual wallets on multiple endpoints.
The KMIP error can occur for other scenarios, but this scenario is the most common.
The steps that result in this error are as follows:
1. You configure two or more endpoints (for example, Endpoint A and Endpoint B) to sharea wallet (Oracle Wallet C), and hence also share the wallet keys.
2. You register Endpoints A and B with Oracle Key Vault.
3. You create a default wallet (Virtual Wallet A) for Endpoint A and then a default wallet(Virtual Wallet B) for Endpoint B. Each virtual wallet is accessible only to thecorresponding endpoint. For example, Endpoint B has no access to Virtual Wallet A.
4. You upload Oracle Wallet C into Virtual Wallet A on Endpoint A.
5. You attempt to upload Oracle Wallet C from Endpoint B into Virtual Wallet B Endpoint B.
The KMIP error occurs because there are two copies of the same key being created andEndpoint B does not have visibility for both. If Endpoint A tries to upload the first key again,Oracle Key Vault detects this action and accounts for it. But because in Step 5, Endpoint B isnot allowed to see the first key, Oracle Key Vault is unable to perform the necessaryharmonization for the two Oracle wallets.
This is expected behavior. To avoid the Invalid Field, create an endpoint group so that youcan share the wallet with multiple endpoints.
Related Topics
•
Appendix CError: Cannot Open Keystore Message
C-7
C.6 WARNING: Could Not Store Private Key ErrorsIf you upload two keystores with the same file name but different contents, a WARNING:Could not store private key error appears.
This error occurs if you use the same alias (-alias slserver) in each keytoolcommand. When you download two such keystores that have the same alias, theokvutil download process ignores the second one because the JKS aliases must beunique.
• To remedy this problem, download the second keystore using a unique alias.
Related Topics
• Downloading JKS or JCEKS KeystoresThe okvutil download command can download an uploaded JKS or JCEKSkeystore.
C.7 Errors After Upgrading Oracle Key VaultSome errors that appear after the upgrade can be ignored.
After you perform an upgrade of Oracle Key Vault on an standalone server, ORA-1109:database does not open, ORA-00313: open failed for members, and ORA-00312:online log 3 thread 1 error messages may appear in the /var/log/messages logfile.
You can safely ignore these messages. Error messages also appear in the /var/log/debug file.
C.8 Error: Failed to Open WalletAn Failed to Open Wallet error can appear if you attempt to use an online masterkey.
If you are attempting to use an online master key (previously called TDE directconnect) and encounter this error, then first check your environment variableORACLE_BASE. In an Oracle Real Application Clusters environment, you must performthis step on all database instances.
You must also set the ORACLE_SID, ORACLE_HOME, and OKV_HOME environment variablesneeded by the PKCS #11 library as follows:
1. Log in to the server where the PKCS #11 library resides and then set theORACLE_SID, ORACLE_HOME, and OKV_HOME environment variables.
2. Log in to the database instance using SQL*Plus as a user with the SYSDBAadministrative privilege.
sqlplus sys / as sysdbaEnter password: password
3. Shut down the database.
For example:
SHUTDOWN IMMEDIATE
Appendix CWARNING: Could Not Store Private Key Errors
C-8
4. From the command line, restart the database service.
su - oraclelsnrctl start
5. In SQL*Plus, restart the database.
STARTUP
Related Topics
• How To Create a TDE Auto_Login Wallet For A Database With Oracle Key Vault OKVTDE Direct Connection / Online Master Key (Doc ID 2120160.1)
C.9 Transaction Check Error: Diagnostics Generation UtilityIf you are trying to perform an upgrade of Oracle Key Vault, a transaction check error mayappear.
For example:
file /usr/local/dbfw/etc/dbfw-diagnostics-package.yml from install ofappliance-18.3.0.0.0-52_190425.2253.d.x86_64 conflicts with file frompackage okv-diagnostic-12.2.0.8.0-40_181013.1730.x86_64
The problem is that the diagnostic generation utility interferes with the upgrade process. Youmust remove the diagnostic generation utility before you can perform the upgrade.
C.10 Fast-Start Failover (FSFO) Suspended (ORA-16818)An ORA-16818: Fast-Start Failover suspended error can appear as a result of a fast startfailover operation failing.
If the primary server was shut down gracefully in a controlled way, such as by clicking aPower Off button instead of manually turning off the computer, then a fast start failovercannot be performed and the ORA-16818: Fast-Start Failover suspended error appears.In a graceful shutdown operation, the primary server's failover status goes into a suspendedstate with the standby waiting indefinitely for the primary server to be available. This is theexpected behavior for a fast-start failover (FSFO) operation, as defined by Oracle Data Guardavoid a split brain scenario. By design, a fast-start failover operation error occurs only whenthe primary server shuts down unexpectedly. If you perform a SHUTDOWN IMMEDIATE orSHUTDOWN NORMAL command in SQL*Plus, then the FSFO does not occur because thedatabase shuts down gracefully.
C.11 SSH Tunnel Add FailureWhile you are configuring the SSH tunnel, a Failed to establish SSH tunnel. Refer toOracle documentation error may appear.
You might get the following error message while trying to set up the SSH tunnel:
The failure may be due to one or more of the following problems:
• The following settings may be invalid:
– Invalid IP address
– Invalid port
Appendix CTransaction Check Error: Diagnostics Generation Utility
C-9

– Invalid user name
• The public SSH Oracle Key Vault key was not copied to the authorized_keys fileof the okv user on the Database as a Service instance.
• The Database as a Service instance is not reachable because of networkoverload.
To remedy this problem, check your input values and connection and retry.
C.12 Error: Provision Command Fails if /usr/bin/java DoesNot Exist
The RESTful service command to provision an endpoint fails if the soft link /usr/bin/java does not exist or points to an incorrect Java directory.
To remedy this problem, ensure that the Java version is 1.7.21 or later. You can createa soft link to the Java home directory as follows:
ln -s Java_home_directory/bin/java /usr/bin/java
C.13 TDE Endpoint Integration IssuesSeveral issues related to Transparent Data Encryption (TDE) endpoint integrationproblems can arise.
Common Transparent Data Encryption (TDE) endpoint integration problems caused byinstallation errors, svrctl misuse, and the mismanagement of security objects in aprimary-standby environment can arise.
• Installing the Oracle Key Vault library: You must run root.sh to install theOracle Key Vault library only once on a computer that has multiple Oracledatabases. During an upgrade you must upgrade the library only after you haveshut down all the associated endpoints. Oracle Key Vault servers are backwardcompatible with endpoint libraries.
• Using svrctl to manage the database: If you use the svrctl utility to managethe database, remember that svrctl can set the ORACLE_BASE environmentvariable to NULL. Oracle recommends that you set ORACLE_BASE to ORACLE_HOME ifORACLE_BASE is not used in your environment.
• Managing security objects the same way in a primary-standby environment:In a primary-standby configuration, ensure that both the primary and standbyservers use the same mechanism to manage security objects. These serversshould either both use a wallet or both use Oracle Key Vault.
C.14 Failover Situations in Primary-Standby ModeFailover situations can occur with or without read-only restricted mode or during aplanned shutdown operation for both primary and standby servers.
• About Failover Situations in Primary-Standby ModeFailover situations in primary-standby node can occur with read-only restrictedmode disabled, and with read-only restricted mode enabled.
Appendix CError: Provision Command Fails if /usr/bin/java Does Not Exist
C-10
• Failover Situations Without Read-Only Restricted ModeIf read-only restricted mode is not used, then various failover situations may occur inOracle Key Vault.
• Failover Situations with Read-Only Restricted ModeThe use read-only restricted mode affects failover operations in Oracle Key Vault.
C.14.1 About Failover Situations in Primary-Standby ModeFailover situations in primary-standby node can occur with read-only restricted modedisabled, and with read-only restricted mode enabled.
The types of failover situations are as follows:
• Planned shutdown of the primary server: A system administrator shuts down theprimary server during an upgrade or maintenance window.
• Planned shutdown of the standby server: A system administrator shuts down thestandby server during an upgrade or maintenance window.
• Unplanned shutdown of the primary server: The primary server is offline due tounforeseen circumstances such as power loss or network failure.
• Unplanned shutdown of the standby server: The standby server is offline due tounforeseen circumstances such as power loss or network failure.
C.14.2 Failover Situations Without Read-Only Restricted ModeIf read-only restricted mode is not used, then various failover situations may occur in OracleKey Vault.
• Primary Server: Planned Shutdown During an UpgradeIn a failover, the use of read-only restricted mode affects a planned shutdown of aprimary server during an upgrade.
• Primary Server: Planned Shutdown During MaintenanceIn a failover, not using read-only restricted mode affects the planned shutdown of aprimary server during maintenance.
• Standby Server: Planned ShutdownIn a failover, not using read-only restricted mode affects a planned shutdown in a standbyserver.
• Primary Server: Unplanned ShutdownIn a failover, not using read-only restricted mode affects an unplanned shutdown in aprimary server.
• Standby Server: Unplanned ShutdownIn a failover, not using read-only restricted mode affects a standby server during anunplanned shutdown.
C.14.2.1 Primary Server: Planned Shutdown During an UpgradeIn a failover, the use of read-only restricted mode affects a planned shutdown of a primaryserver during an upgrade.
If read-only restricted mode is not used, when the primary server goes offline during anupgrade, then the standby server waits in read-only mode for the primary server to returnonline. During the upgrade, you cannot access the Oracle Key Vault management console.
Appendix CFailover Situations in Primary-Standby Mode
C-11
• Recovery process: When the primary server is back online after the upgrade thestandby server will automatically synchronize with the primary server. The primaryand standby servers retain their earlier roles, and both servers will continue tooperate in primary-standby mode.
• Primary server state: Down
• Standby server state: Up
• Does failover occur? No
Related Topics
• Performing a Primary Server Planned Shutdown During an UpgradeYou must upgrade both servers in a pair when you perform a primary servershutdown.
C.14.2.2 Primary Server: Planned Shutdown During MaintenanceIn a failover, not using read-only restricted mode affects the planned shutdown of aprimary server during maintenance.
If read-only restricted mode is not used, when the primary server is powered off orrestarted during maintenance, then the standby server takes over from the primaryserver.
• Recovery process: The standby server is now the new primary server. When theold primary server is back online after maintenance, it will automaticallysynchronize with the new primary server and take over the role of standby server.Both servers will continue to operate in primary-standby mode. Be aware thatwhen the primary server is offline, data replication is disabled. If the new primaryserver goes offline before synchronizing with the new standby server, it may causea loss of critical data.
• Primary server state: Down
• Standby server state: Up
• Does failover occur? Yes
Related Topics
• Performing a Primary Server Planned Shutdown During MaintenanceTo perform a primary server planned shutdown during maintenance, power off orrestart Oracle Key Vault.
C.14.2.3 Standby Server: Planned ShutdownIn a failover, not using read-only restricted mode affects a planned shutdown in astandby server.
If read-only restricted mode is not used, when the standby server is powered off duringupgrade or maintenance, the primary server continues operating as the primary server.Read and write operations are allowed.
• Recovery process: When the standby server is back online post-upgrade or post-maintenance, the primary server will automatically synchronize with the standbyserver. The primary and standby servers retain their earlier roles, and both serverswill continue to operate in primary-standby mode. Be aware that when the standbyserver is offline, data replication is disabled. If the primary server goes offline
Appendix CFailover Situations in Primary-Standby Mode
C-12
before synchronizing with the standby server, then it may cause a loss of critical data.
• Primary server state: Up
• Standby server state: Down
• Does failover occur? No
Related Topics
• Performing a Standby Server Planned Shutdown During an UpgradeYou must upgrade both servers in a pair when you perform a standby server shutdown.
• Performing a Standby Server Planned Shutdown During MaintenanceYou can perform a standby server planned shutdown during maintenance from thestandby server using SSH.
C.14.2.4 Primary Server: Unplanned ShutdownIn a failover, not using read-only restricted mode affects an unplanned shutdown in a primaryserver.
If read-only restricted mode is not used, when the primary server goes offline because ofpower loss, network failure, or hardware failure, the standby server waits for the durationspecified in the Fast Start Failover Threshold field on the Configure High Availability pagein the Oracle Key Vault management console. If the primary server cannot be reached afterthe specified duration has elapsed, then the standby server takes over from the primaryserver.
• Recovery process: The standby server is now the new primary server. Rectify the failurethat affected the primary server by restarting the server or restoring network connectivity.When the primary server is back online, it will automatically synchronize with the newprimary server and take over the role of standby server.
• Primary server state: Down
• Standby server state: Up
• Does failover occur? Yes
C.14.2.5 Standby Server: Unplanned ShutdownIn a failover, not using read-only restricted mode affects a standby server during anunplanned shutdown.
If read-only restricted mode is not used, when the standby server goes offline because ofpower loss, network failure, or hardware failure, then the primary server becomesunavailable. All operations are disabled.
• Recovery process: Rectify the failure that affected the standby server by restarting theserver or restoring network connectivity. When the standby server is back online, it willautomatically synchronize with the primary server. You cannot re-establishsynchronization or network connectivity between the primary and standby servers,contact Oracle Support.
• Primary server state: Up
• Standby server state: Down
• Does failover occur? No
Appendix CFailover Situations in Primary-Standby Mode
C-13
C.14.3 Failover Situations with Read-Only Restricted ModeThe use read-only restricted mode affects failover operations in Oracle Key Vault.
• Primary Server: Planned Shutdown During an UpgradeIn a failover, not using read-only restricted mode affects a planned shutdown of aprimary server during an upgrade
• Primary Server: Planned Shutdown During MaintenanceIn a failover, using read-only restricted mode affects the planned shutdown of aprimary server during maintenance.
• Standby Server: Planned ShutdownIn a failover, using read-only restricted mode affects a planned shutdown in astandby server.
• Primary Server: Unplanned ShutdownIn a failover, using read-only restricted mode affects an unplanned shutdown in aprimary server.
• Standby Server: Unplanned ShutdownIn a failover, using read-only restricted mode affects a standby server during anunplanned shutdown.
C.14.3.1 Primary Server: Planned Shutdown During an UpgradeIn a failover, not using read-only restricted mode affects a planned shutdown of aprimary server during an upgrade
When the primary server goes offline during an upgrade, the standby server entersread-only restricted mode and waits for the primary server to come back online. Duringthe upgrade, you cannot access the Oracle Key Vault management console.
• Recovery process: When the primary server is back online post-upgrade, thestandby server will automatically synchronize with the primary server. The primaryand standby servers retain their earlier roles, and both servers will continue tooperate in primary-standby mode.
• Primary server state: Down
• Standby server state: Up
• Does failover occur? No
Related Topics
• Performing a Primary Server Planned Shutdown During an UpgradeYou must upgrade both servers in a pair when you perform a primary servershutdown.
C.14.3.2 Primary Server: Planned Shutdown During MaintenanceIn a failover, using read-only restricted mode affects the planned shutdown of aprimary server during maintenance.
When the primary server is powered off or restarted during maintenance, the standbyserver enters read-only restricted mode, and takes over from the primary server. TheOracle Key Vault management console displays a warning.
Appendix CFailover Situations in Primary-Standby Mode
C-14
• Recovery process: The standby server is now the new primary server. When the oldprimary server is back online after maintenance, it will automatically synchronize with thenew primary server and take over the role of standby server. Both servers will continue tooperate in primary-standby mode.
• Primary server state: Down
• Standby server state: Up
• Does failover occur? Yes
Related Topics
• Performing a Primary Server Planned Shutdown During MaintenanceTo perform a primary server planned shutdown during maintenance, power off or restartOracle Key Vault.
C.14.3.3 Standby Server: Planned ShutdownIn a failover, using read-only restricted mode affects a planned shutdown in a standby server.
When the standby server is powered off during upgrade or maintenance, the primary serverenters read-only restricted mode, and continues operating as the primary server. The OracleKey Vault management console displays a warning.
• Recovery process: When the standby server is back online post-upgrade or aftermaintenance, the primary server will automatically synchronize with the standby server.The primary and standby servers retain their earlier roles, and both servers will continueto operate in primary-standby mode.
• Primary server state: Up
• Standby server state: Down
• Does failover occur? No
Related Topics
• Performing a Standby Server Planned Shutdown During an UpgradeYou must upgrade both servers in a pair when you perform a standby server shutdown.
• Performing a Standby Server Planned Shutdown During MaintenanceYou can perform a standby server planned shutdown during maintenance from thestandby server using SSH.
C.14.3.4 Primary Server: Unplanned ShutdownIn a failover, using read-only restricted mode affects an unplanned shutdown in a primaryserver.
When the primary server goes offline because of power loss, network failure, or hardwarefailure, then the standby server waits for the duration specified in the Fast Start FailoverThreshold field on the Configure Primary-Standby page in the Oracle Key Vault managementconsole. If the primary server is not reachable after the specified duration has elapsed, thenthe standby server enters read-only restricted mode, and takes over from the primary server.
• Recovery process: The standby server is now the new primary server. Rectify the failurethat affected the primary server by restarting the server or restoring network connectivity.When the primary server is back online, it will automatically synchronize with the newprimary server and take over the role of standby server.
• Primary server state: Down
Appendix CFailover Situations in Primary-Standby Mode
C-15
• Standby server state: Up
• Does failover occur? Yes
C.14.3.5 Standby Server: Unplanned ShutdownIn a failover, using read-only restricted mode affects a standby server during anunplanned shutdown.
When the standby server goes offline because of power loss, network failure, orhardware failure, the primary server waits for the duration specified in the Fast StartFailover Threshold field on the Configure Primary-Standby page of the Oracle KeyVault management console. If the standby server is not reachable after the specifiedduration has elapsed, the primary server enters read-only restricted mode, andcontinues operating as the primary server.
• Recovery process: Rectify the failure that affected the standby server byrestarting the server or restoring network connectivity. When the standby server isback online, it will automatically synchronize with the primary server. If you cannotre-establish synchronization or network connectivity between the primary andstandby servers, then contact Oracle Support.
• Primary server state: Up
• Standby server state: Down
• Does failover occur? No
C.15 Performing a Planned ShutdownA user who has the System Administrator role can perform planned shutdowns duringan upgrade or a maintenance window.
• Primary Server Planned ShutdownA user who has the System Administrator role can plan a shutdown of the primaryserver during an upgrade or a maintenance window.
• Standby Server Planned ShutdownA user who has the System Administrator role can plan a shutdown of the primaryserver during an upgrade or a maintenance window.
C.15.1 Primary Server Planned ShutdownA user who has the System Administrator role can plan a shutdown of the primaryserver during an upgrade or a maintenance window.
• Performing a Primary Server Planned Shutdown During an UpgradeYou must upgrade both servers in a pair when you perform a primary servershutdown.
• Performing a Primary Server Planned Shutdown During MaintenanceTo perform a primary server planned shutdown during maintenance, power off orrestart Oracle Key Vault.
Appendix CPerforming a Planned Shutdown
C-16
C.15.1.1 Performing a Primary Server Planned Shutdown During an UpgradeYou must upgrade both servers in a pair when you perform a primary server shutdown.
During an upgrade, failover does not occur. The primary and standby servers retain theirearlier roles after the primary server is back online post-upgrade. After an upgrade, theprimary and standby server retain their old roles.
• To perform a primary upgrade, upgrade both of the Oracle Key Vault server pair used inthe primary-standby configuration.
Related Topics
• Upgrading a Pair of Oracle Key Vault Servers in a Primary-Standby DeploymentYou should allocate several hours to upgrade the primary server after upgrading thestandby.
C.15.1.2 Performing a Primary Server Planned Shutdown During MaintenanceTo perform a primary server planned shutdown during maintenance, power off or restartOracle Key Vault.
1. Log in to the Oracle Key Vault management console as a user who has the SystemAdministrator role.
2. Select the System tab, and then select Status in the left navigation bar.
3. On the Status page, do one of the following:
• Click the Power Off button.
• Click the Reboot button.
When the primary server is shut down, the standby server waits for the duration specifiedin the Fast Start Failover Threshold field on the Configure Primary-Standby page.When the duration has elapsed, the standby server will failover and take over from theprimary server. The standby server is now the new primary server.
After a maintenance window, the primary and standby server switch roles. When the oldprimary server is back online after maintenance, it will take over the role of standby server.
C.15.2 Standby Server Planned ShutdownA user who has the System Administrator role can plan a shutdown of the primary serverduring an upgrade or a maintenance window.
During upgrade, the standby server shuts down automatically, and no manual steps arenecessary.
• Performing a Standby Server Planned Shutdown During an UpgradeYou must upgrade both servers in a pair when you perform a standby server shutdown.
• Performing a Standby Server Planned Shutdown During MaintenanceYou can perform a standby server planned shutdown during maintenance from thestandby server using SSH.
Appendix CPerforming a Planned Shutdown
C-17
C.15.2.1 Performing a Standby Server Planned Shutdown During an UpgradeYou must upgrade both servers in a pair when you perform a standby servershutdown.
When you restart the standby server during the upgrade, the upgrade script initiatesan automatic shutdown. There are no manual steps to be performed after the standbyserver is restarted.
• To perform a standby upgrade, upgrade both of the Oracle Key Vault server pairused in the primary-standby configuration.
Related Topics
• Upgrading a Pair of Oracle Key Vault Servers in a Primary-Standby DeploymentYou should allocate several hours to upgrade the primary server after upgradingthe standby.
C.15.2.2 Performing a Standby Server Planned Shutdown During MaintenanceYou can perform a standby server planned shutdown during maintenance from thestandby server using SSH.
1. Log in to the standby server terminal using ssh as user support, then switch user(su) to root.
2. Switch user (su) to oracle.
3. Log in to the standby database instance as a user who as the ALTER DATABASEsystem privilege.
For example:
sqlplus sec_adminEnter password: password
4. Execute the ALTER DATABASE statement as follows:
ALTER DATABASE RECOVER MANAGED STANDBY DATABASE CANCEL;
5. Shut down the database.
SHUTDOWN IMMEDIATE
6. Power off the standby server.
a. Log in to the Oracle Key Vault management console as a user who has theSystem Administrator role.
b. Select the System tab, and then select Status from the left navigation bar.
c. In the Status page, click the Power Off button.
Appendix CPerforming a Planned Shutdown
C-18
DSecurity Technical Implementation GuidesCompliance Standards
Oracle Key Vault follows the Security Technical Implementation Guides (STIG)-basedcompliance standards.
• About Security Technical Implementation GuidesA Security Technical Implementation Guide (STIG) is a methodology followed by the U.S.Department of Defense (DOD).
• Enabling and Disabling STIG Rules on Oracle Key VaultYou can enable STIG rules on Oracle Key Vault by enabling Strict mode.
• Current Implementation of STIG Rules on Oracle Key VaultYou should be aware of the vulnerability categories that STIG recommendationsaddresses.
• Current Implementation of Database STIG RulesThe current implementation of the database STIG rules encompass a wide range ofrules.
• Current Implementation of Operating System STIG RulesThe current implementation of the operating system STIG rules encompass a wide rangeof rules.
D.1 About Security Technical Implementation GuidesA Security Technical Implementation Guide (STIG) is a methodology followed by the U.S.Department of Defense (DOD).
STIG is designed reduce the attack surface of computer systems and networks, therebyensuring a lockdown of highly confidential information stored within the DOD network. STIGsprovide secure configuration standards for the DOD's Information Assurance (IA) and IA-enabled devices and systems. STIGs are created by the Defense Information SystemsAgency (DISA).
For over a decade, Oracle has worked closely with the DOD to develop, publish, andmaintain a growing list of STIGs for a variety of core Oracle products and technologiesincluding:
• Oracle Database
• Oracle Solaris
• Oracle Linux
• Oracle WebLogic
When STIGs are updated, Oracle analyzes the latest recommendations in order to identifynew ways to improve the security of its products by:
• Implementing new and innovative security capabilities that are then added to future STIGupdates
D-1
• Delivering functionality to automate the assessment and implementation of STIGrecommendations
• Improving “out of the box" security configuration settings based upon STIGrecommendations
D.2 Enabling and Disabling STIG Rules on Oracle Key VaultYou can enable STIG rules on Oracle Key Vault by enabling Strict mode.
• Enabling STIG Rules on Oracle Key VaultYou enable STIG rules (strict mode) from the command line.
• Disabling STIG Rules on Oracle Key VaultYou disable STIG rules (strict mode) from the command line.
D.2.1 Enabling STIG Rules on Oracle Key VaultYou enable STIG rules (strict mode) from the command line.
1. Log in to the operating system of the Key Vault server as the root user.
2. Run the following command as root:
/usr/local/dbfw/bin/stig -–enable
D.2.2 Disabling STIG Rules on Oracle Key VaultYou disable STIG rules (strict mode) from the command line.
1. Log in to the operating system of the Key Vault server as the root user.
2. Run the following command as root:
/usr/local/dbfw/bin/stig -–disable
D.3 Current Implementation of STIG Rules on Oracle KeyVault
You should be aware of the vulnerability categories that STIG recommendationsaddresses.
Oracle has developed a security-hardened configuration of Oracle Key Vault thatsupports U.S. Department of Defense Security Technical Implementation Guide (STIG)recommendations.
Table D-1 lists the three vulnerability categories that STIG recommendations address.
Table D-1 Vulnerability Categories
Category Description
CAT I Any vulnerability, the exploitation of which will, directly and immediately result inloss of Confidentiality, Availability, or Integrity.
Appendix DEnabling and Disabling STIG Rules on Oracle Key Vault
D-2
Table D-1 (Cont.) Vulnerability Categories
Category Description
CAT II Any vulnerability, the exploitation of which has a potential to result in loss ofConfidentiality, Availability, or Integrity.
CAT III Any vulnerability, the existence of which degrades measures to protect againstloss of Confidentiality, Availability, or Integrity.
D.4 Current Implementation of Database STIG RulesThe current implementation of the database STIG rules encompass a wide range of rules.
Table D-2 shows the current implementation of Database STIG rules on Oracle Key Vault.
Table D-2 Current Implementation of Database STIG Rules
STIG ID Title Severity
Addressed byScript
Addressed byDocumentation
Actionrequired
Implemented
Notes
DG0004-ORACLE11
DBMSapplicationobject owneraccounts
CAT II No No None No Application objectowner accountsKEYVAULT,APEX_040200,MANAGEMENT, andAVSYS are locked afterthe installation ofOracle Key Vault.
DG0008-ORACLE11
DBMSapplicationobjectownership
No No Yes No No The object owneraccounts in the OracleKey Vault server are asfollows:
• KEYVAULT• APEX_040200• AVSYS• MANAGEMENT
DG0014-ORACLE11
DBMSdemonstration and sampledatabases
CAT II No No None No All defaultdemonstration andsample databaseobjects have beenremoved.
DG0071-ORACLE11
DBMSpasswordchangevariance
CAT II No No No No Currently not supported
DG0073-ORACLE11
DBMS failedlogin accountlock
CAT II Yes No No No For profilesFAILED_LOGIN_ATTEMPTS is set to therequired limit in thescript.
Appendix DCurrent Implementation of Database STIG Rules
D-3
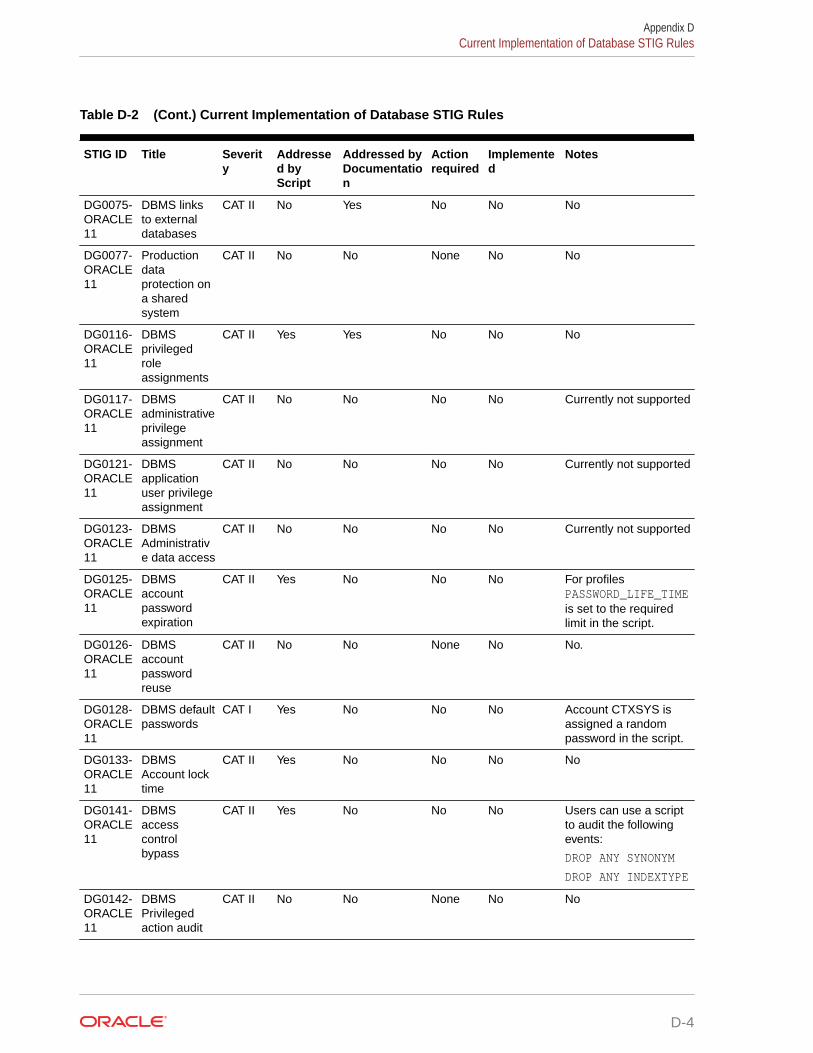
Table D-2 (Cont.) Current Implementation of Database STIG Rules
STIG ID Title Severity
Addressed byScript
Addressed byDocumentation
Actionrequired
Implemented
Notes
DG0075-ORACLE11
DBMS linksto externaldatabases
CAT II No Yes No No No
DG0077-ORACLE11
Productiondataprotection ona sharedsystem
CAT II No No None No No
DG0116-ORACLE11
DBMSprivilegedroleassignments
CAT II Yes Yes No No No
DG0117-ORACLE11
DBMSadministrativeprivilegeassignment
CAT II No No No No Currently not supported
DG0121-ORACLE11
DBMSapplicationuser privilegeassignment
CAT II No No No No Currently not supported
DG0123-ORACLE11
DBMSAdministrative data access
CAT II No No No No Currently not supported
DG0125-ORACLE11
DBMSaccountpasswordexpiration
CAT II Yes No No No For profilesPASSWORD_LIFE_TIMEis set to the requiredlimit in the script.
DG0126-ORACLE11
DBMSaccountpasswordreuse
CAT II No No None No No.
DG0128-ORACLE11
DBMS defaultpasswords
CAT I Yes No No No Account CTXSYS isassigned a randompassword in the script.
DG0133-ORACLE11
DBMSAccount locktime
CAT II Yes No No No No
DG0141-ORACLE11
DBMSaccesscontrolbypass
CAT II Yes No No No Users can use a scriptto audit the followingevents:
DROP ANY SYNONYM
DROP ANY INDEXTYPE
DG0142-ORACLE11
DBMSPrivilegedaction audit
CAT II No No None No No
Appendix DCurrent Implementation of Database STIG Rules
D-4
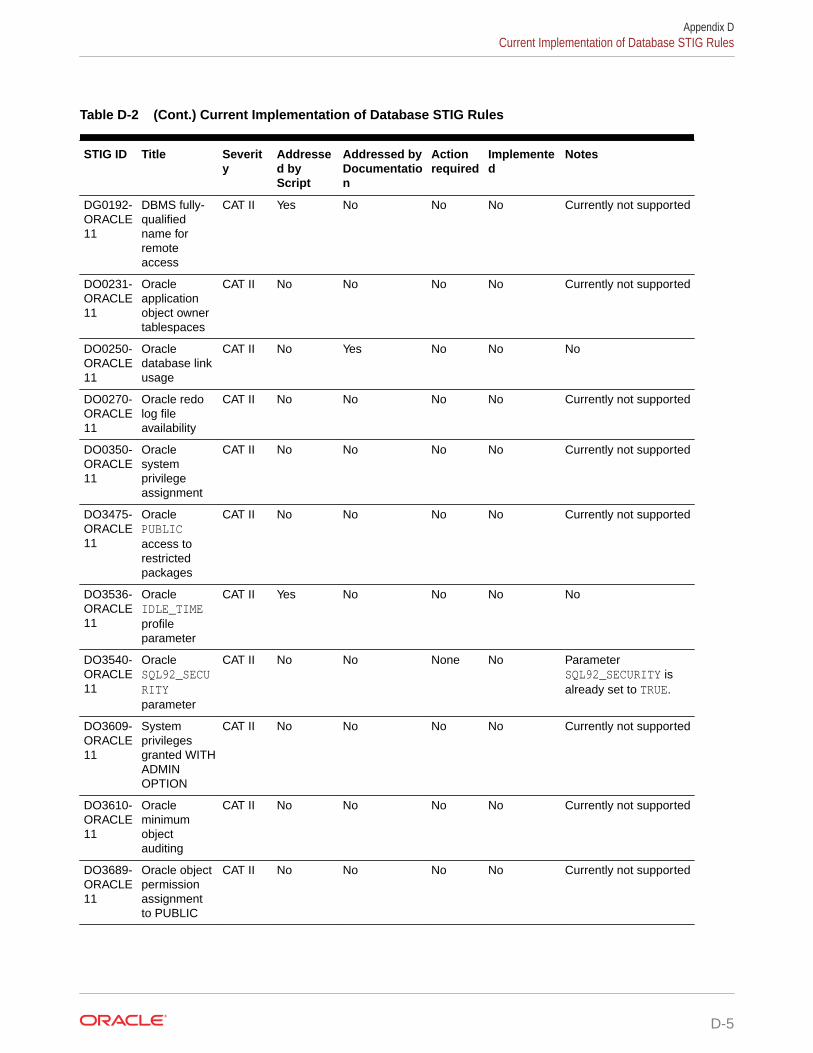
Table D-2 (Cont.) Current Implementation of Database STIG Rules
STIG ID Title Severity
Addressed byScript
Addressed byDocumentation
Actionrequired
Implemented
Notes
DG0192-ORACLE11
DBMS fully-qualifiedname forremoteaccess
CAT II Yes No No No Currently not supported
DO0231-ORACLE11
Oracleapplicationobject ownertablespaces
CAT II No No No No Currently not supported
DO0250-ORACLE11
Oracledatabase linkusage
CAT II No Yes No No No
DO0270-ORACLE11
Oracle redolog fileavailability
CAT II No No No No Currently not supported
DO0350-ORACLE11
Oraclesystemprivilegeassignment
CAT II No No No No Currently not supported
DO3475-ORACLE11
OraclePUBLICaccess torestrictedpackages
CAT II No No No No Currently not supported
DO3536-ORACLE11
OracleIDLE_TIMEprofileparameter
CAT II Yes No No No No
DO3540-ORACLE11
OracleSQL92_SECURITYparameter
CAT II No No None No ParameterSQL92_SECURITY isalready set to TRUE.
DO3609-ORACLE11
Systemprivilegesgranted WITHADMINOPTION
CAT II No No No No Currently not supported
DO3610-ORACLE11
Oracleminimumobjectauditing
CAT II No No No No Currently not supported
DO3689-ORACLE11
Oracle objectpermissionassignmentto PUBLIC
CAT II No No No No Currently not supported
Appendix DCurrent Implementation of Database STIG Rules
D-5
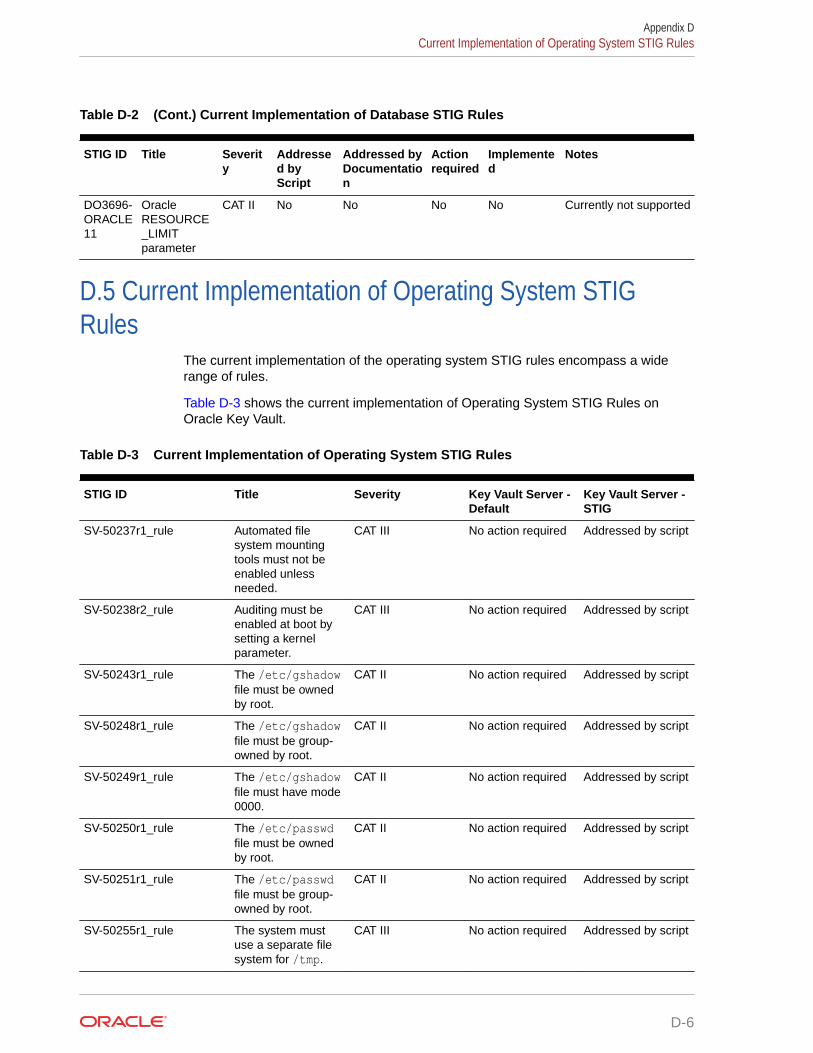
Table D-2 (Cont.) Current Implementation of Database STIG Rules
STIG ID Title Severity
Addressed byScript
Addressed byDocumentation
Actionrequired
Implemented
Notes
DO3696-ORACLE11
OracleRESOURCE_LIMITparameter
CAT II No No No No Currently not supported
D.5 Current Implementation of Operating System STIGRules
The current implementation of the operating system STIG rules encompass a widerange of rules.
Table D-3 shows the current implementation of Operating System STIG Rules onOracle Key Vault.
Table D-3 Current Implementation of Operating System STIG Rules
STIG ID Title Severity Key Vault Server -Default
Key Vault Server -STIG
SV-50237r1_rule Automated filesystem mountingtools must not beenabled unlessneeded.
CAT III No action required Addressed by script
SV-50238r2_rule Auditing must beenabled at boot bysetting a kernelparameter.
CAT III No action required Addressed by script
SV-50243r1_rule The /etc/gshadowfile must be ownedby root.
CAT II No action required Addressed by script
SV-50248r1_rule The /etc/gshadowfile must be group-owned by root.
CAT II No action required Addressed by script
SV-50249r1_rule The /etc/gshadowfile must have mode0000.
CAT II No action required Addressed by script
SV-50250r1_rule The /etc/passwdfile must be ownedby root.
CAT II No action required Addressed by script
SV-50251r1_rule The /etc/passwdfile must be group-owned by root.
CAT II No action required Addressed by script
SV-50255r1_rule The system mustuse a separate filesystem for /tmp.
CAT III No action required Addressed by script
Appendix DCurrent Implementation of Operating System STIG Rules
D-6
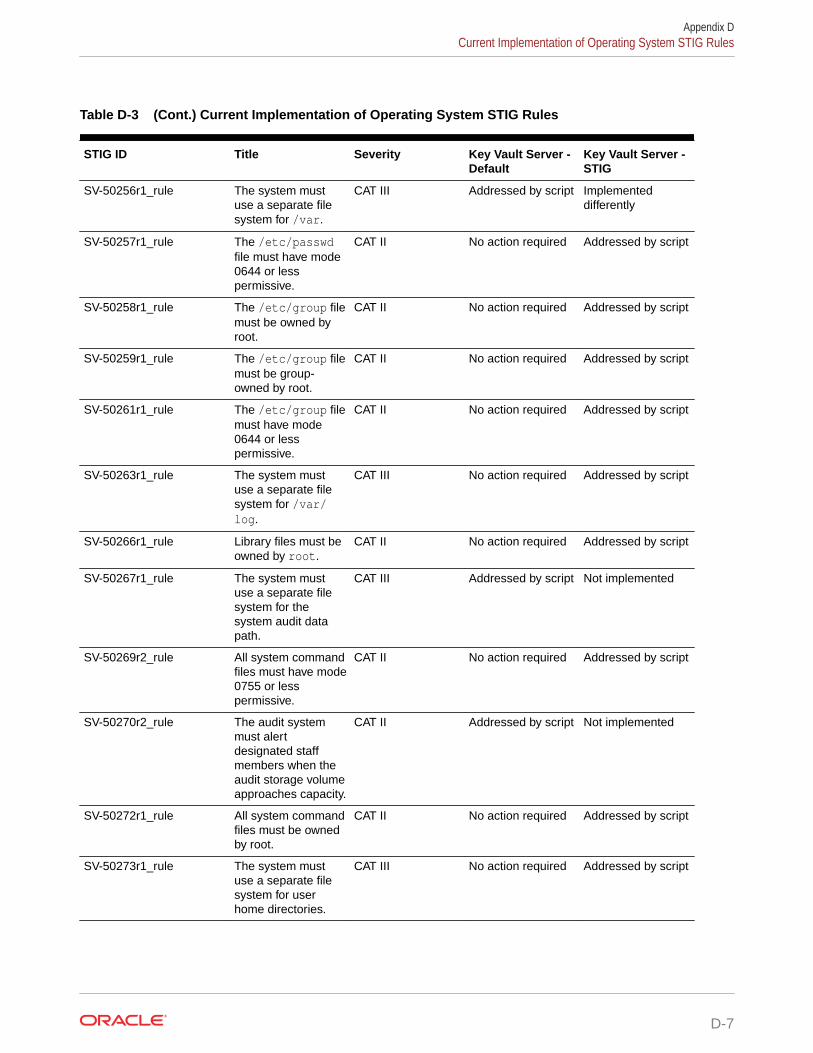
Table D-3 (Cont.) Current Implementation of Operating System STIG Rules
STIG ID Title Severity Key Vault Server -Default
Key Vault Server -STIG
SV-50256r1_rule The system mustuse a separate filesystem for /var.
CAT III Addressed by script Implementeddifferently
SV-50257r1_rule The /etc/passwdfile must have mode0644 or lesspermissive.
CAT II No action required Addressed by script
SV-50258r1_rule The /etc/group filemust be owned byroot.
CAT II No action required Addressed by script
SV-50259r1_rule The /etc/group filemust be group-owned by root.
CAT II No action required Addressed by script
SV-50261r1_rule The /etc/group filemust have mode0644 or lesspermissive.
CAT II No action required Addressed by script
SV-50263r1_rule The system mustuse a separate filesystem for /var/log.
CAT III No action required Addressed by script
SV-50266r1_rule Library files must beowned by root.
CAT II No action required Addressed by script
SV-50267r1_rule The system mustuse a separate filesystem for thesystem audit datapath.
CAT III Addressed by script Not implemented
SV-50269r2_rule All system commandfiles must have mode0755 or lesspermissive.
CAT II No action required Addressed by script
SV-50270r2_rule The audit systemmust alertdesignated staffmembers when theaudit storage volumeapproaches capacity.
CAT II Addressed by script Not implemented
SV-50272r1_rule All system commandfiles must be ownedby root.
CAT II No action required Addressed by script
SV-50273r1_rule The system mustuse a separate filesystem for userhome directories.
CAT III No action required Addressed by script
Appendix DCurrent Implementation of Operating System STIG Rules
D-7
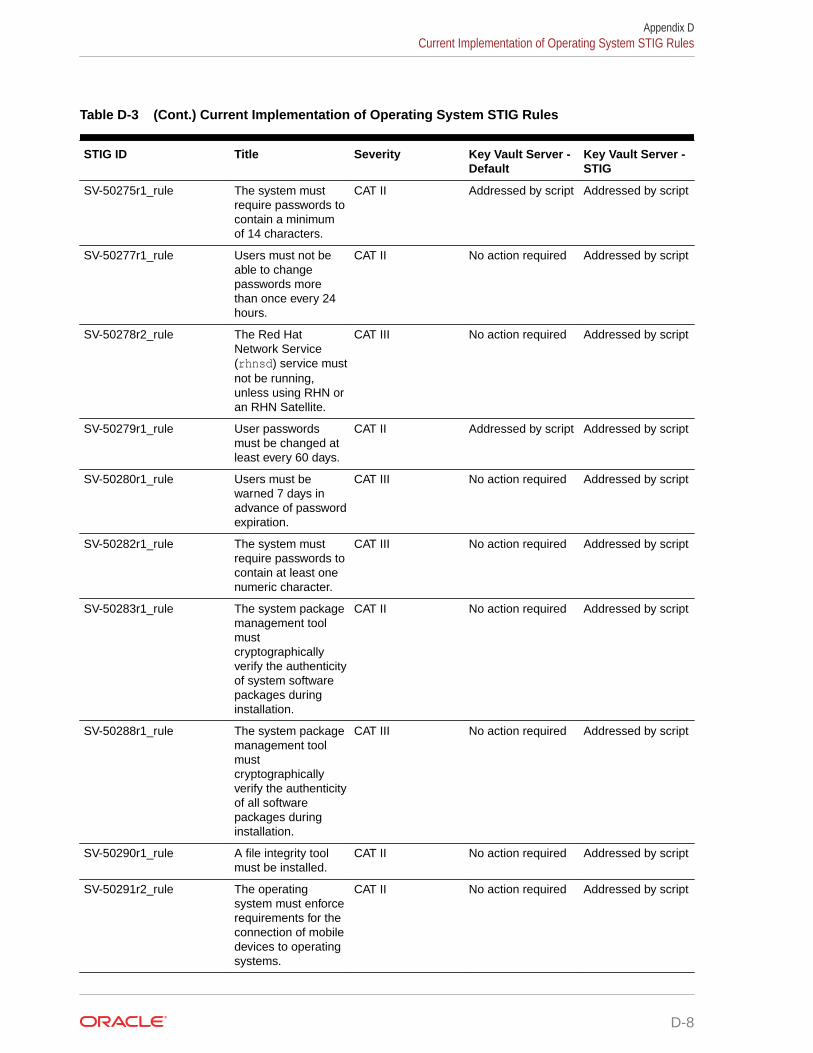
Table D-3 (Cont.) Current Implementation of Operating System STIG Rules
STIG ID Title Severity Key Vault Server -Default
Key Vault Server -STIG
SV-50275r1_rule The system mustrequire passwords tocontain a minimumof 14 characters.
CAT II Addressed by script Addressed by script
SV-50277r1_rule Users must not beable to changepasswords morethan once every 24hours.
CAT II No action required Addressed by script
SV-50278r2_rule The Red HatNetwork Service(rhnsd) service mustnot be running,unless using RHN oran RHN Satellite.
CAT III No action required Addressed by script
SV-50279r1_rule User passwordsmust be changed atleast every 60 days.
CAT II Addressed by script Addressed by script
SV-50280r1_rule Users must bewarned 7 days inadvance of passwordexpiration.
CAT III No action required Addressed by script
SV-50282r1_rule The system mustrequire passwords tocontain at least onenumeric character.
CAT III No action required Addressed by script
SV-50283r1_rule The system packagemanagement toolmustcryptographicallyverify the authenticityof system softwarepackages duringinstallation.
CAT II No action required Addressed by script
SV-50288r1_rule The system packagemanagement toolmustcryptographicallyverify the authenticityof all softwarepackages duringinstallation.
CAT III No action required Addressed by script
SV-50290r1_rule A file integrity toolmust be installed.
CAT II No action required Addressed by script
SV-50291r2_rule The operatingsystem must enforcerequirements for theconnection of mobiledevices to operatingsystems.
CAT II No action required Addressed by script
Appendix DCurrent Implementation of Operating System STIG Rules
D-8

Table D-3 (Cont.) Current Implementation of Operating System STIG Rules
STIG ID Title Severity Key Vault Server -Default
Key Vault Server -STIG
SV-50292r1_rule There must beno .rhosts orhosts.equiv files onthe system.
CAT I No action required Addressed by script
SV-50293r1_rule The system mustprevent the rootaccount from loggingin from virtualconsoles.
CAT II No action required Addressed by script
SV-50295r1_rule The system mustprevent the rootaccount from loggingin from serialconsoles.
CAT III No action required Addressed by script
SV-50296r1_rule Audit log files mustbe owned by root.
CAT II No action required Addressed by script
SV-50298r2_rule The system must nothave accountsconfigured with blankor null passwords.
CAT I No action required Addressed by script
SV-50299r1_rule Audit log files musthave mode 0640 orless permissive.
CAT II No action required Addressed by script
SV-50300r1_rule The /etc/passwdfile must not containpassword hashes.
CAT II No action required Addressed by script
SV-50301r2_rule The root accountmust be the onlyaccount having aUID of 0.
CAT II No action required Addressed by script
SV-50302r3_rule The system mustdisable accountsafter excessive loginfailures within a 15-minute interval.
CAT II No action required Addressed by script
SV-50303r1_rule The /etc/shadowfile must be ownedby root.
CAT II No action required Addressed by script
SV-50304r1_rule The /etc/shadowfile must be group-owned by root.
CAT II No action required Addressed by script
SV-50305r1_rule The /etc/shadowfile must have mode0000.
CAT II No action required Addressed by script
SV-50312r1_rule IP forwarding forIPv4 must not beenabled, unless thesystem is a router.
CAT II No action required Addressed by script
Appendix DCurrent Implementation of Operating System STIG Rules
D-9
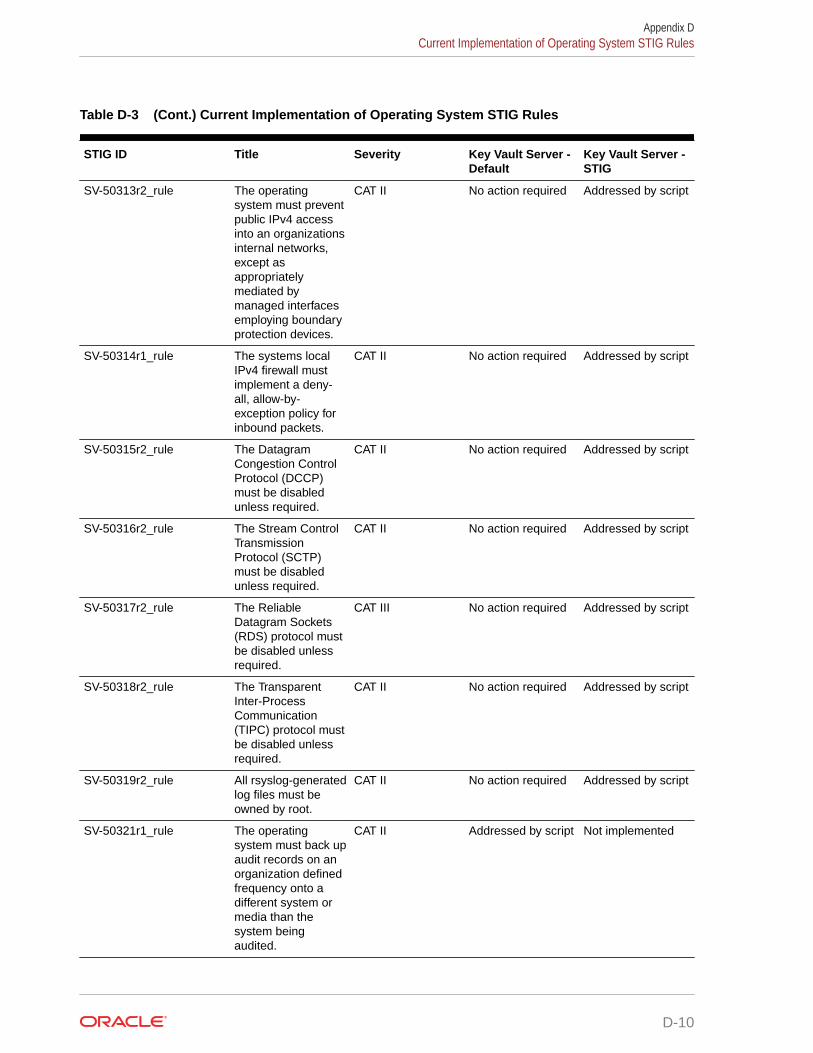
Table D-3 (Cont.) Current Implementation of Operating System STIG Rules
STIG ID Title Severity Key Vault Server -Default
Key Vault Server -STIG
SV-50313r2_rule The operatingsystem must preventpublic IPv4 accessinto an organizationsinternal networks,except asappropriatelymediated bymanaged interfacesemploying boundaryprotection devices.
CAT II No action required Addressed by script
SV-50314r1_rule The systems localIPv4 firewall mustimplement a deny-all, allow-by-exception policy forinbound packets.
CAT II No action required Addressed by script
SV-50315r2_rule The DatagramCongestion ControlProtocol (DCCP)must be disabledunless required.
CAT II No action required Addressed by script
SV-50316r2_rule The Stream ControlTransmissionProtocol (SCTP)must be disabledunless required.
CAT II No action required Addressed by script
SV-50317r2_rule The ReliableDatagram Sockets(RDS) protocol mustbe disabled unlessrequired.
CAT III No action required Addressed by script
SV-50318r2_rule The TransparentInter-ProcessCommunication(TIPC) protocol mustbe disabled unlessrequired.
CAT II No action required Addressed by script
SV-50319r2_rule All rsyslog-generatedlog files must beowned by root.
CAT II No action required Addressed by script
SV-50321r1_rule The operatingsystem must back upaudit records on anorganization definedfrequency onto adifferent system ormedia than thesystem beingaudited.
CAT II Addressed by script Not implemented
Appendix DCurrent Implementation of Operating System STIG Rules
D-10
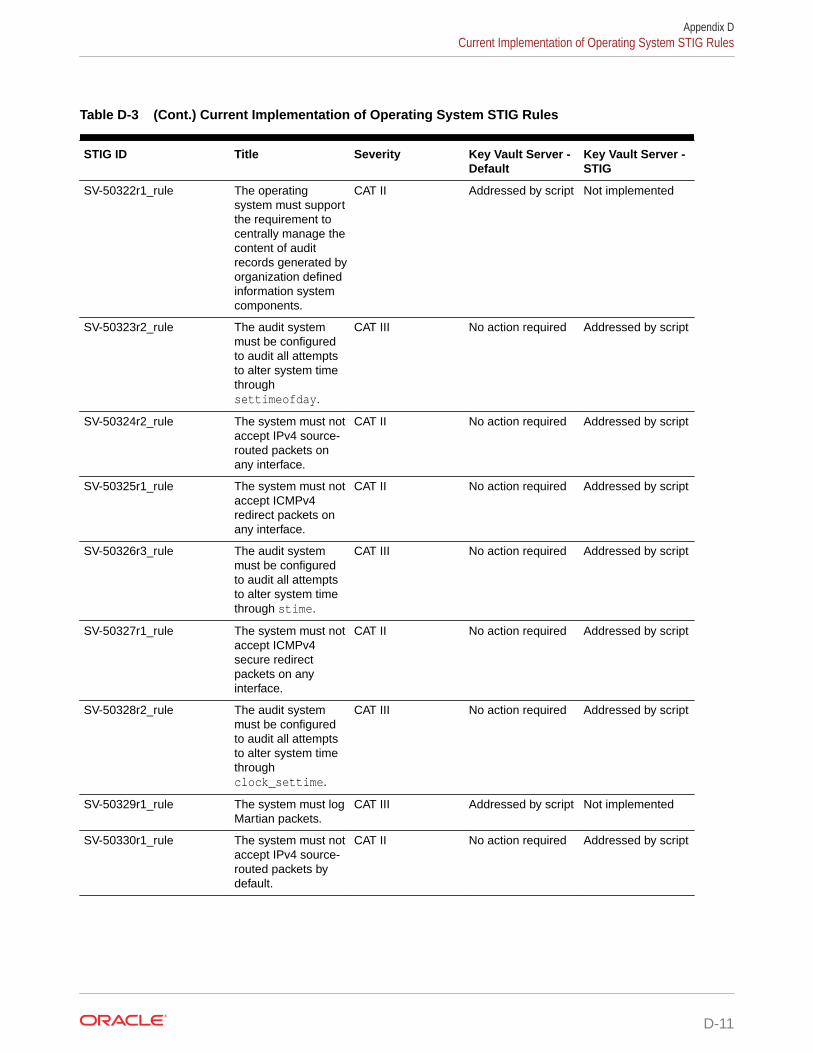
Table D-3 (Cont.) Current Implementation of Operating System STIG Rules
STIG ID Title Severity Key Vault Server -Default
Key Vault Server -STIG
SV-50322r1_rule The operatingsystem must supportthe requirement tocentrally manage thecontent of auditrecords generated byorganization definedinformation systemcomponents.
CAT II Addressed by script Not implemented
SV-50323r2_rule The audit systemmust be configuredto audit all attemptsto alter system timethroughsettimeofday.
CAT III No action required Addressed by script
SV-50324r2_rule The system must notaccept IPv4 source-routed packets onany interface.
CAT II No action required Addressed by script
SV-50325r1_rule The system must notaccept ICMPv4redirect packets onany interface.
CAT II No action required Addressed by script
SV-50326r3_rule The audit systemmust be configuredto audit all attemptsto alter system timethrough stime.
CAT III No action required Addressed by script
SV-50327r1_rule The system must notaccept ICMPv4secure redirectpackets on anyinterface.
CAT II No action required Addressed by script
SV-50328r2_rule The audit systemmust be configuredto audit all attemptsto alter system timethroughclock_settime.
CAT III No action required Addressed by script
SV-50329r1_rule The system must logMartian packets.
CAT III Addressed by script Not implemented
SV-50330r1_rule The system must notaccept IPv4 source-routed packets bydefault.
CAT II No action required Addressed by script
Appendix DCurrent Implementation of Operating System STIG Rules
D-11
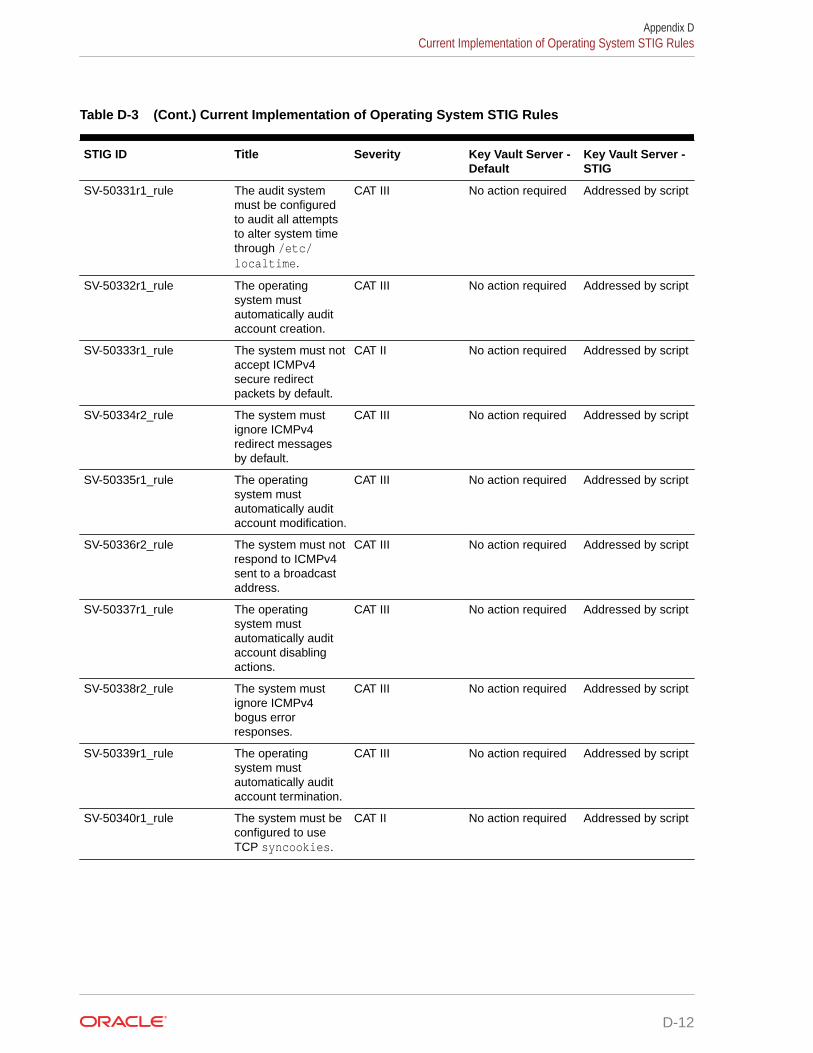
Table D-3 (Cont.) Current Implementation of Operating System STIG Rules
STIG ID Title Severity Key Vault Server -Default
Key Vault Server -STIG
SV-50331r1_rule The audit systemmust be configuredto audit all attemptsto alter system timethrough /etc/localtime.
CAT III No action required Addressed by script
SV-50332r1_rule The operatingsystem mustautomatically auditaccount creation.
CAT III No action required Addressed by script
SV-50333r1_rule The system must notaccept ICMPv4secure redirectpackets by default.
CAT II No action required Addressed by script
SV-50334r2_rule The system mustignore ICMPv4redirect messagesby default.
CAT III No action required Addressed by script
SV-50335r1_rule The operatingsystem mustautomatically auditaccount modification.
CAT III No action required Addressed by script
SV-50336r2_rule The system must notrespond to ICMPv4sent to a broadcastaddress.
CAT III No action required Addressed by script
SV-50337r1_rule The operatingsystem mustautomatically auditaccount disablingactions.
CAT III No action required Addressed by script
SV-50338r2_rule The system mustignore ICMPv4bogus errorresponses.
CAT III No action required Addressed by script
SV-50339r1_rule The operatingsystem mustautomatically auditaccount termination.
CAT III No action required Addressed by script
SV-50340r1_rule The system must beconfigured to useTCP syncookies.
CAT II No action required Addressed by script
Appendix DCurrent Implementation of Operating System STIG Rules
D-12
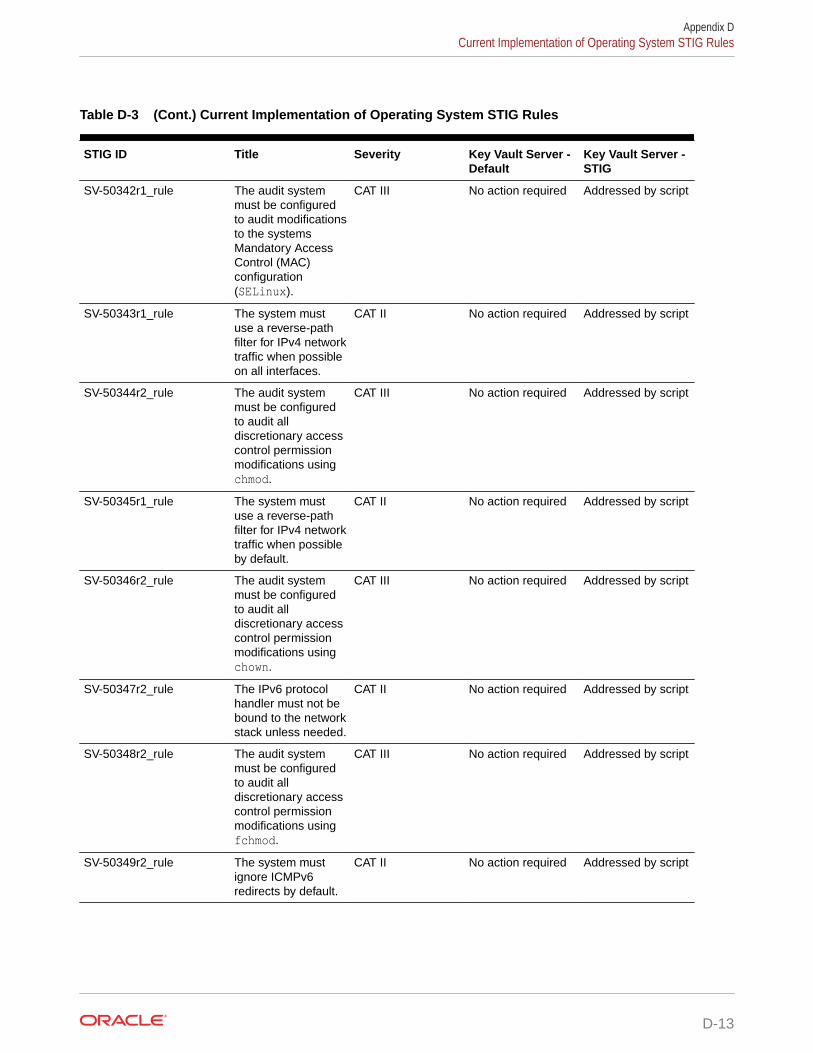
Table D-3 (Cont.) Current Implementation of Operating System STIG Rules
STIG ID Title Severity Key Vault Server -Default
Key Vault Server -STIG
SV-50342r1_rule The audit systemmust be configuredto audit modificationsto the systemsMandatory AccessControl (MAC)configuration(SELinux).
CAT III No action required Addressed by script
SV-50343r1_rule The system mustuse a reverse-pathfilter for IPv4 networktraffic when possibleon all interfaces.
CAT II No action required Addressed by script
SV-50344r2_rule The audit systemmust be configuredto audit alldiscretionary accesscontrol permissionmodifications usingchmod.
CAT III No action required Addressed by script
SV-50345r1_rule The system mustuse a reverse-pathfilter for IPv4 networktraffic when possibleby default.
CAT II No action required Addressed by script
SV-50346r2_rule The audit systemmust be configuredto audit alldiscretionary accesscontrol permissionmodifications usingchown.
CAT III No action required Addressed by script
SV-50347r2_rule The IPv6 protocolhandler must not bebound to the networkstack unless needed.
CAT II No action required Addressed by script
SV-50348r2_rule The audit systemmust be configuredto audit alldiscretionary accesscontrol permissionmodifications usingfchmod.
CAT III No action required Addressed by script
SV-50349r2_rule The system mustignore ICMPv6redirects by default.
CAT II No action required Addressed by script
Appendix DCurrent Implementation of Operating System STIG Rules
D-13
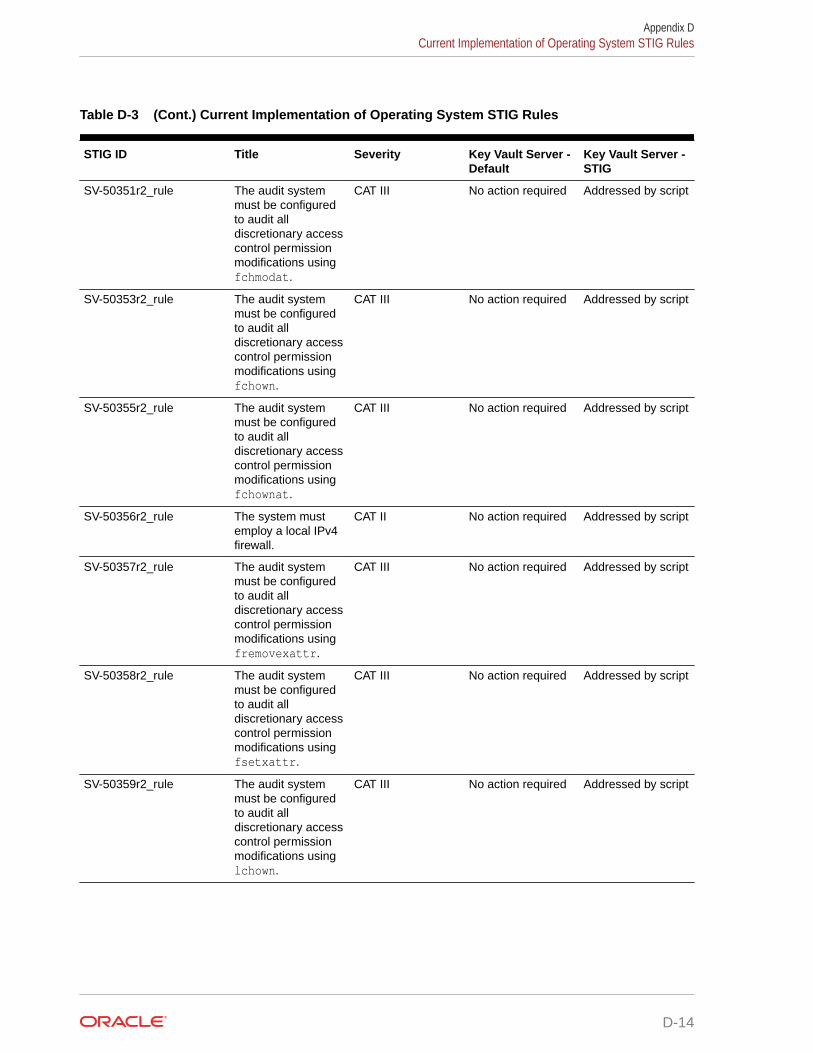
Table D-3 (Cont.) Current Implementation of Operating System STIG Rules
STIG ID Title Severity Key Vault Server -Default
Key Vault Server -STIG
SV-50351r2_rule The audit systemmust be configuredto audit alldiscretionary accesscontrol permissionmodifications usingfchmodat.
CAT III No action required Addressed by script
SV-50353r2_rule The audit systemmust be configuredto audit alldiscretionary accesscontrol permissionmodifications usingfchown.
CAT III No action required Addressed by script
SV-50355r2_rule The audit systemmust be configuredto audit alldiscretionary accesscontrol permissionmodifications usingfchownat.
CAT III No action required Addressed by script
SV-50356r2_rule The system mustemploy a local IPv4firewall.
CAT II No action required Addressed by script
SV-50357r2_rule The audit systemmust be configuredto audit alldiscretionary accesscontrol permissionmodifications usingfremovexattr.
CAT III No action required Addressed by script
SV-50358r2_rule The audit systemmust be configuredto audit alldiscretionary accesscontrol permissionmodifications usingfsetxattr.
CAT III No action required Addressed by script
SV-50359r2_rule The audit systemmust be configuredto audit alldiscretionary accesscontrol permissionmodifications usinglchown.
CAT III No action required Addressed by script
Appendix DCurrent Implementation of Operating System STIG Rules
D-14
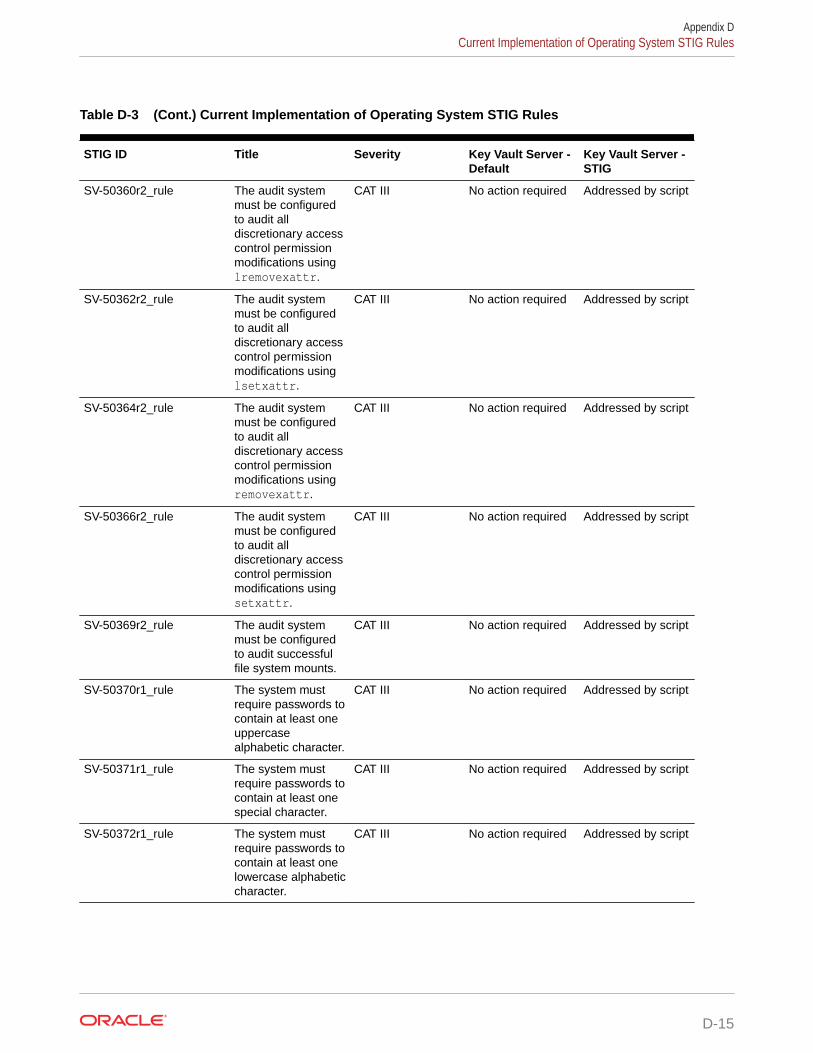
Table D-3 (Cont.) Current Implementation of Operating System STIG Rules
STIG ID Title Severity Key Vault Server -Default
Key Vault Server -STIG
SV-50360r2_rule The audit systemmust be configuredto audit alldiscretionary accesscontrol permissionmodifications usinglremovexattr.
CAT III No action required Addressed by script
SV-50362r2_rule The audit systemmust be configuredto audit alldiscretionary accesscontrol permissionmodifications usinglsetxattr.
CAT III No action required Addressed by script
SV-50364r2_rule The audit systemmust be configuredto audit alldiscretionary accesscontrol permissionmodifications usingremovexattr.
CAT III No action required Addressed by script
SV-50366r2_rule The audit systemmust be configuredto audit alldiscretionary accesscontrol permissionmodifications usingsetxattr.
CAT III No action required Addressed by script
SV-50369r2_rule The audit systemmust be configuredto audit successfulfile system mounts.
CAT III No action required Addressed by script
SV-50370r1_rule The system mustrequire passwords tocontain at least oneuppercasealphabetic character.
CAT III No action required Addressed by script
SV-50371r1_rule The system mustrequire passwords tocontain at least onespecial character.
CAT III No action required Addressed by script
SV-50372r1_rule The system mustrequire passwords tocontain at least onelowercase alphabeticcharacter.
CAT III No action required Addressed by script
Appendix DCurrent Implementation of Operating System STIG Rules
D-15

Table D-3 (Cont.) Current Implementation of Operating System STIG Rules
STIG ID Title Severity Key Vault Server -Default
Key Vault Server -STIG
SV-50373r1_rule The system mustrequire at least fourcharacters bechanged betweenthe old and newpasswords during apassword change.
CAT III No action required Addressed by script
SV-50374r3_rule The system mustdisable accountsafter threeconsecutiveunsuccessful logonattempts.
CAT II No action required Addressed by script
SV-50375r1_rule The system mustuse a FIPS 140-2approvedcryptographichashing algorithm forgenerating accountpassword hashes(system-auth).
CAT II No action required Addressed by script
SV-50376r4_rule The audit systemmust be configuredto audit userdeletions of files andprograms.
CAT III No action required Addressed by script
SV-50377r1_rule The system mustuse a FIPS 140-2approvedcryptographichashing algorithm forgenerating accountpassword hashes(login.defs).
CAT II No action required Addressed by script
SV-50378r1_rule The system mustuse a FIPS 140-2approvedcryptographichashing algorithm forgenerating accountpassword hashes(libuser.conf).
CAT II No action required Addressed by script
SV-50379r1_rule The audit systemmust be configuredto audit changes tothe /etc/sudoersfile.
CAT III No action required Addressed by script
Appendix DCurrent Implementation of Operating System STIG Rules
D-16
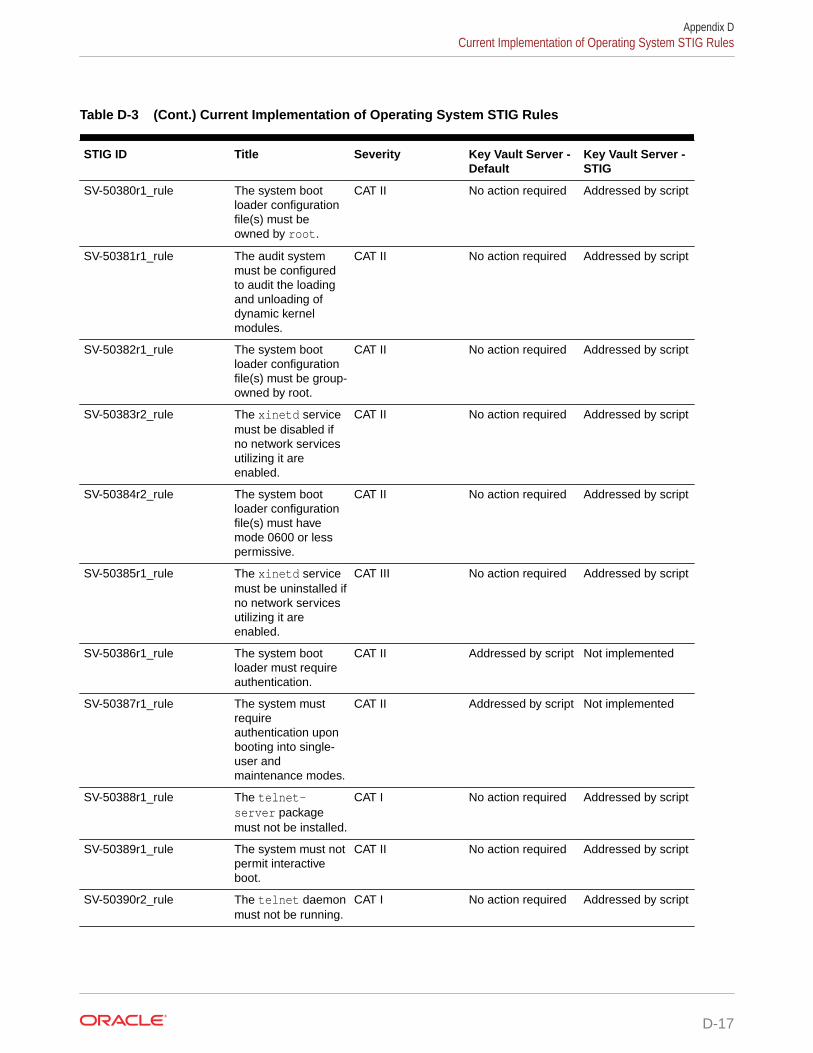
Table D-3 (Cont.) Current Implementation of Operating System STIG Rules
STIG ID Title Severity Key Vault Server -Default
Key Vault Server -STIG
SV-50380r1_rule The system bootloader configurationfile(s) must beowned by root.
CAT II No action required Addressed by script
SV-50381r1_rule The audit systemmust be configuredto audit the loadingand unloading ofdynamic kernelmodules.
CAT II No action required Addressed by script
SV-50382r1_rule The system bootloader configurationfile(s) must be group-owned by root.
CAT II No action required Addressed by script
SV-50383r2_rule The xinetd servicemust be disabled ifno network servicesutilizing it areenabled.
CAT II No action required Addressed by script
SV-50384r2_rule The system bootloader configurationfile(s) must havemode 0600 or lesspermissive.
CAT II No action required Addressed by script
SV-50385r1_rule The xinetd servicemust be uninstalled ifno network servicesutilizing it areenabled.
CAT III No action required Addressed by script
SV-50386r1_rule The system bootloader must requireauthentication.
CAT II Addressed by script Not implemented
SV-50387r1_rule The system mustrequireauthentication uponbooting into single-user andmaintenance modes.
CAT II Addressed by script Not implemented
SV-50388r1_rule The telnet-server packagemust not be installed.
CAT I No action required Addressed by script
SV-50389r1_rule The system must notpermit interactiveboot.
CAT II No action required Addressed by script
SV-50390r2_rule The telnet daemonmust not be running.
CAT I No action required Addressed by script
Appendix DCurrent Implementation of Operating System STIG Rules
D-17
Table D-3 (Cont.) Current Implementation of Operating System STIG Rules
STIG ID Title Severity Key Vault Server -Default
Key Vault Server -STIG
SV-50391r1_rule The system mustallow locking of theconsole screen intext mode.
CAT III Addressed by script Not implemented
SV-50392r1_rule The rsh-serverpackage must not beinstalled.
CAT I No action required Addressed by script
SV-50393r3_rule The system mustrequire administratoraction to unlock anaccount locked byexcessive failed loginattempts.
CAT II Addressed by script Addressed by script
SV-50395r2_rule The rshd servicemust not be running.
CAT I No action required Addressed by script
SV-50399r2_rule The rexecd servicemust not be running.
CAT I No action required Addressed by script
SV-50401r1_rule The system must notsend ICMPv4redirects by default.
CAT II No action required Addressed by script
SV-50402r1_rule The system must notsend ICMPv4redirects from anyinterface.
CAT II No action required Addressed by script
SV-50403r2_rule The rlogindservice must not berunning.
CAT I No action required Addressed by script
SV-50404r1_rule The ypservpackage must not beinstalled.
CAT II No action required Addressed by script
SV-50405r2_rule The ypbind servicemust not be running.
CAT II No action required Addressed by script
SV-50406r2_rule The cron servicemust be running.
CAT II No action required Addressed by script
SV-50407r1_rule The tftp-serverpackage must not beinstalled.
CAT II No action required Addressed by script
SV-50408r1_rule The SSH daemonmust be configuredto use only theSSHv2 protocol.
CAT I No action required Addressed by script
SV-50409r1_rule The SSH daemonmust set a timeoutinterval on idlesessions.
CAT III No action required Addressed by script
Appendix DCurrent Implementation of Operating System STIG Rules
D-18
Table D-3 (Cont.) Current Implementation of Operating System STIG Rules
STIG ID Title Severity Key Vault Server -Default
Key Vault Server -STIG
SV-50411r1_rule The SSH daemonmust set a timeoutcount on idlesessions.
CAT III No action required Addressed by script
SV-50412r1_rule The SSH daemonmust ignore rhostsfiles.
CAT II No action required Addressed by script
SV-50413r1_rule The SSH daemonmust not allow host-basedauthentication.
CAT II No action required Addressed by script
SV-50414r1_rule The system must notpermit root loginsusing remote accessprograms such asSSH.
CAT II No action required Addressed by script
SV-50415r1_rule The SSH daemonmust not allowauthentication usingan empty password.
CAT I No action required Addressed by script
SV-50416r1_rule The SSH daemonmust be configuredwith the Departmentof Defense (DoD)login banner.
CAT II Addressed by script Not implemented
SV-50417r1_rule The SSH daemonmust not permit userenvironmentsettings.
CAT III No action required Addressed by script
SV-50419r2_rule The avahi servicemust be disabled.
CAT III No action required Addressed by script
SV-50421r1_rule The system clockmust besynchronizedcontinuously, or atleast daily.
CAT II Addressed by script Addressed bydocumentation
SV-50422r1_rule The system clockmust besynchronized to anauthoritative DoDtime source.
CAT II No action required Addressed by script
SV-50423r2_rule Mail relaying must berestricted.
CAT II Addressed by script Not applicable
SV-50428r1_rule The openldap-servers packagemust not be installedunless required.
CAT III No action required Addressed by script
Appendix DCurrent Implementation of Operating System STIG Rules
D-19
Table D-3 (Cont.) Current Implementation of Operating System STIG Rules
STIG ID Title Severity Key Vault Server -Default
Key Vault Server -STIG
SV-50430r3_rule The graphicaldesktop environmentmust set the idletimeout to no morethan 15 minutes.
CAT II No action required Addressed by script
SV-50431r3_rule The graphicaldesktop environmentmust automaticallylock after 15 minutesof inactivity and thesystem must requireuser reauthenticationto unlock theenvironment.
CAT II No action required Addressed by script
SV-50434r1_rule The system must seta maximum audit logfile size.
CAT II No action required Addressed by script
SV-50435r1_rule The system mustrotate audit log filesthat reach themaximum file size.
CAT II No action required Addressed by script
SV-50436r2_rule The audit systemmust be configuredto audit all attemptsto alter system timethrough adjtimex.
CAT III No action required Addressed by script
SV-50437r1_rule The system mustretain enoughrotated audit logs tocover the requiredlog retention period.
CAT II No action required Addressed by script
SV-50439r3_rule The graphicaldesktop environmentmust have automaticlock enabled.
CAT II No action required Addressed by script
SV-50440r3_rule The system mustdisplay a publicly-viewable patternduring a graphicaldesktop environmentsession lock.
CAT III No action required Addressed by script
SV-50441r2_rule The Automatic BugReporting Tool(abrtd) service mustnot be running.
CAT III No action required Addressed by script
SV-50442r2_rule The atd servicemust be disabled.
CAT III No action required Addressed by script
Appendix DCurrent Implementation of Operating System STIG Rules
D-20
Table D-3 (Cont.) Current Implementation of Operating System STIG Rules
STIG ID Title Severity Key Vault Server -Default
Key Vault Server -STIG
SV-50443r1_rule The system defaultumask for daemonsmust be 027 or 022.
CAT III No action required Addressed by script
SV-50445r2_rule The ntpdateservice must not berunning.
CAT III No action required Addressed by script
SV-50446r1_rule The system defaultumask in /etc/login.defs mustbe 077.
CAT III No action required Addressed by script
SV-50447r2_rule The oddjobdservice must not berunning.
CAT III No action required Addressed by script
SV-50448r1_rule The system defaultumask in /etc/profilemust be 077.
CAT III Addressed by script Not implemented
SV-50449r2_rule The qpidd servicemust not be running.
CAT III No action required Addressed by script
SV-50450r1_rule The system defaultumask for the cshshell must be 077.
CAT III Addressed by script Not implemented
SV-50451r2_rule The rdisc servicemust not be running.
CAT III No action required Addressed by script
SV-50452r1_rule The system defaultumask for the bashshell must be 077.
CAT III Addressed by script Not implemented
SV-50457r1_rule The system mustuse SMB clientsigning forconnecting to sambaservers usingsmbclient.
CAT III Addressed by script Not implemented
SV-50470r1_rule The postfix servicemust be enabled formail delivery.
CAT III Addressed by script Not implemented
SV-50472r1_rule The sendmailpackage must beremoved.
CAT II No action required Addressed by script
SV-50473r2_rule The netconsoleservice must bedisabled unlessrequired.
CAT III No action required Addressed by script
SV-50475r1_rule X Windows must notbe enabled unlessrequired.
CAT II No action required Addressed by script
Appendix DCurrent Implementation of Operating System STIG Rules
D-21
Table D-3 (Cont.) Current Implementation of Operating System STIG Rules
STIG ID Title Severity Key Vault Server -Default
Key Vault Server -STIG
SV-50476r2_rule Process core dumpsmust be disabledunless needed.
CAT III Addressed by script Not implemented
SV-50477r1_rule The xorg-x11-server-common (XWindows) packagemust not be installed,unless required.
CAT III No action required Addressed by script
SV-50480r2_rule The DHCP clientmust be disabled ifnot needed.
CAT II Addressed by script Not implemented
SV-50481r1_rule The audit systemmust identify staffmembers to receivenotifications of auditlog storage volumecapacity issues.
CAT II No action required Addressed by script
SV-50485r2_rule The system mustlimit users to 10simultaneous systemlogins, or a site-defined number, inaccordance withoperationalrequirements.
CAT III Addressed by script Not implemented
SV-50488r2_rule The system mustprovide VPNconnectivity forcommunications overuntrusted networks.
CAT III Addressed by script Not implemented
SV-50489r2_rule A login banner mustbe displayedimmediately prior to,or as part of,graphical desktopenvironment loginprompts.
CAT II No action required Addressed by script
SV-50492r2_rule The Bluetoothservice must bedisabled.
CAT II No action required Addressed by script
SV-50493r1_rule Accounts must belocked upon 35 daysof inactivity.
CAT III Addressed by script Not implemented
Appendix DCurrent Implementation of Operating System STIG Rules
D-22

Table D-3 (Cont.) Current Implementation of Operating System STIG Rules
STIG ID Title Severity Key Vault Server -Default
Key Vault Server -STIG
SV-50495r1_rule The operatingsystem mustmanage informationsystem identifiers forusers and devices bydisabling the useridentifier after anorganization definedtime period ofinactivity.
CAT III Addressed by script Not implemented
SV-50498r2_rule The sticky bit mustbe set on all publicdirectories.
CAT III Addressed by script No action required
SV-50500r2_rule All public directoriesmust be owned by asystem account.
CAT III No action required Addressed by script
SV-50502r1_rule The TFTP daemonmust operate insecure mode whichprovides access onlyto a single directoryon the host filesystem.
CAT I No action required Addressed by script
SV-65547r1_rule The system mustuse a Linux SecurityModule at boot time.
CAT II No action required Addressed by script
SV-65573r1_rule The system mustuse a Linux SecurityModule configured toenforce limits onsystem services.
CAT II Addressed by script Not implemented
SV-65579r1_rule The system mustuse a Linux SecurityModule configured tolimit the privileges ofsystem services.
CAT III No action required Addressed by script
SV-66089r1_rule The operatingsystem, uponsuccessfullogoNoccess, mustdisplay to the userthe number ofunsuccessfullogoNoccessattempts since thelast successfullogoNoccess.
CAT II No action required Addressed by script
Appendix DCurrent Implementation of Operating System STIG Rules
D-23
Table D-3 (Cont.) Current Implementation of Operating System STIG Rules
STIG ID Title Severity Key Vault Server -Default
Key Vault Server -STIG
SV-68627r1_rule The audit systemmust switch thesystem to single-usermode when availableaudit storage volumebecomesdangerously low.
CAT II Addressed by script Not implemented
Appendix DCurrent Implementation of Operating System STIG Rules
D-24
Glossary
applianceThe format in which Oracle Key Vault is made available. The Oracle Key Vault softwareappliance includes the operating system, the software that implements the Oracle Key Vaultfunctionality, the database, the replication software, and other related components. OracleKey Vault is delivered as a software image that is installed on a standalone computer, ormachine, supplied by the user. Oracle provides all updates for the software on the appliance,including the operating system. Do not load additional software on the Oracle Key Vaultappliance.You can deploy an Oracle Key Vault appliance as a standalone server, a member of aprimary-standby configuration, or a node in a multi-master cluster.
Audit ManagerAn Oracle Key Vault administrative role that enables a user to manage audit lifecycle andpolicies and to separate the role of auditing from the role of managing the Oracle Key Vaultserver.
auto-login walletAn Oracle wallet file that can be accessed without a password. An auto-login wallet is storedin a cwallet.sso file.
candidate nodeDuring node induction, an Oracle Key Vault server to be added to a multi-master cluster. Acandidate node must be a freshly installed Oracle Key Vault appliance, except when it is the initial node, in which case it provides the entirety of the cluster's initial data. A candidate nodemust be at the same release and patch level as the multi-master cluster to which it is beingadded.
After the server has been inducted into a cluster, it is a called a node. After a successful nodeinduction, you can configure the server to use the cluster-wide configuration settings. The cluster data set is then replicated to the node.
Glossary-1
cluster data setThe set of all security objects managed by the cluster. When creating the cluster, theinitial node provides all of the security objects that will be part of the initial cluster dataset.
cluster linkA link that represents the outbound network connection (to the node) and the inboundreplication process (from the node). You can enable or disable the link to managenode data replication.
cluster subgroupA group of one or more nodes that is a subgroup of a cluster. Each node in a clustercan belong to only one subgroup. The node is assigned to a subgroup when the nodeis added to the multi-master cluster. The assignment is for each node, and members ofa read-write pair can be in different subgroups.
The subgroup implements a notion of endpoint affinity. Endpoints are also a part ofsubgroups. The endpoint's subgroup is assigned when the endpoint is created. It isused when you set the endpoint's node search order in the endpoint node scan list.Nodes in the same subgroup as the endpoint are considered local to the endpoint. Thelocal subgroup is scanned first before communicating with nodes that are not in thelocal subgroup.
The cluster topology can change when you add or remove new nodes to and from thecluster. The endpoints get this information with the response messages for theoperations the endpoint initiated. Oracle Key Vault periodically sends the updatedendpoint node scan list back to the endpoint even if there is no change to clustertopology. This is to account for any lost messages.
controller nodeA node that controls or manages a cluster reconfiguration change, such as adding,enabling, disabling, or removing nodes. A node is only a controller node while thechange is being made. During node induction, the controller node provides the servercertificate and the data that is used to initialize the candidate node.
Each concurrent operation will have its own controller node. One controller node canonly control one cluster configuration transaction at a time.
credential fileA file that contains sensitive information such as user IDs, passwords, and keys. Thefile, such as a Kerberos keytab file, is stored as an opaque object, which means thatits individual contents are not interpreted by Oracle Key Vault. The entire file isuploaded and downloaded as an object.
Glossary
Glossary-2
See also security object.
default walletA special virtual wallet that is associated with an endpoint, into which all the endpoint's security objects can be automatically uploaded.
deleted nodeA node that has been disassociated from the cluster, either by using the Delete or ForceDelete buttons on the Oracle Key Vault management console. If it has been disabled forlonger than the Maximum Disable Node duration, then you must delete the node.
Once a node has been deleted, you cannot re-associate it with the cluster. If it is to beinducted into the cluster, then you must re-image it and then convert into a freshly installedserver.
You can use the Delete option under normal operating circumstances. Only use the ForceDelete option if the node is unreachable when the Delete option does not work.
endpointA computer system such as a database server, an application server, and other informationsystems, where keys are used to access encrypted data and credentials are used toauthenticate to other systems.
endpoint administratorOwner of an endpoint. Endpoint administrators can be typically system, security, or databaseadministrators, but they can be any personnel charged with deploying, managing andmaintaining security within an enterprise. They are responsible for enrolling endpoints andcontrolling endpoint access to security objects.
endpoint groupA collection of endpoints that are created to share a set of security objects.
endpoint node scan listA list of nodes to which an endpoint can connect.
heartbeat lagA monitored metric that determines the health of the multi-master cluster. This is anindication of the node and network health. It is the time since the current node received aheartbeat message from a given node. A heartbeat is sent out from each node every twominutes. Every heartbeat should be received on each other node shortly thereafter.
A higher heartbeat lag indicates that the user operations that require conflict resolution likecreating a wallet will take longer. Heartbeat lags between any two nodes affect the operations
Glossary
Glossary-3
cluster wide. If the heartbeat lag is high, ensure that the cluster services are active andthat replication is active. Disable and then re-enable the links between the two nodesbetween which the heartbeat lag is significant.
initial nodeThe first, or initial, node of an Oracle Key Vault Multi-Master Cluster. You create amulti-master cluster by converting a single Oracle Key Vault server to become theinitial node. The Oracle Key Vault server can be a clean installed Oracle Key Vaultserver, or it can already be in service with active data. A standalone server or amember of a primary-standby configuration can be converted to be the initial node of acluster. If you want to use a member of a primary-standby configuration, then you mustfirst break the primary-standby relationship splitting the pair.
If the initial node has been active and therefore has data, then Oracle Key Vault usesthis data as the cluster data set to initialize the cluster.
Initialization can occur only once in the life of the cluster.
installation passphraseA password that is specified during the Oracle Key Vault installation. The installationpassphrase is used to log in to Oracle Key Vault and complete the post-installationtasks. The installation passphrase can only be changed on the Oracle Key Vaultmanagement console after installation but before post-installation. After you completethe post-installation process, this option no longer appears on the managementconsole.
JAVA_HOMEThe environment variable that points to the location of Java files (JDK/JRE) in thesystem. This allows Java applications to look up the JAVA_HOME variable in order tooperate.
Java keystore fileA file that can hold multiple security objects such as keys and certificates. It uses theJava Keystore File (JKS) format.
Key AdministratorAn Oracle Key Vault administrator role that enables a user to manage the key lifecycleand control access to all security objects within Oracle Key Vault. This is a highlysensitive role and should be granted with care.
Glossary
Glossary-4
keystoreA generalized term for a container that stores encryption keys including but not limited to TDEmaster encryption keys.
Management Information Base (MIB)See MIB.
master encryption keySee TDE master encryption key.
maximum disable node durationThe time, in hours, that a node may remain in the disabled state. If the node has beendisabled for a longer duration, it can no longer be enabled.
The default maximum disable node duration is 24 hours.
MIBManagement information base; a text file that, if Oracle Key Vault is monitored throughSNMP, describes the variables that contain the information that SNMP can access. Thevariables described in a MIB, which are also called MIB objects, are the items that can bemonitored using SNMP. There is one MIB for each element that is monitored.
name resolution timeA monitored metric used to determine the health of the multi-master cluster. It is the averagetime taken to ascertain that there is no name conflict in the cluster or to resolve the nameconflict after an attempt to use conflicting names took place.
nodeAn Oracle Key Vault server that has been converted to be a member of an Oracle Key Vaultmulti-master cluster. It is known as an Oracle Key Vault cluster node or simply a node.
node inductionThe process of converting an Oracle Key Vault server to be a node in the multi-mastercluster.
The initial node in a cluster provides the initial cluster data set. Subsequently, only newOracle Key Vault servers can be inducted to the multi-master cluster, and the current data inthe multi-master cluster is loaded into the new nodes.
OKV_HOMEThe environment variable that points to the location in which the Oracle Key Vault endpointsoftware will reside. It contains sub-directories for endpoint software such as the
Glossary
Glossary-5
configuration files, log files, libraries, binaries, and other files that the endpointsoftware utility needs.
online master keyA TDE-generated master encryption key that is stored in Oracle Key Vault. The onlinemaster key enables Oracle Key Vault administrators to have full control over the TDEmaster encryption keys that Key Vault protects. When a key rotation is performed onthe online master key, the change is reflected in all other nodes in a cluster. Inprevious releases, the term for online master key was TDE direct connection.
Opaque ObjectA security object that Oracle Key Vault cannot interpret.
Oracle Key Vault applianceSee appliance.
Oracle Key Vault multi-master clusterA distributed set of Oracle Key Vault nodes that are grouped together so that they allcommunicate with one another. Some pairs of nodes are configured as read-writepairs. In a read-write pair, an update to one node is replicated to the other node, andthe update must be verified on the other node before the update is consideredsuccessful.
All nodes in the multi-master cluster connect to all other nodes. Data updated in aread-write pair is replicated to all nodes.
Oracle Key Vault nodeSee node.
Oracle Key Vault serverAn Oracle Key Vault server that is a standalone installation of the Oracle Key Vaultappliance. It provides all the core functionality related to endpoints and wallets.
Oracle wallet fileA container that can hold multiple security objects such as keys and certificates. Ituses the PKCS#12 cryptographic standard.
You can manage Oracle wallets in Oracle Key Vault just like other security objects.Optionally, you can encrypt them and protect them with a password. An Oracle walletthat can be accessed without a password is called an auto-login wallet.
Glossary
Glossary-6
See also password-protected wallet.
ORACLE_BASEThe environment variable that points to the root of the Oracle Database directory tree. TheOracle Base directory is the top level directory that you can use to install the various Oraclesoftware products. You can use the same Oracle base directory for multiple installations. Forexample, /u01/app/oracle is an Oracle base directory created by the oracle user.
ORACLE_HOMEThe environment variable that points to the directory path to install Oracle components (forexample, /u01/app/oracle/product/18.3.0/db_n). You are prompted to enter an Oraclehome in the Path field of the Specify File Locations window.
ORACLE_HOME corresponds to the environment in which Oracle Database products run. If youinstall an OFA-compliant database, using Oracle Universal Installer defaults, then the Oraclehome (known as $ORACLE_HOME in this guide) is located beneath $ORACLE_BASE. The defaultOracle home is db_n where n is the Oracle home number. It contains subdirectories forOracle Database software executable files and network files.
ORACLE_SIDThe environment variable that represents the Oracle System ID (SID), which uniquelyidentifies a particular database on a system. For this reason, you cannot have more than onedatabase with the same SID on a computer system.
When using Oracle Real Application Clusters, you must ensure that all instances that belongto the same database have a unique SID.
oraenvAlong with coraenv, a Unix/ Linux command line utility that sets the required environmentvariables (ORACLE_SID, ORACLE_HOME and PATH) to allow a user to connect to a given databaseinstance. If these environment variables are not set, then commands such as sqlplus, imp,exp will not work (or not be found).
Use coraenv when using the C Shell and oraenv when using a Bourne, Korn, or Bash shell.
password-protected walletAn encrypted Oracle wallet that has a user-defined password stored in an ewallet.p12 file.
PKCS#11 libraryA library that allows an Oracle TDE database to connect to Oracle Key Vault to manage themaster encryption keys.
Glossary
Glossary-7
PKCS#12 fileIn cryptography, PKCS#12 defines an archive file format for storing manycryptographic objects as a single file. Wallet files are stored in PKCS#12 format.
read-only nodeA node that is not part of a replication pair. Most data cannot be directly updated usingthe Oracle Key Vault management console, or with Oracle Key Vault client software.Critical data such as keys, wallets, and certificates in a read-only node is only updatedthrough replication from read-write nodes.
read-only restricted modeA node enters read-only restricted mode when it has no read-write pair, or if its read-write peer is unavailable. The Oracle Key Vault console displays a warning that thenode is operating in read-only restricted mode. In read-only restricted mode, updatesusing the Oracle Key Vault management console, or Oracle Key Vault client softwareare restricted. However, you can still perform system configuration on the node.
When the node is a member of a read-write pair, this indicates the other node hasbeen disabled but not deleted from the cluster, or the heartbeat is not detected forother reasons.
read-write modeA node is in read-write mode when it is available for endpoint and wallet data updatesusing the Oracle Key Vault management console, or Oracle Key Vault client software.The node must be a member of a read-write pair, and the read-write peer must beonline and active.
When both nodes in the pair are available, both nodes can accept updates, and allupdates to one node are synchronously replicated to the peer. If one of the nodes inthe pair becomes unavailable, then the remaining node enters read-only restrictedmode and will not accept any data updates until the peer is restored.
The node state is displayed on the Monitoring page of the Cluster tab of the nodemanagement console. The Cluster tab of the node management console displays thetype and status of all nodes in the cluster.
read-write nodeAn active, connected, member of a read-write pair of nodes.
read-write pairA pair of nodes that operates with bidirectional synchronous replication. You create theread-write pair by pairing a new node with a read-only node. You can update data,including the endpoint and wallet data, in either node by using the Oracle Key Vaultmanagement console, or Oracle Key Vault client software. The updates are replicated
Glossary
Glossary-8
immediately to the other node in the pair. Updates are replicated asynchronously to all othernodes.
A node can be a member of at most one bidirectional synchronous pair.
A multi-master cluster requires at least one read-write pair to be fully operational. It can havea maximum of 8 read-write pairs.
read-write peerThe specific member of one, and only one, read-write pair in the cluster. Each read-write pairconsists of only two nodes. You configure nodes as peers by setting Add Candidate Nodeas Read-Write Peer to Yes on the controller node during induction of the candidate node. Peers are identified on the Cluster Management Configuration page.
If one member of the pair is deleted, then the peer automatically becomes a read-only node.
recovery passphraseA secret token that is created during the installation of an Oracle Key Vault appliance. Therecovery passphrase created for the initial node is subsequently used by the cluster andpropagated to all other nodes in the cluster.
You enter the existing recovery passphrase on both the controller page and the candidatepage during induction of any nodes into the cluster. Because there is only one recoverypassphrase, you must use that same recovery passphrase when the recovery passphrase isrequired.
replicationThe process of replicating data changes that were made to a read-write node to all other nodes. The read-write peer is updated immediately. Replication is used to distribute the datato all other nodes in the cluster.
replication lagA monitored metric that determines the health of the multi-master cluster. It is the time takenfor an object to be replicated to another node.
A higher replication lag indicates that the Oracle Key Vault operations like changing theaccess permissions for an endpoint on the wallet will take longer to replicate. Depending onthe operation, a replication lag may or may not have a cluster-wide impact. If the replicationlag is significant between two notes, then you should disable and re-enable the cluster links.
security objectAn object that contains critical data provided by the user. A security object can be of thefollowing types:
• private encryption key
Glossary
Glossary-9
• Oracle wallet
• Java keystore
• Java Cryptography Extension keystore
• certificate
• credential file
software applianceA self-contained preconfigured product that can be installed on supported hardwarededicated for a specific purpose.
sqlnet.oraAn Oracle Database configuration file for the client or server. By default, thesqlnet.ora file resides in $ORACLE_HOME/network/admin directory. It specifies thefollowing connection information:
• Client domain to append to unqualified service names or net service names
• Order of naming methods for the client to use when resolving a name
• Logging and tracing features to use
• Route of connections
• External naming parameters
• Oracle Advanced Security parameters
System AdministratorAn Oracle Key Vault administrator role that enables a user to create users, endpointsand their respective groups, configure system settings and alerts, and generallyadminister Oracle Key Vault. This is a highly sensitive role and should be granted withcare.
TDE master encryption keyA key that encrypts the data encryption keys for tables and tablespaces.
templateA collection of attributes for security objects. When a security object is created using atemplate, then the attributes in the template are automatically assigned to the newobject.
Glossary
Glossary-10
userA staff member who uses Oracle Key Vault. Users can be administrators, auditors, orordinary users with no administrative roles.
user groupA named collection of Oracle Key Vault users. A user group can collectively be grantedprivileges or roles.
virtual walletA container for security objects such as public and private encryption keys, TDE masterencryption keys, passwords, credentials, and certificates in Oracle Key Vault. The mainpurpose of a virtual wallet is to enable sharing of keys among endpoints.
Glossary
Glossary-11
Index
Aabout managing, 9-20access control, 2-3
access grants for virtual wallets, 2-4how configuration works, 2-3
access control options, 2-4access grants, 2-4Actions menu, 4-43adding user to user group, 9-22administration users
multi-masters clusters effect on, 9-4administrative roles
about, 2-6about managing, 9-8Audit Manager
about, 2-8granting or changing, 9-8Key Administrator
about, 2-8revoking, 9-13separation of duty, 2-5System Administrator
about, 2-7alerts, 1-10
about, 20-17configuring, 20-19types of, 20-17viewing open alerts, 20-20
architecture, 3-3archiving
credential files, 16-1Audit Manager
about, 2-8Audit Manager role
multi-master cluster effect on, 9-3Audit Vault and Database Firewall
consolidating audit records, 20-24auditing
about, 20-22Audit Vault and Database Firewall,
consolidating audit records, 20-24deleting audit records, 20-24exporting audit records to file, 20-24setting for cluster, 17-27
auditing (continued)setting for node, 17-22syslog file, 20-23viewing audit records, 20-23
Automatic Storage Managementuploading keystores
about, 15-9copying keystore to, 15-11procedure, 15-9
Bbacking up data
about, 19-1best practices, 19-15chanding schedule, 19-10deleting schedule, 19-10multi-master cluster environment, 19-11primary-standby deployment, 19-10recovery passphrase, 19-11scheduling backup, 19-9
backup destinationsabout, 19-2changing settings, 19-5creating remote, 19-3deleting remote, 19-6
backup scheduling, 19-8about, 19-7types, 19-7
backupsconsole certificates, 18-9protecting with recovery passphrase, 19-11reports, 20-31types, 19-7
benefitscentralizing key lifecyle management, 1-2centralizing key storage, 1-2fighting security threats, 1-2
CC SDK, 1-16candidate nodes, 3-10centralized storage
Java keystores, 1-4
Index-1
centralized storage (continued)Oracle wallet files, 1-4
centralized storage and management of securityobjects, 1-9
centrally managed passwords, 16-6certifcates
rotating, about, 18-1rotating, procedure, 18-4rotation, checking status, 18-6
certificates, 18-7rotating, advice, 18-2rotating, factors that may affect process, 18-3
See also console certificateschangepwd command (okvutil), B-3changing a user group description, 9-24Classic mode network interface
checking status of, 17-5cluster node types
about, 3-6cluster nodes
about, 3-4limitation, 3-4
cluster size and availability guidance, 3-14cluster subgroups
about, 3-5clusters
creating first node, 5-2deleting a node, 5-10disabling a node, 5-9disabling node replication, 5-11enabling a node, 5-9enabling node replication, 5-11force deleting a node, 5-10management information, 3-20, 5-12monitoring information, 5-13read-only, creating, 5-6read-write pair of nodes, creating, 5-4read-write pairs of nodes, creating, 5-7restarting cluster services, 5-11setting up, about, 5-2terminating node pairing, 5-8
Commercial National Security Algorithm (CNSA)about, 17-32backup and restore operations, 17-34running scripts, 17-33upgrading primary-standby Oracle Key Vault
servers, 17-36upgrading standalone Oracle Key Vault
server, 17-35configuration files
endpoint configuration file, 14-11configuration parameters
endpoints, 13-15setting for individual endpoints, 13-17
configuration parameters (continued)setting globally for individual endpoints,
13-16configuring a primary-standby deployment, 6-2conflicts in names of objects, 5-15console certificates, 18-7
about managing, 18-7backup data restored, 18-9downloading CA request, 18-7having signed, 18-8primary-standby environments, 18-9RESTful services, 18-9uploading, 18-8
controller nodesabout, 3-9
Create Endpoint Group privilegeendpoint privileges
separation of duty, 2-5granting or changing, 9-11separation of duty, 2-5
Create Endpoint privilegeabout, 2-9granting or changing, 9-10separation of duty, 2-5
creating a user group, 9-21creating user accounts, 9-5credential files
about archiving and downloading, 16-1change to content guidance, 16-3downloading
guidance, 16-3procedure, 16-3
overwriting danger of, 16-3sharing with multiple endpoints guidance,
16-3uploading
guidance, 16-3procedure, 16-2
credentialsguidance for SQL*Plus, 16-4guidance for SSH, 16-4
critical data, 3-5
Ddashboard
status panes, 17-2viewing, 17-2
databacking up, about, 19-1restoring, about, 19-1
Database as a Serviceabout configuring for Key Vault, 8-2configuring instance, 8-2creating low privileged user, 8-3
Index
Index-2
Database as a Service (continued)deleting SSH tunnel, 8-11disabling SSH tunnel, 8-9enrolling instance as endpoint
about, 8-12installing Oracle Key Vault software onto,
8-15post-installation tasks, 8-17preparing environment, 8-15registering, 8-13
resuming access to Oracle Key Vault, 8-20reverse SSH tunnel in multi-master cluster,
8-8reverse SSH tunnel in primary-standby
configuration, 8-8SSH tunnel between Oracle Key Vault and
DBaas instance, 8-5SSH tunnel not active, 8-11suspending access to Oracle Key Vault
about, 8-18procedure, 8-19
userslow privileged user for DBaaS, 8-3
viewing SSH tunnel details, 8-9deleting user accounts, 9-7deleting user groups, 9-25deployment
architecture, 2-2overview, 1-16
deployment scenarioscluster size and availability, 3-14mid-size cluster, 3-15two data centers, 3-15two nodes, 3-14
deploymentscredential files, archiving and downloading,
16-1Java keystores, uploading and downloading,
12-20JKS and JCEKS keystores, archiving and
downloading, 12-23migrating standalone Key Vault server to
multi-master cluster, 3-12online master keys for TDE wallets, 1-5Oracle wallets, uploading and downloading,
12-20primary-standby to multi-master cluster, 3-13recommendations for, 5-17
diagnostic reports, 20-14about, 20-14generating file, 20-16installing generation utility, 20-15removing diagnostic generation utility, 20-16removing temp files, 20-16
diagnosticsaccessing with okvutil diagnostics, B-3
diagnostics generation utilitytransaction check error, C-9
disk spaceadding for release 21.1 for multi-master
cluster environment, 4-34adding for release 21.1 for standalone or
primary-standby environment, 4-19disk space, adding for release 21.1, 4-26DNS
configuring NTP servers for non-multi-masterclusters, 17-9
nodes, 17-19DNS settings
multi-master clusters, 17-25download command (okvutil), B-4downloading
credential files, 16-3JKS and JCEKS keystores, 12-23, 12-24wallets, 12-21
downtime, minimizing, 17-37DSA keys, removing after upgrade, 4-30Dual NIC mode network interface
checking status of, 17-5dual NIC network mode
about, 4-7changing for nodes, 17-20changing for standalone environment, 17-11
Eeffective group membership, LDAP users, 10-1email addresses
changing, 9-19disabling email notifications, 9-19
email notificationabout, 20-10configuring, 20-10disabling, 20-13testing, 20-12
emergency system recovery, 2-15endpoint administrators
about, 2-16endpoint database requirements, 4-4endpoint groups, 13-23
access grant to virtual wallet, 13-26adding endpoint too, 13-27creating, 13-23deleting, 13-29modifying details, 13-25modifying virtual wallets from Keys & Wallets
tab, 11-9multi-master clusters, effect on, 13-23naming guidelines, 2-14
Index
Index-3
endpoint groups (continued)removing access to virtual wallets from Keys
& Wallets tab, 11-7removing endpoint, 13-28
endpoint node scan listsabout, 3-19
endpoint platforms, supported, 4-4endpoint privileges
about managing, 9-8endpoint self-enrollment, about, 13-3endpoints, 13-23
about, 13-10about managing, 13-1adding access to virtual wallet, 13-20adding to an endpoint group, 13-27adding using administrator-initiated
enrollment, 13-5adding using self-enrollment, 13-9adding using self-enrollment, about, 13-9adding using self-enrollment, procedure for,
13-9administrators for, 13-1alternative for individual, 13-11associating default wallet with, 13-18configuration file, 14-11configuration parameters, about, 13-15DBaaS
enrolling, 8-12registering, 8-12
default wallet, setting for, 13-18deleting, 13-10, 13-11details
about, 13-14configuration parameters, about, 13-15modifying, 13-14
diagnostics, B-3downloading software, 14-3endpoint node scan lists, 3-19enrolling and provisioning, 14-3enrollment
about, 14-1administrator initiated, about, 13-3types of enrollment, 13-3
enrollment in multi-master cluster, 13-4enrollment process
about, 14-1enrollment types, 13-3guidance on enrolling across deployments,
3-15installing software for new enrollment, 14-5Java home, how determined, 14-8limitiations of TDE endpoint integration,
12-12modifying virtual wallets from Keys & Wallets
tab, 11-9
endpoints (continued)multi-master clusters, effect on, 13-3naming guidelines, 2-14nodes available for connection, 3-19not using Oracle Key Vault client software,
14-10okvclient.ora file, 14-11okvutil utility for provisioning, B-1one or more endpoints, 13-11Oracle Cloud Infrastructure database
instanceabout, 8-1
password, changing, B-3post-installation for new enrollment, 14-7preparing environment for new enrollment,
14-5privileges for managing, 2-9provisioning
about, 14-1reenrolling, 13-13removing access to virtual wallets from Keys
& Wallets tab, 11-7removing from an endpoint group, 13-28reports, 20-29revoking access to virtual wallet, 13-21setting configuration parameters globally,
13-16setting configuration parameters individually,
13-17suspending, 13-12TDE endpoint management, 14-10upgrading for enrolled, 14-16upgrading for unenrolled
downloading Oracle Key Vaultokvclient.jar software, 14-13
installing Oracle Key Vault okvclient.jarsoftware, 14-13
post-installation tasks, 14-15preparing environment, 14-12
upgrading from unenrolled endpoint, 14-12wallet items, viewing, 13-22
See also endpoint groupsenrolling endpoints
about, 14-1administrator initiated
about, 13-3self-initiated
about, 13-3environment variables
JAVA_HOME, how determined during clientinstallation, 14-8
OKV_HOMEnon-database utilities, 14-9set during installation, 14-9
okvclient.ora location of, 14-9
Index
Index-4
environment variables (continued)persistent master encryption key cache, 12-3sqlnet.ora file, 14-9
ErrorObject is Unstorable in Container error, B-4
EXPIRE PKCS11 PERSISTENT CACHE ONDATABASE SHUTDOWN parameter,12-8
external keystore password uploadsabout, 16-6
external keystore password uploads to largedeployments, 16-6
changing passwords, 16-12example script for using passwords, 16-9sharing secrets, 16-10
Ffailover situations
read-only restricted mode, C-11failovers
restoring primary-standby after, 6-10FIPS 140–2, 2-16FIPS mode, 2-16
disabling, 17-19disabling for non-multi-master clusters, 17-10enabling, 17-19enabling for non-multi-master clusters, 17-10
FIPS-InsideSee FIPS mode
Ggranting access to objects or users, 2-4
Iinitial node
creating, 5-2creation of, 3-8
installation and configurationabout, 4-1downloading appliance software, 4-5endpoint database requirements, 4-4endpoint platform, supported, 4-4installing appliance software procedure, 4-7network port requirements, 4-3post-installation tasks, 4-10system requirements, 4-2
installing appliance software, 4-7interfaces, 1-15
C client, 1-16Java client, 1-16management console, 1-15okvutil endpoint utility, 1-15
interfaces (continued)RESTful services, 1-16
JJava keystores
downloading, B-4uploading, B-8
Java SDK, 1-16JAVA_HOME environment variable
how determined during client installation,14-8
location determined during installation, 14-8JKS and JCEKS keystores
downloadingJKS and JCEKS keystores, 12-23procedure, 12-24
uploadingprocedure, 12-23
JKS and JCKS keystoreschange to content guidance, 12-25downloading
guidance, 12-25overwriting danger of, 12-25sharing with multiple endpoints guidance,
12-25uploading
guidance, 12-25
KKerberos keytabs
downloading, B-4kernels, removing after upgrade, 4-29Key Administrator role
about, 2-8multi-master cluster effect on, 9-3
key lifecycle management, 1-10key management reports for Oracle endpoints,
20-26key rotation, 1-5keys
activating, 11-13deactivating, 11-13deleting, 11-14finding for Key Vault, B-6multi-master clusters, effect on, 11-12reports, 20-27revoking, 11-13state of, managing, 11-12
keystoresAutomatic Storage Management
about uploading from, 15-9copying keystore to, 15-11procedure for uploading from, 15-9
Index
Index-5
KMIP Protocol, 1-12
LLDAP configuration, 10-1
about, 10-1about logging in as LDAP user, 10-7creating the provider connection, 10-5deleting, 10-10disabling, 10-10enabling, 10-9LDAP directory server preparation tasks,
10-4logging in as LDAP user, 10-7mapping LDAP groups to Oracle Key Vault
user groups, 10-6modifying, 10-9privilege grants for LDAP users, 10-3testing, 10-10
LDAP groupsabout, 10-11deleting mapping, 10-13modifying group mappings, 10-11validating group mappings, 10-12
LDAP usersabout, 10-13about validation, 10-15effective group membership, 10-1finding information about, 10-14modifying by regular users who have
manage wallet privileges, 10-17modifying using Key Administrator role,
10-16modifying, about, 10-16removing from Oracle Key Vault, 10-17validating, 10-15
list command (okvutil), B-6local backup destinations
about, 19-2log file locations, C-6logging in
as LDAP user, 10-7as LDAP user, about, 10-7
logging in to management console, 4-16
MManage Endpoint Group privilege
about, 2-11, 2-13endpoint privileges
separation of duty, 2-5granting or changing, 9-11revoking, 9-13separation of duty, 2-5
Manage Endpoint privilegeabout, 2-10granting or changing, 9-10revoking, 9-13separation of duty, 2-5
management consoleabout, 1-15logging in to, 4-16overview of, 4-43
Management Information Base (MIB) variables,20-6
master encryption keyspersistent master encryption key cache, 1-11,
12-3TDE,
See persistent master encryption key cacheuser-defined key as, 12-26
maximum disable node durationmulti-master clusters, 17-25
Microsoft Active DirectorySee LDAP configuration
monitoringdiagnostic reports, 20-14email notification, 20-10Oracle Audit Vault, 17-23, 20-17remote monitoring, 20-2reports, 20-25SNMP, 20-2syslog configuration, 20-13
monitoring information for clusters, 5-13multi-master clusters, 3-3
about managing, 5-2about upgrading, 4-36addition of new server to cluster, 3-10addition of nodes, 3-10administration users, effect on, 9-4Audit Manager role, affect on, 9-3auditing for cluster
setting, 17-27auditing for individual nodes
setting, 17-22backup and restore operations, 19-1benefits, 3-2building and managing, about, 3-7candidate node, 3-10changing recovery passphrase, 17-29checking upgrade success, 4-42cluster node, 3-4cluster subgroups, 3-5controller node, 3-9critical data, 3-5difference from primary-standby
configuration, 6-4DNS for individual nodes
configuring, 17-19
Index
Index-6

multi-master clusters (continued)DNS settings, 17-25downtime, minimizing, 17-37effect on role management, 9-8endpoint enrollment, 13-4endpoint groups, effect on, 13-23endpoints, 13-4endpoints, effect on, 13-3expansion of
about, 3-9addition of more nodes, 3-10controller node, 3-9
FIPS mode for individual nodes, setting,17-19
host name network setting for individualnodes, 17-17
inconsistency resolution, 3-19initial node, 3-8Key Administrator role, effect on, 9-3keys, effect on, 11-12maximum disable node duration, 17-25mid-size cluster, 3-15migrating standalone Key Vault server to,
3-12mode types, 3-6multi-master clusters
expansion ofcandidate nodes, 3-10
name conflict resolution, 3-19network services for individual nodes, 17-17node limitations, 3-4operations permitted on modes, 3-7Oracle Audit Vault, 17-23, 20-17Oracle Key Vault management console,
setting timeout, 17-28overview, 3-1preparation for pre-upgrade, 4-33primary-standby to multi-master cluster, 3-13read-only mode, 3-6read-only node, 3-6read-only restricted mode, 3-6read-write mode, 3-6read-write node, 3-6reconfiguration changes, 3-9RESTful services enablement, 17-26restore operations, 19-14reverse SSH tunnels, 8-8security objects, effect on, 11-12size and availability, 3-14SNMP settings, 17-27SNMP settings for individual node, 17-23syslog destination
clearing, 20-14setting, 20-13
syslog settings, 17-26
multi-master clusters (continued)syslog settings, node, 17-19System Administrator role, effect on, 9-3system settings, 17-15system settings for individual nodes, 17-16system time for cluster
setting, 17-25system time for individual nodes
setting, 17-18system users, effect on, 9-4two data centers, 3-15two nodes, 3-14upgrade, about, 4-32upgrading each node, 4-37upgrading read-write nodes, 4-38user accounts, effect on, 9-2user groups, changing description, 9-24user groups, creating in, 9-21user groups, deleting, 9-25user groups, effect on, 9-20user groups, removing users from, 9-24user groups, renaming, 9-23users, effect on, 9-4virtual wallet user access to, 9-12
MySQL integration with Oracle Key Vault, 15-11
Nnaming conflicts
about, 5-15accepting suggested name, 5-16changing suggested name, 5-16finding, 5-15
network detailsconfiguring for non-multi-master clusters,
17-5network interface
checking status of, 17-5network port requirements, 4-3network services
configuring for non-multi-master clusters,17-6
nodescreating first node, 5-2deleting, 5-10disabling, 5-9disabling replication, 5-11enabling, 5-9enabling replication, 5-11force deleting, 5-10restarting cluster services for, 5-11terminating pairing of, 5-8
NTP serversconfiguring DNS for non-multi-master
clusters, 17-9
Index
Index-7
OOASIS Key Management Interoperability
Protocol (KMIP)Oracle Key Vault implementation of, 1-12
objectsnaming guidelines, 2-14
OKV_HOME environment variablenon-database utilities, 14-9
okvclient.jardownloading for installation on endpoint, 14-3
okvclient.ora fileabout, 14-11
okvutil utility, 1-15about, 1-15changepwd command, B-3diagnostics command, B-3download command, B-4list command, B-6syntax, B-1upload command, B-8used to manage endpoints, B-1
online master keys, 1-5about using with Oracle Key Vault, 1-5centralized management of TDE keys, 1-5Oracle Data Guard connection, 15-5Oracle GoldenGate, 15-3
operations, restrictions and conditions of, A-1options for access control, 2-4Oracle Active Data Guard
support for data moves, 15-12Oracle Audit Vault
enabling Oracle Key Vault to send data to, fornon-multi-master clusters, 17-14
integration for node, 17-23, 20-17Oracle Cloud Infrastructure database instance
endpointsabout, 8-1
Oracle Data Guardmigrating Oracle wallets, 15-6online master keys connection, 15-5reverse migrating wallets, 15-7uploading wallets to Oracle Key Vault, 15-4
Oracle Data Pump support for data moves, 15-12Oracle GoldenGate
online master keys withabout, 15-3
TDE wallet migrationabout, 15-3
wallets used with, 15-2Oracle Key Vault
administering cluster environments, 17-15benefits, 1-2deployment architecture, 2-2deployment overview, 1-16
Oracle Key Vault (continued)key management, about, 1-1standards and protocols, 1-12who should use, 1-8
Oracle Key Vault clientC SDK, 1-16Java SDK, 1-16
Oracle Key Vault client softwareendpoints not using, 14-10
Oracle Key Vault compute instanceabout, 7-1about provisioning, 7-3benefits, 7-2finding image, 7-4launching process, 7-5launching, about, 7-4migrating data out of compute instance, 7-10migrations, about, 7-9post-installation tasks, 7-5post-launch tasks, 7-5prerequisites, 7-4restarting, 7-7starting, 7-7stopping, 7-7system settings, 7-7terminating, 7-8transitioning data into a compute instance,
7-9Oracle Key Vault compute instances
backup operations, 7-8restore operations, 7-8
Oracle Key Vault concepts, 2-1Oracle Key Vault endpoint utility, 1-15
about, 1-15See also okvutil utility
Oracle Key Vault featuresASM cluster file system encryption key
management, 1-14audit and monitoring services, external
support for, 1-13backup and restore support for security
objects, 1-11centralized storage and management of
security objects, 1-9, 1-12database release and platform support, 1-13DBaaS endpoint support, 1-14HSM integration, 1-14key lifecycle management, 1-10MySQL integration, 1-13persistent master encryption key cache, 1-11primary-standby environment support, 1-14,
17-31reporting and alerts, 1-10RESTful service support, 1-12separation of duties, 1-10
Index
Index-8
Oracle Key Vault general system administrationabout, 17-2
Oracle Key Vault interfaces, 1-15management console, 1-15RESTful services, 1-16
Oracle Key Vault keysfinding, B-6
Oracle Key Vault maintenancedashboard, 17-2system settings, 17-16
Oracle Key Vault management consoleabout, 1-15overview of, 4-43timeout for multi-master cluster nodes, 17-28timeout for Web sessions for non-multi-
master clusters, 17-14Oracle Key Vault Multi-Master Cluster, A-1Oracle Key Vault status
viewing, 17-2Oracle Key Vault use cases, 1-4Oracle Real Application Clusters
support for data moves, 15-12wallets, 15-1
Oracle Recovery Manager (RMAN) support fordata moves, 15-12
Oracle walletsdownloading
about, 12-20uploading
about, 12-20
Ppassphrases, 17-28
changing in clusters environment, 17-29changing in non-clusters environment, 17-29recovering credentials, 17-29recovering system, 17-28
See also passwordspasswords, 17-28
about changing, 9-14, 9-15centrally managed, 16-6changing endpoint password, B-3changing password automatically, 9-16changing password manually, 9-16changing support user, 9-17changing your own, 9-15controlling manual password reset
operations, about, 9-18controlling manual password reset
operations, configuration, 9-18See also passphrases
persistent master encryption key cache, 12-2about, 12-2architecture, 12-2
persistent master encryption key cache (continued)caching master encryption keys in-memory, 12-3contents of, listing, 12-9environment variables, importance of setting, 12-3modes of operation
first mode, 12-4Oracle Key Vault first mode, 12-4
Oracle Database deployments, 12-11PEXPIRE PKCS11 PERSISTENT CACHE ON
DATABASE SHUTDOWN parameter, 12-8PKCS11_CACHE_TIMEOUT parameter, 12-6PKCS11_CONFIG_PARAM_REFRESH_INTERVAL
parameter, 12-7PKCS11_PERSISTENT_CACHE_FIRST parameter,
12-7PKCS11_PERSISTENT_CACHE_REFRESH_WINDOW
parameter, 12-8PKCS11_PERSISTENT_CACHE_TIMEOUT parameter,
12-6refresh window, 12-5storage location, 12-3
PKCS11_CACHE_TIMEOUT parameter, 12-6PKCS11_CONFIG_PARAM_REFRESH_INTERV
AL parameter, 12-7PKCS11_PERSISTENT_CACHE_FIRST
parameter, 12-7PKCS11_PERSISTENT_CACHE_REFRESH_WI
NDOW parameter, 12-8PKCS11_PERSISTENT_CACHE_TIMEOUT
parameter, 12-6post-installation tasks, 4-10powering off Oracle Key Vault for non-multi-
master clusters, 17-15powering off Oracle Key Vault nodes, 17-24primary servers
role in primary-standby configuration, 6-4primary-standby
restore operations, 19-14primary-standby configuration
about, 6-2benefits, 6-3best practices, 6-20changing SNMP settings on standby server,
20-4checking TDE wallet migration for logical
standby, 15-8configuring primary server, 6-5configuring standby server, 6-6difference from multi-master clusters, 6-4disabling, 6-11downtime, minimizing, 17-37enabling primary-standby on primary, 6-8migrating TDE wallets to Oracle Key Vault for
standby, 15-8
Index
Index-9
primary-standby configuration (continued)persistent master encryption key cache
downtime, minimizing, 17-37primary server
configuring, 6-5enabling for primary-standby, 6-8
primary server role, 6-4read-only restricted mode
downtime, minimizing, 17-37read-only restricted mode disabled, 6-14read-only restricted mode enabled, 6-14read-only restricted mode impact, 6-13read-only restricted mode state during
network failure, 6-17read-only restricted mode state during
primary server failure, 6-16read-only restricted mode state during
standby server failure, 6-17read-only restricted mode states, 6-15read-only restricted mode, disabling, 6-18read-only restricted mode, enabling, 6-17read-only restricted mode, recovering from,
6-19restoring primary-standby after, 6-10reverse SSH tunnels, 8-8standby server
configuring, 6-6standby server role, 6-5switching servers, 6-9unpairing, 6-11
primary-standby environmentsconsole certificates, 18-9
primary-standby servermoving to multi-master cluster, 3-13
privileges, 2-3access control options, 2-4access grants for virtual wallets, 2-4
See also access control
Rread-only mode
about, 3-6read-only nodes
about, 3-6creating, 5-6
read-only restricted modeabout, 3-6disabling, 6-18enabling, 6-17failover, planned shutdown in standby server,
C-12, C-15failover, planned shutdown of primary server
during upgrade, C-11, C-14
read-only restricted mode (continued)failover, planned shutodwn on primary server
during maintenance, C-12, C-14failover, unplanned shutdown in primary
server, C-13, C-15failover, unplanned shutdown in standby
server, C-13, C-16notifications, 6-20primary-standby configuration with read-only
restricted mode enabled, 6-14primary-standby configuration without read-
only restricted mode enabled, 6-14primary-standby configuration, impact on,
6-13recovering primary-standby, 6-19
read-only restricted mode statesnetwork failure in primary-standby
configuration, 6-17primary server failure, 6-16primary-standby configuration, 6-15standby server failure, 6-17
read-write modeabout, 3-6
read-write nodesabout, 3-6
read-write pair of nodescreating, 5-4
read-write pairs of nodescreating additional, 5-7
rebooting Oracle Key Vault for non-multi-masterclusters, 17-15
rebooting Oracle Key Vault nodes, 17-24recovery passphrase
about recovering, 17-28changing in clusters environment, 17-29changing in non-clusters environment, 17-29protecting the backup, 19-11recovering credentials, 17-29
rekey operation, 1-5remote backup destination
about, 19-2remote backup destinations
changing settings, 19-5creating, 19-3deleting, 19-6
remote monitoringabout, 20-2changing settings on standby server, 20-4changing user name and password, 20-4granting SNMP access to users, 20-3
remotely monitoring using SNMP, 20-5removing user from a user group, 9-24renaming a user group, 9-23reporting, 1-10
Index
Index-10

reportsabout, 20-25endpoint reports, 20-29key management reports for Oracle
endpoints reports, 20-26keys reports, 20-27notification report, 20-31secrets reports, 20-28system reports, 20-31user reports, 20-30wallets reports, 20-27
restarting Oracle Key Vault for non-multi-masterclusters, 17-15
restarting Oracle Key Vault nodes, 17-24RESTful command-line interface commands
reports, 20-31RESTful services
about, 1-16console certificates, 18-9disabling for non-multi-master clusters, 17-13enabling for non-multi-master clusters, 17-13multi-master clusters, enablement, 17-26
restoring dataabout, 19-12best practices, 19-15multi-master clusters, 19-14primary-standby deployment, 19-14procedure, 19-13system state after, 19-15third-party certificates, 19-15
rolesabout, 2-6
root userabout, 2-15
Roots of Trust (RoT), 1-14
Ssearch bars, 4-44searches
how to perform searches in Oracle Key Vaultmanagement console, 4-43
secretsguidance for SQL*Plus, 16-4guidance for SSH, 16-4reports, 20-28
secure user management, 9-18security objects
activating, 11-13adding to virtual wallets, 11-5deactivating, 11-13deleting, 11-14details of, about, 11-14downloading to different types, B-4modifying details of, 11-19
security objects (continued)multi-master clusters, effect on, 11-12removing from virtual wallets, 11-6revoking, 11-13searching for object items, 11-15state of, managing, 11-12viewing details of, 11-16virtual wallets, creating for, 11-2virtual wallets, modifying, 11-4
self-enrollment, for endpoints, 13-9separation of duties, 1-10
how Oracle Key Vault manages, 2-5users, 9-1
SNMPabout, 20-2changing settings on standby server, 20-4changing user name and password, 20-4example of simplified remote monitoring,
20-7granting access to user, 20-3Management Information Base (MIB)
variables, 20-6remotely monitoring Oracle Key Vault, 20-5
SNMP settingsmulti-master clusters, 17-27nodes, 17-23
split-brain scenarios, 6-2SQL*Plus
guidance for credentials, 16-4guidance for secrets, 16-4
sqlnet.ora fileenvironment variables and, 14-9
SSHguidance for credentials, 16-4guidance for secrets, 16-4
SSH key filesdownloading from Key Vault to a wallet, B-4
SSH tunnelscreating between Oracle Key Vault and
DBaas instance, 8-5deleting, 8-11disabling, 8-9multi-master clusters, 8-9, 8-11not active, 8-11reverse SSH tunnel in multi-master cluster,
8-8reverse SSH tunnel in primary-standby
configuration, 8-8viewing details, 8-9
standby serversrole in primary-standby configuration, 6-5
support userabout, 2-15
Index
Index-11
syslogconfiguring for non-multi-master clusters,
17-10syslog configuration
audit records, 20-23destination
clearing, 20-14setting, 20-13
syslog settingsmulti-master cluster node, 17-19multi-master clusters, 17-26
System Administrator roleabout, 2-7multi-master cluster effect on, 9-3
system diagnosticsSee diagnostic reports
system recovery, 2-15, 17-28system requirements, 4-2system time
setting for non-multi-master clusters, 17-7system users
multi-master cluster effect on, 9-4
TTDE direct connect
See online master keysTDE master encryption keys
centralized management, 1-5TDE wallets
Oracle GoldenGate, 15-3TDE-enabled databases, 12-12
about configuring Key Vault for, 12-12configuring environment for, 12-13integrating TDE with Key Vault, 12-15limitations of TDE endpoint integration, 12-12
third-party certificatesrestoring data, 19-15
timesetting for cluster, 17-25setting for node, 17-18setting for non-multi-master clusters, 17-7
Transparent Data Encryption, 12-12downtime, minimizing for TDE heartbeat,
17-37endpoint management, 14-10
See also TDE-enabled databasestransportable tablespaces support for data
moves, 15-12troubleshooting
finding log files, C-6upgrade errors, C-8uploading Java keystores, C-7uploading keystores with same file name but
different contents, C-8
troubleshooting (continued)uploading the same Oracle wallet multiple
times, C-7types of backups, 19-7
Uupgrades
error handling, C-8upgrading
backing upOracle Key Vault server, 4-31
backing up upgraded Oracle Key Vaultserver, 4-31
endpoint software, 4-25Oracle Key Vault pair
about, 4-22procedure, 4-24
Oracle Key Vault standaloneabout, 4-22procedure, 4-22
removing DSA keys, 4-30removing old kernels, 4-29
upgrading endpoint softwareunenrolled endpoint, 14-12
upgrading multi-master cluster nodesabout, 4-32checking upgrade success, 4-42pre-upgrading preparation, 4-33upgrading each node, 4-37upgrading read-write nodes, 4-38
upgrading standalone or primary-serverabout, 4-17
upload command (okvutil), B-8uploading
credential files, 16-2JKS and JCEKS keystores, 12-23wallet to Oracle RAC, 15-1wallets, 12-20
use cases, 1-4centralized storage, 1-4key rotation, 1-5online management of keys and secret data,
1-7storage of credential files, 1-7
user accountsmulti-master clusters, effect on, 9-2
user groups, 9-20adding a user, 9-22changing description, 9-24creating, 9-21deleting, 9-25granting access to virtual wallet, 9-23modifying virtual wallets from Keys & Wallets
tab, 11-9
Index
Index-12

user groups (continued)multi-master clusters, effect on, 9-20naming guidelines, 2-14removing access to virtual wallets from Keys
& Wallets tab, 11-7removing access to virtual wallets from
User's tab, 11-11removing user from, 9-24renaming, 9-23revoking access to virtual wallets, 11-11
user-defined keysabout, 12-26activating, 12-28uploading to Oracle Key Vault, 12-26
users, 9-20about changing password, 9-15about user accounts, 9-1administrative roles, about, 9-8administrative roles, granting or changing,
9-8administrative roles, revoking, 9-13changing own password, 9-15changing password automatically, 9-16changing password manually, 9-16changing passwords, about, 9-14changing support user password, 9-17changing user email address, 9-19controlling manual password reset
operations, about, 9-18controlling manual password reset
operations, configuration, 9-18Create Endpoint Group privilege, granting or
changing, 9-11Create Endpoint privilege, granting or
changing, 9-10creating accounts, 9-5deleting accounts, 9-7disabling email notifications, 9-19endpoint administrators
about, 2-16endpoint privileges, about, 9-8endpoint privileges, revoking, 9-13granting access to virtual wallet, 9-12Manage Endpoint Group privilege, granting
or changing, 9-11Manage Endpoint privilege, granting or
changing, 9-10modifying virtual wallets from Keys & Wallets
tab, 11-9multi-master cluster effect on, 9-4naming guidelines, 2-14removing access to virtual wallets from Keys
& Wallets tab, 11-7removing access to virtual wallets from
User's tab, 11-10
users (continued)reports, 20-30root user
about, 2-15support user
about, 2-15view account details, 9-7
See also user groups
Vviewing user account details, 9-7virtual wallets
about, 11-2access management from Keys and Wallets
tab, 11-7adding endpoint access to, 13-20adding security objects to, 11-5creating, 11-2deleting, 11-6endpoint group access grant, 13-26granting access to from Keys & Wallets tab,
11-7granting access to from Users tab, 11-10granting user access to, 9-12, 9-23granting user group access to from User's
tab, 11-11modifying, 11-4modifying from Keys & Wallets tab, 11-9naming guidelines, 2-14removing security objects from, 11-6removing user access to from Users tab,
11-10revoking endpoint access, 13-21revoking user group access from, 11-11
Wwallets
checking TDE wallet migration for logicalstandby
about, 15-8downloading
guidance, 12-22procedure, 12-21
downloading from Key Vault to a wallet, B-4endpoint group access grant, 13-26endpoints, associating, 13-18endpoints, viewing wallet items for, 13-22key rotation guidance, 12-22migrating existing TDE wallet to Key Vault
about, 12-16procedure, 12-17
Index
Index-13
wallets (continued)migrating TDE to Key Vault for logical
standby databaseabout, 15-8
migrating to Oracle Data Guard, 15-6Oracle GoldenGate use with, 15-2Oracle Real Application Clusters
environment, 15-1overwriting danger of, 12-22reports, 20-27restoring database contents previously
encrypted by TDEabout, 12-19
wallets (continued)reverse migrating in Oracle Data Guard
about, 15-7setting default for endpoint, 13-18sharing with multiple endpoints guidance,
12-22uploading
guidance, 12-22procedure, 12-20
uploading contents to Key Vault server, B-8uploading in Oracle Data Guard
about, 15-4procedure, 15-5
Index
Index-14


