Embed Size (px)
Citation preview
Oracle® Solaris Cluster Data Service forNFS Guide
Part No: E69333August 2018


Oracle Solaris Cluster Data Service for NFS Guide
Part No: E69333
Copyright © 2000, 2018, Oracle and/or its affiliates. All rights reserved.
This software and related documentation are provided under a license agreement containing restrictions on use and disclosure and are protected by intellectual property laws. Exceptas expressly permitted in your license agreement or allowed by law, you may not use, copy, reproduce, translate, broadcast, modify, license, transmit, distribute, exhibit, perform,publish, or display any part, in any form, or by any means. Reverse engineering, disassembly, or decompilation of this software, unless required by law for interoperability, isprohibited.
The information contained herein is subject to change without notice and is not warranted to be error-free. If you find any errors, please report them to us in writing.
If this is software or related documentation that is delivered to the U.S. Government or anyone licensing it on behalf of the U.S. Government, then the following notice is applicable:
U.S. GOVERNMENT END USERS: Oracle programs, including any operating system, integrated software, any programs installed on the hardware, and/or documentation,delivered to U.S. Government end users are "commercial computer software" pursuant to the applicable Federal Acquisition Regulation and agency-specific supplementalregulations. As such, use, duplication, disclosure, modification, and adaptation of the programs, including any operating system, integrated software, any programs installed on thehardware, and/or documentation, shall be subject to license terms and license restrictions applicable to the programs. No other rights are granted to the U.S. Government.
This software or hardware is developed for general use in a variety of information management applications. It is not developed or intended for use in any inherently dangerousapplications, including applications that may create a risk of personal injury. If you use this software or hardware in dangerous applications, then you shall be responsible to take allappropriate fail-safe, backup, redundancy, and other measures to ensure its safe use. Oracle Corporation and its affiliates disclaim any liability for any damages caused by use of thissoftware or hardware in dangerous applications.
Oracle and Java are registered trademarks of Oracle and/or its affiliates. Other names may be trademarks of their respective owners.
Intel and Intel Xeon are trademarks or registered trademarks of Intel Corporation. All SPARC trademarks are used under license and are trademarks or registered trademarks ofSPARC International, Inc. AMD, Opteron, the AMD logo, and the AMD Opteron logo are trademarks or registered trademarks of Advanced Micro Devices. UNIX is a registeredtrademark of The Open Group.
This software or hardware and documentation may provide access to or information about content, products, and services from third parties. Oracle Corporation and its affiliates arenot responsible for and expressly disclaim all warranties of any kind with respect to third-party content, products, and services unless otherwise set forth in an applicable agreementbetween you and Oracle. Oracle Corporation and its affiliates will not be responsible for any loss, costs, or damages incurred due to your access to or use of third-party content,products, or services, except as set forth in an applicable agreement between you and Oracle.
Access to Oracle Support
Oracle customers that have purchased support have access to electronic support through My Oracle Support. For information, visit http://www.oracle.com/pls/topic/lookup?ctx=acc&id=info or visit http://www.oracle.com/pls/topic/lookup?ctx=acc&id=trs if you are hearing impaired.

Référence: E69333
Copyright © 2000, 2018, Oracle et/ou ses affiliés. Tous droits réservés.
Ce logiciel et la documentation qui l'accompagne sont protégés par les lois sur la propriété intellectuelle. Ils sont concédés sous licence et soumis à des restrictions d'utilisation etde divulgation. Sauf stipulation expresse de votre contrat de licence ou de la loi, vous ne pouvez pas copier, reproduire, traduire, diffuser, modifier, accorder de licence, transmettre,distribuer, exposer, exécuter, publier ou afficher le logiciel, même partiellement, sous quelque forme et par quelque procédé que ce soit. Par ailleurs, il est interdit de procéder à touteingénierie inverse du logiciel, de le désassembler ou de le décompiler, excepté à des fins d'interopérabilité avec des logiciels tiers ou tel que prescrit par la loi.
Les informations fournies dans ce document sont susceptibles de modification sans préavis. Par ailleurs, Oracle Corporation ne garantit pas qu'elles soient exemptes d'erreurs et vousinvite, le cas échéant, à lui en faire part par écrit.
Si ce logiciel, ou la documentation qui l'accompagne, est livré sous licence au Gouvernement des Etats-Unis, ou à quiconque qui aurait souscrit la licence de ce logiciel pour lecompte du Gouvernement des Etats-Unis, la notice suivante s'applique :
U.S. GOVERNMENT END USERS: Oracle programs, including any operating system, integrated software, any programs installed on the hardware, and/or documentation,delivered to U.S. Government end users are "commercial computer software" pursuant to the applicable Federal Acquisition Regulation and agency-specific supplementalregulations. As such, use, duplication, disclosure, modification, and adaptation of the programs, including any operating system, integrated software, any programs installed on thehardware, and/or documentation, shall be subject to license terms and license restrictions applicable to the programs. No other rights are granted to the U.S. Government.
Ce logiciel ou matériel a été développé pour un usage général dans le cadre d'applications de gestion des informations. Ce logiciel ou matériel n'est pas conçu ni n'est destiné à êtreutilisé dans des applications à risque, notamment dans des applications pouvant causer un risque de dommages corporels. Si vous utilisez ce logiciel ou ce matériel dans le cadred'applications dangereuses, il est de votre responsabilité de prendre toutes les mesures de secours, de sauvegarde, de redondance et autres mesures nécessaires à son utilisation dansdes conditions optimales de sécurité. Oracle Corporation et ses affiliés déclinent toute responsabilité quant aux dommages causés par l'utilisation de ce logiciel ou matériel pour desapplications dangereuses.
Oracle et Java sont des marques déposées d'Oracle Corporation et/ou de ses affiliés. Tout autre nom mentionné peut correspondre à des marques appartenant à d'autres propriétairesqu'Oracle.
Intel et Intel Xeon sont des marques ou des marques déposées d'Intel Corporation. Toutes les marques SPARC sont utilisées sous licence et sont des marques ou des marquesdéposées de SPARC International, Inc. AMD, Opteron, le logo AMD et le logo AMD Opteron sont des marques ou des marques déposées d'Advanced Micro Devices. UNIX est unemarque déposée de The Open Group.
Ce logiciel ou matériel et la documentation qui l'accompagne peuvent fournir des informations ou des liens donnant accès à des contenus, des produits et des services émanant detiers. Oracle Corporation et ses affiliés déclinent toute responsabilité ou garantie expresse quant aux contenus, produits ou services émanant de tiers, sauf mention contraire stipuléedans un contrat entre vous et Oracle. En aucun cas, Oracle Corporation et ses affiliés ne sauraient être tenus pour responsables des pertes subies, des coûts occasionnés ou desdommages causés par l'accès à des contenus, produits ou services tiers, ou à leur utilisation, sauf mention contraire stipulée dans un contrat entre vous et Oracle.
Accès aux services de support Oracle
Les clients Oracle qui ont souscrit un contrat de support ont accès au support électronique via My Oracle Support. Pour plus d'informations, visitez le site http://www.oracle.com/pls/topic/lookup?ctx=acc&id=info ou le site http://www.oracle.com/pls/topic/lookup?ctx=acc&id=trs si vous êtes malentendant.
Contents
Using This Documentation ................................................................................. 7
1 Installing and Configuring HA for NFS ........................................................... 9Overview of the Installation and Configuration Process for HA for NFS .................. 10Planning the HA for NFS Installation and Configuration ...................................... 10
Service Management Facility Restrictions .................................................. 10NFSv3 Restrictions ................................................................................ 11Loopback File System Restrictions ........................................................... 11ZFS Restrictions .................................................................................... 12
Installing the HA for NFS Package .................................................................. 12▼ How to Install the HA for NFS Package ............................................... 12
Registering and Configuring HA for NFS .......................................................... 13Setting HA for NFS Extension Properties .................................................. 14Tools for Registering and Configuring HA for NFS ..................................... 14▼ How to Register and Configure HA for NFS (clsetup) ........................... 14▼ How to Register and Configure HA for NFS (Command Line Interface) ...... 19▼ How to Change Share Options on an NFS File System ............................ 25▼ How to Dynamically Update Shared Paths on an NFS File System ............. 27How to Tune HA for NFS Method Timeouts .............................................. 28
Configuring SUNW.HAStoragePlus Resource Type ............................................... 29▼ How to Set Up the HAStoragePlus Resource Type for an NFS-ExportedUNIX File System Using the Command Line Interface ................................. 29▼ How to Set Up the HAStoragePlus Resource Type for an NFS-ExportedZFS ..................................................................................................... 31
Securing HA for NFS With Kerberos V5 ........................................................... 34▼ How to Prepare the Nodes ................................................................. 34▼ How to Create Kerberos Principals ...................................................... 35Enabling Secure NFS ............................................................................. 38
5
Contents
Accessing a Kerberos-Protected NFS File System as the root User ................. 38Tuning the HA for NFS Fault Monitor .............................................................. 38
Fault Monitor Startup ............................................................................. 39Fault Monitor Stop ................................................................................ 39Operations of HA for NFS Fault Monitor During a Probe ............................. 39
Upgrading the SUNW.nfs Resource Type ............................................................ 41Information for Registering the New Resource Type Version ......................... 42Information for Migrating Existing Instances of the Resource Type ................. 42
A HA for NFS Extension Properties ................................................................. 43
Index .................................................................................................................. 47
6 Oracle Solaris Cluster Data Service for NFS Guide • August 2018
Using This Documentation
■ Overview – Describes how to install and configure the Oracle Solaris Cluster HA forNetwork File System (NFS) data service.
■ Audience – Experienced system administrators with extensive knowledge of Oraclesoftware and hardware.
■ Required knowledge – Knowledge of the Oracle Solaris operating system, of OracleSolaris Cluster software, and expertise with the volume manager software that is used withOracle Solaris Cluster software.
This document is not to be used as a planning or presales guide.
Product Documentation Library
Documentation and resources for this product and related products are available at http://docs.oracle.com/cd/E69294_01.
Feedback
Provide feedback about this documentation at http://www.oracle.com/goto/docfeedback.
Using This Documentation 7

8 Oracle Solaris Cluster Data Service for NFS Guide • August 2018
1 ♦ ♦ ♦ C H A P T E R 1
Installing and Configuring HA for NFS
This chapter describes the steps to install and configure Oracle Solaris Cluster HA for NFS (HAfor NFS) on your Oracle Solaris Cluster nodes.
Note - Install and configure this data service to run only in the global zone. This data serviceis not supported in non-global zones. For updated information about supported configurationsof this data service, see Oracle Solaris Cluster 4 Compatibility Guide (http://www.oracle.com/technetwork/server-storage/solaris-cluster/overview/solariscluster4-
compatibilityguide-1429037.pdf).
This chapter contains the following sections:
■ “Overview of the Installation and Configuration Process for HA for NFS” on page 10■ “Planning the HA for NFS Installation and Configuration” on page 10■ “Installing the HA for NFS Package” on page 12■ “Registering and Configuring HA for NFS” on page 13■ “Securing HA for NFS With Kerberos V5” on page 34■ “Tuning the HA for NFS Fault Monitor” on page 38■ “Upgrading the SUNW.nfs Resource Type” on page 41
You must configure HA for NFS as a failover data service. See Chapter 1, “Planning for OracleSolaris Cluster Data Services” in Planning and Administering Data Services for Oracle SolarisCluster 4.4 and the Concepts for Oracle Solaris Cluster 4.4 document for general informationabout data services, resource groups, resources, and other related topics.
The NFS mount points that are placed under the control of the data service must be the same onall of the nodes that can master the disk device group that contains those file systems.
HA for NFS requires that all NFS client mounts be "hard" mounts.
No Oracle Solaris Cluster node may be an NFS client of a file system (other than ZFS) thatis exported by HA for NFS and is being mastered on a node in the same cluster. Such cross-mounting of HA for NFS is prohibited. Use the cluster file system to share files among clusternodes.
Chapter 1 • Installing and Configuring HA for NFS 9
Overview of the Installation and Configuration Process for HA for NFS
If Oracle Solaris Resource Manager is used to manage system resources allocated to NFSon a cluster, all HA for NFS resources which can fail over to a common cluster node musthave the same Oracle Solaris Resource Manager project ID. This project ID is set with theResource_project_name resource property.
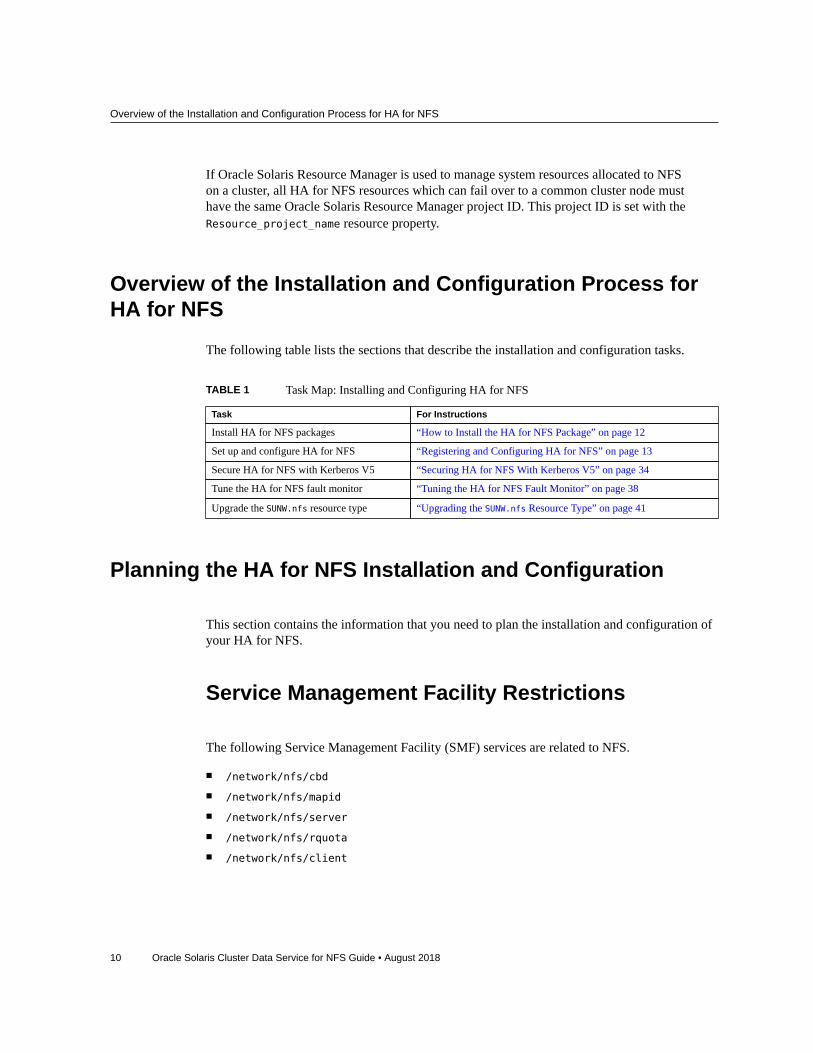
Overview of the Installation and Configuration Process forHA for NFS
The following table lists the sections that describe the installation and configuration tasks.
TABLE 1 Task Map: Installing and Configuring HA for NFS
Task For Instructions
Install HA for NFS packages “How to Install the HA for NFS Package” on page 12
Set up and configure HA for NFS “Registering and Configuring HA for NFS” on page 13
Secure HA for NFS with Kerberos V5 “Securing HA for NFS With Kerberos V5” on page 34
Tune the HA for NFS fault monitor “Tuning the HA for NFS Fault Monitor” on page 38
Upgrade the SUNW.nfs resource type “Upgrading the SUNW.nfs Resource Type” on page 41
Planning the HA for NFS Installation and Configuration
This section contains the information that you need to plan the installation and configuration ofyour HA for NFS.
Service Management Facility Restrictions
The following Service Management Facility (SMF) services are related to NFS.
■ /network/nfs/cbd
■ /network/nfs/mapid
■ /network/nfs/server
■ /network/nfs/rquota
■ /network/nfs/client
10 Oracle Solaris Cluster Data Service for NFS Guide • August 2018
Planning the HA for NFS Installation and Configuration
■ /network/nfs/status
■ /network/nfs/nlockmgr
The HA for NFS data service sets the property application/auto_enable to FALSE and theproperty startd/duration to transient for three of these services.
■ /network/nfs/server
■ /network/nfs/status
■ /network/nfs/nlockmgr
These property settings have the following consequences for these services.
■ When services that depend on these services are enabled, these services are notautomatically enabled.
■ In the event of any failure, SMF does not restart the daemons that are associated with theseservices.
■ In the event of any failure, SMF does not restart these services.
NFSv3 RestrictionsIf you are mounting file systems on the cluster nodes from external NFS servers, such as NASfilers, and you are using the NFSv3 protocol, you cannot run NFS client mounts and the HA forNFS data service on the same cluster node. If you do, certain HA for NFS data-service activitiesmight cause the NFS daemons to stop and restart, interrupting NFS services. However, you cansafely run the HA for NFS data service if you use the NFSv4 protocol to mount external NFSfile systems on the cluster nodes.
Loopback File System Restrictions
Do not use the loopback file system (LOFS) if both conditions in the following list are met:
■ HA for NFS is configured on a highly available local file system.■ The automountd daemon is running.
If both of these conditions are met, LOFS must be disabled to avoid switchover problems orother failures. If only one of these conditions is met, it is safe to enable LOFS.
If you require both LOFS and the automountd daemon to be enabled, exclude from theautomounter map all files that are part of the highly available local file system that is exportedby HA for NFS.
Chapter 1 • Installing and Configuring HA for NFS 11
Installing the HA for NFS Package
ZFS Restrictions
If you are using ZFS as the exported file system, you must set the sharenfs property to off.
To set the sharenfs property to off, run the following command.
$ zfs set sharenfs=off file_system/volume
To verify if the sharenfs property is set to off, run the following command.
$ zfs get sharenfs file_system/volume
Installing the HA for NFS Package
If you did not install the HA for NFS package during your initial Oracle Solaris Clusterinstallation, perform this procedure to install the package.
How to Install the HA for NFS PackagePerform this procedure on each cluster node where you want the HA for NFS software to run.
1. On the cluster node where you are installing the data service package, assumethe root role.
2. Ensure that the data service package is available from the configured publisherand that the solaris and ha-cluster publishers are valid.
# pkg list -a ha-cluster/data-service/nfs
# pkg publisher
PUBLISHER TYPE STATUS P LOCATION
solaris origin online F solaris-repositoryha-cluster origin online F ha-cluster-repository
For information about setting the solaris publisher, see “Adding, Modifying, or RemovingPackage Publishers” in Updating Systems and Adding Software in Oracle Solaris 11.4.
Tip - Use the -nv options whenever you install or update to see what changes will be made, suchas which versions of which packages will be installed or updated and whether a new BE will becreated.
12 Oracle Solaris Cluster Data Service for NFS Guide • August 2018
Registering and Configuring HA for NFS
If you do not get any error messages when you use the -nv options, run the command againwithout the -n option to actually perform the installation or update. If you do get errormessages, run the command again with more -v options (for example, -nvv) or more of thepackage FMRI pattern to get more information to help you diagnose and fix the problem. Fortroubleshooting information, see Appendix A, “Troubleshooting Package Installation andUpdate,” in Updating Systems and Adding Software in Oracle Solaris 11.4.
3. Install the HA for NFS software package.
# pkg install ha-cluster/data-service/nfs
4. Verify that the package installed successfully.
$ pkg info ha-cluster/data-service/nfs
Installation is successful if output shows that State is Installed.
5. Perform any necessary updates to the Oracle Solaris Cluster software.For instructions about updating your software, see Chapter 10, “Updating Software Packages”in Updating Your Oracle Solaris Cluster 4.4 Environment.
Registering and Configuring HA for NFS
This section describes how to register and configure HA for NFS.
Note - Other options also enable you to register and configure the data service. See “Toolsfor Data Service Resource Administration” in Planning and Administering Data Services forOracle Solaris Cluster 4.4 for details about these options.
This section contains the following information:
■ “Setting HA for NFS Extension Properties” on page 14■ “Tools for Registering and Configuring HA for NFS” on page 14■ “How to Register and Configure HA for NFS (clsetup)” on page 14■ “How to Register and Configure HA for NFS (Command Line Interface)” on page 19■ “How to Change Share Options on an NFS File System” on page 25■ “How to Dynamically Update Shared Paths on an NFS File System” on page 27■ “How to Tune HA for NFS Method Timeouts” on page 28
Chapter 1 • Installing and Configuring HA for NFS 13

How to Register and Configure HA for NFS (clsetup)
Setting HA for NFS Extension PropertiesThe sections that follow contain instructions for registering and configuring resources. Forinformation about the HA for NFS extension properties, see Appendix A, “HA for NFSExtension Properties”. The Tunable entry indicates when you can update a property.
To set an extension property of a resource, include the following option in the clresourcecommand that creates or modifies the resource:
-p property=value
-p property
Identifies the extension property that you are setting.
value
Specifies the value to which you are setting the extension property.
You can also use the procedures in Chapter 2, “Administering Data Service Resources” inPlanning and Administering Data Services for Oracle Solaris Cluster 4.4 to configure resourcesafter the resources are created.
Tools for Registering and Configuring HA for NFSOracle Solaris Cluster provides the following tools for registering and configuring HA for NFS:
■ The clsetup(8CL) utility. For more information, see “How to Register and Configure HAfor NFS (clsetup)” on page 14.
■ Oracle Solaris Cluster maintenance commands For more information, see “How toRegister and Configure HA for NFS (Command Line Interface)” on page 19.
The clsetup utility provides a wizard for configuring HA for NFS. This wizard reducesthe possibility for configuration errors that might result from command syntax errors oromissions. This wizard also ensures that all required resources are created and that all requireddependencies between resources are set.
How to Register and Configure HA for NFS(clsetup)Perform this procedure during your initial set up of HA for NFS. Perform this procedure fromone node only.
14 Oracle Solaris Cluster Data Service for NFS Guide • August 2018

How to Register and Configure HA for NFS (clsetup)
Note - The following instructions explain how to perform this operation by using the clsetuputility.
Before You Begin Before you start the HA for NFS wizard, ensure that the following prerequisites are met:
■ Prerequisites for configuring a logical hostname resource are met. This includes adding anentry for each logical hostname to the name service database.
■ Prerequisites for configuring a highly available storage resource are met.■ The HA for NFS package is installed.■ If you are using PNM objects, the objects are configured on the nodes where the logical
hostname resource can be brought online. Public network management (PNM) objectsinclude Internet Protocol network multipathing (IPMP) groups, trunk and datalinkmultipathing (DLMP) link aggregations, and VNICs that are directly backed by linkaggregations.
Have available the logical hostnames that you plan to add to the resource group.
1. Assume the root role on any cluster node.
2. Ensure that the hosts and rpc entries in the /etc/nsswitch.conf file are correct.The example output shows a configuration that uses the NIS external naming service.
a. Display the lookup entries for hosts and rpc.The following example shows the correct lookup entries.
# svccfg -s svc:/system/name-service/switch listprop config/host
hosts: cluster files [SUCCESS=return] nis
# svccfg -s svc:/system/name-service/switch listprop config/rpc
rpc: files nis
Note - For hosts, files must follow cluster and precede any directory or name service.This modification enables HA for NFS to fail over correctly in the presence of public networkfailures.
For rpc, files must precede any directory or name service. This configuration preventstiming-related errors for rpc lookups during periods of public network or name serviceunavailability.
b. If a lookup entry is not correct, set the correct lookups.
■ For hosts:
Chapter 1 • Installing and Configuring HA for NFS 15
How to Register and Configure HA for NFS (clsetup)
# svccfg -s svc:/system/name-service/switch \
setprop config/host = astring: \"cluster files [SUCCESS=return] nis\"
■ For rpc:
# svccfg -s svc:/system/name-service/switch \
setprop config/rpc = astring: \"files nis\"
3. Start the clsetup utility.
# clsetup
The clsetup main menu is displayed.
4. Select the option for Data Services.The Data Services menu is displayed.
5. Select the option for configuring HA for NFS.The clsetup utility displays the list of prerequisites for performing this task.
6. Verify that the prerequisites are met.The clsetup utility displays a list of all cluster nodes that are online.
7. Select the nodes where you require HA for NFS to run.
■ To accept the default selection of all listed nodes in an arbitrary order, typea.
■ To select a subset of the listed nodes, type a comma-separated or space-separated list of the numbers that correspond to the nodes.Ensure that the nodes are listed in the order in which the nodes are to appear in theresource group's node list. The first node in the list is the primary node of this resourcegroup.
■ To select all nodes in a particular order, type a comma-separated or space-separated ordered list of the numbers that correspond to the nodes.Ensure that the nodes are listed in the order in which the nodes are to appear in theresource group's node list. The first node in the list is the primary node of this resourcegroup.
8. To confirm your selection of nodes, type d.The clsetup utility displays the list of available logical hostname resources.
16 Oracle Solaris Cluster Data Service for NFS Guide • August 2018
How to Register and Configure HA for NFS (clsetup)
■ If you need to create a new logical hostname resource, type c.Proceed to Step 9
■ If the logical hostname resources you need already exist, skip to Step 11.
9. Create a new logical hostname.At the prompt, type the logical hostname to use.
■ If more than one PNM object is configured for the specified logicalhostname, the clsetup utility provides a screen where you can specify thePNM objects to use.Proceed to Step 10.
■ If only one PNM object is configured for the specified logical hostname, theclsetup utility lists the names of the Oracle Solaris Cluster logical hostnameresources that the utility will create.Skip to Step 11.
10. Select from the list of available PNM objects one object for each cluster node.The clsetup utility displays the names of the Oracle Solaris Cluster logical hostname resourcesthat the utility will create.
11. Type a comma-separated or space-separated list of the numbers that corespondto the logical hostname resources that your data service requires.The clsetup utility displays the numbers of the logical hostname resources you selected.
12. To confirm your selection of logical hostname resources, type d.The clsetup utility displays information about file system mount points.
13. Press Return to continue.The clsetup utility displays the existing file system mount points.
14. Select the file system mount points for HA for NFS data files.
■ To select a subset of the listed file system mount points, type a comma-separated or space-separated list of the numbers that correspond to the filesystem node point.
Chapter 1 • Installing and Configuring HA for NFS 17

How to Register and Configure HA for NFS (clsetup)
■ To select all file system mount points in a particular order, type a comma-separated or space-separated ordered list of the numbers that correspond tothe file system mount points.
15. To confirm your selection of file system mount points, type d.The clsetup utility displays a screen where you can specify the path prefix for HA for NFSresource group.
16. Select the path prefix for HA for NFS resource group.The clsetup utility displays a screen where you can change the share option for the file systemmount point that the NFS server is sharing.
17. Select the share option.The clsetup utility displays the share options for the selected mount points.
18. If you require a different name for any Oracle Solaris Cluster objects, changeeach name as follows.
a. Select the option for the name that you are changing.The clsetup utility displays a screen where you can specify the new name.
b. At the New Value prompt, type the new name.
The clsetup utility returns you to the list of the names of the Oracle Solaris Cluster objects thatthe utility will create.
19. To confirm your selection of Oracle Solaris Cluster object names, type d.The clsetup utility displays information about the Oracle Solaris Cluster configuration that theutility will create.
20. To create the configuration, type c.The clsetup utility displays a progress message to indicate that the utility is running commandsto create the configuration. When configuration is complete, the clsetup utility displays thecommands that the utility ran to create the configuration.
21. Press Return to continue.The clsetup utility returns you to the Data Services Menu.
22. Type q.The clsetup utility returns you to the Main Menu.
18 Oracle Solaris Cluster Data Service for NFS Guide • August 2018
How to Register and Configure HA for NFS (Command Line Interface)
23. (Optional) Type q and press Return to quit the clsetup utility.If you prefer, you can leave the clsetup utility running while you perform other required tasksbefore using the utility again. If you choose to quit clsetup, the utility recognizes your HA forNFS resource group when you restart the utility.
24. Determine whether the HA for NFS resource group and its resources are online.Use the clresourcegroup command for this purpose. By default, the clsetup utility assigns thename nfs-mountpoint-admin-rg to the HA for NFS resource group.
# clresourcegroup status nfs-mountpoint-admin-rg
25. If the HA for NFS resource group and its resources are not online, bring themonline.
# clresourcegroup online -eM nfs-rg
How to Register and Configure HA for NFS(Command Line Interface)
Before You Begin ■ Verify that all the cluster nodes are online.
# clnode status
■ Ensure that the HA for NFS package is installed.■ Ensure that the /etc/netmasks file has IP-address subnet and netmask entries for all logical
hostnames. If necessary, edit the /etc/netmasks file to add any missing entries.
1. On a cluster member, become an administrator that provides solaris.cluster.admin authorization.
2. Ensure that the hosts and rpc entries in the /etc/nsswitch.conf file are correct.The example output shows a configuration that uses the NIS external naming service.
a. Display the lookup entries for hosts and rpc.The following example shows the correct lookup entries.
# svccfg -s svc:/system/name-service/switch listprop config/host
hosts: cluster files [SUCCESS=return] nis
# svccfg -s svc:/system/name-service/switch listprop config/rpc
rpc: files nis
Chapter 1 • Installing and Configuring HA for NFS 19
How to Register and Configure HA for NFS (Command Line Interface)
Note - For hosts, files must follow cluster and precede any directory or name service.This modification enables HA for NFS to fail over correctly in the presence of public networkfailures.
For rpc, files must precede any directory or name service. This configuration preventstiming-related errors for rpc lookups during periods of public network or name serviceunavailability.
b. If a lookup entry is not correct, set the correct lookups.
■ For hosts:
# svccfg -s svc:/system/name-service/switch \
setprop config/host = astring: \"cluster files [SUCCESS=return] nis\"
■ For rpc:
# svccfg -s svc:/system/name-service/switch \
setprop config/rpc = astring: \"files nis\"
3. Create the Pathprefix directory.Create a Pathprefix directory on the HA file system (cluster file system or highly availablelocal file system). HA for NFS resources will use this directory to maintain administrativeinformation.
You can specify any directory for this purpose. However, you must manually create aPathprefix directory for each resource group that you create. Additionally, ensure that directorypermissions are executable by at least the file owner.
# mkdir -p Pathprefix-directory# chmod 755 Pathprefix-directory
4. Create a failover resource group to contain the NFS resources.
# clresourcegroup create [-n nodelist] -p Pathprefix=Pathprefix-directory resource-group
[-n nodelist]
Specifies an optional, comma-separated list of physical node names or IDs that identifypotential masters. The order here determines the order in which the Resource GroupManager (RGM) considers primary nodes during failover.
-p Pathprefix=Pathprefix-directory
Specifies a directory that resources in this resource group will use to maintainadministrative information. This is the directory that you created in Step 3.
20 Oracle Solaris Cluster Data Service for NFS Guide • August 2018
How to Register and Configure HA for NFS (Command Line Interface)
resource-group
Specifies the failover resource group.
5. Verify that you have added all your logical hostname resources to the nameservice database.To avoid any failures because of name service lookups, verify that all IP addresses to hostnamemappings that are used by HA for NFS are present in the server's and client's /etc/inet/hostsfile.
6. (Optional) Customize the nfsd or lockd startup options.Use the sharectl command to customize the nfsd and lockd options. For more information,see the nfsd(8), lockd(8), and sharectl(8)man pages.
7. Add the desired logical hostname resources into the failover resource group.You must set up a logical hostname resource with this step. The logical hostname that you usewith HA for NFS cannot be a SharedAddress resource type.
# clreslogicalhostname create -g resource-group -h logical-hostname, … [-N netiflist] lhresource
-g resource-group
Specifies the resource group that is to hold the logical hostname resources.
-h logical-hostname, …
Specifies the logical hostname resource to be added.
-N netiflist
Specifies an optional, comma-separated list that identifies the IPMP groups that are on eachnode. Each element in netiflist must be in the form of netif@node. netif can be used as anIPMP group name, such as sc_ipmp0. The node can be identified by the node name or nodeID, such as sc_ipmp0@1 or sc_ipmp@phys-schost-1.
Note - If you require a fully qualified hostname, you must specify the fully qualified name withthe -h option and you cannot use the fully qualified form in the resource name.
Note - Oracle Solaris Cluster does not currently support using the adapter name for netif.
8. From any cluster node, create the SUNW.nfs subdirectory.Create a subdirectory called SUNW.nfs below the directory that the Pathprefix propertyidentifies in Step 4.
Chapter 1 • Installing and Configuring HA for NFS 21
How to Register and Configure HA for NFS (Command Line Interface)
# mkdir Pathprefix-directory/SUNW.nfs
9. Create a dfstab.resource file in the SUNW.nfs directory that you created in Step 8,and set up share options.
a. Create the Pathprefix/SUNW.nfs/dfstab.resource file.This file contains a set of share commands with the shared path names. The shared pathsshould be subdirectories on a cluster file system.
Note - Choose a resource name suffix to identify the NFS resource that you plan to create inStep 11. A good resource name refers to the task that this resource is expected to perform. Forexample, a name such as user-nfs-home is a good candidate for an NFS resource that sharesuser home directories.
b. Set up the share options for each path that you have created to be shared.The format of this file is exactly the same as the format that is used in the /etc/dfs/dfstab file.
# share -F nfs [-o specific_options] [-d "description"] pathname
-F nfs
Identifies the file system type as nfs.
-o specific_options
Grants read-write access to all the clients. See the share(8) man page for a list ofoptions. Set the rw option for Oracle Solaris Cluster.
-d description
Describes the file system to add.
pathname
Identifies the file system to share.
Note - If you want to share multiple paths, the above share command need to be repeated foreach path that you are sharing.
When you set up your share options, consider the following points.
■ When constructing share options do not mix the ro and rw options. If you choose to use theroot option, consider the security risks associated with this choice.
22 Oracle Solaris Cluster Data Service for NFS Guide • August 2018
How to Register and Configure HA for NFS (Command Line Interface)
■ Do not grant access to the hostnames on the cluster interconnect.Grant read and write access to all the cluster nodes and logical hosts to enable HA for NFSmonitoring to do a thorough job. However, you can restrict write access to the file system ormake the file system entirely read-only. If you do so, HA for NFS fault monitoring can stillperform monitoring without having write access.
■ If you specify a client list in the share command, include all the physical hostnames andlogical hostnames that are associated with the cluster. Also include the hostnames for all theclients on all the public networks to which the cluster is connected.
■ If you use net groups in the share command, rather than names of individual hosts, add allthose cluster hostnames to the appropriate net group.
The share -o rw command grants write access to all the clients, including the hostnames thatthe Oracle Solaris Cluster software uses. This command enables HA for NFS fault monitoringto operate most efficiently. See the following man pages for details:
■ share(8)■ share_nfs(8)
10. Register the NFS resource type.
# clresourcetype register resource-type
resource-type
Adds the specified resource type. For HA for NFS, the resource type is SUNW.nfs.
11. Create the NFS resource in the failover resource group.
# clresource create -g resource-group -t resource-type resource
-g resource-group
Specifies the name of a previously created resource group to which this resource is to beadded.
-t resource-type
Specifies the name of the resource type to which this resource belongs. This name must bethe name of a registered resource type.
resource
Specifies the name of the resource to add, which you defined in Step 9. This name can beyour choice but must be unique within the cluster.
The resource is created in the enabled state.
Chapter 1 • Installing and Configuring HA for NFS 23
How to Register and Configure HA for NFS (Command Line Interface)
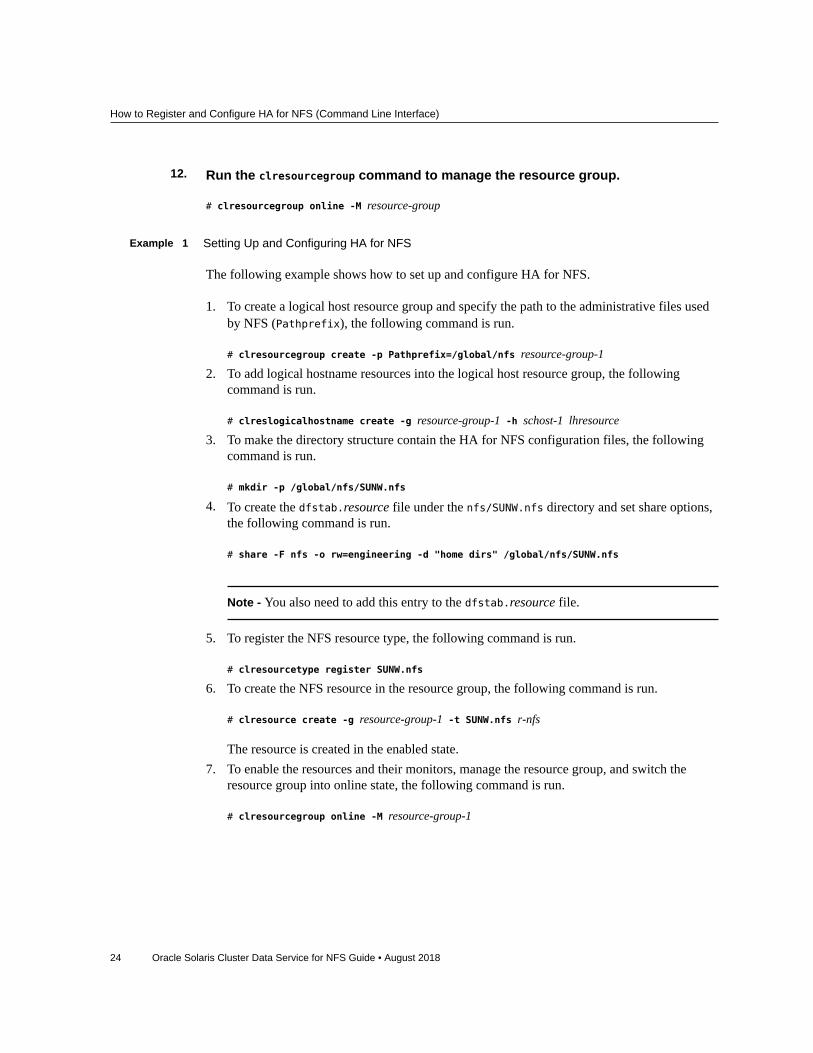
12. Run the clresourcegroup command to manage the resource group.
# clresourcegroup online -M resource-group
Example 1 Setting Up and Configuring HA for NFS
The following example shows how to set up and configure HA for NFS.
1. To create a logical host resource group and specify the path to the administrative files usedby NFS (Pathprefix), the following command is run.
# clresourcegroup create -p Pathprefix=/global/nfs resource-group-1
2. To add logical hostname resources into the logical host resource group, the followingcommand is run.
# clreslogicalhostname create -g resource-group-1 -h schost-1 lhresource
3. To make the directory structure contain the HA for NFS configuration files, the followingcommand is run.
# mkdir -p /global/nfs/SUNW.nfs
4. To create the dfstab.resource file under the nfs/SUNW.nfs directory and set share options,the following command is run.
# share -F nfs -o rw=engineering -d "home dirs" /global/nfs/SUNW.nfs
Note - You also need to add this entry to the dfstab.resource file.
5. To register the NFS resource type, the following command is run.
# clresourcetype register SUNW.nfs
6. To create the NFS resource in the resource group, the following command is run.
# clresource create -g resource-group-1 -t SUNW.nfs r-nfs
The resource is created in the enabled state.7. To enable the resources and their monitors, manage the resource group, and switch the
resource group into online state, the following command is run.
# clresourcegroup online -M resource-group-1
24 Oracle Solaris Cluster Data Service for NFS Guide • August 2018
How to Change Share Options on an NFS File System
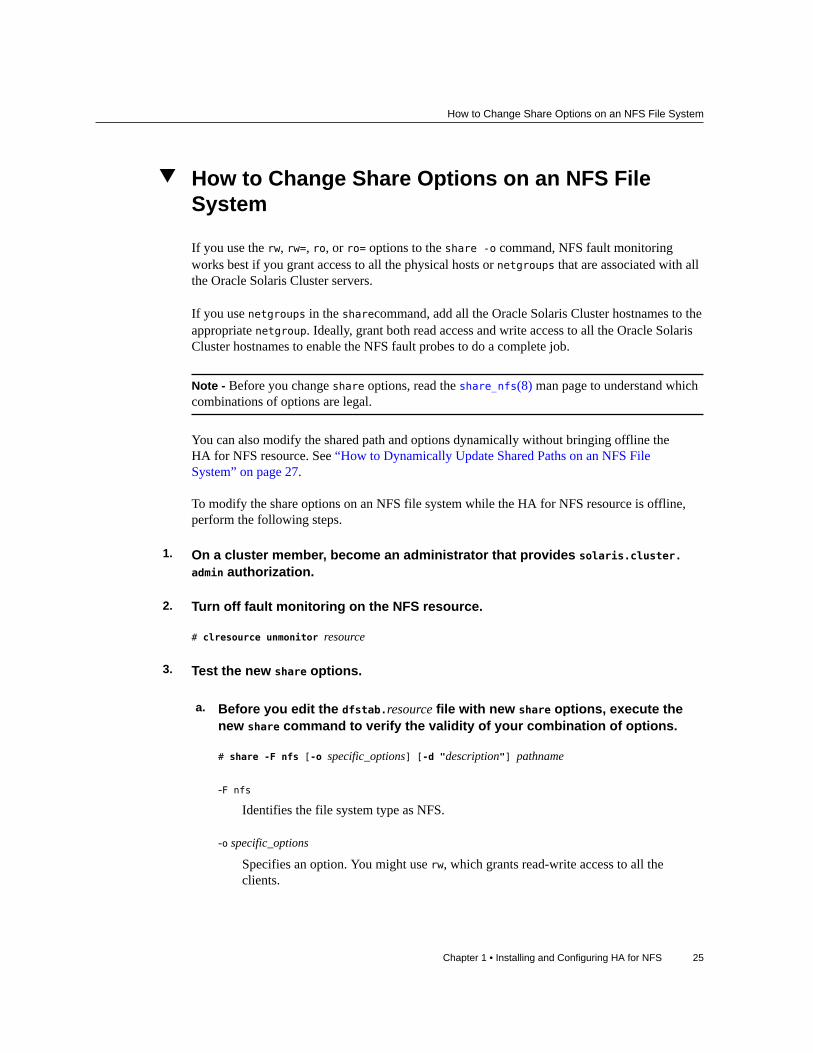
How to Change Share Options on an NFS FileSystem
If you use the rw, rw=, ro, or ro= options to the share -o command, NFS fault monitoringworks best if you grant access to all the physical hosts or netgroups that are associated with allthe Oracle Solaris Cluster servers.
If you use netgroups in the sharecommand, add all the Oracle Solaris Cluster hostnames to theappropriate netgroup. Ideally, grant both read access and write access to all the Oracle SolarisCluster hostnames to enable the NFS fault probes to do a complete job.
Note - Before you change share options, read the share_nfs(8) man page to understand whichcombinations of options are legal.
You can also modify the shared path and options dynamically without bringing offline theHA for NFS resource. See “How to Dynamically Update Shared Paths on an NFS FileSystem” on page 27.
To modify the share options on an NFS file system while the HA for NFS resource is offline,perform the following steps.
1. On a cluster member, become an administrator that provides solaris.cluster.admin authorization.
2. Turn off fault monitoring on the NFS resource.
# clresource unmonitor resource
3. Test the new share options.
a. Before you edit the dfstab.resource file with new share options, execute thenew share command to verify the validity of your combination of options.
# share -F nfs [-o specific_options] [-d "description"] pathname
-F nfs
Identifies the file system type as NFS.
-o specific_options
Specifies an option. You might use rw, which grants read-write access to all theclients.
Chapter 1 • Installing and Configuring HA for NFS 25
How to Change Share Options on an NFS File System
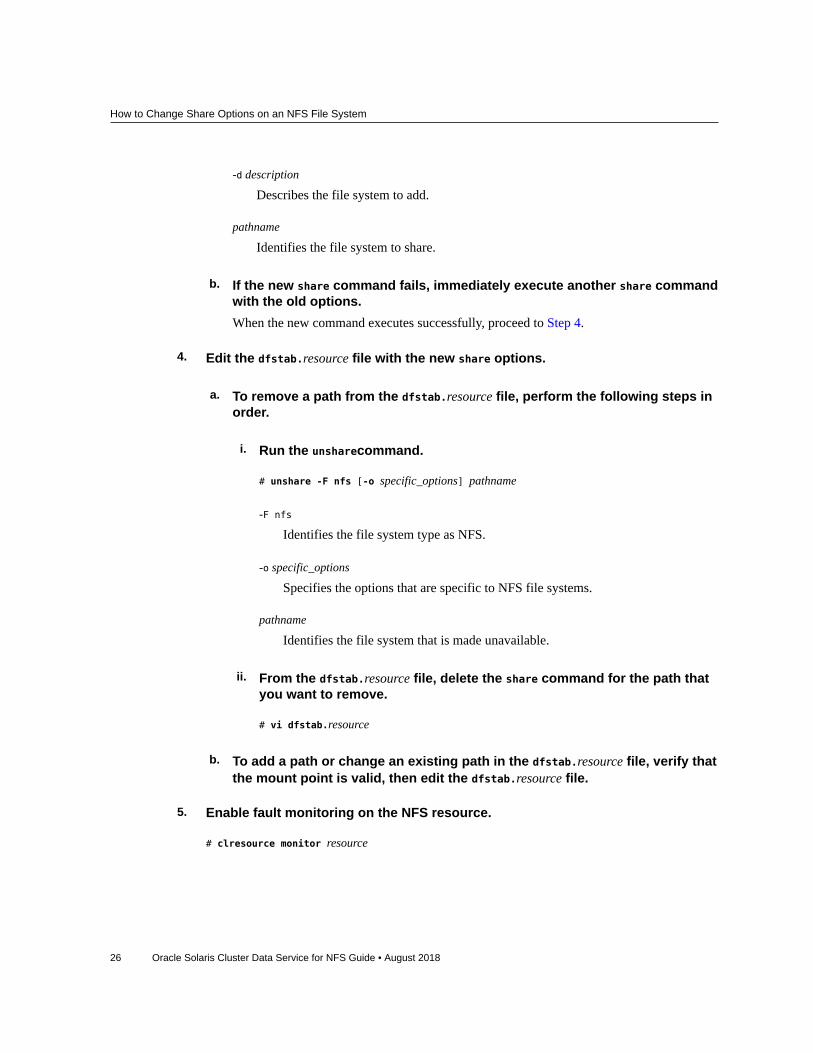
-d description
Describes the file system to add.
pathname
Identifies the file system to share.
b. If the new share command fails, immediately execute another share commandwith the old options.When the new command executes successfully, proceed to Step 4.
4. Edit the dfstab.resource file with the new share options.
a. To remove a path from the dfstab.resource file, perform the following steps inorder.
i. Run the unsharecommand.
# unshare -F nfs [-o specific_options] pathname
-F nfs
Identifies the file system type as NFS.
-o specific_options
Specifies the options that are specific to NFS file systems.
pathname
Identifies the file system that is made unavailable.
ii. From the dfstab.resource file, delete the share command for the path thatyou want to remove.
# vi dfstab.resource
b. To add a path or change an existing path in the dfstab.resource file, verify thatthe mount point is valid, then edit the dfstab.resource file.
5. Enable fault monitoring on the NFS resource.
# clresource monitor resource
26 Oracle Solaris Cluster Data Service for NFS Guide • August 2018
How to Dynamically Update Shared Paths on an NFS File System
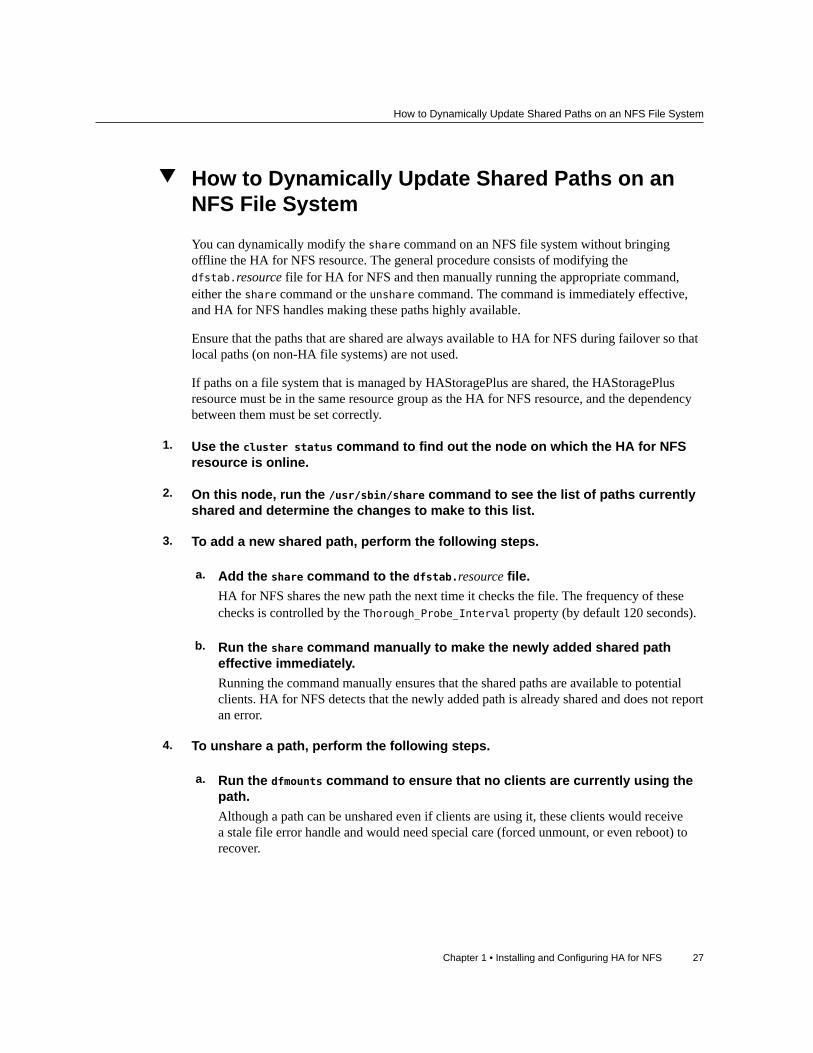
How to Dynamically Update Shared Paths on anNFS File System
You can dynamically modify the share command on an NFS file system without bringingoffline the HA for NFS resource. The general procedure consists of modifying thedfstab.resource file for HA for NFS and then manually running the appropriate command,either the share command or the unshare command. The command is immediately effective,and HA for NFS handles making these paths highly available.
Ensure that the paths that are shared are always available to HA for NFS during failover so thatlocal paths (on non-HA file systems) are not used.
If paths on a file system that is managed by HAStoragePlus are shared, the HAStoragePlusresource must be in the same resource group as the HA for NFS resource, and the dependencybetween them must be set correctly.
1. Use the cluster status command to find out the node on which the HA for NFSresource is online.
2. On this node, run the /usr/sbin/share command to see the list of paths currentlyshared and determine the changes to make to this list.
3. To add a new shared path, perform the following steps.
a. Add the share command to the dfstab.resource file.HA for NFS shares the new path the next time it checks the file. The frequency of thesechecks is controlled by the Thorough_Probe_Interval property (by default 120 seconds).
b. Run the share command manually to make the newly added shared patheffective immediately.Running the command manually ensures that the shared paths are available to potentialclients. HA for NFS detects that the newly added path is already shared and does not reportan error.
4. To unshare a path, perform the following steps.
a. Run the dfmounts command to ensure that no clients are currently using thepath.Although a path can be unshared even if clients are using it, these clients would receivea stale file error handle and would need special care (forced unmount, or even reboot) torecover.
Chapter 1 • Installing and Configuring HA for NFS 27
How to Dynamically Update Shared Paths on an NFS File System
b. Remove the share command from the dfstab.resource file.
c. Run the unshare command manually.
5. To modify options for an existing shared path, perform the following steps.
a. Modify the dfstab.resource file as needed.
b. Run the appropriate command (share or unshare) manually.
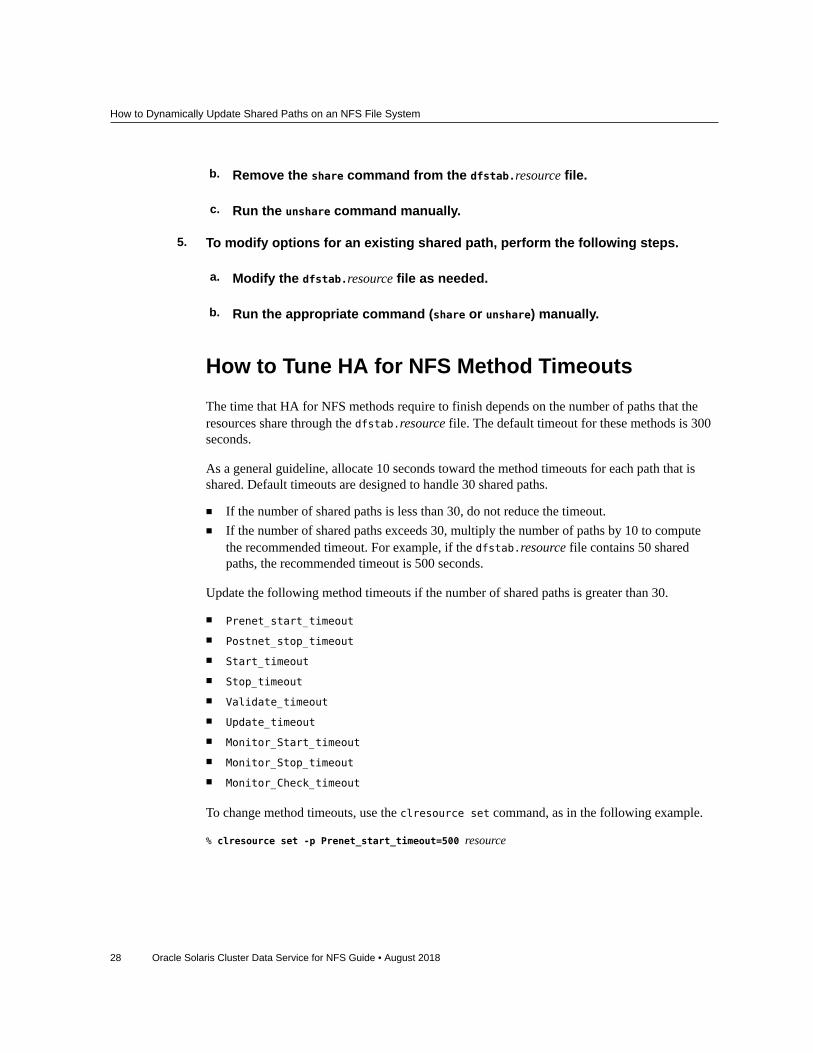
How to Tune HA for NFS Method Timeouts
The time that HA for NFS methods require to finish depends on the number of paths that theresources share through the dfstab.resource file. The default timeout for these methods is 300seconds.
As a general guideline, allocate 10 seconds toward the method timeouts for each path that isshared. Default timeouts are designed to handle 30 shared paths.
■ If the number of shared paths is less than 30, do not reduce the timeout.■ If the number of shared paths exceeds 30, multiply the number of paths by 10 to compute
the recommended timeout. For example, if the dfstab.resource file contains 50 sharedpaths, the recommended timeout is 500 seconds.
Update the following method timeouts if the number of shared paths is greater than 30.
■ Prenet_start_timeout
■ Postnet_stop_timeout
■ Start_timeout
■ Stop_timeout
■ Validate_timeout
■ Update_timeout
■ Monitor_Start_timeout
■ Monitor_Stop_timeout
■ Monitor_Check_timeout
To change method timeouts, use the clresource set command, as in the following example.
% clresource set -p Prenet_start_timeout=500 resource
28 Oracle Solaris Cluster Data Service for NFS Guide • August 2018
Configuring SUNW.HAStoragePlus Resource Type
Configuring SUNW.HAStoragePlus Resource Type
HA for NFS is a disk-intensive data service. Therefore, you should configure the SUNW.HAStoragePlus resource type for use with this data service. For an overview of the SUNW.HAStoragePlus resource type, see “Understanding HAStoragePlus” in Planning andAdministering Data Services for Oracle Solaris Cluster 4.4.
The procedure for configuring the SUNW.HAStoragePlus resource type depends on the type ofthe file system that NFS is sharing. For more information, see the following sections:
■ “How to Set Up the HAStoragePlus Resource Type for an NFS-Exported UNIX File SystemUsing the Command Line Interface” on page 29
■ “How to Set Up the HAStoragePlus Resource Type for an NFS-ExportedZFS” on page 31
How to Set Up the HAStoragePlus Resource Typefor an NFS-Exported UNIX File System Using theCommand Line Interface
The HAStoragePlus resource type synchronizes the startups between resource groups anddisk device groups. The HAStoragePlus resource type has an additional feature to make alocal file system highly available. For background information about making a local filesystem highly available, see “Enabling Highly Available Local File Systems” in Planning andAdministering Data Services for Oracle Solaris Cluster 4.4. To use both of these features, set upthe HAStoragePlus resource type.
Note - These instructions explain how to use the HAStoragePlus resource type with the UNIXfile system (UFS). For information about using the HAStoragePlus resource type with the SunQFS file system, see your Sun QFS documentation.
The following example uses a simple NFS service that exports home directory data from alocally mounted directory /global/local-fs/nfs/export/ home. The example assumes thefollowing:
■ The mount point /global/local-fs/nfs is used to mount a UFS local file system on anOracle Solaris Cluster global device partition.
■ The /etc/vfstab entry for the /global/local-fs/nfs file system should omit the globaloption and specify that the mount at boot flag is no.
Chapter 1 • Installing and Configuring HA for NFS 29
How to Set Up the HAStoragePlus Resource Type for an NFS-Exported UNIX File System Using the Command Line Interface
■ The path-prefix directory is on the root directory of the same file system that is to bemounted, for example, /global/local-fs/nfs. The path-prefix directory is the directorythat HA-NFS uses to maintain administrative information and status information.
1. On a cluster node, become an administrator that provides solaris.cluster.adminauthorization.
2. Determine whether the HAStoragePlus resource type and the SUNW.nfs resourcetype are registered.The following command prints a list of registered resource types.
# clresourcetype show | egrep Type
3. If necessary, register the HAStoragePlus resource type and the SUNW.nfs resourcetype.
# clresourcetype register SUNW.HAStoragePlus
# clresourcetype register SUNW.nfs
4. Create the failover resource group nfs-rg.
# clresourcegroup create -p PathPrefix=/global/local-fs/nfs nfs-rg
5. Create a logical host resource of type SUNW.LogicalHostname.
# clreslogicalhostname create -g nfs-rg -h log-nfs nfs-lh-rs
Note - If you require a fully qualified hostname, you must specify the fully qualified name withthe -h option and you cannot use the fully qualified form in the resource name.
6. Create the resource nfs-hastp-rs of type HAStoragePlus.
# clresource create -g nfs-rg -t SUNW.HAStoragePlus \
-p FilesystemMountPoints=/global/local-fs/nfs \
-p AffinityOn=True nfs-hastp-rs
The resource is created in the enabled state.
Note - You can use the FilesystemMountPoints extension property to specify a list of oneor more mount points for file systems. This list can consist of mount points for both local filesystems and global file systems. The mount at boot flag is ignored by HAStoragePlus for globalfile systems.
7. Bring online the resource group nfs-rg on a cluster node.
30 Oracle Solaris Cluster Data Service for NFS Guide • August 2018
How to Set Up the HAStoragePlus Resource Type for an NFS-Exported ZFS
The node where the resource group is brought online becomes the primary node for the/global/local-fs/nfs file system's underlying global device partition. The file system/global/local-fs/nfs is then mounted on this node.
# clresourcegroup online -M nfs-rg
8. Create the resource nfs-rs of type SUNW.nfs and specify its resource dependencyon the resource nfs-hastp-rs.The file dfstab.nfs-rs must be present in /global/local-fs/nfs/SUNW.nfs.
# clresource create -g nfs-rg -t SUNW.nfs \
-p Resource_dependencies_offline_restart=nfs-hastp-rs nfs-rs
The resource is created in the enabled state.
Note - Before you can set the dependency in the nfs-rs resource, the nfs-hastp-rs resourcemust be online.
9. Take offline the resource group nfs-rg.
# clresourcegroup offline nfs-rg
10. Bring online the nfs-rg group on a cluster node.
# clresourcegroup online -eM nfs-rg
Caution - Ensure that you switch only the resource group. Do not attempt to switch the devicegroup. If you attempt to switch the device group, the states of the resource group and the devicegroup become inconsistent, causing the resource group to fail over.
Whenever the service is migrated to a new node, the primary I/O path for /global/local-fs/nfs will always be online and colocated with the NFS servers. The file system /global/local-fs/nfs is locally mounted before the NFS server is started.
How to Set Up the HAStoragePlus Resource Type foran NFS-Exported ZFSThe following procedure uses a simple NFS service.
See “Creating a Basic ZFS Storage Pool” in Managing ZFS File Systems in Oracle Solaris 11.2for information about how to create a ZFS pool. See “Creating a ZFS File System Hierarchy” in
Chapter 1 • Installing and Configuring HA for NFS 31
How to Set Up the HAStoragePlus Resource Type for an NFS-Exported ZFS
Managing ZFS File Systems in Oracle Solaris 11.2 for information about how to create a ZFSfile system in that ZFS pool.
1. On a cluster node, become an administrator that provides solaris.cluster.adminauthorization.
2. Determine whether the HAStoragePlus resource type and the SUNW.nfs resourcetype are registered.The following command prints a list of registered resource types.
# clresourcetype list
3. If necessary, register the HAStoragePlus resource type and the SUNW.nfs resourcetype.
# clresourcetype register SUNW.HAStoragePlus SUNW.nfs
4. Create the failover resource group.
# clresourcegroup create -p PathPrefix=path resource-group
5. Create a logical host resource of type SUNW.LogicalHostname.
# clreslogicalhostname create -g resource-group \-h logical-hostname logicalhost-resource
Note - If you require a fully qualified hostname, you must specify the fully qualified name withthe -h option and you cannot use the fully qualified form in the resource name.
6. Create the ZFS file system resource of type HAStoragePlus.
# clresource create -g resource-group -t SUNW.HAStoragePlus \-p Zpools=zpool HASP-resource
The resource is created in the enabled state.
Note - You can specify a list of one or more ZFS pools for the Zpools extension property.
7. Bring online the resource group on a cluster node in a managed state.The node on which the resource group is brought online becomes the primary node for the ZFSfile system. The ZFS pool zpool is imported on this node. The ZFS file system is consequentlymounted locally on this node.
# clresourcegroup online -M resource-group
32 Oracle Solaris Cluster Data Service for NFS Guide • August 2018
How to Set Up the HAStoragePlus Resource Type for an NFS-Exported ZFS
8. Create the resource of type SUNW.nfs and specify its resource dependency on theresource of type SUNW.HAStoragePlus.The file dfstab.nfs-rs must be present in zpool/nfs/SUNW.nfs.
# clresource create -g resource-group -t SUNW.nfs \-p resource_dependencies_offline_restart=HASP-resource NFS-resource
The resource is created in the enabled state.
Note - Before you can set the dependency in the NFS-resource resource, the HASP-resourceresource must be online.
9. Bring online the resource-group group on a cluster node in a managed state.
# clresourcegroup online -M resource-group
Example 2 Setting Up the HAStoragePlus Resource Type for an NFS-Exported ZFS File System
The following example uses a simple NFS service. The example assumes the following:
■ The nfs/export directory exists in the ZFS pool /nfszpool.■ The dfstab.resource file exists in the /nfszpool/nfs/SUNW.nfs directory.■ The path-prefix directory is on the root directory of the same file system that is to be
mounted, for example, /nfszpool/nfs. The path-prefix directory is the directory that HA-NFS uses to maintain administrative information and status information.
phys-schost-1% su
Password:
# clresourcetype list
SUNW.LogicalHostname:2
SUNW.SharedAddress:2
# clresourcetype register SUNW.HAStoragePlus SUNW.nfs
# clresourcegroup create -p PathPrefix=/nfszpool/nfs nfs-rg
# clreslogicalhostname create -g nfs-rg -h log-nfs nfs-lh-rs
# clresource create -g nfs-rg -t SUNW.HAStoragePlus \
-p Zpools=nfszpool nfs-hastp-rs
# clresourcegroup online -M nfs-rg
# clresource create -g nfs-rg -t SUNW.nfs \
-p resource_dependencies_offline_restart=nfs-hastp-rs nfs-rs
Chapter 1 • Installing and Configuring HA for NFS 33
Securing HA for NFS With Kerberos V5
Securing HA for NFS With Kerberos V5
You can secure HA for NFS with Kerberos V5 by configuring the Kerberos client. Thisconfiguration includes adding a Kerberos principal for NFS over the logical hostnames on allcluster nodes.
To configure the Kerberos client, perform the following procedures.
■ “How to Prepare the Nodes” on page 34.■ “How to Create Kerberos Principals” on page 35.■ “Enabling Secure NFS” on page 38.■ “Accessing a Kerberos-Protected NFS File System as the root User” on page 38.
How to Prepare the Nodes1. Configure the Key Distribution Center (KDC) server that will be used by the
cluster nodes.Refer to Managing Kerberos in Oracle Solaris 11.4 for details.
2. Set up the time synchronization.The KDC server must be time synchronized with the cluster nodes as well as any clients thatwill be using the HA for NFS services from the cluster. The Network Time Protocol (NTP)method performs time corrections with greater granularity than other methods, and therefore thetime synchronization is more reliable. To benefit from this greater reliability, use NTP for thetime synchronization.
3. Verify the DNS client configuration.The DNS client configuration must be complete and working on all cluster nodes as well as onany NFS clients that will be using secure NFS services from the cluster. Use the resolv.confcommand to verify the DNS client configuration.The DNS domain name must be made known to the Kerberos configuration by keeping amapping in the domain_realm section of the krb5.conf file.The following example shows a mapping of DNS domain name mydept.example.com toKerberos realm EXAMPLE.COM.
[domain_realm].mydept.example.com = EXAMPLE.COM
4. Ensure that the master KDC server is up when the Kerberos client software isconfigured on the cluster nodes.
34 Oracle Solaris Cluster Data Service for NFS Guide • August 2018
How to Create Kerberos Principals
5. Ensure that the same configuration file and the same service key table file areavailable to all cluster nodes.The /etc/krb5/krb5.conf file must be configured the same on all the cluster nodes. Inaddition, the default Kerberos keytab file (service key table), /etc/krb5/krb5.keytab, mustbe configured the same on all the cluster nodes. Consistent configuration can be achieved bycopying the files to all cluster nodes. Alternatively, you can keep a single copy of each fileon a global file system and install symbolic links to /etc/krb5/krb5.conf and /etc/krb5/krb5.keytab on all cluster nodes.
You can also use a highly available local file system to make files available to all cluster nodes.However, a highly available local file system is visible on only one node at a time. Therefore, ifHA for NFS is being used in different resource groups, potentially mastered on different nodes,the files are not visible to all cluster nodes. In addition, this configuration complicates Kerberosclient administrative tasks.
6. Ensure that all Kerberos-related entries in the file /etc/nfssec.conf areuncommented.On all cluster nodes, as well as on any NFS clients that are configured to use secure NFSservices from the cluster, all Kerberos-related entries in the file /etc/nfssec.conf must beuncommented. See the nfssec.conf(5) man page.
How to Create Kerberos Principals
The following steps create the required Kerberos principals and keytab entries in the KDCdatabase. For each cluster node, the keytab entries for which service principals are createddepend on the version of Oracle Solaris that is running on the cluster node.
The principal for the nfs service over the logical hostname is created on one node only andthen added manually to the default Kerberos keytab file on each cluster node. The Kerberosconfiguration file krb5.conf and the keytab file krb5.keytab must be stored as individualcopies on each cluster node and must not be shared on a cluster file system.
1. On each cluster node, log in to the KDC server as the administrator and createthe host principal for each cluster node.Principals must be created using the fully qualified domain names.
Add these entries to the default keytab file on each node. These steps can be greatly simplifiedwith the use of pconsole cluster console utilities. See “How to Install pconsole Softwareon an Administrative Console” in Installing and Configuring an Oracle Solaris Cluster 4.4Environment for more information.
Chapter 1 • Installing and Configuring HA for NFS 35
How to Create Kerberos Principals
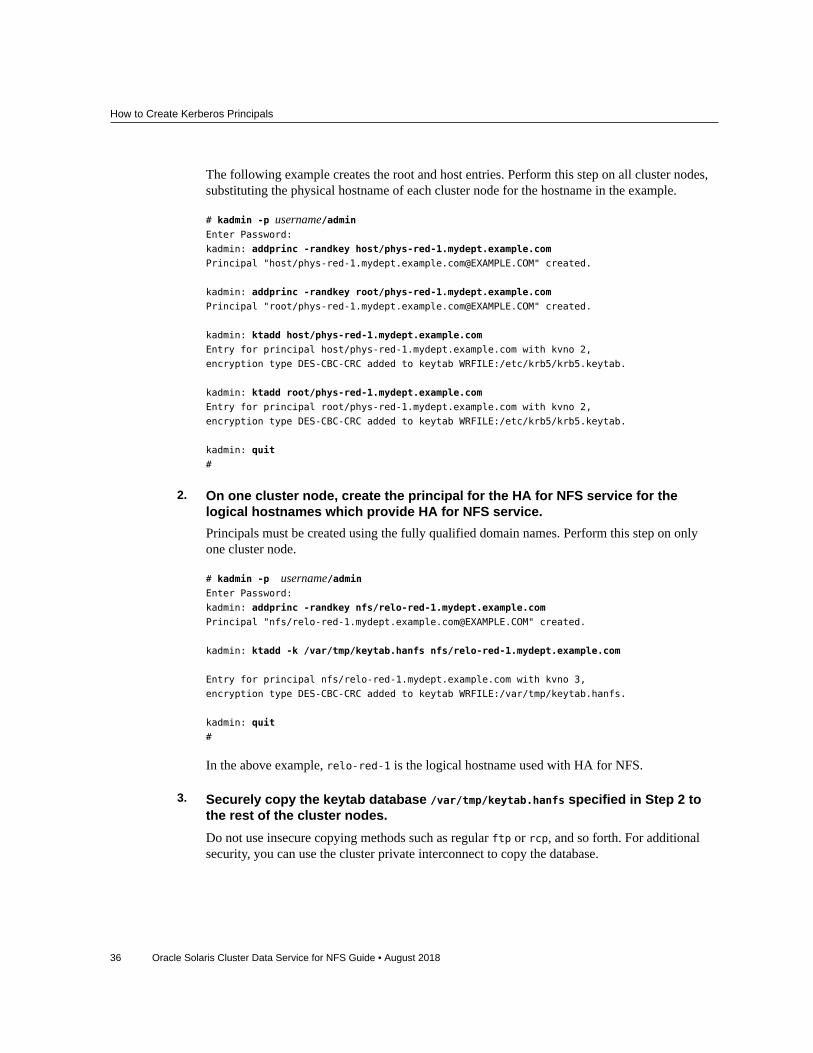
The following example creates the root and host entries. Perform this step on all cluster nodes,substituting the physical hostname of each cluster node for the hostname in the example.
# kadmin -p username/adminEnter Password:
kadmin: addprinc -randkey host/phys-red-1.mydept.example.com
Principal "host/[email protected]" created.
kadmin: addprinc -randkey root/phys-red-1.mydept.example.com
Principal "root/[email protected]" created.
kadmin: ktadd host/phys-red-1.mydept.example.com
Entry for principal host/phys-red-1.mydept.example.com with kvno 2,
encryption type DES-CBC-CRC added to keytab WRFILE:/etc/krb5/krb5.keytab.
kadmin: ktadd root/phys-red-1.mydept.example.com
Entry for principal root/phys-red-1.mydept.example.com with kvno 2,
encryption type DES-CBC-CRC added to keytab WRFILE:/etc/krb5/krb5.keytab.
kadmin: quit
#
2. On one cluster node, create the principal for the HA for NFS service for thelogical hostnames which provide HA for NFS service.Principals must be created using the fully qualified domain names. Perform this step on onlyone cluster node.
# kadmin -p username/adminEnter Password:
kadmin: addprinc -randkey nfs/relo-red-1.mydept.example.com
Principal "nfs/[email protected]" created.
kadmin: ktadd -k /var/tmp/keytab.hanfs nfs/relo-red-1.mydept.example.com
Entry for principal nfs/relo-red-1.mydept.example.com with kvno 3,
encryption type DES-CBC-CRC added to keytab WRFILE:/var/tmp/keytab.hanfs.
kadmin: quit
#
In the above example, relo-red-1 is the logical hostname used with HA for NFS.
3. Securely copy the keytab database /var/tmp/keytab.hanfs specified in Step 2 tothe rest of the cluster nodes.Do not use insecure copying methods such as regular ftp or rcp, and so forth. For additionalsecurity, you can use the cluster private interconnect to copy the database.
36 Oracle Solaris Cluster Data Service for NFS Guide • August 2018
How to Create Kerberos Principals
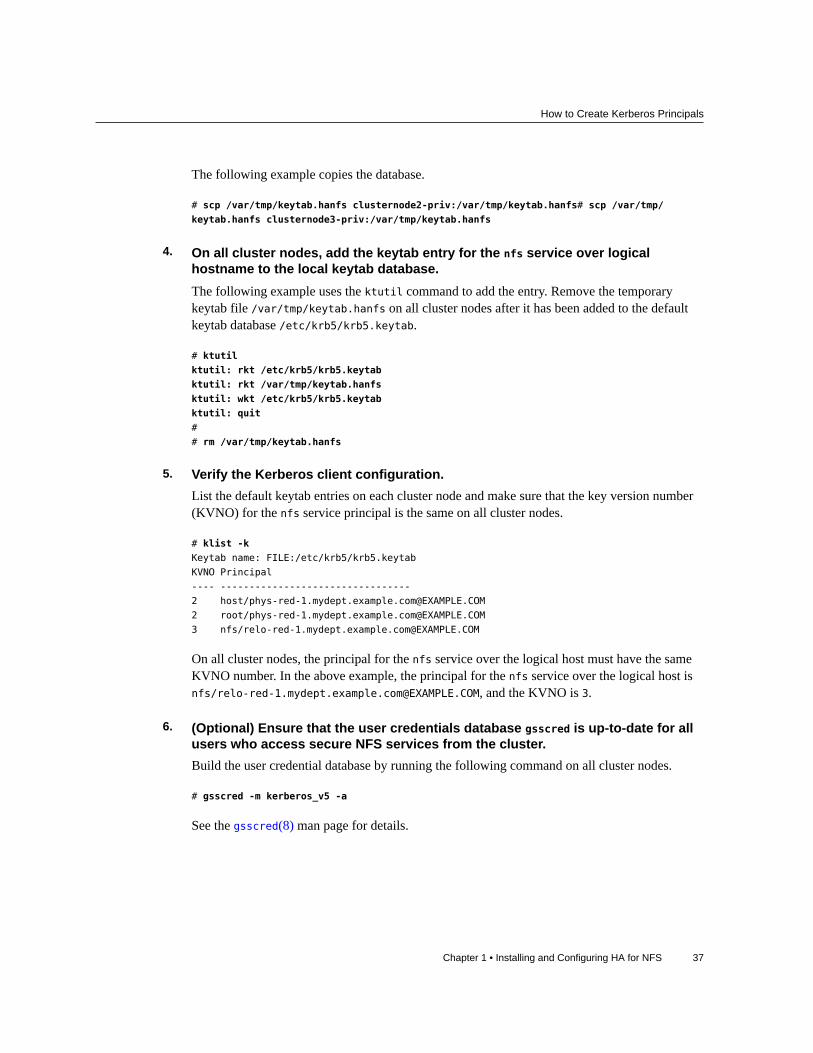
The following example copies the database.
# scp /var/tmp/keytab.hanfs clusternode2-priv:/var/tmp/keytab.hanfs# scp /var/tmp/
keytab.hanfs clusternode3-priv:/var/tmp/keytab.hanfs
4. On all cluster nodes, add the keytab entry for the nfs service over logicalhostname to the local keytab database.The following example uses the ktutil command to add the entry. Remove the temporarykeytab file /var/tmp/keytab.hanfs on all cluster nodes after it has been added to the defaultkeytab database /etc/krb5/krb5.keytab.
# ktutil
ktutil: rkt /etc/krb5/krb5.keytab
ktutil: rkt /var/tmp/keytab.hanfs
ktutil: wkt /etc/krb5/krb5.keytab
ktutil: quit
#
# rm /var/tmp/keytab.hanfs
5. Verify the Kerberos client configuration.List the default keytab entries on each cluster node and make sure that the key version number(KVNO) for the nfs service principal is the same on all cluster nodes.
# klist -k
Keytab name: FILE:/etc/krb5/krb5.keytab
KVNO Principal
---- ---------------------------------
2 host/[email protected]
2 root/[email protected]
3 nfs/[email protected]
On all cluster nodes, the principal for the nfs service over the logical host must have the sameKVNO number. In the above example, the principal for the nfs service over the logical host isnfs/[email protected], and the KVNO is 3.
6. (Optional) Ensure that the user credentials database gsscred is up-to-date for allusers who access secure NFS services from the cluster.Build the user credential database by running the following command on all cluster nodes.
# gsscred -m kerberos_v5 -a
See the gsscred(8) man page for details.
Chapter 1 • Installing and Configuring HA for NFS 37

Tuning the HA for NFS Fault Monitor
Note that the above approach builds the user credentials database only once. Some othermechanism must be employed, for example, the cron command, to keep the local copy of thisdatabase up to date with changes in the user population.
Enabling Secure NFSUse the -o sec=option option of the share command in the dfstab.resource-name entry toshare your file systems securely. See the nfssec(7) man page for details of specific optionsettings.
If the HA for NFS resource is already configured and running, see “How to Change ShareOptions on an NFS File System” on page 25 for information about updating the entries inthe dfstab.resource-name file.
Note - The sec=dh option is not supported on Oracle Solaris Cluster configurations.
Accessing a Kerberos-Protected NFS File Systemas the root User
You can use either of the following methods for to configure root user access to an NFS filesystem that is secured with Kerberos.
■ Configure the nfs client.
# kclient -a adminuser -k kdc-list -R realm
See the kclient(8) man page for more information.■ Configure the Kerberos client, following procedures in Managing Kerberos in Oracle
Solaris 11.4.
Tuning the HA for NFS Fault MonitorThe HA for NFS fault monitor is contained in a resource whose resource type is SUNW.nfs.
For general information about the operation of fault monitors, see “Tuning Fault Monitors forOracle Solaris Cluster Data Services” in Planning and Administering Data Services for OracleSolaris Cluster 4.4.
38 Oracle Solaris Cluster Data Service for NFS Guide • August 2018
Tuning the HA for NFS Fault Monitor
Fault Monitor Startup
The NFS resource MONITOR_START method starts the NFS system fault monitor. This startmethod first checks if the NFS system fault monitor nfs_daemons_probeis already runningunder the process monitor daemon rpc.pmfd. If the NFS system fault monitor is not running,the start method starts the nfs_daemons_probe process under the control of the process monitor.The start method then starts the resource fault monitor nfs_probe, also under the control of theprocess monitor.
Fault Monitor Stop
The NFS resource MONITOR_STOP method stops the resource fault monitor. If no other NFSresource fault monitor is running on the local node, the stop method stops the NFS system faultmonitor.
Operations of HA for NFS Fault Monitor During aProbe
This section describes the operations of the following fault monitoring processes:
■ NFS system fault monitoring■ NFS resource fault monitoring■ Monitoring of file sharing
NFS System Fault Monitoring Process
The NFS system fault monitor probe monitors the NFS daemons nfsd, mountd, statd, andlockd, and the RPC portmapper service daemon rpcbindon the local node. The probe checksfor the presence of the process and its response to a null rpc call. This monitor uses thefollowing NFS extension properties:
■ Rpcbind_nullrpc_timeout
■ Rpcbind_nullrpc_reboot
■ Statd_nullrpc_timeout
■ Lockd_nullrpc_timeout
■ Mountd_nullrpc_timeout
Chapter 1 • Installing and Configuring HA for NFS 39
Tuning the HA for NFS Fault Monitor
■ Mountd_nullrpc_restart
■ Nfsd_nullrpc_timeout
■ Nfsd_nullrpc_restart
See “Setting HA for NFS Extension Properties” on page 14.
Each NFS system fault monitor probe cycle performs the following steps in a loop. The systemproperty Cheap_probe_interval specifies the interval between probes.
1. The fault monitor probes rpcbind.If the process terminates unexpectedly, but a warm restart of the daemon is in progress,rpcbind continues to probe other daemons.If the process terminates unexpectedly, the fault monitor reboots the node.
If a null rpc call to the daemon terminates unexpectedly, Rpcbind_nullrpc_reboot=True,and Failover_mode=HARD, the fault monitor reboots the node.
2. The fault monitor probes statd first, and then lockd.
If statd or lockd terminate unexpectedly, the system fault monitor attempts to restart bothdaemons.
If a null rpc call to these daemons terminates unexpectedly, the fault monitor logs amessage to syslog but does not restart statd or lockd.
3. The fault monitor probes mountd.
If mountd terminates unexpectedly, the fault monitor attempts to restart the daemon.
If the null rpc call to the daemon terminates unexpectedly andMountd_nullrpc_restart=True, the fault monitor attempts to restart mountd if the clusterfile system is available.
4. The fault monitor probes nfsd.
If nfsd terminates unexpectedly, the fault monitor attempts to restart the daemon.
If the null rpc call to the daemon terminates unexpectedly andNfsd_nullrpc_restart=TRUE, the fault monitor attempts to restart nfsd if the cluster filesystem is available.
5. If any one of the above NFS daemons (except rpcbind) fails to restart during a probe cycle,the NFS system fault monitor will retry the restart in the next cycle. When all the NFSdaemons are restarted and healthy, the resource status is set to ONLINE. The monitor tracksunexpected terminations of NFS daemons in the last Retry_interval. When the totalnumber of unexpected daemon terminations has reached Retry_count, the system faultmonitor issues a scha_control giveover. If the giveover call fails, the monitor attempts torestart the failed NFS daemon.
6. At the end of each probe cycle, if all daemons are healthy, the monitor clears the history offailures.
40 Oracle Solaris Cluster Data Service for NFS Guide • August 2018
Upgrading the SUNW.nfs Resource Type
NFS Resource Fault Monitoring Process
NFS resource fault monitoring is specific to each NFS resource. The fault monitor of eachresource checks the status of each shared path to monitor the file systems that the resourceexports.
Before starting the NFS resource fault monitor probes, all the shared paths are read from thedfstab file and stored in memory. In each probe cycle, the probe performs the following steps.
1. If dfstab has been changed since the last read, the probe refreshes the memory.
If an error occurs while reading the dfstab file, the resource status is set to FAULTED, andthe monitor skips the remainder of the checks in the current probe cycle.
2. The fault monitor probes all the shared paths in each iteration by performing stat() on thepath.
If any path is not functional, the resource status is set to FAULTED.3. The probe checks for the presence of NFS daemons (nfsd, mountd, lockd, statd) and
rpcbind.4. If any of these daemons are down, the resource status is set to FAULTED.5. If all shared paths are valid and NFS daemons are present, the resource status is reset to
ONLINE.
Monitoring of File Sharing
The HA for NFS fault monitor probe monitors the success or failure of file sharing bymonitoring the following files:
■ /etc/dfs/sharetab
■ /etc/mnttab
■ Pathprefix/SUNW.nfs/dfstab.resource
The Pathprefix part of the file path is the value of the Pathprefix extension property for theresource group, and resource is the resource name.
If the probe detects any modification to any of these files, it shares the paths in dfstab.resourceagain.
Upgrading the SUNW.nfs Resource Type
Upgrade the SUNW.nfs resource type if the following conditions apply:
Chapter 1 • Installing and Configuring HA for NFS 41
Upgrading the SUNW.nfs Resource Type
■ You upgrade the HA for NFS data service to the latest version of Oracle Solaris Clusterfrom an earlier version of the data service.
■ You upgrade from an earlier version of the operating system.
For general instructions that explain how to upgrade a resource type, see “Upgrading aResource Type” in Planning and Administering Data Services for Oracle Solaris Cluster 4.4.The information that you require to complete the upgrade of the resource type is provided in thesubsections that follow.
Information for Registering the New ResourceType Version
The release of Oracle Solaris Cluster data services indicates the release in which the version ofthe resource type was introduced.
To determine the version of the resource type that is registered, use the clresourcetype showcommand.
The resource type registration (RTR) file for this resource type is /opt/SUNWscnfs/etc/SUNW.nfs.
Information for Migrating Existing Instances of theResource Type
The information that you require to edit each instance of the resource type is as follows:
■ You must perform the migration when the resource group is in an unmanaged state.■ For Oracle Solaris Cluster 4.0, the required value of the Type_version property is 3.3.
The following example shows a command for modifying an instance of the SUNW.nfs resourcetype.
EXAMPLE 3 Migrating Instances of the SUNW.nfs Resource Type
# clresource set -p Type_version=3.3 nfs-rs
This command modifies the Type_version property of the nfs-rs resource to 3.3.
42 Oracle Solaris Cluster Data Service for NFS Guide • August 2018
A ♦ ♦ ♦ A P P E N D I X A
HA for NFS Extension Properties
This section describes the extension properties for the resource type SUNW.nfs. This resourcetype represents the Network File System (NFS) application in an Oracle Solaris Clusterconfiguration.
For details about system-defined properties, see the r_properties(7) man page and therg_properties(7) man page.
The extension properties of the SUNW.nfs resource type are as follows:
Lockd_nullrpc_timeout
The time-out value (in seconds) to use when probing lockd
Data type Integer
Default 120
Range Minimum = 60
Tunable At any time
Monitor_retry_count
The number of times that the process monitor facility (PMF) restarts the fault monitorduring the time window that the Monitor_retry_interval property specifies. Note thatthis property refers to restarts of the fault monitor itself, rather than the resource.
Data type Integer
Default 4
Range 0 – 2,147,483,641A value of –1 indicates an infinite number of restart attempts.
Appendix A • HA for NFS Extension Properties 43
Tunable At any time
Monitor_retry_interval
The time (in minutes) over which failures of the fault monitor are counted. If the numberof times that the fault monitor fails is more than the value that is specified in the extensionproperty Monitor_retry_count within this period, the PMF restarts the fault monitor.
Data type Integer
Default 2
Range 0 – 2,147,483,641
–1 indicates an infinite amount of time.
Tunable At any time
Mountd_nullrpc_restart
A Boolean to indicate whether to restart mountd when a null rpc call fails.
Data type Boolean
Default True
Range Not applicable
Tunable At any time
Mountd_nullrpc_timeout
The time-out value (in seconds) to use when probing mountd.
Data type Integer
Default 120
Range Minimum = 60
Tunable At any time
Nfsd_nullrpc_restart
A Boolean to indicate whether to restart nfsd when a null rpc call fails.
Data type Boolean
44 Oracle Solaris Cluster Data Service for NFS Guide • August 2018
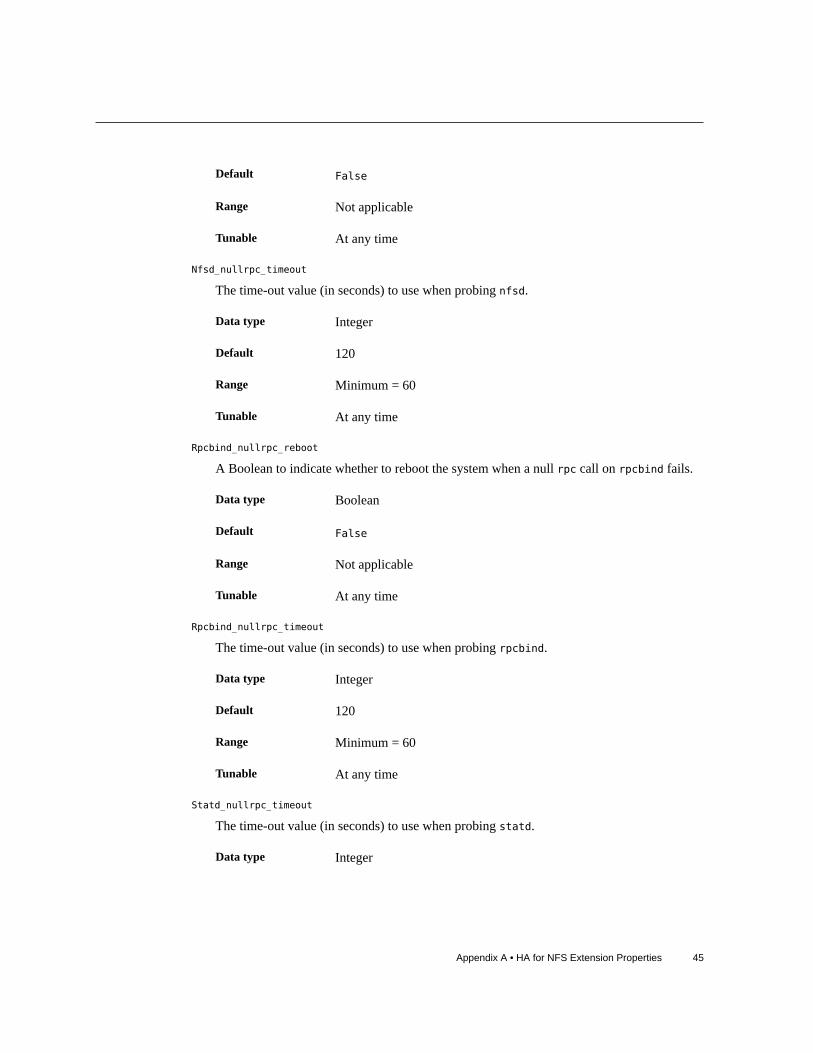
Default False
Range Not applicable
Tunable At any time
Nfsd_nullrpc_timeout
The time-out value (in seconds) to use when probing nfsd.
Data type Integer
Default 120
Range Minimum = 60
Tunable At any time
Rpcbind_nullrpc_reboot
A Boolean to indicate whether to reboot the system when a null rpc call on rpcbind fails.
Data type Boolean
Default False
Range Not applicable
Tunable At any time
Rpcbind_nullrpc_timeout
The time-out value (in seconds) to use when probing rpcbind.
Data type Integer
Default 120
Range Minimum = 60
Tunable At any time
Statd_nullrpc_timeout
The time-out value (in seconds) to use when probing statd.
Data type Integer
Appendix A • HA for NFS Extension Properties 45

Default 120
Range Minimum = 60
Tunable At any time
46 Oracle Solaris Cluster Data Service for NFS Guide • August 2018
Index
Aautomountd daemon, 11
Cchanging share options, 25, 27configuring HA for NFS, 19
Eextension properties
SUNW.nfs resource type, 43
Ffault monitor
operation, 39startup, 39stops, 39
filesRTR, 42
Gglobal zone, 9
HHA for NFS
fault monitor, 38installing, 12registering and configuring, 19
software package, installing, 12task map, 10tuning method timeouts, 28
Iinstalling
HA for NFS, 12
KKerberos
accessing a protected NFS file system, 38securing HA for NFS, 34
Lloopback file system (LOFS), restrictions with, 11
Mmethod timeouts
HA for NFS, 28
Nnon-global zones
restriction, 9
OOracle Solaris Cluster software
47
Index
publisher, 12, 12
Ppackage, 12planning installation and configuration, 10PNM objects
requirements, 15properties, 42
See also extension propertiesType_version, 42
publisherOracle Solaris Cluster software, 12, 12
Rregistering HA for NFS, 19requirements
PNM objects, 15resource type registration (RTR) file, 42resource type upgrade, 41restrictions
loopback file system (LOFS), 11Service Management Facility, 10ZFS, 12zones, 9
RTR (resource type registration) file, 42
SSecuring HA for NFS with Kerberos V5, 34Service Management Facility, restrictions with, 10share options
changing, 25, 27software package, 12SUNW.nfs resource type
extension properties, 43
Ttask map
HA for NFS, 10Type_version property, 42
Uupgrading the resource type, 41
ZZFS, restrictions with, 12zones
restriction, 9
48 Oracle Solaris Cluster Data Service for NFS Guide • August 2018