Embed Size (px)
Citation preview
PR Series Balances Instruction Manual
Balanzas Serie PR Manual de Instrucciones
Balance de Séries PR Manuel d’instruction
PR Serie Waagen Bedienungsanleitung
Bilance Serie PR Manuale di Istruzioni


PR Series Balance EN-1
Table of Contents
1. INTRODUCTION .............................................................................................................. EN-3 1.1 Description ............................................................................................................................................. EN-3 1.2 Features ................................................................................................................................................. EN-3 1.3 Definition of Signal Warnings and Symbols ........................................................................................... EN-3 1.4 Safety Precautions ................................................................................................................................. EN-3
2. INSTALLATION ............................................................................................................... EN-4 2.1 Unpacking .............................................................................................................................................. EN-4 2.2 Select the Location ................................................................................................................................ EN-4 2.3 Leveling .................................................................................................................................................. EN-4 2.4 Connecting Power and Acclimating the Balance ................................................................................... EN-4 2.5 Connecting the Interface ........................................................................................................................ EN-5 2.6 Initial Calibration .................................................................................................................................... EN-5
3. OPERATION .................................................................................................................... EN-6 3.1 Overview of Display, Home Screen ....................................................................................................... EN-6 3.2 Principal Functions and Main Menu ....................................................................................................... EN-7 3.3 Overview of Parts and Features – Draft Shield Mode ........................................................................... EN-7 3.4 Overview of Parts and Features – Non-Draft Shield Models ................................................................. EN-7
4. APPLICATIONS ............................................................................................................... EN-8 4.1 Weighing ................................................................................................................................................ EN-8 4.2 Parts Counting ....................................................................................................................................... EN-8 4.3 Percent Weighing ................................................................................................................................. EN-10 4.4 Additional Features .............................................................................................................................. EN-12
5. MENU SETTINGS .......................................................................................................... EN-13 5.1 Menu Navigation .................................................................................................................................. EN-13 5.1.1 Changing Settings ............................................................................................................................ EN-13 5.2 Calibration ............................................................................................................................................ EN-14 5.2.1 Calibration Sub-menu (InCal models) .............................................................................................. EN-14 5.2.2 Internal Calibration (not applicable to ExCal models) ...................................................................... EN-14 5.2.3 Cal Adjust (not applicable to ExCal models) .................................................................................... EN-14 5.2.4 Span Calibration............................................................................................................................... EN-14 5.2.5 Linearity Calibration ......................................................................................................................... EN-15 5.3 Balance Setup ...................................................................................................................................... EN-17 5.3.1 Filter Level ........................................................................................................................................ EN-17 5.3.2 AZT (Auto Zero Tracking) ................................................................................................................ EN-17 5.3.3 Auto Tare ......................................................................................................................................... EN-17 5.3.4 Graduations ...................................................................................................................................... EN-18 5.3.5 Date Format ..................................................................................................................................... EN-18 5.3.6 Date Setup ....................................................................................................................................... EN-18 5.3.7 Time Format ..................................................................................................................................... EN-18 5.3.8 Time Setup ....................................................................................................................................... EN-19 5.3.9 Brightness ........................................................................................................................................ EN-19 5.3.10 Auto Dim .......................................................................................................................................... EN-19 5.3.11 Approved Mode ................................................................................................................................ EN-20 5.4 Weighing Units ..................................................................................................................................... EN-20 5.5 RS232 Interface Setup ......................................................................................................................... EN-21 5.5.1 Baud Rate ........................................................................................................................................ EN-21 5.5.2 Transmission .................................................................................................................................... EN-22 5.5.3 Handshake ....................................................................................................................................... EN-22 5.6 Print Settings ........................................................................................................................................ EN-22 5.6.1 Stable Only ....................................................................................................................................... EN-22 5.6.2 Numeric Only ................................................................................................................................... EN-23 5.6.3 Single Header .................................................................................................................................. EN-23 5.6.4 Auto Print ......................................................................................................................................... EN-23 5.6.5 Header ............................................................................................................................................. EN-24 5.6.6 Date and Time .................................................................................................................................. EN-24 5.6.7 Balance ID ........................................................................................................................................ EN-24 5.6.8 Balance Name .................................................................................................................................. EN-24
EN-2 PR Series Balance
5.6.9 User Name ....................................................................................................................................... EN-24 5.6.10 Project Name ................................................................................................................................... EN-24 5.6.11 Application Name ............................................................................................................................. EN-24 5.6.12 Result ............................................................................................................................................... EN-24 5.6.13 Gross ................................................................................................................................................ EN-24 5.6.14 Net..... ............................................................................................................................................... EN-25 5.6.15 Tare... ............................................................................................................................................... EN-25 5.6.16 Line Feed ......................................................................................................................................... EN-25 5.7 GLP ...................................................................................................................................................... EN-25 5.7.1 Header ............................................................................................................................................. EN-25 5.7.2 Balance Name .................................................................................................................................. EN-25 5.7.3 User Name ....................................................................................................................................... EN-25 5.7.4 Project Name .................................................................................................................................... EN-25 5.8 Factory Reset ....................................................................................................................................... EN-26 5.9 Lockout................................................................................................................................................. EN-26
6. LEGAL FOR TRADE LFT ........................................................................................ EN-27 6.1 Settings ................................................................................................................................................ EN-27 6.2 Verification ........................................................................................................................................... EN-27 6.3 Sealing ................................................................................................................................................. EN-27
7. PRINTING ...................................................................................................................... EN-28 7.1 Connecting, configuring and Testing the Printer / Computer Interface ............................................... EN-28 7.2 Output format ....................................................................................................................................... EN-29 7.3 Printout Examples ................................................................................................................................ EN-29
8. MAINTENANCE ............................................................................................................. EN-31 8.1 Calibration ............................................................................................................................................ EN-31 8.2 Cleaning ............................................................................................................................................... EN-31 8.3 Troubleshooting ................................................................................................................................... EN-31 8.4 Service Information .............................................................................................................................. EN-31
9. TECHNICAL DATA ........................................................................................................ EN-32 9.1 Specifications ....................................................................................................................................... EN-32 9.2 Drawings and Dimensions ................................................................................................................... EN-40 9.3 Accessories .......................................................................................................................................... EN-41 9.4 Communication .................................................................................................................................... EN-41 9.4.1 Interface Commands ........................................................................................................................ EN-41 9.4.2 RS232 (DB9) Pin Connections ........................................................................................................ EN-43
10. SOFTWARE UPDATES ................................................................................................. EN-43 11. COMPLIANCE ............................................................................................................... EN-44
PR Series Balance EN-3 1. INTRODUCTION
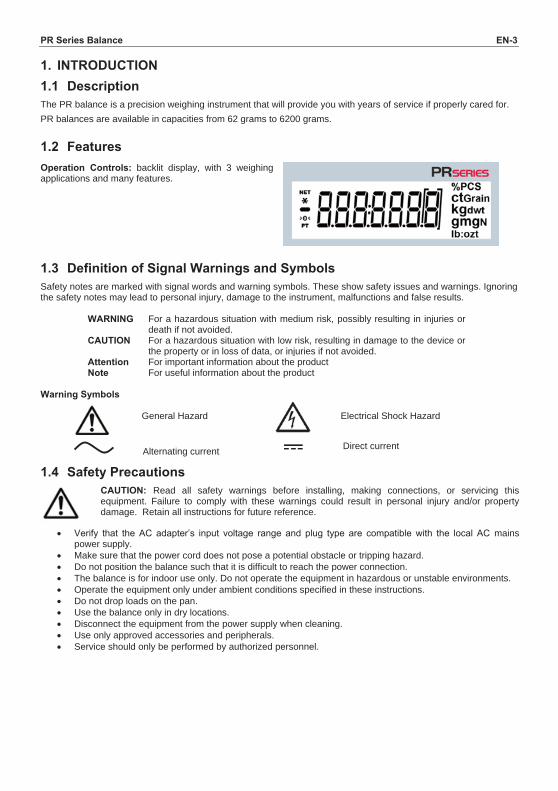
1.1 Description The PR balance is a precision weighing instrument that will provide you with years of service if properly cared for. PR balances are available in capacities from 62 grams to 6200 grams. 1.2 Features Operation Controls: backlit display, with 3 weighing applications and many features.
1.3 Definition of Signal Warnings and SymbolsSafety notes are marked with signal words and warning symbols. These show safety issues and warnings. Ignoring the safety notes may lead to personal injury, damage to the instrument, malfunctions and false results.
WARNING For a hazardous situation with medium risk, possibly resulting in injuries or death if not avoided.
CAUTION For a hazardous situation with low risk, resulting in damage to the device or the property or in loss of data, or injuries if not avoided.
Attention For important information about the product Note For useful information about the product
Warning Symbols General Hazard Electrical Shock Hazard
1.4 Safety Precautions
CAUTION: Read all safety warnings before installing, making connections, or servicing this equipment. Failure to comply with these warnings could result in personal injury and/or property damage. Retain all instructions for future reference.
Verify that the AC adapter’s input voltage range and plug type are compatible with the local AC mains power supply.
Make sure that the power cord does not pose a potential obstacle or tripping hazard. Do not position the balance such that it is difficult to reach the power connection. The balance is for indoor use only. Do not operate the equipment in hazardous or unstable environments. Operate the equipment only under ambient conditions specified in these instructions. Do not drop loads on the pan. Use the balance only in dry locations. Disconnect the equipment from the power supply when cleaning. Use only approved accessories and peripherals. Service should only be performed by authorized personnel.
Direct currentAlternating current
EN-4 PR Series Balance 2. INSTALLATION 2.1 Unpacking Carefully remove your PR balance and each of its components from the package. The included components vary depending on the balance model. Save the packaging to ensure safe storage and transport. Please read the manual completely before installing and using the PR balance to avoid incorrect operation.
Components included:
Balance Power adapter + Attaching plug Stainless steel pan Pan support (for 0.1 g / 0.01 g model only) Warranty card
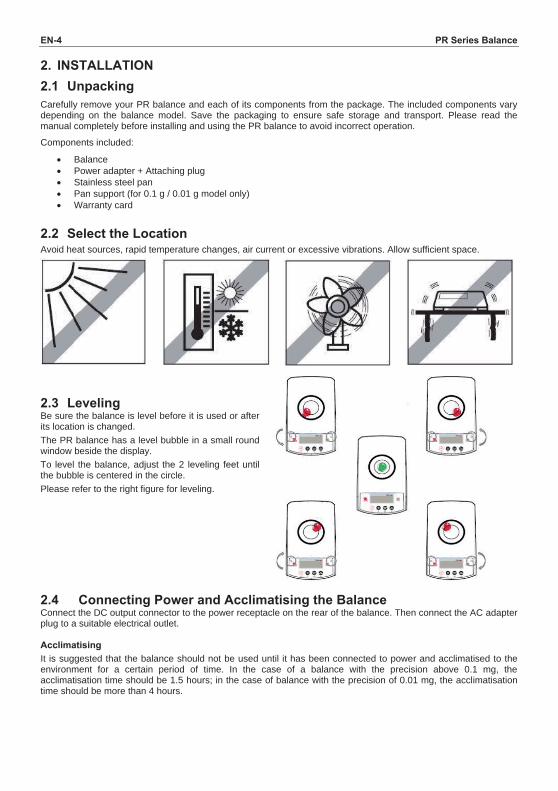
2.2 Select the Location
Avoid heat sources, rapid temperature changes, air current or excessive vibrations. Allow sufficient space.
2.3 Leveling Be sure the balance is level before it is used or after its location is changed. The PR balance has a level bubble in a small round window beside the display. To level the balance, adjust the 2 leveling feet until the bubble is centered in the circle. Please refer to the right figure for leveling.
2.4 Connecting Power and Acclimatising the Balance Connect the DC output connector to the power receptacle on the rear of the balance. Then connect the AC adapter plug to a suitable electrical outlet. Acclimatising It is suggested that the balance should not be used until it has been connected to power and acclimatised to the environment for a certain period of time. In the case of a balance with the precision above 0.1 mg, the acclimatisation time should be 1.5 hours; in the case of balance with the precision of 0.01 mg, the acclimatisation time should be more than 4 hours.
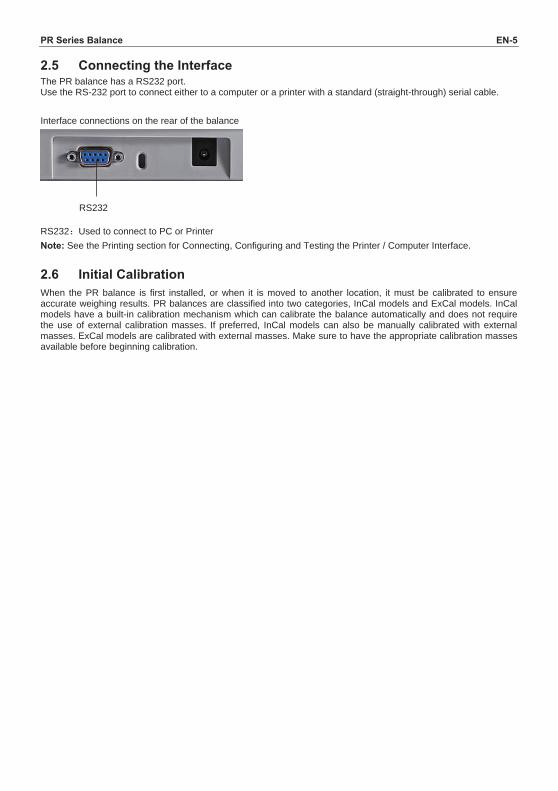
PR Series Balance EN-5 2.5 Connecting the Interface
The PR balance has a RS232 port. Use the RS-232 port to connect either to a computer or a printer with a standard (straight-through) serial cable.
Interface connections on the rear of the balance
RS232 Used to connect to PC or Printer Note: See the Printing section for Connecting, Configuring and Testing the Printer / Computer Interface.
2.6 Initial Calibration When the PR balance is first installed, or when it is moved to another location, it must be calibrated to ensure accurate weighing results. PR balances are classified into two categories, InCal models and ExCal models. InCal models have a built-in calibration mechanism which can calibrate the balance automatically and does not require the use of external calibration masses. If preferred, InCal models can also be manually calibrated with external masses. ExCal models are calibrated with external masses. Make sure to have the appropriate calibration masses available before beginning calibration.
RS232
EN-6 PR Series Balance 3. OPERATION
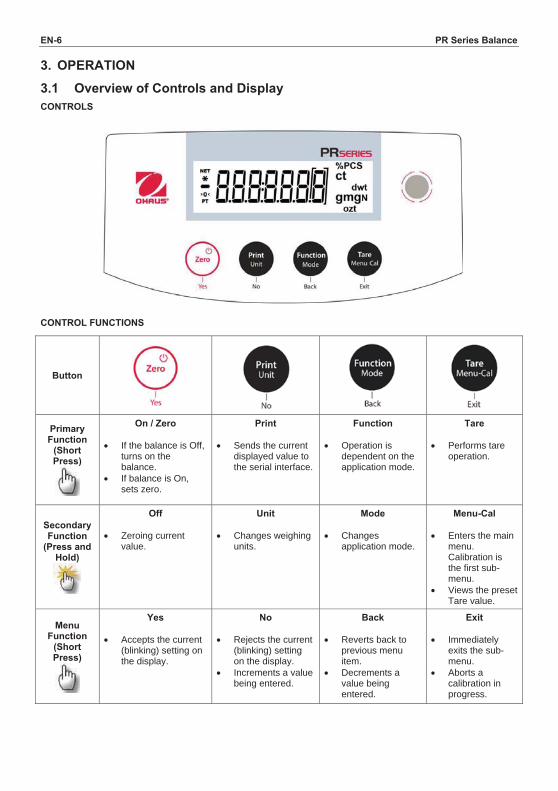
3.1 Overview of Controls and Display CONTROLS
CONTROL FUNCTIONS
Button
Primary Function
(Short Press)
On / Zero
If the balance is Off, turns on the balance.
If balance is On, sets zero.
Sends the current displayed value to the serial interface.
Function
Operation is dependent on the application mode.
Tare
Performs tare operation.
Secondary Function
(Press and Hold)
Off
Zeroing current value.
Unit
Changes weighing units.
Mode
Changes application mode.
Menu-Cal
Enters the main menu. Calibration is the first sub-menu.
Views the preset Tare value.
Menu Function
(Short Press)
Yes
Accepts the current (blinking) setting on the display.
No
Rejects the current (blinking) setting on the display.
Increments a value being entered.
Back
Reverts back to previous menu item.
Decrements a value being entered.
Exit Immediately
exits the sub-menu.
Aborts a calibration in progress.
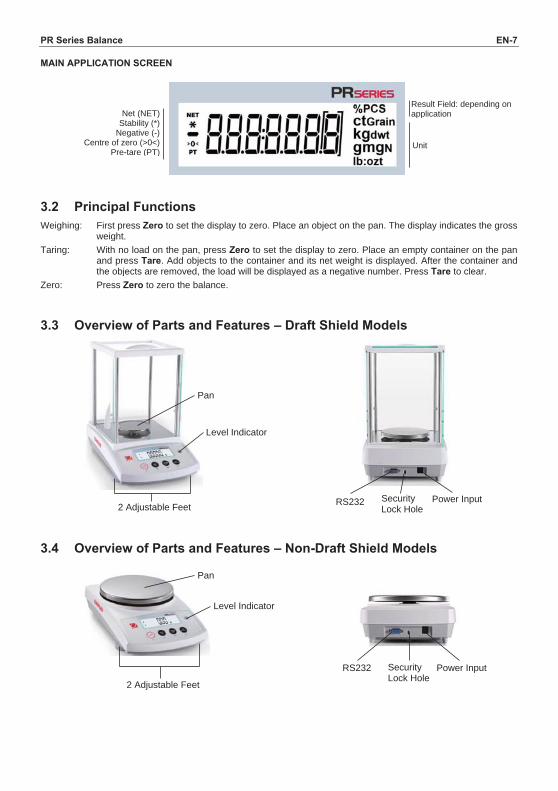
PR Series Balance EN-7 MAIN APPLICATION SCREEN
3.2 Principal Functions
Weighing: First press Zero to set the display to zero. Place an object on the pan. The display indicates the gross weight.
Taring: With no load on the pan, press Zero to set the display to zero. Place an empty container on the pan and press Tare. Add objects to the container and its net weight is displayed. After the container and the objects are removed, the load will be displayed as a negative number. Press Tare to clear.
Zero: Press Zero to zero the balance. 3.3 Overview of Parts and Features – Draft Shield Models
3.4 Overview of Parts and Features – Non-Draft Shield Models
Result Field: depending on application Net (NET)
Stability (*) Negative (-)
Centre of zero (>0<) Pre-tare (PT)
Unit
Pan
Level Indicator
2 Adjustable Feet RS232 Security Lock Hole
Power Input
2 Adjustable Feet
Pan
Level Indicator
RS232 Security Lock Hole
Power Input
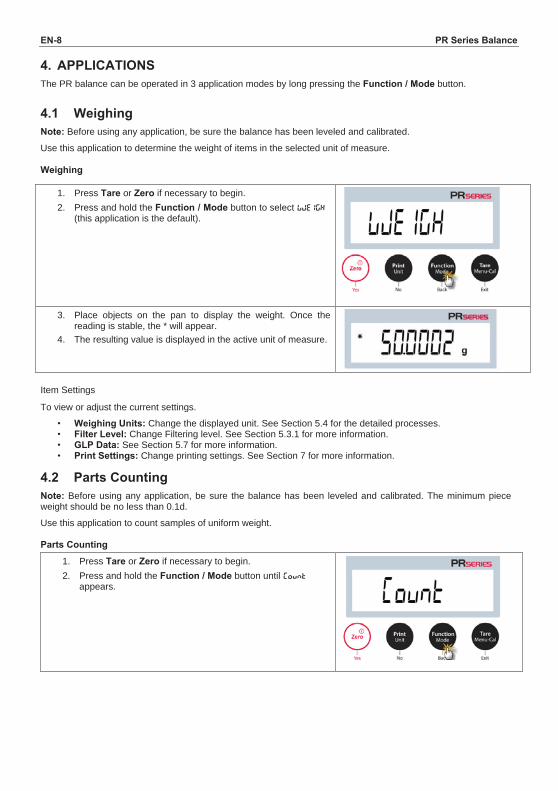
EN-8 PR Series Balance 4. APPLICATIONS The PR balance can be operated in 3 application modes by long pressing the Function / Mode button.
4.1 Weighing Note: Before using any application, be sure the balance has been leveled and calibrated.
Use this application to determine the weight of items in the selected unit of measure.
Weighing
1. Press Tare or Zero if necessary to begin. 2. Press and hold the Function / Mode button to select wWEIGH
(this application is the default).
3. Place objects on the pan to display the weight. Once the reading is stable, the * will appear.
4. The resulting value is displayed in the active unit of measure.
Item Settings
To view or adjust the current settings.
• Weighing Units: Change the displayed unit. See Section 5.4 for the detailed processes. • Filter Level: Change Filtering level. See Section 5.3.1 for more information. • GLP Data: See Section 5.7 for more information. • Print Settings: Change printing settings. See Section 7 for more information.
4.2 Parts Counting Note: Before using any application, be sure the balance has been leveled and calibrated. The minimum piece weight should be no less than 0.1d.
Use this application to count samples of uniform weight. Parts Counting
1. Press Tare or Zero if necessary to begin. 2. Press and hold the Function / Mode button until Count
appears.
PR Series Balance EN-9
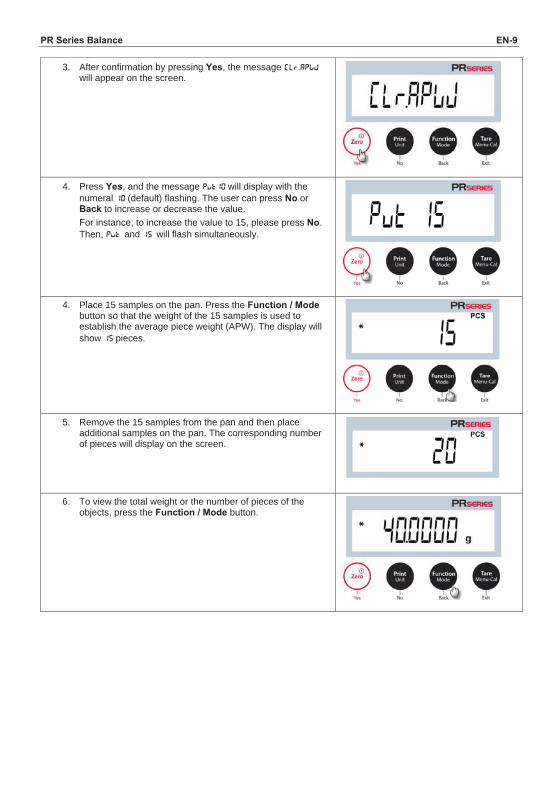
3. After confirmation by pressing Yes, the message Clr.APwj will appear on the screen.
4. Press Yes, and the message Put10 will display with the
numeral 10 (default) flashing. The user can press No or Back to increase or decrease the value. For instance, to increase the value to 15, please press No. Then, Put and 15 will flash simultaneously.
4. Place 15 samples on the pan. Press the Function / Mode
button so that the weight of the 15 samples is used to establish the average piece weight (APW). The display will show 15 pieces.
5. Remove the 15 samples from the pan and then place
additional samples on the pan. The corresponding number of pieces will display on the screen.
6. To view the total weight or the number of pieces of the
objects, press the Function / Mode button.
EN-10 PR Series Balance Item Settings
To view or adjust the current settings.
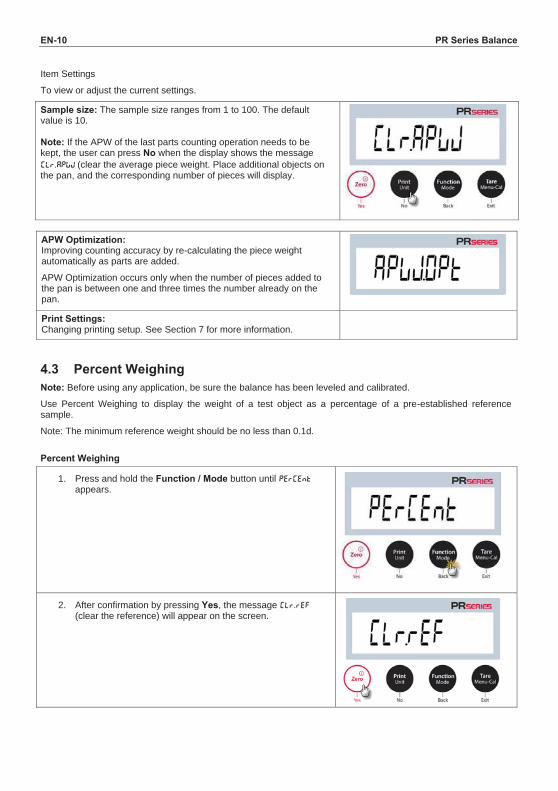
Sample size: The sample size ranges from 1 to 100. The default value is 10. Note: If the APW of the last parts counting operation needs to be kept, the user can press No when the display shows the message Clr.Apwj (clear the average piece weight. Place additional objects on the pan, and the corresponding number of pieces will display.
APW Optimization: Improving counting accuracy by re-calculating the piece weight automatically as parts are added.
APW Optimization occurs only when the number of pieces added to the pan is between one and three times the number already on the pan.
Print Settings: Changing printing setup. See Section 7 for more information.
4.3 Percent Weighing Note: Before using any application, be sure the balance has been leveled and calibrated. Use Percent Weighing to display the weight of a test object as a percentage of a pre-established reference sample.
Note: The minimum reference weight should be no less than 0.1d.
Percent Weighing
1. Press and hold the Function / Mode button until PerCent appears.
2. After confirmation by pressing Yes, the message Clr.ref (clear the reference) will appear on the screen.

PR Series Balance EN-11
3. Press Yes, and PUt.ref (put the reference weight) will display.
4. Place the reference sample on the pan to display the weight. When the reading is stable, the * appears.
5. Press the Function / Mode button so that the weight of the reference sample is stored in memory. The display will show 100%.
6. Remove the reference sample, and place the test object on the pan. The ratio of the test object to the reference sample weight is displayed as a percentage.
7. To view the reference sample weight or the percentage of the test object weight to the reference sample weight, press the Function / Mode button.
8. To establish a new reference sample weight, long press the Function / Mode button and repeat the steps described above.
EN-12 PR Series Balance Item Settings
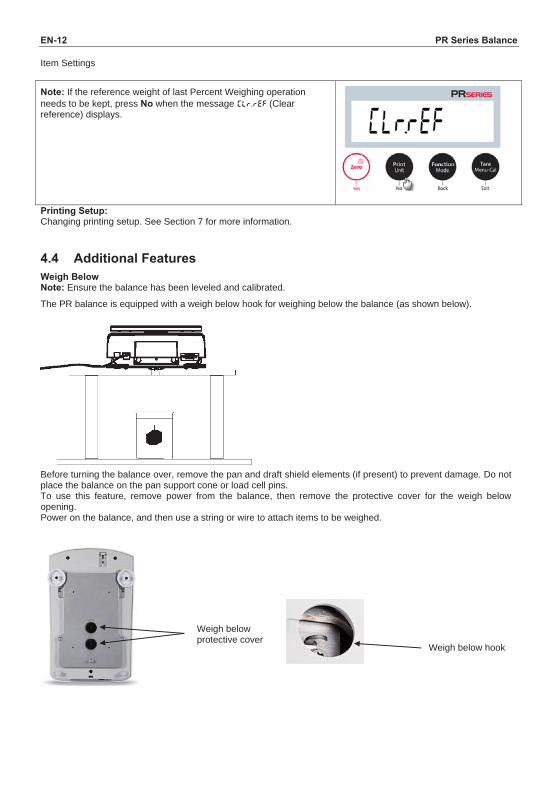
Note: If the reference weight of last Percent Weighing operation needs to be kept, press No when the message Clr.ref (Clear reference) displays.
Printing Setup: Changing printing setup. See Section 7 for more information. 4.4 Additional Features Weigh Below Note: Ensure the balance has been leveled and calibrated.
The PR balance is equipped with a weigh below hook for weighing below the balance (as shown below).
Before turning the balance over, remove the pan and draft shield elements (if present) to prevent damage. Do not place the balance on the pan support cone or load cell pins. To use this feature, remove power from the balance, then remove the protective cover for the weigh below opening. Power on the balance, and then use a string or wire to attach items to be weighed.
Weigh below protective cover
Weigh below hook
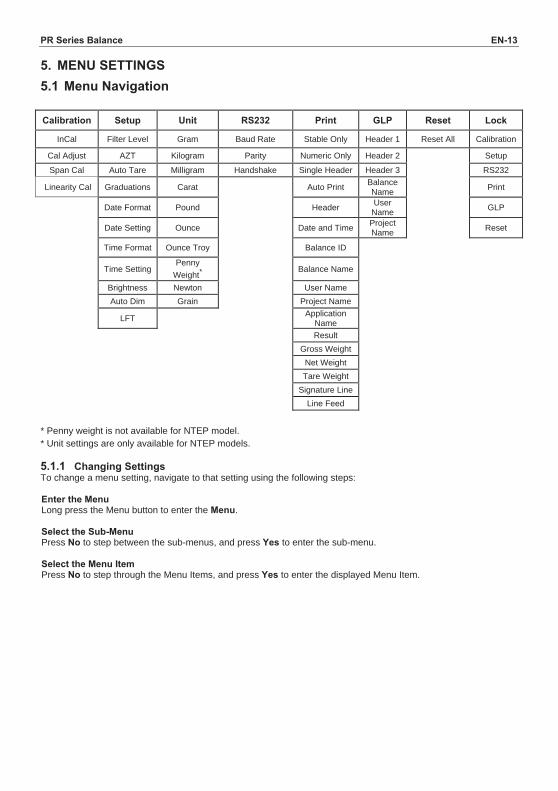
PR Series Balance EN-13 5. MENU SETTINGS 5.1 Menu Navigation
Calibration Setup Unit RS232 Print GLP Reset Lock
InCal Filter Level Gram Baud Rate Stable Only Header 1 Reset All Calibration
Cal Adjust AZT Kilogram Parity Numeric Only Header 2 Setup
Span Cal Auto Tare Milligram Handshake Single Header Header 3 RS232
Linearity Cal Graduations Carat Auto Print Balance Name Print
Date Format Pound Header User Name GLP
Date Setting Ounce Date and Time Project Name Reset
Time Format Ounce Troy Balance ID
Time Setting Penny
Weight* Balance Name
Brightness Newton User Name Auto Dim Grain Project Name
LFT Application
Name
Result Gross Weight Net Weight
Tare Weight
Signature Line
Line Feed
* Penny weight is not available for NTEP model. * Unit settings are only available for NTEP models. 5.1.1 Changing Settings To change a menu setting, navigate to that setting using the following steps: Enter the Menu Long press the Menu button to enter the Menu. Select the Sub-Menu Press No to step between the sub-menus, and press Yes to enter the sub-menu. Select the Menu Item Press No to step through the Menu Items, and press Yes to enter the displayed Menu Item.
EN-14 PR Series Balance 5.2 Calibration PR balances offer a choice of three calibration methods: Internal Calibration (for InCal models only), Span calibration and Linearity Calibration. Attention: Do not disturb the balance during any calibration. 5.2.1 Calibration Sub-menu (InCal models) Note: ExCal models only have Span Calibration and Linearity Calibration. 5.2.2 Internal Calibration (not applicable to ExCal models) Calibration is accomplished with the internal calibration mass. Internal Calibration can be performed at any time, provided the balance has warmed up to operating temperature and is level. With the Balance turned On and no load on the pan, press the Tare / Menu-Cal button and select InCal to initiate the internal calibration. The screen shows the status, and then press any button to return to the current application after calibration. 5.2.3 Cal Adjust (not applicable to ExCal models) Use this calibration method to fine tune the effect of the Internal Calibration. Calibration Adjust may be used to adjust the result of the Internal Calibration by +100 divisions.
Note: Before making a calibration adjustment, perform an Internal Calibration. To verify whether an adjustment is needed, place a test mass equal to the span calibration value on the pan and note the difference (in divisions) between the nominal mass value and the actual balance reading. If the difference is within +/- division, calibration adjustment is not required. If the difference exceeds +/-1 division, calibration adjustment is recommended. Example:
Expected weight reading: 200.000g (Test mass value) Actual weight reading: 200.014g Difference in grams: – 0.014g Difference in divisions: – 14 (InCal Adjust value)
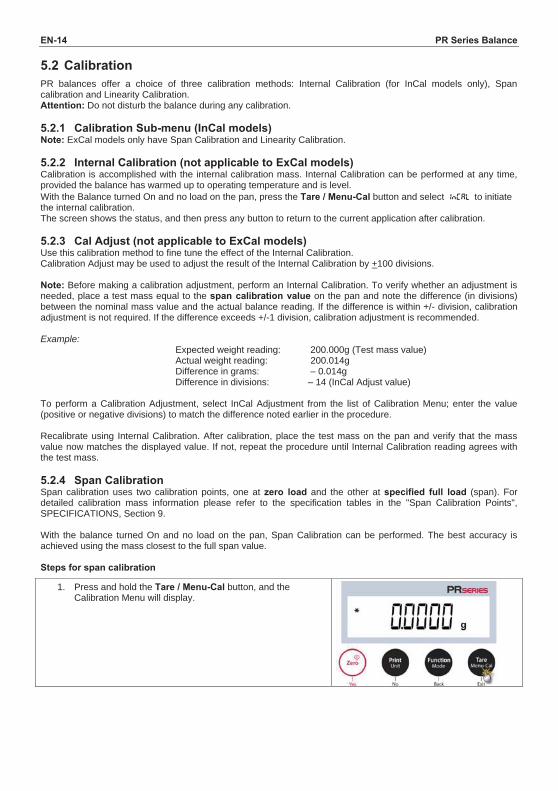
To perform a Calibration Adjustment, select InCal Adjustment from the list of Calibration Menu; enter the value (positive or negative divisions) to match the difference noted earlier in the procedure. Recalibrate using Internal Calibration. After calibration, place the test mass on the pan and verify that the mass value now matches the displayed value. If not, repeat the procedure until Internal Calibration reading agrees with the test mass. 5.2.4 Span Calibration Span calibration uses two calibration points, one at zero load and the other at specified full load (span). For detailed calibration mass information please refer to the specification tables in the "Span Calibration Points", SPECIFICATIONS, Section 9. With the balance turned On and no load on the pan, Span Calibration can be performed. The best accuracy is achieved using the mass closest to the full span value. Steps for span calibration
1. Press and hold the Tare / Menu-Cal button, and the Calibration Menu will display.
PR Series Balance EN-15
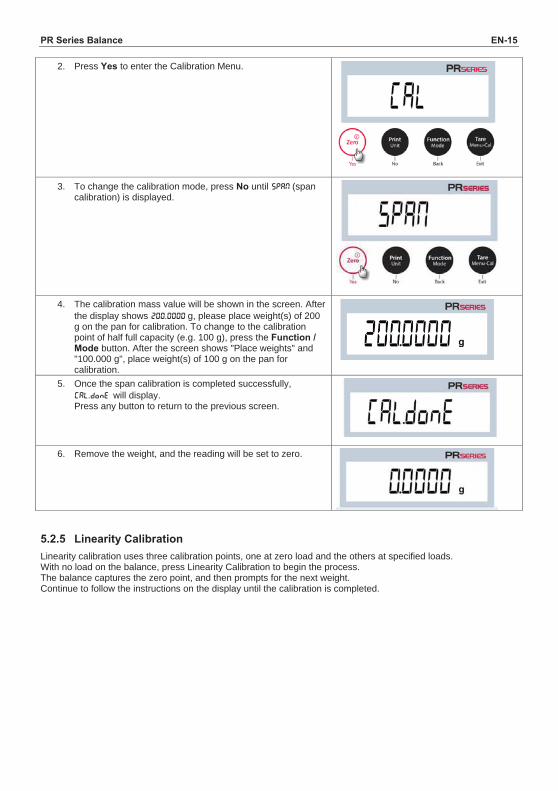
2. Press Yes to enter the Calibration Menu.
3. To change the calibration mode, press No until SpaN (span calibration) is displayed.
4. The calibration mass value will be shown in the screen. After the display shows 200.0000 g, please place weight(s) of 200 g on the pan for calibration. To change to the calibration point of half full capacity (e.g. 100 g), press the Function / Mode button. After the screen shows "Place weights" and "100.000 g", place weight(s) of 100 g on the pan for calibration.
5. Once the span calibration is completed successfully, CAL.Done will display. Press any button to return to the previous screen.
6. Remove the weight, and the reading will be set to zero.
5.2.5 Linearity Calibration Linearity calibration uses three calibration points, one at zero load and the others at specified loads. With no load on the balance, press Linearity Calibration to begin the process. The balance captures the zero point, and then prompts for the next weight. Continue to follow the instructions on the display until the calibration is completed.
EN-16 PR Series Balance Steps for linearity calibration
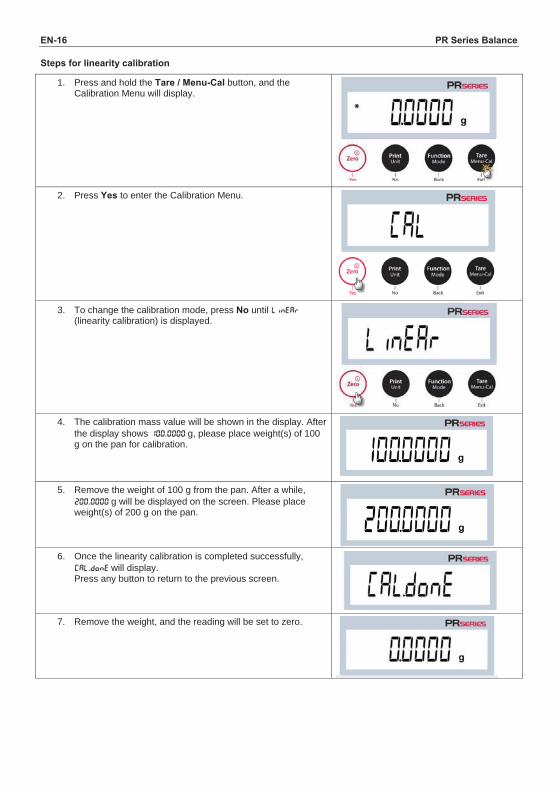
1. Press and hold the Tare / Menu-Cal button, and the Calibration Menu will display.
2. Press Yes to enter the Calibration Menu.
3. To change the calibration mode, press No until LineRr (linearity calibration) is displayed.
4. The calibration mass value will be shown in the display. After the display shows 100.0000 g, please place weight(s) of 100 g on the pan for calibration.
5. Remove the weight of 100 g from the pan. After a while, 200.0000 g will be displayed on the screen. Please place weight(s) of 200 g on the pan.
6. Once the linearity calibration is completed successfully,
CAL.Done will display. Press any button to return to the previous screen.
7. Remove the weight, and the reading will be set to zero.
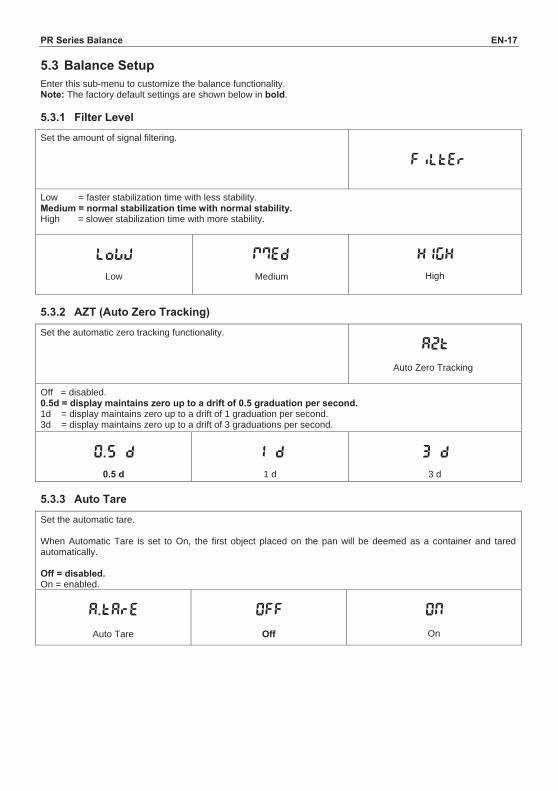
PR Series Balance EN-17 5.3 Balance Setup Enter this sub-menu to customize the balance functionality. Note: The factory default settings are shown below in bold. 5.3.1 Filter Level Set the amount of signal filtering.
Low = faster stabilization time with less stability. Medium = normal stabilization time with normal stability. High = slower stabilization time with more stability.
Low Medium
High
5.3.2 AZT (Auto Zero Tracking) Set the automatic zero tracking functionality.
Auto Zero Tracking
Off = disabled. 0.5d = display maintains zero up to a drift of 0.5 graduation per second. 1d = display maintains zero up to a drift of 1 graduation per second. 3d = display maintains zero up to a drift of 3 graduations per second.
0.5 d 1 d 3 d 5.3.3 Auto Tare Set the automatic tare. When Automatic Tare is set to On, the first object placed on the pan will be deemed as a container and tared automatically. Off = disabled. On = enabled.
Auto Tare Off On
HIGH mMed LowW
ON OFF A.tArE
AZt
3 d 1 d 0.5 d
FiltEr
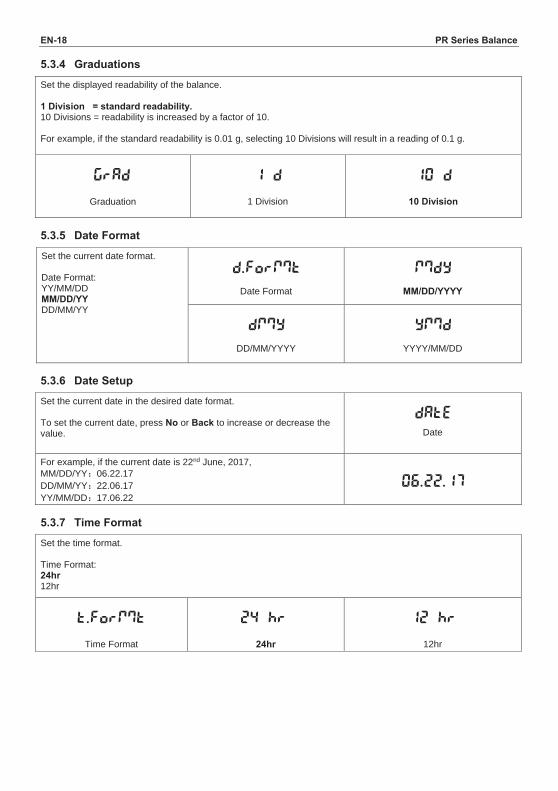
EN-18 PR Series Balance 5.3.4 Graduations Set the displayed readability of the balance. 1 Division = standard readability. 10 Divisions = readability is increased by a factor of 10. For example, if the standard readability is 0.01 g, selecting 10 Divisions will result in a reading of 0.1 g.
Graduation 1 Division 10 Division
5.3.5 Date Format Set the current date format. Date Format: YY/MM/DD MM/DD/YY DD/MM/YY
Date Format
MM/DD/YYYY
DD/MM/YYYY
YYYY/MM/DD
5.3.6 Date Setup Set the current date in the desired date format. To set the current date, press No or Back to increase or decrease the value.
Date
For example, if the current date is 22nd June, 2017, MM/DD/YY 06.22.17 DD/MM/YY 22.06.17 YY/MM/DD 17.06.22 5.3.7 Time Format Set the time format. Time Format: 24hr 12hr
Time Format
24hr 12hr
24 hr t.FormMt
ymMd dmMy
mMdy d.FormMt
GrAd 1 d
dAtE
06.22.17
12 hr
10 d
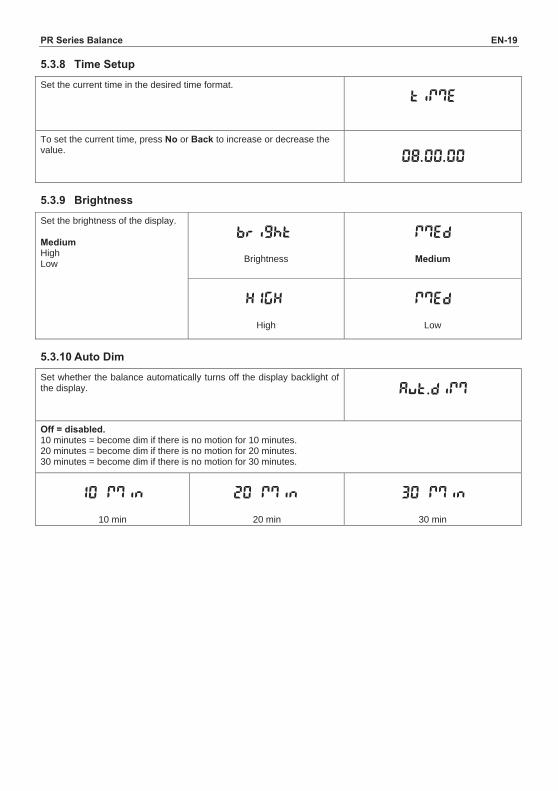
PR Series Balance EN-19 5.3.8 Time Setup Set the current time in the desired time format.
To set the current time, press No or Back to increase or decrease the value.
5.3.9 Brightness Set the brightness of the display.
Medium High Low
Brightness Medium
High Low
5.3.10 Auto Dim Set whether the balance automatically turns off the display backlight of the display.
Off = disabled. 10 minutes = become dim if there is no motion for 10 minutes. 20 minutes = become dim if there is no motion for 20 minutes. 30 minutes = become dim if there is no motion for 30 minutes.
10 min
20 min 30 min
20 mMin 10 mMin
HIGH
bright
30 mMin
Aut.dimM
mMEd
mMEd
08.00.00
timME
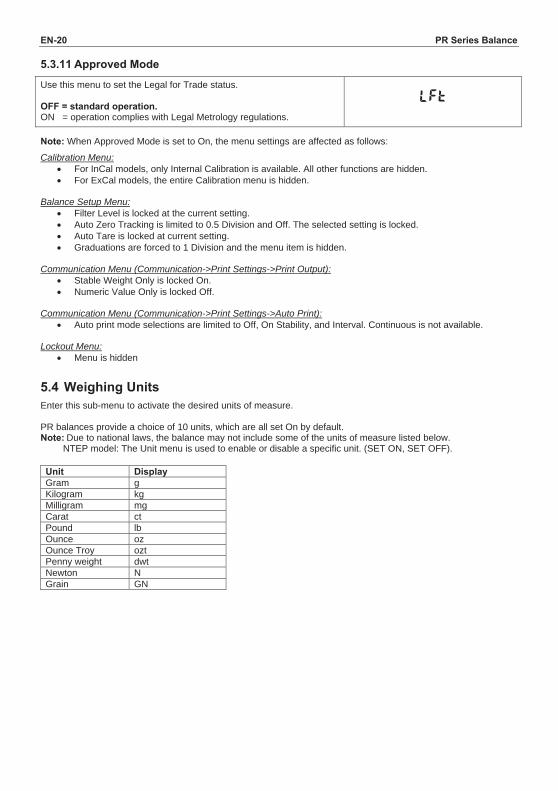
EN-20 PR Series Balance 5.3.11 Approved Mode Use this menu to set the Legal for Trade status. OFF = standard operation. ON = operation complies with Legal Metrology regulations.
Note: When Approved Mode is set to On, the menu settings are affected as follows:
Calibration Menu: For InCal models, only Internal Calibration is available. All other functions are hidden. For ExCal models, the entire Calibration menu is hidden.
Balance Setup Menu:
Filter Level is locked at the current setting. Auto Zero Tracking is limited to 0.5 Division and Off. The selected setting is locked. Auto Tare is locked at current setting. Graduations are forced to 1 Division and the menu item is hidden.
Communication Menu (Communication->Print Settings->Print Output):
Stable Weight Only is locked On. Numeric Value Only is locked Off.
Communication Menu (Communication->Print Settings->Auto Print):
Auto print mode selections are limited to Off, On Stability, and Interval. Continuous is not available. Lockout Menu:
Menu is hidden
5.4 Weighing Units Enter this sub-menu to activate the desired units of measure. PR balances provide a choice of 10 units, which are all set On by default. Note: Due to national laws, the balance may not include some of the units of measure listed below.
NTEP model: The Unit menu is used to enable or disable a specific unit. (SET ON, SET OFF). Unit Display Gram g Kilogram kg Milligram mg Carat ct Pound lb Ounce oz Ounce Troy ozt Penny weight dwt Newton N Grain GN
LFt
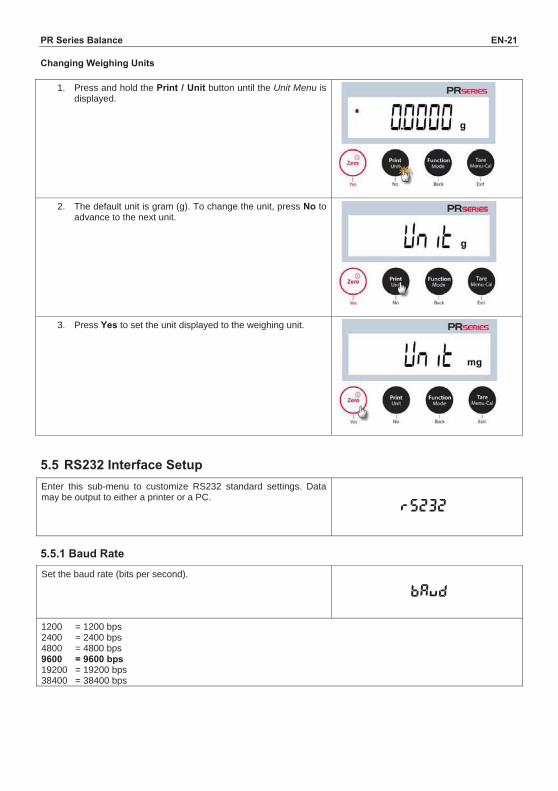
PR Series Balance EN-21 Changing Weighing Units
1. Press and hold the Print / Unit button until the Unit Menu is displayed.
2. The default unit is gram (g). To change the unit, press No to advance to the next unit.
3. Press Yes to set the unit displayed to the weighing unit.
5.5 RS232 Interface Setup Enter this sub-menu to customize RS232 standard settings. Data may be output to either a printer or a PC.
5.5.1 Baud Rate Set the baud rate (bits per second).
1200 = 1200 bps 2400 = 2400 bps 4800 = 4800 bps 9600 = 9600 bps 19200 = 19200 bps 38400 = 38400 bps
rS232
bAud
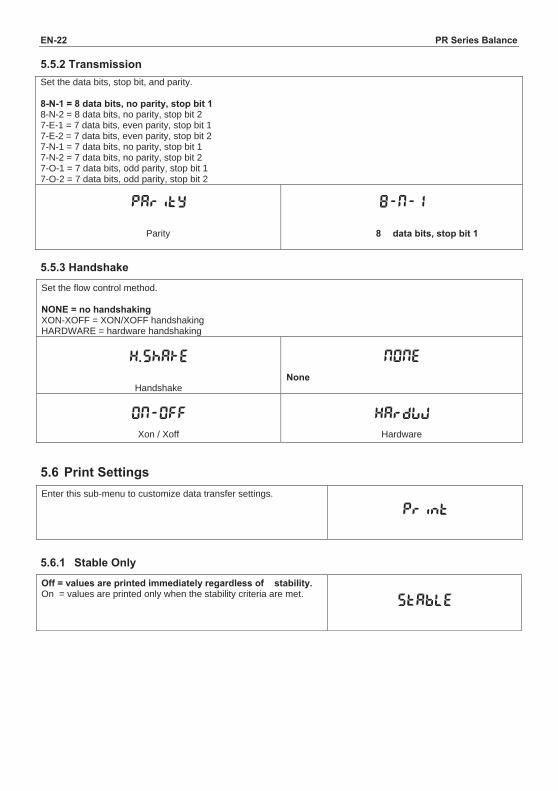
EN-22 PR Series Balance 5.5.2 Transmission Set the data bits, stop bit, and parity. 8-N-1 = 8 data bits, no parity, stop bit 1 8-N-2 = 8 data bits, no parity, stop bit 2 7-E-1 = 7 data bits, even parity, stop bit 1 7-E-2 = 7 data bits, even parity, stop bit 2 7-N-1 = 7 data bits, no parity, stop bit 1 7-N-2 = 7 data bits, no parity, stop bit 2 7-O-1 = 7 data bits, odd parity, stop bit 1 7-O-2 = 7 data bits, odd parity, stop bit 2
Parity
8 data bits, stop bit 1
5.5.3 Handshake Set the flow control method. NONE = no handshaking XON-XOFF = XON/XOFF handshaking HARDWARE = hardware handshaking
Handshake
None
Xon / Xoff Hardware 5.6 Print Settings Enter this sub-menu to customize data transfer settings.
5.6.1 Stable Only Off = values are printed immediately regardless of stability. On = values are printed only when the stability criteria are met.
Parity 8-N-1
H.ShAkE
HRrdwW
NONE
Stable
ON-OFF
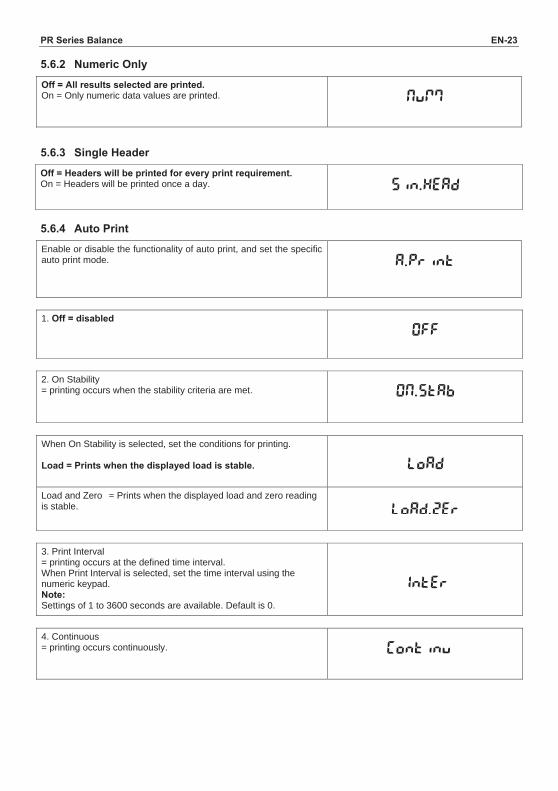
PR Series Balance EN-23 5.6.2 Numeric Only Off = All results selected are printed. On = Only numeric data values are printed.
5.6.3 Single Header Off = Headers will be printed for every print requirement. On = Headers will be printed once a day.
5.6.4 Auto Print Enable or disable the functionality of auto print, and set the specific auto print mode.
1. Off = disabled
2. On Stability = printing occurs when the stability criteria are met.
When On Stability is selected, set the conditions for printing. Load = Prints when the displayed load is stable.
Load and Zero = Prints when the displayed load and zero reading is stable.
3. Print Interval = printing occurs at the defined time interval. When Print Interval is selected, set the time interval using the numeric keypad. Note: Settings of 1 to 3600 seconds are available. Default is 0.
4. Continuous = printing occurs continuously.
NumM
A.Print
OFF
ON.Stab
Load
Load.zer
Inter
Continu
Sin.Head
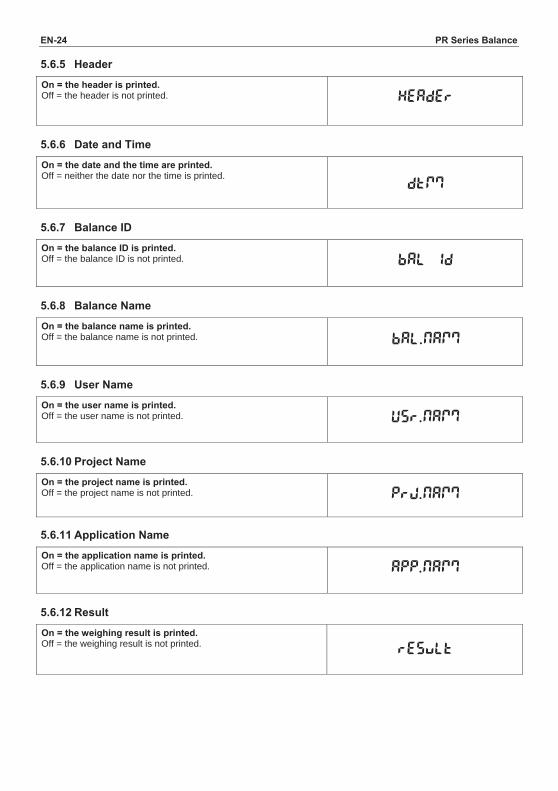
EN-24 PR Series Balance 5.6.5 Header On = the header is printed. Off = the header is not printed.
5.6.6 Date and Time On = the date and the time are printed. Off = neither the date nor the time is printed.
5.6.7 Balance ID On = the balance ID is printed. Off = the balance ID is not printed.
5.6.8 Balance Name On = the balance name is printed. Off = the balance name is not printed.
5.6.9 User Name On = the user name is printed. Off = the user name is not printed.
5.6.10 Project Name On = the project name is printed. Off = the project name is not printed.
5.6.11 Application Name On = the application name is printed. Off = the application name is not printed.
5.6.12 Result On = the weighing result is printed. Off = the weighing result is not printed.
Header
dtmM
Bal Id
Usr.NamM
Prj.NamM
Bal.NamM
result
App.NamM
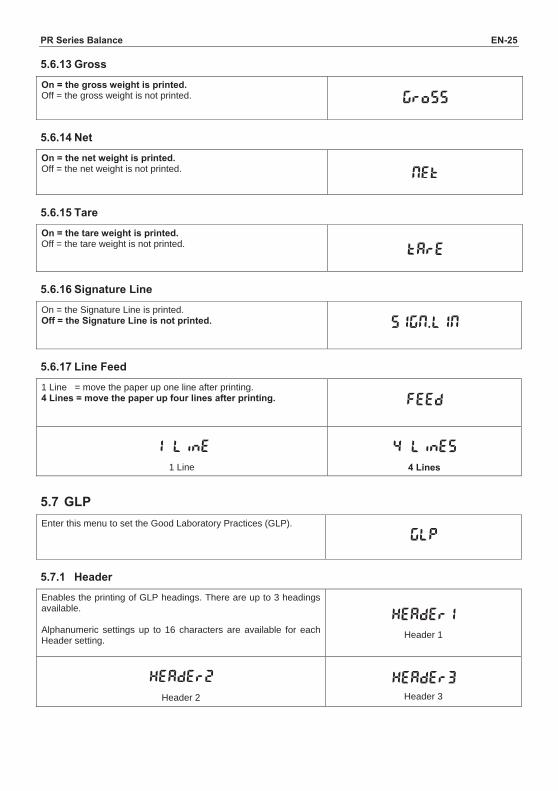
PR Series Balance EN-25 5.6.13 Gross On = the gross weight is printed. Off = the gross weight is not printed.
5.6.14 Net On = the net weight is printed. Off = the net weight is not printed.
5.6.15 Tare On = the tare weight is printed. Off = the tare weight is not printed. 5.6.16 Signature Line On = the Signature Line is printed. Off = the Signature Line is not printed.
5.6.17 Line Feed 1 Line = move the paper up one line after printing. 4 Lines = move the paper up four lines after printing.
1 Line 4 Lines
5.7 GLP Enter this menu to set the Good Laboratory Practices (GLP).
5.7.1 Header Enables the printing of GLP headings. There are up to 3 headings available. Alphanumeric settings up to 16 characters are available for each Header setting.
Header 1
Header 2 Header 3
GrosS
Feed
4 Lines 1 Line
GLP
Header1
Net
tare
Header3 Header2
SIGN.LIN
EN-26 PR Series Balance 5.7.2 Balance Name Set the balance name. Alphanumeric settings up to 16 characters are available for each Header setting. 5.7.3 User Name Set the user name. Alphanumeric settings up to 16 characters are available for each Header setting. 5.7.4 Project Name Set the user name. Alphanumeric settings up to 16 characters are available for each Header setting. The default is blank.
5.8 Factory Reset Use this sub-menu to reset the all menu settings to their Factory default settings.
Reset All = resets all menus to their factory default settings. Exit = return to application main screen without resetting any menus.
5.9 Lockout Use this sub-menu to lock / unlock certain menus. Off = the menu is unlocked. On = the menu is locked.
Bal.NamM
Usr.NamM
Prj.NamM
reset
LOCK
PR Series Balance EN-27 6. LEGAL FOR TRADE LFT When the balance is used in trade or a legally controlled application it must be set up, verified and sealed in accordance with local weights and measures regulations. It is the responsibility of the purchaser to ensure that all pertinent legal requirements are met. 6.1 Settings Before verification and sealing, perform the following steps in order:
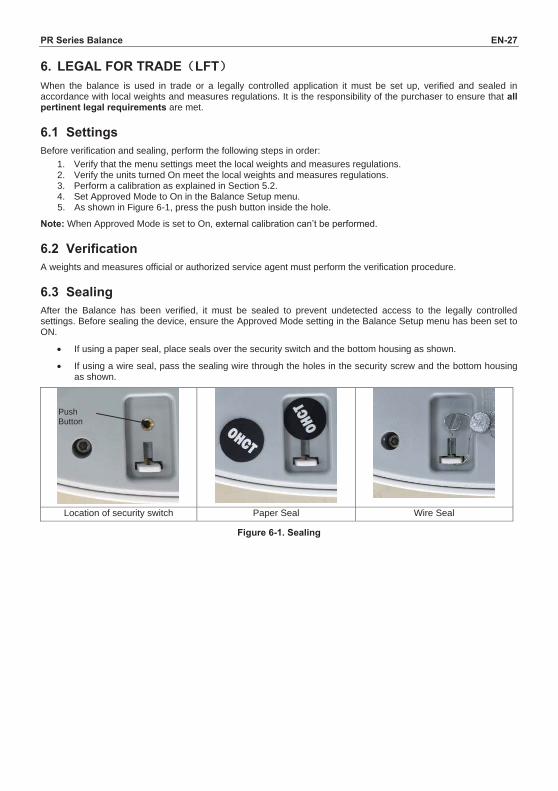
1. Verify that the menu settings meet the local weights and measures regulations. 2. Verify the units turned On meet the local weights and measures regulations. 3. Perform a calibration as explained in Section 5.2. 4. Set Approved Mode to On in the Balance Setup menu. 5. As shown in Figure 6-1, press the push button inside the hole.
Note: When Approved Mode is set to On, external calibration can’t be performed. 6.2 Verification A weights and measures official or authorized service agent must perform the verification procedure. 6.3 Sealing After the Balance has been verified, it must be sealed to prevent undetected access to the legally controlled settings. Before sealing the device, ensure the Approved Mode setting in the Balance Setup menu has been set to ON.
If using a paper seal, place seals over the security switch and the bottom housing as shown.
If using a wire seal, pass the sealing wire through the holes in the security screw and the bottom housing as shown.
Location of security switch Paper Seal Wire Seal
Figure 6-1. Sealing
Push Button
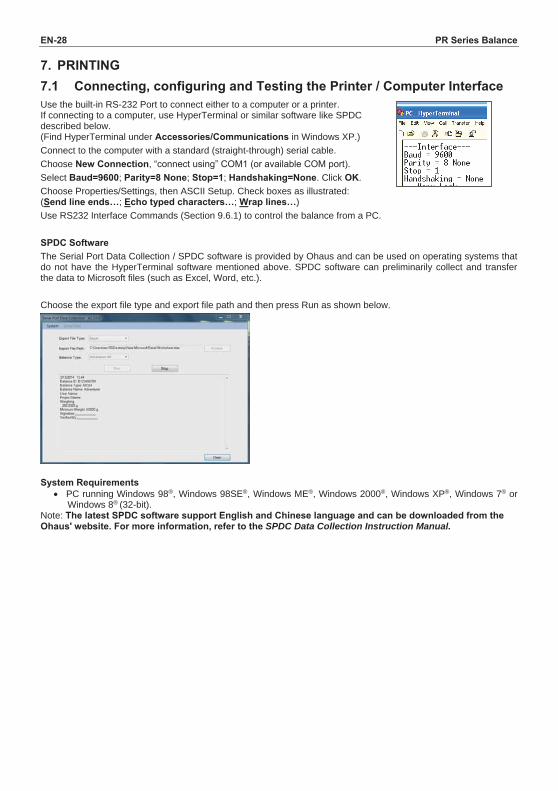
EN-28 PR Series Balance 7. PRINTING 7.1 Connecting, configuring and Testing the Printer / Computer Interface Use the built-in RS-232 Port to connect either to a computer or a printer. If connecting to a computer, use HyperTerminal or similar software like SPDC described below. (Find HyperTerminal under Accessories/Communications in Windows XP.) Connect to the computer with a standard (straight-through) serial cable. Choose New Connection, “connect using” COM1 (or available COM port). Select Baud=9600; Parity=8 None; Stop=1; Handshaking=None. Click OK. Choose Properties/Settings, then ASCII Setup. Check boxes as illustrated: (Send line ends…; Echo typed characters…; Wrap lines…) Use RS232 Interface Commands (Section 9.6.1) to control the balance from a PC. SPDC Software The Serial Port Data Collection / SPDC software is provided by Ohaus and can be used on operating systems that do not have the HyperTerminal software mentioned above. SPDC software can preliminarily collect and transfer the data to Microsoft files (such as Excel, Word, etc.).
Choose the export file type and export file path and then press Run as shown below.
System Requirements PC running Windows 98®, Windows 98SE®, Windows ME®, Windows 2000®, Windows XP®, Windows 7® or
Windows 8® (32-bit). Note: The latest SPDC software support English and Chinese language and can be downloaded from the Ohaus' website. For more information, refer to the SPDC Data Collection Instruction Manual.
PR Series Balance EN-29 7.2 Output format The Result Data, and G/N/T data, is output in the following format.
Field: Label 1 Space 2 Weight 3 Space2 Unit 4 Space Stability 5 Space G/N 6 Space Term. Characters 7
Length: 1 11 1 5 1 1 1 3 0 8 Note:
1. The length of the label field is not fixed.
2. Each field is followed by a single delimiting space (ASCII 32).
3. The Weight field is 11 right justified characters. If the value is negative, the '–' character is located at the immediate left of the most significant digit.
4. The Unit field contains the unit of measure abbreviation up to 5 characters, right justified.
5. The Stability field contains the “?” character if the weight reading is not stable. The Stability field and the following Space field are omitted if the weight reading is stable.
6. The G/N field contains the net or gross indication. For net weights, the field contains “N”. For gross weights, the field contains “G”.
7. The Termination Characters field contains CRLF, Four CRLF or Form Feed (ASCII 12), depending on the LINE FEED menu setting.
8. When Numeric Only is set On, only the Weight Field is printed, left-aligned.
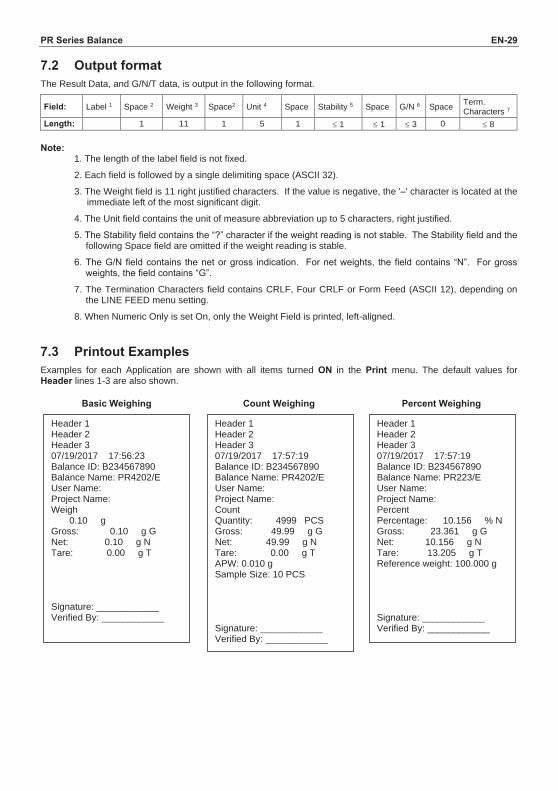
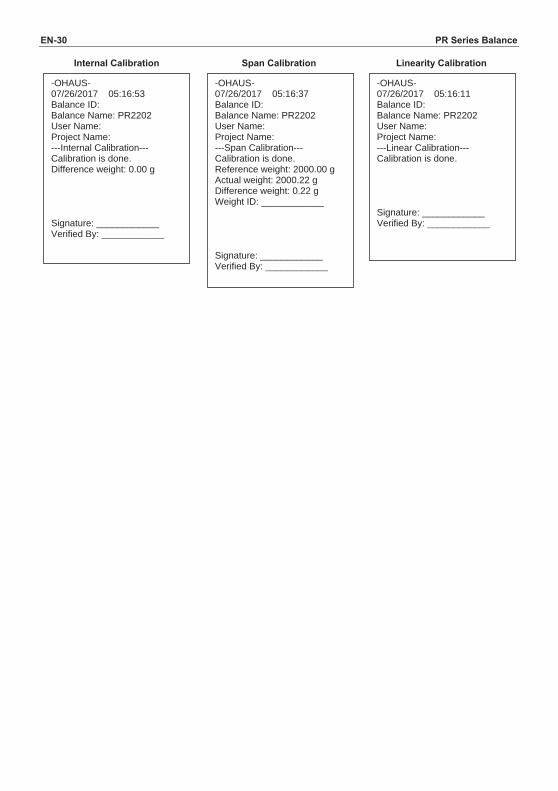
7.3 Printout Examples Examples for each Application are shown with all items turned ON in the Print menu. The default values for Header lines 1-3 are also shown.
Basic Weighing Count Weighing Percent Weighing
Header 1 Header 2 Header 3 07/19/2017 17:56:23 Balance ID: B234567890 Balance Name: PR4202/E User Name: Project Name: Weigh 0.10 g Gross: 0.10 g G Net: 0.10 g N Tare: 0.00 g T Signature: ____________ Verified By: ____________
Header 1 Header 2 Header 3 07/19/2017 17:57:19 Balance ID: B234567890 Balance Name: PR4202/E User Name: Project Name: Count Quantity: 4999 PCS Gross: 49.99 g G Net: 49.99 g N Tare: 0.00 g T APW: 0.010 g Sample Size: 10 PCS Signature: ____________ Verified By: ____________
Header 1 Header 2 Header 3 07/19/2017 17:57:19 Balance ID: B234567890 Balance Name: PR223/E User Name: Project Name: Percent Percentage: 10.156 % N Gross: 23.361 g G Net: 10.156 g N Tare: 13.205 g T Reference weight: 100.000 g Signature: ____________ Verified By: ____________
EN-30 PR Series Balance
Internal Calibration Span Calibration Linearity Calibration
-OHAUS- 07/26/2017 05:16:53 Balance ID: Balance Name: PR2202 User Name: Project Name: ---Internal Calibration--- Calibration is done. Difference weight: 0.00 g Signature: ____________ Verified By: ____________
-OHAUS- 07/26/2017 05:16:37 Balance ID: Balance Name: PR2202 User Name: Project Name: ---Span Calibration--- Calibration is done. Reference weight: 2000.00 g Actual weight: 2000.22 g Difference weight: 0.22 g Weight ID: ____________ Signature: ____________ Verified By: ____________
-OHAUS- 07/26/2017 05:16:11 Balance ID: Balance Name: PR2202 User Name: Project Name: ---Linear Calibration--- Calibration is done. Signature: ____________ Verified By: ____________
PR Series Balance EN-31 8. MAINTENANCE 8.1 Calibration Periodically verify calibration by placing an accurate weight on the balance and viewing the result. If calibration is required, refer to section 5.2 for instructions. 8.2 Cleaning
WARNING: Disconnect the balance from the power supply before cleaning. Make sure that no liquid enters the interior of the balance.
Clean the Balance at regular intervals. Housing surfaces may be cleaned with a lint-free cloth slightly dampened with water or a mild cleaning agent. Glass surfaces may be cleaned with a commercial glass cleaner. Attention: Do not use solvents, harsh chemicals, ammonia or abrasive cleaning agents.
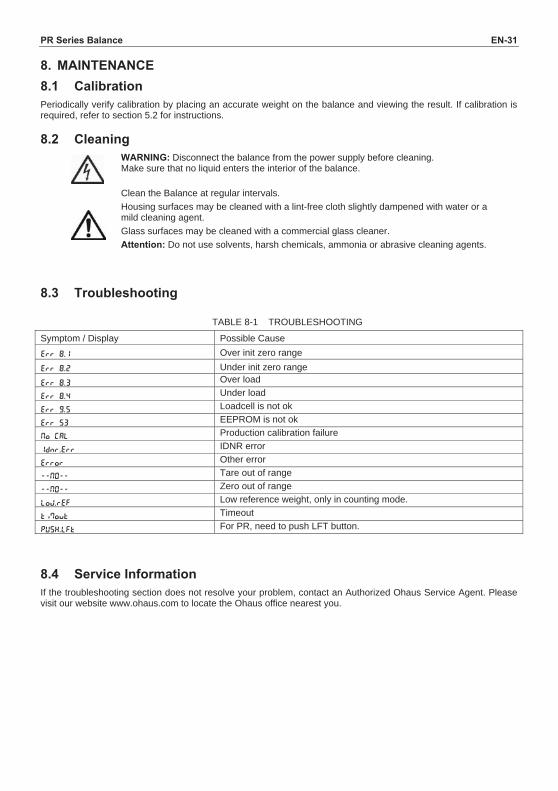
8.3 Troubleshooting
TABLE 8-1 TROUBLESHOOTING
Symptom / Display Possible Cause Err 8.1 Over init zero range Err 8.2 Under init zero range Err 8.3 Over load
Err 8.4 Under load
Err 9.5 Loadcell is not ok
Err 53 EEPROM is not ok
No CAL Production calibration failure
IDnr.Err IDNR error
Error Other error
--NO-- Tare out of range
--NO-- Zero out of range
LoW.rEF Low reference weight, only in counting mode.
tiMout Timeout
PUSH.LFt For PR, need to push LFT button. 8.4 Service Information If the troubleshooting section does not resolve your problem, contact an Authorized Ohaus Service Agent. Please visit our website www.ohaus.com to locate the Ohaus office nearest you.
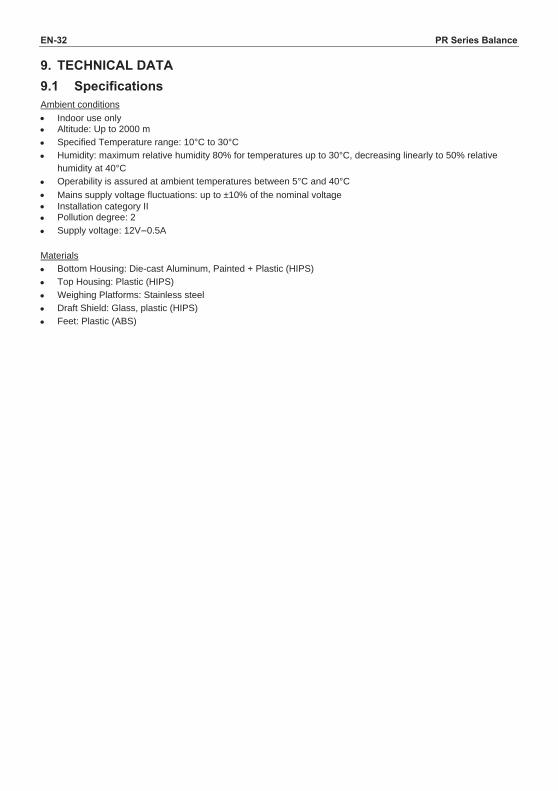
EN-32 PR Series Balance 9. TECHNICAL DATA 9.1 Specifications Ambient conditions Indoor use only Altitude: Up to 2000 m Specified Temperature range: 10°C to 30°C Humidity: maximum relative humidity 80% for temperatures up to 30°C, decreasing linearly to 50% relative
humidity at 40°C Operability is assured at ambient temperatures between 5°C and 40°C Mains supply voltage fluctuations: up to ±10% of the nominal voltage Installation category II Pollution degree: 2 Supply voltage: 12V 0.5A
Materials Bottom Housing: Die-cast Aluminum, Painted + Plastic (HIPS) Top Housing: Plastic (HIPS) Weighing Platforms: Stainless steel Draft Shield: Glass, plastic (HIPS) Feet: Plastic (ABS)
PR Series Balance EN-33
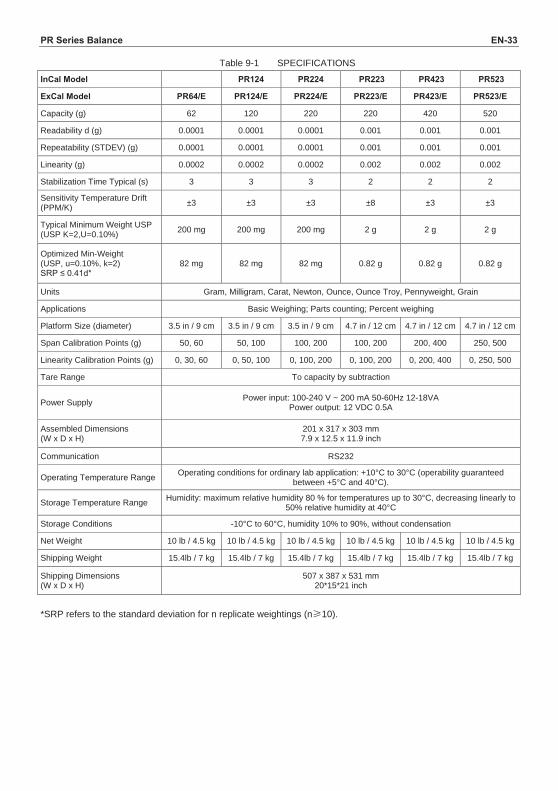
Table 9-1 SPECIFICATIONS
InCal Model PR124 PR224 PR223 PR423 PR523
ExCal Model PR64/E PR124/E PR224/E PR223/E PR423/E PR523/E
Capacity (g) 62 120 220 220 420 520
Readability d (g) 0.0001 0.0001 0.0001 0.001 0.001 0.001
Repeatability (STDEV) (g) 0.0001 0.0001 0.0001 0.001 0.001 0.001
Linearity (g) 0.0002 0.0002 0.0002 0.002 0.002 0.002
Stabilization Time Typical (s) 3 3 3 2 2 2
Sensitivity Temperature Drift (PPM/K) ±3 ±3 ±3 ±8 ±3 ±3
Typical Minimum Weight USP (USP K=2,U=0.10%) 200 mg 200 mg 200 mg 2 g 2 g 2 g
Optimized Min-Weight (USP, u=0.10%, k=2) SRP ≤ 0.41d*
82 mg 82 mg 82 mg 0.82 g 0.82 g 0.82 g
Units Gram, Milligram, Carat, Newton, Ounce, Ounce Troy, Pennyweight, Grain
Applications Basic Weighing; Parts counting; Percent weighing
Platform Size (diameter) 3.5 in / 9 cm 3.5 in / 9 cm 3.5 in / 9 cm 4.7 in / 12 cm 4.7 in / 12 cm 4.7 in / 12 cm
Span Calibration Points (g) 50, 60 50, 100 100, 200 100, 200 200, 400 250, 500
Linearity Calibration Points (g) 0, 30, 60 0, 50, 100 0, 100, 200 0, 100, 200 0, 200, 400 0, 250, 500
Tare Range To capacity by subtraction
Power Supply Power input: 100-240 V ~ 200 mA 50-60Hz 12-18VA Power output: 12 VDC 0.5A
Assembled Dimensions (W x D x H)
201 x 317 x 303 mm 7.9 x 12.5 x 11.9 inch
Communication RS232
Operating Temperature Range Operating conditions for ordinary lab application: +10°C to 30°C (operability guaranteed between +5°C and 40°C).
Storage Temperature Range Humidity: maximum relative humidity 80 % for temperatures up to 30°C, decreasing linearly to 50% relative humidity at 40°C
Storage Conditions -10°C to 60°C, humidity 10% to 90%, without condensation
Net Weight 10 lb / 4.5 kg 10 lb / 4.5 kg 10 lb / 4.5 kg 10 lb / 4.5 kg 10 lb / 4.5 kg 10 lb / 4.5 kg
Shipping Weight 15.4lb / 7 kg 15.4lb / 7 kg 15.4lb / 7 kg 15.4lb / 7 kg 15.4lb / 7 kg 15.4lb / 7 kg
Shipping Dimensions (W x D x H)
507 x 387 x 531 mm 20*15*21 inch
*SRP refers to the standard deviation for n replicate weightings (n 10).
EN-34 PR Series Balance
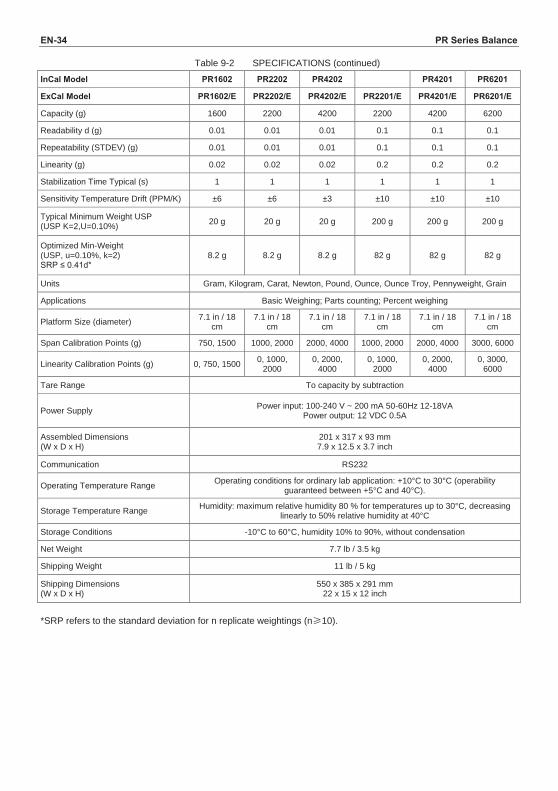
Table 9-2 SPECIFICATIONS (continued)
InCal Model PR1602 PR2202 PR4202 PR4201 PR6201
ExCal Model PR1602/E PR2202/E PR4202/E PR2201/E PR4201/E PR6201/E
Capacity (g) 1600 2200 4200 2200 4200 6200
Readability d (g) 0.01 0.01 0.01 0.1 0.1 0.1
Repeatability (STDEV) (g) 0.01 0.01 0.01 0.1 0.1 0.1
Linearity (g) 0.02 0.02 0.02 0.2 0.2 0.2
Stabilization Time Typical (s) 1 1 1 1 1 1
Sensitivity Temperature Drift (PPM/K) ±6 ±6 ±3 ±10 ±10 ±10
Typical Minimum Weight USP (USP K=2,U=0.10%) 20 g 20 g 20 g 200 g 200 g 200 g
Optimized Min-Weight (USP, u=0.10%, k=2) SRP ≤ 0.41d*
8.2 g 8.2 g 8.2 g 82 g 82 g 82 g
Units Gram, Kilogram, Carat, Newton, Pound, Ounce, Ounce Troy, Pennyweight, Grain
Applications Basic Weighing; Parts counting; Percent weighing
Platform Size (diameter) 7.1 in / 18 cm
7.1 in / 18 cm
7.1 in / 18 cm
7.1 in / 18 cm
7.1 in / 18 cm
7.1 in / 18 cm
Span Calibration Points (g) 750, 1500 1000, 2000 2000, 4000 1000, 2000 2000, 4000 3000, 6000
Linearity Calibration Points (g) 0, 750, 1500 0, 1000, 2000
0, 2000, 4000
0, 1000, 2000
0, 2000, 4000
0, 3000, 6000
Tare Range To capacity by subtraction
Power Supply Power input: 100-240 V ~ 200 mA 50-60Hz 12-18VA Power output: 12 VDC 0.5A
Assembled Dimensions (W x D x H)
201 x 317 x 93 mm 7.9 x 12.5 x 3.7 inch
Communication RS232
Operating Temperature Range Operating conditions for ordinary lab application: +10°C to 30°C (operability guaranteed between +5°C and 40°C).
Storage Temperature Range Humidity: maximum relative humidity 80 % for temperatures up to 30°C, decreasing linearly to 50% relative humidity at 40°C
Storage Conditions -10°C to 60°C, humidity 10% to 90%, without condensation
Net Weight 7.7 lb / 3.5 kg
Shipping Weight 11 lb / 5 kg
Shipping Dimensions (W x D x H)
550 x 385 x 291 mm 22 x 15 x 12 inch
*SRP refers to the standard deviation for n replicate weightings (n 10).
PR Series Balance EN-35
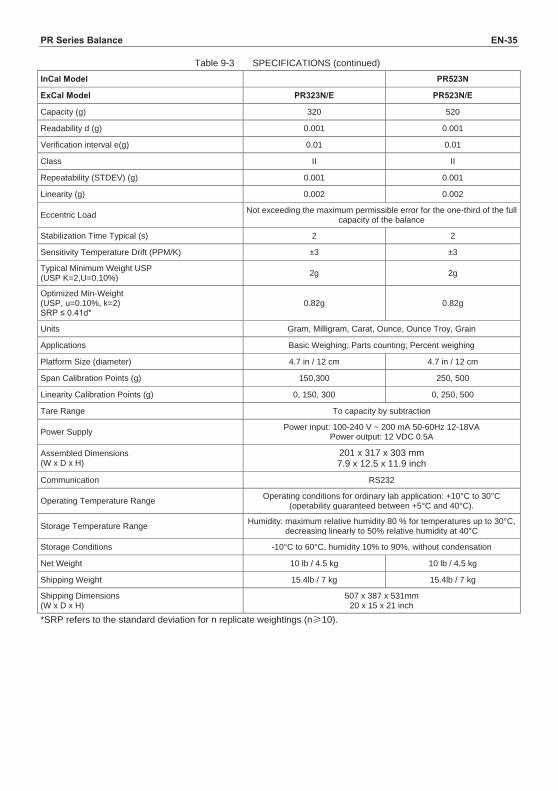
Table 9-3 SPECIFICATIONS (continued) InCal Model PR523N
ExCal Model PR323N/E PR523N/E
Capacity (g) 320 520
Readability d (g) 0.001 0.001
Verification interval e(g) 0.01 0.01
Class II II
Repeatability (STDEV) (g) 0.001 0.001
Linearity (g) 0.002 0.002
Eccentric Load Not exceeding the maximum permissible error for the one-third of the full capacity of the balance
Stabilization Time Typical (s) 2 2
Sensitivity Temperature Drift (PPM/K) ±3 ±3
Typical Minimum Weight USP (USP K=2,U=0.10%) 2g 2g
Optimized Min-Weight (USP, u=0.10%, k=2) SRP ≤ 0.41d*
0.82g 0.82g
Units Gram, Milligram, Carat, Ounce, Ounce Troy, Grain
Applications Basic Weighing; Parts counting; Percent weighing
Platform Size (diameter) 4.7 in / 12 cm 4.7 in / 12 cm
Span Calibration Points (g) 150,300 250, 500
Linearity Calibration Points (g) 0, 150, 300 0, 250, 500
Tare Range To capacity by subtraction
Power Supply Power input: 100-240 V ~ 200 mA 50-60Hz 12-18VA Power output: 12 VDC 0.5A
Assembled Dimensions (W x D x H)
201 x 317 x 303 mm 7.9 x 12.5 x 11.9 inch
Communication RS232
Operating Temperature Range Operating conditions for ordinary lab application: +10°C to 30°C (operability guaranteed between +5°C and 40°C).
Storage Temperature Range Humidity: maximum relative humidity 80 % for temperatures up to 30°C, decreasing linearly to 50% relative humidity at 40°C
Storage Conditions -10°C to 60°C, humidity 10% to 90%, without condensation
Net Weight 10 lb / 4.5 kg 10 lb / 4.5 kg
Shipping Weight 15.4lb / 7 kg 15.4lb / 7 kg
Shipping Dimensions (W x D x H)
507 x 387 x 531mm 20 x 15 x 21 inch
*SRP refers to the standard deviation for n replicate weightings (n 10).
EN-36 PR Series Balance
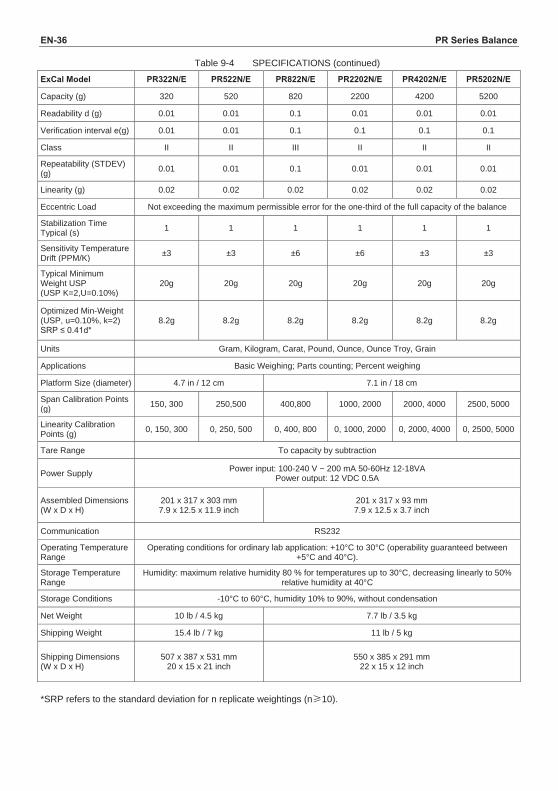
Table 9-4 SPECIFICATIONS (continued)
ExCal Model PR322N/E PR522N/E PR822N/E PR2202N/E PR4202N/E PR5202N/E
Capacity (g) 320 520 820 2200 4200 5200
Readability d (g) 0.01 0.01 0.1 0.01 0.01 0.01
Verification interval e(g) 0.01 0.01 0.1 0.1 0.1 0.1
Class II II III II II II
Repeatability (STDEV) (g) 0.01 0.01 0.1 0.01 0.01 0.01
Linearity (g) 0.02 0.02 0.02 0.02 0.02 0.02
Eccentric Load Not exceeding the maximum permissible error for the one-third of the full capacity of the balance
Stabilization Time Typical (s) 1 1 1 1 1 1
Sensitivity Temperature Drift (PPM/K) ±3 ±3 ±6 ±6 ±3 ±3
Typical Minimum Weight USP (USP K=2,U=0.10%)
20g 20g 20g 20g 20g 20g
Optimized Min-Weight (USP, u=0.10%, k=2) SRP ≤ 0.41d*
8.2g 8.2g 8.2g 8.2g 8.2g 8.2g
Units Gram, Kilogram, Carat, Pound, Ounce, Ounce Troy, Grain
Applications Basic Weighing; Parts counting; Percent weighing
Platform Size (diameter) 4.7 in / 12 cm 7.1 in / 18 cm
Span Calibration Points (g) 150, 300 250,500 400,800 1000, 2000 2000, 4000 2500, 5000
Linearity Calibration Points (g) 0, 150, 300 0, 250, 500 0, 400, 800 0, 1000, 2000 0, 2000, 4000 0, 2500, 5000
Tare Range To capacity by subtraction
Power Supply Power input: 100-240 V ~ 200 mA 50-60Hz 12-18VA Power output: 12 VDC 0.5A
Assembled Dimensions (W x D x H)
201 x 317 x 303 mm 7.9 x 12.5 x 11.9 inch
201 x 317 x 93 mm 7.9 x 12.5 x 3.7 inch
Communication RS232
Operating Temperature Range
Operating conditions for ordinary lab application: +10°C to 30°C (operability guaranteed between +5°C and 40°C).
Storage Temperature Range
Humidity: maximum relative humidity 80 % for temperatures up to 30°C, decreasing linearly to 50% relative humidity at 40°C
Storage Conditions -10°C to 60°C, humidity 10% to 90%, without condensation
Net Weight 10 lb / 4.5 kg 7.7 lb / 3.5 kg
Shipping Weight 15.4 lb / 7 kg 11 lb / 5 kg
Shipping Dimensions (W x D x H)
507 x 387 x 531 mm 20 x 15 x 21 inch
550 x 385 x 291 mm 22 x 15 x 12 inch
*SRP refers to the standard deviation for n replicate weightings (n 10).

PR Series Balance EN-37
Table 9-5 SPECIFICATIONS (continued)
ExCal Model PR2201N/E PR4201N/E PR5201N/E PR6201N/E
Capacity (g) 2200 4200 5200 6200
Readability d (g) 0.1 0.1 0.1 1
Verification interval e(g) 0.1 0.1 0.1 1
Class II II II III
Repeatability (STDEV) (g) 0.1 0.1 0.1 1
Linearity (g) 0.2 0.2 0.2 0.2
Eccentric Load Not exceeding the maximum permissible error for the one-third of the full capacity of the balance
Stabilization Time Typical (s) 1 1 1 1
Sensitivity Temperature Drift (PPM/K) ±10 ±10 ±3 ±10
Typical Minimum Weight USP (USP K=2,U=0.10%)
200g 200g 200g 200g
Optimized Min-Weight (USP, u=0.10%, k=2) SRP ≤ 0.41d*
82g 82g 82g 82g
Units Gram, Kilogram, Carat, Pound, Ounce, Ounce Troy, Grain
Applications Basic Weighing; Parts counting; Percent weighing
Platform Size (diameter) 7.1 in / 18 cm
Span Calibration Points (g) 1000, 2000 2000, 4000 2500, 5000 3000, 6000
Linearity Calibration Points (g) 0, 1000, 2000 0, 2000, 4000 0, 2500, 5000 0, 3000, 6000
Tare Range To capacity by subtraction
Power Supply Power input: 100-240 V ~ 200 mA 50-60Hz 12-18VA Power output: 12 VDC 0.5A
Assembled Dimensions (W x D x H)
201 x 317 x 93 mm 7.9 x 12.5 x 3.7 inch
Communication RS232
Operating Temperature Range
Operating conditions for ordinary lab application: +10°C to 30°C (operability guaranteed between +5°C and 40°C).
Storage Temperature Range Humidity: maximum relative humidity 80 % for temperatures up to 30°C, decreasing linearly to 50% relative humidity at 40°C
Storage Conditions -10°C to 60°C, humidity 10% to 90%, without condensation
Net Weight 7.7 lb / 3.5 kg
Shipping Weight 11 lb / 5 kg
Shipping Dimensions (W x D x H)
550 x 385 x 291 mm 22 x 15 x 12 inch
*SRP refers to the standard deviation for n replicate weightings (n 10).
EN-38 PR Series Balance
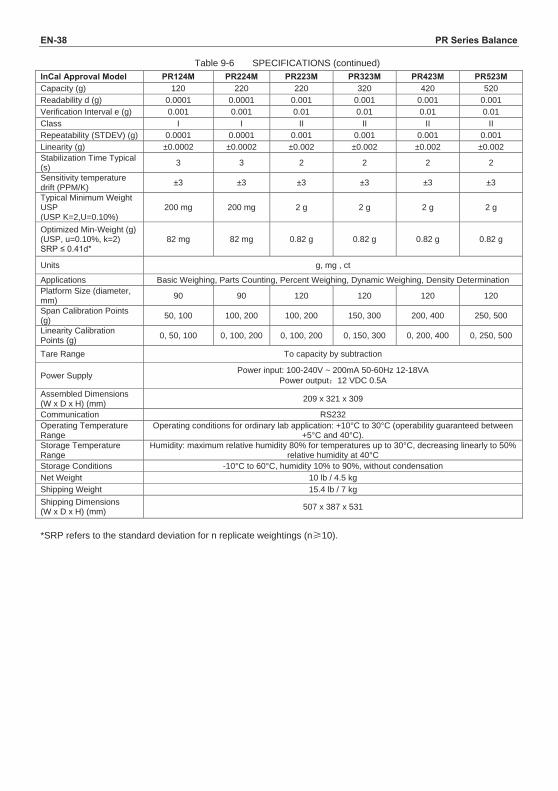
Table 9-6 SPECIFICATIONS (continued) InCal Approval Model PR124M PR224M PR223M PR323M PR423M PR523M Capacity (g) 120 220 220 320 420 520 Readability d (g) 0.0001 0.0001 0.001 0.001 0.001 0.001 Verification Interval e (g) 0.001 0.001 0.01 0.01 0.01 0.01 Class I I II II II II Repeatability (STDEV) (g) 0.0001 0.0001 0.001 0.001 0.001 0.001 Linearity (g) ±0.0002 ±0.0002 ±0.002 ±0.002 ±0.002 ±0.002 Stabilization Time Typical (s) 3 3 2 2 2 2
Sensitivity temperature drift (PPM/K) ±3 ±3 ±3 ±3 ±3 ±3
Typical Minimum Weight USP (USP K=2,U=0.10%)
200 mg 200 mg 2 g 2 g 2 g 2 g
Optimized Min-Weight (g) (USP, u=0.10%, k=2) SRP ≤ 0.41d*
82 mg 82 mg 0.82 g 0.82 g 0.82 g 0.82 g
Units g, mg , ct
Applications Basic Weighing, Parts Counting, Percent Weighing, Dynamic Weighing, Density Determination Platform Size (diameter, mm) 90 90 120 120 120 120
Span Calibration Points (g) 50, 100 100, 200 100, 200 150, 300 200, 400 250, 500
Linearity Calibration Points (g) 0, 50, 100 0, 100, 200 0, 100, 200 0, 150, 300 0, 200, 400 0, 250, 500
Tare Range To capacity by subtraction
Power Supply Power input: 100-240V ~ 200mA 50-60Hz 12-18VA Power output 12 VDC 0.5A
Assembled Dimensions (W x D x H) (mm) 209 x 321 x 309
Communication RS232 Operating Temperature Range
Operating conditions for ordinary lab application: +10°C to 30°C (operability guaranteed between +5°C and 40°C).
Storage Temperature Range
Humidity: maximum relative humidity 80% for temperatures up to 30°C, decreasing linearly to 50% relative humidity at 40°C
Storage Conditions -10°C to 60°C, humidity 10% to 90%, without condensation Net Weight 10 lb / 4.5 kg Shipping Weight 15.4 lb / 7 kg Shipping Dimensions (W x D x H) (mm) 507 x 387 x 531
*SRP refers to the standard deviation for n replicate weightings (n 10).
PR Series Balance EN-39
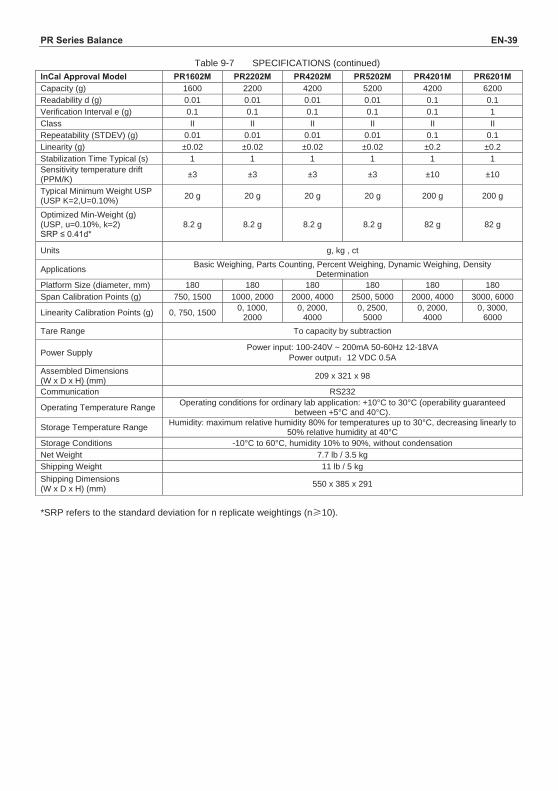
Table 9-7 SPECIFICATIONS (continued) InCal Approval Model PR1602M PR2202M PR4202M PR5202M PR4201M PR6201M Capacity (g) 1600 2200 4200 5200 4200 6200 Readability d (g) 0.01 0.01 0.01 0.01 0.1 0.1 Verification Interval e (g) 0.1 0.1 0.1 0.1 0.1 1 Class II II II II II II Repeatability (STDEV) (g) 0.01 0.01 0.01 0.01 0.1 0.1 Linearity (g) ±0.02 ±0.02 ±0.02 ±0.02 ±0.2 ±0.2 Stabilization Time Typical (s) 1 1 1 1 1 1 Sensitivity temperature drift (PPM/K) ±3 ±3 ±3 ±3 ±10 ±10
Typical Minimum Weight USP (USP K=2,U=0.10%) 20 g 20 g 20 g 20 g 200 g 200 g
Optimized Min-Weight (g) (USP, u=0.10%, k=2) SRP ≤ 0.41d*
8.2 g 8.2 g 8.2 g 8.2 g 82 g 82 g
Units g, kg , ct
Applications Basic Weighing, Parts Counting, Percent Weighing, Dynamic Weighing, Density Determination
Platform Size (diameter, mm) 180 180 180 180 180 180 Span Calibration Points (g) 750, 1500 1000, 2000 2000, 4000 2500, 5000 2000, 4000 3000, 6000
Linearity Calibration Points (g) 0, 750, 1500 0, 1000, 2000
0, 2000, 4000
0, 2500, 5000
0, 2000, 4000
0, 3000, 6000
Tare Range To capacity by subtraction
Power Supply Power input: 100-240V ~ 200mA 50-60Hz 12-18VA Power output 12 VDC 0.5A
Assembled Dimensions (W x D x H) (mm) 209 x 321 x 98
Communication RS232
Operating Temperature Range Operating conditions for ordinary lab application: +10°C to 30°C (operability guaranteed between +5°C and 40°C).
Storage Temperature Range Humidity: maximum relative humidity 80% for temperatures up to 30°C, decreasing linearly to 50% relative humidity at 40°C
Storage Conditions -10°C to 60°C, humidity 10% to 90%, without condensation Net Weight 7.7 lb / 3.5 kg Shipping Weight 11 lb / 5 kg Shipping Dimensions (W x D x H) (mm) 550 x 385 x 291
*SRP refers to the standard deviation for n replicate weightings (n 10).
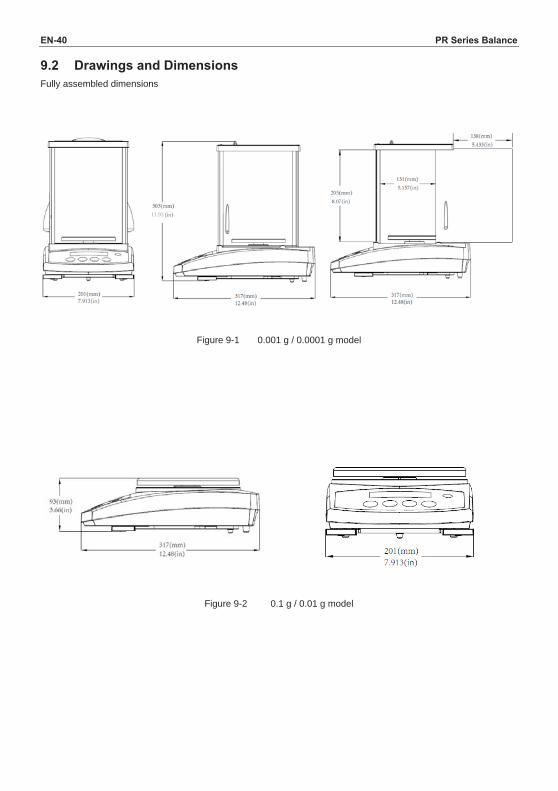
EN-40 PR Series Balance 9.2 Drawings and Dimensions Fully assembled dimensions
Figure 9-1 0.001 g / 0.0001 g model
Figure 9-2 0.1 g / 0.01 g model
11.93
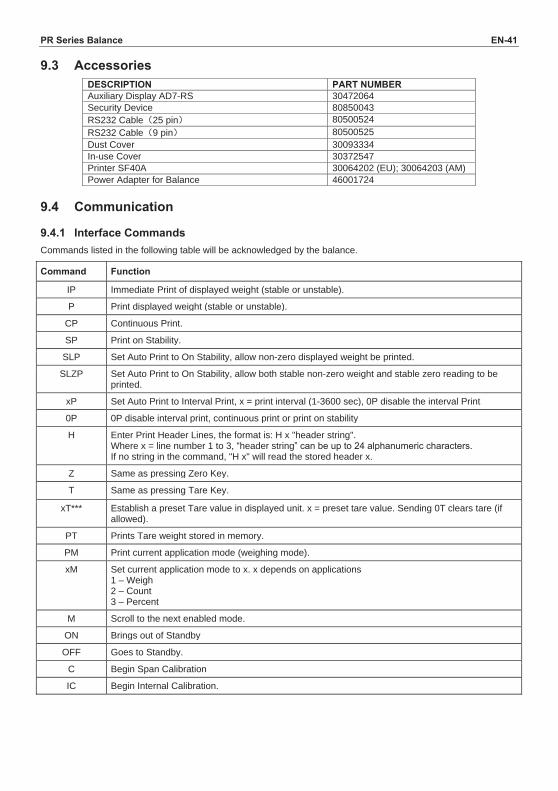
PR Series Balance EN-41 9.3 Accessories
DESCRIPTION PART NUMBER Auxiliary Display AD7-RS 30472064 Security Device 80850043 RS232 Cable 25 pin 80500524 RS232 Cable 9 pin 80500525 Dust Cover 30093334 In-use Cover 30372547 Printer SF40A 30064202 (EU); 30064203 (AM) Power Adapter for Balance 46001724
9.4 Communication
9.4.1 Interface Commands Commands listed in the following table will be acknowledged by the balance.
Command Function
IP Immediate Print of displayed weight (stable or unstable).
P Print displayed weight (stable or unstable).
CP Continuous Print.
SP Print on Stability.
SLP Set Auto Print to On Stability, allow non-zero displayed weight be printed.
SLZP Set Auto Print to On Stability, allow both stable non-zero weight and stable zero reading to be printed.
xP Set Auto Print to Interval Print, x = print interval (1-3600 sec), 0P disable the interval Print
0P 0P disable interval print, continuous print or print on stability
H Enter Print Header Lines, the format is: H x "header string". Where x = line number 1 to 3, “header string” can be up to 24 alphanumeric characters. If no string in the command, "H x" will read the stored header x.
Z Same as pressing Zero Key.
T Same as pressing Tare Key.
xT*** Establish a preset Tare value in displayed unit. x = preset tare value. Sending 0T clears tare (if allowed).
PT Prints Tare weight stored in memory.
PM Print current application mode (weighing mode).
xM Set current application mode to x. x depends on applications 1 – Weigh 2 – Count 3 – Percent
M Scroll to the next enabled mode.
ON Brings out of Standby
OFF Goes to Standby.
C Begin Span Calibration
IC Begin Internal Calibration.
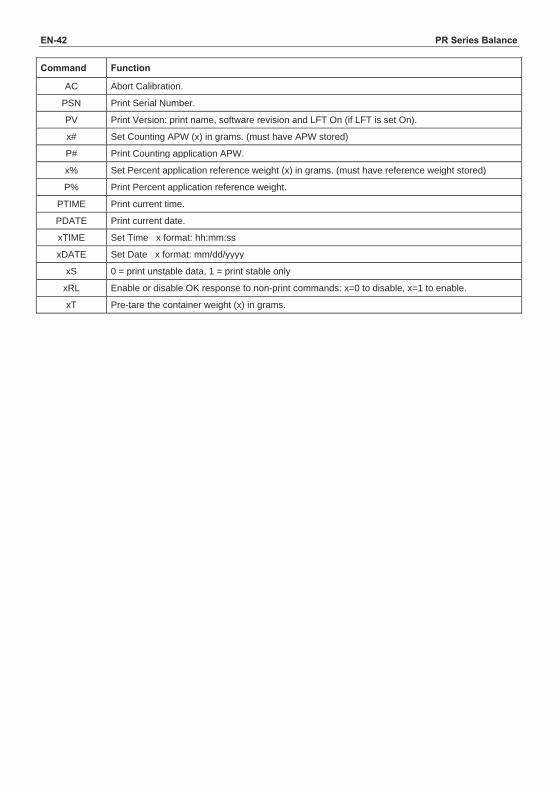
EN-42 PR Series Balance Command Function
AC Abort Calibration.
PSN Print Serial Number.
PV Print Version: print name, software revision and LFT On (if LFT is set On).
x# Set Counting APW (x) in grams. (must have APW stored)
P# Print Counting application APW.
x% Set Percent application reference weight (x) in grams. (must have reference weight stored)
P% Print Percent application reference weight.
PTIME Print current time.
PDATE Print current date.
xTIME Set Time x format: hh:mm:ss
xDATE Set Date x format: mm/dd/yyyy
xS 0 = print unstable data, 1 = print stable only
xRL Enable or disable OK response to non-print commands: x=0 to disable, x=1 to enable.
xT Pre-tare the container weight (x) in grams.
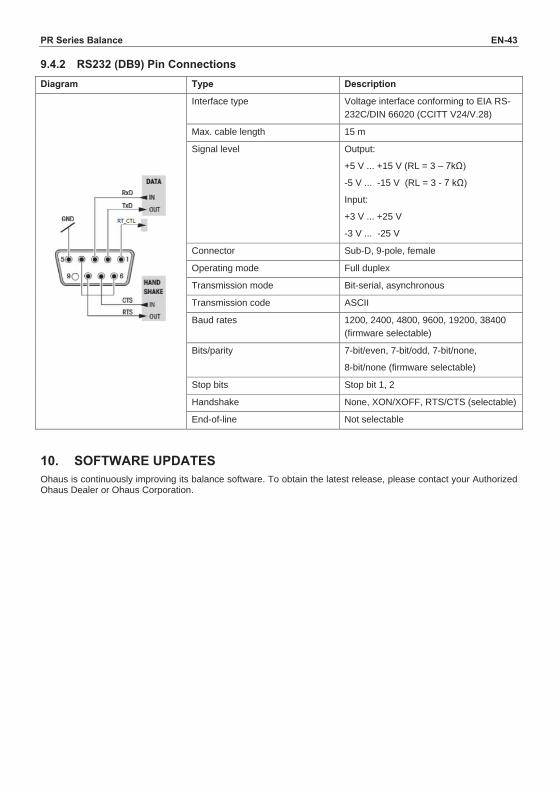
PR Series Balance EN-43 9.4.2 RS232 (DB9) Pin Connections
Diagram Type Description
Interface type Voltage interface conforming to EIA RS-232C/DIN 66020 (CCITT V24/V.28)
Max. cable length 15 m
Signal level Output:
+5 V ... +15 V (RL = 3 – 7kΩ)
-5 V ... -15 V (RL = 3 - 7 kΩ)
Input:
+3 V ... +25 V
-3 V ... -25 V
Connector Sub-D, 9-pole, female
Operating mode Full duplex
Transmission mode Bit-serial, asynchronous
Transmission code ASCII
Baud rates 1200, 2400, 4800, 9600, 19200, 38400 (firmware selectable)
Bits/parity 7-bit/even, 7-bit/odd, 7-bit/none,
8-bit/none (firmware selectable)
Stop bits Stop bit 1, 2
Handshake None, XON/XOFF, RTS/CTS (selectable)
End-of-line Not selectable
10. SOFTWARE UPDATES Ohaus is continuously improving its balance software. To obtain the latest release, please contact your Authorized Ohaus Dealer or Ohaus Corporation.

EN-44 PR Series Balance 11. COMPLIANCE Compliance to the following standards is indicated by the corresponding mark on the product.
Mark Standard
This product complies with the EU Directives 2011/65/EU (RoHS), 2014/30/EU (EMC), 2014/35/EU (LVD) and 2014/31/EU (NAWI). The EU Declaration of Conformity is available online at www.ohaus.com/ce.
EN 61326-1, AS/NZS 61010-1
CAN/CSA-C22.2 No. 61010-1 UL Std. No. 61010-1
This product complies with the EU Directive 2012/19/EU (WEEE). Please dispose of this product in accordance with local regulations at the collecting point specified for electrical and electronic equipment.
For disposal instructions in Europe, refer to www.ohaus.com/weee.
Important notice for verified weighing instruments in the EU When the instrument is used in trade or a legally controlled application it must be set up, verified and sealed in accordance with local weights and measures regulations. It is the responsibility of the purchaser to ensure that all pertinent legal requirements are met. Weighing Instruments verified at the place of manufacture bear the following supplementary metrology marking on the descriptive plate.
Weighing Instruments to be verified in two stages have no supplementary metrology marking on the descriptive plate. The second stage of conformity assessment must be carried out by the applicable weights and measures authorities. If national regulations limit the validity period of the verification, the user of the weighing instrument must strictly observe the re-verification period and inform the weights and measures authorities. As verification requirements vary by jurisdiction, the purchaser should contact their local weights and measures office if they are not familiar with the requirements. FCC Note This equipment has been tested and found to comply with the limits for a Class A digital device, pursuant to Part 15 of the FCC Rules. These limits are designed to provide reasonable protection against harmful interference when the equipment is operated in a commercial environment. This equipment generates, uses, and can radiate radio frequency energy and, if not installed and used in accordance with the instruction manual, may cause harmful interference to radio communications. Operation of this equipment in a residential area is likely to cause harmful interference in which case the user will be required to correct the interference at his own expense. Industry Canada Note This Class A digital apparatus complies with Canadian ICES-003. ISO 9001 Registration In 1994, OHAUS Corporation, USA, was awarded a certificate of registration to ISO 9001 by Bureau Veritas Quality International (BVQI), confirming that the OHAUS quality management system is compliant with the ISO 9001 standard’s requirements. On June 21, 2012, OHAUS Corporation, USA, was re-registered to the ISO 9001:2008 standard.

PR Series Balance EN-45
LIMITED WARRANTY
Ohaus products are warranted against defects in materials and workmanship from the date of delivery through the duration of the warranty period. During the warranty period Ohaus will repair, or, at its option, replace any component(s) that proves to be defective at no charge, provided that the product is returned, freight prepaid, to Ohaus.
This warranty does not apply if the product has been damaged by accident or misuse, exposed to radioactive or corrosive materials, has foreign material penetrating to the inside of the product, or as a result of service or modification by other than Ohaus. In lieu of a properly returned warranty registration card, the warranty period shall begin on the date of shipment to the authorized dealer. No other express or implied warranty is given by Ohaus Corporation. Ohaus Corporation shall not be liable for any consequential damages.
As warranty legislation differs from state to state and country to country, please contact Ohaus or your local Ohaus dealer for further details.

PR Series Balance ES-1
Índice
1. INTRODUCCIÓN .......................................................................................... ES-3 1.1 Descripción ............................................................................................................................ ES-3 1.2 Funcionalidades ..................................................................................................................... ES-3 1.3 Definición de las señales y símbolos de advertencia ............................................................. ES-3 1.4 Precauciones de seguridad .................................................................................................... ES-3
2. INSTALACIÓN ............................................................................................. ES-4 2.1 Desembalaje .......................................................................................................................... ES-4 2.2 Seleccionar la ubicación......................................................................................................... ES-4 2.3 Nivelación ............................................................................................................................... ES-4 2.4 Conexión de la alimentación y aclimatación de la balanza .................................................... ES-4 2.5 Conexión de la interfaz........................................................................................................... ES-5 2.6 Calibración inicial ................................................................................................................... ES-5
3. FUNCIONAMIENTO ..................................................................................... ES-6 3.1 Descripción de la pantalla, pantalla de inicio ......................................................................... ES-6 3.2 Funciones principales y menú principal ................................................................................. ES-6 3.3 Descripción de piezas y características, modelos con cámara de pesaje ............................. ES-7 3.4 Descripción de piezas y características, modelos sin cámara de pesaje .............................. ES-7
4. APLICACIONES .......................................................................................... ES-7 4.1 Pesaje .................................................................................................................................... ES-7 4.2 Recuento de piezas ............................................................................................................... ES-8 4.3 Pesaje porcentual................................................................................................................. ES-10 4.4 Características adicionales .................................................................................................. ES-11
5. CONFIGURACIÓN DEL MENÚ ................................................................. ES-12 5.1 Menú de navegación ............................................................................................................ ES-12 5.1.1 Cambiar la configuración .................................................................................................. ES-12 5.2 Calibración ........................................................................................................................... ES-13 5.2.1 Submenú de calibración (modelos InCal) ......................................................................... ES-14 5.2.2 Calibración interna (no aplicable a modelos ExCal) ......................................................... ES-14 5.2.3 Cal Adjust (no aplicable a modelos ExCal) ....................................................................... ES-13 5.2.4 Calibración de span .......................................................................................................... ES-13 5.2.5 Calibración de linealidad ................................................................................................... ES-14 5.3 Configuración de la balanza ................................................................................................. ES-15 5.3.1 Filter Level (Nivel de filtrado) ............................................................................................ ES-17 5.3.2 AZT (cero automático) ...................................................................................................... ES-16 5.3.3 Auto Tare (Tara automática) ............................................................................................. ES-16 5.3.4 Graduations (Divisiones) .................................................................................................. ES-16 5.3.5 Date Format (Formato de fecha) ...................................................................................... ES-18 5.3.6 Date Setup (Configuración de fecha) ............................................................................... ES-17 5.3.7 Time Format (Formato de hora) ....................................................................................... ES-17 5.3.8 Time Setup (Configuración de hora) ................................................................................. ES-17 5.3.9 Brightness (Brillo) ............................................................................................................. ES-19 5.3.10 Auto Dim (Auto-oscurecer automático) ............................................................................. ES-18 5.3.11 Approved Mode (Modo aprobado) .................................................................................... ES-18 5.4 Weighing Units (Unidades de pesaje) .................................................................................. ES-19 5.5 RS232 Interface Setup (Configuración de la interfaz RS232) .............................................. ES-20 5.5.1 Baud Rate (Velocidad en baudios) ................................................................................... ES-20 5.5.2 Transmission (Transmisión) ............................................................................................. ES-20 5.5.3 Handshake ........................................................................................................................ ES-20 5.6 Print Settings (Configuración de impresión) ......................................................................... ES-20 5.6.1 Stable Only (Solo estable) ................................................................................................ ES-20 5.6.2 Numeric Only (Solo numérico) ......................................................................................... ES-20
ES-2 PR Series Balance
5.6.3 Single Header (Encabezado sencillo) .............................................................................. ES-20 5.6.4 Auto Print (Impresión automática) .................................................................................... ES-20 5.6.5 Header (Encabezado) ...................................................................................................... ES-23 5.6.6 Date and Time (Fecha y hora) .......................................................................................... ES-23 5.6.7 Balance ID Id. De la báscula) ........................................................................................... ES-23 5.6.8 Balance Name (Nombre de la báscula) ............................................................................ ES-23 5.6.9 User Name (Nombre de usuario) ..................................................................................... ES-24 5.6.10 Project Name (Nombre del proyecto) ............................................................................... ES-24 5.6.11 Application Name (Nombre de la aplicación) ................................................................... ES-24 5.6.12 Result (Resultados) .......................................................................................................... ES-24 5.6.13 Gross (Bruto) .................................................................................................................... ES-24 5.6.14 Net (Neto) ......................................................................................................................... ES-24 5.6.15 Tare (Tara) ....................................................................................................................... ES-24 5.6.16 Line Feed (Avance de línea) ............................................................................................ ES-24 5.7 GLP ...................................................................................................................................... ES-25 5.7.1 Header (Encabezado) ...................................................................................................... ES-25 5.7.2 Balance Name (Nombre de la balanza) ........................................................................... ES-25 5.7.3 User Name (Nombre de usuario) ..................................................................................... ES-25 5.7.4 Project Name (Nombre del proyecto) ............................................................................... ES-25 5.8 Factory Reset (Restablecer a fábrica) .................................................................................. ES-25 5.9 Lockout (Bloqueo) ................................................................................................................ ES-25
6. LEGAL PARA COMERCIO (LFT) ............................................................. ES-26 6.1 Ajustes ................................................................................................................................. ES-26 6.2 Verificación ........................................................................................................................... ES-26 6.3 Sellado ................................................................................................................................. ES-26
7. IMPRESIÓN ............................................................................................... ES-27 7.1 Conectar, configurar y probar la impresora / interfaz de ordenador ..................................... ES-27 7.2 Formato de salida................................................................................................................. ES-28 7.3 Ejemplos de impresión ......................................................................................................... ES-28
8. MANTENIMIENTO ..................................................................................... ES-30 8.1 Calibración ........................................................................................................................... ES-30 8.2 Limpieza ............................................................................................................................... ES-30 8.3 Solución de problemas ......................................................................................................... ES-30 8.4 Información de servicio ........................................................................................................ ES-30
9. DATOS TÉCNICOS ................................................................................... ES-31 9.1 Especificaciones .................................................................................................................. ES-31 9.2 Esquemas y dimensiones .................................................................................................... ES-36 9.3 Accesorios ............................................................................................................................ ES-37 9.4 Comunicación ...................................................................................................................... ES-37 9.4.1 Interface Comandos de la interfaz .................................................................................... ES-37 9.4.2 RS232 (DB9) Conexiones pin .......................................................................................... ES-38
10. ACTUALIZACIONES DE SOFTWARE .................................................... ES-39 11. CONFORMIDAD ...................................................................................... ES-39
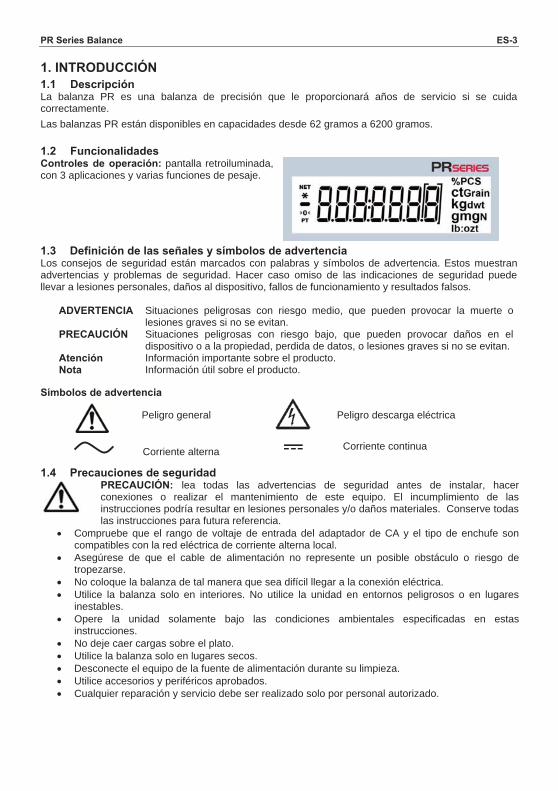
PR Series Balance ES-3
1. INTRODUCCIÓN 1.1 Descripción La balanza PR es una balanza de precisión que le proporcionará años de servicio si se cuida correctamente. Las balanzas PR están disponibles en capacidades desde 62 gramos a 6200 gramos. 1.2 Funcionalidades Controles de operación: pantalla retroiluminada, con 3 aplicaciones y varias funciones de pesaje.
1.3 Definición de las señales y símbolos de advertencia Los consejos de seguridad están marcados con palabras y símbolos de advertencia. Estos muestran advertencias y problemas de seguridad. Hacer caso omiso de las indicaciones de seguridad puede llevar a lesiones personales, daños al dispositivo, fallos de funcionamiento y resultados falsos.
ADVERTENCIA Situaciones peligrosas con riesgo medio, que pueden provocar la muerte o lesiones graves si no se evitan.
PRECAUCIÓN Situaciones peligrosas con riesgo bajo, que pueden provocar daños en el dispositivo o a la propiedad, perdida de datos, o lesiones graves si no se evitan.
Atención Información importante sobre el producto. Nota Información útil sobre el producto.
Símbolos de advertencia Peligro general Peligro descarga eléctrica
1.4 Precauciones de seguridad
PRECAUCIÓN: lea todas las advertencias de seguridad antes de instalar, hacer conexiones o realizar el mantenimiento de este equipo. El incumplimiento de las instrucciones podría resultar en lesiones personales y/o daños materiales. Conserve todas las instrucciones para futura referencia.
Compruebe que el rango de voltaje de entrada del adaptador de CA y el tipo de enchufe son compatibles con la red eléctrica de corriente alterna local.
Asegúrese de que el cable de alimentación no represente un posible obstáculo o riesgo de tropezarse.
No coloque la balanza de tal manera que sea difícil llegar a la conexión eléctrica. Utilice la balanza solo en interiores. No utilice la unidad en entornos peligrosos o en lugares
inestables. Opere la unidad solamente bajo las condiciones ambientales especificadas en estas
instrucciones. No deje caer cargas sobre el plato. Utilice la balanza solo en lugares secos. Desconecte el equipo de la fuente de alimentación durante su limpieza. Utilice accesorios y periféricos aprobados. Cualquier reparación y servicio debe ser realizado solo por personal autorizado.
Corriente continuaCorriente alterna
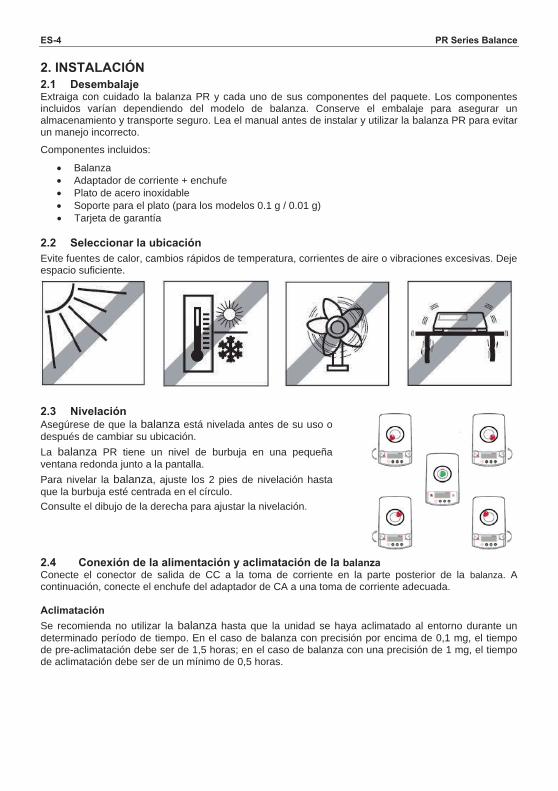
ES-4 PR Series Balance
2. INSTALACIÓN 2.1 Desembalaje Extraiga con cuidado la balanza PR y cada uno de sus componentes del paquete. Los componentes incluidos varían dependiendo del modelo de balanza. Conserve el embalaje para asegurar un almacenamiento y transporte seguro. Lea el manual antes de instalar y utilizar la balanza PR para evitar un manejo incorrecto.
Componentes incluidos:
Balanza Adaptador de corriente + enchufe Plato de acero inoxidable Soporte para el plato (para los modelos 0.1 g / 0.01 g) Tarjeta de garantía
2.2 Seleccionar la ubicación
Evite fuentes de calor, cambios rápidos de temperatura, corrientes de aire o vibraciones excesivas. Deje espacio suficiente.
2.3 Nivelación Asegúrese de que la balanza está nivelada antes de su uso o después de cambiar su ubicación. La balanza PR tiene un nivel de burbuja en una pequeña ventana redonda junto a la pantalla. Para nivelar la balanza, ajuste los 2 pies de nivelación hasta que la burbuja esté centrada en el círculo. Consulte el dibujo de la derecha para ajustar la nivelación. 2.4 Conexión de la alimentación y aclimatación de la balanza Conecte el conector de salida de CC a la toma de corriente en la parte posterior de la balanza. A continuación, conecte el enchufe del adaptador de CA a una toma de corriente adecuada. Aclimatación Se recomienda no utilizar la balanza hasta que la unidad se haya aclimatado al entorno durante un determinado período de tiempo. En el caso de balanza con precisión por encima de 0,1 mg, el tiempo de pre-aclimatación debe ser de 1,5 horas; en el caso de balanza con una precisión de 1 mg, el tiempo de aclimatación debe ser de un mínimo de 0,5 horas.
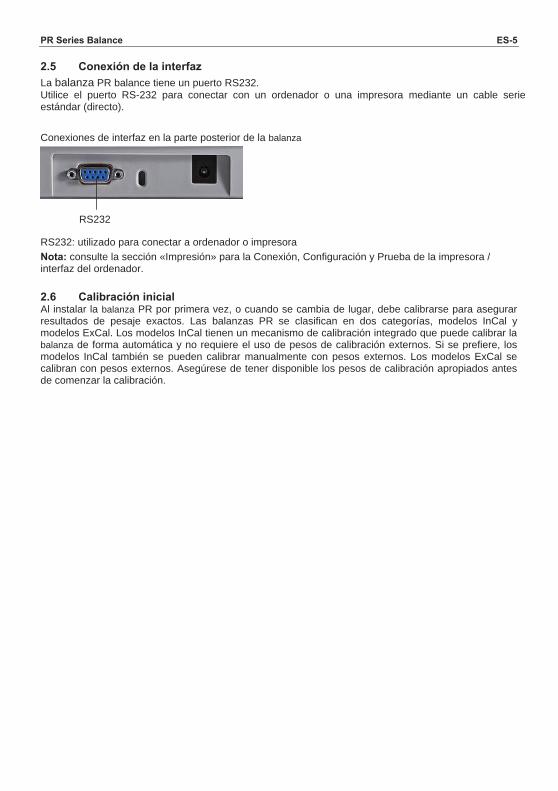
PR Series Balance ES-5
2.5 Conexión de la interfaz
La balanza PR balance tiene un puerto RS232. Utilice el puerto RS-232 para conectar con un ordenador o una impresora mediante un cable serie estándar (directo).
Conexiones de interfaz en la parte posterior de la balanza
RS232: utilizado para conectar a ordenador o impresora Nota: consulte la sección «Impresión» para la Conexión, Configuración y Prueba de la impresora / interfaz del ordenador.
2.6 Calibración inicial Al instalar la balanza PR por primera vez, o cuando se cambia de lugar, debe calibrarse para asegurar resultados de pesaje exactos. Las balanzas PR se clasifican en dos categorías, modelos InCal y modelos ExCal. Los modelos InCal tienen un mecanismo de calibración integrado que puede calibrar la balanza de forma automática y no requiere el uso de pesos de calibración externos. Si se prefiere, los modelos InCal también se pueden calibrar manualmente con pesos externos. Los modelos ExCal se calibran con pesos externos. Asegúrese de tener disponible los pesos de calibración apropiados antes de comenzar la calibración.
RS232
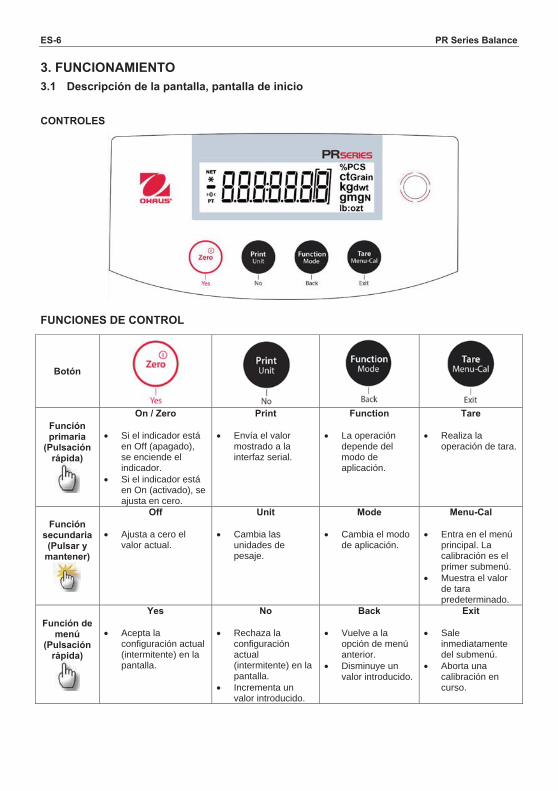
ES-6 PR Series Balance
3. FUNCIONAMIENTO
3.1 Descripción de la pantalla, pantalla de inicio
CONTROLES
FUNCIONES DE CONTROL
Botón
Función primaria
(Pulsación rápida)
On / Zero
Si el indicador está en Off (apagado), se enciende el indicador.
Si el indicador está en On (activado), se ajusta en cero.
Envía el valor mostrado a la interfaz serial.
Function
La operación depende del modo de aplicación.
Tare
Realiza la operación de tara.
Función secundaria (Pulsar y
mantener)
Off
Ajusta a cero el valor actual.
Unit
Cambia las unidades de pesaje.
Mode
Cambia el modo de aplicación.
Menu-Cal
Entra en el menú principal. La calibración es el primer submenú.
Muestra el valor de tara predeterminado.
Función de menú
(Pulsación rápida)
Yes
Acepta la configuración actual (intermitente) en la pantalla.
No
Rechaza la configuración actual (intermitente) en la pantalla.
Incrementa un valor introducido.
Back
Vuelve a la opción de menú anterior.
Disminuye un valor introducido.
Exit Sale
inmediatamente del submenú.
Aborta una calibración en curso.
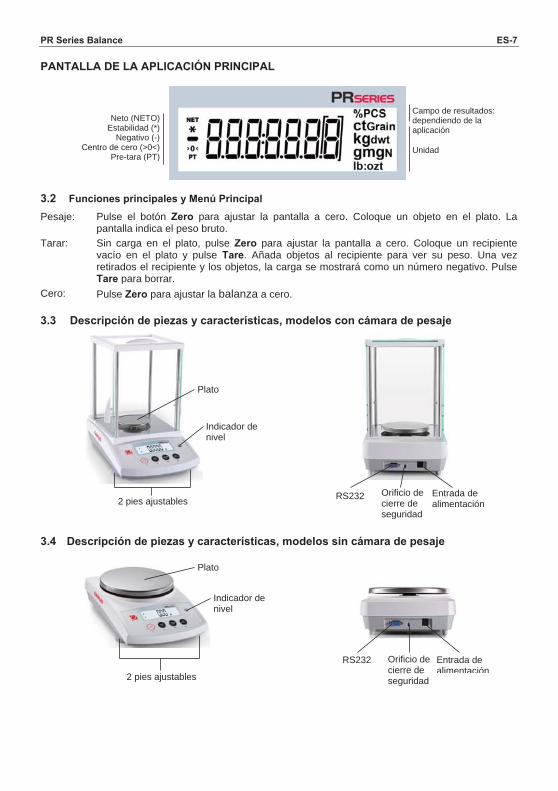
PR Series Balance ES-7
PANTALLA DE LA APLICACIÓN PRINCIPAL
3.2 Funciones principales y Menú Principal
Pesaje: Pulse el botón Zero para ajustar la pantalla a cero. Coloque un objeto en el plato. La pantalla indica el peso bruto.
Tarar: Sin carga en el plato, pulse Zero para ajustar la pantalla a cero. Coloque un recipiente vacío en el plato y pulse Tare. Añada objetos al recipiente para ver su peso. Una vez retirados el recipiente y los objetos, la carga se mostrará como un número negativo. Pulse Tare para borrar.
Cero: Pulse Zero para ajustar la balanza a cero. 3.3 Descripción de piezas y características, modelos con cámara de pesaje
3.4 Descripción de piezas y características, modelos sin cámara de pesaje
Campo de resultados: dependiendo de la aplicación
Neto (NETO) Estabilidad (*)
Negativo (-) Centro de cero (>0<)
Pre-tara (PT) Unidad
Plato
Indicador de nivel
2 pies ajustables RS232 Orificio de cierre de seguridad
Entrada de alimentación
2 pies ajustables
Plato
Indicador de nivel
RS232 Orificio de cierre de seguridad
Entrada de alimentación
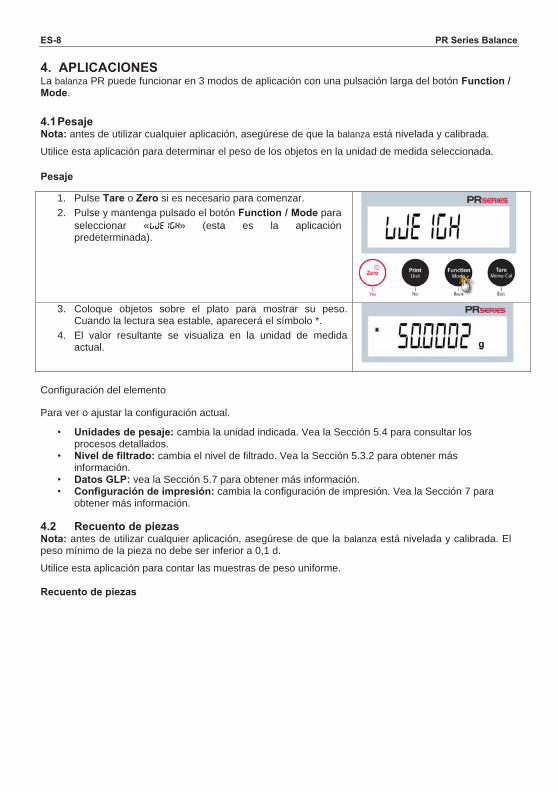
ES-8 PR Series Balance
4. APLICACIONES La balanza PR puede funcionar en 3 modos de aplicación con una pulsación larga del botón Function / Mode. 4.1 Pesaje Nota: antes de utilizar cualquier aplicación, asegúrese de que la balanza está nivelada y calibrada.
Utilice esta aplicación para determinar el peso de los objetos en la unidad de medida seleccionada.
Pesaje
1. Pulse Tare o Zero si es necesario para comenzar. 2. Pulse y mantenga pulsado el botón Function / Mode para
seleccionar «wWEIGH» (esta es la aplicación predeterminada).
3. Coloque objetos sobre el plato para mostrar su peso. Cuando la lectura sea estable, aparecerá el símbolo *.
4. El valor resultante se visualiza en la unidad de medida actual.
Configuración del elemento
Para ver o ajustar la configuración actual.
• Unidades de pesaje: cambia la unidad indicada. Vea la Sección 5.4 para consultar los procesos detallados.
• Nivel de filtrado: cambia el nivel de filtrado. Vea la Sección 5.3.2 para obtener más información.
• Datos GLP: vea la Sección 5.7 para obtener más información. • Configuración de impresión: cambia la configuración de impresión. Vea la Sección 7 para
obtener más información. 4.2 Recuento de piezas Nota: antes de utilizar cualquier aplicación, asegúrese de que la balanza está nivelada y calibrada. El peso mínimo de la pieza no debe ser inferior a 0,1 d.
Utilice esta aplicación para contar las muestras de peso uniforme. Recuento de piezas
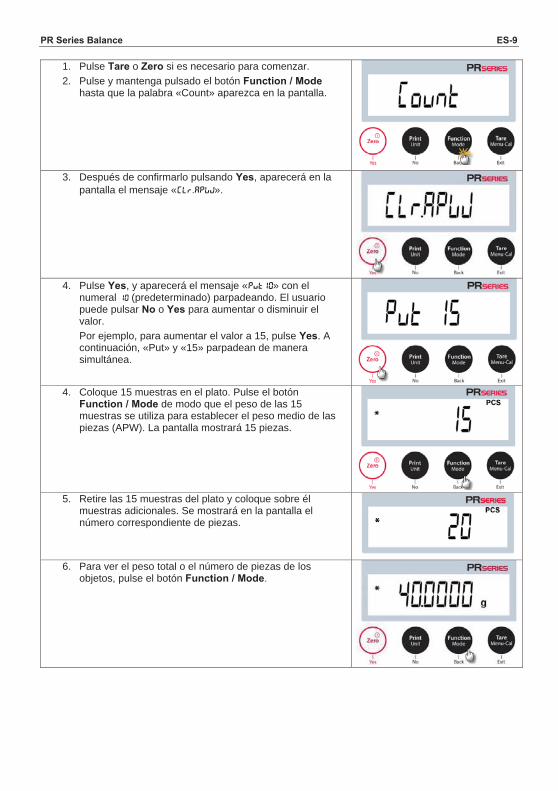
PR Series Balance ES-9
1. Pulse Tare o Zero si es necesario para comenzar. 2. Pulse y mantenga pulsado el botón Function / Mode
hasta que la palabra «Count» aparezca en la pantalla.
3. Después de confirmarlo pulsando Yes, aparecerá en la pantalla el mensaje «Clr.APwj».
4. Pulse Yes, y aparecerá el mensaje «Put10» con el
numeral 10 (predeterminado) parpadeando. El usuario puede pulsar No o Yes para aumentar o disminuir el valor. Por ejemplo, para aumentar el valor a 15, pulse Yes. A continuación, «Put» y «15» parpadean de manera simultánea.
4. Coloque 15 muestras en el plato. Pulse el botón
Function / Mode de modo que el peso de las 15 muestras se utiliza para establecer el peso medio de las piezas (APW). La pantalla mostrará 15 piezas.
5. Retire las 15 muestras del plato y coloque sobre él
muestras adicionales. Se mostrará en la pantalla el número correspondiente de piezas.
6. Para ver el peso total o el número de piezas de los objetos, pulse el botón Function / Mode.
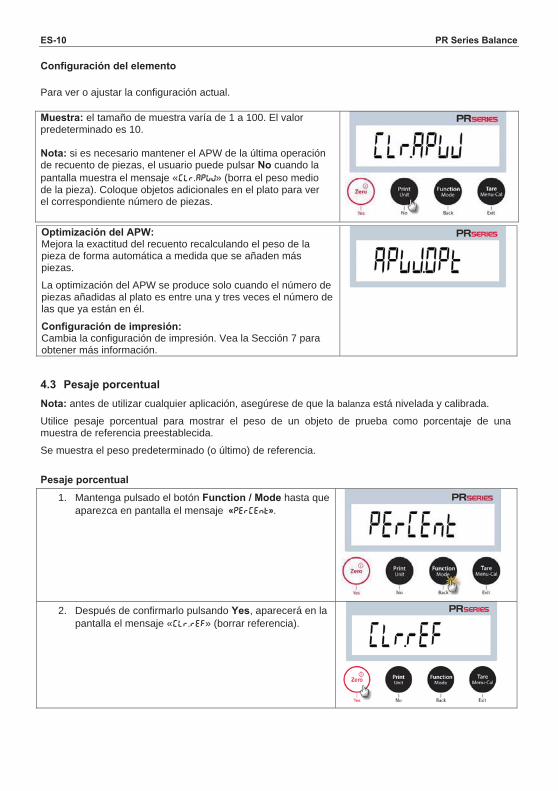
ES-10 PR Series Balance
Configuración del elemento Para ver o ajustar la configuración actual.
Muestra: el tamaño de muestra varía de 1 a 100. El valor predeterminado es 10. Nota: si es necesario mantener el APW de la última operación de recuento de piezas, el usuario puede pulsar No cuando la pantalla muestra el mensaje «Clr.Apwj» (borra el peso medio de la pieza). Coloque objetos adicionales en el plato para ver el correspondiente número de piezas.
Optimización del APW: Mejora la exactitud del recuento recalculando el peso de la pieza de forma automática a medida que se añaden más piezas.
La optimización del APW se produce solo cuando el número de piezas añadidas al plato es entre una y tres veces el número de las que ya están en él.
Configuración de impresión: Cambia la configuración de impresión. Vea la Sección 7 para obtener más información.
4.3 Pesaje porcentual
Nota: antes de utilizar cualquier aplicación, asegúrese de que la balanza está nivelada y calibrada. Utilice pesaje porcentual para mostrar el peso de un objeto de prueba como porcentaje de una muestra de referencia preestablecida.
Se muestra el peso predeterminado (o último) de referencia.
Pesaje porcentual
1. Mantenga pulsado el botón Function / Mode hasta que aparezca en pantalla el mensaje «PerCent».
2. Después de confirmarlo pulsando Yes, aparecerá en la pantalla el mensaje «Clr.ref» (borrar referencia).
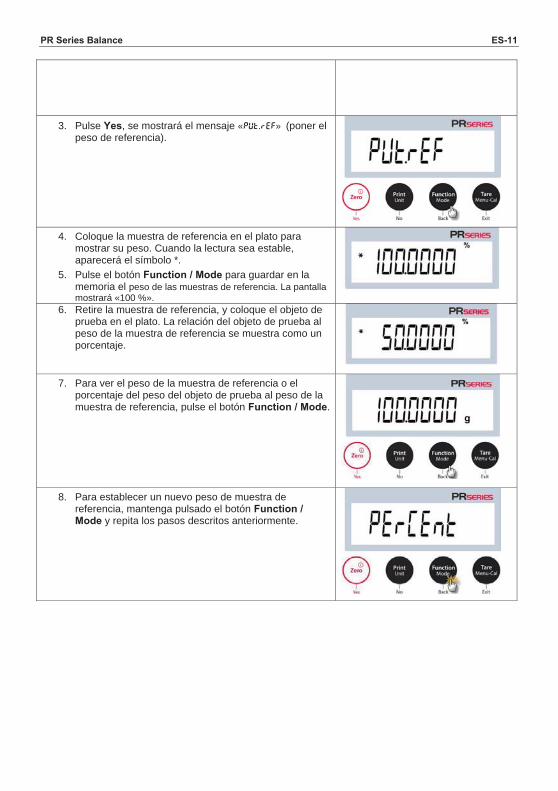
PR Series Balance ES-11
3. Pulse Yes, se mostrará el mensaje «PUt.ref» (poner el peso de referencia).
4. Coloque la muestra de referencia en el plato para mostrar su peso. Cuando la lectura sea estable, aparecerá el símbolo *.
5. Pulse el botón Function / Mode para guardar en la memoria el peso de las muestras de referencia. La pantalla mostrará «100 %».
6. Retire la muestra de referencia, y coloque el objeto de prueba en el plato. La relación del objeto de prueba al peso de la muestra de referencia se muestra como un porcentaje.
7. Para ver el peso de la muestra de referencia o el porcentaje del peso del objeto de prueba al peso de la muestra de referencia, pulse el botón Function / Mode.
8. Para establecer un nuevo peso de muestra de referencia, mantenga pulsado el botón Function / Mode y repita los pasos descritos anteriormente.
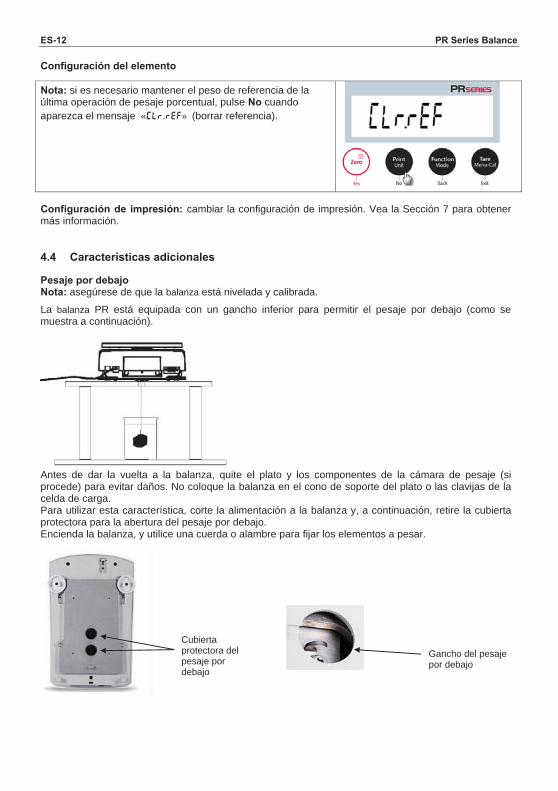
ES-12 PR Series Balance
Configuración del elemento
Nota: si es necesario mantener el peso de referencia de la última operación de pesaje porcentual, pulse No cuando aparezca el mensaje «Clr.ref» (borrar referencia).
Configuración de impresión: cambiar la configuración de impresión. Vea la Sección 7 para obtener más información. 4.4 Características adicionales Pesaje por debajo Nota: asegúrese de que la balanza está nivelada y calibrada.
La balanza PR está equipada con un gancho inferior para permitir el pesaje por debajo (como se muestra a continuación).
Antes de dar la vuelta a la balanza, quite el plato y los componentes de la cámara de pesaje (si procede) para evitar daños. No coloque la balanza en el cono de soporte del plato o las clavijas de la celda de carga. Para utilizar esta característica, corte la alimentación a la balanza y, a continuación, retire la cubierta protectora para la abertura del pesaje por debajo. Encienda la balanza, y utilice una cuerda o alambre para fijar los elementos a pesar.
Cubierta protectora del pesaje por debajo
Gancho del pesaje por debajo
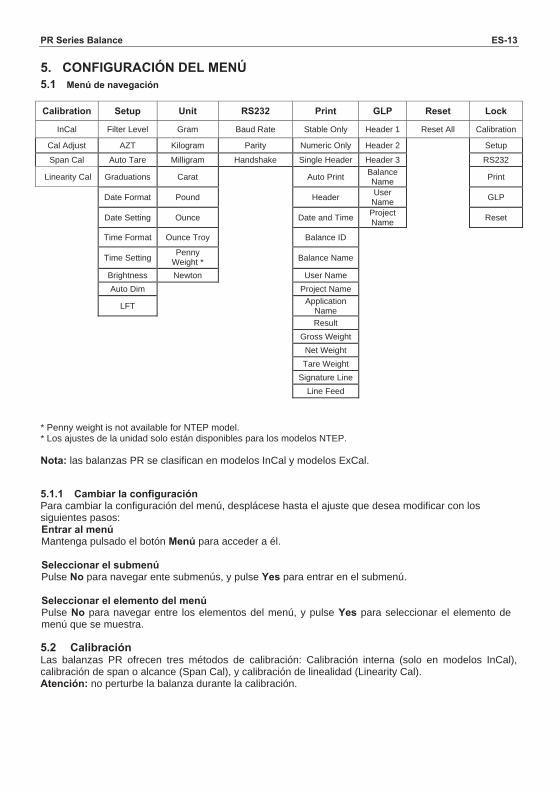
PR Series Balance ES-13
5. CONFIGURACIÓN DEL MENÚ 5.1 Menú de navegación
Calibration Setup Unit RS232 Print GLP Reset Lock
InCal Filter Level Gram Baud Rate Stable Only Header 1 Reset All Calibration
Cal Adjust AZT Kilogram Parity Numeric Only Header 2 Setup
Span Cal Auto Tare Milligram Handshake Single Header Header 3 RS232
Linearity Cal Graduations Carat Auto Print Balance Name Print
Date Format Pound Header User Name GLP
Date Setting Ounce Date and Time Project Name Reset
Time Format Ounce Troy Balance ID
Time Setting Penny Weight * Balance Name
Brightness Newton User Name Auto Dim Project Name
LFT Application
Name
Result Gross Weight Net Weight
Tare Weight
Signature Line
Line Feed
* Penny weight is not available for NTEP model. * Los ajustes de la unidad solo están disponibles para los modelos NTEP. Nota: las balanzas PR se clasifican en modelos InCal y modelos ExCal. 5.1.1 Cambiar la configuración Para cambiar la configuración del menú, desplácese hasta el ajuste que desea modificar con los siguientes pasos: Entrar al menú Mantenga pulsado el botón Menú para acceder a él. Seleccionar el submenú Pulse No para navegar ente submenús, y pulse Yes para entrar en el submenú. Seleccionar el elemento del menú Pulse No para navegar entre los elementos del menú, y pulse Yes para seleccionar el elemento de menú que se muestra. 5.2 Calibración Las balanzas PR ofrecen tres métodos de calibración: Calibración interna (solo en modelos InCal), calibración de span o alcance (Span Cal), y calibración de linealidad (Linearity Cal). Atención: no perturbe la balanza durante la calibración.
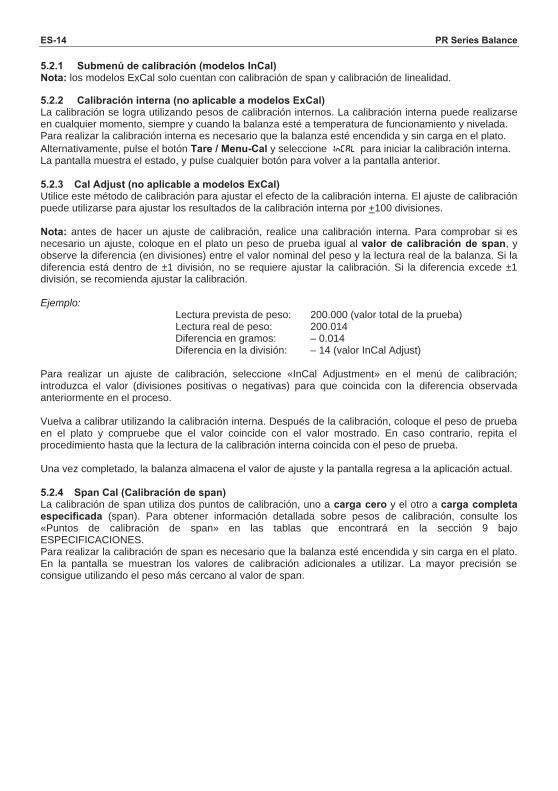
ES-14 PR Series Balance
5.2.1 Submenú de calibración (modelos InCal) Nota: los modelos ExCal solo cuentan con calibración de span y calibración de linealidad. 5.2.2 Calibración interna (no aplicable a modelos ExCal) La calibración se logra utilizando pesos de calibración internos. La calibración interna puede realizarse en cualquier momento, siempre y cuando la balanza esté a temperatura de funcionamiento y nivelada. Para realizar la calibración interna es necesario que la balanza esté encendida y sin carga en el plato. Alternativamente, pulse el botón Tare / Menu-Cal y seleccione InCal para iniciar la calibración interna. La pantalla muestra el estado, y pulse cualquier botón para volver a la pantalla anterior. 5.2.3 Cal Adjust (no aplicable a modelos ExCal) Utilice este método de calibración para ajustar el efecto de la calibración interna. El ajuste de calibración puede utilizarse para ajustar los resultados de la calibración interna por +100 divisiones.
Nota: antes de hacer un ajuste de calibración, realice una calibración interna. Para comprobar si es necesario un ajuste, coloque en el plato un peso de prueba igual al valor de calibración de span, y observe la diferencia (en divisiones) entre el valor nominal del peso y la lectura real de la balanza. Si la diferencia está dentro de ±1 división, no se requiere ajustar la calibración. Si la diferencia excede ±1 división, se recomienda ajustar la calibración. Ejemplo:
Lectura prevista de peso: 200.000 (valor total de la prueba) Lectura real de peso: 200.014 Diferencia en gramos: – 0.014 Diferencia en la división: – 14 (valor InCal Adjust)
Para realizar un ajuste de calibración, seleccione «InCal Adjustment» en el menú de calibración; introduzca el valor (divisiones positivas o negativas) para que coincida con la diferencia observada anteriormente en el proceso. Vuelva a calibrar utilizando la calibración interna. Después de la calibración, coloque el peso de prueba en el plato y compruebe que el valor coincide con el valor mostrado. En caso contrario, repita el procedimiento hasta que la lectura de la calibración interna coincida con el peso de prueba. Una vez completado, la balanza almacena el valor de ajuste y la pantalla regresa a la aplicación actual. 5.2.4 Span Cal (Calibración de span) La calibración de span utiliza dos puntos de calibración, uno a carga cero y el otro a carga completa especificada (span). Para obtener información detallada sobre pesos de calibración, consulte los «Puntos de calibración de span» en las tablas que encontrará en la sección 9 bajo ESPECIFICACIONES. Para realizar la calibración de span es necesario que la balanza esté encendida y sin carga en el plato. En la pantalla se muestran los valores de calibración adicionales a utilizar. La mayor precisión se consigue utilizando el peso más cercano al valor de span.

PR Series Balance ES-15
Pasos para la calibración de span 1. Mantenga pulsado el botón Tare / Menu-Cal para
mostrar el menú de calibración.
2. Pulse Yes para entrar en el menú de calibración.
3. Para cambiar el modo de calibración, pulse No hasta que aparezca «SpaN» (calibración de span) en la pantalla.
4. El valor de los pesos de calibración aparecerá en la pantalla. Cuando la pantalla muestre 200.0000 g, coloque pesos de 200 g en el plato. Para cambiar el punto de calibración a la mitad de la capacidad (es decir, 100 g), pulse el botón Function / Mode. Cuando la pantalla muestra «Place weights» y «100.000 g», coloque en el plato el peso o pesos hasta llegar a 100 g para realizar la calibración.
5. Una vez que la calibración de span se ha completado con éxito, la pantalla mostrará «CAL.Done». Pulse cualquier botón para volver a la pantalla anterior.
6. Retire el peso, y la lectura se pondrá a cero.
5.2.5 Linearity Cal (Calibración de linealidad) La calibración de linealidad utiliza tres puntos de calibración, uno a carga cero y los otros a carga especificada. Sin carga en el plato, pulse Linearity Calibration (calibración de linealidad) para iniciar el proceso. La balanza captura el punto cero y le solicitará el siguiente peso.
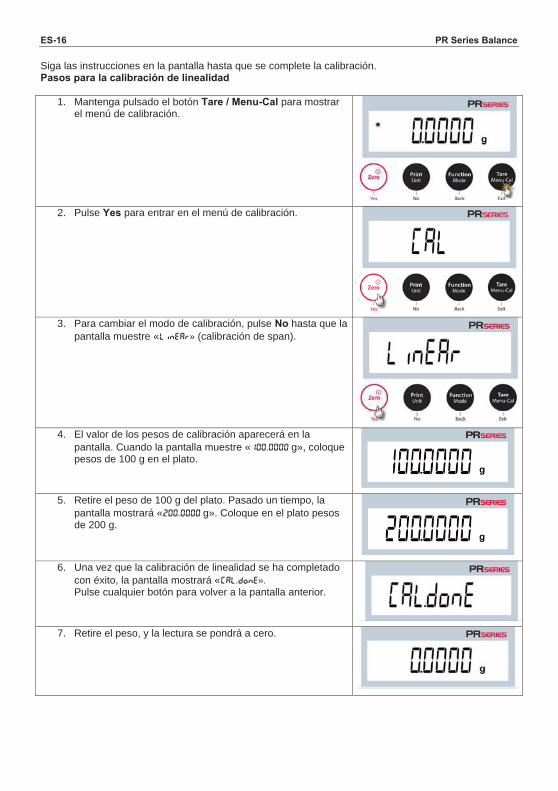
ES-16 PR Series Balance
Siga las instrucciones en la pantalla hasta que se complete la calibración. Pasos para la calibración de linealidad
1. Mantenga pulsado el botón Tare / Menu-Cal para mostrar el menú de calibración.
2. Pulse Yes para entrar en el menú de calibración.
3. Para cambiar el modo de calibración, pulse No hasta que la pantalla muestre «LineRr» (calibración de span).
4. El valor de los pesos de calibración aparecerá en la pantalla. Cuando la pantalla muestre «100.0000 g», coloque pesos de 100 g en el plato.
5. Retire el peso de 100 g del plato. Pasado un tiempo, la pantalla mostrará «200.0000 g». Coloque en el plato pesos de 200 g.
6. Una vez que la calibración de linealidad se ha completado con éxito, la pantalla mostrará «CAL.Done». Pulse cualquier botón para volver a la pantalla anterior.
7. Retire el peso, y la lectura se pondrá a cero.
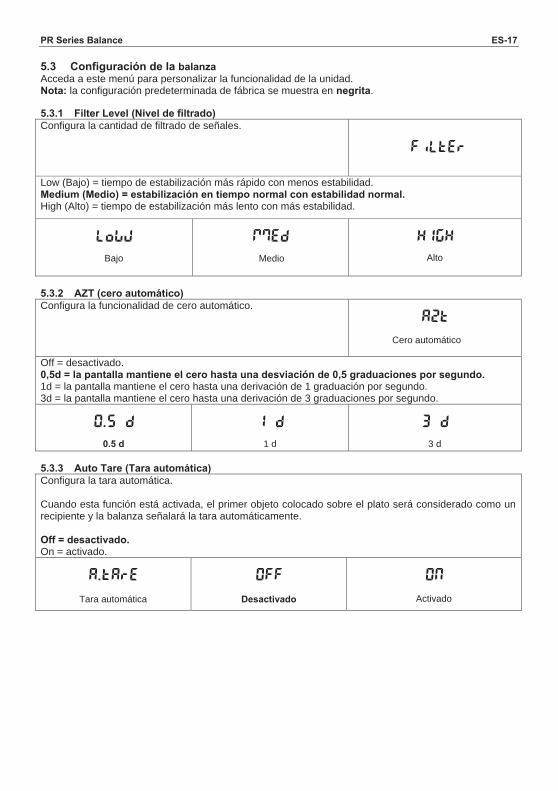
PR Series Balance ES-17
5.3 Configuración de la balanza Acceda a este menú para personalizar la funcionalidad de la unidad. Nota: la configuración predeterminada de fábrica se muestra en negrita. 5.3.1 Filter Level (Nivel de filtrado) Configura la cantidad de filtrado de señales.
Low (Bajo) = tiempo de estabilización más rápido con menos estabilidad. Medium (Medio) = estabilización en tiempo normal con estabilidad normal. High (Alto) = tiempo de estabilización más lento con más estabilidad.
Bajo Medio
Alto
5.3.2 AZT (cero automático) Configura la funcionalidad de cero automático.
Cero automático
Off = desactivado. 0,5d = la pantalla mantiene el cero hasta una desviación de 0,5 graduaciones por segundo. 1d = la pantalla mantiene el cero hasta una derivación de 1 graduación por segundo. 3d = la pantalla mantiene el cero hasta una derivación de 3 graduaciones por segundo.
0.5 d 1 d 3 d 5.3.3 Auto Tare (Tara automática) Configura la tara automática. Cuando esta función está activada, el primer objeto colocado sobre el plato será considerado como un recipiente y la balanza señalará la tara automáticamente. Off = desactivado. On = activado.
Tara automática Desactivado Activado
HIGH mMed LowW
ON OFF A.tArE
AZt
3 d 1 d 0.5 d
FiltEr
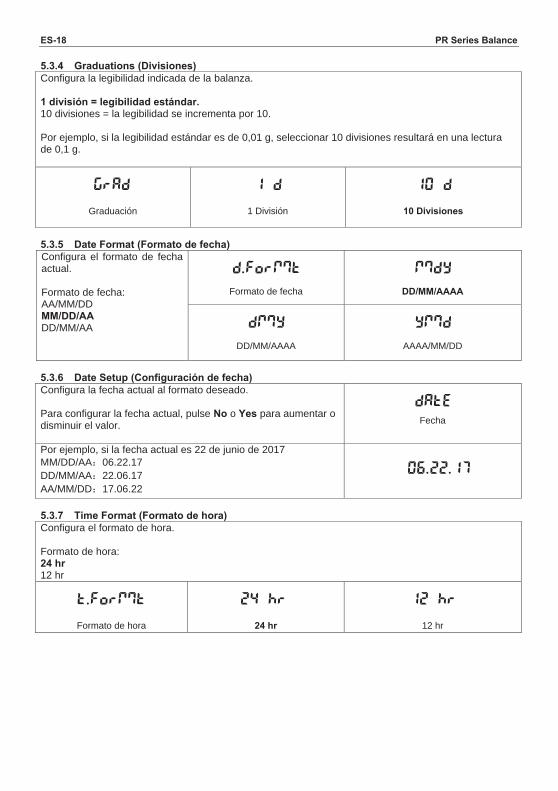
ES-18 PR Series Balance
5.3.4 Graduations (Divisiones) Configura la legibilidad indicada de la balanza. 1 división = legibilidad estándar. 10 divisiones = la legibilidad se incrementa por 10. Por ejemplo, si la legibilidad estándar es de 0,01 g, seleccionar 10 divisiones resultará en una lectura de 0,1 g.
Graduación 1 División 10 Divisiones
5.3.5 Date Format (Formato de fecha) Configura el formato de fecha actual. Formato de fecha: AA/MM/DD MM/DD/AA DD/MM/AA
Formato de fecha
DD/MM/AAAA
DD/MM/AAAA
AAAA/MM/DD
5.3.6 Date Setup (Configuración de fecha) Configura la fecha actual al formato deseado. Para configurar la fecha actual, pulse No o Yes para aumentar o disminuir el valor.
Fecha
Por ejemplo, si la fecha actual es 22 de junio de 2017 MM/DD/AA 06.22.17 DD/MM/AA 22.06.17 AA/MM/DD 17.06.22 5.3.7 Time Format (Formato de hora) Configura el formato de hora. Formato de hora: 24 hr 12 hr
Formato de hora
24 hr 12 hr
24 hr t.FormMt
ymMd dmMy
mMdy d.FormMt
GrAd 1 d
dAtE
06.22.17
12 hr
10 d
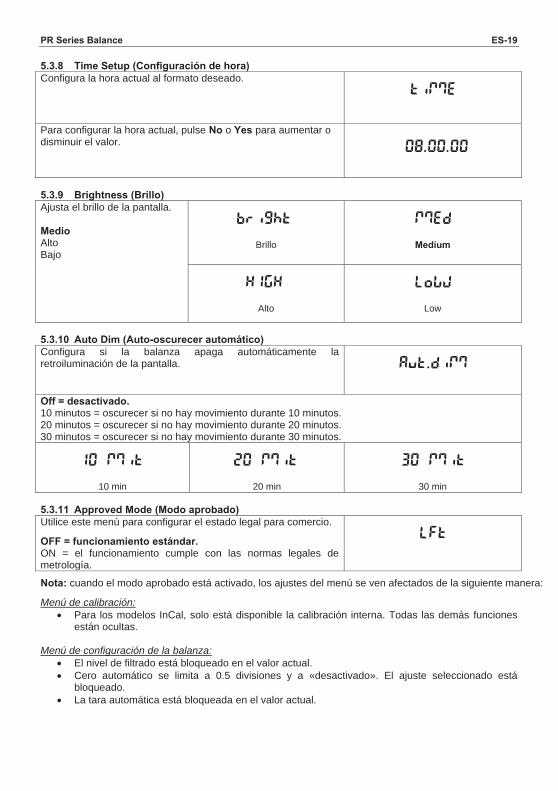
PR Series Balance ES-19
5.3.8 Time Setup (Configuración de hora) Configura la hora actual al formato deseado.
Para configurar la hora actual, pulse No o Yes para aumentar o disminuir el valor.
5.3.9 Brightness (Brillo) Ajusta el brillo de la pantalla.
Medio Alto Bajo
Brillo Medium
Alto Low
5.3.10 Auto Dim (Auto-oscurecer automático) Configura si la balanza apaga automáticamente la retroiluminación de la pantalla.
Off = desactivado. 10 minutos = oscurecer si no hay movimiento durante 10 minutos. 20 minutos = oscurecer si no hay movimiento durante 20 minutos. 30 minutos = oscurecer si no hay movimiento durante 30 minutos.
10 min
20 min 30 min
5.3.11 Approved Mode (Modo aprobado) Utilice este menú para configurar el estado legal para comercio.
OFF = funcionamiento estándar. ON = el funcionamiento cumple con las normas legales de metrología.
Nota: cuando el modo aprobado está activado, los ajustes del menú se ven afectados de la siguiente manera:
Menú de calibración: Para los modelos InCal, solo está disponible la calibración interna. Todas las demás funciones
están ocultas. Menú de configuración de la balanza:
El nivel de filtrado está bloqueado en el valor actual. Cero automático se limita a 0.5 divisiones y a «desactivado». El ajuste seleccionado está
bloqueado. La tara automática está bloqueada en el valor actual.
LFt
20 mMit 10 mMit
HIGH
bright
30 mMit
Aut.dimM
mMEd
LowW
08.00.00
timME
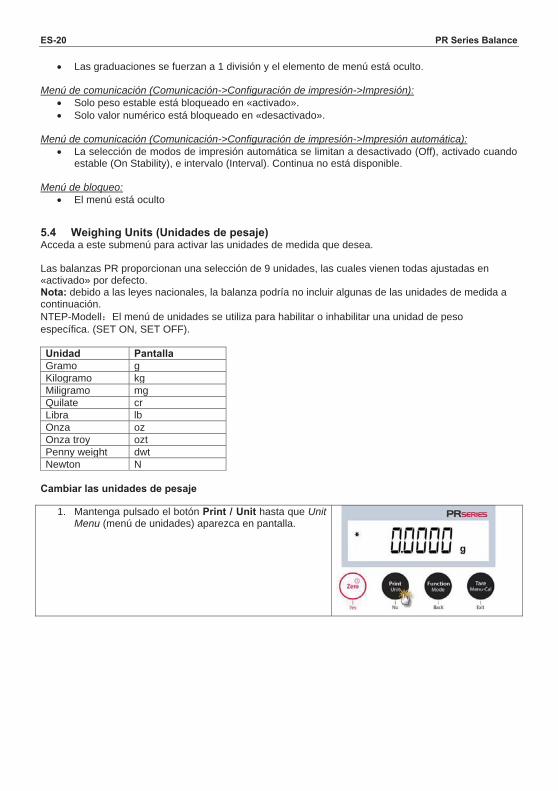
ES-20 PR Series Balance
Las graduaciones se fuerzan a 1 división y el elemento de menú está oculto. Menú de comunicación (Comunicación->Configuración de impresión->Impresión):
Solo peso estable está bloqueado en «activado». Solo valor numérico está bloqueado en «desactivado».
Menú de comunicación (Comunicación->Configuración de impresión->Impresión automática):
La selección de modos de impresión automática se limitan a desactivado (Off), activado cuando estable (On Stability), e intervalo (Interval). Continua no está disponible.
Menú de bloqueo:
El menú está oculto
5.4 Weighing Units (Unidades de pesaje) Acceda a este submenú para activar las unidades de medida que desea. Las balanzas PR proporcionan una selección de 9 unidades, las cuales vienen todas ajustadas en «activado» por defecto. Nota: debido a las leyes nacionales, la balanza podría no incluir algunas de las unidades de medida a continuación. NTEP-Modell El menú de unidades se utiliza para habilitar o inhabilitar una unidad de peso específica. (SET ON, SET OFF). Unidad Pantalla Gramo g Kilogramo kg Miligramo mg Quilate cr Libra lb Onza oz Onza troy ozt Penny weight dwt Newton N
Cambiar las unidades de pesaje
1. Mantenga pulsado el botón Print / Unit hasta que Unit Menu (menú de unidades) aparezca en pantalla.
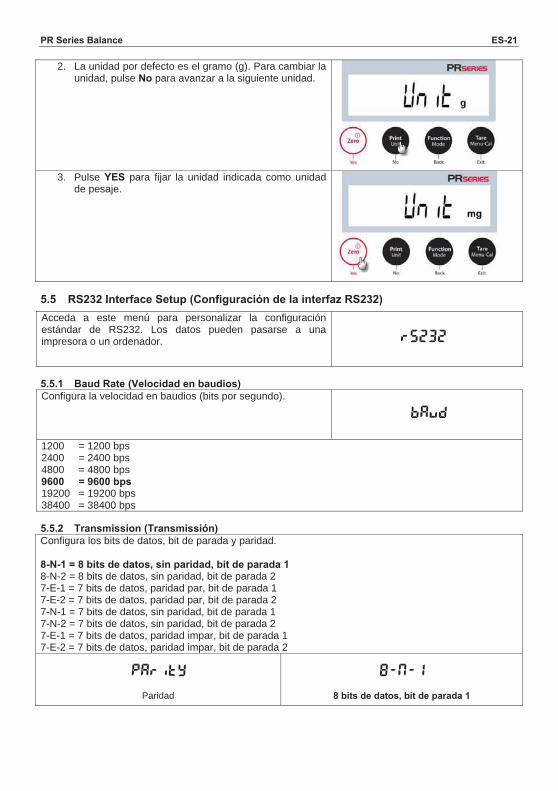
PR Series Balance ES-21
2. La unidad por defecto es el gramo (g). Para cambiar la unidad, pulse No para avanzar a la siguiente unidad.
3. Pulse YES para fijar la unidad indicada como unidad de pesaje.
5.5 RS232 Interface Setup (Configuración de la interfaz RS232) Acceda a este menú para personalizar la configuración estándar de RS232. Los datos pueden pasarse a una impresora o un ordenador. 5.5.1 Baud Rate (Velocidad en baudios) Configura la velocidad en baudios (bits por segundo).
1200 = 1200 bps 2400 = 2400 bps 4800 = 4800 bps 9600 = 9600 bps 19200 = 19200 bps 38400 = 38400 bps 5.5.2 Transmission (Transmissión) Configura los bits de datos, bit de parada y paridad. 8-N-1 = 8 bits de datos, sin paridad, bit de parada 1 8-N-2 = 8 bits de datos, sin paridad, bit de parada 2 7-E-1 = 7 bits de datos, paridad par, bit de parada 1 7-E-2 = 7 bits de datos, paridad par, bit de parada 2 7-N-1 = 7 bits de datos, sin paridad, bit de parada 1 7-N-2 = 7 bits de datos, sin paridad, bit de parada 2 7-E-1 = 7 bits de datos, paridad impar, bit de parada 1 7-E-2 = 7 bits de datos, paridad impar, bit de parada 2
Paridad
8 bits de datos, bit de parada 1
rS232
Parity 8-N-1
bAud
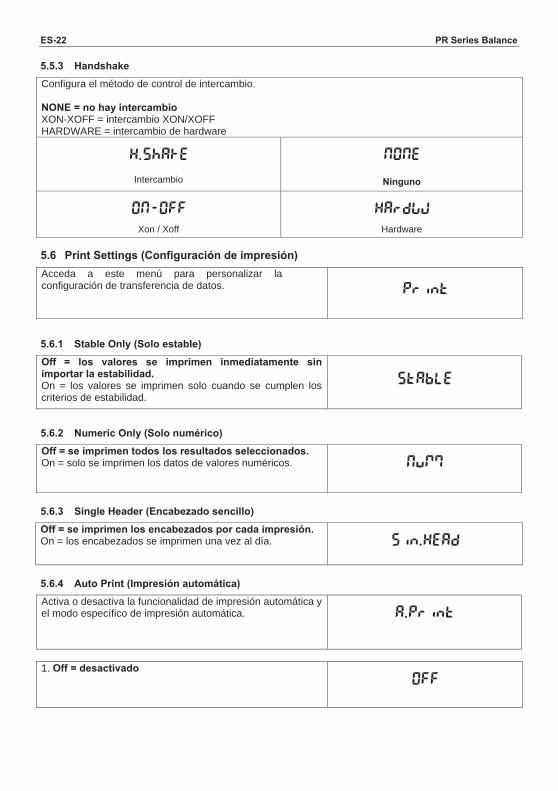
ES-22 PR Series Balance
5.5.3 Handshake Configura el método de control de intercambio. NONE = no hay intercambio XON-XOFF = intercambio XON/XOFF HARDWARE = intercambio de hardware
Intercambio
Ninguno
Xon / Xoff Hardware 5.6 Print Settings (Configuración de impresión) Acceda a este menú para personalizar la configuración de transferencia de datos.
5.6.1 Stable Only (Solo estable)Off = los valores se imprimen inmediatamente sin importar la estabilidad. On = los valores se imprimen solo cuando se cumplen los criterios de estabilidad.
5.6.2 Numeric Only (Solo numérico)Off = se imprimen todos los resultados seleccionados. On = solo se imprimen los datos de valores numéricos.
5.6.3 Single Header (Encabezado sencillo) Off = se imprimen los encabezados por cada impresión. On = los encabezados se imprimen una vez al día.
5.6.4 Auto Print (Impresión automática) Activa o desactiva la funcionalidad de impresión automática y el modo específico de impresión automática.
1. Off = desactivado
H.ShAkE
HRrdwW
NONE
Stable
NumM
A.Print
OFF
Sin.Head
ON-OFF
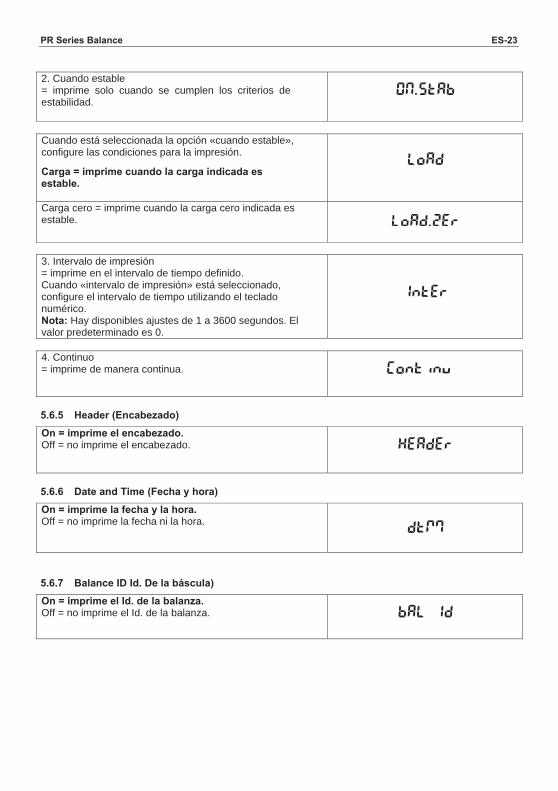
PR Series Balance ES-23
2. Cuando estable = imprime solo cuando se cumplen los criterios de estabilidad.
Cuando está seleccionada la opción «cuando estable», configure las condiciones para la impresión.
Carga = imprime cuando la carga indicada es estable.
Carga cero = imprime cuando la carga cero indicada es estable.
3. Intervalo de impresión = imprime en el intervalo de tiempo definido. Cuando «intervalo de impresión» está seleccionado, configure el intervalo de tiempo utilizando el teclado numérico. Nota: Hay disponibles ajustes de 1 a 3600 segundos. El valor predeterminado es 0.
4. Continuo = imprime de manera continua.
5.6.5 Header (Encabezado) On = imprime el encabezado. Off = no imprime el encabezado.
5.6.6 Date and Time (Fecha y hora)On = imprime la fecha y la hora. Off = no imprime la fecha ni la hora.
5.6.7 Balance ID Id. De la báscula) On = imprime el Id. de la balanza. Off = no imprime el Id. de la balanza.
ON.Stab
Load
Load.zer
Inter
Continu
Header
dtmM
Bal Id
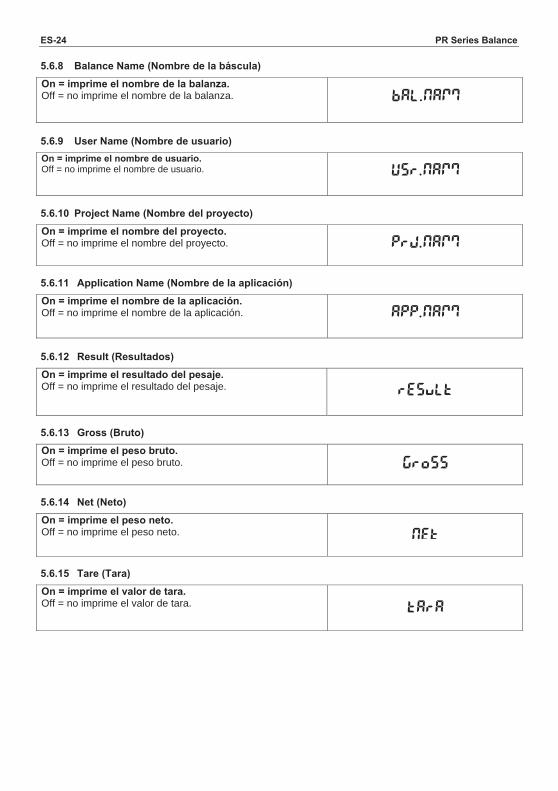
ES-24 PR Series Balance
5.6.8 Balance Name (Nombre de la báscula) On = imprime el nombre de la balanza. Off = no imprime el nombre de la balanza.
5.6.9 User Name (Nombre de usuario) On = imprime el nombre de usuario. Off = no imprime el nombre de usuario.
5.6.10 Project Name (Nombre del proyecto) On = imprime el nombre del proyecto. Off = no imprime el nombre del proyecto.
5.6.11 Application Name (Nombre de la aplicación) On = imprime el nombre de la aplicación. Off = no imprime el nombre de la aplicación.
5.6.12 Result (Resultados) On = imprime el resultado del pesaje. Off = no imprime el resultado del pesaje.
5.6.13 Gross (Bruto) On = imprime el peso bruto. Off = no imprime el peso bruto.
5.6.14 Net (Neto) On = imprime el peso neto. Off = no imprime el peso neto.
5.6.15 Tare (Tara) On = imprime el valor de tara. Off = no imprime el valor de tara.
Usr.NamM
Prj.NamM
GrosS
Bal.NamM
result
App.NamM
Net
tara

PR Series Balance ES-25
5.6.16 Signature Line (Línea de firma) On = se imprime la línea de firma. Off = la línea de firma no se imprime.
5.6.17 Line Feed (Avance de línea) 1 línea = mueve el papel una línea hacia arriba después de la impresión. 4 líneas = mueve el papel cuatro líneas hacia arriba después de la impresión.
1 Line 4 Lines
5.7 GLP Acceda a este menú para establecer las buenas prácticas de laboratorio (GLP). 5.7.1 Header (Encabezado) Permite la impresión de los encabezados. Hay 3 encabezados disponibles. Hay disponibles ajustes alfanuméricos de hasta 16 caracteres para cada configuración de encabezado.
Encabezado 1
Encabezado 2 Encabezado 3 5.7.2 Balance Name (Nombre de la balanza) Configura el nombre de la balanza. Hay disponibles ajustes alfanuméricos de hasta 16 caracteres para cada configuración de encabezado.
Bal.NamM
5.7.3 User Name (Nombre de usuario) Configura el nombre de usuario. Hay disponibles ajustes alfanuméricos de hasta 16 caracteres para cada configuración de encabezado.
Usr.NamM
5.7.4 Project Name (Nombre del proyecto) Configura el nombre del proyecto. Hay disponibles ajustes alfanuméricos de hasta 16 caracteres para cada configuración de encabezado. El valor predeterminado está en blanco.
Feed
4 Líneas 1 Línea
GLP
Header1
Prj.NamM
Header3 Header2
SIGN.LIN
ES-26 PR Series Balance
5.8 Factory reset (Restablecer a fábrica) Utilice este menú para restablecer todas las configuraciones de menú a sus parámetros por defecto.
Reset all = restablece todos los menús a sus ajustes predeterminados. Exit = regresa a la pantalla principal de la aplicación sin restablecer ningún menú.
5.9 Lockout (Bloqueo) Utilice este submenú para bloquear / desbloquear determinados menús. Off = el menú está desbloqueado. On = el menú está bloqueado.
reset
LOCK
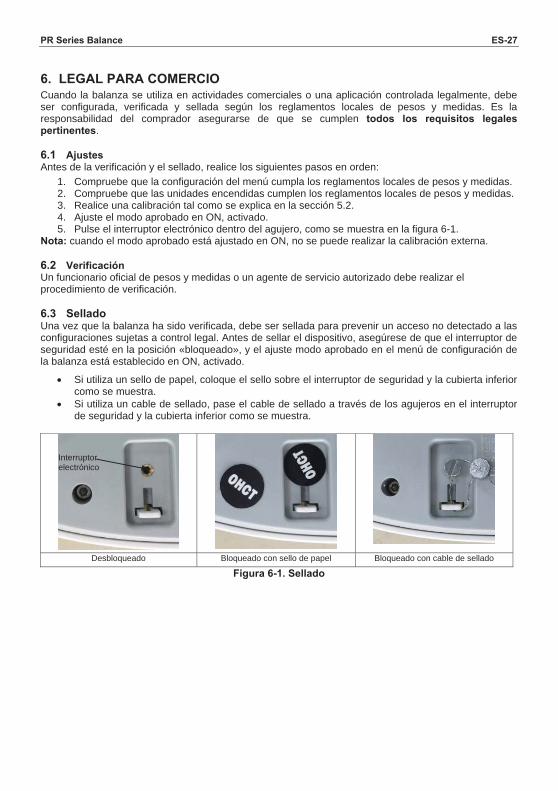
PR Series Balance ES-27
6. LEGAL PARA COMERCIO Cuando la balanza se utiliza en actividades comerciales o una aplicación controlada legalmente, debe ser configurada, verificada y sellada según los reglamentos locales de pesos y medidas. Es la responsabilidad del comprador asegurarse de que se cumplen todos los requisitos legales pertinentes. 6.1 Ajustes Antes de la verificación y el sellado, realice los siguientes pasos en orden:
1. Compruebe que la configuración del menú cumpla los reglamentos locales de pesos y medidas. 2. Compruebe que las unidades encendidas cumplen los reglamentos locales de pesos y medidas. 3. Realice una calibración tal como se explica en la sección 5.2. 4. Ajuste el modo aprobado en ON, activado. 5. Pulse el interruptor electrónico dentro del agujero, como se muestra en la figura 6-1.
Nota: cuando el modo aprobado está ajustado en ON, no se puede realizar la calibración externa. 6.2 Verificación Un funcionario oficial de pesos y medidas o un agente de servicio autorizado debe realizar el procedimiento de verificación. 6.3 Sellado Una vez que la balanza ha sido verificada, debe ser sellada para prevenir un acceso no detectado a las configuraciones sujetas a control legal. Antes de sellar el dispositivo, asegúrese de que el interruptor de seguridad esté en la posición «bloqueado», y el ajuste modo aprobado en el menú de configuración de la balanza está establecido en ON, activado.
Si utiliza un sello de papel, coloque el sello sobre el interruptor de seguridad y la cubierta inferior como se muestra.
Si utiliza un cable de sellado, pase el cable de sellado a través de los agujeros en el interruptor de seguridad y la cubierta inferior como se muestra.
Desbloqueado Bloqueado con sello de papel Bloqueado con cable de sellado
Figura 6-1. Sellado
Interruptor electrónico
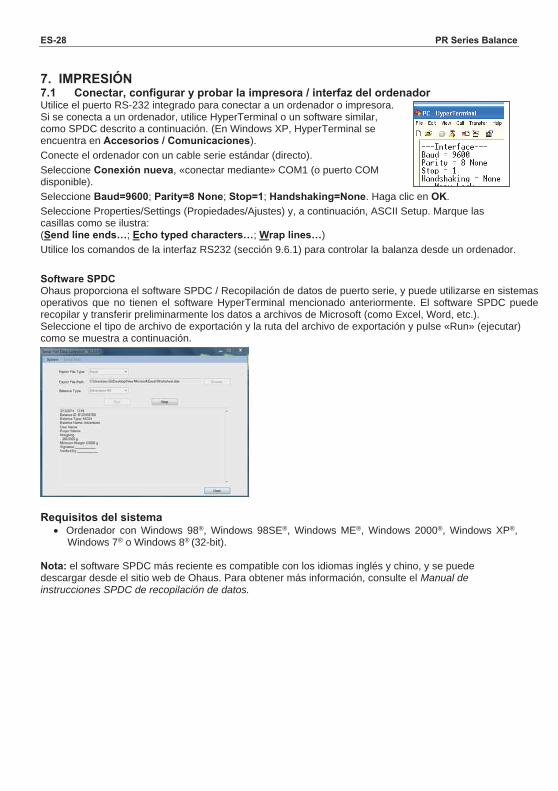
ES-28 PR Series Balance
7. IMPRESIÓN 7.1 Conectar, configurar y probar la impresora / interfaz del ordenador Utilice el puerto RS-232 integrado para conectar a un ordenador o impresora. Si se conecta a un ordenador, utilice HyperTerminal o un software similar, como SPDC descrito a continuación. (En Windows XP, HyperTerminal se encuentra en Accesorios / Comunicaciones). Conecte el ordenador con un cable serie estándar (directo). Seleccione Conexión nueva, «conectar mediante» COM1 (o puerto COM disponible). Seleccione Baud=9600; Parity=8 None; Stop=1; Handshaking=None. Haga clic en OK. Seleccione Properties/Settings (Propiedades/Ajustes) y, a continuación, ASCII Setup. Marque las casillas como se ilustra: (Send line ends…; Echo typed characters…; Wrap lines…) Utilice los comandos de la interfaz RS232 (sección 9.6.1) para controlar la balanza desde un ordenador. Software SPDC Ohaus proporciona el software SPDC / Recopilación de datos de puerto serie, y puede utilizarse en sistemas operativos que no tienen el software HyperTerminal mencionado anteriormente. El software SPDC puede recopilar y transferir preliminarmente los datos a archivos de Microsoft (como Excel, Word, etc.). Seleccione el tipo de archivo de exportación y la ruta del archivo de exportación y pulse «Run» (ejecutar) como se muestra a continuación.
Requisitos del sistema Ordenador con Windows 98®, Windows 98SE®, Windows ME®, Windows 2000®, Windows XP®,
Windows 7® o Windows 8® (32-bit). Nota: el software SPDC más reciente es compatible con los idiomas inglés y chino, y se puede descargar desde el sitio web de Ohaus. Para obtener más información, consulte el Manual de instrucciones SPDC de recopilación de datos.
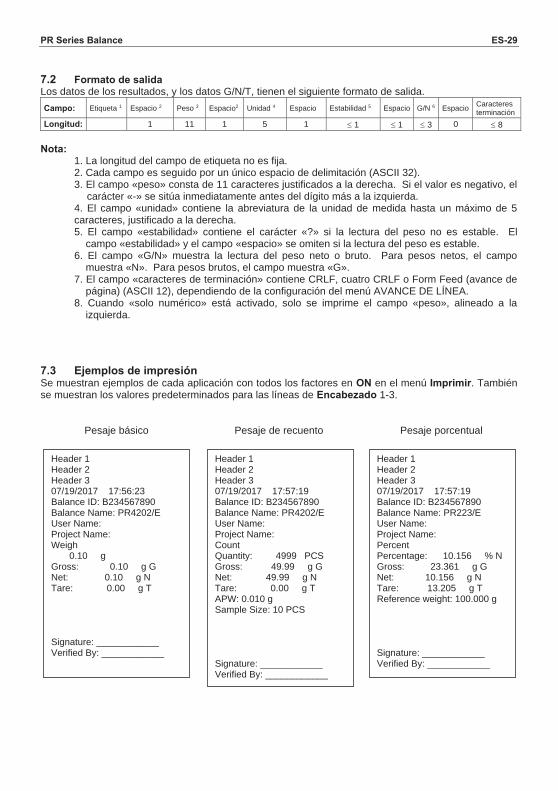
PR Series Balance ES-29
7.2 Formato de salida Los datos de los resultados, y los datos G/N/T, tienen el siguiente formato de salida. Campo: Etiqueta 1 Espacio 2 Peso 3 Espacio2 Unidad 4 Espacio Estabilidad 5 Espacio G/N 6 Espacio Caracteres
terminación Longitud: 1 11 1 5 1 1 1 3 0 8
Nota:
1. La longitud del campo de etiqueta no es fija. 2. Cada campo es seguido por un único espacio de delimitación (ASCII 32). 3. El campo «peso» consta de 11 caracteres justificados a la derecha. Si el valor es negativo, el
carácter «-» se sitúa inmediatamente antes del dígito más a la izquierda. 4. El campo «unidad» contiene la abreviatura de la unidad de medida hasta un máximo de 5 caracteres, justificado a la derecha. 5. El campo «estabilidad» contiene el carácter «?» si la lectura del peso no es estable. El
campo «estabilidad» y el campo «espacio» se omiten si la lectura del peso es estable. 6. El campo «G/N» muestra la lectura del peso neto o bruto. Para pesos netos, el campo
muestra «N». Para pesos brutos, el campo muestra «G». 7. El campo «caracteres de terminación» contiene CRLF, cuatro CRLF o Form Feed (avance de
página) (ASCII 12), dependiendo de la configuración del menú AVANCE DE LÍNEA. 8. Cuando «solo numérico» está activado, solo se imprime el campo «peso», alineado a la
izquierda.
7.3 Ejemplos de impresión Se muestran ejemplos de cada aplicación con todos los factores en ON en el menú Imprimir. También se muestran los valores predeterminados para las líneas de Encabezado 1-3.
Pesaje básico Pesaje de recuento Pesaje porcentual
Header 1 Header 2 Header 3 07/19/2017 17:56:23 Balance ID: B234567890 Balance Name: PR4202/E User Name: Project Name: Weigh 0.10 g Gross: 0.10 g G Net: 0.10 g N Tare: 0.00 g T Signature: ____________ Verified By: ____________
Header 1 Header 2 Header 3 07/19/2017 17:57:19 Balance ID: B234567890 Balance Name: PR4202/E User Name: Project Name: Count Quantity: 4999 PCS Gross: 49.99 g G Net: 49.99 g N Tare: 0.00 g T APW: 0.010 g Sample Size: 10 PCS Signature: ____________ Verified By: ____________
Header 1 Header 2 Header 3 07/19/2017 17:57:19 Balance ID: B234567890 Balance Name: PR223/E User Name: Project Name: Percent Percentage: 10.156 % N Gross: 23.361 g G Net: 10.156 g N Tare: 13.205 g T Reference weight: 100.000 g Signature: ____________ Verified By: ____________
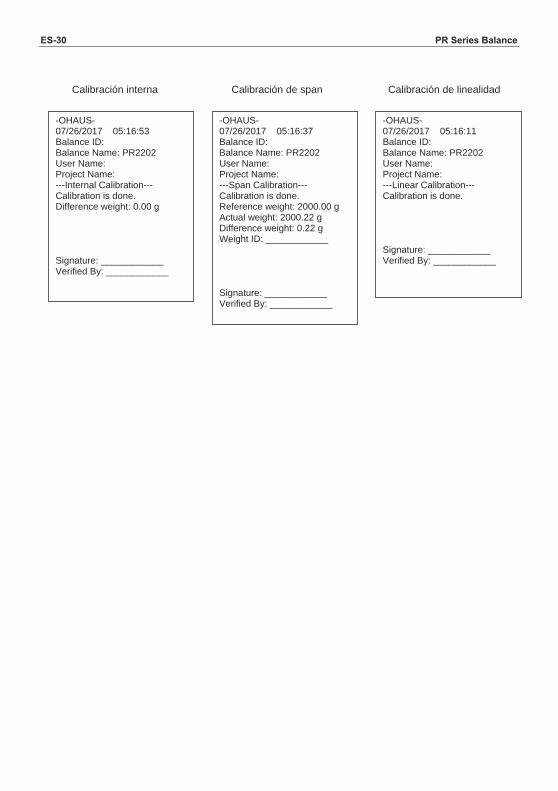
ES-30 PR Series Balance
Calibración interna
Calibración de span
Calibración de linealidad
-OHAUS- 07/26/2017 05:16:53 Balance ID: Balance Name: PR2202 User Name: Project Name: ---Internal Calibration--- Calibration is done. Difference weight: 0.00 g Signature: ____________ Verified By: ____________
-OHAUS- 07/26/2017 05:16:37 Balance ID: Balance Name: PR2202 User Name: Project Name: ---Span Calibration--- Calibration is done. Reference weight: 2000.00 g Actual weight: 2000.22 g Difference weight: 0.22 g Weight ID: ____________ Signature: ____________ Verified By: ____________
-OHAUS- 07/26/2017 05:16:11 Balance ID: Balance Name: PR2202 User Name: Project Name: ---Linear Calibration--- Calibration is done. Signature: ____________ Verified By: ____________
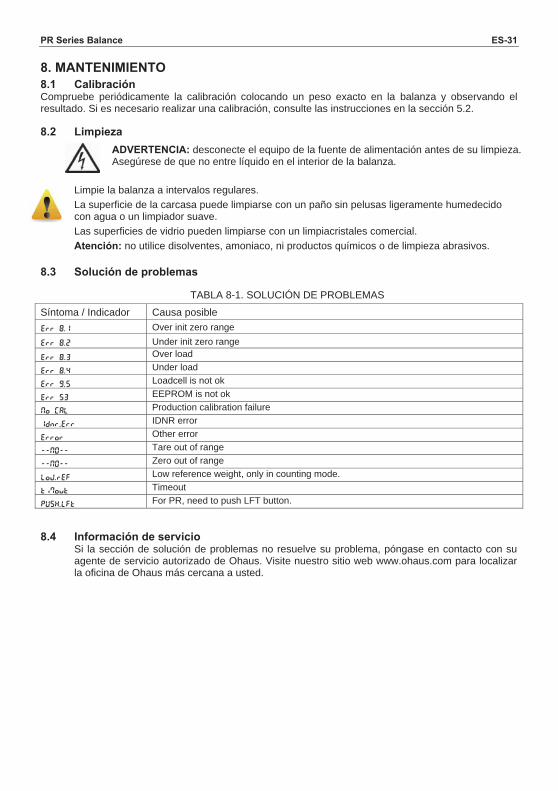
PR Series Balance ES-31
8. MANTENIMIENTO 8.1 Calibración Compruebe periódicamente la calibración colocando un peso exacto en la balanza y observando el resultado. Si es necesario realizar una calibración, consulte las instrucciones en la sección 5.2. 8.2 Limpieza
ADVERTENCIA: desconecte el equipo de la fuente de alimentación antes de su limpieza. Asegúrese de que no entre líquido en el interior de la balanza.
Limpie la balanza a intervalos regulares. La superficie de la carcasa puede limpiarse con un paño sin pelusas ligeramente humedecido con agua o un limpiador suave. Las superficies de vidrio pueden limpiarse con un limpiacristales comercial. Atención: no utilice disolventes, amoniaco, ni productos químicos o de limpieza abrasivos.
8.3 Solución de problemas
TABLA 8-1. SOLUCIÓN DE PROBLEMAS
Síntoma / Indicador Causa posible Err 8.1 Over init zero range Err 8.2 Under init zero range Err 8.3 Over load
Err 8.4 Under load
Err 9.5 Loadcell is not ok
Err 53 EEPROM is not ok
No CAL Production calibration failure
IDnr.Err IDNR error
Error Other error
--NO-- Tare out of range
--NO-- Zero out of range
LoW.rEF Low reference weight, only in counting mode.
tiMout Timeout
PUSH.LFt For PR, need to push LFT button. 8.4 Información de servicio
Si la sección de solución de problemas no resuelve su problema, póngase en contacto con su agente de servicio autorizado de Ohaus. Visite nuestro sitio web www.ohaus.com para localizar la oficina de Ohaus más cercana a usted.

ES-32 PR Series Balance
9. DATOS TÉCNICOS 9.1 Especificaciones Condiciones ambientales Uso de interior solamente Altitud: hasta 2000 m Rango de temperatura: 10 °C a 30 °C Humedad: máxima humedad relativa 80 % para temperaturas hasta 30 °C, disminuyendo
linealmente a 50 % de humedad relativa a 40 °C. La operabilidad se garantiza a temperaturas ambiente entre 5°C y 40°C Fluctuaciones de voltaje del suministro eléctrico: hasta ±10 % el voltaje nominal Categoría de instalación II Grado de contaminación: 2 Voltaje de alimentación: 12 V 0.5 A
Materiales Carcasa inferior: aluminio fundido, pintado + plástico (HIPS) Carcasa superior: plástico (HIPS) Plataformas de pesaje: acero inoxidable Cámara de pesaje: vidrio, plástico (HIPS) Pies: plástico (ABS)
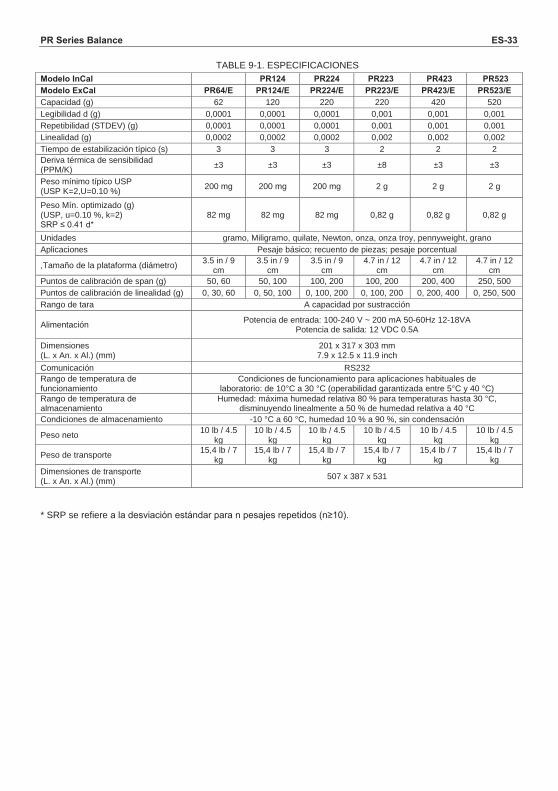
PR Series Balance ES-33
TABLE 9-1. ESPECIFICACIONES Modelo InCal PR124 PR224 PR223 PR423 PR523 Modelo ExCal PR64/E PR124/E PR224/E PR223/E PR423/E PR523/E Capacidad (g) 62 120 220 220 420 520 Legibilidad d (g) 0,0001 0,0001 0,0001 0,001 0,001 0,001 Repetibilidad (STDEV) (g) 0,0001 0,0001 0,0001 0,001 0,001 0,001 Linealidad (g) 0,0002 0,0002 0,0002 0,002 0,002 0,002 Tiempo de estabilización típico (s) 3 3 3 2 2 2 Deriva térmica de sensibilidad (PPM/K) ±3 ±3 ±3 ±8 ±3 ±3
Peso mínimo típico USP (USP K=2,U=0.10 %) 200 mg 200 mg 200 mg 2 g 2 g 2 g
Peso Mín. optimizado (g) (USP, u=0.10 %, k=2) SRP ≤ 0.41 d*
82 mg 82 mg 82 mg 0,82 g 0,82 g 0,82 g
Unidades gramo, Miligramo, quilate, Newton, onza, onza troy, pennyweight, grano Aplicaciones Pesaje básico; recuento de piezas; pesaje porcentual
,Tamaño de la plataforma (diámetro) 3.5 in / 9 cm
3.5 in / 9 cm
3.5 in / 9 cm
4.7 in / 12 cm
4.7 in / 12 cm
4.7 in / 12 cm
Puntos de calibración de span (g) 50, 60 50, 100 100, 200 100, 200 200, 400 250, 500 Puntos de calibración de linealidad (g) 0, 30, 60 0, 50, 100 0, 100, 200 0, 100, 200 0, 200, 400 0, 250, 500 Rango de tara A capacidad por sustracción
Alimentación Potencia de entrada: 100-240 V ~ 200 mA 50-60Hz 12-18VA Potencia de salida: 12 VDC 0.5A
Dimensiones (L. x An. x Al.) (mm)
201 x 317 x 303 mm 7.9 x 12.5 x 11.9 inch
Comunicación RS232 Rango de temperatura de funcionamiento
Condiciones de funcionamiento para aplicaciones habituales de laboratorio: de 10°C a 30 °C (operabilidad garantizada entre 5°C y 40 °C)
Rango de temperatura de almacenamiento
Humedad: máxima humedad relativa 80 % para temperaturas hasta 30 °C, disminuyendo linealmente a 50 % de humedad relativa a 40 °C
Condiciones de almacenamiento -10 °C a 60 °C, humedad 10 % a 90 %, sin condensación
Peso neto 10 lb / 4.5 kg
10 lb / 4.5 kg
10 lb / 4.5 kg
10 lb / 4.5 kg
10 lb / 4.5 kg
10 lb / 4.5 kg
Peso de transporte 15,4 lb / 7 kg
15,4 lb / 7 kg
15,4 lb / 7 kg
15,4 lb / 7 kg
15,4 lb / 7 kg
15,4 lb / 7 kg
Dimensiones de transporte (L. x An. x Al.) (mm) 507 x 387 x 531
* SRP se refiere a la desviación estándar para n pesajes repetidos (n≥10).
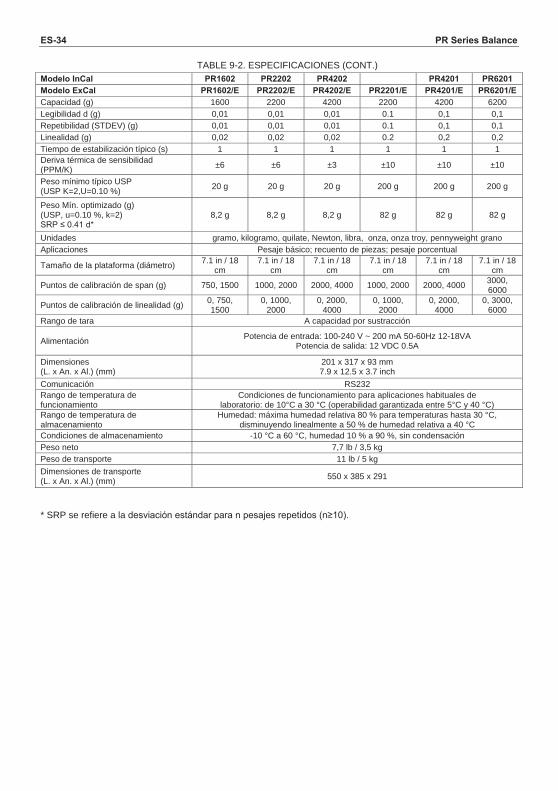
ES-34 PR Series Balance
TABLE 9-2. ESPECIFICACIONES (CONT.) Modelo InCal PR1602 PR2202 PR4202 PR4201 PR6201 Modelo ExCal PR1602/E PR2202/E PR4202/E PR2201/E PR4201/E PR6201/E Capacidad (g) 1600 2200 4200 2200 4200 6200 Legibilidad d (g) 0,01 0,01 0,01 0.1 0,1 0,1 Repetibilidad (STDEV) (g) 0,01 0,01 0,01 0.1 0,1 0,1 Linealidad (g) 0,02 0,02 0,02 0.2 0,2 0,2 Tiempo de estabilización típico (s) 1 1 1 1 1 1 Deriva térmica de sensibilidad (PPM/K) ±6 ±6 ±3 ±10 ±10 ±10
Peso mínimo típico USP (USP K=2,U=0.10 %) 20 g 20 g 20 g 200 g 200 g 200 g
Peso Mín. optimizado (g) (USP, u=0.10 %, k=2) SRP ≤ 0.41 d*
8,2 g 8,2 g 8,2 g 82 g 82 g 82 g
Unidades gramo, kilogramo, quilate, Newton, libra, onza, onza troy, pennyweight grano Aplicaciones Pesaje básico; recuento de piezas; pesaje porcentual
Tamaño de la plataforma (diámetro) 7.1 in / 18 cm
7.1 in / 18 cm
7.1 in / 18 cm
7.1 in / 18 cm
7.1 in / 18 cm
7.1 in / 18 cm
Puntos de calibración de span (g) 750, 1500 1000, 2000 2000, 4000 1000, 2000 2000, 4000 3000, 6000
Puntos de calibración de linealidad (g) 0, 750, 1500
0, 1000, 2000
0, 2000, 4000
0, 1000, 2000
0, 2000, 4000
0, 3000, 6000
Rango de tara A capacidad por sustracción
Alimentación Potencia de entrada: 100-240 V ~ 200 mA 50-60Hz 12-18VA Potencia de salida: 12 VDC 0.5A
Dimensiones (L. x An. x Al.) (mm)
201 x 317 x 93 mm 7.9 x 12.5 x 3.7 inch
Comunicación RS232 Rango de temperatura de funcionamiento
Condiciones de funcionamiento para aplicaciones habituales de laboratorio: de 10°C a 30 °C (operabilidad garantizada entre 5°C y 40 °C)
Rango de temperatura de almacenamiento
Humedad: máxima humedad relativa 80 % para temperaturas hasta 30 °C, disminuyendo linealmente a 50 % de humedad relativa a 40 °C
Condiciones de almacenamiento -10 °C a 60 °C, humedad 10 % a 90 %, sin condensación Peso neto 7,7 lb / 3,5 kg Peso de transporte 11 lb / 5 kg Dimensiones de transporte (L. x An. x Al.) (mm) 550 x 385 x 291
* SRP se refiere a la desviación estándar para n pesajes repetidos (n≥10).
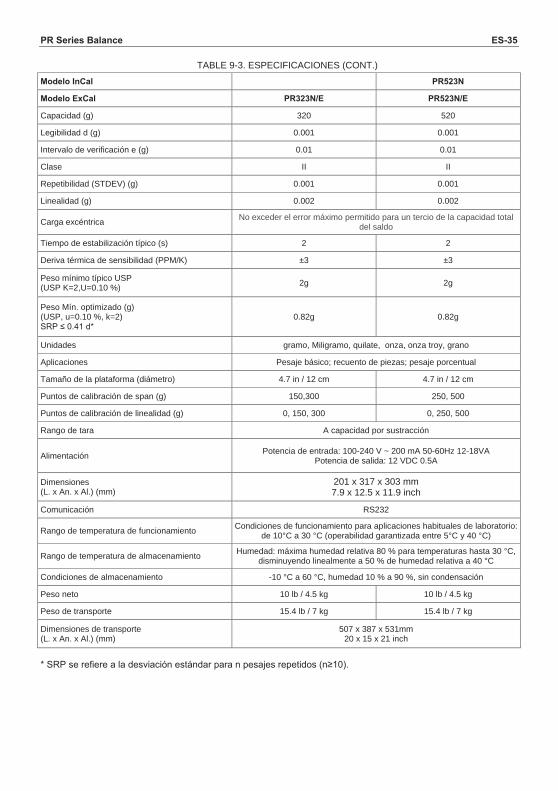
PR Series Balance ES-35
TABLE 9-3. ESPECIFICACIONES (CONT.)
Modelo InCal PR523N
Modelo ExCal PR323N/E PR523N/E
Capacidad (g) 320 520
Legibilidad d (g) 0.001 0.001
Intervalo de verificación e (g) 0.01 0.01
Clase II II
Repetibilidad (STDEV) (g) 0.001 0.001
Linealidad (g) 0.002 0.002
Carga excéntrica No exceder el error máximo permitido para un tercio de la capacidad total del saldo
Tiempo de estabilización típico (s) 2 2
Deriva térmica de sensibilidad (PPM/K) ±3 ±3
Peso mínimo típico USP (USP K=2,U=0.10 %) 2g 2g
Peso Mín. optimizado (g) (USP, u=0.10 %, k=2) SRP ≤ 0.41 d*
0.82g 0.82g
Unidades gramo, Miligramo, quilate, onza, onza troy, grano
Aplicaciones Pesaje básico; recuento de piezas; pesaje porcentual
Tamaño de la plataforma (diámetro) 4.7 in / 12 cm 4.7 in / 12 cm
Puntos de calibración de span (g) 150,300 250, 500
Puntos de calibración de linealidad (g) 0, 150, 300 0, 250, 500
Rango de tara A capacidad por sustracción
Alimentación Potencia de entrada: 100-240 V ~ 200 mA 50-60Hz 12-18VA Potencia de salida: 12 VDC 0.5A
Dimensiones (L. x An. x Al.) (mm)
201 x 317 x 303 mm 7.9 x 12.5 x 11.9 inch
Comunicación RS232
Rango de temperatura de funcionamiento Condiciones de funcionamiento para aplicaciones habituales de laboratorio: de 10°C a 30 °C (operabilidad garantizada entre 5°C y 40 °C)
Rango de temperatura de almacenamiento Humedad: máxima humedad relativa 80 % para temperaturas hasta 30 °C, disminuyendo linealmente a 50 % de humedad relativa a 40 °C
Condiciones de almacenamiento -10 °C a 60 °C, humedad 10 % a 90 %, sin condensación
Peso neto 10 lb / 4.5 kg 10 lb / 4.5 kg
Peso de transporte 15.4 lb / 7 kg 15.4 lb / 7 kg
Dimensiones de transporte (L. x An. x Al.) (mm)
507 x 387 x 531mm 20 x 15 x 21 inch
* SRP se refiere a la desviación estándar para n pesajes repetidos (n≥10).
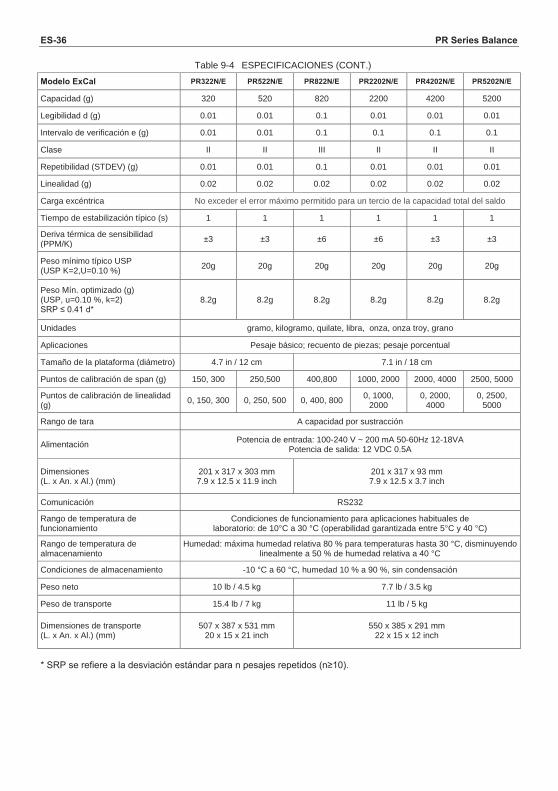
ES-36 PR Series Balance
Table 9-4
Modelo ExCal PR322N/E PR522N/E PR822N/E PR2202N/E PR4202N/E PR5202N/E
Capacidad (g) 320 520 820 2200 4200 5200
Legibilidad d (g) 0.01 0.01 0.1 0.01 0.01 0.01
Intervalo de verificación e (g) 0.01 0.01 0.1 0.1 0.1 0.1
Clase II II III II II II
Repetibilidad (STDEV) (g) 0.01 0.01 0.1 0.01 0.01 0.01
Linealidad (g) 0.02 0.02 0.02 0.02 0.02 0.02
Carga excéntrica No exceder el error máximo permitido para un tercio de la capacidad total del saldo
Tiempo de estabilización típico (s) 1 1 1 1 1 1
Deriva térmica de sensibilidad (PPM/K) ±3 ±3 ±6 ±6 ±3 ±3
Peso mínimo típico USP(USP K=2,U=0.10 %) 20g 20g 20g 20g 20g 20g
Peso Mín. optimizado (g)(USP, u=0.10 %, k=2)SRP ≤ 0.41 d*
8.2g 8.2g 8.2g 8.2g 8.2g 8.2g
Unidades gramo, kilogramo, quilate, libra, onza, onza troy, grano
Aplicaciones Pesaje básico; recuento de piezas; pesaje porcentual
Tamaño de la plataforma (diámetro) 4.7 in / 12 cm 7.1 in / 18 cm
Puntos de calibración de span (g) 150, 300 250,500 400,800 1000, 2000 2000, 4000 2500, 5000
Puntos de calibración de linealidad (g) 0, 150, 300 0, 250, 500 0, 400, 800 0, 1000,
20000, 2000,
40000, 2500,
5000
Rango de tara A capacidad por sustracción
Alimentación Potencia de entrada: 100-240 V ~ 200 mA 50-60Hz 12-18VAPotencia de salida: 12 VDC 0.5A
Dimensiones(L. x An. x Al.) (mm)
201 x 317 x 303 mm7.9 x 12.5 x 11.9 inch
201 x 317 x 93 mm7.9 x 12.5 x 3.7 inch
Comunicación RS232
Rango de temperatura de funcionamiento
Condiciones de funcionamiento para aplicaciones habituales delaboratorio: de 10°C a 30 °C (operabilidad garantizada entre 5°C y 40 °C)
Rango de temperatura de almacenamiento
Humedad: máxima humedad relativa 80 % para temperaturas hasta 30 °C, disminuyendo linealmente a 50 % de humedad relativa a 40 °C
Condiciones de almacenamiento -10 °C a 60 °C, humedad 10 % a 90 %, sin condensación
Peso neto 10 lb / 4.5 kg 7.7 lb / 3.5 kg
Peso de transporte 15.4 lb / 7 kg 11 lb / 5 kg
Dimensiones de transporte(L. x An. x Al.) (mm)
507 x 387 x 531 mm20 x 15 x 21 inch
550 x 385 x 291 mm22 x 15 x 12 inch
* SRP se refiere a la desviación estándar para n pesajes repetidos (n≥10).
ESPECIFICACIONES (CONT.)
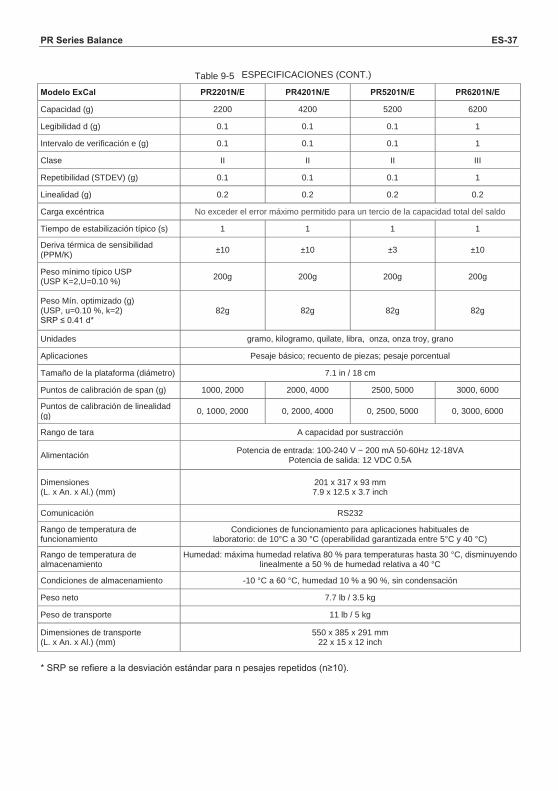
PR Series Balance ES-37
Table 9-5
Modelo ExCal PR2201N/E PR4201N/E PR5201N/E PR6201N/E
Capacidad (g) 2200 4200 5200 6200
Legibilidad d (g) 0.1 0.1 0.1 1
Intervalo de verificación e (g) 0.1 0.1 0.1 1
Clase II II II III
Repetibilidad (STDEV) (g) 0.1 0.1 0.1 1
Linealidad (g) 0.2 0.2 0.2 0.2
Carga excéntrica No exceder el error máximo permitido para un tercio de la capacidad total del saldo
Tiempo de estabilización típico (s) 1 1 1 1
Deriva térmica de sensibilidad (PPM/K) ±10 ±10 ±3 ±10
Peso mínimo típico USP(USP K=2,U=0.10 %) 200g 200g 200g 200g
Peso Mín. optimizado (g)(USP, u=0.10 %, k=2)SRP ≤ 0.41 d*
82g 82g 82g 82g
Unidades gramo, kilogramo, quilate, libra, onza, onza troy, grano
Aplicaciones Pesaje básico; recuento de piezas; pesaje porcentual
Tamaño de la plataforma (diámetro) 7.1 in / 18 cm
Puntos de calibración de span (g) 1000, 2000 2000, 4000 2500, 5000 3000, 6000
Puntos de calibración de linealidad (g) 0, 1000, 2000 0, 2000, 4000 0, 2500, 5000 0, 3000, 6000
Rango de tara A capacidad por sustracción
Alimentación Potencia de entrada: 100-240 V ~ 200 mA 50-60Hz 12-18VAPotencia de salida: 12 VDC 0.5A
Dimensiones(L. x An. x Al.) (mm)
201 x 317 x 93 mm7.9 x 12.5 x 3.7 inch
Comunicación RS232
Rango de temperatura de funcionamiento
Condiciones de funcionamiento para aplicaciones habituales delaboratorio: de 10°C a 30 °C (operabilidad garantizada entre 5°C y 40 °C)
Rango de temperatura de almacenamiento
Humedad: máxima humedad relativa 80 % para temperaturas hasta 30 °C, disminuyendo linealmente a 50 % de humedad relativa a 40 °C
Condiciones de almacenamiento -10 °C a 60 °C, humedad 10 % a 90 %, sin condensación
Peso neto 7.7 lb / 3.5 kg
Peso de transporte 11 lb / 5 kg
Dimensiones de transporte(L. x An. x Al.) (mm)
550 x 385 x 291 mm22 x 15 x 12 inch
* SRP se refiere a la desviación estándar para n pesajes repetidos (n≥10).
ESPECIFICACIONES (CONT.)
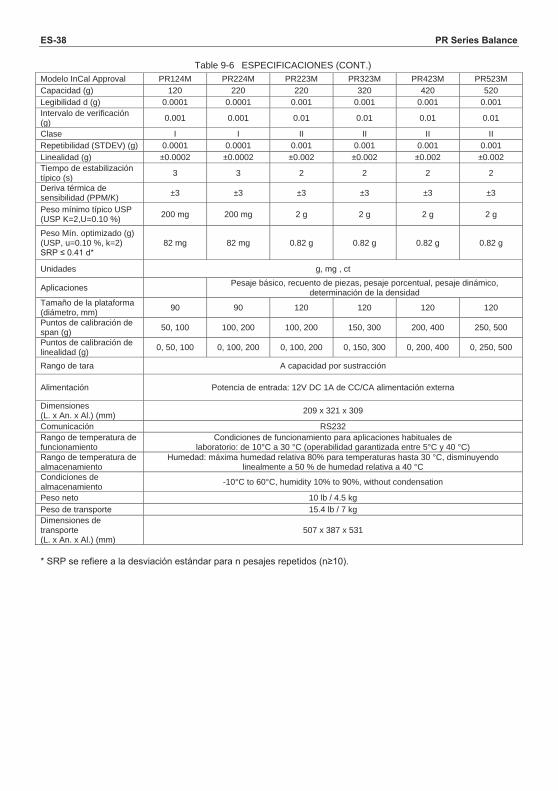
ES-38 PR Series Balance
Table 9-6 Modelo InCal Approval PR124M PR224M PR223M PR323M PR423M PR523MCapacidad (g) 120 220 220 320 420 520Legibilidad d (g) 0.0001 0.0001 0.001 0.001 0.001 0.001Intervalo de verificación (g) 0.001 0.001 0.01 0.01 0.01 0.01
Clase I I II II II IIRepetibilidad (STDEV) (g) 0.0001 0.0001 0.001 0.001 0.001 0.001Linealidad (g) ±0.0002 ±0.0002 ±0.002 ±0.002 ±0.002 ±0.002Tiempo de estabilización típico (s) 3 3 2 2 2 2
Deriva térmica de sensibilidad (PPM/K) ±3 ±3 ±3 ±3 ±3 ±3
Peso mínimo típico USP(USP K=2,U=0.10 %) 200 mg 200 mg 2 g 2 g 2 g 2 g
Peso Mín. optimizado (g)(USP, u=0.10 %, k=2)SRP ≤ 0.41 d*
82 mg 82 mg 0.82 g 0.82 g 0.82 g 0.82 g
Unidades g, mg , ct
Aplicaciones Pesaje básico, recuento de piezas, pesaje porcentual, pesaje dinámico, determinación de la densidad
Tamaño de la plataforma (diámetro, mm) 90 90 120 120 120 120
Puntos de calibración de span (g) 50, 100 100, 200 100, 200 150, 300 200, 400 250, 500
Puntos de calibración de linealidad (g) 0, 50, 100 0, 100, 200 0, 100, 200 0, 150, 300 0, 200, 400 0, 250, 500
Rango de tara A capacidad por sustracción
Alimentación Potencia de entrada: 12V DC 1A de CC/CA alimentación externa
Dimensiones(L. x An. x Al.) (mm) 209 x 321 x 309
Comunicación RS232Rango de temperatura de funcionamiento
Condiciones de funcionamiento para aplicaciones habituales delaboratorio: de 10°C a 30 °C (operabilidad garantizada entre 5°C y 40 °C)
Rango de temperatura de almacenamiento
Humedad: máxima humedad relativa 80% para temperaturas hasta 30 °C, disminuyendo linealmente a 50 % de humedad relativa a 40 °C
Condiciones de almacenamiento -10°C to 60°C, humidity 10% to 90%, without condensation
Peso neto 10 lb / 4.5 kgPeso de transporte 15.4 lb / 7 kgDimensiones de transporte(L. x An. x Al.) (mm)
507 x 387 x 531
* SRP se refiere a la desviación estándar para n pesajes repetidos (n≥10).
ESPECIFICACIONES (CONT.)
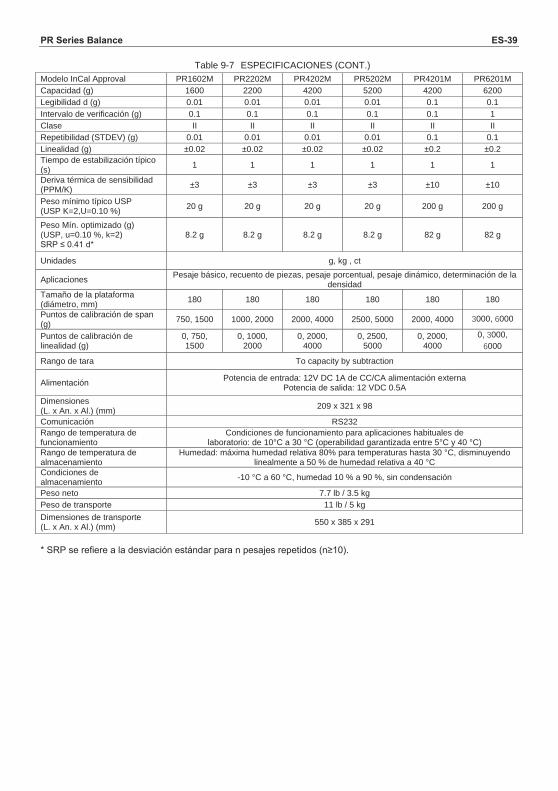
PR Series Balance ES-39
Table 9-7 Modelo InCal Approval PR1602M PR2202M PR4202M PR5202M PR4201M PR6201MCapacidad (g) 1600 2200 4200 5200 4200 6200Legibilidad d (g) 0.01 0.01 0.01 0.01 0.1 0.1Intervalo de verificación (g) 0.1 0.1 0.1 0.1 0.1 1Clase II II II II II IIRepetibilidad (STDEV) (g) 0.01 0.01 0.01 0.01 0.1 0.1Linealidad (g) ±0.02 ±0.02 ±0.02 ±0.02 ±0.2 ±0.2Tiempo de estabilización típico (s) 1 1 1 1 1 1
Deriva térmica de sensibilidad (PPM/K) ±3 ±3 ±3 ±3 ±10 ±10
Peso mínimo típico USP(USP K=2,U=0.10 %) 20 g 20 g 20 g 20 g 200 g 200 g
Peso Mín. optimizado (g)(USP, u=0.10 %, k=2)SRP ≤ 0.41 d*
8.2 g 8.2 g 8.2 g 8.2 g 82 g 82 g
Unidades g, kg , ct
Aplicaciones Pesaje básico, recuento de piezas, pesaje porcentual, pesaje dinámico, determinación de la densidad
Tamaño de la plataforma (diámetro, mm) 180 180 180 180 180 180
Puntos de calibración de span (g) 750, 1500 1000, 2000 2000, 4000 2500, 5000 2000, 4000 000, 000
Puntos de calibración de linealidad (g)
0, 750, 1500
0, 1000, 2000
0, 2000, 4000
0, 2500, 5000
0, 2000, 4000
0, 000, 000
Rango de tara To capacity by subtraction
Alimentación Potencia de entrada: 12V DC 1A de CC/CA alimentación externaPotencia de salida: 12 VDC 0.5A
Dimensiones(L. x An. x Al.) (mm) 209 x 321 x 98
Comunicación RS232Rango de temperatura de funcionamiento
Condiciones de funcionamiento para aplicaciones habituales delaboratorio: de 10°C a 30 °C (operabilidad garantizada entre 5°C y 40 °C)
Rango de temperatura de almacenamiento
Humedad: máxima humedad relativa 80% para temperaturas hasta 30 °C, disminuyendo linealmente a 50 % de humedad relativa a 40 °C
Condiciones de almacenamiento -10 °C a 60 °C, humedad 10 % a 90 %, sin condensación
Peso neto 7.7 lb / 3.5 kgPeso de transporte 11 lb / 5 kgDimensiones de transporte(L. x An. x Al.) (mm) 550 x 385 x 291
* SRP se refiere a la desviación estándar para n pesajes repetidos (n≥10).
ESPECIFICACIONES (CONT.)
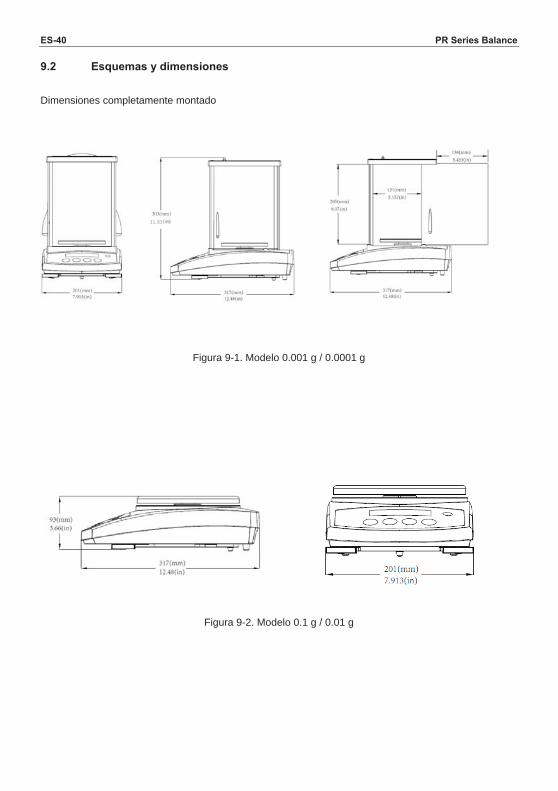
ES-40 PR Series Balance
9.2 Esquemas y dimensiones Dimensiones completamente montado
Figura 9-1. Modelo 0.001 g / 0.0001 g
Figura 9-2. Modelo 0.1 g / 0.01 g
11.93
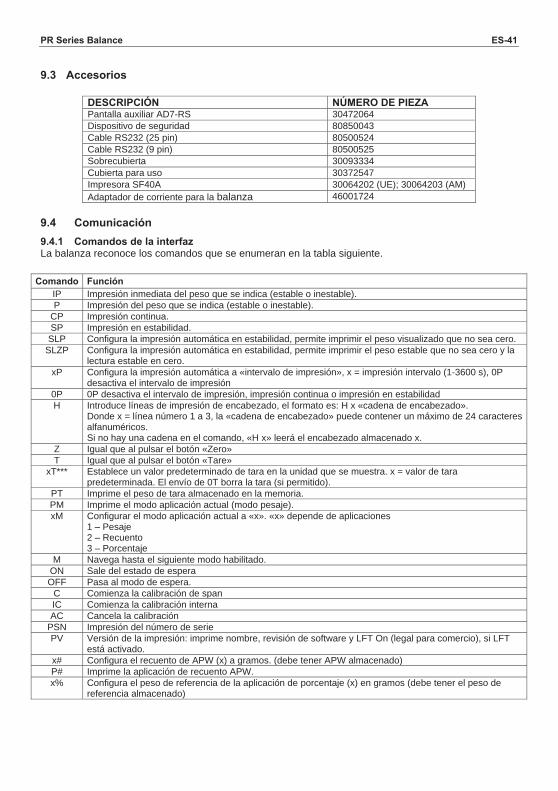
PR Series Balance ES-41
9.3 Accesorios
DESCRIPCIÓN NÚMERO DE PIEZA Pantalla auxiliar AD7-RS 30472064 Dispositivo de seguridad 80850043 Cable RS232 (25 pin) 80500524 Cable RS232 (9 pin) 80500525 Sobrecubierta 30093334 Cubierta para uso 30372547 Impresora SF40A 30064202 (UE); 30064203 (AM) Adaptador de corriente para la balanza 46001724
9.4 Comunicación
9.4.1 Comandos de la interfaz La balanza reconoce los comandos que se enumeran en la tabla siguiente.
Comando Función IP Impresión inmediata del peso que se indica (estable o inestable). P Impresión del peso que se indica (estable o inestable).
CP Impresión continua. SP Impresión en estabilidad. SLP Configura la impresión automática en estabilidad, permite imprimir el peso visualizado que no sea cero.
SLZP Configura la impresión automática en estabilidad, permite imprimir el peso estable que no sea cero y la lectura estable en cero.
xP Configura la impresión automática a «intervalo de impresión», x = impresión intervalo (1-3600 s), 0P desactiva el intervalo de impresión
0P 0P desactiva el intervalo de impresión, impresión continua o impresión en estabilidad H Introduce líneas de impresión de encabezado, el formato es: H x «cadena de encabezado».
Donde x = línea número 1 a 3, la «cadena de encabezado» puede contener un máximo de 24 caracteres alfanuméricos. Si no hay una cadena en el comando, «H x» leerá el encabezado almacenado x.
Z Igual que al pulsar el botón «Zero» T Igual que al pulsar el botón «Tare»
xT*** Establece un valor predeterminado de tara en la unidad que se muestra. x = valor de tara predeterminada. El envío de 0T borra la tara (si permitido).
PT Imprime el peso de tara almacenado en la memoria. PM Imprime el modo aplicación actual (modo pesaje). xM Configurar el modo aplicación actual a «x». «x» depende de aplicaciones
1 – Pesaje 2 – Recuento 3 – Porcentaje
M Navega hasta el siguiente modo habilitado. ON Sale del estado de espera OFF Pasa al modo de espera.
C Comienza la calibración de span IC Comienza la calibración interna AC Cancela la calibración
PSN Impresión del número de serie PV Versión de la impresión: imprime nombre, revisión de software y LFT On (legal para comercio), si LFT
está activado. x# Configura el recuento de APW (x) a gramos. (debe tener APW almacenado) P# Imprime la aplicación de recuento APW. x% Configura el peso de referencia de la aplicación de porcentaje (x) en gramos (debe tener el peso de
referencia almacenado)
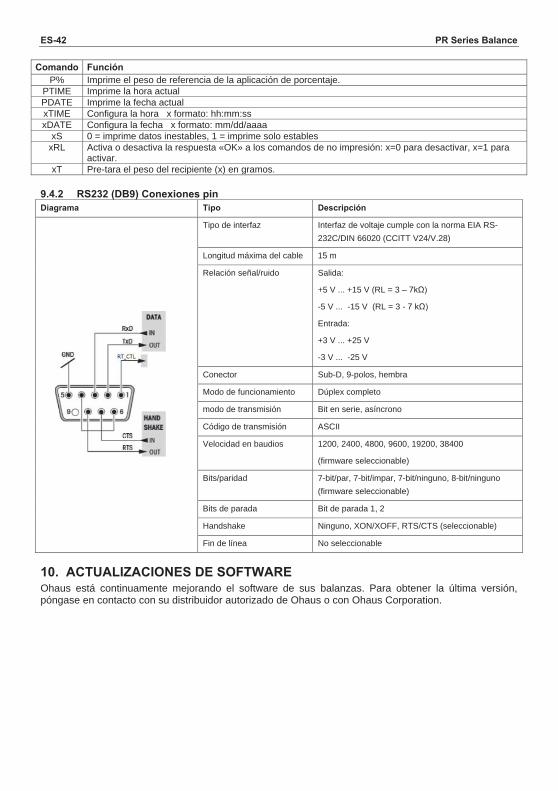
ES-42 PR Series Balance
Comando Función P% Imprime el peso de referencia de la aplicación de porcentaje.
PTIME Imprime la hora actual PDATE Imprime la fecha actual xTIME Configura la hora x formato: hh:mm:ss xDATE Configura la fecha x formato: mm/dd/aaaa
xS 0 = imprime datos inestables, 1 = imprime solo estables xRL Activa o desactiva la respuesta «OK» a los comandos de no impresión: x=0 para desactivar, x=1 para
activar. xT Pre-tara el peso del recipiente (x) en gramos.
9.4.2 RS232 (DB9) Conexiones pin Diagrama Tipo Descripción
Tipo de interfaz Interfaz de voltaje cumple con la norma EIA RS-232C/DIN 66020 (CCITT V24/V.28)
Longitud máxima del cable 15 m
Relación señal/ruido Salida:
+5 V ... +15 V (RL = 3 – 7kΩ)
-5 V ... -15 V (RL = 3 - 7 kΩ)
Entrada:
+3 V ... +25 V
-3 V ... -25 V
Conector Sub-D, 9-polos, hembra
Modo de funcionamiento Dúplex completo
modo de transmisión Bit en serie, asíncrono
Código de transmisión ASCII
Velocidad en baudios 1200, 2400, 4800, 9600, 19200, 38400
(firmware seleccionable)
Bits/paridad 7-bit/par, 7-bit/impar, 7-bit/ninguno, 8-bit/ninguno (firmware seleccionable)
Bits de parada Bit de parada 1, 2
Handshake Ninguno, XON/XOFF, RTS/CTS (seleccionable)
Fin de línea No seleccionable
10. ACTUALIZACIONES DE SOFTWARE Ohaus está continuamente mejorando el software de sus balanzas. Para obtener la última versión, póngase en contacto con su distribuidor autorizado de Ohaus o con Ohaus Corporation.
PR Series Balance ES-43
11. CONFORMIDAD El cumplimiento con los siguientes estándares se indica por la marca correspondiente en el producto. Marca Estándar
Este producto cumple con las directivas 2014/30/EU (EMC), 2014/35/EU (LVD) y 2014/31/EU (NAWI) de la Unión Europea. La declaración de conformidad de la UE está disponible en línea en www.ohaus.com/ce.
EN 61326-1, AS/NZS 61010-1
CAN/CSA-C22.2 No. 61010-1 UL Std. No. 61010-1
Notificación importante para instrumentos de pesaje verificados Los instrumentos de pesaje verificados en el sitio de fabricación llevan una de las marcas precedentes en la etiqueta del embalaje, y la etiqueta verde «M» (metrología) en la placa descriptiva. Estos instrumentos pueden ponerse en funcionamiento inmediatamente. Los instrumentos de pesaje a ser verificados en dos etapas no tienen ninguna «M» (metrología) en la placa descriptiva y llevan una de las marcas de identificación precedentes en la etiqueta del embalaje. La segunda etapa de la verificación inicial debe ser llevada a cabo por la organización de servicio aprobada del representante autorizado dentro de la CE o por las autoridades nacionales de pesos y medidas. La primera etapa de la verificación inicial se lleva a cabo en el sitio del fabricante. Esta comprende todas las pruebas estipuladas por el estándar europeo adoptado EN45501:1992, párrafo 8.2.2. Si las normas nacionales limitan el periodo de validez de la verificación, el usuario del instrumento de pesaje debe seguir estrictamente el período de re-comprobación e informar a las correspondientes autoridades de pesos y medidas.
Instrumentos de pesaje verificados Cuando el dispositivo se utiliza en actividades comerciales o una aplicación controlada legalmente, debe ser configurada, verificada y sellada según los reglamentos locales de pesos y medidas. Es la responsabilidad del comprador asegurarse de que se cumplen todos los requisitos legales pertinentes. Los instrumentos de pesaje verificados en el sitio de fabricación llevan la siguiente marca adicional de metrología en la placa descriptiva.
Los instrumentos de pesaje verificados en dos etapas no tienen ninguna marca adicional de metrología en la placa descriptiva. La segunda etapa de evaluación de la conformidad debe realizarse por las autoridades de pesos y medidas aplicables. Si las normas nacionales limitan el periodo de validez de la verificación, el usuario de la balanza debe observar el período de nueva comprobación estrictamente e informar a las autoridades de pesos y medidas.

ES-44 PR Series Balance
Ya que los requisitos de verificación varían según la jurisdicción, el comprador debe ponerse en contacto con su oficina local de pesos y medidas si no están familiarizados con los requisitos. Nota de la FCC Este equipo ha sido sometido a las pruebas pertinentes y cumple con los límites establecidos para un dispositivo digital de clase A, conforme al apartado 15 de las reglas de la FCC. Estos límites están diseñados para proporcionar una protección razonable contra interferencias perjudiciales, cuando el equipo funciona en un entorno comercial. Este equipo genera, utiliza y puede emitir energía de radio frecuencia y si no se instala y se utiliza conforme a las instrucciones, puede provocar interferencias perjudiciales para las comunicaciones por radio. El funcionamiento de este equipo en un área residencial puede causar interferencias perjudiciales, en cuyo caso los usuarios tendrán que corregir la interferencia a su propio coste. Declaración de Industry Canada Este dispositivo digital de Clase A cumple con la normativa canadiense ICES-003. Registro ISO 9001 En 1994, Bureau Veritas Quality International (BVQI) otorgó a OHAUS Corporation, EE. UU., un certificado de registro ISO 9001 el cual confirma que el sistema administrativo de calidad de OHAUS cumple con los requerimientos del estándar ISO 9001. El 21 de mayo de 2009, OHAUS Corporation, EE. UU., fue registrada nuevamente al estándar ISO 9001:2008.
Este producto cumple con la Directiva de la UE 2012/19/CE (WEEE). Elimine este producto, según las disposiciones locales, mediante el sistema de recogida selectiva de aparatos eléctricos y electrónicos.
Para consultar las instrucciones de eliminación en Europa, visite www.ohaus.com/weee.
PR Series Balance ES-45
GARANTÍA LIMITADA
Los productos Ohaus están garantizados contra defectos en los materiales y mano de obra desde la fecha de entrega y hasta que termine el período de garantía. Durante el período de garantía, Ohaus reparará, o si procede, reemplazará sin coste alguno cualquier componente o componentes que resulten ser defectuosos, siempre y cuando se devuelva el producto a Ohaus con los gastos de envío pagados por adelantado.
Esta garantía no se aplica si el producto ha sido dañado por accidente o mal uso, expuesto a materiales radioactivos o corrosivos, si algún objeto extraño entra en el interior del producto, o como resultado de haber sido modificado o prestado servicio por personas ajenas a Ohaus. Además del envío apropiado de la tarjeta de garantía, el periodo de garantía comienza en la fecha del envío al distribuidor autorizado. No existe ninguna otra garantía expresa o implícita ofrecida por Ohaus Corporation. Ohaus Corporation no puede ser demandada por daños consecuentes.
Ya que las legislaciones de garantías difieren de estado a estado y de país a país, para obtener más información póngase en contacto con su representante local de Ohaus.

Balance de séries PR FR-1
Table des matières
1. INTRODUCTION ............................................................................................................... FR-31.1 Description ............................................................................................................................................. FR-31.2 Caractéristiques ..................................................................................................................................... FR-31.3 Définition des symboles et signes d’avertissement ............................................................................... FR-31.4 Précautions de sécurité ......................................................................................................................... FR-3
2. INSTALLATION................................................................................................................. FR-42.1 Désemballage ........................................................................................................................................ FR-42.2 Sélection de la position .......................................................................................................................... FR-42.3 Nivellement ............................................................................................................................................ FR-42.4 Branchement de l’alimentation et acclimatation de la balance .............................................................. FR-42.5 Branchement de l’interface .................................................................................................................... FR-52.6 Calibrage initial ...................................................................................................................................... FR-5
3. OPERATION ..................................................................................................................... FR-63.1 Aperçu de l’affichage, de l’écran d’accueil ............................................................................................. FR-63.2 Fonction principales et menu principal .................................................................................................. FR-73.3 Aperçu des parties et des fonctions – Mode paravent .......................................................................... FR-73.4 Aperçu des pièces et des fonctions – Modèle sans paravent ............................................................... FR-7
4. APPLICATIONS .......................................................................................................................................... FR-84.1 Pesage ................................................................................................................................................... FR-84.2 Comptage des pièces ............................................................................................................................ FR-84.3 Pesage en pourcentage ....................................................................................................................... FR-104.4 Fonctionnalités supplémentaires ......................................................................................................... FR-12
5. REGLAGES DU MENU ................................................................................................... FR-135.1 Menu de navigation .............................................................................................................................. FR-135.1.1 Changement des réglages ................................................................................................................ FR-135.2 Calibrage .............................................................................................................................................. FR-135.2.1 Sous menu de calibrage (modèles InCal) ......................................................................................... FR-145.2.2 Calibrage interne (non applicable aux modèles ExCal) .................................................................... FR-145.2.3 Réglage de cal (non applicable aux modèles ExCal) ....................................................................... FR-145.2.4 Calibrage de portée .......................................................................................................................... FR-145.2.5 Calibrage de linéarité ........................................................................................................................ FR-155.3 Réglage de la balance ......................................................................................................................... FR-165.3.1 Niveau de filtre .................................................................................................................................. FR-175.3.2 AZT (Mise à zéro automatique) ........................................................................................................ FR-175.3.3 Auto Tare .......................................................................................................................................... FR-175.3.4 Graduations ...................................................................................................................................... FR-175.3.5 Format de date .................................................................................................................................. FR-185.3.6 Réglage de date ................................................................................................................................ FR-185.3.7 Format de l’heure .............................................................................................................................. FR-185.3.8 Réglage de l’heure ............................................................................................................................ FR-185.3.9 Luminosité ......................................................................................................................................... FR-185.3.10 Auto Dim ........................................................................................................................................... FR-195.3.11 Mode approuvé ................................................................................................................................. FR-195.4 Unités de pesage ................................................................................................................................. FR-205.5 Réglage d’interface RS232 .................................................................................................................. FR-215.5.1 Taux de bauds .................................................................................................................................. FR-215.5.2 Transmission ..................................................................................................................................... FR-215.5.3 Salutations ........................................................................................................................................ FR-215.6 Réglages d’impression ......................................................................................................................... FR-21 5.6.1 Stable uniquement ............................................................................................................................ FR-21 5.6.2 Numérique uniquement .................................................................................................................... FR-21 5.6.3 En-tête unique ................................................................................................................................... FR-21 5.6.4 Impression automatique .................................................................................................................... FR-21 5.6.5 En-tête ............................................................................................................................................... FR-21 5.6.6 Date et heure .................................................................................................................................... FR-21 5.6.7 ID de Balance ................................................................................................................................... FR-21
FR-2 Balance de séries PR
5.6.8 Nom de la balance ............................................................................................................................ FR-21 5.6.9 Nom d’utilisateur ............................................................................................................................... FR-21 5.6.10 Nom du projet ................................................................................................................................... FR-21 5.6.11 Nom d’application ............................................................................................................................. FR-21 5.6.12 Résultat ............................................................................................................................................. FR-21 5.6.13 Brut .................................................................................................................................................... FR-21 5.6.14 Net ..................................................................................................................................................... FR-21 5.6.15 Tare ................................................................................................................................................... FR-21 5.6.16 Ligne d’alimentation .......................................................................................................................... FR-21 5.7 GLP ...................................................................................................................................................... FR-24 5.7.1 En-tête ............................................................................................................................................... FR-24 5.7.2 Nom de la balance ............................................................................................................................ FR-24 5.7.3 Nom d’utilisateur ............................................................................................................................... FR-24 5.7.4 Nom du projet ................................................................................................................................... FR-24 5.8 Ré initialisation d’usine ........................................................................................................................ FR-255.9 Se déconnecter .................................................................................................................................... FR-25
6. CERTIFIE POUR USAGE COMMERCIAL (LFT) ............................................................ FR-266.1 Réglages .............................................................................................................................................. FR-266.2 Vérification ........................................................................................................................................... FR-266.3 Scellement ........................................................................................................................................... FR-26
7. IMPRESSION .................................................................................................................. FR-277.1 Connexion, configuration et test de l’imprimante / Interface de l’ordinateur ........................................ FR-277.2 Format d’affichage ............................................................................................................................... FR-287.3 Exemples imprimés .............................................................................................................................. FR-28
8. ENTRETIEN .................................................................................................................... FR-308.1 Calibrage .............................................................................................................................................. FR-308.2 Nettoyage ............................................................................................................................................. FR-308.3 Dépannage .......................................................................................................................................... FR-308.4 Renseignement sur le service ............................................................................................................. FR-30
9. DONNÉES TECHNIQUES ............................................................................................... FR-319.1 Spécifications ....................................................................................................................................... FR-319.2 Schémas et dimensions ....................................................................................................................... FR-399.3 Accessoires .......................................................................................................................................... FR-409.4 Communication .................................................................................................................................... FR-409.4.1 Commandes d’interface .................................................................................................................... FR-409.4.2 RS232 (DB9) Connexions de broche ............................................................................................... FR-41
10. MISE À JOUR DU LOGICIEL ....................................................................................... FR-4111. CONFORMITE ............................................................................................................... FR-42
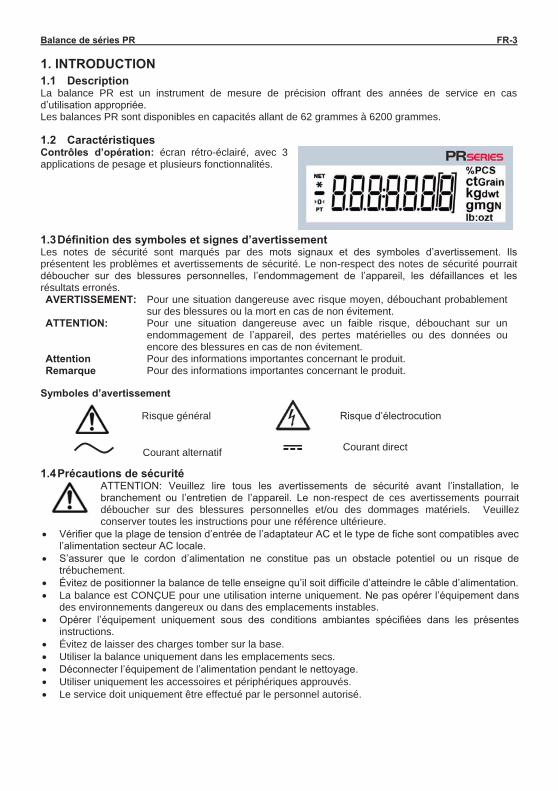
Balance de séries PR FR-3 1. INTRODUCTION 1.1 Description La balance PR est un instrument de mesure de précision offrant des années de service en cas d’utilisation appropriée. Les balances PR sont disponibles en capacités allant de 62 grammes à 6200 grammes. 1.2 Caractéristiques Contrôles d’opération: écran rétro-éclairé, avec 3 applications de pesage et plusieurs fonctionnalités.
1.3 Définition des symboles et signes d’avertissement Les notes de sécurité sont marqués par des mots signaux et des symboles d’avertissement. Ils présentent les problèmes et avertissements de sécurité. Le non-respect des notes de sécurité pourrait déboucher sur des blessures personnelles, l’endommagement de l’appareil, les défaillances et les résultats erronés. AVERTISSEMENT: Pour une situation dangereuse avec risque moyen, débouchant probablement
sur des blessures ou la mort en cas de non évitement. ATTENTION: Pour une situation dangereuse avec un faible risque, débouchant sur un
endommagement de l’appareil, des pertes matérielles ou des données ou encore des blessures en cas de non évitement.
Attention Pour des informations importantes concernant le produit.Remarque Pour des informations importantes concernant le produit.
Symboles d’avertissement Risque général Risque d’électrocution
1.4 Précautions de sécurité
ATTENTION: Veuillez lire tous les avertissements de sécurité avant l’installation, le branchement ou l’entretien de l’appareil. Le non-respect de ces avertissements pourrait déboucher sur des blessures personnelles et/ou des dommages matériels. Veuillez conserver toutes les instructions pour une référence ultérieure.
Vérifier que la plage de tension d’entrée de l’adaptateur AC et le type de fiche sont compatibles avec l’alimentation secteur AC locale.
S’assurer que le cordon d’alimentation ne constitue pas un obstacle potentiel ou un risque de trébuchement.
Évitez de positionner la balance de telle enseigne qu’il soit difficile d’atteindre le câble d’alimentation. La balance est CONÇUE pour une utilisation interne uniquement. Ne pas opérer l’équipement dans
des environnements dangereux ou dans des emplacements instables. Opérer l’équipement uniquement sous des conditions ambiantes spécifiées dans les présentes
instructions. Évitez de laisser des charges tomber sur la base. Utiliser la balance uniquement dans les emplacements secs. Déconnecter l’équipement de l’alimentation pendant le nettoyage. Utiliser uniquement les accessoires et périphériques approuvés. Le service doit uniquement être effectué par le personnel autorisé.
Courant directCourant alternatif
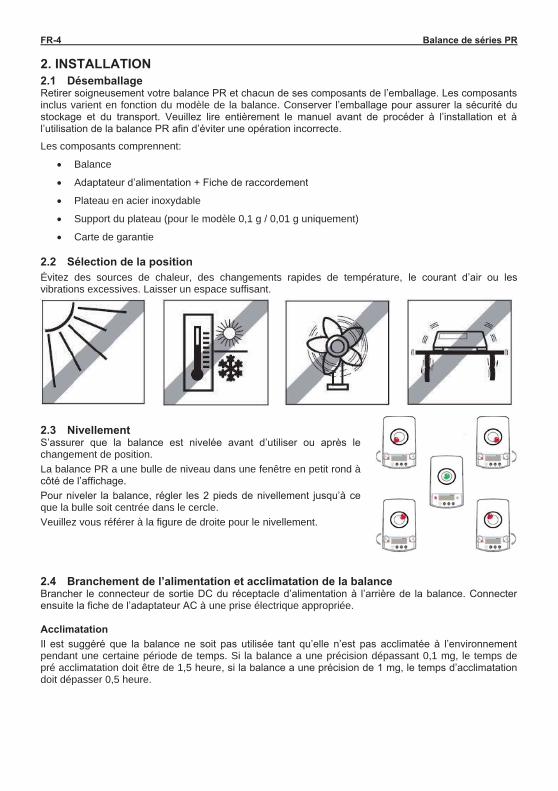
FR-4 Balance de séries PR 2. INSTALLATION 2.1 Désemballage Retirer soigneusement votre balance PR et chacun de ses composants de l’emballage. Les composants inclus varient en fonction du modèle de la balance. Conserver l’emballage pour assurer la sécurité du stockage et du transport. Veuillez lire entièrement le manuel avant de procéder à l’installation et à l’utilisation de la balance PR afin d’éviter une opération incorrecte.
Les composants comprennent:
Balance
Adaptateur d’alimentation + Fiche de raccordement
Plateau en acier inoxydable
Support du plateau (pour le modèle 0,1 g / 0,01 g uniquement)
Carte de garantie
2.2 Sélection de la position
Évitez des sources de chaleur, des changements rapides de température, le courant d’air ou les vibrations excessives. Laisser un espace suffisant.
2.3 Nivellement S’assurer que la balance est nivelée avant d’utiliser ou après le changement de position. La balance PR a une bulle de niveau dans une fenêtre en petit rond à côté de l’affichage. Pour niveler la balance, régler les 2 pieds de nivellement jusqu’à ce que la bulle soit centrée dans le cercle. Veuillez vous référer à la figure de droite pour le nivellement. 2.4 Branchement de l’alimentation et acclimatation de la balance Brancher le connecteur de sortie DC du réceptacle d’alimentation à l’arrière de la balance. Connecter ensuite la fiche de l’adaptateur AC à une prise électrique appropriée. Acclimatation Il est suggéré que la balance ne soit pas utilisée tant qu’elle n’est pas acclimatée à l’environnement pendant une certaine période de temps. Si la balance a une précision dépassant 0,1 mg, le temps de pré acclimatation doit être de 1,5 heure, si la balance a une précision de 1 mg, le temps d’acclimatation doit dépasser 0,5 heure.

Balance de séries PR FR-5 2.5 Branchement de l’interface
La balance PR a un port RS232. Utiliser le port RS-232 pour connecter soit un ordinateur, soit une imprimante avec câble de série standard (direct).
Connexions d’interface sur l’arrière de la balance
RS232 Utilisé pour connecter le PC ou l’imprimante. Remarque: Consulter la section d’impression pour la connexion, la configuration et le test de l’imprimante/l’interface de l’ordinateur.
2.6 Calibrage initial Lors de la première installation de la balance PR, ou lorsqu’elle est déplacée dans une autre position, elle doit être calibrée afin de s’assurer des résultats de pesage précis. Les balances PR sont classifiées en deux catégories notamment les modèles InCal et ExCal. Les modèles InCal ont un mécanisme de calibrage intégré capable de calibrer automatiquement la balance et ne nécessite pas l’utilisation des masses de calibrage externe. Si préféré, les modèles InCal doivent être manuellement calibrées avec des masses externes. Les modèles ExCal sont calibrés avec des masses externes. S’assurer d’avoir des masses de calibrage disponible avant le début du calibrage.
RS232
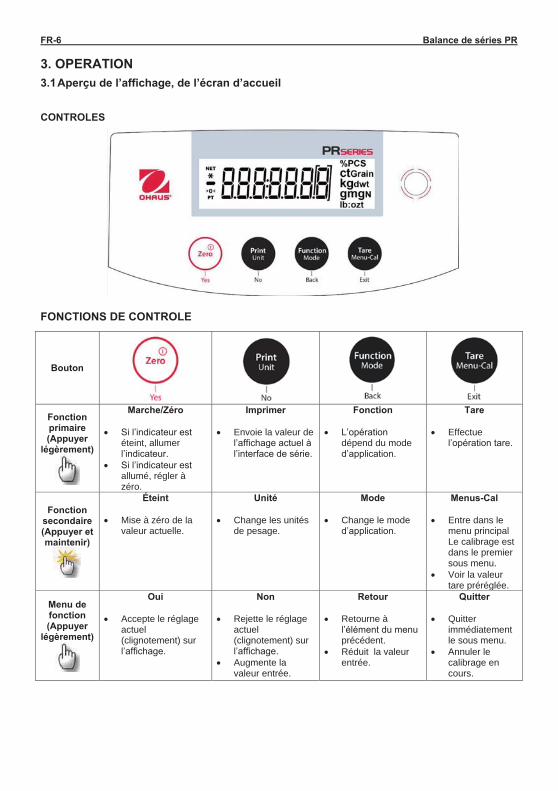
FR-6 Balance de séries PR 3. OPERATION
3.1 Aperçu de l’affichage, de l’écran d’accueil
CONTROLES
FONCTIONS DE CONTROLE
Bouton
Fonction primaire (Appuyer
légèrement)
Marche/Zéro
Si l’indicateur est éteint, allumer l’indicateur.
Si l’indicateur est allumé, régler à zéro.
Imprimer
Envoie la valeur de l’affichage actuel à l’interface de série.
Fonction
L’opération dépend du mode d’application.
Tare
Effectue l’opération tare.
Fonction secondaire (Appuyer et maintenir)
Éteint
Mise à zéro de la valeur actuelle.
Unité
Change les unités de pesage.
Mode
Change le mode d’application.
Menus-Cal
Entre dans le menu principal Le calibrage est dans le premier sous menu.
Voir la valeur tare préréglée.
Menu de fonction (Appuyer
légèrement)
Oui
Accepte le réglage actuel (clignotement) sur l’affichage.
Non
Rejette le réglage actuel (clignotement) sur l’affichage.
Augmente la valeur entrée.
Retour
Retourne à l’élément du menu précédent.
Réduit la valeur entrée.
Quitter Quitter
immédiatement le sous menu.
Annuler le calibrage en cours.
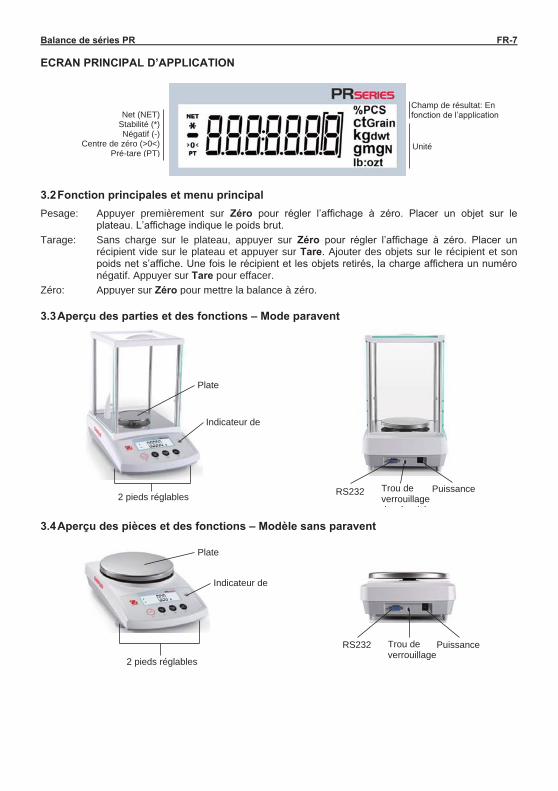
Balance de séries PR FR-7 ECRAN PRINCIPAL D’APPLICATION
3.2 Fonction principales et menu principal
Pesage: Appuyer premièrement sur Zéro pour régler l’affichage à zéro. Placer un objet sur le plateau. L’affichage indique le poids brut.
Tarage: Sans charge sur le plateau, appuyer sur Zéro pour régler l’affichage à zéro. Placer un récipient vide sur le plateau et appuyer sur Tare. Ajouter des objets sur le récipient et son poids net s’affiche. Une fois le récipient et les objets retirés, la charge affichera un numéro négatif. Appuyer sur Tare pour effacer.
Zéro: Appuyer sur Zéro pour mettre la balance à zéro. 3.3 Aperçu des parties et des fonctions – Mode paravent
3.4 Aperçu des pièces et des fonctions – Modèle sans paravent
Champ de résultat: En fonction de l’application Net (NET)
Stabilité (*) Négatif (-)
Centre de zéro (>0<) Pré-tare (PT)
Unité
Plate
Indicateur de
2 pieds réglables RS232 Trou de verrouillage d é ité
Puissance
2 pieds réglables
Plate
Indicateur de
RS232 Trou de verrouillage d é ité
Puissance
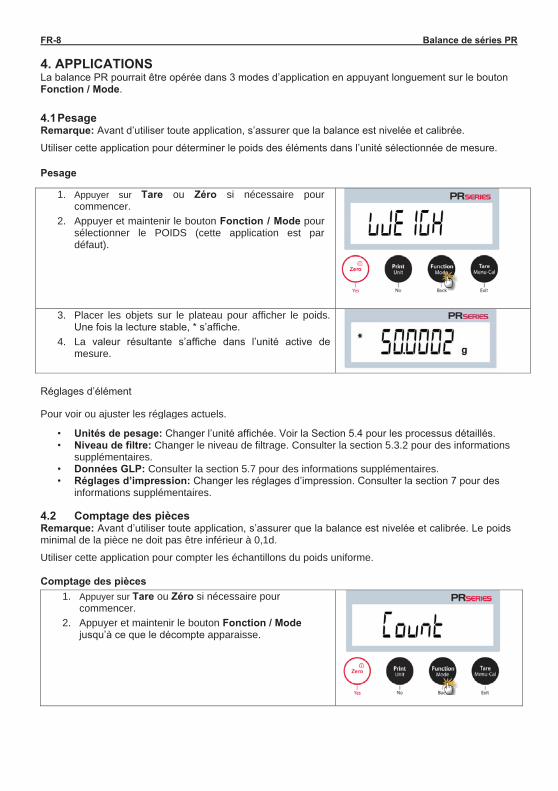
FR-8 Balance de séries PR 4. APPLICATIONS La balance PR pourrait être opérée dans 3 modes d’application en appuyant longuement sur le bouton Fonction / Mode. 4.1 Pesage Remarque: Avant d’utiliser toute application, s’assurer que la balance est nivelée et calibrée.
Utiliser cette application pour déterminer le poids des éléments dans l’unité sélectionnée de mesure.
Pesage
1. Appuyer sur Tare ou Zéro si nécessaire pour commencer.
2. Appuyer et maintenir le bouton Fonction / Mode pour sélectionner le POIDS (cette application est par défaut).
3. Placer les objets sur le plateau pour afficher le poids. Une fois la lecture stable, * s’affiche.
4. La valeur résultante s’affiche dans l’unité active de mesure.
Réglages d’élément
Pour voir ou ajuster les réglages actuels.
• Unités de pesage: Changer l’unité affichée. Voir la Section 5.4 pour les processus détaillés. • Niveau de filtre: Changer le niveau de filtrage. Consulter la section 5.3.2 pour des informations
supplémentaires. • Données GLP: Consulter la section 5.7 pour des informations supplémentaires. • Réglages d’impression: Changer les réglages d’impression. Consulter la section 7 pour des
informations supplémentaires. 4.2 Comptage des pièces Remarque: Avant d’utiliser toute application, s’assurer que la balance est nivelée et calibrée. Le poids minimal de la pièce ne doit pas être inférieur à 0,1d.
Utiliser cette application pour compter les échantillons du poids uniforme. Comptage des pièces
1. Appuyer sur Tare ou Zéro si nécessaire pour commencer.
2. Appuyer et maintenir le bouton Fonction / Mode jusqu’à ce que le décompte apparaisse.
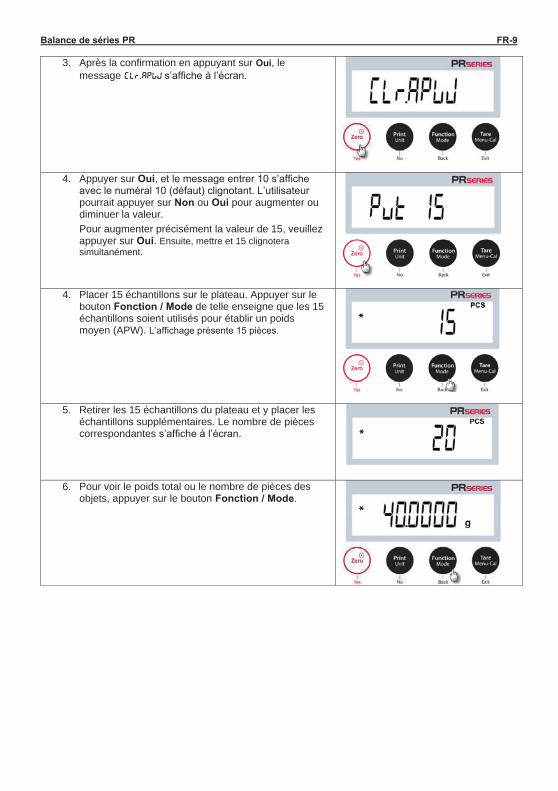
Balance de séries PR FR-9
3. Après la confirmation en appuyant sur Oui, le message Clr.APwj s’affiche à l’écran.
4. Appuyer sur Oui, et le message entrer 10 s’affiche
avec le numéral 10 (défaut) clignotant. L’utilisateur pourrait appuyer sur Non ou Oui pour augmenter ou diminuer la valeur. Pour augmenter précisément la valeur de 15, veuillez appuyer sur Oui. Ensuite, mettre et 15 clignotera simultanément.
4. Placer 15 échantillons sur le plateau. Appuyer sur le bouton Fonction / Mode de telle enseigne que les 15 échantillons soient utilisés pour établir un poids moyen (APW). L’affichage présente 15 pièces.
5. Retirer les 15 échantillons du plateau et y placer les
échantillons supplémentaires. Le nombre de pièces correspondantes s’affiche à l’écran.
6. Pour voir le poids total ou le nombre de pièces des
objets, appuyer sur le bouton Fonction / Mode.
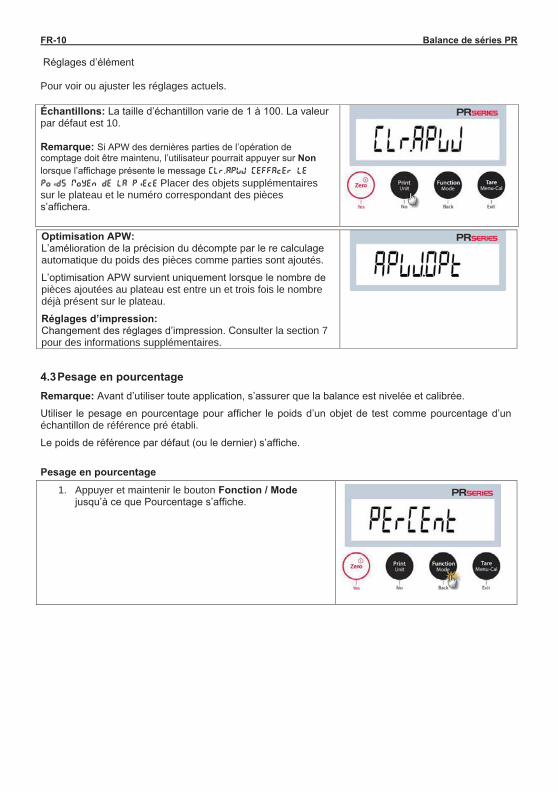
FR-10 Balance de séries PR Réglages d’élément Pour voir ou ajuster les réglages actuels.
Échantillons: La taille d’échantillon varie de 1 à 100. La valeur par défaut est 10. Remarque: Si APW des dernières parties de l’opération de comptage doit être maintenu, l’utilisateur pourrait appuyer sur Non lorsque l’affichage présente le message Clr.Apwj (effacer le poids moyen de la pièce Placer des objets supplémentaires sur le plateau et le numéro correspondant des pièces s’affichera.
Optimisation APW: L’amélioration de la précision du décompte par le re calculage automatique du poids des pièces comme parties sont ajoutés.
L’optimisation APW survient uniquement lorsque le nombre de pièces ajoutées au plateau est entre un et trois fois le nombre déjà présent sur le plateau.
Réglages d’impression: Changement des réglages d’impression. Consulter la section 7 pour des informations supplémentaires.
4.3 Pesage en pourcentage
Remarque: Avant d’utiliser toute application, s’assurer que la balance est nivelée et calibrée. Utiliser le pesage en pourcentage pour afficher le poids d’un objet de test comme pourcentage d’un échantillon de référence pré établi.
Le poids de référence par défaut (ou le dernier) s’affiche.
Pesage en pourcentage
1. Appuyer et maintenir le bouton Fonction / Mode jusqu’à ce que Pourcentage s’affiche.
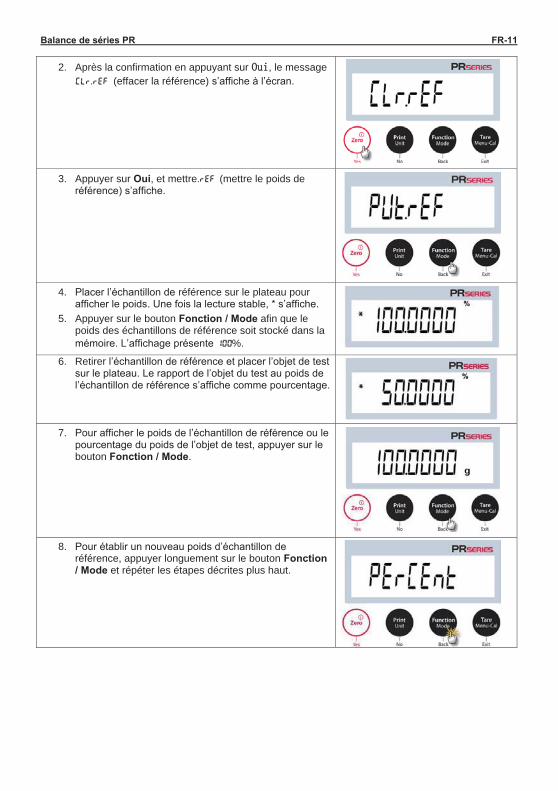
Balance de séries PR FR-11
2. Après la confirmation en appuyant sur , le message Clr.ref (effacer la référence) s’affiche à l’écran.
3. Appuyer sur Oui, et mettre.ref (mettre le poids de référence) s’affiche.
4. Placer l’échantillon de référence sur le plateau pour afficher le poids. Une fois la lecture stable, * s’affiche.
5. Appuyer sur le bouton Fonction / Mode afin que le poids des échantillons de référence soit stocké dans la mémoire. L’affichage présente 100%.
6. Retirer l’échantillon de référence et placer l’objet de test sur le plateau. Le rapport de l’objet du test au poids de l’échantillon de référence s’affiche comme pourcentage.
7. Pour afficher le poids de l’échantillon de référence ou le pourcentage du poids de l’objet de test, appuyer sur le bouton Fonction / Mode.
8. Pour établir un nouveau poids d’échantillon de référence, appuyer longuement sur le bouton Fonction / Mode et répéter les étapes décrites plus haut.
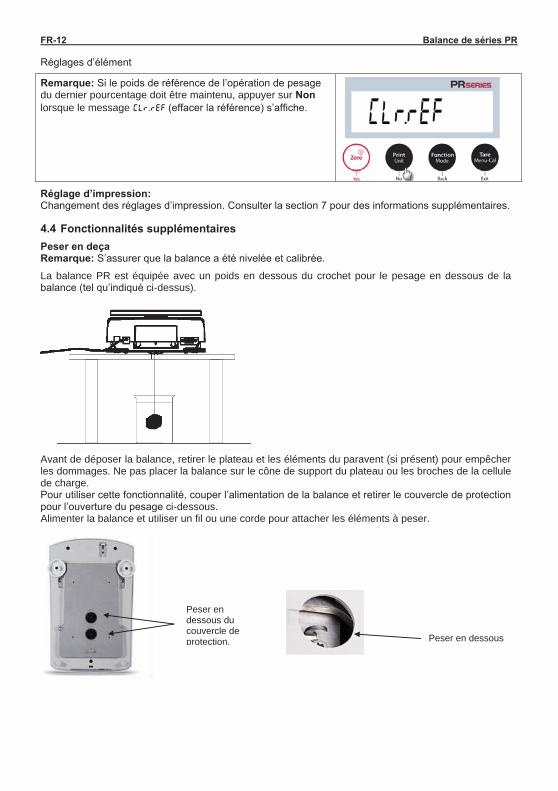
FR-12 Balance de séries PR Réglages d’élément
Remarque: Si le poids de référence de l’opération de pesage du dernier pourcentage doit être maintenu, appuyer sur Non lorsque le message Clr.ref (effacer la référence) s’affiche.
Réglage d’impression: Changement des réglages d’impression. Consulter la section 7 pour des informations supplémentaires. 4.4 Fonctionnalités supplémentaires
Peser en deça Remarque: S’assurer que la balance a été nivelée et calibrée.
La balance PR est équipée avec un poids en dessous du crochet pour le pesage en dessous de la balance (tel qu’indiqué ci-dessus).
Avant de déposer la balance, retirer le plateau et les éléments du paravent (si présent) pour empêcher les dommages. Ne pas placer la balance sur le cône de support du plateau ou les broches de la cellule de charge. Pour utiliser cette fonctionnalité, couper l’alimentation de la balance et retirer le couvercle de protection pour l’ouverture du pesage ci-dessous. Alimenter la balance et utiliser un fil ou une corde pour attacher les éléments à peser.
Peser en dessous du couvercle de protection. Peser en dessous
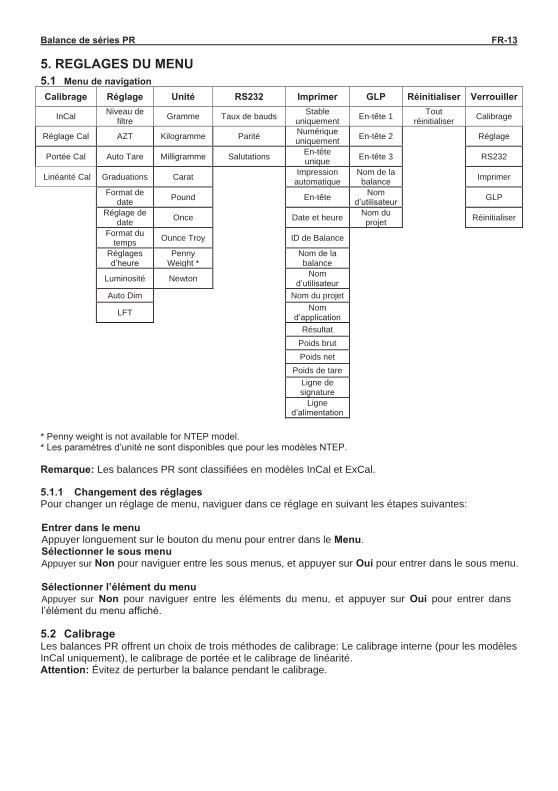
Balance de séries PR FR-13 5. REGLAGES DU MENU 5.1 Menu de navigation Calibrage Réglage Unité RS232 Imprimer GLP Réinitialiser Verrouiller
InCal Niveau de filtre Gramme Taux de bauds Stable
uniquement En-tête 1 Tout réinitialiser Calibrage
Réglage Cal AZT Kilogramme Parité Numérique uniquement En-tête 2 Réglage
Portée Cal Auto Tare Milligramme Salutations En-tête unique En-tête 3 RS232
Linéarité Cal Graduations Carat Impression
automatique Nom de la balance Imprimer
Format de
date Pound En-tête Nom d’utilisateur GLP
Réglage de
date Once Date et heure Nom du projet Réinitialiser
Format du
temps Ounce Troy ID de Balance
Réglages d’heure
Penny Weight *
Nom de la balance
Luminosité Newton Nom
d’utilisateur
Auto Dim Nom du projet
LFT Nom
d’application
Résultat Poids brut Poids net
Poids de tare
Ligne de signature
Ligne d’alimentation
* Penny weight is not available for NTEP model. * Les paramètres d’unité ne sont disponibles que pour les modèles NTEP. Remarque: Les balances PR sont classifiées en modèles InCal et ExCal. 5.1.1 Changement des réglages Pour changer un réglage de menu, naviguer dans ce réglage en suivant les étapes suivantes: Entrer dans le menu Appuyer longuement sur le bouton du menu pour entrer dans le Menu. Sélectionner le sous menu Appuyer sur Non pour naviguer entre les sous menus, et appuyer sur Oui pour entrer dans le sous menu. Sélectionner l’élément du menu Appuyer sur Non pour naviguer entre les éléments du menu, et appuyer sur Oui pour entrer dans l’élément du menu affiché. 5.2 Calibrage Les balances PR offrent un choix de trois méthodes de calibrage: Le calibrage interne (pour les modèles InCal uniquement), le calibrage de portée et le calibrage de linéarité. Attention: Évitez de perturber la balance pendant le calibrage.
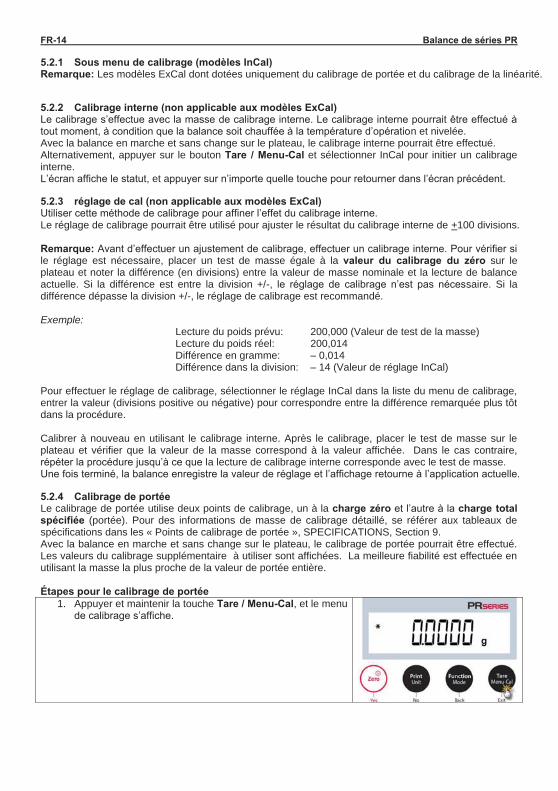
FR-14 Balance de séries PR 5.2.1 Sous menu de calibrage (modèles InCal) Remarque: Les modèles ExCal dont dotées uniquement du calibrage de portée et du calibrage de la linéarité. 5.2.2 Calibrage interne (non applicable aux modèles ExCal) Le calibrage s’effectue avec la masse de calibrage interne. Le calibrage interne pourrait être effectué à tout moment, à condition que la balance soit chauffée à la température d’opération et nivelée. Avec la balance en marche et sans change sur le plateau, le calibrage interne pourrait être effectué. Alternativement, appuyer sur le bouton Tare / Menu-Cal et sélectionner InCal pour initier un calibrage interne. L’écran affiche le statut, et appuyer sur n’importe quelle touche pour retourner dans l’écran précédent. 5.2.3 réglage de cal (non applicable aux modèles ExCal) Utiliser cette méthode de calibrage pour affiner l’effet du calibrage interne. Le réglage de calibrage pourrait être utilisé pour ajuster le résultat du calibrage interne de +100 divisions.
Remarque: Avant d’effectuer un ajustement de calibrage, effectuer un calibrage interne. Pour vérifier si le réglage est nécessaire, placer un test de masse égale à la valeur du calibrage du zéro sur le plateau et noter la différence (en divisions) entre la valeur de masse nominale et la lecture de balance actuelle. Si la différence est entre la division +/-, le réglage de calibrage n’est pas nécessaire. Si la différence dépasse la division +/-, le réglage de calibrage est recommandé. Exemple:
Lecture du poids prévu: 200,000 (Valeur de test de la masse) Lecture du poids réel: 200,014 Différence en gramme: – 0,014 Différence dans la division: – 14 (Valeur de réglage InCal)
Pour effectuer le réglage de calibrage, sélectionner le réglage InCal dans la liste du menu de calibrage, entrer la valeur (divisions positive ou négative) pour correspondre entre la différence remarquée plus tôt dans la procédure. Calibrer à nouveau en utilisant le calibrage interne. Après le calibrage, placer le test de masse sur le plateau et vérifier que la valeur de la masse correspond à la valeur affichée. Dans le cas contraire, répéter la procédure jusqu’à ce que la lecture de calibrage interne corresponde avec le test de masse. Une fois terminé, la balance enregistre la valeur de réglage et l’affichage retourne à l’application actuelle. 5.2.4 Calibrage de portée Le calibrage de portée utilise deux points de calibrage, un à la charge zéro et l’autre à la charge total spécifiée (portée). Pour des informations de masse de calibrage détaillé, se référer aux tableaux de spécifications dans les « Points de calibrage de portée », SPECIFICATIONS, Section 9. Avec la balance en marche et sans change sur le plateau, le calibrage de portée pourrait être effectué. Les valeurs du calibrage supplémentaire à utiliser sont affichées. La meilleure fiabilité est effectuée en utilisant la masse la plus proche de la valeur de portée entière. Étapes pour le calibrage de portée
1. Appuyer et maintenir la touche Tare / Menu-Cal, et le menu de calibrage s’affiche.
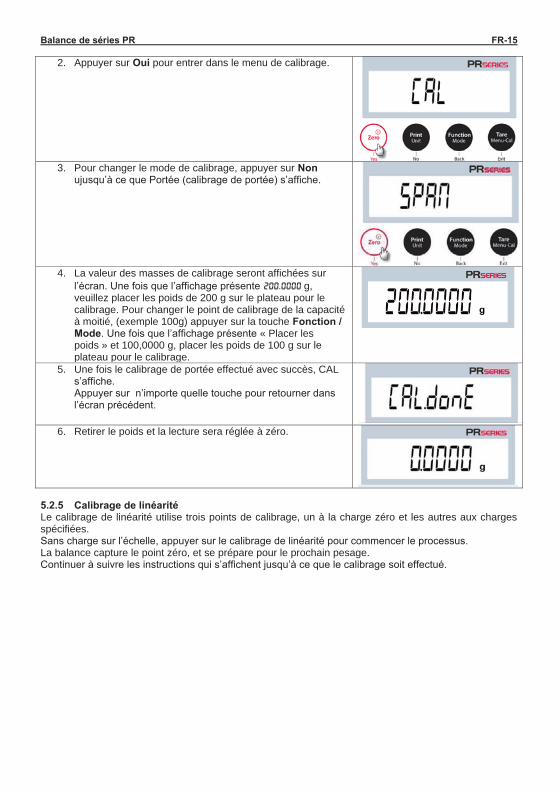
Balance de séries PR FR-15
2. Appuyer sur Oui pour entrer dans le menu de calibrage.
3. Pour changer le mode de calibrage, appuyer sur Non
ujusqu’à ce que Portée (calibrage de portée) s’affiche.
4. La valeur des masses de calibrage seront affichées sur
l’écran. Une fois que l’affichage présente 200,0000 g, veuillez placer les poids de 200 g sur le plateau pour le calibrage. Pour changer le point de calibrage de la capacité à moitié, (exemple 100g) appuyer sur la touche Fonction / Mode. Une fois que l’affichage présente « Placer les poids » et 100,0000 g, placer les poids de 100 g sur le plateau pour le calibrage.
5. Une fois le calibrage de portée effectué avec succès, CAL s’affiche. Appuyer sur n’importe quelle touche pour retourner dans l’écran précédent.
6. Retirer le poids et la lecture sera réglée à zéro.
5.2.5 Calibrage de linéarité Le calibrage de linéarité utilise trois points de calibrage, un à la charge zéro et les autres aux charges spécifiées. Sans charge sur l’échelle, appuyer sur le calibrage de linéarité pour commencer le processus. La balance capture le point zéro, et se prépare pour le prochain pesage. Continuer à suivre les instructions qui s’affichent jusqu’à ce que le calibrage soit effectué.

FR-16 Balance de séries PR Étapes pour le calibrage de linéarité
1. Appuyer et maintenir la touche Tare / Menu-Cal, et le menu de calibrage s’affiche.
2. Appuyer sur Oui pour entrer dans le menu de
calibrage.
3. Pour changer le mode de calibrage, appuyer sur
Nonjusqu’à ce que LineRr (calibrage de portée) s’affiche.
4. La valeur des masses de calibrage seront affichées sur
l’écran. Une fois que l’affichage présente 100,0000 g, veuillez placer les poids de 100 g sur le plateau pour le calibrage.
5. Retirer le poids de 100 g sur le plateau. Après un
certain temps, 200,0000 g s’affiche à l’écran. Veuillez placer le poids de 200 g sur le plateau.
6. Une fois le calibrage de linéarité effectué avec succès,
CAL s’affiche. Appuyer sur n’importe quelle touche pour retourner dans l’écran précédent.
7. Retirer le poids et la lecture sera réglée à zéro.
5.3 Réglage de la balance Entrer dans le sous menu pour personnaliser la fonctionnalité de balance. Remarque: Les réglages d’usine par défaut s’affichent ci-dessous en gras.
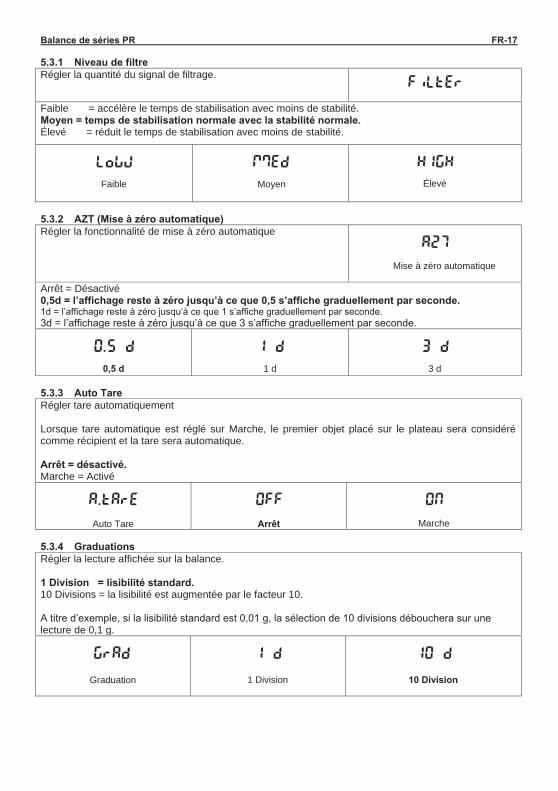
Balance de séries PR FR-17 5.3.1 Niveau de filtre Régler la quantité du signal de filtrage. FiltEr
Faible = accélère le temps de stabilisation avec moins de stabilité. Moyen = temps de stabilisation normale avec la stabilité normale. Élevé = réduit le temps de stabilisation avec moins de stabilité.
Faible Moyen
Élevé
5.3.2 AZT (Mise à zéro automatique) Régler la fonctionnalité de mise à zéro automatique
Mise à zéro automatique
Arrêt = Désactivé 0,5d = l’affichage reste à zéro jusqu’à ce que 0,5 s’affiche graduellement par seconde. 1d = l’affichage reste à zéro jusqu’à ce que 1 s’affiche graduellement par seconde. 3d = l’affichage reste à zéro jusqu’à ce que 3 s’affiche graduellement par seconde.
0,5 d 1 d 3 d 5.3.3 Auto Tare Régler tare automatiquement Lorsque tare automatique est réglé sur Marche, le premier objet placé sur le plateau sera considéré comme récipient et la tare sera automatique. Arrêt = désactivé. Marche = Activé
Auto Tare Arrêt Marche 5.3.4 Graduations Régler la lecture affichée sur la balance. 1 Division = lisibilité standard. 10 Divisions = la lisibilité est augmentée par le facteur 10. A titre d’exemple, si la lisibilité standard est 0,01 g, la sélection de 10 divisions débouchera sur une lecture de 0,1 g.
Graduation 1 Division 10 Division
GrAd
HIGH mMed LowW
ON OFF A.tArE
1 d 10 d
AZT
3 d 1 d 0,5 d
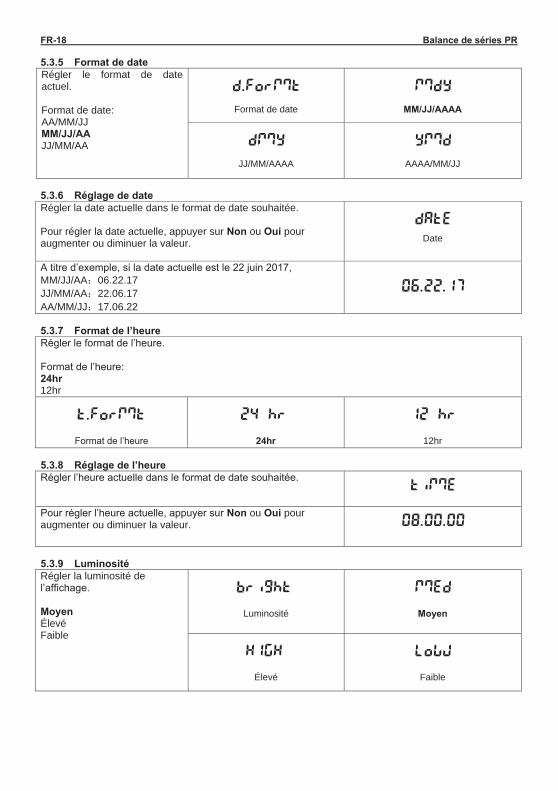
FR-18 Balance de séries PR 5.3.5 Format de date Régler le format de date actuel. Format de date: AA/MM/JJ MM/JJ/AA JJ/MM/AA
Format de date
MM/JJ/AAAA
JJ/MM/AAAA
AAAA/MM/JJ
5.3.6 Réglage de date Régler la date actuelle dans le format de date souhaitée. Pour régler la date actuelle, appuyer sur Non ou Oui pour augmenter ou diminuer la valeur.
Date
A titre d’exemple, si la date actuelle est le 22 juin 2017, MM/JJ/AA 06.22.17 JJ/MM/AA 22.06.17 AA/MM/JJ 17.06.22 5.3.7 Format de l’heure Régler le format de l’heure. Format de l’heure: 24hr 12hr
Format de l’heure
24hr 12hr
5.3.8 Réglage de l’heure Régler l’heure actuelle dans le format de date souhaitée. timME
Pour régler l’heure actuelle, appuyer sur Non ou Oui pour augmenter ou diminuer la valeur.
08.00.00
5.3.9 Luminosité Régler la luminosité de l’affichage.
Moyen Élevé Faible
Luminosité Moyen
Élevé Faible
HIGH
bright
24 hr t.FormMt
ymMd dmMy
mMdy d.FormMt
dAtE
06.22.17
12 hr
mMEd
LowW
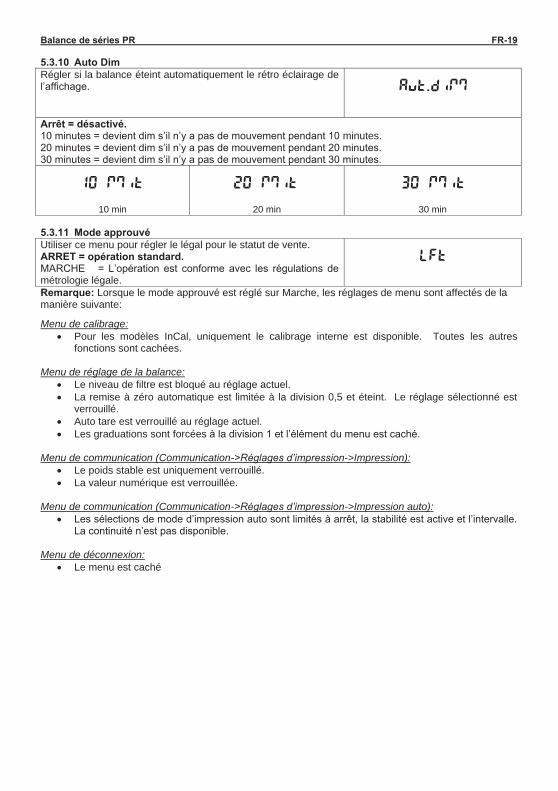
Balance de séries PR FR-19 5.3.10 Auto Dim Régler si la balance éteint automatiquement le rétro éclairage de l’affichage.
Arrêt = désactivé. 10 minutes = devient dim s’il n’y a pas de mouvement pendant 10 minutes. 20 minutes = devient dim s’il n’y a pas de mouvement pendant 20 minutes. 30 minutes = devient dim s’il n’y a pas de mouvement pendant 30 minutes.
10 min
20 min 30 min
5.3.11 Mode approuvé Utiliser ce menu pour régler le légal pour le statut de vente. ARRET = opération standard. MARCHE = L’opération est conforme avec les régulations de métrologie légale.
Remarque: Lorsque le mode approuvé est réglé sur Marche, les réglages de menu sont affectés de la manière suivante:
Menu de calibrage: Pour les modèles InCal, uniquement le calibrage interne est disponible. Toutes les autres
fonctions sont cachées. Menu de réglage de la balance:
Le niveau de filtre est bloqué au réglage actuel. La remise à zéro automatique est limitée à la division 0,5 et éteint. Le réglage sélectionné est
verrouillé. Auto tare est verrouillé au réglage actuel. Les graduations sont forcées à la division 1 et l’élément du menu est caché.
Menu de communication (Communication->Réglages d’impression->Impression):
Le poids stable est uniquement verrouillé. La valeur numérique est verrouillée.
Menu de communication (Communication->Réglages d’impression->Impression auto):
Les sélections de mode d’impression auto sont limités à arrêt, la stabilité est active et l’intervalle. La continuité n’est pas disponible.
Menu de déconnexion:
Le menu est caché
LFt
20 mMit 10 mMit 30 mMit
Aut.dimM
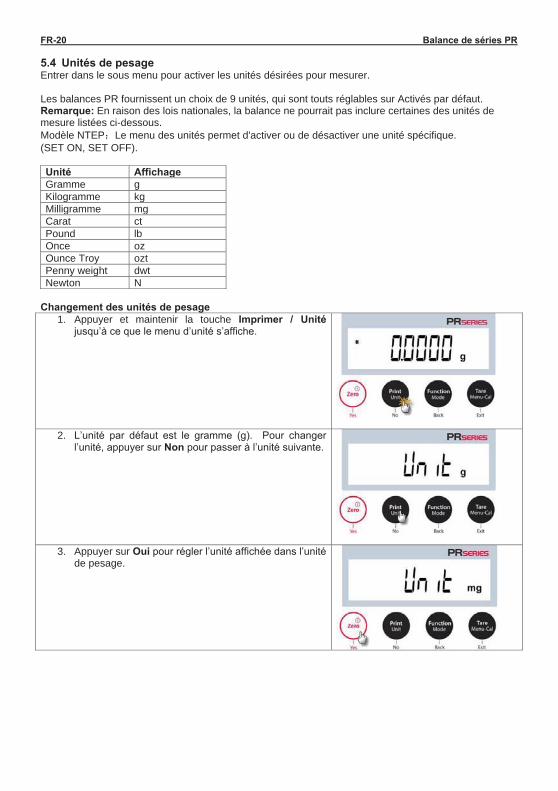
FR-20 Balance de séries PR 5.4 Unités de pesage Entrer dans le sous menu pour activer les unités désirées pour mesurer. Les balances PR fournissent un choix de 9 unités, qui sont touts réglables sur Activés par défaut. Remarque: En raison des lois nationales, la balance ne pourrait pas inclure certaines des unités de mesure listées ci-dessous. Modèle NTEP Le menu des unités permet d'activer ou de désactiver une unité spécifique. (SET ON, SET OFF). Unité Affichage Gramme g Kilogramme kg Milligramme mg Carat ct Pound lb Once oz Ounce Troy ozt Penny weight dwt Newton N
Changement des unités de pesage
1. Appuyer et maintenir la touche Imprimer / Unité jusqu’à ce que le menu d’unité s’affiche.
2. L’unité par défaut est le gramme (g). Pour changer l’unité, appuyer sur Non pour passer à l’unité suivante.
3. Appuyer sur Oui pour régler l’unité affichée dans l’unité de pesage.
Balance de séries PR FR-21 5.5 Réglage d’interface RS232 Entrer dans le sous menu pour personnaliser les réglages standard RS232. Les données pourraient être lues sur une imprimante ou sur un PC.
rS232
5.5.1 Taux de bauds Régler le taux de bauds (bits par seconde).
bAud
1200 = 1200 bps 2400 = 2400 bps 4800 = 4800 bps 9600 = 9600 bps 19200 = 19200 bps 38400 = 38400 bps 5.5.2 Transmission Régler les bits de données, les bits d’arrêt et la parité. 8-N-1 = 8 bits de données, aucune parité, bit d’arrêt 1 8-N-2 = 8 bits de données, aucune parité, bit d’arrêt 2 7-E-1 = 7 bits de données, parité égale, bit d’arrêt 1 7-E-2 = 7 bits de données, parité égale, bit d’arrêt 2 7-N-1 = 7 bits de données, aucune parité, bit d’arrêt 1 7-N-2 = 7 bits de données, aucune parité, bit d’arrêt 2 7-O-1 = 7 bits de données, parité inégale, bit d’arrêt 1 7-O-2 = 7 bits de données, parité inégale, bit d’arrêt 2
Parité
8-N-2 = 8 bits de données, bit d’arrêt 1
5.5.3 Salutations Régler la méthode de contrôle du flux. AUCUN = Pas de salutation XON-XOFF = XON/XOFF salutations HARDWARE = logiciel de salutation
Salutations
Aucun
Xon / Xoff Matériel 5.6 Réglages d’impression Entrer dans le sous menu pour personnaliser les réglages de transfert des données. Print
Parity 8-N-1
H.ShAkE
HRrdwW
NONE
ON-OFF
FR-22 Balance de séries PR 5.6.1 Stable uniquementArrêt = Les valeurs sont imprimées immédiatement sans tenir compte de la stabilité. Marche = Les valeurs imprimées sont uniquement imprimés lorsque les critères de stabilité sont respectés.
5.6.2 Numérique uniquementArrêt = Tous les résultats sélectionnés sont imprimés. Marche = Uniquement les valeurs de données numériques sont imprimées.
5.6.3 En-tête unique Arrêt = Les en-têtes seront imprimées pour chaque exigence d’impression. Marche = Les entêtes seront imprimées une fois par jour.
5.6.4 Impression automatique Activer ou désactiver la fonctionnalité d’impression auto, et régler le mode d’impression auto spécifique.
1. Arrêt = Désactivé
2. Stabilité activée Les valeurs imprimées sont uniquement imprimés lorsque les critères de stabilité sont respectés.
Lorsque la stabilité active est sélectionnée, régler les conditions pour l’impression.
Charge = Imprime lorsque la charge affichée est stable. Charge et zéro = Imprime lorsque la lecture de la charge affichée et zéro est stable.
3. Intervalle d’impression = Les impressions surviennent dans l’intervalle de temps défini. Lorsque l’intervalle d’impression est sélectionnée, régler l’intervalle d’heure en utilisant le clavier numérique. Remarque: Les réglages de 1 à 3600 secondes sont disponibles. Le défaut est 0.
Stable
NumM
A.Print
OFF
ON.Stab
Load
Load.zer
Inter
Sin.Head
Balance de séries PR FR-23 4. Continu = les impressions continuent normalement.
5.6.5 En-tête Marche = l’en-tête est imprimée. Arrêt = l’en-tête n’est pas imprimée.
5.6.6 Date et heureMarche = La date et l’heure sont imprimées. Arrêt = La date et l’heure ne sont pas imprimées.
5.6.7 ID de Balance Marche = ID de balance est imprimé. Arrêt = ID de balance n’est pas imprimé.
5.6.8 Nom de la balance Marche = le nom de la balance est imprimé. Arrêt = Le nom de la balance n’est pas imprimé.
5.6.9 Nom d’utilisateur Marche = le nom d’utilisateur est imprimé. Arrêt = Le nom d’utilisateur n’est pas imprimé.
5.6.10 Nom du projet
Marche = le nom de projet est imprimé. Arrêt = Le nom de projet n’est pas imprimé.
5.6.11 Nom d’application
Marche = le nom d’application est imprimé. Arrêt = Le nom d’application n’est pas imprimé.
Continu
Header
dtmM
Bal Id
Usr.NamM
Prj.NamM
Bal.NamM
App.NamM
FR-24 Balance de séries PR 5.6.12 Résultat Marche = le résultat de pesage est imprimé. Marche = le résultat de pesage n’est pas imprimé.
5.6.13 Brut Marche = le poids brut est imprimé. Marche = le poids brut n’est pas imprimé.
5.6.14 Net Marche = le poids net est imprimé. Marche = le poids net n’est pas imprimé.
5.6.15 Tare Marche = le poids tare est imprimé. Marche = le poids tare n’est pas imprimé. 5.6.16 Ligne de signature Marche = la ligne de signature est imprimée. Arrêt = la ligne de signature n'est pas imprimée.
5.6.17 Ligne d’alimentation 1 Ligne = déplacer le papier vers le haut à une ligne après l’impression. 4 Lignes = déplacer le papier vers le haut à quatre lignes après l’impression.
1 ligne 4 lignes
5.7 GLP Entrer dans ce menu pour configurer les bonnes pratiques de laboratoire (BPL) 5.7.1 En-tête Active l’impression des entêtes de BPL. Il y a trois en-têtes disponibles. Les réglages alphanumériques atteignent jusqu’à 16 caractères disponibles pour chaque réglage d’en-tête.
En-tête 1
GrosS
Feed
4 lines 1 line
GLP
Header1
result
Net
tare
SIGN.LIN

Balance de séries PR FR-25
En-tête 2 En-tête 3 5.7.2 Nom de la balance Régler le nom de la balance Les réglages alphanumériques atteignent jusqu’à 16 caractères disponibles pour chaque réglage d’en-tête. 5.7.3 Nom d’utilisateur Régler le nom d’utilisateur Les réglages alphanumériques atteignent jusqu’à 16 caractères disponibles pour chaque réglage d’en-tête. 5.7.4 Nom du projet Régler le nom d’utilisateur Les réglages alphanumériques atteignent jusqu’à 16 caractères disponibles pour chaque réglage d’en-tête. Le défaut est vide.
5.8 Ré initialisation d’usine Utiliser ce sous menu pour réinitialiser tous les réglages de menu à leurs réglages d’usine par défaut.
Tout réinitialiser: réinitialise tous les menus à leurs réglages d’usine par défaut. Quitter = retourne à l’écran principal d’application sans réinitialiser les menus.
5.9 Se déconnecter Utiliser ce sous menu pour verrouiller/déverrouiller certains menus. Arrêt = le menu est déverrouillé Marche = le menu est verrouillé.
Bal.NamM
Usr.NamM
Prj.NamM
Reset
LOCK
Header3 Header 2
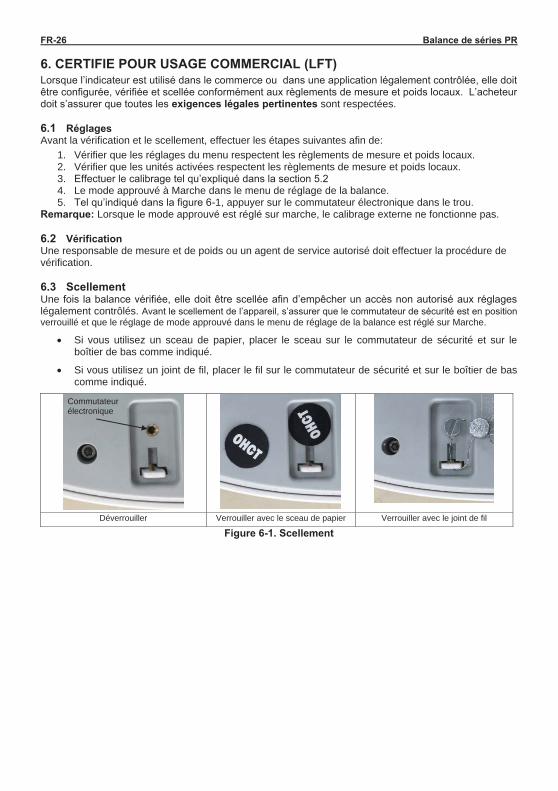
FR-26 Balance de séries PR 6. CERTIFIE POUR USAGE COMMERCIAL (LFT) Lorsque l’indicateur est utilisé dans le commerce ou dans une application légalement contrôlée, elle doit être configurée, vérifiée et scellée conformément aux règlements de mesure et poids locaux. L’acheteur doit s’assurer que toutes les exigences légales pertinentes sont respectées. 6.1 Réglages Avant la vérification et le scellement, effectuer les étapes suivantes afin de:
1. Vérifier que les réglages du menu respectent les règlements de mesure et poids locaux. 2. Vérifier que les unités activées respectent les règlements de mesure et poids locaux. 3. Effectuer le calibrage tel qu’expliqué dans la section 5.2 4. Le mode approuvé à Marche dans le menu de réglage de la balance. 5. Tel qu’indiqué dans la figure 6-1, appuyer sur le commutateur électronique dans le trou.
Remarque: Lorsque le mode approuvé est réglé sur marche, le calibrage externe ne fonctionne pas. 6.2 Vérification Une responsable de mesure et de poids ou un agent de service autorisé doit effectuer la procédure de vérification. 6.3 Scellement Une fois la balance vérifiée, elle doit être scellée afin d’empêcher un accès non autorisé aux réglages légalement contrôlés. Avant le scellement de l’appareil, s’assurer que le commutateur de sécurité est en position verrouillé et que le réglage de mode approuvé dans le menu de réglage de la balance est réglé sur Marche.
Si vous utilisez un sceau de papier, placer le sceau sur le commutateur de sécurité et sur le boîtier de bas comme indiqué.
Si vous utilisez un joint de fil, placer le fil sur le commutateur de sécurité et sur le boîtier de bas comme indiqué.
Déverrouiller Verrouiller avec le sceau de papier Verrouiller avec le joint de fil
Figure 6-1. Scellement
Commutateur électronique
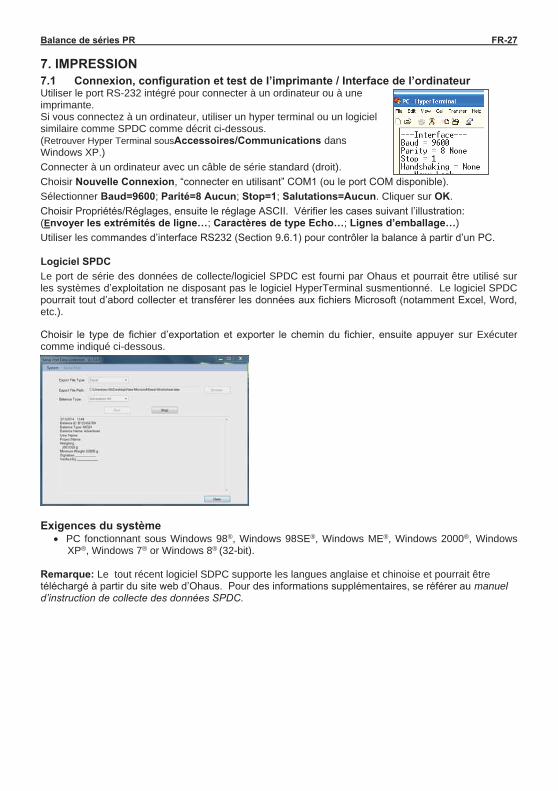
Balance de séries PR FR-27 7. IMPRESSION 7.1 Connexion, configuration et test de l’imprimante / Interface de l’ordinateur Utiliser le port RS-232 intégré pour connecter à un ordinateur ou à une imprimante. Si vous connectez à un ordinateur, utiliser un hyper terminal ou un logiciel similaire comme SPDC comme décrit ci-dessous. (Retrouver Hyper Terminal sousAccessoires/Communications dans Windows XP.) Connecter à un ordinateur avec un câble de série standard (droit). Choisir Nouvelle Connexion, “connecter en utilisant” COM1 (ou le port COM disponible). Sélectionner Baud=9600; Parité=8 Aucun; Stop=1; Salutations=Aucun. Cliquer sur OK. Choisir Propriétés/Réglages, ensuite le réglage ASCII. Vérifier les cases suivant l’illustration: (Envoyer les extrémités de ligne…; Caractères de type Echo…; Lignes d’emballage…) Utiliser les commandes d’interface RS232 (Section 9.6.1) pour contrôler la balance à partir d’un PC.
Logiciel SPDC Le port de série des données de collecte/logiciel SPDC est fourni par Ohaus et pourrait être utilisé sur les systèmes d’exploitation ne disposant pas le logiciel HyperTerminal susmentionné. Le logiciel SPDC pourrait tout d’abord collecter et transférer les données aux fichiers Microsoft (notamment Excel, Word, etc.).
Choisir le type de fichier d’exportation et exporter le chemin du fichier, ensuite appuyer sur Exécuter comme indiqué ci-dessous.
Exigences du système PC fonctionnant sous Windows 98®, Windows 98SE®, Windows ME®, Windows 2000®, Windows
XP®, Windows 7® or Windows 8® (32-bit). Remarque: Le tout récent logiciel SDPC supporte les langues anglaise et chinoise et pourrait être téléchargé à partir du site web d’Ohaus. Pour des informations supplémentaires, se référer au manuel d’instruction de collecte des données SPDC.
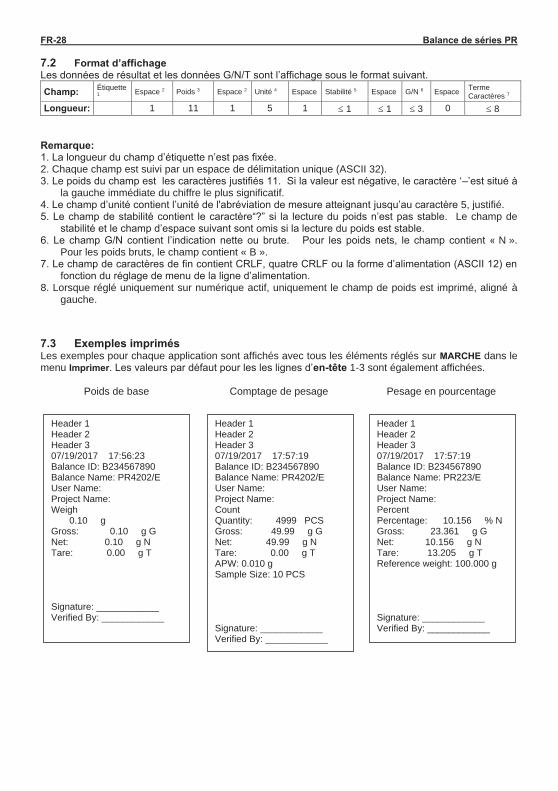
FR-28 Balance de séries PR 7.2 Format d’affichage Les données de résultat et les données G/N/T sont l’affichage sous le format suivant. Champ: Étiquette
1 Espace 2 Poids 3 Espace 2 Unité 4 Espace Stabilité 5 Espace G/N 6 Espace Terme Caractères 7
Longueur: 1 11 1 5 1 1 1 3 0 8 Remarque: 1. La longueur du champ d’étiquette n’est pas fixée. 2. Chaque champ est suivi par un espace de délimitation unique (ASCII 32). 3. Le poids du champ est les caractères justifiés 11. Si la valeur est négative, le caractère ‘–’est situé à
la gauche immédiate du chiffre le plus significatif. 4. Le champ d’unité contient l’unité de l'abréviation de mesure atteignant jusqu’au caractère 5, justifié. 5. Le champ de stabilité contient le caractère“?” si la lecture du poids n’est pas stable. Le champ de
stabilité et le champ d’espace suivant sont omis si la lecture du poids est stable. 6. Le champ G/N contient l’indication nette ou brute. Pour les poids nets, le champ contient « N ».
Pour les poids bruts, le champ contient « B ». 7. Le champ de caractères de fin contient CRLF, quatre CRLF ou la forme d’alimentation (ASCII 12) en
fonction du réglage de menu de la ligne d’alimentation. 8. Lorsque réglé uniquement sur numérique actif, uniquement le champ de poids est imprimé, aligné à
gauche.
7.3 Exemples imprimés Les exemples pour chaque application sont affichés avec tous les éléments réglés sur MARCHE dans le menu Imprimer. Les valeurs par défaut pour les les lignes d’en-tête 1-3 sont également affichées.
Poids de base Comptage de pesage Pesage en pourcentage
Header 1 Header 2 Header 3 07/19/2017 17:56:23 Balance ID: B234567890 Balance Name: PR4202/E User Name: Project Name: Weigh 0.10 g Gross: 0.10 g G Net: 0.10 g N Tare: 0.00 g T Signature: ____________ Verified By: ____________
Header 1 Header 2 Header 3 07/19/2017 17:57:19 Balance ID: B234567890 Balance Name: PR4202/E User Name: Project Name: Count Quantity: 4999 PCS Gross: 49.99 g G Net: 49.99 g N Tare: 0.00 g T APW: 0.010 g Sample Size: 10 PCS Signature: ____________ Verified By: ____________
Header 1 Header 2 Header 3 07/19/2017 17:57:19 Balance ID: B234567890 Balance Name: PR223/E User Name: Project Name: Percent Percentage: 10.156 % N Gross: 23.361 g G Net: 10.156 g N Tare: 13.205 g T Reference weight: 100.000 g Signature: ____________ Verified By: ____________
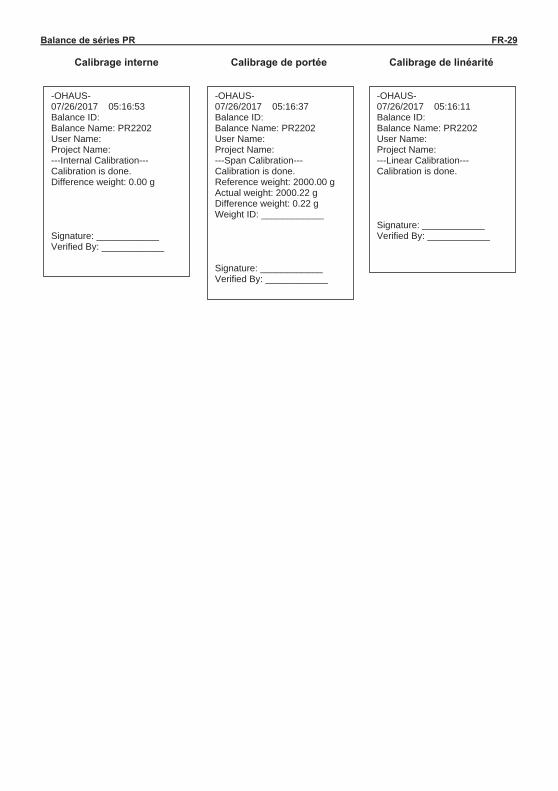
Balance de séries PR FR-29
Calibrage interne Calibrage de portée Calibrage de linéarité
-OHAUS- 07/26/2017 05:16:53 Balance ID: Balance Name: PR2202 User Name: Project Name: ---Internal Calibration--- Calibration is done. Difference weight: 0.00 g Signature: ____________ Verified By: ____________
-OHAUS- 07/26/2017 05:16:37 Balance ID: Balance Name: PR2202 User Name: Project Name: ---Span Calibration--- Calibration is done. Reference weight: 2000.00 g Actual weight: 2000.22 g Difference weight: 0.22 g Weight ID: ____________ Signature: ____________ Verified By: ____________
-OHAUS- 07/26/2017 05:16:11 Balance ID: Balance Name: PR2202 User Name: Project Name: ---Linear Calibration--- Calibration is done. Signature: ____________ Verified By: ____________
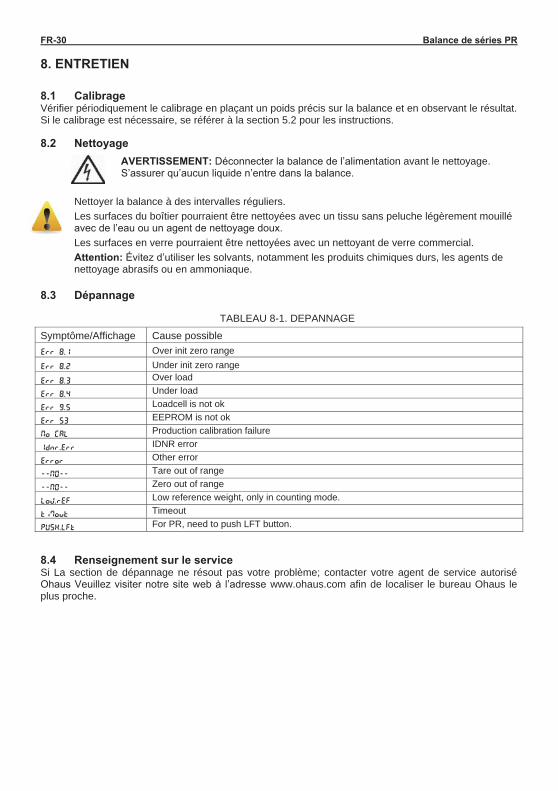
FR-30 Balance de séries PR 8. ENTRETIEN 8.1 Calibrage Vérifier périodiquement le calibrage en plaçant un poids précis sur la balance et en observant le résultat. Si le calibrage est nécessaire, se référer à la section 5.2 pour les instructions. 8.2 Nettoyage
AVERTISSEMENT: Déconnecter la balance de l’alimentation avant le nettoyage. S’assurer qu’aucun liquide n’entre dans la balance.
Nettoyer la balance à des intervalles réguliers. Les surfaces du boîtier pourraient être nettoyées avec un tissu sans peluche légèrement mouillé avec de l’eau ou un agent de nettoyage doux. Les surfaces en verre pourraient être nettoyées avec un nettoyant de verre commercial. Attention: Évitez d’utiliser les solvants, notamment les produits chimiques durs, les agents de nettoyage abrasifs ou en ammoniaque.
8.3 Dépannage
TABLEAU 8-1. DEPANNAGE
Symptôme/Affichage Cause possible Err 8.1 Over init zero range Err 8.2 Under init zero range Err 8.3 Over load
Err 8.4 Under load
Err 9.5 Loadcell is not ok
Err 53 EEPROM is not ok
No CAL Production calibration failure
IDnr.Err IDNR error
Error Other error
--NO-- Tare out of range
--NO-- Zero out of range
LoW.rEF Low reference weight, only in counting mode.
tiMout Timeout
PUSH.LFt For PR, need to push LFT button. 8.4 Renseignement sur le service Si La section de dépannage ne résout pas votre problème; contacter votre agent de service autorisé Ohaus Veuillez visiter notre site web à l’adresse www.ohaus.com afin de localiser le bureau Ohaus le plus proche.
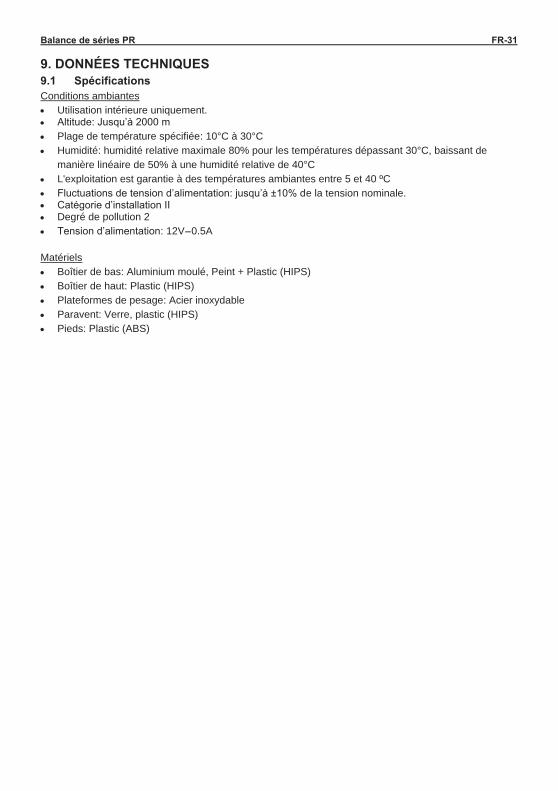
Balance de séries PR FR-31 9. DONNÉES TECHNIQUES 9.1 Spécifications Conditions ambiantes Utilisation intérieure uniquement. Altitude: Jusqu’à 2000 m Plage de température spécifiée: 10°C à 30°C Humidité: humidité relative maximale 80% pour les températures dépassant 30°C, baissant de
manière linéaire de 50% à une humidité relative de 40°C L'exploitation est garantie à des températures ambiantes entre 5 et 40 ºC Fluctuations de tension d’alimentation: jusqu’à ±10% de la tension nominale. Catégorie d’installation II Degré de pollution 2 Tension d’alimentation: 12V 0.5A
Matériels Boîtier de bas: Aluminium moulé, Peint + Plastic (HIPS) Boîtier de haut: Plastic (HIPS) Plateformes de pesage: Acier inoxydable Paravent: Verre, plastic (HIPS) Pieds: Plastic (ABS)
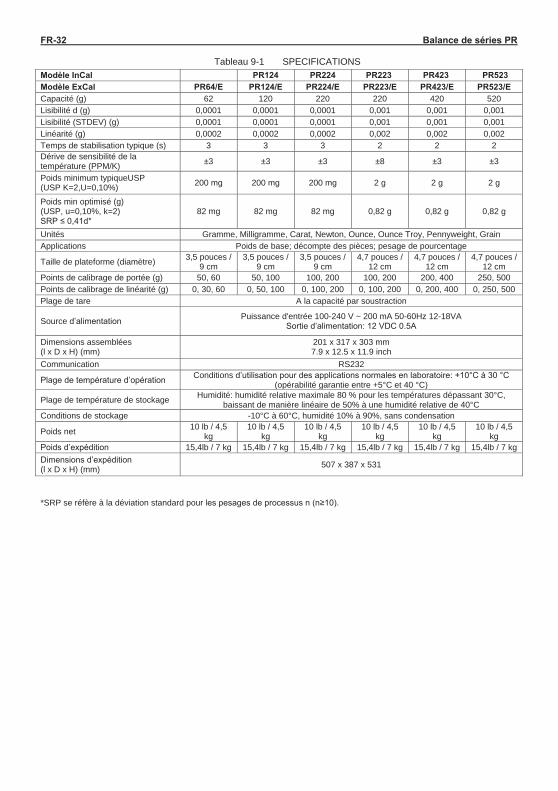
FR-32 Balance de séries PR
Tableau 9-1 SPECIFICATIONS Modèle InCal PR124 PR224 PR223 PR423 PR523 Modèle ExCal PR64/E PR124/E PR224/E PR223/E PR423/E PR523/E Capacité (g) 62 120 220 220 420 520 Lisibilité d (g) 0,0001 0,0001 0,0001 0,001 0,001 0,001 Lisibilité (STDEV) (g) 0,0001 0,0001 0,0001 0,001 0,001 0,001 Linéarité (g) 0,0002 0,0002 0,0002 0,002 0,002 0,002 Temps de stabilisation typique (s) 3 3 3 2 2 2 Dérive de sensibilité de la température (PPM/K) ±3 ±3 ±3 ±8 ±3 ±3
Poids minimum typiqueUSP (USP K=2,U=0,10%) 200 mg 200 mg 200 mg 2 g 2 g 2 g
Poids min optimisé (g) (USP, u=0,10%, k=2) SRP ≤ 0,41d*
82 mg 82 mg 82 mg 0,82 g 0,82 g 0,82 g
Unités Gramme, Milligramme, Carat, Newton, Ounce, Ounce Troy, Pennyweight, Grain Applications Poids de base; décompte des pièces; pesage de pourcentage
Taille de plateforme (diamètre) 3,5 pouces / 9 cm
3,5 pouces / 9 cm
3,5 pouces / 9 cm
4,7 pouces / 12 cm
4,7 pouces / 12 cm
4,7 pouces / 12 cm
Points de calibrage de portée (g) 50, 60 50, 100 100, 200 100, 200 200, 400 250, 500 Points de calibrage de linéarité (g) 0, 30, 60 0, 50, 100 0, 100, 200 0, 100, 200 0, 200, 400 0, 250, 500 Plage de tare A la capacité par soustraction
Source d’alimentation Puissance d'entrée 100-240 V ~ 200 mA 50-60Hz 12-18VA Sortie d’alimentation: 12 VDC 0.5A
Dimensions assemblées (l x D x H) (mm)
201 x 317 x 303 mm 7.9 x 12.5 x 11.9 inch
Communication RS232
Plage de température d’opération Conditions d’utilisation pour des applications normales en laboratoire: +10°C à 30 °C (opérabilité garantie entre +5°C et 40 °C)
Plage de température de stockage Humidité: humidité relative maximale 80 % pour les températures dépassant 30°C, baissant de manière linéaire de 50% à une humidité relative de 40°C
Conditions de stockage -10°C à 60°C, humidité 10% à 90%, sans condensation
Poids net 10 lb / 4,5 kg
10 lb / 4,5 kg
10 lb / 4,5 kg
10 lb / 4,5 kg
10 lb / 4,5 kg
10 lb / 4,5 kg
Poids d’expédition 15,4lb / 7 kg 15,4lb / 7 kg 15,4lb / 7 kg 15,4lb / 7 kg 15,4lb / 7 kg 15,4lb / 7 kg Dimensions d’expédition (l x D x H) (mm) 507 x 387 x 531
*SRP se réfère à la déviation standard pour les pesages de processus n (n≥10).
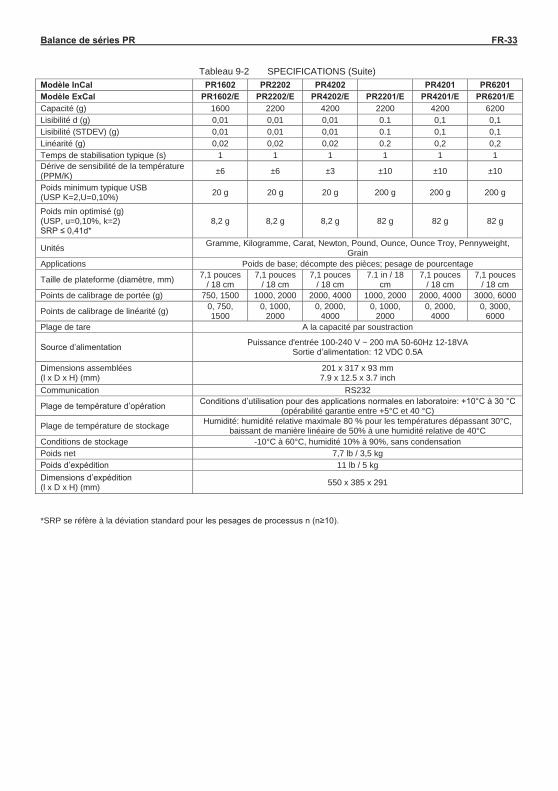
Balance de séries PR FR-33
Tableau 9-2 SPECIFICATIONS (Suite) Modèle InCal PR1602 PR2202 PR4202 PR4201 PR6201 Modèle ExCal PR1602/E PR2202/E PR4202/E PR2201/E PR4201/E PR6201/E Capacité (g) 1600 2200 4200 2200 4200 6200 Lisibilité d (g) 0,01 0,01 0,01 0.1 0,1 0,1 Lisibilité (STDEV) (g) 0,01 0,01 0,01 0.1 0,1 0,1 Linéarité (g) 0,02 0,02 0,02 0.2 0,2 0,2 Temps de stabilisation typique (s) 1 1 1 1 1 1 Dérive de sensibilité de la température (PPM/K) ±6 ±6 ±3 ±10 ±10 ±10
Poids minimum typique USB (USP K=2,U=0,10%) 20 g 20 g 20 g 200 g 200 g 200 g
Poids min optimisé (g) (USP, u=0,10%, k=2) SRP ≤ 0,41d*
8,2 g 8,2 g 8,2 g 82 g 82 g 82 g
Unités Gramme, Kilogramme, Carat, Newton, Pound, Ounce, Ounce Troy, Pennyweight, Grain
Applications Poids de base; décompte des pièces; pesage de pourcentage
Taille de plateforme (diamètre, mm) 7,1 pouces / 18 cm
7,1 pouces / 18 cm
7,1 pouces / 18 cm
7.1 in / 18 cm
7,1 pouces / 18 cm
7,1 pouces / 18 cm
Points de calibrage de portée (g) 750, 1500 1000, 2000 2000, 4000 1000, 2000 2000, 4000 3000, 6000
Points de calibrage de linéarité (g) 0, 750, 1500
0, 1000, 2000
0, 2000, 4000
0, 1000, 2000
0, 2000, 4000
0, 3000, 6000
Plage de tare A la capacité par soustraction
Source d’alimentation Puissance d'entrée 100-240 V ~ 200 mA 50-60Hz 12-18VA Sortie d’alimentation: 12 VDC 0.5A
Dimensions assemblées (l x D x H) (mm)
201 x 317 x 93 mm 7.9 x 12.5 x 3.7 inch
Communication RS232
Plage de température d’opération Conditions d’utilisation pour des applications normales en laboratoire: +10°C à 30 °C (opérabilité garantie entre +5°C et 40 °C)
Plage de température de stockage Humidité: humidité relative maximale 80 % pour les températures dépassant 30°C, baissant de manière linéaire de 50% à une humidité relative de 40°C
Conditions de stockage -10°C à 60°C, humidité 10% à 90%, sans condensation Poids net 7,7 lb / 3,5 kg Poids d’expédition 11 lb / 5 kg Dimensions d’expédition (l x D x H) (mm) 550 x 385 x 291
*SRP se réfère à la déviation standard pour les pesages de processus n (n≥10).
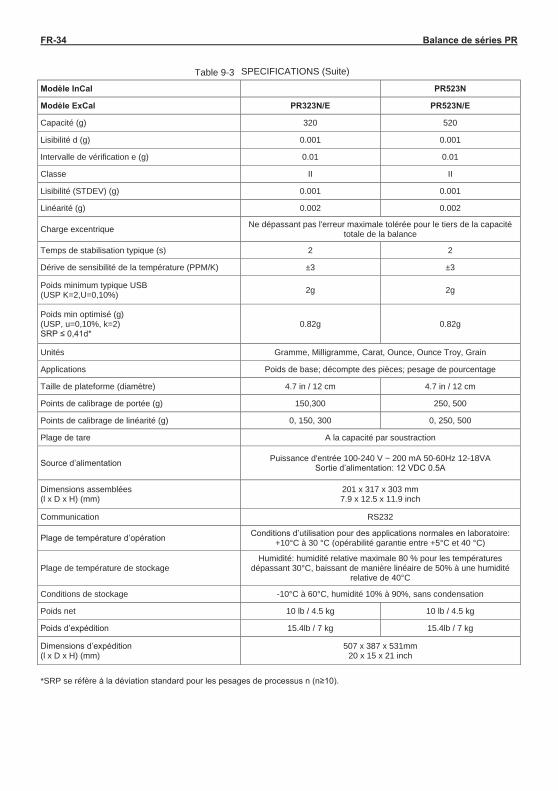
FR-34 Balance de séries PR
Table 9-3
Modèle InCal PR523N
Modèle ExCal PR323N/E PR523N/E
Capacité (g) 320 520
Lisibilité d (g) 0.001 0.001
Intervalle de vérification e (g) 0.01 0.01
Classe II II
Lisibilité (STDEV) (g) 0.001 0.001
Linéarité (g) 0.002 0.002
Charge excentrique Ne dépassant pas l'erreur maximale tolérée pour le tiers de la capacité totale de la balance
Temps de stabilisation typique (s) 2 2
Dérive de sensibilité de la température (PPM/K) ±3 ±3
Poids minimum typique USB(USP K=2,U=0,10%) 2g 2g
Poids min optimisé (g)(USP, u=0,10%, k=2)SRP ≤ 0,41d*
0.82g 0.82g
Unités Gramme, Milligramme, Carat, Ounce, Ounce Troy, Grain
Applications Poids de base; décompte des pièces; pesage de pourcentage
Taille de plateforme (diamètre) 4.7 in / 12 cm 4.7 in / 12 cm
Points de calibrage de portée (g) 150,300 250, 500
Points de calibrage de linéarité (g) 0, 150, 300 0, 250, 500
Plage de tare A la capacité par soustraction
Source d’alimentation Puissance d'entrée 100-240 V ~ 200 mA 50-60Hz 12-18VASortie d’alimentation: 12 VDC 0.5A
Dimensions assemblées(l x D x H) (mm)
201 x 317 x 303 mm7.9 x 12.5 x 11.9 inch
Communication RS232
Plage de température d’opération Conditions d’utilisation pour des applications normales en laboratoire: +10°C à 30 °C (opérabilité garantie entre +5°C et 40 °C)
Plage de température de stockageHumidité: humidité relative maximale 80 % pour les températures
dépassant 30°C, baissant de manière linéaire de 50% à une humidité relative de 40°C
Conditions de stockage -10°C à 60°C, humidité 10% à 90%, sans condensation
Poids net 10 lb / 4.5 kg 10 lb / 4.5 kg
Poids d’expédition 15.4lb / 7 kg 15.4lb / 7 kg
Dimensions d’expédition(l x D x H) (mm)
507 x 387 x 531mm20 x 15 x 21 inch
*SRP se réfère à la déviation standard pour les pesages de processus n (n≥10).
SPECIFICATIONS (Suite)
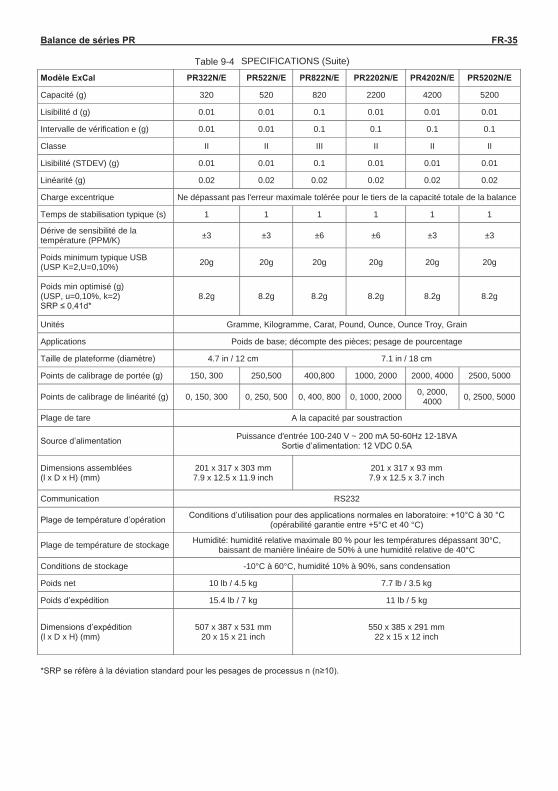
Balance de séries PR FR-35
Table 9-4
Modèle ExCal PR322N/E PR522N/E PR822N/E PR2202N/E PR4202N/E PR5202N/E
Capacité (g) 320 520 820 2200 4200 5200
Lisibilité d (g) 0.01 0.01 0.1 0.01 0.01 0.01
Intervalle de vérification e (g) 0.01 0.01 0.1 0.1 0.1 0.1
Classe II II III II II II
Lisibilité (STDEV) (g) 0.01 0.01 0.1 0.01 0.01 0.01
Linéarité (g) 0.02 0.02 0.02 0.02 0.02 0.02
Charge excentrique Ne dépassant pas l'erreur maximale tolérée pour le tiers de la capacité totale de la balance
Temps de stabilisation typique (s) 1 1 1 1 1 1
Dérive de sensibilité de la température (PPM/K) ±3 ±3 ±6 ±6 ±3 ±3
Poids minimum typique USB(USP K=2,U=0,10%) 20g 20g 20g 20g 20g 20g
Poids min optimisé (g)(USP, u=0,10%, k=2)SRP ≤ 0,41d*
8.2g 8.2g 8.2g 8.2g 8.2g 8.2g
Unités Gramme, Kilogramme, Carat, Pound, Ounce, Ounce Troy, Grain
Applications Poids de base; décompte des pièces; pesage de pourcentage
Taille de plateforme (diamètre) 4.7 in / 12 cm 7.1 in / 18 cm
Points de calibrage de portée (g) 150, 300 250,500 400,800 1000, 2000 2000, 4000 2500, 5000
Points de calibrage de linéarité (g) 0, 150, 300 0, 250, 500 0, 400, 800 0, 1000, 2000 0, 2000, 4000 0, 2500, 5000
Plage de tare A la capacité par soustraction
Source d’alimentation Puissance d'entrée 100-240 V ~ 200 mA 50-60Hz 12-18VASortie d’alimentation: 12 VDC 0.5A
Dimensions assemblées(l x D x H) (mm)
201 x 317 x 303 mm7.9 x 12.5 x 11.9 inch
201 x 317 x 93 mm7.9 x 12.5 x 3.7 inch
Communication RS232
Plage de température d’opération Conditions d’utilisation pour des applications normales en laboratoire: +10°C à 30 °C (opérabilité garantie entre +5°C et 40 °C)
Plage de température de stockage Humidité: humidité relative maximale 80 % pour les températures dépassant 30°C, baissant de manière linéaire de 50% à une humidité relative de 40°C
Conditions de stockage -10°C à 60°C, humidité 10% à 90%, sans condensation
Poids net 10 lb / 4.5 kg 7.7 lb / 3.5 kg
Poids d’expédition 15.4 lb / 7 kg 11 lb / 5 kg
Dimensions d’expédition(l x D x H) (mm)
507 x 387 x 531 mm20 x 15 x 21 inch
550 x 385 x 291 mm22 x 15 x 12 inch
*SRP se réfère à la déviation standard pour les pesages de processus n (n≥10).
SPECIFICATIONS (Suite)
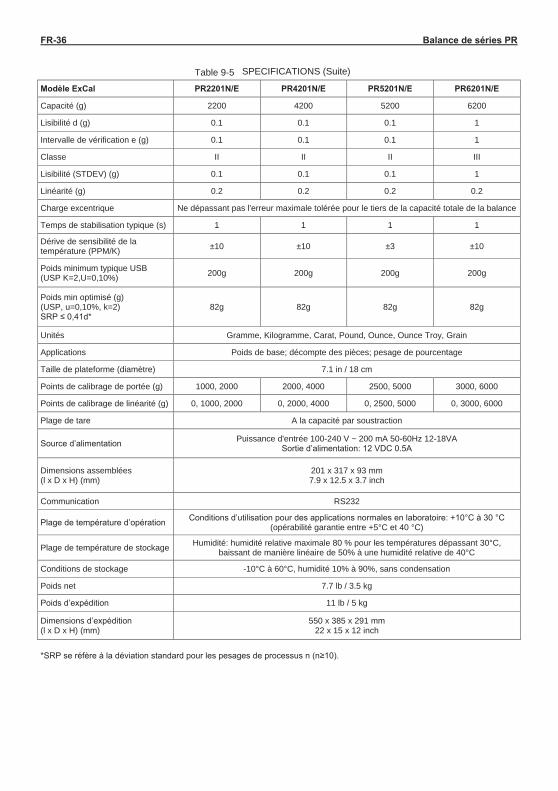
FR-36 Balance de séries PR
Table 9-5
Modèle ExCal PR2201N/E PR4201N/E PR5201N/E PR6201N/E
Capacité (g) 2200 4200 5200 6200
Lisibilité d (g) 0.1 0.1 0.1 1
Intervalle de vérification e (g) 0.1 0.1 0.1 1
Classe II II II III
Lisibilité (STDEV) (g) 0.1 0.1 0.1 1
Linéarité (g) 0.2 0.2 0.2 0.2
Charge excentrique Ne dépassant pas l'erreur maximale tolérée pour le tiers de la capacité totale de la balance
Temps de stabilisation typique (s) 1 1 1 1
Dérive de sensibilité de la température (PPM/K) ±10 ±10 ±3 ±10
Poids minimum typique USB(USP K=2,U=0,10%) 200g 200g 200g 200g
Poids min optimisé (g)(USP, u=0,10%, k=2)SRP ≤ 0,41d*
82g 82g 82g 82g
Unités Gramme, Kilogramme, Carat, Pound, Ounce, Ounce Troy, Grain
Applications Poids de base; décompte des pièces; pesage de pourcentage
Taille de plateforme (diamètre) 7.1 in / 18 cm
Points de calibrage de portée (g) 1000, 2000 2000, 4000 2500, 5000 3000, 6000
Points de calibrage de linéarité (g) 0, 1000, 2000 0, 2000, 4000 0, 2500, 5000 0, 3000, 6000
Plage de tare A la capacité par soustraction
Source d’alimentation Puissance d'entrée 100-240 V ~ 200 mA 50-60Hz 12-18VASortie d’alimentation: 12 VDC 0.5A
Dimensions assemblées(l x D x H) (mm)
201 x 317 x 93 mm7.9 x 12.5 x 3.7 inch
Communication RS232
Plage de température d’opération Conditions d’utilisation pour des applications normales en laboratoire: +10°C à 30 °C (opérabilité garantie entre +5°C et 40 °C)
Plage de température de stockage Humidité: humidité relative maximale 80 % pour les températures dépassant 30°C, baissant de manière linéaire de 50% à une humidité relative de 40°C
Conditions de stockage -10°C à 60°C, humidité 10% à 90%, sans condensation
Poids net 7.7 lb / 3.5 kg
Poids d’expédition 11 lb / 5 kg
Dimensions d’expédition(l x D x H) (mm)
550 x 385 x 291 mm22 x 15 x 12 inch
*SRP se réfère à la déviation standard pour les pesages de processus n (n≥10).
SPECIFICATIONS (Suite)
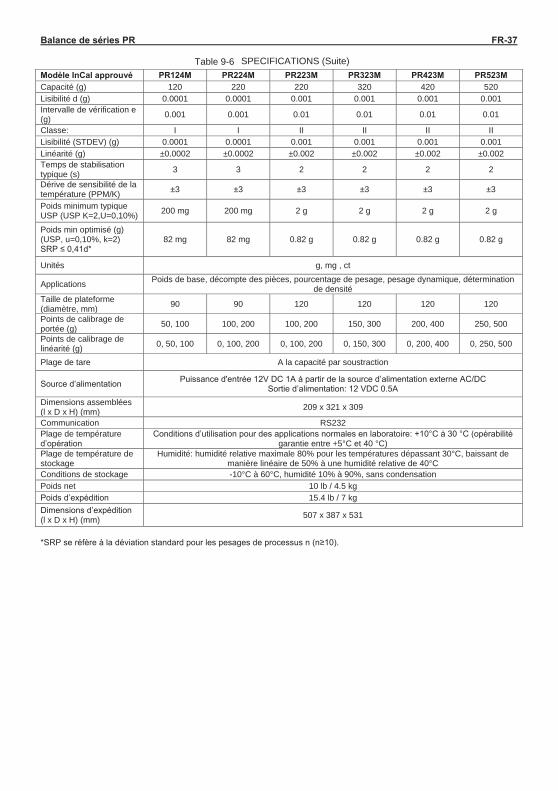
Balance de séries PR FR-37
Table 9-6 Modèle InCal approuvé PR124M PR224M PR223M PR323M PR423M PR523MCapacité (g) 120 220 220 320 420 520Lisibilité d (g) 0.0001 0.0001 0.001 0.001 0.001 0.001Intervalle de vérification e (g) 0.001 0.001 0.01 0.01 0.01 0.01
Classe: I I II II II IILisibilité (STDEV) (g) 0.0001 0.0001 0.001 0.001 0.001 0.001Linéarité (g) ±0.0002 ±0.0002 ±0.002 ±0.002 ±0.002 ±0.002Temps de stabilisation typique (s) 3 3 2 2 2 2
Dérive de sensibilité de la température (PPM/K) ±3 ±3 ±3 ±3 ±3 ±3
Poids minimum typique USP (USP K=2,U=0,10%) 200 mg 200 mg 2 g 2 g 2 g 2 g
Poids min optimisé (g)(USP, u=0,10%, k=2)SRP ≤ 0,41d*
82 mg 82 mg 0.82 g 0.82 g 0.82 g 0.82 g
Unités g, mg , ct
Applications Poids de base, décompte des pièces, pourcentage de pesage, pesage dynamique, détermination de densité
Taille de plateforme (diamètre, mm) 90 90 120 120 120 120
Points de calibrage de portée (g) 50, 100 100, 200 100, 200 150, 300 200, 400 250, 500
Points de calibrage de linéarité (g) 0, 50, 100 0, 100, 200 0, 100, 200 0, 150, 300 0, 200, 400 0, 250, 500
Plage de tare A la capacité par soustraction
Source d’alimentation Puissance d'entrée 12V DC 1A à partir de la source d’alimentation externe AC/DCSortie d’alimentation: 12 VDC 0.5A
Dimensions assemblées (l x D x H) (mm) 209 x 321 x 309
Communication RS232Plage de température d’opération
Conditions d’utilisation pour des applications normales en laboratoire: +10°C à 30 °C (opérabilité garantie entre +5°C et 40 °C)
Plage de température de stockage
Humidité: humidité relative maximale 80% pour les températures dépassant 30°C, baissant de manière linéaire de 50% à une humidité relative de 40°C
Conditions de stockage -10°C à 60°C, humidité 10% à 90%, sans condensationPoids net 10 lb / 4.5 kgPoids d’expédition 15.4 lb / 7 kgDimensions d’expédition (l x D x H) (mm) 507 x 387 x 531
*SRP se réfère à la déviation standard pour les pesages de processus n (n≥10).
SPECIFICATIONS (Suite)
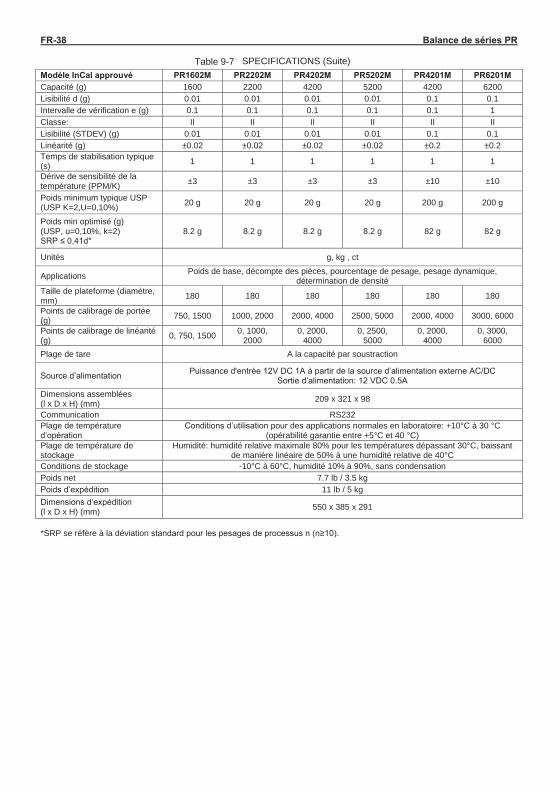
FR-38 Balance de séries PR
Table 9-7 Modèle InCal approuvé PR1602M PR2202M PR4202M PR5202M PR4201M PR6201MCapacité (g) 1600 2200 4200 5200 4200 6200Lisibilité d (g) 0.01 0.01 0.01 0.01 0.1 0.1Intervalle de vérification e (g) 0.1 0.1 0.1 0.1 0.1 1Classe: II II II II II IILisibilité (STDEV) (g) 0.01 0.01 0.01 0.01 0.1 0.1Linéarité (g) ±0.02 ±0.02 ±0.02 ±0.02 ±0.2 ±0.2Temps de stabilisation typique (s) 1 1 1 1 1 1
Dérive de sensibilité de la température (PPM/K) ±3 ±3 ±3 ±3 ±10 ±10
Poids minimum typique USP (USP K=2,U=0,10%) 20 g 20 g 20 g 20 g 200 g 200 g
Poids min optimisé (g)(USP, u=0,10%, k=2)SRP ≤ 0,41d*
8.2 g 8.2 g 8.2 g 8.2 g 82 g 82 g
Unités g, kg , ct
Applications Poids de base, décompte des pièces, pourcentage de pesage, pesage dynamique, détermination de densité
Taille de plateforme (diamètre, mm) 180 180 180 180 180 180
Points de calibrage de portée (g) 750, 1500 1000, 2000 2000, 4000 2500, 5000 2000, 4000 3000, 6000
Points de calibrage de linéarité (g) 0, 750, 1500 0, 1000,
20000, 2000,
40000, 2500,
50000, 2000,
40000, 3000,
6000Plage de tare A la capacité par soustraction
Source d’alimentation Puissance d'entrée 12V DC 1A à partir de la source d’alimentation externe AC/DCSortie d’alimentation: 12 VDC 0.5A
Dimensions assemblées (l x D x H) (mm) 209 x 321 x 98
Communication RS232Plage de température d’opération
Conditions d’utilisation pour des applications normales en laboratoire: +10°C à 30 °C (opérabilité garantie entre +5°C et 40 °C)
Plage de température de stockage
Humidité: humidité relative maximale 80% pour les températures dépassant 30°C, baissant de manière linéaire de 50% à une humidité relative de 40°C
Conditions de stockage -10°C à 60°C, humidité 10% à 90%, sans condensationPoids net 7.7 lb / 3.5 kgPoids d’expédition 11 lb / 5 kgDimensions d’expédition (l x D x H) (mm) 550 x 385 x 291
*SRP se réfère à la déviation standard pour les pesages de processus n (n≥10).
SPECIFICATIONS (Suite)

Balance de séries PR FR-39 9.2 Schémas et dimensions Dimensions de l’assemblage entier
Figure 9-1 0,001 g / 0,0001 g modèle
Figure 9-2 0,1 g / 0,01 g modèle
11.93
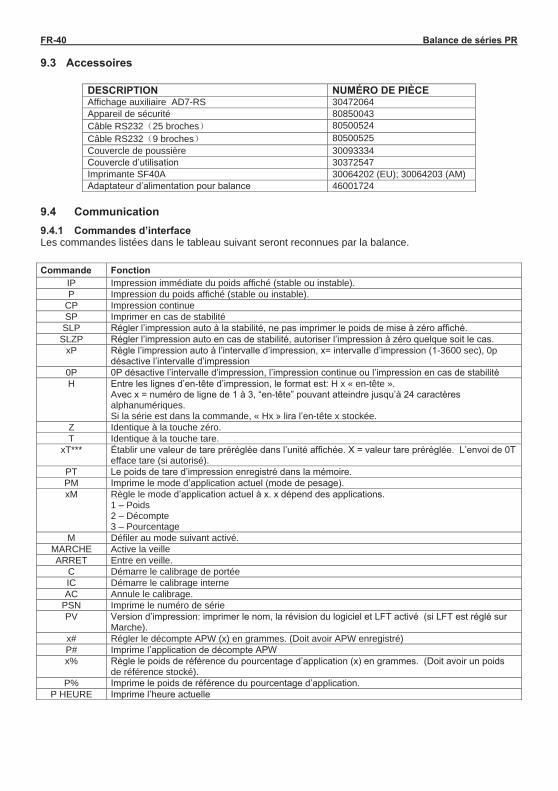
FR-40 Balance de séries PR 9.3 Accessoires
DESCRIPTION NUMÉRO DE PIÈCE Affichage auxiliaire AD7-RS 30472064 Appareil de sécurité 80850043 Câble RS232 25 broches 80500524 Câble RS232 9 broches 80500525 Couvercle de poussière 30093334 Couvercle d’utilisation 30372547 Imprimante SF40A 30064202 (EU); 30064203 (AM) Adaptateur d’alimentation pour balance 46001724
9.4 Communication
9.4.1 Commandes d’interface Les commandes listées dans le tableau suivant seront reconnues par la balance. Commande Fonction
IP Impression immédiate du poids affiché (stable ou instable). P Impression du poids affiché (stable ou instable).
CP Impression continue SP Imprimer en cas de stabilité
SLP Régler l’impression auto à la stabilité, ne pas imprimer le poids de mise à zéro affiché. SLZP Régler l’impression auto en cas de stabilité, autoriser l’impression à zéro quelque soit le cas.
xP Règle l’impression auto à l’intervalle d’impression, x= intervalle d’impression (1-3600 sec), 0p désactive l’intervalle d’impression
0P 0P désactive l’intervalle d’impression, l’impression continue ou l’impression en cas de stabilité H Entre les lignes d’en-tête d’impression, le format est: H x « en-tête ».
Avec x = numéro de ligne de 1 à 3, “en-tête” pouvant atteindre jusqu’à 24 caractères alphanumériques. Si la série est dans la commande, « Hx » lira l’en-tête x stockée.
Z Identique à la touche zéro. T Identique à la touche tare.
xT*** Établir une valeur de tare préréglée dans l’unité affichée. X = valeur tare préréglée. L’envoi de 0T efface tare (si autorisé).
PT Le poids de tare d’impression enregistré dans la mémoire. PM Imprime le mode d’application actuel (mode de pesage). xM Règle le mode d’application actuel à x. x dépend des applications.
1 – Poids 2 – Décompte 3 – Pourcentage
M Défiler au mode suivant activé. MARCHE Active la veille ARRET Entre en veille.
C Démarre le calibrage de portée IC Démarre le calibrage interne AC Annule le calibrage.
PSN Imprime le numéro de série PV Version d’impression: imprimer le nom, la révision du logiciel et LFT activé (si LFT est réglé sur
Marche). x# Régler le décompte APW (x) en grammes. (Doit avoir APW enregistré) P# Imprime l’application de décompte APW x% Règle le poids de référence du pourcentage d’application (x) en grammes. (Doit avoir un poids
de référence stocké). P% Imprime le poids de référence du pourcentage d’application.
P HEURE Imprime l’heure actuelle
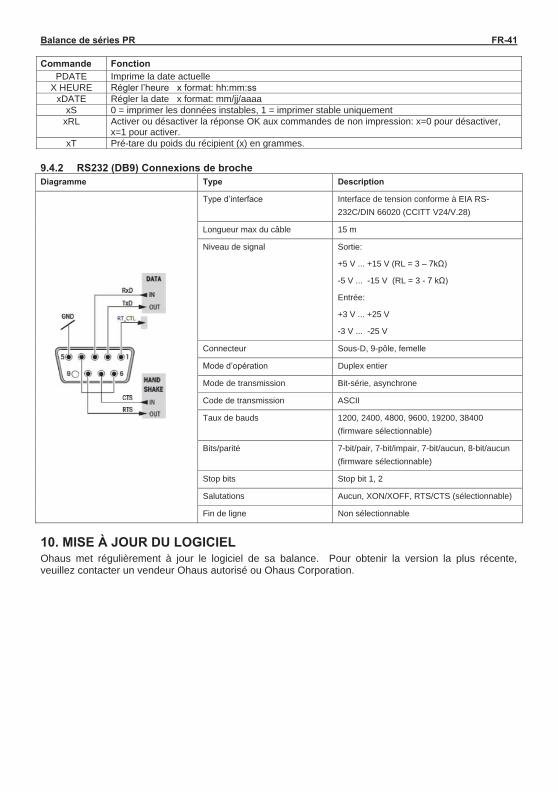
Balance de séries PR FR-41 Commande Fonction
PDATE Imprime la date actuelle X HEURE Régler l’heure x format: hh:mm:ss
xDATE Régler la date x format: mm/jj/aaaa xS 0 = imprimer les données instables, 1 = imprimer stable uniquement
xRL Activer ou désactiver la réponse OK aux commandes de non impression: x=0 pour désactiver, x=1 pour activer.
xT Pré-tare du poids du récipient (x) en grammes. 9.4.2 RS232 (DB9) Connexions de broche Diagramme Type Description
Type d’interface Interface de tension conforme à EIA RS-232C/DIN 66020 (CCITT V24/V.28)
Longueur max du câble 15 m
Niveau de signal Sortie:
+5 V ... +15 V (RL = 3 – 7kΩ)
-5 V ... -15 V (RL = 3 - 7 kΩ)
Entrée:
+3 V ... +25 V
-3 V ... -25 V
Connecteur Sous-D, 9-pôle, femelle
Mode d’opération Duplex entier
Mode de transmission Bit-série, asynchrone
Code de transmission ASCII
Taux de bauds 1200, 2400, 4800, 9600, 19200, 38400 (firmware sélectionnable)
Bits/parité 7-bit/pair, 7-bit/impair, 7-bit/aucun, 8-bit/aucun (firmware sélectionnable)
Stop bits Stop bit 1, 2
Salutations Aucun, XON/XOFF, RTS/CTS (sélectionnable)
Fin de ligne Non sélectionnable
10. MISE À JOUR DU LOGICIEL Ohaus met régulièrement à jour le logiciel de sa balance. Pour obtenir la version la plus récente, veuillez contacter un vendeur Ohaus autorisé ou Ohaus Corporation.
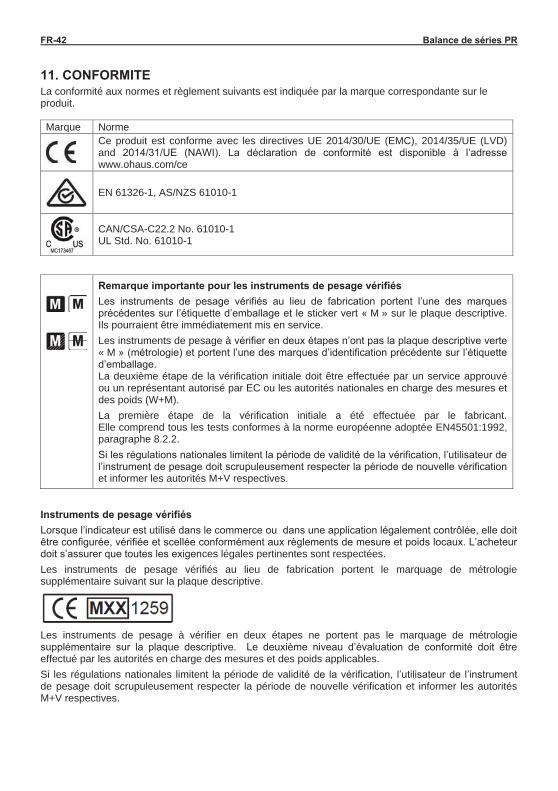
FR-42 Balance de séries PR
11. CONFORMITE La conformité aux normes et règlement suivants est indiquée par la marque correspondante sur le produit. Marque Norme
Ce produit est conforme avec les directives UE 2014/30/UE (EMC), 2014/35/UE (LVD) and 2014/31/UE (NAWI). La déclaration de conformité est disponible à l’adresse www.ohaus.com/ce
EN 61326-1, AS/NZS 61010-1
CAN/CSA-C22.2 No. 61010-1 UL Std. No. 61010-1
Remarque importante pour les instruments de pesage vérifiés Les instruments de pesage vérifiés au lieu de fabrication portent l’une des marques précédentes sur l’étiquette d’emballage et le sticker vert « M » sur le plaque descriptive. Ils pourraient être immédiatement mis en service. Les instruments de pesage à vérifier en deux étapes n’ont pas la plaque descriptive verte « M » (métrologie) et portent l’une des marques d’identification précédente sur l’étiquette d’emballage. La deuxième étape de la vérification initiale doit être effectuée par un service approuvé ou un représentant autorisé par EC ou les autorités nationales en charge des mesures et des poids (W+M). La première étape de la vérification initiale a été effectuée par le fabricant. Elle comprend tous les tests conformes à la norme européenne adoptée EN45501:1992, paragraphe 8.2.2. Si les régulations nationales limitent la période de validité de la vérification, l’utilisateur de l’instrument de pesage doit scrupuleusement respecter la période de nouvelle vérification et informer les autorités M+V respectives.
Instruments de pesage vérifiés Lorsque l’indicateur est utilisé dans le commerce ou dans une application légalement contrôlée, elle doit être configurée, vérifiée et scellée conformément aux règlements de mesure et poids locaux. L’acheteur doit s’assurer que toutes les exigences légales pertinentes sont respectées. Les instruments de pesage vérifiés au lieu de fabrication portent le marquage de métrologie supplémentaire suivant sur la plaque descriptive.
Les instruments de pesage à vérifier en deux étapes ne portent pas le marquage de métrologie supplémentaire sur la plaque descriptive. Le deuxième niveau d’évaluation de conformité doit être effectué par les autorités en charge des mesures et des poids applicables. Si les régulations nationales limitent la période de validité de la vérification, l’utilisateur de l’instrument de pesage doit scrupuleusement respecter la période de nouvelle vérification et informer les autorités M+V respectives.
Balance de séries PR FR-43 Étant donné que les exigences de vérification varient en fonction des juridictions, l’acheteur doit contacter le bureau local des poids et mesures s’ils ne maitrisent pas ces exigences.
Note FCC Cet équipement a été testé et déclaré conforme aux limites pour appareils numériques de classeA, selon la section 15 des règlements de la FCC. Ces limites sont conçues afin de fournir une protection raisonnable contre l’interférence dangereuse lorsque l’équipement est opéré dans un environnement commercial. Cet équipement, génère, utilise et pourrait radier l’énergie de fréquence radio, et si installé et utilisé en violation des instructions, pourrait causer une interférence dangereuse aux communications radio. L’opération de cet équipement dans une zone résidentielle pourrait causer des interférences dangereuses que l’utilisateur devrait réparer à ses propres frais.
Note industrielle concernant le Canada Cet appareil numérique de classe A est conforme avec la norme canadienne ICES-003. Enregistrement ISO 9001 En1994, Ohaus Corporation, USA a reçu le certificat d’enregistrement à ISO 9001 par le par le Bureau Veritas Quality International (BVQI), confirmant que le système de gestion de la qualité d’Ohaus est conforme avec les exigences de la norme ISO 9001. Le jeudi 21 juin 2012, Ohaus Corporation USA a renouvelé son enregistrement à la norme ISO 9001:2008.
Ce produit est conforme avec la directive 2012/19/UE (WEEE). Veuillez éliminer ce produit conformément aux règlements locaux dans le point de collecte spécifié pour les équipements électriques et électroniques.
Pour les instructions de mise au rebut en Europe, veuillez se référer à www.ohaus.com/weee.

FR-44 Balance de séries PR
GARANTIE LIMITÉE
Les produits Ohaus sont garantis contre les défaillances dans les matériels et la fabrication à partir de la date de livraison jusqu’à la couverture entière de la période de garantie. Pendant la période de garantie, Ohaus réparera gratuitement, selon son appréciation ou remplacera tous les composants défectueux , à condition que le produit soit retourné à Ohaus et le fret prépayé.
La présente garantie devient nulle si le produit est endommagé par accident ou par mauvaise utilisation, est exposé aux matériels radioactifs ou corrosifs, comporte des corps étrangers ou suite à une modification ou une réparation par des personnes non autorisées. Outre le renvoi de la carte d’enregistrement de garantie, la période de garantie commence à la date d’expédition au revendeur autorisé. Aucune autre garantie expresse ou implicite n’est offerte par Ohaus Corporation. Ohaus Corporation décline sa responsabilité pour des dommages consécutifs.
Etant donné que la législation de garantie varie selon les états et les pays, veuillez contacter Ohaus ou votre distributeur local Ohaus pour des informations supplémentaires.
Waage PR Serie DE-1
Inhaltsverzeichnis
1. EINLEITUNG ..................................................................................................................... DE-31.1 Beschreibung ......................................................................................................................................... DE-31.2 Eigenschaften ........................................................................................................................................ DE-31.3 Definition von Signalwarnungen und Symbolen .................................................................................... DE-31.4 Sicherheitsmaßnahmen ......................................................................................................................... DE-3
2. INSTALLATION................................................................................................................. DE-42.1 Auspacken ............................................................................................................................................. DE-42.2 Standort auswählen ............................................................................................................................... DE-42.3 Nivellierung ............................................................................................................................................ DE-42.4 Stromanschluss und Akklimatisierung der Waage ................................................................................ DE-42.5 Schnittstellenanschluss .......................................................................................................................... DE-52.6 Erstkalibrierung ...................................................................................................................................... DE-5
3. BETRIEB ........................................................................................................................... DE-63.1 Überblick über das Display und den Home-Bildschirm ......................................................................... DE-63.2 Hauptfunktionen und Hauptmenü .......................................................................................................... DE-73.3 Überblick über Teile und Funktionen - Windschutzmodus .................................................................... DE-73.4 Überblick über Teile und Funktionen - Modelle ohne Windschutzschild ............................................... DE-7
4. ANWENDUNGEN ....................................................................................................................................... DE-84.1 Wägung .................................................................................................................................................. DE-84.2 Stückzählung ......................................................................................................................................... DE-84.3 Prozent Wägung .................................................................................................................................. DE-104.4 Zusatzfunktionen .................................................................................................................................. DE-13
5. MENÜEINSTELLUNGEN ................................................................................................ DE-145.1 Menünavigation .................................................................................................................................... DE-145.1.1 Einstellungen ändern ....................................................................................................................... DE-145.2 Kalibrierung .......................................................................................................................................... DE-155.2.1 Kalibrierungsuntermenü (InCal-Modelle) ......................................................................................... DE-155.2.2 Interne Kalibrierung (gilt nicht für ExCal-Modelle) ........................................................................... DE-155.2.3 Cal Anpassung (gilt nicht für ExCal-Modelle) .................................................................................. DE-155.2.4 Spannenkalibrierung ........................................................................................................................ DE-155.2.5 Linearität Kalibrierung ...................................................................................................................... DE-175.3 Waageneinstellung .............................................................................................................................. DE-185.3.1 Filterebene ....................................................................................................................................... DE-185.3.2 AZT (Automatische Nullpunktverfolgung) ........................................................................................ DE-185.3.3 Auto Tara ......................................................................................................................................... DE-185.3.4 Abstufungen ..................................................................................................................................... DE-195.3.5 Datumsformat ................................................................................................................................... DE-195.3.6 Datumseinstellung ........................................................................................................................... DE-195.3.7 Zeitformat ......................................................................................................................................... DE-195.3.8 Zeiteinstellung .................................................................................................................................. DE-205.3.9 Helligkeit ........................................................................................................................................... DE-205.3.10 Auto Dim .......................................................................................................................................... DE-205.3.11 Genehmigt-Modus ........................................................................................................................... DE-205.4 Wiegeeinheiten .................................................................................................................................... DE-215.5 RS232-Schnittstellenkonfiguration ....................................................................................................... DE-225.5.1 Baudrate ........................................................................................................................................... DE-225.5.2 Übertragung ..................................................................................................................................... DE-225.5.3 Handschlag ...................................................................................................................................... DE-235.6 Druckeinstellungen .............................................................................................................................. DE-23 5.6.1 Nur stabil .......................................................................................................................................... DE-23 5.6.2 Nur numerisch .................................................................................................................................. DE-23 5.6.3 Einzelne Kopfzeile ........................................................................................................................... DE-23 5.6.4 Auto Druck ....................................................................................................................................... DE-23 5.6.5 Kopfzeile .......................................................................................................................................... DE-23 5.6.6 Datum und Uhrzeit ........................................................................................................................... DE-23 5.6.7 Waage-ID ........................................................................................................................................ DE-23 5.6.8 Waage-Name .................................................................................................................................. DE-23
DE-2 Waage PR Serie
5.6.9 Benutzername ................................................................................................................................. DE-23 5.6.10 Name des Projekts ........................................................................................................................... DE-23 5.6.11 Name der Anwendung ..................................................................................................................... DE-23 5.6.12 Ergebnis ........................................................................................................................................... DE-23 5.6.13 Brutto ............................................................................................................................................... DE-23 5.6.14 Netto ................................................................................................................................................ DE-23 5.6.15 Tare ................................................................................................................................................. DE-23 5.6.16 Zeilenvorschub ................................................................................................................................ DE-23 5.7 GLP ...................................................................................................................................................... DE-26 5.7.1 Kopfzeile .......................................................................................................................................... DE-26 5.7.2 Waage-Name ................................................................................................................................... DE-26 5.7.3 Benutzername ................................................................................................................................. DE-26 5.7.4 Name des Projekts .......................................................................................................................... DE-26 5.8 Zurücksetzung auf Werkseinstellungen ............................................................................................... DE-275.9 Sperrung .............................................................................................................................................. DE-27
6. EICHPFLICHTIGE ANWENDUNG (LEGAL FOR TRADE, LFT) .................................... DE-286.1 Einstellungen ....................................................................................................................................... DE-286.2 Überprüfung ......................................................................................................................................... DE-286.3 Versiegelung ........................................................................................................................................ DE-28
7. DRUCK ............................................................................................................................ DE-297.1 Anschluss, Konfiguration und Testen der Drucker- / Computerschnittstelle ....................................... DE-297.2 Ausgabeformat ..................................................................................................................................... DE-307.3 Ausdruckbeispiele ................................................................................................................................ DE-30
8. WARTUNG ...................................................................................................................... DE-328.1 Kalibrierung .......................................................................................................................................... DE-328.2 Reinigung ............................................................................................................................................. DE-328.3 Fehlerbehebung ................................................................................................................................... DE-328.4 Service-Informationen .......................................................................................................................... DE-32
9. TECHNISCHE DATEN .................................................................................................... DE-339.1 Spezifikationen ..................................................................................................................................... DE-339.2 Zeichnungen und Dimensionen ........................................................................................................... DE-419.3 Zubehörteile ......................................................................................................................................... DE-429.4 Kommunikation .................................................................................................................................... DE-429.4.1 Schnittstellenbefehle ........................................................................................................................ DE-429.4.2 RS232 (DB9) Stiftverbindungen ....................................................................................................... DE-43
10. SOFTWARE UPDATES ................................................................................................ DE-4311. EINHALTUNG ............................................................................................................... DE-44
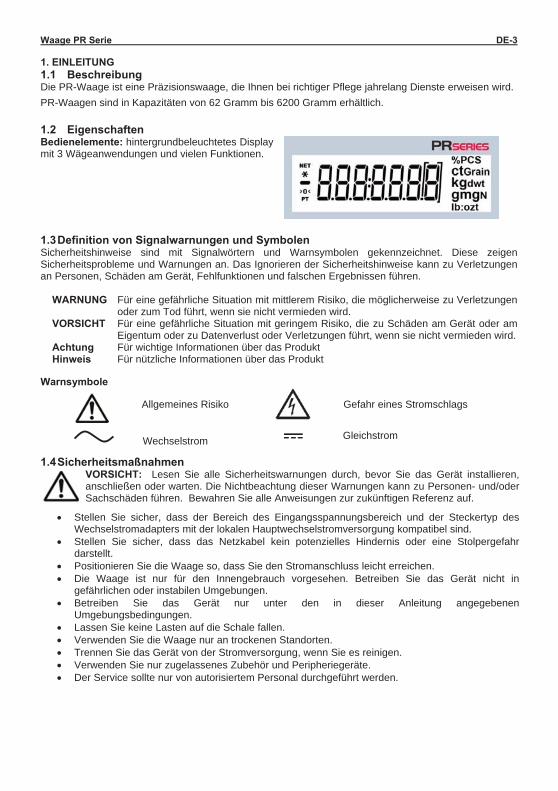
Waage PR Serie DE-3
1. EINLEITUNG 1.1 BeschreibungDie PR-Waage ist eine Präzisionswaage, die Ihnen bei richtiger Pflege jahrelang Dienste erweisen wird.PR-Waagen sind in Kapazitäten von 62 Gramm bis 6200 Gramm erhältlich.
1.2 EigenschaftenBedienelemente: hintergrundbeleuchtetes Displaymit 3 Wägeanwendungen und vielen Funktionen.
1.3Definition von Signalwarnungen und SymbolenSicherheitshinweise sind mit Signalwörtern und Warnsymbolen gekennzeichnet. Diese zeigenSicherheitsprobleme und Warnungen an. Das Ignorieren der Sicherheitshinweise kann zu Verletzungenan Personen, Schäden am Gerät, Fehlfunktionen und falschen Ergebnissen führen.
WARNUNG Für eine gefährliche Situation mit mittlerem Risiko, die möglicherweise zu Verletzungenoder zum Tod führt, wenn sie nicht vermieden wird.
VORSICHT Für eine gefährliche Situation mit geringem Risiko, die zu Schäden am Gerät oder amEigentum oder zu Datenverlust oder Verletzungen führt, wenn sie nicht vermieden wird.
Achtung Für wichtige Informationen über das ProduktHinweis Für nützliche Informationen über das Produkt
Warnsymbole
Allgemeines Risiko Gefahr eines Stromschlags
1.4SicherheitsmaßnahmenVORSICHT: Lesen Sie alle Sicherheitswarnungen durch, bevor Sie das Gerät installieren,anschließen oder warten. Die Nichtbeachtung dieser Warnungen kann zu Personen- und/oderSachschäden führen. Bewahren Sie alle Anweisungen zur zukünftigen Referenz auf.
Stellen Sie sicher, dass der Bereich des Eingangsspannungsbereich und der Steckertyp desWechselstromadapters mit der lokalen Hauptwechselstromversorgung kompatibel sind.Stellen Sie sicher, dass das Netzkabel kein potenzielles Hindernis oder eine Stolpergefahrdarstellt.Positionieren Sie die Waage so, dass Sie den Stromanschluss leicht erreichen.Die Waage ist nur für den Innengebrauch vorgesehen. Betreiben Sie das Gerät nicht ingefährlichen oder instabilen Umgebungen.Betreiben Sie das Gerät nur unter den in dieser Anleitung angegebenenUmgebungsbedingungen.Lassen Sie keine Lasten auf die Schale fallen.Verwenden Sie die Waage nur an trockenen Standorten.Trennen Sie das Gerät von der Stromversorgung, wenn Sie es reinigen.Verwenden Sie nur zugelassenes Zubehör und Peripheriegeräte.Der Service sollte nur von autorisiertem Personal durchgeführt werden.
GleichstromWechselstrom
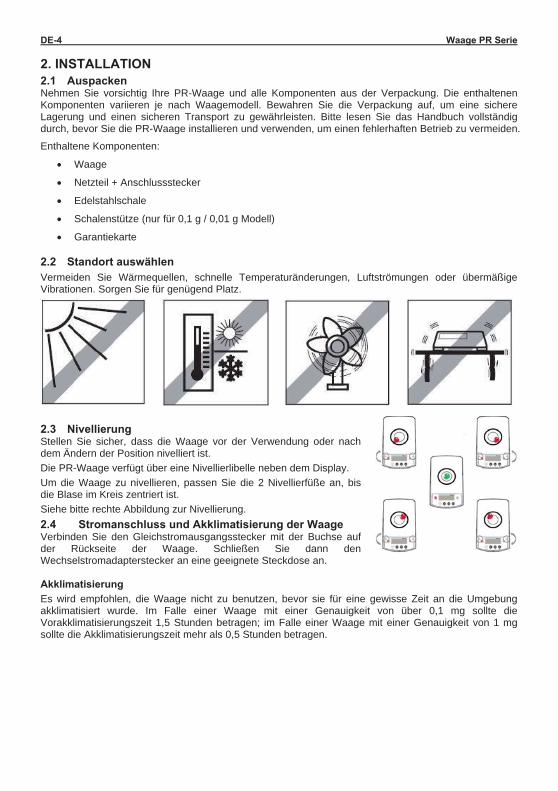
DE-4 Waage PR Serie 2. INSTALLATION 2.1 Auspacken Nehmen Sie vorsichtig Ihre PR-Waage und alle Komponenten aus der Verpackung. Die enthaltenen Komponenten variieren je nach Waagemodell. Bewahren Sie die Verpackung auf, um eine sichere Lagerung und einen sicheren Transport zu gewährleisten. Bitte lesen Sie das Handbuch vollständig durch, bevor Sie die PR-Waage installieren und verwenden, um einen fehlerhaften Betrieb zu vermeiden.
Enthaltene Komponenten:
Waage
Netzteil + Anschlussstecker
Edelstahlschale
Schalenstütze (nur für 0,1 g / 0,01 g Modell)
Garantiekarte
2.2 Standort auswählen
Vermeiden Sie Wärmequellen, schnelle Temperaturänderungen, Luftströmungen oder übermäßige Vibrationen. Sorgen Sie für genügend Platz.
2.3 Nivellierung Stellen Sie sicher, dass die Waage vor der Verwendung oder nach dem Ändern der Position nivelliert ist. Die PR-Waage verfügt über eine Nivellierlibelle neben dem Display. Um die Waage zu nivellieren, passen Sie die 2 Nivellierfüße an, bis die Blase im Kreis zentriert ist. Siehe bitte rechte Abbildung zur Nivellierung. 2.4 Stromanschluss und Akklimatisierung der Waage Verbinden Sie den Gleichstromausgangsstecker mit der Buchse auf der Rückseite der Waage. Schließen Sie dann den Wechselstromadapterstecker an eine geeignete Steckdose an. Akklimatisierung Es wird empfohlen, die Waage nicht zu benutzen, bevor sie für eine gewisse Zeit an die Umgebung akklimatisiert wurde. Im Falle einer Waage mit einer Genauigkeit von über 0,1 mg sollte die Vorakklimatisierungszeit 1,5 Stunden betragen; im Falle einer Waage mit einer Genauigkeit von 1 mg sollte die Akklimatisierungszeit mehr als 0,5 Stunden betragen.
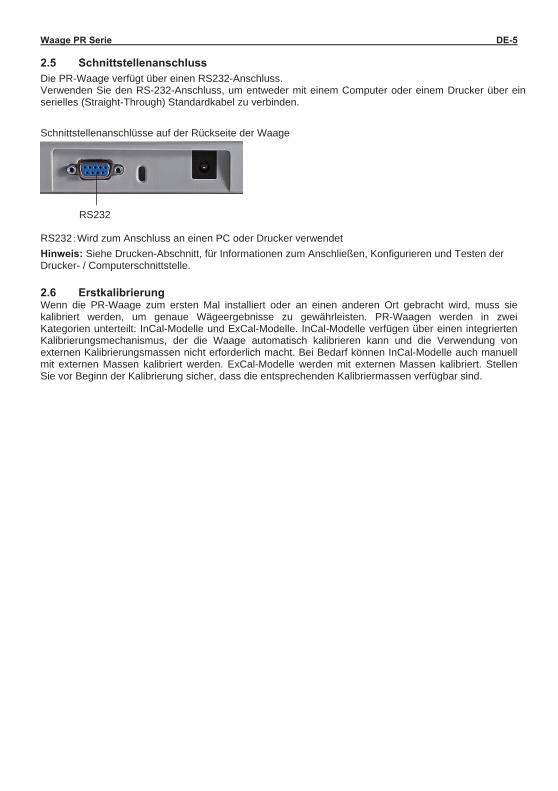
Waage PR Serie DE-5 2.5 Schnittstellenanschluss
Die PR-Waage verfügt über einen RS232-Anschluss. Verwenden Sie den RS-232-Anschluss, um entweder mit einem Computer oder einem Drucker über ein serielles (Straight-Through) Standardkabel zu verbinden.
Schnittstellenanschlüsse auf der Rückseite der Waage
RS232 Wird zum Anschluss an einen PC oder Drucker verwendet Hinweis: Siehe Drucken-Abschnitt, für Informationen zum Anschließen, Konfigurieren und Testen der Drucker- / Computerschnittstelle.
2.6 Erstkalibrierung Wenn die PR-Waage zum ersten Mal installiert oder an einen anderen Ort gebracht wird, muss sie kalibriert werden, um genaue Wägeergebnisse zu gewährleisten. PR-Waagen werden in zwei Kategorien unterteilt: InCal-Modelle und ExCal-Modelle. InCal-Modelle verfügen über einen integrierten Kalibrierungsmechanismus, der die Waage automatisch kalibrieren kann und die Verwendung von externen Kalibrierungsmassen nicht erforderlich macht. Bei Bedarf können InCal-Modelle auch manuell mit externen Massen kalibriert werden. ExCal-Modelle werden mit externen Massen kalibriert. Stellen Sie vor Beginn der Kalibrierung sicher, dass die entsprechenden Kalibriermassen verfügbar sind.
RS232
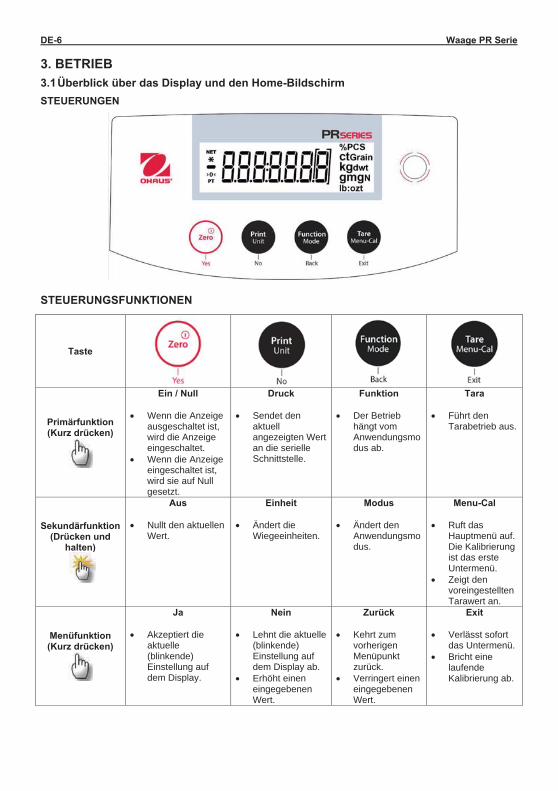
DE-6 Waage PR Serie 3. BETRIEB
3.1 Überblick über das Display und den Home-Bildschirm STEUERUNGEN
STEUERUNGSFUNKTIONEN
Taste
Primärfunktion (Kurz drücken)
Ein / Null
Wenn die Anzeige ausgeschaltet ist, wird die Anzeige eingeschaltet.
Wenn die Anzeige eingeschaltet ist, wird sie auf Null gesetzt.
Druck
Sendet den aktuell angezeigten Wert an die serielle Schnittstelle.
Funktion
Der Betrieb hängt vom Anwendungsmodus ab.
Tara
Führt den Tarabetrieb aus.
Sekundärfunktion (Drücken und
halten)
Aus
Nullt den aktuellen Wert.
Einheit
Ändert die Wiegeeinheiten.
Modus
Ändert den Anwendungsmodus.
Menu-Cal
Ruft das Hauptmenü auf. Die Kalibrierung ist das erste Untermenü.
Zeigt den voreingestellten Tarawert an.
Menüfunktion (Kurz drücken)
Ja
Akzeptiert die aktuelle (blinkende) Einstellung auf dem Display.
Nein
Lehnt die aktuelle (blinkende) Einstellung auf dem Display ab.
Erhöht einen eingegebenen Wert.
Zurück
Kehrt zum vorherigen Menüpunkt zurück.
Verringert einen eingegebenen Wert.
Exit Verlässt sofort
das Untermenü. Bricht eine
laufende Kalibrierung ab.
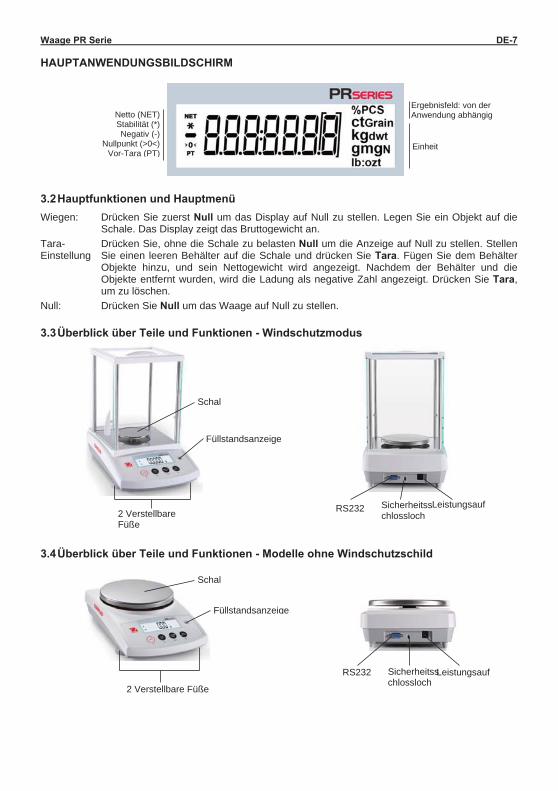
Waage PR Serie DE-7 HAUPTANWENDUNGSBILDSCHIRM
3.2 Hauptfunktionen und Hauptmenü
Wiegen: Drücken Sie zuerst Null um das Display auf Null zu stellen. Legen Sie ein Objekt auf die Schale. Das Display zeigt das Bruttogewicht an.
Tara-Einstellung
Drücken Sie, ohne die Schale zu belasten Null um die Anzeige auf Null zu stellen. Stellen Sie einen leeren Behälter auf die Schale und drücken Sie Tara. Fügen Sie dem Behälter Objekte hinzu, und sein Nettogewicht wird angezeigt. Nachdem der Behälter und die Objekte entfernt wurden, wird die Ladung als negative Zahl angezeigt. Drücken Sie Tara, um zu löschen.
Null: Drücken Sie Null um das Waage auf Null zu stellen.
3.3 Überblick über Teile und Funktionen - Windschutzmodus
3.4 Überblick über Teile und Funktionen - Modelle ohne Windschutzschild
Ergebnisfeld: von der Anwendung abhängig Netto (NET)
Stabilität (*) Negativ (-)
Nullpunkt (>0<) Vor-Tara (PT)
Einheit
Schal
Füllstandsanzeige
2 Verstellbare Füße
RS232 Sicherheitsschlossloch
Leistungsauf
2 Verstellbare Füße
Schal
Füllstandsanzeige
RS232 Sicherheitsschlossloch
Leistungsauf
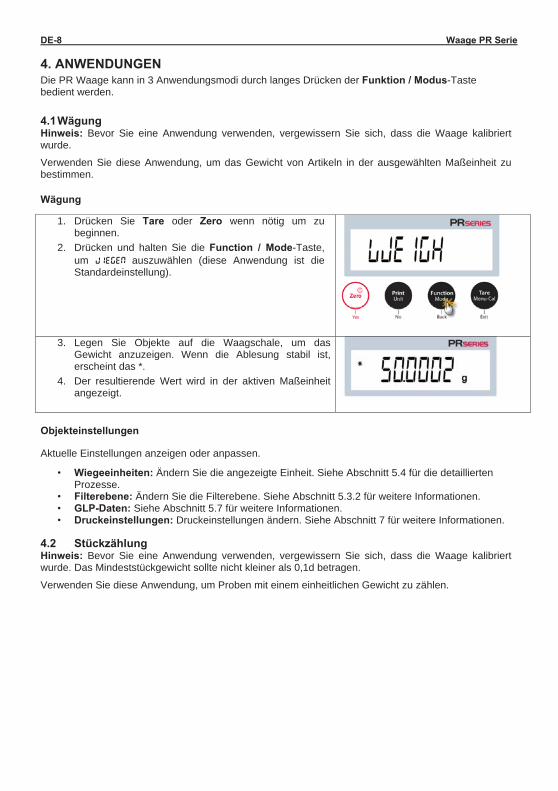
DE-8 Waage PR Serie 4. ANWENDUNGEN Die PR Waage kann in 3 Anwendungsmodi durch langes Drücken der Funktion / Modus-Taste bedient werden. 4.1 Wägung Hinweis: Bevor Sie eine Anwendung verwenden, vergewissern Sie sich, dass die Waage kalibriert wurde.
Verwenden Sie diese Anwendung, um das Gewicht von Artikeln in der ausgewählten Maßeinheit zu bestimmen.
Wägung
1. Drücken Sie Tare oder Zero wenn nötig um zu beginnen.
2. Drücken und halten Sie die Function / Mode-Taste, um WIEGEN auszuwählen (diese Anwendung ist die Standardeinstellung).
3. Legen Sie Objekte auf die Waagschale, um das Gewicht anzuzeigen. Wenn die Ablesung stabil ist, erscheint das *.
4. Der resultierende Wert wird in der aktiven Maßeinheit angezeigt.
Objekteinstellungen
Aktuelle Einstellungen anzeigen oder anpassen.
• Wiegeeinheiten: Ändern Sie die angezeigte Einheit. Siehe Abschnitt 5.4 für die detaillierten Prozesse.
• Filterebene: Ändern Sie die Filterebene. Siehe Abschnitt 5.3.2 für weitere Informationen. • GLP-Daten: Siehe Abschnitt 5.7 für weitere Informationen. • Druckeinstellungen: Druckeinstellungen ändern. Siehe Abschnitt 7 für weitere Informationen.
4.2 Stückzählung Hinweis: Bevor Sie eine Anwendung verwenden, vergewissern Sie sich, dass die Waage kalibriert wurde. Das Mindeststückgewicht sollte nicht kleiner als 0,1d betragen.
Verwenden Sie diese Anwendung, um Proben mit einem einheitlichen Gewicht zu zählen.
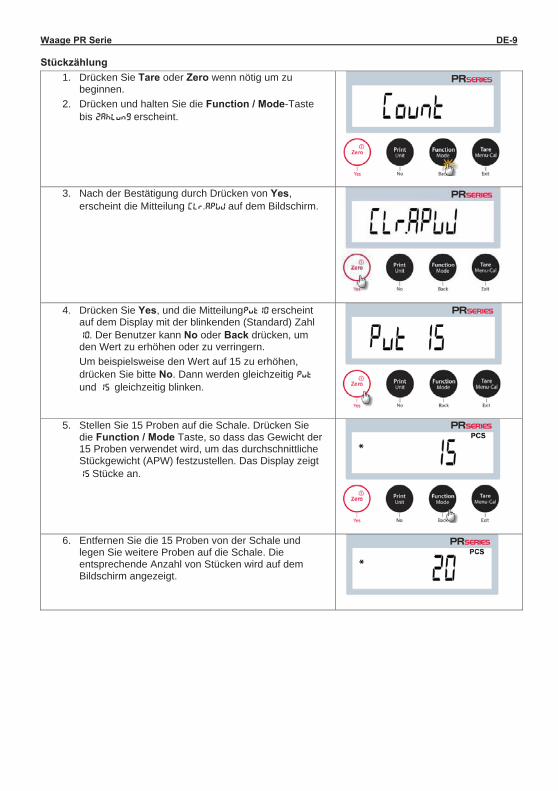
Waage PR Serie DE-9 Stückzählung
1. Drücken Sie Tare oder Zero wenn nötig um zu beginnen.
2. Drücken und halten Sie die Function / Mode-Taste bis Zählung erscheint.
3. Nach der Bestätigung durch Drücken von Yes,
erscheint die Mitteilung Clr.APwj auf dem Bildschirm.
4. Drücken Sie Yes, und die MitteilungPut10 erscheint
auf dem Display mit der blinkenden (Standard) Zahl 10. Der Benutzer kann No oder Back drücken, um den Wert zu erhöhen oder zu verringern. Um beispielsweise den Wert auf 15 zu erhöhen, drücken Sie bitte No. Dann werden gleichzeitig Put und 15 gleichzeitig blinken.
5. Stellen Sie 15 Proben auf die Schale. Drücken Sie die Function / Mode Taste, so dass das Gewicht der 15 Proben verwendet wird, um das durchschnittliche Stückgewicht (APW) festzustellen. Das Display zeigt 15 Stücke an.
6. Entfernen Sie die 15 Proben von der Schale und
legen Sie weitere Proben auf die Schale. Die entsprechende Anzahl von Stücken wird auf dem Bildschirm angezeigt.
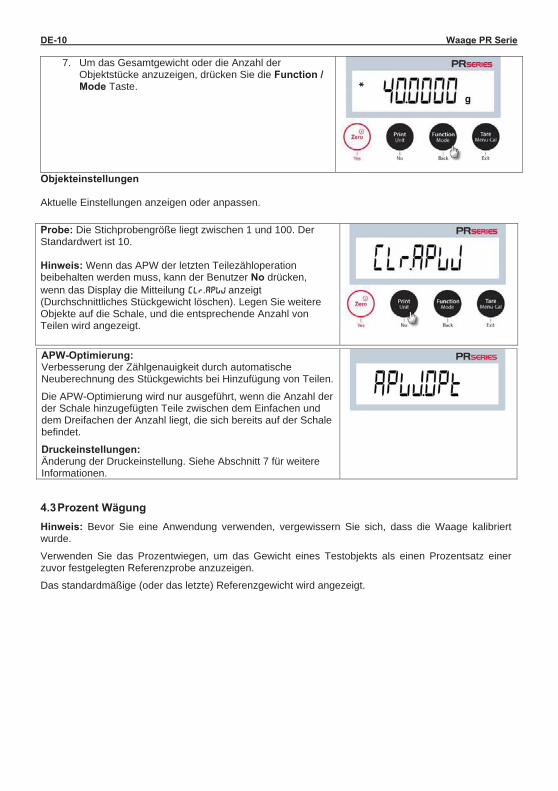
DE-10 Waage PR Serie
7. Um das Gesamtgewicht oder die Anzahl der Objektstücke anzuzeigen, drücken Sie die Function / Mode Taste.
Objekteinstellungen Aktuelle Einstellungen anzeigen oder anpassen.
Probe: Die Stichprobengröße liegt zwischen 1 und 100. Der Standardwert ist 10. Hinweis: Wenn das APW der letzten Teilezähloperation beibehalten werden muss, kann der Benutzer No drücken, wenn das Display die Mitteilung Clr.Apwj anzeigt (Durchschnittliches Stückgewicht löschen). Legen Sie weitere Objekte auf die Schale, und die entsprechende Anzahl von Teilen wird angezeigt.
APW-Optimierung: Verbesserung der Zählgenauigkeit durch automatische Neuberechnung des Stückgewichts bei Hinzufügung von Teilen.
Die APW-Optimierung wird nur ausgeführt, wenn die Anzahl der der Schale hinzugefügten Teile zwischen dem Einfachen und dem Dreifachen der Anzahl liegt, die sich bereits auf der Schale befindet.
Druckeinstellungen: Änderung der Druckeinstellung. Siehe Abschnitt 7 für weitere Informationen.
4.3 Prozent Wägung
Hinweis: Bevor Sie eine Anwendung verwenden, vergewissern Sie sich, dass die Waage kalibriert wurde. Verwenden Sie das Prozentwiegen, um das Gewicht eines Testobjekts als einen Prozentsatz einer zuvor festgelegten Referenzprobe anzuzeigen.
Das standardmäßige (oder das letzte) Referenzgewicht wird angezeigt.
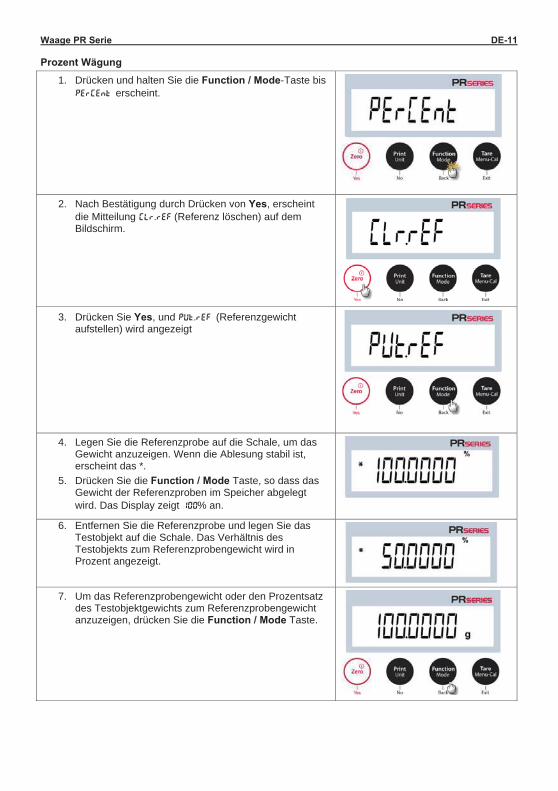
Waage PR Serie DE-11 Prozent Wägung
1. Drücken und halten Sie die Function / Mode-Taste bis PerCent erscheint.
2. Nach Bestätigung durch Drücken von Yes, erscheint
die Mitteilung Clr.ref (Referenz löschen) auf dem Bildschirm.
3. Drücken Sie Yes, und PUt.ref (Referenzgewicht aufstellen) wird angezeigt
4. Legen Sie die Referenzprobe auf die Schale, um das Gewicht anzuzeigen. Wenn die Ablesung stabil ist, erscheint das *.
5. Drücken Sie die Function / Mode Taste, so dass das Gewicht der Referenzproben im Speicher abgelegt wird. Das Display zeigt 100% an.
6. Entfernen Sie die Referenzprobe und legen Sie das Testobjekt auf die Schale. Das Verhältnis des Testobjekts zum Referenzprobengewicht wird in Prozent angezeigt.
7. Um das Referenzprobengewicht oder den Prozentsatz des Testobjektgewichts zum Referenzprobengewicht anzuzeigen, drücken Sie die Function / Mode Taste.
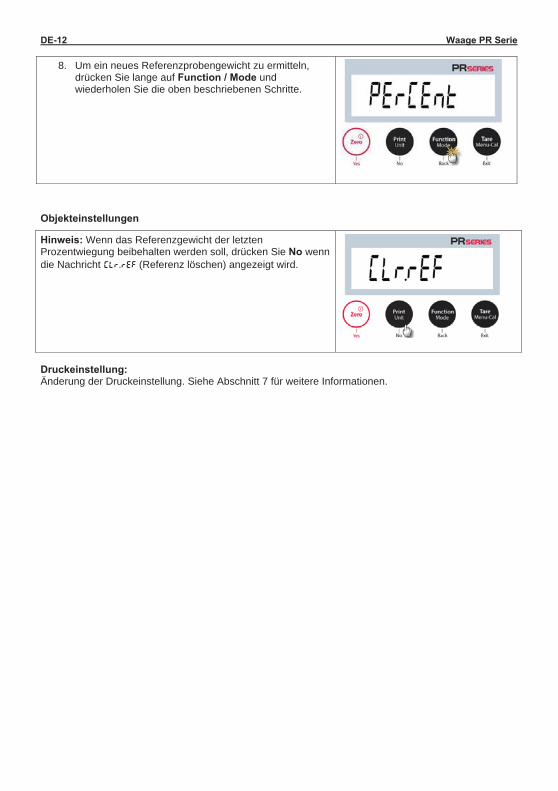
DE-12 Waage PR Serie
8. Um ein neues Referenzprobengewicht zu ermitteln, drücken Sie lange auf Function / Mode und wiederholen Sie die oben beschriebenen Schritte.
Objekteinstellungen
Hinweis: Wenn das Referenzgewicht der letzten Prozentwiegung beibehalten werden soll, drücken Sie No wenn die Nachricht Clr.ref (Referenz löschen) angezeigt wird.
Druckeinstellung: Änderung der Druckeinstellung. Siehe Abschnitt 7 für weitere Informationen.
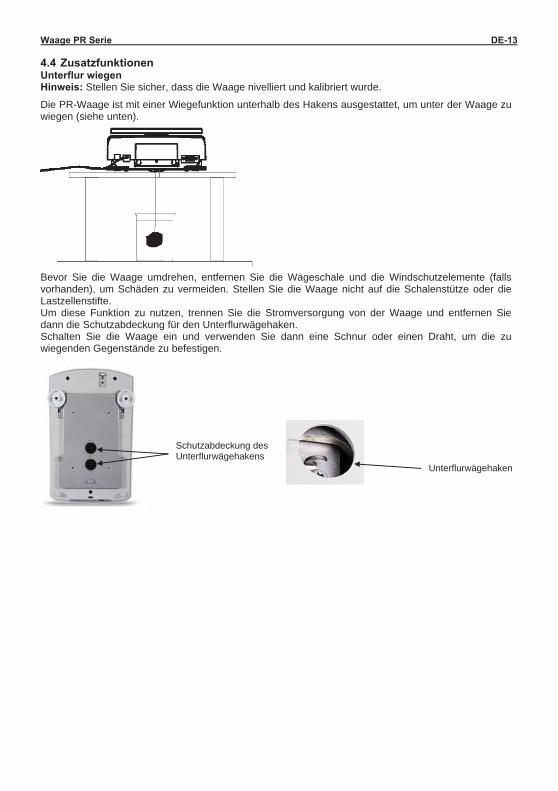
Waage PR Serie DE-13 4.4 Zusatzfunktionen Unterflur wiegen Hinweis: Stellen Sie sicher, dass die Waage nivelliert und kalibriert wurde.
Die PR-Waage ist mit einer Wiegefunktion unterhalb des Hakens ausgestattet, um unter der Waage zu wiegen (siehe unten).
Bevor Sie die Waage umdrehen, entfernen Sie die Wägeschale und die Windschutzelemente (falls vorhanden), um Schäden zu vermeiden. Stellen Sie die Waage nicht auf die Schalenstütze oder die Lastzellenstifte. Um diese Funktion zu nutzen, trennen Sie die Stromversorgung von der Waage und entfernen Sie dann die Schutzabdeckung für den Unterflurwägehaken. Schalten Sie die Waage ein und verwenden Sie dann eine Schnur oder einen Draht, um die zu wiegenden Gegenstände zu befestigen.
Schutzabdeckung des Unterflurwägehakens
Unterflurwägehaken
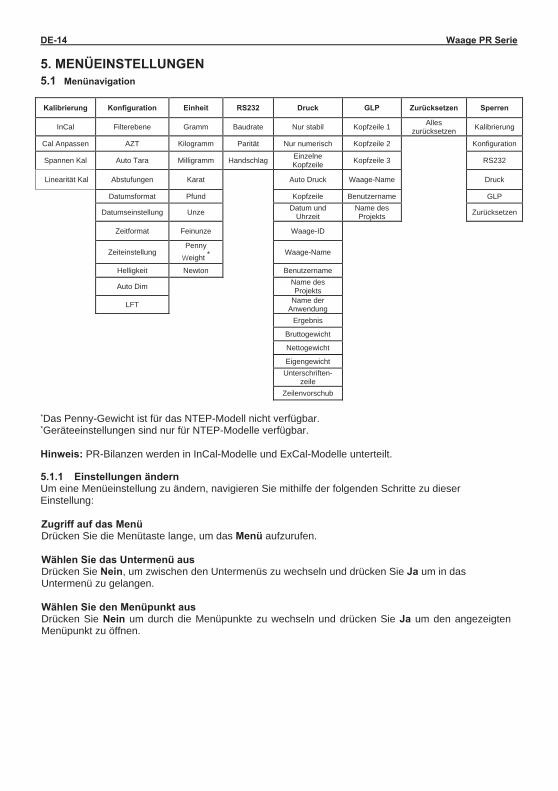
DE-14 Waage PR Serie 5. MENÜEINSTELLUNGEN 5.1 Menünavigation Kalibrierung Konfiguration Einheit RS232 Druck GLP Zurücksetzen Sperren
InCal Filterebene Gramm Baudrate Nur stabil Kopfzeile 1 Alles zurücksetzen Kalibrierung
Cal Anpassen AZT Kilogramm Parität Nur numerisch Kopfzeile 2 Konfiguration
Spannen Kal Auto Tara Milligramm Handschlag Einzelne Kopfzeile Kopfzeile 3 RS232
Linearität Kal Abstufungen Karat Auto Druck Waage-Name Druck
Datumsformat Pfund Kopfzeile Benutzername GLP
Datumseinstellung Unze Datum und
Uhrzeit Name des Projekts Zurücksetzen
Zeitformat Feinunze Waage-ID
Zeiteinstellung Penny eight * Waage-Name
Helligkeit Newton Benutzername
Auto Dim Name des Projekts
LFT Name der
Anwendung Ergebnis
Bruttogewicht
Nettogewicht
Eigengewicht
Unterschriften-zeile
Zeilenvorschub
*Das Penny-Gewicht ist für das NTEP-Modell nicht verfügbar. *Geräteeinstellungen sind nur für NTEP-Modelle verfügbar. Hinweis: PR-Bilanzen werden in InCal-Modelle und ExCal-Modelle unterteilt. 5.1.1 Einstellungen ändern Um eine Menüeinstellung zu ändern, navigieren Sie mithilfe der folgenden Schritte zu dieser Einstellung: Zugriff auf das Menü Drücken Sie die Menütaste lange, um das Menü aufzurufen. Wählen Sie das Untermenü aus Drücken Sie Nein, um zwischen den Untermenüs zu wechseln und drücken Sie Ja um in das Untermenü zu gelangen. Wählen Sie den Menüpunkt aus Drücken Sie Nein um durch die Menüpunkte zu wechseln und drücken Sie Ja um den angezeigten Menüpunkt zu öffnen.
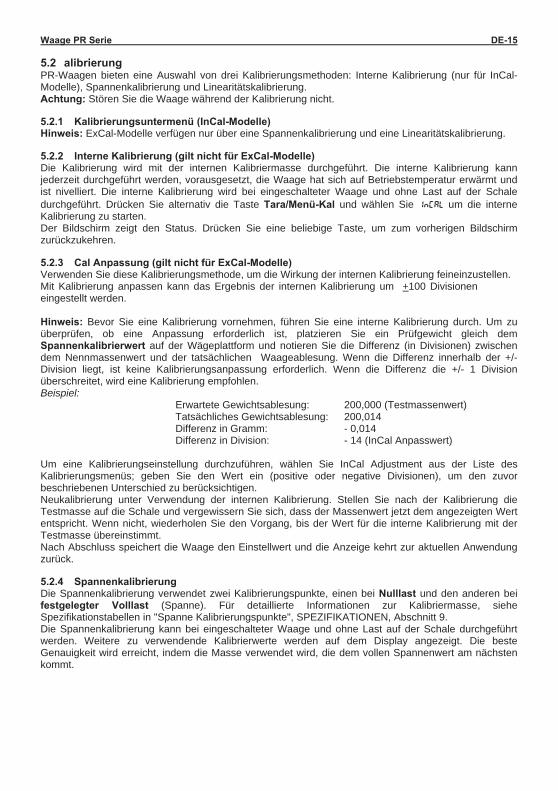
Waage PR Serie DE-15 5.2 alibrierung PR-Waagen bieten eine Auswahl von drei Kalibrierungsmethoden: Interne Kalibrierung (nur für InCal-Modelle), Spannenkalibrierung und Linearitätskalibrierung. Achtung: Stören Sie die Waage während der Kalibrierung nicht. 5.2.1 Kalibrierungsuntermenü (InCal-Modelle) Hinweis: ExCal-Modelle verfügen nur über eine Spannenkalibrierung und eine Linearitätskalibrierung. 5.2.2 Interne Kalibrierung (gilt nicht für ExCal-Modelle) Die Kalibrierung wird mit der internen Kalibriermasse durchgeführt. Die interne Kalibrierung kann jederzeit durchgeführt werden, vorausgesetzt, die Waage hat sich auf Betriebstemperatur erwärmt und ist nivelliert. Die interne Kalibrierung wird bei eingeschalteter Waage und ohne Last auf der Schale durchgeführt. Drücken Sie alternativ die Taste Tara/Menü-Kal und wählen Sie InCal um die interne Kalibrierung zu starten. Der Bildschirm zeigt den Status. Drücken Sie eine beliebige Taste, um zum vorherigen Bildschirm zurückzukehren. 5.2.3 Cal Anpassung (gilt nicht für ExCal-Modelle) Verwenden Sie diese Kalibrierungsmethode, um die Wirkung der internen Kalibrierung feineinzustellen. Mit Kalibrierung anpassen kann das Ergebnis der internen Kalibrierung um +100 Divisionen eingestellt werden.
Hinweis: Bevor Sie eine Kalibrierung vornehmen, führen Sie eine interne Kalibrierung durch. Um zu überprüfen, ob eine Anpassung erforderlich ist, platzieren Sie ein Prüfgewicht gleich dem Spannenkalibrierwert auf der Wägeplattform und notieren Sie die Differenz (in Divisionen) zwischen dem Nennmassenwert und der tatsächlichen Waageablesung. Wenn die Differenz innerhalb der +/- Division liegt, ist keine Kalibrierungsanpassung erforderlich. Wenn die Differenz die +/- 1 Division überschreitet, wird eine Kalibrierung empfohlen. Beispiel:
Erwartete Gewichtsablesung: 200,000 (Testmassenwert) Tatsächliches Gewichtsablesung: 200,014 Differenz in Gramm: - 0,014 Differenz in Division: - 14 (InCal Anpasswert)
Um eine Kalibrierungseinstellung durchzuführen, wählen Sie InCal Adjustment aus der Liste des Kalibrierungsmenüs; geben Sie den Wert ein (positive oder negative Divisionen), um den zuvor beschriebenen Unterschied zu berücksichtigen. Neukalibrierung unter Verwendung der internen Kalibrierung. Stellen Sie nach der Kalibrierung die Testmasse auf die Schale und vergewissern Sie sich, dass der Massenwert jetzt dem angezeigten Wert entspricht. Wenn nicht, wiederholen Sie den Vorgang, bis der Wert für die interne Kalibrierung mit der Testmasse übereinstimmt. Nach Abschluss speichert die Waage den Einstellwert und die Anzeige kehrt zur aktuellen Anwendung zurück. 5.2.4 Spannenkalibrierung Die Spannenkalibrierung verwendet zwei Kalibrierungspunkte, einen bei Nulllast und den anderen bei festgelegter Volllast (Spanne). Für detaillierte Informationen zur Kalibriermasse, siehe Spezifikationstabellen in "Spanne Kalibrierungspunkte", SPEZIFIKATIONEN, Abschnitt 9. Die Spannenkalibrierung kann bei eingeschalteter Waage und ohne Last auf der Schale durchgeführt werden. Weitere zu verwendende Kalibrierwerte werden auf dem Display angezeigt. Die beste Genauigkeit wird erreicht, indem die Masse verwendet wird, die dem vollen Spannenwert am nächsten kommt.
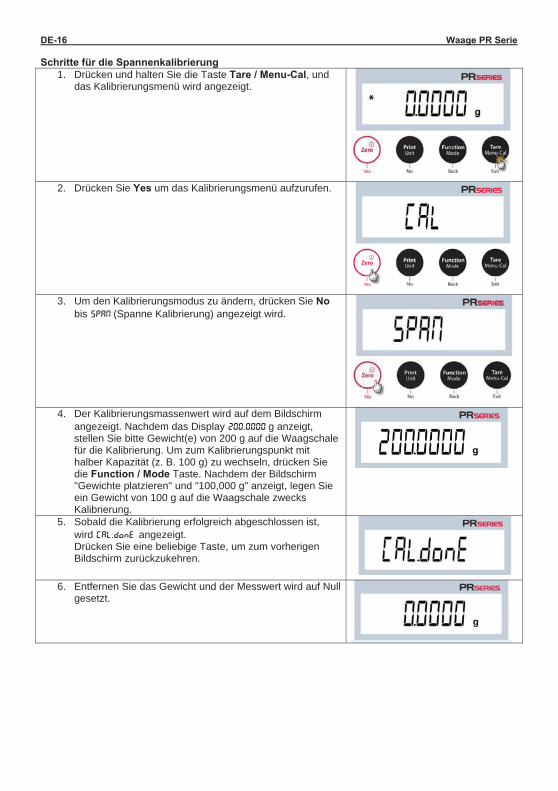
DE-16 Waage PR Serie Schritte für die Spannenkalibrierung
1. Drücken und halten Sie die Taste Tare / Menu-Cal, und das Kalibrierungsmenü wird angezeigt.
2. Drücken Sie Yes um das Kalibrierungsmenü aufzurufen.
3. Um den Kalibrierungsmodus zu ändern, drücken Sie No bis SpaN (Spanne Kalibrierung) angezeigt wird.
4. Der Kalibrierungsmassenwert wird auf dem Bildschirm angezeigt. Nachdem das Display 200,0000 g anzeigt, stellen Sie bitte Gewicht(e) von 200 g auf die Waagschale für die Kalibrierung. Um zum Kalibrierungspunkt mit halber Kapazität (z. B. 100 g) zu wechseln, drücken Sie die Function / Mode Taste. Nachdem der Bildschirm "Gewichte platzieren" und "100,000 g" anzeigt, legen Sie ein Gewicht von 100 g auf die Waagschale zwecks Kalibrierung.
5. Sobald die Kalibrierung erfolgreich abgeschlossen ist, wird CAL.Done angezeigt. Drücken Sie eine beliebige Taste, um zum vorherigen Bildschirm zurückzukehren.
6. Entfernen Sie das Gewicht und der Messwert wird auf Null
gesetzt.
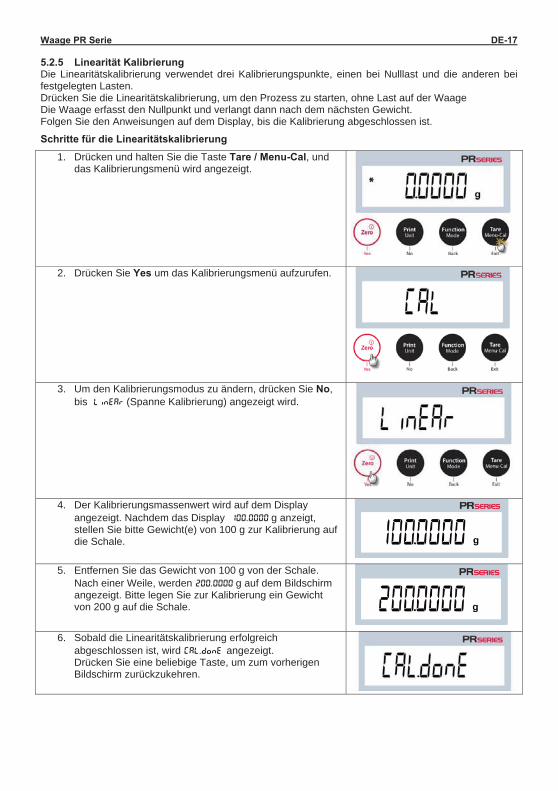
Waage PR Serie DE-17 5.2.5 Linearität Kalibrierung Die Linearitätskalibrierung verwendet drei Kalibrierungspunkte, einen bei Nulllast und die anderen bei festgelegten Lasten. Drücken Sie die Linearitätskalibrierung, um den Prozess zu starten, ohne Last auf der Waage Die Waage erfasst den Nullpunkt und verlangt dann nach dem nächsten Gewicht. Folgen Sie den Anweisungen auf dem Display, bis die Kalibrierung abgeschlossen ist.
Schritte für die Linearitätskalibrierung 1. Drücken und halten Sie die Taste Tare / Menu-Cal, und
das Kalibrierungsmenü wird angezeigt.
2. Drücken Sie Yes um das Kalibrierungsmenü aufzurufen.
3. Um den Kalibrierungsmodus zu ändern, drücken Sie No, bis LineRr (Spanne Kalibrierung) angezeigt wird.
4. Der Kalibrierungsmassenwert wird auf dem Display angezeigt. Nachdem das Display 100.0000 g anzeigt, stellen Sie bitte Gewicht(e) von 100 g zur Kalibrierung auf die Schale.
5. Entfernen Sie das Gewicht von 100 g von der Schale.
Nach einer Weile, werden 200,0000 g auf dem Bildschirm angezeigt. Bitte legen Sie zur Kalibrierung ein Gewicht von 200 g auf die Schale.
6. Sobald die Linearitätskalibrierung erfolgreich abgeschlossen ist, wird CAL.Done angezeigt. Drücken Sie eine beliebige Taste, um zum vorherigen Bildschirm zurückzukehren.
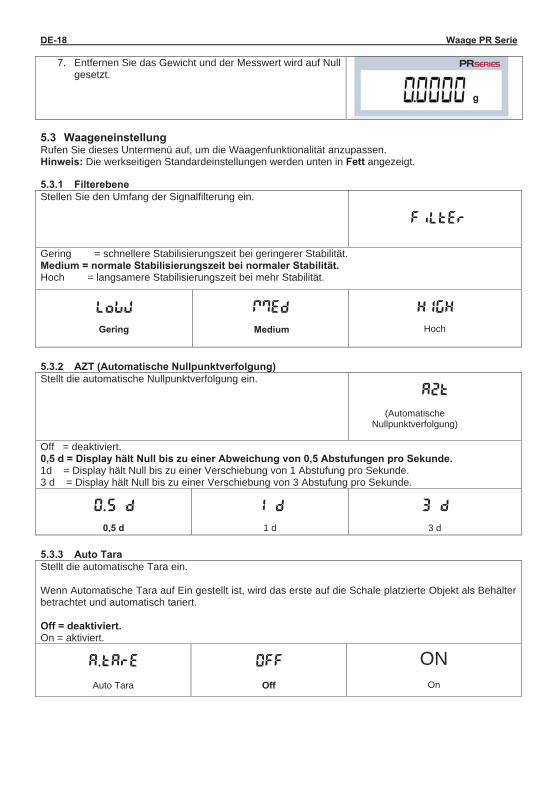
DE-18 Waage PR Serie
7. Entfernen Sie das Gewicht und der Messwert wird auf Null gesetzt.
5.3 Waageneinstellung Rufen Sie dieses Untermenü auf, um die Waagenfunktionalität anzupassen. Hinweis: Die werkseitigen Standardeinstellungen werden unten in Fett angezeigt. 5.3.1 Filterebene Stellen Sie den Umfang der Signalfilterung ein.
Gering = schnellere Stabilisierungszeit bei geringerer Stabilität. Medium = normale Stabilisierungszeit bei normaler Stabilität. Hoch = langsamere Stabilisierungszeit bei mehr Stabilität.
Gering Medium
Hoch
5.3.2 AZT (Automatische Nullpunktverfolgung) Stellt die automatische Nullpunktverfolgung ein.
(Automatische Nullpunktverfolgung)
Off = deaktiviert. 0,5 d = Display hält Null bis zu einer Abweichung von 0,5 Abstufungen pro Sekunde. 1d = Display hält Null bis zu einer Verschiebung von 1 Abstufung pro Sekunde. 3 d = Display hält Null bis zu einer Verschiebung von 3 Abstufung pro Sekunde.
0,5 d 1 d 3 d 5.3.3 Auto Tara Stellt die automatische Tara ein. Wenn Automatische Tara auf Ein gestellt ist, wird das erste auf die Schale platzierte Objekt als Behälter betrachtet und automatisch tariert. Off = deaktiviert. On = aktiviert.
Auto Tara Off On
HIGH mMed LowW
ON OFF A.tArE
AZt
3 d 1 d 0,5 d
FiltEr

Waage PR Serie DE-19 5.3.4 Abstufungen Stellt die angezeigte Lesbarkeit der Waage ein. 1 Division = Standardlesbarkeit. 10 Divisionen = Lesbarkeit ist um den Faktor 10 erhöht. Wenn die Standardlesbarkeit beispielsweise 0,01 g beträgt, ergibt die Auswahl von 10 Divisionen einen Wert von 0,1 g.
Abstufung 1 Division 10 Division
5.3.5 Datumsformat Stellen Sie das aktuelle Datumsformat ein. Datumsformat: JJ/MM/TT MM/TT/JJ TT/MM/JJ
Datumsformat
MM/TT/JJJJ
DD/MM/JJJJ
JJJJ/MM/TT
5.3.6 Datumseinstellung Stellen Sie das aktuelle Datum im gewünschten Datumsformat ein. Um das aktuelle Datum einzustellen, drücken Sie Nein oder Ja um den Wert zu erhöhen oder zu verringern.
Datum
Wenn das aktuelle Datum zum Beispiel der 22. Juni 2017 ist, MM/TT/JJ 17 DD/MM/JJ JJ/MM/TT 5.3.7 Zeitformat Stellen Sie das Zeitformat ein. Zeitformat: 24hr 12hr
Zeitformat
24hr 12hr
24 hr t.FormMt
ymMd dmMy
mMdy d.FormMt
GrAd 1 d
dAtE
06.22.17
12 hr
10 d
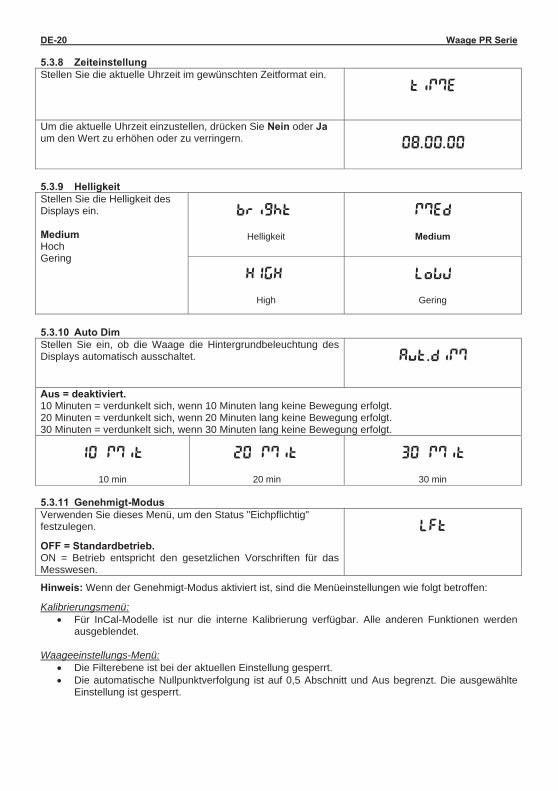
DE-20 Waage PR Serie 5.3.8 Zeiteinstellung Stellen Sie die aktuelle Uhrzeit im gewünschten Zeitformat ein.
Um die aktuelle Uhrzeit einzustellen, drücken Sie Nein oder Ja um den Wert zu erhöhen oder zu verringern.
5.3.9 Helligkeit Stellen Sie die Helligkeit des Displays ein.
Medium Hoch Gering
Helligkeit Medium
High Gering
5.3.10 Auto Dim Stellen Sie ein, ob die Waage die Hintergrundbeleuchtung des Displays automatisch ausschaltet.
Aus = deaktiviert. 10 Minuten = verdunkelt sich, wenn 10 Minuten lang keine Bewegung erfolgt. 20 Minuten = verdunkelt sich, wenn 20 Minuten lang keine Bewegung erfolgt. 30 Minuten = verdunkelt sich, wenn 30 Minuten lang keine Bewegung erfolgt.
10 min
20 min 30 min
5.3.11 Genehmigt-Modus Verwenden Sie dieses Menü, um den Status "Eichpflichtig" festzulegen.
OFF = Standardbetrieb. ON = Betrieb entspricht den gesetzlichen Vorschriften für das Messwesen.
Hinweis: Wenn der Genehmigt-Modus aktiviert ist, sind die Menüeinstellungen wie folgt betroffen:
Kalibrierungsmenü: Für InCal-Modelle ist nur die interne Kalibrierung verfügbar. Alle anderen Funktionen werden
ausgeblendet. Waageeinstellungs-Menü:
Die Filterebene ist bei der aktuellen Einstellung gesperrt. Die automatische Nullpunktverfolgung ist auf 0,5 Abschnitt und Aus begrenzt. Die ausgewählte
Einstellung ist gesperrt.
LFt
20 mMit 10 mMit
HIGH
bright
30 mMit
Aut.DimM
mMEd
LowW
08.00.00
timME
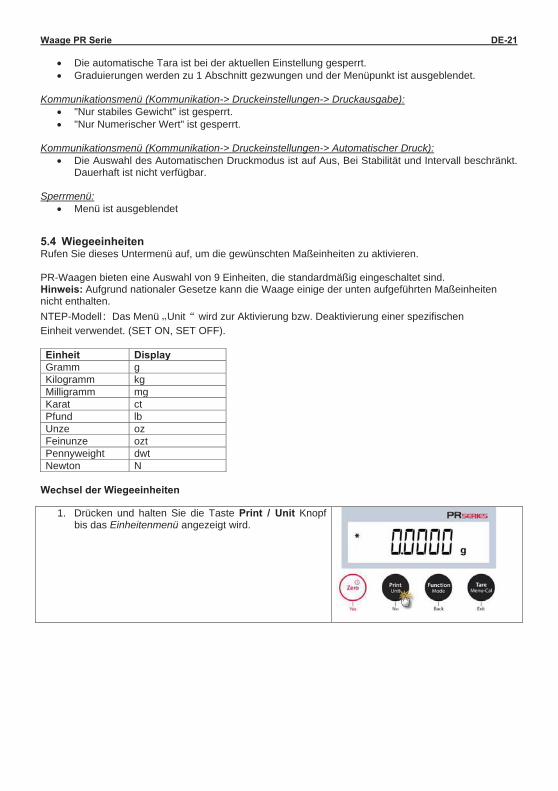
Waage PR Serie DE-21
Die automatische Tara ist bei der aktuellen Einstellung gesperrt. Graduierungen werden zu 1 Abschnitt gezwungen und der Menüpunkt ist ausgeblendet.
Kommunikationsmenü (Kommunikation-> Druckeinstellungen-> Druckausgabe):
"Nur stabiles Gewicht" ist gesperrt. "Nur Numerischer Wert" ist gesperrt.
Kommunikationsmenü (Kommunikation-> Druckeinstellungen-> Automatischer Druck):
Die Auswahl des Automatischen Druckmodus ist auf Aus, Bei Stabilität und Intervall beschränkt. Dauerhaft ist nicht verfügbar.
Sperrmenü:
Menü ist ausgeblendet
5.4 Wiegeeinheiten Rufen Sie dieses Untermenü auf, um die gewünschten Maßeinheiten zu aktivieren. PR-Waagen bieten eine Auswahl von 9 Einheiten, die standardmäßig eingeschaltet sind. Hinweis: Aufgrund nationaler Gesetze kann die Waage einige der unten aufgeführten Maßeinheiten nicht enthalten. NTEP-Modell Das Menü Unit wird zur Aktivierung bzw. Deaktivierung einer spezifischen Einheit verwendet. (SET ON, SET OFF). Einheit Display Gramm g Kilogramm kg Milligramm mg Karat ct Pfund lb Unze oz Feinunze ozt Pennyweight dwt Newton N
Wechsel der Wiegeeinheiten
1. Drücken und halten Sie die Taste Print / Unit Knopf bis das Einheitenmenü angezeigt wird.
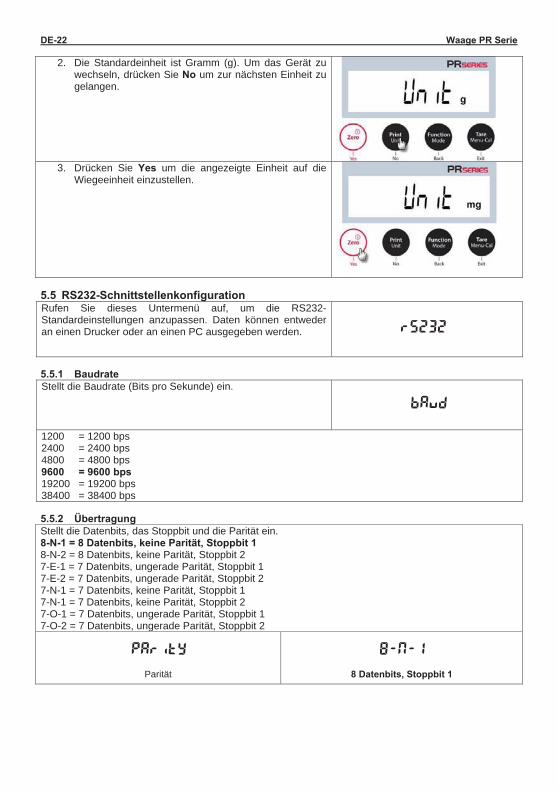
DE-22 Waage PR Serie
2. Die Standardeinheit ist Gramm (g). Um das Gerät zu wechseln, drücken Sie No um zur nächsten Einheit zu gelangen.
3. Drücken Sie Yes um die angezeigte Einheit auf die
Wiegeeinheit einzustellen.
5.5 RS232-Schnittstellenkonfiguration Rufen Sie dieses Untermenü auf, um die RS232-Standardeinstellungen anzupassen. Daten können entweder an einen Drucker oder an einen PC ausgegeben werden. 5.5.1 Baudrate Stellt die Baudrate (Bits pro Sekunde) ein.
1200 = 1200 bps 2400 = 2400 bps 4800 = 4800 bps 9600 = 9600 bps 19200 = 19200 bps 38400 = 38400 bps 5.5.2 Übertragung Stellt die Datenbits, das Stoppbit und die Parität ein. 8-N-1 = 8 Datenbits, keine Parität, Stoppbit 1 8-N-2 = 8 Datenbits, keine Parität, Stoppbit 2 7-E-1 = 7 Datenbits, ungerade Parität, Stoppbit 1 7-E-2 = 7 Datenbits, ungerade Parität, Stoppbit 2 7-N-1 = 7 Datenbits, keine Parität, Stoppbit 1 7-N-1 = 7 Datenbits, keine Parität, Stoppbit 2 7-O-1 = 7 Datenbits, ungerade Parität, Stoppbit 1 7-O-2 = 7 Datenbits, ungerade Parität, Stoppbit 2
Parität
8 Datenbits, Stoppbit 1
rS232
Parity 8-N-1
bAud
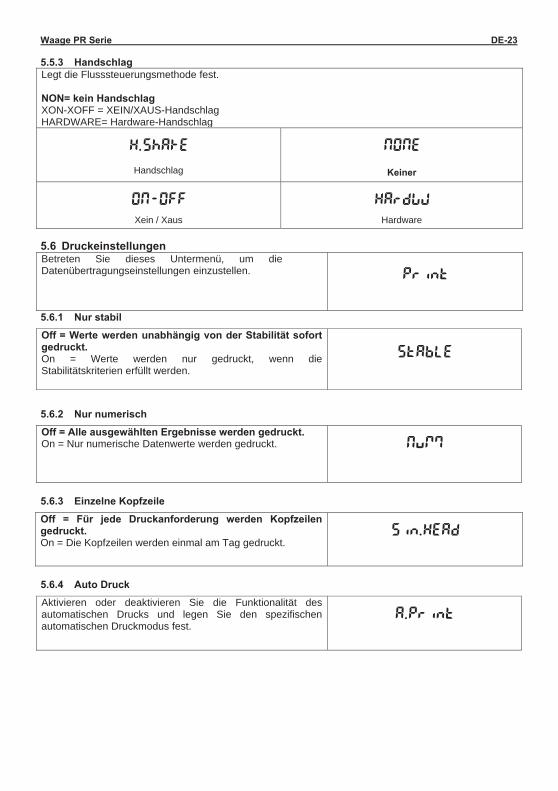
Waage PR Serie DE-23 5.5.3 Handschlag Legt die Flusssteuerungsmethode fest. NON= kein Handschlag XON-XOFF = XEIN/XAUS-Handschlag HARDWARE= Hardware-Handschlag
Handschlag
Keiner
Xein / Xaus Hardware 5.6 Druckeinstellungen Betreten Sie dieses Untermenü, um die Datenübertragungseinstellungen einzustellen.
5.6.1 Nur stabilOff = Werte werden unabhängig von der Stabilität sofort gedruckt. On = Werte werden nur gedruckt, wenn die Stabilitätskriterien erfüllt werden.
5.6.2 Nur numerischOff = Alle ausgewählten Ergebnisse werden gedruckt. On = Nur numerische Datenwerte werden gedruckt.
5.6.3 Einzelne Kopfzeile Off = Für jede Druckanforderung werden Kopfzeilen gedruckt. On = Die Kopfzeilen werden einmal am Tag gedruckt.
5.6.4 Auto Druck Aktivieren oder deaktivieren Sie die Funktionalität des automatischen Drucks und legen Sie den spezifischen automatischen Druckmodus fest.
H.ShAkE
HRrdwW
NONE
Stable
NumM
A.Print
Sin.Head
ON-OFF
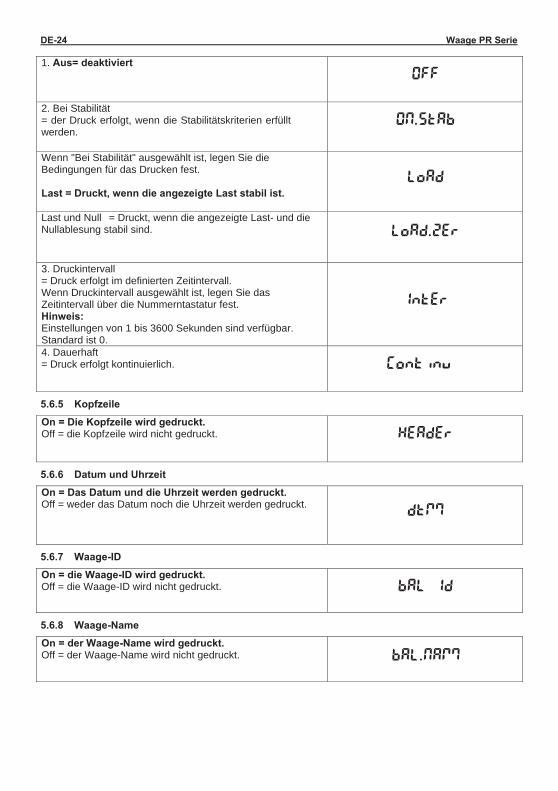
DE-24 Waage PR Serie 1. Aus= deaktiviert
2. Bei Stabilität = der Druck erfolgt, wenn die Stabilitätskriterien erfüllt werden.
Wenn "Bei Stabilität" ausgewählt ist, legen Sie die Bedingungen für das Drucken fest. Last = Druckt, wenn die angezeigte Last stabil ist.
Last und Null = Druckt, wenn die angezeigte Last- und die Nullablesung stabil sind.
3. Druckintervall = Druck erfolgt im definierten Zeitintervall. Wenn Druckintervall ausgewählt ist, legen Sie das Zeitintervall über die Nummerntastatur fest. Hinweis: Einstellungen von 1 bis 3600 Sekunden sind verfügbar. Standard ist 0. 4. Dauerhaft = Druck erfolgt kontinuierlich.
5.6.5 Kopfzeile On = Die Kopfzeile wird gedruckt. Off = die Kopfzeile wird nicht gedruckt.
5.6.6 Datum und UhrzeitOn = Das Datum und die Uhrzeit werden gedruckt. Off = weder das Datum noch die Uhrzeit werden gedruckt.
5.6.7 Waage-ID On = die Waage-ID wird gedruckt. Off = die Waage-ID wird nicht gedruckt.
5.6.8 Waage-Name On = der Waage-Name wird gedruckt. Off = der Waage-Name wird nicht gedruckt.
OFF
ON.Stab
Load
Load.zer
Inter
Continu
Header
dtmM
Bal Id
Bal.NamM
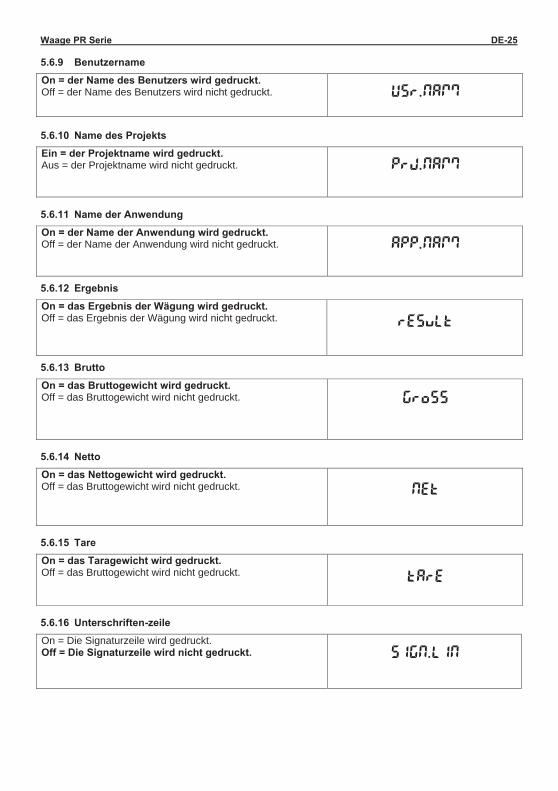
Waage PR Serie DE-25 5.6.9 Benutzername On = der Name des Benutzers wird gedruckt. Off = der Name des Benutzers wird nicht gedruckt.
5.6.10 Name des Projekts Ein = der Projektname wird gedruckt. Aus = der Projektname wird nicht gedruckt.
5.6.11 Name der Anwendung
On = der Name der Anwendung wird gedruckt. Off = der Name der Anwendung wird nicht gedruckt.
5.6.12 Ergebnis On = das Ergebnis der Wägung wird gedruckt. Off = das Ergebnis der Wägung wird nicht gedruckt.
5.6.13 Brutto On = das Bruttogewicht wird gedruckt. Off = das Bruttogewicht wird nicht gedruckt.
5.6.14 Netto On = das Nettogewicht wird gedruckt. Off = das Bruttogewicht wird nicht gedruckt.
5.6.15 Tare On = das Taragewicht wird gedruckt. Off = das Bruttogewicht wird nicht gedruckt. 5.6.16 Unterschriften-zeile On = Die Signaturzeile wird gedruckt. Off = Die Signaturzeile wird nicht gedruckt.
Usr.NamM
Prj.NamM
GrosS
result
App.NamM
Net
tare
SIGN.LIN
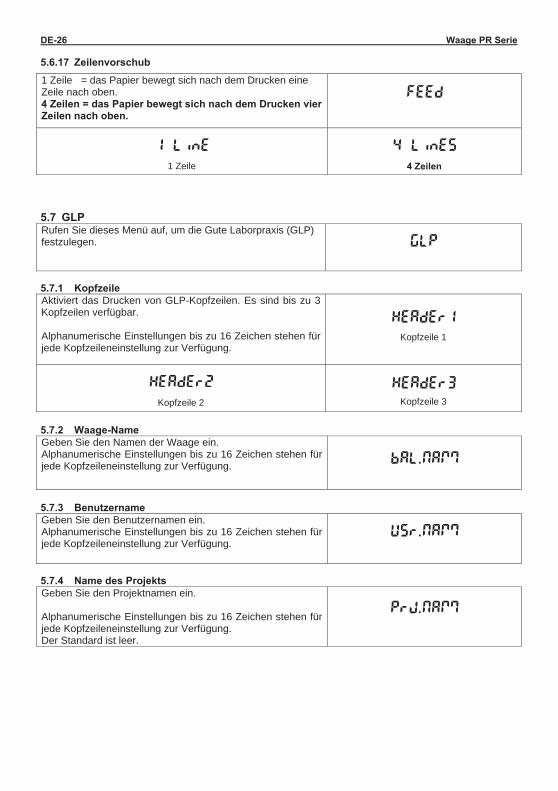
DE-26 Waage PR Serie 5.6.17 Zeilenvorschub 1 Zeile = das Papier bewegt sich nach dem Drucken eine Zeile nach oben. 4 Zeilen = das Papier bewegt sich nach dem Drucken vier Zeilen nach oben.
1 Zeile 4 Zeilen
5.7 GLP Rufen Sie dieses Menü auf, um die Gute Laborpraxis (GLP) festzulegen.
5.7.1 Kopfzeile Aktiviert das Drucken von GLP-Kopfzeilen. Es sind bis zu 3 Kopfzeilen verfügbar. Alphanumerische Einstellungen bis zu 16 Zeichen stehen für jede Kopfzeileneinstellung zur Verfügung.
Kopfzeile 1
Kopfzeile 2 Kopfzeile 3
5.7.2 Waage-Name Geben Sie den Namen der Waage ein. Alphanumerische Einstellungen bis zu 16 Zeichen stehen für jede Kopfzeileneinstellung zur Verfügung.
5.7.3 Benutzername Geben Sie den Benutzernamen ein. Alphanumerische Einstellungen bis zu 16 Zeichen stehen für jede Kopfzeileneinstellung zur Verfügung. 5.7.4 Name des Projekts Geben Sie den Projektnamen ein. Alphanumerische Einstellungen bis zu 16 Zeichen stehen für jede Kopfzeileneinstellung zur Verfügung. Der Standard ist leer.
Feed
4 Lines 1 Line
GLP
Header1
Bal.NamM
Usr.NamM
Prj.NamM
Header3 Header2
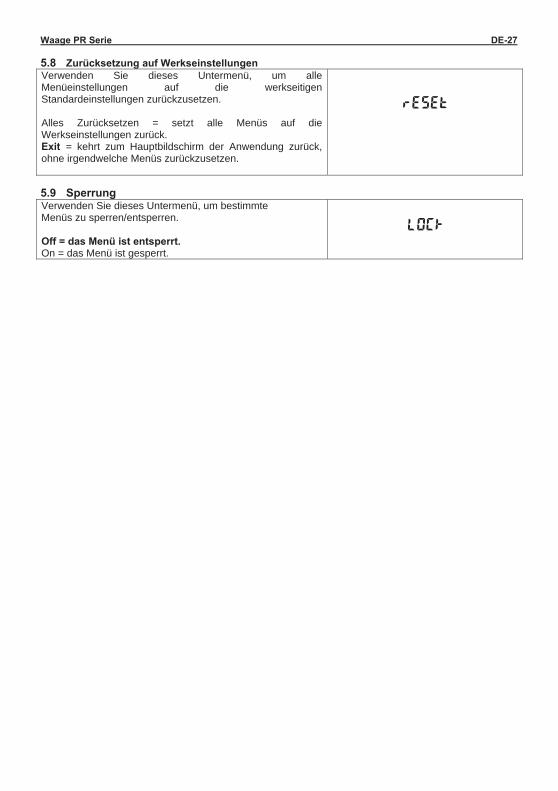
Waage PR Serie DE-27 5.8 Zurücksetzung auf Werkseinstellungen Verwenden Sie dieses Untermenü, um alle Menüeinstellungen auf die werkseitigen Standardeinstellungen zurückzusetzen.
Alles Zurücksetzen = setzt alle Menüs auf die Werkseinstellungen zurück. Exit = kehrt zum Hauptbildschirm der Anwendung zurück, ohne irgendwelche Menüs zurückzusetzen.
5.9 Sperrung Verwenden Sie dieses Untermenü, um bestimmte Menüs zu sperren/entsperren. Off = das Menü ist entsperrt. On = das Menü ist gesperrt.
reset
LOCK

DE-28 Waage PR Serie 6. EICHPFLICHTIGE ANWENDUNG (LEGAL FOR TRADE, LFT) Wenn die Waage im Handel oder in einer gesetzlich kontrollierten Anwendung verwendet wird, muss sie entsprechend den örtlichen Eichvorschriften aufgestellt, geprüft und versiegelt werden. Es liegt in der Verantwortung des Käufers, sicherzustellen, dass alle relevanten gesetzlichen Anforderungen erfüllt sind. 6.1 Einstellungen Führen Sie vor der Überprüfung und Versiegelung die folgenden Schritte der Reihe nach durch:
1. Überprüfen Sie, ob die Menüeinstellungen den lokalen Vorschriften für Maße und Gewichte entsprechen.
2. Prüfen Sie, ob das Gerät eingeschaltet ist. Beachten Sie die örtlichen Vorschriften für Maße und Gewichte.
3. Führen Sie eine Kalibrierung durch, wie in Abschnitt 5.2 erläutert. 4. Genehmigt-Modus im Menü "Waageeinstellung" auf "On". 5. Drücken Sie wie in Abbildung 6-1 gezeigt den elektronischen Schalter in der Öffnung.
Hinweis: Wenn der Genehmigt-Modus aktiviert ist, kann keine externe Kalibrierung durchgeführt werden. 6.2 Überprüfung Ein lokaler Eichbeamter oder autorisierter Kundendienstvertreter muss das Prüfverfahren durchführen. 6.3 Versiegelung Nachdem die Waage überprüft wurde, muss sie versiegelt werden, um einen unerkannten Zugriff auf die gesetzlich kontrollierten Einstellungen zu verhindern. Stellen Sie vor dem Versiegeln des Geräts sicher, dass sich der Sicherheitsschalter in der gesperrten Position befindet und die Genehmigt-Modus-Einstellung im Menü "Waagenkonfiguration" auf "ON" gestellt wurde.
Wenn Sie eine Papierdichtung verwenden, legen Sie die Dichtung wie abgebildet über den Sicherheitsschalter und das untere Gehäuse.
Wenn Sie eine Kabeldichtung verwenden, führen Sie den Versiegelungskabel wie gezeigt durch die Löcher im Sicherheitsschalter und im unteren Gehäuse.
Entsperrt Mit Papiersiegel verschlossen Mit Drahtsiegel verschlossen
Abbildung 6-1. Versiegelung
Elektronischer Schalter
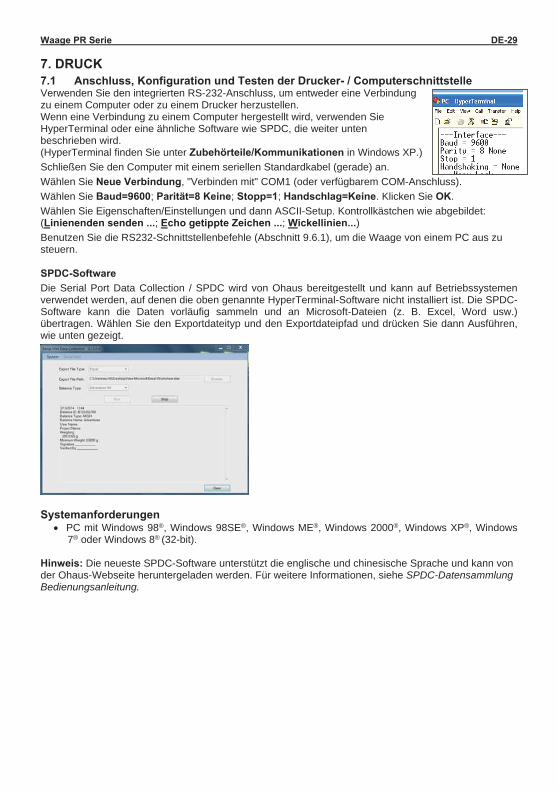
Waage PR Serie DE-29 7. DRUCK 7.1 Anschluss, Konfiguration und Testen der Drucker- / Computerschnittstelle Verwenden Sie den integrierten RS-232-Anschluss, um entweder eine Verbindung zu einem Computer oder zu einem Drucker herzustellen. Wenn eine Verbindung zu einem Computer hergestellt wird, verwenden Sie HyperTerminal oder eine ähnliche Software wie SPDC, die weiter unten beschrieben wird. (HyperTerminal finden Sie unter Zubehörteile/Kommunikationen in Windows XP.) Schließen Sie den Computer mit einem seriellen Standardkabel (gerade) an. Wählen Sie Neue Verbindung, "Verbinden mit" COM1 (oder verfügbarem COM-Anschluss). Wählen Sie Baud=9600; Parität=8 Keine; Stopp=1; Handschlag=Keine. Klicken Sie OK. Wählen Sie Eigenschaften/Einstellungen und dann ASCII-Setup. Kontrollkästchen wie abgebildet: (Linienenden senden ...; Echo getippte Zeichen ...; Wickellinien...) Benutzen Sie die RS232-Schnittstellenbefehle (Abschnitt 9.6.1), um die Waage von einem PC aus zu steuern.
SPDC-Software Die Serial Port Data Collection / SPDC wird von Ohaus bereitgestellt und kann auf Betriebssystemen verwendet werden, auf denen die oben genannte HyperTerminal-Software nicht installiert ist. Die SPDC-Software kann die Daten vorläufig sammeln und an Microsoft-Dateien (z. B. Excel, Word usw.) übertragen. Wählen Sie den Exportdateityp und den Exportdateipfad und drücken Sie dann Ausführen, wie unten gezeigt.
Systemanforderungen PC mit Windows 98®, Windows 98SE®, Windows ME®, Windows 2000®, Windows XP®, Windows
7® oder Windows 8® (32-bit). Hinweis: Die neueste SPDC-Software unterstützt die englische und chinesische Sprache und kann von der Ohaus-Webseite heruntergeladen werden. Für weitere Informationen, siehe SPDC-Datensammlung Bedienungsanleitung.
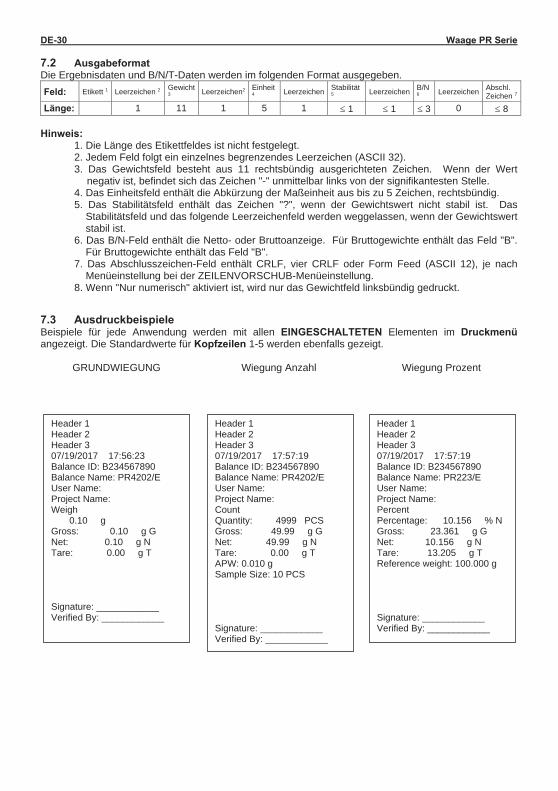
DE-30 Waage PR Serie 7.2 Ausgabeformat Die Ergebnisdaten und B/N/T-Daten werden im folgenden Format ausgegeben. Feld: Etikett 1 Leerzeichen 2 Gewicht
3 Leerzeichen2 Einheit 4 Leerzeichen Stabilität
5 Leerzeichen B/N 6 Leerzeichen Abschl.
Zeichen 7
Länge: 1 11 1 5 1 1 1 3 0 8 Hinweis:
1. Die Länge des Etikettfeldes ist nicht festgelegt. 2. Jedem Feld folgt ein einzelnes begrenzendes Leerzeichen (ASCII 32). 3. Das Gewichtsfeld besteht aus 11 rechtsbündig ausgerichteten Zeichen. Wenn der Wert
negativ ist, befindet sich das Zeichen "-" unmittelbar links von der signifikantesten Stelle. 4. Das Einheitsfeld enthält die Abkürzung der Maßeinheit aus bis zu 5 Zeichen, rechtsbündig. 5. Das Stabilitätsfeld enthält das Zeichen "?", wenn der Gewichtswert nicht stabil ist. Das
Stabilitätsfeld und das folgende Leerzeichenfeld werden weggelassen, wenn der Gewichtswert stabil ist.
6. Das B/N-Feld enthält die Netto- oder Bruttoanzeige. Für Bruttogewichte enthält das Feld "B". Für Bruttogewichte enthält das Feld "B".
7. Das Abschlusszeichen-Feld enthält CRLF, vier CRLF oder Form Feed (ASCII 12), je nach Menüeinstellung bei der ZEILENVORSCHUB-Menüeinstellung.
8. Wenn "Nur numerisch" aktiviert ist, wird nur das Gewichtfeld linksbündig gedruckt.
7.3 Ausdruckbeispiele Beispiele für jede Anwendung werden mit allen EINGESCHALTETEN Elementen im Druckmenü angezeigt. Die Standardwerte für Kopfzeilen 1-5 werden ebenfalls gezeigt.
GRUNDWIEGUNG Wiegung Anzahl Wiegung Prozent
Header 1 Header 2 Header 3 07/19/2017 17:56:23 Balance ID: B234567890 Balance Name: PR4202/E User Name: Project Name: Weigh 0.10 g Gross: 0.10 g G Net: 0.10 g N Tare: 0.00 g T Signature: ____________ Verified By: ____________
Header 1 Header 2 Header 3 07/19/2017 17:57:19 Balance ID: B234567890 Balance Name: PR4202/E User Name: Project Name: Count Quantity: 4999 PCS Gross: 49.99 g G Net: 49.99 g N Tare: 0.00 g T APW: 0.010 g Sample Size: 10 PCS Signature: ____________ Verified By: ____________
Header 1 Header 2 Header 3 07/19/2017 17:57:19 Balance ID: B234567890 Balance Name: PR223/E User Name: Project Name: Percent Percentage: 10.156 % N Gross: 23.361 g G Net: 10.156 g N Tare: 13.205 g T Reference weight: 100.000 g Signature: ____________ Verified By: ____________
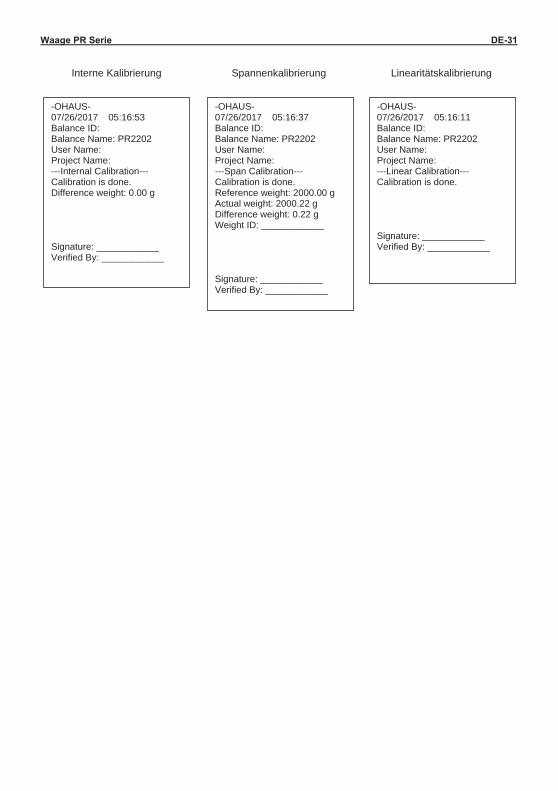
Waage PR Serie DE-31
Interne Kalibrierung Spannenkalibrierung Linearitätskalibrierung
-OHAUS- 07/26/2017 05:16:53 Balance ID: Balance Name: PR2202 User Name: Project Name: ---Internal Calibration--- Calibration is done. Difference weight: 0.00 g Signature: ____________ Verified By: ____________
-OHAUS- 07/26/2017 05:16:37 Balance ID: Balance Name: PR2202 User Name: Project Name: ---Span Calibration--- Calibration is done. Reference weight: 2000.00 g Actual weight: 2000.22 g Difference weight: 0.22 g Weight ID: ____________ Signature: ____________ Verified By: ____________
-OHAUS- 07/26/2017 05:16:11 Balance ID: Balance Name: PR2202 User Name: Project Name: ---Linear Calibration--- Calibration is done. Signature: ____________ Verified By: ____________
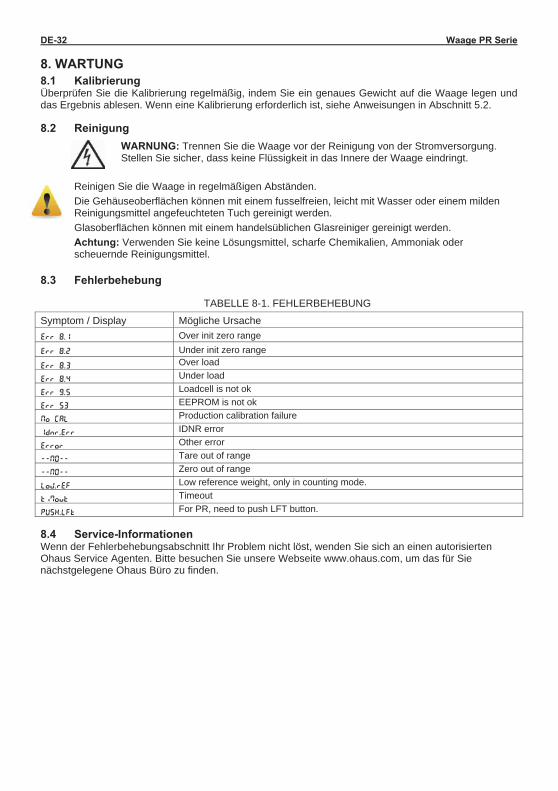
DE-32 Waage PR Serie 8. WARTUNG 8.1 Kalibrierung Überprüfen Sie die Kalibrierung regelmäßig, indem Sie ein genaues Gewicht auf die Waage legen und das Ergebnis ablesen. Wenn eine Kalibrierung erforderlich ist, siehe Anweisungen in Abschnitt 5.2. 8.2 Reinigung
WARNUNG: Trennen Sie die Waage vor der Reinigung von der Stromversorgung. Stellen Sie sicher, dass keine Flüssigkeit in das Innere der Waage eindringt.
Reinigen Sie die Waage in regelmäßigen Abständen. Die Gehäuseoberflächen können mit einem fusselfreien, leicht mit Wasser oder einem milden Reinigungsmittel angefeuchteten Tuch gereinigt werden. Glasoberflächen können mit einem handelsüblichen Glasreiniger gereinigt werden. Achtung: Verwenden Sie keine Lösungsmittel, scharfe Chemikalien, Ammoniak oder scheuernde Reinigungsmittel.
8.3 Fehlerbehebung
TABELLE 8-1. FEHLERBEHEBUNG
Symptom / Display Mögliche Ursache Err 8.1 Over init zero range Err 8.2 Under init zero range Err 8.3 Over load
Err 8.4 Under load
Err 9.5 Loadcell is not ok
Err 53 EEPROM is not ok
No CAL Production calibration failure
IDnr.Err IDNR error
Error Other error
--NO-- Tare out of range
--NO-- Zero out of range
LoW.rEF Low reference weight, only in counting mode.
tiMout Timeout
PUSH.LFt For PR, need to push LFT button. 8.4 Service-Informationen Wenn der Fehlerbehebungsabschnitt Ihr Problem nicht löst, wenden Sie sich an einen autorisierten Ohaus Service Agenten. Bitte besuchen Sie unsere Webseite www.ohaus.com, um das für Sie nächstgelegene Ohaus Büro zu finden.

Waage PR Serie DE-33 9. TECHNISCHE DATEN 9.1 Spezifikationen Umgebungsbedingungen Nur zur Innenanwendung Höhe: Bis zu 2000 m Angegebener Temperaturbereich: 10°C bis 30°C Luftfeuchtigkeit: maximale relative Luftfeuchtigkeit 80% für Temperaturen bis 30°C, linear
abnehmend bis 50% relative Luftfeuchtigkeit bei 40°C Die Betriebsfähigkeit wird bei Umgebungstemperaturen zwischen 5 °C und 40 °C gewährleistet Netzversorgungsspannungsschwankungen: bis zu ± 10% der Nennspannung Installationskategorie II Verschmutzungsgrad: 2 Versorgungsspannung: 12V 0,5A
Materialien Unteres Gehäuse: Aluminiumdruckguss, Angestrichen + Kunststoff (HIPS) Oberes Gehäuse: Kunststoff (HIPS) Wägungsplattformen: Edelstahl Windschutz: Glas, Kunststoff (HIPS) Füße: Kunststoff (ABS)
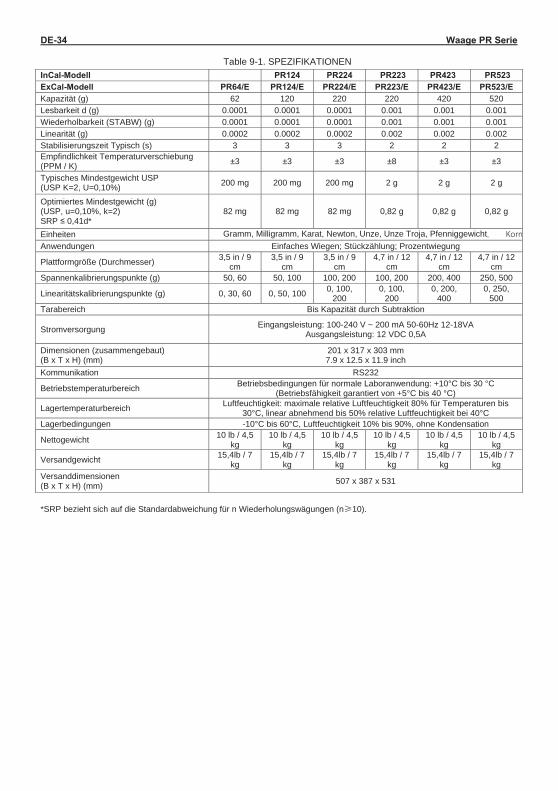
DE-34 Waage PR Serie
Table 9-1. SPEZIFIKATIONEN InCal-Modell PR124 PR224 PR223 PR423 PR523 ExCal-Modell PR64/E PR124/E PR224/E PR223/E PR423/E PR523/E Kapazität (g) 62 120 220 220 420 520 Lesbarkeit d (g) 0.0001 0.0001 0.0001 0.001 0.001 0.001 Wiederholbarkeit (STABW) (g) 0.0001 0.0001 0.0001 0.001 0.001 0.001 Linearität (g) 0.0002 0.0002 0.0002 0.002 0.002 0.002 Stabilisierungszeit Typisch (s) 3 3 3 2 2 2 Empfindlichkeit Temperaturverschiebung (PPM / K) ±3 ±3 ±3 ±8 ±3 ±3
Typisches Mindestgewicht USP (USP K=2, U=0,10%) 200 mg 200 mg 200 mg 2 g 2 g 2 g
Optimiertes Mindestgewicht (g) (USP, u=0,10%, k=2) SRP ≤ 0,41d*
82 mg 82 mg 82 mg 0,82 g 0,82 g 0,82 g
Einheiten Gramm, Milligramm, Karat, Newton, Unze, Unze Troja, Pfenniggewicht Anwendungen Einfaches Wiegen; Stückzählung; Prozentwiegung
Plattformgröße (Durchmesser) 3,5 in / 9 cm
3,5 in / 9 cm
3,5 in / 9 cm
4,7 in / 12 cm
4,7 in / 12 cm
4,7 in / 12 cm
Spannenkalibrierungspunkte (g) 50, 60 50, 100 100, 200 100, 200 200, 400 250, 500
Linearitätskalibrierungspunkte (g) 0, 30, 60 0, 50, 100 0, 100, 200
0, 100, 200
0, 200, 400
0, 250, 500
Tarabereich Bis Kapazität durch Subtraktion
Stromversorgung Eingangsleistung: 100-240 V ~ 200 mA 50-60Hz 12-18VA Ausgangsleistung: 12 VDC 0,5A
Dimensionen (zusammengebaut) (B x T x H) (mm)
201 x 317 x 303 mm 7.9 x 12.5 x 11.9 inch
Kommunikation RS232
Betriebstemperaturbereich Betriebsbedingungen für normale Laboranwendung: +10°C bis 30 °C (Betriebsfähigkeit garantiert von +5°C bis 40 °C)
Lagertemperaturbereich Luftfeuchtigkeit: maximale relative Luftfeuchtigkeit 80% für Temperaturen bis 30°C, linear abnehmend bis 50% relative Luftfeuchtigkeit bei 40°C
Lagerbedingungen -10°C bis 60°C, Luftfeuchtigkeit 10% bis 90%, ohne Kondensation
Nettogewicht 10 lb / 4,5 kg
10 lb / 4,5 kg
10 lb / 4,5 kg
10 lb / 4,5 kg
10 lb / 4,5 kg
10 lb / 4,5 kg
Versandgewicht 15,4lb / 7 kg
15,4lb / 7 kg
15,4lb / 7 kg
15,4lb / 7 kg
15,4lb / 7 kg
15,4lb / 7 kg
Versanddimensionen (B x T x H) (mm) 507 x 387 x 531
*SRP bezieht sich auf die Standardabweichung für n Wiederholungswägungen (n 10).
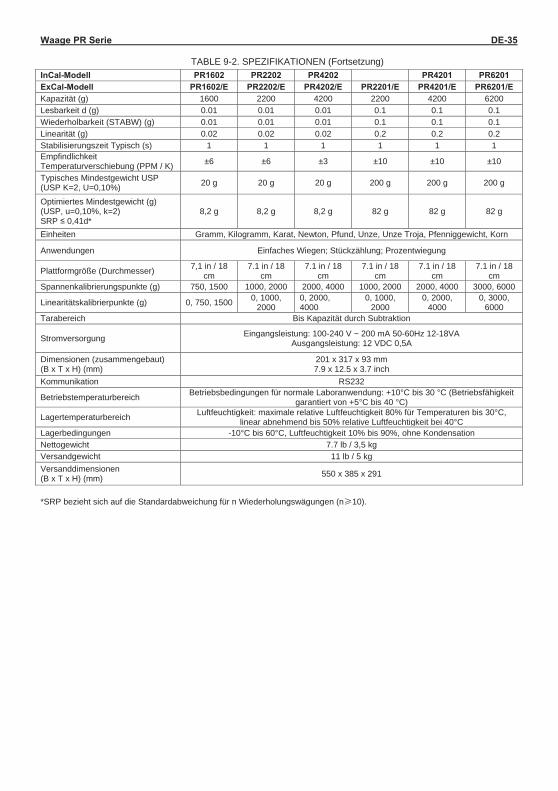
Waage PR Serie DE-35
TABLE 9-2. SPEZIFIKATIONEN (Fortsetzung) InCal-Modell PR1602 PR2202 PR4202 PR4201 PR6201 ExCal-Modell PR1602/E PR2202/E PR4202/E PR2201/E PR4201/E PR6201/E Kapazität (g) 1600 2200 4200 2200 4200 6200 Lesbarkeit d (g) 0.01 0.01 0.01 0.1 0.1 0.1 Wiederholbarkeit (STABW) (g) 0.01 0.01 0.01 0.1 0.1 0.1 Linearität (g) 0.02 0.02 0.02 0.2 0.2 0.2 Stabilisierungszeit Typisch (s) 1 1 1 1 1 1 Empfindlichkeit Temperaturverschiebung (PPM / K) ±6 ±6 ±3 ±10 ±10 ±10
Typisches Mindestgewicht USP (USP K=2, U=0,10%) 20 g 20 g 20 g 200 g 200 g 200 g
Optimiertes Mindestgewicht (g) (USP, u=0,10%, k=2) SRP ≤ 0,41d*
8,2 g 8,2 g 8,2 g 82 g 82 g 82 g
Einheiten Gramm, Kilogramm, Karat, Newton, Pfund, Unze, Unze Troja, Pfenniggewicht, Korn
Anwendungen Einfaches Wiegen; Stückzählung; Prozentwiegung
Plattformgröße (Durchmesser) 7,1 in / 18 cm
7.1 in / 18 cm
7.1 in / 18 cm
7.1 in / 18 cm
7.1 in / 18 cm
7.1 in / 18 cm
Spannenkalibrierungspunkte (g) 750, 1500 1000, 2000 2000, 4000 1000, 2000 2000, 4000 3000, 6000
Linearitätskalibrierpunkte (g) 0, 750, 1500 0, 1000, 2000
0, 2000, 4000
0, 1000, 2000
0, 2000, 4000
0, 3000, 6000
Tarabereich Bis Kapazität durch Subtraktion
Stromversorgung Eingangsleistung: 100-240 V ~ 200 mA 50-60Hz 12-18VA Ausgangsleistung: 12 VDC 0,5A
Dimensionen (zusammengebaut) (B x T x H) (mm)
201 x 317 x 93 mm 7.9 x 12.5 x 3.7 inch
Kommunikation RS232
Betriebstemperaturbereich Betriebsbedingungen für normale Laboranwendung: +10°C bis 30 °C (Betriebsfähigkeit garantiert von +5°C bis 40 °C)
Lagertemperaturbereich Luftfeuchtigkeit: maximale relative Luftfeuchtigkeit 80% für Temperaturen bis 30°C, linear abnehmend bis 50% relative Luftfeuchtigkeit bei 40°C
Lagerbedingungen -10°C bis 60°C, Luftfeuchtigkeit 10% bis 90%, ohne Kondensation Nettogewicht 7.7 lb / 3,5 kg Versandgewicht 11 lb / 5 kg Versanddimensionen (B x T x H) (mm) 550 x 385 x 291
*SRP bezieht sich auf die Standardabweichung für n Wiederholungswägungen (n 10).
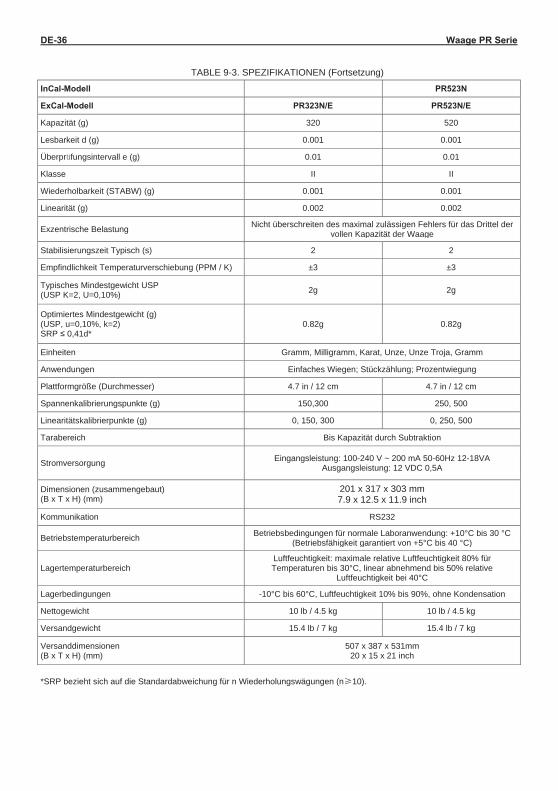
DE-36 Waage PR Serie
TABLE 9-3. SPEZIFIKATIONEN (Fortsetzung)
InCal-Modell PR523N
ExCal-Modell PR323N/E PR523N/E
Kapazität (g) 320 520
Lesbarkeit d (g) 0.001 0.001
Überpr fungsintervall e (g) 0.01 0.01
Klasse II II
Wiederholbarkeit (STABW) (g) 0.001 0.001
Linearität (g) 0.002 0.002
Exzentrische Belastung Nicht überschreiten des maximal zulässigen Fehlers für das Drittel der vollen Kapazität der Waage
Stabilisierungszeit Typisch (s) 2 2
Empfindlichkeit Temperaturverschiebung (PPM / K) ±3 ±3
Typisches Mindestgewicht USP (USP K=2, U=0,10%) 2g 2g
Optimiertes Mindestgewicht (g) (USP, u=0,10%, k=2) SRP ≤ 0,41d*
0.82g 0.82g
Einheiten Gramm, Milligramm, Karat, Unze, Unze Troja, Gramm
Anwendungen Einfaches Wiegen; Stückzählung; Prozentwiegung
Plattformgröße (Durchmesser) 4.7 in / 12 cm 4.7 in / 12 cm
Spannenkalibrierungspunkte (g) 150,300 250, 500
Linearitätskalibrierpunkte (g) 0, 150, 300 0, 250, 500
Tarabereich Bis Kapazität durch Subtraktion
Stromversorgung Eingangsleistung: 100-240 V ~ 200 mA 50-60Hz 12-18VA Ausgangsleistung: 12 VDC 0,5A
Dimensionen (zusammengebaut) (B x T x H) (mm)
201 x 317 x 303 mm 7.9 x 12.5 x 11.9 inch
Kommunikation RS232
Betriebstemperaturbereich Betriebsbedingungen für normale Laboranwendung: +10°C bis 30 °C (Betriebsfähigkeit garantiert von +5°C bis 40 °C)
Lagertemperaturbereich Luftfeuchtigkeit: maximale relative Luftfeuchtigkeit 80% für Temperaturen bis 30°C, linear abnehmend bis 50% relative
Luftfeuchtigkeit bei 40°C
Lagerbedingungen -10°C bis 60°C, Luftfeuchtigkeit 10% bis 90%, ohne Kondensation
Nettogewicht 10 lb / 4.5 kg 10 lb / 4.5 kg
Versandgewicht 15.4 lb / 7 kg 15.4 lb / 7 kg
Versanddimensionen (B x T x H) (mm)
507 x 387 x 531mm 20 x 15 x 21 inch
*SRP bezieht sich auf die Standardabweichung für n Wiederholungswägungen (n 10).
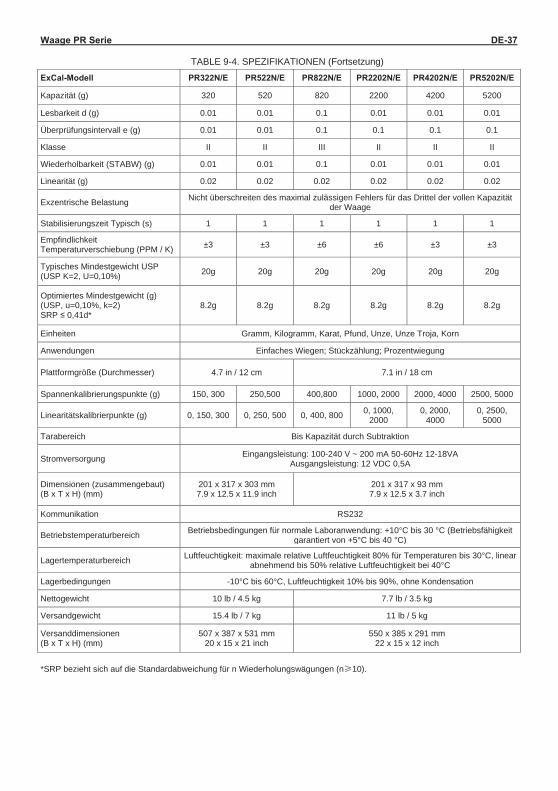
Waage PR Serie DE-37
TABLE 9-4. SPEZIFIKATIONEN (Fortsetzung)
ExCal-Modell PR322N/E PR522N/E PR822N/E PR2202N/E PR4202N/E PR5202N/E
Kapazität (g) 320 520 820 2200 4200 5200
Lesbarkeit d (g) 0.01 0.01 0.1 0.01 0.01 0.01
Überprüfungsintervall e (g) 0.01 0.01 0.1 0.1 0.1 0.1
Klasse II II III II II II
Wiederholbarkeit (STABW) (g) 0.01 0.01 0.1 0.01 0.01 0.01
Linearität (g) 0.02 0.02 0.02 0.02 0.02 0.02
Exzentrische Belastung Nicht überschreiten des maximal zulässigen Fehlers für das Drittel der vollen Kapazität der Waage
Stabilisierungszeit Typisch (s) 1 1 1 1 1 1
Empfindlichkeit Temperaturverschiebung (PPM / K) ±3 ±3 ±6 ±6 ±3 ±3
Typisches Mindestgewicht USP (USP K=2, U=0,10%) 20g 20g 20g 20g 20g 20g
Optimiertes Mindestgewicht (g) (USP, u=0,10%, k=2) SRP ≤ 0,41d*
8.2g 8.2g 8.2g 8.2g 8.2g 8.2g
Einheiten Gramm, Kilogramm, Karat, Pfund, Unze, Unze Troja, Korn
Anwendungen Einfaches Wiegen; Stückzählung; Prozentwiegung
Plattformgröße (Durchmesser) 4.7 in / 12 cm 7.1 in / 18 cm
Spannenkalibrierungspunkte (g) 150, 300 250,500 400,800 1000, 2000 2000, 4000 2500, 5000
Linearitätskalibrierpunkte (g) 0, 150, 300 0, 250, 500 0, 400, 800 0, 1000, 2000
0, 2000, 4000
0, 2500, 5000
Tarabereich Bis Kapazität durch Subtraktion
Stromversorgung Eingangsleistung: 100-240 V ~ 200 mA 50-60Hz 12-18VA Ausgangsleistung: 12 VDC 0,5A
Dimensionen (zusammengebaut) (B x T x H) (mm)
201 x 317 x 303 mm 7.9 x 12.5 x 11.9 inch
201 x 317 x 93 mm 7.9 x 12.5 x 3.7 inch
Kommunikation RS232
Betriebstemperaturbereich Betriebsbedingungen für normale Laboranwendung: +10°C bis 30 °C (Betriebsfähigkeit garantiert von +5°C bis 40 °C)
Lagertemperaturbereich Luftfeuchtigkeit: maximale relative Luftfeuchtigkeit 80% für Temperaturen bis 30°C, linear abnehmend bis 50% relative Luftfeuchtigkeit bei 40°C
Lagerbedingungen -10°C bis 60°C, Luftfeuchtigkeit 10% bis 90%, ohne Kondensation
Nettogewicht 10 lb / 4.5 kg 7.7 lb / 3.5 kg
Versandgewicht 15.4 lb / 7 kg 11 lb / 5 kg
Versanddimensionen (B x T x H) (mm)
507 x 387 x 531 mm 20 x 15 x 21 inch
550 x 385 x 291 mm 22 x 15 x 12 inch
*SRP bezieht sich auf die Standardabweichung für n Wiederholungswägungen (n 10).
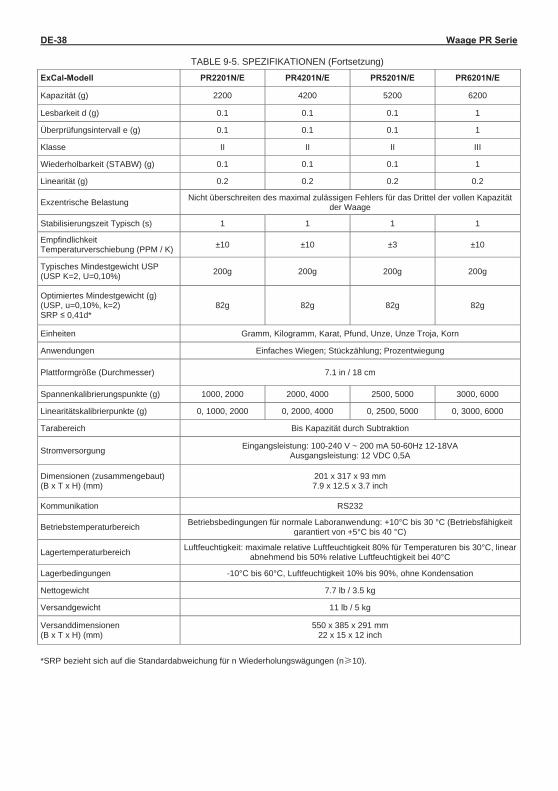
DE-38 Waage PR Serie
TABLE 9-5. SPEZIFIKATIONEN (Fortsetzung)
ExCal-Modell PR2201N/E PR4201N/E PR5201N/E PR6201N/E
Kapazität (g) 2200 4200 5200 6200
Lesbarkeit d (g) 0.1 0.1 0.1 1
Überprüfungsintervall e (g) 0.1 0.1 0.1 1
Klasse II II II III
Wiederholbarkeit (STABW) (g) 0.1 0.1 0.1 1
Linearität (g) 0.2 0.2 0.2 0.2
Exzentrische Belastung Nicht überschreiten des maximal zulässigen Fehlers für das Drittel der vollen Kapazität der Waage
Stabilisierungszeit Typisch (s) 1 1 1 1
Empfindlichkeit Temperaturverschiebung (PPM / K) ±10 ±10 ±3 ±10
Typisches Mindestgewicht USP (USP K=2, U=0,10%) 200g 200g 200g 200g
Optimiertes Mindestgewicht (g) (USP, u=0,10%, k=2) SRP ≤ 0,41d*
82g 82g 82g 82g
Einheiten Gramm, Kilogramm, Karat, Pfund, Unze, Unze Troja, Korn
Anwendungen Einfaches Wiegen; Stückzählung; Prozentwiegung
Plattformgröße (Durchmesser) 7.1 in / 18 cm
Spannenkalibrierungspunkte (g) 1000, 2000 2000, 4000 2500, 5000 3000, 6000
Linearitätskalibrierpunkte (g) 0, 1000, 2000 0, 2000, 4000 0, 2500, 5000 0, 3000, 6000
Tarabereich Bis Kapazität durch Subtraktion
Stromversorgung Eingangsleistung: 100-240 V ~ 200 mA 50-60Hz 12-18VA Ausgangsleistung: 12 VDC 0,5A
Dimensionen (zusammengebaut) (B x T x H) (mm)
201 x 317 x 93 mm 7.9 x 12.5 x 3.7 inch
Kommunikation RS232
Betriebstemperaturbereich Betriebsbedingungen für normale Laboranwendung: +10°C bis 30 °C (Betriebsfähigkeit garantiert von +5°C bis 40 °C)
Lagertemperaturbereich Luftfeuchtigkeit: maximale relative Luftfeuchtigkeit 80% für Temperaturen bis 30°C, linear abnehmend bis 50% relative Luftfeuchtigkeit bei 40°C
Lagerbedingungen -10°C bis 60°C, Luftfeuchtigkeit 10% bis 90%, ohne Kondensation
Nettogewicht 7.7 lb / 3.5 kg
Versandgewicht 11 lb / 5 kg
Versanddimensionen (B x T x H) (mm)
550 x 385 x 291 mm 22 x 15 x 12 inch
*SRP bezieht sich auf die Standardabweichung für n Wiederholungswägungen (n 10).
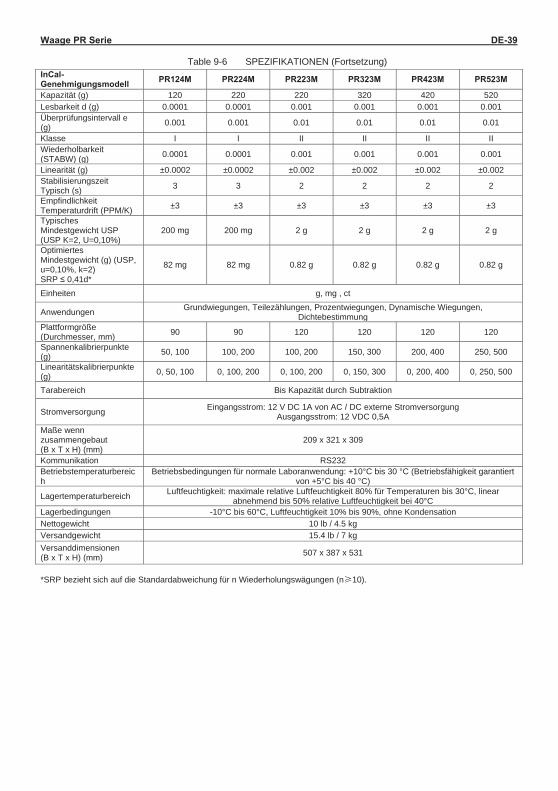
Waage PR Serie DE-39
Table 9-6 SPEZIFIKATIONEN (Fortsetzung) InCal-Genehmigungsmodell PR124M PR224M PR223M PR323M PR423M PR523M
Kapazität (g) 120 220 220 320 420 520 Lesbarkeit d (g) 0.0001 0.0001 0.001 0.001 0.001 0.001 Überprüfungsintervall e (g) 0.001 0.001 0.01 0.01 0.01 0.01
Klasse I I II II II II Wiederholbarkeit (STABW) (g) 0.0001 0.0001 0.001 0.001 0.001 0.001
Linearität (g) ±0.0002 ±0.0002 ±0.002 ±0.002 ±0.002 ±0.002 Stabilisierungszeit Typisch (s) 3 3 2 2 2 2
Empfindlichkeit Temperaturdrift (PPM/K) ±3 ±3 ±3 ±3 ±3 ±3
Typisches Mindestgewicht USP (USP K=2, U=0,10%)
200 mg 200 mg 2 g 2 g 2 g 2 g
Optimiertes Mindestgewicht (g) (USP, u=0,10%, k=2) SRP ≤ 0,41d*
82 mg 82 mg 0.82 g 0.82 g 0.82 g 0.82 g
Einheiten g, mg , ct
Anwendungen Grundwiegungen, Teilezählungen, Prozentwiegungen, Dynamische Wiegungen, Dichtebestimmung
Plattformgröße (Durchmesser, mm) 90 90 120 120 120 120
Spannenkalibrierpunkte (g) 50, 100 100, 200 100, 200 150, 300 200, 400 250, 500
Linearitätskalibrierpunkte (g) 0, 50, 100 0, 100, 200 0, 100, 200 0, 150, 300 0, 200, 400 0, 250, 500
Tarabereich Bis Kapazität durch Subtraktion
Stromversorgung Eingangsstrom: 12 V DC 1A von AC / DC externe Stromversorgung Ausgangsstrom: 12 VDC 0,5A
Maße wenn zusammengebaut (B x T x H) (mm)
209 x 321 x 309
Kommunikation RS232 Betriebstemperaturbereich
Betriebsbedingungen für normale Laboranwendung: +10°C bis 30 °C (Betriebsfähigkeit garantiert von +5°C bis 40 °C)
Lagertemperaturbereich Luftfeuchtigkeit: maximale relative Luftfeuchtigkeit 80% für Temperaturen bis 30°C, linear abnehmend bis 50% relative Luftfeuchtigkeit bei 40°C
Lagerbedingungen -10°C bis 60°C, Luftfeuchtigkeit 10% bis 90%, ohne Kondensation Nettogewicht 10 lb / 4.5 kg Versandgewicht 15.4 lb / 7 kg Versanddimensionen (B x T x H) (mm) 507 x 387 x 531
*SRP bezieht sich auf die Standardabweichung für n Wiederholungswägungen (n 10).
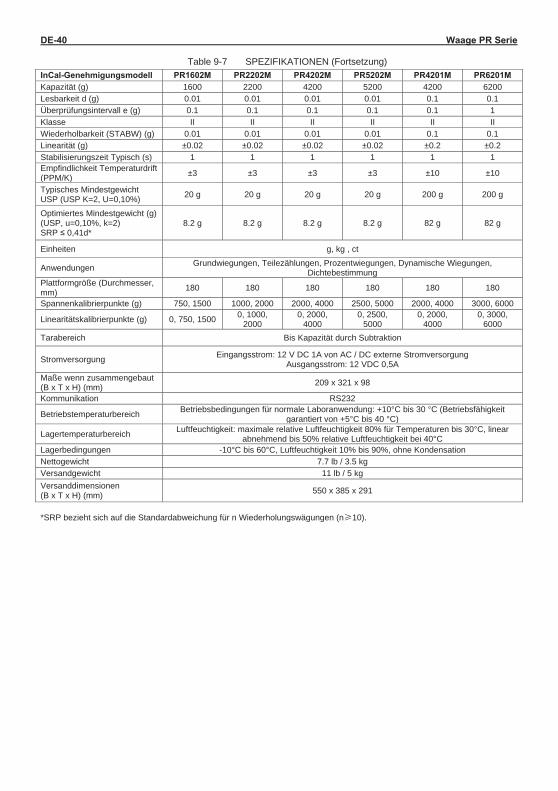
DE-40 Waage PR Serie
Table 9-7 SPEZIFIKATIONEN (Fortsetzung) InCal-Genehmigungsmodell PR1602M PR2202M PR4202M PR5202M PR4201M PR6201M Kapazität (g) 1600 2200 4200 5200 4200 6200 Lesbarkeit d (g) 0.01 0.01 0.01 0.01 0.1 0.1 Überprüfungsintervall e (g) 0.1 0.1 0.1 0.1 0.1 1 Klasse II II II II II II Wiederholbarkeit (STABW) (g) 0.01 0.01 0.01 0.01 0.1 0.1 Linearität (g) ±0.02 ±0.02 ±0.02 ±0.02 ±0.2 ±0.2 Stabilisierungszeit Typisch (s) 1 1 1 1 1 1 Empfindlichkeit Temperaturdrift (PPM/K) ±3 ±3 ±3 ±3 ±10 ±10
Typisches Mindestgewicht USP (USP K=2, U=0,10%) 20 g 20 g 20 g 20 g 200 g 200 g
Optimiertes Mindestgewicht (g) (USP, u=0,10%, k=2) SRP ≤ 0,41d*
8.2 g 8.2 g 8.2 g 8.2 g 82 g 82 g
Einheiten g, kg , ct
Anwendungen Grundwiegungen, Teilezählungen, Prozentwiegungen, Dynamische Wiegungen, Dichtebestimmung
Plattformgröße (Durchmesser, mm) 180 180 180 180 180 180
Spannenkalibrierpunkte (g) 750, 1500 1000, 2000 2000, 4000 2500, 5000 2000, 4000 3000, 6000
Linearitätskalibrierpunkte (g) 0, 750, 1500 0, 1000, 2000
0, 2000, 4000
0, 2500, 5000
0, 2000, 4000
0, 3000, 6000
Tarabereich Bis Kapazität durch Subtraktion
Stromversorgung Eingangsstrom: 12 V DC 1A von AC / DC externe Stromversorgung Ausgangsstrom: 12 VDC 0,5A
Maße wenn zusammengebaut (B x T x H) (mm) 209 x 321 x 98
Kommunikation RS232
Betriebstemperaturbereich Betriebsbedingungen für normale Laboranwendung: +10°C bis 30 °C (Betriebsfähigkeit garantiert von +5°C bis 40 °C)
Lagertemperaturbereich Luftfeuchtigkeit: maximale relative Luftfeuchtigkeit 80% für Temperaturen bis 30°C, linear abnehmend bis 50% relative Luftfeuchtigkeit bei 40°C
Lagerbedingungen -10°C bis 60°C, Luftfeuchtigkeit 10% bis 90%, ohne Kondensation Nettogewicht 7.7 lb / 3.5 kg Versandgewicht 11 lb / 5 kg Versanddimensionen (B x T x H) (mm) 550 x 385 x 291
*SRP bezieht sich auf die Standardabweichung für n Wiederholungswägungen (n 10).
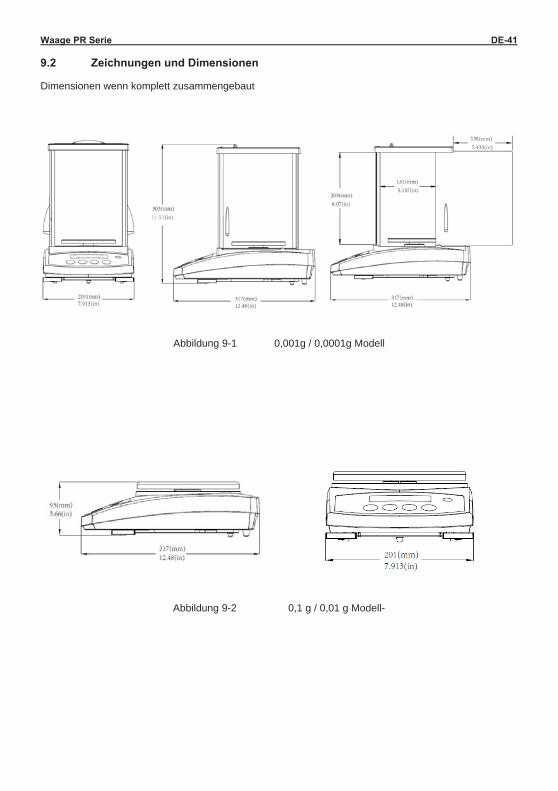
Waage PR Serie DE-41 9.2 Zeichnungen und Dimensionen Dimensionen wenn komplett zusammengebaut
Abbildung 9-1 0,001g / 0,0001g Modell
Abbildung 9-2 0,1 g / 0,01 g Modell-
11.93
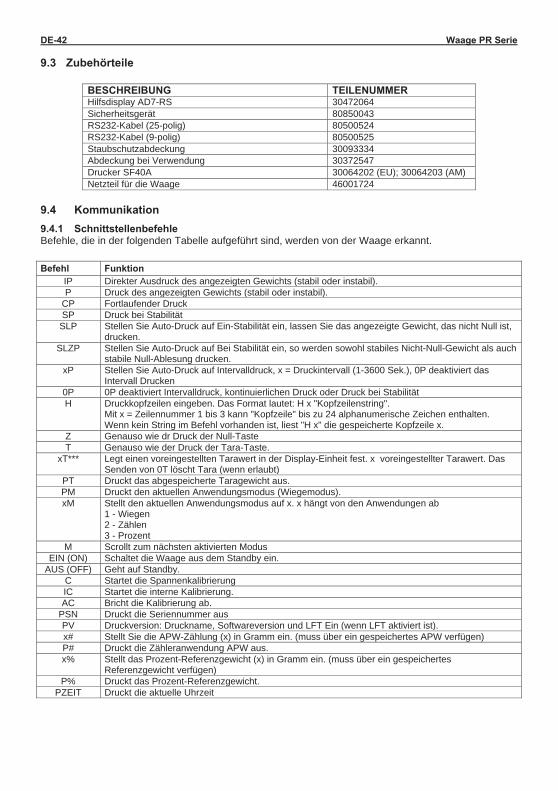
DE-42 Waage PR Serie 9.3 Zubehörteile
BESCHREIBUNG TEILENUMMER Hilfsdisplay AD7-RS 30472064 Sicherheitsgerät 80850043 RS232-Kabel (25-polig) 80500524 RS232-Kabel (9-polig) 80500525 Staubschutzabdeckung 30093334 Abdeckung bei Verwendung 30372547 Drucker SF40A 30064202 (EU); 30064203 (AM) Netzteil für die Waage 46001724
9.4 Kommunikation
9.4.1 Schnittstellenbefehle Befehle, die in der folgenden Tabelle aufgeführt sind, werden von der Waage erkannt. Befehl Funktion
IP Direkter Ausdruck des angezeigten Gewichts (stabil oder instabil). P Druck des angezeigten Gewichts (stabil oder instabil).
CP Fortlaufender Druck SP Druck bei Stabilität
SLP Stellen Sie Auto-Druck auf Ein-Stabilität ein, lassen Sie das angezeigte Gewicht, das nicht Null ist, drucken.
SLZP Stellen Sie Auto-Druck auf Bei Stabilität ein, so werden sowohl stabiles Nicht-Null-Gewicht als auch stabile Null-Ablesung drucken.
xP Stellen Sie Auto-Druck auf Intervalldruck, x = Druckintervall (1-3600 Sek.), 0P deaktiviert das Intervall Drucken
0P 0P deaktiviert Intervalldruck, kontinuierlichen Druck oder Druck bei Stabilität H Druckkopfzeilen eingeben. Das Format lautet: H x "Kopfzeilenstring".
Mit x = Zeilennummer 1 bis 3 kann "Kopfzeile" bis zu 24 alphanumerische Zeichen enthalten. Wenn kein String im Befehl vorhanden ist, liest "H x" die gespeicherte Kopfzeile x.
Z Genauso wie dr Druck der Null-Taste T Genauso wie der Druck der Tara-Taste.
xT*** Legt einen voreingestellten Tarawert in der Display-Einheit fest. x voreingestellter Tarawert. Das Senden von 0T löscht Tara (wenn erlaubt)
PT Druckt das abgespeicherte Taragewicht aus. PM Druckt den aktuellen Anwendungsmodus (Wiegemodus). xM Stellt den aktuellen Anwendungsmodus auf x. x hängt von den Anwendungen ab
1 - Wiegen 2 - Zählen 3 - Prozent
M Scrollt zum nächsten aktivierten Modus EIN (ON) Schaltet die Waage aus dem Standby ein.
AUS (OFF) Geht auf Standby. C Startet die Spannenkalibrierung IC Startet die interne Kalibrierung. AC Bricht die Kalibrierung ab.
PSN Druckt die Seriennummer aus PV Druckversion: Druckname, Softwareversion und LFT Ein (wenn LFT aktiviert ist). x# Stellt Sie die APW-Zählung (x) in Gramm ein. (muss über ein gespeichertes APW verfügen) P# Druckt die Zähleranwendung APW aus. x% Stellt das Prozent-Referenzgewicht (x) in Gramm ein. (muss über ein gespeichertes
Referenzgewicht verfügen) P% Druckt das Prozent-Referenzgewicht.
PZEIT Druckt die aktuelle Uhrzeit
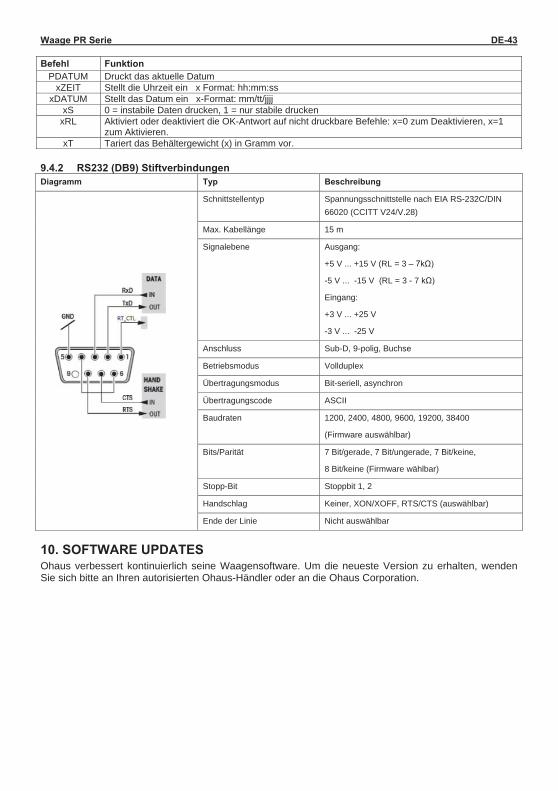
Waage PR Serie DE-43 Befehl Funktion
PDATUM Druckt das aktuelle Datum xZEIT Stellt die Uhrzeit ein x Format: hh:mm:ss
xDATUM Stellt das Datum ein x-Format: mm/tt/jjjj xS 0 = instabile Daten drucken, 1 = nur stabile drucken
xRL Aktiviert oder deaktiviert die OK-Antwort auf nicht druckbare Befehle: x=0 zum Deaktivieren, x=1 zum Aktivieren.
xT Tariert das Behältergewicht (x) in Gramm vor. 9.4.2 RS232 (DB9) Stiftverbindungen Diagramm Typ Beschreibung
Schnittstellentyp Spannungsschnittstelle nach EIA RS-232C/DIN 66020 (CCITT V24/V.28)
Max. Kabellänge 15 m
Signalebene Ausgang:
+5 V ... +15 V (RL = 3 – 7kΩ)
-5 V ... -15 V (RL = 3 - 7 kΩ)
Eingang:
+3 V ... +25 V
-3 V ... -25 V
Anschluss Sub-D, 9-polig, Buchse
Betriebsmodus Vollduplex
Übertragungsmodus Bit-seriell, asynchron
Übertragungscode ASCII
Baudraten 1200, 2400, 4800 9600 19200 38400
(Firmware auswählbar)
Bits/Parität 7 Bit/gerade, 7 Bit/ungerade, 7 Bit/keine,
8 Bit/keine (Firmware wählbar)
Stopp-Bit Stoppbit 1, 2
Handschlag Keiner, XON/XOFF, RTS/CTS (auswählbar)
Ende der Linie Nicht auswählbar
10. SOFTWARE UPDATES Ohaus verbessert kontinuierlich seine Waagensoftware. Um die neueste Version zu erhalten, wenden Sie sich bitte an Ihren autorisierten Ohaus-Händler oder an die Ohaus Corporation.
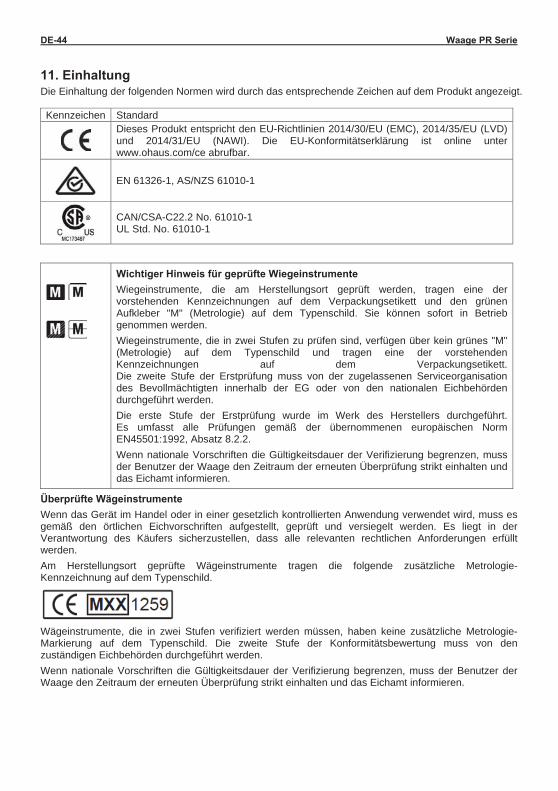
DE-44 Waage PR Serie
11. Einhaltung Die Einhaltung der folgenden Normen wird durch das entsprechende Zeichen auf dem Produkt angezeigt. Kennzeichen Standard
Dieses Produkt entspricht den EU-Richtlinien 2014/30/EU (EMC), 2014/35/EU (LVD) und 2014/31/EU (NAWI). Die EU-Konformitätserklärung ist online unterwww.ohaus.com/ce abrufbar.
EN 61326-1, AS/NZS 61010-1
CAN/CSA-C22.2 No. 61010-1 UL Std. No. 61010-1
Wichtiger Hinweis für geprüfte WiegeinstrumenteWiegeinstrumente, die am Herstellungsort geprüft werden, tragen eine der vorstehenden Kennzeichnungen auf dem Verpackungsetikett und den grünen Aufkleber "M" (Metrologie) auf dem Typenschild. Sie können sofort in Betrieb genommen werden. Wiegeinstrumente, die in zwei Stufen zu prüfen sind, verfügen über kein grünes "M" (Metrologie) auf dem Typenschild und tragen eine der vorstehenden Kennzeichnungen auf dem Verpackungsetikett. Die zweite Stufe der Erstprüfung muss von der zugelassenen Serviceorganisation des Bevollmächtigten innerhalb der EG oder von den nationalen Eichbehörden durchgeführt werden. Die erste Stufe der Erstprüfung wurde im Werk des Herstellers durchgeführt. Es umfasst alle Prüfungen gemäß der übernommenen europäischen Norm EN45501:1992, Absatz 8.2.2. Wenn nationale Vorschriften die Gültigkeitsdauer der Verifizierung begrenzen, muss der Benutzer der Waage den Zeitraum der erneuten Überprüfung strikt einhalten und das Eichamt informieren.
Überprüfte Wägeinstrumente Wenn das Gerät im Handel oder in einer gesetzlich kontrollierten Anwendung verwendet wird, muss es gemäß den örtlichen Eichvorschriften aufgestellt, geprüft und versiegelt werden. Es liegt in der Verantwortung des Käufers sicherzustellen, dass alle relevanten rechtlichen Anforderungen erfüllt werden. Am Herstellungsort geprüfte Wägeinstrumente tragen die folgende zusätzliche Metrologie-Kennzeichnung auf dem Typenschild.
Wägeinstrumente, die in zwei Stufen verifiziert werden müssen, haben keine zusätzliche Metrologie-Markierung auf dem Typenschild. Die zweite Stufe der Konformitätsbewertung muss von den zuständigen Eichbehörden durchgeführt werden. Wenn nationale Vorschriften die Gültigkeitsdauer der Verifizierung begrenzen, muss der Benutzer der Waage den Zeitraum der erneuten Überprüfung strikt einhalten und das Eichamt informieren.

Waage PR Serie DE-45 Da die Prüfanforderungen je nach Jurisdiktion unterschiedlich sind, sollte sich der Käufer an seine örtliche Eichbehörde wenden, wenn er mit den Anforderungen nicht vertraut ist. FCC-Hinweis Diese Ausrüstung wurde getestet und entspricht den Grenzwerten für digitale Geräte der Klasse A gemäß Teil 15 der FCC-Bestimmungen. Diese Grenzwerte dienen dazu, einen angemessenen Schutz gegen schädliche Störungen zu bieten, wenn das Gerät in einer kommerziellen Umgebung betrieben wird. Dieses Gerät erzeugt, verwendet und kann Hochfrequenzenergie ausstrahlen und, falls es nicht in Übereinstimmung mit der Bedienungsanleitung installiert und verwendet wird, schädliche Interferenzen bei der Funkkommunikation hervorrufen. Der Betrieb dieser Ausrüstung in einem Wohngebiet verursacht wahrscheinlich schädliche Interferenzen. In diesem Fall muss der Benutzer die Störungen auf eigene Kosten korrigieren.
Industry Canada-Hinweis Dieses digitale Gerät der Klasse A entspricht der kanadischen Norm ICES-003. ISO 9001 Registrierung Im Jahr 1994 erhielt die OHAUS Corporation, USA, von Bureau Veritas Quality International (BVQI) das Zertifikat für die Registrierung laut ISO 9001 und bestätigte, dass das OHAUS Qualitätsmanagementsystem den Anforderungen der ISO 9001 entspricht. Am 21. Juni 2012 wurde die OHAUS Corporation, USA, erneut in den ISO 9001:2008 Standard aufgenommen.
Dieses Produkt entspricht der EU-Richtlinie 2012/19/EU (WEEE). Bitte entsorgen Sie dieses Produkt gemäß den örtlichen Bestimmungen an der für Elektro- und Elektronikgeräte angegebenen Sammelstelle.
Für Anweisungen zur Entsorgung in Europa, siehe www.ohaus.com/weee.

DE-46 Waage PR Serie
EINGESCHRÄNKTE GARANTIE
Für Ohaus-Produkte gilt eine Garantie für Material- und Verarbeitungsfehler ab dem Zeitpunkt der Lieferung für die Dauer der Garantiezeit. Während der Garantiezeit repariert Ohaus alle Komponenten, die sich als defekt erweisen, oder ersetzt diese kostenlos, sofern das Produkt frachtfrei an Ohaus zurückgesandt wird.
Diese Garantie gilt nicht, wenn das Produkt durch einen Unfall oder unsachgemäßen Gebrauch beschädigt wurde, radioaktiven oder korrosiven Materialien ausgesetzt wird, Fremdmaterial ins Innere des Produkts eindringt oder als das Ergebnis einer Wartung oder Modifizierung von Ohaus. Anstelle einer ordnungsgemäßen Rücksendung der Garantiekarte beginnt die Gewährleistungsfrist mit dem Datum des Versands an den Vertragshändler. Von der Ohaus Corporation wird keine andere ausdrückliche oder stillschweigende Garantie gewährt. Die Ohaus Corporation haftet nicht für Folgeschäden.
Da die Garantiebestimmungen von Bundesstaat zu Bundesstaat und von Land zu Land unterschiedlich sind, wenden Sie sich bitte an Ohaus oder Ihren lokalen Ohaus-Händler für weitere Details.
Bilancia Serie PR IT-1
Sommario 1. INTRODUZIONE ................................................................................................................. IT-3
1.1 Descrizione............................................................................................................................................... IT-31.2 Caratteristiche .......................................................................................................................................... IT-31.3 Definizione dei Segnali di Avvertimento e dei Simboli ............................................................................. IT-31.4 Precauzioni di Sicurezza .......................................................................................................................... IT-3
2. INSTALLAZIONE ............................................................................................................... IT-42.1 Disimballaggio .......................................................................................................................................... IT-42.2 Selezionare la Posizione .......................................................................................................................... IT-42.3 Livellamento ............................................................................................................................................. IT-42.4 Collegamento dell’Alimentazione Elettrica e Adattamento della Bilancia ................................................ IT-42.5 Collegamento dell’Interfaccia ................................................................................................................... IT-52.6 Taratura Iniziale ....................................................................................................................................... IT-5
3. FUNZIONAMENTO ............................................................................................................. IT-63.1 Visualizzazione del Display, Schermata Iniziale ...................................................................................... IT-63.2 Funzioni Principali e Menu Principali ....................................................................................................... IT-73.3 Visualizzazione dei Pezzi e le loro Caratteristiche – Modelli Scudo Paravento ...................................... IT-73.4 Visualizzazione dei Pezzi e le loro Caratteristiche – Modelli Senza Scudo Paravento ........................... IT-7
4. APPLICAZIONI .............................................................................................................................................. IT-84.1 Pesatura ................................................................................................................................................... IT-8 4.2 Conteggio dei Pezzi ................................................................................................................................. IT-8 4.3 Pesatura Percento ................................................................................................................................. IT-104.4 Caratteristiche Supplementari ................................................................................................................ IT-12
5. IMPOSTAZIONI MENU ..................................................................................................... IT-135.1 Menu Navigazione ................................................................................................................................. IT-135.1.1 Cambiamento delle Impostazioni ....................................................................................................... IT-13 5.2 Taratura .................................................................................................................................................. IT-13 5.2.1 Taratura dei Sottomenu (modelli InCal) ............................................................................................. IT-15 5.2.2 Taratura Interna (non applicabile ai modelli ExCal) ........................................................................... IT-15 5.2.3 Regolazione Cal (non applicabile ai modelli ExCal) .......................................................................... IT-15 5.2.4 Taratura di Portata ............................................................................................................................. IT-15 5.2.5 Taratura di Linearità ........................................................................................................................... IT-15 5.3 Impostazione della bilancia .................................................................................................................... IT-175.3.1 Livello del Filtro .................................................................................................................................. IT-175.3.2 AZT (Tracciamento Automatico dello Zero) ....................................................................................... IT-175.3.3 Auto-Taratura ..................................................................................................................................... IT-175.3.4 Graduazioni ........................................................................................................................................ IT-185.3.5 Formattazione della Data ................................................................................................................... IT-185.3.6 Impostazione della Data ..................................................................................................................... IT-185.3.7 Formattazione dell’Orario ................................................................................................................... IT-185.3.8 Impostazione dell’Orario .................................................................................................................... IT-195.3.9 Luminosità .......................................................................................................................................... IT-195.3.10 Auto-Oscurazione ............................................................................................................................... IT-195.3.11 Modalità Approvata ............................................................................................................................ IT-19 5.4 Unità di pesatura .................................................................................................................................... IT-215.5 Impostazione Interfaccia RS232 ............................................................................................................ IT-215.5.1 Baud Rate .......................................................................................................................................... IT-215.5.2 Trasmissione ...................................................................................................................................... IT-215.5.3 Handshake ......................................................................................................................................... IT-225.6 Impostazioni di Stampa .......................................................................................................................... IT-22 5.6.1 Solamente Stabile .............................................................................................................................. IT-22 5.6.2 Solamente Numerici ........................................................................................................................... IT-22 5.6.3 Intestazione Singola ........................................................................................................................... IT-22 5.6.4 Auto-Stampa ...................................................................................................................................... IT-22 5.6.5 Intestazione ........................................................................................................................................ IT-22 5.6.6 Data e Orario ...................................................................................................................................... IT-22 5.6.7 ID della Bilancia ................................................................................................................................. IT-22 5.6.8 Nome della Bilancia ........................................................................................................................... IT-22
IT-2 Bilancia Serie PR
5.6.9 Nome dell’Utente ................................................................................................................................ IT-22 5.6.10 Nome del Progetto ............................................................................................................................. IT-22 5.6.11 Nome dell’Applicazione ...................................................................................................................... IT-22 5.6.12 Risultato ............................................................................................................................................. IT-22 5.6.13 Lordo .................................................................................................................................................. IT-22 5.6.14 Netto ................................................................................................................................................... IT-22 5.6.15 Taratura .............................................................................................................................................. IT-22 5.6.16 Alimentazione della Linea .................................................................................................................. IT-22 5.7 GLP (Buone Pratiche di Laboratorio) ..................................................................................................... IT-25 5.7.1 Intestazione ........................................................................................................................................ IT-25 5.7.2 Nome della Bilancia ........................................................................................................................... IT-25 5.7.3 Nome dell’Utente ................................................................................................................................ IT-25 5.7.4 Nome del Progetto ............................................................................................................................. IT-25 5.8 Ripristino Impostazioni di Fabbrica ........................................................................................................ IT-255.9 Bloccaggio .............................................................................................................................................. IT-26
6. (LFT) LEGALE PER IL COMMERCIO ............................................................................. IT-27 6.1 Impostazioni ........................................................................................................................................... IT-28 6.2 Verifica ................................................................................................................................................... IT-28 6.3 Sigillatura ................................................................................................................................................ IT-28
7. STAMPA ........................................................................................................................... IT-287.1 Collegare, configurare and Provare la Stampante/Interfaccia del Computer ........................................ IT-28 7.2 Formato di Output .................................................................................................................................. IT-28 7.3 Esempi di Stampa .................................................................................................................................. IT-28
8. MANUTENZIONE ............................................................................................................. IT-318.1 Taratura .................................................................................................................................................. IT-318.2 Pulizia ..................................................................................................................................................... IT-318.3 Risoluzione dei Problemi ........................................................................................................................ IT-318.4 Informazione di Servizio ......................................................................................................................... IT-31
9. DATI TECNICI .................................................................................................................. IT-329.1 Specifiche ............................................................................................................................................... IT-329.2 Disegni e Dimensioni ............................................................................................................................. IT-409.3 Accessori ................................................................................................................................................ IT-419.4 Comunicazione ...................................................................................................................................... IT-419.4.1 Controlli Interfaccia ............................................................................................................................. IT-419.4.2 Collegamenti Perno RS232 (DB9) ..................................................................................................... IT-42
10. AGGIORNAMENTI DEI SOFTWARE ............................................................................. IT-4211. CONFORMITÀ ................................................................................................................ IT-43
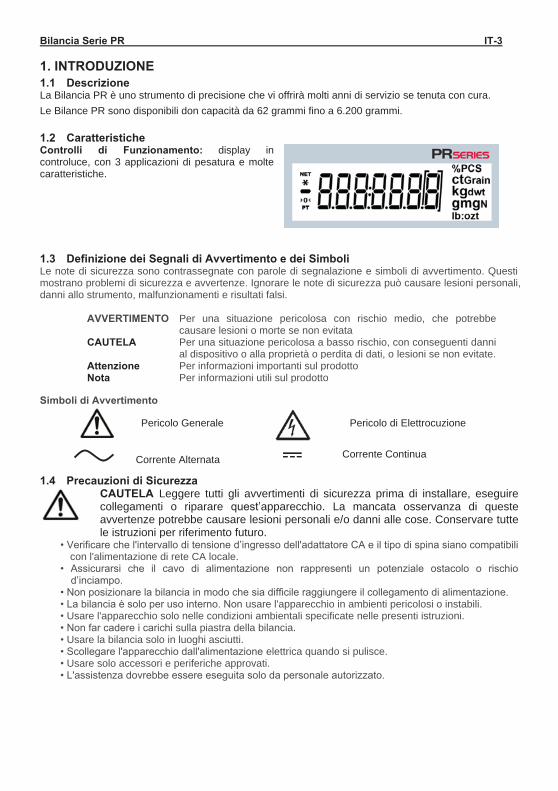
Bilancia Serie PR IT-3 1. INTRODUZIONE 1.1 Descrizione La Bilancia PR è uno strumento di precisione che vi offrirà molti anni di servizio se tenuta con cura. Le Bilance PR sono disponibili don capacità da 62 grammi fino a 6.200 grammi. 1.2 Caratteristiche Controlli di Funzionamento: display in controluce, con 3 applicazioni di pesatura e molte caratteristiche.
1.3 Definizione dei Segnali di Avvertimento e dei Simboli Le note di sicurezza sono contrassegnate con parole di segnalazione e simboli di avvertimento. Questi mostrano problemi di sicurezza e avvertenze. Ignorare le note di sicurezza può causare lesioni personali, danni allo strumento, malfunzionamenti e risultati falsi.
AVVERTIMENTO Per una situazione pericolosa con rischio medio, che potrebbe causare lesioni o morte se non evitata
CAUTELA Per una situazione pericolosa a basso rischio, con conseguenti danni al dispositivo o alla proprietà o perdita di dati, o lesioni se non evitate.
Attenzione Per informazioni importanti sul prodotto Nota Per informazioni utili sul prodotto
Simboli di Avvertimento Pericolo Generale Pericolo di Elettrocuzione
1.4 Precauzioni di Sicurezza
CAUTELA Leggere tutti gli avvertimenti di sicurezza prima di installare, eseguire collegamenti o riparare quest’apparecchio. La mancata osservanza di queste avvertenze potrebbe causare lesioni personali e/o danni alle cose. Conservare tutte le istruzioni per riferimento futuro.
• Verificare che l'intervallo di tensione d’ingresso dell'adattatore CA e il tipo di spina siano compatibili con l'alimentazione di rete CA locale.
• Assicurarsi che il cavo di alimentazione non rappresenti un potenziale ostacolo o rischio d’inciampo.
• Non posizionare la bilancia in modo che sia difficile raggiungere il collegamento di alimentazione. • La bilancia è solo per uso interno. Non usare l'apparecchio in ambienti pericolosi o instabili. • Usare l'apparecchio solo nelle condizioni ambientali specificate nelle presenti istruzioni. • Non far cadere i carichi sulla piastra della bilancia. • Usare la bilancia solo in luoghi asciutti. • Scollegare l'apparecchio dall'alimentazione elettrica quando si pulisce. • Usare solo accessori e periferiche approvati. • L'assistenza dovrebbe essere eseguita solo da personale autorizzato.
Corrente ContinuaCorrente Alternata
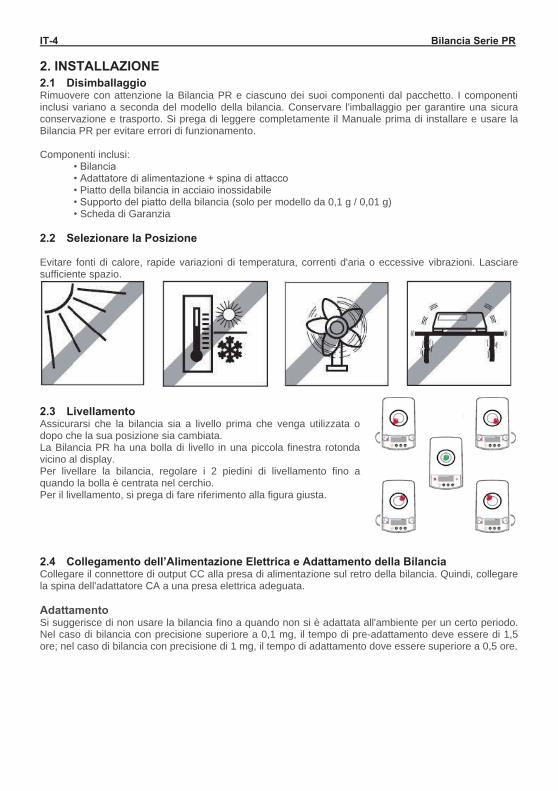
IT-4 Bilancia Serie PR 2. INSTALLAZIONE 2.1 Disimballaggio Rimuovere con attenzione la Bilancia PR e ciascuno dei suoi componenti dal pacchetto. I componenti inclusi variano a seconda del modello della bilancia. Conservare l'imballaggio per garantire una sicura conservazione e trasporto. Si prega di leggere completamente il Manuale prima di installare e usare la Bilancia PR per evitare errori di funzionamento. Componenti inclusi:
• Bilancia • Adattatore di alimentazione + spina di attacco • Piatto della bilancia in acciaio inossidabile • Supporto del piatto della bilancia (solo per modello da 0,1 g / 0,01 g) • Scheda di Garanzia
2.2 Selezionare la Posizione Evitare fonti di calore, rapide variazioni di temperatura, correnti d'aria o eccessive vibrazioni. Lasciare sufficiente spazio.
2.3 Livellamento Assicurarsi che la bilancia sia a livello prima che venga utilizzata o dopo che la sua posizione sia cambiata. La Bilancia PR ha una bolla di livello in una piccola finestra rotonda vicino al display. Per livellare la bilancia, regolare i 2 piedini di livellamento fino a quando la bolla è centrata nel cerchio. Per il livellamento, si prega di fare riferimento alla figura giusta. 2.4 Collegamento dell’Alimentazione Elettrica e Adattamento della Bilancia Collegare il connettore di output CC alla presa di alimentazione sul retro della bilancia. Quindi, collegare la spina dell'adattatore CA a una presa elettrica adeguata. Adattamento Si suggerisce di non usare la bilancia fino a quando non si è adattata all'ambiente per un certo periodo. Nel caso di bilancia con precisione superiore a 0,1 mg, il tempo di pre-adattamento deve essere di 1,5 ore; nel caso di bilancia con precisione di 1 mg, il tempo di adattamento dove essere superiore a 0,5 ore.

Bilancia Serie PR IT-5 2.5 Collegamento dell’Interfaccia
La Bilancia PR ha una porta RS232. Usare la porta RS-232 per collegarsi sia a un computer o a una stampante con un cavo seriale standard (diretto) Interfacciare i collegamenti sul retro della bilancia.
RS232 È usato per collegare il PC o la Stampante Nota: Vedi la sezione Stampante per Collegare, Configurare e Provare la Stampante/Interfaccia del Computer.
2.6 Taratura Iniziale Quando la Bilancia PR viene installata per la prima volta, o quando viene spostata in un'altra posizione, deve essere calibrata per garantire risultati precisi della pesatura. Le Bilance PR sono classificate in due categorie: modelli InCal e modelli ExCal. I modelli InCal hanno un meccanismo di taratura incorporato che può tarare automaticamente la bilancia e non richiede l'uso di masse di taratura esterne. Se si dovesse preferire, i modelli InCal possono anche essere tarati manualmente con masse esterne. I modelli ExCal sono tarati con masse esterne. Assicurarsi di avere a disposizione le masse di taratura appropriate prima di iniziare la taratura.
RS232
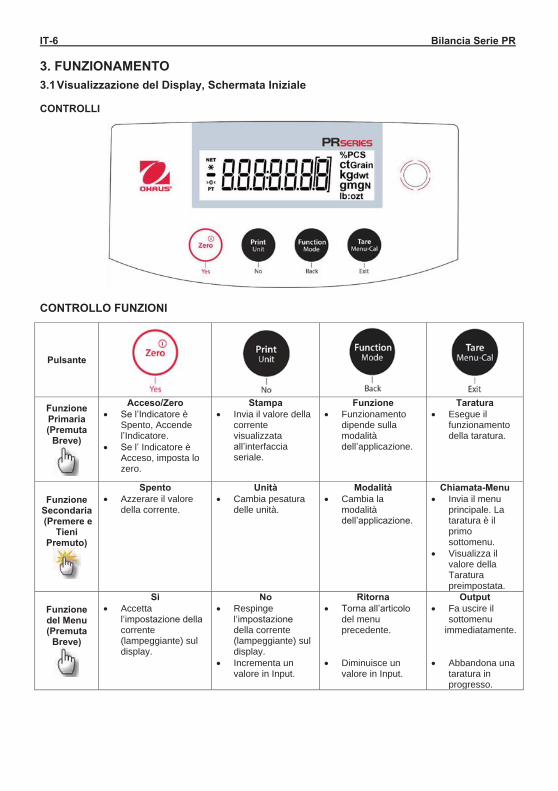
IT-6 Bilancia Serie PR 3. FUNZIONAMENTO
3.1 Visualizzazione del Display, Schermata Iniziale
CONTROLLI
CONTROLLO FUNZIONI
Pulsante
Funzione Primaria (Premuta
Breve)
Acceso/Zero Se l’Indicatore è
Spento, Accende l’Indicatore.
Se l’ Indicatore è Acceso, imposta lo zero.
Stampa Invia il valore della
corrente visualizzata all’interfaccia seriale.
Funzione Funzionamento
dipende sulla modalità dell’applicazione.
Taratura Esegue il
funzionamento della taratura.
Funzione Secondaria (Premere e
Tieni Premuto)
Spento Azzerare il valore
della corrente.
Unità Cambia pesatura
delle unità.
Modalità Cambia la
modalità dell’applicazione.
Chiamata-Menu Invia il menu
principale. La taratura è il primo sottomenu.
Visualizza il valore della Taratura preimpostata.
Funzione del Menu (Premuta
Breve)
Si Accetta
l‘impostazione della corrente (lampeggiante) sul display.
No Respinge
l‘impostazione della corrente (lampeggiante) sul display.
Incrementa un valore in Input.
Ritorna Torna all’articolo
del menu precedente.
Diminuisce un
valore in Input.
Output Fa uscire il
sottomenu immediatamente. Abbandona una
taratura in progresso.
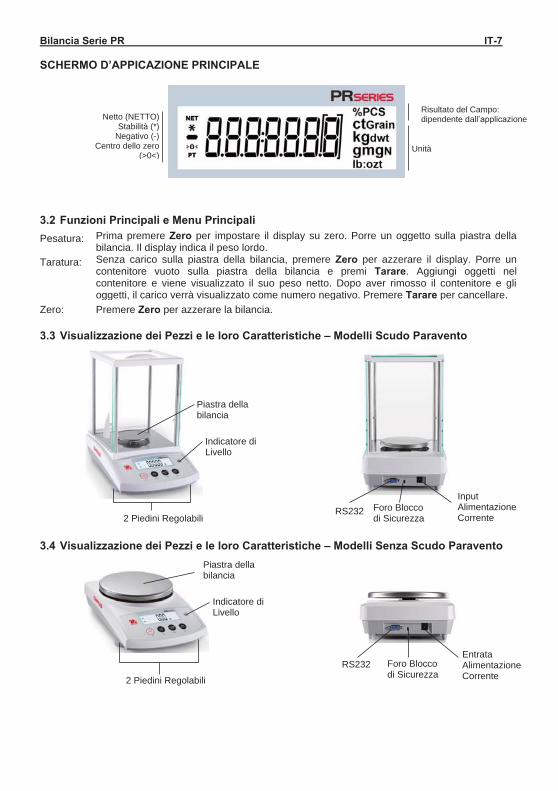
Bilancia Serie PR IT-7 SCHERMO D’APPICAZIONE PRINCIPALE
3.2 Funzioni Principali e Menu Principali
Pesatura: Prima premere Zero per impostare il display su zero. Porre un oggetto sulla piastra della bilancia. Il display indica il peso lordo.
Taratura: Senza carico sulla piastra della bilancia, premere Zero per azzerare il display. Porre un contenitore vuoto sulla piastra della bilancia e premi Tarare. Aggiungi oggetti nel contenitore e viene visualizzato il suo peso netto. Dopo aver rimosso il contenitore e gli oggetti, il carico verrà visualizzato come numero negativo. Premere Tarare per cancellare.
Zero: Premere Zero per azzerare la bilancia. 3.3 Visualizzazione dei Pezzi e le loro Caratteristiche – Modelli Scudo Paravento
3.4 Visualizzazione dei Pezzi e le loro Caratteristiche – Modelli Senza Scudo Paravento
Risultato del Campo: dipendente dall’applicazione Netto (NETTO)
Stabilità (*) Negativo (-)
Centro dello zero (>0<)
Unità
Piastra della bilancia
Indicatore di Livello
2 Piedini Regolabili RS232 Foro Blocco
di Sicurezza
Input Alimentazione Corrente
2 Piedini Regolabili
Piastra della bilancia
Indicatore di Livello
RS232 Foro Blocco di Sicurezza
Entrata Alimentazione Corrente
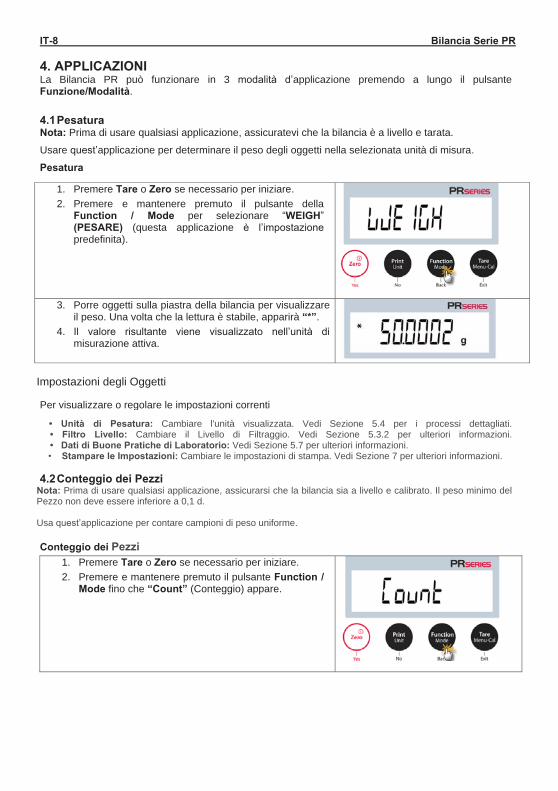
IT-8 Bilancia Serie PR 4. APPLICAZIONI La Bilancia PR può funzionare in 3 modalità d’applicazione premendo a lungo il pulsante Funzione/Modalità. 4.1 Pesatura Nota: Prima di usare qualsiasi applicazione, assicuratevi che la bilancia è a livello e tarata.
Usare quest’applicazione per determinare il peso degli oggetti nella selezionata unità di misura.
Pesatura
1. Premere Tare o Zero se necessario per iniziare. 2. Premere e mantenere premuto il pulsante della
Function / Mode per selezionare “WEIGH” (PESARE) (questa applicazione è l’impostazione predefinita).
3. Porre oggetti sulla piastra della bilancia per visualizzare il peso. Una volta che la lettura è stabile, apparirà “*”.
4. Il valore risultante viene visualizzato nell’unità di misurazione attiva.
Impostazioni degli Oggetti
Per visualizzare o regolare le impostazioni correnti
• Unità di Pesatura: Cambiare l'unità visualizzata. Vedi Sezione 5.4 per i processi dettagliati. • Filtro Livello: Cambiare il Livello di Filtraggio. Vedi Sezione 5.3.2 per ulteriori informazioni. • Dati di Buone Pratiche di Laboratorio: Vedi Sezione 5.7 per ulteriori informazioni.
• Stampare le Impostazioni: Cambiare le impostazioni di stampa. Vedi Sezione 7 per ulteriori informazioni. 4.2 Conteggio dei Pezzi
Nota: Prima di usare qualsiasi applicazione, assicurarsi che la bilancia sia a livello e calibrato. Il peso minimo del Pezzo non deve essere inferiore a 0,1 d. Usa quest’applicazione per contare campioni di peso uniforme.
Conteggio dei Pezzi
1. Premere Tare o Zero se necessario per iniziare. 2. Premere e mantenere premuto il pulsante Function /
Mode fino che “Count” (Conteggio) appare.
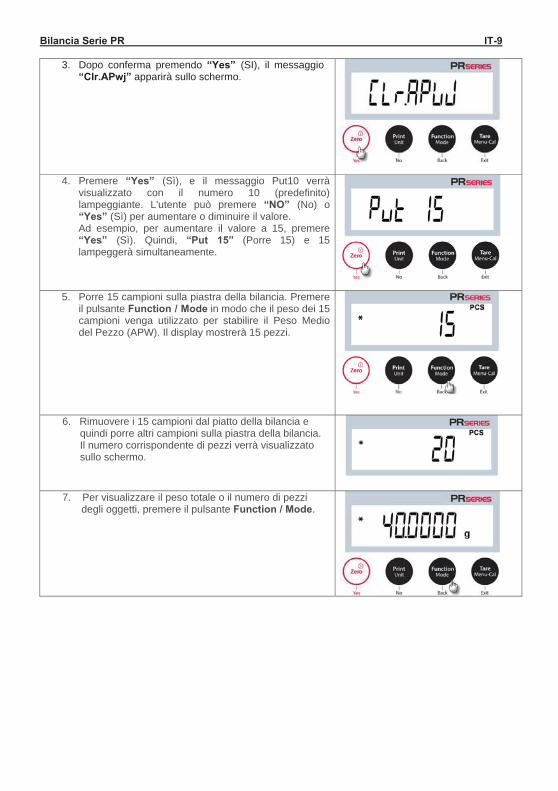
Bilancia Serie PR IT-9
3. Dopo conferma premendo “Yes” (SI), il messaggio “Clr.APwj” apparirà sullo schermo.
4. Premere “Yes” (Sì), e il messaggio Put10 verrà
visualizzato con il numero 10 (predefinito) lampeggiante. L'utente può premere “NO” (No) o “Yes” (Sì) per aumentare o diminuire il valore. Ad esempio, per aumentare il valore a 15, premere “Yes” (Sì). Quindi, “Put 15” (Porre 15) e 15 lampeggerà simultaneamente.
5. Porre 15 campioni sulla piastra della bilancia. Premere
il pulsante Function / Mode in modo che il peso dei 15 campioni venga utilizzato per stabilire il Peso Medio del Pezzo (APW). Il display mostrerà 15 pezzi.
6. Rimuovere i 15 campioni dal piatto della bilancia e quindi porre altri campioni sulla piastra della bilancia. Il numero corrispondente di pezzi verrà visualizzato sullo schermo.
7. Per visualizzare il peso totale o il numero di pezzi degli oggetti, premere il pulsante Function / Mode.
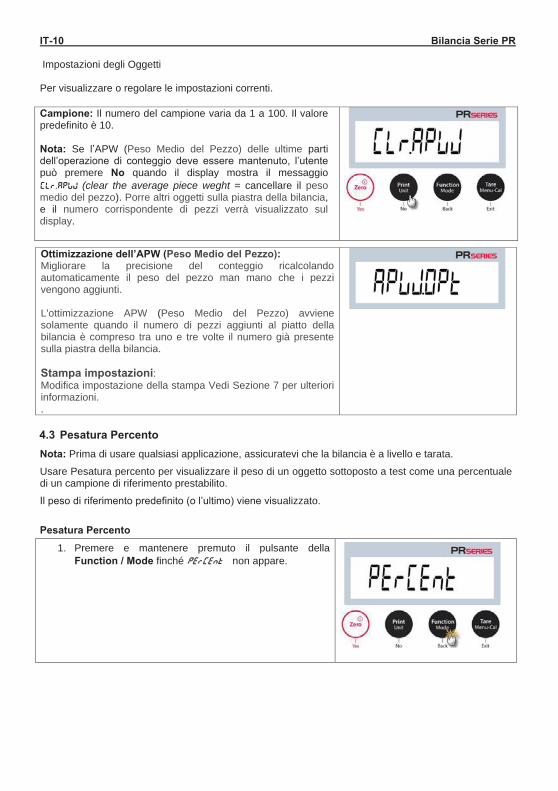
IT-10 Bilancia Serie PR Impostazioni degli Oggetti Per visualizzare o regolare le impostazioni correnti.
Campione: Il numero del campione varia da 1 a 100. Il valore predefinito è 10. Nota: Se l’APW (Peso Medio del Pezzo) delle ultime parti dell’operazione di conteggio deve essere mantenuto, l’utente può premere No quando il display mostra il messaggio Clr.Apwj (clear the average piece weght = cancellare il peso medio del pezzo). Porre altri oggetti sulla piastra della bilancia, e il numero corrispondente di pezzi verrà visualizzato sul display.
Ottimizzazione dell’APW (Peso Medio del Pezzo): Migliorare la precisione del conteggio ricalcolando automaticamente il peso del pezzo man mano che i pezzi vengono aggiunti. L'ottimizzazione APW (Peso Medio del Pezzo) avviene solamente quando il numero di pezzi aggiunti al piatto della bilancia è compreso tra uno e tre volte il numero già presente sulla piastra della bilancia. Stampa impostazioni: Modifica impostazione della stampa Vedi Sezione 7 per ulteriori informazioni. .
4.3 Pesatura Percento
Nota: Prima di usare qualsiasi applicazione, assicuratevi che la bilancia è a livello e tarata.
Usare Pesatura percento per visualizzare il peso di un oggetto sottoposto a test come una percentuale di un campione di riferimento prestabilito.
Il peso di riferimento predefinito (o l’ultimo) viene visualizzato.
Pesatura Percento
1. Premere e mantenere premuto il pulsante della Function / Mode finché PerCent non appare.
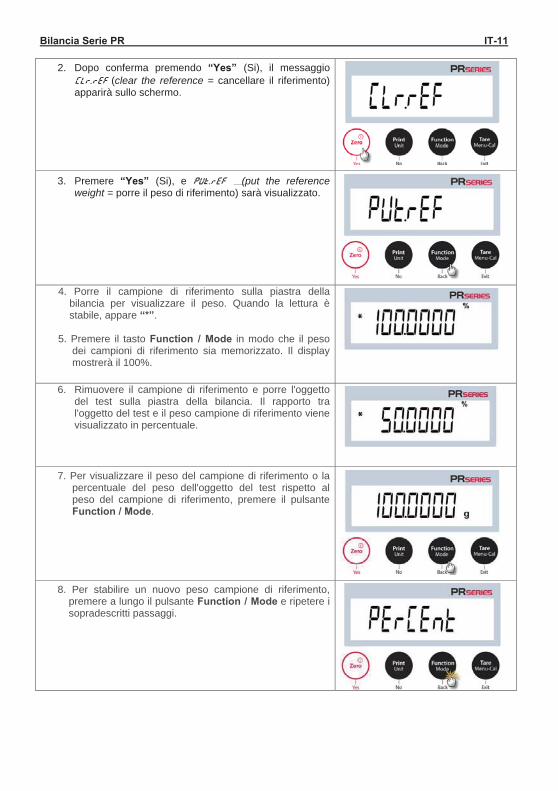
Bilancia Serie PR IT-11
2. Dopo conferma premendo “Yes” (Si), il messaggio Clr.ref (clear the reference = cancellare il riferimento) apparirà sullo schermo.
3. Premere “Yes” (Si), e PUt.ref (put the reference weight = porre il peso di riferimento) sarà visualizzato.
4. Porre il campione di riferimento sulla piastra della bilancia per visualizzare il peso. Quando la lettura è stabile, appare “*”.
5. Premere il tasto Function / Mode in modo che il peso
dei campioni di riferimento sia memorizzato. Il display mostrerà il 100%.
6. Rimuovere il campione di riferimento e porre l'oggetto
del test sulla piastra della bilancia. Il rapporto tra l'oggetto del test e il peso campione di riferimento viene visualizzato in percentuale.
7. Per visualizzare il peso del campione di riferimento o la
percentuale del peso dell'oggetto del test rispetto al peso del campione di riferimento, premere il pulsante Function / Mode.
8. Per stabilire un nuovo peso campione di riferimento, premere a lungo il pulsante Function / Mode e ripetere i sopradescritti passaggi.
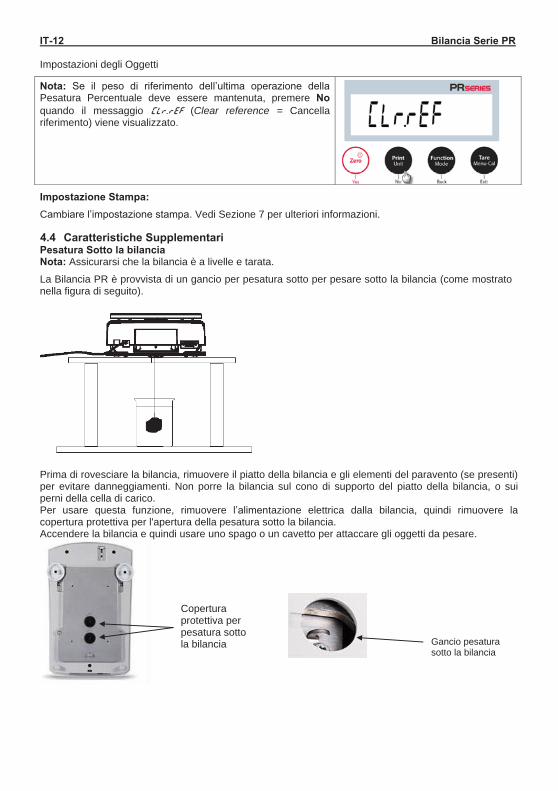
IT-12 Bilancia Serie PR Impostazioni degli Oggetti
Nota: Se il peso di riferimento dell’ultima operazione della Pesatura Percentuale deve essere mantenuta, premere No quando il messaggio Clr.ref (Clear reference = Cancella riferimento) viene visualizzato.
Impostazione Stampa: Cambiare l’impostazione stampa. Vedi Sezione 7 per ulteriori informazioni. 4.4 Caratteristiche Supplementari Pesatura Sotto la bilancia Nota: Assicurarsi che la bilancia è a livelle e tarata.
La Bilancia PR è provvista di un gancio per pesatura sotto per pesare sotto la bilancia (come mostrato nella figura di seguito).
Prima di rovesciare la bilancia, rimuovere il piatto della bilancia e gli elementi del paravento (se presenti) per evitare danneggiamenti. Non porre la bilancia sul cono di supporto del piatto della bilancia, o sui perni della cella di carico. Per usare questa funzione, rimuovere l’alimentazione elettrica dalla bilancia, quindi rimuovere la copertura protettiva per l'apertura della pesatura sotto la bilancia. Accendere la bilancia e quindi usare uno spago o un cavetto per attaccare gli oggetti da pesare.
Copertura protettiva per pesatura sotto la bilancia Gancio pesatura
sotto la bilancia
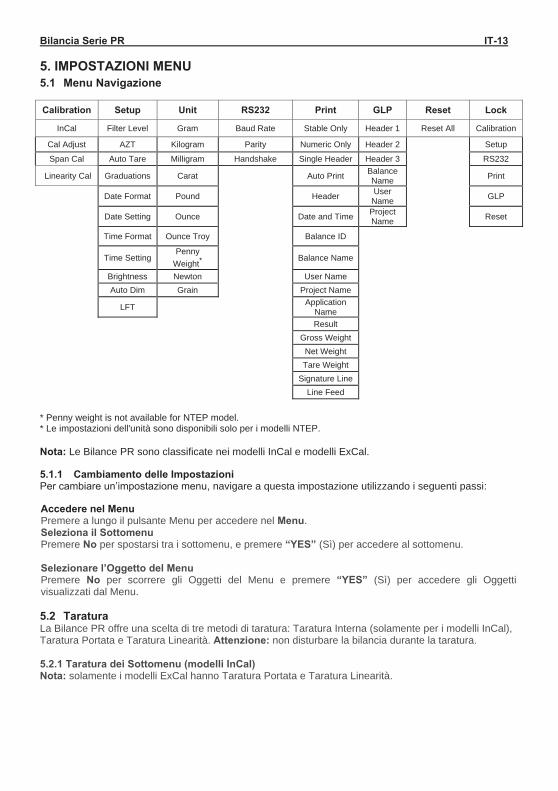
Bilancia Serie PR IT-13 5. IMPOSTAZIONI MENU 5.1 Menu Navigazione
Calibration Setup Unit RS232 Print GLP Reset Lock
InCal Filter Level Gram Baud Rate Stable Only Header 1 Reset All Calibration
Cal Adjust AZT Kilogram Parity Numeric Only Header 2 Setup
Span Cal Auto Tare Milligram Handshake Single Header Header 3 RS232
Linearity Cal Graduations Carat Auto Print Balance Name Print
Date Format Pound Header User Name GLP
Date Setting Ounce Date and Time Project Name Reset
Time Format Ounce Troy Balance ID
Time Setting Penny
Weight* Balance Name
Brightness Newton User Name Auto Dim Grain Project Name
LFT Application
Name
Result Gross Weight Net Weight
Tare Weight
Signature Line
Line Feed
* Penny weight is not available for NTEP model. * Le impostazioni dell'unità sono disponibili solo per i modelli NTEP. Nota: Le Bilance PR sono classificate nei modelli InCal e modelli ExCal. 5.1.1 Cambiamento delle Impostazioni Per cambiare un’impostazione menu, navigare a questa impostazione utilizzando i seguenti passi: Accedere nel Menu Premere a lungo il pulsante Menu per accedere nel Menu. Seleziona il Sottomenu Premere No per spostarsi tra i sottomenu, e premere “YES” (Sì) per accedere al sottomenu. Selezionare l’Oggetto del Menu Premere No per scorrere gli Oggetti del Menu e premere “YES” (Sì) per accedere gli Oggetti visualizzati dal Menu. 5.2 Taratura La Bilance PR offre una scelta di tre metodi di taratura: Taratura Interna (solamente per i modelli InCal), Taratura Portata e Taratura Linearità. Attenzione: non disturbare la bilancia durante la taratura. 5.2.1 Taratura dei Sottomenu (modelli InCal) Nota: solamente i modelli ExCal hanno Taratura Portata e Taratura Linearità.
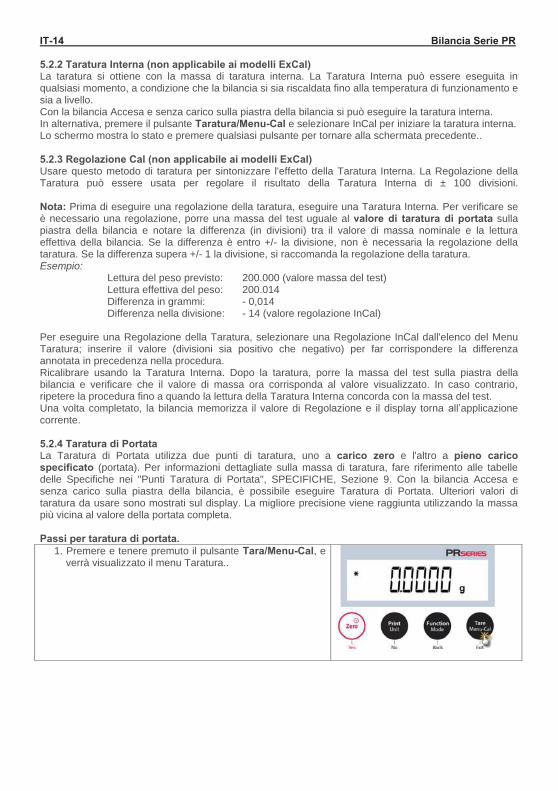
IT-14 Bilancia Serie PR 5.2.2 Taratura Interna (non applicabile ai modelli ExCal) La taratura si ottiene con la massa di taratura interna. La Taratura Interna può essere eseguita in qualsiasi momento, a condizione che la bilancia si sia riscaldata fino alla temperatura di funzionamento e sia a livello. Con la bilancia Accesa e senza carico sulla piastra della bilancia si può eseguire la taratura interna. In alternativa, premere il pulsante Taratura/Menu-Cal e selezionare InCal per iniziare la taratura interna. Lo schermo mostra lo stato e premere qualsiasi pulsante per tornare alla schermata precedente.. 5.2.3 Regolazione Cal (non applicabile ai modelli ExCal) Usare questo metodo di taratura per sintonizzare l'effetto della Taratura Interna. La Regolazione della Taratura può essere usata per regolare il risultato della Taratura Interna di ± 100 divisioni. Nota: Prima di eseguire una regolazione della taratura, eseguire una Taratura Interna. Per verificare se è necessario una regolazione, porre una massa del test uguale al valore di taratura di portata sulla piastra della bilancia e notare la differenza (in divisioni) tra il valore di massa nominale e la lettura effettiva della bilancia. Se la differenza è entro +/- la divisione, non è necessaria la regolazione della taratura. Se la differenza supera +/- 1 la divisione, si raccomanda la regolazione della taratura. Esempio:
Lettura del peso previsto: 200.000 (valore massa del test) Lettura effettiva del peso: 200.014 Differenza in grammi: - 0,014 Differenza nella divisione: - 14 (valore regolazione InCal)
Per eseguire una Regolazione della Taratura, selezionare una Regolazione InCal dall'elenco del Menu Taratura; inserire il valore (divisioni sia positivo che negativo) per far corrispondere la differenza annotata in precedenza nella procedura. Ricalibrare usando la Taratura Interna. Dopo la taratura, porre la massa del test sulla piastra della bilancia e verificare che il valore di massa ora corrisponda al valore visualizzato. In caso contrario, ripetere la procedura fino a quando la lettura della Taratura Interna concorda con la massa del test. Una volta completato, la bilancia memorizza il valore di Regolazione e il display torna all’applicazione corrente. 5.2.4 Taratura di Portata La Taratura di Portata utilizza due punti di taratura, uno a carico zero e l'altro a pieno carico specificato (portata). Per informazioni dettagliate sulla massa di taratura, fare riferimento alle tabelle delle Specifiche nei "Punti Taratura di Portata", SPECIFICHE, Sezione 9. Con la bilancia Accesa e senza carico sulla piastra della bilancia, è possibile eseguire Taratura di Portata. Ulteriori valori di taratura da usare sono mostrati sul display. La migliore precisione viene raggiunta utilizzando la massa più vicina al valore della portata completa. Passi per taratura di portata. 1. Premere e tenere premuto il pulsante Tara/Menu-Cal, e
verrà visualizzato il menu Taratura..
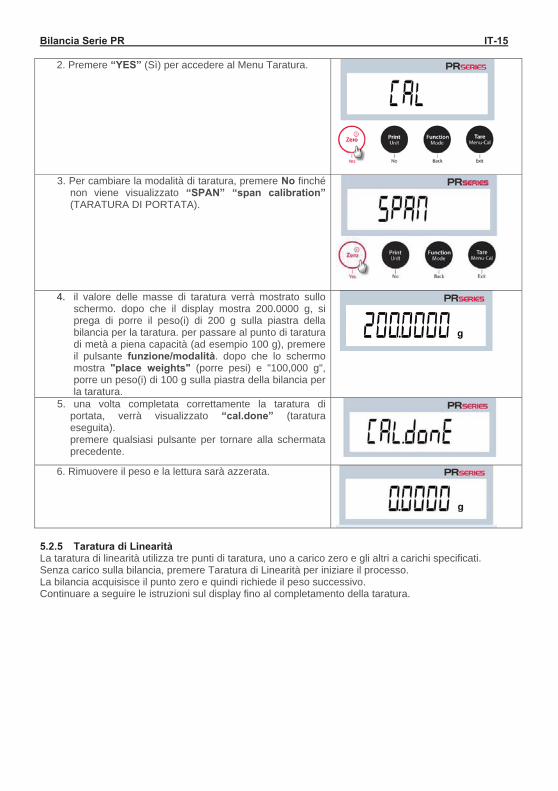
Bilancia Serie PR IT-15
2. Premere “YES” (Sì) per accedere al Menu Taratura.
3. Per cambiare la modalità di taratura, premere No finché non viene visualizzato “SPAN” “span calibration” (TARATURA DI PORTATA).
4. il valore delle masse di taratura verrà mostrato sullo schermo. dopo che il display mostra 200.0000 g, si prega di porre il peso(i) di 200 g sulla piastra della bilancia per la taratura. per passare al punto di taratura di metà a piena capacità (ad esempio 100 g), premere il pulsante funzione/modalità. dopo che lo schermo mostra "place weights" (porre pesi) e "100,000 g", porre un peso(i) di 100 g sulla piastra della bilancia per la taratura.
5. una volta completata correttamente la taratura di portata, verrà visualizzato “cal.done” (taratura eseguita). premere qualsiasi pulsante per tornare alla schermata precedente.
6. Rimuovere il peso e la lettura sarà azzerata.
5.2.5 Taratura di Linearità La taratura di linearità utilizza tre punti di taratura, uno a carico zero e gli altri a carichi specificati. Senza carico sulla bilancia, premere Taratura di Linearità per iniziare il processo. La bilancia acquisisce il punto zero e quindi richiede il peso successivo. Continuare a seguire le istruzioni sul display fino al completamento della taratura.
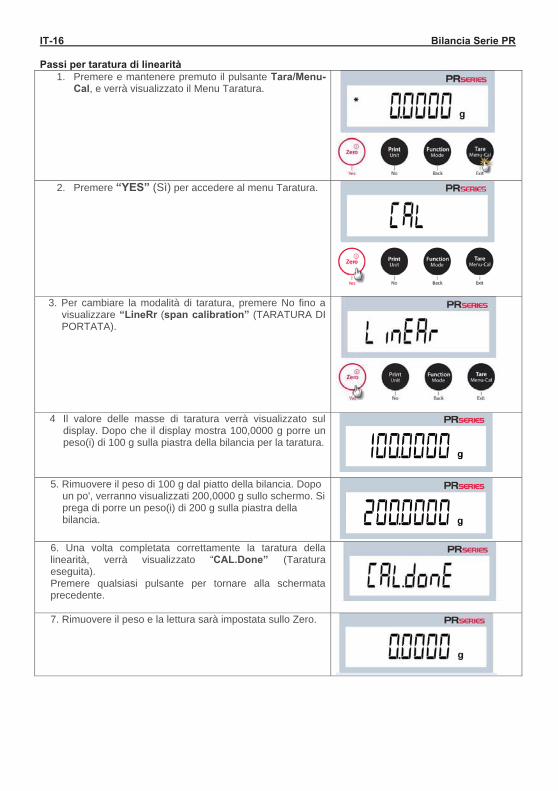
IT-16 Bilancia Serie PR Passi per taratura di linearità
1. Premere e mantenere premuto il pulsante Tara/Menu-Cal, e verrà visualizzato il Menu Taratura.
2. Premere “YES” (Sì) per accedere al menu Taratura.
3. Per cambiare la modalità di taratura, premere No fino a visualizzare “LineRr (span calibration” (TARATURA DI PORTATA).
4 Il valore delle masse di taratura verrà visualizzato sul display. Dopo che il display mostra 100,0000 g porre un peso(i) di 100 g sulla piastra della bilancia per la taratura.
5. Rimuovere il peso di 100 g dal piatto della bilancia. Dopo un po', verranno visualizzati 200,0000 g sullo schermo. Si prega di porre un peso(i) di 200 g sulla piastra della bilancia.
6. Una volta completata correttamente la taratura della linearità, verrà visualizzato “CAL.Done” (Taratura eseguita). Premere qualsiasi pulsante per tornare alla schermata precedente.
7. Rimuovere il peso e la lettura sarà impostata sullo Zero.
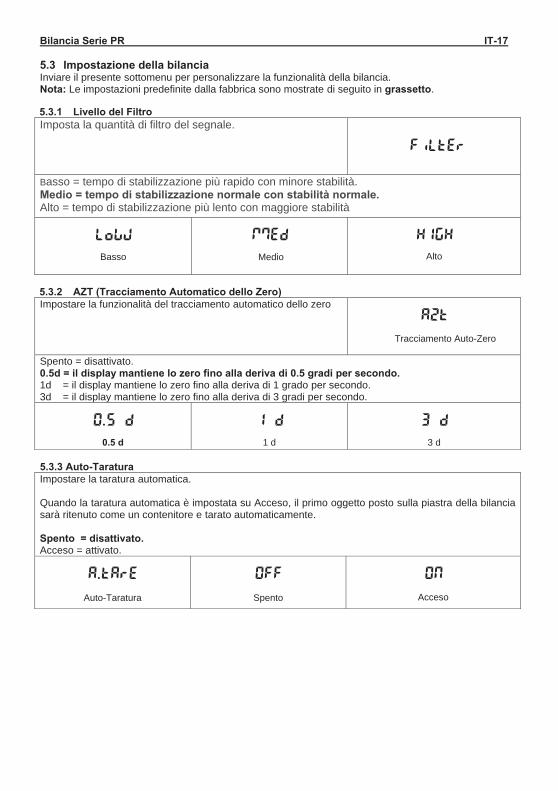
Bilancia Serie PR IT-17 5.3 Impostazione della bilancia Inviare il presente sottomenu per personalizzare la funzionalità della bilancia. Nota: Le impostazioni predefinite dalla fabbrica sono mostrate di seguito in grassetto. 5.3.1 Livello del Filtro Imposta la quantità di filtro del segnale.
Basso = tempo di stabilizzazione più rapido con minore stabilità. Medio = tempo di stabilizzazione normale con stabilità normale. Alto = tempo di stabilizzazione più lento con maggiore stabilità
Basso Medio
Alto
5.3.2 AZT (Tracciamento Automatico dello Zero) Impostare la funzionalità del tracciamento automatico dello zero
Tracciamento Auto-Zero
Spento = disattivato. 0.5d = il display mantiene lo zero fino alla deriva di 0.5 gradi per secondo. 1d = il display mantiene lo zero fino alla deriva di 1 grado per secondo. 3d = il display mantiene lo zero fino alla deriva di 3 gradi per secondo.
0.5 d 1 d 3 d 5.3.3 Auto-Taratura Impostare la taratura automatica. Quando la taratura automatica è impostata su Acceso, il primo oggetto posto sulla piastra della bilancia sarà ritenuto come un contenitore e tarato automaticamente. Spento = disattivato. Acceso = attivato.
Auto-Taratura Spento Acceso
HIGH mMed LowW
ON OFF A.tArE
AZt
3 d 1 d 0.5 d
FiltEr
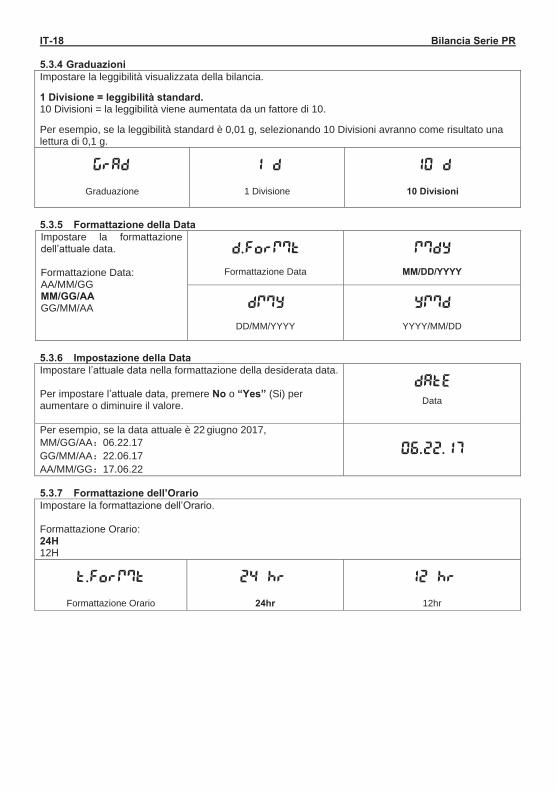
IT-18 Bilancia Serie PR 5.3.4 Graduazioni Impostare la leggibilità visualizzata della bilancia. 1 Divisione = leggibilità standard. 10 Divisioni = la leggibilità viene aumentata da un fattore di 10. Per esempio, se la leggibilità standard è 0,01 g, selezionando 10 Divisioni avranno come risultato una lettura di 0,1 g.
Graduazione 1 Divisione 10 Divisioni
5.3.5 Formattazione della Data Impostare la formattazione dell’attuale data. Formattazione Data: AA/MM/GG MM/GG/AA GG/MM/AA
Formattazione Data
MM/DD/YYYY
DD/MM/YYYY
YYYY/MM/DD
5.3.6 Impostazione della Data Impostare l’attuale data nella formattazione della desiderata data. Per impostare l’attuale data, premere No o “Yes” (Si) per aumentare o diminuire il valore.
Data
Per esempio, se la data attuale è 22 giugno 2017, MM/GG/AA 06.22.17 GG/MM/AA 22.06.17 AA/MM/GG 17.06.22 5.3.7 Formattazione dell’Orario Impostare la formattazione dell’Orario. Formattazione Orario: 24H 12H
Formattazione Orario
24hr 12hr
24 hr t.FormMt
ymMd dmMy
mMdy d.FormMt
GrAd 1 d
dAtE
06.22.17
12 hr
10 d
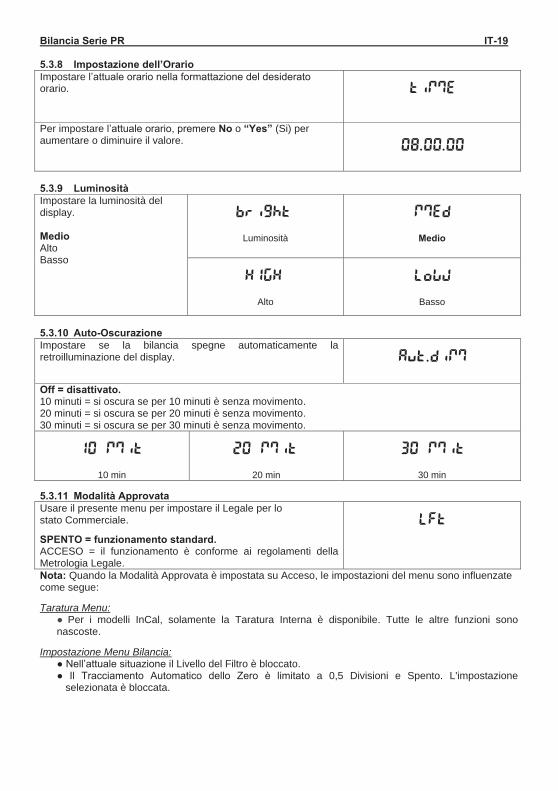
Bilancia Serie PR IT-19 5.3.8 Impostazione dell’Orario Impostare l’attuale orario nella formattazione del desiderato orario. Per impostare l’attuale orario, premere No o “Yes” (Si) per aumentare o diminuire il valore.
5.3.9 Luminosità Impostare la luminosità del display.
Medio Alto Basso
Luminosità Medio
Alto Basso
5.3.10 Auto-Oscurazione Impostare se la bilancia spegne automaticamente la retroilluminazione del display.
Off = disattivato. 10 minuti = si oscura se per 10 minuti è senza movimento. 20 minuti = si oscura se per 20 minuti è senza movimento. 30 minuti = si oscura se per 30 minuti è senza movimento.
10 min
20 min 30 min
5.3.11 Modalità Approvata Usare il presente menu per impostare il Legale per lo stato Commerciale.
SPENTO = funzionamento standard. ACCESO = il funzionamento è conforme ai regolamenti della Metrologia Legale.
Nota: Quando la Modalità Approvata è impostata su Acceso, le impostazioni del menu sono influenzate come segue: Taratura Menu:
● Per i modelli InCal, solamente la Taratura Interna è disponibile. Tutte le altre funzioni sono nascoste.
Impostazione Menu Bilancia:
● Nell’attuale situazione il Livello del Filtro è bloccato. ● Il Tracciamento Automatico dello Zero è limitato a 0,5 Divisioni e Spento. L'impostazione
selezionata è bloccata.
LFt
20 mMit 10 mMit
HIGH
bright
30 mMit
Aut.dimM
mMEd
LowW
08.00.00
timME
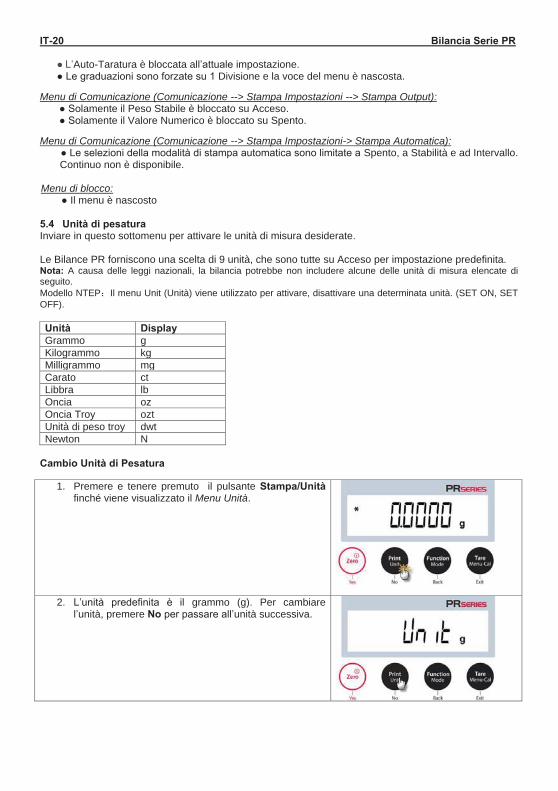
IT-20 Bilancia Serie PR
● L’Auto-Taratura è bloccata all’attuale impostazione. ● Le graduazioni sono forzate su 1 Divisione e la voce del menu è nascosta.
Menu di Comunicazione (Comunicazione --> Stampa Impostazioni --> Stampa Output):
● Solamente il Peso Stabile è bloccato su Acceso. ● Solamente il Valore Numerico è bloccato su Spento.
Menu di Comunicazione (Comunicazione --> Stampa Impostazioni-> Stampa Automatica):
● Le selezioni della modalità di stampa automatica sono limitate a Spento, a Stabilità e ad Intervallo. Continuo non è disponibile.
Menu di blocco:
● Il menu è nascosto 5.4 Unità di pesatura Inviare in questo sottomenu per attivare le unità di misura desiderate. Le Bilance PR forniscono una scelta di 9 unità, che sono tutte su Acceso per impostazione predefinita. Nota: A causa delle leggi nazionali, la bilancia potrebbe non includere alcune delle unità di misura elencate di seguito. Modello NTEP Il menu Unit (Unità) viene utilizzato per attivare, disattivare una determinata unità. (SET ON, SET OFF). Unità Display Grammo g Kilogrammo kg Milligrammo mg Carato ct Libbra lb Oncia oz Oncia Troy ozt Unità di peso troy dwt Newton N
Cambio Unità di Pesatura
1. Premere e tenere premuto il pulsante Stampa/Unità finché viene visualizzato il Menu Unità.
2. L’unità predefinita è il grammo (g). Per cambiare l’unità, premere No per passare all’unità successiva.
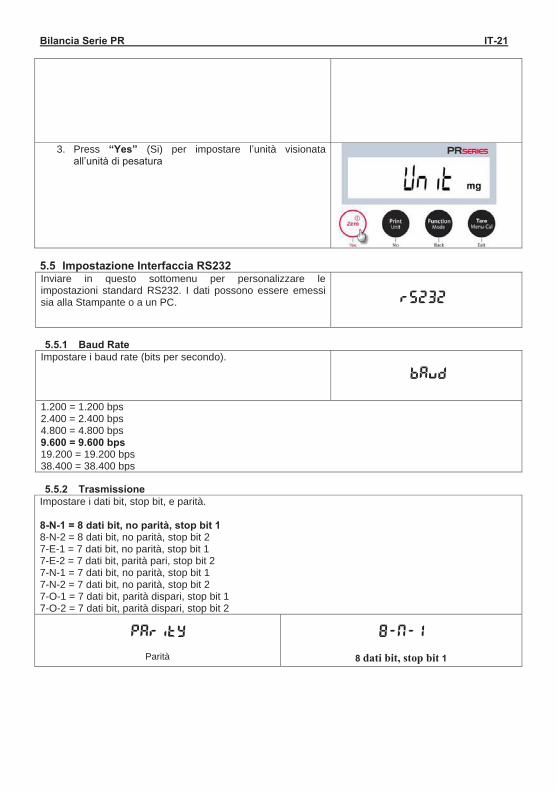
Bilancia Serie PR IT-21
3. Press “Yes” (Si) per impostare l’unità visionata all’unità di pesatura
5.5 Impostazione Interfaccia RS232 Inviare in questo sottomenu per personalizzare le impostazioni standard RS232. I dati possono essere emessi sia alla Stampante o a un PC. 5.5.1 Baud Rate
Impostare i baud rate (bits per secondo).
1.200 = 1.200 bps 2.400 = 2.400 bps 4.800 = 4.800 bps 9.600 = 9.600 bps 19.200 = 19.200 bps 38.400 = 38.400 bps 5.5.2 Trasmissione
Impostare i dati bit, stop bit, e parità. 8-N-1 = 8 dati bit, no parità, stop bit 1 8-N-2 = 8 dati bit, no parità, stop bit 2 7-E-1 = 7 dati bit, no parità, stop bit 1 7-E-2 = 7 dati bit, parità pari, stop bit 2 7-N-1 = 7 dati bit, no parità, stop bit 1 7-N-2 = 7 dati bit, no parità, stop bit 2 7-O-1 = 7 dati bit, parità dispari, stop bit 1 7-O-2 = 7 dati bit, parità dispari, stop bit 2
Parità
8 dati bit, stop bit 1
rS232
Parity 8-N-1
bAud
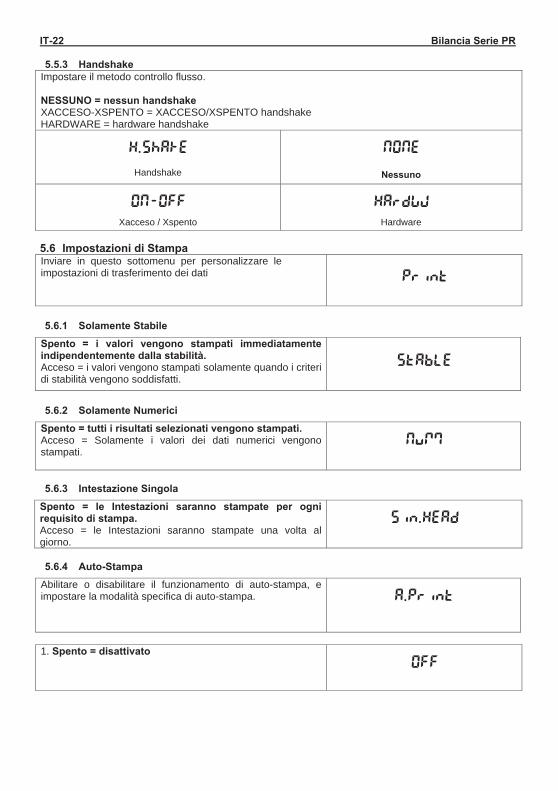
IT-22 Bilancia Serie PR 5.5.3 Handshake
Impostare il metodo controllo flusso. NESSUNO = nessun handshake XACCESO-XSPENTO = XACCESO/XSPENTO handshake HARDWARE = hardware handshake
Handshake
Nessuno
Xacceso / Xspento Hardware 5.6 Impostazioni di Stampa Inviare in questo sottomenu per personalizzare le impostazioni di trasferimento dei dati
5.6.1 Solamente StabileSpento = i valori vengono stampati immediatamente indipendentemente dalla stabilità. Acceso = i valori vengono stampati solamente quando i criteri di stabilità vengono soddisfatti.
5.6.2 Solamente NumericiSpento = tutti i risultati selezionati vengono stampati. Acceso = Solamente i valori dei dati numerici vengono stampati.
5.6.3 Intestazione Singola Spento = le Intestazioni saranno stampate per ogni requisito di stampa. Acceso = le Intestazioni saranno stampate una volta al giorno.
5.6.4 Auto-Stampa Abilitare o disabilitare il funzionamento di auto-stampa, e impostare la modalità specifica di auto-stampa.
1. Spento = disattivato
H.ShAkE
HRrdwW
NONE
Stable
NumM
A.Print
OFF
Sin.Head
ON-OFF
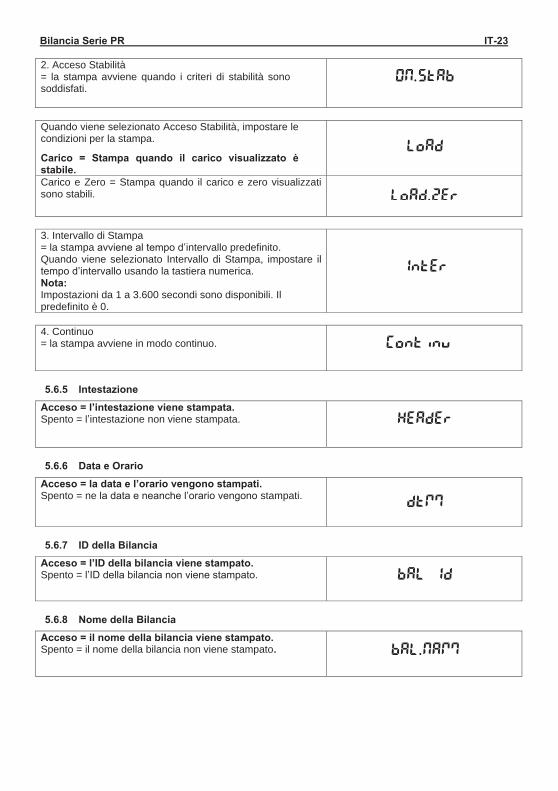
Bilancia Serie PR IT-23 2. Acceso Stabilità = la stampa avviene quando i criteri di stabilità sono soddisfati.
Quando viene selezionato Acceso Stabilità, impostare le condizioni per la stampa.
Carico = Stampa quando il carico visualizzato è stabile. Carico e Zero = Stampa quando il carico e zero visualizzati sono stabili.
3. Intervallo di Stampa = la stampa avviene al tempo d’intervallo predefinito. Quando viene selezionato Intervallo di Stampa, impostare il tempo d’intervallo usando la tastiera numerica. Nota: Impostazioni da 1 a 3.600 secondi sono disponibili. Il predefinito è 0.
4. Continuo = la stampa avviene in modo continuo.
5.6.5 Intestazione Acceso = l’intestazione viene stampata. Spento = l’intestazione non viene stampata.
5.6.6 Data e OrarioAcceso = la data e l’orario vengono stampati. Spento = ne la data e neanche l’orario vengono stampati.
5.6.7 ID della Bilancia Acceso = l’ID della bilancia viene stampato. Spento = l’ID della bilancia non viene stampato.
5.6.8 Nome della Bilancia Acceso = il nome della bilancia viene stampato. Spento = il nome della bilancia non viene stampato.
ON.Stab
Load
Load.zer
Inter
Continu
Header
dtmM
Bal Id
Bal.NamM
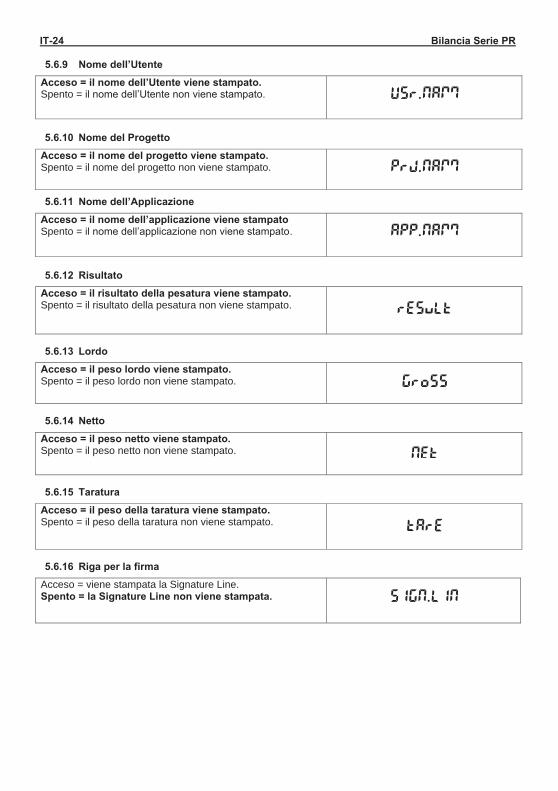
IT-24 Bilancia Serie PR 5.6.9 Nome dell’Utente
Acceso = il nome dell’Utente viene stampato. Spento = il nome dell’Utente non viene stampato.
5.6.10 Nome del Progetto Acceso = il nome del progetto viene stampato. Spento = il nome del progetto non viene stampato.
5.6.11 Nome dell’Applicazione Acceso = il nome dell’applicazione viene stampato Spento = il nome dell’applicazione non viene stampato.
5.6.12 Risultato Acceso = il risultato della pesatura viene stampato. Spento = il risultato della pesatura non viene stampato.
5.6.13 Lordo
Acceso = il peso lordo viene stampato. Spento = il peso lordo non viene stampato.
5.6.14 Netto
Acceso = il peso netto viene stampato. Spento = il peso netto non viene stampato.
5.6.15 Taratura
Acceso = il peso della taratura viene stampato. Spento = il peso della taratura non viene stampato. 5.6.16 Riga per la firma
Acceso = viene stampata la Signature Line. Spento = la Signature Line non viene stampata.
Usr.NamM
Prj.NamM
GrosS
result
App.NamM
Net
tare
SIGN.LIN
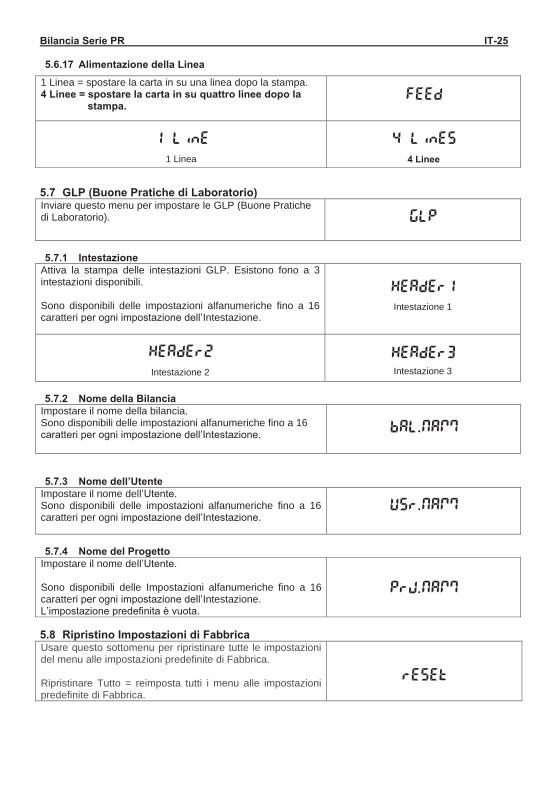
Bilancia Serie PR IT-25 5.6.17 Alimentazione della Linea
1 Linea = spostare la carta in su una linea dopo la stampa. 4 Linee = spostare la carta in su quattro linee dopo la
stampa.
1 Linea 4 Linee
5.7 GLP (Buone Pratiche di Laboratorio) Inviare questo menu per impostare le GLP (Buone Pratiche di Laboratorio). 5.7.1 Intestazione
Attiva la stampa delle intestazioni GLP. Esistono fono a 3 intestazioni disponibili. Sono disponibili delle impostazioni alfanumeriche fino a 16 caratteri per ogni impostazione dell’Intestazione.
Intestazione 1
Intestazione 2 Intestazione 3 5.7.2 Nome della Bilancia
Impostare il nome della bilancia. Sono disponibili delle impostazioni alfanumeriche fino a 16 caratteri per ogni impostazione dell’Intestazione.
5.7.3 Nome dell’Utente
Impostare il nome dell’Utente. Sono disponibili delle impostazioni alfanumeriche fino a 16 caratteri per ogni impostazione dell’Intestazione. 5.7.4 Nome del Progetto
Impostare il nome dell’Utente. Sono disponibili delle Impostazioni alfanumeriche fino a 16 caratteri per ogni impostazione dell’Intestazione. L’impostazione predefinita è vuota.
5.8 Ripristino Impostazioni di Fabbrica Usare questo sottomenu per ripristinare tutte le impostazioni del menu alle impostazioni predefinite di Fabbrica. Ripristinare Tutto = reimposta tutti i menu alle impostazioni predefinite di Fabbrica.
Feed
4 Lines 1 Line
GLP
Header1
Bal.NamM
Usr.NamM
Prj.NamM
reset
Header3 Header2

IT-26 Bilancia Serie PR Esci = tornare alla schermata principale dell'applicazione senza reimpostare alcun menu. .
5.9 Bloccaggio Usare questo sottomenu per bloccare/sbloccare certi menu. Spento = il menu è sbloccato. Acceso = il menu è bloccato.
LOCK

Bilancia Serie PR IT-27
6. (LFT) LEGALE PER IL COMMERCIO Quando la bilancia viene utilizzata in commercio o in un’applicazione legalmente controllata, deve essere installata, verificata e sigillata in conformità con le normative locali per Pesi e Misurazioni. È responsabilità dell'acquirente assicurarsi che tutti i requisiti legali pertinenti siano soddisfatti. 6.1 Impostazioni Prima della verifica e della sigillatura, eseguire i seguenti passaggi nell'ordine:
1. Verificare che le impostazioni di menu soddisfino i pesi e le misurazioni locali. 2. Verificare che le unità attivate soddisfino i pesi e le misurazioni locali. 3. Eseguire una taratura come spiegato nella Sezione 5.2. 4. Modalità Approvata su Acceso nel’impostazione del menu della Bilancia. 5. Come mostrato nella Figura 6-1, premere l'interruttore elettronico all'interno del foro
Nota: Quando la Modalità Approvata è impostata su Acceso, la taratura esterna non può essere eseguita.
6.2 Verifica La procedura di verifica deve essere eseguire da un funzionario o agente dei servizi autorizzato Pesi e Misurazioni. 6.3 Sigillatura Dopo che la bilancia è stata verificata, deve essere sigillata per impedire accesso non rilevato alle impostazioni legalmente regolate. Prima di sigillare il dispositivo, assicurarsi che l'interruttore di sicurezza si trovi in posizione di Blocco e che l'impostazione della Modalità Approvata nel menu Bilancia Gestione sia stata impostata su ACCESO.
• Se si utilizza un sigillo di carta, porlo sull'interruttore di sicurezza e l'alloggiamento inferiore come mostrato.
• Se si utilizza un sigillo metallico, passare il filo di tenuta attraverso i fori nell'interruttore di sicurezza e l'alloggiamento inferiore come mostrato.
Sbloccato Bloccato con Sigillo di Carta Bloccato con Sigillo Metallico
Figura 6-1. Sigillatura
Electronic Switch
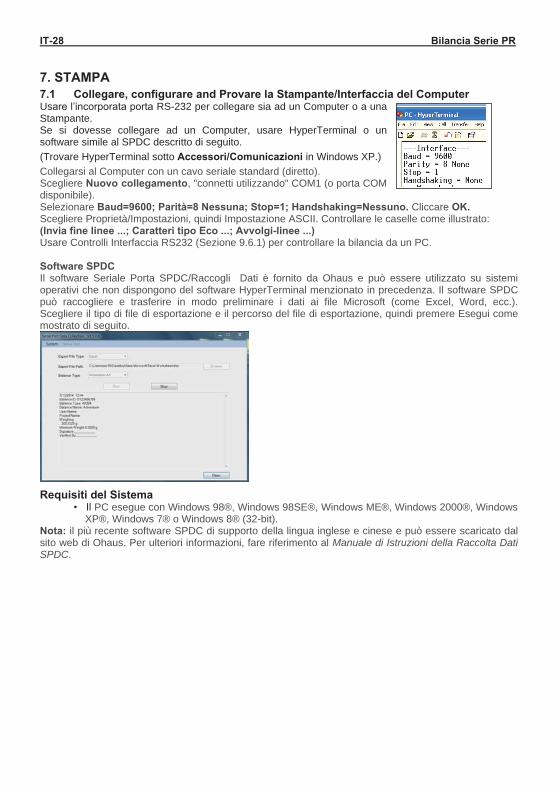
IT-28 Bilancia Serie PR
7. STAMPA 7.1 Collegare, configurare and Provare la Stampante/Interfaccia del Computer Usare l’incorporata porta RS-232 per collegare sia ad un Computer o a una Stampante. Se si dovesse collegare ad un Computer, usare HyperTerminal o un software simile al SPDC descritto di seguito. (Trovare HyperTerminal sotto Accessori/Comunicazioni in Windows XP.) Collegarsi al Computer con un cavo seriale standard (diretto). Scegliere Nuovo collegamento, "connetti utilizzando" COM1 (o porta COM disponibile). Selezionare Baud=9600; Parità=8 Nessuna; Stop=1; Handshaking=Nessuno. Cliccare OK. Scegliere Proprietà/Impostazioni, quindi Impostazione ASCII. Controllare le caselle come illustrato: (Invia fine linee ...; Caratteri tipo Eco ...; Avvolgi-linee ...) Usare Controlli Interfaccia RS232 (Sezione 9.6.1) per controllare la bilancia da un PC. Software SPDC Il software Seriale Porta SPDC/Raccogli Dati è fornito da Ohaus e può essere utilizzato su sistemi operativi che non dispongono del software HyperTerminal menzionato in precedenza. Il software SPDC può raccogliere e trasferire in modo preliminare i dati ai file Microsoft (come Excel, Word, ecc.). Scegliere il tipo di file di esportazione e il percorso del file di esportazione, quindi premere Esegui come mostrato di seguito.
Requisiti del Sistema
• Il PC esegue con Windows 98®, Windows 98SE®, Windows ME®, Windows 2000®, Windows XP®, Windows 7® o Windows 8® (32-bit).
Nota: il più recente software SPDC di supporto della lingua inglese e cinese e può essere scaricato dal sito web di Ohaus. Per ulteriori informazioni, fare riferimento al Manuale di Istruzioni della Raccolta Dati SPDC.
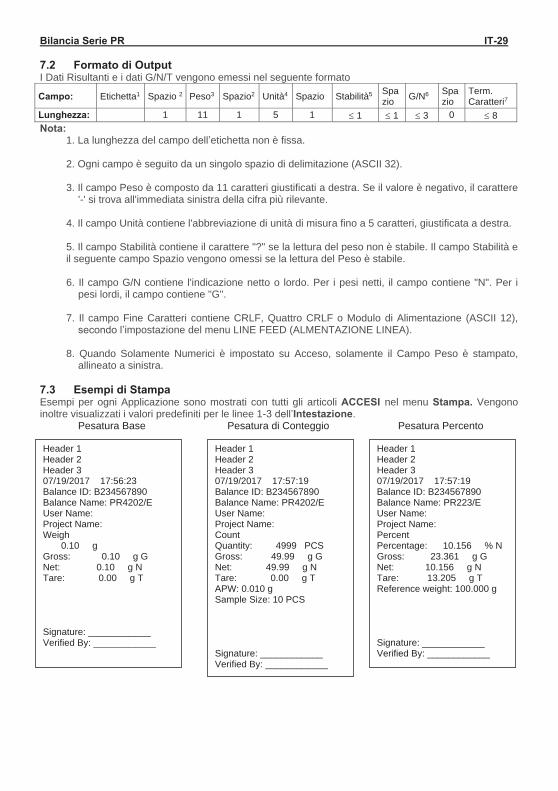
Bilancia Serie PR IT-29 7.2 Formato di Output I Dati Risultanti e i dati G/N/T vengono emessi nel seguente formato
Campo: Etichetta1 Spazio 2 Peso3 Spazio2 Unità4 Spazio Stabilità5 Spazio G/N6 Spa
zio Term. Caratteri7
Lunghezza: 1 11 1 5 1 1 1 3 0 8 Nota:
1. La lunghezza del campo dell’etichetta non è fissa. 2. Ogni campo è seguito da un singolo spazio di delimitazione (ASCII 32). 3. Il campo Peso è composto da 11 caratteri giustificati a destra. Se il valore è negativo, il carattere
'-' si trova all'immediata sinistra della cifra più rilevante. 4. Il campo Unità contiene l'abbreviazione di unità di misura fino a 5 caratteri, giustificata a destra. 5. Il campo Stabilità contiene il carattere "?" se la lettura del peso non è stabile. Il campo Stabilità e il seguente campo Spazio vengono omessi se la lettura del Peso è stabile. 6. Il campo G/N contiene l'indicazione netto o lordo. Per i pesi netti, il campo contiene "N". Per i
pesi lordi, il campo contiene "G". 7. Il campo Fine Caratteri contiene CRLF, Quattro CRLF o Modulo di Alimentazione (ASCII 12),
secondo l’impostazione del menu LINE FEED (ALMENTAZIONE LINEA). 8. Quando Solamente Numerici è impostato su Acceso, solamente il Campo Peso è stampato,
allineato a sinistra. 7.3 Esempi di Stampa Esempi per ogni Applicazione sono mostrati con tutti gli articoli ACCESI nel menu Stampa. Vengono inoltre visualizzati i valori predefiniti per le linee 1-3 dell’Intestazione.
Pesatura Base Pesatura di Conteggio Pesatura Percento Header 1
Header 2 Header 3 07/19/2017 17:56:23 Balance ID: B234567890 Balance Name: PR4202/E User Name: Project Name: Weigh 0.10 g Gross: 0.10 g G Net: 0.10 g N Tare: 0.00 g T Signature: ____________ Verified By: ____________
Header 1 Header 2 Header 3 07/19/2017 17:57:19 Balance ID: B234567890 Balance Name: PR4202/E User Name: Project Name: Count Quantity: 4999 PCS Gross: 49.99 g G Net: 49.99 g N Tare: 0.00 g T APW: 0.010 g Sample Size: 10 PCS Signature: ____________ Verified By: ____________
Header 1 Header 2 Header 3 07/19/2017 17:57:19 Balance ID: B234567890 Balance Name: PR223/E User Name: Project Name: Percent Percentage: 10.156 % N Gross: 23.361 g G Net: 10.156 g N Tare: 13.205 g T Reference weight: 100.000 g Signature: ____________ Verified By: ____________
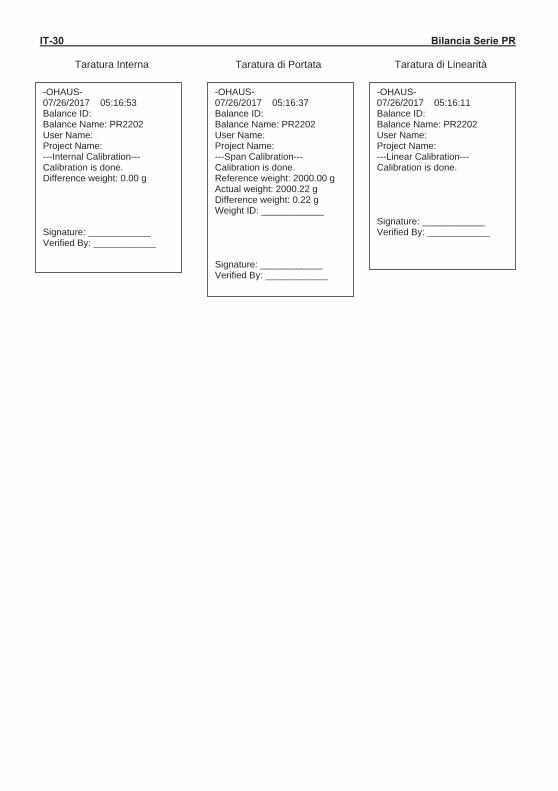
IT-30 Bilancia Serie PR
Taratura Interna Taratura di Portata Taratura di Linearità
-OHAUS- 07/26/2017 05:16:53 Balance ID: Balance Name: PR2202 User Name: Project Name: ---Internal Calibration--- Calibration is done. Difference weight: 0.00 g Signature: ____________ Verified By: ____________
-OHAUS- 07/26/2017 05:16:37 Balance ID: Balance Name: PR2202 User Name: Project Name: ---Span Calibration--- Calibration is done. Reference weight: 2000.00 g Actual weight: 2000.22 g Difference weight: 0.22 g Weight ID: ____________ Signature: ____________ Verified By: ____________
-OHAUS- 07/26/2017 05:16:11 Balance ID: Balance Name: PR2202 User Name: Project Name: ---Linear Calibration--- Calibration is done. Signature: ____________ Verified By: ____________
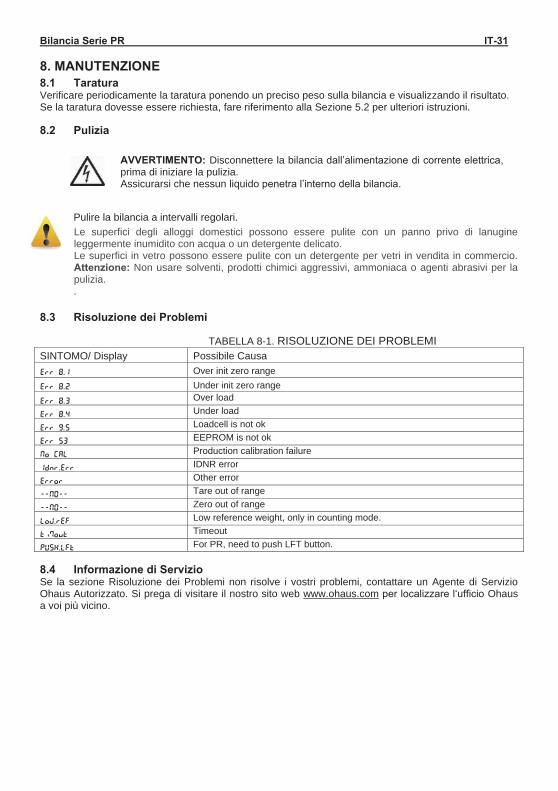
Bilancia Serie PR IT-31 8. MANUTENZIONE 8.1 Taratura Verificare periodicamente la taratura ponendo un preciso peso sulla bilancia e visualizzando il risultato. Se la taratura dovesse essere richiesta, fare riferimento alla Sezione 5.2 per ulteriori istruzioni. 8.2 Pulizia
AVVERTIMENTO: Disconnettere la bilancia dall’alimentazione di corrente elettrica, prima di iniziare la pulizia. Assicurarsi che nessun liquido penetra l’interno della bilancia.
Pulire la bilancia a intervalli regolari. Le superfici degli alloggi domestici possono essere pulite con un panno privo di lanugine leggermente inumidito con acqua o un detergente delicato. Le superfici in vetro possono essere pulite con un detergente per vetri in vendita in commercio. Attenzione: Non usare solventi, prodotti chimici aggressivi, ammoniaca o agenti abrasivi per la pulizia. .
8.3 Risoluzione dei Problemi TABELLA 8-1. RISOLUZIONE DEI PROBLEMI SINTOMO/ Display Possibile Causa Err 8.1 Over init zero range Err 8.2 Under init zero range Err 8.3 Over load
Err 8.4 Under load
Err 9.5 Loadcell is not ok
Err 53 EEPROM is not ok
No CAL Production calibration failure
IDnr.Err IDNR error
Error Other error
--NO-- Tare out of range
--NO-- Zero out of range
LoW.rEF Low reference weight, only in counting mode.
tiMout Timeout
PUSH.LFt For PR, need to push LFT button. 8.4 Informazione di Servizio Se la sezione Risoluzione dei Problemi non risolve i vostri problemi, contattare un Agente di Servizio Ohaus Autorizzato. Si prega di visitare il nostro sito web www.ohaus.com per localizzare l‘ufficio Ohaus a voi più vicino.
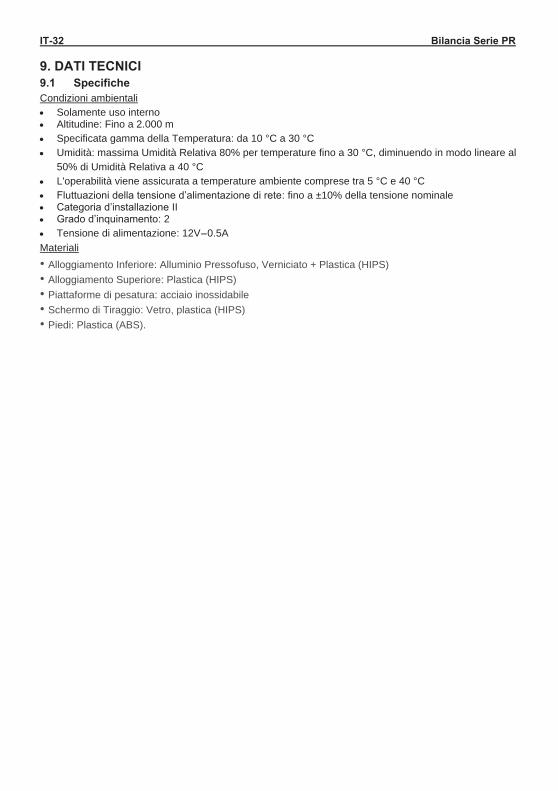
IT-32 Bilancia Serie PR 9. DATI TECNICI 9.1 Specifiche Condizioni ambientali Solamente uso interno Altitudine: Fino a 2.000 m Specificata gamma della Temperatura: da 10 °C a 30 °C Umidità: massima Umidità Relativa 80% per temperature fino a 30 °C, diminuendo in modo lineare al
50% di Umidità Relativa a 40 °C L'operabilità viene assicurata a temperature ambiente comprese tra 5 °C e 40 °C Fluttuazioni della tensione d’alimentazione di rete: fino a ±10% della tensione nominale Categoria d’installazione II Grado d’inquinamento: 2 Tensione di alimentazione: 12V 0.5A
Materiali • Alloggiamento Inferiore: Alluminio Pressofuso, Verniciato + Plastica (HIPS) • Alloggiamento Superiore: Plastica (HIPS) • Piattaforme di pesatura: acciaio inossidabile • Schermo di Tiraggio: Vetro, plastica (HIPS) • Piedi: Plastica (ABS).
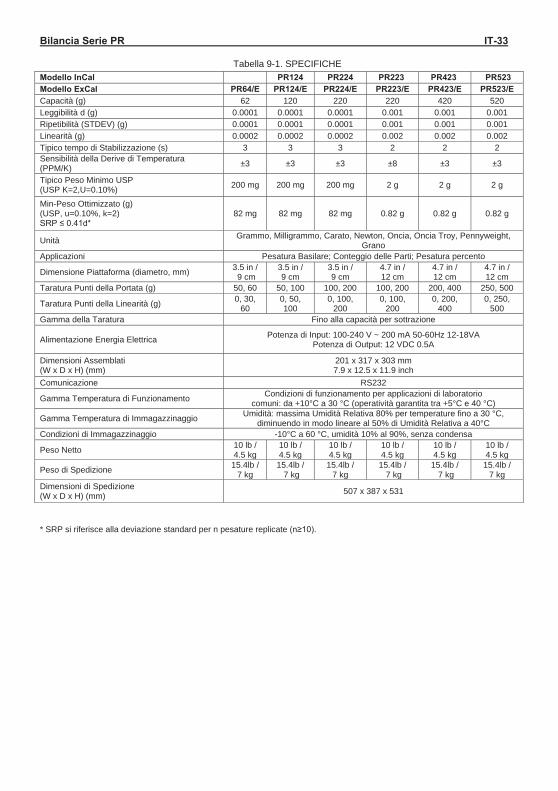
Bilancia Serie PR IT-33
Tabella 9-1. SPECIFICHE Modello InCal PR124 PR224 PR223 PR423 PR523 Modello ExCal PR64/E PR124/E PR224/E PR223/E PR423/E PR523/E Capacità (g) 62 120 220 220 420 520 Leggibilità d (g) 0.0001 0.0001 0.0001 0.001 0.001 0.001 Ripetibilità (STDEV) (g) 0.0001 0.0001 0.0001 0.001 0.001 0.001 Linearità (g) 0.0002 0.0002 0.0002 0.002 0.002 0.002 Tipico tempo di Stabilizzazione (s) 3 3 3 2 2 2 Sensibilità della Derive di Temperatura (PPM/K) ±3 ±3 ±3 ±8 ±3 ±3
Tipico Peso Minimo USP (USP K=2,U=0.10%) 200 mg 200 mg 200 mg 2 g 2 g 2 g
Min-Peso Ottimizzato (g) (USP, u=0.10%, k=2) SRP ≤ 0.41d*
82 mg 82 mg 82 mg 0.82 g 0.82 g 0.82 g
Unità Grammo, Milligrammo, Carato, Newton, Oncia, Oncia Troy, Pennyweight, Grano
Applicazioni Pesatura Basilare; Conteggio delle Parti; Pesatura percento
Dimensione Piattaforma (diametro, mm) 3.5 in / 9 cm
3.5 in / 9 cm
3.5 in / 9 cm
4.7 in / 12 cm
4.7 in / 12 cm
4.7 in / 12 cm
Taratura Punti della Portata (g) 50, 60 50, 100 100, 200 100, 200 200, 400 250, 500
Taratura Punti della Linearità (g) 0, 30, 60
0, 50, 100
0, 100, 200
0, 100, 200
0, 200, 400
0, 250, 500
Gamma della Taratura Fino alla capacità per sottrazione
Alimentazione Energia Elettrica Potenza di Input: 100-240 V ~ 200 mA 50-60Hz 12-18VA Potenza di Output: 12 VDC 0.5A
Dimensioni Assemblati (W x D x H) (mm)
201 x 317 x 303 mm 7.9 x 12.5 x 11.9 inch
Comunicazione RS232
Gamma Temperatura di Funzionamento Condizioni di funzionamento per applicazioni di laboratorio comuni: da +10°C a 30 °C (operatività garantita tra +5°C e 40 °C)
Gamma Temperatura di Immagazzinaggio Umidità: massima Umidità Relativa 80% per temperature fino a 30 °C, diminuendo in modo lineare al 50% di Umidità Relativa a 40°C
Condizioni di Immagazzinaggio -10°C a 60 °C, umidità 10% al 90%, senza condensa
Peso Netto 10 lb / 4.5 kg
10 lb / 4.5 kg
10 lb / 4.5 kg
10 lb / 4.5 kg
10 lb / 4.5 kg
10 lb / 4.5 kg
Peso di Spedizione 15.4lb / 7 kg
15.4lb / 7 kg
15.4lb / 7 kg
15.4lb / 7 kg
15.4lb / 7 kg
15.4lb / 7 kg
Dimensioni di Spedizione (W x D x H) (mm) 507 x 387 x 531
* SRP si riferisce alla deviazione standard per n pesature replicate (n≥10).
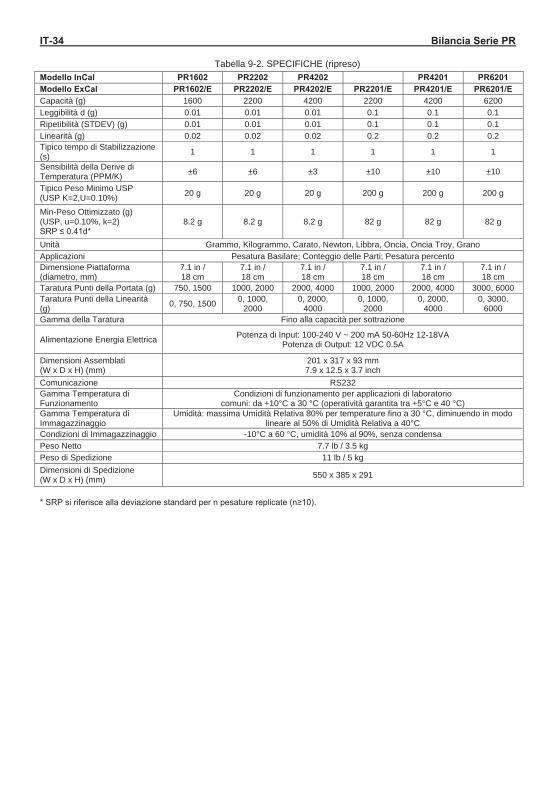
IT-34 Bilancia Serie PR
Tabella 9-2. SPECIFICHE (ripreso) Modello InCal PR1602 PR2202 PR4202 PR4201 PR6201 Modello ExCal PR1602/E PR2202/E PR4202/E PR2201/E PR4201/E PR6201/E Capacità (g) 1600 2200 4200 2200 4200 6200 Leggibilità d (g) 0.01 0.01 0.01 0.1 0.1 0.1 Ripetibilità (STDEV) (g) 0.01 0.01 0.01 0.1 0.1 0.1 Linearità (g) 0.02 0.02 0.02 0.2 0.2 0.2 Tipico tempo di Stabilizzazione (s) 1 1 1 1 1 1
Sensibilità della Derive di Temperatura (PPM/K) ±6 ±6 ±3 ±10 ±10 ±10
Tipico Peso Minimo USP (USP K=2,U=0.10%) 20 g 20 g 20 g 200 g 200 g 200 g
Min-Peso Ottimizzato (g) (USP, u=0.10%, k=2) SRP ≤ 0.41d*
8.2 g 8.2 g 8.2 g 82 g 82 g 82 g
Unità Grammo, Kilogrammo, Carato, Newton, Libbra, Oncia, Oncia Troy, Grano Applicazioni Pesatura Basilare; Conteggio delle Parti; Pesatura percento Dimensione Piattaforma (diametro, mm)
7.1 in / 18 cm
7.1 in / 18 cm
7.1 in / 18 cm
7.1 in / 18 cm
7.1 in / 18 cm
7.1 in / 18 cm
Taratura Punti della Portata (g) 750, 1500 1000, 2000 2000, 4000 1000, 2000 2000, 4000 3000, 6000 Taratura Punti della Linearità (g) 0, 750, 1500 0, 1000,
2000 0, 2000,
4000 0, 1000,
2000 0, 2000,
4000 0, 3000,
6000 Gamma della Taratura Fino alla capacità per sottrazione
Alimentazione Energia Elettrica Potenza di Input: 100-240 V ~ 200 mA 50-60Hz 12-18VA Potenza di Output: 12 VDC 0.5A
Dimensioni Assemblati (W x D x H) (mm)
201 x 317 x 93 mm 7.9 x 12.5 x 3.7 inch
Comunicazione RS232 Gamma Temperatura di Funzionamento
Condizioni di funzionamento per applicazioni di laboratorio comuni: da +10°C a 30 °C (operatività garantita tra +5°C e 40 °C)
Gamma Temperatura di Immagazzinaggio
Umidità: massima Umidità Relativa 80% per temperature fino a 30 °C, diminuendo in modo lineare al 50% di Umidità Relativa a 40°C
Condizioni di Immagazzinaggio -10°C a 60 °C, umidità 10% al 90%, senza condensa Peso Netto 7.7 lb / 3.5 kg Peso di Spedizione 11 lb / 5 kg Dimensioni di Spedizione (W x D x H) (mm) 550 x 385 x 291
* SRP si riferisce alla deviazione standard per n pesature replicate (n≥10).
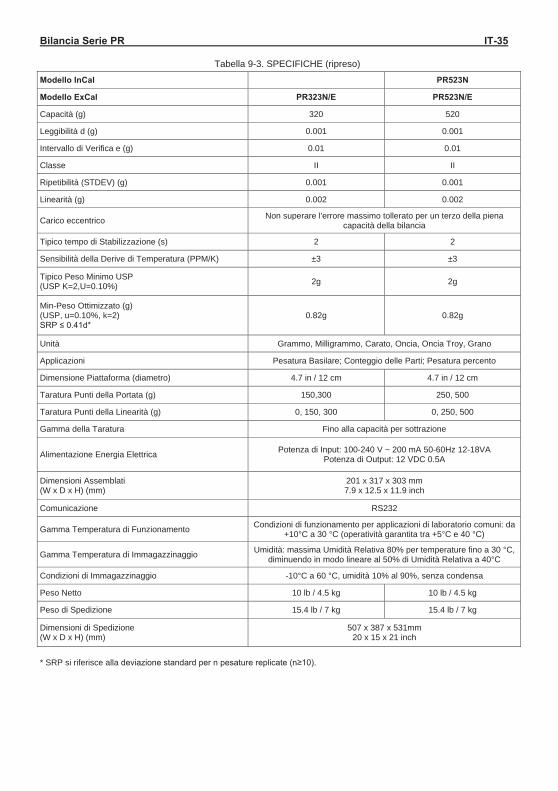
Bilancia Serie PR IT-35
Tabella 9-3. SPECIFICHE (ripreso)
Modello InCal PR523N
Modello ExCal PR323N/E PR523N/E
Capacità (g) 320 520
Leggibilità d (g) 0.001 0.001
Intervallo di Verifica e (g) 0.01 0.01
Classe II II
Ripetibilità (STDEV) (g) 0.001 0.001
Linearità (g) 0.002 0.002
Carico eccentrico Non superare l'errore massimo tollerato per un terzo della piena capacità della bilancia
Tipico tempo di Stabilizzazione (s) 2 2
Sensibilità della Derive di Temperatura (PPM/K) ±3 ±3
Tipico Peso Minimo USP (USP K=2,U=0.10%) 2g 2g
Min-Peso Ottimizzato (g) (USP, u=0.10%, k=2) SRP ≤ 0.41d*
0.82g 0.82g
Unità Grammo, Milligrammo, Carato, Oncia, Oncia Troy, Grano
Applicazioni Pesatura Basilare; Conteggio delle Parti; Pesatura percento
Dimensione Piattaforma (diametro) 4.7 in / 12 cm 4.7 in / 12 cm
Taratura Punti della Portata (g) 150,300 250, 500
Taratura Punti della Linearità (g) 0, 150, 300 0, 250, 500
Gamma della Taratura Fino alla capacità per sottrazione
Alimentazione Energia Elettrica Potenza di Input: 100-240 V ~ 200 mA 50-60Hz 12-18VA Potenza di Output: 12 VDC 0.5A
Dimensioni Assemblati (W x D x H) (mm)
201 x 317 x 303 mm 7.9 x 12.5 x 11.9 inch
Comunicazione RS232
Gamma Temperatura di Funzionamento Condizioni di funzionamento per applicazioni di laboratorio comuni: da +10°C a 30 °C (operatività garantita tra +5°C e 40 °C)
Gamma Temperatura di Immagazzinaggio Umidità: massima Umidità Relativa 80% per temperature fino a 30 °C, diminuendo in modo lineare al 50% di Umidità Relativa a 40°C
Condizioni di Immagazzinaggio -10°C a 60 °C, umidità 10% al 90%, senza condensa
Peso Netto 10 lb / 4.5 kg 10 lb / 4.5 kg
Peso di Spedizione 15.4 lb / 7 kg 15.4 lb / 7 kg
Dimensioni di Spedizione (W x D x H) (mm)
507 x 387 x 531mm 20 x 15 x 21 inch
* SRP si riferisce alla deviazione standard per n pesature replicate (n≥10).
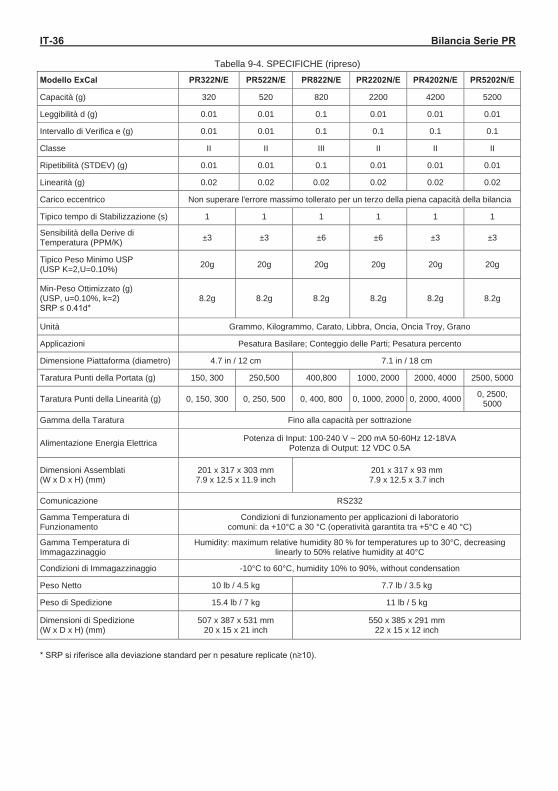
IT-36 Bilancia Serie PR
Tabella 9-4. SPECIFICHE (ripreso)
Modello ExCal PR322N/E PR522N/E PR822N/E PR2202N/E PR4202N/E PR5202N/E
Capacità (g) 320 520 820 2200 4200 5200
Leggibilità d (g) 0.01 0.01 0.1 0.01 0.01 0.01
Intervallo di Verifica e (g) 0.01 0.01 0.1 0.1 0.1 0.1
Classe II II III II II II
Ripetibilità (STDEV) (g) 0.01 0.01 0.1 0.01 0.01 0.01
Linearità (g) 0.02 0.02 0.02 0.02 0.02 0.02
Carico eccentrico Non superare l'errore massimo tollerato per un terzo della piena capacità della bilancia
Tipico tempo di Stabilizzazione (s) 1 1 1 1 1 1
Sensibilità della Derive di Temperatura (PPM/K) ±3 ±3 ±6 ±6 ±3 ±3
Tipico Peso Minimo USP (USP K=2,U=0.10%) 20g 20g 20g 20g 20g 20g
Min-Peso Ottimizzato (g) (USP, u=0.10%, k=2) SRP ≤ 0.41d*
8.2g 8.2g 8.2g 8.2g 8.2g 8.2g
Unità Grammo, Kilogrammo, Carato, Libbra, Oncia, Oncia Troy, Grano
Applicazioni Pesatura Basilare; Conteggio delle Parti; Pesatura percento
Dimensione Piattaforma (diametro) 4.7 in / 12 cm 7.1 in / 18 cm
Taratura Punti della Portata (g) 150, 300 250,500 400,800 1000, 2000 2000, 4000 2500, 5000
Taratura Punti della Linearità (g) 0, 150, 300 0, 250, 500 0, 400, 800 0, 1000, 2000 0, 2000, 4000 0, 2500, 5000
Gamma della Taratura Fino alla capacità per sottrazione
Alimentazione Energia Elettrica Potenza di Input: 100-240 V ~ 200 mA 50-60Hz 12-18VA Potenza di Output: 12 VDC 0.5A
Dimensioni Assemblati (W x D x H) (mm)
201 x 317 x 303 mm 7.9 x 12.5 x 11.9 inch
201 x 317 x 93 mm 7.9 x 12.5 x 3.7 inch
Comunicazione RS232
Gamma Temperatura di Funzionamento
Condizioni di funzionamento per applicazioni di laboratorio comuni: da +10°C a 30 °C (operatività garantita tra +5°C e 40 °C)
Gamma Temperatura di Immagazzinaggio
Humidity: maximum relative humidity 80 % for temperatures up to 30°C, decreasing linearly to 50% relative humidity at 40°C
Condizioni di Immagazzinaggio -10°C to 60°C, humidity 10% to 90%, without condensation
Peso Netto 10 lb / 4.5 kg 7.7 lb / 3.5 kg
Peso di Spedizione 15.4 lb / 7 kg 11 lb / 5 kg
Dimensioni di Spedizione (W x D x H) (mm)
507 x 387 x 531 mm 20 x 15 x 21 inch
550 x 385 x 291 mm 22 x 15 x 12 inch
* SRP si riferisce alla deviazione standard per n pesature replicate (n≥10).
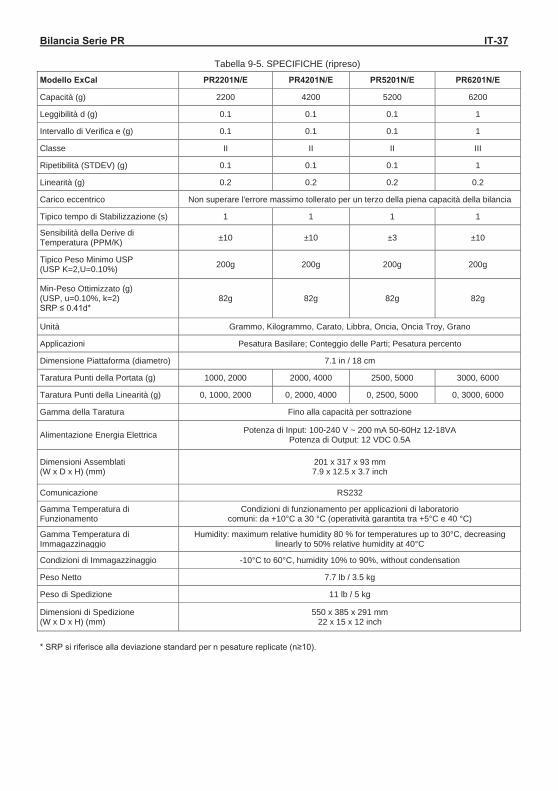
Bilancia Serie PR IT-37
Tabella 9-5. SPECIFICHE (ripreso)
Modello ExCal PR2201N/E PR4201N/E PR5201N/E PR6201N/E
Capacità (g) 2200 4200 5200 6200
Leggibilità d (g) 0.1 0.1 0.1 1
Intervallo di Verifica e (g) 0.1 0.1 0.1 1
Classe II II II III
Ripetibilità (STDEV) (g) 0.1 0.1 0.1 1
Linearità (g) 0.2 0.2 0.2 0.2
Carico eccentrico Non superare l'errore massimo tollerato per un terzo della piena capacità della bilancia
Tipico tempo di Stabilizzazione (s) 1 1 1 1
Sensibilità della Derive di Temperatura (PPM/K) ±10 ±10 ±3 ±10
Tipico Peso Minimo USP (USP K=2,U=0.10%) 200g 200g 200g 200g
Min-Peso Ottimizzato (g) (USP, u=0.10%, k=2) SRP ≤ 0.41d*
82g 82g 82g 82g
Unità Grammo, Kilogrammo, Carato, Libbra, Oncia, Oncia Troy, Grano
Applicazioni Pesatura Basilare; Conteggio delle Parti; Pesatura percento
Dimensione Piattaforma (diametro) 7.1 in / 18 cm
Taratura Punti della Portata (g) 1000, 2000 2000, 4000 2500, 5000 3000, 6000
Taratura Punti della Linearità (g) 0, 1000, 2000 0, 2000, 4000 0, 2500, 5000 0, 3000, 6000
Gamma della Taratura Fino alla capacità per sottrazione
Alimentazione Energia Elettrica Potenza di Input: 100-240 V ~ 200 mA 50-60Hz 12-18VA Potenza di Output: 12 VDC 0.5A
Dimensioni Assemblati (W x D x H) (mm)
201 x 317 x 93 mm 7.9 x 12.5 x 3.7 inch
Comunicazione RS232
Gamma Temperatura di Funzionamento
Condizioni di funzionamento per applicazioni di laboratorio comuni: da +10°C a 30 °C (operatività garantita tra +5°C e 40 °C)
Gamma Temperatura di Immagazzinaggio
Humidity: maximum relative humidity 80 % for temperatures up to 30°C, decreasing linearly to 50% relative humidity at 40°C
Condizioni di Immagazzinaggio -10°C to 60°C, humidity 10% to 90%, without condensation
Peso Netto 7.7 lb / 3.5 kg
Peso di Spedizione 11 lb / 5 kg
Dimensioni di Spedizione (W x D x H) (mm)
550 x 385 x 291 mm 22 x 15 x 12 inch
* SRP si riferisce alla deviazione standard per n pesature replicate (n≥10).

IT-38 Bilancia Serie PR
Table 9-6 SPECIFICHE (ripreso) Modello Approvato InCal PR124M PR224M PR223M PR323M PR423M PR523M
Capacità (g) 120 220 220 320 420 520 Leggibilità d (g) 0.0001 0.0001 0.001 0.001 0.001 0.001 Intervallo di Verifica e (g) 0.001 0.001 0.01 0.01 0.01 0.01 Classe I I II II II II Ripetibilità (deviazione standard) (g) 0.0001 0.0001 0.001 0.001 0.001 0.001
Linearità (g) ±0.0002 ±0.0002 ±0.002 ±0.002 ±0.002 ±0.002 Tipico Tempo di Stabilizzazione (s) 3 3 2 2 2 2
Sensitività della Deriva di Temperatura (PPM/K) ±3 ±3 ±3 ±3 ±3 ±3
Tipico Peso Minimo USP (USP K=2,U=0,10%) 200 mg 200 mg 2 g 2 g 2 g 2 g
Peso Minimo Ottimizzato (g) (USP, u=0,10%, k=2) SRP≤0.41d*
82 mg 82 mg 0.82 g 0.82 g 0.82 g 0.82 g
Unità g, mg , ct
Applicazioni Pesate di Base, Conteggio Pezzi, Pesata Percento, Pesata Dinamica, Determinazione della Densità
Dimensione Piattaforma (diametro, mm) 90 90 120 120 120 120
Taratura Punti della Portata (g) 50, 100 100, 200 100, 200 150, 300 200, 400 250, 500
Taratura Punti della Linearità (g) 0, 50, 100 0, 100, 200 0, 100, 200 0, 150, 300 0, 200, 400 0, 250, 500
Gamma della Taratura Fino alla capacità per sottrazione
Alimentazione Energia Elettrica
Potenza di Input: 12 V CC 1A da CA/CC alimentazione di corrente esterna Potenza di Output: 12 VDC 0.5A
Dimensioni Assemblati (W x D x H) (mm) 209 x 321 x 309
Comunicazione RS232 Gamma Temperatura di Funzionamento
Condizioni di funzionamento per applicazioni di laboratorio comuni: da +10°C a 30 °C (operatività garantita tra +5°C e 40 °C)
Gamma Temperatura di Immagazzinaggio
Umidità: Massima Umidità Relativa 80% per temperature fino a 30 °C, diminuendo in modo lineare a 40 °C al 50% di Umidità Relativa
Condizioni di Immagazzinaggio Da -10°C a 60 °C, umidità dal 10% al 90%, senza condensa
Peso Netto 10 lb / 4.5 kg Peso di Spedizione 15.4 lb / 7 kg Dimensioni di Spedizione (W x D x H) (mm) 507 x 387 x 531
* SRP si riferisce alla deviazione standard per n pesature replicate (n≥10).
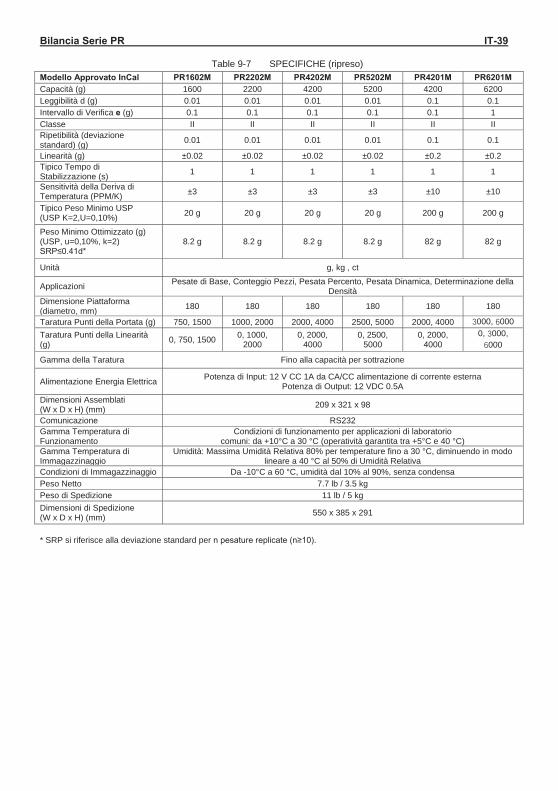
Bilancia Serie PR IT-39
Table 9-7 SPECIFICHE (ripreso) Modello Approvato InCal PR1602M PR2202M PR4202M PR5202M PR4201M PR6201M Capacità (g) 1600 2200 4200 5200 4200 6200 Leggibilità d (g) 0.01 0.01 0.01 0.01 0.1 0.1 Intervallo di Verifica e (g) 0.1 0.1 0.1 0.1 0.1 1 Classe II II II II II II Ripetibilità (deviazione standard) (g) 0.01 0.01 0.01 0.01 0.1 0.1
Linearità (g) ±0.02 ±0.02 ±0.02 ±0.02 ±0.2 ±0.2 Tipico Tempo di Stabilizzazione (s) 1 1 1 1 1 1
Sensitività della Deriva di Temperatura (PPM/K) ±3 ±3 ±3 ±3 ±10 ±10
Tipico Peso Minimo USP (USP K=2,U=0,10%) 20 g 20 g 20 g 20 g 200 g 200 g
Peso Minimo Ottimizzato (g) (USP, u=0,10%, k=2) SRP≤0.41d*
8.2 g 8.2 g 8.2 g 8.2 g 82 g 82 g
Unità g, kg , ct
Applicazioni Pesate di Base, Conteggio Pezzi, Pesata Percento, Pesata Dinamica, Determinazione della Densità
Dimensione Piattaforma (diametro, mm) 180 180 180 180 180 180
Taratura Punti della Portata (g) 750, 1500 1000, 2000 2000, 4000 2500, 5000 2000, 4000 000, 000 Taratura Punti della Linearità (g) 0, 750, 1500 0, 1000,
2000 0, 2000,
4000 0, 2500,
5000 0, 2000,
4000 0, 000,
000
Gamma della Taratura Fino alla capacità per sottrazione
Alimentazione Energia Elettrica Potenza di Input: 12 V CC 1A da CA/CC alimentazione di corrente esterna Potenza di Output: 12 VDC 0.5A
Dimensioni Assemblati (W x D x H) (mm) 209 x 321 x 98
Comunicazione RS232 Gamma Temperatura di Funzionamento
Condizioni di funzionamento per applicazioni di laboratorio comuni: da +10°C a 30 °C (operatività garantita tra +5°C e 40 °C)
Gamma Temperatura di Immagazzinaggio
Umidità: Massima Umidità Relativa 80% per temperature fino a 30 °C, diminuendo in modo lineare a 40 °C al 50% di Umidità Relativa
Condizioni di Immagazzinaggio Da -10°C a 60 °C, umidità dal 10% al 90%, senza condensa Peso Netto 7.7 lb / 3.5 kg Peso di Spedizione 11 lb / 5 kg Dimensioni di Spedizione (W x D x H) (mm) 550 x 385 x 291
* SRP si riferisce alla deviazione standard per n pesature replicate (n≥10).
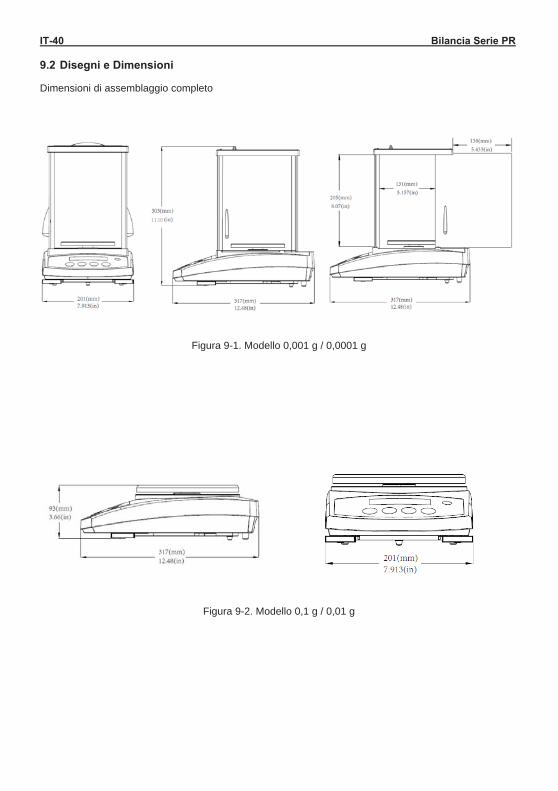
IT-40 Bilancia Serie PR 9.2 Disegni e Dimensioni Dimensioni di assemblaggio completo
Figura 9-1. Modello 0,001 g / 0,0001 g
Figura 9-2. Modello 0,1 g / 0,01 g
11.93
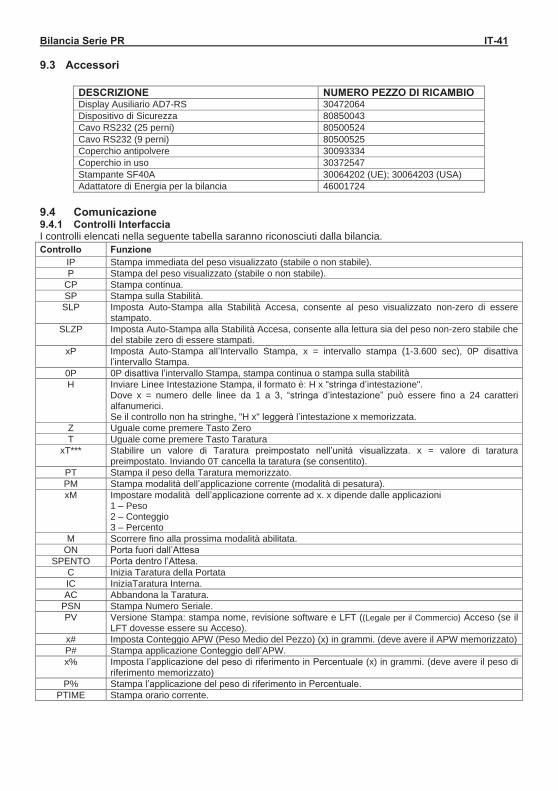
Bilancia Serie PR IT-41 9.3 Accessori
DESCRIZIONE NUMERO PEZZO DI RICAMBIO Display Ausiliario AD7-RS 30472064 Dispositivo di Sicurezza 80850043 Cavo RS232 (25 perni) 80500524 Cavo RS232 (9 perni) 80500525 Coperchio antipolvere 30093334 Coperchio in uso 30372547 Stampante SF40A 30064202 (UE); 30064203 (USA) Adattatore di Energia per la bilancia 46001724
9.4 Comunicazione 9.4.1 Controlli Interfaccia I controlli elencati nella seguente tabella saranno riconosciuti dalla bilancia. Controllo Funzione
IP Stampa immediata del peso visualizzato (stabile o non stabile). P Stampa del peso visualizzato (stabile o non stabile).
CP Stampa continua. SP Stampa sulla Stabilità. SLP Imposta Auto-Stampa alla Stabilità Accesa, consente al peso visualizzato non-zero di essere
stampato. SLZP Imposta Auto-Stampa alla Stabilità Accesa, consente alla lettura sia del peso non-zero stabile che
del stabile zero di essere stampati. xP Imposta Auto-Stampa all’Intervallo Stampa, x = intervallo stampa (1-3.600 sec), 0P disattiva
l’intervallo Stampa. 0P 0P disattiva l’intervallo Stampa, stampa continua o stampa sulla stabilità H Inviare Linee Intestazione Stampa, il formato è: H x "stringa d’intestazione".
Dove x = numero delle linee da 1 a 3, “stringa d’intestazione” può essere fino a 24 caratteri alfanumerici. Se il controllo non ha stringhe, "H x" leggerà l’intestazione x memorizzata.
Z Uguale come premere Tasto Zero T Uguale come premere Tasto Taratura
xT*** Stabilire un valore di Taratura preimpostato nell’unità visualizzata. x = valore di taratura preimpostato. Inviando 0T cancella la taratura (se consentito).
PT Stampa il peso della Taratura memorizzato. PM Stampa modalità dell’applicazione corrente (modalità di pesatura). xM Impostare modalità dell’applicazione corrente ad x. x dipende dalle applicazioni
1 – Peso 2 – Conteggio 3 – Percento
M Scorrere fino alla prossima modalità abilitata. ON Porta fuori dall’Attesa
SPENTO Porta dentro l’Attesa. C Inizia Taratura della Portata IC IniziaTaratura Interna. AC Abbandona la Taratura.
PSN Stampa Numero Seriale. PV Versione Stampa: stampa nome, revisione software e LFT ((Legale per il Commercio) Acceso (se il
LFT dovesse essere su Acceso). x# Imposta Conteggio APW (Peso Medio del Pezzo) (x) in grammi. (deve avere il APW memorizzato) P# Stampa applicazione Conteggio dell’APW. x% Imposta l’applicazione del peso di riferimento in Percentuale (x) in grammi. (deve avere il peso di
riferimento memorizzato) P% Stampa l’applicazione del peso di riferimento in Percentuale.
PTIME Stampa orario corrente.
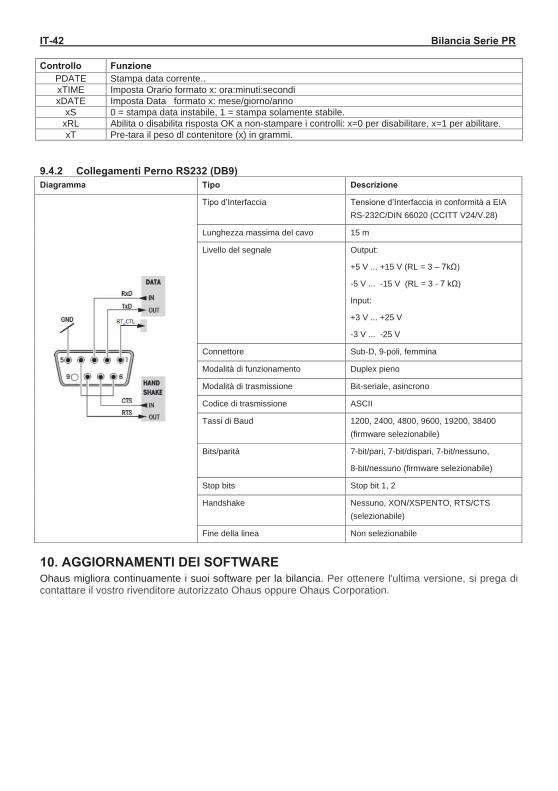
IT-42 Bilancia Serie PR Controllo Funzione
PDATE Stampa data corrente.. xTIME Imposta Orario formato x: ora:minuti:secondi xDATE Imposta Data formato x: mese/giorno/anno
xS 0 = stampa data instabile, 1 = stampa solamente stabile. xRL Abilita o disabilita risposta OK a non-stampare i controlli: x=0 per disabilitare, x=1 per abilitare. xT Pre-tara il peso dl contenitore (x) in grammi.
9.4.2 Collegamenti Perno RS232 (DB9) Diagramma Tipo Descrizione
Tipo d’Interfaccia Tensione d’Interfaccia in conformità a EIA RS-232C/DIN 66020 (CCITT V24/V.28)
Lunghezza massima del cavo 15 m
Livello del segnale Output:
+5 V ... +15 V (RL = 3 – 7kΩ)
-5 V ... -15 V (RL = 3 - 7 kΩ)
Input:
+3 V ... +25 V
-3 V ... -25 V
Connettore Sub-D, 9-poli, femmina
Modalità di funzionamento Duplex pieno
Modalità di trasmissione Bit-seriale, asincrono
Codice di trasmissione ASCII
Tassi di Baud 1200, 2400, 4800, 9600, 19200, 38400 (firmware selezionabile)
Bits/parità 7-bit/pari, 7-bit/dispari, 7-bit/nessuno,
8-bit/nessuno (firmware selezionabile)
Stop bits Stop bit 1, 2
Handshake Nessuno, XON/XSPENTO, RTS/CTS (selezionabile)
Fine della linea Non selezionabile
10. AGGIORNAMENTI DEI SOFTWARE Ohaus migliora continuamente i suoi software per la bilancia. Per ottenere l'ultima versione, si prega di contattare il vostro rivenditore autorizzato Ohaus oppure Ohaus Corporation.
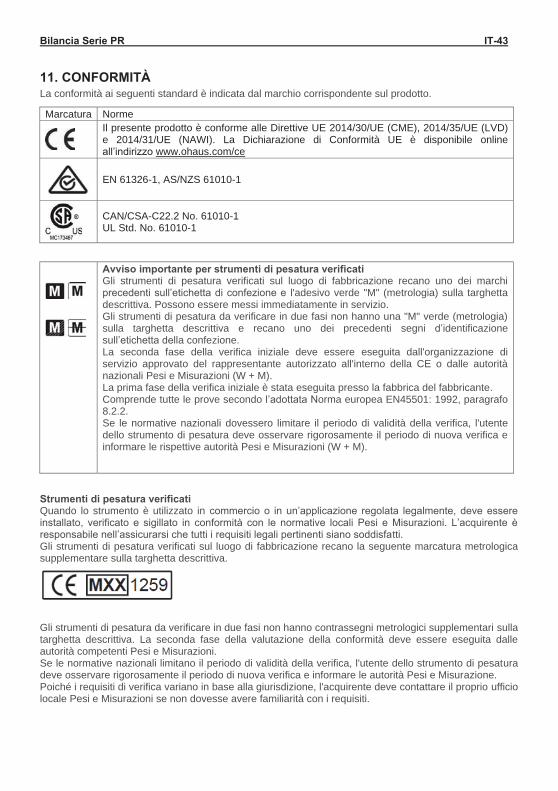
Bilancia Serie PR IT-43
11. CONFORMITÀ La conformità ai seguenti standard è indicata dal marchio corrispondente sul prodotto.
Marcatura Norme
Il presente prodotto è conforme alle Direttive UE 2014/30/UE (CME), 2014/35/UE (LVD) e 2014/31/UE (NAWI). La Dichiarazione di Conformità UE è disponibile online all’indirizzo www.ohaus.com/ce
EN 61326-1, AS/NZS 61010-1
CAN/CSA-C22.2 No. 61010-1 UL Std. No. 61010-1
Avviso importante per strumenti di pesatura verificati Gli strumenti di pesatura verificati sul luogo di fabbricazione recano uno dei marchi precedenti sull’etichetta di confezione e l'adesivo verde "M" (metrologia) sulla targhetta descrittiva. Possono essere messi immediatamente in servizio. Gli strumenti di pesatura da verificare in due fasi non hanno una "M" verde (metrologia) sulla targhetta descrittiva e recano uno dei precedenti segni d’identificazione sull’etichetta della confezione. La seconda fase della verifica iniziale deve essere eseguita dall'organizzazione di servizio approvato del rappresentante autorizzato all'interno della CE o dalle autorità nazionali Pesi e Misurazioni (W + M). La prima fase della verifica iniziale è stata eseguita presso la fabbrica del fabbricante. Comprende tutte le prove secondo l’adottata Norma europea EN45501: 1992, paragrafo 8.2.2. Se le normative nazionali dovessero limitare il periodo di validità della verifica, l'utente dello strumento di pesatura deve osservare rigorosamente il periodo di nuova verifica e informare le rispettive autorità Pesi e Misurazioni (W + M).
Strumenti di pesatura verificati Quando lo strumento è utilizzato in commercio o in un’applicazione regolata legalmente, deve essere installato, verificato e sigillato in conformità con le normative locali Pesi e Misurazioni. L’acquirente è responsabile nell’assicurarsi che tutti i requisiti legali pertinenti siano soddisfatti. Gli strumenti di pesatura verificati sul luogo di fabbricazione recano la seguente marcatura metrologica supplementare sulla targhetta descrittiva.
Gli strumenti di pesatura da verificare in due fasi non hanno contrassegni metrologici supplementari sulla targhetta descrittiva. La seconda fase della valutazione della conformità deve essere eseguita dalle autorità competenti Pesi e Misurazioni. Se le normative nazionali limitano il periodo di validità della verifica, l'utente dello strumento di pesatura deve osservare rigorosamente il periodo di nuova verifica e informare le autorità Pesi e Misurazione. Poiché i requisiti di verifica variano in base alla giurisdizione, l'acquirente deve contattare il proprio ufficio locale Pesi e Misurazioni se non dovesse avere familiarità con i requisiti.

IT-44 Bilancia Serie PR Nota FCC Questa apparecchiatura è stata sottomessa a prove e trovata conforme ai limiti per un dispositivo digitale di Classe A, in conformità alla Parte 15 dei Regolamenti FCC. Questi limiti sono progettati per fornire una protezione ragionevole contro interferenze dannose quando l'apparecchiatura viene utilizzata in un ambiente commerciale. Quest’apparecchiatura genera, utilizza e può irradiare energia in radiofrequenza e, se non installata e utilizzata in conformità con il Manuale delle Istruzioni, può causare interferenze dannose alle comunicazioni radio. Lo sviluppo di quest’apparecchiatura in un'area residenziale può causare interferenze dannose, nel qual caso l'utente sarà tenuto a correggere l'interferenza a proprie spese. Nota delle industrie canadesi Quest’apparecchio digitale di Classe A è conforme all'ICES-003 canadese. Registrazione ISO 9001 Nel 1994, a OHAUS Corporation, USA, è stato assegnato un certificato di registrazione ISO 9001 da Bureau Veritas Quality International (BVQI), confermando che il sistema di gestione della qualità OHAUS è conforme ai requisiti della Norma ISO 9001. Il 21 giugno 2012, OHAUS Corporation, USA, è stata registrata di nuovo alla Norma ISO 9001: 2008.
Il presente prodotto è conforma alla Direttive UE 2012/19/UE (WEEE). Si prega di smaltire questo prodotto secondo i regolamenti locali al punto di raccolta specificato per l’apparecchiatura elettrica ed elettronica.
Per le istruzioni di smaltimento in Europa, si prega di fare riferimento al sito web www.ohaus.com/weee .


Ohaus Corporation7 Campus DriveSuite 310Parsippany, NJ 07054 USATel: +1 973 377 9000Fax: +1 973 944 7177
With offices worldwide / Con oficinas en todo el mundo / Avec des bureaux partout dans le monde / Mit Bürosweltweit / Con uffici in tutto il mondowww.ohaus.com
*30372570* P/N 30372570 J © 2019 Ohaus Corporation, all rights reserved / todos los derechos reservados / tous droits réservés / alle Rechte vorbehalten / tutti i diritti riservati


