Embed Size (px)
Citation preview
PROVIDER-PERFORMED MICROSCOPY PROCEDURES
PROVIDER-PERFORMED MICROSCOPY PROCEDURES
PROVIDER-PERFORMED MICROSCOPY PROCEDURESA Focus on Quality Practices
https://www.cdc.gov/PPMP
Division of Laboratory SystemsCenter for Surveillance, Epidemiology, and Laboratory Services
CS258020-A

For additional information go to: https://www.cdc.gov/PPMP
Contact the Division of Laboratory Systems at [email protected] . The findings and conclusions in this booklet are those of the authors and do not necessarily represent the
official position of the Centers for Disease Control and Prevention.
Introduction — iii
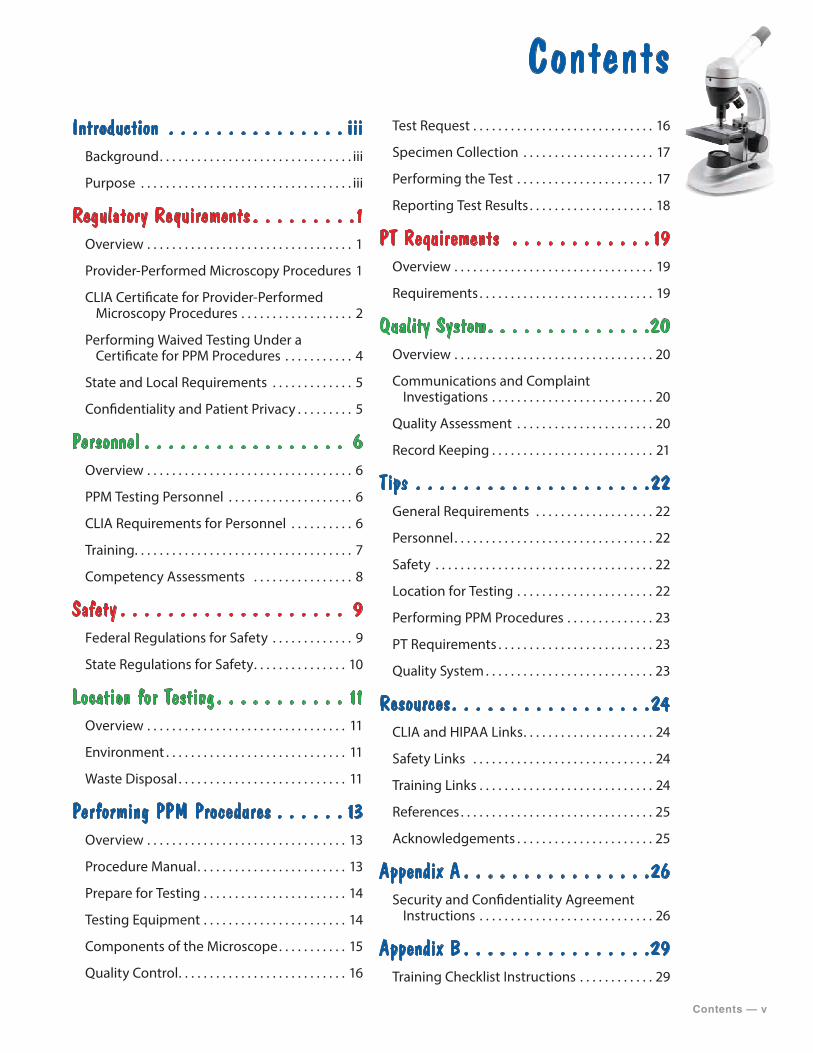
IntroductionBACKGROUNDHealth care providers use laboratory test results to diagnose disease, determine prognosis, and monitor a patient’s treatment or health status. Current practice shows an increased trend for medical decisions based on tests performed at the point of care. Forethought, planning, and preparation are critical when making decisions to begin testing or when adding a new test to the menu in a laboratory, physician office, or other point-of-care location. The Clinical Laboratory Improvement Amendments of 1988 (CLIA) Certificate for Provider-Performed Microscopy (PPM) procedures issued by the Centers for Medicare & Medicaid Services (CMS) permits a laboratory or testing site to perform a limited list of moderate complexity microscopic tests, as well as any waived tests.
PURPOSEPPM-certified laboratories may perform certain microscopic examinations during the course of a patient visit using specimens that quickly deteriorate or are not easily transportable. PPM-certified laboratories must meet the same CLIA quality standards as laboratories performing moderate complexity tests. This booklet describes recommended practices for physicians, midlevel practitioners (nurse midwife, nurse practitioner, or physician assistant), and dentists who perform patient testing under a CLIA Certificate for PPM procedures. The CLIA requirements for testing under a Certificate for PPM can be found at http://www.gpo.gov/fdsys/pkg/CFR-2003-title42-vol3/xml/CFR-2003-title42-vol3-part493.xml#seqnum493.19.
Although some of the recommendations in this booklet exceed CLIA requirements for provider-performed microscopy testing, following these good testing practices will likely lead to reliable, high quality test results.

Contents — v
ContentsIntroduction . . . . . . . . . . . . . . . iii
Background . . . . . . . . . . . . . . . . . . . . . . . . . . . . . . . iii
Purpose . . . . . . . . . . . . . . . . . . . . . . . . . . . . . . . . . . iii
Regulatory Requirements . . . . . . . . .1Overview . . . . . . . . . . . . . . . . . . . . . . . . . . . . . . . . . 1
Provider-Performed Microscopy Procedures 1
CLIA Certificate for Provider-Performed Microscopy Procedures . . . . . . . . . . . . . . . . . . 2
Performing Waived Testing Under a Certificate for PPM Procedures . . . . . . . . . . . 4
State and Local Requirements . . . . . . . . . . . . . 5
Confidentiality and Patient Privacy . . . . . . . . . 5
Personnel . . . . . . . . . . . . . . . . . 6Overview . . . . . . . . . . . . . . . . . . . . . . . . . . . . . . . . . 6
PPM Testing Personnel . . . . . . . . . . . . . . . . . . . . 6
CLIA Requirements for Personnel . . . . . . . . . . 6
Training. . . . . . . . . . . . . . . . . . . . . . . . . . . . . . . . . . . 7
Competency Assessments . . . . . . . . . . . . . . . . 8
Safety . . . . . . . . . . . . . . . . . . . 9Federal Regulations for Safety . . . . . . . . . . . . . 9
State Regulations for Safety . . . . . . . . . . . . . . . 10
Location for Testing . . . . . . . . . . . 11Overview . . . . . . . . . . . . . . . . . . . . . . . . . . . . . . . . 11
Environment . . . . . . . . . . . . . . . . . . . . . . . . . . . . . 11
Waste Disposal . . . . . . . . . . . . . . . . . . . . . . . . . . . 11
Performing PPM Procedures . . . . . . 13Overview . . . . . . . . . . . . . . . . . . . . . . . . . . . . . . . . 13
Procedure Manual . . . . . . . . . . . . . . . . . . . . . . . . 13
Prepare for Testing . . . . . . . . . . . . . . . . . . . . . . . 14
Testing Equipment . . . . . . . . . . . . . . . . . . . . . . . 14
Components of the Microscope . . . . . . . . . . . 15
Quality Control . . . . . . . . . . . . . . . . . . . . . . . . . . . 16
Test Request . . . . . . . . . . . . . . . . . . . . . . . . . . . . . 16
Specimen Collection . . . . . . . . . . . . . . . . . . . . . 17
Performing the Test . . . . . . . . . . . . . . . . . . . . . . 17
Reporting Test Results . . . . . . . . . . . . . . . . . . . . 18
PT Requirements . . . . . . . . . . . . 19Overview . . . . . . . . . . . . . . . . . . . . . . . . . . . . . . . . 19
Requirements . . . . . . . . . . . . . . . . . . . . . . . . . . . . 19
Quality System . . . . . . . . . . . . . .20Overview . . . . . . . . . . . . . . . . . . . . . . . . . . . . . . . . 20
Communications and Complaint Investigations . . . . . . . . . . . . . . . . . . . . . . . . . . 20
Quality Assessment . . . . . . . . . . . . . . . . . . . . . . 20
Record Keeping . . . . . . . . . . . . . . . . . . . . . . . . . . 21
Tips . . . . . . . . . . . . . . . . . . . .22General Requirements . . . . . . . . . . . . . . . . . . . 22
Personnel . . . . . . . . . . . . . . . . . . . . . . . . . . . . . . . . 22
Safety . . . . . . . . . . . . . . . . . . . . . . . . . . . . . . . . . . . 22
Location for Testing . . . . . . . . . . . . . . . . . . . . . . 22
Performing PPM Procedures . . . . . . . . . . . . . . 23
PT Requirements . . . . . . . . . . . . . . . . . . . . . . . . . 23
Quality System . . . . . . . . . . . . . . . . . . . . . . . . . . . 23
Resources . . . . . . . . . . . . . . . . .24CLIA and HIPAA Links . . . . . . . . . . . . . . . . . . . . . 24
Safety Links . . . . . . . . . . . . . . . . . . . . . . . . . . . . . 24
Training Links . . . . . . . . . . . . . . . . . . . . . . . . . . . . 24
References . . . . . . . . . . . . . . . . . . . . . . . . . . . . . . . 25
Acknowledgements . . . . . . . . . . . . . . . . . . . . . . 25
Appendix A . . . . . . . . . . . . . . . .26Security and Confidentiality Agreement
Instructions . . . . . . . . . . . . . . . . . . . . . . . . . . . . 26
Appendix B . . . . . . . . . . . . . . . .29Training Checklist Instructions . . . . . . . . . . . . 29
vi — Introduction
Appendix C . . . . . . . . . . . . . . . .32Training Evaluation Instructions . . . . . . . . . . . 32
Appendix D . . . . . . . . . . . . . . . . 35Competency Assessment Instructions . . . . . 35
Appendix E . . . . . . . . . . . . . . . .38Eyewash Station Weekly Maintenance
Log Instructions . . . . . . . . . . . . . . . . . . . . . . . . 38
Appendix F . . . . . . . . . . . . . . . . 41Safety Plan . . . . . . . . . . . . . . . . . . . . . . . . . . . . . . 41
Appendix F1 . . . . . . . . . . . . . . .45Safety Training Checklist Instructions . . . . . . 45
Appendix F2 . . . . . . . . . . . . . . .48Incident Report Instructions . . . . . . . . . . . . . . 48
Appendix G . . . . . . . . . . . . . . . . 51Common Disinfectants and Antiseptics . . . . 51
Appendix H . . . . . . . . . . . . . . . .52Procedure Contents and Tips . . . . . . . . . . . . . 52
Appendix I . . . . . . . . . . . . . . . .53Care and Maintenance of the Microscope . . 53
Appendix J . . . . . . . . . . . . . . . .54Microscope Maintenance Log Instructions . 54
Appendix K . . . . . . . . . . . . . . . . 57PPM Procedure Examples . . . . . . . . . . . . . . . . . 57
Appendix K1 . . . . . . . . . . . . . . .58Wet Mount . . . . . . . . . . . . . . . . . . . . . . . . . . . . . . 58
Preparing a Wet Mount . . . . . . . . . . . . . . . . . . . 62
Appendix K2 . . . . . . . . . . . . . . .63KOH Preparation . . . . . . . . . . . . . . . . . . . . . . . . . 63
KOH Procedure. . . . . . . . . . . . . . . . . . . . . . . . . . . 65
Appendix K3 . . . . . . . . . . . . . . 66Pinworm Examination . . . . . . . . . . . . . . . . . . . . 66
Appendix K4 . . . . . . . . . . . . . . .67Fern Test . . . . . . . . . . . . . . . . . . . . . . . . . . . . . . . . . 67
Appendix K5 . . . . . . . . . . . . . . .68Post-Coital Direct, Qualitative Examination
of Vaginal or Cervical Mucus . . . . . . . . . . . . 68
Appendix K6 . . . . . . . . . . . . . . .70Urine Sediment Examination. . . . . . . . . . . . . . 70
Appendix K7 . . . . . . . . . . . . . . . 78Nasal Smear for Granulocytes . . . . . . . . . . . . . 78
Appendix K8 . . . . . . . . . . . . . . .80Fecal Leukocyte Examination . . . . . . . . . . . . . 80
Appendix K9 . . . . . . . . . . . . . . . 81Qualitative Semen Analysis . . . . . . . . . . . . . . . 81
Appendix L . . . . . . . . . . . . . . . .82Terms and Abbreviations . . . . . . . . . . . . . . . . . 82
Regulatory Requirements — 1
Regulatory RequirementsOVERVIEWProvider-performed microscopy (PPM) procedures are a select group of moderately complex microscopy tests commonly performed by health care providers during patient office visits. Tests included in PPM procedures do not meet the criteria for waiver because they are not simple procedures; they require training and specific skills for test performance. A CLIA Certificate for PPM procedures allows physicians, midlevel practitioners, and dentists to perform certain moderate complexity microscopic examinations in addition to waived testing during a patient’s visit. Controls are generally not available to monitor the complete testing process for these procedures. Therefore, only limited activities are suitable for inspection. The laboratory or testing site performing PPM procedures is not subject to routine biennial inspections. However, a CLIA certificate is required and the laboratory or testing site must meet the CLIA quality standards for moderate complexity testing.
PROVIDER-PERFORMED MICROSCOPY PROCEDURESThe moderate complexity PPM procedures are performed by a health care provider during a patient visit in the context of a physical examination. Limited specimen handling or processing is required and the specimen is labile or delay in performing the test could compromise the accuracy of the test result, and control materials are not available to monitor the entire testing process.
The PPM-certified testing site is restricted to nine specific microscopic examinations using bright-field or phase-contrast microscopy:
99 All direct wet mount preparations for the presence or absence of bacteria, fungi, parasites, and human cellular elements99 All potassium hydroxide (KOH) preparations99 Pinworm examinations99 Fern tests99 Post-coital direct, qualitative examinations of vaginal or cervical mucous99 Urine sediment examinations99 Nasal smears for granulocytes99 Fecal leukocyte examinations99 Qualitative semen analysis (limited to the presence or absence of sperm and detection of motility)
Under PPM, the testing site may also perform all waived tests.
2 — Regulatory Requirements
CLIA CERTIFICATE FOR PROVIDER-PERFORMED MICROSCOPY PROCEDURES Obtaining a CLIA Certificate for PPM ProceduresBefore testing patient specimens, federal regulations require testing sites to have a CLIA certificate issued by CMS. Sites performing PPM procedures must file for a Certificate for PPM procedures and obtain a separate certificate for each location.
To obtain a CLIA Certificate for PPM procedures, complete the CMS-116 form found at: https://www.cms.gov/Medicare/CMS-Forms/CMS-Forms/downloads/cms116.pdf.
The CMS-116 form must
99 be signed by an owner or the laboratory director who attests that the laboratory or testing site will be operated in accordance with the requirements established by CLIA. 99 describe the characteristics of the operation and the examinations and other test procedures performed including:
• the name and total number of test procedures and examinations performed annually (excluding tests for quality control, quality assurance or proficiency testing purposes);
• the methodologies for each test procedure or examination performed, or both; • the qualifications (educational background, training, and experience) of the personnel directing and supervising the laboratory or testing site and performing the examinations and test procedures.
Send your completed CMS-116 form to the address of the local State Agency for the state in which your testing site resides. You should contact this State Agency for additional forms that are needed to complete the registration process. Additionally, the CLIA contact in the Regional Office may provide assistance. The list of CMS State Agency & Regional Office CLIA Contacts can be found at http://www.cms.gov/Regulations-and-Guidance/Legislation/CLIA/Downloads/CLIASA.pdf.
For additional information on how to obtain a Certificate for PPM procedures, refer to the CMS brochure located online at http://www.cms.gov/Regulations-and-Guidance/Legislation/CLIA/Downloads/HowObtainCLIACertificate.pdf.
Once your site has obtained a CLIA Certificate for PPM procedures, requirements for testing include:
99 Pay the certificate renewal fee every two years.99 Notify your State Agency of any changes in the laboratory’s ownership, name, address, or director within 30 days, or if you wish to add tests that are not categorized as PPM procedures or waived.99 Allow announced or unannounced on-site inspections by a CMS representative.
Regulatory Requirements — 3
PersonnelThe laboratory director must possess a current license as a laboratory director issued by the state in which the laboratory or testing site is located, if the licensing is required and must be either a
• physician (Medical Doctor, Doctor of Osteopathy, or Doctor of Podiatric Medicine) • midlevel practitioner (nurse midwife, nurse practitioner, or physician assistant), or • dentist (Doctor of Dental Surgery or Doctor of Dental Medicine).
Facility AdministrationPPM testing needs to be performed in a location with adequate space, an appropriate physical environment, and accommodations for proper disposal of biohazardous waste. The testing site must have appropriate and sufficient equipment, instruments, reagents, materials, and supplies for the type and volume of testing it performs. Safety procedures must be established, accessible, and observed to ensure protection. The testing site must retain its records and, as applicable, slides for easy retrieval of information, and must be in compliance with applicable federal, state, and local laboratory requirements.
Participation in Proficiency TestingModerate complexity tests are subject to participation in proficiency testing (PT). While PT is not specifically required for PPM procedures, each laboratory or testing site must meet the general CLIA requirements for alternative performance assessment by verifying the accuracy of their testing procedures at least twice per year. Several CLIA-approved PT programs offer voluntary modules for PPM and participation in a clinical microscopy or PPM PT module will satisfy the bi-annual alternative performance assessment requirement. If laboratories or testing sites enroll in PT, they are subject to all of the requirements for PT including the prohibition of PT referral.
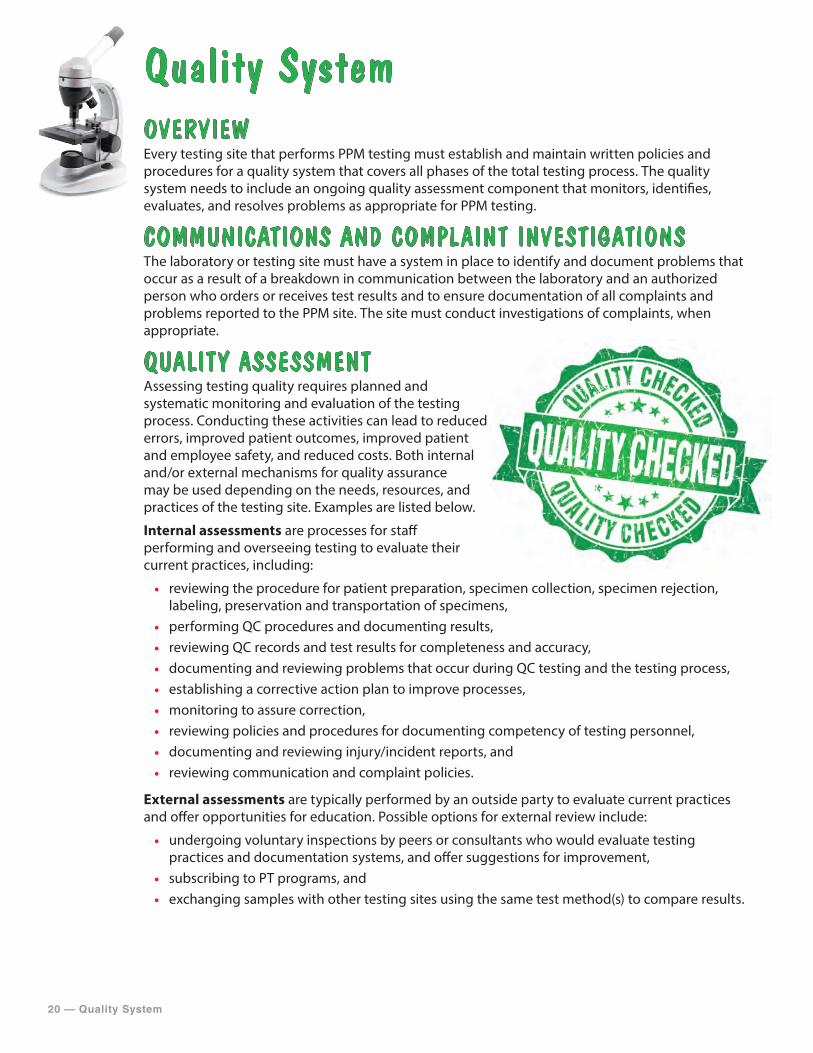
Quality SystemEvery testing site that performs PPM testing must establish and maintain written policies and procedures for a quality system that covers all phases of the total testing process. The quality system needs to include an ongoing quality assessment component that monitors, identifies, evaluates, and resolves problems as appropriate for PPM testing.
InspectionAlthough not routinely done, CMS will inspect PPM sites under certain circumstances such as:
• if a complaint is made, • to determine if the testing site is performing tests not permitted with a Certificate for PPM, • if there is a risk of harm to a patient due to inaccurate testing, and • to collect information about PPM procedures.
EnforcementIf the testing site fails to comply with the applicable CLIA requirements, CMS may impose alternative and/or principal sanctions. Alternative sanctions include directed plan of correction, directed portion of a plan of correction, state onsite monitoring, and civil money penalty. Principal sanctions include suspension, limitation, or revocation of the PPM Certificate. In addition, failure to meet the CLIA requirements may result in suspension of all or part of payments under Medicare and Medicaid. The overall compliance history of the laboratory or testing site as well as the nature, severity and duration of the deficiencies will be considered when choosing sanctions.
4 — Regulatory Requirements
PERFORMING WAIVED TESTING UNDER A CERTIFICATE FOR PPM PROCEDURESTesting sites with a CLIA Certificate for PPM procedures may also perform waived testing. Waived tests include test systems cleared by the Food and Drug Administration (FDA) for home use and those tests approved for waiver under CLIA criteria. The FDA list of waived tests is continuously being updated. The most current information on FDA-cleared waived tests for verification that the test(s) performed by your laboratory or testing site is categorized as waived can be found at the following website: http://www.accessdata.fda.gov/scripts/cdrh/cfdocs/cfClia/testswaived.cfm
Requirements for performing waived testing include:
• Follow the current manufacturer’s instructions for the waived tests you perform, withoutany changes.
• Pay the certificate renewal fee every two years. • Notify your State Agency of any changes in ownership, name, address, or director within
30 days, or if you wish to add tests that are not waived. • Allow announced or unannounced on-site inspections by a CMS representative.
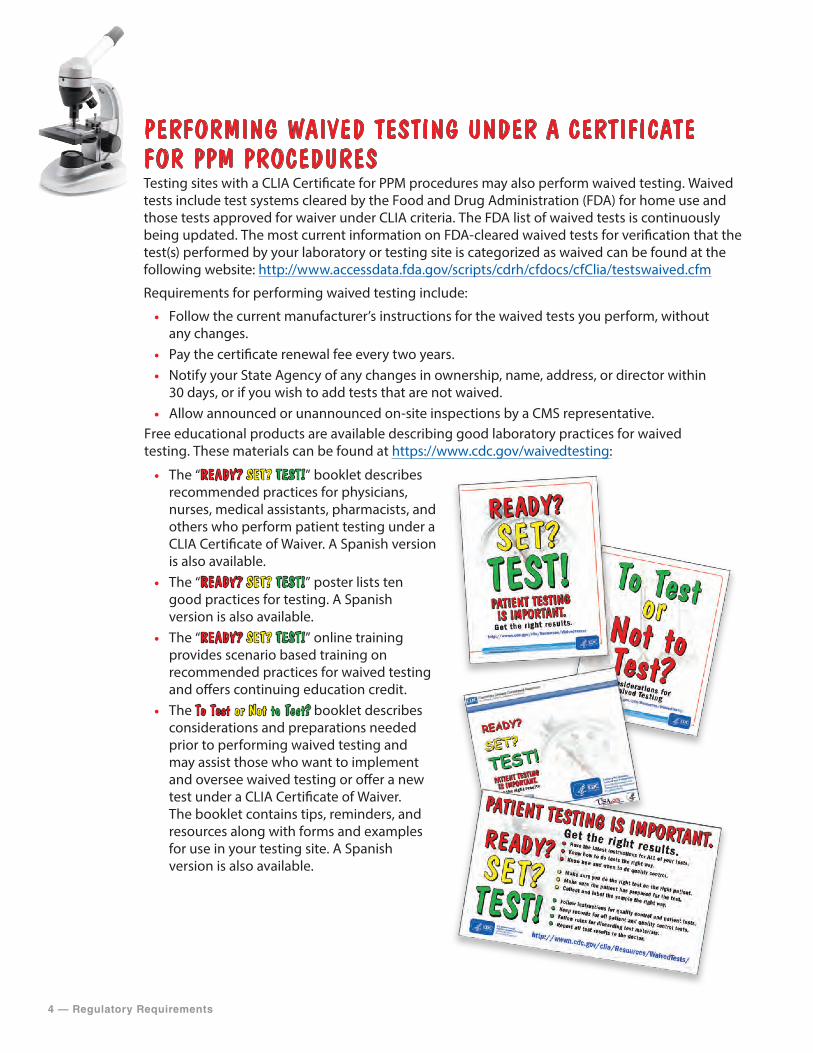
Free educational products are available describing good laboratory practices for waived testing. These materials can be found at https://www.cdc.gov/waivedtesting:
• The “READY? SET? TEST!” booklet describesrecommended practices for physicians,nurses, medical assistants, pharmacists, andothers who perform patient testing under aCLIA Certificate of Waiver. A Spanish versionis also available.
• The “READY? SET? TEST!” poster lists tengood practices for testing. A Spanishversion is also available.
• The “READY? SET? TEST!” online trainingprovides scenario based training onrecommended practices for waived testingand offers continuing education credit.
• The To Test or Not to Test? booklet describesconsiderations and preparations neededprior to performing waived testing andmay assist those who want to implementand oversee waived testing or offer a newtest under a CLIA Certificate of Waiver.The booklet contains tips, reminders, andresources along with forms and examplesfor use in your testing site. A Spanishversion is also available.
Regulatory Requirements — 5
STATE AND LOCAL REQUIREMENTSState and local jurisdictions vary in how they regulate laboratory testing. Some have requirements governing testing, personnel licensure, or phlebotomy. Often there are specific regulations for biohazard safety or the handling and disposal of medical waste. The person overseeing testing should ensure that all state and local requirements are met. When state, local, and federal requirements are not the same, follow the strictest requirement that applies to your site.
CONFIDENTIALITY AND PATIENT PRIVACYThe Health Insurance Portability and Accountability Act of 1996 (HIPAA) addresses the privacy rights and protection of personal health information. Testing sites are required to establish policies and procedures to protect the confidentiality of health and personal information about their patients, including patient identification, test results, and all records of testing throughout the entire testing process. Several states have medical privacy laws that apply to testing sites. All personnel should receive training on maintaining the confidentiality of patient information. Refer to the following link for more information on HIPAA: https://www.hhs.gov/hipaa/index.html
See Appendix A for an example of a Security and Confidentiality Agreement form.
6 — Personnel
PersonnelOVERVIEWPPM testing must be personally performed by a health care provider during a patient visit within the context of a physical examination. The testing personnel are responsible for specimen processing, test performance, and for reporting test results.
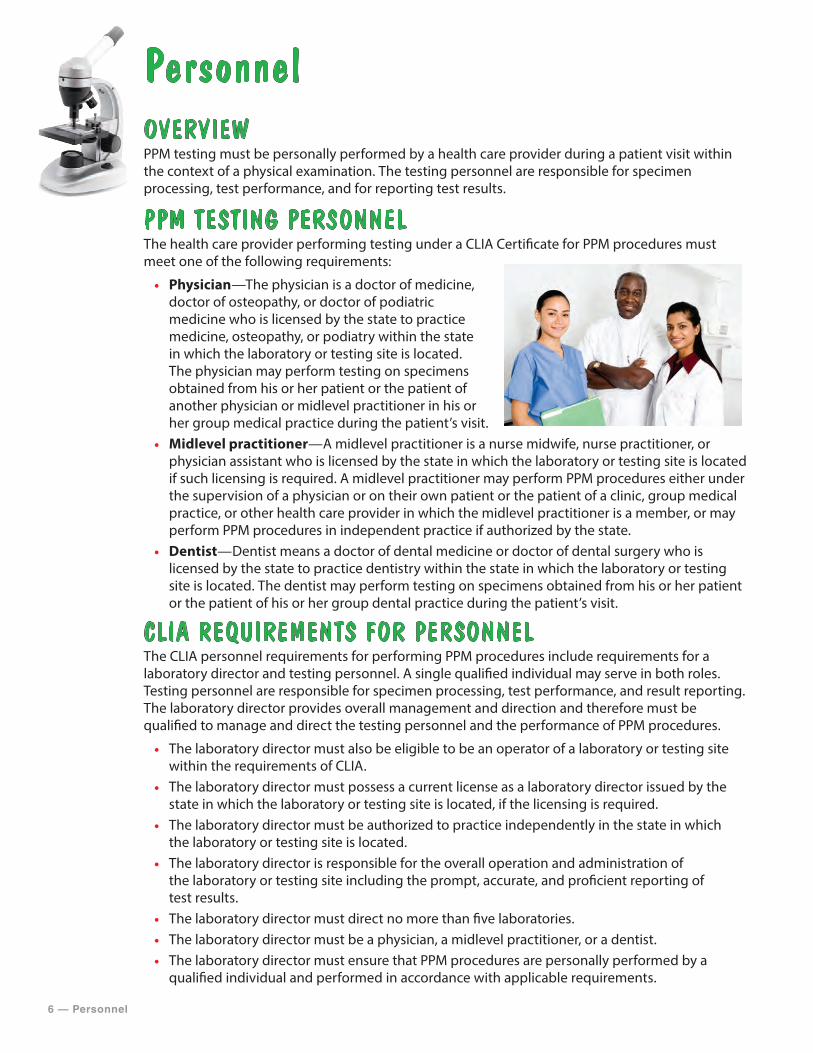
PPM TESTING PERSONNEL The health care provider performing testing under a CLIA Certificate for PPM procedures must meet one of the following requirements:
• Physician—The physician is a doctor of medicine, doctor of osteopathy, or doctor of podiatric medicine who is licensed by the state to practice medicine, osteopathy, or podiatry within the state in which the laboratory or testing site is located. The physician may perform testing on specimens obtained from his or her patient or the patient of another physician or midlevel practitioner in his or her group medical practice during the patient’s visit.
• Midlevel practitioner—A midlevel practitioner is a nurse midwife, nurse practitioner, or physician assistant who is licensed by the state in which the laboratory or testing site is located if such licensing is required. A midlevel practitioner may perform PPM procedures either under the supervision of a physician or on their own patient or the patient of a clinic, group medical practice, or other health care provider in which the midlevel practitioner is a member, or may perform PPM procedures in independent practice if authorized by the state.
• Dentist—Dentist means a doctor of dental medicine or doctor of dental surgery who is licensed by the state to practice dentistry within the state in which the laboratory or testing site is located. The dentist may perform testing on specimens obtained from his or her patient or the patient of his or her group dental practice during the patient’s visit.
CLIA REQUIREMENTS FOR PERSONNELThe CLIA personnel requirements for performing PPM procedures include requirements for a laboratory director and testing personnel. A single qualified individual may serve in both roles. Testing personnel are responsible for specimen processing, test performance, and result reporting. The laboratory director provides overall management and direction and therefore must be qualified to manage and direct the testing personnel and the performance of PPM procedures.
• The laboratory director must also be eligible to be an operator of a laboratory or testing site within the requirements of CLIA.
• The laboratory director must possess a current license as a laboratory director issued by the state in which the laboratory or testing site is located, if the licensing is required.
• The laboratory director must be authorized to practice independently in the state in which the laboratory or testing site is located.
• The laboratory director is responsible for the overall operation and administration of the laboratory or testing site including the prompt, accurate, and proficient reporting of test results.
• The laboratory director must direct no more than five laboratories. • The laboratory director must be a physician, a midlevel practitioner, or a dentist. • The laboratory director must ensure that PPM procedures are personally performed by a
qualified individual and performed in accordance with applicable requirements.
Personnel — 7
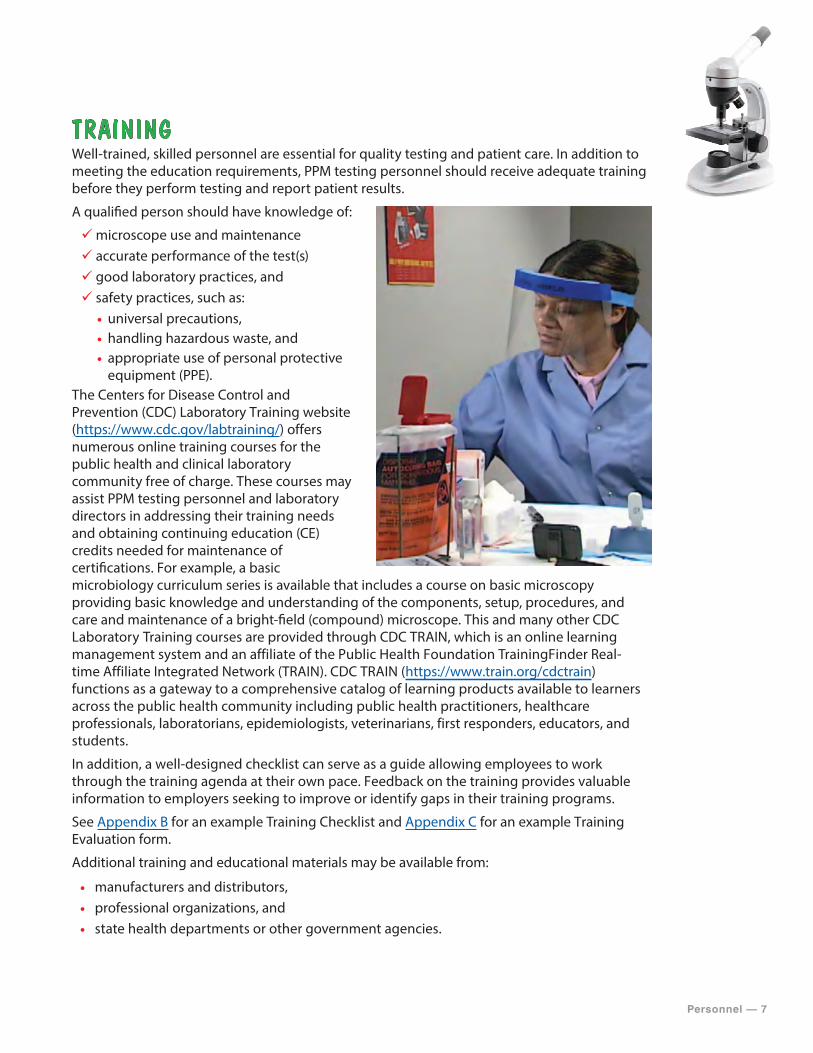
TRAININGWell-trained, skilled personnel are essential for quality testing and patient care. In addition to meeting the education requirements, PPM testing personnel should receive adequate training before they perform testing and report patient results.
A qualified person should have knowledge of:
99microscope use and maintenance99 accurate performance of the test(s)99 good laboratory practices, and99 safety practices, such as:
• universal precautions, • handling hazardous waste, and • appropriate use of personal protectiveequipment (PPE).
The Centers for Disease Control and Prevention (CDC) Laboratory Training website (https://www.cdc.gov/labtraining/) offers numerous online training courses for the public health and clinical laboratory community free of charge. These courses may assist PPM testing personnel and laboratory directors in addressing their training needs and obtaining continuing education (CE) credits needed for maintenance of certifications. For example, a basic microbiology curriculum series is available that includes a course on basic microscopy providing basic knowledge and understanding of the components, setup, procedures, and care and maintenance of a bright-field (compound) microscope. This and many other CDC Laboratory Training courses are provided through CDC TRAIN, which is an online learning management system and an affiliate of the Public Health Foundation TrainingFinder Real-time Affiliate Integrated Network (TRAIN). CDC TRAIN (https://www.train.org/cdctrain) functions as a gateway to a comprehensive catalog of learning products available to learners across the public health community including public health practitioners, healthcare professionals, laboratorians, epidemiologists, veterinarians, first responders, educators, and students.
In addition, a well-designed checklist can serve as a guide allowing employees to work through the training agenda at their own pace. Feedback on the training provides valuable information to employers seeking to improve or identify gaps in their training programs.
See Appendix B for an example Training Checklist and Appendix C for an example Training Evaluation form.
Additional training and educational materials may be available from:
• manufacturers and distributors, • professional organizations, and • state health departments or other government agencies.
8 — Personnel
COMPETENCY ASSESSMENTS Competency is the ability of personnel to apply their skill, knowledge, and experience to perform their duties correctly. Competency assessment is used to ensure that the testing personnel are fulfilling their duties as required by applicable federal, state, and local requirements. To make sure testing is consistent and accurate, the laboratory director should periodically check the competency of testing personnel and provide additional training when needed.
PPM testing personnel are required to undergo competency assessment to ensure accurate and reliable testing and reporting. If the laboratory director is the only individual testing and reporting test results, a minimum level of proficiency must be established and documented in order to ensure that the required competency for accurate and reliable testing and reporting is maintained. A common method to establish competency is to participate in external assessment activities such as PT. The requirements for performing the assessment and its frequency are determined by laboratory or testing site policy and procedure and must be performed for testing personnel for each test that the individual is approved to perform.
The following six procedures are the minimum regulatory requirements for assessment of competency for all personnel performing testing:
1. Direct observations of routine patient test performance, including patient preparation, if applicable, specimen handling, processing and testing;
2. Monitoring the recording and reporting of test results;3. Review of intermediate test results or worksheets, QC records, PT results, and preventive
maintenance records;4. Direct observations of performance of instrument maintenance and function checks;5. Assessment of test performance through testing previously analyzed specimens, internal
blind testing samples or external PT samples; and6. Assessment of problem solving skills.
Competency assessment for PPM may include:
• observing routine patient test performance, including specimen handling, processing, and testing,
• monitoring the recording and reporting of results according to the laboratory’s or testing site’s procedure,
• reviewing testing documents such as worksheets, QC records, PT results, and corrective action records,
• observing microscope cleaning and maintenance procedures, • monitoring the number of procedural failures, • checking documents for accuracy and completeness, • participating in external assessment activities such as PT programs, and • monitoring the number of PT failures.
See Appendix D for an example Competency and Performance Assessment form.
CMS provides a brochure providing additional information on competency assessment. “What Do I Need to Do to Assess Personnel Competency?” http://www.cms.gov/Regulations-and-Guidance/Legislation/CLIA/Downloads/CLIA_CompBrochure_508.pdf
Safety — 9
FEDERAL REGULATIONS FOR SAFETYThe Occupational Safety and Health Administration (OSHA) requires employers to provide a safe and healthy workplace for employees. Each site must comply with OSHA standards including:
• Comply with OSHA standards to assure the safety and health of employees. OSHA provides a list of regulations that normally apply to medical and dental offices in a brochure, Medical & Dental Offices—A Guide to Compliance with OSHA Standards: https://www.osha.gov/Publications/osha3187.pdf
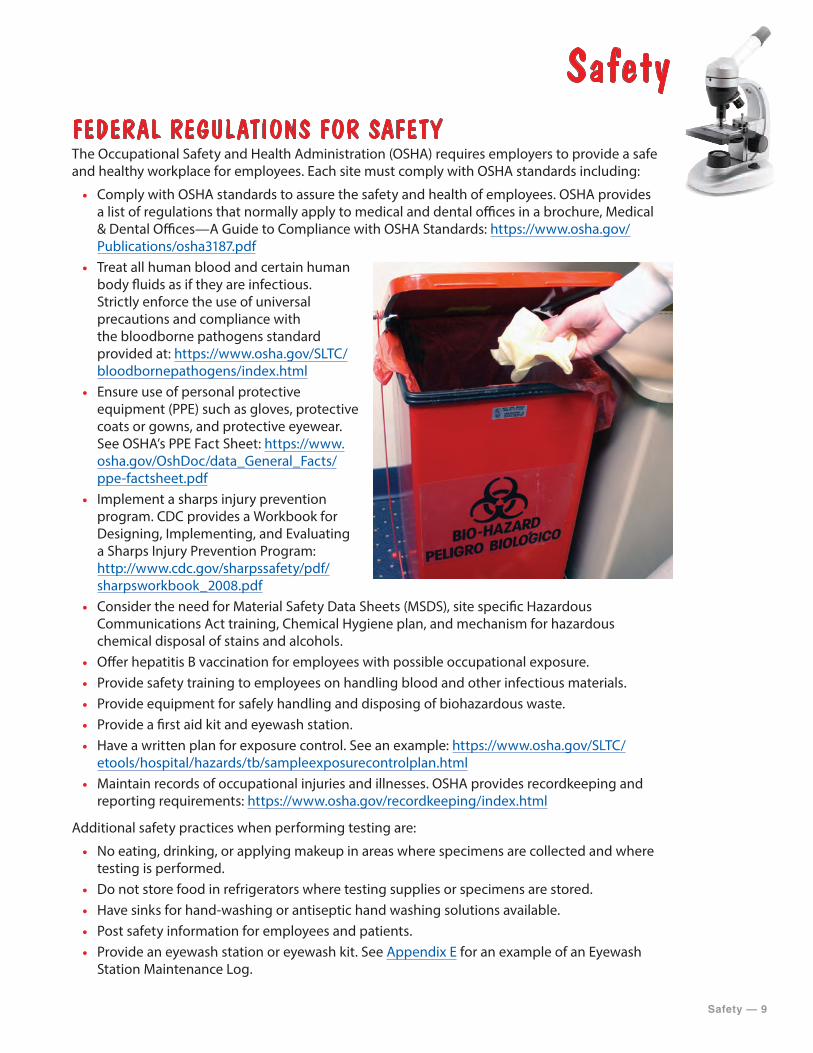
• Treat all human blood and certain human body fluids as if they are infectious. Strictly enforce the use of universal precautions and compliance with the bloodborne pathogens standard provided at: https://www.osha.gov/SLTC/bloodbornepathogens/index.html
• Ensure use of personal protective equipment (PPE) such as gloves, protective coats or gowns, and protective eyewear. See OSHA’s PPE Fact Sheet: https://www.osha.gov/OshDoc/data_General_Facts/ppe-factsheet.pdf
• Implement a sharps injury prevention program. CDC provides a Workbook for Designing, Implementing, and Evaluating a Sharps Injury Prevention Program: http://www.cdc.gov/sharpssafety/pdf/sharpsworkbook_2008.pdf
• Consider the need for Material Safety Data Sheets (MSDS), site specific Hazardous Communications Act training, Chemical Hygiene plan, and mechanism for hazardous chemical disposal of stains and alcohols.
• Offer hepatitis B vaccination for employees with possible occupational exposure. • Provide safety training to employees on handling blood and other infectious materials. • Provide equipment for safely handling and disposing of biohazardous waste. • Provide a first aid kit and eyewash station. • Have a written plan for exposure control. See an example: https://www.osha.gov/SLTC/
etools/hospital/hazards/tb/sampleexposurecontrolplan.html • Maintain records of occupational injuries and illnesses. OSHA provides recordkeeping and
reporting requirements: https://www.osha.gov/recordkeeping/index.html
Additional safety practices when performing testing are:
• No eating, drinking, or applying makeup in areas where specimens are collected and where testing is performed.
• Do not store food in refrigerators where testing supplies or specimens are stored. • Have sinks for hand-washing or antiseptic hand washing solutions available. • Post safety information for employees and patients. • Provide an eyewash station or eyewash kit. See Appendix E for an example of an Eyewash
Station Maintenance Log.
Safety
10 — Safety
Development of a site-specific safety plan that describes policies, procedures, and work practices for employee safety provides testing personnel and staff protection from the health hazards that may be involved in testing. Accreditation organizations may have additional safety requirements.
See Appendix F for examples of a Safety Plan, Safety Training Checklist, and Incident Report.
STATE REGULATIONS FOR SAFETYMany states have Occupational Safety and Health (OSH) Plans that are monitored by OSHA. If you live in a state that provides a State Plan, you must comply with the State OSH standards. OSHA provides information on State OSH programs: https://www.osha.gov/dcsp/osp/states.html
Location for Testing — 11
Location for TestingOVERVIEWAssuring the appropriate physical environment for performing all phases of testing is important for achieving reliable test results. In general, testing should be performed in a clean work area with space for patient privacy while safely collecting specimens and performing testing. Each testing site should arrange for the proper disposal of hazardous waste.
ENVIRONMENTAssuring the appropriate physical environment for performing testing is important for achieving reliable test results. PPM testing sites may include medical or dental offices, emergency rooms, ambulatory, hospital laboratories or clinics. In general, testing should be performed in a clean work area with space for patient privacy while safely collecting specimens and performing testing. Each testing site should arrange for proper disposal of hazardous waste.
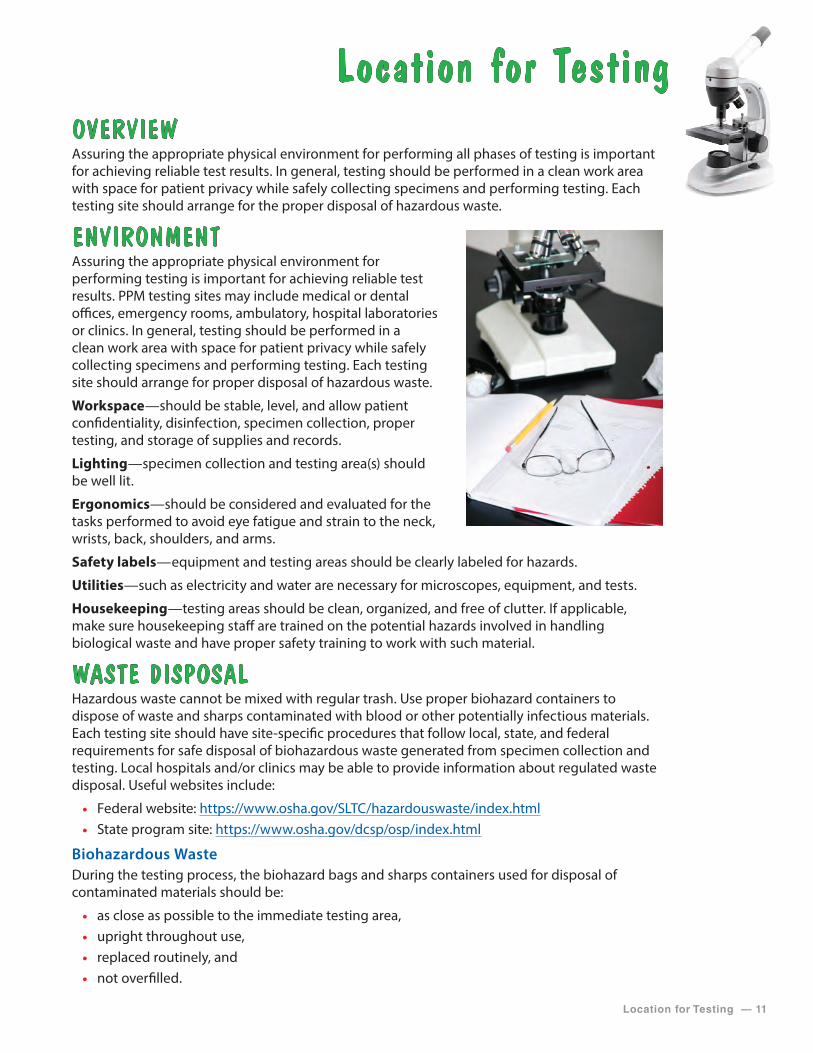
Workspace—should be stable, level, and allow patient confidentiality, disinfection, specimen collection, proper testing, and storage of supplies and records.
Lighting—specimen collection and testing area(s) should be well lit.
Ergonomics—should be considered and evaluated for the tasks performed to avoid eye fatigue and strain to the neck, wrists, back, shoulders, and arms.
Safety labels—equipment and testing areas should be clearly labeled for hazards.
Utilities—such as electricity and water are necessary for microscopes, equipment, and tests.
Housekeeping—testing areas should be clean, organized, and free of clutter. If applicable, make sure housekeeping staff are trained on the potential hazards involved in handling biological waste and have proper safety training to work with such material.
WASTE DISPOSALHazardous waste cannot be mixed with regular trash. Use proper biohazard containers to dispose of waste and sharps contaminated with blood or other potentially infectious materials. Each testing site should have site-specific procedures that follow local, state, and federal requirements for safe disposal of biohazardous waste generated from specimen collection and testing. Local hospitals and/or clinics may be able to provide information about regulated waste disposal. Useful websites include:
• Federal website: https://www.osha.gov/SLTC/hazardouswaste/index.html • State program site: https://www.osha.gov/dcsp/osp/index.html
Biohazardous WasteDuring the testing process, the biohazard bags and sharps containers used for disposal of contaminated materials should be:
• as close as possible to the immediate testing area, • upright throughout use, • replaced routinely, and • not overfilled.
12 — Location for Testing
Containers for contaminated waste must be:
• constructed to contain all contents and prevent leakage of fluids during handling, storage, transport and/or shipping,
• labeled or color-coded to indicate biohazard material, and • closed prior to removal to prevent spillage or protrusion of contents during handling.
Disinfecting Work Surfaces • Disinfect surfaces before performing any test procedure, whenever contamination is
visible, and before leaving the testing area. Bacteria and viruses can be present in very high concentrations in just a few drops of blood or body fluids and some remain infectious for at least one week in dried blood on countertops and doorknobs.
• Use the appropriate disinfectant for decontaminating your work area. See Appendix G: Common Disinfectants and Antiseptics.
Performing PPM Procedures — 13
Performing PPM ProceduresOVERVIEWPreparing for patient testing is important. Equipment used for testing should be maintained, with cleaning and servicing performed and documented as directed in the manufacturer’s instructions.
PROCEDURE MANUALWritten procedures must be developed, approved, and updated for each PPM procedure performed at the testing site. Textbooks may supplement but not replace the laboratory’s written procedures for testing. Procedures must be easily available to all testing personnel. When writing procedures, it is helpful to use a general template with standard headings. See Appendix H for Procedure Contents and Tips.
Procedure manuals may be created by a testing site in order to provide a single location for all documents, forms, and instructions used by the testing site. The procedure manual must be approved and dated by the laboratory director prior to patient testing and should be reviewed and signed once a year and whenever changes are made. Changes in procedures must be approved, signed, and dated by the current laboratory director. Copies of old versions of procedures should be removed from the active manual, clearly labeled as inactive, dated, and filed.
Procedure manuals should have instructions and forms for:
99 cleaning and maintenance of the microscope,99 patient identification and preparation,99 specimen collection and labelling,99 specimen acceptability and rejection criteria including detecting inadequately prepared slides,99 preparation of slides, test reagents, controls, stains, and other test materials,99 storage of slides, test reagents, controls, stains, and other test materials,99 performing quality control (QC) procedures,99 performing the test(s),99 interpreting and recording the test result(s),99 reportable range for test results including normal values,99 entering test results in the patient record and reporting patient results,99 troubleshooting testing problems,99 recording temperatures of refrigerators and storage areas,99 keeping inventories and lot numbers of reagents,99 handling hazardous waste,99 cleaning and disinfecting work areas and equipment,99 selecting and using personal protective equipment,99 performing work area environmental and ergonomic assessments, and 99 referring testing to outside laboratories.
14 — Performing PPM Procedures
PREPARE FOR TESTINGTesting should be performed in an area with adequate space to safely conduct testing while maintaining patient privacy. The microscope should sit on a sturdy flat surface. Testing and storage areas should be monitored to be sure they meet specific environmental requirements described in the manufacturer’s instructions. The laboratory must have appropriate and sufficient equipment, instruments, reagents, materials, and supplies for the type and volume of testing it performs.
Some important points to consider are:
99 Inspect electrical connections to ensure they are functioning properly.99 Inspect all equipment such as centrifuges to ensure they are functioning properly.99 Clean work surfaces before and after testing.99 Inspect and clean the microscope before and after testing.99 Check inventory regularly to ensure you will have enough reagents, stains, and supplies on hand for testing.99 Verify proper storage of reagents, stains, and supplies.99 Check and record expiration dates of reagents and stains and discard any reagents or stains that have expired.
TESTING EQUIPMENTAll equipment used for testing should be cleaned and maintained according to the laboratory’s procedure and policy. Professional servicing should be performed and documented as directed by the manufacturer.
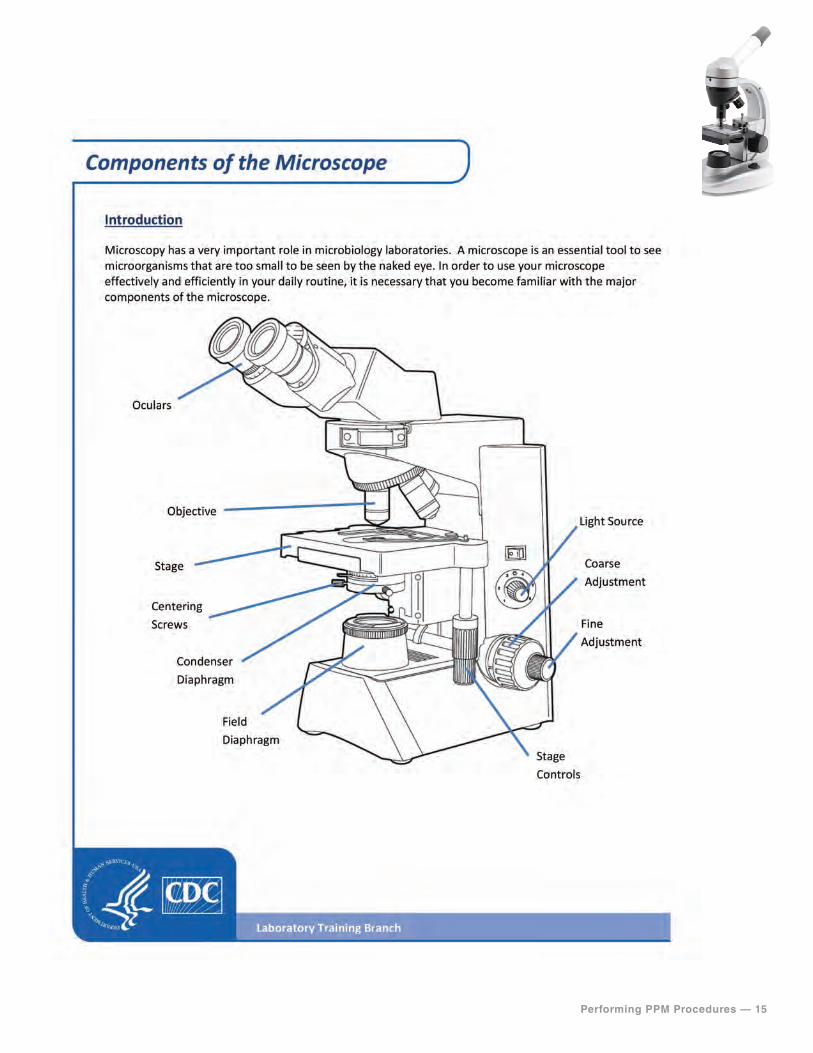
MicroscopePPM procedures are limited to those performed under a bright-field or phase contrast microscope. Bright-field microscopy is a simple technique involving specimen illumination by white light and contrast in the specimen is created by the absorbance of some of the transmitted light. Bright-field microscopy retains the natural colors of the specimen which appears darker on a bright background. Phase contrast microscopy requires special phase contrast objectives and a special phase contrast condenser which produce high contrast images of transparent specimens. Phase contrast microscopy reveals many cellular elements that are not visible with bright-field microscopy.
Microscopes used for testing must be maintained and serviced by a professional as directed by the manufacturer. Testing sites must document all maintenance and professional service activities. See Appendix I for Care and Maintenance of the Microscope and Appendix J for Microscope Maintenance Log.
CentrifugeMaintenance on a centrifuge used for PPM procedures includes:
• wiping the chamber, rotor, rotor lid, and centrifuge housing with an approved germicidal agent before and after use, and
• documenting maintenance performed.
Performing PPM Procedures — 15
Components of the Microscope
16 — Performing PPM Procedures
QUALITY CONTROLQuality control (QC) testing gives confidence that your results are accurate and reliable. The practitioners are expected to follow the manufacturers’ directions for QC or follow good laboratory practices. QC material is often not available to monitor the entire process of performing a PPM procedure making QC complicated. Good laboratory practice would dictate that controls be run whenever possible and results documented and reviewed for acceptability before reporting patient results. The testing site must document all QC testing performed including errors and corrective action taken.
Each testing site should have a policy for QC testing establishing the number and type of control materials needed and the frequency of testing them. If available, two levels of controls should be performed with
• each day of testing,• each new shipment of stains, reagents, or kits,• a change in lot numbers, and• each new operator.
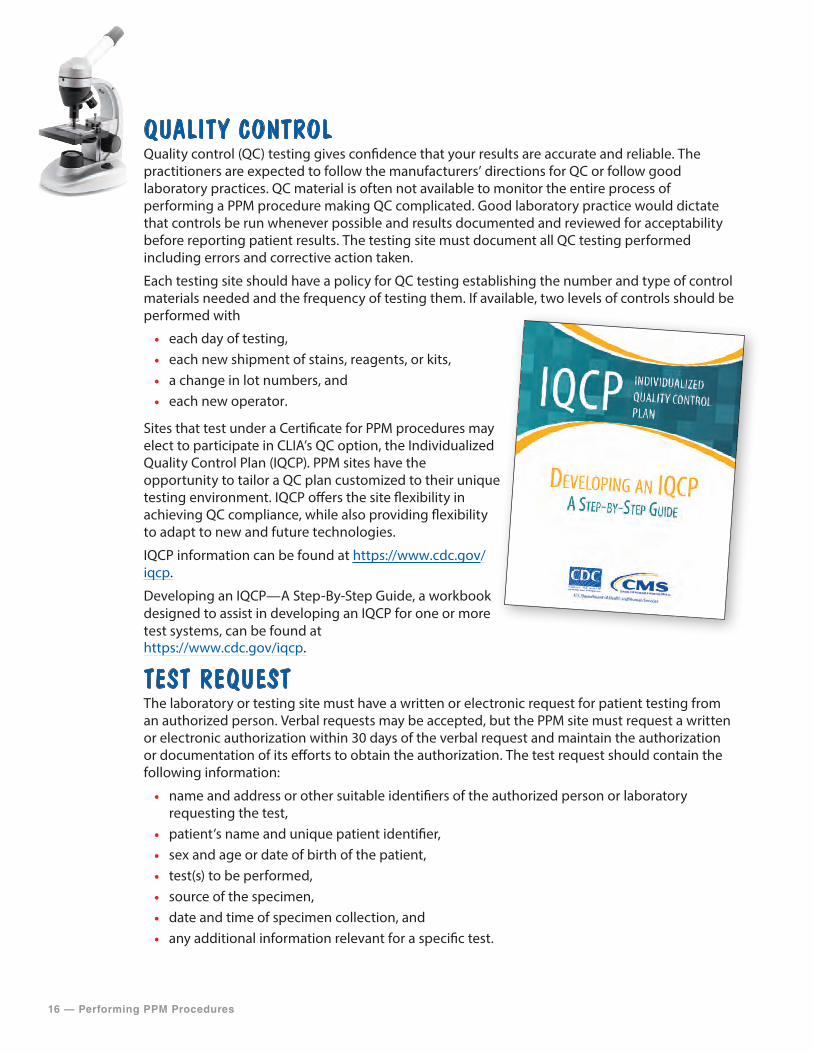
Sites that test under a Certificate for PPM procedures may elect to participate in CLIA’s QC option, the Individualized Quality Control Plan (IQCP). PPM sites have the opportunity to tailor a QC plan customized to their unique testing environment. IQCP offers the site flexibility in achieving QC compliance, while also providing flexibility to adapt to new and future technologies.
IQCP information can be found at https://www.cdc.gov/iqcp.
Developing an IQCP—A Step-By-Step Guide, a workbook designed to assist in developing an IQCP for one or more test systems, can be found at https://www.cdc.gov/iqcp.
TEST REQUESTThe laboratory or testing site must have a written or electronic request for patient testing from an authorized person. Verbal requests may be accepted, but the PPM site must request a written or electronic authorization within 30 days of the verbal request and maintain the authorization or documentation of its efforts to obtain the authorization. The test request should contain the following information:
• name and address or other suitable identifiers of the authorized person or laboratoryrequesting the test,
• patient’s name and unique patient identifier, • sex and age or date of birth of the patient, • test(s) to be performed, • source of the specimen, • date and time of specimen collection, and • any additional information relevant for a specific test.
Performing PPM Procedures — 17
The patient’s chart or medical record may be used as the test request or authorization but must be available to the laboratory or testing site at the time of testing and available to CMS or a CMS agent upon request. If the test requisition or authorization information is entered into a record system or a laboratory information system, the PPM site must ensure the information transcribed or entered is transcribed or entered accurately.
Before collecting a specimen, confirm:
99 The test order—if there is a question whether the order is correct, check with the individual who requested the test. 99 Patient identification—because names can be similar and lead to confusion, use birth dates, middle initials, identification numbers or other ways to make sure the specimen is collected from the correct patient.
SPECIMEN COLLECTIONProperly collected patient specimens are critical for accurate and reliable test results. The person collecting the specimen should have a good understanding of the type of specimen needed for the test and how to collect it. Do not test specimens that are improperly collected or handled. PPM procedures use specimens such as body fluids or skin scrapings. The laboratory must establish and follow written policies and procedures that ensure positive identification and optimum integrity of a patient’s specimen from the time of collection or receipt of the specimen through completion of testing and reporting of results.
Remember, if your site performs waived testing in addition to PPM procedures, only unprocessed specimens can be used for waived tests. Use of specimens that require processing such as centrifugation, dilution, or extraction is not appropriate for waived tests.
PERFORMING THE TESTWhen performing a test, follow the testing steps in the exact order as they are in the procedure manual. Interpret and record results legibly in a log or following the testing site policy and keep results as a permanent record. These records should have enough detail for easy retrieval of information. Invalid or unacceptable results should also be recorded. If a test needs to be repeated, record the first result (invalid or unacceptable), resolve the problem, and then record the repeated result(s). Report the final acceptable result only.
Appendix K PPM Procedure Examples provides example procedures that may be used by your laboratory or testing site. Each example includes specimen collection, slide preparation and microscopic examination procedures, and images of common microscopic findings for the nine PPM procedures specified by CLIA.
18 — Performing PPM Procedures
REPORTING TEST RESULTSTesting sites must have a system in place to ensure the timely reporting of test results and other patient-specific information.
The test report must include the following:
• patient’s name and unique patient identifier, • name and address of the testing site, • test report date, • test performed, • specimen source, • test result, • information regarding the condition and disposition
of specimens that do not meet the laboratory’scriteria for acceptability, and
• pertinent “normal” values, as determined by thelaboratory performing the tests.
Guidelines for issuing test reports:
99 Patient test reports should be legible, standardized, and reported in a timely manner. 99 Reports from tests conducted on-site should be easily distinguishable from referral laboratory test reports. 99 Patient test reports should only be given to authorized persons. 99 Verbal test reports should be documented and followed by a written test report.
PT Requirements — 19
PT RequirementsOVERVIEWProficiency testing (PT) for PPM procedures involves the periodic shipment of photographs or digital images by a CLIA-approved PT program to a laboratory or testing site for evaluation and submission of results back to the PT program. The PT program then compares the testing site results with the correct result for that photograph or image, and provides a report back to the participating laboratory or testing site. PT is an important tool used to verify the accuracy and reliability of testing.
REQUIREMENTSPT is not specifically required for PPM procedures. However, PPM testing sites need to verify the accuracy of their testing at least twice per year. Participation in a voluntary PT program will satisfy that requirement. If PPM testing sites enroll in a PT program, they are subject to all of the requirements for PT including those that prohibit PT referral.
There are many benefits of participating in a PT program. PT provides:
• a regular, external check on quality of testing, • motivation to improve performance, • comparison of performance with that of other
participating sites, • an opportunity to obtain feedback and technical
advice from programs that offer PT, • assistance in evaluating methods and
instrumentation, • assistance with staff education, training and competence monitoring, and • opportunities for identifying areas needing improvement.
Many PT programs offer modules for PPM procedures. Although use of a CLIA-approved PT program is not a requirement, a list of CLIA- approved PT providers can be found at: http://www.cms.gov/Regulations-and-Guidance/Legislation/CLIA/downloads/ptlist.pdf
See also CMS brochure “Proficiency Testing” available online: http://www.cms.gov/Regulations-and-Guidance/Legislation/CLIA/Downloads/CLIAbrochure8.pdf
All CLIA-approved PT programs offer a clinical microscopy module with at least two testing events per year.
20 — Quality System
Quality SystemOVERVIEWEvery testing site that performs PPM testing must establish and maintain written policies and procedures for a quality system that covers all phases of the total testing process. The quality system needs to include an ongoing quality assessment component that monitors, identifies, evaluates, and resolves problems as appropriate for PPM testing.
COMMUNICATIONS AND COMPLAINT INVESTIGATIONSThe laboratory or testing site must have a system in place to identify and document problems that occur as a result of a breakdown in communication between the laboratory and an authorized person who orders or receives test results and to ensure documentation of all complaints and problems reported to the PPM site. The site must conduct investigations of complaints, when appropriate.
QUALITY ASSESSMENTAssessing testing quality requires planned and systematic monitoring and evaluation of the testing process. Conducting these activities can lead to reduced errors, improved patient outcomes, improved patient and employee safety, and reduced costs. Both internal and/or external mechanisms for quality assurance may be used depending on the needs, resources, and practices of the testing site. Examples are listed below.
Internal assessments are processes for staff performing and overseeing testing to evaluate their current practices, including:
• reviewing the procedure for patient preparation, specimen collection, specimen rejection, labeling, preservation and transportation of specimens,
• performing QC procedures and documenting results, • reviewing QC records and test results for completeness and accuracy, • documenting and reviewing problems that occur during QC testing and the testing process, • establishing a corrective action plan to improve processes, • monitoring to assure correction, • reviewing policies and procedures for documenting competency of testing personnel, • documenting and reviewing injury/incident reports, and • reviewing communication and complaint policies.
External assessments are typically performed by an outside party to evaluate current practices and offer opportunities for education. Possible options for external review include:
• undergoing voluntary inspections by peers or consultants who would evaluate testing practices and documentation systems, and offer suggestions for improvement,
• subscribing to PT programs, and • exchanging samples with other testing sites using the same test method(s) to compare results.
Quality System — 21
RECORD KEEPINGRetain records for at least two years or as required by your state. The types of records to be retained include:
99 Test requisitions and authorizations99 Patient’s chart or medical record99 Discontinued test procedures99 QC records99 Patient test reports99 PT records99 Quality assessment records
Testing sites must maintain specimen information that includes the following:
99 The positive identification of the specimen.99 The date and time of specimen receipt into the laboratory. 99 The condition and disposition of specimens that do not meet the laboratory’s criteria for specimen acceptability. 99 The records and dates of all specimen testing, including the identity of the personnel who performed the test(s).
22 — Tips
TipsThe following checklist summarizes the steps to be taken when implementing and overseeing PPM testing.
GENERAL REQUIREMENTS 99 Understand the procedures that PPM laboratories or testing sites are allowed to perform.99 Obtain a CLIA Certificate for PPM before offering testing. 99 Renew the Certificate for PPM every 2 years. 99 Notify your State Agency of any changes in ownership, name, address, or director within 30 days, or if you wish to add tests that are not waived or PPM procedures. 99 Allow announced or unannounced on-site inspections by CMS representatives. 99 Follow all applicable CLIA requirements for testing:
• Personnel • Facility Administration • Proficiency Testing • Quality System • Inspection • Enforcement99 Follow all applicable state and local requirements. 99 Follow regulations for confidentiality and patient privacy.
PERSONNEL99 Follow all applicable CLIA requirements for the laboratory director.99 Testing must be personally performed by a physician, podiatrist, midlevel practitioner, or dentist during a patient visit within the context of a physical examination. 99Make sure that all testing personnel understand and can perform the test correctly before they report patient results. 99 Periodically assess and document the competency of testing personnel; semiannually during the first year and at least annually thereafter.
SAFETY99 Follow regulations for safety. 99Wear appropriate personal protective equipment (PPE) such as gloves. 99 Collect and label a good specimen for testing. 99 Clean hands and change gloves between patients. 99 Use the proper biohazard containers to dispose of waste and sharps. 99Maintain records of occupational injuries and illnesses.
LOCATION FOR TESTING99 Perform testing in a stable and level area with adequate space for patient privacy while safely collecting specimens and performing testing. 99 Consider environmental issues, such as temperature and humidity, especially in nontraditional test settings. 99 Have clean work surfaces and good lighting for specimen collection and testing. 99 Dispose of waste safely.
Tips — 23
PERFORMING PPM PROCEDURES99 Provide a procedure manual that includes specific instructions for each PPM procedure for your testing site.99 Inspect equipment and electrical connections on the microscope to ensure they are functional.99 Check inventory regularly to ensure you will have enough reagents, stains, and supplies on hand for testing.99 Perform and document microscope maintenance.99 Perform QC as recommended in the laboratory’s PPM procedure manual and policy.99 Verify the test request.99 Properly collect and label an appropriate specimen for testing.99 Do not test specimens that are improperly collected or handled.99 Perform PPM testing following the steps in the laboratory’s PPM procedure manual.99Make sure patient reports are legible and reported in a timely manner. 99 Report patient test results only to authorized persons. 99 Document verbal reports, followed by a written test report.
PT REQUIREMENTS99 Verify accuracy of testing at least twice per year.99 Use PT as a way to routinely monitor performance.
QUALITY SYSTEM99 Document communication and complaint issues.99 Establish written policies and procedures to monitor and evaluate the entire testing process.99 Perform assessments to improve your current practice.99 Follow record keeping requirements.
24 — Resources
ResourcesCLIA AND HIPAA LINKS• CMS CLIA overview: http://www.cms.gov/Regulations-and-Guidance/Legislation/CLIA/index.
html?redirect=/CLIA/• CLIA regulations: https://www.cdc.gov/clia/law-regulations.html• CMS brochure “How to Obtain a CLIA Certificate”: http://www.cms.gov/Regulations-and-
Guidance/Legislation/CLIA/Downloads/HowObtainCLIACertificate.pdf• CMS brochure “What Do I Need to Do to Assess Personnel Competency?”: http://www.cms.gov/
Regulations-and-Guidance/Legislation/CLIA/Downloads/CLIA_CompBrochure_508.pdf• CLIA requirements for testing under a Certificate for PPM: http://www.gpo.gov/fdsys/pkg/
CFR-2003-title42-vol3/xml/CFR-2003-title42-vol3-part493.xml#seqnum493.19• CLIA Certificate of PPM Procedures Application: http://cms.gov/Medicare/CMS-Forms/CMS-
Forms/Downloads/CMS116.pdf• CLIA State Agency Contacts: http://cms.gov/Regulations-and-Guidance/Legislation/CLIA/
Downloads/CLIASA.pdf• FDA’s CLIA Waived Test List: http://www.accessdata.fda.gov/scripts/cdrh/cfdocs/cfclia/
testswaived.cfm• CDC’s waived tests educational materials: https://www.cdc.gov/clia/waived-tests.html• HIPAA regulations: http://www.hhs.gov/ocr/privacy/• CMS IQCP: http://www.cms.gov/Regulations-and-Guidance/Legislation/CLIA/Individualized_
Quality_Control_Plan_IQCP.html• CMS Approved PT Programs: http://www.cms.gov/Regulations-and-Guidance/Legislation/CLIA/
downloads/ptlist.pdf• CMS brochure “Proficiency Testing”: http://www.cms.gov/Regulations-and-Guidance/
Legislation/CLIA/Downloads/CLIAbrochure8.pdf
SAFETY LINKS • The Centers for Disease Control and Prevention (CDC) and the National Institutes of Health
(NIH) Biosafety link: http://www.cdc.gov/biosafety/ • State occupational safety and health programs: https://www.osha.gov/dcsp/osp/index.html • Medical & Dental Offices—A Guide to Compliance with OSHA Standards at: https://www.osha.
gov/Publications/osha3187.pdf • Bloodborne Pathogens Standard: https://www.osha.gov/SLTC/bloodbornepathogens/
index.html • OSHA’s PPE Fact Sheet: https://www.osha.gov/OshDoc/data_General_Facts/ppe-factsheet.pdf • CDC Workbook for Designing, Implementing, and Evaluating a Sharps Injury Prevention
Program: http://www.cdc.gov/sharpssafety/pdf/sharpsworkbook_2008.pdf • WHO patient safety website: http://www.who.int/patientsafety/en/
TRAINING LINKS• CDC Laboratory Training: https://www.cdc.gov/labtraining/• CDC TRAIN: https://www.train.org/cdctrain
Resources — 25
REFERENCES • Bauer JD, Clinical Laboratory Methods. 9th ed. St. Louis, MO; CV Mosby Co; 1982. • Versalovic J, Carroll KC, Jorgensen JH, Funke G, Landry ML, Warnock DW (ed), Manual of
Clinical Microbiology, 10th ed, vol 2. ASM Press, Washington, DC, 2011. • CLSI. Physician and Nonphysician Provider-Performed Microscopy Testing; Approved
Guideline-Second Edition. CLSI document POCT10-A2, Vol. 31 No. 24. Wayne, PA: Clinical andLaboratory Standards Institute, 2011.
ACKNOWLEDGEMENTSThe Michigan Department of Community Health, Michigan Regional Laboratory Wet Mount Proficiency Program and the Wisconsin State Laboratory of Hygiene Proficiency Testing Program generously provided many of the images used in the booklet.
26 — Appendices
Appendix A
SECURITY AND CONFIDENTIALITY AGREEMENT INSTRUCTIONSPurpose:The U.S. Department of Health and Human Services (HHS) issued the Privacy Rule to implement the requirements of the Health Insurance Portability and Accountability Act of 1996 (HIPAA). The Privacy Rule standards address the use and disclosure of individuals’ health information—protected health information (PHI) by organizations subject to the Privacy Rule (called covered entities), as well as standards for individuals’ privacy rights to understand and control how their health information is used.
The Privacy Rule protects all PHI held or transmitted by a covered entity or its business associate, in any form or media, whether electronic, paper, or oral. PHI is information including demographic data that relates to:
• the individual’s past, present or future physical or mental health or condition, • the provision of health care to the individual, or • the past, present, or future payment for the provision of health care to the individual, and • identification of the individual or for which there is a reasonable basis to believe the
information can be used to identify the individual.PHI includes many common identifiers (e.g., name, address, birth date, Social Security Number).
Good work practices should be in place to prevent the disclosure of PHI. New employees should be trained on these practices. This Security and Confidentiality Agreement form documents the agreement of all employees to abide by HIPAA’s Privacy Rule and prevent disclosure of patient PHI.
Contents: There are many ways to document compliance training with HIPAA. A blank form is included for your use, along with an example form that demonstrates how to correctly enter site specific information.
1. Example Security and Confidentiality Agreement Form Completed.2. Blank Security and Confidentiality Form.
Instructions for Completing the Security and Confidentiality Agreement Form: 1. Train new employees on the work practices and the importance of HIPAA.2. Employees should sign the Security and Confidentiality Agreement Form indicating their
understanding and willingness to adhere to HIPAA.3. File signed form with employee records.4. The person who directs or supervises the testing should review and sign when the Security
and Confidentiality Agreement form is completed.
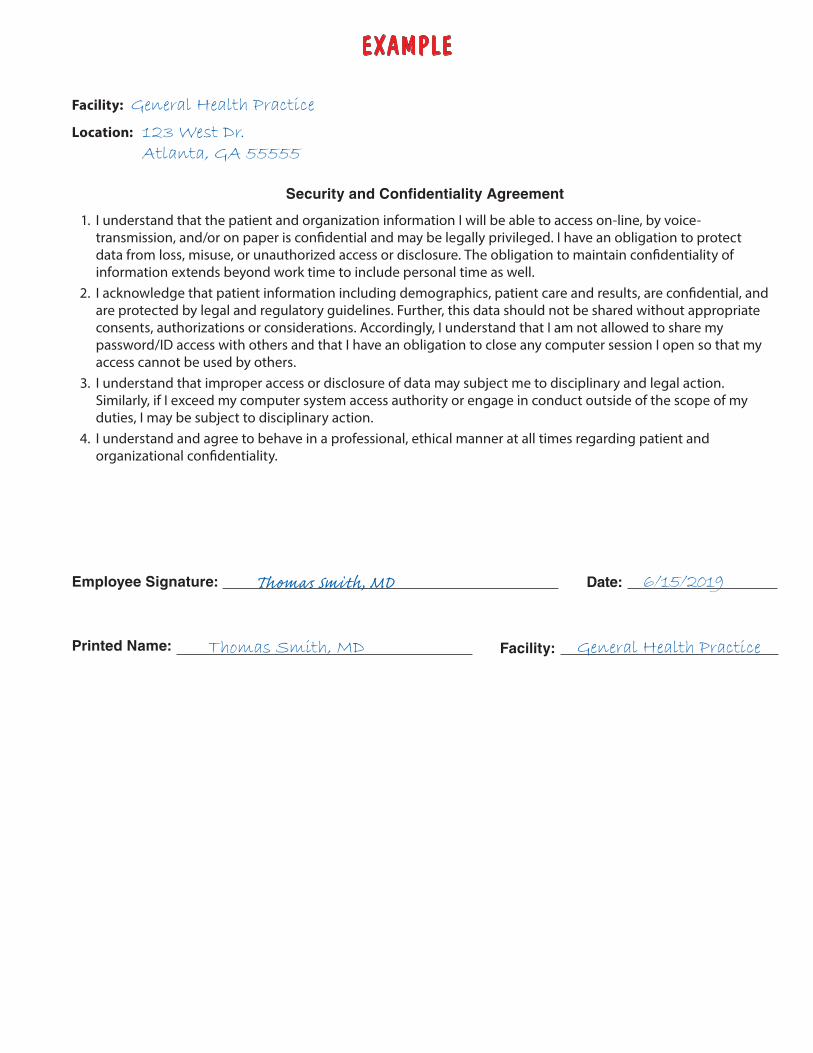
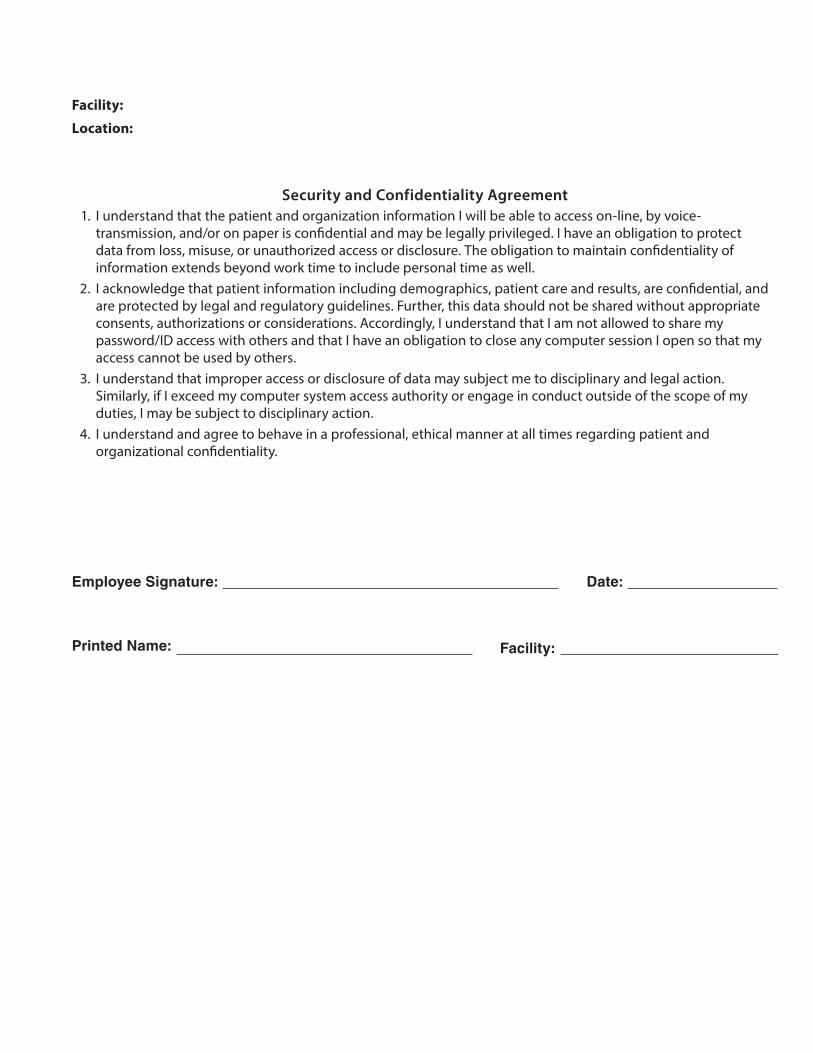
EXAMPLE
Facility: General Health Practice
Location: 123 West Dr. Atlanta, GA 55555
Security and Confidentiality Agreement
1. I understand that the patient and organization information I will be able to access on-line, by voice-transmission, and/or on paper is confidential and may be legally privileged. I have an obligation to protectdata from loss, misuse, or unauthorized access or disclosure. The obligation to maintain confidentiality ofinformation extends beyond work time to include personal time as well.
2. I acknowledge that patient information including demographics, patient care and results, are confidential, andare protected by legal and regulatory guidelines. Further, this data should not be shared without appropriateconsents, authorizations or considerations. Accordingly, I understand that I am not allowed to share mypassword/ID access with others and that I have an obligation to close any computer session I open so that myaccess cannot be used by others.
3. I understand that improper access or disclosure of data may subject me to disciplinary and legal action.Similarly, if I exceed my computer system access authority or engage in conduct outside of the scope of myduties, I may be subject to disciplinary action.
4. I understand and agree to behave in a professional, ethical manner at all times regarding patient andorganizational confidentiality.
Employee Signature: Thomas Smith, MD Date: 6/15/2019
Printed Name: Thomas Smith, MD Facility: General Health Practice
Facility:
Location:
Security and Confidentiality Agreement 1. I understand that the patient and organization information I will be able to access on-line, by voice-
transmission, and/or on paper is confidential and may be legally privileged. I have an obligation to protect data from loss, misuse, or unauthorized access or disclosure. The obligation to maintain confidentiality of information extends beyond work time to include personal time as well.
2. I acknowledge that patient information including demographics, patient care and results, are confidential, and are protected by legal and regulatory guidelines. Further, this data should not be shared without appropriate consents, authorizations or considerations. Accordingly, I understand that I am not allowed to share my password/ID access with others and that I have an obligation to close any computer session I open so that my access cannot be used by others.
3. I understand that improper access or disclosure of data may subject me to disciplinary and legal action. Similarly, if I exceed my computer system access authority or engage in conduct outside of the scope of my duties, I may be subject to disciplinary action.
4. I understand and agree to behave in a professional, ethical manner at all times regarding patient and organizational confidentiality.
Employee Signature: Date:
Printed Name: Facility:

Appendices — 29
Appendix B
TRAINING CHECKLIST INSTRUCTIONSPurpose:All employees need to understand their role in the organization as a whole, learn the expectations of their supervisor, and practice the basic elements of their job. Their experience in the first few weeks will have a significant effect on the level of commitment and ability to become productive quickly.
Checklists provide a structured approach to training new employees. Checklists allow new employees to work through the training agenda at their own pace, spending less time on issues with which they are already familiar, and more time on those issues that are new or unfamiliar to them.
A well-designed training checklist can serve as a guide for new arrivals as they learn all the elements of their job.
Contents: There are many ways to document training. A blank checklist is included for your use, along with an example checklist that demonstrates how to correctly enter site specific information.
1. Example Training Checklist Completed.2. Blank Training Checklist.
Instructions for Completing the Training Checklist Form: 1. The employee should read the procedure that they will be trained to perform.2. The trainer should review the procedure before beginning the training.3. The trainer will demonstrate the procedure explaining each step as they perform it.4. The trainee will perform the procedure and be able to explain key steps.5. Upon completion, the trainer and trainee will document the training with the checklist
and address any issues or concerns that arise. If re-training is necessary, this should bedocumented on the checklist.
6. The checklist should be filed with the employee’s other records.
EXAMPLE
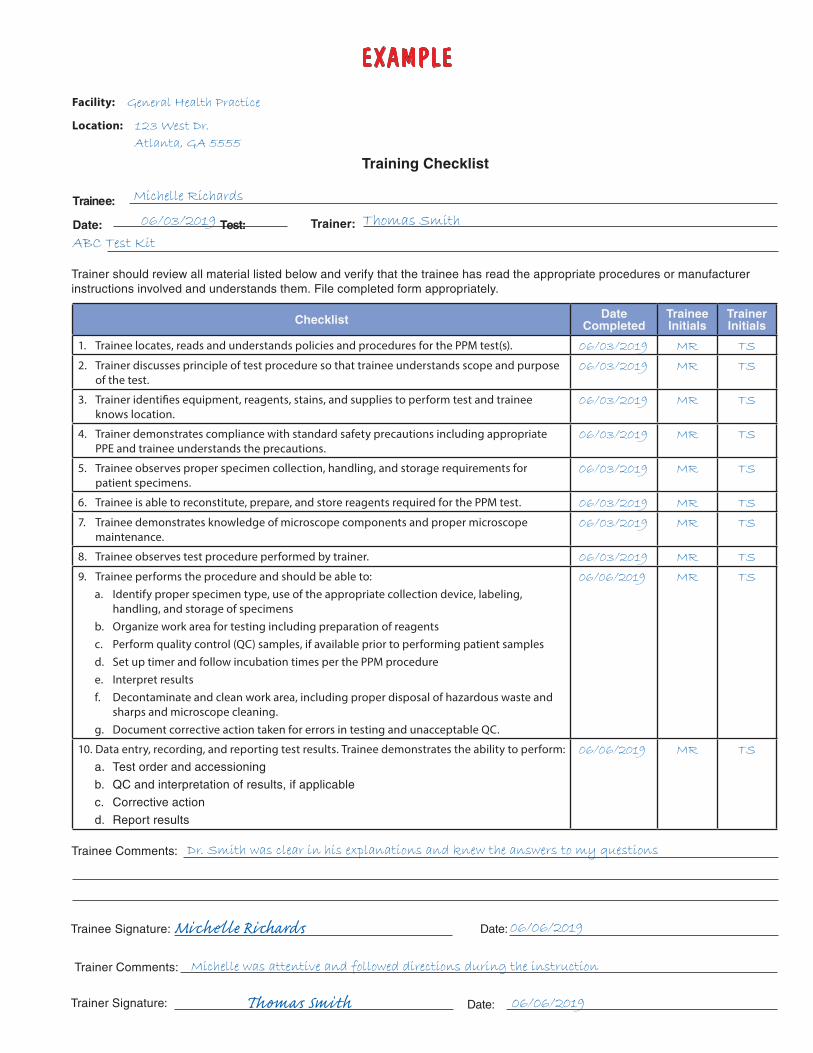
Training Checklist
Facility: General Health Practice
Location: 123 West Dr.
Atlanta, GA 5555
Trainer: Thomas Smith
Trainee: Michelle Richards
Date: 06/03/2019 Test: ABC Test Kit
Trainer should review all material listed below and verify that the trainee has read the appropriate procedures or manufacturer instructions involved and understands them. File completed form appropriately.
Checklist Date Completed
Trainee Initials
Trainer Initials
1. Trainee locates, reads and understands policies and procedures for the PPM test(s). 06/03/2019 MR TS
2. Trainer discusses principle of test procedure so that trainee understands scope and purposeof the test.
06/03/2019 MR TS
3. Trainer identifies equipment, reagents, stains, and supplies to perform test and traineeknows location.
06/03/2019 MR TS
4. Trainer demonstrates compliance with standard safety precautions including appropriate PPE and trainee understands the precautions.
06/03/2019 MR TS
5. Trainee observes proper specimen collection, handling, and storage requirements forpatient specimens.
06/03/2019 MR TS
6. Trainee is able to reconstitute, prepare, and store reagents required for the PPM test. 06/03/2019 MR TS
7. Trainee demonstrates knowledge of microscope components and proper microscope maintenance.
06/03/2019 MR TS
8. Trainee observes test procedure performed by trainer. 06/03/2019 MR TS
9. Trainee performs the procedure and should be able to:a. Identify proper specimen type, use of the appropriate collection device, labeling,
handling, and storage of specimensb. Organize work area for testing including preparation of reagentsc. Perform quality control (QC) samples, if available prior to performing patient samplesd. Set up timer and follow incubation times per the PPM proceduree. Interpret resultsf. Decontaminate and clean work area, including proper disposal of hazardous waste and
sharps and microscope cleaning.g. Document corrective action taken for errors in testing and unacceptable QC.
06/06/2019 MR TS
10. Data entry, recording, and reporting test results. Trainee demonstrates the ability to perform:a. Test order and accessioning
b. QC and interpretation of results, if applicable
c. Corrective action
d. Report results
06/06/2019 MR TS
Trainee Comments: Dr. Smith was clear in his explanations and knew the answers to my questions
Trainee Signature: Michelle Richards Date: 06/06/2019
Trainer Comments: Michelle was attentive and followed directions during the instruction
Trainer Signature: Thomas Smith Date: 06/06/2019
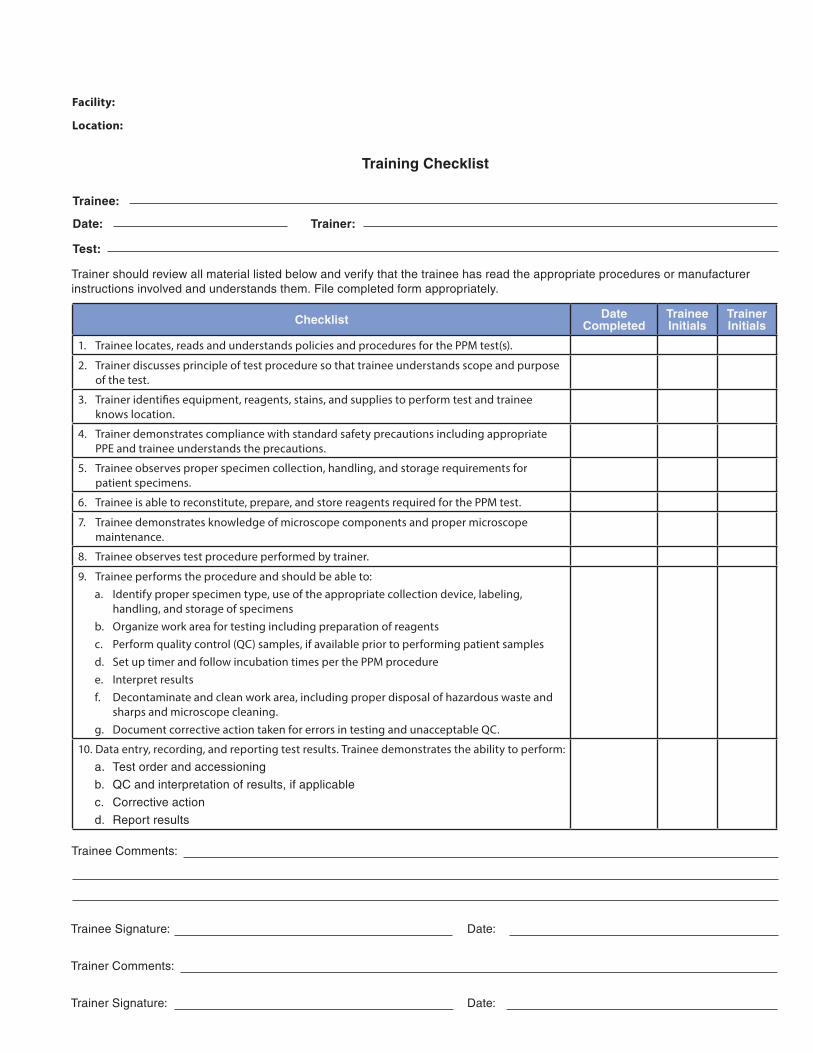
Training Checklist
Facility:
Location:
Trainee:
Date: Trainer:
Test:
Trainer should review all material listed below and verify that the trainee has read the appropriate procedures or manufacturer instructions involved and understands them. File completed form appropriately.
Checklist Date Completed
Trainee Initials
Trainer Initials
1. Trainee locates, reads and understands policies and procedures for the PPM test(s).
2. Trainer discusses principle of test procedure so that trainee understands scope and purposeof the test.
3. Trainer identifies equipment, reagents, stains, and supplies to perform test and traineeknows location.
4. Trainer demonstrates compliance with standard safety precautions including appropriate PPE and trainee understands the precautions.
5. Trainee observes proper specimen collection, handling, and storage requirements forpatient specimens.
6. Trainee is able to reconstitute, prepare, and store reagents required for the PPM test.
7. Trainee demonstrates knowledge of microscope components and proper microscope maintenance.
8. Trainee observes test procedure performed by trainer.
9. Trainee performs the procedure and should be able to:a. Identify proper specimen type, use of the appropriate collection device, labeling,
handling, and storage of specimensb. Organize work area for testing including preparation of reagentsc. Perform quality control (QC) samples, if available prior to performing patient samplesd. Set up timer and follow incubation times per the PPM proceduree. Interpret resultsf. Decontaminate and clean work area, including proper disposal of hazardous waste and
sharps and microscope cleaning.g. Document corrective action taken for errors in testing and unacceptable QC.
10. Data entry, recording, and reporting test results. Trainee demonstrates the ability to perform:a. Test order and accessioning
b. QC and interpretation of results, if applicable
c. Corrective action
d. Report results
Trainee Comments:
Trainee Signature: Date:
Trainer Comments:
Trainer Signature: Date:

32 — Appendices
Appendix C
TRAINING EVALUATION INSTRUCTIONSPurpose:The individual overseeing testing acts as an advocate for employees by gathering and distributing the resources needed by employees in order for them to be able to do a good job and by providing positive encouragement for a job well done. They should display the interpersonal skills required to engage employees and enhance their self-confidence.
Feedback from employees on the training experience provides valuable information to employers seeking to improve or identify gaps in their training programs. This method also opens an avenue of communication between the employee and employer.
Many training programs fail to deliver the expected organizational benefits. Having a well-structured measuring system in place can help you determine where the problem lies.
Contents: There are many ways to evaluate training. A blank evaluation form is included for your use, along with an example evaluation form that demonstrates how to correctly enter site specific information.
1. Example Training Evaluation Completed.2. Blank Training Evaluation.
Instructions for Completing the Training Evaluation Form: 1. After training is completed, the trainee should complete the Training Evaluation.2. The trainee should be honest and open about the training experience without fear of
remedial action or other adverse reactions as a result of the evaluation.3. Management should review and compile the results to assess the training program’s
effectiveness and make improvements and changes to the program as necessary.
EXAMPLE
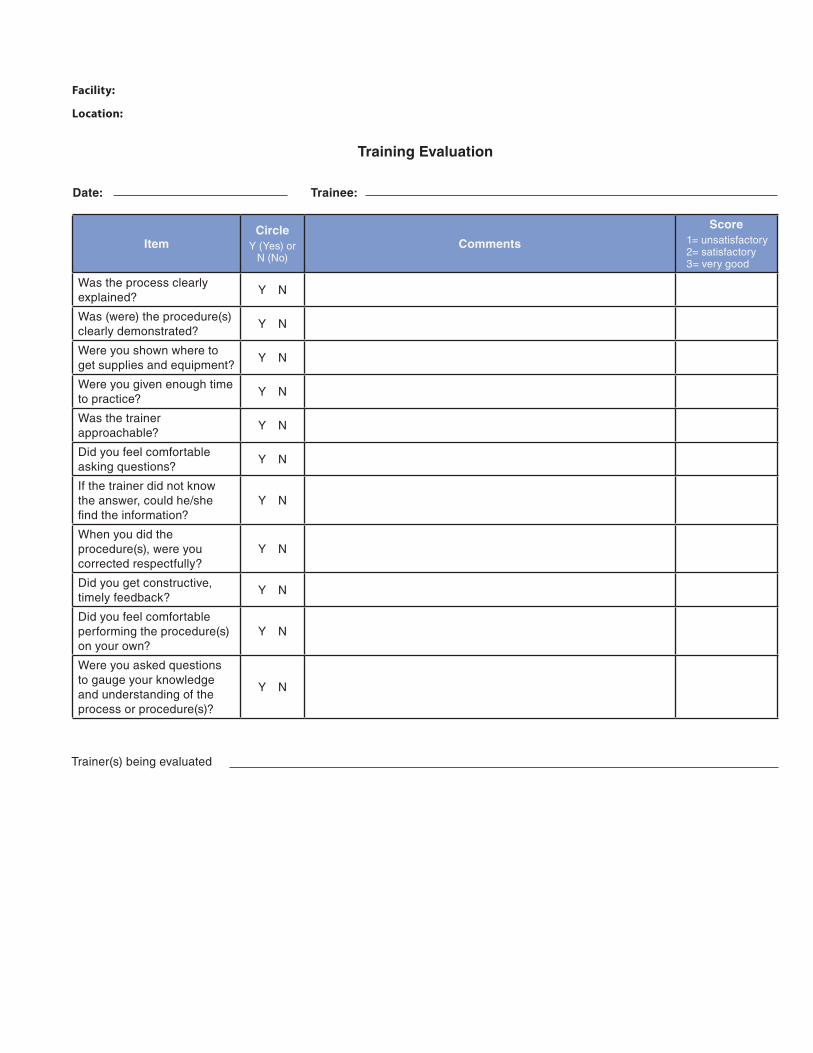
Training Evaluation
Facility: General Health Practice
Location: 123 West Dr.
Atlanta, GA 5555
Date: 06/06/2019 Trainee: Michelle Richards
ItemCircle
Y (Yes) or N (No)
Comments
Score1= unsatisfactory 2= satisfactory 3= very good
Was the process clearly explained?
Y N 3
Was (were) the procedure(s) clearly demonstrated?
Y N 3
Were you shown where to get supplies and equipment?
Y N 3
Were you given enough time to practice?
Y N I felt rushed and I could have used more time to read the fields. 1
Was the trainer approachable?
Y N 3
Did you feel comfortable asking questions?
Y N 3
If the trainer did not know the answer, could he/she find the information?
Y N 3
When you did the procedure(s), were you corrected respectfully?
Y N 3
Did you get constructive, timely feedback?
Y N 3
Did you feel comfortable performing the procedure(s) on your own?
Y NI felt like I needed a few more times identifying the organisms
prior to testing patient specimens.1
Were you asked questions to gauge your knowledge and understanding of the process or procedure(s)?
Y N 3
Trainer(s) being evaluated Thomas Smith, MD
Training Evaluation
Facility:
Location:
Date: Trainee:
ItemCircle
Y (Yes) or N (No)
Comments
Score1= unsatisfactory 2= satisfactory 3= very good
Was the process clearly explained?
Y N
Was (were) the procedure(s) clearly demonstrated?
Y N
Were you shown where to get supplies and equipment?
Y N
Were you given enough time to practice?
Y N
Was the trainer approachable?
Y N
Did you feel comfortable asking questions?
Y N
If the trainer did not know the answer, could he/she find the information?
Y N
When you did the procedure(s), were you corrected respectfully?
Y N
Did you get constructive, timely feedback?
Y N
Did you feel comfortable performing the procedure(s) on your own?
Y N
Were you asked questions to gauge your knowledge and understanding of the process or procedure(s)?
Y N
Trainer(s) being evaluated
Appendices — 35
Appendix D
COMPETENCY ASSESSMENT INSTRUCTIONSPurpose:The ability of each person to perform their duties should be assessed following training and periodically thereafter. Retraining and reassessment of employee performance needs to be done when problems are identified with employee performance. The training and assessment program should be documented and specific for each job description. Activities requiring judgment or interpretive skills need to be included in the assessment.
Competency assessment can
• identify key training areas, • identify processes that need improvement, • provide supervisors and managers with data on employee performance, and • provide evidence to customers and management that the laboratory assures quality with
trained staff.
Contents: There are many ways to assess competency. A blank assessment is included for your use, along with an example assessment that demonstrates how to correctly enter site-specific information.
1. Example Competency Assessment Completed.2. Blank Competency Assessment.
Instructions for Completing the Competency Assessment Form: 1. Record the facility name and location.2. Record the employee’s name and the procedure being observed.3. Have the employee perform the procedure.4. Record whether the steps completed were satisfactory or unsatisfactory, note any comments,
and document any corrective action needed.5. Sign and date the form.6. Have the employee sign and date the form and provide comments.
EXAMPLE
Competency Assessment
Facility: General Health Practice
Location: 123 West Dr.
Atlanta, GA 55555
Employee Name: Michelle Richards
Procedure to be Observed: PPM Procedure: KOH Preparation
Instructions to the Employee:
1. Review the procedure.2. Perform the procedure, including collecting the specimen, equipment maintenance, and records management,
while being observed.3. Your performance will be based on how well you follow the procedure. You may refer to the written procedure
during the performance of the procedure. If the evaluation of your performance is unsatisfactory, you will begiven instructions for corrective action.
4. If you find that the written procedure is unclear or missing necessary information, please make a note in theemployee comments section below.
Instructions to the Observer:
1. Select previously analyzed specimens or samples with known results for the employee to demonstrate theprocedure.
2. Directly observe the employee perform each step of the procedure. If any step of the procedure is performedincorrectly, please note this in the observer comments section.
3. Test the employee’s problem solving skills with a question or observe the employee resolving a problem.4. If procedure is followed correctly, mark as satisfactory. If there are steps that are not followed, then mark
unsatisfactory and describe the corrective action necessary to obtain a satisfactory rating.5. Record your name and date on the ‘observed by’ line.6. Ask the employee to sign and date the form and file appropriately.
Assessment of Specimen Handling _________ Satisfactory __________ Unsatisfactory
Assessment of Test Performance _________ Satisfactory __________ Unsatisfactory
Assessment of Quality Control _________ Satisfactory __________ Unsatisfactory
Assessment of Data Management _________ Satisfactory __________ Unsatisfactory
Assessment of Problem Solving _________ Satisfactory __________ Unsatisfactory
Observer Comments: Michelle did not know where to file completed result forms
Corrective Action Needed (if applicable): We discussed the proper procedure and where to file result forms
Observed By: Thomas Smith, MDReviewed by Employee: Michelle Richards
Date: 06/27/2019
Date: 06/27/2019
Observer Comments: I now understand the proper filing procedures
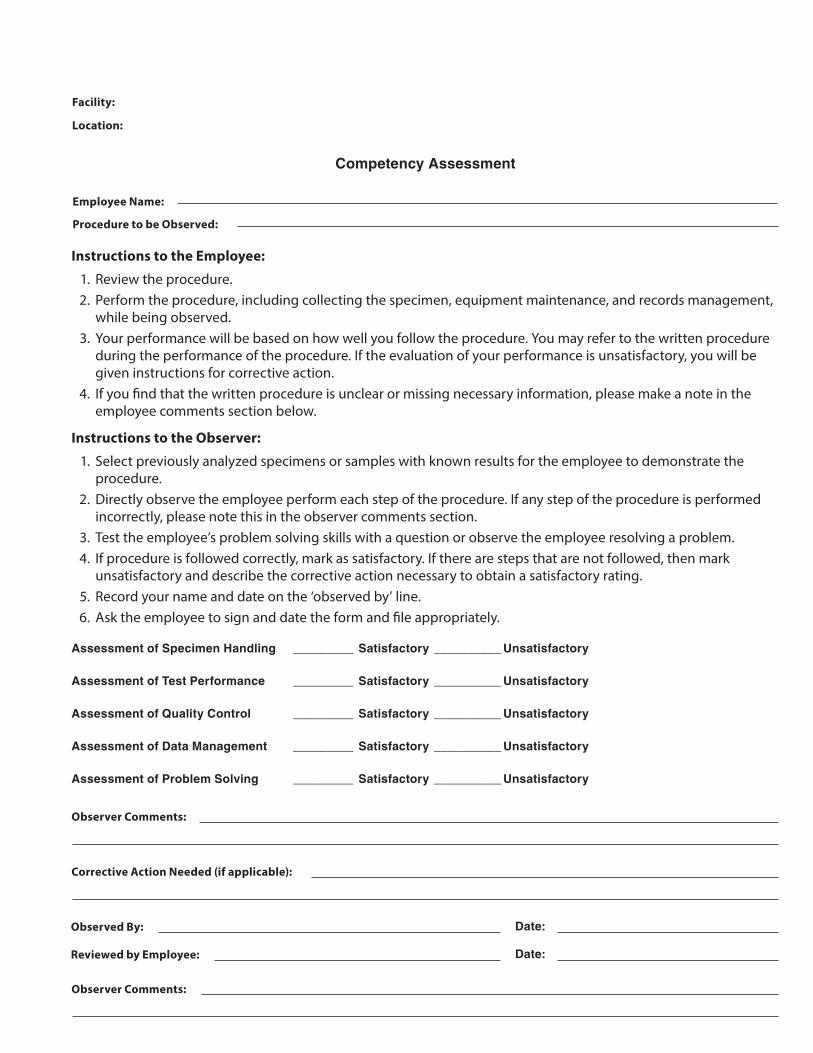
Competency Assessment
Facility:
Location:
Employee Name:
Procedure to be Observed:
Instructions to the Employee:
1. Review the procedure.2. Perform the procedure, including collecting the specimen, equipment maintenance, and records management,
while being observed.3. Your performance will be based on how well you follow the procedure. You may refer to the written procedure
during the performance of the procedure. If the evaluation of your performance is unsatisfactory, you will begiven instructions for corrective action.
4. If you find that the written procedure is unclear or missing necessary information, please make a note in theemployee comments section below.
Instructions to the Observer:
1. Select previously analyzed specimens or samples with known results for the employee to demonstrate theprocedure.
2. Directly observe the employee perform each step of the procedure. If any step of the procedure is performedincorrectly, please note this in the observer comments section.
3. Test the employee’s problem solving skills with a question or observe the employee resolving a problem.4. If procedure is followed correctly, mark as satisfactory. If there are steps that are not followed, then mark
unsatisfactory and describe the corrective action necessary to obtain a satisfactory rating.5. Record your name and date on the ‘observed by’ line.6. Ask the employee to sign and date the form and file appropriately.
Assessment of Specimen Handling _________ Satisfactory __________ Unsatisfactory
Assessment of Test Performance _________ Satisfactory __________ Unsatisfactory
Assessment of Quality Control _________ Satisfactory __________ Unsatisfactory
Assessment of Data Management _________ Satisfactory __________ Unsatisfactory
Assessment of Problem Solving _________ Satisfactory __________ Unsatisfactory
Observer Comments:
Corrective Action Needed (if applicable):
Observed By: Date:
Reviewed by Employee: Date:
Observer Comments:
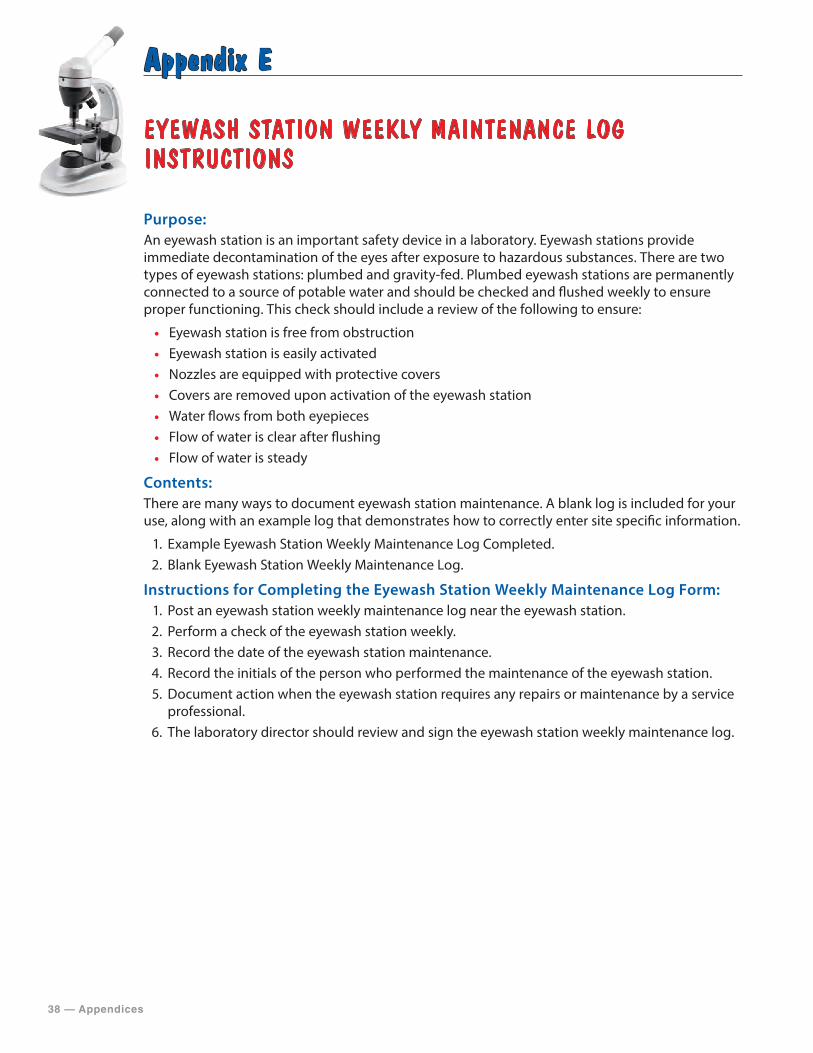
38 — Appendices
Appendix E
EYEWASH STATION WEEKLY MAINTENANCE LOG INSTRUCTIONS
Purpose:An eyewash station is an important safety device in a laboratory. Eyewash stations provide immediate decontamination of the eyes after exposure to hazardous substances. There are two types of eyewash stations: plumbed and gravity-fed. Plumbed eyewash stations are permanently connected to a source of potable water and should be checked and flushed weekly to ensure proper functioning. This check should include a review of the following to ensure:
• Eyewash station is free from obstruction • Eyewash station is easily activated • Nozzles are equipped with protective covers • Covers are removed upon activation of the eyewash station • Water flows from both eyepieces • Flow of water is clear after flushing • Flow of water is steady
Contents:There are many ways to document eyewash station maintenance. A blank log is included for your use, along with an example log that demonstrates how to correctly enter site specific information.
1. Example Eyewash Station Weekly Maintenance Log Completed.2. Blank Eyewash Station Weekly Maintenance Log.
Instructions for Completing the Eyewash Station Weekly Maintenance Log Form: 1. Post an eyewash station weekly maintenance log near the eyewash station.2. Perform a check of the eyewash station weekly.3. Record the date of the eyewash station maintenance.4. Record the initials of the person who performed the maintenance of the eyewash station.5. Document action when the eyewash station requires any repairs or maintenance by a service
professional.6. The laboratory director should review and sign the eyewash station weekly maintenance log.
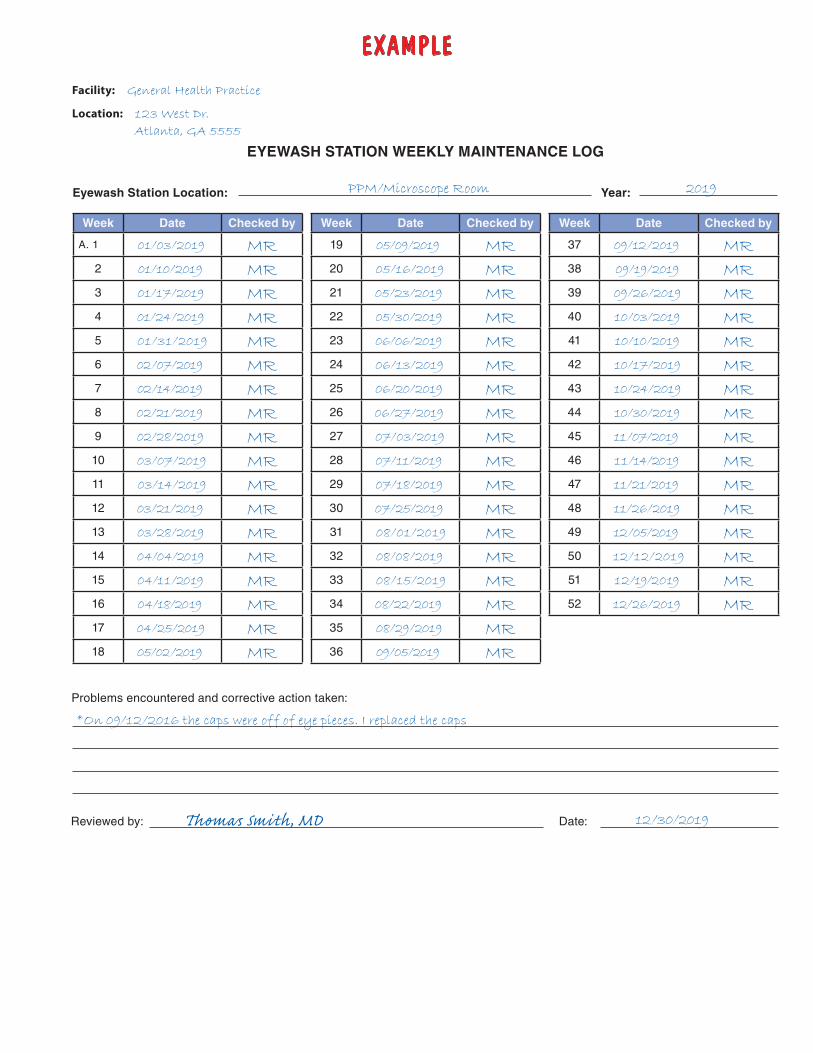
EXAMPLE
EYEWASH STATION WEEKLY MAINTENANCE LOG
Facility: General Health Practice
Location: 123 West Dr.
Atlanta, GA 5555
Eyewash Station Location: PPM/Microscope Room Year: 2019
Week Date Checked by
A. 1 01/03/2019 MR2 01/10/2019 MR3 01/17/2019 MR4 01/24/2019 MR5 01/31/2019 MR6 02/07/2019 MR7 02/14/2019 MR8 02/21/2019 MR9 02/28/2019 MR10 03/07/2019 MR11 03/14/2019 MR12 03/21/2019 MR13 03/28/2019 MR14 04/04/2019 MR15 04/11/2019 MR16 04/18/2019 MR17 04/25/2019 MR18 05/02/2019 MR
Week Date Checked by
19 05/09/2019 MR20 05/16/2019 MR21 05/23/2019 MR22 05/30/2019 MR23 06/06/2019 MR24 06/13/2019 MR25 06/20/2019 MR26 06/27/2019 MR27 07/03/2019 MR28 07/11/2019 MR29 07/18/2019 MR30 07/25/2019 MR31 08/01/2019 MR32 08/08/2019 MR33 08/15/2019 MR34 08/22/2019 MR35 08/29/2019 MR36 09/05/2019 MR
Week Date Checked by
37 09/12/2019 MR38 09/19/2019 MR39 09/26/2019 MR40 10/03/2019 MR41 10/10/2019 MR42 10/17/2019 MR43 10/24/2019 MR44 10/30/2019 MR45 11/07/2019 MR46 11/14/2019 MR47 11/21/2019 MR48 11/26/2019 MR49 12/05/2019 MR50 12/12/2019 MR51 12/19/2019 MR52 12/26/2019 MR
Problems encountered and corrective action taken:
*On 09/12/2016 the caps were off of eye pieces. I replaced the caps
Reviewed by: Thomas Smith, MD Date: 12/30/2019
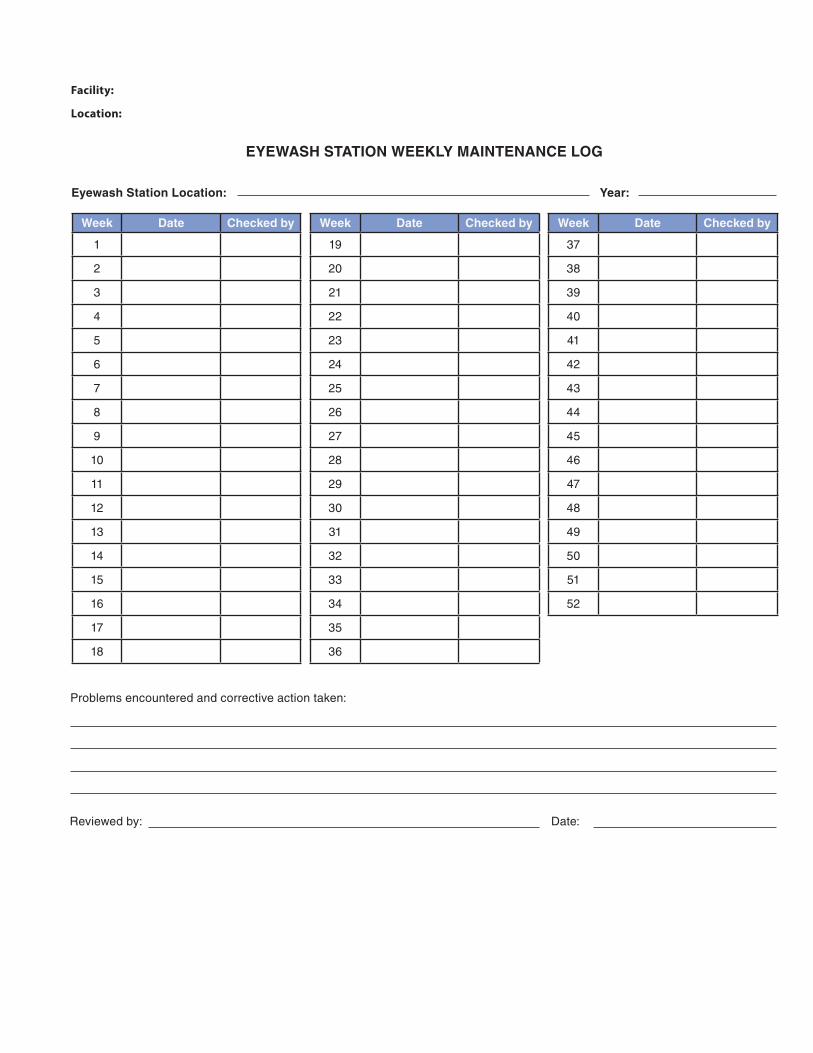
EYEWASH STATION WEEKLY MAINTENANCE LOG
Facility:
Location:
Eyewash Station Location: Year:
Week Date Checked by
1
2
3
4
5
6
7
8
9
10
11
12
13
14
15
16
17
18
Week Date Checked by
19
20
21
22
23
24
25
26
27
28
29
30
31
32
33
34
35
36
Week Date Checked by
37
38
39
40
41
42
43
44
45
46
47
48
49
50
51
52
Problems encountered and corrective action taken:
Reviewed by: Date:
Appendix F
EXAMPLE
SAFETY PLAN I. INTRODUCTION The safety plan describes policies and procedures to ensure the safety of the personnel who perform testing. Participation and cooperation in following safety precautions may also prevent endangerment of the health and safety of fellow workers and the surrounding community.
II. PLAN AVAILABILITY The plan that includes policies and procedures to assure safety needs to be available to all employees for review. All employees are expected to familiarize themselves with these safety responsibilities. A site-specific copy of the safety plan needs to be located in each testing area. Some useful safety documents can be found here: http://www.cdc.gov/od/ohs/biosfty/biosfty.htm
III. RESPONSIBILITIESImplementation of the safety plan is a shared responsibility. The individual overseeing testing and personnel who perform the testing all have roles to play. These roles are outlined below.
A. Individual Overseeing Testing
1. Establish a plan that includes policies and procedures for employee safety. 2. Designate an area in each testing area for storage and easy access of the site-specific
safety plan. 3. Make sure testing personnel and other staff follow the guidelines in the safety plan. 4. Provide site-specific safety training to all new employees BEFORE they perform testing. 5. Document completion of safety training for all employees, including housekeeping staff,
and maintain training records. 6. Provide appropriate personal protective equipment (PPE) and engineering controls
needed to work safely. Make sure that such equipment is used correctly and is in working order.
7. Identify and offer to employees appropriate immunizations for the testing being performed.
8. Correct all unsafe practices immediately. 9. Review and update policies and procedures for employee safety annually.
B. Testing Personnel
1. Review the site-specific safety plan. 2. Attend laboratory safety training. 3. Make sure training is properly documented. 4. Complete the Appendix F1. Safety Training Checklist. 5. Follow all safety policies and procedures.6. Use appropriate engineering controls and PPE. 7. Report all incidents, accidents, and potential exposures to the individual overseeing testing.
IV. GENERAL SAFETY GUIDELINES To ensure a safe work environment, follow the guidelines below.
A. Conduct
1. Maintain professionalism at all times. 2. Avoid working alone, if possible. 3. No horseplay in the workplace. 4. Learn the proper location, operation, and maintenance of safety equipment (i.e. fire
alarms, fire extinguishers, eyewash stations, and safety showers).
B. Avoidance of Routine Exposures
1. Make certain that you are familiar with emergency and evacuation procedures. 2. Read all warning labels and manufacturer instructions prior to operating ANY equipment.
*Do not use damaged equipment. 3. Be aware of potential hazards in the testing area. 4. Wear appropriate PPE. 5. Report ALL exposures immediately to the individual overseeing testing.
C. Personal Hygiene
1. Smoking, drinking, eating, gum chewing, applying or removing contact lenses and the application of cosmetics are forbidden in the testing area.
2. Do not store food in freezers or refrigerators designated for testing. 3. Wash hands frequently and thoroughly. At a minimum, before and after each patient. 4. Wear footwear that completely covers the feet. 5. Tie or pin-up long hair while performing the testing procedures. 6. Be cautious of any unsafe laboratory conditions. Notify the individual overseeing testing
of any hazards.
D. Housekeeping Practices
1. Keep testing areas clean, organized, and free of clutter. 2. Clean spills efficiently and properly from work area and floors. Notify the individual
overseeing testing. 3. Do not impede or use doorways and walkways for storage. 4. Keep all exits, emergency equipment and controls accessible. 5. Flush eyewash stations, if available, weekly and emergency showers every six months.
Keep records for documentation.
E. Ergonomics
1. Perform an ergonomic assessment of work area, including chair, workstation, desk, and computer.
2. Provide an environment that limits ergonomic stress.
V. SAFETY SIGNAGE AND LABELING The individual overseeing testing is responsible for posting safety and hazard warning signs, as necessary, for use by all employees. The following information should be posted in and next to testing areas:
A. Phone numbers of emergency personnel/facilities, and the individual overseeing testing.
B. Identity labels, showing contents of containers and associated hazards.
C. Location signs for safety showers, eyewash stations, other safety and first aid equipment and exits.
D. Warnings at areas or equipment where special or unusual hazards exist.
VI. SHARPS REDUCTION POLICY PRACTICES The Occupational Safety and Health Administration (OSHA) Bloodborne Pathogen Standard requires laboratories to institute practices that reduce injuries from needles and other sharp objects used in the testing site. The following practices need to be used by all personnel who collect samples and perform testing:
A. Do not touch broken glass; it should be removed mechanically using forceps, brush and dust pan, etc. Deposit in sharps container.
B. Needles (do not resheath, recapping of needles is prohibited), syringes, slides, pipettes, capillary tubes, scalpels, broken glass must be placed in a rigid puncture-resistant disposable container with a lid.
C. Needleless systems should be used whenever possible. Sharp objects such as needles, glass pipettes, etc. should be used only when there is no alternative available.
VII. CONTAMINATION Control and Decontamination PROCEDURES The procedures listed below are intended as a resource for preparing and responding to spills and testing personnel exposure.
A. Spill Kit
1. Testing sites should keep a spill kit handy if working with a hazardous or infectious substance.
2. Biohazard Spill Kit Contents: a) Disinfecting solution b) Forceps or tongs, disposable broom and dustpan or other device for handling sharps c) Paper towels d) Biohazard bags e) Waterproof utility gloves and examination glovesf) Face protection (face shield, splash goggles, disposable face mask) g) Disposable scrubs h) Spill sign to post on door to room
B. Biohazard Spill Procedure
1. Avoid inhaling airborne material while quickly leaving the room. 2. Notify others to leave. Close door and post with a warning sign. 3. Remove contaminated clothing, turn exposed area inward and place in a biohazard bag.
Launder contaminated clothing/lab coats in hot water with bleach.
4. Wash exposed skin with antiseptic soap and water. 5. Wear appropriate PPE: gloves, lab coat, and splash goggles and face mask.6. Cover spill with paper towels and carefully pour a 10% sodium hypochlorite (bleach)
solution or other appropriate disinfectant on the towels and around the spill allowing it to mix with the material. If using a disinfectant product, follow the manufacturer’s instructions for proper use, concentration, and contact time. When using bleach for this initial decontamination step, allow it to soak for at least 20 minutes.
7. Using forceps or tongs pick up any pieces of broken glass and place them in a sharps container.
8. Carefully pick up the absorbent toweling and the bulk of the spill material and discard these into a biohazard bag. Use fresh toweling to wipe up any residual material and discard along with the other disposable materials.
9. Clean the surface with an EPA-registered detergent/disinfectant and allow to air dry. Alternatively, clean the surface with detergent and water, followed with an application of bleach solution. Allow to air dry.
10. Remove disposable gloves and discard as biohazardous waste. Discard any disposable protective clothing used during spill clean-up. Clean and disinfect utility gloves, face shield, goggles, and any other reusable item used during spill clean-up.
11. Wash hands with antiseptic soap and water. 12. Dispose of biohazardous waste following applicable regulations. 13. Notify individual overseeing testing and document the incident accordingly. 14. Replenish or replace any items used in the spill kit.
C. Exposed Personnel Procedures
1. Splashes to face (eyes, nose and mouth) a) Use the eyewash station to flush exposed area. b) Report to the individual overseeing testing immediately for prophylaxis, if necessary.
2. Hands or other exposed skin a) Wash with antiseptic or soap. b) Report to the individual overseeing testing immediately for prophylaxis, if necessary.
3. Needlesticks and Puncture Wounds a) Squeeze around the injury to encourage the flow of blood out of the wound. b) Report to the individual overseeing testing immediately for prophylaxis, if necessary.
D. Documentation Procedures
1. All spills and/or exposures should be documented. 2. The incidents should be reviewed by the individual overseeing testing and work practices
put in place to prevent reoccurrence, if necessary. Appendix F2: Example Incident Report. 3. Comply with OSHA injury and illness reporting.
VIII. APPENDICESF1. Safety Training Checklist
F2. Incident Report
Appendices — 45
Appendix F1
SAFETY TRAINING CHECKLIST INSTRUCTIONS
Purpose:Workers in many different occupations are at risk of exposure to bloodborne pathogens, including hepatitis B, hepatitis C, and HIV. First aid team members, housekeeping personnel, nurses, and other healthcare providers are examples of workers who may be at risk of exposure.
Contents:There are many ways to document safety training for new employees. A blank checklist is included for your use, along with an example checklist that demonstrates how to correctly enter site specific information.
1. Example Safety Training Checklist Completed.2. Blank Safety Training Checklist.
Instructions for Completing the Safety Training Checklist: 1. Train new employees on work practices, procedures, and the importance of safety. 2. Employees should sign the Safety Training Checklist indicating their understanding and
willingness to follow established safety practices. 3. File signed form with employee records.
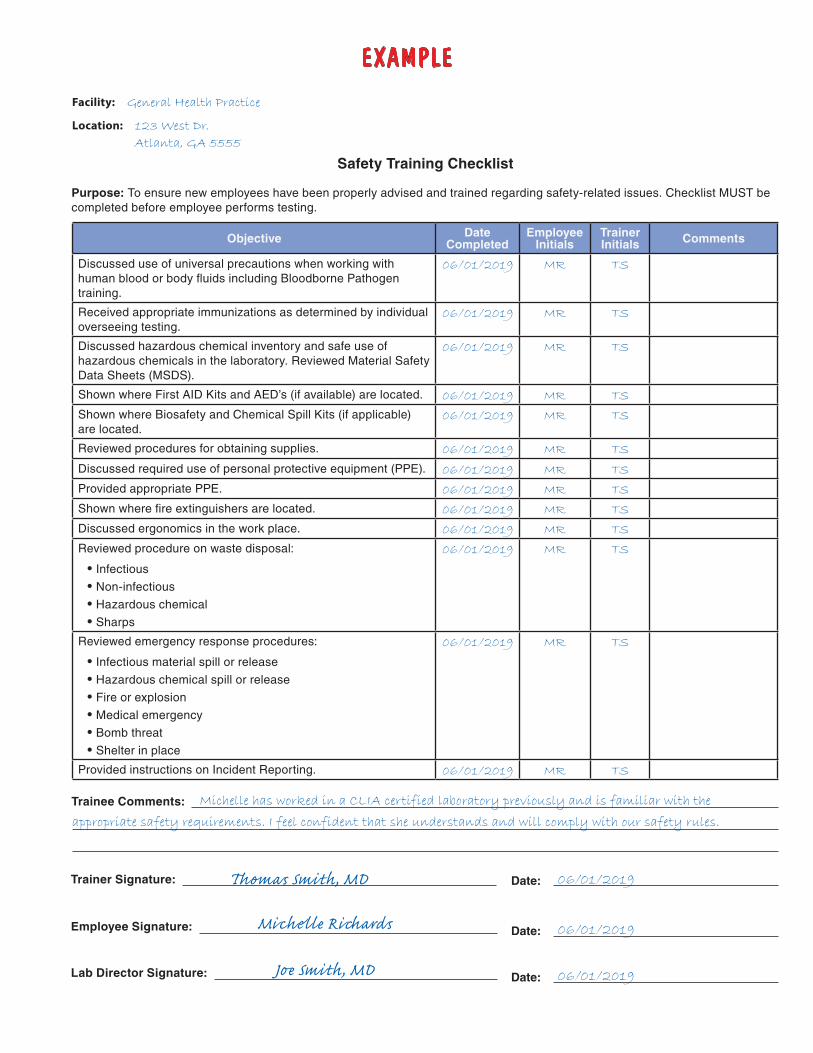
EXAMPLE
Safety Training Checklist
Facility: General Health Practice
Location: 123 West Dr.
Atlanta, GA 5555
Purpose: To ensure new employees have been properly advised and trained regarding safety-related issues. Checklist MUST be completed before employee performs testing.
Objective Date Completed
Employee Initials
Trainer Initials Comments
Discussed use of universal precautions when working with human blood or body fluids including Bloodborne Pathogen training.
06/01/2019 MR TS
Received appropriate immunizations as determined by individual overseeing testing.
06/01/2019 MR TS
Discussed hazardous chemical inventory and safe use of hazardous chemicals in the laboratory. Reviewed Material Safety Data Sheets (MSDS).
06/01/2019 MR TS
Shown where First AID Kits and AED’s (if available) are located. 06/01/2019 MR TS
Shown where Biosafety and Chemical Spill Kits (if applicable) are located.
06/01/2019 MR TS
Reviewed procedures for obtaining supplies. 06/01/2019 MR TS
Discussed required use of personal protective equipment (PPE). 06/01/2019 MR TS
Provided appropriate PPE. 06/01/2019 MR TS
Shown where fire extinguishers are located. 06/01/2019 MR TS
Discussed ergonomics in the work place. 06/01/2019 MR TS
Reviewed procedure on waste disposal:
• Infectious
• Non-infectious
• Hazardous chemical
• Sharps
06/01/2019 MR TS
Reviewed emergency response procedures:
• Infectious material spill or release
• Hazardous chemical spill or release
• Fire or explosion
• Medical emergency
• Bomb threat
• Shelter in place
06/01/2019 MR TS
Provided instructions on Incident Reporting. 06/01/2019 MR TS
Trainee Comments: Michelle has worked in a CLIA certified laboratory previously and is familiar with the
appropriate safety requirements. I feel confident that she understands and will comply with our safety rules.
Trainer Signature: Thomas Smith, MD Date: 06/01/2019
Employee Signature: Michelle Richards Date: 06/01/2019
Lab Director Signature: Joe Smith, MD Date: 06/01/2019
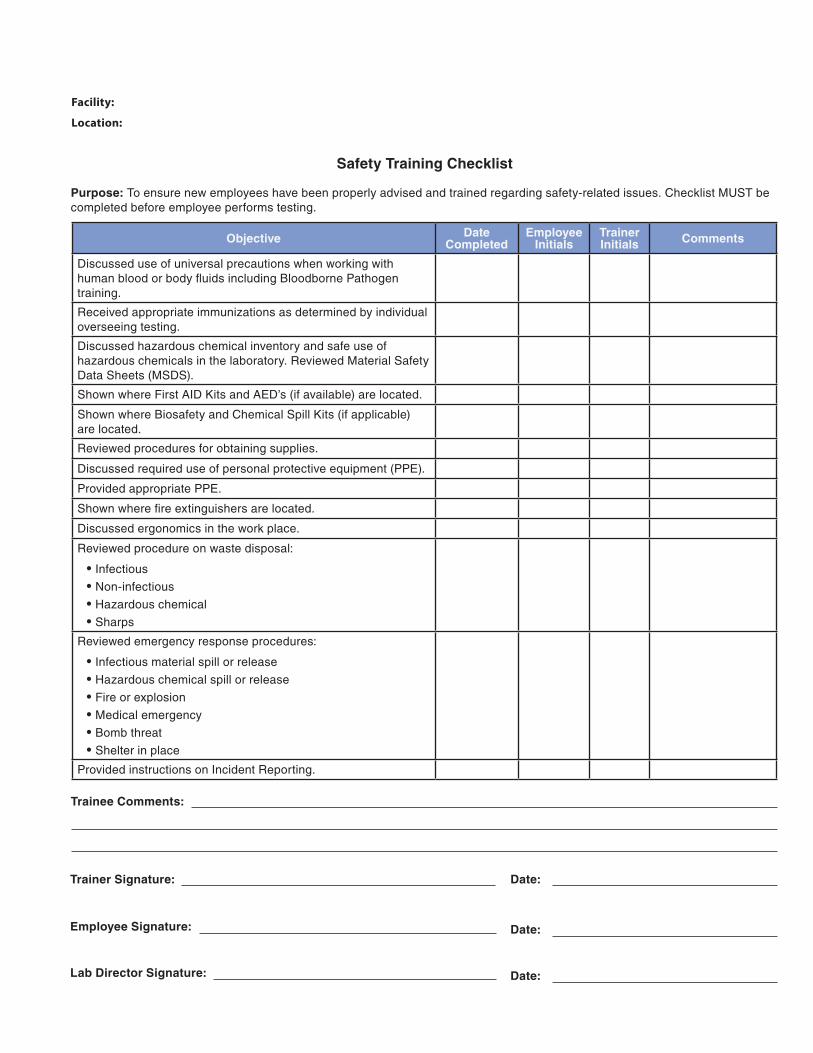
Safety Training Checklist
Facility:
Location:
Purpose: To ensure new employees have been properly advised and trained regarding safety-related issues. Checklist MUST be completed before employee performs testing.
Objective Date Completed
Employee Initials
Trainer Initials Comments
Discussed use of universal precautions when working with human blood or body fluids including Bloodborne Pathogen training.
Received appropriate immunizations as determined by individual overseeing testing.
Discussed hazardous chemical inventory and safe use of hazardous chemicals in the laboratory. Reviewed Material Safety Data Sheets (MSDS).
Shown where First AID Kits and AED’s (if available) are located.
Shown where Biosafety and Chemical Spill Kits (if applicable) are located.
Reviewed procedures for obtaining supplies.
Discussed required use of personal protective equipment (PPE).
Provided appropriate PPE.
Shown where fire extinguishers are located.
Discussed ergonomics in the work place.
Reviewed procedure on waste disposal:
• Infectious
• Non-infectious
• Hazardous chemical
• Sharps
Reviewed emergency response procedures:
• Infectious material spill or release
• Hazardous chemical spill or release
• Fire or explosion
• Medical emergency
• Bomb threat
• Shelter in place
Provided instructions on Incident Reporting.
Trainee Comments:
Trainer Signature: Date:
Employee Signature: Date:
Lab Director Signature: Date:
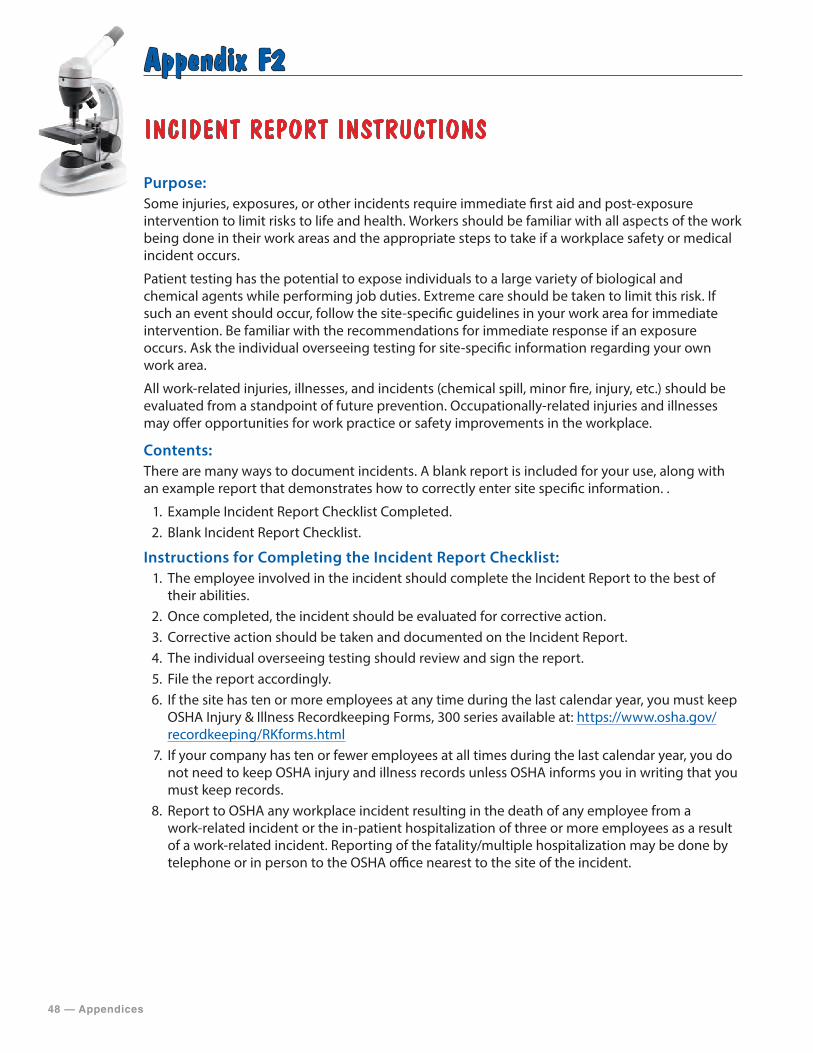
48 — Appendices
Appendix F2
INCIDENT REPORT INSTRUCTIONS
Purpose:Some injuries, exposures, or other incidents require immediate first aid and post-exposure intervention to limit risks to life and health. Workers should be familiar with all aspects of the work being done in their work areas and the appropriate steps to take if a workplace safety or medical incident occurs.
Patient testing has the potential to expose individuals to a large variety of biological and chemical agents while performing job duties. Extreme care should be taken to limit this risk. If such an event should occur, follow the site-specific guidelines in your work area for immediate intervention. Be familiar with the recommendations for immediate response if an exposure occurs. Ask the individual overseeing testing for site-specific information regarding your own work area.
All work-related injuries, illnesses, and incidents (chemical spill, minor fire, injury, etc.) should be evaluated from a standpoint of future prevention. Occupationally-related injuries and illnesses may offer opportunities for work practice or safety improvements in the workplace.
Contents:There are many ways to document incidents. A blank report is included for your use, along with an example report that demonstrates how to correctly enter site specific information. .
1. Example Incident Report Checklist Completed.2. Blank Incident Report Checklist.
Instructions for Completing the Incident Report Checklist: 1. The employee involved in the incident should complete the Incident Report to the best of
their abilities.2. Once completed, the incident should be evaluated for corrective action.3. Corrective action should be taken and documented on the Incident Report.4. The individual overseeing testing should review and sign the report.5. File the report accordingly.6. If the site has ten or more employees at any time during the last calendar year, you must keep
OSHA Injury & Illness Recordkeeping Forms, 300 series available at: https://www.osha.gov/recordkeeping/RKforms.html
7. If your company has ten or fewer employees at all times during the last calendar year, you do not need to keep OSHA injury and illness records unless OSHA informs you in writing that you must keep records.
8. Report to OSHA any workplace incident resulting in the death of any employee from a work-related incident or the in-patient hospitalization of three or more employees as a result of a work-related incident. Reporting of the fatality/multiple hospitalization may be done by telephone or in person to the OSHA office nearest to the site of the incident.

EXAMPLE
Incident Report
Facility: General Health Practice
Location: 123 West Dr.
Atlanta, GA 55555
Name of Person Involved in Incident: Michelle Richards
Date of Incident: 06/30/2019 Time of Incident: 2:30 PM
Location of Incident: PPM Laboratory/Microscope
Description of Incident: [Type of incident, e.g., illness, accident, injury. Indicate circumstances and who was involved. Indicate any substances (e.g., amount and kind of chemical) or object involved.]
Dropped a glass slide that broke and cut finger when picking it up
Action Taken:
A. First Aid: Wash, Burn, Band-Aid, Eyewash, or other:
B. Medical Treatment beyond First Aid:
C. Clean-up or Spill D. Fire E. Evacuation
Preventive Measures to Prevent Reoccurrence (if applicable):
N/A
To be completed by person involved in incident:
Did your supervisor advise you on the hazards of the workplace as part of training? Y / N
Were you wearing appropriate PPE (gloves, face shield, etc) properly? Y / N
Did you read and sign the Safety Training Checklist before working in the lab? Y / N
What do you believe was the cause of the incident?
Need to use a broom and dustpan to pick up broken glass
Reviewed by: Thomas Smith, MD Date: 06/30/2019
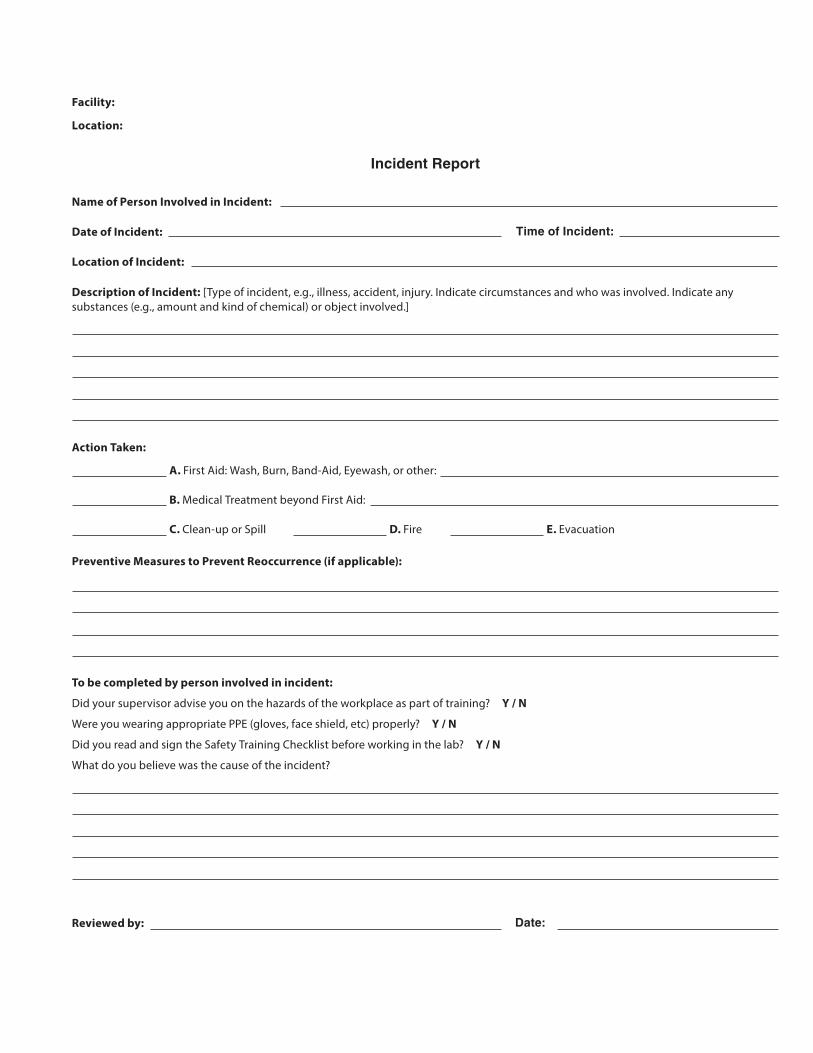
Incident Report
Facility:
Location:
Name of Person Involved in Incident:
Date of Incident: Time of Incident:
Location of Incident:
Description of Incident: [Type of incident, e.g., illness, accident, injury. Indicate circumstances and who was involved. Indicate any substances (e.g., amount and kind of chemical) or object involved.]
Action Taken:
A. First Aid: Wash, Burn, Band-Aid, Eyewash, or other:
B. Medical Treatment beyond First Aid:
C. Clean-up or Spill D. Fire E. Evacuation
Preventive Measures to Prevent Reoccurrence (if applicable):
To be completed by person involved in incident:
Did your supervisor advise you on the hazards of the workplace as part of training? Y / N
Were you wearing appropriate PPE (gloves, face shield, etc) properly? Y / N
Did you read and sign the Safety Training Checklist before working in the lab? Y / N
What do you believe was the cause of the incident?
Reviewed by: Date:
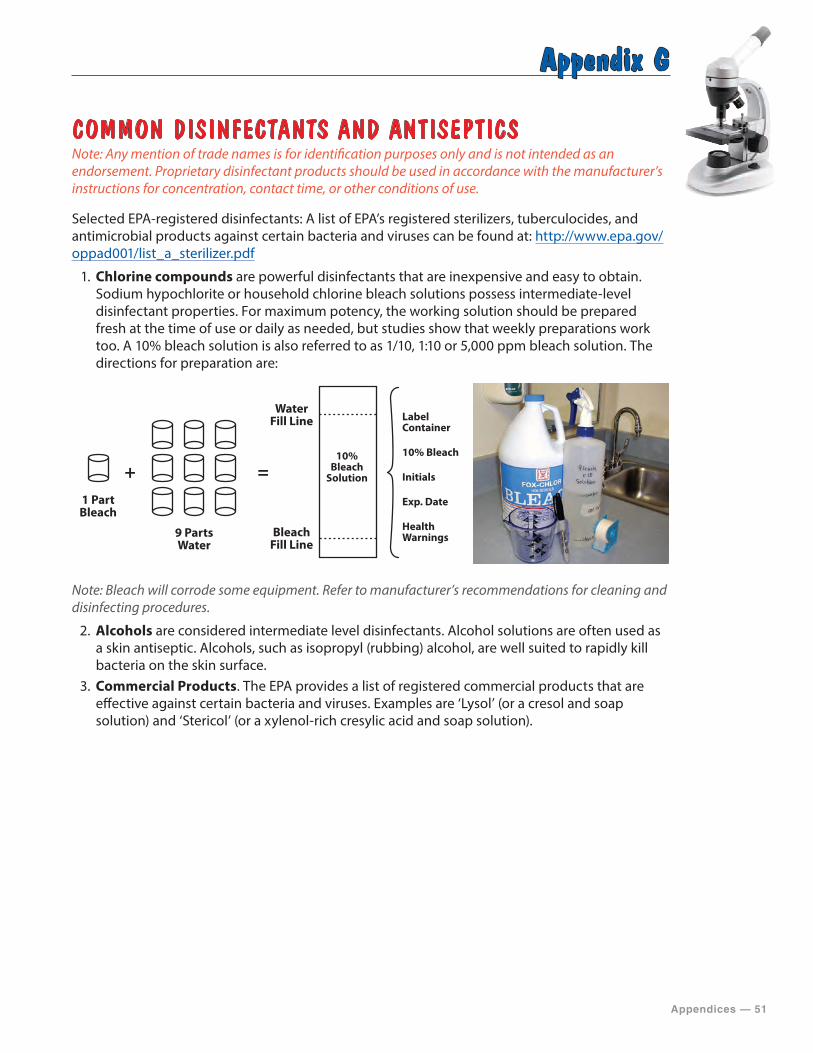
Appendices — 51
Appendix G
COMMON DISINFECTANTS AND ANTISEPTICSNote: Any mention of trade names is for identification purposes only and is not intended as an endorsement. Proprietary disinfectant products should be used in accordance with the manufacturer’s instructions for concentration, contact time, or other conditions of use.
Selected EPA-registered disinfectants: A list of EPA’s registered sterilizers, tuberculocides, and antimicrobial products against certain bacteria and viruses can be found at: http://www.epa.gov/oppad001/list_a_sterilizer.pdf
1. Chlorine compounds are powerful disinfectants that are inexpensive and easy to obtain. Sodium hypochlorite or household chlorine bleach solutions possess intermediate-level disinfectant properties. For maximum potency, the working solution should be prepared fresh at the time of use or daily as needed, but studies show that weekly preparations work too. A 10% bleach solution is also referred to as 1/10, 1:10 or 5,000 ppm bleach solution. The directions for preparation are:
1 Part Bleach
9 Parts Water
+ =
Water Fill Line
Bleach Fill Line
10% Bleach
Solution
Label Container
10% Bleach
Initials
Exp. Date
Health Warnings
Note: Bleach will corrode some equipment. Refer to manufacturer’s recommendations for cleaning and disinfecting procedures.
2. Alcohols are considered intermediate level disinfectants. Alcohol solutions are often used as a skin antiseptic. Alcohols, such as isopropyl (rubbing) alcohol, are well suited to rapidly kill bacteria on the skin surface.
3. Commercial Products. The EPA provides a list of registered commercial products that are effective against certain bacteria and viruses. Examples are ‘Lysol’ (or a cresol and soap solution) and ‘Stericol’ (or a xylenol-rich cresylic acid and soap solution).
52 — Appendices
Appendix H
PROCEDURE CONTENTS AND TIPS
Procedure Contents:Testing sites must develop procedures for each PPM test performed. The procedures must be approved and signed by the Laboratory Director prior to use in patient testing. They must be available and followed by testing personnel. Procedures can be developed from the manufacturer’s instructions or textbooks, to also include specific instructions for your testing site. When writing procedures, it is helpful to use a general template with standard headings. Headings that are often used for writing procedures are:
• Title (Test Name)—the title should clearly state the intent of the procedure. • Purpose—states what the test measures and clinical use of the result. • Materials—lists all materials, reagents, stains, supplies, equipment needed and how to
prepare and store them. • Specimen—describes the type of specimen, how to collect, label and store it, and
patient pre-test information or preparation instructions. Information on identification and handling of unacceptable specimens or inadequately prepared slides should also be included in this section.
• Special Safety Precautions—indicates any safety requirements that are unique to this procedure or need to be highlighted.
• Quality Control (QC)—describes the types of controls for the test, steps to perform QC, how often to test, interpreting the results, and how to recognize and correct problems.
• Procedure—use the manufacturer or textbook instructions, supplemented with site-specific information that includes: • Step by step test instructions for each PPM procedure • Preparation of slides, solutions, or other materials used in testing • Pertinent literature references
• Method Performance Specifications—this section should include information about precision, accuracy, and specificity as well as the reportable and expected results for the PPM test. Information on interfering substances, or conditions that can affect the test result should also be included in this section.
• Interpreting, Recording, and Reporting Results • How to read and interpret test results (photos or diagrams are especially useful) • Comparison of the results to the expected values or diagnostic findings to determine if the result is normal, abnormal, or indeterminate
• Follow-up for indeterminate results • Criteria for referral of specimens including procedures for specimen submission and handling, if needed
• How to report results • Actions to take if results cannot be reported (invalid or out of range values). Include contact information for the manufacturer, individual overseeing testing or other consultants
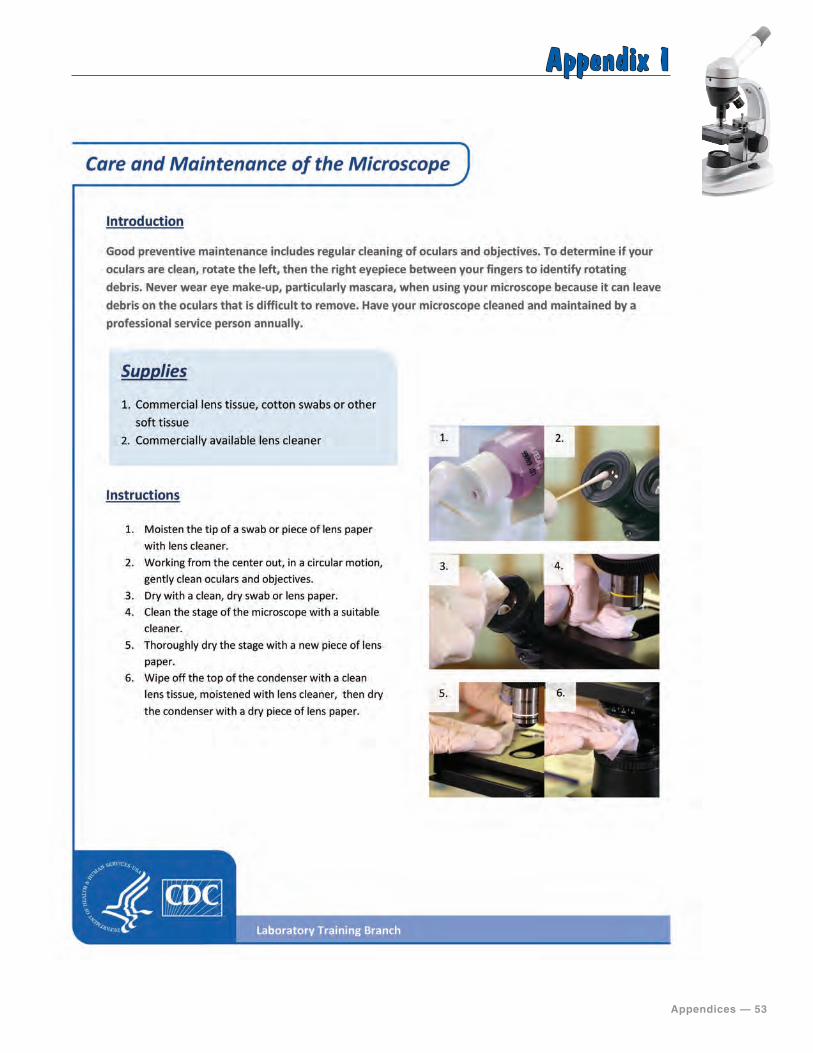
Appendices — 53
Appendix I
Care and Maintenance of the Microscope
54 — Appendices
Appendix J
MICROSCOPE MAINTENANCE LOG INSTRUCTIONS
Procedure Contents:Microscopes used for testing must be maintained and serviced by a professional as directed by the manufacturer. Testing sites must document all maintenance and professional service activities. Maintenance may include:
• clean dust in microscope area • clean oculars • clean stage • clean condenser
Procedure Contents:There are many ways to document microscope maintenance. A blank log is included for your use, along with an example log that demonstrates how to correctly enter site specific information.
1. Example Microscope Maintenance Log Completed. 2. Blank Microscope Maintenance Log.
Instructions for Completing the Microscope Maintenance Log: 1. Post a microscope maintenance log near the microscope.2. Perform microscope maintenance weekly.3. Record the date of the microscope maintenance.4. Record the initials of the person who performed the maintenance.5. Document action taken when the microscope requires any repairs or maintenance by a
service professional.6. The laboratory director should review and sign the microscope maintenance log.
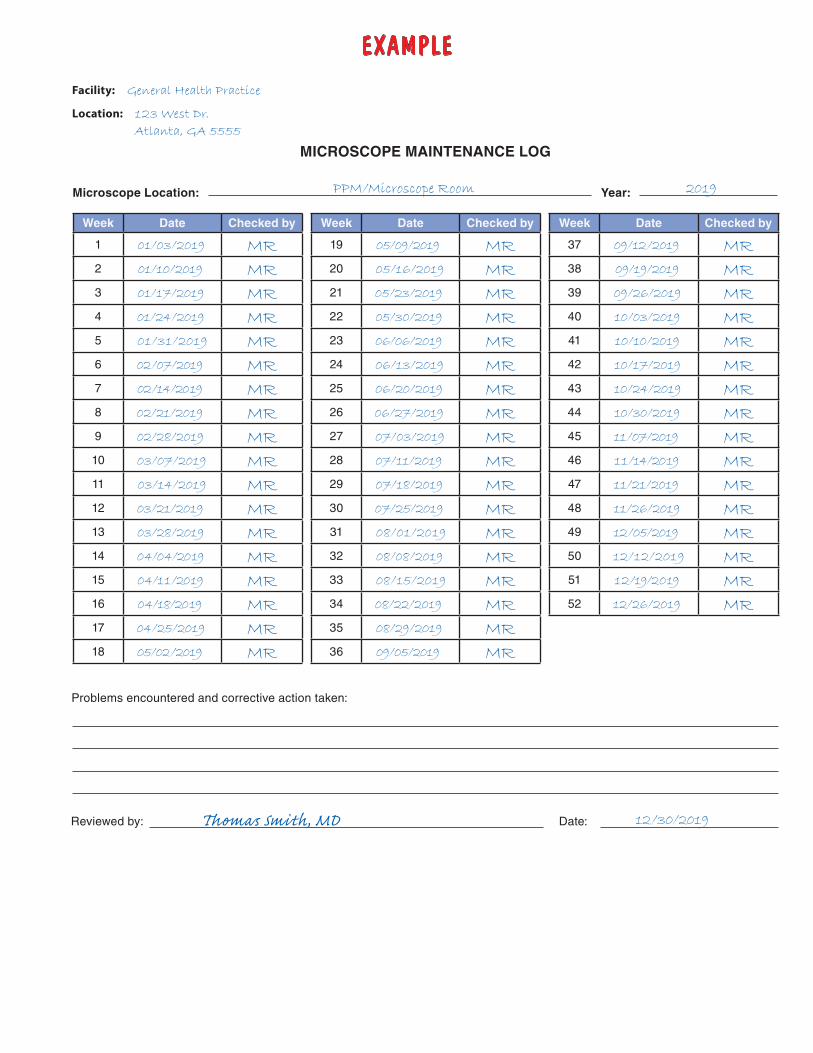
EXAMPLE
MICROSCOPE MAINTENANCE LOG
Facility: General Health Practice
Location: 123 West Dr.
Atlanta, GA 5555
Microscope Location: PPM/Microscope Room Year: 2019
Week Date Checked by
1 01/03/2019 MR2 01/10/2019 MR3 01/17/2019 MR4 01/24/2019 MR5 01/31/2019 MR6 02/07/2019 MR7 02/14/2019 MR8 02/21/2019 MR9 02/28/2019 MR10 03/07/2019 MR11 03/14/2019 MR12 03/21/2019 MR13 03/28/2019 MR14 04/04/2019 MR15 04/11/2019 MR16 04/18/2019 MR17 04/25/2019 MR18 05/02/2019 MR
Week Date Checked by
19 05/09/2019 MR20 05/16/2019 MR21 05/23/2019 MR22 05/30/2019 MR23 06/06/2019 MR24 06/13/2019 MR25 06/20/2019 MR26 06/27/2019 MR27 07/03/2019 MR28 07/11/2019 MR29 07/18/2019 MR30 07/25/2019 MR31 08/01/2019 MR32 08/08/2019 MR33 08/15/2019 MR34 08/22/2019 MR35 08/29/2019 MR36 09/05/2019 MR
Week Date Checked by
37 09/12/2019 MR38 09/19/2019 MR39 09/26/2019 MR40 10/03/2019 MR41 10/10/2019 MR42 10/17/2019 MR43 10/24/2019 MR44 10/30/2019 MR45 11/07/2019 MR46 11/14/2019 MR47 11/21/2019 MR48 11/26/2019 MR49 12/05/2019 MR50 12/12/2019 MR51 12/19/2019 MR52 12/26/2019 MR
Problems encountered and corrective action taken:
Reviewed by: Thomas Smith, MD Date: 12/30/2019

MICROSCOPE MAINTENANCE LOG
Facility:
Location:
Microscope Location: Year:
Week Date Checked by
1
2
3
4
5
6
7
8
9
10
11
12
13
14
15
16
17
18
Week Date Checked by
19
20
21
22
23
24
25
26
27
28
29
30
31
32
33
34
35
36
Week Date Checked by
37
38
39
40
41
42
43
44
45
46
47
48
49
50
51
52
Problems encountered and corrective action taken:
Reviewed by: Date:
Appendices — 57
Appendix K
PPM PROCEDURE EXAMPLES
Purpose:These procedures are provided as a guide and should not take precedent over established laboratory or testing site procedures. Procedures were developed using the cited references below.
Contents:There are nine PPM procedures specified by CLIA. This appendix includes specimen collection, slide preparation and microscopic examination procedures, and images of common microscopic findings for each of the PPM procedures. The high power (40X) objective was used for identification of the majority of images provided.
In addition to the procedures used in your laboratory or testing site, it is recommended that reference texts, atlases, and posters are available for reference when performing PPM testing.
References:The following references were used in development of the PPM procedures test instructions.
• Bauer JD, Clinical Laboratory Methods. 9th ed. St. Louis, MO; CV Mosby Co; 1982. • Versalovic J, Carroll KC, Jorgensen JH, Funke G, Landry ML, Warnock DW (ed), Manual of
Clinical Microbiology, 10th ed, vol 2. ASM Press, Washi ngton, DC, 2011. • CLSI. Physician and Nonphysician Provider-Performed Microscopy Testing; Approved Guideline-
Second Edition. CLSI document POCT10-A2, Vol. 31 No. 24. Wayne, PA: Clinical and Laboratory Standards Institute, 2011.
58 — Appendices
Appendix K1
WET MOUNT
A wet mount is a microscopic procedure performed to examine material collected from a specimen suspended in a drop of liquid on a glass slide. A wet mount is used to view cells and organisms for motility, morphological characteristics and identification. Specifically, it is used for the presence or absence of bacteria, fungi, parasites, and human cellular elements.
Specimen CollectionPrior to collecting specimens, perform hand hygiene and put on gloves. Standard precautions should be taken when collecting and handling blood or body fluid specimens.
1. Collect a sampling of material with a sterile cotton swab passed through and along the area of concern.
2. For vaginal specimens, test the specimen for pH and document before adding to tube, if needed. Note: a pH greater than 4.5 is generally associated with bacterial vaginosis or trichomoniasis.
3. Place the swabs in a clean test tube containing 0.5 ml of normal (0.9%) saline. (Note: Ensure that the specimen tube has at least 0.5 ml of saline and no more than 1.0 ml which may affect quantification criteria based on your laboratory’s procedure.)
4. Label the tube with patient identifiers, date, and time of collection.5. Gently twist the swabs in saline to dislodge particles from the swab tip.6. Reseal the tube to preserve the specimen.7. Do not refrigerate the specimens.8. Perform testing immediately or transport to the laboratory for testing as soon as possible.9. Examine the specimens within two hours of collection.
Wet Mount Slide Preparation1. Label a clean microscope slide with specimen identification.2. Using a sterile transfer pipette or dropper, gently mix the specimen with the pipette.3. Remove a specimen from the tube and place one drop (10 μl) on the labeled microscope slide.4. Immediately put a coverslip over the specimen for examination.5. Examine the slide to verify that it is not overfilled and leaking once the cover slip is in place.
Wet Mount Microscopic Examination1. Place slide on microscope for examination.2. Focus using low power (10X) and low light.3. Scan the entire slide.4. Identify objects using high power (40X).5. Read at least 10 fields using an “S” shaped viewing pattern.6. Record findings.
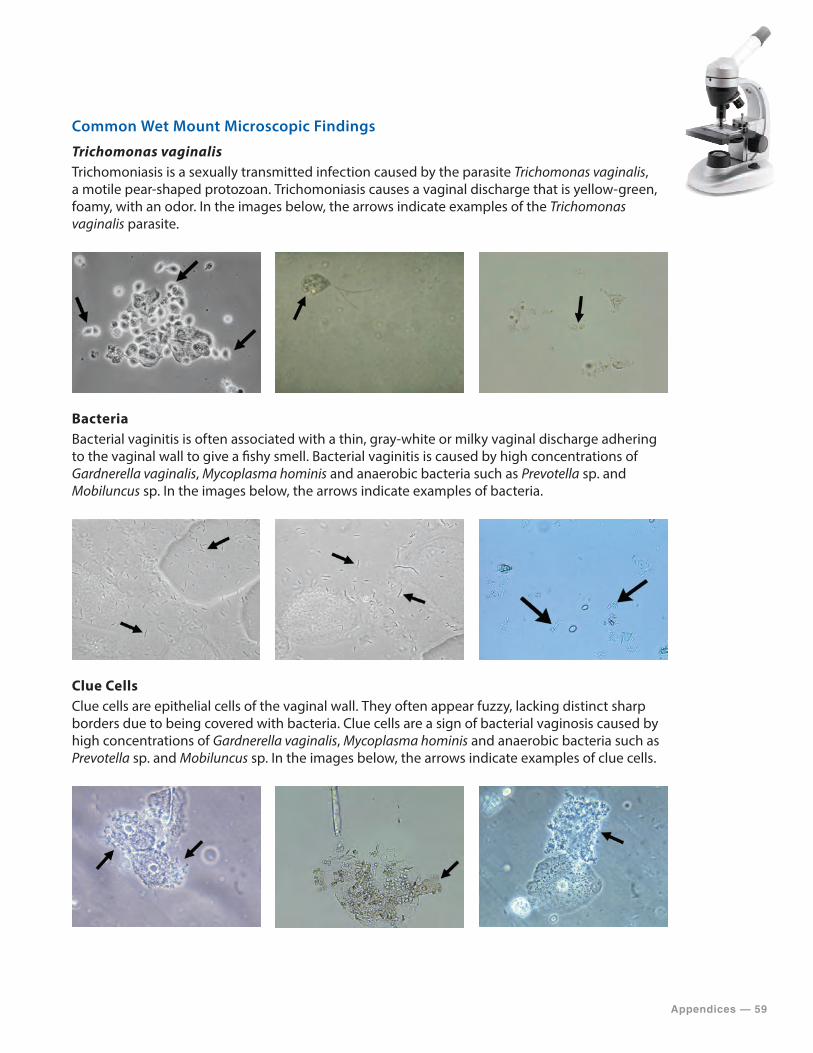
Appendices — 59
Common Wet Mount Microscopic Findings
Trichomonas vaginalisTrichomoniasis is a sexually transmitted infection caused by the parasite Trichomonas vaginalis, a motile pear-shaped protozoan. Trichomoniasis causes a vaginal discharge that is yellow-green, foamy, with an odor. In the images below, the arrows indicate examples of the Trichomonas vaginalis parasite.
BacteriaBacterial vaginitis is often associated with a thin, gray-white or milky vaginal discharge adhering to the vaginal wall to give a fishy smell. Bacterial vaginitis is caused by high concentrations of Gardnerella vaginalis, Mycoplasma hominis and anaerobic bacteria such as Prevotella sp. and Mobiluncus sp. In the images below, the arrows indicate examples of bacteria.
Clue CellsClue cells are epithelial cells of the vaginal wall. They often appear fuzzy, lacking distinct sharp borders due to being covered with bacteria. Clue cells are a sign of bacterial vaginosis caused by high concentrations of Gardnerella vaginalis, Mycoplasma hominis and anaerobic bacteria such as Prevotella sp. and Mobiluncus sp. In the images below, the arrows indicate examples of clue cells.
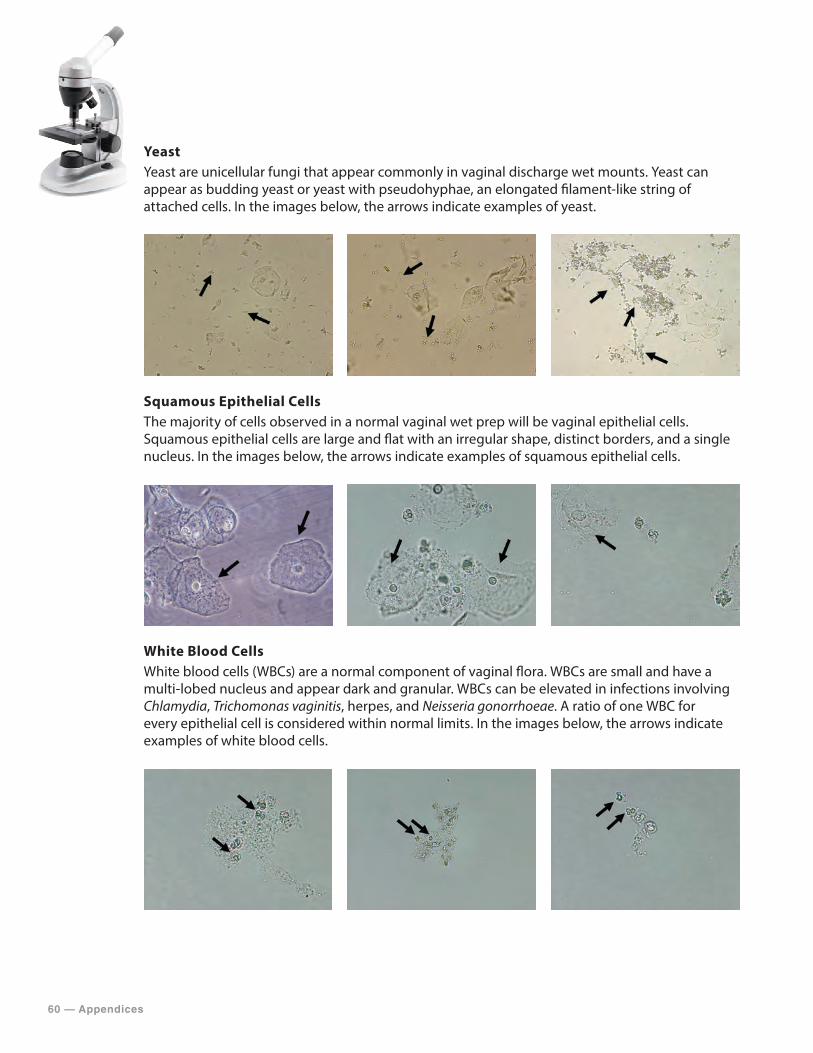
60 — Appendices
YeastYeast are unicellular fungi that appear commonly in vaginal discharge wet mounts. Yeast can appear as budding yeast or yeast with pseudohyphae, an elongated filament-like string of attached cells. In the images below, the arrows indicate examples of yeast.
Squamous Epithelial Cells The majority of cells observed in a normal vaginal wet prep will be vaginal epithelial cells. Squamous epithelial cells are large and flat with an irregular shape, distinct borders, and a single nucleus. In the images below, the arrows indicate examples of squamous epithelial cells.
White Blood CellsWhite blood cells (WBCs) are a normal component of vaginal flora. WBCs are small and have a multi-lobed nucleus and appear dark and granular. WBCs can be elevated in infections involving Chlamydia, Trichomonas vaginitis, herpes, and Neisseria gonorrhoeae. A ratio of one WBC for every epithelial cell is considered within normal limits. In the images below, the arrows indicate examples of white blood cells.
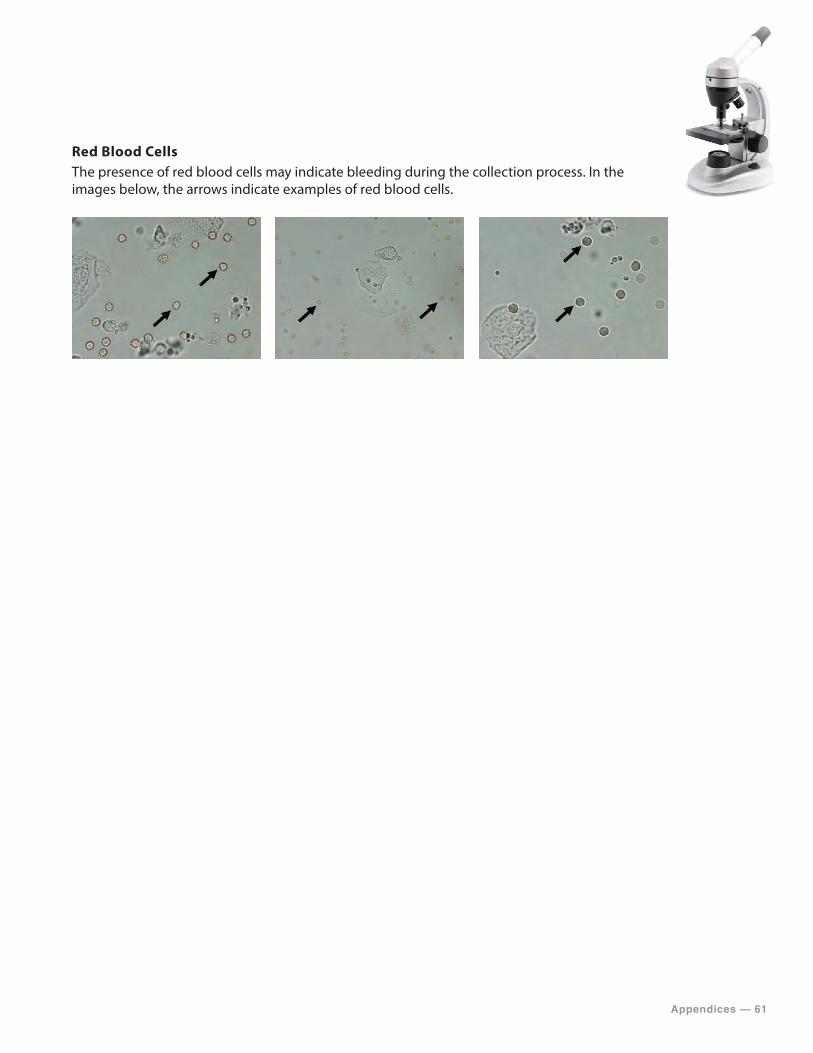
Appendices — 61
Red Blood CellsThe presence of red blood cells may indicate bleeding during the collection process. In the images below, the arrows indicate examples of red blood cells.
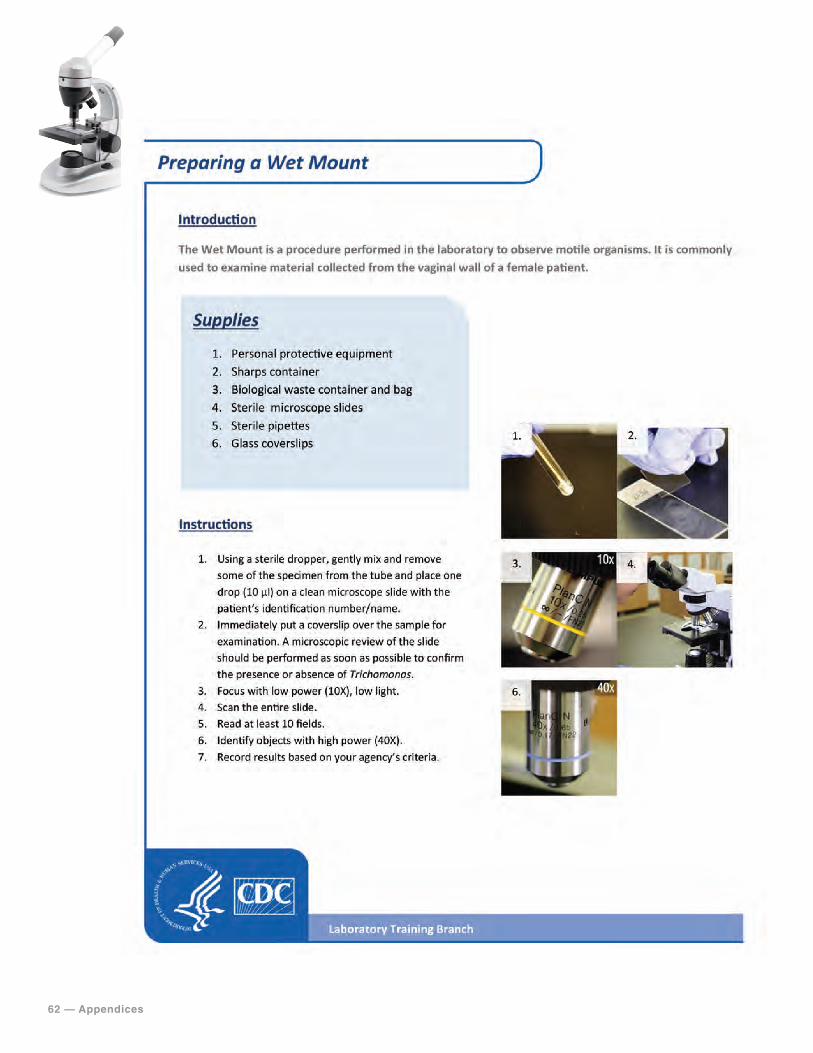
62 — Appendices
Preparing a Wet Mount
Appendices — 63
Appendix K2
KOH PREPARATION
PPM laboratories and testing sites use KOH preparations to detect the presence or absence of fungi in vaginal or thick mucoid specimens or in specimens containing keratinous material such as skin, hair, and nails. KOH digests cellular components of the host cells and other contaminants leaving the fungal cell wall intact allowing the fungal elements to be clearly observed. Fungal infections of the skin, hair, and nails are commonly caused by Tinea species, Trichophyton rubrum, and Candida albicans.
Specimen CollectionPrior to collecting specimens, perform hand hygiene and put on gloves. Standard precautions should be taken when collecting and handling blood or body fluid specimens.
Vaginal Specimens1. Collect vaginal specimens as described in the Wet Mount procedure section.
Skin Scrapings1. Scrape the surface of the skin. Be careful not to contaminate scrapings with blood.2. Place the skin scrapings between two clean glass slides or in a sterile container.
Hair1. Collect at least 10–12 affected hairs with the base of the shaft attached.2. Place in a sterile container.
Nail Scrapings1. Collect a nail clipping.2. Place nail clipping in a collection packet or sterile glass slide.3. Cut nail clipping into small fragments.4. Scrape the excess keratin produced under the nail.5. Place in a sterile container.
KOH Slide Preparation
Vaginal Specimens 1. Label a clean microscope slide with specimen identification.2. Using a sterile transfer pipette or dropper, gently mix the specimen with the pipette.3. Remove a specimen from the tube and place one drop (10 μl) on the labeled microscope slide.4. Use a clean pipette and add one drop (10 μl) of 10% KOH directly on top of the specimen.5. Check the slide for a “fishy”, amine odor and note presence or absence. The odor indicates
anaerobic bacteria overgrowth.6. Wait up to 5 minutes to allow cellular tissue and debris to dissolve.7. Immediately put a coverslip over the specimen for examination.8. Examine the slide to verify it is not overfilled and leaking once the cover slip is in place.
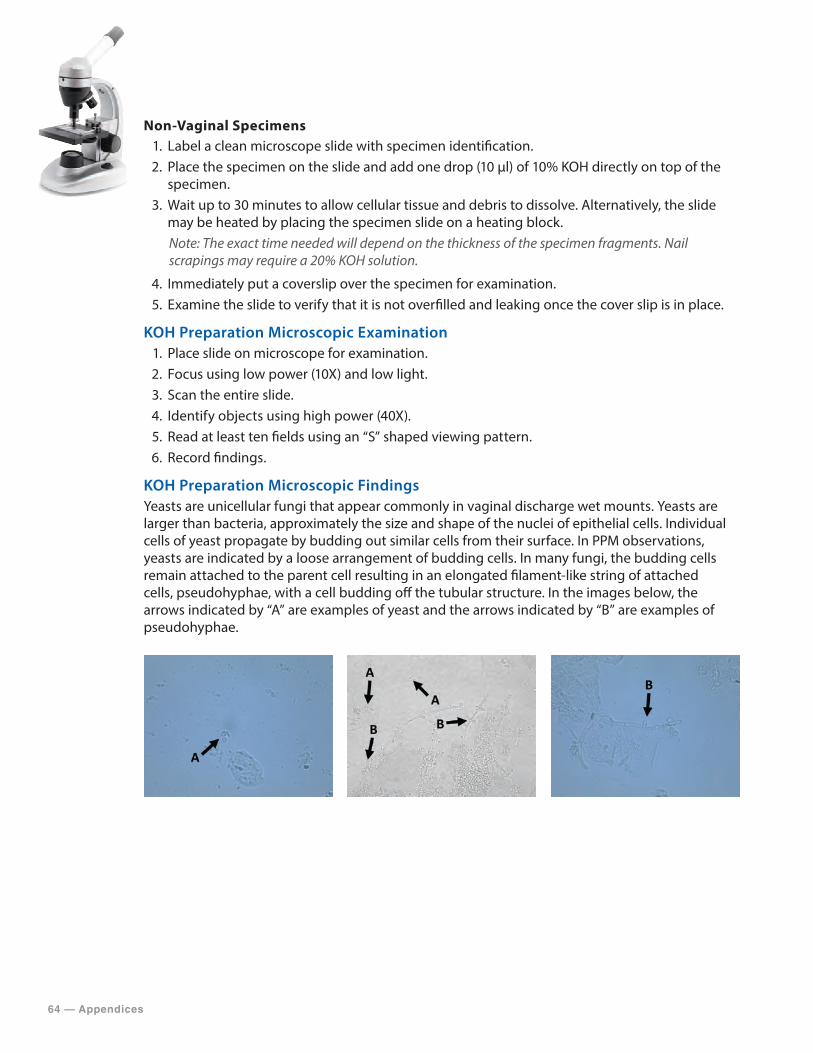
64 — Appendices
Non-Vaginal Specimens 1. Label a clean microscope slide with specimen identification.2. Place the specimen on the slide and add one drop (10 μl) of 10% KOH directly on top of the
specimen.3. Wait up to 30 minutes to allow cellular tissue and debris to dissolve. Alternatively, the slide
may be heated by placing the specimen slide on a heating block. Note: The exact time needed will depend on the thickness of the specimen fragments. Nail scrapings may require a 20% KOH solution.
4. Immediately put a coverslip over the specimen for examination.5. Examine the slide to verify that it is not overfilled and leaking once the cover slip is in place.
KOH Preparation Microscopic Examination1. Place slide on microscope for examination.2. Focus using low power (10X) and low light.3. Scan the entire slide.4. Identify objects using high power (40X).5. Read at least ten fields using an “S” shaped viewing pattern.6. Record findings.
KOH Preparation Microscopic FindingsYeasts are unicellular fungi that appear commonly in vaginal discharge wet mounts. Yeasts are larger than bacteria, approximately the size and shape of the nuclei of epithelial cells. Individual cells of yeast propagate by budding out similar cells from their surface. In PPM observations, yeasts are indicated by a loose arrangement of budding cells. In many fungi, the budding cells remain attached to the parent cell resulting in an elongated filament-like string of attached cells, pseudohyphae, with a cell budding off the tubular structure. In the images below, the arrows indicated by “A” are examples of yeast and the arrows indicated by “B” are examples of pseudohyphae.
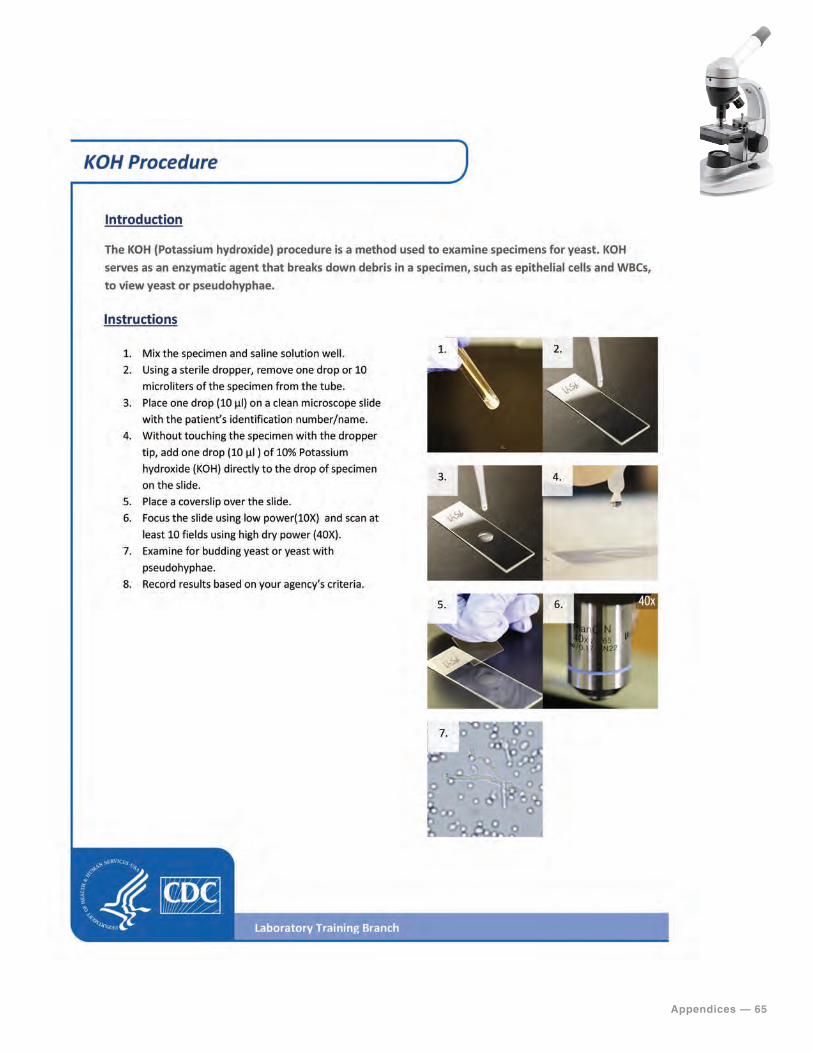
Appendices — 65
KOH Procedure
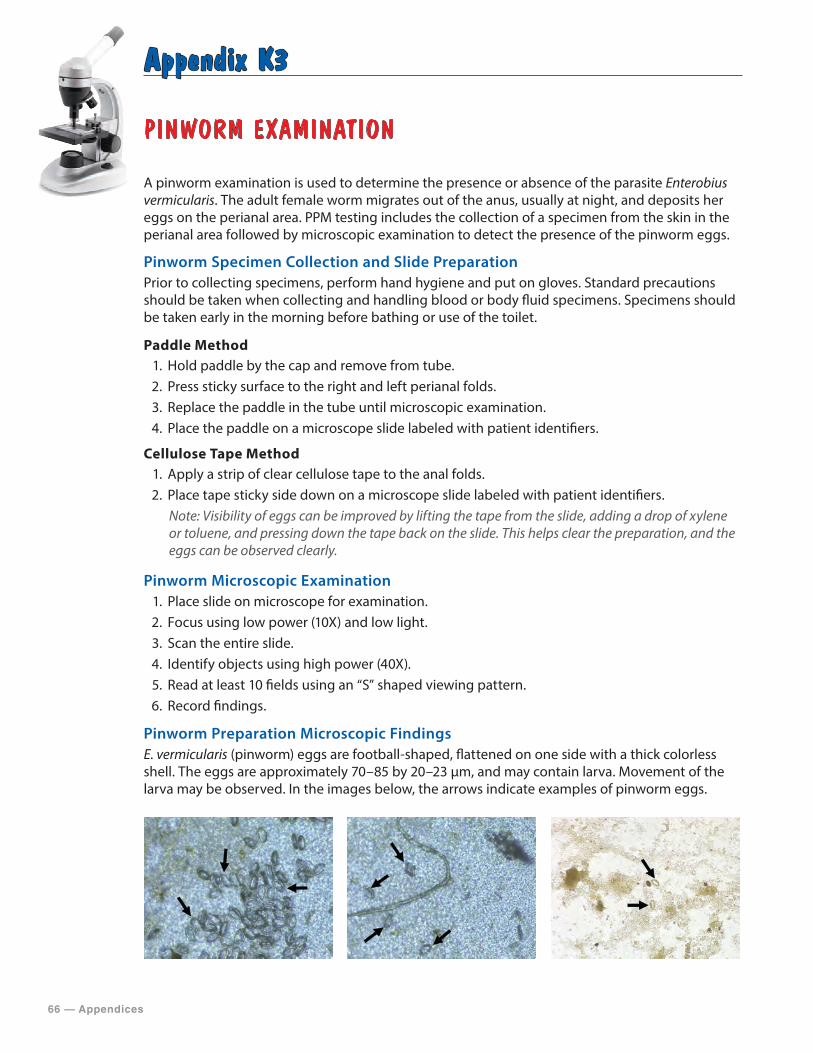
66 — Appendices
Appendix K3
PINWORM EXAMINATION
A pinworm examination is used to determine the presence or absence of the parasite Enterobius vermicularis. The adult female worm migrates out of the anus, usually at night, and deposits her eggs on the perianal area. PPM testing includes the collection of a specimen from the skin in the perianal area followed by microscopic examination to detect the presence of the pinworm eggs.
Pinworm Specimen Collection and Slide PreparationPrior to collecting specimens, perform hand hygiene and put on gloves. Standard precautions should be taken when collecting and handling blood or body fluid specimens. Specimens should be taken early in the morning before bathing or use of the toilet.
Paddle Method1. Hold paddle by the cap and remove from tube.2. Press sticky surface to the right and left perianal folds.3. Replace the paddle in the tube until microscopic examination.4. Place the paddle on a microscope slide labeled with patient identifiers.
Cellulose Tape Method1. Apply a strip of clear cellulose tape to the anal folds.2. Place tape sticky side down on a microscope slide labeled with patient identifiers.
Note: Visibility of eggs can be improved by lifting the tape from the slide, adding a drop of xylene or toluene, and pressing down the tape back on the slide. This helps clear the preparation, and the eggs can be observed clearly.
Pinworm Microscopic Examination1. Place slide on microscope for examination.2. Focus using low power (10X) and low light.3. Scan the entire slide.4. Identify objects using high power (40X).5. Read at least 10 fields using an “S” shaped viewing pattern.6. Record findings.
Pinworm Preparation Microscopic FindingsE. vermicularis (pinworm) eggs are football-shaped, flattened on one side with a thick colorless shell. The eggs are approximately 70–85 by 20–23 μm, and may contain larva. Movement of the larva may be observed. In the images below, the arrows indicate examples of pinworm eggs.
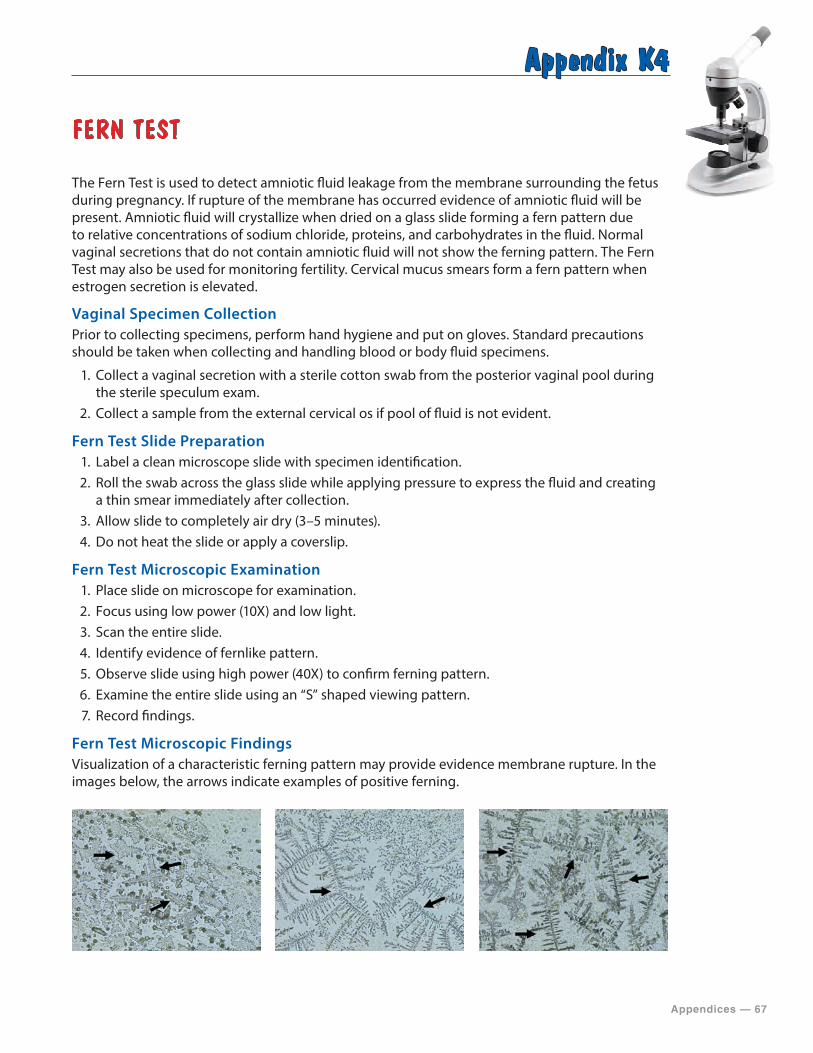
Appendices — 67
Appendix K4
FERN TEST
The Fern Test is used to detect amniotic fluid leakage from the membrane surrounding the fetus during pregnancy. If rupture of the membrane has occurred evidence of amniotic fluid will be present. Amniotic fluid will crystallize when dried on a glass slide forming a fern pattern due to relative concentrations of sodium chloride, proteins, and carbohydrates in the fluid. Normal vaginal secretions that do not contain amniotic fluid will not show the ferning pattern. The Fern Test may also be used for monitoring fertility. Cervical mucus smears form a fern pattern when estrogen secretion is elevated.
Vaginal Specimen CollectionPrior to collecting specimens, perform hand hygiene and put on gloves. Standard precautions should be taken when collecting and handling blood or body fluid specimens.
1. Collect a vaginal secretion with a sterile cotton swab from the posterior vaginal pool during the sterile speculum exam.
2. Collect a sample from the external cervical os if pool of fluid is not evident.
Fern Test Slide Preparation1. Label a clean microscope slide with specimen identification.2. Roll the swab across the glass slide while applying pressure to express the fluid and creating
a thin smear immediately after collection.3. Allow slide to completely air dry (3–5 minutes).4. Do not heat the slide or apply a coverslip.
Fern Test Microscopic Examination1. Place slide on microscope for examination.2. Focus using low power (10X) and low light.3. Scan the entire slide.4. Identify evidence of fernlike pattern.5. Observe slide using high power (40X) to confirm ferning pattern.6. Examine the entire slide using an “S” shaped viewing pattern.7. Record findings.
Fern Test Microscopic FindingsVisualization of a characteristic ferning pattern may provide evidence membrane rupture. In the images below, the arrows indicate examples of positive ferning.
68 — Appendices
Appendix K5
POST-COITAL DIRECT, QUALITATIVE EXAMINATION OF VAGINAL OR CERVICAL MUCUS
The post-coital test involves direct, qualitative examination of vaginal or cervical mucus to evaluate factors that could affect fertility. The test involves the qualitative analysis of the mucus including color, viscosity, and tenacity and the determination of the presence and motility of sperm. The assessment provides information to determine the receptivity of cervical mucus and the ability of sperm to penetrate the mucus.
Patient Preparation1. Patients should use an ovulation determination method.2. When ovulation is detected, the patient and her partner should have intercourse.3. Patient should remain in bed 10 to 15 minutes following intercourse to allow the semen to
contact the cervical mucus.4. Testing should be performed within 2–12 hours following intercourse.5. Upon arrival for testing, provider should record time since intercourse.
Post-Coital Direct, Qualitative Examination of Vaginal or Cervical Mucus Slide Preparation Prior to collecting specimens, perform hand hygiene and put on gloves. Standard precautions should be taken when collecting and handling blood or body fluid specimens. No lubrication should be used.
1. Remove excess vaginal secretions with a sterile cotton swab during the sterile speculum exam to prevent contamination.
2. Remove cervical mucus using a suction device on the cervical os.3. Test the specimen as soon as possible after collection.
Post-Coital Direct, Qualitative Examination of Vaginal or Cervical Mucus Procedure
Qualitative Analysis of Cervical Mucus1. Determine the volume of mucus in the syringe. Alternatively, expel the mucus from the syringe
into a sterile Petri dish and estimate the amount of mucus (scant, moderate, or profuse).2. Record the color and clarity of the mucus. 3. Label a clean microscope slide with specimen identification.4. Remove a specimen from the Petri dish and place one drop (10 μl) on the labeled
microscope slide.5. Immediately put a coverslip over the specimen.6. Pull the glass coverslip off of the glass slide. 7. Determine the distance a thread of mucus remains attached to the glass slide when lifted.
Alternatively, place a drop of mucus on a microscope slide and test tenacity by grasping a portion of the mucus with forceps and noting the distance which it can be drawn without breaking.
Appendices — 69
Determination of Sperm Presence and Motility1. Label a clean microscope slide with specimen identification.2. Remove a specimen from the Petri dish and place one drop (10 μl) on the labeled
microscope slide. 3. Immediately put a coverslip over the specimen.4. Examine the slide immediately to prevent drying of the specimen which may result in
killing active spermatozoa.5. Place slide under the microscope for examination.6. Focus using low power (10X) and low light.7. Observe slide using high power (40X).8. Examine the entire slide using an “S” shaped viewing pattern.9. Record the number and motility of sperm for each high powered field.
Post-Coital Direct, Qualitative Examination of Vaginal or Cervical Mucus FindingsNormal mid-cycle mucus should be clear, with minimal viscosity, and profuse. A tenacity measurement of 6 to 10 cm is desirable. The normal number of sperm in a post-coital examination is not precise. Within 6–8 hours after coitus at least 5–10 motile sperm should be present per high powered field.

70 — Appendices
Appendix K6
URINE SEDIMENT EXAMINATION
Urine sediment examination is used for the detection and identification of formed elements in the urine. The test involves the collection of urine and microscopic examination of the urine sediment for formed elements such as cells, casts, crystals, and microorganisms. Specimens not obtained by “clean catch” methods often contain elements from other sources other than the urinary tract. The microscopic examination is a valuable diagnostic tool for the detection of renal and urinary tract disorders.
Patient Preparation1. Provide patients with instructions on how to perform a clean-catch urine specimen collection.
Urine Specimen Collection and ProcessingPrior to collecting specimens, perform hand hygiene and put on gloves. Standard precautions should be taken when collecting and handling blood or body fluid specimens.
1. Label a clean, dry container free of lint and debris with patient identifiers, date, and time of collection.
2. Obtain a midstream, clean-catch urine specimen. Concentrated first morning specimens are preferred.
3. Examine the specimen within 2 hours of collection or 4 hours if refrigerated. Otherwise, bacteria may proliferate, casts and crystals may dissolve, and particulate matter may settle out.
4. Place 12–15 ml of urine in a conical centrifuge tube labeled with the patient identifiers.5. Centrifuge at 400 x g for 5 minutes. To prevent re-suspension of urine sediment, do not apply
brake at the end of centrifugation. Higher centrifugation rates and longer centrifugation times may result in denigration of cellular casts.
6. Decant the supernatant carefully into a biohazard-designated sink or receptacle leaving approximately 1 ml in the tube.
7. Resuspend the sediment by gently tapping the bottom of the tube or using a pipet to mix.
Urine Sediment Microscope Slide Preparation1. Label a clean microscope slide with specimen identification.2. Using a sterile transfer pipette or dropper, gently mix the specimen.3. Remove specimen from the tube and place one drop (10 μl) on the labeled microscope slide.4. Immediately put a coverslip over the specimen for examination.5. Allow urine to settle for 30–60 seconds before examination6. Examine the slide to verify that it is not overfilled and leaking once the cover slip is in place.
Urine Sediment Microscopic Examination1. Place slide under the microscope for examination.2. Focus using low power (10X) and low light.3. Scan the entire slide.4. Read at least 10 fields using an “S” shaped viewing pattern.5. Record the presence of crystals, casts, and squamous epithelial cells using semi-quantitative
terms such as rare, few, moderate, or many and report results following laboratory procedure.6. Identify objects using high power (40X).
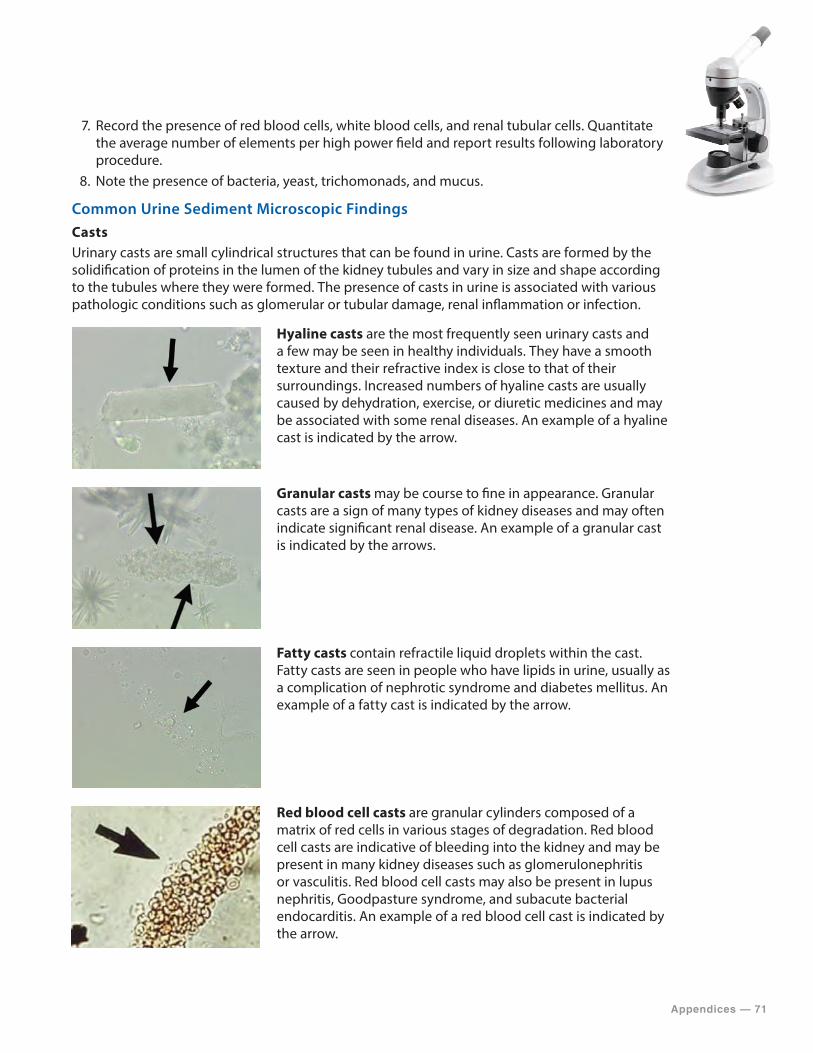
Appendices — 71
7. Record the presence of red blood cells, white blood cells, and renal tubular cells. Quantitate the average number of elements per high power field and report results following laboratory procedure.
8. Note the presence of bacteria, yeast, trichomonads, and mucus.
Common Urine Sediment Microscopic FindingsCastsUrinary casts are small cylindrical structures that can be found in urine. Casts are formed by the solidification of proteins in the lumen of the kidney tubules and vary in size and shape according to the tubules where they were formed. The presence of casts in urine is associated with various pathologic conditions such as glomerular or tubular damage, renal inflammation or infection.
Hyaline casts are the most frequently seen urinary casts and a few may be seen in healthy individuals. They have a smooth texture and their refractive index is close to that of their surroundings. Increased numbers of hyaline casts are usually caused by dehydration, exercise, or diuretic medicines and may be associated with some renal diseases. An example of a hyaline cast is indicated by the arrow.
Granular casts may be course to fine in appearance. Granular casts are a sign of many types of kidney diseases and may often indicate significant renal disease. An example of a granular cast is indicated by the arrows.
Fatty casts contain refractile liquid droplets within the cast. Fatty casts are seen in people who have lipids in urine, usually as a complication of nephrotic syndrome and diabetes mellitus. An example of a fatty cast is indicated by the arrow.
Red blood cell casts are granular cylinders composed of a matrix of red cells in various stages of degradation. Red blood cell casts are indicative of bleeding into the kidney and may be present in many kidney diseases such as glomerulonephritis or vasculitis. Red blood cell casts may also be present in lupus nephritis, Goodpasture syndrome, and subacute bacterial endocarditis. An example of a red blood cell cast is indicated by the arrow.
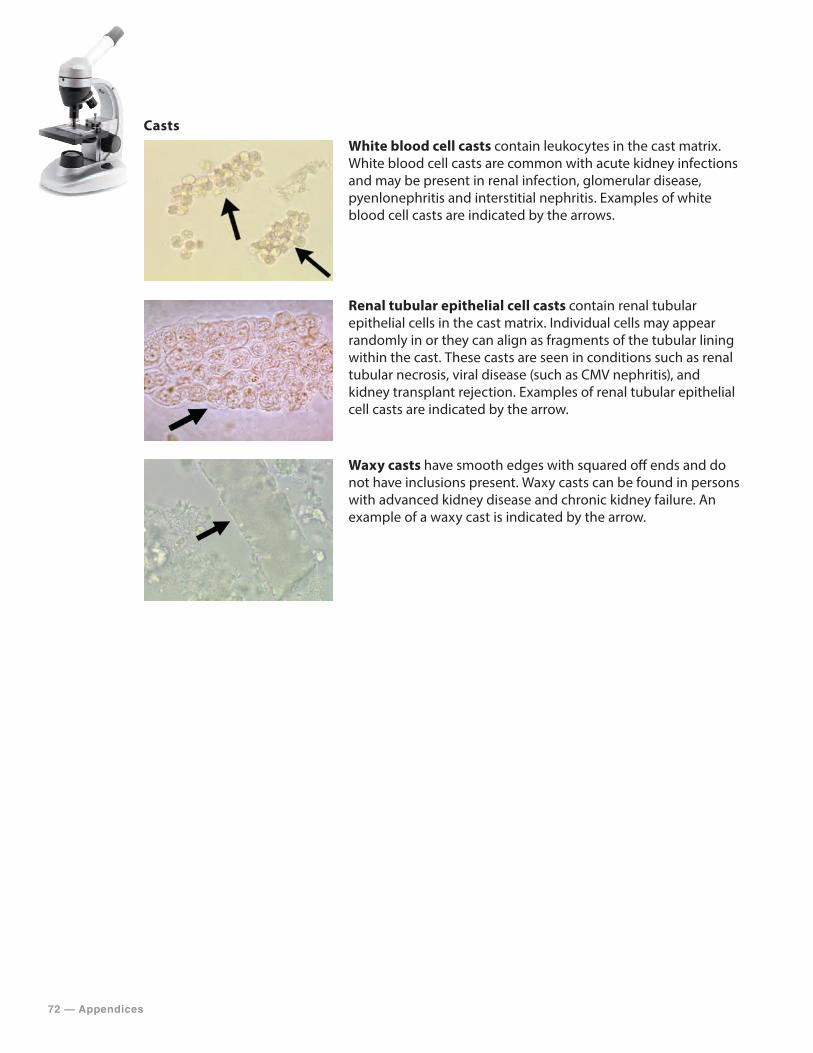
72 — Appendices
Casts
White blood cell casts contain leukocytes in the cast matrix. White blood cell casts are common with acute kidney infections and may be present in renal infection, glomerular disease, pyenlonephritis and interstitial nephritis. Examples of white blood cell casts are indicated by the arrows.
Renal tubular epithelial cell casts contain renal tubular epithelial cells in the cast matrix. Individual cells may appear randomly in or they can align as fragments of the tubular lining within the cast. These casts are seen in conditions such as renal tubular necrosis, viral disease (such as CMV nephritis), and kidney transplant rejection. Examples of renal tubular epithelial cell casts are indicated by the arrow.
Waxy casts have smooth edges with squared off ends and do not have inclusions present. Waxy casts can be found in persons with advanced kidney disease and chronic kidney failure. An example of a waxy cast is indicated by the arrow.
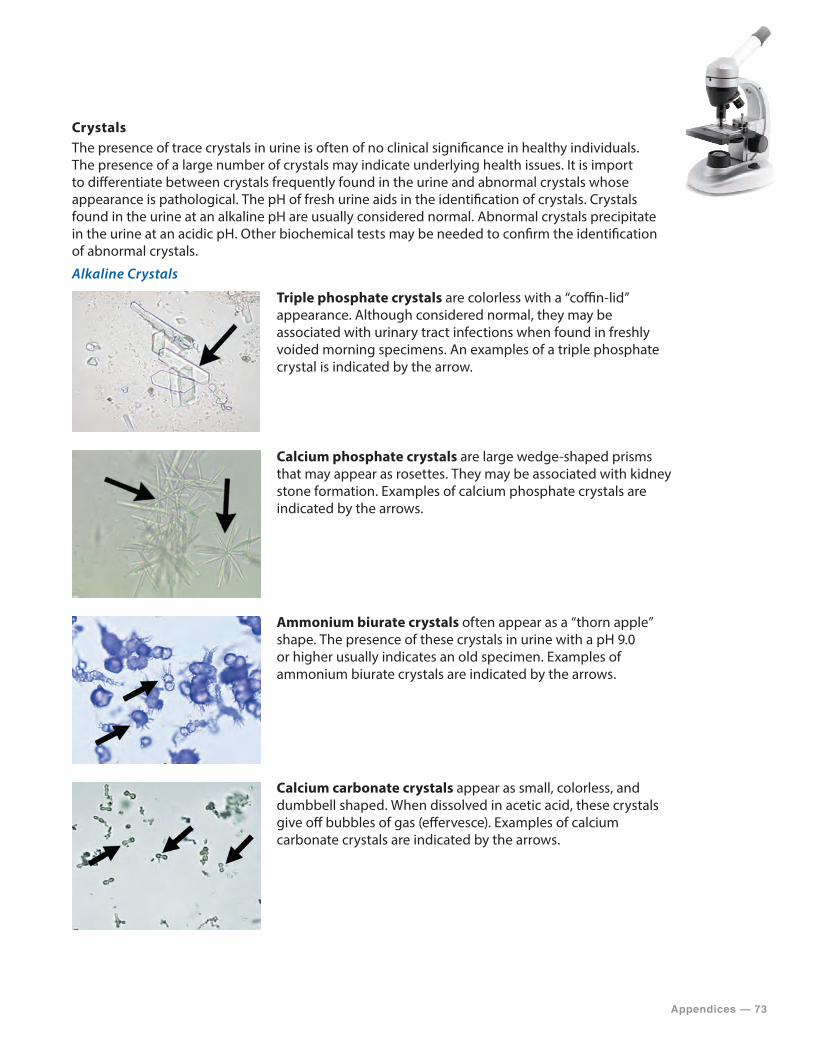
Appendices — 73
CrystalsThe presence of trace crystals in urine is often of no clinical significance in healthy individuals. The presence of a large number of crystals may indicate underlying health issues. It is import to differentiate between crystals frequently found in the urine and abnormal crystals whose appearance is pathological. The pH of fresh urine aids in the identification of crystals. Crystals found in the urine at an alkaline pH are usually considered normal. Abnormal crystals precipitate in the urine at an acidic pH. Other biochemical tests may be needed to confirm the identification of abnormal crystals.
Alkaline Crystals
Triple phosphate crystals are colorless with a “coffin-lid” appearance. Although considered normal, they may be associated with urinary tract infections when found in freshly voided morning specimens. An examples of a triple phosphate crystal is indicated by the arrow.
Calcium phosphate crystals are large wedge-shaped prisms that may appear as rosettes. They may be associated with kidney stone formation. Examples of calcium phosphate crystals are indicated by the arrows.
Ammonium biurate crystals often appear as a “thorn apple” shape. The presence of these crystals in urine with a pH 9.0 or higher usually indicates an old specimen. Examples of ammonium biurate crystals are indicated by the arrows.
Calcium carbonate crystals appear as small, colorless, and dumbbell shaped. When dissolved in acetic acid, these crystals give off bubbles of gas (effervesce). Examples of calcium carbonate crystals are indicated by the arrows.
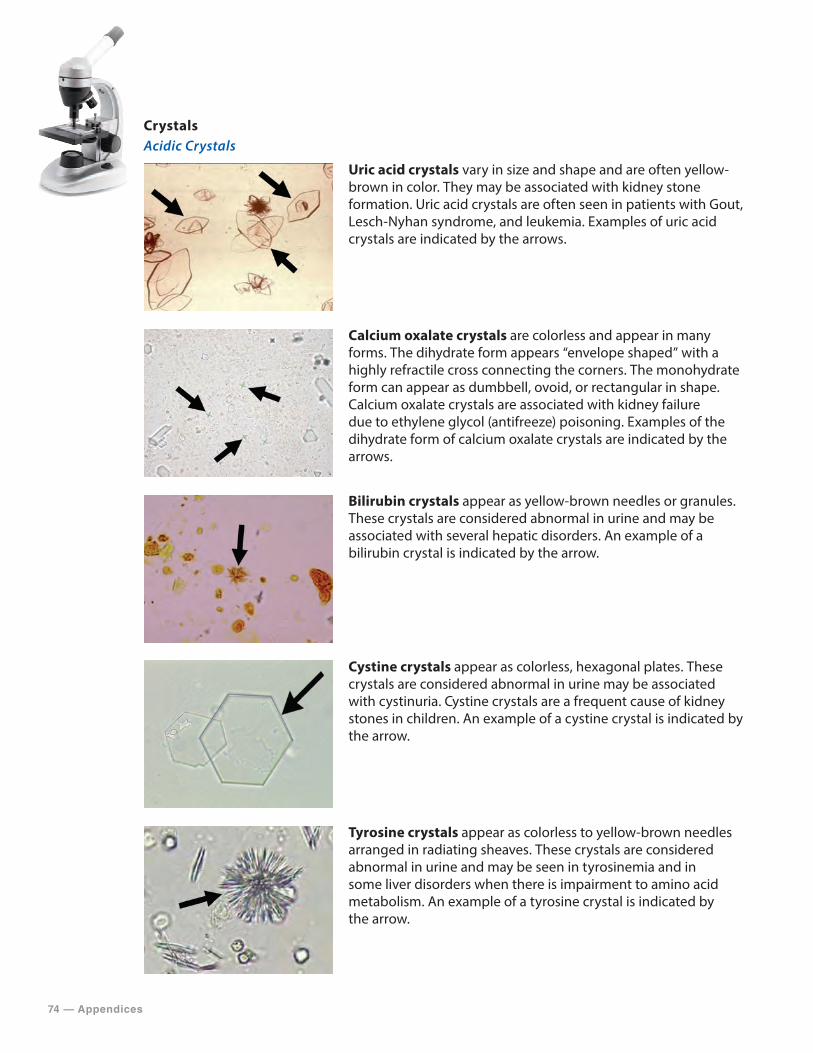
74 — Appendices
CrystalsAcidic Crystals
Uric acid crystals vary in size and shape and are often yellow-brown in color. They may be associated with kidney stone formation. Uric acid crystals are often seen in patients with Gout, Lesch-Nyhan syndrome, and leukemia. Examples of uric acid crystals are indicated by the arrows.
Calcium oxalate crystals are colorless and appear in many forms. The dihydrate form appears “envelope shaped” with a highly refractile cross connecting the corners. The monohydrate form can appear as dumbbell, ovoid, or rectangular in shape. Calcium oxalate crystals are associated with kidney failure due to ethylene glycol (antifreeze) poisoning. Examples of the dihydrate form of calcium oxalate crystals are indicated by the arrows.
Bilirubin crystals appear as yellow-brown needles or granules. These crystals are considered abnormal in urine and may be associated with several hepatic disorders. An example of a bilirubin crystal is indicated by the arrow.
Cystine crystals appear as colorless, hexagonal plates. These crystals are considered abnormal in urine may be associated with cystinuria. Cystine crystals are a frequent cause of kidney stones in children. An example of a cystine crystal is indicated by the arrow.
Tyrosine crystals appear as colorless to yellow-brown needles arranged in radiating sheaves. These crystals are considered abnormal in urine and may be seen in tyrosinemia and in some liver disorders when there is impairment to amino acid metabolism. An example of a tyrosine crystal is indicated by the arrow.
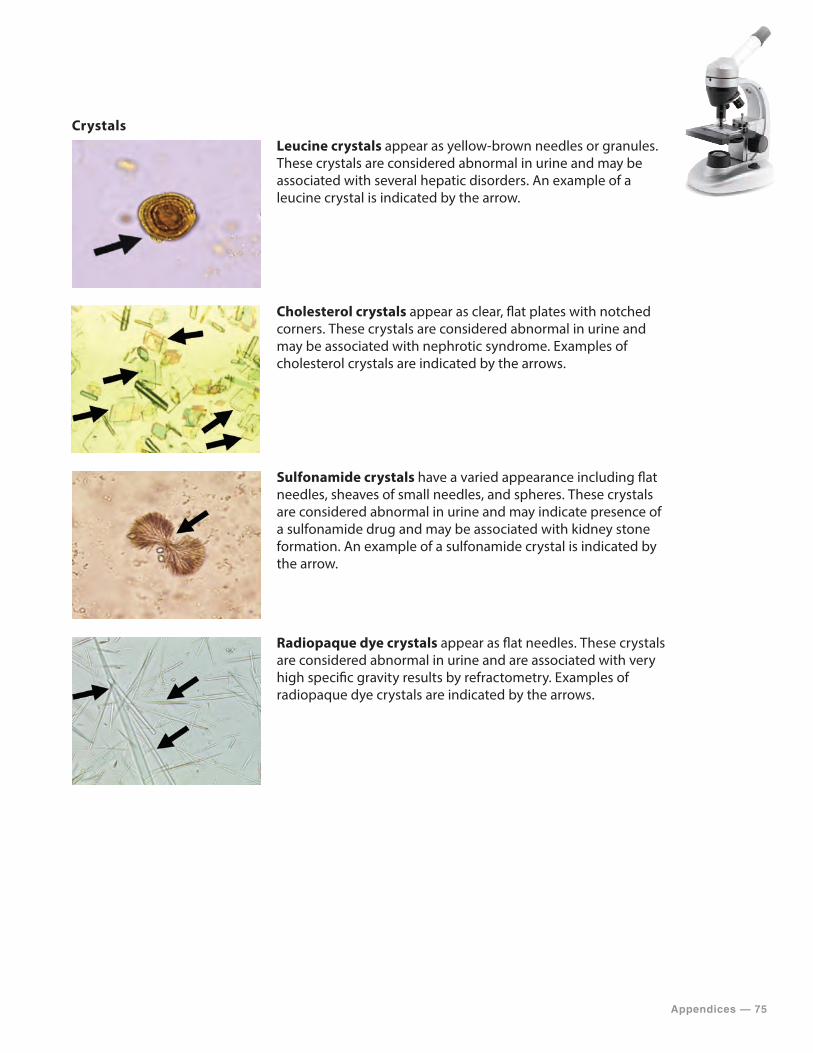
Appendices — 75
Crystals
Leucine crystals appear as yellow-brown needles or granules. These crystals are considered abnormal in urine and may be associated with several hepatic disorders. An example of a leucine crystal is indicated by the arrow.
Cholesterol crystals appear as clear, flat plates with notched corners. These crystals are considered abnormal in urine and may be associated with nephrotic syndrome. Examples of cholesterol crystals are indicated by the arrows.
Sulfonamide crystals have a varied appearance including flat needles, sheaves of small needles, and spheres. These crystals are considered abnormal in urine and may indicate presence of a sulfonamide drug and may be associated with kidney stone formation. An example of a sulfonamide crystal is indicated by the arrow.
Radiopaque dye crystals appear as flat needles. These crystals are considered abnormal in urine and are associated with very high specific gravity results by refractometry. Examples of radiopaque dye crystals are indicated by the arrows.

76 — Appendices
Other Microscopic Findings
Mucus
The presence of mucus threads is often a benign situation. Large amounts of mucus in the urine most often indicates a urinary tract infection but may also be associated with irritable bowel syndrome, kidney stones, and some cases of malignant tumors of the urinary tract. An example of a mucus thread is indicated by the arrow.
Red Blood Cells
In fresh urine, normal red blood cells appear as biconcave discs with distinct, dark, smooth cell walls. Red blood cells may be present in less than 5 cells per high power field in normal urine. In hypotonic urine, the red blood cells swell and lyse resulting in cells that appear as an empty shell. In hypertonic urine, the red blood cells crenate and form jagged cell walls. High red blood cell counts are associated with urinary tract disease such as glomerulonephritis. Examples of red blood cells are indicated by the arrows.
White Blood Cells
The presence of up to five white blood cells per high powered field may be seen in normal urine. High neutrophil counts suggest inflammation or infection within the urinary tract. Examples of white blood cells are indicated by the arrows.
Renal Tubular Epithelial Cells
Renal tubular epithelial cells are large and have a distinct single round nucleus. The presence of more than 15 renal tubular epithelial cells per high power field may be indicative of renal disease or tubular injury. Examples of renal tubular epithelial cells are indicated by the arrows.
Epithelial Cells
Squamous epithelial cells (indicated by “A” in the image) are flat with an irregular border. A large number of squamous epithelial cells present may indicate a contaminated specimen. Transitional epithelial cells (indicated by “B” in the image) from the skin surface or from the outer urethra can appear in normal urine. Increased numbers may indicate infection and transitional cell carcinoma.
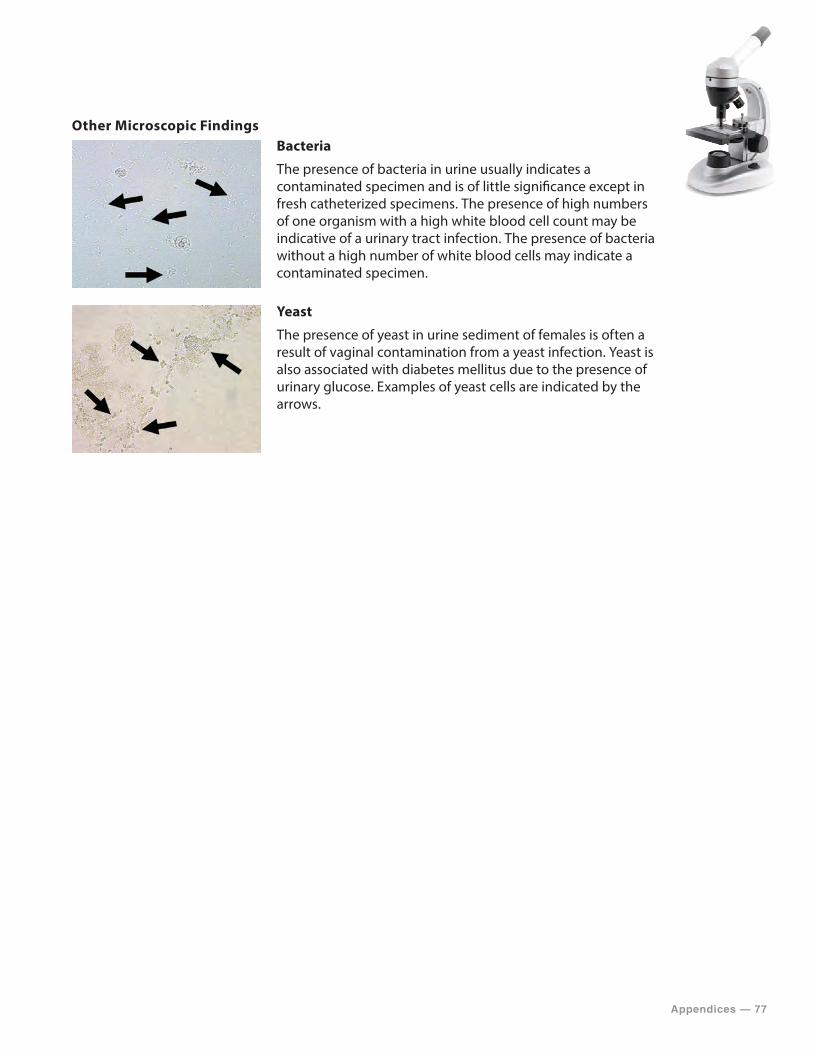
Appendices — 77
Other Microscopic Findings
Bacteria
The presence of bacteria in urine usually indicates a contaminated specimen and is of little significance except in fresh catheterized specimens. The presence of high numbers of one organism with a high white blood cell count may be indicative of a urinary tract infection. The presence of bacteria without a high number of white blood cells may indicate a contaminated specimen.
Yeast
The presence of yeast in urine sediment of females is often a result of vaginal contamination from a yeast infection. Yeast is also associated with diabetes mellitus due to the presence of urinary glucose. Examples of yeast cells are indicated by the arrows.
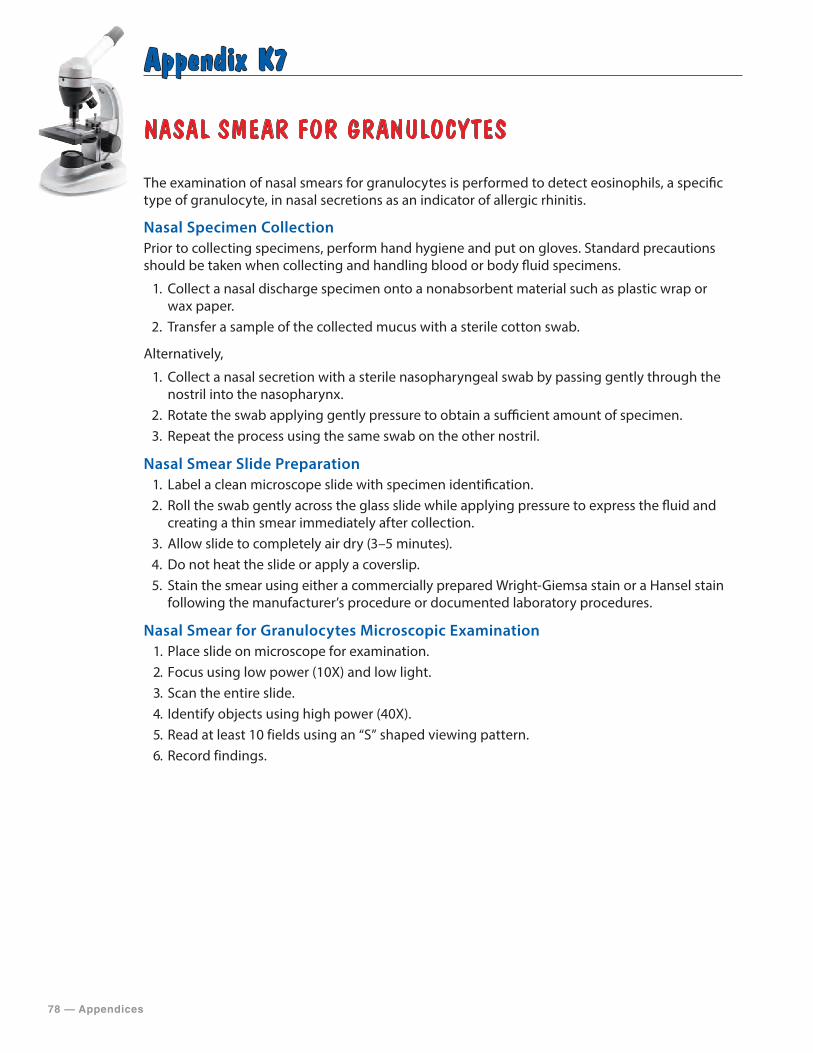
78 — Appendices
Appendix K7
NASAL SMEAR FOR GRANULOCYTES
The examination of nasal smears for granulocytes is performed to detect eosinophils, a specific type of granulocyte, in nasal secretions as an indicator of allergic rhinitis.
Nasal Specimen CollectionPrior to collecting specimens, perform hand hygiene and put on gloves. Standard precautions should be taken when collecting and handling blood or body fluid specimens.
1. Collect a nasal discharge specimen onto a nonabsorbent material such as plastic wrap orwax paper.
2. Transfer a sample of the collected mucus with a sterile cotton swab.
Alternatively,
1. Collect a nasal secretion with a sterile nasopharyngeal swab by passing gently through thenostril into the nasopharynx.
2. Rotate the swab applying gently pressure to obtain a sufficient amount of specimen.3. Repeat the process using the same swab on the other nostril.
Nasal Smear Slide Preparation1. Label a clean microscope slide with specimen identification.2. Roll the swab gently across the glass slide while applying pressure to express the fluid and
creating a thin smear immediately after collection.3. Allow slide to completely air dry (3–5 minutes).4. Do not heat the slide or apply a coverslip.5. Stain the smear using either a commercially prepared Wright-Giemsa stain or a Hansel stain
following the manufacturer’s procedure or documented laboratory procedures.
Nasal Smear for Granulocytes Microscopic Examination1. Place slide on microscope for examination.2. Focus using low power (10X) and low light.3. Scan the entire slide.4. Identify objects using high power (40X).5. Read at least 10 fields using an “S” shaped viewing pattern.6. Record findings.
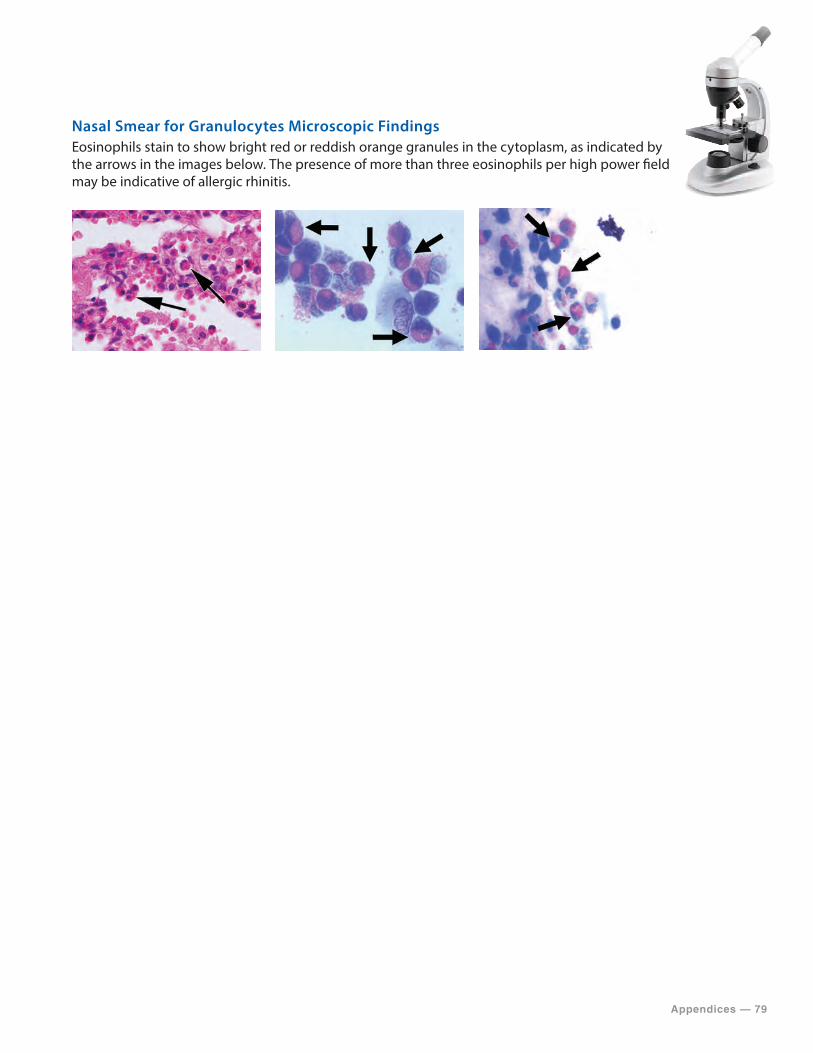
Appendices — 79
Nasal Smear for Granulocytes Microscopic FindingsEosinophils stain to show bright red or reddish orange granules in the cytoplasm, as indicated by the arrows in the images below. The presence of more than three eosinophils per high power field may be indicative of allergic rhinitis.
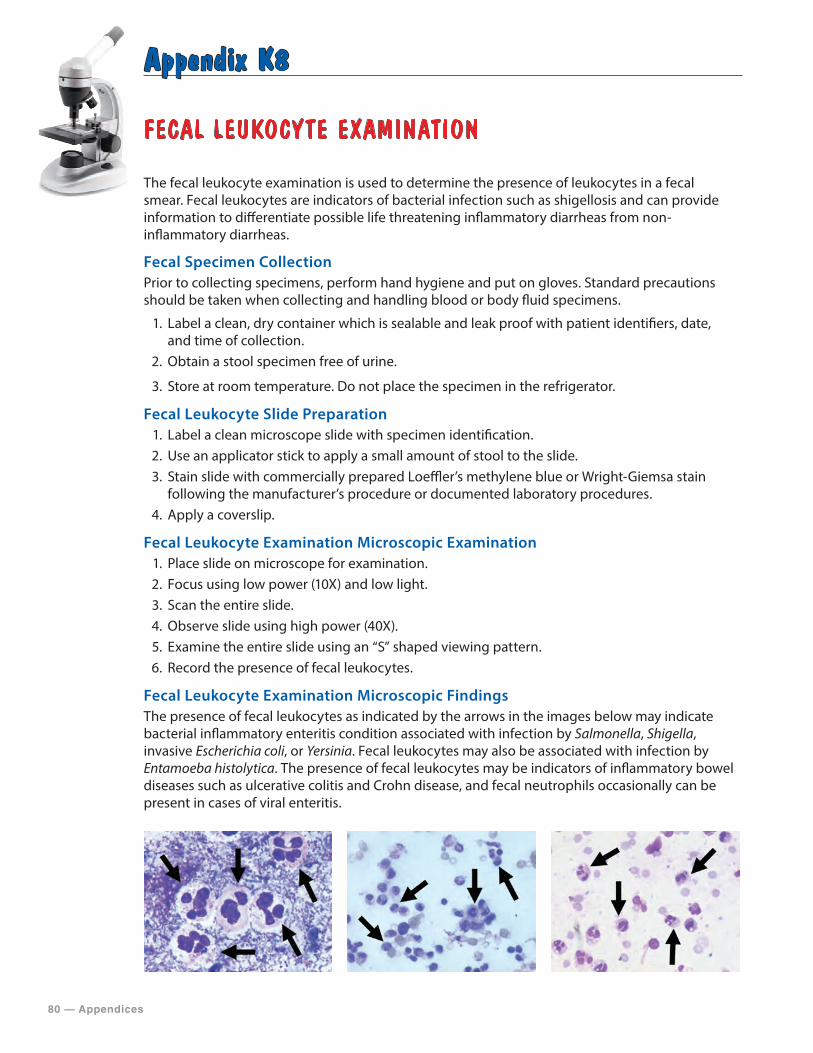
80 — Appendices
Appendix K8
FECAL LEUKOCYTE EXAMINATION
The fecal leukocyte examination is used to determine the presence of leukocytes in a fecal smear. Fecal leukocytes are indicators of bacterial infection such as shigellosis and can provide information to differentiate possible life threatening inflammatory diarrheas from non-inflammatory diarrheas.
Fecal Specimen CollectionPrior to collecting specimens, perform hand hygiene and put on gloves. Standard precautions should be taken when collecting and handling blood or body fluid specimens.
1. Label a clean, dry container which is sealable and leak proof with patient identifiers, date, and time of collection.
2. Obtain a stool specimen free of urine.
3. Store at room temperature. Do not place the specimen in the refrigerator.
Fecal Leukocyte Slide Preparation1. Label a clean microscope slide with specimen identification.2. Use an applicator stick to apply a small amount of stool to the slide.3. Stain slide with commercially prepared Loeffler’s methylene blue or Wright-Giemsa stain
following the manufacturer’s procedure or documented laboratory procedures.4. Apply a coverslip.
Fecal Leukocyte Examination Microscopic Examination1. Place slide on microscope for examination.2. Focus using low power (10X) and low light.3. Scan the entire slide.4. Observe slide using high power (40X).5. Examine the entire slide using an “S” shaped viewing pattern.6. Record the presence of fecal leukocytes.
Fecal Leukocyte Examination Microscopic FindingsThe presence of fecal leukocytes as indicated by the arrows in the images below may indicate bacterial inflammatory enteritis condition associated with infection by Salmonella, Shigella, invasive Escherichia coli, or Yersinia. Fecal leukocytes may also be associated with infection by Entamoeba histolytica. The presence of fecal leukocytes may be indicators of inflammatory bowel diseases such as ulcerative colitis and Crohn disease, and fecal neutrophils occasionally can be present in cases of viral enteritis.
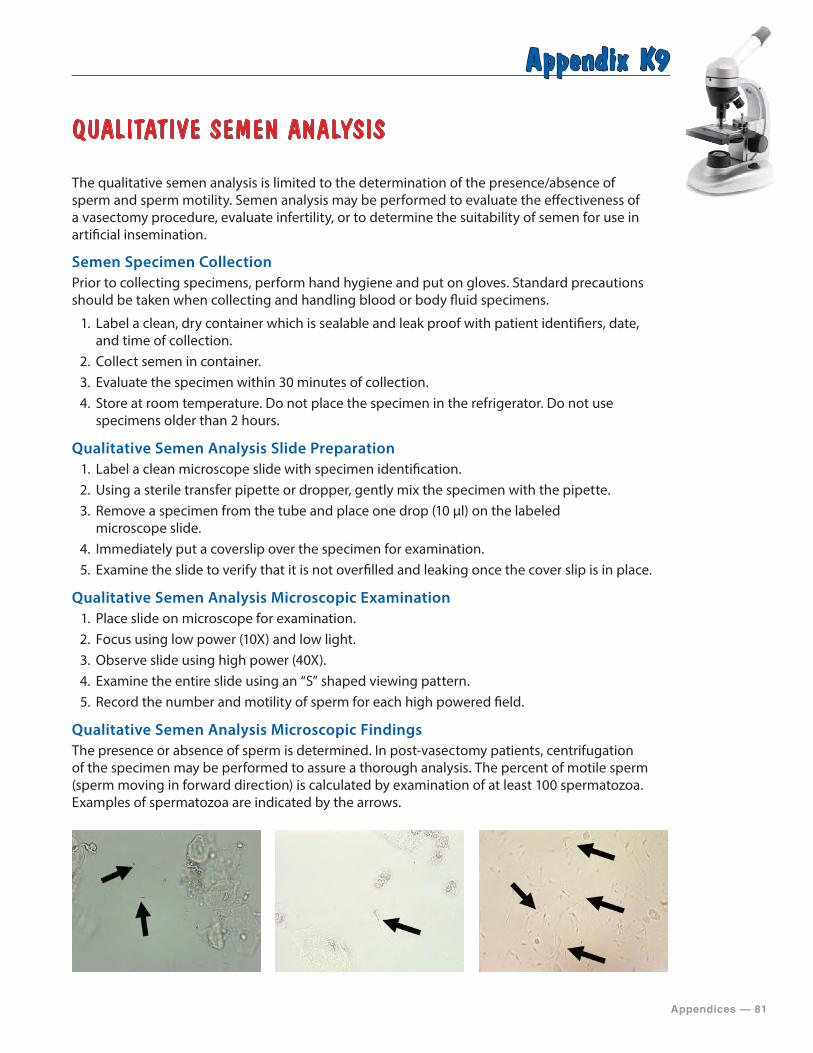
Appendices — 81
Appendix K9
QUALITATIVE SEMEN ANALYSIS
The qualitative semen analysis is limited to the determination of the presence/absence of sperm and sperm motility. Semen analysis may be performed to evaluate the effectiveness of a vasectomy procedure, evaluate infertility, or to determine the suitability of semen for use in artificial insemination.
Semen Specimen CollectionPrior to collecting specimens, perform hand hygiene and put on gloves. Standard precautions should be taken when collecting and handling blood or body fluid specimens.
1. Label a clean, dry container which is sealable and leak proof with patient identifiers, date, and time of collection.
2. Collect semen in container.3. Evaluate the specimen within 30 minutes of collection.4. Store at room temperature. Do not place the specimen in the refrigerator. Do not use
specimens older than 2 hours.
Qualitative Semen Analysis Slide Preparation1. Label a clean microscope slide with specimen identification.2. Using a sterile transfer pipette or dropper, gently mix the specimen with the pipette.3. Remove a specimen from the tube and place one drop (10 μl) on the labeled
microscope slide.4. Immediately put a coverslip over the specimen for examination.5. Examine the slide to verify that it is not overfilled and leaking once the cover slip is in place.
Qualitative Semen Analysis Microscopic Examination1. Place slide on microscope for examination.2. Focus using low power (10X) and low light.3. Observe slide using high power (40X).4. Examine the entire slide using an “S” shaped viewing pattern.5. Record the number and motility of sperm for each high powered field.
Qualitative Semen Analysis Microscopic FindingsThe presence or absence of sperm is determined. In post-vasectomy patients, centrifugation of the specimen may be performed to assure a thorough analysis. The percent of motile sperm (sperm moving in forward direction) is calculated by examination of at least 100 spermatozoa. Examples of spermatozoa are indicated by the arrows.
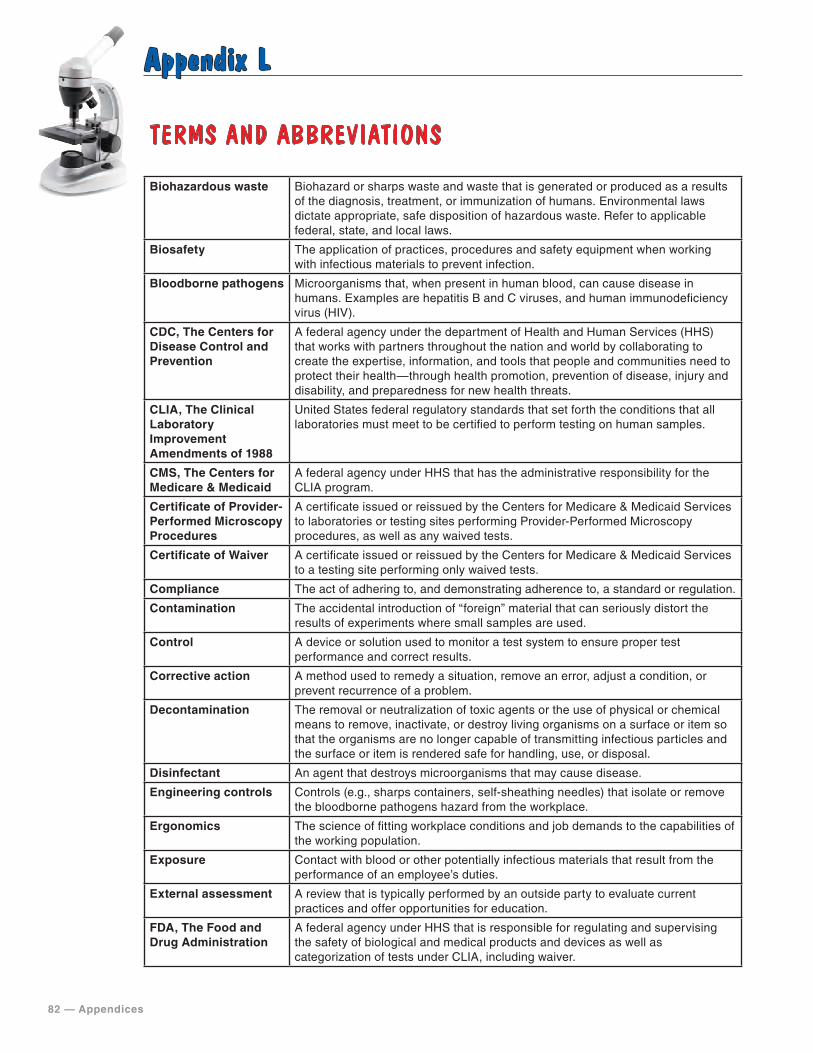
82 — Appendices
Appendix L
TERMS AND ABBREVIATIONS
Biohazardous waste Biohazard or sharps waste and waste that is generated or produced as a results of the diagnosis, treatment, or immunization of humans. Environmental laws dictate appropriate, safe disposition of hazardous waste. Refer to applicable federal, state, and local laws.
Biosafety The application of practices, procedures and safety equipment when working with infectious materials to prevent infection.
Bloodborne pathogens Microorganisms that, when present in human blood, can cause disease in humans. Examples are hepatitis B and C viruses, and human immunodeficiency virus (HIV).
CDC, The Centers for Disease Control and Prevention
A federal agency under the department of Health and Human Services (HHS) that works with partners throughout the nation and world by collaborating to create the expertise, information, and tools that people and communities need to protect their health—through health promotion, prevention of disease, injury and disability, and preparedness for new health threats.
CLIA, The Clinical Laboratory Improvement Amendments of 1988
United States federal regulatory standards that set forth the conditions that all laboratories must meet to be certified to perform testing on human samples.
CMS, The Centers for Medicare & Medicaid
A federal agency under HHS that has the administrative responsibility for the CLIA program.
Certificate of Provider-Performed Microscopy Procedures
A certificate issued or reissued by the Centers for Medicare & Medicaid Services to laboratories or testing sites performing Provider-Performed Microscopy procedures, as well as any waived tests.
Certificate of Waiver A certificate issued or reissued by the Centers for Medicare & Medicaid Services to a testing site performing only waived tests.
Compliance The act of adhering to, and demonstrating adherence to, a standard or regulation.
Contamination The accidental introduction of “foreign” material that can seriously distort the results of experiments where small samples are used.
Control A device or solution used to monitor a test system to ensure proper test performance and correct results.
Corrective action A method used to remedy a situation, remove an error, adjust a condition, or prevent recurrence of a problem.
Decontamination The removal or neutralization of toxic agents or the use of physical or chemical means to remove, inactivate, or destroy living organisms on a surface or item so that the organisms are no longer capable of transmitting infectious particles and the surface or item is rendered safe for handling, use, or disposal.
Disinfectant An agent that destroys microorganisms that may cause disease.
Engineering controls Controls (e.g., sharps containers, self-sheathing needles) that isolate or remove the bloodborne pathogens hazard from the workplace.
Ergonomics The science of fitting workplace conditions and job demands to the capabilities of the working population.
Exposure Contact with blood or other potentially infectious materials that result from the performance of an employee’s duties.
External assessment A review that is typically performed by an outside party to evaluate current practices and offer opportunities for education.
FDA, The Food and Drug Administration
A federal agency under HHS that is responsible for regulating and supervising the safety of biological and medical products and devices as well as categorization of tests under CLIA, including waiver.
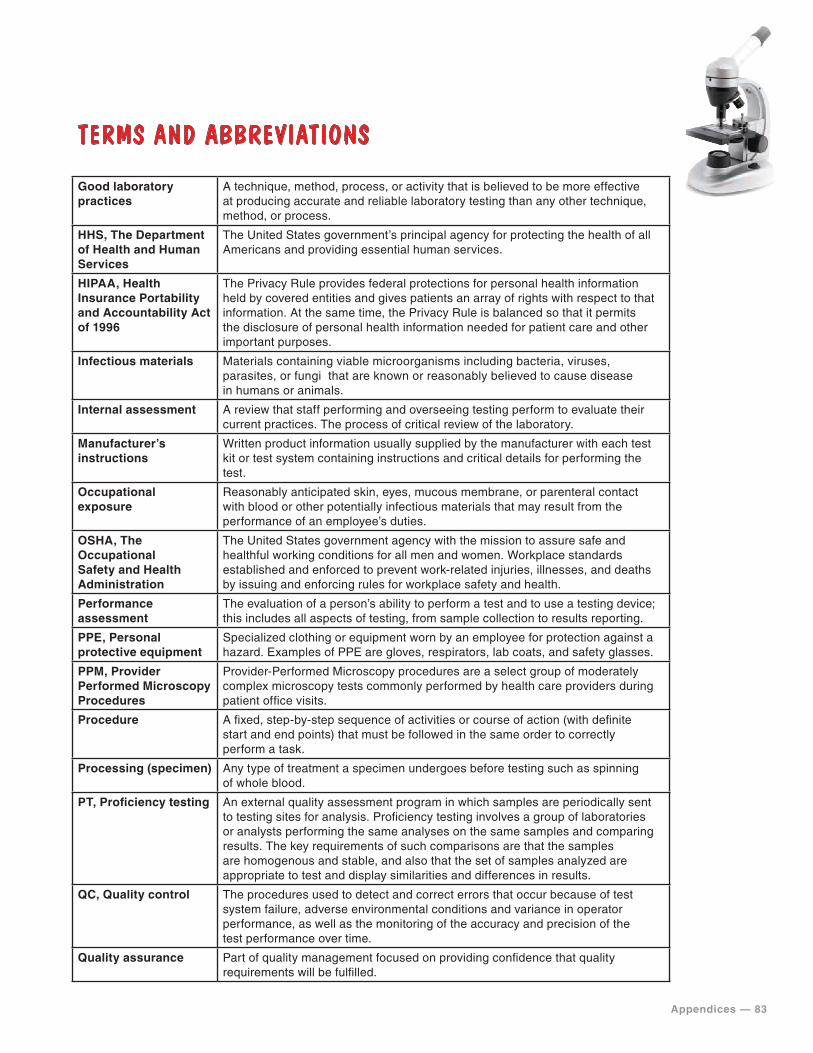
Appendices — 83
TERMS AND ABBREVIATIONS
Good laboratory practices
A technique, method, process, or activity that is believed to be more effective at producing accurate and reliable laboratory testing than any other technique, method, or process.
HHS, The Department of Health and Human Services
The United States government’s principal agency for protecting the health of all Americans and providing essential human services.
HIPAA, Health Insurance Portability and Accountability Act of 1996
The Privacy Rule provides federal protections for personal health information held by covered entities and gives patients an array of rights with respect to that information. At the same time, the Privacy Rule is balanced so that it permits the disclosure of personal health information needed for patient care and other important purposes.
Infectious materials Materials containing viable microorganisms including bacteria, viruses, parasites, or fungi that are known or reasonably believed to cause disease in humans or animals.
Internal assessment A review that staff performing and overseeing testing perform to evaluate their current practices. The process of critical review of the laboratory.
Manufacturer’s instructions
Written product information usually supplied by the manufacturer with each test kit or test system containing instructions and critical details for performing the test.
Occupational exposure
Reasonably anticipated skin, eyes, mucous membrane, or parenteral contact with blood or other potentially infectious materials that may result from the performance of an employee’s duties.
OSHA, The Occupational Safety and Health Administration
The United States government agency with the mission to assure safe and healthful working conditions for all men and women. Workplace standards established and enforced to prevent work-related injuries, illnesses, and deaths by issuing and enforcing rules for workplace safety and health.
Performance assessment
The evaluation of a person’s ability to perform a test and to use a testing device; this includes all aspects of testing, from sample collection to results reporting.
PPE, Personal protective equipment
Specialized clothing or equipment worn by an employee for protection against a hazard. Examples of PPE are gloves, respirators, lab coats, and safety glasses.
PPM, Provider Performed Microscopy Procedures
Provider-Performed Microscopy procedures are a select group of moderately complex microscopy tests commonly performed by health care providers during patient office visits.
Procedure A fixed, step-by-step sequence of activities or course of action (with definite start and end points) that must be followed in the same order to correctly perform a task.
Processing (specimen) Any type of treatment a specimen undergoes before testing such as spinning of whole blood.
PT, Proficiency testing An external quality assessment program in which samples are periodically sent to testing sites for analysis. Proficiency testing involves a group of laboratories or analysts performing the same analyses on the same samples and comparing results. The key requirements of such comparisons are that the samples are homogenous and stable, and also that the set of samples analyzed are appropriate to test and display similarities and differences in results.
QC, Quality control The procedures used to detect and correct errors that occur because of test system failure, adverse environmental conditions and variance in operator performance, as well as the monitoring of the accuracy and precision of the test performance over time.
Quality assurance Part of quality management focused on providing confidence that quality requirements will be fulfilled.
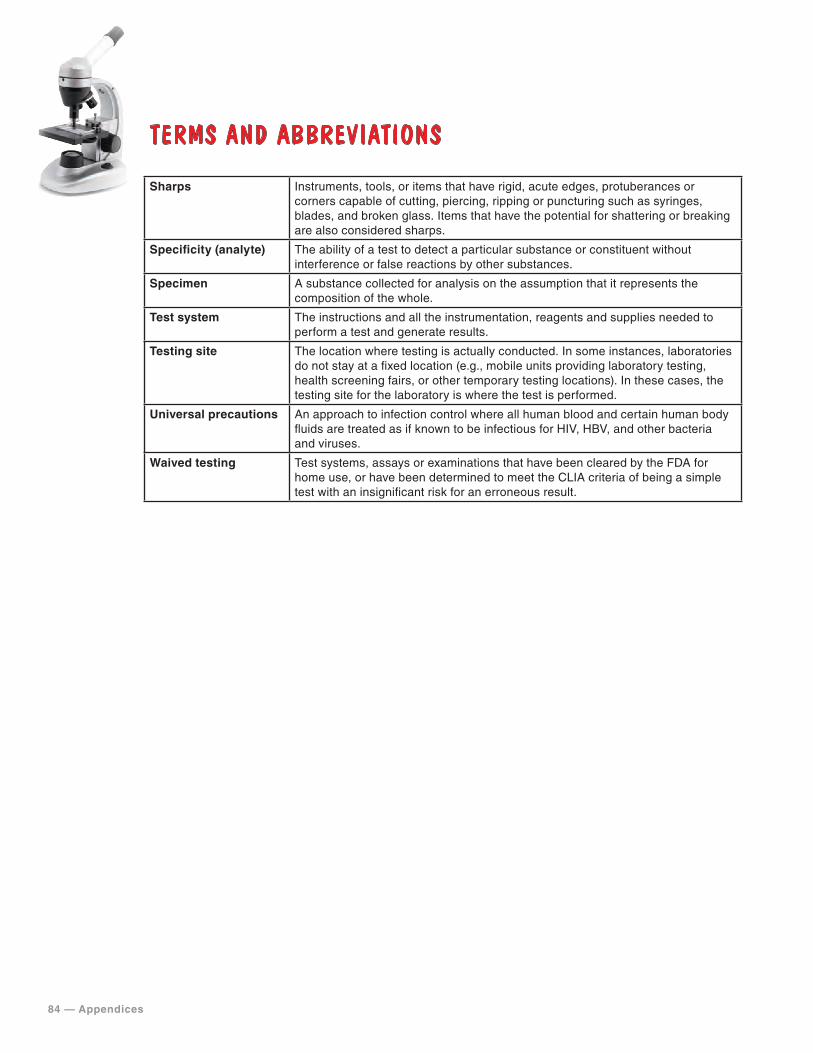
84 — Appendices
TERMS AND ABBREVIATIONS
Sharps Instruments, tools, or items that have rigid, acute edges, protuberances or corners capable of cutting, piercing, ripping or puncturing such as syringes, blades, and broken glass. Items that have the potential for shattering or breaking are also considered sharps.
Specificity (analyte) The ability of a test to detect a particular substance or constituent without interference or false reactions by other substances.
Specimen A substance collected for analysis on the assumption that it represents the composition of the whole.
Test system The instructions and all the instrumentation, reagents and supplies needed to perform a test and generate results.
Testing site The location where testing is actually conducted. In some instances, laboratories do not stay at a fixed location (e.g., mobile units providing laboratory testing, health screening fairs, or other temporary testing locations). In these cases, the testing site for the laboratory is where the test is performed.
Universal precautions An approach to infection control where all human blood and certain human body fluids are treated as if known to be infectious for HIV, HBV, and other bacteria and viruses.
Waived testing Test systems, assays or examinations that have been cleared by the FDA for home use, or have been determined to meet the CLIA criteria of being a simple test with an insignificant risk for an erroneous result.
For additional information go to: https://www.cdc.gov/PPMP
Contact the Division of Laboratory Systems at [email protected].
July 2019